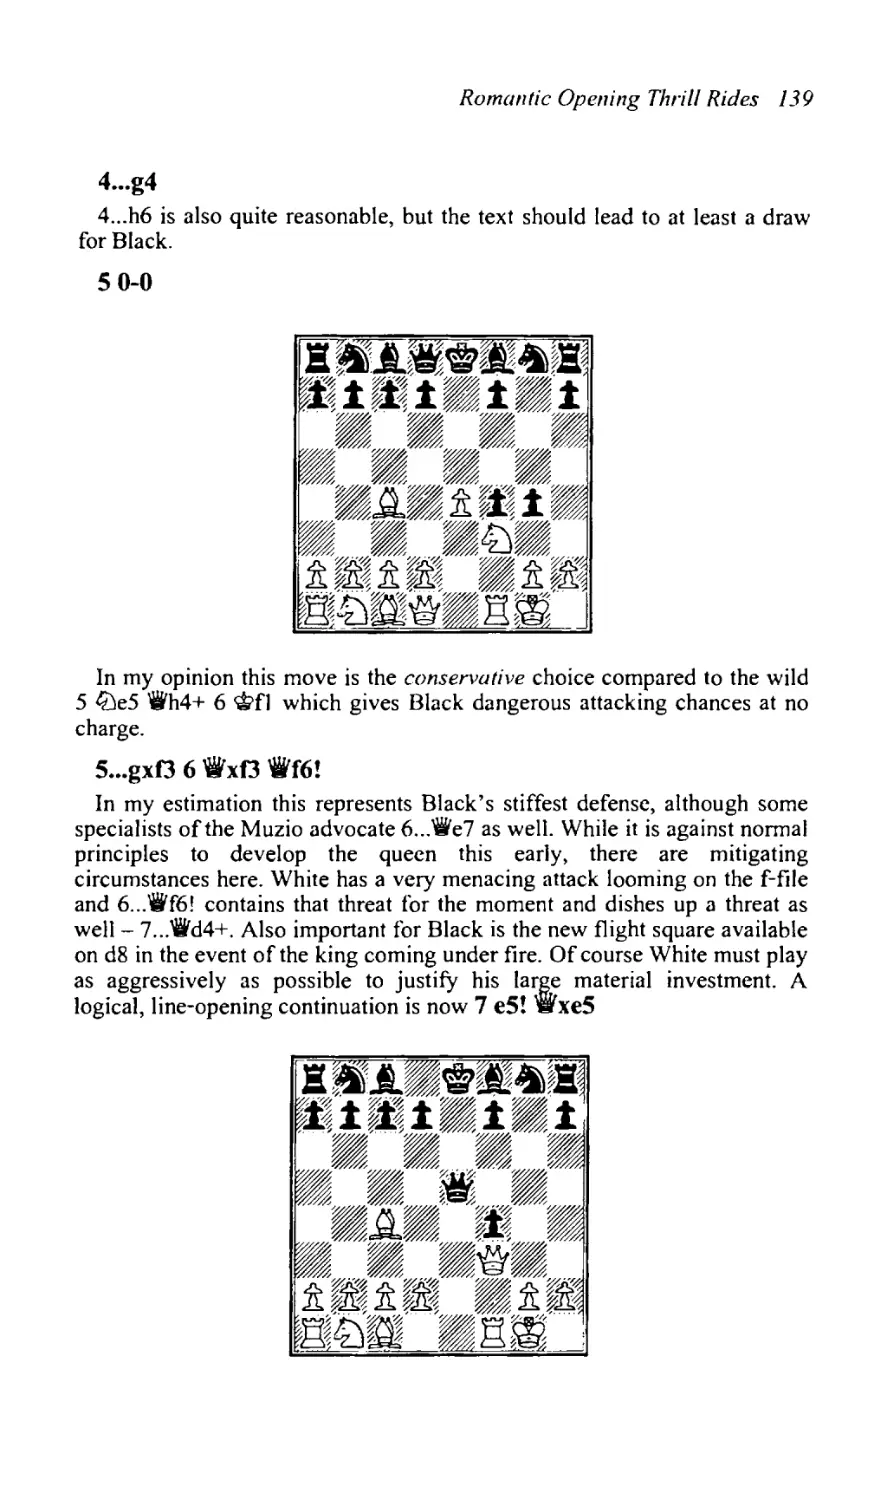
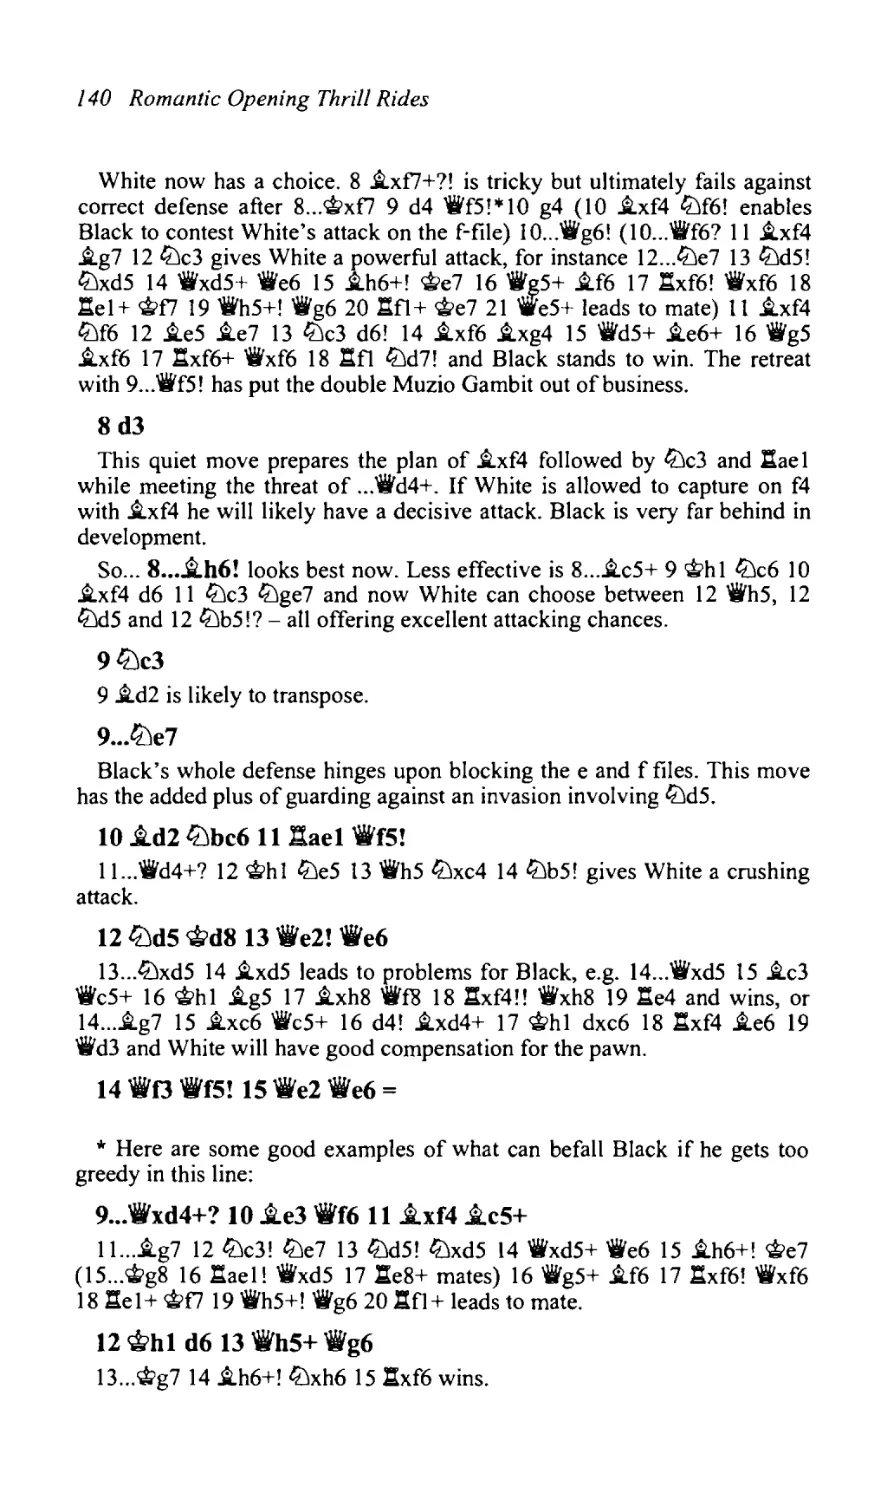
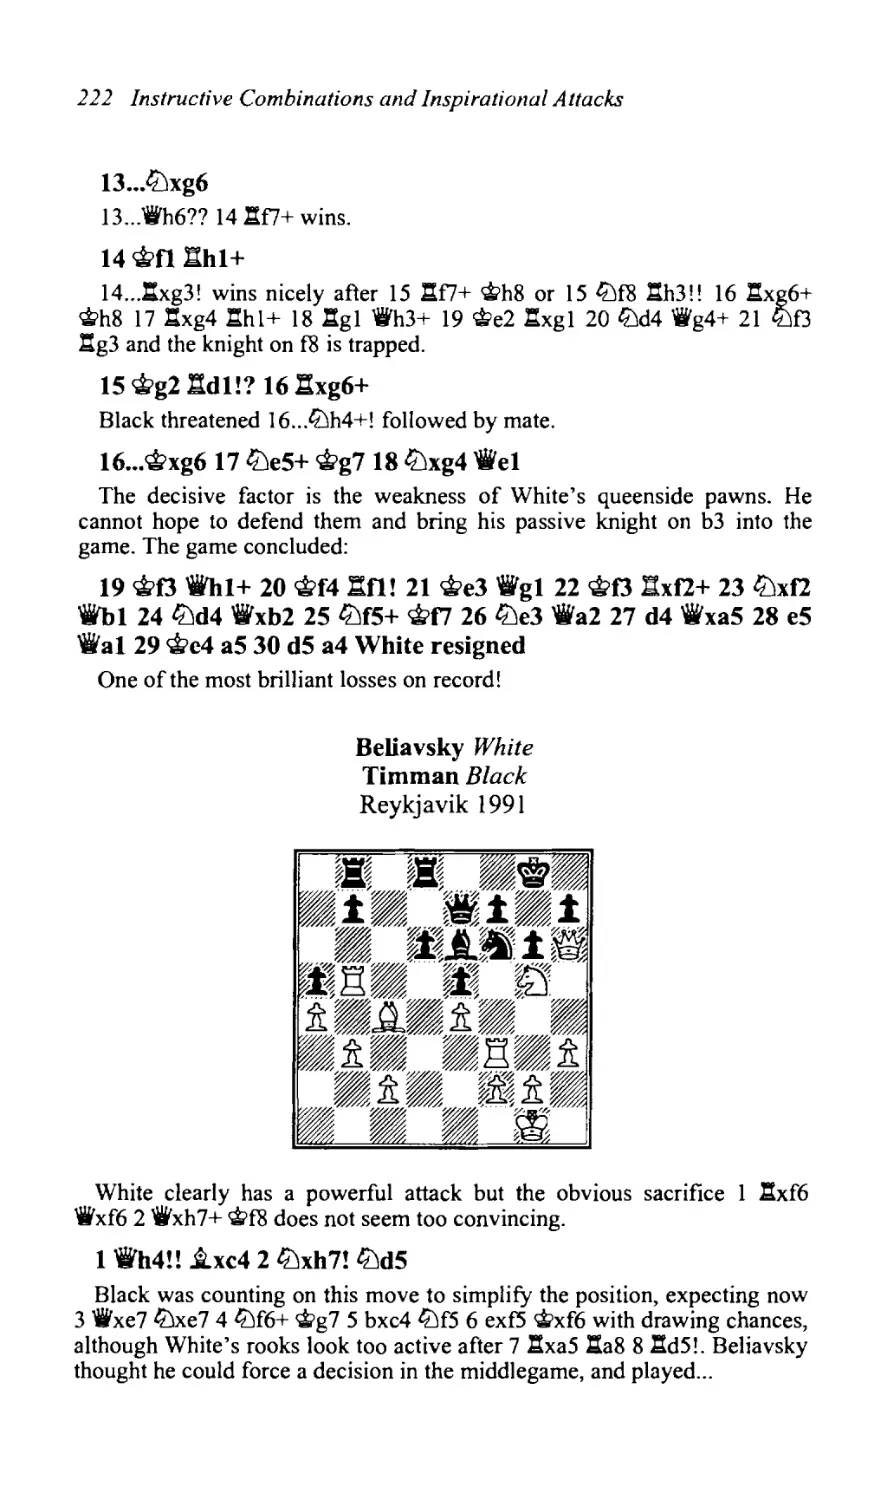
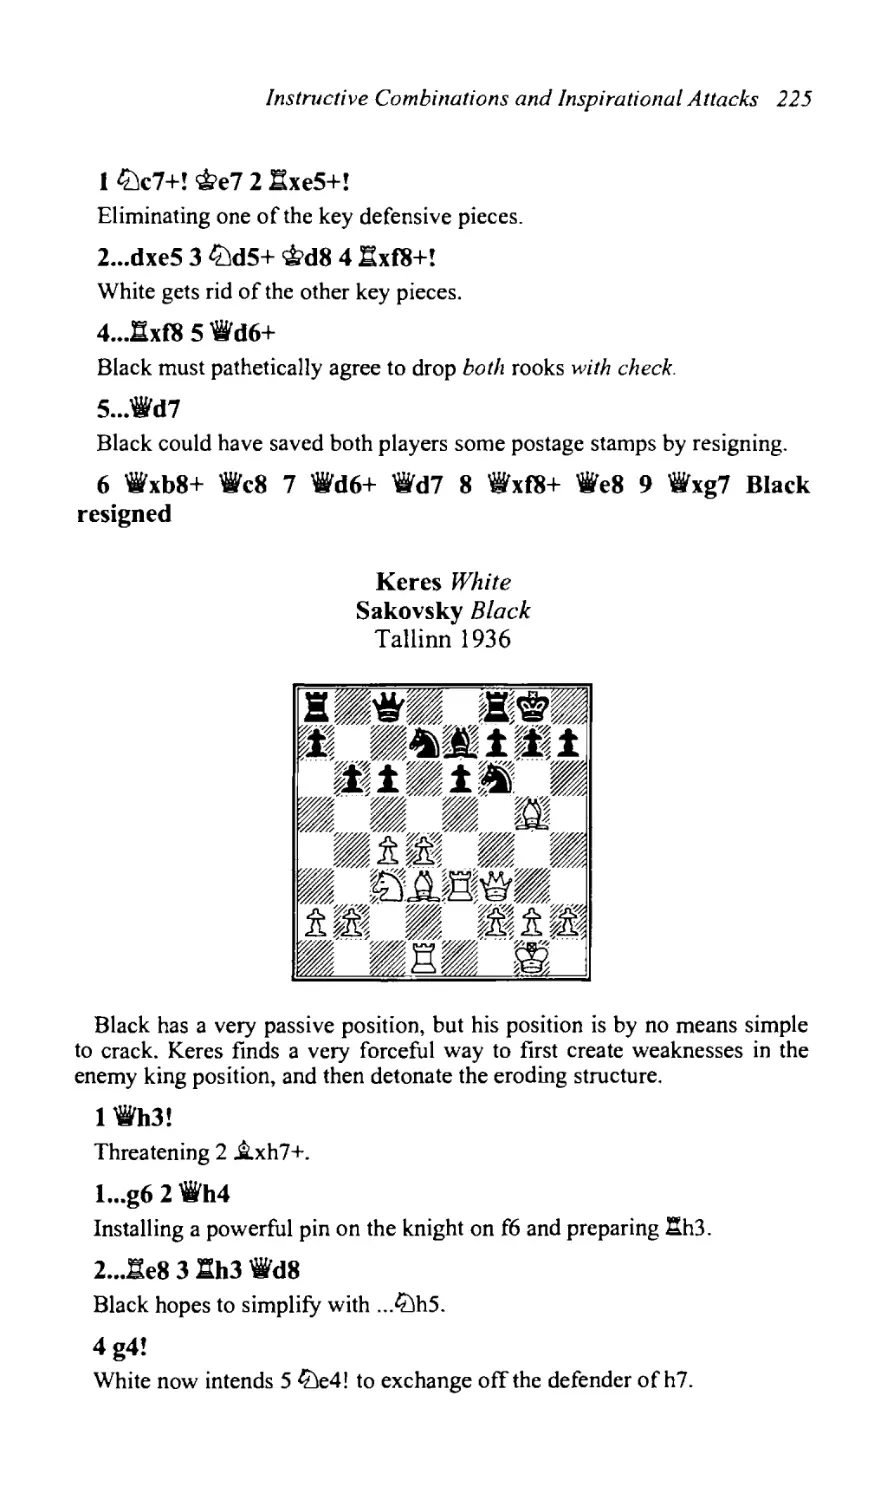
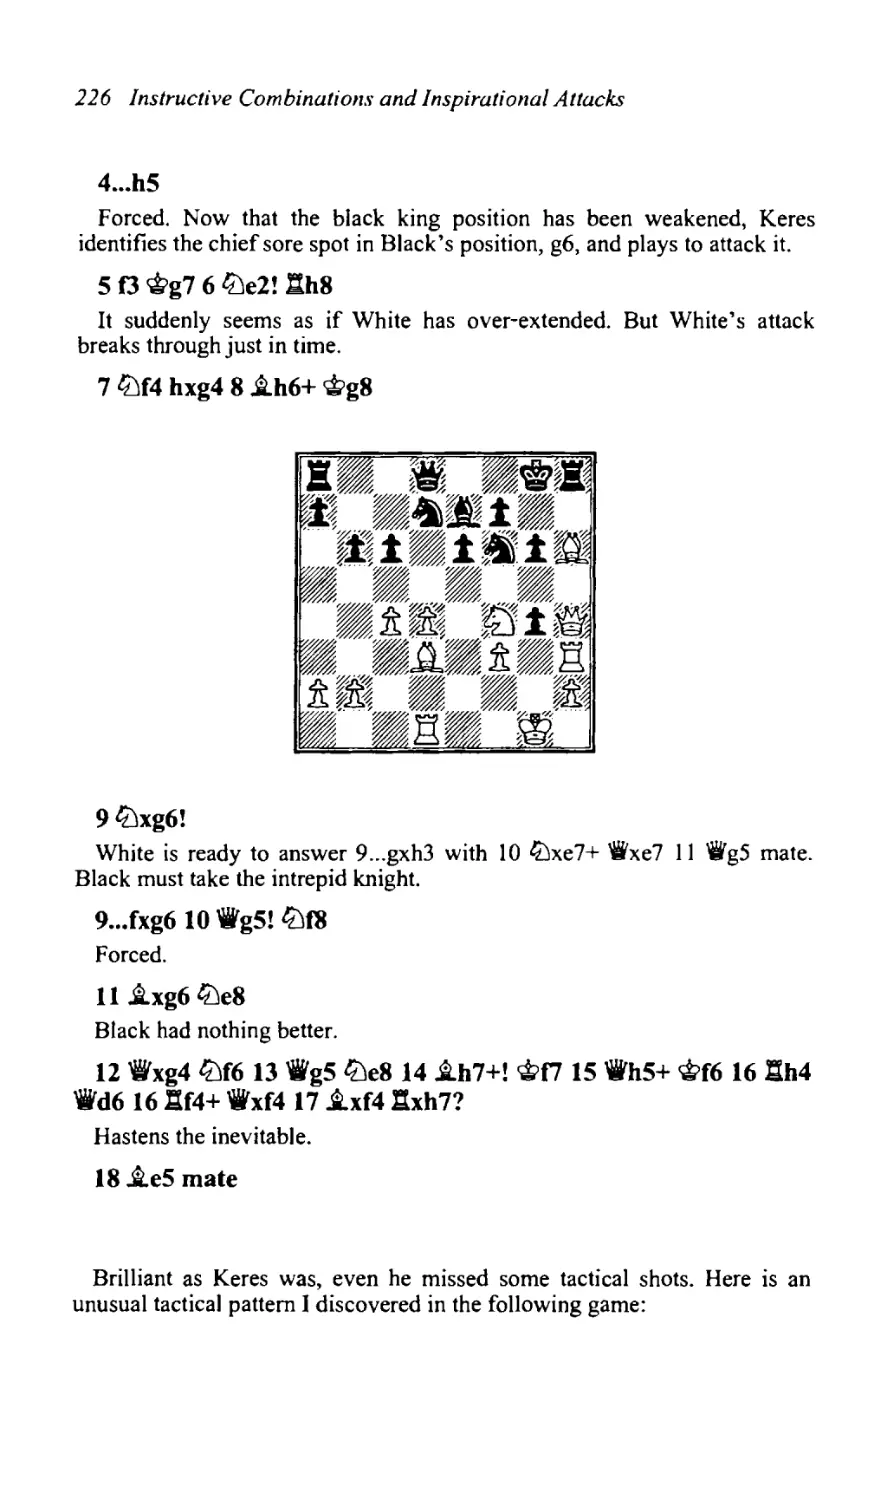
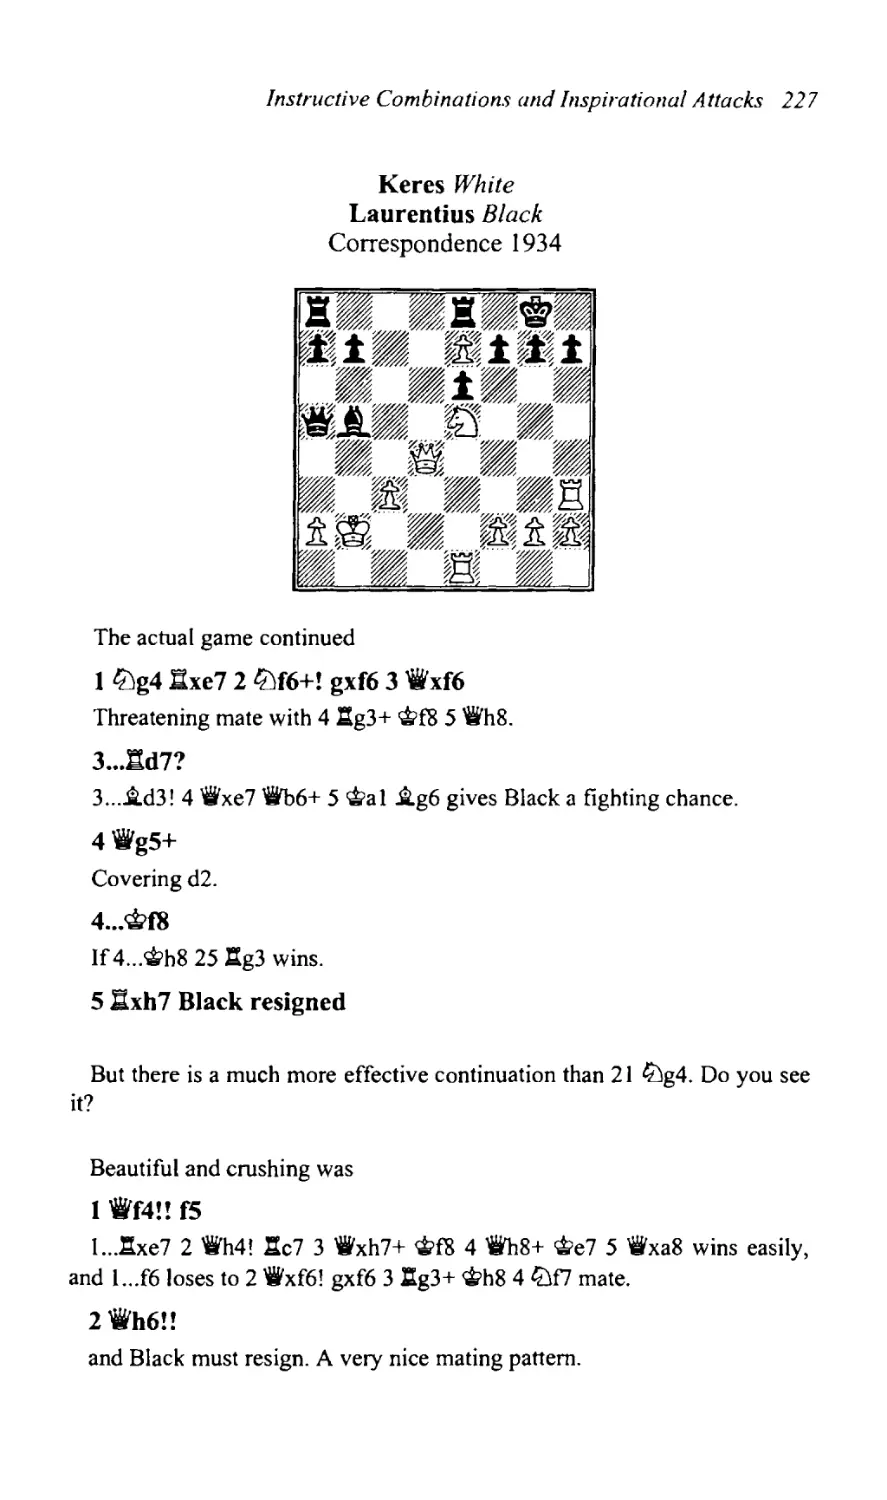
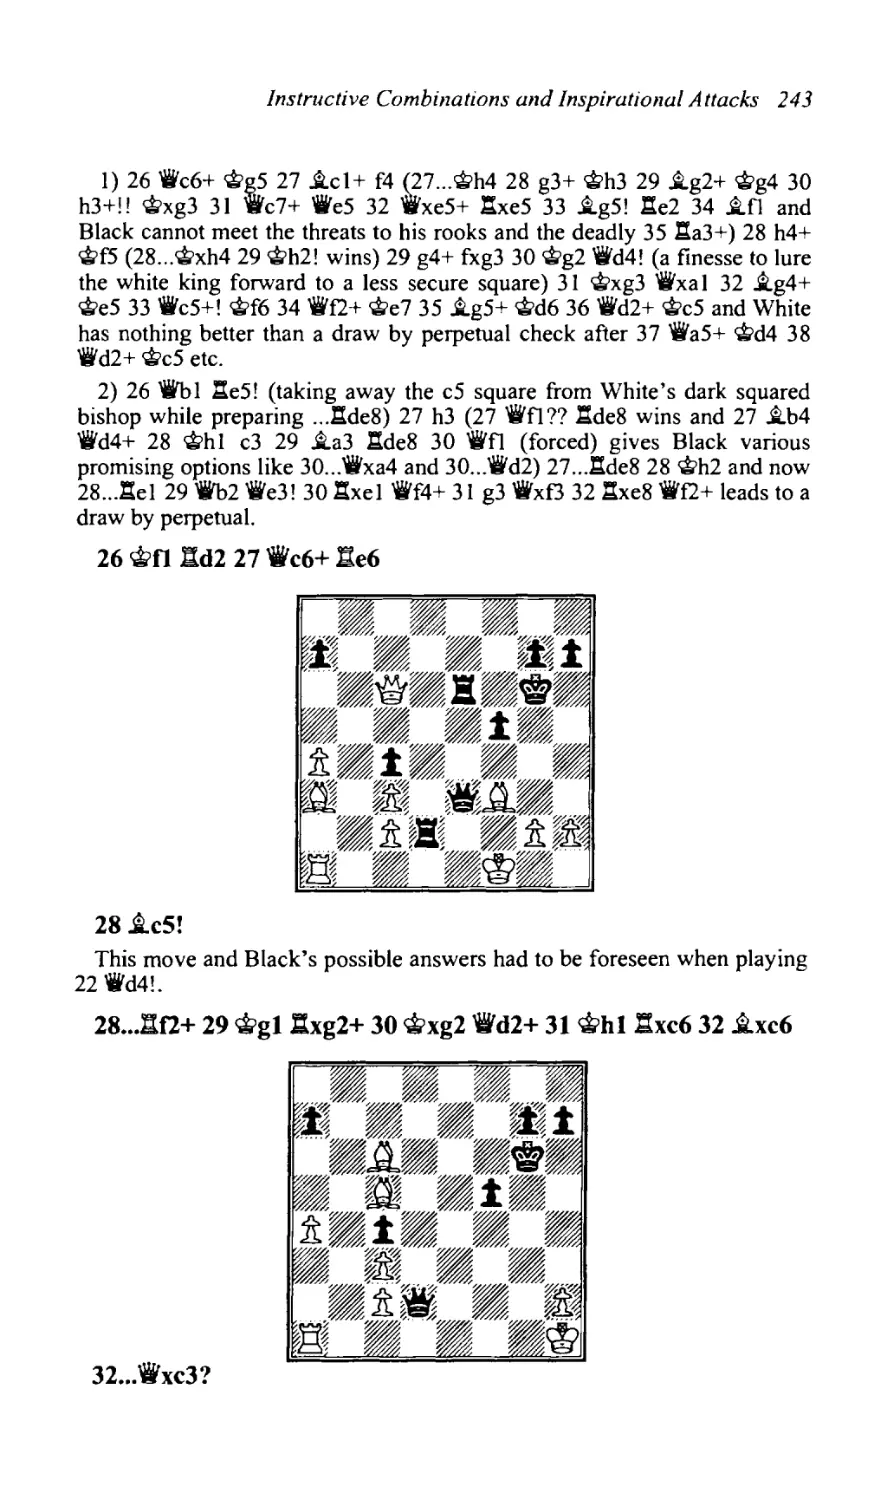
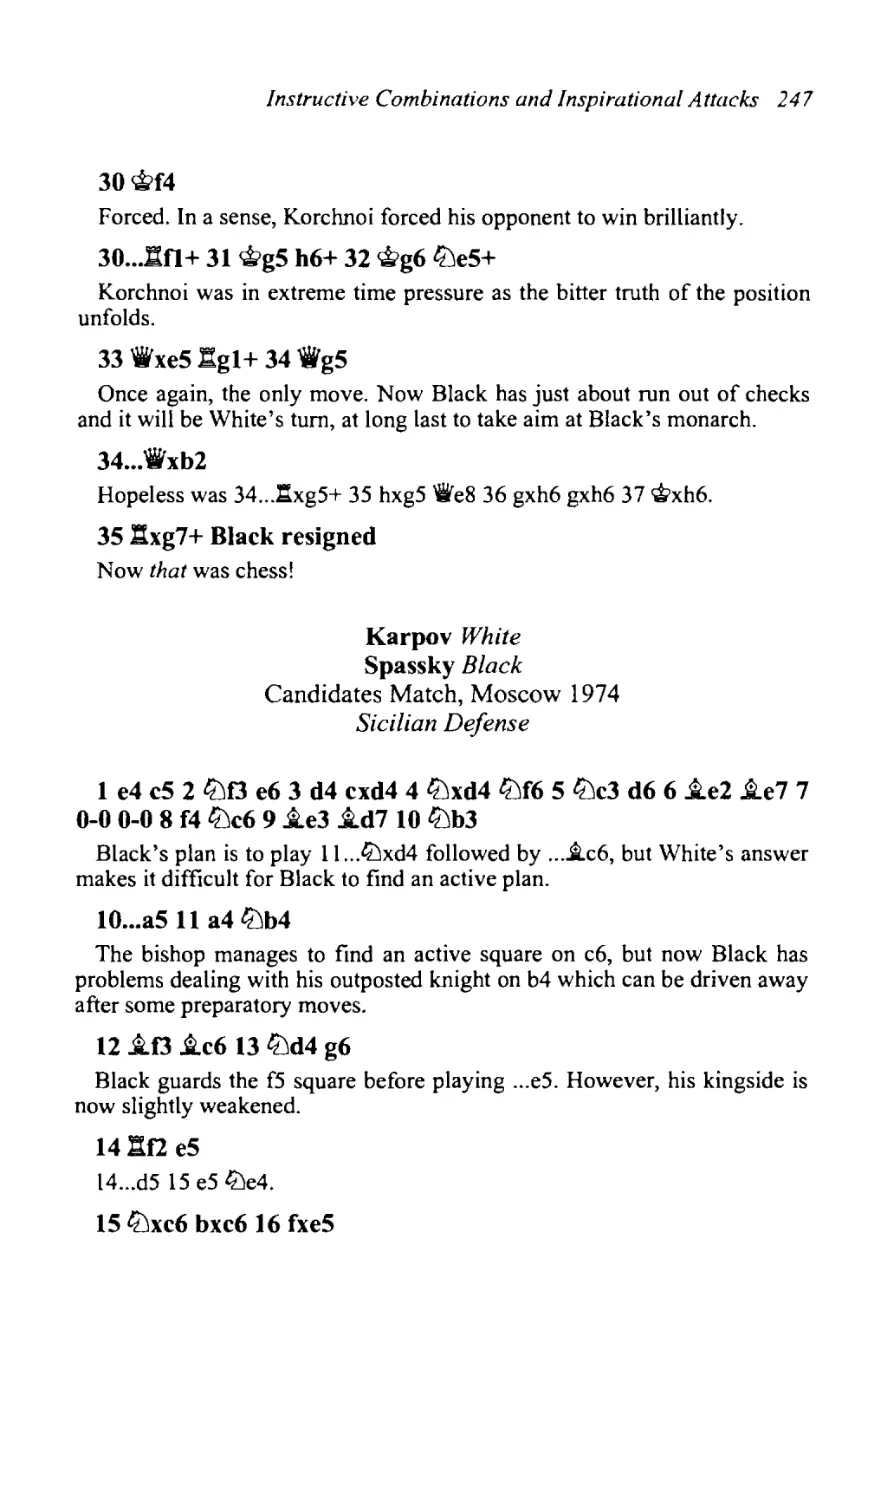
/


Текст
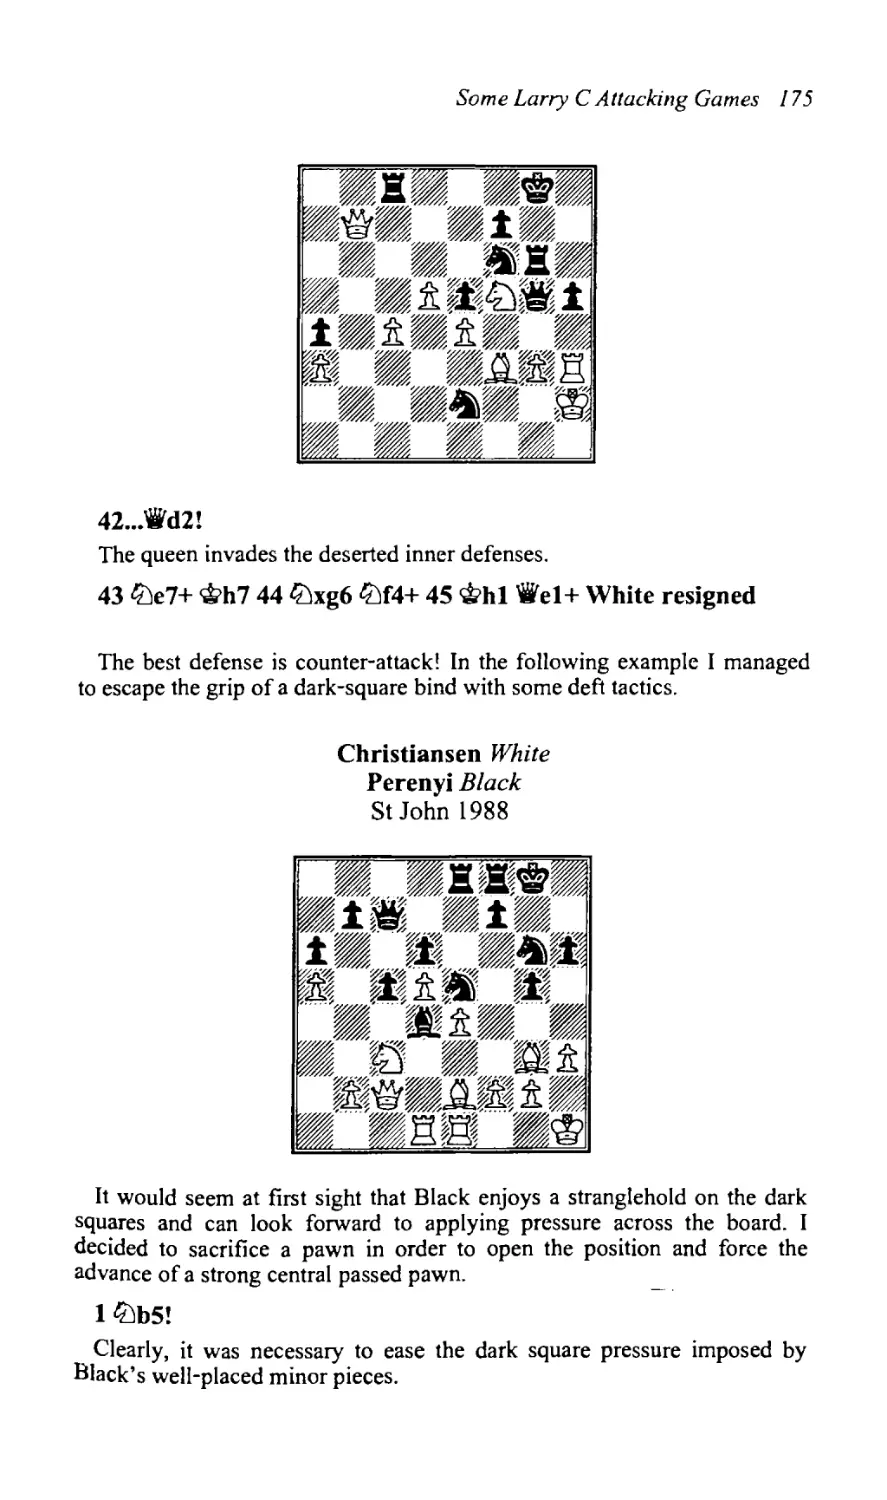
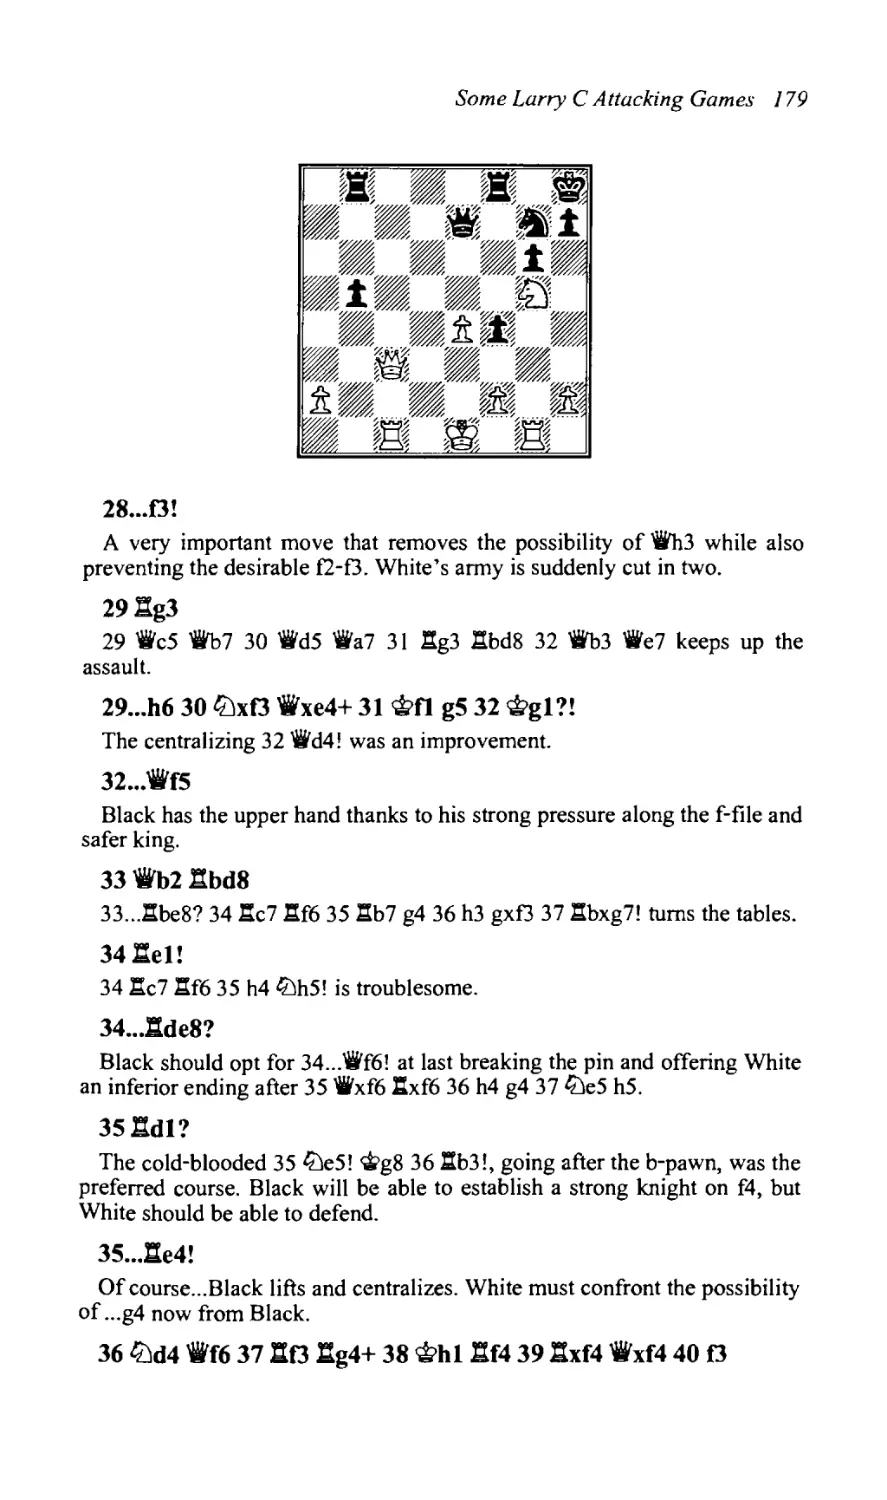
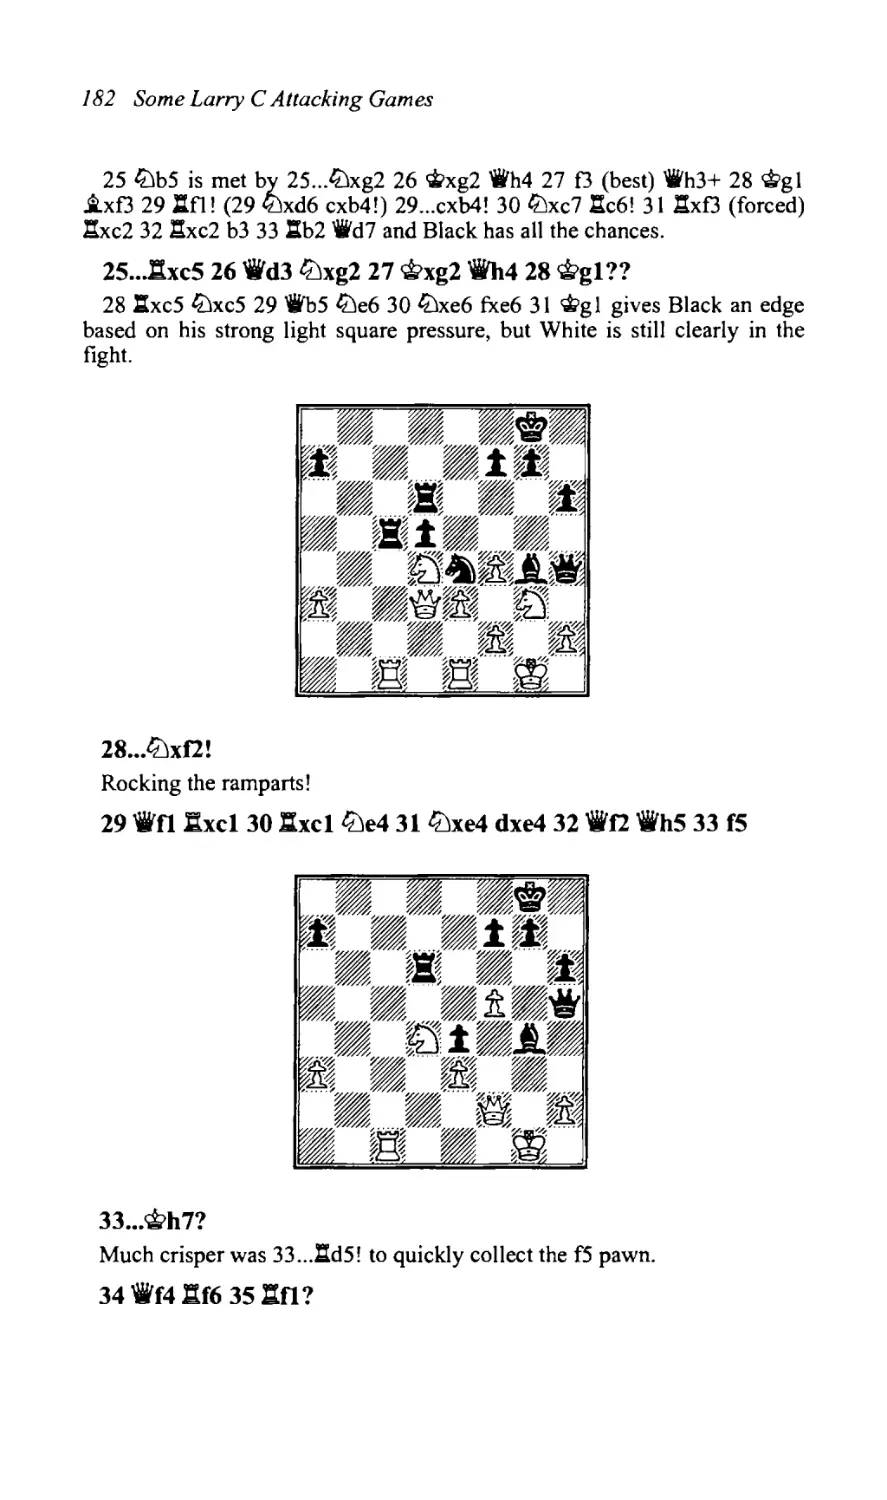
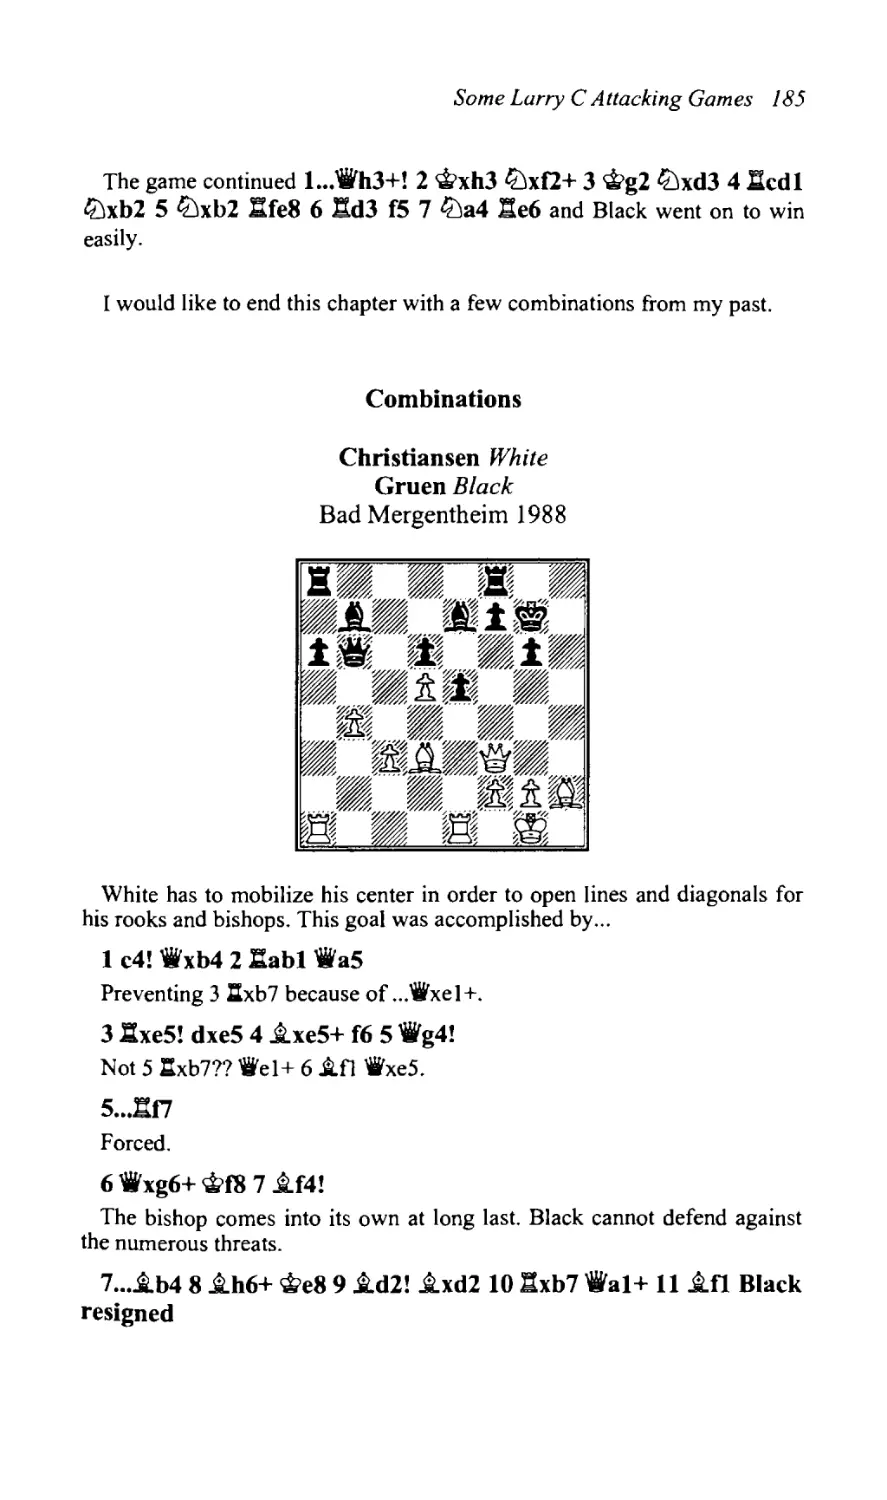
Rocking the Ramparts
Larry Christiansen
B.T. Batsford Ltd, London
First published in 2003
© Larry Christiansen 2003
ISBN 0713487763
British Library Cataloguing-in-Publication Data.
A catalogue record for this book is
available from the British Library.
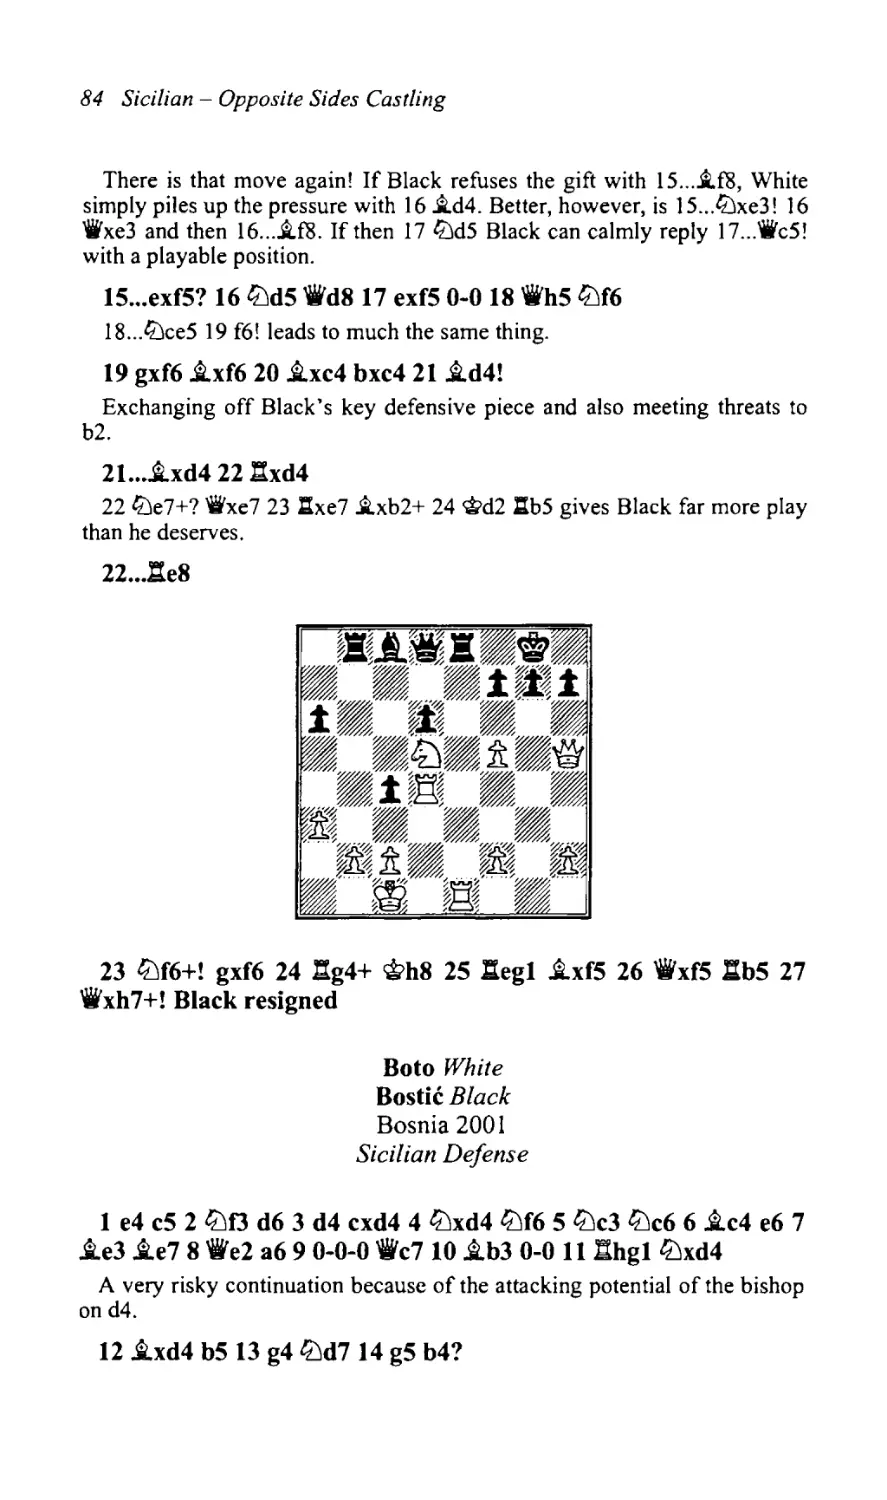
All rights reserved. No part of this book may be
reproduced, by any means, without prior permission
of the publisher.
Printed in Great Britain by
Creative Print and Design (Wales), Ebbw Vale
for the publishers,
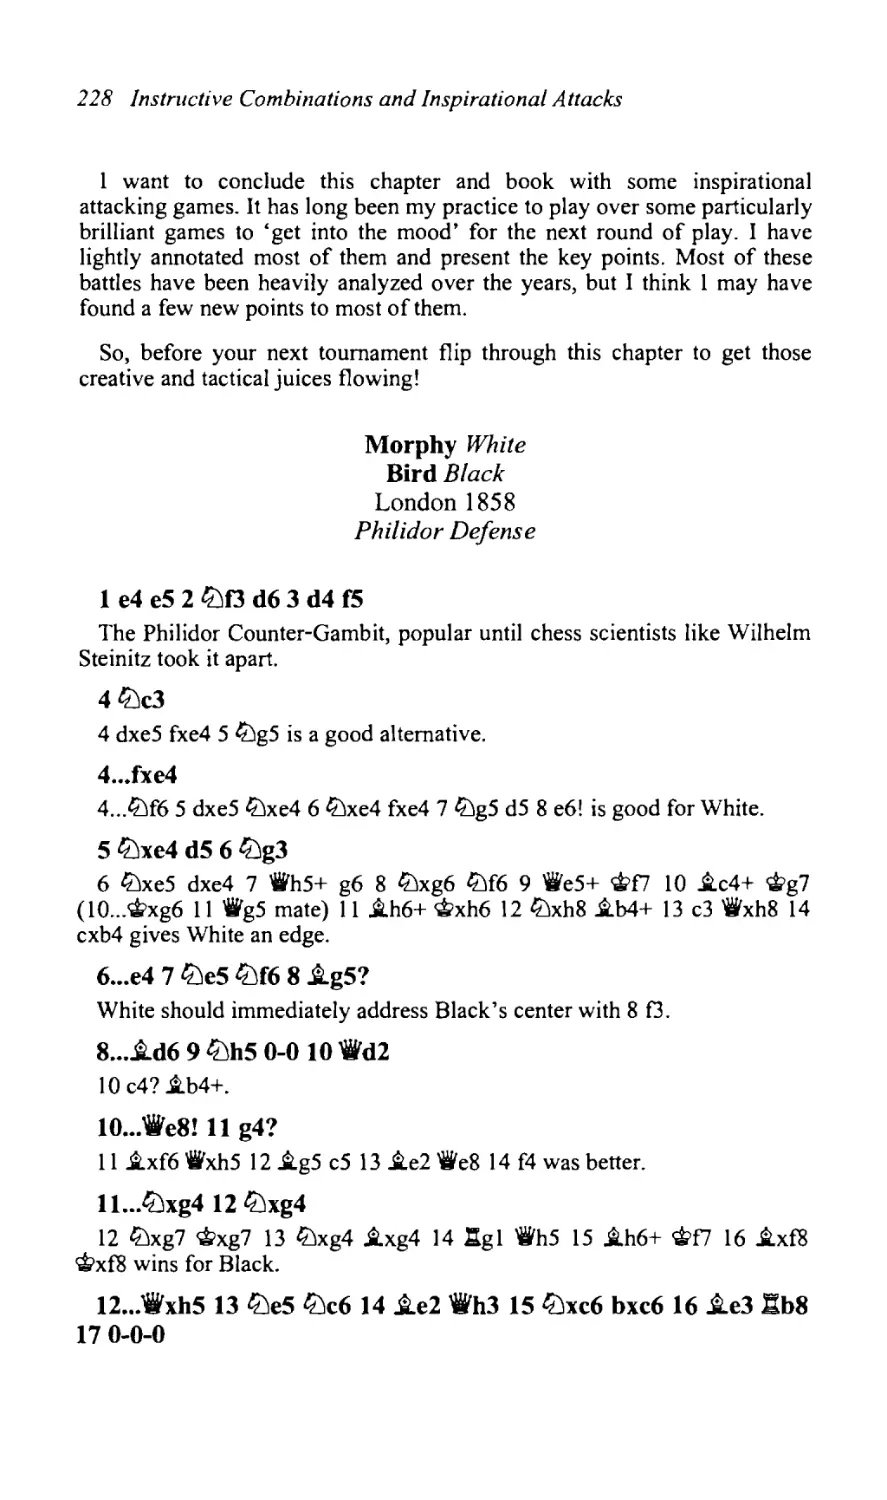
B.T. Batsford Ltd,
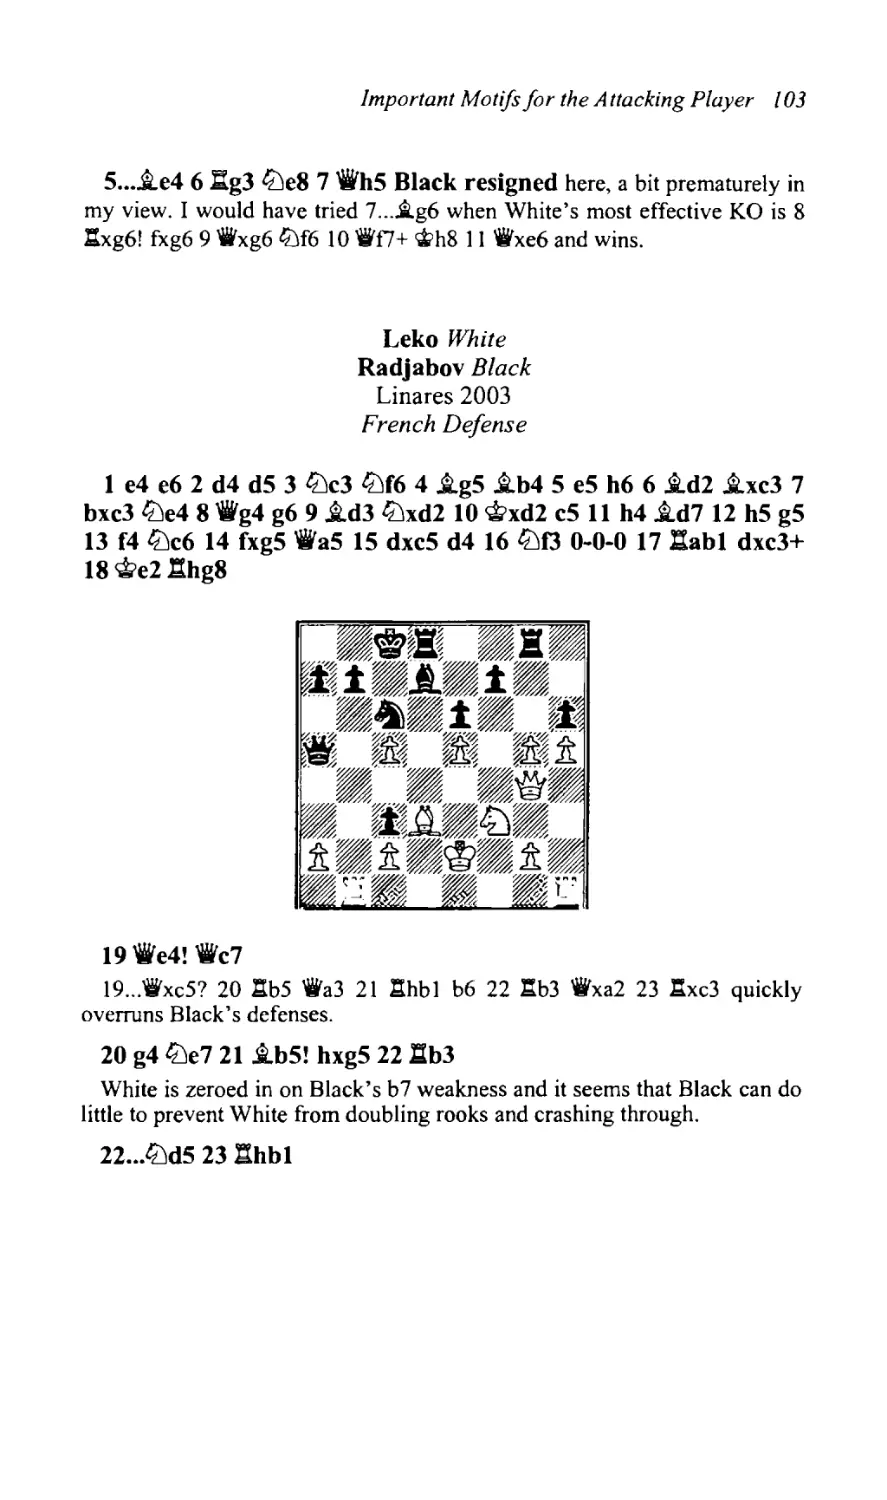
The Chrysalis Building
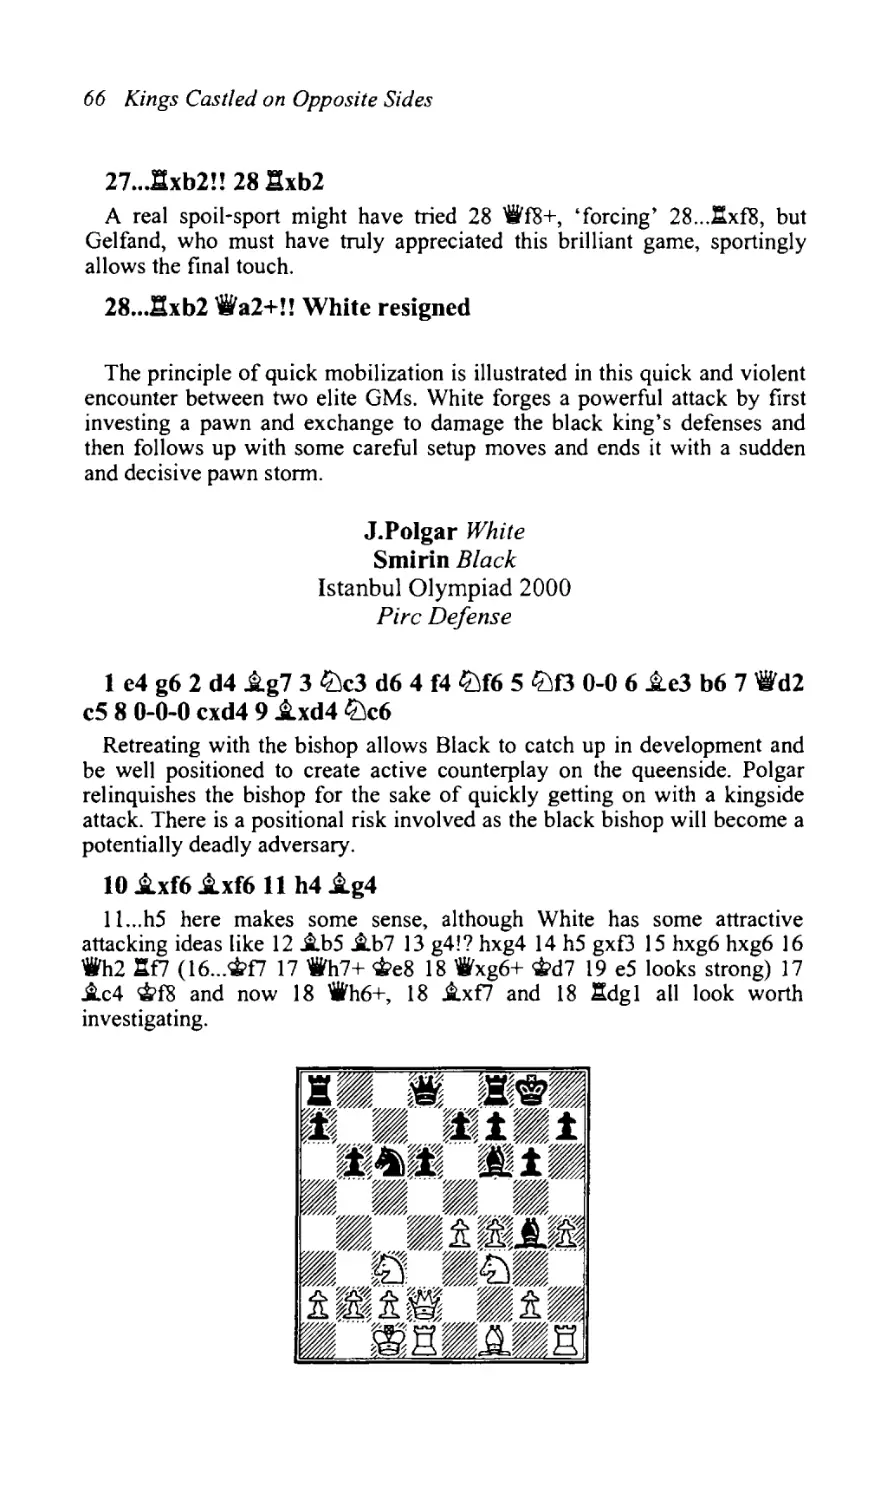
Bramley Road,
London, W 10 6SP
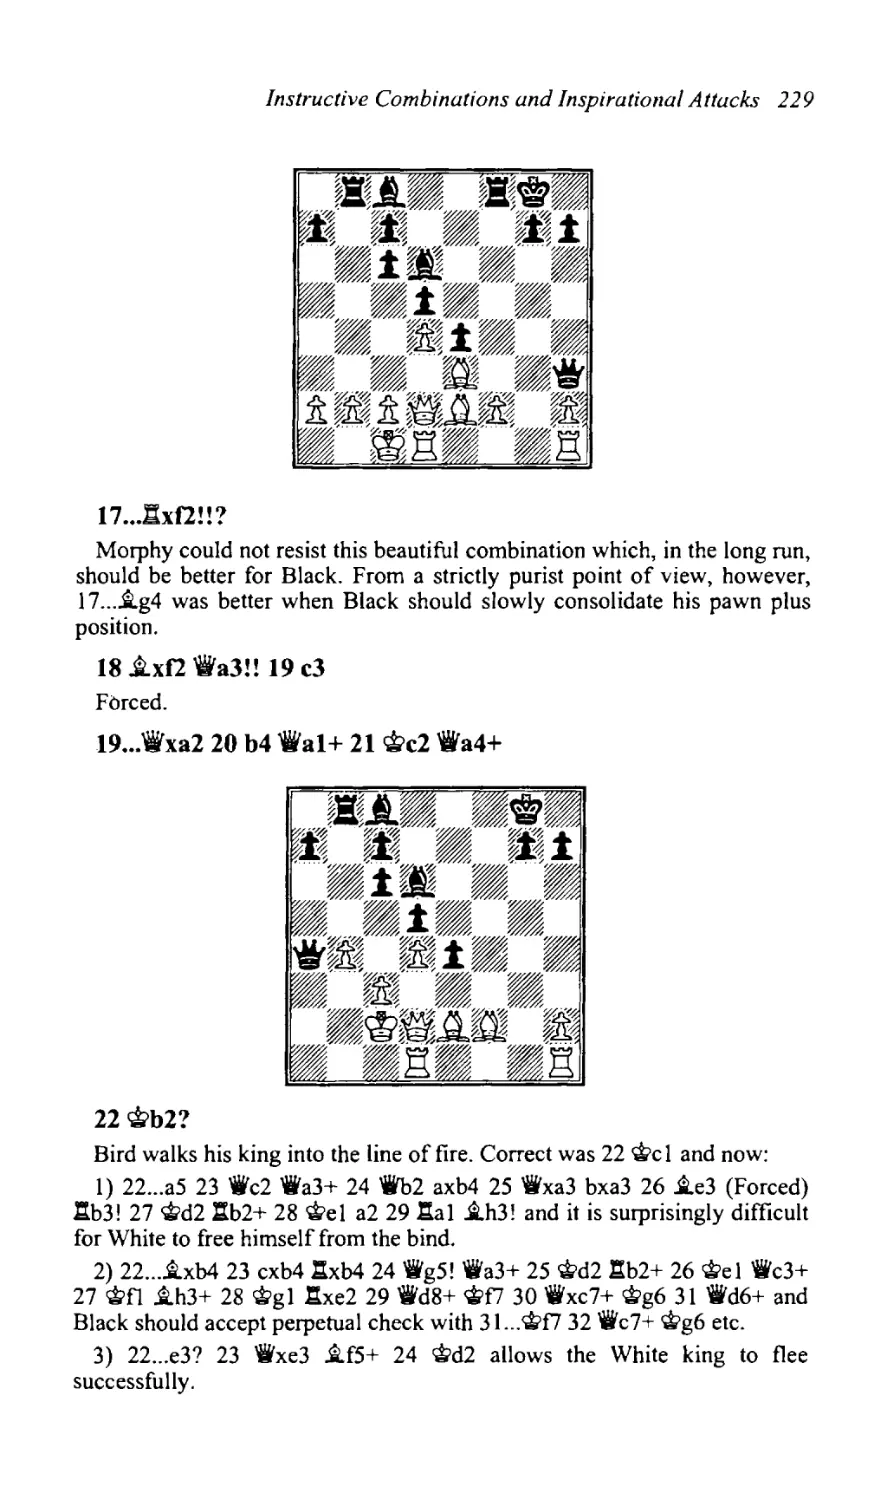
Distributed in the United States and Canada by Sterling Publishing Co.,
387 Park Avenue South, New York, NY 10016, USA
A BATSFORD CHESS BOOK
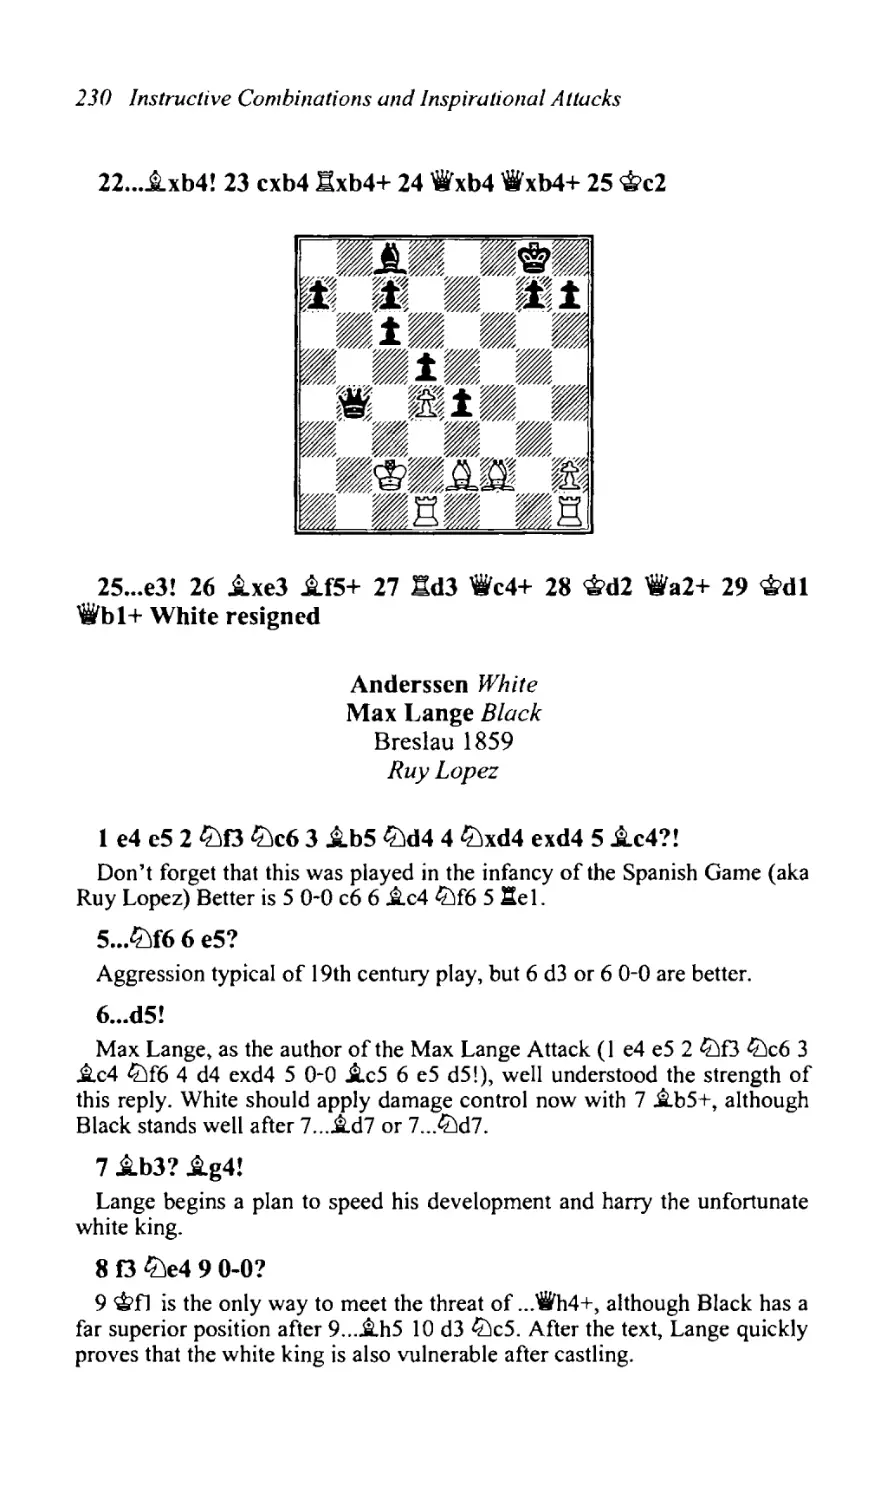
Contents
The Art of Attack
2
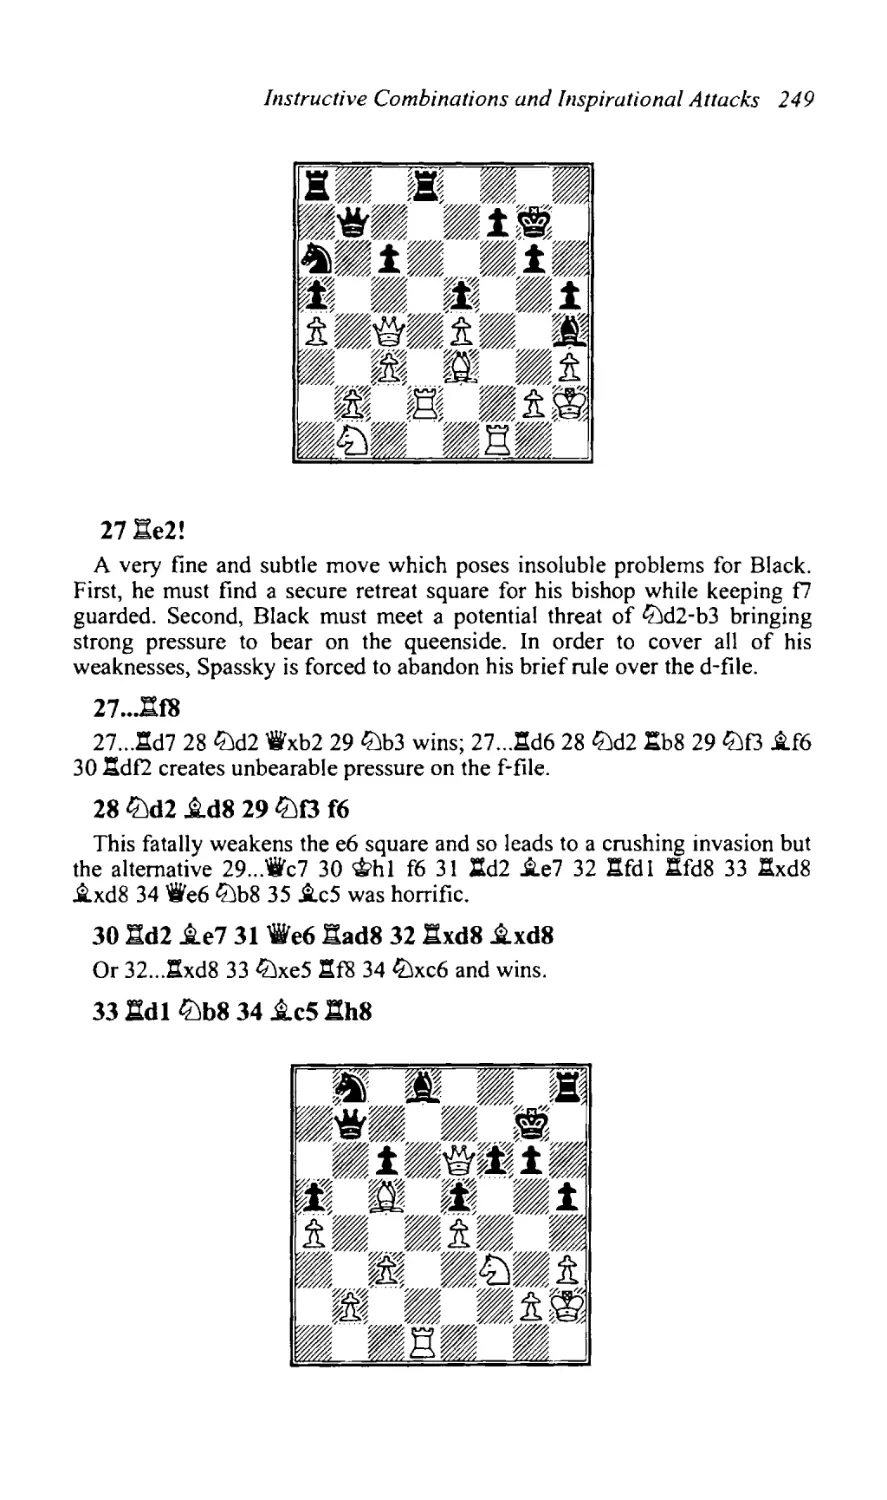
5
Attack on the Castled King Drawing the King from its Lair
31
3
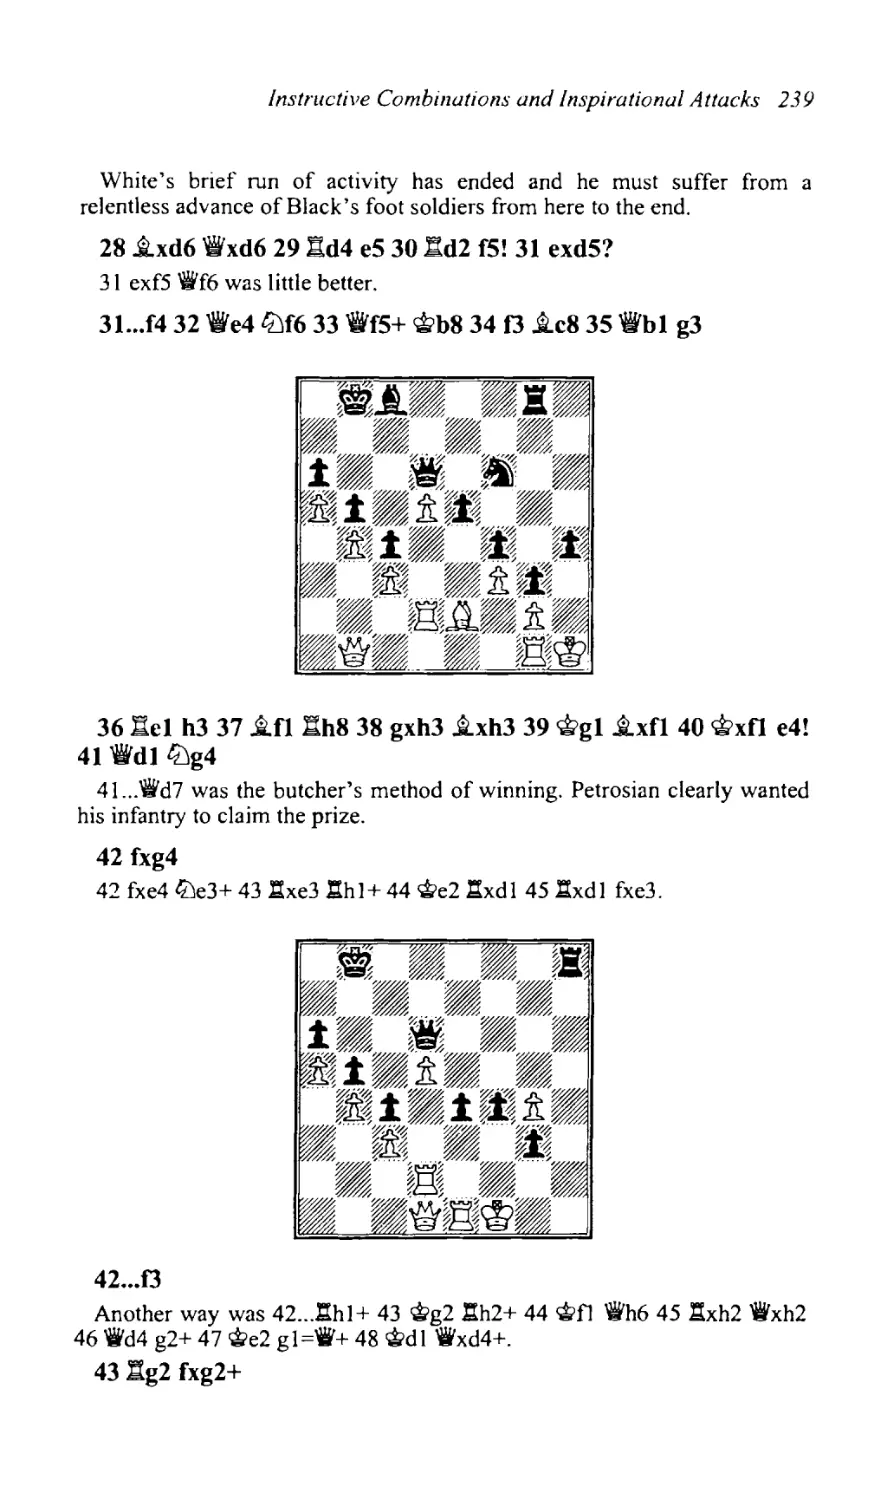
Kings Castled on Opposite Sides
50
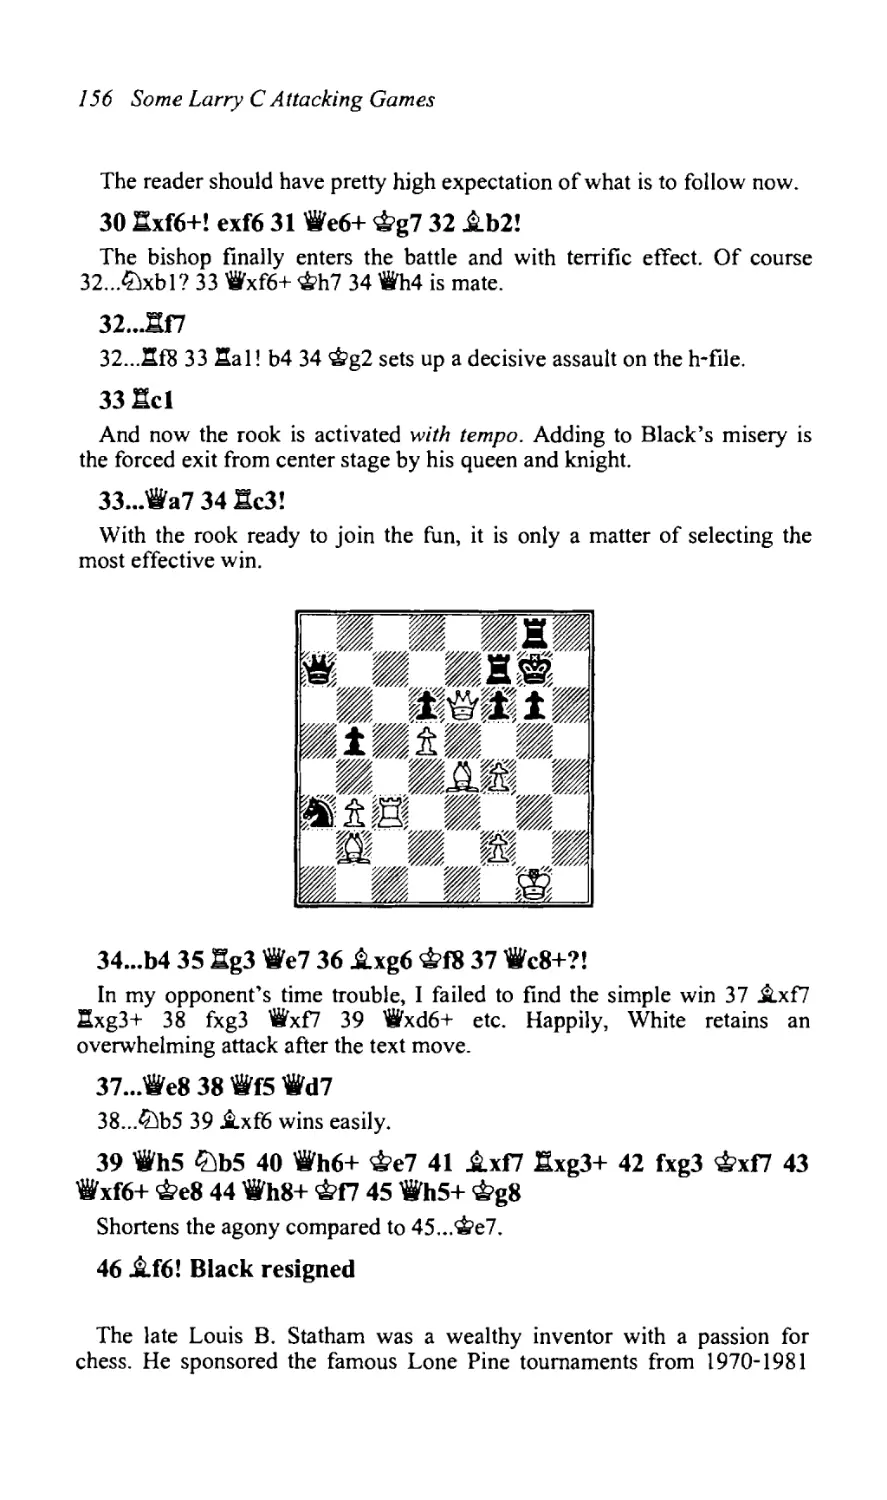
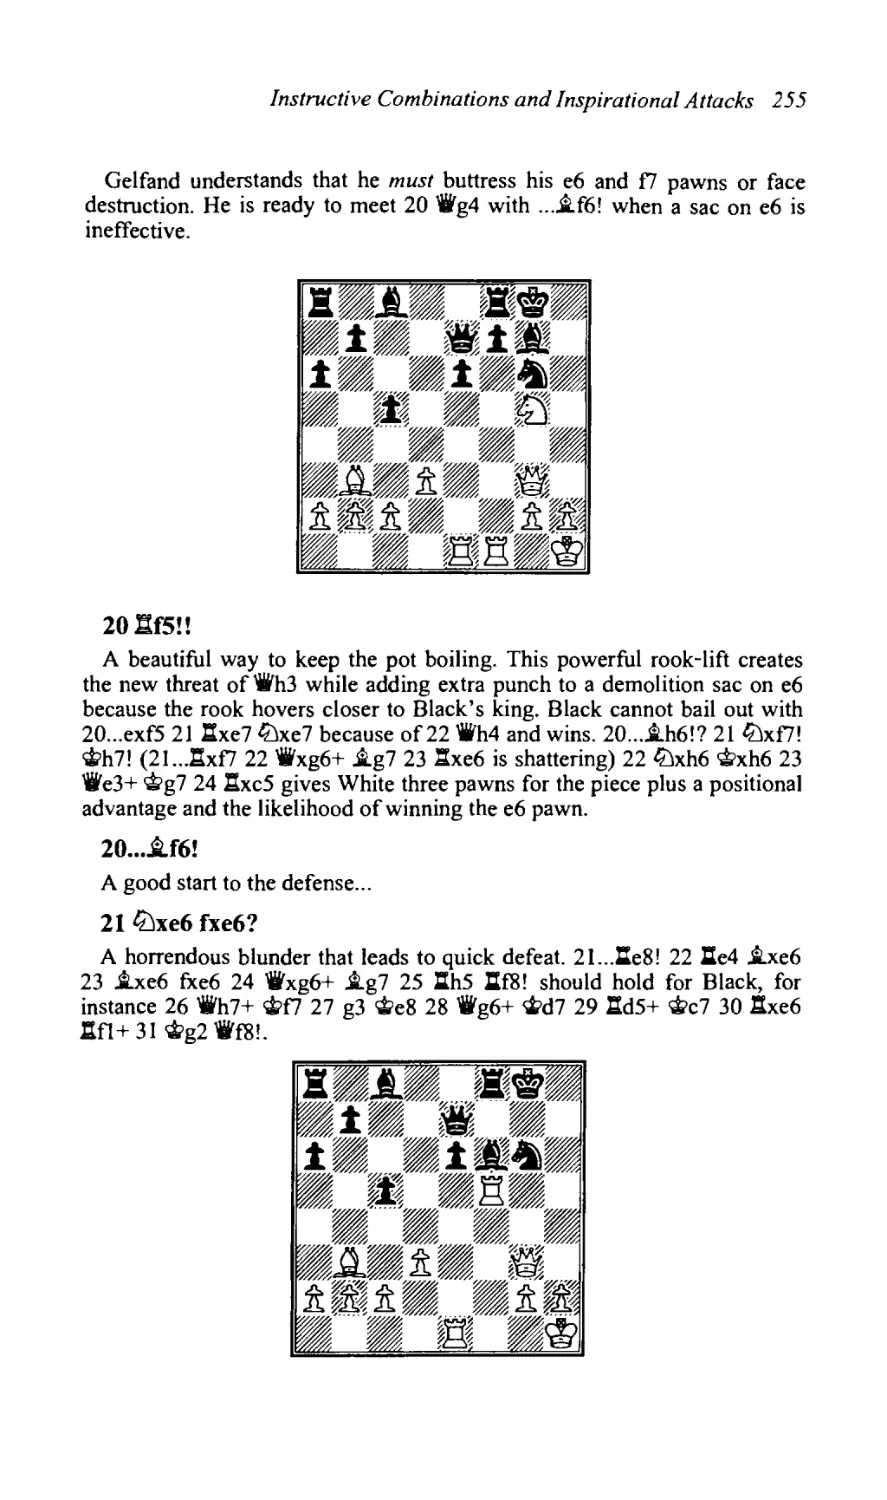
4
Sicilian - Opposite Sides Castling
71
5
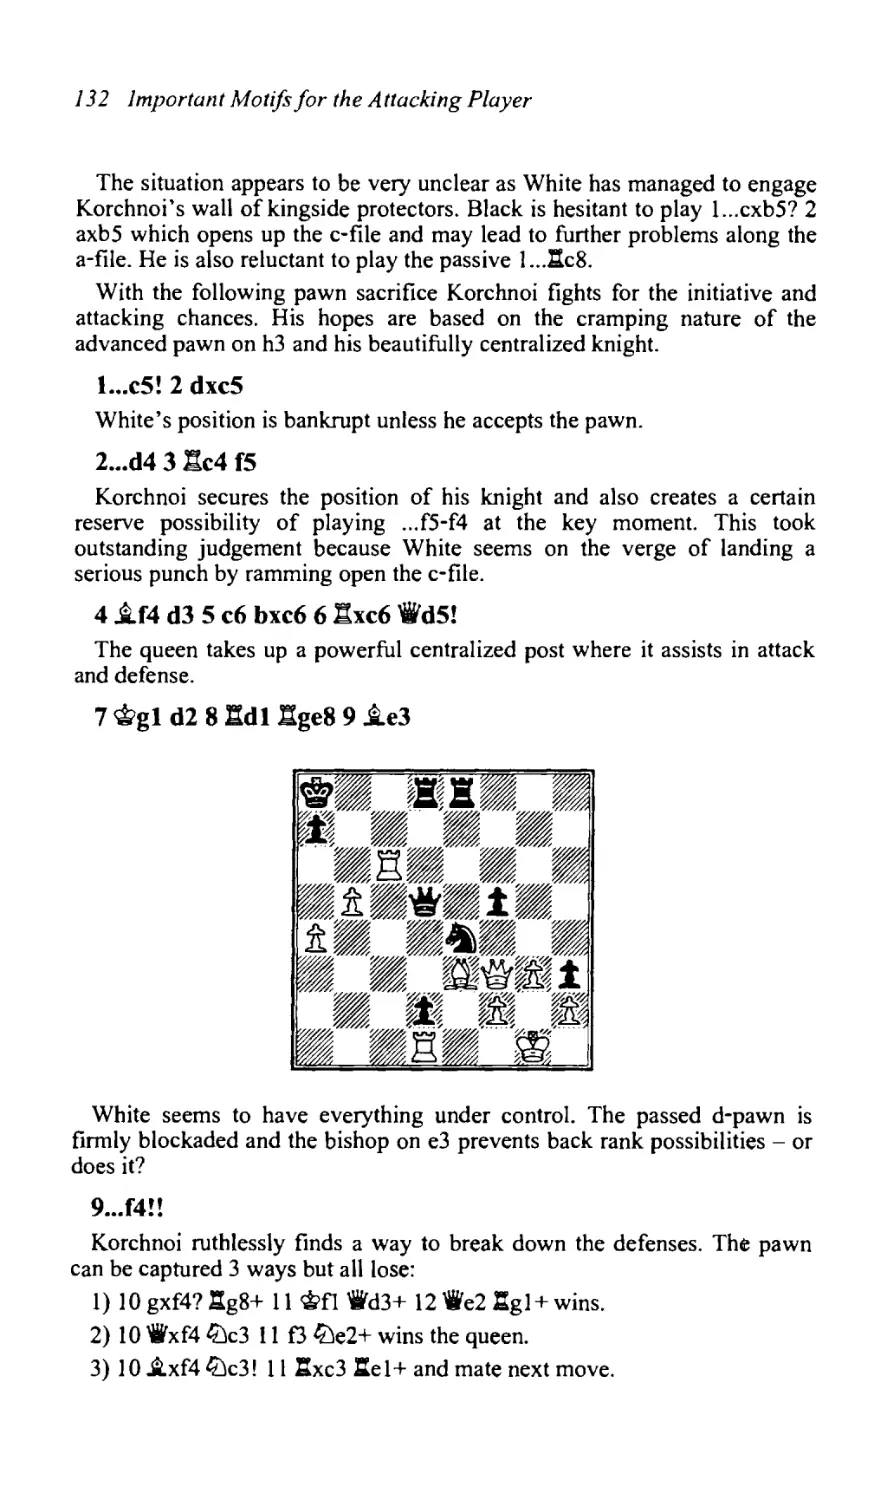
Important Motifs for the Attacking Player
101
6
Romantic Opening Thrill Rides
138
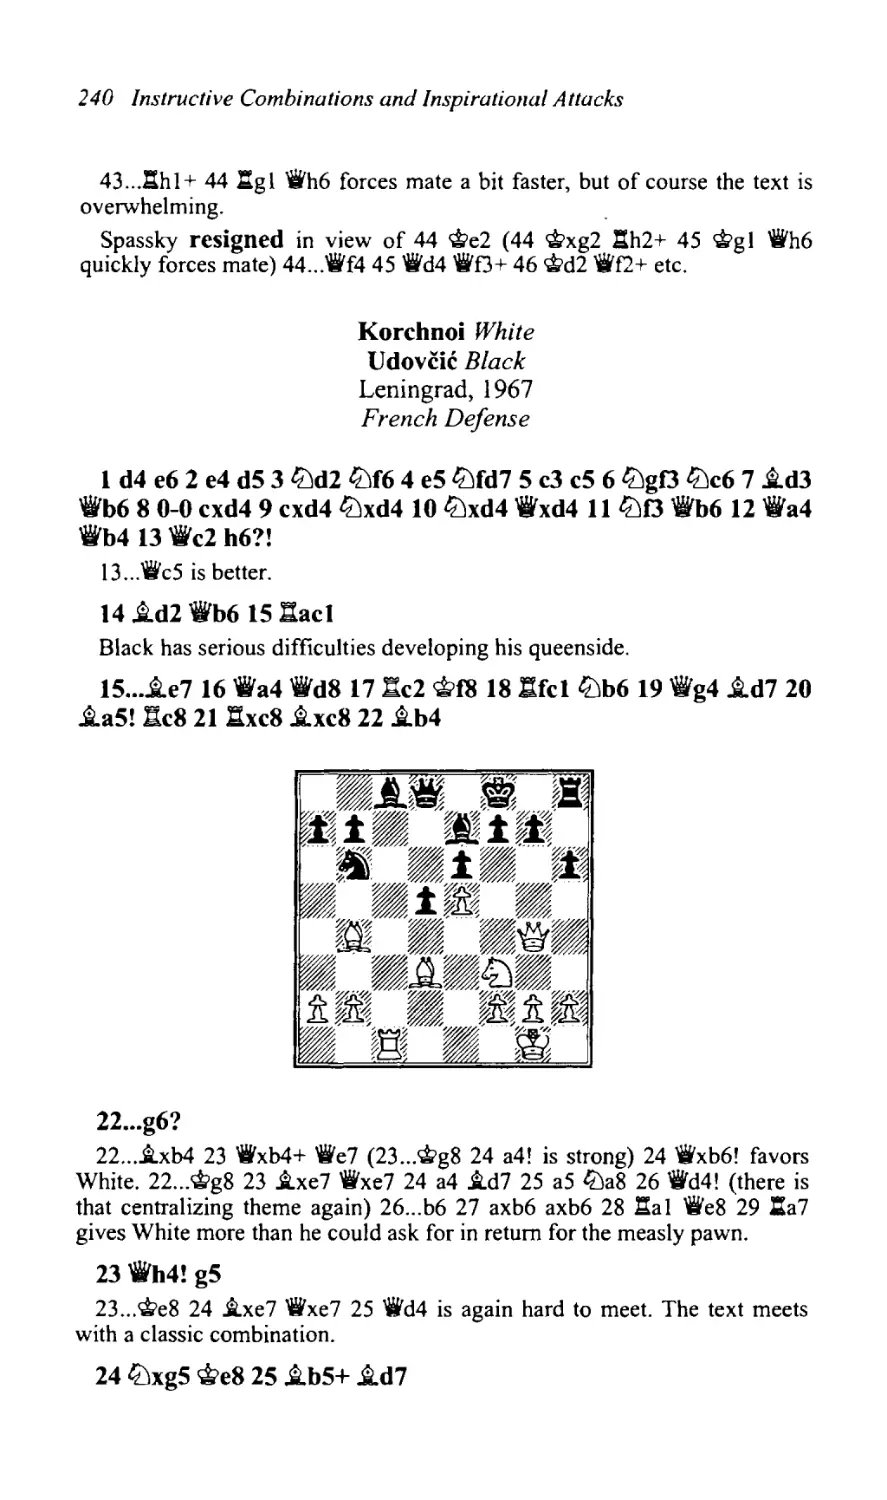
7
Some Larry C Attacking Games
148
8
Instructive Combinations and Inspirational Attacks
195
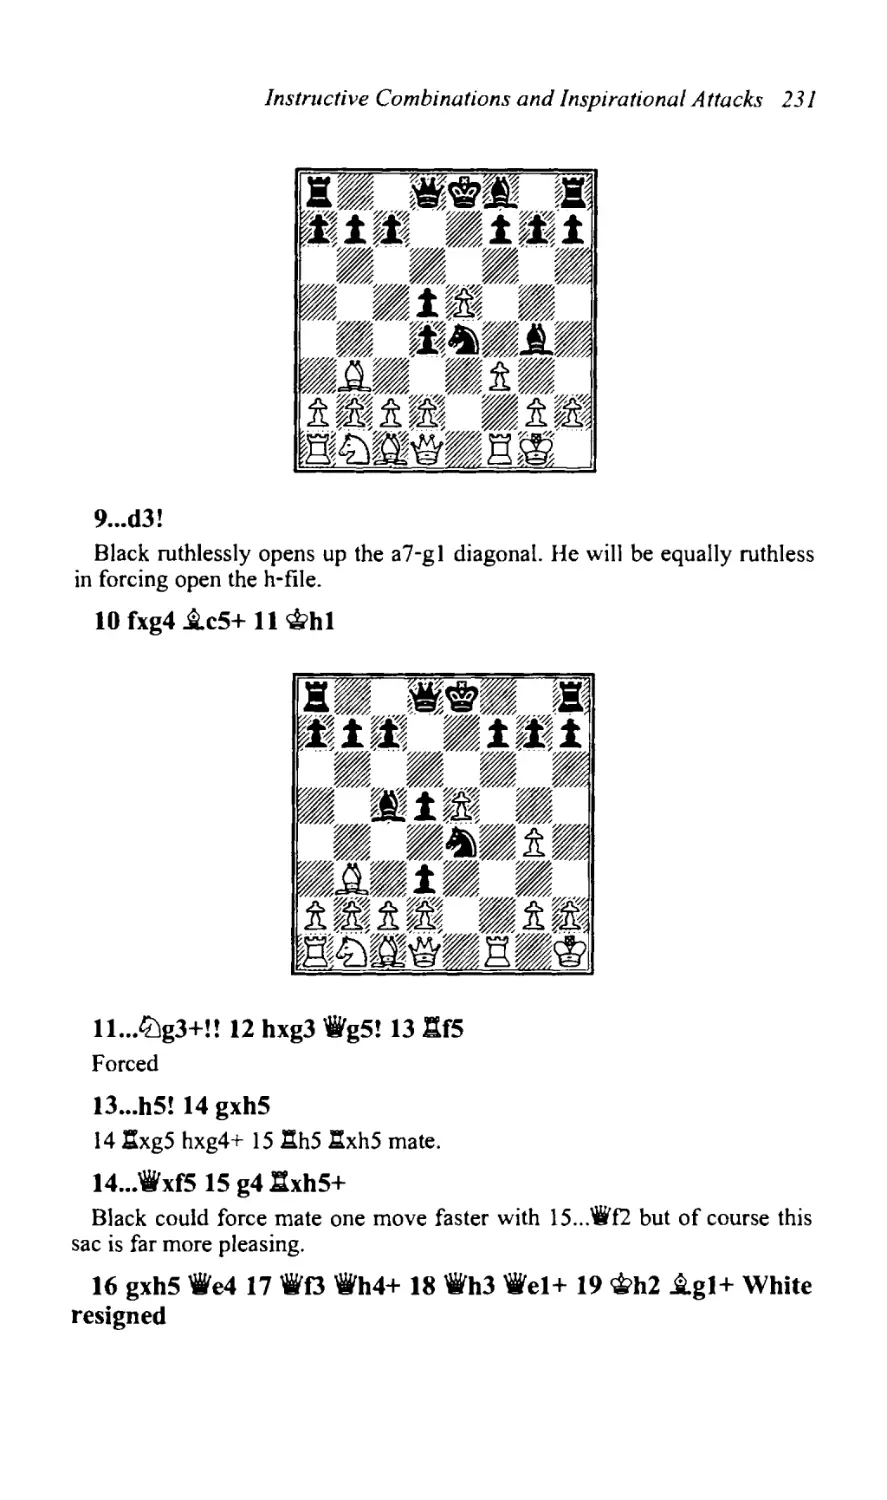
To my mother Virlee,
and to the memory of
Harold P. Christiansen
The Art of Attack
To attack successfully in chess one must try to be extremely open
minded. For a direct attack on an enemy king there are literally thousands
of devices, patterns, tricks, tactics and methods to assist in delivering the
ultimate goal of checkmate. Developing that 'feel' for the art of attack is
what this book aims to instill - and one very important aspect is developing
skill at finding and anticipating those surprise shots and plans to keep the
opponent off balance. This chapter is devoted to expanding your mind and
instilling the creative juices that propel a successful attack. I have included
a large number of examples of varying degrees of difficulty.
Most, if not all of my early chess heroes were the tactical wizards of yore
such as Morphy, Marshall, Anderssen and Rudolf Spielmann. Their
combinations and games were relatively simple to understand. I later
developed a love for Alekhine's magnificent style that combined scientific
preparation, tactical flair and near-limitless creativity. Alekhine was clearly
a total chess fanatic and his life revolved around the 64 squares. The
following win over Bogolyubov from Hastings, 1922 made a deep
impression on me because of its magical creativity. The way Alekhine built
up his attack to set up the 'execution phase' was nearly as impressive as the
final combination.
Bogolyubov While
Alekhine Black
Hastings 1922
Dutch Defense
1 d4 f5 2 e4lbf6 3 g3 e64 i..g2 i..b4+ 51i.d2 i..xd2+ 6 lbxd2?!
lbe6 7 lbgfJ 0-0 8 0-0 d6 9 'iVb3
Bogolyubov must have overlooked Alekhine's 10th move which allows
Black full parity in the center and excellent kingside attacking chances.
9...'it>h8 10 'iVe3 e5 11 e3 a5 12 b3 'iVe8 13 a3 'it'h5 14 h4?
This compromising move, borne of defensive panic, fatally weakens the
kingside. Alekhine now begins manoeuvres designed to provoke
weaknesses in the enemy position.
14...lbg4! 15lbg5 i..d7 16 fJ
White tires of the annoying knight but this move deprives his own knight
of the f3 square. The knight on g5 will soon retire to h3 where it will be
sidelined for the rest of the game.
16 .••lbf6 17 f4 e4
6 The Art ofAttack
Now the lights are dimmed on White's bishop and Black enjoys
superiority in the center. With the kingside under control, Alekhine soon
switches his attention to the queenside.
IS11fdl h6 19 tDh3 d5! 20 liJfl tDe7 21 a4?!
Bogolyubov creates holes in his queens ide to mirror his kingside mess.
This opens up the d3 square for a black knight invasion.
21...tDc6! 22 lid2liJb4 23 .lthl 'iWeS 24 1:tg2
Bogolyubov has faint hopes of playing g2-g4 someday.
24... dxc4 25 bxc4 .txa4 26liJf2 .ltd7 27 tDd2 b5 2SliJdlliJd3 29
lha5 b4 30 ~xaS bxc3!
Actually 3o .. :ii'xa8 is also very strong, e.g. 31 iVb3 'iVa I! 32 tUft ~a8 33
tUb2 ~a3 and Black is clearly on the road to victory. Alekhine could not
resist the fantastic promotion combination that ensues after the text.
31 l:txeS
31...c2!! 32 1:txf8+ ~h7 33 tDf2 cl='iW+
The Art ofAttack 7
White is doing quite well in the material department, but positionally his
game is hopelessly compromised. Alekhine secured the win in inspired
fashion.
34 tDn tDel 35 :h2 'iVxc4 36 :b8 ..tb5 37 lXxb5 'iVxb5 38 g4
tDf3+ 39 ..txf3 exf3 40 gxf5 'iie2 41 d5 ~g8 42 h5 'it>h7 43 e4
tDxe4 44 tDxe4 'iixe4 45 d6 cxd6 46 f6 gxf6 47 :d2 'iie2!
Returning once again to the promotion theme!
48 l:txe2 fxe2 49 ~f2 exn ='ii+ 50 ~xn ~g7 51 ~e2 ~f7 52 ~e3
53 ~e4 d5+ White resigned
~e6
I encountered this remarkable game at age 13 and it made a huge impact
on me. As a young student of the game I had feasted on the usual steady
diet of Morphy, Marshall and Blackburne brilliancies. This monumental
game by Alekhine seemed to be on a totally different level. Most instructive
to me was the careful review of Alekhine's patient build-up leading to the
winning combination. Every move from move 9 to the end seemed to have
a purpose and force behind it. His game plan was as follows:
1) He takes control of the kingside and provokes weaknesses.
2) After weaknesses have been created he ties White's pieces down to
defending those weaknesses.
3) He then turns his attention to the queenside and also provokes
weaknesses in that area.
4) He finally wins a pawn and consolidates his position.
5) The final phase shows an inspired Alekhine artfully investing that
extra pawn to further increase his advantages untiil the winning
combination is detected.
Not everyone can aspire to be an Alekhine, but most everybody can
improve their combinative and strategic skills. All of the players renowned
for their strategic and positional understanding were fabulous tacticians.
Indeed, a strong argument could be made that the so-called positional
geniuses (Lasker, Capablanca, Botvinnik, Petrosian, Karpov, Kramnik) are
superior tactically to those wizards of attack (Alekhine, Tal, Shirov,
Morozevich). Maybe they just saw that half move extra to deter them from
playing a risky attack. It could also be argued that the wizards were
endowed with a bit more creativity than the positionals.
How to improve your combinative skill
Unquestionably, tactical skill is an essential ingredient for successful
attacking play. There is no easy way to develop sharp, tactical ability but I
can suggest the following as methods for improvement.
8 The Art ofAttack
First, you have to get a real handle on the nuts and bolts of tactics - pins,
double-attack, forks (a unique form of double-attack), discovered attack,
discovered check, double check, interference, and the basic checkmating
patterns. I developed much of my early tactical skill by reading
combination books by Fred Reinfeld till the print wore off the books. My
early opening systems, such as they were, were all open I e4 and 1 e4 e5
lines that put a premium on quick development and alertness to dangers
inherent in open positions. I developed a healthy fear of gambits and
sacrifices after some painful losses. I quickly learned that it is usually good
policy to return a gambit pawn for the sake of development.
All players would benefit by constantly challenging themselves with
tactical problems, whether in books, magazines or quick games at the club
or on the internet. As a youngster I would sometimes spend an afternoon
devouring books on tactics and combinations at the Riverside public library.
The weekly chess columns by Kashdan and Koltanowsky always got my
attention and I would spend Sunday mornings playing over the latest
international games, even if they were pretty much of a mystery to me.
Eventually I became very familiar with most of the basic tactical themes.
I learned that loose, unguarded pieces were to be avoided. I kept extra
vigilence when opposing knights established outposts. Cheap bishop sacs
on h7 and f7 occurred with diminishing frequency against me. In sum, by
age 14 or so I had a strong sense of danger and opportunity when sitting
down at the board.
One extremely important point I wish to emphasize is to always look at
forcing moves. A forcing move is a move that demands a response from
your opponent. Any sacrifice, no matter how large, which draws out the
enemy king, should be contemplated to its logical conclusion. Naturally,
many of these will be unsound, but a surprising number of them do work or
come very close. I have seen literally hundreds of wasted opportunities by
club players who lazily fail to examine this type of sacrifice. Of course the
intensity of your examination of forcing moves is influenced by factors like
the time control and your physical stamina. Some players will try to
calculate to the absolute very end of various tactical possibilities. As a
player, I tended to calculate fairly deeply but I would often abandon a
tactical possiblity when it just seemed to lose its 'feel'. I would assume 'that
can't work' based on earlier experiences in similar positions. That has cost
me a few points during my career, but has spared me the nerve-racking time
pressure imbroglios that typically plague the calculating machines.
Now let's get to the action! I will focus initially on the vital subject of
attacking the king with direct assaults. Let's start with the subject of 'king
in the center'.
A king in the center is particularly vulnerable to attack. The aim of most
openings is to get your pieces out, put up a pawn stake in the center, castle
and connect rooks. In my mind, the opening is not completed until that
magic moment when the rooks are in communication with each other.
Delay in bringing the king to safety is a recipe for disaster. There are
thousands of chess horror stories involving kings in the center.
The Art ofAttack 9
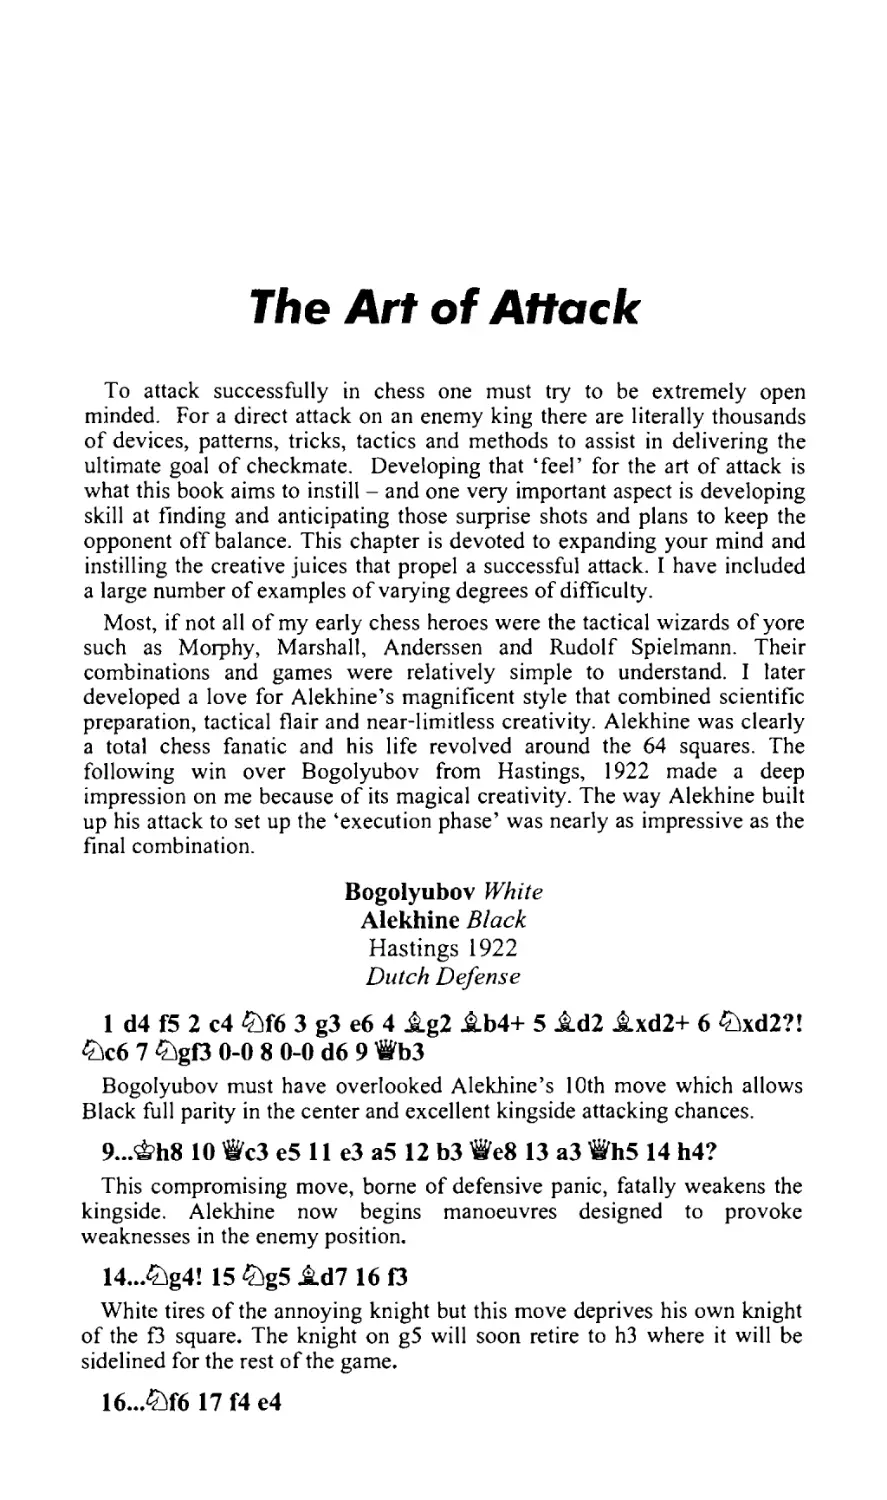
Akopian White
S.Ivanov Black
Queen's Gambit Declined
The following diagram position was derived from the famous Vienna
Variation of the Queen's Gambit Declined
I d4 dS 2 c4 e6 3 ltJc3 ltJf6 4 ltJf3 dxc4 S e4 .i.b4 6 .i.gS cS 7
.i.xc4 cxd4 8 ltJxd4 .i.xc3+ 9 bxc3 'iWaS 10 .i.bS+ ltJbd7 11 .i.xf6
'iWxc3+ 12 ~n gxf6 13 h4 a6 14 :h3 'iWaS IS .i.e2 ~e7 16 ltJb3
'iWb6 17 'iWcl l:[d8 18 l:[d3 ltJf8 19 'iWa3+ ~e8 20 lhd8 'iWxd8 21
ltJaS 'it'e7 22 'iWc3ltJd7? 23 i::.dl 'iWcs 24ltJc4 bS 2SltJd6+ q;e7 26
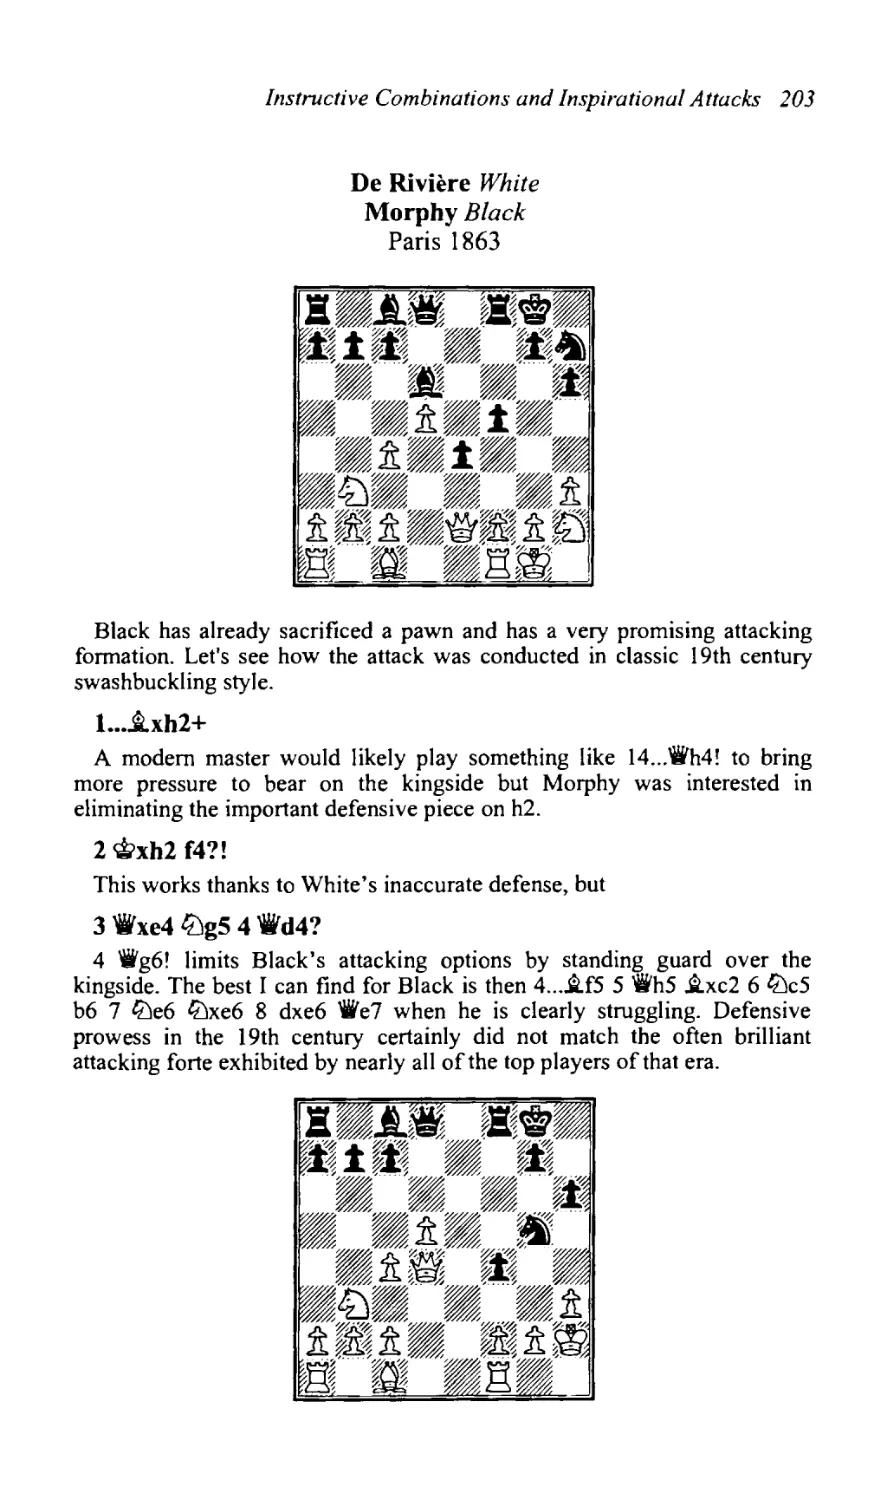
'iWd2 l:b8
Black is a pawn ahead but the white knight on d6 coupled with the 'iI' + :
battery on the d-file are breathing hotly on the centrally situated black king.
Akopian no doubt examined the possibility 27 tiJxc8+ iVxc8 28 iVd6+ 'it>e8
29 .i.hS but abandoned that path due to 29 ... tiJeS! 30 f4 tiJc4 with strong
counterplay for Black. Then no doubt he quickly got interested in the thrust
27 eS - promising point number 1 is that 27 .. JWxeS fails to 28 tiJxc8+ and
27 ... tiJxeS loses at once to 28 tiJe4! (28 tiJfS+? exfS 29 iVd8+ 'it>e6)
28 ...'iI'c7 29 'iI'b4+ and wins. That left only the dismal game continuation
for Black.
27 eS! fxeS 28 'ii'gS+ f6
28 ... tiJf6 runs into 29 tiJe4.
29 'ii'g8
The black king is now far too exposed to expect a long life.
29•...i.b7 30 ltJfS+!
Simple shots like this come in bulk order in such positions.
30...exfS 31 'iWg7+ ~e8 32 .i.hS+ Black resigned
10 The Art ofAttack
The attacker must always look at forcing, energetic moves like 27 e5!
when attacking a king in the center.
Milov White
Volkov Black
Biel2000
Slav Defense
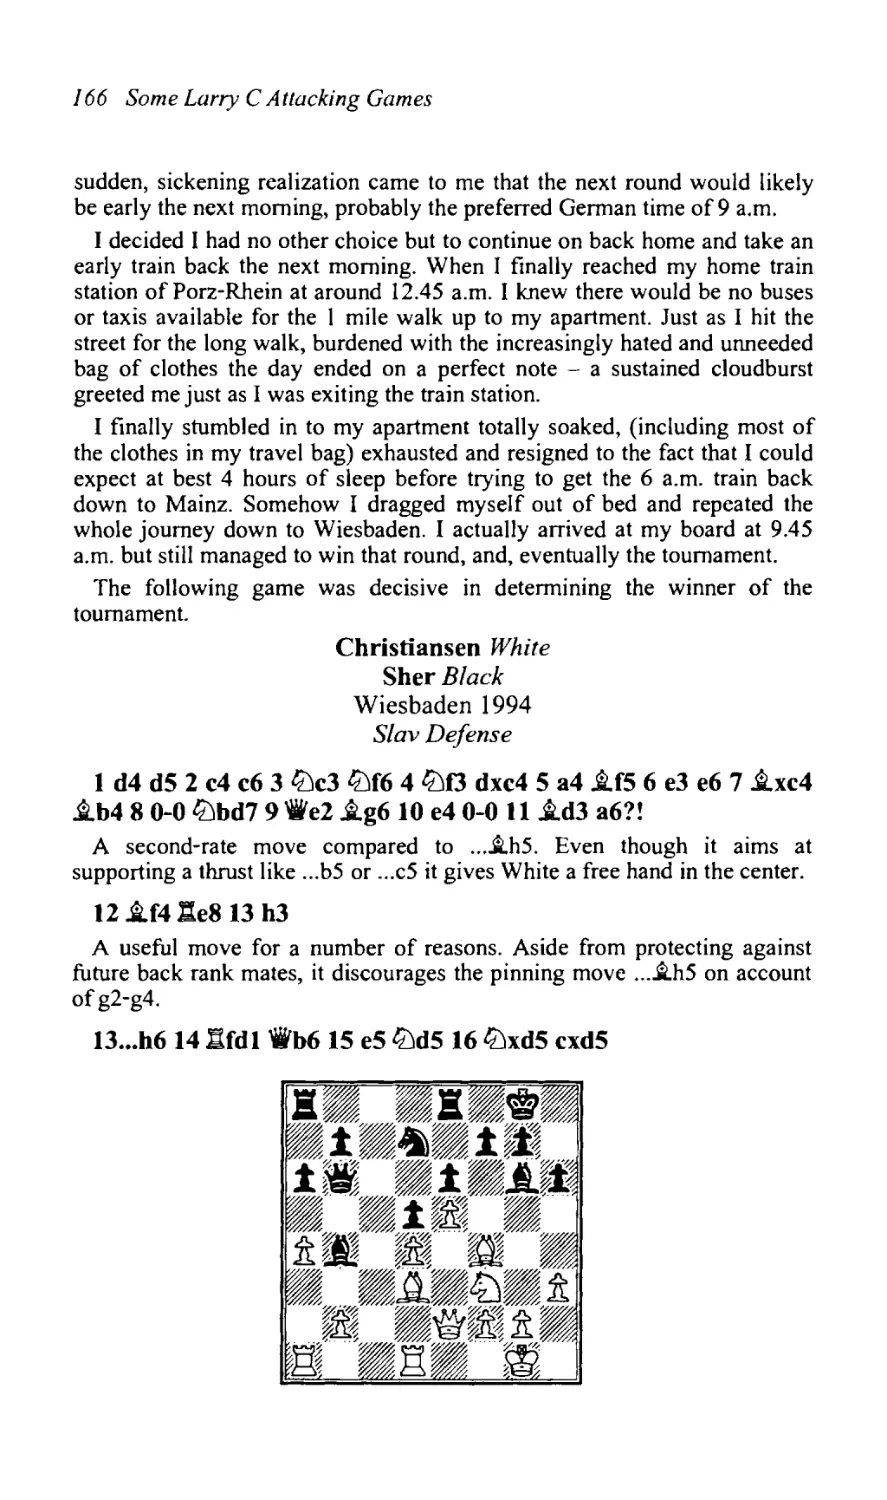
1 d4 d5 2 c4 c6 3lbc3 lDf6 4 cxd5 cxd5 5 lDf3 lDc6 6 i.f4 e6 7 e3
lDh5 8 i.g5 ~b6 9 i.b5 h6 10 i.h4 i.d7 Ulbd2 g6 12lDb3 i.b4
13 i.e2 lbg7 14 0-0 lDa5 15 lDc5 g5 16 lDxd7 ~xd7 17 lDa4 ~d8
18 i.g3 lDf5 19 e4 dxe4 20 a3 i.d6 21 d5 ~e7 22 b4 e5 23 lDc3
lDd4 24 lDxe4lDab3
At first sight, Black looks OK. His knights are busy harassing the enemy
pieces and White's bishop pair lie dormant. The following outburst,
exploiting the key feature that is Black's exposed king stuck in the center, is
the type of move to which one must always be alert. With one powerful
move, White forces open the position to increase the scope of his pieces
while opening up lines and diagonals leading to the black king.
25 f4!! 'ii'b6
25 ... tZ':lxal 26 fxe5 tZ':lxe2+ 27 'iWxe2 .ib8 28 d6+ 'i2r>f8 29 e6 is totally
overwhelming.
26 ~hl gxf4 27 i.h4+ ~f8 28 .r.tbllDxe2 29 ~xe2lDd4 30 'ii'h5
f5 31lDg5 ~c7 32lDe6+!
White exchanges off Black's best piece and introduces a dangerous
passed pawn to deepen Black's crisis.
32 ...lDxe6 33 dxe6 ~g8 34 i.f6 'ilVh7 35l':.bdl i.e7 36 :d7 i.xf6
The Art ofA track 11
Time pressure explains Black's reluctance to resign.
37 lIxh7 'It>xh7 38 'iVn+ i...g7 39 'ti'xf5+ ~g8 40 %:tdIItf8 41 'iVg6
Black resigned
Fedorov White
Shirov Black
Polanica Zdroj 2000
King's Gambit
1 e4 e5 2 f4 exf4 3 ttJf3 g5 4 h4 g4 5 ttJe5 d6 6 ttJxg4 ttJf6 7 ttJf2
lig8 8 d4 ~h6 9 ttJc3 ttJc6 10 ttJd5?! ttJxd5 II cxd5 'iVe7+! 12 ~e2
ttJb4 13 c4
Black has a very promising-looking position but right now he must deal
with the threat of 14 ~a4+ winning his knight. Shirov accurately judged
that the knight can be sacrificed for the sake of speedy development and a
quick attack aimed at White's king in the center.
13 ... i...f5!
Black invites capture of the knight with this strong, forcing move. He
threatens ... ttJc2+ and prepares castling.
14 'iVa4+
This turns out badly, but the alternative, 14 0-0 0-0-0 15 .tg4 'iVd7 16
i.xf5 (16 a3 ttJc2 17 'iVxc2 :xg4 is very strong - look at the g2 pawn)
16 ...'ihfS 17 a3 ttJc2 does not inspire much confidence either.
14.•.~f8?!
14 ... 'it'd8! 15 ~xb4 Ite8 16 0-0 (forced since 16 'iVd2 f3!) 16 ... ~xe2
looks even more effective.
15 'iVxb4 ~e8 16 'i'd21bg2 17 ~fl ~g3 18 'i'dl i...e4 19 nh2 f5
12 The Art ofAttack
A very strong move that supports Black's grip on the center and prepares
to swing the queen to the g-file to form a deadly battery of major pieces
aimed at the hapless white king.
20 lOxe4
20 liJhl is swept aside by 20 ... iLxhl 21 l:txhl 'ife4! 22 l:tgl (forced)
l:txgl+ 23 'itxgl 'ifxe2 with an easy win.
20... fxe4 21 i.g4
No relief is offered by 21 iLh5 'ifg7 22l:thl e3 23 'ifc2 f3 24 'iff5+ 'itg8
25 i.xe8 e2+ 26 'itf2 l:tg2+ 27 ~xf3 'ifg3+ 28 We4 el='if+ 29 l:txel
'ifxe 1+ 30 ~d3 'ifg3+ with mate in two in the offing.
2t... e3
2l...'ilVg722l:tg2.
22 i.f3 'ii'g7 23 l:hl :g2! White resigned
A total massacre ensues after 24 iLxg2 e2+ 25 'ifxe2 l:txe2.
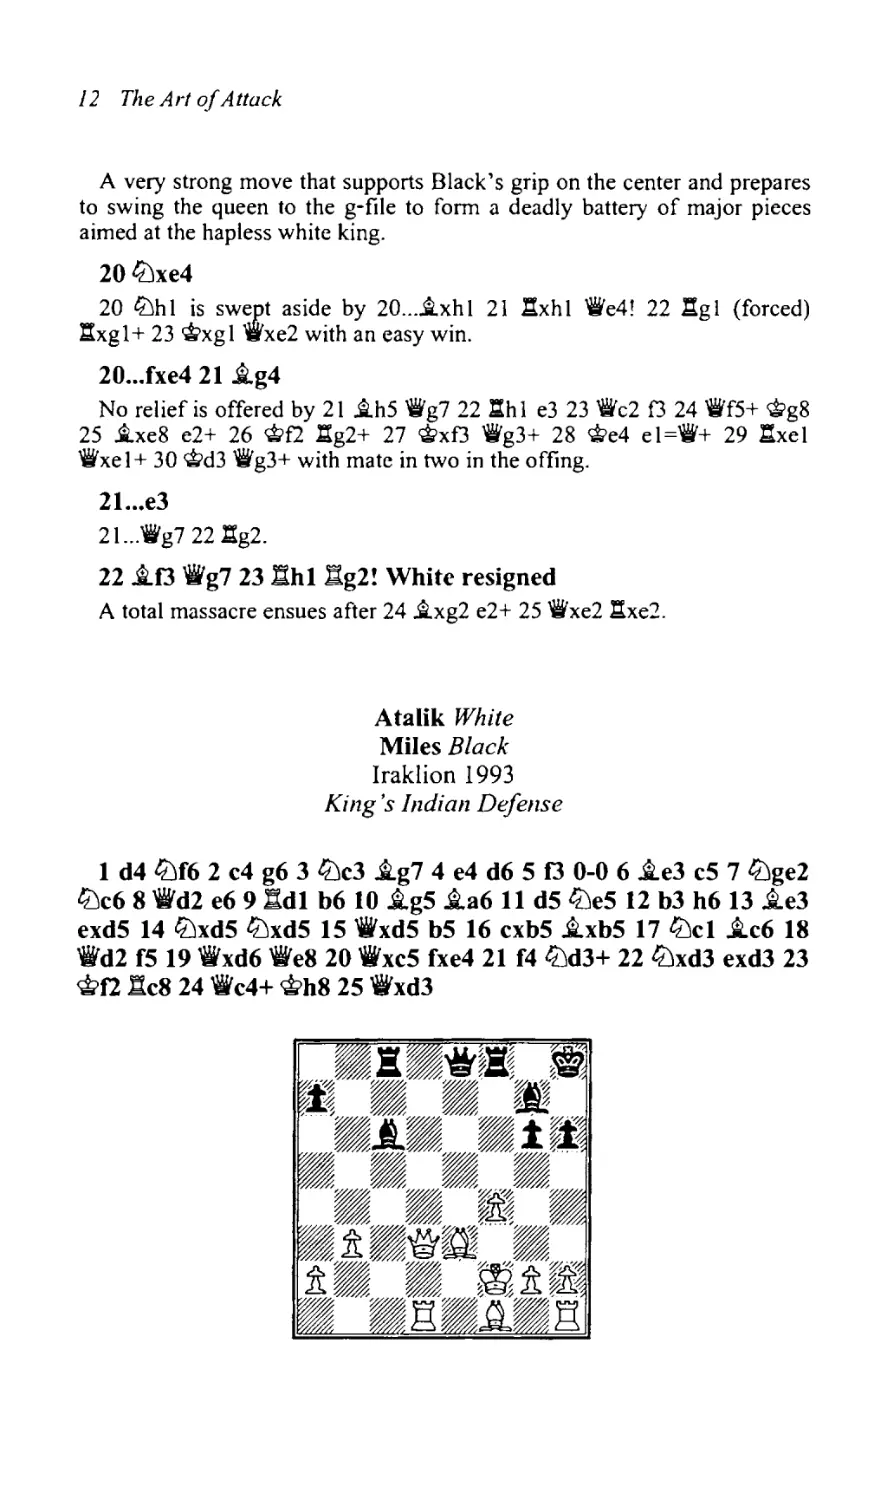
Atalik White
Miles Black
Iraklion 1993
King's Indian Defellse
1 d4 lOf6 2 c4 g6 3 lOc3 i.g7 4 e4 d6 S f3 0-0 6 i.e3 cS 7 lOge2
lOc6 8 ~d2 e6 9 lidl b6 10 i.gS i.a6 11 dSlOeS 12 b3 h6 13 i.e3
exdS 14 lOxdS lOxdS IS 'iWxdS bS 16 cxbS i.xbS 17 lOci i.c6 18
'ii'd2 fS 19 'ii'xd6 ~e8 20 'iWxcs fxe4 21 f41Od3+ 221Oxd3 exd3 23
~f2 :c8 24 ~c4+ ~h8 2S ~xd3
The Art ofAttack 13
Let's assess this complicated situation. White is two pawns ahead but his
king is far from secure. Black must try energetically to rip open the white
king's defenses before he flees to safety. The late Tony Miles, who in his
youth cut his attacking teeth playing the Dragon Sicilian as Black,
understood the principles of ruthless attacking play.
25 ...g5! 26 ':cl?
Can White survive the fully concentrated black attack? Perhaps he might
have tried 26 h3!? which serves two purposesI) it reserves a flight square on h2 for his king.
2) In some variations the rook may be needed on h2 to defend the
vulnerable g2 pawn.
It is not pretty, but I have been unable to find anything better for Black
than 26 ... gxf4 27 iLd4! 'ile7 28 iLxg7+ 'ilxg7 29 ifd4 l:.f6 30 l:.h2 l:.cfS
with good compensation for the pawn but nothing more. But defending
positions with dangerously exposed kings is a very difficult chore. White
falters straight away.
26.. J:td8!
It, is important for Black to control the d4 square and prevent White from
simplitying with iLd4.
27 'ife2 gxf4 28 ii.c5
White threatens to trade queens and take the exchange. What can Black
do?
28...f3!!
Tony Miles finds a spectacular solution to the attacking problem (he most
likely planned this move after playing 26 ...l:.d8). The peculiar position of
the white king invites an underpromotion combination. I should mention
that there was an equally effective, if less artistic crusher in 28.,.'ild7 29
i.xfS (29 'ild3 'ilg4 is murderous) 29 ... 'ild4+ 30 ~el iLxfS and White's
king becomes easy prey to the barrage of bishops and major pieces.
14 The Art ofAttack
29 'iVxe8 fxg2+ 30 .i.xf8 gxhl=lLl+! White resigned
In view of 31 'iitfgl ~d4+ followed by mate or 31 'iitfel l:txe8+ 32 ~e2
~b5! 33 ~xg7+ 'iitfxg7 34 l:tc2 'iitff6 35 'iitffl l:txe2 36 ~xe2 'iitff5 37 'iitfel
.i.xe2 38 c;t>xe2 'iitfe4 and Black will surrender his knight in order to plunder
the white queens ide pawns. A beautiful coupling of energy and creativity
by Miles.
Larsen White
Spassky Black
USSR vs The Rest of the World, Belgrade 1970
Larsen's Opening
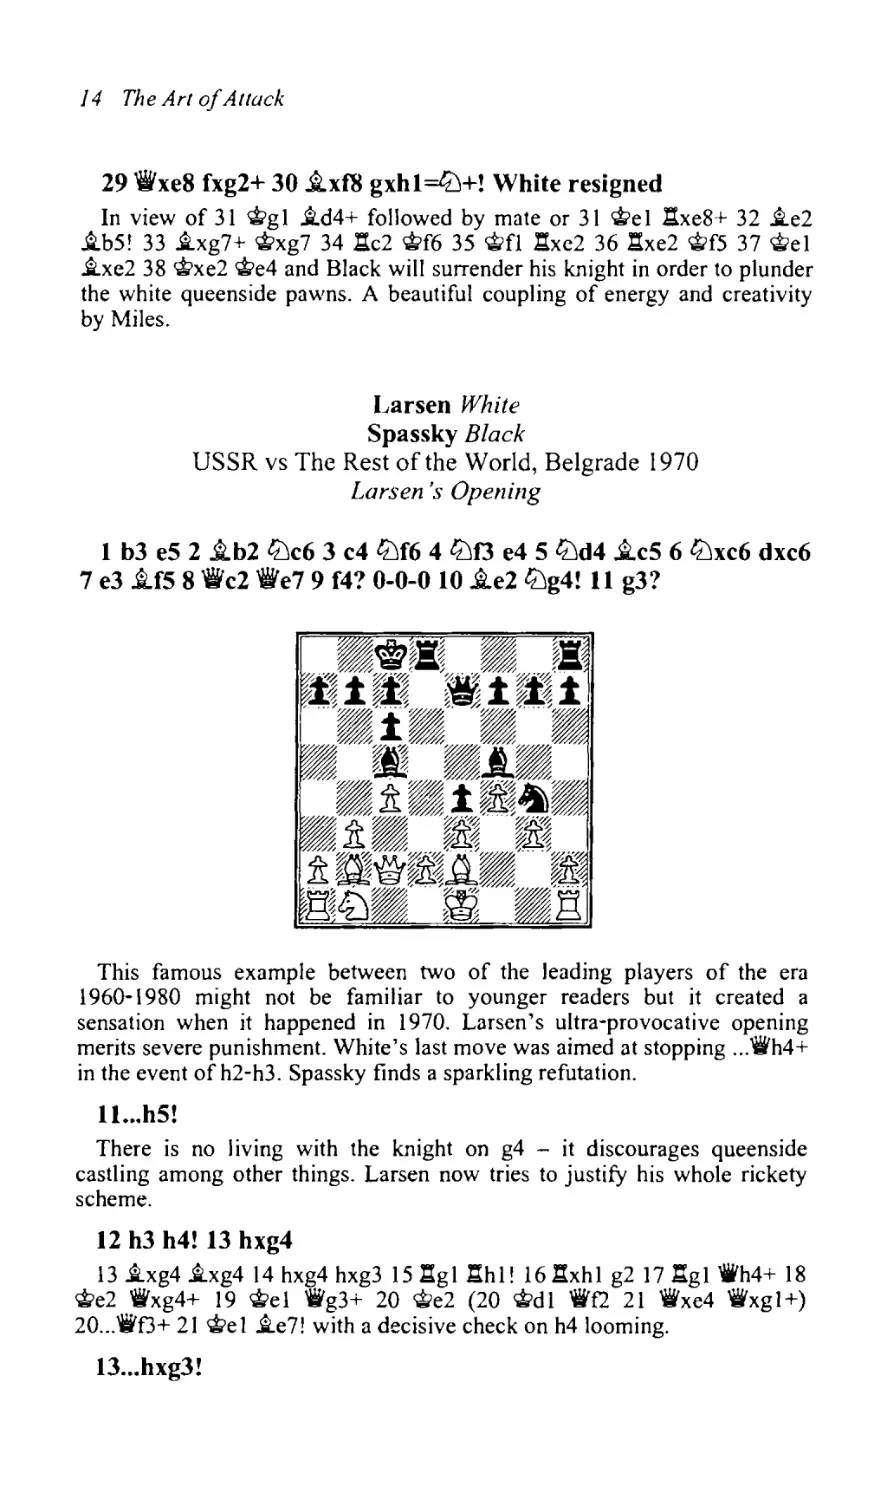
1 b3 e5 2 Jtb2 tZ:lc6 3 c4 tZ:lf6 4 tZ:lo e4 5 tZ:ld4 Jtc5 6 tZ:lxc6 dxc6
7 e3 Jtf5 8 'iVc2 'WIe7 9 f4? 0-0-0 10 Jte2 tZ:lg4! 11 g3?
This famous example between two of the leading players of the era
1960-1980 might not be familiar to younger readers but it created a
sensation when it happened in 1970. Larsen's ultra-provocative opening
merits severe punishment. White's last move was aimed at stopping ... iVh4+
in the event ofh2-h3. Spassky finds a sparkling refutation.
11 ••. h5!
There is no living with the knight on g4 - it discourages queenside
castling among other things. Larsen now tries to justify his whole rickety
scheme.
12 h3 h4! 13 hxg4
13 ~xg4 ~xg4 14 hxg4 hxg3 15 ~gll:thI! 16 ~xhl g2 17 ~gl 'iVh4+ 18
'iitfe2 iVxg4+ 19 'iitfel iVg3+ 20 'iitfe2 (20 'iitfdl iVf2 21 iVxe4 iVxgl+)
20 ... iVf3+ 21 'iitfel ~e7! with a decisive check on h4 looming.
13... hxg3!
The Art ofAttack J5
Suddenly White is confronted with a terrible passed pawn in his midst.
14 I:[gl
White is counting on this to stem the attack but Spassky persists with his
aggression. Anyway, 14 ':xh8 was no defense as Black wins after
14 ... .tIxh8 IS gxfS :hl+ 16 i.fl g2.
14...lahl!!
This is the key move. Black gladly invests the rook in order to bring on
the real wrecking crew - the g-pawn and the queen.
15l'lxhl g2 16 1%fl
Or 16 .tIgl 'ii'h4+ 17 'itdl 'ii'hl! 18 'ii'c3 'ii'xgl+ 19 ~c2 'ii'el 20 lLla3
'ii'xe2 21 gxf5 ii.b4! 22 'ii'xb4 'ii'd3+ with mate next.
16.•.'iVh4+ 17 ~dl gxfl ='iV+ White resigned
After 18 i.xfl ii.xg4+ mate follows.
Hamdouchi White
Bologan Black
Belfort 2002
Sicilian Defense
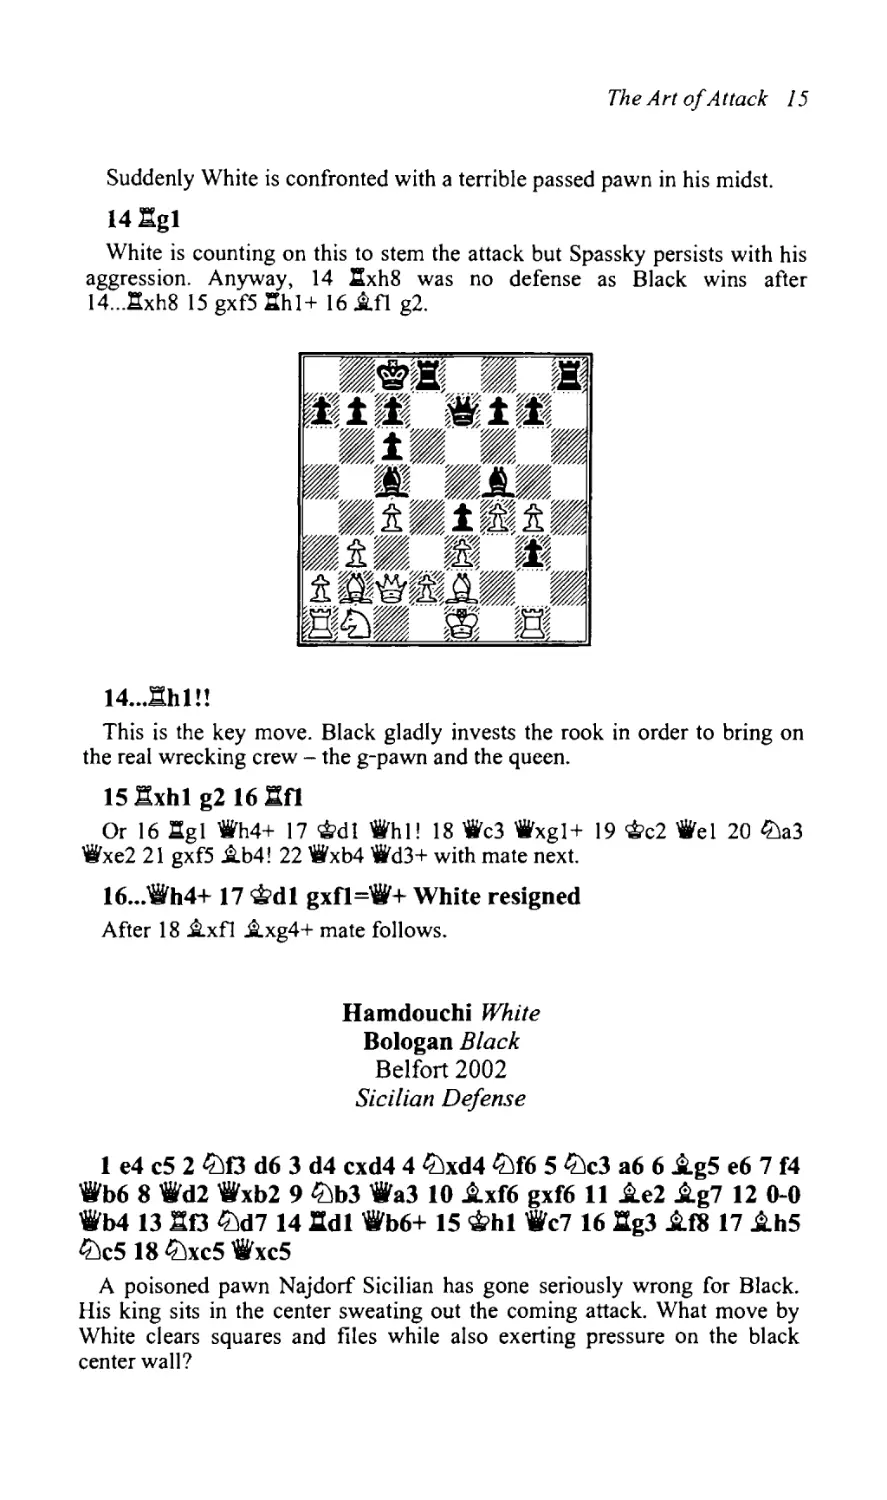
I e4 c5 2 lbo d6 3 d4 cxd4 4 lbxd4 lbf6 5 lbc3 a6 6 i.g5 e6 7 f4
'iVb6 8 'it'd2 'iVxb2 9 lbb3 'it'a3 10 i.xf6 gxf6 II i.e2 i.g7 12 0-0
'iVb4 13 nOlbd7 14 %:tdl 'iVb6+ 15 ~hl 'iVc7 16 %:tg3 i.f8 17 i.h5
lbc5 18lbxc5 'it'xc5
A poisoned pawn Najdorf Sicilian has gone seriously wrong for Black.
His king sits in the center sweating out the coming attack. What move by
White clears squares and files while also exerting pressure on the black
center wall?
16 The Art ofAttack
19 e5!
Yes of course! Suddenly Black must face a devastating threat of 20 fiJe4.
The key point behind 19 eS is 19 ... fxeS 20 fiJe4 'ii'd4 (hoping to trade
queens and squelch the attack) 21 'ii'e I! 'ii'b2 22 fiJf6+ ~e7 23 fxeS 'ii'xeS
24 'ii'xeS! (now White is agreeable to a queen trade thanks to the poor
position of the black king) 24 ... dxeS 25 1:10 and Black cannot meet the
threat of fiJg8+ folIowed by 1:1xf7+ with a mating attack.
19...~a5
Black hopes to hang on with 20 exd6 .i.d7 but even there 21 'ii'd4! looks
crushing as 21...'iVxhS 22 'iVxf6 wins the rook on h8. Hamdouchi preferred
another way to hammer Black's position.
20 'iVe2!
White focuses his attention on n with a deadly plan to sacrifice and draw
out the black king for punishment.
20 ... dxe5
Or 20 ... fxeS 21 .i.xf7+ ~xn 22 'iVh5+ ~e7 23 fiJe4 ~d8 24 'iVn dS 2S
'iif6+ 'it>e8 26 'iVxh8 dxe4 27 1:1g8 'iVb4 28 1:1xf8+ 'iVxf8 29 1:1d8+ and wins.
21 .txt7+! ~xt7 22 'it'h5+ ~e7 23ltJe4 .td7
An example of a king helpless in the center is seen in the variation
23 ...'ii'b4 24 ttJgS! fxgS 2S 'iVxgS+ 'iti>n 26 fxeS! (threatening 27 'iVf6+ and
1:1d8 mate) 26 ... .i.d7 27 1:1gd3! .i.e7 28 1:10+! (even better than 28 1:1xd7
which is also strong) 28 ... 'iti>e8 29 'iVg7! ::tf8 30 lIxf8+ .i.xf8 31 'iVxd7 mate.
Bologan's forlorn defense loses less spectacularly.
24 'ii'h4 exf4 25 'iVxf6+ ~e8 26 :g7! Black resigned
The Art ofAttack 17
Leko White
Gbaem Magbami Black
World Team Championshp, Yerevan 2001
Sicilian Defense
I e4 cS 2 lOO d6 3 d4 cxd4 4 lOxd4 lOf6 S lOc3 a6 6 .i.g5 e6 7 f4
bS 8 eS dxe5 9 fxeS 'iNc7 10 exf6 'iieS+ II .i.e2 'iixgS 12 0-0 :a7
13 'iid3 lld7 141Oe4 'iieS
This example might combine a little opening theory with a good model of
attack in the center. The ultra-sharp Polugaevsky Variation of the Najdorf
Sicilian has led to this typical situation where Black has an extra pawn but
his king stands with knees shaking in the center. Moreover, Black has a
very annoying pin operating on the d file and his rook seems ideally placed
both to defend his own king and bottle up White's attacking schemes. Let
us now watch and admire as Grandmaster Leko skillfully demolishes
Black's defenses.
ISlOO!
An excellent move - White's chances of creating pressure on the enemy
king hinge on two factors - his fight for the dark squares in the enemy camp
like c5, d6 and f6, and proper utilization of his main attacking weapon of
the moment, his f6 pawn. With 15 lLln White drives the black queen from
its centralized perch and forcibly breaks the pin. Now a queen trade by
Black results in being a pawn down and with a positionally inferior ending
after 15 .. ..lhd3 16lL\xe5 Ad5 17 fxg7 iLxg7 18 lLlxfl 0-0 (18 ... i.xb2 19
lLlxh8 i.xh8 20 lLlf6+ should win for White) 19 lLlfd6l:.d8 20 lLlxc8 l:.xc8
21 c3. Black may as well take the offered pawn on b2.
IS..•'iI'xb2 16 'ife3!
The queen is brilliantly placed on this centralized square where it can
influence all sectors of the board while also protecting the assault team.
18 The Art of Attack
16... it.b7
This is the best move - Black develops actively and prepares further
development with ...lDc6.
17 a4!
A very important move to soften up Black's queenside structure. His
rooks need targets and open, clear files and this facilitates that goal.
17... b4
Black is quickly routed after 17 .. :~xc2 18 lDfg5! h6 (18 ... ~xe4 19 liJxe4
creates the killer threat of 20 lIfc I) 19 lIacl ~xa4 20 liJxe6! fxe6 21 fxg7
~xg7 22 i.h5+ 'it>d8 23 'iVb6+ and wins. Black logically tries to keep the
queens ide closed.
18l1abl! 'Yi'xc2 19 liJfg5!
All of White's forces are actively attacking. Sacrifices on e6 now loom
along with direct attacks on fl.
19..:ilc7
19 ... ~xe4 20 lDxe4 ~c7 21 lIxb4! is identical to the game continuation.
Leko's shattering next move breaches the defenses spectacularly.
20 ':xb4!!
Shades of Bogolyubov-Alekhine! Black will soon be a full queen ahead
but with a lost position.
20...it.xe4
Black loses after 20 ... h6 21 fxg7 JLxg7 22lDxf7! (22 ... 0-0 23lDf6+ i.xf6
24 lIxf6 lIfxf7 25 lIg4+ forces mate).
21liJxe4 it.xb4 22 fxg7l:r.g8
The Art ofAttack /9
Relatively best was 22 ... nf8 23 tiJf6+ 'iit>d8 24 gxf8='ii'+ ~xf8 25 tiJxd7
tiJxd7 26 'iit>hl and White has some technical problems but should win
without much trouble.
23 liJf6+ ~d8 24 liJxg8! ~c5 25 liJf6 ~xe3+ 26 ~hl ~c8 27
liJxd7 Black resigned
Boto White
PericBlack
Bosnia 1998
RuyLopez
1 e4 e5 2 liJO liJc6 3 ~b5 f5 4 liJc3 fxe4 5 liJxe4 liJf6 6 liJxf6+
'i'xf6 7 0-0 liJd4 8 liJxd4 exd4 9 b3 c6 10 lIel+ ~e7
The opening has started off innocently enough. Black now expects
something like 11 ~d3 0-0 12 'ii'e2 d5! with a very pleasant position.
Instead, an alert White finds a way to fix the black king in the center and
launch a stinging attack.
II ~a3!
Black answers with the only move.
1l ... d6 12 'ti'h5+!
What's this? It seems that White has allowed a double attack.
12... g6 13 'ti'd5!
The point now becomes clear. White threatens both 14 Ji.xd6 and 14
The black king cannot flee the scene because the centralized white
queen controls the castling square g8. Black must break the pin on the e-file
and only two options to do this are available and both of these promise a
short life of misery for the king in the center.
~xc6+.
20 The Art ofAttack
13 •. .'~d8
13 ... ~d7 14 ~b2! justifies the opening of the al-h8 diagonal resulting
from 12 'ii'h5+ g6. Black has no satisfactory defense to a capture on d4.
14.ixc6
This barely qualifies as a sacrifice. It is more like a one-two punch.
14... bxc6 15 'ii'xc6 l:b8 16 ktxe7!
White will soon acquire a minimum of four solid pawns for the piece.
16...'ifxe7 17 .ixd6 'i'b7 18 'ii'c5 :a8?
A typical collapse in the face of a fierce onslaught. Black could struggle
on with 18 ...:e8 19 ~xb8 'ifxb8 20 'iVxd4+ .td7 when White must avoid
going for a fifth pawn with 21 'ifh4+ ~c8 22 'iVxh7?? on account of
22 ...'ife5! 23 :n 1:h8 turning the tables. Much better for White is 20
'it'xd4+ .td7 21 h3. Now White secures a decisive material advantage.
19 l:.el! iVb6 20 .ic7+! 'ilxc7 21 'iVg5+ Black resigned
White gorges on major pieces after 2l...'Ot>d7 22 :e7+ 'Ot>c6 23 :xc7+
'Ot>xc7 24 'ife5+ winning the rook on h8.
VelimiroviC White
Pavlovic Black
Panonno 1998
Sic/ian Defense
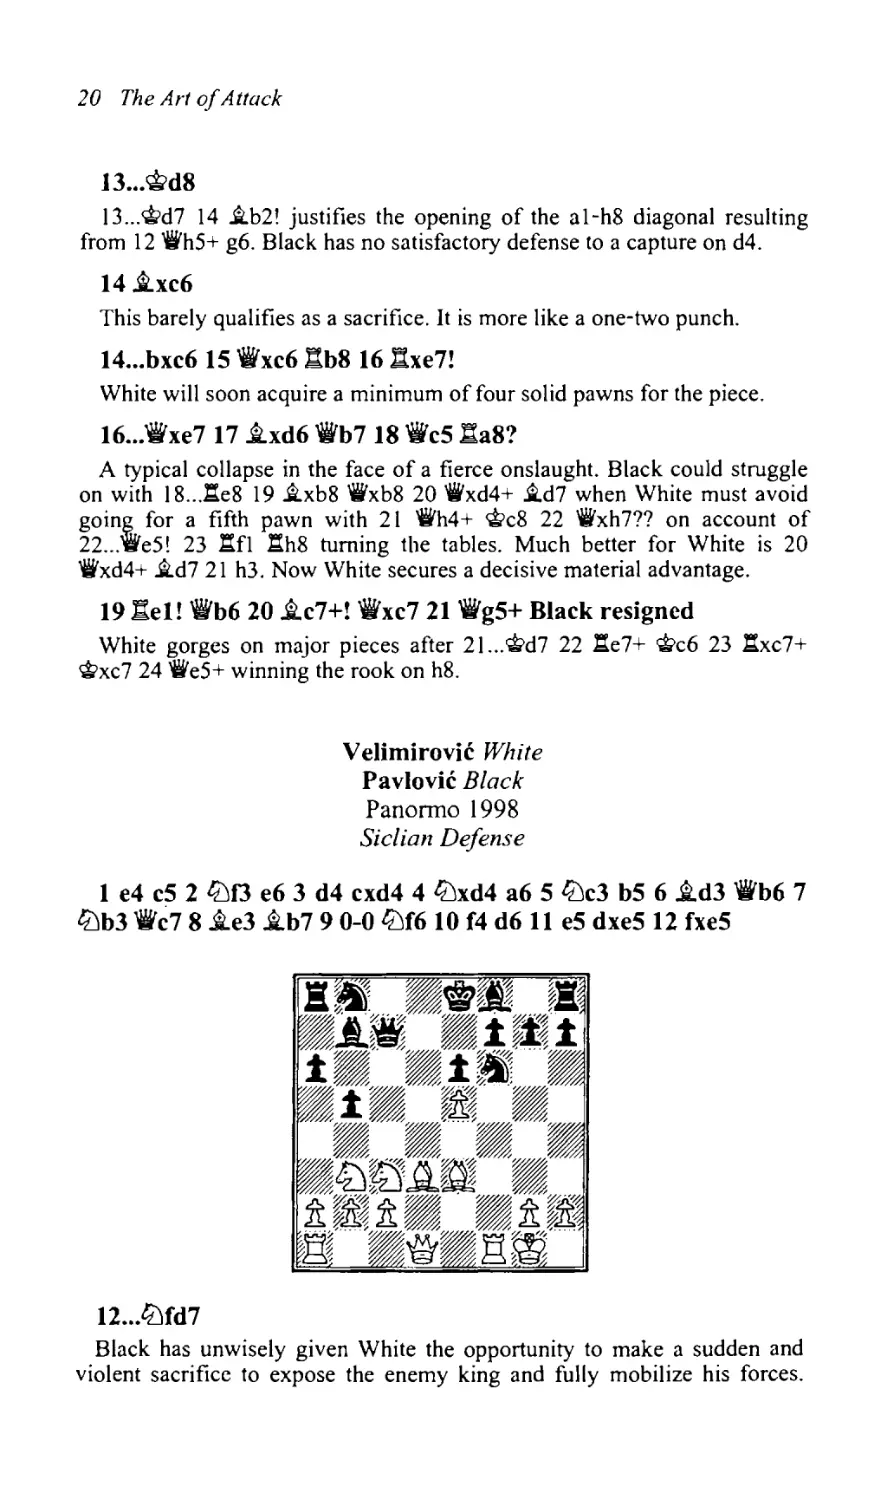
1 e4 c5 2 ttJrJ e6 3 d4 cxd4 4 ttJxd4 a6 5 ttJc3 b5 6 .id3 'iWb6 7
ttJb3 'fie7 8 .ie3 .ib7 9 0-0 ttJf6 10 f4 d6 11 e5 dxe5 12 fxe5
12...ttJfd7
Black has unwisely given White the opportunity to make a sudden and
violent sacrifice to expose the enemy king and fully mobilize his forces.
The Art ofAttack 21
Much safer was 12 ... lDd5 13 i.d4!? lDxc3 14 bxc3 lDc6 15 'ii'el with
roughly equal chances. On the other hand the greedy 12 ...'il'xe5 is shaky
after 13 i.f4 'ili'h5 14 i.e2 'ii'g6 15 .tf3! lDc6 16 'ili'e2! and Black has
problems dealing with the threat of 17lDxb5!
13 :'xf7!!
Of course any attacker worth his salt would examine this move. It draws
out the enemy king and brings the full array of White's active pieces to bear
on the endangered royalty. The key lines to calculate after 13 .. .'~xf7 14
'ili'h5+ are the defenses 14 ... g6 and l4 .. .'oti)g8 as 14 ... c:J;;e7 is battered by 15
i.g5+. How far does the attacker have to calculate here? When does
calculation stop and intuition take over? In this case it would be imperative
to calculate this sac at least 10 moves deep to feel pretty confident. Not an
easy task but it is helped by the relatively few defensive options at Black's
disposal. After 14 .. .'i!i'g8 15 l:tfl Black has two plausible ways to meet the
threat of 16 iif7 mate:
a) 15 ... lDxe5 is qIJickly disposed with - 16 l:txf8+ c:J;;xf8 17 i.c5+ forces
the disastrous 17 ...'iVxc5.
b) 15 ... g6 16 i.xg6! lDxe5 (16 ... hxg6 17 'iixg6+ i.g7 18 'fi'f7+ ~h7 19
1:;f4 leads to mate) and this is where intuition might take over.
My instinct here would be to get rid of the bishop on f8 in order to attack
on the dark squares - thus 17 l:txf8+ would have to be examined and it
looks like a winner after 17 ...<iti'xf8 18 lDd4! (a powerful table-setter
focusing on e6) 18 ... ..te7 (l8 ... ~g8 19 i.f5! is crushing as 19 ...exf5 20
"e8+ c:J;;g7 21lDe6+ c:J;;f6 22 .tg5 is mate) 19 'iig5+ ..td7 20 lDxe6! (fully
exposing the black king now) and Black is mated after 20 ... c:J;;xe6 21 .-f5+
c:J;;d6 22 '6'f6+ ~d7 23 .tf5+ ..te8 24 'ili'xh8+ ..te7 25 i.g5+ ..td6 26 'ili'f8+
..tc6 27 i.e4+ 'it'b6 28 i.e3+ ..ta5 29 b4 mate! I should mention that 17
lDe4 is also good, as played in the game Polzin-Chuchelov, Dresden 1999
but the follow-up was bungled after 17 ... i.xe4 (forced) 18 i.xe4lDbc6 19
i.xc6? (prematurely releasing the pressure - 19 lDd4 was very strong)
19.....xc6 20 'ili'xe5 i.g7 and the attack ran out of steam and White resigned
on the 42nd move.
22 The Art ofAttack
13 ...~xf7 14 'tih5+ g6?!
This is a much easier defense to refute compared to 14 ... g6. Black loses in
very straightforward fashion.
15 i..xg6+! hxg6 16 'tixh8
Black has no defense to the threat of 1:[fl +.
16...lbxe5 17 'tih7+
Better than 17 1:[fl + ltJf3+ 18 gxf3 which merely gives White a large
advantage.
17...i..g7 18 i..h6
Black has only spite checks left after this.
18.. JWb6+ 19 ~hl i..xg2+ 20 ~xg2 ~b7+ 21 ~gllbf3+ 22 ~f2
Black resigned
Long Term Sacrifices Aimed at Fixing the Opposing King
in the Center
There are times when a sacrifice to keep the opposing king situated in the
center does not reap immediate results. These are cases where there is a lull
after the sac in order to mobilize the rest of the available forces and
manoeuvre them to their optimal squares. I wish there was a general rule to
follow about testing the soundness of sacrifices which aim to fix the
opposing king in place. Perhaps the following considerations could be
useful:
If the sacrifice is a pawn or the exchange, it should be sound if the
opposing side cannot connect rooks for two moves or more alld one
additional weakness in the opposing camp is created.
If the sacrifice is a piece, it should be sound if you receive the initiative, a
pawn and either one uncontested outpost or total control of a file plus two
weaknesses in the enemy camp.
If the sacrifice is a rook, it should be sound if you receive two pawns,
major enemy king exposure, the initiative, and total control of a file or
outpost and extraordinary positioning of at least one piece.
The inability of the opposing side to connect rooks is a very vital factor.
This severely affects his chances to coordinate his pieces and organize a
defense.
Here are some examples of the theme of sacrifices to keep the opposing
king in the center.
The Art ofAttack 23
Gulko White
Rivas Black
Dos Hennanas 1994
1 d4 d6 2 c4 e5 3 lLlfJ e4 4 fDg5 f5 5 lLlc3 c6 6 fDh3 i.e7 7 .if4
g58 i.d2 h6 9 e3 fDf6 10 fJ a6 11 fxe4 fxe4 12 lLln d5 13 cxd5
cxd5 14 'iVb3 b5 15l'Z.cl .ib7 16 .ie2 fDc6
Black has been forced to delay castling in order to support his center. If
White continues passively with 17 O-O?! ltJa5 the white queen is driven
back and Black can bring his king to relative safety after 18 'it'dl 0-0. There
are two violent methods for White to consider that keep the black king
confined in the center and under constant assault. Besides 17 ltJfxe4, the
game continuation, there is the fascinating line 17 ltJg4! ltJa5 18 ltJxf6+
i.xf6 19 ~h5+ ~fS 20 'ikb4+! ~e7
21 ltJxd5! ~xb4 22 ~xb4+ ~g8 23 ltJe7+ 'iti>h7! (23 ... 'iti>g7 24 ~d6!!
ltJc4 25 ,l;[xc4! bxc4 26 0-0 forces 26 ...11i'xe7 27 ~xe7 with a clear edge for
White - note that 26 ... ,I;[fS is mated by 27 ~e5+ ~h7 28 ~g6) 24 ~g6+
rl;g7 25 0-0 ,l;[g8! and now extensive analysis leads me to the conclusion
that 26ltJxg8! ~xg8 27 ~f7+ ~h8! (27 ... rJ;;g7 or 27 ...~h7 are worse due to
28 i.e6) 28 ~e6! gives White at least enough compensation for his heavy
sacrifice. Black should probably then play 28 ...ltJc4 (28 ... ltJc6 29 ~c5
menacing d4-d5 is strong) 29 d5! ~xd5 (29 ...ltJd6 30 ~c3+ rl;h7 31 ~f6!
is promising) 30 ~c3+ 'ii'h7 31 l:i.f7+ ~g6 32 g4! h5 33 ,l;[g7+ 'it?h6 34 ~f5
'it'g8 (forced) 35 ,l;[xg8 1:txg8 36 ~d4 with an edge in the ending for White.
Gulko most likely pondered many of these lines, (he supplied several of
these variations in Informant 60/game 22) but shied away from such a
dare-devil continuation in favor ofa line that guaranteed at least a draw.
17 fDcxe4 dxe4 18lLlxe4 ~f8?
Rivas wilts quickly under the assault. Correct was the greedy defense
18 ...ltJxe4! 19 i.h5+ 'iti>d7 20 'ii'd5+ (White can force a draw with 20 ~g4+
'ifi1e8 21 ~h5+ etc) 20... ltJd6! 21 ~g4+ 'it?e8 22 'ii'e6 (22 i.h5+ is still a
draw) 22 ... 'ii'c7! 23 d5 ~d8! 24 dxc6 ~c8 25 'ii'e5 l:i.fS and Black has
weathered the storm and come away with a clear advantage.
24 The Art ofAttack
19 tLlxf6 ~xf6 20 ~h5! l:th7
20 ...'ifd7 21 0-0 ~g7 22 lIxf6! ~xf6 23 1If1+ wins convincingly.
21 0-0 'ifd6 22 llxf6+ 'ifxf6 23 llfl 'ifxfl+ 24 ~xfl Ite7 25 d5
tLle5 26 ~b4 l:.d8 27 e4 ltdd7 28 'ifc3 ~g7 29 ~xe7 l:lxe7 30 d6
Black resigned
Christiansen White
Foyge) Black
US Championship, Seattle 2002
Gurgenidze System
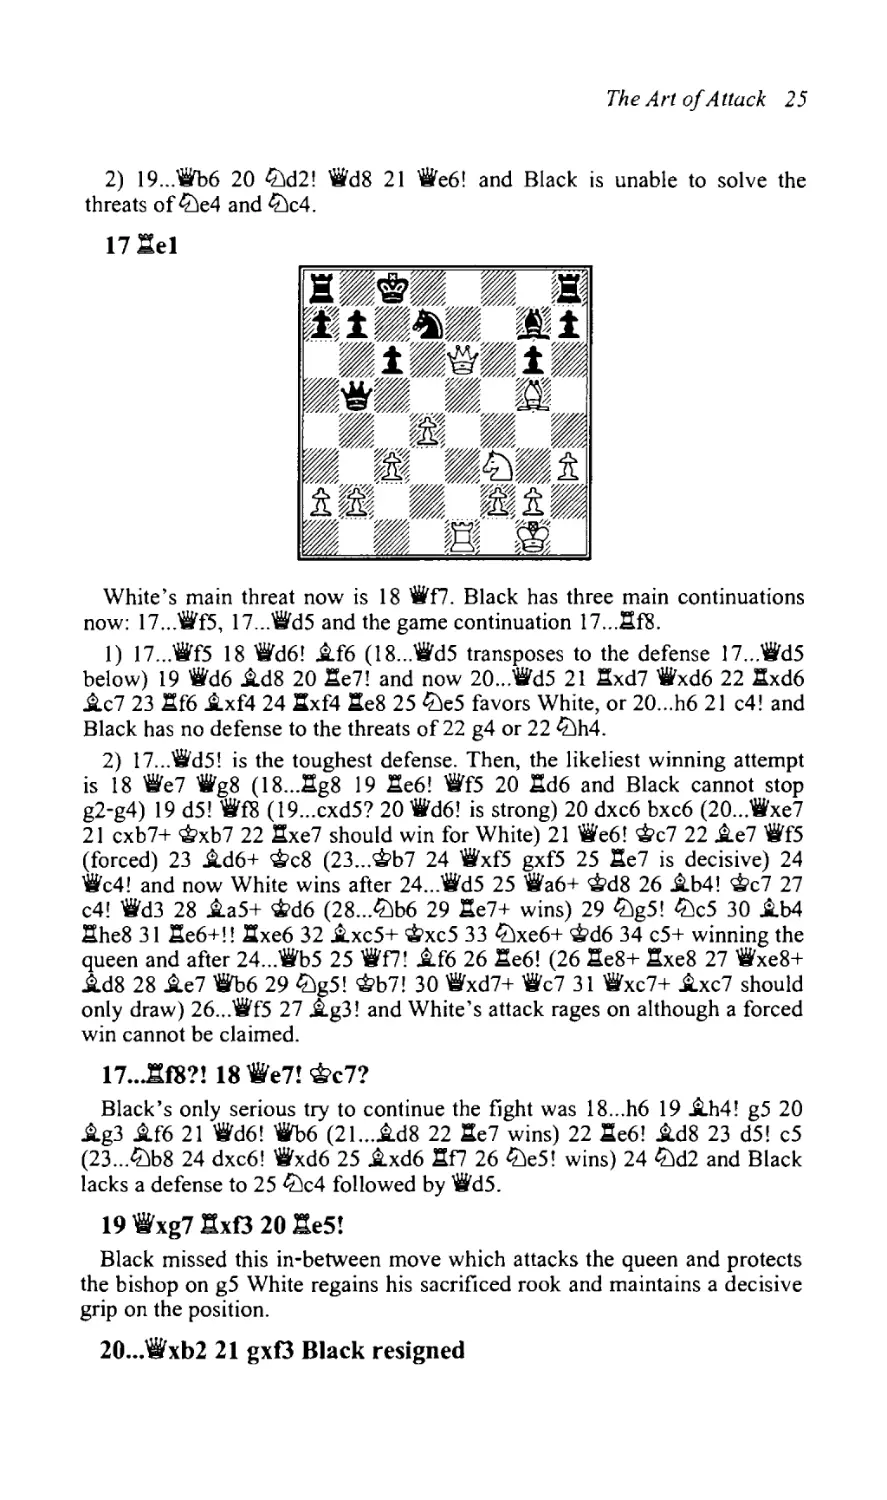
1 e4 g6 2 d4 ~g7 3 tLlc3 c6 4 tLlo d5 5 h3 tLlf6 6 ~d3 dxe4 7
tLlxe4 tLlxe4 8 ~xe4 ~f5 9 ~xf5 'ila5+ 10 c3 'iixfS 11 0-0 tLld7 12
.:et e6 13 'ifb3 'ifb5
White has a choice between trading queens with 14 'ii'xb5 or gambling on
the sacrifice 14 lIxe6+. After about half an hour of deliberation I decided to
take the plunge and sacrifice.
The following factors, when weighed together tipped the scale in favor of
the sacrifice:
1) White receives two pawns as a down payment for the investment.
2) White is able to fully mobilize his forces and be in an excellent
position to attack not only Black's king, but his loose, unprotected pieces.
3) White's own king is safe and immune to counter-attack based on back
rank mate.
141be6+! fxe6 15 'ifxe6+ ~d8 16 ~g5+ ~c8
16 ... ~c7 makes less sense. White has a fierce attack after 17 i4f4+! ~c8
18 lIel (threatening 19 'ife8+!) 18 ... i..f6 19 'ii'd6 and now:
1) 19...i..d8 fails to 20 lIe7! c5 21 d5! (threatening 22 c4) 21...a5 22
lL)e5! (not 22 c4 1i'a4 23 b3 lIa6!) 22 ... i4xe7 23 'ii'xe7 c4 (23 ... lL)xe5? 24
'ifxe5 <li>d7 25 'ifg7+ wins) 24 lL)f71i'xd5 25 lL)xh8 with a crushing position
for White.
The Art ofAttack 25
2) 19 ... 'ii'b6 20 liJd2! 'ii'd8 21 'ii'e6! and Black is unable to solve the
threats of liJe4 and liJc4.
17 lIel
White's main threat now is 18 'ii'f7. Black has three main continuations
now: 17 ...'ii'f5, 17 ... 'ii'd5 and the game continuation 17 .. JU8.
I) 17 ... 'ii'f5 18 'ii'd6! i.f6 (l8 ......d5 transposes to the defense 17 ......d5
below) 19 'iVd6 i.d8 20 l:te7! and now 20 ...1iVd5 21 l:txd7 'ii'xd6 22 ':xd6
i.c7 23 l:tf6 .i.xf4 24 ':xf4l:te8 25liJe5 favors White, or 20 ... h6 21 c4! and
Black has no defense to the threats of 22 g4 or 22 liJh4.
2) 17 ... 'ilVd5! is the toughest defense. Then, the likeliest winning attempt
is 18 'ii'e7 'ii'g8 (18 ... l:tg8 19 l:te6! 'iVf5 20 l:td6 and Black cannot stop
g2-g4) 19 d5! 'ii'fS (l9 ... cxd5? 20 'ii'd6! is strong) 20 dxc6 bxc6 (20 ......xe7
21 cxb7+ ~xb7 22l:txe7 should win for White) 21 "'e6! ~c7 22 i.e7 'ii'f5
(forced) 23 i.d6+ ~c8 (23 .. .'iti'b7 24 "'xf5 gxf5 25 l:te7 is decisive) 24
'ii'c4! and now White wins after 24 .. :itd5 25 'ii'a6+ rt>d8 26 i.b4! rt>c7 27
c4! 'ii'd3 28 .i.a5+ ~d6 (28 ... liJb6 29 l:te7+ wins) 29 liJg5! liJc5 30 .i.b4
l:the8 31l:te6+!! l:txe6 32 .i.xc5+ ~xc5 33liJxe6+ 'i!i'd6 34 c5+ winning the
queen and after 24 ... 'ii'b5 25 'ii'f7! i.f6 26 l:te6! (26l:te8+ l:txe8 27 'ii'xe8+
i.d8 28 i.e7 'ii'b6 29liJg5! Wb7! 30 'iVxd7+ 'iVc7 31 'ii'xc7+ .i.xc7 should
only draw) 26 .. :itf5 27 i.g3! and White's attack rages on although a forced
win cannot be claimed.
17...:tf8?! 18 'it'e7! rJ;;c7?
Black's only serious try to continue the fight was 18 ... h6 19 .i.h4! g5 20
i.g3 .i.f6 21 'ii'd6! ~6 (2l....id8 22 l:te7 wins) 22 l:te6! .id8 23 d5! c5
(23 ... liJb8 24 dxc6! 'iVxd6 25 i.xd6l:tf7 26liJe5! wins) 24liJd2 and Black
lacks a defense to 25 liJc4 followed by 'iVd5.
19'tWxg7 :txO 20 hte5!
Black missed this in-between move which attacks the queen and protects
the bishop on g5 White regains his sacrificed rook and maintains a decisive
grip on the position.
20...'iVxb2 21 gxO Black resigned
26 The Art ofAttack
The Sicilian Defense is famous for long term sacrifices to keep the enemy
king sweating in the center. The ever-creative attacking genius Alexei
Shirov has built one of his pet variations against the Najdorf Sicilian around
a long-term piece sac. Here is one of his typical efforts. I am including quite
a bit of opening theory in this study of a long-term sacrifice but the lines are
instructive in illustrating basic principles of attacking an enemy king in the
middle of the board.
Shirov White
Topalov Black
Wiik aan Zee 2001
Sicilian Defense
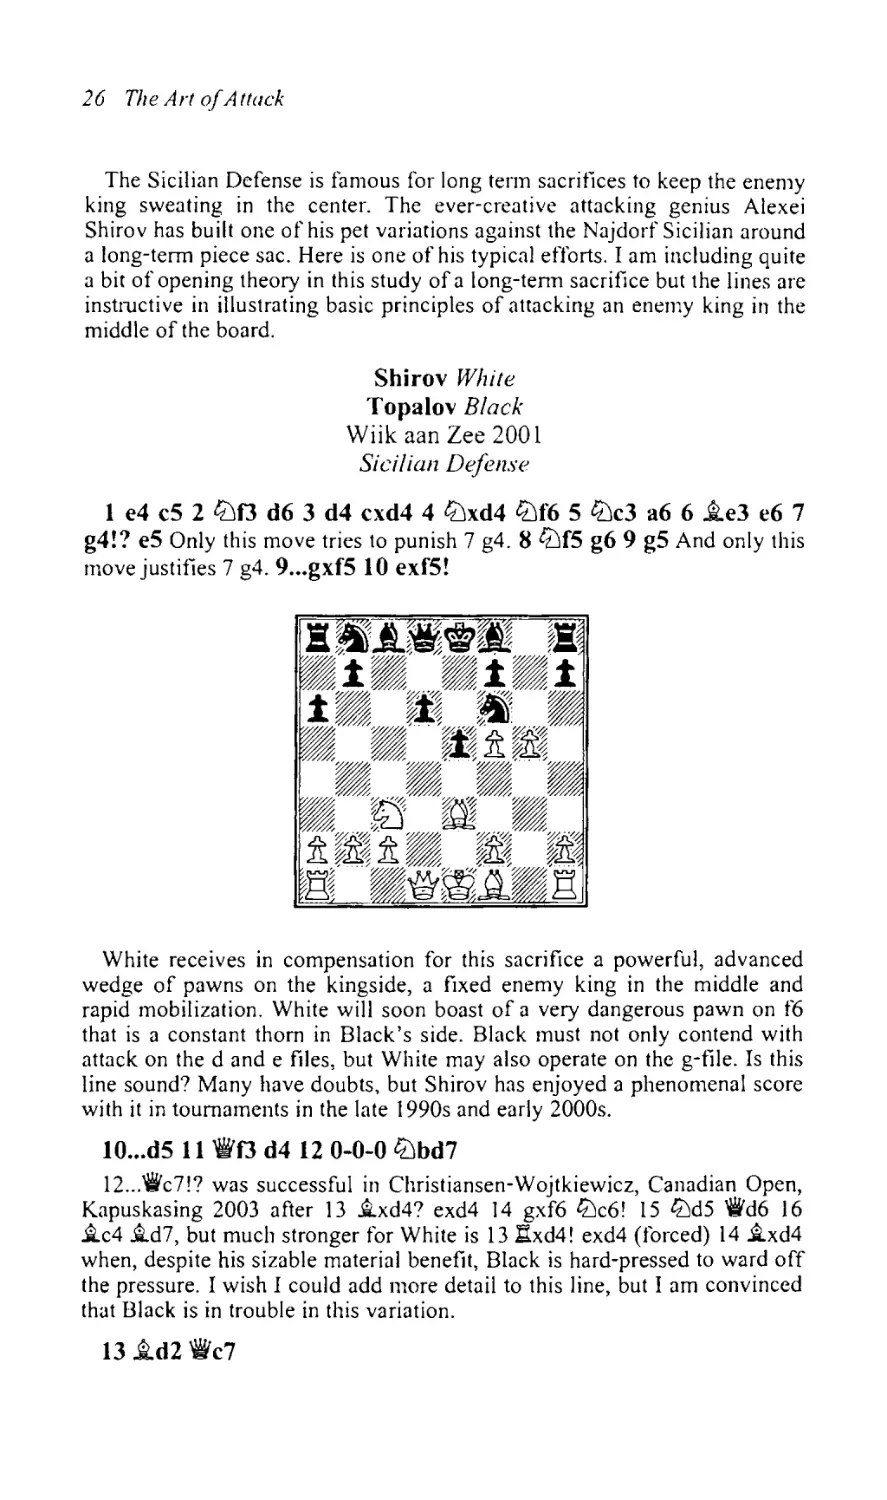
t e4 c5 2 ttJf3 d6 3 d4 cxd4 4 ttJxd4 ttJf6 5 ttJc3 a6 6 i.e3 e6 7
g4!? e5 Only this move tries to punish 7 g4. 8 ttJf5 g6 9 g5 And only this
move justifies 7 g4. 9 .•• gxf5 10 exf5!
White receives in compensation for this sacrifice a powerful, advanced
wedge of pawns on the kingside, a fixed enemy king in the middle and
rapid mobilization. White will soon boast of a very dangerous pawn on 1'6
that is a constant thorn in Black's side. Black must not only contend with
attack on the d and e files, but White may also operate on the g-tile. Is this
line sound? Many have doubts, but Shirov has enjoyed a phenomenal score
with it in tournaments in the late 1990s and early 2000s.
to ...dS 11 'iWf3 d4 120-0-0 ttJbd7
12 ... ~c7!? was successful in Christiansen-Wojtkiewicz, Canadian Open,
Kapuskasing 2003 after 13 jLxd4? exd4 14 gxf6 ttJc6! 15 ttJd5 ~d6 16
jLc4 jLd7, but much stronger for White is 13ltxd4! exd4 (forced) 14 jLxd4
when, despite his sizable material benefit, Black is hard-pressed to ward off
the pressure. I wish I could add more detail to this line, but I am convinced
that Black is in trouble in this variation.
13 .td2 ~c7
The Art ofAttack 27
13 ... jLd6 is best answered by 14 jLh3! dxc3 15 jLxc3 when White will
retrieve one of his pieces and enjoy compensation in the form of Black's
center-dwelling king. Not good is 14 jLc4? "fic7 15 i.b3 dxc3 16 jLxc3 e4!!
with a decisive advantage for Black, Onischuk-Bologan, Russia 2001. Also
possible for Black is 13 ... dxc3 14 jLxc3 'iVb6 (14 ... tiJg8 15 f6 is very strong
as White will follow with ~g2 and nhe I to prepare f2-f4 to rip away the e5
pawn. If 15 ... tiJgxf6 16 jLxe5! is murderous) 15 gxf6 i.b4 16 ngl! (16
jLc4 ~xb4 17 jLxf7+ is only good for a draw at best) 16 ... jLxc3 17 "fixc3
'iVxf6 18 jLh3 and Black is a long way from consolidating while White
calmly prepares f2-f4. This line is very new so these lines need practical
tests. It may seem strange for White to post his bishop on h3 but f5 is
important in limiting Black's development and the central files must not be
obstructed by the bishop (on d3 for example).
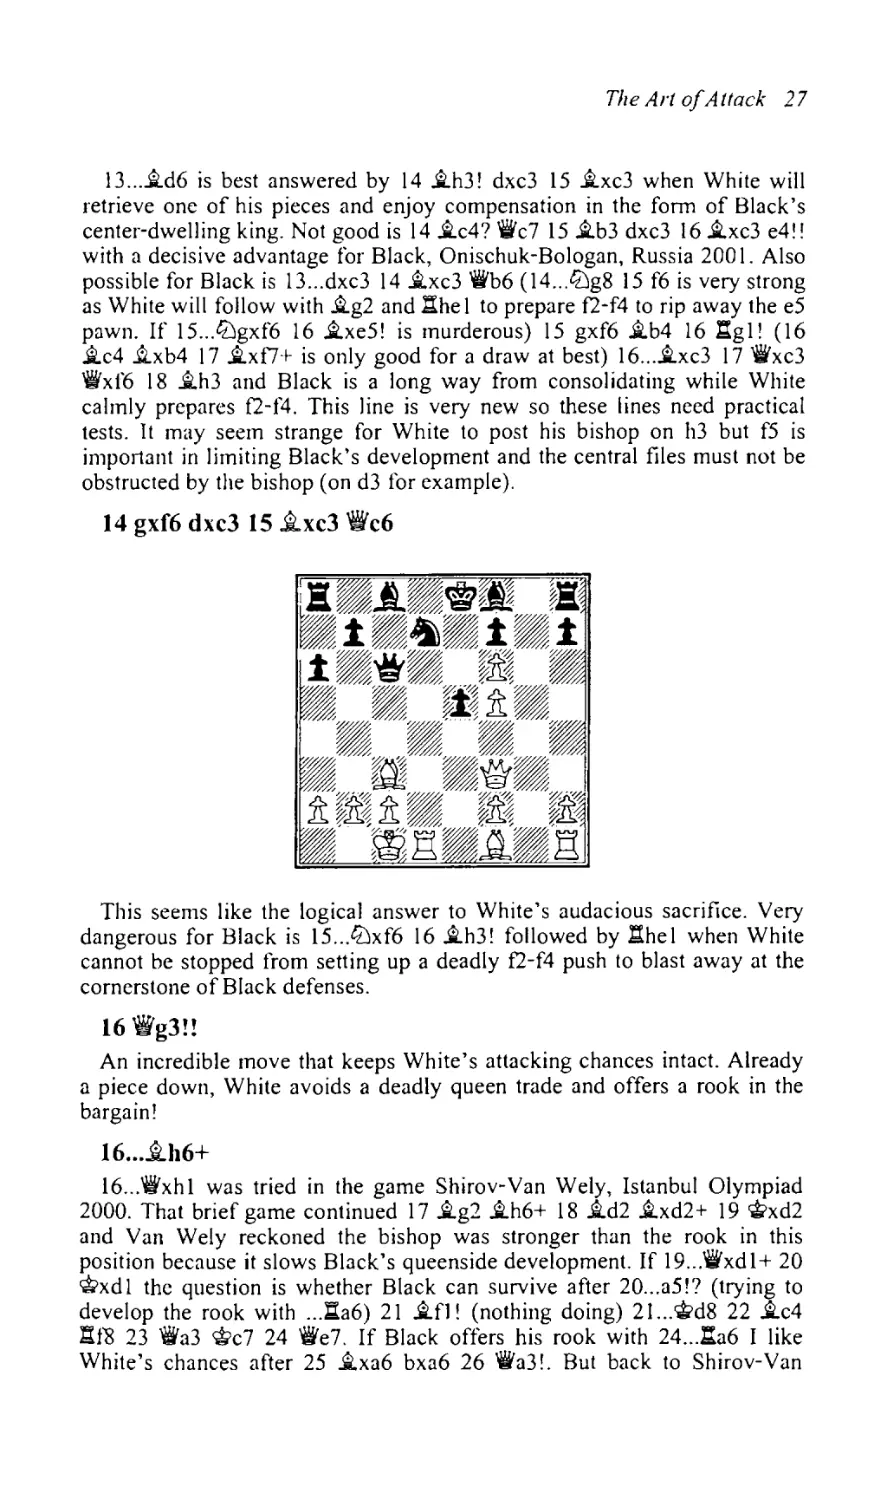
14 gxf6 dxc3 15 .txc3 ~c6
This seems like the logical answer to White's audacious sacrifice. Very
dangerous for Black is 15 ... tiJxf6 16 jLh3! followed by nhel when White
cannot be stopped from setting up a deadly f2-f4 push to blast away at the
cornerstone of Black defenses.
16 'iWg3!!
An incredible move that keeps White's attacking chances intact. Already
a piece down, White avoids a deadly queen trade and offers a rook in the
bargain!
16 ....t116+
16 ...'ti'xhl was tried in the game Shirov-Van Wely, Istanbul Olympiad
2000. That brief game continued 17 jLg2 jLh6+ 18 jLd2 jLxd2+ 19 'ittxd2
and Van Wely reckoned the bishop was stronger than the rook in this
position because it slows Black's queenside development. If 19 ..."fixdl+ 20
'it>xdl the question is whether Black can survive after 20 ... a5!? (trying to
develop the rook with ... na6) 21 jLfl! (nothing doing) 21...'it'd8 22 jLc4
nfB 23 ~a3 'ittc7 24 "fie7. If Black offers his rook with 24 .. .1:a6 I like
White's chances after 25 jLxa6 bxa6 26 "fia3!. But back to Shirov-Van
28 The Art ojAttack
Wely - 19 ... ~xg2 20 ~xg2 a5 21 f4! (probably overlooked by Van Wely)
2l...exf4 22 'fkg7 1:fS 23 l:te I + ~dS 24 .l:te7 and now Black blundered
horribly with 24 ... <>t>c7 but he had no serious answer to l:hd7+. 25 ~xfS
and Black resigned.
t7~bl
17... ~f4
Amazingly, 17 ...~xh 1 IS i.xe5! sets up an unstoppable attack despite the
heavy material deficit. Black's only defense is IS ... ~e4 when 19 i.c7!!
keeps the black king in the hot seat. The threat is simply 20 Jid3 driving the
black queen off the e-file. The stop-gap defense 20 ... Jid2 loses to 21 Jid3
~c6 22 a3 (preparing llxd2 next) 22 ... lLlc5 (Black lacks a retreat for the
bishop, nor can it be defended) 23 llxd2lLlxd3 24lle2+! i.e6 (or 24 .. /~d7
25lle7 mate) 25 cxd3 with a decisive attack against the hapless black king.
18 'iVd3! :g8
IS ...'iVxf6 19 llgl! is very strong. One beautiful possibility then is
19 ... lLlc5 20 'Wic4 Wle7 21 Wlxf4!! extll 22 i.xhslLld7 23 llg8+ lLlfS 24 f6
~c5 25 Jig7 Jie6 26 JixfS ~xfS 27 lIxfS+ 'it>xfS 28 Jig2 with an easily
won endgame. 18 ... 0-0 was successful in the game Kalka-Van Wely, 2000,
after 19 l:tg I -I- 'it>h8 20 ~b4? lLlc5 (20 ... llg8 also looks good) 21 'Wic3 'iVxf6
22 Jixc5 ~xf5. An improvement is 20 'ilVe2! (preparing to transfer the
queen to g4 or h5 while taking aim at the key e5 pawn). If Black holds it is
by the skin of his teeth. I offer the folIowing line - 20 ... 'iVxf6 21 llg4!
(aiming to blast open the al-h8 diagonal. 21 ~g4!? ~h6 22 1:d6! f6 23
Jic4 Jig5 seems to hold for Black) 2l...Wlxf5 22 Jih3 lLlf6 (forced) 23
llxf4 'iVxf4 24 ~xe5 ~g5 25 ~e3 ~g6 26 ~f4 <>t>g8 27 ~xf6 ~xf6 28
Jixf6 lle8 29 ~g2 and White has good prospects in the ending despite
having only one pawn for the exchange. There are plenty of areas to explore
in this line. Now let's get back to the Shirov-Topalov game.
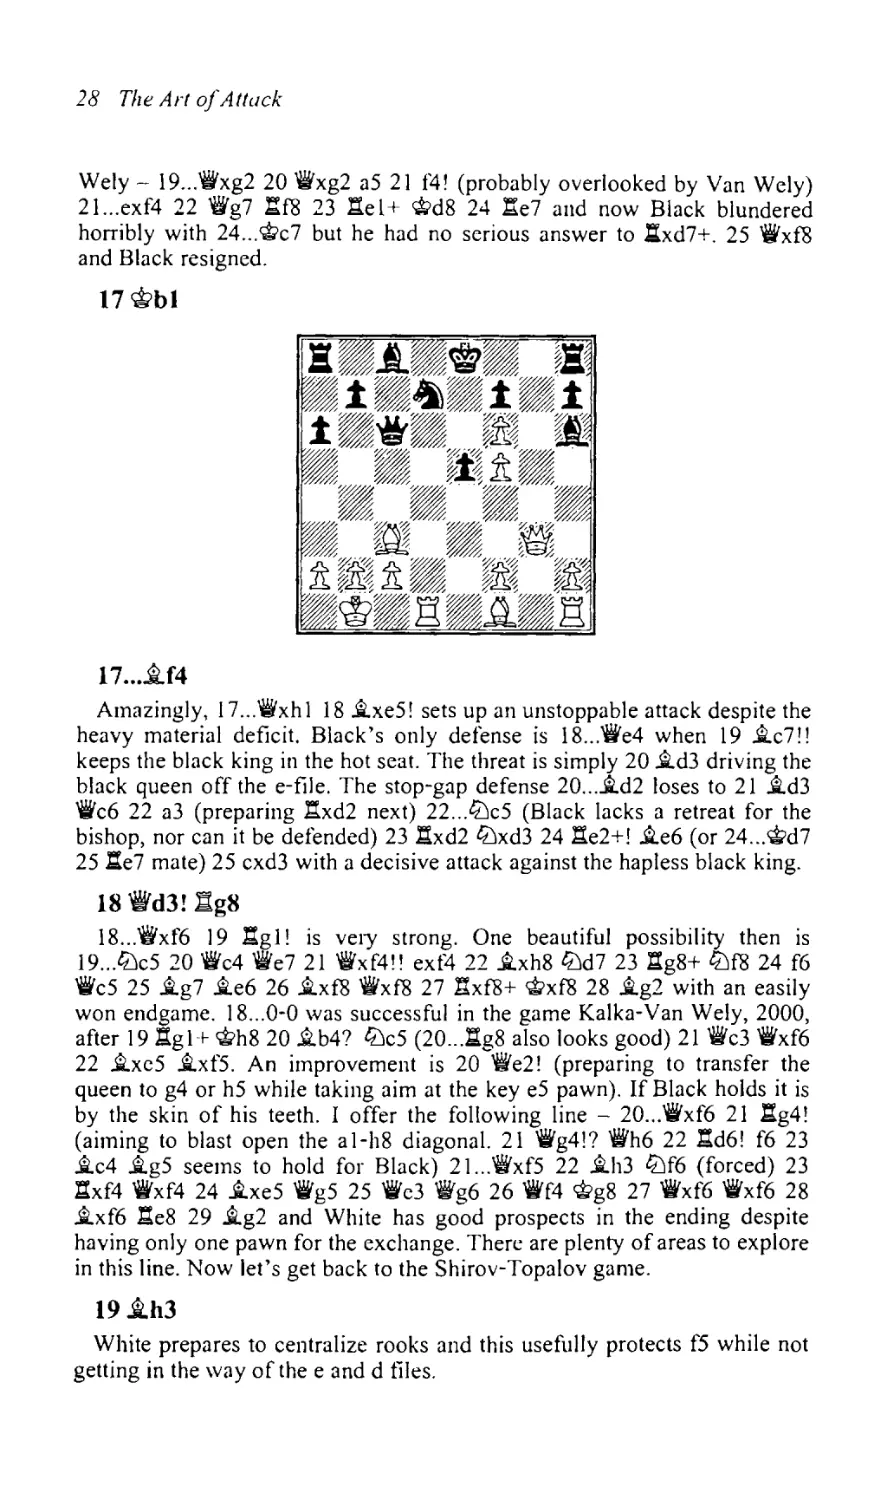
t9~h3
White prepares to centralize rooks and this usefully protects f5 while not
getting in the way of the e and d tiles.
The Art ofAttack 29
It is a good idea now to stop and think about White's plans in this
position. He has fully mobilized and has all of his pieces actively engaged
in the attack. The key asset for White is his control of the d-file and
influence on the d5 and g6 squares. The natural defender of d6, the
dark-squared bishop, is offside protecting e5 and doing little else.
One question to ask is what does White do if Black simply takes on f6
wit~ 19 .. :ifxf6. My educated guess would be 20 l:thel, planning to follow
with l:te4. Black cannot move his queen for fear of f5-f6 and he cannot
move the knight on account of .ltxe5 shots (19 ... lLlc5 20 it.xe5! wins
straight away). Can Black improve his defenses or seek active counterplay?
He is a long way offfrom that. Only 19 ... a5, planning a rook lift, makes any
sense but that slow move permits White to play 21 'ii'c4 threatening 'ii'xf4.
If then 21.. ..ltxh2 22 f4! is a powerful blast which cannot be survived.
Topalov tries a plan of bringing his king to the queenside, but the move has
too many negatives. It walks into a pin on the d-file, leaves f7 unguarded
and does nothing to help get the queenside untangled. Lastly, it gives up the
right to castle - an important option.
19...~d8?!
19... a5 20 l:thel! (20 .ltxe5!? .ltxe5 21 l:thel 'ib6 22 'ii'c3 'ifxf6 23 f4 is
also promising) 20 .. :.xf6 21 'ifc4 'ii'h6 22 f6! suddenly brings the bishop
on h3 into the battle with decisive effect. The only move that addresses
Black's need for development is 19 ... b5. White should then operate on the
g-file as 20 l:thel is just too slow now. 20 l:thgl! l:hgJ 21 l:txgl .ltb722
l:tg8+ ltJf8 23 .ltg2! 'ifc7 (23 ...'ii'xg2 24 l:txg2 I:td8 25 'ii'e2 .ltxg2 26
'ii'xe5+ favors White) 24 .ltb4 .lth6 25 .ltd6 'Wb6 and White has nothing
better than to force perpetual check with 26 .ltxf8 .ltxf8 27 .ltc6+ 'ii'xc6 28
l:txf8+ 'it>xf8 29 'ii'a3+ b4 30 'ii'xb4+ ~g8 31 'iig4+ 'it>f8 etc.
20.tb4!
Shirov takes the important invasion square d6 under his control. Not only
is Black suffering from backward development but one of his developed
pieces stands pitifully clinging to e5 and unable to influence play on the
other side of the board.
30 The Art ofAttack
20•••'iWxf6
20 ... c;Pe8 21 lIhel b5 22 i.d6 i.b7 23 i.xe5! i.xe5 (23 ... liJxe5 24 'ji'd4
wins convincingly) 24 f4 and since Black has forfeited the right to castle,
his king position is hopelessly exposed.
21 'iWc4
Black cannot meet White's creeping pressure. Black has too many weak
points to defend everything.
21. ..:g5?
Black had to play 21 ... b5 22 i.a5+ ~e8 23 'ikc7 lIg5 when 24 lId6 e4 25
'ii'xd7+ i.xd7 26 lIxf6 gives White a better ending, but Black is far from
lost. White can try to increase his build-up with 22 :the I but the black king
may slip out of danger with 22 ... ~f8!' White should cash in to the superior
ending.
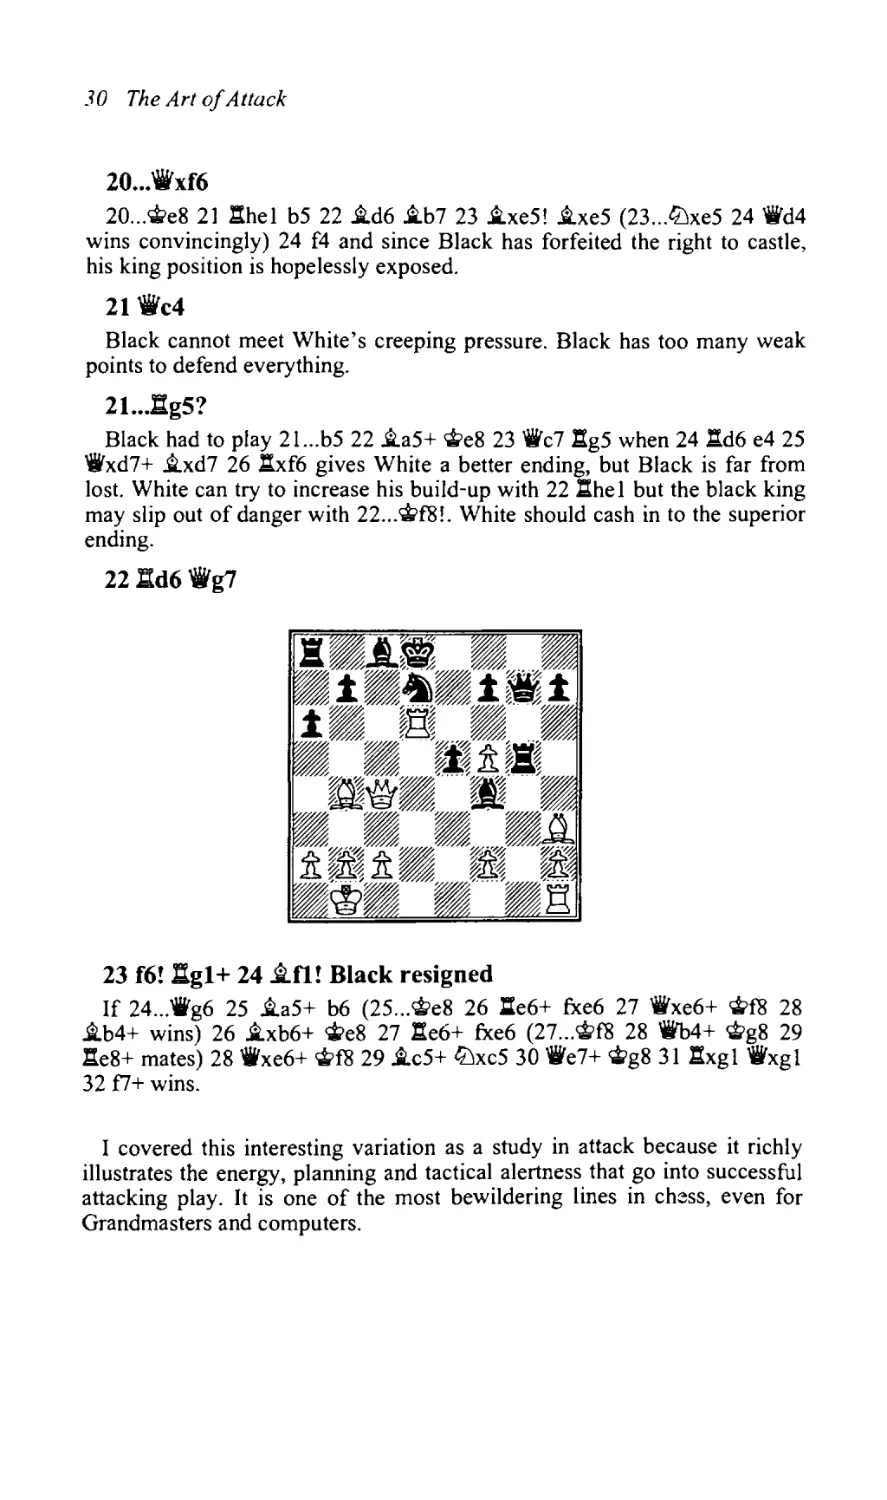
22 %:td6 'ifg7
23 f6! :gi+ 24 .lift! Black resigned
If 24 ...'ii'g6 25 i.a5+ b6 (25 ... c;Pe8 26 l:te6+ fxe6 27 'ii'xe6+ c;Pf8 28
i.b4+ wins) 26 i.xb6+ ~e8 27 l:te6+ fxe6 (27 .. .'ii?f8 28 'iVb4+ c;Pg8 29
l:te8+ mates) 28 'ii'xe6+ 'iti>f8 29 i.c5+ liJxc5 30 'ii'e7+ 'iti>g8 31 l:txgl 'ii'xgl
32 f7+ wins.
I covered this interesting variation as a study in attack because it richly
illustrates the energy, planning and tactical alertness that go into successful
attacking play. It is one of the most bewildering lines in chess, even for
Grandmasters and computers.
2 Attack on the Castled King Drawing the King from its Lair
Attacking the castled king position comes in many fonns. Just as in the
case of attacking an uncastled king in the center, any sacrifice that draws
out the enemy king must always be examined to its fullest extent. This
principle also applies in reverse to defenders. Watch out for potential
sacrifices that expose the king. The most basic example of a sacrifice to
draw out the king is the ancient ~xh7+ 'Greek gift' which has been played
tens of thousands of times at all levels of the game. See Chapter 8 for
various example of this basic, but extremely important, combination.
At the higher levels of the game, the ~xh7+ sacrifice is rarely seen,
though it lurks within the calculations of both attackers and defenders if it is
remotely possible. Because the position of bishop on the a l-h7 diagonal is
so prevalent in so many openings, it is a constant source of opportunity and
danger.
Multiple sacrifices to draw out the king require much deeper calculation
and visualization. Sacrificing two pieces is a lot of wood to bum and the
defender has the option of returning a great deal of material to stem the
attack. The target king might race across the board shedding material as he
flees, but the final tally may disappoint the attacker. Situations where the
king is not hemmed in by his own pieces pose particular flight risks.
Here are two examples of the famous two bishop sacrifice where the
defender's attempts to flee the onslaught went for naught.
Vogel White
Kliesch Black
Correspondence 2002
French Defense
1 e4 e6 2 d4 d5 3 lbc3 i.b4 4 a3 i.xc3+ 5 bxc3 dxe4 6 0 c5 7
'ikd2 lbf6 8 fxe4 lbxe4 9 'ike3 'iia5 10 i.b2 lbf6 II 0-0-0 0-0 12
.ltd3 lbbd7 13 lbo b6 14 lbe5 cxd4 15 cxd4 i.b7 161Ihfl :lac8 17
..t>bl b5 18 lbxd7 lbxd7
32 Attack 011 the Castled Killg - Drawing the Killgfrom its Lair
The black king stands quavering behind his thin wall of pawns. White
engineers a classic barrage of sacrifices to rip into the vulnerable black
castled position.
19d5!
White happily invests a pawn to clear the diagonal for his bishop on b2.
Black cannot close the diagonal without paying a heavy price, for instance
19 ... e5 loses to 20 ~h3 f5 21 :'xf5! g6 (relatively best) 22 :'xe5! lLlxe5 23
~e6+ lLlfl 24 ~f6 and Black is helpless.
19...~xd5 20 ~xh7+!
The classic double-bishop sacrifice made famous in the game
Nimzovich-Tarrasch, St Petersburg 1914 (see below) and even earlier in
Lasker-Bauer, Amsterdam 1889.
20 .. .'~xh7 21 ~xg7! ~xg7
Black also succumbs after 21...f6 22 ~h6+ ~g8 23 ~xf8 lLlxf8
(23 ... ~a2+ 24 ~xa2 l:xc2+ 25 ~bl l:xg2 26 :'xd7 wins) 24 :'xf6 giving
White a winning attack.
22 'iig5+ ~h7 23 'iih5+ ~g7 24 'iig4+ ~h6 25 :d3 :c3 26
'iWh4+ ~g6 27 'i!Vg3+ ~h6 28 1:f4! Black resigned
28 ...~a4 29 :'xc3 ~xf4 30 ~xf4 is hopc\ess.
Every attacker should have the two bishop sacrifice in his arsenal of
weapons. Here is the most famous example:
Attack 011 the Castled Killg - Drawing the Kingfrom its Lair 33
Nimzovich White
Tarrasch Black
St Petersburg 1914
Compare this position to the example preceding it. The resemblance is
absolutely striking. Dr. Tarrasch finished off the great strategic thinker with
1...~xh2+! 2 <i.t>xh2 'iih4+ 3 ~gl it.xg2! 4 f3
4 ~xg2 ~g4+ 5 ~h2 l:[d5 6 ~xc5 ~h5+ 7 ~g2 ir'g5+ 8 ~h2 l:[xc5 9
l:[xc5 'iVxd2 wins.
4 ...lUe8! 5lDe4 'iih1+ 6 <i.t>f2 ~xn 7 d5
7 l:[xfl ir'h2+ wins the queen.
7... f5! 8 'iic3 'iig2+ 9 <i.t>e3l:he4+! 10 fxe4 f4+?!
Quicker was IO ...'ii'g3+ II ~d2 ir'f2+ 12 ~d I ir'e2 mate.
11 ~xf4 :f8+ 12 ~e5
12 'i!Vf6 avoids the mate but is hopeless.
12 .. :iWh2+! 13 <i.t>e611e8+ 14 ~d7 Sl.b5 mate!
The two bishop sacrifice is a good lead-in to the examples I will present
below. They all involve violent, bone-crushing sacrifices to draw out the
king and either force mate or gain a decisive material advantage. In some of
the examples I have, for completness sake, included some cutting-edge
opening theory and ideas.
The following examples illustrate how a well-judged sacrifice can quickly
and decisively end resistance.
34 Attack on the Castled King - Drawing the Kingfrom its Lair
Timman White
Korchnoi Black
Tilburg 1991
French Defense
I e4 e6 2 d4 dS 3 lLlc3 dxe4 4 lLlxe4lLld7 slLlo lLlgf6 6 .tgS .te7
7 lLlxf6+ .txf6 S h4 cS 9 "'d2 cxd4 10 0-0-0 eS 11 :el 0-0 12
lLlxeS
Thanks to the annoying pin imposed on the bishop on f6, White enjoys
some pressure because of his lead in development and chances to build up a
kingside attack. His task was eased considerably however by Black's
careless next move which exposes his king to a vicious, sacrificial attack.
12.. .l:teS?
Black should play 12 ... ltJxe5 13 l:txe5 iLe6, although White stands
slightly better after 14 a3! h6 15 iLxf6 'iVxf6 16 f4 l:tac8 19 iLd3. Instead,
the normally highly alert Victor Korchnoi casually leaves his king exposed.
13lLlxti!
This shot sets up an overwhelming attack based on the power of the pin.
Black's defenders on the queens ide become fair game as Black must return
material to avoid a worse fate.
13•••1txel+
Simpler for White was 13 ...~xf7 14 .ic4+ ~f8 IS l:txe8+ 'iVxe8 16 l:tel
ltJe5 (16 ...'iVd8 17 ifb4+) 17 .ixf6! gxf6 18 'ji'h6+ ~e7 19 'iVg7+ ~d8 20
'iVxf6+ 'iVe7 21 'ji'h8+ 'ji'e8 22 'ji'xe8+ ~xe8 23 :xe5+ with an easy win.
14 'irxel ~xti IS .tc4+ ~f8 16 "'e6
Black's king will be forced to evacuate into a pin.
16....txgS+ 17 hxgS 'ii'xgS+ IS ~bllLleS
Attack 011 the Castled King - Drawing the KingJrom its Lair 35
Hopeless was 18 ... 'iWf6 19 'iWg8+ <t;e7 20 I:tel+ lLle5 (20 ... <t;d6 21 I:te6+)
21 'iWd5.
19 'ii'g8+ ~e7 20 ~el
White had to foresee that Black was too disorganized to offer much of a
defense when making his sacrifice on move 13. Black suffers from not only
an exposed king but also the effects of the pinned bishop and knight.
20....id7
Korchnoi manages to put up some symbolic resistance with this move.
21 ..wxa8 'iVd2 22 ':xe5+ <it>f6 23 a3 'it'xe5 24 't!Vb8+ 'it'f5 25 'ii'f8+
Black resigned
Van Wely White
Acs Black
Wijk aan Zee 2002
Nimzo-Indian Defense
1 d4 lbf6 2 c4 e6 3 lbc3 .ib4 4 e3 0-0 5 .id3 d5 6 cxd5 exd5 7
lbge2 lle8 8 0-0 .id6 9 a3'!
White's last move ignores the potential for a sudden and violent kingside
attack. Although the black queens ide is undeveloped, the bishop on c8 is
actually already in play and influencing the kingside. Let's examine the
position through Mr. Acs' eyes. The first move for Black to consider is the
stock sac 9 ... .txh2+. It forces the white king out to the third rank but Black
is not well-enough developed to seriousl~ endanger the wandering
monarch. 9... .txh2+ 10 <t;xh2lLlg4+ 11 <t;g3 ifd6+ 12lllf4 g5 13lLlcxd5 is
likely to lead to a White kingside attack once the smoke clears. Another
forcing move is 9 ... lLlg4 - or is that a shot in the dark as well? Well it does
force a reaction by White and 10 g3 looks bad on general grounds. That
leaves 10 h3 to consider. Hmm - if Black then presses on with the knight by
36 Attack on the Castled King - Dral'ving the Kingfrom its Lair
1O ... tiJh2 all sorts of promising ideas are materializing. Acs probed even
deeper and liked what he saw.
9...liJg4! 10 h3liJh2! 11 l:.elliJfJ+
This tears open the white king's defenses. The only question now is
whether Black has more than perpetual check.
12 gxfJ 'iig5+ 13lt>hl 'iih4! 14liJf4
The only move. If White tries closing down the b8-h2 diagonal with 14
f4, then Black breaks through on the light squares by 14 .. .'ihh3+ 15 'it>gl
~g4! and White lacks a decent defense against the threat of ... .ltO. Black
has a very promising-looking positon but can he land a knockout blow?
14...i..xh315liJcxd5
White expects 15 ... ~e6 16 'it>gl 'ii'g5+ 17 'it>f] .ltxd5 18 tiJxd5 'ifxd5 19
ioe4 when he has weathered the storm and emerged with a solid positional
advantage.
15...::'e6!!
Black tightens the noose around White's king by bringing up the heavy
wood. The devastating threat of .. J::th6 compels White to take the new
invader.
16liJxe6 i..f5+!
Black finds a very elegant mating net which works perfectly here thanks
to the self-created wall of white pieces that block escape routes. This move
is important in denying White the option of ~xh7+.
17lt>gl 'it'h2+ Islt>n i..g3!!
White resigned as he has only meaningless spite checks available to
delay inevitable mate. A very spectacular combination by the young
Hungarian GM.
Attack on the Castled King - Drawing the King from its Lair 37
I.Schneider White
Yudasin Black
New York 2001
Sicilian Defense
1 e4 c5 2 lbo d6 3 d4 cxd4 4 lbxd4 lbf6 5 lbc3 a6 6 i.c4 e6 7
.li.b3 lbbd7 8 f4 lbc5 9 "if0 .li.e7 10 0-0 0-0 II i.e3 'iIIc7 12 %:tael
%:te8 13 g4 b5 14 g5 lbfd7 15 f5lbe5 16 i¥h5 g6 17 ~h4 i.f8 18
fxg6 lbxg6 19 ~h5 b4 20 lbce2 i.b7 21 lbg3 lbxe4 22 ~h3 lbxg3
White has sacrificed a pawn but all forces are at battle stations and the
black king is exposed. Can Black repulse the attack? The obvious defensive
move 22 ... i..g7 leads to trouble after 23 ltJgf5! exf5 24tiJxf5 tiJe5 25 ltJxg7
~xg7 26 'it'h6+ ~g8 27 g6! hxg6 28 i..xf7+! tiJxf7 29 'it'xg6+ ~h8 30
lhf7 'it'xf7 31 'it'xf7 l:tg8+ 32 ~fl l:taf8 33 i..d4+ and wins.
23 hxg3!
White has a plan of tripling major pieces on the h-file and it is not easy to
see a defense to this plan. Black must not only cover h7 but he also faces
dangers on the a2-g8 diagonal and in addition f7 is very weak.
23 ....li.g7
Also 23 ...'it'd7 24l:te2 iJ..g7 25 l:th2lbf8 to protect the e6 and h7 squares.
24 :e2 .li.e4?
Black needed to use his queen actively for defensive purposes to thwart
White's plan of tripling major pieces on the h-file. He must also close down
potential threats on the a2-g8 diagonal. He can combine both goals with
24 ... d5! 25l:th2tiJf8 26l:tf4 'iVe5! which decisively disrupts White's plan.
White now begins a brilliant combination culminating in checkmate.
25lbxe6! fxe6 26 i.xe6+ ~h8 27 1:.17 :e7
38 Attack 011 the Castled King - Drawillg the Killgfrom its Lair
28 'iWxh7+!! \t>xh7 29 'u'h2+ ibh4 30 ::'xh4+ \t>g6 31 :f6+! ..txf6
32 I:th6+ ~g7 33 gxf6+ ~f8 34l:r.h8 mate
Attacks rarely come any sweeter than this fine brilliancy. Schneider's
combination was very similar to a mating combination conducted by
German GM Christopher Lutz.
Here is the position after 3l...'iit>e7 from Lutz-Ftacnik, Germany 200l.
Lutz delivered mate with 32 'ifxf6+!! ~xf6 33 1:g6+!! fxg6 34
lixg6+ ~e7 35 f6+ Black resigned.
Shirov White
Benjamin Black
Horgen 1994
Sicilian Defense
1 e4 c5 2 ibn e6 3 d4 cxd4 4 tLlxd4 ibc6 5 ibc3 a6 6 ..te2 'iIIc7 7
..te3ibf6 8 0-0 ..te7 9 f4 d6 10 'ifel 0-0 II 'ifg3 tLlxd4 12 ..txd4 b5
13 a3 ..tb7 14 ~hl ..tc6 15l:tael \lib7 16 i.d3 b4 17 tLldl
Attack on the Castled King - Drawing the Kingfrom its Lair 39
This is one of the key variations of the classic Scheveningen Sicilian.
White has assembled a very menacing attacking formation pointed
primarily at the black king position. Black is not without resources. His
pressure on e4 and compact position make it difficult for White to break
open his bishops. The strongest modem expert in this variation, Sergei
Movsesian, has managed to keep this line reputable by continuing 17 ...bxa3
18 bxa3 l:lad8 which strengthens his center and indirectly attacks the bishop
on d4 (if White plays e4-e5 for instance). Then 19 iDf2 can be met by the
simplifying combination 19 ... iDh5 20 'iWf3 iDxf4 21 'ir'xf4 e5 22 .ixe5 dxe5
23 'ir'xeS with approximate equality. Very bad, on the other hand is 19 ... d5?
20 Ji.xf6! Ji.xf6 21 iDg4 Ji.e7 22 e5! with a powerful attack for White,
Shabalov-Lesiege, Bermuda 2001.
In this example, however, Black tried to simplify the position but soon
found his king on the receiving end of a vicious attack because of
weaknesses caused by ...
17... g6?! 18 ttJf2 bxa3 19 bxa3 ttJh5?! 20 'iie3 ttJxf4?
More circumspect was 20 ... f6 to close down the long diagonal, although
White can then switch to the a2-g8 diagonal - 21 Ji.c4 d5 22 Ji.a2! l:lae8 23
iDg4 with disagreeable pressure.
21 'ii'xf4 e5 22 ttJg4!
Black did not miss this rather obvious shot but the crushing follow-up on
move 24.
22 ... f6
22 ... exd4 23 iDh6+ ~g7 24 iDxfl Ji.g5 25 'ir'xg5 l:lxfl 26 e5! is very
strong.
23 JLc4+ 'li?h8
23 ... d5 24 exd5! Ji.xd5 25 'ir'e4 wins.
40 Attack all the Castled Killg - Drawing the Kingj;·om its Lair
24 ttJxe5! dxe5 25 'iixe5
Also effective was 25 .i.xe5 but Shirov follows the principle of
centralization. The queen is immune as 25 ... fxe5 26 .i.xe5+ .i.f6 27 l:txf6
l:txf6 28 .i.xf6+ 'it'g7 29 .i.xg7+ <3;xg7 30 <3;gl leads to an easy win. So
White has won a pawn, but a far more important factor is the erosion of the
black king's defenses.
25...~g7 26 'iif4 l%ad8 27 c3
White gets ready for the decisive breakthrough e4-e5.
27 ...h6
26 ... l:tde8 27 <3;gl! sets up e5-e6.
28 llbl 'iVa8
28 ... 'it'd7 29 e5 quickly ends the fight.
29l:ib6! l:ixd4 30 cxd4
~xe4
31 l:ie I!
Shirov does not let up for a second.
31.•. f5
Black does not give White the satisfaction of 3l....i.xg2+ 32 <3;gl .i.d8 33
l:tb8! 'it'D 34 l:txd8! 'tit'xD 35 l:te7+ ebh8 36 l:txf8 mate.
32 'We5+ ~f6 33 ~xf6 Black resigned
Alexander Shabalov shows how to bust open a long diagonal in the
following diabolical effort against Luxembourg GM Alberto David.
Attack on the Castled King - Drawing the Kingfrom its Lair 41
Shabalov White
David Black
New Yark Open 2000
Sicilian Defense
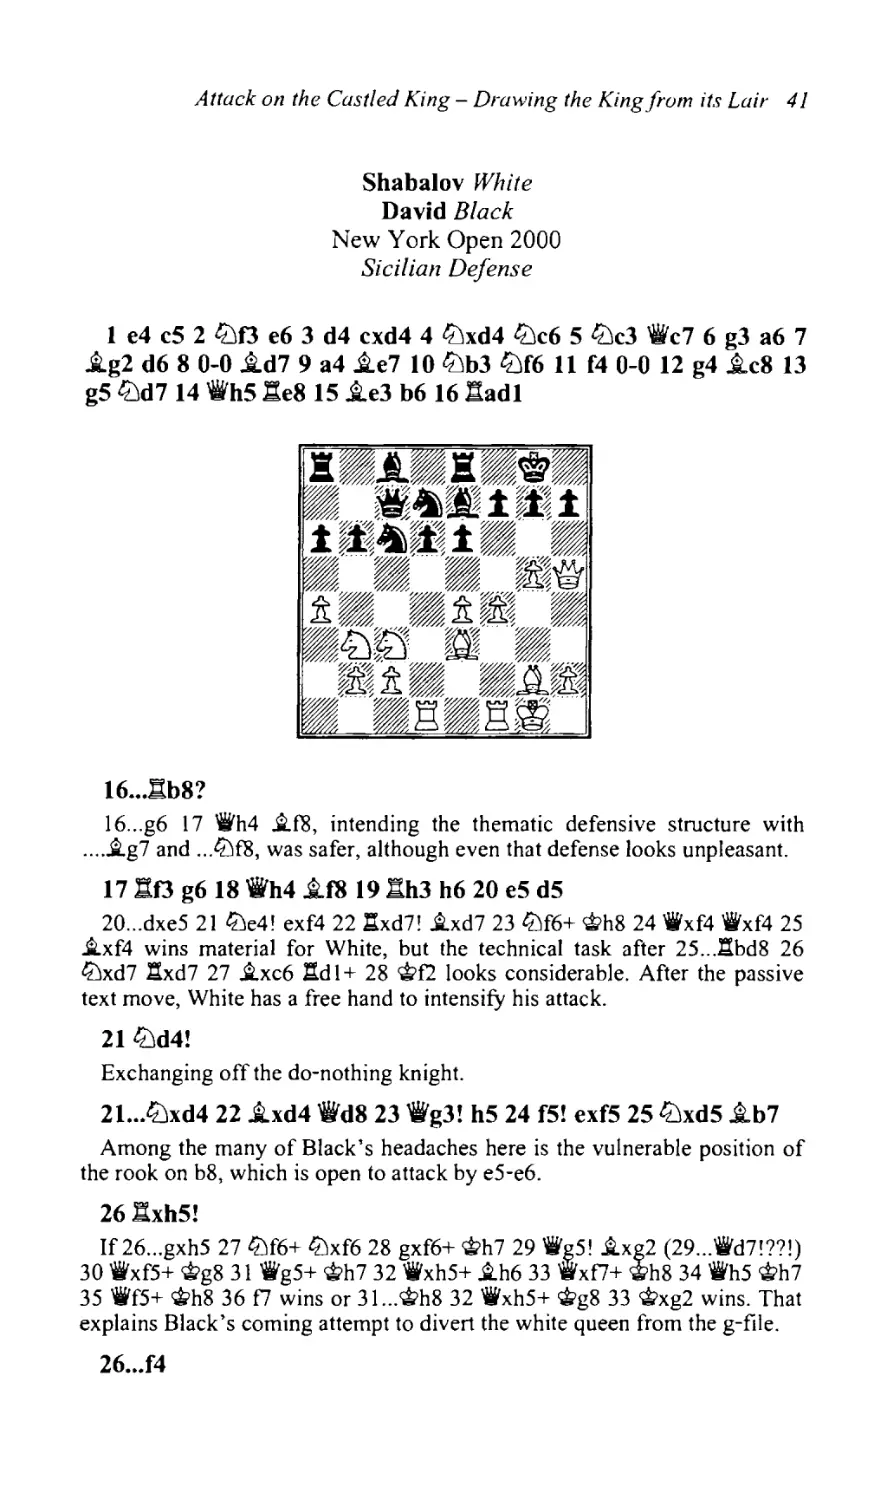
1 e4 c5 2 lLlfJ e6 3 d4 cxd4 4 lLlxd4 lLlc6 5 lLlc3 "iic7 6 g3 a6 7
i.g2 d6 8 0-0 .td7 9 a4 i.e7 10 lLlb3 lLlf6 II f4 0-0 12 g4 i.c8 13
g5 lLld7 14 ~h5l:[e8 15 i.e3 b6 16 lladl
16...l:[b8?
16 ... g6 17 'iVh4 i.f8, intending the thematic defensive structure with
.... i.g7 and ... ttJf8, was safer, although even that defense looks unpleasant.
17!tfJ g6 18 ~h4 i.f8 19 :h3 h6 20 e5 d5
20 ... dxe5 21 ttJe4! exf4 22 l:xd7! i..xd7 23 ttJf6+ 'itlh8 24 'ii'xf4 'it'xf4 25
i.xf4 wins material for White, but the technical task after 25 ... l:bd8 26
ttJxd7 l:xd7 27 i.xc6 l:d I + 28 Wf2 looks considerable. After the passive
text move, White has a free hand to intensifY his attack.
21 lLld4!
Exchanging off the do-nothing knight.
21...lLlxd4 22 .txd4 "iid8 23 "iig3! h5 24 f5! exf5 25 lLlxd5 .tb7
Among the many of Black's headaches here is the vulnerable position of
the rook on b8, which is open to attack by e5-e6.
26 I:txh5!
If 26 ... gxh5 27 ttJf6+ ttJxf6 28 gxf6+ 'iti>h7 29 'it'g5! .ixg2 (29 .. .'iVd7!??!)
30 'it'xf5+ Wg8 31 'it'g5+ 'iti>h7 32 'iVxh5+ .th6 33 'it'x17+ Wh8 34 'it'h5 Wh7
35 'it'f5+ c;t.?h8 36 17 wins or 31... Wh8 32 iixh5+ c;t.?g8 33 Wxg2 wins. That
explains Black's coming attempt to divert the white queen from the g-file.
26 ... f4
42 Attack on the Castled King - Drawing the Kingfrom its Lair
27 e6!!
This was obviously foreseen by Shabalov several moves earlier. The
black king position becomes terminal.
27 ... gxh5
27 ... fxg3 28l:th8 mate.
28 ext7+ ~xt7 29 ~xf4+ ~g8 30 'iVf5
A rook up but helpless. The bishop on d4 is chairman of the board.
30.. Jie7
30 ....i.g7 31 .i.xg7 'it'xg7 32li'lf6! cleans up.
31 'iWg6+ iLg7 32 iLe4
Yet another piece joins the attack.
32•.•tiJf8
32 ... l:tfl 33 ~h7+ <it>f8 34 .i.xg7+ l:txg7 35 l:tfl +.
33 tiJf6+ Black resigned
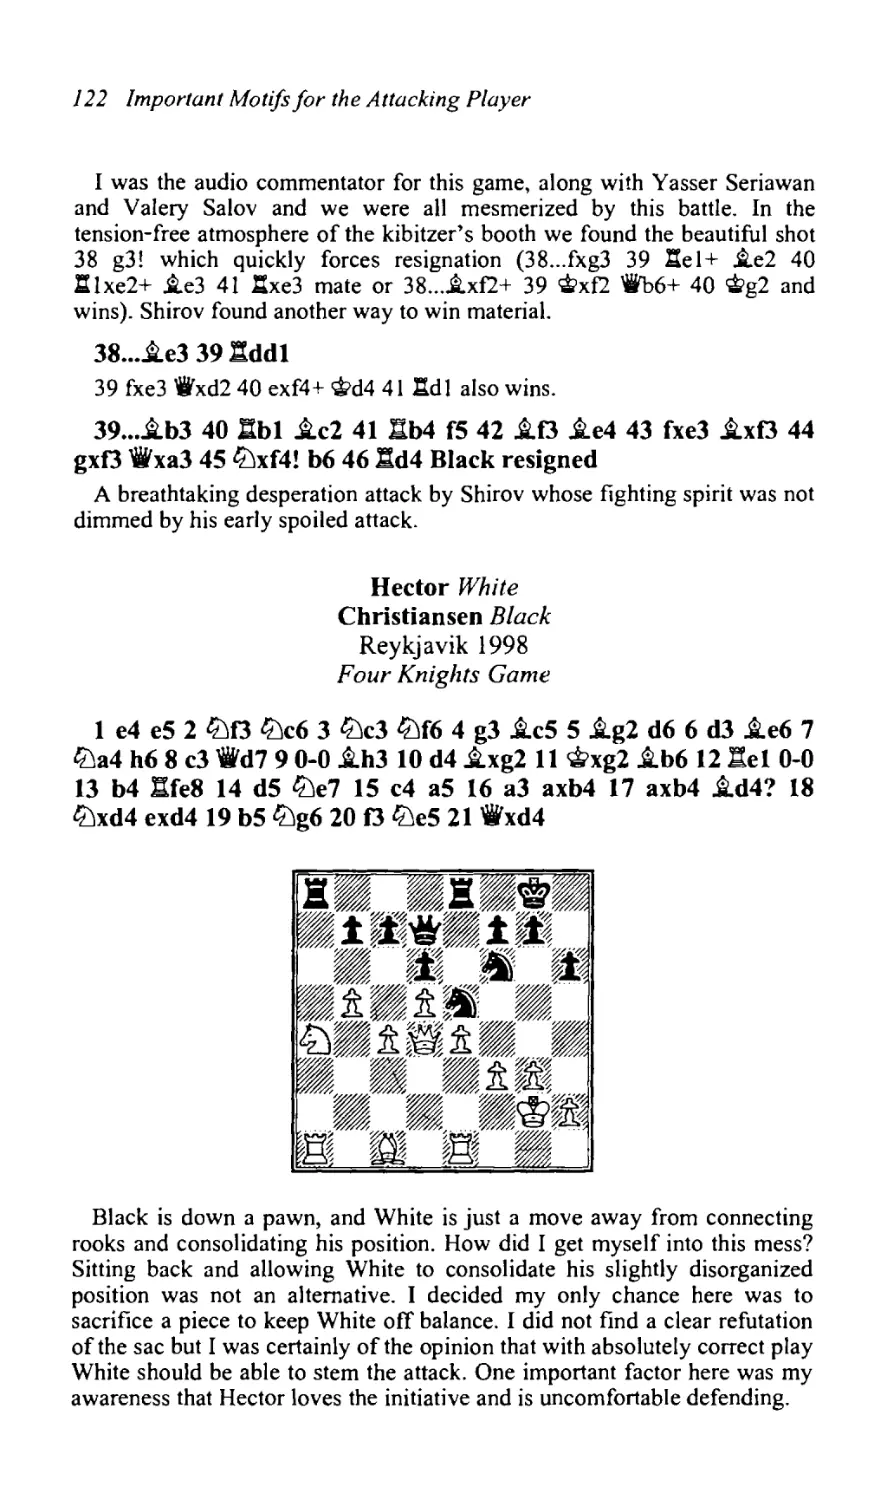
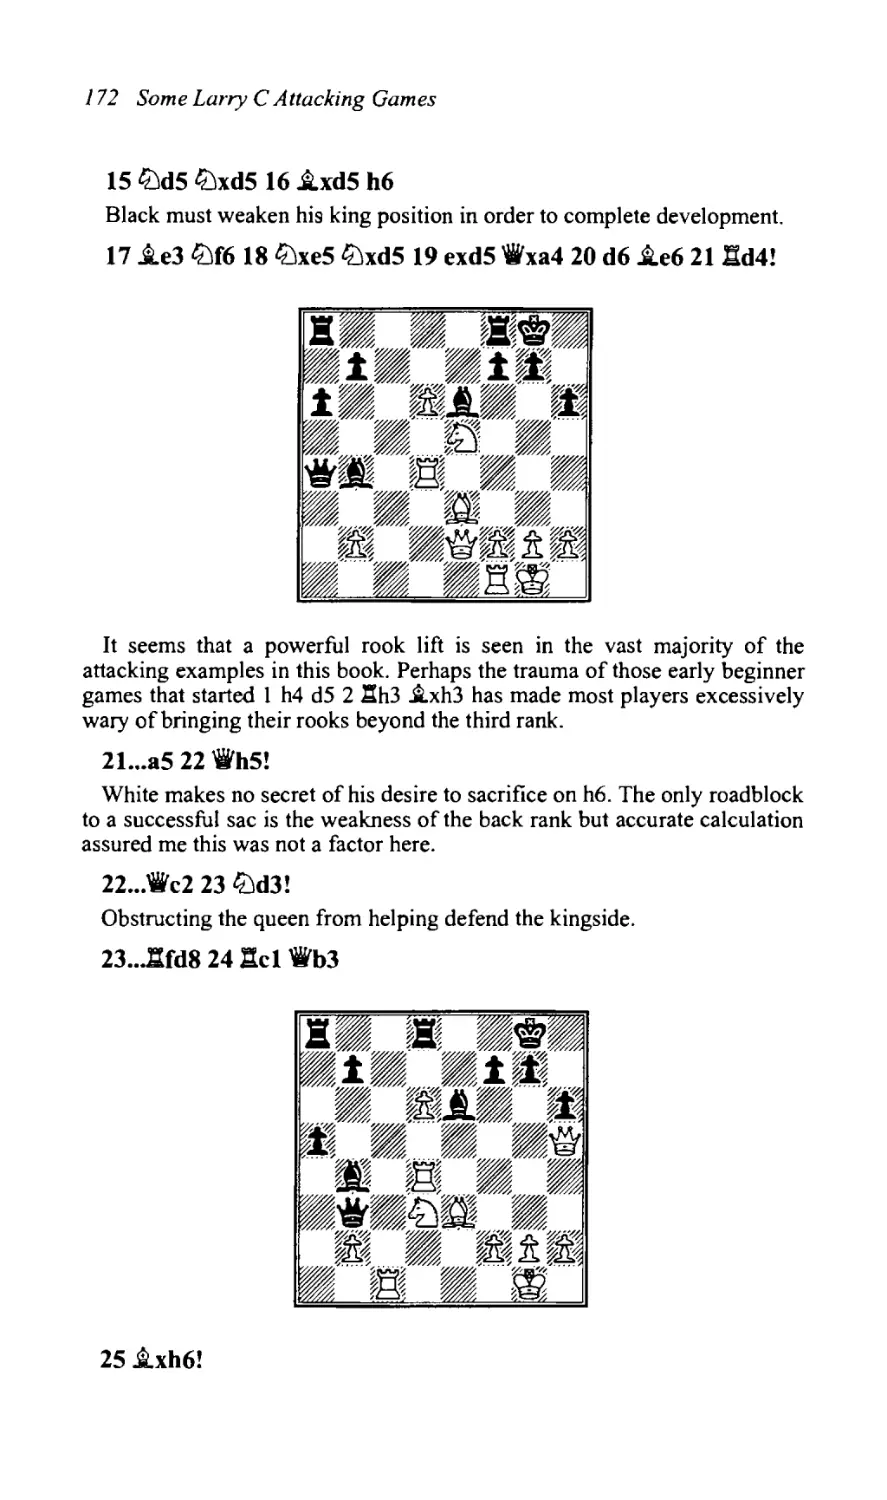
Naiditsch White
Zeller Black
German Championship 2002
Sicilian Defense
I e4 e5 2 ibn e6 3 d4 exd4 4 tiJxd4 a6 5 iLd3 iLc5 6 ibb3 iLe7 7
0-0 d6 8 c4 ibf6 9 tiJc3 b6 10 f4 ibbd7 11 'iWn iLb7 12 ~hl 'iVc7
13 iLd2 h5 14 'iWh3 ibg4 1511acl tiJdf6 16 f5 ~d7 17 ibd4 lie8 18
b3 iLd8 19 fxe6 fxe6 20 tiJd5 0-0 21 tiJxf6+ iLxf6 22 'iWxh5 ibe5 23
iLbl nc5 24 'iWh3 iLe8 25 tiJe2 b5 26 iLe3 ~c6 27 tiJf4 bxe4
Attack all the Castled King - Drawillg the Kingfrom its Lair 43
Black's rickety position is held up only by the well-placed knight on e5.
That gives a clue to the method White devises to force a mating attack.
28 ttJg6!!
Forcing open the a2-h7 diagonal is worth more than a piece. Black's
stalwart defender on e5 is finally displaced and the path to Black's king is
suddenly wide open.
28 ... ttJxg6 29 eS ttJxeS
29 ... lZ'lh4 30 exf6lZ'lf5 31 ~xfS exfS 32 fxg7 brings little relief.
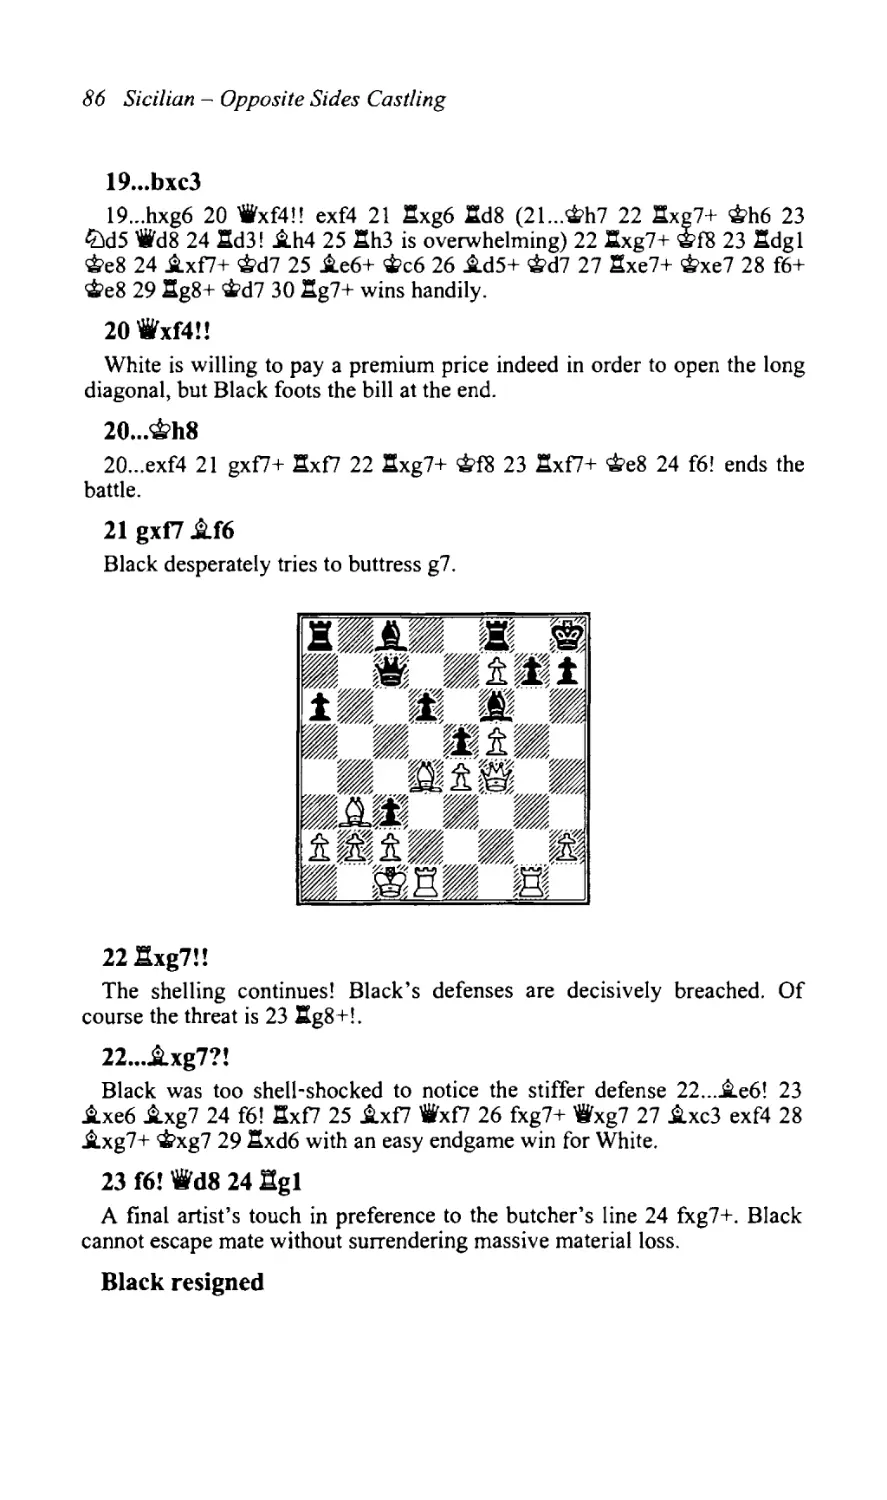
30 't!Vh7+ ~f7 31 Itxf6+!
White clears the f-file of a key defender.
31...~xf6 32 ~fl+ ~e7 33 'ilxg7+ ttJf7 34l:lxf7+! ~xf7 3S i.gS+
~e8 36 'iVg8+ Black resigned
36...
:f8 37 ~g6+ finishes off Black.
Mikhalevski White
Rabinovich Black
Dieren 1999
Slav Defense
1 d4 dS 2 c4 c6 3 ttJc3 ttJf6 4 ttJO dxc4 S a4 ttJa6 6 e4 i.g4 7
i.xc4 i.xf3 8 gxf3 e6 9 0-0 ttJb4 10 i.e3 i.e7 11 <o¥thl 0-0 12 :gl
~h8 13 f4 cS 14 dxcS iVc8 IS eS ttJd7 16 ttJe4 b6 17 'iVhS iVb7 18
f3
44 Attack 011 the Castled King - Drawillg the Kingfrom its Lair
It certainly looks like White is on the verge of developing a mating attack
thanks to the open g-file and his powerful wedge of pawns cramping
Black's kings ide defenses. Black made it easy by rushing for counterplay
with
18... lL'lc2?
allowing White to strike with the hammer-blows
19 l::lxg7!! <ittxg7 20 lL'lf6! lL'lxf6 21 exf6+ iLxf6 22 l:.gt+ 'ith8 23
iLd3 Black resigned
Black can only meet the mate threat with the pathetic 23 .....xf3+.
Going back to the diagram, how can White break through against the best
defense IB ... g6? Victor Mikhalevski gives the following convincing and
instructive one in Informant 76 - 19 "h6lt'lc2 (Black must get this in) 20
~g3! ~gB (the only way to meet the threat of 21 ~h3) 21 c6! (this little
investment helps White remove a vital black defender) 21.....xc6 22 ~b5
"d5 23 ~xd7! ~f8 (forced before It'lf6 hits) 24 "h4lt'lxal 25lt'lf6 "dl+
26 ..igl! h6 27 ..ixe6! (ripping open the over-ripe king position) 27 ... fxe6
2Blt'lxgB 'ittxg8 29 "f6! Wid7 (coming back to the rescue?) 30 'ii'xg6+ ~g7
31 f5! exf5 32 e6 and Black cannot hold after the coming pin and winner 33
iLd4. Mikhalevski explored this position in far greater detail and it would
be very worthwhile for the serious student to sit down and carefully review
his notes to the game.
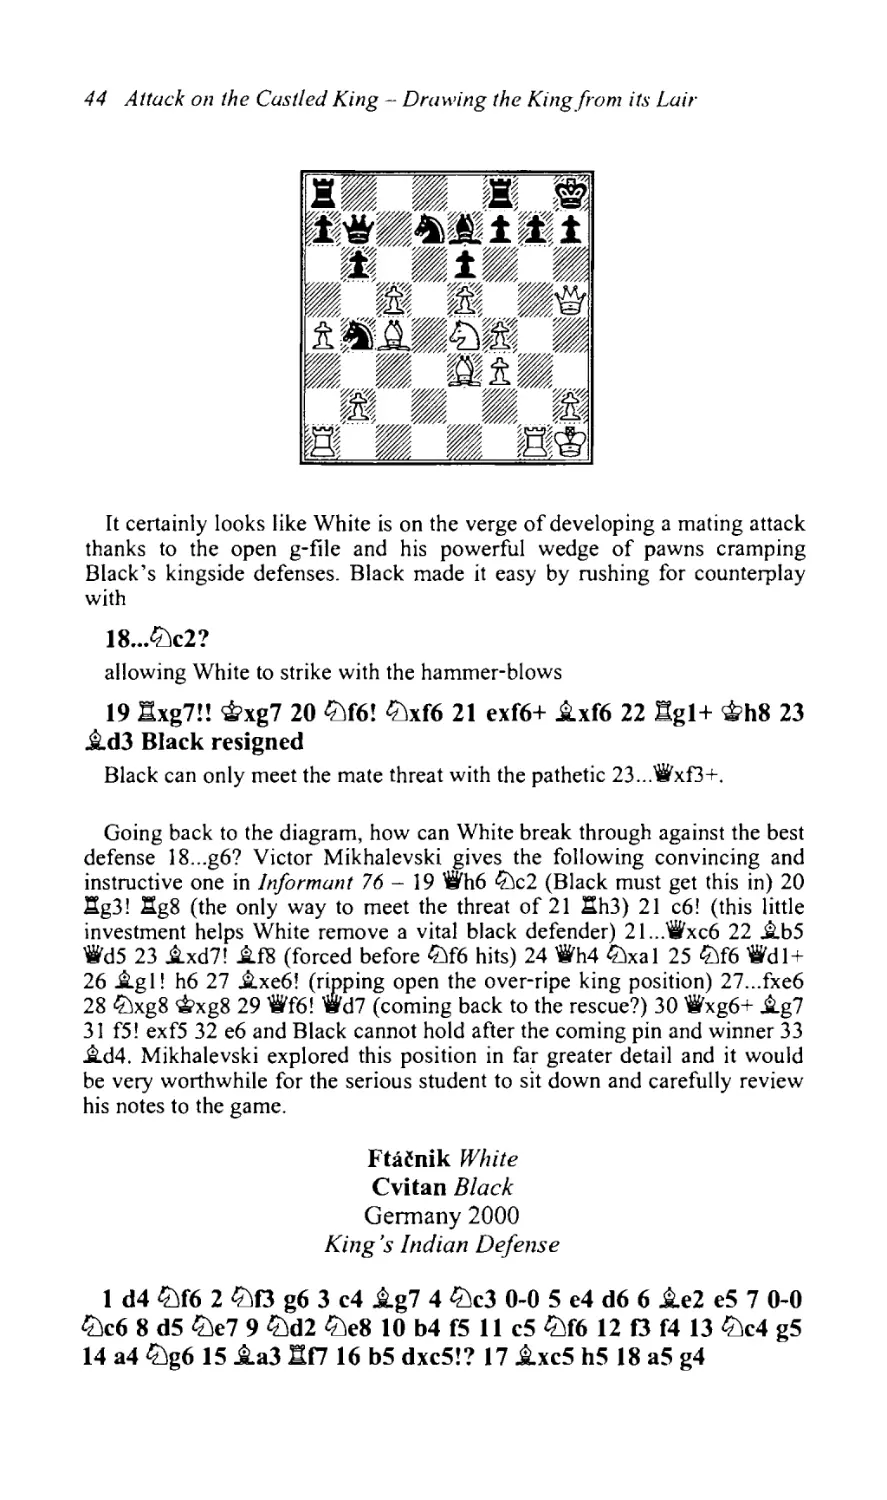
Fta~nik
White
Cvitan Black
Germany 2000
King's Indian Defense
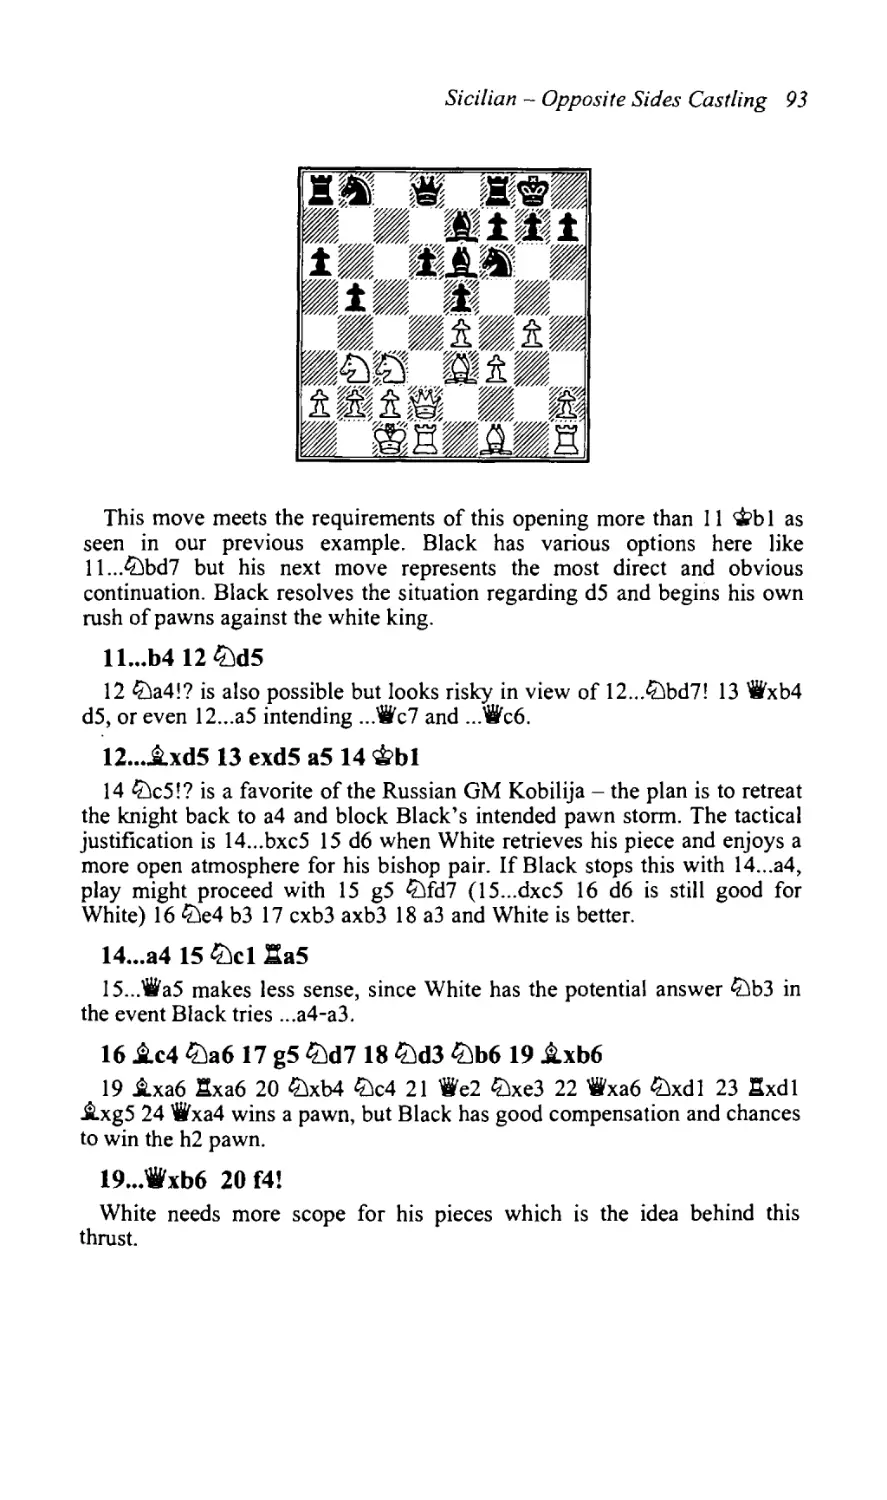
1 d4 lL'lf6 2 lL'lfJ g6 3 c4 iLg7 4 lL'lc3 0-0 5 e4 d6 6 iLe2 e5 7 0-0
lL'lc6 8 d5 lL'le7 9lL'ld2 lL'le8 10 b4 f5 11 c5 lL'lf6 12 fJ f4 13 lL'lc4 g5
14 a4lL'lg6 15 i.a3l:!f7 16 b5 dxc5!? 17 iLxc5 h5 18 a5 g4
Attack on the Castled King - Drawing the Kingfrom its Lair 45
A very tense position has arisen from the King's Indian. Black has
launched a fierce kings ide pawn storm while White has very strong pressure
on the queenside and center. Structurally, Black suffers from a weak e5
pawn and backward queens ide. Who gets there first? White must be very
careful about allowing ... g4-g3 which creates all sorts of mating themes
against the sparsely defended white king. Probably safest here is 19 J.f2!
to discourage ... g3. Black should then play 19... J.f8 intending .. J:tg7. This
combines attack and defense as Black stops d5-d6 while bringing the rook
into position to support the kingside attack. The game Lputian-Gadjili,
Dubai 2000 then continued in lively fashion.
20 'iVd2 g3!?
A typical pawn sac to clear squares and files.
21 hxg3 .l:Ig7 22ltJxe5!
The first but not the last counter-sacrifice in this game. Black's position
crumbles after 22 ... tt:Jxe5 23 gxf4 tt:Jf7 24 i.d4! and the pawn mass far
outweighs Black's extra piece.
22 ... fxg3 23 J.xg3 i.c5+ 24 nf2!
White happily offers up the exchange in order to dampen the attack.
24 ... h4 25 J.h2 h3 26ltJd3! J.xf2+ 27ltJxf2 hxg2 28 e5
28 'ir'h6 and 28 'It>xg2 look good here too.
28...ltJh5 29 :a4 J.f5 30 ltJg4 J.xg4 31 fxg4??
31 l:hg4 neutralizes Black's powerfully placed rook and gives White a
clear upper hand. After the game continuation Black amazingly brings new
energy to his attack.
46 Attack on the Castled King - Drawing the Kingfrom its Lair
31 ...~h4!! 32 ttJdl?
32 gxhS lLlf4! 33 'it'xf4 (33 l:txf4 ~xh2+) 33 ...~e\+ forces mate. 32
'it'xg2 l:tf8 33 .i.f3 :gf7!! 34 gxhS l:txf3! 35 :xh4 lLlxh4+ 36 ~h I l:tfl + 37
SLgl l:txg\+ wins.
32 ... ttJxe5?!
Black wins quickly with 32 ... lLlhf4! 33 l:txf4l:th7!.
33 ttJe3 l::tf8 34 ..td 1
White must meet the threat of mate on £2.
34 ••• ttJf4 35 :xf4 lhf4 36 ttJxg2 l:fl+ 37 <it>xfl 'ii'xh2 White
resigned
A typical King's Indian game. Black's kings ide attack seemed about to
dissolve until some inaccurate play by White and some very energetic and
imaginative play by Black brought it back to life again. Let's return to the
position after lS ...g4.
Attack on the Castled King - Drawing the Kingfrom its Lair 47
Let's see what happens if White ignores Black's ... g4-g3 scheme and
merrily pursues his dreams of queenside attack. Ftacnik-Cvitan,
Germany 1997, shows the explosive potential in Black's attacking prospects
if White neglects his defenses:
19 b6 g3!
Black aims to pile pressure on h2 and provoke h2-h3. White must be alert
to attack on both h2 and g2. The h-pawn can be covered with the
dark-squared bishop. As for the g-pawn, only the king is monitoring that
crisis point. A mistake now for White would be 20 bxc7? Axc7 21 ~b4
lDh7 22 h3 'iVh4 and Black will soon sacrifice decisively on h3.
20 cJthl ttJh7
Clearing the queen's path to h4 while also manoeuvring the knight to the
excellent attacking square g5. A mistake would be 20 ... gxh2 as the pawn on
h2 serves as a shield for the white king.
21 d6!
White rushes to break through in the center but can he hold off Black's
attack? The answer is yes provided he plays with absolute accuracy now. A
good alternative here was 21 nel, planning ~fl to defend g2 if necessary.
21. ..'i'h4 22 JLgl ..ih3!
Black's attack evaporates after 22 ... gxh2? 23 ~f2 when the pawn on h2
only helps shield the white king from attack. Also weak is 22 ... cxb6? 23
axb6 a6 24 tiJd5 which leaves Black totally bankrupt positionally. Cvitan's
continuation carries a very malicious threat and is Black's best chance.
23 bxc7??
White must play 23 gxh3 'ifxh3 24 :f2 which surrenders material for the
sake of slowing Black's attack. White has tremendous positional
compensation after 24 ... gxf2 25 ~xf2 cxb6 26 axb6 a6 27 lDd5 in the form
of better placed pieces, the powerful d-pawn and weaknesses on e5 and b7
to attack. Because the King's Indian Defense is suspect from a positional
viewpoint, it forces Black to attack with maximum energy.
48 Attack on the Castled King - Drawing the King from its Lair
23 ....i.xg2+!
Drawing out the king.
24 ~xg2 'ii'h3+!!
A I ittle further.
25~xh3 ~g5+
"Back in your cage!"
26~g2~h4+
.. .lifting the sword-"I resign".
Finally, I had the pleasure of successfully conducting a king raid in the
following manner. Although this was only a 'blitz' game, it illustrates that
accurate and creative attacks can be calculated even with a small amount of
time. The key was my observance of Larry's Golden Rule 'Always analyze
to the fullest possible extent a sacrifice that draws out the enemy king. '
'Wannabee' White
'Vaska' Black
Internet Chess Club 2002 (blitz game)
This is from a 3 minute game played on the Internet Chess Club in 2002.
White is a multi-time US Champion who shall remain incognito and I had
Black. The handle 'Vaska' is the name of my cat. While White is not
technically in a castled position, his rooks are connected and his king stands
behind a wall of pawns.
Black stands well thanks to his bishop pair but he needs to create a
weakness or open the position for the bishops to work effectively. I went
forward with
l...h4 2 ~e3 hxg3 3 ~xg3?
White should swap rooks on the h-file with 3 nxh8+ Jtxh8 and then
protect against .. :ii'h4 with 4 nh 1. Black has a promising position after
Attack on the Castled King - Drawing the Kingfrom its Lair 49
4 ...~e7 5 lLJf5+ (5 'iti>xg3? 'iVxf4+!! 6 'iti>xf4 i.e5+ 7 'iti>g5 .l:tg8+ 8 'iti>h4
.l:th8+ 9 Wg5 f6+ 10 ~g6 i.e8+ II r3;g7 f5 mate!) 5... .txf5 6 exf.5 'iti>d8 but
certainly far from a win.
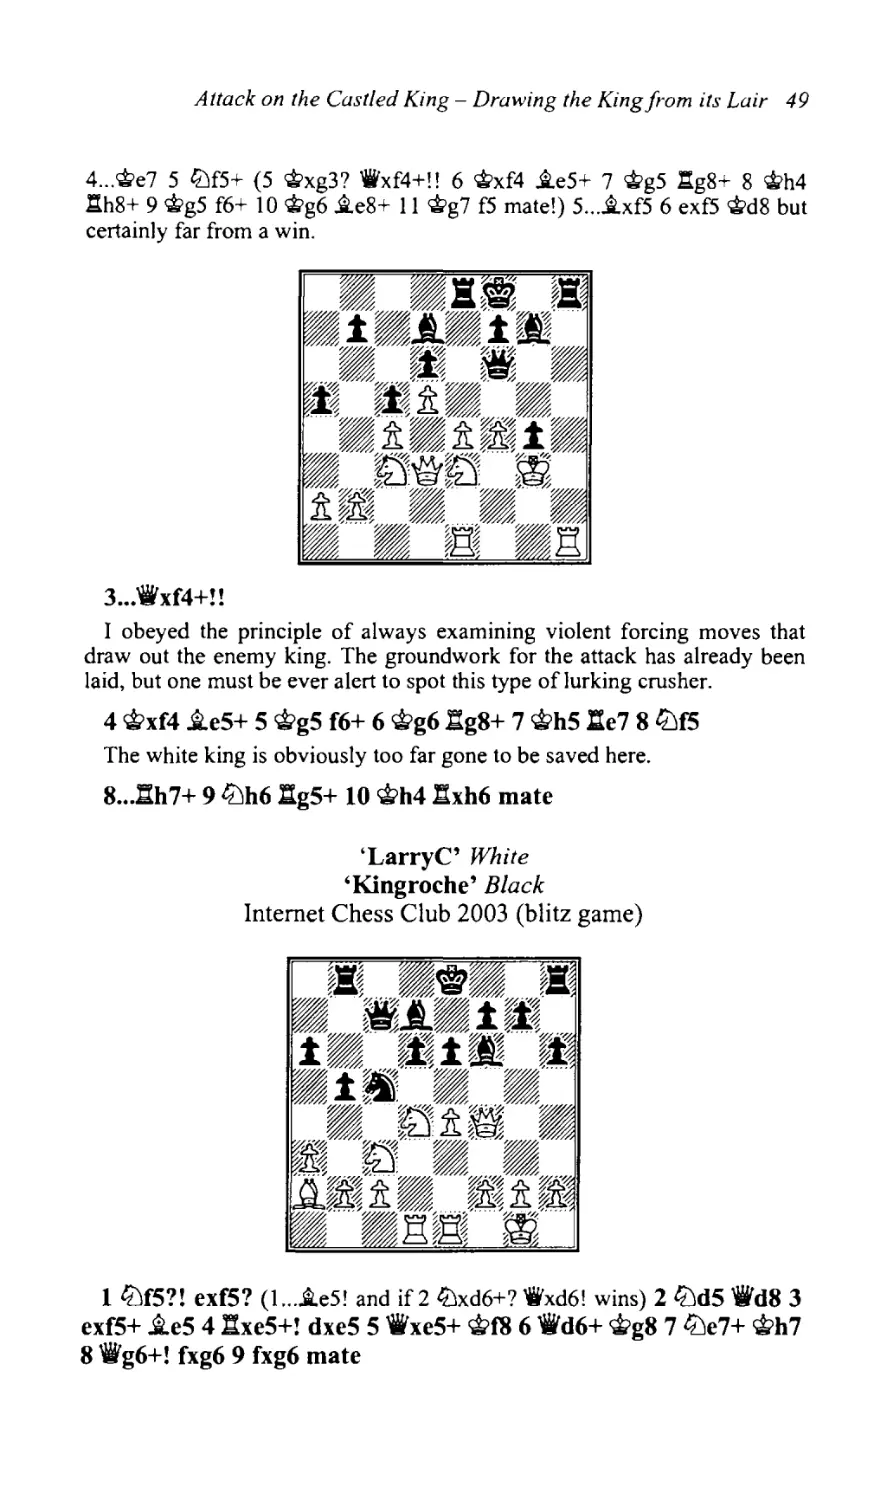
3 .• :ii'xf4+!!
I obeyed the principle of always examining violent forcing moves that
draw out the enemy king. The groundwork for the attack has already been
laid, but one must be ever alert to spot this type of lurking crusher.
4 'it>xf4 i.e5+ 5 'it>g5 f6+ 6 'it>g6 :tg8+ 7 'it>h5l:te7 8 tLlfS
The white king is obviously too far gone to be saved here.
8...:th7+ 9 tLlh6 :tg5+ 10 'it>h4 llxh6 mate
'LarryC' White
'Kingroche' Black
Internet Chess Club 2003 (blitz game)
1 tLlf5?! exfS? (l...i.e5! and if2lLJxd6+? 'iVxd6! wins) 2 tLld5 'iWd8 3
exf5+ i.e5 4 lhe5+! dxe5 5 'iWxe5+ 'it>f8 6 'iWd6+ <iitg8 7 tLle7+ 'it>h7
8 'iWg6+! fxg6 9 fxg6 mate
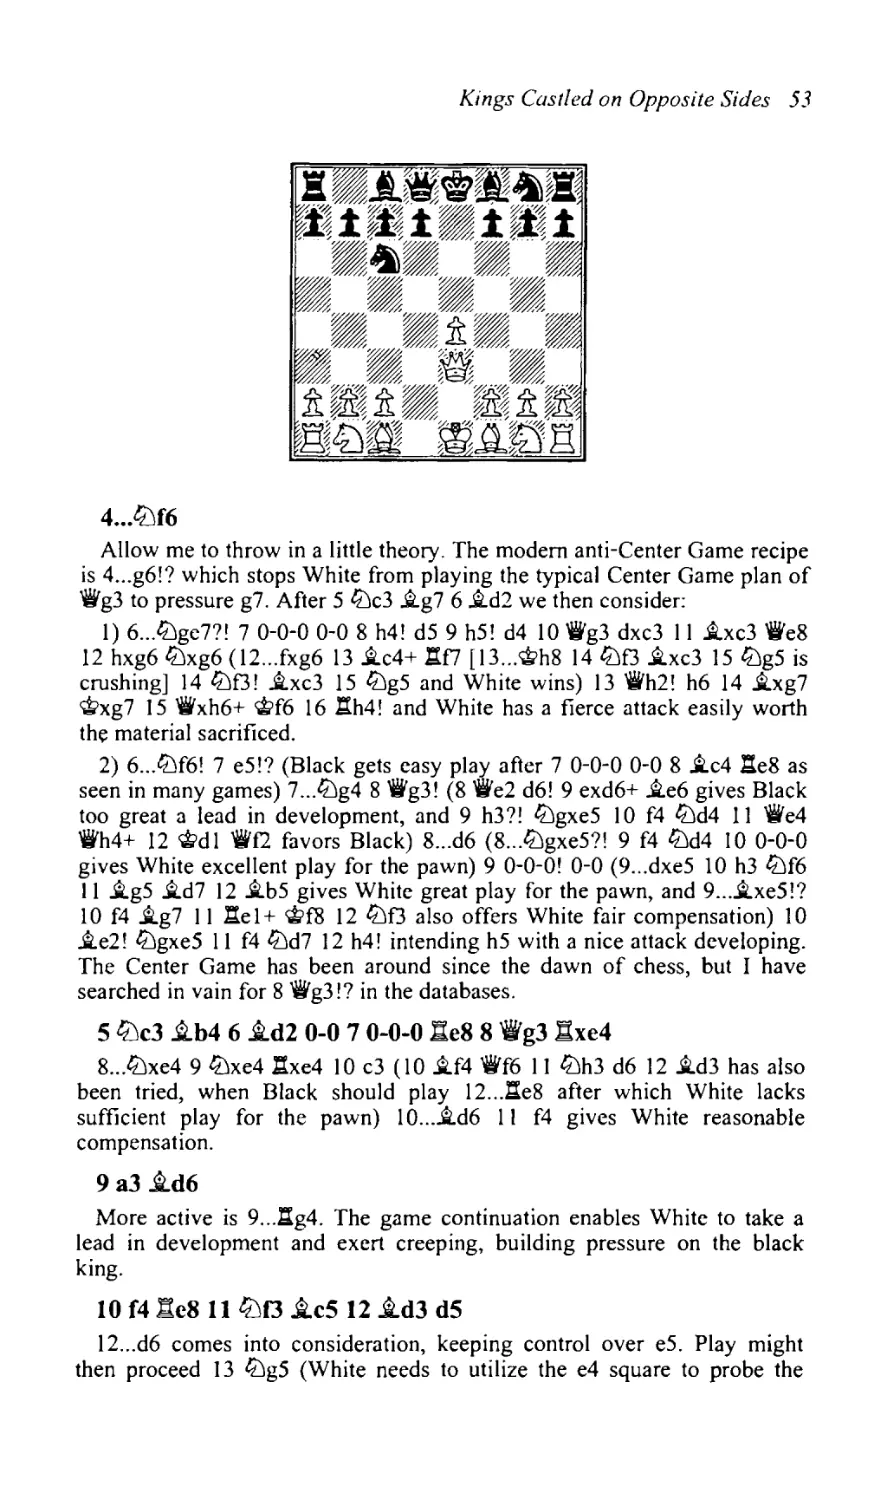
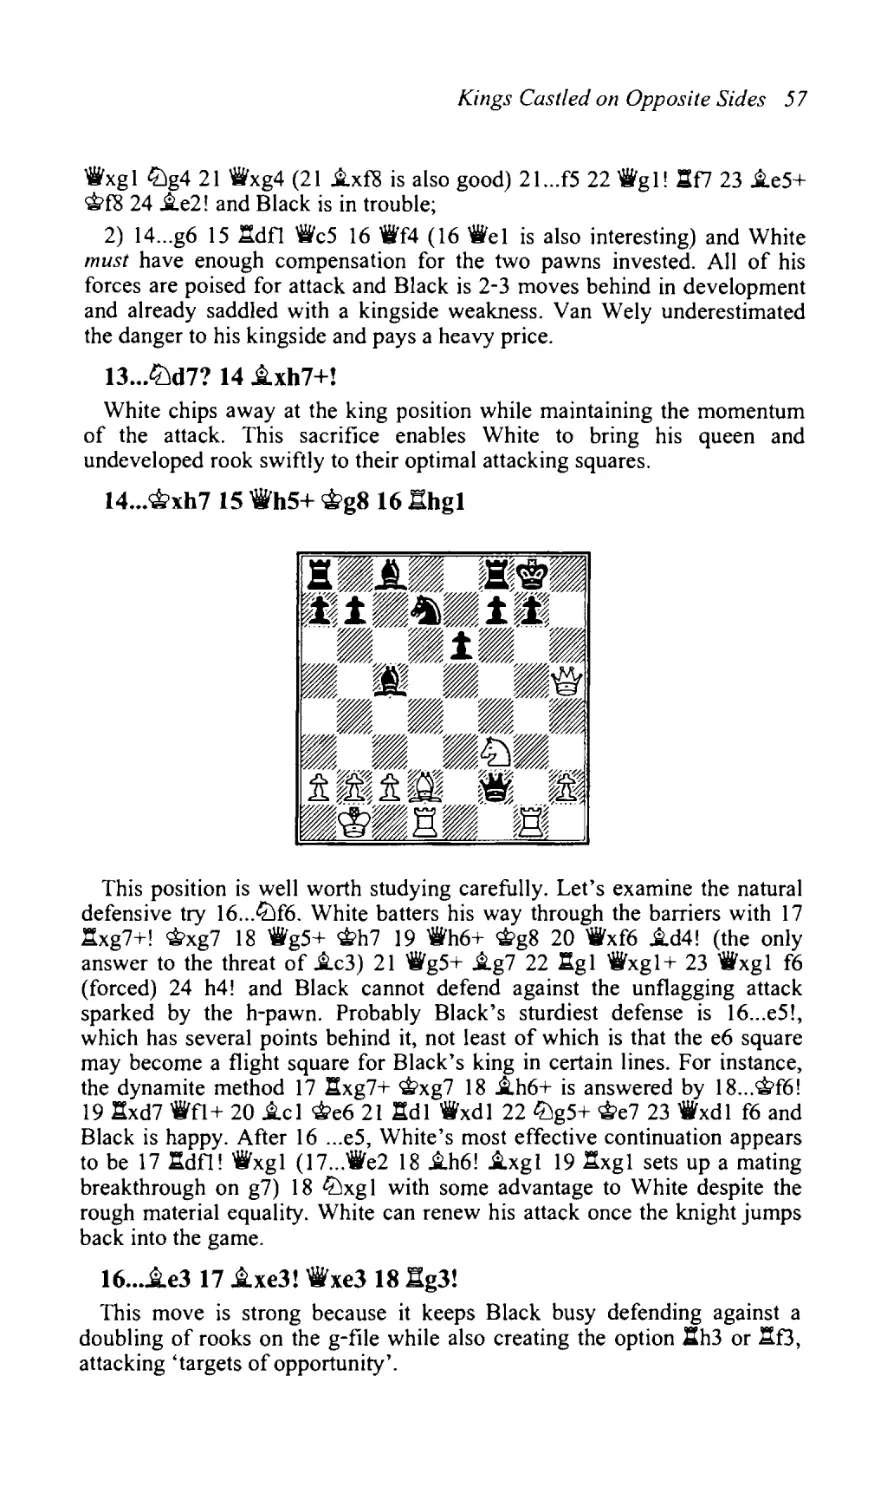
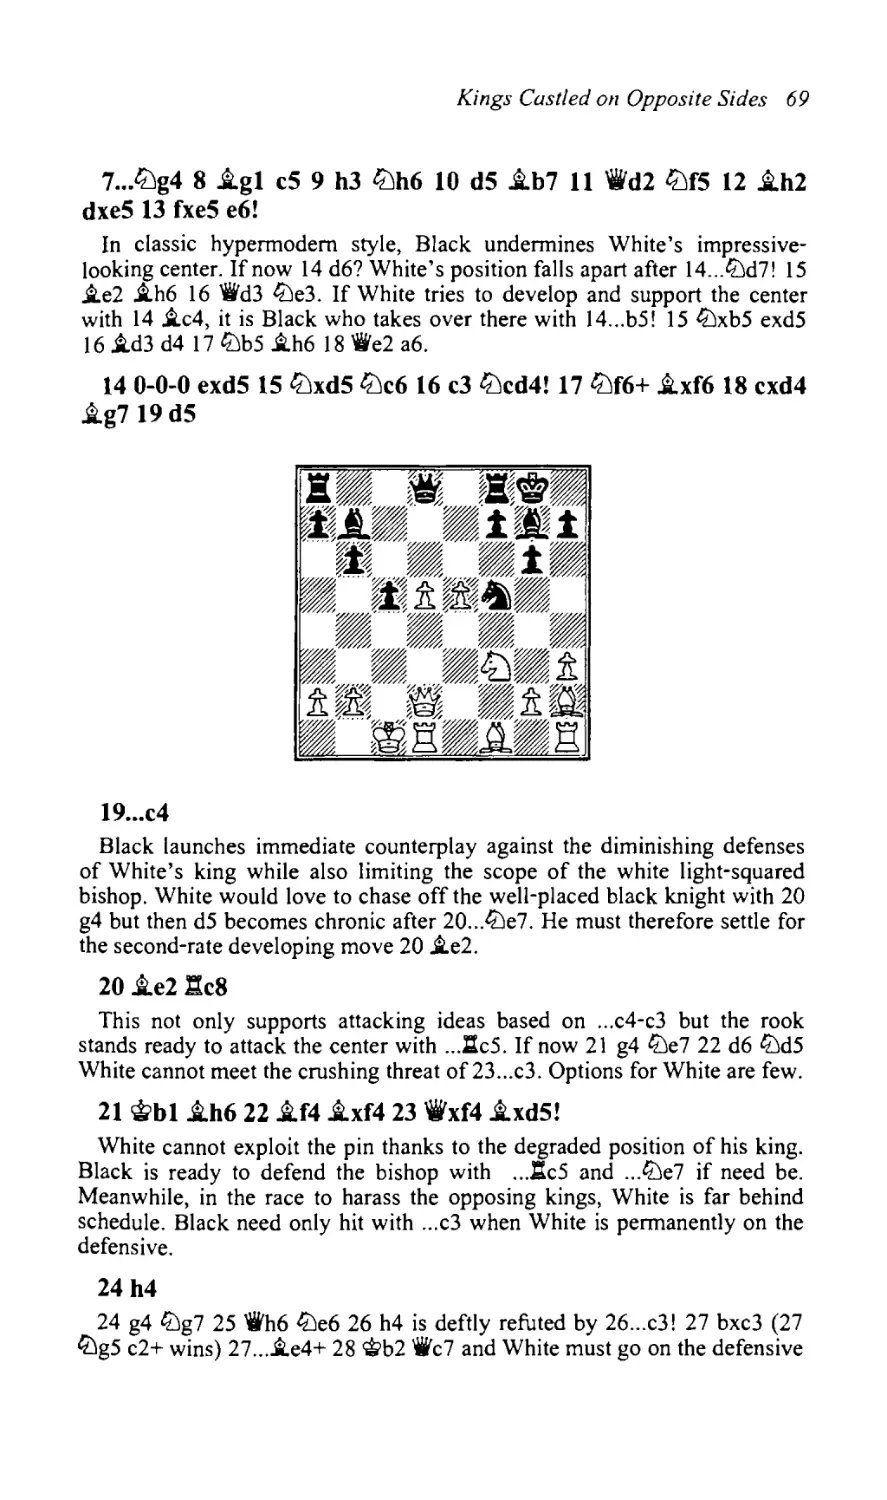
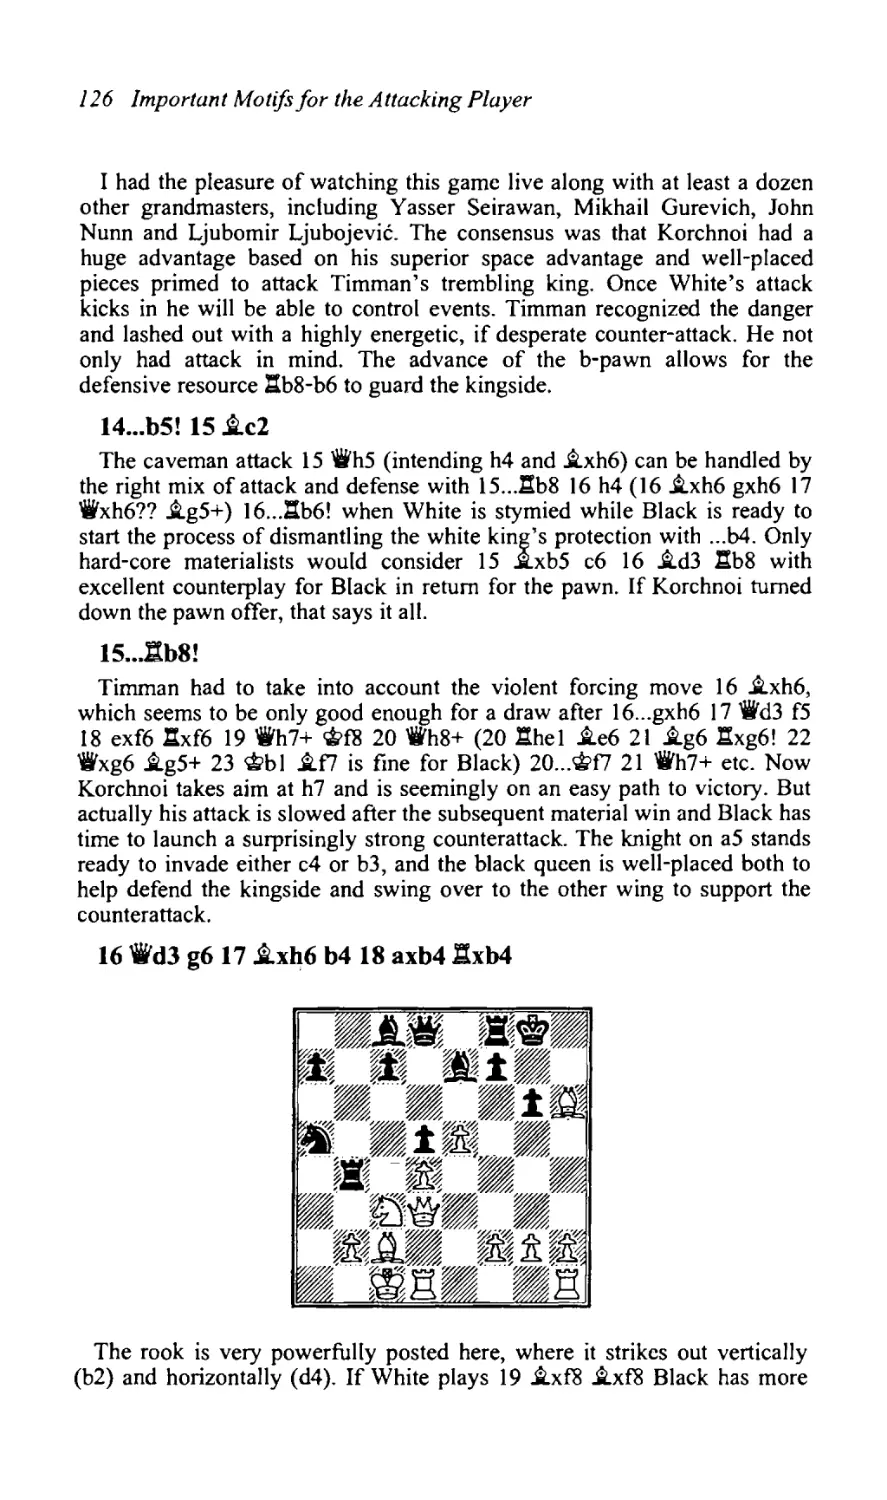
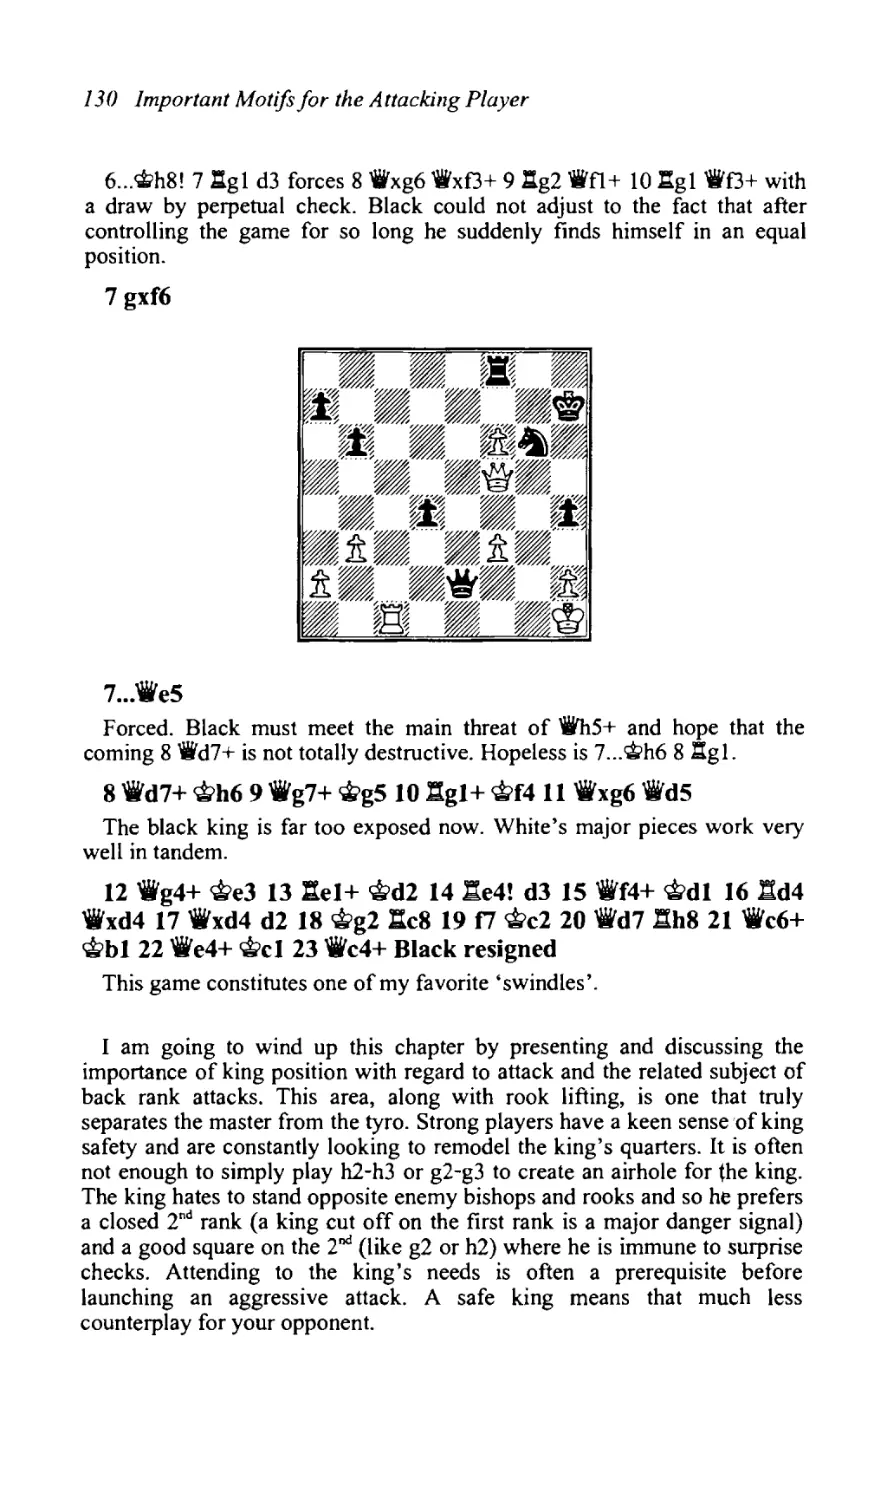
3 Kings Castled on Opposite
Sides
In this chapter I am going to focus on the attack when kings have castled
on opposite sides. The classic means to whip up a menacing attack is
through the pawn storm - ruthlessly shoving forward your pawns.
Overwhelmingly, the majority of this type of situation arises out of Sicilian
Defenses, but more than a few also come out of I d4 openings such as the
Queen's Gambit Declined, Nimzo-Indian and King's Indian. And a few
come out of offbeat I e4 eS lines such as the Center Game (see below).
Obviously, pawn storming leads to exciting tense battles where one small
slip can be costly. Often the attacker must first attend to the needs of his
king, anticipating the heavy weather and girding the ramparts before
launching his own assault. Invariably in the Sicilian this means playing 'i!i>bl
after castling long to get the king off the c-file. White must also find a good
retreat square for the knight once it is kicked by ... bS-b4.
Once the pawn storm commences, care must be taken to prevent the
defender closing lines. This may mean White should avoid situations like
g4-gS allowing liJhS which blocks or slows the further advance of the
kings ide pawns. Material balance is not nearly as important in pawn
storming operations as in generic attacking cases. Investing heavy material
for the sake of breaking through is a common occurence in these attacks.
Let's start by examing two fine attacking games by one of the modem era's
most relentless attacking players, Alexander Shabalov.
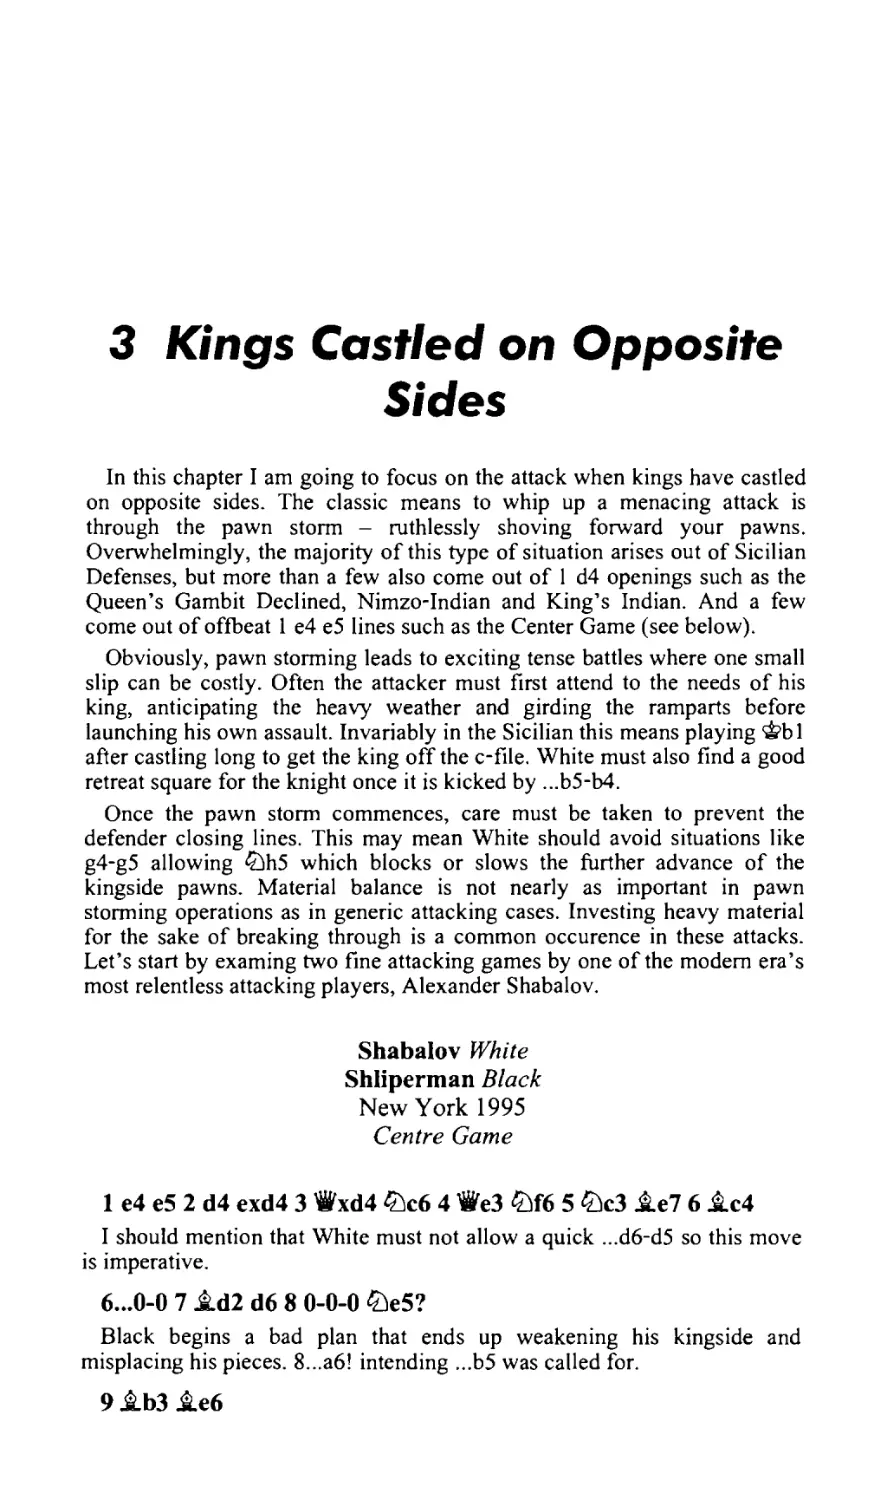
Shabalov White
Shliperman Black
New York 1995
Centre Game
I e4 e5 2 d4 exd4 3 ~xd4lDc6 4 ~e3lDf6 5lDc3 iLe7 6 iLc4
I should mention that White must not allow a quick ... d6-dS so this move
is imperative.
6... 0-0 7 iLd2 d6 8 0-0-0 lDe5?
Black begins a bad plan that ends up weakening his kings ide and
misplacing his pieces. 8... a6! intending ... bS was called for.
9 iLb3 iLe6
Kings Castled on Opposite Sides 51
10 f4!
Note how quickly Shabalov places his forces on optimal attacking
squares. Soon he will have a powerfully placed knight on f5 combining
with the queen to cast a long shadow over Black's king position.
10...ttJe4 11 i.xe4 i.xe4 12 ttJO e6 13 ttJd4! I:te8 14 'it'g3 i.f8 IS
libel 'ike7 16 b3 i.a6
16 ... .lte6 was also unpleasant. A very strong continuation would then be
17 f5! .ltd7 18 .tg5 .lte7 19l:.d3! preparing 'ii'h4 and l:th3.
17 ttJfS 'it'd7 18 'ifgS!
The queen clears the third rank for a rook lift.
18...:te6 19 l:e3 ~h8?
Black had to play 19 ... lIae8 when 20 ttJxg7?! h6! 21 'iVxh6 ttJh7! casts
doubt on the attack. Better is 20 l:de 1 to support e4 while preparing lIg3
with advantage to White.
20.:th3 :tae8
52 Kings Castled on Opposite Sides
21..te3!
White brings up the reserves. The bishop will supply decisive firepower
from d4. The e4 pawn is untouchable as 21...ti)xe4 22 ti)xe4 l:txe4 23
l::txd6! 'iVc8 24 'iVh5 h6 25 ti)xg7! ventilates the king position.
21. •.liJg8 22 ..td4 I:g6 23 'ifh4 h6
The first crack in the ramparts appears. Now a pawn storm finishes the
job. Black cannot organize any kind of defense and he has no counter-attack
to distract White.
24 g4! ..te7
24 ... '>it>h7 is met by 25 g5 d5 (what else?) 26 'iVg4! threatening ti)xh6 and
a rout is evident.
25 g5 'ife6
A sickly defense, but providing for a beautiful conclusion. White's
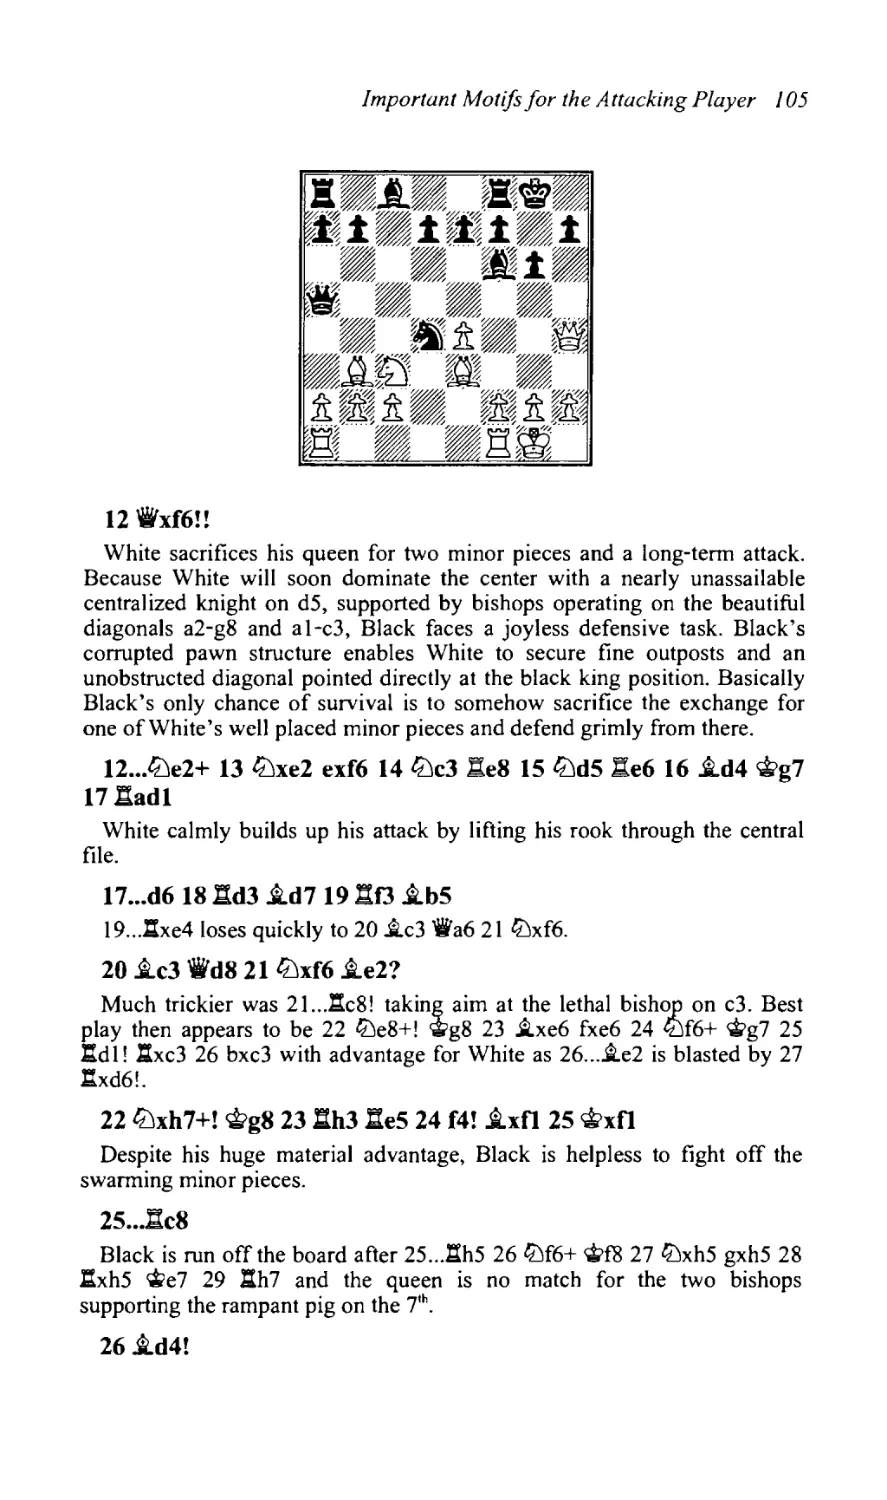
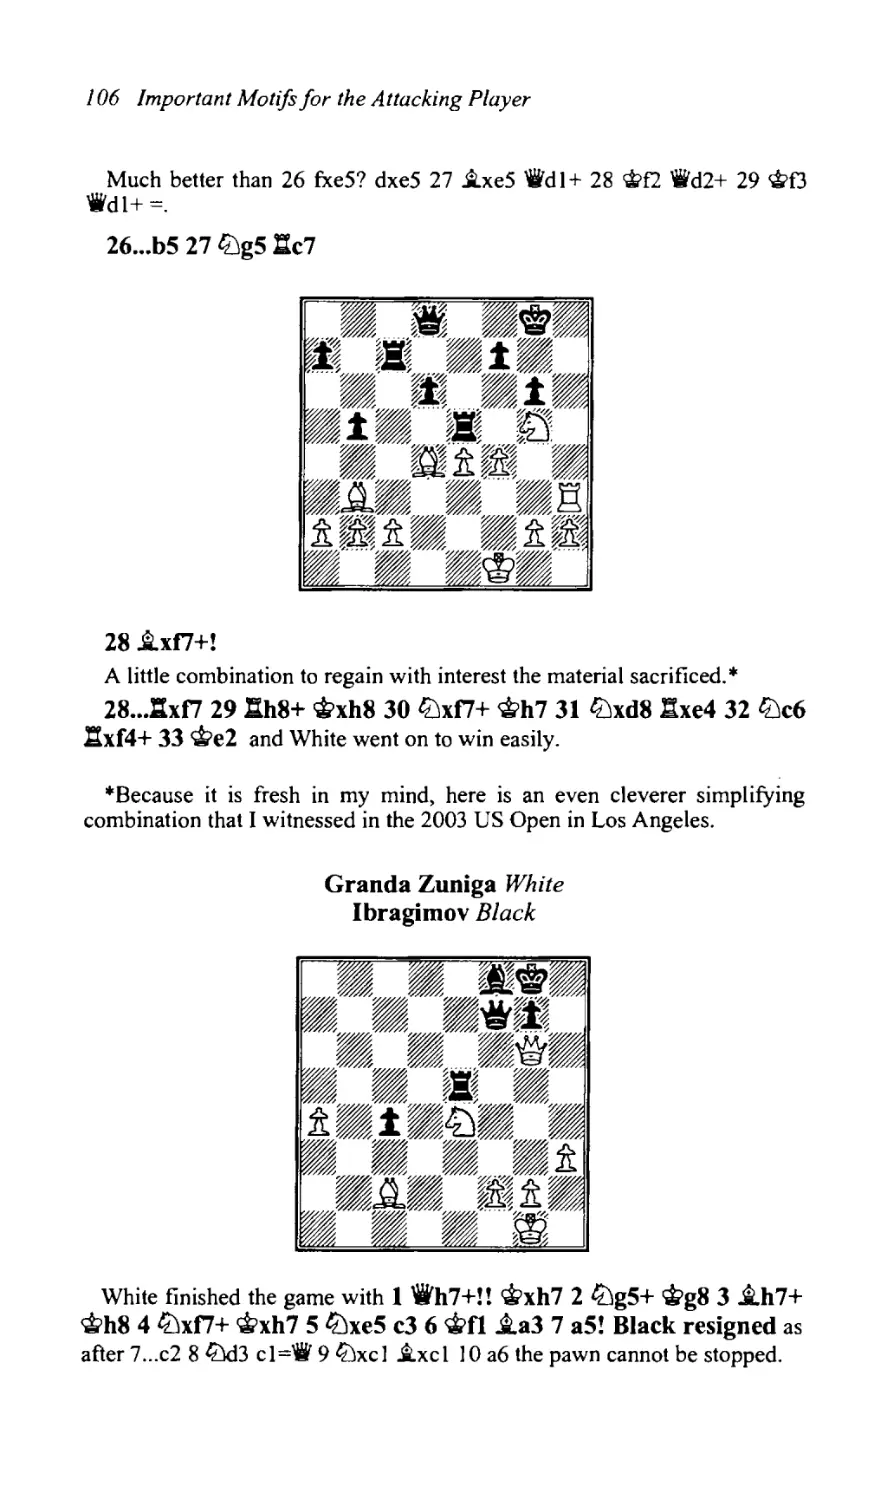
accurate build-up now leads to the pleasure of blowing apart the king
position with well-calculated sacrifices.
26liJxg7! lhg7 27 f5 'ii'd7
28 gxh6!! J..xh4 29 hxg7+ <ii>h7 30 :xh~+ liJh6 31 :gl
Now 31 ... 'iVd8 32 f6 c5 33 i.e3 'ii'xf6 34l:txh6+ li'xh6 35 i.xh6 wins.
31 •••:g8 32 ..tf6 d5 33 :xh6+! Black resigned
Black will be mated soon after 33 ... '>it>xh6 34l:tg4.
Shabalov White
Ivanov Black
U.S. Championship, Key West 1994
Centre Game
1 e4 e5 2 d4 exd4 3 'ifxd4liJc6 4 'ii'e3
Kings Castled on Opposite Sides 53
4•..tbf6
Allow me to throw in a little theory. The modern anti-Center Game recipe
is 4... g6!? which stops White from playing the typical Center Game plan of
~g3 to pressure g7. After 5lDc3 iLg7 6iLd2 we then consider:
I) 6 ... lDge7?! 70-0-00-0 8 h4! d5 9 h5! d4 10 'iVg3 dxc3 II ~xc3 ~e8
12 hxg6lDxg6 (l2 ... fxg6 13 iLc4+ %:rf7 [13 ... c;.&ih8 14lDf3 iLxc3 I5lDg5 is
crushing] 14 lDf3! iLxc3 15 lDg5 and White wins) 13 ~h2! h6 14 iLxg7
c;.&ixg7 15 ~xh6+ 'iti>f6 16 %:rh4! and White has a fierce attack easily worth
the material sacrificed.
2) 6 ...lDf6! 7 e5!? (Black gets easy play after 7 0-0-0 0-0 8 ~c4 l:te8 as
seen in many games) 7... lDg4 8 ~g3! (8 ~e2 d6! 9 exd6+ iLe6 gives Black
too great a lead in development, and 9 h3?! lDgxe5 10 f4 lDd4 11 'iVe4
~h4+ 12 c;.&idl 'iVa favors Black) 8 ...d6 (8 ... lDgxe5?! 9 f4 lDd4 10 0-0-0
gives White excellent play for the pawn) 9 O-O-O! 0-0 (9 ... dxe5 10 h3 lDf6
II iLg5 iLd7 12iLb5 gives White great play for the pawn, and 9 ... ~xe5!?
10 f4 ~g7 II l:te I + <it'f8 12 lDf3 also offers White fair compensation) 10
i.e2! lDgxe5 II f4lDd7 12 h4! intending h5 with a nice attack developing.
The Center Game has been around since the dawn of chess, but I have
searched in vain for 8 'iVg3!? in the databases.
5 ~c3
iLb4 6 .i.d2 0-0 7 0-0-0 l!e8 8 ~g31be4
8 ... lDxe4 9lDxe4 l:txe4 10 c3 (10 i.f4 ~f6 II lDh3 d6 12 i.d3 has also
been tried, when Black should play 12 ... %:re8 after which White lacks
sufficient play for the pawn) 10 ... i.d6 II f4 gives White reasonable
compensation.
9 a3 .i.d6
More active is 9... %:rg4. The game continuation enables White to take a
lead in development and exert creeping, building pressure on the black
king.
10 f4 IIe8 11 ~f3 .i.c5 12 .i.d3 d5
12 ... d6 comes into consideration, keeping control over e5. Play might
then proceed 13 lDg5 (White needs to utilize the e4 square to probe the
54 Kings Castled on Opposite Sides
black position) 13 ... ltJd4 14 l::tdel i.fS 14 i.xfSltJxfS IS "h3ltJh6 16 fS!
'ir'd7 17 ltJge4 ltJxe4 18 ltJxe4 'ifxfS 19 i.xh6 'ii'xh3 20 gxh3 l::txe4 21
l::txe4 gxh6 22 l::te7 with an endgame plus for White.
l3lIde1lhel+ 14 .:txe1
Let's try to make sense of this position. Does White really have enough
compensation for his pawn? He has a lead in development and well-placed
pieces poised to support a kingside attack. The standard defensive plan of
trading off pieces is not easily achieved here. Also, a counter-attack against
White's king is very remote. Ivanov's next few moves appear logical but
within a few moves he faces a fierce attack as Shabalov finds a way to hurl
his kingside pawns forward to break into the black king position.
14••• tL'le7 15 tL'lh4
IS ltJeS! at once.
15••• tL'lg6 16 tL'lO tL'le7
A tacit draw offer.
17 tL'le5! .i.fS
17 ... c6 18 'iff3! (intending 19 g4) 18 ... i.fS 19 g4 i.xd3 20 ltJxd3 i.d4 21
ltJe2! (not the hasty 21 gS? i.xc3 22 i.xc3ltJe4 and the attack fizzles out)
2l...i.b6 22 lbg3! and the pawn storm is ready to roll.
18 .i.xfS tL'lxf5 19 'ifd3 tL'le7
19...lDd6 20 ltJxdS is better for White thanks to his fine centralization.
20 g4 c6 21 g5 tL'ld7 22 tL'lg4!
A very instructive move. The side with greater freedom should generally
avoid exchanges. Also, this configuration is a very promising one with the
knight backing up the pawn storm. The reason is that the knight can quickly
fill in holes like h6 and f6 created by stormers.
22••• tL'lb6?
Kings Castled on Opposite Sides 55
Correct was 22 .. .'iVf8! planning to meet 23 f5 with ... f6 while also
preparing .. J:te8. White should then play 23 h4! l:te8 24 h5 li'lc8 25 l:tfl
(avoiding exchanges again!) 25 ... li'ld6 26 g6! with promising attacking
chances. The text releases Black's vital supervision of the f6 square.
23 f5 'iid7 24 lUI ! iLd6
Perhaps Black intended 24 ... li'lc4 but saw too late the kilIer shot 25 li'le4!
attacking the bishop and threatening 26li'lef6+!.
25 'iih3!
White indirectly protects f5 and swings the queen to a better attacking
square. The execution phase is about to begin. There is no defense now to
f6.
25 ...ebh8 26 f6 gxf6 27 gxf6 tLlg6 28 iLh6! iLf8 29 iLg7+!
The culmination of the attack.
29... i.xg7 30 fxg7+ ebxg7 31 ~b6+ ebb8 32 tLlf6 Black resigned
Our next case demonstrates the perils of dare-devil pawn grabbing on the
same side as your king.
Morozevich White
Van Wely Black
Wijk aan Zee 2002
French Defense
1 e4 e6 2 d4 d5 3 ~c3 dxe4 4 tLlxe4 tLld7 5 .i.d3 ~gf6 6 ~e2 c5 7
tLlxf6+ ~xf6 8 dxc5 .i.xc5 9 .i.d2 0-010 O-O-O!?
56 Kings Castled on Opposite Sides
The latest fashion of the Rubinstein French has given Black the
opportunity to fork the a2 and g2 pawns with 1O ...'ii'd5. White's pieces are
better placed in the event of a generic mutual attack on opposing kings so
this represents Black's best attempt to steer the game his way. The real test
is whether Black can grab the pawns on the kingside and survive the
onslaught that follows.
lO...'ird5!
If Black reacts routinely, White is very well placed to "make contact" on
the kingside with a pawn storm thanks partly to the time gained in attacking
the knight on f6 with a later g4-g5. Therefore Black's best chance in this
opening does appear to be this double attack on the a2 and g2 pawns.
II ~bl
II ~c3!? is also possible and seems to be a conservative alternative to the
more radical game continuation which gambits two pawns.
11..:ii'xg2!?
Now a brief theoretical digression: II...e5! is much safer, when 12 iLc3?!
'il'xg2 (12 ...~d4 is =) 13 "xe5 (1311Jf3 ..ig4 14 'ihe5 .i.xf2 1511Jg5 .i.xdl
16 ~xh7+ ~h8 17 ~e4 .i.d4!! 18 ..ixg2 (forced as 18 .i.xd4 .i.xc2+ 19
.i.xc2 'ii'xh I, or 18 'ii'xd4 'ii'xg5) 18 ... .i.xe5 19 ~xeS J:tae8! is better for
Black) 13 ...'il'xhl 14 'ii'xcSllJe4! IS ~xe4 (IS 'ii'xfS+ 'ittxfS 16 ~b4+ llJd6!
wins) IS ...'ifxe4 16 J:tel J:td8! defends for Black.
12 tbfJ'ti'xfl 13 'ire5
White welcomes 13 ... 'iVxf3 14 'ii'xc5 b6 IS 'ifeS when Black will be
unable to shake off the long diagonal pressure. The critical defense now is
the retreat 13 ... .i.e7! which bolsters the kings ide and prepares the retreat
...'ifcS. A promising. continuation is then 14 J:thgl! (several games have
continued 14 J:tdfl 'WcS 15 'ifg3 llJhS 16 'ii'h3 g6 which looks tenable for
Black) and now:
I) 14 ...'ifxf3 IS J:txg7+ 'ittxg7 16 J:tgl+ 'ith8 17 ..ih6 'iff2 (17 ... J:tg8 18
J:txg8+ 'ittxg8 19 'il'gS+ and mate next) 18 ..ig7+ 'itg8 19 'ii'g5 'ii'xgl+ 20
Kings Castled on Opposite Sides 57
"xg I tUg4 21 'ilxg4 (21 iLxf8 is also good) 21...f5 22 'ifg I! lIn 23 iLe5+
~f8 24 i.e2! and Black is in trouble;
2) 14 ... g6 15 lldfl 'ifc5 16 'iff4 (16 'ifel is also interesting) and White
must have enough compensation for the two pawns invested. All of his
forces are poised for attack and Black is 2-3 moves behind in development
and already saddled with a kingside weakness. Van Wely underestimated
the danger to his kingside and pays a heavy price.
13 ...tiJd7? 14 i.xh7+!
White chips away at the king position while maintaining the momentum
of the attack. This sacrifice enables White to bring his queen and
undeveloped rook swiftly to their optimal attacking squares.
14...'it>xh7 IS 'ii'hS+ 'it>g8 16 llhgl
This position is well worth studying carefully. Let's examine the natural
defensive try 16... tUf6. White batters his way through the barriers with 17
lIxg7+! ~xg7 18 'ifg5+ 'iifh7 19 'li'h6+ ~g8 20 'li'xf6 iLd4! (the only
answer to the threat of i.c3) 21 'ifg5+ i.g7 22 l:tgl 'ifxg1+ 23 'ifxgl f6
(forced) 24 h4! and Black cannot defend against the unflagging attack
sparked by the h-pawn. Probably Black's sturdiest defense is 16... e5!,
which has several points behind it, not least of which is that the e6 square
may become a flight square for Black's king in certain lines. For instance,
the dynamite method 17 lIxg7+ r;j;xg7 18 i.h6+ is answered by 18 ... ~f6!
19 lIxd7 'iWfl + 20 i.c 1 'iiPe6 21 l:td 1 'ifxd 1 22 tUg5+ cJ;e7 23 'iixd I f6 and
Black is happy. After 16 ... e5, White's most effective continuation appears
to be 17 lIdfl! "xg 1 (17 ...'Ii'e2 18 i.h6! i.xgl 19 lIxg 1 sets up a mating
breakthrough on g7) 18 tUxgl with some advantage to White despite the
rough material equality. White can renew his attack once the knight jumps
back into the game.
16•..i.e3 17 i.xe3! 'ii'xe3 18 ':'g3!
This move is strong because it keeps Black busy defending against a
doubling of rooks on the g-file while also creating the option l:h3 or 1If3,
attacking 'targets of opportunity'.
58 Kings Castled on Opposite Sides
18.•.'ii'c5??
Not sUlprisingly, 18 ...'iif4!, planting the queen in the thick of the defense,
poses the most trouble here for White. After 19 l::tdgl l::td8! (creating
needed running room for the black king) White would have to discover the
powerful retreat 20 li:)d2!! which suddenly unmasks threats along both the g
and f files. Black's best defense then would be 20 .. .'o1;>f8 21 l::tf3 li:)f6
(2l...'iixf3 22li:)xf3 should win for White) 22 'iih8+ ~e7 23 'iixd8+ 'otxd8
24 l::txf4 ~e7 25 l::txg7 i.d7 and White still has some technical problems to
overcome. The game continuation allows a quick mate.
19 'ifh6! Black resigned
19 ... g6 20 l::th3 forces mate.
Rozentalis White
Luther Black
Panonno 2001
French Defense
1 e4 e6 2 d4 d5 3 lZ'ld2 c5 4 lZ'lgt3 cxd4 5 exd5 'ii'xd5 6 il.c4 'ii'd6
7 'ii'e2lZ'lf6 8lZ'lb3lt:'!c6 9 il.g5 a6 100-0-0 b5 11 il.d3 il.b7 12 ~bl
il.e7 13 lZ'lbxd4lZ'lxd4 14lZ'lxd4 'ii'c5 15 h4! 0-0 16 .:thel ~fe8
17lZ'lt3
Rozentalis rejected 17 li:)xe6 fxe6 18 'iixe6+ because of 18 ... ~f8! (not
18 ... ..t>h8 19 i.xf6 winning) 19 l::te5 i.d6! and White's 'attack' is just a
two-move wonder.
17... h6
This weakening of the black king position leads to serious problems later.
Black must reckon with potential.i.xh7+ shots (for instance 17... b4 18li:)e5
a5? 19 i.xf6 i.xf6 20 i.xh7+! ~xh7 21 'ii'h5+ 'otg8 22 'ii'xf7+ ..t>h7 23
li:)d7 and wins) but a steadier defense was 17 ... l::ted8 18 li:)e5 i.d5! which
Kings Castled on Opposite Sides 59
stops ttJxf7 ideas and prepares simplification with ....tc4. The sac 19
.txh7+ ~xh7 20 "h5+ ~gS 21 "xf7+ is only good enough for a draw in
this line.
18lLle5 hxg5?!
Black's king will feel a cold draft after this impatient move. Black should
think about a plan involving ... .td5 and ...1lacS in order to play for ... .tc4.
An instructive continuation might then be IS ....td5 19 f4 l:tacS 20 g4! b4
21 .ixh6! (better than 21 .ixf6 gxf6!) 2l...gxh6 22 g5 ~a5 23 b3 .txb3 24
axb3 ttJd5 25 "h5! ttJc3+ 26 ~c1 and Black's counterattack falls short.
The move 21 .txh6! is a characteristic line-opening sacrifice in that type of
formation.
19 hxg5 g6 20 gxf6 .i.xf6 21 f4 :ad8 22 'ifg4
22 .••.i.g7?
Black's queen must come to the rescue of her beleaguered mate with
22 .....f8 although White's attack is gale-force after 23 l:te3! 'fig7 24 l:thl
followed by l:teh3. 22 ....txe5 fails to relieve the pressure as 23 l:txe5 "f8
(23 ... l:td5 24 .ixg6 wins) 24 l:th5 'it'g7 25 l:th4 followed by tripling major
pieces on the h-file should settle Black's fate.
23lLlxt7!
23 .txg6 was also a knock-out blow but this is very convincing.
23 ...~xt7 24 .i.xg6+ ~f8 25 llxd8! lbd8 26 'iixe6 Black
resigned
It's mate after 26 .....d5 27 "eS+! l:txeS 2Sl:txeS.
The King's Indian Defense comprises a wide array of structures and
formations and castling on opposite wings is often seen in such lines as the
Siimisch Variation (l d4 ttJf6 2 c4 g6 3 ~c3 .ig74 e4 d6 5 f3). In the next
example, we see White violently exploit holes in Black's formation to whip
up a devastating attack.
60 Kings Castled on Opposite Sides
Tegshsuren White
Shulman Black
Foxwoods 2002
King's Indian Defense
1 d4 lDf6 2 c4 g6 3 lDc3 i..g7 4 e4 d6 5 1i.e2 0-0 6 lDo e5 7 1i.e3
lDg4 81i.g5 f6 9 i.h4lDc6 10 d5lDe7 UlDd2 h5 12 h3lDh6 13 g4
hxg4?! 14 hxg4lDn 15 'iWc21i.d7 160-0-0 c5? 17 :h2lDc8?
Black has underestimated the dangers lurking in this position. He figures
on neutralizing White's expected doubling of rooks on the h-file with
... <j;g7 and ...11hS but fails to consider the consequences if he ruthlessly rips
open lines with f2-f4. This is all the more surprising since this is White's
only method of creating greater range for his pieces. He wasted time with
17 ... lZ'lcS instead of generating counterplay with 17 ... a6 and ... b5. His
hedgehog-like kingside would not be an easy target if he kept his minor
pieces in place while seeking counterplay with the ... b5 advance.
This negligence enables White to engineer a smashing attack based on the
h-file coupled with a dramatic central burst.
18 1i.g3 i..h6?
The losing move. Black must sit tight on the kings ide and seek a
counterattack with 18 ... a6 and ... b5. Play might continue 18 ... a6 19 f4 exf4
20 Sl.xf4 b5 21 11dhllZ'le5! 22 11h7! lZ'lxg4 23 'ir'dl! lZ'lf2 24 'iVgl lZ'lxhl 25
'iVxg6 1117 26 11xhl with strong compensation for the exchange.
19 f4! exf4
Kings Castled on Opposite Sides 61
20 e5!! <i;g7
20 ... tt'lxe5 21 l:txh6 fxg3 22 l:txg6+! ~f7 23 l:th6! l:th8 24 l:th7+ leads to
a winning attack for White.
21 exf6+ 'ii'xf6 22 tDce4
After the breakthrough started by 20 e5, White's pieces quickly find
excellent attacking squares.
22 ...'iie7
22 ... 'ii'e5 walks into 23 il.h4 g5 24 tt'lf3! ~a4!? 25 'iVbl 'ii'e8 26 tt'lexg5
and Black is doomed.
23~h4! g5
I had the distracting pleasure of watching this game from an adjacent
board and at this point remembered thinking to myself "what about 24
~xg5?" before turning to study my own game. The next time I looked over,
Black's king was on the 4th rank all by itself. The following combination, if
followed correctly, should end resistance swiftly.
24 ioxg5! ~xg5
62 Kings Castled on Opposite Sides
24 ... lLlxg5 25 l:tdhl f3 26lLlxg5 'it'xg5 27 l:txh6 'ii'xh6 28 %:txh6 'it>xh6 29
lLlxf3 is overwhelming.
25:h7+!
The key move to find when playing 24 ~xg5. On an intuitive basis, I
would just have to play this sac without examining it all the way to mate. It
is very rare that a king can survive the following type of 'march or die'
expedition.
25•.•<ilxh7
25 ...~g8 26lLlxc5! ends resistance quickly.
26lLlxg5+ <ilh6
Or 26 ... ~g7 27 'iWh7+ ~f6 28 lLlce4+ 'it>e5 29 lLlf3 mate. At this point
Mr. Tegshsuren was becoming visibly nervous. And he became focused on
only one line of play. Ifhe had looked at the/orcing line 27 :hl+ he would
surely have discovered the mate that follows 27 ... 'it>xg5 28 lLlf3+ Iti>f6
(28 ... 'it>xg4 29 %:tgl+ mates quickly as well) 29 g5+! lLlxg5 30 %:th6+ 'it>f7 31
'iVg6 mate. The line he chose is also enough to win, but actually nailing
down the mate became pretty frustrating.
27 'iih7+ <ilxg5 28 'iig7+ <ilh4 29 'ifh7+
White was gaining time on the clock.
29...Wg5 30 'ifg7+ <ilh4 31 nh1+! <ilg3
Now there was a large crowd of spectators following this game, including
myself. King hunts have a special allure, especially when the attacking side
is very short on time. At this point I noted the double-attack possibility of
32 'ii'h7! which threatens both 33 'iVh2 mate and also 33 'iVd3+. The end
might then be 32 ... f3 (32 ...%:th8 33 'ii'd3+ forces mate) 33 'ii'h2+ ~xg4 34
'Wh3+ 'it>f4 35 'ii'xf3+ ~e5 36 %:tfl 'Wh4 37 'We3+ 'ii'e4 38 'ii'xe4 mate.
Tegshsuren took another path.
32lLlf1+ <iln 33 :h2+ <;t;gl 34 'ifc3 'iWe3+
Kings Castled on Opposite Sides 63
I expected 34 .....e4 here, although White wins convincingly after 3S
"el.
35l2Jxe3 ~xh2 36l2Jfl+ ~gl 37 'ifel
Now I was thinking, "gee this is not so easy for White". The natural
impulse here is to play checks, but Tegshsuren had the presence of mind to
firmly arrange a mating net.
37...~g2 38l2Jd2
38 lDh2! was a little quicker, but with little time left the text makes far
more sense.
38..•l2Je5 39 i..fl + ~gl 40 i..e2+
40 'iWe2! f3 4IlDxf3+ and mate next.
40 ...~g2 41 'iffl+ ~h2 42 'iff2+ ~h3 43l2Je4!
Threatening mate on gS.
43 .. J:tg8 44 'ifxf4 Black resigned
Gelfand White
Kramnik Black
Berlin 1996
Semi-Slav Defense
1 d4 d5 2 c4 c6 3 l2Jc3 4.'If6 4 l2Jf3 e6 5 e3 l2Jbd7 6 'ifc2 i..d6 7
g4!? i..b4 8 i..d2 'iie7 9 a3
Theory alert! Ponomariov-Vallejo Pons, Linares 2003 continued 9 .i.d3
e5 10 cxd5 .i.xc3 II .i.xc3 e4 12 dxc6 exd3 (l2 ...bxc6 13 g5 exd3 14 fxe7
is good for White) 13 cxd7+ 'ii'xd7 14 'iib3 (14 "xd3 'iWdS! is strong)
14 ...'iixg4 15'iidllDe4 16 lDeS 'i'xdl+ 17~xdl f618lDxd3i..g419l:tcl
.i.f3 20 ~g 1 <3;f7 21 lDcs lDd6 22 lLlb3 lDe4 23 lDd2 lDxd2 24 <3;xd2 and
White has a fairly good extra pawn. Gelfand's move has some long-term
drawbacks, notably the weakening of his light squares.
9...i..xc3 10 i..xc3 b6 11 i..d3 i..a6 12 'iia4?!
This does not work out very well. Better was 12 .i.b4 in order to activate
the dark-squared bishop. Then, 12 ... c5 13 dxcS bxcS 14 .i.c3 .i.xc4 IS
i..xc4 dxc4 16 gS lDh5 17 'i'e4 looks reasonable for White.
12•.. dxc4 13 'iixa6 cxd3 14 'ifxd3?
White should try to keep Black off balance with 14 'iib7 0-0 IS lDeS!
when the most ambitious continuatrion for Black is 15 ...'iie8! (getting out
of the pin) 16 lDxc6lDds with good chances.
14.••0-0 15 g5l2Jd5 16 i..d2
64 Kings Castled on Opposite Sides
16... f5!
This powerful move serves several purposes. First, it secures the position
of the knight on dS by discouraging e3-e4. Also, White finds it much more
difficult to create a meaningful kings ide attack. Black can meet any
potential pawn storm with either ... h6 (in the event of gS-g6) or ... g5-g6 (in
the event ofh5-h6).
170-0-0
Obviously 17 gxf6? 'ii'xf6 is a non-starter. White must find adequate
housing for his king and the kings ide is chock full of holes.
17... cS!
Kramnik does not waste any time creating play in the area of the white
king. With the powerfully centralized and unassailable knight on d5 already
poised for attack he ruthlessly opens lines and files for his other forces.
18 ~bl bS!
A slower-paced move like IS ... l:Iac8 allows White time to organize a
defense with 19 Acl. There is now a powerful positional threat of ... c4
followed by ... as with a pawn avalanche looming so White must accept the
proffer.
19 'iixbS .:tab8 20 'ifaS
20 "a4 cxd4 21 exd4 lLl7b6 22 'iVa6 lLlc4!! 23 'ir'xc4 "xa3 crashes
White's defenses.
20•••I;[b3!
A very powerful penetration by the rook where it exerts pressure in all
directions.
21 ~a2?
21 ~aI was the only try, although Black can exploit White's weaknesses
on b2 and the long a8-hi diagonal with 2l...c4! 22 Acl lLl7b6! 23 lLle5
'i!Vb7 (threatening to hit the rook on hI) 24 J:lhfl (protecting f2 is important)
24 .. .l:txb2! 2S i.b4! (25 'it>xb2 lLla4+ 26 ~c2 'i!Vb3 mate) 25 ... c3! 26 i.xc3
Kings Castled on Opposite Sides 65
(26 ..txf8? ltJc4!! 27 ltJxc4 'lib3 forces mate) 26 .. .l::tb3 27 ..tb4 ltJxb4 28
axb4 ltJd5 and White's king is still suffering. This was a considerable
improvement over the game continuation however.
21 ...'utb8 22 'ubi
22 ... eS!
A move of terrific force that exploits the position of the king on a2 and
the knight on f3. Now 23 dxe5 (23 ltJxe5 ltJxe5 24 dxe5 'iVb7 wins on the
spot) 23 ... ltJxe5 24ltJxe5 'ii'xe5 25 ..tb4 "iVe6! (25 ... ltJxb4+ is also good but
this leads to a certain KO) 26 ~xb3 ltJb6+ 27 'iittc2 'ii'e4+ 28 'iittd2 lllc4+ 29
~e2 "iVc2+ 30 c;i;>f3 ltJe5+! 31 'it>g2 'ii'e4+ 32 ~gl ltJf3+ and Black will
clean out both white rooks.
23 Abel 'ife6 24 ~al exd4 25 'uxc5?
Stiffer resistance was offered by 25 'ii'xa7, although Black is clearly on
top after the prosaic 25 ... dxe3 26 fxe3 f4! 27 g6!? fxe3 28 gxh7+ 'iitth8 and
White is at the end of his resources. That would have cheated us of a
beautiful finale.
2s ...lbxc5 26 'ii'xcSlbc3! 27lbxd4
66 Kings Castled on Opposite Sides
27•..ltxb2!! 28 l:xb2
A real spoil-sport might have tried 28 "fS+, 'forcing' 28 ... ':'xfS, but
Gelfand, who must have truly appreciated this brilliant game, sportingly
allows the final touch.
28.. Jhb2 'iVa2+!! White resigned
The principle of quick mobilization is illustrated in this quick and violent
encounter between two elite GMs. White forges a powerful attack by first
investing a pawn and exchange to damage the black king's defenses and
then follows up with some careful setup moves and ends it with a sudden
and decisive pawn storm.
J.Polgar White
Smirin Black
Istanbul Olympiad 2000
Pirc Defense
I e4 g6 2 d4 i.g7 3 lbc3 d6 4 f4 lbf6 5 lbf3 0-0 6 i.e3 b6 7 'iWd2
c5 8 0-0-0 cxd4 9 i.xd4lbc6
Retreating with the bishop allows Black to catch up in development and
be well positioned to create active counterplay on the queens ide. Polgar
relinquishes the bishop for the sake of quickly getting on with a kings ide
attack. There is a positional risk involved as the black bishop will become a
potentially deadly adversary.
10 i.xf6 i.xf6 11 h4 i.g4
11...h5 here makes some sense, although White has some attractive
attacking ideas like 12 J.b5 J.b7 13 g4!? hxg4 14 h5 gxf3 15 hxg6 hxg6 16
'ii'h2 ':'f7 (l6 ...~f7 17 'iWh7+ ~e8 18 'iWxg6+ 'iti>d7 19 e5 looks strong) 17
J.c4 'ifi>fS and now 18 "h6+, 18 J.xf7 and 18 ':'dgl all look worth
investigating.
Kings Castled on Opposite Sides 67
12 h5!
White must keep up the pace before Black has a chance to organize.
12....ixh5
White happily invests an exchange to disfigure the black king position.
The unguarded knight on c6 enables White to quickly shift her queen to its
optimal attacking square.
13 ~xh5! gxh5 14 ~d5 iic8?
14 ... .i.xc3 15 bxc3 li.)a5 (l5 ... l:tc8 16 'ii'xh5 <t;g7 17 .i.a6 is overwhelming) 16 'ii'xh5 f6 17 e5 'ii'e8 18 'ii'h4! gives White a very powerful
attack thanks in particular to the wretched placement of the knight on a5.
Play might continue 18 ... dxe5 19 .i.d3 'ii'n 20 l:th I h5 21 fxe5 l:tfd8 22
li.)d4 fxe5 23 'ii'g5+! 'ikg7 24 .i.h7+!! ~xh7 25 'ii'xh5+ <t;g8 26 li.)e6 and
Black is lost. Black has other attempts to defend, but in all cases, due to the
poor placement of the knight, White enjoys more than enough
compensation for the exchange.
15 iVxh5 .ig7
Black must anticipate e4-e5 followed by .i.d3/li.)g5.
16 e5
The attack pretty much plays itself now. There are good squares,
diagonals and files available for the white army and Black does not have a
wisp of counterplay. Smirin tries to drive off the powerfully placed queen
now but his next move has the consequence of boxing in his king.
16...~e8
The alternatives were bleak, tor instance 16 ... h6 17 li.)h4 e6 18 l:txd6 'ii'e8
19 .i.b5 a6 20 .i.xa6 l:td8 21 li.)e4 l:txd6 22 li.)xd6 'ika8 23 .i.c4 'ika4 24 'ikf3
and, with careful play, White should be winning.
17 'ii'h3!
A very fine retreat that keeps up the pressure on Black's king and avoids
defenses based on ... f5 or ... f6. This retreat also comes with a threat, for
instance 17 ... dxe5 18 lbg5! h6 19 'ikf5 hxg5 20 ~d3 with mate soon to
follow.
17... h6 18 .id3 tiJb4
Black tries to deflect the bishop from its deadly diagonal and also start a
counterattack, but White comes crashing through with a sudden pawn
storm.
19 .ie4 e6
Forced. 19 ... f5 20 .i.xfS helps little.
68 Kings Castled on Opposite Sides
20 f5!
White carefully evaluated that Black's coming queens ide distraction
could not disturb the relentless attack on the other side of the board.
20 .. .lbc3
Black's position also crumbles after 20 ... f6 21 exd6 .l:txc3 22 bxc3 tDxa2+
23 ~b2 ~5+ 24 'it>xa2 .c4+ 25 '1ti>b2 .xe4 26 d7 .l:td8 27 fxe6 etc.
21 f6!
Black cannot meet the threat of .g3 without avoiding decisive material
loss. The white king is ready to gobble the kamikazes.
21..:iVbS
21.....a4 22 bxc3 tDxa2+ 23 ~b2 'ii'e4 24 'ii'g3 'ii'g6 25 'ir'xg6 fxg6 26
fxg7 l:tc8 27 'it>xa2 wins easily.
22 'i'g3 Black resigned
Black is set to be mated after the spite checks starting with 22 .. .l::txc2+ 23
i.xc2 tDxa2+ 24 'i!?d2 'iib4+ 25 'it>e3 'ii'c5+ 26 .l:td4.
Allow me now to give equal time for a fine Black victory in the 6 i.e3
Variation of the Austrian Attack. The young Viswanathan Anand wins the
fight for the initiative in this opposite castling variation of the Austrian.
Beliavsky White
Anand Black
Munich 1991
Pirc Defense
1 d4 d6 2 e4lLlf6 3lLlc3 g6 4 f4 .tg7 slLlo 0-0 6 .te3 b6 7 eS?!
This line has gone completely out of fashion thanks mainly to this game.
The early theme of this battle is the method Black uses to attack the center
while swiftly mobilizing his pieces.
Kings Castled on Opposite Sides 69
7...liJg4 8 i..gl cS 9 h3 tiJh6 10 dS i..b7 11 ~d2 tiJfS 12 i..h2
dxe5 13 fxeS e6!
In classic hypermodern style, Black undermines White's impressivelooking center. Ifnow 14 d6? White's position falls apart after 14 ... lLld7! IS
~e2 ~h6 16 'ild3 lLle3. If White tries to develop and support the center
with 14 ~c4, it is Black who takes over there with 14 ... bS! IS lLlxbS exdS
16 ~d3 d4 17lLlbS ~h6 18 'ife2 a6.
140-0-0 exdS 15 tiJxdS tiJc6 16 c3 tiJcd4! 17 tiJf6+ i..xf6 18 cxd4
i..g719 dS
19... c4
Black launches immediate counterplay against the diminishing defenses
of White's king while also limiting the scope of the white light-squared
bishop. White would love to chase off the well-placed black knight with 20
g4 but then dS becomes chronic after 20 ... lLle7. He must therefore settle for
the second-rate developing move 20 ~e2.
20 i..e2 l:lc8
This not only supports attacking ideas based on ... c4-c3 but the rook
stands ready to attack the center with .. .l::tcS. If now 21 g4 lLle7 22 d6 lLldS
White cannot meet the crushing threat of23 ... c3. Options for White are few.
21 ~bl i..h6 22 i..f4 i..xf4 23 ~xf4 i..xdS!
White cannot exploit the pin thanks to the degraded position of his king.
Black is ready to defend the bishop with .. .l:tcS and ... lLle7 if need be.
Meanwhile, in the race to harass the opposing kings, White is far behind
schedule. Black need only hit with ... c3 when White is permanently on the
defensive.
24h4
24 g4 lLlg7 2S 'ii'h6 lLle6 26 h4 is deftly refuted by 26 ... c3! 27 bxc3 (27
ltJgS c2+ wins) 27 ... ~e4+ 28 ~b2 'ikc7 and White must go on the defensive
70 Kings Castled on Opposite Sides
with 29 'ii'e3 and admit to a strategically lost game. The slow plan of
doubling rooks on the d-file with 24 :d2 is brushed aside by 24 ...:c5! 25
:hdl 'Was! with Black holding his extra pawn and keeping a better
position.
24 ... c3 25 bxc3 lbc3
White can try to defend his king and pile up on d5 with 26 nd2, but Black
should have no trouble after 26 ... ttJe3 27 h5 'ii'e7 28 hxg6 fxg6 29 1!fh4
'ii'c7! since 30 ttJg5 is blown away by the interference crusher 30...:fl+!!.
26 h5
If 26 :d2 ttJe3 27 h5 1!fe7 28 hxg6 fxg6 29 'ii'h4 "ilc7 30 ttJg5
:xfl ttJxfl.
:n + 31
26 ...ttJe3 27 ttJg5
Complete desperation. Black can now play 27 ... ttJxd I but he prefers to
go formate.
27...'ilic7
27 ... ttJxdl 28 ttJxh7 (28 i.xdl i.xg2) 28 ... i.xa2+ 29 'ot>al :a3 30 ttJf6+
~g7.
28 ttJxh7
28 :d3 'iVc5 is also crushing.
28.. Jib3+! White resigned
After 29 axb3 'iVc2+ 30 'iti>al 'iVc3+ 31 'iti>bl "ilxb3+ 32 'iti>al1!fa2 is mate.
The really classic battles involving opposite castled kings come, of
course, in various lines of the Sicilian Defense. The following variations
typically involve opposite castled kings - Dragon, Najdorf English Attack,
Sozin Velimirovic Attack, Scheveningen Sicilian and some lines of the
Taimanov Sicilian. I will explore try to cover the basic themes of opposite
castling Sicilians in the next chapter.
4 Sicilian - Opposite Sides
Castling
Most modern games that involve castling on opposite sides come from
certain variations of the Sicilian Defense. Some, like the Keres Attack of the
Scheveningen Sicilian, involve your basic pawn storm where both sides
fling their pawns forward to open up the enemy king position. In others,
such as the Velimirovic Attack of the Sozin Sicilian, there is typically a
limited pawn advance and the major work is done with the pieces.
In many of the examples I present below, the attacker may take a pause in
his attack to bolster his own defenses before pressing on. It is absolutely
vital not to allow the opponent anything more than a temporary initiative.
When sacrifices are involved, foresight and judgement are very important
as often the sacrifices are not simple 'sac, check and mate' sequences, but
involve delicate strengthening moves.
As in the preceding chapters I combine some modern theory with my
examples to shed light on what the top masters of attack are playing.
One of the most interesting openings from a pure attacker's point of view
is the Velimirovic Attack of the Sozin Sicilian (1 e4 c5 2lbf3 d6 3 d4 cxd4
4 lLlxd4 lbf6 5 lbc3 lLlc6 6 ~c4 e6 7 i.e3 ~e7 8 'ili'e2). There has been
much written about this crazy line and practitioners on both sides of this
opening must know vast amounts of data to navigate the complications.
Unless you have lots of spare time to devote to this opening, my advice
would be to stay away from it! Nevertheless, keeping a general awareness
of this hyper-sharp opening gives the student a very good feel for attack and
defense for almost any opening. Reckless-looking sacrifices, many of a long
term nature, abound in this line and the fight for the initiative is intense.
One important defensive theme that is often seen in the Velimirovic is the
placement of Black's king rook. One might think that the rook should stand
near the king on £8 or maybe e8. The problem with that is that it often
creates a traffic jam while sitting on £8. If White sacrifices and rips into the
king position and mounts threats, the king must be fleet of foot and have
room for escape. That is why, in many lines of the Velimirovic the black
rook develops way over to c8 where it aggressively supports a
counter-attack and gives the king a flight path through £8.
I will focus mainly on one of the most interesting and important lines.
72 Sicilian - Opposite Sides Castling
The' Poisoned Knight' Variation
This phenomenal attacking game carved out a whole new chapter of
theory in this variation. Sacrifices on the d5 and f5 squares are nothing new
in the Sozin, but usually they come with a serious, concrete threat such as
.!iJf5 attacking g7 or .!iJd5 - attacking the queen. Usually the sacrifice is
designed to open a file (most often the e-fiIe) while also taking control of
important squares and diagonals.
A.Sokolov White
Salov Black
USSR 1983
Sicilian Defense
1 e4 eS 2 tLlf3 tLle6 3 d4 exd4 4 tLlxd4 tLlf6 5 tLle3 d6 6 .te4 e6 7
.te3 a6 8 'ii'e2 'ii'e7 9 0-0-0 i.e7 10 i.b3 0-0 11 :hgl tLld7 12 g4
tLleS
13 tLlf5!
This was a major novelty that no doubt had a disconcerting effect even on
such a cool customer as Mr. Salov. Previous to this game, 13 g5 was nearly
automatic here, although the antidote of vigorous counterattack led off by
13 ...b5 14 'ii'h5 .!iJxb3+ 15 axb3 b4 seems convincingly adequate for Black.
By posting a piece so close to the enemy king, Black must be on extremely
high alert against tactics that may involve .!iJxg7 or .!iJh6+.
13 ••• bS
If! had to face 13 .!iJf5 cold I would also be reluctant to play 13 ... exf5 14
gxf5 which surrenders the d5 square and opens the g-file for the already
positioned rook on gl. I take a look at the possibility of 13 ... exf5 in the next
game.
14 i.dS
Sicilian - Opposite Sides Castling 73
One thunderbolt follows another!. Has White gone mad? This move
comes with the threat of 15 J.xc6 of course, and now 14 ... exf5? 15 gxf5 is
really suicidal, as 15 ... 'iti>h8 is annihilated by 16 .l:txg7! 'iti>xg7 17 I:tgl+ 'it>h8
18 'iVg4 J.f6 19 J.h6 with mate coming soon.
14....i.b7
For a discussion on the merits of 14 ... exd5 see the next example.
15 g5 exf5?
15 .. .lUc8! is better.
16 g6 hxg6 17 lbg6ltJe5
17 ... lIfc8 18 lIdgl J.f8 19 J.h6 ttJd4 20 .l:txg7+ J.xg7 21 lIxg7+ ~h8 22
'ir'h5 ttJe2+ 23 'ltdl ttJf4 24 'ir'xf5 ttJg6 25 'ir'f6 ttJe6 26 ':xf7+ 'it>g8 27
'ir'xg6+ ~h8 28 'ir'h7 mate.
18 l:.xg7+!! ~xg7 19 l:.g1+ ltJg6
19 ... ttJg4 20 exf5 cleans up.
20 exf5l:.h8
74 Sicilian - Opposite Sides Castling
Forced. Black had to give his king some room while also stopping 'iih5.
20 ... b4 21 'iVh5 wins at once.
21 .i.d4+! .i.f6 22 fxg6 fxg6
22 ... ~xd4 23 gxfl+ 'it.>f6 24 "g4 <tie7 25 'iixd4 l:.afS 26 J:!.g8! is too
strong.
23 Wg4 l:.h6 24 ~xf6+ <;£;h7
24 .. .'~xf6 25 "d4+ ~fS 26 "e3.
25 lIe1 .i.xd5 26 lLlxd5 'lic8 27 lIe7+ <;£;g8 28 l:tg7+ <;£;f8 29
I:tg8+! <;£;xg8 30 lLle7+ Black resigned
A superlative attacking game.
Fedorov White
Lanka Black
European Team Championship, Pula 1997
Sicilian Defense
1 e4 c5 2 lLln lLlc6 3 d4 cxd4 4 lLlxd4 lLlf6 5 lLlc3 d6 6 .i.c4 e6 7
.i.e3 ~e7 8 We2 a6 9 0-0-0 'ilc7 10 .i.b3 0-0 11 :Lhgl lLld7 12 g4
lLlc5 13lLlf5!?
Is the knight really poisoned? Black's survival is questionable after
13 ... exf5 14 gxfSlLlxb3+ 15 axb3 <tih8 (Black must get his king off the file)
16 lLld5 'iVd8 17 'iVh5 f6 (l7 ...J:!.g8 18 'iixfl "fS 19 "h5 gives White
another pawn while hardly diminishing the attack) 18 l:.g6! (some sources
mention 18 lLlf4 but 18 .....e8 is then hard to refute; 18 .:tg6! on the other
hand introduces the unstoppable mating plan of l:.dgl followed by l::tg3)
IS ....td7 19 l::tdgl ~eS 20 l:.lg3 "a5 (fishing for counterplay) 21 c3 'iial+
22 'iitc2 "hI 23 l::th3 ~xg6 24 fxg6 h6 25 i.xh6 and White crashes
through.
13... b5 14 ~d5!?
By pinning the knight on c6, White creates some disharmony in Black's
formation. He also manages to avoid ...lLlxb3+, albeit at the cost of a piece.
White has considerable compensation after 14 ... exd5 15 lLlxd5 'iib7 16 e5!
lLle6! 17lLldxe7+ lLlxe7 lSlDxd6 'iVc6 19 f4 which may even carry on into
the ending. For instance, 19 ... lLld5 20 f5 lLlxe3 21 'iixe3 'iic5 22 l::tgel
'iVxe3+ 23 lIxe3 is uncomfortable for Black. It seems more logical to
continue developing and preparing to finally launch a counterattack on the
c-fiIe. The question is how long can Black live with those menacing minor
pieces perched on d5 and fS?
14.•..i.b7 15 g5 l:r.fc8 16 :g3
16 'iVh5 is an excellent alternative as we shall discuss in the next example.
16••.lLle517 l::th3!?
Sicilian - Opposite Sides Castling 75
17...~g6??
Black must at long last capture the dangerous knight on f5 with 17 ... exf5,
relying on the defense 18 'ii'h5 h6!. Try as I might, I could not find a decent
continuation for White. I doubt if a redoubtable attacker like Fedorov would
just throw his pieces out there and cross his fingers - he must have had
some idea. Then it struck me. White must, at all cost, (OK, two pieces) pry
open the files leading to the black king. Therefore, the most plausible way
to crash the defenses is 19 ~xf7+! (nothing else looks even close to
justifying the initial sacrifice) 19 ... lDxf7 20 gxh6 which blows open, at the
cost of two pieces, both the g and h files. This is an important position to
consider and may even be useful for Sozin fanatics to analyze.
Black then has numerous defensive tries:
1) 20 ... ~f6 21 hxg7 ~xg7 22 exf5 (threatening 23 'ii'g6+) 22 ... ~f8 (best)
23 'ii'g6! 'iJie7 (23 ... iLxc3 24 bxc3 leaves Black defenseless, e.g. 24 ... lDce4
25 [6 lDxf6 26 'ii'xf6 ~e8 27 ~g5! and wins) 24 l:th7 ~e8 and now the
explosive 25 l:txd6! keeps Black off balance, leading to 25 ... l:tc6 26 ':xc6
~xc6 27 iLxc5! ~g5+ 28 iLe3! ~xe3+ 29 'it>bl and a double attack on e3
and c6 with material balance as well as a continuing strong attack for
White.
76 Sicilian - Opposite Sides Castling
2) 20 ... ~xe4 21 hxg7 f4 (the main point behind 20 ... ~xe4 - Black tries
to put this bishop to work defensively) 22 'iVh8+ lLlxh8 23 gxh8='iV+ ~f7
24 'iVh5+ ~g6 25 'iVd5+ lLle6 26
'iVd7 27 ~xf4 ~e8 28 :e3! ~f7 29
.l:tdel b4 (alternatives are bleak) 30 ~e4 ~xf4 31 lLlxd6+ ~d8 32 'it'a5+
'ikc7 33 llxe7! 'it'xa5 34lLlb7 mate!
3) 20 ... lLlxe4 21 'it'g6! ~xh6 (2l...~f6 22 hxg7 ~xg7 23 .l:tgl gives
White a decisive attack) 22 .l:txh6 ~f6 23 l:tgl! ~xc3 24 'it'h7+ ~f7
(24 .. .'.t'f8 25 llxf6+ wins) 25 :xf6+ ~xf6 26 bxc3! and despite his material
surplus, Black has continuing difficulties warding off the attack. This last
line represents Black's best defense and he may be able to weather the
storm, but my instinct tells me Black is in trouble here.
These variations are complex and quite possibly there may be
improvements lurking within, but they instructively show the force that
comes with major pieces operating on wide open files directed against a
beleaguered king. Even a piece or two down, White can afford to make
relatively quiet strengthening moves to continually keep up the pressure. As
for the game continuation, Black is rapidly demolished. He missed his last
chance to grab the knight on his terms.
:f3
18 'iVh5
Black's king position is now ripped open with a very obvious sac on g7.
18...ltJf8 19 ttJxg7 i.xd5
19 ...~xg7 20 ~d4+ ~g8 21 'iVh6 e5 22 g6 ~g5+ 23 'iVxg5 ~xg6 24
~xc5 dxc5 25 'iVh6.
20 'ii'h6!
White calmly creates a mating net.
20 ... e5 21ltJh5ltJce6 22 exd5 b4 23 dxe6ltJxe6 24ltJf6+ i.xf6 25
gxf6 Black resigned
Black paid a dear price by refusing to capture the attacking knight at the
correct moment.
The travails of Mr Lanka continued in this next encounter. Same opening,
same result except he lasted one move longer. .
Ginsburg White
Lanka Black
Cappelle la Grande 1997
Sicilian Defense
1 e4 c5 2 ltJo ltJc6 3 d4 cxd4 4 ltJxd4 ttJf6 5 ltJc3 d6 6 i.c4 e6 7
i.e3 i.e7 8 'iVe2 a6 9 0-0-0 'iVc7 10 i.b3 0-0 11 :thgl ttJd7 12 g4
ttJc5 13ltJf5 b5 14 i.d5 i.b7 15 g5 :tfc8
Sicilian - Opposite Sides Castling 77
A fascinating position! White's attack is being led by his hanging pieces
on f5 and d5, while Black cooly creates a flight square on f8 for his king
and increases pressure on the c-file. Making sense of this position is not
easy, but I will try to do my best. White has two ways to prosecute the
attack now. The most obvious plan involves 16 'ii'h5 followed by either
l::tg3 or perhaps explosive king-wrecking shots like 0.xg7 and g5-g6. 16
l::tg3 is the alternative - see below.
16 'iih5 tbe5
The key test of the attack is l6 ... g6! which stops ideas based on g5-g6,
and 0.xg7. Then, the direct 17 0.h6+ ~g7 18 'ii'f3 0.e5 19 j.d4 looks like
White's best try. After 19 ... exd5 20 'ii'xf7+ ~h8 21 f4 b4! 22 <it>bl (White
secures his king and prepares the attacking blow 0.f5) 22 ... bxc3 23 fxe5
dxe5 24 0.f5! j.xg5! (24 ... gxf5 25 g6 ~f6 26 'it'xf6+ 'iig7 27 'iVxe5! dxe5
28 .itxe5+ '.t>g8 29 gxh7+ 'it>xh7 30 l:tg7+ <it>h6 31 l:dgl wins) 25 'ii'xc7
l::txc7 26 ~xe5+ ~g8 27 exd5 (27 .itxc7 0.xe4) 27 ... l::tf7! looks roughly
equal. Black's idea behind 16 ... 0.e5 is to manoeuvre the knight to f8 while
unmasking pressure along the c-fiIe. But it is far too slow to work.
17 f4 tbg6?
It was high time for Black to start exchanging some pieces. 17 ... i.xd5 18
0.xe7+ .xe7 19 exd5 0.g6 20 dxe6 fxe6 21 'ii'f3 l::tf8, although White
maintains an edge with 22 f5!.
ISl:[g3 b4
18 ...exd5 19 l::th3 0.f8 20 j.d4 0.ce6 21 iLxg7 iLxg5 22 l::tgl ~xf4+ 23
~b I leads to overkill.
19 !th3 tbrs 20 i-d4! exd5
If Black tries to defend with 20 ... ~d8 White wins simply with 21 ~xg7
bxc3 22 ~xf8. The tempting and spectacular 21 'ii'h6 f6 22 gxf6 should win
too, especially after 22 ...gxh6 23 0.xh6+ ..t>h8 24 l::tg3! and mate is
unstoppable, but Black has other ways to prolong resistance.
21 i-xg7 i-dS
78 Sicilian - Opposite Sides Castling
Black has 'no time for 21 ... bxc3 on account of 22 tiJh6+ ~xg7 23 'ii'x17+
~h8 24 'ii'g8 mate.
22 ~xf8 ~xf8 23 'tWxh7
Clearly the attack is decisive. The murderous knight on f5 is too strong.
23 •.. ~e8 24 exd5 ~e7 25 I:.el 'iVd8 26 ~he3 Black resigned
Now, let's take a look at a more conventional line of the Velimirovic
Attack.
Relange White
Mednis Black
Cannes 1996
Sicilian Defense
1 e4 c5 2 liJf3 liJc6 3 d4 cxd4 4 liJxd4 liJf6 5 liJc3 d6 6 ~c4 e6 7
~e3 ~e7 8 'tWe2 0-0 9 0-0-0 a6 10 ~b3 'ilic7 11 g4 liJxd4 12 ~xd4
liJd7 13 g5 liJc5 14 'tWh5
White's idea is to provoke ... g6 which enables White later to play h4-h5
forcing open the h-file. Another, more flexible approach is to play %:tg I
intending %:tg3-h3.
14... g615 'iVe2
White's manoeuvre has cost some vital time but Black must accurately
deai'with the threat ofh4-h5. With correct play he should be able to set up a
sturdy defense. His next move, while weakening in some respects, helps
Black defend his kings ide while activating the rook on f8.
15... f5! 16 exf5 J::txf5 17 h4!
Much too slow is the plan seen in our previous example of 17 %:tg I (to go
g3-h3). Black is able to fortifY his defenses quite weII with 17 ... b5 18 :g3
tiJxb3+ 19 axb3 .ib7 (19 ....id7 is also good) 20 %:th4 .!:taf8! 21 %:tgh3 .1:817
and White's attack has come to a dead end while Black's counterattack is
set to kick in.
17...'ilic6!
This move gives the queen more scope and makes possible the queentrading defensive measure .. .'6'1'3 in some cases.
18 ~h2 ~d7! 19 h5 ~e8 20 :ldh4 liJxb3+ 21 axb3
Sicilian - Opposite Sides Castling 79
2t ...d5?
Probably Black initally intended 21...'iVf3 but White can then attack
behind enemy lines with 22 'ji'c4! d5 23 'iVc7!. Much better though was
2l...l:xg5! 22 SLxg5 .i.xg5+ 23 f4 SLxh4 24 hxg6! .i.xg6 25 'ji'xe6+ <lig7 26
':'xh4 :e8 27 'iVh3 'ji'c5! with good play.
22 hxg6 ~xg6
23I1xh7!
White crashes through on the h-file and will soon create problems with
the newly passed and far advanced g-pawn.
23••• ~xh7 24 'iWh5 ~f8
24 ... l:tf7 25 g6 is overwhelming.
25 'ii'xh7 ~e8 26 g6 ~d7
Black cannot organize a defense here. White has too many pluses in the
position.
27~a4!
White demonstrates that the queenside is not a refuge for the king.
80 Sicilian - Opposite Sides Castling
27 ...:te8 28 g7 d4
The only way to prevent major material loss.
29 i.xd4 l:tg5 30 f4 l:tg2 31 l:th3!
More forceful than 31 .l:txg2 'iVxg2. The black king is prevented from
fleeing to safety (31...'iti>c8 32 .l:tc3) and soon the rook will combine with the
other pieces to create a mating net.
31 ••:ifd6
Or 3l...'iib5 32l:td3! and Black faces too many threats.
32 'i*'e4 'ifc6 33 liJb6+ 'iil>d8 34 litc3! Black resigned
Here is a more recent example of this variation. The attacking plan in this
game is far less subtle than the previous case.
Dgebuadze White
Baramidze Black
Groningen 2002
Sicilian Defense
1 e4 c5 2 liJo liJc6 3 d4 cxd4 4 liJxd4 liJf6 5 liJc3 d6 6 i.c4 e6 7
i.b3 i.e7 8 i.e3 0-09 'i*'e2 a6 100-0-0 'i*'c7 11 g4 liJxd4
It is worth mentioning that if Black plays 11...tt:'ld7 here, White can offer
the poisoned knight at once by 12 tt:'lf5!? without waiting for ~hgl. Even
with the rook still parked on hI it is extremely risky to grab the knight on
f5. But if Black refuses the sacrifice with 12 ...tt:'lc5 White has a small but
certain edge after 13 tt:'lxe7+ 'iVxe7 14 f4 due to Black's weak d6 pawn.
12 :'xd4 liJd7 13 g5 liJc5 14 lIgl f5?
White has plans to blitz the enemy with the standard plan of l:tg3 and
'iVh5. Black's last move is designed to give his kingside defenders some
Sicilian - Opposite Sides Castling 81
operating room, and create squares for the eventual location of his lightsquared bishop. Black would ideally like to transfer his light-squared bishop
to g6 where it firmly protects the kingside while also bearing down on
White's king. Unfortunately, White has an unstoppable plan to attack
Black's main weakness in the position - his h7 pawn - and so break down
the black king's defenses. White uses a mace and club now to mug the
black king.
15 exf51bf5 16 l::th4!
White hones in on the h7 weakness and threatens 'ii'h5.
16...liJxb3+ 17 axb3 g6
Black must stop IS 'ifh5 but White has a crushing solution to the
attacking problem.
18 ':g3! i..d7
IS ... b5 19 l:.gh3 h5 20 l:txh5! is decisive. A friendless king rarely
survives an assault by queen and rook.
19 l:.gh3
~f7
20 'ifd3!
Threatening 21 1r'xg6+!! hxg6 22l:thS+ <l;;g7 23l:t3h7 mate.
20•..lIg7
Forced.
21 ':xh7! ':xh7 22 'ifxg6+ %:tg7 23 'ifh6 i..xg5 24 i..xg5 i..c6
Black has no chance to defend here. Making his problems unsolvable is
the unprotected status of his rook on as.
25 i..f6 J:.gI + 26 ~d2 'ifd7 27 'iff4 Black resigned
82 Sicilian - Opposite Sides Castling
Velimirovic Attack Classics
Anyone who wishes to learn the Sozin Velimirovic Attack should know
these classic games. I wiIl present them with sparse commentary but will
diagram the key attacking ideas and themes that make this line one of the
most interesting openings in chess. There is a very good reason why they
caIl it the Ve1imirovic Attack.
Szmetan White
Garcia Black
Malaga 1976
Sicilian Defense
1 e4 c5 2 ttJO e6 3 d4 cxd4 4 ttJxd4 ttJc6 5 ttJc3 d6 6 i.e3 ttJf6 7
.i..c4 i.e7 8 'iVe2 a6 9 0-0-0 'iVc7 10 i.b3 0-0 II g4 ttJxd4 12 .u.xd4
b5 13 g5 ttJd7 14 :gl ttJc5 15 e5
15.•. g6?
15 ... dxe5! 16 l::th4lLlxb3+ 17 axb3 g6 18 'iWf3 (18 lLle4 is also strong but
the caveman approach seems more effective) 18 ... ~b7 19 'iWh3 h5 20
l:txh5! gxh5 21 'ili'xh5 iLd6 22 g6 f5 23 g7 l::tfc8 24 l:tg6! 'iWe7 25 ~g5
'iWxg7 26 l:txg7+ ~xg7 27 'iWh6+ rj;f7 28 'ii'f6+ wins. Correct is 15 ... d5! and
now 16 ~xd5 exd5 17 lLlxd5 'iWxe5 18 f4 'ii'e6 19 f5 'ii'e5 20 f6 iLd8 comes
up short, and slower lines like 16 f4 enable Black to generate queens ide
counterplay with 16... b4 17lLla4 ~d7.
16 :h4 i.b7 17 I:g3 <it>g7
17 ... lLlxb3+ 18 axb3 b4 19 l::txb4 dxe5 20 l::th4 l::tfc8 21 'ii'g4 (21 l::tgh3
iLg2!) and Black has trouble meeting the threats oflhh7 or l::tgh3.
18 i.d4! d5?!
Sicilian - Opposite Sides Castling 83
Necessary was 18 ... lDxb3+ 19 axb3 and then 19 ... d5.
19 J.xdS! J.xdS?
Damage control with 19... l::tfd8 was forced, although White has an extra
pawn and much better position.
20 ltJxdS exdS 21 e6+ f6
22 'fihS!! ltJd3+ 23 ~bl gxhS 24 gxf6+ ~h8 2S fxe7+ ltJeS 26
exf8=...v+ ':xf8 27 ':xhS ':'xf2 28 J.xf2 Black resigned
Nunn White
Pritchett Black
England 1985
Sicilian Defense
1 e4 cS 2 ltJo e6 3 d4 cxd4 4 ltJxd4 ltJc6 S ltJc3 d6 6 i.e3 ltJf6 7
J.c4 a6 8 ...ve2 'ikc7 90-0-0 ltJaS 10 J.d3 bS 11 a3 J.e7 12 g4 ':'b8
13 %:.he1ltJc4 14 gSltJd7 ISltJf5!
84 Sicilian - Opposite Sides Castling
There is that move again! If Black refuses the gift with IS ... i.f8, White
simply piles up the pressure with 16 i.d4. Better, however, is IS ... ttJxe3! 16
.xe3 and then 16 ... ~f8. If then 17 ttJdS Black can calmly reply 17 ...•c5!
with a playable position.
15... exf5? 16lLld5 'ifd8 17 exf5 0-0 18 'ifhSlLlf6
IS ... ttJceS 19 f6! leads to much the same thing.
19 gxf6 i.xf6 20 i.xc4 bxc4 21 i.d4!
Exchanging off Black's key defensive piece and also meeting threats to
b2.
21. .•i.xd4 22 l:txd4
22 ttJe7+? 'ii'xe7 23 llxe7 i.xb2+ 24 Wd2 nbS gives Black far more play
than he deserves.
22 ...lte8
23 lLlf6+! gxf6 24 ltg4+ ~h8 25 l:tegl i.xf5 26 'ifxf5 l:b5 27
'ifxh7+! Black resigned
Boto White
Bostic Black
Bosnia 2001
Sicilian Defense
1 e4 c5 2 lLlo d6 3 d4 cxd4 4 lLlxd4 lLlf6 5 lLlc3 lLlc6 6 i.c4 e6 7
i.e3 i.e7 8 'ife2 a6 9 0-0-0 'ifc710 i.b3 0-0 11l1hgllLlxd4
A very risky continuation because of the attacking potential of the bishop
ond4.
12 i.xd4 b5 13 g4lLld7 14 g5 b4?
Sicilian - Opposite Sides Castling 85
Black is really asking for it with this move. Much better is 14 ... tLlc5 in
order to eliminate the dangerous bishop on b3 at an opportune moment, as
well as stopping a powerful rook lift with 1:d3. White now assembles a
huge strike force of attackers aimed at the black king.
15 iih5! tDe5
15. ... bxc3 16 l:td3 l:td8 17 g6! hxg6 18 l:lxg6 is overwhelming.
16 f4! tDg6?
16...bxc3 was better and slows down the attack considerably. Play might
then continue 17 !Xe5 cxb2+ (17 ...dxe5 18 .i.xc3) 18 .i.xb2 dxe5 19 l:ld3!
.i.b7 (threatening ... .i.xe4) 20 g6! hxg6 21 l:lxg6! fxg6 22 .i.xe6+ l:l£7 23
'-xg6 .i.f6 24 l:lh3! .i.xe4 25 'iixe4 l:lb8 26 '-g6! and wins.
17 f5! tDf4
17 ...bxc3 18 :dfl! (introducing threats along the f-file and reinforcing
f5-f6 ideas) 18 ... cxb2+ 19 ~bl tLle5 20 1:f4 l:lb8 21 l:lh4 h6 22 f6! l:lxb3 23
gxh6 g6 24 h7+ ~h8 25 .-h6 and mate is around the comer.
18 iifJ e5 19 g6!
Just as Black closes one diagonal, another one opens up.
86 Sicilian - Opposite Sides Castling
19.•. bxc3
19... hxg6 20 "xf4!! exf4 21 l:txg6 :d8 (2l...~h7 22 l:txg7+ c;t>h6 23
lDd5 'ifd8 24 l:td3! ~h4 25 l:th3 is overwhelming) 22 l:txg7+ 'itf8 23 l:tdg I
~e8 24 ~xf7+ c;t>d7 25 ~e6+ ~c6 26 ii.d5+ 'ifild7 27 l:txe7+ ~xe7 28 f6+
~e8 29 l:tg8+ ~d7 30 :g7+ wins handily.
20 'ii'xf4!!
White is willing to pay a premium price indeed in order to open the long
diagonal, but Black foots the bill at the end.
20 ••.~h8
20 ... exf4 21 gxf7+ l:txf7 22 l:txg7+ 'ifilf8 23 l:txf7+ 'ifile8 24 f6! ends the
battle.
21 gxt7 i.f6
Black desperately tries to buttress g7.
22l:bg7!!
The shelling continues! Black's defenses are decisively breached. Of
course the threat is 23 :g8+!.
22 •••i.xg7?!
Black was too shell-shocked to notice the stiffer defense 22 ... ~e6! 23
~xe6 ~xg7 24 f6! l:txf7 25 ~xf7 "xf7 26 fxg7+ 'ikxg7 27 i.xc3 exf4 28
~xg7+ ~xg7 29l:txd6 with an easy endgame win for White.
23 f6! 'iid8 24 I1g1
A final artist's touch in preference to the butcher's line 24 fxg7+. Black
cannot escape mate without surrendering massive material loss.
Black resigned
Siciliall - Opposite Sides Castling 87
Sicilian Opposite Castling - The English Attack
Unquestionably, the Najdorf Sicilian is the most popular opening in
chess. And for good reason. The key to the Najdorfs resilience and
dynamism is its flexiblity. In most variations of the Najdorf, Black has a
variety of playable options in countering White's selected system.
The English Attack (l e4 c5 2 lLlf3 d6 3 d4 cxd4 4 lLlxd4 ttJf6 5 ttJc3 a6 6
1Le3) became a popular weapon against the Najdorfin the late 1970s thanks
to the efforts of GMs John Nunn and Nigel Short, and later their top GM
Michael Adams. Nowadays it represents the weapon of choice for I e4
players of all levels.
In most lines of the English Attack, White plays an early f3 in order to
guard the e4 pawn and support a flank pawn storm with g4-g5 (there are
exceptions to this, i.e. Shirov's line I e4 c5 2 ttJf3 d6 3 d4 cxd4 4 ttJxd4
ttJf6 5 ttJc3 a6 61Le3 e6 7 g4!?). Black can react to this plan in a number of
ways, but the truly classical Najdorf reply to 6 ..te3 is 6 ... e5 and it is this
line I want to examine in some detail from an attacking player's point of
view. Play is invariably razor-sharp and one slip can be and usually is fatal.
These lines are instructive because of the usual race to attack the opposing
kings. However, as a rule, the play requires a surgeon's touch, especially in
the build-up stages. Once the king is finally exposed, the butcher can take
over.
The following selected examples illustrate the current ideas and themes
contained in this rich and exciting opening and should be instructive to
players of any repertoire who wish to sharpen their attacking skill. As a
player who has generally been on the sidelines of Najdorf theoretical
debates, this was a very educational experience for me.
Grischuk White
Vaulin Black
St Petersburg 1999
Sicilian Defense
1 e4 c5 2 l2Jf3 d6 3 d4 cxd4 4 l2Jxd4 l2Jf6 5 l2Jc3 a6 6 0 e5 7 l2Jb3
.te68.te3
This line has been a hotly disputed theoretical battleground for the past 15
years or so. I include it in my brief survey of attacking openings because it
emphasizes energetic and creative play and illustrates many of the key
principles in developing an attack against an opposite castled king.
88 Sicilian - Opposite Sides Castling
White's pawn storm is coming with g2-g4, followed usually but not
always with h4. The ultimate goal is to advance the pawns in tandem until
gS-g6 is finally realizable which disturbs the black king position and the
squares surrounding it.
Black fights back by starting his own action on the queenside, often with
the manoeuvre ... b7-bS and ... ~d7-b6. The passive knight on b3 can be
subject to pressure from a quick ... a6-aS-a4 in some cases but Black must
beware that knight jumping to c6 via as in formations where White plays an
early ~dS .i.xdS exdS.
8...i.e7 9 'iVd2 0-0 10 0-0-0 b5 11 ~bl?!
In this ultra-sharp line, timing is everything. White should set his kings ide
pawns in motion at once with 11 g4. For a good example of the
continuation 11...b4 12 ~d5 .i.xdS 13 exdS as 14 ~b1 a4 IsllSc3, see the
example Tiviakov-Bekker Jensen, Gausdal 2000 analyzed below.
11 ...~bd7 12 g4 ~b6
12 ... ~hS is another approach, when Black may end up sacrificing a pawn
with ... ~f4Iater in order to trade off White's powerful dark-squared bishop.
13 g5 ~fd7
13 ... ~hS is another approach, when Black will most likely later sacrifice
a pawn with ... ~f4.
14 h4!?
The race to rip open the respective king positions commences! Black will
make contact first with his ... as-a4 plan, but White has ideas of creating a
queen and bishop battery on the b1-h7 diagonal.
14...'iVc7 15 h5 b4 16 ~d5 i.xd5 17 exd5 a5 18 'ii'd3 a4 19 ~d2
a3!
Black must play all-out now. The greedy 19 ...1:aS? loses to 20 'WfS ~xdS
21 .i.d3 J~6 22 hxg6 ~xe3 23 'Wh3. Now White must be careful as 20 b3?
1:aS 21
loses to 21...'i'c3.
"f5
Sicilian - Opposite Sides Castling 89
20"'f5!
This theme is a constant in this variation. White provokes ... g6 in order to
force open the h-file.
20 ... axb2 21 ~d3 g6 22 hxg6 :'xa2!
It seems as if Black has crashed through first as this blow threatens mate
with 23 ... l:tal+ 24 ~xb2 'ii'c3 and 23 'it'xa2 loses to 23 ... l:ta8+ 24 ~bl
l:tal+ 25 ~xb2 'fic3 mate, and 23 gxfl+? l:txfl 24 ~xa2 meets a similar
fate after 24 .....a5+ 25 'it'xb2 'ii'a3+ 26 ~bl t'L)a4. What to do?
23 c4!
The only move. White denies Black's queen access to the c3 square and
gives himself some running room. Now Black must support his attack or
face death after the coming g6-g7.
23 ...tDxd5!
23 ... hxg6? 24 "h3 l:tal+ 25 ~xb2 and Black's king will be mated. But
now Black threatens ... t'L)c3+ and the rook on a2 remains taboo - 24 'it'xa2?
'fia5+ 25 ~xb2 'ii'a3+ 26 ~c2 t'L)xe3+ or 26 ~bl hxg6 27 'ii'xd7 'fixd3+
and wins. Grischuk stays calm under fire.
90 Sicilian - Opposite Sides Castling
24 iLd4!! 'ita7?
A_pity that this flashy move fails. Black is still in the game after 24 ... exd4
25 'ilxd5 (forced) 25 ...'ii'a5! (Black must chaIlenge the centralized queen)
26 gxt7+ (26 gxh7+ ~g7 is also possible) 26... l:txt7 27 ii.xh7+ <J;;g7 28
'ii'xa5 l:txa5. Black was under the iIlusion that he actually threatened serious
damage with this move, but Grischuk calmly ignores the phantom threats
and seals the black king's fate.
25 g7! ~al+ 26 'iii'c2 Black resigned
Black has nothing after 26 ... l:tcl+ 27 l:txcl bxcl='ii'+ 28 ~xcl or
26 ...'ii'a4+ 27 .!iJb3.
Morozevich White
Sadvakasov Black
Astana 2001
Sicilian Defense
1 e4 c5 2 ttJO d6 3 d4 cxd4 4 ttJxd4 ttJf6 5 ttJc3 a6 6 0 e5 7 ttJb3
iLe6 8 iLe3 h5 9 'itd2 ttJbd7 10 0-0-0 Iic8 11 'iitbl iLe7 12 h3 'itc7
13 iLd3 b5 14 g4 ttJb6 15 i.xb6 'itxb6 16 g5 ttJd7 17 ttJd5 iLxd5(?)
18 exd5 g6
It would seem that Black should be pretty satisfied with the outcome of
the opening. White's knight on b3 is out of play and it is not obvious how
he can create attacking chances on the kingside. The break f3-f4 is available
but, if timed incorrectly, Black's knight will occupy e5. Black seems to
have the makings of his own attack against the white king by mobilizing his
queenside pawns. In reality, Black has difficulties here. Thanks to his space
advantage White can manoeuvre to prevent Black from creating attacking
chances while timing his D-f4 break at just the right moment to seize
control of the e-file. Black's kings ide is forever subject to sacrifices to
break up his t7-g6-h5 pawn chain. Let's see how Morozevich, one of the
Sicilian - Opposite Sides Castling 91
world's foremost attacking players" patiently builds up his attack while
keeping an eye on Black's activity.
191:thel
This prevents 19... 0-0 on account of 20 f4 when Black cannot stop the
positionally crushing f4-f5.
19.. :.~·c7
Other possibilities are 19... lLlc5 20 lLlxc5 (20 f4!?) 20 ...l:xc5 21 ~e4 0-0
22 f4 exf4 23 'ir'xf4 ltc4 24 lte2 'ir'd8 25 h4 'ir'a5 26 'ir'g3 ltc7 27 ~d3 b4
28 ltdel .id8; or 19.. Jid8 20 f4 exf4 21 'ir'xf4 0-0.
20h4
20 f4 is premature, allowing ... exf4 followed by ...lLle5. So White
improves his position by securing the g5 pawn.
20..•ttJb6
20 ... lLlc5 21 lLlxc5 'ir'xc5 22 f4 is very powerful. 20 ... 0-0 is again met by
21 f4 intending f5. Sadvakasov possibly felt that the pressure on d5 would
delay White's thematic break off3-f4.
21 f4!
Morozevichjudged that 2l...lLlxd5 22 f5! lLlf4 (forced) 23 f6 lLlxd3
(23 ... ~f8 24 it'xf4 wins) 24 'ir'xd3 ~f8 would be very favorable, if not
winning for White, because of the total imprisonment of the kingside
pieces.
21...exf4 22 ..-xf4 0-0 23 ttJd4!
The long-suffering knight plunges into battle with crushing effect. Now
all of White's forces are well placed and mutually supporting. The tactical
iVb7 25 ~fl! ':fe8 26 'ir'f3! ':c5 27
point is that 23 ... lLlxd510ses to 24
~g2 'ir'c7 28 lLlb3 and wins.
-.e4
23 .•.l:tfe8
92 Sicilian - Opposite Sides Castling
23 ... tt'lc4 loses to 24 .i.xc4 bxc4 25 tt'lc6 .i.d8 26 1i'xc4 with an extra
pawn and dominating position.
24lLlrs
No doubt Morozevich also considered 24 tt'le6 'iVb7 (24 ... fxe6 25 ':xe6
leads to a slaughter) 25 .i.xg6! fxg6 26 'ilVe4, but Black has chances to hang
on, barely, with 26 ... .i.f8 27 'ii'xg6+ ..ti>h8. 24 tt'lf5! is clearly better.
24...i.f8
24 ...gxf5 25 1i'xf5 leads to mate.
25 lLlh6+ i.xh6 26 gxh6
White has too many weapons moving in on the black king. 26 ... tt'ld7 now
loses to 27 h7+ ~g7 28 ~xg6! fxg6 29 h8='if+!. 26 ... tt'lxd5 is probably
'best' but White should win without difficulties after 27 'ifd4 :te5 28 ':xe5
tt'lc3+ 29 'ifxc3 'ifxc3 30 bxc3 dxe5 31 ..ti>b2 ~h7 32 .i.e2 'it>xh6 33 l:td6.
26...'it>h7 27 ~f6 ~xh6 28 :e6?!
A much cleaner win was 28 :xe8 l:txe8 29 l:tgl (threatening ':xg6+)
29 ... l:tg8 30 :tg5! (threatening 31 ':xh5+ <ittxh5 32 1i'g5 mate) 30 ... 'ifd8 31
'ifxf7 'ife8 32 'it'xe8 ':xe8 33 ':xg6+ ~h7 34 :e6+ etc.
After 28 :e6?! Black resigned but he could have struggled on a bit
with 28 ... tt'lxd5 29 'ifg5+ ~g7 30 :xe8 (30 :'xg6+ is good enough only for
a draw) 30 ... tt'lc3+ 31 bxc3 ':xe8 32 :fl :e6, though White should win
with careful play.
Tiviakov White
Bekker Jensen Black
Gausdal 2000
Sicilian Defense
1 e4 c5 2 lLlo d6 3 d4 lLlf6 4 lLlc3 cxd4 5 lLlxd4 a6 6 i.e3 e5 7
lLlb3 i.e6 8 0 i.e7 9 ~d2 0-0100-0-0 b5 11 g4
Sicilian - Opposite Sides Castling 93
This move meets the requirements of this opening more than I I ~b I as
seen in our previous example. Black has various options here like
I 1... lLlbd7 but his next move represents the most direct and obvious
continuation. Black resolves the situation regarding d5 and begins his own
rush of pawns against the white king.
1l ... b4 12 tDd5
12 lLla4!? is also possible but looks risky in view of 12 ... lLlbd7! 13 'ii'xb4
d5, or even 12 ... a5 intending .....c7 and ... 'ir'c6.
12...i.xd513 exd5 a514 ~bl
14lLlc5!? is a favorite of the Russian OM Kobilija - the plan is to retreat
the knight back to a4 and block Black's intended pawn storm. The tactical
justification is 14 ... bxc5 15 d6 when White retrieves his piece and enjoys a
more open atmosphere for his bishop pair. If Black stops this with 14 ... a4,
play might proceed with 15 g5 lLlfd7 (l5 ...dxc5 16 d6 is still good for
White) 16lLle4 b3 17 cxb3 axb3 18 a3 and White is better.
14...a4 15 tDcl :a5
IS .. :iVa5 makes less sense, since White has the potential answer lLlb3 in
the event Black tries ... a4-a3.
16 i.c4 tDa617 g5 tDd7 18 tDd3 tDb6 19 i.xb6
19 i.xa6 nxa6 20 lLlxb4 lLlc4 21 "e2 lLlxe3 22 "xa6 lLlxdl 23 nxdl
i.xg5 24 "xa4 wins a pawn, but Black has good compensation and chances
to win the h2 pawn.
19••:ilfxb6 20 f4!
White needs more scope for his pieces which is the idea behind this
thrust.
94 Sicilian - Opposite Sides Castling
This is a critical moment. Can Black organize countetplay in the face of
White's central pressure?
20 ... exf4?
20 ... e4 21 .txa6 b3!? is tricky, but White emerges with a clear advantage
after 22 lDb4 bxc2+ 23 rJo1xc2 l:tb8 24 a3 l:txa6 25 rJo1b 1 followed by l:the I
and the e4 pawn is doomed. 2o ... lDc7 21 'i't'xb4 'i't'xb4 22lDxb4 l:tc5! 23 b3
exf4 24 h4 seems to favor White. Perhaps Black's best chance was 20 ... b3
21 cxb3 axb3 22 .txb3 (22 a3 !?) 22 ... e4 with some activity for the pawn.
21lrxf4
The queen is ideally posted here. It assists in the kings ide advance and
has access to vital squares like d4, f5 and e4.
21 ...lbc5 22 ':del 1:a7 23 h4 a3
23 ... b3 24 cxb3 axb3 25 a3 l:ta4 26 lDb4! is too strong. Black cannot
afford to temporize but must try to attack, although it turns out that White is
one tempo ahead in the attacking race.
24 h5 axb2 25 h6!
The usual pawn-storming device is to play g5-g6 but thanks to the
position of the queen, this is the wrecking ball of choice.
25...lIfa8
25 ...lDxd3 26 cxd3 g6 27 l:txe7 l:txe7 28 'it'f6 forces mate. Black throws
everything at the white king but comes up empty.
26 hxg7 b3 27 cxb3 lIxa2 28 ':xe7 :a1+ 29 ~c2 Black resigned
Where did Black go wrong? It appears that the 20 ... exf4 was the culprit,
allowing White's queen to become very active.
Sicilian - Opposite Sides Castling 95
Movsesian White
Sutovsky Black
Kaskady 2002
Sicilian Defense
I e4 c5 2 lLlfJ d6 3 d4 cxd4 4 lLlxd4 lLlf6 5 lLlc3 a6 6 ~e3 e5 7
lLlb3 ~e6 8 fJ ~e7 9 'iid2 0-0100-0-0 'iic711 g4l:tc8
Black's aim here is to enforce the thrust ... d6-d5, a classic 'wing play
should be met by play in the center' strategy. Because ... d6-d5 frees Black's
position to a high degree, White should likely clamp down on this idea and
play 12 g5lbh5.
12 'itbl?! d5! 13 exd5
13 g5 d4 14 J.xd4 exd4 15 liJxd4 liJfd7 16 liJxe6 fxe6 17 J.h3 ~c6 is
insufficient.
13...lLlxd5 14lLlxd5 ~xd5 IS ~e2
15 'ir'xd5 loses to 15 .. Jld8! so White protects f3 and looks forward to
utilizing his control of the d-fiJe. But Black's next move, creating
immediate activity against White's king fonnation, keeps him off balance.
15... a5! 16 ~b6
White is already experiencing some discomfort:
I) 16 'ir'xd51i'xc2+ 17 'it;1al 'it'xe2 18 l:thel 'it'xh2 19 l:th1 'ii'e2 20 'ii'xe5
~f6 is good for Black.
2) 16 c4? J.xc4 17 l:tc1 b5 contributes nothing.
3) 16 a4 J.c6! wins an important pawn;
4) 16 l:the1 a4 17liJcl a3! 18 b3 ~b4! wins.
5) 16 J.b5 represents White's best try, but Black is now controlling
events.
96 Sicilian - Opposite Sides Castling
16...'iWxb6 17 'ii'xd5 'ii'c7 18 i.d3 a4 19 tiJd2 a3 20 i.c4
20 l:he 1 li)c6 21 b3 leads to serious dark-square .problems for White.
Movsesian tries to react actively. GMs have an instinctive aversion to
passive play.
20... axb221 'ii'xfi+ ~h8 22 c3!
White dreads the prospect of ... li)c6-d4, and this temporary pawn sac
leads to the recovery of the dangerous b2 pawn. Black has to be careful
about his back rank.
22 •..:a3! 23 i.b3 'ifxc3 24 tiJc4
24 'fixe7? l::txb3 wins.
24...tiJc6! 25 tiJxb2
25 li)xa3 .ltxa3 26 'fic4 li)d4 27 "'xc3 .l:Ixc3 leaves White unable to stop
an eventual (after securing the back rank) ... li)e2 followed by l::tcl+.
25 ... e4!
Black blasts open the h8-a 1 diagonal to keep White occupied on another
front. He must already deal with threats on the c-file, a-file and an
impending li)c6-b4 or d4. Now 26 fxe4? .ltf6 loses quickly, so White tries
to confuse the issue.
26 l:c1! 'ilxo 27 'ife6?
White had to play 27 'ii'xf3 exf3 28 li)c4! :a6 29 li)e5! when he will
recover the f3 pawn and maintain a fairly even position.
27.•.:f8 28 .id5
White expects to win back the e4 pawn but there is the lurking danger
now that Black will finally activate his dark-squared bishop.
28 ....if6 29 i.xe4
Sicilian - Opposite Sides Castling 97
29.. Jba2!!
White's kingside is denuded spectacularly. Now 30 iVxa2 (30 J.xf3
:xb2+ 31 'it>al :a8+ and mate next) 30 .. :iVxe4+ 31 ~al J.xb2+ wins after
both 32 'irxb2 :a8+ or 32 ~xb2 1:[f2+.
30 l:tc2 ::'xb2+ 31l:bb2 'iVa3
Black wins the exchange back and has a wide open king to harass.
32 'iWb3 ~xb2 33 'iVxb2 'iVe3 34 i.c2lt::ld4 35l:tdllt::lxc2 36 'i'xc2
'iWb6+ 37 ~cl 'ii'e6! 38 'i'a4 'ii'h6+ 39 ~bl 'i'xh2 40 'ii'b4l:f.a8 41
'ii'xb7 l:[b8 42 ~cl 'tlff4+ 43 'it>c2 'tlfc4+ White resigned
Malakhov White
Cvitan Black
Bled Olympiad 2002
Sicilian Defense
1 e4 c5 2 It::ltJ d6 3 d4 cxd4 4 It::lxd4 It::lf6 5 It::lc3 a6 6 ~e3 e5 7
It::lb3 ~e6 8 tJ i.e7 9 'iid2 0-0 100-0-0 It::lbd7 II g4 b5 12 g5lt::lh5
13 It::ld5 ~xd5 14 exd5
98 Sicilian - Opposite Sides Castling
14... f5!?
Black tries to solve his problems by gaining space on the kingside. But
this has some drawbacks. White gains access to the h3-c8 diagonal for his
light-squared bishop, pressure along the g-file and the benefit of a slightly
weakened king position.
15 gxf6
15 h4? lDg3 16 AgllDxfl solves most of Black's problems.
15.. Jbf616lba5lbf4
The knight looks very well placed on f4 but it really does not do all that
much. White can still probe on the kingside thanks to his strong control of
the light squares and a powerfully posted knight on c6. Also, the knight
obstructs the f-file and pressure on White's sickly f3 weakness.
17lbc6 'iWe8 18 l1el ~f8!?
Black did not want his bishop to go bad with 18 ... ~f8, but his king is not
very secure on f8.
19 l:tgl 'iin 20 i.xf4
A more subtle approach here is 22 c4! bxc4 23 ~xc4 followed soon by
<bb 1 and White has play on both sides of the board and continuing attacking
chances. The c-fiIe could welI become a dark alIey for the insecure black
king.
20.. Jbf4 21 i.h3
White was apparently not satisfied with 21 lDxe7 rj;xe7 22 Axg7 iVxg7
23 1Wxf4 1:f8 24 'ifh4+ iVf6! when Black has good counterplay. This was
probably his original intention when playing 20 ~xf4.
21...i.h4
22l1e4
Sicilian - Opposite Sides Castling 99
22 .ite6!? looks stronger, e.g. 22 ... .i.xel 23 it'xel it'e8 24 it'g3 g6 25
'iWh3! 'i;g7 26 .itxd7 'ikf7 27 'iWe6l:hD 28 b4! (fixing Black's queenside).
22 ...lhe4?
Black obligingly opens up the f-file and improves White's pawn
structure. After 22 ... liJc5! 23 l:txf4 'iWxf4 24 'iWxf4+ exf4 25 b4 liJa4! (not
25 ... .itf2? 26 bxc5 .itxgl 27 cxd6 with a strong bind for the exchange)
Black has a very playable ending.
23 fxe4liJf6 24 'ii'b4!
Hitting the soft spot in Black's position - d6.
24..•'ii'c7
Black defends agaist the threatened 25 liJxe5 which now fails to 25 ... a5,
but White keeps up the pressure with his next move.
25.i.e6
Now liJxe5 does loom as a threat.
25•.•g6
25 ... l:te8 26 liJxe5 a5 27 ira3 b4 28 'ii'h3 wins and 25 ... ~e8 26 a4! .itf2
27 Ag2 .itc5 28 'iWb3 liJxe4 29 'iWD! liJf6 30 'ii'xf6! decides. Black tries
desperately to create some space for his king.
26liJxe5! a5 27 'ii'd2 dxe5 28 'iWh6+ ~e7 29 'iVxh4
White has not only won a pawn but the pin on f6 is decisive.
29...'ii'c5 30 Iifl 'ii'e3+ 31 ~bl !;Its
White to move and win:
321hf6! %:.xf6 33 'it'xh7+ ~e8 34 'ifd7+ Black resigned
White takes the rook with check after 34 ... 'iii>f8 35 'iWd8+ 'i;g7 36 'iWg8+
'i;h6 37 'iWh8+ ~g5 38 h4+ ~f4 39 'i'xf6+ etc.
100 Sicilian - Opposite Sides Castling
G.Shahade White
Yudasin Black
New York 2001
Sicilian Defense
I e4 c5 2 ttJf3 d6 3 d4 cxd4 4 lbxd4 ttJf6 5 ttJc3 a6 6 .i.e3 ttJg4 7
.i.d ttJf6 8 .i.e3 e5 9 ttJb3 .i.e7 10 f3 i.e6 11 'iVd2lbbd7 12 g4 0-0
13 0-0-0 ttJb6 14 h4 !:Ic8 15 'it>bl 'iVc7
Black's setup does not look right. His build-up of major pieces on the
c-fiIe is wasted.
16 hS ttJfd7 17 gS
Clearly White is far along on his attack while Black is hardly making a
squeak on the other wing.
17...ttJc4 18 i.xc4 'iVxc4 19ndgl f5?
19 ... b5 had to be tried here, although White can take a pause to protect his
king with 20 a3 before launching the standard attack with g5-g6.
20 g6 f4 21 h6!
An attacking player's dream! The pawns blow open the black king
position. Take away the white knight on b3 and this attack still looks
decisive!
21 ••• gxh6 22 gxh7+?!
White gets a little ahead of himself. 22 'ii'h2! ends matters at once. Even
this minor slip does not matter too much. The black king is far too exposed
to expect a long reign.
22 •.•'it>f7 23 i.f2 :h8 24 l1xh6 i.f8 2SlbaS!
White is back in the groove.
2S...'iVb4 26 l1xe6! 'iVxaS 27 ':xd6 i.xd6 28 'iVxd6 lbf6 29 i.b6
nc6 30 'iVxc6 Black resigned
5 Important Motifs for the
Attacking Player
In this chapter I am going to cover various important subjects in what is,
in my opinion, their order of importance. All are important motifs that must
be understood by the attacking player. Let's start out by dealing with the
center and its vital importance to successful attacking play.
Centralization
It is no secret in chess that control of the center, whether by pieces or
pawns, usually confers a big advantage to the controlling party. Top players
are religious about adhering to this principle. Sometimes I think they
silently chant the mantra "centralize, centralize, centralize ... " during a
game. Of course in the heat of battle, players often lose sight of this
principle and simply forget to occupy vacated central squares with queens
and rooks at the cost of losing the fight for the center.
The following examples illustrate in particular the power of centralized
major pieces and especially the queen in assisting or directing an attack.
Even in murky, obscure-looking positions, centralized pieces can cut
through the fog and make concrete attacking plans far easier. Tactics and
combinations usually just flow out of well-centralized positions.
Here is an instructive example of how a better centralized position can
quickly lead to a mating attack within just a few moves.
102 Important Motifsfor the Attacking Player
This is from the game Van Wely-Lein, New York 1997. White clearly
has greater control of space plus more influence in the center. His first
move prepares for a direct kingside attack.
I
~e3!
I can visualize a club player playing something anaemic like I i.b I? i.e8
followed later by a mass exchange of rooks on the d-file. The side with
superior central control and space should avoid exchanges unless they lead
to a tangible advantage.
1...h6
Lein has a defensive plan of playing ... 'ittf8 in answer to 1:g3 but this slow
move does nothing to stop the momentum of White's build-up. Does Black
have a better defensive try? Let's see what happens after a standard type
defense - l.....te8 (covering f7 and unmasking the rook on d8) 2 g4! b5!
(Black must strive to distract White from the attack) 3 1:h3! bxc4 4 g5
liJh5! (4 ... cxd3 5 gxf6 wins quickly) 5 ~xh7+ 'ittxh7 61:xh5 ~ 'ittg8 7liJd7!!
1:xd7 (7 .. .'.fS 8 'ifh4 f6 91:h8+ 'ittfl IO 1:f8+ 'itte7 II gxf6+ gxf6 121:xf6
wins) 81:xd7 ..txd7 9 'ifh4 'ittf8 IO g6! winning.
2 g4!
A very instructive move and one not often played at the under-2000 level.
This move adds extra force to the white attack and handily removes
back-rank worries. The club player would be tempted to probe Black's king
position using just his pieces.
2••.1Lc63 b4!
A small investment to drive the black queen to an inferior square.
3..:i!Vxb44 g5! hxgS 5 'iVxg5
Black has no defense to the coming 1:g3. For instance, 5... 'iff8 loses to 6
1:g3 1:xd3 7 1:gxd3 ..te4 8 1:g3 liJh7 9 'ifh4 ..tfS 10 1:d7 'ifb4 11 1:xg7+!
'ittxg7 121:xfl+ 'itth8 13liJg6+! ..txg6 14 'ifd4+ with mate in a few moves.
Important Motifs for the Attacking Player 103
S....i.e4 6 J:tg3 ttJe8 7 'ilVhS Black resigned here, a bit prematurely in
my view. I would have tried 7... i.g6 when White's most effective KO is 8
l:txg6! fxg6 9 'ii'xg6ltJf6 to 'ii'f7+ 'it>h8 11 'iVxe6 and wins.
Leko White
Radjabov Black
Linares 2003
French Defense
1 e4 e6 2 d4 dS 3 ttJc3 tLJf6 4 .i.gS .i.b4 5 eS h6 6 .i.d2 i.xc3 7
bxc3 ttJe4 8 'ilVg4 g6 9 .i.d3 ttJxd2 10 ~xd2 cS 11 h4 i.d7 12 hS gS
13 f4 ttJc6 14 fxgS'ilVaS IS dxcS d4 16 ttJO 0-0-0 17 .:tabl dxc3+
18 ~e211hg8
19 'ilVe4! 'ilVc7
I9 ...'iVxc5? 20 l:tb5 'iVa3 21 l:thbI b6 22 l:tb3 'iVxa2 23 l:txc3 quickly
overruns Black's defenses.
20 g4 tLJe7 21 i.bS! hxgS 2211b3
White is zeroed in on Black's b7 weakness and it seems that Black can do
little to prevent White from doubling rooks and crashing through.
22 ...ttJdS 23 .:thbl
104 Important Motifs for the Attacking Pluyer
A critical position. The powerfully centralized white queen exerts
pressure in all directions while also helping to contain Black's counterplay.
23 ...'iVxc5? fails to 24 .ia6! so Black must look for activity in the center.
23 ... fS! looks like his best shot, when 24 gxfS? exfS 25 'iVxd5? loses to
25 ... .ixb5+. The positional approach 24 exf6 liJxf6 25 'iVe5 .ixb5+ 26
l:txb5 :d2+! 27 'it>el 'iVxe5+ 28liJxe5 :g7 gives Black a playable ending.
It is surprising that the young Radjabov failed to find this chance. The
whole basis of his selected opening, the McCutcheon Defense of the French
is to parry thrust with counter-thrust. By failing to hit back in the center and
disturb White's centralized queen, Black's position dissolves.
23 ..•.tc6 24 .txc6 'iVxc6 25 ttJd4
More centralization!
25.•.'ifa6+ 26 \t1el %:td7 27 c6
Now it becomes a rout. The rest is pure mop-up.
27...'f1..c7 28 l1xb7 litxb7 29 %:txb7 ttJb6 30 'ifh7 %itf8 31 "iVg7 'iVa3
32 'ifxf8+! 'ifxf8 33 ttJb5 'iVc5 34 ttJd6+ ~d8 35 c7+ 'ifxc7 36 ':'xc7
~xc7 37 h6 ttJd7 38 h7 Black resigned
Nezhmetdinov White
Chernikov Black
USSR Team Championship, Rostov-on-Don 1962
Sicilian Defense
1 e4 c5 2 ttJO lbc6 3 d4 cxd4 4 ttJxd4 g6 5 ttJc3 i.g7 6 i.e3 lbf6
7 i.c4 0-0 8 .tb3 ttJg4 9 'ifxg4 ttJxd4 10 'ifh4 'ifa5 11 0-0 i.f6
Black is hoping for something like 12 'iVh6 .ig7 13'iVh4 ~f6 with a draw
by repetition. However, White has a real shocker in store for him.
Important Motifs for the Attacking Player J05
12 iixf6!!
White sacrifices his queen for two minor pieces and a long-term attack.
Because White will soon dominate the center with a nearly unassailable
centralized knight on d5, supported by bishops operating on the beautiful
diagonals a2-g8 and al-c3, Black faces a joyless defensive task. Black's
corrupted pawn structure enables White to secure fine outposts and an
unobstructed diagonal pointed directly at the black king position. Basically
Black's only chance of survival is to somehow sacrifice the exchange for
one of White's well placed minor pieces and defend grimly from there.
12...tl'le2+ 13 tl'lxe2 exf6 14 tl'lc3 ne8 15 tl'ld5 ne6 16 J..d4 ~g7
17 :adl
White calmly builds up his attack by lifting his rook through the central
file.
17...d6 18 Itd3 J..d7 19:t0 J..b5
19.. Jhe4 loses quickly to 20 i4c3 'ii'a6 2llLlxf6.
20 J..c3 iid8 21 tl'lxf6 J..e2?
Much trickier was 21...l:tc8! taking aim at the lethal bishop on c3. Best
play then appears to be 22 lLle8+! 'it'g8 23 ~xe6 fxe6 24 tilf6+ ~g7 25
l:td l! lhc3 26 bxc3 with advantage for White as 26 ... .te2 is blasted by 27
':xd6!.
22 tl'lxh7+! ~g8 23 :th3l:te5 24 f4! i.xfl 25 ~xfl
Despite his huge material advantage, Black is helpless to fight off the
swarming minor pieces.
25..•Itc8
Black is run off the board after 25 .. J~h5 26lLlf6+ ~f8 27 lLlxh5 gxh5 28
l:txh5 ~e7 29 l:th7 and the queen is no match for the two bishops
supporting the rampant pig on the 7th •
26 i.d4!
106 Important Motifs for the Attacking Player
Much better than 26 fxe5? dxe5 27 .ltxe5 1i'd I + 28 ~f2 1i'd2+ 29 'it'f3
'ii'dl + =.
26...bS 27lZJgS 1:c7
28 il.xt7+!
A little combination to regain with interest the material sacrificed. *
28••..:.xt7 29 :h8+ ~xh8 30 lZJxt7+ 'ith7 31 lZJxd8 l::txe4 32lZJc6
lbf4+ 33 ~e2 and White went on to win easily.
*Because it is fresh in my mind, here is an even cleverer simplifying
combination that I witnessed in the 2003 US Open in Los Angeles.
Granda Zuniga White
Ibragimov Black
White finished the game with I 'ifh7+!! ~xh7 2lZJgS+ ~g8 3 il.h7+
'ith8 4 lZJxt7+ ~xh7 SlZJxeS c3 6 ~fl i.a3 7 as! Black resigned as
after 7 ... c2 SlLXi3 cl=1i' 9 /l)xcl .ixcl 10 a6 the pawn cannot be stopped.
Important Motifsfor the Attacking Player 107
Gavrikov White
Christiansen Black
Bie11991
Sicilian Defense
1 e4 c5 2 lLlo e6 3 d4 cxd4 4 lLlxd4 a6 5 ~d3 ~cS 6 lLlb3 ~a7 7
't'ie21L1c6 8 iLe3 lLlf6 9 lLlc3 d6 10 f4 eS II ~xa7 l:txa7 12 f5 b5 13
0-0
13 'iiie3!? 0-0 ) 4 a4 b4 IS lDdS lDxdS 16 exdS lDd4! 17 lDxd4 exd4 18
'ir'xd4 l:.e7+ 19 'it'f2 l:.eS gave Black enough play for the pawn in
Stefansson-Christiansen, Manila 1992. 13 O-O-O! is White's strongest
continuation and casts some doubt on Black's opening. Perhaps the radical
13 ... hS to stop g2-g4 offers the best chances.
13•..1L1e7!
Not good is 13 ... 0-0? 14 a4 b4 ISlDdS! lDxdS 16 exdS with a clear edge
for White. It is vitally important for Black to fight for control of the central
square dS.
14 a4 b4 IslLldl 0-0 16 as d5!
A pawn sacrifice to activate Black's pieces and fight for control of the
center.
17 exdS ~e8!?
17 ...ihdS 18 lDe3 'iVc6 19 lDg4 lDxg4 20 'iVxg4 lDdS was not bad, but
poses less problems for White to solve.
181L1e3
White should have played 18 'iVxeSlDexdS 19 'ilid4 l:.d7 20 lDcs l:.d6 21
'iVh4 'ilic7 22 l:.c I! when it is not clear if Black has sufficient compensation
for the pawn.
18...ttJexdS 19 ttJxd5 'iWxd5
Black is nicely centralized now and looks forward to advancing the
e-pawn.
20 lIa4 e4 21 i.c4 'iWe5!
From here forward, Black develops a hefty attack that is directly related
to the centralized queen. White is invited to lunch while Black starts an
attack that flows from the strength of his mighty e-pawn and powerfully
centralized pieces.
22 Itxb4 'iWxb2 23 .l:b6 'iWe5
Back again. By removing the b2 pawn from the board, Black has fresh
squares to occupy, like c3, and White's c2 pawn has been devalued.
108 Important Motifs for the Attacking Player
24 i.xa6
White grabs a pawn, but that is a small price to pay for the monolithic
queen position on e5.
24 ... i.xa6 25 lha6 lLlg4!
Black opens up the white king position and envisages outposting on t2.
26g3
Forced.
26.. J~xa6 27 "'xa6 e3 28 'ti'e2
If 28 'ilVc6 e2 29l:te I ij'e3+ 30 ~g2 'iWf2+ 31 r,t>h3 l:tf8 wins.
28...lLlfl
Suddenly ...ij'e4 is a major threat. White's reply is forced, but he cannot
meet the threats on the long diagonal without shedding material.
29 'fin 'iVc3 30 'ii'e2
30 l:tc I lDh3+ 31 r,t>g2 lDg5 - a typical strategem in this kind of position.
A queen operating on the long diagonal combined with a knight on g5 are a
~owerful duo in attacking a deserted fianchetto formation. 32 ~d5 e2 33
llld2 ~c8 34l:te I l:td8 wins.
30......c6 31 :txfl
Materially, White is doing fine, but his king is too exposed and his pawns
are too weak to offer much resistance.
31... exf2+ 32 'ii'xfl :d8 33 lii'e2 h6 34 h4?! "'c3 35 ~g2 ~c8 36
~h3 lii'b2 37 a6lhc2 38 "'e8+ ~h7 39 a7
Or 39 ~xt7 l:th2+ 40 r,t>g4 ij'e2+ 41 r,t>f4 l:tf2 mate.
39...h5!
Cinching the noose.
White resigned
Important Motifs for the Attacking Player 109
Cutting the Board in Two
One very agreeable method of attack is to disable the lines of
communication of the opponent's forces. This kind of operation is usually
an outcome of a significant space advantage where the attacker throws in a
monkey wrench, often in the form of a pawn, to disturb or block the
opponent's pieces from transferring to a threatened sector. The theme is
closely related to the control of the center because this principle of cutting
the board in two invariably involves the advance or sacrifice of a center
pawn.
Here is a classic example.
Timman White
Hubner Black
Match 1991
English Opening
1 c4 e5 2 ll'lc3 ll'lf6 3 ll'lf3 ll'lc6 4 g3 ~b4 5 ~g2 0-060-0 %le8 7
ll'ldS ll'lxd5 8 cxd5 ll'ld4 9 ll'lxd4 exd4 10 e3 c5 11 a3 ~a5 12 exd4
cxd4
13 d6!
White cuts Black's position in half with this move. The pawn can, and
must be taken but that entails a loss of time that White can profitably use to
further his development.
13.•:"C6 14 d3 'iixd6 15 ~f4 'iia6
15 .....f6 16 'ir'h5 .ib6 (16 ...'iVd8 17 ~d5 g6 18 .txf7+ <it>xf7 19 'ii'xh7+
c;t>f6 20 h4! wins) 17 .l:tael ne6 18 .id5 (designed more to keep Black tied
up rather than win the exchange) 18 .. .'ii'd8 19 l:te4! and Black is helpless to
stop the steady build-up.
110 Important Motiftfor the Attacking Player
16 b4.id8 17 liel
White can build up a crushing attack as Black's queens ide stands frozen.
17...1:1818 'ifhS d6 19 .idS
Threatening 20 'ii'xf7+!.
19....id7 20 a4! l:c8 21 .ie4
Provoking a weakness in the king position as a prelude to the final phase
of the attack. Now 21 ... f5 22 Ji.d5+ ..t>h8 23 Ji.f7! d5 24 Ji.e8 is
overwhelming.
21 ... g6 22 'iff3 nc7
22 ... Ji.c6 23 i.h6 settles matters.
23 bS 'iVb6 24 .ih6 a6 25 .idS
White prefers to create a mating attack rather than win material.
2S....ifS 26 g4 .ic8 27 .l:te2 axbS Black resigned
Black did not care to wait for the decisive 28 lIae I! when there is no
defense to 29 lIe8 (28 ... i.d7 29 'ifxf7+! lIxf7 30 lIe8+ i.xe8 31 lIxe8
mate).
I remembered this game because I served as a commentator on the
German TV station WDR which was covering this match between the
Dutch GM and Germany's top player. GM Helmut Pfleger, the host of the
coverage, would fire questions at me in German and I would demonstrate
my limited knowledge of the language; Pfleger (in German): "Larry, who is
the favorite in this match?" Christiansen: "Timman's bishops are very
strong." Pfleger: "Larry, tell us about your encounters with these players."
Christiansen: "Hubner has development problems." Anyway, I had the
chance to playa similar 'board cutting' advance 11 years later in the
foHowing game with the young Canadian champion Pascal Charbonneau.
Christiansen White
Charbonneau Black
Vancouver 2002
English Opening
1 c4 eS 2 g3 liJf6 3 .ig2 liJc6 4 liJc3 .ib4 5 liJd5 .ics 6 e3 liJxdS
7 cxdS liJe7 8 b4!? .id6?!
8 ... Ji.xb4 9 'iVg4 ~c5 10 'ii'xg7ltJg6 II 'ii'h6 d6 looks OK for Black.
9 .ib2 0-0 10 a3 5?! 11 f4! liJg6 12 liJf3 'iWe8 13 0-0 exf4? 14
exf4.ie7 15 :tel 'iVd8
The next move absolutely destroys Black's position.
Important Motifs for the Attacking Player III
16 d6! cxd6
After 16... ..ixd6 17 lDg5 there is no defense to both 18 "h5 and 18
'ifb3+.
17l::t.xe7!
Removing Black's key defensive piece.
17•..llJxe7
17 .....xe7 18lDg5 h6 19 i.d5+ 'Otih8 20 ~'h5 wins.
18llJg5 d5
Black tries to close down the a2-g8 diagonal.
19'iVe2
White plans to simply pile up on e7 until the knight gives way. The text is
simpler than 19 'iWh5 h6 20 lIe I hx.g5 21 'ifxg5 lI17 22 i.xd5 'iib6+ 23
~hllDxd5 24 lIe8+ 'iti>h7 25 'iWh5+ Wfh6 26 "x17 which leads to a decisive
attack.
19••• h6
19...'ii'b6+ 20 'it>hl 'iWd6 21 lIe I lDc6 22 'ifh5 (22 'ifd3 also wins) 22 ... h6
23 ..if6!! (a beautiful interference theme) and now:
I) 23 .. Jlxf6 24lIe8+ l:tf8 25 lIxf8+ ~xf8 26"17 mate.
2) 23 ... hxg5 24 fxg5! lIxf6 (else 25 g6) 25 gxf6lDe5 26 'ife8+ ~h7 27
.!he5 wins.
3) 23 ...'ii'xf6 24 ..ixd5+ 'i!th8 25 l:te8lDe7 26lD17+ ~h7 27 l:txf8 wins.
20l:eI!
White's powerful bishops and Black's backward development assure an
easy win.
20... hxg5
20 ... l:tn 2llDxt7 'it>x17 22 'ii'e5"f8 23 'ifd6 wins easily.
112 Important Motifs for the A ttacking Player
21 'iixe7 'iixe7 22l!xe7 Black resigned
Black has nothing better than 22 .. .1::tf6 23 ~xd5+ ~f8 24 ~xf6 gxf6 25
l::tf7+ ~e8 26l::txf6 with an easily won ending.
In this next example of cutting the board in half, White uses a bishop to
powerful effect to paralyze one wing of the board in order to focus his real
attack on the other flank.
Dreev White
Tiviakov Black
Dos Hermanas 2003
Queen's Indian Defense
I d4 ltJf6 2 c4 e6 3 ltJf3 b6 4 a3 ~b7 5 ltJc3 d5 6 cxd5 ltJxd5 7
~d2 ltJd7 8ltJxd5 ~xd5 9 'iic2 c5 10 e4 ~b7 II d5! exd5 12 exd5
~d6
12 ... ~xd5? 13 0-0-0 is too strong, e.g. 13 ... .i.d6 14 ~g5 or 13 ... ~e7 14
.i.c3.
13 0-0-00-0
14 ~b5!
White begins a plan to paralyze Black's queenside. He will install the
light-squared bishop on c6 where it will inhibit Black's queenside forces
from assisting in the defense to an impending kingside attack.
14... h6
Black was worried about 14 ...'iVc7 15 ttJg5! but it is not a healthy sign to
make such a weakening move like 14 ... h6. The alternative 14 ... a6 15 ~c6
'iVc7 however, looks bleak ... White starts aiming at the kingside with 16
.i.c3! .i.xc6 17 dxc6 ttJb8 (17 ...'iVxc6? 18 'iVd2 wins) 18 'iVf5! ttJxc6
Important Motifs for the Attacking Player J J3
(18 ... ~f4+ 19 ~bl lDxc6 20 ~xg7 transposes) 19 ~xg7! Jt.f4+ 20 ~bl
Q;xg7 21 lld7 'ii'c8 22 l::thd 1 and Black cannot adequately meet the threat of
the lift 23111d3.
IS ~c3 tbf6
15 ... a6 16 ~c6 'ii'c7 17 ~bl! llfe8 (17 ...~xc6? 18 dxc6 'ii'xc6 19 'ii'd3
wins) 18lDh4 makes life unpleasant for Black.
16 ~c6 ltb817 h4!
Suddenly White threatens the murderous 18lDg5!.
17•..tbg4 18 'ittbl ~c8
Black desperately tries to regroup, but White has control now over most
ofthe board and attacking possibilities ranging from left to right.
19%:del g6
20 lte6!!
A truly inspired way of blasting away the rickety king position. The threat
of 21 l::txg6+ compels acceptance of the sacrifice but this transforms the
well-placed but restricted bishop on c6 into a fearsome attacker on the other
wing.
20...~xe6 21 dxe6 f5
2l...'ii'e7 22 exf7+ 'ii'xf7 23 ~d5! wins.
22 hS! gxhS
Many online spectators groaned at this but the more natural-looking
22 ... g5 loses to 23 e7! 'ii'xe7 24 ~d5+ ~h7 2511el 'ii'd8 26 ~e6! and there
is no defense to the killing threat of27 ~xf5+.
23 l%xhS 'fie7 24 tbh4 'fixe6 2S tbxfS .ieS 26 .idS!
It is appropriate that this bishop delivers the final crushing blow.
Black resigned
114 Important Motifs for the Attacking Player
Now let's address some practical attacking problems.
Desperation Attacks
Let's say your position has taken a turn for the worse, or you find
yourself a pawn or two behind without any sort of compensation. Sitting
tight and waiting for a mistake by your opponent is not likely to prove
successful. In my early years in that type of situation I would often let my
time run down to under two minutes in the hope my opponent might get
nervous or over-excited. This strategy worked more than once, and if your
opponent exhibits an excitable personality it is worth considering. Usually
though, my main strategy to avert defeat is to attack or counter-attack
furiously. I have various rules of engagement in lost positions. It is usually
better to be down the exchange than to be down two pawns. It is better to be
a piece down with activity than a pawn down and passive. In time pressure,
knights are better than bishops although that changes after move 40.
Exchange sacrifices in return for activity - any activity is better than
suffering passively while your opponent steadily improves his position.
Throughout my own chess career, whether because of shoddy opening
play or a careless mistake, I have frequently resorted to furious, desperation
attacks to stave off defeat. When behind two pawns or more, you may as
well throw all caution to the wind and charge forward. If I am clearly
strategically lost then very drastic measures must be undertaken. An
exchange sac to change the structure of the position might be a thought or
even a piece sac to nab some center pawns and ease the pressure.
The following examples are illustrative of the type of energy and audacity
required to reverse the natural course of the game.
Morozevich White
TopaJov Black
Pamplona 1994
Sicilian Defense
1 e4 cS 2 lDfJ d6 3 ilobS+ ilod7 4 i..xd7+ "xd7 S c4 g6 6 d4 cxd4
71Dxd4 ilog7 8 0-0 lDc6 9 lDe2lDeS 10 lDbc31Dxc4 II b3 lDb6 12
a4 'ji'd8 13 iloe31Df6 14 l:tct 0-0 IS h31Dbd7
Some sloppy opening play by Morozevich has led to the loss of an
important pawn without any visible compensation. Topalov looks forward
to smoothly consolidating his solid position but Morozevich imaginatively
throws one obstacle after another in his mad pursuit of attacking chances.
Let's see how he succeeded.
Important Motifs for the Attacking Player J J5
16 g4!
Let the confusion begin! White's only potential source of counterplay is
on the kings ide so he sensibly grabs some space in that sector.
16.•.lLleS?!
Topalov underestimates the dangers lurking on the kings ide. A good
sensible move was 16... a6 in order to expand later with ... b7-bS.
17 f4 liJc6 IS G!
"Sometimes you need to give a square to gain a square." White concedes
Black control over eS but secures some much-needed space for kingside
operations.
IS .. ,11c8 19 liJf4lLld7
One can hardly blame Topalov for his play which has been completely
logical. How can White conjure up much of an attack when Black has such
iron control over the eS square?
20gS!
White continues to stir things up on the kingside. One crude idea is to
continue with h3-h4-hS to weaken Black's king protection. Also Black must
be alert to the possiblity offS-f6 in certain variations.
20... liJb4
This forces White back but also takes away a potentially important
defensive piece from the kings ide.
21 lLlce2! lLlcs
Black should trade off the rooks on the c-file with 21...l:txc 1 22 'it'xcI
'ili'c8! when 23 iLxa7 b6 24 fxg6 hxg6 2SlDxg6? fxg6 26 ':xf8+ 'ir'xf8 27
'ir'c4+ 'it>h7 28 ii'xb4 'it'D is crushing for Black.
22 l:c4!
J J6 Important Motift for the Attacking Player
This move gains valuable time for White to increase his kingside
pressure.
22 •.. a5 23 It)g3
White continues his kingside build-up while Black is preoccupied on the
other wing. All of a sudden, White has very good compensation for his
pawn.
23 ...~e5 24 'ifg4!
White reinforces his desperation attack and sets a very deep and beautiful
trap.
24...lt)xb3??
Topalov's sense of danger deserted him. He could have simplified with
24 ... .i.xf4 25 iVxf4 lbxb3 26 l:.xc8 'ii'xc8 27 f6 e5 28 'it'h4 'it>h8 which
should win for Black.
25 fxg6!!
Suddenly Black's kingside is on fire!
25 •• .lbc4
Black is also destroyed after 25 ... hxg6 26 lbxg6! l:.xc4 (26 ... fxg6 27
l:.xf8+ wins) 27 lbxe5 dxe5 28 g6 fxg6 29 'it'xg6+ 'it>h8 30 ii'h5+ 'it>g8 31
lbf5.
26 gxh7+ ~h8 27 g6
The assault is unstoppable. White has a massive material advantage where
it counts - the kingside.
27..•lt)c2 28lt)f5 ~g7 29 gxf7 ':xf7 30 'ifh5! lU6 31 It)g6+ l:lxg6
32 'iVxg6 'iWfS 33 ~h6!
Now in view of the horrendous 33 ... .i.xh6 34lbxh6 Black resigned.
Important Motifs for the Attacking Player I J 7
Shirov White
Short Black
Las Vegas 1999
French Defense
I e4 e6 2 d4 dS 3 tiJc3 tiJf6 4 .tgS dxe4 5 tiJxe4 .te7 6 .txf6 gxf6
7 tiJf3 tiJd7 8 .tc4 cS 9 0-0 0-0 10 l:el tiJb6 11 .tn cxd4 12 tiJxd4
~h813 c3 eS
A less daring player than Shirov would probably settle for 14 tLlbS, whch
promises White a small edge thanks to the coming invasion of the d6
square. But the master of illusion and confusion could not resist trying to
force an attack here.
14 'fihS!
The queen takes up a strong attacking position and additionally secures
control of the fS square. Black is mated after 14 ... exd4?? IS tLlxf6! 1i.xf6 16
.i.e4, so Short hurriedly transfers his knight to aid in the defense and fight
for control of key squares on the kingside.
14...tiJdS IS %:tadl?
Shirov's attacking intuition rarely fails, but this is one of those rare
occasions. He has built up a powerful attack, but here he should have
applied the surgeon's touch with IS tLle2! (controlling f4 and stopping
...liJf4) when Black has difficulties meeting the threat of :tad I and c4. For
instance, IS ...1i.e6 16 c4 tLlb4 17 :tadl 'iVc8 18 'Wh6 is decisive.
IS ... exd4l6 l:txd4 fS!
Forced but effective. Threats on the b I-h7 diagonal are removed and the
f6 square is cleared for the knight to help defend the kings ide.
17 tiJg3
171i.c4 fxe4 18 :xdS 'ii'c7! (Black prepares to defend his 71h rank with
... f5) 19 lhe4 fS gives White some compensation, but clearly Black is in
J J8 Important Motifs for the Attacking Player
control of events. Shirov was more interested in setting his opponent the
most difficult possible problems instead of playing technically better moves
that clarify the position.
17... i.c5!
17... ~f6 IS :d2 (1S :g4 is pretty but Black rebuffs it with IS ...:gS and
not IS ... fxg4?? 19 ~d3) IS ... ~e6 19 J.c4 (19 c4 Wa5! is a strong
rejoinder) 19...~g5 20 :xd5 J.xd5 21 J.xd5 Wxd5 22 'ii'xg5 gives White
fair compensation for the exchange. Short's 17 ... J.c5! combines defense
with counterattack, as White's f2 pawn now becomes a source of
counterplay for Black and forces White to take precautions.
18l:td2
IS :h4 lLlf6 secures the king position while maintaining pressure on f2.
18...'fib6
Black deftly escapes the pin on the d-file and keeps White busy defending
his sore f2 pawn.
19 'iie2
Shirov recognizes that his sacrifice has failed dismally, but he keeps the
fight going by retaining maximum tension in the position. In order to
confuse the issue, he must keep Black from connecting rooks and
challenging White's control of the e-file.
19••.lbf6
After floundering early in the fight, Shirov now introduces one obstacle
after another to keep Black off balance. This is akin to a car chase where the
fleeing car throws out smoke screens, nails and anything he can find to slow
down his pursuers.
20 'fie5!
This keeps Black from developing his queens ide, at least for the moment.
It also meets the threat of ...lLlg4 and sets a trap - 20 ...:e8?? 21 Wxf6+
'iWxf6 22 l:xeS+ <J;g7 23 lLlh5+ and wins.
Important Motifs for the Attacking Player J J 9
20••• ~g8
20 ....id7!? 21 lLlh5 l:tfe8 22 'ii'xf6+ 'ii'xf6 23 lLlxf6 ':'xel 24 l:txd7 ~g7
25lLlh5+ (25 lLld5 .l:[ae8 26 b4 l:tcl! 27 g3 l:teel 28 bxc5 l:txfl+ 29 'it'g2
l:tfdl! should win for Black) 25 ... 'it'h6 26 lLlf4 l:td8 27 l:txd8 .ixd8 28 g3
gives White drawing chances because it is very difficult for Black to attack
the queenside pawns after a subsequent lLld3. Nigel Short has a real killer
instinct and he correctly assumed there was more in the position.
21 h3!
White can retrieve some of his lost material with 21 b4, but Black has
only a minor technical task after 2l...lLlg4! 22 'ii'f4 .ixf2+ 23 l:txf2 '-xf2+
24 'ii'xf2 lLlxf2 25 'it'xf2 .ie6. Now Black faces the choice of playing
21.. ..id7 or playing 21...l:te8. The latter wins further material, but offers
White attacking chances based on the insecure position of the black king.
21. ..l:te8
This is pretty hard to resist. Short realizes that his king will take a hike to
the center of the board and that White should recoup some material thanks
to the pin along the back rank, but in the end, he has reckoned on starting
his own attack on White's vulnerable f2 pawn and the adjacent king. A
more conservative player might have opted for 21 ....id7 22 lLlxfS (22 b4
.ixf2+ 23 .l:[xf2 l:tae8 wins) 22 ... .ixfS 23 'ii'xf5 l:tfe8 24 l:tddl l:tad8 with a
more simplified position but also a smaller material advantage.
22 'it'xe8+ lDxe8 23 lbe8+ ~g7 24 b4
24..•'it'c6
It is hard to blame Short for missing 24 ... JLe7! with the point of 25 l:txe7
.ie6 trapping the rook and easing the pressure. Better, after 24 ....ie7 is the
centralizing 25 l:td4! (25 lLlh5+ 'it'h6 26 l:txe7 <t>xh5 27 l:txf7 .ie6 28
l:txh7+ 'it'g6 should win for Black with careful play) when 25 ....ig5! 26 h4
.if6 27 lLlh5+ 'it'h6 28 lLlxf6 'ii'xf6 29 l:tc4 .ie6 30 l:txa8 .ixc4 31 .ixc4
.-xc3 32 .ifl promises a stubborn fight.
J20 Important Motifs for the Attacking Player
25 litdd8!
This not only augments the pin along the rank, -but also prepares to
disturb the black king with ':g8+.
25.••J.b6 26 l1g8+ c.t>f6
26 ... 'ith6 27 %lxc8 "xc8 (27 .. Jlxc8?? 28 ttlxf5+ 'ith5 29 g4 mate) 28
':xc8 ':xc8 29 ttlxf5+ ~g5 30 ttld6 ':c6 31 ttlc4 :e6 32 g3 ~c7 33 <iltg2
':el 34 ttle3 holds comfortably.
27itJh5+!
This poses far thornier problems than the materialistic 27 %lde8 J.e6 28
%lxa8 "xc3 when Black will soon conquer the vital 12 pawn.
27...c.t>e5
27 .. .'tJe7? 28 b5! forces 28 ... J.xd8 29 bxc6 and White has the upper
hand. Short now probably expected the materially depleted Shirov to play
28 ':ge8+ J.e6 29 ':xa8, allowing Black to take over the initiative with
29 ......xc3 when White's own king faces the wrath of a battery aimed at the
12 pawn. He is in for a shocker, as Shirov detects a move that not only
keeps the black king skating on thin ice, but shores up his own defenses.
28:d3!!
The rook stands guard over c3 while keeping the black king at bay! He
intends to play :e8+ without conceding the c3 pawn.
28 ...'iih6?
A very curious position is reached after 28 ... a5! 29 b5 '6'c5 30 c4! a431
a3! when, despite Black's material advantage, it is difficult to extricate
himself from both the pin along the back rank and devilish mating threats
against the black king. Getting low on time, the English GM decides to
force the win of the c3 pawn, but this allows White's bishop to join the
other pieces in creating mating threats.
Important Motifsfor the Attacking Player 121
291i.e2! 'iVc1+ 30 :dl 'iVxc3 311i.f3!
Suddenly White threatens 32 l::te8+ iLe6 33 l:td5 mate.
31 ..•1i.e6
Black could have saved a tempo by first playing 31 ... iLd4, as after 32
l:te8+ i.e6 33 l:txa8 Black can then counterattack with 33 .. .'iib2!, finally
putting pressure on f2. White can then guard f2 only by relaxing his mating
net with 34 l:te 1+ 'it>d6 35 l:te2 'ifxb4 and the fairest outcome is likely a
draw. Both players were by now in serious time pressure, just as the game
reaches its crisis point. Shirov is generally recognized as one of the world's
finest blitz players while Nigel Short ranks somewhat below him in speed
play.
32l:'l.xaS'iVxb4?
Black should still play 32 ...'ifb2!.
33%%eS
Threatening 34 l:td5 mate.
33 •••1i.d4 34l:tdS! 1i.b6 35 a3! 'iVaS
35 ...'ii'xa3?? 36 l:tel+ wins.
36l:tSd2
Those rooks have had quite a career. Not long ago they were doubled on
the back rank and now they return to home base to attack the hapless black
king. Black has only one way to meet the threatened 37l:te2+.
36••• f4 37 1i.g4!
White refuses to release the black king from the mating web. Now
37 ... iLxg4 38 hxg4 only makes matters worse.
37•.•1i.c4
3S11e1+
J22 Important Motifs for the Attacking Player
I was the audio commentator for this game, along with Yasser Seriawan
and Valery Salov and we were all mesmerized by this battle. In the
tension-free atmosphere of the kibitzer's booth we found the beautiful shot
38 g3! which quickly forces resignation (38 ... fxg3 39 l1el+ .te2 40
l:tlxe2+ .te3 41 .:txe3 mate or 38 ... ~xf2+ 39 'it'xf2 'iib6+ 40 'it'g2 and
wins). Shirov found another way to win material.
38..•~e3 39 l:ddl
39 fxe3 'i!fxd2 40 exf4+ 'it>d4 41 l:tdl also wins.
39••. ~b3 40 %:.bl ~c2 41 llb4 fS 42 ~O ~e4 43 fxe3 ~xO 44
gxO it'xa3 4S ~xf4! b6 46 l:[d4 Black resigned
A breathtaking desperation attack by Shirov whose fighting spirit was not
dimmed by his early spoiled attack.
Hector White
Christiansen Black
Reykjavik 1998
Four Knights Game
1 e4 eS 2 ~O ~c6 3 ~c3 lDf6 4 g3 ~cS S ~g2 d6 6 d3 ~e6 7
lDa4 h6 8 c3 it'd7 9 0-0 ~h3 10 d4 ~xg211 'ifi'xg2 ~b6 12 l:.el 0-0
13 b4 lUe8 14 dS ~e7 IS c4 as 16 a3 axb4 17 axb4 ~d4? 18
lDxd4 exd4 19 bSlDg6 20 OlDeS 21 it'xd4
Black is down a pawn, and White is just a move away from connecting
rooks and consolidating his position. How did I get myself into this mess?
Sitting back and allowing White to consolidate his slightly disorganized
position was not an alternative. I decided my only chance here was to
sacrifice a piece to keep White ofT balance. I did not find a clear refutation
of the sac but I was certainly of the opinion that with absolutely correct play
White should be able to stem the attack. One important factor here was my
awareness that Hector loves the initiative and is uncomfortable defending.
Important Motifs for the Attacking Player 123
21. ..liJxfJ
After the sacrifice, Black's pieces are energized and White must defend
his sore points e4 and h2 while striving to coordinate his pieces.
22 WxfJ 'i/ih3
Black must not let the white king scurry back to g2.
23 i.b2 l:te7!
The only hope for Black is to activate the rooks and pressure e4, with a
reserve plan of bursting the center with ... 5. I was also happy to secure my
g7 pawn from attack on the long diagonal.
24liJc3
After 24 b6!? cxb6 25lLlxb6 ]:lae8 26 ':a8! (this takes the pressure ofT e4)
26 ... ':xa8 27 lLlxa8 'iixh2 28 ~c3 (28 e5 dxe5 29 ':xe5 'ii'h 1+ 30 ~e2
"g2+ 31 'it>dl
+ 32 ~d2 ':xeS 33 "xeS "xc4 34 d6 'iia6! 35 lLlc7
"xd6+! draws) 28 ...'iih3 29lLlb6 "g4+ 30 ~g2lLlxe4 Black does not have
enough for the piece, but the text move was also quite sensible.
"fl
24.. Jbe8
25 'i/igl?
There was no need to retreat the powerfully centralized queen. Knights
are very able king defenders so with that in mind 25 lLldl! was the solution
to White's problems. Black has nothing better than 25 .....xh2 26 lLlf2lLlh5
27 g4! 'ii'f4+ 28 'iitg2! lLlf6 29 :a3 and White should win.
25.•.liJg4
Now Black is in business. Suddenly White is faced with ... f7-5 and the
loss of his h2 pawn.
26 We2 liJxh2
26 ... lLleS was also good, but I was in a hurry to have at least a pawn for
the piece along with attacking chances.
124 Important Motifsfor the Attacking Player
27~d3
f5
27 ... lLlf3 28 iV£2 lLlxe I + 29 .!:txe I eases the pressure a bit for the sake of
minor material gain. I felt my active knight was stronger than the passive
rook.
28 'iVa?!
28 .!:te2! lLlg4 29 iVg2 was a sturdier defense, although Black has fair
compensation for the piece.
28...ttJg4 29 'iVgl f4?!
I became a little too devoted to the knight and should have preferred
29 ... lLle5+ 30 <it'c2 lLlf3 31 ti'e3 lLlxeI+ 32 .!:txel fxe4 33 ~b3 iVg4 and
Black has a pull. Hector by now was in some time pressure so I wanted to
make the most 'troublesome' moves in the position rather than regain some
material and allow the position to clarify.
30~c2
30 lLle2! g5 (30 ... .!:txe4 31 lLlxf4 wins) 31 ii.d4 and again 31...lhe4 fails
to 32 lLlxf4, leaving Black nothing better than 3l...lLlh2 (again!) 32 iV£2
.!:txe4 with a very unclear position.
30•.•fxg3
30 ... f3!? 31 .!:tfl llf7 32lLldi was also promising.
31 'ii'hl ttJh2! 32 lte3 ltf8 33 :gl?
33 lLle2! :£2 34 ~d3! iVg4 35 iVgl :ef8 36 ii.d4! is better for White,
although very difficult to find.
:0
33...
34 ':'xf1?!
34 lLle2 is too late - 34 ... g2!! 35 l:txh3 gxhl=iV 36 l:txhl l:txhl 37lLlg3
l:tgl 38 lLlrs .!:tg2+ wins for Black. 34 <it'd3!? l:tefl 35 iVg2 iVh5 36 iVxg3
.!:t1f3 37 'iVg6 l:txe3+ 38 <3txe3 'iWf3+ 39 <3td2 .-£2+ 40 <it'cI lLlf3 41 l:tdl
lLle5 is unclear.
Important Mot~fs for the Attacking Player J25
34...'Ii'xfl 35 'ii'xfl ttJxfl 36:0 g2
Now everything clicks for Black. He scoops up a bounty of pawns and
keeps White tied down defending against the strong passed g-pawn.
37 ttJe2 :xe4 38 ttJgl .I1xe4+ 39 <t>d3 :re5 40 ~d4 lbd5 41 I:f2
e5 42 bxe6 bxe6 43 l:!xg2 e5 44 ':xg7+ <t>f8 45 ttJe2 l:txd4+ 46
ttJxd4 cot>xg7 47 ttJf5+ cot>f6 48 ttJxd6 cot>e6 49 ttJe4 <t>d5 50 ttJf6+
~e6 51 ttJe4 <t>b5 52 <t>e2 ttJh2 53 c;t;e3 e4 54 c;t;f4 cot>e6 55 <t>g3
<t>d5 56 ttJc3+ c;t;d4 57 ttJb5+ <t>e5 58 ttJe3 ttJfl + 59 cot>h4 cot>d4 60
ttJb5+ <t>d3 61 <t>h5 ttJe3 62 <t>xh6 ttJf5+ 63 <it>g5 ttJd6! 64 ttJe7 ~e4
65 ttJa6 e3 66 ttJb4 ttJb5 67 <t>g4 ttJa3 68 ~g3 ~d4 69 ~f2 c;t;e4 70
ttJa2 e2 71 <t>e3 <t>b3 72 ttJc1 + ~b2 73 ttJd3+ ~e3 74 ttJc1 ttJe4+
75 ~e2 ~b2 76 ttJd3+ ~bl White resigned
I later had that knight cast in bronze.
Jan Timman seemed to be on the wrong side of an opposite castling
attacking battle against Viktor Korchnoi in a pivotal game of their 1991
FIDE quarter-final match. With very energetic and ruthless play, he
managed to seize the initiative and go on to victory.
Korehnoi White
Timman Black
Brussels 1991
English Opening
I c4 ttJf6 2 ttJe3 e6 3 e4 d5 4 e5 ttJe4 5 ttJO ~e7 6 'li'e2 ttJg5 7
ttJxg5 ~xg5 8 exd5 exd5 9 d4 ~e7 10 ~e3 0-0 11 0-0-0 ttJe6 12 a3
ttJa513 ~d3 h6 14 'li'e2
126 Important Motift for the Attacking Player
I had the pleasure of watching this game live along with at least a dozen
other grandmasters, including Vasser Seirawan, Mikhail Gurevich, John
Nunn and Ljubomir Ljubojevic. The consensus was that Korchnoi had a
huge advantage based on his superior space advantage and well-placed
pieces primed to attack Timman's trembling king. Once White's attack
kicks in he will be able to control events. Timman recognized the danger
and lashed out with a highly energetic, if desperate counter-attack. He not
only had attack in mind. The advance of the b-pawn allows for the
defensive resource :tb8-b6 to guard the kingside.
14.•.b5! 15 i.c2
The caveman attack 15 'ii'h5 (intending h4 and ~xh6) can be handled by
the right mix of attack and defense with 15 ...:tb8 16 h4 (16 jLxh6 gxh6 17
'ii'xh6?? .iog5+) 16...:tb6! when White is stymied while Black is ready to
start the process of dismantling the white king's protection with ... h4. Only
hard-core materialists would consider 15 .i.xb5 c6 16 jLd3 :tb8 with
excellent counterplay for Black in return for the pawn. If Korchnoi turned
down the pawn offer, that says it all.
15...l':.b8!
Timman had to take into account the violent forcing move 16 ~xh6,
which seems to be only good enough for a draw after 16 ... gxh6 17 'ii'd3 f5
18 exf6 l:txf6 19 'iWh7+ Wf8 20 'iWh8+ (20 :thel ~e6 21 ~g6 :txg6! 22
'ii'xg6 .iog5+ 23 'it>bl .iofl is fine for Black) 20...Wfl 21 it'h7+ etc. Now
Korchnoi takes aim at h7 and is seemingly on an easy path to victory. But
actually his attack is slowed after the subsequent material win and Black has
time to launch a surprisingly strong counterattack. The knight on a5 stands
ready to invade either c4 or b3, and the black queen is well-placed both to
help defend the kings ide and swing over to the other wing to support the
counterattack.
16 'it'd3 g6 17 i.x~6 b4 18 axb4 l:.xb4
The rook is very powerfully posted here, where it strikes out vertically
(b2) and horizontally (d4). If White plays 19 jLxf8 .i.xf8 Black has more
Important Motifs for the A ttacking Player J27
than enough compensation for the exchange as White has no convincing
answer to the plan of ... c6 followed by ... 'ii'b6. For instance, 20 h4 tDc4 21
tDa4 l:txa4 221i.xa4 'ili'a5! quickly overruns White's defenses.
19 'iVg3!
Korchnoi is loath to grab the passive rook as it then becomes Black's tum
to do the attacking. He logically takes aim at g6 and diverts the black darksquared bishop away from the f8-a3 diagonal.
19•••.th4!
Completely forced but very strong.
20"'f4
20 1i.xf8 ..to>xf8! (much better than 20 ....Ihg3 21 1i.xb4) 21 'ili'e3 tDc4! 22
'ili'h6+ ..to>g8 23 tDxd5! ltxb2! 24 tDf6+ ~xf6 25 exf6 'ii'xf6 26 nhel 1i.e6
and Black's attack continues.
20... c6!
Black anchors his d5 pawn and prepares to swing the queen over to the
white king's environs. The white rooks need open files to justify their
superiority over Black's active minor pieces but none are in sight. The
materialistic alternative fails dismally - 20 ...:e8 21 g3 (21 tDxd5? 'ifxd5 22
ii'xh4 'ii'a2 and Black gets in first) 2l...1i.e7 22 h4! tDc4 23 h5! l:txb2
(23 ... g5 24 ~h7+!! wins) 24 hxg6 l:txc2+ 25 'iii'xc2 fxg6 26 g4! is too
strong.
21 :del?
This is too slow. In such a life or death position, White must playas
energetically as possible. He had two better alternatives:
1) 21 e6 .ltxe6 22 %:thel ne8 (22 ...'iIi'f6 23 'ii'xf6 1i.xf6 24 ~xf8 'ittxfS
gives Black sufficient compensation for the exchange) 23 g3 ~f6 24 h4
'llc4 25 tDa4 'IWe7! and Black seems to have the upper hand thanks to the
threat of ...nxa4 followed by ...'IWb4.
128 Important Motifs for the Attacking Player
2) 21 .i.xfB! (best) 2l....i.g5 (2l...'ito'xfB 22 "h6+ 'ito'g8 23 f4! sets up the
threat of .txg6 and puts Black on the defensive) 22 ~xb4 .i.xf4+ 23 'ito'bl
lLlc4 24 b3! ""6 25 J.c5 'lib7 26 ~a2! and White should be able to ward
off the threats and start to exploit his material advantage.
21...J.e6
Black is now primed to launch his attack. White can enjoy a temporary
material advantage but the vastly superior positions of Black's forces decide
the issue.
22l:.e3
Black's attack ploughs ahead after 22 g3 i.e7 23 i.xfB i.xfB 24 h4lLlc4
25 b3 "a5! 26 bxc4 l:txc4 27lLlbl'ii'a4! when, despite the rook deficit, the
combined action of Black's major pieces and bishop pair gives him a
decisive attack.
22 •••c5!
22 ... lLlc4 23 l:tg3! l:txb2 24 .ixfB Wa5! 25 'ii'h6! leads to a draw by
perpetual after 25 .....al+ 26 .ibll::txb1+ 27lLlxbl 'ifb2+ 28 'ito'dl "ii'xb1+
29 'ito'e2 "ii'e4+ 30 ~fl 'lib 1+ 31 ~e2 "ii'e4+ etc.
23 J.xfS J.g5 24 'ifg3 <tt>xfS 25 h4 J.h6 26 h5 g5?!
More ruthless was 26 ...cxd4 27 hxg6 "ii'g5! and Black should win.
27liJa2
27lLldl
lLlc4 28 l:td3 "ii'a5 29 ~bl 'ifb5 is crushing.
27•..:tb8
A powerful retreat White's king is besieged from all sides, including the
bishop on h6 which lies in wait for ... g4+.
28 dxc5 g4 29 <tt>bl
Fleeing the other direction brings QO relief, e.g. 29 'ito'd] l:txb2 30 l:ta3
lLlc4 31 l:tel "ii'g5! 32 f4 gxf3 331Wxg5 i.xg5 and Black wins.
29..•liJc4 30 ':b3liJd2+ 31 ~alliJxb3+ 32 J.xb3 'ifa5 33 lid 1
White can only delay the execution with 33 c6 'ifb6 34 c7 "ii'xc7 35 i.dl
"'6 and the power of Black's bishop pair in the open position will soon be
felt.
33 •••'ifb5 34 lId3 J.f5?
34 ...d4! wins comfortably, for instance 35 c6 J.xb3 36 l:txb3 "fl +
(Timman, in time pressure, probably overlooked this check) 37lLlc] "ii'xcl+
38 'ito'a21fc4 with a decisive advantage.
35 l:txd5 'ifxb3 36 'ifxb3 l:[xb3 37 c6 %ld3 38liJb4
More resistance was offered by 38l::txd3 i.xd3 39 c7.
Important Motifs for the A ttacking Player J29
38...flxd5 39ltJxd5 ~e8 40 ltJf6+ ~d8 41 fJ gxfJ 42 gxfJ .i.e6 43
ltJg8 .i.f4 44 h6 .i.xe5 45 h7 ~c7 46 f4 .i.g7 47 ltJh6 ~xc6 48 f5
.i.b3 49 ~bl ~d6 50 ltJg4 .i.d5 51 ltJh6 ~e5 52 ~c2 ~f4 White
resigned
Despite some minor errors in time pressure, this was a magnificent save
by Timman.
Christiansen White
Fernandez Black
Caracas 1976
White has been totally outplayed thus far. Black's centralized formation
and powerfully placed knight indicate the end is not far away. My last move
was 1 ~h 1, which prepares a last, desperate counter-attack.
1...ltJf4 2 'fic4+ ~h7?!
Black did not want to settle for 2 ... 'it>h8 3 ..wc7! ..wxc7 (3 ...'WWxe2 4..wxd8+
'it>h7 5 g6+ lDxg6 6 'iPgl wins) 4 :xc7 lDxe2 5 lDd3 which offers White
some drawing chances in the ending thanks to his active rook and
well-placed, blockading knight. Now at long last I seize the chance to
finally create some active counterplay.
3 'fin!
Up to here this was practically my only active move of the game. I based
my chances on the coming sacrifice. Passive play offered no prospect of
survival.
3...'fixe2 4 'ti'xf5+ ltJg6
Black has seemingly secured his king position and now threatens to
advance the d-pawn or chase away the queen with 5...:f8.
5ltJe4! lU8 6ltJf6+ gxf6?
J30 Important Motifs for the Attackillg Player
6 .. .'~h8! 7 J:tgl d3 forces 8 'ji'xg6 'it'xf3+ 9 J:tg2 'it'fl+ 10 J:tgl 'it'f3+ with
a draw by perpetual check. Black could not adjust to the fact that after
controlling the game for so long he suddenly finds himself in an equal
position.
7gxf6
7...'ileS
Forced. Black must meet the main threat of'it'h5+ and hope that the
coming 8 'it'd7+ is not totally destructive. Hopeless is 7.. .'~i)h6 8 J:tgl.
8 'ild7+ ~h6 9 'ilg7+ ~gS 10 l':tgl+ ~f4 II 'iixg6 'iid5
The black king is far too exposed now. White's major pieces work very
well in tandem.
12 'iig4+ ~e3 13 lIel+ ~d2 14 :te4! d3 15 'ilf4+ ~dl 16 I:r.d4
'iixd4 17 'ilxd4 d2 18 ~g2 ric8 19 f7 ~c2 20 'ild7 l:th8 21 'ilc6+
~bl 22 'iie4+ ~c1 23 'iic4+ Black resigned
This game constitutes one of my favorite 'swindles'.
I am going to wind up this chapter by presenting and discussing the
importance of king position with regard to attack and the related subject of
back rank attacks. This area, along with rook lifting, is one that truly
separates the master from the tyro. Strong players have a keen sense 'of king
safety and are constantly looking to remodel the king's quarters. It is often
not enough to simply play h2-h3 or g2-g3 to create an airhole for the king.
The king hates to stand opposite enemy bishops and rooks and so he prefers
a closed 2nd rank (a king cut off on the first rank is a major danger signal)
and a good square on the 2nd (like g2 or h2) where he is immune to surprise
checks. Attending to the king's needs is often a prerequisite before
launching an aggressive attack. A safe king means that much less
counterplay for your opponent.
Important Motifs for the Attackiflg Player 13 J
OK, let's look at some examples.
Klinger White
Glek Black
Black anticipates something like 1 ii'e4 ttJf8 with reasonable counterplay
for the pawn. But White has a far stronger continuation:
1 'iic8+! l:xc8 (note that 1...ttJf8 loses to 2 'ilVxh3) 2 lrxc8+ ttJf8 3
lhf8+! ~xf8 4 .i.c5+ l:.d6 5 £l.xd6+ ~g8 6 :te8 mate.
This warm-up combination brings us now to a very deep and striking
display of attacking ingenuity courtesy ofMr. Viktor Korchnoi.
Beliavsky White
Korchnoi Black
Pula 1997
132 Important Motifs for the Attacking Player
The situation appears to be very unclear as White has managed to engage
Korchnoi's wall of kings ide protectors. Black is hesitant to play 1...cxb5? 2
axb5 which opens up the c-fiIe and may lead to further problems along the
a-file. He is also reluctant to play the passive ] .. J:tcS.
With the following pawn sacrifice Korchnoi fights for the initiative and
attacking chances. His hopes are based on the cramping nature of the
advanced pawn on h3 and his beautifully centralized knight.
l...cS! 2 dxcS
White's position is bankrupt unless he accepts the pawn.
2•••d4 3 :c4 fS
Korchnoi secures the position of his knight and also creates a certain
reserve possibility of playing ... f5-f4 at the key moment. This took
outstanding judgement because White seems on the verge of landing a
serious punch by ramming open the c-fiIe.
41.f4 d3 S c6 bxc6 6lbc6 'iidS!
The queen takes up a powerful centralized post where it assists in attack
and defense.
7 <at>gl d2 8 :dl l:tge8 91.e3
White seems to have everything under contro!' The passed d-pawn is
firmly blockaded and the bishop on e3 prevents back rank possibilities - or
does it?
9... f4!!
Korchnoi ruthlessly finds a way to break down the defenses. The pawn
can be captured 3 ways but all lose:
I) 10 gxf4? :gS+ II c;ftfl 'ifd3+ 12 'iVe2 l:tgl+ wins.
2) 10 'ii'xf4 tbc3 11 f3 ~e2+ wins the queen.
3) 10 .i.xf4 ~c3! 111:txc3 l:tel+ and mate next move.
important Motifs for the Attacking Pluyer 133
Black had to also consider White's game continuation, but he accurately
determined that it led to an easily won ending.
10 lbd2lbxd2 11 ':e8+ 'iit>b7 12 'iixd5+ lbd5 13 l'txe8lbf3+ 14
'iit>fllbxh2+ 15 'iit>e2 fxe3 16 nh8 exf2 17 'iit>xf2 rLd2+ 18 'iit>e3lbfl+
White resigned
Black wins easily now after 19 <ofi>e4 h2 etc.
Nunn White
Murshed Black
England 1985
Black seems on the verge of consolidating and has calculated that 1 it.xe5
'iWxg4 2 i.xf6+ ~g8 leaves him sitting pretty. White has other ideas and
bases the decisive assault on Black's back rank weakness.
1 'iixe5!
Of course 1...i.xe5? 2 it.xe5+ wins at once and 1...'iWxg4 loses a piece
after 2 'iWxf6+ <ofi>g8 3 i.xb8. Black's reply is forced.
1..:ifd8 2 'iig3 ':b5
Black hopes either to win the h-pawn or create counterplay along the
d-file.
3 h6! %:td54 .i.e7!
This denies access to a5 while keeping the bishop active.
4...'ife8 5 'iit>a2! !;[d2
If 5 ... l:1c5 6 'iWd6! 'iWe7 7 l:1e4!! wins.
134 Important Motifs for the Attacking Player
6~e5!!
Ihfl
6 ... ii.xe5 7 ng8+! forces mate.
7l:te4
7 i.xf6+ 1:1xf6 8l:te4! also wins.
7... ~xe5 8 'ii'g7+! Black resigned
The famous Marshall Gambit (I e4 e5 2 lLlfJ lLlc6 3 i.b5 a6 4 ii.a4 lLlf6 5
0-0 ii.e7 6 l:.e I b5 7 i.b3 0-0 8 c3 d5) is well known for lightning strikes
against White's back rank. Here is a fine illustration of what can go wrong
if the back rank is neglected.
Kotronias White
Adams Black
Greece 1992
White has just played 1 axb5, not suspecting the hurricane just over the
horizon.
Important Motifs for the Attacking Player J35
1... lDf4!! 2 gxf4 ~xf4 3lDo
3 liJfl i.e4 4 f3 i.xf3 is crushing.
3.. Jig4+4~n
Perhaps White was expecting a perpetual check now with 4 ... 'ii'h3+ 5
'itgl 'ii'g4+ etc. But Black finds a brilliant way to gain access to White's
vulnerable first rank.
4••• ~d3+!! White resigned
It is mate after 5 'ii'xd3 'ii'h3+ 6 roti>gl l:tel+!! 7 liJxel i.xh2+ 8 'ithl
i.g3+ 9 roti>gl 'ii'h2+ 10 'itfl ii'xf2 mate.
Rahman White
Volzhin Black
Dhaka 2001
White is down a pawn but he has a pair of active bishops to show for it
and good play on Black's weakened dark squares. However, he failed to
account for his weak back rank and the game ended suddenly as follows:
J36 Important Motifs for the Attacking Player
1 i.e3? d4 2 i.d2 d3! 3 i.e3
White was counting on this move.
3...dxe2! 4 i.xg7 :d7
Taking aim at the back rank.
s.:n :dl 6 i.h6 i.e4 7 h3 ::'xn+ and Black went on to win easily.
Finally, let's conclude with a lovely back rank combination that came at
the end of a well-executed squeeze by Nigel Short.
Short White
Stefansson Black
Reykjavik 2002
In this position White has a very strong grip on the position but the active
black queen on c5 is stubbornly preventing a knockout blow. Nigel Short
finds a solution to the attacking problem - he first plays to trade off
Black's most active piece.
l'it'e3 lIdS
Black hopes a queen trade will lead to a reduction in pressure.
2 'iixeSlixeS 3 e6li.eS
Now comes a shocker.
Important Motifs for the Attacking Player 137
4 .id5! l:xd5 5 e7 ':e5
If 5 ...::tg5 White simply replies 6 ~g3 intending ~h4 and culminating in
a conclusion similar to the game continuation.
6l:.xg6+!! Black resigned
If 6 ... hxg6 White wins with 7 h7+ ~g7 8 exf'8='W+ ~xf8 9 h8=1ir'+ etc.
6 Romantic Opening
Thrill Rides
In order to gain confidence in wide open tactical posItions, I highly
recommend studying and playing (if only in casual games) romantic
openings such as the King's Gambit, Evans Gambit, Max Lange Attack and
so forth. While some of these lines have been nearly analyzed to death,
others such as the Evans Gambit continue to be employed by a number of
the world's elite players. I myself have played it on a few occasions but I
generally prefer to dabble with it in ofThand blitz games.
What these openings force you to do is attack or die. A pawn sacrifice is a
significant investment and energetic play is a must. I would like to explore
some typical variations of the King's Gambit, the Evans Gambit, Max
Lange and Center Game and also clear my files that are stuffed with ideas
relating to open games. What are openings doing in a middle-game book?
Almost every great attacking player started out exploring and playing sharp
open games and understanding them is a good way to increase tactical
awareness and capabilities in fighting for the initiative.
The venerable old King's Gambit Accepted is one of the most fun and
attack oriented openings in the chess pantheon. As a youngster, I gained
invaluable insights into the importance of quick development and the perils
of lethargic play by playing and studying this opening.
Since our main topic is attack, I will skip a deep review of the King's
Gambit as a whole and focus on just one, important line and how it relates
to attacking principles. For players who prefer less combative openings this
review should still be instructive because of the emphasis on quick
development and razor-sharp attacking play. Even so-called positional
openings often erupt into wild mayhem and keeping your composure in
wide-open tactical positions is of critical importance.
One of the most crucial lines of the KG is the famed Muzio Gambit where
White sacrifices not just a pawn but also a piece for the sake of rapid
mobilization. I would like to present a brief overview of this ancient but still
vital line.
Muzio Gambit
1 e4 e5 2 f4 exf4 3 ttJO g5 4 i.c4
Nowadays 4 h4 is the main line of the King's Gambit Accepted with
4 ... g4 5 ltJe5 ltJf6! 6 SLc4 d5 7 exd5 Jl.d6 S d4 lLlh5 9 0-0 'ii'xh4 10 'ii'el,
considered about equal. Another interesting line goes 4 ... g4 5 lLle5 lLlf6 6
lLlxg4 d6 7lLlxf6+ 'ii'xf6 SlLlc3ltJc6 9lLld5 'iVg6! 10 d3 it'g3+ 11 Wd2 and
now 11...lLlb4! is thought to be equal.
Romantic Opening Thrill Rides 139
4...g4
4 ... h6 is also quite reasonable, but the text should lead to at least a draw
for Black.
5 0-0
In my opinion this move is the conservative choice compared to the wild
5 tDe5 'iWh4+ 6 <it>f1 which gives Black dangerous attacking chances at no
charge.
5••• gxO 6 Vi'xo Vi'f6!
In my estimation this represents Black's stiffest defense, although some
specialists of the Muzio advocate 6 ... 'iWe7 as well. While it is against normal
principles to develop the queen this early, there are mitigating
circumstances here. White has a very menacing attack looming on the f-file
and 6 ... 'iWf6! contains that threat for the moment and dishes up a threat as
well- 7...'iWd4+. Also important for Black is the new flight square available
on d8 in the event of the king coming under fire. Of course White must play
as aggressively as possible to justifY his larg~ material investment. A
logical, line-opening continuation is now 7 e5! wt'xe5
140 Romantic Opening Thrill Rides
White now has a choice. 8 ~xf7+?! is tricky but ultimately fails against
correct defense after 8 ... ~xf7 9 d4 'ii'f5!"'10 g4 (10 ~xf4 lDf6! enables
Black to contest White's attack on the f-file) IO ...'ii'g6! (IO ...'ii'f6? I I ~xf4
~g7 12lDc3 gives White a powerful attack, for instance 12 ... lDe7 13 lDd5!
lDxd5 14 'ii'xd5+ 'ii'e6 15 ~h6+! ~e7 16 ~.g5+ ~f6 17 1::txf6! 'ii'xf6 18
1::tel+ ~f7 19 'ii'h5+! 'ii'g6 20 1::tf1+ rt;e7 21 .e5+ leads to mate) 11 ~xf4
lDf6 12 ~e5 ~e7 13 lDc3 d6! 14 ~xf6 ~xg4 15 'ii'd5+ ~e6+ 16 'ii'g5
~xf6 17 1::txf6+ 'ii'xf6 18 1::tf1 lDd7! and Black stands to win. The retreat
with 9...'ii'f5! has put the double Muzio Gambit out of business.
Sd3
This quiet move prepares the plan of ~xf4 followed by lDc3 and :ae 1
while meeting the threat of ...'ii'd4+. If White is allowed to capture on f4
with ~xf4 he will likely have a decisive attack. Black is very far behind in
development.
So ... S....th6! looks best now. Less effective is 8 ... ~c5+ 9 ~hllDc6 10
~xf4 d6 11 lDc3 lDge7 and now White can choose between 12 'ii'h5, 12
lDd5 and 12lDb5!? - all offering excellent attacking chances.
9lZJc3
9 ~d2 is likely to transpose.
9...tlJe7
Black's whole defense hinges upon blocking the e and ffiles. This move
has the added plus of guarding against an invasion involving lDd5.
10 .td2lZJbc6 11 :bel 'tWfS!
11...'ii'd4+? 12 ~hl lDe5 13 'ii'h5lDxc4 14lDb5! gives White a crushing
attack.
12lZJds ~dS 13 'tWe2! 1/ie6
13 ... lDxd5 14 ~xd5 leads to problems for Black, e.g. 14 ...'ii'xd5 15 ~c3
-.c5+ 16 ~h I ~g5 17 ~xh8 'ii'fS 18 l::txf4!! 'ii'xh8 19 l::te4 and wins, or
14 ... ~g7 15 ~xc6 'ilfc5+ 16 d4! ~xd4+ 17 rt;hl dxc6 18 l::txf4 ~e6 19
-.d3 and White will have good compensation for the pawn.
141/iO 1/ifS! IS1/ie2 'tWe6 =
* Here are some good examples of what can befall Black if he gets too
greedy in this line:
9...'ii'xd4+? 10 .te31/if6 11 .txf4 .tcS+
11...~g7 12 lDc3! lDe7 13 lDd5! lDxd5 14 'ii'xd5+ 'ii'e6 15 ~h6+! ~e7
(15 ... ~g8 16l::tael! 'ii'xd5 17 :e8+ mates) 16 'ii'g5+ ~f6 17 l::txf6! 'ii'xf6
18l::tel+ ~f7 19 'ii'h5+! 'ii'g6 20 :f1+ leads to mate.
12 ~hl d6 13 1/ihS+ 'tWg6
13 ... ~g7 14 ~h6+! lDxh6 15 l:.xf6 wins.
Romantic Opening Thrill Rides 141
14 .txd6+ ttJf6 15 lhf6+! ~xf6 16 'iiVe5+ ~fi 17 'iiVe7+ ~g8 18
'tifS male
Mazeau-Guirol, Correspondence 1979.
9.••'iiVxd4+ 10 .te3 'iiVf6 11 .txf4 ~e8
Black tries to flee the scene of his crime.
12 ttJc3 ttJc6 13 ttJd5! 'iiVg6 14l:tae1+ .te7 15 .td6! Wd8 16 'tifS+
.txfS 17 i..xc7 mate
Shirov-Lapinski, DaugavpiJs 1990.
Evans Gambit
The Evans Gambit is another fun, combative romantic opening that
demands extremely energetic play from both sides. Here is a quick primer
on some of the more critical variations. Hopefully this will provide a good
background for use in casual play at least. Any aspiring attacking player
should have some background in open games and at least a passing
knowledge oflines like the King's Gambit and Evans Gambit.
1 e4 e5 2 ttJO ttJc6 3 i..c4 i..c5 4 b4 i..xb4
Declining the gambit with 4 ... ~b6 is a solid alternative, but also an
admission of timidity.
5 c3 i..a5 6 d4
and now I will examine the defenses 6 ... d6 and 6 ... exd4.
1) 6...d6 maintains Black's stake in the center and prepares the
completion of queenside development.
7 'iiVb3! 'iiVd7
142 Romantic Opening Thrill Rides
A recurring theme in the Evans Gambit is the problems Black encounters
when he places his queen on the a3-f8 diagonal. 7 ... 'ike7? 8 dS! wins a piece
here as 7... tDd8 8 'ikbS+ picks off the bishop.
8dxe5
8 tDbd2!? is a move I analyzed in the December 23, 1996 issue of Inside
Chess but has not been tried much in practice. The critical line seems to be
8 ... ..tb6! 9 a4! and now:
a) 9 ... exd4 10 cxd4 tDxd4 II 'ikc3! tDxf3+ 12 gxf3! f6 13 as ..tcS 14 tDb3
and White has considerable pressure for the two pawns sacrificed.
b) 9... tDf6 10 as! tDxaS (IO ... ..txaS II dS ~b6 12 dxc6 favors White) II
l:txaS ..txaS 12 dxeS tDg4 13 exd6 ..tb6! (best) 14 h3! tDxf2 (retreating with
14 ... tDh6 invites disaster) IS l:tfl 0-0 16 ~a3 cxd6 17 l:txf2 ..txf2+ 18
~xf2 with roughly equal play.
8.•.dxe5
8... ..tb6 is often seen, but White seems to have a small plus after 9 tDbd2
tDaS IO 'ikc2 tDxc4 II tDxc4 thanks to his lead in development and greater
central control.
9 .lta3 .ltb6! 10 ttJbd2 ttJa5 11 'iYb4
II tDxeS is actually 'safer' but Black is at least equal after II.....txf2 t- 12
tDxb3 13 axb3 ~b6! 14 tDxd7 ~xd7 IS l:thfl liJh6.
~e2
11 •.•c5 12 'ilVb2 ttJxc4 13 ttJxc4 f6!
Black buttresses his defenses and calmly prepares to consolidate with
.....te6 and ... tDh6.
14 :dl 'iic6 15 ttJd6+ rJ;e7 160-0 .i.e6 17 c4 l:d8! 18 ttJxe5
Otherwise White is just a pawn down for nothing.
18...Wc7!
18 ... fxeS 19 "xeS poses problems for Black.
19 ttJxb7 ];txdl 201hd1
Romantic Opening Thrill Rides 143
20... iixeS! 21 'iVbslLlh6 22 ttJxcS ~f7!
White has insufficient play for the material sacrificed. This pretty much
covers the defense 6 ... d6. I think it is time for a workout with 8 ~bd2
instead of 8 dxe5
Now let us look at 2) 6... exd4, the other main choice in the Evans
Gambit Accepted.
70-0 ttJge7
7... d6 8 'ifb3 ~e7 9 e5! 'iii'xe5 10 ~a3 ~f6 11 cxd4 gives White
tremendous play.
S ttJgS!
8 cxd4 d5! 8 exd5 ~xd5 is quite comfortable for Black. The text seems to
be the only continuation in this line that creates any sort of trouble for
Black.
S... dS
8... ~e5 9 ~xf7 ~xf7 10 ~xf7+ ~xf7 11 'iii'h5+ gives White good
compensation for a pawn.
9 exdS ttJeS 10 ir'xd4! f6
1O ... ~xc4? 11 'iVxg7 wins quickly.
11 liel! lLlfS!
1l...~b6 12 'iii'h4 seems to favor White. For instance, 12 ... ~5g6 13 'iVh5
fxg5 14 ~xg5 .tc5 (forced) 15 d6! .txd6 16 ~d2 ~d7 (Black plans ... 'iVg4
or ... 'iVf5 while also giving his king a flight square on d8) 17ltJe4 .ta3 18
h3! (18 l:tadl ~g4 19 ~xe7 ~xe7 20 'iVd5 'iVxg2+! saves Black or 20
'ifb5+ c6 [20 ... ~f8??
21 l:td8+!! .txd8 22 'ii'e8+!! ~xe8 23 ~f6+ ~f8 24 l:te8 mate!] 21 'iVc5
~d7 holds for Black) 18 ... 'iii'5 19 :adl ~d7 20 g4! 'iVa5 (20 ...'iVf8? 21
.txe7 ~xe7
144 Romantic Opening Thrill Rides
22 l:txd7!! 'it'xd7 23 ~e6+!! 'it'xe6 [23 ...'it'd8 24 iVd5+ ~d6 25 liJxd6
iVxd6 26 'ii'xb7 q;e7 27 ~g8+! 'it'f6 28 iVf3+! liJf4 29 lte6+! wins] 24
liJf6+!! ~f7 25 iVd5+ 'it'xf6 26 iVf5 mate) 21 ~xe7! 'ii'xh5 22 ~xa3 'ii'e5
(forced) 23 f4! 'ii'xf4! 24liJg5+ 'it'd8 25liJe6+ Q;c8 26 liJxf4liJxf4 27 'it'h2
and White has strong pressure in the ending despite his small material
deficit. Now back to Black's best move, 1l •..tt:)f5!
Romantic Opening Thrill Rides J45
At first sight this looks bad due to 12l:.xeS+ fxeS 13 'ifxeS+ iie7 14liJe6
i.xe6 IS dxe6 with a double attack on the minor pieces. However, Black
can then launch a strong counter-attack based on White's weak back rank
by IS ... 0-0-0 16 'ii'xaSl:.dl+ 17 .tfll:.xcl 18 'ii'xa7 'ifxe6! 19 iia8+ ~d7
20 'ifxh8 'ifdS! (centralization!) and Black's threat of 2l...l:.xfl+ forces
White to give up his rook with 21 liJd2. Also very risky for White is 12
i..bS+ c6 13 l:.xeS+ fxeS 14 iixeS+ iie7 IS dxc6 'ifxeS 16 cxb7+ iixbS 17
bxa8='ii' 0-0 and Black has a very strong attack.
Probably White must settle for 12 'ildl 0-0 13 'iih5! fxg5 14 ~xe5
~b6! 15 ~xg5 ~xf2+! 16 ~hl (16 ~xf2 'ii'd6 is unpleasant) 16...'iid6
17 ':'e8 ~d7 18 :xa8 %ba8 19 ttJd2 with an equal position. So, if you
are a 1 e4 eS player, I suggest you learn this relatively simple defense
against the Evans.
Max Lange Attack
The Max Lange Attack is another wild double-king pawn opening that the
student might consider experimenting with. Here is a very critical line that
some youngsters at a chess camp in Gainsville, Florida had analyzed in
some depth.
1 e4 e5 2 ttJf3 ttJc6 3 ~c4 ttJf6 4 d4 exd4 5 0-0 ~c5 6 e5 d5 7
exf6 dxc4 8 l:te1+ ~e6 9 ttJg5 'ild5 10 ttJc3 'ilf5 11 g4!?
A very tricky line that is worth knowing from both sides.
11.•.'ilg6
Not good is 1l...'i'xf6 12 liJdS! 'i'd8 13 l:.xe6+ fxe6 14 liJxe6 'i'd7 IS
liJdxc7+ ~f7 16 liJgS+! 'it?g8 17 liJxa8 and Black will have trouble
recovering his lost piece without seeing his position collapse.
12 ttJxe6 fxe6 13 ::'xe6+ 'it>d7 14 f4
146 Romantic Opening Thrill Rides
The terrible threat of 15 f5 forces ...
14..:it'xc2! IS 'ii'xc2 d3+ 16 'itfg2 dxc2 17 fxg7
Retreating the rook with 17 l:te4 gives Black good play after 17... gxf6 18
l:txc4 iLe7 19 ltJe4 l:tagS! and Black is all set to loosen up White's
formation with ... h5.
17...<ifi>xe6 18 gxh8='iV ':xh8 19 iLd2 lld8!
Despite White's dangerously mobile kings ide maJonty, Black is in
control here. The rook will venture down to d3 to cut off White's king from
events, followed by ... ltJd4 securing c2. For instance, 20 ltJe4 iLe7 21 l:tcl
l:td4! is strong for Black Advocates for White in this line should look for
another continuation.
Center Game
Here is an interesting line in the unheralded Center Game.
I e4 e5 2 d4 exd4 3 'ii'xd4lbc6 4 'ii'e3 g6
The standard line goes 4 ... ltJf6 5 ltJc3 iLb4 6 iLd2 0-0 7 0-0-0 l:teS S'it'g3
which I discussed in some detail in Chapter 3. Black's motive behind 4 ... g6
is to quickly mobilize with ...ltJge7, 0-0 and finally ... d7-d5 to clear the
center. The fianchettoed bishop will be a potent force in the event White
castles kingside.
5 lbc3 iLg7 6 iLd2 lbge7
6 ... ltJf6 7 e5! ltJg4 S 'iig3 d6 (S ... ltJgxe5 9 f4ltJd4 10 O-O-O! gives White
good play for the pawn) 9 exd6 0-0 10 dxc7 'ii'e7+ II iLe2 looks
speCUlative for Black.
70-0-00-0
Romantic Opening Thrill Rides 147
8h4!
White cannot waste any time pursuing his attack.
8 ...dS
8 ... hS 9 g4! tears into Black's kings ide with strong effect.
9 hS! d4 10 'ii'g3 dxc3 11 ..txc3 'ii'e8 12 hxg6 ttJxg6 13 'ii'h2 h6
(Forced) 14 ..txg7 ~xg7 15 'ii'xb6+ ~f6 16 ':'h4!
The rook is ready to swing horizontally over to f4 thanks to the nice pin
on the g6 knight. This will allow White to bring his queen into the attack in
a move or two and Black is clearly hard-pressed to stem the attack.
Give these old open games a try, at least in casual games.
7 Some Larry C Attacking
Games
This chapter will be devoted in large part to some of my own attacking
games. Like most players I have gradually become more conservative or
'mature' in my play - mainly because leaping into massive complications
demands the energy and mental stamina of youth, but also because
experience has led to greater respect for defensive resources.
Reviewing these games has also opened my eyes when reviewing the
often naive optimism of my earlier days. Could I really have believed that I
had enough compensation for many of those sacrifices? With the aid of
those ruthless silicon 'spell-checkers' of the modem era - Fritz, Crafty,
Junior etc. I have noted a surprising number of tactical errors in a large
number of these games. 'Masterpieces' of my younger days are sometimes
pitilessly refuted by my electronic friends.
At any rate, I think the reader will find the games in this chapter both
instructional and entertaining. Please note the aggressive rook play in most
of these games. In virtually every one of these games the reader will note
that I am forever lifting and throwing the heavy artillery into battle. I have
made this point many times before in this book and here are yet more
examples of this extremely important aspect of attacking play.
Christiansen White
Kaidanov Black
U.S. Championship, Key West 1994
English Opening
I c4 e5 2 ltJc3 ltJf6 3 ltJo ltJc6 4 g3 i.b4 5 i.g2 0-0 6 0-0 .i.xc3 7
bxc3 i;[e8 8 d3 e4 9ltJg5 exd3 10 exd3 b6 II .i.d5!?
Alternatives include II ':'e 1 and II i.f4. My inspiration for this came
from a game I had three years earlier as Black against Armenian GM
Vladimir Akopian which continued II ]:tel ':'xel 12 'iWxel i.b7 13 i.d5!?
'iWf8! 14 'it'dl (14 i.xf7+ ~h8 15 i.d5 h6! gives Black good play for the
pawn) 14 ... liJd8 with equality.
11..•ltJxd5 12 cxd5 h6!
A good answer to White's attacking ambitions. White can briefly disrupt
the black king position, but Black will have good play against White's
broken center.
13ltJxfi
Some Larry C Attacking Games 149
13liJe4 B! 14 dxc6 fxe4 15 dxe4 dxc6 is roughly equal but could lead to
an interesting battle.
13•.. ~xfi 14 'iWhS+ <it>g8 IS dxc6 dxc6 16 i..xh6
This is the only move that can provide any problems for Black. The move
is not particularly bold, as White can force perpetual check if Black accepts
the piece offer.
16.••i..e6
In hindsight, taking the piece with 16... gxh6 looks like Black's best
continuation. Then 17 1i'g6+ ~f8 IS 1i'xh6+ <t;f7 (IS ...~gS is riskier) 19
'it'h7+ ~f8! (19 ... ~e6?! 20 l:1ael+ is not easy to handle) 20 l:1ael (the only
way to play for a win) 20 .. Jlxel 21 ':xel "f6! 22 'iWxc7 .th3 and the
position, if anything, favors Black. Objectively, after 16... gxh6 White
should take the perpetual check. The game continuation leads to very
complex play where Black tries to fend off White's attack while attacking
his weak central squares.
17 'iWg6 'iWd7 18 i..f4 i..dS
Because White's kingside majority is very healthy, Black should avoid
endings such as IS ... i.f7 19 ii'g5 1i'xd3 20 i.e5 1i'g6 21 'iWxg6 .txg6 22
f4! .tf7!.
19 %lael
The a2 pawn was hardly worth the bother of defending. I did not want to
waste any time guarding such a meaningless pawn if it meant slowing down
my attack.
19•••i..fi!
Black's best hope now lies in raiding White's queens ide pawns in order to
offer a trade of queens later to defuse the attack.
20 'ii'gS i..xa2 21 i..eS %If8 22 c4!
/50 Some Larry C Attacking Games
This enables White to double rooks on the e-file and temporarily keep the
bishop out of play.
22 ••.
:.n 23 !:te2
White must keep watch on the 12 pawn while doubling rooks.
23 •..i.b3 24 llfel ~afS 25 i.b2!
2S 'ilVg6 was the main alternative, when 2S ... aS 26 h4 (the logical
continuation) 26 ...bS 27 hS 'ilVfS! should hold for Black.
25 ..:ifxd3
Forced.
2611e8
26 l:le7? l:lxe7 27 l:lxe7 'ilVb1+! is good for Black.
26 ...i.xc4
26 ...'ilVd6 27 l:l8e7 l:lxe7 (27 ...'ilVh6 28 'ilVg4! 'ilVd2 28 J..xg7 'ilVx12+ 29
<it>hl wins) 28 l:lxe7 'ilVdl+ 29 ~g2 'ilVf3+ 30 'it>h3 'ilVfS+ 31 'WxfSlhfS 32
l:lxg7+ ~f8 33 f4! l:lhS+ (33 ... l:lf7 341hf7 ~xf7 3S cS! wins) 34 ~g2 (34
~g4?? J..dl mate!) 34 ... ..tdS+ 3S ~gl should win for White because the
white bishop helps stop Black's passers while supporting its own.
27 lhfS+ <it>xfS
White now produces a little combination that results in a superior 'iIV + l:l
ending.
28 i.a3+! c5 29 i.xc5+! bxc5 30 'iVxc5+ 'iVd6
30...~g8 31 :e8+ ~h7 32 'ilVhS mate.
31 'ii'xc4 'ii'b6?
Black unwisely decentralizes. More fight was offered by 31 ... cS 32 'ilVe4
~g8 33 ~g2! and now 33 ... 'ilVd4 34 'ilVxd4 cxd4 3S l:le8+ ~h7 (3S ... l:lf8 36
l:lxf8+! ~xf8 37 ~f3 as 38 ~e4 wins for White) 36 l:ld8 as 37 l:lxd4 l:la7
Some Larry C Attacking Games J5 J
38 1:Ia4 g5! (in the game this was prevented by h2-h4) 39 ~f3 ~g6 40 ~g4
1:Ia8 and Black has good drawing chances.
32 it'e2!
Fixing the g-pawn to create a fine target later.
32..•g6 33 'ifc2 a5 34 :e4!
The rook is ideally situated on the 4'h rank where it stops the advance of
the queenside pawns and attacks Black's weak pawn on c7 and later g6. It
also helps shelter the white king by controlling central squares.
34...'it>g7 35 h4 it'f6 36 l:tc4 'iie5 37 llc6
Black has too many weaknesses to defend so he tries his luck in a rook
ending where he hopes his passed a-pawn can balance White's 3-1 kingside
majority.
37,..'tif5 38 it'xf511xf5
38 ... gxfS 39 1:Ia6 wins.
39l:bc7+ lU7 40 l1c4 1:a7 41 :'a4 'it>f6 42 ~g2 'it>e5 43 ~h3
43,..'it>d5
If Black adopts a passive defense, such as 43 ... tilff6 White wins as
follows: 44 g4 ~e5 45 ~g3 ~f6 46 f4 1:Ia7 47 ~f3 1:Ia6 (best) 48 g5+! ~fS
49 lle4 lle6 50 Ilc4 1:Ia6 51 l:1c7 ~e6 52 1:Ig7 <ittd5 53 f5! gxf5 54 h5 a4 55
h6 a3 56 h7 a2 57 h8=1i' al='ii 58 l:.d7+ <ittc4 59 'iic8+ and mate is not far
off.
44 'it>g4 'it>c5 45 ~g5 :a6 46 f4
White finally gets his majority in motion.
46...~b5 47 1:.al a4 48 g4 ~c4 49 h5 gxh5 50 gxh5 'it>b3 51 h6
a3 52 h711a8 53 f5 'it>b2 5411hl a2 55 f6 Black resigned
152 Some Larry C Attacking Games
Christiansen White
Winants Black
Antwerp 1993
Nimzo-Indian Defense
I d4 ~f6 2 c4 e6 3 ~f3 d5 4 ~c3 .tb4 5 .tg5 ~bd7 6 e3 c5 7
.td3 cxd4 8 exd4 dxc4 9 .txc4 0-0 100-0 .txc3 11 bxc3 'iic7 12
.td3 b6
12 ...'iVxc3 is possible, but Black must be girded for battle after 13 l:tcl
'iVaS 14 tUeS tUxeS IS l:tcs 'tWa3 16 dxeS - see Dolmatov-Speelman next.
13l:tcl .tb7 14 x:r.elllfe8
A more active continuation is 14 ...l:tfc8 IS .th4 'iVd6! intending ...~a3 one of many creative ideas from Anatoly Karpov.
15 .th4 'ii'c6 16.tn :ac8
A good juncture to stop and consider the position. White enjoys a small
advantage due to his bishop pair and greater control of the center. However,
Black's position is very solid and White should be on guard against piece
exchanges and freeing breaks such as ... bS. White must slowly improve his
position with a general thrust toward an eventual kings ide attack. White has
alternate plans of launching a minority attack with a2-a4-a5 or preparing a
central push with d4-dS.
17 c4 h6 18 'ii'b3 .ta8
Black cannot do more than undertake a wait-and-see strategy.
19 :lcdl ~h5?!
He should shuffle the bishop with 19....tb7 and await events. A good
move then for White is 20 h3 to provide a retreat square on h2 and air for
his king.
20'ii'e3?!
Some Larry C Attacking Games J53
Much more to the point was 20 4.JeS! 4.JxeS 21 :xeS 4.Jf4 22 ~g3! 4.Jg6
(22 ... 4.Jxg2? 23 dS wins) 23 dS! with a sizable advantage for White.
20...'fi'c7 21 ttJe5 ttJhf6
21 ... 4.JxeS 22 dxeS gS 23 ~g3 'ii'cs 24 l:d7 is better for White.
22 ttJxd7
A little too timid. White should take control of more space with 22 f4!
when Black must sooner or later acquiesence to the disagreeable ...4.JxeS
fxeS.
22 ...ttJxd7 23 ~g3
The bishop is at last secure from an exchange and operates very
powerfully on the h2-b8 diagonal.
23 .•:ii'b7 24 f3 l.!ed8 25 ~d6 ttJf6 26 ~e5 ttJd7 27 ~g3 ttJrs 28
a4!
White opens another front on the queens ide in order to create a weakness.
28•..'ii'd7 29 'fi'a3 ~c6 30 as! ttJg6
30 ... bS 31 dS! exdS 32 lle7 'ii'fS 33 cxbS is too strong. So Black must
agree to struggle with a fresh weakness on b6.
31 axb6 axb6 32 'fi'b4 h5 33 h3
The greedy 33 'ii'xb6 leads to a strong counterattack after 33 ... h4 34 Sit.f2
h3 3S Sit.g3 hxg2 36 ~xg2 ~a4!.
33.•.'fi'b7 34 'ii'b2 :d7 35 %tbl ttJe7 36 ~f2 %tb8 37 'fi'c3 'fi'c7 38
l:te5 ttJrs 39 'fi'b2 g6 40 :tbe1 ?!
40 Sit.d3 was stronger, for instance 40 ... 'iVd8 41 Sit.xfS gxfS 42 'iVd2
followed by 43 'ii'f4 keeps a powerful grip on the position.
40 ...'iVd8 41 I:tdl h4
Time pressure is over and I had to take stock of the position. I was
annoyed at myself for letting Black secure a fine position for his knight
J54 Some Larry C Attacking Games
which exerts pressure on d4 while helping to defend the porous king
position. After some reflection, I determined that I had to open up the
position for the benefit of my under-employed pair of bishops.
42 dS! bS
42 ... exd5 43 cxd5 .llxd5 (43 ...Itxd5? 44 Itexd5 ~xd5 45 'iVe5 wins) 44
Itxf5! gxf5 45 'iVe5! ~c6 46 ~xh4 (46 Itd4 and 46 ~d4 are also
promising) 46...Itxdl 47 .llxd8 l::tbxd8 48 'iVxf5 gives White excellent
winning chances in the ending.
43 lixfS! exfS 44 'illeS llc8
44 ....llb7 45 ~xh4 'iVf8 46 d6 leads to a decisive attack.
4511d4!
Threatening both 46 dxc6 and 46 Itxh4. Black is drowned by passed
pawns after 45 ... f6 46 dxc6! fxe5 47 Itxd7 'iVf6 48 cxb5.
4s ...iLb7 46 llxh4 f6 47 'iIIe6+ ~g7 48iLe3! gS 49iLxg5! fxg5 SO
:th6 Black resigned
There is no defense to the mating attack.
* A game Dolmatov-Speelman continued 16......xc5 17 iLxf6
17...lle8?
Black must play 17... gxf6 18 'iVg4+ ~h8 19 'ii'h4 f5 20 'iVf6+ ~g8 21
l:r.el .lld7 22 l::te3 'iVxe3! with approximate equality.
18iLxh7+!! ~xh7 19 'ii'hS+ ~g8 20 'iIIg5 'ii'fB 2l1Idl!
A full rook behind and with a vulnerable back rank, White calmly
prepares to lift the rook. Black is too far behind in development to stop him.
21.•. b6 22 lld4iLa6 23 llg4iLe2 24 iLxg7iLxg4 2S iLxfB+ ~xfB
26 'iIIxg4 %:tac8 27 h4 ~e7 28 'iIIgS+ ~d7 29 'iVf4 a5 30 'iIIxti+ ~c6
Some Larry C Attacking Games J55
31 'iff3+ ~c5 32 'ii'e3+ ~c6 33 'ii'f3+ ~c5 34 'ifa3+ ~c4 35 'ii'b3+
~c5 36 a4 iib8 37 'ii'c3+ ~d5 38 f4 ~e4 39 "'13+ ~d4 40 'ii'c6
~e3 41 'ii'cH ~e2 42 h5 liec8 43 'ii'fl+ ~d2 44 'ii'b5 ~e3 45 g3
~d4 46 ~g2 ~c3 47 h6 l:th8 48 'it'd7 b5 49 axb5 a4 50 b6 a3 51
'ifa4 ~b2 52 'ii'b4+ Wa2 53 h7 %!bc8 54 b7 ::'c2+ 55 ~f3l::tb2 56
'ifc5 :b3+ 57 ~g4 ~b2 58 'ifc8 ':xh7 59 b8='it' ltg7+ 60 ~h5
IIgxg3 61 'it'd6 l:th3+ 62 ~g6 l:bg3+ 63 ~fi l:h7+ 64 ~xe6 l:h6+
65 ~f5 lbd6 66 exd6 a2 67 d7 al ='it' 68 'ii'b7+ Black resigned
This end to this game strongly reminded me of an earlier game I had
against German GM Lev Gutman from a tournament in 1988. Here was the
position after 24 ... axbS.
Obviously White has strong pressure on e7 and the kingside but he needs
to somehow bring his queens ide pieces into action and reduce the pawn
chain h7-g6-fS surrounding Black's king. I went straight for the king with ...
25 g4! fxg4 26 'ii'xg4 1:c7
26 ... I1g8 27 I1xf6+! exf6 28 "iWe6+ ~g7 29 'ii'e7+ wins quickly.
27 hxg6+ hxg6 28 it.e4 :g8 29 b3 lLla3
156 Some Larry C Attacking Games
The reader should have pretty high expectation of what is to follow now.
30 I1xf6+! exf6 31 We6+ <;t>g7 32 .tb2!
The bishop finally enters the battle and with terrific effect. Of course
32 ...tZ'.lxb I? 33 il'xf6+ ~h7 34 it'h4 is mate.
:n
32 ••.
32 ...:tf8 33 :tal! b4 34 ~g2 sets up a decisive assault on the h-file.
33:cl
And now the rook is activated with tempo. Adding to Black's misery is
the forced exit from center stage by his queen and knight.
33 ...'iIr'a7 34 :c3!
With the rook ready to join the fun, it is only a matter of selecting the
most effective win.
34 ... b4 3S lig3 We7 36 .txg6 <;t>f8 37 Wc8+?!
In my opponent's time trouble, I failed to find the simple win 37 i..xfl
l:txg3+ 38 fxg3 it'xfl 39 it'xd6+ etc. Happily, White retains an
overwhelming attack after the text move.
37...We8 38 Wrs Wd7
38 ... tZ'.lb5 39 i..xf6 wins easily.
39 Wh5 lLlbS 40 Wh6+ <;t>e7 41 .txn Ihg3+ 42 fxg3 ~xn 43
11r'xf6+ <;t>e8 44 'Wh8+ <;t>n 4S 'ifh5+ <;t>g8
Shortens the agony compared to 45 ... ~e7.
46 .tf6! Black resigned
The late Louis B. Statham was a wealthy inventor with a passion for
chess. He sponsored the famous Lone Pine tournaments from 1970-1981
Some Larry C Attacking Games 157
until his death in 1982. Lone Pine is a small town on the eastern side of the
Sierra Nevada mountain range not far from Mt Whitney - the highest
mountain in the lower 48 states of the U.S. The scenic beauty of the area
made it a backdrop for many Hollywood Westerns and lured wealthy
retirees such as Mr Statham with its crisp pure air and warm weather.
My development as a chessplayer was aided greatly by this tournament
which attracted international stars such as Tigran Petrosian, Lajos Portisch,
Jan Timman, Lev Polugaevsky, Victor Korchnoi. Artur Yusupov, Svetozar
Gligoric and many others. There are many fond memories from the
tournament but one of the funniest had to be in 1980 when Roman
Dzindzihashvili won the tournament. There was one free day during the
9-round tournament and "Dzindzi" decided to spend it playing an epic blitz
match with Argentine GM Miguel Quinteros. Actually, they started the
match in the evening before the free day and continued throughout the next
day and evening until finally concluding the morning of round 6! Their 40
hour marathon of blitz ended with one side (not sure who) ahead something
like $3000. I remember periodically checking in on their match during the
free day but was totally amazed when, the next morning on the way to
breakfast, I noticed that they were still at it!
The following bizarre game, while far from perfect, is a good illustration
of my sometimes manic style during the late 1970s and early 80s.
Lein White
Christiansen Black
Lone Pine 1981
Bogoljubow-Indian Defense
I d4 tbf6 2 c4 e6 3 tbo iLb4+ 4 iLd2 as 5 e3 b6 6 iLd3 iLb7 7
0-0 0-0 8 tbc3 d6 9 Wle2 tbbd7 10 a3 iLxc3 11 iLxc3 tbe4 12 tbd2
f513 O?!
White cannot expect to gain an advantage by allowing the doubling of his
c-pawns without any sort of corresponding compensation.
13...tbxc3 14 bxc3 e5 15 iLc2 iLc6?!
A rather awkward square for the bishop - I was a little too impressed with
White's plan of playing i.a4. A solid and logical continuation is 15...'ii'e7
16 i.a4.
16 f4 e4?!
This only inhibits counter-play along_ the e-file. Respectable was
16... exd4 17 cxd4 (17 exd4 ne8 18 'iVf2 'iff6 19 :fel tLlf8=) 17 ...'iVf6 18
Aael nae8 19 d5 tLlc5.
158 Some Larry C Attacking Games
17 g4! ltJf6 18 gxf5!
This is far more combative than 18 g5 ltJd7 19 h4 with a very static
position for both sides. The position now takes on certain characteristics of
the French Defense - an opening that Mr. Lein has shown a marked
preference for throughout his career.
18.•.'ilfe7 19 rJi>hl iLd7
Black regains his pawn with a satisfactory position.
20 %:tgl h6 21 %:tg3 iLxfS 22 iLa4 ~h7 23 d5
23 .•• b5?
An over-reaction to White's plan of playing ltJb3-d4. A sensible
continuation is 23"':.88 24 ltJb3 naf8! (Black keeps his rooks connected by
this setup) 25 ltJd4 lDd7! with a roughly equal position. Nowadays I can
only smile at the free and loose disregard for material exhibited in my early
days.
24 iLxb5 a4
Black has at least stopped the white knight from activating, but now a4 is
a ripe target and Black is a long way from creating any sort of attack on the
kingside.
25 l:[bl g6 26 iLc6 llab8 27 l:tb4ltJhS 28 :gl Wif6! 29ltJbl 'iih4
Desperately trying to stir up activity with ... g5 in mind.
30 iLxa4 g5! 31 iLdl!
31 fxg51hb4 32 cxb4 .i.c8! 33 g6+ rt;g7 34 'ii'b2+ <ot>g8 35 .i.dI (forced)
:f2 36 ii'xf2 ii'xf2 37 .i.xh5 is unclear.
31. •. iLg6 32 'ilfg2 l:be8 33 flb7?
Instead of greedily going after more loose pawns, White should have
bolstered his defenses with 33 ltJd2 when Black has nothing better than
Some Larry C Attacking Games 159
33 ... lLlxf4 34 exf4 ~xf4 35 ~fI! ':ef8 36 'ittgl ':xfI + 37lLlxfI 'ifel 38 'ife2
'ifxc3 39 ':b3 'ifd4+ 40 lLle3 and White should consolidate without too
much difficulty.
33 ...l2Jxf4! 34 ':'xc7+ ~h8 35 'iig4
35 exf4? e3 36 .ltc2 (36 'ifg3?? i.e4+ wins) 36... e2! 37 i.xg6 el='ii' 38
i.xe8 ':xe8 wins for Black.
35...'iixg4 36 ioxg4l2Jd3
Despite his two pawn deficit, Black is now controlling events. White must
meet the threat of ... lLlf2+ and somehow bring his knight into play.
37 h41lb8! 38 ~h2 Ilb2+ 39 ~g3l2Je5 40 Itc8
40 hxg5 loses to 40 ... lLlxg4 41 Iit>xg4 h5+ 42 1it>h4 AD! 43 Ahl l:tg2 and
mate is inevitable.
40 ... gxh4+ 41 ~h3 ':xc8 42 ioxc8 h5!
Black secures his bind by taking control of g4.
43 c5
Better was 43 i.e6 lLlD 44 Ahl <i;g7 although Black has a near-perfect
bind. Also losing was 43 a4lLlD 44 ':hl ':b8 45 .i.e6 .ltf5+!! 46 .i.xf5 l:tg8
with mate coming.
43 ... dxc5?!
Missing the above-mentioned problem-like 43 ...lLlD· 44 Ah I Ab8! 45
.i.e6 i.f5+!! 46 .i.xf5 ':g8 with unstoppable mate, but the win is not in
jeopardy.
44d6
44 i.e6 was again better, although Black should win with 44 ...lLlD 45
Ahl Ae2 46 a4 ':xe3 47 a5 ':e2 48lLla3 e3 49lLlc4 .ltd3! 50 lLld6 ':d2 and
White has no defense to ... i.fI +.
44...l2JO 45 :hl ~g7?
160 Some LarlY C Attacking Games
Black can force mate with 45 ... ~f7! 46 ~f5 .i.c4! 47 d7 ~f1 + 48 l:hfl
IU2 mate. Luckily, White is in such a bind that I c~n leisurely bring the
king over to deal with the passed d-pawn.
46 a4 l:tb8 47 i..d7 ~f6 48 i..b5 i..f5+ 49 ~g2 c4 50 ~f2 h3 51
d7 <t;e7 52 l:dl h2 53 ltJa3 i..h3
54.txc4
54 ~c6 is a much trickier move to solve, but Black wins with 54 .. ..I:H8 55
b4+!! 56 ~xh3 hl='ii+!! 57 Ihhl :g8 58 d8='ii+ ~xd8 59 :dl+
1;c7 and White faces mate after some spite checks.
~g3
54...1:i.b2+?
54 ... lLlgI! 55 :xgl :f8+ wins at once.
551it>g3 i..xd7 56 l:hl h4+ 57 ~f4 i..h3
There is no defense to 58 ....i.g2 so White resigned
Christiansen White
NunnBlack
Gennany 1989
King's Indian Defense
1 d4ltJf6 2 c4 g6 3 ltJc3 .tg7 4 e4 d6 5 fJ
I enjoyed considerable success with the Samisch Variation in the 1980s
and 1990s although on many occasions I was less than satisfied with my
position after the opening.
5.••0-0 6 .te3 ltJc6 7 Wd2 a6 8ltJge2 l:tb8 9 h4 h5 10 ltJcl e5 11
d5ltJd4 12liJb3ltJxb3?!
Passive compared to 12 ... c5 13 dxc6 bxc6 14 lLlxd4 exd4 15 ~xd4 ne8
16 ~e2 d5! 17 exd5 :b4! 18 ~c5 lLlxe4! 19 fx.e4 ~xc3 20 'fixc3 .l::tbxe4 21
0-0 lhe2 with about even chances.
Some Larry C Attacking Games 161
13 axb3 c5 14 iLe2 iLd7 15lbdl!
White plans to transfer the knight to f2 where it will support the thrust
g2-g4 or cheer-lead a queenside advance with b2-b4.
15•..1ib6 16 tiJf2
A reasonable pawn offer that mobilizes White's forces for an eventual
kingside attack. Nowadays I might put a little more value on the b3 pawn
and continue 16 1:a3.
16.•.1ixb3 17 tiJd3 l:fc8 180-0 iLe8!
An excellent defensive move that enables Black to keep control of the
all-important e5 point while also adding needed defense to f7 and g6.
19 l:a31ib6 20 b4 tiJd7 21 bxc5 dxc5 22 iLh6
A necessary prelude to the attacking thrust f3-f4.
22 •.•iLh8
22 ...'iH6!? 23 i.xg7 ~xg7 24 ~el b5 (24 f4 exf4 25 1:xf4 ~d4+ is good
for Black) 25 f4 exf4 26 lLlxf4 ~d4+ 27 ~h I gives White good attacking
chances in return for the pawn.
23 f4 'iid6 24 f5 b5 25 tiJf2
25 .•. bxc4?
Black should play 25 ... b4! to secure his queenside advantages and force
White to play with maximum energy to create serious attacking chances on
the kingside. Best then appears to be 26 1:f3 ~f6 27 fxg6 fxg6 28 g4! ~d7!
(28 ... hxg4? 29 ~xg4 ~xg4 30 :f8+ ~h7 31 i.xg4 is crushing) 29 g5 ~h7
30 :al! (White must blockade the passed pawns) 30...~6 31liJd3 a5 32
~dl and White has been distracted from his attack, but now has positional
compensation for the sacrificed pawn. After the text, Black is burdened
with defending weaknesses on both sides of the board.
26 ioxc4 %tb6 27 tiJh3 ~f6 28 fxg6 fxg6 29 ~g5 iob5
J62 Some Larry C Attacking Games
29 ...iLd7 offered little hope, White just crashes through after 30 l:taf3
1lb4 (hoping to sidetrack White) 31 'Wf2! %hc4 32 l:txf6 l:txfO 33 'ii'xf6
'ii'xf6 34 l:txf6 and there is no defense against the splendidly placed trio of
attacking pieces.
30 i.xb5lbb5
30... axb5 31 lLIe6 is similar.
31 ~e6 lIb7 32 'ifg5 ~h7 33 l:g3 ~g4 34 i.f8 Black resigned
Mate is just around the corner after 34 ...l:txfS 35 lLIxfS+ ~g8 36 lLIe6
37 l:xg4 hxg4 38 h5.
~h7
Christiansen White
Blatny Black
Thessaloniki Olympiad 1988
Old Indian Defense
1 d4 ~f6 2 c4 d6 3 ~c3 e5 4 ~t3 ~bd7 5 i.g5 i.e7 6 "'c2 c6 7
e3 a6 8 0-0-0 "'c7 9 g4!?
The Old Indian Defense has a slightly seedy reputation because it gives
White too much of a free hand in the center. This spike attack discourages
Black from castling short and gains useful kingside space.
9......a5
9 ... h6 10 ~xf6 lLIxf6 II h3 ~e6 12 iLd3 0-0-0 13 i..f5 results in a
pleasant space advantage for White.
10 i.h4 b5?
Black should play 1O... h6 to hold up the further advance of the g-pawn.
11 g5 ~h5 12 dxe5 dxe5 13 i.h3 b4 14 ~a4 ~c5
14 ... e4 is destroyed by 15 ~xd7+ ~xd7 16 :xd7! Wxd7 17 'ii'xe4 'ii'xa4
18 l:dl+ ~e8 19'1:le5! 'ot>fS 20 'ii'f5 and wins.
15 i.xc8 l:xc816 ~xc5 "'xc517 i.g3
White obtains a decisive positional advantage with this simple move.
Now I7 ...lLIxg3 18 hxg3 would open the h-file with powerful effect.
17...i.d618 ~d2 'ii'aS 19 ~e4 ~c7 20 ~bl 0-021 l:d7 l:tb8
If Black challenges the d-file with 2l...l:fd8, White plays 22 'ii'dl! l:r.xd7
23 'ii'xd7 .l:[d8 24 'Wxc6 with a solid extra pawn.
22 ':hdl i.d8
The desperate 22 ...b3 leads to 23 axb3 1lb4 24 lle7 '6'b6 25 Ildd7 lOxg3
(25 ... ~b8 26 ~xe5 i..xe5 27 :xe5 Ilxb3 28 lLIc5 1lb4 28 Ilb7 wins) 26
hxg3 Ilxb3 27 g6! bxg6 28 lLIfO+! gxfO 29 'ii'xg6+! fxg6 30 l:txg7+ 'ot>h8 31
Ilh7+ 'ot>g8 32 l:r.dg7 mate.
Some Larry C Attacking Games /63
23 e5 i.e7 24 'ii'b3 l:tbc8
The execution phase now begins.
25 l:txt7! z::!.xt7 26 :'d7 kldS 27 :'xt7 I:lxt7 28 g6 Black resigned
The denouement would be 28 ... hxg6 29 tbg5 ~h8 30 1!i'xt7 tbf6 31 1!i'f8+
tbg8 32 tbe6 with mate soon to follow.
Mainka White
Christiansen Black
Germany 1989
Sicilian Defense
1 e4 e5 2 lbo lbc6 3 i.b5 e6 4 i.xe6 bxe6 5 d3 lbe7 6 0-0 lbg6 7
b3?!
This gives Black the time to gain space in the center and kingside.
7...e5 8 lbbd2 i.e7 9 lbe4 d6 10 i.d2 0-0 11 i.a5 'iie8 12 b4
exb4 13 i.xb4 e5! 14 i.e3 f5! 15lbfd2lbf4
Clearly White is already on the defensive. Now comes the build-up to a
full-blown attack.
16 <ifi>hl 'ii'g617 g3
The first weakening in the pawn cover of the kingside is step one in
Black's plan to steadily degrade White's defenses. The next step for Black
is to bring maximum pressure to bear on the freshly weakened f3 square.
17•..lbh3 180 fxe4 19 dxe4 i.a6 20 lbe3
White is happy to part with the exchange if it means cooling off Black's
attack. He would receive some compensation in the form of strong
light-square control.
20•.. i.g5!
164 Some Larry C Attacking Games
Black is not interested yet in winning the exchange but prefers to increase
the pressure. Besides, at the moment the bishop on a6 is more valuable than
the hapless rook on fl.
II ttJd5 lIn 22 'it>g2 'fih5 23 lIbl .cafS 24 :b3 'ilVh6
25 :hl ~d8 26 ~b2 ~c8 27 ~cl ~g5 28 ttJc4 ~xcl
Black has succeeded in trading off a valuable defensive piece while
working around White's only asset - the outposted knight on d5.
29 'iWxcl 'iig6 30 %:tel h5!
Softening the kingside structure. White's defenses become overstretched.
31 ttJd2 ~e6 32 c4 h4 33 ttJe3 ttJg5
33 ... lLlf4+ 34 'iti>f2 hxg3+ 35 hxg3liJh3+ 36 <iti>g2.
34 ttJd5 'iih5 35 g4
35...~xg4
After the carefully constructed attack, Black finally breaches the defenses
with a relatively simple combination.
Some Larry C Attacking Games 165
36 fxg4 'ilixg4+ 37 ~hl lIn 38 l'tgl 'ilie2 39 lbn "xe4+ White
resigned
The ramparts have been breached!
True Confessions
One of the strangest, and most unpleasant days I have ever experienced in
a chess tournament came about because of my own carelessness. It was late
summer of 1994 and a spur-of-the moment decision to participate in the
Wiesbaden Open brought me down from Porz, Germany to the pretty spa
town of Wiesbaden, situated near Mainz in west central Germany. When I
arrived to play in the tournament 1 learned that all of the hotels in the area
were booked for the first few days due to a huge trade fair in the area. No
problem, 1 would take the train back to Porz and simply commute a few
hours per day on the train. The financial expense was mitigated by my
railway 'Bahncard' which gave me a 50% discount on train trips within
Germany.
I easily won my first game and made my way to the Wiesbaden train
station at around 7 p.m., loaded down somewhat with a week's worth of
luggage (I had originally planned to book a room). I needed to get to Mainz
in order to catch a train up to Cologne and then on to Porz. My first attempt
to get to Mainz landed me in Mainz-Kassel, a suburb on the wrong side of
the Mainz river. 1 returned to Wiesbaden to try again. Just as I arrived I
noticed another train about to leave on the other side of the track. 1
hurriedly asked somebody "zug nach Mainz?". The answer came back "Ja"
and I jumped on the train, expecting a short 10 minute train to Mainz. No
luck. I had gotten on another train to this infernal Mainz-Kassel.
By this time, it was getting past 9 p.m. and I knew the last train from
Mainz to Cologne departed at 10 p.m. At one of the stops on the way to
Mainz-Kassel I got off and hailed a cab and urgently told the driver my
destination was Mainz Hauptbahnhof. As we finally approached the bridge
that joined Wiesbaden and Mainz, we noticed some sort of roadblock on the
bridge. Auto traffic across was "verboten". I paid the driver, got out of the
car with my millstone of luggage and rushed across the bridge. I had about
10 minutes to go before the train left the station. 1 managed to summon all
of my limited running abilities and somehow made the 10 p.m. train with
seconds to spare. 1 could finally relax.
The train from Mainz to Cologne is a scenic and enjoyable ride. About a
third of my way on the trip 1 pulled out my copy of the German chess
monthly Rochade and went to the tournament calender section. I wanted to
check again on the prizes in the tournament. After skimming the prize
listings, I glanced at the actual tournament schedule. My eyes focused on
the line "kein Hangpartei nach zweite Runde". which meant no adjourned
games for the second round. I wondered why that was. I looked at the
schedule - August 27-Sept 3. There are 31 days in August - 1 counted the
days off and they only totaled 8 days to play 9 games. 1 counted again. The
166 Some Larry C Attacking Games
sudden, sickening realization came to me that the next round would likely
be early the next morning, probably the preferred German time of 9 a.m.
I decided I had no other choice but to continue on back home and take an
early train back the next morning. When I finally reached my home train
station ofPorz-Rhein at around 12.45 a.m. I knew there would be no buses
or taxis available for the I mile walk up to my apartment. Just as I hit the
street for the long walk, burdened with the increasingly hated and unneeded
bag of clothes the day ended on a perfect note - a sustained cloudburst
greeted me just as I was exiting the train station.
I finally stumbled in to my apartment totally soaked, (including most of
the clothes in my travel bag) exhausted and resigned to the fact that I could
expect at best 4 hours of sleep before trying to get the 6 a.m. train back
down to Mainz. Somehow I dragged myself out of bed and repeated the
whole journey down to Wiesbaden. I actually arrived at my board at 9.45
a.m. but still managed to win that round, and, eventually the tournament.
The following game was decisive in determining the winner of the
tournament.
Christiansen White
Sher Black
Wiesbaden 1994
Slav Defense
I d4 dS 2 c4 c6 3 ltJc3 ltJf6 4 ltJo dxc4 S a4 .tfS 6 e3 e6 7 .txc4
.tb4 8 0-0 lDbd7 9 'iie2 .tg6 10 e4 0-0 t 1 .td3 a6?!
A second-rate move compared to ....i.h5. Even though it aims at
supporting a thrust like ... b5 or ... c5 it gives White a free hand in the center.
12 .tf4 l:t.e8 13 h3
A useful move for a number of reasons. Aside from protecting against
future back rank mates, it discourages the pinning move ....ih5 on account
ofg2-g4.
13..•h614 l:fdl 'iib61S eSlDdS 16ltJxdS cxdS
Some Larry C Attacking Games 167
17 tiJh4!
This tactically alert attacking move forces Black to make a choice
between the bleak 17 ... .i.xd3 18 lIxd3, which is tactically justified by
18 ... g5 (otherwise White has an overwhelming and mindless attack) 19 'iVg4
c;l1f8 20 ~e3! gxh4 (else Black has seriously weakened his king position for
nothing) 21 .i.xh6+ q;e7 22 "xh4+ f6 23 .i.g7 with a crushing position, or
to plunge forward with the game continuation 17.....xd4 which allows
White to damage Black's king position and obtain a healthy bishop pair.
17.•:iixd4 18 tiJxg6 fxg619 ~g3 'ilfb6 20 .txg6 1:ec8
The pawn structure indicates that the best way to impose pressure on
Black's positon is to enforce the break f4-f5. Black cannot do much with
the c-fiIe because he has no reliable entry points.
21 !it>h2 tiJf8 22 ~d3 :'c7 23 f4 g6
An ugly weakening of the kingside but this was necessary to stop the
crushing effects off4-f5.
24
:0 ~e7 25 a5 'ilfc6 26 ~f2
Less effective was 27 "g4 h5!. The plan now is to tear into the kingside
with g4 followed soon by f5. The bishop may also take up position on the
fine central outpost d4, or harass Black's forces with .i.b6.
26...'ilfe8 27 g4 ~c5 28 ~xc5
28 ~g3 was a good alternative, keeping all assets in place, but I was in
the mood to settle matters quickly.
28 ....t:hc5 29 fS exfS 30 gxfS d4
31 fxg6
A more ironclad continuation was 31 lIael and Black cannot bear the
brunt of the fully mobilized and well-supported attack.
31 .•.ltxe5?
168 Some Larry C Attacking Games
Trickier was 3l.....xe5+ 32 "xe5 l:txe5 33 .ic4+ (33 l:tf7? ttJxg6! 34
.txg6 l:tg5 retrieves the piece and forces a drawn rook ending) 33 ... <;t;>h8!
(33 .. .'it>g7 34 l:tf7+ ~xg6 35 l:tafI! wins a piece or mates) 34 g7+ ~xg7 35
l:tf7+ ~h8 (36 ...~g6 37 l:tafI wins) 37 l:txb7 with a vastly superior ending
for White. Still, this would have been a small moral victory for Black
compared to the position after 30... l:txe5.
32 i.c4+ ~g7 33 :f7+ 'ifxf7 34 'jixe5+ 'iif6 35 'ilfc7+ ~h8 36
nn 'jig7
36 .....xg6 37 l:tgl wins the queen or mates.
37 l:[f7 Black resigned
37 .....xg6 38 "e5+ forces mate.
My experience in Wiesbaden was self-inflicted. German-American GM
Eric Lobron is famous (or perhaps infamous) for bizarre experiences during
journeys around the globe. Perhaps the most unfortunate of his many
adventures was in Buenos Aires, Argentina.
Eric had just finished a youth tournament in western Argentina and was
visiting Buenos Aires strictly as a tourist. Shortly after arrival at his hotel,
Eric decided to take a walk along Buenos Aires' main shopping street Calle Florida (flower street). After walking a few blocks along that
beautiful boulevard a thief suddenly ripped off Eric's expensive watch and
ran off. Eric bolted after the thief and managed to overtake him, pinning
him to the ground. Unfortunately for Eric, a political protest march
involving mothers of victims of Argentina's military dictatorship happened
to be passing by. Eric's thief yelled out in Spanish that he was being
attacked by a Fascist military sympathizer and soon a collection of
concerned citizens decided to intervene on the thiers behalf and teach the
'Fascist' a lesson! Eric was soon overwhelmed by a mob of the thiers new
friends and suffered a broken knee, bruises and a general beating. Some
policeman who tried to help break up the scuffle suffered a similar fate.
After a visit to a Buenos Aires hospital, it was determined that an
operation on Eric's knee was necessary as soon as possible. Because of
insurance restrictions, the operation had to be performed in Germany and
Eric tried to catch a flight the next day. Unfortunately, he was unable to
book a direct flight back to Germany due to a strike by Aerolineas
Argentina. Lufthansa reported to Eric that all flights to Frankfurt were full.
He finally managed to find a flight back through a circuitous route via
Madrid with a Spanish Airline. Eric experienced more snafus and
headaches getting medical attention for his knee (misplaced x-ray charts)
upon arrival in Germany but he finally made it to the operating table.
I was privileged to be a member of the gold-medal winning USA team in
the 1993 World Team championship held in Lucerne, Switzerland. The
following victory supplied the winning margin in a crucial match with a
strong Chinese team.
Some Larry C Attacking Games 169
Wang Li White
Christiansen Black
World Team Championship, Lucerne 1993
Nimzo-Indian Defense
1 d4 tLlf6 2 c4 e6 3 tLlc3 .i.b4 4 Wc2 0-0 5 a3 .i.xc3+ 6 Wxc3 b6 7
~g5 c5 8 dxc5 bxc5 9 e3 tLlc6 10 tLlh3
I had the benefit of having witnessed Anatoly Karpov's smashing victory
in this line as Black aganst Dutch GM Jan Timman from their 1993 FIDE
world championship match. I simply followed in Karpov's footsteps for the
first 17 moves.
10••. h6 11 .i.h4?
Black obtains a powerful initiative after this move. White should settle for
II i.xf6 'iWxf6 12 'iWxf6 gxf6 with equal play.
11 •.. g5! 12 .i.g3 tLle4 13 Wc2 Wa5+ 14 'it>e2 f5 15 f3 tLlxg3+ 16
hxg3I:[b8
17 tLlfl .i.a6 18 tLldl
Timman-Karpov, Amsterdam 1993 continued 18 liJd3 d5! 19 b3 .l:txb3!
20 'iWxb3 dxc4 21 'iWa2 cxd3+ 22 ~f2 l:tf6 23 l:tcl ~g7 24 f4 c4 with a
huge plus for Black. 18 liJdl is just a slight improvement over that game.
Losing at once is 18 l:txh6? i.xc4+! 19liJd3 (19 'itdl i.b3) 19... i.xd3+ 20
hd3 liJb4+ 21 axb4 'iWxa I 22 'iti>e2 1::txb4 and wins.
18•••:tf6 19 'it>fl tLle5 20 .i.e2 d5 21 b3
21 cxd5 i.xe2 22 1i'xe2 exd5 followed by ... c4 is strong.
21 •••d4
Even stronger is 2l...'iWb6!.
22 f4 tLlf1 23 'it>gl :d8
J70 Some Larry C Attacking Games
24:a2.tb7
Time to improve the position of this piece.
2S~h2"'c7?!
After a fine start (thanks to Karpov) I begin to drift a bit. 2S ... eS! hits
White where he is weakest - the kings ide - and begins the process of
stripping away the king's pawn cover for the benefit of Black's finely
posted pieces.
26:0 dxe3?!
Black should still look to the kingside for his chances with 26 ... l::tg6!
which breathes down on the weaknesses on g3 and g2. White cannot
organize a defense to meet the coming ... e6-eS.
27lbxe3?
White was clearly too anxious to bring the knight back into play or else
he would have played 27 'iWc3! l::tg6 28 ~hS l::tg7 29 'iWxe3 iLe4 30 l:[d2
with only a small plus for Black.
27.•.l::td4
This forces White to surrender the f4-pawn since 28 fxgS ~xgS serves up
a crushing attack.
28 ~gl gxf4 29 gxf4l.ixf4 30 'iVc3 ltd4!
Staying true to the principle that the side with a greater space advantage
should avoid simplification.
31.tO
31 ~c2 l::tg6 32 ~xd4.
31....i.xO 32 gxOllg6+ 33 :t.g2lbgS 34 'ilVet
Some Larry C A ttacking Games 171
34..:'i'f4! 35 'VWe2 'ii'h4!
Controlling the f2 escape square seals White's fate.
36 l:el tiJxO+! 37 ~fl 'VWhl+ 38 ~f2 'ifh4+ 39 ~fl 'ii'h3 40 ~f2
':'xg2+ 41 tiJxg211d2 White resigned
More rook lifts
Perhaps the reader is getting sick of all these examples involving rook
lifts. It is almost impossible for me to find an attacking game without this
theme. Here is another one to add to the pile.
Christiansen White
Velikov Black
St John 1988
1 d4 d5 2 c4 c6 3 tiJc3 tiJf6 4 e3 e6 5 tiJo tiJbd7 6 i.d3 a6 7 0-0
dxc4 8 i.xc4 c5 9 a4 i.e7 10 'ii'e2 O-O?!
Standard is 1O...cxd4 11 exd4 ttJb6 followed by blockading dS. The text
lets White mobilize his remaining forces too quickly.
II dxc5 i.xc5 12 e4
Threatening to create a powerful attacking wedge with e4-eS. Black can
stop that but only by ceding control of dS and opening up the a2-f7
diagonal.
12...e5 13 i.g5 'ifa5 14l::tadl i.b4
It is painful for Black to neglect development, but 14 ... b6 IS :td3 (IS
J.xf6 ttJxf6 16 ttJxeS J.xf2+ 17 'iWxf2 'iWxeS 18 'iWxb6 seems somehow too
cheap) lS ... J.b7 16 :tfdl i..c6 17 ttJh4 gives White an overwhelming
attack.
172 Some Larry C Attacking Games
15 ~5 iDxd5 16 .txd5 h6
Black must weaken his king position in order to complete development.
17 J.e3 iDf6 18 iDxe5 iDxd5 19 exd5 'iha4 20 d6 iLe6 21 l:ld4!
It seems that a powerful rook lift is seen in the vast majority of the
attacking examples in this book. Perhaps the trauma of those early beginner
games that started 1 h4 d5 2 l:th3 ~xh3 has made most players excessively
wary of bringing their rooks beyond the third rank.
2l. •.a5 22 "'h5!
White makes no secret of his desire to sacrifice on h6. The only roadblock
to a successful sac is the weakness of the back rank but accurate calculation
assured me this was not a factor here.
22......c2 23 iDd3!
Obstructing the queen from helping defend the kingside.
23 ..,llfd8 24 :tcl "'b3
25 iLxh6!
Some Larry C Attacking Games 173
Finally!
25•••gxh6 26 'ifxh6 J.xd6
Black must stop 27 l:tg3.
27lbc5! J.xc5?
The surprising 27 ..."a2 offers fairly stiff resistance, (I have to admit 1 did
not see this defense during the _game) but White should win with 28 l:txd6
lhd6 29 lZ'le4 'it'xb2 30 lZ'lf6+ _xf6 31 'it'xf6 :td5 32 h4 b5 33 :tel! :ad8
34f4.
28 'ii'gS+ 'iiif8 29 ':xd8+ lbd8 30 'ii'xd8+ <it>g7 31 %:xcS 'iWxb2 32
h4 a4 33 %:g5+ Black resigned
The following game is one of my personal favorites. After first
weakening White's king position, I succeeded in finding a very effective
plan to bring my apparently idle heavy artillery into the attack.
Lalie White
Christiansen Black
St John 1988
1 d4 lbf6 2 c4 e6 3 g3 J.b4+ 4 .i.d2 'ii'e7 5 J.g2 lbc6 6 lbo
£xd2+ 7 lbbxd2 d6 8 0-0 a5 9 e4 eS 10 dslbb8 11 b3 0-0 12 lbe1
c6 13lbd3lba6 14 :tel J.d7 IS f4 lUe8 16 a3 'ii'd8 17 fxeS
17••."'6+ 18 ~hl dxeS 19 'ii'e2 cxdS 20 cxdS J.bS! 21 'ii'fl'ii'd6
2lliJb2liJg4! 23 'ii'gl 'ilh6 24 lladl :ac8 2slbdc4 a4 26 J.O?
Play is about equal after 26lbe3 lbxe3 27 'iWxe3. The text surrenders too
mUch control of the dark squares.
26•••J.xc4 27 bxc4 lbf6 28 'iWb6
J 74 Some Larry C A ttacking Games
White was counting on this move to tie up Black's pieces but the queen's
absence from the kingside will soon be felt.
2s...lbc5 29 ~g2 'i!Vg6 30 :e2 h5 31 h4
White has temporarily halted Black's kings ide initiative but I managed to
find a surprising method of opening a fresh avenue of attack.
31 ...~h7!
The plan is to simply play .. .'ii'h6 followed by ...l:tg8 and finally ...g5. The
passive position of White's pieces means there is little he can do to defend
against this plan.
32 l:del l::tgS 33 :hl
White hopes to discourage Black from prying open the g-file by placing
the rook opposite the black king, but it does little to lessen the impact.
33 ...'Wh6 34 'Wd6 g5! 35 hxg5 'Wxg5 36 :h3 :g6 37 'We7 ~g7
The king gets off the h-file and defends f7 without obstructing any
attacking pieces.
3slbdl
38 :'£2 is crushed by 38 ... h4 39 ':f1 'ii'd2+ 40 ':£2 'ii'f4! 41 lDdl l:txg3+
42 :'xg3 hxg3! 43 ':e2l:th8! 44l:te3 llh2+ 45 <it>gll:td2! 46 "xc5 ':xdl+!
47 ii.xdl 'ii'£2+ 48 c;;t>hl 'ii'h2 mate.
38...lbd3 39lbe3lbf4+ 40 ~h2lbxe2 41lbcs+ ~g8 42 'Wxb7
Some Larry C Attacking Games 175
42 ..•'ifd2!
The queen invades the deserted inner defenses.
43 liJe7+ ~h7 44 liJxg6 liJf4+ 45 ~hl 'ifel+ White resigned
The best defense is counter-attack! In the following example I managed
to escape the grip of a dark-square bind with some deft tactics.
Christiansen White
Perenyi Black
St John 1988
It would seem at first sight that Black enjoys a stranglehold on the dark
squares and can look forward to applying pressure across the board. I
decided to sacrifice a pawn in order to open the position and force the
_ .
advance of a strong central passed pawn.
1 liJb5!
Clearly, it was necessary to ease the dark square pressure imposed by
Black's well-placed minor pieces.
/76 Some Larry C Attackillg Games
1...axb5 2 lIxd4 ~xa5 3 b4!
This is the whole point behind 1 lLIbS. Black's extra pawn is negated by
White's greater central control and denoted mainly by a powerful
centralized white rook on dS.
3...~b6 4 bxc5 dxc5 5 :tddl c4 6 d6 itJf4 7 .i.xf4 gxf4 8 .i.n :e6
9 I:td5! b4
Black tries to create counter-play by invading my own king position, but
he soon comes up against a move that combines attack with defense.
10 .i.xc4 itJxc4 11 ~xc4 ~xf2 121:.g1 b3 13 'ilixb3l:he4
14 ~f3!
A very strong move long prepared. The annoying queen is driven away,
enabling White to make further progress with his deadly passed pawn.
14...'iWe2 15 d7 ~d8 161Ic1 'iiitf8
There was no adequate defense to the looming threat of l:tc8.
17 'ilic3 'iiite7 18 ~c5+ 'iiitf6 19 ~b6+ 'iiitg7 20 ~xd8 f3 21 :g5+
hxg5 22 'it'xg5+ Black resigned
Christiansen White
Anastasian Black
Yerevan Olympiad 1996
Nimzo-Indiall Defense
1 d4 itJf6 2 c4 e63 itJc3 .i.b4 4 e3 .i.xc3+
Anastasian is partial to this line but White should be able to develop a
promising attacking formation with correct play.
5 bxc3 c5 6 .i.d3 itJc6 7 itJe2
Some Larry C A ttacking Games 177
e2 is a far more agreeable square for the knight than n because it can
quickly aid in promoting a kings ide attack while also supporting the white
center from e2.
7•.. d6 8 0-0 eS 9 e4 0-0 10 f3 b6 II dS 4'Je7 12 lbg3 lbg6 13 4'JfS
tDf4 141t.c2 g6 IS lbh6+ ~g7 16 g3 ~xh6
The alternative was 16... t2)h3+ 17 'ito>g2.
17 gxf4 <it>g7 18 fxeS dxe5 19 f4
19 'jid2 was a good alternative, with the idea of 19 ... t2)hS 20 'iWh6+ 'it>g8
21 f4 with a promising attack in the works.
19•.•exf4?
Black had to play 19 ....ih3 when 20 fxeS (20 .l%f2!? t2)g4 21l:tn 'jiM 22
.i.d2 is possible) 20 ... t2)d7! (not 20... .i.xfl? 21 J.gS!) 21l:tf2 t2)xeS 22 J.f4
f6 is about equal.
201t.xf41t.h3?!
Anastasian missed White's 2200 move, but his position was probably
beyond repair anyway. 20... t2)hS 21 'jin t2)xf4 22 ii'xf4 f6 23 eS fxeS 24
"ii'xeS+ 'ito>g8 2S .l%xf8+ 'iWxf8 26 l:tfl 'iWd8 27 J.e4! intending 28 d6 next
wins for White.
21 .tg5! 1t.xfl 22 e54'Jxd5 23 1t.xd81t.xc4 24 1t.h4
White has a decisive material advantage but I was slightly uneasy because
of my many weak pawns.
24•••:ae8 25 'ii'g4 b5 26 liIel!
The eS pawn must be held in order to later support a direct mating attack.
26•••.txa2 27 'ii'd7 :te6 28 'ii'xa7 1t.c4 29 'ii'xc5lbxc3
/78 Some Larry C Attacking Games
30 Jd5
30 ~f6+ 'iti>g8 31 ~b3 also wins smoothly.
30.•.l:a6
30... gxfS 31 ~fO+ 'iti>g8 32 'ii'12 l:tc8 33 'ii'g3+ 'iti>f8 34 'ii'xc3 should win
easily.
31 .i.c8 l:a2 and Black resigned before White finishes with 32 ~f6+
'iti>g8 33 'ii'e3lLle2+ 34 l:txe2 etc.
Pinter White
Christiansen Black
Reggio Emilia 1987/88
1 d4 d6 2 lLlo .i.g4 3 c4 .i.xt3 4 gxt3 g6 5 lLlc3 .i.g7 6 f4 c6 7 e3
lLld7 8 .i.d3 e6 9lLle4lLldf6 10 lLlg5lLle7 11 'ii'b3 %:tb8 12 .i.d2 a6
Black prepares the desirable ...b7-b5 which is useful no matter where the
white king castles.
13 l:.cl 0-0 14 'ii'a3lLlfS 15 .i.b4lLle8 16 d5?!
16 M! was better.
16••• c5 17 .i.c3 'ii'e7 18 %:tgl b5 19 cxb5 axb5 20 dxe6 fxe6 21 b4
e5
2l...c4 22 ~xfS l:txfS 23 ~xg7 lLlxg7 24 ttJe4 followed by ttJc3 is
roughly equal. I wanted to start opening lines on the kingside.
22 bxc5 exf4 23 cxd6
23 ""3+ 'it>h8 24 ttJe6 fxe3 25 lLlxf8 ex12+ 26 'ito>x12 "e3+ wins for
Black.
23 •••.i.xc3+ 24 'ii'xc3 lLlexd6 25 'iWb3+ ~h8 26 .i.xfS lLlxfS 27
'iWc3+ lLlg7 28 e4
Some Larry C Attacking Games J 79
28 ...f3!
A very important move that removes the possibility of 'iib3 while also
preventing the desirable 12-0. White's army is suddenly cut in two.
29:g3
29 'ii'c5 'ii'b7 30 'ii'd5 "a7 31 1:[g3 1:[bd8 32 'iib3 'ii'e7 keeps up the
assault.
29... h6 30 ~xf3 'iixe4+ 31 ~n gS 32 ~gl?!
The centralizing 32 'it'd4! was an improvement.
32 •••'iifS
Black has the upper hand thanks to his strong pressure along the f-file and
safer king.
33'it'b2I:.bd8
33 ...1:[be8? 341:[c7 1:[f6 35 1:[b7 g4 36 h3 gxO 37 1:[bxg7! turns the tables.
34 l:.el!
341:[c7 1:[f6 35 h4lZ)h5! is troublesome.
34...l:.de8?
Black should opt for 34 .....f6! at last breaking the pin and offering White
an inferior ending after 35 "xf61hffi 36 h4 g4 37lZ)e5 h5.
3Sl1dl?
The cold-blooded 35lZ)e5! <;t.>g8 36 l:tb3!, going after the b-pawn, was the
preferred course. Black will be able to establish a strong knight on f4, but
White should be able to defend.
3S.••:e4!
Of course... Black lifts and centralizes. White must confront the possibility
of ... g4 now from Black.
36 ~d4 'it'f6 37 ':f3 ':g4+ 38 <it>hll::tf4 391bf4 'it'xf4 40 f3
180 Some Larry C Attacking Games
40 ii'xb5? ii'e4+ 41 D l:txD is too strong.
40...:td8 41 %:td3 'ifeS 42 :td2 'ife3 43 ~g2 'iff4
43 ...b4 44lDb3 l:tf8.
44lDb3 1:[f8 4slDd4 g4 46 :tf2?!
46 l:td3! l:tf6 47 'ii'xb5 l:tg6 48..tfl! 'ii'xh2 49 fxg4 l:txg4 50 lDe2! holds.
46•• J:tf6 47 ~fl?
47 ..tgl! l:td6 48 lDe2 l:td1+ 49 r.t>g2 gxD+ 50 lIxD 'ii'g5+ 51 r.t>h3! (51
l:tg3? l:td2 wins) should lead to a draw.
47 ..•:d6! 48lDe2
48lDxb5 is met by 48 .. J::td1+ 49 r.t>e2 l:td5! 50 lDc3 gxD+ 51 ..tfl l:tg5!
and Black wins.
48...gxf3! White resigned
An unexpected back-rank shot ends the battle.
The following mid-tournament encounter with the redoubtable attacker
Alexander Shabalov was a major step for me in winning the 2002 US
Championship.
Shabalov White
Christiansen Black
U.S. Championship, Seattle 2002
Queen's Indian Defense
1 d4 lDf6 2 c4 e6 3 lDf3 b6 4 lDc3 .i.b7 S a3 dS 6 cxdS exdS 7 g3
i.d6 8 .i.g2 0-0 90-0 lDbd710 .i.f4
10 lDb5 ~e7 11 .if4 c6 12 It)d6 ~xd6 13 ~xd6 l:te8 gives White the
bishop pair but Black is very solid. The position is slightly better for White,
but that type of position probably did not suit Shabalov's penchant for
Some Larry C Attacking Games 181
wide-open attacking play. With the game continuation White hopes to
secure e5 as a ripe invasion square for a knight and later exploit the
half-open g-file for attacking purposes.
10..•i4xf411 gxf4 c5 12 e311c8 13 IIctltJe4 14ltJe2 'fie7 15ltJg3
1:tfd8 16 i4h3 %:tc7 17 'iWe2ltJf8
I intended to manoeuvre the knight to g6 in order to create later kingside
play.
181Udl i4c8! 19 i..g2 i4g4 20 dxc5
20 h3 ~xg3 21 fxg3 .i.e6 22 ~g5 .i.f5 23 dxc5 h6 24 ~f3 bxc5 25 ~e5
~e6 26 'ii'b5 f6 is fine for Black.
20•.. bxc5 21 'fic2
21 b4 c4 22 h3 ~xg3 23 fxg3 .i.xf3 24 .i.xf3 l:[cd7 25 l:[d4 is roughly
equal.
21 •••l:d6!? 22 %:tel
The cautious 22 l:[fl was better.
27.•.ltJg6 23 b4 h6
23 ... l:Idc6 24 b5 l:[b6 25 ~d4 h5 26 ~c6.
24ltJd4
24 lLlxe4 dxe4 25 ~d4 cxd4 26 'iixc7 'ii'xc7 27 l:Ixc7 d3 28 l:[bl d229
.i.xe4 dl="+ 30 l:txdl l:txdl+ 31 q;g2 f5 32 .i.c2 l:[al should win for
Black. Also dangerous is 24 lLlxe4 dxe4 25 lLld2 lLlM! 26 .i.xe4 (26 lLlxe4
lLlxg2 27 'iti>xg2 ~f5 28 f3 l:te6 29 -'c3 .i.xe4 30 fxe4 l:tg6+ 31 ~f3 'ii'h4
wins) 26 ...l:txd2! 27 'ii'xd2 ~f3! 28 .i.c2 .i.b7! 29 .i.dl l:tc6 30 ¢>fl l:tg6!
31 .i.h5 .i.a6+ 32l:te2 "e4! with a crushing attack for Black.
24.•.ltJh4! 25 bxc5
182 Some Larry C Attacking Games
25 .!Db5 is met by 25 ... .!Dxg2 26 ~xg2 'ikh4 27 f3 (best) 'ii'h3+ 28 'ittgl
.txf3 29 :fl! (29lt)xd6 cxb4!) 29 ... cxb4! 30 .!Dxc7 l:tc6! 31 l:txf3 (forced)
l:txc2 32 l:txc2 b3 33 l:tb2 'ifd7 and Black has all the chances.
25 .. .lhc5 26 'ilid3 lZ)xg2 27 'it>xg2 ~4 28 'it>gl ??
28 l:txc5 .!Dxc5 29 'ilib5 .!De6 30 .!Dxe6 fxe6 31 ~g 1 gives Black an edge
based on his strong light square pressure, but White is still clearly in the
fight.
28 .•.lZ)xf2!
Rocking the ramparts!
29 'ilio llxcl30 l:bcllZ)e4 31lZ)xe4 dxe4 32 'ilif2 'ilib5 33 f5
33...~b7?
Much crisper was 33 ...l:td5! to quickly collect the f5 pawn.
34 'ilif4 :f6 35 :O?
Some Larry C Attacking Games 183
In severe time pressure, Shabalov misses the tenacious defense 35 l:tc5!
which keeps the rook active. Black still has a clear upper hand after
35 ... .i.f3 or 35 ....i.h3!? but a definite win is hard to prove.
35...~h3
Black wins the f5 pawn, making further resistance futile.
36 lIcl ~xf5 37 ttJxf51hf5 White resigned
Christiansen White
Vaganian Black
New York 1990
Alekhine's Defense
I e4 ttJf6 2 e5 ttJd5 3 d4 d6 4 ttJfJ g6 5 ~c4 c6 6 0-0 ~g7 7 exd6
'ii'xd6 8 ttJbd2 ~g4 9 h3 ~xfJ 10 ttJxfJ ttJd7 II ~b3 0-0 12 :el
e6 13 ~g5 b5 14 a4 b4 15 'ii'd2 a5 16 :adlllfe8 17 ~h6
17 .i.h4 'ii'f4 18 'ii'xf4 lDxf4 19 lDe5 lDxe5 20 dxe5 lDd5 21 lle4 h6 22 g4
g5 23 .i.g3.
17...ttJ7b6
Black should hans_ on to his dark-squared bishop with 17 ... .i.h8, when
White can play 18 'ife2! which supports an outpost on e5 and prepares a
queens ide raid with 'it'a6 at the proper moment.
18 ttJe5 c5?
Vaganian must have missed my 21" move or else he would surely have
played the solid 18...11ad8 when White has some pressure after 19 .i.xg7
~xg7 20 l%e4! and Black must delay his aim of playing for ...c5 in order to
secure his king position.
19~xg7~xg7
J84 Some Larry C A ttacking Games
20 'iVh6+!* ~g8 21 dxc5 'iVxc5
22 ttJxf7! ~xf7 23 'iVxh7+ ~f6 24 %:td3 lbf4
24 ... e5 25 ':'0+ 'it'e6 26':'£7 cbd6 27 ':'dl ':'ad8 28 ':'b7 'it'c6.
25 lIn 'ii'fS
25 ...'iVg5 26 g3 ':'e7 27 :xf4+ 'iVxf4 28 ':'xe6+ :xe6 29 gxf4.
26 iIIc7 g5 27 'iVxb6
White regains his piece and has netted two pawns with a continuing
attack. The rest is a mop-up operation.
27...~g6 28 :fe3 'iVf6 2911e5 lIad8 30 iIIe3lid6 3111xa5 'ii'xb2
32 'iVe4+ ~f6 33 'ii'h7 Black resigned
"'This is not the first time I have played this kind of combination. Here
was the position in Sunye-Christiansen, Mexico 1980, after ':'hl:
Some Larry C Attacking Games /85
The game continued 1...'ifh3+! 2 Wxh3 tiJxf2+ 3 ~g2 tiJxd3 4l:lcdl
tiJxb2 S tiJxb2 :lfe8 6 ltd3 fS 7 tiJa4 :e6 and Black went on to win
easily.
I would like to end this chapter with a few combinations from my past.
Combinations
Christiansen White
Gruen Black
Bad Mergentheim 1988
White has to mobilize his center in order to open lines and diagonals for
his rooks and bishops. This goal was accomplished by ...
I c4! 'ifxb4 2 %labl 'ifaS
Preventing 3l::txb7 because of .. :ii'xel+.
3 ltxeS! dxeS 4 .i.xeS+ f6 S 'ifg4!
Not 5 l:txb7?? 'ii'el+ 6 ~fl "xe5.
S...:17
Forced.
6 'ifxg6+ WfS 7 .i.f4!
The bishop comes into its own at long last. Black cannot defend against
the numerous threats.
7... i.b48 .i.h6+ We8 9 i.d2! .i.xd2 10 l:xb7 'iWa1+ 11 .i.n Black
resigned
186 Some Larry C Attacking Games
Gschnitzer White
Christiansen Black
Gennany 1991
With White suffering from an exposed king and a horribly situated knight
on aI, violent methods will lead to a successful conclusion. Thus ...
1...ttJxg4+! 2 hxg4 'ilfxg4 3 .i.g3
Forced.
3...%th5+ 4 ~glltJd4!! 5 'ilfxe4
5 'iWxcSllJxe2+ 6 lit'fl :hl+ 7 lit'g2 'iWf3 mate.
5...1i'h3!
White lacks a good defense to 6 ...11Jxe2+.
6 'ii'g2 ':xc1 7 \i'xh31Ixdt+ White resigned
Some Larry C Attacking Games 187
Christiansen White
SanzBlack
Las Vegas 1999
White has the bishop pair and total control of the d-file which led to a
pretty finale:
1 :d8! ltxd8 2 l:xd8+ ~h7 3 'ii'xh5+! .th6 4 'iixe5 .tg7 5 'iie2
e6 6 f5! exfS 7 'iih5+!
Back again for a return visit.
7... gxh5 8 .txf5 mate
Christiansen White
Shabalov Black
U.S. Championship, Seattle 2000
The following combination is a very unusual one involving assorted pins,
in-between moves and double attacks.
1 l:.xe5! ttJxe5 2 .th7+ ~h8 3 ttJcxe5 .txe5 4 .tg5 .th2+! 5
~xh2 'ifd6+ 6 ttJe5!
188 Some Larry C Attacking Games
Not 6 ~gI1:hel+ 7lL1xel f5 8 i.xf5 i.xf5 9 'iVa4 'ili'e6 10 .te3 'iVe4 and
Black is happy.
6...l:.xeS
Hopeless is 6 ... f6 7 'iVd 1 'ili'xd 1 8 lLIg6+ ..ti'xh7 9 lLIxf8+ 'it>g8 10 l:txd 1
11 i..xh4.
~xf8
7 .tf4 1:.fe8 8 lXxeS l:xeS 9 .te4 gS?
9 ... i.c6 10 i.xc6 bxc6 11 'ii'cl! 'iVe6 12 i.xe5 'iVxe5+ 13 'it>gI is far from
easy for White to win.
10 'ild3! 'ile7 11 .i.xeS+ 'ii'xeS+ 12 ~gl .i.bS
12 ... i.c6 13 i.xc6 bxc6 14 'ili'd4 'iVxd4 15 cxd4 cj;g7 16 g3 ~f6 17 ~g2
18 ~f3 ~d5 19 ~g4 wins easily.
~e6
13 'ildS! 'ilf4 14 'ii'd4+ ~g8 IS .txb7 'ilxd4 16 cxd4 fS 17 f4 g4
18 g3 Black resigned
A.Ivanov White
Christiansen Black
U.S. Championship 1996
Some Larry C Attacking Games 189
I have also been on the receiving end of some beautiful combinations.
One particularly striking and dramatic combination came in this position
against GM Alexander Ivanov. Just coming out of time pressure. I thought
I had calculated everything now as White loses after I 'ifxh5? l:txg2+ 2
<it'xg2 'ifg3+ with mate next, or I i.xd5+ 'it'f8 2 i.xc4 'ilVd2! and wins, and
finally 1 'ifh4 i.h2+! 2 ~hl (2 ~xh2 'ifxfl wins) 2 .....xfl+! 3 i.xfl i.f3+
4 i.g2 :txg2 wins. Then, to my horror I noticed the possiblity of I f6 which
suddenly looked like trouble. Incredibly, despite all of Black's threats and
active pieces, he cannot survive the onslaught. Ivanov thought for about 20
minutes now and finally played the expected crusher.
1 f6!! .i.xg4
Black cannot deflect any of White's attacking pieces as I ...Itxg2+ just
loses to 2 'ifxg2, and l...'iVxfl + fails to 2 'iitxfl Ita 1+ 3 ~f2 Ita2+ 4 'it>e3
i.xg4 5 i.xd5+ ~f8 6 fxg7+ ~e7 7 i.f6+ (not 7 g8='if?? :te2 mate) and
wins; finally l...i.h2+ 2 ~xh2 i.xg4 3 f7+ 'iti>f8 4 i.c5 is mate. So Black
has no choice but to take the queen. Unfortunately, White is able to promote
to a new queen with an all-important check.
2 .i.xd5+ .i.e6
2•.. 'iPf8 3 fxg7+ 'iPe7 4 l:tf7+ forces mate .
.3 .i.xe6+ ~f8 4 fxg7+ ~e7
5 i.f6+!
The key to the combination. He forces queening with check ...
5.•.~xe6 6 g8='if+ ~d7 7 'iVd8+ ~c6 8 'iie8+ Black resigned
I resigned because of 8...'iti>b6 9 i.d4+ ~a6 10 'ifa8+ 'it'b5 11 'it'xa2
'ji'g3+ 12 'iVg2 etc.
J90 Some Lany C Attacking Games
Here is the conclusion to a game with the great Viktor Korchnoi from the
1993 Wijk aan Zee tournament:
Korchnoi White
Christiansen Black
Wijk aan Zee 1993
The situation seems fairly placid. White has a slightly better pawn
structure, but his kings ide is porous and Black has a compact
well-organized position. I correctly decided to open the center.
1... e5 2 dxe5 lbd7 3 .id4
3 f4? lLlxc5 4 'ilfxc5 :d2+ 5 ~gl :ed8! is very dangerous for White as
Black's rook enjoys absolute control of the 2nd rank.
3 ...lbxe5 4 :edl :d5!
I am a very strong advocate of rook-lifts and here Black goes one better
by playing a centralizing rook lift. In some variations this rook may swing
over to the kingside to assist in a mating attack.
5 'iVe2 'ife6 6.ixa7
Both players (at least I certainly was) were under the illusion that 6 :xc7
could be answered by 6 ... lLlxf3 7 ~xf3 'ii'h3, although this is shot down by
the calm 8 'ilfc4! which prepares a haven on the queenside for the exposed
white king and keeps Black busy': defending n. Much better, after 6 l::txc7, is
6 ... lLlc6! 7 'ilfc4lLlxd4 8 exd4 We3+ 9 ~g2
10:0 (10 'ilfd3 :xf3 I I
'ilfxe3 :fxe3 12 :xa7 :e2+ 13 ~gI :a2=) 1O.....xa3 with equality.
:f5
6..Jla5
Some Larry C Attacking Games 191
7..tcS?!
Here White should.play 7 lhc7!, when my intended 7.. .liJxfJ? again fails
after 8 'itxfJ 'il'h3 9 "c4!. On sober second thought, I might have found the
sensible 7...:xa3, when 8 i.d4 .f5! 9 'ot>g2 (9 i.xe5 .xe5 double-attacks
e3 and c7) 9 .. JIa2! is better for Black, and 8 'iti>g2 (preventing raids based
on ...•h3) 8...1:.a8 9 i.d4 1:.a2 10 1:.d2 l:[xd2 II 'il'xd21:.a2 12 l:[c2 liJxfJ!
rocks White's ramparts (13 'it>xfJ .fS+).
7.•.'ifh3 8 ct>gl 'iff5 9 ct>g2lDxfJ 10 ..tb4lDgS 11 ..txaS'ifxaS 12
'ifd3 'ifa8+ 13 'ifdS 'ifxa3 14 h4??
14 1:.xc7 'iVxe3 151Ifl 1:.e5 16 'ii'c4 'iti>h8 17 .c2 f6 18 l:tc8+.
14...%he3! 15 hxgS %1xg3+ 16 ct>n 'ife3 White resigned
17 'ii'd8+ 'it>h7 18 'iVd3+ .xd3+ 19 l:xd3 l:xd3 20 l:xc7 1:IfJ+ 21 'iti>g2
l:[fS 22 gxh6 'iti>xh6 wins.
Razuvaev White
Christiansen Black
New York Open 1989
1 d4 d6 2 lDfJ ..tg4 3 c4 lDd7 4 e4 eS 5 dS ..te7 6 lDc3 ..txfJ 7
'ifxfJ ..tgS 8 ..txgS 'ii'xgS 9 g3 a6 10 h4 'ife7 11 ..th3 hS 12 0-0
lDdf6 13 b4lDh6 14 'ii'e3lDh7 IS cS
192 Some Larry C Attacking Games
At first sight, White has a very imposing position. His bishop has
command of a fine diagonal and he has all the makings of a powerful
queenside attack. Black has problems finding a safe haven for his king and
achieving the goal of connecting rooks is far off. However, with energetic
play I managed to create some pressure on White's temporarily snug king
position.
15•.•g5! 16 c6
This closes down White's major area of influence-the queenside, but
White had to anticipate Black's potential kingside attack and this gives him
time to consolidate his king position.
16... b6 17 ~d7+ ~fS 18 'it'g2l::tg8
18 ...gxh4 19 l:hl was unattractive.
19 l:thl 'iVf6
The fight begins over key kingside squares. Thanks to the closed nature
of the center and queens ide, Black is able to connect rooks by bringing out
his king.
20 hxg5 J::txg5 21 :h4 cJ;e7 22 l::tahl 'iVg6 23 a4 ttJf6 24 a5 b5 25
'iVt3 J::tg8 26 ttJdllbxd7 27 cxd7 ttJg4! 28lbe3 ttJxe3+ 29 'ifxe3 fS
30 exfS ':xfS 31 'iVa7 J::tgfS 32 :n 'iVti 33 cJ;gl cJ;xd7 34 ':el :c8
35 :dl :13 36 :e4?
36 'ii'xa6 llxf2 37 .-xb5+ r,i>e7+.
36.••:'xg3+ 37 fxg3 'iVfJ 38 :del 'iVxg3+ 39 ~n 'if13+ 40
'iWhl+ White resigned
'ii'fl
Some Larry C Attacking Games J 93
Silman White
Christiansen Black
USA 1989
1 d4 ltJf6 2 c4 cS 3 d5 bS 4 cxbS a6 S ltJc3 axbS 6 e4 b4 7 ltJbS
d6 8 ~f4 gS 9 .i.xgsltJxe4 10 ~f4 'ilVaS 11 .tc4.i.g7 12 'i*'e2 b3+
13 ~n fS14 f3
14...0-0! 15 fxe4 fxe4 16 g3 'i*'xa2 17 iba2 bxa2 18 .txa2 Iba2
19ltJc7 .tf5 20 ltJe6 llxb2 21 ltJxf8?? (21 'i'el Fritz) 21. ..l:txe2 22
ltJxe2 ~xf8 23 ~f2 ltJa6 24 .td2 ltJc7 25 ltJf4 ~eS 26 .i.aS .i.xf4
27 .txc7 .tgS 28 h3 ~e8 29 g4 .tc8 30 ~g3?? (30 l::tdl+ Fritz)
30....td2 31 Itbl e3 32 ~O ~d7 33 ~b8 .ta6 34 h4 e2 35 ~f2
.td3 36 :al ~c8 37 .i.a7 ~b7 White resigned
Finally, here is an amusing last round battle for next-to-last place from
my disastrous Wijk aan Zee 1982 tournament.
Sunye Neto White
Christiansen Black
Wijk aan Zee 1982
English Opening
1 c4 eS 2 ltJc3 ltJf6 3 ltJo ltJc6 4 d3 .tb4 S ~d2 0-0 6 a3 .txc3 7
~xc3 :e8 8 e4 d6 9 .i.e2 a6 10 h3 bS 11 cxbS axbS 12 b4ltJe7 13
0-0 l::tb8 14 :e1ltJg6 IS .tn .tb7 16 l:cl cS 17ltJd2 .ta8 18ltJb3
c4?! 19 dxc4ltJxe4 20 cxbSltJf4 21 lIe3 l:te6 22ltJaS?
194 Some Larry C Attacking Games
Black has played super-recklessly but White has carelessly left his king
open for a blitzkrieg attack. First, I had to divert White's most important
defensive piece.
22 ...:xb5! 23 i..xb5 llg6 24 g4
24.•.tbxf2! 25 ~xf2 'ifh4+ 26 ~gl?
An extremely unbalanced position results after 26 l:[g3! li)xh3+ 27 <Jte3
'ii'xg3+ 28 ~d2 l:txg4. Black's massive 5-0 absolute pawn majority and
better placed pieces should overcome White's slight material advantage.
26.•.tbxh3+ 27 lbh3 'ifxh3 28 .i.c6 'ifg3+ 29 ~fl :f6+ White
resigned
B Instructive Combinations
and Inspirational Attacks
In closing this book, I am presenting a large collection of instructive
combinations and some important, inspirational attacking games for the
reader to refer to in order to sharpen the mind and spirit of combat on the
chessboard. It has long been my practice to get into that proper, aggressive
frame of mind by reviewing beautiful attacking games of the past. Ones that
I return to again and again for refreshing tastes of attacking samples are the
collected games of great attacking geniuses such as Alekhine, Keres, Tal,
Kasparov, and Shirov.
Instead of throwing in reams of analysis for the games, I have included
mainly light notes and lots of diagrams, with an emphasis on stopping at the
critical points where plans must be made and tactics calculated. The games
range from mid-19th century to the present. I spent a lot of time analyzing
and researching some of the old attacking games from the last century and
what struck me is that attacking skill has improved only moderately
compared to 100+ years ago but defensive play has improved dramatically.
The principles of returning extra material or counter-sacrificing to avoid
passive positons are commonplace now but not well understood by our
grandfathers. A passive, lifeless position, albeit equal materially, is a death
certificate today. Counterplay reigns supreme.
So let's get to the action!
Back rank themes and smothered mates
The combinative possibilities involving the back rank and a confined,
smothered king are among the most common in chess.
We start with an example that combines both of these themes. A very
exciting position has been reached with both sides trying their best to
deliver mate. Although the 19th century top players had great imagination
and will to win, basic tactical errors are often seen in their games ...
196 Instructive Combinations and Inspirational Attacks
La Bourdonnais White
McDonnell Black
Match, Paris/London 1834
The game continued, in slapstick style...
1 .....g3..tg6?
1..."f6! 2 l%g8+ ~h7 3 l%g7+ <it>h6 should win for Black.
2hxg6
2 J:th7+! was also good.
2......el+ 3lbe1??
3 lbbl! .xg3 4 J:th7+! wins.
3..':xel+ 4 .....xe1 ltJxe1
5 lth7+ <it>g8 6 gxf7+ ~.xh7 7 f7-f8=ltJ+ ~h6 White resigned
Instructive Combinations and Inspirational Attacks J97
Mikenas White
Bronstein Black
Tallinn 1965
White has just played 1 :h4-b4 to protect his loose b-pawn. He expected
to settle down to a positional struggle, hoping to exploit his superior pawn
structure. He was in for quite a shock, however, after Black's reply. The
finely centralized black queen on e5 should have put White on his guard.
1..•':xa3!! White resigned.
Topalov White
Morozevich Black
Cannes 2002
Not many players enjoy the dreary task of grinding out long endings. Can
White save himself that bother?
1 i..e4!! Black resigned
198 Instructive Combinations and Inspirational Attacks
Staniszewski White
Kuczynski Black
Poland 2002
Black's king is still in the center. Is there a way to punish Black for
abusing his right to castle?
11:.c6!! 'iVxc6 2 lDf6+ 'iixf6 3 'ii'xa8+ ~d7 4 'iib7+ <it>d8 5 :d1+
lDd6 6 it.b6+ ~e8 7 'ifc8+! Black resigned
Essen White
Duff Black
California 1945
1 'iif6! lDg8 2 'iWe7+!! tDxe7 3lDf6 mate
Instructive Combinations and Inspirational Attacks 199
Hodgson White
A.Martin Black
England 1992
White has a very promising-looking position but can he find a way to
blast through Black's creaky position?
1 lLlxti! rttxti 2 d5 .i.e5
If2 ... fxe3 3 dxe6+ ~e8 4ll)d6+ ~e7 Sll)fS+ wins.
3 dxe6+ rttg7 4 'iic5 .i.c8 5 l:.d7+! .i.xd7 6 'iie7+ rttg8 7
mate
iiti
J.Polgar White
I.Rogers Black
Biel1993
Black seems to be on the verge of subduing White's attacking notions
thanks to his well-placed knights. Is there a way for White to breach the
defenses?
200 Instructive Combinations and Inspirational Attacks
1 ~g6! :'xd3
1...fxg6 2 'ii'xe6+ 'ii'fl 3 'ii'xc8+ wins.
2 .i.h7+! Black resigned.
Black loses decisive material after 2.. .'it'f8 3 i.xf5 g6 4 i.xd3
Skembris White
Mikhalchisin Black
PortorozlRogaska Slatina 1993
Black has very obvious compensation for the two pawn deficit but he
must strike before White can organize a defense. What is the most effective
way to exploit Black's massive lead in development?
1••Jbe2+!
In the actual game, Black played 1... i.xe2? 2 i.xe2 'ii'xg2 3 I1fl I1xe2+ 4
'ihe2 I1e8+ 5 'itd3 'ii'f3+ 6 ~c2 I1c8+ 7 i.c3 'ii'e2+ 8 Wb3 'ii'c4+ 9 'it>c2
'iVe2+ and a draw was agreed.
2 ~xe2 'iVxg2 3
'ife4 mate!
:n l:e8 4 'ifd3 .i.xe2 5 'iVxe2 :'xe2+ 6 ~xe2
Instructive Combinations and Inspirational Attacks 201
Larsen White
Kristiansen Black
Denmark 1991
White's attack has apparently run out of steam. His knight on e5 is
attacked and must apparently retreat. Can White use violent means to lead
the black king to his abdication?
1 ':g8+!! ~xg8 2 'it'd8+ ~g7
3 h6+! ~xh6 41L1g4+ ~h5 Or 4 ... <ifi>g7 5 'ii'xf6+ <it>g8 6 lL'lh6 mate 5
tCJxf6+ ~h6 6 lLlg4+ Black resigned It is mate after 6 ... 'it>h5 7 'ii'g5.
Bent Larsen at his most sublime.
202 Instructive Combinations and Inspirational Attacks
Kasparov White
Anand Black
Tilburg 1991
Black is in trouble after both L.'itfB and L.axb5. Try to visualize
efficient attacking continuations against both possibilities.
If Black plays 1...'it>fB! the forceful 2 l:txf6! is best, when 2 ... exd4 3 i..f4!
'ike7 (3 ... e5 4 lLld5 is also crushing) 4 i..e5 gxf6 5 i..xf6 'ilc7 6 i..xh8 gives
White a large advantage.
The actual game continued
l...axb5 2liJdxb5 'i!Vc6 3 ~xc5 'i!Vxc5 4liJd6+! 'it;e7 5 llxf6' gxf6
5...'ilxd6? 6 l:txf7+ wins.
6liJce4 'i!Vd4
6...'ile3? 7lLlfS+! exfS 8 'ild6+ 'it>e8 9lLlf6 mate.
:f8
7 'iih5
8 ~dl!
White assembles all of his forces for the final assault.
8 •.•'i!Ve3 9 'i!Vh4 'i!Vf4 10 'i!Ve1!
The queenside beckons now that the black queen has been diverted to
emergency defense of f6.
10.•.:a4 11 'irc3! l:td4 12 ':xd4 'i!Vfl+ 13 ~h2 exd4 14 'i!Vc5! ~d7
15liJb5! 'i!Vf4+ 16 g3 Black resigned
In view of 16...'iWe5 17lLlxf6+! 'iWxf6 18 'iWd6+ 'it>e8 19lLlc7 mate.
Instructive Combinations and Inspirational Attacks 203
De Riviere White
Morphy Black
Paris 1863
Black has already sacrificed a pawn and has a very promising attacking
formation. Let's see how the attack was conducted in classic 19th century
swashbuckling style.
1•••i.xh2+
A modern master would likely play something like 14 ...'ii'h4! to bring
more pressure to bear on the kings ide but Morphy was interested in
eliminating the important defensive piece on h2.
2 <it>xh2 f4?!
This works thanks to White's inaccurate defense, but
3 'iWxe4lLlg5 4 'iWd4?
4 'iWg6! limits Black's attacking options by standing guard over the
kingside. The best I can find for Black is then 4 ... i..f5 5 'i!i'h5 i..xc2 6 lLlc5
b6 7 lLle6 lLlxe6 8 dxe6 'iWe7 when he is clearly struggling. Defensive
prowess in the 19th century certainly did not match the often brilliant
attacking forte exhibited by nearly all of the top players of that era.
204 Instructive Combinations and Inspirational Attacks
4...lDo+!!
Morphy envisages the coming decisive bind that results from this
sacrifice.
5 gxO 'iVh4 6 :hl
There was no defense: 6 ':e I ~xh3 7 ':e7 loses to 7 ... ~f5+ followed by
8... 'iIi'xe7.
6....txh3 7 .td2 :f6 White resigned
Black threatens to close the net around the white king with 7...':g6 and
the desperate 8 'ili'xf6leads to mate after 8...'iIi'xf2+! 9 <itxh3 _g3.
Rubinstein White
Bromadka Black
Maehrisch-Ostrau 1923
King's Gambit
1 e4 eS 2 f4 .tc5 3 lDo d6 4 .tc4lDc6 5 lDe3 lDf6 6 d3 .tg4 7 h3
.txO 8 'iixOlDd4
Nowadays 8... exf4 is considered Black's most reliable continuation.
9 'iig3! 'iVe7
9... liJxc2+ 10 <itdl liJxal II 'ili'xg7 <itd7 (1l...l:tfS 12 fxe5 dxe5 13 14ft
i.e7 14 ~g5 is crushing) 12 fxe5 dxe5 13 l:tft i.e7 14 i.g5 ':g8 (14 ... liJd5
15 ':xf7 ':g8 16liJxd5! ':xg7 17 ':xg7 wins spectacularly as 17...'iIi'fS 18
':xe7+ 'iPd6 19 d4! c6 20 b4!! cxd5 21 dxe5+ 'iPc6 22 exd5+ ~b6 23 i.e3
is mate) 15 'ili'xf1 l4xg5 16 'ili'e6+! <ite8 17 ':xf6 ':g7 18 'ili'xe5 c6 19 .:n!
':g6 (otherwise Black just loses the rook) 20 ':fS+! 'iti>xfS 21 'ili'h8+ and
mate next.
10 fxeS dxe511
~dl
e612 a4!
An important move that limits Black's possibilities by controlling space
on the queens ide while preparing a future pincer attack with a4-a5.
12...:tg8 13 ':n h6 14 lDe2 0-0-0 15 lDxd4 .txd4 16 c3 .tb6 17
a5 .te7 18 .te3 <iitb8 19 ..te2 ~a8 20 ':'0 ~dS 21 .tgl ~f4 22 'jIn
.tb8
White has very skillfully assembled his forces by combining threats along
the gl-a7 diagonal and pressure on the f-file. Now the time is right to
deliver the final blows.
23 g3! lDxh3 24 :bn 'iVd6
Black probably expected something on the order of 25 'ii'e3 liJxgl when
most of White's pressure evaporates.
Instructive Combinations and Inspirational Attacks 205
25 'ifb6!! IId7 26 J..cS lbn 27 J..xd6 ltf2+ 28 'ii'xf2 tiJxf2 29
J..cS Black resigned.
Here is the modem equivalent to this beautiful game by Rubinstein.
Kasparov White
Ivanchuk Black
Linares 1994
1 as!
White is able to keep his queen on its best attacking square. The
devastating threat of2 l:te7 forces Black's reply.
1.•.l:td7 2 :te8!!
A beautiful move that destroys the coordination of Black's pieces. White
threatens 3 'ili'a7 mate and Black dare not trade queens with 2...'iWxb6 3
axb6+. Ivanchuk desperately places his hopes on his cluster of center
pawns.
206 Instructive Combinations and Inspirational Attacks
2.. .'t'Vh2+ 3 -.t>f1 "ii'xg2+
Forced.
4 c;t>xg2 d4+ 5 'iYxb7+! :'xb7 6l'hh8 ':'xb5 7 a6 -.t>a7
Otherwise 8 a7 is killing.
8l:if8l1xb2 9lbf7+ 'it>a8 10 a7 c3 II l:tf8! Black resigned
Rotlevi White
Rubinstein Black
Lodz 1907
1•..l:txc3!! 2 gxh4 ltd2!! 3 'iVxd2 .i.xe4+ 4 'iVg2
4 •. .l::th3!! White resigned
The following brilliancy emphasizes the explosive potential of a mass of
minor pieces trained menacingly at the enemy king.
Instructive Combinations and Inspirational Attacks 207
Szabo White
Sigurjonsson Black
Reykjavik 1968
t ...cS!
This is the kind of move a true attacking player must be alert to at all
times. Black bursts open the a8-hl diagonal leading in the direction of
White's king.
2 ltJxcs ':xcS! 3 bxcS
3•..ltJO+!
The foregoing minor sacrifices have set the table now for the concluding
attack. Black invests more wood to create a nasty mating bind.
4 ..ixo ..ixo SltJe2
Forced on account of 5 gxf3? 'ifh3 6 f4ll)g4 with mate to follow.
S...ltJe4 6ltJg3 ltJxd2
Black has retrieved his material and maintains the attack.
208 Instructive Combinatiolls and Illspirational Attacks
7 gxf3 tiJxf3+ 8 ~g2
8......c6!
Black is just about ready to cash in his chips. White can offer resistance if
he loses only one pawn, but two in a nonnai-type position is hopeless.
9 e4 tiJxe1+ 10 lixel i.xg3 11 hxg3 l:.eS! 12 l:[dl nxcs 13 :td8+
14 'iie2 5!
~h7
Black has calculated that the ensuing endgame poses no problems.
ISlld4 l:c4 161bc4 'iixc4! 17 'iixc4 bxc4 18 ~f3 gS 19 exfS hS
White resigned
Janssen White
I.Sokolov Black
White has seemingly neutralized Black's pressure and looks forward to
further exchanges. However, Black found a way to exploit White's
surprisingly vulnerable back rank.
1...l%d2!! White resigned.
It is mate after 2 l:[xd2 .Jtf3+! 3 .Jtxf3 'ii'fl mate.
Instructive Combinations and Inspirational Attacks 209
Sherbakov White
Shabanov Black
Russia 1995
White has a very powerful-looking position but Black 'threatens' to trade
queens and ease the pressure. What is the best way for White to increase his
grip on the position?
1 'ifeS!
The theme of centralization, combined with a concrete attacking plan
involving a demolition sac on f6 keeps Black in a quandary. The move is
tacticall~ backed up by variations such as 1... ~e6 2 :'xe6! fxe6 3 ii'xe6+
..t>h8 4 tl)e5 with a crushing attack, or l...~d7 2 a3! ii'xc4 3 ~d3 'ilia4 4
':xf6! gxf6 5 "ifxf6 :ae8 (5 ..."ifg4 6ltJe5 is too strong) 6ltJe5 ii'g4 7 ':e3
and Black has no defense to :lg3. Black decided to snatch the c4 pawn and
play to swing his queen over to the kingside.
1..•'ifxc4 2 ~d3 'ifg4
The real test of White's attacking plan is 2.....a4, to meet 3 :lxf6 gxf6 4
"ifxf6 with 4 ..."ifg4, although White must have an overwhelming attack
after 5 "ifxh6 ii'g7 6 .-h4 followed soon by either a rook lift or ltJg5.
3 h3 "'S 4 'ifg3!
Threatening both 5 :lxf6 and 5 :re5 - Black must fatally weaken his
position to meet both threats.
4...li)dS S l:eS fS 6 J:tg6 1:[n 7 :eS+ ~h7 Sli)eS :'c7 9 f4!
210 Instructive Combinations and Inspirational Attacks
Black faces the beautiful combination 10 .ie2! 'ihe2 II l:txh6+! gxh6
(11...'it?xh6 12l:th8 mate) and there is clearly no defense against it.
Black resigned
Andersson White
Hartston Black
Hastings 1972173
White could not resist playing 'iixc7 last move but came in for a severe
shock after Black's reply.
1...'ii'h3+!! White resigned. It is mate after 2 'it?xh3 .ifl or 2 'it'hl
'iifl+ 3 .igl 'ihfl
Instructive Combinations and Inspirational Attacks 2 J J
Schneider White
Tal Black
Lucerne Olympiad 1982
I remember witnessing this game and thinking to myself "Gee, Tal is
busted if White finds the right move! The Soviet Union team, led by
Karpov and Kasparov, lost only two games out of 56 in the Olympiad,
cruising easily to the gold medal.
White's chance of a lifetime however soon evaporated when he__ played
the feeble I g3 here and was forced to resign after 1... h5 2 lDg5 it'xb2 3
lLle6 lhfl + 4 'iWxfl iLf6! 5 l:td8+ <j;fl 6 lDg5+ ~e7 7 lLlxe4 ~xd8. Can
you spot the winning crusher?
It's 1 'it'xh6! with the threat of 2 'ii'h8+! iLxh8 3 lLlh6 mate. If 1... iLxh6
2 lLlxh6+ <j;h8 3 l:txfS mate or I ... llxfl 2 l:td8+ llfS 3 l:txf8+ mating.
Of course Tal is best known for playing beautiful combinations. One of
my favorites arose in this position against the veteran Hungarian 1M Honfi.
Bonti White
Tal Black
Sukhumi 1972
212 Instructive Combinations and Inspirational Attacks
Black has built up a very imposing attack but how to finish White off?
Tal found
I ••. b3! 1 cxb3 axb3 3 axb3
3 a3 .txd5!! 4 .txd5 "c2+ wins.
3....tel!! 4 'ii'xel
Hopeless is 4 lle3 .txdl 5 llxc7 llxc7 (threatening 6...11ca7) 6 .te3
.txb3 and wins.
4.••'ii'a7 5 l:c3
5 "c4 llxc4 6 bxc4 "a2+ 7 'it'c2 "xc4+ 8 q;,bl "a2+ 9 'it'c2 .tb4 wins
easily.
5.•:ii'al+ 6 ~cl %bc3+ 7 ~xc3
7•••.tb4+! 8 ~xb4
Or 8 ~c2 llc8+ 9 'it'd3 "xb3 mate!
8.•.'ii'a5+ 9 ~c4 'ii'a6+ White resigned.
White must lose his queen.
Instructive Combinations and Inspirational Attacks ·213
Dutch Grandmaster Jan Hein Donner (1925-1994) was a strong GM in
the era 1955-1975. He was also the leading chess journalist and writer in
Holland, and famous for provoking controversy and upsetting the status
quo. He was also famous for being on the losing side of many short
brilliancies, probably because he liked to take risks and also because of
certain tactical blindspots. The following loss, while not full of heavy
sacrifices, illustrates how an optimist like Tal would handle a position
where his opponent's king lingers in the center.
Tal White
Donner Black
Wijk aan Zee 1968
French Defense
1 e4 e6 2 d4 dS 3 li:'Jc3 ~b4 4 eS cS 5 a3 i..xc3+ 6 bxc3 'ikc7 7
li:'Jo b6 8 a4 i..a6 9 ~xa6li:'Jxa6 10 'ife2li:'Jb8 11 as bxaS 12 ~a3
li:'Jd7 13 dxcS li:'Je7
14 c6!
This pawn clearly just gets in the way and so should be eliminated. Now
of course Black is unable to castle kingside.
14..:iixc6 150-0 'ifxc3
Black helps himself to another weakling while White strengthens his
position. But it is not apparent how White will be able to launch any kind of
attack against the apparently safe king who is hiding behind an impressive
wall of pawns.
16 'ufdlli:'Jc6 17 ~d6 'ifc4 18 'ike3 'ike4 19 'ifb3li:'Jb6
214 Instructive Combinations and Inspirational Attacks
20c4
A very important move, clearing yet another obstruction for White's
rooks. Tal has in mind an attack based on the open c-file coupled with a
queen making probes on the kingside. The hope is that Black will be
induced to create a weakness which can then be exploited. With correct
defense, however, Black should be able to survive the onslaught.
20 •••'iVxc4 21 'iVaJ 'iVa6 22 %:tacl ':c8 23lLld2 f6?
Black mistakenly breaks up his fine pawn chain. Best was 23 .....e2!,
semi-paralyzing White's rooks while also preparing to swing over the
kingside. White has compensation after 24 'ifg3 1:188 25 ltJf3, with the idea
of 25 ...ltJc4 26 "h3 h6 27 l:txd5 or 26 ...'iWe4 27 ltJd2! trading off Black's
best piece.
24 exf6 gxf6 25 'iff3 'ittd7
26 'iVxf6! l:the8
26... <;t;.>xd6 27 tDe4+ <;t;.>c7 28 ltJc5! (Donner probably missed this move)
28 ...'iib5 29 "g7+ ltJe7 30 "xe7+ carries the day.
27lLle4
Instructive Combinations and Inspirational Attacks 215
The end comes suddenly. Black's hole-riddled position cannot be
salvaged.
27 ...li'Je7 28ltlc5+ :Ixc5 29 ~xc5ltlc4 30 ~xe7 Black resigned
de Firmian White
Stefansson Black
Yerevan Olympiad 1996
White forgot about his own back rank and played I lbd5? fxe4! which
allowed Black to squirm away with a draw after the further 2 "f6+ 'ii'xf6 3
lbxf6 .lif5 4 lbxe8 1::txe8 etc. How could he have settled matters quickly?
1 ~xe5+! l:lxe5 2 'ilfd8+ lIe8 3 'ilfd4+ with mate in two more moves.
Ye Jiaangchuan White
Kramnik Black
Yerevan Olympiad 1996
White has managed to clear open squares and files near Black's ventilated
king position. The game continued ...
216 Instructive Combinations and Inspirational Attacks
1.••i..xd4 2 %:[h3!!
White threatens devastation on the h-file and 2.. Jld1 3 'itf6! tiJh7 4 'ii'h4
f5 (forced) 5 exf6 ~xf6 6 'itg4! leaves Black defenseless. Kramnik finds
the toughest defense.
2...i..xeS 3 'WxeS tLlh7
4 i..xg6!
Black is given no rest to consolidate.
4 ••• fxg6 S 'Wxe6+ 'itg7 6 WeS+ 'itg8 7 'We6+ 'itg7
Ye now agreed to a draw, just when he was on the verge of victory. Do
you see the winning continuation?
White should win with 8 l:.g3! gS 9 'ii'eS+! 'itg8 (9 ... ~g6 10 Ah3! is
crushing) 10 l:tfgl! 'ii'ti (forced) 11 l:txgS+ tLlxgS 12 lbgs+ 'itt'S 13
l::tfS and with queen and two pawns White should win the ending.
Instructive Combinations and Inspirational Attacks 217
Karpov White
Ribli Black
Dubai Olympiad 1986
White has a huge space advantage but Black has hopes of trading queens
and offering resistance in the endgame. Karpov found a way to end
resistance immediately.
I 'iWh2!! :xb5
l...ttJxg5 2l:thl wins quickly.
2 'iVxh7+!! ~xh7 3 :th2+ ~g8 4 :dhl f6 5 :h8+ Black resigned
Hodgson White
Granda Zuniga Black
Amsterdam 1996
It seems as if White has really gone out on a limb and must deal with his
proud e5 pawn under attack and apparent problems looming on the dark
squares. Julian Hodgson, one of the most creative players of the modem
era, solved the attacking problem with a bold, long-term sacrifice.
218 Instructive Combinations and Inspirational Attacks
1 ttJxfi! ~xfi 2 .i.hS+ ~g8
The alternative 2...fj;g7 is met by 3 0-0 l:tfS 4 ltD! lIxf4 S lIg3 lIfS
(Black is lost after S... d3+ 6 fj;hl "xg3 7 hxg3 lIf5 8 g4! ':'xeS 9 lIfl and a
mating attack is unstoppable) 6 ltxgS+ lhgS 7 "f4! and Black is in
trouble.
3 0-0l1h7
Black must huny to meet the threat of lID-g3.
4110 l:.g7
4.. .'ii'xeS S lIel 'iVd6 6 l:tefl (6 ~g4!?) also leads to a powerful attack.
S :LaO ttJd7
Black tries to protect his fS square in anticipation of White's plan of 6
lbg6! (for instance 6 ...lbc6? 7lbg6! Wi'xd2 8 l:tfS+ 'it>h7 9 lIh8 mate).
6 :g3 d3+ 7 ~hl W'fS
7...'iVxeS 8 ~f7+! fj;xf7 9 lbg6+ "f6 10 l:txf6+ lbxf6 II 'iVxh6 lIg8 12
cxd3 'it'e8 13 lbeS is crushing.
8 .i.g6! W'IS
9 W'xd3
A nice consolidating move that breaks the pin of the knight and prepares
~h7+. The immediate 9 ~h7+! was even stronger, however, as 9... <ti>xh7
10 Wi'xd3+ 'it>g8 (10 .....fS 11 lbxe6 wins and 1O ... ~h8 12 lbg6+ J:txg6 13
lIxg6 is murder) 11 lbxe6 'iixfl+ (forced) 12 "xfl l:bg3 13 hxg3 and
Black cannot defend his bereft king.
9...ttJxeS
Black seems on the way to defusing the attack as he covers e6 and g6 and
puts the white queen under attack.
10 .i.h7+ ~h8 II ttJg6+ ttJxg6 12 .i.xg6 W'g8 13l:U6!
Instructive Combinations and Inspirational Attacks 219
A very fine move that sets up an unstoppable attack against Black's new
weak point - h6.
13...~d8
Or 13 ... ~c7 14 -.d2! .i.xg3 15 -.xh6+ I1h7 16 ~xh7 ikg7 17 11f8+ with
an easy win for White.
14 'iid2! ~xf6 15 'iixh6+ %:.h7 16 ~xh7 ~g7
16 ...ikxh7 17 -.xf6+ -'g7 18 -'xg7 mate.
17 'iih5! 'iif8 18 i..d3+ Black resigned
Anand White
Sokolov Black
Wijk aan Zee 1996
White has a mighty centralized bishop on d5 exerting pressure on both
the hl-a8 and a2-g8 diagonals, but Black has a plan to first break the pin
with ...l1ad8 and then eject the powerful cleric with ...li:-.e7. Anand found a
fantastic plan to keep Black on the defensive.
I li[f)! tlad8?!
Black suspects nothing and makes ready for ...li:-.e7. Somewhat better was
l...g6 2lLlb3 l1a7, when 3lLlc5 -.e7 holds the position together.
: :f5g6
220 Instructive Combinations and Inspirational Attacks
3.xg4!!
A magnificent conception. Anand had to judge that the ensuing bind and
attack along the f-file could be maintained and strengthened.
3.•. hxg4 4 lbf6 ti:Je7
Forced.
5 iLxfi+! ~g7
S...:xf7 6 l:1xf7 'ife6 (6 ...~xf7 7lt)xeS+ wins) 7 l:1afl 'ifxf7 8 :xf7 ~xf7
9lt)xeS+ gives White too many pawns for the exchange.
6%lafl.bS
Black guards his weaknesses on the queens ide and gets the queen off of a
bad square. Black is nearly in Zugzwang already.
7 g3!
Anand combines attack and defense. He stops ...g4-g3 while also creating
quick access to the h-file for a rook.
7....:d7
Sokolov tries his best to set up the best possible defensive formation.
8 %lIn .cS 9 ti:Jb3
9 b3, preventing any future counterplay involving ... b4-b3 was also
strong, with a plan of It)fI-h3-xg4. Black seems unable to do very much
about that. However, Anand's move was also good, if followed up
correctly.
9...'iWa7
Instructive Combinations and Inspirational Attacks -221
totDxeS??
The beautiful crusher was 10 llxa6!! 'ifxa6 11 lDcs 'ifc6 (ll...llxf7 12
l:txf7+ ~xf7 13 ll)xeS+ ~e8 14 ll)xa6 wins) 12 ll)e6+ 'ii'xe6 13 .ltxe6
:xf2+ 14 <t>xf2 followed by the careful advance of both the a-pawn and the
center pawns should win. A real pity that Anand did not find this line to
conclude his earlier brilliant play.
to••••xe3 11 tDxd7
1l ...:h8!
Suddenly White's own king is in danger. Anand presses on searching for
a win that isn't there.
12~g2:h3
Black threatens to play 13 ...'ii'el with 14 An 'ii'xg3 mate in mind and
13 ...'ifh6 so White must find a way to divert him from these deadly threats.
Therefore, he desperately sheds some hard-won material to stop these
mating ideas.
13 i.xg6
13 ~n at once loses to 13 ... l:thl+ 14 ~g2 'ii'h6.
222 Instructive Combinations and Inspirational Attacks
13...lL'lxg6
13 ...'iWh6?? 141:.t7+ wins.
14 ~fll:thl+
14 ...:xg3! wins nicely after 15 1:.t7+ ~h8 or 15 liJf8 1:.h3!! 16 1:.xg6+
~h8 17 1:.xg4 :h 1+ 18 1:.g 1 'ili'h3+ 19 'ite2 1:.xg 1 20 liJd4 'iii'g4+ 21 ltJf3
1:.g3 and the knight on f8 is trapped.
IS ~g2 :1dl!? 16l:bg6+
Black threatened] 6 ... liJh4+! followed by mate.
16...~xg6 17lL'le5+ ~g7 18lL'lxg4 \'let
The decisive factor is the weakness of White's queenside pawns. He
cannot hope to defend them and bring his passive knight on b3 into the
game. The game concluded:
19 ~f3 'ilhl+ 20 ~f4 lUI! 21 ~e3 'ii'gt 22 ~f3 l:txf2+ 23 l"Dxf2
""'1 24lL'ld4 'ilxb2 25lL'lf5+ rJ;fi 26lL'le3 'ila2 27 d4 'ilxa5 28 e5
'iVaI 29 ~c4 as 30 d5 a4 White resigned
One of the most brilliant losses on record!
Beliavsky White
Timman Black
Reykjavik 1991
White clearly has a powerful attack but the obvious sacrifice 1 :xf6
'ili'xf6 2 'ili'xh7+ 'it>f8 does not seem too convincing.
I 'ilh4!! ~xc4 2 lL'lxh7! lL'ld5
Black was counting on this move to simplify the position, expecting now
3 'iWxe7 liJxe7 4 liJf6+ ~g7 5 bxc4 liJfS 6 exfS 'itxf6 with drawing chances,
although White's rooks look too active after 7 1:.xa5 :a8 81:.d5!. Beliavsky
thought he could force a decision in the middlegame, and played ...
Instructive Combinations and Inspirational Attacks 223
3 'iih6!
Now almost anybody would calculate that 3.....txb5 was forced here.
Black has two pieces hanging and a free rook for the taking. However,
Black has the resource 3.....te2, when 4 :xd5 iLxf3 5 gxf3l:lbc8 6 c4! leads
to a very curious position. I don't see how Black can defend against a plan
of'ith2 followed by l:tgl and h4-h5. The black rooks are walled in by the
pawn structure and Black's queen must shadow the f6 square. Added
together, he is in a bind that cannot be broken.
3.•.J.xb5 4 exd5 f5 5 'iixg6+ 'iig7 6 liJf6+ rt>f8 7 'iixf5! J.e8 8
liJh5+ 'iif7 9 'iig5
White gains a decisive material advantage plus the killer duo of'iV+ ll:\ vs
exposed king.
9...l:bc8 10 'iig7+ rt>e7 11 'iig5+ rt>d7 12 l:[xf7+ J.xf7 13 liJf6+
Black resigned
Boleslavsky White
Dzindzichashvili Black
Minsk 1967
224 Instructive Combinations and Inspirational Attacks
It seems as if Black, who is the exchange ahead materially, has managed
to neutralize White's attack and can begin the process of consolidating.
However, there was a very shocking surprise in store. .
1 l:td8+!!
I JJ..xe7l:[cl+ 2l:[dll:[xdl+ 3 'ii'dl 'ii'xe7 4lDc6 flc7 wins for Black.
1...~xd8
2iLlxfi+
Wherever the king goes, he either loses his queen or meets a worse fate.
2••.~d7(?)
3... ..ti>c8 4 lDd6+ ~b8 5 lDxb7 ..ti>xb7 6 b4 gives White a winning
advantage but is better than the suicidal game continuation.
3 'iig4+ ~c6
3...!iite8 4liJd6+ 'iPd8 5 lDxb7+ l:[xb7 6 'ii'xg7 wins easily.
4 'iVe6+! ~xcS S 'iid6+ ~c4 6iLleS mate
Paul Keres (1918-1975) was a tremendous attacking player. As a youth,
he honed his tactical skills by playing wild gambits and counter gambits and
he developed his brilliant analytical skills by playing correspondence chess
in his fonnative period. Playing through his early games is a study in
tactical wizardry and there are countless examples of slashing attacks and
brilliant tactics.
Here is a small dose of the early Paul Keres.
Keres White
Shapiro Black
Correspondence Game 1935
The game concluded with
Instructive Combinations and Inspirational Attacks 225
• ttJc7+! r:i;e7 2 ~xe5+!
Eliminating one of the key defensive pieces.
2... dxe53 ttJd5+ r:i;d8 4 %bf8+!
White gets rid of the other key pieces.
4•••:xf8 5 'iVd6+
Black must pathetically agree to drop both rooks with check.
5...'iid7
Black could have saved both players some postage stamps by resigning.
6 'iixb8+ 'iic8 7 'iid6+ 'ii'd7 8 'Vi'xf8+ 'iVe8 9 'ii'xg7 Black
resigned
Keres White
Sakovsky Black
Tallinn 1936
Black has a very passive position, but his position is by no means simple
to crack. Keres finds a very forceful way to first create weaknesses in the
enemy king position, and then detonate the eroding structure.
• 'iVh3!
Threatening 2 ~xh7+.
1... g6 2 'iVh4
Installing a powerful pin on the knight on f6 and preparing :h3.
2...~e8 3 %:th3 'iid8
Black hopes to simplify with ... ll'lh5.
4 g4!
White now intends 5ll'le4! to exchange off the defender ofh7.
226 Instructive Combinations and Inspirational Attacks
4 ... hS
Forced. Now that the black king position has been weakened, Keres
identifies the chief sore spot in Black's position, g6, and plays to attack it.
S 0 ~g7 6ltJe2! l::th8
It suddenly seems as if White has over-extended. But White's attack
breaks through just in time.
7 ltJf4 hxg4 8 i.h6+ ~g8
9ltJxg6!
White is ready to answer 9 ... gxh3 with 10 It)xe7+ ~xe7 II ~g5 mate.
Black must take the intrepid knight.
9... fxg6 10 'iVgS! ltJf8
Forced.
11 i.xg6 ltJe8
Black had nothing better.
12 'iVxg4ltJf6 13 'iWgSltJe8 14 .i.h7+! ~t7 IS 'iWhS+ ~f6 16 llh4
'iWd6 16 l:tf4+ 'ir'xf4 17 i.xf4 l:.xh7?
Hastens the inevitable.
18 .i.eS mate
Brilliant as Keres was, even he missed some tactical shots. Here is an
unusual tactical pattern I discovered in the following game:
Instructive Combinations and Inspirational Attacks 227
Keres White
Laurentius Black
Correspondence 1934
The actual game continued
I ttJg4 :xe7 2 ttJf6+! gxf6 3 'VWxf6
Threatening mate with 4 l::tg3+ ~f8 5 'iWh8.
3•••l::td7?
3 ....i.d3! 4 'iWxe7 'i!i'b6+ 5 'it>al .i.g6 gives Black a fighting chance.
4 'ifgS+
Covering d2.
4.••~f8
If 4 ... ~h8 25 l::tg3 wins.
5 l:r.xh7 Black resigned
But there is a much more effective continuation than 21 li:)g4. Do you see
it?
Beautiful and crushing was
I 'iff4!! fS
l...l::txe7 2 'iWh4! l:c7 3 'iWxh7+ 'it>f8 4 'iWh8+ 'it>e7 5 'iWxa8 wins easily,
and 1...f6 loses to 2 'iWxf6! gxf6 3 l:tg3+ ~h8 4 li:)f7 mate.
2 'ifh6!!
and Black must resign. A very nice mating pattern.
228 Instructive Combinations and Inspirational Attacks
I want to conclude this chapter and book with some inspirational
attacking games. It has long been my practice to play over some particularly
brilliant games to 'get into the mood' for the next round of play. I have
lightly annotated most of them and present the key points. Most of these
battles have been heavily analyzed over the years, but I think I may have
found a few new points to most of them.
So, before your next tournament flip through this chapter to get those
creative and tactical juices flowing!
Morphy White
Bird Black
London 1858
Philidor Defense
1 e4 eS 2 ltJf3 d6 3 d4 f5
The Philidor Counter-Gambit, popular until chess scientists like Wilhelm
Steinitz took it apart.
4ltJc3
4 dxe5 fxe4 5 lLlg5 is a good alternative.
4..•fxe4
4 ... lLlf6 5 dxe5 lLlxe4 6lLlxe4 fxe4 7lLlg5 d5 8 e6! is good for White.
S ltJxe4 dS 6 ltJg3
6 lLlxe5 dxe4 7 'iWh5+ g6 8 lLlxg6 lLlf6 9 'iWe5+ cj;f7 10 JLc4+ cj;g7
(1O ...cj;xg6 11 'iWg5 mate) 11 i.h6+ cj;xh6 12 lLlxh8 JLb4+ 13 c3 'iWxh8 14
cxb4 gives White an edge.
6... e4 7ltJeS ltJf6 S .tgS?
White should immediately address Black's center with 8 D.
S....td6 9ltJhS 0-010 'iid2
10 c4? i.b4+.
10...'ii'eS! 11 g4?
11 i.xf6 'iWxh5 12 JLg5 c5 13 i.e2 'ife8 14 f4 was better.
11 ...ltJxg4 12 ltJxg4
12 lLlxg7 ri;xg7 13 lLlxg4 JLxg4 14 l:tgi 'it'h5 15 i.h6+ cj;f7 16 JLxf8
cj;xf8 wins for Black.
12...'ii'xhS 13 ltJeS ltJc6 14 .te2 'ii'h3 ISltJxc6 bxc6 16 .te3 :bS
170-0-0
Instructive Combinations and Inspiratiollal Attacks 229
17...lhf2!!?
Morphy could not resist this beautiful combination which, in the long run,
should be better for Black. From a strictly purist point of view, however,
17 ... i.g4 was better when Black should slowly consolidate his pawn plus
position.
18 SLxf2 'ifa3!! 19 c3
Forced.
19...'ifxa2 20 b4 'ilal+ 21 ~c2 'ila4+
22~b2?
Bird walks his king into the line of fire. Correct was 22 'it>c I and now:
I) 22 ... a5 23 'i'c2 'i'a3+ 24 "'2 axb4 25 'fixa3 bxa3 26 i.e3 (Forced)
l:!.b3! 27 'ittd2 l:!.b2+ 28 ~el a2 29 l:!.al i.h3! and it is surprisingly difficult
for White to free himself from the bind.
2) 22 ... i.xb4 23 cxb4 l:!.xb4 24 'fig5! 'ita3+ 25 <ifo?d2 l:!.b2+ 26 Cit>el 'fic3+
27 ~fl i.h3+ 28 <ifo?gl l:!.xe2 29 'itd8+ ~f7 30 'it'xc7+ ~g6 31 'ii'd6+ and
Black should accept perpetual check with 31 ... Cit>f7 32 'ii'c7+ ~g6 etc.
3) 22 ... e3? 23 'fixe3 i.f5+ 24 Cit>d2 allows the White king to flee
successfully.
230 Instructive Combinations and Inspiratiollal Attacks
22 ....txb4! 23 cxb41hb4+ 24 'ii'xb4 'ii'xb4+ 25 ~c2
25 ... e3! 26 .txe3 .tf5+ 27 %:[d3 'ii'c4+ 28 ~d2 iVa2+ 29 ~dl
'iWbl+ White resigned
Andersscn White
Max Lange Black
Breslau 1859
RuyLopez
1 e4 e5 2 ~f3 ~c6 3 .tb5 liJd4 4 ~xd4 exd4 5.tc4?!
Don't forget that this was played in the infancy of the Spanish Game (aka
Ruy Lopez) Better is 5 0-0 c6 6 ~c4 iDf6 5 :e 1.
5...~f6 6 e5?
Aggression typical of 19th century play, but 6 d3 or 6 0-0 are better.
6.•.d5!
Max Lange, as the author of the Max Lange Attack (I e4 e5 2 iDn lDc6 3
~c4 lDf6 4 d4 exd4 S 0-0 Jtc5 6 e5 d5!), well understood the strength of
this reply. White should apply damage control now with 7 ~bS+, although
Black stands well after 7 ... ~d7 or 7... lDd7.
7 .tb3? .tg4!
Lange begins a plan to speed his development and harry the unfortunate
white king.
8 f3 ~e4 9 O-O?
9 ~f1 is the only way to meet the threat of ...'iVh4+, although Black has a
far superior position after 9 ... JthS 10 d3 lDcs. After the text, Lange quickly
proves that the white king is also vulnerable after castling.
Instructive Combinations and Inspirational Attacks 231
9... d3!
Black ruthlessly opens up the a7-g1 diagonal. He will be equally ruthless
in forcing open the h-file.
10 fxg4 i.cS+ 11 ~hl
1l •••lLlg3+!! 12 hxg3 'iVgS! 13 :fS
Forced
13 .•. hS! 14 gxhS
14 %1xg5 hxg4+ 15 %1h5l:[xh5 mate.
14•.•'iVxfS IS g4 1:txhS+
Black could force mate one move faster with 15 ...'i!r'f2 but of course this
sac is far more pleasing.
16 gxhS 'iVe4 17 'iVf3 'iVh4+ 18 'iVh3 'iVel+ 19 ~h2 i.gl+ White
resigned
232 Instructive Combinations and Inspirational Attacks
Glucksberg White
Najdorf Black
Warsaw 1930
Dutch Defense
1 d4 fS 2 c4 tiJf6 3 tiJc3 e6 4 tiJo dS S e3 c6 6 .td3 .td6 7 0-0 0-0
8 tiJe2?!
White should outpost on e5 with 8 lLle5.
8... ltJbd7 9ltJgS?
This move was not an obvious blunder. White hopes to trap the bishop on
h2 by surrounding it while Black is kept busy defending e6.
9....txh2+ 10 ~hl tiJg4! II f4 'iWe8 12 g3 'ii'hS 13 ~g2
White's idea becomes clearer. He intends to play .l:th I followed by lLlD.
Has Black over-extended?
13 ....igl!!
Najdorf launches an all-out assault on the enemy king. The key to the
combination is the coming break on move 15.
14ltJxgl 'ii'h2+ IS ~O
IS... eS!!
Suddenly the bulk of Black's army converges on the target - White's
king.
16 dxeS
16 'it'e2 loses at once to 16... e4+ 17 lLlxe4 lLlde5+ 18 dxe5 lLlxe5+ 19
fxe5 fxe4 mate.
16...ltJdxeS+ 17 fxeS tiJxeS+ 18 ~f4ltJg6+ 19 ~O
Instructive Combinations and Inspirational Attacks 233
White expects Black to settle for a perpetual check with 19 ... ttJe5+ 20
'ittf4 ttJg6+ etc.
19... f4!! 20 exf4
White is mated after 20 iLxg6 iLg4+!! 21 ~xg4 'ili'xg3+ 22 ~h5 hxg6+
23 ~xg6 1:[f6+ 24 ~h5 l:th6 mate.
20•...tg4+!!
21 ~xg4
Hopeless is 21 ~e3 i.xd 1 22 l:xd I 'ili'xg3+ etc. but that is better than
mate.
21...~eS+!
22 fxeS h5 mate
234 Instructive Combinations and Inspirational Attacks
Alekhine White
Em. Lasker Black
Zurich 1934
Queen's Gambit Declined
1 d4 d5 2 c4 e6 3 ttJc3 ttJf6 4 ttJf3 i.e7 5 i.g5 ttJbd7 6 e3 0-0 7
l:tcl c6 8 i.d3 dxc4 9 i.xc4 ttJd5 10 i.xe7 V/lixe7 11 ttJe4 ttJ5f6 12
ttJg3 e5 13 0-0 exd4 14 tiJf5 V/lid8 15 tiJ3xd4 ttJe5 16 iLb3 i.xf5 17
ttJxf5 Vllib6?
An astonishing error by Lasker that allows White's queen to disturb the
coordination of Black's pieces. Correct was 17 ... ~xdl 18 l:tfxdl l:tad8 19
tLJd6l:td7 with a passive but defensible position.
18 'ifd6 ttJ5d7 19 .tIfdl .tIad8
20 V/lig3
Alekhine forces concessions in Black's king position.
20 ... g6 21 'ilVg5! ~h8 22 ttJd6
Instructive Combinations and Inspirational Attacks 235
The knight does many things here besides attacking f7 - it also supports
the advance e4-e5 and keeps Black from simplifying on the d-file.
22 •..~g7 23 e4iLlg8 24 :td3 f6
24 ... h6 25ltJf5+ 'i.t>h7 26 ltJxh6ltJxh6 27 l:th3 wins.
2siLlfS+ ~h8
26 'tiVxg6!! Black resigned
Nezhmetdinov White
Tal Black
USSR Championship, Baku 1961
Mikhail Tal gets a little taste of his own attacking medicine courtesy of a
fellow attacking genius. White's seemingly extravagant opening idea to
stop Black from castling (the sequence leading up to IS li)h6) led later to a
merciliess attack as Tal was never able to get his king out of the line of fire.
1 e4 eS 2iLlf3 d6 3 d4 exd4 4iLlxd4iLlf6 SiLle3 e6 6 .i.e2 iLlbd7 7
0-0 a6 8 f4 We7 9 g4 bS 10 a3 .i.b7 II .i.f3iLleS 12 ~e2 eS l3ltJfS
g6 14 fxeS dxeS IS iLlh6ltJe6 16 .i.g2 .i.g7
236 Instructive Combillations alld Inspirational Attacks
Now comes the first of many sacrifices to keep Black's king in the central
hot seat.
17 l1xf6 ~xf618lDd5 'iid8
Also 18 ....txd5 19 exd5 lDd4 20 'iVf2 'iVa7 21 .te3 .th4 22 'iVxh4 lDf3+
23 ~xf3 'iVxe3+ 24 ~g2 wins for White.
19 'iNn lLlf4 20 ~xf4 exf4
21 e5! ~xe5
Or 2l....th4 22 'ir'd4 %:tf8 23 %:tel ~xel 24lDf6+ ~e7 25 'ikc5+ ~e6 26
.txb7 .tf2+ 27 'iVxf2 l:b8 28 .td5+ ~xe5 29 g5 coordinating nicely.
2211el f6
23lDxf6+!
Black's main pillar holding up his position is demolished and White's
queen hungrily takes over a commanding, centralized position.
23..:ihf6 24 it'd4 ~f8 25 ':xe5 'iid8 26 ltf5+! gxf5 27 'ii'xh8+
281t'g7+ ~e6 29 gxf5+ Black resigned
~e7
Instntctive Combinations and Inspirational Attacks 237
Geller White
Smyslov Black
Match, Moscow 1965
Grunfeld Defense
1 d4 ~f6 2 c4 g6 3 ~c3 d5 4 cxd5 ~xd5 5 e4 ~xc3 6 bxc3 1l.g7
7 1l.c4 c5 8 ~e2 0-0 9 0-0 ~c6 10 ~e3 ~c7 lll:[cl l':.d8 12 f4 e6?
This move is simply too passive to pass the smell test. 12 ....ltg4!
equalizes for Black.
13~hl
A good preparatory move to eliminate tactics based on the a7-g1
diagonal. White is now free to play moves like "j!j'el and ltJg3 with a clear
conscience.
13... b6 14 f5 ~a5
14 ... exf5 15 .ltg5! ':f8 16 exf5 .ltxf5 17 ltJg3 .ie6 18 d5 ltJe5 19 dxe6
It:\xc4 20 exfl+ 'iitth8 21 "j!j'd5 b5 (2l...ltJe5 22 ':cel) 22 ':cel is tremendous
for White.
15 ~d3 exfS 16 exf5 ~b7 17 'it'd2l:Ie818 ~g3 'ii'c6 19':12
White carefully masses his forces for the kill while keeping a careful eye
on Black's potential counterplay on the long diagonal and the e-file.
19...1iad8 20 ~h6 ~h8
Black has no chances to defend if he agrees to the exchange of this lonely
defender of his king.
21 'it'f4 J:td7 22 ttJe4 c4
22 ... l:de7 23 fxg6 hxg6 24ltJd6 :el+ 25 .ltfl f5 26 "j!j'g3 'iitth7 27ltJxe8
wins for White.
23 1l.c2 %tde7 24 %:ten!
24 fxg6 hxg6 25 ':cfl fS 26ltJd6 :el 27 'ii'g3 l:8e6 28 ltJxb7 ltJxb7 29
.ltxfS l:hfl + 30 ':xfl ':f6 31 .ltg5 ':xf5 32 ':xf5 gxfS 33 .ltf6+ 'iittfl 34
.ltxh8 'iVe4 35 'iVg7+ ~e8 36 ii'g6+ ~d7 37 'ii'fl+ ~c6 38 'ii'xc4+ ltJc5 39
h3 leads to an ending in which White is two pawns up. But Geller does
better than that.
24...l:xe4 25 fxg6 f6 26 'ikg5! 'it'd7
238 Instructive Combinations and Inspirational Attacks
27 ~gl!! i.g7
27 ... ~dS 28 l:txf6 ~xf6 29 'iWxf6 hxg6 30 it'xg6+ 'it>h8 31 it'hS 'it>g8 32
~xe4 ~xe4 33 l:tf4 with l:tg4+ to follow.
28l:txf6! ltg4
28 ...~xf6 29 'iWxf6 hxg6 30 it'xg6+ ~h8 31 'iWhS ~g8 32 .i.xe4 iLxe4
and again the rook lift - 33 l:tf4.
29 gxh7+ Wh8 30 i.xg7+ 'iixg7 31 'iixg4! Black resigned
Spassky White
Petrosian Black
World Championship, Moscow 1966
Torre Attack
I d4 lbf6 2 lbo e6 3 i.gS dS 4 lbbd2 i.e7 5 e3 lbbd7 6 i.d3 cS 7
c3 b6 8 0-0 i.b7 9lbeS lbxeS 10 dxeS lbd7 II i.f4?
Correct is II iLxe7 'iWxe7 12 f4 f6 13 'iWhS+ g6 14 exf6 with a roughly
equal position.
1l ..•'ifc7 12lbo h6! 13 b4 gS 14 i.g3 hS IS h4?
Better is IS h3 c4 () S... g4 16 hxg4 hxg4 17 lLlh2 lLlxeS ) 8 lLlxg4 ~d6 19
'it>f8 20 bxcS bxcS) 16 ~c2 0-0-0 17lLld4 a6 18 f4.
~bS+
IS...gxh4 16 i.f4 0-0-0 17 a4 c4 18 i.e2 a6!
This ensures that all files on the queens ide will remain shut. If White tries
b4-b5, Black answers with ... a6-aS. If White plays a4-aS, Black closes it
with ...b6-bS.
19 ~hI J:tdg8 20 l:gllIg4! 21 'iid2 nhg8 22 as bS 23 l:adl i.f8
Black plans to play ... ~g7 followed by ... lLlxeS.
24 lbh2 lbxeS! 25 lbxg4 hxg4 26 e4 i.d6 27 'ife3lbd7
Instructive Combinations and Inspirational Attacks 239
White's brief run of activity has ended and he must suffer from a
relentless advance of Black's foot soldiers from here to the end.
28 ~xd6 'ii'xd6 29 l:.d4 e5 30 1id2 f5! 31 exd5?
31 exf5 "Vi'f6 was little better.
31... f4 32 'ii'e4 tLJf6 33 'iif5+ ~b8 34 f3 ~c8 35 'iibl g3
361iel h3 37 ~n ':h8 38 gxh3 ~xh3 39 ~gl ~xn 40 ~xn e4!
41 'fidl tLJg4
41..."Vi'd7 was the butcher's method of winning. Petrosian clearly wanted
his infantry to claim the prize.
42 fxg4
42 fxe4liJe3+ 431:txe3 l:thl+ 44 ~e2 :xdl 45 :xdl fxe3.
42 ...f3
Another way was 42 ...:hl+ 43 ~g2 :h2+ 44 ~f] 'ilr'h6 45 :xh2 'ilr'xh2
46 'ilr'd4 g2+ 47 ~e2 gl=='iIr'+ 48 ~dl 'iVxd4+.
43 ~g2 fxg2+
240 Instructive Combinations and Inspiratiollal Attacks
43 .. Jlhl+ 44 l::tgl 'ili'h6 forces mate a bit faster, but of course the text is
overwhelming.
Spassky resigned in view of 44 ~e2 (44 ~xg2 l::th2+ 45 ~gl 'ili'h6
quickly forces mate) 44 ...'ili'f4 45 'ili'd4 'ili'f3+ 46 ~d2 'ili'f2+ etc.
Korchnoi White
Udovcic Black
Leningrad, 1967
French Defense
I d4 e6 2 e4 d5 3 tiJd2 liJf6 4 e5tiJfd7 5 c3 c5 6tiJgf3 tiJc6 7 ~d3
'i¥b6 8 0-0 cxd4 9 cxd4 tiJxd4 10 tiJxd4 'i¥xd4 II tiJf3 'ifb6 12 'i¥a4
'i¥b4 13 'iWc2 h6?!
13 ... 'ili'c5 is better.
14 ~d2 'iWb6 1511ael
Black has serious difficulties developing his queenside.
15...~e7 16 'ika4 iid8 17 ':e2 o;t>f8 18 kIfel liJb6 19 'iig4 ~d7 20
lIe8 21 :xc8 ~xc8 22 ~b4
~a5!
22 ...g6?
22 ... ..txb4 23 'ili'xb4+ 'ili'e7 (23 ... ~g8 24 a4! is strong) 24 'ili'xb6! favors
White. 22 ...~g8 23 ..txe7 'ili'xe7 24 a4 ..td7 25 a5 ltJa8 26 'ili'd4! (there is
that centralizing theme again) 26 ... b6 27 axb6 axb6 28 l::tal 'ili'e8 29 :a7
gives White more than he could ask for in return for the measly pawn.
23 'ifh4! g5
23 ...~e8 24 ~xe7 .xe7 25 'ili'd4 is again hard to meet. The text meets
with a classic combination.
24liJxg5 o;t>e8 25 ~b5+ ~d7
IlIstrtlctil'e Combinations and Inspiratiunal Attacks 241
26 ~xe6!! fxe6
26 ... iLxh4 27 l1Jg7 mate! 26 ... iLxbS 27 l1Jg7+ 'it>fB (27 ... 'it>d7 28 'ii'g4+ fS
29 'fi'xfS mate) 28lDfS! l1Jc8 29l:xc8 demolishes.
27 'illh5+ 'it>f8 28 ':c3
The key to so many attacks - the rook lift.
28...:h7 29 'iig6! lig7 30 'iVxh6 i.xb5
If 30... 'it>g8 31 iLxd7 'ii'xd7 32 l:h3 'ii'a4 33 'fi'h8+ 'it>f7 34 1:1f3+ cJi>g6 35
l:tg3+ 'it>fS 36 'ii'hS+ iLg5 37 iLd6! seals it.
31llg3 Black resigned
Fischer White
Larsen Black
Candidates Match, Denver 1971
French Defense
I e4 e6 2 d4 d5 3 ~c3 i.b4 4 e5 ~e7 5 a3 i.xc3+ 6 bxc3 c5 7 a4
~bc6 8 ~f3 i.d7 9 i.d3 'iic7 100-0 c4?!
This leads to trouble on the a3-fB diagonal.
II i.e2 f6 12 I:Iel ~g6 13 i.a3! fxe5 14 dxe5 ~cxe5 15 ltJxe5
ltJxe5 16 'iVd4! ltJg6
Black is already in trouble and it is debatable whether 16... 0-0-0 17 'ii'xa7
l1Jc6 18 We3! is an improvement over the game continuation.
17 i.h5 ~f7?!
17 ... 0-0-0 18 'ii'xa7 b6 19 'ii'a8+ 'ii'b8 20 'ii'xb8+ ~xb8 21 as bxaS 22
.i.d6+ ~b7 23 l:baS ~b6 24 l:ea I i.bS 25 iLg3 l:td7 26 1:1Sa2 gives White
the upper hand but looks better than the text.
18 f4! l:.he8
242 Instructive Combinations and Inspirational Attacks
18 ...'iti>g8 19 f5! lDf4 20 ~f3 is very strong.
19 fS! exfS 20 'i'xdS+ ~f6
21
~f3?
21 .i.d6! should win quickly, for instance 21.....c6 22 'iVd4+ <tIfl 23 .i.f3
"'6 24 .i.c5 with a crushing check looming on d5, or 21..."'6 22 .i.c5
'ii'c6 23 'iVd4+ 'iti>g5 (23 ...~fl 24 ~f3 wins again) 24 ~f3 'ii'c7 25 h4+!
~h6 (25 ... lDxh4 26 'iVxg7+ lDg6 27 ~f2!, threatening 28 ~h4+!! wins) 26
'ii'd2+! f4 27 .i.d6! 'iib6+ 28 'iti>h2 and Black is helpless.
21 ..•ti:)eS! 22 'i'd4 ~g6! 23 l:xeS!
After his lapse on move 21, Fischer calculates deeply the consequences of
this move.
23•..'i'xeS 24 'i'xd7 l::tad8 2S 'ti'xb7
2S•••'i'e3+?!
25 ...'ii'xc3!? gives White the choice between the wild 26 'ii'c6+ and the
apparently solid 26 ..., 1.
Instructive Combinations and Inspirational Attacks 243
I) 26 'ii'c6+ ~g5 27 .tc1+ f4 (27 ... ~h4 28 g3+ ~h3 29 .tg2+ ~g4 30
h3+!! ..ti'xg3 31 'Wc7+ 'ire5 32 jixe5+ .l:txe5 33 ~g5! .l:te2 34 .ttl and
Black cannot meet the threats to his rooks and the deadly 35 .l:ta3+) 28 h4+
..ti'f5 (28 ... ~xh4 29 ..ti'h2! wins) 29 g4+ fxg3 30 Wg2 Wd4! (a finesse to lure
the white king forward to a less secure square) 31 ~xg3 'ii'xal 32.tg4+
<it'e5 33 'ii'c5+! <it'f6 34 'ii'12+ ~e7 35 ~g5+ ~d6 36 'ii'd2+ ..ti'c5 and White
has nothing better than a draw by perpetual check after 37 'ii'a5+ <it'd4 38
'iWd2+ 'iti>c5 etc.
2) 26 "'1 .l:te5! (taking away the c5 square from White's dark squared
bishop while preparing ... .l:tde8) 27 h3 (27 'ir'fl?? .l:tde8 wins and 27 .tb4
'ii'd4+ 28 <it'hl c3 29 .ta3 .l:tde8 30 'ii'fl (forced) gives Black various
promising options like 30...'ii'xa4 and 30...'ii'd2) 27 ... .l:tde8 28 ~h2 and now
28 ... .l:tel 29 'ii'b2 'ii'e3! 30 .l:txel 'ii'f4+ 31 g3 'ii'xf3 32 ':xe8 'ii'f2+ leads to a
draw by perpetual.
26 c3i>f1 %:d2 27 'iVc6+ Ite6
28~cS!
This move and Black's possible answers had to be foreseen when playing
22 'ii'd4!.
28•. Jlf2+ 29 c3i>gli:txg2+ 30 c3i>xg2 'ii'd2+ 31 c3i>hl ':'xc6 32 ~xc6
32 ••. 'iixc3?
244 Instructive Combinations and Inspirational Attacks
This is the losing move. Strong resistance was still offered by 32 ... a5 33
.i.d4 eJilf7 34 :gl g6 (better than 34... g5 which exposes the f5 pawn to
attack) 35 .i.d5+ eJilf8 35 .i.xc4 'itc2! and White has his hands full
converting this to a full point.
33 llgl+ ~f6 34 i.xa7 g5
34 .....xc2 35 a5 "a2 36 .i.d4+ eJilf7 37 :al "d2 38 .i.gl wins.
35 i.b6 'ilixc2 36 a5 'ilib2 37 i.d8+ ~e6 38 a6 'ilia3 39 i.b7 'ii'c5
40 :bl c3 41 i.b6 Black resigned
The famed chess pioneer and author of the classic book My System, Aron
Nimzovich, once wrote that "the threat is stronger than the execution". In
the following wild battle, White sets up a potentially deadly discovered
check right in the heart of Black's positiion. Despite a feverish, sacrificial
counter-attack that runs the white king up the board, the ever-present
discovered check threat proved mightier than Black's attempts to mate.
This game was one of the most thrilling I have ever seen and I remember
as a youngster trying to make some kind of sense of this phenomenal battle.
It takes a great game to beat a great player and this game was no doubt the
crowning artistic achievement of Shashin's career. A lot of credit for it must
go to Korchnoi, who virtually forced his opponent to find brilliant moves or
suffer loss.
Shashin White
Korchnoi Black
Leningrad 1973
Nimzo-llldian Defense
1 d4 ttJf6 2 c4 e6 3 ttJc3 i.b4 4 e3 0-0 5 i.d3 c5 6 ttJf3 d5 7 0-0
ttJc6 8 a3 cxd4 9 exd4 .txc3 10 bxc3 dxc4 II i..xc4 'ilia5 12 .tb2
e5 13 'u'el i..g4 14 h3 i..xf3 15 'ilixf3 :ad8 16 iLa2 ~d7 17 l%e2
};tfd8 18l::tael exd4 19 cxd4 'ii'b6
Instructive Combinations and Inspirational Attacks 245
A position of high drama. Black has piled overwhelming pressure on the
d4 pawn, but White is excellently placed to attack both on the bank rank
and along the 71h rank. But White cannot be too hasty. The impetuous 20
d5? ltld4 21 i..xd4 'iVxd4 drains the position of attacking potential. Shashin
found the only way to keep Black off balance.
20 'ifc3!
Threatening to sweep Black away on the long diagonal with 21 d5. Black
must take on d4, and endure the consequences of an invasion of his 71h rank.
20...ttJxd4 21 :e7 :'xe7
2l...~f8 22 l:.xd7 l:.xd7 23
'iVc8+ 'iVd8 24 'iVc5+ ~g8 25 'iVxa7 b6 26
'iVa6 is much better for White.
22 ':xe7
22 ...ttJCS?!
One can hardly blame Korchnoi for misjudging the coming fantastic
complications. It seems incredible that White can survive the furious assault
that Korchnoi has planned, but such is the power of the threat of discovered
check that White's king can merrily run down the board and remain serene
that details like an exposed queen are less of a problem than Black's
dilemma regarding the discovered check threat. 22 ... ~e6! should hold after
23 'ilVb3 (23 i.xe6? l:.dl+ 24 ~h2 ikd6+ wins for Black) 23 .. :ifxb3 24
i.xb3 ltld5! 25 l:.xb7 ltlc5, or 25 i.xd5 l:.xd5 26 l:.e8+ (26 l:.xb7 h5! 27
l:.xa7 l:.dI + 28 ~h2 l:.d2 should give Black enough counter-play to offset
the passed a-pawn) 26 ... ltlf8 27 i.c3 a5!.
23 l'txfi
Forced, but also very strong.
23 ...:dl+ 24 'It>h2 'ifd6+ 25 g3
246 Instructive Combinations and Inspirational Attacks
25 ...liJg4+
Now the white king comes under assault.
26 'it>g2
26 hxg4?? 'jj'h6+ forces mate.
26•..liJh4+
White calmly answers 26 ... lt:lge3+ with 27 'otlf3 and Black has no follow
up, while White has about a dozen lethal threats.
27 gxh4 'ii'h2+ 28 'it>fJ 'ii'xf2+ 29 'it>e4!
29 ~xg4?? ':gl+ 30 'it>h5 g6+ forces mate.
29•• :it'e2+
It is truly incredible that White wins after 29 ... ':e I + 30 ~d5!! It:le3+
(30 ... lt:lf6+ 31 ':xf6 gxf6 32 'ii'xf6; 30 .....xf7+ 31 'it>d6!! ..!:tdl+ 32 ~c5
1r'xa2 33 1i'xg7 mate) 31 'it>d6 It:lc4+ 32 1r'xc4! 'iib6+ 33 'it>d7 ':dl+ 34
"d4!! ':xd4+ 35 i.xd4 1r'xd4+ 36 'it>c8 and Black is helpless to stop a
discovered check that will either win his queen, or deliver mate on the back
rank.
Instructive Combinations and Inspirational Attacks 247
30~f4
Forced. In a sense, Korchnoi forced his opponent to win brilliantly.
:0+ 31 ~g5 h6+ 32 ~g6 ttJe5+
30...
Korchnoi was in extreme time pressure as the bitter truth of the position
unfolds.
33 "'xe5ligl + 34 'ifg5
Once again, the only move. Now Black has just about run out of checks
and it will be White's tum, at long last to take aim at Black's monarch.
34......xb2
Hopeless was 34 ... l:txgS+ 3S hxgS 'iVe8 36 gxh6 gxh6 37 ..ti>xh6.
35 %bg7+ Black resigned
Now that was chess!
Karpov White
Spassky Black
Candidates Match, Moscow 1974
Sicilian Defense
1 e4 c5 2 ttJt3 e6 3 d4 cxd4 4 ttJxd4 ttJf6 5 ttJc3 d6 6 i.e2 i.e7 7
0-00-08 f4 ttJc6 9 i.e3 i.d7 10 ttJb3
Black's plan is to play 11 ... lDxd4 followed by ... .i.c6, but White's answer
makes it difficult for Black to find an active plan.
10... a5 11 a4 ttJb4
The bishop manages to find an active square on c6, but now Black has
problems dealing with his outposted knight on b4 which can be driven away
after some preparatory moves.
12 i.t3 i.c613 ttJd4 g6
Black guards the fS square before playing ... eS. However, his kingside is
now slightly weakened.
14:(2 e5
14 ... dS IS eSlDe4.
15lbxc6 bxc6 16 fxe5
248 Instructive Combinations and Inspirational Attacks
16... dxe5
This structure would be fine for Black if he could manage to trade off
dark-squared bishops. Karpov now begins a sequence that combines probes
all across the board to weaken the enemy defenses and manoeuvres to
improve the position of his knight which has few prospects in its present
location.
17 'ifn!
A very strong move. The queen backs up pressure along the f-file while
giving itself the option of playing 'ii'c4. Black must be wary of getting his
knight on b4 trapped as well.
17...'ifc8 18 h3
Typical Karpovian restriction. He looks forward not only to a life free
from ...ltJg4 worries, but also the prospect of improving his king position by
means ofc;t>h2.
18...lDd7?
18 ...'ii'e6 seems better here, when 19 .ie2 can be answered by 19 ... tt'lxc2.
Much better then is 19 l:[c 1 to prepare .ie2 although Black can solve some
problems with 19... tt'la2! 20 tt'lxa2 'ii'xa2 21 b3! 'ii'a3 22 'ii'c4 (stopping
....ic5) 22 ...ltJd7 and White has only a modest advantage.
19 it.g4! h5?
Less weakening is 19 ...'ii'c7.
20 it.xd7 'iYxd7 21 Yi'c4 it.h4
From here to the end, Karpov takes over the board with mechanical
precision.
22 :d2 'fIie7 23 llnl1fd8 24lDbl! 'ifb7 25 c,th2! c,tg7 26 c3lDa6
Instructive Combinations and Inspirational Attacks 249
27 :e2!
A very fine and subtle move which poses insoluble problems for Black.
First, he must find a secure retreat square for his bishop while keeping f7
guarded. Second, Black must meet a potential threat of tiJd2-b3 bringing
strong pressure to bear on the queenside. In order to cover all of his
weaknesses, Spassky is forced to abandon his brief rule over the d-file.
27 ...l:tfS
27 ...l:.d7 28 tiJd2 'ii'xb2 29 tiJb3 wins; 27 ... l:.d6 28 tiJd2 l:b8 29 tiJD il.f6
30 l:.df2 creates unbearable pressure on the [-file.
28 lLld2 ~d8 29 lLlfJ f6
This fatally weakens the e6 square and so leads to a crushing invasion but
the alternative 29 .. :ikc7 30 cJi>hI f6 31 l:[d2 ~e7 32 l:.fdl %:tfd8 33 l:.xd8
il.xd8 34 'iWe6 tiJb8 35 i.c5 was horrific.
30 l:td2 ~e7 31 'iie6 l1ad8 32 ':xd8 ~xd8
Or 32 ...:'xd8 33 tiJxe5l:.f8 34 tiJxc6 and wins.
33 %:tdllLlb8 34 ~c5 llh8
250 Instructive Combinations and Inspirational Attacks
3s1:.xd8!
A petite combination that leads to the destruction of Black's king
position.
3S...lhd8 36 i.e7 Black resigned
Postscript to this game: I had an occasion to playa manoeuvre similar to
Karpov's 27 l:te2.
Christiansen White
NunnBlack
Pan Pacific International, San Francisco 1995
I had Karpov's masterpiece against Spassky in mind when I played the
following move.
ll:tdl !
Black's prospects would improve considerably if he could effect a mass
trade of major pieces on the e-file. By avoiding a trade of rooks White can
lift the rook to the third rank where it can probe Black's slighly vulnerable
king position or join with its brother rook in applying pressure on Black's
isolated f-pawn. This strategy is effective because Black has no invasion
squares along the f-file and a plan involving queenside expansion can be
easily nipped in the bud. The game continued ...
1...:17 2 l:.d3 ~h8 3 'iVd2 a6 4 a4 b6 5 b3 'iVh4 6 ttJe2 'iVg4 7
:dO l::tfe7 8 ttJg3 'iVg6 9 i.gSlleS 10 .te3 cS
Black tries to prevent the exchange of his dark-squared bishop but he
weakens his center with this thrust.
11 i.f4 l::tSe7 12 b4! .txa4
12 ...b5 13 bxc5 dxc5 14 d6 l::te6 IS axb5 axb5 16 1i'd5! (The old
centralization principle at work) 16... bxc4 17 lDxf5 l::te2 18 i.g3 and Black
is busted.
Instructive Combinations and Inspirational Attacks 251
13 bxc5 dxc5
13 ... bxc5 14 :a3 ~d7 15 :xa6 ..te5 16 ..txe5+ :xe5 favors White but
gives Black more breathing room.
14 J.g5 l:e5 15 ~xf5 tte2 16 'iff4l:.f8
16... ~e5 17 'ii'h4 b5 18 lDg3 is gruesome for Black.
17~h4
17 'ii'g3! is even stronger, with the idea of 17 .....te5 18lDe7! and wins.
17...'iih5 18 'fWxf8+ J.xf8 19 Iixf8+ ~g7
20 J.h6+! ~xh6 21 Itt f6+ 'fWg6
2l...~g5 22lDf3+ 'ii'xf3
23 :'xf3 ..tc2 24 ~gl wins.
22 ~xg6 hxg6 23 h4 :e4
Now, I spoiled my previous excellent play with 24 l:.h8+?? (24 :xb6
wins easily) 24 ...~g7 25 l:ff8 ':xc4 and had to eventually settle for a
draw. I should have paid as close attention to Karpov's technique as to his
middlegame subtleties!
252 Instructive Combinations and Inspirational Attacks
Djurhuus White
Kaidanov Black
Yerevan Olympiad 1996
French Defense
1 e4 e6 2 d4 d5 3 ltJc3 .tb4 4 e5 b6 5 "YWg4 .trs 6 ltJo i.a6 7
ltJb5 "YWd7 8 a4 ltJe7 9 .td3 ltJf5 10 '*'f4 c6 11 g4 ltJh6 12 ltJc3
.txd3 13 cxd3ltJa614 h4ltJb4 15 ~e2!
White finally finishes his development by officially connecting rooks. He
next exchanges off Black's best placed piece before turning his attention to
the kingside.
15....te7 16 .td2 "YWb7 17ltJa2! ltJxa2 18 l'lxa2 as 19 b3iLb4 20
.te3ltJg8 21 h5 h6 22 :Ic2ltJe7 23ltJh4
White envisages supporting a pawn storm on the kings ide with f4-f5.
23 ...~d7
An ingenious defensive try that deserved a better fatc. Black obviously
cannot castle kings ide and he cannot afford to wait before White sets forth
the pawn storm with f4-f5.
24 'ii'xt7! ~af8 25 "YWxg7 %lfg8 26 'ii'f6 %:tf8 27 'ikg7 lUg8 28 'iif6
1.'trs
It looks like a draw by repetition of moves is in prospect but White has a
shocking surprise in store.
29ltJg6! Ihf6 30 exf6ltJxg6 31 hxg6
The connected passers on the sixth rank will soon win back at Icast a
bishop while keeping Black busy guarding against a breakthrough on the
c-file and the kings ide.
31 ....tf8
Instructive Combinations and Inspirational Attacks 253
Black must stop the raging pawns. The passive 31 ...:g8 is swamped by
321::txh6 'it>d8 33 l:th7 'Wc8 34 f7 l:txg6 35 l:th8+ and wins.
32 g7 i.xg7 33 fxg7 J:g8 34 i.xh6 'it'b8 35 %1hcl c5 36 dxc5
'it'e5+ 37 <it>fl 'it'd4 38 cxb6 'it'xg4 39 Itc7+ ~d6 40 i.e3 d4
41 b7!
This wins because of the unfortunate placement of Black's king which is
on a square that is open to checks from a shiny new white queen.
41. .. dxe3 42 I:.c8 e2+ 43 ~e1 'it'b4+
Black manages to get this pawn, but he faces a new problem on g7.
44 ~xe2 'it'xb7 45 lbg8 <i.t>e5 46 f4+ Black resigned in view of
46 ...'it>f647l:tgl.
The Grand-Prix Attack (I e4 c5 2 ttJc3 d6 3 f4 g6 4 ttJf3 i.g7 5 i.c4 ttJc6
6 d3) is very popular with club players and has even occasionally made its
way to the top levels. The following game illustrates how a careless defense
can be summarily ripped to shreds.
Anand White
Gelfand Black
Wijk aan Zee, 1996
Sicilian Defense
1 e4 c5 2 lbc3 d6 3 f4 g6 4 lbfJ i.g7 5 i.c4 lbc6 6 d3 e6 7 0-0
lbge78 'it'e1 h6 9 i.b3 a6 10 e5!?
This looks at first like an overreach, but this thrust is actually a pawn
sacrifice aimed at fixing the black king in the center.
10...lbf5 11 <it>hllbfd4
254 Instructive Combinations and Inspiratiollal Attacks
11 ... d5 is safer. Gelfand has never been one to tum down a challenge, but
Black has serious problems finishing his development after he grabs the e5
pawn.
12lDe4lDxf3 13 :xf3 dxeS 14 fxeS lDxe5 IS I;lfl
Black has nabbed his pawn, but finding a secure spot for his king is not
easy.
IS...gS!?
This self-inflicted weakening of the kings ide invites trouble. Black did
not like the looks of 15 ...0-0 16 1.xh6 1.xh6 17lUf6+ cj;g7 18 W'xe5 'iWd4
19 W'c7 when his queenside remains frozen. Perhaps 15 ...W'c7 16 1.f4 g5
17 1.g3 f5!? was his best chance.
16 'ifg3 0-0
17 iLxgS!?
17 lUxc5 wins back the pawn with a slight advantage for White. The
defensive task imposed by the game continuation is extremely difficult so
this may be White's best practical continuation.
17•.•hxgS 18lDxgS
Black's problem stems from his weaknesses on both h7 and fl. The black
king cannot easily evade the coming threats on h7 without allowing his
surviving kingside pawns to be decimated.
18..•tbg6
18 ...W'd4 19l:tf4 W'xb2 20 l:tafl is crushing.
19:ae1
Anand calmly builds up his attack. Not good is 19 W'g4 'Wd4 20 'ii'h5
1i'h4 and Black defends. Now, however, W'g4 is a threat as ...W'd4 can be
answered by l:e4.
19...'ife7
Instructive Combinations and Inspirational Attacks 255
Gelfand understands that he must buttress his e6 and fl pawns or face
destruction. He is ready to meet 20 'ii'g4 with ...1.f6! when a sac on e6 is
ineffective.
20l:f5!!
A beautiful way to keep the pot boiling. This powerful rook-lift creates
the new threat of'ii'h3 while adding extra punch to a demolition sac on e6
because the rook hovers closer to Black's king. Black cannot bailout with
20 ...exfS 21l:lxe7liJxe7 because of22 'ii'h4 and wins. 20...1.h6!? 21liJxfl!
~h7! (2l...l:txfl 22 'ii'xg6+ 1.g7 23 l:txe6 is shattering) 22 liJxh6 ~xh6 23
'ii'e3+ ~g7 24 l:txc5 gives White three pawns for the piece plus a positional
advantage and the likelihood of winning the e6 pawn.
20•..Ji.f6!
A good start to the defense ...
21lLlxe6 fxe6?
A horrendous blunder that leads to quick defeat. 2l...l:le8! 22 l:le4 1.xe6
23 1.xe6 fxe6 24 Wxg6+ 1.g7 25 l:lh5 l:lf8! should hold for Black, for
instance 26 'ii'h7+ ~fl 27 g3 ~e8 28 Wg6+ ~d7 29 l:ld5+ ci;c7 30 l:txe6
Ilfl+ 31 ~g2 'ii'f8!.
256 instructive Combinations and inspirational Attacks
22 I:lxe6! <3;;g7
22 ... .txe6 23 'iiVxg6+ .tg7 24 .txe6+ wins thanks to the position of the
rook on f5.
23 l:lxe7+ i.xe7 24 l::.xfSi.xfS 25 h4! Black resigned
Black has no adequate defense to 26 h5.