/


Год: 2018

Текст
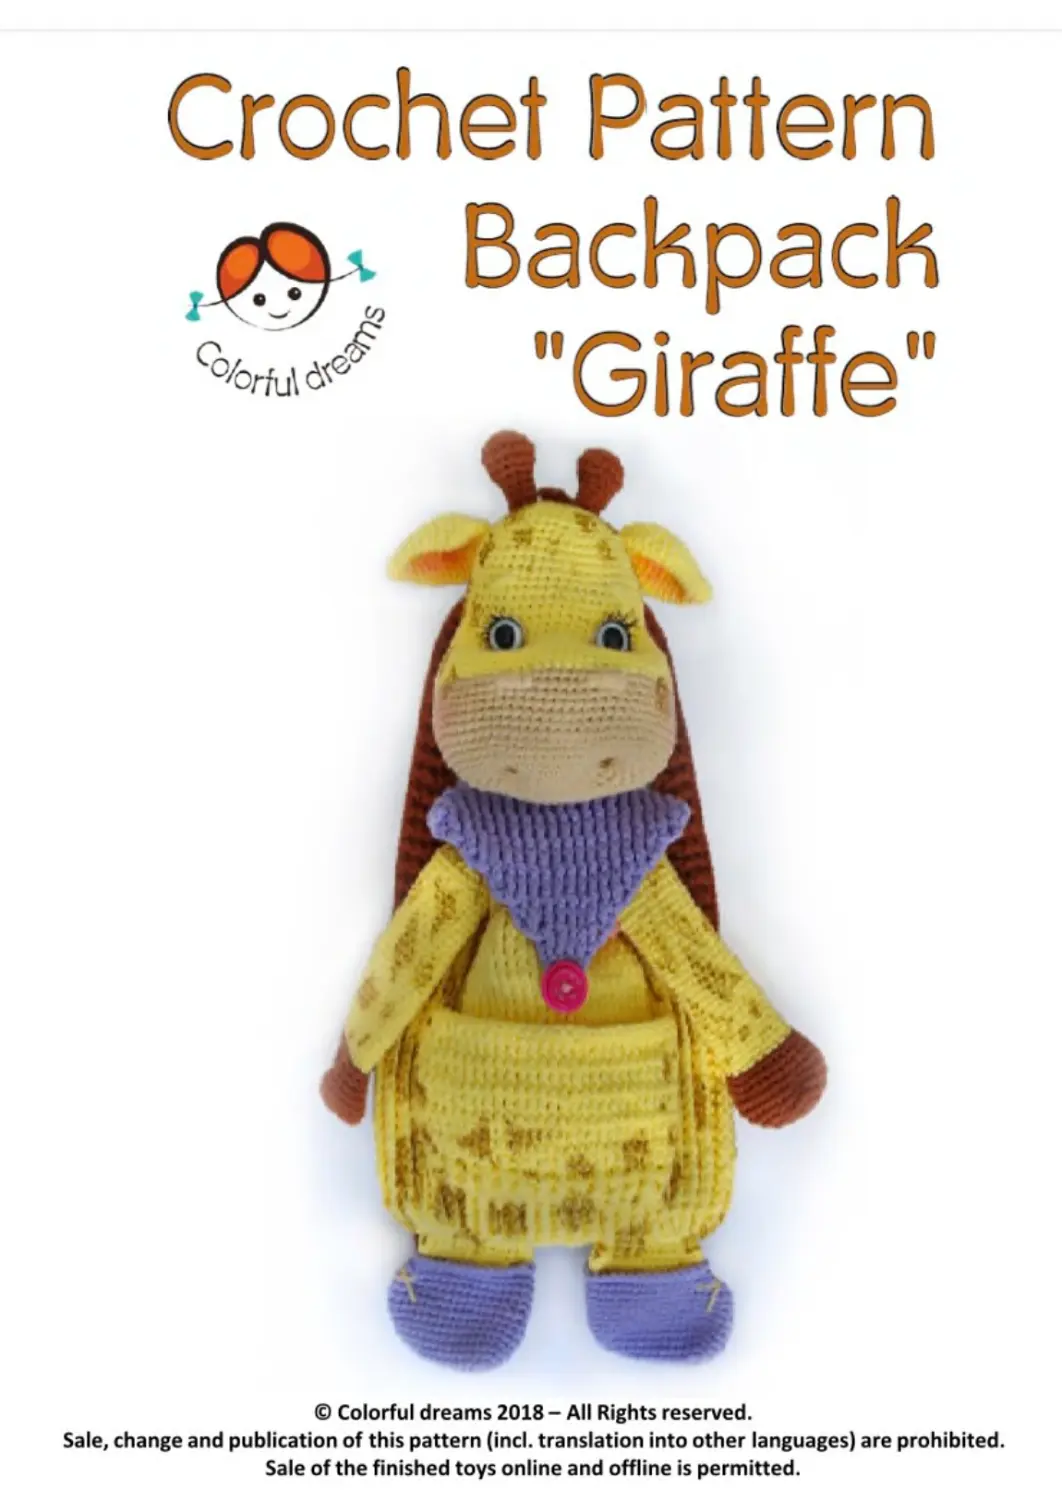
                    Crochet Pattern
Backpack
"Giraffe"
© Colorful dreams 2018 - All Rights reserved.
Sale, change and publication of this pattern (incl. translation into other languages) are prohibited.
Sale of the finished toys online and offline is permitted.
You will need the following:
>/ The yarn 95m/50g
Yellow - 250 g
Brown- 45 g
Purple- 60 g
Beige- 20 g
>/ The hook 3,25mm and 2,75mm for the head.
/ The eyes 20mm in diameter, the felt, the
eyelashes.
\/ Stuffing
v/ The glue Hobby Pattex
\Z A button
Abbreviations (US):
SC - single crochet
DC-double crochet
CH-chain(s)
dec - decrease
inc - increase
FP de-front post de
BP de - back post de
3SC tog - crochet 3 SC together
3SC1 - crochet 3 SC in one and
the same stitch
(...)x - repeat those in brackets
x-times
Both boys and girls can use this
backpack. You can easily fit their
small toys and other things for
your child. The bag size is 25cm
x 22cm. The total size of the
backpack from the head to the
boots is 45cm.). Depending on
the wool you choose, the bag can
be bigger or smaller.
This backpack can become the
favorite toy of your child, where
he or she can hide their secrets
in, you just need to remove the
straps.
SOME TIPS:
1. Every Part will be worked in
spiral rounds. Each round will be
finished with slst.
2. Use a stitch marker. A little
thread (just use a different colour
from the main one) can help as
well to count the rounds. Place it
over the working thread and it will
be easy to pull it out.
______________________________Bag
* You will be crocheting in joined rounds. Every
round starts with 3 CH and finishes with 1 si st.
The 3 CH doesn't count as the stitch.
Crochet chain 33 CH.
1. From the 4th loop from the hook crochet
29DC, 7DC in 1, 29DC, 7DC in 1 (72)
Now we'll alternate the FP de (front post de) and
the BP de (back post de).
2. Crochet 29 de, alternating 1 BP de and 1 FP
de (Attention: we begin crocheting with the BP
de), then (crochet 2 FP de in one stitch of the
previous round)x7, along the opposite side of
the chain 29 de, alternating 1 BP de and 1 FP de
(Attention: we also begin crocheting with the
BP de), then (crochet 2 FP de in one stitch of the
previous round)x7 (86)
3. 29 de, alternating 1 BP de and 1 FP de,
(crochet 2 FP de in one stitch of the previous
round, 1 FP dc)x 7, 29 de, alternating 1 BP de
and 1 FP de, (crochet 2 FP de in one stitch of the
previous round, 1 FP dc)x 7(100)
4- 9. Crochet 100 de, alternating 1 BP de and
1 FPdc.
10. Crochet 53 de, alternating 1 BP de and 1 FP
de, 23 FP de, 24 de, alternating 1 BP de and 1 FP
de(100)
11- 26. Crochet 52 de, alternating 1 BP de and 1
FP de, 25 FP de, 23 de, alternating 1 BP de and 1
FPdc (100)
27-28. Crochet 53 de, alternating 1 BP de and 1
FP de, 23 FP de, 24 de, alternating 1 BP de and 1
FPdc (100)
29- 34. Crochet 100 de, alternating 1 BP de and
1 FP de.
35. In the 35th round begin crocheting in the
4th loop, skip first BP de, then crochet: (1 FP
de, 1 CH, skip BP dc)x crochet till the end of the
round (100)
36.Crochet
100 de
The bag is
ready.
120)
Drawstring - Crochet a
chain to fit comfortably
around the top of the
bag and tie in a bow. (I
have made a chain of
____________________________________Flap
Crochet chain 49 ch.
1. Begin in the 4th loop from the hook crochet 45DC *At the end of each row turn your work and
crochet. In the other direction.
2. lch, 45sc
3.3ch, (ldc, lch, skip one stitch of the previous row)x repeat till the end of the row.
4.	lch, 45sc (45)
5.	3ch, dec, 41dc, dec (43)
6.	lch, dec, 39sc, dec (41)
7.	3ch, dec, 37dc, dec (39)
8-10. 3ch, further crochet de, alternating 1 FP de and 1 BP de (39)
11. 3ch, crochet 2 FP de together (BP de stays at the back, we skip it, look the photo below), then
crochet 33 de, alternating 1 BP de and 1 FP de, crochet 2 FP de together (BP de stays at the back, we
skip it, look the photo below) (35)
12-13. 3ch, 35 de, alternating 1 FP
de and 1 BP de
14.	3ch, crochet 2 FP de together
(BP de stays at the back, we skip
it, look the photo below), then
crochet 29 de, alternating 1 FP
de and 1 BP de, crochet 2 FP de
together (BP de stays at the back, we skip it, look the photo below) (31)
15.	3ch, crochet 2 FP de together (BP de stays at the back, we skip it, look the photo below), then
crochet 25 de, alternating 1 FP de and 1 BP de, crochet 2 FP de together (BP de stays at the back, we
skip it, look the photo above) (27)
16.	3ch, crochet 2 FP de together (BP de stays at the back, we skip it, look the photo below), then
crochet 21 de, alternating 1 FP de and 1 BP de, crochet 2 FP de together (BP de stays at the back, we
skip it, look the photo above) (23)
17.	3ch, crochet 2 FP de together (BP de stays at the back, we skip it, look the photo below), then
crochet 17 de, alternating 1 FP de and 1 BP de, crochet 2 FP de together (BP de stays at the back, we
skip it, look the photo above) (19)
18.	3ch, crochet 2 FP de together (BP de stays at the back, we skip it, look the photo below), then
crochet 13 de, alternating 1 FP de and 1 BP de, crochet 2 FP de together (BP de stays at the back, we
skip it, look the photo above) (15)
19.	3ch, crochet 2 FP de together (BP de stays
at the back, we skip it, look the photo below),
then crochet 9 de, alternating 1 FP de and 1 BP
de, crochet 2 FP de together (BP de stays at the
back, we skip it, look the photo above) (11)
20. 3ch, crochet 2 FP de together (BP de stays
at the back, we skip it, look the photo below),
then crochet 5 de, alternating 1 FP de and 1 BP
de, crochet 2 FP de together (BP de stays at the
back, we skip it, look the photo above) (7)
Crochet 6 CH and slip stitch to the opposite side
to^eate the loop for the button.
4
firms
Begin crocheting with the hooves.
Crochet 6 sc in the magic ring,
1.	6-inc (12)
2.	(1 sc, 1 inc)x6 (18)
3.	(2 sc, 1 inc)x6 (24)
4.	(3 sc, 1 inc)x6 (30)
5-	7. 30 sc
8.	(3 sc, ldec)x6 (24)
9.	24 sc
10.	(2 sc, ldec)x6 (18)
Change the color to the main color you are using.
11-	39.18 sc
Leave enough thread for sewing, do not stuff the arms.
Thread the cord through the openings in the bag, placing the flap over the back section of the bag,
simultaneously thread the cord through the bag and the flap.
Sew the arms at the sides approx, between the 32nd and
33rd rows of the bag.
5
Begin crocheting with the boots.
Crochet chain 11CH,
1.	from the 2nd loop from the hook crochet 9sc,
3sc in 1, 9sc, 3sc in 1 (24)
2.	9 sc, 3inc, 9 sc, 3inc (30)
3.	9 sc, (1 sc, inc)x3, 9 sc, (1 sc. inc)x3 (36) _
4-10. 36sc
11.12sc, 2dec, 20sc (34)
The decreases should be
at the side (to form the
toe)
12.	Use, 2dec, 19sc (32)
13.	lOsc, 3sc together,
18sc(30)
14.	Change the color to the main color, 30sc
crochet in the back loop only.
15-16. 30 sc
Fasten off and leave
enough thread for
sewing. Do not stuff
the legs.
Sew the legs at the
bottom of the bag.
Using the boot color
work a round of sc into
the front loops left
from the color change.
------Head
EARS
Crochet 6 sc in the
magic ring.
1.6 sc
2.	6-inc (12)
3.	(Isc, 1 inc)x6 (18)
4.	18 sc
5.	(2 sc, 1 inc)x6 (24)
6- 7. 24 sc
8. (3 sc, 1 inc)x6 (30)
9-10. 30 sc
11. (3 sc, 1 dec)x6 (24)
12-13. 24 sc
Tighten the ears at the end of the
crocheting, do not stuff them.
Leave enough thread for sewing.
HEAD
It is crocheted from the bottom up to the top,
begin crocheting with the beige color.Crochet
chain 12 CH,
1. Begin in 2nd loop from the hook crochet 10
sc, 4 sc in 1, 10 sc, 4 sc in 1 (28)
2. 10 sc, 4 inc, 10 sc, 4 inc (36)
3.10 sc, (1 sc, 1 inc)x4,10 sc, (1 sc, 1 inc)x4 (44)
4.10 sc, (2 sc, 1 inc)x4, 10 sc, (2 sc, 1 inc)x4 (52)
5.	52 sc
Crochet 5 SC and mark this as the new beginning
of the row. Keep the marker straight with shift
stitches if needed. It goes straight along the
back of the head.
6.	5 sc, (3 sc, 1 inc)x4, 10 sc, (3 sc, 1 inc)x4, 5 sc
(60)
7.	5 sc, (4 sc, 1 inc)x4, 10 sc, (4 sc, 1 inc)x4, 5 sc
Head
8-14. 68 sc
Change the color to the yellow.
15-18. 68 sc
19.	5 sc, (4 sc, 1 dec)x4,10 sc, (4 sc, 1 dec)x4, 5 sc
(60)
20- 22. 60 sc
23. 5 sc, (3 sc, 1 dec)x4,10 sc, (3 sc, 1 dec)x4, 5 sc
(52)
24- 32. 52 sc
33.	(Use, dec)x4(48)
34.	(6 sc, 1 dec)x6 (42)
35.	42 sc
36.	(5 sc, 1 dec)x6 (36)
37.	36 sc Stuff the head.
38.	(4 sc, 1 dec)x6 (30)
Leave the opening for attaching the safety eyes
and make the tightenings for the eye sockets.
Tigthenings for the eyesockets and the smile: Between the 22 and 23 rows find the points for the
tightening of the eyesockets. A,B,C,D (the space between the eyesockets is 7- 8 stitches). The points
for the smile tightening are at the bottom between the 2 and 3 rows at the right side and at the left
side. Using the photo as a guide, find and mark the sculpting points with pins.
Begin from the right side. Insert the needle between the 2nd and 3rd rows (at the left end of the
starting chain) and take it out at the top at point A. Step 3 stitches to the right from point A and
insert the needle in point B, from point В go back to the 3rd row. Repeat the same for the second
eyesocket, but at the left side. Insert the needle between the 2nd and 3rd rows (this time at the
right end of the starting chain) and take it out at the top in point C. Step 3 stitches to the left from
point C and insert the needle in point D, from point D go back to the 3rd row. Tighten the thread,
make the knot and hide the end.
Now fasten the safety eyes at the
places of the tightenings, securing
them from the inner side.
After the eyes are firmly fastened
you can crochet the rest of the head
and close the opening.
39.	(3 sc, 1 dec)x6 (24)
40.	(2 sc, 1 dec)x6 (18)
41.	(lsc, 1 dec)x6 (12)
42.	6 dec
Fasten off, cut the yarn and
hide the end.
Go 13 rows up from the
eyesocket tightening and sew
the ears at the sides.
Then crochet the horns.
HORNS
1.	6 sc in the magic ring
2.	6-inc (12)
3.	(lsc, 1 inc)x6 (18)
4.18 sc
5.	(lsc, 1 dec)x6 (12)
6.	(1 sc, 1 dec)x4 (8)
7-	9. 8 sc
Slightly stuff the horns, to give them the
round shape. Sew them at the top of the
head at the equal space from the ears to
the center.
Head
Embroider the nose with the
stitches between the 15 and
16 rows.
Further make the eyelids around the
eyes. To do this take the needle with
the thread quadrupled (4 strands held
together). See the photos below. Insert
the needle at the back of the head and
take it out at one edge of the eye, insert the needle in the other
edge of the eye and take it out at the back of the head. Divide
the threads, 2 threads for the upper eyelid and 2 threads for
the lower eyelid. Accurately tighten the threads at the back, cut
them and hide the ends. You can add some glue to the threads
to prevent them from sliding over the eyes. If you want, you can
glue the eyelashes above the eye under the eyelid.
Tint with the pink pastel
crayons inside the ears.
Also you can tint the
cheeks.
Paint the spots. I chose
the usual marker for the
cloth for the spots and
paint a couple of spots at
the arms, bag and at the
top of the head. You can
crochet a small swatch
from the same yarn as you
used for the giraffe, and
try different ways to apply
color on it to see how it
will look. If you have no
marker for the cloth, you
can embroider the spots.
9
Assembly
Firmly sew the head to the flap.
Sew the button at the center of the bag.
STRAPS
Crochet chain 93ch, from the 3rd loop from the hook
crochet 90 de.
2- 3. 3ch, crochet 90 de, alternating 1 FP de and 1 BP de
Sew the straps between the 28 and 29 rows of the head
and to the bottom of the bag.
Attach the mane by the most usual way, like the fringe.
Cut the necessary length of the hair, approx. 10 cm long
and attach them at the center of the head beginning
from the top of the head.
You can add the pocket to the bag, if you want.
POCKET
Crochet chain 34 ch,
1. Begin in 4th loop from the hook crochet 30dc, turn
the work
Further crochet de, alternating 1 FP de and 1 BP de.
2- 3. 3 ch, crochet 30 de, alternating 1 FP de and 1 BP
de. (30)
4-13. 3 ch, crochet 30 FP de
Sew the pocket to the bag.
You want to know more?
https://www.facebook.com/
Colorfuldreams.en/
If you have any questions, please,
contact me:
My e-mail: info.crochetdolls@gmail.com
Have fun crocheting!