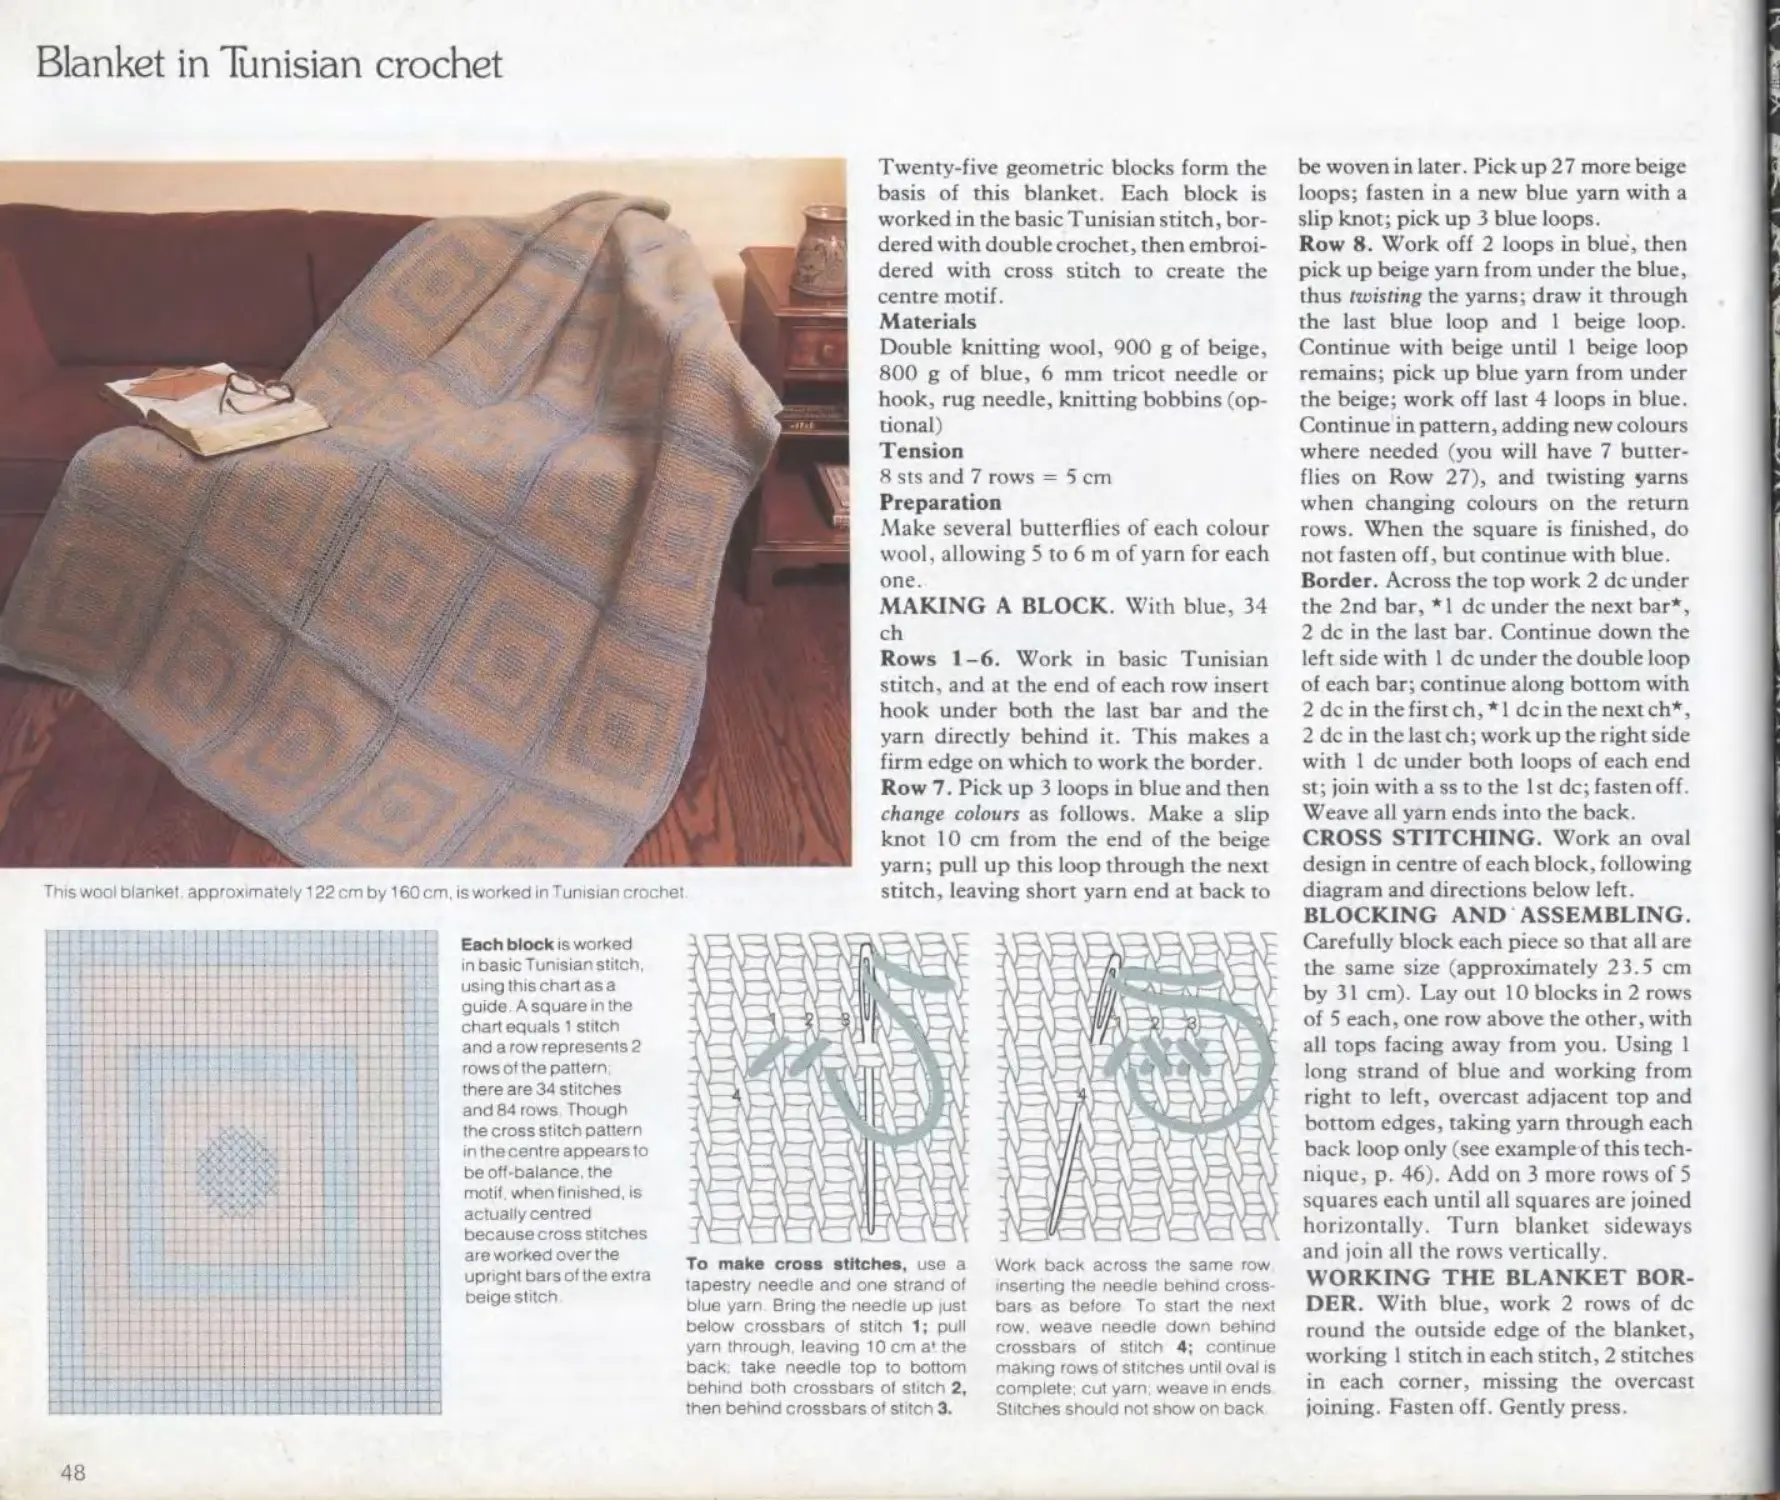
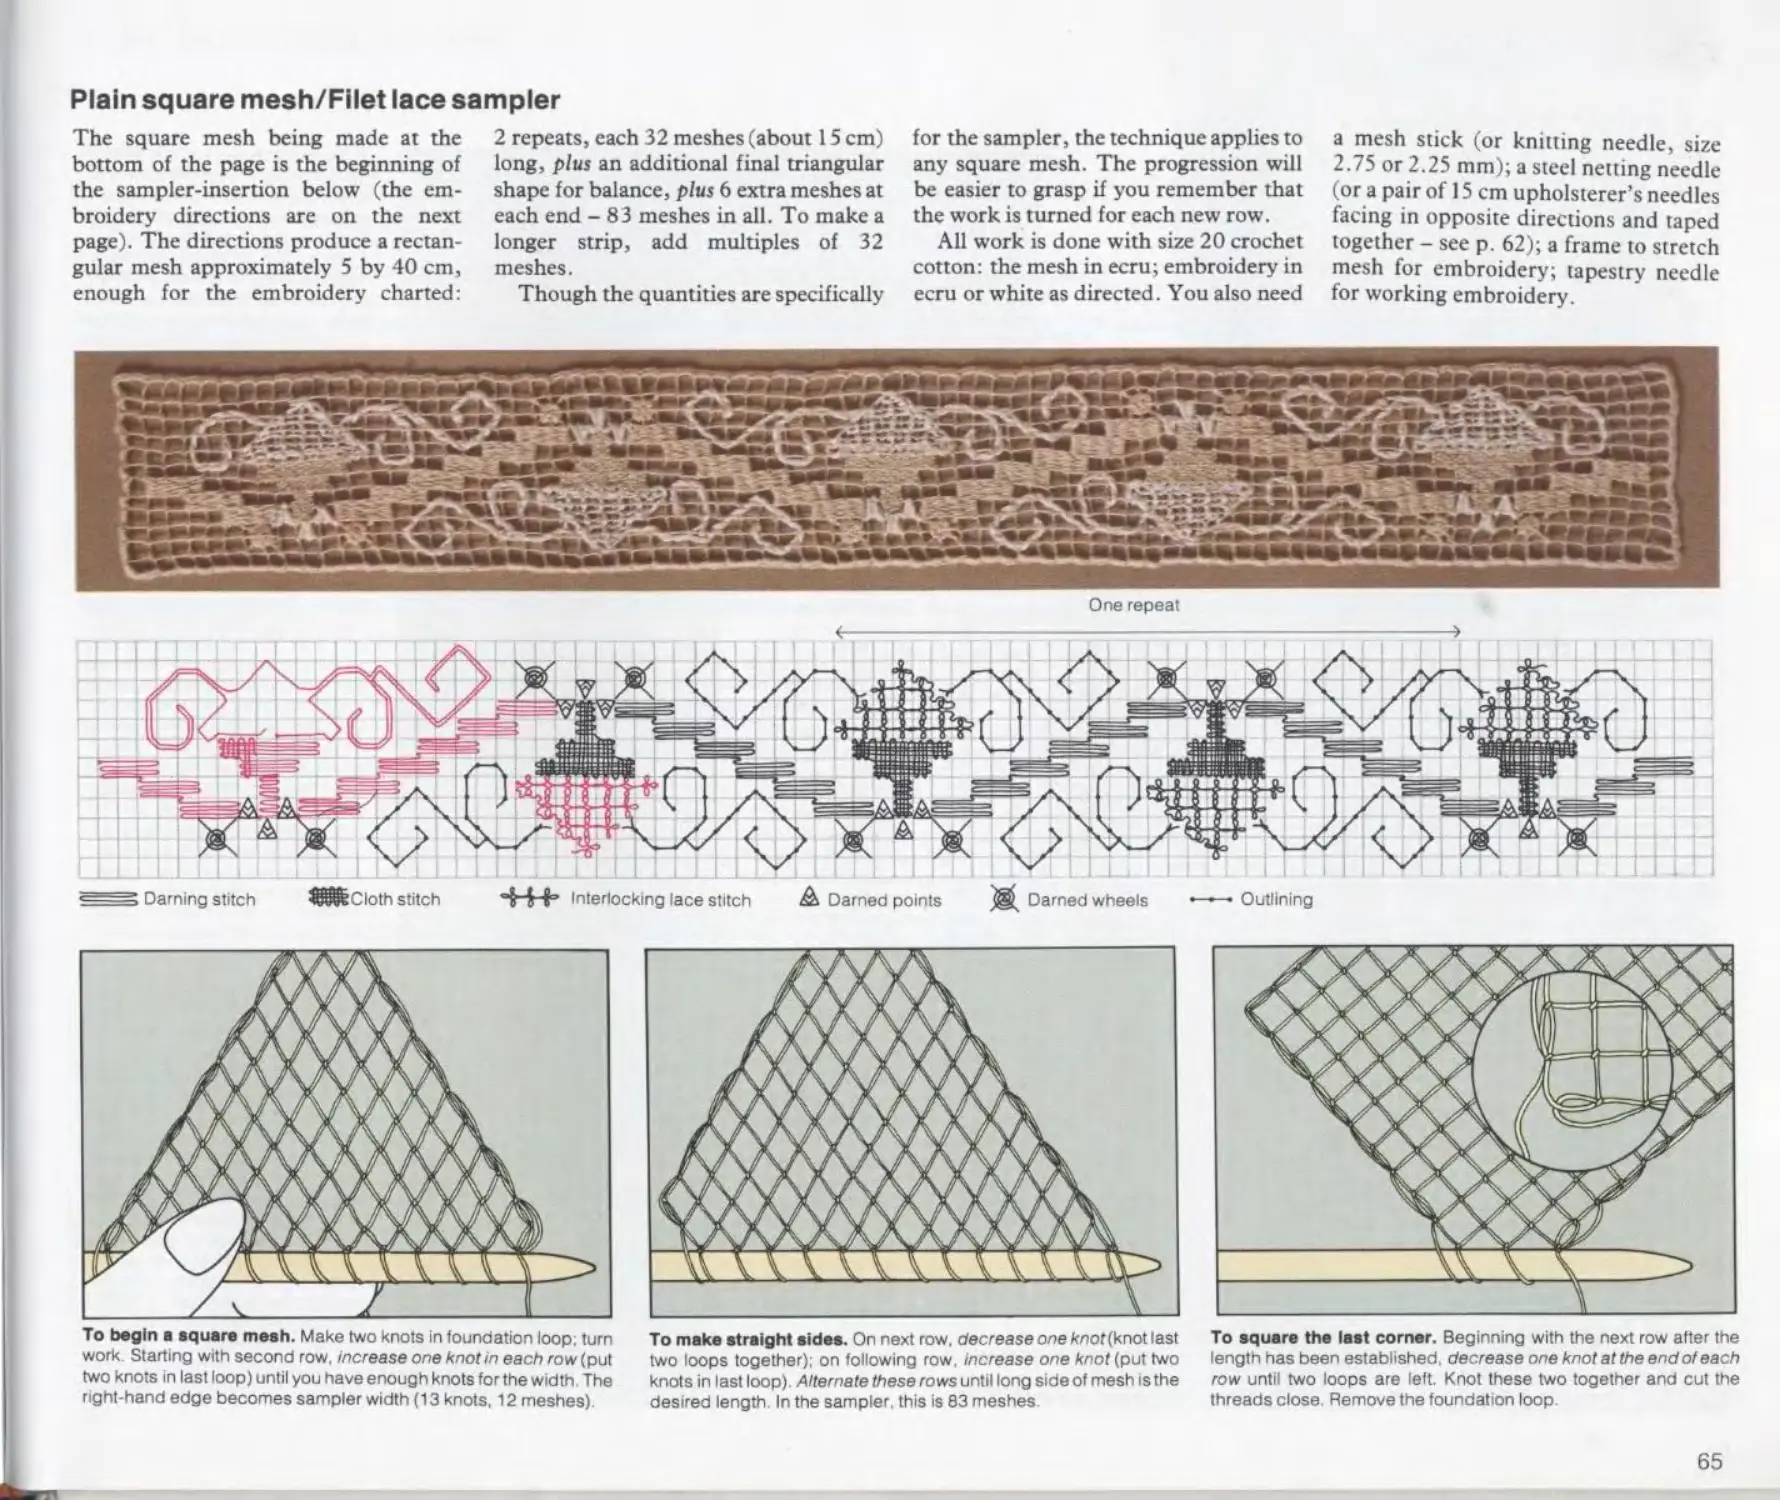
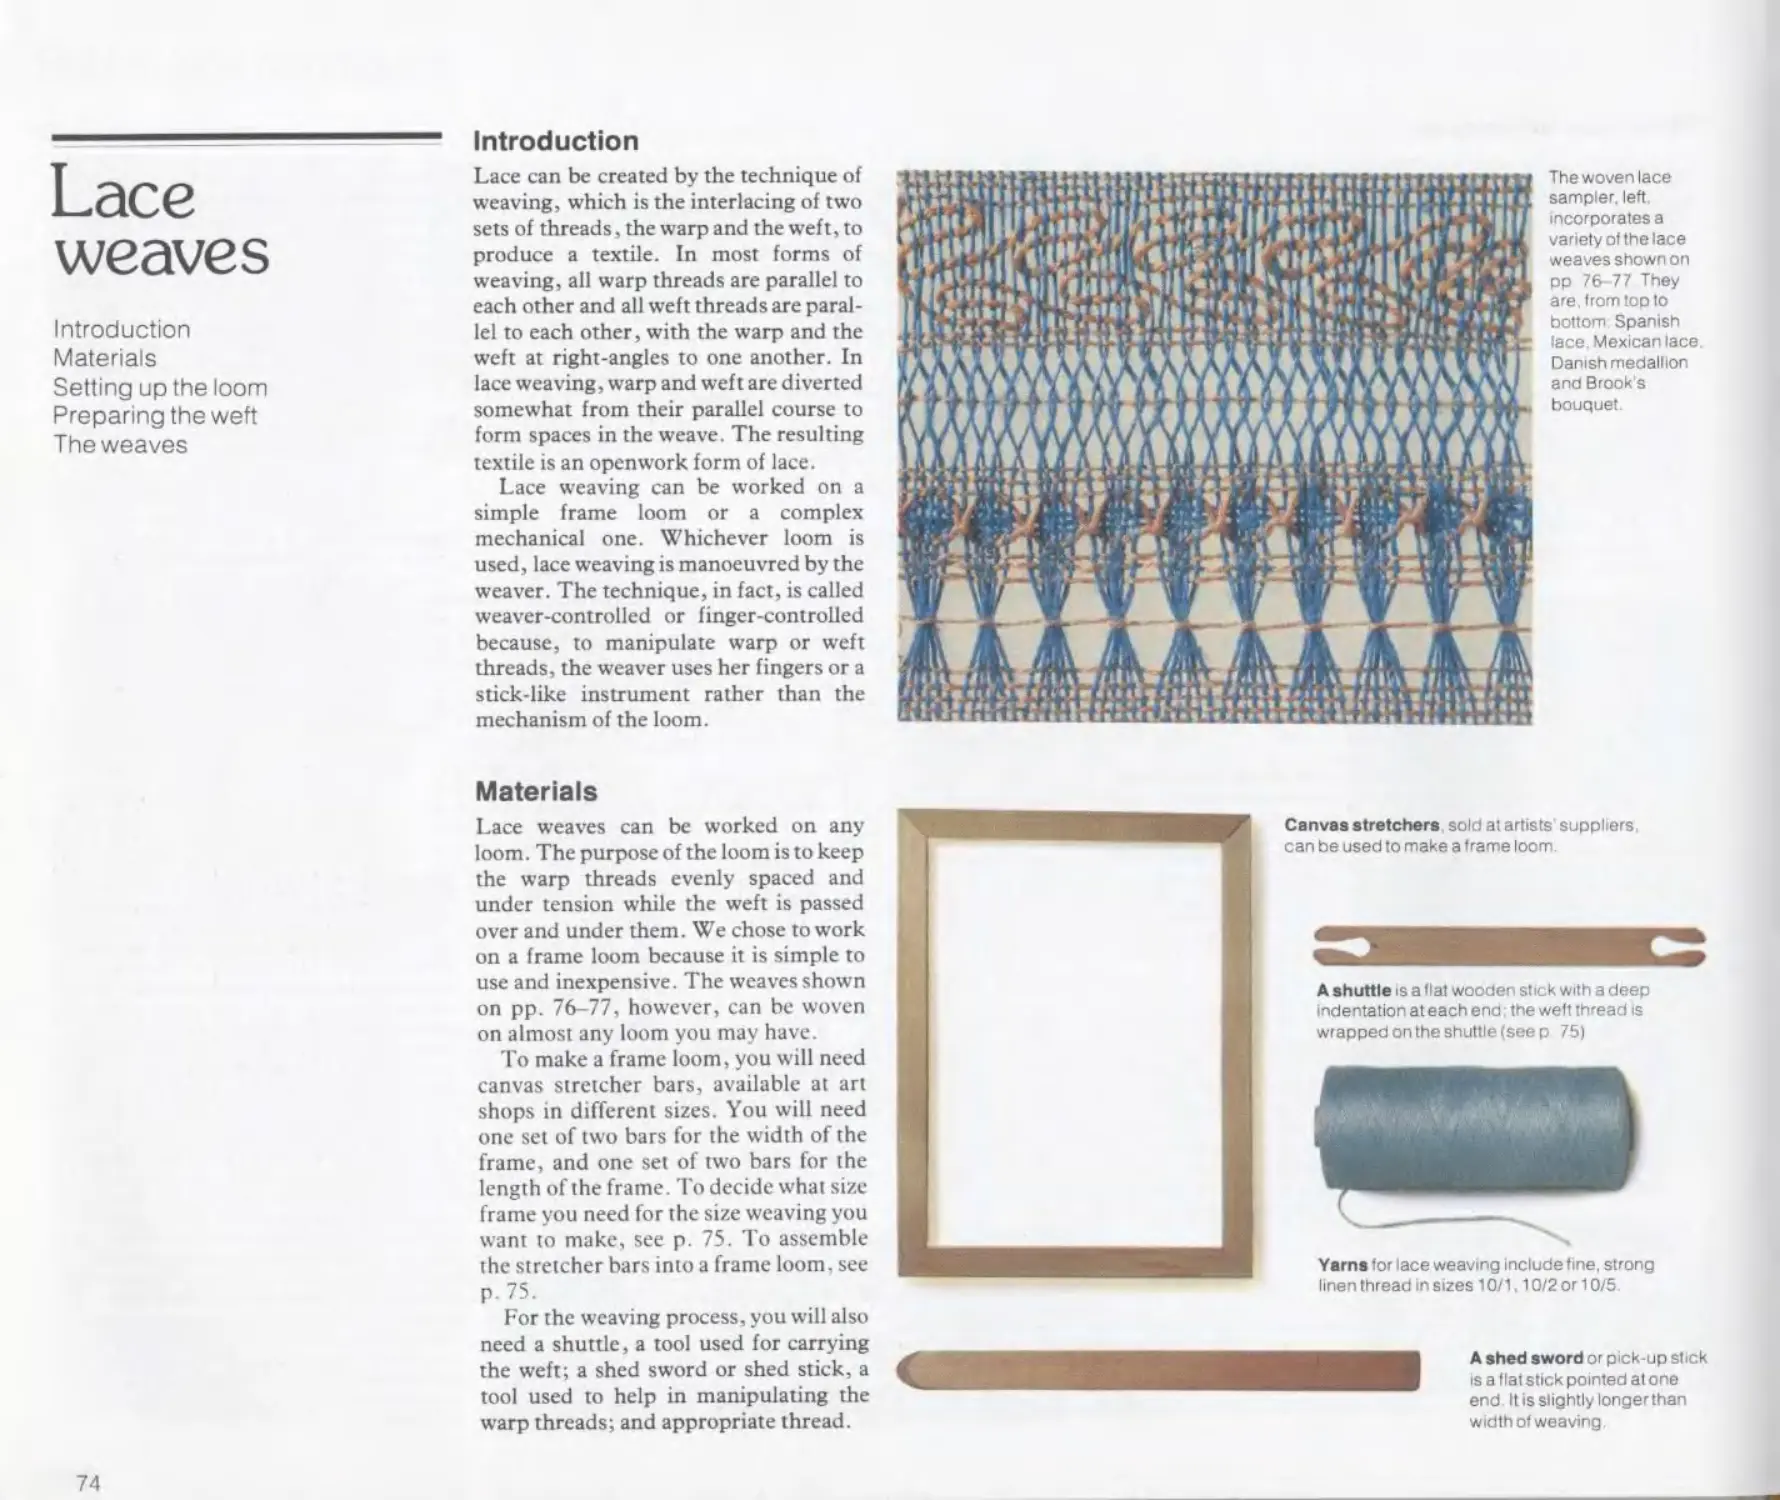
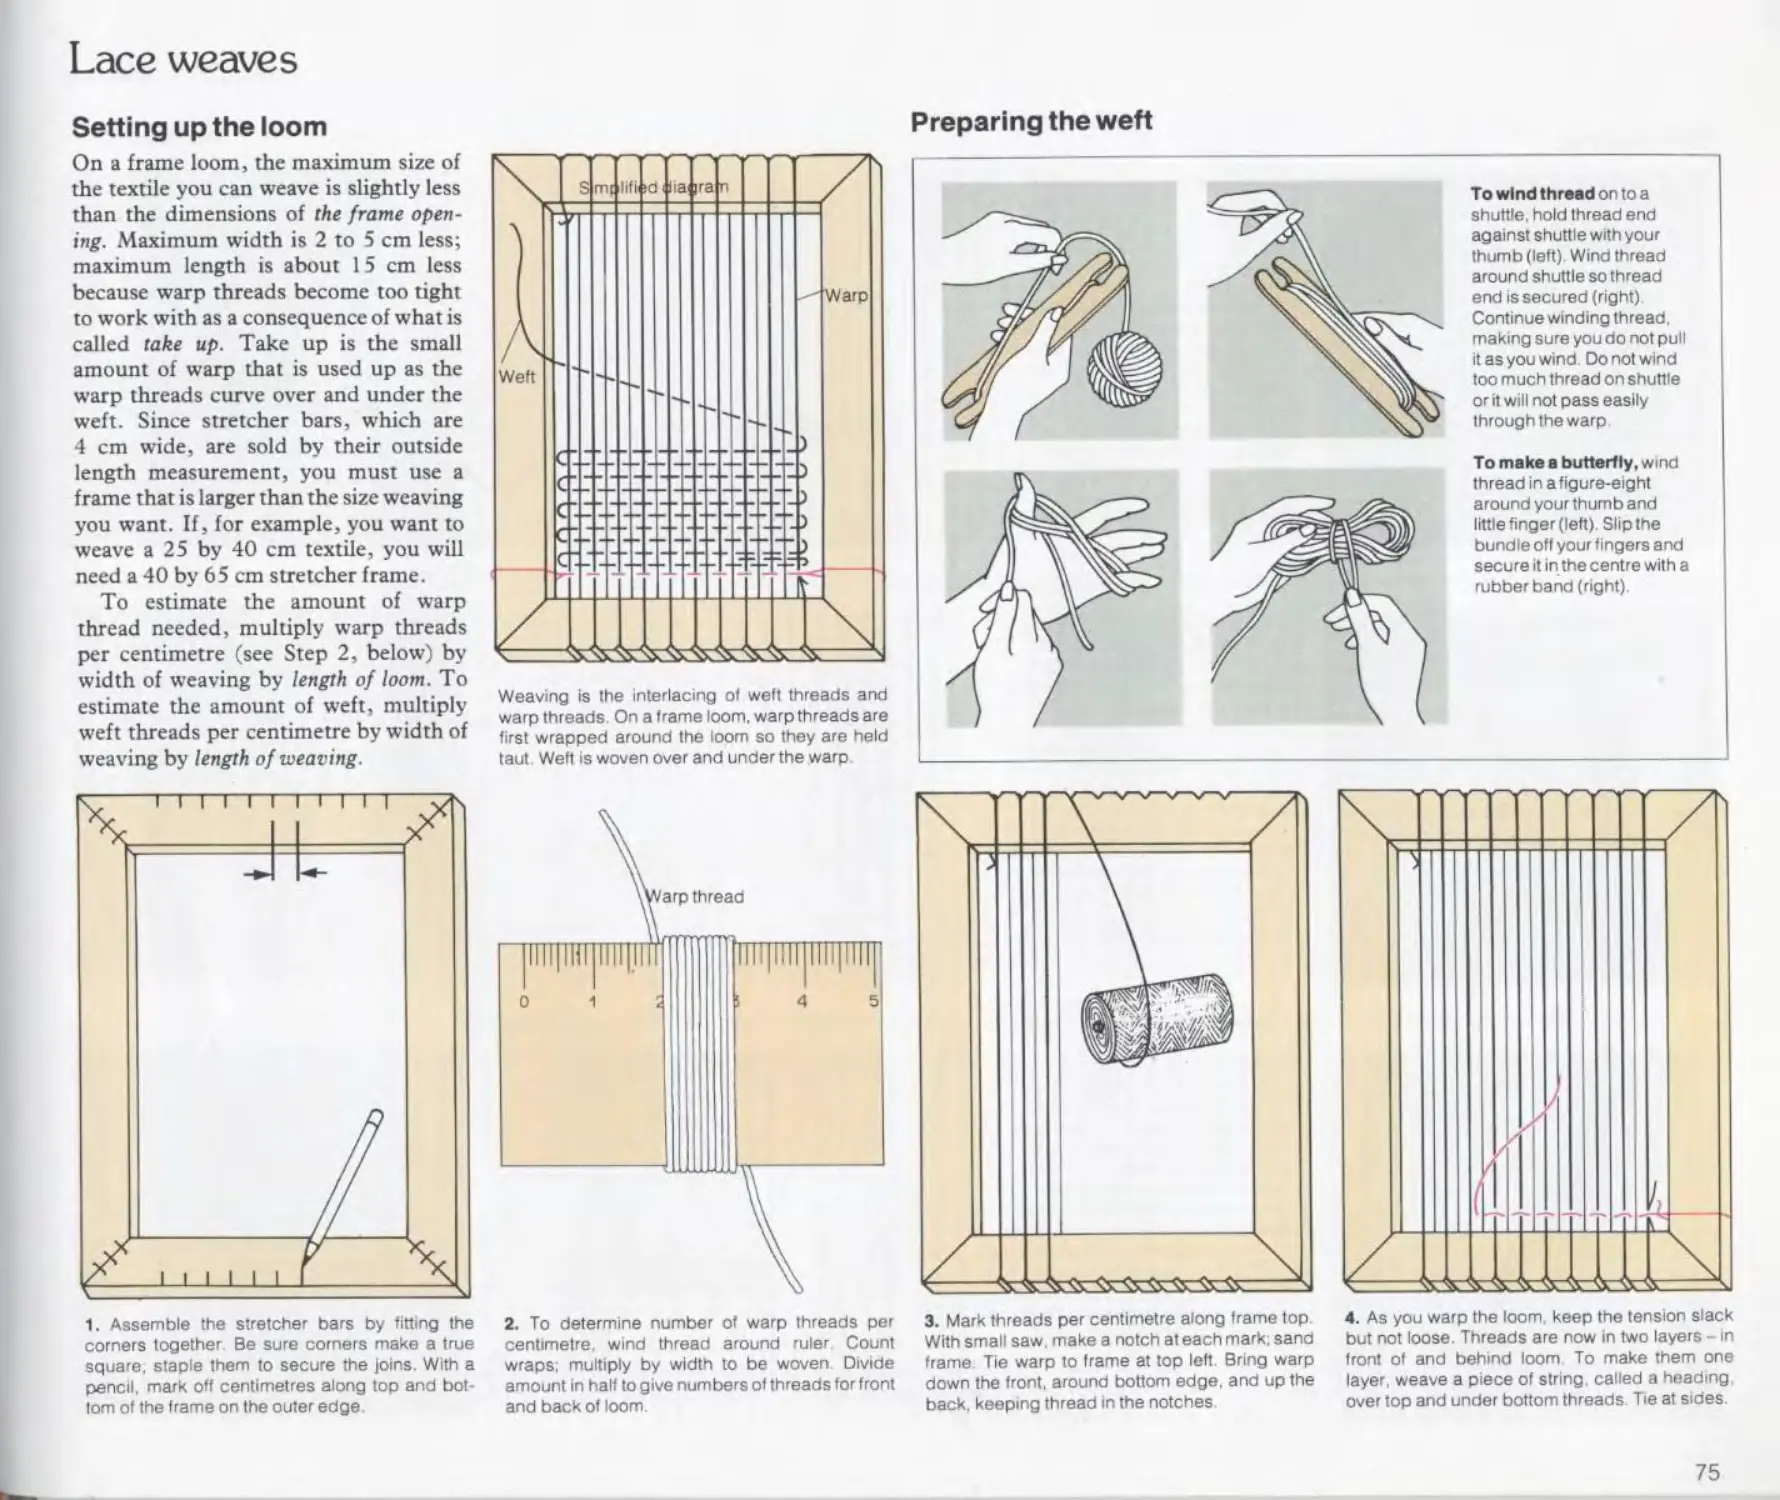
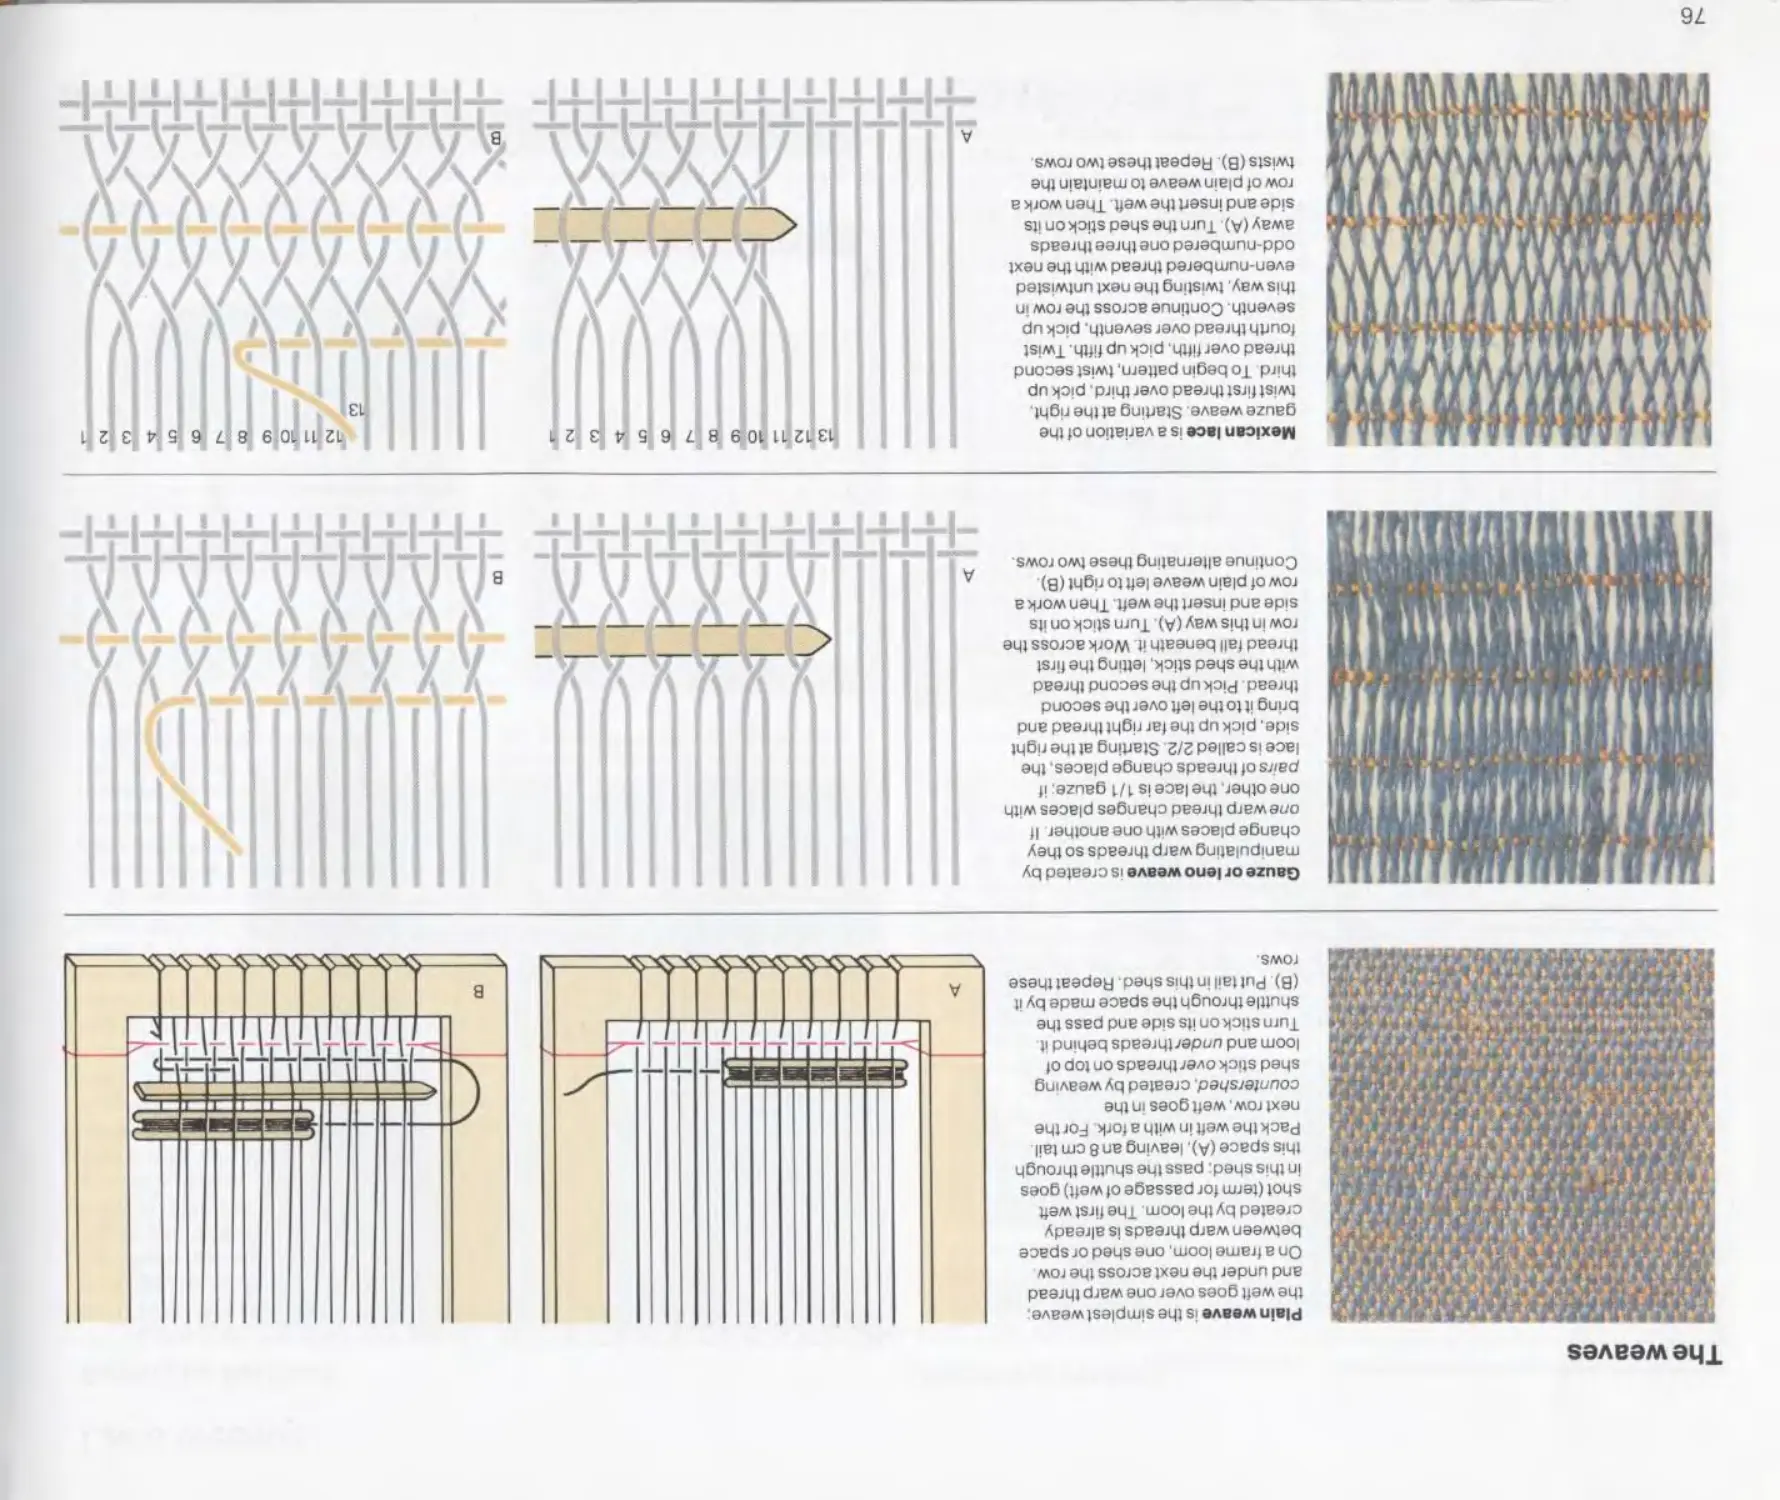
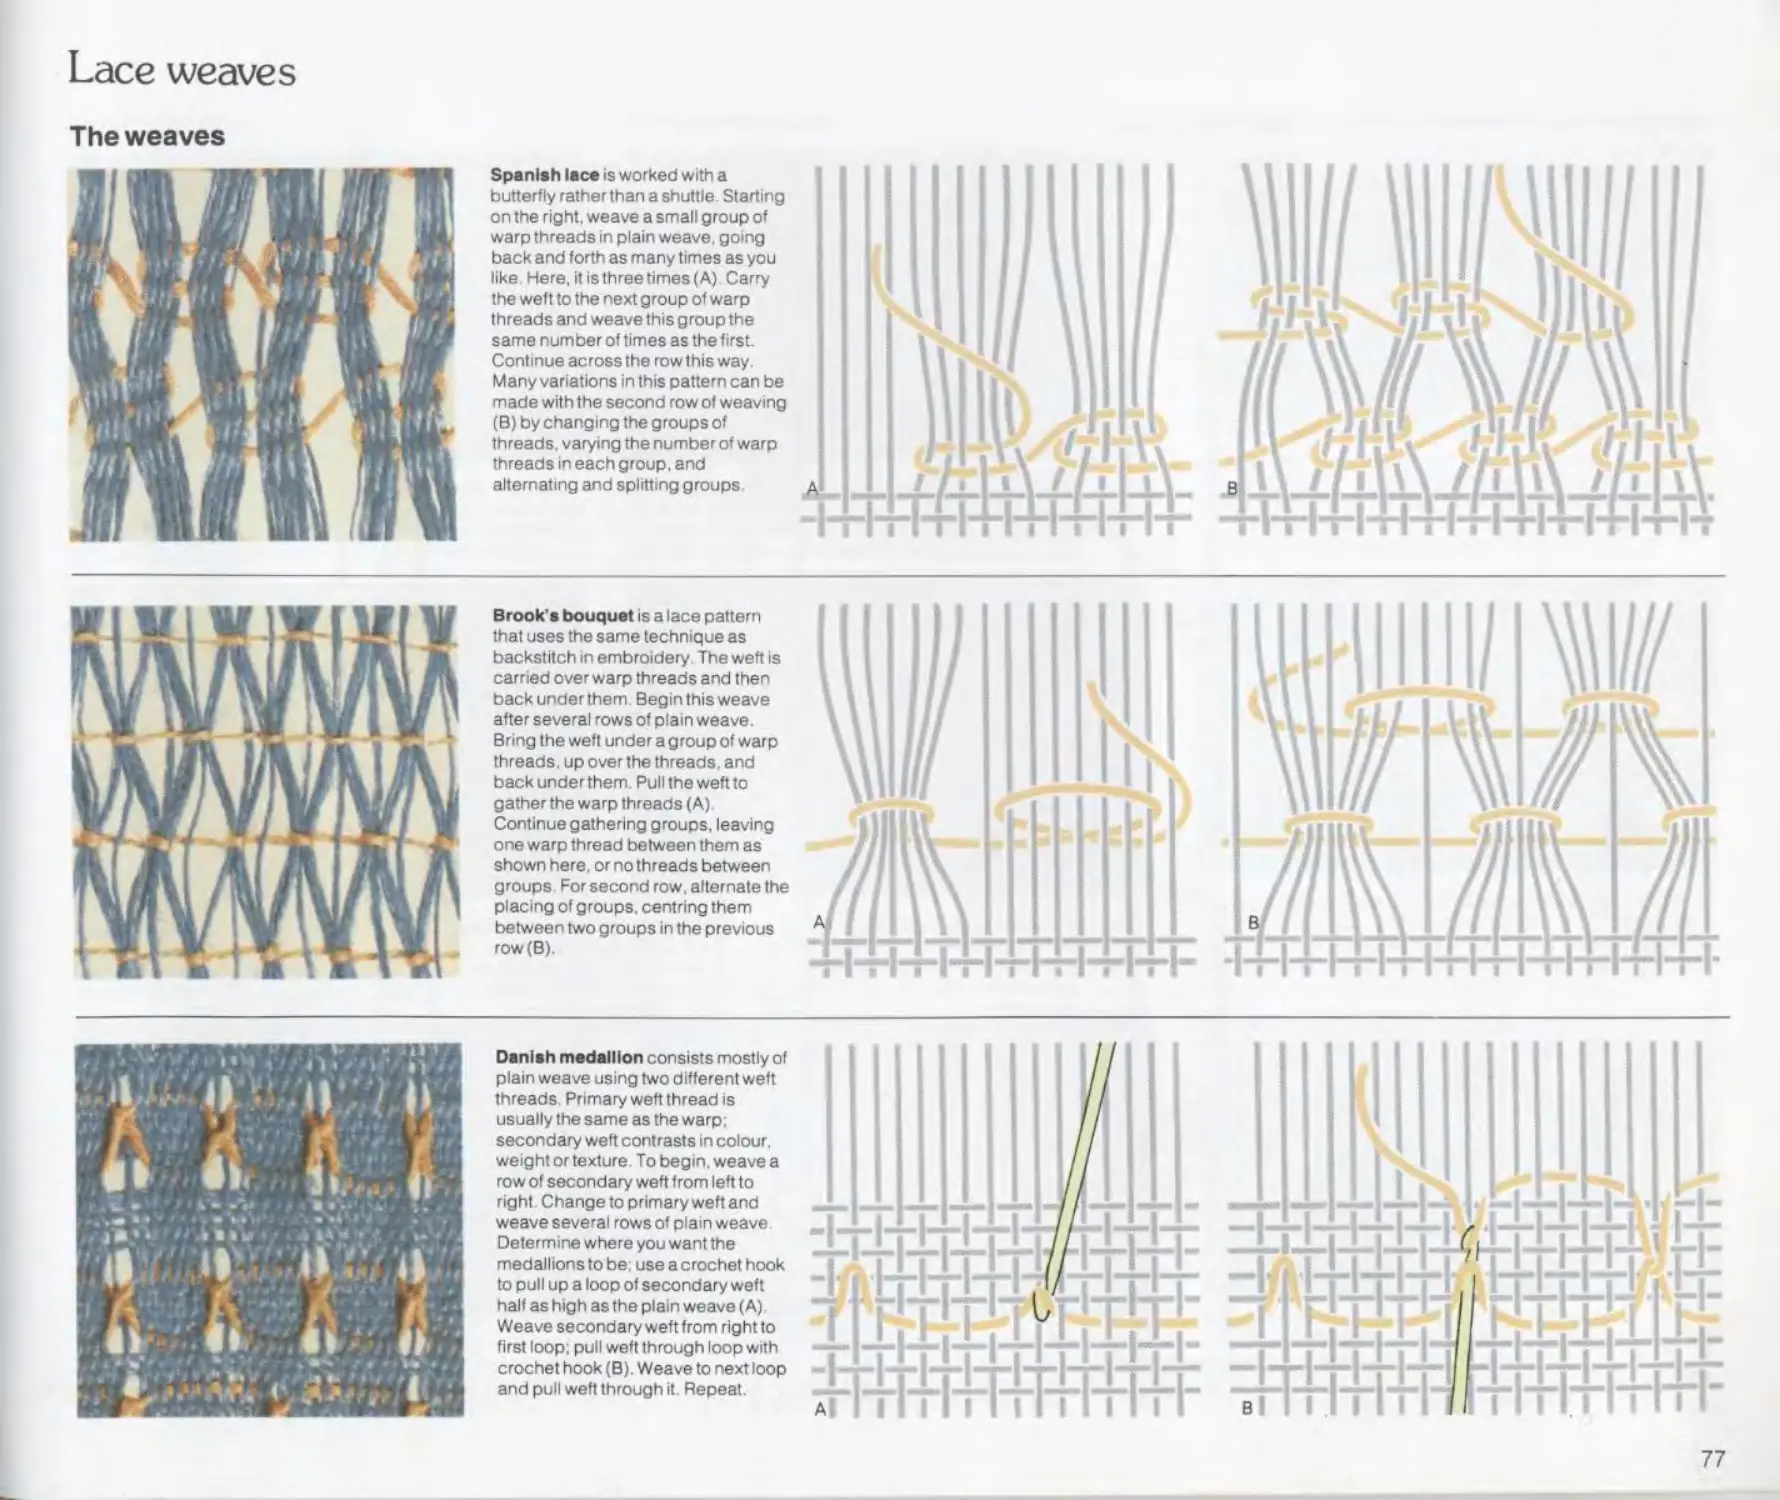
/


Текст
Reader’s Digest Needlecraft Guides
CROCHET &
LACEMAKING
Step-by-step diagrams for every stitch and technique
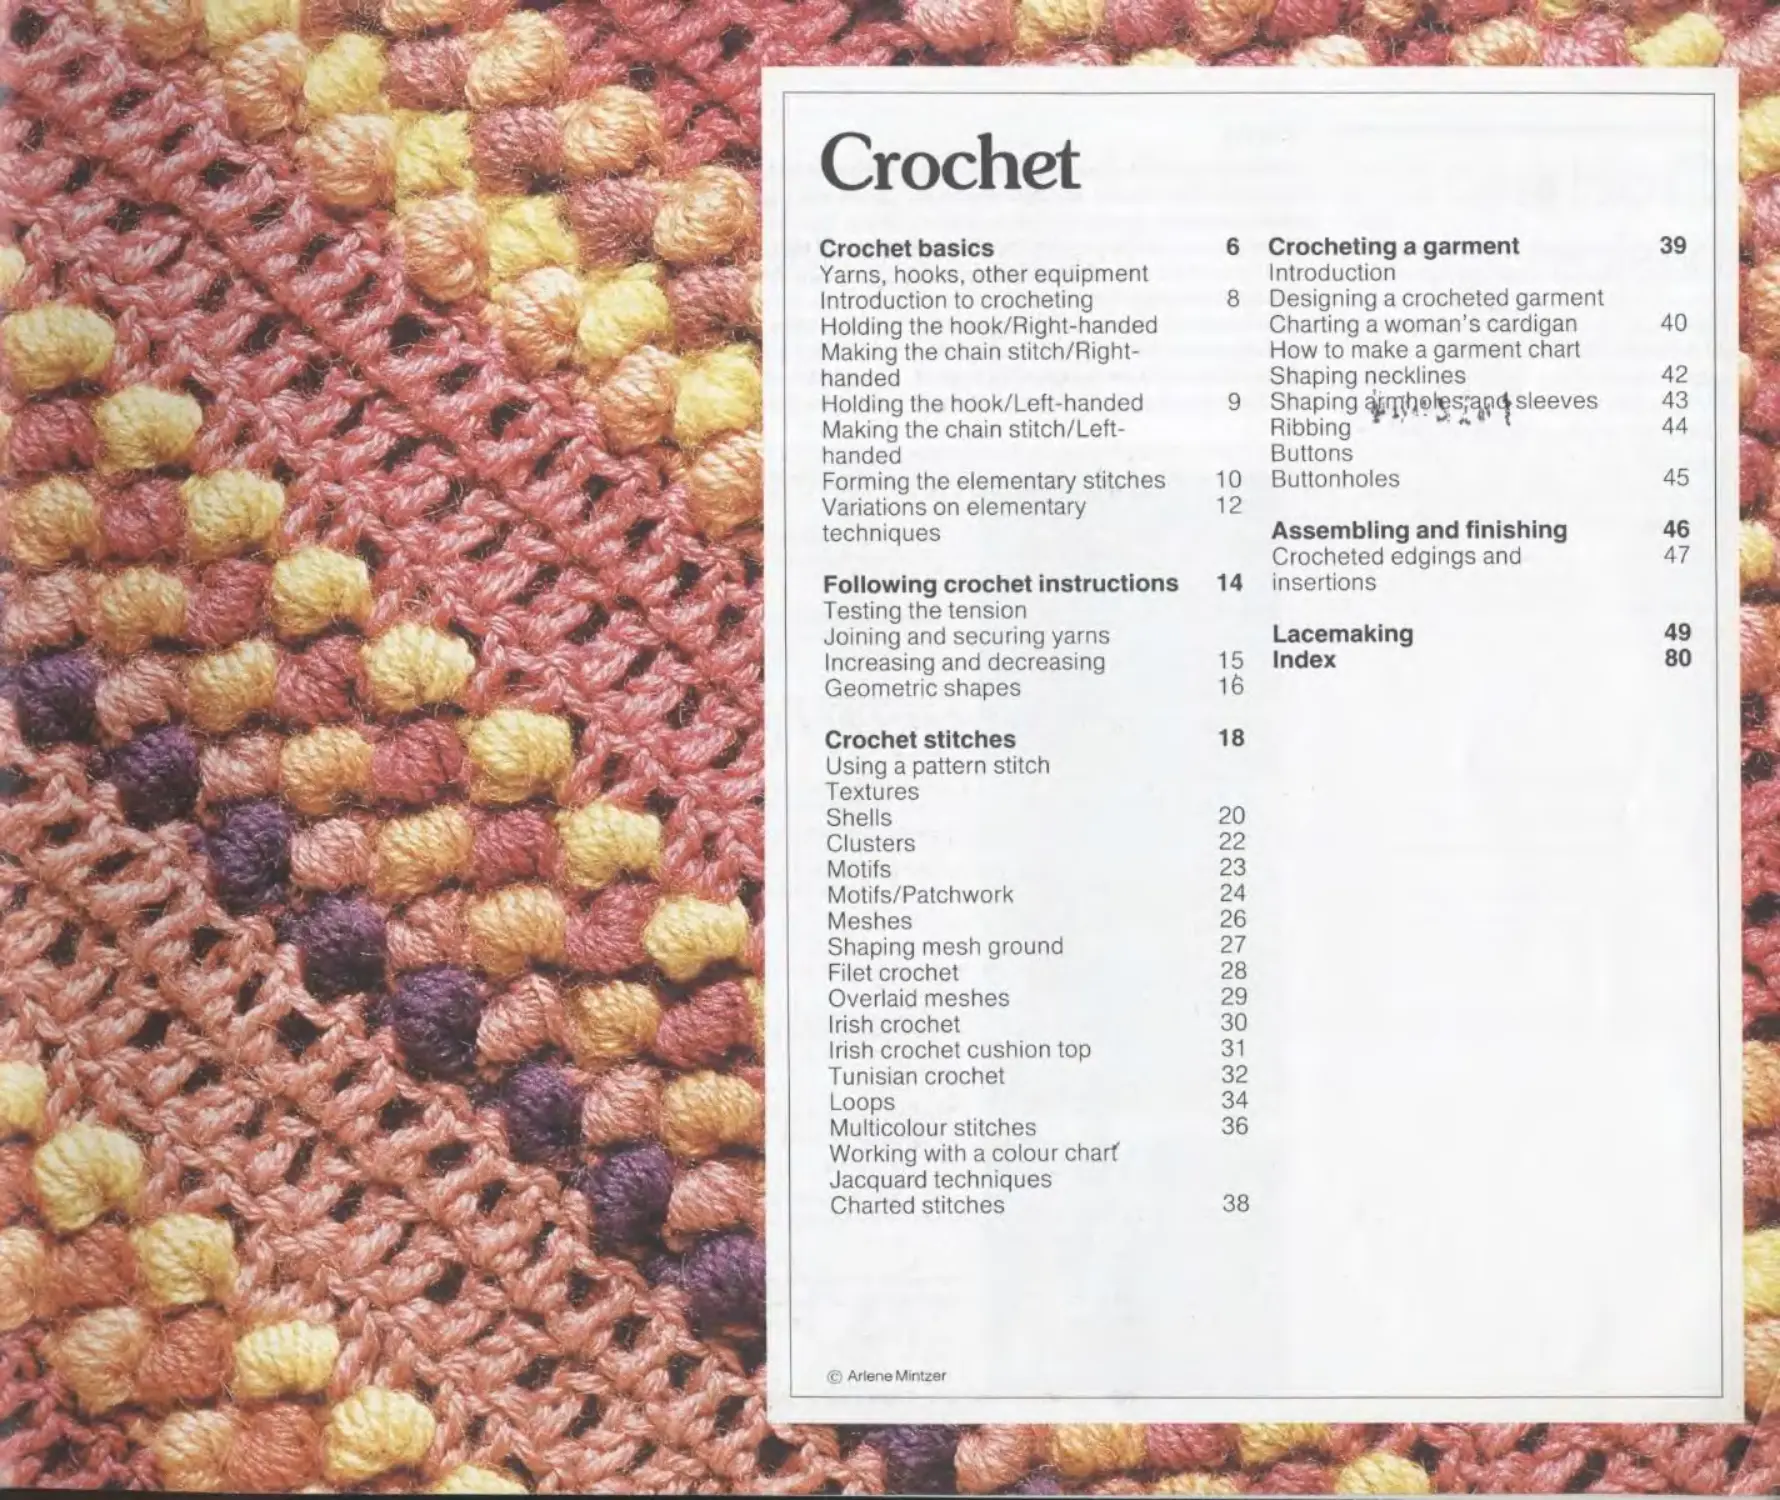
Crochet
Crochet basics 6 Crocheting a garment 39
Yarns, hooks, other equipment Introduction
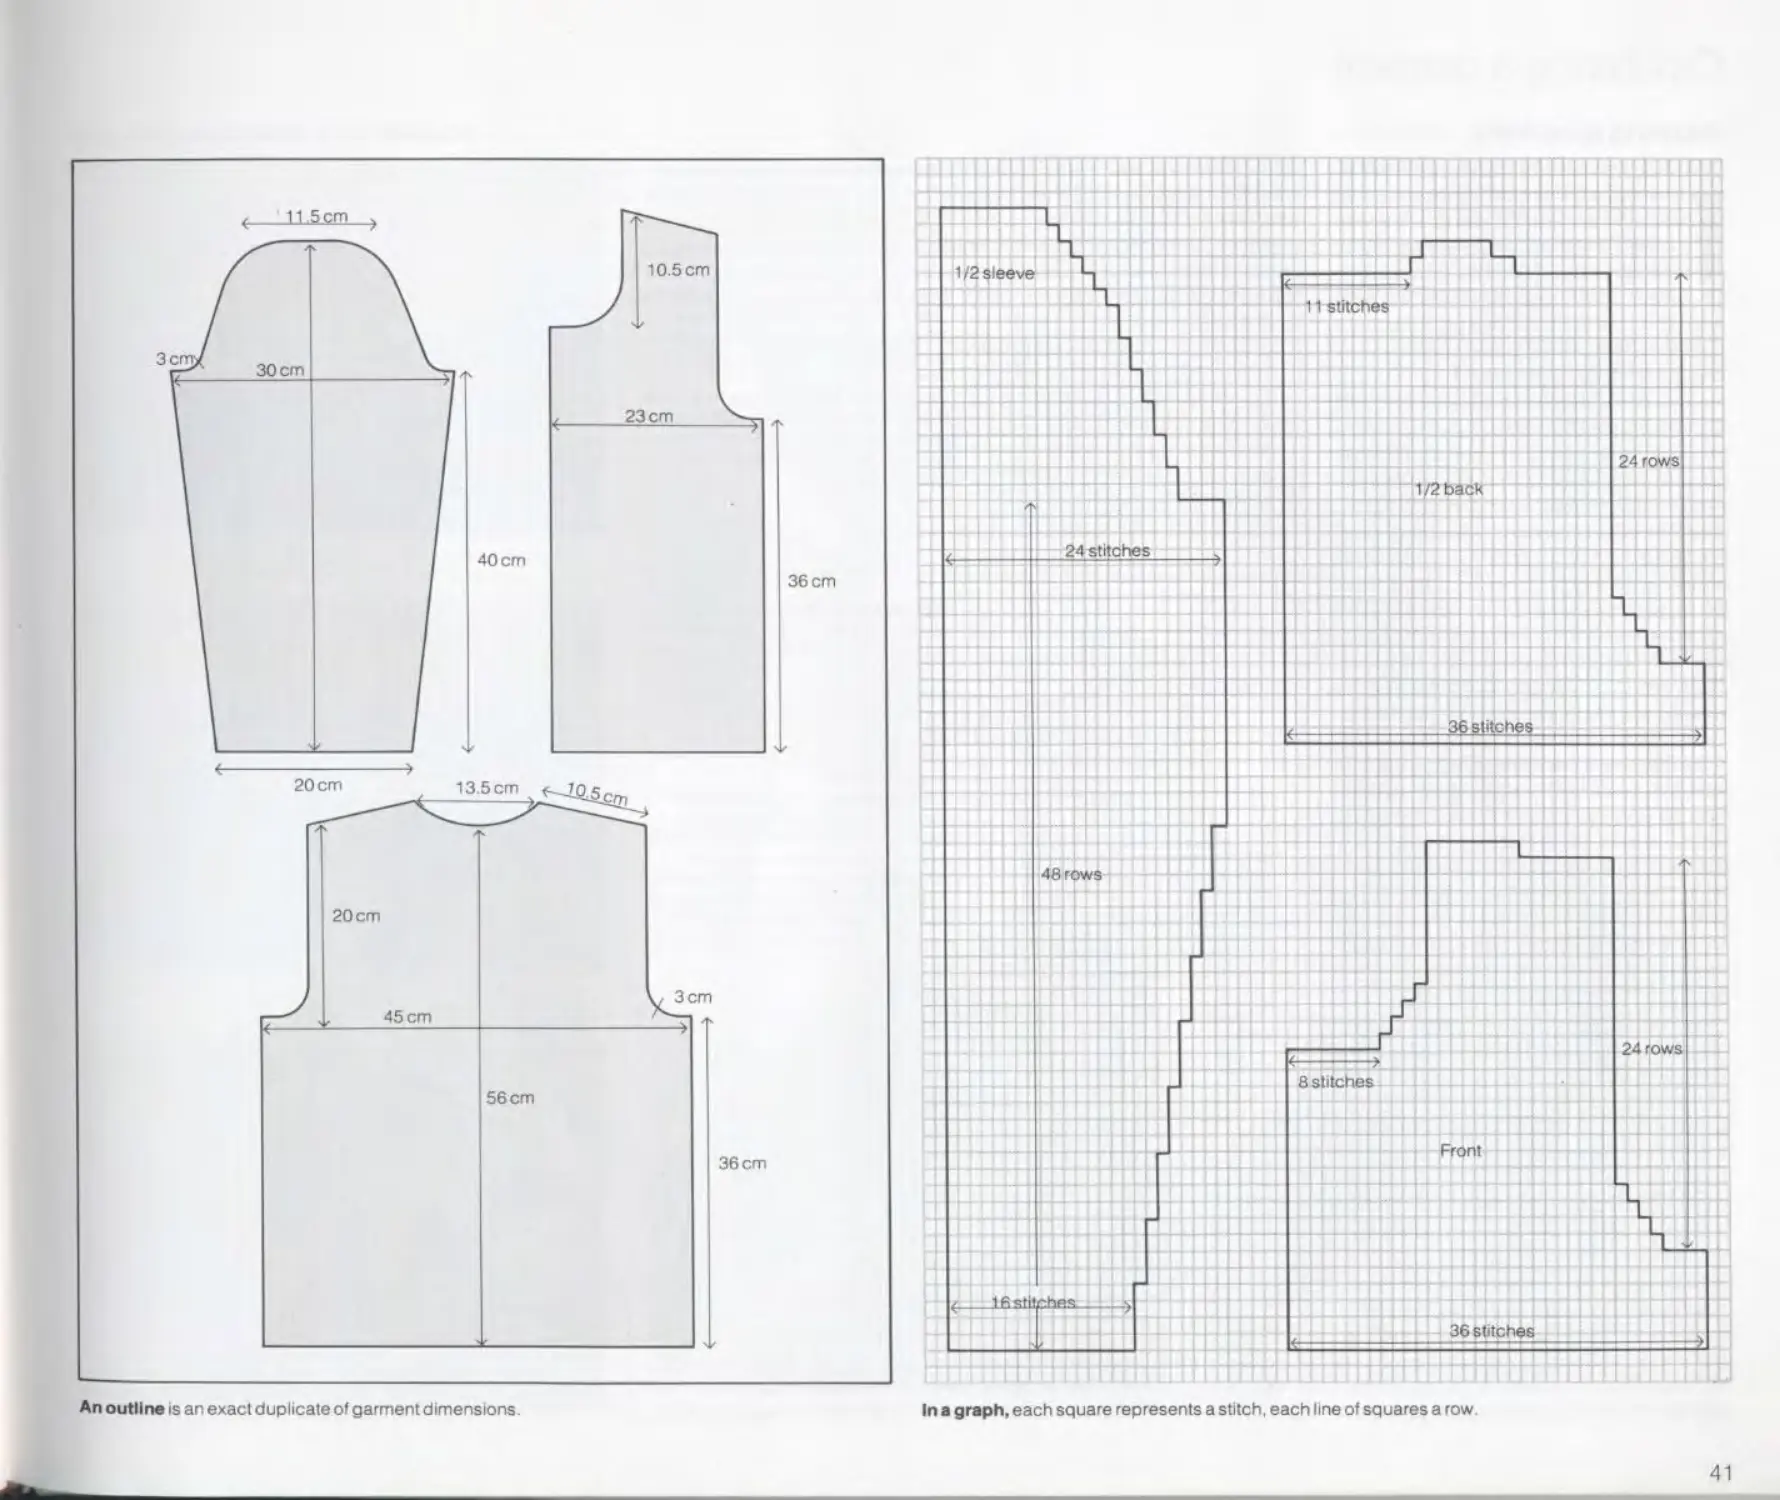
Introduction to crocheting 8 Designing a crocheted garment
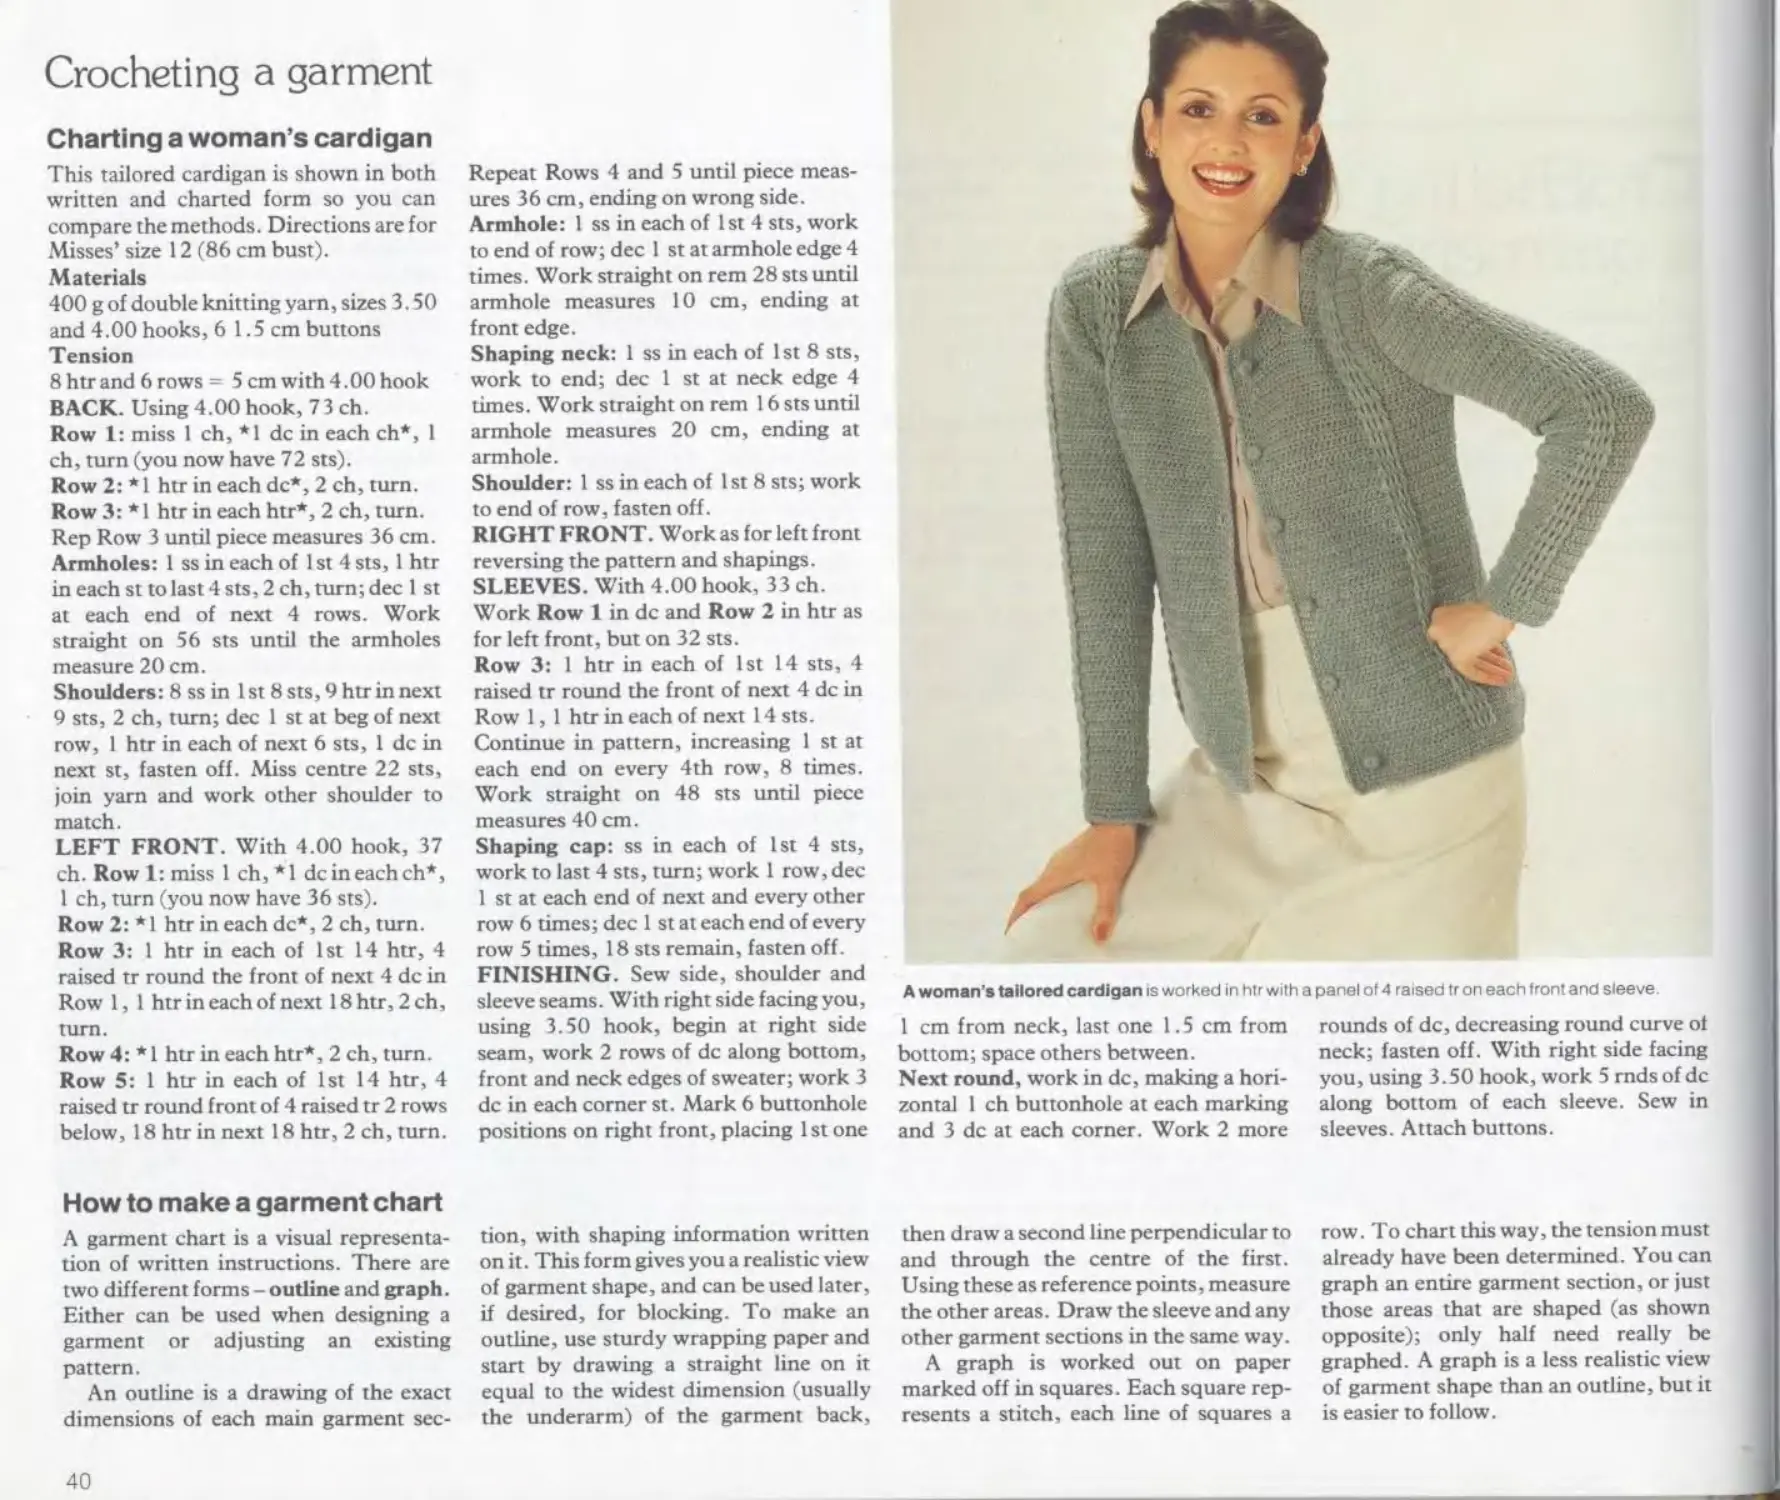
Holding the hook/Right-handed Charting a woman’s cardigan 40
Making the chain stitch/Right- How to make a garment chart
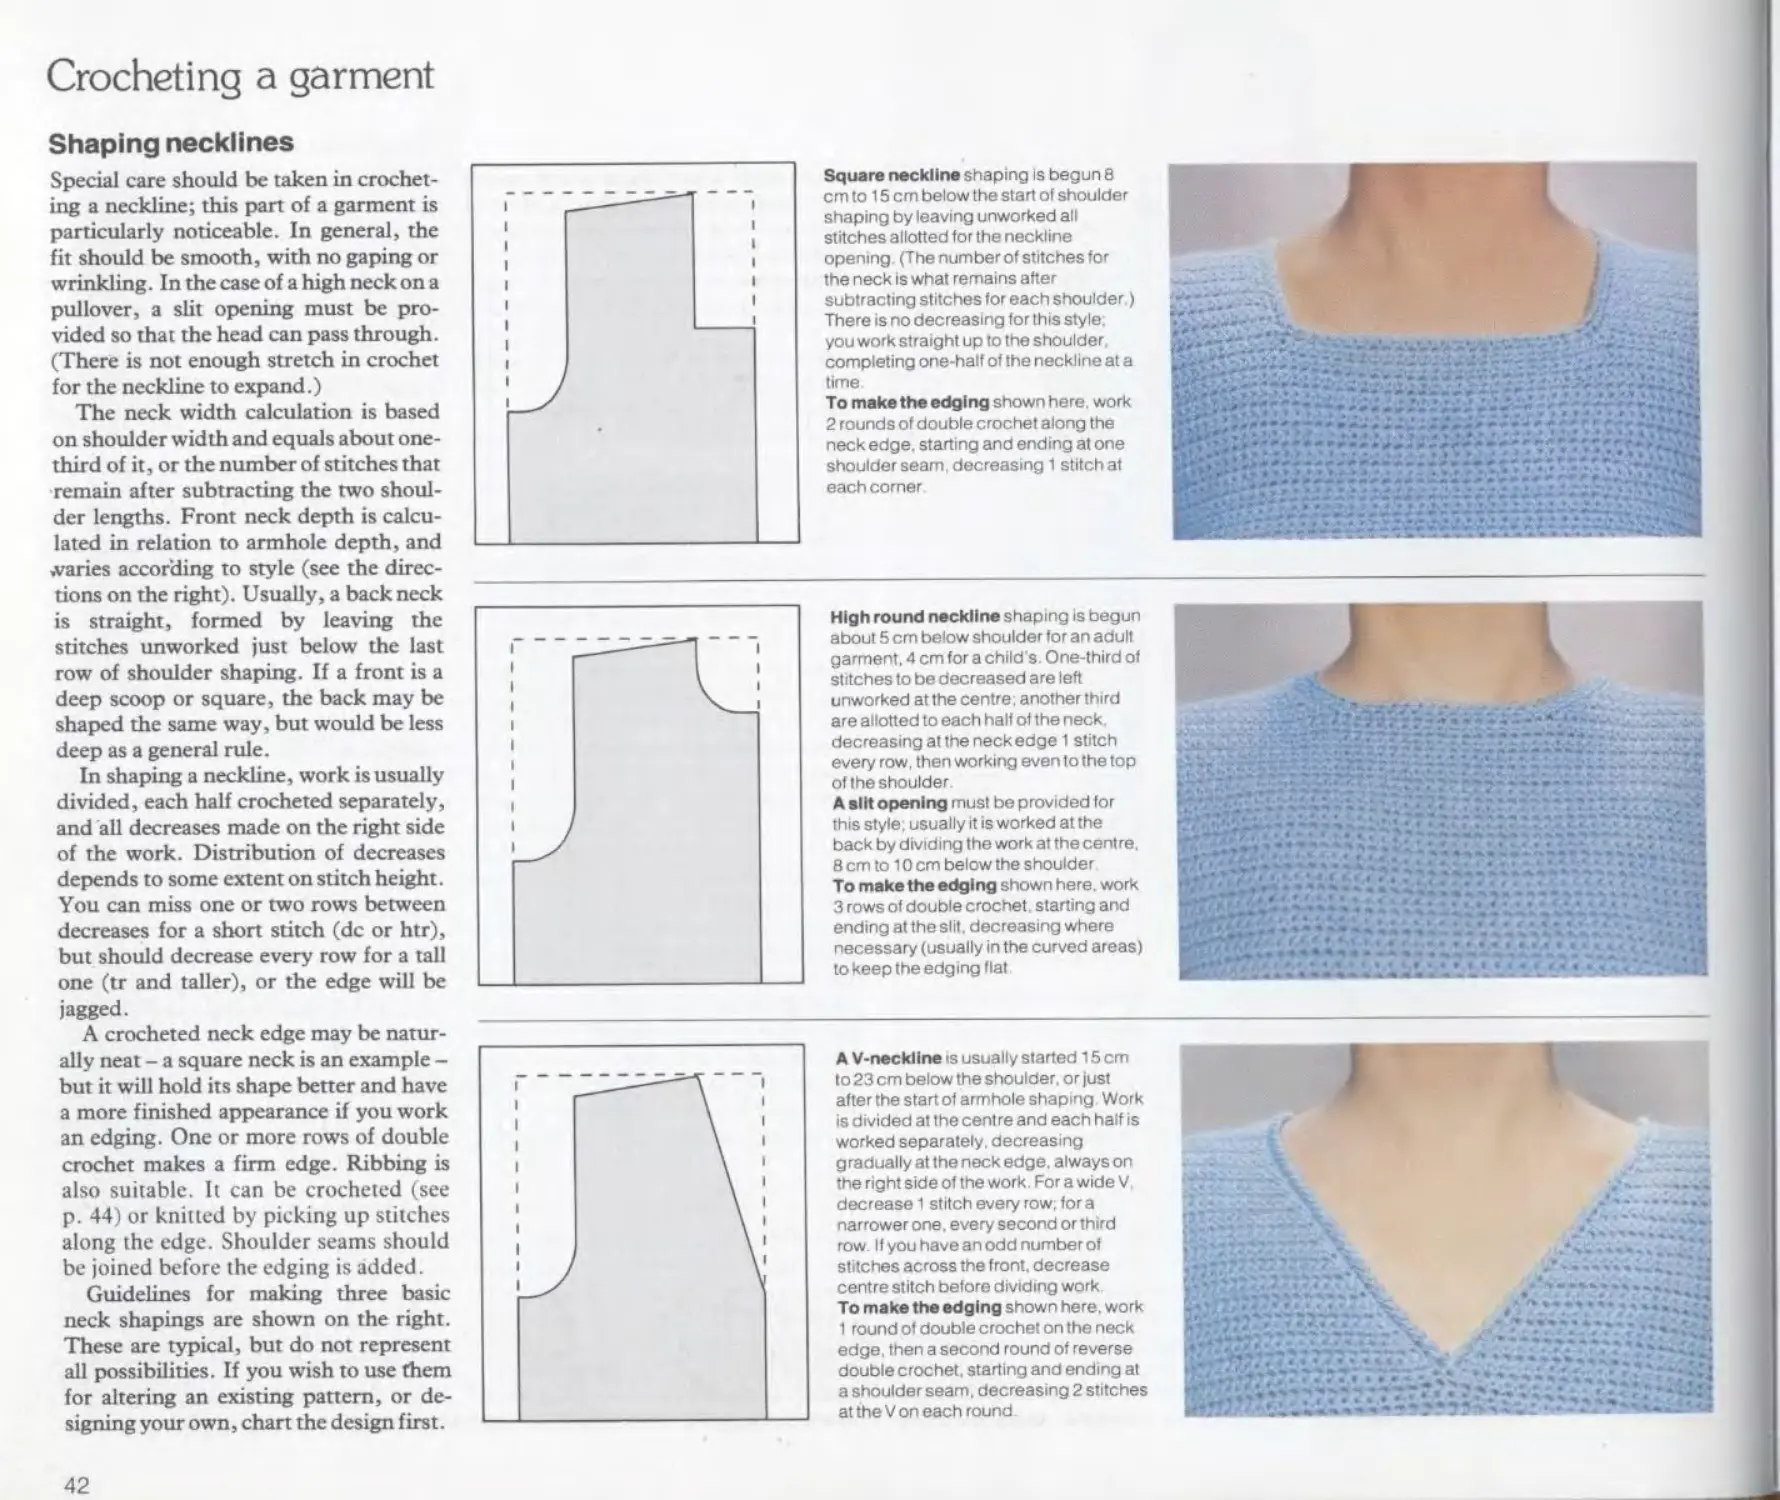
handed Shaping necklines 42
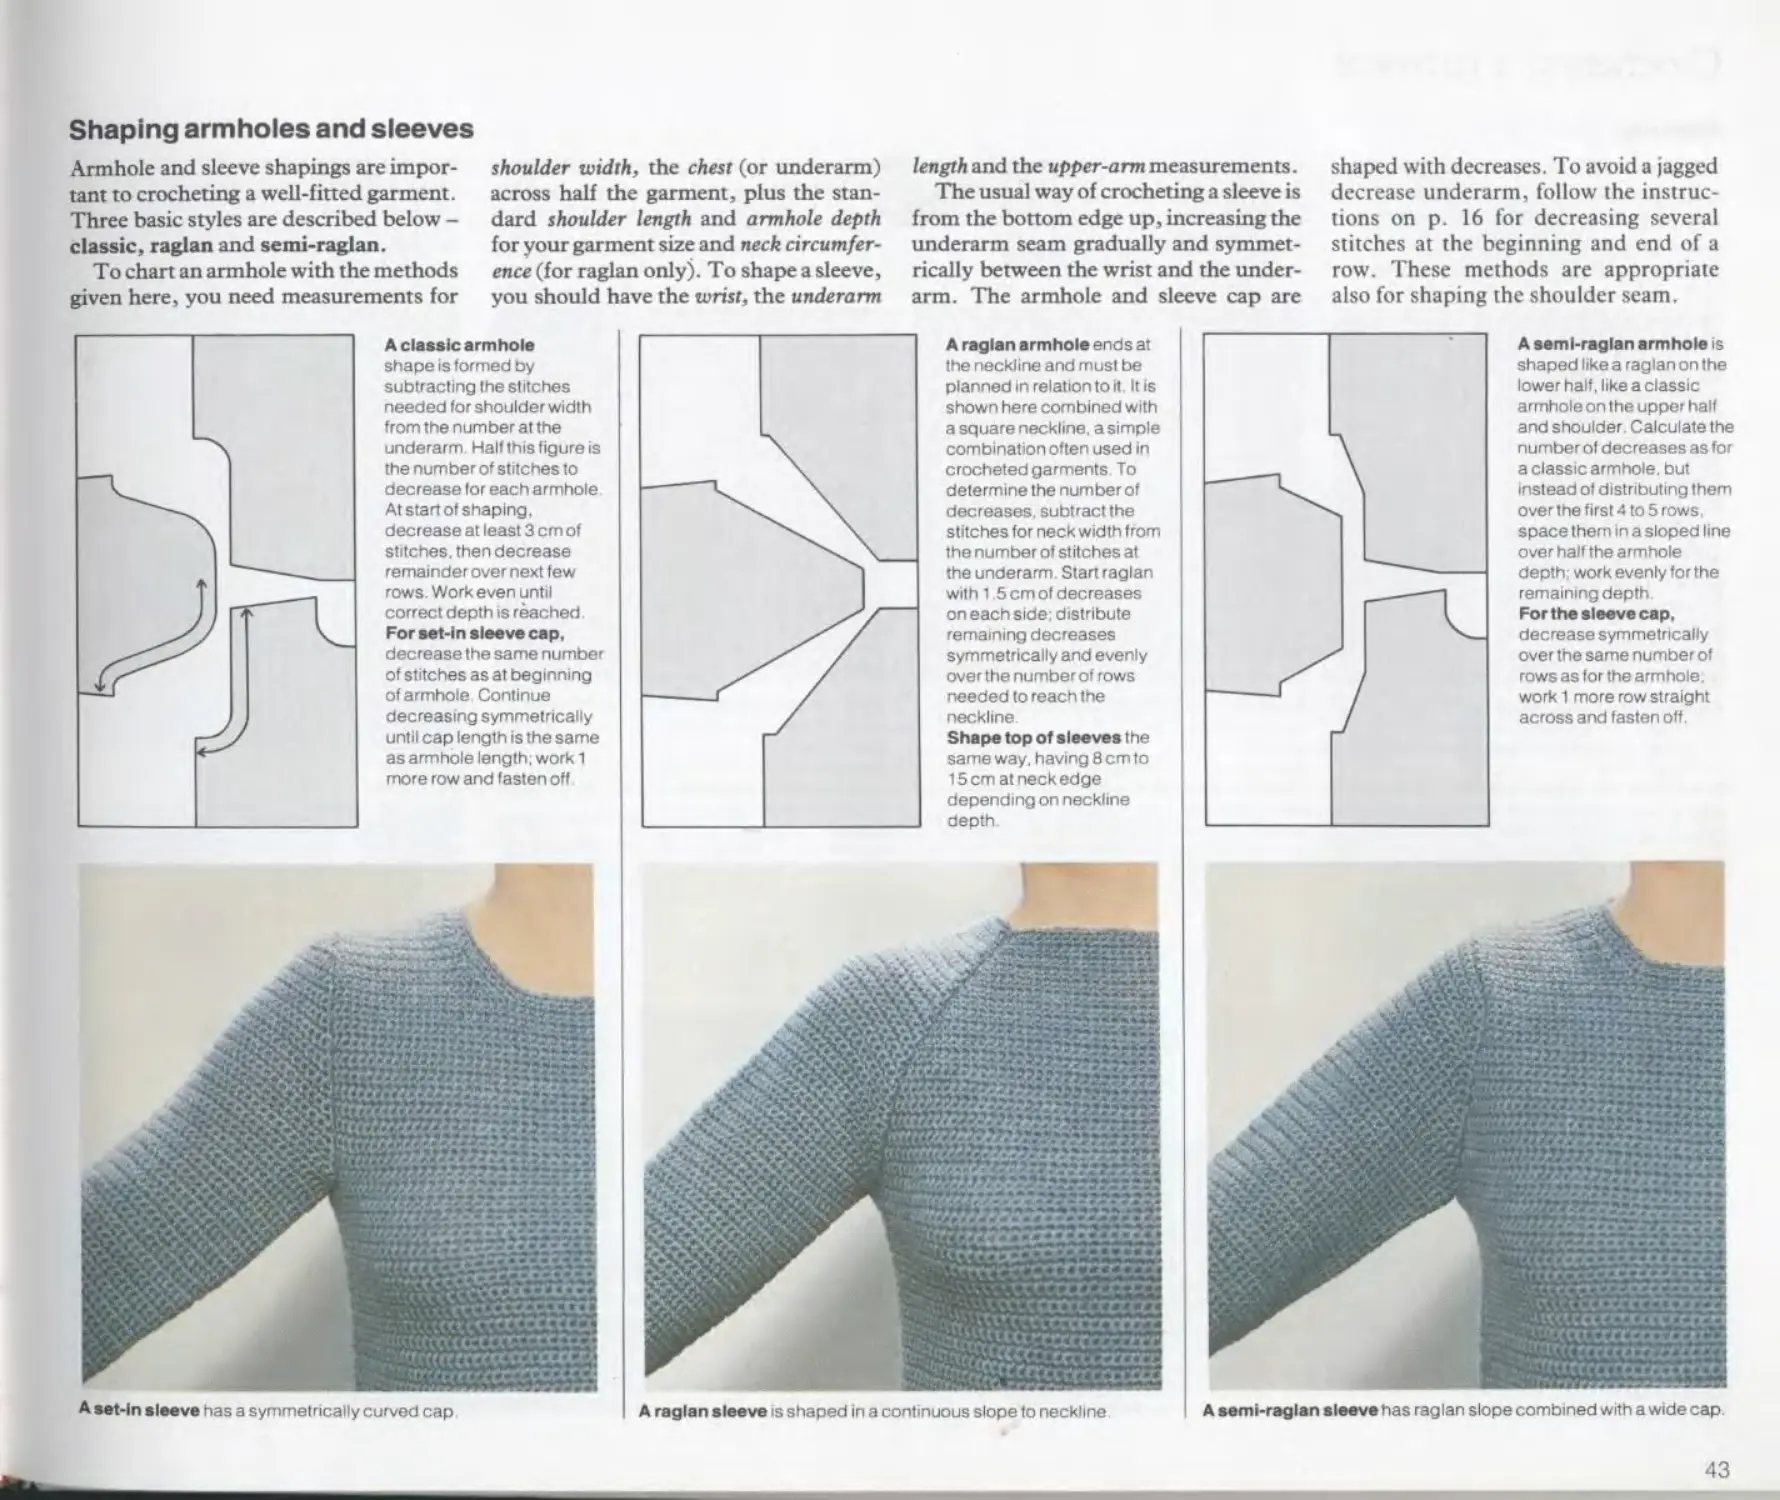
Holding the hook/Left-handed 9 Shaping ajrj(lj6tes^4 sleeves 43
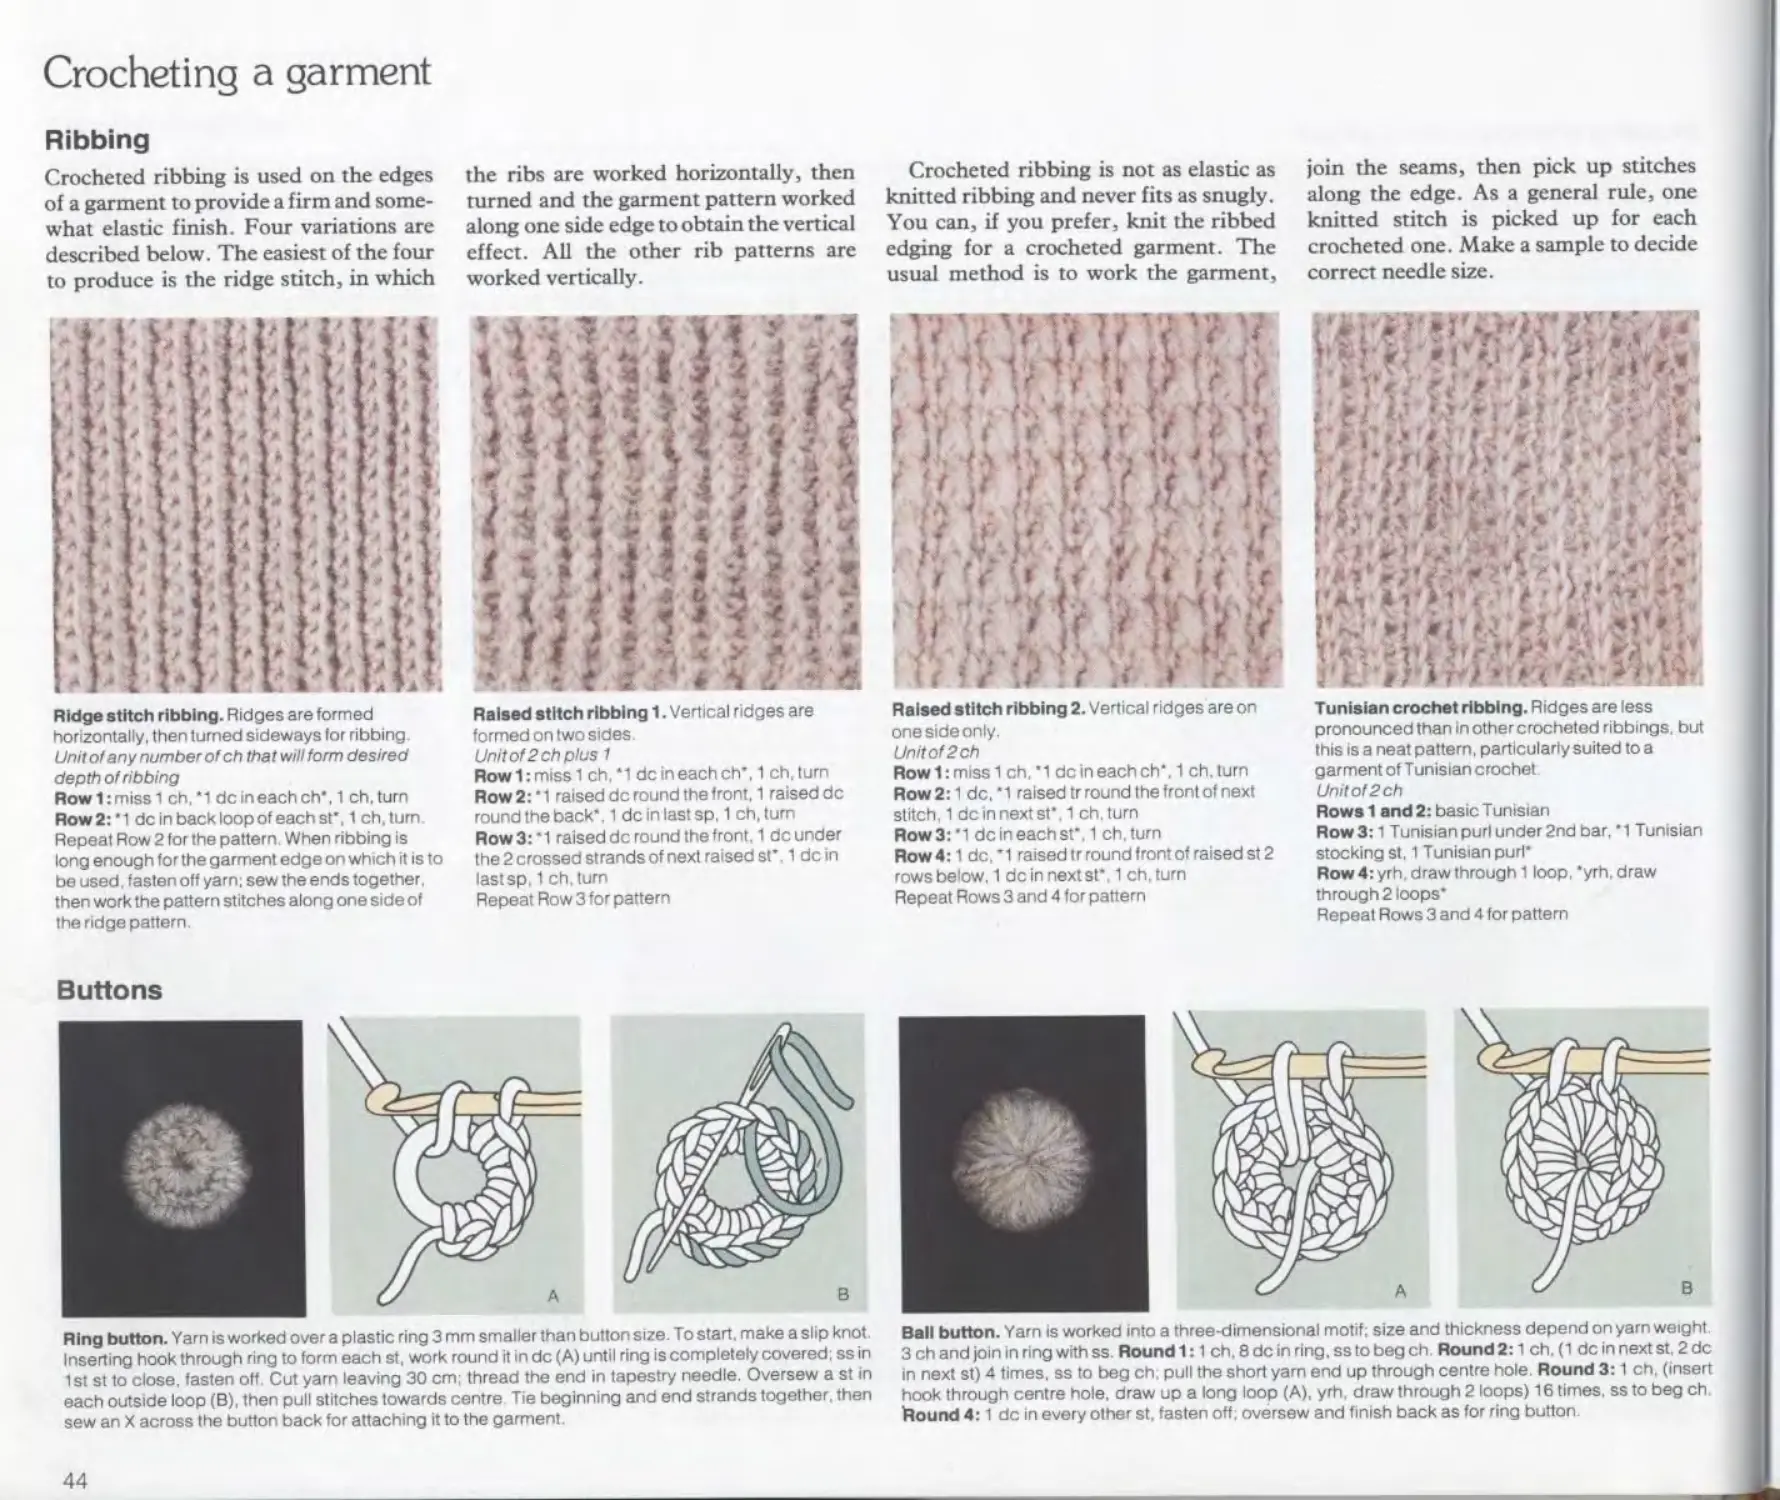
Making the chain stitch/Left- Ribbing ’л 44
handed Buttons
Forming the elementary stitches 10 Buttonholes 45
Variations on elementary 12
techniques Assembling and finishing 46
Crocheted edgings and 47
Following crochet instructions 14 insertions
Testing the tension
Joining and securing yarns Lacemaking 49
Increasing and decreasing 15 Index 80
Geometric shapes 16
Crochet stitches 18
Using a pattern stitch
Textures
Shells 20
Clusters 22
Motifs 23
Motifs/Patchwork 24
Meshes 26
Shaping mesh ground 27
Filet crochet 28
Overlaid meshes 29
Irish crochet 30
Irish crochet cushion top 31
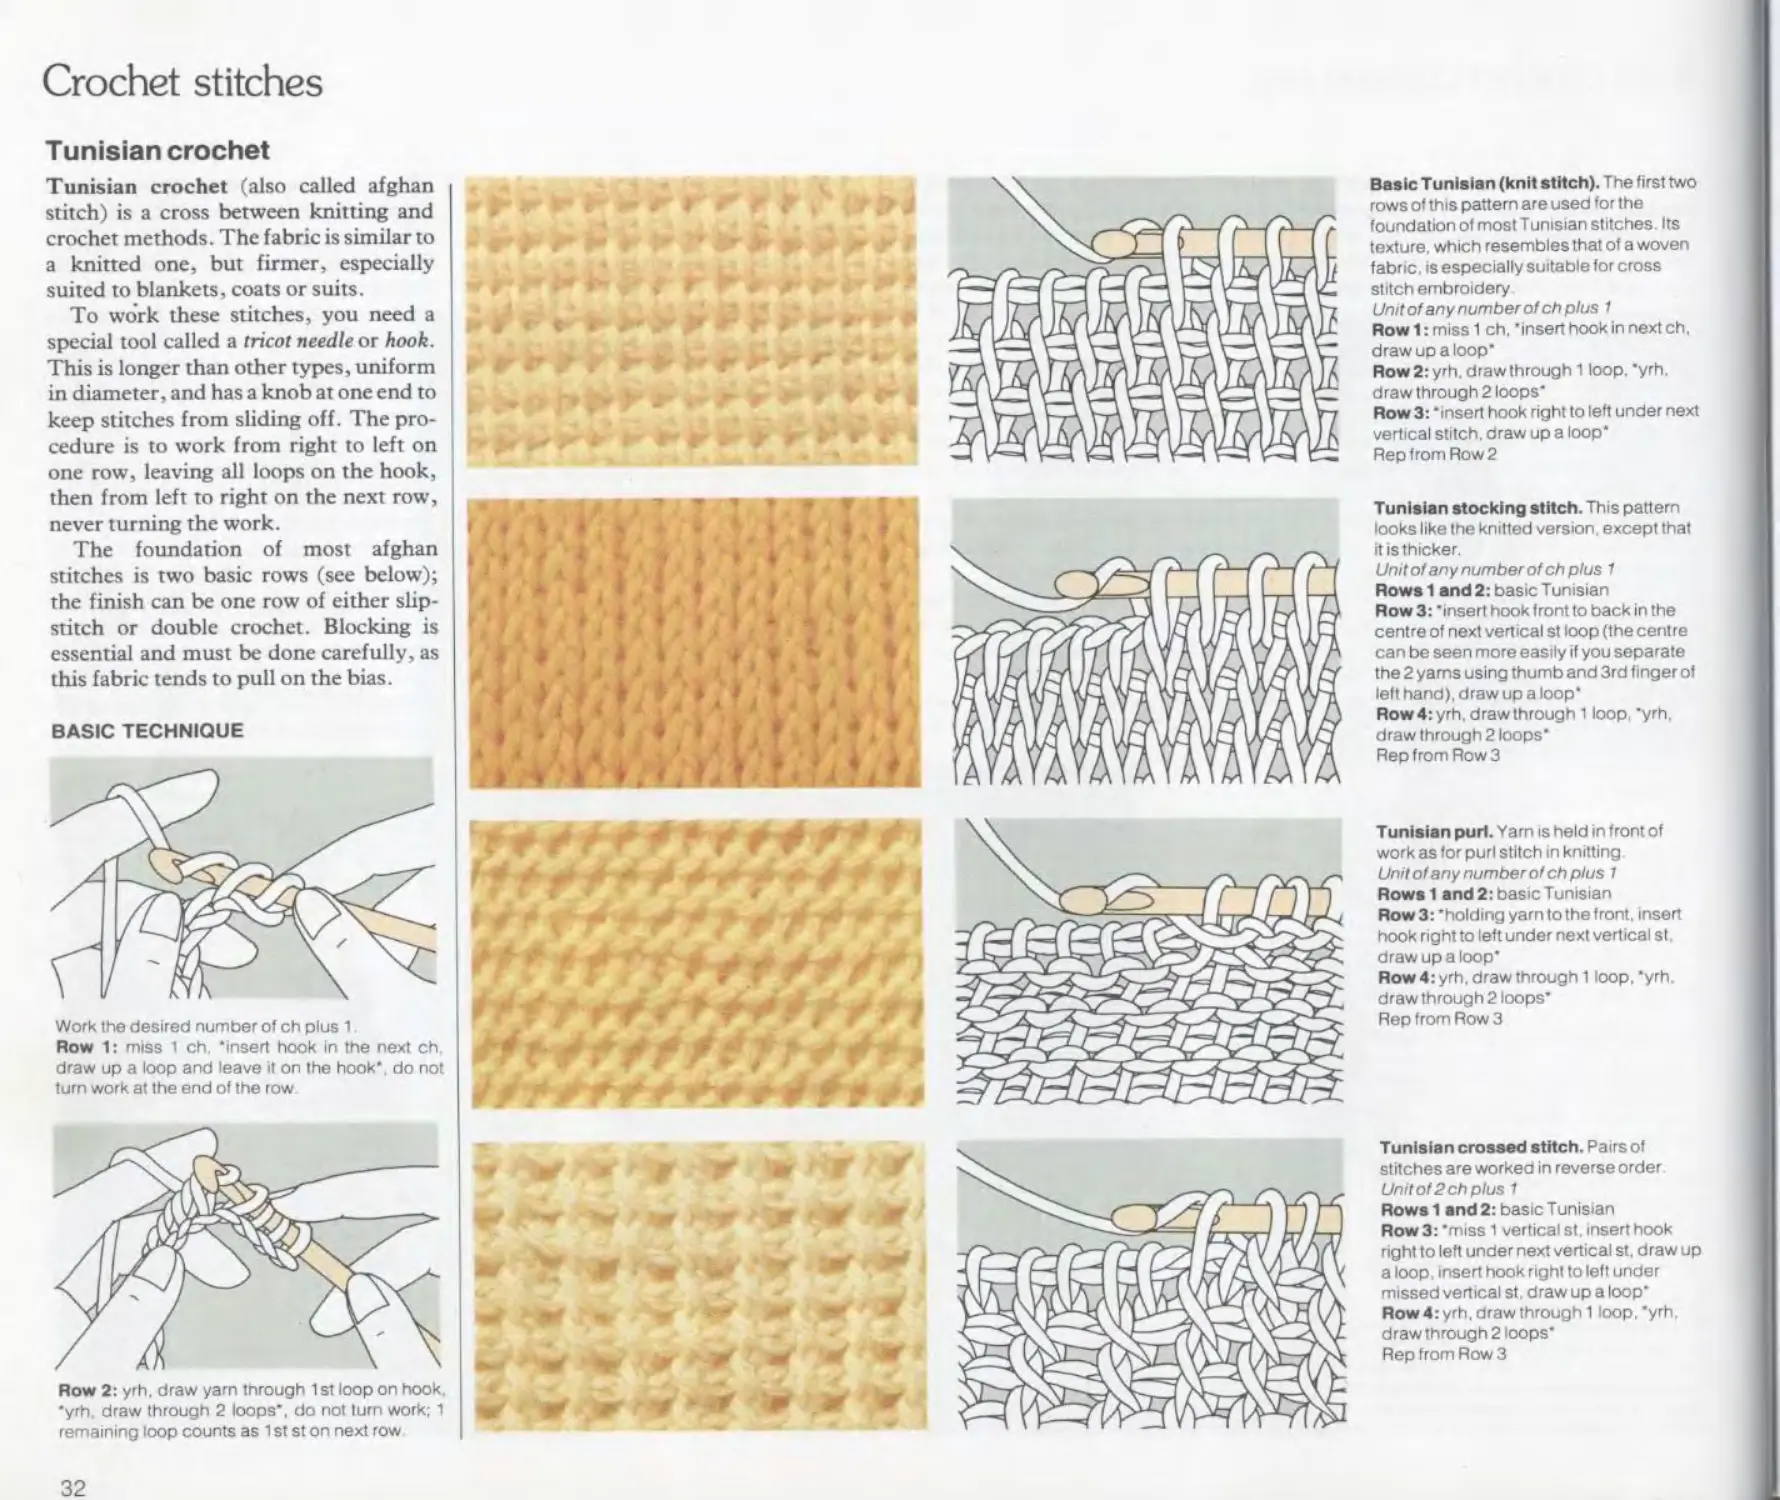
Tunisian crochet 32
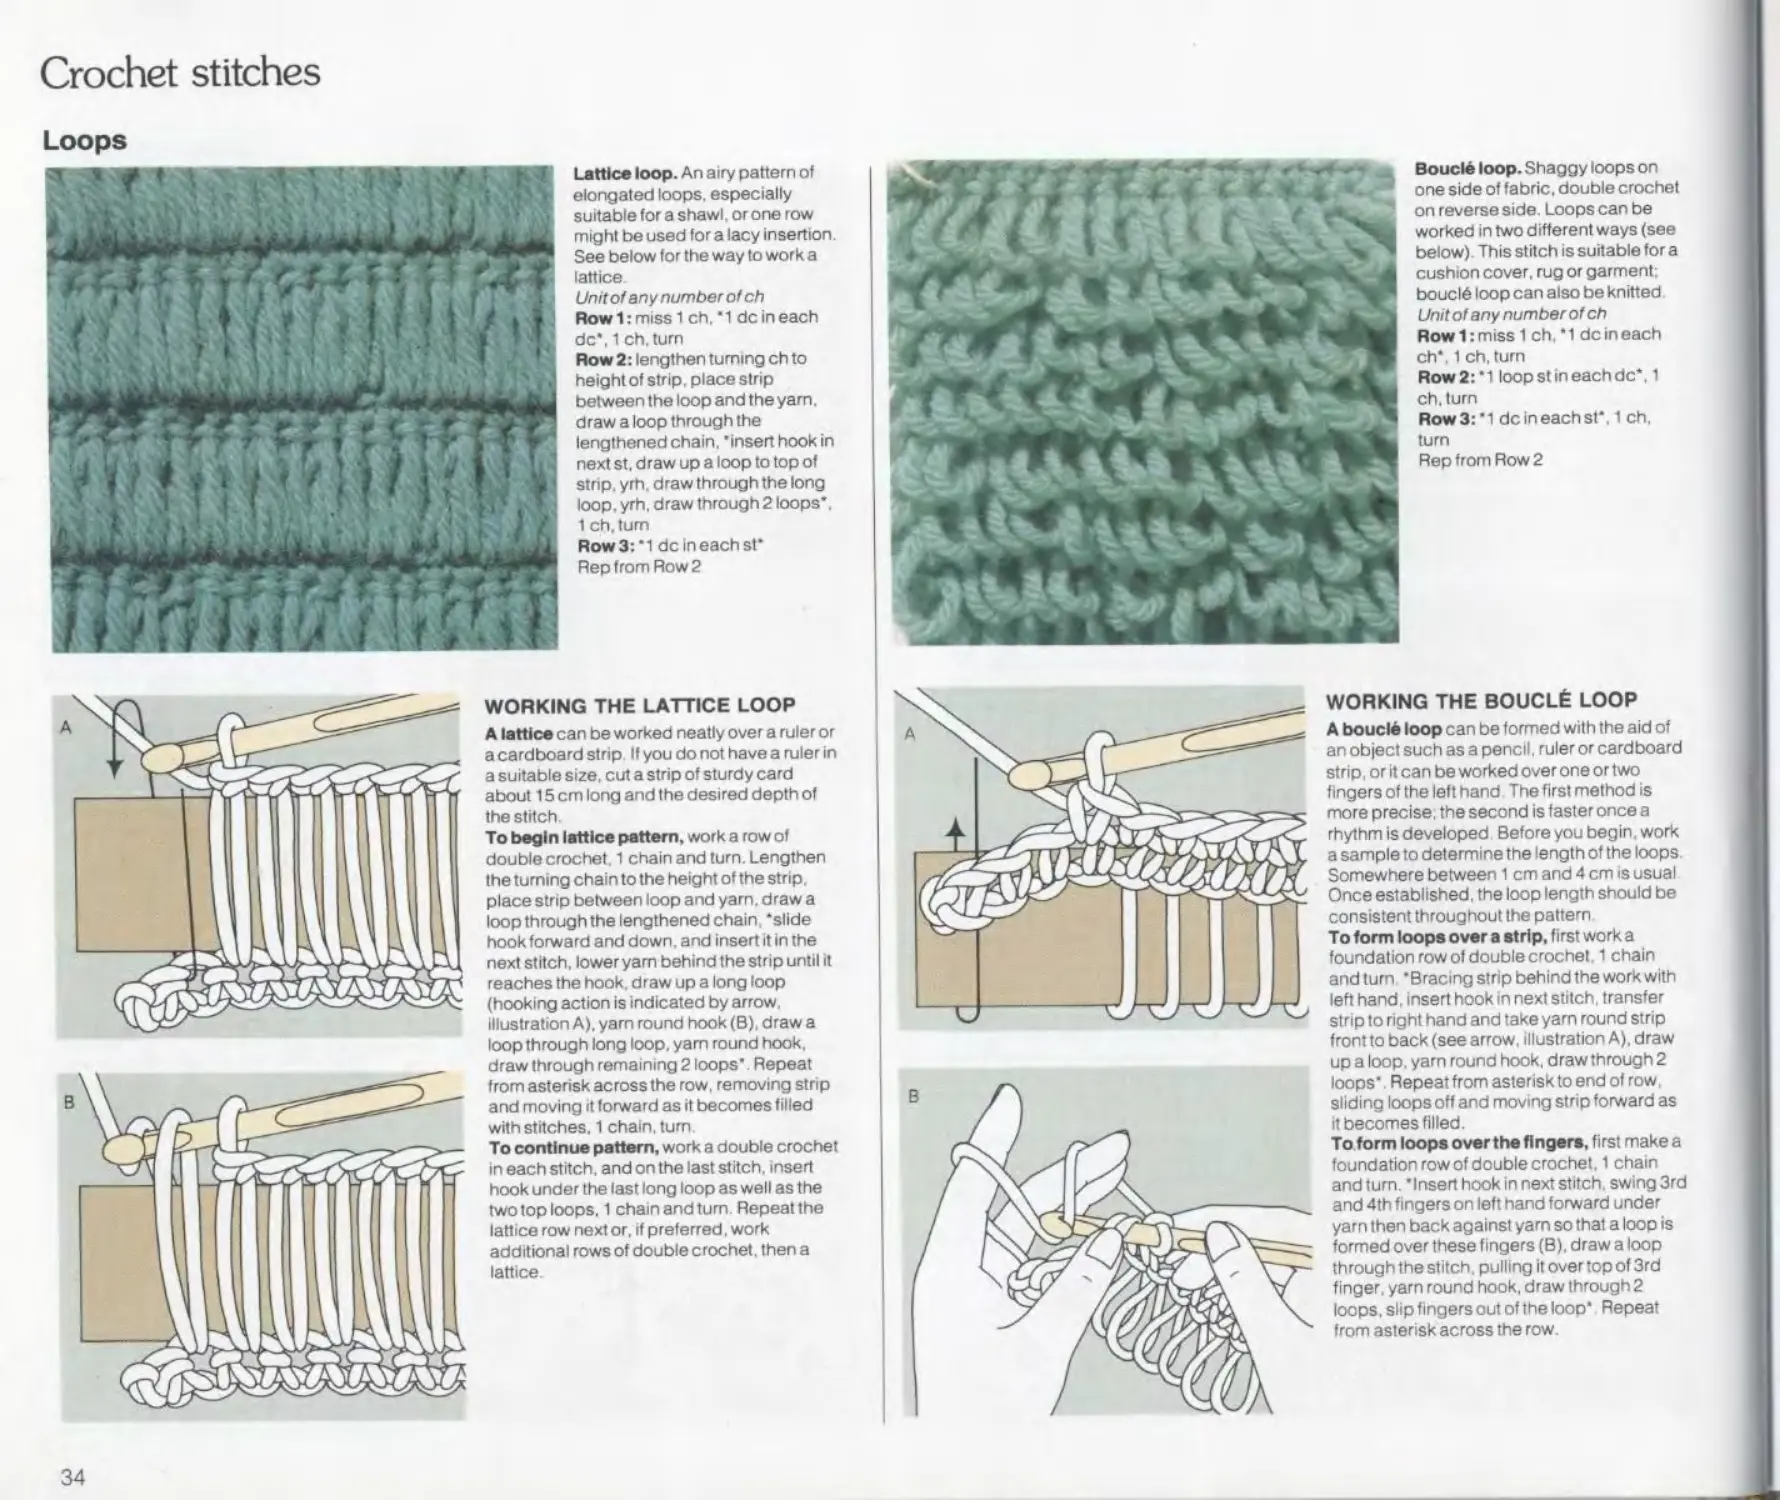
Loops 34
Multicolour stitches 36
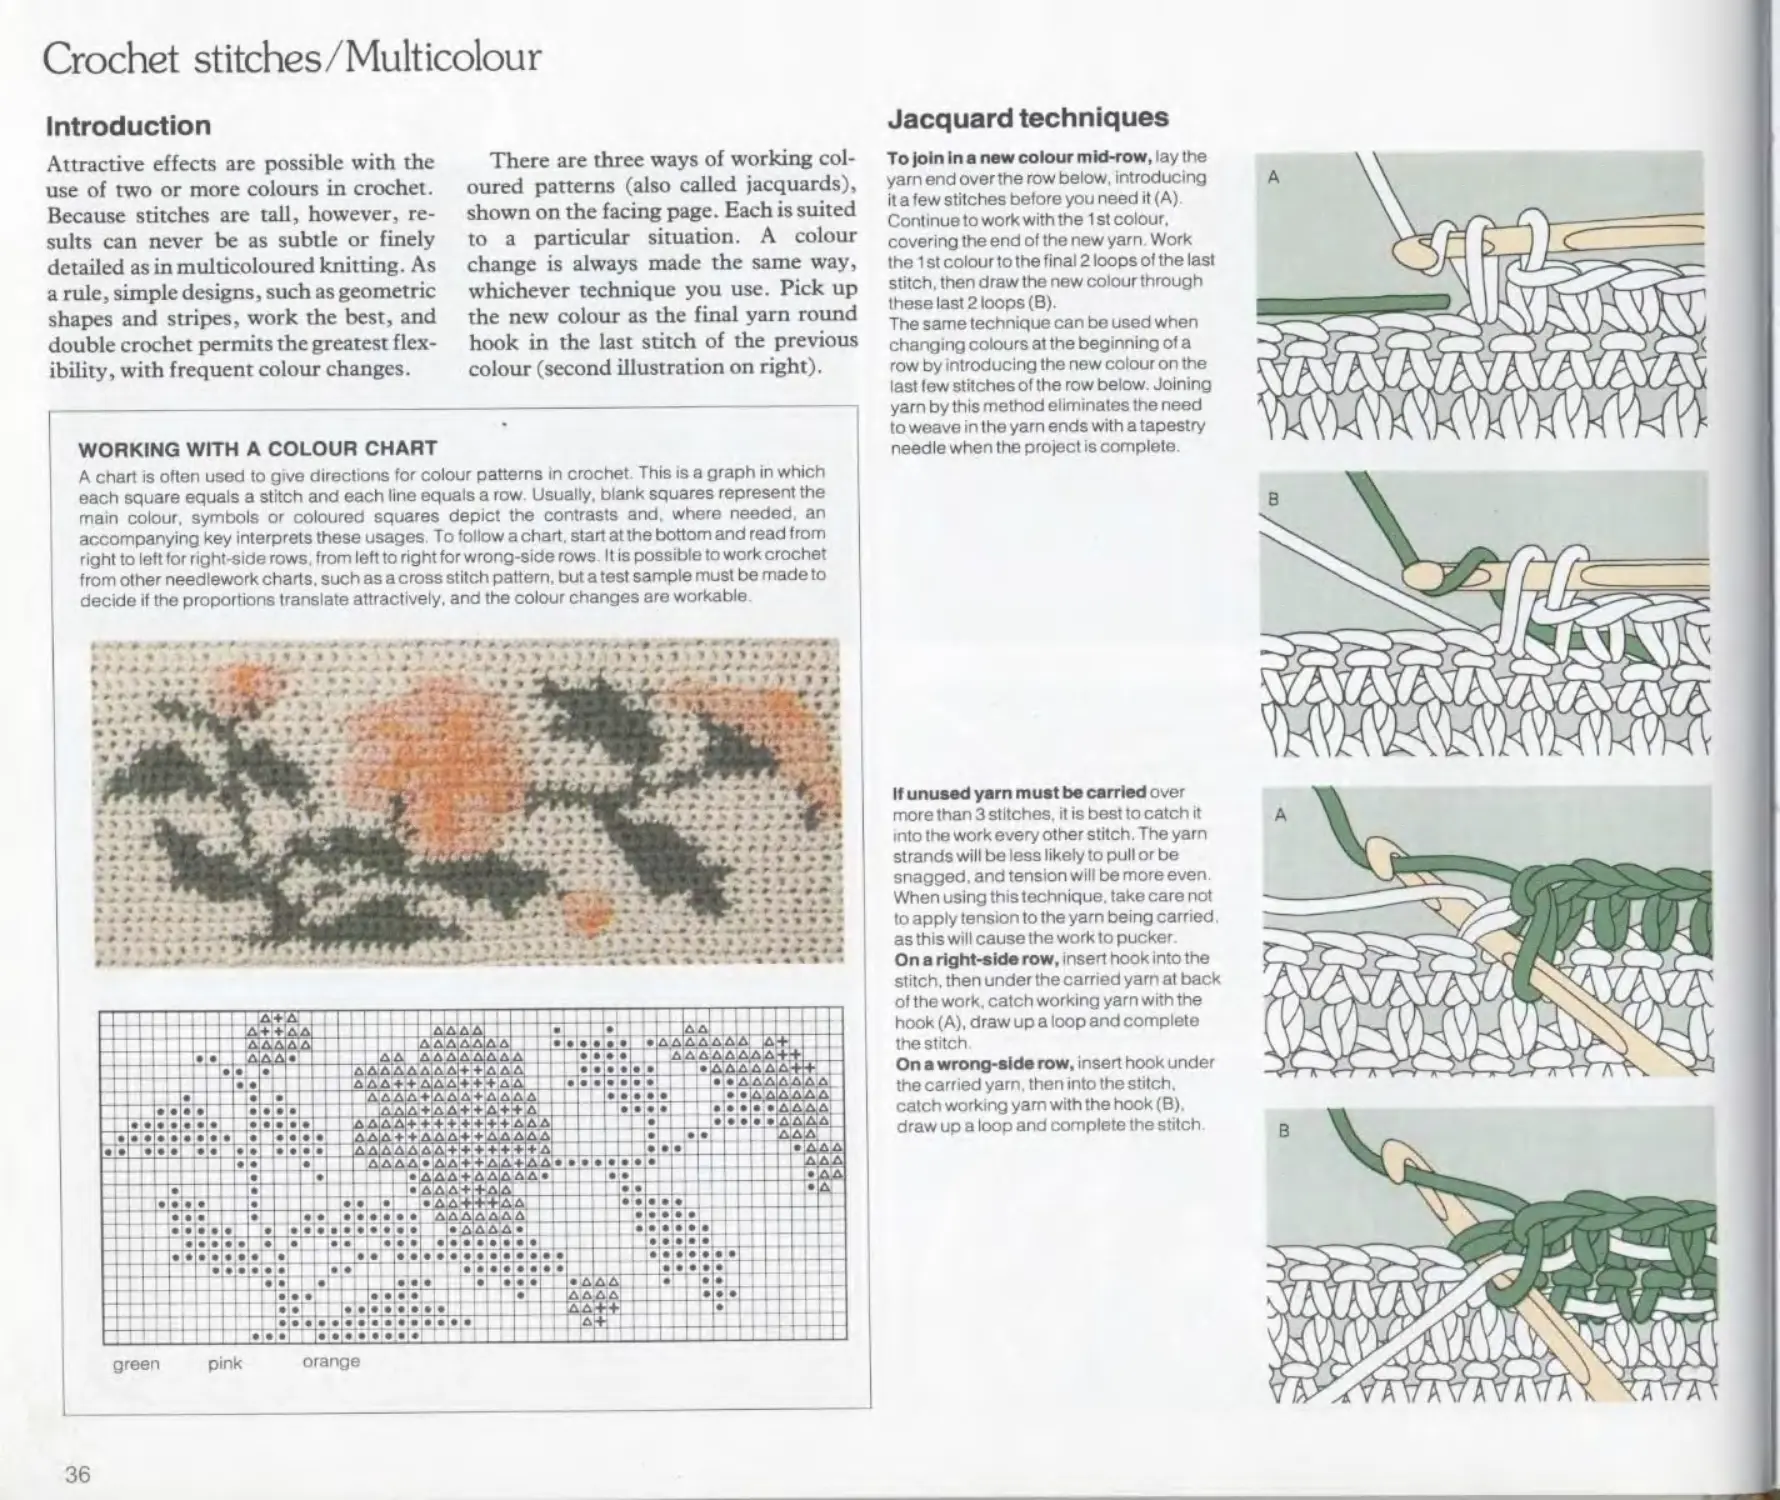
Working with a colour chart
Jacquard techniques
Charted stitches 38
© Aflene Mintzer
Yarns
Crocheting can be done with any stringy
material from finest tatting cotton to
raffia, leather cords or fabric strips.
Your choice only has to suit the purpose
and be worked with an appropriate hook
(see opposite page for selection).
For convenience in comparing similar
yarn types, a chart of wools and synthe-
tic yarns appears on the opening page of
the Knitting chapter; below is a chart of
Crochet
basics
Yarns
Hooks and supplementary
equipment
Holding the hook/Right-handed
Making the chain stitch/Right-
handed
Holding the hook/Left-handed
Making the chain stitch/Left-
handed
Forming the elementary stitches
Variations on elementary
techniques
crochet yarns. A significant difference
between these two groups: yarns in the
first are sold by weight, those in the
second by ball. Sometimes the length is
shown in metres.
Most cotton yarns are mercerised; this
means they have undergone a process
that strengthens and gives them greater
lustre. Most are colourfast, a term that
signifies colours will not run or fade in
hot water. Some of these terms appear
on the label, along with other descrip-
tive information, such as number of plies
or cords - single units - that have been
twisted together, and sometimes a
number (usually between 10 and 60)
that signifies thickness of the ply. The
higher the number, the finer the yarn. If
yarn comes in a skein, it is best to wind it
in a ball to prevent it tangling in use.
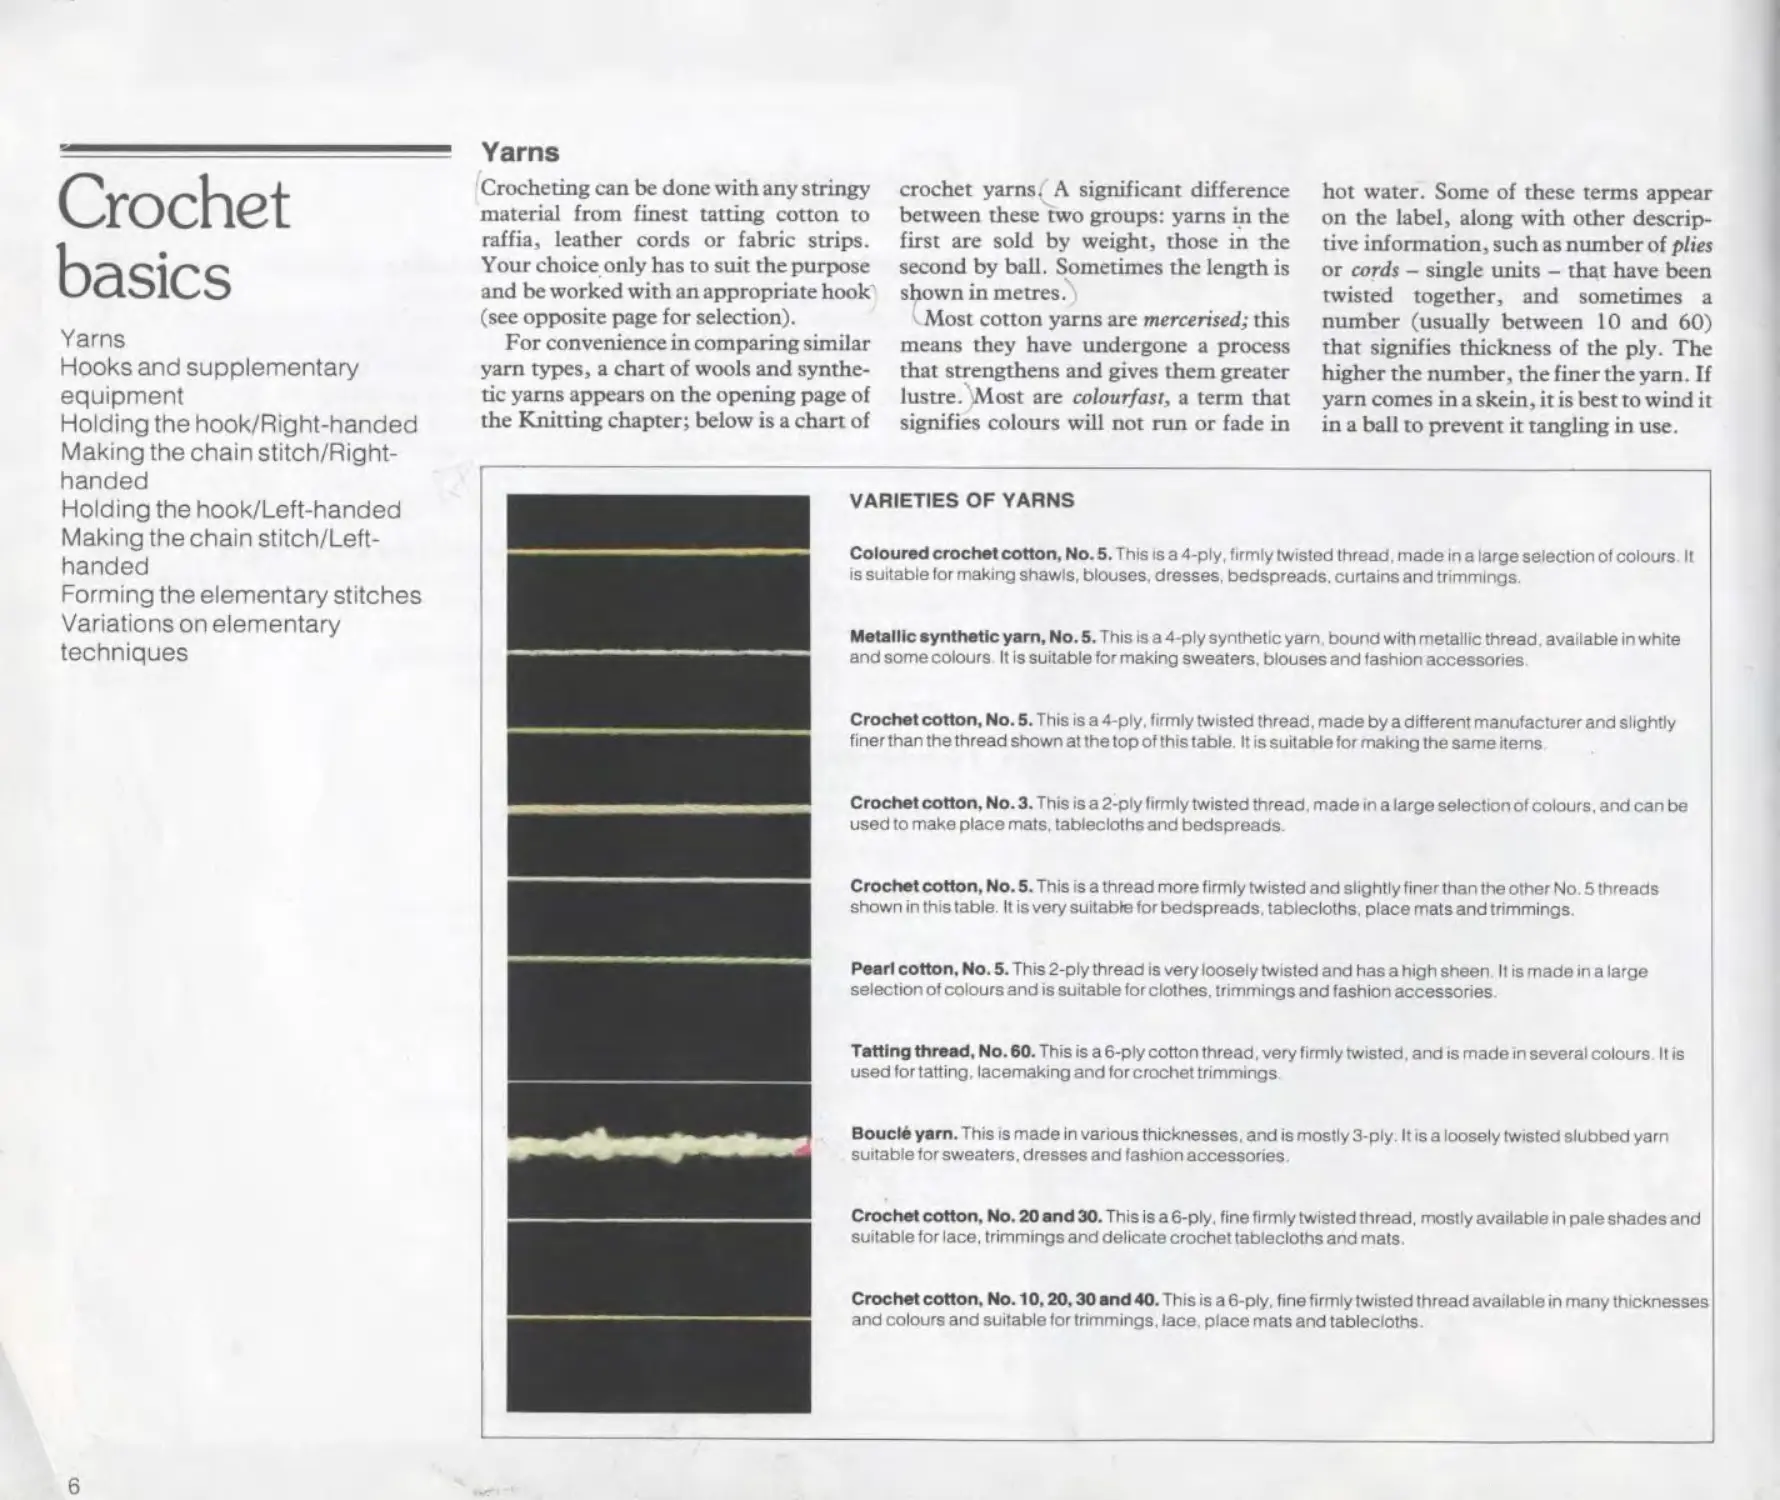
VARIETIES OF YARNS
Coloured crochet cotton. No. 5. This is a 4-ply, firmly twisted thread, made in a large selection ot colours It
is suitable for making shawls, blouses, dresses, bedspreads, curtains and trimmings.
Metallic synthetic yarn, No. 5. This is a 4-ply synthetic yarn, bound with metallic thread, available in white
and some colours It is suitable for making sweaters, blouses and fashion accessories
Crochet cotton, No. 5. This is a 4-ply. firmly twisted thread, made by a different manufacturer and slightly
finer than the thread shown at the top of this table. It is suitable for making the same items
Crochet cotton. No. 3. This is a 2-ply firmly twisted thread made in a large selection of colours, and can be
used to make place mats, tablecloths and bedspreads.
Crochet cotton. No. 5. This is a thread more firmly twisted and slightly finer than the other No. 5 threads
shown in this table It is very suitable tor bedspreads, tablecloths, place mats and trimmings
Pearl cotton. No. 5. This 2-ply thread is very loosely twisted and has a high sheen It is made in a large
selection of colours and is suitable tor clothes, trimmings and fashion accessories.
Tatting thread. No. 60. This is a 6-ply cotton thread, very firmly twisted. and is made in several colours It is
used tor tatting, lacemaking and for crochet trimmings
Boucle yarn. This is made In various thicknesses, and is mostly 3-ply. It is a loosely twisted slubbed yarn
suitable tor sweaters. dresses and fashion accessories
Crochet cotton. No. 20 and 30. This is a 6-ply, fine firmly twisted thread, mostly available in pale shades and
suitable for lace, trimmings and delicate crochet tablecloths and mats.
Crochet cotton. No. 10,20,30 and 40. This is a 6-ply, fine firmly twisted thread available in many thicknesses
and colours and suitable tor trimmings, lace, place mats and tablecloths.
6
Hooks and supplementary equipment
Crochet hooks are made in many sizes
and materials. Thickness of most hooks
is indicated by a number (the number
corresponds to the same size in a knit-
ting needle); the larger the number, the
larger the size. Steel hooks for fine
crochet are usually 13 cm long, and
made in a range of sizes from 60 mm to
1.75 mm. When selecting a hook, the
thicker your yarn, the larger your hook
should be to make the work easier.
Collect several sizes of crochet hook,
so that if the tension of a sample is not
right you can make another sample
using a hook that is one size larger or
smaller.
To prevent the hooks getting lost,
keep them together with an elastic band
in your work-basket, or if you prefer,
make a felt bag with a narrow pocket for
each hook, like a pencil case. Mark each
section with the size of the hook and it
will be easy to keep the hooks safe, and
to find a hook quickly to use for any
piece of crochet.
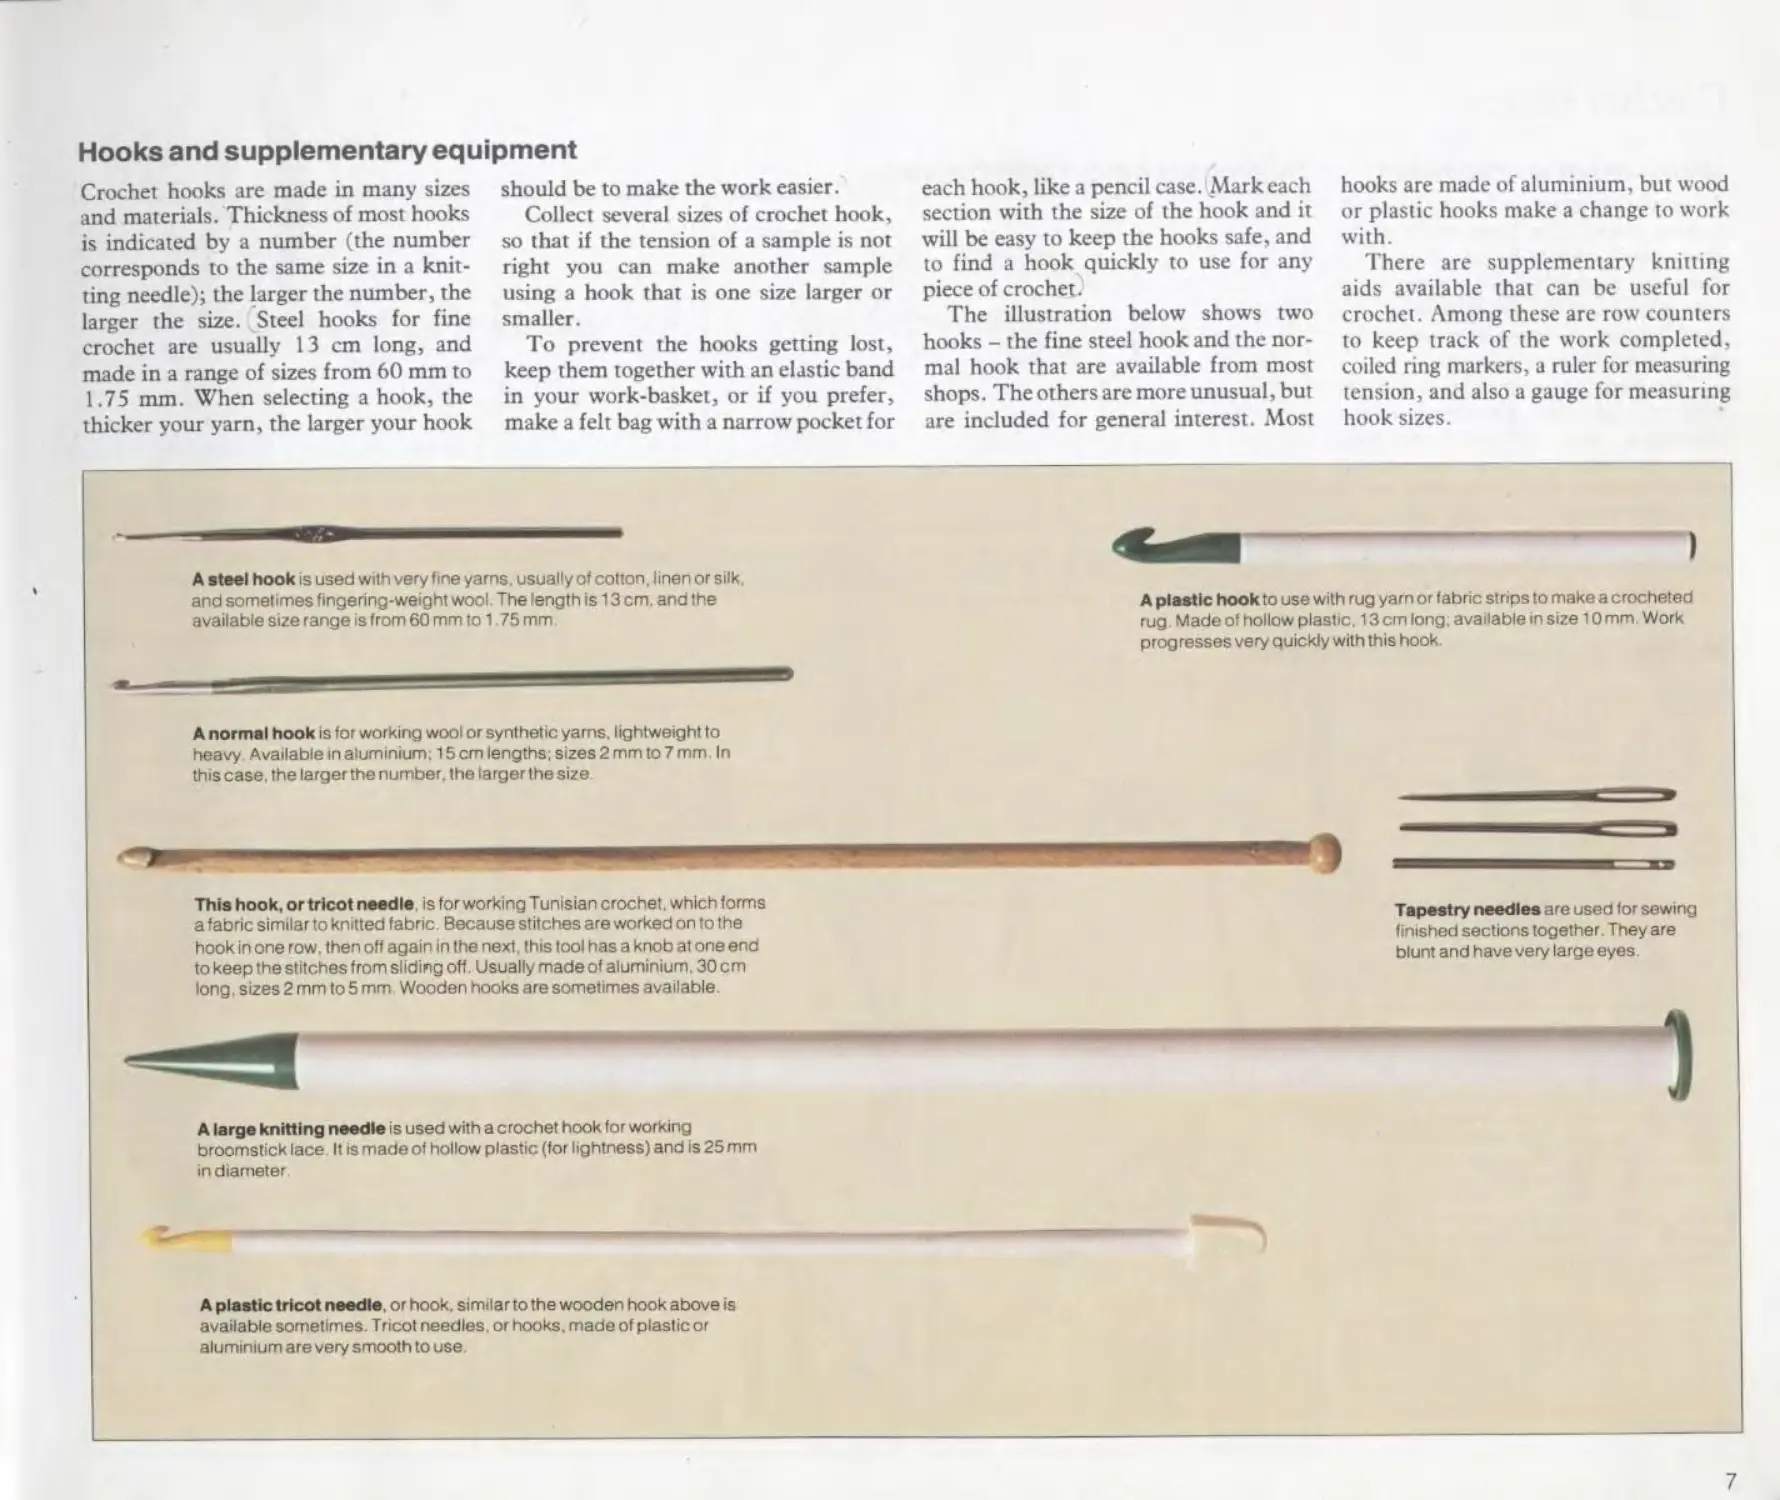
The illustration below shows two
hooks - the fine steel hook and the nor-
mal hook that are available from most
shops. The others are more unusual, but
are included for general interest. Most
hooks are made of aluminium, but wood
or plastic hooks make a change to work
with.
There are supplementary knitting
aids available that can be useful for
crochet. Among these are row counters
to keep track of the work completed,
coiled ring markers, a ruler for measuring
tension, and also a gauge for measuring
hook sizes.
A steel hook is used with very fine yams, usually of cotton, linen or silk,
and sometimes fingering-weight wool The length is 13 cm. and the
available size range is from 60 mm to 1.75 mm
A plastic hook to use with rug yarn or fabric strips to make a crocheted
rug Made of hollow plastic, 13 cm long; available in size 10 mm. Work
progresses very quickly with this hook
A normal hook is for working wool or synthetic yams, lightweight to
heavy Available in aluminium; 15 cm lengths; sizes 2 mm to 7 mm. In
this case, the larger the number, the larger the size
This hook, ortricot needle, is for working Tunisian crochet, which forms
a fabric similar to knitted fabric. Because stitches are worked on to the
hook in one row. then off again in the next, this tool has a knob at one end
to keep the stitches from sliding off. Usually made of aluminium. 30 cm
long, sizes 2 mm Io 5 mm Wooden hooks are sometimes available.
Tapestry needles are used for sewing
finished sections together. They are
blunt and have very large eyes
A large knitting needle is used with acrochet hook for working
broomstick lace It is made ot hollow plastic (for lightness) and is 25 mm
in diameter
A plastic tricot needle, or hook, similarto the wooden hook above is
available sometimes. Tricot needles, or hooks, made of plastic or
aluminium are very smooth to use
7
Crochet basics
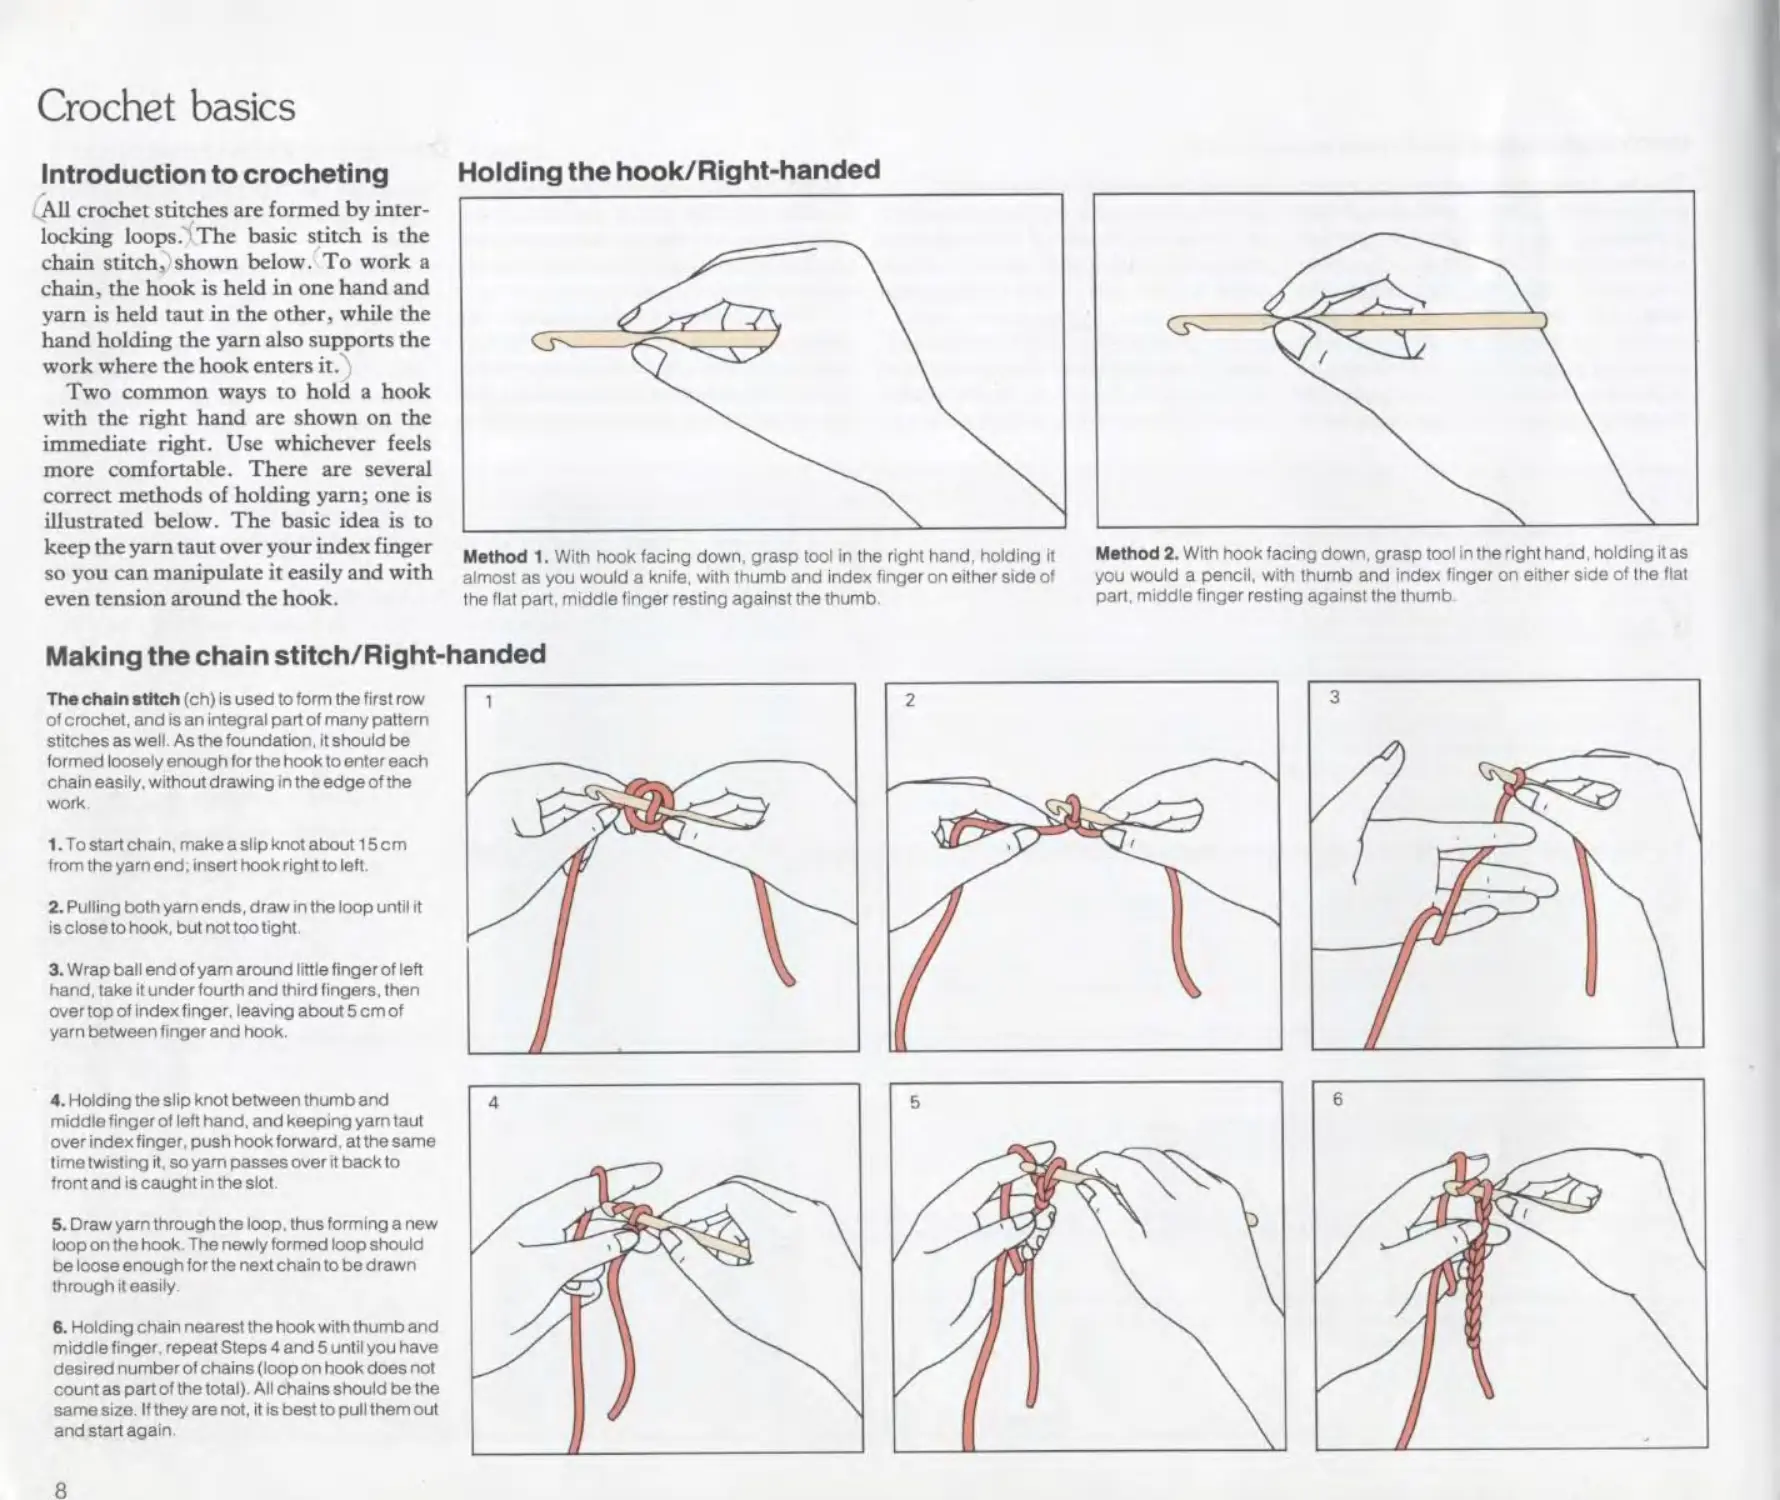
Introduction to crocheting
All crochet stitches are formed by inter-
locking loops. The basic stitch is the
chain stitch, shown below. To work a
chain, the hook is held in one hand and
yarn is held taut in the other, while the
hand holding the yarn also supports the
work where the hook enters it.
Two common ways to hold a hook
with the right hand are shown on the
immediate right. Use whichever feels
more comfortable. There are several
correct methods of holding yarn; one is
illustrated below. The basic idea is to
keep the yarn taut over your index finger
so you can manipulate it easily and with
even tension around the hook.
Holding the hook/Right-handed
Method 1. With hook facing down, grasp tool in the right hand, holding It
almost as you would a knife, with thumb and index finger on either side of
the flat pan, middle finger resting against the thumb.
Method 2. With hook facing down, grasp tool in the right hand. holding it as
you would a pencil, with thumb and index finger on either side of the flat
part, middle finger resting against the thumb
Making the chain stitch/Right-handed
The chain stitch (ch) is used to form the first row
of crochet, and is an integral part of many pattern
stitches as well. As the foundation, It should be
formed loosely enough for the hook to enter each
chain easily, without drawing in the edge of the
work
1. To start chain, make a slip knot about 15 cm
from the yarn end; insert hook right to left,
2. Pulling both yarn ends, draw in the loop until it
is close to hook, but not too tight.
3. Wrap ball end of yam around little finger of left
hand, take it under fourth and third fingers, then
over top of index finger, leaving about 5 cm of
yarn between finger and hook.
4. Holding the slip knot between thumb and
middle finger ol left hand, and keeping yam taut
over index finger, push hook forward. at the same
time twisting it. so yam passes over it back to
front and is caught in the slot.
5. Draw yarn through the loop, thus forming a new
loop on the hook. The newly formed loop should
be loose enough for the next chain to be drawn
through it easily.
6. Holding chain nearest the hook with thumb and
middle finger, repeat Steps 4 and 5 until you have
desired number of chains (loop on hook does not
count as part of the total). All chains should be the
same size. If they are not. it is best to pull them out
and start again.
8
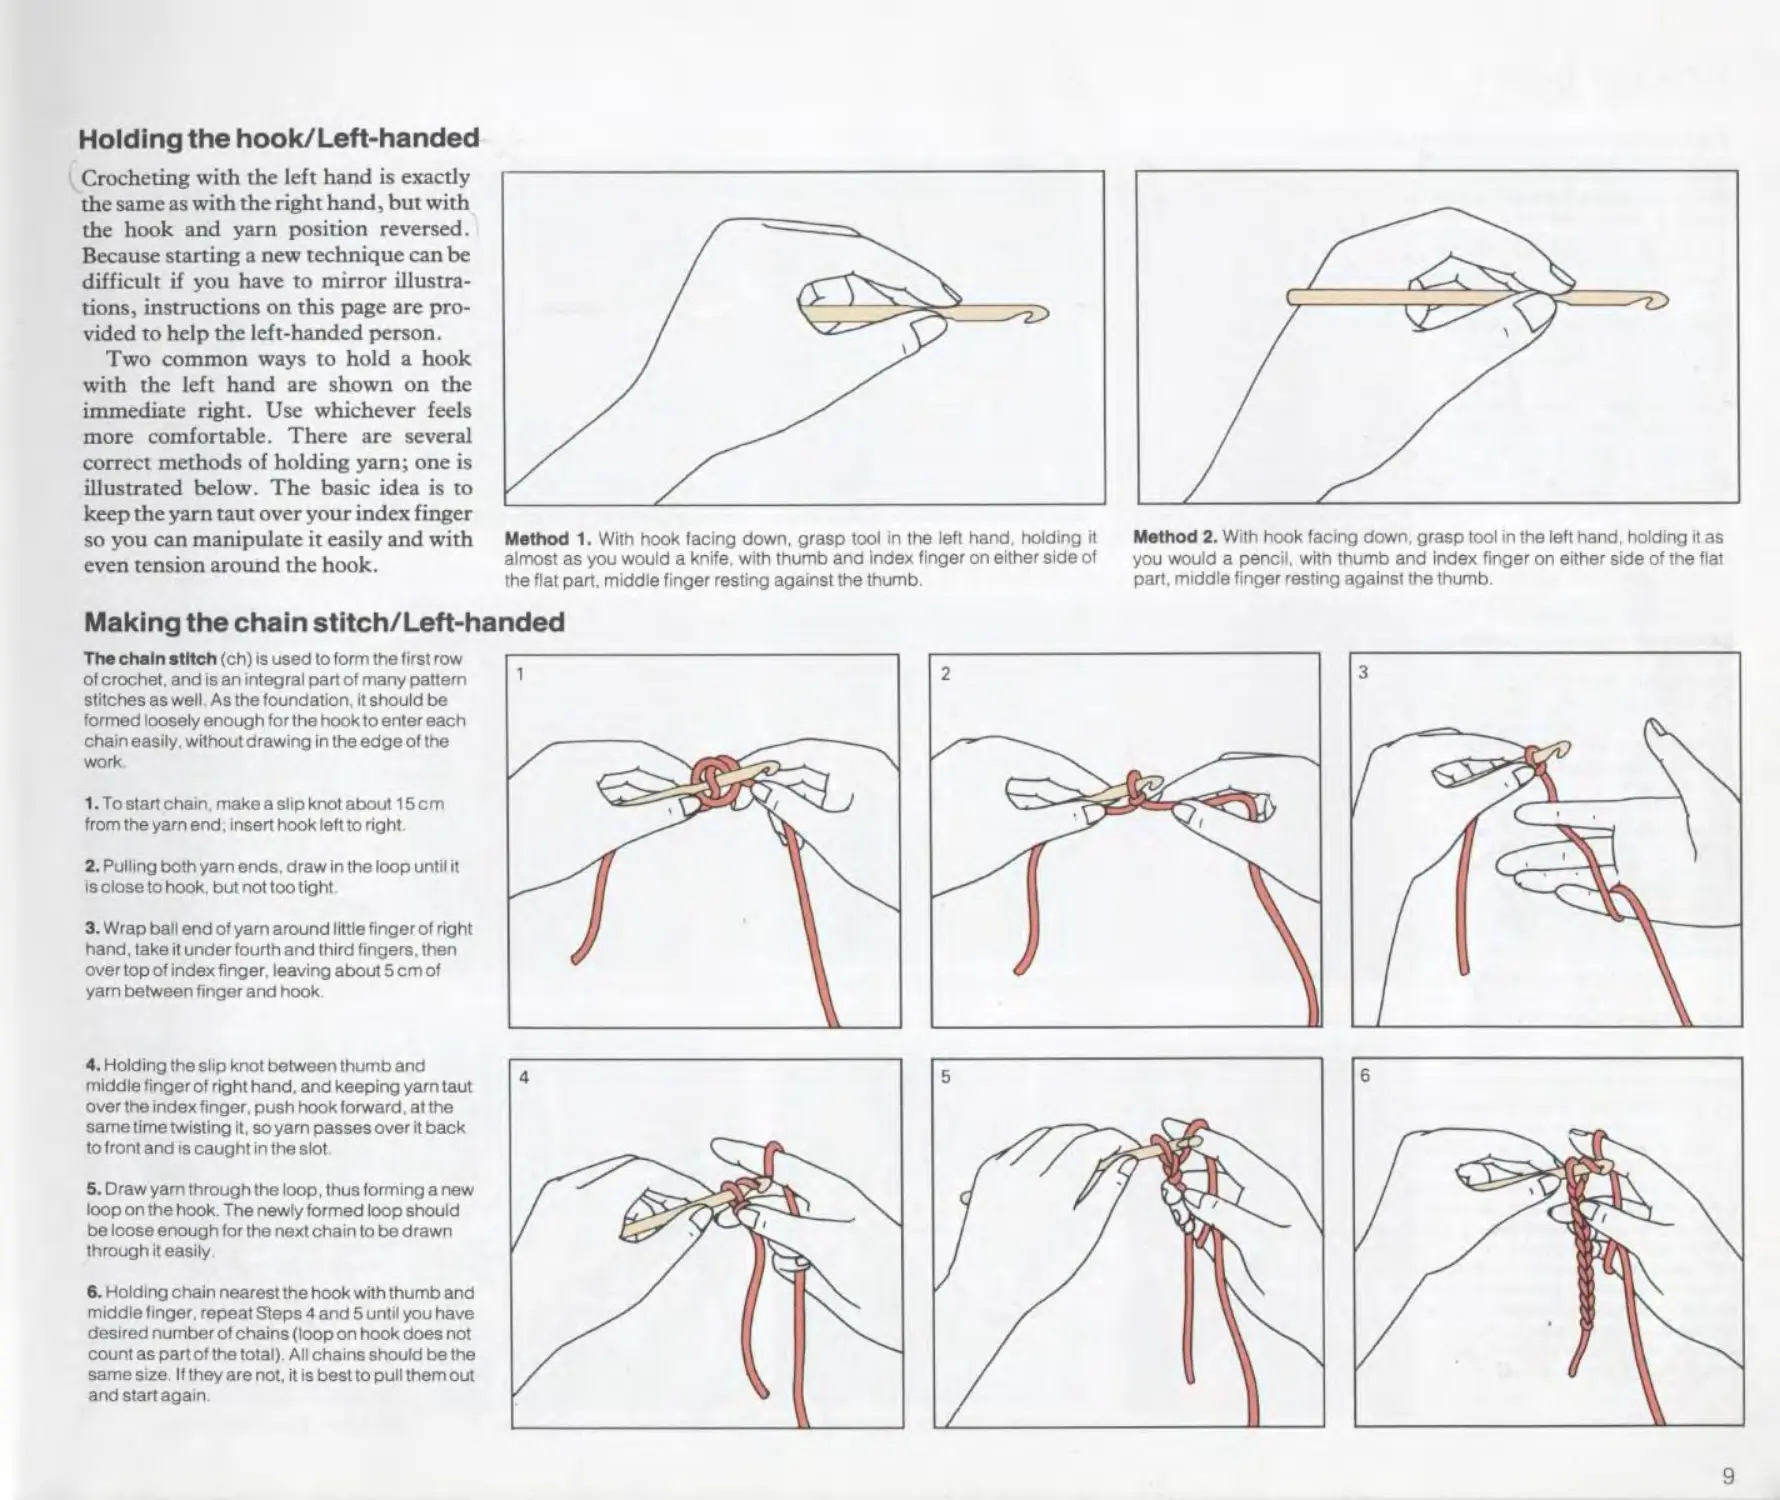
Holding the hook/Left-handed
Crocheting with the left hand is exactly
the same as with the right hand, but with
the hook and yarn position reversed.
Because starting a new technique can be
difficult if you have to mirror illustra-
tions, instructions on this page are pro-
vided to help the left-handed person.
Two common ways to hold a hook
with the left hand are shown on the
immediate right. Use whichever feels
more comfortable. There are several
correct methods of holding yarn; one is
illustrated below. The basic idea is to
keep the yarn taut over your index finger
so you can manipulate it easily and with
even tension around the hook.
Method 1. With hook facing down, grasp tool in the left hand, holding it
almost as you would a knife, with thumb and index finger on either side of
the flat part, middle finger resting against the thumb.
Method 2. With hook facing down, grasp tool in the left hand, holding it as
you would a pencil, with thumb and index finger on either side of the flat
part, middle finger resting against the thumb.
Making the chain stitch/Left-handed
The chain stitch (ch) is used to form the first row
of crochet, and is an integral part of many pattern
stitches as well. As the foundation, it should be
formed loosely enough for the hook to enter each
chain easily, without drawing in the edge of the
work
1. To start chain, make a slip knot about 15 cm
from the yarn end; insert hook left to right.
2. Pulling both yarn ends, draw in the loop until it
Isclosetohook. but not too tight
3. Wrap ball end of yarn around little finger of right
hand, take it under fourth and third fingers, then
over top of index finger, leaving about 5 cm of
yam between finger and hook.
4. Holding the slip knot between thumb and
middle finger of right hand, and keeping yarn taut
over the index finger, push hook forward. at the
same time twisting it, so yarn passes over it back
to front and is caught in the slot
5. Draw yarn through the loop, thus forming a new
loop on the hook. The newly formed loop should
be loose enough for the next chain to be drawn
through it easily
6. Holding chain nearest the hook with thumb and
middle finger, repeat Steps 4 and 5 until you have
desired number of chains (loop on hook does not
count as part of the total). All chains should be the
same size. II they are not, it is best to pull them out
and start again.
9
Crochet basics
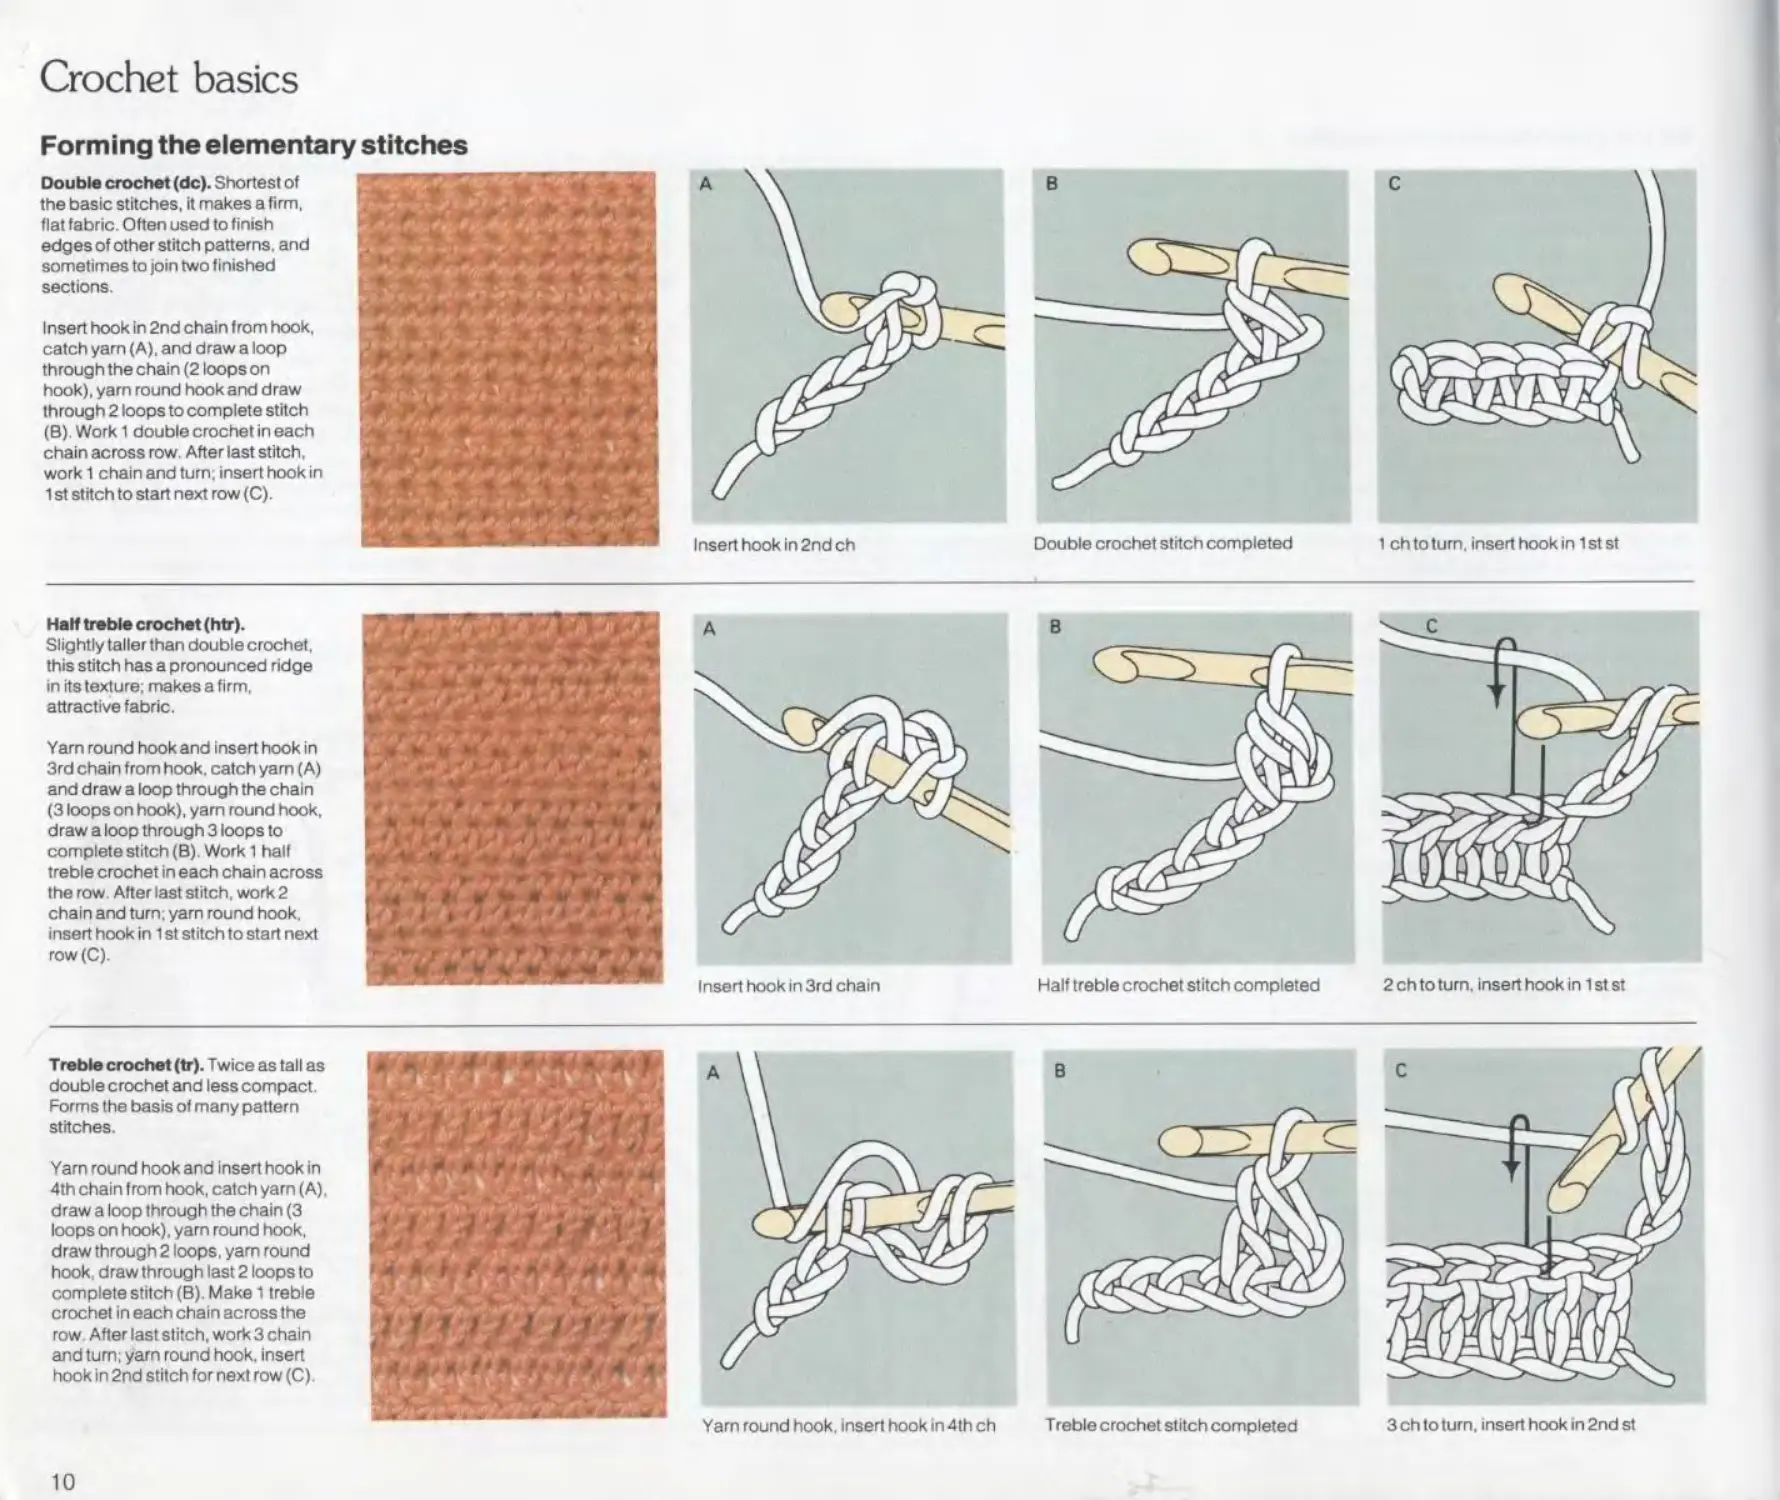
Forming the elementary stitches
Double crochet (de). Shortest of
the basic stitches, it makes a firm,
flat fabric. Often used to finish
edges of other stitch patterns, and
sometimes to join two finished
sections.
Insert hook in 2nd chain from hook,
catch yarn (A), and draw a loop
through the chain (2 loops on
hook), yarn round hook and draw
through 2 loops to complete stitch
(B),Work1 double crochet in each
chain across row. After last stitch,
work 1 chain and turn; insert hook in
1 st stitch to start next row (C).
Half treble crochet (htr).
Slightly taller than double crochet,
this stitch has a pronounced ridge
in its texture; makes a firm,
attractive fabric.
Yarn round hook and insert hook in
3rd chain from hook, catch yarn (A)
and draw a loop through the chain
(3 loops on hook), yarn round hook,
draw a loop through 3 loops to
complete stitch (B) Work 1 half
treble crochet in each chain across
the row After last stitch, work 2
chain and turn; yarn round hook,
insert hook in 1 st stitch to start next
row(C).
Treble crochet (tr). Twice as tall as
double crochet and less compact.
Forms the basis of many pattern
stitches.
Yarn round hook and insert hook in
4th chain from hook, catch yarn (A),
draw a loop through the chain (3
loops on hook), yarn round hook,
draw through 2 loops, yam round
hook, draw through last 2 loops to
complete stitch (B). Make 1 treble
crochet in each chain across the
row. After last stitch, work 3 chain
and turn; yarn round hook, insert
hook in 2nd stitch for next row (C).
Insert hook in 2nd ch
Double crochet stitch completed
1 ch to turn, insert hook in 1 st st
Yarn round hook, insert hook in 4th ch
Treble crochet stitch completed
3 ch to turn, insert hook in 2nd st
10
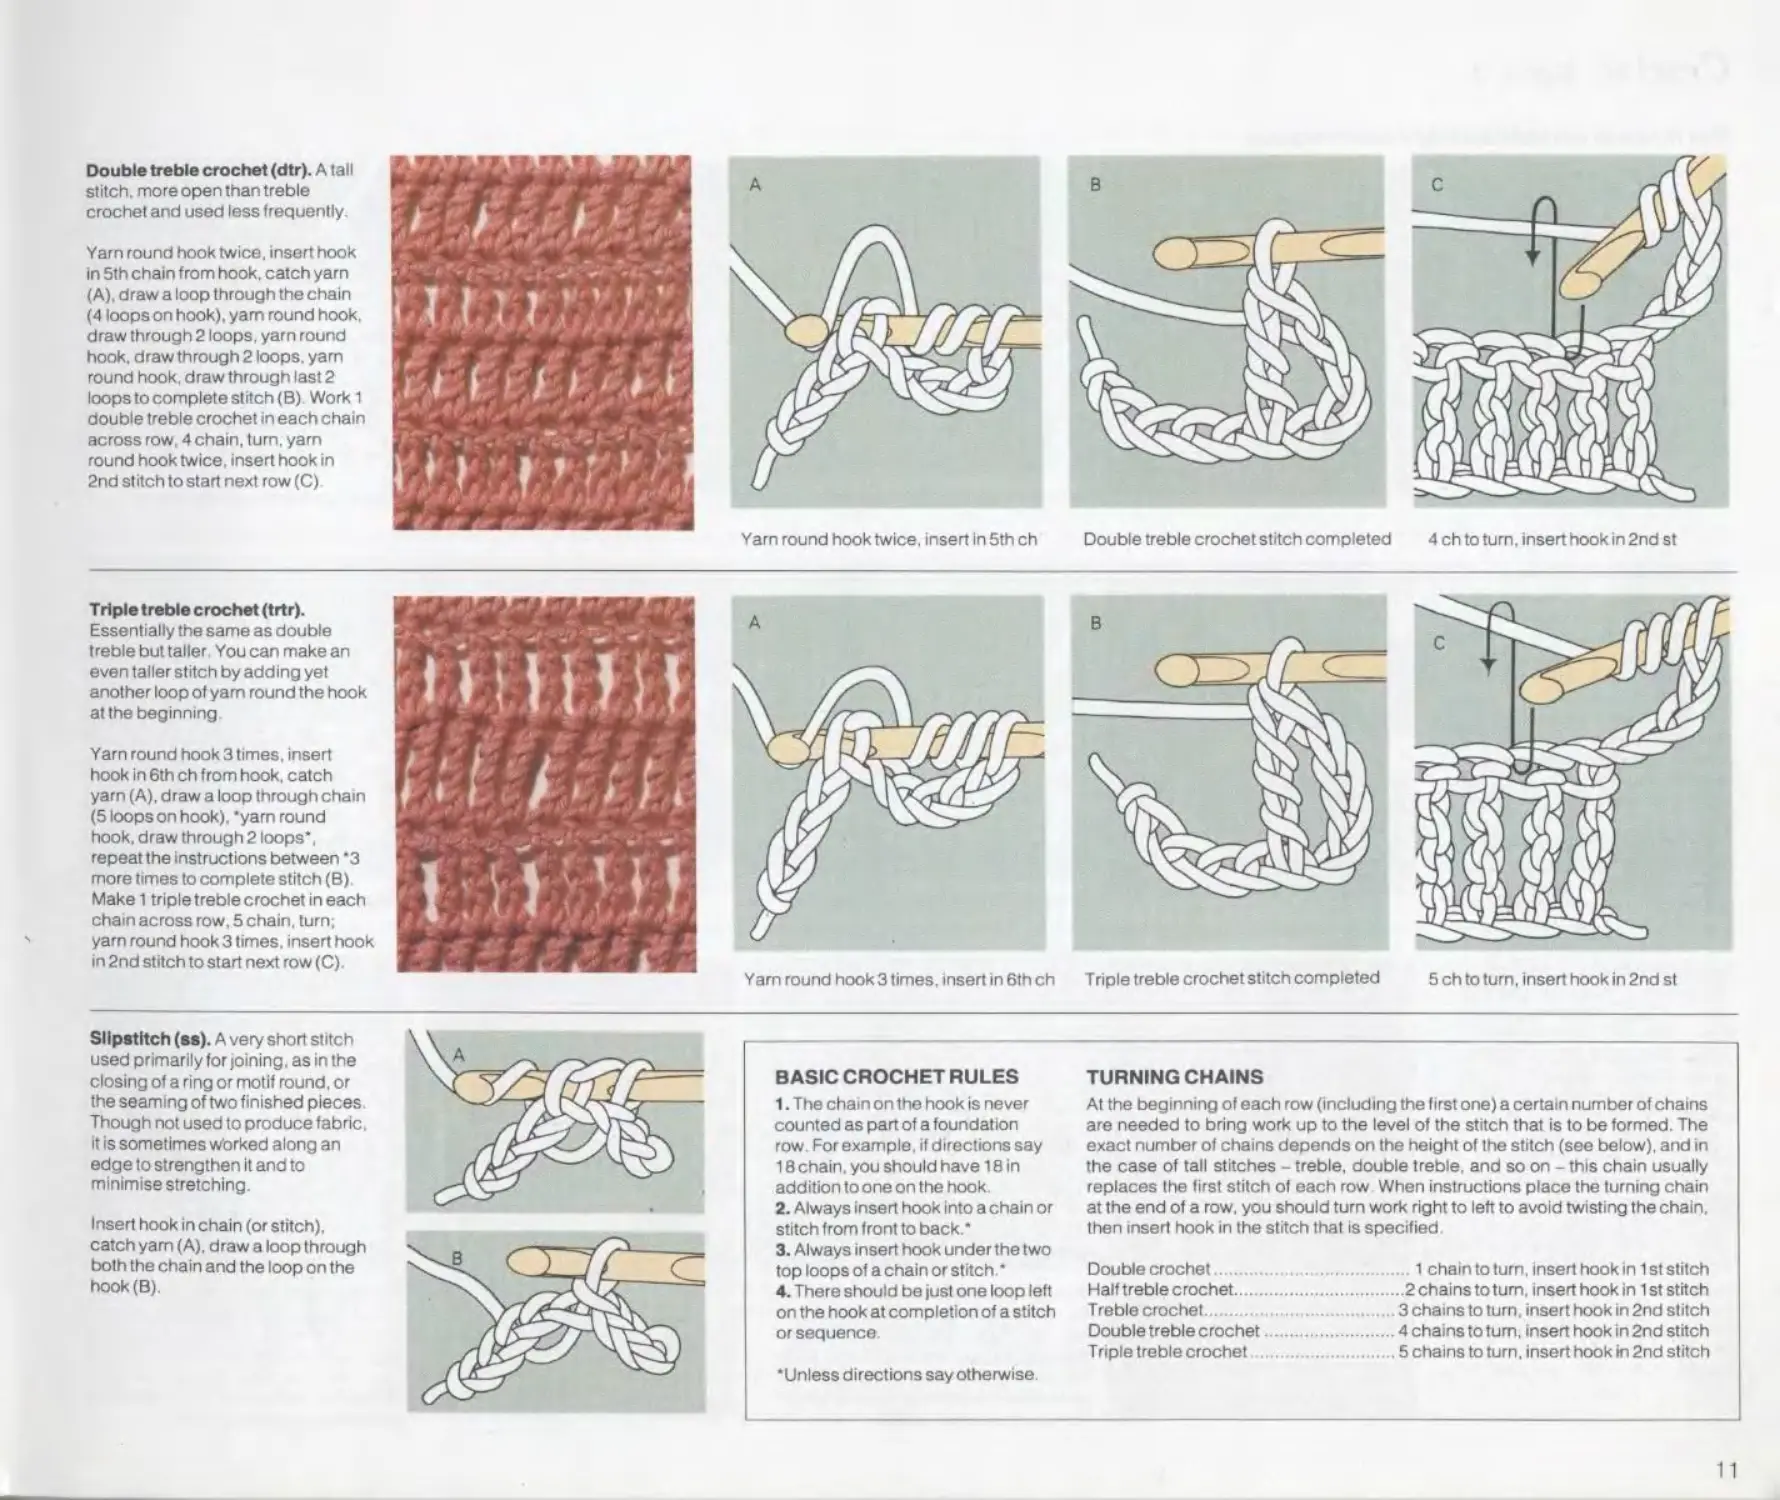
Double treble crochet (dtr). A tall
stitch, more open than treble
crochet and used less frequently
Yarn round hook twice, insert hook
in 5th chain from hook, catch yarn
(A), draw a loop through the chain
(4 loops on hook), yam round hook,
draw through 2 loops, yarn round
hook, draw through 2 loops, yam
round hook, draw through last 2
loops to complete stitch (B) Work 1
double treble crochet in each chain
across row, 4 chain, turn, yarn
round hook twice, insert hook in
2nd st itch to start next row(C)
Yarn round hook twice, insert in 5th ch
Double treble crochet stitch completed
4 ch to turn, insert hook in 2nd st
Triple treble crochet (trtr).
Essentially the same as double
treble but taller You can make an
even taller stitch by adding yet
another loop of yam round the hook
at the beginning
Yarn round hook 3 times, insert
hook in 6th ch from hook, catch
yam (A), draw a loop through chain
(5 loops on hook), 'yam round
hook, draw through 2 loops".
repeat the instructions between "3
more times to complete stitch (В)
Make 1 triple treble crochet in each
chain across row, 5 chain, turn;
yam round hook3 times, insert hook
in 2nd stitch to start next row (C).
Yarn round hook 3 times, insert in 6th ch Triple treble crochet stitch completed
5 ch to turn, insert hook in 2nd st
Sllpstltch (ss). A very short stitch
used primarily for joining, as in the
closing of a ring or motif round, or
the seaming of two finished pieces.
Though not used to produce fabric,
it is sometimes worked along an
edge to strengthen it and to
minimise stretching.
Insert hook in chain (or stitch),
catch yam (A), draw a loop through
both the chain and the loop on the
hook(B).
BASIC CROCHET RULES
1. The chain on the hook is never
counted as part of a foundation
row For example, if directions say
18 chain, you should have 18 in
addition to one on the hook.
2. Always insert hook into a chain or
stitch from front to back."
3. Always insert hook under the two
top loops of a chain or stitch."
4. There should be just one loop left
on the hook at completion of a stitch
or sequence
"Unless directions say otherwise.
TURNING CHAINS
At the beginning of each row (including the first one) a certain number of chains
are needed to bring work up to the level of the stitch that is to be formed. The
exact number of chains depends on the height of the stitch (see below), and in
the case of tall stitches - treble, double treble, and so on - this chain usually
replaces lhe first stitch of each row When instructions place the turning chain
at the end of a row. you should turn work right to left to avoid twisting the chain,
then insert hook in the stitch that is specified.
Double crochet.....................
Half treble crochet.................
Treble crochet.... ................
Double treble crochet..............
Triple treble crochet .............
.. . 1 chain to turn, insert hook in 1 st stitch
. .2 chains to turn, insert hook in 1 st stitch
3 chains to turn, insert hook in 2nd stitch
4 chains to turn, insert hook in 2nd stitch
. 5 chains to turn, insert hook in 2nd stitch
11
Crochet basics
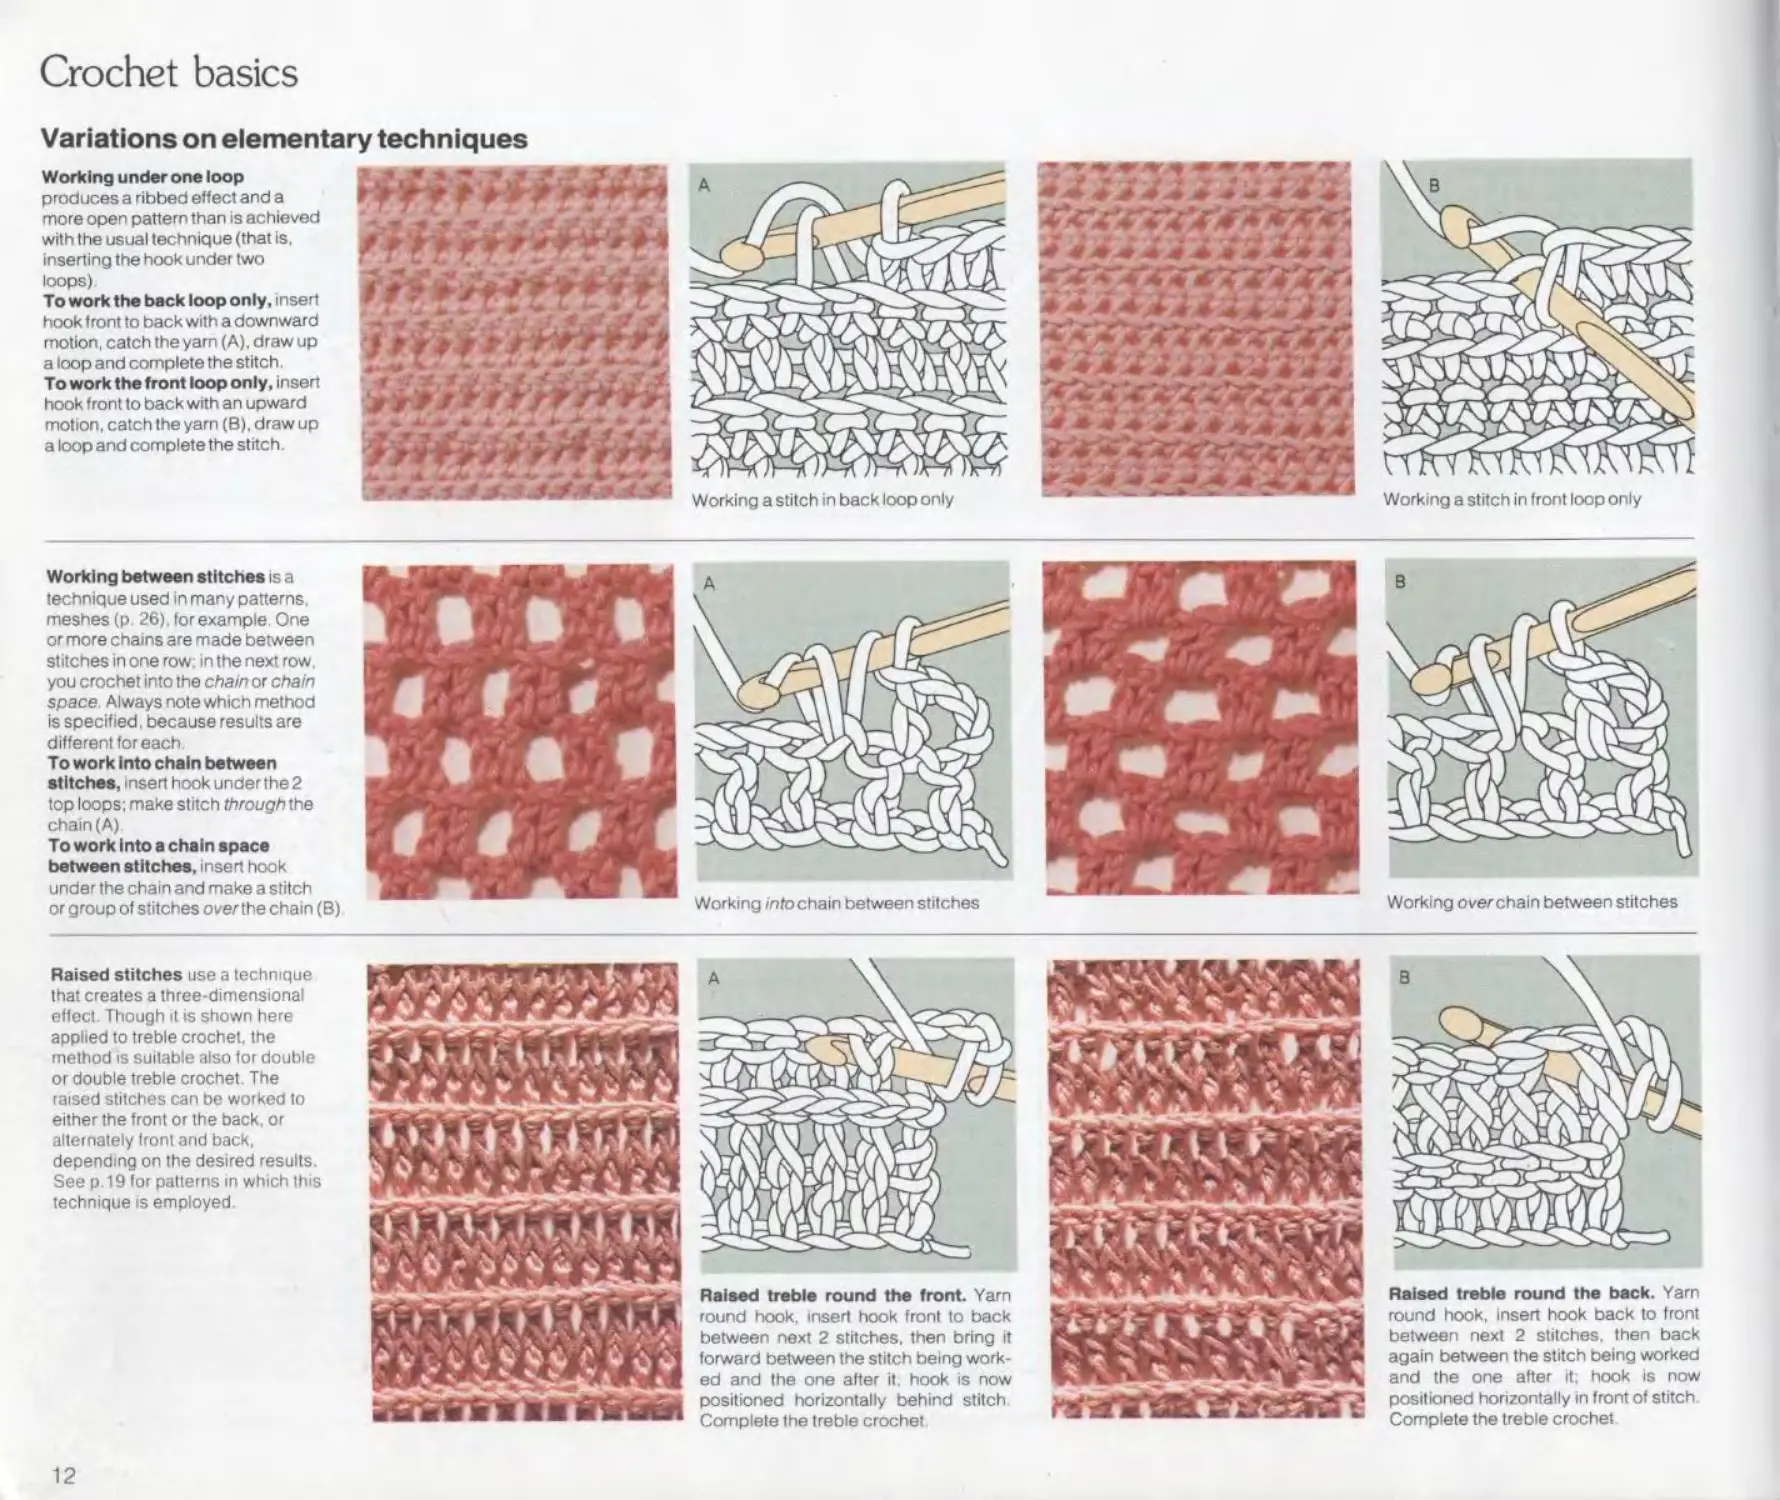
Variations on elementary techniques
Working under one loop
produces a ribbed effect and a
more open pattern than is achieved
with the usual technique (that is.
inserting the hook under two
loops)
To work the back loop only, insert
hook front to back with a downward
motion, catch the yarn (A), draw up
a loop and complete the stitch.
To work the front loop only, insert
book front to back with an upward
motion, catch the yarn (B). draw up
a loop and complete the stitch.
Working a stitch in back loop only
Working between stitches is a
technique used in many patterns,
meshes (p. 26). for example. One
or more chains are made between
stitches in one row: in the next row
you crochet into the chain or chain
space Always note which method
is specified, because results are
different for each
To work Into chain between
stitches, insert hook under the 2
top loops; make stitch through the
chain (A)
To work Into a chain space
between stitches, insert hook
under the chain and make a stitch
or group of stitches over the chain (B)
Working overchain between stitches
Raised stitches use a technique
that creates a three-dimensional
effect. Though it is shown here
applied to treble crochet, the
method is suitable also for double
or double treble crochet. The
raised stitches can be worked to
either the front or the back, or
alternately front and back,
depending on the desired results.
See p. 19 for patterns in which this
technique is employed.
Raised treble round the front. Yarn
round hook, insert hook front to back
between next 2 stitches, then bring it
forward between the stitch being work-
ed and the one after it; hook is now
positioned horizontally behind stitch
Complete the treble crochet,
Raised treble round the back. Yarn
round hook, insert hook back to front
between next 2 stitches, then back
again between the stitch being worked
and the one after it; hook is now
positioned horizontally in front of stitch
Complete the treble crochet.
12
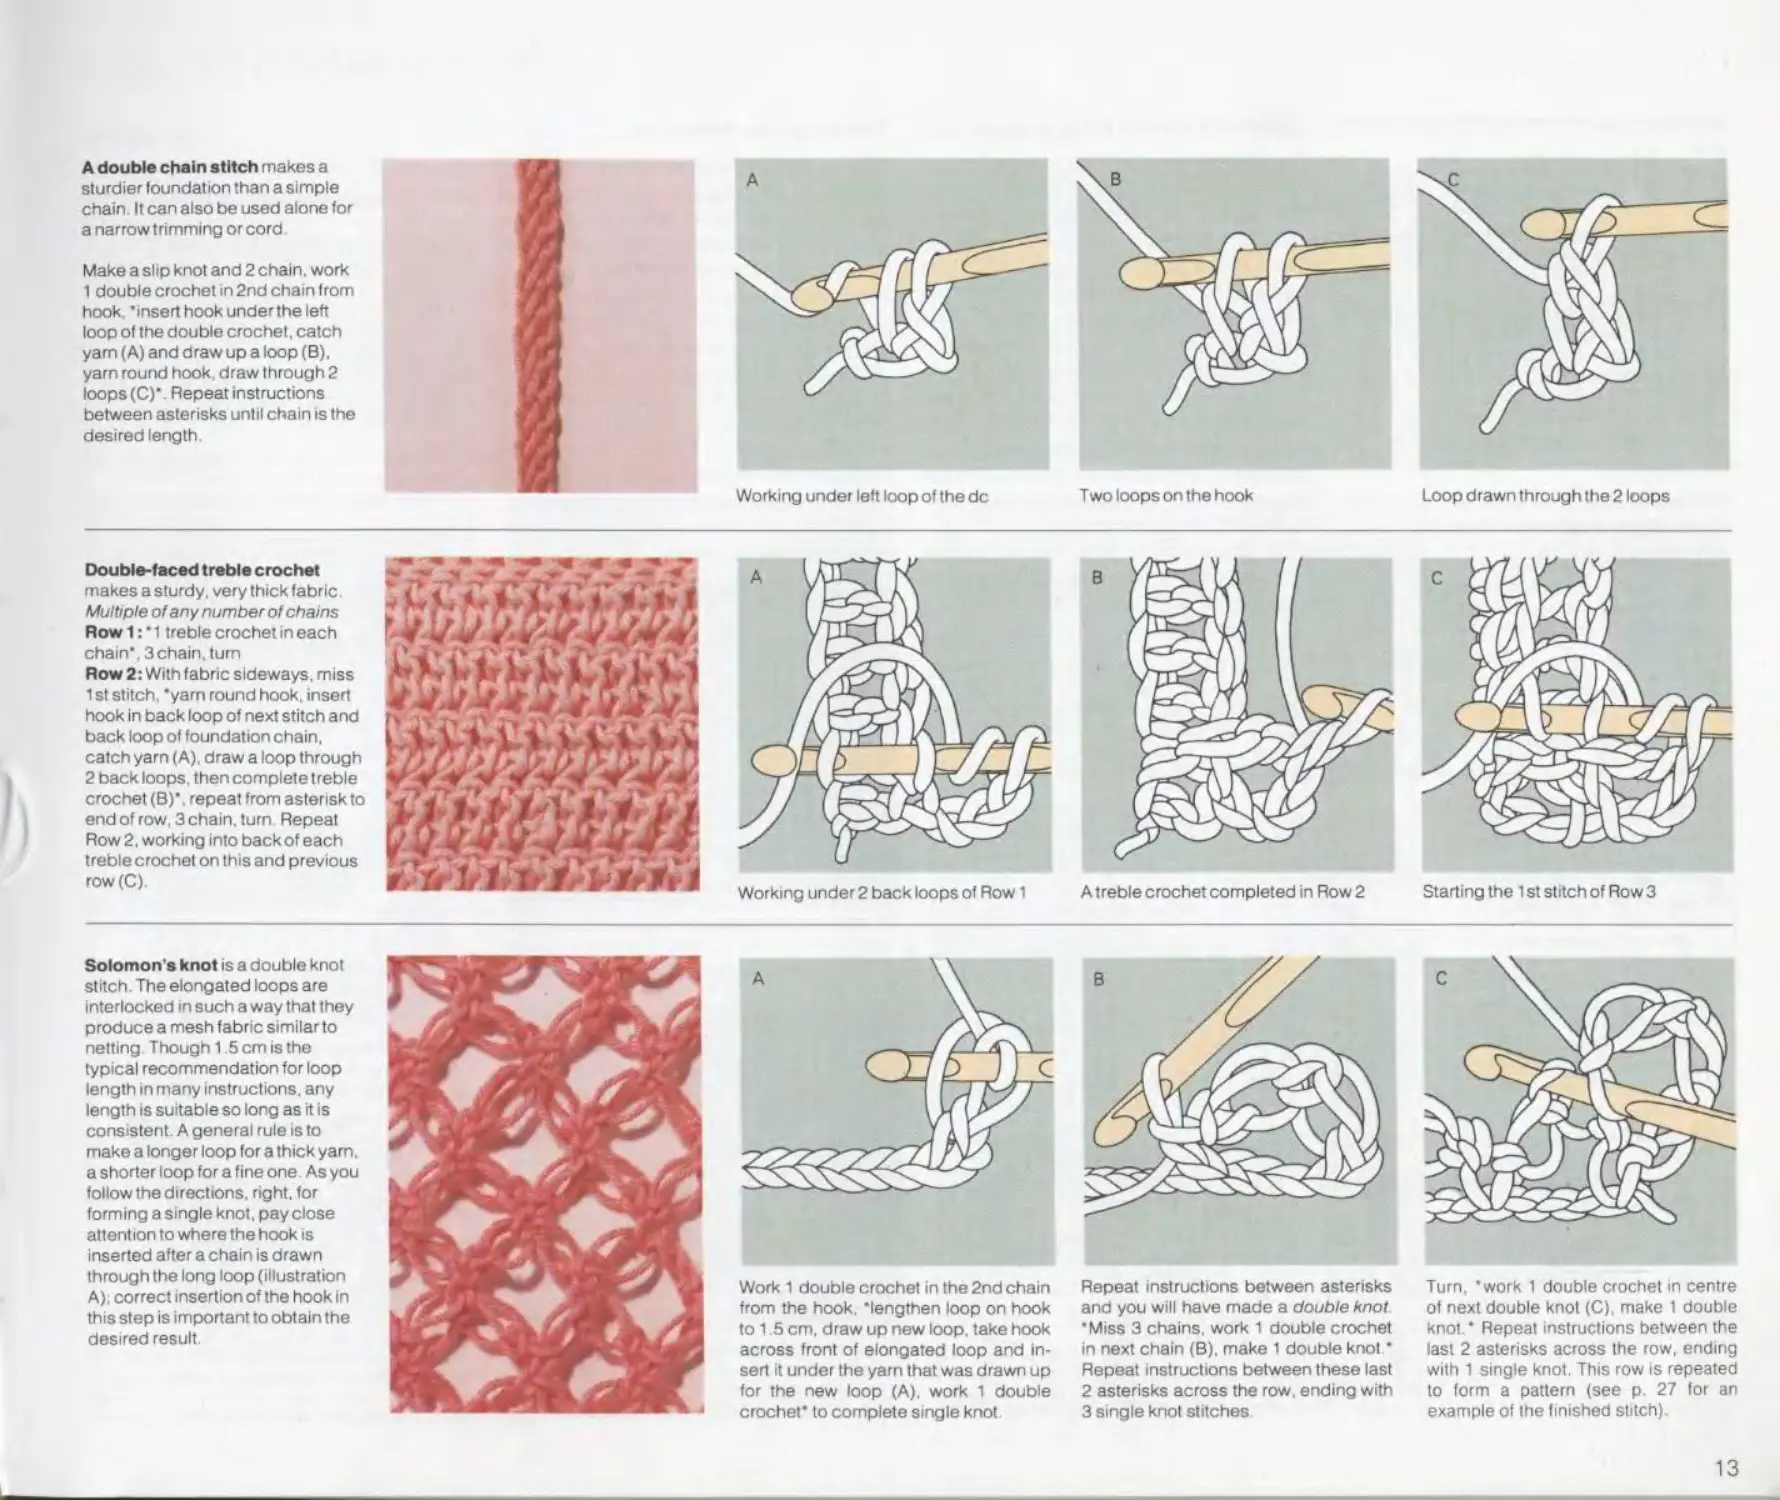
A double chain stitch makes a
sturdier foundation than a simple
chain It can also be used alone for
a narrow trimming or cord
Make a slip knot and 2 chain, work
1 double crochet in 2nd chain from
hook, 'insert hook underthe left
loop of the double crochet, catch
yam (A) and draw up a loop (B).
yarn round hook, draw through 2
loops (C)' Repeat instructions
between asterisks until chain is the
desired length
Working under left loop of the de Two loops on the hook
Loop drawn through the 2 loops
Double-faced treble crochet
makes a sturdy, very thick fabric
Multiple of any number of chains
Row 1: '1 treble crochet in each
chain', 3chain, turn
Row 2: With fabric sideways, miss
1 st stitch, 'yarn round hook, insert
hook in back loop of next stitch and
back loop of foundation chain,
catch yarn (A), draw a loop through
2 back loops, then complete treble
crochet (B). repeat from asterisk to
endof row, 3 chain, turn Repeat
Row 2, working into back of each
treble crochet on this and previous
row(C).
Starting the 1 st stitch of Row 3
Solomon's knot is a double knot
stitch. The elongated loops are
interlocked in such a way that they
produce a mesh fabric similar to
netting Thought 5 cm is the
typical recommendation for loop
length in many instructions, any
length is suitable so long as it is
consistent A general rule is to
make a longer loop for a thick yam.
a shorter loop for a fine one As you
follow the directions, right, for
forming a single knot, pay close
attent ion to where the hook is
inserted after a chain is drawn
through the long loop (illustration
A): correct insertion of the hook in
this step is important to obtain the
desired result.
Work 1 double crochet in the 2nd chain
from the hook, 'lengthen loop on hook
to 1.5 cm, draw up new loop, take hook
across front of elongated loop and in-
sert it under the yarn that was drawn up
for the new loop (A), work 1 double
crochet' to complete single knot
Repeat instructions between asterisks
and you will have made a double knot.
'Miss 3 chains, work 1 double crochet
in next chain (B). make 1 double knot'
Repeat instructions between these last
2 asterisks across the row. ending with
3 single knot stitches
Turn, 'work 1 double crochet in centre
of next double knot (C). make 1 double
knot.' Repeat instructions between the
last 2 asterisks across the row, ending
with 1 single knot. This row is repeated
to form a pattern (see p. 27 for an
example of the finished stitch).
13
Following
crochet
instructions
Crochet terms
Testing the tension
Joining and finishing yarn ends
Increasing
Decreasing
Geometric shapes worked in rows
Working in rounds
ch chain pp. 8-9 slipstitch p 11 * • Instructions between asterisks are repeated
ss until the number of stitches
de double crochet p. 10 specified runs out
htr half treble crochet p. 10 treble crochelp. 10 ( ) Steps within parentheses are worked according to
tr instructions that follow the
dtr double treble crochet p. 11 parenthesis, either worked into one stitch, or repeated
trtr triple treble p. 11 a specified number of times
alt alternate 1 ] Instructions in brackets
beg begin, beginning explain a particular stitch or technique
dec decrease pp. 15-16 tension The number of stitches and
inc increase p. 15 rows per cm
patt pattern mark Tie on contrasting yarn or
rep repeat stitch slip a coil ring marker on the stitch indicated
rnd round p. 17 unit The number of stitches
tog together required to work one repeat
st stitch of a pattern stitch
space work Continue to work pattern
straight without increasing or
yrh yarn round hook decreasing
To measure stitch tension, insert two pins. 5cm
apart: count stitches between. If pin falls in centre
of a stitch, tension may be measured over 10 cm
Crochet terminology
For written crochet instructions, there
is a special vocabulary, much of it ex-
pressed in abbreviated or symbolic
form. The forms used in this book are
listed below with their definition. Also
included are the numbers of pages on
which techniques are illustrated. You
may encounter slight variations of the
terms given here, but these are common
British forms. Before using new instruc-
tions, you should find out whether they
are British or American, because Ameri-
can terms have different meanings. Our
double crochet, for example, is the same
as American single crochet.
An alternative to written instructions
is a chart. For this purpose, different
symbols are used (see pp. 302 and 304).
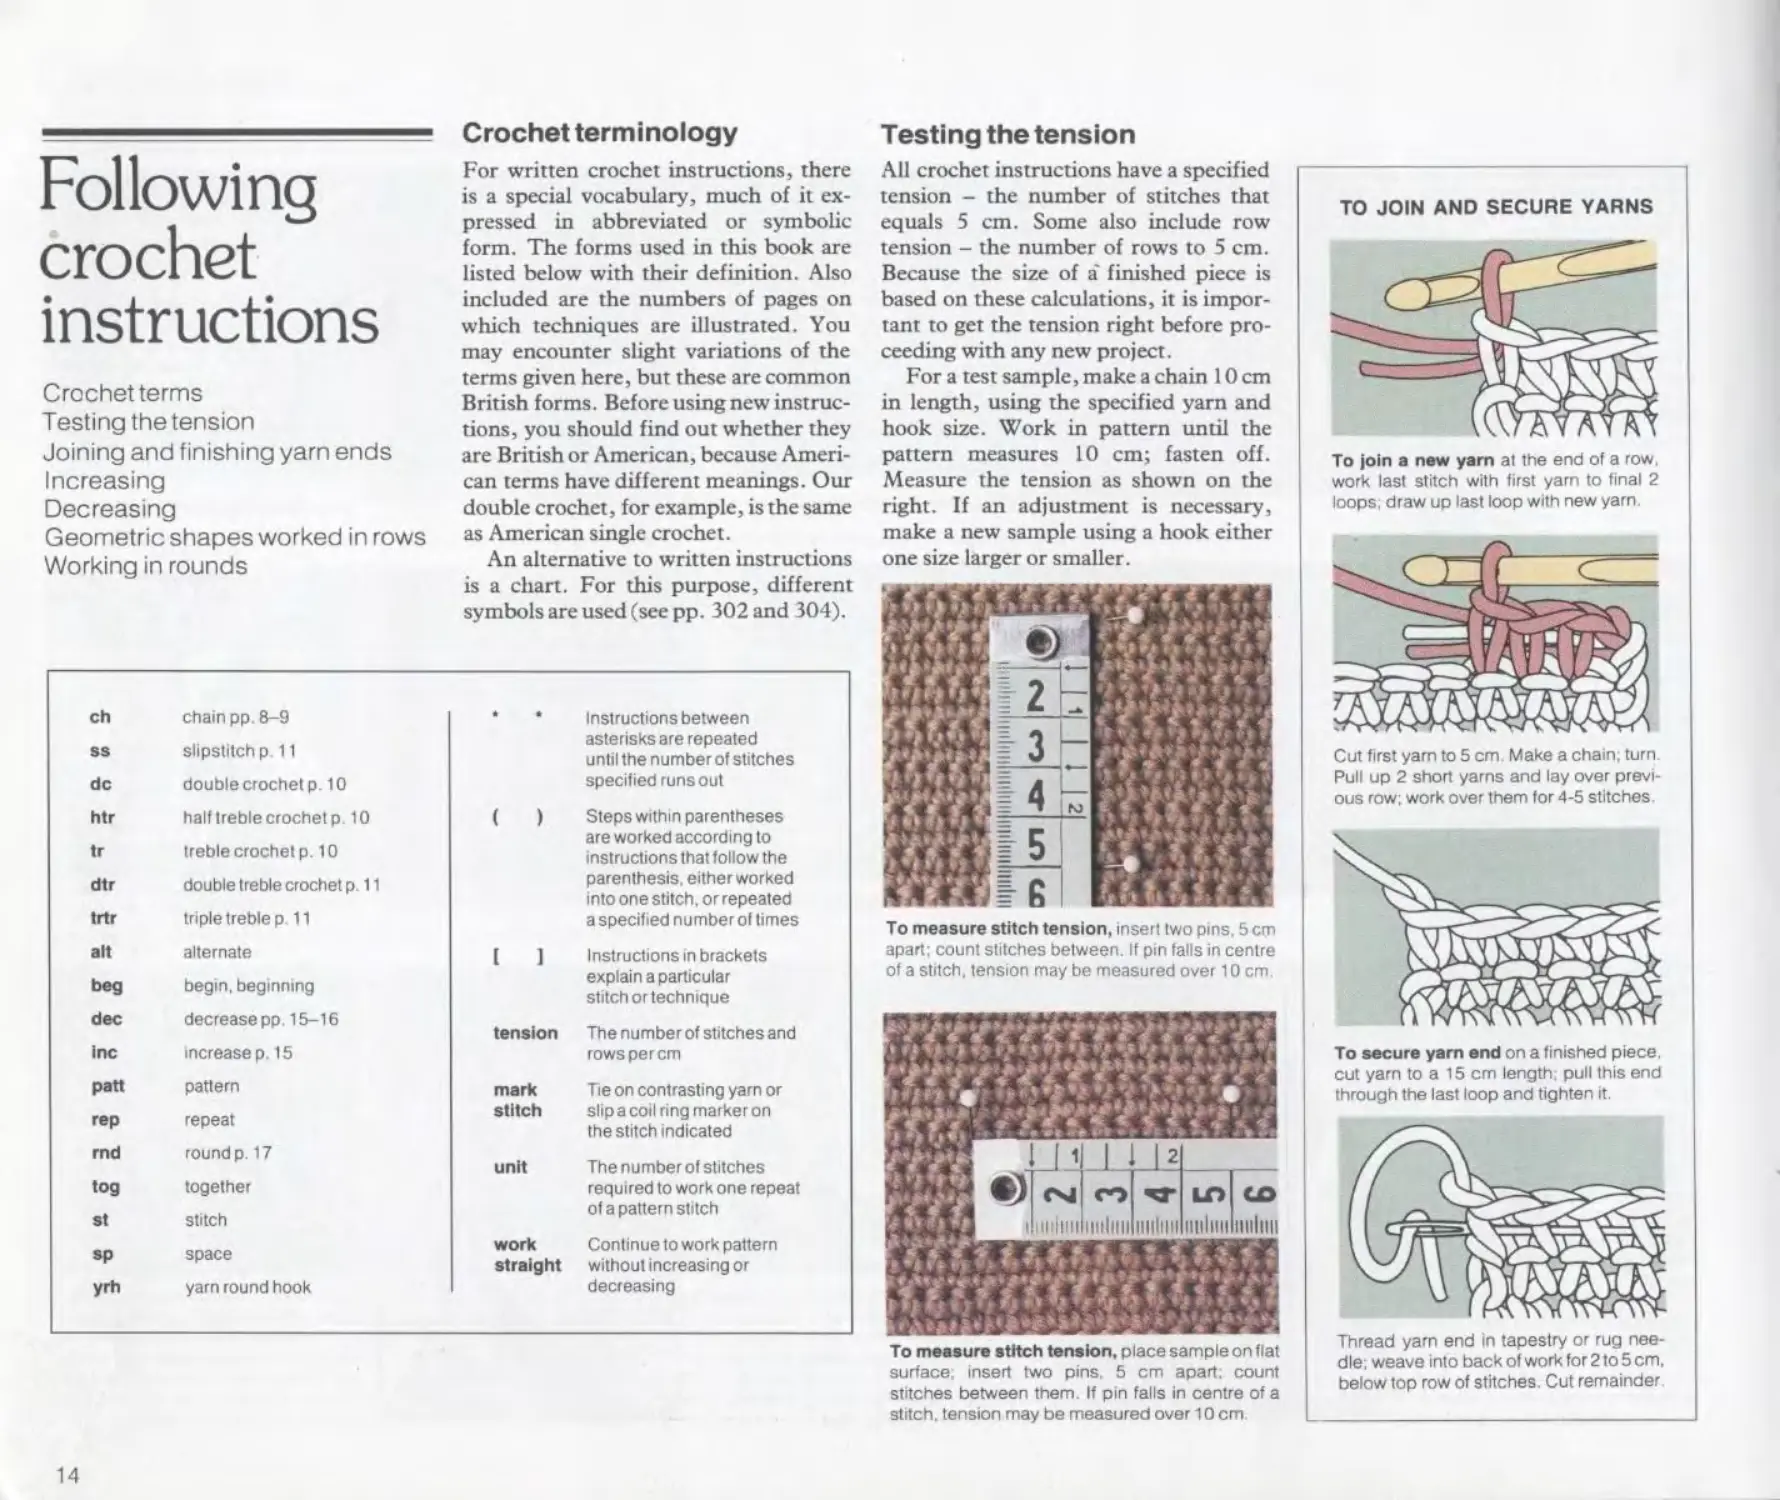
Testing the tension
All crochet instructions have a specified
tension - the number of stitches that
equals 5 cm. Some also include row
tension - the number of rows to 5 cm.
Because the size of a' finished piece is
based on these calculations, it is impor-
tant to get the tension right before pro-
ceeding with any new project.
For a test sample, make a chain 10 cm
in length, using the specified yarn and
hook size. Work in pattern until the
pattern measures 10 cm; fasten off.
Measure the tension as shown on the
right. If an adjustment is necessary,
make a new sample using a hook either
one size larger or smaller.
TO JOIN AND SECURE YARNS
To join a new yam at the end of a row,
work last stitch with first yarn to final 2
loops; draw up last loop with new yarn.
To measure stitch tension, place sample on flat
surface, insert two pins. 5 cm apart, count
stitches between them. If pin falls in centre of a
stitch, tension may be measured over 10 cm.
Cut first yam to 5 cm Make a chain; turn.
Pull up 2 short yarns and lay over previ-
ous row; work over them for 4-5 stitches.
To secure yarn end on a finished piece,
cut yarn to a 15 cm length, pull this end
through the last loop and tighten it.
Thread yam end in tapestry or rug nee-
dle; weave into back of work for 2 to 5 cm,
below top row of stitches. Cut remainder
14
Following crochet instructions
Shaping
Shaping in crochet is done by increasing
and decreasing. Once mastered, these
techniques permit you to crochet any
shape or form. Six examples are shown
overleaf, more on p. 17.
A single increase is made by working
twice into the same stitch. If made with-
in a row, and repeated over several rows,
the increase positions move right or left.
To keep the progression orderly, place a
marker (contrasting yarn or a plastic coil
ring) where increasing begins. For shap-
ing to the right, increase before the
marker; to the left, after the marker. On
the next row, reverse this order to main-
tain consistency of the direction.
A single decrease is made by working
two successive stitches into one final
loop. Repeated over several rows, pro-
gression is the same as for increasing.
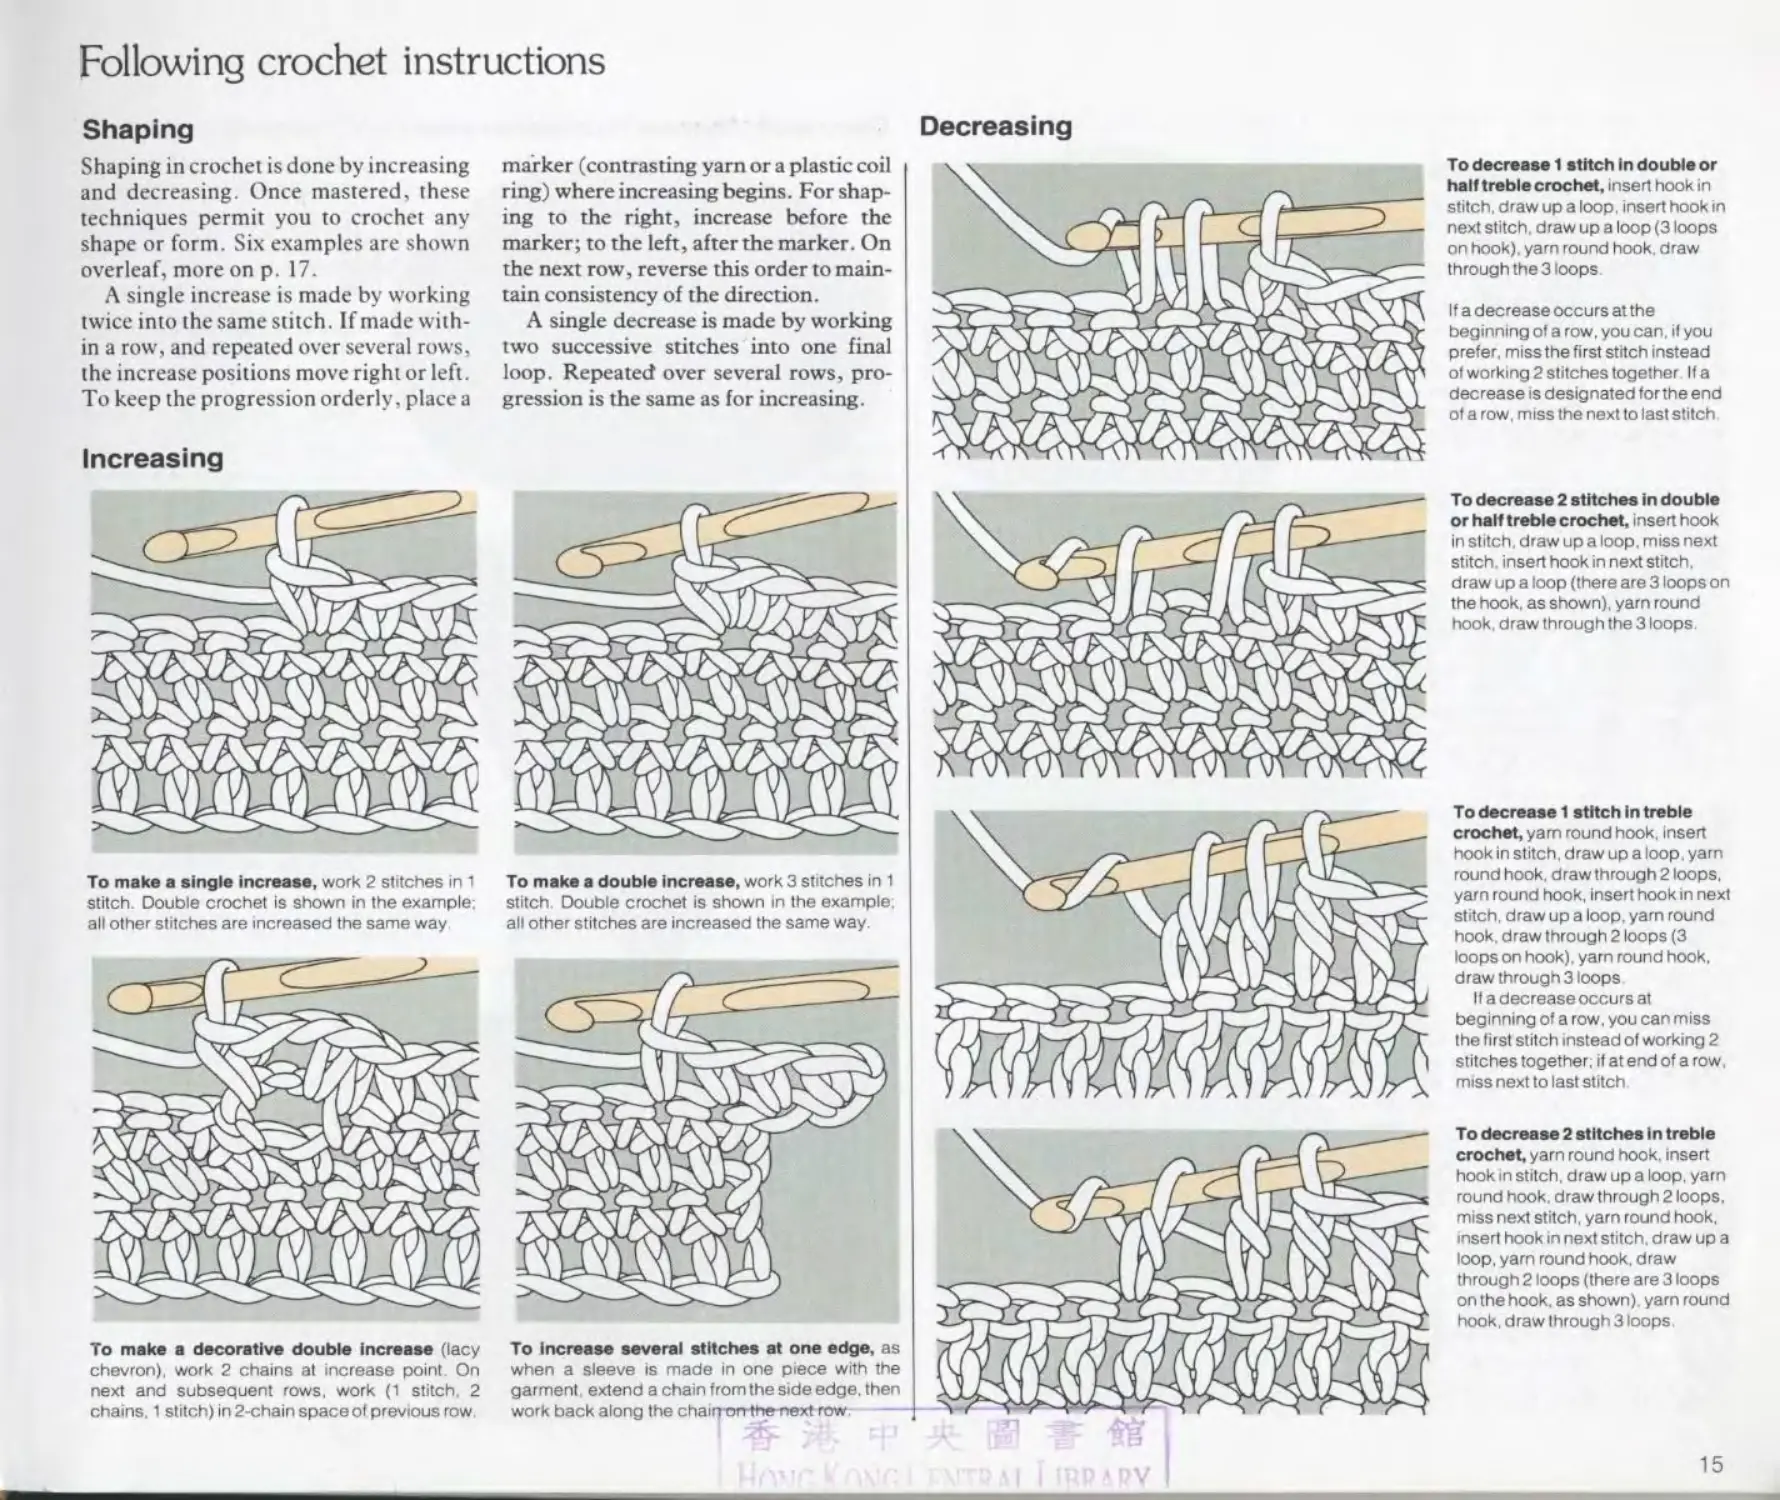
Increasing
To make a single increase, work 2 stitches in 1
stitch. Double crochet is shown in the example:
all other stitches are increased the same way
To make a double Increase, work 3 stitches in 1
stitch Double crochet is shown in the example,
all other stitches are increased the same way.
To make a decorative double increase (lacy
chevron), work 2 chains at increase point On
next and subsequent rows, work (1 stitch. 2
chains. 1 stitch) in 2-chain space of previous row
To Increase several stitches at one edge, as
when a sleeve Is made in one piece with the
garment, extend a chain from the side edge, then
work back along the chainorrthe next row
Decreasing
To decrease 1 stitch In double or
half treble crochet, insert hook in
stitch, draw up a loop, insert hook in
next stitch, draw up a loop (3 loops
on hook), yarn round hook, draw
through the 3 loops
If a decrease occurs at the
beginning ot a row. you can. II you
prefer, miss the first stitch instead
of working 2 stitches together If a
decrease is designated for the end
of a row, miss the next to last stitch.
To decrease 2 stitches in double
or half treble crochet, insert hook
in stitch, draw up a loop, miss next
stitch, insert hook in next stitch,
draw up a loop (there are 3 loops on
the hook, as shown), yarn round
hook, draw through the 3 loops.
To decrease 1 stitch In treble
crochet, yam round hook, insert
hook in stitch. draw up a loop .yarn
round hook, draw through 2 loops,
yarn round hook, insert hook in next
stitch, draw up a loop, yarn round
hook, draw through 2 loops (3
loops on hook), yarn round hook,
draw through 3 loops
If a decrease occurs at
beginning of a row. you can miss
the first stitch instead of working 2
stitches together; if at end of a row.
miss next to last stitch
To decrease 2 stitches In treble
crochet, yarn round hook, Insert
hook in stitch, draw up a loop, yarn
round hook, draw through 2 loops,
miss next stitch, yarn round hook,
insert hook in next stitch, draw up a
loop, yarn round hook, draw
through 2 loops (there are 3 loops
on the hook, as shown), yarn round
hook, draw through 3 loops
15
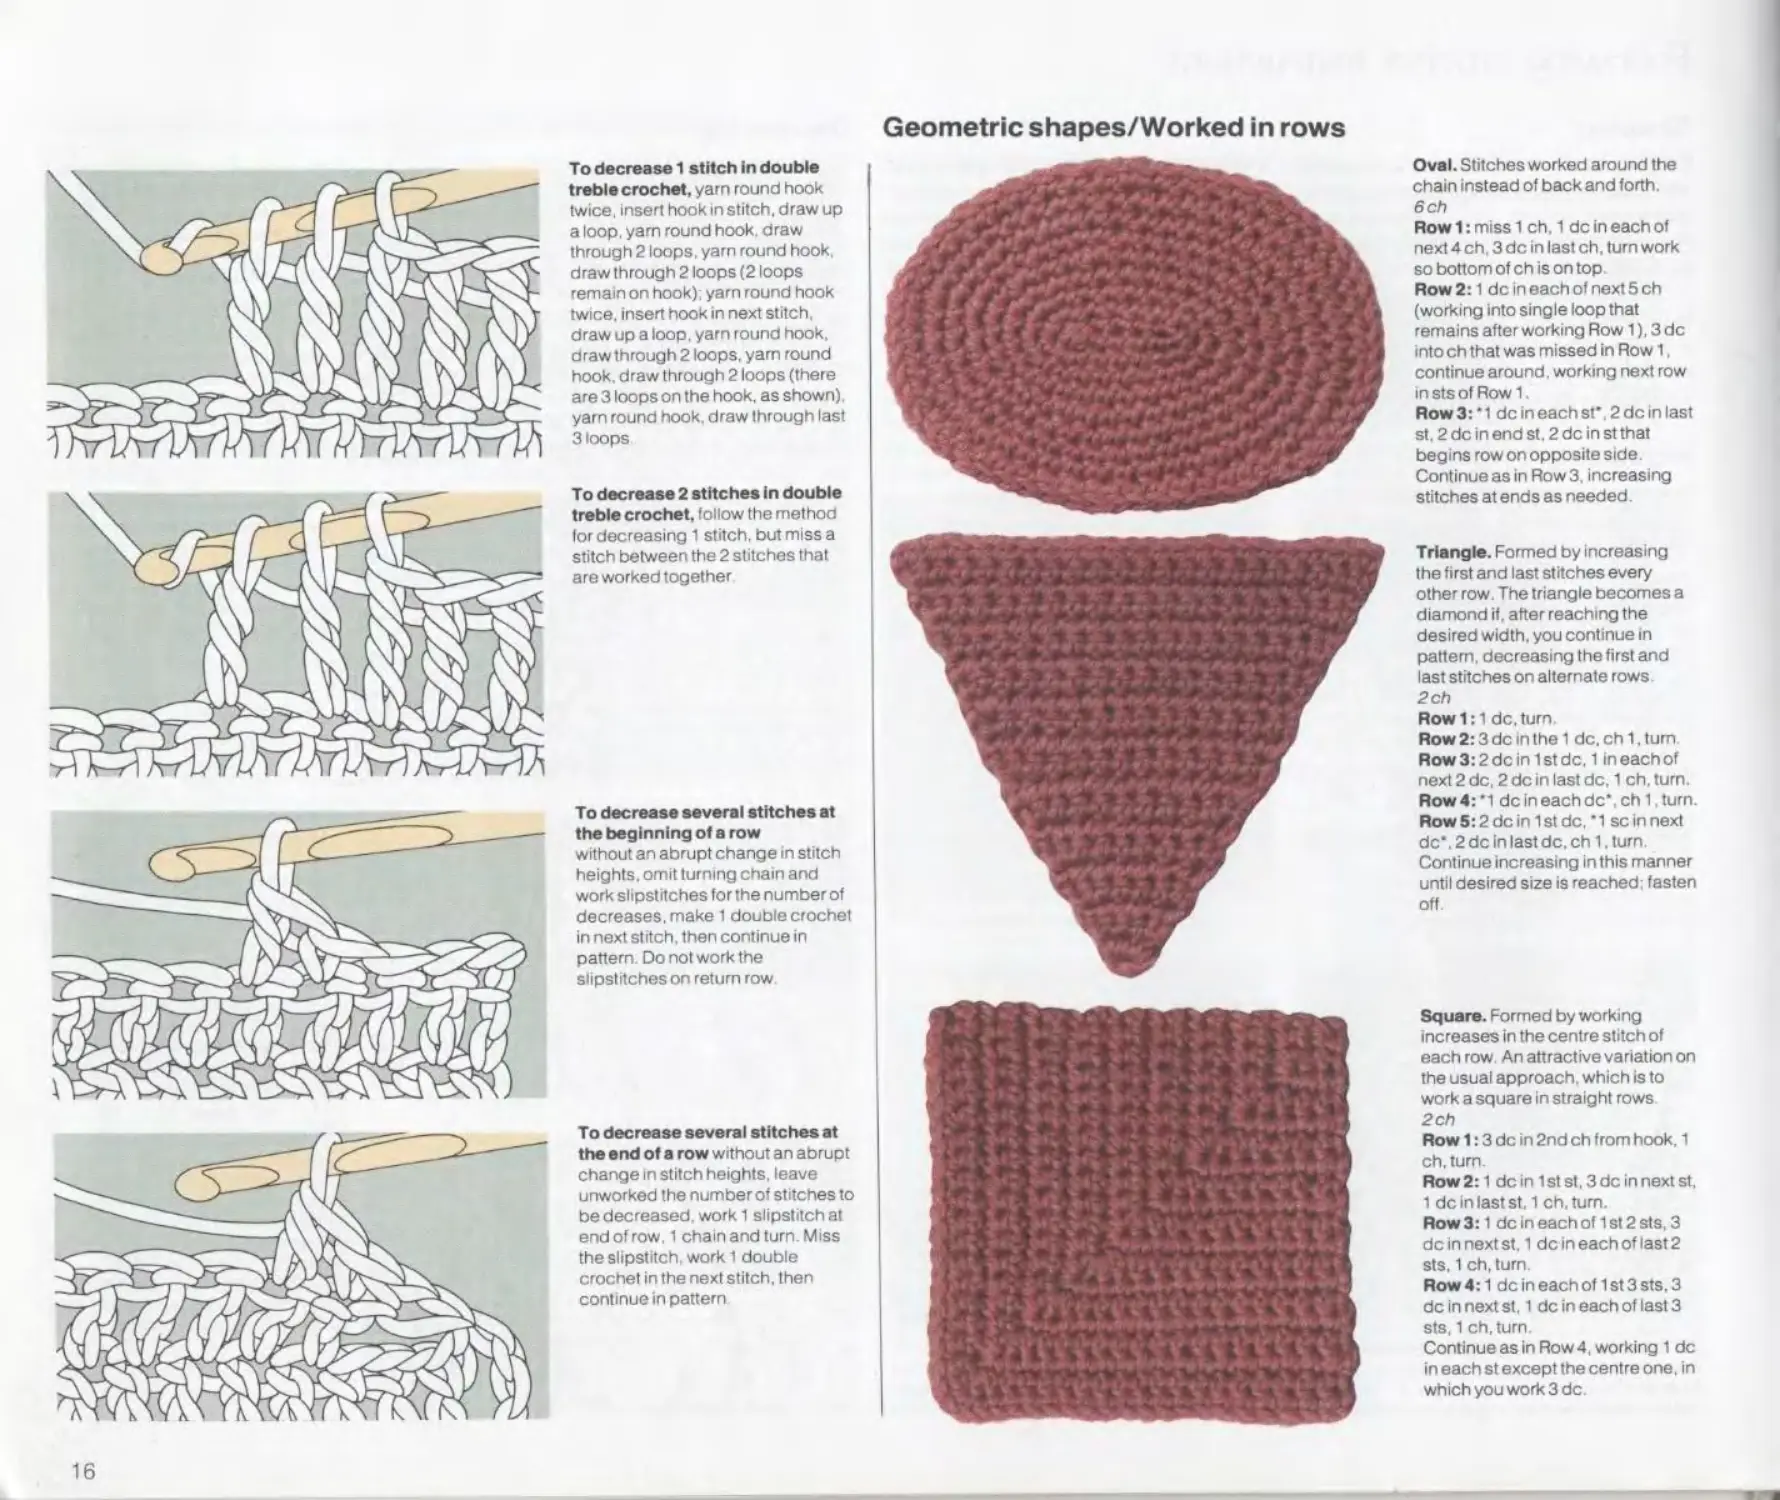
To decrease 1 stitch In double
treble crochet, yarn round hook
twice, insert hook in stitch, draw up
a loop, yarn round hook, draw
through2 loops, yarn round hook
draw through 2 loops (2 loops
remainon hook): yarn round hook
twice, insert hook in next stitch,
draw up a loop, yarn round hook,
draw through 2 loops, yam round
hook, draw through 2 loops (there
are 3 loops on the hook, as shown),
yarn round hook, draw through last
3 loops
To decrease 2 stitches in double
treble crochet, follow the method
lor decreasing 1 stitch, but miss a
stitch between the 2 stitches that
are worked together
To decrease several stitches at
the beginning of a row
without an abrupt change in stitch
heights, omit turning chain and
work slipstitches for the number of
decreases, make 1 double crochet
in next stitch, then continue in
pattern. Do not work the
slipstitches on return row
To decrease several stitches at
the end of a row without an abrupt
change In stitch heights, leave
unworked the number of stitches to
be decreased, work 1 slipstitch at
end of row. 1 chain and turn Miss
the slipstitch, work 1 double
crochet in the next stitch, then
continue in pattern
16
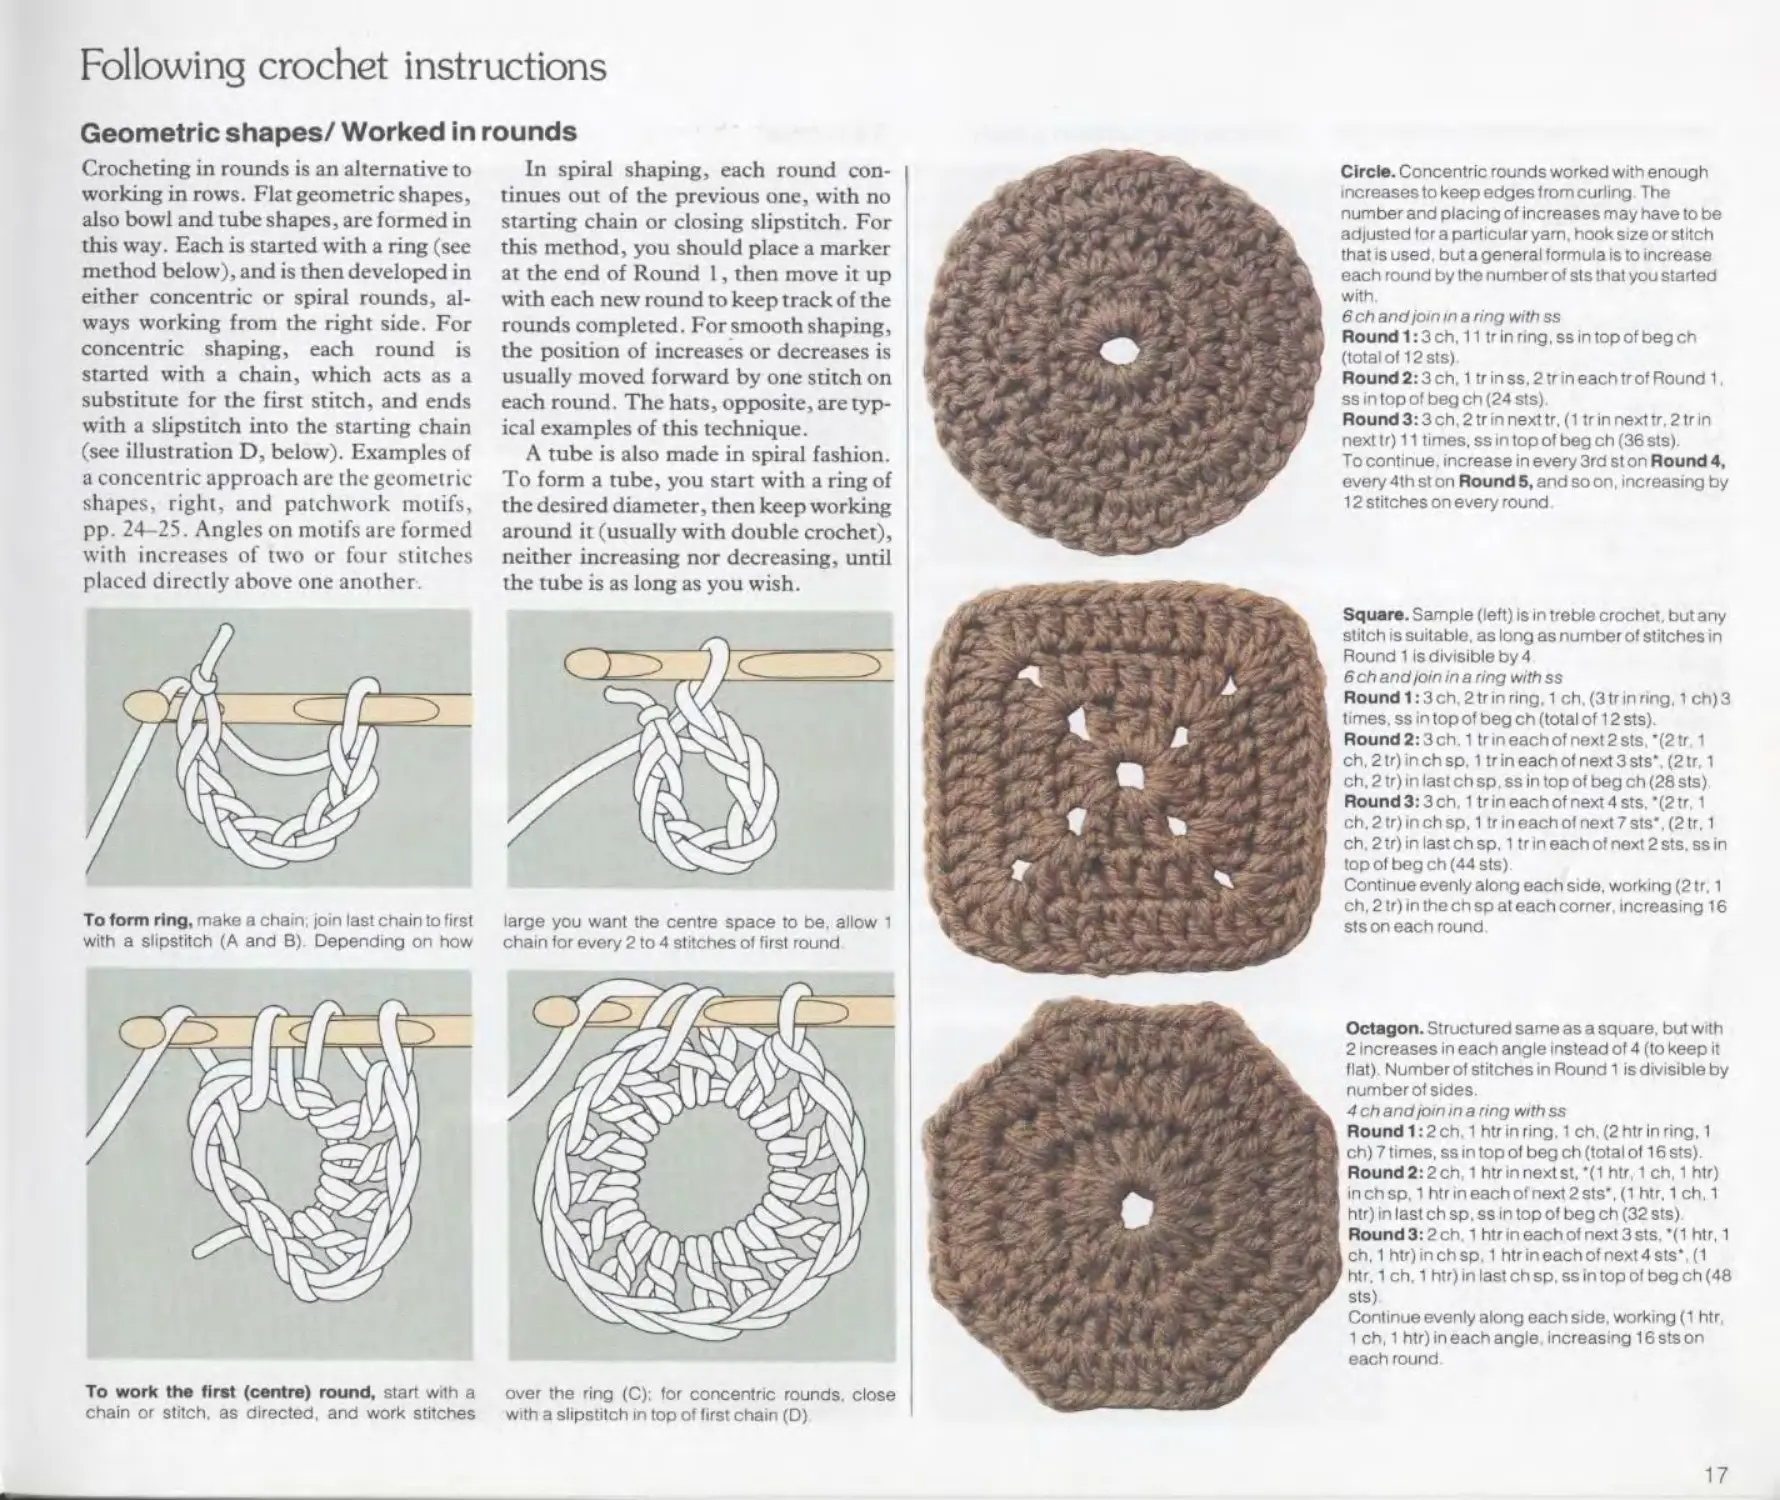
Geometric shapes/Worked in rows
Oval. Stitches worked around the
chain instead of back and forth.
6ch
Row 1: miss 1 ch. 1 de in each of
next 4 ch, 3 de in last ch, turn work
so bottom of ch is on top.
Row 2:1 de in each of next 5 ch
(working into single loop that
remains after working Row 1), 3 de
into ch that was missed in Row 1,
continue around, working next row
in sts of Row 1.
Row 3: • 1 de in each st', 2 de In last
st. 2 de in end st. 2 de in st that
begins row on opposite side.
Continue as in Row 3. increasing
stitches at ends as needed.
Triangle. Formed by increasing
the first and last stitches every
other row The triangle becomes a
diamond if. after reaching the
desired width, you continue in
pattern, decreasing the first and
last stitches on alternate rows
2ch
Row 1:1 de. turn
Row 2:3 de in the 1 de. ch 1, turn
Row 3:2 de in 1st de. 1 in each of
next 2 de, 2 de in last de, 1 ch. turn.
Row4:'1 de in each de', ch 1 .turn.
Row5:2dcin 1st de, '1 sc in next
dc‘. 2 de in last de. ch 1. turn
Continue increasing in this manner
until desired size is reached; fasten
off
Square. Formed by working
increases in the centre stitch of
each row An attractive variation on
the usual approach, which is to
work a square in straight rows
2 ch
Row 1:3 de in 2nd ch from hook, 1
ch.turn
Row 2:1 de in 1 st st. 3 de in next st.
1 de in last st. 1 ch. turn.
Row 3:1 de in each of 1 st 2 sts, 3
de in next st. 1 de in each of Iast2
sts. 1 ch, turn
Row4:1 de in each of 1st 3 sts. 3
de in next st. 1 de in each of last 3
sts, 1 ch. turn.
Continue as in Row 4, working 1 de
in each st except the centre one, in
which you work 3 de
Following crochet instructions
Geometric shapes/ Worked in rounds
Crocheting in rounds is an alternative to
working in rows. Flat geometric shapes,
also bowl and tube shapes, are formed in
this way. Each is started with a ring (see
method below), and is then developed in
either concentric or spiral rounds, al-
ways working from the right side. For
concentric shaping, each round is
started with a chain, which acts as a
substitute for the first stitch, and ends
with a slipstitch into the starting chain
(see illustration D, below). Examples of
a concentric approach are the geometric
shapes, right, and patchwork motifs,
pp. 24-25. Angles on motifs are formed
with increases of two or four stitches
placed directly above one another.
In spiral shaping, each round con-
tinues out of the previous one, with no
starting chain or closing slipstitch. For
this method, you should place a marker
at the end of Round 1, then move it up
with each new round to keep track of the
rounds completed. For smooth shaping,
the position of increases or decreases is
usually moved forward by one stitch on
each round. The hats, opposite, are typ-
ical examples of this technique.
A tube is also made in spiral fashion.
To form a tube, you start with a ring of
the desired diameter, then keep working
around it (usually with double crochet),
neither increasing nor decreasing, until
the tube is as long as you wish.
To form ring, make a chain, join last chain to first
with a slipstitch (A and B) Depending on how
large you want the centre space to be. allow 1
chain for every 2 to 4 stitches of first round
To work the first (centre) round, start with a
chain or stitch, as directed, and work stitches
over the ring (C): for concentric rounds, close
with a slipstitch in top of first chain (D)
Circle. Concentric rounds worked with enough
increases to keep edges from curling The
number and placing of increases may have to be
adjusted for a particular yarn, hook size or stitch
that is used, but a general formula is to increase
each round by the number of sts that you started
with.
6 ch and join in a ring with ss
Round 1:3 ch, 11 tr In ring, ss in top of beg ch
(total of 12 sts)
Round2:3ch, 1 trinss.2trineachtrofRound 1
ss in top of beg ch (24 sts)
Round 3:3 ch. 2 tr in next tr, (1 trin nexttr. 2 tr in
nexttr) 11 times, ss in top of beg ch (36 sts).
To continue, increase in every 3rd st on Round 4,
every 4th st on Round 5, and so on, increasing by
12 stitches on every round.
Square. Sample (left) is in treble crochet, but any
stitch is suitable, as long as number of stitches in
Round 1 is divisible by 4
в ch and loin in a ring with ss
Round 1: 3ch. 2 trin ring, 1 ch, (3 trin ring, 1 ch)3
times, ss in top of beg ch (total of 12 sts).
Round 2:3 ch. 1 tr in each of next 2 sts, '(2 tr, 1
ch. 2 tr) in ch sp, 1 tr in each of next 3 sts'. (2 tr. 1
ch. 2 tr) in last ch sp. ss in top of beg ch (28 sts)
Round 3:3 ch. 1 trin each of next 4 sts. *(2 tr. 1
ch. 2 tr) in ch sp. 1 trin each of next 7 Sts". (2 tr, 1
ch. 2 tr) in last ch sp. 1 tr in each of next 2 sts. ss in
top of beg ch (44 sts)
Continue evenly along each side, working (2 tr. 1
ch, 2 tr) in the ch sp at each corner, increasing 16
sts on each round
Octagon. Structured same as a square, but with
2 increases in each angle instead of 4 (to keep it
Hat). Number of stitches in Round 1 isdivisibleby
number of sides.
4 ch and /от in a ring with ss
Round 1:2ch. 1 htrinring. 1 ch. (2 htr in ring. 1
ch) 7 times, ss in top of beg ch (total of 16 sts).
Round2:2ch, 1 htr in next st. ‘(1 htr, 1 ch, 1 htr)
in ch sp. 1 htr in each of next 2 sts',(1 htr, 1 ch, 1
htr) in last ch sp. ss in top of beg ch (32 sts)
Round3:2ch. 1 htrineachofnext3sts.'(1 htr, 1
ch. 1 htr)inchsp, 1 htr in each of next 4 sts‘, (1
htr. 1 ch. 1 htr) in last ch sp, ss in top of beg ch (48
sts)
Continue evenly along each side, working (1 htr,
1 ch, 1 htr) in each angle, increasing 16 sts on
each round
17
Crochet
stitches
Selecting a pattern stitch
Textures
Shells
Clusters
Motifs
Motifs/Patchwork
Meshes
Shaping mesh ground
Filet crochet
Overlaid meshes
Irish crochet
Tunisian crochet
Loop stitches
Multicolour crochet
Charting a pattern stitch
Selecting a pattern stitch
A pattern stitch is a sequence of crochet
techniques, repeated continuously to
form a fabric. There are two ways of
working a pattern - in rows or in rounds.
To work a pattern in rows, start with a
number of chains which is a multiple of
the stitches needed to complete one
horizontal motif, plus any additional
chains indicated. These extra chains in-
clude the ones that will be missed at the
beginning of Row 1, and sometimes a
few for balancing pattern motifs. (The
chain on the hook is never counted.)
After completing all rows in the pattern,
begin again, usually at Row 2; the first
row is usually a setting-up row. If a
pattern is complex, use a row counter or
markers to keep count.
To work a pattern in rounds, begin
with a ring of chain stitches or yarn and
work the first round into the ring (see
p. 17 for the method). All subsequent
rounds are worked with the right side
facing you; the item is complete when
you have obtained the desired size. It is
not necessary to work all rounds.
Whether worked in rounds or rows,
there is usually little difference between
the two sides of a crochet pattern. Ex-
ceptions are some Tunisian stitches, also
two-colour patterns in which yarn is
carried up one side. Unless directions
specify otherwise. Row 1 begins the
right side.
Most pattern stitches can be classified
according to structure. Familiarity with
these basic structures will permit you to
‘read’ almost any pattern from a picture
or sample. Patterns in this section are
grouped according to type, though in
some cases a stitch fits more than one
category. The first group, textures, is a
selection of compact patterns that are
variations of basic crochet stitches.
They are firmer and stiffer than the
comparable knitted stitches. In select-
ing a pattern, consider its suitability for
both yarn and purpose. Make a test
sample to find out.
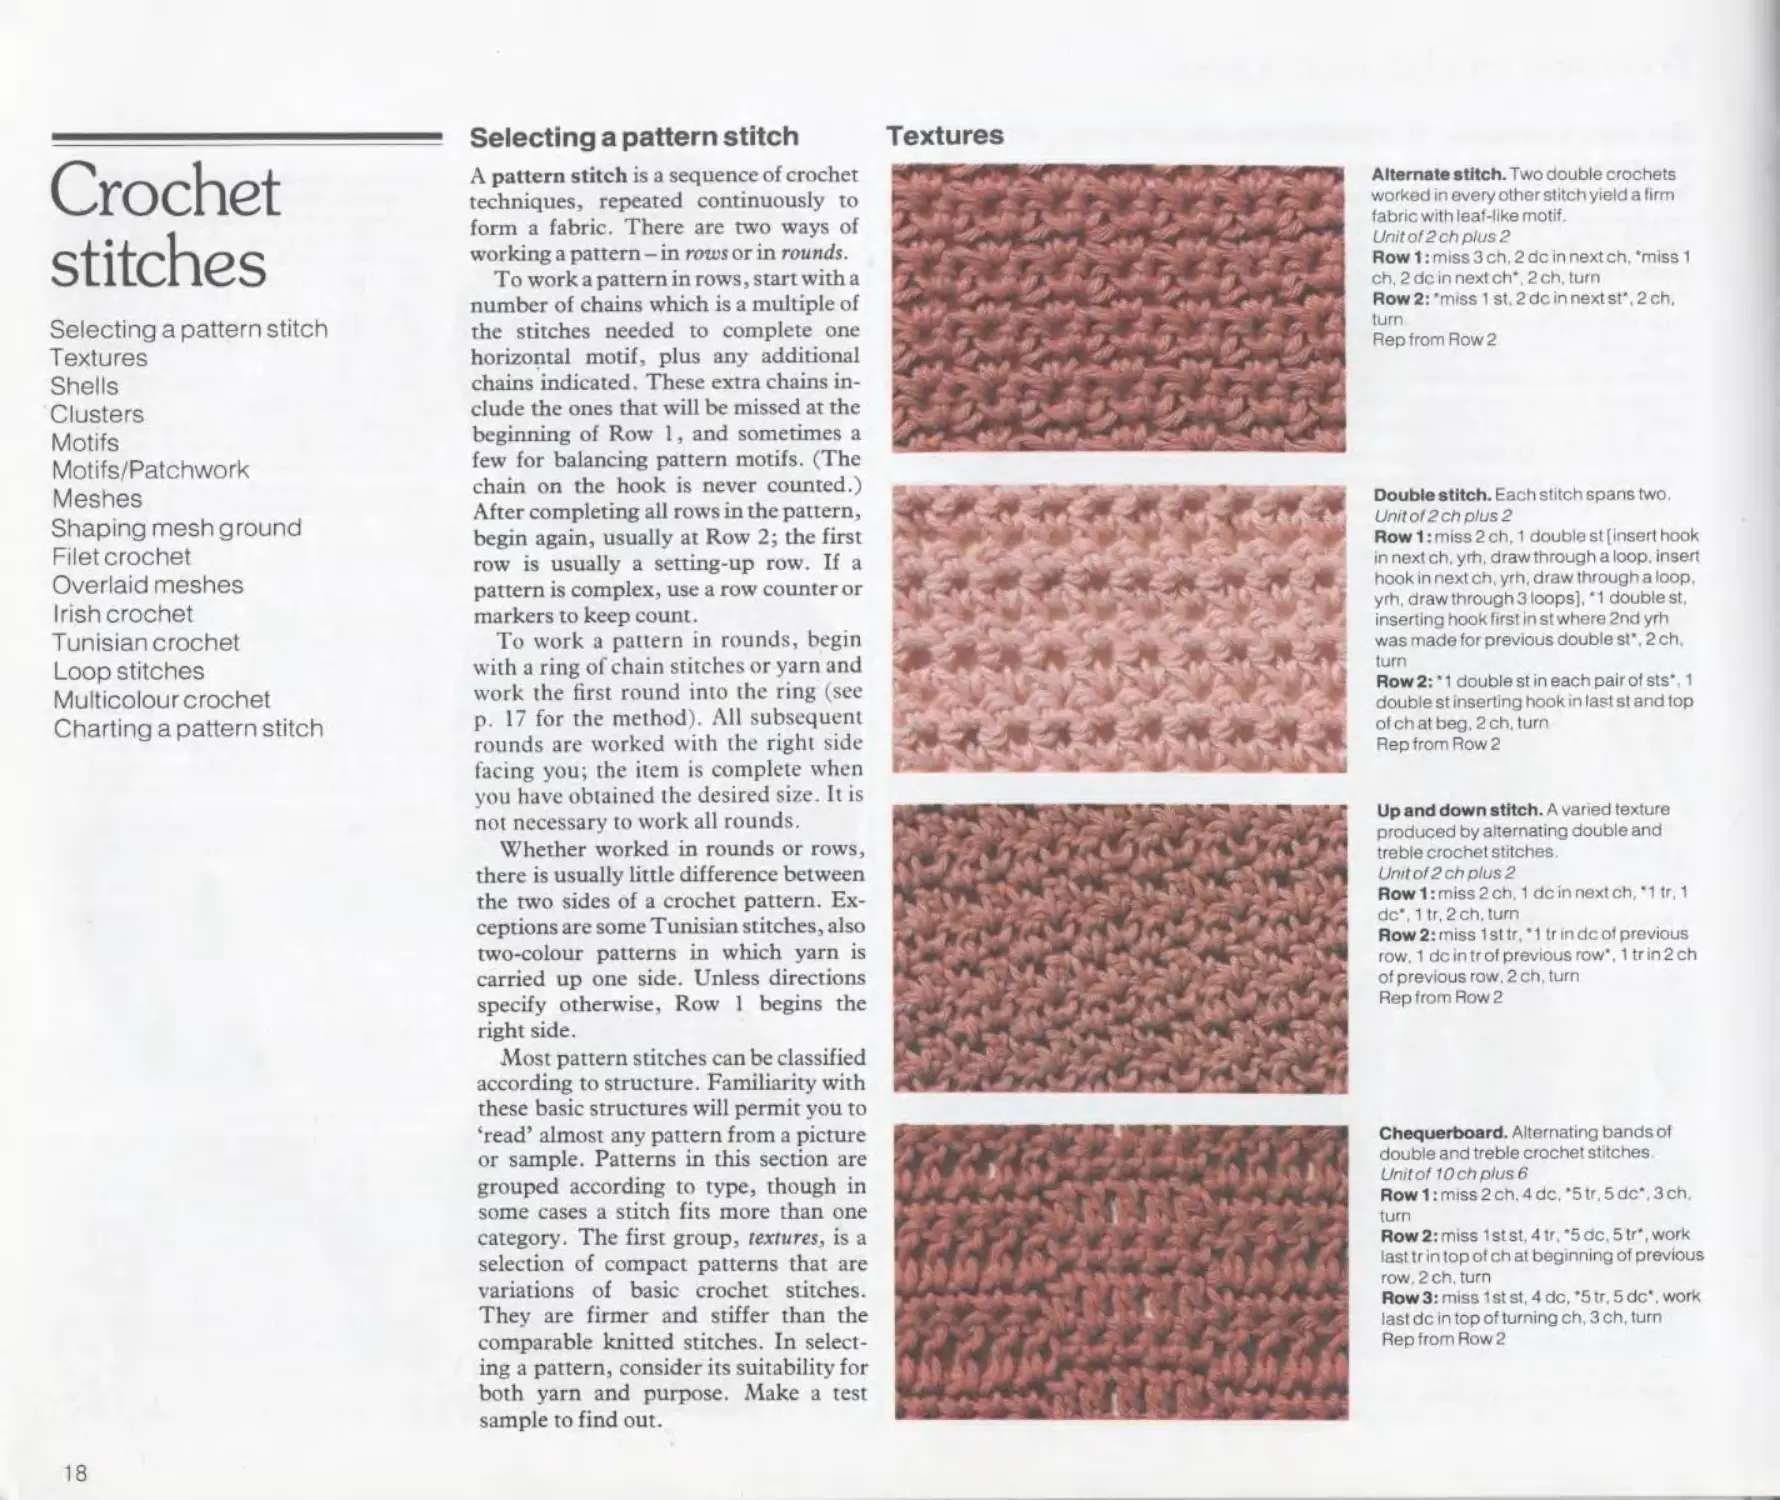
Textures
Alternate stitch. Two double crochets
worked in every other stitch yield a firm
labric with leaf-like motif.
Unit of 2 ch plus 2
Row 1: miss 3 ch. 2 de in next ch. 'miss 1
ch, 2 de in next ch", 2 ch. turn
Row2:*miss 1 st.2dcinnextsf,2ch,
turn
Rep from Row 2
Double stitch. Each stitch spans two.
Unitof2chplus2
Row 1: miss 2 ch. 1 double st [insert hook
in next ch. yrh, draw through a loop, insert
hook in next ch. yrh, draw through a loop,
yrh, draw through 3 loops], "1 double st.
inserting hook first in st where 2nd yrh
was made for previous double st". 2 ch.
turn
Row2:"1 double st in each pair of sts". 1
double st inserting hook in last si and top
ol ch at beg. 2 ch. turn
Rep from Row 2
Up and down stitch. A varied texture
produced by alternating double and
treble crochet stitches.
Unit ol 2 ch plus 2
Row 1: miss 2 ch. 1 de in next ch, *1 tr. 1
de", 1 tr. 2 ch, turn
Row 2: miss 1 st tr," 1 tr in de of previous
row. 1 dcintrof previous row". 1 trin2ch
of previous row. 2 ch. turn
Rep from Row 2
Chequerboard. Alternating bands of
double and treble crochet stitches
Unitof10chplus6
Row 1: miss 2 ch. 4 de. "5 tr. 5 de", 3 ch,
turn
Row 2: miss 1 st st. 4 tr. "5 de. 5 tr", work
last tr in top of ch at beginning of previous
row. 2 ch. turn
Row 3: miss 1 st st. 4 de. "5 tr, 5 de". work
last de in top of turning ch. 3 ch, turn
Rep from Row 2
18
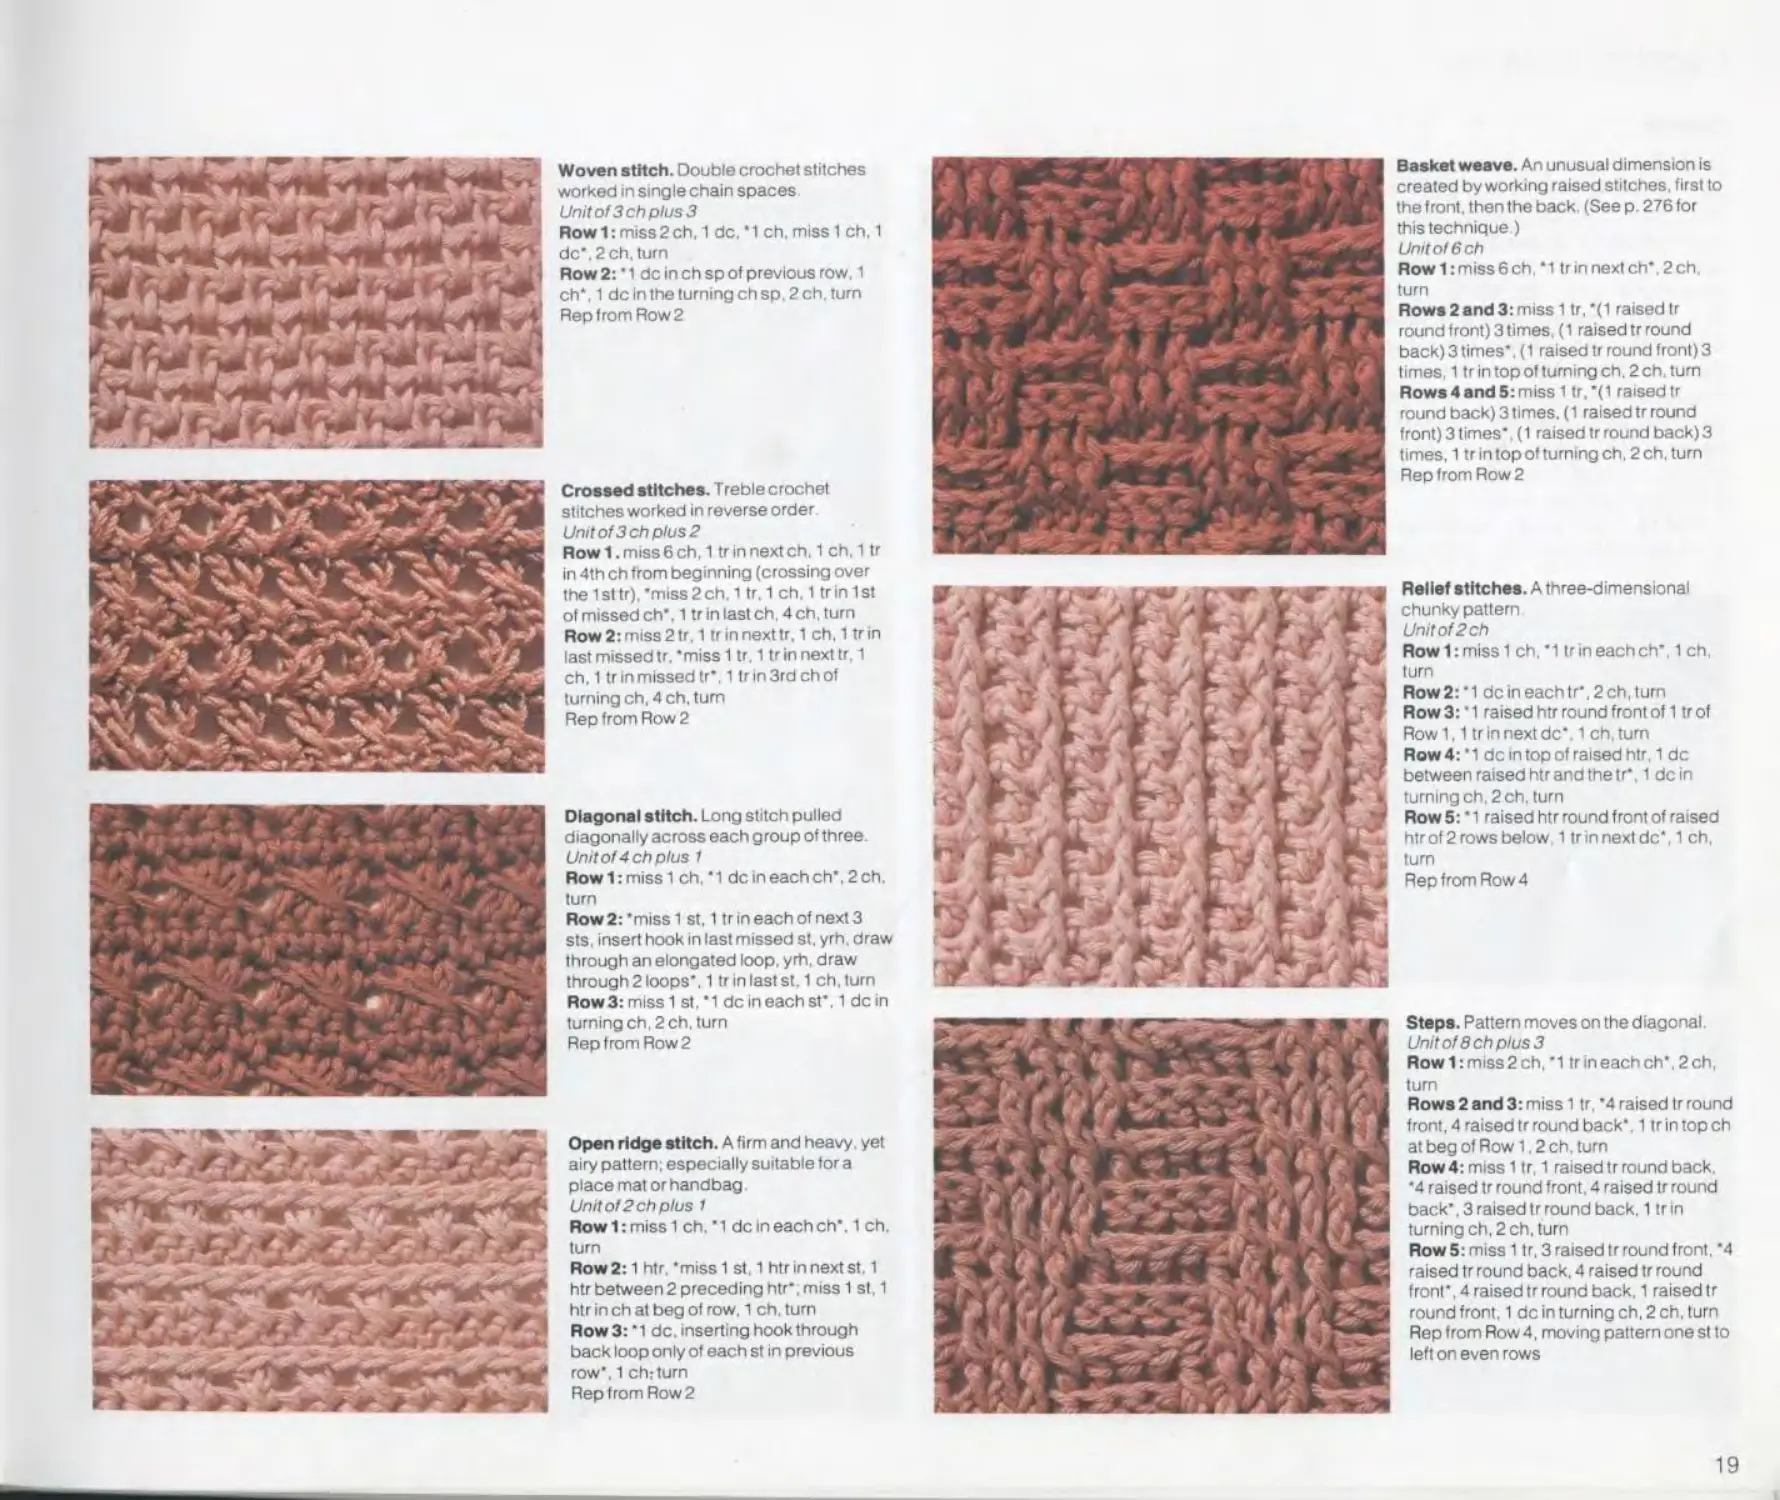
Woven stitch. Double crochet stitches
worked in single chain spaces
Unit of 3 ch plus 3
Row 1: miss 2 ch, 1 de. ‘ 1 ch. miss 1 ch. 1
de". 2 ch. turn
Row 2:' 1 de in ch sp of previous row. 1
ch*. 1 de In the turning ch sp. 2 ch. turn
Rep from Row 2
Crossed stitches. Treble crochet
stitches worked in reverse order.
Unit of 3 ch plus 2
Row1.miss6ch. 1 tr in next ch. 1 ch, 1 tr
in 4th ch from beginning (crossing over
the 1 st tr). "miss 2 ch. 1 tr, 1 ch. 1 tr in 1 st
of missed ch*. 1 trin last ch, 4 ch. turn
Row 2: miss 2 tr. 1 trinnexttr. 1 ch. 1 trin
last missed tr. 'miss 1 tr. 1 tr in next tr, 1
ch, 1 tr in missed tr’. 1 trin 3rd ch of
turning ch, 4 ch, turn
Rep from Row 2
Diagonal stitch. Long stitch pulled
diagonally across each group of three
Unitof4chplus 1
Row1:mlss1 ch.’l de in each ch’, 2 ch.
turn
Row 2: ’miss 1 st. 1 tr in each of next 3
sts. insert hook in last missed st. yrh. draw
through an elongated loop. yrh. draw
through 2 loops’. 1 trin last st. 1 ch.turn
Row3:miss1 st, ’1 dcineachst’. 1 de in
turning ch, 2 ch. turn
Rep from Row 2
Open ridge stitch. A firm and heavy, yet
airy pattern; especially suitable tor a
place mat or handbag
Unitof2chplus 1
Row1:miss1 ch. ’1 dcineachch’, 1 ch,
turn
Row 2:1 htr, ’miss 1 st. 1 htr in next st. 1
htr between 2 preceding htr’, miss 1 st. 1
htr in ch at beg of row. 1 ch. turn
Row3: ’1 de. inserting hook through
back loop only of each st in previous
row’, 1 ch: turn
Rep from Row 2
Basket weave. An unusual dimension is
created by working raised stitches, first to
the front, then the back. (See p. 276 for
this technique)
Unit ol 6 ch
Row 1: miss 6 ch,‘1 trin next ch*. 2 ch
turn
Rows 2 and 3:miss 1 tr, *(1 raised tr
round front) 3 times. (1 raised tr round
back) 3 times*. (1 raised tr round front) 3
times, 1 trintopoftumingch,2ch.tum
Rows 4 and 5: miss 1 tr, *(1 raised tr
round back) 3 times. (1 raised tr round
front) 3 times*. (1 raised tr round back) 3
times, 1 tr in top of turning ch. 2 ch. turn
Rep from Row 2
Relief stitches. A three-dimensional
chunky pattern
Unit of 2 ch
Row 1: miss 1 ch. *1 tr in each ch*. 1 ch.
turn
Row2:*1 dcineachtr*.2ch,turn
Row 3: * 1 raised htr round front of 1 tr of
Row 1,1 tr in next de*. 1 ch. turn
Row 4: *1 de in top of raised htr, 1 de
between raised htr and the tr*, 1 de in
turning ch. 2 ch. turn
Row 5: * 1 raised htr round front of raised
htr of 2 rows below, 1 trin next de*. 1 ch,
turn
Rep from Row 4
Steps. Pattern moves on the diagonal.
Unit of 8 ch plus 3
Row 1: miss 2 ch, *1 tr in each ch*. 2 ch,
turn
Rows 2 and 3: miss 1 tr. *4 raised tr round
front, 4 raised tr round back*. 1 tr in top ch
at beg of Row 1.2 ch. turn
Row 4: miss 1 tr, 1 raised tr round back.
*4 raised tr round front. 4 raised tr round
back*. 3 raised tr round back. 1 tr in
turning ch, 2 ch, turn
Row 5: miss 1 tr, 3 raised tr round front. *4
raised tr round back. 4 raised tr round
front*, 4 raisedtr round back. 1 raised tr
round front, 1 de in turning ch, 2 ch. turn
Rep from Row 4, moving pattern one st to
left on even rows
19
Crochet stitches
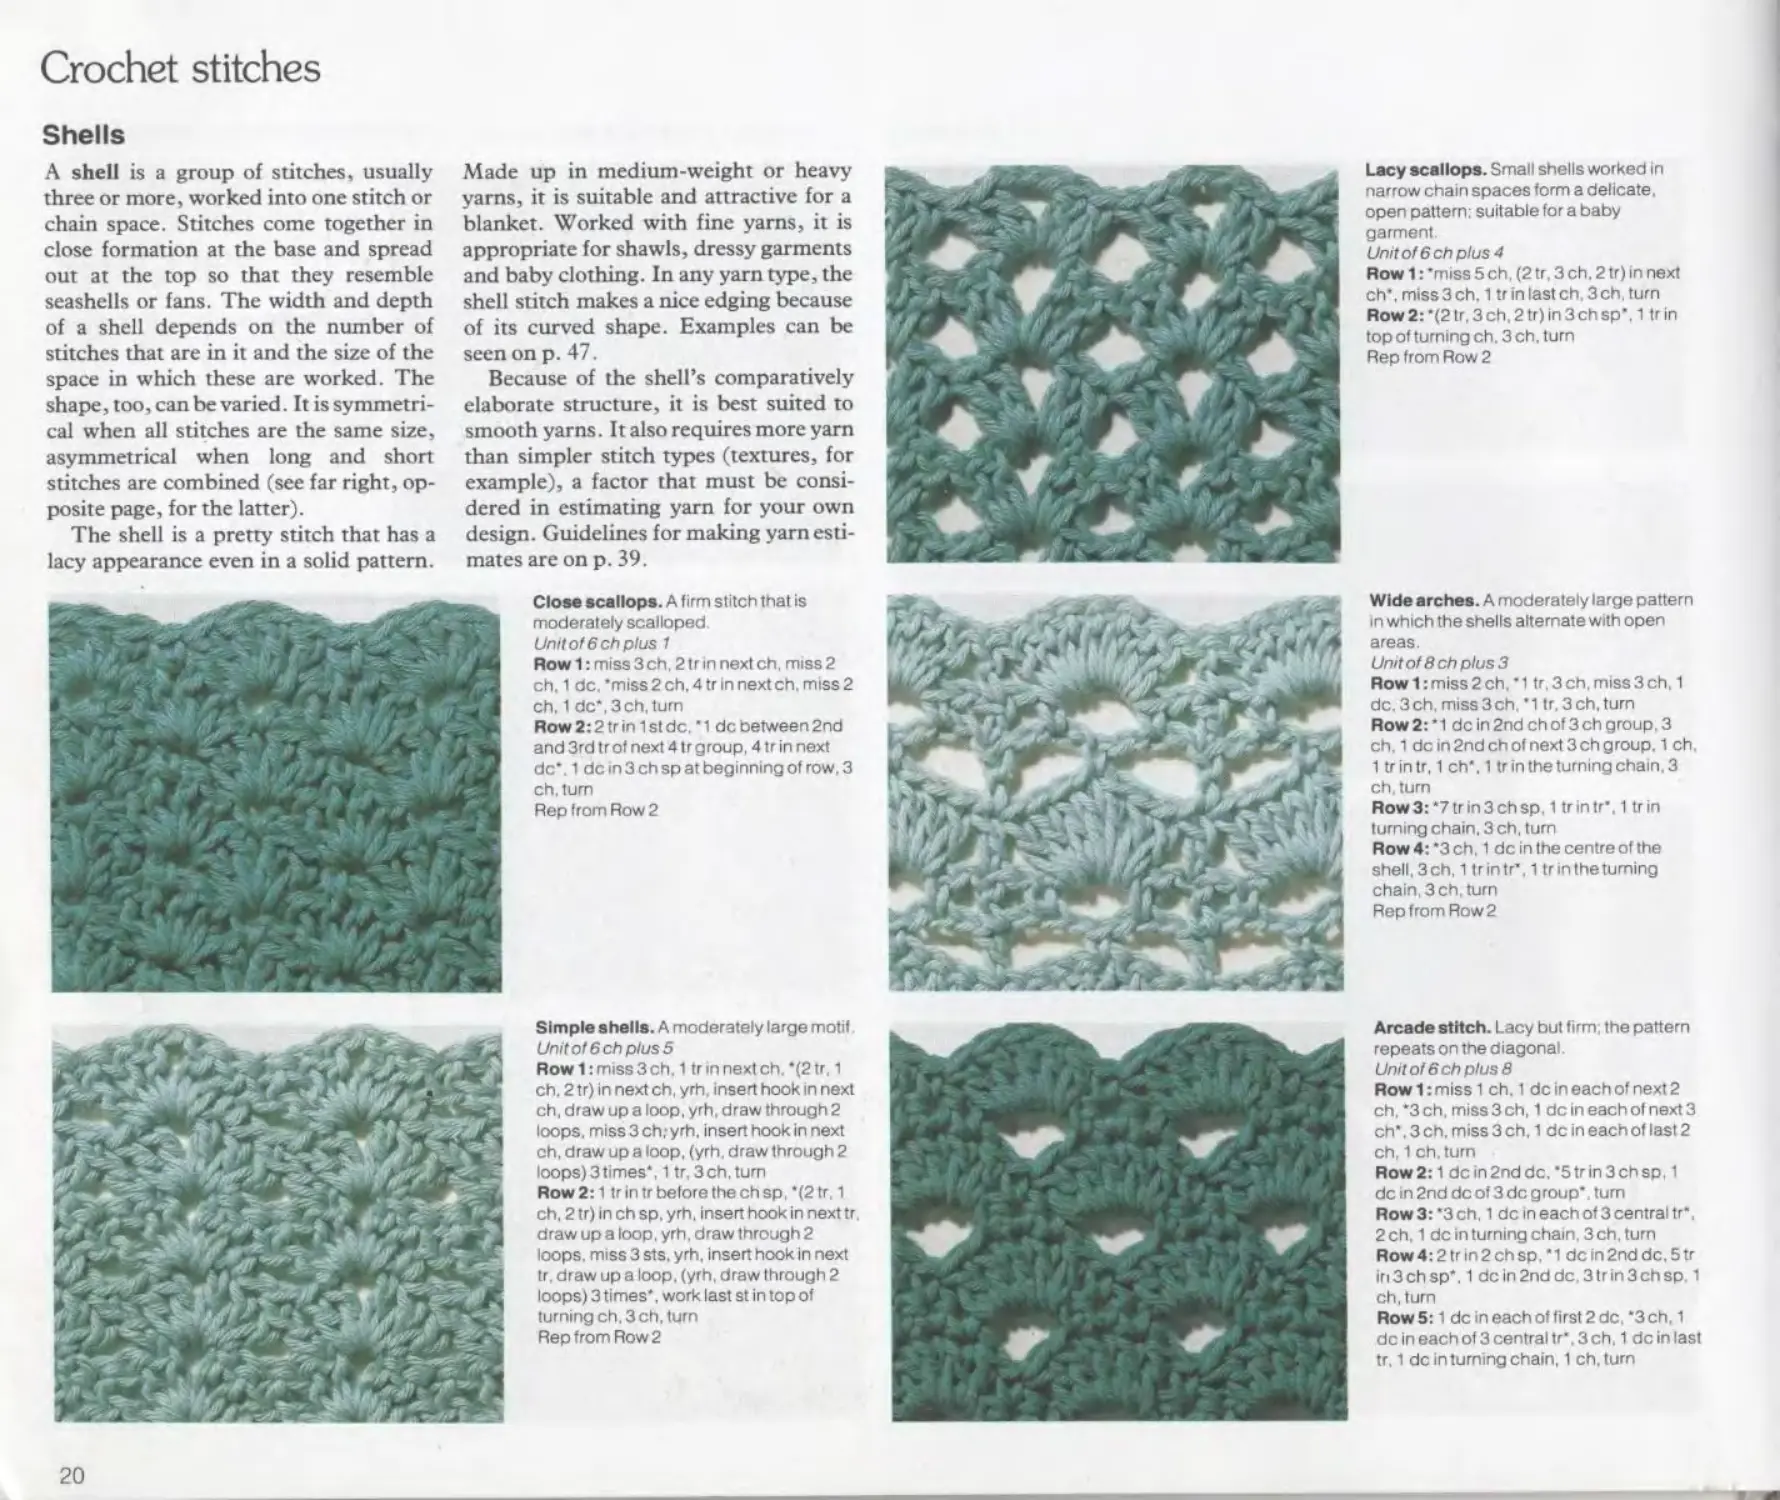
Shells
A shell is a group of stitches, usually
three or more, worked into one stitch or
chain space. Stitches come together in
close formation at the base and spread
out at the top so that they resemble
seashells or fans. The width and depth
of a shell depends on the number of
stitches that are in it and the size of the
space in which these are worked. The
shape, too, can be varied. It is symmetri-
cal when all stitches are the same size,
asymmetrical when long and short
stitches are combined (see far right, op-
posite page, for the latter).
The shell is a pretty stitch that has a
lacy appearance even in a solid pattern.
Made up in medium-weight or heavy
yams, it is suitable and attractive for a
blanket. Worked with fine yarns, it is
appropriate for shawls, dressy garments
and baby clothing. In any yarn type, the
shell stitch makes a nice edging because
of its curved shape. Examples can be
seen onp. 47.
Because of the shell’s comparatively
elaborate structure, it is best suited to
smooth yarns. It also requires more yarn
than simpler stitch types (textures, for
example), a factor that must be consi-
dered in estimating yarn for your own
design. Guidelines for making yarn esti-
mates are on p. 39.
Lacy seal lops. Small shells worked in
narrow chain spaces form a delicate,
open pattern: suitable for a baby
garment
Unit of 6 ch plus 4
Row 1:’miss 5ch. (2 tr. 3 ch. 2 tr) in next
ch*,miss3ch. 1 tr in last ch. 3ch. turn
Row 2: *(2 tr, 3 ch, 2 tr) in 3 ch sp*. 1 tr in
top of turning ch. 3 ch. turn
Rep from Row 2
Close scallops. A firm stitch that is
moderately scalloped
Unitof6chplus 1
Row 1: miss 3 ch, 2 tr in next ch. miss 2
ch. 1 de. ’miss 2 ch, 4 tr in next ch. miss 2
ch. 1 de*. 3 ch, turn
Row 2:2 tr in 1 st de. * 1 de between 2nd
and 3rd trot next 4 tr group, 4 tr in next
de*. 1 de in 3 ch sp at beginning of row. 3
ch. turn
Rep from Row 2
Wide arches. A moderately large pattern
in which the shells alternate with open
areas.
Unit of 8 ch plus 3
Row 1: miss 2 ch. * 1 tr, 3 ch, miss 3 ch, 1
de. 3ch,miss3ch. *1 tr.3ch.turn
Row2:*1 dcin2ndchof3chgroup,3
ch, 1 de in2ndchofnext3chgroup. 1 ch.
1 tr in tr. 1 ch*. 1 tr in the turning chain. 3
ch. turn
Row 3: *7 tr in 3 ch sp. 1 tr in tr*. 1 tr in
turning chain. 3 ch, turn
Row 4: *3 ch. 1 de in the centre of the
shell, 3 ch, 1 tr in tr*. 1 tr in the turning
chain, 3 ch. turn
Rep from Row 2
Simple shells. A moderately large motif
Unit of 6 ch plus 5
Row 1: miss 3 ch. 1 tr in next ch. *(2tr, 1
ch. 2 tr) in next ch, yrh, insert hook in next
ch, draw up a loop. yrh. draw through 2
loops. miss3ch,'yrh. insert hook in next
ch. draw up a loop, (yrh. draw through 2
loops) 3 times*, 1 tr, 3ch.turn
Row2:1trintrbeforethechsp,*(2tr,1
ch. 2 tr) in ch sp. yrh, insert hook in next tr
draw up a loop. yrh. draw through 2
loops, miss 3 sts. yrh, insert hook in next
tr. draw up a loop. (yrh. draw through 2
loops) 3 times*, work last st in top of
turning ch. 3 ch. turn
Rep from Row 2
Arcade stitch. Lacy but firm; the pattern
repeats on the diagonal
Unit of 6 ch plus 8
Row1:miss 1 ch. 1 de in each of next 2
ch, *3ch, miss3ch, 1 de in each of next 3
ch*.3ch. miss 3 ch. 1 de in each of last 2
ch. 1 ch, turn
Row 2:1 de in 2nd de. *5trin3chsp, 1
de in 2nd de of 3 de group*, turn
Row3:*3ch, 1 de in each of 3 central tr*.
2 ch. 1 de in turning chain, 3 ch. turn
Row4:2trin2chsp. *1 dcin2nddc.5tr
in 3 ch sp*. 1 de in 2nd de. 3 tr in 3 ch sp 1
ch.turn
Row 5:1 de in each of first 2 de. *3 ch. 1
de in each of 3 central tr*. 3 ch, 1 de in last
tr. 1 de in turning chain, 1 ch. turn
20
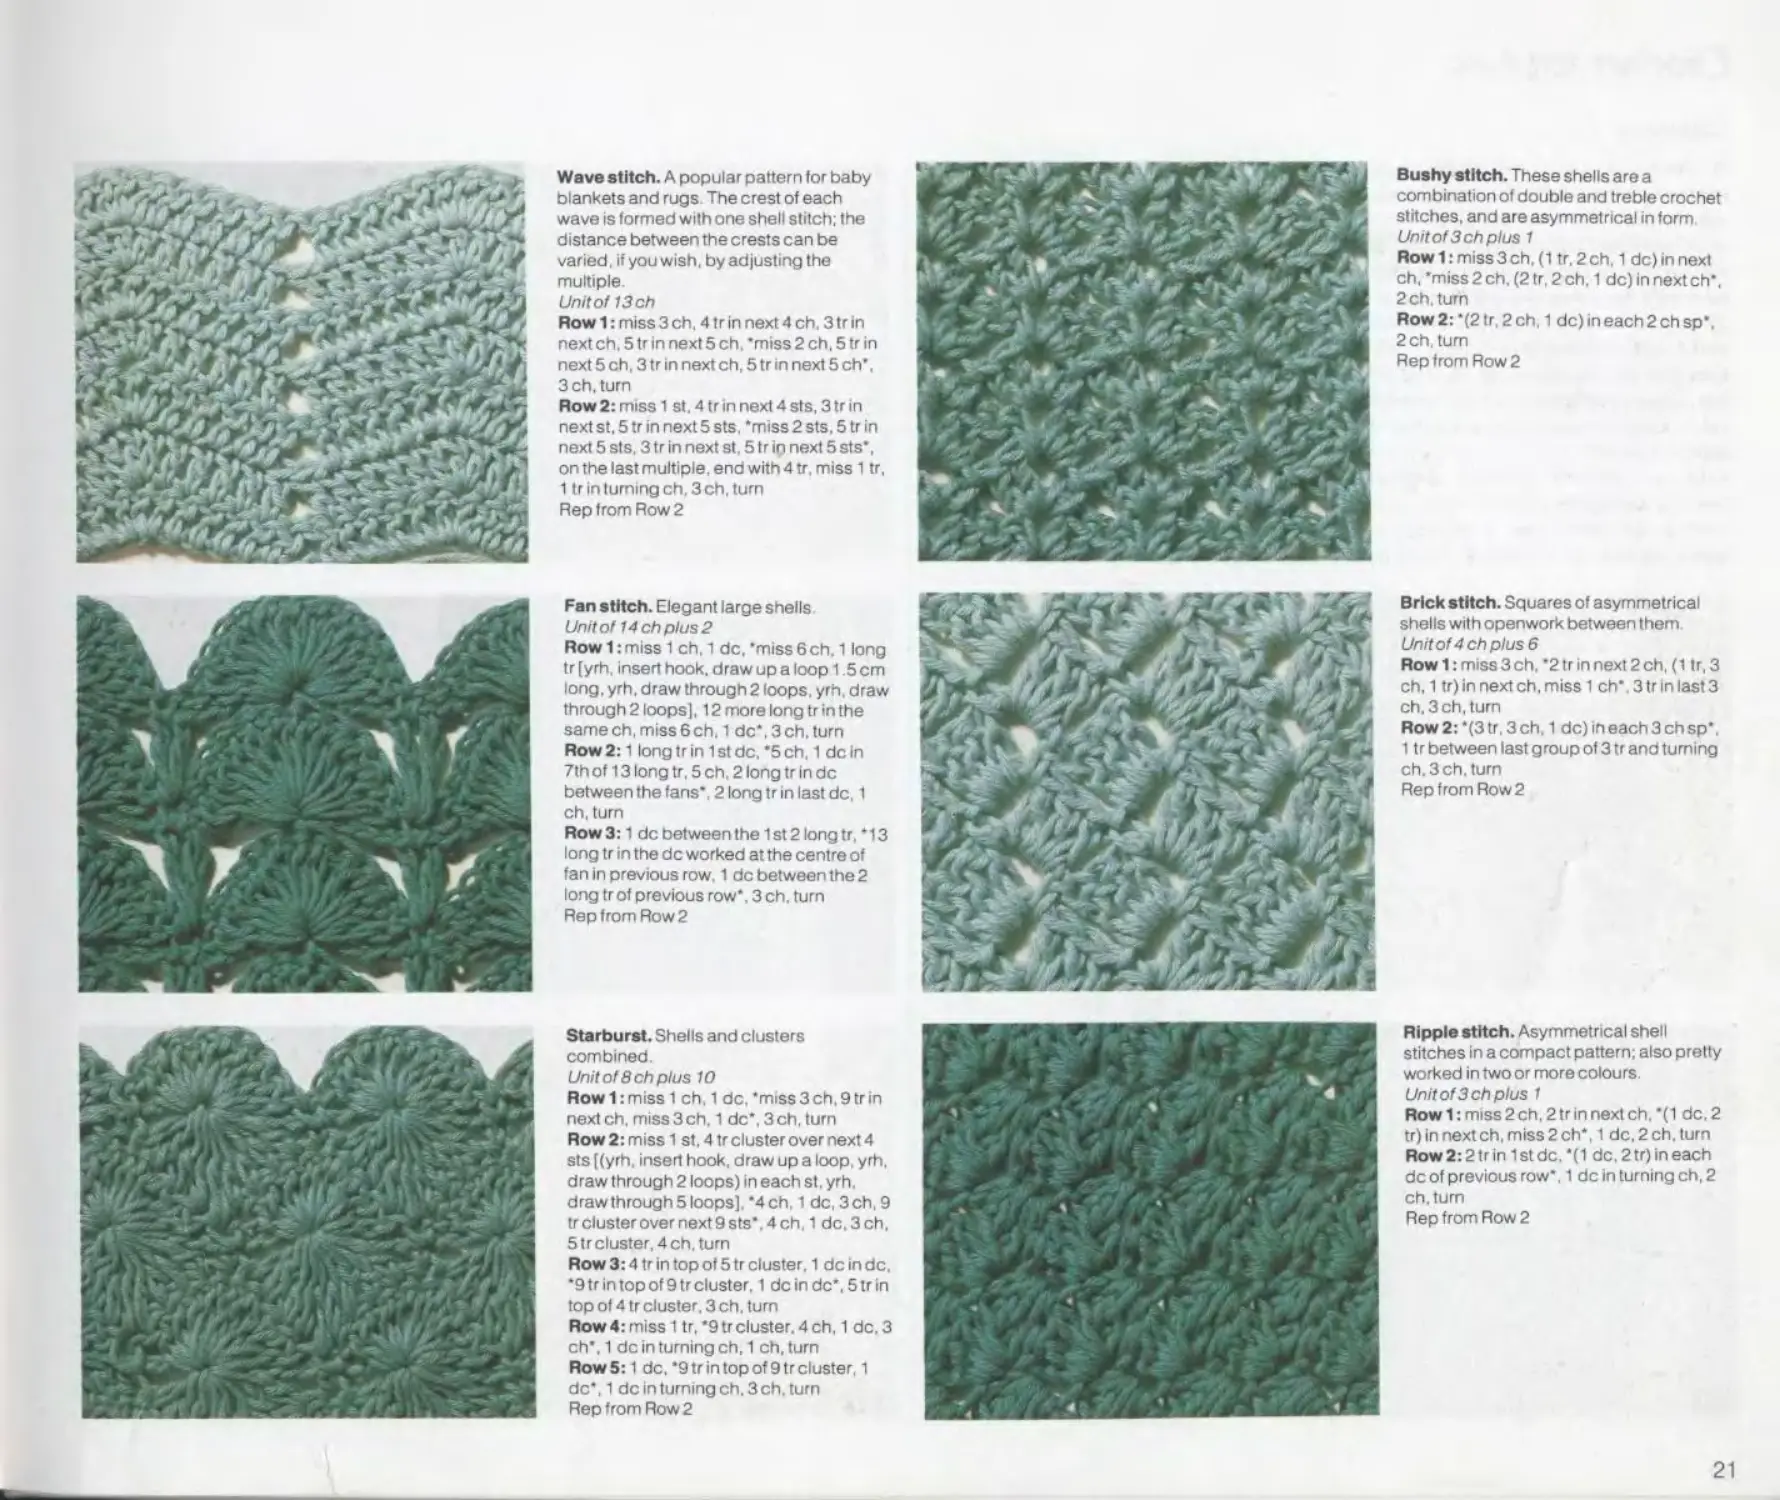
Wave stitch. A popular pattern tor baby
blankets and rugs- The crest of each
wave is formed with one shell stitch; the
distance between the crests can be
varied. if you wish, by adjusting the
multiple.
Unitof 13ch
Row 1: miss 3 ch. 4 tr in next 4 ch. 3 tr in
next ch. 5 tr in next 5 ch. "miss 2 ch, 5 tr in
next 5 ch, 3 tr in next ch, 5 tr in next 5 ch',
3 ch. turn
Row 2: miss 1 st, 4 tr in next 4 sts, 3 tr in
next st. 5 tr in next5 sts. *miss2 sts. 5 tr in
next 5 sts. 3tr in next st, 5 tr in next 5sts',
on the last multiple, end with 4 tr, miss 1 tr,
1 tr in turning ch, 3 ch. turn
Rep from Row 2
Fan stitch. Elegant large shells
Unitof 14 ch plus 2
Row 1: miss 1 ch, 1 de. 'miss6ch, 1 long
tr (yrh, insert hook, draw up a loop 1.5 cm
long, yrh. draw through 2 loops, yrh, draw
through 2 loops], 12 more long tr in the
samech,miss6ch. 1 dc*,3ch.turn
Row 2:1 long tr in 1 st de. '5 ch, 1 de In
7th of 13 long tr, 5 ch, 2 long tr in de
between the fans', 2 long tr in last de. 1
ch, turn
Row 3:1 de between the 1 st 2 long tr, '13
long tr in the de worked at the centre of
fan In previous row, 1 de between the 2
long tr of previous row', 3 ch, turn
Rep from Row 2
Starburst. Shells and clusters
combined.
UnitofBchplus 10
Row 1: miss 1 ch. 1 de, 'miss 3 ch. 9 tr in
next ch. miss3ch, 1 dc',3ch, turn
Row 2: miss 1 st. 4 tr cluster over next 4
sts [(yrh. insert hook, draw up a loop, yrh.
draw through 2 loops) in each st. yrh.
drawthrough5loops]. '4ch, 1 de. 3ch, 9
tr cluster over next 9 sts'. 4 ch, 1 de. 3 ch.
5 tr cluster, 4 ch. turn
Row 3:4 tr in topof 5 tr cluster. 1 de in de.
'9 trin top of 9 tr cluster, 1 de in de’, 5 trin
top of 4 tr cluster, 3 ch. turn
Row 4: miss 1 tr. '9 tr cluster. 4 ch. 1 dc,3
ch', 1 de in turning ch, 1 ch, turn
Row5:1 de.'9tr in topof9tr cluster. 1
de'. 1 de in turning ch. 3 ch. turn
Rep from Row 2
Bushy stitch. These shells are a
combination of double and treble crochet
stitches, and are asymmetrical in form
Unitof 3 ch plus 1
Row 1: miss 3 ch. (1 tr. 2 ch, 1 de) in next
ch. "miss 2 ch. (2 tr. 2 ch. 1 de) in next ch",
2 ch. turn
Row 2: ’(2tr, 2 ch, 1 de) in each 2 ch sp’.
2 ch. turn
Rep from Row 2
Brick stitch. Squares of asymmetrical
shells with openwork between them
Unitof4chplus6
Row 1: miss 3 ch. ’2 tr in next 2 ch, (1 tr, 3
ch, 1 tr) in next ch, miss 1 ch’. 3 tr in last 3
ch. 3 ch, turn
Row2:’(3tr,3ch, 1 de) in each 3 ch sp’.
1 tr between last group of 3 tr and turning
ch. 3 ch. turn
Rep from Row 2
Ripple stitch. Asymmetrical shell
stitches in a compact pattern; also pretty
worked in two or more colours.
Unit of 3 ch plus 1
Row 1: miss 2 ch. 2 tr in next ch. ’(1 de. 2
tr)innextch,miss2ch*. 1 dc.2ch.turn
Row 2:2 trin 1st de. ’(1 dc.2tr)ineach
de of previous row’. 1 de in turning ch, 2
ch. turn
Rep from Row 2
21
Crochet stitches
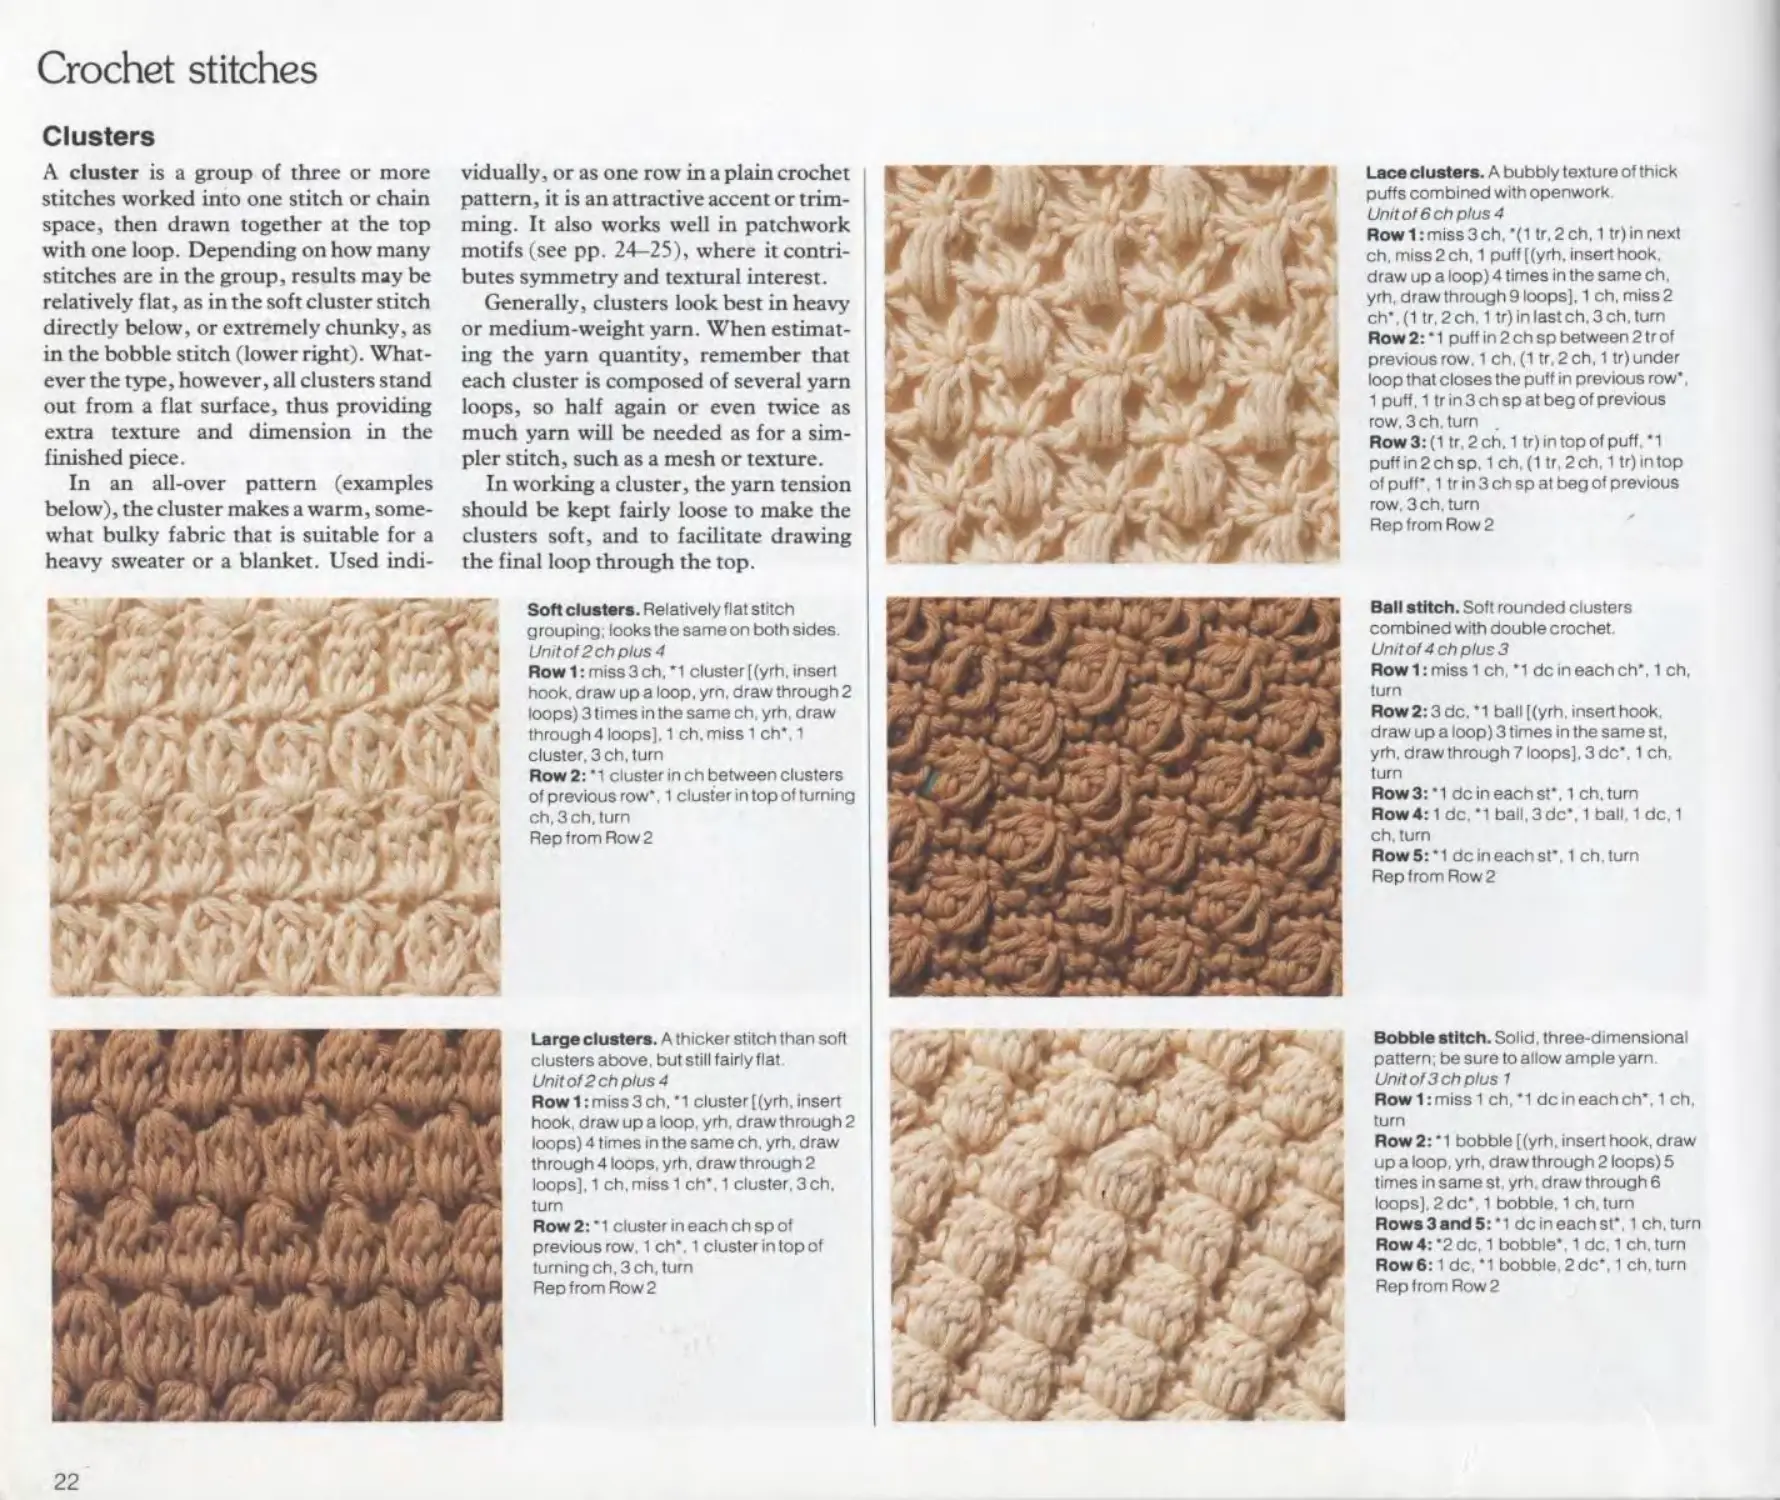
Clusters
A cluster is a group of three or more
stitches worked into one stitch or chain
space, then drawn together at the top
with one loop. Depending on how many
stitches are in the group, results may be
relatively flat, as in the soft cluster stitch
directly below, or extremely chunky, as
in the bobble stitch (lower right). What-
ever the type, however, all clusters stand
out from a flat surface, thus providing
extra texture and dimension in the
finished piece.
In an all-over pattern (examples
below), the cluster makes a warm, some-
what bulky fabric that is suitable for a
heavy sweater or a blanket. Used indi-
vidually, or as one row in a plain crochet
pattern, it is an attractive accent or trim-
ming. It also works well in patchwork
motifs (see pp. 24—25), where it contri-
butes symmetry and textural interest.
Generally, clusters look best in heavy
or medium-weight yarn. When estimat-
ing the yarn quantity, remember that
each cluster is composed of several yarn
loops, so half again or even twice as
much yam will be needed as for a sim-
pler stitch, such as a mesh or texture.
In working a cluster, the yarn tension
should be kept fairly loose to make the
clusters soft, and to facilitate drawing
the final loop through the top.
Soft clusters. Relatively flat stitch
grouping; looks the same on both sides.
Unit ol 2 ch plus 4
Row 1: miss 3 ch. *1 cluster [(yrh. insert
hook, draw up a loop. yrn. draw through 2
loops) 3times in the same ch. yrh, draw
through 4 loops). 1 ch. miss 1 ch’. 1
cluster. 3 ch, turn
Row 2: ’1 cluster in ch between clusters
of previous row*. 1 cluster in topof turning
ch, 3 ch. turn
Rep from Row 2
Large clusters. A thicker stitch than soft
clusters above, but still fairly flat
Unit of 2 ch plus 4
Row 1: miss 3 ch. *1 cluster [(yrh, insert
hook, draw up a loop, yrh, draw through 2
loops) 4 times in the same ch, yrh. draw
through 4 loops, yrh. draw through 2
loops], 1 ch. miss 1 ch’. 1 cluster. 3 ch.
turn
Row2:*1 cluster in each ch spof
previous row, 1 ch’. 1 cluster in top of
turning ch, 3 ch, turn
Rep from Row 2
22
Lace clusters. A bubbly texture of thick
puffs combined with openwork
Unit of 6 ch plus 4
Row 1: miss 3 ch. '(1 tr. 2 ch. 1 tr) in next
ch. miss 2 ch, 1 puff ((yrh, insert hook,
draw up a loop) 4 times in the same ch,
yrh. draw through 9 loops], 1 ch. miss 2
ch'.(1 tr,2ch. 1 tr) in last ch. 3 ch. turn
Row 2: ‘ 1 puff in 2 ch sp between 2 tr of
previous row. 1 ch.(1 tr. 2 ch, 1 tr) under
loop that closes the puff in previous row'.
1 puff.1 tr in 3 ch spat beg of previous
row. 3 ch. turn .
Row3:(1 tr. 2 ch. 1 tr) in top of puff. '1
puff in 2 ch sp. 1 ch, (1 tr, 2 ch, 1 tr) in top
of puff', 1 tr in 3 ch sp at beg of previous
row. 3ch. turn
Rep from Row 2
Ball stitch. Soft rounded clusters
combined with double crochet.
Unit of 4 ch plus 3
Row 1: miss 1 ch, '1 de in each ch’, 1 ch,
turn
Row 2:3 de. ’ 1 ball [(yrh, insert hook,
draw up a loop) 3 times in the same st.
yrh. drawthrough7loops],3dc', 1 ch,
turn
Row3:’1 de in each st'. 1 ch. turn
Row4:1 de. ’1 ball,3de’. 1 ball. 1 de. 1
ch. turn
Row5:'1 de in each st'. 1 ch.turn
Rep from Row 2
Bobble stitch. Solid, three-dimensional
pattern; be sure to allow ample yarn.
Unitof3chplus 1
Row 1: miss 1 ch, ’1 de in each ch*. 1 ch,
turn
Row 2: ’1 bobble [(yrh. insert hook, draw
up a loop, yrh, draw through 2 loops) 5
times in same st. yrh. draw through 6
loops], 2dc‘. 1 bobble. 1 ch. turn
Rows3and5:*1 dcineachsf. 1 ch.turn
Row 4: ’2 de. 1 bobble', 1 de. 1 ch. turn
Row 6:1 de, ‘1 bobble. 2 dc*. 1 ch. turn
Rep from Row 2
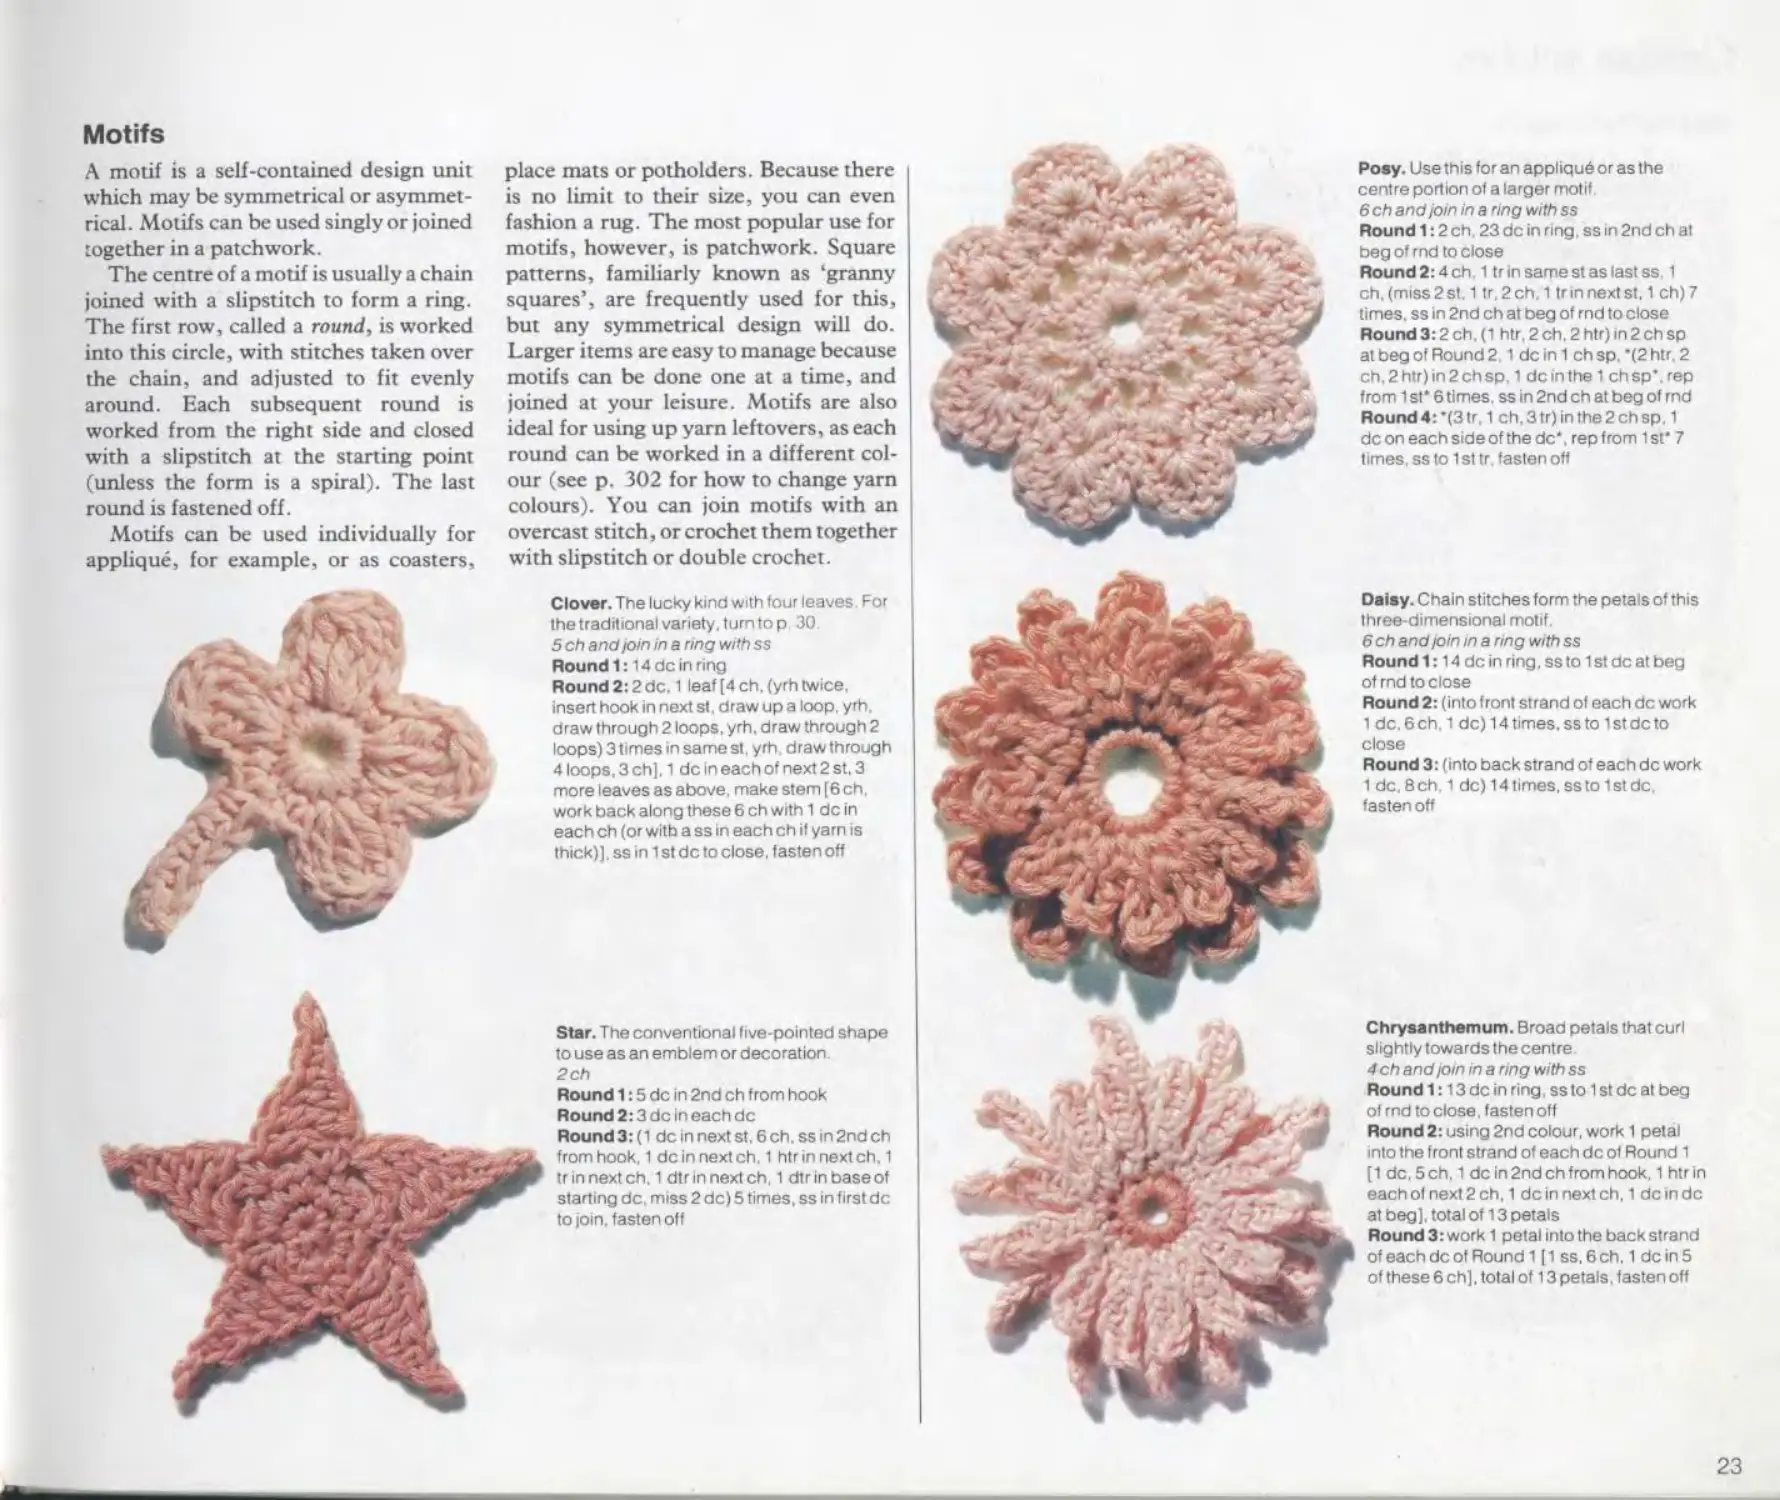
Motifs
A motif is a self-contained design unit
which may be symmetrical or asymmet-
rical . Motifs can be used singly or joined
together in a patchwork.
The centre of a motif is usually a chain
joined with a slipstitch to form a ring.
The first row, called a round, is worked
into this circle, with stitches taken over
the chain, and adjusted to fit evenly
around. Each subsequent round is
worked from the right side and closed
with a slipstitch at the starting point
(unless the form is a spiral). The last
round is fastened off.
Motifs can be used individually for
applique, for example, or as coasters.
place mats or potholders. Because there
is no limit to their size, you can even
fashion a rug. The most popular use for
motifs, however, is patchwork. Square
patterns, familiarly known as ‘granny
squares’, are frequently used for this,
but any symmetrical design will do.
Larger items are easy to manage because
motifs can be done one at a time, and
joined at your leisure. Motifs are also
ideal for using up yarn leftovers, as each
round can be worked in a different col-
our (see p. 302 for how to change yarn
colours). You can join motifs with an
overcast stitch, or crochet them together
with slipstitch or double crochet.
Clover. The lucky kind with tour leaves. For
the traditional variety, turn to p. 30.
5 ch and join in a ring with ss
Round 1:t4dcin ring
Round 2:2 de. 1 leaf [4 ch, (yrh twice,
insert hook In next st. draw up a loop. yrh.
draw through 2 loops, yrh. draw through 2
loops) 3 times in same st. yrh. draw through
4loops,3ch],1 de in each of next 2 st, 3
more leaves as above, make stem [6 ch.
work back along these 6 ch with 1 de in
each ch (or with a ss in each ch it yam is
thick)], ss in 1 st de to close, fasten off
Star. The conventional five-pointed shape
to use as an emblem or decoration.
2ch
Round 1:5 de in 2nd ch from hook
Round 2:3 de in each de
Round 3:(1 de In next st, 6 ch. ss in 2nd ch
from hook. 1 de in next ch. 1 htr in next ch. 1
tr in next ch. 1 dtrinnexteh, 1 dtrinbaseof
starting de. miss 2 de) 5 times, ss in first de
to join, fasten off
Posy. Use this for an applique or as the
centre portion of a larger motif
6 ch and join in a ring with ss
Round 1:2 ch , 23 de in ring, ss in 2nd ch at
beg of rnd to close
Round2:4ch. 1 tr in same st as last ss 1
ch, (miss 2 st. 1 tr. 2 ch. 1 tr in next st. 1 ch) 7
times, ss in 2nd ch at beg of rnd to close
Round 3:2 ch. (1 htr, 2 ch. 2 htr) in 2 ch sp
at beg of Round 2.1 de in 1 ch sp, '(2 htr, 2
ch.2htr)in2chsp. 1 de in the 1 chsp’.rep
from 1st* 6 times, ss in 2nd ch at beg of rnd
Round4:’(3tr 1 ch,3tr)inthe2chsp, 1
dconeachsideofthedc*. rep from 1st' 7
times, ss to 1 st tr, fasten off
Daisy. Chain stitches form the petals of this
three-dimensional motif.
6 ch and join in a ring with ss
Round 1:14 de in ring, ss to 1st de at beg
of rnd to close
Round 2: (into front strand of each de work
1 de. 6 ch. 1 de) 14 times, ss to 1 st de to
close
Round 3: (into back strand of each de work
1 de. 8 ch 1 de) 14 times, ss to 1 st de.
fasten off
Chrysanthemum. Broad petals that curl
slightly towards the centre
4 ch and join in a ring with ss
Round 1:13 de in ring, ss to 1 st de at beg
of rnd to close, fasten off
Round 2: using 2nd colour, work 1 petal
into the front strand of each de of Round 1
[1 de. 5 ch, 1 de in 2nd ch from hook. 1 htr in
each of next 2 ch, 1 deinnexteh, 1 de in de
at beg], total of 13 petals
Round 3: work 1 petal into the back strand
of each de of Round 1 [1 ss. 6 ch. 1 de in 5
of these 6 ch], total of 13 petals, fasten off
23
Crochet stitches
Motifs/Patchwork
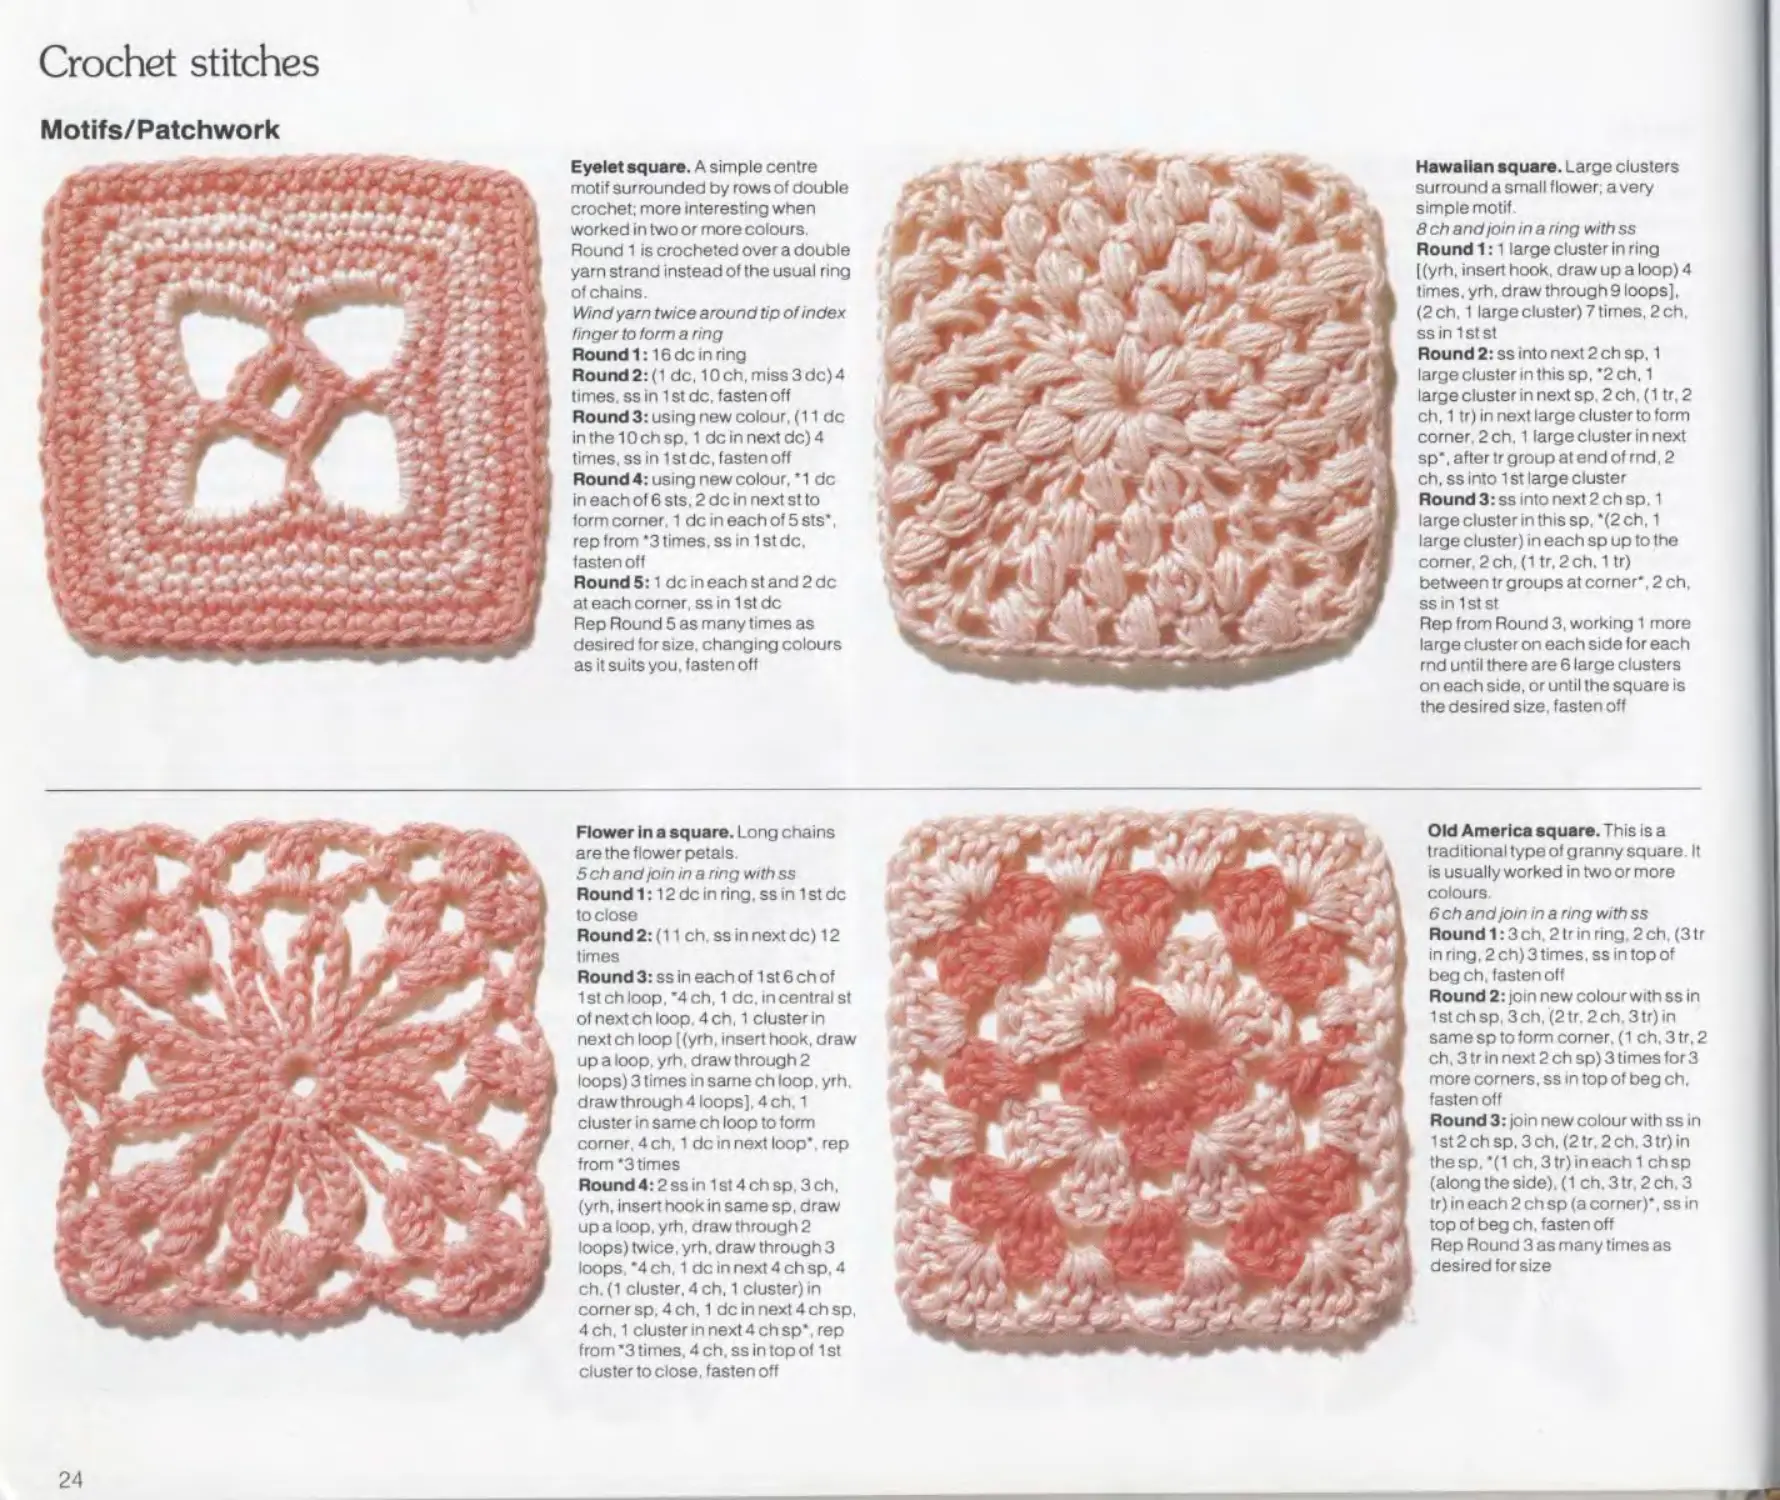
Eyelet square. A simple centre
motif surrounded by rows of double
crochet; more interesting when
worked in two or more colours.
Round 1 is crocheted over a double
yarn strand instead of the usual ring
of chains.
Wind yam twice around tip ofindex
finger to form a ring
Round 1:16 de in ring
Round 2: (1 de, 10 ch, miss 3 de) 4
times, ss in 1 st de. fasten off
Round 3: using new colour, (11 de
in the 10 ch sp. 1 de in next de) 4
times, ss in 1 st de, fasten off
Round 4: using new colour.’1 de
in each of 6 sts. 2 de in next st to
form corner, 1 de in each of 5 Sts’.
rep from "3 times, ss in 1st de.
fasten off
Round5:1 de in each st and 2 de
at each corner, ss in 1 st de
Rep Round 5 as many times as
desired for size, changing colours
as it suits you. fasten oft
Hawaiian square. Large clusters
surround a small flower, a very
simple motif
8 ch and join in a ring with ss
Round 1:1 large cluster in ring
I(yrh. insert hook, draw up a loop) 4
times, yrh, draw through 9 loops],
(2 ch. 1 large cluster) 7 times. 2 ch.
ss in 1st st
Round 2: ss into next 2 ch sp. 1
large cluster in this sp. ’2 ch. 1
large cluster in next sp. 2 ch. (1 tr, 2
ch. 1 tr) in next large cluster to form
corner, 2 ch. 1 largeclusterinnext
sp’. after tr group at end of rnd, 2
ch, ss into 1 st large cluster
Round3:ssmtonext2chsp, 1
large cluster in this sp. ‘(2 ch, 1
large cluster) in each sp up to the
comer, 2 ch. (1 tr,2ch. 1 tr)
between tr groups at corner’, 2 ch,
ss in 1 st st
Rep from Round 3, working 1 more
large cluster on each side for each
rnd until there are 6 large clusters
on each side, or until the square is
the desired size, fasten off
Flower In a square. Long chains
are the flower petals.
5 ch and ioin in a ring with ss
Round 1:12 de in ring, ss in 1 st de
to close
Round 2: (11 ch, ss in next de) 12
limes
Round 3: ss in each of 1 st 6 ch of
1st ch loop. ’4 ch, 1 de. mcentrai si
of next ch loop. 4 ch. 1 cluster In
next ch loop I (yrh. insert hook, draw
up a loop. yrh. draw through 2
loops) 3 times in same ch loop. yrh.
draw through 4 loops], 4 ch, 1
cluster in same ch loop to form
corner. 4 ch. 1 de in next loop’ rep
from ’3 times
Round 4:2 ss in 1 st 4 ch sp. 3 ch.
(yrh. insert hook in same sp. draw
up a loop. yrh. draw through 2
loops) twice, yrh. draw through3
loops. ’4 ch, 1 de in next 4 ch sp. 4
ch.(1 cluster. 4 ch. 1 cluster)in
comer sp. 4 ch, 1 de in next 4 ch sp.
4ch. 1 cluster in next 4 ch sp’. rep
from’3 times. 4 ch. ss in top of 1st
cluster to close, fasten off
Old America square. This is a
traditional type of granny square It
is usually worked in two or more
colours
6 ch and join in a ring with ss
Round 1:3 ch, 2 tr in ring. 2 ch. (3 tr
in ring, 2 ch) 3 times. ss in top of
beg ch. fasten off
Round 2: join new colour with ss in
1 st ch sp, 3 ch, (2 tr. 2 ch. 3 tr) in
same sp to form comer, (1 ch. 3 tr, 2
ch, 3 tr in next 2 ch sp) 3 times for 3
more corners, ss in top of beg ch.
fasten off
Round 3: join new colour with ss in
1 st 2 ch sp. 3 ch. (2 tr. 2 ch. 3 tr) in
thesp,’(1 ch,3tr)ineach1 chsp
(along the side). (1 ch. 3tr, 2ch,3
tr) in each 2 ch sp (a corner)’. ss in
top of beg ch. fasten off
Rep Round 3 as many times as
desired for size
24
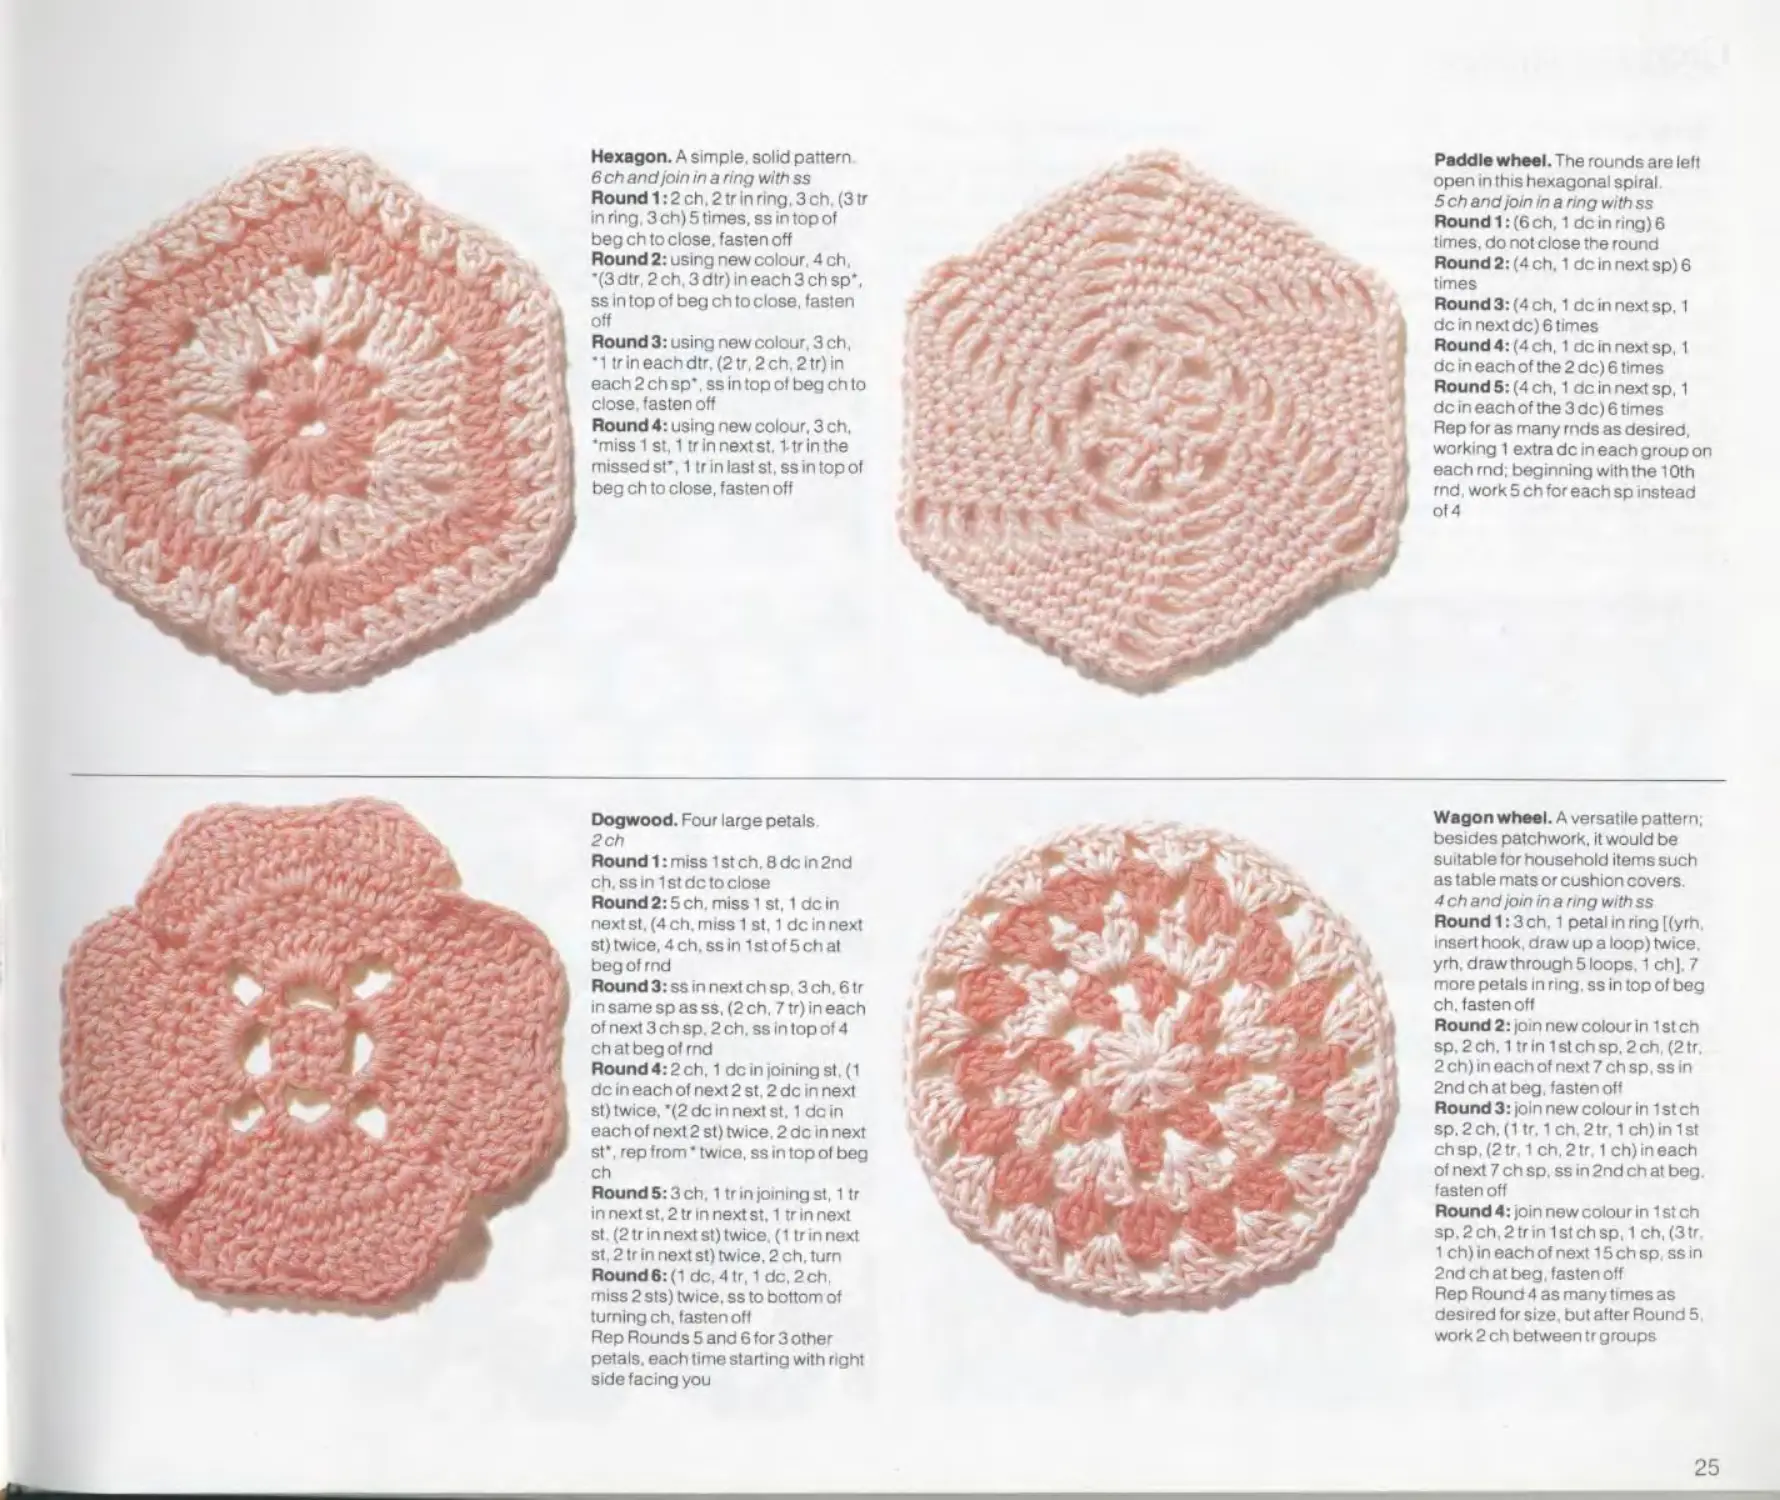
Hexagon. A simple, solid pattern
6 ch and join in a ring with ss
Round 1:2 ch. 2 tr in ring. 3 ch, (3 tr
in ring. 3 ch) 5 times, ss in lop of
beg ch to close, fasten off
Round 2: using new colour, 4 ch,
'(3 dtr, 2 ch, 3 dtr) in each 3 ch sp’.
ss in top of beg ch to close, fasten
off
Round 3: using new colour, 3 ch,
• 1 tr in each dtr. (2 tr. 2 ch, 2 tr) in
each 2 ch sp’. ss in top of beg ch to
close, fasten off
Round 4: using new colour. 3 ch,
•miss 1 st. 1 tr in next st. 1-tr in the
missed st’. 1 tr in last st. ss in top of
beg ch to close, fasten off
Paddle wheel. The rounds are left
open in this hexagonal spiral.
5 ch and join in a ring with ss
Round 1: (6 ch, 1 de in ring) 6
times, do not close the round
Round 2: (4 ch, 1 de In next sp) 6
times
Round 3: (4 ch, 1 de in next sp. 1
de in next de) 6 times
Round 4: (4 ch. 1 de in next sp, 1
de in each of the 2 de) 6 times
Round 5: (4 ch. 1 de in next sp, 1
de in each of the 3 de) 6 times
Rep for as many rnds as desired,
working 1 extra de in each group on
each rnd; beginning with the 10th
rnd, work 5 ch for each sp instead
of 4
Dogwood. Four large petals
2 ch
Round 1: miss 1 st ch. 8 de In 2nd
ch, ss In 1 st de to close
Round 2:5 ch. miss 1 st, 1 de In
next st. (4 ch. miss 1 st. 1 de in next
st) twice. 4 ch, ss in 1 st of 5 ch at
beg of rnd
Round 3: ss in next ch sp, 3 ch. 6 tr
in same sp as ss, (2 ch, 7 tr) in each
of next 3 ch sp. 2 ch. ss in fop of 4
ch at beg of rnd
Round4:2ch, 1 de in joining st. (1
de in each of next 2 st. 2 de in next
st) twice, "(2 de in next st. 1 de in
each of next 2 st) twice, 2 de in next
st', rep from • twice, ss in top of beg
ch
Round 5:3 ch. 1 tr in joining st, 1 tr
in next st. 2 tr in next st. 1 tr in next
st. (2 trin next st) twice, (1 trin next
st, 2 tr in next st) twice. 2 ch. turn
Round 6: (1 de, 4 tr. 1 de, 2 ch
miss 2 sts) twice, ss to bottom of
turning ch. fasten oft
Rep Rounds 5 and 6 for 3 other
petals, each time starting with right
side facing you
Wagon wheel. A versatile pattern;
besides patchwork, it would be
suitable lor household items such
as table mats or cushion covers
4 ch and join in a ring with ss
Round 1:3ch. 1 petal in ring [(yrh,
insert hook, draw up a loop) twice,
yrh. drawthrough 5 loops. 1 ch], 7
more petals In ring, ss in top of beg
ch. fasten off
Round 2: join new colour In 1st ch
sp. 2 ch. 1 tr in 1 st ch sp. 2 ch, (2 tr.
2 ch) in each of next 7 ch sp, ss in
2nd ch at beg. fasten off
Round 3: join new colour in 1 st ch
sp. 2 ch. (1 tr. 1 ch,2tr, 1 ch) in 1st
chsp, (2 tr. 1 ch.2tr, 1 ch) in each
of next 7 ch sp. ss in 2nd ch at beg
fasten off
Round 4: join new colour in 1 st ch
sp.2ch,2trin 1st chsp. 1 ch,(3tr.
1 ch) in each of next 15 ch sp. ssin
2nd ch at beg. fasten off
Rep Round 4 as many times as
desired tor size, but after Round 5.
work 2 ch between tr groups
25
Crochet stitches
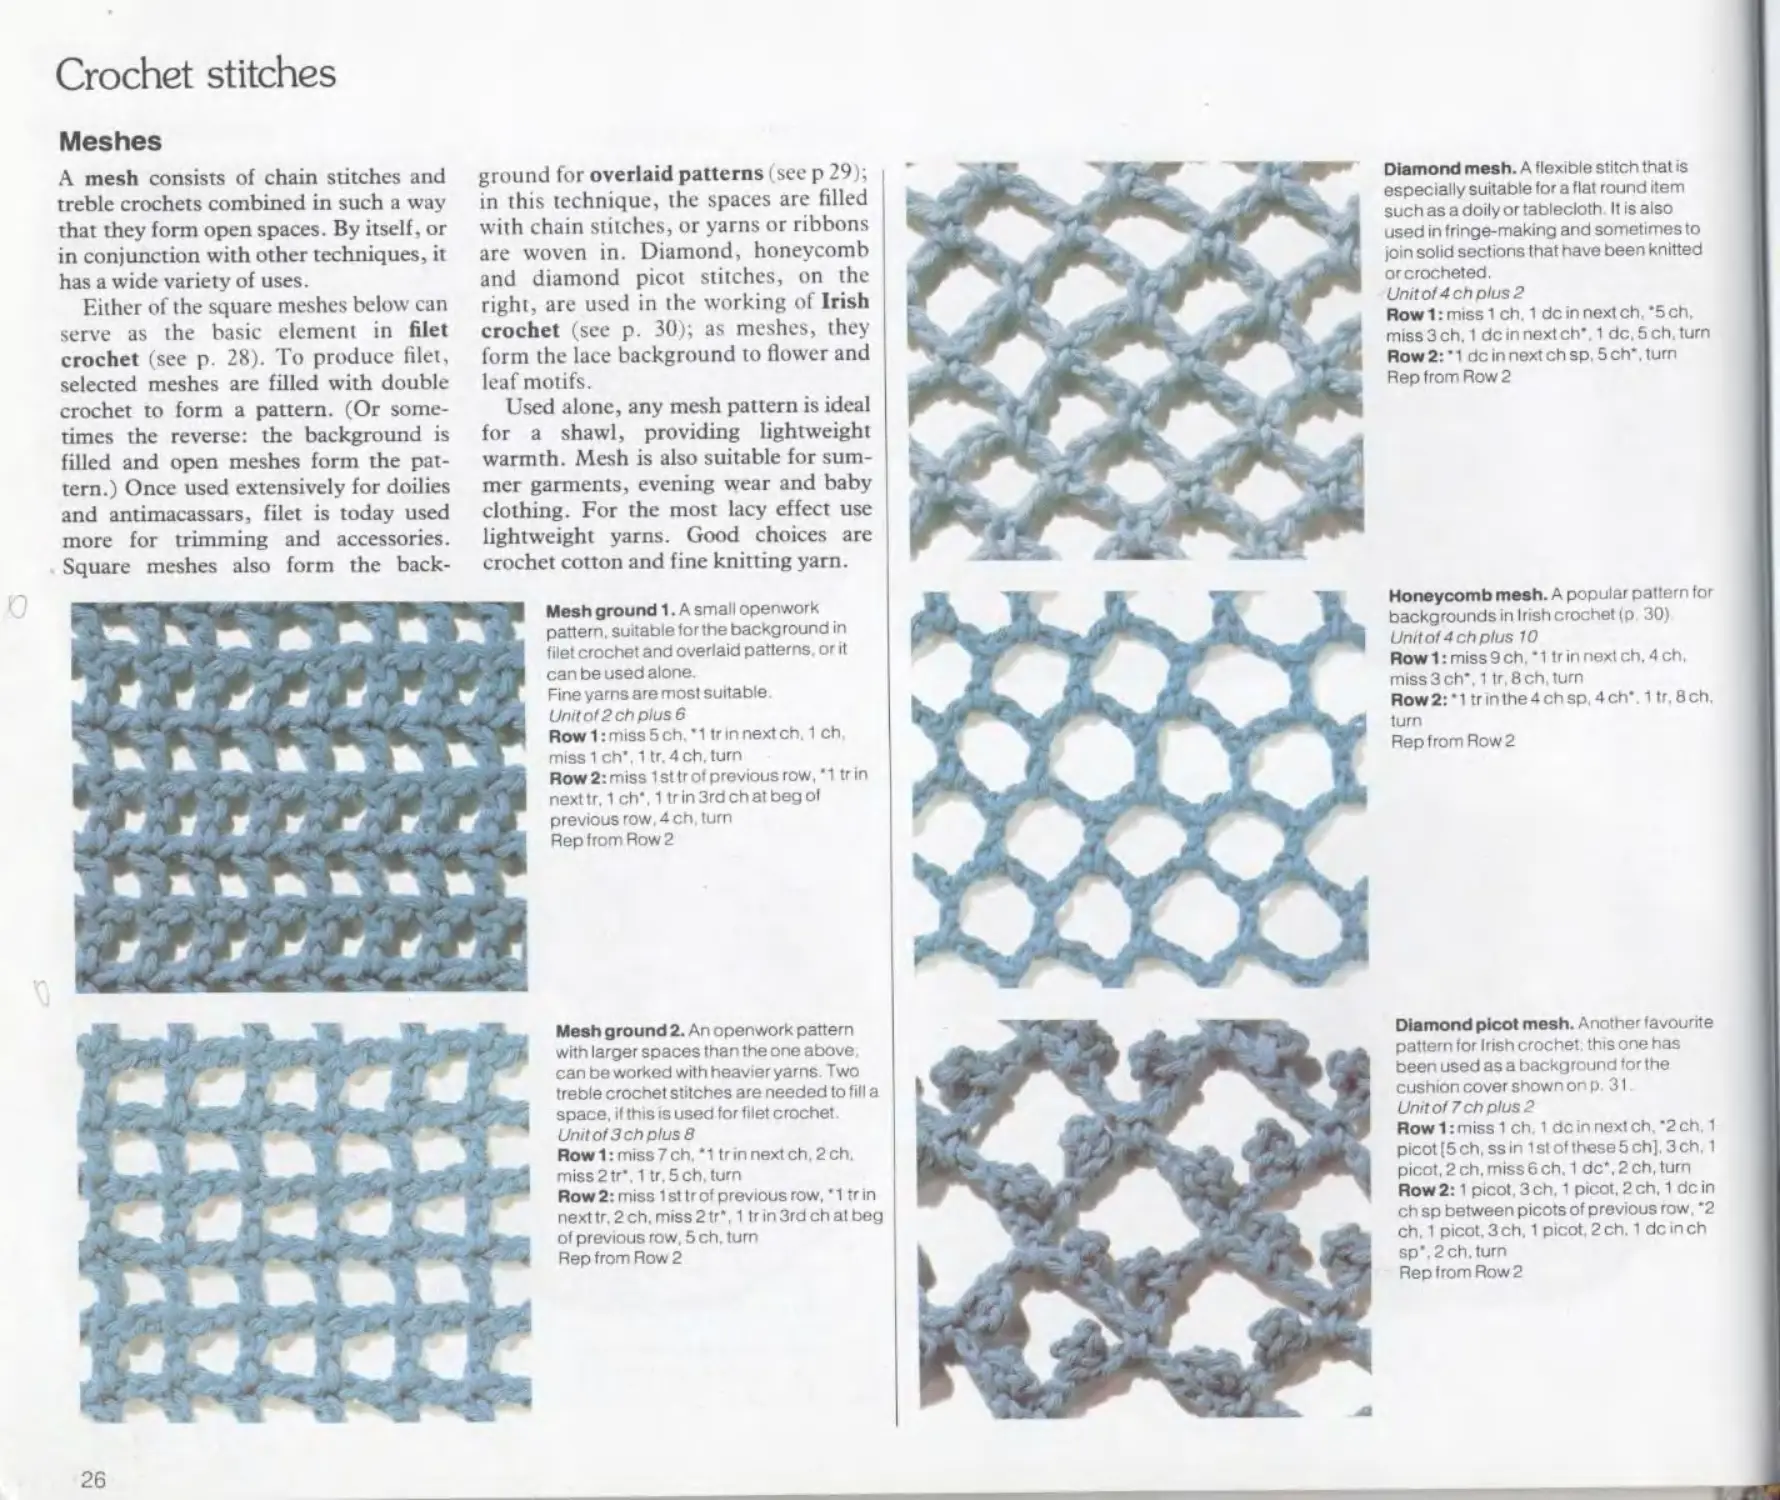
Meshes
A mesh consists of chain stitches and
treble crochets combined in such a way
that they form open spaces. By itself, or
in conjunction with other techniques, it
has a wide variety of uses.
Either of the square meshes below can
serve as the basic element in filet
crochet (see p. 28). To produce filet,
selected meshes are filled with double
crochet to form a pattern. (Or some-
times the reverse: the background is
filled and open meshes form the pat-
tern.) Once used extensively for doilies
and antimacassars, filet is today used
more for trimming and accessories.
Square meshes also form the back-
ground for overlaid patterns (see p 29);
in this technique, the spaces are filled
with chain stitches, or yarns or ribbons
are woven in. Diamond, honeycomb
and diamond picot stitches, on the
right, are used in the working of Irish
crochet (see p. 30); as meshes, they
form the lace background to flower and
leaf motifs.
Used alone, any mesh pattern is ideal
for a shawl, providing lightweight
warmth. Mesh is also suitable for sum-
mer garments, evening wear and baby
clothing. For the most lacy effect use
lightweight yarns. Good choices are
crochet cotton and fine knitting yarn.
Mesh ground 1. A small openwork
pattern, suitable tor the background in
filet crochet and overlaid patterns or it
can be used alone.
Fine yarns are most suitable
Unit of 2 ch plus 6
Row1:miss5ch "1 trin next ch. 1 ch
miss 1 ch", 1 tr. 4 ch. turn
Row 2: miss 1 st tr of previous row, ' 1 tr in
next tr. 1 ch". 1 tr in 3rd ch at beg of
previous row. 4 ch. turn
Rep from Row 2
Mesh ground 2. An openwork pattern
with larger spaces than the one above
canbeworkedwithheavieryarns. Two
treble crochet stitches are needed to fill a
space, if this is used for filet crochet
Unit of 3 ch plus 8
Row 1: miss7ch. '1 trin next ch. 2 ch.
miss2tr". 1 tr.5ch.turn
Row 2: miss 1st trof previous row, "1 tr in
next tr, 2 ch. miss 2 tr", 1 tr in 3rd ch at beg
of previous row. 5 ch. turn
Rep from Row 2
26
Diamond mesh. A flexible stitch that is
especially suitable for a flat round item
such as a doily or tablecloth It is also
used in fringe-making and sometimes to
join solid sections that have been knitted
orcrocheted.
Unit of 4 ch plus 2
Row1:miss1 ch. 1 de in next ch. '5ch,
miss 3 ch, 1 de in next ch'. 1 de. 5 ch. turn
Row2:'1 de in next ch sp. 5 ch", turn
Rep from Row 2
Honeycomb mesh. A popular pattern for
backgrounds in Irish crochet (p 30)
Unitof4chplus 10
Row1:miss9ch.'t trin next ch, 4 ch,
miss 3 ch', 1 tr, 8 ch, turn
Row2:'1 trinthe4ch sp,4ch' 1 tr.8ch,
turn
Rep from Row 2
Diamond picot mesh. Another favourite
pattern for Irish crochet this one has
been used as a background tor the
cushion cover shown on p. 31
Unit of 7 ch plus 2
Row 1: miss 1 ch. 1 de in next ch. '2 ch. 1
picot [5 ch. ss in 1 st of these 5 ch], 3 ch. 1
picot, 2 ch. miss 6 ch. 1 de*, 2 ch, turn
Row 2:1 picot. 3 ch. 1 picot, 2 ch, 1 de in
ch sp between picots of previous row. "2
ch. 1 picot. 3 ch. 1 picot. 2 ch. 1 de in ch
sp'. 2 ch. turn
Rep from Row 2
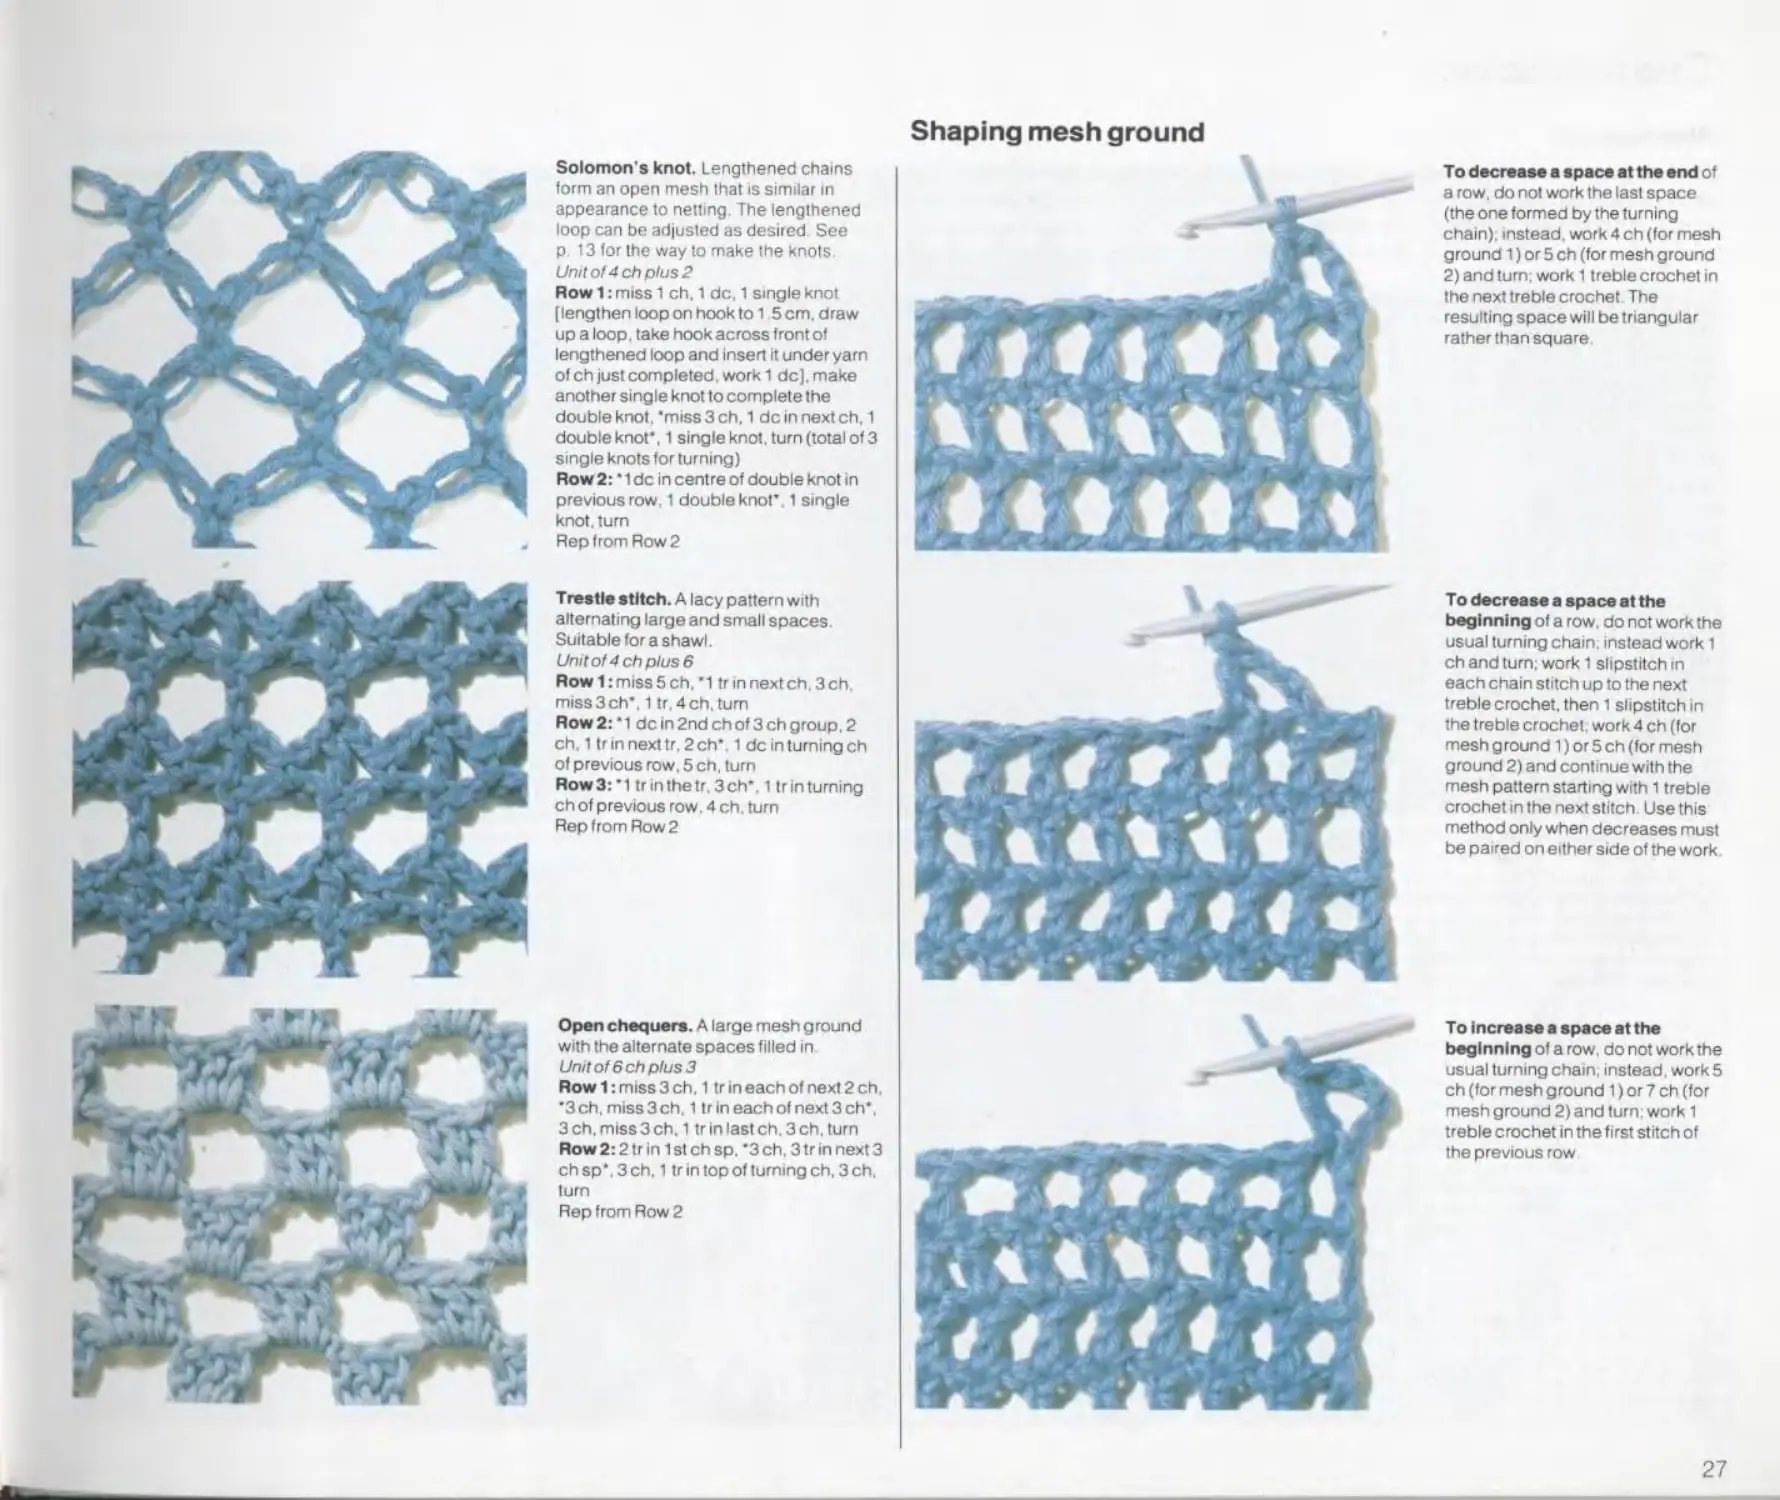
Solomon's knot Lengthened chains
form an open mesh that is similar in
appearance to netting. The lengthened
loop can be adjusted as desired See
p. 13 for the way to make the knots
Unit of 4 ch plus 2
Row 1: miss 1 ch. 1 de. 1 single knot
(lengthen loop on hook to 1 5 cm. draw
up a loop, take hook across front of
lengthened loop and insert it under yarn
of ch just completed, work 1 de), make
another single knot to complete the
double knot. 'miss3ch. 1 de in next ch, 1
double knot*. 1 single knot, turn (total of 3
single knots for turning)
Row 2: * 1 de in centre of double knot in
previous row. 1 double knot*. 1 single
knot, turn
Rep from Row 2
Trestle stitch. A lacy pattern with
alternating large and small spaces.
Suitable for a shawl.
Unit of 4 ch plus 6
Row 1: miss 5 ch. *1 tr in next ch. 3 ch
miss3ch*. 1 tr.4ch.tum
Row2:*1 dcin2ndchof3chgroup,2
ch, 1 trin nexttr, 2ch*. 1 de in turning ch
of previous row. 5 ch. turn
Row3:*1 trin the tr. 3ch*. 1 trin turning
ch of previous row. 4 ch. turn
Rep from Row 2
Open chequers. A large mesh ground
with the alternate spaces filled in
Unit of 6 ch plus 3
Row 1: miss 3 ch. 1 tr in each of next 2 ch.
*3ch, miss3ch. 1 tr in each of next 3 ch*.
3 ch. miss 3 ch. 1 tr in lastch, 3 ch. turn
Row 2:2 tr in 1 st ch sp. *3 ch. 3 tr in next 3
ch sp*. 3 ch. 1 tr in top of turning ch. 3 ch.
turn
Rep from Row 2
Shaping mesh ground
To decrease a space at the end of
a row. do not work the last space
(the one formed by the turning
chain); instead, work 4 ch (lor mesh
ground 1) or 5 ch (for mesh ground
2) and turn; work 1 treble crochet in
the next treble crochet The
resulting space will be triangular
rather than square.
To decrease a space at the
beginning of a row. do not work the
usual turning chain; instead work 1
ch and turn; work 1 slipstitch in
each chain stitch up to the next
treble crochet, then 1 slipstitch in
the treble crochet, work 4 ch (tor
mesh ground 1) or 5 ch (for mesh
ground 2) and continue with the
mesh pattern starting with 1 treble
crochet in the next stitch. Use this
method only when decreases must
be paired on either side of the work
To increase a space at the
beginning of a row. do not work the
usual turning chain; instead. work5
ch (for mesh ground 1) or 7 ch (for
mesh ground 2) and turn; work 1
treble crochet in the first stitch of
the previous row
27
Crochet stitches
Filet crochet
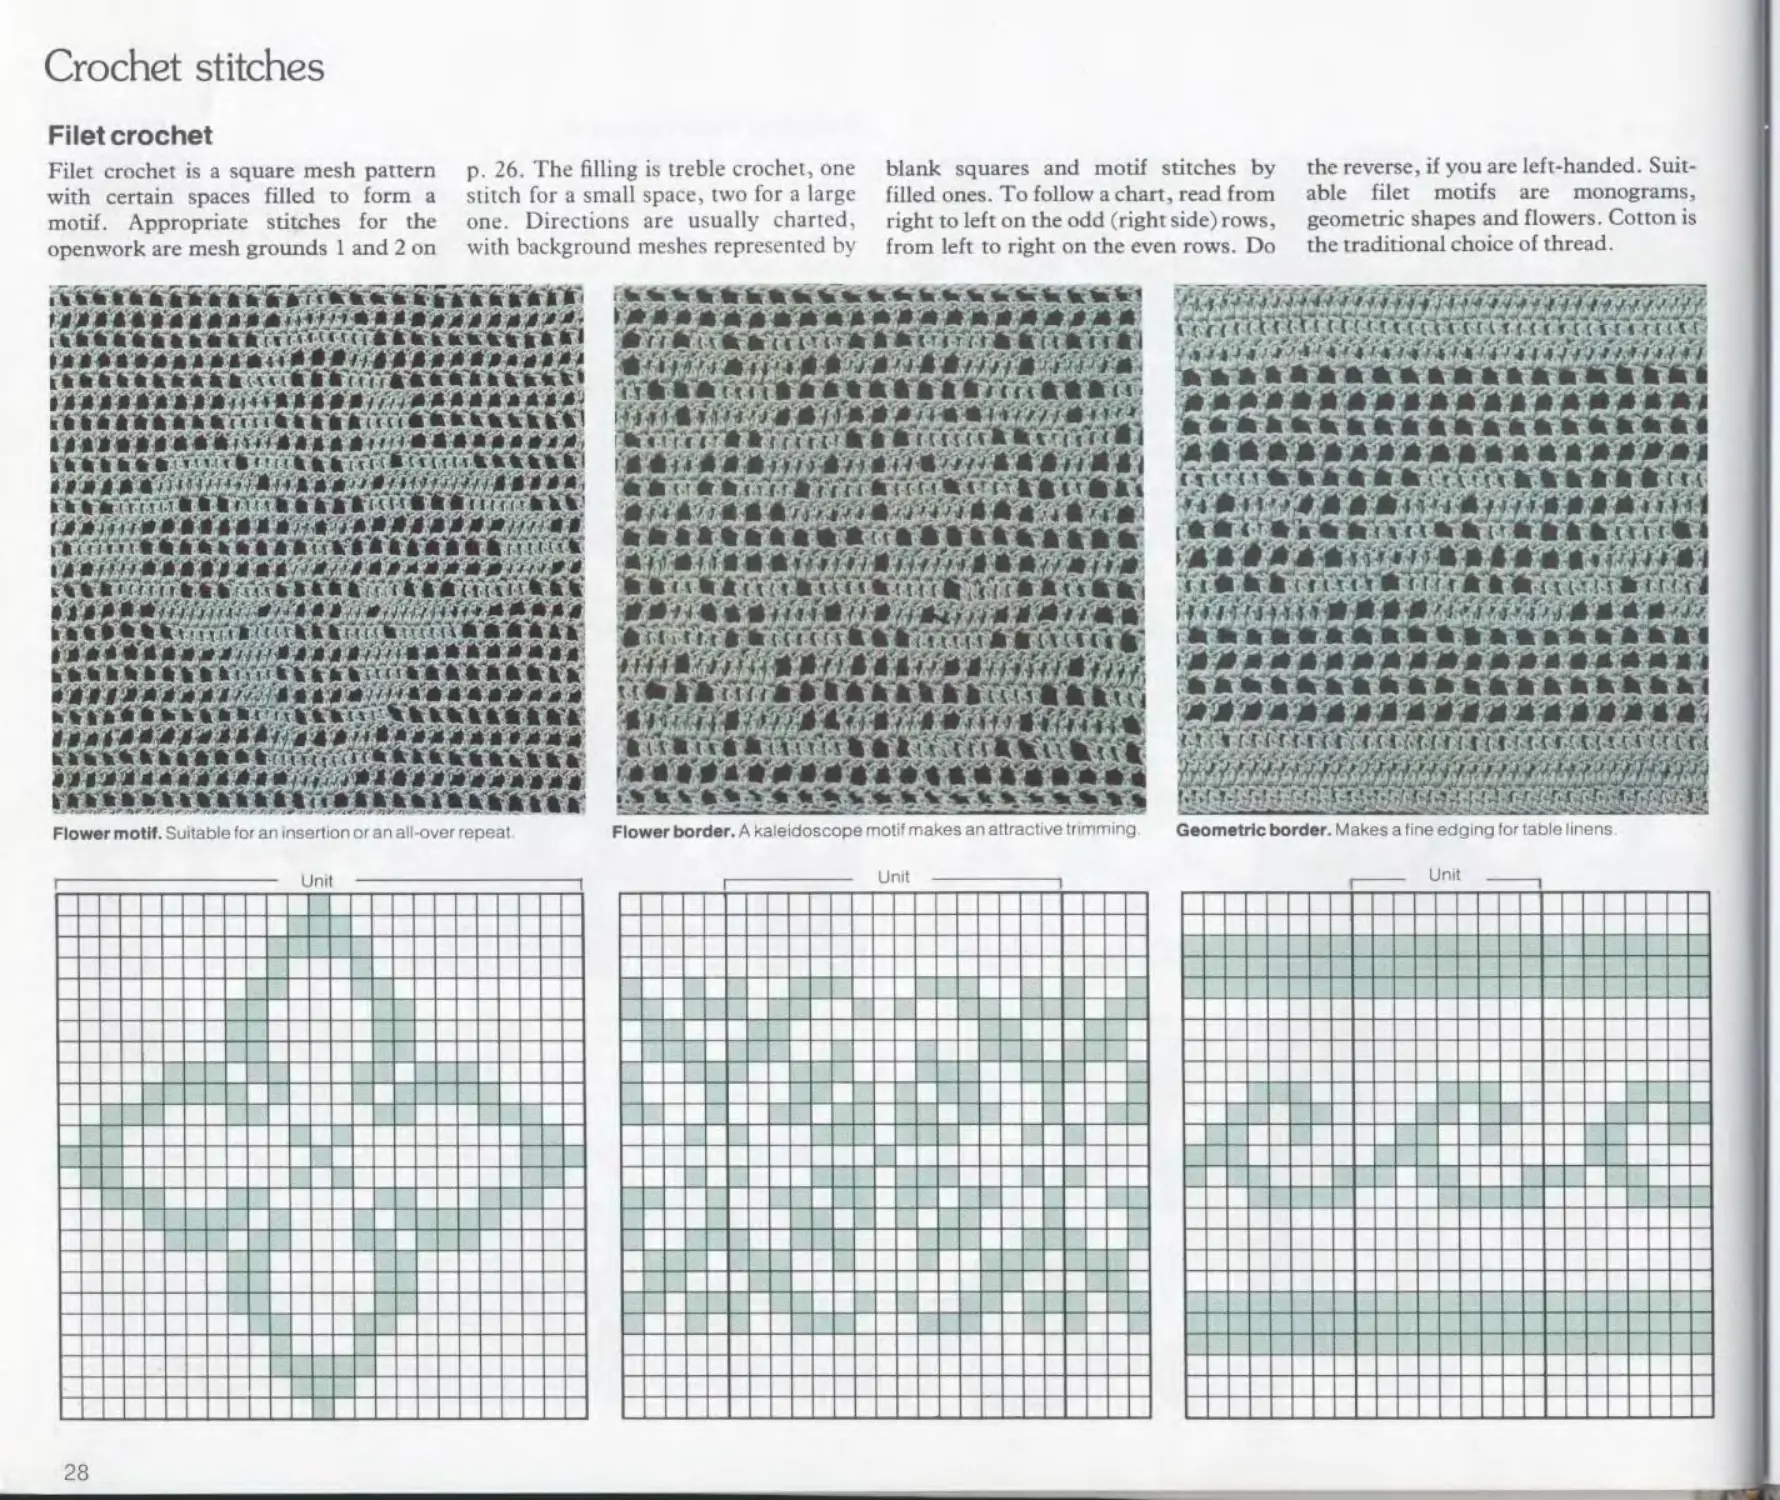
Filet crochet is a square mesh pattern
with certain spaces filled to form a
motif. Appropriate stitches for the
openwork are mesh grounds 1 and 2 on
p. 26. The filling is treble crochet, one
stitch for a small space, two for a large
one. Directions are usually charted,
with background meshes represented by
blank squares and motif stitches by
filled ones. To follow a chart, read from
right to left on the odd (right side) rows,
from left to right on the even rows. Do
the reverse, if you are left-handed. Suit-
able filet motifs are monograms,
geometric shapes and flowers. Cotton is
the traditional choice of thread.
k'ft tftkUkUktWaTa'iTtTra'a'aTa'Va'fc**
roaaaa***** * * • * -
ьа m гаахаттгса a aaa й v<> •
h'fafc'h a'a a;'.0* 'a’fcTft ’ • ’ Л1.1.1 ’Л * * *1
Flower border. A kaleidoscope motif makes an attractive trimming
Geometric border. Makes a fine edging for table linens
Flower motif. Suitable for an insertion or an all-over repeat
28
Overlaid meshes
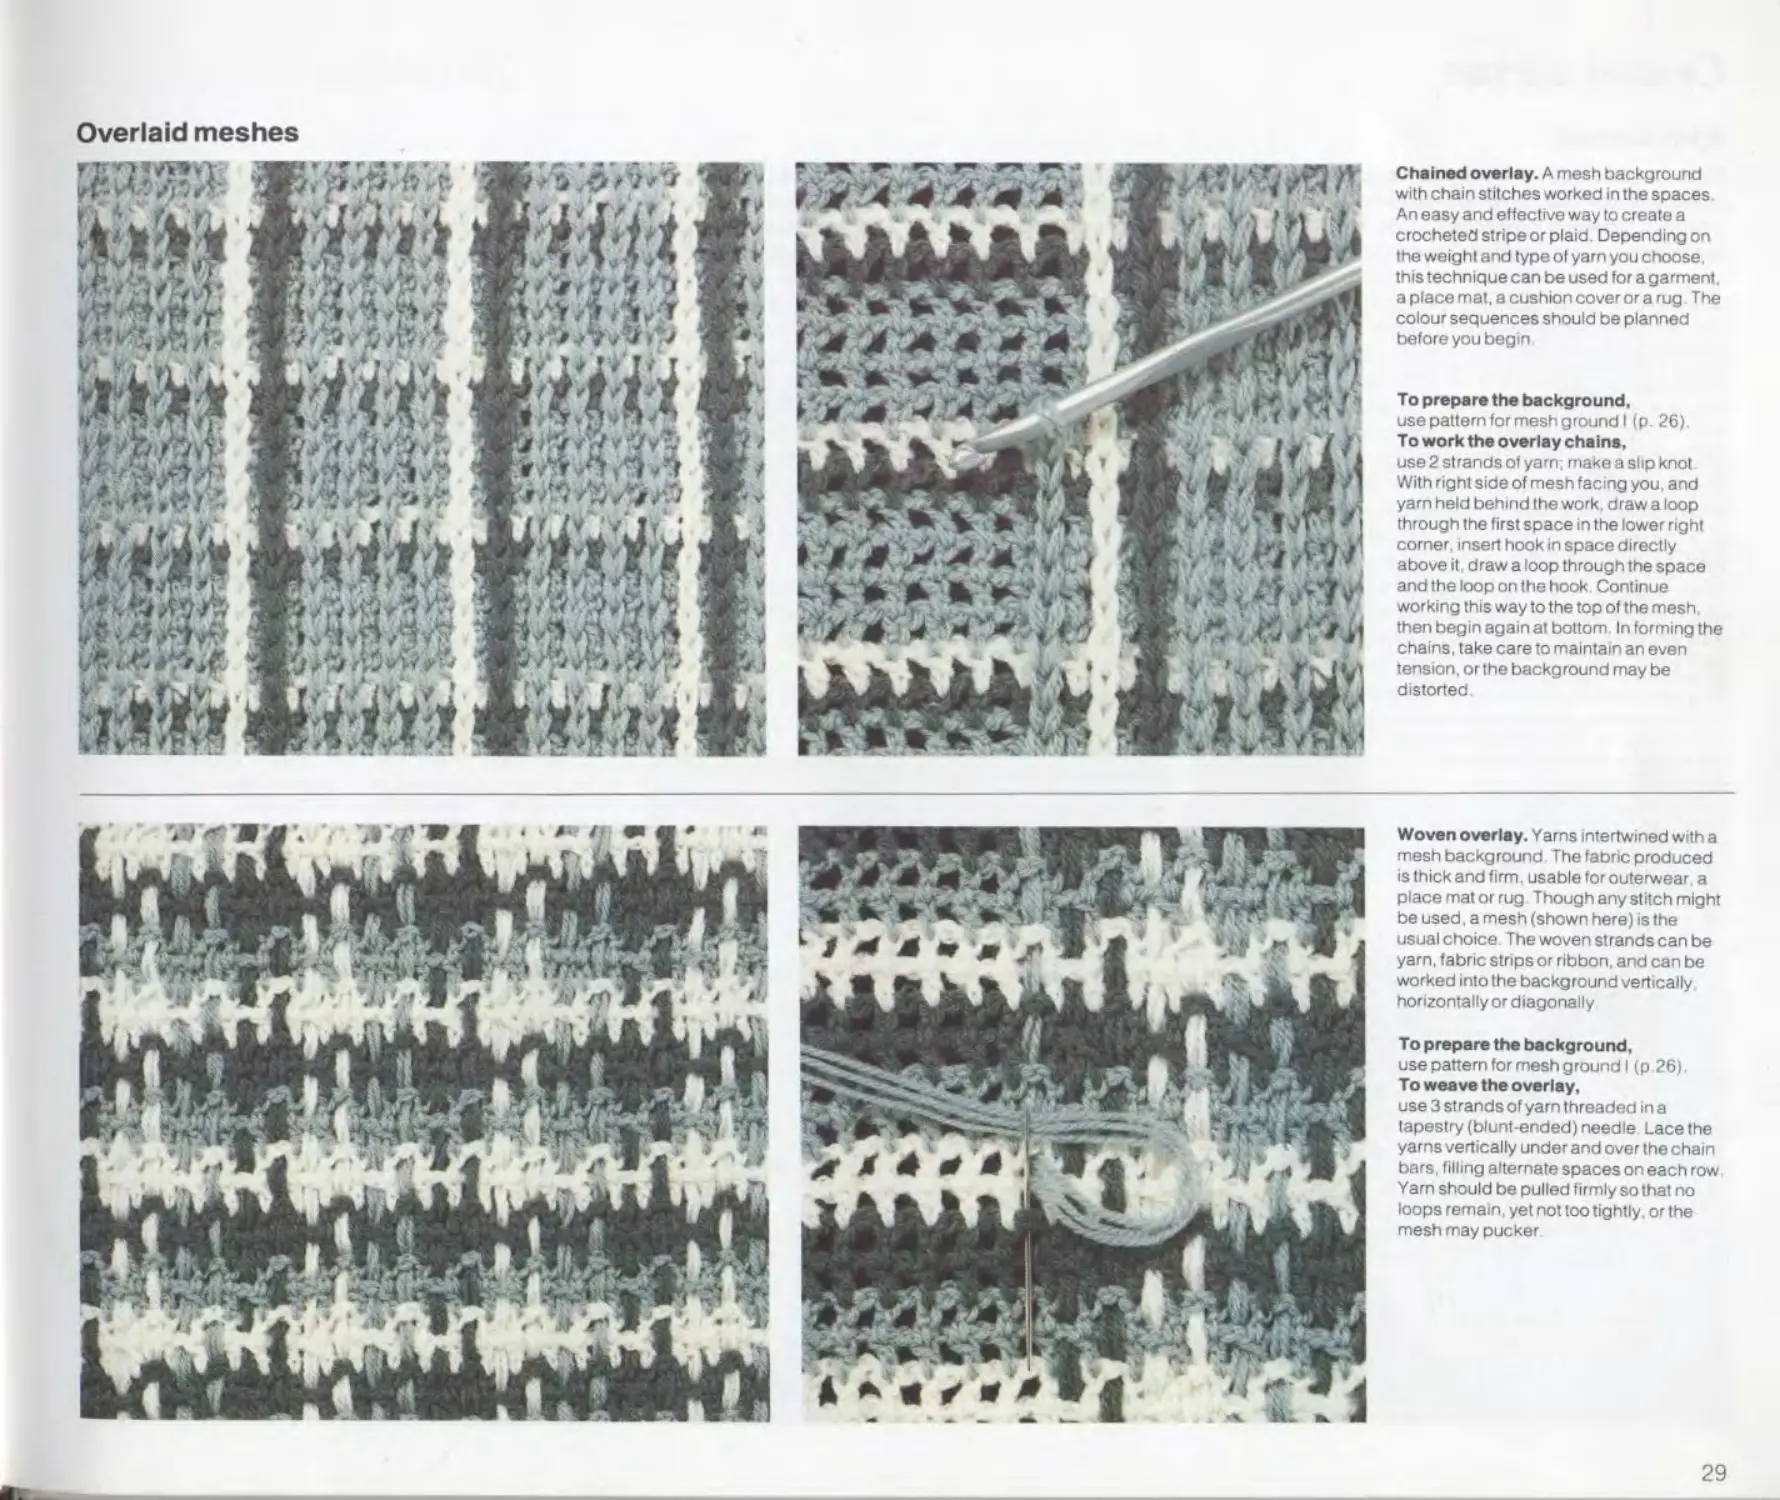
Chained overlay. A mesh background
with chain stitches worked in the spaces
An easy and effective way to create a
crocheted stripe or plaid. Depending on
the weight and type of yarn you choose,
this technique can be used for a garment,
a place mat. a cushion cover or a rug. The
colour sequences should be planned
before you begin
To prepare the background.
use pattern for mesh ground I (p. 26).
To work the overlay chains,
use 2 strands of yarn, make a slip knot
With right side of mesh facing you, and
yarn held behind the work, draw a loop
through the first space in the lower right
corner, insert hook in space directly
above it draw a loop through the space
and the loop on the hook Continue
working this way to the top of the mesh,
then begin again at bottom. In forming the
chains, take care to maintain an even
tension, or the background may be
distorted
Woven overlay. Yarns intertwined with a
mesh background The fabric produced
is thick and firm, usable for outerwear a
place mat or rug Though any stitch might
be used. a mesh (shown here) is the
usual choice The woven strands can be
yarn, fabric strips or ribbon, and can be
worked into the background vertically
horizontally or diagonally
To prepare the background.
use pattern for mesh ground I (p.26).
To weave the overlay,
use 3 strands of yarn threaded in a
tapestry (blunt-ended) needle Lace the
yarns vertically under and over the chain
bars, filling alternate spaces on each row
Yarn should be pulled firmly so that no
loops remain, yet not too tightly, or the
mesh may pucker
29
Crochet stitches
Irish crochet
Irish crochet was developed in the mid-
19th century, its style inspired by a
popular Venetian lace. The lovely de-
signs are most elegant worked in fine
cotton or linen yarns. A typical pattern
consists of floral motifs set in a mesh
background. The mesh is usually work-
ed around motifs, but in some modern
adaptations it is crocheted separately
and the motifs applied to it. A three-
dimensional look can be given to the
motifs by working certain portions over
an additional yarn strand called a found-
ation cord. This cord, which is used also
to control shaping, should be about
twice the thickness of the working yarn.
Shamrock. Wind foundation cord twice
around index linger and slip it off
Round 1:2 de in ring, 1 picot[4ch](10dc
in ring, 4ch) twice. 8 de in ring, ss to 1 st de.
pull cord so sts lie flat
Round 2:15 de over cord only, missl picot
and 1 de: over cord and sts make 1 de in
each of next 7 de. pull cord so sts lie flat. 18
de over cord only, miss 1 picot and de. 1 de
in each of next 7 de. 15 de on cord only,
miss 1 picot and 1 de, 1 de in each of next 7
de
Round 3: drop cord. round 1 st leaf (1 ch. 1
de) in each of next 2 sts, (1 ch. 1 tr) In each
of next 3 sts,(1 ch. 1 dtr) in each of next 5
sts, (1 ch, 1 tr) in each of next 3 sts. (1 ch, 1
de) in each of next 2 sts. ss in de between
leaves, work other 2 leaves as the 1 st, but
work 7 dtr in 2nd leaf, ss between leaves
Round 4: pick up foundation cord, miss 1 st
ch, *3 de in each of next 2 ch. 4 ch*, rep
from * round leaf, omitting last 4 ch. pull up
cord, continue same way round other 2
leaves, ss to close
Short stem: 30de over cord. 1 ch. turn,
leave loop of cord at end. work back up
stem with 1 de in each de. ss to base
Long stem: same as short one but 160 de
To form motif centre, wind foundation cord over
index finger 1, 2, or 3 times (if number is not in
directions, determine it by cord thickness). Slip
ring off and work centre stitches over it. When
ring is complete, pull cord gently to bring stitches
close together Work subsequent rounds over the
cord where indicated in directions (stitches are
made over cord alone or over both cord and
stitches). As work progresses, pull cord gently Io
keep stitches close together.
When motif Is complete, cut the cord and work-
ing yam. leaving ends at least 15 cm long. Using
a rug or tapestry needle, weave each yarn end
into the motif back for about 1.5 cm. Cut ends off.
Leaf. Worked over foundation cord and
stitches, pulling up the cord periodically to
make stitches lie flat. 15 ch, lay foundation
cord over ch
Row 1: miss 1 ch. *1 de in each ch’, 5 de in
last ch (to form the tip), 1 de in each loop
along opposite side of ch, 3 de over
foundation cord only (to go around base). 1
de in back loop of each de on 1 st side of ch
ending 4 de from the centre de in leaf tip. 1
ch. turn
Row 2: picking up front loop only. 1 de in
each de down side. 3 de in centre de at
base. 1 de in each de up other side, ending
3 de from tip. 1 ch. turn
Row 3: picking up back loop. 1 de in each
de down side. 3 de in centre de at base, 1
de in each de up other side, end 3 de from
tip of previous row. 1 ch. turn
Rows 4 and 6: as Row 3. working front loop
only Row 5: as Row 3. working back loop
only Fasten off at end of Row 6
Rose. 8 ch and join in a ring with ss
Round 1:6 ch. (1 tr, 3ch) 7 times, ss In 3rd
ch at beg or md
Round2:(1 de. 1 htr,3tr.1 htr.1 dc)over
each 3 ch loop
Round 3:working behind Round 2, work 1
ssinssofRound1.5ch.(1 sslnnexttrof
Round 1,5 ch) 7 times, ssin 1 st ss to close
Round4:(1 de. 1 htr. Str. 1 htr. 1 dc)over
each 5 ch loop
Round5: working behind Round 4. work 1
ssin 1 st ss of Round 3.7 ch. (1 ssinnextss
of Round 3,7 ch) 7 times, ss in 1 st ss to
close
Round 6: (1 de. 1 htr, 7tr, 1 htr, 1 de) over
each 7 ch loop
Round 7: working behind Round 6. work 1
ss in 1 st ss of Round 5.9 ch, (1 ss in next ss
of Round 5.9 ch) 7 times, ss In 1st ss to
close
Round 8: (1 de. 1 htr, 9tr, 1 htr, 1 de) over
each 9 ch loop, fasten off
30
Irish crochet cushion top
This lovely cushion is a fine way to
display your talent for crochet. Approxi-
mate sizes are given, but the best result
will be obtained if you crochet the top
first, and then make or buy a cushion to
fit.
Materials
200 g of No. 8 and 100 g No. 5 crochet
cotton (for foundation cord); steel
crochet hook 1.75 mm to obtain mesh
tension; tapestry needle; 38 cm square
of light-coloured muslin to work on;
tacking thread and needle, 1 cushion of
about 30 or 34 cm square, covered with
plain, smooth fabric
Tension
For mesh, 16 chains to 5 cm
For motifs, no tension can be specified,
but approximate sizes are: leaf, 5.5 cm
from tip to base; shamrock, 5.5 cm from
top to stem; rose 6.5 cm in diameter
Preparing the grid. Draw a 30 cm
square on muslin. Mark off 2.5 cm seg-
ments along each side, then use the
marks to draw lines diagonally (see il-
lustration below). Work mesh over this.
Making motifs. Following the instruc-
tions on the opposite page, make one
rose, eight leaves, two shamrocks with
short stems facing in opposite direc-
tions, two shamrocks with long stems
facing in opposite directions (to reverse
a stem, turn it over just before slipstitch-
ing it to the base). Finish off all of the
foundation cords except the ones ex-
tending from the long shamrock stems.
Assemble the motifs and attach them to
the grid as directed below.
Making the mesh. Work Rows 1 and 2,
then tack the mesh to the grid, right side
up, and follow instructions below.
98 ch and check your tension
Row 1 (wrong side): miss 1 ch, 1 de, *2
ch, 1 picot [5 ch, ss in 1st of these 5 ch],
3 ch, 1 picot, 2 ch, miss 7 ch, 1 de in
next ch*, turn
Row 2: 10 ch, 1 picot, 2 ch, 1 de in the 3
ch sp between picots of previous row, *2
ch, 1 picot, 3 ch, 1 picot, 2 ch, 1 de in
the 3 ch sp*, turn
Row 3: 2 ch, 1 picot, 3 ch, 1 picot, 3 ch,
1 picot, 2 ch, 1 de in 3 ch sp, *2 ch, 1
picot, 3 ch, 1 picot, 2 ch, 1 de in the 3 ch
sp*, work last de in the 10 ch sp of the
previous row, turn
Repeat Rows 2 and 3 for pattern.
After mesh is attached to grid, each
right-side row is worked with the grid
facing you right-side up; for a wrong-
side row, grid must be turned upside-
down and the mesh pulled away from it
slightly. Wherever mesh comes in con-
tact with a motif, slipstitch it to one edge
of the motif, then chain enough stitches
to move up a row or to continue horizon-
tally on the wrong side of the motif.
When mesh is complete, connect
diamonds along top and left edges with
*8 ch, 1 de in each 3 ch sp*
Forming a border. Cut a length of foun-
dation cord 1 52 cm long. Starting at one
comer, work (5 de, 5 ch) 3 times over
cord and each 8 ch group. Pull up cord
periodically to make stitches lie flat. Do
not fasten off foundation cord until after
cover has been mounted, as some adjust-
ment may be necessary.
Finishing. Detach crocheted piece care-
fully from grid; remove tacking threads.
Pin it to one side of cushion, adjusting fit
either by stretching gently or pulling on
the foundation cord. Sew the border
with double thread, taking small
stitches through back of border and
under cushion fabric; weave foundation
cord into back of border for 3 cm; cut
remainder. Tack rose to prevent shift-
ing. Steam-press lightly.
To assemble motifs, lay them out in the arrangement shown. Join
seven leaves first, making small stitches at contact points. Next,
attach rose and bottom leaf. Join shamrocks where picots touch,
then draw up cords on stems, shaping them as shown. Sew each
stem in position, cut its cord, weave end into the back Centre
motifs on grid; tack their centres to fabric, leaving edges free
To crochet mesh around motifs, work first 2 rows, then tack
foundation chain to bottom line of grid with the 10-ch group at right
edge, mesh lines aligning with grid lines Work 3rd row of mesh,
taking it behind shamrocks as necessary. Continue up right side to
top of motifs: fasten off. work left side, then top. tacking meshtogrid
as work proceeds. Complete border as directed above
Sew the completed piece by hand to one side of cushion, centring
it between finished edges, as shown, or attaching it along the
seams (if it fits precisely). Smooth fabric, in a dark or medium
colour, sets off this lace to best advantage For laundering, it would
be wise to remove lace to avoid the risk of the colour running Wash
it gently by hand, wet-block on grid; re-sew to cushion when dry.
31
Crochet stitches
T unisian crochet
Tunisian crochet (also called afghan
stitch) is a cross between knitting and
crochet methods. The fabric is similar to
a knitted one, but firmer, especially
suited to blankets, coats or suits.
To work these stitches, you need a
special tool called a tricot needle or hook.
This is longer than other types, uniform
in diameter, and has a knob at one end to
keep stitches from sliding off. The pro-
cedure is to work from right to left on
one row, leaving all loops on the hook,
then from left to right on the next row,
never turning the work.
The foundation of most afghan
stitches is two basic rows (see below);
the finish can be one row of either slip-
stitch or double crochet. Blocking is
essential and must be done carefully, as
this fabric tends to pull on the bias.
BASIC TECHNIQUE
Work the desired number of ch plus 1
Row 1: miss 1 ch. ‘insert hook in the next ch
draw up a loop and leave it on the hook* do not
turn work at the end of the row
Row 2: yrh. draw yarn through 1st loop on hook.
yrh. draw through 2 loops’, do not turn work; 1
remaining loop counts as 1 st st on next row
32
Basic Tunisian (knit stitch). The first two
rows of this pattern are used tor the
foundation of most Tunrsian stitches. Its
texture, which resembles that of a woven
fabric, is especially suitable for cross
stitch embroidery
Unit of any number ol ch plus 1
Row 1: miss 1 ch, ’insert hook in next ch,
draw up a loop’
Row2:yrh.drawthrough1 loop.’yrh.
draw through 2 loops’
Row 3: ’insert hook right to left under next
vertical stitch, draw up a loop’
Rep from Row 2
Tunisian stocking stitch. This pattern
looks like the knitted version, except that
it is thicker.
Unit olany number ol ch plus 1
Rows 1 and 2: basic Tunisian
Row 3: ’insert hook front to back in the
centre of next vertical st loop (the centre
can be seen more easily if you separate
the 2 yams using thumb and 3rd finger of
left hand), draw up a loop’
Row4:yrh,drawthrough 1 loop, ’yrh,
draw through 2 loops’
Rep from Row 3
Tunisian purl. Yarn is held in front of
work as for purl stitch in knitting.
Unit ol any number ol ch plus 1
Rows 1 and 2: basic Tunisian
Row 3: ’holding yarn to the front, insert
hook right to left under next vertical st,
draw up a loop’
Row 4: yrh, draw through! loop.’yrh.
draw through 2 loops’
Rep from Row 3
Tunisian crossed stitch. Pairs of
stitches are worked in reverse order
Unltof2chplus 1
Rows 1 and 2: basic T unisian
Row 3: ’miss 1 vertical st, insert hook
right to left under next vertical st. draw up
a loop, insert hook right to left under
missed vertical st. draw up a loop"
Row 4: yrh, draw through! loop.’yrh.
draw through 2 loops’
Rep from Row 3
1. ч «г I* V
SjsfEf: f.
Tunisian double stitch. Rows of
diagonal stitches alternate with rows of
the basic vertical pattern.
Unit of any number of ch plus 1
Rows 1 and 2: basic Tunisian
Row 3: "insert hook right to left under next
vertical st. draw up a loop. yrh. draw
through 1 loop'
Row 4: yrh. draw through 1 loop. 'yrh.
draw through 2 loops'
Rep from Row 3
Tunisian rib. A combination of basic and
purled Tunisian stitches.
Unit of 6 ch plus 4
Rows 1 and 2: basic Tunisian
Row 3: '3sts basic Tunisian. 3 sts
Tunisian purl'. 3sts basicTunisian
Row 4: yrh. draw through 1 loop. 'yrh.
draw through 2 loops'
Rep from Row 3
Tunisian bias stitch. Worked in the
same manner as Tunisian crossed stitch
(opposite page), but pattern is moved
one stitch to the left on alternate rows.
Unitof2chplus 1
Rows 1 and 2: basic Tunisian
Rows 3 and 4: Tunisian crossed stitch
Row 5: draw a loop under next vertical
stitch, 'cross next pair ot stitches’, draw a
loop under last vertical stitch
Row6:yrh, draw through 1 loop. 'yrh.
draw through 2 loops'
Rep from Row 3
Tunisian popcorn.The knobs are
worked on aground of basicTunisian If
desired, popcorn size can be increased
by lengthening the chain; also, spacing
can be varied by adjusting the number of
stitches between popcorns.
Unit of 4 ch plus 5
Rows 1 and 2: basic T unisian
Row 3: draw a loop through each of next
4 vertical sts, ‘3 ch. draw a loop through
each of next 4 vertical sts'
Rows 4,5,6: basic T unisian
Row 7: draw a loop through each side of
next 2 vertical sts. '3 ch, draw a loop
through each of next 4 vertical sts'. 3 ch.
draw a loop through each of next 2
vertical sts
Rows 8,9,10: basic T unisian
Rep from Row 3
Tunisian honeycomb. Knit and purl
stitches are alternated in the same way as
for knitted moss stitch.
Unit of 2 ch plus 1
Rows 1 and 2: basic Tunisian
Row3:’t Tunisian purl under next
vertical bar. 1 basicTunisian under next
vertical bar"
Rows 4 and 6: yrh, draw through 1 loop.
•yrh, draw through 2 loops'
Row5:'1 basic Tunisian under next
vertical bar. 1 Tunisian purl under next
vertical bar’
Rep from Row 3
Tunisian lace. An exceptionally pretty
pattern that is very easy to work.
Unit of 4 ch plus 1
Row 1: basic T unisian
Row 2: '3 ch. yrh, draw through 5 loops.
yrh. draw through 1 loop'
Row 3: ’draw up a loop through the top of
each cluster, draw up a loop in each ch of
the 3 ch group'
Rep from Row 2
33
Crochet stitches
Loops
Lattice loop. An airy pattern of
elongated loops, especially
suitable for a shawl, or one row
might be used for a lacy insertion
See below for the way to work a
lattice
Unitof any number of ch
Row 1: miss 1 ch,' 1 de in each
de*. 1 ch, turn
Row 2: lengthen turning ch to
height of strip, place strip
between the loop and the yarn,
draw a loop through the
lengthened chain, 'insert hook in
next st. draw up a loop to top of
strip, yrh. draw through the long
loop. yrh. draw through? loops'.
1 ch. turn
Row 3:' 1 de in each st'
Rep from Row 2
WORKING THE LATTICE LOOP
A lattice can be worked neatly over a ruler or
a cardboard strip. If you do not have a ruler in
a suitable size, cut a strip of sturdy card
about 15 cm long and the desired depth of
the stitch.
To begin lattice pattern, work a row of
double crochet. 1 chain and turn. Lengthen
the turning chain to the height of the strip,
place strip between loop and yam. draw a
loop through the lengthened chain 'slide
hook forward and down, and insert it in the
next stitch, lower yam behind the strip until it
reaches the hook, draw up a long loop
(hooking action is indicated by arrow.
Illustration A), yarn round hook (B). draw a
loop through long loop, yam round hook,
draw through remaining 2 loops' Repeat
from asterisk across the row. removing strip
and moving it forward as it becomes filled
with stitches. 1 chain, turn
To continue pattern, work a double crochet
in each stitch, and on the last stitch, insert
hook under the last long loop as well as the
two top loops, 1 chain and turn Repeat the
lattice row next or, if preferred, work
additional rows of double crochet, then a
lattice
34
Boucle loop. Shaggy loops on
one side of fabric, double crochet
on reverse side. Loops can be
worked in two different ways (see
below) This stitch is suitable for a
cushion cover, rug or garment:
boucle loop can also be knitted
Unitof any number of ch
Row1:miss1 ch, ‘1 dcineach
ch*. 1 ch, turn
Row2:*1 loop st in each de*. 1
ch.turn
Row 3: * 1 de in each st*, 1 ch,
turn
Rep from Row 2
WORKING THE BOUCLfe LOOP
A boucle loop can be formed with the aid of
an object such as a pencil, ruler or card board
strip, or it can be worked overoneortwo
fingers of the left hand The first method is
more precise, the second is faster once a
rhythm is developed Before you begin, work
a sample to determine the length of the loops.
Somewhere between 1 cm and 4 cm is usual
Once established, the loop length should be
consistent throughout the pattern
To form loops over a strip, first worka
foundation row ot double crochet. 1 chain
and turn 'Bracing strip behind the work with
left hand, insert hook in next stitch, transfer
strip to right hand and take yam round strip
front to back (see arrow, illustration A), draw
up a loop, yarn round hook, draw through 2
loops' Repeat from asterisk to end of row,
sliding loops off and moving strip forward as
it becomes filled.
To form loops over the fingers, f irst make a
foundation row of double crochet. 1 chain
and turn. 'Insert hook in next stitch, swing 3rd
and 4th fingers on left hand forward under
yarn then back against yarn so that a loop is
formed over these fingers (B). draw a loop
through the stitch, pulling it over top of 3rd
finger, yarn round hook, draw through 2
loops, slip fingers out of the loop* Repeat
from asterisk across the row.
Chain loop stitch. Curly loops
are worked on a background of
double crochet Different effects
can be obtained by making
longer chains, or by working the
ground in treblecrochet. This
pattern has the same uses as
boucle loop (left)
Unit of any number of ch plus 2
Rows 1 and 2: double crochet
Row 3: working into front loop of
eachst'1 dc.8ch’, 1 de. 1 ch.
turn
Row4: ’1 de. working intoother
loop of each st worked in
previous row’. 1 ch, turn
Rep from Row 1
WORKING THE CHAIN LOOP
A chain loop is produced by
making a long chain between 2
stitches. The crowding of these
loops forces them to curl and
form a thick, spongy texture on
the fabric face
To begin a chain loop pattern,
work 2 rows of double crochet, 1
chain and turn. ’Inserting hook
into front loop of each stitch (A),
work 1 double crochet, Schain'.
Repeat from ending the row
with 1 double crochet, 1 chain,
turn
Tо continue pattern, 'insert
hook into other loop of each stitch
in the previous row (B), work 1
double crochet*. 1 chain, turn.
Broomstick lace. A soft and
spongy texture; a useful stitch lor
shawls and baby blankets. The
pattern is a combination of large
loops, worked over a 'stick'
(dowel or large knitting needle).
and double crochet, worked over
a group of 5 loops
Unit of 5 ch
Row 1: transfer ch on hook to the
stick. ‘ insert hook in next ch,
draw up a loop and place it on the
stick*, do not turn
Row 2: ’insert hook through 5
loops and slide them from stick,
draw a loop through the 5 loops,
yrh. draw through 1 loop, 4 de
over same 5 loops’. do not turn
Row 3: transfer chon hook to the
stick, ’draw up a loop through
next de. place loop on stick’, do
not turn
Rep from Row 2
WORKING BROOMSTICK LACE
Broomstick loops are formed over a dowel
or thick knitting needle, of a diameter
between 1 cm and 2.5 cm, and of sufficient
length to hold all stitches To make a blanket,
for example, a dowel 2.5 cm thick and 90 cm
long might be used If using a dowel, layersof
tape or a few rubber bands should be
wrapped round one end to keep stitches from
sliding off
To begin broomstick pattern, work a row of
chain divisible by 5, counting the chain on
hook Transfer chain on hook to stick and
brace the stick under your left arm 'Insert
hook in next chain, draw up a loop (A) and
place it on the stick’ Repeat from asterisk
across the row; do not turn.
To continue pattern, 'insert hook right to left
through 5 loops, draw a loop through the 5
loops (B). yarn round hook, draw a loop
through the 1 loop, 4 double crochet over the
same 5 loops (C)’ Repeat from asterisk
across the row; do not turn. All loops are
worked from left to right, double crochet rows
from right to left (the reverse if you are left-
handed)
35
Crochet stitches/Multicolour
Introduction
Jacquard techniques
Attractive effects are possible with the
use of two or more colours in crochet.
Because stitches are tall, however, re-
sults can never be as subtle or finely
detailed as in multicoloured knitting. As
a rule, simple designs, such as geometric
shapes and stripes, work the best, and
double crochet permits the greatest flex-
ibility, with frequent colour changes.
There are three ways of working col-
oured patterns (also called jacquards),
shown on the facing page. Each is suited
to a particular situation. A colour
change is always made the same way,
whichever technique you use. Pick up
the new colour as the final yarn round
hook in the last stitch of the previous
colour (second illustration on right).
WORKING WITH A COLOUR CHART
A chart is often used to give directions for colour patterns in crochet This is a graph in which
each square equals a stitch and each line equals a row. Usually, blank squares represent the
main colour, symbols or coloured squares depict the contrasts and. where needed, an
accompanying key interprets these usages To follow a chart, start at the bottom and read from
right to left for right-side rows, from left to rightfor wrong-side rows It is possible to work crochet
from other needlework charts, such as a cross stitch pattern, but a test sample must be made to
decide if the proportions translate attractively, and the colour changes are workable
To Join In a new colour mid-row, lay the
yarn end overthe row below, introducing
it a tew stitches before you need it (A)
Continue to work with the 1 st colour,
covering the end of the new yarn Work
the 1 st colour to the final 2 loops ol the last
stitch, then draw the new colour through
these last 2 loops (B).
The same technique can be used when
changing colours at the beginning of a
row by introducing the new colour on the
last tew stitches of the row below. Joining
yarn by this method eliminates the need
to weave in the yarn ends with a tapestry
needle when the project is complete.
If unused yarn must be carried over
more than 3 stitches, it is best to catch it
into the work every other stitch. The yarn
strands will be less likely to pull or be
snagged, and tension will be more even.
When using this technique, take care not
to apply tension to the yarn being carried.
as this will cause the work to pucker
On a right-side row, insert hook into the
stitch, then under the carried yam at back
of the work, catch working yarn with the
hook (A), draw up a loop and complete
the stitch.
Ona wrong-side row, insert hook under
the carried yarn, then into the stitch,
catch working yam with the hook (B).
draw up a loop and complete the stitch
36
Carrying unused colours across the
wrong side is suitable for any crocheted
fabric that reveals just one finished
surface - a pullover or a cushion cover,
for example. If carried over more than 3
stitches, unused yarn should be caught
into the work every other stitch (see lower
right, opposite page)
To change colours on a right-side row,
work the t st colour to the final 2 loops of
the last stitch, drop 1 st colour back and to
the left of 2nd colour, yrh and draw
through 2 loops with 2nd colour.
To change colours on a wrong-side
row, work 1 st colour to the final 2 loops of
the last stitch, drop 1 st colourforward
and to the right of 2nd colour, yrh and
draw through 2 loops with 2nd colour.
Working over colours not In use is one
way to crochet a reversible fabric. This
method is faster than cutting and
weaving (below), but it consumes more
yarn and produces a fabric that is quite
heavy. The carried yarn, though covered
by the stitches, rs visible between
stitches, and the fabric Is attractive or not
depending on the design and colours
you are working with Use a hook one size
larger than usual to allow tor the bulk of
the unused yarn.
To carry the unused colour, lay it on top
of the previous row as you work stitches in
the contrasting colour.
Tо change colours, draw a loop of the
2nd colour through the final 2 loops of the
last stitch in the 1st colour.
Cutting and weaving the yarn ends is
another way to manage colour changes
on a reversible fabric An alternative to
working over yarn (above), this is a
practical approach when unused yarn
must be carried a great distance, when
colours are changed at the end of a row.
or when the pattern is an inset motif, as in
the example on the right
To discontinue a colour, work it to the
final 2 loops of the last stitch, then draw
up a loop with the new colour Cut off the
1 st colour, leaving a 15 cm end. When the
work is complete, weave the yam end
through 4 to 6 stitches of the colour that
matches it; cut off the remainder
37
Crochet stitches/Charted
Shorthand symbols
Crochet techniques can be represented
by symbols and the symbols used to
chart a pattern stitch, or an entire pro-
ject, visually. Because a chart resembles
the actual look of a pattern, it aids in
visualising an unfamiliar stitch. It is
especially suited to working in the
round.
Listed on the right are symbols, their
meanings and the numbers of pages on
which illustrations of the techniques can
be found. As a rule, no more than a few
symbols are used in one pattern, so it is
necessary to remember only the ones for
which you have immediate use.
Though crochet symbols are used in
many countries, they are not standar-
dised. The ones given here are typical,
but not universal, examples. If you need
a symbol that is not shown here, you can
invent your own.
Charted stitch
Clusters In a square. Directions
below, charted form on the right
6 ch and join in a ring with ss
Round 1: 3ch, (yrh. insert hook in
ring, draw up a loop, yrh, draw
through 2 loops) twice, yrh, draw
through 3 loops, 2 ch. *3 tr cluster in
ring [(yrh. insert hook, draw up a loop,
yrh. draw through 2 loops) 3 times,
yrh, draw through 4 loops], 2 ch’, rep
from ‘6 more times, ss in top of beg
ch
Round 2:3 ch, 2 tr in 2 ch sp, at end
of Round 1 (infrontof3ch)2ch, (3tr
in next 2 ch sp. 2 ch) 7 times, ss in top
of beg ch
Round3:1 ch,"1 de in 2nd tr,2ch,3
dtr cluster in next 2 ch sp [(yrh twice,
insert hook, draw up a loop. yrh. draw
through 2 loops, yrh, draw through 2
loops) 3 times, yrh. draw through4
loops], 2 ch", rep from "7 more times,
ss in beg ch
Round 4:1 ch. "3 de in st at top of
cluster. (3 tr, 2 ch. 3 tr) in next de, 3 de
in top of next cluster, 1 ch. 1 de in next
de, 1 ch". rep from" 5 more times, ss
in beg ch
Round5:1 ch. 1 de in each st or ch,3
de in each 2 ch sp at comers, ss in
beg ch. fasten off
38
Crocheting
a garment
Introduction
Designing a crocheted garment
Charting a woman’s cardigan
How to make a garment chart
Shaping necklines
Shaping armholes and sleeves
Ribbing
Buttons
Buttonholes
Introduction
This section contains the basic informa-
tion necessary to help you understand
how crochet patterns are constructed,
and to help you plan and design
crocheted garments. Before crocheting
any garment, read through the instruc-
tions to make sure you understand
them, and try out any new techniques.
Designing a crocheted garment
There are two ways to design a
crocheted garment. One is to alter an
existing pattern - making changes to fit
your measurements - the other is to
design your own. With either method
you will need the following:
1. An accurate set of body or garment
measurements.
2. A sample square to decide which
tension to use to calculate the amount of
yarn needed.
3. Squared paper for the pattern.
Before you begin, read pp. 42-43 for
information about shaping necklines,
armholes and sleeves.
The first thing to do is write down the
width and the length measurements for
each section of the garment you are
planning. If your plan is based on
body measurements, you must add
ease, around the chest and upper arm
for example, using other patterns for
guides. You should also add 5 mm for
seams, and plan the overall length,
for example, from the underarm to the
bottom edge of a sweater. Next, choose
a yarn and stitch pattern, crochet a
sample, or several if necessary, until
you are satisfied with the appearance of
the stitch, then measure the tension. To
translate garment width dimensions
into stitches, multiply the stitch tension
by centimetres. For example, if you are
planning a sweater that measures 45 cm
at the bottom edge of the back, and the
stitch tension is 8 stitches to 5 cm, you
would need (45 -t- 5 x 8 = 72) 72
stitches plus 2 stitches for seams for the
Compare the measurements of the
pattern with those of the person for
whom the garment is intended. When
taking body measurements remember
that ease must be added to ensure a good
fit. If the measurements are not given in
the pattern, you can work them out by
dividing the total of the row of stitches
back section. To translate garment
length measurements into rows, multi-
ply row tension by centimetres. If a
sweater measures 40 cm from bottom
edge to underarm, and row tension is 6
rows to 5 cm, there would be (40 4- 5 x
6 = 48) 48 rows from bottom to under-
arm. To determine the number and
placing of decreases for shaping arm-
holes, sleeves and neckline, follow the
guidelines on pp. 42-43. Prepare a
chart or outline (see pp. 40-41 for the
method), then calculate the quantity of
yarn.
To estimate how much yarn you will
need for your own design, there are
several approaches; these are described
below. One general rule to keep in mind
is that pattern stitches with clusters,
shells or bobbles usually require about
50 per cent more yarn than the basic
stitches and textures (see p. 18).
One way to estimate yarn quantity is
to use the amount specified for a similar
pattern using similar yarn and stitch.
(For this purpose, it is useful to keep a
notebook of patterns.) This quantity
may not be precisely what you need, so it
is advisable to buy extra yarn to be sure
of having enough from the same dye lot.
Many shops will let you return unused
yarn within a reasonable time; check
with the shop at the time of purchase.
Another approach is to consult the
sales assistant in a wool shop. The
assistants usually have the experience
from which to make an estimate.
If you cannot find either assistance or
by the tension width (5cm) and multi-
plying the answer by the number of
stitches in the tension width. For
example, if the shoulder has 20 stitches,
and the tension is 8 stitches to 5 cm, you
divide 20 by 8 which equals 2.5, and
multiply this by 5. The answer is 12.5 cm
and this is the shoulder measurement.
an appropriate pattern, here is a way to
make your own estimate. Buy a ball of
desired yarn and wind off a length of
yarn that equals about one-eighth of the
total length. Measure this length care-
fully. It might be, for example, 18 m.
Make a tension sample and measure its
area; if the sample is 10 cm by 7.5 cm,
the area would be 75 sq. cm.
Next, calculate the approximate area
for each garment section by multiplying
widest measurement by overall length.
Add these figures together, then divide
the sum by the sample area and multiply
this number by the length of yarn used
for the sample.
The following is an example:
Sweater
across the chest 45 cm
length, neck to bottom 50 cm
total area 2,250 sq.cm
Sweater front
area, same as back 2,250 sq.cm
Sweater sleeves
width at upper arm 30 cm
overall length 57.5 cm
total area, both sleeves 3,450 sq. cm
Total area for sweater 7,950 sq.cm
Sweater area divided
by sample area (75) 106
106 is the approximate number of 10 cm
by 7.5 cm samples needed to crochet the
garment. Multiply 18 m (length of yarn
used in sample) by 106 to determine
total amount of yarn - 1,908 m. Deduct
10 percent for shaping decreases-total
of 1,717 m. Divide this by 144(18 x 8)
to get an estimate of balls required (12).
39
Crocheting a garment
Charting a woman’s cardigan
This tailored cardigan is shown in both
written and charted form so you can
compare the methods. Directions are for
Misses’ size 12 (86 cm bust).
Materials
400 g of double knitting yam, sizes 3.50
and 4.00 hooks, 6 1.5 cm buttons
Tension
8 htr and 6 rows = 5 cm with 4.00 hook
BACK. Using 4.00 hook, 73 ch.
Row 1: miss 1 ch, *1 de in each ch*, 1
ch, turn (you now have 72 sts).
Row 2: *1 htr in each de*, 2 ch, turn.
Row 3: * 1 htr in each htr*, 2 ch, turn.
Rep Row 3 until piece measures 36 cm.
Armholes: 1 ss in each of 1 st 4 sts, 1 htr
in each st to last 4 sts, 2 ch, turn; dec 1 st
at each end of next 4 rows. Work
straight on 56 sts until the armholes
measure 20 cm.
Shoulders: 8 ss in 1 st 8 sts, 9 htr in next
9 sts, 2 ch, turn; dec 1 st at beg of next
row, 1 htr in each of next 6 sts, 1 de in
next st, fasten off. Miss centre 22 sts,
join yarn and work other shoulder to
match.
LEFT FRONT. With 4.00 hook, 37
ch. Row 1: miss 1 ch, *1 de in each ch*,
1 ch, turn (you now have 36 sts).
Row 2: * 1 htr in each de*, 2 ch, turn.
Row 3: 1 htr in each of 1st 14 htr, 4
raised tr round the front of next 4 de in
Row 1, 1 htr in each of next 18 htr, 2 ch,
turn.
Row 4: *1 htr in each htr*, 2 ch, turn.
Row 5: 1 htr in each of 1st 14 htr, 4
raised tr round front of 4 raised tr 2 rows
below, 18 htr in next 18 htr, 2 ch, turn.
Repeat Rows 4 and 5 until piece meas-
ures 36 cm, ending on wrong side.
Armhole: 1 ss in each of 1st 4 sts, work
to end of row; dec 1 st at armhole edge 4
times. Work straight on rem 28 sts until
armhole measures 10 cm, ending at
front edge.
Shaping neck: 1 ss in each of 1st 8 sts,
work to end; dec 1 st at neck edge 4
times. Work straight on rem 16 sts until
armhole measures 20 cm, ending at
armhole.
Shoulder: 1 ss in each of 1st 8 sts; work
to end of row, fasten off.
RIGHT FRONT. Work as for left front
reversing the pattern and shapings.
SLEEVES. With 4.00 hook, 33 ch.
Work Row 1 in de and Row 2 in htr as
for left front, but on 32 sts.
Row 3: 1 htr in each of 1st 14 sts, 4
raised tr round the front of next 4 de in
Row 1, 1 htr in each of next 14 sts.
Continue in pattern, increasing 1 st at
each end on every 4th row, 8 times.
Work straight on 48 sts until piece
measures 40 cm.
Shaping cap: ss in each of 1st 4 sts,
work to last 4 sts, turn; work 1 row, dec
1 st at each end of next and every other
row 6 times; dec 1 st at each end of every
row 5 times, 18 sts remain, fasten off.
FINISHING. Sew side, shoulder and
sleeve seams. With right side facing you,
using 3.50 hook, begin at right side
seam, work 2 rows of de along bottom,
front and neck edges of sweater; work 3
de in each corner st. Mark 6 buttonhole
positions on right front, placing 1 st one
A woman's tailored cardigan is worked in htr with a panel of 4 raised tr on each front and sleeve.
1 cm from neck, last one 1.5 cm from
bottom; space others between.
Next round, work in de, making a hori-
zontal 1 ch buttonhole at each marking
and 3 de at each corner. Work 2 more
rounds of de, decreasing round curve of
neck; fasten off. With right side facing
you, using 3.50 hook, work 5 rnds of de
along bottom of each sleeve. Sew in
sleeves. Attach buttons.
How to make a garment chart
A garment chart is a visual representa-
tion of written instructions. There are
two different forms - outline and graph.
Either can be used when designing a
garment or adjusting an existing
pattern.
An outline is a drawing of the exact
dimensions of each main garment sec-
tion, with shaping information written
on it. This form gives you a realistic view
of garment shape, and can be used later,
if desired, for blocking. To make an
outline, use sturdy wrapping paper and
start by drawing a straight line on it
equal to the widest dimension (usually
the underarm) of the garment back.
then draw a second line perpendicular to
and through the centre of the first.
Using these as reference points, measure
the other areas. Draw the sleeve and any
other garment sections in the same way.
A graph is worked out on paper
marked off in squares. Each square rep-
resents a stitch, each line of squares a
row. To chart this way, the tension must
already have been determined. You can
graph an entire garment section, or just
those areas that are shaped (as shown
opposite); only half need really be
graphed. A graph is a less realistic view
of garment shape than an outline, but it
is easier to follow.
40
An outline is an exact duplicate of garment dimensions.
41
Crocheting a garment
Shaping necklines
Special care should be taken in crochet-
ing a neckline; this pan of a garment is
particularly noticeable. In general, the
fit should be smooth, with no gaping or
wrinkling. In the case of a high neck on a
pullover, a slit opening must be pro-
vided so that the head can pass through.
(There is not enough stretch in crochet
for the neckline to expand.)
The neck width calculation is based
on shoulder width and equals about one-
third of it, or the number of stitches that
remain after subtracting the two shoul-
der lengths. Front neck depth is calcu-
lated in relation to armhole depth, and
.varies according to style (see the direc-
tions on the right). Usually, a back neck
is straight, formed by leaving the
stitches unworked just below the last
row of shoulder shaping. If a front is a
deep scoop or square, the back may be
shaped the same way, but would be less
deep as a general rule.
In shaping a neckline, work is usually
divided, each half crocheted separately,
and all decreases made on the right side
of the work. Distribution of decreases
depends to some extent on stitch height.
You can miss one or two rows between
decreases for a short stitch (de or htr),
but should decrease every row for a tall
one (tr and taller), or the edge will be
jagged.
A crocheted neck edge may be natur-
ally neat - a square neck is an example -
but it will hold its shape better and have
a more finished appearance if you work
an edging. One or more rows of double
crochet makes a firm edge. Ribbing is
also suitable. It can be crocheted (see
p. 44) or knitted by picking up stitches
along the edge. Shoulder seams should
be joined before the edging is added.
Guidelines for making three basic
neck shapings are shown on the right.
These are typical, but do not represent
all possibilities. If you wish to use them
for altering an existing pattern, or de-
signing your own, chart the design first.
Square neckline shaping is begun 8
cm to 15 cm below the start of shoulder
shaping by leaving unworked all
stitches allotted for the neckline
opening (The number of stitches for
the neck is what remains after
subtracting stitches for each shoulder)
There is no decreasing for this style,
you work straight up to the shoulder,
completing one-half of the neckline at a
lime.
To make the edging shown here, work
2 rounds of double crochet along the
neck edge, starting and ending at one
shoulder seam, decreasing 1 stitch at
each corner
High round neckline shaping is begun
about 5 cm below shoulder tor an adult
garment. 4 cm tor achild's. One-third of
stitches to be decreased are left
unworked at the centre; another third
are allotted to each half of the neck,
decreasing at the neck edge 1 stitch
every row. then working even to the top
of the shoulder
A slit opening must be provided tor
this style, usually it is worked at the
back by dividing the work at the centre.
8 cm to 10 cm below the shoulder
To make the edging shown here, work
3 rows of double crochet, starting and
ending at the slit, decreasing where
necessary (usually in the curved areas)
to keep the edging flat
A V-neckline is usually started 15 cm
Io 23 cm below the shoulder, or just
after the start of armhole shaping Work
is divided at the centre and each half is
worked separately, decreasing
gradually at the neck edge, always on
the right side of the work. For a wide V,
decrease 1 stitch every row; fora
narrower one. every second or third
row If you have an odd number of
stitches across the front, decrease
centre stitch before dividing work
To make the edging shown here, work
1 round of double crochet on the neck
edge, then a second round of reverse
double crochet, starting and ending at
a shoulder seam, decreasing 2 stitches
at the V on each round
42
Shaping armholes and sleeves
Armhole and sleeve shapings are impor-
tant to crocheting a well-fitted garment.
Three basic styles are described below -
classic, raglan and semi-raglan.
To chart an armhole with the methods
given here, you need measurements for
shoulder width, the chest (or underarm)
across half the garment, plus the stan-
dard shoulder length and armhole depth
for your garment size and neck circumfer-
ence (for raglan only). To shape a sleeve,
you should have the wrist, the underarm
length and the upper-arm measurements.
The usual way of crocheting a sleeve is
from the bottom edge up, increasing the
underarm seam gradually and symmet-
rically between the wrist and the under-
arm. The armhole and sleeve cap are
shaped with decreases. To avoid a jagged
decrease underarm, follow the instruc-
tions on p. 16 for decreasing several
stitches at the beginning and end of a
row. These methods are appropriate
also for shaping the shoulder seam.
A classic arm hole
shape is formed by
subtracting the stitches
needed for shoulder width
from the number at the
underarm. Halt this figure is
the number of stitches to
decrease lor each armhole.
At start ofshaping,
decrease at least 3 cm of
stitches, then decrease
remainder over next few
rows. Work even until
correct depth is reached
For set-in sleeve cap,
decrease the same number
of stitches as at beginning
of armhole Continue
decreasing symmetrically
until cap length is the same
as armhole length; work 1
more row and fasten off
A raglan armhole ends at
the neckline and must be
planned in relation to it. it is
shown here combined with
a square neckline, a simple
combination often used in
crocheted garments To
determine the number of
decreases, subtract the
stitches for neck width from
the number of stitches at
the underarm. Start raglan
with 1.5 cm of decreases
on each side: distribute
remaining decreases
symmetrically and evenly
over the number of rows
needed to reach the
neckline.
Shape top of sleeves lhe
same way. having 8 cm to
15 cm at neck edge
depending on neckline
depth.
A semi-raglan armhole is
shaped like a raglan on the
lower half, like a classic
armhole on the upper half
and shoulder. Calculate the
number of decreases as for
a classic armhole, but
instead of distributing them
over the first 4 to 5 rows,
space them in a sloped line
over half the arm hole
depth; work evenly for the
remaining depth
Forthe sleeve cap,
decrease symmetrically
over the same number of
rows as for the arm hole,
workl more row straight
across and fasten off.
A set-ln sleeve nas a symmetrically curved cap
A raglan sleeve is shaped in a continuous slope to neckline
A semi-raglan sleeve has raglan slope combined with a wide cap.
43
Crocheting a garment
Ribbing
Crocheted ribbing is used on the edges
of a garment to provide a firm and some-
what elastic finish. Four variations are
described below. The easiest of the four
to produce is the ridge stitch, in which
the ribs are worked horizontally, then
turned and the garment pattern worked
along one side edge to obtain the vertical
effect. All the other rib patterns are
worked vertically.
Crocheted ribbing is not as elastic as
knitted ribbing and never fits as snugly.
You can, if you prefer, knit the ribbed
edging for a crocheted garment. The
usual method is to work the garment,
join the seams, then pick up stitches
along the edge. As a general rule, one
knitted stitch is picked up for each
crocheted one. Make a sample to decide
correct needle size.
Ridge stitch ribbing. Ridges are formed
horizontally, then turned sideways lor ribbing
Unit of any number ol ch that will form desired
depth of ribbing
Row 1: miss 1 ch, "1 de in each ch*. 1 ch. turn
Row 2:' 1 de in back loop of each st". 1 ch, turn
Repeat Row 2 for the pattern When ribbing is
long enough for the garment edge on which it is to
be used. fasten off yarn; sew the ends together,
then work the pattern stitches along one side of
the ridge pattern.
Raised stitch ribbing 1. Vertical ridges are
formed on two sides.
Unit of 2 ch plus 1
Row 1: miss 1 ch, *1 de in each ch’. 1 ch. turn
Row 2: ’ 1 raised de round the front, 1 raised de
round the back*, 1 de in last sp. 1 ch, turn
Row3:*1 raised de round the front. 1 de under
the 2 crossed strands of next raised st’. 1 de in
lastsp, 1 ch, turn
Repeat Row 3 for pattern
Raised stitch ribbing 2. Vertical ridges are on
one side only.
Unitof2ch
Row 1: miss 1 ch, ’1 de in each ch*. 1 ch. turn
Row2:1 dc,*1 raised tr round the front of next
stitch, 1 de in next st’. 1 ch, turn
Row3:’1 de in each st’. 1 ch. turn
Row4:1 dc,’1 raised tr round front of raised st 2
rows below. 1 de in nextst’, 1 ch, turn
Repeat Rows 3 and 4 for pattern
Tunisian crochet ribbing. Ridges are less
pronounced than in other crocheted ribbings, but
this is a neat pattern, particularly suited to a
garment of Tunisian crochet
Unitof2ch
Rows 1 and 2: basic Tunisian
Row3:1 Tunisian purl under 2nd bar, *1 Tunisian
stocking st. 1 Tunisian purl’
Row 4: yrh. draw through 1 loop, ’yrh, draw
through 2 loops’
Repeat Rows 3 and 4 for pattern
Buttons
Ring button. Yarn is worked over a plastic ring 3 mm smaller than button size. To start, make a slip knot
Inserting hook through ring to form each st, work round it in de (A) until ring is completely covered; ss in
1st st to close, fasten off. Cut yarn leaving 30 cm; thread the end in tapestry needle. Oversew a st in
each outside loop (B), then pull stitches towards centre Tie beginning and end strands together, then
sew an X across the button back for attaching it to the garment.
Ball button. Yarn is worked into a three-dimensional motif; size and thickness depend on yarn weight
3 ch and join in ring with ss. Round 1:1 ch. 8 de in ring, ss to beg ch Round 2:1 ch. (1 de in nextst. 2 de
in next st) 4 times, ss to beg ch; pull the short yarn end up through centre hole. Round 3:1 ch. (insert
hook through centre hole, draw up a long loop (A), yrh. draw through 2 loops) 16 times, ss to beg ch
Round 4:1 de in every other st. fasten off; oversew and finish back as for ring button
44
Buttonholes
Horizontal buttonhole, double
crochet.
At the beginning of buttonhole position,
work a number of chain stitches that will
accommodate the diameter of the
button (usually from 1 to 5). Miss the
number of stitches for which you have
chains, then continue in pattern (A).
Next row. Work over the buttonhole
chain in double crochet, making the
same number of stitches as there are
chains (B)
A 4-chain buttonhole completed
Double crochet stitches worked over buttonhole chain
Horizontal buttonhole, treble
crochet.
Insert hook under diagonal strand
halfway down last stitch (A), ‘draw up a
loop, yarn round hook, drawthrough 2
loops, insert hook under left strand at
front of last stitch*, repeat from' to ‘ for
desired length. To complete
buttonhole, draw up loop, miss same
number of stitches as made for
buttonhole, insert hook in next stitch,
draw up a loop, complete a treble
crochet (B)
Inserting hook under the diagonal yarn
A double-chain buttonhole completed
Vertical buttonhole, any stitch.
On right side of garment, work across
the row to buttonhole position; turn and
continue to work this half until depth of
buttonhole has been obtained If the
number of buttonhole rows is uneven,
fasten oft yam (A), weave into back of
work later; if even. leave yarn at side of
work Starting at buttonhole edge,
attach yarn. work second half to match
the first Next row. start at side edge
and continue in pattern across both
sections (B)
A
First half of vertical buttonhole completed
Second half of vertical buttonhole completed
Buttonhole loop of double crochet.
On a right-side row. work to end of
buttonhole position Work a chain the
same length as buttonhole, join it to
beginning of buttonhole thus: slip hook
out of chain, insert it front to back
through top of stitch, hook chain and
pull it through; insert hook in next stitch
to the right, yarn round hook (A), draw a
loop through both stitch and chain.
Work double crochet over chain,
slipstitch in stitch where chain was
started (B); continue in pattern
Joining chain to beginning of buttonhole
Working double crochet over buttonhole loop
45
Assembling
and finishing
General information
Joining sections right side's
together
Joining sections edge to edge
Crocheted edgings and insertions
General information
There are several ways to finish crochet;
select methods that suit your needs and
work patiently for professional results.
Blocking is generally the first step.
This procedure shapes crocheted pieces
to specific measurements and, at the
same time, usually smooths slight stitch
irregularities. There are two basic
blocking methods - steam (for wool and
other natural yarns), and wet (for highly
JOINING SECTIONS RIGHT SIDES TOGETHER
textured stitches). Before beginning,
check the yarn label; some yarns should
not be blocked.
Joining is the step after blocking for
any project worked in sections. There
are several methods (see below). Selec-
tion should be made according to, first,
the needs of the situation, then personal
preference. Joining with a seam allow-
ance (right sides together) is necessary
when edges are uneven; it is often pre-
ferred for its firm and neat appearance.
Joining edge to edge is possible only
when edges are even and have the same
number of stitches. This method is espe-
cially suitable for ribbings and motifs.
Edging may be applied as a final step
to provide extra firmness and a uniform
appearance for a crocheted edge. Sug-
gestions for finishes are given opposite.
Backstitch. Worked any distance from edge
use for uneven edges or to alter garment
Bring needle up through 2 corresponding
stitches; 'insert through 2 stitches behind thread
(where thread emerges for last stitch): bring up
through 2 stitches in front of the thread.'
Slipstitch. A firm joining that is suitable for seams
in which minimal stretch is required.
Draw up a loop through a corresponding stitch
on each section; 'insert hook through the next 2
stitches; draw a loop through both stitches and
the loop on the hook '
Slipstitch plus chain. A more flexible joining
than plain slipstitch; use for bulky yarns or when a
greater degree of stretch is desired
Work sllpstltch through 2 corresponding
stitches at start of row. ‘make a chain equal to
height of row; work slipstitch at point of next row '
JOINING SECTIONS EDGE TO EDGE
Mattress stitch. An invisible joining, especially
suited to taller stitches and filet.
Lay sections right side up. 'Take needle under
lower half of edge stitch on one piece, then under
upper half of edge stitch on adjacent piece.'
Weaving top or bottom edges, invisible joining
for straight edges with equal numbers of stitches
Right sides up, 'bring needle up through 1 loop,
down through next loop on one edge; weave
down and up through 2 loops on other edge.'
Overcasting. Used mainly to join patchwork
motifs. 'Insert needle at a nght-angle under
back loop of a corresponding stitch on each
edge, draw yarn through.' When you reach the
corners of 2 motifs, continue as shown above
46
Crocheted edgings and insertions
Crochet lends itself so naturally to use as
a trimming that pattern possibilities are
nearly endless. Worked along the edge
of crochet or knitting (see directly
below), it serves to make an edge firm,
give it a neat look, and reinforce its
shape with a distinctive outline. When
applied to a garment, seams should be
joined first and the edge stitch begun at
one seam. Worked separately, a trim-
ming can be crocheted horizontally
(examples in centre row) or vertically
(bottom row), and sewn to crocheted,
knitted or woven fabrics. Any yam is
suitable so long as it is compatible with
the fabric to which it is applied.
Double crochet edging. Use one to four rows for
sleeveless armholes or a neckline, at least 2 to 3
cm for front or bottom edges of a garment
Corded edging. A very firm and neat trimming
Row 1: double crochet, worked right to left
Row 2: slipstitch, worked left to right
Little plcot edging. For a child's dress
Every row: • 1 ss in each of next 2 sts. 1 de in next
st. 3 ch. 1 de in same st as last de’
Scalloped edging. Suitable for any lacy item.
Every row: 1 ss. ’miss 2 sts, 5 tr in next st. miss 2
sts. 1 ss in next st*
Eyelet insertion. Unit of 2 ch plus 2
Row 1: miss 1 ch. "1 de in each ch’, 1 ch, turn
Row 2: ‘1 de in each de'. 4 ch. turn
Row 3: miss 2 de. ‘1 tr in next de, 1 ch. miss 1
de. 1 trin last de. 1 ch. turn
Row 4: "1 de in each tr. 1 de in each ch’, 1 ch,
turn
Row5:"1 de in each dc*. fasten off
Twisted braid. Unit of any number of ch
Row 1: miss 1 ch. ’insert hook in next ch. draw up
a loop, twist hook horizontally and clockwise 1 full
turn, yrh, draw through 2 loops’; at end of row, 1
ch and continue round opposite side of ch; re-
peat instructions between asterisks in each loop
on that side; fasten off
Filet and picot edging. Unit of 2 ch plus 4
Row 1: miss 5 ch. 1 trin next ch, ‘1 ch. miss! ch.
1 tr in next ch’, 1 ch. turn
Row 2:1 de in each st and ch sp. 4 ch. turn
Row 3: miss 1 de, ‘ss innextde. 4ch. miss 1 de*.
ss in 4th ch at beg of Row 1. fasten off
Fancy scalloped edging. Unit of 5 ch plus 3
Row 1: miss 1 ch. *1 de in each ch’, turn
Row 2: ss in 1st de, *3ch. miss 3 de, ssin next 2
de’, turn
Row 3: ss in 1st2ss, '(1 tr. 1 ch) 4 times in next 3
chsp. 1 tr in same sp. 2ss*. turn
Row 4: *(1 de. 3 ch in next 1 ch sp) 4 times, ss in
next 2 ss’. fasten off
Double shell edging. 19 ch Row 1: miss 9 ch, 1 shell [4 tr. 3ch, 4 tr] in next ch. miss 5 ch. 1 shell in next
ch, miss 2 ch, 1 trtr in last ch. 5 ch. turn. Row 2:1 shell in each ch spot shell below, 1 trtr in last trot 2nd
shell, 5 ch. turn Repeat Row2forpattem.ending last rowwith2ch,1 trin last tr; do not turn Along one
edge, 1 ch. 1 de in loop just formed. *3 ch. 1 de in next loop’ for entire length. 1 ch. turn. Next row: 1 de
in 1st de. ’3dcin next3chsp, 1 de in next de’, fasten off
Looped edging. 13 ch Row 1: miss 6 ch. 1 dtr in next ch, 9ch. miss 5 ch, ssin last ch, 1 ch, turn Row 2:
In 9 ch sp (3 de. 3 ch) 5 times. 2 de in same sp, 1 de in dtr, 2 de in 6 ch sp, 5 ch. turn Row 3: miss 2 de. 1
dtr in next de, 9 ch. miss 2 3 ch loops, ss in next 3 ch loop. 1 ch. turn Row 4: in 9 ch sp (3 de. 3 ch) 5
times. 2 de in same sp. 1 de in dtr, 1 de in 4th ch of turning ch, 5 ch. turn. Repeat Rows 3 and 4 for
desired length: fasten off
47
Blanket in Tunisian crochet
This wool blanket, approximately 122 cm by 160 cm. is worked In Tunisian crochet
Twenty-five geometric blocks form the
basis of this blanket. Each block is
worked in the basic Tunisian stitch, bor-
dered with double crochet, then embroi-
dered with cross stitch to create the
centre motif.
Materials
Double knitting wool, 900 g of beige,
800 g of blue, 6 mm tricot needle or
hook, rug needle, knitting bobbins (op-
tional)
Tension
8 sts and 7 rows = 5 cm
Preparation
Make several butterflies of each colour
wool, allowing 5 to 6 m of yarn for each
one.
MAKING A BLOCK. With blue, 34
ch
Rows 1 -6. Work in basic Tunisian
stitch, and at the end of each row insert
hook under both the last bar and the
yarn directly behind it. This makes a
firm edge on which to work the border.
Row 7. Pick up 3 loops in blue and then
change colours as follows. Make a slip
knot 10 cm from the end of the beige
yarn; pull up this loop through the next
stitch, leaving short yarn end at back to
Each block Is worked
in basic Tunisian stitch,
using this chart as a
guide. A square in the
chart equals 1 stitch
and a row represents 2
rows of the pattern
there are 34 stitches
and 84 rows Though
the cross stitch pattern
in the centre appears to
be otf-balance, the
motif, when finished, is
actually centred
because cross stitches
are worked over the
upright bars of the extra
beige stitch
To make cross stitches, use a
tapestry needle and one strand of
blue yarn Bring the needle up iust
below crossbars of stitch 1; pull
yarn through, leaving 10 cm a’ the
back, take needle top to bottom
behind both crossbars of stitch 2,
then behind crossbars of stitch 3.
Work back across the same row
inserting the needle behind cross-
bars as before To start the next
row. weave needle down behind
crossbars of stitch 4; continue
making rows of stitches until oval is
complete, cut yarn, weave in ends
Stitches should not show on back
be woven in later. Pick up 27 more beige
loops; fasten in a new blue yarn with a
slip knot; pick up 3 blue loops.
Row 8. Work off 2 loops in blue, then
pick up beige yarn from under the blue,
thus twisting the yarns; draw it through
the last blue loop and 1 beige loop.
Continue with beige until 1 beige loop
remains; pick up blue yarn from under
the beige; work off last 4 loops in blue.
Continue in pattern, adding new colours
where needed (you will have 7 butter-
flies on Row 27), and twisting yams
when changing colours on the return
rows. When the square is finished, do
not fasten off, but continue with blue.
Border. Across the top work 2 de under
the 2nd bar, *1 de under the next bar*,
2 de in the last bar. Continue down the
left side with 1 de under the double loop
of each bar; continue along bottom with
2 de in the first ch, *1 de in the next ch*,
2 de in the last ch; work up the right side
with 1 de under both loops of each end
st; join with a ss to the 1st de; fasten off.
Weave all yarn ends into the back.
CROSS STITCHING. Work an oval
design in centre of each block, following
diagram and directions below left.
BLOCKING AND ASSEMBLING.
Carefully block each piece so that all are
the same size (approximately 23.5 cm
by 31 cm). Lay out 10 blocks in 2 rows
of 5 each, one row above the other, with
all tops facing away from you. Using 1
long strand of blue and working from
right to left, overcast adjacent top and
bottom edges, taking yarn through each
back loop only (see example of this tech-
nique, p. 46). Add on 3 more rows of 5
squares each until all squares are joined
horizontally. Turn blanket sideways
and join all the rows vertically.
WORKING THE BLANKET BOR-
DER. With blue, work 2 rows of de
round the outside edge of the blanket,
working 1 stitch in each stitch, 2 stitches
in each corner, missing the overcast
joining. Fasten off. Gently press.
"-'A’t'v''
-;-4
ж
I
' Lacemaking
Needlepoint lace 50 Bobbin lace 68
Materials Tools and materials
Making a sampler 51 Preparing the pricking/ 69
Needlepoint lace stitches 52 Bobbin lace sampler
Meshes Winding the bobbins 70
Bars and picots 54 Working the two basic stitches
Insertions/Woven 55 Weaving a design 71
Insertions/Russian 56 Pinning within stitches
Edgings Ground patterns 72
Other lace techniques 73
Tatting Terms and abbreviations 57 Lace weaves 74
Materials Materials
Tatting techniques 58 Setting up the loom 75
Forming the double stitch Preparing the weft
Practice with one shuttle 59 The weaves 76
Points to remember 60
Working with two threads 61 Hairpin crochet lace Making strips 78
Filet lace netting 62 Joining strips 79
Materials and equipment Finishing edges
Making the basic knot 63 Variations
Basic mesh techniques 64
Plain square mesh/ 65
Filet lace sampler Embroidering the sampler 66
Filet lace cushion cover 67
I
I
Nineteenth-century Belgian bobbin lace with needlepoint lace insertions from the collection of
Susanna E Lewis. Brooklyn New York
Needlepoint
lace
Introduction to needlepoint lace
Materials
Making a sampler
General information on stitches
Meshes
Barsand picots
Insertions/Woven
Insertions/Russian
Edgings
Needlepoint lace butterfly
Introduction
Needlepoint lace is what its name sug-
gests - lace made with a needle and
thread. The techniques probably
evolved from those used for openwork
embroidery, but the structure is built
entirely of thread, with fabric used only
as an anchoring device. While there are
several styles of needlepoint lace, just
one, called Renaissance lace, is dealt
with in this chapter; it is not difficult to
do. To produce this lace, variations of
buttonhole stitch are worked between
sections of a narrow tape that has been
tacked, along the lines of the design, to a
backing. When work is completed, the
backing is removed, leaving just the lace
structure.
Renaissance lace was popular in the Victorian era
Materials
First consideration is usually given to
selecting a tape, because the thread is
then chosen to match or blend with it.
For best performance, the tape should
be between 5 mm and 1.5 cm wide, flex-
ible enough to mould to curves in a
design, constructed loosely enough so
that it offers little resistance to a thick
needle, and woven in a way that will
guide the spacing of stitches. Braids,
eyelets, tape with picot edging, and two
ricracs twisted together are suitable pos-
sibilities. See examples on the right.
For the thread, medium-weight
crochet cotton is recommended because
it has the firm twist needed for these
techniques and enough body to give
character to the stitches. The needle
should have an eye large enough to ac-
commodate the thread; a tapestry needle
is preferable because it will not catch in
the backing. You will also need an ordi-
nary needle and sewing thread for tack-
ing, sturdy paper for backing, and fabric
that contrasts with thread colour to
show it up. A transfer pencil is useful
because it allows you to hot-iron a
design on to backing fabric. A thimble
and small scissors are also necessary.
/50
Making a sampler
A sampler is an easy and practical way to
learn needlepoint lace techniques.
Materials
3.60 m of tape (see opposite page for
suitable choices), 1 ball medium-weight
crochet cotton, tapestry needle, tacking
thread and needle, medium-weight
drawing paper 28 by 35 cm, plain,
smooth fabric, 28 by 35 cm, in colour to
contrast with the thread.
Preparation
Cut 4 strips of tape 20 cm long, 3 strips
30 cm long, and a 1 m piece for the
border. Lay fabric on the paper and
strips on the fabric, arranging them so
that the large centre spaces measure
about 6.5 by 4.5 cm. Tack strips to
LZ
27 20A В 19 21 m co JE *— •— 27
22 1 2 3 4 23
30 6 8 8 7 9 10 11 5
31 12 13 14 18 29
28A 24 26 25 26 28B
35___ss___3§___________;
KEY TO SAMPLER DIAGRAM
fabric and paper; oversew tapes to each
other at intersections. Tack border over
ends of strips, rounding the corners.
Working the stitches
Following key (above right), work
stitches 1-37 in order. The number of
rows to work is given with the stitch
instructions on pp. 52-56. Where no
number of rows is given, fill section as
shown on right. Do not stitch into
backing.
1 Single net stitch
2 Double net stitch
3 Buttonholed net stitch
4. Brussels net stitch
5. Pea stitch
6. Cloth stitch
7. Eyelets in cloth stitch
8. Embroidered cloth stitch
9. Side stitch
10. Double side stitch
11 Shell stitch
12 Spanish point
13. Twisted Spanish point
14. Twisted Spanish point
patterns
15. Twisted bar
16. Double twisted bar
17A. В Buttonholed bars
18. Branched bar tilling
19. Bar with buttonholed picot
20A. В Bar with pinned picots
21. Bar with bullion plcot
22 Woven leaves
23. Open leaves with wheels
24. Beaded insertion
25. Wheel filling
26. Rings
27. Rosettes
28A. В Spiders webs
29 . Buttonholed Russian stitch
30 Double Russian stitch
31 Hall bars
32 . Knotted edging
33 Side stitsh edging
34 Pinned picot edging
35 Bullion picot edging
36 Buttonholed picot edging
37 . Shell edging
51/
Needlepoint lace stitches
General information
All the stitches for Renaissance lace are
variations of just one, buttonhole stitch,
illustrated below in both right and left
forms because most of the patterns are
worked back and forth in rows. To pro-
duce such variety, the buttonhole stitch
is worked three different ways: (1)
loosely, referred to in directions as a
loop; (2) tightly and closely spaced, cal-
led stitch or buttonholing; (3) to one
side over another loop, known as side-
ways stitch. For more variety, but-
tonhole stitch may be combined with
embroidery techniques, such as bullion
knot or weaving. The page references
for these are given where needed.
General rules for working
l.The stitches should be pulled firmly
enough to prevent their sagging, but not
so taut as to draw in the tape edges.
2. The tape edge is used as a guide in
spacing the stitches and rows.
3. Oversewing stitch (illustration above)
is used along tape edges between rows.
4. For a mesh stitch or filling, the
number of loops remains constant for a
regular space, is increased or decreased
as needed for an irregular space, but
stitch depth remains the same.
5. For most patterns with a one-row
repeat, each row is started with a whole
loop, and ended with a half-loop.
Meshes
Meshes are especially suitable for filling
large or irregular spaces in a lace pat-
tern. They are grouped here and oppo-
site according to the basic way of work-
ing each stitch. Net stitches (this page)
are openwork patterns, each a variation
of the single net stitch (right). Cloth
stitches (top row opposite) are closely
spaced in a solid cloth effect; they can be
embellished with eyelets or embroidery.
Side stitches (centre row) are character-
ised by a second stitch that is made
sideways over the first and locks it in
place. Spanish points (bottom row) are
similar to. single net, but have an extra
twist in the loop.
Buttonholed net stitch
Brussels net stitch
Pea stitch
Singlenetstltch(4rows, No 1) Anopen
pattern, simplest and most basic of the meshes.
Bow 1: work evenly spaced loops, making each
loop about as deep as it is wide
Row 2: repeat Row 1. working each stitch into the
centre of the large loop above. Repeat this row for
the pattern
Double net stitch (5 rows. No 2). This stitch
looks better if you make the large loop a bit
shallower than for the single net stitch (above).
Row 1: work 1 large loop and 1 small loop
alternately
Row 2: repeat Row 1, working large and small
loops into each of the large loops above. Repeat
this row for the pattern
Buttonholed net stitch (8 rows. No 3). This
stitch is purposely started at the right edge
because the second row. closely spaced
buttonhole stitches, is easier to work from left to
right Also, it is evenly spaced, because it has a
two-row repeat
Row 1: working right to left, make widely spaced
loops, beginning and ending with a half-loop
Row 2: working left to right, fill each loop with
closely spaced buttonhole stitches (about 6 for
each lull loop, 2 for each half-loop)
Row 3: working right to left, work large loops into
the small spaces between buttonholed bars of
the row above
Repeat Rows 2 and 3 for pattern For last row in
sampler, catch tape between buttonholed bars
Brussels net stitch (No 4)
Row 1: make closely spaced loops in multiples of
6 (18 were made on the sampler).
Row 2: make 1 large loop into every sixth stitch
above.
Row 3: make 4 stitches to form 3 loops on each
large loop above
Row 4: make 1 large loop into the centre of the
4-stitch group above.
Repeat Rows 3 and 4 for the pattern
Pea stitch (No 5)
Row 1: make 1 large loop and 1 small loop
alternately, beginning and ending with half-
loops
Row 2: work 1 loop into the small loop above and
3 stitches forming 2 loops on each large loop,
ending with 1 loop.
Row 3: make 2stitches into the 3-loop group
above (1 stitch between the first and second
stitches, and 1 stitch between the second and
third stitches)
Row 4: work 3 stitches on each large loop above
and 1 stitch into the small loop.
Repeat Rows 3 and 4 for the pattern.
52
Side stitch
Spanish point
Twisted Spanish point
Embroidered cloth stitch
Shell stitch
Twisted Spanish point patterns
Cloth stitch (12 rows, No. 6)
Row 1: working left to right, make closely spaced
loops, then pull thread back across the space.
Row 2: again left to right, make a loop into each
loop above, going over the loose thread as well.
Pull thread back to left side and repeat this row
Eyelets in cloth stitch (7 eyelets, No. 7)
Row 1: for each eyelet, miss 4 stitches, carrying
thread straight across the empty space. At end of
row, pull thread back to the leftside.
Row 2: for each eyelet, work 3 buttonhole
stitches over the 3 strands.
Embroidered cloth stitch (No. 8). Centre of the
raised spot is 2 satin stitches worked over 1 cloth
stitch and 4 rows, sides are 2 satin stitches over 1
cloth stitch and 2 rows Leaves consist of 3
bullion knots; to hold it flat, each clover leaf is
anchored with 1 stitch at centre of outside curve.
Side stitch (4 rows, No 9)
Row 1: left to right, make 1 loose buttonhole
stitch, make a second stitch sideways around
both threads of first one; pull tightly in place.
Row 2: working right to left, and reversing
position of thread, repeat Row 1
Double side stitch (5 rows. No. 10).
Row 1: make single loops spaced widely apart
Row 2: make 1 loose buttonhole stitch into loop
above, make a second stitch in same loop: pull it
tight Make 2 sideways stitches below second
buttonhole stitch. Repeat this row for pattern.
Shell stitch (6 rows, No. 11).
Row 1: working left to right, make 1 side stitch,
pulling thread firmly so that the sideways stitch
lies against the tape and the loop slants left. Make
3 more sideways stitches above first, each one
slightly looser than preceding one. One shell Is
now completed; start next shell touching it
Row 2: rightto left, work 1 stitch between each
shell. drawing loop thus formed closely under
shell
Spanish point (4 rows. No 12)
Row 1: left to right, make athread loop that faces
right, holding loop with left thumb, take needle
through the tape (or stitch above), then through
the loop: adjust stitch to desired depth.
Row 2: repeat Row 1, facing each loop to left
Twisted Spanish point (2 rows, No 13)
Row 1: work as for Row 1 in Spanish point.
Row 2: work back along row above pass needle
once behind bottom of each loop Pull thread
firmly, but not sotight as to pull bars askew
Twisted Spanish point patterns (5 rows.
No. 14). Arrange stitches as shown
53
Needlepoint lace stitches
Bars and picots
Twisted bar(No 15).
Fasten thread to tape at the left
side, stretch it across the
space, and take a stitch in tape
on opposite side. (When laying
the foundation of a bar, stretch
the thread firmly across the
opening, but not so taut that
you draw the tape inwards.)
Work back to the left side,
winding the thread 4 times
around the bar (for a wider
space, you would wind more
times to make bar firm).
Doubletwistedbar(No 16)
Lay a foundation across the
space as for twisted bar on left,
but stretch thread across 3
times instead of once. Work
back to the left side. going over
the bar 3 times (Fewer twists
are needed for this stitch to
make it firm.)
Buttonholed bar (No 17A)
Starting at the right edge,
stretch thread across the
space 3 times lor foundation,
then work closely spaced
buttonhole stitches across it.
Before starting the stitches,
oversew 1 space down on the
tape to secure the end of the
bar and prevent it from curling
For a thicker bar (No. 17B).
make buttonhole stitches over
5 threads.
Branched barfilllng(No 18)
Each bar should emerge from
last one without having to cut
and join the thread. Starting in
the upper right corner (see
diagram), make a foundation of
3 threads, work buttonhole
stitches for half its length. Make
a new foundation for the next
bar. anchoring it through
bottom of the last stitch, work
buttonhole stitches for hall its
length Begin the third and
subsequent bars the same
way When all bars have been
laid out and partially
buttonholed, complete them by
working back along each one
in reverse order.
Bar with buttonholed plcot
(No. 19). Make a buttonholed
bar, working stitches three-
quarters of the way across, or
6 stitches beyond where the
picot is to start Take thread
back to the left and pass
needle between the sixth and
seventh stitches, then back to
the rightand around the bar.
then back to the left and
between the same 2 stitches
(there should be a 3-strand
loop below the bar). Work
closely spaced buttonhole
stitches over the loop, then
complete the bar
C
Bar with pinned plcot (No
20). Make a buttonholed bar.
working stitches to the point
where you want the picot; insert
a pin into backing fabric to the
desired depth of the picot.
Passthread around the pin.
then behind the foundation
threads to the outside of the
loop Make a side stitch around
the loop and the working thread
(as shown in illustration A).
Complete the buttonholed bar
(B). Foralongerpicot.make2
or more side stitches, placing
the first one down low enough
for the additional stitches to fit
between itand the bar (C).
Take care not to sew backing
Bar with bullion plcot (No
21) Make a buttonholed bar
working stitches to the point
where you want the picot: insert
needle halfway through the last
stitch that was made and wind
thread around the needle point
15 times (not too tightly) Pull
needle through and drawthe
bullion into a circle. Complete
the buttonholed bar.
54
Insertions/Woven
Open leaves with wheels (No
23). Stretch thread bottom to
top and form 3 small leaves tied
with a sideways stitch. Weave
around the centre, going over
side leaves, under stem and
top leaf 4 limes. Wind thread
twice around stem before
making next pair of leaves (A)
Woven leaves (No 22) Form
stem and 2 groups of leaves
2.5 cm apart (B) then retrace
foundation, bottom to top.
anchoring through each
sideways stitch. Starting at top.
weave first leaf tip to base,
going over thread groups
alternately on each side, weave
stem and side leaves same
way(C)
Beaded Insertion (No 24)
Make 1 row of large, evenly
spaced loops along each long
side of the space (7 loops were
made in the sampler) Starting
at the top left side, connect
opposite loops by taking the
thread 4 times through each
pair, be sure the thread does
not become c rossed or twisted
Before moving from one group
tothenext, oversew once
around the left loop.
Wheel filling (No. 25) First fill
the space with double strands
laid diagonally in parallel rows
(see diagram). Oversew along
the tape between rows Fasten
off the thread and re-attach it
where indicated Stretch
thread across the grid, take a
stitch in tape at the opposite
side, and return across the row.
At each intersection, weave a
wheel, going 3 times under the
diagonals and over the single
thread Oversew once around
single thread before starting
next wheel. Alternate wheels
are wound in the opposite
direction.
Rings (No 26) These are
made separately, then sewn on
to the work wherever desired.
Wind thread around a rubber
pencil 15 times, then
buttonhole over all the strands
(The buttonholing is easier if
you push the threads up
towards the pencil point.)
When ring is complete, remove
from pencil, flatten, and sew in
place.
Rosette (No. 27). This appears
in the sampler as one filling for
a small space. It can also be
worked in multiples to fill a
larger area. First prepare a grid
as in the diagram, laying 2 pairs
of parallel strands for each
rosette Notice that the
intersecting areas for each
rosette are spaced 1 stitch
apart and interlaced. For each
rosette, weave a wheel, going
around the circle 4 times, then
buttonhole closely over all
threads, placing 2 stitches
between the parallel strands
and 3 stitches at the corners
Spiders' webs (No 28A, No
28B) This stitch is good for
filling a square space. First
make 4 twisted bars. 2 across
the centre and 2 diagonally.
Twist the fourth bar only to the
centre, work spider s web. then
complete the bar
Woven web (No 28A)
Working from the centre out.
weave a wheel, missing 1 bar at
the end of each round so threads
will alternate on each row
Ridged web (No 28B)
Starting at the centre, take
thread under 2 bars, then
weave in a circle, going back
over 1 bar. forward under 2
bars (backstitch)
55
Needlepoint lace stitches
Buttonholed Russian stitch Double Russian stitch
Half bars
Buttonholed Russian stitch (No 29) Starting al
bottom centre of the space, make a basic
Russian foundation, looping thread from side to
side as in first illustration, left (for sampler, there
are 9 loops on each side) Take a small stitch at
top centre to secure thread, then work down the
centre of the foundation making closely spaced
buttonhole stitches over each pair of threads
Make 2 stitches over each of the first 4 pairs, 4
stitches over the next 5 pans. 6 stitches over the
next 4. and 8 stitches over the last 4 pairs
Double Russian stitch i No 30) Make 1 row of
evenly spaced loops along the tape on eacn side
of the space (for the sampler 14 loops) Connect
opposite pairsof loops with 2 Russian foundation
stitches through each one Density can be
increased by taking 3 or 4 stitches in each loop
Halfbars(No 31) Starting al the top centre
make 1 Russian foundation stitch on the right side
and pull it up to a loose diagonal take 1 stitch in
the tape to secure the bar (not shown), then make
8 buttonhole stitches over the diagonal thread
Repeat this procedure on alternate sides
Edgings
Knotted edging (No 32). Make a loop as illustrated, take the
needle through lhe tape edge, then through the loop, going behind
the upper and over the lower thread Work this and all the edgings
on the sampler horn left to right
Pinned picot edging (No 34) Make a buttonhole loop on the tape
Insert a pm mto backing to desired depth ot picot take thread
around it right to left Make a second loop in front oi the pin pass the
needle through buttonhole and second loop pull thread tight
Side stitch edging (No 33) Make a buttonhole loop on the tape,
over this loop make 1 sideways stitch and pull it up close to the
tape Take the thread through the loop and then make another
sideways stitch next to the first one
Bullion picot edging (No 35). Oversew along t ie tape to desired
place for picot Insert needle halfway through tape wino thread
around needle point 15 times draw bullion into a tight circle
Buttonholed picot edging (No 36) Work 7 buttonhole stitches
along the tape edge Make a buttonholed picot (see directions,
p 54) adding 1 pinned picot (p 54) every 5 stitches, if desired
Shell edging (No 37) Make 1 loose buttonhole loop on the tape,
make a second stitch sideways around both threads ot the first one
and pull it tight Make 3 more sideways stitches above the lirst
56
Introduction
Terms and abbreviations
Tatting
Introduction
Terms and abbreviations
Materials
Forming the double stitch
Practice with one shuttle
Points to remember
Working with two threads
Tatting is a form of lace work that con-
sists of one knot, called double stitch,
worked in groups over a single thread.
This thread is pulled to draw stitches
into rings and chains, and these in turn
are joined in larger groupings or motifs.
Traditionally, the technique has been
used to make edgings and insertions,
but a tatting enthusiast can produce
items such as collars or a table centre
piece. This lace is usually worked with
fine cotton thread, so it is delicate look-
ing but very strong.
In tatting, a continuous thread is used
and it is wound on a small shuttle (see
below). A loop of thread is held in the
left hand while the shuttle, held by the
right, is manoeuvred around it; double
stitches (the same knots are known as
lark’s head in macrame) form over the
shuttle thread. To use the instructions
in this section effectively, you should
practise a double stitch (p. 58) until
you can do it smoothly - and rapidly.
Then try each technique in the order
presented: they are arranged in order of
increasing complexity.
For tatting directions, there are spe-
cial terms and abbreviations. Those
used in this book are listed on the im-
mediate right. These are in common use
elsewhere, except for slip join and lock
join. Most patterns make no distinction
between the two, but simply say ‘join’.
ds double stitch
p. 58
r ring p. 59
ch chain
p.61
p picot
p.59
sj slip join
p 59
Ij lock join
p.60
rw reverse work
p 60
cl close p. 59
Ig large
sm small
space length ol thread left unworked
( ) instructions between parentheses
• • or asterisks should be repeated the
number of times indicated after
parentheses or asterisks
Materials
There are two types of tatting shuttles
commonly available. One is metal with a
removable bobbin and a hook for joining
rings. This is best suited to fine crochet
cotton in sizes No. 60 to 10. The other
shuttle is plastic and has a centre post
around which the thread is wound, and a
tapered point to use in joining. It is more
suitable for No. 5 or No. 3 (a thread
thicker than No. 3 is impractical be-
cause you cannot wind enough on the
bobbin). In addition, you might want a
steel crochet hook to use instead of the
shuttle point for joining, and needles for
finishing thread ends (see p. 60).
The best thread for tatting is smooth
cotton with a firm twist. Samples made
with different thicknesses of thread are
shown on the far right. For practice,
No. 5 or 3 crochet cotton or thin string is
best.
57
Tatting techniques
Forming the double stitch
Double stitch (ds) is the fundamental technique
used in tatting It is formed in two stages, with the
right hand used to manoeuvre the shuttle around
a loop of thread controlled by the left hand It is
this left-hand loop that forms the stitches over the
shuttle thread. Once you grasp this principle, and
master the forward and backward movementof
the shuttle, co-ordination of the tatting
movements is fairly easy and a steady rhythm
can be established.
Preparing a bobbin. Wind thread firmly from
centre to edge of bobbin: insert bobbin in the
shuttle.
Holding the thread. Unwind 40 cm; hold the end
firmly between thumb and index finger of left
hand. Spread your lingers, wind thread around
them, and grasp thread again alter it comes full
circle Hold shuttle horizontally in right hand, with
thread unwinding from the back, passing over
the top of the hand and supported by raising the
little finger (A).
First half of double stitch. Holding the thread as
shown, pass shuttle under the top thread of loop
held in left hand (B). Still holding shuttle
horizontally, slide it backwards overthe same
thread (C). Allow thread to slide off the right hand
and pull shuttle thread taut. At the same time.
relax fingers of the left hand slightly, so that the
loop forms around foe shuttle thread (D).
Second halt of double stitch. Hold the shuttle
horizontally as before, but instead of passing
thread overthe right hand, push down on it with
the fingers Pass the shuttle overthe top thread of
the left-hand loop (E). then slide it backwards
uncterthis thread (F) Pull shuttle thread taut,
allowing loop to transfer to the shuttle thread(G)
If the stitch has been formed correctly, you
should be able to slide the shuttle thread through
it. Practise until actions are automatic.
Practice with one shuttle
Two of the basic elements in tatting are
rings and picots. These should be mas-
tered along with the slip join technique
(bottom of page) before you proceed to
the more complex methods that follow.
A ‘ring’ is a circle, semicircle or oval
of double stitches formed by pulling on
the shuttle thread. Its size and shape can
vary depending on the number of
stitches, the thickness of the thread and
how tight the shuttle thread is pulled.
A picot is a thread loop set between
two stitches. It is used for decoration
and to join rings. Picot size, too, can be
varied, but should be consistent in one
pattern, unless picots of different sizes
are called for in the directions. As a rule,
small picots (3 to 5 mm long) are used
for joining rings; large picots (5 mm or
longer) are used to enhance a design.
A ring (r) is formed by
releasing left-hand loop with
which double stitches are
made, and pulling on the
shuttle thread until stitches
are drawn Into a tight circle
(see above) or semicircle. In
instructions this is called
closing (cl)
To practise making a ring,
wind thread around left
hand and work 20 ds (A),
slide thread oft left ha nd,
and. holding the stitches
between left thumb and
index finger, pull shuttle
thread gently so that
stitches are drawn together
Keep pulling until stitches
are as closely set as
possible (C).
A plcot (p) Is formed by
leaving a length of thread
between two double
stitches, then sliding the
stitches together so that the
thread length becomes a
loop
To practise making picots.
start with 5 ds. work first halt
of the sixth stitch, leaving
5 mm space between it and
the fifth ds (A), complete the
sixth stitch, then slide it next
to the fifth, thus pushing up
the loop (B). Work (5 ds. p)
2 more times, 5 ds, cl.
Remem ber. the stitch that
closes a picot is counted as
the first one in the next group
of stitches
A slip Join (s J), made by working a double stitch
through an adjacent picot, is the conventional
method of joining two rings For practice, make
r of 20 ds and 3 p. as explained above right.
Leave 1.5 cm space (length of thread) and start
second r with 5 ds (A). Lay the third p of the first r
over the left-hand loop Using tip of shuttle or a
crochet hook, draw up a loop through the p and
pass shuttle through this loop (B). Keeping shut-
tle thread taut, pull loop close to last ds. taking
care not to pull shuttle thread back through the
picot (C) The join counts as first half of a ds
complete the second half (see inset) and count
this as the first ds in the next group Finish r with (5
ds. p) twice, 5 ds. cl. Repeat second r as many
times as desired to produce a handsome edging.
59
Tatting techniques
Practice with one shuttle
Reversing work (rw) is the turning of a completed
ring downwards, so that the next ring is worked
above the previous ring. This technique permits a
greater variety in design, and also allows you to make
wider patterns.
To practise reversing, make this tatted braid.
Make rot 5 ds. sm p. (3 ds. Ig p) 3 times, 3 ds. sm p.
5 ds, cl (A), rw. 5 mm space, make second r like the
first (B). rw. 5 mm space, make third r of 5 ds. sj to fifth
p of first ring. 3 ds. Ig p. (3 ds. Ig p) twice. 3 ds. sm p. 5
ds, cl. Repeat instructions for the third ring until braid
is the desired length, joining each ring to the fifth
picot of the ring adjacent to it.
Locking join (l|) is the connecting of two parts with
half a slip join. Once made, shuttle thread can no
longer be pulled through stitches, so method is
limited to completed rings or chains.
To practise locking Join, make this medallion.
Make centre r of (2 ds. sm p) 7 times, 2 ds. cl: starting
next to last ds of centre r, make petal of r of 5 ds, sm p,
3 ds, sm p, (3 ds, Ig p) 3 times. (3 ds. sm p) twice. 5
ds. cl; Ij to centre r by drawing up a loop through first
p. passing shuttle through this loop (A), then pulling
the loop tight (B) Do not count Ij as a stitch. Make 7
more petals as follows r of 5 ds. sj to last p of previous
petal. 3 ds. sj to next p, (3 ds, Ig p)3 times. (3 ds, sm
p) twice. 5 ds. cl. Ij to next p in centre r. Join 8th ring to
2nd and istpof 1str.
Points to remember
A new thread is joined only at the end of a ring or
chain, before starting the next part of the design.
A reef knot, illustrated, is an effective way to tie
threads together Leave enough length so that
the thread ends can be woven into the back of the
completed work.
A thread end Is finished most neatly by weaving
it under a few stitches, then cutting the remain-
der. The needle used must have an eye large
enough tor the thread but thin enough to pass
under stitches. An alternative is to run the thread
up and down along the edge and pull tight.
A mistake Is corrected most easily while a ring is
in progress It it Is necessary to open a ring, you
have a better chance of success if you pry loose a
thread between two stitches of a picot. as Illus-
trated. Otherwise, thread must be cut, then re-
joined after eliminating the error
To avoid confusion, remember:
1. The thread in the left hand is the one to
show itself in the stitches, if it is looped,
the result will be a ring; if it is passed over
the fingers, the result will be a chain.
2. Work progresses from left to right.
3. The knotted edge of the double
stitches are facing to the left while a ring
or chain is being formed.
4. The term picot refers only to a thread
loop, not to the double stitch that en-
closes it. The closing stitch is counted as
the first In the next group ol stitches.
5. Never set work down in the middle of a
ring or chain, it is difficult to resume the
correct position and tension.
60
Working with two threads
Working with two threads considerably
enlarges the scope of tatting. It permits
introduction of a second colour, and
allows you to work stitches over the
connecting threads between rings - a
form called chain (ch). To make a chain,
one thread is passed over the left fingers
and around the little finger to provide
tension; the second is used to make
double stitches. As with a ring, thread in
the left hand forms the stitches.
For working two threads of one col-
our, use a shuttle plus ball of thread and
work over the ball thread to form chains.
Tatting with two colours usually re-
quires two shuttles.
Two-colour edging. Composed
of rings and chains in two
colours, this is a good practice
piece for mastering the use of two
shuttles. Keep in mind that the
shuttle not in use rests in the lap
or on a table, and whatever
colour is in the left hand will form
the stitches. Wind one shuttle
with blue, the other with white:
knot the two ends loosely
together Starting close to knot,
with blue makerof8ds p.8ds
(A), cl, rw. with white tensioned
over left hand and blue in right
hand, make ch of (3 ds. p) 6
times,6ds (B).do not rw with
white make r of 8 ds. p. 8 ds (C).
rw with blue tensioned over left
hand and white in right hand,
start chwlth3ds.p,3ds(D).S)to
p of 1 st blue r as follows, pull up a
loop of blue. insert white shuttle
through it (E), pull loop close to
the last ds (F), and complete sj
(G). finish ch with (3 ds, p) 3
times.3ds,rw with white make
r of 8 ds, sj to p of 1 st white r. 8 ds.
cl, rw, with blue. make ch of
(3 ds. p) 5 times. 3ds. rw: make 2
more sm white rings, connecting
them to p of first white r and with a
blue ch between them. do not rw:
with white, make ch of 6 ds. sj to
1 st p of opposite white ch. 3ds. sj
to next p. (3 ds. p) 4 times. 3 ds.
rw with blue make r of 8 ds. sj to
2nd p of last blue ch. 8 ds. cl. First
repeat is now complete To begin
the next one. do not rw. but make
1 st blue r right next to last one. rw
begin 1 st white ch with 3 ds. sj to
1 st p on opposite ch. finish with
(3 ds. p) 5 times, 6 ds. Continue
as for first repeat
61
Filet lace
netting
What is filet lace netting?
Materials and equipment
Making the basic knot
Basic mesh techniques
Plain square mesh/Filet lace
sampler
Embroidering the sampler
Filet lace cushion cover
What is filet lace netting?
Filet lace netting is a type of netting used
for many items, from tennis nets and
hammocks to lace of the delicate kind
shown on the right. No matter what
form the netting takes, the basic techni-
que remains the same and involves only
one knot (see opposite page).
In lacemaking terms, filet netting is a
mesh worked in diamond or square
shape, with a design embroidered on it.
(Actually, all mesh is diamond-shaped;
it is squared as explained on p. 65).
Netting reached its peak of popularity
in 17th-century Europe, when it fea-
tured intricate embroidery in many col-
ours and textures. It came back into
favour during the Victorian era, but in a
less ornate form characterised by
geometric patterns in natural-coloured
cotton and linen thread. Our example
shows this more moderate style, the one
associated most closely with the tradi-
tion. Today, tradition can be followed
with fine crochet cottons. Bear in mind,
however, that the knots should look
crisp and be nearly invisible; this re-
quires smooth, tightly twisted cord (but
not so hard a twist that knots will be
obvious). Embroidery thread can be
crochet cotton or stranded cotton.
Example of filet lace netting in which both beginning mesh ana embroidery are worked in natural colours.
Diamond mesh Square mesh
Materials and equipment
Besides knotting cord, you need heavier
cord (about 30 cm) for a foundation
loop, into which the starting meshes are
made; a shuttle to hold knotting cord;
and a mesh stick to establish mesh size.
The number of starting meshes depends
on the shape: several for diamond mesh,
which starts at an edge (see facing page
and p. 64); two for square mesh, which
begins at a corner (p. 55). The ideal
shuttle for lace is the netting needle
below; an alternative, also shown, is two
15 cm upholsterer’s needles placed in
opposite directions and taped together
below the eyes. A good mesh ‘stick’ for
lace is a double-pointed knitting needle.
The size of the needle will determine the
size of the netting holes.
The best shuttle tor lace is this special netting needle, made for the knotting of fine mesh.
An alternative shuttle can be made ol two 15 cm upholsterer's needles, facing in opposite directions and taped together below the eyes
Good mesh'stick'for filet netting is a double-pointed knitting needle: slim enough to establish small openings, short enough to bemanaoeable
62
Making the basic knot
Knot foundation cord into loop; anchor to stable object so it will not
move when pulled. Thread shuttle, be sure, when wound, it is not
larger than mesh stick Knot end of shuttle thread into foundation
cord. Holding mesh stick between thumb and index finger of left
hand and shuttle in right, as shown, pass shuttle thread over stick,
around the third finger, and back up behind stick. Holding thread
against stick with thumb, loop thread up and around figure-eight
style. Pass shuttle through loop on finger behind stick, through
foundation loop, and over top of figure-eight loop.
Draw shuttle through and away, hooking trailing thread on little
finger Release thumb, then loop on third finger, continue pulling
until all slack tightens around stick, but do not release thread on
little finger Place knot on top of and touching stick, then release
little finger, drawing thread towards you and keeping foundation
cord taut. This forms first knot Make starting loops on stick and
over foundation (about 10 for diamond mesh above; for square
mesh, see p 65). Remove stick; turn work (knotting always goes left
to right). Continue knotting, except now Into loop above.
63
Filet lace netting
Basic mesh techniques
Shaping Is accomplished by
increasing (left) to widen the
mesh, and decreasing (right) to
narrow it These drawings show
the basic techniques; for the
method used in making square
mesh, refer to the opposite
page. To Increase form two or
more knots in one loop.
widening that row. and also
those that follow, since youwill
be knotting Into an additional
mesh wherever an increase
was made
Anew thread is best joined at
the end of a row, Tie the end of
the new thread very close to the
last knot that was made, then
join the two ends In a reef knot
as shown. Clip the ends close
to the joining knot.
To decrease, work one knot in
two or more loops, tying them
together, and reducing the
number of meshes to be
worked in subsequent rows
Though shaping is the main
use for both these techniques,
especially by a beginner,
decorative netting can be
made by alternating decreases
and increases from row to row.
or at fixed intervals.
Try to correct mistakes
before the knot is tightened
Use a pin to loosen it. If a knot
cannot be untied, cut the
thread close, untie it, and join a
new thread. If you make very
tight knots, whole sections of
netting can be cut without knots
coming undone.
For embroidery mesh must be stretched in a frame. Be sure to leave at least 3 cm allowance between
mesh and inner edge of frame Wind cord through each mesh and around the frame at top and bottom
and through every other mesh at sides. Adjust tension so stretching is even and netting is taut. A mesh
too long for a frame can be rolled up and the rolled part finished after the first is completed
Edge finishes. For any technique, use the same thread as was used for the mesh In square mesh, the
shaping causes side meshes to come out double; to conceal this, and produce a straight, firm edge,
good finishing choices are double crochet (A) or close buttonhole stitch (B) The edges of diamond
mesh are often cut close to the knots (C). There is no danger of the knots coming undone.
64
Plain square mesh/Filet lace sampler
The square mesh being made at the
bottom of the page is the beginning of
the sampler-insertion below (the em-
broidery directions are on the next
page). The directions produce a rectan-
gular mesh approximately 5 by 40 cm,
enough for the embroidery charted:
2 repeats, each 32 meshes (about 15 cm)
long, plus an additional final triangular
shape for balance, plus 6 extra meshes at
each end - 83 meshes in all. To make a
longer strip, add multiples of 32
meshes.
Though the quantities are specifically
for the sampler, the technique applies to
any square mesh. The progression will
be easier to grasp if you remember that
the work is turned for each new row.
All work is done with size 20 crochet
cotton: the mesh in ecru; embroidery in
ecru or white as directed. You also need
a mesh stick (or knitting needle, size
2.75 or 2.25 mm); a steel netting needle
(or a pair of 15 cm upholsterer’s needles
facing in opposite directions and taped
together - see p. 62); a frame to stretch
mesh for embroidery; tapestry needle
for working embroidery.
To begin a square mesh. Make two knots in foundation loop; turn
work. Starting with second row. increase one knot in each row (put
two knots in last loop) until you have enough knots for the width. The
right-hand edge becomes sampler width (13 knots, 12 meshes)
To make straight sides. On next row. decrease one knot(knot last
two loops together); on following row, increase one knot (put two
knots in last loop). Alternate these rows until long side of mesh is the
desired length. In the sampler, this is 83 meshes.
To square the last corner. Beginning with the next row after the
length has been established, decrease one knot at the end ot each
row until two loops are left. Knot these two together and cut the
threads close. Remove the foundation loop
65
Filet lace stitches
Embroidering the sampler
1. Darning stitch (ecru, single
fhread). In 1st group at left end. tie
thread to top left corner of 1 st mesh of
design Weave over and under
meshes, from top to bottom, until
space is filled - 10-12threads will
usually be enough. With next section,
attach thread to left corner of 1 st
mesh, and proceed downwards.
2. Cloth stitch (ecru, single thread).
Done in two steps - first warp, then
weft threads, in each pattern area (A)
Attach thread at bottom left. Weave
single meshes first, over and under,
bottom to top. 4 threads per mesh.
Weave somewhat loosely; slack is
taken up in second step. At next
mesh, be sure to weave 1 st thread as
you did last thread on previous mesh;
thread between will be included in
next step (B) Without breaking
thread. begin at upper left and weave
weft threads back and forth across
warp threads. Include all intervening
mesh threads in weaving; put in
4 threads per mesh After each row.
pull slightly on warp threads so that
weaving is flat and even.
3. Interlocking lace stitch (white,
single thread). Done in loop or
buttonhole stitch; can be worked
diagonally as well as back and forth.
Each row takes two steps. (A) Begin
with longest row on chart. Attach
thread to centre of mesh on left side.
Make one loop stitch in each mesh,
large enough to cover half the mesh.
At end of row. make a loop stitch in
side of mesh. (B) Going right to left in
same row, make loops as before,
going over each loop in preceding
row and under each vertical mesh. To
move to second row, oversew around
last mesh; begin again as in A. but
pass needle through bottom loops of
previous row to interlock.
4. Darned points (white, single
thread). Darn from top to base. Begin
with left point. Attach thread at lower
left corner of mesh Loop around top.
down to opposite corner, back up to
top This forms a scaffold lor darning
Beginning at top. darn alternately
from each side into centre - from right
a buttonhole stitch. from left a plain
stitch: catch in loose end from knot as
part of scaffold. When working last
stitch on each side, go around
bottom of mesh to anchor base of
point Run thread behind mesh to
centre top of next point and form
scaffold as before.
5. Darned wheels (ecru, single
thread). Attach thread at centre of
4 meshes. Make a bar from there to
each corner of 4-mesh square by
passing thread around corner, then
passing needle twice around it to
twist bar. When bars are made,
weave thread spirallyaround centre,
over bars and under mesh threads,
until wheel is desired size (aboutfour
times) Fasten off on back by passing
thread through twists of a bar or tying
a reef knot with beginning thread
6. Outlining (white, doublethread)
Begin at bottom centre of interlocking
lace stitch: weave over and under
mesh threads as indicated by dots on
chart. Following chart and
photograph, weave first spiral. When
centre is reached, begin weaving
back alongside first thread, except
pass thread under each mesh thread
previously passed over and twisting
once around previously laid thread
Continue around second spiral, then
finish off top of first on way back to
triangle. Continue around triangle.
making other side the same. Fasten
off thread with reef knot to beginning
thread.
66
Filet lace cushion cover
Materials
Small netting shuttle; knitting needle,
2.25 mm, for mesh stick; tapestry
needle; embroidery scissors; frame and
cord to mount mesh (at least 30 cm
square inside space); size 20 crochet
cotton, 1 ball, ecru; size 8 pearl cotton,
1 ball each, 5 shades of blue; square
cushion for the finished piece. It is 56
meshes (about 25.5 cm) square; for a
larger size, use size 10 crochet cotton,
size 2.7 5 or 3 mm knitting needle, size 5
pearl cotton.
Making the net (square mesh)
To begin, make two knots into founda-
tion loop; turn. Starting with second
row, increase one knot at end of each row
until you have 57 knots. On next row,
net plain (no increase). Next row, begin
decreasing one knot at end of each row
Cloth stitch (fish's outline and head) Numbers
on diagram mark starting points for first threads
Follow lines to point where thread turns and
second threads are woven in. Weave second
threads in as far as possible, then begin at next
number before completing first area. Lay in 4
threads per mesh; remember that first thread in
each mesh is woven the same as last thread of
previous mesh. Travelling threads, sometimes
needed to get from one row to next, are
incorporated into mesh threads during second
stage of weaving. Work numbers 1 -3 in colour A
Complete work in this colour before going further
Numbers 5-10 are worked in colour B, number 11
in colour C.
Darning stitch (fish's fins, tail bars and eye; all
darkest areas in border). Lay in about 12 threads
per mesh. Work bars in tail vertically in colour В
(4) Raised vertical threads of mesh help 'outline'
them Gofrom bar to bar by passing thread
through edge of cloth stitch from back. All other
darning Is worked horizontally Fins on left side
are worked in colours В and A in that order. Small
bars are made after last row is completed by
passing thread 3 times around mesh, then
wrapping twice around threads and going to next
small bar. Fins above head are worked, bottom to
top, in colour D. When top mesh is completed
pull end of thread down so it is doubled, and
proceed with outline at top of each fin. Work
darning in eye. all border darning, in colour E.
Darned wheels (fish's eye: border). Worked
somewhat differently from sampler Thread is
brought out from darned area adjacent at corner
between first two wheels. Diagonal bars are laid
until two knots are left. Knot these to-
gether, cut thread, remove foundation
loop. Stretch mesh in frame, winding
the cord through every other mesh.
Embroidery
In five shades of blue, charted as A, B,
C, D, E (lightest to darkest). Stitches are
those in sampler, but worked as listed on
this page. To secure thread ends during
work, run thread back and forth a few
times from back (do not make knots).
Always thread needle with thread as it
comes off the ball or skein, this enhances
sheen of stitches and keeps thread from
untwisting. Turn frame with stretched
mesh so the raised mesh threads run
vertically and face you; those on the
back run horizontally. Direction of
raised threads makes a difference in the
darning stitches.
from centre to each comer, but first corner will
have only one thread. Its second thread is laid
after wheel itself is darned, enabling you to begin
second wheel from adjacent corner. After
second wheel is completed, thread is concealed
in darning and brought around between next two
wheels to be worked. In these wheels, corner
threads are laid under mesh, darning is done by
passing needle over mesh threads and under
corner about3 times. Work fish's eye in colour A.
border wheels in D.
Interlocking lace stitch (fish's body: border)
Work fish's body in colour A. Begin in upper left
corner and work down Conceal travelling
threads in edge stitches at left side. Work outside
border areas in colour E; begin and end at point
indicated. Work Inside border area in colour C;
begin above fish's head and work first row all the
way around, putting in diagonal stitches as
indicated Diagram shows how to lay in return row
on diagonal (pass needle under mesh knot in
same way that you pass it under mesh thread
when doing a straight row)
Darned points (fish's teeth). Work in colour D, left
to right. Scaffold for each point will have one
thread on left, two on right.
Outlining (fish's eye, around head; inside
border) Use double thread. Outline fish's eye in
colour A, eye socket in D, top of head, from last
tooth to first fin, in colour B: bottom of head, from
tooth to halfway around back of head, in colour A.
inside border in colour D.
Edging. With double thread in colour C, work
4 buttonhole stitches into each mesh all around
(one extra at each corner)
A traditional design
adapted for the present
day as a cushion cover
The fish is the carp, a
favourite in Chinese
folklore, worked in five
shades ol blue on an ecru
mesh. The cushion cover is
56 meshes (about 25.5 cm)
square, but can easily be
made larger by changing
thread and mesh stick
(knitting needle) sizes.
67
Bobbin
асе
Introduction
Toolsand materials
Preparing the pricking/Bobbin lace
sampler
Winding bobbin pairs
Working the basic (half and whole)
stitches
Weaving a design
Pinning within a design
Ground patterns
Other lace techniques
Introduction
This section shows the continental
method for making bobbin lace, simp-
lified for beginners. Bobbin lace is a lace
woven of pairs of threads wound on
bobbins. Only two basic stitches are
involved, half stitch and whole stitch
(see pp. 70-72), but from these many
designs can be woven. The weaving is
done over an actual-size paper pattern
mounted on a pillow or padded board
(see below). Pins are inserted through
the pattern into the pillow to hold
threads in place; the pattern is called a
pricking because the design lines are per-
forated.
Bobbin lace is an old technique, dat-
ing back to the 15th century. As its
popularity spread, local styles de-
veloped with patterns and stitches
whose names reflected their place of
origin. As a result, old pieces of bobbin
lace exhibit a wide range of styles, from
geometric patterns made with a few
pairs of bobbins, to complex floral and
pictorial designs requiring hundreds.
Tools and materials
Though their forms may be different,
the elements required for bobbin lace
have stayed the same for centuries: ap-
propriate thread, bobbins, a pattern to
follow, a pillow on which to mount the
pattern. Traditional threads were silk,
metallic or linen, spun very smooth and
incredibly fine; for most modern bobbin
lace, the choice is a smooth cotton. Bob-
bins were wood, bone or ivory, often
weighted (‘spangled’) with glass beads
to help hold thread taut. These bobbins
can still be found in antique shops, but
modern plastic and turned wooden bob-
bins are available.There are many satis-
factory alternatives: slotted clothes
pegs; dowelling or pencils cut to 15 cm
lengths and grooved at one end; swizzle
sticks; tapestry or fly shuttle bobbins
used in weaving. Traditional prickings
were of parchment so they could be
re-used; for present purposes, use graph
paper. The pillow or board must sup-
port the work firmly and take pins easi-
ly. A sawdust-filled cushion is ideal.
Lace pillow showing pocket (see p. 74) being made Traditional antique and modern bobbins are
being used. A pincushion is attached at the side to provide pins as the knots are made
Homemade and traditional
bobbins. From left to right
notched dowel; clothes peg;
three traditional types of
turned bobbins. The one on
the right is weighted or
'spangled' with beads.
Preparing the pricking/Bobbin lace sampler
The sampler is designed to introduce
you to the half stitch and whole stitch,
and several of the patterns that can be
made from them; and to the pattern, or
pricking, that you follow to produce
bobbin lace designs. On your graph
paper (see equipment list on right),
using waterproof ink, copy the diagram
below square for square, putting in all
dots, lines and numbers precisely as
shown. One colour is sufficient; three
are used here to make the diagram easier
to follow. The right side of the braid-
tape that edges the sampler is exactly the
reverse of the pattern for the left side.
Pin your pricking at the corners, in
the centre and as near the top of the
pillow or board as possible. Using a
pricker (a pin vice with a No. 8 needle),
or a large needle fitted with a dowel or
penholder handle, punch holes through
all dots into the board.
The diagram is labelled with the
names of the stitches in the order in
which they are worked in the sampler,
and the numbers of the pages on which
instructions for them appear. You may
Braid or
tapep. 73
Plaits with
picots p. 73
Virgin Plaits
ground p. 72
Brussels Plaits Torchon Plaits Square hole
ground p. 72 ground p. 72 ground p 72
cross
pair,
pairs
c
pr,
prs
find it helpful to indicate these stitch
names on your diagram, perhaps also
the page numbers. Listed below are ab-
breviations used in the instructions, and
some working suggestions.
Abbreviations used in instructions
h st (or t,c) half stitch
w st (or c,t,c) whole stitch
t twist
Points to remember
1. Pairs of bobbins are numbered left to
right; numbers refer to their position on
the board, not to actual bobbins.
2. In twisting, the right partner crosses
over the left partner.
3. In crossing, the right bobbin of the
left pair crosses over the left bobbin of
the right pair.
4. Pins are placed perpendicular to the
pillow or board, except at the edges
where they are slanted outwards.
5. Place pins in their holes between the
last two pairs of bobbins worked.
6. Always keep bobbins hanging evenly.
7. Do not roll bobbins on the board; this
makes thread unwind. Instead, push
them back and forth in pairs.
8. Join a new thread by working both
new and old ends into the weaving to-
gether; clip when lace is completed.
Equipment specifically for sampler:
Board or 'pillow' approximately 65 cm square
(usable also for project, p. 74). You can make
your own with two or more pieces of corrugated
cardboard taped together and padded with
layers of felt, cotton or wool fabric. Acoustic tile or
similar soft board will also work well, provided the
surface issmooth Insert a few pins in 'pillow' to
be sure they go In easily and hold firmly. If they
protrude at the bottom when pushed in all the
way, place thick towel ling or some similar
padding underneath, or change to a shorter type
of pin.
Dressmaker's straight pins (or shorter pins if
they are more suitable) to use in weaving. Long
T-pins are helpful for pinning bobbins not in use
out of the way
Bobbins, 24. either the traditional style (available
in some shops) or one of the alternatives
described in the list of materials on the opposite
page
Thread of almost any kind can be used in
contemporary work For learning, a smooth
medium-weight crochet cotton is best. Sampler
calls for one ball of size 10 in white or ecru
Pricker, or a needle-like equivalent that will make
satisfactory pinholes, for perforating the pricking
at all the dots in the design. These are the points
at which pins will be inserted, and piercing
makes insertion far easier.
Pricking requires two 22 by 28 cm sheets of
centimetre graph paper
Crochet hook, size 4.3.75or 3 50 mm. which is
used in making sewing joins (see p. 73).
Cloth cover, a 40 to 50 cm square of smooth
fabric to protect lace that has been woven as you
work on another section, or to cover your project
when you put it aside or away
Dowel, 3 mm in diameter and about 18 cm long,
for mounting bobbins so that the sampler is ready
for hanging when it is completed.
Plaits Whole stitch Plaits Half stitch Half stitch
ground p. 72 ground p. 72 plaits p. 70
69
Bobbin lace techniques
Winding bobbin pairs
Measure off enough thread to fill the
bobbins but not overload them. For the
sampler, this is about 6 metres -3m per
bobbin. Wind bobbins from each end
towards centre, leaving about 45 cm
basic (half and whole) stitches
Working the
The illustrations below show two bob-
bin pairs mounted as described on the
left. Work is done on the side shown; the
reverse side becomes the right side when
lace is finished. Two adjacent pairs are
woven together, the left pair held in the
left hand and the right pair in the right.
In directions, pairs are numbered left to
right. Numbers indicate board position,
not actual bobbins. The first row of
drawings shows the steps to a half stitch
plait. These occur in the sampler in
series of six, made by plaiting all the
pairs as you did prs 1-2 (prs 3-4, pin at
No. 2, prs 5-6, pin at No. 3, and soon).
unwound for mounting. Secure thread
with noose, made by looping thread as
shown, twisting bobbin away from you,
then slipping noose over head of bobbin.
Pull thread to tighten. Noose lets you
unwind thread as needed (above left) or
wind up excess thread (right) without
undoing the knot. Mount two pairs of
bobbins together with a lark’s head
knot. Place a pin between each two
pairs, just under dowel - points a to f on
pricking.
Start weaving as illustrated
above, with pair 1 held in the left
hand and pair 2 in the right, pin the
other bobbins out of the way.
Begin the half stitch (written t.c)
with a twist, worked as follows
push right member of each pair
over left with thumb of each hand.
In the cross, inside members ex-
change places, the one on the left
crossing over the one on the right.
This completes one half stitch.
To produce a plait, make half
stitches as described down the
pricking to the first hole. Place a pin
at No. 1 between the two pairs.
In whole (or cloth) stitch (written
c.t.c). pairs are crossed, twisted,
then crossed again. The illustration
above shows the first cross.
All crosses and twists are worked
exactly the same for whole stitch as
for half stitch. The twist is being
worked in the drawing above.
The step illustrated here is the sec-
ond cross, which completes the
whole stitch. A plait cannot be
made with a whole stitch. When it
is repeated, the result is whole
stitch ground, (fourth stitch area in
samplerj For whole stitch ground
instructions, see p 72).
Weaving a design
Pinning within a design
This sequence, of basic steps to half stitch
ground, is designed to give a general sense of
the interaction of pairs of bobbins. The drawings
also clarify what is meant by numbers signifying
positions of bobbins on board. not actual
bobbins. Space limitations permit showing only
6 pairs of bobbins instead of the 12 used in the
sampler, but the principles are the same. In A, the
half stitch (t.c) has been completed with prs 1 -2;
В, C. D and E show half stitches made with prs
2-3,3-4,4-5 and 5-6 respectively; in illustration F,
the left-to-right sequence has been pinned
(Unless otherwise indicated, pins are always
placed between the two pairs of bobbins
involved in the just-completed stitch.) In
illustration G. half stitches have been worked in
reverse (prs 6-5,5-4.4-3,3-2,2-1). Stitch is
worked the same way regardless of direction.
This sequence, repeated, produces the ground.
Another pinning principle is demonstrated by
torchon ground, a mesh form of the whole stitch
ground. It is worked diagonally, making it
necessary to place a pin m the centre of each
whole stitch to hold It in place. The mesh is
created by twisting both pairs of bobbins before
each whole stitch; the twists force the stitches
apart, producing diamond-shaped holes. Edge
bobbins are also given an extra twist for added
firmness. The drawings show only the start of the
procedure; for full instructions, see next page. To
begin the stitch, t.c prs 3-2. pin at No. 1, t.c. This
makesawholestitch with apmatits centre, both
pairs having been twisted first. Then t.c prs 2-1.
pin at No. 2. t,c, extra twist to pr 1 (the edge pair)
t,c prs 5-4, pin at No. 3. t.c. and so on down the
second diagonal row.
Bobbin lace techniques
Ground patterns
Plaits are worked at start and between sections. See
p 69 for positions, p 70 for technique
Half stitch ground (also net or lattice ground).
1. t.c prs 1 -2 (lay down pr 1, shift pr 2 to left hand and
take up pr3 in right): t.c prs 2-3 (shift prs again); t.c
prs3-4.4-5.etc..toprs11-12;pinatNo. 1 between
11 -12. Twist pr 12 once more (extra twist makes edge
firmer), pull slightly on all bobbins to make threads lie
even. Remember numbers signify board position, not
actual bobbins
2. Work back across row the same way; t.c prs 12-11
11 -10,10-9.9-8, etc., to prs 2-1. Pin at No 2 between
prs 2 and 1. extra twist to pr 1.
3. Repeat these two rows until space is filled. ending
with pin No 11
Half stitch ground
W hole stitch ground (also cloth stitch) worked over
an area looks like a woven fabric. In this stitch (written
c.I.c), pairs are crossed, then twisted, then crossed
again.
1. c.t.c prs 1-2.2-3.3-4 etc . to prs 11-12. Pm at No 1
between prs 11-12. twist pr 12 once more
2. Work back across row the same way: c.t.c prs
12-11,11-10.10-9, etc ,toprs2-1 Pin at No 2. extra
twist to pr 1
3. Repeat rows 1 and 2 to pin No. 11 Occasionally
pull down on threads to keep tension even. In this
stitch, an ’active' pair passes back and forth through
the other passive' pairs Variations can be achieved
by twisting active, or passive, or both, between
stitches or groups of stitches
Square hole ground (or whole stitch and twist), a
variation of the whole stitch ground. is worked exactly
as above, except both pairs of bobbins are twisted
once before each whole stitch is made. The twists
force the whole stitches apart, making 'square holes'.
I.t.c.t.cprs 1-2.2-3.3-4, etc., to prs 11-12. Put a pin
between prs 11-12 at No 1 Edge bobbins do not get
extra twists in this pattern.
2. Work back across row the same way t,c.t.c prs
12-11,11-10.10-9, etc .to prs 2-1. Put a pin between
prs 2-1 at No. 2.
3. Repeat rows 1 and 2 to pin No. 11. Pull threads into
position carefully after every row. Do this by pulling
down on the bobbins, not by pulling the threads
themselves.
Square hole ground
Torchon ground >s like square hole ground. except
worked diagonally, making it necessary to put a pin in
the centre of each w st to hold it in place
1.t,cprs3-2, pin at No. 1, t.c (makes aw st with a pin
in its centre, both prs having been twisted first); t.c
prs 2-1. pin at No. 2, t.c. Extra twist to pr 1
2. t.c prs 5-4, pin at No. 3, t.c; t.c prs 4-3. pin at No. 4.
t.c.t.cprs 3-2, pin at No. 5, t.c; t.c prs 2-1, pin at No. 6.
t.c.Extra twisttoprt.
3. t.c prs 7-6, pin at No. 7, t.c; t.c prs 6-5. pin at No 8.
t.c; t.c prs 5-4, pin at No. 9. t.c. t.c prs 4-3, pin at No
10. t.c; t.c prs 3-2. pin at No 11. t.c; t.c prs 2-1. pin at
No. 12. t.c. Extra twist to pr 1.
4. Continue, always picking upthe two prs of bobbins
on either side of 1 st hole for each new diagonal row
Remember to give pr 12 an extra twist before making
stitch at No 31. etc., soeach edge has 2 twists.
Brussels ground sequence is the same as for
torchon ground, except Brussels ground has two
whole stitches at each pin. with pin placed between
them.
1. t.c.t.c prs 3-2. pin at No. 1, t,c.t.c (extra twist made
after the pin because you cannot cross the same prs
twice without twisting them first); t.c.t.c prs 2-1. pin at
No. 2, t.c.t.c. No extra twist needed to prs 1 and 12 in
this pattern
2. t.c.t.c prs 5-4, pin at No. 3. t.c.t.c; t.c.t.c prs 4-3. pin
at No. 4, t.c.t.c. t.c.t.c prs 3-2, pin at No 5, t.c.t.c.
t.c.t.c prs 2-1. pin at No 6. t.c.t.c
3. Continue in this way. always starting each new
diagonal row by picking up the prs of bobbins on
either side ol 1 st hole
Virgin ground (or Rose ground) is worked in a series
of large diamonds, each in a 'box Whole stitches
with a twist between are worked in each corner of
diamond and pinned in centre Corners of boxes are
completed with one half stitch (no pins).
1. t c prs 2-3, pin at No. 1. t.c; extra twist pr 1. t.c prs
1 -2. pm at No. 2, t.c, t.c prs 3-4. pin at No 3. t.c; t.c prs
2-3, pin at No. 4. t.c. Diamond I complete. Extra twist
pr 1. t.c prs 1 -2. pin at No. 5. t.c; t.c prs 3-4. Lower
corners of box around Diamond I are now complete.
Begin Diamond II.
2. t.c prs 6-7, pin at No. 6. t.c: t.c prs 5-6. pin at No 7.
t.c; t.c prs 7-8, pin at No. 8. t.c. t.c prs 6-7. pin at No. 9.
t.c; t.c prs 7-8 and prs 5-6 to complete lower comers
of box around Diamond II.
3. t.c prs 4-5. pin at No. 10. t.c; t.c prs 3-4. pin at No.
11. t.c; t.c prs 5-6; pin at No 12, t.c. t.c prs 4-5, pin at
No. 13. t.c; t.c prs 3-4 and prs 5-6.
4. t.c prs 2-3. pin at No. 14, t.c; extra twist pr 1. t.c prs
1-2, pin at No. 15. t.c.t.c prs 3-4. pin at No. 16, t.c. t.c
prs 2-3. pin at No 17. t.c. extra twist pr 1. t.c prs 1-2,
pin at No 18, t.c; t.c prs 3-4.
5. Continue same way with Diamond V, giving pr 12
an extra twist for a firmer edge. Each diamond begins
with prs on either side of its 1 st (top) hole - prs 10 and
11 for Diamond V. As Diamond IX, XII, XIII are
completed. put pins under hall stitches at holes No
57-62 to hold them in place for next section
Virgin ground
Other lace techniques
Plaited lace
Plaited lace is simply half
stitch plaits enhanced with
tiny picots and joined.
Begin by making a plait
with prs 1 -2 long enough to
reach pin No 1 Do not put
in a pin yet, but lay the plait
aside, and make a plait with
prs 3-4 halfway to pin No. 1.
The two holes at this point
mark the positions for the
picots.
Left plcot
Right plcot
Left and right picots are
made with the left and right
pairs of bobbins - see
diagram. Use a pin to help
pull up the loop as shown,
then insert pin in the loop
and pull down carefully on
the two bobbins to lock the
picot In place. Continue
making the plait to pin No. 1
and then join this plait to the
first by means of a 'windmill
join'(below)
The windmill join is iust a
whole stitch, with a pin In its
centre, made with each
pair of bobbins functioning
as a single bobbin Cross
pr 2 over pr 3; cross pr 4
over pr 3 and pr 2 over pr 1
(this is the twist). Put pin in
No. 1. Cross pr 2 over pr 3
Join is now completed.
Repeat this procedure with
prs 9 to 12, putting another
join at No. 2 With prs 5 to 8.
make plaits and join at No.
3 Continue making plaits,
picots and joins where
indicated on the pricking.
At pins No 11 to No. 16,
place pins between the
pairs of bobbins in each
plait to hold them in position
for the next section
Windmill join
Braid or tape lace, a style popular in Russia and Eastern Europe, is characterised by
curving lines and tree forms Although apparently complex, designs require only a few
pairs of bobbins, just enough for the width of the tape, which turns, curves and joins to
itself by means of sewings' (below). The tape is made like whole stitch ground, varied
by twisting the pairs Io make openings Before starting. remove all centre pins from the
g round patterns, and push the pins right in along both edges. Cover the completed
lace, but leave the pricking exposed where you will be working the tape. You will be
making two sections, one at each side, with six pairs of bobbins lor each: 6th pair is
active for left side, 1 st pair for right. Pin the right-side bobbins out of the way - left side is
made first When thread runs out on active weavers, turn into passive, then join a new
thread and work old and new together for a few rows. Cut off old ends.
Making the tape:
1. t.c.t.c prs 6-5. t pr 5; c.t.c prs 5-4,4-3,3-2: t.c.t.c prs 2-1: pin at No 1
2. t.c.t.c prs 1-2.tpr2, c.t.cprs 2-3,3-4,4-5. t.c.t.c prs 5-6 pin at No 2.
Blind pin (pins No. 5.9.13,27.31,35. etc.) To
make a smooth curve in the tape, there must be
more threads at the outer edge and fewer at the
inner edge. To achieve this, the active pair is
woven from the outer edge halfway to the inner
edge, then woven back out again For example,
after pin No. 4 has been placed t.c.t.c prs 6-5: t
pr 5. c,t,c prs 5-4: c.t.c prs 4-3: c.t.c prs 3-2: pin at
No. 5: c.t.c prs 2-3. c.t.c prs 3-4: c.t.c prs 4-5:
t.c.t.c prs 5-6 etc
Sewings. As the tape curves, it must be joined to
itself at intervals with 'sewings', made by joining
the active pair of bobbins to previously made
portion of tape at a pm Sewings are made here at
pins No 6.8.17.19.21.23.25. etc These pins
are placed further than usual from the edge of the
tape, and best given one or two extra twists for
added firmness Pins No. 6 and 8 are joined on
the other side, so the first sewing comes after pin
No. 36. When it has been placed, weave through
tape as usual towards pin No 25: extra twist to
active pr Remove pin at No. 25. with crochet
hook, reach down through loop at No 25 and pull
up thread of nearest bobbin Insert other bobbin
through pulled-up thread, then gently pull both
threads back in position Replace pin at No. 25.
and continue weaving as usual Sewings are
sometimes made without an extra twist on the
pair eg .at No 49. where a sewing is made to
No 1: at No. 51. where one is made into the plait,
along edges of ground patterns, where tape is
joined to sampler edges. After completing tape,
finish off dowel by making a plait with each group
of 4 bobbins long enough to go around it End
with sewing made through base of plait with each
pair acting as a single bobbin. Tie prs in tight reef
knot: clip close
Lace
weaves
Introduction
Materials
Setting up the loom
Preparing the weft
The weaves
Introduction
Lace can be created by the technique of
weaving, which is the interlacing of two
sets of threads, the warp and the weft, to
produce a textile. In most forms of
weaving, all warp threads are parallel to
each other and all weft threads are paral-
lel to each other, with the warp and the
weft at right-angles to one another. In
lace weaving, warp and weft are diverted
somewhat from their parallel course to
form spaces in the weave. The resulting
textile is an openwork form of lace.
Lace weaving can be worked on a
simple frame loom or a complex
mechanical one. Whichever loom is
used, lace weaving is manoeuvred by the
weaver. The technique, in fact, is called
weaver-controlled or finger-controlled
because, to manipulate warp or weft
threads, the weaver uses her fingers or a
stick-like instrument rather than the
mechanism of the loom.
The woven lace
sampler, left,
incorporates a
variety of the lace
weaves shown on
pp 76-77 They
are, from lop to
bottom Spanish
lace, Mexican lace.
Danish medallion
and Brook s
bouquet.
Materials
Lace weaves can be worked on any
loom. The purpose of the loom is to keep
the warp threads evenly spaced and
under tension while the weft is passed
over and under them. W’e chose to work
on a frame loom because it is simple to
use and inexpensive. The weaves shown
on pp. 76-77, however, can be woven
on almost any loom you may have.
To make a frame loom, you will need
canvas stretcher bars, available at art
shops in different sizes. You will need
one set of two bars for the width of the
frame, and one set of two bars for the
length of the frame. To decide what size
frame you need for the size weaving you
want to make, see p. 75. To assemble
the stretcher bars into a frame loom, see
p.75.
For the weaving process, you will also
need a shuttle, a tool used for carrying
the weft; a shed sword or shed stick, a
tool used to help in manipulating the
warp threads; and appropriate thread.
Canvas stretchers, sold at artists suppliers,
can be used to make a frame loom.
A shuttle is a flat wooden stick with a deep
indentation at each end; the weft thread is
wrapped on the shuttle (see p 75)
Yarns for lace weaving include fine, strong
linen thread in sizes 10/1,10/2 or 10/5.
A shed sword or pick-up slick
is a flat stick pointed at one
end Itisslightlylongerthan
width of weaving
74
Lace weaves
Setting up the loom
On a frame loom, the maximum size of
the textile you can weave is slightly less
than the dimensions of the frame open-
ing. Maximum width is 2 to 5 cm less;
maximum length is about 15 cm less
because warp threads become too tight
to work with as a consequence of what is
called take up. Take up is the small
amount of warp that is used up as the
warp threads curve over and under the
weft. Since stretcher bars, which are
4 cm wide, are sold by their outside
length measurement, you must use a
frame that is larger than the size weaving
you want. If, for example, you want to
weave a 25 by 40 cm textile, you will
need a 40 by 65 cm stretcher frame.
To estimate the amount of warp
thread needed, multiply warp threads
per centimetre (see Step 2, below) by
width of weaving by length of loom. To
estimate the amount of weft, multiply
weft threads per centimetre by width of
weaving by length of weaving.
Weaving is the interlacing of weft threads and
warp threads On a frame loom, warp threads are
first wrapped around the loom so they are held
taut. Weft is woven over and under the warp
Preparing the weft
To wind thread on to a
shuttle, hold thread end
against shuttle with your
thumb (left) Wind thread
around shuttle so thread
end is secured (right)
Continue winding thread,
making sure you do not pull
it as you wind. Do not wind
too much thread on shuttle
or it will not pass easily
through the warp
To make a butterfly, wind
thread in a figure-eight
around your thumb and
little finger (left). Slip the
bundle off your fingers and
secure it in the centre with a
rubber band (right).
1. Assemble the stretcher bars by fitting the
corners together Be sure corners make a true
square, staple them to secure the joins. With a
pencil, mark off centimetres along top and bot-
tom of the frame on the outer edge.
2. To determine number of warp threads per
centimetre, wind thread around ruler Count
wraps; multiply by width to be woven Divide
amount in half to give numbers of threads for front
and back of loom.
3. Mark threads per centimetre along frame top.
With small saw, make a notch at each mark; sand
frame Tie warp to frame at top left Bring warp
down the front, around bottom edge, and up the
back, keeping thread in the notches.
4. As you warp the loom, keep the tension slack
but not loose. Threads are now in two layers - in
front of and behind loom To make them one
layer, weave a piece of string, called a heading
over top and under bottom threads Tie at sides.
75
The weaves
Plain weave is the simplest weave,
the weft goes over one warp thread
and under the next across the row
On a frame loom, one shed or space
between warp threads is already
created by the loom. The first weft
shot (term for passage ol weft) goes
in this shed; pass the shuttle through
this space (A), leaving an 8 cm tail
Pack the weft in with a fork For the
next row. weft goes in the
countershed, created by weaving
shed stick over threads on top of
loom and under threads behind it
Turn stick on its side and pass the
shuttle through the space made by it
(B) Put tail in this shed, Repeat these
rows.
Gauze or leno weave is created by
manipulating warp threads so they
change places with one another If
onewarp thread changes places with
one other.the lace is 1/1 gauze; if
pairs of threads change places, the
lace is called 2/2 Starting at the right
side, pick up the far right thread and
bring it to the left over the second
thread. Pick up the second thread
with the shed stick, letting the first
thread fall beneath it Work across the
row in this way (A). Turn stickon its
side and insert the weft Then work a
row of plain weave left to right (B)
Continue alternating these two rows.
Mexican lace is a variation of the
gauze weave Starting atthe right,
twist first thread over third. pick up
third To begin pattern, twist second
thread over fifth, pick up fifth. Twist
fourth thread over seventh, pick up
seventh. Continue across the row in
this way, twisting the next untwisted
even-numbered thread with the next
odd-numbered one three threads
away (A) Turn the shed stick on its
side and insert the weft. Then work a
row of plain weave to maintain the
twists (B) Repeat these two rows
76
Lace weaves
The weaves
Spanish lace is worked with a
butterfly rather than a shuttle Starting
on the right, weave a small group of
warp threads in plain weave, going
back and forth as many times as you
like Here, it is three times (A) Carry
the weft to the next group of warp
threads and weave this group the
same number of times as the first
Continue across the row this way.
Many variations in this pattern can be
made with the second row of weaving
(B) by changing the groups of
threads, varying the number of warp
threads in each group, and
alternating and splitting groups д
Brook's bouquet is a lace pattern
that uses the same technique as
backstitch in embroidery The weft is
carried over warp threads and then
back under them Begin this weave
after several rows of plain weave.
Bring the weft under a group of warp
threads, up over the threads, and
back under them. Pull the weft to
gather the warp threads (A)
Continue gathering groups, leaving
one warp thread between them as
shown here, or no threads between
groups For second row. alternate the
placing of groups, centring them
between two groups in the previous
row(B).
Danish medallion consists mostly of
plain weave using two different weft
threads Primary weft thread is
usually the same as the warp;
secondary weft contrasts in colour,
weight or texture To begin, weave a
row of secondary weft from left to
right Change to primary weft and
weave several rows of plain weave.
Determine where you want the
medallions to be; use a crochet hook
to pull up a loop of secondary weft
half as high as the plain weave (A)
Weave secondary weft from right to
first loop; pull weft through loop with
crochet hook (B). Weave to next loop
and pull weft through it. Repeat.
A
Hairpin
crochet lace
Making strips
Joining strips
Finishing edges
Variations
Making strips
Hairpin crochet lace is a type of crochet
worked with a two-pronged fork, or
hairpin, and a crochet hook. Yarn is
wound round the prongs of the hairpin
to form a series of large loops held to-
gether by a row of crochet stitches work-
ed in the centre, called the spine. The
1. To begin, hold the
hairpin in the left
hand with prongs
pointing downwards
Use the metal clip if it
is provided with the
hairpin Make a slip
knot in the yarn and
slide the loop that it
formson to the left
prong Adjust the
knot so that it is in the
centre between the
prongs
2. Wind the yarn
around the right
prong, front to back,
and hold it taut with
your left hand. Insert
the crochet hook
under the front strand
of the loop. Pick up
the yarn at the back
and bring it through
the loop to form a
loop on the hook.
strips produced by this process are then
joined together. (See opposite page for
methods of joining.) The width of the
strips is determined by the distance be-
tween the prongs. The hairpins are U-
shaped, and available in a wide range of
sizes from 10 mm to 100 mm. They may
3. With the crochet
hook, pick up the
yarn at the back
again This is called
yarn round hook.
4. Draw the yarn
through the loop on
the hook; youwill
have one loop on the
hook. This completes
the joining of the first
loop on the right of
the hairpin.
5. Remove the hook
from the loop. From
the back, insert the
hook in the dropped
loop Turnthehairpin
from right to left in
front of you
6. Turning the hairpin
causes the yarn to
wrap round what is
now the right prong to
form another loop.
The crochet hook is
now at the front of the
hairpin.
or may not incorporate detachable clips
for use at the end of the prongs. (See
diagrams below for placing.) The lacy
strips can be made from any type of yarn
from thin cotton to thick knitting yarn.
Directions for the basic crochet stitches
are on pp. 9-11.
7. This new loop Is
secured in the centre
with a double crochet
stitch. Todothis;
insert hook under
front strand of left
loop, yarn round
hook and draw
through the left loop
so you have two
loops on the hook.
8. Yarn round hook
and draw through
both loops on the
hook. Continue
making the strip by
repeating steps 5.6.
7 and 8. Each new
loop is formed by
turning the hairpin at
the completion of
double crochet stitch
in the centre
9. When hairpin Is full,
slide all but the top
four loops on both
sides off the prongs
Continue working as
before
Attach clip at the end
of the prongs
Remove clip before
sliding loops off
prongs, then replace
Metal clip
78
Joining strips
Finishing edges
Variations
Sllpstltch. With a crochet hook and extra yarn held underneath
the work, join the strips by inserting the hook into one loop from
left and one loop from right strip. Slipstitch them together by
catching yarn on hook and drawing it through the three loops.
A double crochet stitch along the edge is the simplest way to
finish the outside loops of a strip. To do this, make a loop on the
hook with a separate length of yarn. Work a double crochet stitch
Into each loop along the length of the strip
An insertion. Make a strip of the appropriate length. To edge
each side, work 1 de (for abbreviations, see p. 14) in first 4
loops, keeping the twist in them, 3 ch. Repeat for the length of the
strip. For second row, work 1 de in de ol previous row. 3 ch. 1 de in
centre stitch of 3 ch loop. 3 ch. Repeat across row.
Weaving. This method requires no extra yarn. Insert the crochet
hook into one. two or three loops of one strip, then into the same
number of loops of the other strip. Draw the second group
through the first. Continue along the length of the strips.
A wavy band. Make a strip of the appropriate length. To edge
one side, work (4 de in 6 loops held together, 4 ch) 3 times, then
work (1 de in 6 loops held together) 3 times. 4 ch. On the other
side, start with second group of stitches - double crochet without
chain stitches - so groups are opposite each other
To group the loops, pick up several loops, keeping the twist in
them Work a double crochet stitch in the centre space of the
groups of loops Make a chain between groups of loops that has
one stitch less than the number of loops you picked up.
Chain stitch. With a crochet hook and extra yarn, pick up two
loops from one strip and work a double crochet stitch (p. 10) in the
space. Work 2 chain (p. 9), pick up two loops from the other strip
and work a double crochet in the space. 2 chain Repeal.
To make a plcot edging, work a double crochet stitch into first
two loops held together 4 chain, work a double crochet stitch into
third chain from hook. 2 chain, work a double crochet stitch into
next two loops held together. Repeat from the 4 chain.
Fringe. Make two strips of the appropriate length. Join the two
strips by weaving them together Fold the resulting band in halt so
that the weaving is on top To finish this edge, work 1 de in the first
space, 2 ch. work 1 de in the next space, 2 ch. Repeat along the
Strip. For fringe, cut loops along other side of strip.
79
Index
Back stitch, 46
Bobbin lace, 68-73
ground patterns, 72
pinning within a design, 71
preparing the pricking, 69
tools and materials, 68
weaving a design, 71
winding bobbin pairs, 70
Chain stitch, 8-9
Crochet, 4-48
assembling and finishing, 46-7
basics, 6-13
buttonholes, 45
buttons, 44
charting, 38
edgings and insertions, 47’
geometric shapes, 16-17
joining sections, 46
ribbing, 44
shaping, 15, 42-3
shorthand symbols, 38
terminology, 14
Crochet stitches, 18-37
clusters, 22
filet crochet, 28
Irish crochet, 30-1
Jacquard, 36-7
loops, 34-5
meshes, 26-7, 29
motifs, 23-5
multicolour, 36-7
shells, 20-1
textures, 18-19
Tunisian crochet, 32-3
Crocheted shapes, 16-17
Crocheting a garment, 39-45
charting, 40-1
designing, 39
Double chain stitch, 13
Double crochet, 10
Double-faced treble crochet, 13
Double treble crochet, 11
80
Filet lace netting, 62-7
basic techniques, 63-4
cushion cover, 67
materials, 62
plain square mesh, 65
sampler, 65
stitches, 66
Hairpin crochet lace, 78-9
Half treble crochet, 10
Hook, 7-9
Irish crochet, 30-1
Jacquard crochet techniques, 36-7
Lace weaves, 74-7
materials, 74
preparation, 75
weaves, 76-7
Left-handed crochet techniques, 9
Multicolour crochet, 36-7
Needlepoint lace, 50-6
bars and picots, 54
edgings, 56
insertions, 55-6
materials, 50
meshes, 52-3
sampler, 51
stitches, 52-6
Raised crochet stitches, 12
Slipstitch, 11
Stitch, selecting, 18
Tatting, 57-61
forming double stitch, 58
materials, 57
one shuttle, 59-60
terms and abbreviations, 57
working with two threads, 61 "1
Tension, testing crochet, 14
Tools and materials
bobbin lace, 68-7
crochet, 6-7
filet lace netting, 62
lace weaves, 74
needlepoint lace, 50
tatting, 57
Treble crochet, 10
Triple treble crochet, 11
Tunisian crochet, 32-3
blanket, 48
Yarns, 6
Reader's Digest Needlecraft Guides put needlework success at your
fingertips. Crochet & Lacemaking offers all the practical information you
need, from useful and encouraging advice on crochet to the secrets of the
lacemaker’s art, including needlepoint, filet, woven and bobbin methods.
Techniques and stitches are clearly explained and each is illustrated with
step-by-step diagrams and photography. A guide to materials and threads
and a comprehensive stitch directory make this an essential reference for
both beginner and expert alike.
• More than 400 illustrations and photographs
• Step-by-step diagrams for every stitch and technique
• Detailed explanation on following patterns
• An essential reference guide
Other Reader’s Digest Needlecraft Guides
• EMBROIDERY
• CANVAS WORK
• APPLIQUE, PATCHWORK & QUILTING
ISBN 0-276-42179-5
£7.99
W* Readers
IVnigcst
9
780276’421792