/


Текст
MINIATURE
SADDLE
ISBN 1-892214-83-0
6054-00 HOW TO COLOR LEATHER
98834
17938
ASK FORTHEM
AND OTHERS AT
YOUR DEALERS
Zm -Slolitinan
(f
OTHER FINE LEATHERCRftFT BOOKS AlStohlmaH
• INVERTED LEATHER CARVING
• FIGURE CARVING
• HOWTO CARVE LEATHER
RED
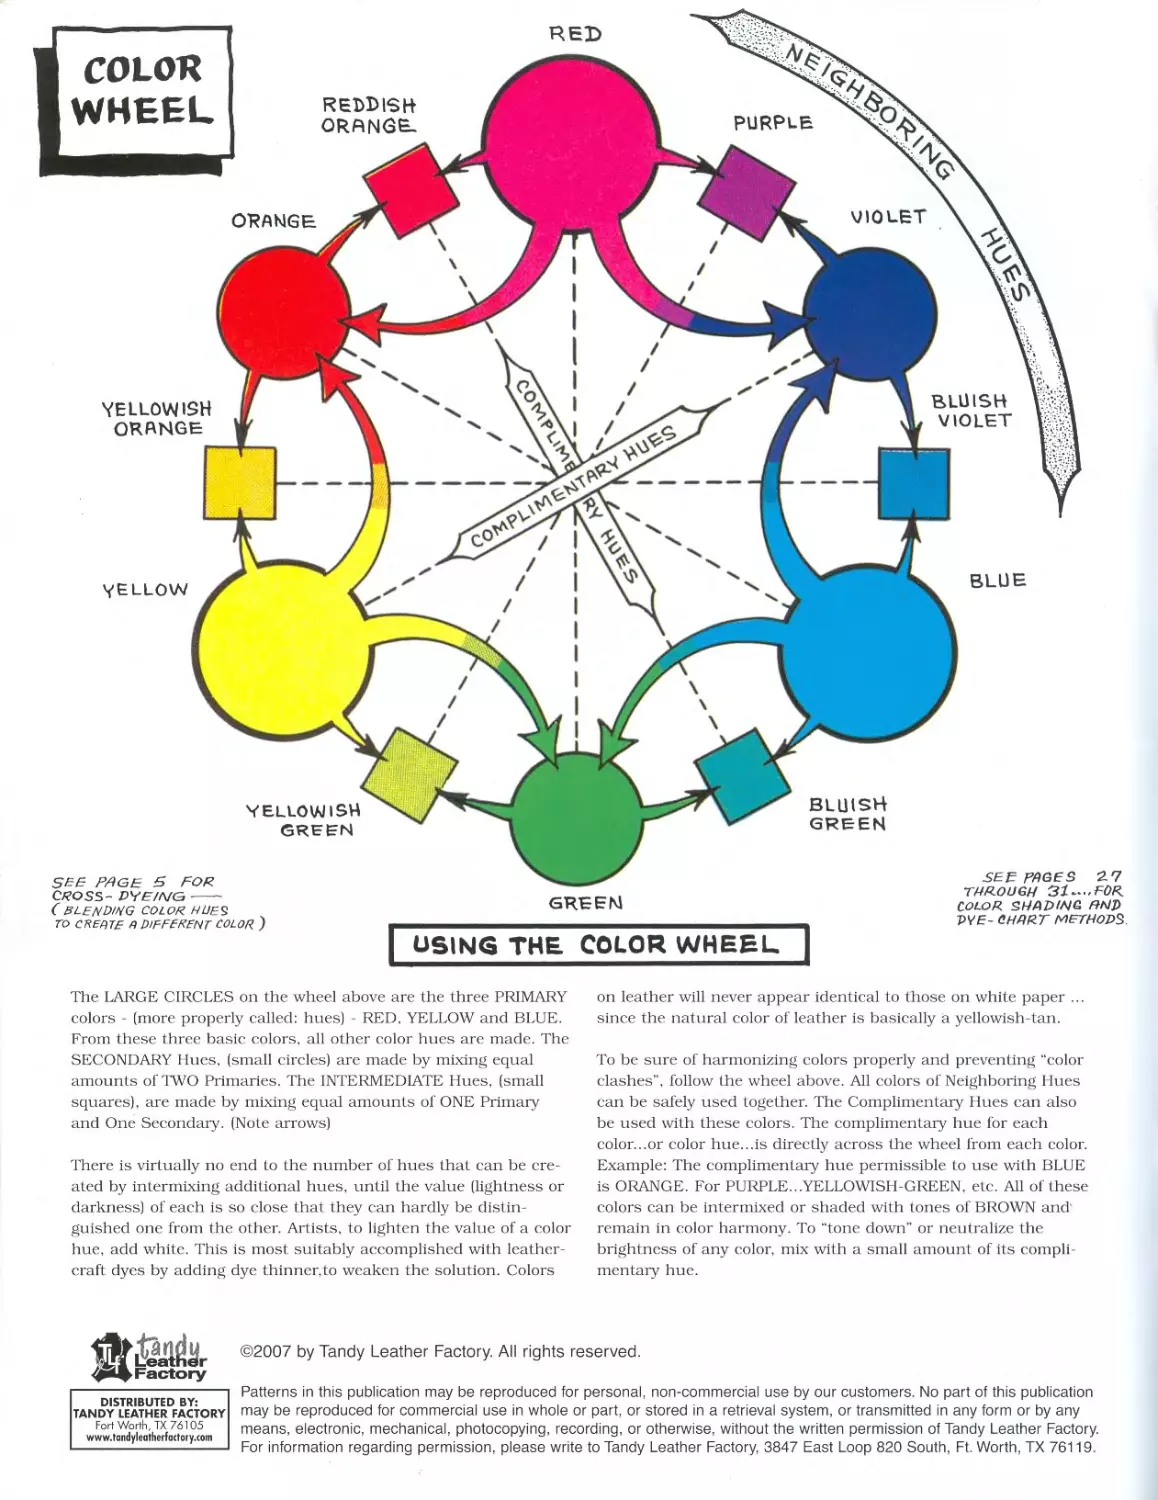
The LARGE CIRCLES on the wheel above are the three PRIMARY
colors - (more properly called: hues) - RED. YELLOW and BLUE.
From these three basic colors, all other color hues are made. The
SECONDARY Hues, (small circles) are made by mixing equal
amounts of TWO Primaries. The INTERMEDIATE Hues, (small
squares), are made by mixing equal amounts of ONE Primary
and One Secondary. (Note arrows)
There is virtually no end to the number of hues that can be cre-
ated by intermixing additional hues, until the value (lightness or
darkness) of each is so close that they can hardly be distin-
guished one from the other. Artists, to lighten the value of a color
hue, add white. This is most suitably accomplished with leather-
craft dyes by adding dye thinner,to weaken the solution. Colors
on leather will never appear identical to those on white paper ...
since the natural color of leather is basically a yellowish-tan.
To be sure of harmonizing colors properly and preventing “color
clashes”, follow the wheel above. All colors of Neighboring Hues
can be safely used together. The Complimentary' Hues can also
be used with these colors. The complimentary hue for each
color...or color hue...is directly' across the wheel from each color.
Example: The complimentary hue permissible to use with BLUE
is ORANGE. For PURPLE...YELLOWISH-GREEN, etc. All of these
colors can be intermixed or shaded with tones of BROWN and'
remain in color harmony. To "tone down" or neutralize the
brightness of any color, mix with a small amount of its compli-
mentary' hue.
DISTRIBUTED BY:
TANDY LEATHER FACTORY
Fori Worth, TX 76105
www.londyleatherfaclory.com
©2007 by Tandy Leather Factory. All rights reserved.
Patterns in this publication may be reproduced for personal, non-commercial use by our customers. No part of this publication
may be reproduced for commercial use in whole or part, or stored in a retrieval system, or transmitted in any form or by any
means, electronic, mechanical, photocopying, recording, or otherwise, without the written permission of Tandy Leather Factory.
For information regarding permission, please write to Tandy Leather Factory, 3847 East Loop 820 South, Ft. Worth, TX 76119.
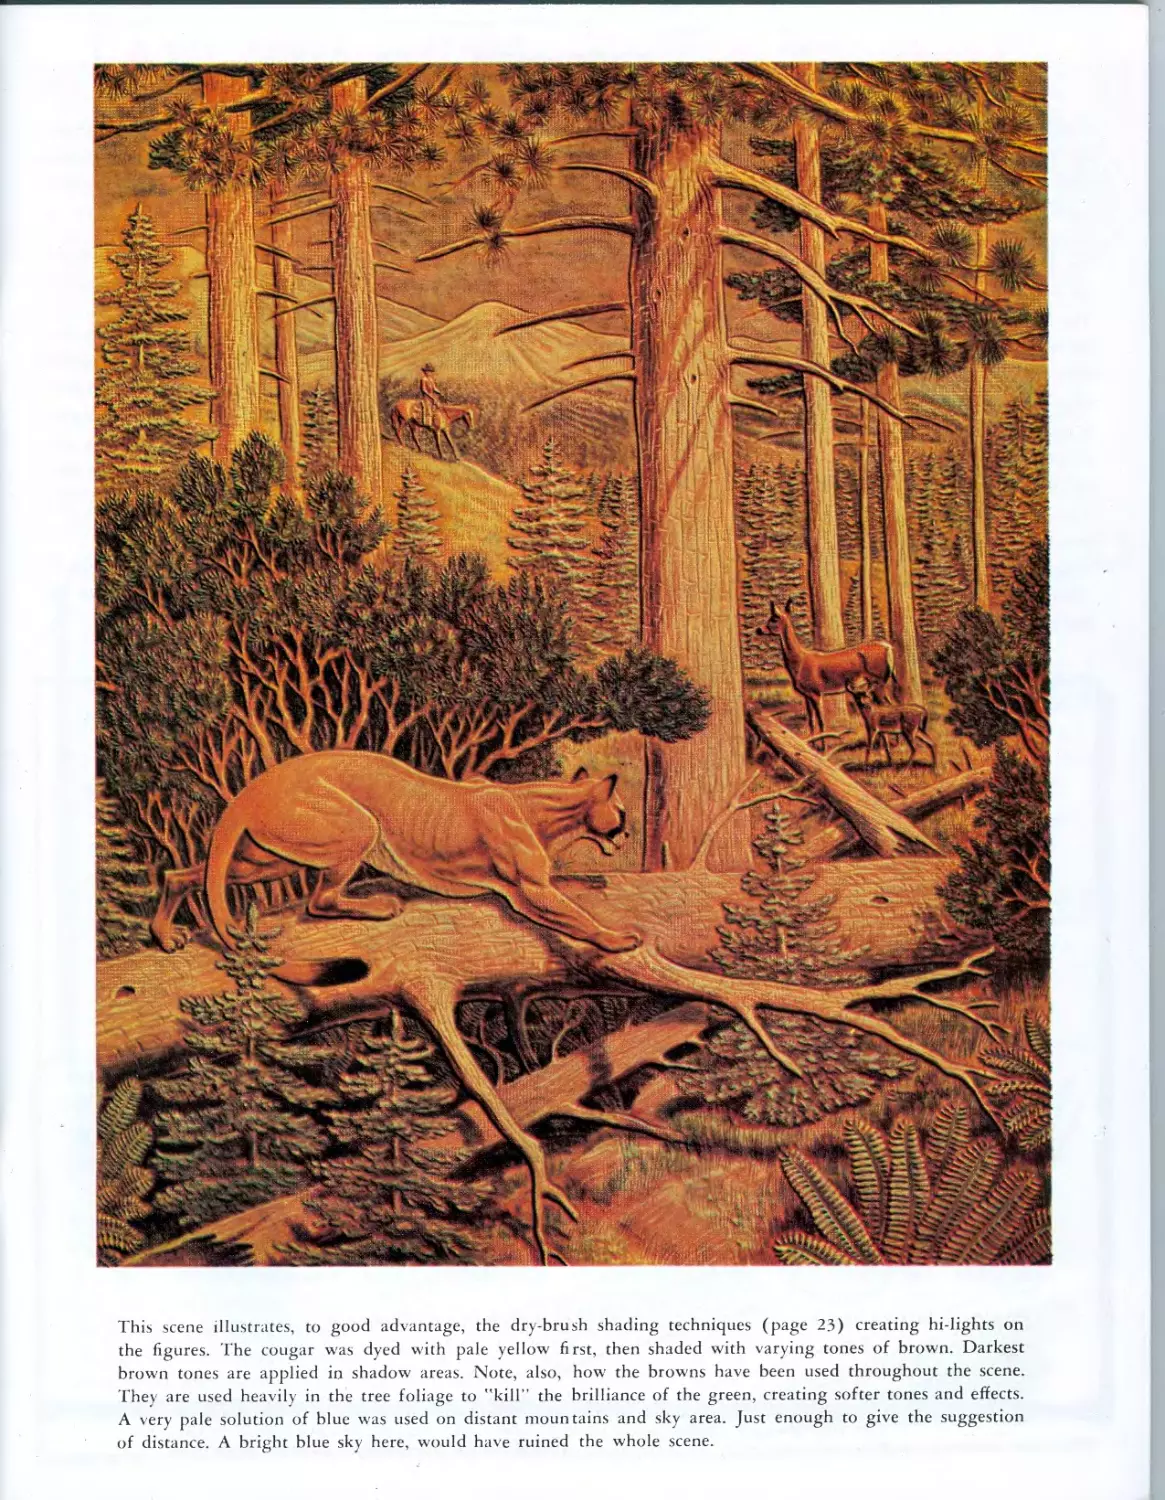
This scene illustrates, to good advantage, the dry-brush shading techniques (page 23) creating hi-lights on
the figures. The cougar was dyed with pale yellow first, then shaded with varying tones of brown. Darkest
brown tones are applied in shadow areas. Note, also, how the browns have been used throughout the scene.
They are used heavily in the tree foliage to "kill” the brilliance of the green, creating softer tones and effects.
A very pale solution of blue was used on distant mountains and sky area. Just enough to give the suggestion
of distance. A bright blue sky here, would have ruined the whole scene.
FOREWORD
This book does not endeavor to delve into the ancient history
of coloring leather, nor become involved in a lot of technical
data that will be of little interest or help to the craftsman
wanting to get into color NOW! We will begin the coloring
lessons at once, using the modern art of coloring leather with
the dyes and materials most readily available to all . . . and
the common practices involved in their uses.
The color plates throughout this book are presented to show
the varied coloring techniques and applications of dye by
different craftsmen. It must be remembered that the lithog-
raphers inks seldom reproduce the colored leather project as
it actually was. However, the color plates do give the viewer
a fairly accurate idea of where the dyes were applied and the
varying degrees of color strength and shading effects created.
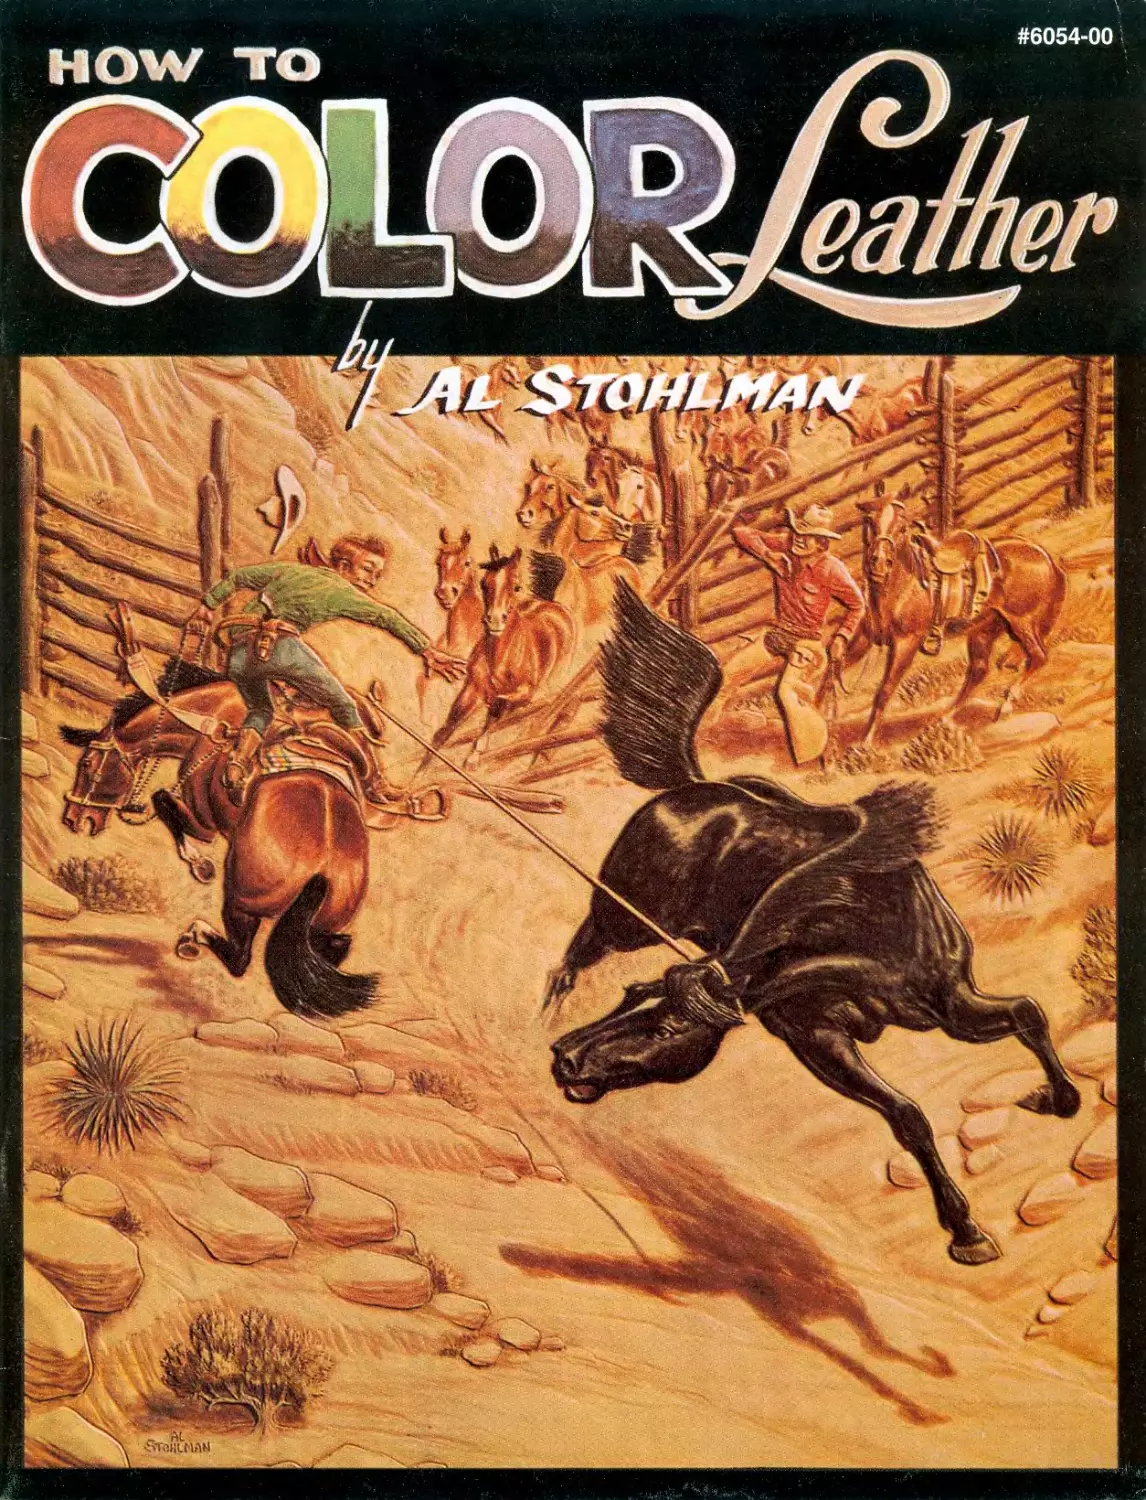
The cover illustration, Al Stohlman's "Black Stallion", is a
very fine example of the COLOR SHADING techniques as
explained on pages 27 and 30. The shading and shadow
effects of the ground and rocks are created with the light
tones of brown. Actually, the light browns are used through-
out the scene ... on bushes, horses, cowboys, etc. The pur-
pose of this is to "tone down” the colors and blend the entire
scene together to avoid any eye distracting concentrations of
brilliant color.
Note the very pale green in the bushes and grass. The bright-
est spot in the scene is the cowboy’s green shirt. However,
you’ll note this was dyed with tw-o shades of green . . . with
the leather actually showing through on the man’s back and
shoulders . . . thus creating more realism. The same coloring
techniques are used on his pants. The glistening highlights on
the horses are achieved by leaving this area of the leather
undyed. These "hi-lights” create roundness and a more life-
like appearance. The more solid colors surrounding these
areas are gradually faded into the highlights with the "DRY
BRUSH" technique—Page 23.
Before attempting this type of dyeing, however, it would be
wise to go through this book, step by step, and first learn the
uses of the brushes and the basic dyeing techniques.
INDEX
Page
Color Plate—Cougar 1 Dyeing Your Saddle 19
A Bit About Leather 3 Monochrome Harmony 20
Overall — Solid Color Dyeing 4 Shading Techniques 22
Cross Dyeing 5 "Dry” Brush Shading 23
Selection of Brushes 6 Color Dyeing 24
Dyeing the Background 7 Color Plates—Billfolds 25
Open Background Dyeing 10 Accenting With White 26
Care of Brushes 11 Dye Formulas 27
Edge Dyeing 12 Color Plate—Flowers 28
Dyeing Before Stamping 13 Color Plate—Boy & Colt 29
Leather Enamels 14 Color Shading 30
Leather Antiques 16 Color Plate—Dude Wrangler 32
Dyeing Leather Black 18 Color Plate—Vaquero 33
Copyright 1961 Craitool Co.
The full page four color reproductions in this book were covers of THE LEATHER CRAFTSMAN
2 magazine and are reprinted by permission of ‘’THE LEATHER CRAFTSMAN”, the copyright holder.
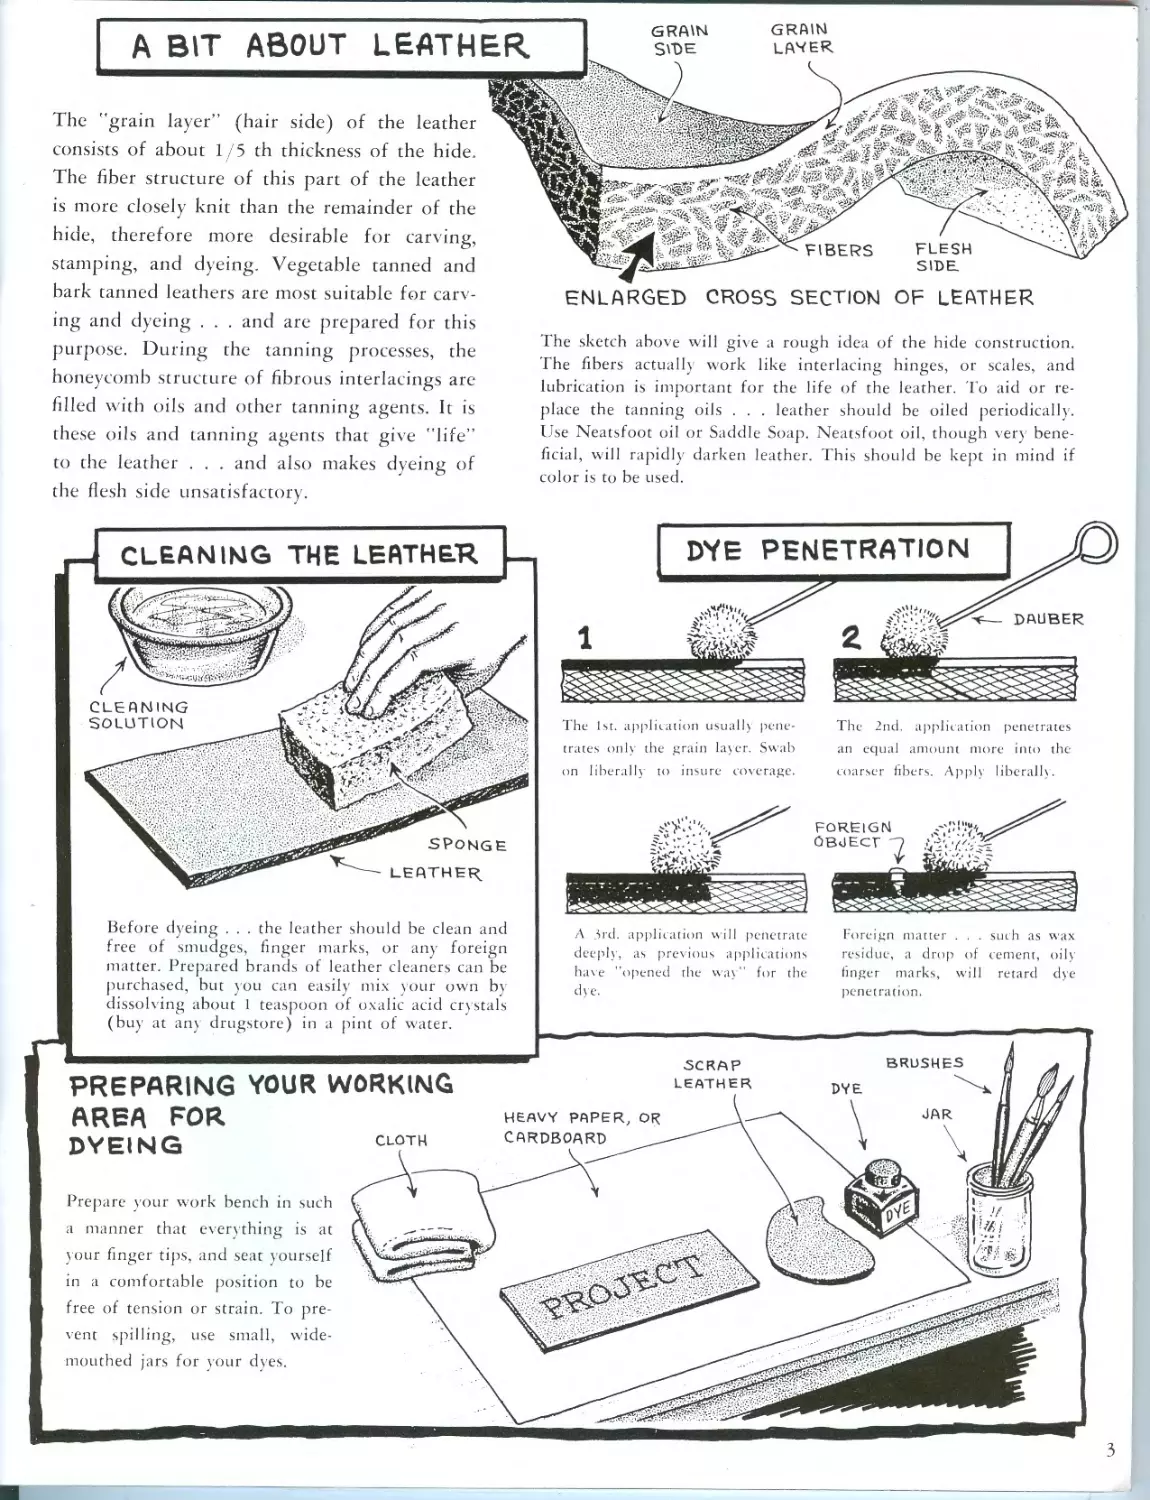
A BIT ABOUT LEATHER
The "grain layer” (hair side) of the leather
consists of about 1/5 th thickness of the hide.
The fiber structure of this part of the leather
is more closely knit than the remainder of the
hide, therefore more desirable for carving,
stamping, and dyeing. Vegetable tanned and
bark tanned leathers arc most suitable for carv-
GRAIN
SVDE
GRAIN
LARER.
FIBERS
FLESH
SIDE
KltbWik X
sSL,'.• m *s*- aa \
s® w-
ENLARGED CROSS SECTION
OF LEATHER
ing and dyeing . . . and are prepared for this
purpose. During the tanning processes, the
honeycomb structure of fibrous interlacings are
filled with oils and other tanning agents. It is
these oils and tanning agents that give "life”
to the leather . . . and also makes dyeing of
the flesh side unsatisfactory.
The sketch above will give a rough idea of the hide construction.
The fibers actually work like interlacing hinges, or scales, and
lubrication is important for the life of the leather. 'Го aid or re-
place the tanning oils . . . leather should be oiled periodically.
Use Neatsfoot oil or Saddle Soap. Neatsfoot oil, though very bene-
ficial, will rapidly darken leather. This should be kept in mind if
color is to be used.
CLEANING THE LEATHER
DYE PENETRATION
CLEANING
SOLUTION
SPONGE
- LEATHER.
The 1st. application usually pene-
trates only the grain layer. Swab
on liberally to insure coverage.
The 2nd. application penetrates
an equal amount more into the
coarser libers. Apply liberal!).
Before dyeing . . . the leather should be clean and
free of smudges, finger marks, or any foreign
matter. Prepared brands of leather cleaners can be
purchased, but you can easily mix your own by
dissolving about 1 teaspoon of oxalic acid crystals
(buy at any drugstore) in a pint of water.
PREPARING YOUR WORKING
AREA FOR
DYEING
Prepare your work bench in such
a manner that everything is at
y our finger tips, and seat yourself
in a comfortable position to be
free of tension or strain. To pre-
vent spilling, use small, wide-
mouthed jars for your dyes.
A 3rd. application will penetrate
deeply, as previous applications
have "opened rhe way" for the
dye.
BRUSHES
CLOTH
SCRAP
LEATHER
HEAVY PAPER, OR
CARDBOARD
Foreign matter . . . such as wax
residue, a drop of cement, oily
finger marks, will retard dye
penetration.
3
0,^4/
DYE
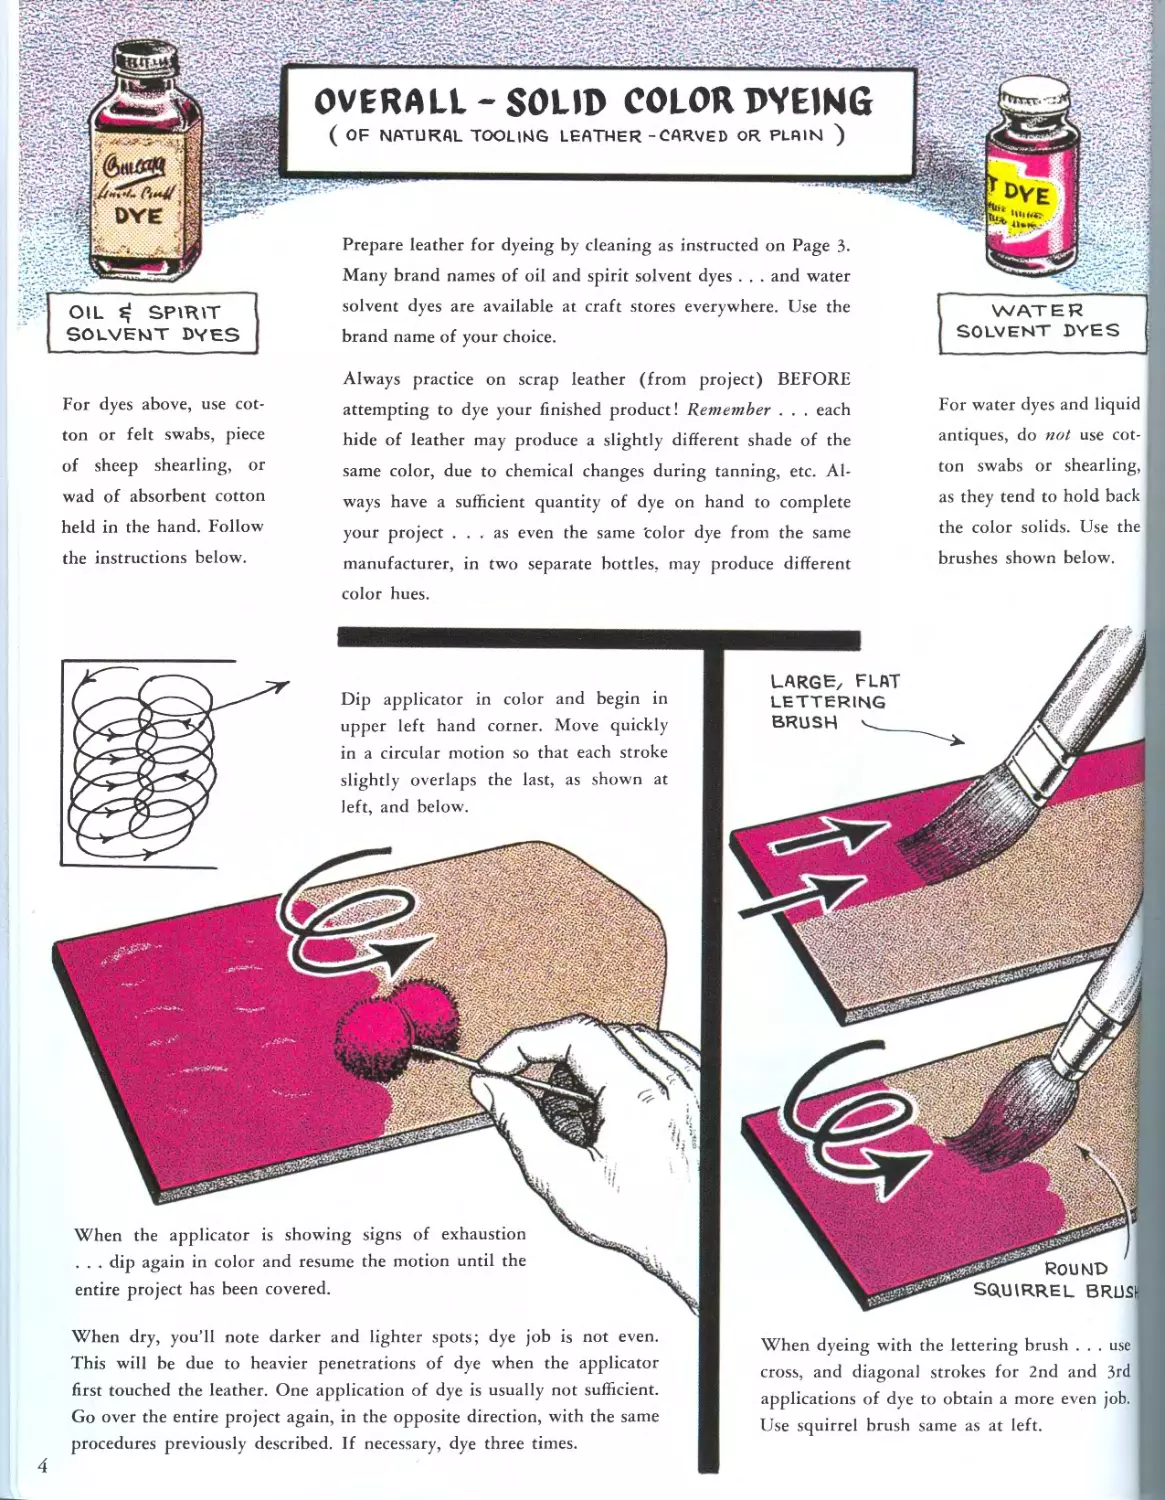
OVERALL - SOLID COLOR DVEING
( OF NATURAL TOOLING LEATHER - CARVED OR PLAIN )
Dip applicator in color and begin in
upper left hand corner. Move quickly
in a circular motion so that each stroke
slightly overlaps the last, as shown at
left, and below.
Round
SQUIRREL BRUSI
When the applicator is showing
. . . dip again in color and resume
entire project has been covered.
signs of exhaustion
the motion until the
OIL SPIRIT
SOLVENT DYES
For water dyes and liquid
antiques, do not use cot-
ton swabs or shearling,
as they tend to hold back
the color solids. Use the
brushes shown below.
Prepare leather for dyeing by cleaning as instructed on Page 3.
Many brand names of oil and spirit solvent dyes . . . and w'ater
solvent dyes are available at craft stores everywhere. Use the
brand name of your choice.
WATER
SOLVENT DYES
For dyes above, use cot-
ton or felt swabs, piece
of sheep shearling, or
wad of absorbent cotton
held in the hand. Follow
the instructions below'.
Always practice on scrap leather (from project) BEFORE
attempting to dye your finished product! Remember . . . each
hide of leather may produce a slightly different shade of the
same color, due to chemical changes during tanning, etc. Al-
ways have a sufficient quantity of dye on hand to complete
your project ... as even the same 'color dye from the same
manufacturer, in two separate bottles, may produce different
color hues.
When dry, you’ll note darker and lighter spots; dye job is not even.
This will be due to heavier penetrations of dye when the applicator
first touched the leather. One application of dye is usually not sufficient.
Go over the entire project again, in the opposite direction, with the same
procedures previously described. If necessary, dye three times.
When dyeing with the lettering brush ... use
cross, and diagonal strokes for 2nd and 3rd
applications of dye to obtain a more even job.
Use squirrel brush same as at left.
LARGE/ FLAT
LETTERING
BRUSH '---
4
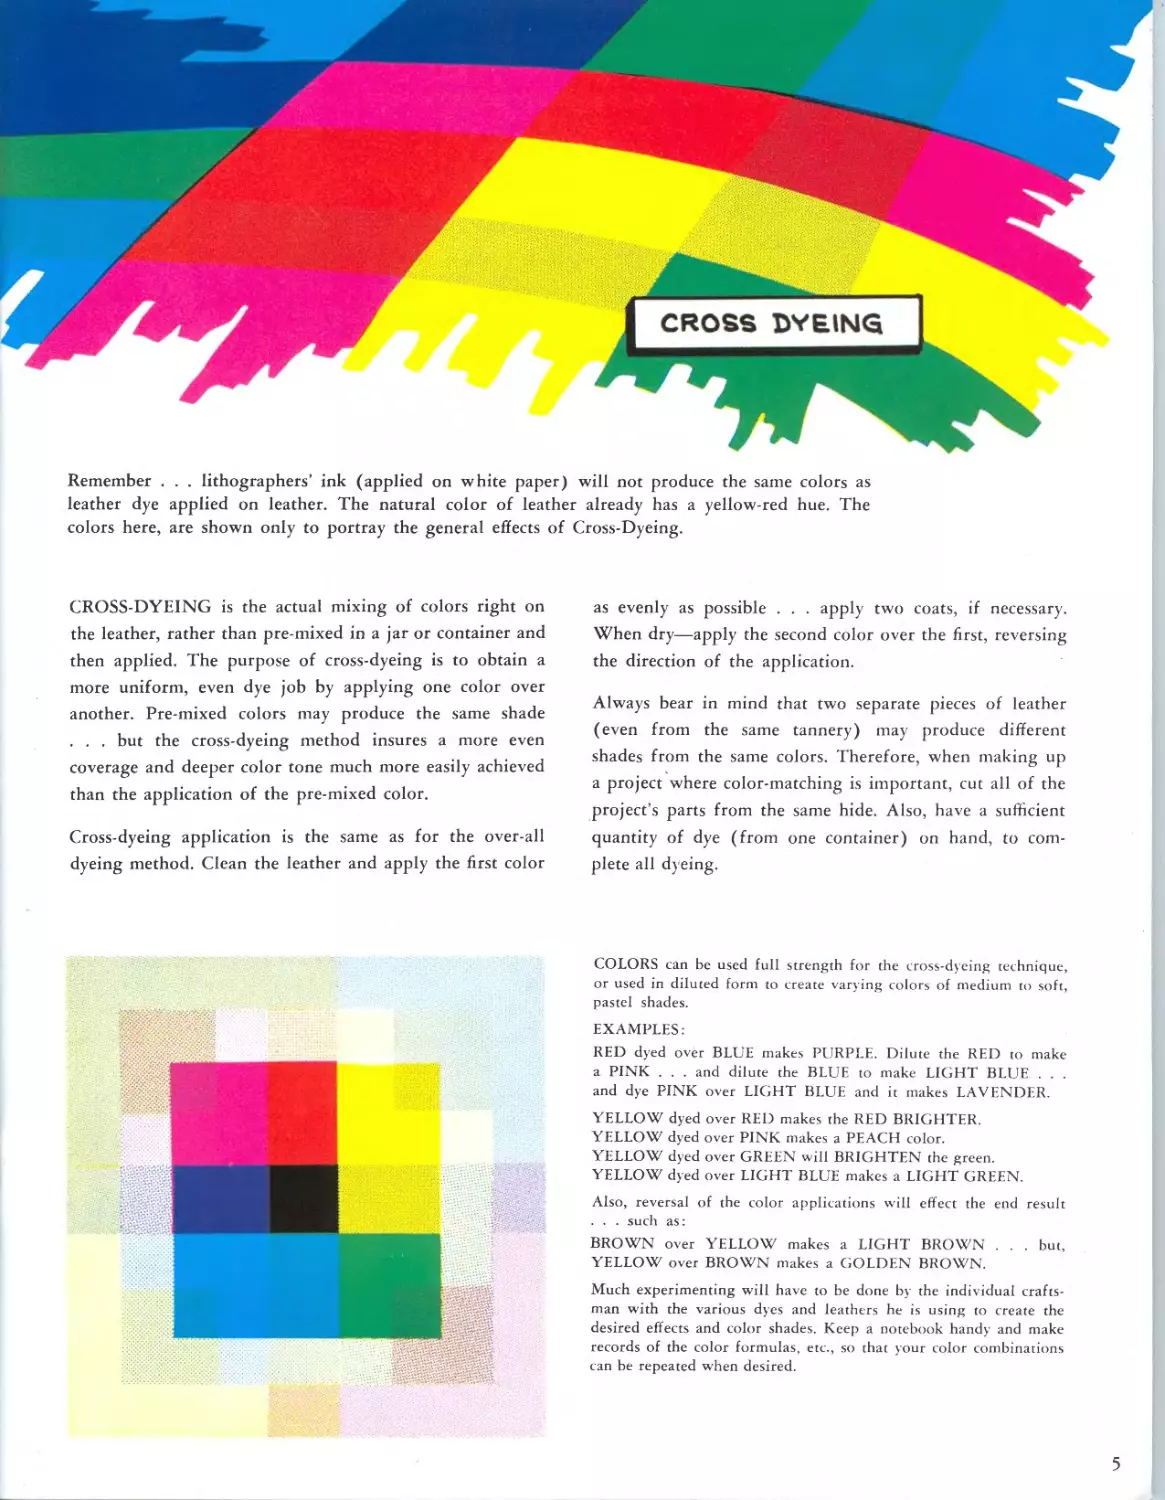
CROSS DYEING
Remember . . . lithographers’ ink (applied on white paper) will not produce the same colors as
leather dye applied on leather. The natural color of leather already has a yellow-red hue. The
colors here, are shown only to portray the general effects of Cross-Dyeing.
CROSS-DYEING is the actual mixing of colors right on
the leather, rather than pre-mixed in a jar or container and
then applied. The purpose of cross-dyeing is to obtain a
more uniform, even dye job by applying one color over
another. Pre-mixed colors may produce the same shade
. . . but the cross-dyeing method insures a more even
coverage and deeper color tone much more easily achieved
than the application of the pre-mixed color.
Cross-dyeing application is the same as for the over-all
dyeing method. Clean the leather and apply the first color
as evenly as possible . . . apply two coats, if necessary.
When dry—apply the second color over the first, reversing
the direction of the application.
Always bear in mind that two separate pieces of leather
(even from the same tannery) may produce different
shades from the same colors. Therefore, when making up
a project where color-matching is important, cut all of the
project’s parts from the same hide. Also, have a sufficient
quantity of dye (from one container) on hand, to com-
plete all dyeing.
COLORS can be used full strength for the cross-dyeing technique,
or used in diluted form to create varying colors of medium to soft,
pastel shades.
EXAMPLES:
RED dyed over BLUE makes PURPLE. Dilute the RED to make
a PINK . . . and dilute the BLUE to make LICHT BLUE . . .
and dye PINK over LIGHT BLUE and it makes LAVENDER.
YELLOW dyed over RED makes the RED BRIGHTER.
YELLOW dyed over PINK makes a PEACH color.
YELLOW dyed over GREEN will BRIGHTEN the green.
YELLOW dyed over LIGHT BLUE makes a LIGHT GREEN.
Also, reversal of the color applications will effect the end result
. . . such as:
BROWN over YELLOW makes a LIGHT BROWN . . . but,
YELLOW over BROWN makes a GOLDEN BROWN.
Much experimenting will have to be done by the individual crafts-
man with the various dyes and leathers he is using to create the
desired eff ects and color shades. Keep a notebook handy and make
records of the color formulas, etc., so that your color combinations
can be repeated when desired.
5
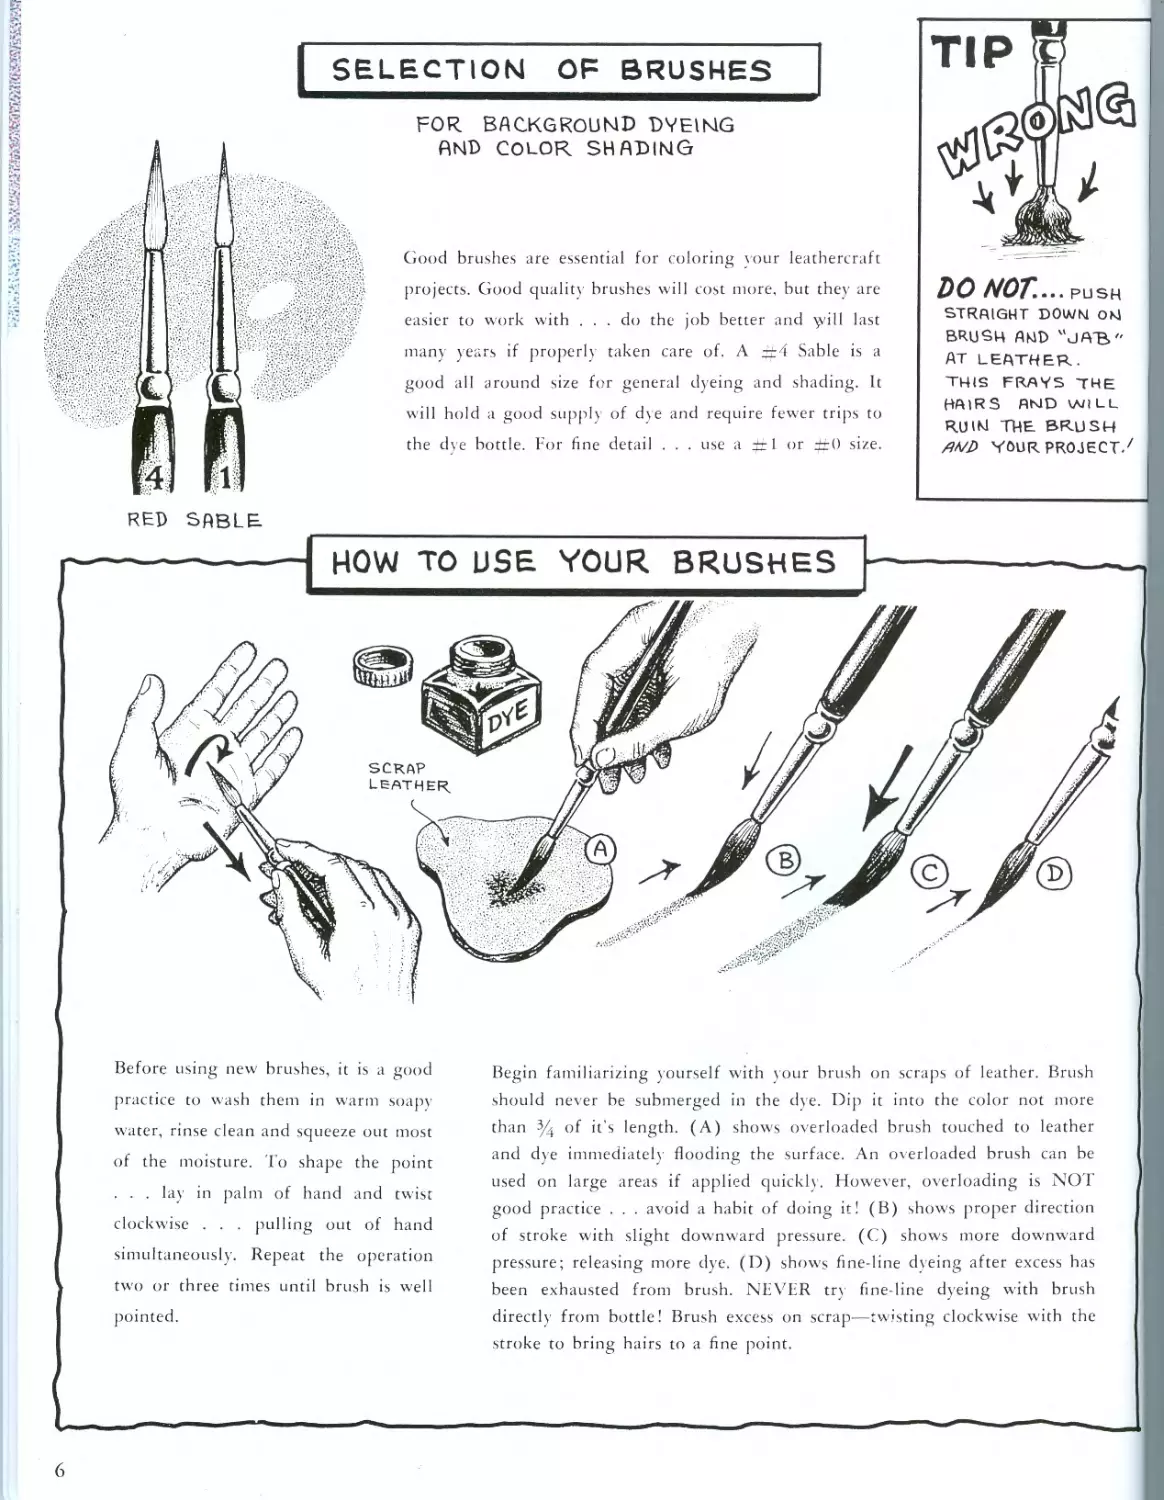
SELECTION OF BRUSHES
RED SABLE.
FOR. BACKGROUND DVEING
AND COLOR SHADING
Good brushes are essential for coloring your leathercraft
projects. Good quality brushes will cost more, but they are
easier to work with ... do the job better and yviH last
many years if properly taken care of. A Sable is a
good all around size for general dyeing and shading. It
will hold a good supply of dye and require fewer trips to
the dye bottle. For fine detail . . . use a il or ~() size.
DO NOT. ...PUSH
STRAIGHT DOWN ON
BRUSH AND “JAB"
AT LEATHER.
THIS FRAYS THE
HAIRS AND WILL
R.UIK1 THE. BRUSH
/?VZ) YOUR PROJECT.7
HOW TO DSE YOUR BRUSHES
Before using new brushes, it is a good
practice to wash them in warm soapy
water, rinse clean and squeeze out most
of the moisture. To shape the point
. . . lay in palm of hand and twist
clockwise . . . pulling out of hand
simultaneously. Repeat the operation
two or three times until brush is well
pointed.
Begin familiarizing yourself with your brush on scraps of leather. Brush
should never be submerged in the dye. Dip it into the color not more
than % of it's length. (A) shows overloaded brush touched to leather
and dye immediately flooding the surface. An overloaded brush can be
used on large areas if applied quickly. However, overloading is NOT
good practice . . . avoid a habit of doing it! (B) shows proper direction
of stroke with slight downward pressure. (C) shows more downward
pressure; releasing more dye. (D) shows fine-line dyeing after excess has
been exhausted from brush. NEVER try fine-line dyeing with brush
directly from bottle! Brush excess on scrap—twisting clockwise with the
stroke to bring hairs to a fine point.
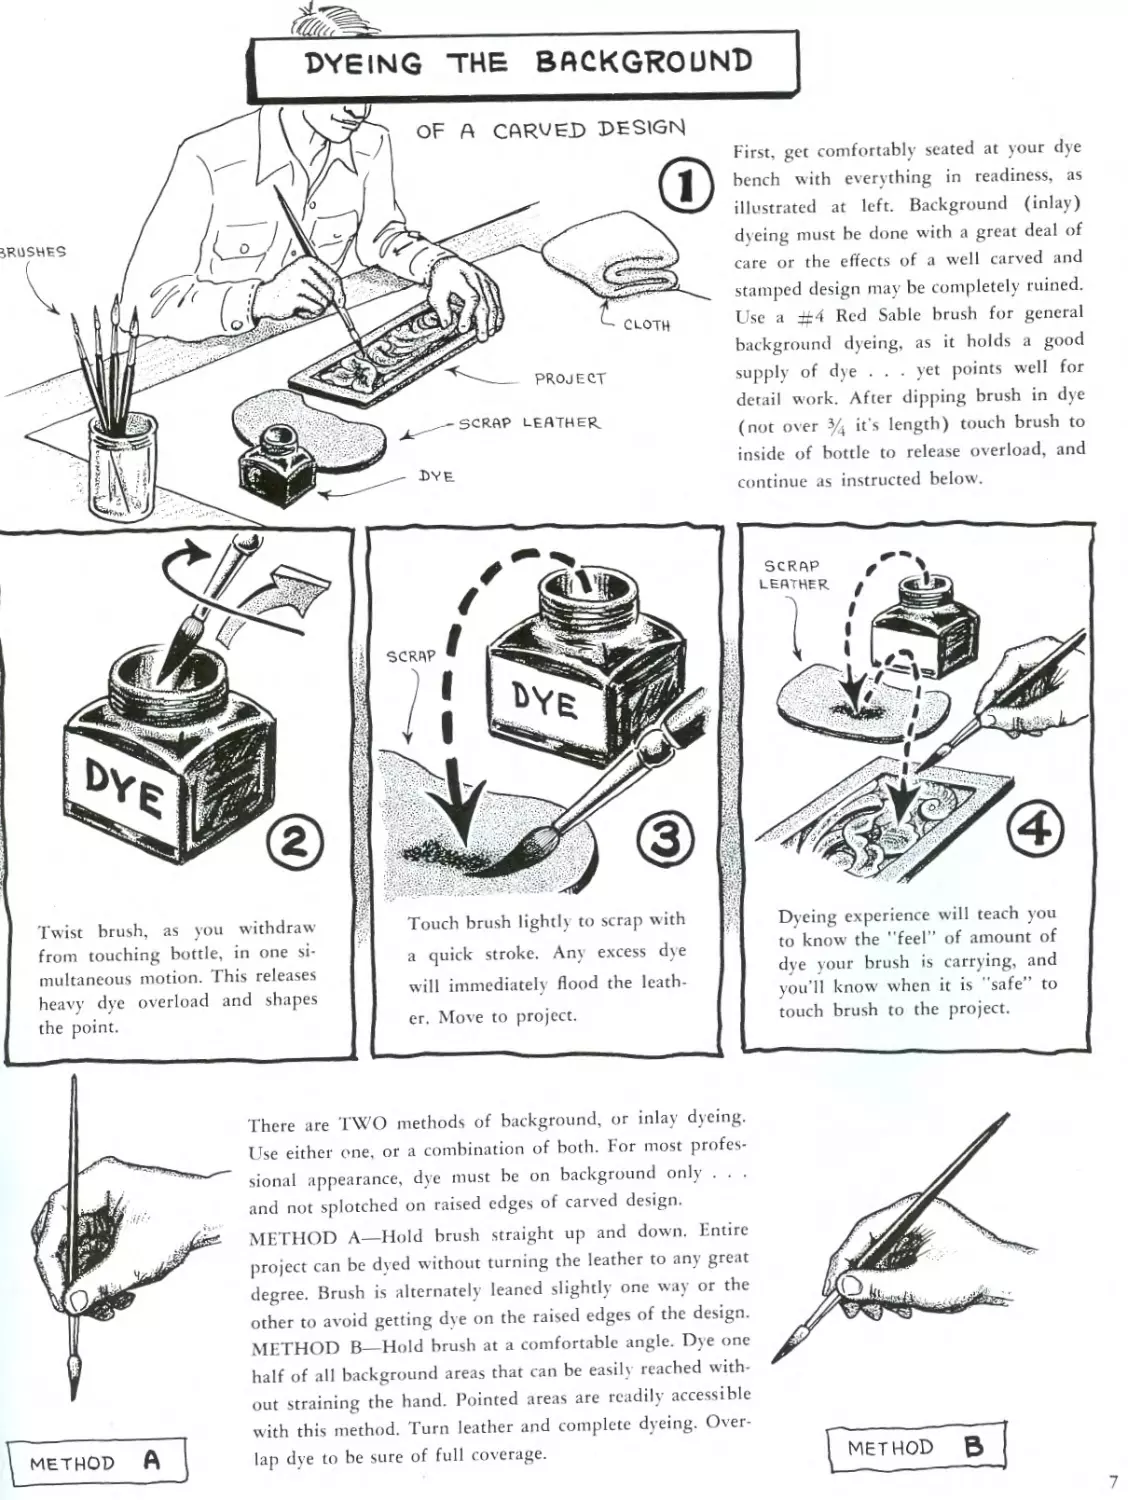
DYEING THE BACKGROUND
OF f\ carved design
brushes
SCRAP
LEATHER
CLOTH
PROJECT
-—SCRAP LEATHER^
Dyeing experience will teach you
to know the "feel” of amount of
dye your brush is carrying, and
you’ll know’ when it is "safe” to
touch brush to the project.
Twist brush, as you withdraw
from touching bottle, in one si-
multaneous motion. This releases
heavy dye overload and shapes
the point.
First, get comfortably seated at your dye
bench with everything in readiness, as
illustrated at left. Background (inlay)
dveing must be done with a great deal of
care or the effects of a well carved and
stamped design may be completely ruined.
Use a Red Sable brush for general
background dyeing, as it holds a good
supply of dye . . . yet points well for
derail work. After dipping brush in dye
(not over % it’s length) touch brush to
inside of bottle to release overload, and
continue as instructed below.
METHOD A
There are TWO methods of background, or inlay dyeing.
Use either one, or a combination of both. For most profes-
sional appearance, dye must be on background only . . .
and not splotched on raised edges of carved design.
METHOD A—Hold brush straight up and down. Entire
project can be dved without turning the leather to any great
degree. Brush is alternately leaned slightly one way or the
other to avoid getting dve on the raised edges of the design.
METHOD B—Hold brush at a comfortable angle. Dye one
half of all background areas that can be easily reached with-
out straining the hand. Pointed areas are readily accessible
with this method. Turn leather and complete dyeing. Over-
lap dye to be sure of full coverage.
7
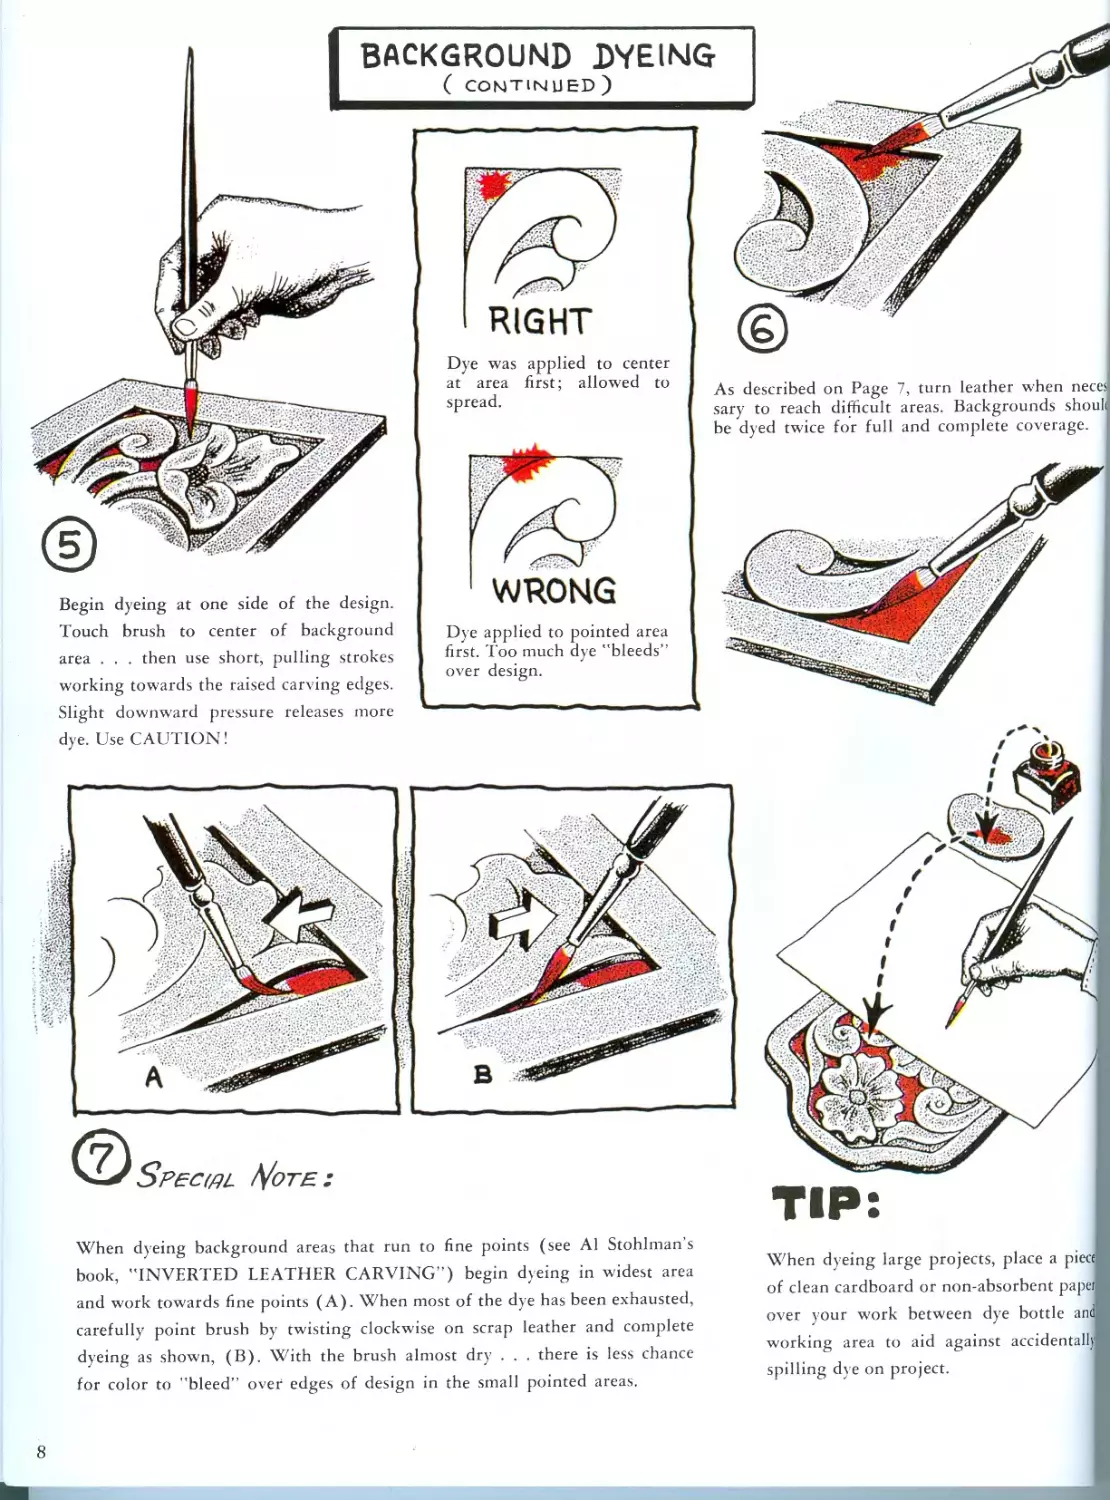
BACKGROUND DYEING
( continued)
Begin dyeing at one side of the design.
Touch brush to center of background
area . . . then use short, pulling strokes
working towards the raised carving edges.
Slight downward pressure releases more
RIGHT
Dye was applied to center
at area first; allowed to
spread.
As described on Page 7, turn leather when necc!
sary to reach difficult areas. Backgrounds shoul
be dyed twice for full and complete coverage.
WRONG
Dye applied to pointed area
first. Too much dye "bleeds”
over design.
-------------------- (
dye. Use CAUTION!
Special Note:
When dyeing background areas that run to fine points (see Al Stohlman s
book, "INVERTED LEATHER CARVING”) begin dyeing in widest area
and work towards fine points (A). When most of the dye has been exhausted,
carefully point brush by twisting clockwise on scrap leather and complete
dyeing as shown, (B). With the brush almost dry . . . there is less chance
for color to "bleed” over edges of design in the small pointed areas.
When dyeing large projects, place a pieci
of clean cardboard or non-absorbent papei
over your work between dye bottle ant
working area to aid against accidental!)
spilling dye on project.
8
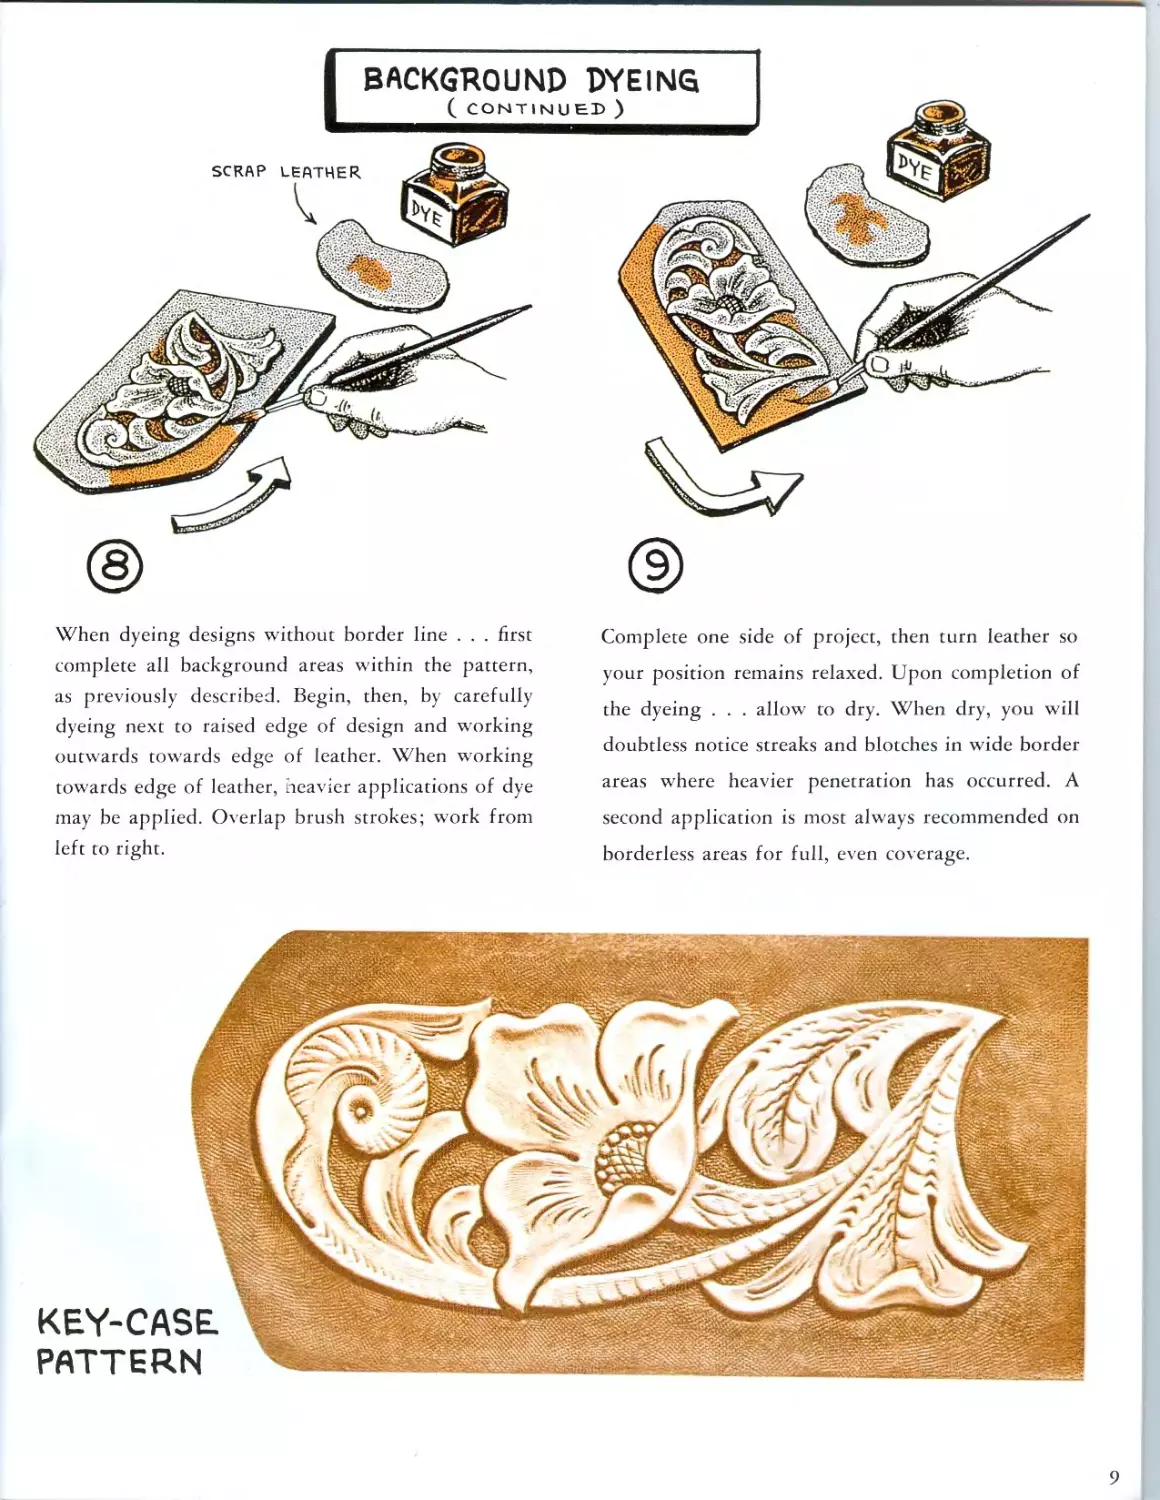
BACKGROUND DYEING
( continued )
When dyeing designs without border line . . . first
complete all background areas within the pattern,
as previously described. Begin, then, by carefully
dyeing next to raised edge of design and working
outwards towards edge of leather. When working
towards edge of leather, heavier applications of dye
may be applied. Overlap brush strokes; work from
left to right.
Complete one side of project, then turn leather so
your position remains relaxed. Upon completion of
the dyeing . . . allow' to dry. When dry, you will
doubtless notice streaks and blotches in wide border
areas where heavier penetration has occurred. A
second application is most always recommended on
borderless areas for full, even coverage.
9
й
g
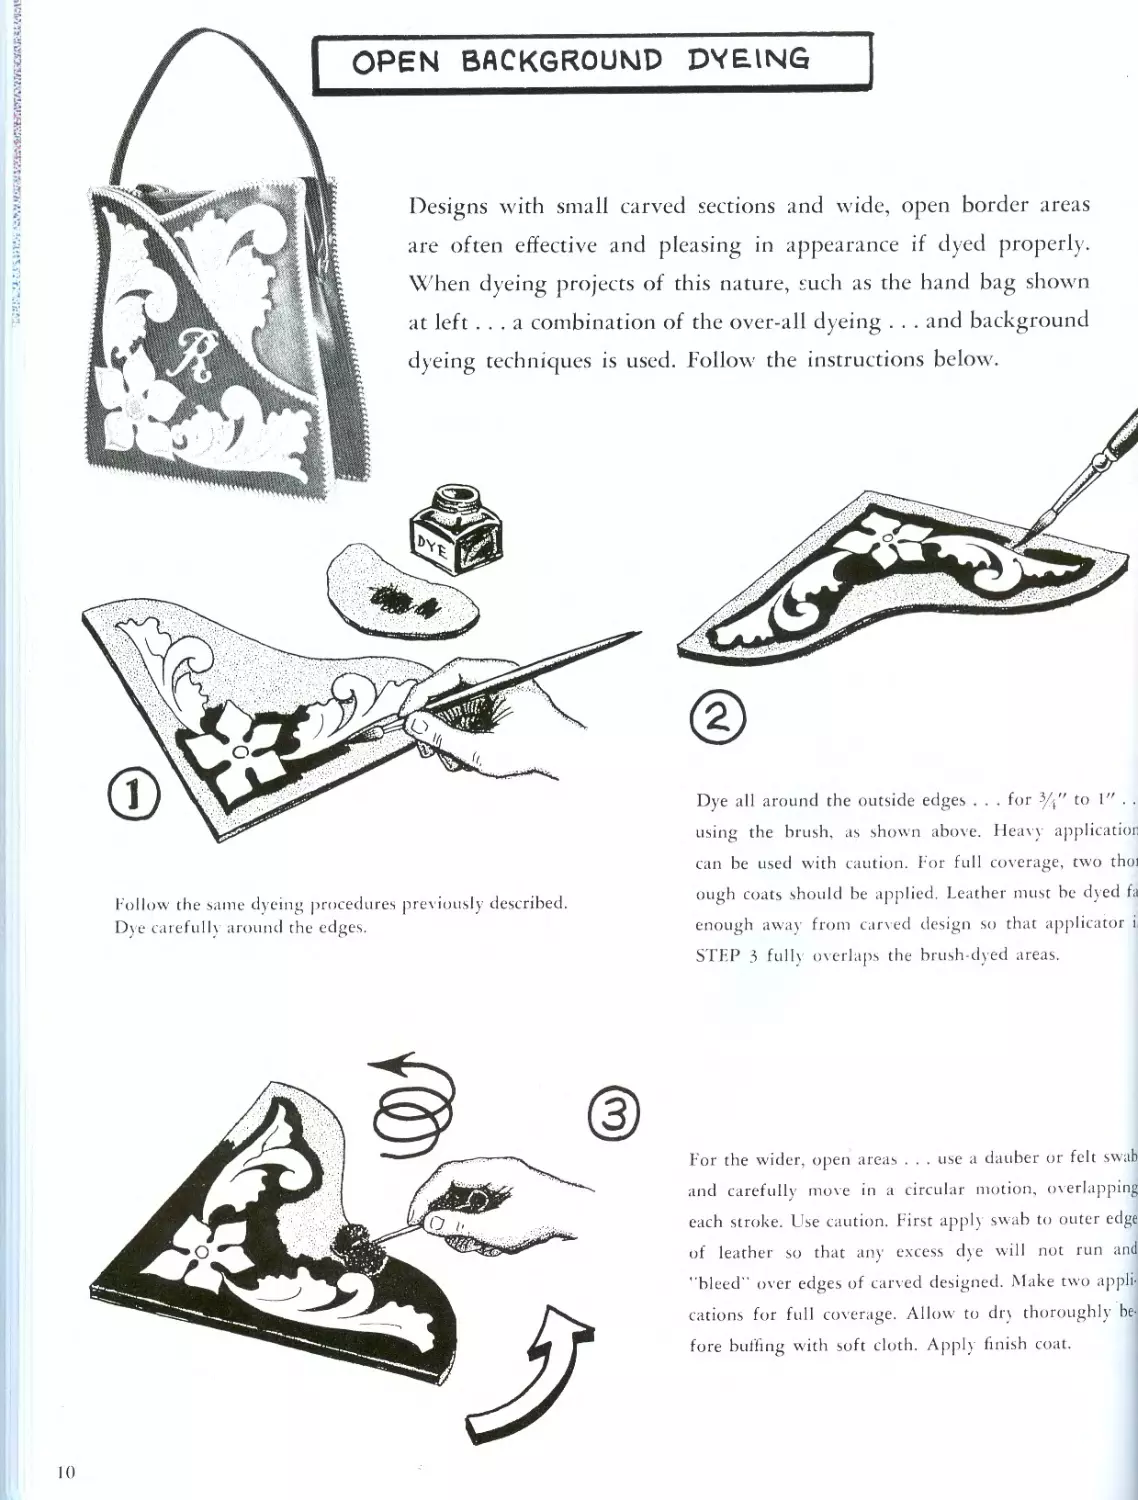
OPEN BACKGROUND DYEING
Designs with small carved sections and wide, open border areas
are often effective and pleasing in appearance if dyed properly.
When dyeing projects of this nature, such as the hand bag shown
at left ... a combination of the over-all dyeing . . . and background
dyeing techniques is used. Follow the instructions below.
Follow the same dyeing procedures previously described.
Dye carefully around the edges.
Dye all around the outside edges . . . for %
using the brush, as shown above. Heavy application
can be used with caution. For full coverage, two thoi
ough coats should be applied. Leather must be dyed fa
enough away
STEP 3 fullv
from carved design so that applicator i
overlaps the brush-dyed areas.
For the wider, open areas . . . use a dauber or felt swab
and carefully move in a circular motion, overlapping
each stroke. Use caution. First apply swab to outer edge
of leather so that any excess dye will not run and
"bleed" over edges of carved designed. Make two appli-
cations for full coverage. Allow to dn thoroughly be-
fore bulling with soft cloth. Apply finish coat.
10
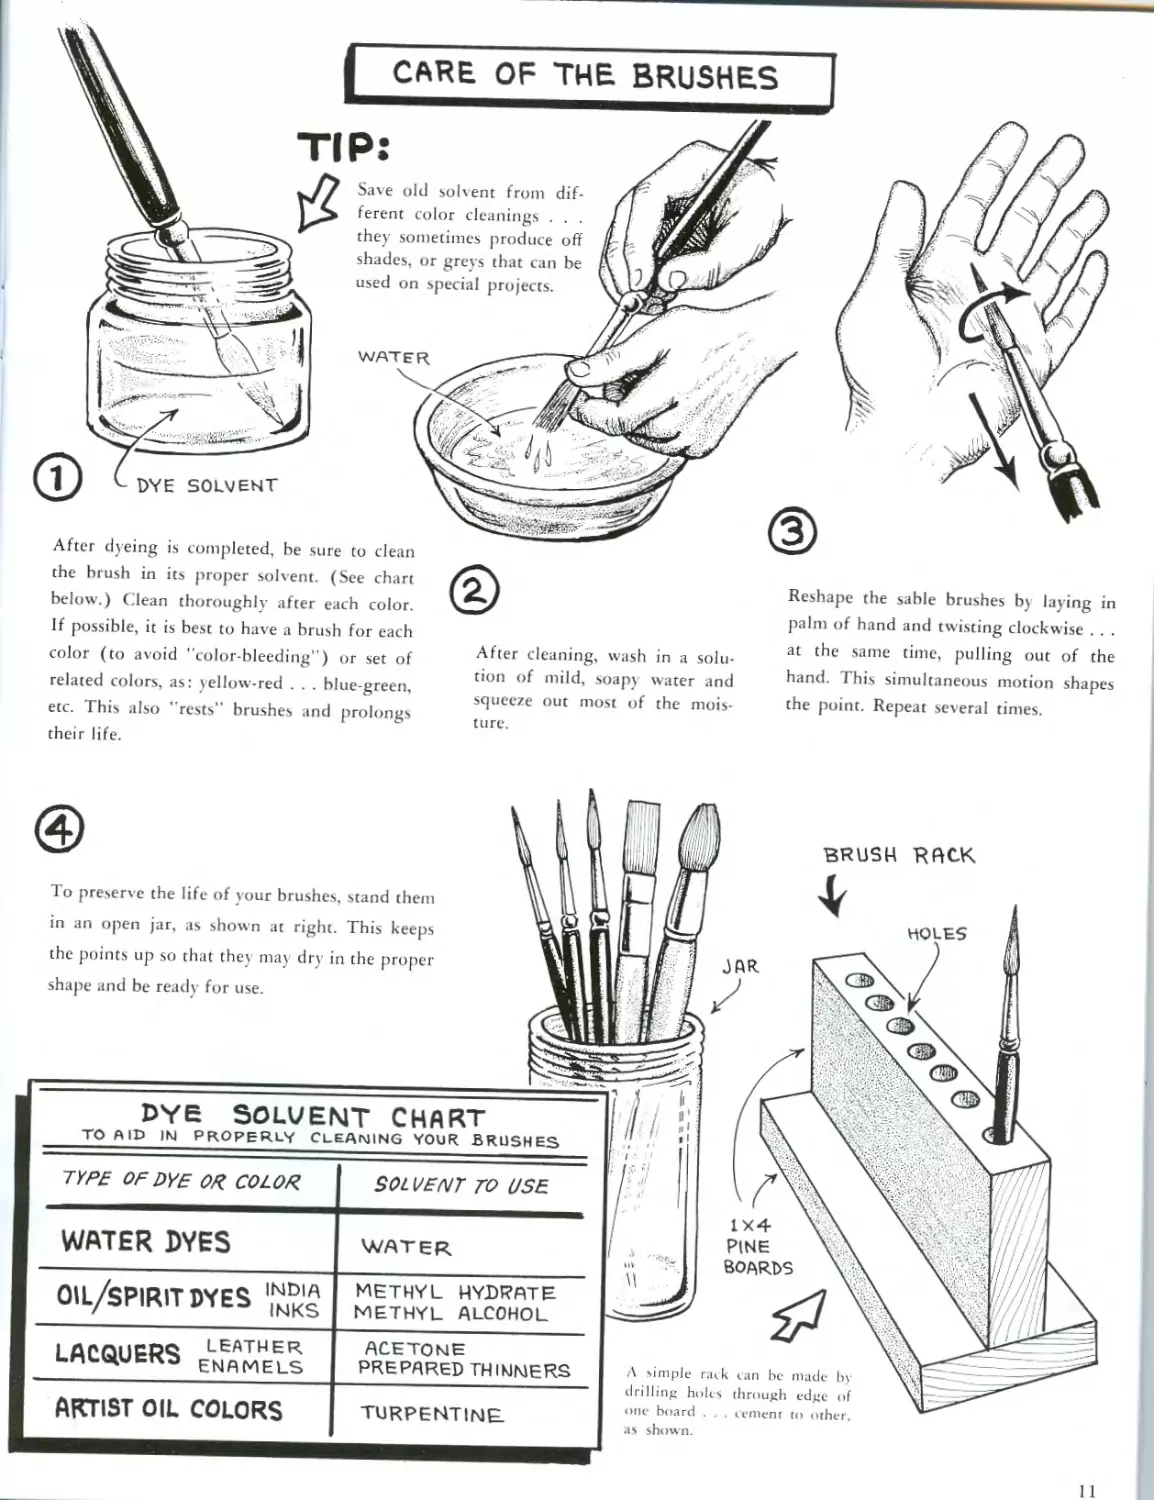
CARE OF THE BRUSHES
DYE SOLVENT
to clean
Save old solvent from dif-
ferent color cleanings . . .
they sometimes produce off
shades, or greys that can be
used on special projects.
WATER
After dyeing is completed, be sure
the brush in its proper solvent. (See chart
below.) Clean thoroughly after each color.
If possible, it is best to have a brush for each
color (to avoid "color-bleeding") or set of
related colors, as: yellow-red . . . blue-green,
etc. This also "rests" brushes and prolongs
their life.
After cleaning, wash in a solu-
tion of mild, soapy water and
squeeze out most of the
ture.
mois-
Reshape the sable brushes by laying in
palm of hand and twisting clockwise . . .
at the same time, pulling out of the
hand. This simultaneous
the point. Repeat several
motion shapes
times.
To preserve the life of your brushes, stand them
in an open jar, as shown at right. This keeps
the points up so that they may dry in the proper
shape and be ready for use.
DYE SOLVENT CHART TO AID IN PROPERLY CLEANING YOUR BRUSHES
TYPE OF DYE OR COLOR. SOL VENT TO USE
WATER DYES water
oil/spiritdtes METHYL HYDRATE METHYL ALCOHOL
LACQUERS ACETONE PREPARED THINNERS
ARTIST OIL COLORS TURPENTINE-
A simple rat к can be made
drilling holes through edge
one board . . , cement to other,
as shown.
HACK
BRUSH
HOLES
JRR.
PINE
BOARDS
11
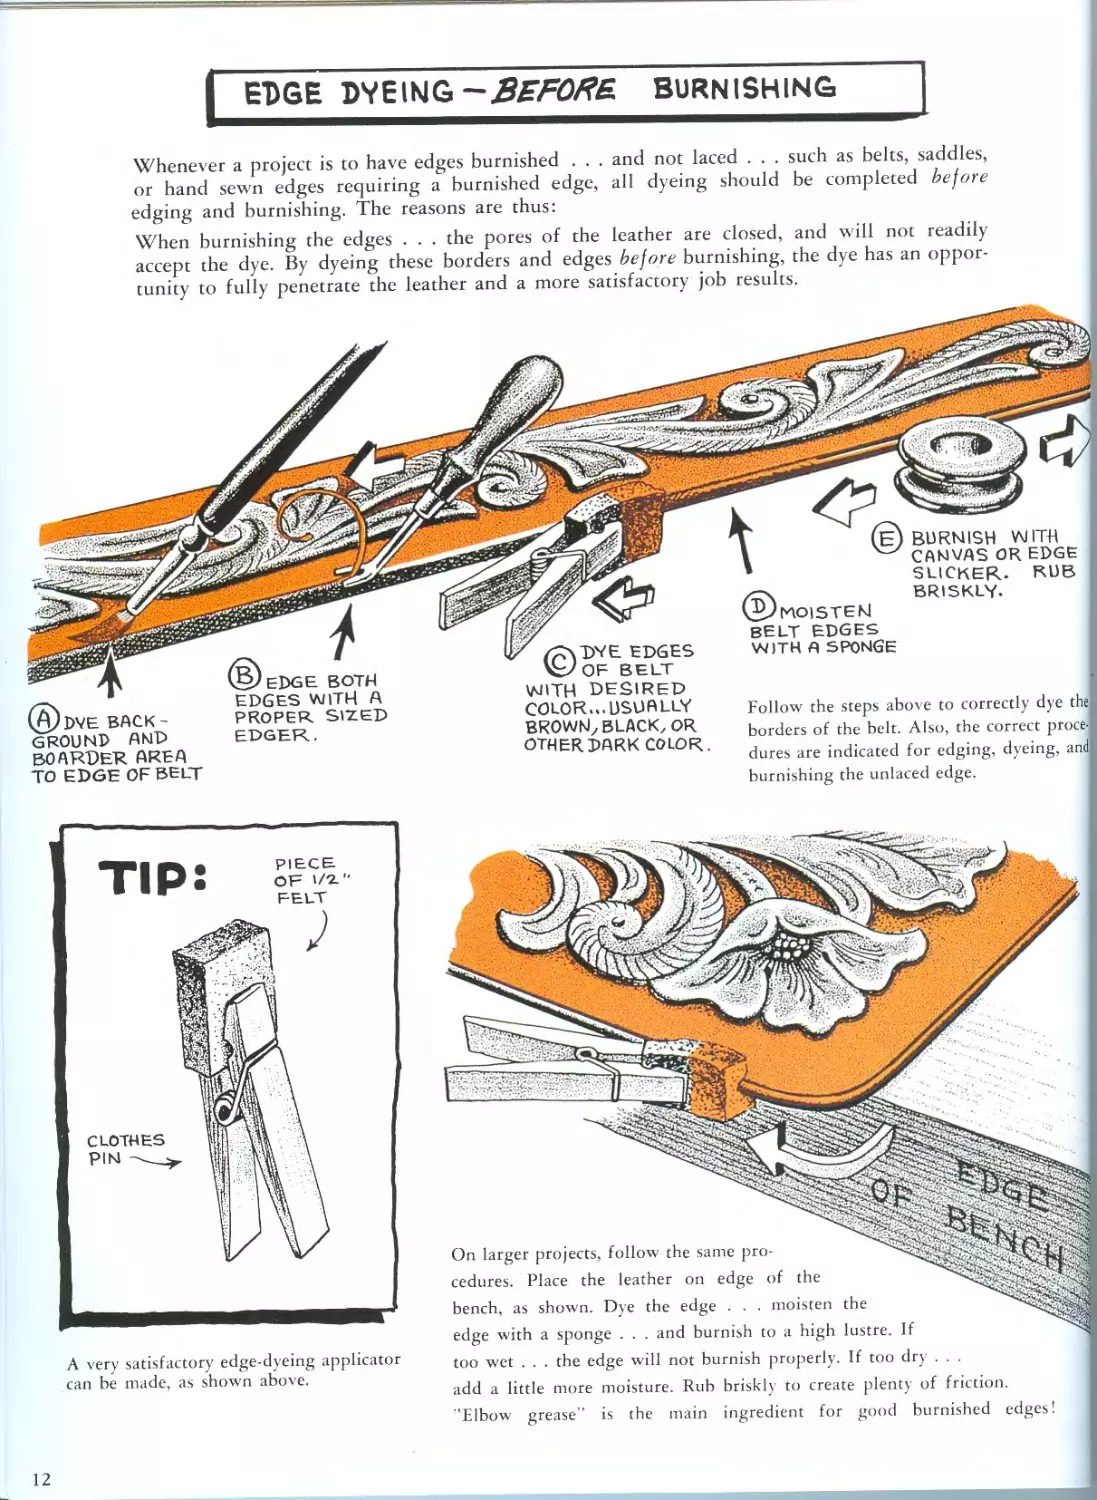
EDGE DVEING -BEFORE. BURNISHING
Whenever a project is to have edges burnished . . . and not laced . . . such as belts, saddles,
or hand sewn edges requiring a burnished edge, all dyeing should be completed before
edging and burnishing. The reasons are thus:
When burnishing the edges . . . the pores of the leather are closed, and will not readily
accept the dye. By dyeing these borders and edges before burnishing, the dye has an oppor-
tunity to fully penetrate the leather and a more satisfactory job results.
EDGE BOTH
EDGES WITH A
PROPER. SIZED
EDGER.
BELT EDGES
WITH A SPONGE
BURNISH WITH
CANVAS OR EDGE
SLICKER. RUB
BRISKLY.
Follow the steps above to correctly dye the
borders of the belt. Also, the correct proce-l
dures are indicated for edging, dyeing, and
burnishing the unlaced edge.
©DYE EDGES
OF BELT
WITH DESIRED
COLOR... USUALLY
BROWN, BLACK, OR
OTHER DARK COLOR.
(A)dve back-
ground and
BOARDER AREA
TO EDGE OF BELT
A very satisfactory edge-dyeing applicator
can be made, as shown above.
On larger projects, follow the same pro-
cedures. Place the leather on edge of the
bench, as shown. Dye the edge . . . moisten the
edge with a sponge . . . and burnish to a high lustre. If
too wet . . . the edge will not burnish properly. If too dry . . .
add a little more moisture. Rub briskly to create plenty of friction.
'Elbow grease” is the main ingredient for good burnished edges!
12
DYEING - BEFORE. STAMPING
4)
Another method of dyeing the background (or the design
itself) . . . especially suited to those who are not accus-
tomed to handling the dye brush ... is to apply the dye
before stamping the design! This method has a greater
advantage in obtaining smoother coverage, and successive
applications of dye can easily be brushed on as you are
working on a flat, smooth surface. To some degree, there
is also less chance of getting dye on the design.
Prepare the leather for carving as usual, transfer and cut
the design with the swivel knife. Dye the background while
the leather is still moist and about ready to stamp. (NOTE:
Do NOT use LACQUERS or ENAMELS on damp leath-
er!) Use only oil and spirit solvent, or water-base dyes.
Dye thoroughly for deep penetration. After dyeing, pro-
ceed with the stamping in the usual manner. Add moisture
when necessary.
§
4j
4Q
2
О
7)
in
p
P
-j
о
U-
_l
_l
CD
888
Ю1
BACKGROUND
TOOLS
NOT
Recommended
o.k. TO
USE м
104- 98 99 898
Sharp cutting edges of certain backgrounders are not recom-
mended. After backgrounding . . . any "natural areas” (ex-
posed by heavy or choppy stamping) can be touched up with
the dye brush.
13
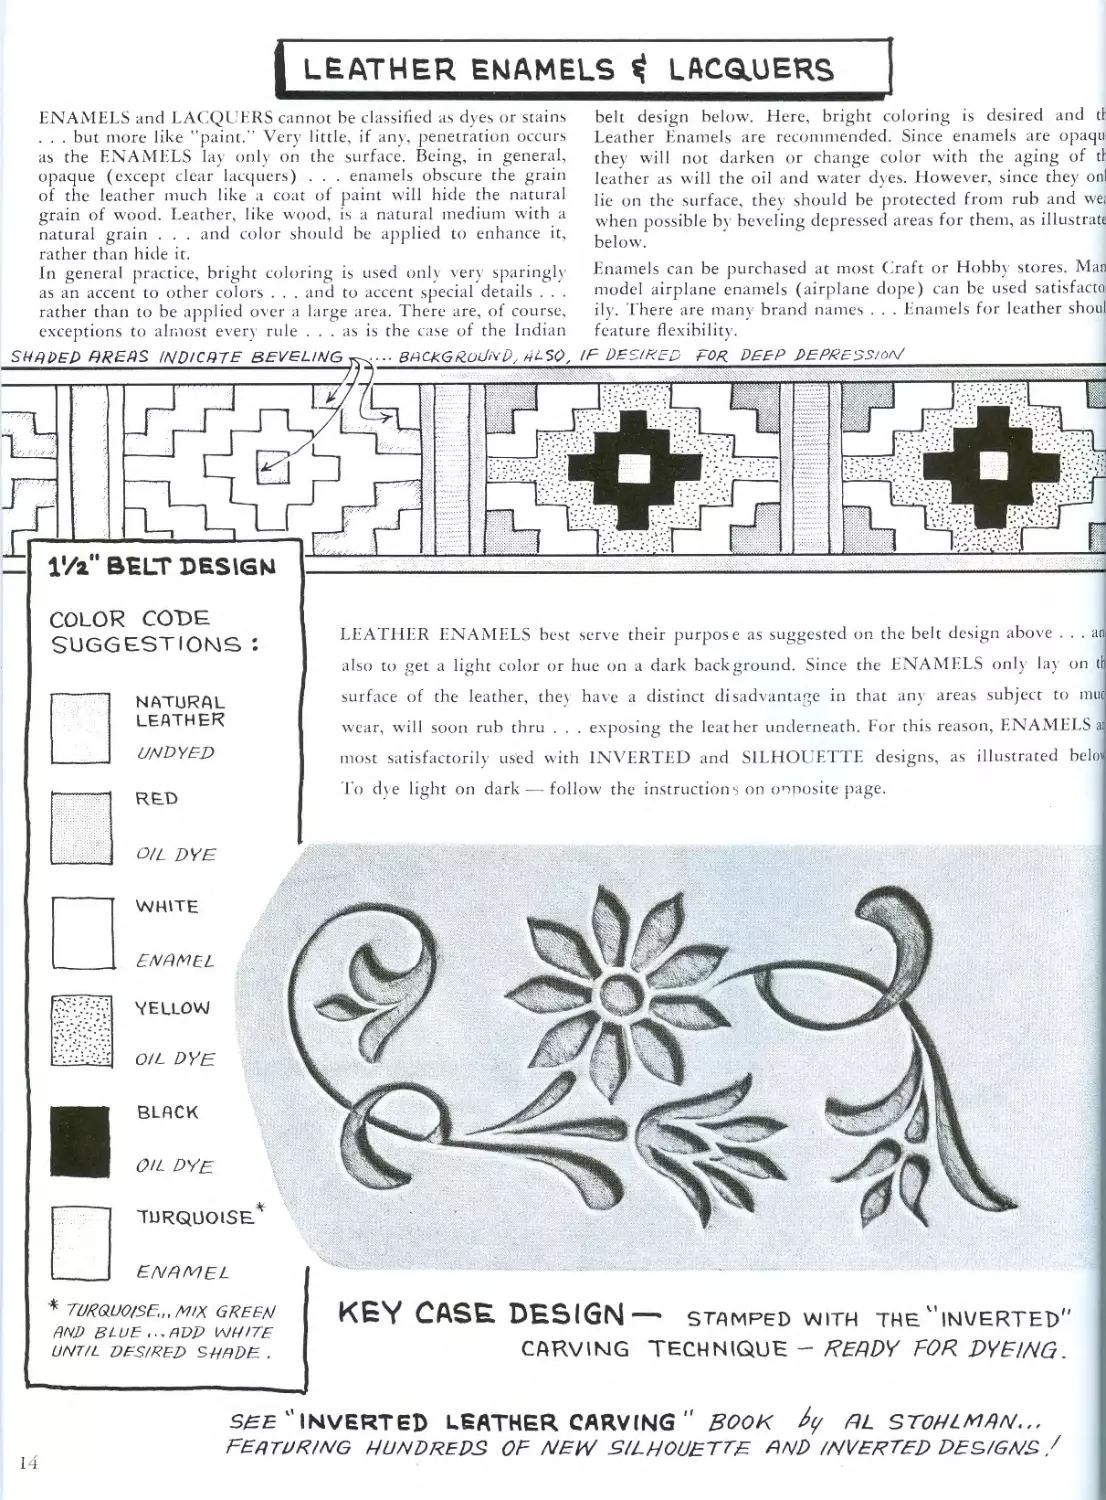
LEATHER ENAMELS < LACQAJERS
ENAMELS and LACQUERS cannot be classified as dyes or stains
. . . but more like "paint.” Very little, if any, penetration occurs
as the ENAMELS lay only on the surface. Being, in general,
opaque (except clear lacquers) . . . enamels obscure the grain
of the leather much like a coat of paint will hide the natural
grain of wood. Leather, like wood, is a natural medium with a
natural grain . . . and color should be applied to enhance it,
rather than hide it.
In general practice, bright coloring is used only very sparingly
as an accent to other colors . . . and to accent special details . . .
rather than to be applied over a large area. There are, of course,
exceptions to almost every rule ... as is the case of the Indian
SHADED AREAS INDICATE BEVELING .... BACKGROUND, ALSO,
171 BELT DESIGN
belt design below. Here, bright coloring is desired and tl
Leather Enamels are recommended. Since enamels are opaqu
they will not darken or change color with the aging of tl
leather as will the oil and water dyes. However, since they onl
lie on the surface, they should be protected from rub and we;
when possible by beveling depressed areas for them, as illustrate
below.
Enamels can be purchased at most Craft or Hobby stores. Man
model airplane enamels (airplane dope) can be used satisfacto
ily. There are many brand names . . . Enamels for leather shout
feature flexibility.
IP DESIRED FOR DEEP REPRESSION
COLOR CODE
SUGGESTIONS *.
UNDYED
NATURAL
LEATHER
RUD
LEATHER ENAMELS best serve their purpose as suggested on the belt design above ... an
also to get a light color or hue on a dark background. Since the ENAMELS only lay on tl
surface of the leather, they have a distinct disadvantage in that ant areas subject to intit
wear, will soon rub thru . . . exposing the leather underneath. For this reason, ENAMELS ai
most satisfactorily used with INVERTED and SILHOUETTE designs, as illustrated belot
To dye light on dark — follow the instructions on opposite page.
WHITE
ENAMEL
VELLOVJ
BLACK
TURQUOISE
ENAMEL
* TURDUOtSE,, MIX GREEN
END BLUE ...RDP WHITE
UNTIL DESIRED SRDDE. .
O/L DYE
OIL DYE
OIL DYE
KEY CASE DESIGN
STAMPED WITH THE "INVERTED'
CARVING TECHNIQUE - HEDDY FOR DYE/NG.
SHE "INVERTED LEATHER CARVING " BOOK HL ST0HLN1AN...
featuring hundreds of new silhouette END /NVERTED DES/GNS /
14
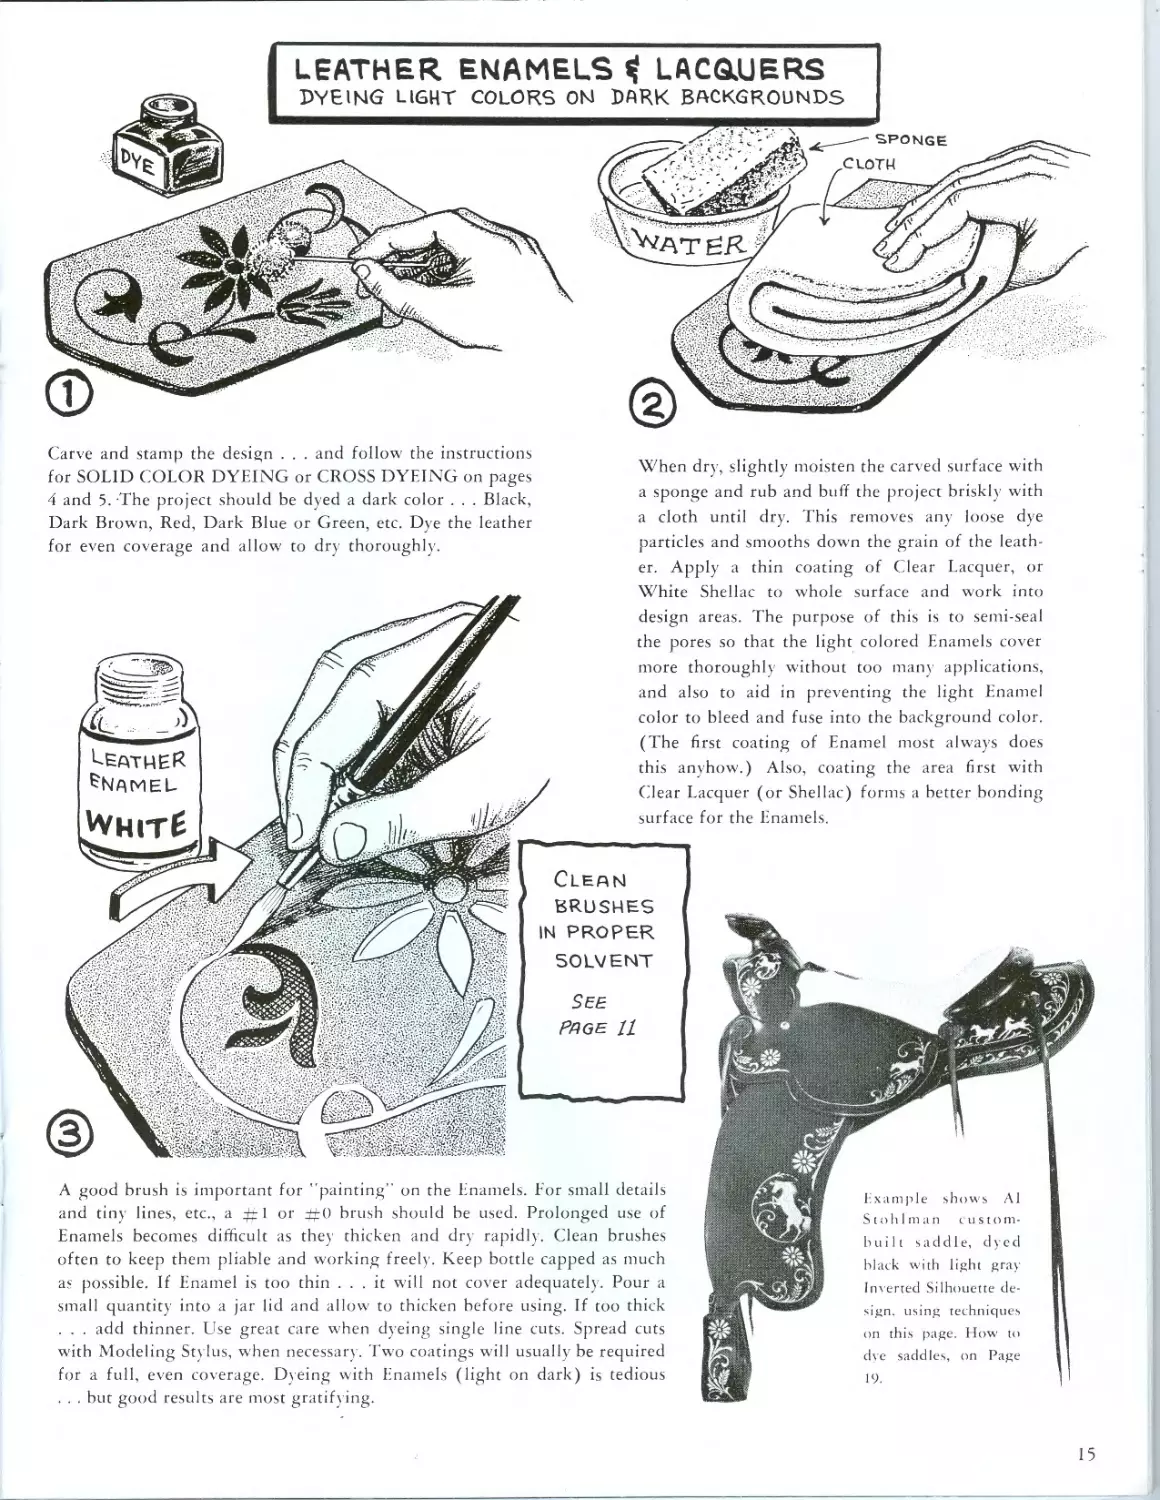
LEATHER ENAMELS $ LACQUERS
DYEING LIGHT COLORS OH DARK BACKGROUNDS
Carve and stamp the design . . . and follow the instructions
for SOLID COLOR DYEING or CROSS DYEING on pages
4 and 5. The project should be dyed a dark color . . . Black,
Dark Brown, Red, Dark Blue or Green, etc. Dye the leather
for even coverage and allow to dry thoroughly.
When dry, slightly moisten the carved surface with
a sponge and rub and buff the project briskly with
a cloth until dry. This removes any loose dye
particles and smooths down the grain of the leath-
er. Apply a thin coating of Clear Lacquer, or
Leather
Enamel
White Shellac to whole surface and work into
design areas. The purpose of this is to semi-seal
the pores so that the light colored Enamels cover
more thoroughly without too many applications,
and also to aid in preventing the light Enamel
color to bleed and fuse into the background color.
(The first coating of Enamel most always does
this anyhow.) Also, coating the area first with
Clear Lacquer (or Shellac) forms a better bonding
surface for the Enamels.
Clern
BRUSHES
IN PROPER
SOLVENT
See
PAGE IL
A good brush is important for "painting" on the Enamels. For small details
and tiny lines, etc., a +r I or i+0 brush should be used. Prolonged use of
Enamels becomes difficult as they thicken and dry rapidly. Clean brushes
often to keep them pliable and working freely. Keep bottle capped as much
as possible. If Enamel is too thin ... it will not cover adequately. Pour a
small quantity into a jar lid and allow to thicken before using. If too thick
. . . add thinner. Use great care when dyeing single line cuts. Spread cuts
with Modeling Stylus, when necessary. Two coatings will usually be required
for a full, even coverage. Dyeing with Enamels (light on dark) is tedious
. . . but good results are most gratifying.
15
LEATHER ANTIQUES
There are many brand names and types of Leather Antiques
available to the craftsman. We will not endeavor to list manu-
facturers names or products here . . . nor make recommenda-
tions ... as each individual will have to experiment with the
various brands and decide for himself which kind of Antique,
or combinations of Antiques, he wishes to use. Antiques come
in several forms: PASTE — LIQUID PASTE — and WATER
solids. Basically . . . each performs the same function; to
"two-tone," or bring out the carving design in greater con-
trast than it was in the natural state, and to bring out the
natural grains of the leather.
Whether the Paste — Liquid Paste — or Water type of An-
tique is used, they are all applied liberally, in excessive
amounts, over the surface of the leather and worked down
into all the carved depressions, knife cuts, pores and grains
of the leather. Each manufacturer’s instructions may differ to
some extent . . . but the surplus is then wiped free of the
surface of the leather with a clean cloth, allowing the color
pigments to remain in all of the depressions. This is the
simplest and quickest form of achieving a two-tone effect with
a single operation. Practice with various brand names on
scraps of leather. Follow manufacturer's instructions.
Antiquing is not only restricted to the use of brown tones.
Some manufacturers furnish antiques in a restricted color
range. You can experiment and make your own
form of mild Antiques by applying small amounts
of Brown, or colored dyes to Fiebings Tan Kot
treeing compound. Mix well and pour liberally
over the carved leather . . . spread with the palm
of your hand and work into depressions with the
fingers. Wipe off excess immediately.
Artist’s Oil Colors (purchase at any art supply
store), can also be used as Antiques. Mix with tur-
pentine to the consistency of cream and apply lib-
erally with a swab. Wipe off surplus with a cloth.
As stated before . . . you will have to experiment
wdth the Antiques to achieve the desired effects or
color shades. It would be impossible to give exact
formulas on these pages, as different leathers
accept different dyes and antique solutions with
many irregularities.
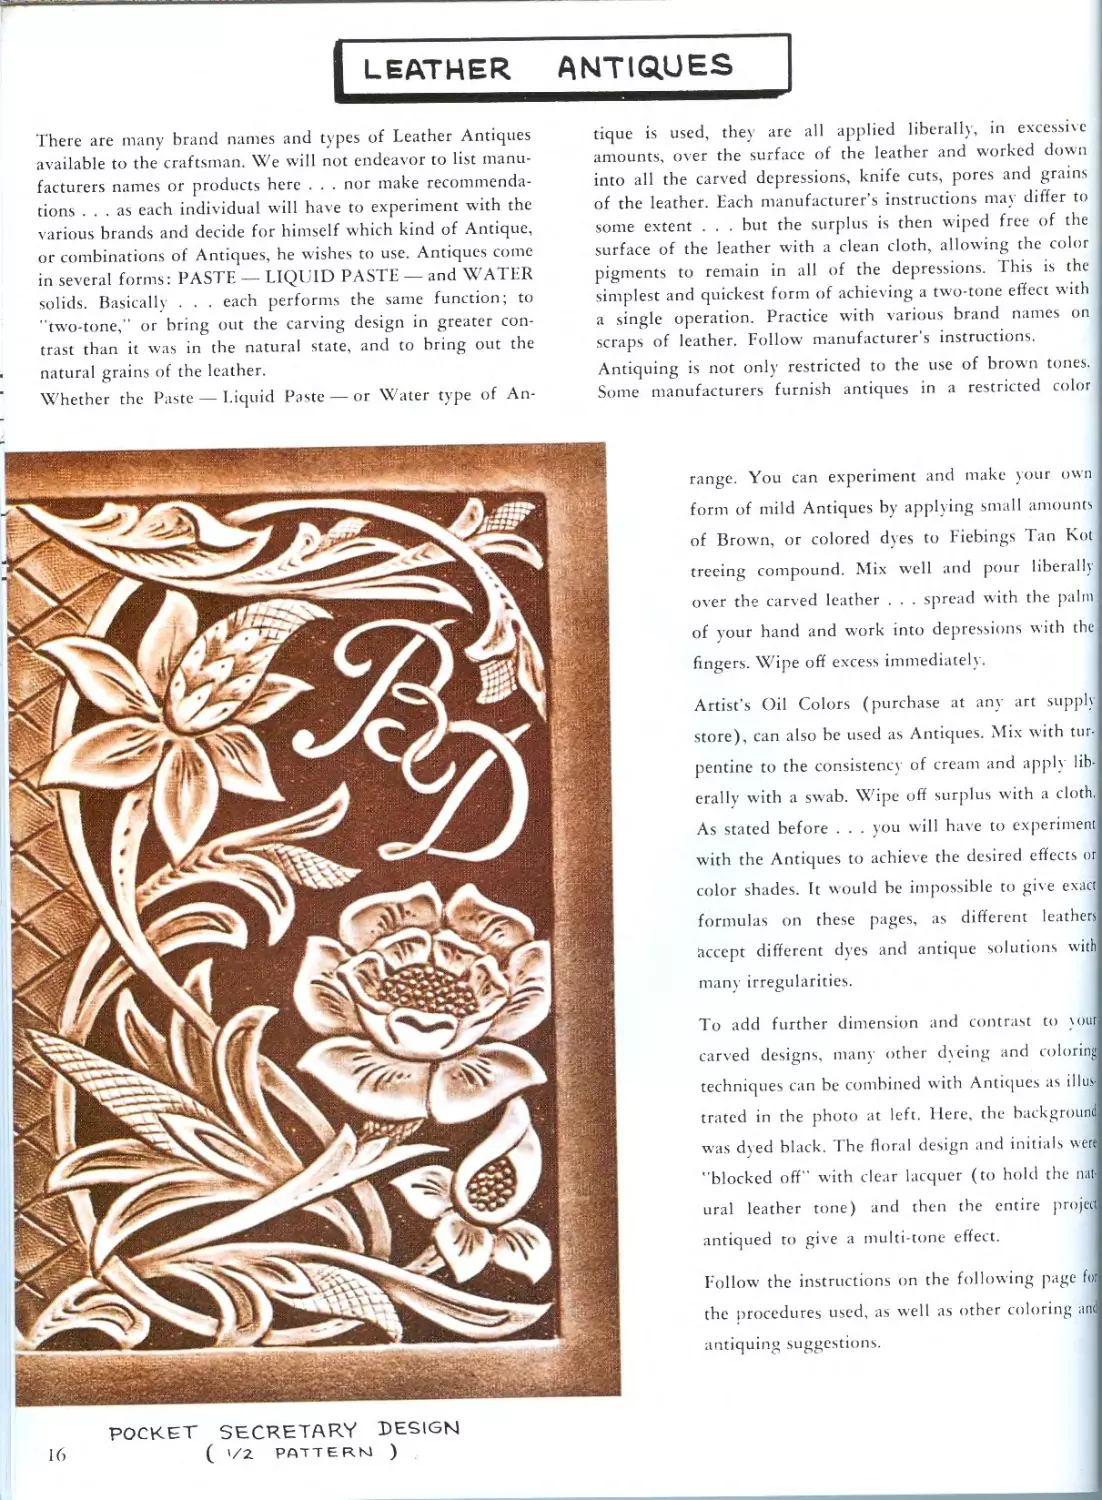
To add further dimension and contrast to your
carved designs, many other dveing and coloring
techniques can be combined with Antiques as illusj
trated in the photo at left. Here, the background
was dyed black. The floral design and initials were
"blocked off" with clear lacquer (to hold the nat-
ural leather tone) and then the entire project
antiqued to give a multi-tone effect.
Follow- the instructions on the following page for
the procedures used, as well as other coloring ant
antiquing suggestions.
POCKET SECRETARY DESIGN
16 ( >/2 PATTERN )
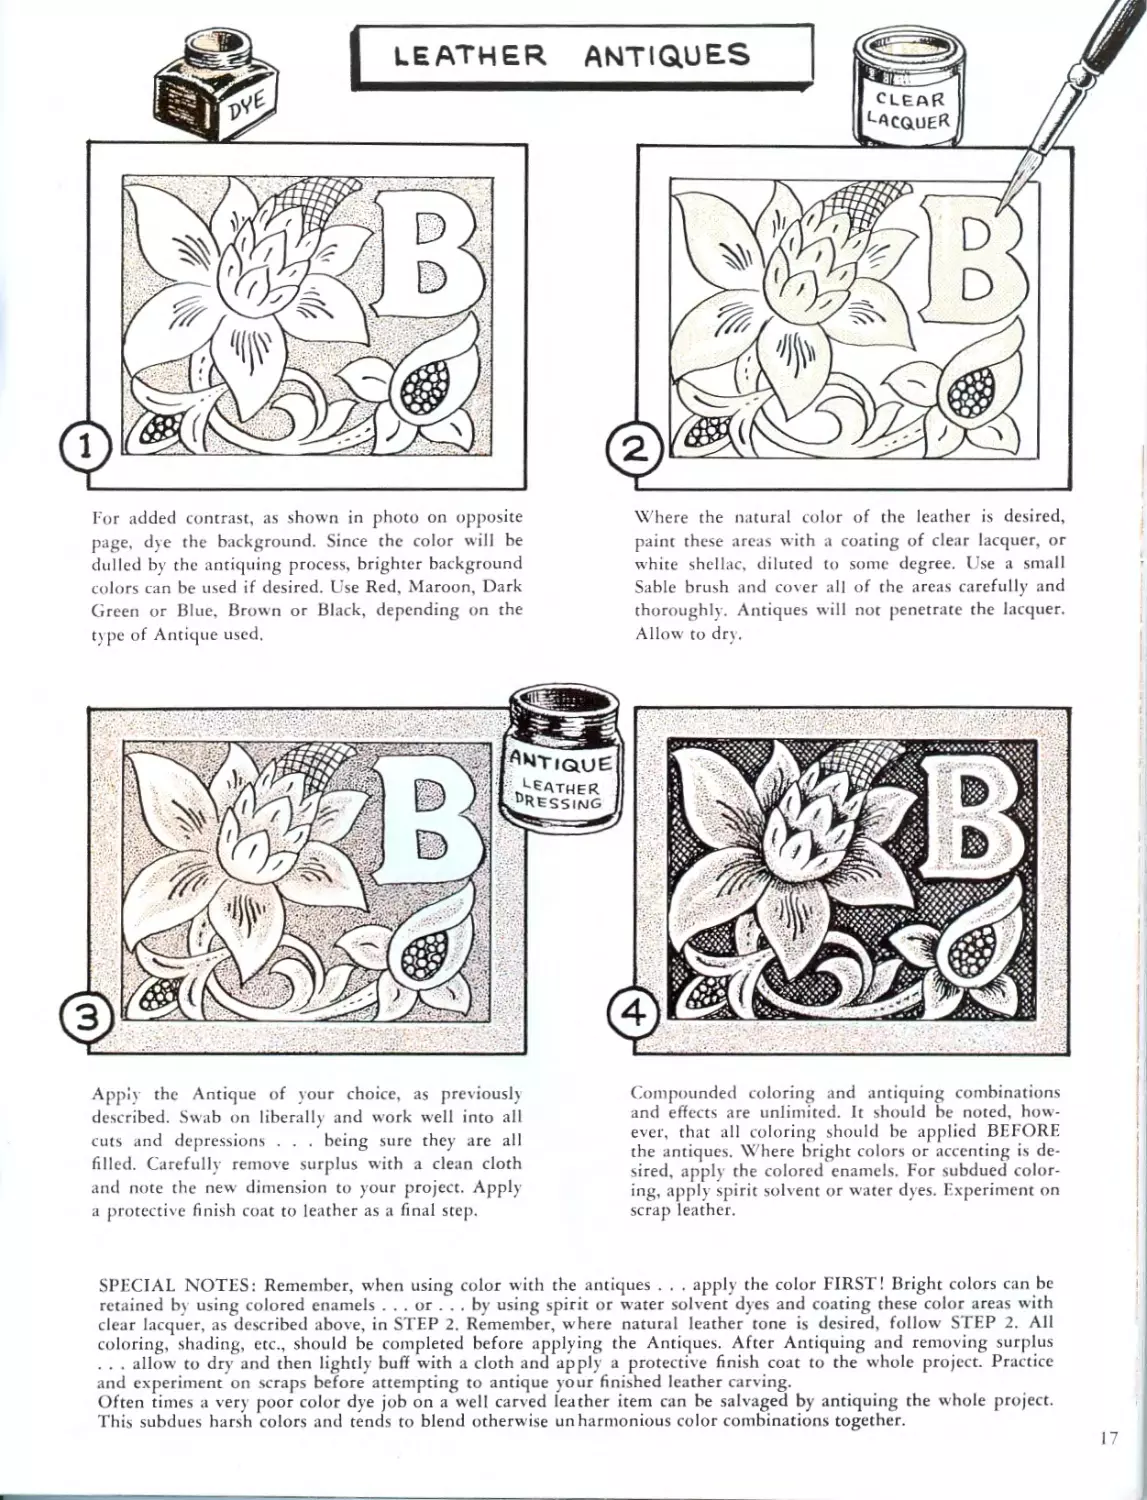
For added contrast, as shown in photo on opposite
page, dye the background. Since the color will be
dulled by the antiquing process, brighter background
colors can be used if desired. Use Red, Maroon, Dark
Green or Blue. Brown or Black, depending on the
ty pe of Antique used.
Where the natural color of the leather is desired,
paint these areas with a coating of clear lacquer, or
white shellac, diluted to some degree. Use a small
Sable brush and cover all of the areas carefully and
thoroughly. Antiques will not penetrate the lacquer.
Allow' to dry .
Apply the Antique of your choice, as previously
described. Swab on liberally and work well into all
cuts and depressions . . . being sure they are all
filled. Carefully remove surplus with a clean cloth
and note the new dimension to your project. Apply
a protective finish coat to leather as a final step.
Compounded coloring and antiquing combinations
and effects are unlimited. It should be noted, how-
ever, that all coloring should be applied BEFORE
the antiques. Where bright colors or accenting is de-
sired, apply the colored enamels. For subdued color-
ing, apply spirit solvent or water dyes. Experiment on
scrap leather.
SPECIAL NOTES: Remember, w'hcn using color with the antiques . . . apply the color FIRST! Bright colors can be
retained by using colored enamels ... or ... bv using spirit or water solvent dyes and coating these color areas with
clear lacquer, as described above, in STEP 2. Remember, where natural leather tone is desired, follow STEP 2. All
coloring, shading, etc., should be completed before applying the Antiques. After Antiquing and removing surplus
. . . allow to dry and then lightly buff with a cloth and apply a protective finish coat to the whole project. Practice
and experiment on scraps before attempting to antique your finished leather carving.
Often times a very poor color dye job on a well carved leather item can be salvaged by antiquing the whole project.
This subdues harsh colors and tends to blend otherwise un harmonious color combinations together.
17
DYEING LEATHER BLACK
BLACK ... is probably one of the greatest causes of frustration
among the dyeing craftsmen, as it is difficult to obtain deep,
lasting penetration and it readily rubs off on hands and cloth-
ing if not properly applied. It does, however, salvage a lot of
ruined dye jobs ... as with the age-old expression: "You can
always dye it black!”
Water base black dyes are not as strong in color depth as the
spirit solvent blacks, but are easier to use and not as difficult
to "set” ... to keep from rubbing off. They can be mixed with
browns (water base) to obtain heavier shading than the browns
can produce by themselves, and have an excellent place in
Figure Carving work.
There are many applications for the use of BLACK with carved
leather decoration. Black must be used with caution and discre-
tion, however, and is best suited to small background areas or
as an accent to the work, as in figure carving (see page 30 and
and the Figure Carved color plates throughout the book). It
can be used very strikingly in larger background areas when
the design has been dyed in color (see PAGE 25). However,
our instructions here are for the purpose of OVER-ALL DYE-
ING.
Spirit Solvent BLACK dyes are rich and strong in intensity and
have greater penetration than the w'ater dyes. One of the bad
characteristics of spirit solvent BLACK is that the thinning
agent evaporates quickly when the container is open and dye
is in use. After prolonged usage, the dye thickens and when
applied, will leave a metallic sheen on the surface of the leather.
This usually disappears when the finish coat is applied. In
severe cases, where a good deal of the thinner has evaporated,
the BLACK actually becomes like paste and brushes on as such.
Practically no penetration results and the Black will rub off on
anything it touches. Do not allow your dye to get in this condi-
tion. Add more thinner to keep it in working condition ... or
throw the solution out and use a fresh supply.
To do a good, permanent, over-all dye job that will not rub
off requires a little effort and a lot of "elbow grease.” First, the
leather must be thoroughly cleaned with oxalic acid solution, or
warm w'ater and mild soap. The dying can begin while the
leather is still a bit damp ... or when dry. Keep plenty of
newspapers underneath the object to be dyed, and in the sur-
rounding area.
First . . . dye the leather BLUE — GREEN — or DARK
BROWN. (Use spirit solvent dyes.) BLUE is a very concen-
trated, penetrating color that acts as a good base, and "sets the
stage” for the acceptance of the BLACK. When dyeing the
BLUE, follow instructions on PAGE 4.
NEXT . . . apply the BLACK. On the first coating, do not t
for heavy coverage . . . try to put the dye on uniformly, a
over. Be sure it gets into all the cuts and design depression
Allow to dry thoroughly. When the first coating has dried, n
over the entire surface with a soft, cotton cloth. Rub back ar
forth and in a circular motion, not applying too much pressur
but firm enough to remove all of the loose black that is layir
on the surface of the leather. A lot of black will come off t
the cloth . . . some of the blue may show through.
Apply a second coating of Black. Make this application liber
to be sure of full coverage. Allow to dry thoroughly. Wht
dry, rub again with the cloth to remove more loose particles <
Black. Now, wet your sponge in water and moisten the enti:
surface of the black leather. Take a clean linen cloth, and n
briskly back and forth and in several directions. The purpo
of the water is to raise and soften the grain of the leather. Tl
action of the cloth removes tiny, loose particles of Black ente
ing the pores ... at the same time laying the grain back dowi
closing the pores and burnishing the surface. Rub the clot
briskly until you can feel the heat generated by the frictiot
Rub until no more black appears on the cloth. If any Blue sti
show's . . . the operation will have to be repeated.
Generally, two applications of Black are sufficient for most cr;
projects such as wallets, belts, handbags, etc. Three applicatior
are recommended for Holsters, Gun Belts, Saddles, or otht
items that will undergo heavy usage and abuse. After the fir!
coat rubbing . . . add the moisture to the leather before eac
following rubbing operation.
BLACK dyeing (with spirit solvent dye is harmful to man
oils in the leather and if not replaced, the leather become
brittle and may crack at folds or bends. Leathers lighter tha:
4 oz. can be conditioned with creams or saddle soap, etc. Neat!
foot oil is recommended for heavier leathers. It is very pent
trating and will aid in "setting” the dye. It also intensifies th
color. Apply it liberally with a sheep-wool applicator or laq
brush. Allow plenty of time for it to penetrate and dry befor
rubbing again with a cloth. After 24 hours, buff the leathe
and apply a finish coat as usual.
Note: Neatsfoot Oil is very penetrating. If applied too
freely on light weight leathers it may bleed through to the
flesh side . . . and would soil the lining leather (if used).
Use Neatsfoot Oil carefully.
BLACK . . . can be reduced to varying shades of grey by addit
more amounts of thinner or dye reducer. Often times you wi
find the need for a grey tone in your leathercraft projects.
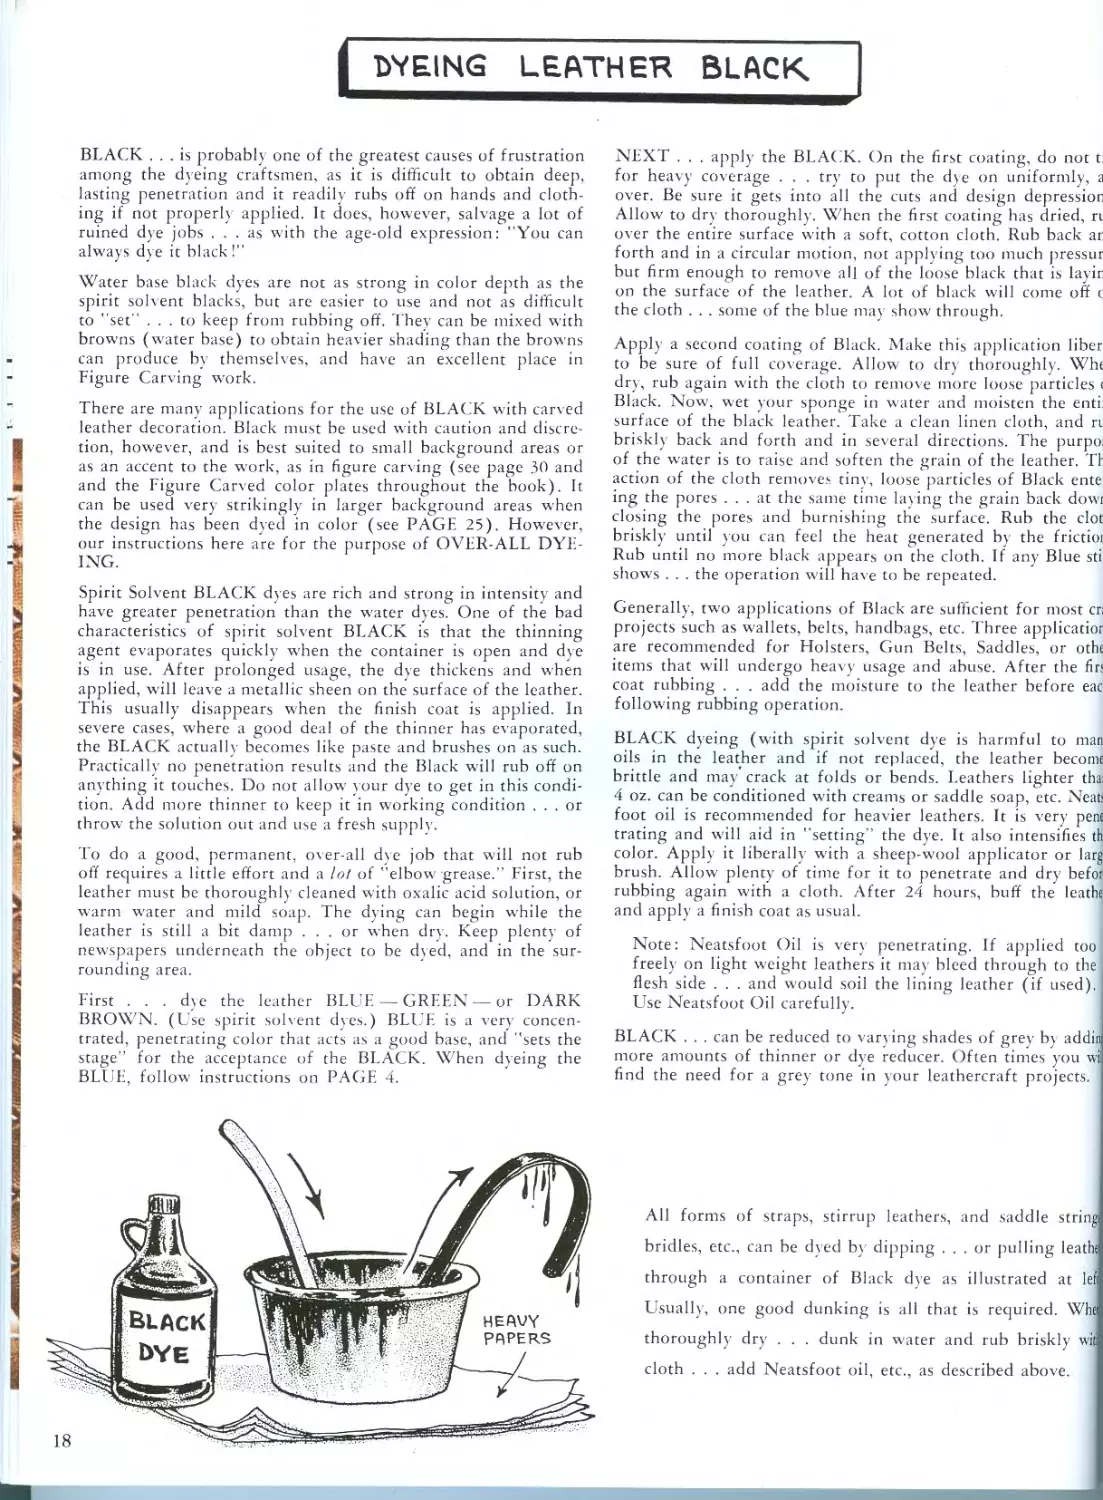
All forms of straps, stirrup leathers, and saddle string
bridles, etc., can be dyed by dipping ... or pulling leathe
through a container of Black dye as illustrated at lei
Usually, one good dunking is all that is required. Win
thoroughly dry . . . dunk in water and rub briskly wi
cloth . . . add Neatsfoot oil, etc., as described above.
18
DYEING YOUR SADDLE BLACK
HORN
SEAT
CANTLE
water
even
SCREVY
saddle
obtained
with the
SKIRT
as shown
part,
SKIRT
TIE CONCHO
FENDER
CONCHO
STIRRUP
TIE CONCHO
TREE BOR
strings.
STIRRUP STRAP
SWELL
BINDING
SADDLE
STRINGS
STIRRUP
LEATHER.
CONTLE
.BINDING
LEATHER
ROSETTE
STIRRUP
STRAP
STIRRUP
LEATHER
LACING
STRINGS
LEATHER
ROSETTE
SEAT -
JOCKEY
SEAT
JOCKEY
RIGGING
LEATHER
RIGGING
RING
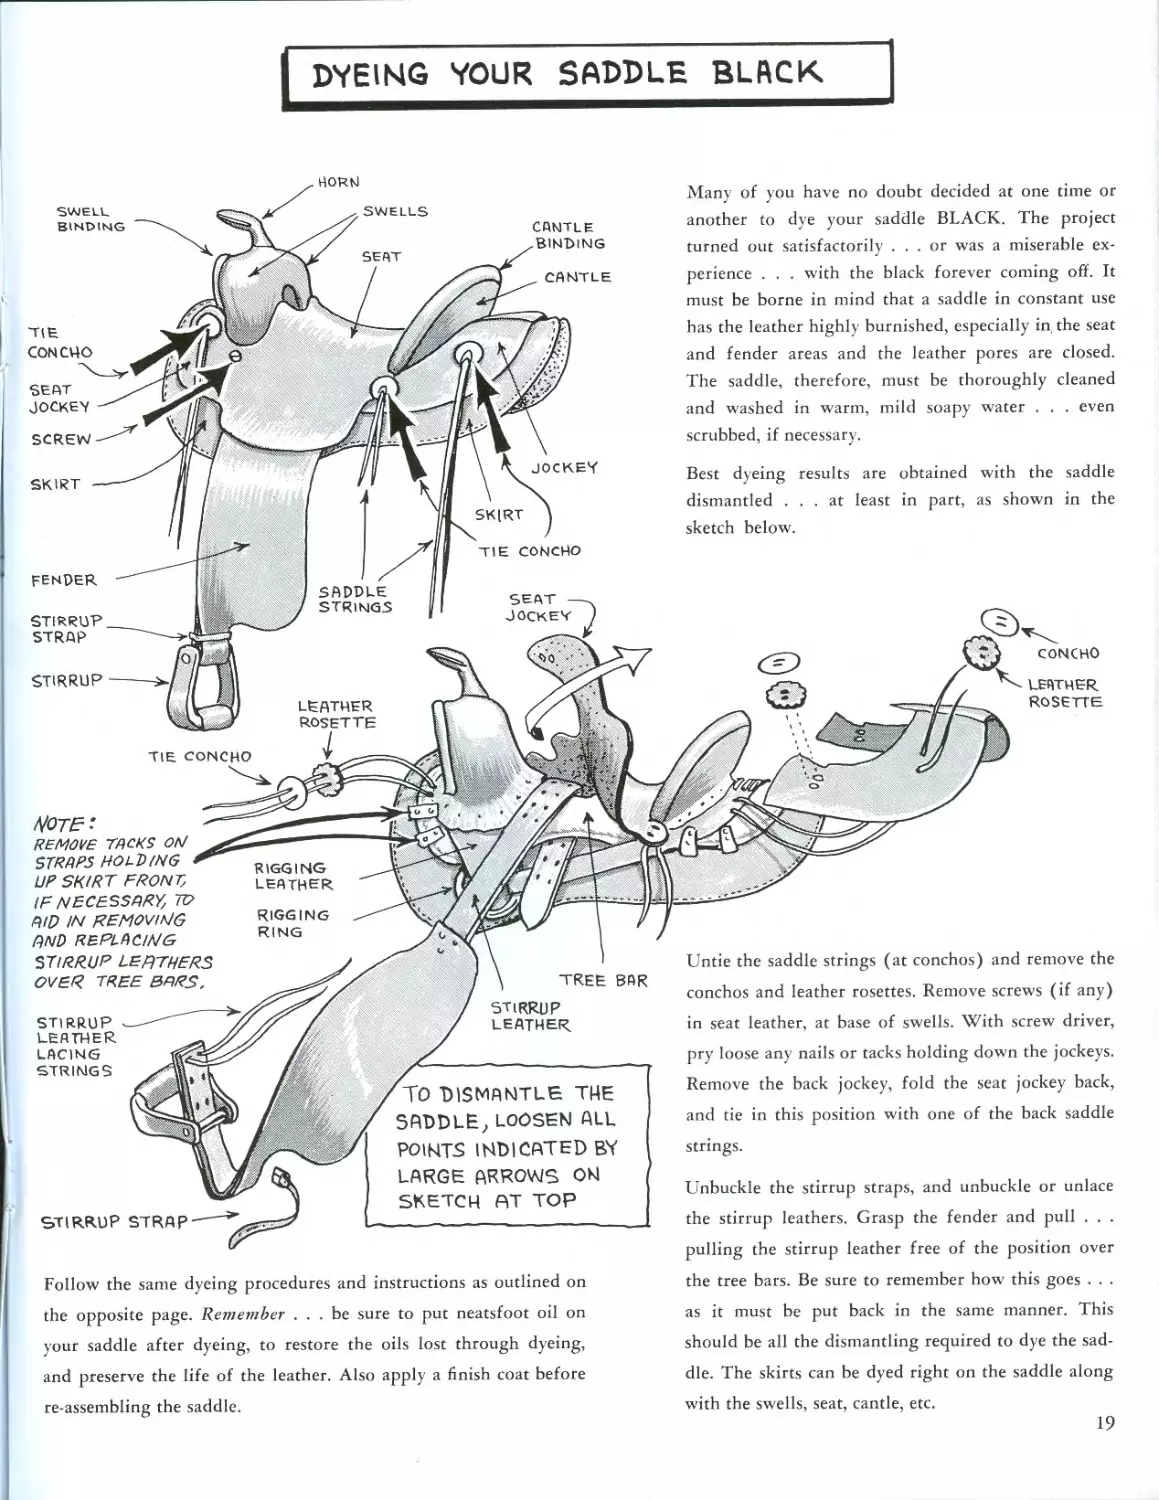
TO DISMANTLE THE
SADDLE,LOOSEN ALL
POINTS INDICATED BY
LARGE ARROWS ON
SKETCH AT TOP
Note
REMOVE TACKS ON
STRAPS HOLDING
UP SKIRT FRONT,
IF NECESSARY, TO
PUD IN REMOVING
AND REPLACING
STIRRUP LEATHERS
OVER TREE ERRS.
TIE
CONCHO
Untie the saddle strings (at conchos) and remove the
conchos and leather rosettes. Remove screws (if any)
in seat leather, at base of swells. With screw driver,
Unbuckle the stirrup straps, and unbuckle or unlace
the stirrup leathers. Grasp the fender and pull . . .
pulling the stirrup leather free of the position over
Best dyeing results are
dismantled ... at least
sketch below.
pry loose any nails or tacks holding down the jockeys.
Remove the back jockey, fold the seat jockey back,
and tie in this position with one of the back saddle
Many of you have no doubt decided at one time or
another to dye your saddle BLACK. The project
turned out satisfactorily ... or was a miserable ex-
perience . . . with the black forever coming off. It
must be borne in mind that a saddle in constant use
has the leather highly burnished, especially in the seat
and fender areas and
The saddle, therefore,
and washed in warm,
scrubbed, if necessary.
the leather pores are closed,
must be thoroughly cleaned
mild soapy
Follow the same dyeing procedures and instructions as outlined on
the opposite page. Remember ... be sure to put neatsfoot oil on
your saddle after dyeing, to restore the oils lost through dyeing,
and preserve the life of the leather. Also apply a finish coat before
the tree bars. Be sure to remember how this goes . . .
as it must be put back in the same manner. This
should be all the dismantling required to dye the sad-
dle. The skirts can be dyed right on the saddle along
re-assembling the saddle.
with the swells, seat, cantie, etc.
19
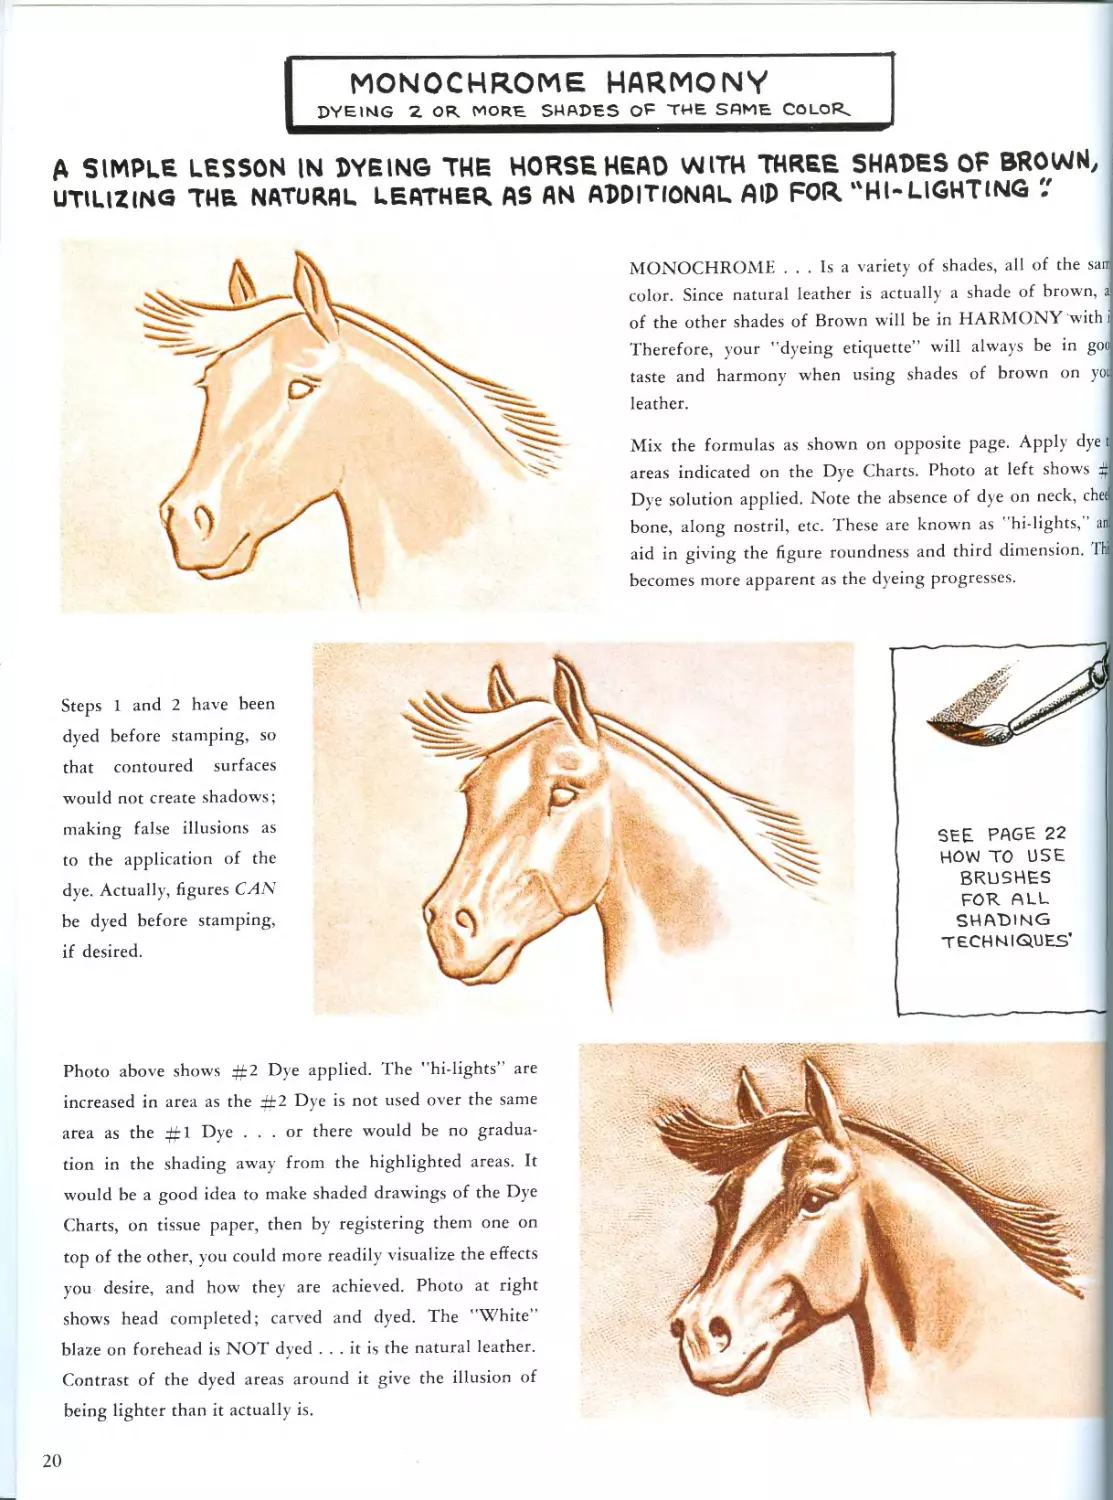
MONOCHROME HARMONY
DYEING 2 OR MORE SHADES OF THE SAME COLOK.
A SIMPLE LESSON IN DYEING THE HORSEHEAD WITH THREE SHADES OF BROWH,
UTILIZING THE NATURAL LEATHER AS AN ADDITIONAL AID FOR "HI-LIGHTING 7
MONOCHROME ... Is a variety of shades, all of the san
color. Since natural leather is actually a shade of brown, a
of the other shades of Brown will be in HARMONY with i
Therefore, your "dyeing etiquette” will always be in goo
taste and harmony when using shades of brown on yoi
leather.
Mix the formulas as shown on opposite page. Apply dye ti
areas indicated on the Dye Charts. Photo at left shows ±'
Dye solution applied. Note the absence of dye on neck, chea
bone, along nostril, etc. These are known as "hi-lights," an:
aid in giving the figure roundness and third dimension. Th
becomes more apparent as the dyeing progresses.
Steps 1 and 2 have been
dyed before stamping, so
that contoured surfaces
would not create shadows;
making false illusions as
to the application of the
dye. Actually, figures CAN
be dyed before stamping,
if desired.
SEE PAGE 22
HOW TO USE
BRUSHES
FOR ALL
SHADING
TECHNIQUES'
Photo above shows ±i2 Dye applied. The "hi-lights” are
increased in area as the it2 Dye is not used over the same
area as the ifl Dye ... or there would be no gradua-
tion in the shading away from the highlighted areas. It
would be a good idea to make shaded drawings of the Dye
Charts, on tissue paper, then by registering them one on
top of the other, you could more readily visualize the effects
you desire, and how they are achieved. Photo at right
shows head completed; carved and dyed. The "White"
blaze on forehead is NOT dyed ... it is the natural leather.
Contrast of the dyed areas around it give the illusion of
being lighter than it actually is.
20
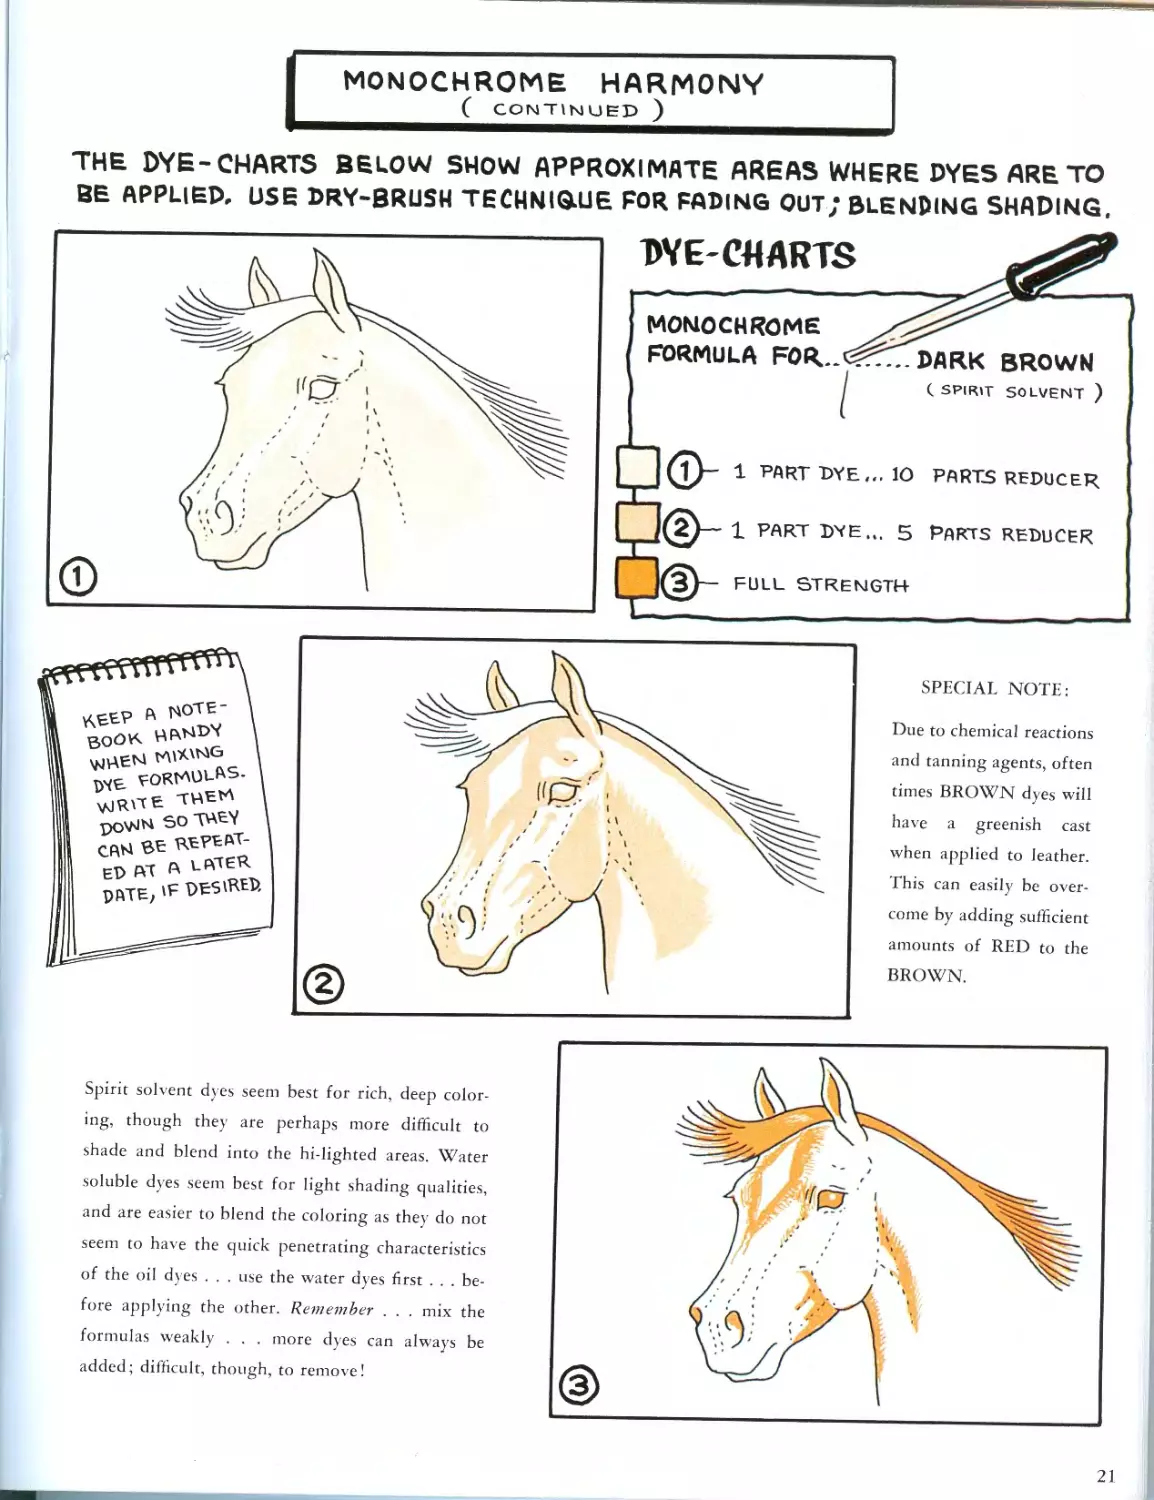
MONOCHROME HARMONY
( continued )
THE DYE-CHARTS BELOW SHOW APPROXIMATE AREAS WHERE DYES ARE TO
BE APPLIED, DSE DRY-BRUSH TECHNIQUE FOR FADING OUT; BLENDING SHADING.
SPECIAL NOTE:
Due to chemical reactions
and tanning agents, often
times BROWN dyes will
have a greenish cast
when applied to leather.
This can easily be over-
come by adding sufficient
amounts of RED to the
BROWN.
Spirit solvent dyes seem best for rich, deep color-
ing, though they are perhaps more difficult to
shade and blend into the hi-lighted areas. Water
soluble dyes seem best for light shading qualities,
and are easier to blend the coloring as they do not
seem to have the quick penetrating characteristics
of the oil dyes . . . use the water dyes first . . . be-
fore applying the other. Remember . . . mix the
formulas weakly . . . more dves can always be
added; difficult, though, to remove!
21
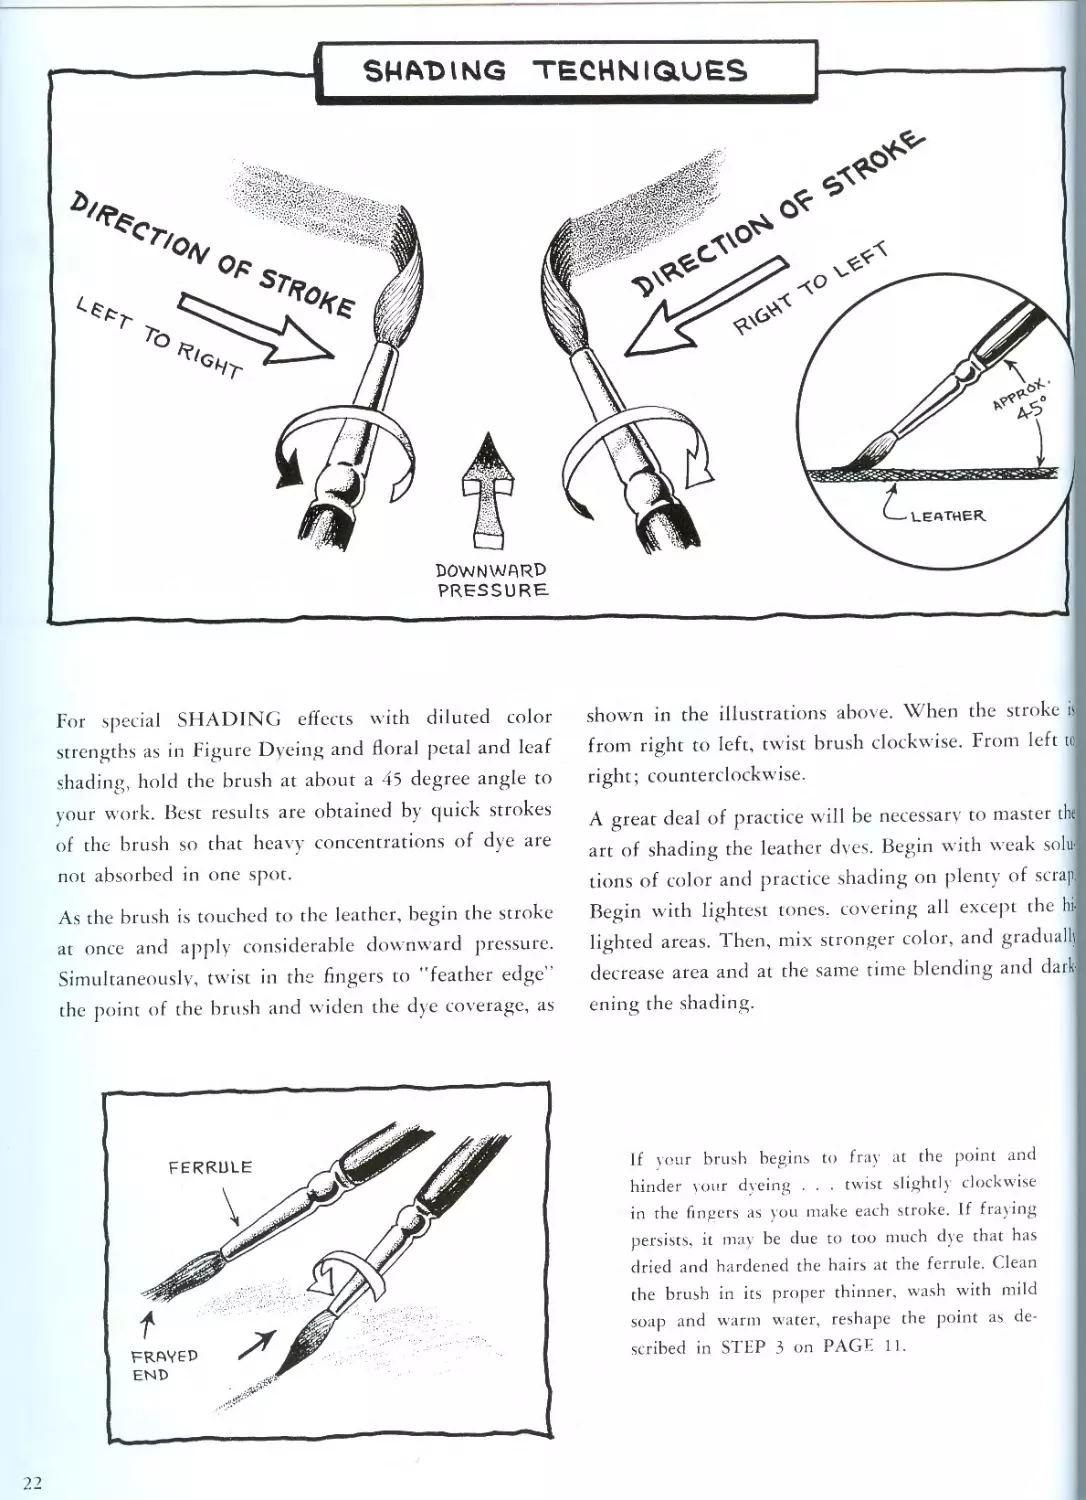
SHADING TECHNIQUES
For special SHADING effects with diluted color
strengths as in Figure Dyeing and floral petal and leaf
shading, hold the brush at about a 45 degree angle to
your work. Best results are obtained by quick strokes
of the brush so that heavy concentrations of dye are
not absorbed in one spot.
As the brush is touched to the leather, begin the stroke
at once and apply considerable downward pressure.
Simultaneously, twist in the fingers to "feather edge"
the point of the brush and widen the dye coverage, as
shown in the illustrations above. When the stroke i
from right to left, twist brush clockwise. From left t<
right; counterclockwise.
A great deal of practice will be necessary to master th
art of shading the leather dyes. Begin with weak sola
tions of color and practice shading on plenty of scrap
Begin with lightest tones, covering all except the hi
lighted areas. Then, mix stronger color, and gradua
decrease area and at the same time blending and dark
ening the shading.
If your brush begins to fray at the point and
hinder your dyeing . . . twist slightly clockwise
in the fingers as you make each stroke. If fraying
persists, it may be due to too much dye that has
dried and hardened the hairs at the ferrule. Clean
the brush in its proper thinner, wash with mild
soap and warm water, reshape the point as de-
scribed in STEP 3 on PAGE 11.
22
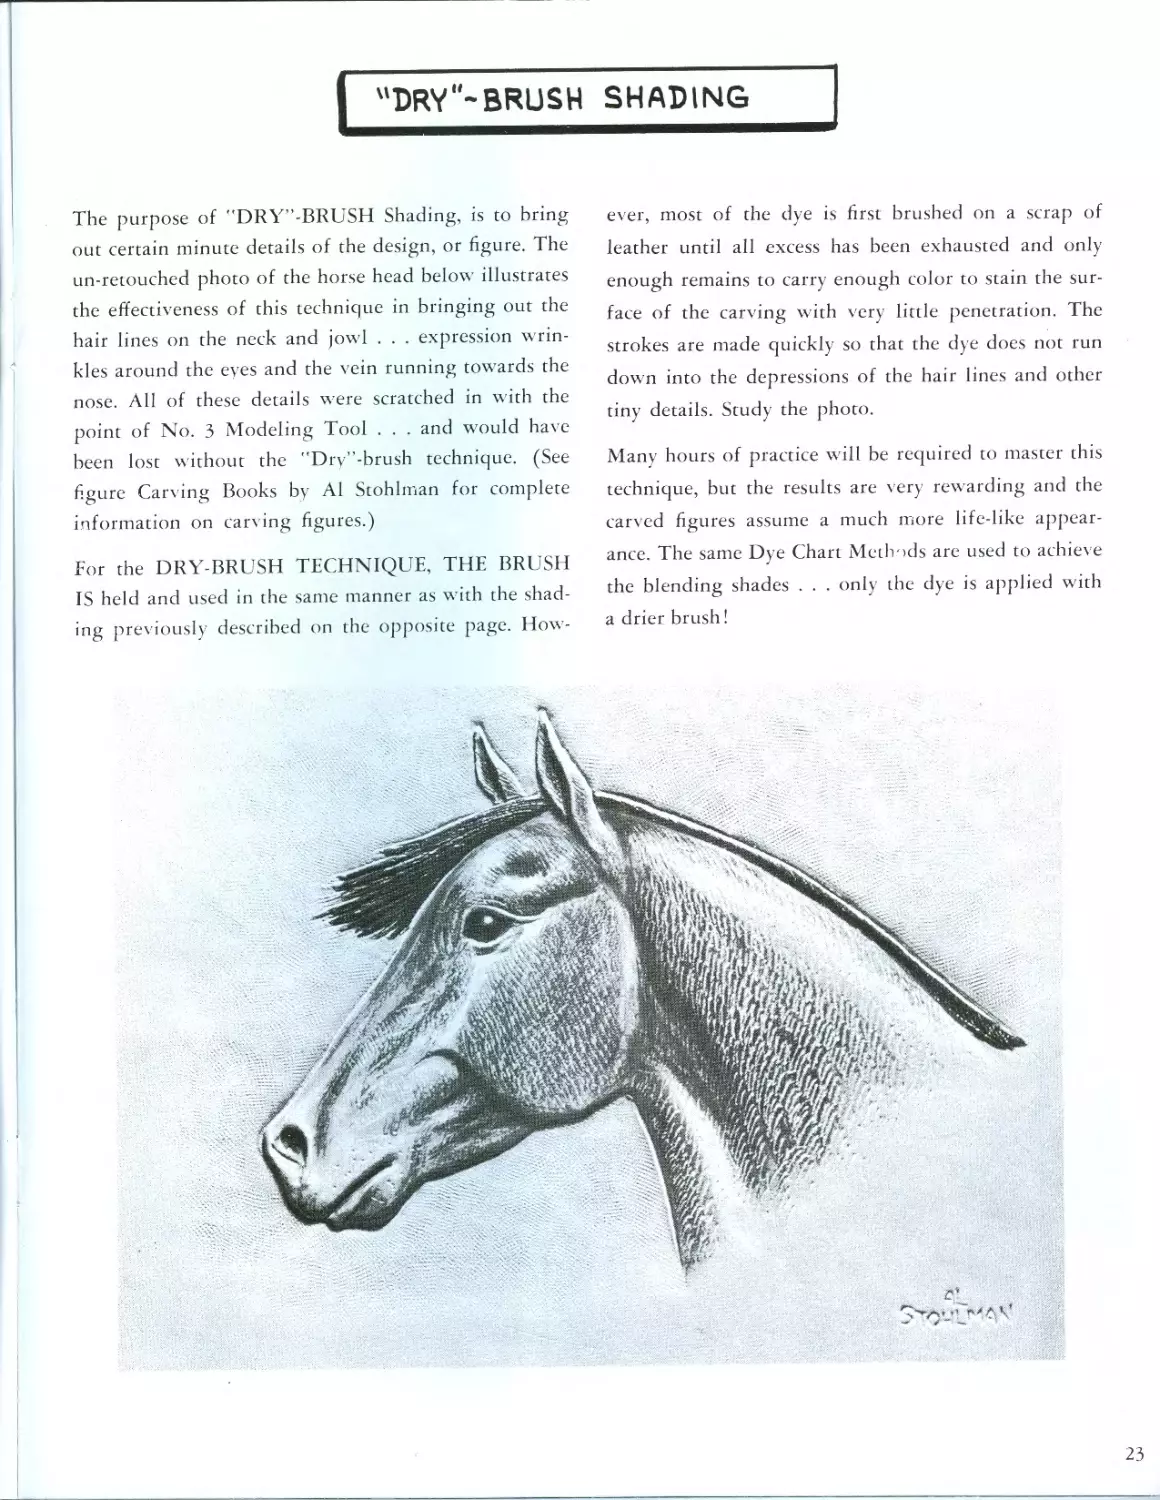
"DRY"-BRUSH SHADING
The purpose of "DRY”-BRUSH Shading, is to bring
out certain minute details of the design, or figure. The
un-retouched photo of the horse head below illustrates
the effectiveness of this technique in bringing out the
hair lines on the neck and jowl . . . expression wrin-
kles around the eyes and the vein running towards the
nose. All of these details were scratched in with the
point of No. 3 Modeling Tool . . . and would have
been lost without the "Dry”-brush technique. (See
figure Carving Books by Al Stohhnan for complete
information on carving figures.)
For the DRY-BRUSH TECHNIQUE, THE BRUSH
IS held and used in the same manner as with the shad-
ing previously described on the opposite page. How-
ever, most of the dye is first brushed on a scrap of
leather until all excess has been exhausted and only
enough remains to carry enough color to stain the sur-
face of the carving with very little penetration. The
strokes are made quickly so that the dye does not run
down into the depressions of the hair lines and other
tiny details. Study the photo.
Many hours of practice will be required to master this
technique, but the results are very rewarding and the
carved figures assume a much more life-like appear-
ance. The same Dye Chart Methods are used to achieve
the blending shades . . . only the dye is applied with
a drier brush!
23
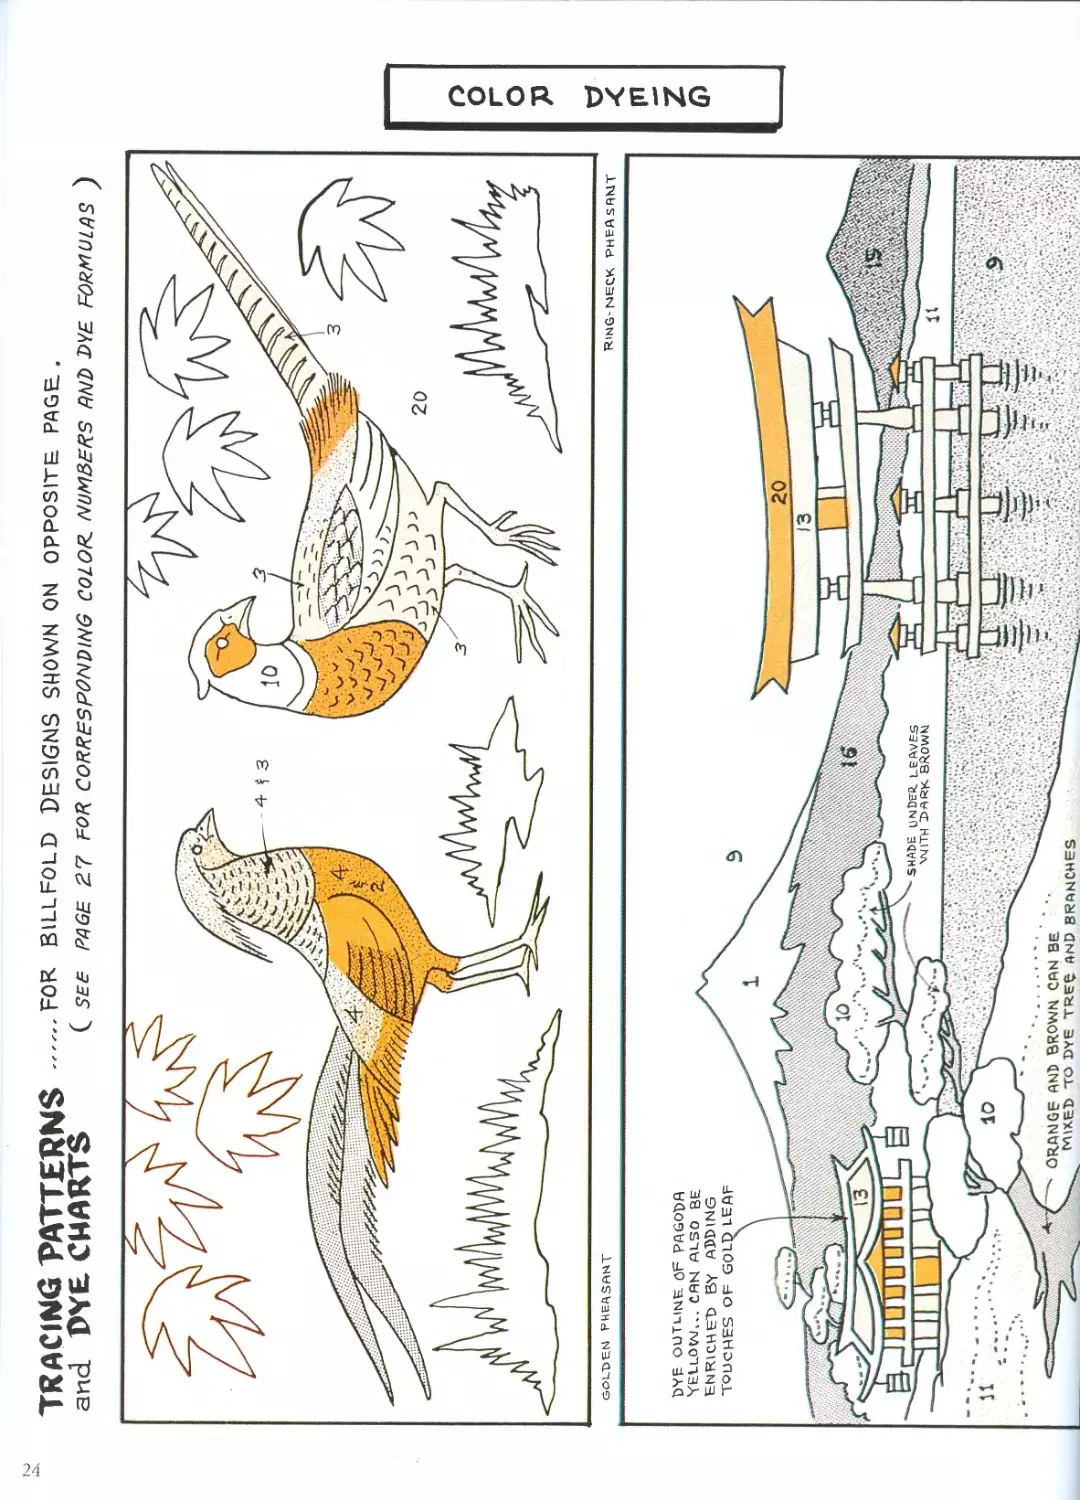
TRACING PATTERNS ......F0R billfold designs shown on opposite page.
and RYE CHARTS ( SEE PAGE 27 POP CORRESPONDING COLOR. NUMBERS RND DYE FORMULAS )
GOLDEN PHEASANT
RING-NECK PHEASANT
О
о
о
p
о
m
z
6)
n
о
о
W
rn
in
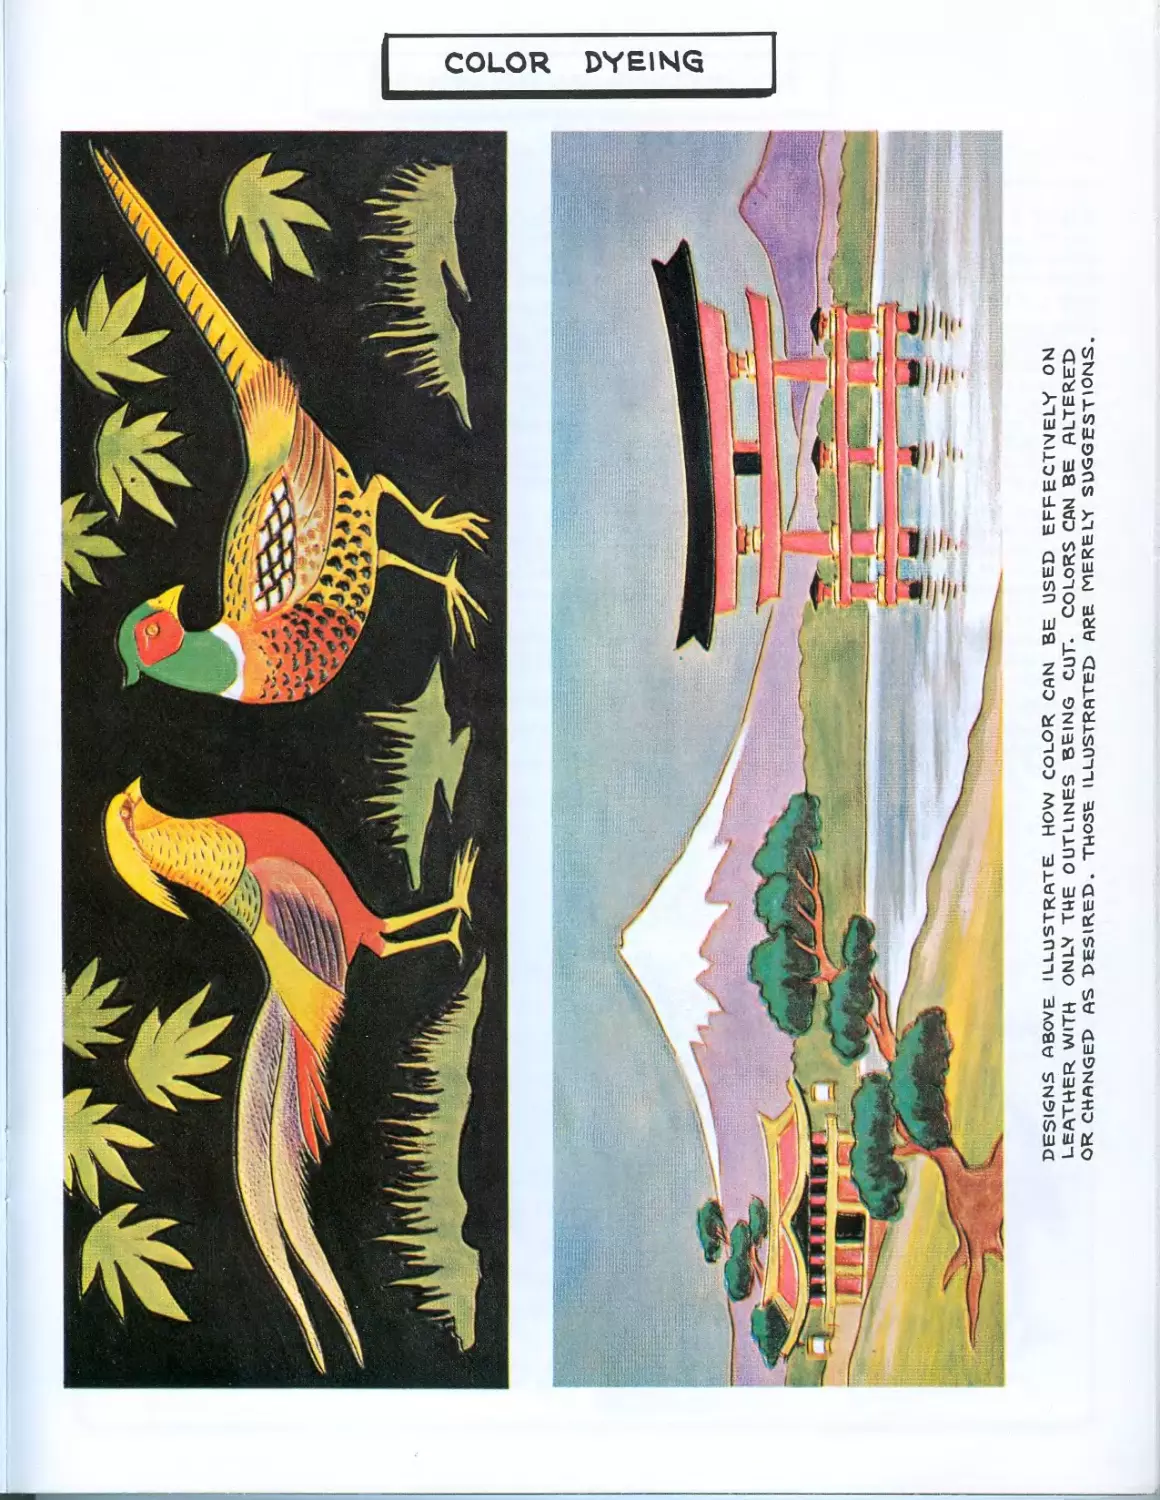
DESIGNS ABOVE ILLUSTRATE HOW COLOR CAN BE USED EFFECTIVELY ON
LEATHER WITH ONLV THE OUTLINES BEING CUT. COLORS CAN BE ALTERED
OR CHANGED AS DESIRED. THOSE ILLUSTRATED ARE MERELT SUGGESTIONS.
| ACCENTING WITH WHITE
WHITE is not a color . . . nor is there a WHITE DYE. The
only Whites available are Enamels, or white finishes (pig-
ments), that only remain on the surface of the leather, or settle
in the pores and other depressions. Heavy applications are
subject to cracking, flaking, and rubbing off.
Often times, the craftsman wants certain areas of his carving
dyed WHITE. As a general rule . . . very little, if any White
should be used on carved leather designs. Pure WHITE, if too
prominent, detracts from the overall effect of the carving and
gives an "unnatural appearance.” This is especially true in
Figure Carving where the solid White of a horse’s marking,
clouds, etc., (if "painted in solid") are the first to "hit-you-in-
the-face!” The photo illustrations below should clearly illus-
trate this point.
The photo on the right shows the WRONG uses of WHITE.
Here, the clouds are painted in heavily; solid white. The mark-
ings on the horse as well as the bleached cow skull are much
too apparent to the viewer.
The example on the left is much more pleasing to the eye. Here
the WHITE is used in its most sparing form on the clouds.
The horse, being the nearest object in the scene, has the heav-
iest application of White. EVEN here, the white is used very
sparingly.
The WHITE used on these carvings was the NEAT DYE
(water solvent) brand. A liquid white shoe polish will perform
satisfactorily also, as only the pigment worked into the leather
grain and pores should be allowed to remain. Heavy accumula-
tions of white solids should be removed. Unless black or othei
bright colors are used, the addition of WHITE should mostly
be "suggestive,” rather than "painted” on in solid, opaqut
form.
Usually, in figure carving, the "white” effect desired is created
by "suggestion” only. That is . . . dyeing the surrounding area,
in sharper contrast and leaving the natural color of the leathei
to "suggest” the white (see Horsehead illustration, Page 20)
These "White” areas can be clear lacquered if desired to pre-
serve as much as possible the original, natural color of the
leather. You will find that this suggested type of "whiting'1
. . . or the slightest of White dye application as previousl!
described is far more satisfactory and in much better harmonj
with the overall effect of the leather carving.
In direct contrast to all that has just been reviewed, WHITE
can be used heavily in concentrated form. But, as previously
mentioned, other strong colors must be used in combination
with white ... to balance the overall effect. A very fine
example of this is shown in the color plate on PAGE 28. Notice
the white . . . toned and shaded with yellow. Also, notice the
other bright yellow flowers . . . the black . . . the purple . .
and bright greens ... all aiding to pull the eye away from the
White, and balance the scene.
Use WHITE on your leathercraft designs . . . but remember its
place. Also remember that any color lighter than the natural
color of the leather itself should be used with caution and
discretion.
RIGHT
WRONG
26
COLOR SHADING
COLOR SHADING is actually no different than Monochrome
Shading as described on page 20. The same brushing techniques
are used and the same dyeing procedures apply. The only dif-
ference . . . the addition of color.
The colors are usually applied in reduced form, also allowing
the "hi-lighted" areas to remain undyed just as with the mono-
chrome shading. The brown tones are used with color shading
to aid in blending the colors and also to neutralize any harsh,
unharmonious color applications. PAGES 30 and 31 present
patterns and complete DYE CHARTS for color application.
It is a good practice to have all of your various color shades
pre-mixed and bottled in small non-tipping jars . . . and labeled
with the name or number of the color. Always try your color
shades on scraps of leather. Remember too, that colors appear
darker when wet . . . before the\ have completely dried. Mix
and experiment . .. experiment and mix.
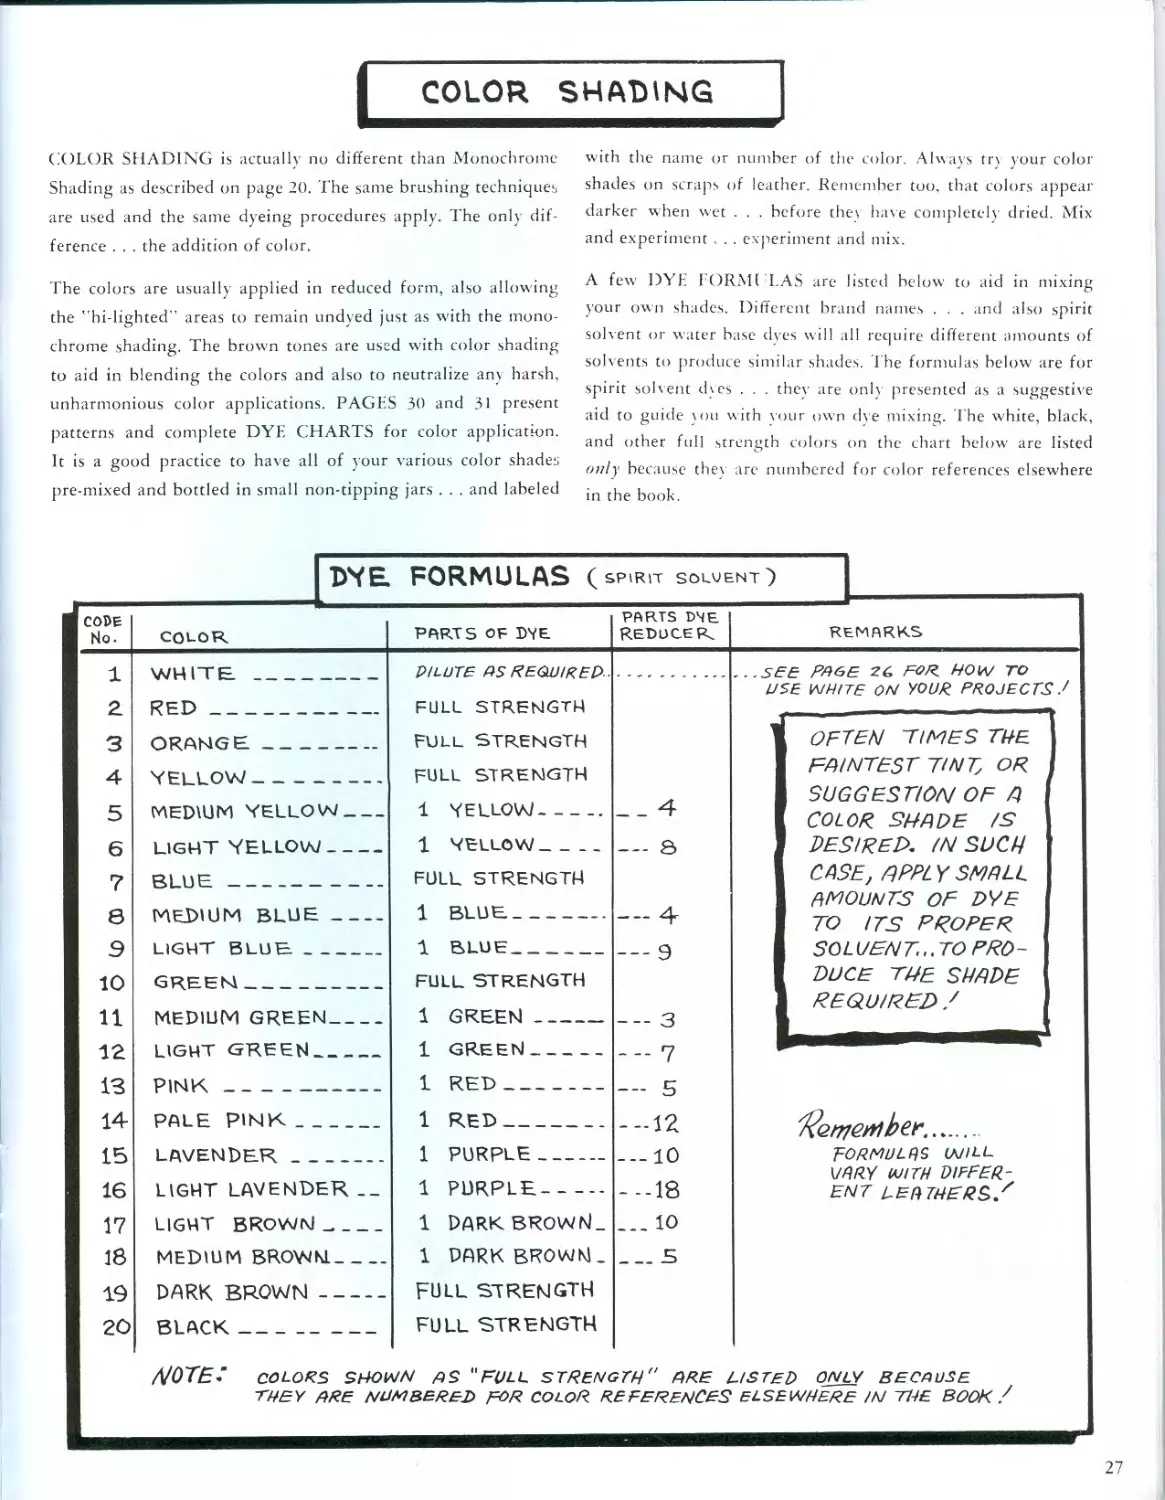
A few DYE FORM! LAS are listed below to aid in mixing
your own shades. Different brand names . . . and also spirit
solvent or water base dyes will all require different amounts of
solvents to produce similar shades. The formulas below are for
spirit solvent dyes . . . they are only presented as a suggestive
aid to guide you with your own dye mixing. The white, black,
and other full strength colors on the chart below are listed
only because they are numbered for color references elsewhere
in the book.
DYE. FORMULAS (spirit solvent)
CODE No. COLOR PARTS OF DTE PARTS D4E REDUCEК REMARKS
1 2. 3 4 5 6 7 8 Э 10 11 WHITE. RED ORANGE. YELLOW MEDIUM YELLOW LIGHT YELLOW BLUE MEDIUM BLUE LIGHT BLUE. _ _ PI LUTE AS REQUIRED . FULL STRENGTH Full strength FULL STRENGTH 1 YELLOW 1 YELLOW FULL STRENGTH 1 BLUE.- . . PFC-.F FOR HOW TO
1 1 1 : । F CP -F USE WHITE ON YOUR PROJECTS
OFTEN TIMES THE FAINTEST TINT, OR SUGGESTION OF A COLOR SHADE /S DESIRED. IN SUCH CASE, QPPL Y SMALL AMOUNTS OF DYE TO ITS PROPER SOLVENT,. TO PRO- DUCE THE SHADE REQUIRED /
1 BLUE FULL STRENGTH 1 GREEN ii । i ii • । ii ii J GO GO
GREEN
MEDIUM GREEN LIGHT GREEN
12 13 14 15 16 17 18 19 20 1 GREEN
PINK PALE PINK LAVENDER LIGHT LAVENDER __ LIGHT BROWN-, MEDIUM BROWN. DARK BROWN 1 RED 1 RED 1 PURPLE 1 PURPLE — 5 ---12 --10 IP FORMULAS WILL UR RY WITH DIFFER- ENT LEATHERS/ -IS TED only BECAUSE ELSEWHERE IN THE BOOK /
1 DARK BROWN- 1 DARK BROWN. FULL STRENGTH FULL STRENGTH YN ZJS "FULL STRENC mbered for color r ... 10 s гГЧ" ORE L EFERENCES
BLACK /\10TE’ colors suob THEY ARE NU
27
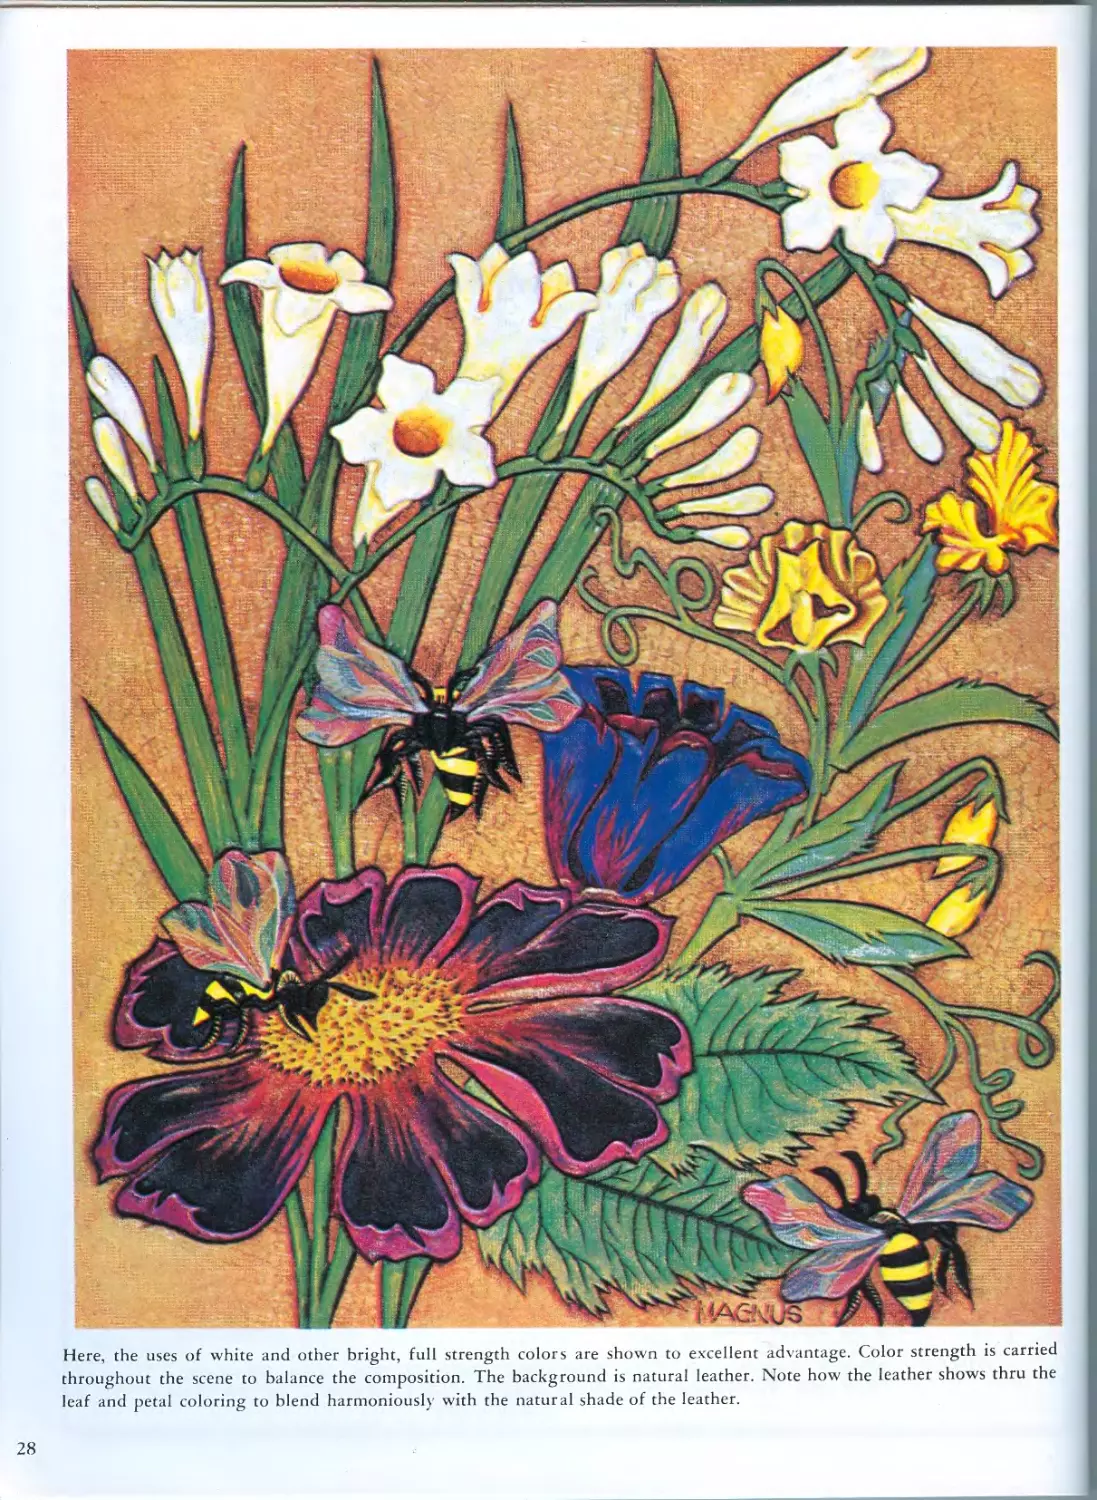
Here, the uses of white and other bright, full strength colors are shown to excellent advantage. Color strength is carried
throughout the scene to balance the composition. The background is natural leather. Note how the leather shows thru the
leaf and petal coloring to blend harmoniously with the natural shade of the leather.
28
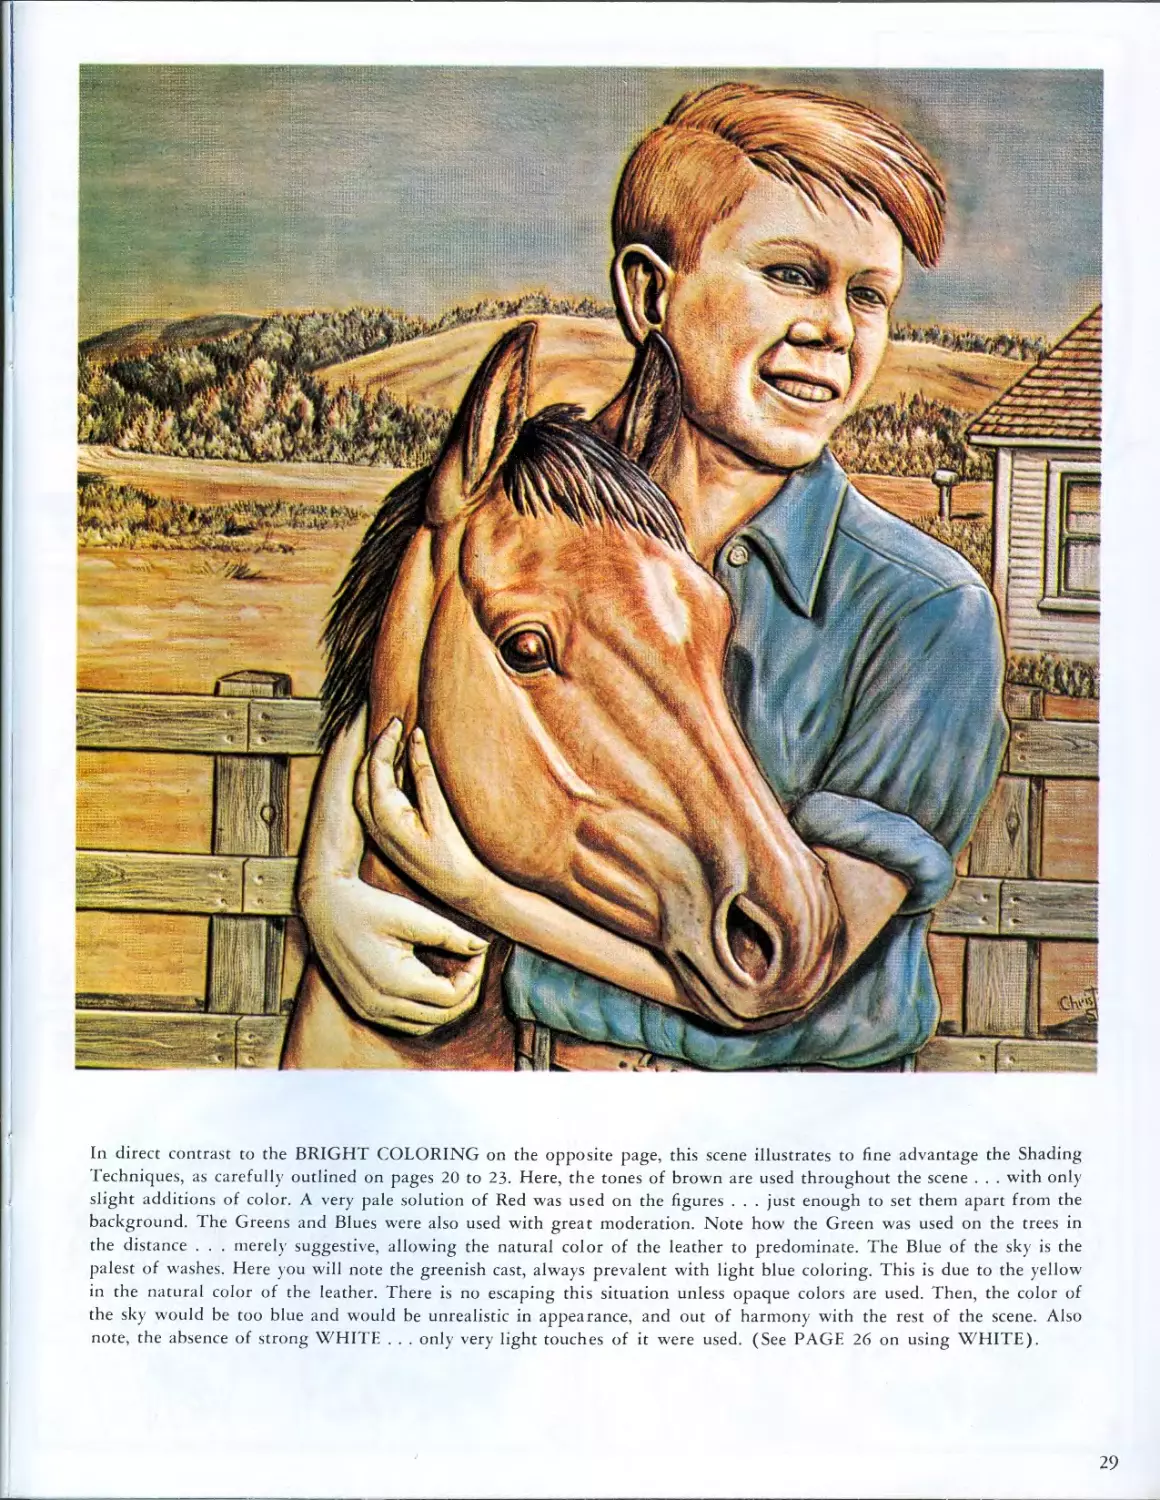
In direct contrast to the BRIGHT COLORING on the opposite page, this scene illustrates to fine advantage the Shading
Techniques, as carefully outlined on pages 20 to 23. Here, the tones of brown are used throughout the scene . . . with only
slight additions of color. A very pale solution of Red was used on the figures . . . just enough to set them apart from the
background. The Greens and Blues were also used with great moderation. Note how the Green was used on the trees in
the distance . . . merely suggestive, allowing the natural color of the leather to predominate. The Blue of the sky is the
palest of washes. Here you will note the greenish cast, always prevalent with light blue coloring. This is due to the yellow
in the natural color of the leather. There is no escaping this situation unless opaque colors are used. Then, the color of
the sky would be too blue and would be unrealistic in appearance, and out of harmony with the rest of the scene. Also
note, the absence of strong WHITE . . . only very light touches of it were used. (See PAGE 26 on using WHITE).
29
FULL COLOK
EEPPODUCr/ON
ON PAGE 32
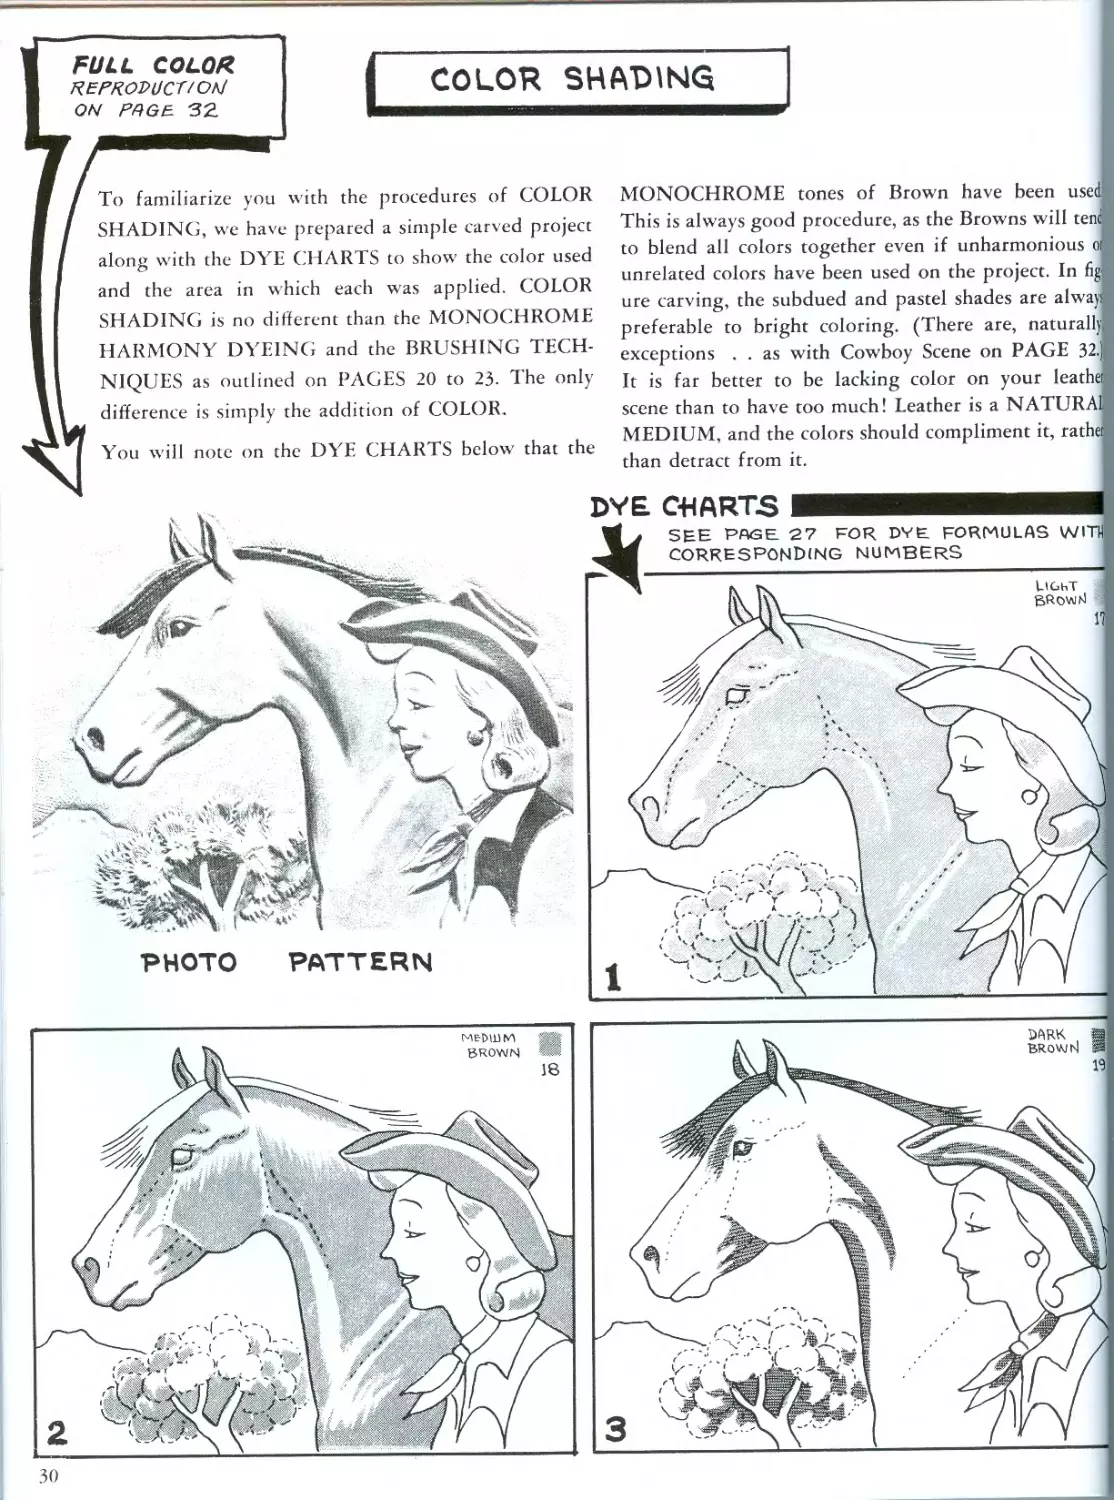
COLOR SHADING
with the procedures of COLOR
prepared a simple carved project
CHARTS to show the color used
and the area in which each was applied. COLOR
SHADING is no different than the MONOCHROME
HARMONY DYEING and the BRUSHING TECH-
NIQUES as outlined on PAGES 20 to 23. The only
difference is simply the addition of COLOR.
You will note on the DYE CHARTS below that the
MONOCHROME tones of Brown have been used
This is always good procedure, as the Browns will tent
to blend all colors together even if unharmonious oi
unrelated colors have been used on the project. In fig
ure carving, the subdued and pastel shades are alway
preferable to bright coloring. (There are, naturally
exceptions . . as with Cowboy Scene on PAGE 32.
It is far better to be lacking color on your leathe
scene than to have too much! Leather is a NATURAI
MEDIUM, and the colors should compliment it, rathei
than detract from it.
30
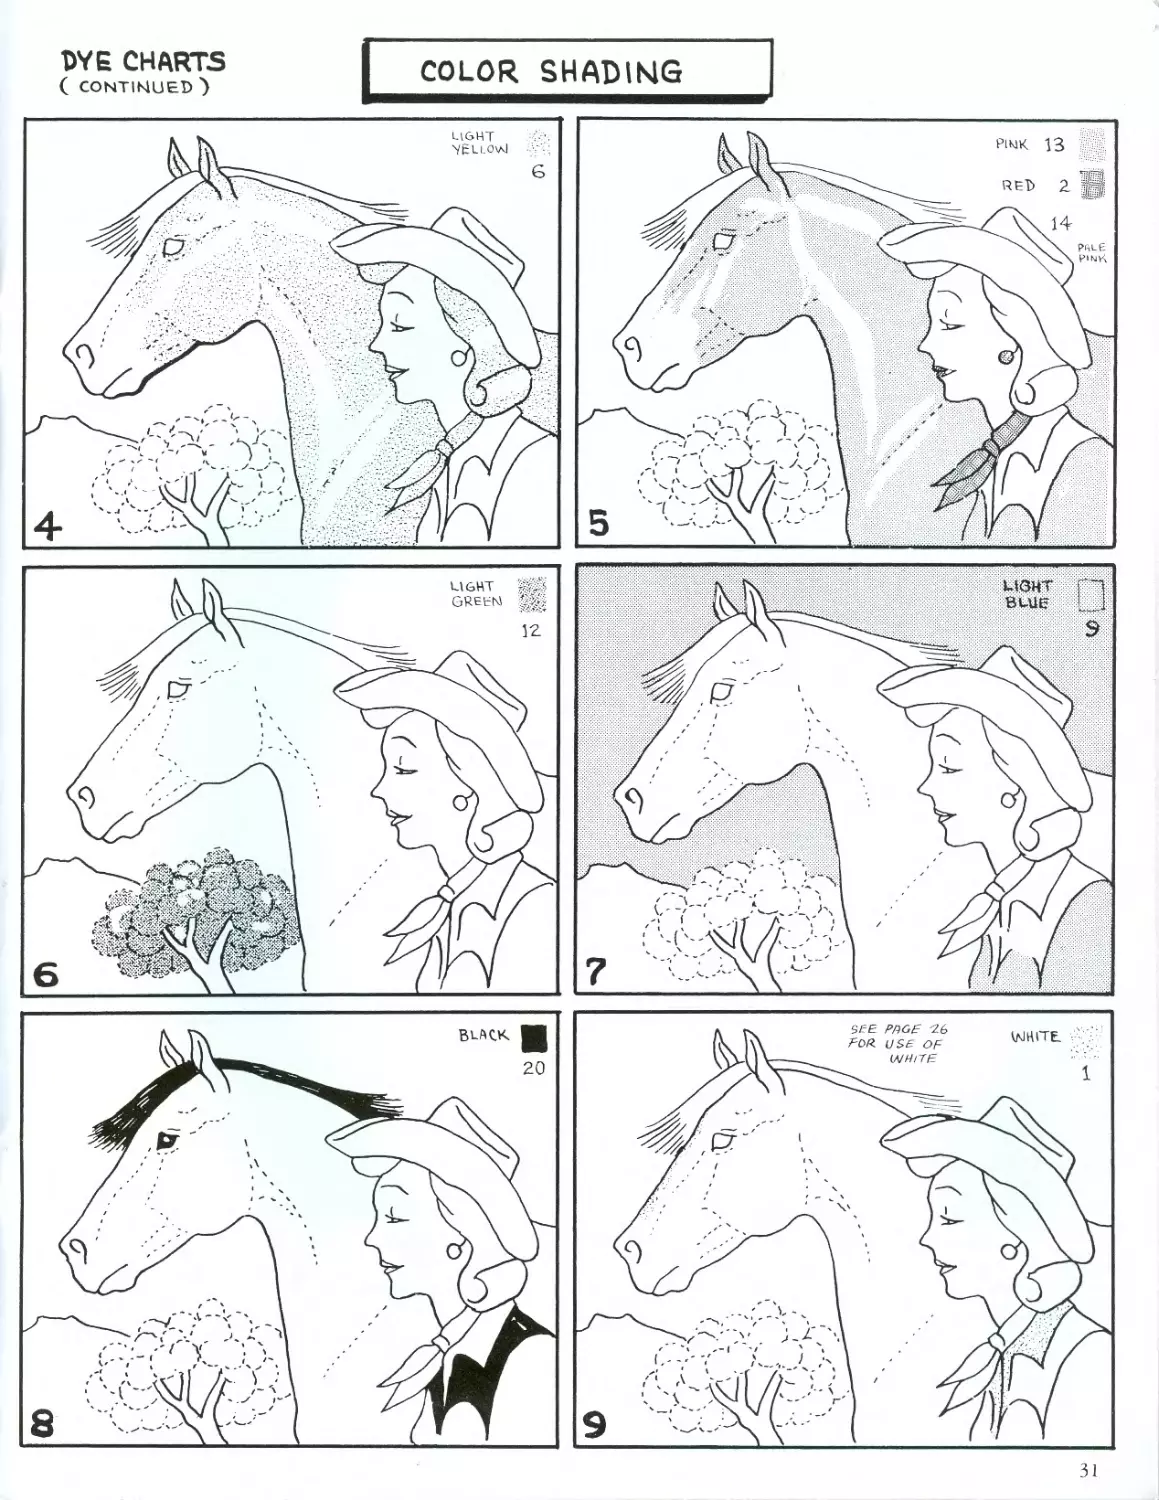
DYE CHARTS
( CONTINUED >
COLOR SHADING
31
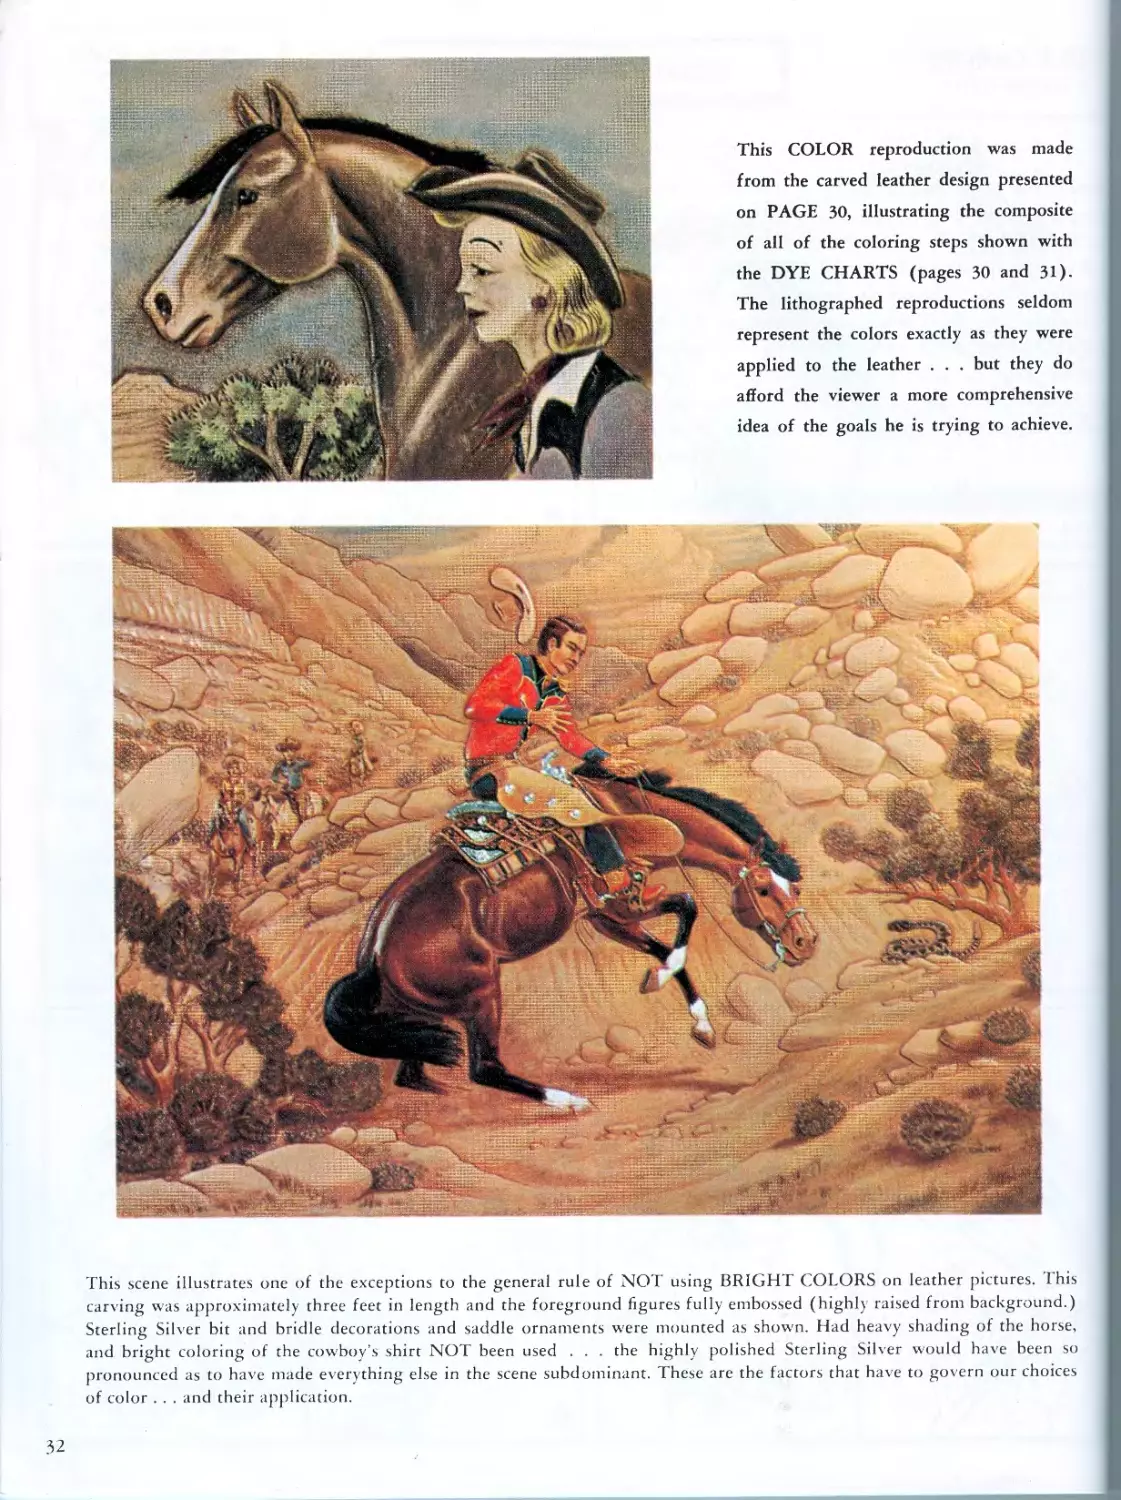
This COLOR reproduction was made
from the carved leather design presented
on PAGE 30, illustrating the composite
of all of the coloring steps shown with
the DYE CHARTS (pages 30 and 31).
The lithographed reproductions seldom
represent the colors exactly as they were
applied to the leather . . . but they do
afford the viewer a more comprehensive
idea of the goals he is trying to achieve.
This scene illustrates one of the exceptions to the general rule of NOT using BRIGHT COLORS on leather pictures. This
carving was approximately three feet in length and the foreground figures fully embossed (highly raised from background.)
Sterling Silver bit and bridle decorations and saddle ornaments were mounted as shown. Had heavy shading of the horse,
and bright coloring of the cowboy’s shirt NOT been used . . . the highly polished Sterling Silver would have been so
pronounced as to have made everything else in the scene subdominant. These are the factors that have to govern our choices
of color . . . and their application.
.32
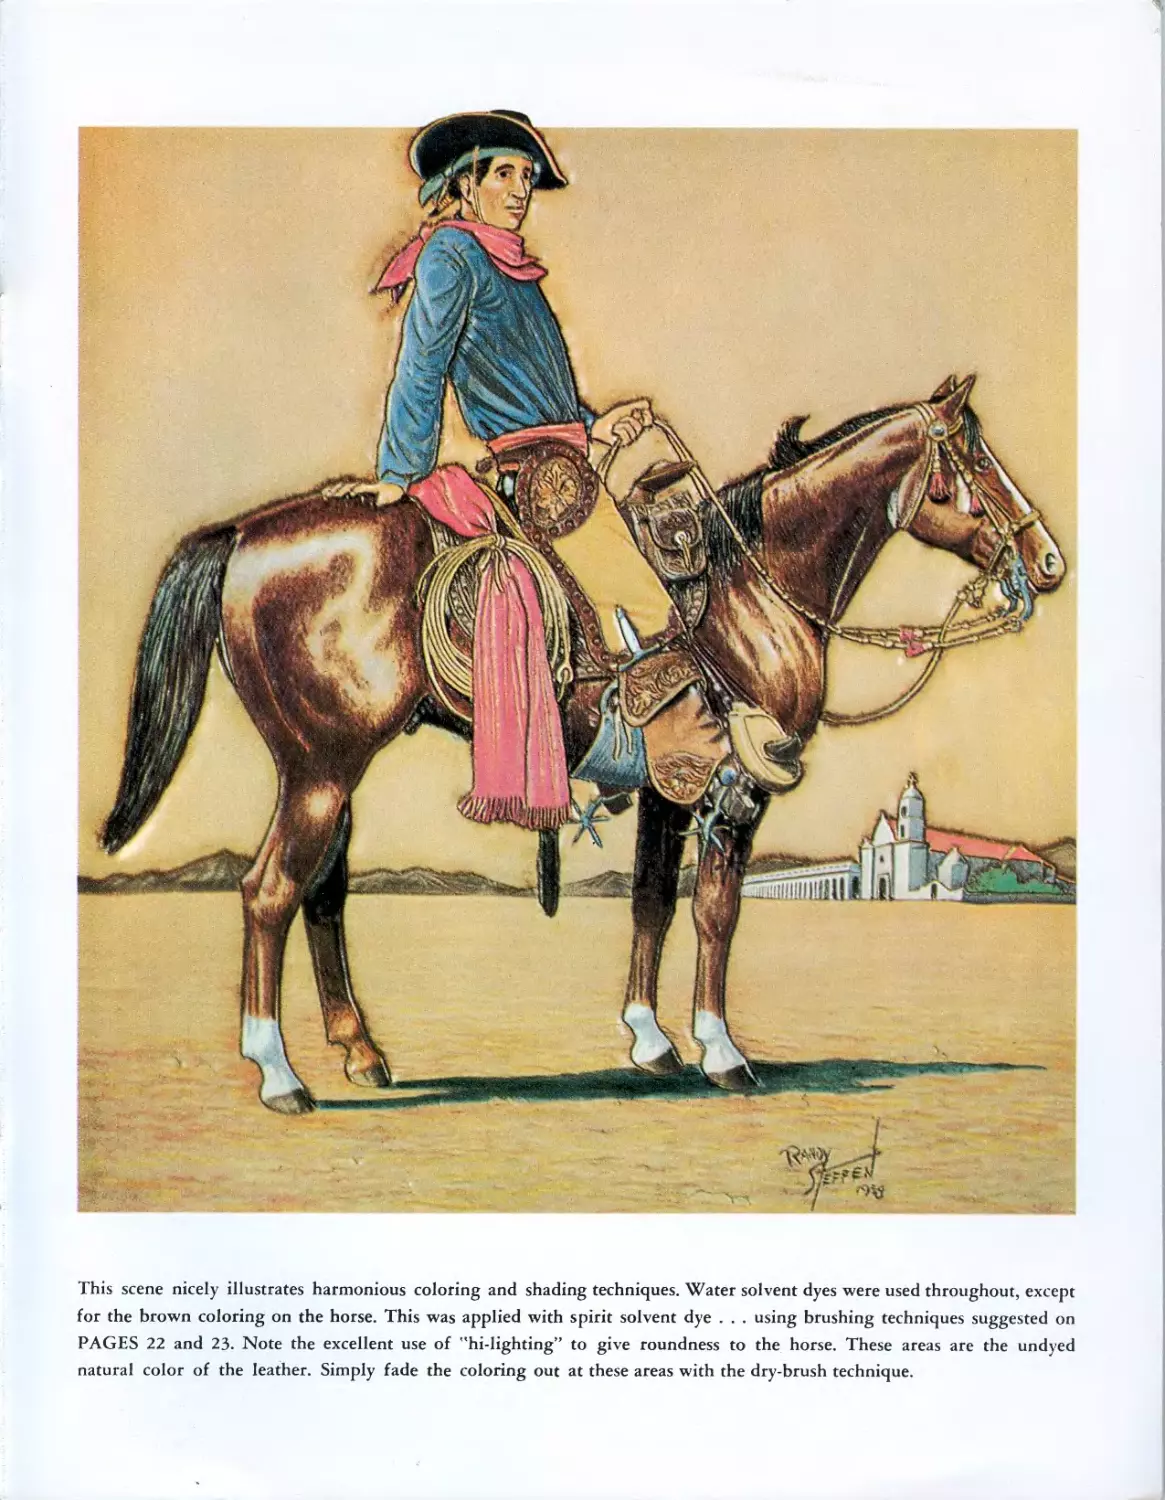
This scene nicely illustrates harmonious coloring and shading techniques. Water solvent dyes were used throughout, except
for the brown coloring on the horse. This was applied with spirit solvent dye . . . using brushing techniques suggested on
PAGES 22 and 23. Note the excellent use of "hi-lighting” to give roundness to the horse. These areas are the undyed
natural color of the leather. Simply fade the coloring out at these areas with the dry-brush technique.