/


Текст
LIFE
/999-20^
A Tuckerdude Scan 2005
WORKSHOP GUIDE
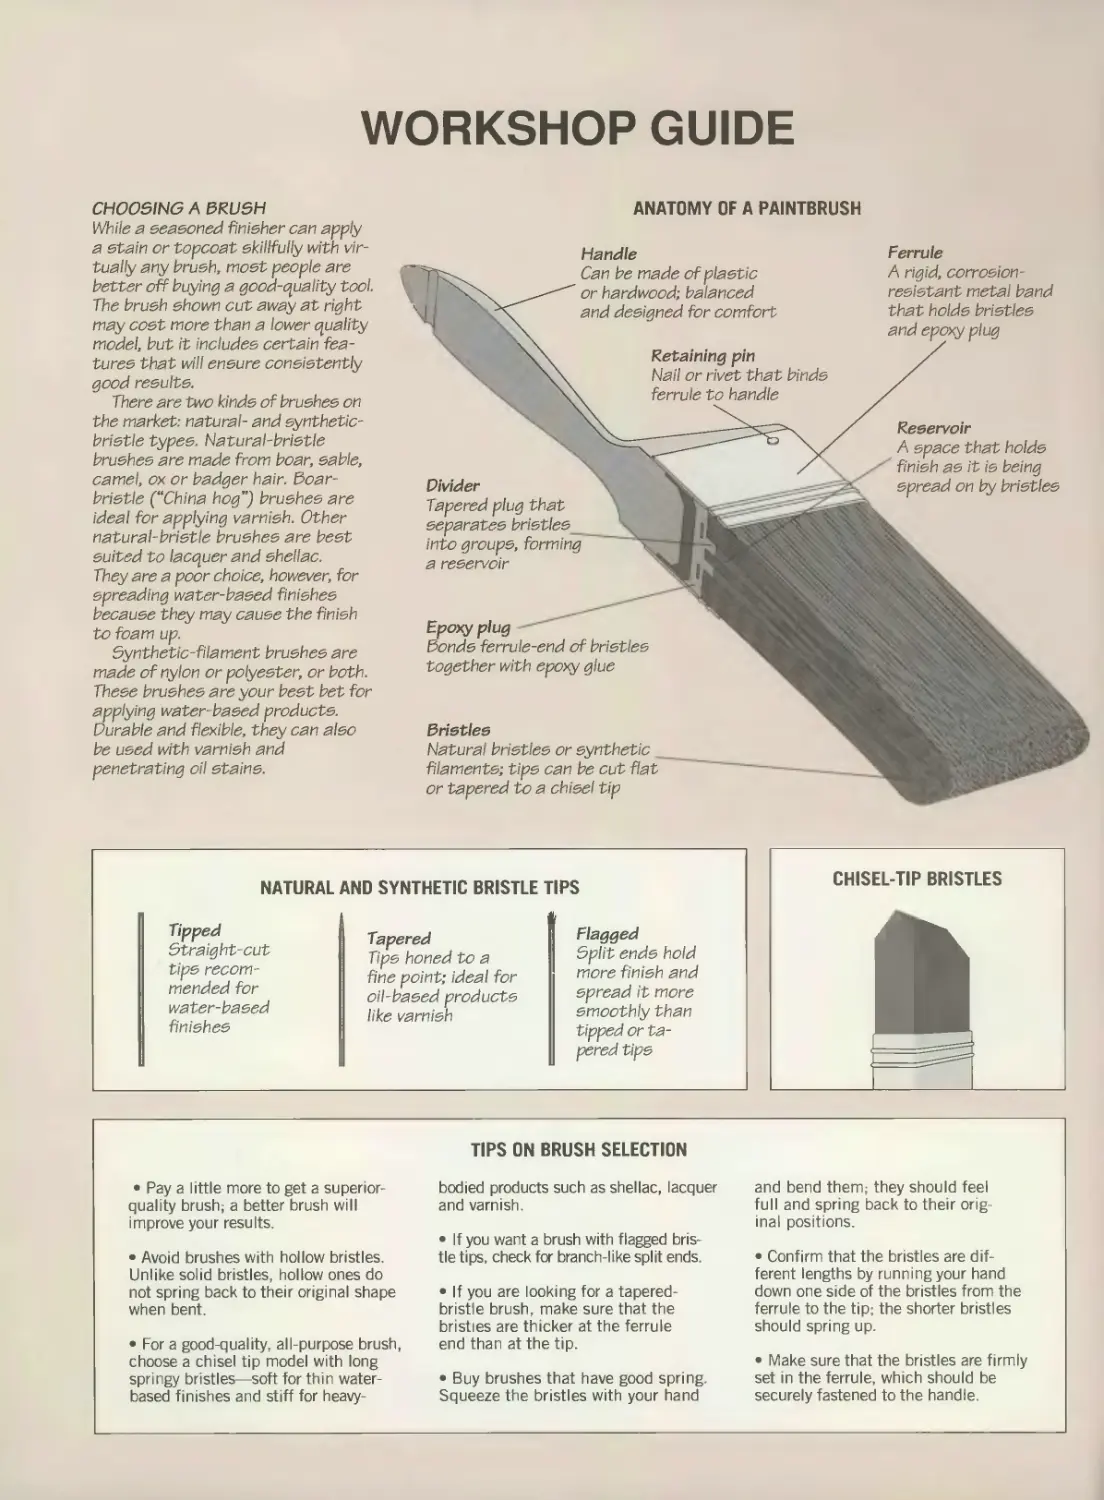
CHOOSING A BRUSH
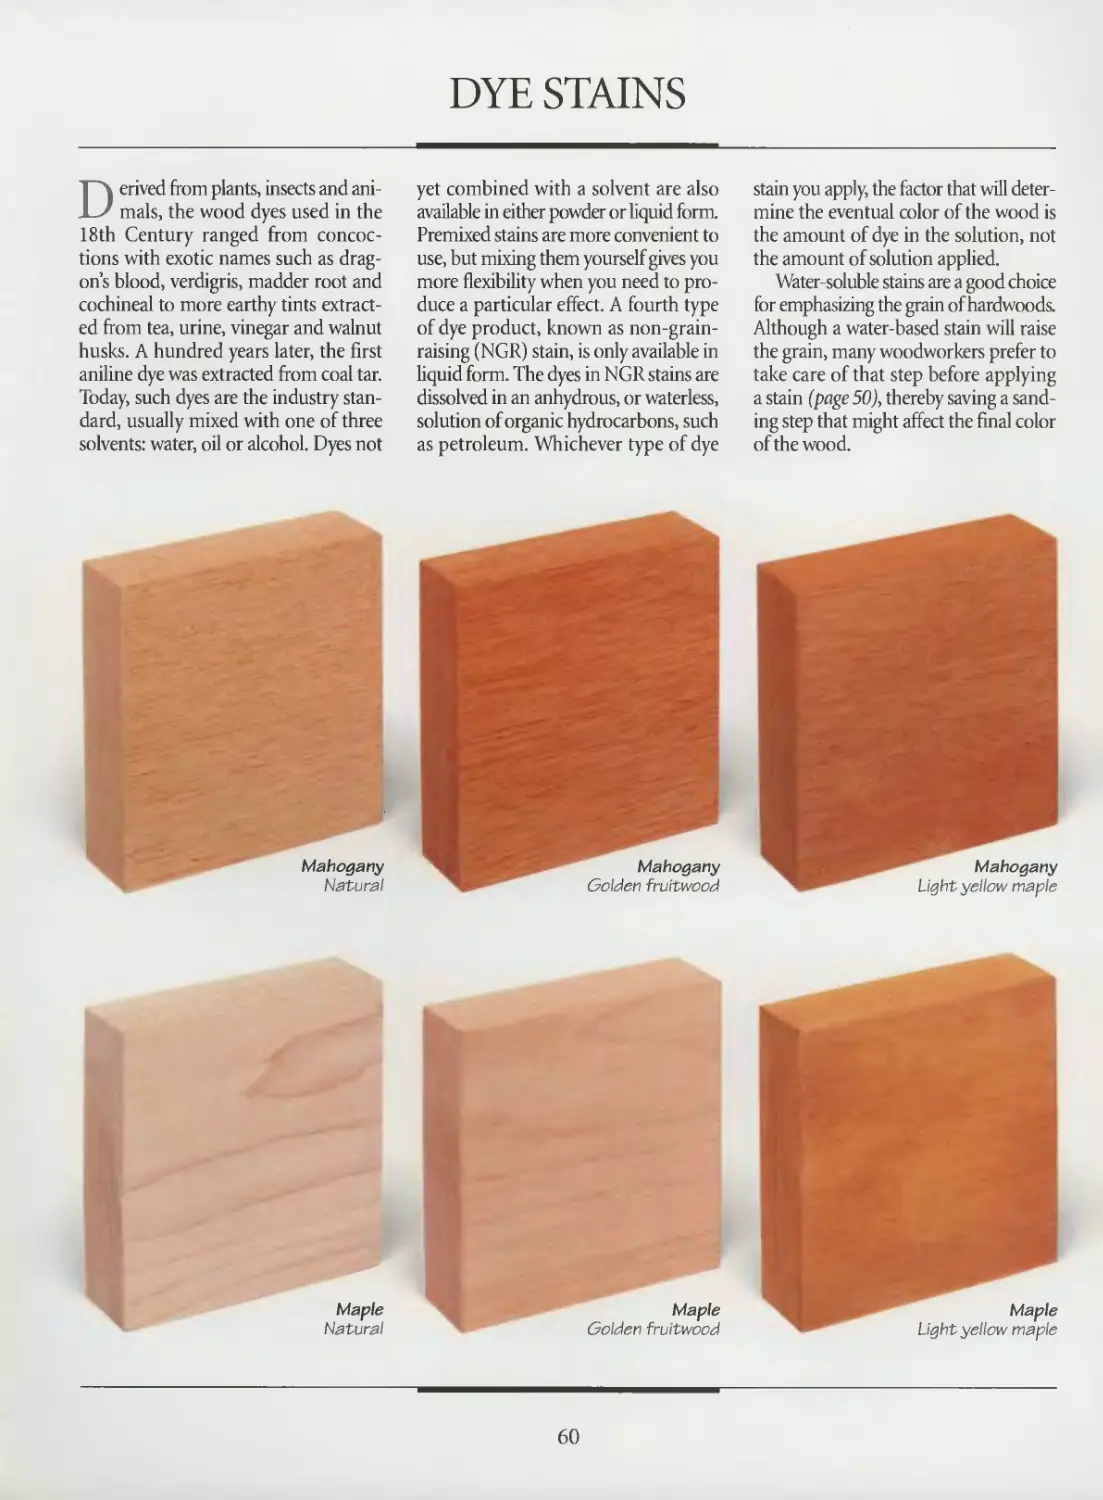
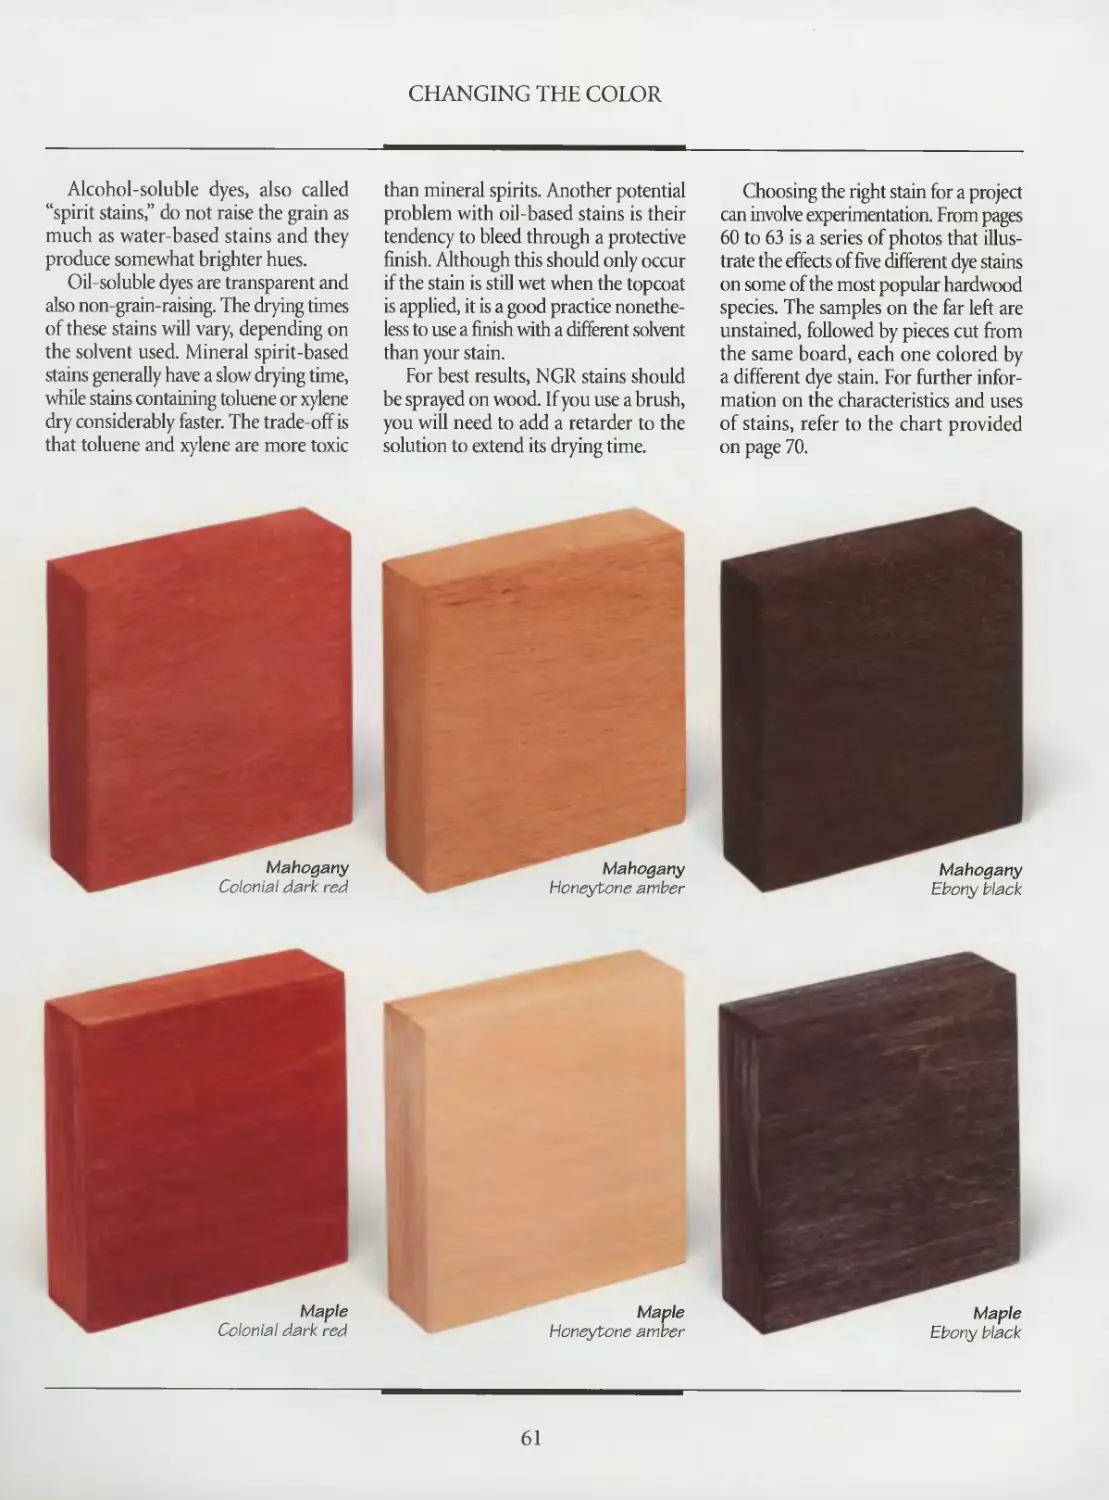
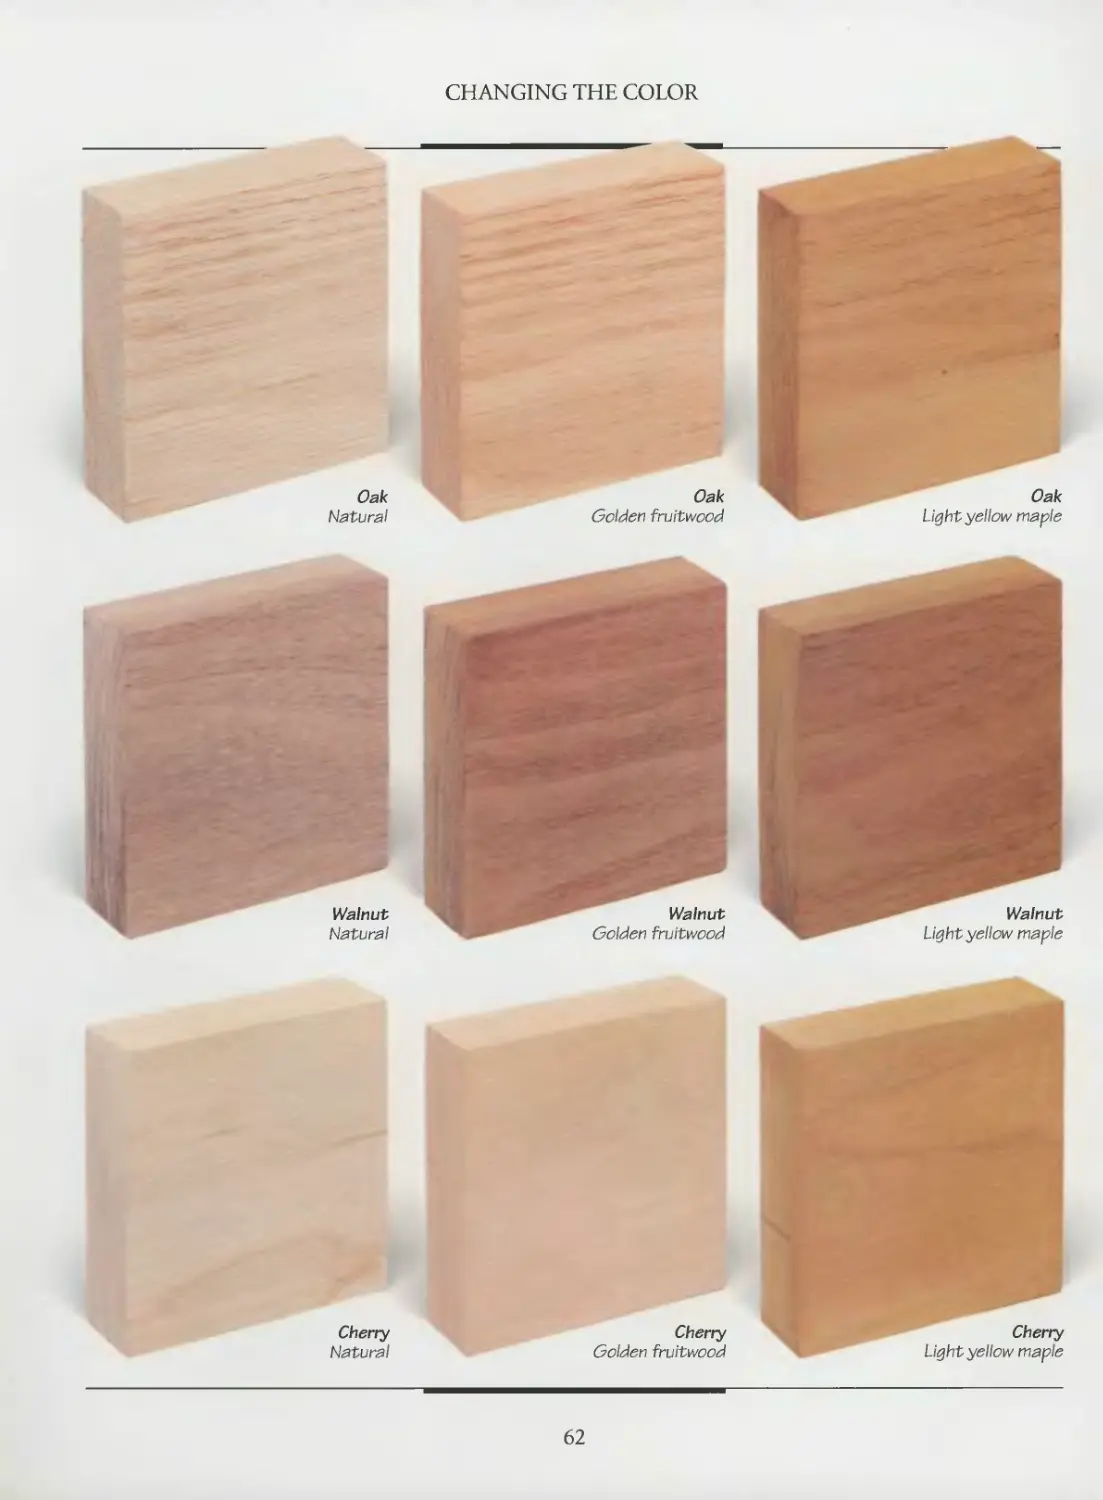
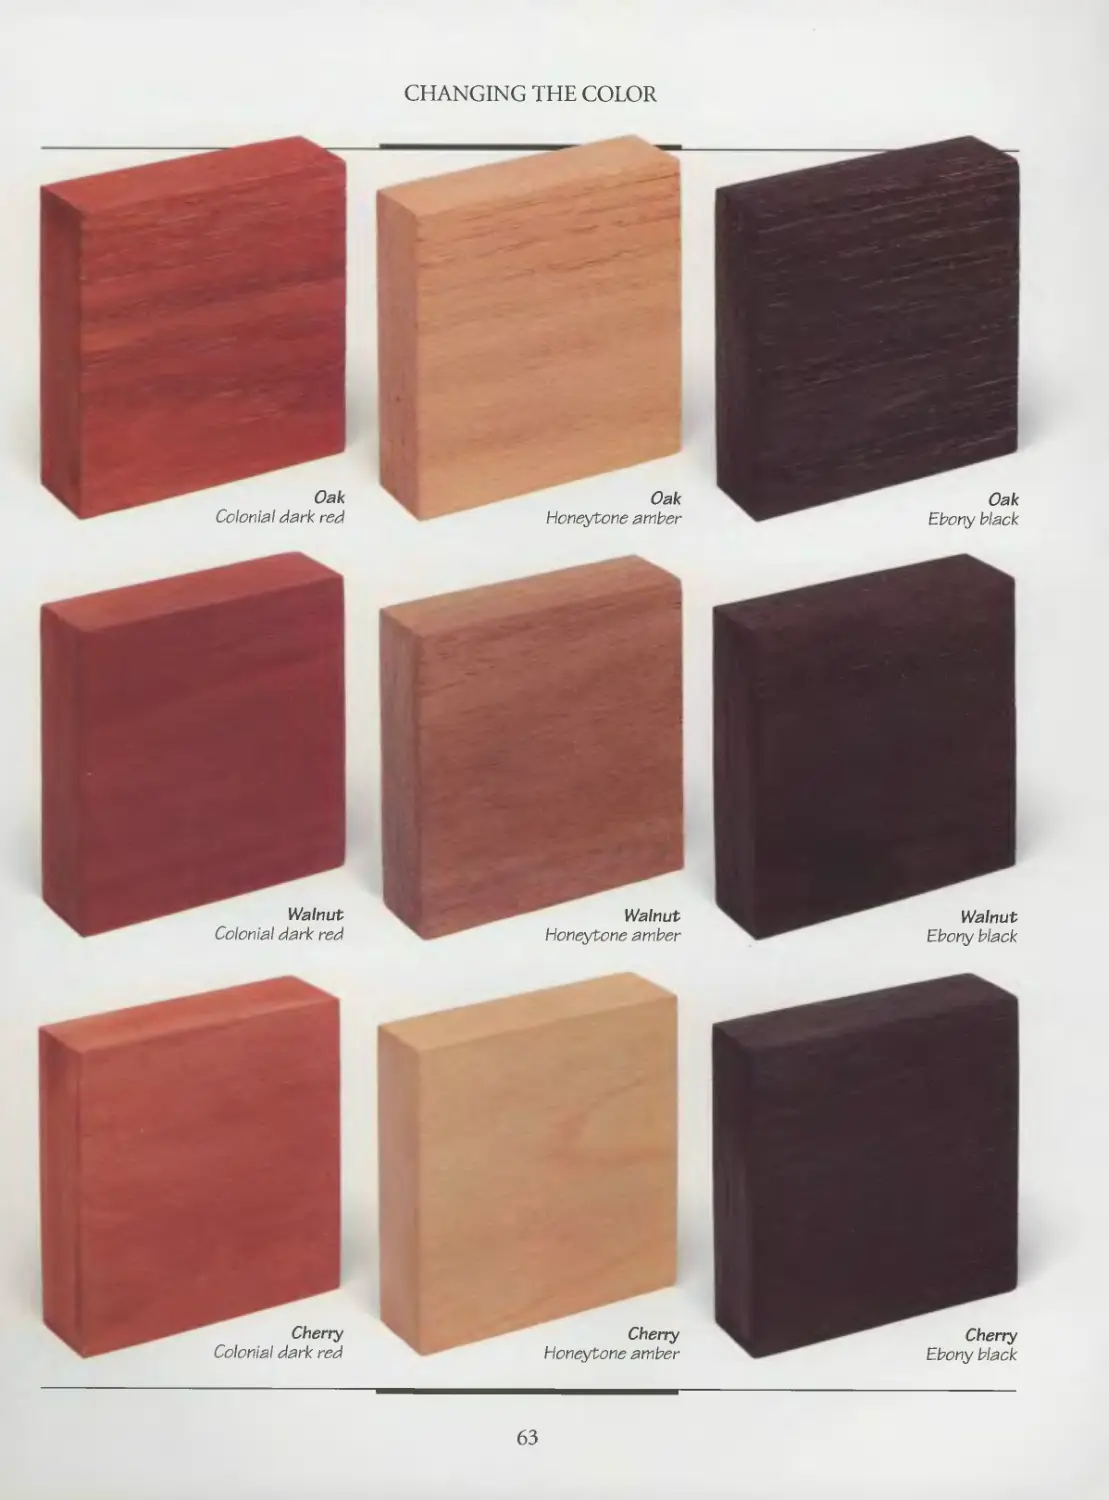
While a seasoned finisher can apply
a stain or topcoat skillfully with vir-
tually any brush, most people are
better off buying a good-quality tool.
The brush shown cut away at right
may cost more than a lower quality
model, but it includes certain fea-
tures that will ensure consistently
good results.
There are two kinds of brushes on
the market: natural- and synthetic-
bristle types. Natural-bristle
brushes are made from boar, sable,
camel, ox or badger hair. Boar-
bristle (“China hog”) brushes are
ideal for applying varnish. Other
natural-bristle brushes are best
suited to lacquer and shellac.
They are a poor choice, however, for
spreading water-based finishes
because they may cause the finish
to foam up.
Synthetic-filament brushes are
made of nylon or polyester, or both.
These brushes are your best bet for
applying water-based products.
Durable and flexible, they can also
be used with varnish and
penetrating oil stains.
ANATOMY OF A PAINTBRUSH
Handle
Ferrule
A rigid, corrosion-
resistant metal band
that holds bristles
Can be made of plastic
or hardwood; balanced
and designed for comfort
Reservoir
A space that holds
finish as it is being
spread on by bristles
Epoxy plug
Bonds ferrule-end of bristles
together with epoxy glue
Bristles
Natural bristles or synthetic
filaments; tips can be cut flat
or tapered to a chisel tip
Divider
Tapered plug that
separates bristles
into groups,
a reservoir
NATURAL AND SYNTHETIC BRISTLE TIPS
Tipped
Straight-cut
tips recom-
mended for
water-based
finishes
Tapered
Tips honed to a
fine point; ideal for
oil-based products
like varnish
Flagged
Split ends hold
more finish and
spread it more
smoothly than
tipped or ta-
piered tips
CHISEL-TIP BRISTLES
• Pay a little more to get a superior-
quality brush; a better brush will
improve your results.
• Avoid brushes with hollow bristles.
Unlike solid bristles, hollow ones do
not spring back to their original shape
when bent.
• For a good-quality, all-purpose brush,
choose a chisel tip model with long
springy bristles—soft for thin water-
based finishes and stiff for heavy-
TIPS ON BRUSH SELECTION
bodied products such as shellac, lacquer
and varnish.
• If you want a brush with flagged bris-
tle tips, check for branch-like split ends.
• If you are looking for a tapered-
bristle brush, make sure that the
bristles are thicker at the ferrule
end than at the tip.
• Buy brushes that have good spring.
Squeeze the bristles with your hand
and bend them; they should feel
full and spring back to their orig-
inal positions.
• Confirm that the bristles are dif-
ferent lengths by running your hand
down one side of the bristles from the
ferrule to the tip; the shorter bristles
should spring up.
• Make sure that the bristles are firmly
set in the ferrule, which should be
securely fastened to the handle.
THE ART OF WOODWORK! NG
WOOD
FINISHING
THE ART OF WOODWORKING
WOOD
FINISHING
TIME-LIFE BOOKS
ALEXANDRIA, VIRGINIA
ST. REMY PRESS
MONTREAL* NEW YORK
THE ART OF WOODWORKING was produced by
ST. REMY PRESS
PUBLISHER
PRESIDENT
Series Editor
Series Art Director
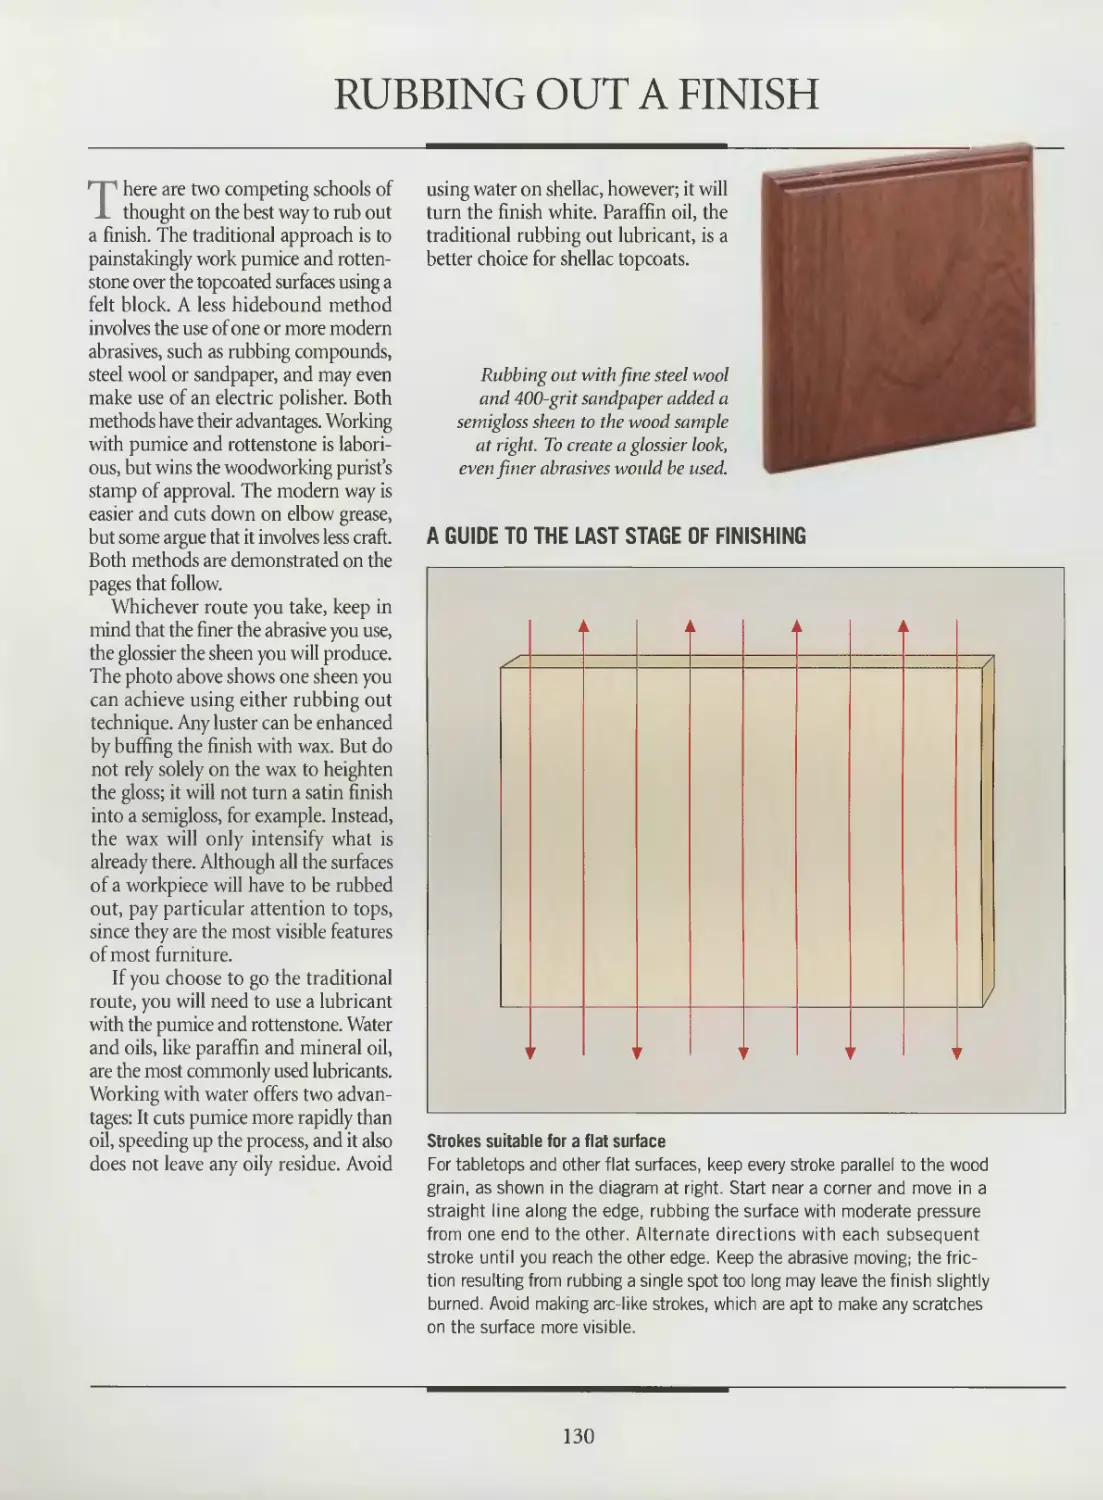
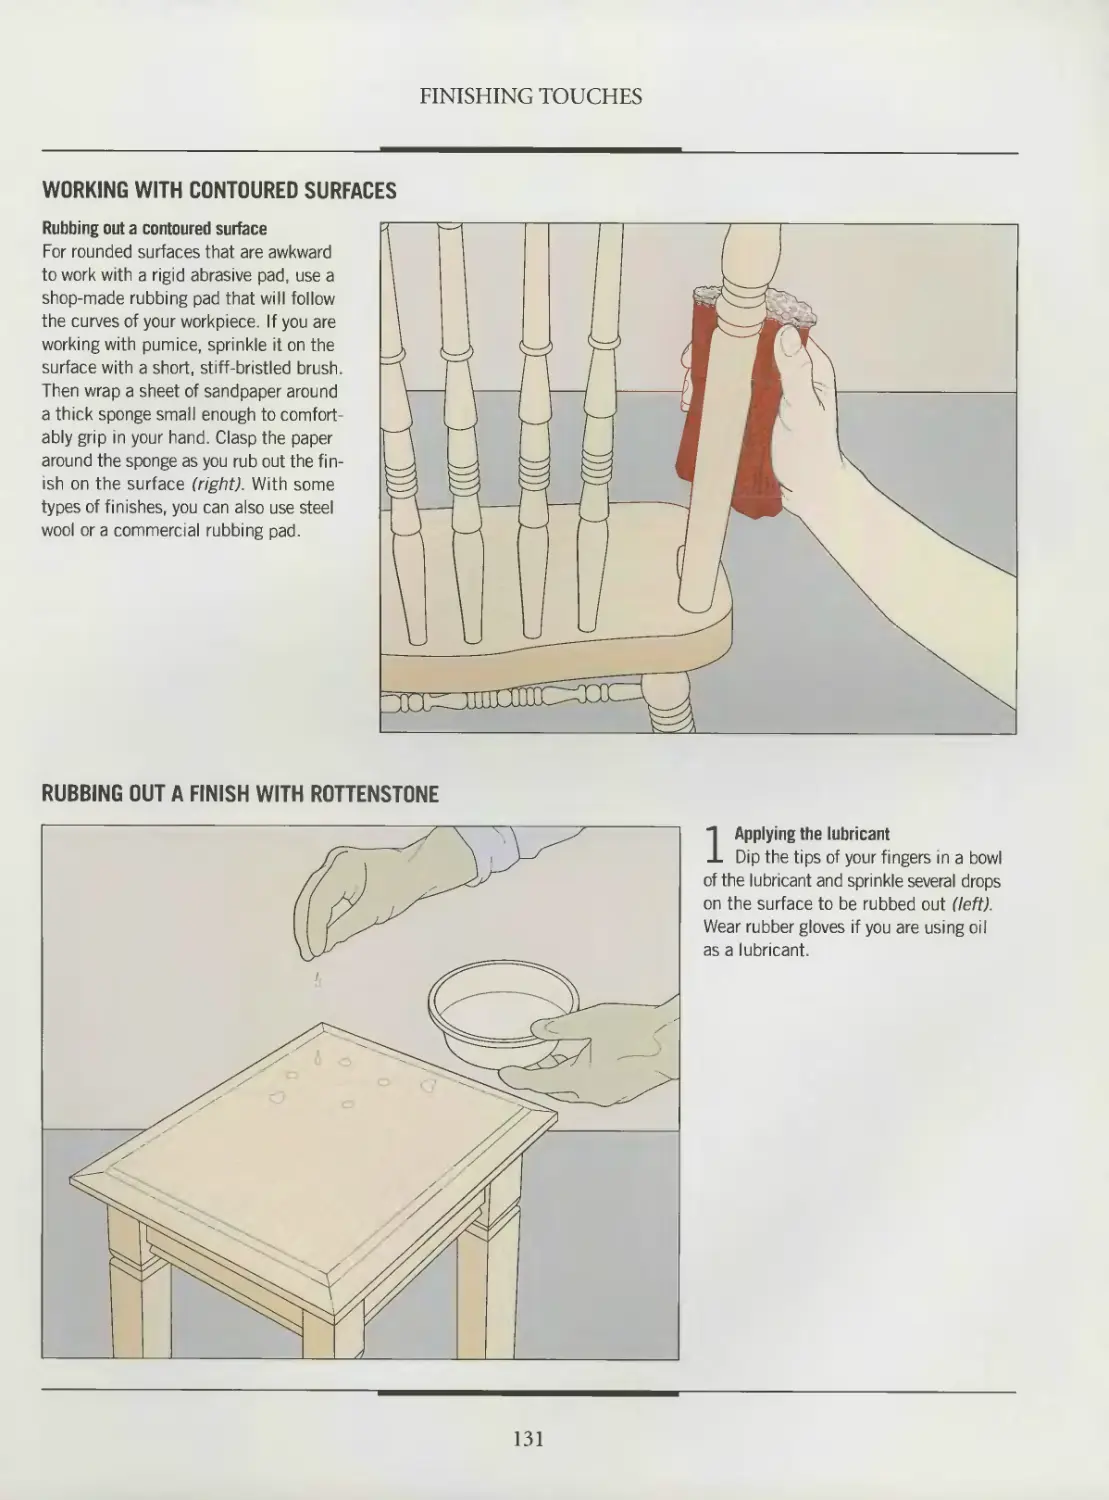
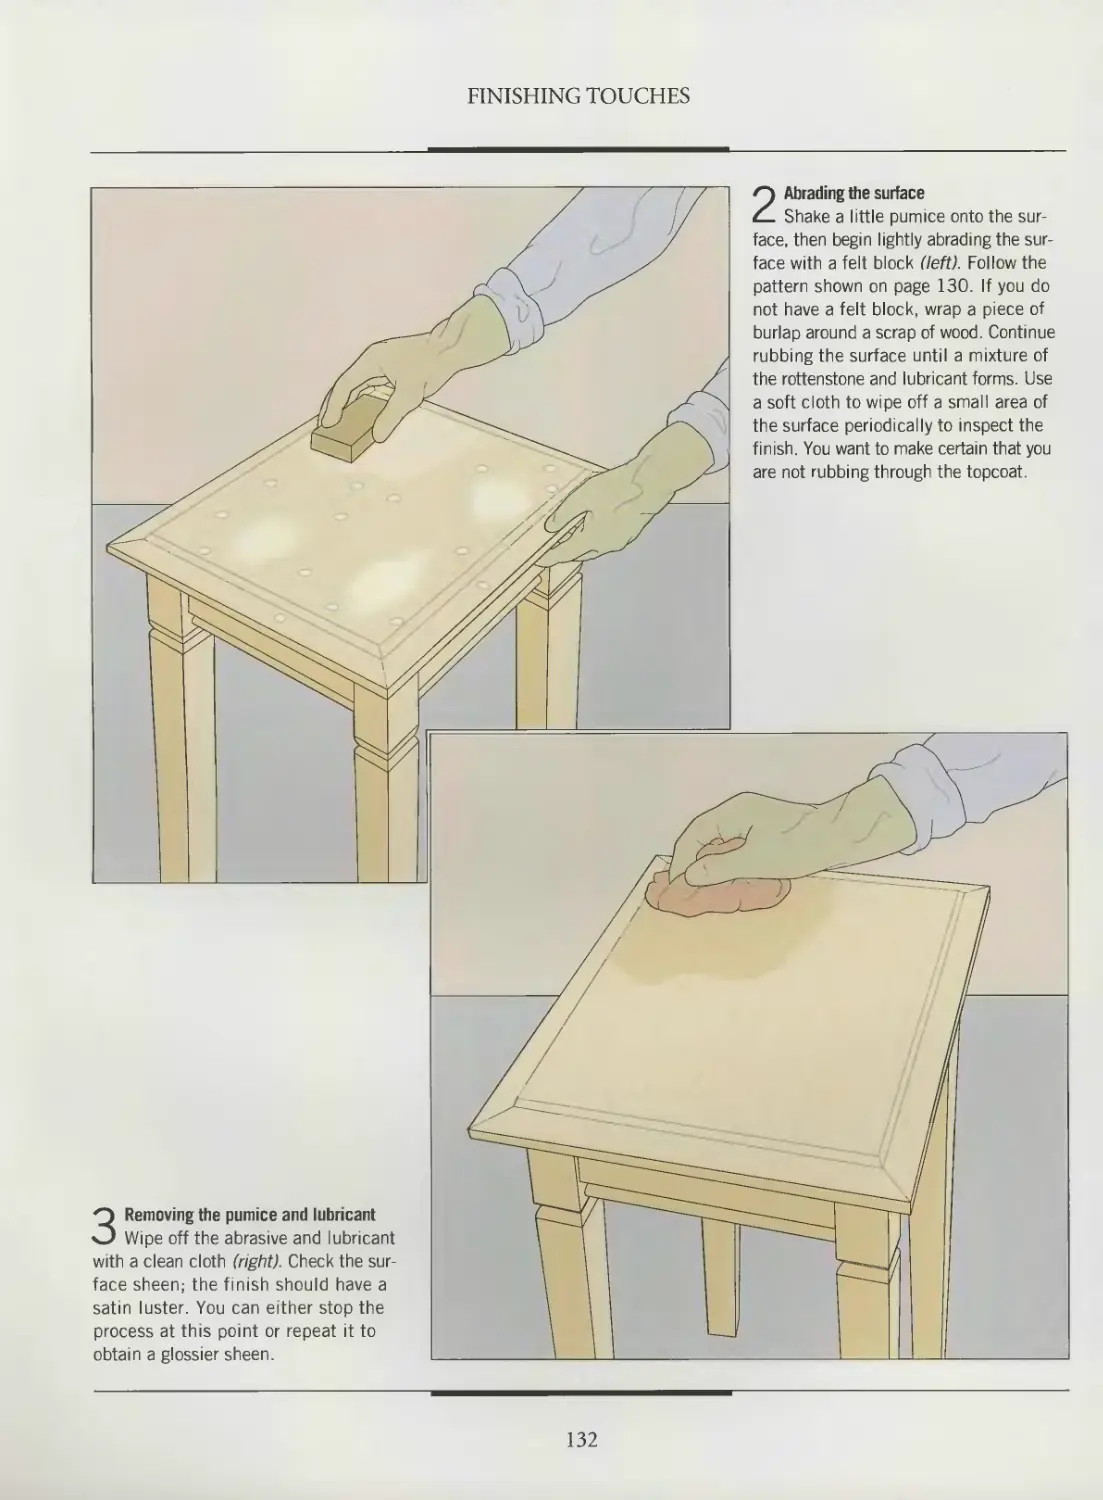
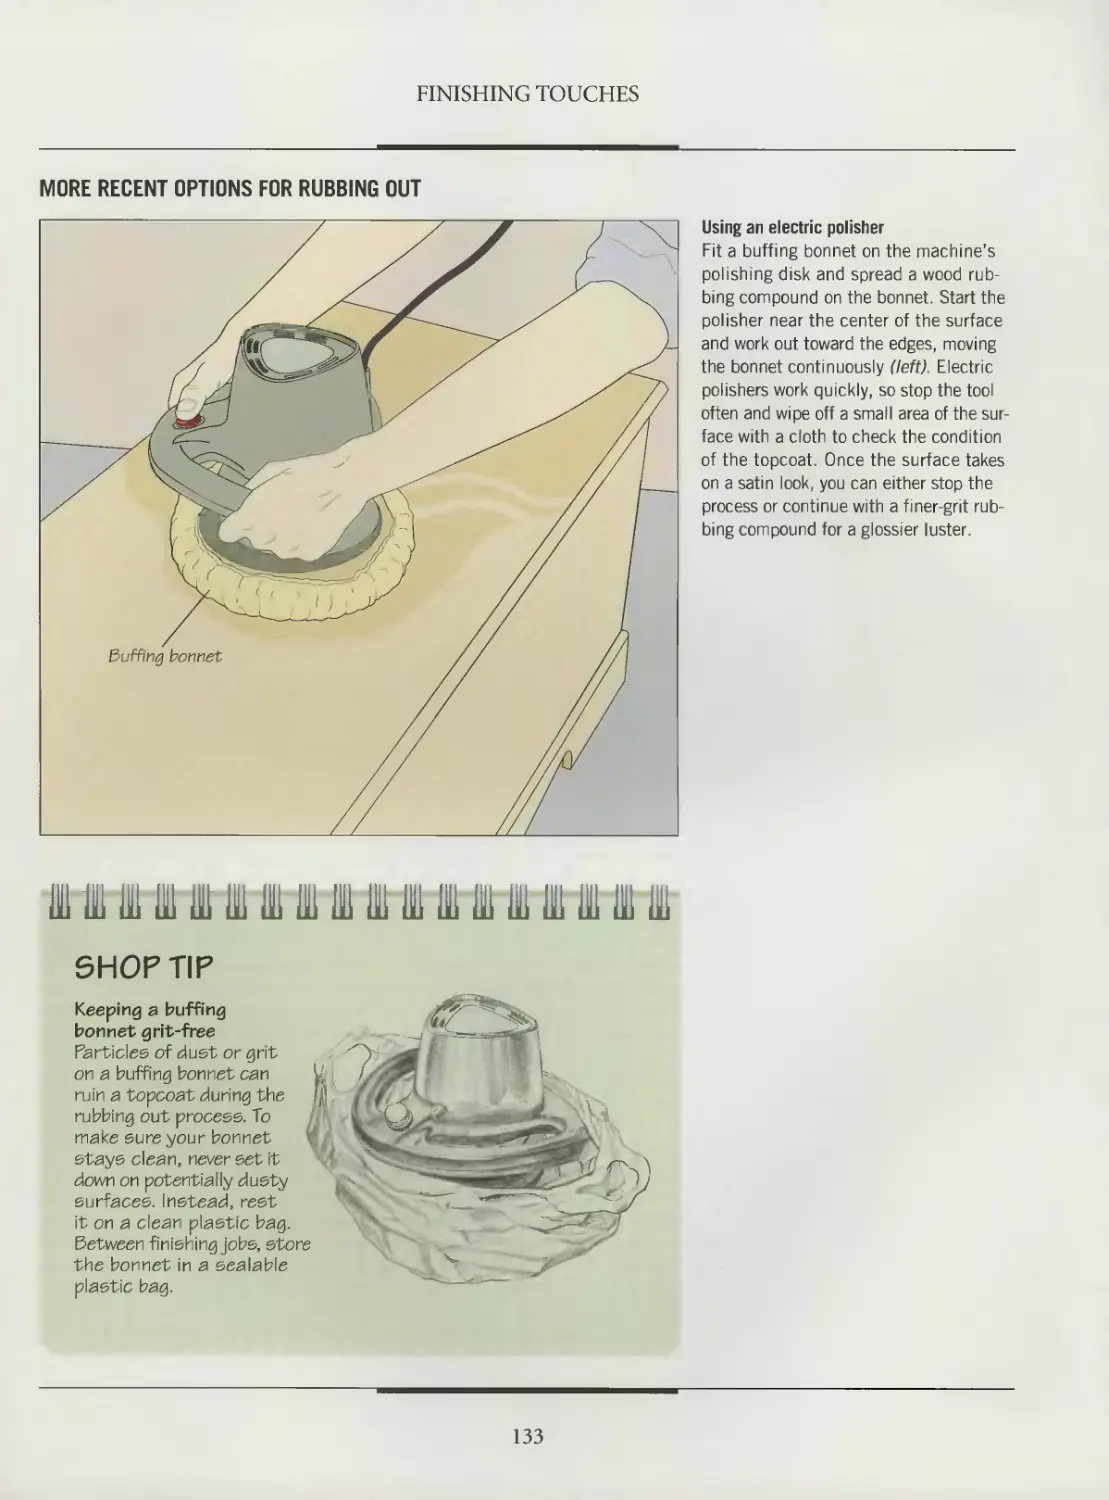
Senior Editors
Art Directors
Designer
Research Editor
Picture Editor
Writers
Contributing Writer
Contributing Illustrators
Administrator
Production Manager
System Coordinator
Photographer
Index
Proofreader
Kenneth Winchester
Pierre Leveille
Pierre Horne-Douglas
Francine Lemieux
Marc Cassini (Text)
Heather Mills (Research)
Normand Boudreault, Solange Laberge
Luc Germain
Jim McRae
Christopher Jackson
Tamsin M. Douglas. Andrew Jones
Laura Tringali
Michel Blais, Jean-Pierre Bourgeois,
Ronald Durepos, Serge Guibord,
Robert Paquet, Jacques Perrault,
James Therien, Jocelyn Veillette
Natalie Watanabe
Michelle Turbide
Jean-Luc Roy
Robert Chartier
Christine M. Jacobs
Judith Yelon
Time-Life Books is a division of Time-Life fnc.,
a wholly owned subsidiary of
THE TIME INC. BOOK COMPANY
TIME-LIFE BOOKS
President
Publisher
Managing Editor
Directoi of Editorial Resources
Mary N. Davis
Robert H. Smith
Thomas H. Flaherty
Elise D. Ritter-Clough
Associate Publisher
Marketing Director
Editorial Director
Consulting Editor
Production Manager
Trevor Lunn
Regina Hall
Donia Ann Steele
Bob Doyle
Marlene Zack
THE CONSULTANTS
Michael Dresdner is a former contributing
editor to Fine Woodworking magazine. He cur-
rently writes the “Just Finishing” column for
American Woodworker magazine.
Frank Klausz owns and operates Frank’s Cabinet
Shop in Pluckemin, New Jersey. He contributes
to Fine Woodworking magazine and has made
videotapes with Taunton Press, including one
on wood finishing.
Paul McGoldrick owns and operates Pianoforte
Inc., a piano restoration company in Montreal,
Quebec. He is responsible for the maintenance
and concert preparation of the pianos used by the
Montreal Symphony Orchestra and the National
Arts Center Orchestra in Ottawa, Ontario.
Giles Miller-Mead has taught advanced cabinet-
making at Montreal technical schools for more
than 10 years. A native of New Zealand, he previ-
ously worked as a restorer of antique furniture.
Joseph Truini is Senior Editor of Home
Mechamx magazine. A former Shop and Tools
Editor of Popular Mechanics, he has worked as
a cabinetmaker, home improvement contractor
and carpenter.
Wood Finishing
p. cm.—(The Art of Woodworking)
Includes index.
ISBN 0-8094-9912-6 (trade)
ISBN 0-8094-9913-4 (lib)
1. Wood Finishing.
I. Time- Life Books. II. Series
TT325.W66 1992
684.1’043—dc20 92 32892
CIP
For information about any Time-Life book,
please call 1-800-621-7026, or write:
Reader Information
Time-Life Customer Service
P.O. Box C-32068
Richmond, Virginia
23261-2068
© 1992 Time-Life Books Inc.
All rights reserved.
No part of this book may be reproduced in
any form or by any electronic or mechanical
means, including information storage and
retrieval devices or systems, without prior
written permission from the publisher, except
that brief passages may be quoted for reviews.
First printing. Printed in U.S.A.
Published simultaneously in Canada.
TIME-LIFE is a trademark of Time Warner
Inc. U.S.A.
CONTENTS
6 INTRODUCTION 110 112 DECORATIVE FINISHES Tools and accessories
12 20 22 24 30 35 43 50 51 SAFETY PREPARING THE SURFACE Tools and accessories Planing Scraping Sanding Repairing surface damage Raising the grain Filling the grain 113 118 122 126 128 129 130 136 Stenciling Graining Marbling FINISHING TOUCHES Tools and accessories Preparing to rub out the finish Rubbing out a finish CLEANING AND STORAGE
54 56 57 59 60 64 68 75 76 80 CHANGING THE COLOR Tools and accessories Bleaching The varieties of wood stains Dye stains Pigment stains Staining wood Pickling a wood surface Chemical stains Fuming 140 142 144 GLOSSARY INDEX ACKNOWLEDGMENTS
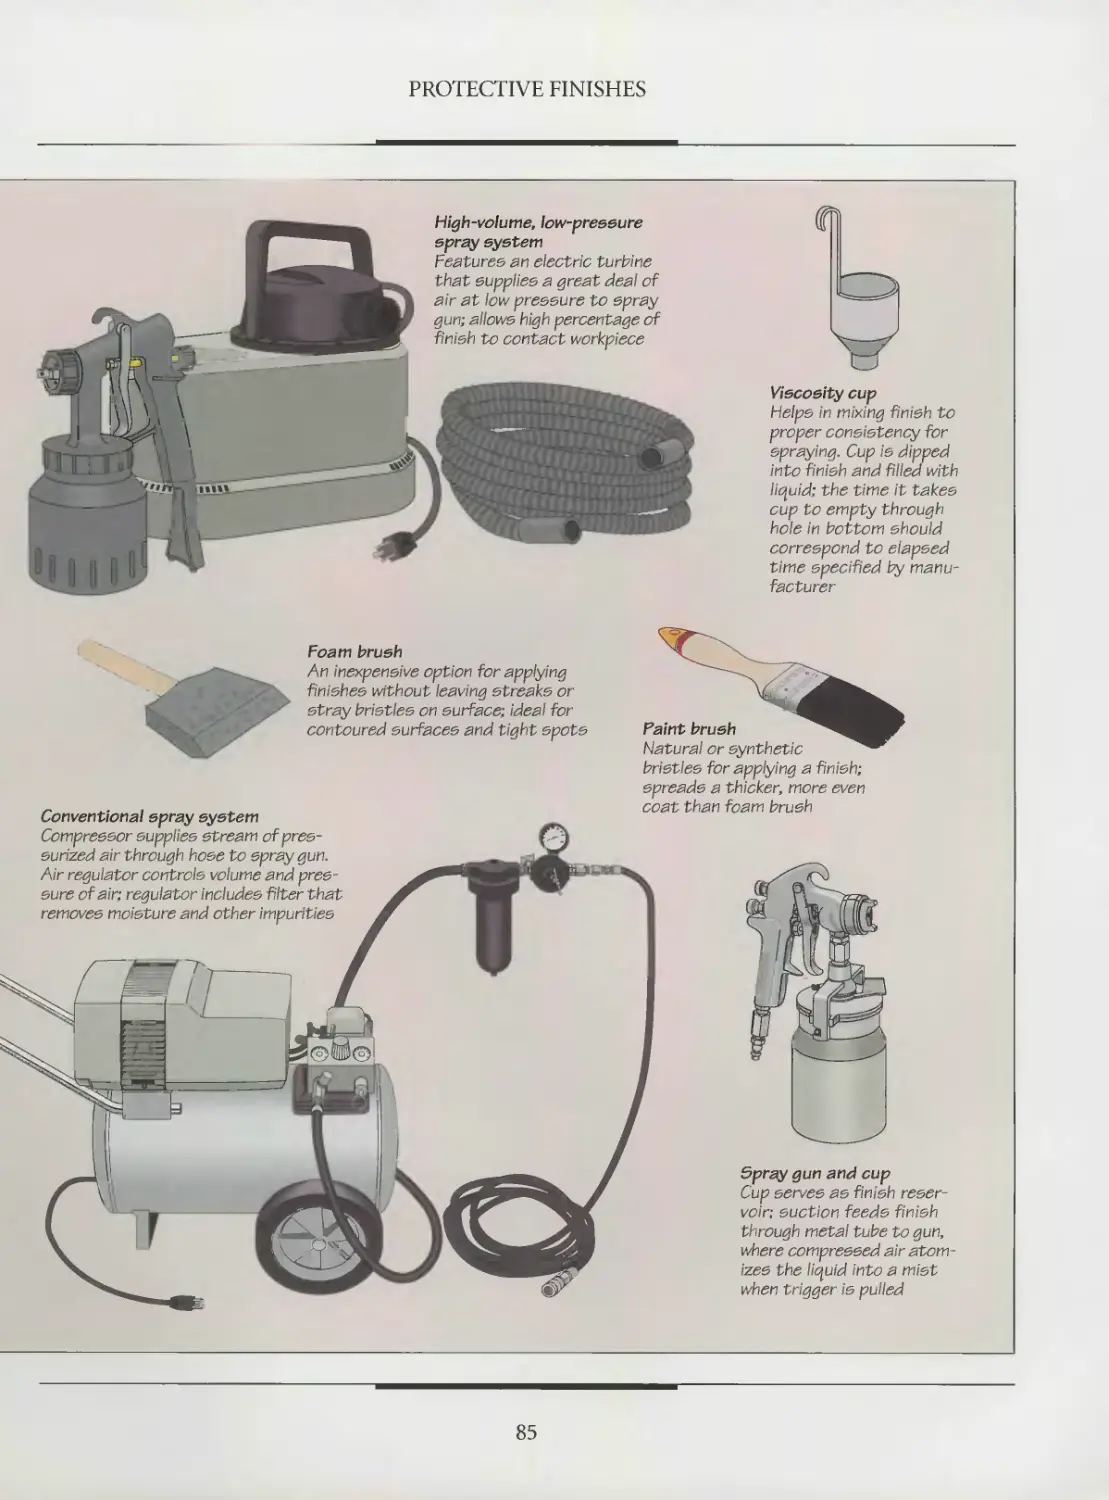
82 84 PROTECTIVE FINISHES Tools and accessories
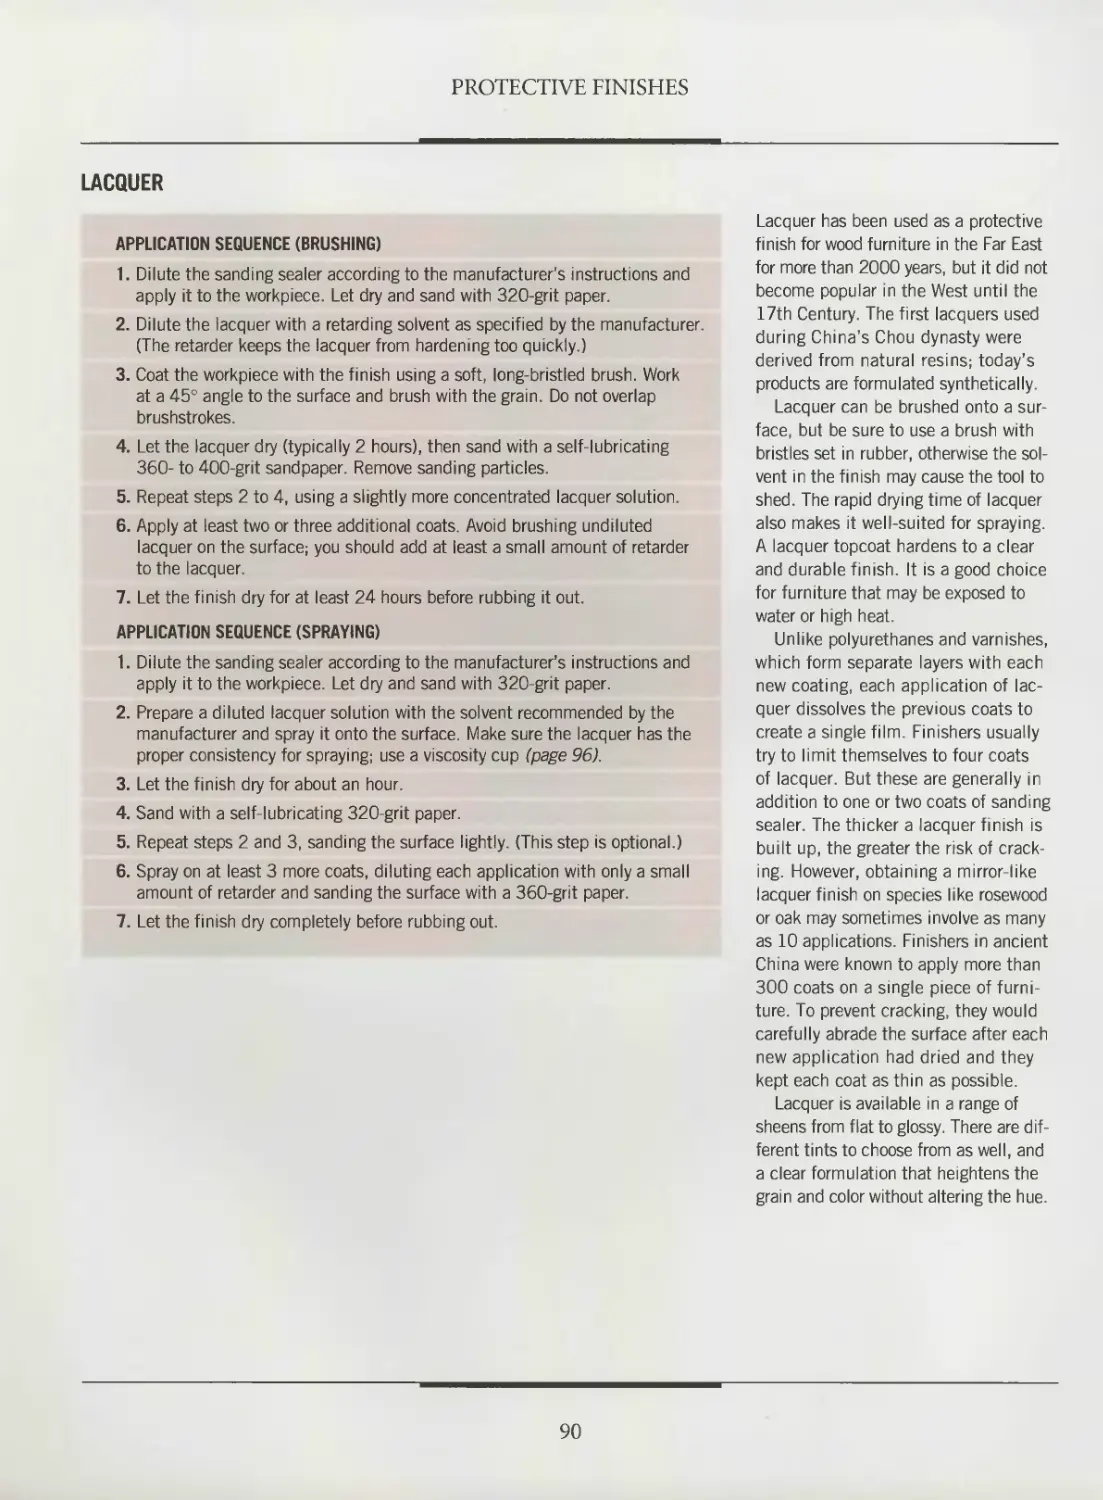
86 Choosing a protective finish
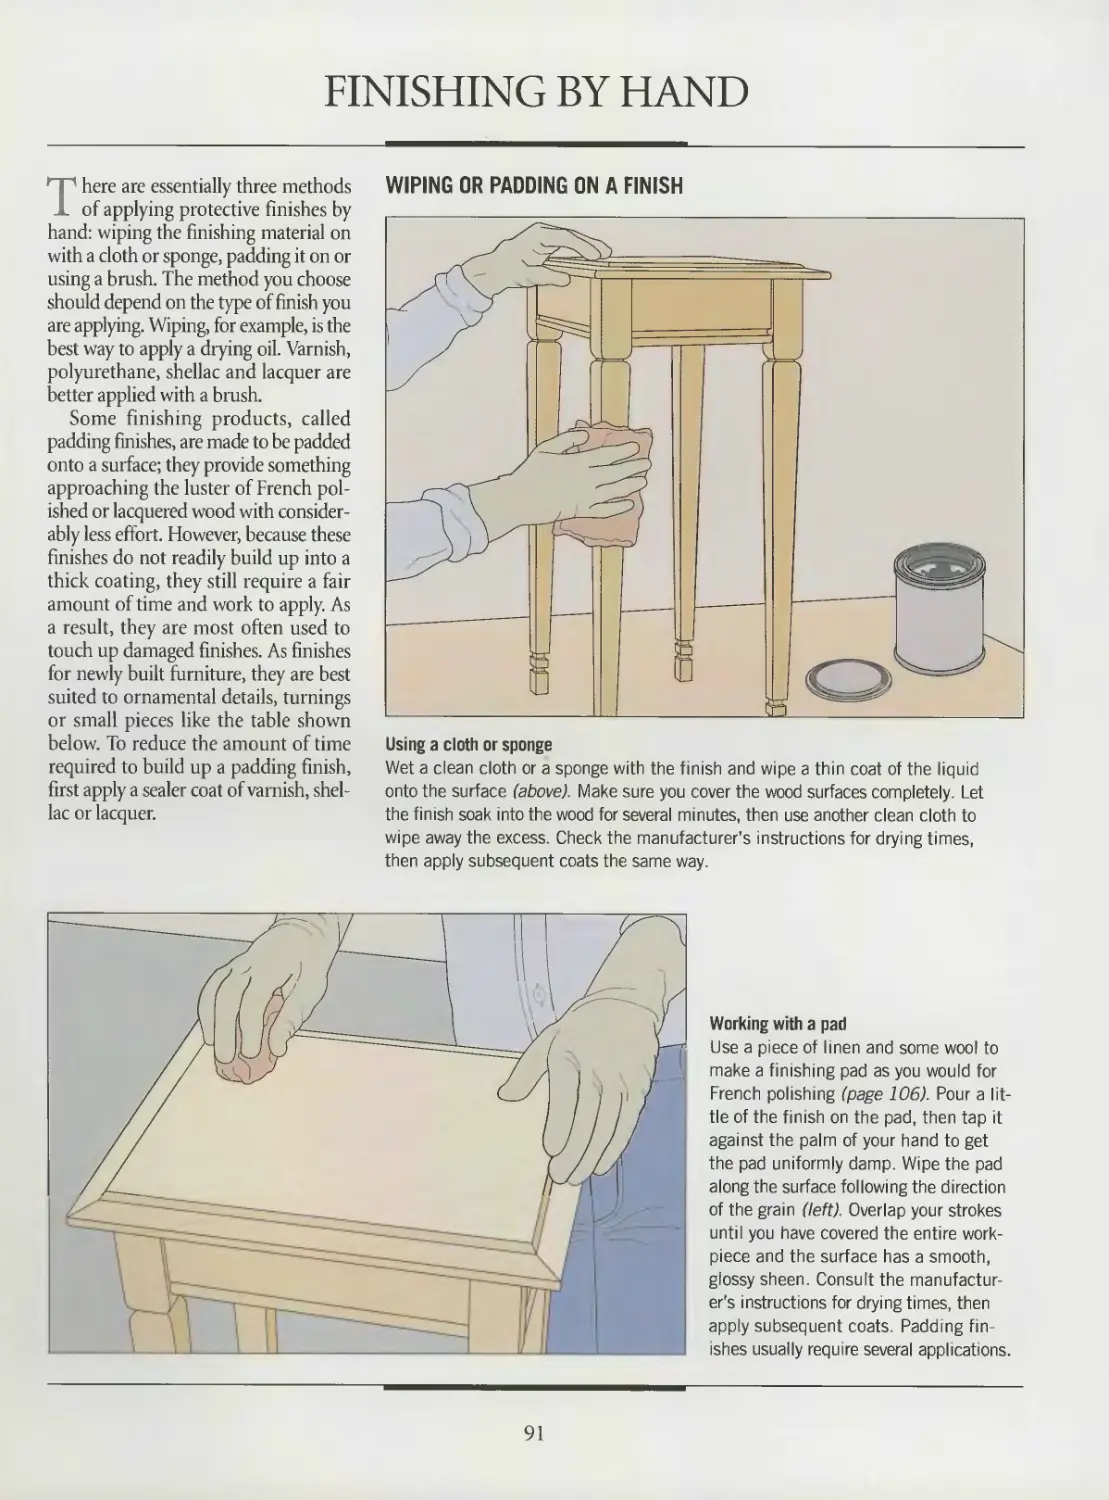
91 Finishing by hand
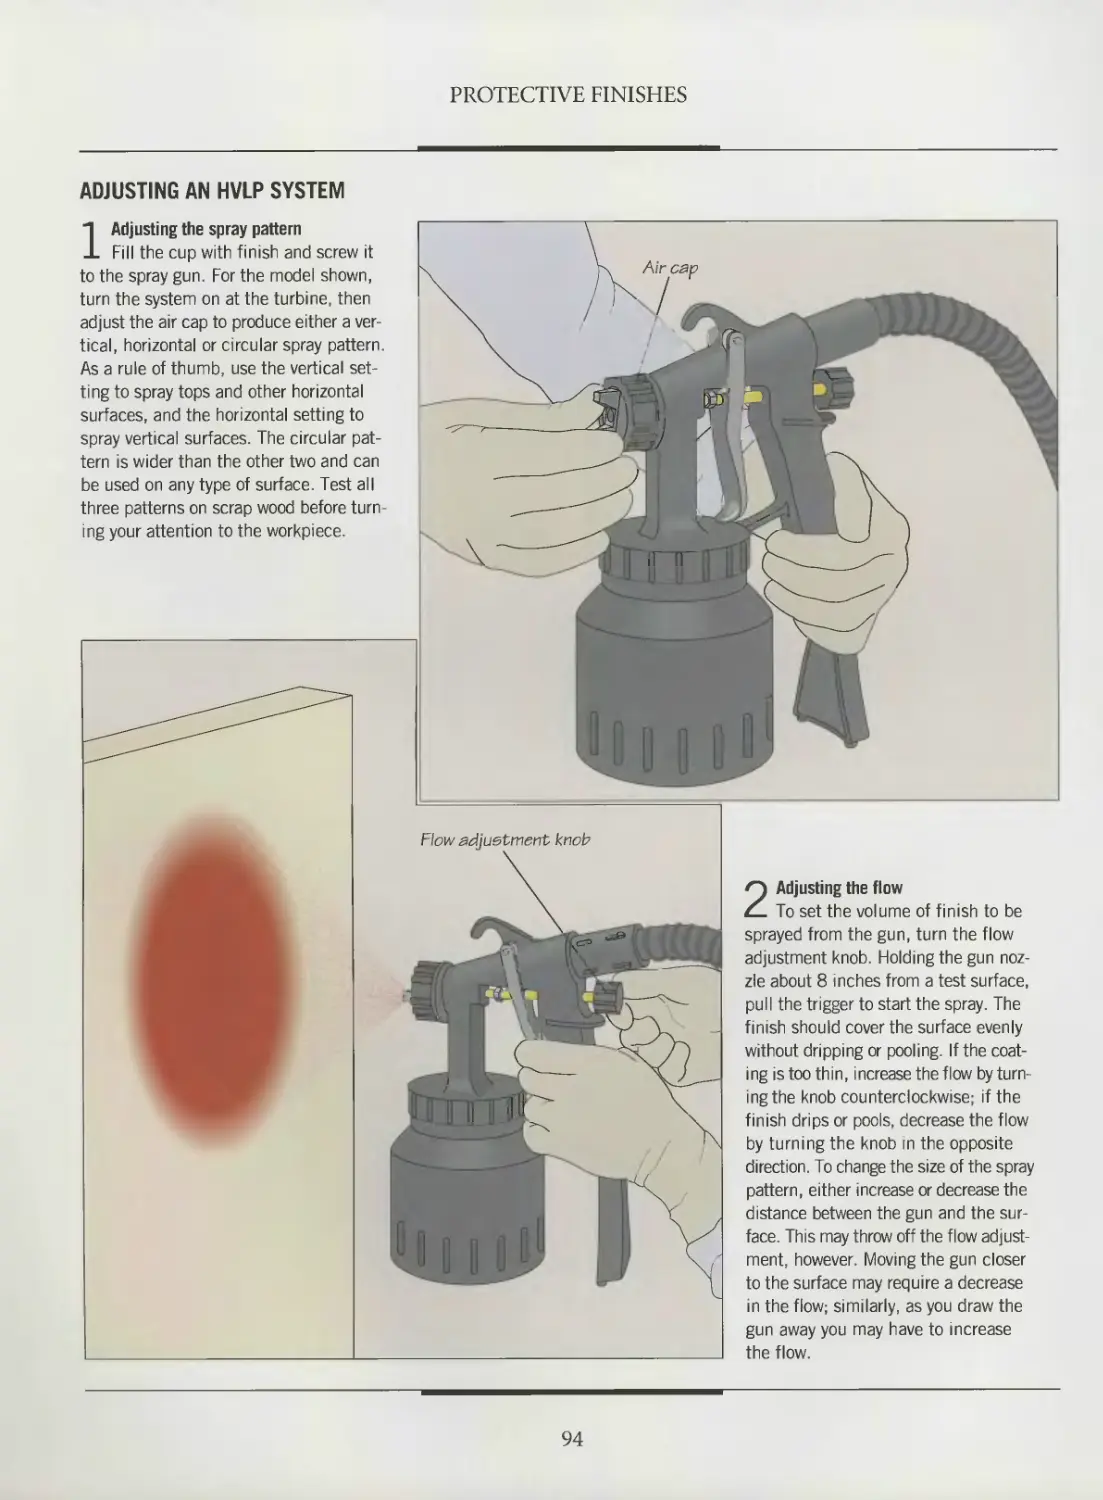
93 Setting up your spray equipment
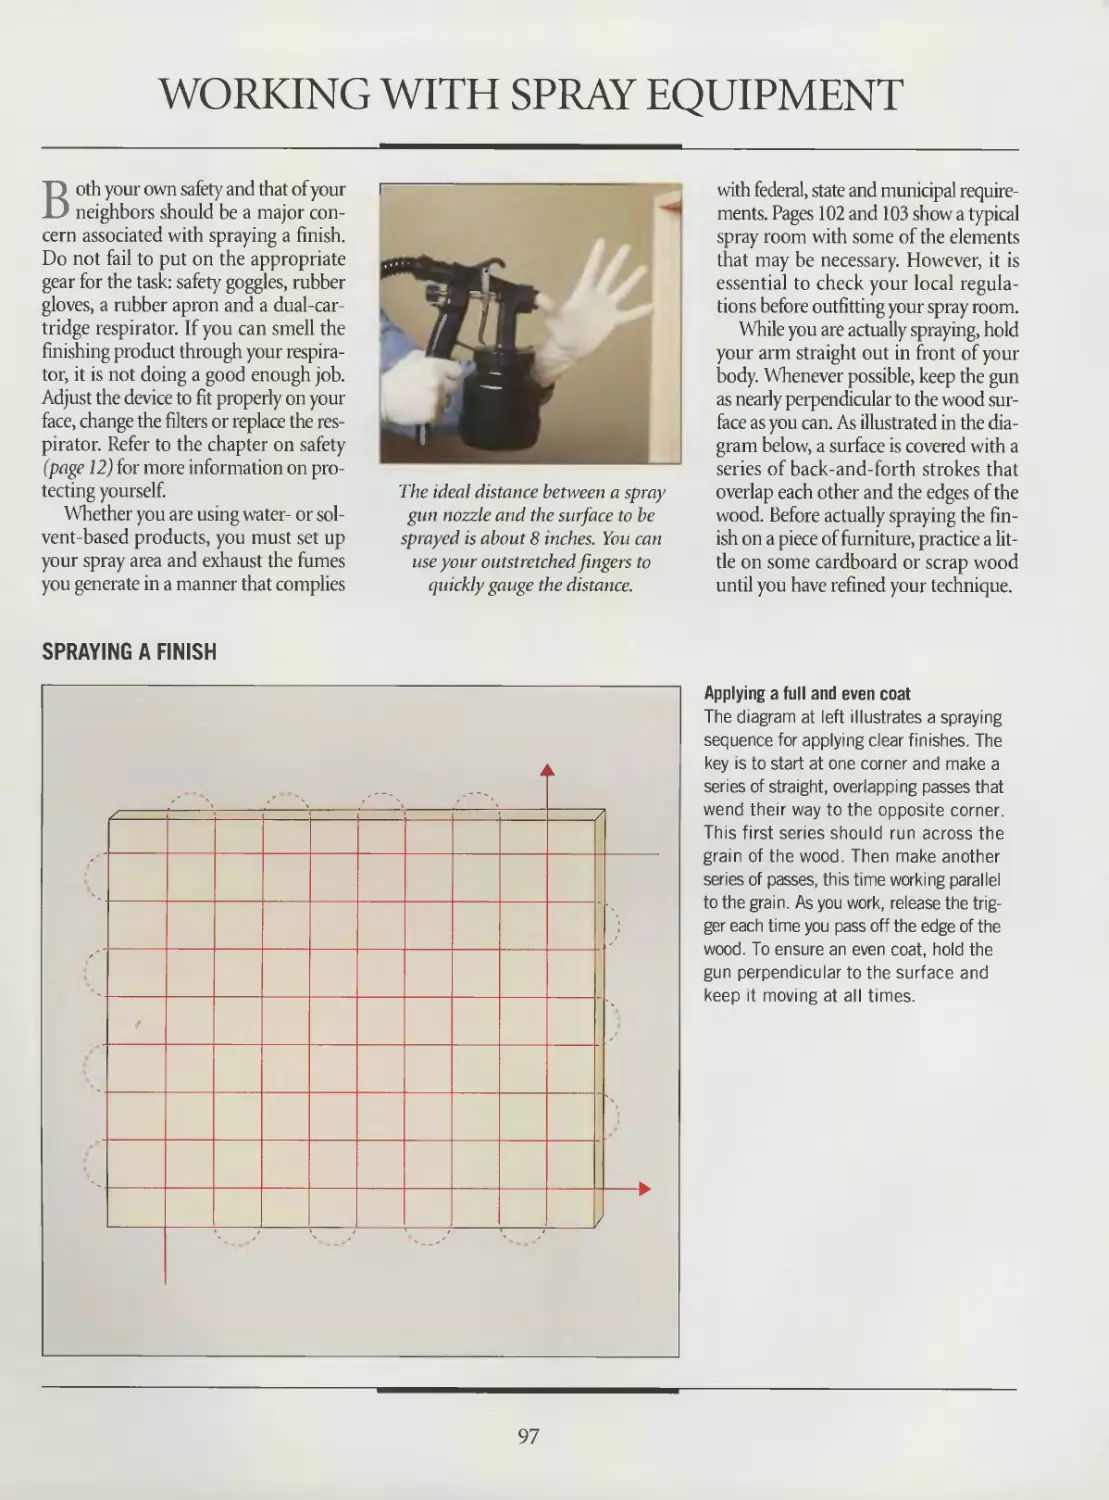
97 Working with spray equipment
102 Anatomy of a spray room
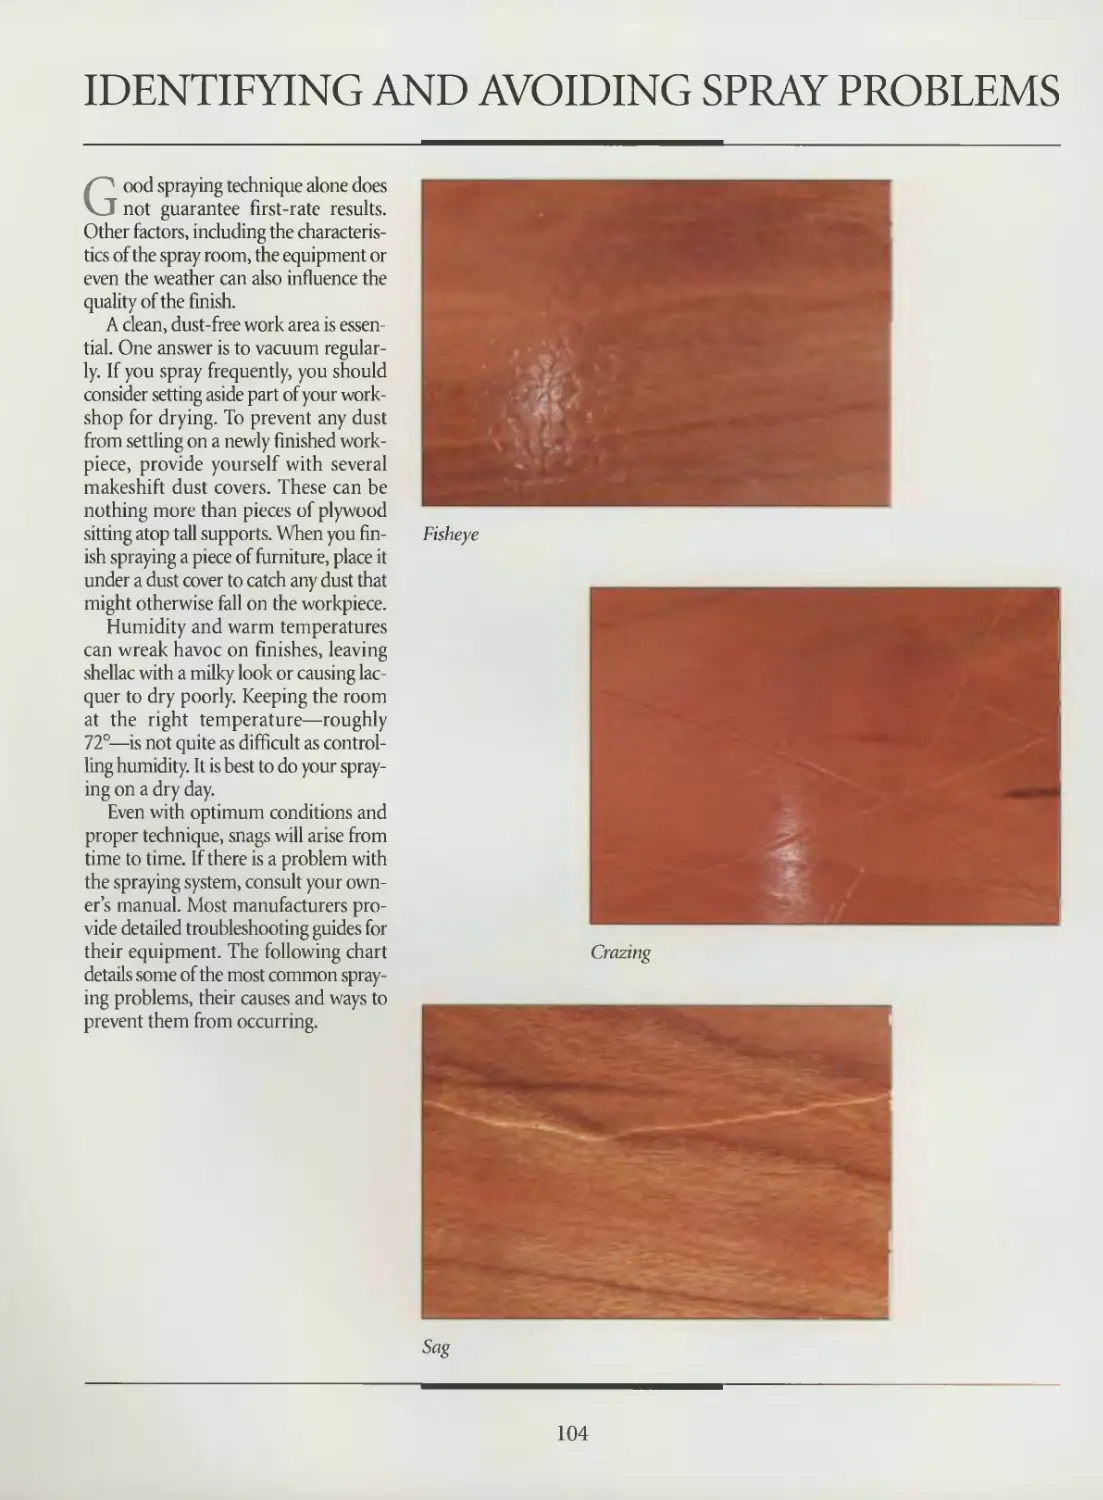
104 Identifying and avoiding
spray problems
106 French polishing
INTRODUCTION
Paul McGoldrick describes
FINISHING
A PIANO
My career in restoring pianos began like a lot of opportunities in life—by chance.
When I was 23 I had a cabinetmaking shop in Montreal; next door was a
Parisian cabinetmaker, Jean Gilles Jozon. Jean was a cabinetmaker of the old tradition
and I spent many hours in his atelier learning about different finishing methods—tech-
niques that haven’t changed for generations. I later followed him to Paris and spent
a working holiday there restoring antiques.
Through mutual friends I met a piano technician named Gilles Losier, and I began
doing finishing work on pianos he was restoring. In his youth, Gilles had a foreman
who could select the wood for a piano case, install the soundboard, string the piano,
cut the keys, and assemble and regulate the mechanism. He could even sit down and
play a tune. Sadly, craftsmen with that range of expertise in the piano trade have all
but vanished.
Restoring pianos presents many challenges: The instrument must not only look
great; it must also sound superb and respond well mechanically. The instrument shown
in the photograph is a 7-foot Chickering and Sons grand piano built in Boston in 1875.
I counted 10 different woods used in its making, although the entire surface is veneered
with Brazilian rosewood.
My first task involved filling the grain of the wood with a dark paste filler. I then
applied a coat of sanding sealer, and next sprayed on eight coats of lacquer. To keep
the final finish thin and to level any depressions caused by the large pores of the rose-
wood veneer, I cut every second lacquer coating with 220-grit sandpaper.
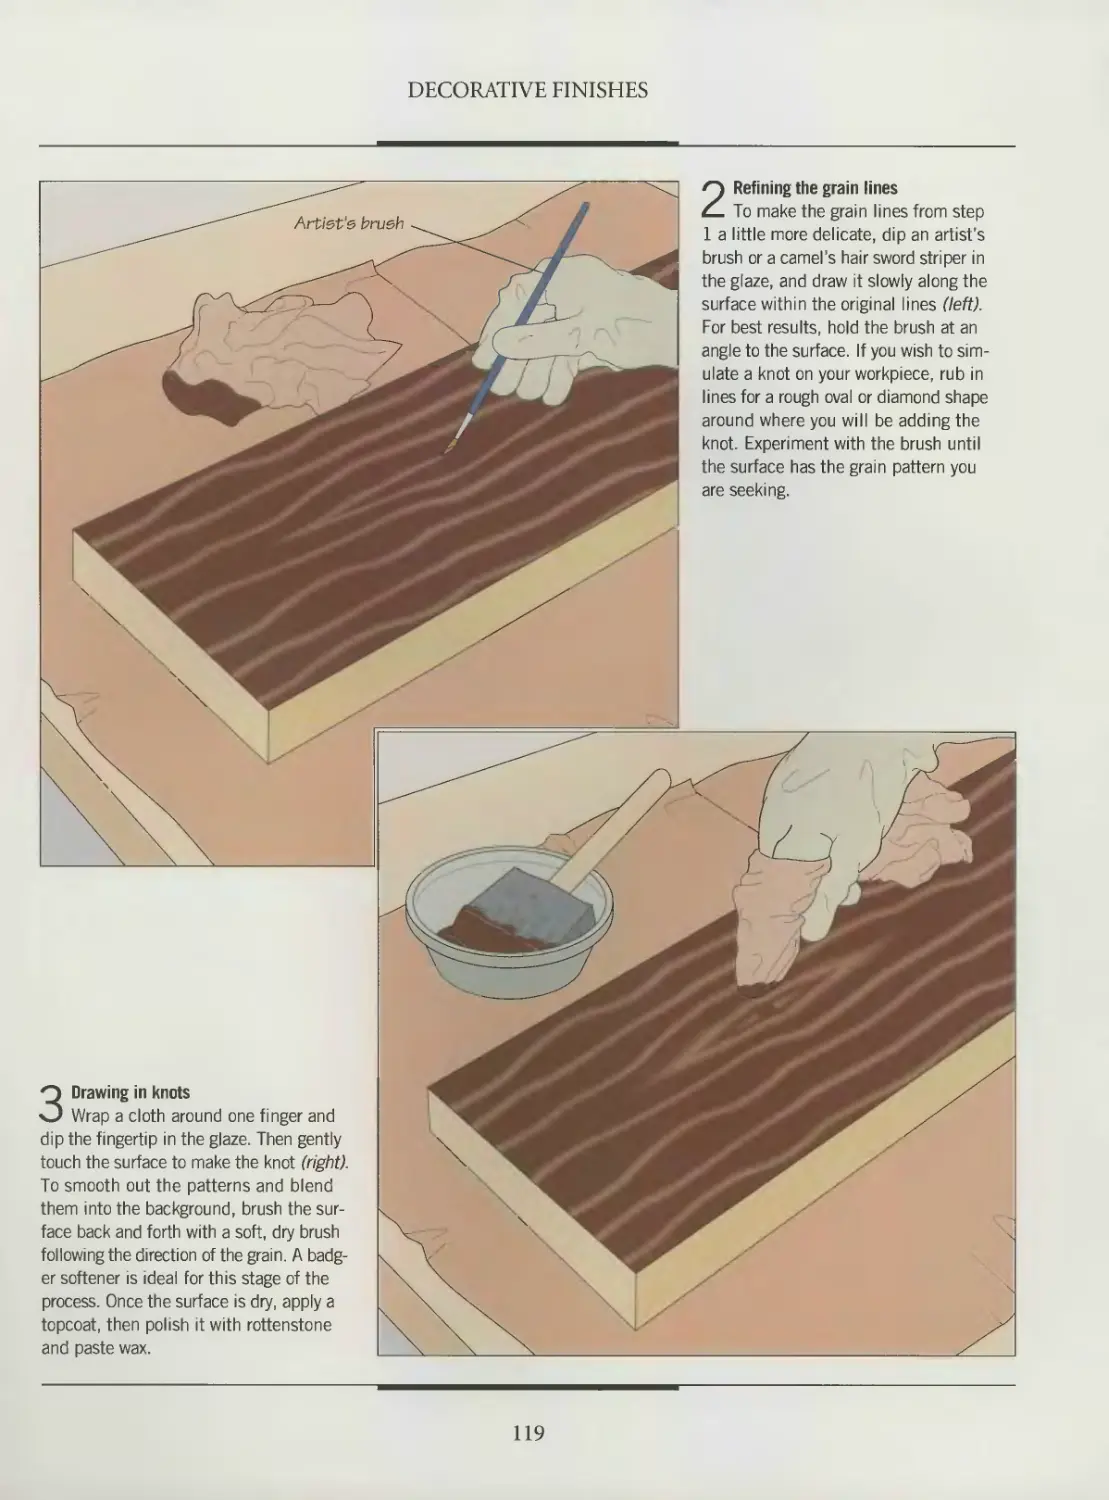
The legs demanded special attention. They were made from large blocks of poplar
wood so I had to create my own stain, blending in just enough yellow and red to sim-
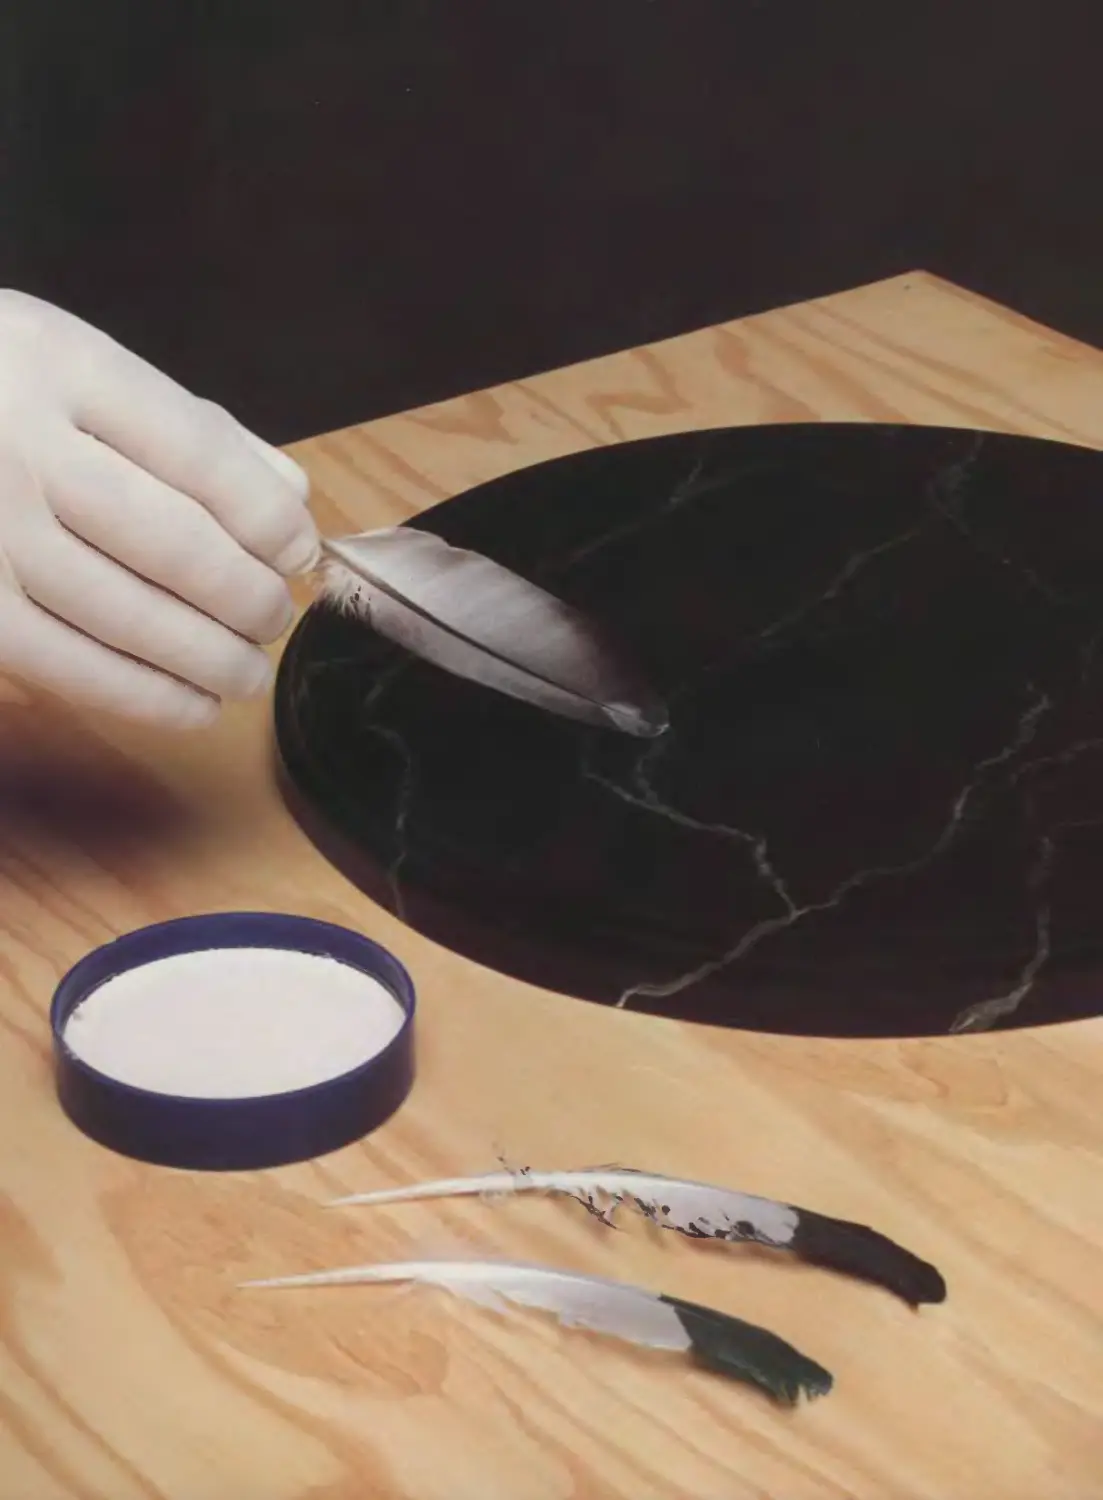
ulate rosewood’s distinctive hue. I sketched in grain lines using a combination of feath-
ers and brushes, with the top of the piano standing nearby as a guide. The grain
patterns in rosewood can get quite wild, so you can take artistic liberties in trying to
simulate it as long as you respect a few rules, such as keeping the grain lines running
parallel.
The final coat of finish was sanded with 220-grit and then 400-grit paper. All that
remained at the time this photo was taken was to rub the finish to a soft gloss with
0000 steel wool, buff with a cotton cloth and apply a carnauba-based wax.
Paul McGoldrick finishes and restores
pianos in his shop in Montreal, Quebec.
6
INTRODUCTION
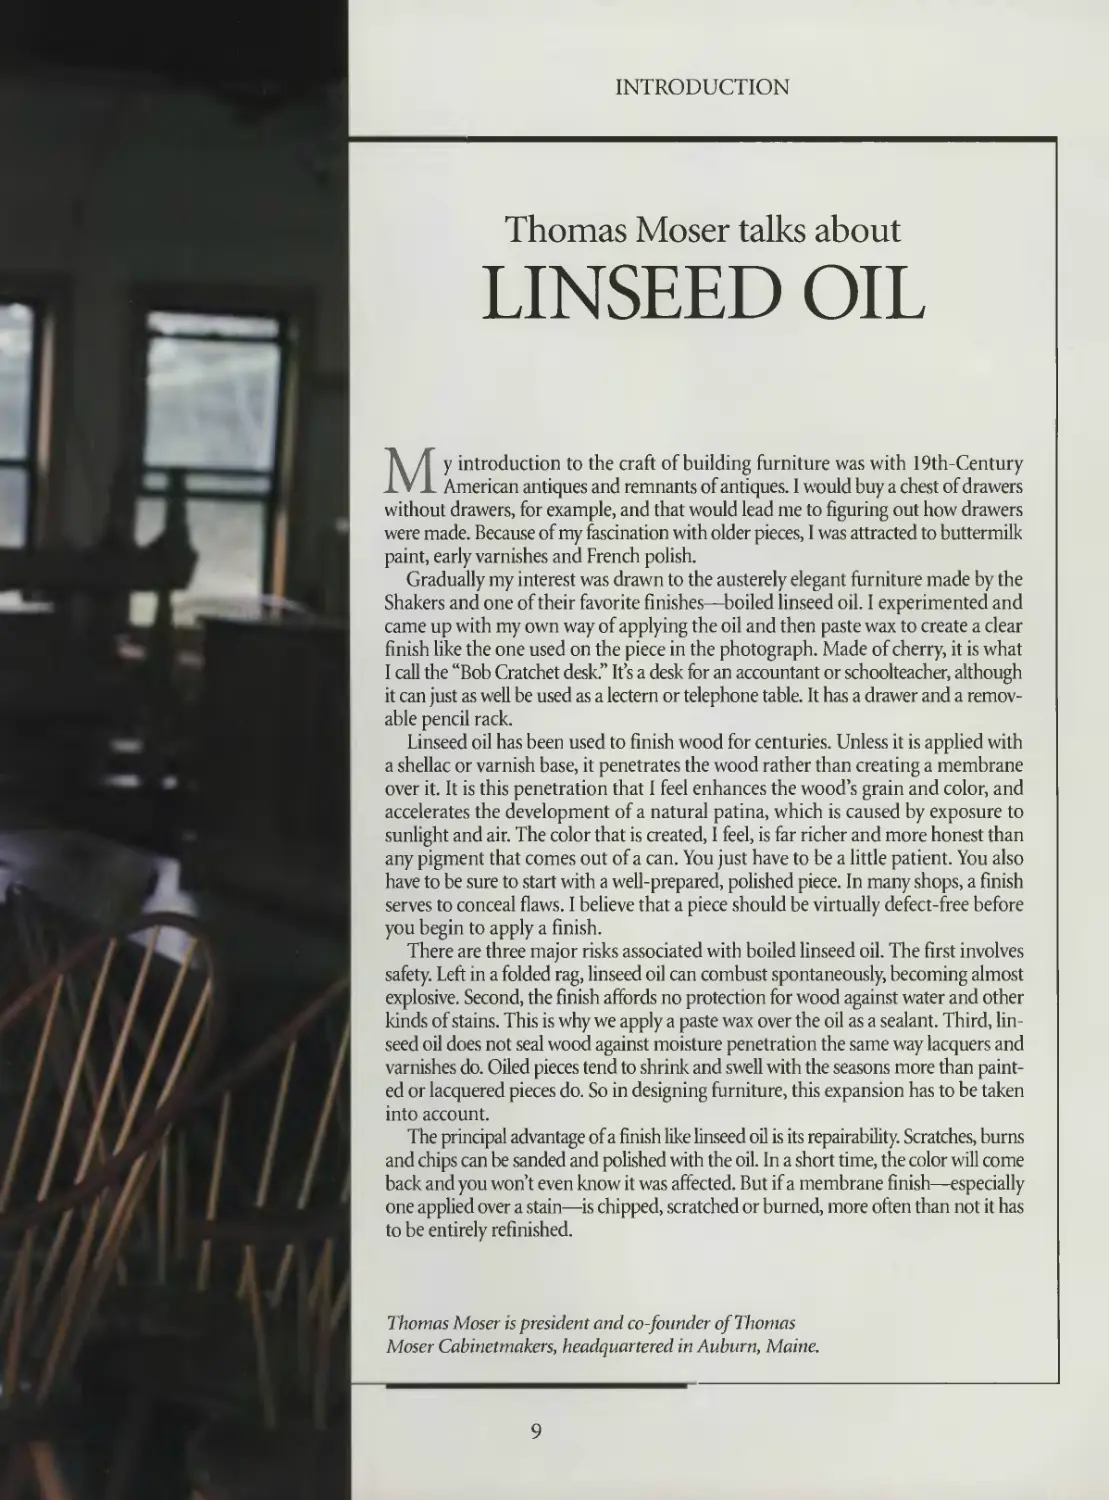
Thomas Moser talks about
LINSEED OIL
My introduction to the craft of building furniture was with 19th-Century
American antiques and remnants of antiques. I would buy a chest of drawers
without drawers, for example, and that would lead me to figuring out how drawers
were made. Because of my fascination with older pieces, I was attracted to buttermilk
paint, early varnishes and French polish.
Gradually my interest was drawn to the austerely elegant furniture made by the
Shakers and one of their favorite finishes—boiled linseed oil. I experimented and
came up with my own way of applying the oil and then paste wax to create a clear
finish like the one used on the piece in the photograph. Made of cherry, it is what
I call the “Bob Cratchet desk.” It’s a desk for an accountant or schoolteacher, although
it can just as well be used as a lectern or telephone table. It has a drawer and a remov-
able pencil rack.
Linseed oil has been used to finish wood for centuries. Unless it is applied with
a shellac or varnish base, it penetrates the wood rather than creating a membrane
over it. It is this penetration that I feel enhances the wood’s grain and color, and
accelerates the development of a natural patina, which is caused by exposure to
sunlight and air. The color that is created, I feel, is far richer and more honest than
any pigment that comes out of a can. You just have to be a little patient. You also
have to be sure to start with a well-prepared, polished piece. In many shops, a finish
serves to conceal flaws. I believe that a piece should be virtually defect-free before
you begin to apply a finish.
There are three major risks associated with boiled linseed oil. The first involves
safety. Left in a folded rag, linseed oil can combust spontaneously, becoming almost
explosive. Second, the finish affords no protection for wood against water and other
kinds of stains. This is why we apply a paste wax over the oil as a sealant. Third, lin-
seed oil does not seal wood against moisture penetration the same way lacquers and
varnishes do. Oiled pieces tend to shrink and swell with the seasons more than paint-
ed or lacquered pieces do. So in designing furniture, this expansion has to be taken
into account.
The principal advantage of a finish like linseed oil is its repairability. Scratches, burns
and chips can be sanded and polished with the oil. In a short time, the color will come
back and you won’t even know it was affected. But if a membrane finish—especially
one applied over a stain—is chipped, scratched or burned, more often than not it has
to be entirely refinished.
Thomas Moser is president and co-founder of Thomas
Moser Cabinetmakers, headquartered in Auburn, Maine.
9
INTRODUCTION
Prew Savoy on
THE
CRAFT ETHIC
The piece I am working on in the photograph is a Sheraton-style, two-drawer work
table, typical of early 19th-Century American furniture building. Knowing how
to apply the appropriate finish takes a good appreciation of furniture style. You have
to approximate the original as closely as possible—in color as well as in topcoat com-
position. The best way to get onto the right track is to study furniture styles as thor-
oughly as you can. Talk to people experienced with period pieces—museum curators,
serious collectors and restoration or conservation craftsmen. They are usually very
willing to share technical information. Also try to see as many original examples as
possible.
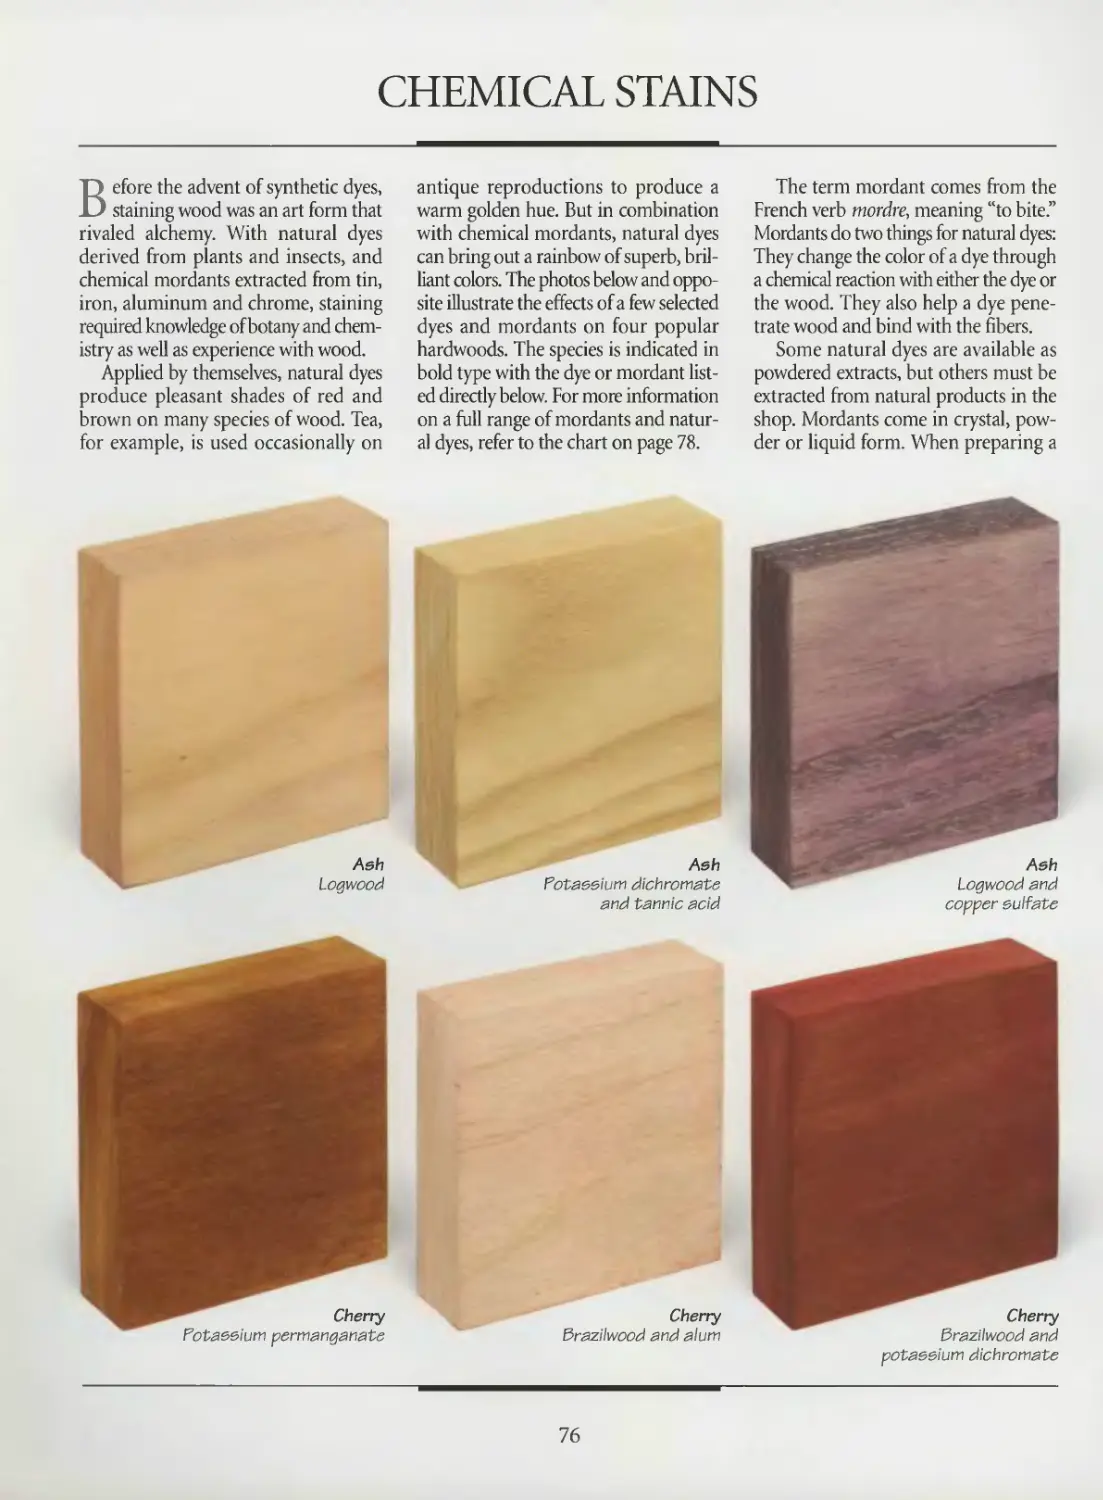
For this piece, I selected natural and chemical dyes to make the color appropriate
to its history. The table is made of cherry with a figured veneer applied to the drawer
fronts. Two different combinations were used: logwood extract (a natural dye) and
potassium dichromate (a chemical mordant) on the veneer; and lye and walnut crys-
tals on the cherry.
For the topcoat, I padded a 3-pound-cut orange shellac on the wood. I like using
a pad made up of a wool interior and a linen exterior, but other finishers prefer pol-
ishing cloths—perhaps because good-quality linen is hard to find. The technique is
called French polishing, but the term can be misleading. There are several ways to apply
a French polish, some using pumice and oil to fill the pores of the wood completely,
providing a mirror-like finish. That is not always appropriate for all American pieces.
I trace my interest in fine furniture back to my childhood and my parents who were
collectors themselves. As an adult I spent two summers working with a boat builder,
and much later studied with George Frank in China. When I started collecting fine
furniture, I couldn’t afford the pieces I liked, so I learned to build replicas instead.
I believe that cabinetmakers should consider themselves as caretakers of a sort,
building something that will be passed down from generation to generation. You need
to develop what I call a “craft ethic.” You have to love what you do, not for the result
or for a wage, but simply for the sake of finding the finest way of doing each step.
Prew Savoy specializes in furniture finishing and
restoration. He also teaches wood finishing at the
Olde Mill Cabinet Shoppe in York, Pennsylvania.
11
SAFETY
Finishing can be a dangerous business
if you are not well informed and
properly prepared. From wood fillers to
waxes, polyurethane varnishes and tung
oil, finishing products frequently depend
on toxic organic solvents to do their
work. Without the proper safety gear and
precautions, short-term exposure to these
solvents can result in irritation to the
skin, eyes and throat, as well as dizziness,
headache, nausea and shortness of
breath. Longer-term exposure poses
more potential risks; some effects may
not be apparent until you have used the
substances for months or even years.
In addition to the health risks, most
of these solvents are flammable. Some
oil-derived products like linseed oil can
combust spontaneously at room tem-
perature if the vapors are sufficiently
concentrated. When vaporized in a small
enough concentration of air, a small
quantity of lacquer thinner can cause a
life-threatening explosion.
All this is not to suggest that working
with finishing products has to be dan-
gerous—only that it can be if you take a
cavalier attitude towards the risks. If you
spray finishes, consider buying a spray
booth (page 13) or constructing a spray
room of your own (page 102). As most of
the harm from organic solvents comes
from inhalation, wear a dual-cartridge
Safety goggles
Use when epraying a finish;
theee vented goggles pre-
vent finiehing fumee from
irritating the eyee
Neoprene rubber gloves
Use to protect the ekin
when epraying or mixing
caustic finiehing products;
snug-fitting surgeon’s
gloves are suitable for
Rubber apron
Provides protection
when working with
a wood bleach or
chemical stain
Class ABC fire
extinguisher
For putting out a
small fire in the shop
Steel waste dis-
posal container
For temporary
safe disposal of
solvent-soaked
rags; dampen rags
with water first
Dual-cartridge respirator
Use when spraying a finish or working with
chemicals; interchangeable filters and car-
tridges protect against specific hazards.
Cartridges purify air contaminated with
toxins as they are inhaled, then expel
them through exhalation valve; filter
prevents inhalation of dust
12
SAFETY
SPRAYING SAFELY
respirator (page 14), particularly if you
are spraying or will be exposed to fumes
for more than an hour. To prevent eye
injury, wear safety goggles, and don rub-
ber gloves when working with caustic or
toxic finishing products.
Whenever possible, choose a product
that combines the finish you want with
low volatility and toxicity (page 19).
Work with the windows open and use a
certified spark-proof fan to keep the air
moving. This will help prevent the fumes
in your work area from reaching a toxic
or flammable level. If you experience
drowsiness, fatigue, headache, blurred
vision, weakness, numbness, irritation of
the eyes, skin or throat, shortness of breath
or a loss of coordination while finishing,
stop immediately and leave the work
area until the symptoms clear. After-
wards, ventilate the work area thoroughly
and use a different finishing product.
SAFETY TIPS
• Do not eat, drink or smoke
when using finishing products.
• Keep finishing products away
from children.
• Avoid exposure to organic
solvents if you are pregnant or
breast-feeding.
• Install at least one smoke
detector on the ceiling of your
shop above potential fire hazards;
keep a fully charged ABC fire
extinguisher nearby.
• Never store solvents or chemi-
cals in unmarked containers.
Chemical solutions should always
be stored in dark glass jars to
shield them from light, which
may change their composition.
• Do not flush used solvents down
the drain. Consult the Yellow Pages
to find out who handles chemical
disposal in your area, or check
with your local fire department.
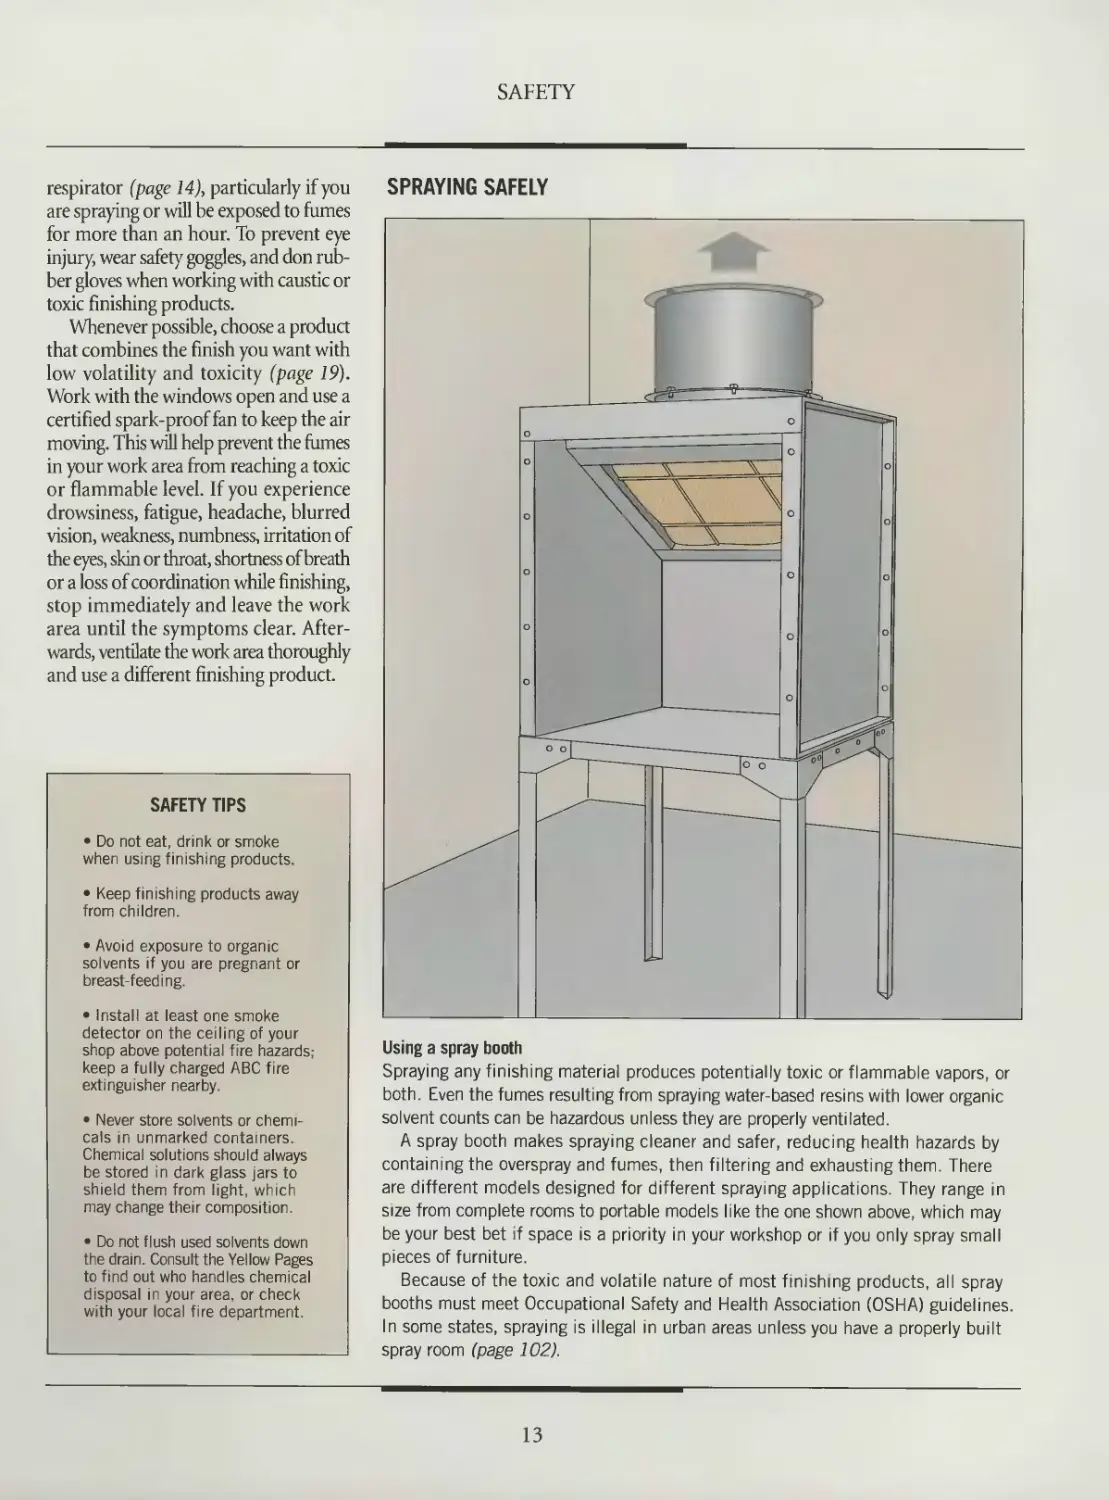
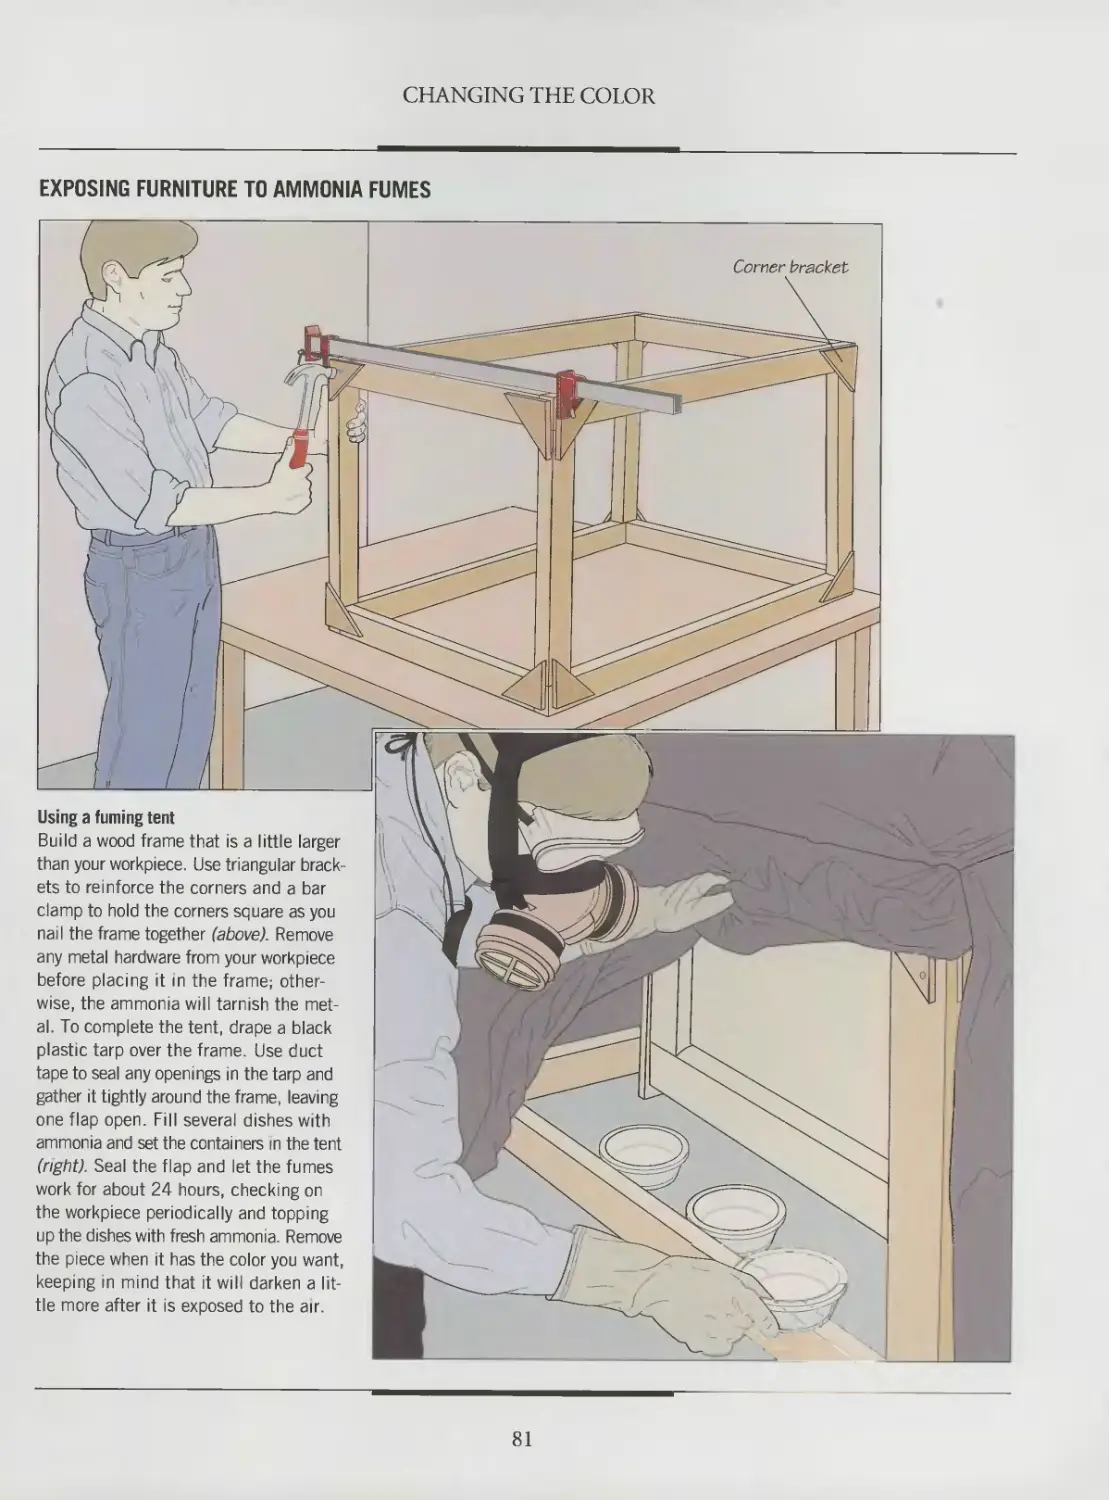
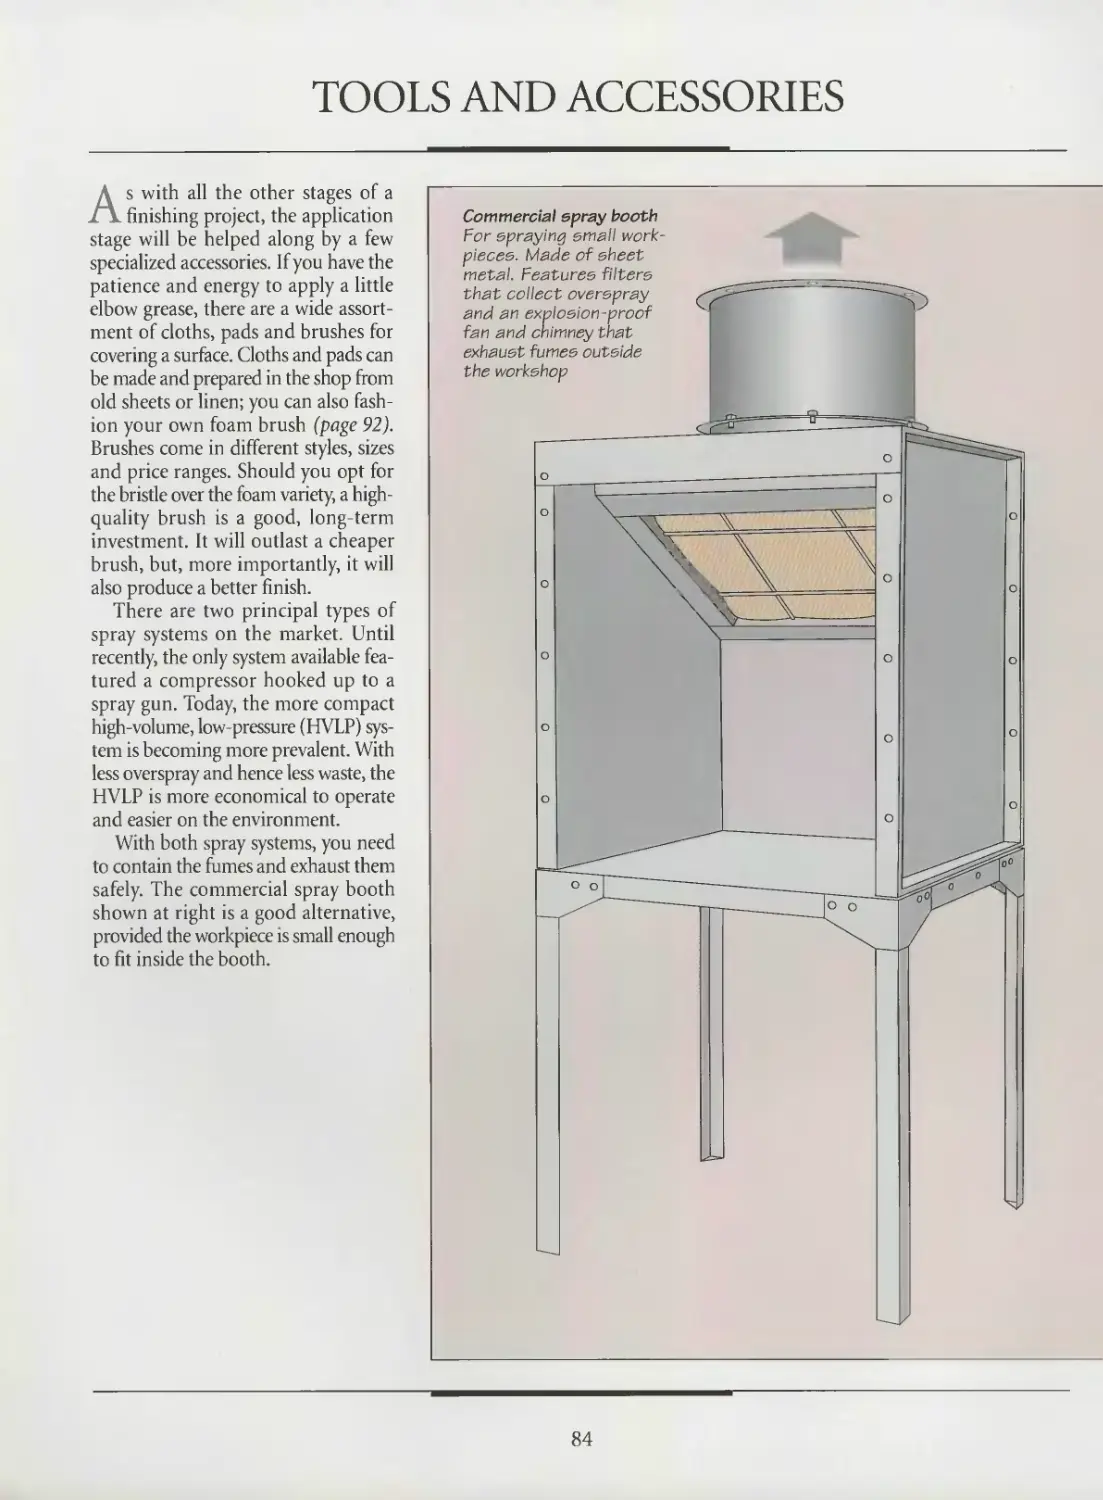
Using a spray booth
Spraying any finishing material produces potentially toxic or flammable vapors, or
both. Even the fumes resulting from spraying water-based resins with lower organic
solvent counts can be hazardous unless they are properly ventilated.
A spray booth makes spraying cleaner and safer, reducing health hazards by
containing the overspray and fumes, then filtering and exhausting them. There
are different models designed for different spraying applications. They range in
size from complete rooms to portable models like the one shown above, which may
be your best bet if space is a priority in your workshop or if you only spray small
pieces of furniture.
Because of the toxic and volatile nature of most finishing products, all spray
booths must meet Occupational Safety and Health Association (OSHA) guidelines.
In some states, spraying is illegal in urban areas unless you have a properly built
spray room (page 102).
13
SAFETY
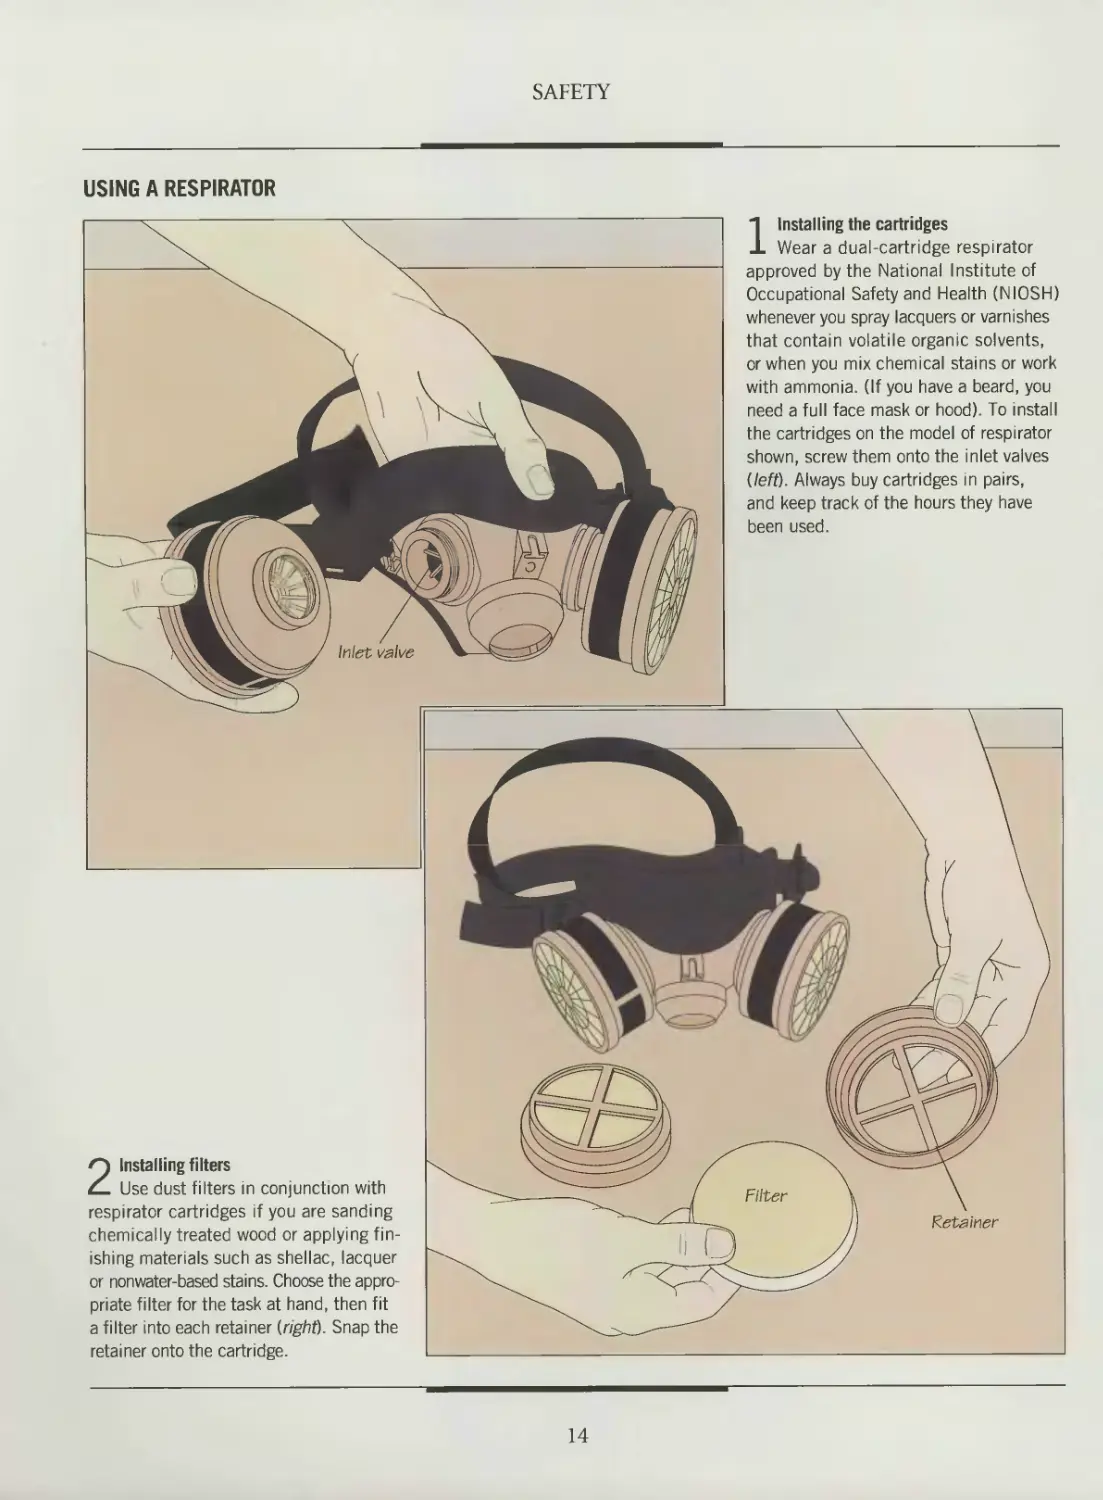
USING A RESPIRATOR
2 Installing filters
Use dust filters in conjunction with
respirator cartridges if you are sanding
chemically treated wood or applying fin-
ishing materials such as shellac, lacquer
or nonwater-based stains. Choose the appro-
priate filter for the task at hand, then fit
a filter into each retainer (right). Snap the
retainer onto the cartridge.
1 Installing the cartridges
Wear a dual-cartridge respirator
approved by the National Institute of
Occupational Safety and Health (NIOSH)
whenever you spray lacquers or varnishes
that contain volatile organic solvents,
or when you mix chemical stains or work
with ammonia. (If you have a beard, you
need a full face mask or hood). To install
the cartridges on the model of respirator
shown, screw them onto the inlet valves
(left). Always buy cartridges in pairs,
and keep track of the hours they have
been used.
14
SAFETY
3 Testing the respirator
Place the respirator on your face,
with the top strap over the crown of your
head. Pull on the sidestraps until the
facepiece of the respirator fits snugly.
Test the device by blocking the outlet
valve with your hand and exhaling gently
(above). There should be no air leakage
around the facepiece. If there are any
gaps, adjust the straps for a tighter
fit. If necessary, replace the facepiece
according to the manufacturer’s instruc-
tions, or replace the respirator
ШШШШ Ш Ш Hl Hi Hi Uli 111 И Mill 111
SHOP TIP
Storing respirator
cartridges
Even water vapor
can deplete the
purifying
chemicals
in respira-
tor car-
tridges.
To extend
their life, store the
cartridges in a dry, airtight
environment, such as a plastic freez-
er bag. Record the amount of time the
cartridges have been used and replace them
after eight hours of use or as soon as you
can smell the finishing product through them.
15
SAFETY
CLEANING UP A TOXIC SOLVENT OR CHEMICAL SPILL
Disposing of soiled rags
Immediately open all doors and windows,
extinguish any sources of heat and turn
off all electrical sources. Wearing a rubber
apron, rubber boots, heavy rubber gloves,
safety goggles and a respirator, soak up
the spill with rags or paper towels; then
place them in a metal can double-lined
with heavy-duty plastic garbage bags. Add
a small amount of water to prevent sponta-
neous combustion. You can also spread
the rags outside and allow the solvent to
evaporate before disposing of them. Clean
up any residue with the appropriate sol-
vent listed in the chart below. If the
product is extremely flammable or poiso-
nous and more than one gallon has been
spilled, leave the work area and call the
fire department. Otherwise, dispose of the
soiled rags following the environmental
regulations in effect in your community.
THE RIGHT SOLVENT FOR A SPILL
PRODUCT SPILLED SOLVENT REQUIRED
Mineral spirits Turpentine Paint remover Household detergent and water Household detergent and water Household detergent and water; or mineral spirits or paint thinner, then household detergent and water
Denatured alcohol None
Methyl alcohol Acetone None None
Lacquer thinner Water-based stain or latex paint Oil-based stain None Household detergent and water Mineral spirits or paint thinner, then household detergent and water
Urethane or polyurethane Varnish Mineral spirits or paint thinner, then household detergent and water Mineral spirits or paint thinner, then household detergent and water
Lacquer Shellac Lacquer thinner Denatured alcohol (ethyl alcohol) or methyl alcohol
Linseed oil Mineral spirits or paint thinner, then household detergent and water
Tung oil Oxalic acid or two-part wood bleach Lye Mineral spirits or paint thinner, then household detergent and water Water and baking soda Water and vinegar, mixed in equal parts
16
SAFETY
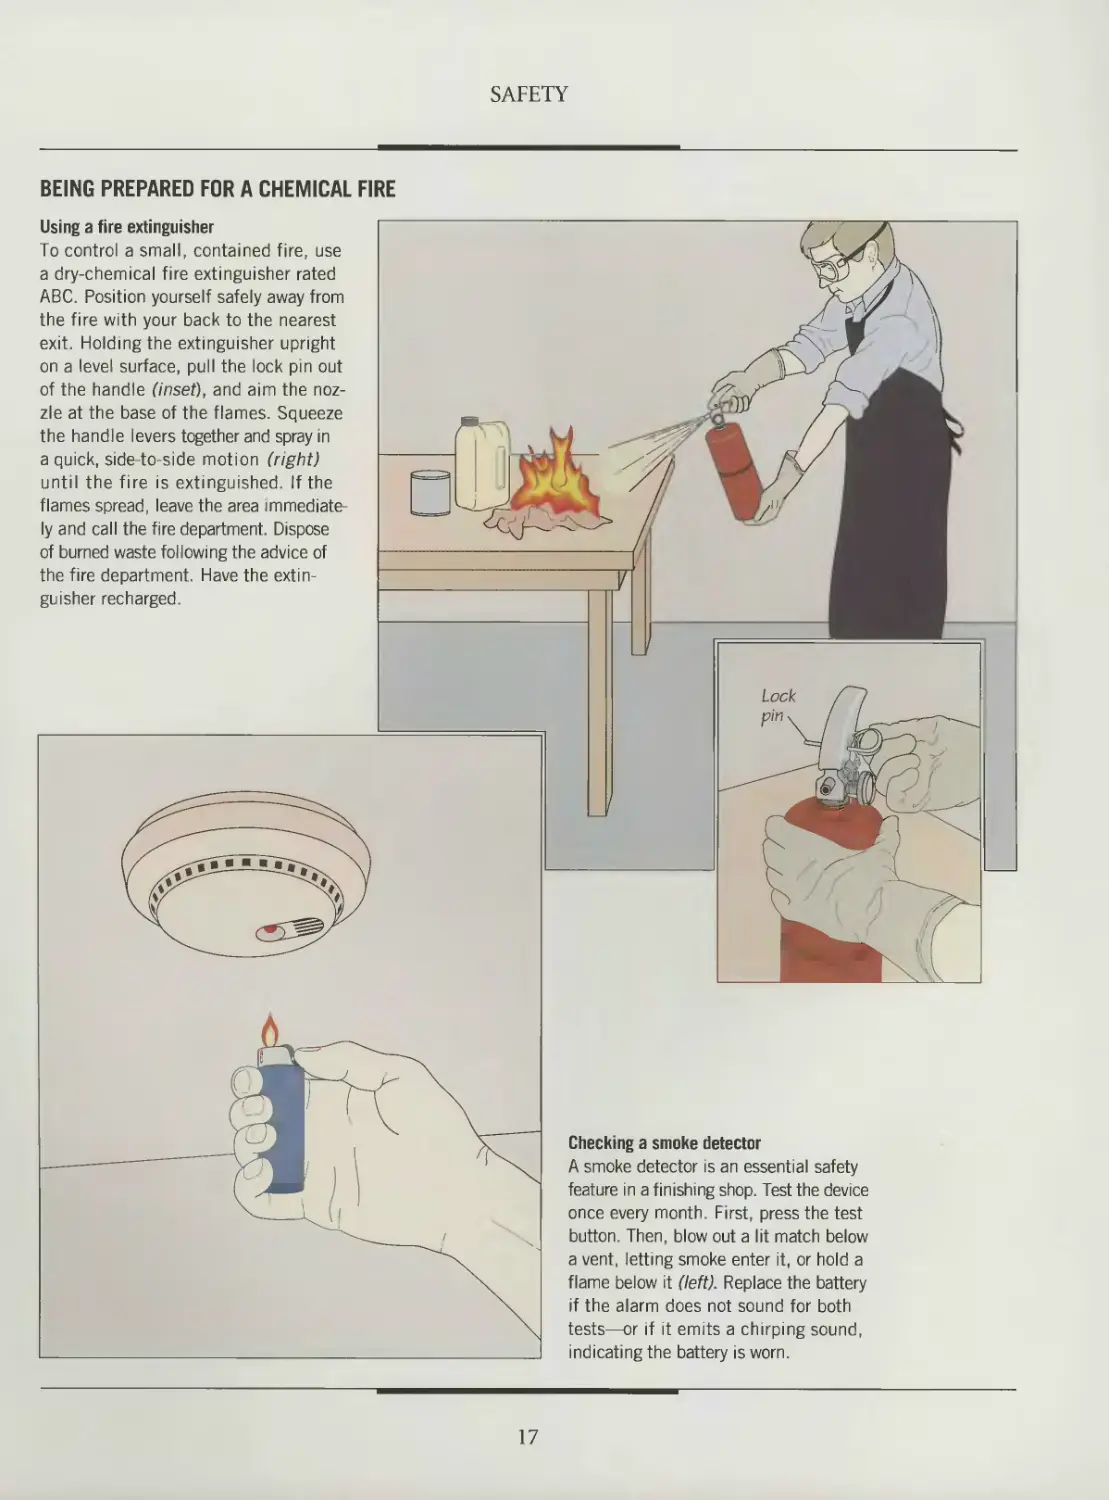
BEING PREPARED FOR A CHEMICAL FIRE
Using a fire extinguisher
To control a small, contained fire, use
a dry-chemical fire extinguisher rated
ABC. Position yourself safely away from
the fire with your back to the nearest
exit. Holding the extinguisher upright
on a level surface, pull the lock pin out
of the handle (inset), and aim the noz-
zle at the base of the flames. Squeeze
the handle levers together and spray in
a quick, side-to-side motion (right)
until the fire is extinguished. If the
flames spread, leave the area immediate-
ly and call the fire department. Dispose
of burned waste following the advice of
the fire department. Have the extin-
guisher recharged.
Checking a smoke detector
A smoke detector is an essential safety
feature in a finishing shop. Test the device
once every month. First, press the test
button. Then, blow out a lit match below
a vent, letting smoke enter it, or hold a
flame below it (left). Replace the battery
if the alarm does not sound for both
tests—or if it emits a chirping sound,
indicating the battery is worn.
17
SAFETY
DECIPHERING THE LABEL INFORMATION
Safety precautions
Directions for use
Inhalation warning
that are chemically incom-
patible with the product
evaporated vapors on the atmos-
phere directly above the liquid,
measured in milometers of mercury.
The greater the vapor pressure, the
more volatile the product
names and proportions of both volatile
and non-volatile ingredients in the prod-
uct, such as resins, solvents, driers and
flatteners; also indicates whether the
solvent is sensitive to light and photo-
chemically reactive, which can create
airborne pollutants
Reading a product label
The label on a container of finish is more than just a trademark
and a set of instructions. It is both the key to comparing the
finish’s characteristics with those of other products and a guide
to using the substance safely in the shop. The composite label
shown above includes the features you should look for when
choosing a finishing product, such as toxicity rating, VOC rat-
ing, vapor pressure and flammability. Refer to the chart on
page 19 to determine the toxicity of a product's active ingredi-
ents and compare them with those of other similar products to
help you choose the least toxic finish. Follow the safety precau-
tions specified on the label to set up the proper ventilation
and working conditions, and familiarize yourself with the first aid
instructions in the event of an accident.
Some states allow the use of Trade Secret Registry num-
bers for a product's ingredients to protect patented chemical
formulas. If you find the information on the label too vague,
request a Material Safety Data Sheet (MSDS) from the
manufacturer if one is available. An MSDS will explicitly
detail the product’s hazardous ingredients as well as precau-
tions for safe handling and use.
18
SAFETY
CHOOSING A SAFE FINISH
Finishing chemistry has changed radically in recent years.
The most significant advance has been the development of
water-based finishes in response to both the health risks
posed by solvents and clean-air legislation that limits the
percentage of VOCs, or volatile organic compounds, in sol-
vent-based finishes. Most of these regulations are primarily
intended for furnituremakers who use more than one gallon
of finish per day, yet industry experts predict that by the
mid-1990s, VOC-compliant finishes will be the rule rather
than the exception for everyone in the United States.
Inhalation is the most common way that solvents are
absorbed into the bloodstream, but toxins can also be ingest-
ed from food and beverages left in the shop. Others can be
absorbed directly through the skin or even by swallowing
vapors in saliva.
In their most poisonous form, solvents can cause damage
to the central nervous system and respiratory tract. Methylene
chloride, for example, is suspected of being a carcinogen,
while some glycol ethers have been linked to birth defects.
Keep in mind, however, that the health hazards of any
finishing product depend on a number of factors. Most
products on the market are actually benign when used
only on occasion, and could only be considered poisonous
if swallowed directly. Some can even be made non-
toxic; shellac is commonly used as an ingredient in
confectioners’ glaze.
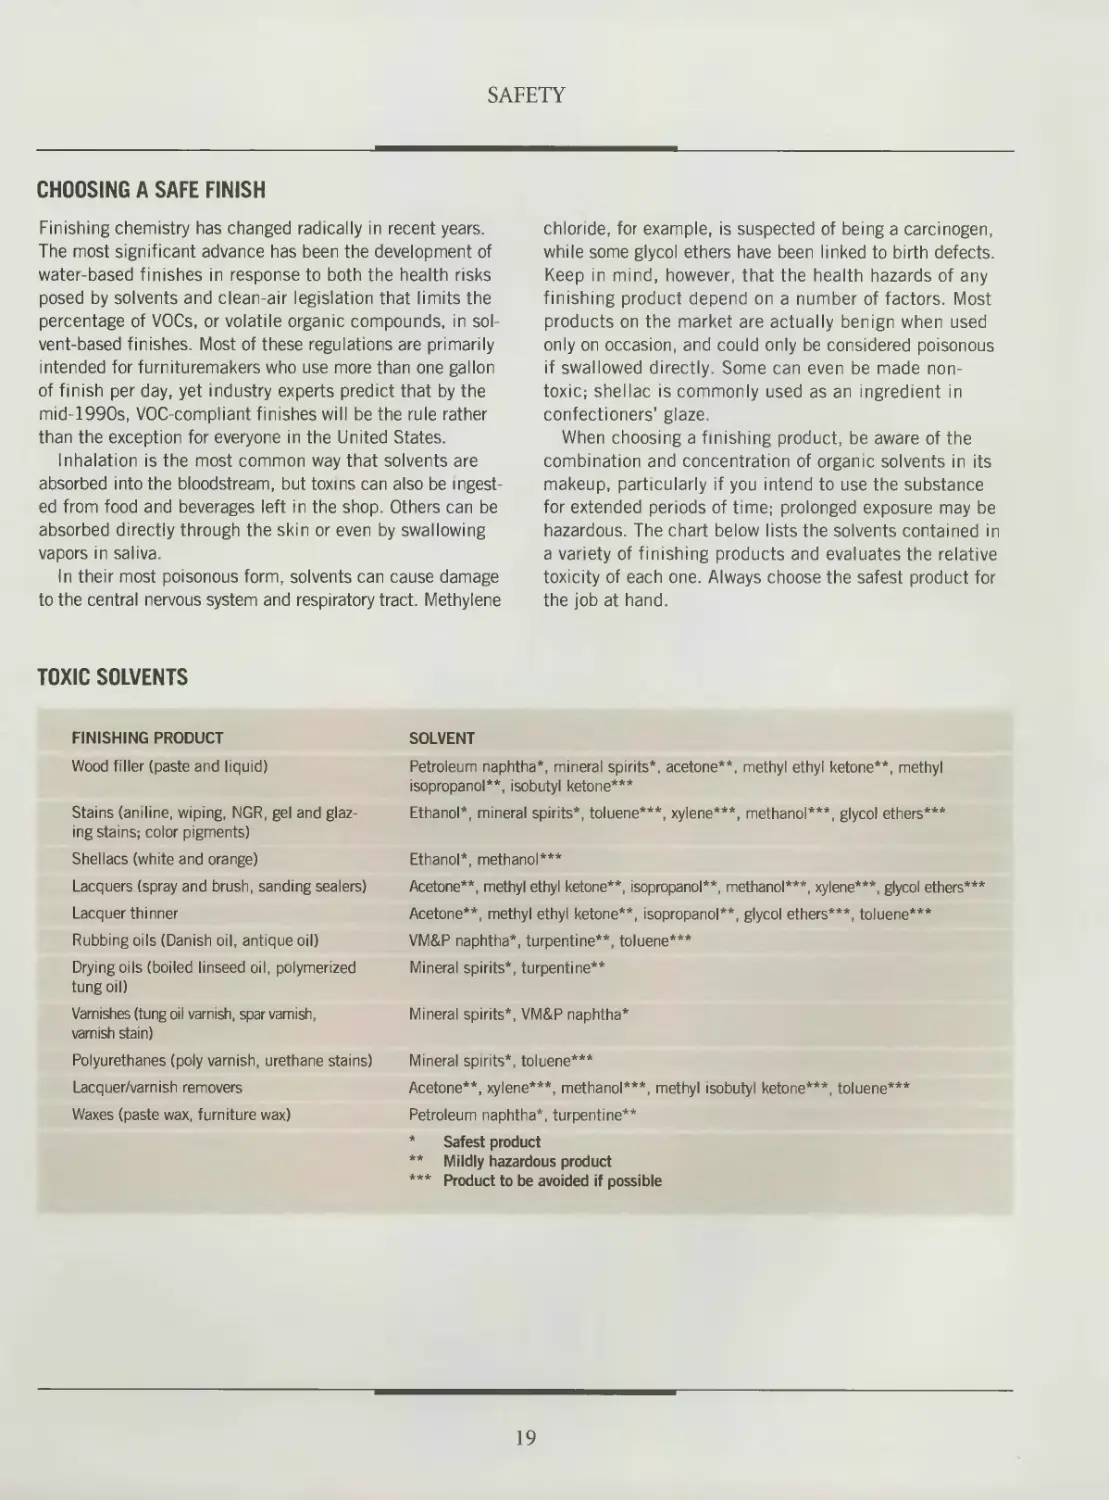
When choosing a finishing product, be aware of the
combination and concentration of organic solvents in its
makeup, particularly if you intend to use the substance
for extended periods of time; prolonged exposure may be
hazardous. The chart below lists the solvents contained in
a variety of finishing products and evaluates the relative
toxicity of each one. Always choose the safest product for
the job at hand.
TOXIC SOLVENTS
FINISHING PRODUCT
Wood filler (paste and liquid)
Stains (aniline, wiping, NGR, gel and glaz-
ing stains; color pigments)
Shellacs (white and orange)
Lacquers (spray and brush, sanding sealers)
Lacquer thinner
Rubbing oils (Danish oil, antique oil)
Drying oils (boiled linseed oil, polymerized
tungoil)
Varnishes (tung oil “arnish, spar varnish,
varnish stain)
Polyurethanes (poly varnish, urethane stains)
Lacquer/varnish removers
Waxes (paste wax, furniture wax)
SOLVENT
Petroleum naphtha*, mineral spirits*, acetone**, methyl ethyl ketone**, methyl
isopropanol**, isobutyl ketone***
Ethanol*, mineral spirits*, toluene***, xylene***, methanol***, glycol ethers***
Ethanol*, methanol***
Acetone**, methyl ethyl ketone**, isopropanol**, methanol***, xylene***, glycol ethers***
Acetone**, methyl ethyl ketone**, isopropanol**, glycol ethers***, toluene***
VM&P naphtha*, turpentine**, toluene***
Mineral spirits*, turpentine**
Mineral spirits*, VM&P naphtha*
Mineral spirits*, toluene***
Acetone**, xylene***, methanol***, methyl isobutyl ketone***, toluene***
Petroleum naphtha*, turpentine**
* Safest product
* * Mildly hazardous product
* ** Product to be avoided if possible
19
PREPARING THE SURFACE
Among its many uses, the hand scraper
can help clear away dried adhesive
after gluing up a carcase or drawer.
Old-time wood finishers smoothed
wood with sharkskin and rush,
filled its pores with plaster of Paris and
pulverized brick, colored it with mate-
rials such as iron filings and walnut
shells, and finished it with secret com-
binations of oils and beeswax. Modern
finishing techniques are mundane by
comparison, but the object is the same:
to bring out the beauty of the wood.
Whether this means a glassy film on the
surface of the wood or a finish that soft-
ly glows from within depends on the
type of protection the wood needs and
the effect you wish to achieve. Because
taste is involved, there is no single right answer to every finishing
question. But all professional-quality finishes have one thing
in common: painstaking surface preparation, which readies
the wood to accept the finishing materials.
The amount of time you spend on surface preparation and
the tools you use depend in large part on your work habits
and your wood. Surfaces speckled with dried glue obviously
require more work to smooth. Loose knots, splits and other
defects need repair prior to finishing; so does every dent and
chisel nick. The wood probably has jointer and planer marks,
which you can remove with shallow cuts using a smoothing
plane. The plane must be properly adjusted and sharp, so it cuts
wood fibers rather than tearing them and roughening the sur-
face. If the wood has an irregular pattern, so you cannot avoid
tearing the grain as it changes direction, substitute a cabinet
scraper—a thin, flat piece of steel with a burred edge. (For ulti-
mate smoothness of straight-grained wood, use both the smooth-
ing plane and cabinet scraper.) Cabinet scrapers take practice
to sharpen and use, but once mastered they can substantially
reduce your sanding time. Beware of an improperly sharp-
ened edge, however, which can scratch
the wood as badly as coarse sandpaper.
Sanding with successively finer grits
completes the surface preparation. For
hand-sanding a fairly smooth surface, a
typical progression is 150 grit, followed
by 220 and then 280 grit. (If you did not
smooth the wood with a cabinet scraper,
you might need to start with 80 or 120
grit.) Never skip an intermediate grit or
you will leave scratches in the wood that
the finish will magnify. With an orbital
sander, use the same grit sequence; plan
on hand-sanding with the final grit to
remove any whorls. After final sanding,
you may wish to “raise the grain” and then resand, to remove
the whiskery fibers that might otherwise pop up through the
finish on the first humid day. This step is essential when apply-
ing any material with a water, rather than solvent, base.
Whether or not you fill the pores of the wood is again a
matter of taste. If you like a natural-looking finish that allows
you to “read the wood grain,” do not use filler. Close-grained
species such as pine and cherry do not require filling in any
case, but if you want a glassy finish on an open-grained species,
such as oak or mahogany, you must fill the wood.
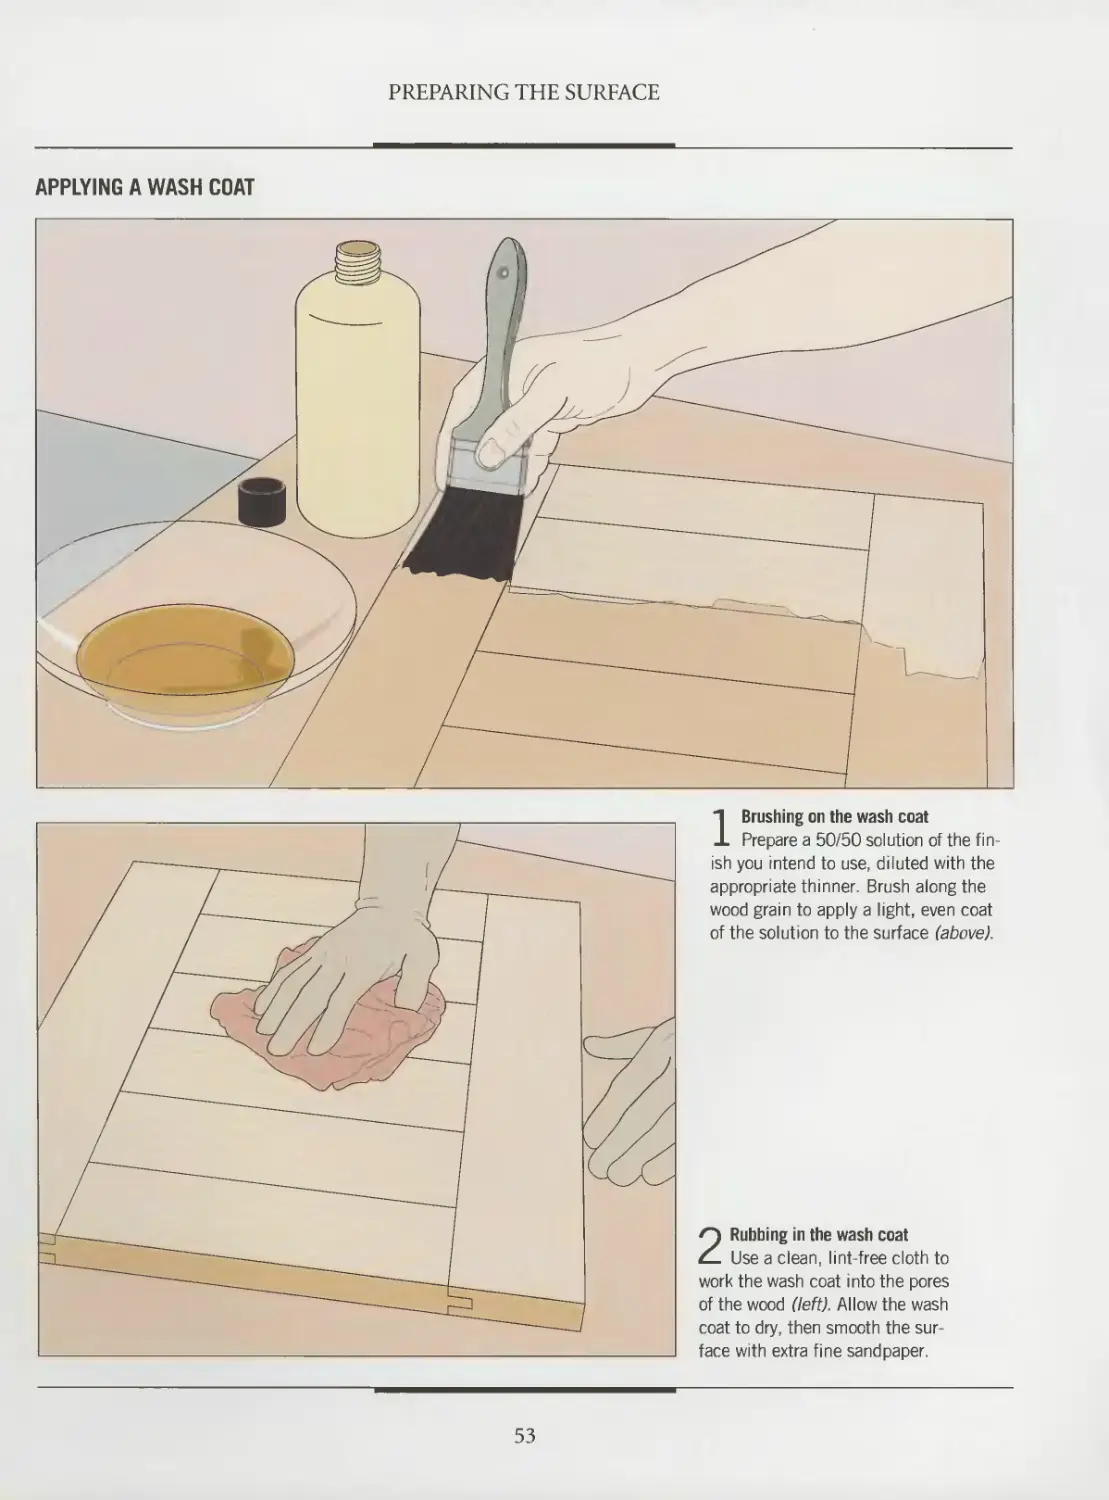
A wash coat may be applied to the wood before or after
staining—or not at all if you are applying a penetrating oil fin-
ish. A wash coat can be nothing more than a half-and-half
solution of your final finish and the solvent recommended by
its manufacturer ‘for lacquer, use sanding sealer). The point of
using a wash coat is to prevent the wood from uneven or exces-
sive absorption of finishing materials. When applied before
the final finish, the wash coat keeps the wood from drinking up
the finish, thereby reducing the number of coats required to
build up the proper thickness.
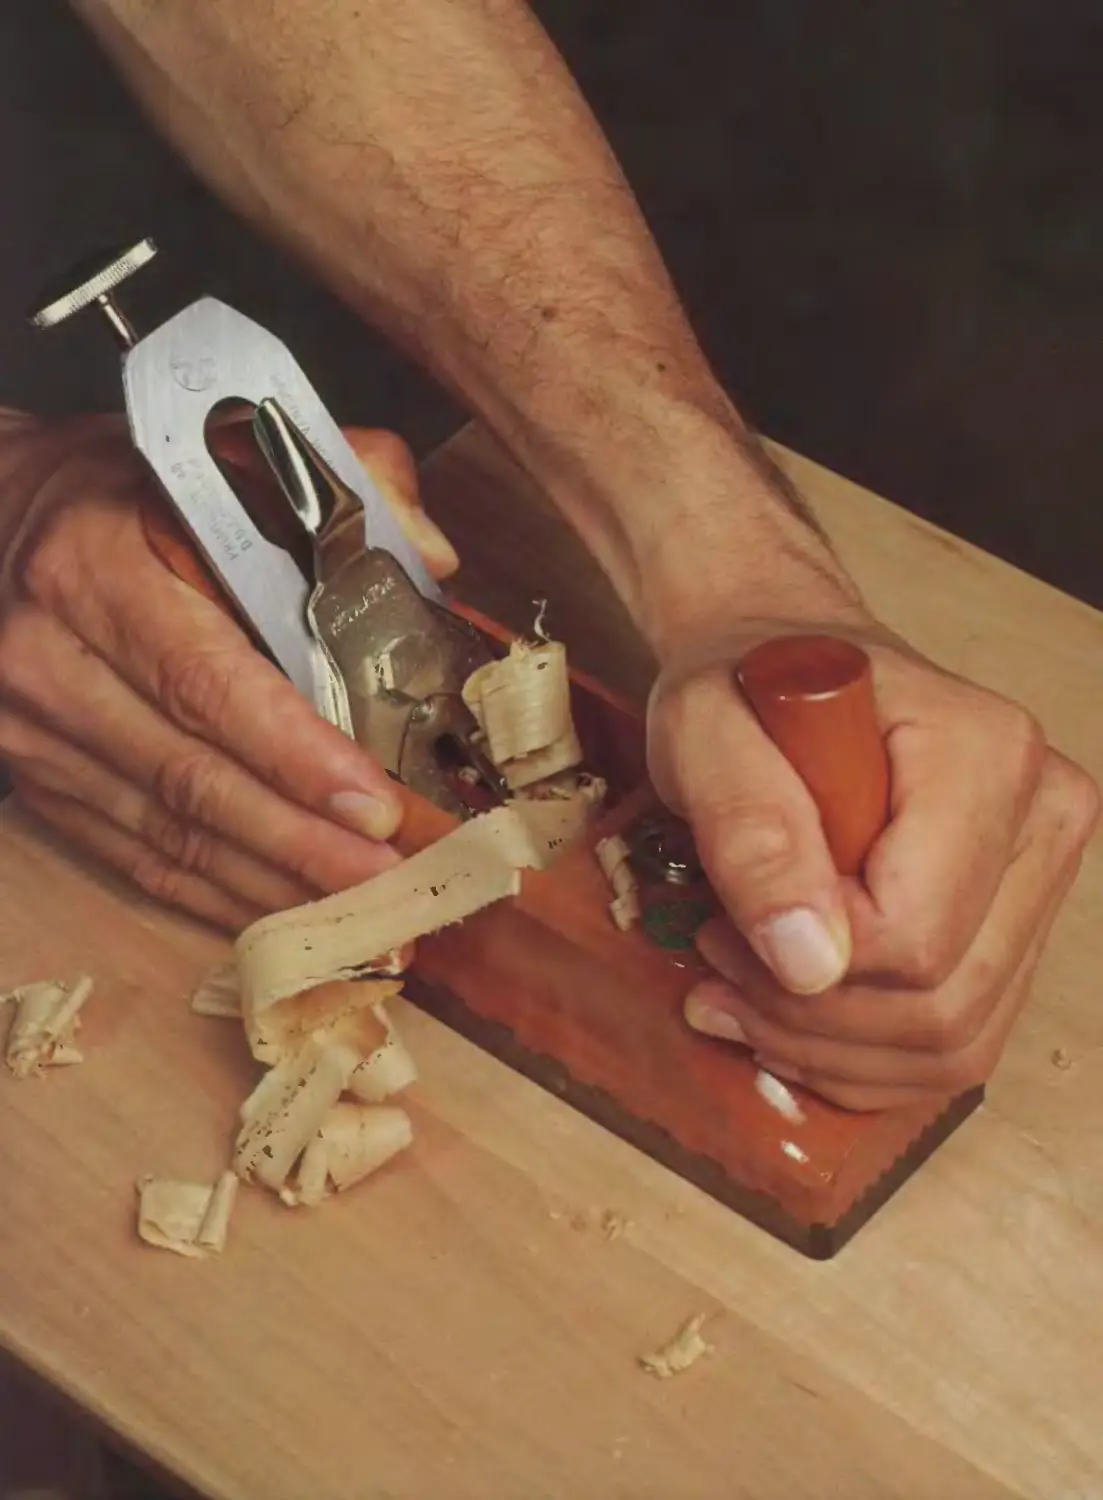
Despite a modern blade adjustment mechanism that enables the tool to slice off paper-
thin shavings, this smoothing plane retains the handcrafted quality of a traditional
hand tool. Producing smooth surfaces is a crucial step in finishing furniture.
21
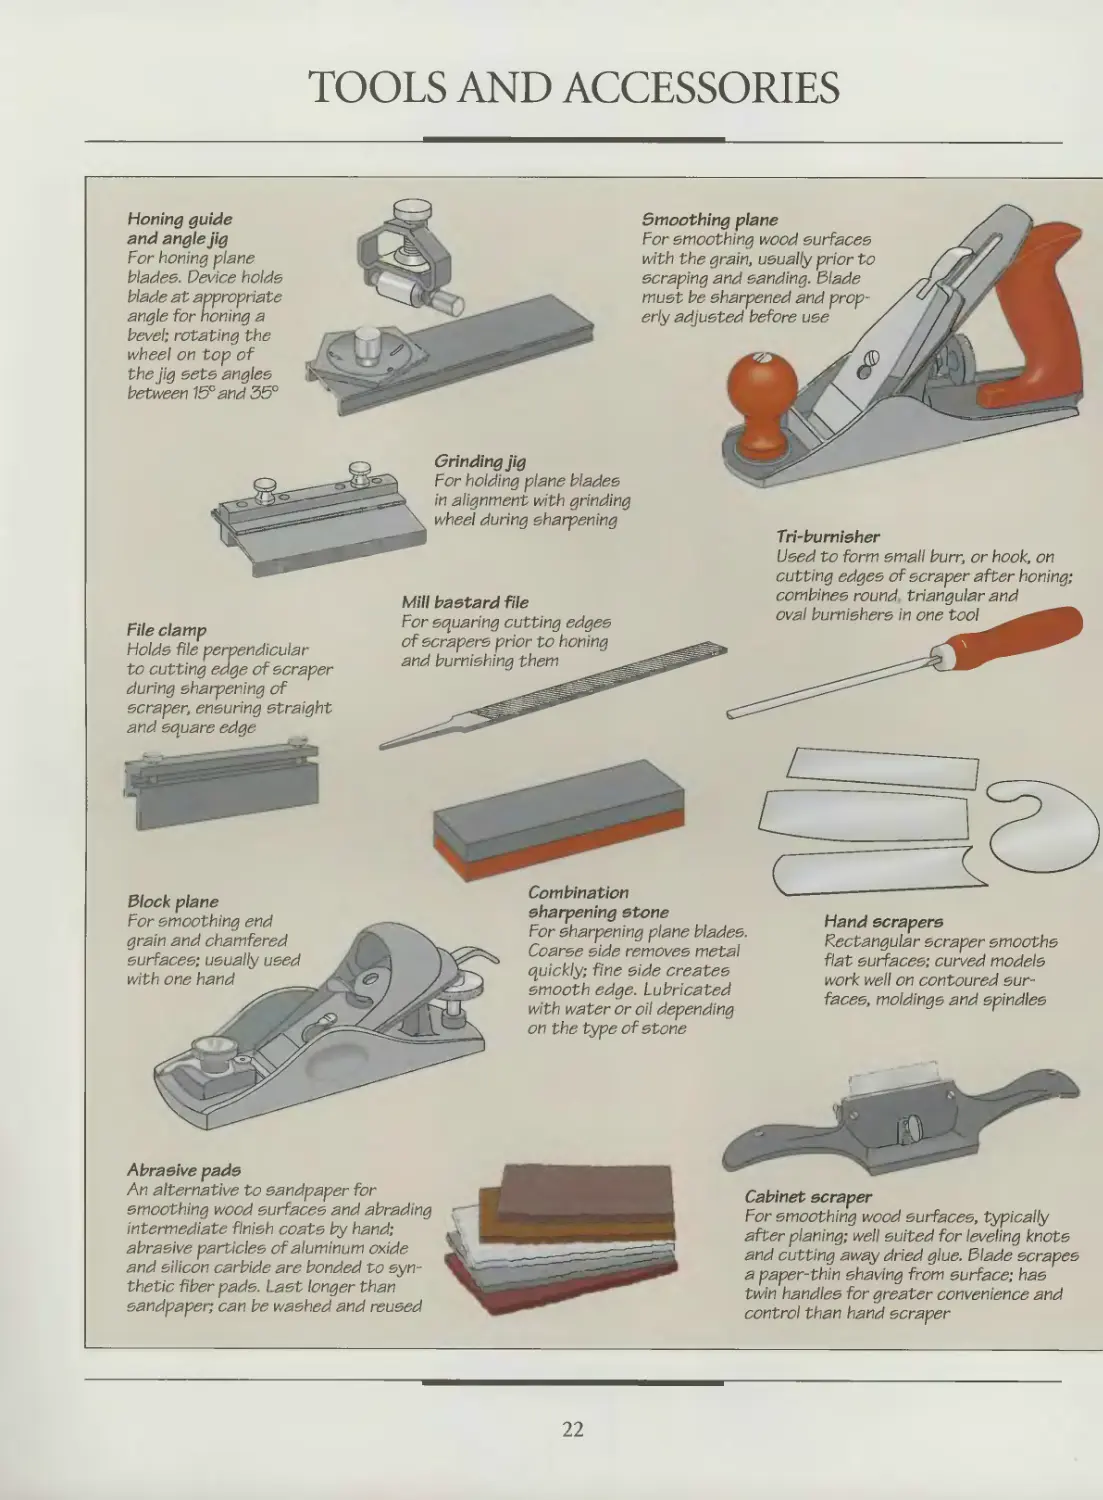
TOOLS AND ACCESSORIES
Honing guide
and angle jig
For honing plane
blades. Device holds
blade at appropriate
angle for honing a
bevel; rotating the
wheel on top of
the jig sets angles . ___
between 15° and 35°
Grinding jig
For holding plane blades
in alignment with grinding
wheel during sharpening
Smoothing plane
For smoothing wood surfaces
with the grain, usually prior to
scraping and sanding. Blade
must be sharpened and prop-
erly adjusted before use
Mill bastard file
For squaring cutting edges
of scrapers prior to honing
and burnishing them
Tri-bumisher
Used to form small burr, or hook, on
cutting edges of scraper after honing;
combines round triangular and
oval burnishers in one tool
Hand scrapers
Rectangular scraper smooths
flat surfaces; curved models
work well on contoured sur-
faces, moldings and spindles
File clamp
Holds file perpendicular
to cutting edge of scraper
during sharpening of
scraper, ensuring straight
and square edge
Block plane
For smoothing end
grain and chamfered
surfaces; usually used
with one hand
Combination
sharpening stone
For sharpening plane blades.
Coarse side removes metal
quickly; fine side creates
smooth edge. Lubricated
with water or oil depending
on the type of stone
Abrasive pads
An alternative to sandpaper for
smoothing wood surfaces and abrading
intermediate finish coats by hand;
abrasive particles of aluminum oxide
and silicon carbide are bonded to syn-
thetic fiber pads. Last longer than
sandpaper; can be washed and reused
Cabinet scraper
For smoothing wood surfaces, typically
after planing; well suited for leveling knots
and cutting away dried glue. Blade scrapes
a paper-thin shaving from surface; has
twin handles for greater convenience and
control than hand scraper
22
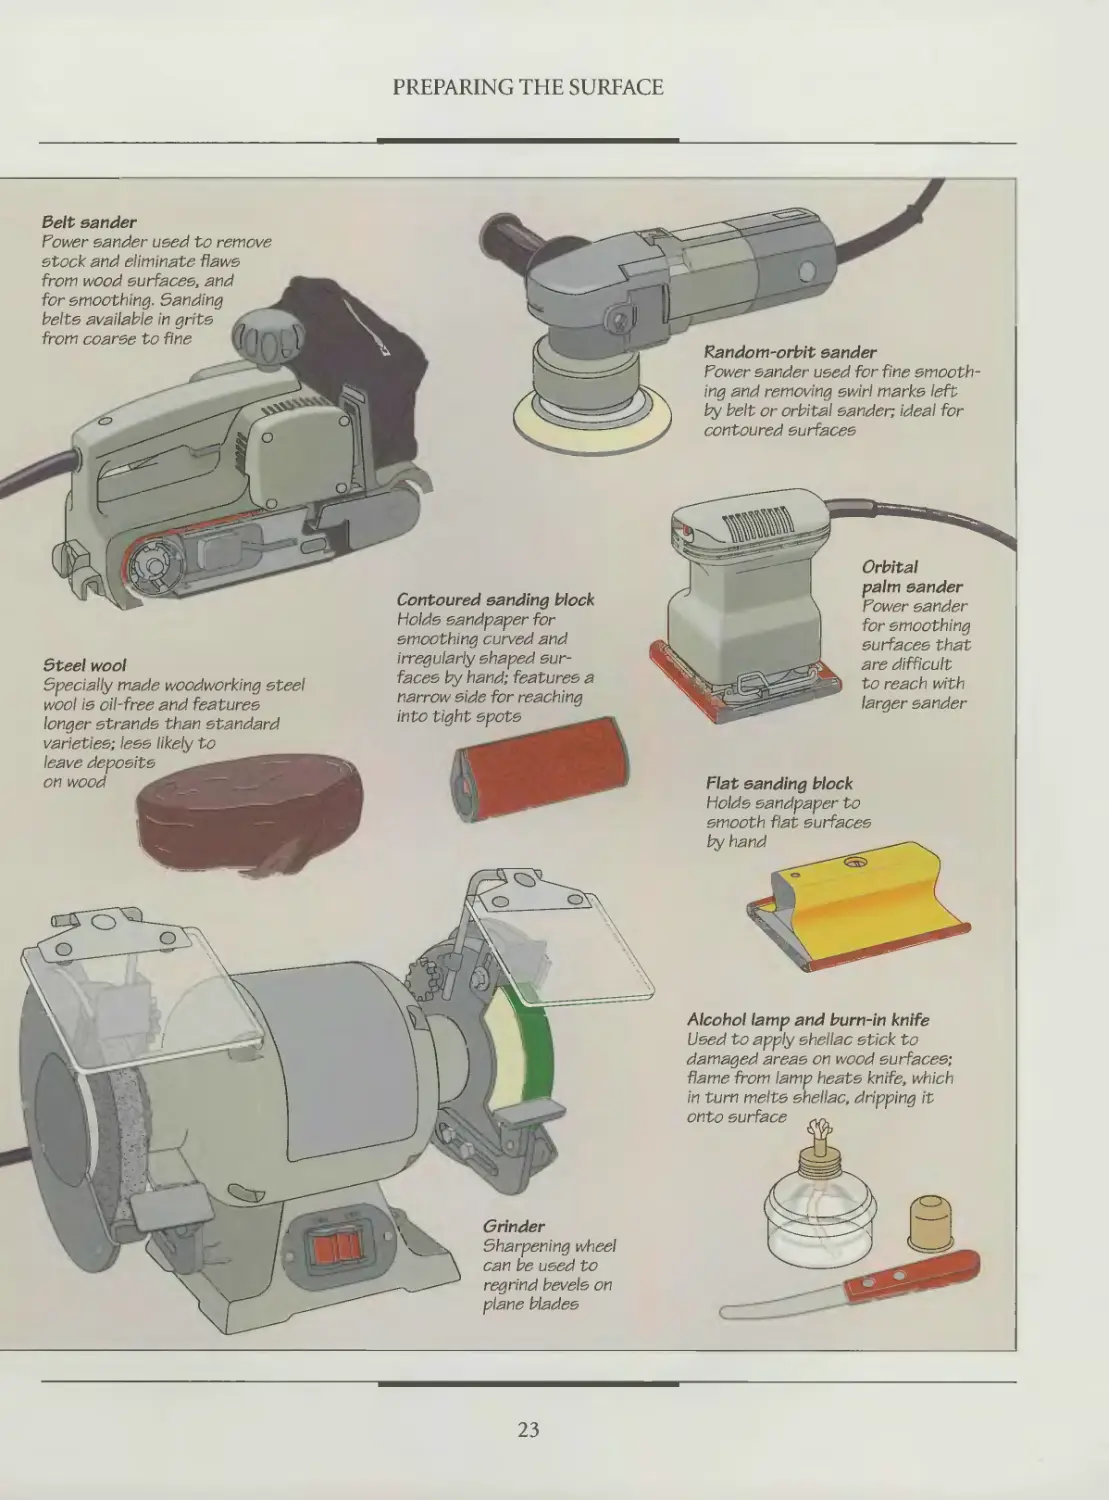
PREPARING THE SURFACE
Alcohol lamp and burn-in knife
Used to apply shellac stick to
damaged areas on wood surfaces;
fiame from lamp heats knife, which
in turn melts sherac, dripping it
onto surface
Random-orbit sander
Power sander used for fine smooth
ing and removing swirl marks left
by belt or orbital sander, idea! for
contoured surfaces
Flat sanding block
Holds sandpaper to
smooth flat surfaces
by hand
Belt sander
Power sander used to remove
stock and eliminate flaws
from wood surfaces, and
for smoothing. Sanding
belts available in grits
from coarse to fine ' i
Grinder
Sharpening wheel
can be used to
regrind bevels on
plane blades
Orbital
palm sander
Power sander
for smoothing
surfaces that
are difficult
to reach with
larger sander
Steel wool
Specially made woodworking steel
wool is oil-free and features
longer strands than standard
varieties; less likely to
leave deposits
on wood
Contoured sanding block
Holds sandpaper for
smoothing curved and
irregularly shaped sur-
faces by hand; features a
narrow side for reaching
into tight spots ________
23
PLANING
Choosing the best way to smooth a
wood surface is a matter of indi-
vidual preference. There are no ordained
steps or prescribed rules. Some wood-
workers plane and then sand; others
plane and scrape before sanding.
Whichever sequence you decide to
follow, the object is to produce a surface
that is as smooth as glass and just as flat.
This section of the book explains the
use of a smoothing plane to begin the
process of preparing a wood surface to
accept a finish.
A well-sharpened blade in a proper-
ly adjusted plane can shear off fine shav-
ings of wood. You can make all the
adjustments with only a screwdriver,
despite the plane’s apparently compli-
cated design (below).
Plane blades require regular sharp-
ening. Although you can hone a blade
by hand (page 26), a grinder is the best
tool to bring a cutting edge to peak per-
formance. For a nicked blade or an old
out-of-square one you wish to salvage,
Planing the edges of a workpiece with a
smoothing plane—also known as edge
jointing—is usually done before plan-
ing the faces. This allows you to remove
any blemishes from the faces left by
the jaws of a clamp or a vise.
square its end (page 25, step 1). For a
new blade or one that has had its bevel
worn away, hone a new bevel on the cut-
ting edge (step 2). To maintain a keen
edge, hone the blade frequently on a
sharpening stone (step 3).
Before using a plane, set the depth of
cut to remove only a thin shaving on
each stroke. Because an excessive depth
setting may produce gouges in the work-
piece, you should test your setting first
on a scrap board. For best results on a
large surface use a long plane; a short
one will be more likely to follow exist-
ing contours.
Set a plane on its bottom when stor-
ing the tool to prevent the iron from get-
ting nicked by other tools. Occasionally
rub a thin film of light machine oil on
the blade to prevent rust. Once a year,
or depending on the amount of use, take
the tool apart for a general cleaning.
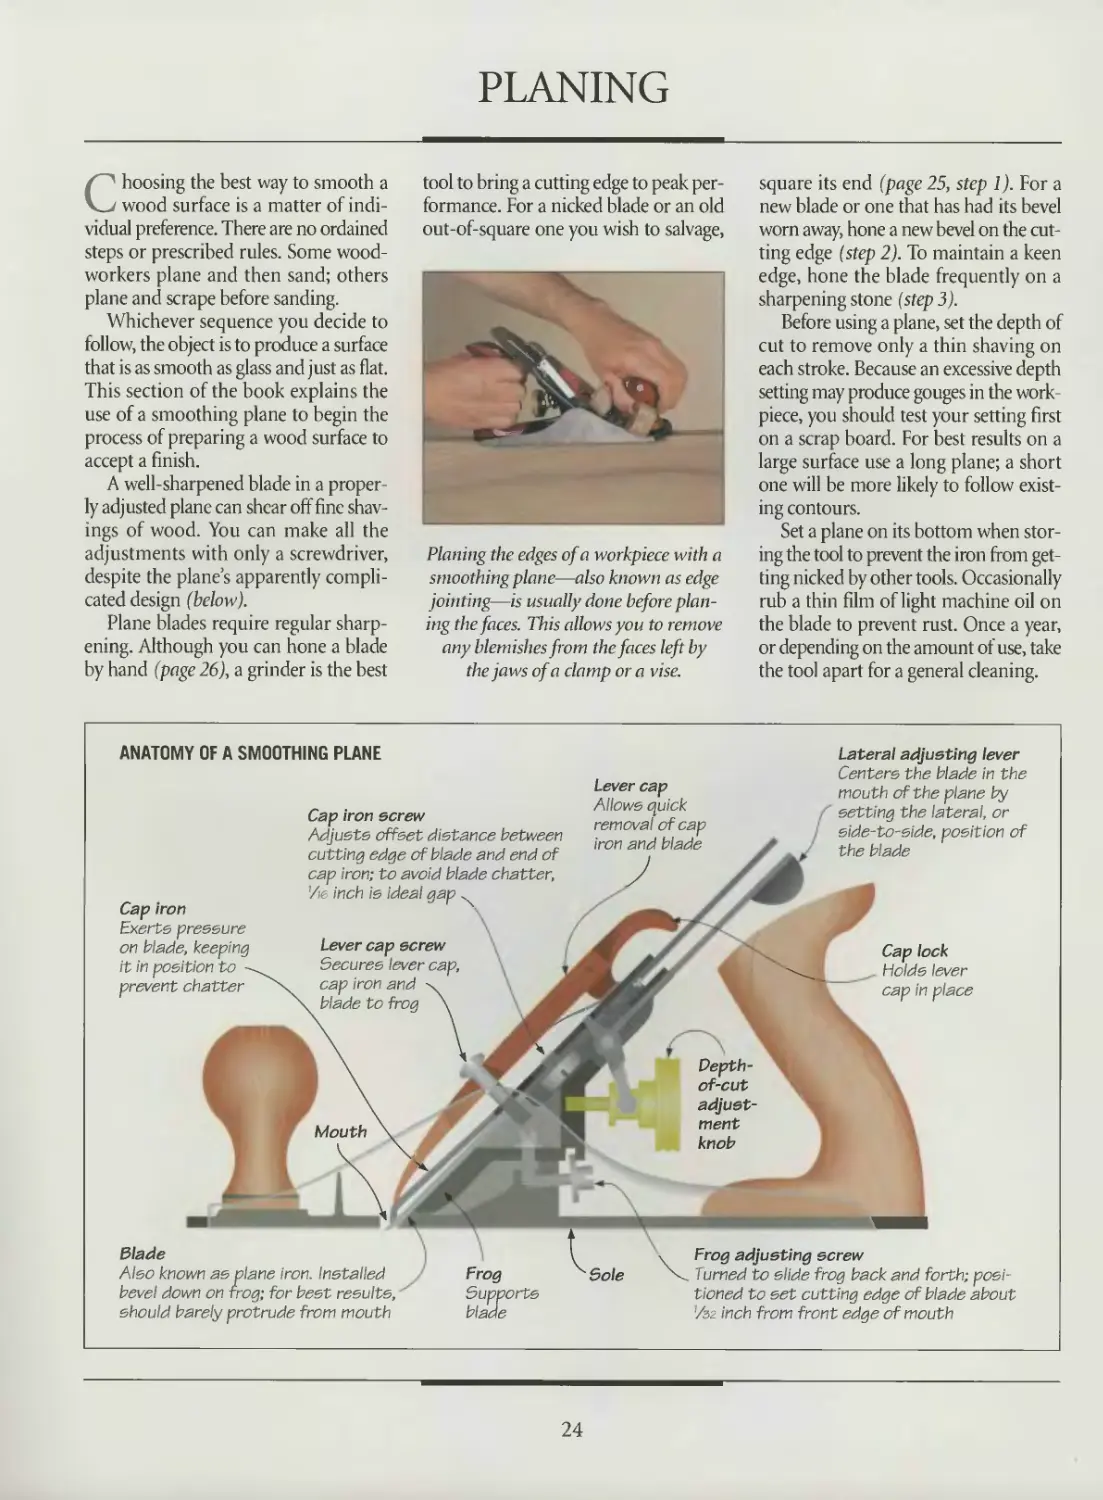
ANATOMY OF A SMOOTHING PLANE
Lateral adjusting lever
Cap iron
Exerts pressure
on blade, keeping
it in position to
prevent chatter
Cap iron screw
Adjusts offset distance between
cutting edge of blade and end of
cap iron; to avoid blade chatter,
Vie inch is ideal gap
Lever cap screw
Lever cap
Allows quick
removal of cap
iron and blade
Blade
Also known as plane iron. Installed
bevel down on frog; for best results,
should barely protrude from mouth
Supports
blade
Centers the blade in the
mouth of the plane by
setting the lateral, or
side-to-side, position of
the blade
Cap lock
Holds lever
cap in place
Frog adjusting screw
Turned to slide frog back and forth; posi-
tioned to set cutting edge of blade about
Vsz inch from front edge of mouth
24
PREPARING THE SURFACE
SHARPENING A PLANE BLADE WITH A MACHINE
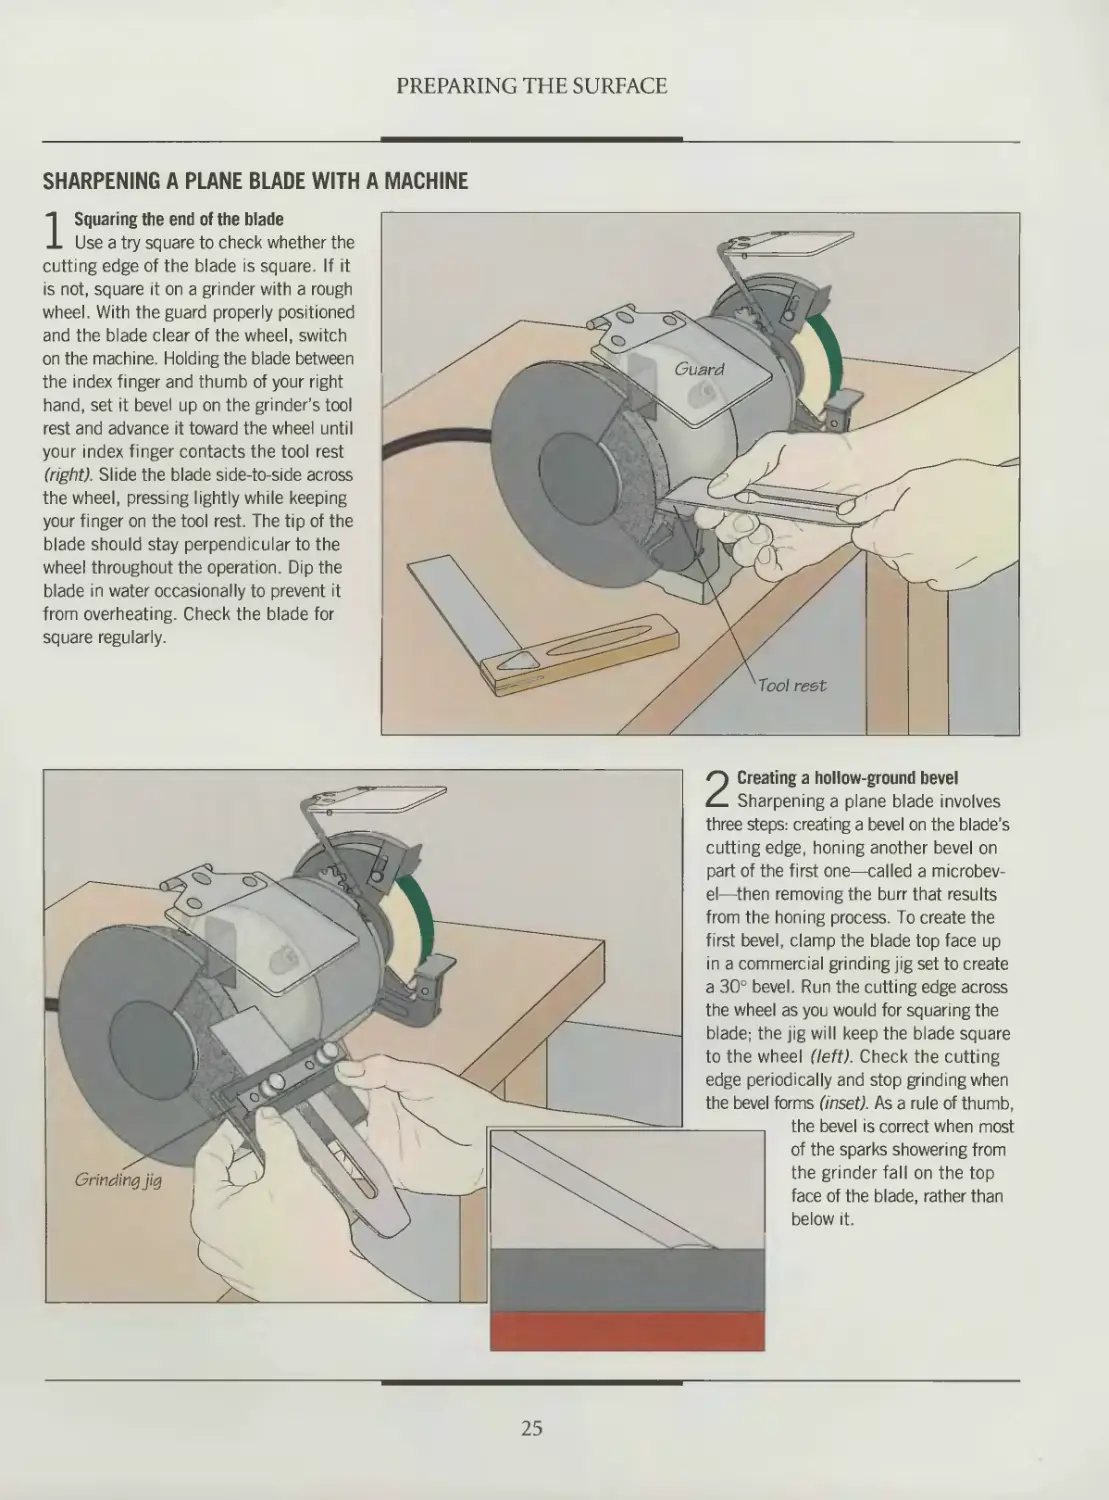
1 Squaring the end of the blade
Use a try square to check whether the
cutting edge of the blade is square. If it
is not, square it on a grinder with a rough
wheel. With the guard properly positioned
and the blade clear of the wheel, switch
on the machine. Holding the blade between
the index finger and thumb of your right
hand, set it bevel up on the grinder’s tool
rest and advance it toward the wheel until
your index finger contacts the tool rest
(right). Slide the blade side-to-side across
the wheel, pressing lightly while keeping
your finger on the tool rest. The tip of the
blade should stay perpendicular to the
wheel throughout the operation. Dip the
blade in water occasionally to prevent it
from overheating. Check the blade for
square regularly.
the bevel is correct when most
of the sparks showering from
the grinder fall on the top
face of the blade, rather than
below it.
2 Creating a hollow-ground bevel
Sharpening a plane blade involves
three steps: creating a bevel on the blade’s
cutting edge, honing another bevel on
part of the first one—called a microbev-
el—then removing the burr that results
from the honing process. To create the
first bevel, clamp the blade top face up
in a commercial grinding jig set to create
a 30° bevel. Run the cutting edge across
the wheel as you would for squaring the
blade; the jig will keep the blade square
to the wheel (left). Check the cutting
edge periodically and stop grinding when
the bevel forms (inset). As a rule of thumb,
25
PREPARING THE SURFACE
3 Honing the microbevel
Place a combination sharpening stone
fine side up on a work surface. Nail cleats
to the table against the stone to keep it
from moving. One of the cleats should be
the same height as the stone and 4 to 5
inches long; this will allow you to use the
full length of the abrasive surface. Clamp
the blade in a commercial angle-setting
honing guide with the bevel touching
the stone. Saturate the stone with the
appropriate lubricant—either water or
a light oil—until it pools on the surface.
Then, holding the honing guide, slide the
blade back and forth from end to end
along the stone (left), applying moderate
pressure until a microbevel forms (inset).
Honing guide
Continue until a burr—a thin ridge
of metal—forms on the flat face
of the blade. Then lap the burr
as you would when sharpening a
plane by hand (step below).
SHARPENING A PLANE BLADE BY HAND
Lapping the burr
Clamp the blade in a commercial guide
(step above) and grind a 30° bevel using
the coarse side of the stone. Then reposi-
tion the blade in the guide and turn the
stone over to hone the microbevel. To
remove the burr from the blade—a
process woodworkers call “lapping” the
burr—remove the blade from the honing
guide and saturate the stone once again.
Holding the blade flush on the stone, bev-
el side up, move it in a circular pattern on
the stone (right) until the flat side of the
cutting edge is smooth to the touch. A
few strokes should suffice to eliminate
the burr. Test the sharpness of the cut-
ting edge on a piece of paper; a sharp
blade will slice a sliver from the edge.
Microbevel
26
PREPARING THE SURFACE
Assessing a plane blade’s cutting edge
No matter how well it is adjusted, a dull or poorly sharp-
ened plane blade will do a poor job of smoothing the wood
surfaces of your furniture. Moreover, its condition will only
deteriorate if you persist in using it, losing its beveled
cutting edge and possibly even going out-of-square, as
in the blade shown (far left). Such a blade would need
to be squared and sharpened on a grinder. A well-sharp-
ened blade (near left) has a visible bevel and microbevel,
making it a razor-sharp cutting implement. This blade
needs only an occasional honing on a sharpening stone.
ADJUSTING A PLANE
1 Positioning the cutting edge
Loosen the lever cap screw and remove the blade assem-
bly—including the lever cap, cap iron and blade—from the
plane. Then loosen the cap iron screw and slide the cap iron
on the face of the blade to leave a gap of about Vie inch
between the end of the cap iron and the cutting edge of the
blade. Tighten the cap iron screw. Next place the blade
assembly in position on the frog. The gap between the front
edge of the blade and the front of the mouth should be about
Ae inch. If not, loosen both frog setscrews about 7i turn,
then turn the frog adjusting screw with a screwdriver to set
the proper gap (above). Lock the blade assembly in position
27
PREPARING THE SURFACE
2 Centering the blade and
setting the depth of cut
Holding the plane as shown, shift the
lateral adjusting lever to one side or the
other to center the cutting edge in the
mouth. To set the cutting depth, turn
the depth-of-cut adjustment knob so
that no more than about Уз? inch of the
cutting edge protrudes from the mouth.
Check the depth of cut by eye (right),
then confirm the setting by making a
test cut on a scrap board. The shavings
should be paper-thin; the finer the cut,
the more transparent the shavings.
Adjust the cutting depth, if necessary.
SMOOTHING WITH HAND PLANES
Using a smoothing plane
Guide a hand plane along a wood surface with smooth, even
strokes. Always cut with the grain of the wood; planing against
the grain will tear the wood, rather than shaving it off clean-
ly. If you cannot determine the orientation of the grain, light-
ly slide the plane parallel to an edge in one direction, then
repeat in the opposite direction. The cutting edge will chat-
ter or catch on the wood fibers when it is cutting against the
grain. If the grain orientation changes on the surface, switch
the direction of your stroke to follow the grain. To smooth a
surface such as a tabletop, move the plane back and forth
using a series of straight passes that slightly overlap, as shown
in the diagram at right. When pulling the plane back after
each forward stroke, tilt the tool to one side to lift the cut-
ting edge clear of the surface.
28
PREPARING THE SURFACE
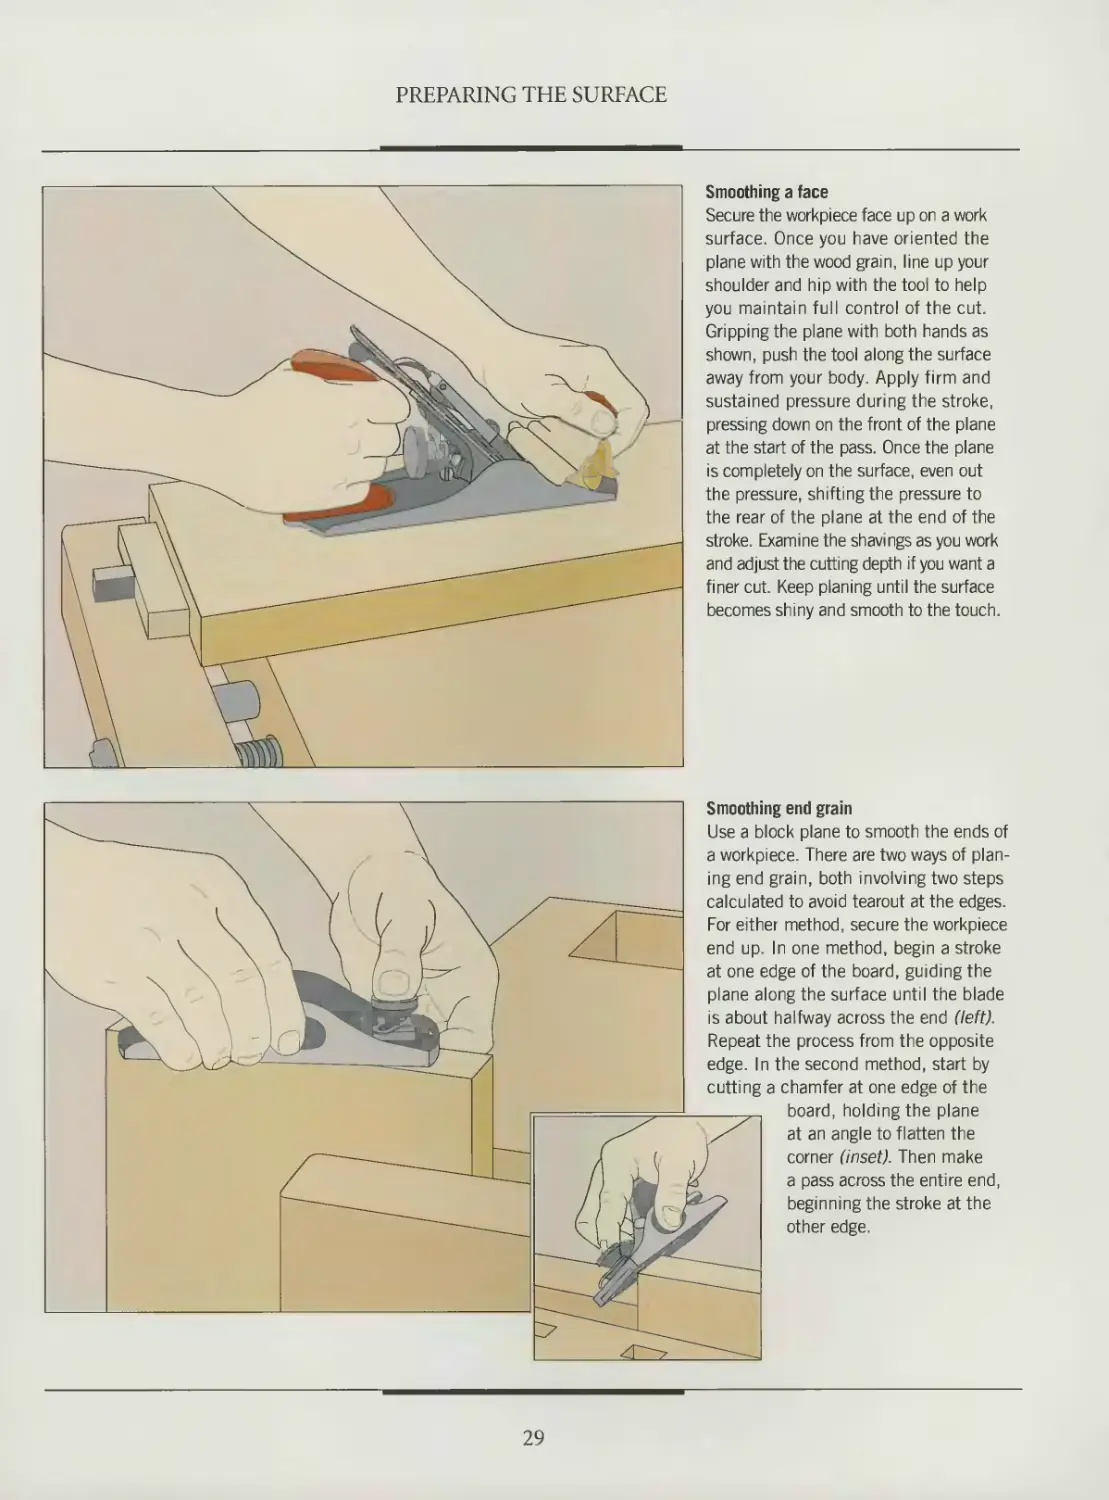
Smoothing a face
Secure the workpiece face up on a work
surface. Once you have oriented the
plane with the wood grain, line up your
shoulder and hip with the tool to help
you maintain full control of the cut.
Gripping the plane with both hands as
shown, push the tool along the surface
away from your body. Apply firm and
sustained pressure during the stroke,
pressing down on the front of the plane
at the start of the pass. Once the plane
is completely on the surface, even out
the pressure, shifting the pressure to
the rear of the plane at the end of the
stroke. Examine the shavings as you work
and adjust the cutting depth if you want a
finer cut. Keep planing until the surface
becomes shiny and smooth to the touch.
Smoothing end grain
Use a block plane to smooth the ends of
a workpiece. There are two ways of plan-
ing end grain, both involving two steps
calculated to avoid tearout at the edges.
For either method, secure the workpiece
end up. In one method, begin a stroke
at one edge of the board, guiding the
plane along the surface until the blade
is about halfway across the end (left).
Repeat the process from the opposite
edge. In the second method, start by
cutting a chamfer at one edge of the
board, holding the plane
at an angle to flatten the
corner (inset). Then make
a pass across the entire end,
beginning the stroke at the
other edge.
29
SCRAPING
Scraping wood surfaces is an inter-
mediate step between planing and
sanding. A sharp scraper can remove
high spots, tearout and glue lines,
smooth a surface, and clean up marks
left by a plane. The tool is inexpensive,
easy to use and relatively simple to sharp-
en. Two commonly used types are the
hand scraper—a single blade of steel—
and the cabinet scraper, a blade mount-
ed in a metal or wood body that
resembles a spokeshave. This implement
features winged handles for two-hand-
ed pushing or pulling.
Scraper blades are made from thin
sheets of spring steel and sharpened to
form a cutting edge. They are available
in different thicknesses, depending on
the work you want them to perform.
Thick scrapers are suitable for heavy cuts;
light scrapers are used for finer work.
Unlike a plane blade, the scraper has a
hook—a small flare along the length of
the cutting edge (inset, page 32). The
hook’s cutting action allows the scraper
to be pulled or pushed in any direction,
so you can reach corners and tight spots
inaccessible to a plane.
A scraper’s cutting edges dull quick-
ly and require regular sharpening, which
involves filing, honing and burnishing.
The size of the scraper’s shavings signal
its condition: the duller the blade, the
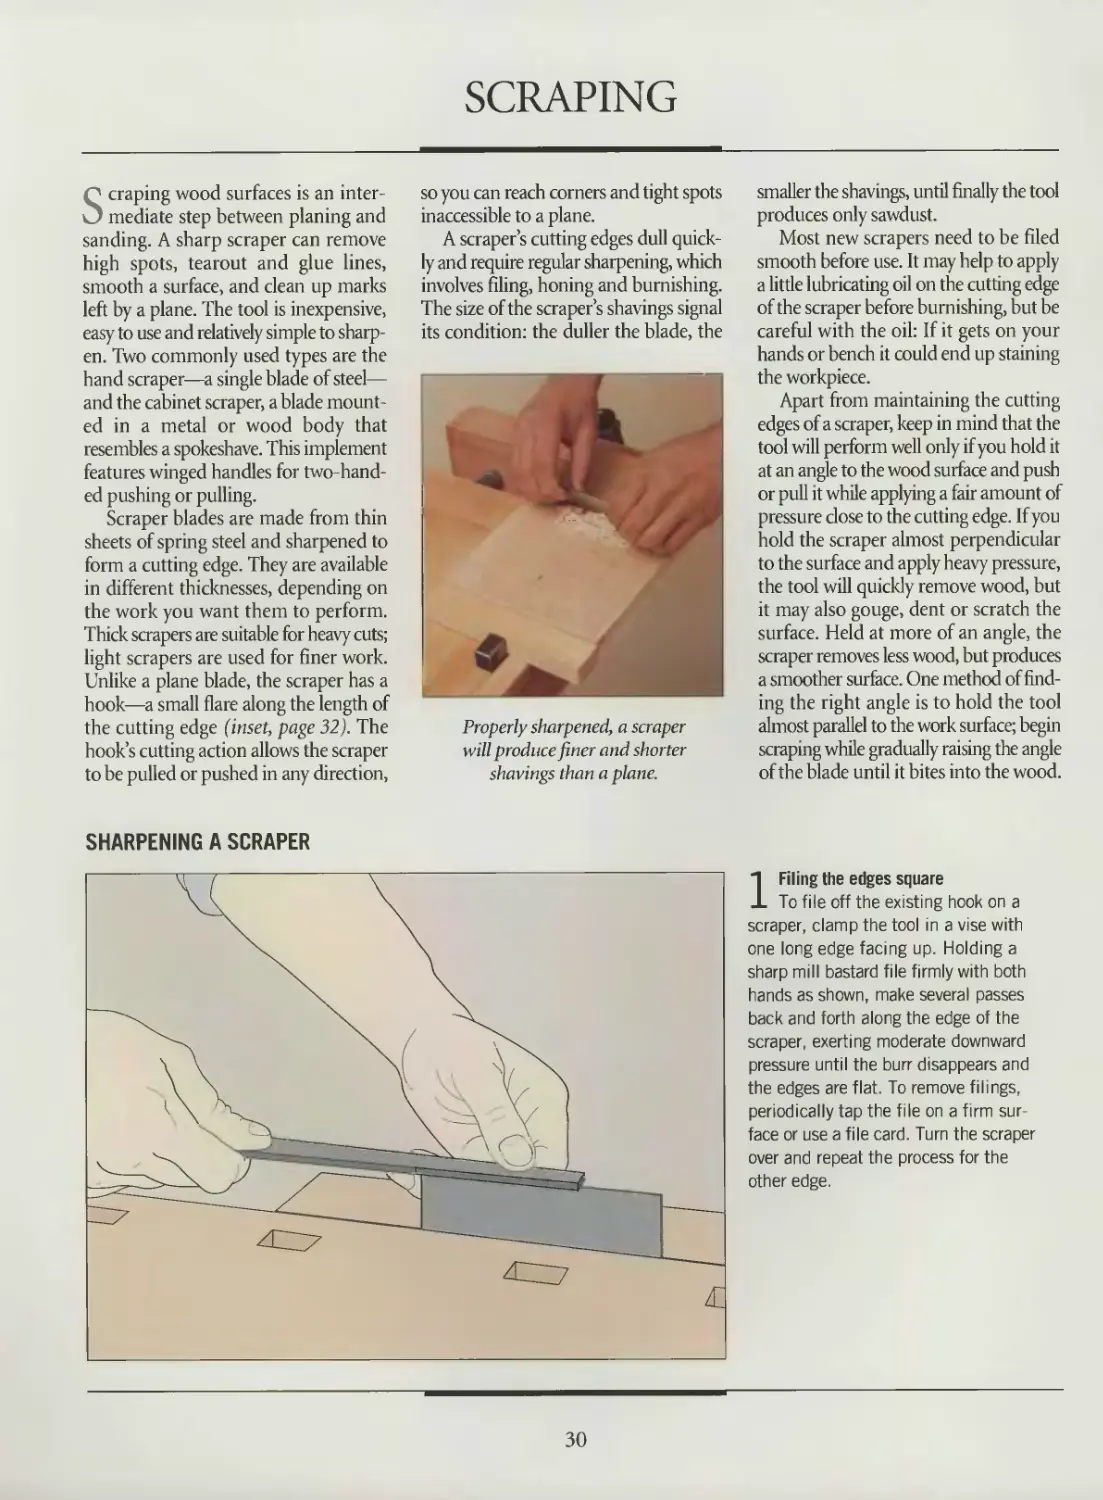
Properly sharpened, a scraper
will produce finer and shorter
shavings than a plane.
smaller the shavings, until finally the tool
produces only sawdust.
Most new scrapers need to be filed
smooth before use. It may help to apply
a little lubricating oil on the cutting edge
of the scraper before burnishing, but be
careful with the oil: If it gets on your
hands or bench it could end up staining
the workpiece.
Apart from maintaining the cutting
edges of a scraper, keep in mind that the
tool will perform well only if you hold it
at an angle to the wood surface and push
or pull it while applying a fair amount of
pressure close to the cutting edge. If you
hold the scraper almost perpendicular
to the surface and apply heavy pressure,
the tool will quickly remove wood, but
it may also gouge, dent or scratch the
surface. Held at more of an angle, the
scraper removes less wood, but produces
a smoother surface. One method of find-
ing the right angle is to hold the tool
almost parallel to the work surface; begin
scraping while gradually raising the angle
of the blade until it bites into the wood.
1 Filing the edges square
To file off the existing hook on a
scraper, clamp the tool in a vise with
one long edge facing up. Holding a
sharp mill bastard file firmly with both
hands as shown, make several passes
back and forth along the edge of the
scraper, exerting moderate downward
pressure until the burr disappears and
the edges are flat. To remove filings,
periodically tap the file on a firm sur-
face or use a file card. Turn the scraper
over and repeat the process for the
other edge.
30
PREPARING THE SURFACE
Hi III IB 111 111 Illi 111 111 ш ш Hi ill Ш Oil Ш 111 ill1
SHOP TIP
Using a file clamp
Designed to hold a file
perpendicular to the edge
of a scraper, a file clamp
makes it easy to remove
hooks and file straight
edges on the tool. To use
the file clamp, secure the
scraper in a vise along
with a wood block on one
side to keep it rigid. Insert
the file in the clamp and
fix it in place using the
thumbscrews on top of the
implement. Position the clamp
on the edge of the scraper and file the scraper’s edge until it
feels sharp, taking care not to cut yourself when testing.
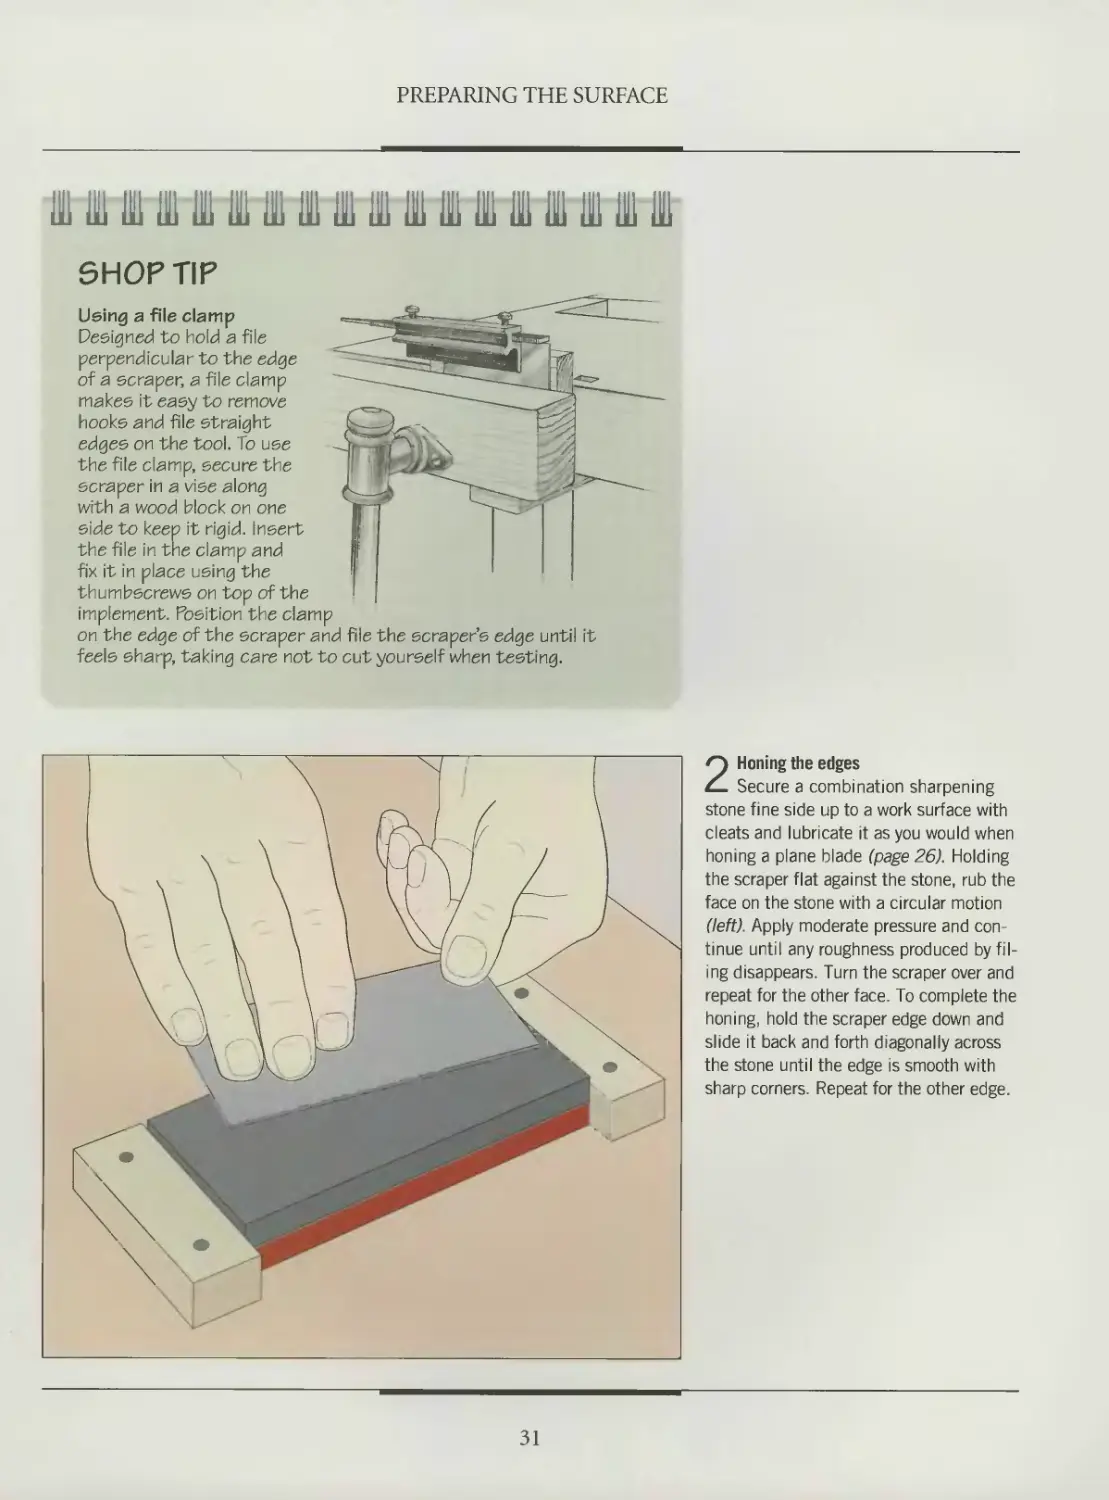
2 Honing the edges
Secure a combination sharpening
stone fine side up to a work surface with
cleats and lubricate it as you would when
honing a plane blade (page 26). Holding
the scraper flat against the stone, rub the
face on the stone with a circular motion
(left). Apply moderate pressure and con-
tinue until any roughness produced by fil-
ing disappears. Turn the scraper over and
repeat for the other face. To complete the
honing, hold the scraper edge down and
slide it back and forth diagonally across
the stone until the edge is smooth with
sharp corners. Repeat for the other edge.
31
PREPARING THE SURFACE
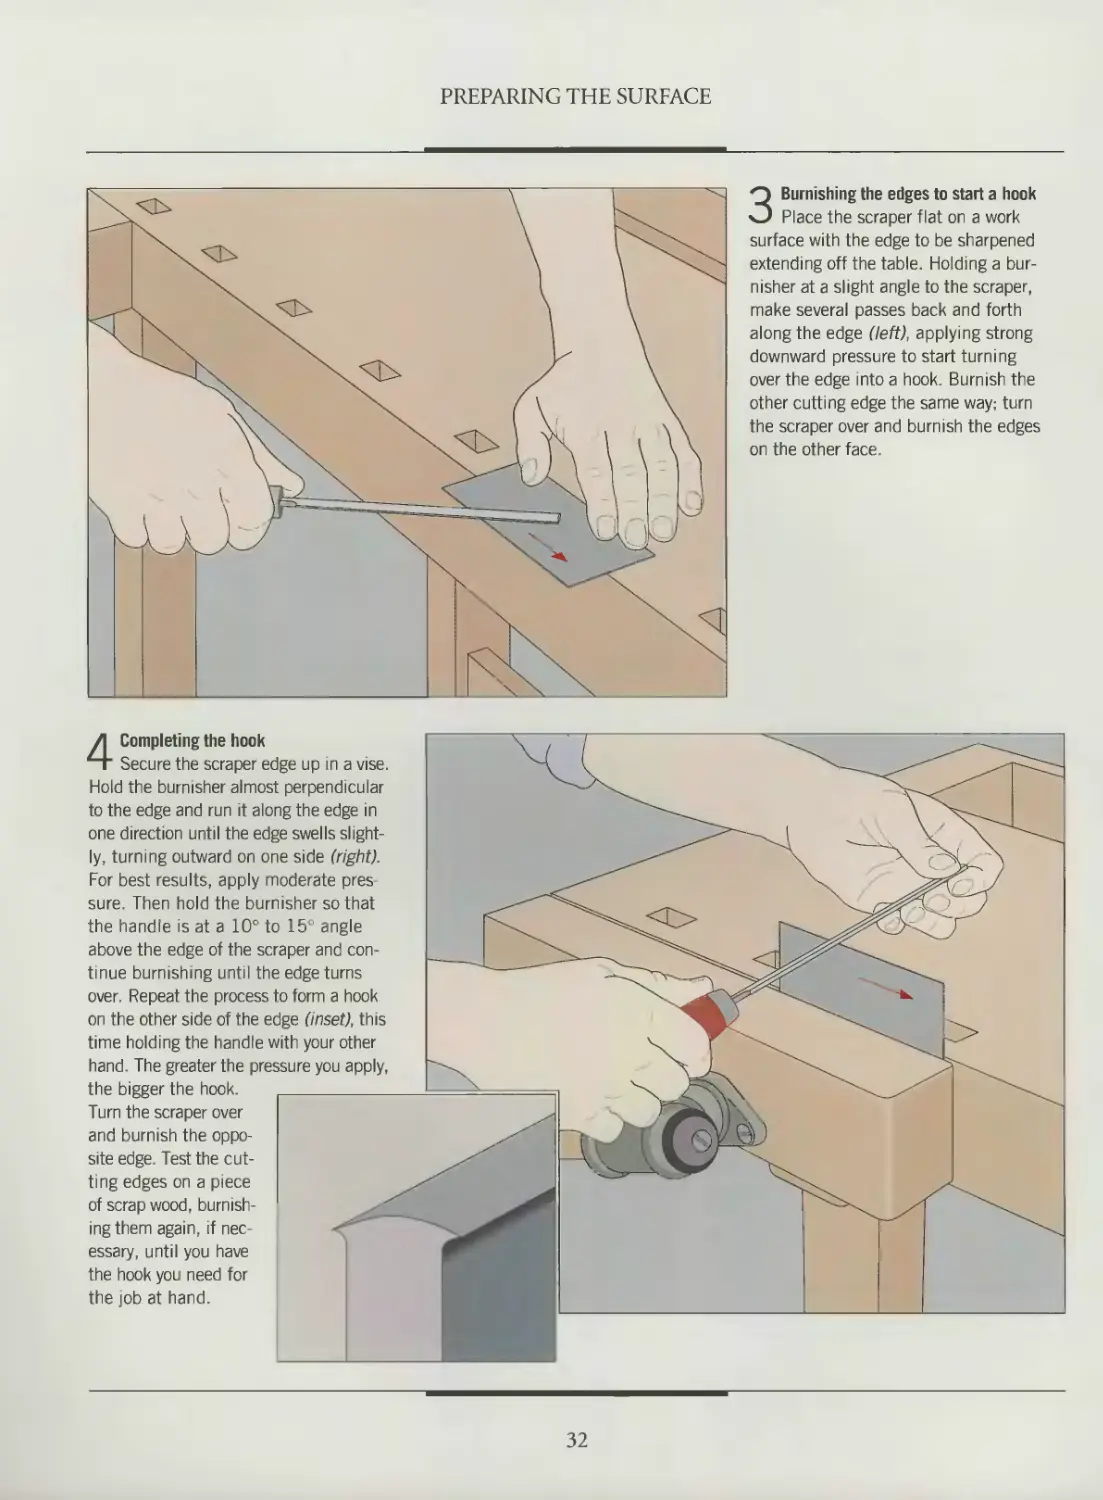
3 Burnishing the edges to start a hook
Place the scraper flat on a work
surface with the edge to be sharpened
extending off the table. Holding a bur-
nisher at a slight angle to the scraper,
make several passes back and forth
along the edge (left), applying strong
downward pressure to start turning
over the edge into a hook. Burnish the
other cutting edge the same way; turn
the scraper over and burnish the edges
on the other face.
4 Completing the hook
Secure the scraper edge up in a vise.
Hold the burnisher almost perpendicular
to the edge and run it along the edge in
one direction until the edge swells slight-
ly, turning outward on one side (right).
For best results, apply moderate pres-
sure. Then hold the burnisher so that
the handle is at a 10° to 15° angle
above the edge of the scraper and con-
tinue burnishing until the edge turns
over. Repeat the process to form a hook
on the other side of the edge (inset), this
time holding the handle with your other
hand. The greater the pressure you apply,
the bigger the hook.
Turn the scraper over
and burnish the oppo-
site edge. Test the cut-
ting edges on a piece
of scrap wood, burnish-
ing them again, if nec-
essary, until you have
the hook you need for
the job at hand.
32
PREPARING THE SURFACE
111 (11 111 111 IB IB IB Ш Ш Ш 111 Hi 111 111 III III Illi Ill
SHOP TIP
Using a variable burnisher
Holding a burnisher at the right
angle for turning over a
hook on a scraper is no
easy task. One answer
is a commercial jig that
provides precise control
of the burnishing angle.
The actual burnisher is
a carbide rod mounted
within the body; a knob
on the top adjusts the
angle of the rod between O°and 15°. To use
the burnisher, secure the scraper in a vise and
fit its blade in the burnisher’s slot; running the burnisher
back and forth along the blade with moderate downward
pressure creates a hook of the appropriate angle.
SMOOTHING A SURFACE WITH A HAND SCRAPER
Using a hand scraper
Secure the stock to a work surface.
Standing at one end of the workpiece,
curl your fingers around the front of the
scraper and press on the back with your
thumbs to make the tool bow slightly
outward. Tilt the scraper forward about
20° from the vertical and scrape the
surface in the direction that the bow is
facing (left). If the cutting edge does
not bite into the wood properly, adjust
the angle of the tool slightly. Work at
a slight angle to the grain, applying
moderate pressure and making long,
fluid, overlapping strokes. At the end
of each stroke, lift the scraper off the
surface before stopping. You can also
pull with the scraper, but be sure to
flex the bow toward you.
33
PREPARING THE SURFACE
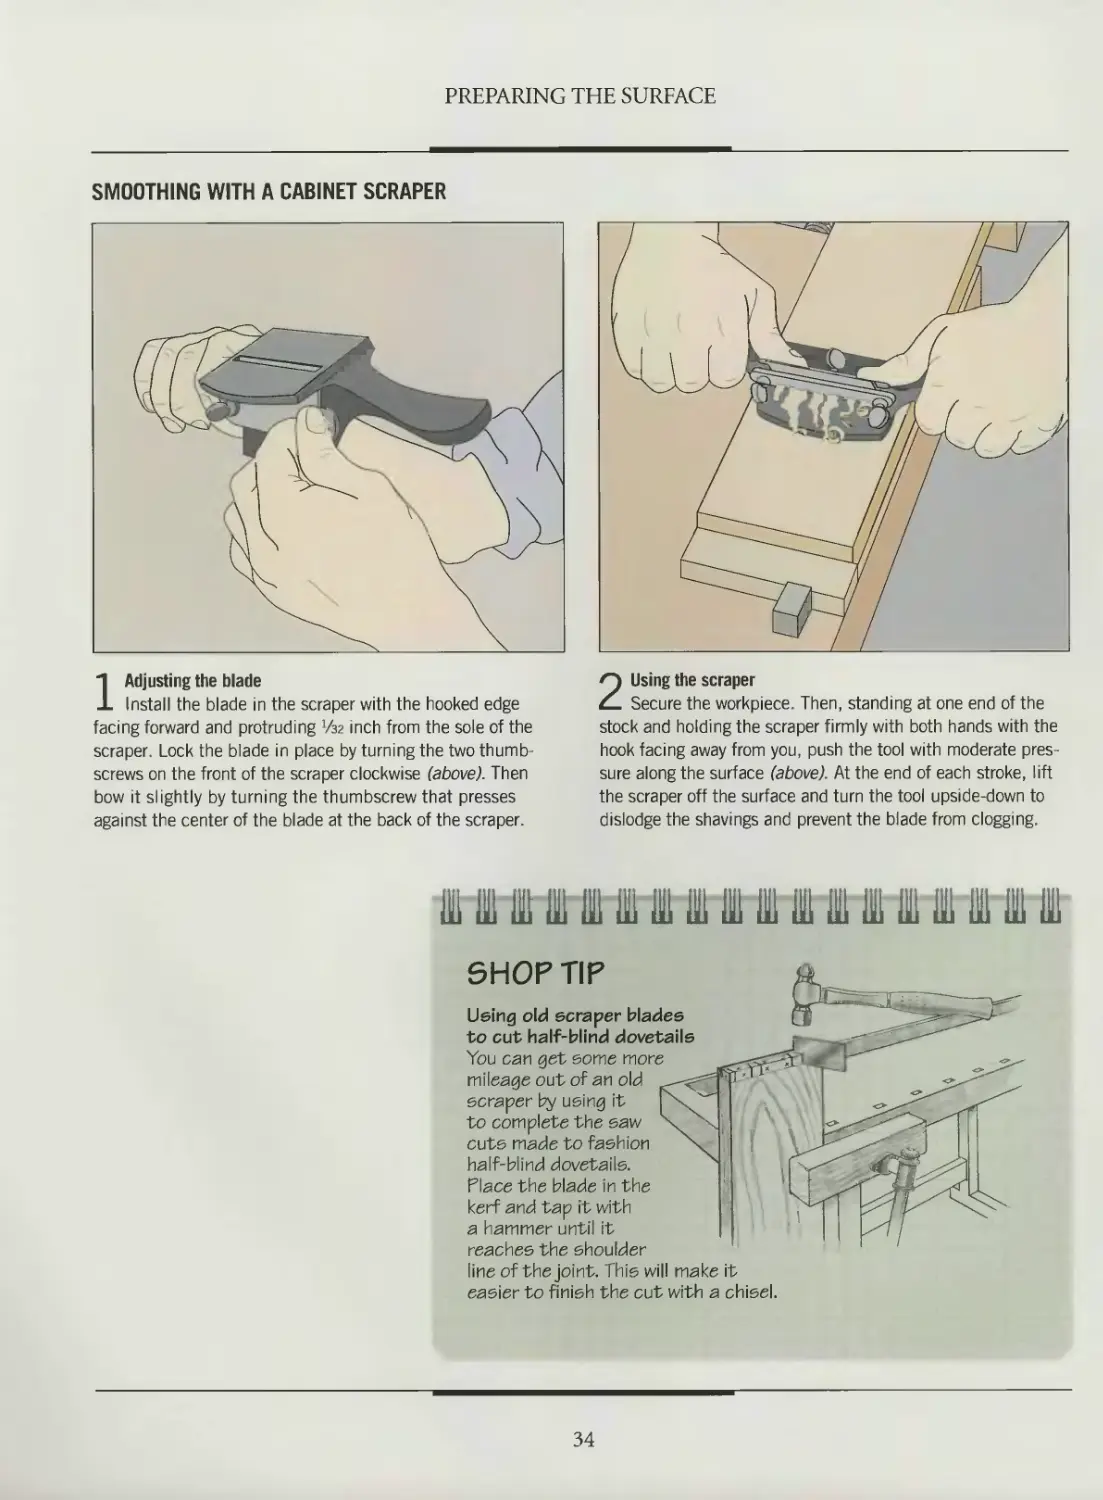
1 Adjusting the blade
Install the blade in the scraper with the hooked edge
facing forward and protruding V32 inch from the sole of the
scraper. Lock the blade in place by turning the two thumb-
screws on the front of the scraper clockwise (above). Then
bow it slightly by turning the thumbscrew that presses
against the center of the blade at the back of the scraper.
2 Using the scraper
Secure the workpiece. Then, standing at one end of the
stock and holding the scraper firmly with both hands with the
hook facing away from you, push the tool with moderate pres-
sure along the surface (above). At the end of each stroke, lift
the scraper off the surface and turn the tool upside-down to
dislodge the shavings and prevent the blade from clogging.
ui in Hi in id ui ie m in hi ie ie111111 mi in m id
SHOP TIP
Using old scraper blades
to cut half-blind dovetails
You can get some more
mileage out of an old
scraper by using it
to complete the saw
cuts made to fashion
half-blind dovetails.
Place the blade in the
kerf and tap it with
a hammer until it
reaches the shoulder
line of the joint. This will make it
easier to finish the cut with a chisel.
34
SANDING
Sanding is the final stage in smooth-
ing a piece of furniture and is also
indispensable in eliminating any blem-
ishes left by planes and scrapers. Both
tools sometimes leave marks and ridges
on wood surfaces. They can also com-
press wood fibers and close the pores in
the wood, inhibiting its capacity to prop-
erly accept a finish. Sanding as the final
step opens closed pores, allowing the
finish to penetrate the surface.
A wide variety of natural and man-
made sandpaper abrasives are available
for the woodworker, from natural mate-
rials such as flint, garnet and emery to
artificial ones like aluminum oxide and
silicon carbide. For most applications, you
need a sandpaper with hard, sharp-edged
particles that are not easily dislodged from
their paper backing. Garnet, silicon car-
bide and aluminum oxide are the abra-
sives that best satisfy these criteria.
A typical sanding sequence begins
with a 120- or 150-grit paper, depending
on whether or not you used a scraper
(page 30). You may first need an 80-grit
abrasive to eliminate defects or irregu-
larities from a surface. Continue sanding
with a 220-grit paper, moving to increas-
ingly finer abrasives to remove the
scratches left by the preceding opera-
tion. For a surface that is to receive a
glossy finish, you will need to use a paper
at least as fine as 320 grit. How high up
the grit scale you climb depends on the
finishing product you intend to apply
and the effect you wish to achieve. Keep
in mind, however, that polishing a sur-
face to a high gloss with an ultra-fine
paper may keep a stain from penetrating
evenly. Refer to the chart on page 37 for
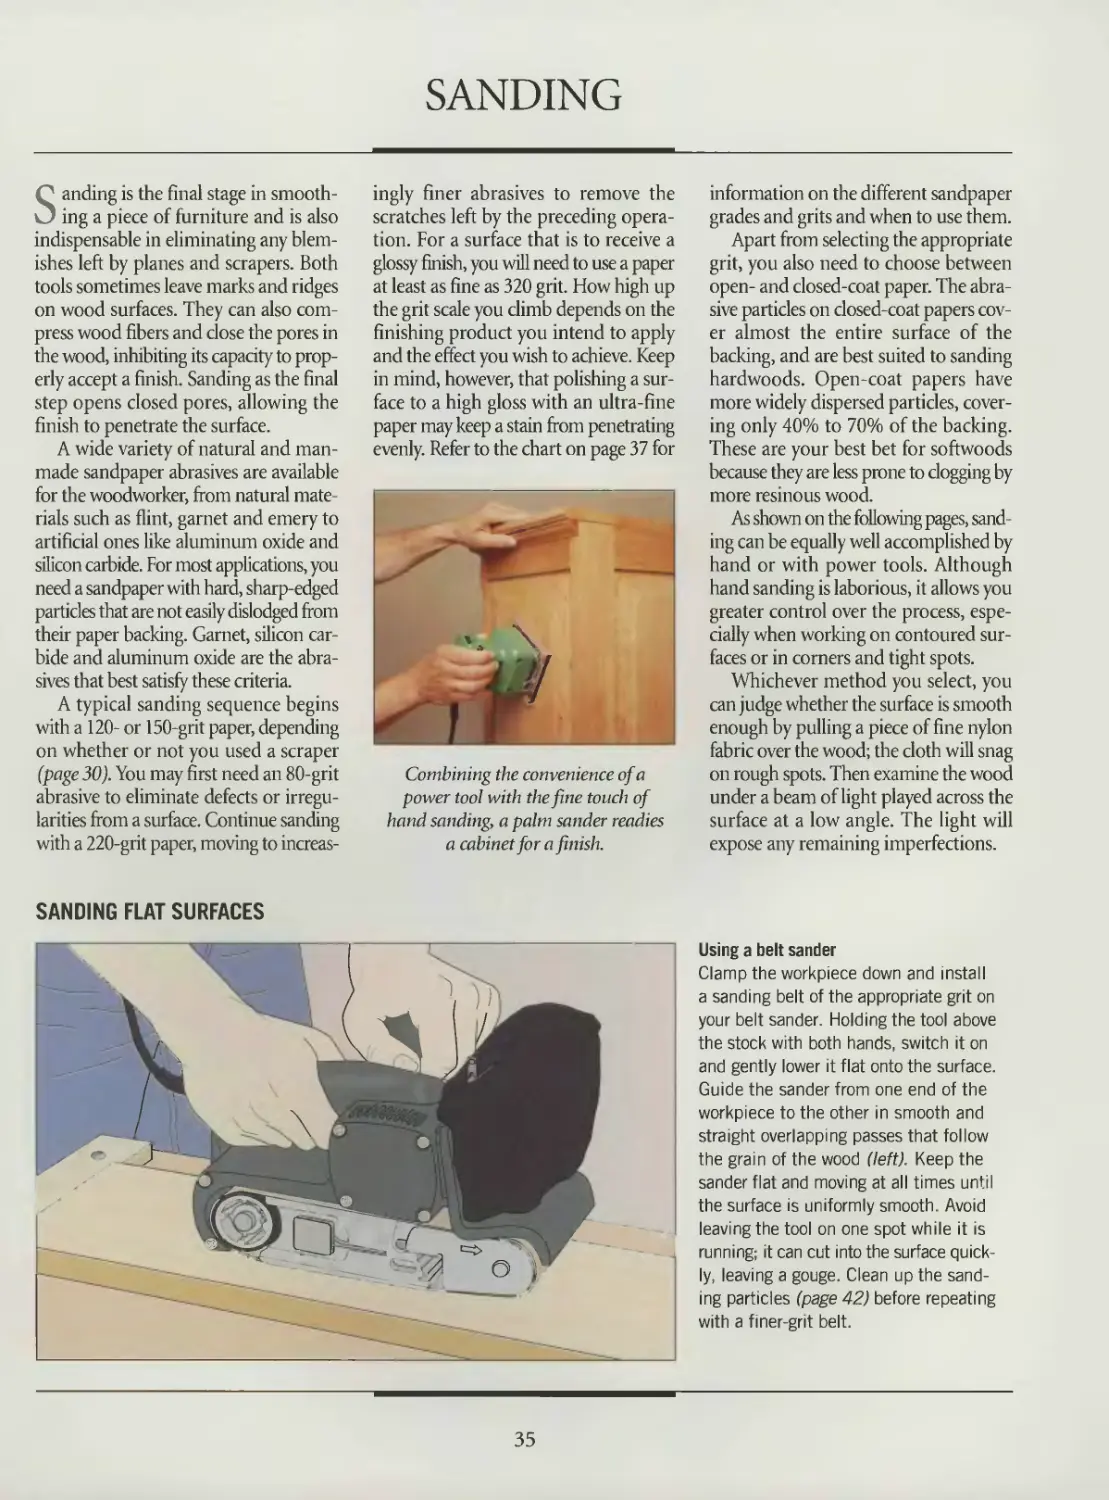
Combining the convenience of a
power tool with the fine touch of
hand sanding, a palm sander readies
a cabinet for a finish.
information on the different sandpaper
grades and grits and when to use them.
Apart from selecting the appropriate
grit, you also need to choose between
open- and closed-coat paper. The abra-
sive particles on closed-coat papers cov-
er almost the entire surface of the
backing, and are best suited to sanding
hardwoods. Open-coat papers have
more widely dispersed particles, cover-
ing only 40% to 70% of the backing.
These are your best bet for softwoods
because they are less prone to clogging by
more resinous wood.
As shown on the following pages, sand-
ing can be equally well accomplished by
hand or with power tools. Although
hand sanding is laborious, it allows you
greater control over the process, espe-
cially when working on contoured sur-
faces or in corners and tight spots.
Whichever method you select, you
can judge whether the surface is smooth
enough by pulling a piece of fine nylon
fabric over the wood; the cloth will snag
on rough spots. Then examine the wood
under a beam of light played across the
surface at a low angle. The light will
expose any remaining imperfections.
SANDING FLAT SURFACES
Using a belt sander
Clamp the workpiece down and install
a sanding belt of the appropriate grit on
your belt sander. Holding the tool above
the stock with both hands, switch it on
and gently lower it flat onto the surface.
Guide the sander from one end of the
workpiece to the other in smooth and
straight overlapping passes that follow
the grain of the wood (left). Keep the
sander flat and moving at all times until
the surface is uniformly smooth. Avoid
leaving the tool on one spot while it is
running; it can cut into the surface quick-
ly, leaving a gouge. Clean up the sand-
ing particles (page 42) before repeating
with a finer-grit belt.
35
PREPARING THE SURFACE
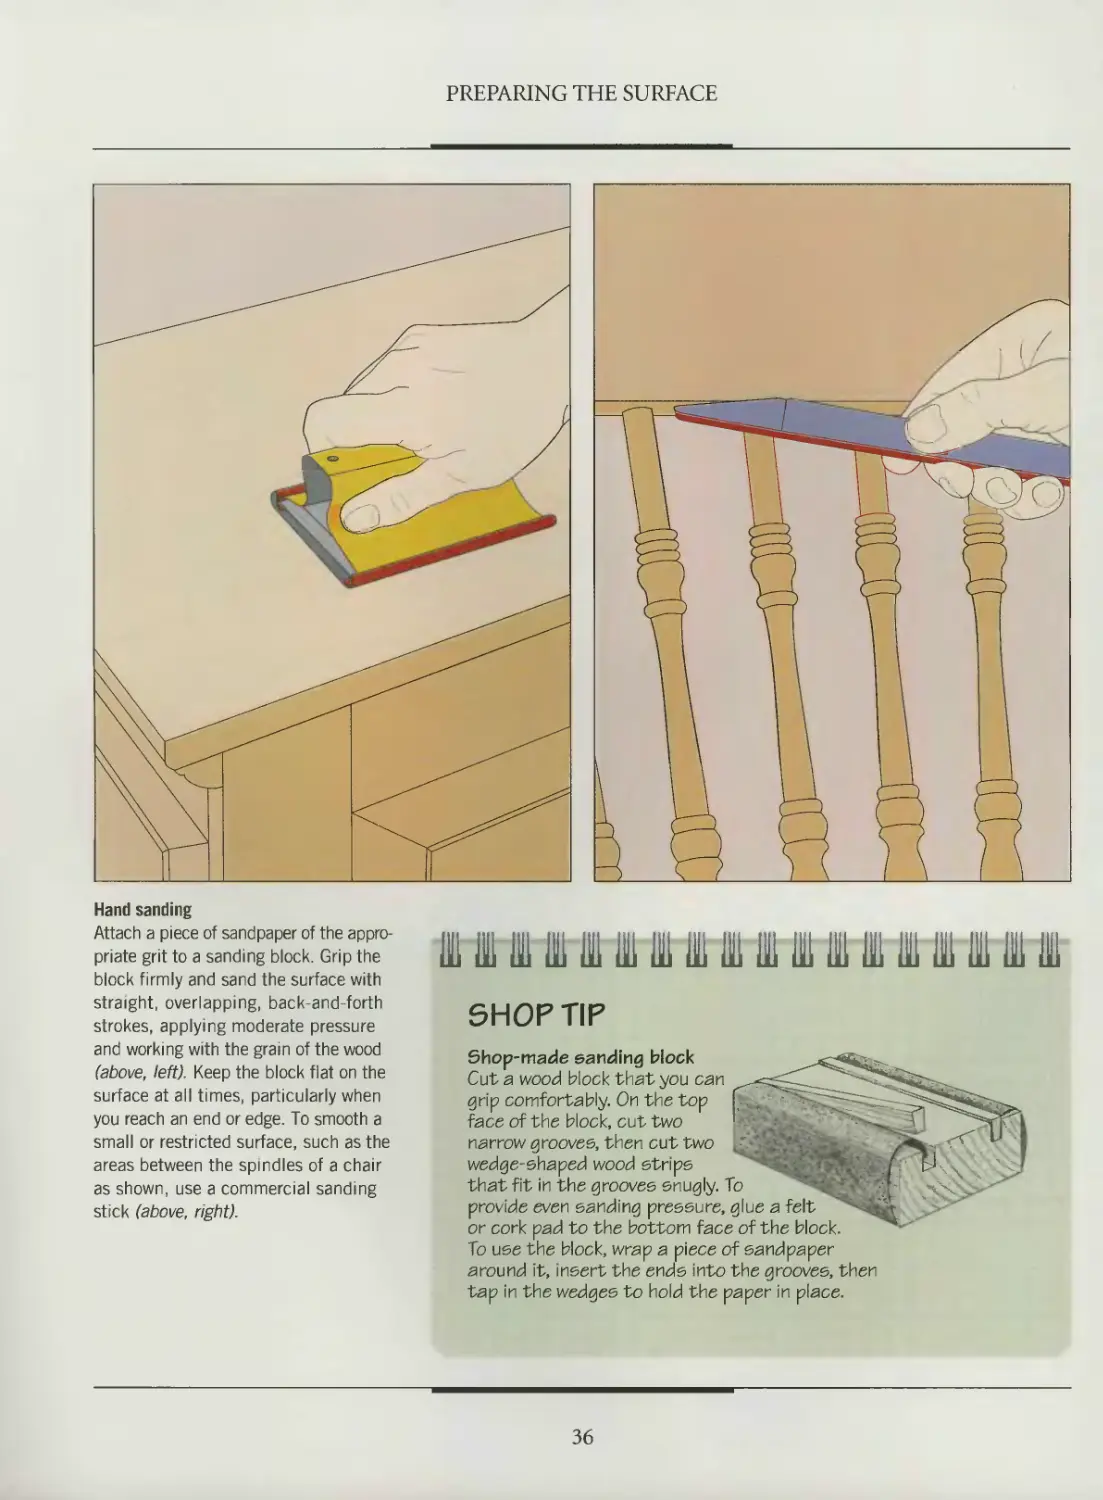
Hand sanding
Attach a piece of sandpaper of the appro-
priate grit to a sanding block. Grip the
block firmly and sand the surface with
straight, overlapping, back-and-forth
strokes, applying moderate pressure
and working with the grain of the wood
(above, left). Keep the block flat on the
surface at all times, particularly when
you reach an end or edge. To smooth a
small or restricted surface, such as the
areas between the spindles of a chair
as shown, use a commercial sanding
stick (above, right).
IB Bi IB Bl IB Bl IB ill Bl Bl ill 111 111 Bl IB bi bi bi
SHOP TIP
Shop-made sanding block
Cut a wood block that you can
grip comfortably. On the top
face of the block, cut two
narrow grooves, then cut two
wedge-shaped wood strips
that fit in the grooves snugly. To
provide even sanding pressure, glue a felt
or cork pad to the bottom face of the block.
To use the block, wrap a piece of sandpaper
around it, insert the ends into the grooves, then
tap in the wedges to hold the paper in place.
36
PREPARING THE SURFACE
ABRASIVE GRADES AND GRITS
Choosing sandpaper
SANDPAPER Grade Grit Uses The range of sandpaper grits in the chart at left will serve for almost any
Medium 80, 100, 120 Initial smoothing; removing shallow depressions finishing job. When buying sandpa-
Fine 150, 180 and scratches Intermediate smoothing per, consider its composition. Alu- minum oxide paper works best with
Very fine 220, 240 Final smoothing before applying a finish a belt sander. Choose silicon carbide paper in grits above 220 for finish
Extra fine 280, 320 Removing dust particles and air bubbles between sanding with an orbital sander.
Super fine 360, 400 600, 1200 finish coats Final sanding before final coat of finish; initial sanding for high gloss finish Rubbing down the final coat of high gloss finish
STEEL WOOL
Medium 1 Light removal of particles and raised fibers; smoothing of shallow depressions and scratches
Fine 00 Smoothing before applying a clear finish
Extra fine 000 Smoothing between coats of finish; light cleaning and deglossing of a finish or polish
Super fine 0000 Polishing; waxing
III 111 111 111 111 ill 111 in 111 111 111 111 in 111 111 111 m m
SHOP TIP
of the sheet with the line and tear.
Making a sandpaper cutting board
To cut sheets of sandpaper quickly
and accurately, use a shop-made
cutting board. Screw a hacksaw
blade to a piece of plywood
with a washer under each
end to raise it slightly
off the plywood. To
cut a sandpaper
sheet in half,
slide it under
the blade.
Holding one
end down, tear
the other part of the
sheet off. For a quarter sheet,
mark a line parallel to the blade
that is one-quarter of the width of a
sheet from the teeth. Then align the end
37
PREPARING THE SURFACE
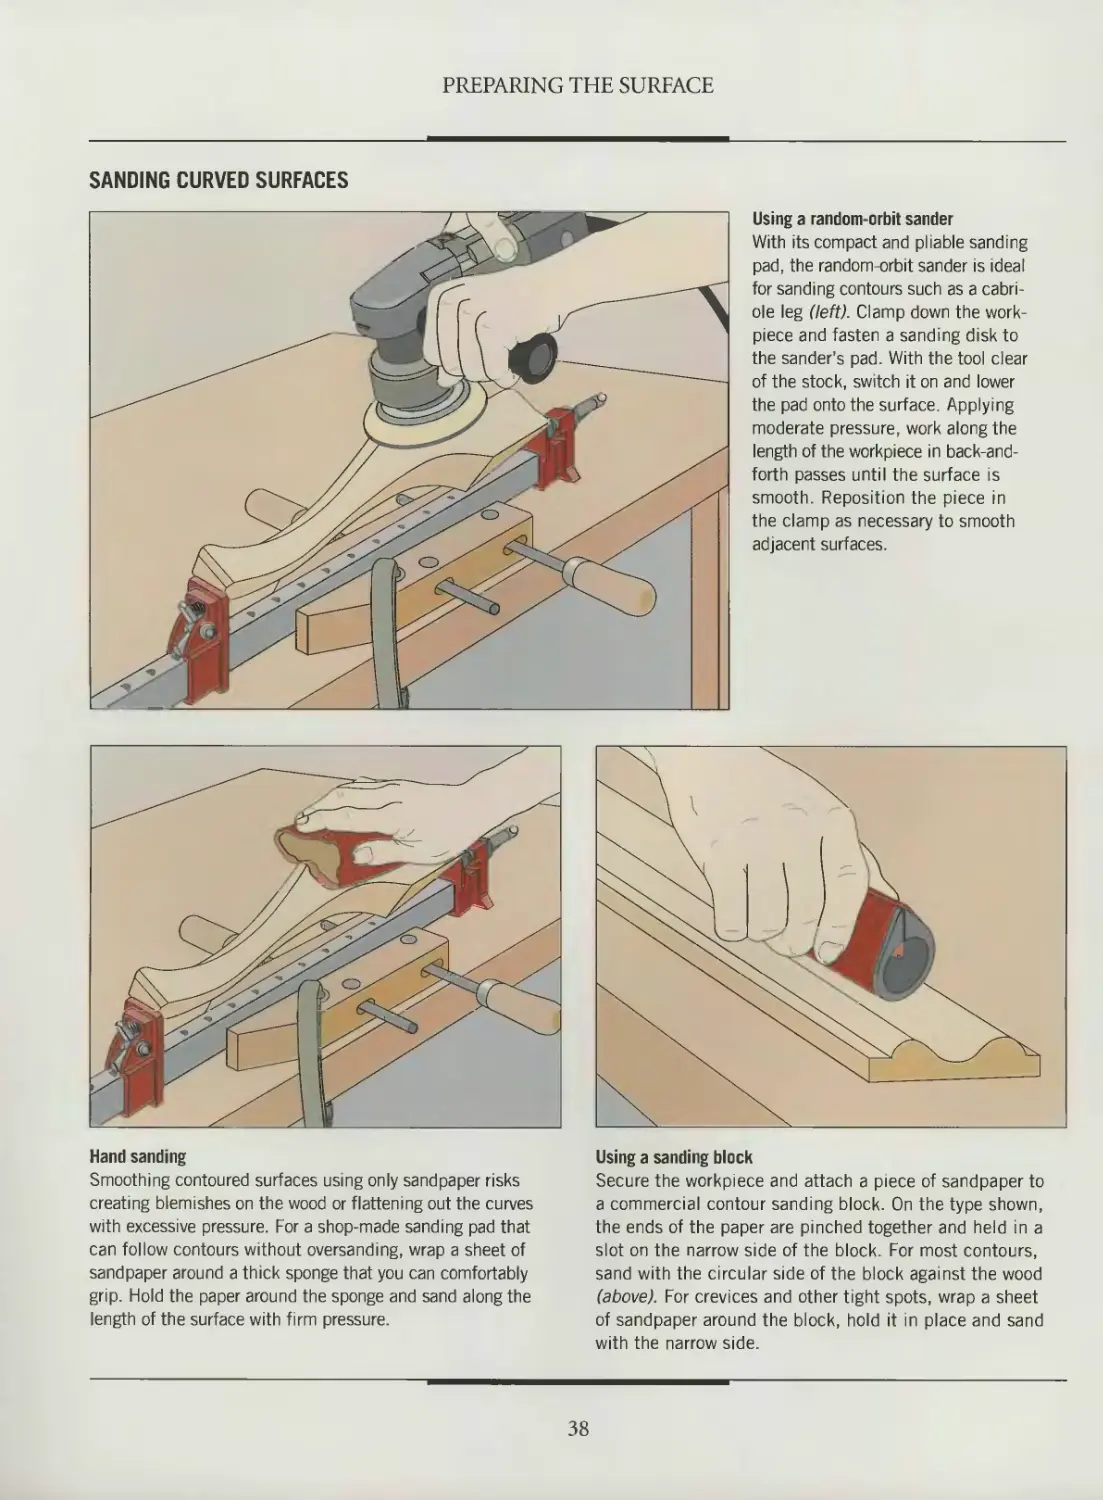
SANDING CURVED SURFACES
Using a random-orbit sander
With its compact and pliable sanding
pad, the random-orbit sander is ideal
for sanding contours such as a cabri-
ole leg (left). Clamp down the work-
piece and fasten a sanding disk to
the sander's pad. With the tool clear
of the stock, switch it on and lower
the pad onto the surface. Applying
moderate pressure, work along the
length of the workpiece in back-and-
forth passes until the surface is
smooth. Reposition the piece in
the clamp as necessary to smooth
adjacent surfaces.
Hand sanding
Smoothing contoured surfaces using only sandpaper risks
creating blemishes on the wood or flattening out the curves
with excessive pressure. For a shop-made sanding pad that
can follow contours without oversanding, wrap a sheet of
sandpaper around a thick sponge that you can comfortably
grip. Hold the paper around the sponge and sand along the
length of the surface with firm pressure.
Using a sanding block
Secure the workpiece and attach a piece of sandpaper to
a commercial contour sanding block. On the type shown,
the ends of the paper are pinched together and held in a
slot on the narrow side of the block. For most contours,
sand with the circular side of the block against the wood
(above). For crevices and other tight spots, wrap a sheet
of sandpaper around the block, hold it in place and sand
with the narrow side.
38
PREPARING THE SURFACE
BUILD IT YOURSELF
CONTOURED SANDING BLOCK
Smoothing the contours of a piece of
molding evenly without damaging its
contours is a difficult task with only
sandpaper or a conventional sanding
block. However, you can use a short
sample of the molding to shape your
own sanding block that corresponds
exactly to the surface of the work-
piece. Fashioning the block requires
body filler or modeling rubber, used
to make a mold of the profile.
To prepare the mold, nail together
a small box slightly longer and wider
than the sample molding and about
inch deeper than the thickest part
of the molding. Prepare the filler fol-
lowing the manufacturer’s instruc-
tions, then fill about half the box with
it. Lay a single thickness of plastic
wrap over the box. While the filler
is still soft, press the molding sam-
ple into the box and clamp it firmly
against the filler. Let the filler hard-
en, then carefully remove the mold-
ing sample from the box. Saw off
the ends of the box.
To transform the box into a sand-
ing block, stretch a piece of sand-
paper abrasive side up across the
molded side of the box. Use the
molding sample to press the paper
against the hardened filler, then
staple the ends to the sides of
the box.
To use the block, clamp the work-
piece down and slide the block back
and forth along the molding (left).
39
PREPARING THE SURFACE
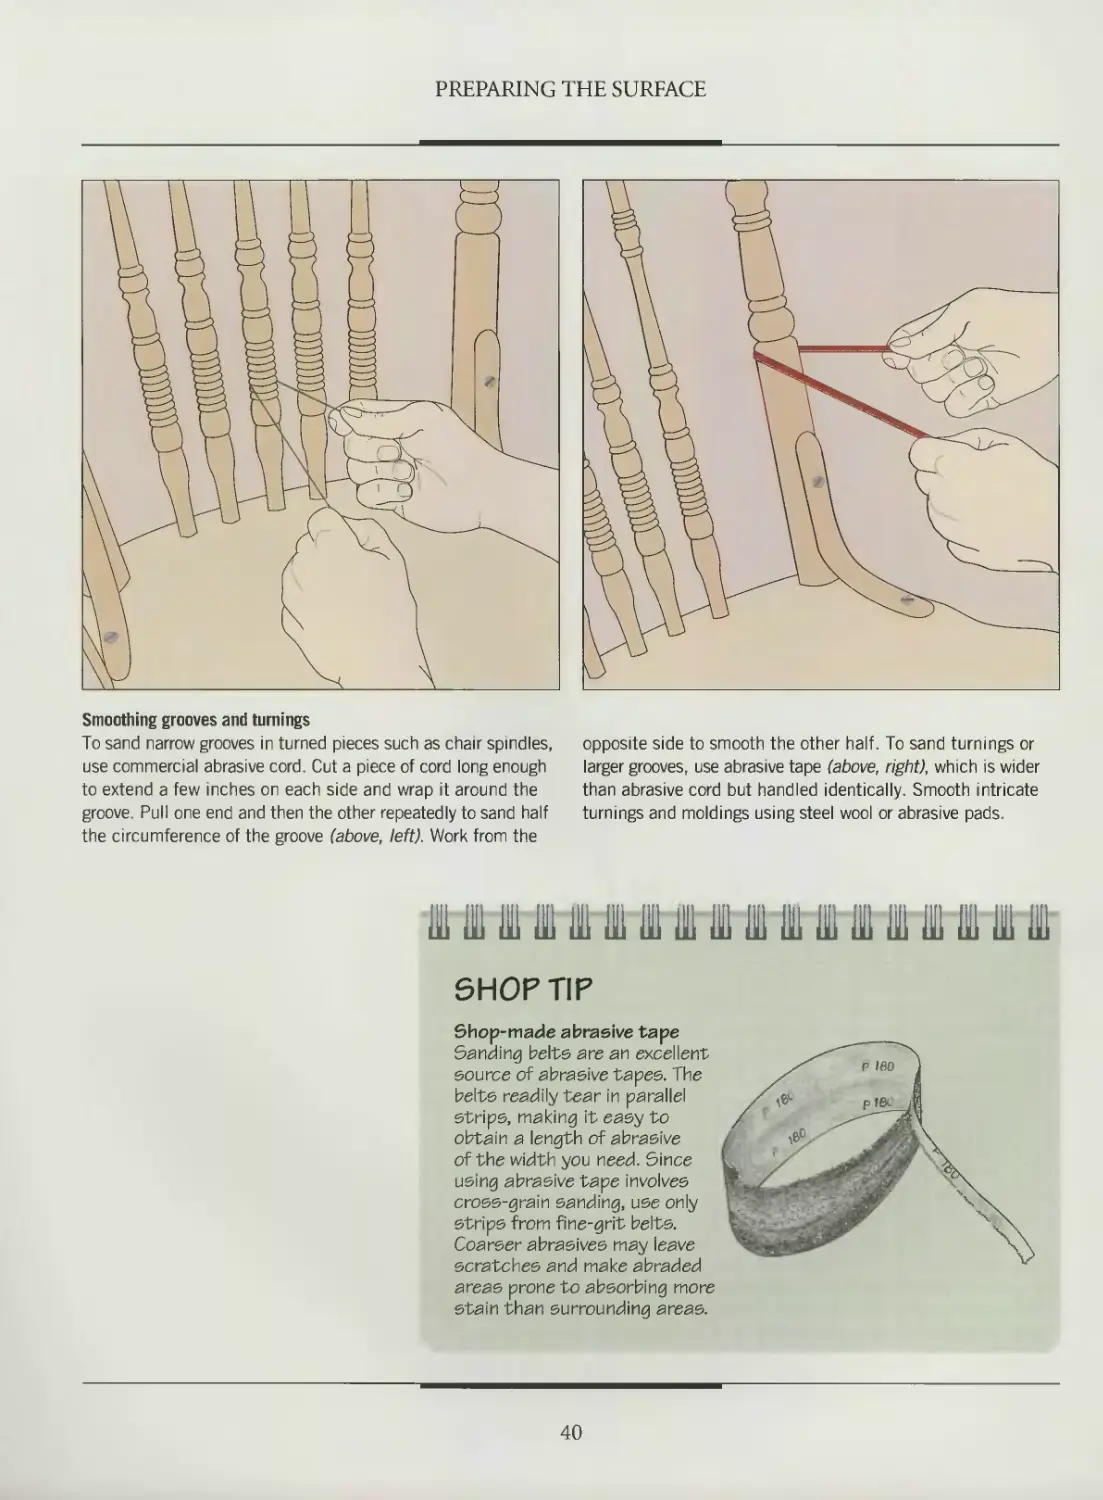
Smoothing grooves and turnings
To sand narrow grooves in turned pieces such as chair spindles,
use commercial abrasive cord. Cut a piece of cord long enough
to extend a few inches on each side and wrap it around the
groove. Pull one end and then the other repeatedly to sand half
the circumference of the groove (above, left). Work from the
opposite side to smooth the other half. To sand turnings or
larger grooves, use abrasive tape (above, right), which is wider
than abrasive cord but handled identically. Smooth intricate
turnings and moldings using steel wool or abrasive pads.
SHOP TIP
Shop-made abrasive tape
Sanding belts are an excellent
source of abrasive tapes. The
belts readily tear in parallel
strips, making it easy to
obtain a length of abrasive
of the width you need. Since
using abrasive tape involves
cross-grain sanding, use only
strips from fine-grit belts.
Coarser abrasives may leave
scratches and make abraded
areas prone to absorbing more
stain than surrounding areas.
40
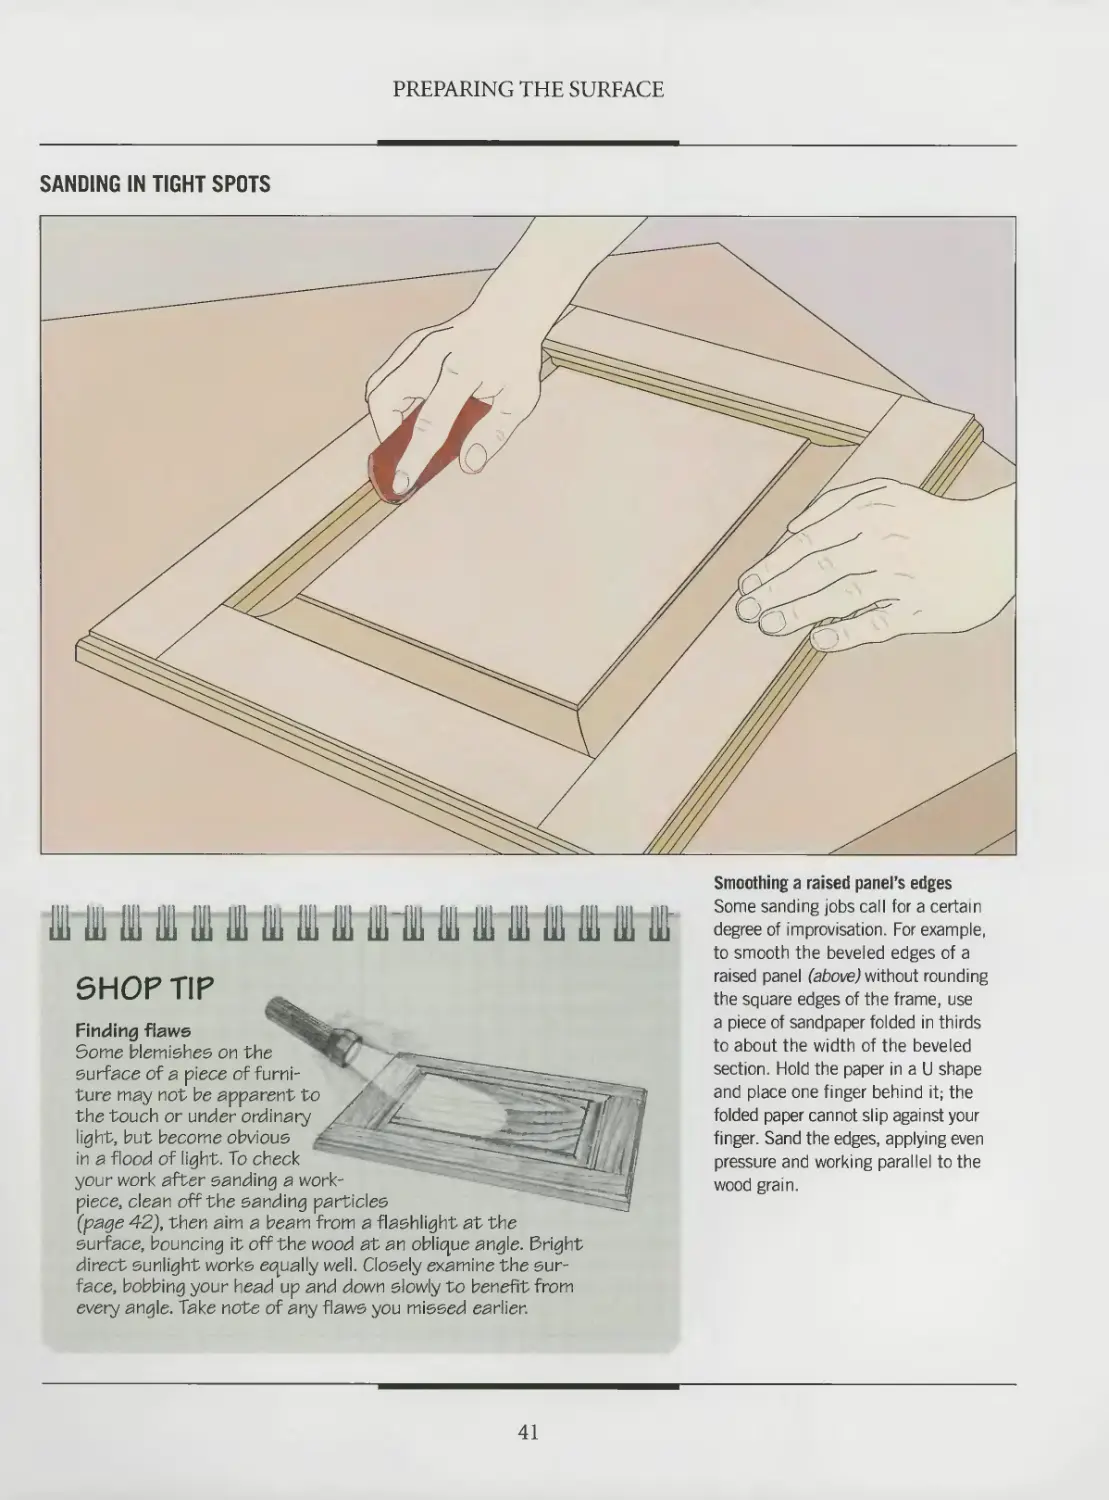
PREPARING THE SURFACE
to smooth the beveled edges of a
SHOP TIP
Finding flaws
Some blemishes on the
surface of a piece of furni-
ture may not be apparent to
the touch or under ordinary
light, but become obvious
in a flood of light To check
your work after sanding a work-
piece, clean off the sanding particles
(page 42J, then aim a beam from a flashlight at the
surface, bouncing it off the wood at an oblique angle. Bright
direct sunlight works equally well. Closely examine the sur-
face, bobbing your head up and down slowly to benefit from
every angle. Take note of any flaws you missed earlier.
raised panel (above) without rounding
the square edges of the frame, use
a piece of sandpaper folded in thirds
to about the width of the beveled
section. Hold the paper in a U shape
and place one finger behind it; the
folded paper cannot slip against your
finger. Sand the edges, applying even
pressure and working parallel to the
wood grain.
41
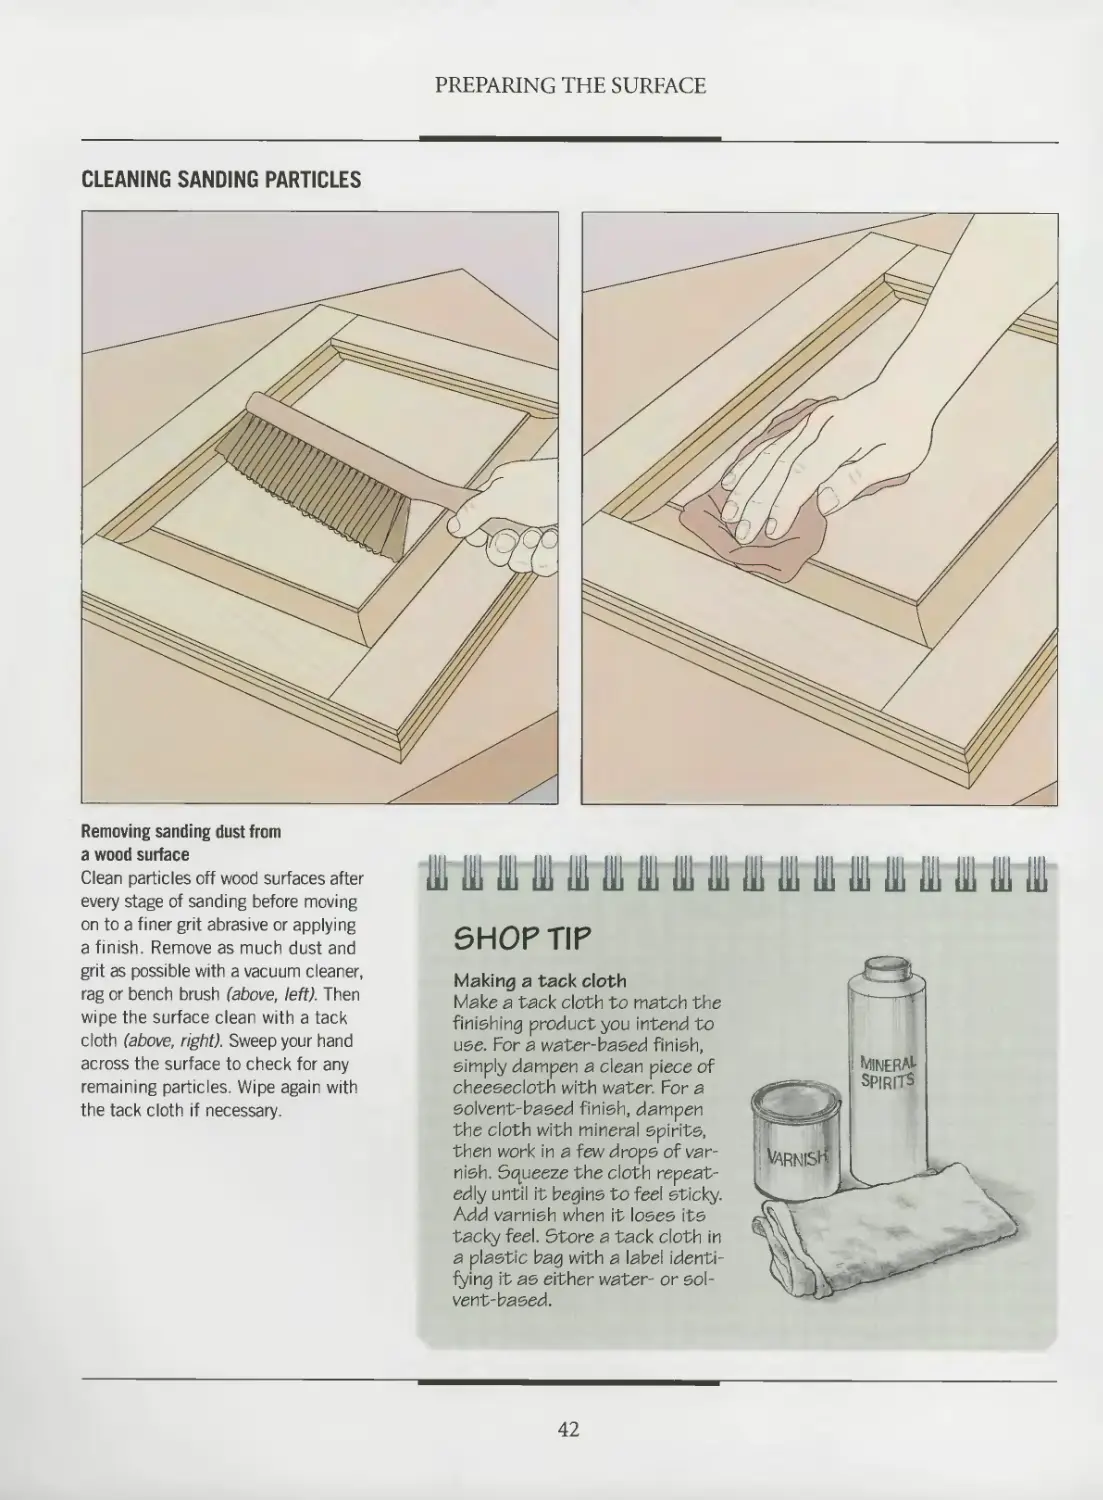
PREPARING THE SURFACE
Removing sanding dust from
a wood surface
Clean particles off wood surfaces after
every stage of sanding before moving
on to a finer grit abrasive or applying
a finish. Remove as much dust and
grit as possible with a vacuum cleaner,
rag or bench brush (above, left). Then
wipe the surface clean with a tack
cloth (above, right). Sweep your hand
across the surface to check for any
remaining particles. Wipe again with
the tack cloth if necessary.
„ Ш IO H IO IO IO III 111 III О
SHOP TIP
Making a tack cloth
Make a tack cloth to match the
finishing productyou intend to
use. For a water-based finish,
simply dampen a clean piece of
cheesecloth with water. For a
solvent-based finish, dampen
the cloth with mineral spirits,
then work in a few drops of var-
nish. Squeeze the cloth repeat-
edly until it begins to feel sticky.
Add varnish when it loses its
tacky feel. Store a tack cloth in
a plastic bag with a label identi-
fying it as either water- or sol-
vent-based.
42
REPAIRING SURFACE DAMAGE
Flaws on a wood surface can show
through almost any finish. In fact, a
clear finish like lacquer may magnify
imperfections. Before you apply a fin-
ish to a piece of furniture, you need to
find and mend any surface damage.
Most defects stick out, but you need to
find and eliminate the less obvious blem-
ishes as well. Try running a hand across
the wood and feeling for them. You can
also wash the surface with low angle light
(page 41) and look for them.
The best approach to a repair and
the materials required depend on the
nature of the damage. A suitable repair
for a dent, for example, is to lift it with
steam (page 44). However, if the wood
fibers are severed rather than simply
crushed, steam will not work; a wood
filler may be the best remedy. For small
blemishes, wax or shellac sticks can pro-
duce a virtually invisible fix. Both are
available in a variety of colors to match
many wood species.
You can buy special burn-in kits
for applying shellac sticks. The typi-
cal package includes a burn-in knife
with a gently bent, stainless steel blade;
an alcohol lamp for heating the knife;
and a special solution for soaking a felt
block that levels the repair with the sur-
rounding surface.
Most larger blemishes are best con-
cealed with wood filler. Although many
types are pre-colored, you can tint filler
yourself for a perfect match. Test the
filler on a scrap of the target wood
before committing yourself to a par-
ticular formulation. In situations where
a filler is inappropriate—because the
damaged area is too large or the filler
would be conspicuous—you can mend
the defect with a shop-made patch
fashioned from a wood scrap of the
same species (page 47).
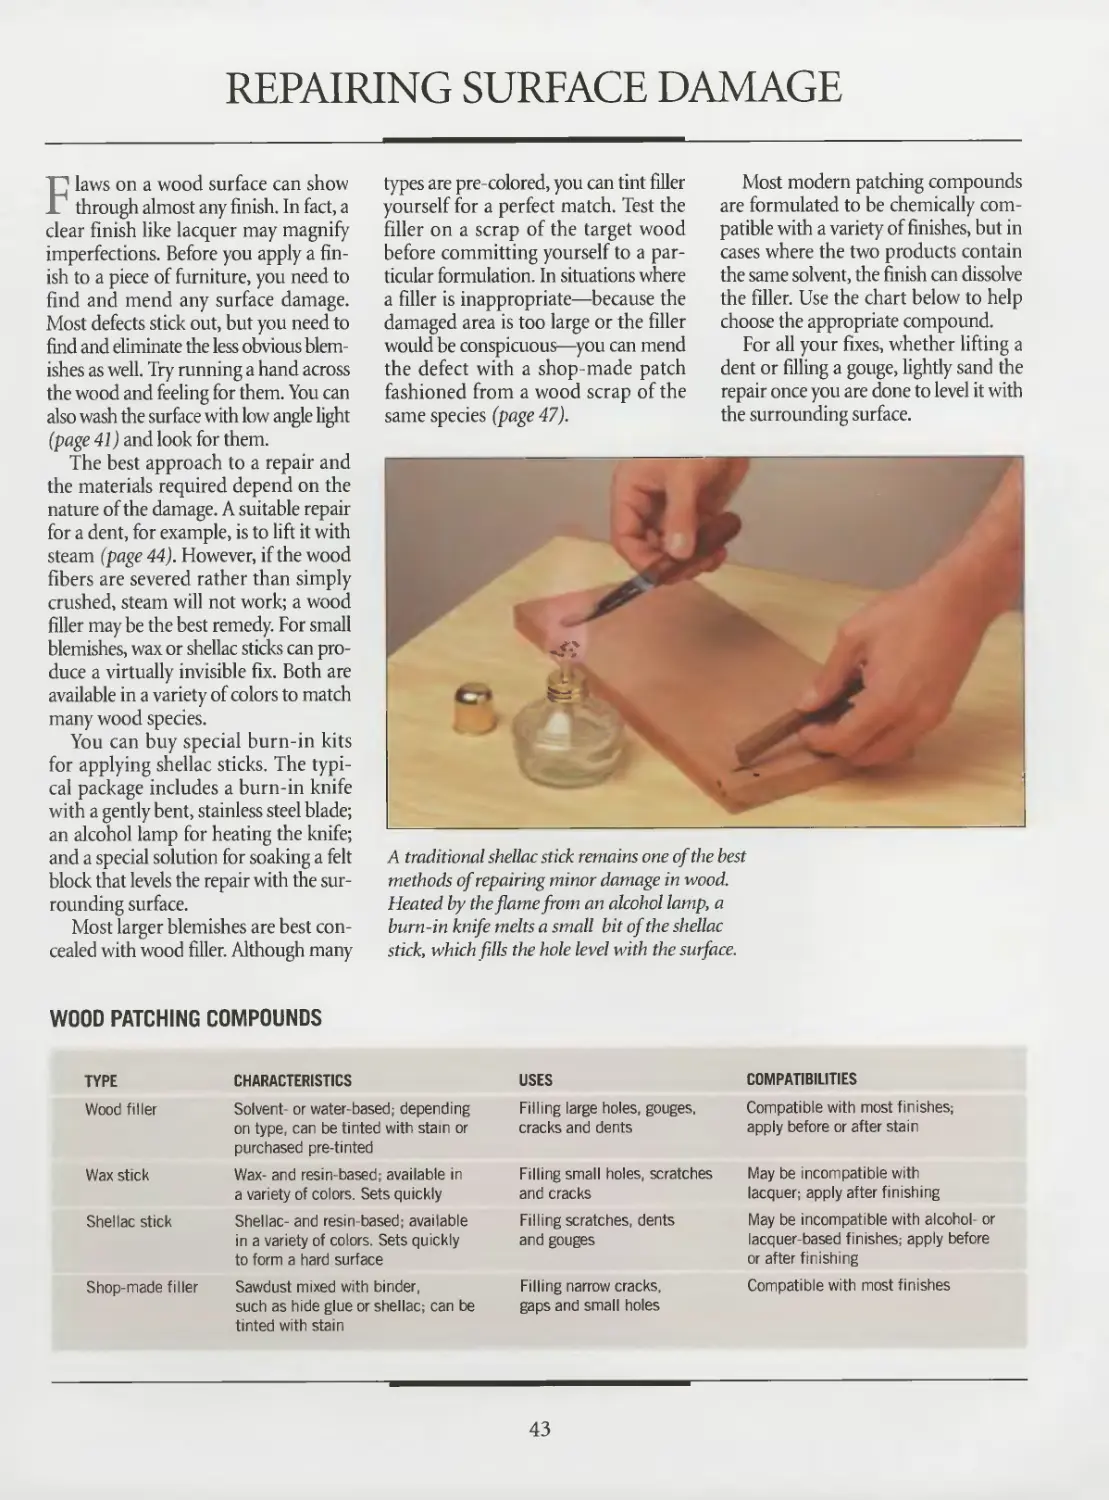
A traditional shellac stick remains one of the best
methods of repairing minor damage in wood.
Heated by the flame from an alcohol lamp, a
burn-in knife melts a small bit of the shellac
stick, which fills the hole level with the surface.
Most modern patching compounds
are formulated to be chemically com-
patible with a variety of finishes, but in
cases where the two products contain
the same solvent, the finish can dissolve
the filler. Use the chart below to help
choose the appropriate compound.
For all your fixes, whether lifting a
dent or filling a gouge, lightly sand the
repair once you are done to level it with
the surrounding surface.
WOOD PATCHING COMPOUNDS
TYPE CHARACTERISTICS USES COMPATIBILITIES
Wood filler Solvent- or water-based; depending on type, can be tinted with stain or purchased pre-tinted Filling large holes, gouges, cracks and dents Compatible with most finishes; apply before or after stain
Wax stick Wax- and resin-based; available in a variety of colors. Sets quickly Filling small holes, scratches and cracks May be incompatible with lacquer; apply after finishing
Shellac stick Shellac- and resin-based; available in a variety of colors. Sets quickly to form a hard surface Filling scratches dents and gouges May be incompatible with alcohol- or lacquer-based finishes apply before or after finishing
Shop-made filler Sawdust mixed with binder, such as hide glue or shellac; can be tinted with stain Filling narrow cracks gaps and small holes Compatible with most finishes
43
PREPARING THE SURFACE
LIFTING DENTS
Repairing a dented surface
One way to fix a dent in wood is to
swell crushed wood fibers to their orig-
inal shape. Turn a household iron to
its highest setting and allow it to heat
up. Meanwhile, soak a clean cloth in
water, fold it over a few times and
place it on the dent. Press the tip of
the iron against the cloth over the dent
(above), holding it in place until the
cloth steams. The steam will swell the
wood fibers, lifting out the dent. Add
water to the cloth as necessary and
avoid leaving the iron on the cloth for
too long, which may scorch the wood.
ill 111 IB Ш fii Ш Ш Hi Ш Ш й HI ffi ill ill 111 lii ill
SHOP TIP
Gluing an edge splinter back
A small splinter on the edge of a work-
piece can be glued in place, as long as
it is still attached. Clamp the stock in a
vise and squeeze some glue into the gap
between the splinter and the wood. Then
press the splinter into place and secure
it with masking tape. Once the glue is
dry, remove the tape and sand the repair
flush with adjacent surfaces.
44
PREPARING THE SURFACE
FILLING SMALL NICKS AND NAIL HOLES
Applying wood filler
Choose a filler that is compatible with
the ingredients and color of the finish
you will be applying. Use a putty knife
to work the filler into the hole and over-
fill it slightly (left), then scrape off the
excess to level it with the surrounding
surface. Avoid spreading filler onto undam-
aged areas, where it may cause uneven
coloring if a stain is applied.
Melting shellac stick with a soldering gun
Select a shellac stick of the appropriate color and set a solder-
ing gun on Low. Holding the stick over the hole, melt it with
the tip of the gun (above, left). Drip enough of the product to
fill the hole. While the filler is still soft, use a knife or a wood
chisel to press it evenly into the damaged area. Work carefully
to avoid marring the surrounding area with the knife or chisel
blade. Allow the filler to cool. To level the filler with the sur-
rounding surface, soak the bottom of a felt block with a small
amount of commercial leveling solution and lightly rub the
block back and forth across the repair (above, right). The slow-
acting solvent in the solution dissolves excess filler without
harming the wood.
45
PREPARING THE SURFACE
Applying shellac stick with
a burn-in knife
Light the alcohol torch and hold the
burn-in knife over the wick for several
seconds. With the shellac stick over
the damaged area, press the knife
against the stick so that enough filler
melts and drips into the hole (above).
Reheat the knife as necessary until
the hole is filled. Use the knife to
spread the filler evenly. Finish the
repair with leveling solution and a
felt block (page 45).
in wi ui mtai in hi in in ш iii ini in in hi m Hi
SHOP TIP
Using a glue gun to apply
shellac stick
A glue gun offers a simple alternative
to a burn-in knife or soldering gun for
repairing damage with a shellac
stick. Use a sharp knife to
whittle a shellac stick so
that it fits in the barrel of
your glue gun. To melt the
filler, pull the trigger as
you would to apply glue,
then drip the melted shellac
stick onto the damaged area. Press the filler
into the hole with a knife or wood chisel, and
level it as shown on page 45—using a felt
block and leveling solution.
46
PREPARING THE SURFACE
PATCHING A LARGER HOLE
1 Making and outlining the patch
An effective way to mend a larger
hole on a wood surface is to cut a patch
and a matching mortise over the hole,
then glue the patch in place. Using a
cut-off scrap from the workpiece, or a
piece of veneer with similar grain and
color, cut a patch that is slightly larger
than the hole. Give the patch a diamond
shape, less conspicuous than a square
or rectangular patch after the finish is
applied. Use a wood chisel to bevel the
edges of the bottom face of the patch,
then sand both faces. Place the patch
over the hole, aligning its grain with the
surface grain, and mark its outline with
a sharp pencil (right).
2 Chiseling the mortise
Secure the workpiece with a clamp
if necessary. Select a wood chisel slightly
narrower than the sides of the mortise to
cut along the outline. Tilt the tool with its
bevel facing up to produce an angle cor-
responding to that on the edges of the
patch. Remove the remaining waste from
the outline with the chisel bevel facing
down (left). Periodically test-fit the patch
in the mortise until the mortise is slightly
shallower than the patch is thick.
47
PREPARING THE SURFACE
3 Gluing down the patch
Spread some glue in the mortise
and set the patch in place. Lay a piece
of wax paper over the patch, then posi-
tion a wood block on top. (The paper
will keep the patch from adhering to
the block.) If the patch is located where
you cannot clamp it directly, set a board
atop the block and clamp the ends to
focus the clamping pressure on the patch
(left). Work quickly to prevent the
patch from absorbing moisture from
the glue and swelling.
PATCHING A DAMAGED CORNER
1 Preparing the damaged area
A damaged corner is best repaired
with a patch. If the edges of the break
are ragged or sharp, use a wood chisel
to cut a shallow, oval-shaped mortise
with smooth edges around the damage.
Hold the chisel with the bevel facing
down and work w:th the grain of the
wood (right).
48
PREPARING THE SURFACE
2 Installing the patch
Cut a patch that roughly fits the
mortise, then shape it with sandpaper
or a chisel until it fits perfectly. Spread
some glue in the mortise and set
the patch in position, aligning its grain
with that of the workpiece. Use mask-
ing tape to keep the patch in place
while the glue dries. To level the patch
with the surrounding surfaces, pare
away the excess with the chisel (above).
Cut with the grain, keeping the chisel
bevel side up.
Hi Uli IB 111 IB IB HI IB IB Hi Hi in IB 111 111 111 ibib
SHOP TIP
Filling a
damaged corner
An alternative
to patching a
damaged corner
is to reconstruct
it with wood filler.
Secure the workpiece
in a vise. Make a form
to keep the filler from
sagging by taping a
thin piece of metal or
plastic, or a tongue
depressor to the side of the
stock. If you use a tongue depressor, place a strip of wax paper
underneath to keep the filler from bonding to the stick. Apply the
filler with a putty knife, then tape a second form to the top surface.
49
RAISING THE GRAIN
Wetting the surface
Every phase of working with wood—from
jointing and sawing boards to planing
and scraping them—compresses the
fibers on the surface. Exposure to water
causes the fibers to stand up, roughen-
ing the surface. If you intend to use a
water-based finish, wet the surface to
raise the grain before applying the fin-
ishing solution. Spray water on the sur-
face (left), then wipe off the excess with
a clean cloth. Allow the surface to dry,
then lightly scuff the wood with very
fine (220-grit) sandpaper. Avoid over-
sanding, which might expose fresh grain,
making it necessary to repeat the process.
Raising the grain has other benefits, such
as lifting shallow dents, exposing defects
and helping a finish adhere.
Hi lb 111 Hi Ill 111 Hi 111 ill 111 Hl III ill 111 111 HI ill Hl
SHOP TIP
Coloring grain filler
Untinted grain filler can
be colored to match or
contrast with the stain
on your workpiece. For a
water-based filler, use an
oil-free pigment in liquid or pow-
der form, such as universal tint-
ing or dry earth colors. Tint an
oil-based filler with an oil-based
pigment, such as artist’s oil or
japan colors. To prepare the filler,
pour it into a dish and add a small amount of the coloring agent.
Mix the two ingredients with a putty knife. Continue adding color-
ing agent until the filler takes on the desired color. Test the filler
on a scrap board before applying it to your workpiece. Add more
coloring agent to darken the mixture: add filler to lighten it.
50
FILLING THE GRAIN
Filling the wood grain is the easiest
way to achieve a high gloss, mirror-
like finish on open-grained species like
ash, oak and mahogany. Grain filler, also
known as pore filler or paste wood filler,
is not appropriate for every job, howev-
er. A closed-grain wood has no need
for filler, and some woodworkers avoid
fillers altogether in favor of a more nat-
ural look.
If you decide to fill the grain of your
wood, you should understand the vari-
ous options regarding when to apply the
filler and exactly what type to use. Filler
is usually applied before stain; if you
choose to stain before filling you must
be careful not to damage the stain when
removing the excess filler. Yet another
alternative is to apply the stain and filler
together on the raw wood, although the
result is often a flat, monochromatic
appearance. To bring out the character
of a species like mahogany, try staining
the wood, then sealing the stain with a
wash coat (page 53), and finally apply-
ing a filler with a contrasting color.
Filler comes in several colors; choose
a shade slightly deeper than the wood
Applying a filler to an open-grained
species like oak does more than
simply fill the wood pores. In contrast
with the natural surface on the right,
the filler added to the sample
on the left has accentuated the
wood’s grain pattern.
so it will match as the wood darkens with
age. You can also buy untinted filler and
color it yourself in the shop (page 50).
Before committing yourself to a partic-
ular sequence or color, apply the filler
to pieces of scrap wood both before
and after staining, and choose the best
combination.
For best results, make sure that the
workpiece is clean and dust-free. Then
prepare the filler following the manu-
facturer’s directions; it should have the
consistency of thick cream.
Because grain filler can absorb a lot
of finish, always apply a wash coat to a
filled surface before staining or finish-
ing it. The wash coat, consisting of the
finish you plan to use diluted by the
appropriate thinner, creates a barrier
between the filler and the finish. With
some species like mahogany, a wash coat
is advisable before filling, to prevent the
filler from developing unsightly white
spots several months after it is applied.
APPLYING A FILLER
1 Brushing on the filler
With the workpiece face up on a
work surface, pour some of the filler
into a container. Apply the filler with
a paintbrush (left) or abrasive pads.
Using back-and-forth, overlapping
strokes, cover the surface completely
with the filler, working first with the
grain, then across it. Examine the work-
piece under direct light to confirm
that the surface is covered thoroughly.
Apply more filler, if necessary.
51
PREPARING THE SURFACE
2 Wiping off excess filler
Once the filler begins to dry, losing
its shine and turning hazy, wipe it with
a piece of clean burlap folded into a
pad (right). Starting at one end of the
workpiece, work with a circular motion
to pack the filler into the wood pores
and remove the excess.
3 Cleaning up
On a detailed workpiece such as a
raised panel, remove excess filler from
hard-to-reach spots with a sharpened
tongue depressor wrapped in a clean
piece of burlap (left). Dab the pointed
end into corners and along edges to
remove excess filler. Allow the filler to
dry, then smooth the surface with 220-
to 320-grit sandpaper. If a second coat
is required, apply it the same way.
52
PREPARING THE SURFACE
APPLYING A WASH COAT
1 Brushing on the wash coat
Prepare a 50/50 solution of the fin-
ish you intend to use, diluted with the
appropriate thinner. Brush along the
wood grain to apply a light, even coat
of the solution to the surface (above).
2 Rubbing in the wash coat
Use a clean, lint-free cloth to
work the wash coat into the pores
of the wood (left). Allow the wash
coat to dry, then smooth the sur-
face with extra fine sandpaper.
53
CHANGING THE COLOR
Staining allows you to dramatically alter the
outward appearance of wood. This maple
piano bench was ebonized, or colored black,
with multiple applications of tinted lacquer.
From the deep, clear and bright
tones of dye-tinted stains to the
dense richness of the pigment-tint-
ed varieties, the materials used in
coloring wood afford a great degree
of latitude. Stains allow you to make
white woods colorful, light woods
dark, plain woods fancy and streaked
woods uniform.
Throughout the long history of
furnituremaking, stains have been
called upon to fool the eye. They
have helped common woods take
on the appearance of more desir-
able ones, adding color and figure
where it was lacking. They have also
produced colors and patterns that
nature never imagined.
One trick involved inlaying mahogany surfaces with pat-
terns of white holly. The challenge was to darken the sur-
rounding wood without discoloring the inlay, and the solution
lay in a wash of potassium permanganate or dichromate. The
wash reacted with the high tannin content in the mahogany,
bringing out rich reds and browns, but it left the tannin-free
holly unchanged.
Modern stains fall into two broad categories: those con-
taining dyes and those with pigments. Dyes impart translu-
cent color to wood, altering nature’s palette while leaving the
intricate grain patterns visible. Pigment stains contain opaque
colorants that cling to the surface of the wood. Pigments can
be used to add patterns and contrast to the wood grain, or to
bring definition and highlights to corners and carvings.
Of course, not all wood cries out
to be changed; some species are best
left au naturel. ft is hard to imagine
improving on the rich patterns of
rosewood, Macassar ebony or Carpa-
thian elm burl, just as it seems futile
to alter the shocking intensity of pur-
pleheart, padauk or Osage orange.
But for most woodworkers, oppor-
tunities to work with perfect speci-
mens are rare. The typical project
involves making do with whatever
materials are available and afford-
able. Stains help to make this feasible.
Ebony—costly and difficult to
work, but strikingly beautiful—offers
a prime example of the special effects
that staining makes possible. Even
when the wood is available, the small tree diameter makes it
impossible to obtain wide boards and the natural instability of
the wood virtually assures that a good-sized piece of ebony
will crack sooner or later. Fortunately, a widely used staining
technique called “ebonizing” gives the appearance of ebony to
more stable and affordable woods like mahogany and maple.
Perhaps more important than mere fakery is the ability of
stains to create new woods by adding unlikely colors to famil-
iar materials. But not all staining is so blatantly obvious. A
more subtle, but equally valuable use of stain is to add to fur-
niture that most elusive of traits: age. More than one “antique”
has come to market with adroitly applied mixtures of wax and
rottenstone, or even shop dust and japan colors, hiding the
fact that the piece only recently left its maker’s hands.
A colonial red aniline dye stain enlivens a pale piece of oak.
Whether it colors the wood fibers or merely covers the surface
with a layer of pigments, staining can change the look of a work-
piece more radically than any other step in the finishing process.
55
TOOLS AND ACCESSORIES
Along with an assortment of stains,
pigments and dyes, there are a
number of implements and accessories
that every finisher needs. A sampling of
the most useful items is featured below.
Changing the color of wood involves
as much art as science, but in some
instances precise measuring is helpful.
For example, if you are attempting to
match an earlier staining job, it helps
to know the exact proportions in which
the original ingredients were mixed
together. Use graduated cylinders and
cups to measure out liquids accurately,
and a scale for determining precise
weights of powders, crystals and other
dry components.
Brushes, sponges, rags and pad appli-
cators of varying sizes are the most com-
mon tools for applying stains and
bleaches. Brushes are categorized by the
nature of their bristles. The brush you
choose for a particular project will
depend on the substances you need to
apply. Solvent-based stains should be
spread on with natural-fiber brushes;
use synthetic brushes to apply water-
based products. An oil-based product,
such as a pigmented wiping stain, can
be applied with either type of brush.
All of the products presented in this
chapter are toxic to varying degrees.
Whether mixing or applying a stain or
bleach, wear safety goggles, neoprene
rubber gloves and a dual-cartridge
respirator.
AN INVENTORY OF STAINING IMPLEMENTS
For applying stains
and bleaches. Synthetic brushes
made from nylon or polyester are more
durable than natural-bristle brushes
Foam brush
For applying stains
without brush marks;
type shown synthetic
and disposable
Pad applicator
For applying stains even-
ly on wide surfaces; type
shown features rectan-
gular pad with thousands
of short filaments and a
foam backing
Sponge
For applying bleaches
and chemical
stains
High-volume, low-pressure (HVLP) spray unit
For spraying on stains; features a turbine which blows
a steady stream of air through a spray gun, forcing
the stain through the gun’s nozzle as a fine vapor
Weighing
scale
For precise
measurement
of powders
and crystals
in stains and
bleaches
Graduated cylinders
For precise measure-
ment of liquid ingredi-
ents in stains and
bleaches
Glass jars
Clear jars used for mixing
stains and bleaches;
brown jars used for
storing solutions since
they block out some
of the light
56
BLEACHING
Bleaches are highly reactive chemi-
cals that break down the natural
colorants in wood. For years, wood-
workers have used bleach to lighten
the color of their stock. The effect can
be startling. Mahogany turns a tone of pale
rose when bleached; walnut becomes
creamy in color.
Bleaching has other applications,
however, that go beyond simply wash-
ing out color. The process can be the
first step in preparing a piece for a spe-
cific stain, such as a blond finish for
mahogany; it is also used to ready a dark
oak for liming. In addition, bleaching is
an effective way to suppress the color
variations between the sapwood and
Natural cherry
heartwood of a species like poplar and
make them more uniform. It also rids
wood of water and rust stains.
There are three common types of
wood bleach. Oxalic acid, sold in liquid
form as “deck brightener,” is your best
choice for removing stains from wood.
Sodium hypochlorite will do an excel-
lent job of removing an aniline dye
stain from a workpiece. This product is
available as liquid laundry bleach. But
the most effective all-purpose wood
lightener is two-part A/В wood bleach.
Using this variety of bleach involves
combining lye and peroxide; the result-
ing effect is stronger than that of either
ingredient on its own.
Wood bleach can affect your tools as
drastically as the wood. Use a synthet-
ic brush or sponge to apply bleach; a
natural-bristle brush will eventually dis-
integrate in the solution. Mix and store
bleach in glass containers; the chemicals
may react with metal. Bleaching leaves
residues on wood that can become haz-
ardous airborne irritants when the sur-
face is sanded. The three main types of
bleach can all be washed away by rins-
ing the wood with water.
Bleach can be dangerous if handled
improperly, so follow the manufactur-
er’s instructions. Never mix bleach with
another chemical, and always work
with a fresh batch.
Natural walnut
Bleached cherry
Bleached walnut
57
CHANGING THE COLOR
BLEACHING WOOD
Applying the bleach
Clean the workpiece of any dirt or oil,
then ready the two-part bleach by pour-
ing a quantity of each solution into sep-
arate glass bowls. Do not mix the two
parts together; they will be applied in
separate steps. Spread a generous but
even coat of Part A on the wood surface
with a paintbrush or a rag. Let the prod-
uct do its work for about 5 minutes, then
apply Part В the same way. Let the work-
piece sit for at least 4 hours, then rinse
the surface with water or the neutralizer
supplied with the bleach. Allow the work-
piece to dry overnight before applying a
stain or finish. Two-part bleach is usual-
ly strong enough so that one application
is sufficient; however, to lighten the
wood further, repeat the process.
ill 111 111 HI Hi III Hi 111 HI HI 111 III 111 ill Hl Hl Hl 111
SHOP TIP
Lightening wood with grain filler
To lighten wood without bleaching
it, use an oil-based grain
filler mixed with some
white pigment. First apply
a wash coat to the work-
piece (page 53), then
prepare a batch of
filler (page 51),
adding enough
white japan or
other oil-based
pigments to obtain the shade
Wilier
you want. You can apply the mixture as you would any
grain filler. The process will accentuate the grain of
open-pore species like oak, ash, mahogany and elm.
58
THE VARIETIES OF WOOD STAINS
Staining was once key to the cabinet-
maker’s subtle art of forgery. Armed
with natural dyes, chemical mordants
and secret recipes, cabinetmakers could
imitate the look of prized, exotic woods,
or give newly built chairs, chests and
cabinets the patina that antiques acquire
with the passage of time.
Today, camouflaging and enhancing
wood with stains are still important
aspects of woodworking. Whether a stain
penetrates and dyes the fibers of the wood,
or merely covers the surface with a thin
layer of pigments, no other step in the fin-
ishing process brings about such a radi-
cal change. Staining can highlight grain
patterns, mask homely surfaces, add col-
or or impart a uniform hue to different
woods within a single piece of furniture.
All stains consist of a coloring agent
mixed in a liquid. The two basic types of
coloring agents are dyes and pigments.
Dye stains work much like the coloring
agents used on cloth. Dissolved in water,
oil or alcohol, they penetrate the surface
and bond to the wood fibers. Pigment
stains contain finely ground colored pow-
ders suspended in a liquid such as linseed
oil. They work more like very thin paints.
When applied to wood, the liquid dries,
binding the pigment to the surface.
Dyes for staining wood are most com-
monly sold as aniline powders, which
must be mixed with a liquid before use
(page 68). Their intense colors can be
combined in varying proportions to pro-
vide a virtual rainbow of hues and tones.
Pigment stains are available in the same
wide range of colors, yet come in ready-
to-use liquid, gel or glaze form. Pigments
can also be purchased in concentrated
form as earth pigments or japan colors;
the concentrate is added to a ready-to-
use stain for enhanced effects. Both dyes
and pigments can be mixed with lac-
quer, varnish, wax or shellac to provide
colored finishes.
When choosing a stain, remember
that most dye stains are brilliant and
transparent, but generally not as lightfast,
or impervious to fading, as pigment
stains. Dye stains are excellent for high-
lighting grain. Pigment stains are opaque
and tend to cloud the grain. Some new-
er liquid stains contain both dyes and
pigments, providing the useful proper-
ties of both types of coloring agents with
added ease of application.
The most desirable liquid base for a
stain depends on the effect you are seek-
ing. The deeper the vehicle penetrates
the wood, the darker and richer the
resulting color. Because water penetrates
deepest, water-soluble stains are gener-
ally the best choice for hardwoods. One
drawback of water, however, is that it
raises the grain, necessitating further
sanding of the surface.
Available in easy-to-apply liquid
form, the gel stain shown in use below
contains pigments that will impart a
dark brown mahogany tone.
59
DYE STAINS
Derived from plants, insects and ani-
mals, the wood dyes used in the
18th Century ranged from concoc-
tions with exotic names such as drag-
on’s blood, verdigris, madder root and
cochineal to more earthy tints extract-
ed from tea, urine, vinegar and walnut
husks. A hundred years later, the first
aniline dye was extracted from coal tar.
Today, such dyes are the industry stan-
dard, usually mixed with one of three
solvents: water, oil or alcohol. Dyes not
yet combined with a solvent are also
available in either powder or liquid form.
Premixed stains are more convenient to
use, but mixing them yourself gives you
more flexibility when you need to pro-
duce a particular effect. A fourth type
of dye product, known as non-grain-
raising (NGR) stain, is only available in
liquid form. The dyes in NGR stains are
dissolved in an anhydrous, or waterless,
solution of organic hydrocarbons, such
as petroleum. Whichever type of dye
stain you apply, the factor that will deter-
mine the eventual color of the wood is
the amount of dye in the solution, not
the amount of solution applied.
Water-soluble stains are a good choice
for emphasizing the grain of hardwoods.
Although a water-based stain will raise
the grain, many woodworkers prefer to
take care of that step before applying
a stain (page 50), thereby saving a sand-
ing step that might affect the final color
of the wood.
Maple
Light yellow maple
60
CHANGING THE COLOR
Alcohol-soluble dyes, also called
“spirit stains,” do not raise the grain as
much as water-based stains and they
produce somewhat brighter hues.
Oil-soluble dyes are transparent and
also non-grain-raising. The drying times
of these stains will vary, depending on
the solvent used. Mineral spirit-based
stains generally have a slow drying time,
while stains containing toluene or xylene
dry considerably faster. The trade-off is
that toluene and xylene are more toxic
than mineral spirits. Another potential
problem with oil-based stains is their
tendency to bleed through a protective
finish. Although this should only occur
if the stain is still wet when the topcoat
is applied, it is a good practice nonethe-
less to use a finish with a different solvent
than your stain.
For best results, NGR stains should
be sprayed on wood. If you use a brush,
you will need to add a retarder to the
solution to extend its drying time.
Choosing the right stain for a project
can involve experimentation. From pages
60 to 63 is a series of photos that illus-
trate the effects of five different dye stains
on some of the most popular hardwood
species. The samples on the far left are
unstained, followed by pieces cut from
the same board, each one colored by
a different dye stain. For further infor-
mation on the characteristics and uses
of stains, refer to the chart provided
on page 70.
61
CHANGING THE COLOR
Oak
Natural
Oak
Golden fruitwood
Walnut
Golden fruitwood
Walnut
Light yellow maple
Cherry
Natural
Cherry
Golden fruitwood
62
CHANGING THE COLOR
63
PIGMENT STAINS
Any substance that can be reduced
to a powder can become a pigment
that will impart color to wood. Minerals,
ores, metallic oxides and many other
naturally occurring earth compounds
can all be ground into very fine parti-
cles. Once they are suspended in a sol-
vent such as oil, varnish, polyurethane
or water, these powders become spread-
able pigment stains. Because the particles
are suspended, rather than dissolved
in the solution, pigment stains dry to a
thin, paint-like coating on the surface
of the wood.
Whereas dye stains color wood fibers
and tend to accentuate the grain, pig-
ment stains are opaque and hide the
wood patterns. As a result, pigment
stains are often used for glazing, grain-
ing and other finishing techniques that
compensate for the lack of distinct grain
patterns in certain varieties of wood.
These are described in detail in Decora-
tive Finishes (page 110).
Today, pigments are produced syn-
thetically, with binders and driers added
to help them adhere to the wood as the
solvent dries. Pigment stains come in
different liquid and gel forms. The most
popular and best-known are pigment-
ed wiping stains. These ready-to-use fin-
ishing products contain a finely ground
pigment suspended in linseed oil, which
doubles as solvent and binding agent.
Wiping stains are slow-drying, allowing
plenty of time to spread them on or wipe
wiping stain
wiping stain
Maple
Antique white
wiping stain
wiping stain
wiping stain
wiping stain
64
CHANGING THE COLOR
off any excess. Either sprayed on or
applied with a rag or a brush, they are
particularly useful when the wood sur-
face is made up of heartwood and con-
trasting sapwood.
Other popular pigment stains include
japan colors, glazing stains and gel stains.
Japan colors offer a more vibrant range
of hues than wiping stains, but they need
to be thinned before use. They can be
used to tint other stains when you are
trying to match an existing surface.
The main selling point of glazing
stains is that they are heavier and thick-
er than wiping stains—and thus useful
for concealing grain. Gel stains, mean-
while, are easy to apply and they set
quickly, reducing drips on vertical sur-
faces. Refer to the chart on page 70 for
more information on these and other
pigment stains.
Pigments are also available in pow-
dered or concentrated form. Earth pig-
ments, like siennas, umbers and ochres,
are mined from the earth and processed
in deoxygenated conditions at high heat
to bring out their bright colors. Different
pigment stains can be mixed together or
with powdered or concentrated varieties
to produce unique colors and tones, pro-
vided the solvents are compatible; an oil-
based stain cannot be mixed with a
water-based stain, for example.
Pages 64 to 67 illustrate the effects of
various pigment stains on five different
types of hardwoods.
wiping stain
Maple
Golden oak
wiping stain
wiping stain
Maple
Mahogany dark
wiping stain
wiping stain
wiping stain
65
CHANGING THE COLOR
Birch
Flake white
japan color
Birch
French ochre yellow
japan color
japan color
glazing stain
gel stain
66
CHANGING THE COLOR
Birch
Chrome yellow
japan color
67
STAINING WOOD
Woodworkers are quite naturally
disappointed when a carefully
applied and apparently uniform coating
of stain produces uneven
results on a piece of fur-
niture. Unfortunately, dif-
ferent parts of the same
board cannot be expected
to absorb liquid evenly.
Unless exposed end grain
is sealed, for example, it
will usually take in more
of a stain than faces or
edges, making the ends
appear darker. As shown
on page 69, sealing end
grain is simply a matter of brushing on
the appropriate sealer before you stain.
There are other preparations you
should make at this stage. While a grain
filler can be applied either before or
after staining, you need to raise the
grain of the wood (page 50) before
applying a water-based stain. Otherwise,
the stain will lift the wood fibers, requir-
ing sanding that may remove the stain.
A test strip takes the guesswork out
of staining. This sample illustrates
the effects on unstained oak of one,
two and three coats of stain (moving
from left to right). The bottom half
of the strip is topcoated to show how
the stain looks under a clear finish.
Many stains can be bought pre-
mixed and ready to use. However,
if you enjoy experimenting, you may
also prefer to custom
mix your colors. As
shown in the photo at
left, a test strip can help
you produce the right
combination of ingre-
dients and determine
the number of appli-
cations you will need
to make.
From paintbrushes
and rags to pad appli-
cators and spray guns,
there are alternatives in applying stains
as well. Whichever method you choose,
wear safety goggles and rubber gloves.
It is a good practice also to don a dual-
cartridge respirator to filter out toxic
fumes produced as a stain evapo-
rates (page 19).
PREPARING A STAIN
Mixing the ingredients
When working with dyes or pigments
in powder form, use a wooden stick
to mix some of the powder with the
appropriate solvent in a glass contain-
er (left). Apply the stain to a sample
strip of the wood that you will be col-
oring. Allow the strip to dry. To darken
the color of the stain, add a small
amount of powder to the solution. To
lighten the stain, mix in a little more
solvent. Make another test strip, adjust-
ing the color of the stain until you are
satisfied with the results.
68
CHANGING THE COLOR
READYING THE WORKPIECE
Sealing end grain
Use a rag or paintbrush to apply a
sealer to the end grain of your work-
piece. Make certain that the product
you use for this task is compatible with
the stain and finish you will be using.
Spread on shellac for water- or oil-
based stains or finishes; for alcohol-
based products, seal end grain with an
oil-based wood conditioner. Avoid slop-
ping the sealer onto the face or edge of
the workpiece; this could affect the
evenness of the stain.
SHOP TIP
Preparing a natural
walnut stain
To make “broue de noix,” a
natural walnut dye stain popular
in the 1600s, collect several green
husks from fallen walnuts, letting
them dry and turn black. Soak the
husks for a few days in a large non-
stick steel pot filled with water.
Then simmer the mixture for several
hours on a stove, adding one table- :
spoon of lye for every gallon of the
mixture. Bottle the solution in clear
glass jars and leave them in bright
sunlight until the mixture darkens fur-
ther. Strain the dye through an old cloth
and re-bottle it, discarding the husks. Applied
with a brush, “broue de noix” produces a range
of rich brown tones on wood.
69
CHANGING THE COLOR
A GALLERY OF STAINS
TYPE AVAILABLE FORM CHARACTERISTICS AND USES PREPARATION AND APPLICATION
DYE STAINS
Water-based stain Powdered; water-soluble Penetrating; not very lightfast; transparent; brilliant; tends to raise grain; good for hard- woods; compatible with any finish Raise grain. Add to water, strain. Apply with brush, rag or spray gun.
Spirit stain Powdered; alcohol-soluble Penetrating; not lightfast; dries quickly, but tends to leave lap and streak marks Mix with alcohol and stra i. Brush or wipe on Best for small areas.
Oil stain Powdered; oil-soluble Penetrating; transparent; does not obscure grain; slow-drying; bleeds; needs sealer coat of shellac; good for softwoods Dissolve in mineral or spirit petro- leum distillate and strain. Apply with nylon-bristle brush and wipe off excess.
NGR stain Liquid; dissolved in methanol and petroleum distillate solution Does not raise grain; transparent and lightfast; good for veneers Thin to desired consistency. Apply with spray gun. If applying with a brush or rag, use retarder.
Penetrating oil stain Liquid; dissolved in mineral spirits Penetrates open-grained wood; moderately lightfast; transparent; easy to apply; colors can be mixed; does not raise or obscure grain; bleeds; needs wash coat; good for softwoods Apply with brush or rag. Wipe off excess after desired color is achieved.
Varnish stain Liquid; dissolved in varnish Highly transparent; lightfast; non-penetrating; adds filler, color and gloss in one operation; good for lower grades of lumber Apply with a rag and wipe off, or use a spray gun.
PIGMENT STAINS
Wiping stain Liquid; suspended in oil and mineral spirits Lightfast; will not bleed; non-penetrating; opaque; tends to hide grain Apply with brush, rag or spray gun. Wipe off excess after desired color is achieved.
Earth pigment Powder; soluble in any liquid Easy to use; lightfast; opaque; hides grain; good for wood with indistinct grain or tinting protective finish Mix with oil or varnish. Apply with brush, rag or spray gun.
Japan color Liquid; concentrated in varnish Excellent for tinting varnish, stain, lacquer Apply with synthetic brush.
Gel stain Liquid; suspended in petroleum-based gel Easy to use; hides grain Apply with rag; wipe off excess after desired color is achieved.
Glazing stain Liquid; suspended in varnish Excellent for figuring, shading, or correcting sap streaks; hides grain; wears off; needs a hard finish coat Apply with brush or rag; allow to set. Wipe off with grain if desired.
Water-based stain Liquid; suspended in an acrylic and water base Non-penetrating; lightfast; brilliant; colors can be mixed together; non-toxic and non-flammable Raise grain. Apply with brush, rag or spray gun.
70
CHANGING THE COLOR
APPLYING A STAIN
ui ui hi ui min di hi in m hi in hi in in m ai in
SHOP TIP
Controlling the flow of stain
Although flooding on stain is the recom-
mended practice when working on a horizon-
tal surface, doing the same when the wood
is vertical will result in dripping, and make
a mess of your project. One answer is
to rig up a clean metal can to regulate
the flow of liquid from your brush.
Punch two holes on opposite
sides of the can near the rim.
String a wire between the holes
and pour stain into the contain-
er. After dipping the brush,
draw the bristles across the
wire, squeezing any excess
liquid back into the car.
Brushing on stain
Dip a clean paintbrush into the stain,
coating about half the bristle length.
To minimize lap marks, flood the sur-
face with stain and brush along the
wood grain in light, even strokes
(above). Once the surface is completely
covered, wipe it with a clean, dry, lint-
free cloth to even out the color and
soak up excess liquid. For uniform
coverage with an alcohol-based stain,
wipe the surface as soon as possible
after brushing it on.
71
CHANGING THE COLOR
Wood
stain
Wiping on the stain
Fold a clean, dry, lint-free cloth into a
pad and soak it with stain, squeezing out
the excess until the pad does not drip.
Wipe the stain on the surface, working
parallel to the grain (left). Rub off the
excess with a clean cloth.
Using a pad applicator
Fill the well of a pad applicator
tray half full of stain and pull the
pad over the roller, loading it with
the liquid. Draw the applicator
along the workpiece following
the grain (below), wetting the sur-
face liberally. Use a clean cloth
to wipe away the excess.
72
CHANGING THE COLOR
SHOP TIP
Getting stain into tight spots
Keep a selection of small brushes
on hand to stain corners, moldings,
carvings and trim that a cloth or
a larger brush cannot reach. For
brushes that are smaller than
those found in most hard-
ware stores, try an art
supply shop.
Dipping a small workpiece
To color a workpiece that is too
small for brushing or wiping, dip it
right into a container filled with the
stain (above). Hold the piece over
the can to let the excess liquid run
off. Then hold the piece by the cor-
ners and wipe it with a clean cloth.
73
CHANGING THE COLOR
Spraying a stain
Prepare the spray gun following the
manufacturer's instructions. To stain
a piece of furniture like the one shown
above, hold the gun about 6 to 10
inches from the surface with the nozzle
perpendicular to the wood. Starting at
the top of the piece, squeeze the trigger
to apply the stain, moving the gun from
side to side in overlapping sweeps until
you reach the bottom. For more infor-
mation on adjusting and using spray
equipment, refer to page 93. Before
spraying a stain, contact your local
authorities to ensure that your spray
area satisfies local safety regulations
(page 102).
Bl ill IB 111 ill 111 Bl 111 Hl in Bi m ill 111 si Bl IB HI
SHOP TIP
Supports for drying
After staining a workpiece,
let it dry evenly and
blemish-free on a set
of shop-made sup-
ports. Cut four 2-inch-
square wood blocks and
drive a small nail through
the middle of each one.
Arrange the blocks on a
level surface with the nail
tips pointing up so that
they will support the work-
piece at its corners.
74
PICKLING A WOOD SURFACE
Pickling, or liming, refers to any one
of a number of antiquing tech-
niques intended to impart an aged and
weathered look to light-colored wood.
Traditionally, woodworkers have pick-
led furniture with such chemicals as
nitric acid, lye and lime. As shown below,
however, you can achieve comparable
results by applying a coat of white paint,
pigmented white shellac or white glaze to
the workpiece. The trick is to wipe off
A pickled finish can give a newly
made chair the time-worn
appearance of a vintage antique.
the bulk of the stain, leaving traces in
moldings and corners.
Once the pickled stain is dry, it should
be sealed with a light topcoat. You can
pickle either bare or stained wood sur-
faces, but if you have used a water-based
dye on the wood, you will also need to
seal it prior to applying a latex paint or
glaze. Pickling can be attempted with
any species, but the process works best
with oak or pine.
APPLYING A PICKLED FINISH
1 Applying the white stain
Use a rag to spread white paint or stain on the surfaces.
While the paint is still wet, wipe off the bulk of it with a
burlap rag, leaving a whitish glaze on flat surfaces and streaks
of white in crevices and carvings (above). Let the stain dry.
If the effect is too pronounced, abrade the surface with
220-grit sandpaper until you obtain the look you want.
2 “Aging” the surface
To give the wood an antique appearance, use a rag to
rub a mixture of rottenstone and paste wax over the surface
(above). Wipe off the excess with a burlap rag, taking care to
leave some residue in the crevices and carvings.
75
CHEMICAL STAINS
Before the advent of synthetic dyes,
staining wood was an art form that
rivaled alchemy. With natural dyes
derived from plants and insects, and
chemical mordants extracted from tin,
iron, aluminum and chrome, staining
required knowledge of botany and chem-
istry as well as experience with wood.
Applied by themselves, natural dyes
produce pleasant shades of red and
brown on many species of wood. Tea,
for example, is used occasionally on
antique reproductions to produce a
warm golden hue. But in combination
with chemical mordants, natural dyes
can bring out a rainbow of superb, bril-
liant colors. The photos below and oppo-
site illustrate the effects of a few selected
dyes and mordants on four popular
hardwoods. The species is indicated in
bold type with the dye or mordant list-
ed directly below. For more information
on a full range of mordants and natur-
al dyes, refer to the chart on page 78.
The term mordant comes from the
French verb mordre, meaning “to bite.”
Mordants do two things for natural dyes:
They change the color of a dye through
a chemical reaction with either the dye or
the wood. They also help a dye pene-
trate wood and bind with the fibers.
Some natural dyes are available as
powdered extracts, but others must be
extracted from natural products in the
shop. Mordants come in crystal, pow-
der or liquid form. When preparing a
and tannic acid
potassium dichromate
76
CHANGING THE COLOR
chemical stain, mix a 15 percent solu-
tion of the dry ingredients and distilled
water. It is better to make the concen-
tration too weak than too strong; it is
easier to darken the wood than to light-
en it. Allow each coat to dry complete-
ly before applying the next; color can be
misleading when the stain is wet.
Some natural dyes can cause allergic
reactions, but most are relatively benign.
Many chemical mordants, however, are
caustic and sometimes toxic. Prepare and
apply these products carefully, wearing
safety goggles, neoprene gloves and a
rubber apron. A dual-cartridge respira-
tor is a must for a mixture producing
toxic fumes. Do not spread a chemical
stain on bleached wood or you nsk cre-
ating poisonous chlorine gas. To avoid
splashes when diluting a mordant, add
the chemical to the water, a little at a time.
There are no hard and fast rules for
applying chemical stains. Typically, the
dye solution is spread on the wood, then
the mordant is added while the dye is
still wet. The solutions should be mixed
separately and applied when cool.
Experimentation is the key to good
results; keep a record of your recipes and
the colors they produce.
Chemical staining is becoming a
dying art. Many products can be found
only at photography and chemical sup-
ply houses. But if you are after striking
and unique effects, they can be well
worth the trouble of seeking them out.
potassium dichromate
copper sulfate
77
CHANGING THE COLOR
CHEMICAL MORDANTS AND NATURAL DYES
MORDANT FORM AND CHARACTERISTICS COLORS PRODUCED
Alum White mineral salts; non-toxic Purplish and dark crimson tones
Ammonia 28% liquid solution; highly toxic (For fuming) Dark violet browns with logwood dye; light yellow browns with brazilwood dye
Copper sulfate (blue vitriol) Blue copper crystals; highly toxic (For preserving wood) Dark gray and olive tones with logwood dye
Ferrous sulfate (copperas) Iron crystals; highly toxic; reacts with tannin in wood Steel gray to bluish tones; ebony-like black with logwood dye or alum
Hydrated lime (quicklime) Calcium oxide crystals; toxic Antique limed finish on hardwoods such as cherry and walnut; must be neutralized with vinegar
Potassium carbonate Potash crystals; mildly toxic A range of greens with alum and fustic
Potassium dichromate Orange chrome crystals; extremely toxic; reacts to high tannin content Deep reds to rich browns; combines well with aniline dyes
Potassium permanganate Violet potash crystals; mildly toxic (For ebonizing) Turns wood with high tannin content a purplish brown
Sodium hydroxide White lye powder; toxic Darkens cherry and oak; must be neutralized with vinegar
Stannous chloride White tin crystals; moderately toxic Light red with brazilwood dye; pink with alizarin; combines well with many dyes
Tannic acid Yellow powder extracted from hemlock and oak; mildly toxic Boosts tannin content in wood
NATURAL DYE FORM AND ORIGIN COLORS PRODUCED
Alizarin A synthetic dye or the active coloring agent of madder root "Turkish red"; crimson, orange, yellow and brown, depending on the mordant
Alkanet root An ancient organic dye from the borage family (For French polishing) Gray tones with alum; a range of reds with linseed oil
Annato Seeds from a Central American tree Oranges and golds with chrome, tin or alum; oak brown with lye
Brazilwood A popular dye from several species of South American redwood trees Vibrant reds, browns, and purples, depending on the mordant
Cochineal Dried tropical insects Many shades of red mixed with alum
Cutch An extract of the heartwood of the Asian acacia tree Various lightfast shades of brown, from beige to chocolate
Dragon’s blood A resin from the fruit of the rattan palm Bright, lightfast reds
Fustic An extract from the heartwood of the American mulberry tree Orange-yellow on its own; yellows to greenish-yellows with alum
Indigo A dye extracted from Indian indigo plants Deep blue; yellow-white with sodium hydroxide
Logwood An extract from Central American campeche hardwoods Lightfast grays, browns, blacks, blues and purples, depending on the mordant
Madder root Extracted from the roots of the Eurasian madder plant Reds, blues, browns and yellows, depending on the mordant
78
CHANGING THE COLOR
APPLYING A CHEMICAL STAIN
Mixing the ingredients
In preparing a natural dye solution or a
chemical mordant, you will generally be
following the directions supplied with
the coloring agent. But it is important
to be very precise in combining these
ingredients. Measure out the dry ingre-
dients with a scale and set them aside
in a dish. If your recipe calls for boiling
or hot water, you can use a kettle to
heat up the liquid. Fill a measuring
cup with the volume of water you need,
then pour it into a glass jar. Add the
dry ingredients to the water slowly
(above), stirring the solution with a
wood stick until the powder dissolves.
Apply the mixture to your workpiece
with a synthetic sponge, following the
procedure for wiping on a stain with a
cloth (page 72).
HI 111 III 111 III III HI 111 Hl 111 lli ш Hl hi hi Щ 111 Щ
SHOP TIP
A chemical stain for ebonizing
To make your own stain for turning a wood black, sub-
merge a steel wool pad and a few rusty nails in a large
glass jar filled with cider vinegar.
Let the mixture sit, uncovered,
until it turns cloudy and
gray; this should take
about a week. Then strain
the solution through a
coffee filter. To apply the
stain, sponge several
coats of it on the wood,
letting each application
dry before putting on
the next. After the
last coat, brush on
some liquid ammonia
or flood the surface
with water to neutral-
ize the acid in the vine-
gar. Then sand the wood.
79
FUMING
One of the characteristics of ammo-
nia is its tendency to react with the
tannin in wood. Exposed to a piece of
furniture, this water-soluble liquid will
darken the wood, giving it the classic look
of an antique. In oak and cherry, ammo-
nia will bring out a variety of hues rang-
ing from light honey to dark brown.
Depending on the amount of exposure,
the chemical will turn some species
almost black.
Natural mahogany
Ammonia can be applied by either
sponging or brushing the liquid or by suf-
fusing the wood in ammonia vapor inside
a shop-built tent. This second option,
called fuming, has definite advantages.
The process colors exposed surfaces even-
ly without lap marks or streaks. And
although the fumes penetrate the wood
more deeply than brushed-on liquid
ammonia, fuming does not raise the
gram, since no liquid contacts the wood.
Natural walnut
You can fume wood with regular
household ammonia, but aqueous
ammonia, available from chemical sup-
ply houses in a 28 percent solution, works
much more quickly. Both products are
caustic and harmful to the eyes, skin and
respiratory system; concentrated ammo-
nia fumes can even be fatal if inhaled. If
possible, fume wood outdoors; wear rub-
ber gloves, safety goggles and a dual-car-
tridge respirator.
Natural oak
Fumed mahogany
Fumed walnut
Fumed oak
80
CHANGING THE COLOR
EXPOSING FURNITURE TO AMMONIA FUMES
Corner bracket
Using a fuming tent
Build a wood frame that is a little larger
than your workpiece. Use triangular brack-
ets to reinforce the corners and a bar
clamp to hold the corners square as you
nail the frame together (above). Remove
any metal hardware from your workpiece
before placing it in the frame; other-
wise, the ammonia will tarnish the met-
al. To complete the tent, drape a black
plastic tarp over the frame. Use duct
tape to seal any openings in the tarp and
gather it tightly around the frame, leaving
one flap open. Fill several dishes with
ammonia and set the containers in the tent
(right). Seal the flap and let the fumes
work for about 24 hours, checking on
the workpiece periodically and topping
up the dishes with fresh ammonia. Remove
the piece when it has the color you want,
keeping in mind that it will darken a lit-
tle more after it is exposed to the air.
81
PROTECTIVE FINISHES
A varnish topcoat brings out the luster
of an oak table. Finishing a piece by
hand demands care. Loading the brush
with too much finish, particularly
when coating vertical surfaces, can
result in drips and runs.
Unlike a cabinetmaking project in
which wood is cut away until you
are satisfied with the shape that remains,
a finish is built up layer by layer. Simply
put, finishing is the process of spread-
ing a fluid over wood to dry in thin
sheets. And while it is a slower and less
dramatic stage of a project, the end result
is equally important in producing a
beautiful piece of furniture.
Perhaps the most impressive aspect
of a finish is the amount of protection
it will provide. Most commercial finish-
es are no thicker than the page of a book,
yet they must guard the wood on which
they rest from dirt, moisture and even
mild abrasion.
The earliest clear finishes were prob-
ably applied in the simplest way—wiped
on with whatever was at hand. A true oil finish consists of
nothing more than natural drying oils flooded onto the wood.
The excess is then wiped off, leaving a thin film to dry. One
or two coats seal the surface and subsequent layers can be built
up to almost any thickness or sheen. Even today, the term
“hand-rubbed finish” conjures up an image of luster and qual-
ity. Shellac, a naturally occurring resin, can be handled in much
tbe same way as oil. One or two coats seal the wood, but you
can keep adding coats to develop the deep, glossy surface known
as French polish (page 106).
Most topcoats can be applied by hand, and wiping ranks
as one of the best and easiest ways to ensure thin, even cov-
erage of a wood surface. Because of its structure—under a
microscope, wood looks like a bundle of
straws—wood absorbs finish at differ-
ent rates. Applying a uniform coating
of a finish often results in what appears
to be uneven coverage. The reason is
that end grain absorbs more finish,
leaving its surface looking bare, while
the adjacent faces and edges appear
adequately covered. The solution is to
flood on a coat of finish and allow dif-
ferent amounts to be taken in by the
end and flat grain areas. The wood will
then be properly covered when you
wipe off the excess.
Over time, finishers must have grown
impatient with the thin coats that wip-
ing produces, and brushes were intro-
duced to the process. Brushes enable you
to get into the most inaccessible of carv-
ings and crevices, to apply finish quickly in thicker coats and,
not incidentally, to keep your hands clean. Today, with the var-
ious bristle types and brush configurations available, there is
a brush for virtually every variety of finishing product.
Application times were further reduced starting in the 1920s
with the development of the spray gun. Spraying is by far the
quickest way to apply a finish, blanketing the wood in a cloud
of finely atomized fluid. But technology comes with its draw-
backs. Spray guns can be wasteful, for a substantial portion of
that cloud generally misses its mark. One of the goals of fin-
ishing equipment designers is to create a new generation of
spray guns that preserve their traditional speed of operation
while curbing wastefulness.
Spraying makes quick work of finishing intri-
cate turnings. Quick-drying finishes like lac-
quer and shellac are ideal for this technique.
83
TOOLS AND ACCESSORIES
As with all the other stages of a
finishing project, the application
stage will be helped along by a few
specialized accessories. If you have the
patience and energy to apply a little
elbow grease, there are a wide assort-
ment of cloths, pads and brushes for
covering a surface. Cloths and pads can
be made and prepared in the shop from
old sheets or linen; you can also fash-
ion your own foam brush (page 92).
Brushes come in different styles, sizes
and price ranges. Should you opt for
the bristle over the foam variety, a high-
quality brush is a good, long-term
investment. It will outlast a cheaper
brush, but, more importantly, it will
also produce a better finish.
There are two principal types of
spray systems on the market. Until
recently, the only system available fea-
tured a compressor hooked up to a
spray gun. Today, the more compact
high-volume, low-pressure (HVLP) sys-
tem is becoming more prevalent. With
less overspray and hence less waste, the
HVLP is more economical to operate
and easier on the environment.
With both spray systems, you need
to contain the fumes and exhaust them
safely. The commercial spray booth
shown at right is a good alternative,
provided the workpiece is small enough
to fit inside the booth.
84
PROTECTIVE FINISHES
Viscosity cup
Helps in mixing finish to
proper consistency for
spraying. Cup is dipped
into finish and filled with
liquid; the time it takes
cup to empty through
hole in bottom should
correspond to elapsed
time specified by manu-
facturer
Foam brush
An inexpensive option for applying
finishes without leaving streaks or
stray bristles on surface; ideal for
contoured surfaces and tight spots
Paint brush
Natural or synthetic
Conventional spray system
Compressor supplies stream of pres-
surized air through hose to spray gun.
Air regulator controls volume and pres-
sure of air; regulator includes filter that
removes moisture and other impurities
bristles for applying a finish;
spreads a thicker, more even
coat than foam brush
Spray gun and cup
Cup serves as finish reser-
voir; suction feeds finish
through metal tube to gun,
where compressed air atom-
izes the liquid into a mist
when trigger is pulled
85
CHOOSING A PROTECTIVE FINISH
The protective finish you choose for
a project has a lot to do with your
personal taste and the effect you wish to
achieve. The principal feature of a prod-
uct like tung oil, for example, is its capac-
ity to penetrate wood, giving the surface
a warm glow and accentuating the grain
and its pattern. A varnish or polyure-
thane topcoat provides a higher degree
of protection by drying to a plastic-like
film; however, it will also mask the sur-
face details to some degree.
Many protective finishes, including
varnish, polyurethane and lacquer, are
now available in two formulations: sol-
vent- and water-based. Years ago, sol-
vent-based products monopolized the
marketplace, but recent environmental
concerns have spurred the development
of water-based finishes. Solvent-based
finishes are generally flammable; water-
based products are not. Another sell-
ing point of water-based finishes is that
they do not release toxic solvents into
the atmosphere except when they are
sprayed, and thus comply with increas-
ingly stringent air quality standards in
states like California. The procedures for
preparing and applying a water-based
finish may differ from the methods used
for its solvent-based counterpart. Always
refer to the manufacturer’s instructions
for mixing and applying a topcoat.
Whichever finish you select, apply-
ing it entails more than slopping on a
few coats of the product and letting them
dry. The wood surface has to be prop-
erly prepared: If you want to fill the grain
(page 50) of an open-pore species like
oak, you will need to do so before apply-
ing the finish. Before applying a lacquer
topcoat to an open-pore wood surface,
a sealer coat may be in order. Finally,
you will need to bleach or stain the piece
ahead of time if changing its color (page
54) is part of your game plan.
Before preparing your tools and
opening up your container of finish,
make sure that any filler, wash coat or
stain is completely dry. As a final prepa-
ration, go over the wood surfaces with
a tack cloth to be sure they are free of
sanding particles and dust.
The procedures for applying a top-
coat depend on the product you are
using and the application method you
have selected. Pages 87 to 90 detail the
steps for applying a wide range of prod-
ucts by hand or, where appropriate, with
the help of spray equipment.
Easy to apply, a coat of polymerized
tung oil is wiped onto the surface of this
cherry toy chest, protecting the wood
and giving it a warm luster.
86
PROTECTIVE FINISHES
DRYING OILS
Drying oils, such as linseed, tung and walnut oil, are a group
of natural finishes that cure to form a relatively hard film on a
wood surface. Tung oil, also known as China wood oil, is one of
the most popular drying oil finishes. Extracted from the nut
of the tung tree, the oil is available in pure, modified and poly-
merized form.
Because it contains no additives, pure tung oil is a good
choice for finishing children’s toys and eating utensils such as
salad bowls. If you are planning to use it, check the label to
make sure that the contents are 100 percent pure. The main
benefit of modified tung oils is that they contain chemical
additives that allow them to dry more quickly. Polymerized
tung oil undergoes a special heat treatment; it dries faster still
and produces a glossier sheen.
Drying oils are reactive finishes, meaning that they dry and
harden when exposed to air—even in a sealed container.
When you store a drying oil, use a container that is as small
as possible to reduce the volume of air to which the oil is
exposed. A couple of other suggestions are discussed in the
Shop Tip below.
APPLICATION SEQUENCE
1. Wipe the oil on the surface with a cloth; it should be
applied straight from the container.
2. Let the oil soak into the wood (typically for 15 min-
utes), then use a clean cloth to wipe off the excess.
3. Let the surface dry, usually overnight.
4. Sand the surface with 400-grit paper and remove
sanding particles.
5. Repeat steps 1 to 4 as many times as neces-
sary to achieve the finish you want. Depending on
the wood, five coats of oil will typically yield a semi-
gloss sheen.
6. Let the surface cure for at least a week before rub-
bing out the finish (page 126).
Ш Ш 111 111 ill 111 111 111 111 111 ill 111 111 Ш 111 111 III 111
SHOP TIP
Preventing reactive finishes
from drying out
To expose a reactive finish
to as little air as possi-
ble, pour it into a collapsi-
ble plastic container like
those used for photo-
graphic chemicals (far
right). Collapse the folds
of the container to expel
all the air, then cap it
tightly (near right). If you
are keeping a reactive finish in
a glass container, drop enough
small stones or marbles into the '
liquid to raise it to the level of the
brim, then screw on the cap. Whichever storage
method you choose, fix a label to the container
identifying the contents.
87
PROTECTIVE FINISHES
VARNISH
Varnish is a highly durable protective coat-
ing for wood, more resistant to heat and
alcohol damage than products like shellac
and lacquer. Whether you are brushing it
on or using spray equipment, it is also rel-
atively easy to apply. If you are brushing,
try to work with a white wall or a window
in back of the workpiece. The reflected
light will help you see if you are skipping
an area or if you are picking up dust.
Varnishes were once made with natural
resins and oils like linseed oil. These materials
have since been supplanted by synthetic
resins, but the old system of classifying
varnish based on the proportion of oil-to-
resin still prevails. Accordingly, varnishes
are designated as either short, medium or
long oil. Long-oil varnish is slow drying,
producing a soft and elastic coating.
Short-oil varnish is hard, and glossy—
good for withstanding abrasion. Medium-
oil varnish provides a finish that falls
between the two in gloss and durability.
APPLICATION SEQUENCE (BRUSHING)
1. Dilute the varnish and spread a thin coat on the surface with a high-
quality bristle brush; work first against the grain, then with it.
2. Let the surface dry, typically for 12 to 24 hours.
3. Sand the surface with a self-lubricating 240- or 280-grit sandpaper.
4. Repeat steps 1 to 3, using a stronger dilution of varnish and sanding the
surface with a finer grit sandpaper (280- to 320-grit).
5. Brush on an undiluted coat of varnish.
6. Let the surface dry and sand with 400-grit sandpaper.
7. Repeat steps 5 and 6 two or three times.
8. Let the surface cure for 24 to 72 hours before rubbing out the finish.
APPLICATION SEQUENCE (SPRAYING)
1. Dilute the varnish to the proper viscosity (page 96).
2. Set the spray gun at low pressure to minimize overspray and pooling.
3. Spray a thin coat on the surface.
4. Let the surface dry, then sand with 320-grit sandpaper.
5. Repeat steps 3 and 4 two or three times.
6. Let the surface cure for 24 to 72 hours before rubbing out the finish.
POLYURETHANE
Polyurethane is a transparent, varnish-like finish that is
durable, abrasion-resistant and easy to apply. Formulated
with synthetic resin, it dries more quickly than varnish,
making it an ideal choice when you have limited time for
the finishing work. Like varnish, polyurethane can be
brushed or sprayed on furniture.
Polyurethanes are available in a variety of lusters, rang-
ing from flat to glossy. Because they do not release toxic
solvents into the atmosphere while drying, water-based poly-
urethanes are safer for the environment than their solvent-
based counterparts. If you plan to spray a water-based
polyurethane, be sure your spray equipment is scrupulously
clean; oil will contaminate the water-based product.
APPLICATION SEQUENCE (BRUSHING)
1. Apply a thin and even coat with a paint brush or pad
applicator, always brushing with the grain.
2. Let the surface dry for about 2 hours.
3. Sand the surface with a 320- to 400-grit sandpaper.
4. Repeat steps 1 to 3, abrading the surface with a finer
grit sandpaper.
5. Apply a final coat, giving the surface 18 to 24 hours
to dry before rubbing out the finish.
APPLICATION SEQUENCE (SPRAYING)
1. Spray the workpiece as you would for varnish, allowing
30 to 60 minutes for the coat to dry.
2. Sand the surface with a 320- to 400-grit sandpaper.
3. Apply two more coats, using progressively finer grit
sandpaper to abrade the surface after each application.
4. Wait at least 18 to 24 hours before rubbing out
the finish.
88
PROTECTIVE FINISHES
SHELLAC
Shellac is a natural finish produced from
the secretions of the lac insect, which is
indigenous to Indochina and India. The
bugs feed on tree sap and expel a resin
that forms a protective shell around their
bodies. Eventually this material builds up
and is deposited on tree twigs and branch-
es; it is then harvested and processed.
In its commercial forms, shellac is
available both as a liquid and in flakes.
Liquid shellac is ready for use, but the
flakes must be mixed first with dena-
tured alcohol. In some regard, however,
the flakes are the more convenient form
of the product since you can prepare only
as much of the solution as you need for
a particular project. Both types of shel-
lac are available in a variety of shades,
ranging from dark brown and orange to
blond and white.
Shellac is also classified according
to its “pound cut,” which refers to the
amount of resin in the solvent. A 1-pound-
cut shellac, for instance, has one pound
of resin for each gallon of solvent.
Shellac comes in different grades,
depending on where and when the prod-
uct was harvested. Coarse shellac has
APPLICATION SEQUENCE (BRUSHING)
1. Either buy or prepare a 1- or 2-pound-cut shellac with which to apply two
or three wash coats to the surface (page 53). Brush the finish on quickly
and evenly with as few strokes as possible, working with the grain only.
Avoid overlapping the brushstrokes.
2. Let the surface dry, typically for at least 2 hours.
3. Sand the surface with a self-lubricating 360- or 400-grit sandpaper. Remove
sanding particles.
4. Brush on another coat, using a 3-pound-cut shellac, then sand.
5. Apply three or more coats with a 5-pound-cut shellac, sanding before each
application.
6. Allow 24 to 72 hours of drying time before rubbing out the finish.
APPLICATION SEQUENCE (SPRAYING)
1. Prepare a solution with the proper consistency for spraying following the
manufacturer’s instructions; a 1- or 2-pound-cut shellac is typical. If you
are using liquid shellac, you may have to dilute it.
2. Adjust the spray gun for a light coat to keep drips and runs to a minimum.
3. Spray on two or three wash coats.
4. Let the surface dry for about 30 minutes, then sand it with a self-
lubricating 360- or 400-grit sandpaper. Remove sanding particles.
5. Spray on three or four additional coats using a more concentrated solution
and sanding between applications.
6. Let the finish dry for 48 to 72 hours before rubbing out.
bits of twigs and bugs; the super-refined
variety is virtually pure liquid.
While shellac provides a durable fin-
ish that protects wood from humidity
and abrasion, it does not stand up well
to water, alcohol or heat. Like other sol-
vent-release finishes, shellac forms a
milky cloud on a surface—called blush-
ing—if it is sprayed in high humidity or
with excessive moisture in the solvent.
Keep the solvent in a sealed container.
A viscosity cup is used to test the consistency
of a finish for spraying. Proper dilution of
the finish will ensure that it coats a workpiece
uniformly and with a minimum of dripping.
89
PROTECTIVE FINISHES
LACQUER
APPLICATION SEQUENCE (BRUSHING)
1. Dilute the sanding sealer according to the manufacturer’s instructions and
apply it to the workpiece. Let dry and sand with 320-grit paper.
2. Dilute the lacquer with a retarding solvent as specified by the manufacturer.
(The retarder keeps the lacquer from hardening too quickly.)
3. Coat the workpiece with the finish using a soft, long-bristled brush. Work
at a 45° angle to the surface and brush with the grain. Do not overlap
brushstrokes.
4. Let the lacquer dry (typically 2 hours), then sand with a self-lubricating
360- to 400-grit sandpaper. Remove sanding particles.
5. Repeat steps 2 to 4, using a slightly more concentrated lacquer solution.
6. Apply at least two or three additional coats. Avoid brushing undiluted
lacquer on the surface; you should add at least a small amount of retarder
to the lacquer.
7. Let the finish dry for at least 24 hours before rubbing it out.
APPLICATION SEQUENCE (SPRAYING)
1. Dilute the sanding sealer according to the manufacturer’s instructions and
apply it to the workpiece. Let dry and sand with 320-grit paper.
2. Prepare a diluted lacquer solution with the solvent recommended by the
manufacturer and spray it onto the surface. Make sure the lacquer has the
proper consistency for spraying; use a viscosity cup (page 96).
3. Let the finish dry for about an hour.
4. Sand with a self-lubricating 320-grit paper.
5. Repeat steps 2 and 3, sanding the surface lightly. (This step is optional.)
6. Spray on at least 3 more coats, diluting each application with only a small
amount of retarder and sanding the surface with a 360-grit paper.
7. Let the finish dry completely before rubbing out.
Lacquer has been used as a protective
finish for wood furniture in the Far East
for more than 2000 years, but it did not
become popular in the West until the
17th Century. The first lacquers used
during China's Chou dynasty were
derived from natural resins; today’s
products are formulated synthetically.
Lacquer can be brushed onto a sur-
face, but be sure to use a brush with
bristles set in rubber, otherwise the sol-
vent in the finish may cause the tool to
shed. The rapid drying time of lacquer
also makes it well-suited for spraying.
A lacquer topcoat hardens to a clear
and durable finish. It is a good choice
for furniture that may be exposed to
water or high heat.
Unlike polyurethanes and varnishes,
which form separate layers with each
new coating, each application of lac-
quer dissolves the previous coats to
create a single film. Finishers usually
try to limit themselves to four coats
of lacquer. But these are generally in
addition to one or two coats of sanding
sealer. The thicker a lacquer finish is
built up, the greater the risk of crack-
ing. However, obtaining a mirror-like
lacquer finish on species like rosewood
or oak may sometimes involve as many
as 10 applications. Finishers in ancient
China were known to apply more than
300 coats on a single piece of furni-
ture. To prevent cracking, they would
carefully abrade the surface after each
new application had dried and they
kept each coat as thin as possible.
Lacquer is available in a range of
sheens from flat to glossy. There are dif-
ferent tints to choose from as well, and
a clear formulation that heightens the
grain and color without altering the hue.
90
FINISHING BY HAND
There are essentially three methods
of applying protective finishes by
hand: wiping the finishing material on
with a cloth or sponge, padding it on or
using a brush. The method you choose
should depend on the type of finish you
are applying. Wiping, for example, is the
best way to apply a drying oil. Varnish,
polyurethane, shellac and lacquer are
better applied with a brush.
Some finishing products, called
padding finishes, are made to be padded
onto a surface; they provide something
approaching the luster of French pol-
ished or lacquered wood with consider-
ably less effort. However, because these
finishes do not readily build up into a
thick coating, they still require a fair
amount of time and work to apply. As
a result, they are most often used to
touch up damaged finishes. As finishes
for newly built furniture, they are best
suited to ornamental details, turnings
or small pieces like the table shown
below. To reduce the amount of time
required to build up a padding finish,
first apply a sealer coat of varnish, shel-
lac or lacquer.
WIPING OR PADDING ON A FINISH
Using a cloth or sponge
Wet a clean cloth or a sponge with the finish and wipe a thin coat of the liquid
onto the surface (above). Make sure you cover the wood surfaces completely. Let
the finish soak into the wood for several minutes, then use another clean cloth to
wipe away the excess. Check the manufacturer's instructions for drying times,
then apply subsequent coats the same way.
Working with a pad
Use a piece of linen and some wool to
make a finishing pad as you would for
French polishing (page 106). Pour a lit-
tle of the finish on the pad, then tap it
against the palm of your hand to get
the pad uniformly damp. Wipe the pad
along the surface following the direction
of the grain (left). Overlap your strokes
until you have covered the entire work-
piece and the surface has a smooth,
glossy sheen. Consult the manufactur-
er's instructions for drying times, then
apply subsequent coats. Padding fin-
ishes usually require several applications.
91
PROTECTIVE FINISHES
Brushing on a finish
Set the workpiece slightly above your
work surface so you can cover the wood
right to the bottom without slopping
finish on the table. For a shop-made
stand, prop the corners on wood blocks
with small nails driven through them. If
you are using a bristle brush, dip about
one-third of the bristle length in the
finish and brush along the grain leaving
behind thin, even coats. Resist the
temptation to spread the finish thickly
or the liquid will run, sag or pool. To
avoid air bubbles and lap marks on the
surface, use as few brushstrokes as pos-
sible. Use tweezers to remove stray
bristles from the finish before it has a
chance to dry. A foam brush will cut
down on the problem of lap marks.
Hi ill 111 III IB 111 Hi IB 111 111 ill Ш Ill ill III 111 in Ill
SHOP TIP
A foam brush
You can make your
own disposable
foam brushes to
suit any job at
hand. Use scrap
wood for the handle
and a piece of polyure-
thane foam for the applicator.
You can buy polyurethane foam at
fabric and upholstery shops. Cut the
foam to the size you need, then fold it over one
end of the handle and staple it in place. Use
scissors to trim the foam to the right profile
for your workpiece.
92
SETTING UP YOUR SPRAY EQUIPMENT
With a bit of practice, spraying is
a highly efficient method of
applying professional-looking finishes.
High-volume, low-pressure (HVLP)
systems offer the best transfer efficien-
cy—that is, they land a high percent-
age of the spray on the workpiece and
waste less as overspray. Since they use
low-pressure air to create a mist of fin-
ish, HVLP systems also create less
“bounce back” than conventional sys-
tems. Bounce back often occurs when
spraying is done in an enclosed space:
The overspray rebounds toward the
spray gun and settles on other surfaces.
The key to successful spraying is to
keep your equipment properly adjust-
ed. With both HVLP and conventional
systems the adjustments are made with
the actual solution you will be using, so
you will need to start the process by
preparing a batch of finish (page 96).
ANATOMY OF AN HVLP SPRAY SYSTEM
Spray gun and cup
Finish flows from cup to
gun where air turns liq-
uid into a mist, direct-
ing it at the workpiece;
cup unscrews from gun
ANATOMY OF A CONVENTIONAL SPRAY SYSTEM
To compressor
Air regulator
Sets volume
of air pumped
to gun
Air hose
Connects spray gun to
turbine; stores in turbine
when not in use
Turbine
Features a 7-amp motor
that powers a fan dis-
charging low-pressure air
through the air hose; tur-
bine is lightweight and
compact compared to
the compressors used
on conventional systems
Air pressure gauge
Fluid cup and lid
assembly
Fluid cup holds finish;
usually one quart or
less; screws on to
spray gun in front of
trigger. Compressed air
streaming through gun
creates a vacuum that
siphons finish from cup
up to gun. Lid assembly
clamps to cup
Hose
High-pressure air from
compressor, storage
tank and air regulator
passes through hose
to spray gun
Spray gun
Atomizes finish into a spray; fea-
tures fluid adjustment screw for
setting flow volume and spreader
adjustment valve for regulating
spray pattern
93
PROTECTIVE FINISHES
ADJUSTING AN HVLP SYSTEM
1 Adjusting the spray pattern
Fill the cup with finish and screw it
to the spray gun. For the model shown,
turn the system on at the turbine, then
adjust the air cap to produce either a ver-
tical, horizontal or circular spray pattern.
As a rule of thumb, use the vertical set-
ting to spray tops and other horizontal
surfaces, and the horizontal setting to
spray vertical surfaces. The circular pat-
tern is wider than the other two and can
be used on any type of surface. Test all
three patterns on scrap wood before turn-
ing your attention to the workpiece.
2 Adjusting the flow
To set the volume of finish to be
sprayed from the gun, turn the flow
adjustment knob. Holding the gun noz-
zle about 8 inches from a test surface,
pull the trigger to start the spray. The
finish should cover the surface evenly
without dripping or pooling. If the coat-
ing is too thin, increase the flow by turn-
ing the knob counterclockwise; if the
finish drips or pools, decrease the flow
by turning the knob in the opposite
direction. To change the size of the spray
pattern, either increase or decrease the
distance between the gun and the sur-
face. This may throw off the flow adjust-
ment, however. Moving the gun closer
to the surface may require a decrease
in the flow; similarly, as you draw the
gun away you may have to increase
the flow.
94
PROTECTIVE FINISHES
ADJUSTING A CONVENTIONAL SPRAY SYSTEM
1 Setting the air pressure
Attach the air line from the compressor to the air inlet on
the regulator. Then install the hose, connecting one end to the
air outlet on the regulator and the other to the air inlet on
the gun. To adjust the air pressure on the model shown, take
the fluid cup off the spray gun and turn on the compressor,
allowing the tank to pressurize. Open the outlet valve on the
pressure gauge to the level specified by the manufacturer
(above), typically about 50 psi.
95
PROTECTIVE FINISHES
2 Adjusting the spray pattern and flow
Fill the fluid cup with finish and
attach it to the spray gun. Adjust the spray
pattern and the flow of the finish in the
same way that you would for an HVLP
system (page 94). Turn the fluid adjust-
ment screw counterclockwise to increase
the flow and clockwise to decrease it.
Use the spreader adjustment valve to set
the size of the spray pattern (right), turn-
ing it counterclockwise to produce a larg-
er pattern and in the opposite direction
to narrow the scope of the spray.
PREPARING A FINISH
Adjusting the consistency of a finish
A finish may need to be thinned to the
proper consistency before it can be sprayed.
To determine the consistency of a finish-
ing product, dip a viscosity cup into the
fluid, then lift it out and time how long it
takes for the cup to empty (left). If the
time exceeds the interval specified by the
manufacturer, dilute the finish with the
appropriate solvent. Test the solution as
many times as necessary, but make sure
that you get it to the proper consistency.
Before filling the fluid cup, strain the fin-
ish through a paint filter to remove impuri-
ties that might otherwise clog the spray
system or mar the finish.
96
WORKING WITH SPRAY EQUIPMENT
Both your own safety and that of your
neighbors should be a major con-
cern associated with spraying a finish.
Do not fail to put on the appropriate
gear for the task: safety goggles, rubber
gloves, a rubber apron and a dual-car-
tridge respirator. If you can smell the
finishing product through your respira-
tor, it is not doing a good enough job.
Adjust the device to fit properly on your
face, change the filters or replace the res-
pirator. Refer to the chapter on safety
(page 12) for more information on pro-
tecting yourself.
Whether you are using water- or sol-
vent-based products, you must set up
your spray area and exhaust the fumes
you generate in a manner that complies
The ideal distance between a spray
gun nozzle and the surface to be
sprayed is about 8 inches. You can
use your outstretched fingers to
quickly gauge the distance.
with federal, state and municipal require-
ments. Pages 102 and 103 show a typical
spray room with some of the elements
that may be necessary. However, it is
essential to check your local regula-
tions before outfitting your spray room.
While you are actually spraying, hold
your arm straight out in front of your
body. Whenever possible, keep the gun
as nearly perpendicular to the wood sur-
face as you can. As illustrated in the dia-
gram below, a surface is covered with a
series of back-and-forth strokes that
overlap each other and the edges of the
wood. Before actually spraying the fin-
ish on a piece of furniture, practice a lit-
tle on some cardboard or scrap wood
until you have refined your technique.
SPRAYING A FINISH
Applying a full and even coat
The diagram at left illustrates a spraying
sequence for applying clear finishes. The
key is to start at one corner and make a
series of straight, overlapping passes that
wend their way to the opposite corner.
This first series should run across the
grain of the wood. Then make another
series of passes, this time working parallel
to the grain. As you work, release the trig-
ger each time you pass off the edge of the
wood. To ensure an even coat, hold the
gun perpendicular to the surface and
keep it moving at all times.
97
PROTECTIVE FINISHES
A SPRAY ROOM DOLLY
To wheel a workpiece in and out of
your spray room, and to move it
around without having to set hands
on the drying wood, use the shop-
built dolly shown at right and below
The dimensions in the illustration
will yield a dolly that is large enough
for most furniture projects.
Cut a piece of 3/4-mch plywood
for the base, then screw the corner
blocks in place. Screw a caster onto
each corner block. To set up the
dolly for the piece to be sprayed,
drive nails through the centers
of four wood blocks. Position the
blocks on the base with the nail tips
pointing up so they will support the
corners of the workpiece.
To use the dolly, set the piece
on the nails. To avoid touching the
workpiece after spraying it, use your
foot to move the dolly. You can also
attach a tow rope to the base and
use it to pull the dolly along.
98
PROTECTIVE FINISHES
Spraying the flat surfaces
To finish a piece of furniture, start with the outside surfaces,
first spraying the top and then the sides. In preparation for
the job, set the piece slightly above your work surface, prop-
ping it up on wood blocks with nails driven through them as
shown overleaf. For the top, be sure to adjust the air cap to
the vertical spray pattern position (page 94) and use a spray
pattern that works first across the grain and then with it.
Holding the gun at a slight angle to the surface, start at the
edge closest to you and work toward the opposite edge (abo-
ve, left). For the sides, set the air cap to the horizontal
spray pattern position and work with the gun perpendicular
to the surface (above, right). To ensure even coverage, hold
your arm out straight to maintain a uniform distance between
the gun and the wood. Always work in straight lines; circular
spraying patterns will leave the edges with a thinner coating
than the center.
Spraying the inside surfaces
To cover the inside of a piece of furni-
ture, start with the least conspicuous
surface. For the cabinet shown, first
spray the underside of the top, begin-
ning at the back and moving toward
the opening at the front. Be careful
not to aim the spray at yourself. Spray
the corners, the sides, the back and
finally the bottom of the cabinet.
99
PROTECTIVE FINISHES
---• BUILD IT YOURSELF
A TURNTABLE FOR SPRAYING
To spray all the surfaces of a piece of
furniture without having to move
your equipment, use the shop-made
turntable shown at right. The device
consists of two pieces of plywood
with a “Lazy Susan” bearing fas-
tened in between. The setup allows
a piece of furniture to be rotated at
any speed as it is being sprayed.
To make the turntable, cut two
pieces of 3/4-inch plywood slightly
larger than the width of the piece
of furniture to be finished. Set the
base on a work surface and center
the bearing on top of it. On the base,
mark the access hole and the four
screw holes in the inner ring of the
bearing. Bore the access hole through
the base and drill four pilot holes,
then attach the bearing to the base
with screws. To fasten the turntable
piece, set the base on top of it with
the bearing sandwiched between
the two pieces of wood. Aligning the
edges of the pieces, slowly rotate
the base until the access hole in it
lines up with one of the four screw
holes in the outer ring of the bearing.
Screw the bearing to the turntable
piece and repeat the process at the
other three holes.
To use the turntable, cut four
small wood blocks and drive nails
through them. Set the workpiece on
the tips of the nails, then slowly
rotate the turntable with one hand
while operating the spray gun with
the other (right, bottom).
Bearing access hole
Base
Turntable piece
Wood block
100
PROTECTIVE FINISHES
Spraying contoured surfaces
When spraying, treat contoured surfaces,
such as chair spindles and legs, as if they
were four-sided objects. Holding the gun
at a slight angle to the wood, spray each
side in turn.
CLEANING THE SPRAY EQUIPMENT
Cleaning the spray gun and fluid cup
To keep your spray equipment in good
working order, clean the gun and fluid
cup after each use. For the HVLP system
shown, unscrew the cup from the gun
and pour any finish left in the cup into a
container for storage or disposal. Then
pour a small amount of the appropriate
solvent into the cup and reattach it to the
gun. Spray the solvent into an empty can.
Repeat as many times as necessary until
the solvent comes out clean. Wipe the
outside of the cup and gun, then pull
the suction tube assembly from the gun.
Remove the air cap by unscrewing its
retaining ring from the gun; soak the two
pieces briefly in solvent. Clean the fluid
nozzle, suction tube assembly and air cap
with a soft brush dampened with solvent
(left). Reassemble the gun and screw the
fluid cup to it.
101
ANATOMY OF A SPRAY ROOM
Air filters
Remove hazardous particles
from air; made of non-com-
bustible material. At least
four 20" x 20" filters arrayed
edge-to-edge required to pro-
vide adequate protection;
need to be cleaned and
replaced regularly
Airflow meter
Also known as manometer. Visual
readout indicates air velocity through
the fan; when velocity drops below a
certain level, filters should be replaced
Light switch
Must be explosion-proof,
or incapable of produc-
ing sparks that could
Ignite vapors
Workpiece
Should be positioned
between spray gun and
fan; no large objects
should impede airflow
between workpiece
and fan
Tube-axial fan
Exhausts air from room to the
outdoors; mounted on exterior
wall. Features explosion-proof
motor and spark-resistant pro-
peller; available from industrial
suppliers. Moves large volumes
of air efficiently using a minimal
amount of electricity
Door
Made of
metal
Automatic
sprinkler system
Water sprinklers
activated by smoke
or heat from a fire
Fire
extinguisher
Should be
mounted in
a convenient
location \
Waste can
For temporary stor-
age of combustible
waste; made of steel
with tight-fitting lid
102
PROTECTIVE FINISHES
Light fixture
Features incandescent bulb in a
sealed glass globe that prevents
vapors in room from igniting
Wall
Can be made of con-
crete, sheet metal or
fire-rated drywall cov-
ered with sheet metal
Air regulator
Spray gun
Because of the hazards associated with
spraying finishes, the practice is
strictly controlled by law. You cannot,
for example, set up a furniture spraying
facility in your garage without ade-
quately guarding against fire and envi-
ronmental contamination.
Spraying generates toxic and flam-
mable vapors, solvents and particles,
making the air in the immediate area
harmful to breathe and potentially explo-
sive. Toxic vapors must be filtered out
before the air can be exhausted; and the
spray area must be contained in the event
of fire. Although water-based products
pose less of a fire hazard than solvent-
based finishes, making them a safer alter-
native for the finisher, both types produce
harmful vapors when sprayed.
If you want to spray furniture, you
have two options: You can use a com-
mercial booth (page 84) or you can
build a spray room. The latter alterna-
tive is a complex undertaking, howev-
er. According to one of the regulatory
agencies, the National Fire Protection
Association (NFPA), a spray room must
be fully enclosed and feature a power-
operated ventilation system.
SPRAY ROOM SAFETY TIPS
Air compressor
Pressurizes air for spray
system. Located outside
spray room; air hose running
through wall connects it to
air regulator inside room
• Consult the fire department as well
as pertinent local, state and federal
authorities before choosing a site for
your air exhaust outlet. Depending on
the area in which you live, levels of cer-
tain contaminants may be restricted by
specific regulations. In general, locate
an outlet to avoid exposing passersby,
children and pets to the exhaust.
• Check with your local authorities
about noise regulations; the ventilation
system in your spray room may create
noise levels that are deemed excessive
for residential areas.
• Do not wear clothing or safety gear
used during spraying outside of the spray
room; store these items in a metal locker.
The illustration at left shows some of
the elements that might be incorporat-
ed in a typical spray room. A powerful
electric fan pulls air from the room
through a panel of filters, which remove
toxic substances before the air is exhaust-
ed. The walls are constructed in such a
way as to prevent the spread of fire. The
electrical system is explosion-proof: the
switches, outlets and fixtures will not
create a spark or produce a voltage lev-
el that could cause an explosion.
Before designing a spray room, there
are several important preliminary steps.
First, consult your local, state and fed-
eral inspection authorities to make cer-
tain your design complies with the fire,
electrical, building and environmental
codes in effect in your community. For
example, your spray room will have to
meet NFPA and Occupational Safety and
Health Administration (OSHA) safety
guidelines. Also check with your home
insurance carrier. You may discover that
operating a spray room voids your insur-
ance policy. If you still see fit to proceed,
consult a ventilation engineer who can
give you expert guidance on properly
situating and designing your system.
• Keep the walls, floor and other sur-
faces of your spray room scrupulously
clean to prevent toxic or flammable sub-
stances from accumulating.
• Always wear protective safety gear
when spraying: long pants, a long-
sleeved shirt, safety goggles, rubber
gloves, a rubber apron and a dual-
cartridge respirator.
• Replace air filters regularly, as indicat-
ed by the airflow meter.
• Dispose of used air filters according
to local fire regulations.
• Store finishing products safely
(page 136).
103
IDENTIFYING AND AVOIDING SPRAY PROBLEMS
Good spraying technique alone does
not guarantee first-rate results.
Other factors, including the characteris-
tics of the spray room, the equipment or
even the weather can also influence the
quality of the finish.
A clean, dust-free work area is essen-
tial. One answer is to vacuum regular-
ly. If you spray frequently, you should
consider setting aside part of your work-
shop for drying. To prevent any dust
from settling on a newly finished work-
piece, provide yourself with several
makeshift dust covers. These can be
nothing more than pieces of plywood
sitting atop tall supports. When you fin-
ish spraying a piece of furniture, place it
under a dust cover to catch any dust that
might otherwise fall on the workpiece.
Humidity and warm temperatures
can wreak havoc on finishes, leaving
shellac with a milky look or causing lac-
quer to dry poorly. Keeping the room
at the right temperature—roughly
72°—is not quite as difficult as control-
ling humidity. It is best to do your spray-
ing on a dry day.
Even with optimum conditions and
proper technique, snags will arise from
time to time. If there is a problem with
the spraying system, consult your own-
er’s manual. Most manufacturers pro-
vide detailed troubleshooting guides for
their equipment. The following chart
details some of the most common spray-
ing problems, their causes and ways to
prevent them from occurring.
Fisheye
Crazing
Sag
104
PROTECTIVE FINISHES
Run
Pinholes
DEFECT DESCRIPTION AND CAUSE
Crazing Fine cracks caused by solvent or material
incompatibility.
Checking Subtle, grid-like cracks in the finish caused by a rapid
shift in temperature. If the workpiece is exposed to
warm temperatures and then suddenly brought into a
cold room, the finish will contract at a different rate
than the wood.
PREVENTION
Make sure your thinner and finishing materials are
compatible, according to the manufacturer’s
specifications.
Keep the finished workpiece in a temperature-
controlled environment.
Blushing Milky-white clouds in the finish usually occurring when a finish is sprayed on a humid day. Spray on dry days; keep the temperature constant. A retarder added to the finishing material on humid days will allow the fmish to dry more slowly and coun- teract the problem of the top layer drying too quickly.
Orange peel A rough, “orange peel" texture, the result of holding the spray gun too close or too far from the surface, using too little thinner or setting the wrong pressure for the material being applied. Hold the gun at the proper distance from the work surface—about 8 inches—and adjust the air pressure for the finish that you are spraying; check the material viscosity.
Run A large drip that runs down a vertical surface after too much finish has been sprayed in one spot. Move the gun evenly and more quickly. Reduce the material feed adjustment and ensure that the finish is thinned to the proper consistency.
Sag Similar to a run, but covers a larger area. Hold the gun at the correct angle and keep it moving at an even pace. Reduce the material feed adjustment and check that the finish is thinned to spray consistency.
Overspray Material that dries before it reaches the workpiece because it is being sprayed from too far away. Hold the gun closer to the surface or reduce the air pressure.
Fisheye Small, circular, occasionally iridescent shapes caused by contamination from silicone or wax from blades or tools. Wipe the workpiece with naphtha and diluted ammo- nia before finishing. Avoid touching the workpiece if you have come into contact with silicone or wax.
Pinholes Small holes caused by spraying at too high a velocity or by spraying too close to the work surface. Add a moisture retarder to the finishing material; it will slow down the drying time, allowing the finish to flow over the holes. Reduce the air pressure and make sure you are using the proper spraying technique.
105
FRENCH POLISHING
French polishing is a time-
honored method of fin-
ishing that involves padding
on shellac with a cloth. The
result is a lustrous, almost
three-dimensional finish typ-
ical of fine antique furniture.
The look does not come eas-
ily, however. French polish-
ing takes time to master and
a lot of elbow grease. For commercial
woodworking shops, the labor and time
requirements generally rule out this type
of finish for most jobs; it is much easi-
er to rely on lacquers and modern spray
equipment. Still, for an amateur wood-
worker, French polishing can be a
rewarding way—some purists would
argue the very best way—to finish a spe-
cial project. Although the finish does
not stand up to water, alcohol or heat, it
is relatively easy to repair once the piece
is completed.
The materials required for French
polishing are wool and linen rags (pieces
of old sweaters and shirts or a well-
washed bedsheet will work fine), shellac
flakes, denatured alcohol, mineral oil,
pumice and polishing compound.
Shellac is measured by the “cut”—the
number of pounds of shellac flakes dis-
solved in each gallon of alcohol. So, a
5-pound cut refers to 5 pounds of shel-
lac dissolved in a gallon of alcohol. For
French polishing, use а 2Vi- to a Ski-
pound cut, although you will, of course,
be dealing in quantities smaller than
a gallon.
The process consists of several steps
that are done to the following schedule:
On the first day, a coat of oil is applied
to the wood and the excess is wiped off.
After the top of this table was
French polished, the legs were
given a similar look by brush-
ing on three coats of shellac
and then wiping on a fourth
coat with a pad.
Then the pores are filled with pumice.
On the second day, additional coats
of shellac are padded on to build up
the body of the finish. On the third day,
the oil film is removed with a clean
cloth. This is the time to examine the
surface under a light and build up the
body where you notice dull spots or
open grain.
If you cannot afford the time required
for a French polish, there are substitutes
called padding lacquers that provide a
similar look without the same level of
effort. Padding lacquers are frequently
used to repair old finishes, but can also
be applied to new wood.
PADDING ON THE SHELLAC
1 Making a pad
Take a piece of wool roughly 3 inches
square and fold the corners toward the
center, stretching the wool with each
fold. Then squeeze the wool pad into an
oval and add a few drops of 2'/2- to ЗУг-
pound-cut shellac. Disperse the shellac
throughout the wool by crumpling the pad
in your hand, then place it in the middle
of a single thickness of coarse linen. Add
several drops of alcohol to the pad (right).
106
PROTECTIVE FINISHES
ш in i ш ui in i m n mi in min in in и in
SHOP TIP
Making a pumice dispenser
Some finishers use a salt
shaker to sprinkle on pumice
for French polishing (page 103,
step 3). You can also fashion
a more traditional dispenser.
Pour a small amount of pumice
into a piece of linen. Fold the
linen over and tie the top with
a small piece of string to form
a ball. To use the dispenser,
shake the bag, sprinkling a
small amount of pumice
through the cloth and onto
the wood.
2 Preparing the pad
for French polishing
Gather the linen around the ball of wool
and twist the linen until the pad is held
firmly in place (above, left). Then tap
the pad against the palm of your hand
to spread out the shellac and alcohol
and form a flat surface (above, right).
If the pad is too wet, squeeze out the
excess liquid. (When not in use, the pad
should be stored moist in an airtight
container to prevent it from stiffening.)
107
PROTECTIVE FINISHES
Filling the pores
Apply a sealer coat of shellac with a brush and allow it to
dry. (This procedure can be done before making the pad.) Then
sprinkle pumice on the workpiece and shake a small amount on
the pad. Grip the pad tightly between your fingers and thumb
and work the pumice into the wood with any of the strokes
shown in the diagram below; choose the one that proves most
comfortable. Keep the pad moving while it is on the surface to
prevent the alcohol on the pad from leaving a mark on the wood
(above). Pay particular attention to the edges so as not to leave
them untouched. At first, the pumice will sound scratchy as you
rub. The more the pores fill, the less scratchy the pumice will
sound. Continue to pad, occasionally sprinkling on fresh pumice
and adding more alcohol, until the pores are completely filled and
the surface has a matte look. Depending on the size of the work-
piece, this procedure may require 30 minutes or more. After fill-
ing the pores, set the workpiece aside for a day.
POLISHING PATTERNS
108
PROTECTIVE FINISHES
Building up the film
Prepare a new pad and dab a drop of oil onto it with a fin-
ger to provide lubrication for padding the surface (above, left).
Polish with the same strokes you used to fill the pores. Use
light pressure with a wet pad. As the pad dries and the friction
increases, apply more pressure. Recharge the pad with shellac
and alcohol, as needed. Repeat the process until the look of the
finish pleases you and the polishing streaks disappear (above,
right). Set aside the workpiece for a day. After the shellac has
dried you will notice a milky clouding of the surface, as in the
upper half of the workpiece in the photo (below). This is the
oil used to lubricate the pad; having risen to the surface it
must now be removed. Moisten a pad with alcohol and rub
the surface with long strokes (or polish with a fine glazing
compound) until the oil disappears. This will reveal the final
look of the French polish as shown in the lower half of work-
piece in the photo.
109
DECORATIVE FINISHES
Stenciling has developed from a crude interior
decorating technique into a minor art form.
The top rail of this Boston rocker, stenciled with
bronze powder, is typical of 19th Century designs.
Decorative painting traces its
history back to about 3000 BC,
when artisans in Egypt, India and the
Onent learned to transform ordinary
materials and objects into ornamental
ones through marbling, graining, sten
tiling and other practices. Along with
more traditional prizes of the trading
route, the techniques of decorative
painting were carried to the West,
where they have cycled in and out of
fashion down through the centuries.
Stenciling, in particular, found favor
among the early colonists of North
America. Colonial furnituremakers used stencils to embellish
their inexpensive chairs; householders of modest means sten-
ciled their rough floors and plaster walls to mimic the beau-
ty of the wallpaper and rugs they could not afford. During the
Victorian era, artisans both in the United States and abroad
took inspiration from the Arts and Crafts Movement, elevat-
ing the faux (or false) finishes—marbling and graining—to
the realm of high style. In the hand of an expert, a pot of glaze
and a feather could transform bland tabletops and small box-
es into rich marble look-alikes; a deftly wielded graining brush
could give an item of plain pine furniture the luxurious look
of walnut burl.
While the techniques and materials of stenciling changed
little over time, the methodology of marbling and graining
grew ever more refined. Close-mouthed professionals kept
their trade secrets close to the vest, even carrying the par-
ticulars of their artistry with them to the grave. Novices may
not be able to duplicate the finishes of the masters, but pleas-
ing results are usually obtainable with
a little patience. The glaze is brushed,
ragged, combed, sponged, or even
spattered over an opaque base coat. In
all decorative finishes except stencil-
ing, the color of the base coat is vis-
ible through the glaze which imparts
to the finish a deep, subtle glow. It is
generally a good idea to mix more
glaze than you think you will need,
because it is next to impossible to
match such a finish exactly. The real
challenge of decorative painting
is in the patterning of the glaze.
Stenciling is the least complex technique—you can just stip-
ple the color on over the base coat with a brush or a sponge,
working through a paper or acetate template. Marbling
and graining are more difficult to execute, because both
color and pattern must be fairly realistic for the finish to
be attractive. In marbling, this means you must first cre-
ate a believable cloud of background colors, then shoot
it through with natural looking veins. Because the pat-
terns of heartwood and sapwood are less free-flowing
than the veins in marble, graining requires even more
skill than it takes to disguise wood as marble. In both
cases, finishing will go more smoothly if you continual-
ly refer to a sample of the material you are trying to sim-
ulate. With any decorative finish, always test the
appearance of the glaze over the base coat before begin-
ning work; with marbling and graining, practice pat-
terning on large pieces of illustration board until you are
confident of your technique.
In contrast to the violent natural forces that create real mar-
ble, this bird feather requires a deft touch to transform tinted
oil paint and a glaze coating into a marble finish on wood.
Ill
TOOLS AND ACCESSORIES
with a swiveling tip for
cutting contours of stencils
Stenciling brush
For applying paint or \|
bronze powders through
stencil openings; has stiff
hog’s-hair bristles that
help prevent paint from
bleeding under stencil
Marine sponge
For removing excess
glaze and softening
grain and marbled
patterns; features
a naturally rough
surface
Badger softener ( л
A specialty brush
used for softening
grain and marbled pat- 1
terns, and smoothing out
decorative finishes; made
of fine badger hair
Block cushion grainer
For creating wood grain
patterns on a workpiece.
Fulled and rocked along
the surface of a glazed
workpiece at any angle;
features a rubber face
Bird’s
feather Ax
Used to apply A
glaze in marbled
finishes; works best when
slightly worse for wear
Graining rollers
For producing wood
grain patterns on a
workpiece; pulled across
a glazed surface
Swivel A
knife
A precision
artist’s knife
Graining combs
For designing wood grain
patterns on a workpiece; fea
ture metal or rubber teeth
Hog's-hair
bristle brush л
For applying the
base coat and
removing staining
glaze when producing
wood grain patterns; its
flagged bristle tips promote
maximum coverage
Camel's- 5
hair sword
striper brush
A fine, soft brush used
to apply individual veins
or grain lines in freehand
graining and marbling
112
STENCILING
Ever since the Egyptians in ancient
times began decorating mummy
cases with stencils, such decorative pat-
terns have been a ubiquitous feature of
furniture design. They have appeared
on everything from shields to chairs and
toy chests.
As simple as a fine-veined leaf or as
complex as a multicolored, repeating
motif of fruits and flowers, a stencil can
be applied to a piece of furniture either
before or after the last coat of finish. The
stencil is typically reduced or enlarged
from a master pattern and cut from
either stencil board or acetate. Because
acetate can be cleaned with mineral spir-
its and reused, it is more durable than
paper. The translucent material can be
bought at most drafting supply stores.
Stencil designs can be sprayed on or
applied with a special short-bristled sten-
ciling brush. While early American set-
tlers stenciled with milk paint, any
thick-bodied paint, such as quick-dry-
ing japan colors or an oil-based or acrylic
paint, will fit the bill equally well. Bronze
powders can be combined in the same
stencil to yield a variety of metallic col-
ors within a single design, creating the
illusion of light and shadow—a tech-
nique made famous by the Hitchcock
chairs of the mid- 1800s.
Designs are generally stenciled with either paint (above, left) or bronze powders
(above, right). The application techniques are different, as are the range of effects.
Bronze powders, for example, can create a burnished, three-dimensional look.
MAKING THE STENCIL
1 Enlarging a pattern
One way to produce a larger version
of a pattern for stenciling is to use a pho-
tocopier with an enlargement feature;
another way is to transfer the shape using
a grid. Draw a grid of squares over the pat-
tern, using a ruled straightedge to make
all the squares exactly the same size. (The
smaller you make the squares, the easier it
will be to reproduce the pattern.) Then, on a
blank sheet of graph paper or acetate, make
a larger grid, increasing the size of the
squares by the same amount you wish to
enlarge the pattern. For example, if you
need a stencil design that is twice the size
of the pattern, make the second set of
squares twice as large as the first. To pro-
duce the stencil design, draw in each square
of the enlarged grid the part of the pattern
that is in the corresponding square of the
smaller grid (left). To make a stencil small-
er than the original pattern, follow the same
steps, but make the second grid smaller
than the first one.
113
DECORATIVE FINISHES
2 Cutting out the pattern
Transfer your design to a piece
of stencil board or acetate. With the
stencil board, use carbon paper;
for an acetate stencil, simply place
the sheet over your design and trace
it in ink. If your design will include
more than one color, make a sepa-
rate stencil for each color. Use a
swivel knife to cut out the pattern,
pulling the knife toward you (above).
Keep your free hand out of the
blade’s path.
IB Hffi IB Ш IB IB 111 111 111 in dl IB H ;B 111
SHOP TIP
Projecting a pattern
Another way to reproduce a stencil in a different size involves
projecting the design onto a wall. First take a photograph of the
pattern using slide film. To avoid distortion, shootfrom directly in
front of the pattern. Once the film is developed use a slide projec-
tor to display the pattern on a wall. The
distance between the projector and the
wall will determine the size of the image.
To transfer the pattern, project the
image onto a piece of stencil board
or acetate and trace over it.
114
DECORATIVE FINISHES
PAINT STENCILING
ш in in min mi in m ui hi m hi in ш ui m in in
1 Taping down the stencil
To help align the stencil precisely,
draw a reference line centered along
each side of both the workpiece and
SHOP TIP
A cure for bleeding
To prevent wet paint from bleeding under a stencil,
temporarily bond the stencil to your workpiece.
Spray the underside of the stencil with
an aerosol adhesive, then place it
the stencil. Then secure the stencil
to the workpiece with masking tape,
making sure the reference lines match
up properly (above).
in position on the work-
piece, pressing out
any air pockets.
Apply the paint
as soon as pos-
sible so that you
can peel off the
stencil before it
adheres permanently.
115
DECORATIVE FINISHES
Applying the paint
Transfer the stencil design to your workpiece by spraying
or brushing on paint. If you are spraying, mask the surfaces
surrounding the stencil with paper and set the workpiece edge
up on a work surface. Holding an aerosol paint can about 6 to
10 inches from the workpiece, direct the spray at the stencil
until the exposed wood is coated lightly with paint (above, left).
To prevent paint from bleeding under the stencil, keep the
nozzle level with the stencil and spray in a straight line. To
use a stenciling brush, set the workpiece flat on a work sur-
face and dip only the tips of the bristles in the paint. This will
result in a light coat and thus reduce bleeding. Holding the
brush perpendicular to the surface, jab the bristles up and
down on the stencil until the wood is covered (above, right),
reloading the brush as necessary. If you are using more than
one stencil to apply several colors, let each coat dry before
spraying or brushing on the next.
3 Removing the stencil
To avoid any bleeding, remove the
stencil while the paint is wet. Peel the
masking tape from two adjoining cor-
ners, then gently lift the stencil off the
workpiece, pulling up the two sides even
ly (left). Avoid sliding the stencil along
the surface or you may smear some of
paint. Once the paint is dry, remove any
adhesive residue with naphtha before top-
coating the workpiece.
116
DECORATIVE FINISHES
BRONZE POWDER STENCILING
2 Rubbing on the powder
With the varnish still tacky, wrap a
piece of chamois or a clean, soft cloth
around your index finger and dip it into the
bronze powder. Rub the powder onto
the surface exposed by the cutouts in the
stencil. Rub the areas you wish to high-
light relatively hard; rub more lightly
on areas you want to shade. Apply addi-
tional powder as necessary until the sur-
face is colored to your satisfaction, but
work quickly to keep the varnish from
drying completely before you are fin-
ished. Then peel off the stencil. To high-
light the three-dimensional quality, apply
several layers of bronze powder, separated
by thin layers of varnish. When you are fin-
ished stenciling, protect the surface with
two final coats of varnish.
1 Positioning the stencil
Draw the stencil on acetate and
cut out the pattern. Place the bronze
powder in a bowl or on a palette and
set it aside. Prepare the workpiece by
applying a thin coat of slow-drying var-
nish to the surface you will be sten-
ciling. Let the varnish dry until it is
firm but still tacky. Place the acetate
in position on the workpiece glossy
side down so that it adheres to the
surface (left).
117
GRAINING
Graining is a process in which the
appearance of one type of wood is
re-created on another for decorative pur-
poses. On species with muted grain, the
technique can be used to imitate the tex-
ture and warmth of more
exotic species. But grain-
ing can also camouflage
visual defects—like a wood
patch used to repair a dam-
aged surface. With practice,
experimentation and care-
ful study of the species you
wish to emulate, you can
produce a diverse range of
styles, from the close grain
of beech to the free-flow-
ing pattern of pine.
Graining was especial-
ly popular in the 1800s
among westward-moving
American pioneers. With hardwood in
scarce supply, woodworkers harvested
softwoods and grained them to resem-
ble more highly figured woods like cher-
ry, oak and mahogany.
Graining involves several stages. First,
the surface is painted with a flat base
coat and the base is allowed to dry.
A deftly wielded artist's brush and a grain-
ing roller combined to etch a vivid pattern
of heart gram on a piece of particleboard.
A color glaze is then applied and the
grain pattern is traced into the glaze
with special graining tools such as
combs, ray markers, mottlers and rollers.
Finally, a protective topcoat is added.
Graining glazes can
be prepared in the shop,
but commercial, ready-to-
use glazing stains are just
as effective; they can be
tinted with japan colors
to produce virtually any
shade you wish. The glazes
you make yourself will
usually consist of one part
boiled linseed oil and two
parts varnish; they are tint-
ed with artists’ colors. You
need a heavy-bodied con-
sistency, but not so heavy
that the drying time is slow
or the grain patterns will tend to flow
back together. You can buy special addi-
tives to speed up the drying time.
GRAINING A SURFACE BY HAND
1 Preparing and applying the glaze
Tint a container of flat oil-based paint
with artists’ colors so that it matches the
hue of the wood you wish to imitate.
Spread a layer of the paint on your work-
piece as a base coat and allow it to dry.
Then apply a graining glaze on the paint-
ed surface with a foam brush or pad appli-
cator. To begin the process of creating a
grain pattern on the wood, wrap a soft
cloth tightly around three of your fingers,
then draw the cloth along the surface sev-
eral times, drawing thin, wavy, parallel
lines (right).
118
DECORATIVE FINISHES
3 Drawing in knots
Wrap a cloth around one finger and
dip the fingertip in the glaze. Then gently
touch the surface to make the knot (right).
To smooth out the patterns and blend
them into the background, brush the sur-
face back and forth with a soft, dry brush
following the direction of the grain. A badg-
er softener is ideal for this stage of the
process. Once the surface is dry, apply a
topcoat, then polish it with rottenstone
and paste wax.
2 Refining the grain lines
To make the grain lines from step
1 a little more delicate, dip an artist’s
brush or a camel's hair sword striper in
the glaze, and draw it slowly along the
surface within the original lines (left).
For best results, hold the brush at an
angle to the surface. If you wish to sim-
ulate a knot on your workpiece, rub in
lines for a rough oval or diamond shape
around where you will be adding the
knot. Experiment with the brush until
the surface has the grain pattern you
are seeking.
119
DECORATIVE FINISHES
WORKING WITH GRAINING TOOLS
1 Simulating other grain patterns
Spread a base coat of tinted paint and then a glazing stain
following the procedures described on page 118. To simulate
the random grain markings characteristic of oak, run a ray
marker along the surface of the board in straight lines, parallel
to the edges (above, left). To reproduce the broad grain pattern
typical of mahogany, draw a metal or rubber graining comb
along the surface, creating a series of slightly wavy but paral-
lel lines (above, right).
2 Blending in the grain
While the glaze is still wet, gently draw
a soft, dry paint brush, such as a badger
softener, back and forth over the surface,
following the direction of the grain (right).
This will fan out the grain lines and give
the surface a more uniform and natural
appearance.
120
DECORATIVE FINISHES
SUILP IT YOURSELF
A BLOCK CUSHION GRAINER
With a molding jig and silicone rubber,
you can make a block cushion grainer
to suit your needs. For the jig, cut a cir-
cular block of 1 i/2-inch-thick wood that
will fit on the sanding disk of your elec-
tric drill. Screw the block to the disk, then
install the disk in the drill chuck. Attach
a commercial drill stand to a %-inch ply-
wood base, then install the drill. Clamp
the base to a work surface and secure a
short scrap of 2-by-4 just in front of the
block to serve as a tool rest. Cut notches
in the 2-by-4 for clamps.
To shape the wood block, lock the drill
in the On position and hold the tip of a
small skew chisel against the rotating
surface, etching a Ve-inch-deep groove
into the wood. Rest the chisel blade on
the 2-by-4 to keep it steady. Cut on the
left-hand side of the block to prevent the
chisel from being kicked up. Carve a
series of concentric grooves in the block
(above,right), varying their widths and the
intervals between them to suit the grain
pattern you wish to design. Closely spaced
grooveswill produce a hardwood look;
grooves that are spread farther apart are
better for simulating softwoods.
To make the actual grainer, remove the
block from the sanding disk and coat its
grooved face with paste wax. Then apply
a ‘/e-inch-thick layer of silicone rubber
over the wax. Let the rubber cure for
about 24 hours, then peel it off the block
(below, right). Trim the rubber imprint
and glue it to a rounded piece of 2-by-2
with a plywood handle. Remove any resid-
ual paste wax with naphtha.
The tool is used the same way as tradi-
tional grainers (page 120), but remember
to push it along the surface with a forward
rocking motion.
121
MARBLING
In the past, when structural consider-
ations ruled out the use of real mar-
ble, faux marbre, or false marble, finishes
were commonly used as a substitute on
everything from walls and floors to man-
tels and furniture.
Real marble is a by-product of intense
natural forces that occur when limestone
is melted under great heat and pressure.
Minerals running through the molten
rock cool and crystallize. The result is
layer upon layer of veins colored white,
black and other hues, which together
form a lattice that is somehow both
opaque and translucent.
Of the many techniques for replicat-
ing the appearance of marble on wood,
most involve working with two or three
colored paints on a wet, glazed surface.
Tools for manipulating the paints range
from rags to newspapers to sponges. Fine
brushes or a feather are the best imple-
ments for simulating the depth and pat-
tern of the veins.
As a rule of thumb, the colors on a
marbled surface should be limited to a
maximum of three, including the base
color. The choice of colors is best restrict-
ed to the natural colors found in mar-
ble. The constituent parts of marble
actually flow during the formation of
the stone, and it is vital to capture this
appearance of fluidity. To produce a real-
istic design, work with good reference
photographs or keep a sample of the real
thing on hand.
White and green marbled wood
simulates the fluid appearance
and misty depth of real marble.
MARBLING WITH A BRUSH
1 Applying the glaze
For the base coat of a white marble
finish, brush a coat of white, semigloss
oil-based paint on your workpiece as a
base coat and allow it to dry. To elimi-
nate any brush marks, lightly sand the
surface with a 320-grit sandpaper. Tint
a container of white glaze with a small
amount of one of the artists’ colors that
you will be using in the finish. Then use
a cloth or a creased piece of newspaper to
coat the painted surface with glaze (right)
122
DECORATIVE FINISHES
2 Sketching in the marble veins
While the surface is still wet, squeeze
some of the artists' color used in step 1
onto a palette. Dip an artists’ brush into
the color and use wavy strokes to paint
imitation-marble veins in the glaze (above).
The veins should appear to wander random-
ly about the surface, forking right and left.
Rolling the brush between your fingers
while you paint can also produce a realis-
tic effect. Once you have painted in all the
veins, remove the excess glaze and soften
the veins by pulling a soft cloth diagonally
across the surface (right). Repeat the process
to paint in more marble veins in a second
color. If you wish to layer on additional veins,
reverse the order of the colors, or mix them
together to provide contrast and depth to
the surface.
123
DECORATIVE FINISHES
3 Smoothing the pattern
While the surface is still wet, gently
draw a soft, dry paint brush, such as a
badger softener, back and forth across
the veins (right). Continue until the sur-
face looks misty and translucent. Once
the surface is dry, let it sit for about 24
hours and apply a coat of semigloss or
high-gloss polyurethane varnish. Polish
the workpiece with a soft cloth.
FEATHERING A MARBLED SURFACE
1 Sketching broad veins
For a green marble finish, spread
a base coat of green paint and then a
glaze tinted a lighter color on your work-
piece following the procedure on page
122. Dip a bird feather into the glaze
and draw it diagonally across the surface
to produce broad marble-like veins (left).
Smooth and soften the pattern by brush-
ing the veins lightly with a marine sponge,
a badger softener or a soft cloth. While
the surface is still wet, prepare another
batch of glaze and tint it lighter than the
first coating. Apply and feather this glaze
the same way you did the first one, but
this time, make the veins cross over the
ones already in place.
124
DECORATIVE FINISHES
2 Opening up the pattern
To produce a mottled effect on the
surface, dip a clean, stiff-bristled paint
brush into a container of mineral spirits.
Holding the brush a few inches above the
workpiece, run a gloved finger along the
bristles, moistening the veins with a fine
spray (right).
3 Completing the pattern
Dip a bird feather in white artists’
color and allow the excess to drip off
to prevent any blobbing. Then use the
feather tip to sketch in a series of thin
white veins within the broad veins
already on the surface. When all the
fine veins have been painted, smooth,
varnish and polish the surface as
described in step 3 on page 124.
125
FINISHING TOUCHES
The varnish topcoat on this 19th-Century farm-
house-style table was rubbed out with extra
fine steel wool and buffed with paste wax.
Although woodworking cat-
alogs abound with a wide vari-
ety of rubbing compounds and
fancy electric polishers, purists still
rely on the centuries-old process of
“rubbing out” a finish with tradi
tional abrasives. Rubbing a finish to
a satin sheen with pumice, a pow-
dered form of volcanic rock,
imparts a soft look suggestive of
brushed brass and leaves the wood
smooth and silky to the touch.
Taking the process yet another step
further with an even finer powder
called rottenstone removes the abrasions caused by the pumice
to add an extra measure of shine—even to glossy topcoats of
varnish or lacquer.
The notion of rubbing out a meticulously applied topcoat
with abrasive compounds may have an incongruous ring to it.
But the final coat of finish on a piece of furniture seldom
leaves the surface clear and perfectly smooth. It is not unusu-
al for the topcoat to be speckled with random dust and dirt
particles that settle on the finish before it dries. In addition,
some “signature” of the tool used to apply the finish may be
visible. Even when brushes are adroitly handled, they often
leave behind faint bristle marks, and a sprayed surface may
show a texture similar to that of an orange peel. The first step
in the rubbing process therefore is to level the surface as per-
fectly as possible. The smoother it is, the better the look and
feel of the topcoat. Once the surface is level, it can be buffed
to almost any sheen.
The difference between a rubbed
satin finish and one that is buffed to
a gloss depends on the grit of the
abrasive you choose. Rubbing com-
pounds, for example, contain par-
ticles that leave minute scratches
on a surface. Coarser-grit com-
pounds produce a fairly large pat-
tern that makes the surface appear
dull, or satin. Finer-grit compounds
leave marks that are harder to see,
creating a glossier look. Virtually
anything that abrades can be used
for rubbing out. In addition to rub-
bing compounds, finishers rely on sandpaper, steel wool and
nylon abrasive pads. In each case, the size of the scratch pat-
tern dictates the level of sheen.
If rubbing out has an inherent problem, it is the risk of
rubbing through the finish. Since the process involves grind-
ing small amounts of the thinly layered topcoat, there is always
the possibility of cutting right through the coating to the
wood. You need to be especially careful near the edges. With
some varnishes, rubbing through even the very top layer will
create a blemish. The resulting outline of the cut area, called
a “halo” or “witness line,” is a faint but visible reminder of
just how thin each layer of a finish really is.
While most of the rubbing out process is a removal of
material, the last step puts a tiny amount back. Waxing a
surface adds an ultra-thin layer of protection atop the
rubbed topcoat, imparting a little more sheen and dura-
bility to the finish.
Fitted with a lamb’s wool buffing bonnet, a random-orbit
sander serves as an electric polisher, rubbing out the finish
and then buffing the topcoat to a high-gloss sheen.
127
TOOLS AND ACCESSORIES
Lubricant
Keeps pumice from remov-
ing finish when steel wool or
abrasive pads are used to
rub out finish; potassium-
oleate type is gentle enough
to be used as cleaner
Rubbing oil
Speeds up rubbing out process; used with sandpa-
per or pumice stone to achieve a high-gloss finish
Paste wax
Buffed on surface
after rubbing out
to produce a water-
resistant and long-
lasting luster finish;
blended waxes are
often made with
carnauba, a hard,
natural wax, mixed
with paraffin or
beeswax
&
^BRicAl^i
PUMICE
STONE
Pumice stone
Medium coarse (2F)
and fine (4F) grades
sprinkled on surface
and used with felt
block; made from
ground up lava
^OTTENSTO^
Felt block
Felt-covered hard-
wood block for
spreading rubbing
compound on fin-
ished surface
Electric polisher
Used with huffing
bonnet and rubbing
compound to work
on large surfaces
Lamb’s wool
buffing bonnet
Installed on elec-
tric polisher
Rottenstone
A fine abrasive powder sprinkled on
surface after pumice to achieve a high-
gioss sheen; used with felt block
Rubbing compound
An abrasive paste specially formulat-
ed for rubbing out lacquer, varnish and
shellac finishes; applied with a rag or
electric polisher
Steel wool
Rubbing pads
Super fine pad
used alone or with
lubricant, such as
rubbing oil; made
from durable poly-
ester fiber
128
PREPARING TO RUB OUT THE FINISH
Having graced your workpiece with
a final coat of finish and waited for
it to dry, you may be impatient to move
on to the next step. However, before a
topcoat can be rubbed out, it must first
dry and set, so as to be hard enough to
be worked over with very fine abrasives.
Before rubbing out your workpiece, you
must wait for the topcoat to cure—that
is, you must allow it ample time to
become as hard as it will get. Without
time to cure, you are likely to scratch the
finish during the rubbing out phase.
No two finishes take the same amount
of time to cure. The duration of the
process depends on several factors,
including the type of finishing product
you use, the number of coats you apply,
and the amount of time that elapses
between subsequent coats. For example,
shellac and the water-based finishes can
usually be rubbed out after 24 hours.
For lacquer, the wait is more like 48
hours, while varnish takes three or four
days. Oil finishes can require weeks to
cure. The greater the number of coats
on a surface, the longer the curing time.
But remember that a finish cures more
rapidly if more time is left for drying
between coats. Always read the instruc-
tions before applying a finish; a suggested
curing time will usually be indicated.
The type of sheen you end up with
after rubbing out a finish hinges on the
abrasives you use. For a satin gloss, use
400-grit paper, then buff the surface. Use
0000 steel wool in conjunction with 400-
grit paper for a semigloss. An even finer
grit sandpaper, such as 600, combined
with rubbing compound will result in a
high gloss. The same effect can also be
achieved with a 600-grit paper and
pumice or rottenstone.
Start by abrading the topcoat to a
matte sheen. If you choose a wet/dry
sandpaper, select a grit that is finer than
the one used to prepare the surface for
the final coat of finish. The next step is to
remove dust and sanding particles (page
42), then repeat the abrading process sev-
eral times with successively finer-grit
papers. For a dull- or flat-looking sur-
face, stop at 400-grit paper. Move up to a
higher grit for a glossier finish.
TESTING A FINISH TO SEE IF IT IS CURED
Checking the finish
Perform the following simple tests to
determine whether a topcoat has cured.
Try to dig a fingernail into the finish on
an inconspicuous part of the workpiece
(left). You should not be able to leave an
indentation. If you do, the finish needs
additional curing time. Smell is another
good indication. If you can detect the
odor of the solvent on the workpiece,
the topcoat is not ready for rubbing
out. Once the finish passes both of
these tests, sand a hidden area lightly.
If the paper clogs, allow more time for
curing. If the paper glides over the sur-
face, turning some of the finish to powder,
the topcoat is fully cured.
129
RUBBING OUT A FINISH
There are two competing schools of
thought on the best way to rub out
a finish. The traditional approach is to
painstakingly work pumice and rotten-
stone over the topcoated surfaces using a
felt block. A less hidebound method
involves the use of one or more modern
abrasives, such as rubbing compounds,
steel wool or sandpaper, and may even
make use of an electric polisher. Both
methods have their advantages. Working
with pumice and rottenstone is labori-
ous, but wins the woodworking purist’s
stamp of approval. The modern way is
easier and cuts down on elbow grease,
but some argue that it involves less craft.
Both methods are demonstrated on the
pages that follow.
Whichever route you take, keep in
mind that the finer the abrasive you use,
the glossier the sheen you will produce.
The photo above shows one sheen you
can achieve using either rubbing out
technique. Any luster can be enhanced
by buffing the finish with wax. But do
not rely solely on the wax to heighten
the gloss; it will not turn a satin finish
into a semigloss, for example. Instead,
the wax will only intensify what is
already there. Although all the surfaces
of a workpiece will have to be rubbed
out, pay particular attention to tops,
since they are the most visible features
of most furniture.
If you choose to go the traditional
route, you will need to use a lubricant
with the pumice and rottenstone. Water
and oils, like paraffin and mineral oil,
are the most commonly used lubricants.
Working with water offers two advan-
tages: It cuts pumice more rapidly than
oil, speeding up the process, and it also
does not leave any oily residue. Avoid
using water on shellac, however; it will
turn the finish white. Paraffin oil, the
traditional rubbing out lubricant, is a
better choice for shellac topcoats.
Rubbing out with fine steel wool
and 400-grit sandpaper added a
semigloss sheen to the wood sample
at right. To create a glossier look,
even finer abrasives would be used.
A GUIDE TO THE LAST STAGE OF FINISHING
Strokes suitable for a flat surface
For tabletops and other flat surfaces, keep every stroke parallel to the wood
grain, as shown in the diagram at right. Start near a corner and move in a
straight line along the edge, rubbing the surface with moderate pressure
from one end to the other. Alternate directions with each subsequent
stroke until you reach the other edge. Keep the abrasive moving; the fric-
tion resulting from rubbing a single spot too long may leave the finish slightly
burned. Avoid making arc-like strokes, which are apt to make any scratches
on the surface more visible.
130
FINISHING TOUCHES
WORKING WITH CONTOURED SURFACES
Rubbing out a contoured surface
For rounded surfaces that are awkward
to work with a rigid abrasive pad, use a
shop-made rubbing pad that will follow
the curves of your workpiece. If you are
working with pumice, sprinkle it on the
surface with a short, stiff-bristled brush.
Then wrap a sheet of sandpaper around
a thick sponge small enough to comfort-
ably grip in your hand. Clasp the paper
around the sponge as you rub out the fin-
ish on the surface (right). With some
types of finishes, you can also use steel
wool or a commercial rubbing pad.
RUBBING OUT A FINISH WITH ROTTENSTONE
1 Applying the lubricant
Dip the tips of your fingers in a bowl
of the lubricant and sprinkle several drops
on the surface to be rubbed out (left).
Wear rubber gloves if you are using oil
as a lubricant.
131
FINISHING TOUCHES
2 Abrading the surface
Shake a little pumice onto the sur-
face, then begin lightly abrading the sur-
face with a felt block (left). Follow the
pattern shown on page 130. If you do
not have a felt block, wrap a piece of
burlap around a scrap of wood. Continue
rubbing the surface until a mixture of
the rottenstone and lubricant forms. Use
a soft cloth to wipe off a small area of
the surface periodically to inspect the
finish. You want to make certain that you
are not rubbing through the topcoat.
3 Removing the pumice and lubricant
Wipe off the abrasive and lubricant
with a clean cloth (right). Check the sur-
face sheen; the finish should have a
satin luster. You can either stop the
process at this point or repeat it to
obtain a glossier sheen.
132
FINISHING TOUCHES
MORE RECENT OPTIONS FOR RUBBING OUT
Using an electric polisher
Fit a buffing bonnet on the machine’s
polishing disk and spread a wood rub-
bing compound on the bonnet. Start the
polisher near the center of the surface
and work out toward the edges, moving
the bonnet continuously (left). Electric
polishers work quickly, so stop the tool
often and wipe off a small area of the sur-
face with a cloth to check the condition
of the topcoat. Once the surface takes
on a satin look, you can either stop the
process or continue with a finer-grit rub-
bing compound for a glossier luster.
SHOP TIP
Keeping a buffing
bonnet grit-free
Particles of dust or grit
on a buffing bonnet can
ruin a topcoat during the
rubbing out process. To
make sure your bonnet
stays clean, never set it
down on potentially dusty
surfaces. Instead, rest
it on a clean plastic bag.
Between finishing Jobs, store
the bonnet in a sealable
plastic bag.
133
FINISHING TOUCHES
Using rubbing compounds
Scoop up a little rubbing compound with
a clean cloth and rub it along the wood
surface (right) as you would pumice. Once
you have abraded the entire surface,
wipe the compound off the surface with
another cloth. For a glossier sheen, repeat
the process with a finer-grit compound.
To obtain a softer gloss than is possible
with rubbing compound, some finishers
rub out the finish with a lubricant and
super fine steel wool or a commercial
rubbing pad.
CLEANING AND REPAIR TIPS FOR FINISHES
FINISH CLEANING TIPS
Lacquer Wipe using clean cloth
dampened with light detergent,
potassium oleate or naphtha;
avoid using thinners
Shellac Wipe using clean cloth
dampened with naphtha;
Avoid using water; it will turn
shellac white
Varnish Wipe using light detergent,
potassium oleate or naphtha;
avoid using methyl hydrate
Oils Use naphtha on polymerized
oil finishes; use soap and
water on pure oil surfaces
REPAIR TIPS
Repair cracks with lacquer stick (page 45) or shop-made lacquer
putty by letting a small amount of lacquer dry to a honey-like consistency.
For white spots, carefully dig out the damage with a putty knife and apply
lacquer thinner until the white portion turns clear; then apply lacquer
stick or putty, let dry and sand lightly.
Lightly sand away scratches.
Repair discolored areas by padding the surface with shellac as in
French polishing (page 106).
Repair small cracks or gouges with lacquer stick (page 45).
Sand away scratches, then recoat with oil. Recoat discolored or dull areas.
134
FINISHING TOUCHES
WAXING FOR A PROTECTIVE SHEEN
1 Applying the wax
A coating of wax will protect a
rubbed-out topcoat from damage, but
select a product with a consistency
that is slightly thicker than a liquid or
cream wax. Scoop a bit of the wax onto
a clean cloth, then spread a thin, even
coat on the surface, rubbing the wax into
one small area at a time (right). If you try
to work on too large a surface area at a
time, the solvent in the wax may evapo-
rate before you can rub it over the surface,
causing the wax to harden premature-
ly. Let the wax dry according to the
manufacturer’s instructions, typically
about 15 minutes.
2 Buffing the wax
Rub with a clean cloth until the
waxed surface shines. For contours or
surfaces with details, as shown at left,
buff the wax with a stiff-bristled brush,
giving the wood short, brisk strokes.
135
CLEANING AND STORAGE
A finishing project is not quite fin-
ished until you clean and put away
your brushes, store the solvents, and dis-
pose of any oily rags. While foam brush-
es are usually discarded after a single
use, bristle brushes and pad applicators
can be cleaned and reused. With the
proper care, a high-quality brush can
provide many years of service.
But good cleanup habits will do more
than protect your investment; they are
also key elements of shop safety and envi-
ronmental responsibility. To keep finish-
ing products out of the reach of children,
store containers in a locked metal cabi-
net. Avoid throwing out wet, oily rags
with the trash; this increases the risk that
they will catch fire. For temporary storage,
dampen the rags and place them in a
sealed metal container. This will isolate
them from any sparks or flames and
quickly starve any spontaneous fire of
needed oxygen. The safest way to dispose
of oily rags is to first spread them out to
dry out of doors.
Store finishing products in sealed,
properly labeled containers. Avoid using
bottles or jars that normally contain
food or liquids; a visitor to your shop
could mistake a chemical product for
something drinkable.
Always store stains and finishes at
room temperature; a water-based prod-
uct will be ruined if allowed to freeze.
Reactive finishes such as tung oil or var-
nish, which eventually harden when
exposed to air, should be stored in airless
containers. Rather than keeping a small
volume of a reactive finish in a large con-
tainer, transfer the product to a smaller
one, exposing the liquid to less air. A bet-
ter solution is to buy finishing products
in smaller quantities or to store them in
collapsible plastic containers (page 87).
Do not flush any finishing product
down the drain. Even a water-based fin-
ish can pose problems by coagulating
in drain pipes and backing up your
plumbing system. To dispose of small
quantities of a product let it sit in an
uncovered container outside until the
solvent evaporates. For larger volumes,
consult the waste disposal service in
your community.
• Avoid standing a brush on its bristles;
this may bend them permanently and
ruin the brush.
• Break in a new brush by suspending it
up to the ferrule in a solvent that is com-
patible with the finish you will apply.
Soak the bristles for about 10 minutes,
then clean the brush with detergent and
warm water.
CLEANING AND STORAGE TIPS
• After breaking in a new brush or
cleaning a used one, wrap it in paper
for storage.
• Salvage a hardened brush by soaking
the bristles overnight in a mixture of 2
parts xylene, 1 part acetone and 1 part
denatured alcohol. Use a brush comb to
remove fragments of hardened finish
from the bristles.
• To dispose of a water-based finish,
pour or brush it onto scraps of cardboard;
let it dry and discard the cardboard.
• Instead of discarding a container of
used mineral spirits, recycle it. Let the
solvent sit in a cool spot for a week or
two, then decant the spirits that have
risen to the top in a clean container
and dispose of the residue.
SHOP AIDS FOR BRUSHES
Brush comb
A metal comb for
cleaning solid finish
residues from brush
bristles
Brush bucket and lid
An airtight storage con-
tainer for suspending
brushes in a solvent;
features plastic clips
that hold brushes with
the bristles above the
bottom of the container
Brush spinner
Uses centrifugal force to spin solvent from
brush bristles: one end of the device holds the
brush while the pump-like handle at the other
end creates the spinning action
136
CLEANING AND STORAGE
STORING A BRUSH OVERNIGHT
Soaking brushes in solvent
There is no point cleaning a brush (page
138) if you plan to use it the following
day. Instead, suspend the brush in the
appropriate solvent for the finishing prod-
uct you are using: for varnish, a mixture
of turpentine and varnish; for shellac,
denatured alcohol; for lacquer, lacquer
thinner; for a stain, a “brush keeper"
solution of 2 parts raw linseed oil and 1
part turpentine. (For oil-based finishing
products, just wrap the brush in plastic
wrap.) When soaking a brush, submerge
only the bristles, and not the ferrule,
making sure they are suspended above
the bottom of the container. Keep the
brush in a commercial brush bucket
(page 136), or hang it from a nail in a
shop-made rack (above).
SHOP TIP
Punching drip holes
It takes very little time for the rim
of a can of finish to fill up with liq-
uid. The result is often a messy
dripping and a splash when the lid
is tapped closed. To keep
a container from over-
flowing its rim, punch a
series of holes around
its circumference with a
nail. This will allow liquid
to fall through the holes
back into the container.
137
CLEANING AND STORAGE
CLEANING A BRUSH
1 Rinsing the brush in solvent
Submerge the brush’s bristles in the
appropriate solvent for the finishing prod-
uct used (page 16). Swirl the brush in the
solvent, pressing the bristles against the
sides of the container. Work the solvent
through the bristles with your hands until
the brush is clean (left). To remove all the
residue from the brush, wash the bristles
in a solution of mild detergent and warm
water, then pull a brush comb through
them as many times as necessary (below).
138
CLEANING AND STORAGE
2 Spinning the brush dry
To rid a brush of solvent, shake it by
hand or use a brush spinner. In both cas-
es, hold the brush inside a 5-gallon can
to catch the solvent as it sprays from the
bristles. To use a spinner, insert the brush
handle into the device and, holding the
brush in the can, pump the handle to set
it spinning (left). Continue until there is
no longer any solvent flying off the brush.
STORING A BRUSH
Wrapping the bristles
A well-cleaned brush can be stored indefi-
nitely. Wrap the bristles a few times in thick,
absorbent paper. Avoid using plastic wrap,
which will keep the bristles from drying
properly and may leave them limp. The
paper should cover the bristles completely,
extending beyond the tips and over the fer-
rule. Use a rubber band to hold the wrap-
per in place, making sure the elastic grips
the ferrule rather than the bristles (right).
Hang the brush up to dry.
139
GLOSSARY
A-В
Abrasive: Either a coarse powder, or
a piece of paper or fabric coated with
grit particles used to smooth wood
in preparation for finishing or to
abrade finish coats; includes sandpa-
per, abrasive pads, steel wool, pumice
and rottenstone.
Aniline dye: A lightfast, permanent
synthetic dye derived from coal tars;
soluble in water, alcohol or oil.
Artists’ colors: Rich, colored pig-
ments mixed in linseed oil; used to
tint paints and stains.
Base coat: An undercoat of glaze or
paint applied as the first step in many
decorative finishing techniques.
Bleach: A liquid that chemically alters
wood; used to lighten the color.
Bleeding: The tendency of a stain or
grain filler to seep through to the top-
coat. Best avoided by applying a wash
coat on the stain or filler.
Brazilwood: A natural dyestuff extract-
ed from the South American redwood
tree; used in chemical staining of wood.
Bristle brush: A paintbrush with bris-
tles made from the hair of animals,
such as ox, badger, boar or sable.
Bronze powder: Metallic, powdered
pigment used in stenciling or for oth-
er decorative finishes, such as gilding.
Burnisher: A rod-like tool used to
sharpen scrapers.
C
Catalytic finish: A two-part finish
comprising resins and chemical cata-
lysts; the resins react with the catalysts
to oxidize and harden the finish.
Crazing: The tendency of a finish to
fracture erratically as it dries; results
from solvent incompatibility.
Curing: The process by which a finish
hardens completely, leaving it ready
for rubbing out. Curing time varies
according to the type of finish and the
number of coats.
Cut: The number of pounds of shellac
flakes dissolved in each gallon of dena-
tured alcohol. A 3-pound-cut shellac,
for example, contains 3 pounds of
shellac for every gallon of alcohol.
D-E
Distressing: A finishing technique
that involves adding scratches, dents
and other blemishes to the wood or
topcoat to simulate the well-worn
look of an antique.
Driers: Chemicals added to a fin-
ishing product to speed up the
drying time.
Drying oil: One of a group of organ-
ic oils that harden when exposed to
the air; tung oil and boiled linseed oil
are examples.
Dyestuff: A natural coloring agent
extracted from plants or animals and
used as a base for dye stains.
F-G
Fisheye: The tendency of a finish to
show small circular depressions when
contaminated by silicone or wax.
Flat finish: A finish with no sheen;
one that contains flattening agents,
which reduce light reflection.
French polishing: A traditional fin-
ish typically built up with many
layers of shellac to produce a deep,
lustrous sheen.
Gel stain: A blend of pigments and
dyes in a gel that becomes liquid
when stirred.
Glaze: A heavy-bodied stain used in
decorative finishes such as graining
and marbling.
Glossy finish: A finish with a reflec-
tive, shiny surface.
Graining: A decorative finishing tech-
nique in which a specific grain pattern
is replicated on a prepared surface.
H-I-J-K-L
Heartwood: Wood from the center of
a log; generally darker than sapwood.
HVLP: Abbreviation of high-volume,
low-pressure; in finishing, a system
for spraying that uses large volumes
of air at low pressure to turn a liquid
into a fine mist.
Japan color: Highly refined colored
pigments; used to tint stains or
protective finishes such as lacquer
or shellac.
Lacquer: A tough, clear synthetic
finish usually derived from nitro-
cellulose; dries quickly to a flat or
glossy finish.
Lightfast: Describes a stain or dye
that does not readily fade after pro-
longed exposure to light.
Long-oil varnish: Varnish containing
100 pounds of resin for each 40 to 100
gallons of oil, resulting in a product
that dries slowly to a durable and elas-
tic finish. See short-oil varnish.
M-N-O
MSDS: Abbreviation of manufac-
turer’s safety data sheet; the infor-
mation describes the flammability,
volatility and health hazards of a
finishing product.
Marbling: A decorative finishing tech-
nique used to imitate the appearance
of marble.
Mineral spirits: A petroleum-based
solvent commonly used for thinning
various finishes and for cleaning appli-
cation tools.
Mordant: A chemical substance that
changes the color of wood; often used
in conjunction with natural dyes.
140
NGR stain: Abbreviation of non-
grain-raising stain; NGR stains are
made from aniline dyes in a waterless
solution of methanol and petroleum
products; they are designed to avoid
raising the grain of wood.
Orange peel: The tendency of a top-
coat to take on the texture of an
orange peel when the finish is sprayed
poorly or at the wrong viscosity.
Overspray: Dried finish particles that
adhere to the surface, or finish spray
that misses the workpiece and is dis-
persed into the air.
p-Q
Padding: A technique for wiping on
a finish with a cloth pad.
Photochemically reactive: Describes
a finishing product that breaks down
in its chemical structure when
exposed to light.
Pickled finish: An antique finish con-
sisting of a light-colored glaze wiped
over a basecoat.
Pigment: Finely ground, colored par-
ticles of earth or metallic oxides sus-
pended in a liquid to create a stain or
a tint for protective finishes.
Polymerized tung oil: Tung oil that
has been treated with heat to acceler-
ate its drying time.
Polyurethane: A synthetic, durable,
oil-modified urethane varnish that is
resistant to abrasion; available in lus-
ters ranging from flat to glossy.
Pumice: A volcanic rock that is ground
to a powdery consistency for use as
an abrasive.
R
Ray marker: A tool used to produce
grain patterns typical of oak.
Reactive finish: A finish that hardens
when exposed to the air; tung oil, var-
nish and polyurethane are examples.
Rottenstone: A fine abrasive made
from pulverized limestone used to
rub out finishes to a high gloss; tex-
ture is finer than that of pumice.
Rubbing oil: A light oil used as a
lubricant when rubbing out finishes.
Rubbing out: The process of abrading
a topcoat to level the surface and add
sheen to the finish.
S-T-U
Sanding sealer: A preliminary coat
for a lacquer finish.
Sap streak: Pockets of pitch in wood
that tend to bleed into a finish unless
first sealed.
Sapwood: The live wood near the
outside of a log; generally lighter in
color than the interior. See heartwood.
Satin finish: A finish of intermedi-
ate sheen; not as dull as a flat finish,
nor as shiny or reflective as a high-
gloss sheen.
Shellac: A clear finish derived from
the natural secretions of the lac beetle;
sold ready to use or in flakes, which
are then mixed with denatured alcohol.
Short-oil varnish: Varnish containing
100 pounds of resin for each 5 to 12
gallons of oil, resulting in a product
that dries to a hard, glossy finish. See
long-oil varnish.
Smoothing plane: For shaving wood
surfaces smooth and level; longer than
the average jack plane.
Solvent-release finish: A finish that
forms a solid film after the solvent
has evaporated; shellac and lacquer
are examples.
Solvent: A liquid used to dissolve
another substance; examples are
turpentine, mineral spirits, toluene,
acetone and water.
Stain: A finishing product used to
color wood; may contain dyes, pig-
ments or chemicals.
Tack cloth: A cloth dampened with
an oil-and-varnish mixture or with
water; used to remove sanding parti-
cles from wood surfaces.
Tannic acid: A naturally occurring
acid found in wood; changes color
when exposed to certain chemicals.
Thinner: A solvent used to reduce
the consistency of a finish.
Topcoat: The final finishing product
applied to the workpiece.
Tung oil: A water-resistant drying oil
derived from the seeds of the Chinese
tung tree; available in pure, modified
and polymerized forms. Also known
as China wood oil.
Universal color: Concentrated pig-
ments used to tint protective finishes,
such as varnish or lacquer.
V-W-X-Y-Z
Varnish: A clear finish made with
synthetic oils that excels at resisting
water and alchohol.
VOC rating: Indicates the amount of
hazardous organic solvents in a finish;
provided in percent, grams per liter or
pounds per gallon.
Wash coat: A coat of diluted finishing
material for sealing wood pores.
Water-based finish: A product in
which the solvent is primarily water.
Wiping stain: A non-fading stain
containing pigments suspended in oil.
Wood filler: A putty product used for
repairing surface damage in wood, or
a paste used for filling open grain.
141
INDEX
Page references in italics indicate
an illustration of subject matter.
Page references in bold indicate
a Build It Yourself project.
A
Abrasives, 35, 37, 128
Abrasive cord, 40
Making a sandpaper cutting board
(Shop Tip), 37
Rottenstone, 127, 130, 131-132
Shop-made abrasive tape (Shop Tip), 40
See also Pumice
Ammonia, 80-81
Antique effect finishes, 55
Pickling, 75
В
Belt sanders, 23, 35
Blades. See Cabinet scrapers; Hand
scrapers; Planes
Bleaching, 57-58
Block planes, 22, 29
Bronze powder stenciling, 113, 117
Broue de noix, 69
Brushes, front endpaper, 83
A foam brush (Shop Tip), 92
Buffing, 126, 128, 135
Keeping a buffing bonnet grit-free
(Shop Tip), 133
Build It Yourself:
Graining
block cushion grainers, 121
Protective finishes
spray room dollies, 98
turntables for spraying, 100
Surface preparation
contoured sanding block, 39
Burn-in kits, 43, 46
c
Cabinet scrapers, 22, 30, 34
Sharpening, 30-32
using a file clamp (Shop Tip), 31
using a variable burnisher
(Shop Tip), 33
Using old scraper blades to cut half-
blind dovetails (ShopTip), 34
Chemicals:
Ammonia, 80-81
Bleach, 57-58
Mordants, 76-79
Spills, 16
See also Solvents; Stains
China wood oil, 86, 87
Cleaning techniques, 136-139
Chemical spills, 16
Finished surfaces, 134
Decorative painting, 111
Tools, 112
See also Graining; Marbling;
Stenciling
D
Dents:
Repair, 44
Dollies, 98
Dovetail joints:
Using old scraper blades to cut half-
blind dovetails (ShopTip), 34
Drying oils, 87, 134
Preventing reactive finishes from
drying out (Shop Tip),87
Dyes, 55, 59, 60-63, 70
Natural dyes, 69, 76-79
See also Stains
E-F
Ebonizing, 55
A chemical stain for ebonizing
(Shop Tip), 79
File clamps, 31
Finishes. See Decorative painting;
Polishing; Protective finishes; Stains
Fire:
Extinguishers, 12, 17
Safety precautions, 12, 17
Spray rooms, 103
French polishing, 106-109
Making a pumice dispenser
(Shop Tip), 107
Fuming, 80-81
G
Gel stains, 65, 66-67, 70
Glazing stains, 65, 66-67, 70
Grain:
Raising, 21, 50
Grain filler, 21, 51-53
Coloring grain filler (Shop Tip), 50
Lightening wood with grain filler
(Shop Tip), 58
Graining, 111, 118-120
Tools, 112,121
H
Half-blind dovetail joints:
Using old scraper blades to cut half-
blind dovetails (Shop Tip), 34
Hand scrapers, 21, 22, 30, 33
Sharpening, 30-32
using a file clamp (Shop Tip), 31
using a variable burnisher
(Shop Tip), 33
Using old scraper blades to cut half-
blind dovetails (ShopTip), 34
High-volume, low-pressure spray
systems, 93, 94
Holes:
Filling
filling a damaged corner
(Shop Tip), 49
Patching, 47-49
HVLP spray systems, 93, 94
I-J-K
Insurance:
Spray rooms, 103
Japan colors, 65, 66-67, 70
Jigs:
Block cushion grainers, 121
Supports for drying (Shop Tip), 74
Turntables for spraying, 100
Variable burnishers (Shop Tip), 33
L-M-N
Lacquers, 90, 134
Liming, 75
Linseed oil, 9, 87
Marbling, 110, 122-125
Tools, 112
McGoldrick, Paul, 6-7
Metric measures:
Conversion, back endpaper
Mordants, 76-79
Moser, Thomas, 8-9
Natural dyes, 76-79
NGR stains, 60, 61
O-P-Q
Padding lacquers, 106
Palm sanders, 23, 35
Paste wood filler. See Grain filler
Patching compounds, 43, 45-46
Filling a damaged corner
(Shop Tip), 49
Using a glue gun to apply shellac
stick (Shop Tip), 46
Pickling, 75
Pigment stains, 55, 59, 64 67, 70
See also Stains
Planes, 20, 21, 22, 24
Adjustment, 27-28
Sharpening, 24, 25-27
Planing, 21, 28-29
Polishing:
Waxing, 127, 135
See also Buffing; Rubbing out
Polyurethanes, 88
Pore filler. See Grain filler
Power tools. See Sanders; Sprayers
Product labels, 18
Protective clothing, 12
Protective finishes, 83, 86, 87-90
Application techniques, 83, 86
brushing, 83, 92
flooding, 83
French polishing, 106-109
padding, 91
spraying, 82, 83, 97-101, 100
spraying problems, 104-105
wiping, 83, 91
Curing, 129
142
Tools, 85
a foam brush (Shop Tip), 92
sprayers, 84, 85, 93-96, 101
viscosity cups, 89, 96
Types
drying oils, 87, 134
lacquers, 90, 134
polyurethanes, 88
shellacs, 89, 106-109, 134
varnishes, 83, 88, 134
See also Buffing; Rubbing out; Waxing
Pumice, 130, 131 132
French polishing, 107-108
Making a pumice dispenser
(Shop Tip), 107
R
Raising the grain, 21, 50
Random-orbit sanders, 38
Reactive finishes, 87
Preventing reactive finishes from
drying out (Shop Tip), 87
Repairs:
Finished surfaces, 134
Surface preparation, 43-49
gluing an edge splinter back
(Shop Tip), 44
Respirators, 12, 14-15
Storing respirator cartridges
(Shop Tip), 15
Rottenstone, 127, 130, 131-132
Rubbing compounds, 133
Rubbingout, 126-133
Tools, 128
Safety precautions, 12-13
Bleach, 57
Dual-cartridge respirators, 12, 14-15
storing respirator cartridges
(Shop Tip), 15
Fire, 12, 17, 103
Mordants, 77
Protective clothing, 12
Spray booths, 13, 84
Spray rooms, 102-103
Sanders, 23, 35, 38
Buffing bonnets, 726, 128, 133
keeping a buffing bonnet grit-free
(Shop Tip), 133
See also Abrasives
Sanding, 35-36
Curved surfaces, 38, 40
Finding flaws (Shop Tip), 41
Removing dust particles, 42
making a tack cloth (Shop Tip), 42
Tight spots, 47
See also Sanders
Sanding blocks:
Contoured sanding blocks, 39
Curved surfaces, 38
Shop-made sanding blocks
(Shop Tip), 36
Sandpaper. See Abrasives
Savoy, Prew, 10-11
Scrapers. See Cabinet scrapers;
Hand scrapers
Scraping, 33-34
Scratches:
Repair, 134
Shellacs, 89, 134
French polishing, 706 709
making a pumice dispenser
(Shop Tip), 107
Shellac sticks, 43, 45-46
using a glue gun to apply shellac
stick (Shop Tip), 46
Shop Tips:
Decorative finishes, 774, 7 75
Protective finishes, 87, 92, 107
Rubbing out, 733
Safety, 75
Staining, 58, 69, 71, 73, 74, 79
Surface preparation
grain filler, 50
repairs, 44, 46, 49
sanding, 36, 37, 40, 47, 42
scraping, 37, 33, 34
Smoke detectors, 7 7
Solvents:
Product labels, 18
Protective finishes, 86, 103
Safety precautions, 12-19, 84, 102-103
Toxicity, 79, 86, 103
Waste disposal, 72, 13, 76
Sprayers, 84, 85, 93-96
Cleaning, 707
Viscosity cups, 89, 96
Spraying, 97, 99, 7 07
Dollies, 98
Problems, 104-105
Spray booths, 73, 84
Spray rooms, 102-103
Turntables, 100
Staining, 54, 55, 71-74
Controlling the flow of stain
(ShopTip), 77
End grain, 69
Getting stain into tight spots
(Shop Tip), 73
Pickling, 75
Supports for drying (Shop Tip), 74
Tools, 56
See also Bleaching; Fuming
Stains:
Chemical, 76-79
a chemical stain for ebonizing
(Shop Tip), 79
Dyes, 55, 59, 60-63, 70
natural dyes, 69, 76-79
Pigment stains, 55, 59, 64-67, 70
Preparation, 68
preparing a natural walnut stain
(Shop Tip), 69
See also Staining
Stenciling, 7 7 7, 113-116
A cure for bleeding (Shop Tip), 775
Bronze powder, 7 73, 117
Patterns, back endpaper, 113-114
projecting a pattern (Shop Tip), 774
Tools, 772
Surface preparation, 21
Repairs, 43-49
filling a damaged corner
(Shop Tip), 49
gluing an edge splinter back
(Shop Tip), 44
See also Planing; Sanding; Scraping
T
Tack cloths:
making a tack cloth (Shop Tip), 42
Tools:
Decorative painting, 112
Protective finishes, 84-85, 92
Rubbing out, 128
Spray booths, 7 3, 84
Spray rooms, 102-103
Staining, 56
Storage, 136, 137, 139
Surface preparation, 22-23
Variable burnishers, 33
See also Abrasives; Brushes; Cabinet
scrapers; Hand scrapers; Planes;
Sanders; Sanding blocks; Sprayers
Tung oil, 86, 87
U-V-W-X-Y-Z
U.S. measures:
Conversion, back endpaper
Vapor pressure, 18
Variable burnishers, 33
Varnishes, 83, 88, 134
VOC (Volatile Organic Compound)
rating, 18
Walnut oil, 87
Walnut stains:
preparing a natural walnut stain
(Shop Tip), 69
Wash coats, 21, 51, 53
Waste disposal:
Solvents, 72, 13, 16
Waxing, 127, 135
Wax sticks, 43
Wiping stains, 64-65, 70
Wood:
Color, 55
Grain, 57
Wood filler, 43, 45
Filling a damaged corner (Shop Tip), 49
143
ACKNOWLEDGMENTS
The editors wish to thank the following:
SAFETY
DeVilbiss Spray Booth Products Co., Barrie, Ont;
Chris A. Minick, Stillwater, MN
PREPARING THE SURFACE
Adjustable Clamp Co., Chicago, IL; American Tool Cos.,
Lincoln, NE; Black and Decker/Elu Power Tools, Hunt Valley, MD;
Delta International Machinery/Porter Cable, Guelph, Ont.;
Hitachi Power Tools U.S.A. Ltd., Norcross, GA;
Lee Valley Tools Ltd., Ottawa, Ont.; Record Tools Inc, Pickering, Ont.;
Stanley Tools, Division of the Stanley Works, New Britain, CT;
3M Canada, Dorval, Que.; Veritas Tools Inc., Ottawa,
Ont./Ogdensburg, NY
CHANGING THE COLOR
Adjustable Clamp Co., Chicago, IL; Jonathan B.Kemp, H. Behlen Co.,
Amsterdam, N.Y.; Olde Mill Cabinet Shoppe, York, PA;
Wagner Spray Tech Corp., Minneapolis, MN
DECORATIVE FINISHES
Advanced Equipment Manufacturing Company, Inc., Chicago, IL;
Lee Valley Tools Ltd., Ottawa, Ont.
PROTECTIVE FINISHES
DeVilbiss Ransburg Industrial Coating Equipment, Barrie, Ont.;
DeVilbiss Spray Booth Products Co., Barrie, Ont.;
The Hydrocote Co. Inc., East Brunswick, NJ;
Wagner Spray Tech Corp., Minneapolis, MN
FINISHING TOUCHES
Delta International Machinery/Porter Cable, Guelph, Ont.;
H. Behlen Co., Amsterdam N.Y.; 3M Canada Inc.,
Dorval, Que.
CLEANING AND STORAGE
Lee Valley Tools Ltd., Ottawa, Ont.
Chris A. Minick, Stillwater, MN
The following persons also assisted in the preparation
of this book:
Elizabeth Cameron, Donna Curtis, Lorraine Dore,
Kent J. Farrell, Kam Ghaffari, Michel Giguere,
Serge Guibord, Brian Parsons, Maryo Proulx
PICTURE CREDITS
Cover Paul McCarthy/Au Puits de Lumiere
6,7 Ronald Maisonneuve
8,9 Grace Huang
10,11 Ian Gittler
144
WORKSHOP GUIDE
U.S. AND METRIC
CONVERSION U.S. MEASURE CONVERSION FACTOR METRIC MEASURE
To find the metric measure Weight
equivalent of a U.S. measure in
the left-hand column, multiply Pound 0.454 Kilogram
by the conversion factor in the
center column. To find the U.S. Ounce 28.350 Gram
measure equivalent of a metric Volume (Liquid)
measure in the right-hand column,
divide by the conversion factor. Gallon 4 Quarts 3.785 Liter
16 Pints 3.785 Liter
128 Fluidounces 3.785 Liter
Quart 2 Pints 0.946 Liter
32 Fluidounces 0.946 Liter
Pint 16 Fluidounces 0.473 Liter
Half pint 8 Fluidounces 0.236 Liter
Fluidounce 29.573 Milliliter
STENCIL PATTERN
This fruit fowl pattern was
a commonly used motif on
19th Century furniture. To
make a stencil I com it to
decorate your own furni-
ture, fol'ow the steps
st&^trg on page 115
ISBN 0-8094-9912-6