/


Текст
L>o
How to Make Beaded
by Julie Collings & Candice Elton
KLUTZ
Buzz
Baby
Biaierfly
page 14
1.17,in! i
page 26
Grasshoppi
page 54
Dancin 'Ants
page 50
Whiffy Skunk
page 30
rlL COLOKS
Haby Tree Frog
page 34
What you get
with this
• a super-cool,
handydandy
bead wheel lo
store your beads
book
2 spools of
34 gauge wire
Other household
items you’ll need:
A ruler to measure
out your wire
and a pair of
scissors or nail
Q/ clippers to cut your
wire. (Don’t use your
mom or dad’s
best pair!) У
8 mm
wonder beads
(for the angel and
lhe mermaid's head)
4 mm
’*•5120 4
bugle beads
’’•size 10
seed beads
* 4 mm
wonder beads
(for lhe eyes of lhe
baby tree frog)
(for lhe eyes of
lhe giant tree frog)
What if I need more beads or
wire? Search out your local bead
store or craft store to find more wire
and beads. Or you can order more
stuff through the Klutz Catalog.
(See catalog request card on last page.)
Angel page 70
P^e66
Tritpica I Tish page 80
± Starfish page 8'1
Mermaid
page 74
Sparkle
Seahorse
page 86
People.
People,
(•"д People
Before diving into the projects...1
Read This Stuff First!
Look for the Tips!
There are helpful hints
strategically placed throughout
the book. They’ll help
make the projects
easier for you. _A;
Very First Project
** *•' Start by making the first project in
the book: The Вам BEE. It’ll teach you
the Back & Forth beading technique that’s
used throughout the book.
Threading Beads with Ease
Start each project by cutting the
length of wire needed. Poke
the wire end into
the bead and
slide the bead up
the wire with
your fingers
Crinkly Wire?
When your wire looks (Цр here,
like this... ~ ——
use scissors or nail clippers to clip
the end to make beading easier.
Avoid Kinks!
Kinks in your wire can make
beading difficult. Straighten them
OUt before beading ОП.Try to avoid this.
'40, what
can I do with
my beadlings after
I've made them?
'There are so many different things
you can do with your beadling
creations. Here are just a few:
Use them as necklace or bracelet charms
Glue them to a headband
Make them into hair clips
Glue them to a picture frame
Attach them to gift tags
Make them into decorative pins
Create bookmarks with them
A Note from the Authors
The idea for this
book came from our
own kids. They
started making
beadlings to give to
their friends at
school. Soon we were
making patterns for
everything. l.,et your
imaginanon go wild
and create your own
beadling designs.
This project
teaches the
basic Back &
Forth beading
technique.
< Once you
learn this, you
can do all the
projects in this
book with
cqsc!
гонг
String one black seed
bead on rhe center of
a 20" wire.
Thread wire В back
through the bead as
shown. •
Pull both wire ends to
snug the wire loop around
the bead.
A В
Thread wire A
back through the
beads in the
opposite direction
as shown.
Pull snug.
Thread wire A back
through the three
beads.
Pull both
wires snug.
Congratulations! You зге well
on your way to mastering the
Back & Forth technique.
String another
black seed bead
on wire B.
Now thread
three seed
beads on
wire B.
в
Pull those
wires snug!
Pull snug.
в
| For row four, string
J four yellow seed
beads on wire A.
Thread wire В back
through the beads in
the opposite direction
And now...
you guessed it...
pull your wires
12
Okay, you’re ready to do
this on your own.
Follow the pattern
shown in the drawing
and bead on the next
two rows using the Back
Pull snug.
Curl the wire ends
around о toothpick
to moke the .
< cr
*7 antennae.
'?W~
direction.
Hold the first
wing bead next to
the body as у on
pull the wire
snug.
Using the Back &
Forth technique,
bead two more rows
following the pat-
tern below. Finish
with antennae or a
pendant loop.
For the pendant loop, loop
both wires, thread the ends
through a bead and secure
by twisting.
String 12 clear seed beads
on wire A. Thread the end
of the wire back through
the first bead as shown.
Pull snug. Repeat on the
other side.
String three
black seed beads
on wire A.
Thread wire
В through
the beads in
the opposite
String three seed beads on wire A. Thread
wire В back through the beads in rhe oppo-
site direction as shown. Do this twice.
. .4» '
String one seed bead on the
center of a 24" wire. Thread
wire В back through the bead
as shown.
String ten seed beads on wire A.
Thread the end of the wire back
through the first wing beads as
shown. Pull snug. Repeat on wire B.
A A
Hold the first
wing bend next to
the body as you
pull the wire snug.
Repeat on the
other side.
14
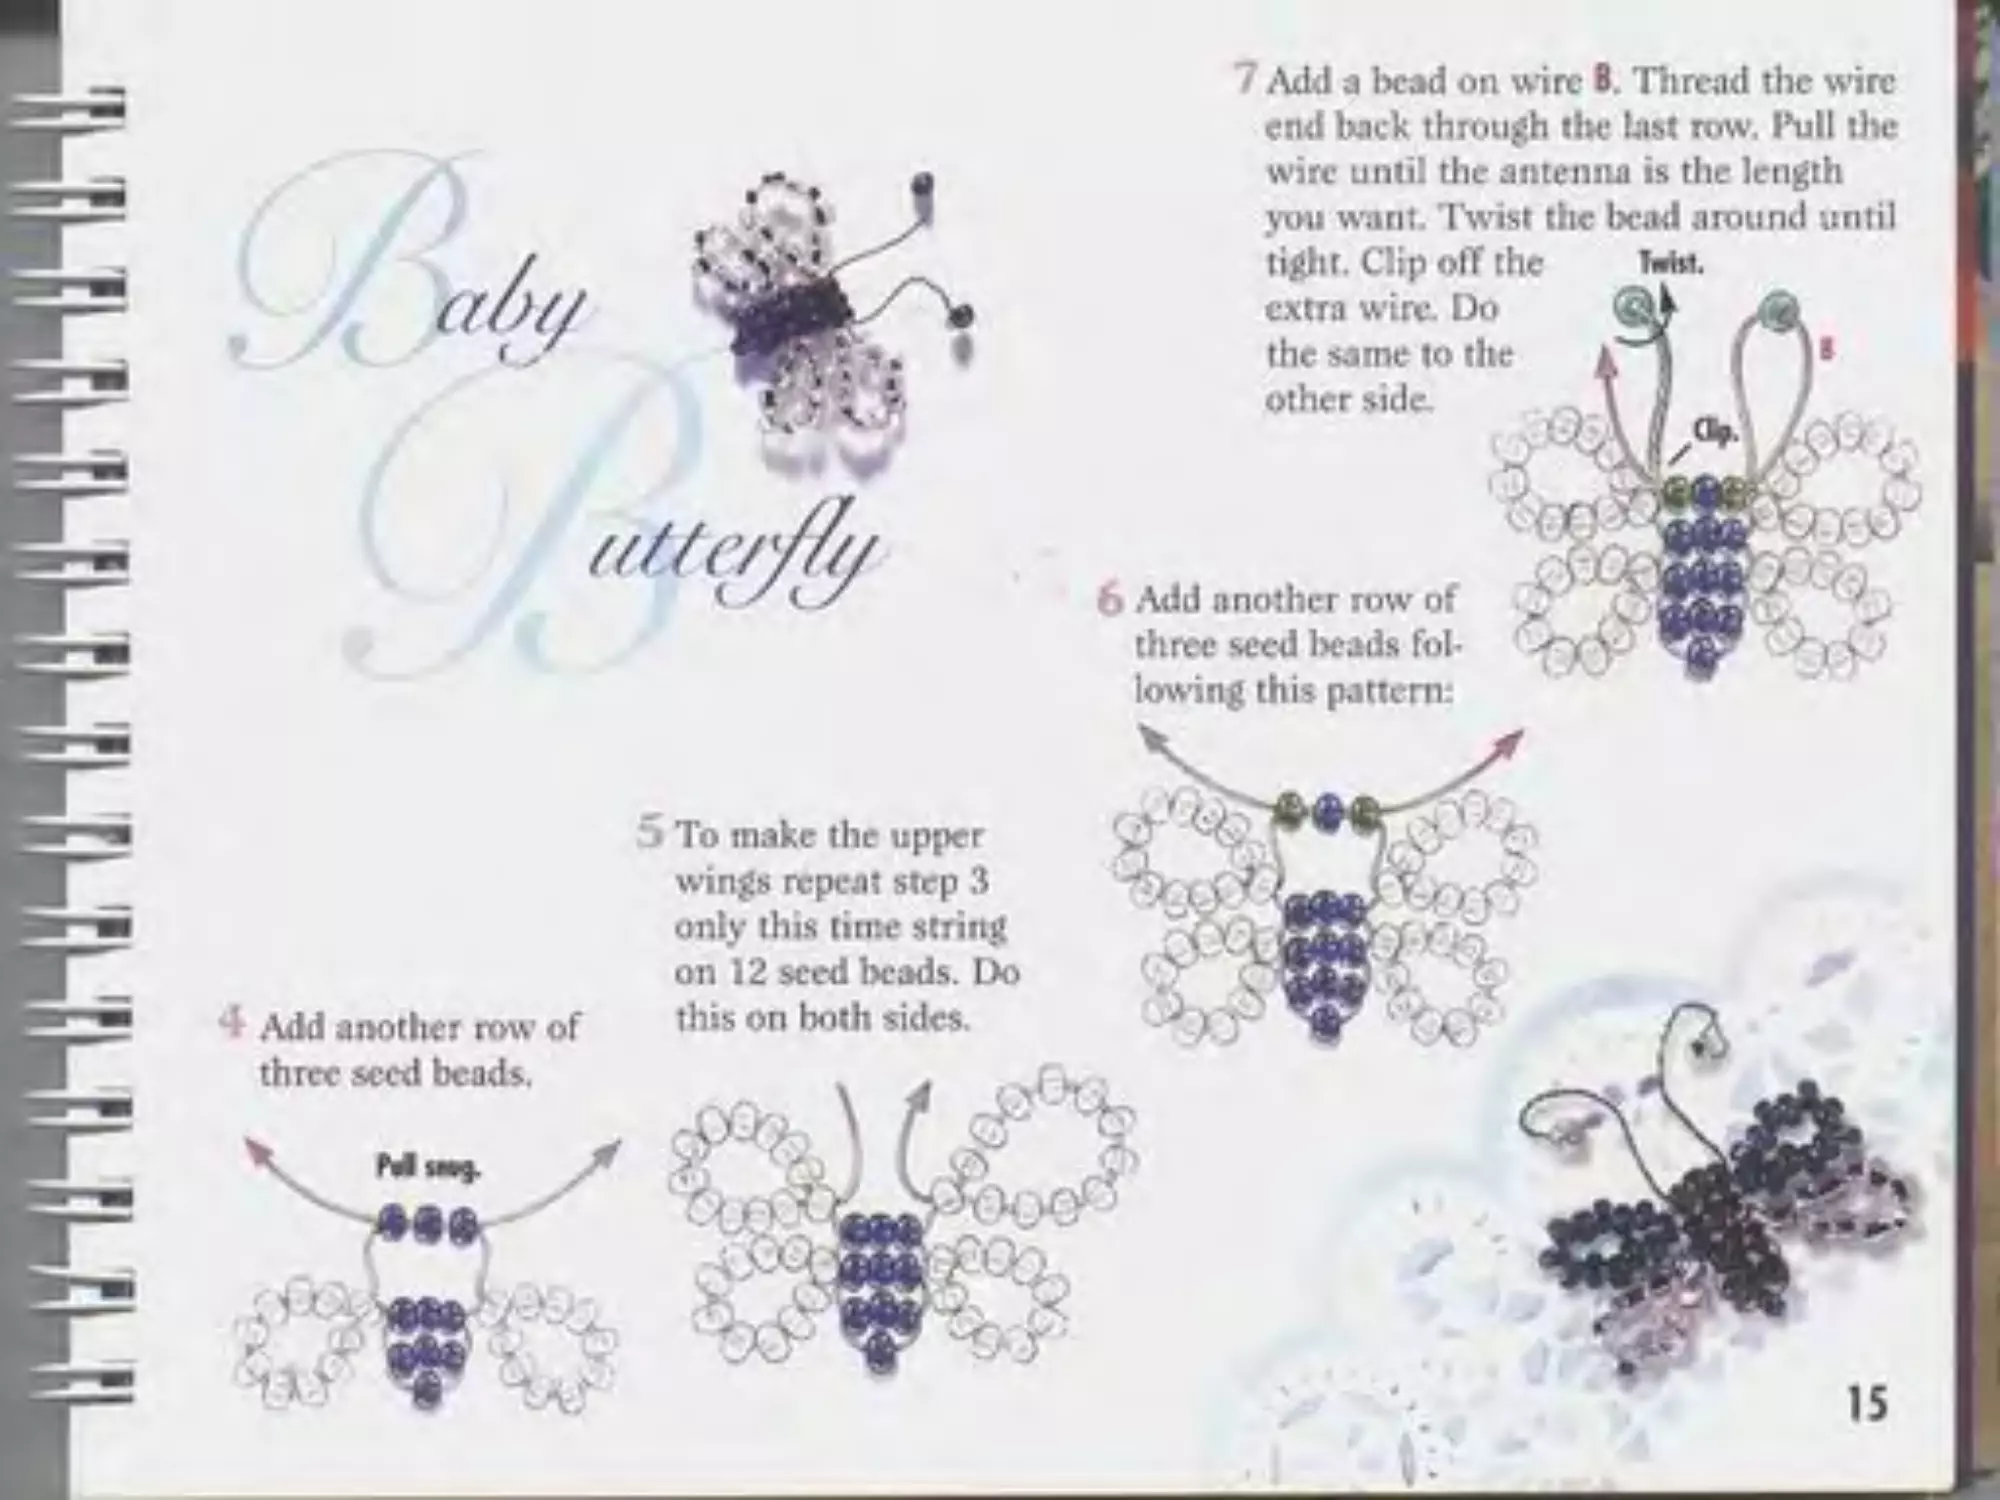
7 Add a l>ead on wire B. Thread the wire
end back through the List row. Pull the
wire until die antenna is the length
you want. Twist the bead around until
tight. Clip off the
extra wire. Do
the same to the
other side.
b Add another row of
three seed beads fol-
lowing this pattern:
z/Z/r/^z
' Add another row of
three seed beads.
5 To make the upper
wings repeat step 3
only this time string
on 12 seed beads. Do
this on both sides.
1Г И
Pull snug.
Damsel flu
String five seed beads on the
center of a 24" wire following
the color pattern. Thread wire
A back through the two beads.
String three turquoise seed
beads on wire A. Thread
wire В through the beads in
the opposite direction.
Pull snug.
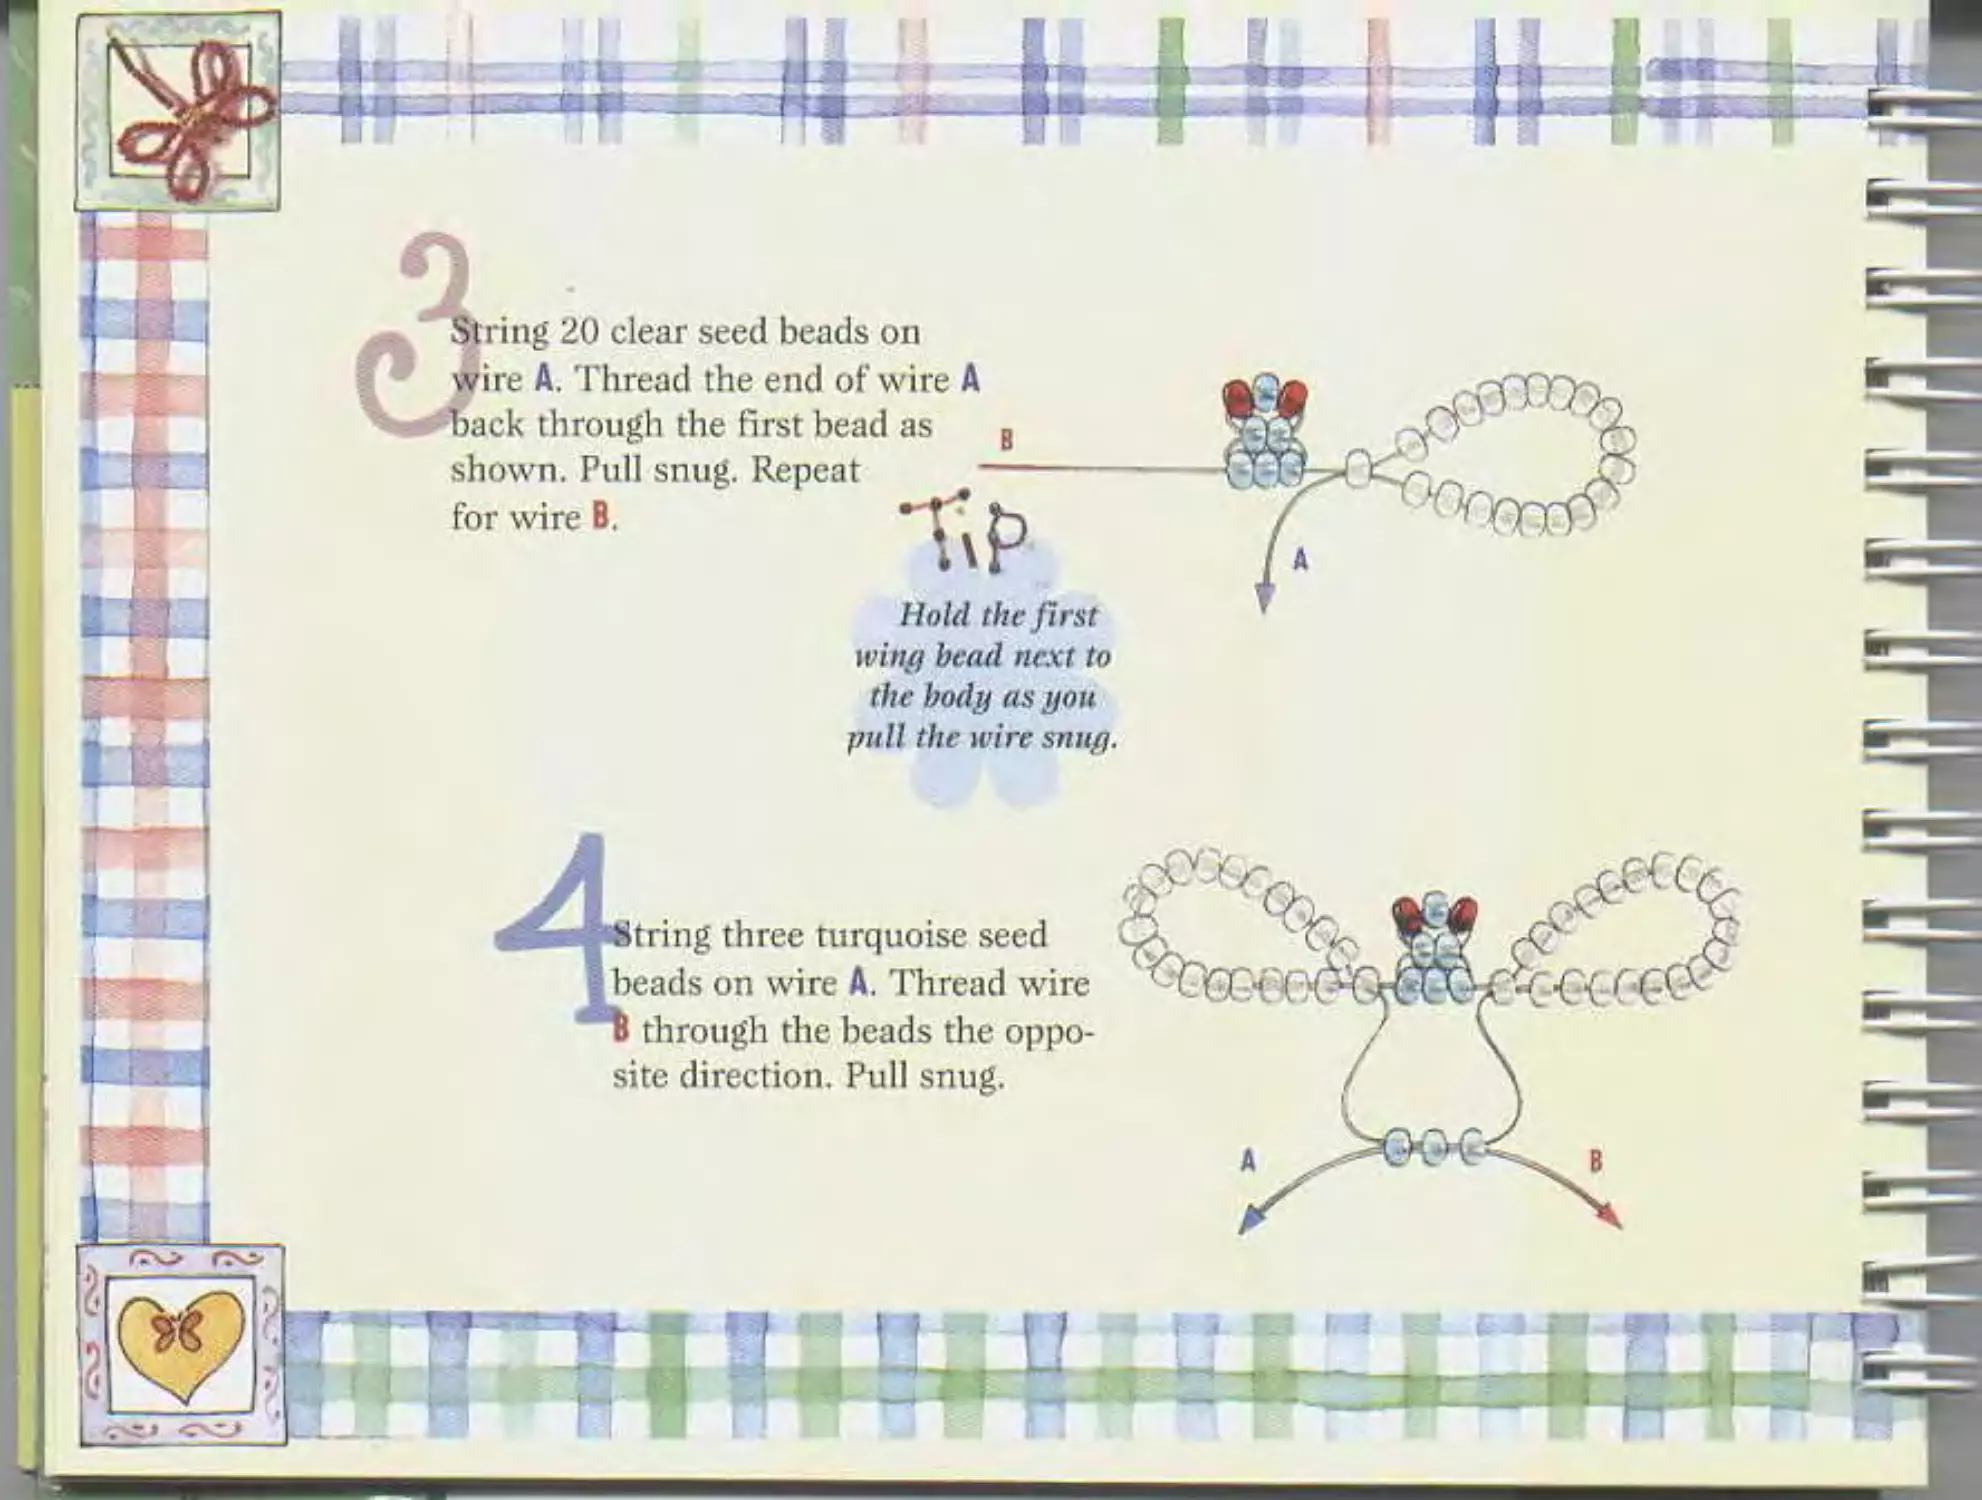
ring 20 clear seed beads on
ire A. Thread the end of wire A
ack through the first bead as
shown. Pull snug. Repeat
for wire B.
Hold the first
winy bead next to
the body as you
pull the wire snug.
tring three turquoise seed
beads on wire A. Thread wire
through the beads the oppo-
site direction. Pull snug.
4
epeat step 3 to make
le second set of wings.
Add the tail by stringing this pattern of
beads onto both wires. Loop one wire
around and through the last seed bead as
shown. Hold tail close to the body as you
pull snug.
Pull wires
snug.
To finish, loop
one wire around
snug.
String wing beads.
snug.
String wing beads on wire©
following the color pattern above.
Thread the end of wire © back
through the first seed bead as
shown below. Pull snug.
Repeat on the
other side.
String four seed beads
on wire ©. Thread wire
О through the beads in
the opposite direction
as shown. Pull snug.
String six seed
beads on the cen-
ter of a 40" wire
following the
color pattern.
Thread wire©
back through the
three beads as
shown.
;•«««€ ~=
О о
л
21
Pull snug
offer each row.
dkute, bead on the
4ws, following
ttem.
4 Repeat step 2 for botk-
wire © and О lo create
the second set
of wings.
With both wires together, string on the
tail beads following' the pattern. Loop
either wire © or wire О around
and through the last seed bead
as shown. Hold tail beads
close to the body as you
pull snug. Clip ends
of wire to finish.
hete"
putt snug-
Pull snug.
Д Bead on the next four rows
following the color pattern.
To end, thread wires back
through the wing as shown.
ZTTX cliP extra wire.
L -si
' ж_________________________
i' J Adding the Wings
Cut a p*ece °f ю" vv^re
- 7 V and thread it through two
--J of the top body beads.
On the new wiiv, «
) the Back & Forth
technique, make one
c *»vo red beads.
u.._ • wire, using
the Back & roid*
~ make one
ro* of *
String two orange seed beads on
one orange seed bead on the
of a 24" wire. Thread wire В
hack through the bead as shown.
on the next
rows following
is color pattern:
wire A. Thread wire В back
through the beads as shown.
26
tring three orange seed
eads and three red seed
beads on wire A.
Loop wire A around the
red beads and thread it
To avoid having a gap
between the leg and the
bodg, slide the beads
toward the bodg before
gou pull snug.
back through the orange
beads as shown.
Repeat
for wire B.
28
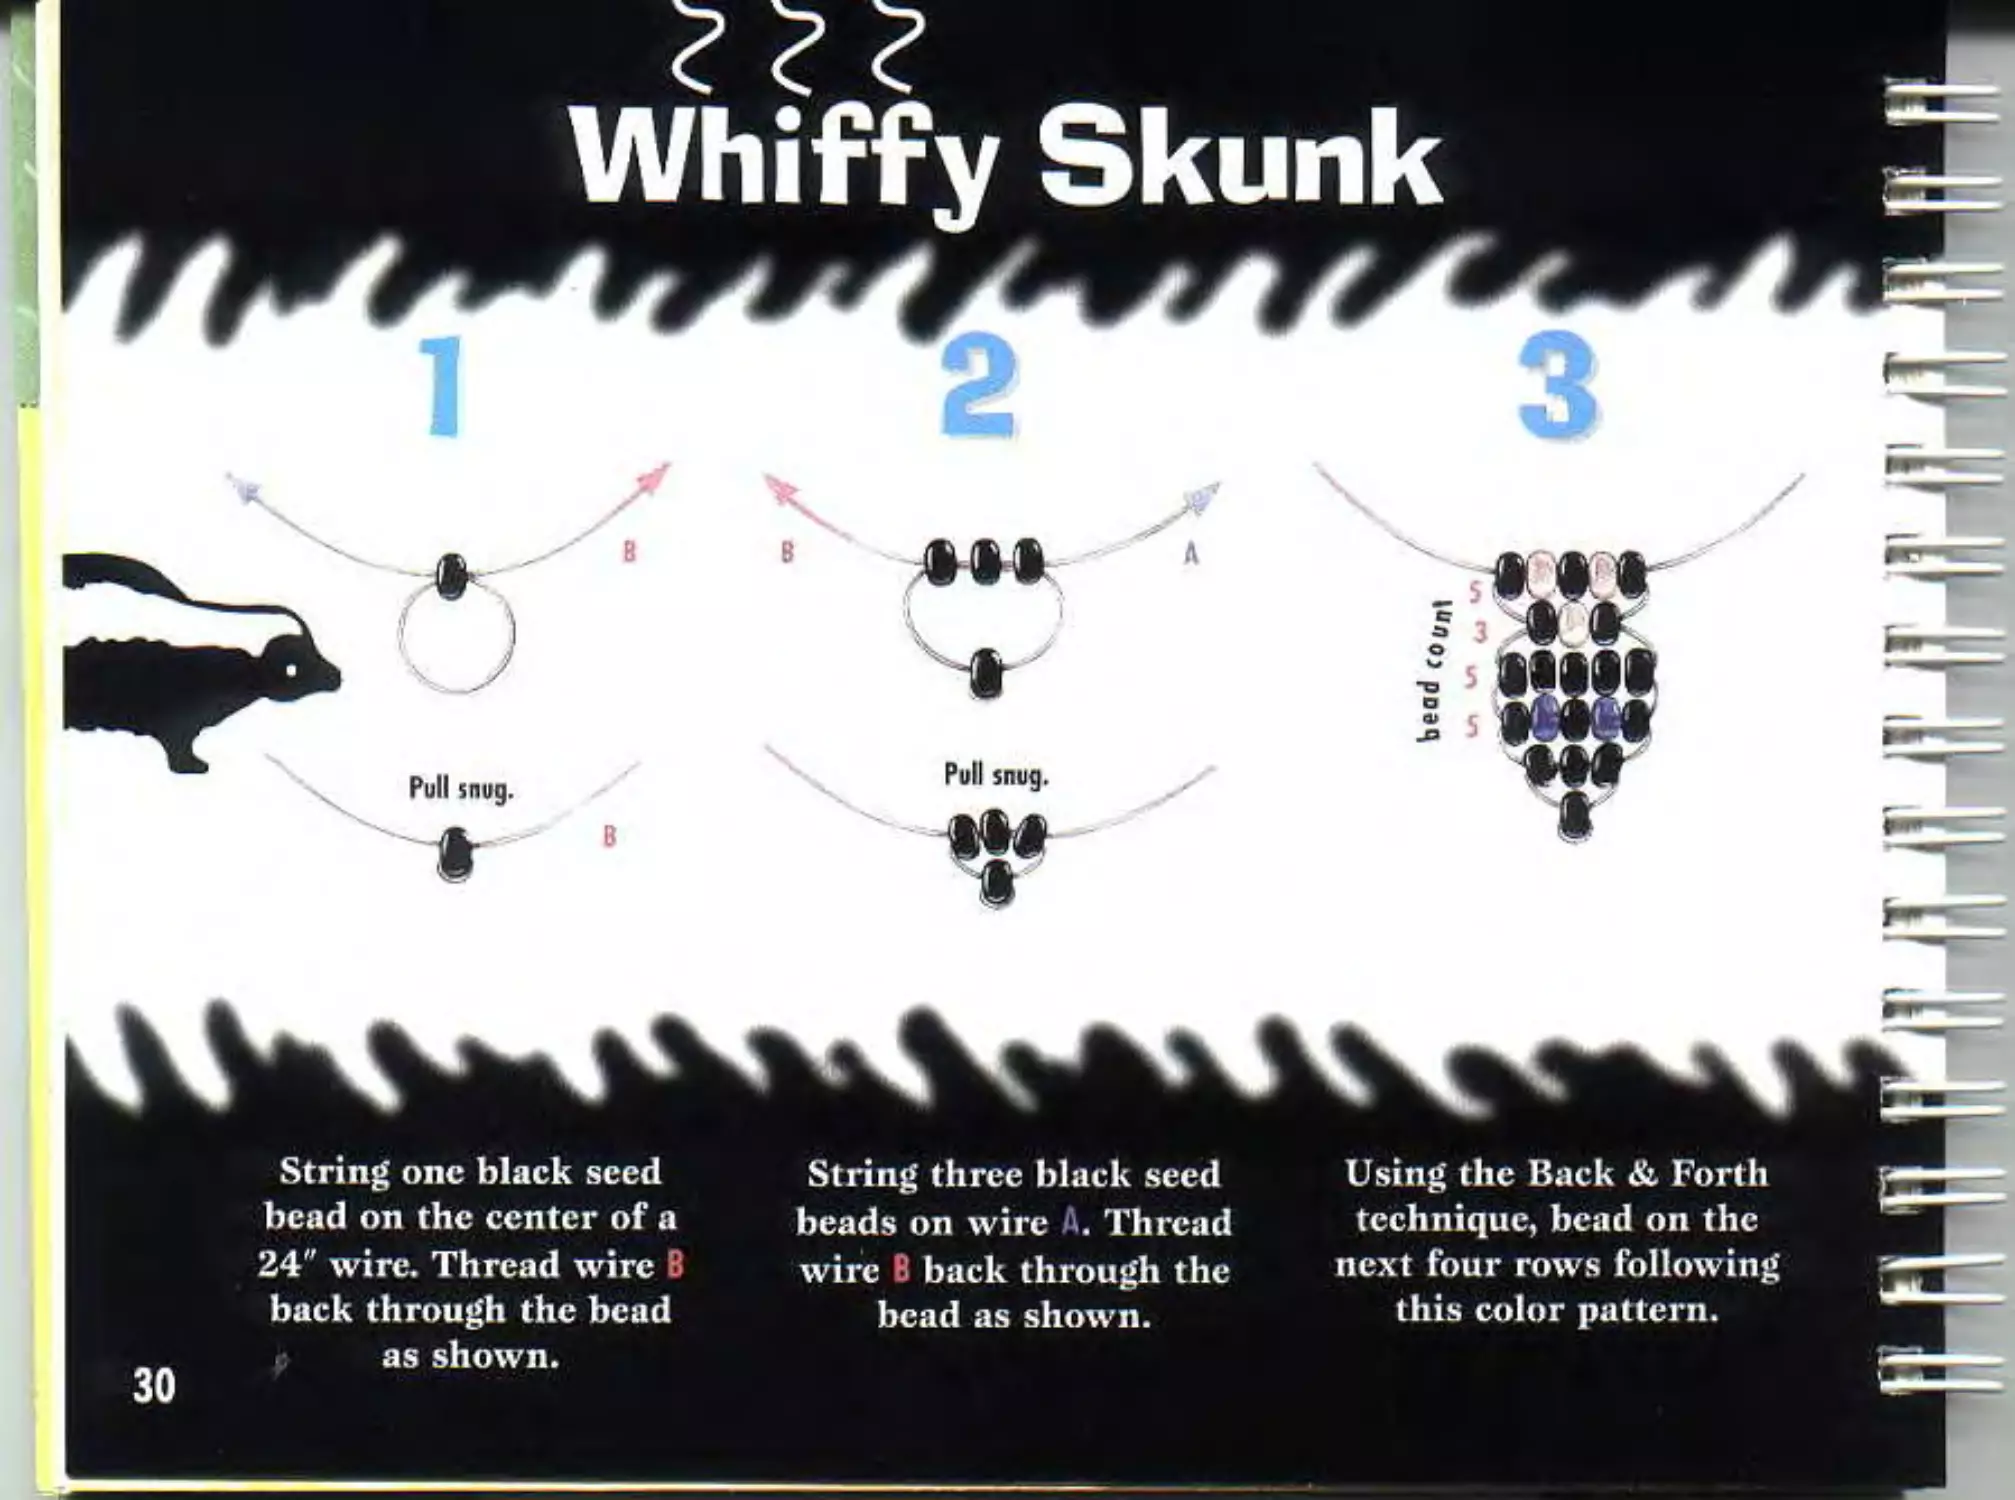
Whiffy Skunk
Using the Back & Forth
technique, bead on the
next four rows following
this color pattern.
String three black seed
beads on wire A. Thread
wire В back through the
bead as shown.
String one black seed
bead on the center of a
24" wire. Thread wire 8
back through the bead
as shown.
30
р То avoid
• A F having а дар
* between the leg
and the body, slide
the beads toward
the body before you
pull snug.
Loop wire
around
\ 3 beads.
Thread wire back
through the
other 3
beads.
1 Pull snug. Repeat
J for second leg.
String on 6 beads.
String six black seed beads on wire A. Loop
wire A around the first three black beads
and thread it back through the last black
beads as shown. Pull snug. Repeat on
the other side of your skunk.
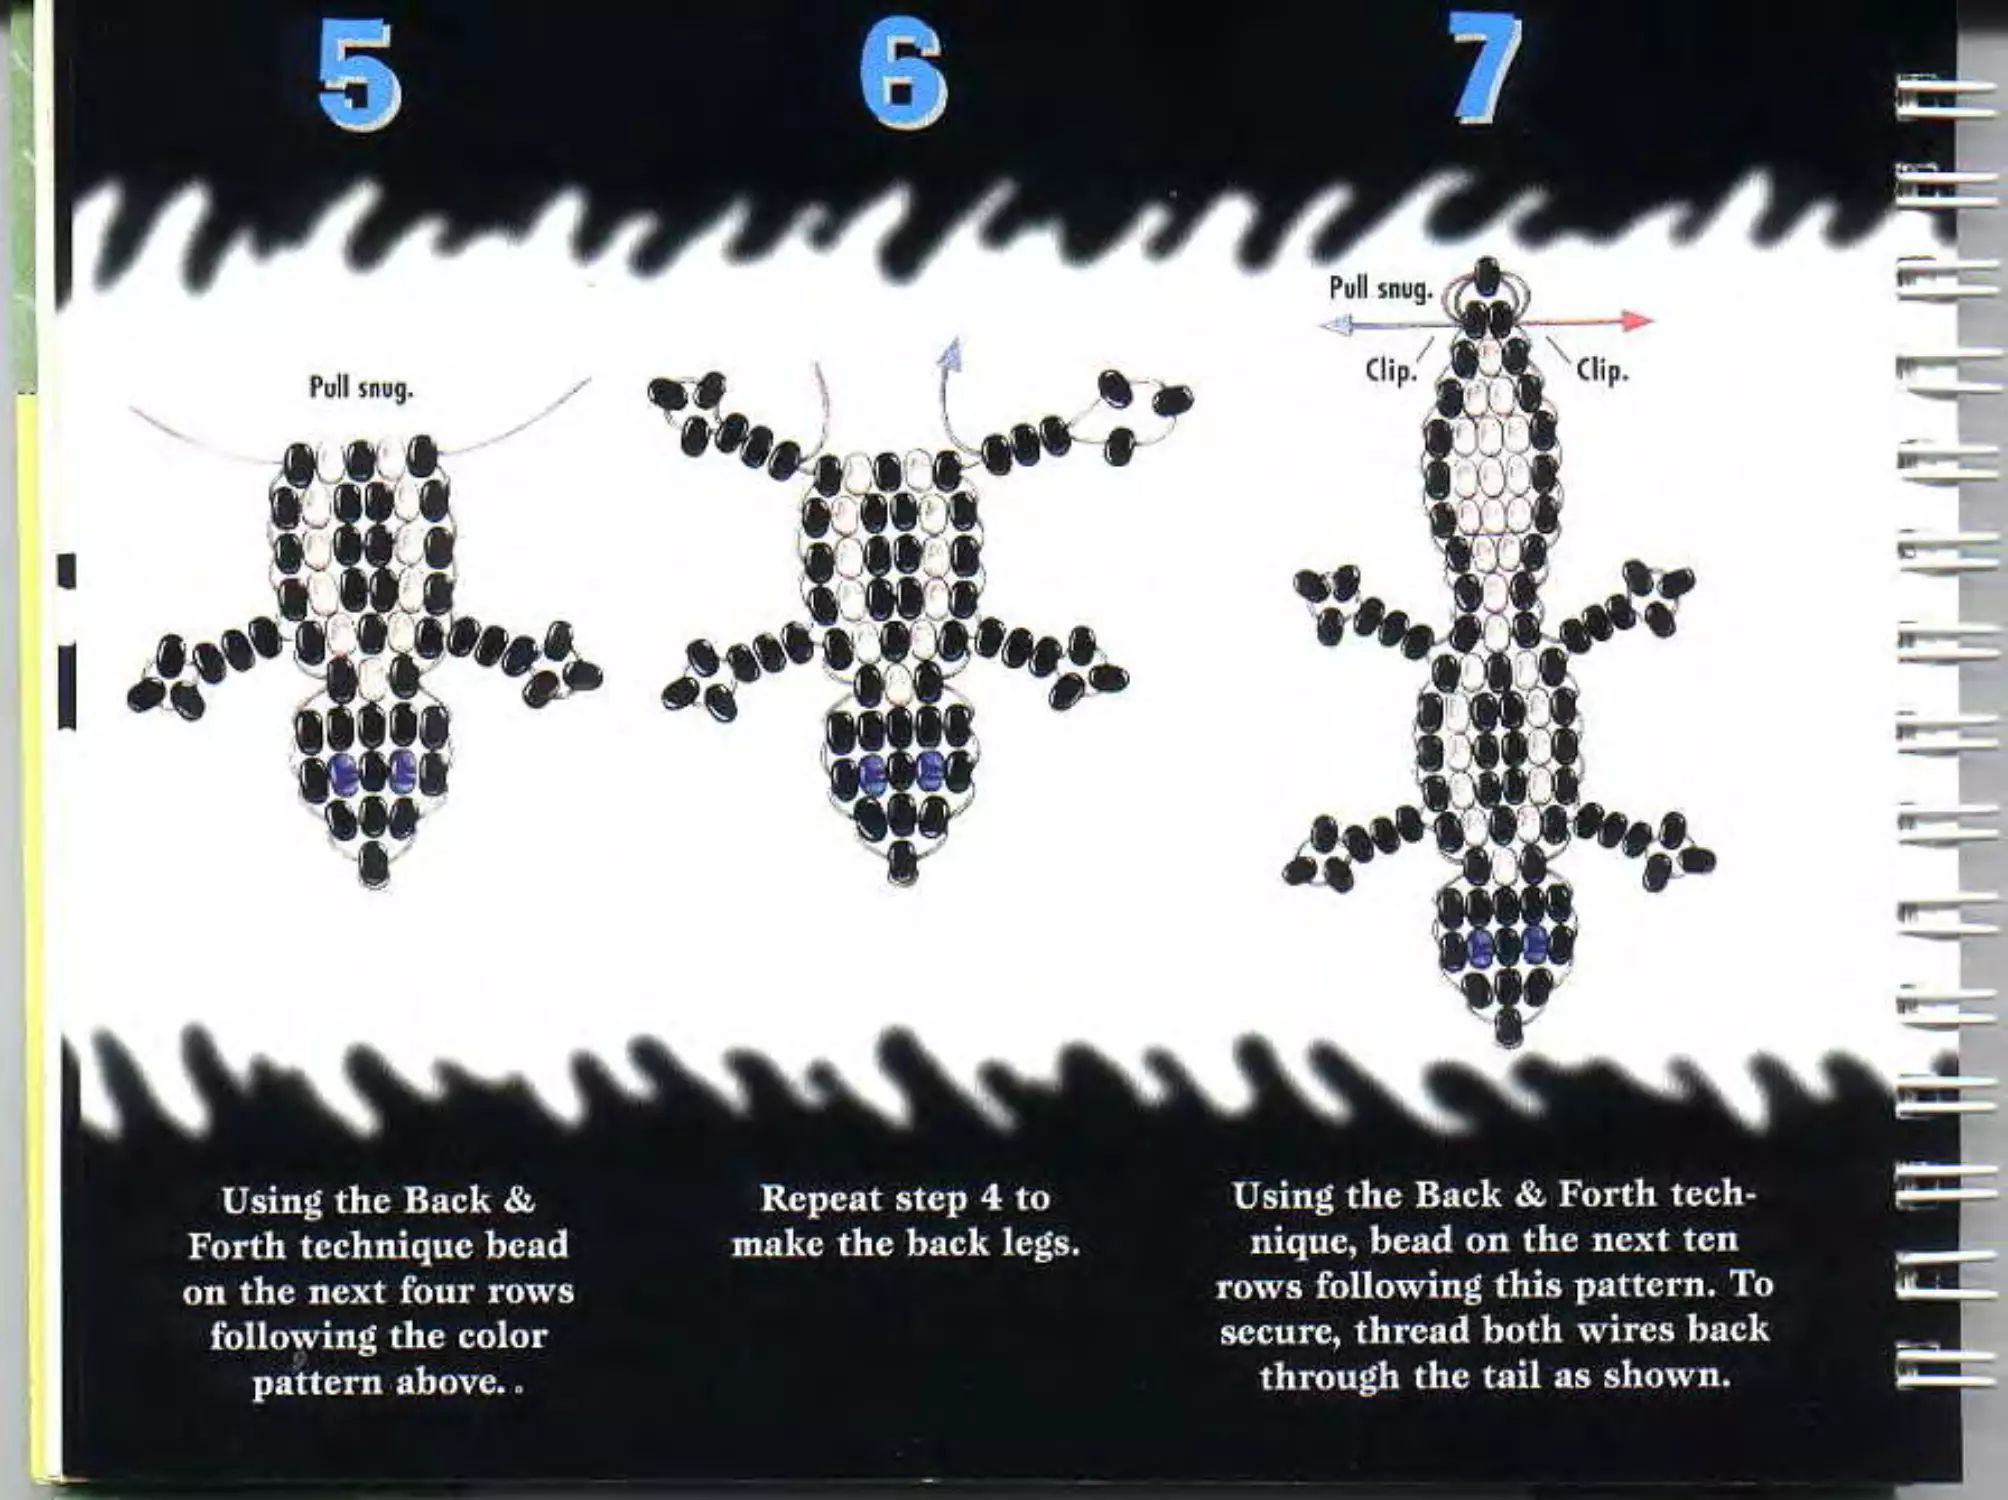
Repeat step 4 to
make the back legs.
Using the Back & Forth tech-
nique, bead on the next ten
rows following this pattern. To
secure, thread both wires back
through the tail as shown.
Using the Back &
Forth technique bead
on the next four rows
following the color
pattern above..
Pull snug.
, Clip.
I Л*****?*****Д ??•**• »V
! /bZ.<aa «Хш
я
11» Шт 1Нмы.
2 String six orange seed
beads on wire A. Thread
wire В through the
beads in the opposite
direction. Pull the petal
beads as close to the
stem as you can.
3Now string one yellow
seed bead on wire A.
Thread wire A back
through three seed
beads as shown. Bend
the petals around the
yellow bead to form
the flower. To finish off,
wind both wires
around the top
fV of the stem.
• To odd the
flower to your
skunk: Wind
I both wires о
ew times
around your
skunk's hand.
B;dip the
ft- excess wire.
String one seed bead and one
small wonder bead on the
center of a 20" wire. Loop
wire A around the seed
bead and back through the
wonder bead.
End up like this with
о little space between
the two eyes.
4*>'- ' v‘ - •
Repeat step i on wire B,
but this time thread on
the wonder bead first and
< then the seed bead.
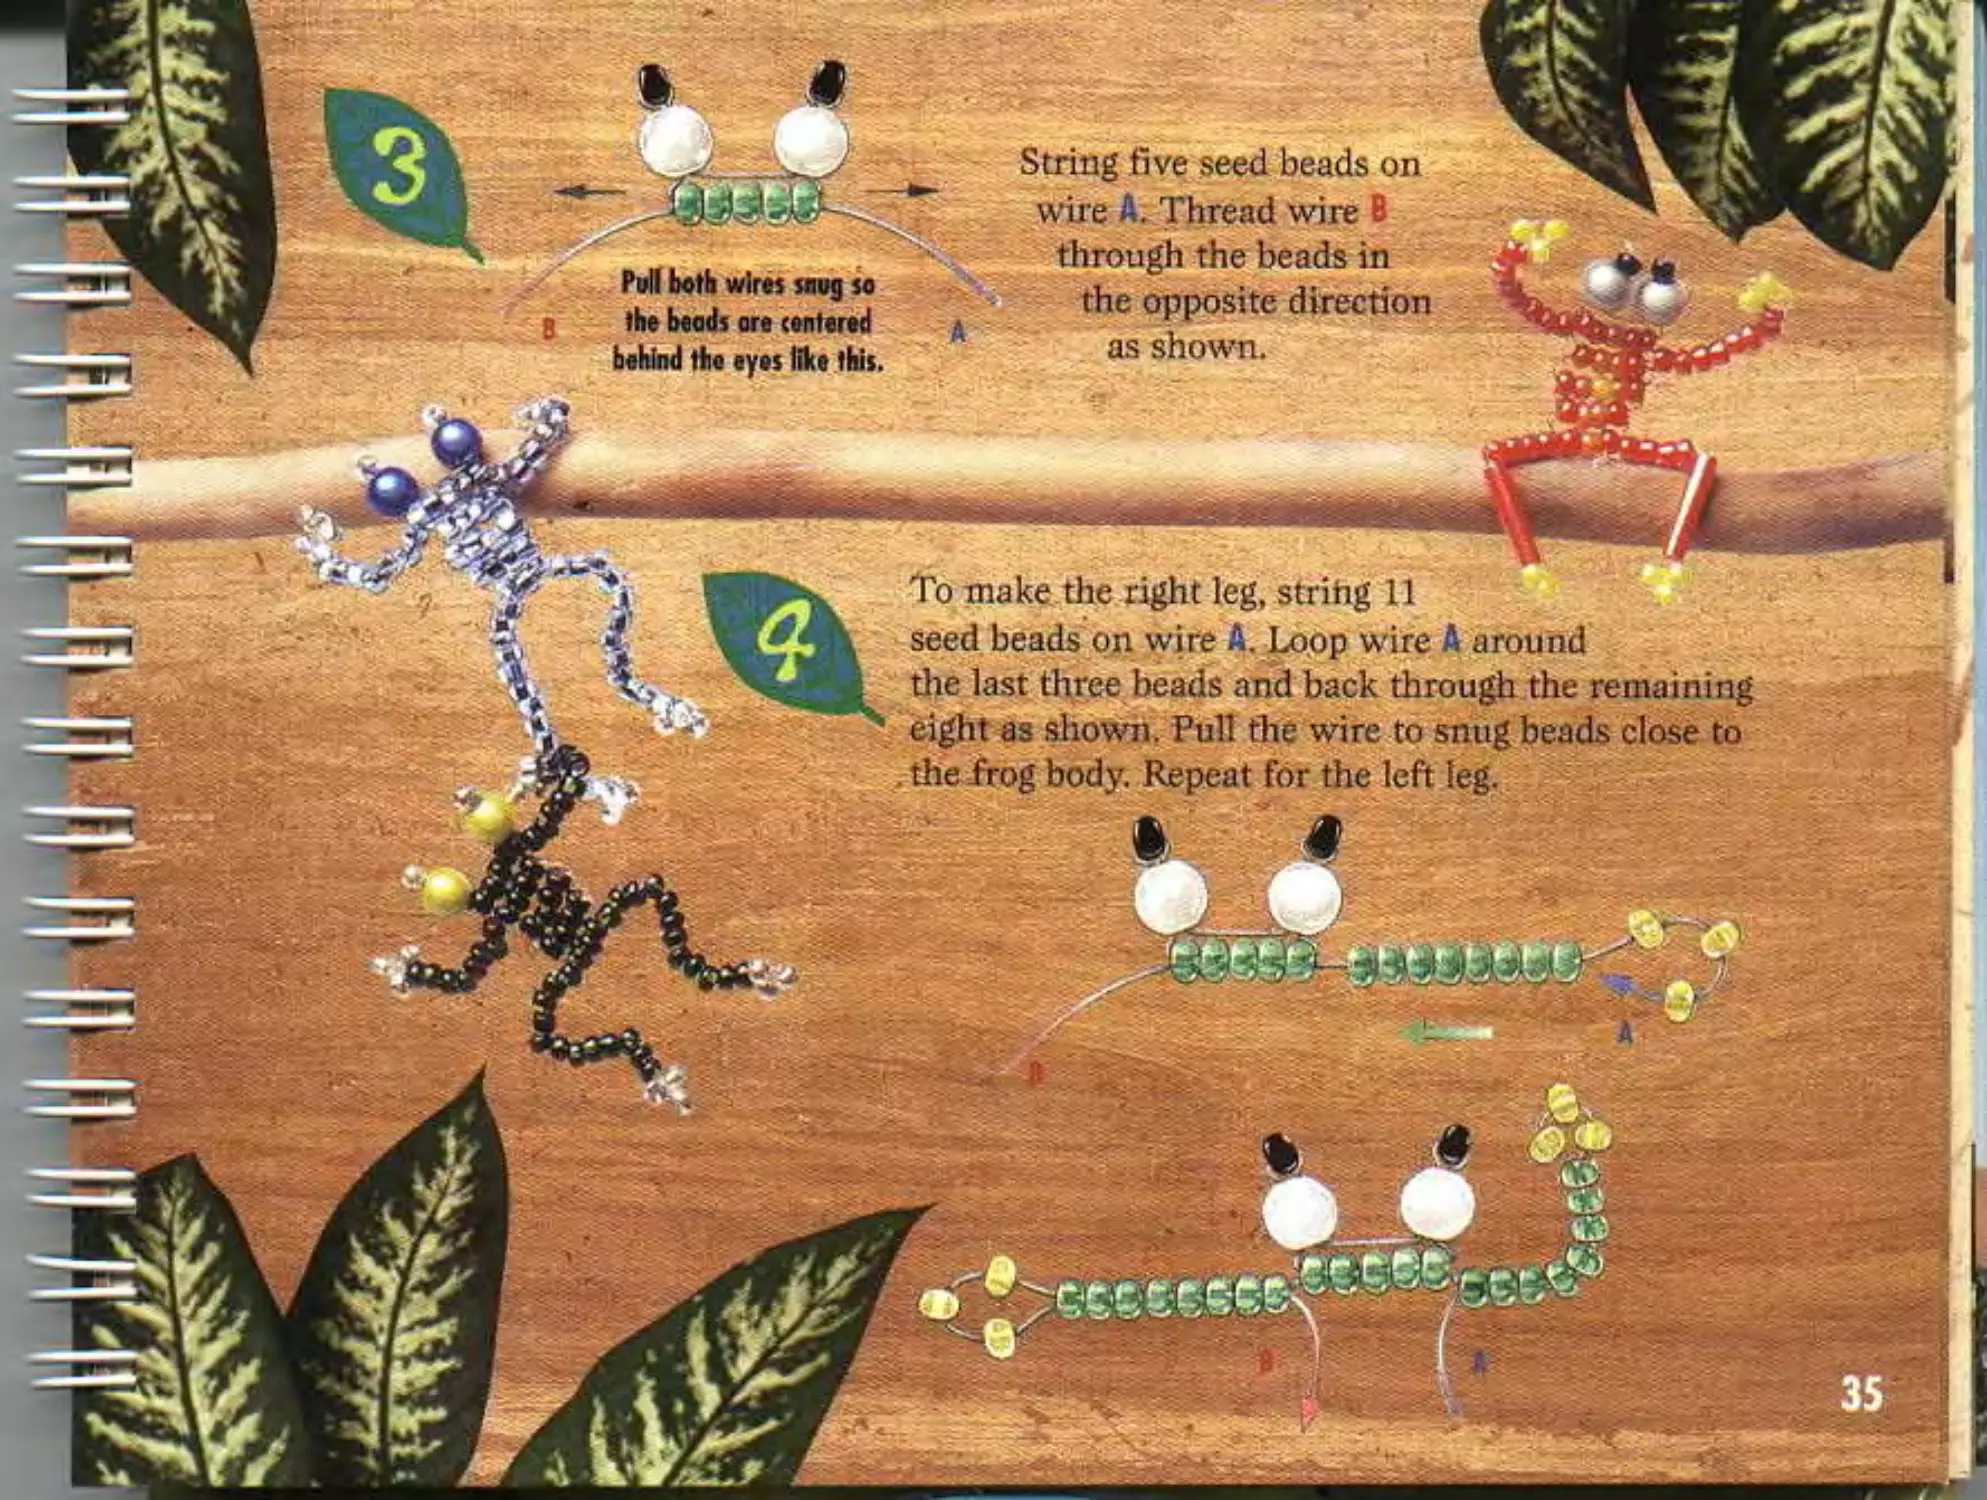
To make the right leg, strihg 11
seed beads on wire A. Loop wire A around
the last three beads and back through the remaining
eight as shown. Pull the wire to snug beads close to
rhe frog body. Repeat for the left 10g.
String five seed beads on
wire A; Thread wire
through the beads in
the opposite direction
as shown.
Pull both wires snug so
the beads are centered
behind the eyes like this
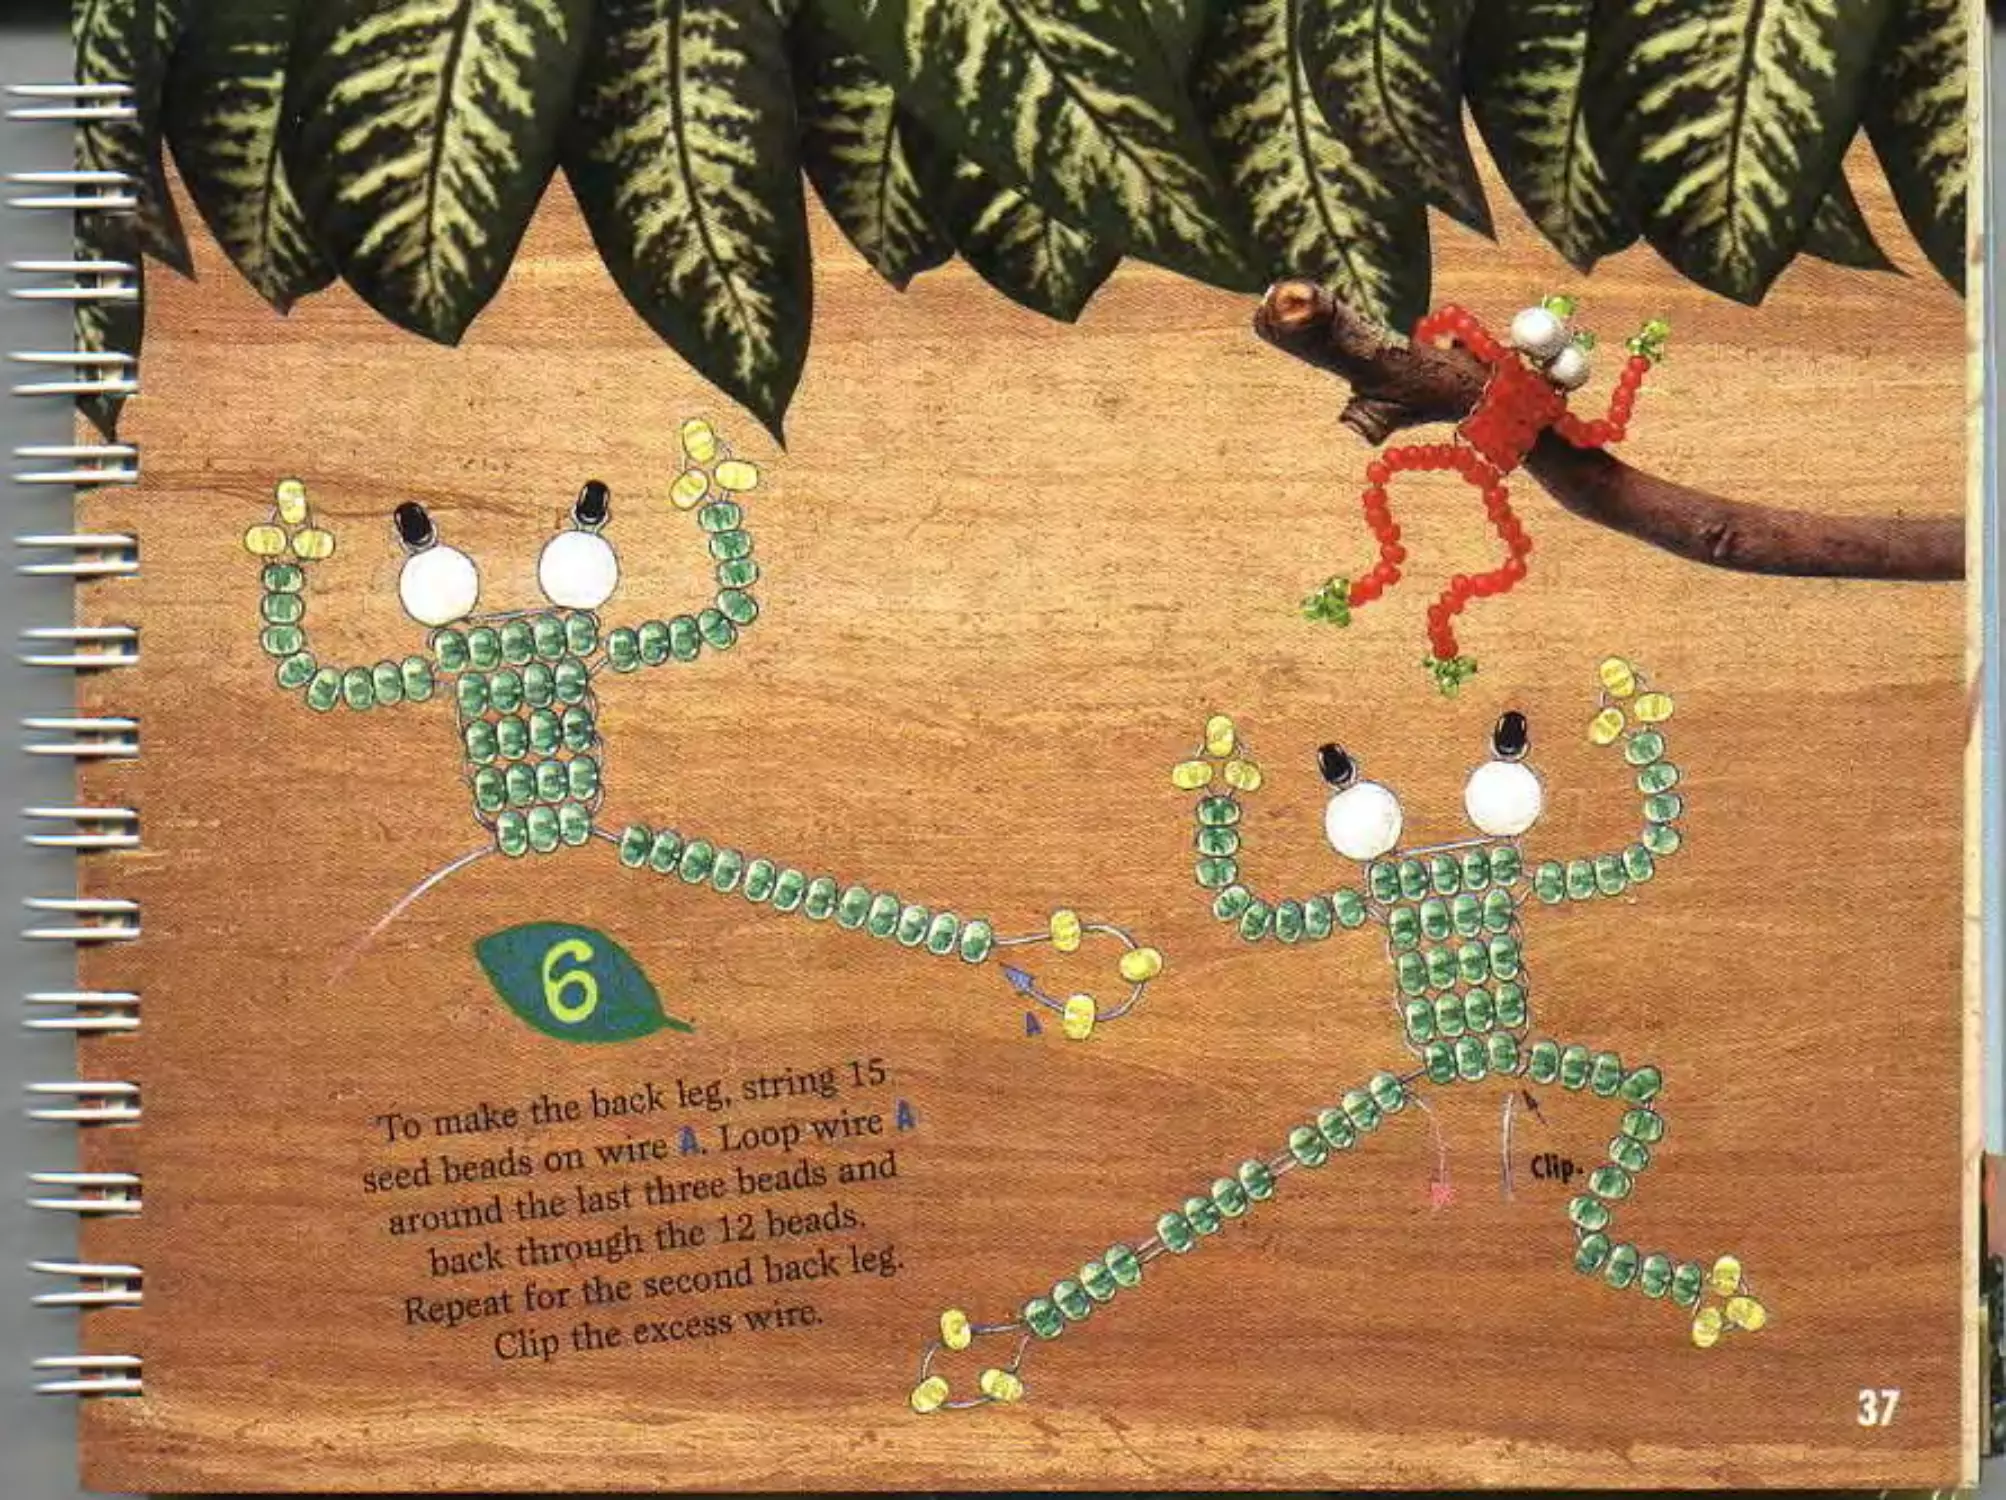
To make the back leg, string 15
seed beads on wire A. Loop wire
around the last three beads and
.back through the 12 beads.
Repeat for the second back leg.
Clip the excess wire.
Tree frog
A
Cut a piece of wire 36 long.
Thread one seed bead and one
medium-sized wonder bead
onto the center of the wire. Loop
the end of wire A back through
the wonder bead as shown.
Pull snug, keeping the beads
centered on the wire.
For the other eye, thread
a wonder bead and then
a seed bead on wire B.
Loop rhe wire back
through the wonder bead.
End up like
this with a
little space
between
the eyes. A
bi
•нт
Pull super snug
to make your
rows overlop.
Using the Back & Forth technique,
bead on the next two rows.
Pull each tw
super tight
It'll make your bead
rows overlap.
wire A like this:
RS
• • ’А <
String three seed beads, one bugle
bead, one seed bead, another bugle
bead and three more seed beads on
9*
A *
Loop the end of wire A around the last
seed head and string it back through
two seed beads.
String three more seed beads on wire A
Loop wire A around the last seed head
and back through the other two beads.
Add a third toe by
repeating step 4.
Pull wire to snug the beads
up close to the first toe.
МуигНгм
про tigM t«
na.iu i*w>
Using the Back & forth tech-
nique. Iiead on the next eight
rows of six beads following the
color pattern as shown. Titcn
add two rows of four beads.
Thread the end of wire
hack through the leg
heads as shown and pull
snug. Repeat steps -I -5
for wire B.
Use 4 beads
for each toe.
String the leg beads on wire A
following the color pattern.
Loop wire A around the last seed
bead and thread it all the way
back through the leg beads. Hold
the leg beads next to the body
and pull snug. Repeat on wire B.
В A
all eight legs.
To finish, thread
wires back through
the body to secure,
then clip extra wire
with clippers.
49
putt 'nUS-
Putt snvtt-
red seed
beads on
the center wead xv'ne &
How
string^6
red seed
as shown-
[ Using the Back &
.) Forth tech-
AK nique, bead
ЙН on the
©fejj' next six
ЙГ) rows,
Ж following
7У the bead
count.
»’< •'» '
The back legs are next.
String on two bugle beads and
three seed beads. Then loop the
. end of your wire around the
last seed bead and thread it
back through the rest of
у' the leg beads. Hold the
beads close to the
г'X,- body as you pull
snug. Repeat to
make the other leg.
more foUow’
ing the bead
count-
the on the
Clip the wires
evenly and
X~'w"te,vei’
up to you to give
your dancin’ ant a
fancy pow-
String seven green seed beads on
the center of a 30" piece of wire.
Thread wire A back through four
seed beads like this:
С Л Using the Back & Forth
/•J technique, bead on the next
eight rows following this pattern
(the last row is a bugle bead):
For the back legs» string on four bugle
beads and three seed beads on wire A.
Loop wire A around the last seed bead
and thread it back through the leg
beads like this:
Repeat step 3 for the
other back leg.
9*Л Using the Back & Forth
—technique, string on one
bugle bead and pull snug.
For the second set of legs:
String on two seed
beads, one bugle
bead and three
more seed beads
on wire A.
Loop wire A around
the last seed bead and
...read it back through the
remaining beads as shown.
Using the Back & Forth technique,
bead on the next four rows.
Ta finish, clip the wire ends (not
too short!) and shape them into
60
String seven seed beads
on the center of a 24"
wire. Thread wire A
back through the four
beads as shown.
Using rhe Back & Forth
technique, bead on rhe next
row following
the pattern.
Pull wire
to snug
beads.
String four seed beads
on wire 8. Loop wire В
around the last seed
bead and back through
the next three beads.
Repeat step 3
for wire A.
Pull snug.
snug.
snug.
Repeat for wire A,
Loop the end of wire В
around three seed beads and
thread back through the
MKi next four beads as
shown.
String seven seed
aaa beads on wire В
Using the Back & Forth tech
niquc, bead on the
next two rows fol- JFWL
lowing this JSrvjj
pattern:
While your wires are
still loose, thread a
Using the Back
& Forth
technique,
bead on the
next five K
rows:
new piece of wire
10" long through the
four center beads.
Repeat step 7
for wire B.
(Don’t pull it
snug, yet.)
Okay, Now pull
everything
snug!
Thread wire A around the far
left seed bead and back
through two beads J
as shown. (Don’t
pull it snug, yet.)
To make the legs,
use the Back £z
and Forth
technique with
wires В and . Bead
on the next six rows
following this pattern
Repeat for
wires A and .
& TO’**
а 'Го finish off the foot, loop the end of
wire around the heel seed bead and
~ BnraR 0111 trough ^le toe-
x. Thread wire A back through
I (Z^sIiIIIHHEIbI dfa?'4F^ ^1С ап^е as shown. Clip
the excess wire.
2 _ Repeat for the left leg.
& Forth rows ood о
hy this Howvig skin end imtdring
p^se ensemble.
By using rhe Bxk & Forth irxh/wy®.
it's easy to moke the skirt. (Add some
extra beads on the
tot a stylish bmrdo. bead
yout gid's head Йе this
one, witboul hair. Then
svhen you're done, ш
some braided entbiotdery
floss on top to make hoir.
65
String seven seed beads on the
center of a 24" wire.
Thread wire A
hack through 999 9^9
four beads.
Like this:
Don’t forget to pull
the wire ends snug’
Pull snug.
Using the Back &,
Forth technique, bead
on the next three
rows following
the pattern.
Pull snug after
each row.
String seven seed beads on wire A.
Loop the end of wire A around three
seed beads and thread
it back through the
next four seed beads
as shown.
Do the
same on wire B.
A
Using the Back & Forth
technique, bead on the next
four rows following
the pattern:
Loop wire A
around the
outside seed bead and
back through one bead
to the center.
Repeat for wire B.
Pull the wires snug.
и чв
Keep wires
A and В
crossed.
Cut a new wire 10" long.
Thread it through the four
beads as shown.
To make the pants,
begin with wires
В and . Using the
Back &, Forth
technique, make
five rows of two
blue beads.
Repeat for wires
A and .
A
To end, thread
wire В back through
the second to last row.
7To make the
shoes, add one
row of two green
beads, and then
a row of three
green beads.
Loop wire around
the heel bead and out
through the other
two toe beads. Repeat
for the other foot.
I ry out
for o styhsf/ iioicdo, l/veod a piece
of wire through й lop beads of
y-Gur boy's heed and give ii о
couple of fight twists. Cot ten
strops of on/ (ofc embfcidety
floss (o 2” length vfoiks well).
Wrap the wife ends tysfuiy otound
й cenlet cf yoof floss pietes.
Jwist the >we ends о few times
and (lip off the excess whe.
With scissors, give yoor boy G
socppy haircut.
69
A N
G E L
1
Cut 20" of wire.
Loop the center around a
round pencil. Give it a
couple of twists then slip
it off the pencil.
This makes a nice halo
or a handy loop to string
your angel on a necklace.
2
String one clear
seed bead and one
large wonder bead
onto both wires.
Slide the beads up
close to the loop.
-b.,
Л
л*
।
rr
String three clear
beads on wire A.
Thread wire 8 through the
beads in the opposite
direction as shown.
Pull both wires snug
to center the beads
under the wonder bead.
70
।
ihetwAoWS®'5
Medou'oBhope
reshaped
уЛШ your репей.
String the wing beads (ten clear
seed beads, one bugle, one clear
seed bead, one bugle) on wire
A following the pattern.
Thread the end of wire A \
back through the first
? seed bead as shown.
r Pull snug.
Repeat step 4 for wire В.
Now shape them into wings.
5
Using the Back & Forth
technique, bead on
the next eight rows
following the pattern.
To finish, thread
wire ends back through
a row of beads.
Pull snug and
clip the extra wire.
71
F«
Pull snug.
(hoose an orange seed
bead with a BIG center
hole. This is where the
three wires for the
hair will go.
Using the Back &
Forth technique, bead
on the next two rows
following the pattern.
Pull snug.
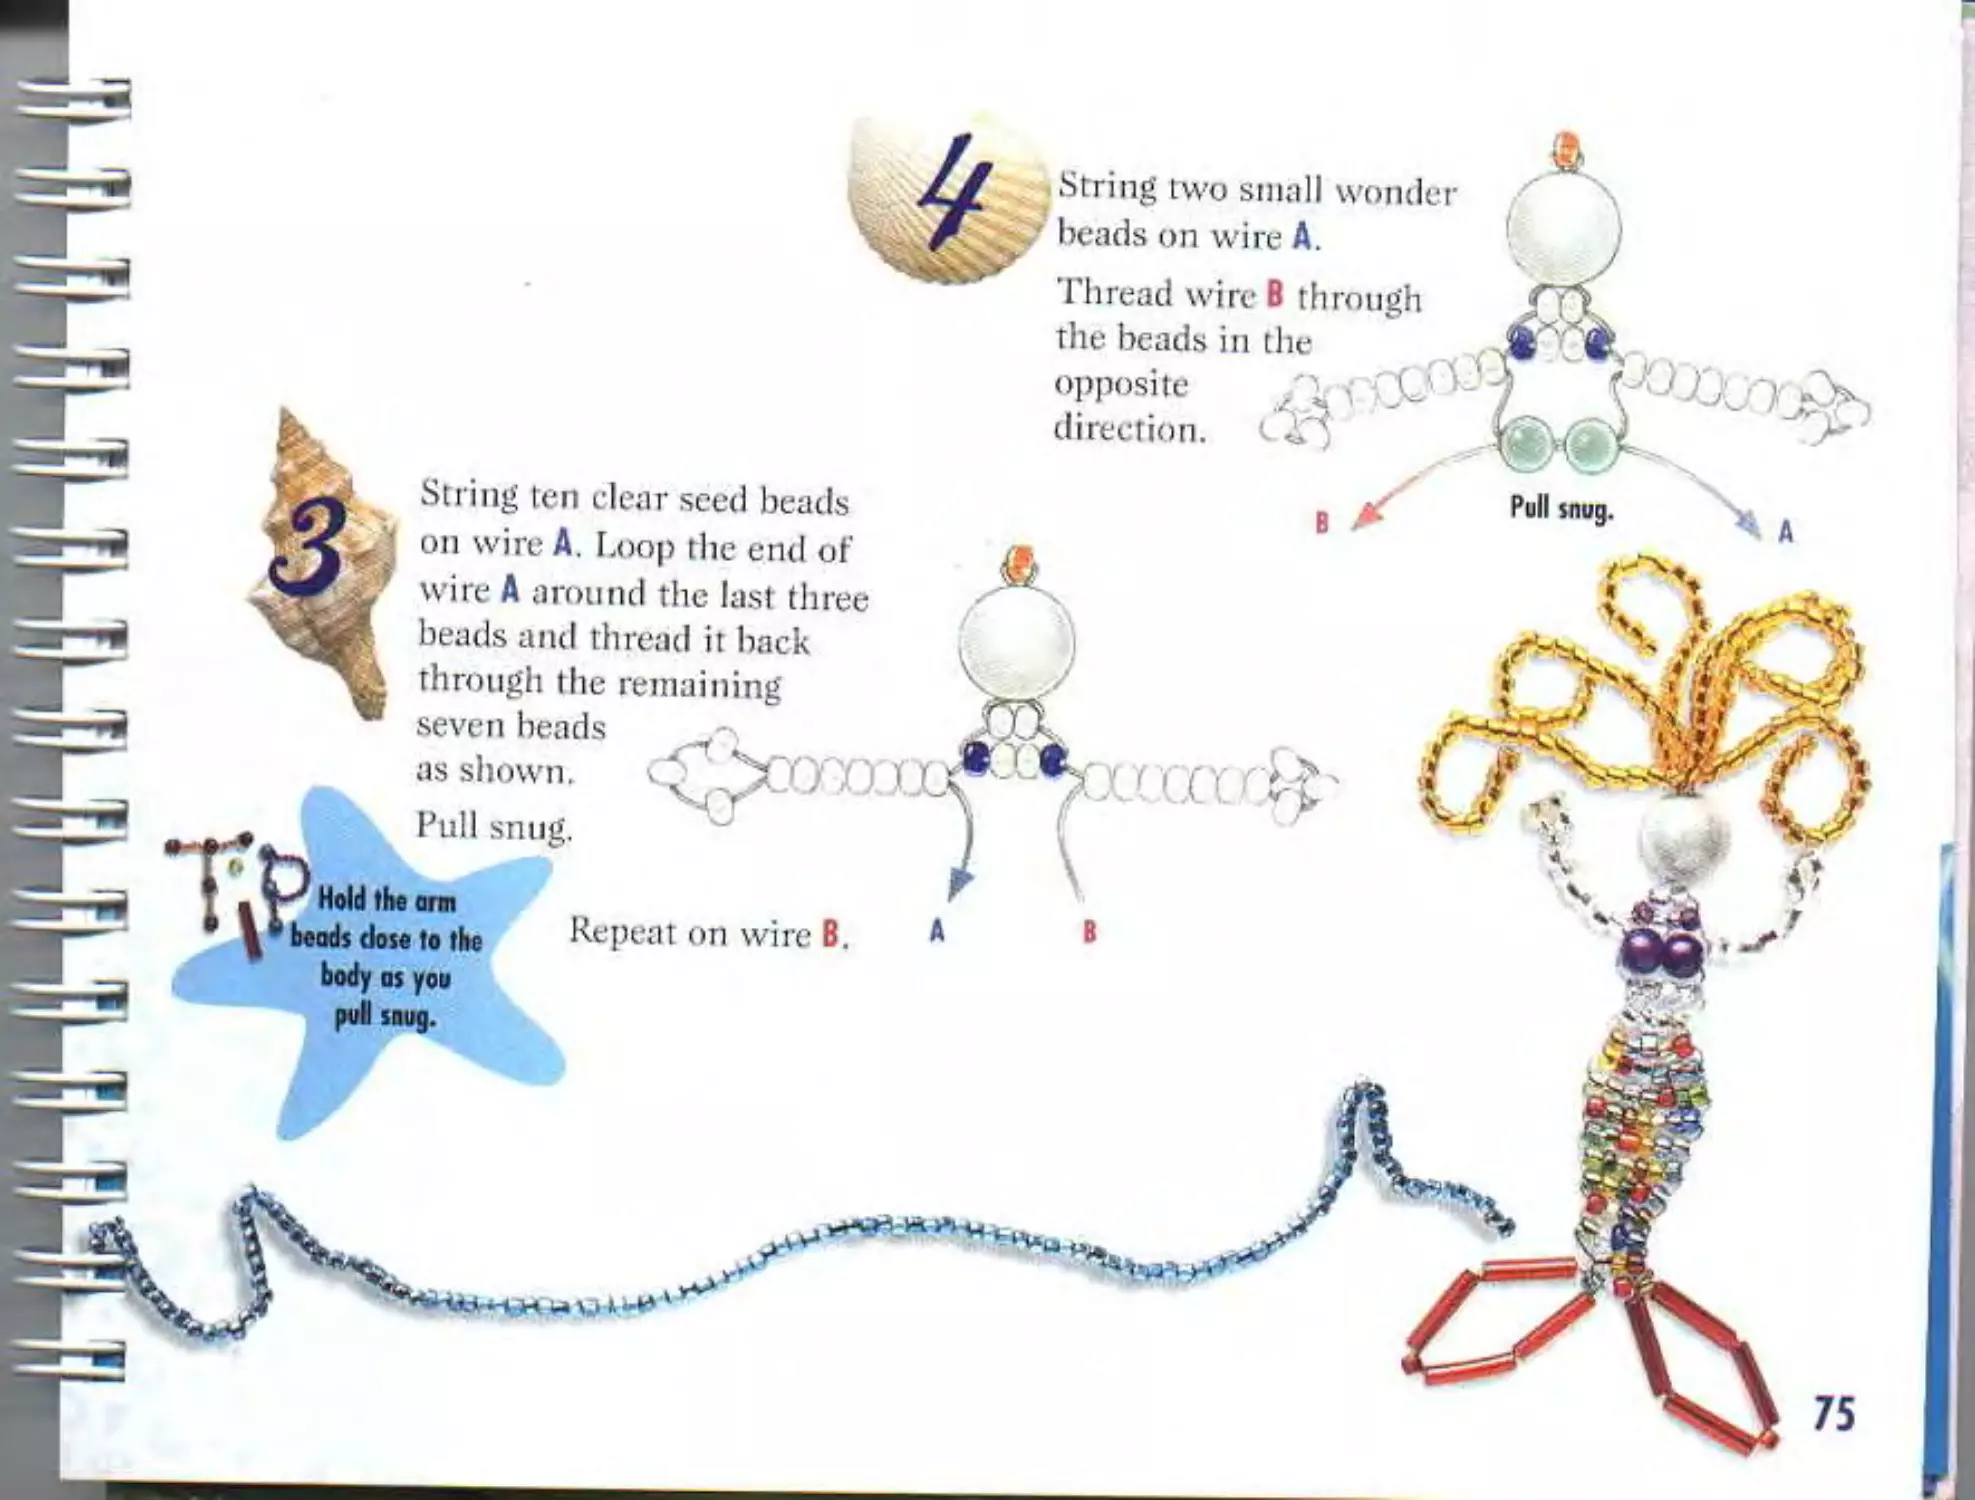
String one seed bead and one
large wonder bead on the center
of a 30" strand of wire.
Loop rhe end of wire A around
the seed bead and thread it back
through the wonder bead
as shown. Pull snug. A
String two small wonder
beads on wire A.
Thread wire В through
the beads in the
। I '
opposite , s у
direction. L j
String ten clear seed beads
on wire A. Loop the end of
wire A around the las! three
beads and thread it back
through the remaining
seven beads
as shown
Pull snug
snug.
Hold the arm
beads dose to the
body as you
pull snug.
Repeat on wire В
75
Using the Back &
Forth technique,
bead on the next
13 rows. Use
whatever color
combinations
you want.
On wire A, string on the tail beads in
this order: two bugle beads, one seed
bead, and two more bugle beads.
Thread the end of wire A back
through the seed bead as shown.
Pull snug. Repeat for wire B.
To finish, thread wires hack
through the second-to-last body
bead row. Don’t forget to clip the
extra wire ends.
77
78
Cut three 10 wires.
Thread each wire
evenly through the
top head bead.
Bend wires
in the middle to keep
them from pulling
through as you work
with them.
Clip here.
Starting with one wire end.
string on 16 to 24 seed beads.
Loop the wire end around the
last seed bead and thread it back
through several seed beads to
secure.
To tighten, pull the other
side of the wire snug.
Repeat on all live remaining
wire ends.
79
p c a h
1
I
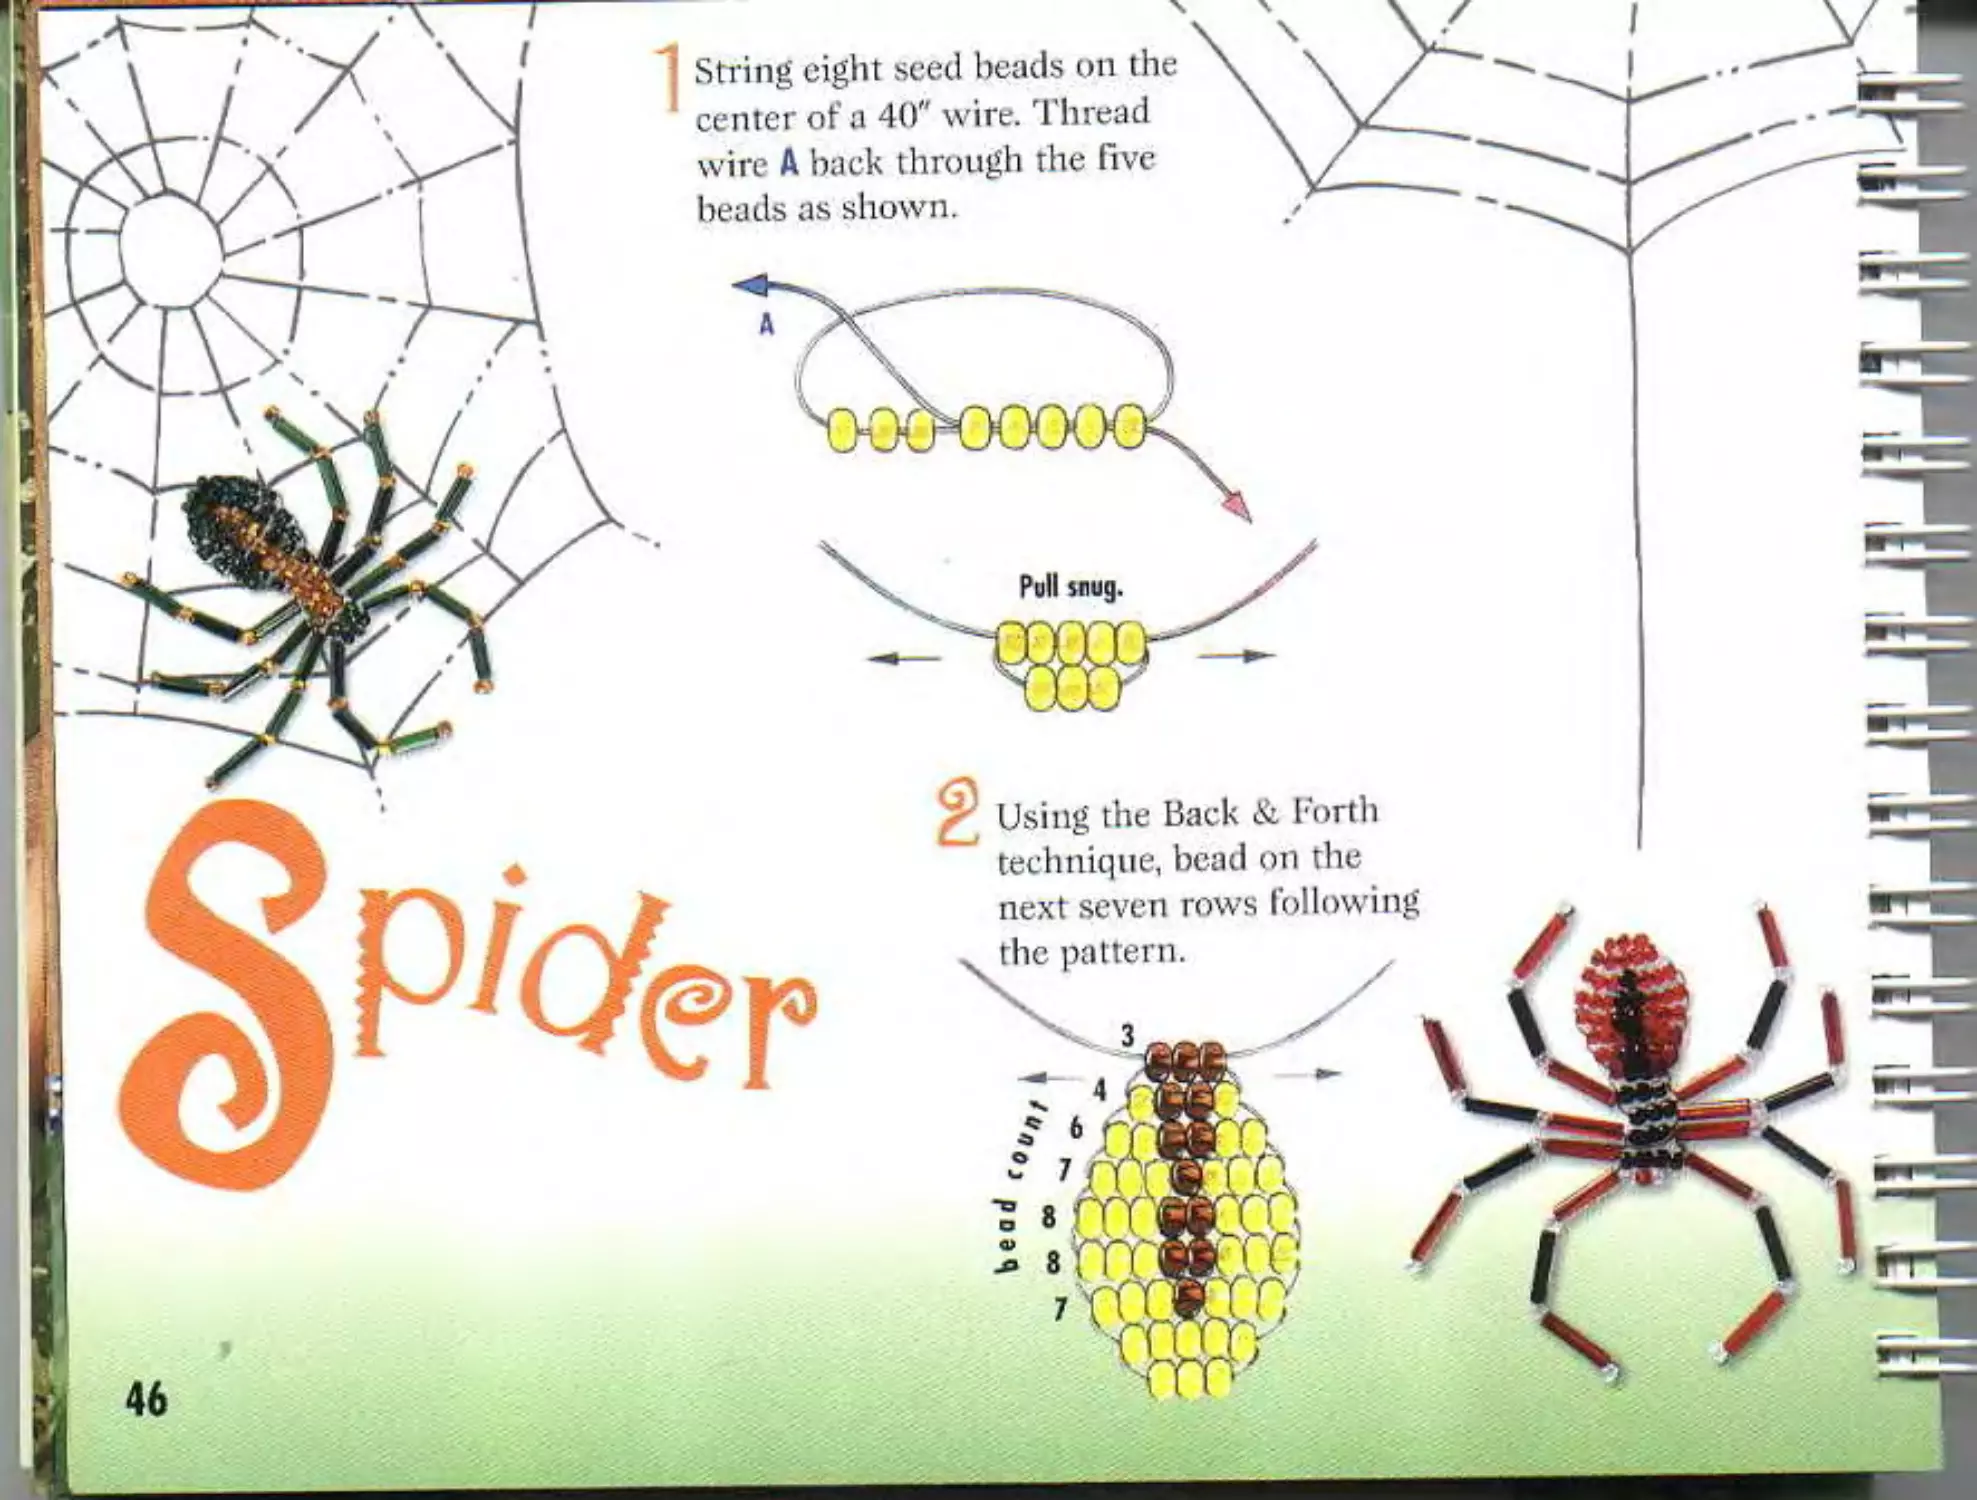
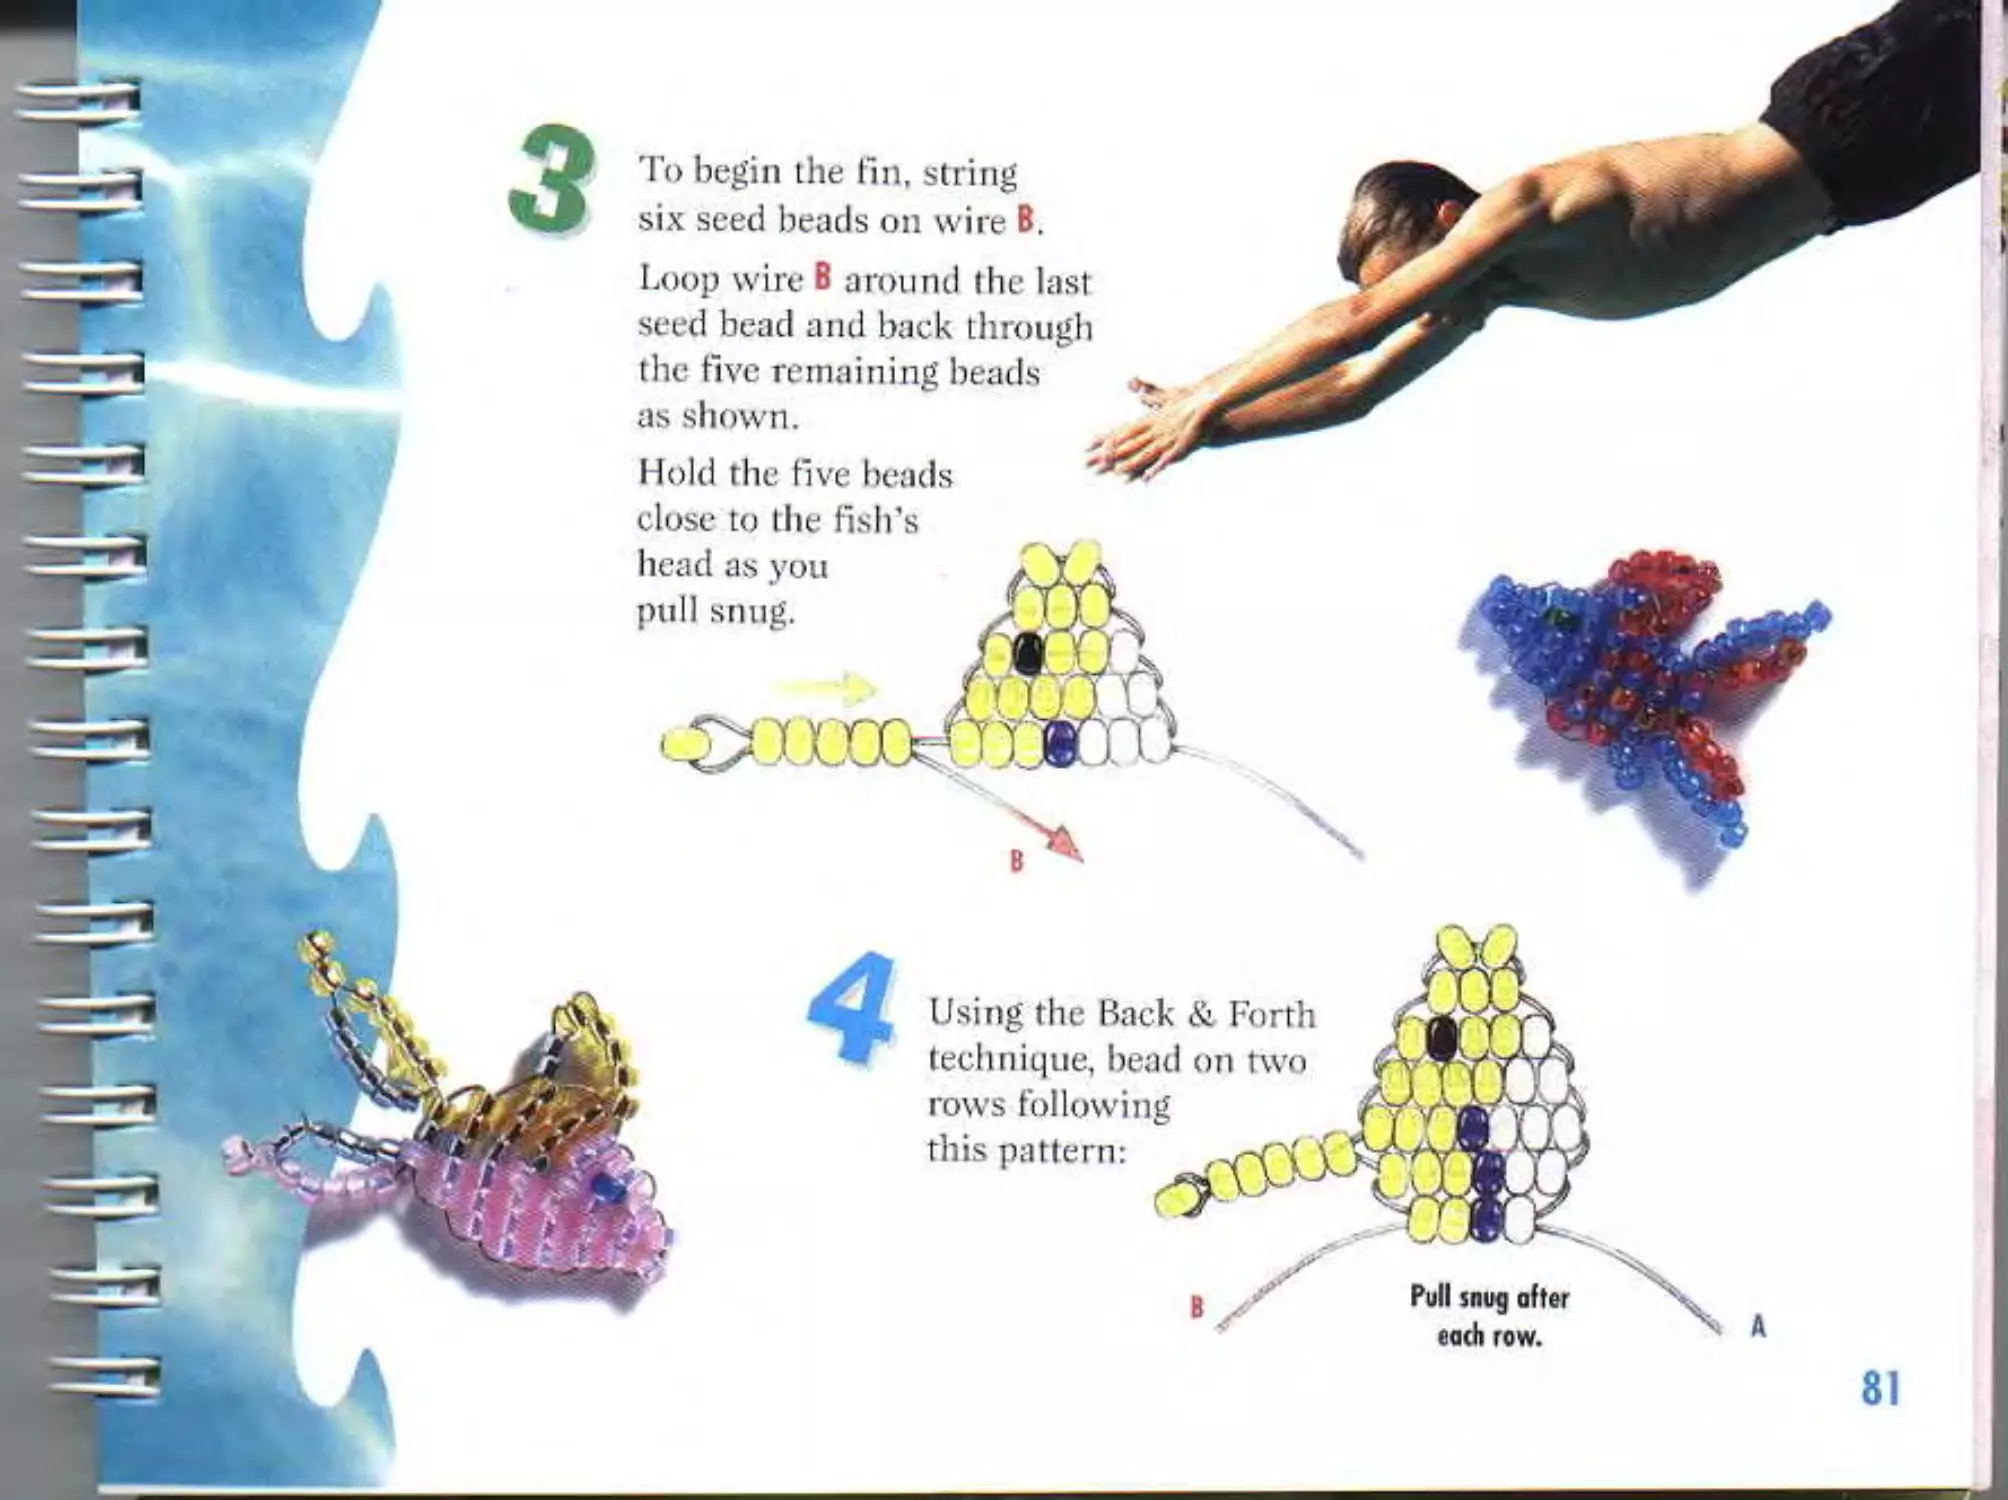
String five seed beads on the
center of 18" of wire.
Thread wire A back
through three
beads like this:
Using the Back & Forth
technique, bead on the
next three rows following
this pattern:
Pull snug after
each row.
fin
Pull snug.
Hold rhe five heads
close to the fish’s
head as you
pull snug.
'Го begin the fin, string
six seed beads on wire B.
Loop wire В around the last
seed bead and back through
the five remaining beads
as shown.
Using the Back & Forth
technique, bead on two
rows following
this pattern:
81
Pull snug.
snug.
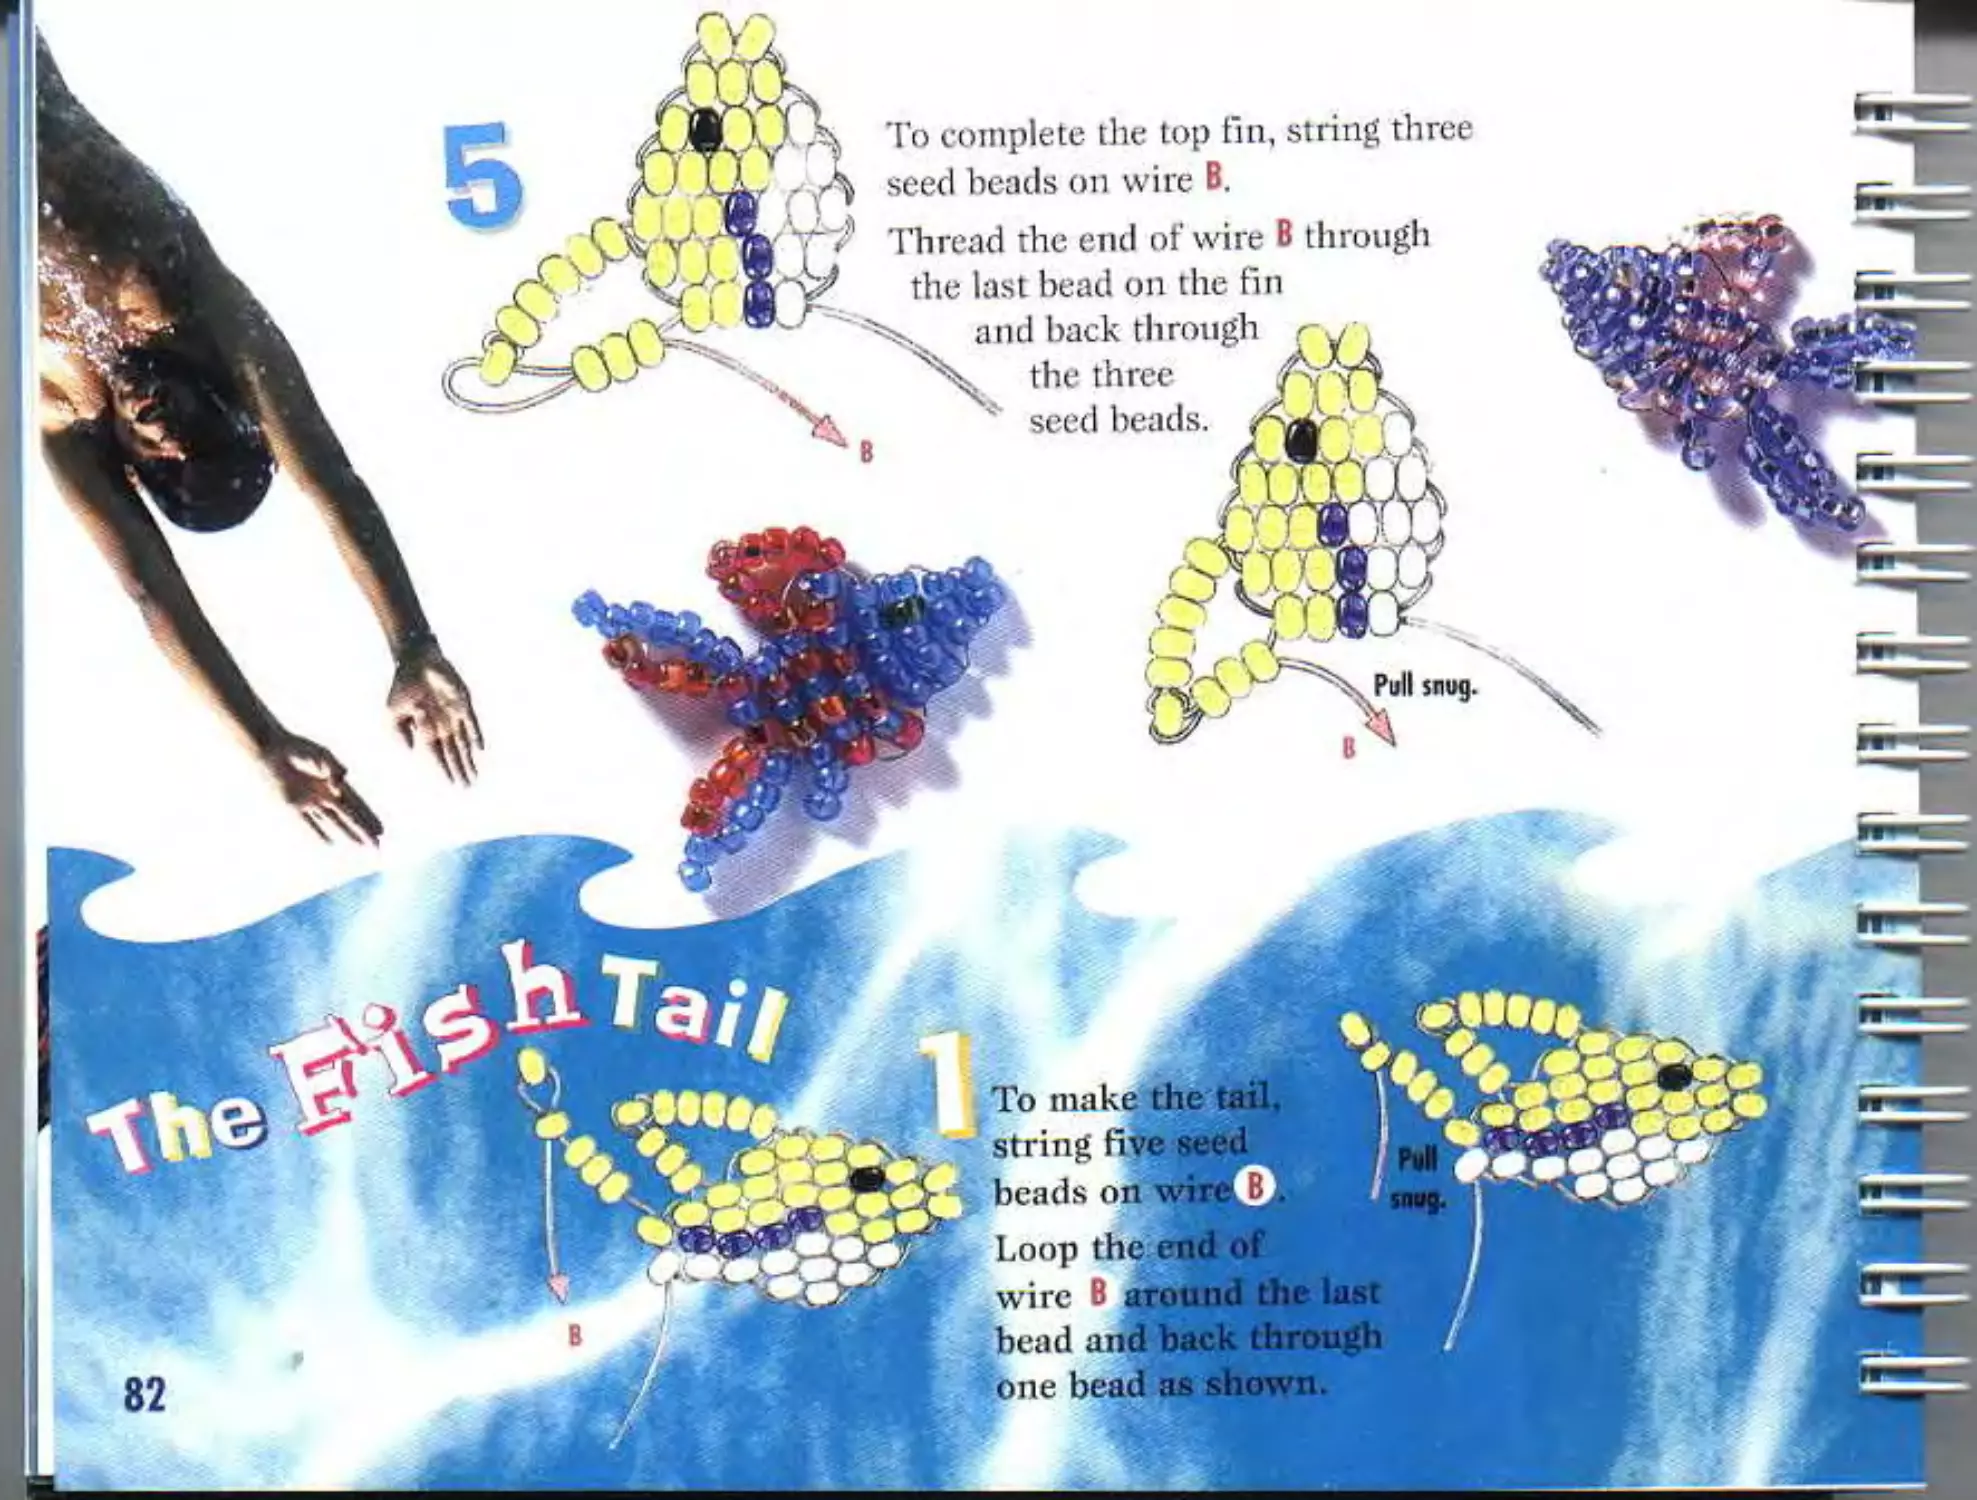
To make the tail,
string Hve seed
beads on wir
Loop the end of
wire around the last
bead and back through
one bead as shown.
'Го complete the top fin, string three
seed beads on wire B.
Thread rhe end of wire В through
the last bead on the fin
>. and back through .< ,
X the three AvL
' seed beads. /
snug.
String four
seed beads
Repeat
The Fiah Tail
finish, thread wire В back
:h rough one seed bead and
then back through
tbe bodX bead
_ row as shown.
Pull snug (hen
clip the extra wire.
Using the Back & Forth
~j-. technique, bead on
the next two rows
~ •'>fol lowi ng t his
ly’/Л pattern.
Loop
the wire
around the last bead
and pull it tight.
4 Repeat steps 2 & 3
four more times to make all
five legs. Leave off the last
green bead on the fifth leg.
Thread the end of wire A
through the first green bead
•-3^ Using the same wire A,
string on five lime beads
and one green bead.
String four seed beads on
the center of a 36" wire.
Thread wire A back through
the two seed beads like this:
Then pull snug.
Using the Back &
Forth technique,
bead on the next
six rows following
the pattern.
Pull snug
after each row.
Turn the head right
side up and begin bead-
ing the body.
Pull snug after
each row.
Using the Back &
Forth technique,
bead on the
following
pattern:
String two lime beads
on wire A.
Loop wire A around the
last seed bead and
thread it back through
the other lime bead as
shown.
87
Using the Back &
Forth technique,
head on the next row
of a bugle bead and
three seed beads.
Pull snug.
Pull snug.
Following the
pattern, repeat
steps 6 and 7
for the next two
rows.
V-
String two lime
seed beads on
м :‘J wire B. Loop wire В
around the last seed bead
and thread it back through the n
other lime seed bead.
88
Pull snug
after each
row.
2 seed + 1 bugle bead
8
7
6
5
4
4
3
3
3
3
2
2
2
2
2
2
I
r«
Using the Back & Forth
technique, bead on the
next 19 rows for the tail.
Don't forget to pull snug
after each row!
'Го secure the ends, thread
the wire ends back through
the second-to-last row.
Clip.
When you’re
done, curl up
the tail of
your sea-
horse.
455 Portage Avenue
Palo Alto, CA 94306
First
Class
Postage
Here
KLUTZ is mi independent
publishing company staffed entirely
by real human livings. We began onr
corporate life bark in 1977 in a Palo
Alm. California garage that we
shared with a Chevrolet Impala.
Back (hen. founders John Cassidy.
Darrell l.orenlzcnand B.C. Rimbvau.x
were all students ami one of the
founding principles was thusly stated:
Be in and mil of business by the
end of summer vacation.
So much for that plan.
Plan B? Create Ihv best written,
best-looking. most imaginative books
in the world. Be honest and fair in all
our dealings. Work hand to make every
day feel like I he first day of
summer vacation.
We aim high,
We'd love lo hear your
commentsabout (his book.
Write ns.
455 tillage Avenue. Palo Alto. CA 91306
www.klulz.com
Book manufactured in Malaysia. Beads in Taiwan
& Czech Republic. Wire in Taiwan
€ 2000 Julie Collings & Candice Elton.
.All rights reserved.
KlutZyjQ is a registered trademark of Klutz, Inc.
Beadlitigs is a trademark of Klutz, Inc.
ISBN I 57054 476 X
4 I 5 В 5 7 О В В
Additional Copies
Give us a call at (65O> 857 0BB8 and
. we’ll help track down your nearest Klutz
retailer. Should they be out of stock,
additional copies of this book as
well:JS H>e entire library of
100% Klutz certified books
are available in I he Klutz
Catalog. See the Iasi page for details.
A WARNING:
CHOKING HAZARD
Small parts. Not for children
under 3 years.