/


Автор: Bertoglio-Giffin J.
Теги: fashion magazine crochet fashion bead crochet ropes magazine
Год: 2002


Текст
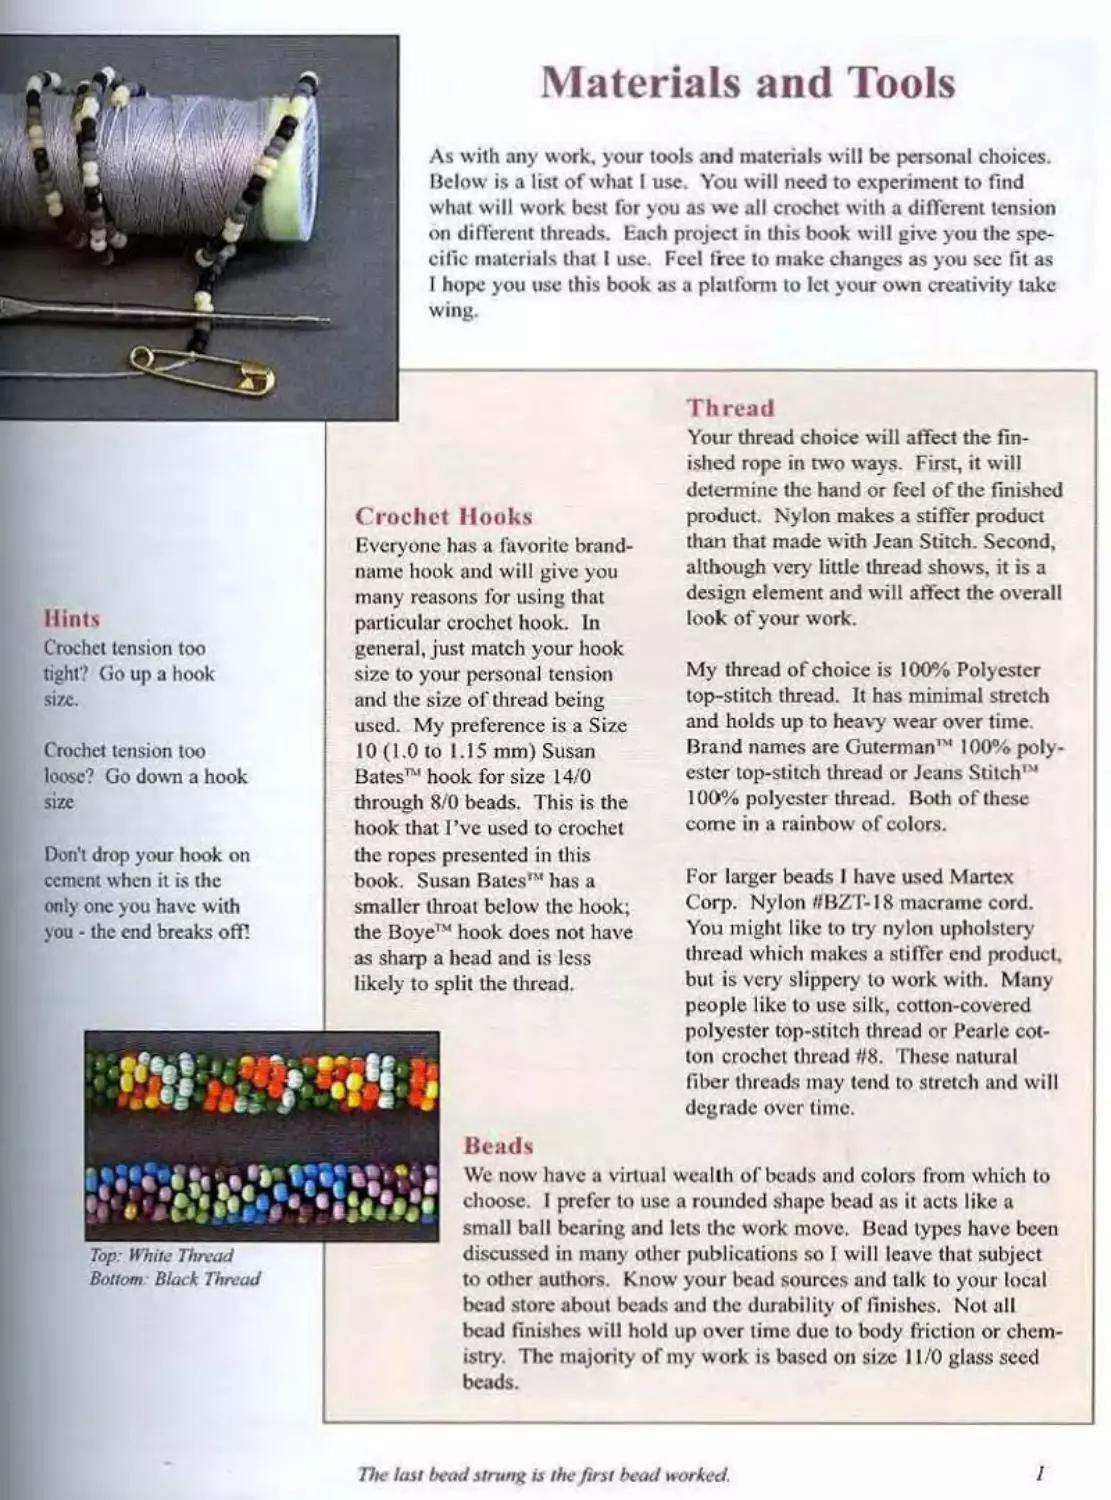
Materials and Tools
As with any work, your tools and materials will be personal choices.
Below is a list of what I use. You will need to experiment to find
what will work best for you as we all crochet with a different tension
on different threads, bach project in this book will give you the spe-
cific materials that I use. Feel free to make changes as you see fit as
I hope you use this book as a platform to let your own creativity take
wing.
Thread
Your thread choice will affect the fin-
ished rope in two ways. First, it will
determine the hand or feci of the finished
Hints
Crochet tension too
tight? Go up a hook
size.
Crochet tension too
loose? Go down a hook
size
Crochet Hooks
Everyone has a favorite brand-
name hook and will give you
many reasons for using that
particular crochet hook. In
general, just match your hook
size to your personal tension
and the size of thread being
used. My preference is a Size
10 (1.0 to 1.15 mm) Susan
Bates™ hook for size 14/0
titrough 8/0 beads. This is the
hook that I’ve used to crochet
product. Nylon makes a stiffer product
than that made with Jean Stitch. Second,
although very' little thread shows, it is a
design element and will affect the overall
look of your work.
My thread of choice is 100% Polyester
top-stitch thread. It has minimal stretch
and holds up to heavy wear over time.
Brand names are Guterman'4’ 100% poly-
ester top-stitch thread or Jeans Stitch,M
100% polyester thread. Both of these
come in a rainbow of colors.
Don't drop your hook on
cement when it is the
only one you have with
you - the end breaks off!
the ropes presented in this
book. Susan Bates™ has a
For larger beads I have used Martex
smaller throat below the hook;
the Boye"' hook does not have
as sharp a head and is less
likely to split the thread.
Corp. Nylon //BZT-18 macrame cord.
You might like to try' nylon upholstery'
thread which makes a stiffer end product,
but is very slippery to work with. Many
people like to use silk, cotton-covered
Top: White Thread
Bottom Black Thread
polyester top-stitch thread or Pearle cot-
ton crochet thread //8. These natural
fiber threads inay tend to stretch and will
degrade over time.
Beads
We now have a virtual wealth of beads and colors from which to
choose. I prefer to use a rounded shape bead as it acts like a
small ball bearing and lets the work move. Bead types have been
discussed in many other publications so I will leave that subject
to other authors. Know your bead sources and talk to your local
bead store about beads and the durability of finishes. Not all
bead finishes will hold up over lime due to body friction or chem-
istry. The majority of my work is based on size 11/0 glass seed
beads.
The last bead strung й the firn bead worked.
1
Handy Reference Guide
I have been asked many times how much thread and how many beads
it will take to complete a project. Some of it depends on your personal
crocheting tension and some of it depends simply on the length and
diameter of your rope, combined with the size of your beads. Here arc
a few of my “general rules of thumb” guides for figuring out what
you will need for any given project.
Bead-Crochet Rope Diameters
As a general rule of thumb you can do a
crocheted tube as small as four-around
Pattern Terminology
Л bead-crochet rope starts with a set number of beads joined into
a circle. This defines the diameter of the rope and the type of
pattern that you can use. If you start with a circle of six beads it
is referred to as a 6-around rope and only a pattern designed for
6-around will work. If a pattern is designated as 6-around, then
you will know to start with six beads in the initial circle and the
beads in the pattern will fall into their proper places when cro-
cheted.
up to as large as eight-around. At ninc-
around. the tube begins to collapse.
I lowever, this is a crocheted tube and
you could insert another material into the
center of the tube such as memory wire,
cording, clothes line, elastic, braided
bolo cord, or even larger beads to sup-
port the tube. Use your imagination!
Strung Thread Used
Beads Beads Per Inch of
Per Gram Per Inch Strung Beads
15/0 seed beads 290 24 9”
11/0 cylinder seed beads 190 20 —
11/0 seed beads no 18 7й
8/0 seed beads 38 13 6"
6/0 seed beads 15 10 -
Beads
Most bead vendors sell beads in grams;
however not all beads of a like size will
weigh the same. A metallic seed bead
will be heavier than a transparent seed
bead. Also, each manufacturer's seed
bead will be a slightly different size so
the items in these charts are approxima-
tions.
Io yield approximately Г of
finished bead-crochet rope using
a “top Stitch** thread weight
Bead size Length to String
5-around 15/0 3.5”
5-around 11/0 5”
6-around 15/0 4.S”
6-around 11/0 6**
6-around 8/0 5“
6-around 6/0 5.5"
8-around 6/0 6“
6-around raised spiral 11/0 base 12 size 6/0 beads
6-around flat rope 11/0 base 8 pairs of “drops**
2
The last bead л trung is I he first head worked
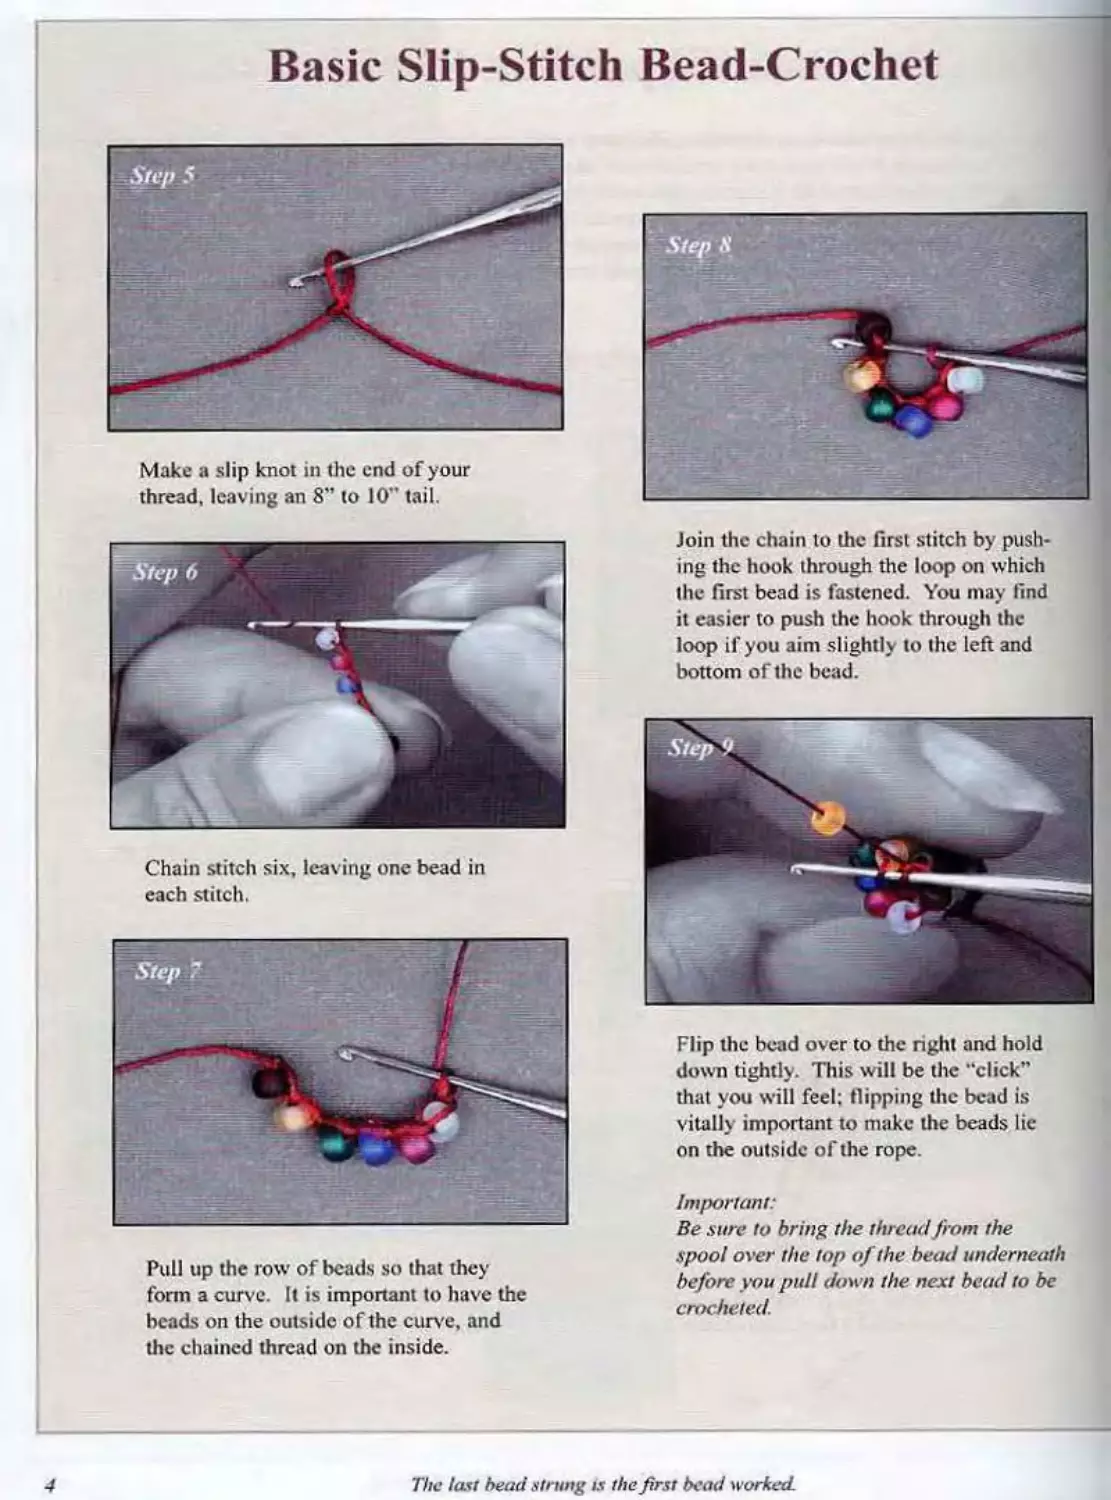
Basic Slip-Stitch Bead-Crochet
Even if you have been crocheting for many years, crocheting with beads might not be quickly learned.
Adding in beads makes the stitches work and feel differently. My suggestion is to string 18” of beads
onto white thread for a practice piece and keep going even if the work does not look perfect. At some
point you will begin to feel a "click” as the crocheted bead falls into place correctly. For your first
practice piece, string a pattern of six opaque beads with at least three different colors so that you will
always be crocheting a like-colored bead over a like-colored bead.
Bead Crochet patterns arc given in a table
of repeats. This panem is written as: I A.
IB, 1C. ID, IE. IF; repeat this sequence
until you have about 18” of strung beads.
There are various personal preferences as
to how to hold your thread for crochet-
ing. I wrap the working thread around
my little finger and bring it up over my
index linger with 4 to 6 beads ready to
work.
These are right handed instructions,
reverse for left handed work
The thread that comes over my index
linger is the "tensioner” which keeps my
work at a constant tension.
1 hold the rope between my thumb and
index linger and pull down the next bead
w ith the middle finger of the other hand
The Iasi bead strung is the first bead worked.
3
Basic Slip-Stitch Bead-Crochet
Make a slip knot in the end of your
thread, leaving an 8" to 10" tail.
•is?
Flip the bead over to the nght and hold
down tightly. This will be the “click”
that you will feel; flipping the bead is
vitally important to make the beads lie
on the outside of the rope.
Chain stitch six, leaving one bead in
each stitch.
Important:
Be sure to bring the thread from the
Pull up the row of beads so that they
form a curve. It is important to have the
beads on the outside of the curve, and
the chained thread on the inside.
Join the chain to the first stitch by push-
ing the hook through the loop on which
the first bead is fastened. You may find
it easier to push the hook through the
loop if you aim slightly to the left and
bottom of the bead.
spool over the top of the bead underneath
before you pull down the next bead to be
crocheted.
4
The last head strung is the first bead worked.
Basic Slip-Stitch Bead-Crochet
Pull down the next bead, yam over or
catch the thread above the bead.
Pull the thread through the first loop on
the hook.
Pull die resulting loop through the second
loop on the hook. This completes one
slip stitch with a bead. When you are
more comfortable with bead crochet you
can pull the thread through both loops in
one smooth motion.
If you are doing the stitch correctly then
the beads that you ate to crochet under
will be laying sideways. Once these
beads arc crocheted they will stand up.
Continue in this manner, working in a
slip-stitch spiral until the desired length
of rope is reached.
To end your rope (bind off). cut the
thread about 8" to 10" past the last bead
and pull through your last loop.
Tips
If you are going to join the ends of a rope
you need to always end with a complete
patient repeat to make the join invisible.
Secure your loop with a safety pin to
keep the work from unraveling.
A safety pin is also good for picking up a
dropped stich because the point is finer
than your crochet hook.
Have an extra bead in your pattern?
Carefully break it out with pliers.
Missing a bead? Then make a “bead-
less" stitch and sew one in that place
later on.
The last head strung is the first bead worked.
Simple Spiral Ropes
This is the basic bead-crochet rope pattern for all bead-crochet ropes,
Become familiar with the bead crochet technique by practicing these
simple spiral designs. Bead-crochet ropes will always form a spiral oi
helix as you crochet. Your choice of bead color and finish will deter-
mine how simple, elegant, and/or complex die final product will be.
Basic Six-Around Rope Patterns
Make a practice piece using white thread and up
to six different colors of opaque beads.
Design Ideas
Black or white with
primary colors gives
you an ethnic look,
especially with 8/0
seed beads.
Use some 1-cuts or
3-cuts to add a subtle
sparkle.
Any combination of
beads that total 6 will
give you different
width spirals in
6-around ropes.
Hints
If you are not sure you
are going to like a
color combination,
string and crochet only
18" and turn it into a
key chain.
Always end on a com-
plete pattern sequence
i f you are going to
make an invisible join.
String:
2A, IB, 2A, IB
Repeat for desired length.
6
The last betid strung is the firs! bead worked.
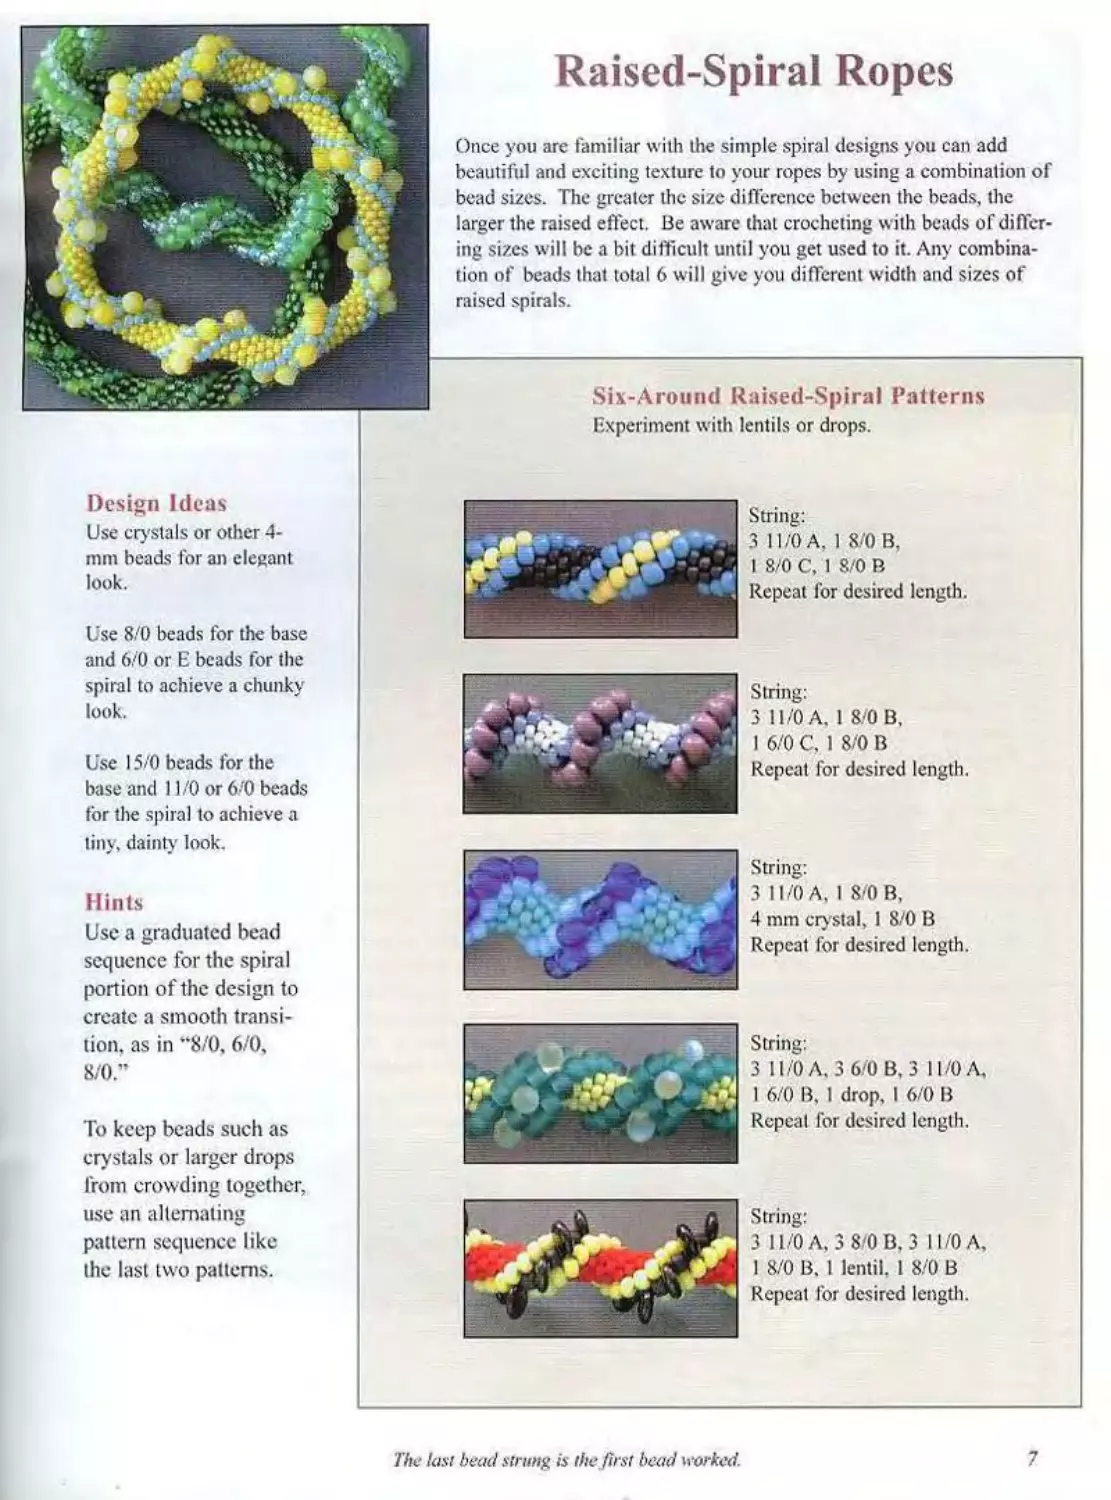
Raised-Spiral Ropes
Once you are familiar with the simple spiral designs you can add
beautiful and exciting texture to your ropes by using a combination of
bead sizes. The greater the size difference between the beads, the
larger the raised effect. Be aware that crocheting with beads of differ-
ing sizes will be a bit difficult until you get used to it. Any combina-
tion of beads that total 6 will give you different width and sizes of
raised spirals.
Six-Around Raised-Spiral Patterns
Experiment with lentils or drops.
Design Ideas
Use crystals or other 4-
mm beads for an elegant
look.
Use 8'0 beads for the base
and 6'0 or E beads for the
spiral to achieve a chunky
look.
Use 15/0 beads for the
base and 11/0 or 6'0 beads
for the spiral to achieve a
liny, dainty look.
Hints
Use a graduated bead
sequence for the spiral
portion of the design to
create a smooth transi-
tion. as in “8/0, 6/0,
8/0.”
To keep beads such as
crystals or larger drops
front crowding together,
use an alternating
pattern sequence like
the last two patients.
String:
3 11/0 A. 1 8/0 B.
I 8/0 С, 1 8/0 В
Repeat for desired length.
The Iasi bead strung is the first bead worked.
7
Joining Bead-Crochet Ropes
A bcad-crochci rope may be closed using an “invisible" join ora 1
large bead. This allows a bracelet to stretch slightly and roll onto the
wrist, making a bracelet that has no metal clasp and is a joy to war
A good rule of thumb is to make your bracelet approximately a li iif
inch larger than your wrist size. You may also use this technique I
with a necklace to make a nice continuous loop of flexible beading
Invisible Join
Before ending your rope, make sure that you have etc
Join With a Large Bead
You cun use a large bead(s) to join a bracelet It is a
bit easier to get a neat closure this way as you don’t
have to worry about getting your pattern as nicely
lined up. This is also a good way to add interest to a
necklace and to join multiple pieces of crocheted
rope, such as for a lariat.
You will use the- invisible join technique, just add a
large bead(s) in-between the ends You will be lacing
the ends together through the large bead.
cheted a complete pattern sequence or the pattern will
not line up no matter what you do. Bind oil', leaving
about an K” tail of thread (end tail). You will be lac-
ing the ends together.
Work the start tail of thread
from the start of the rope back
into the crochet tube to get it
out of the way and cut it elf
Thread a tapestry
needle w ith the end tail
Pass your needle back under
the last thread into which у<Kt|
crocheted t beads 1 to 2). I
Work the start tail of thread back into the crochet tube
to get it out of the way and cut it off. Thread a tapes-
try needle with the end tail. Pass your needle back
As you pull this thread up. be sure that it does not
wrap around a bead
under the last thread into which you crocheted (beads
I to 2). As you pull this thread up. be sure that it docs
not wrap around the bead. Thread your large bead(s)
onto the needle and continue as above until you have
captured all of the beads on each side Snug your
work up as you go and the ends should sit nicely onto
the contour of the large bead. Sew back into the cro-
chet work, tie it off and clip.
Line up the pattern and locale the first bead crocheted
on the other end (bead 3). You may need to twist the
rope a bit m one direction or another to make it кюк
right. Pass your needle under the thread of bead 3. |
Leave your weaving loose at this point. Then pass I
your needle back across to the next bead on the other
side (bead 4). Make sure that your needle goes from
inside to outside so the beads flip up in the same
direction as they were crocheted. At about bead 5 or
6. snug your work up gently and check to see that
everything is lining up nicely.
Do not pull too hard or it will make the join narrow. ;
At the very end. do not forget to pick up the last bead
crocheted (Bead 1 and'or 14). Il may have slipped
inside Then sew back into the crochet work, tie otT
your thread, and clip.
8
The last bead strung Is the first bead worked.
The last bead strung is the first bead worked.
9
Bracelet in forefront by Ellen Gaimari
Flat “Caterpillar”
I he Caterpillar is quite versatile and lends itself to many variations
and embellishments. This rope makes one of the more sensuous
feeling bracelets. This pattern does not have a special crochet stitch
to make it Hat. It is the precise placement of larger beads that makes
it appear Hat. Any bead with a hole near one end is fair game for this
rope. Experiment with any firn bead shape that you find.
Design Idea
Use sharp-edged triangle
beads for a snakeskin
effect.
String:
9 11/0, I 8/0,
2 11/0, 1 8/0
Repeat for desired length.
The basic pattern.
Hints
If you use a larger drop
Or other shaped bead, the
edge tends to ruffle if the
bead is used in each set.
To keep this from hap-
pening, alternate the
large bead with an 8'0
bead as in the last pattent
shown.
This is done with small drops.
String:
9 11/0. I drop,
2 11/0, I drop
Repeat for desired length.
Reversible
Caterpillar
Rope
You can make
your rope
reversible by
stringing
the following
sequence:
ЗА, ЗВ, ЗА. I 8/0,2B, I 8'0 Repeat for
desired length and crochet in 6-around.
Consult the graph to see how the colors
make up the different sides.
side 1 side 2 sldel side 2/
,< л'ОЗ'С/'.'ОО?
Lentils give a unique look
String:
9 11/0, 1 lentil,
2 11/0, I lentil
Repeat for desired length.
Vary the edge beads.
String:
9 11/0, I 8/0,2 11/0. I 8/0,
9 11/0. I 4-mm bead,
2 11/0, 1 4-mm bead
Repeat the entire 26 bead
sequence for desired length.
10
The last bead strung й the first bead worked.
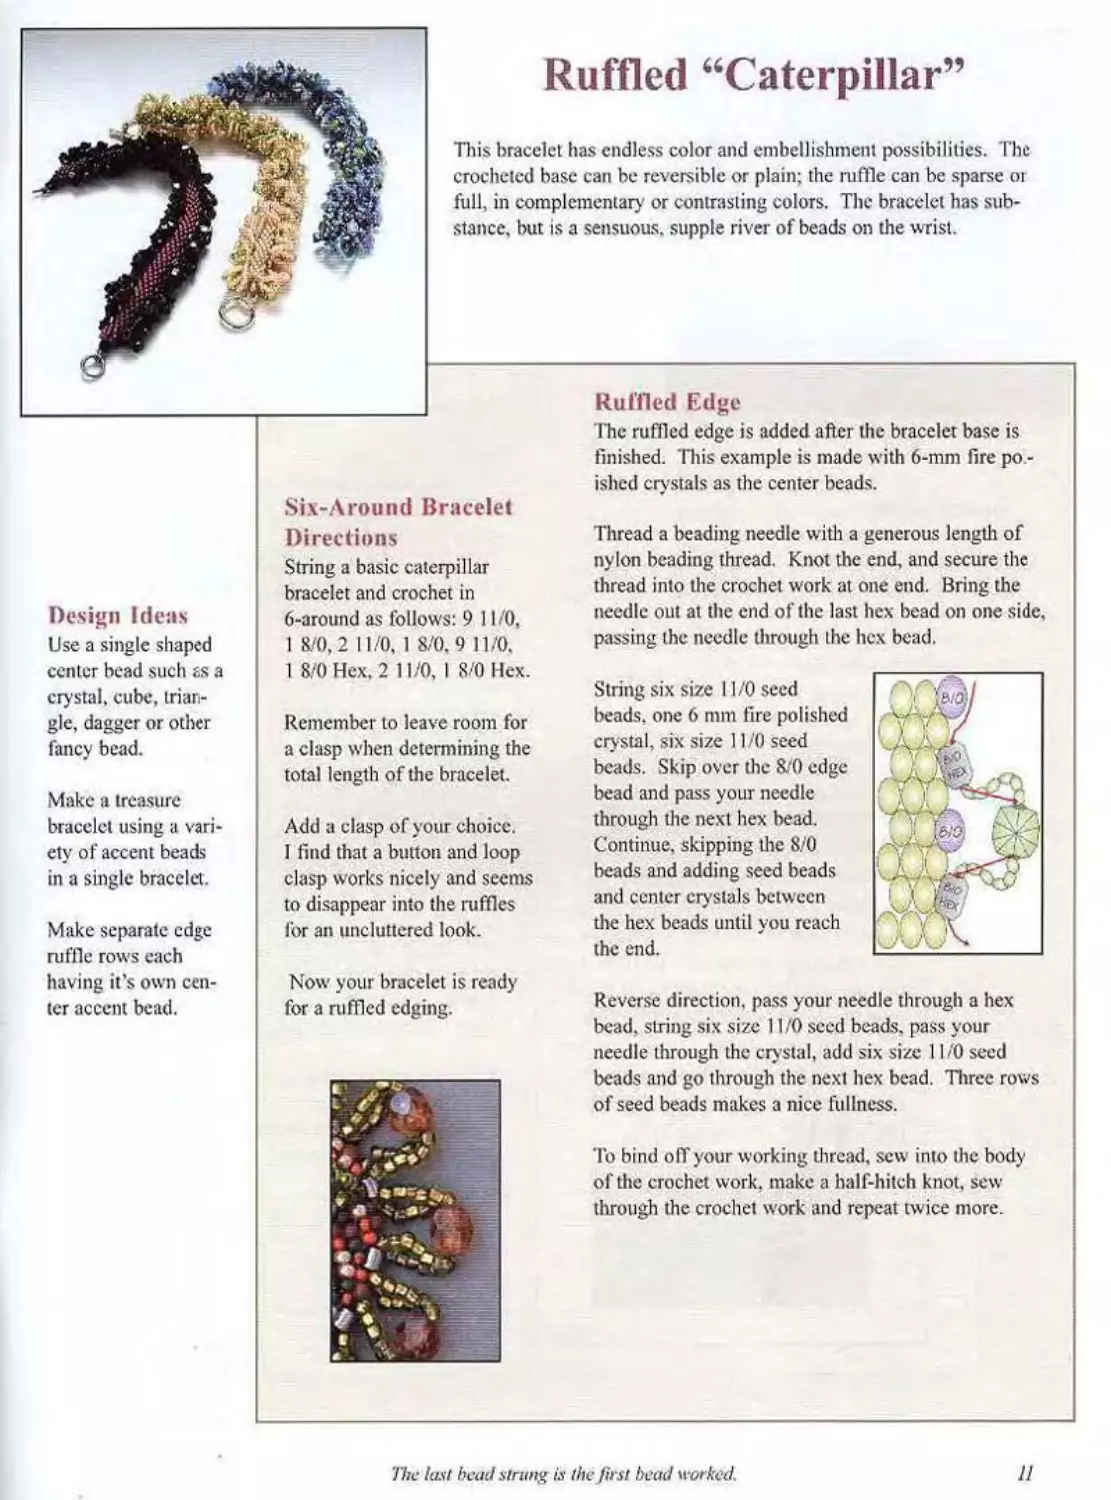
Ruffled “Caterpillar”
This bracelet has endless color and embellishment possibilities. The
crocheted base can be reversible or plain; the ruffle can be sparse or
full, in complementary or contrasting colors. The bracelet has sub-
stance. but is a sensuous, supple river of beads on the wrist.
Ruined Edge
The ruffled edge is added after the bracelet base is
finished. This example is made with 6-mm fire po -
Design Ideas
Use a single shaped
center bead such as a
crystal, cube, trian-
gle. dagger or other
fancy bead.
Make a treasure
bracelet using a vari-
ety of accent beads
in a single bracelet.
Make separate edge
ruffle rows each
having it’s own cen-
ter accent bead.
Six-Around Bracelet
Directions
String a basic caterpillar
bracelet and crochet in
6-arottnd as follows: 9 11 /0,
1 8/0,2 I I/O, 1 8/0,9 11/0,
I 8/0 Hex, 2 11/0, I 8/0 Hex.
Remember to leave room for
a clasp when determining the
total length of the bracelet.
Add a clasp of your choice.
I find that a button and loop
clasp works nicely and seems
to disappear into the ruffles
for an uncluttered look.
ished crystals as the center beads.
Thread a treading needle with a generous length of
nylon beading thread. Knot the end, and secure the
thread into tire crochet work al one end. Bring the
needle out at the end of the last hex bead on one side,
passing the needle through lhe hex bead.
String six size 11/0 seed
treads, one 6 min fire polished
crystal, six size 11 /0 seed
beads. Skip over the 8:0 edge
bead and pass your needle
through the next hex bead.
Continue, skipping lire 8/0
beads and adding seed beads
and center crystals between
the hex beads until you reach
the end.
Now your bracelet is ready
for a ruffled edging.
Reverse direction, pass your needle through a hex
bead, string six size 11 /0 seed beads, pass your
needle through the crystal, add six size 11 /0 seed
beads and go through the next hex bead. Three rows
of seed beads makes a nice fullness.
To bind off your working thread, sew into the body
of the crochet work, make a half-hitch knot, sew
through the crochet work and repeat twice more.
The hist bead strung is lhe first bead worked.
11
Ellen (hllllHiri
Basketweave
Cathy Ixe I.ielausis, of Glass Cat Beads, developed this unique
textural pattern. It makes two spirals that go in opposite direc-
tions and weave under and over each other. It is complicated to
string, but is well worth the time as it works up into an "Oh
Wow!" rope.
Six-Around Basket-weave Pattern
Design Ideas
Use all 11/0 beads in
bright matte colors for a
festive harlequin-looking
rope.
The cylinder beads make
a very tight background
which allows the spirals
to pop into the forefront.
Hint
If you have trouble keeping the
stringing pattern straight, place a
piece of tape on the thread after the
first complete sequence. You can
then lay the following string of bead
repeats against it for a visual check
of patient correctness. An alternative
is to use a bright colored bead at the
end of the first sequence and break it
out when you crochet up to it.
Bead Color Codes:
“A" - the sides to Spiral 1 in 11/0 seed bead
"B" - background color in I I /O cylinder bead
“C” - the sides to Spiral 2 in 11/0 seed bead
“D"- the center of Spiral 2 in 8/0 seed bead
"E” - the center of Spiral I in 8/0 seed bead
String:
/С. ID. IC. ЗВ. IA
1C, ID, 1C.2B, I A. IE
IC. ID. IC. IB. IA. IB. JA
IC, ID, IC, IA. IE. IA. IB
IC. ID. IA. IE. I A. 2B
IC. I A. IE, IA.3B
I A. IE. IA. ЗВ. IA
IE, IA. IC.2B, IA. IE
IA. ID. IC. IB. IA. IE. JA
IC. ID. IC. IA, IE, IA. IB
IC. ID. IC. IE. I A. 2B
IC, ID, IC, IA, 3H
Repeat for desired length, ending with a complete
pattern sequence and crochet in 6-around.
To help keep the stringing rows straight, highlight
every other row or number the rows. One student
makes a separate card for each row and Hips them
over as she strings that row.
12
‘Die last bead rrrrmg is the first bead worked.
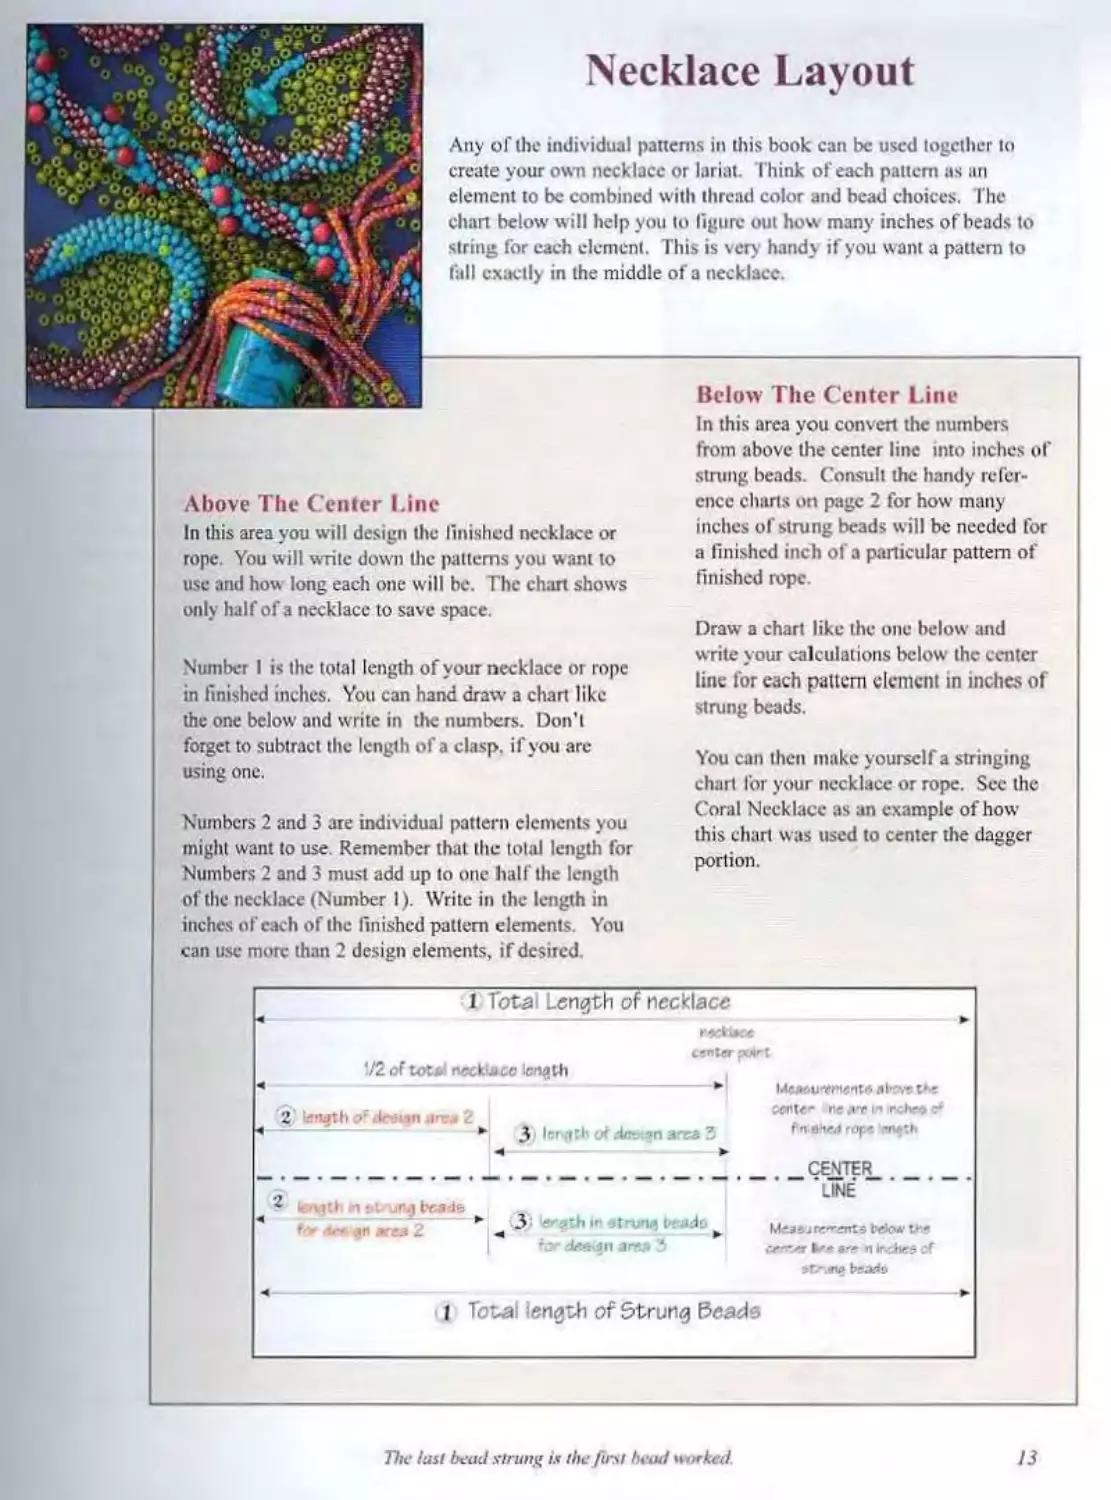
Necklace Layout
Any of the individual patterns in this book can be used together to
create your own necklace or lariat. Think of each pattern as an
element to be combined with thread color and bead choices. The
chan below will help you to figure out how many inches of beads to
string for each element. This is very handy if you want a patient to
fall exactly in the middle of a necklace
Below The Center Line
In this area you convert the numbers
from above the center line into inches of
Above The Center Line
In this area you will design the finished necklace or
rope. You will write down die patterns you want to
use and how long each one will be. The chart shows
only half of a necklace to save space
Number I is the total length of your necklace or rope
in finished inches. You can hand draw a chart like
the one below and write in the numbers. Don't
strung beads. Consult the handy refer-
ence charts on page 2 for how many
inches of strung beads will be needed for
a finished inch of a particular pattern of
finished rope.
Draw a chart like the one below and
write your calculations below the center
line for each pattern element in inches of
strung beads.
forget to subtract the length of a clasp, if you arc-
using one.
NTimbcrs 2 and 3 are individual pattern elements you
might want to use. Remember that the total length for
Numbers 2 and 3 must add up to one half the length
of the necklace (Number I). Write in the length in
inches of each of the finished pattern elements You
can use more than 2 design elements, if desired.
You can then make yourself a stringing
chart for your necklace or rope. See the
Coral Necklace as an example of how
this chart was used to center the dagger
portion.
The last bead strung is the first head worked
13
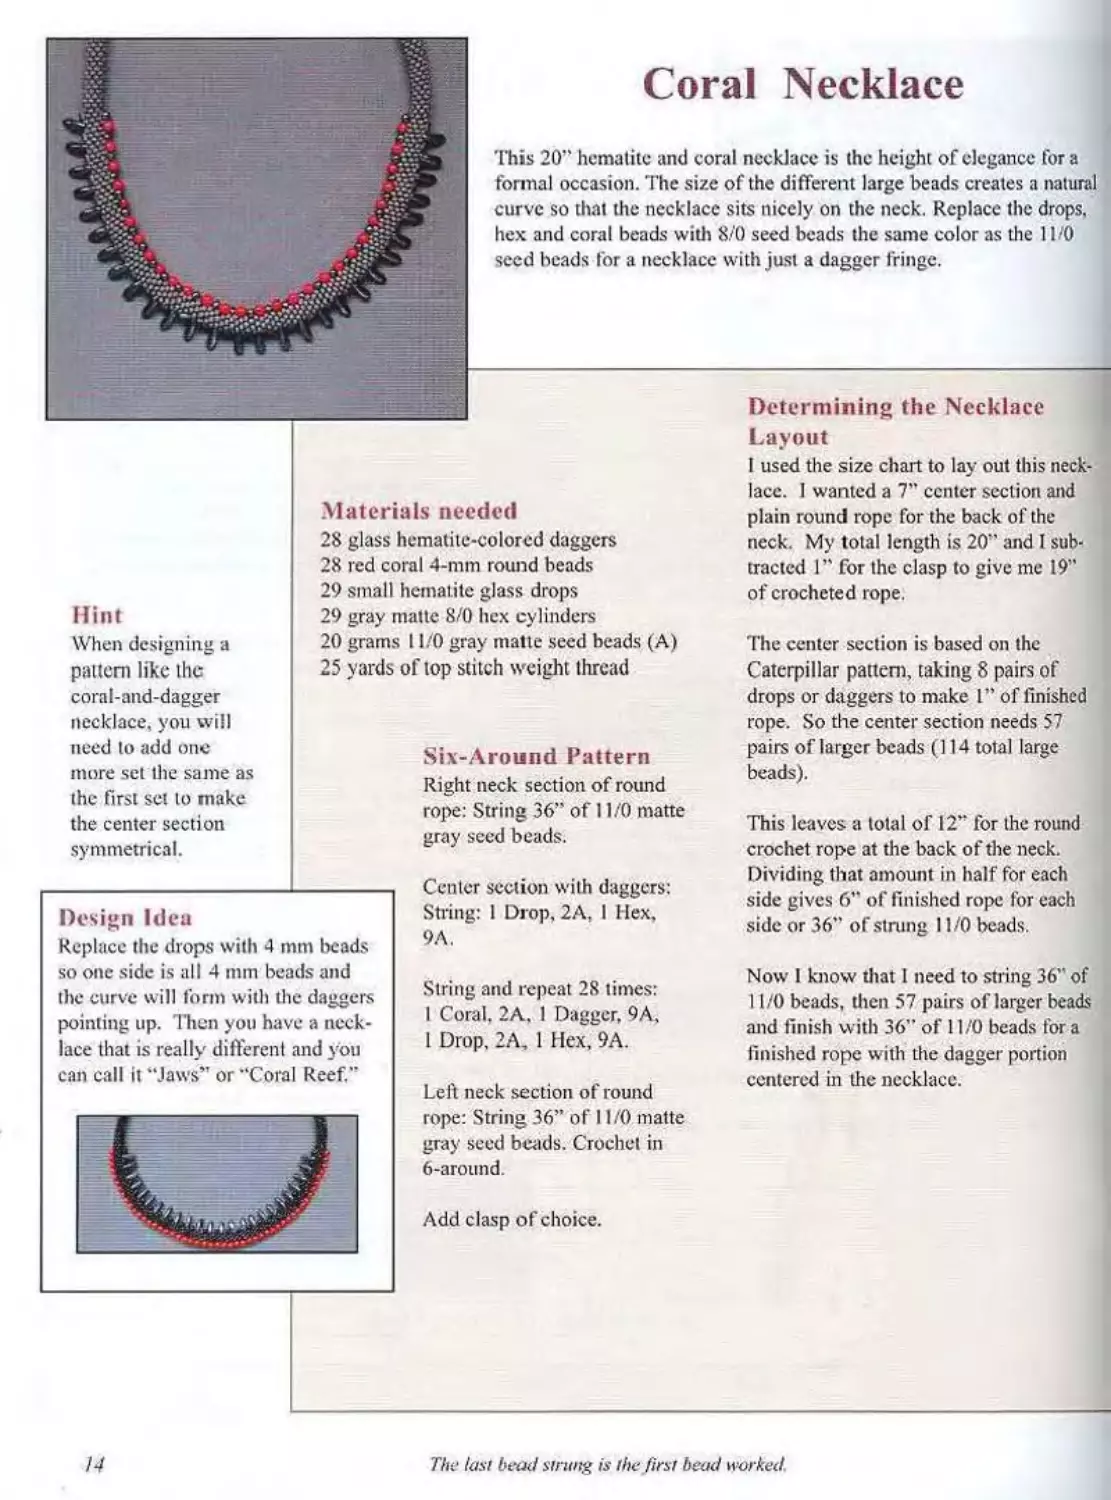
Coral Necklace
This 20” hematite and coral necklace is the height of elegance fora
formal occasion. The size of the different large beads creates a natural
curve so that the necklace sits nicely on the neck. Replace the drops,
hex and coral beads with 8/0 seed beads the same color as the 110
seed beads for a necklace with just a dagger fringe.
Determining the Necklace
Hint
When designing a
pattern like the
coral-and-dagger
necklace, you will
need to add one
more set the same as
the first set to make
the center section
symmetrical.
Materials needed
28 glass hematite-colored daggers
28 red coral 4-mm round beads
29 small hematite glass drops
29 gray matte 8/0 hex cylinders
20 grams 1 l.'O gray matte seed beads (A)
25 yards of top stitch weight thread
Design Idea
Replace the drops with 4 mm beads
so one side is all 4 mm beads and
the curve will form with the daggers
pointing up. Then you have a neck-
lace that is really different and you
can call it "Jaws” or “Coral Reef."
Six-Around Pattern
Right neck section of round
rope: String 36” of 11/0 matte
gray seed beads.
Center section with daggers:
String: I Drop, 2A, I Hex,
9Л. ”
String and repeat 28 times:
I Coral. 2A. 1 Dagger, 9A,
1 Drop. 2A, 1 Hex, 9A.
Left neck section of round
rope: String 36” of 11/0 matte
gray seed beads. Crochet in
6-around.
Add clasp of choice.
Layout
I used the size chart to lay out this neck-
lace. I wanted a 7” center section and
plain round rope for the back of the
neck. My total length is 20” and I sub-
tracted 1” for the clasp to give me 19”
of crocheted rope.
The center section is based on the
Caterpillar pattern, taking 8 pairs of
drops or daggers to make 1” of finished
rope. So the center section needs 57
pairs of larger beads (114 total large
beads).
This leaves a total of 12” for the round
crochet rope at the back of the neck.
Dividing that amount in half for each
side gives 6” of finished rope for each
side or 36” of strung 11/0 beads.
Now 1 know that I need to string 36” of
11/0 beads, then 57 pairs of larger beads
and finish with 36” of 11/0 beads for a
finished rope with the dagger portion
centered in lhe necklace.
14
The last bead strung is lhe first bead worked.
New Wave
This textural pattern makes a whimsical wave or scallop. It is a
Caterpillar variation that lends itself to being a bracelet, choker or ends
fora lariat. Make each wave a different length for an informal
look. Use the reversible caterpillar pattern to make a two-colored
New Wave bracelet.
New Wave Pattern
Repeat 4 times: I drop, 2A. I В. 9A
Repeat 4 times: I В, 2A. I drop, 9A
Hint
If you have trouble
keeping the wave tight,
pull up two or three
sections and knot your
thread, then do another
few sections.
Continue stringing the above repeats until you have the desired
length and crochet in 6-around.
Make the wave form:
Thread a beading needle with a generous amount of nylon bead-
ing thread. Knot the end and secure it in the body of the crochet
work. Exit the edge of the work at the end of Color B.
New Wave 20” Necklace
“A” is an opaque green turquoise I I/O seed bead
“B” is a silver-lined green 11/0 seed bead
“drop” is a transparent green tiny drop bead
String 27”of color A, then string:
IB. 2A, I drop. 9A
Wave section:
String and repeat tire following 4 limes:
I drop. 2A, I В. 9A
Repeat the following 4 times:
IB, 2A, 1 drop. 9A~
Repeat the wave section 21 times.
String 27" of color A
Refer to the instructions for making the wave form and
tightly pull up the center section. Add end caps or a size
6/0 bead to each end of the rope before putting on a
clasp. A small button and loop would also make a good
closure.
The work looks like this before pulling up
the wave.
Pass the needle through the four color В beads, then pass
the needle perpendicular through the crochet rope to the
other side. Pass the needle through the four beads of
color В on the opposite side.
Continue going from side to side and threading through
each set of four Color В beads until you reach the end.
Pull this thread up very tightly and you will sec the wave
form. Maintain a tight tension on this thread and bind off
into the crochet work.
The last bead strung is the first bead worked.
I.'.
5-Around Wisteria
Lariat Pattern
(Leave a beginning 18” tail of thread)
14" plum seed beads
12” of transition area, plum to lavender
seed beads
12" lavender seed beads
12” of transition area, lavender to white
seed beads
1” white seed beads
95” of the following floral sequence:
Flower pattern #1
14 white seed beads
Flower pattern 112
10 white seed beads
Flower pattern #3
12 white seed beads
1” white seed beads
12” of transition area, white to lavender
seed beads
14" lavender seed beads
12" of transition area, lavender to plum
seed beads
16" plum seed beads
Bind off your rope leaving an 18" tail
Hint
Work in 3 sections to make bead man-
agement easier. You could make separate
sections and use an invisible join; or cro-
chet a section, string the next and join
the thread in.
Wisteria Lariat
5-Arouttd pattern for approximately a 45” lariat
When I created this larial 1 used (he “design-as-you-go" method. In
other words, I did not have a pattern laid out. but added elements as
they occurred to me. In recreating the pattern. I use a more structure
layout to make the pattern easier to follow.
Materials for Approximately a 45” Lariat
18 g. I I/O plum opal gilt-lined seed beads (L)
14 g. 11/0 light purple opal gilt-lined seed beads (P)
16 g. 11/0 white opal gilt-lined seed beads (W)
8 g. 11/0 satin dark green opal gilt-lined seed beads (G)
2 large 1" decorative end beads
1 spool white Jean Stitch thread
16
The last bead Strung is the first bead worked.
Transition or Shaded Area
Mix equal amounts of beads of both colors. Start stringing one
color and gradually add more and more of the second color in
random patterns until you are stringing all of the second color.
1 used 100 beads of plum and 100 beads of lavender for the 12"
transition area.
End Fringe
Thread the crochet thread "tail" onto a beading
needle. Pass the needle through one of the large end
beads and start making a flower stem. You should
make a top flower strand after every other lower
strand.
Step 1 Single Flower Strand
Make 3, each 5 green beads longer than the last one.
String 25 green beads (main stem), then 1 plum, I
lavender, and 1 plum bead. Pass your needle back
through lhe last 3 green beads to make the end wiste-
ria flower. String 2 green, 1 plum. 1 lavender, and I
plum bead. Pass the needle back through the 2 green
beads and up through 3 green beads on the main
stern. This completes one side blossom. Continue
going back up the main stem, making flowers after
every third bead on the main stem.
After completing the first strand, pass your needle
back through the large bead, back into the crochet
work and bind off.
Thread a beading needle with a long length of nylon
beading thread. Knot the end. Pass the needle
through tlic crocheted rope two limes, making a half
hitch after each pass to secure the thread and exit at
the bottom of lhe rope. Pass the needle under one of
the threads in the last row of the crochet rope, and
through lhe large bead, then make two more single
strands of wisteria blossoms.
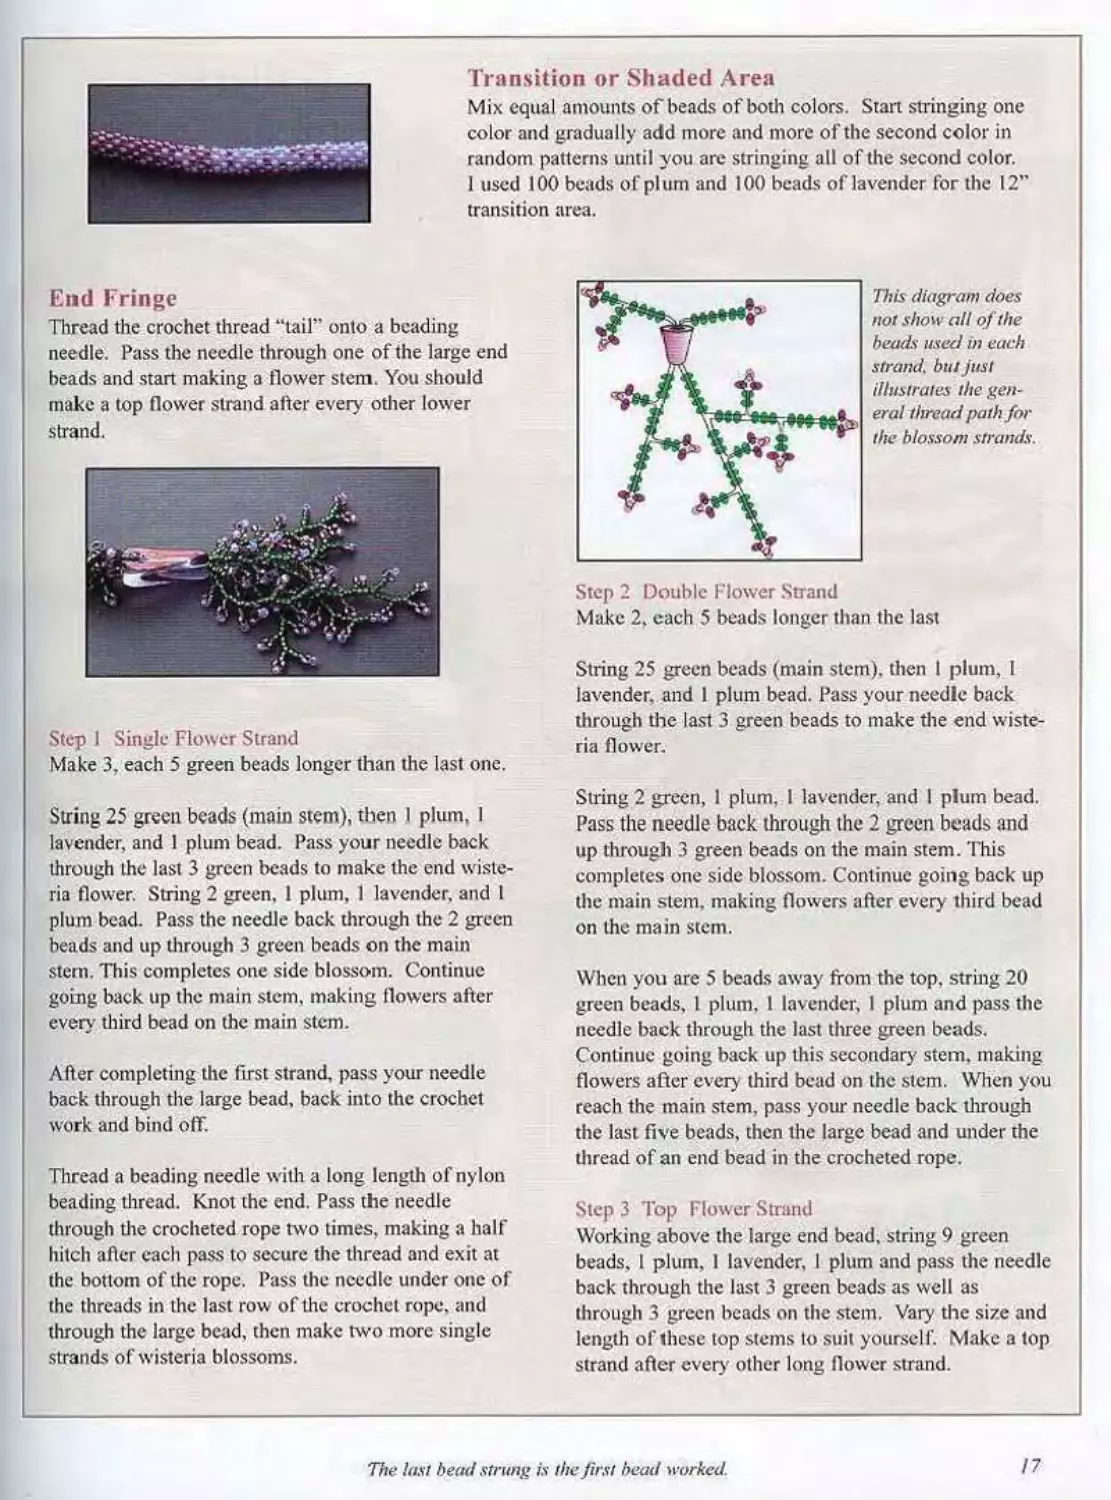
This diagram does
not show ail of the
heads used nt each
strand, but just
illustrates the gen-
eral thread path for
the blossom strands.
Step 2 Double Flower Strand
Make 2. each 5 beads longer than the last
String 25 green beads (main stem), then 1 plum. I
lavender, and I plum bead. Pass your needle back
through tire last 3 green beads to make the end wiste-
ria flower.
String 2 green, 1 plum, 1 lavender, and I plum bead.
Pass the needle back through lhe 2 green beads and
up through 3 green beads on the main stem. This
completes one side blossom. Continue going back up
the main stem, making flowers after every third bead
on the main stem.
When you are 5 beads away from the top, string 20
green beads, 1 plum. 1 lavender, I plum and pass the
needle back through the last three green beads.
Continue going back up this secondary' stem, making
flowers after every third bead on lhe stem. When you
reach the main stem, pass your needle back through
the last five beads, then the large bead and under the
thread of an end bead in the crocheted rope.
Step 3 Top Flower Strand
Working above the large end bead, string 9 green
beads. 1 plum. I lavender, I plum and pass the needle
back through the last 3 green beads as well as
through 3 green beads on the stem. Vary the size and
length of these top stems Io suit yourself. Make a top
strand after every other long flower strand.
The last bead strung is the first bead worked.
17
The last bead strung is the first bead worked
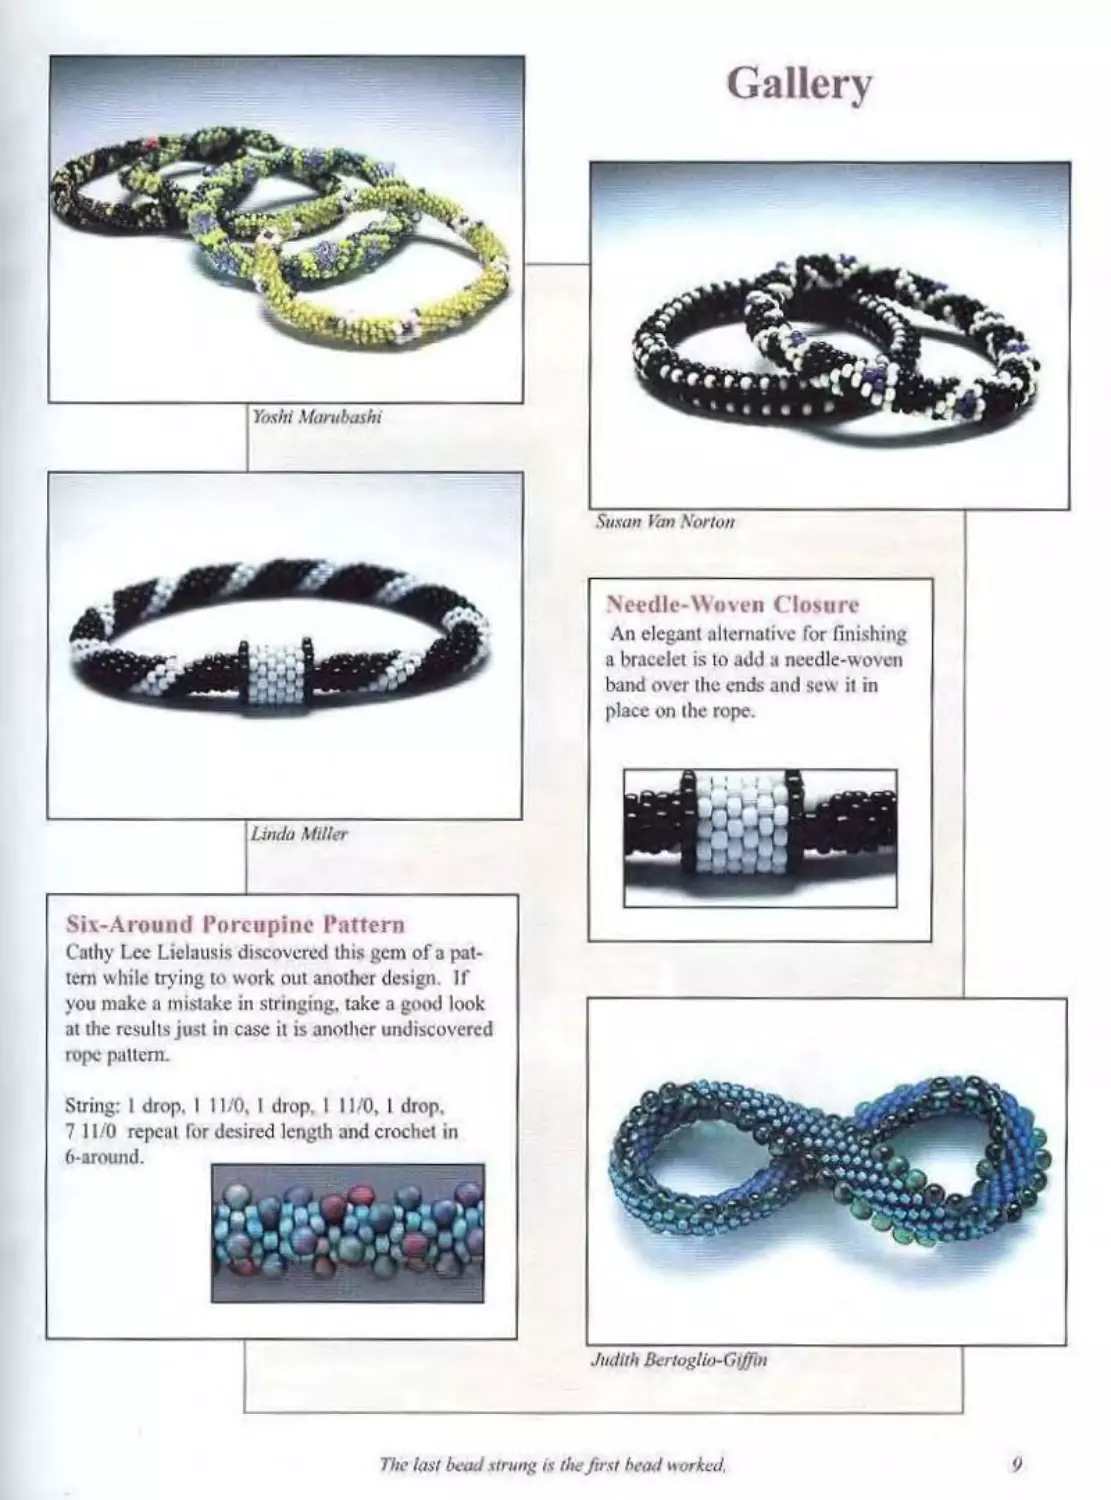
Judith Bertoglio-Gijfin
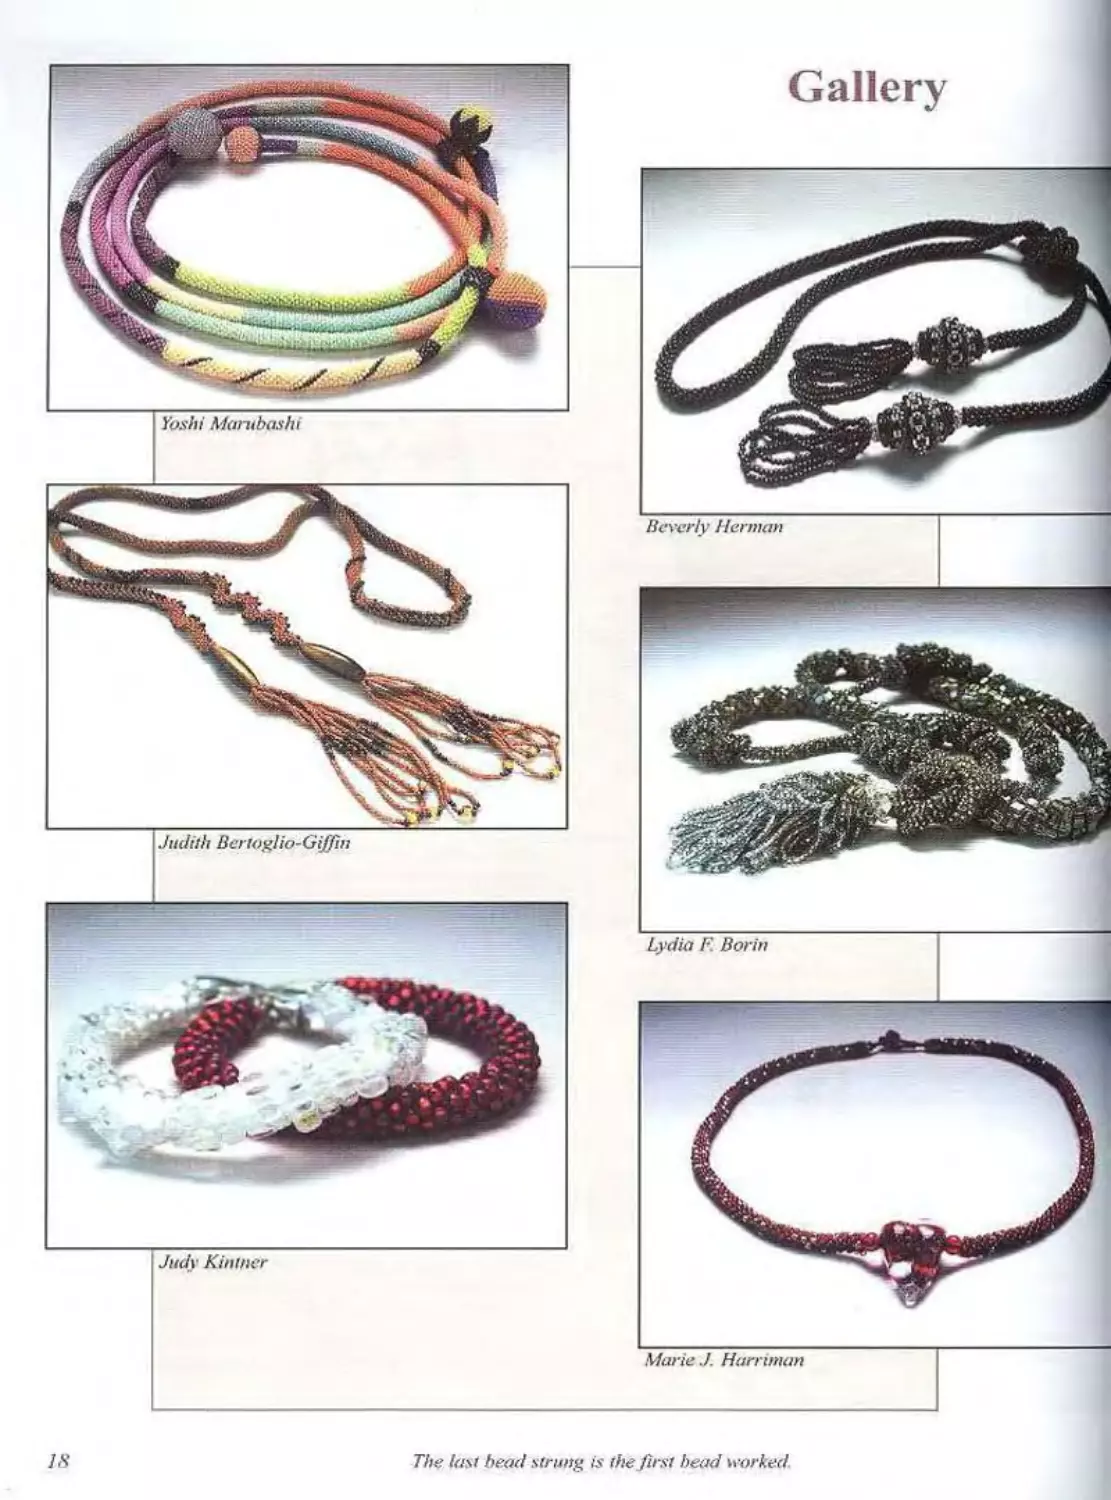
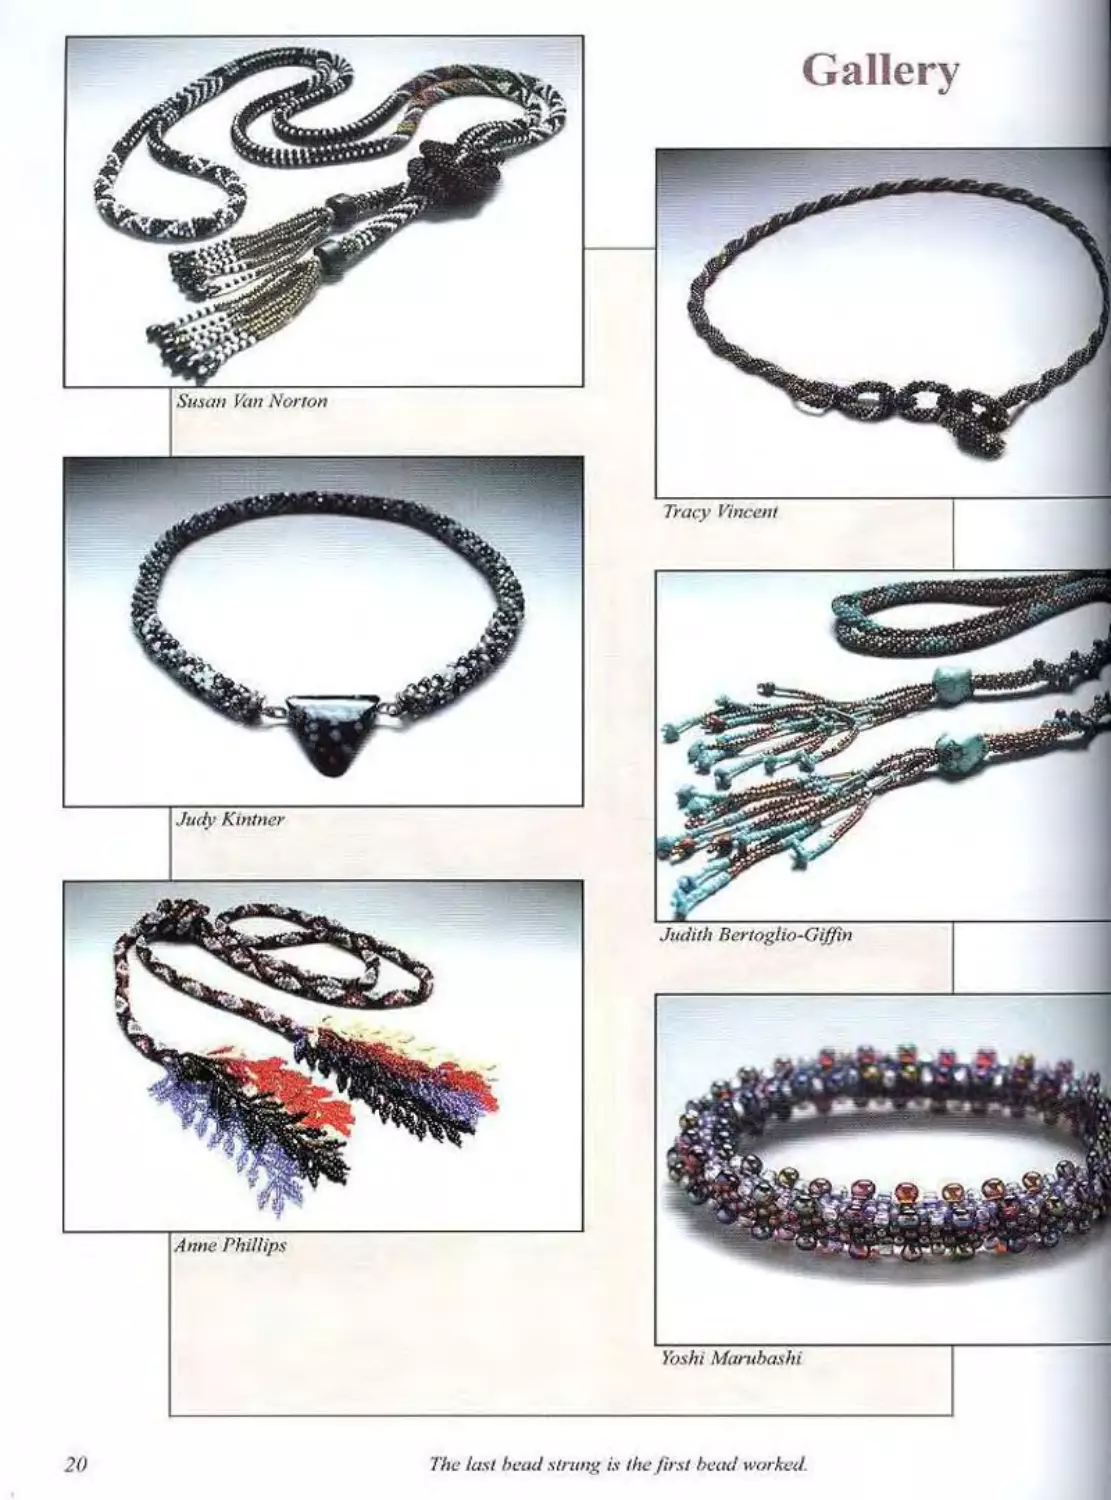
Gallery
Susan Van Norton
Judith Bertoglio-Gijfin
Yusbi Marubushi
The last bead strung is the first bead worked.
19
20
The last bead strung is the first bead worked.
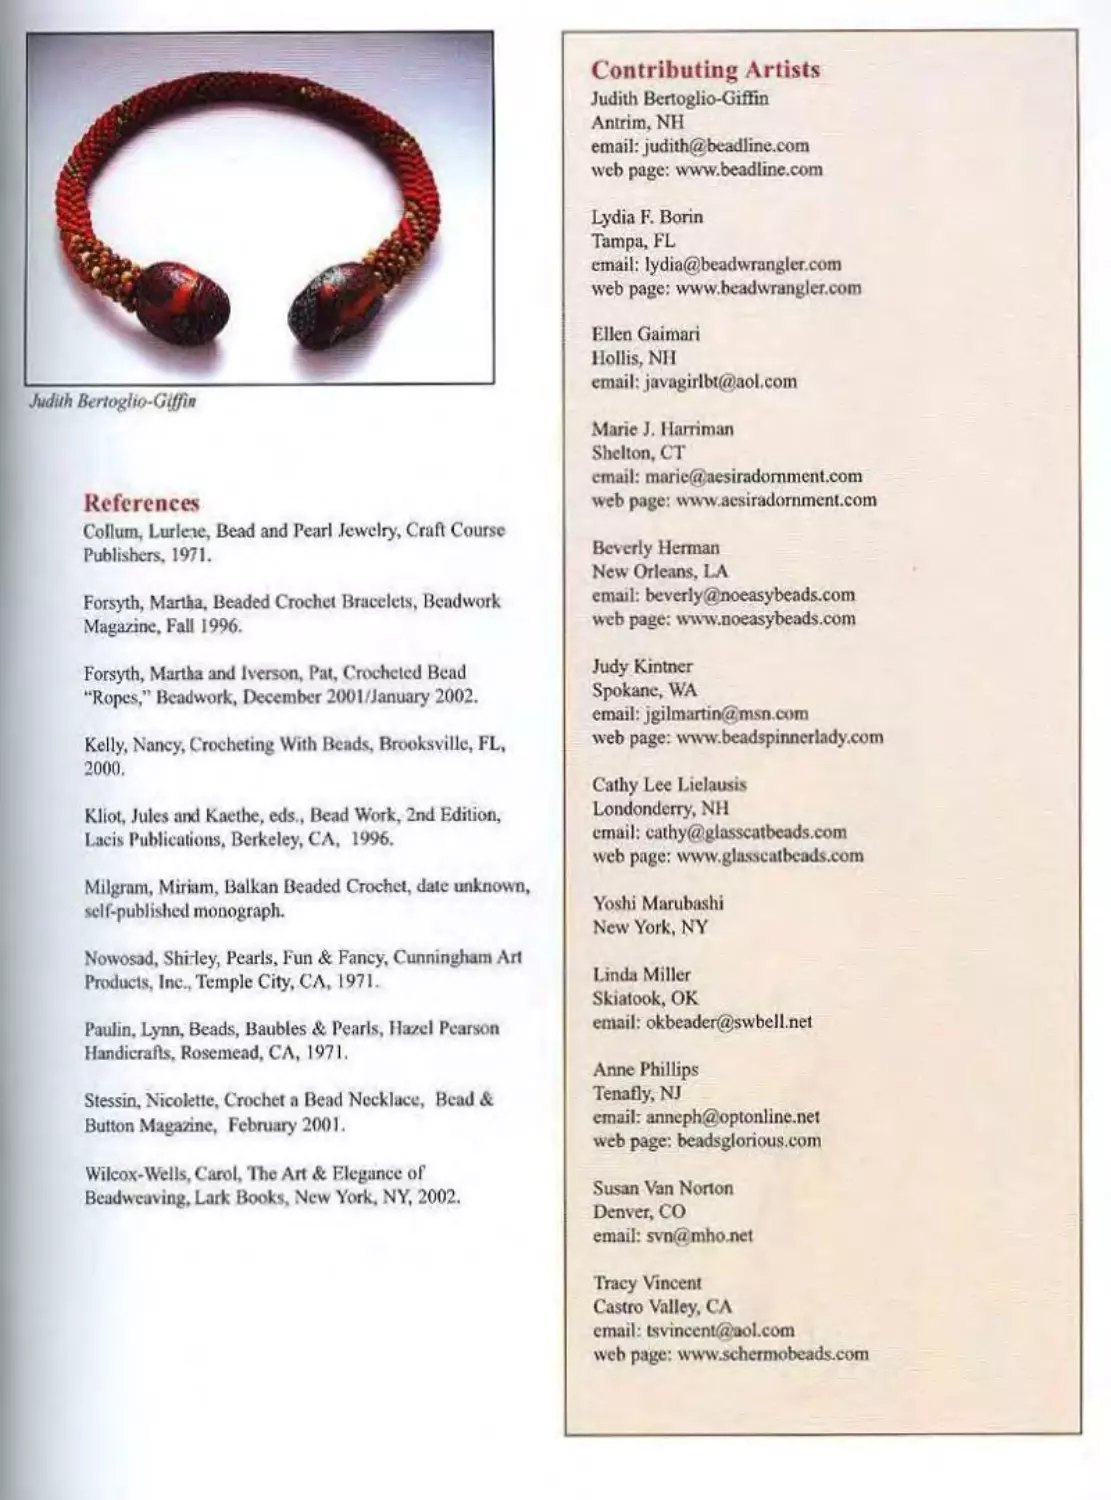
Judilh Berlo^lio-Giffin
References
Collum, Lurleie, Bead and Pearl Jewelry, Craft Course
Publishers. 1971.
Forsyth, Martha, Beaded Crochel Bracelets, Bcadwork
Magazine. Fall 1996.
Forsyth, Martha and Iverson, Pat, Crocheted Bead
“Ropes,” Bcadwork, December 2001/January 2002.
Kelly, Nancy, Crocheting With Beads. Brooksville, FL,
2000.
Kliot, Jules aixl Kacthe. eds., Bead Work, 2nd Edition,
Lacis Publications. Berkeley, СЛ. 1996.
Milgram, Miriam, Balkan Beaded Crochet, dale unknown,
self-published monograph.
Nowosad, Shirley, Pearls, Fun & Fancy, Cunningham .Art
Products. Inc., Temple City, СЛ, 1971.
Paulin. Lynn. Beads, Baubles & Pearls, Hazel Pearson
Handicrafts. Rosemead. СЛ, 1971.
Stessin. Nicolette, Crochet a Bead Necklace, Bead &
Button Magazine, February 2001.
Wilcox-Wells, Carol, The Art & Elegance of
Beadwcaving, Lark Books. New York. NY, 2002.
Contributing Artists
Judith Bcrtoglio-Giffin
Antrim, NH
email: judith@bcadline.com
web page: www.beadline.com
Lydia F. Borin
Tampa, FL
email: lydia@beadwranglcr.com
web page: www.beadwranglcr.com
Ellen Gaimari
Hollis. NH
email: iavagirlbt@aol.com
Marie J. Harriman
Shelton, CT
email: maric@acsiradommcnt.com
web page: www.acsiradornmcnt.com
Beverly Herman
New Orleans. I-A
email: bcverly@noeasybeads.com
web page: www.noeasybeads.com
Judy Kintncr
Spokane, WA
email: jgilmartin@ msn.com
web page: www.beadspirmcrlady.com
Cathy Lee Liclausis
Londonderry, NH
email: cathy@glasscatbcads.com
web page: www.glasscalbcads.com
Yoshi Marubashi
New- York, NY
Linda Miller
Skiatook, OK
email: okbcader@swbell.ne1
Anne Phillips
Tenafly, NJ
email: anncph@optonline.net
web page: beadsglorious.com
Susan Van Norton
Denver, CO
email: svn@mho.net
Tracy Vincent
Castro Valley, СЛ
email: Lsvincenl@aol.com
web page: www.schermobeads.com
CRAFTS
Cathy Lee Lielausis
Bead Crochet Ropes
About the Author
Judith Bcnoglio-GifTin.
artist, designer and
teacher has been beading
for over 20 years. She
teaches bead crochet
workshops nationwide
that include basic and
advanced techniques that
emphasize creative appli-
cations. Judith splits her
time between Tombstone,
Arizona and Antrim,
New Hampshire.
About the Editor
Cathy Lee Lielausis,
editor and owner of
Glass Cat Books (a divi-
sion of Glass Cat Beads.
LLC) has been beading
for more than 25 years,
and teaching for the last
3 years. She makes her
home in New Hampshire
with a husband and
seven cats.
isbn о-чтеаьы-о-ч
This book includes all the basic techniques lor
slip-stitch bead-crochct that you will need to begin
making lovely ropes. The experienced
bead-crocheter will find new patterns and exciting
techniques.
* Step-by-Step Instructions and Illustrations
* Helpful Hints
* Design Ideas
* 17 Patterns
* 6 Complete Projects
* Basic and Advanced Techniques
* Gallery of Contemporary Work
Bead Crochet Ropes Through History
The creation of beaded articles today is not just a fad but a con-
tinuation of a process that began long ago, and is constantly being
adapted to changing fashion styles. Both beadwork and crochet
work date from Mediaeval times; however we can only suppose
that beaded crochet ropes were fashioned then. The first written
examples of this technique are from the Victorian era when
bracelets and long lariats were popular adornments. Many exam-
ples of Victorian and Flapper ropes are still in existence. Once
more, these supple, sensuous ropes have become popular and are
being used as design elements along with other beadwork or as
individual pieces of jewelry.
We hope that if you’ve enjoyed this book, you will look for
upcoming volumes from Glass Cat Books on Bead Crochet
Pattern Design and 3-Dimensional Bead Crochet.
$22.95
Glass Cai Banks, Publisher