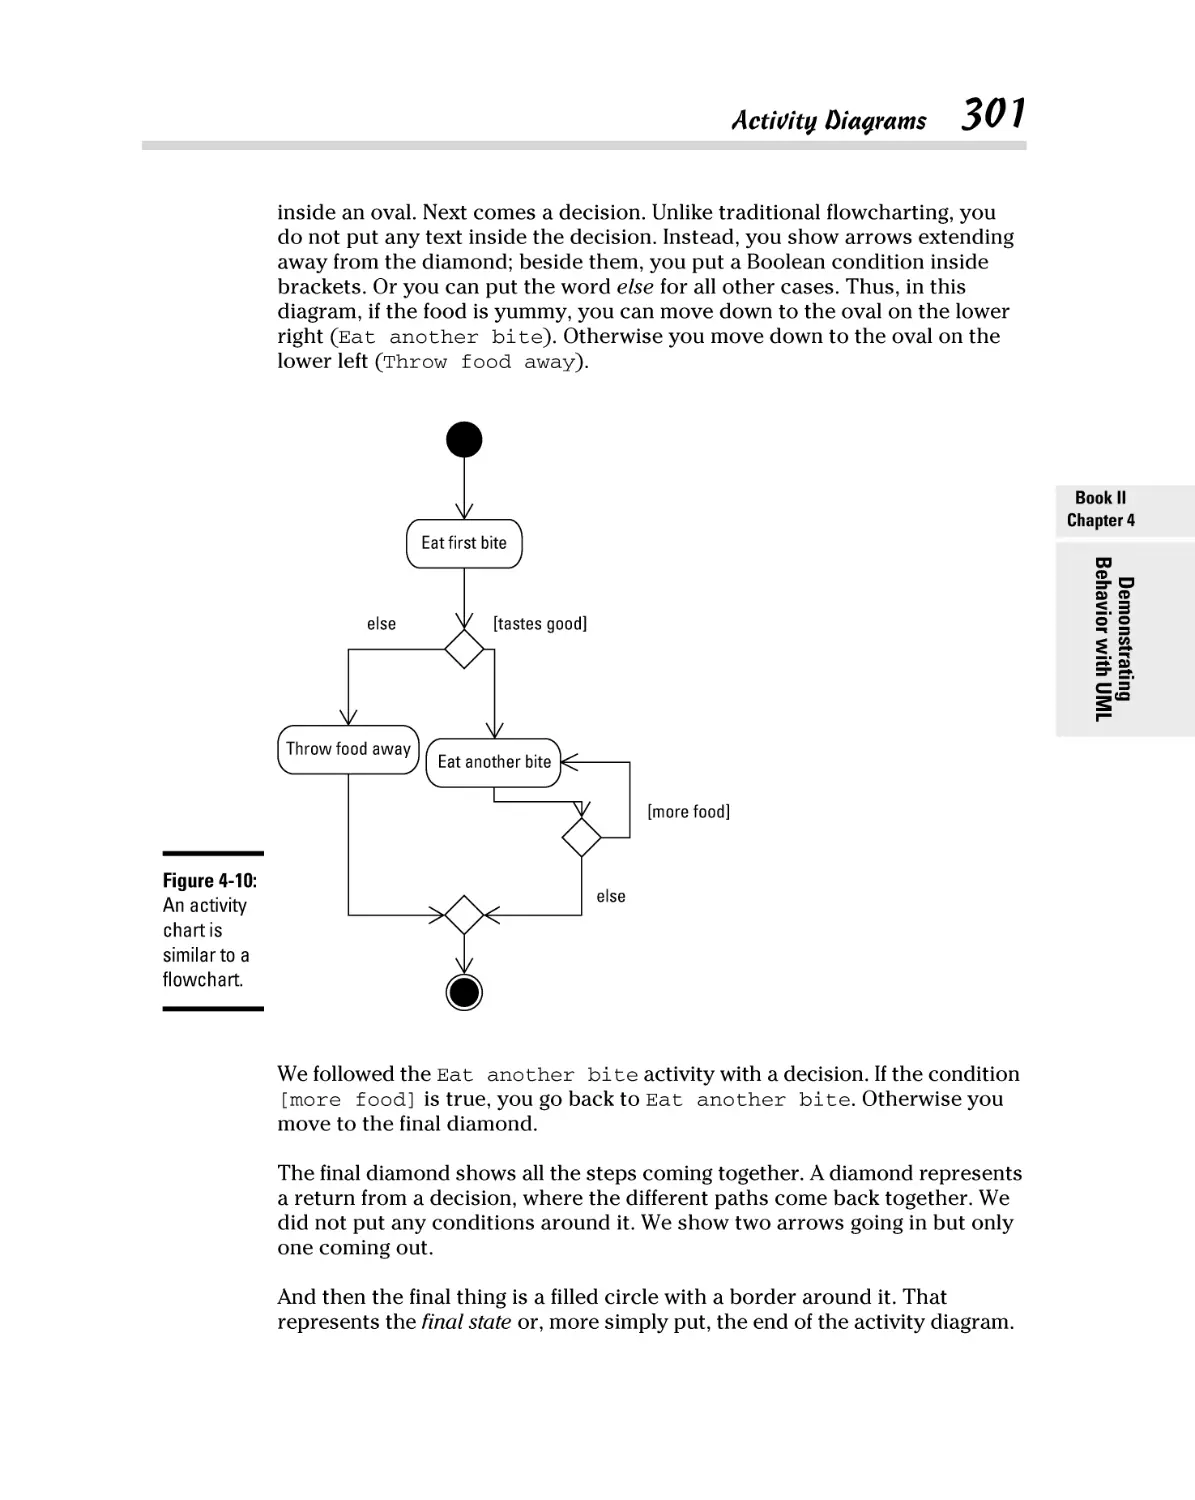
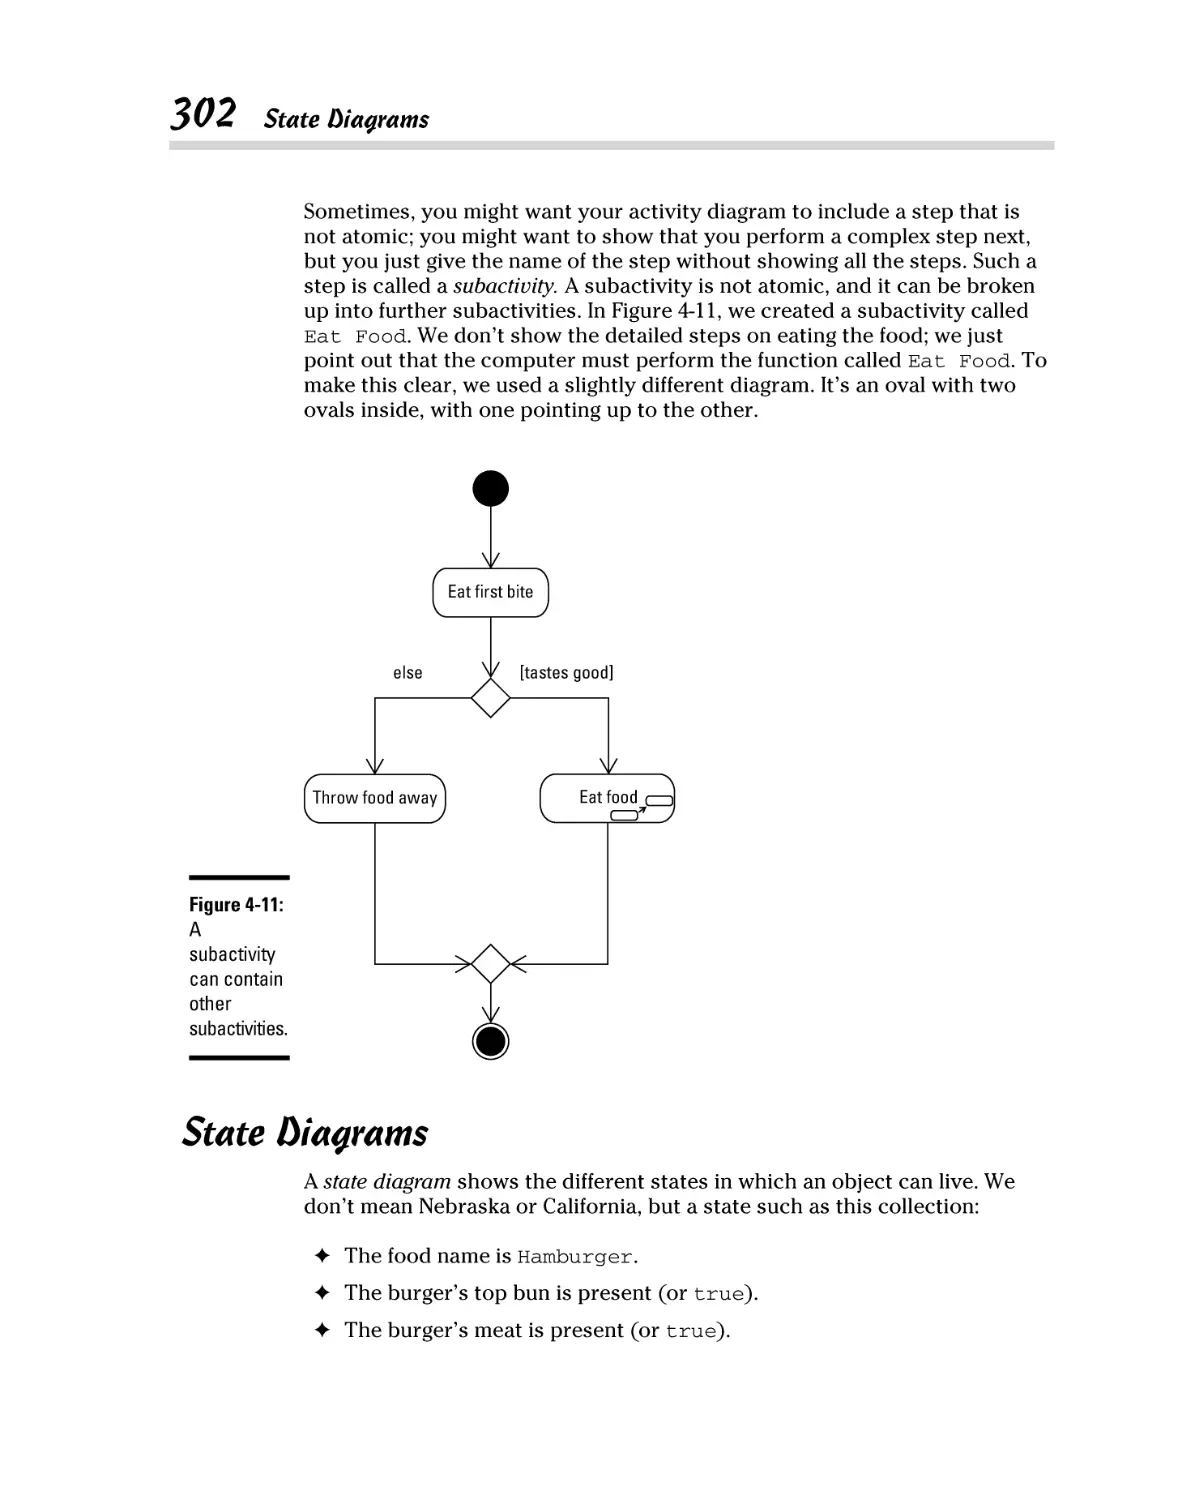
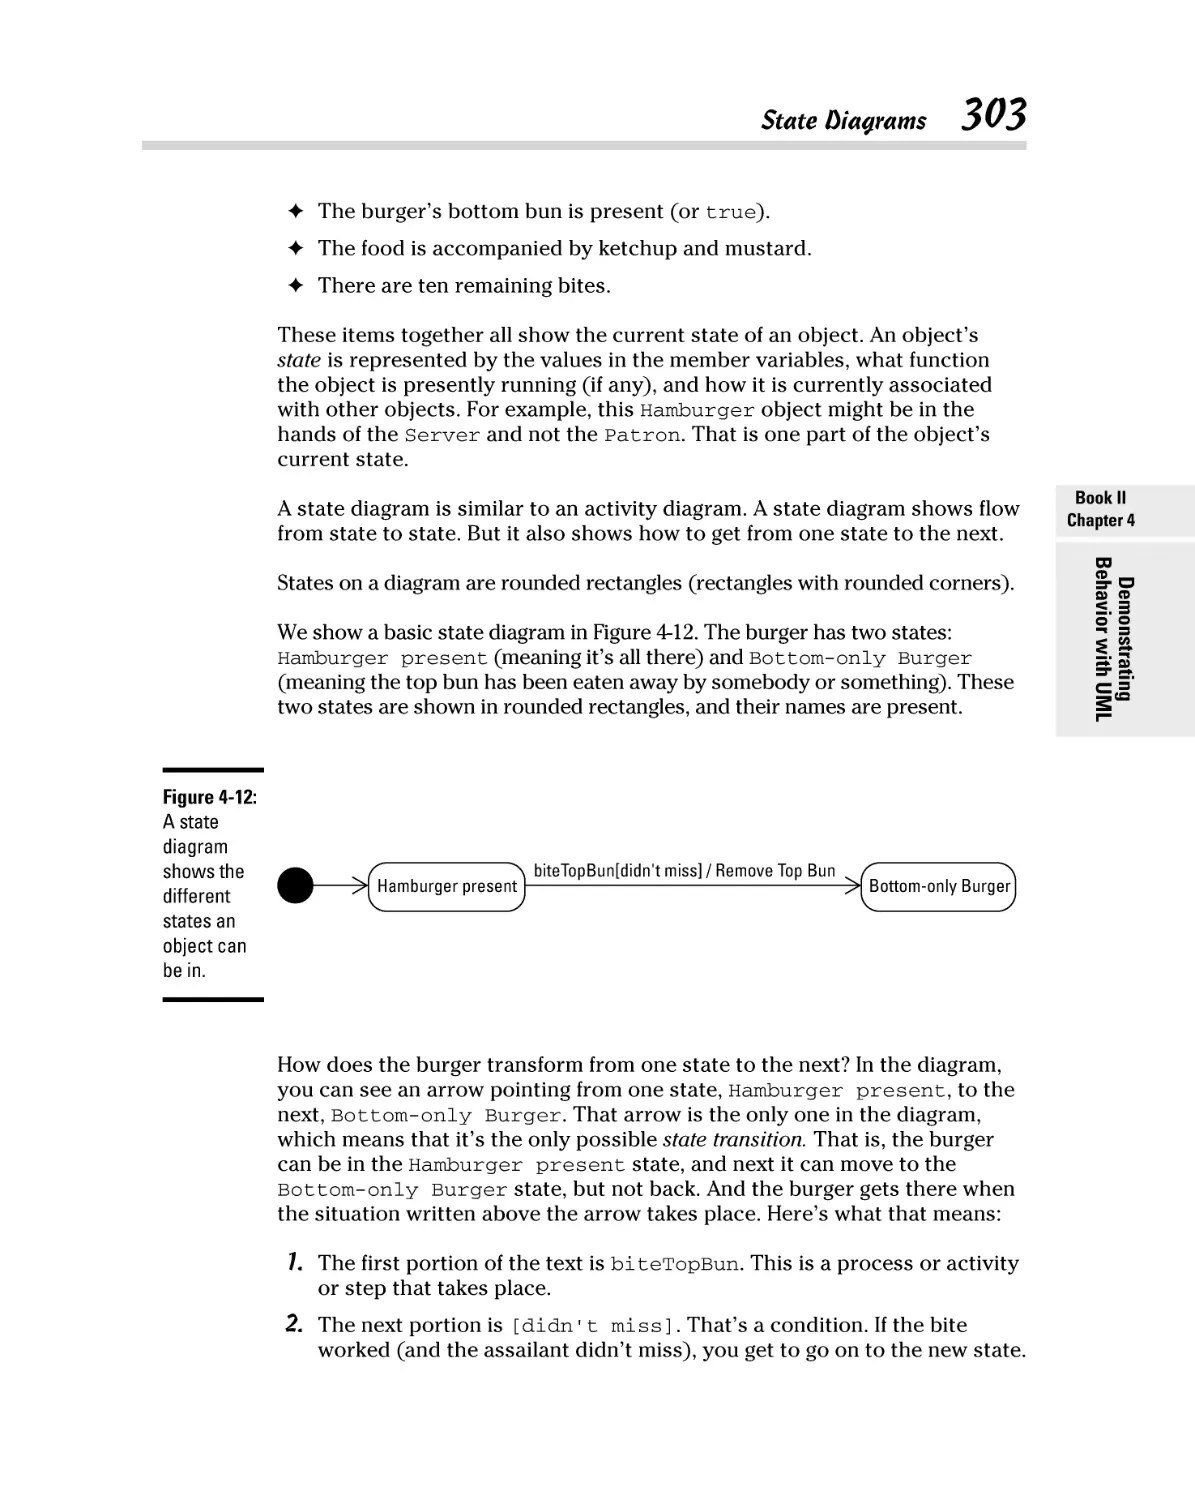
/


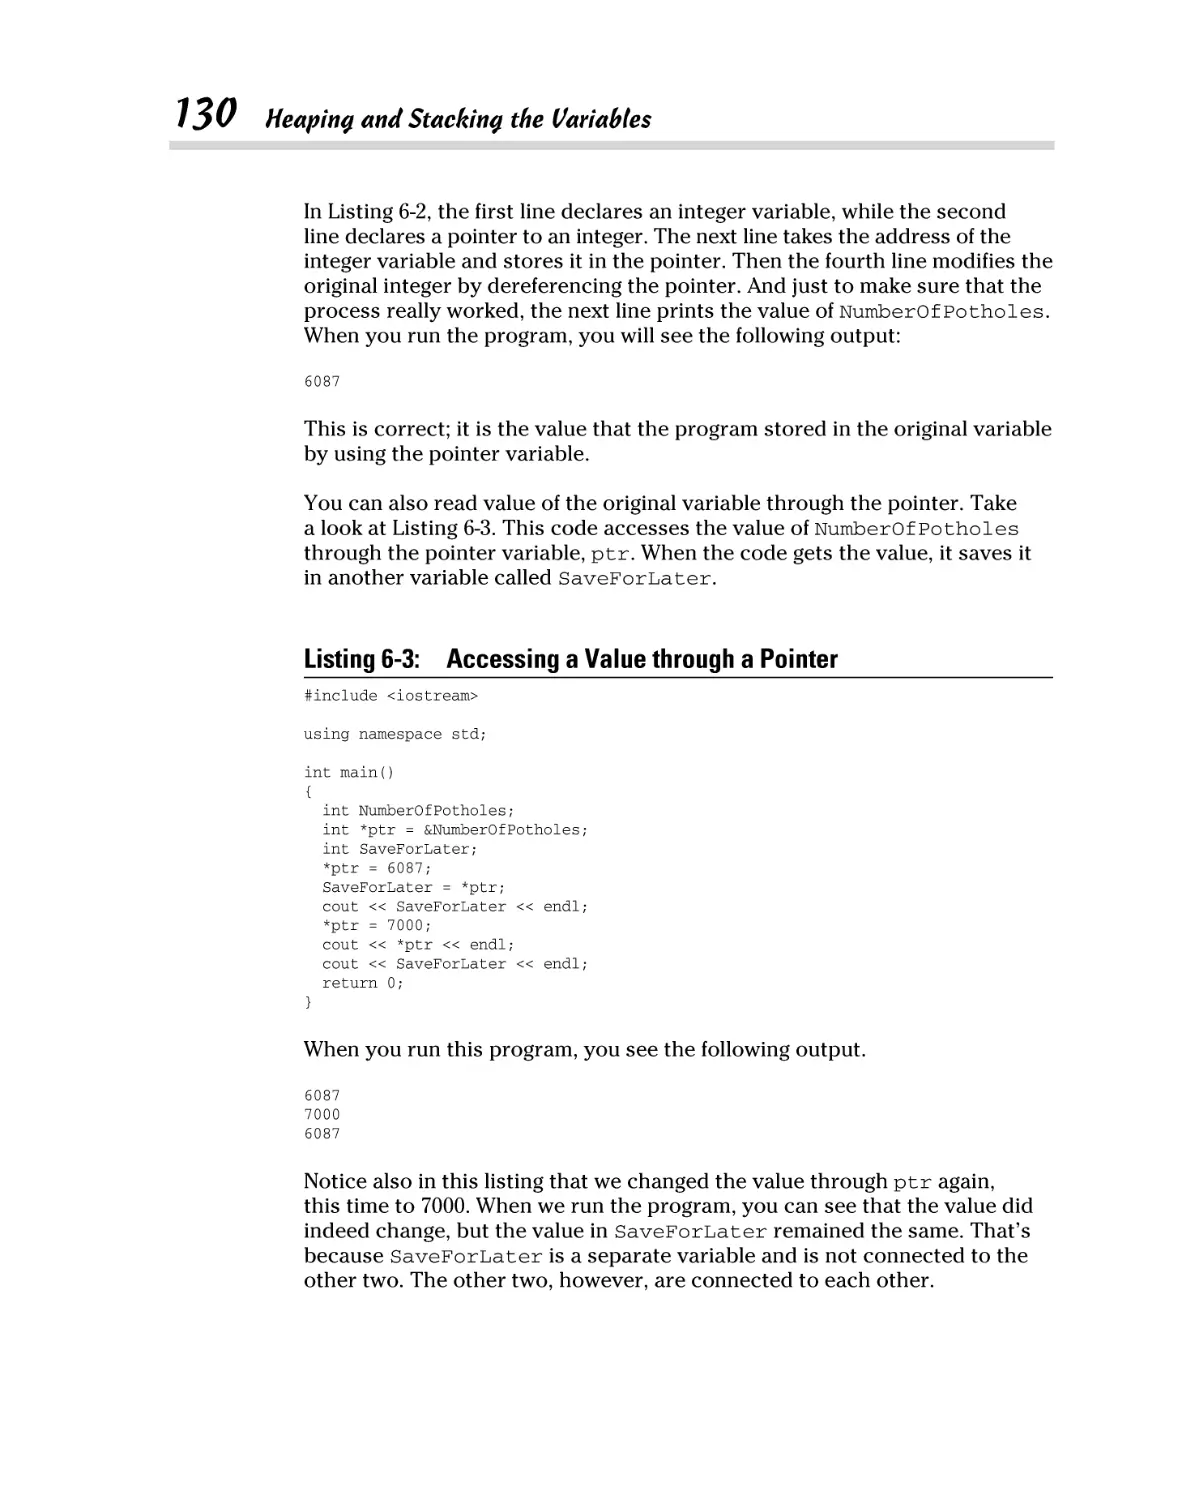
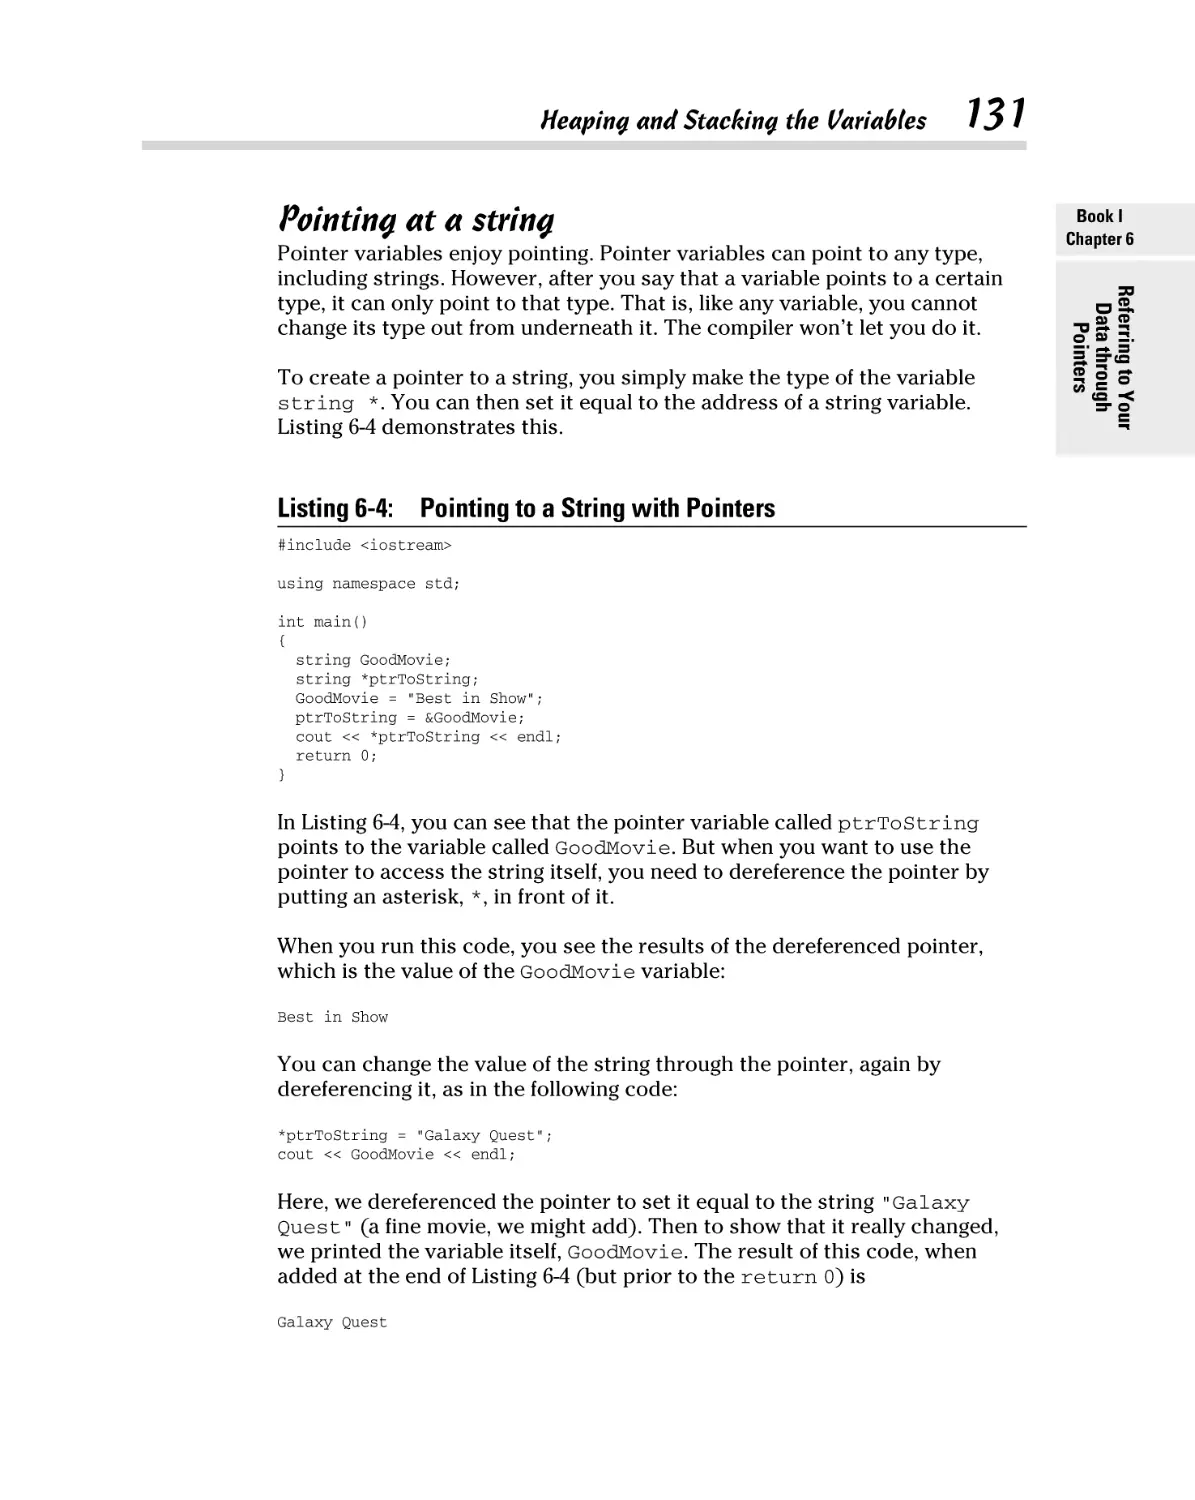
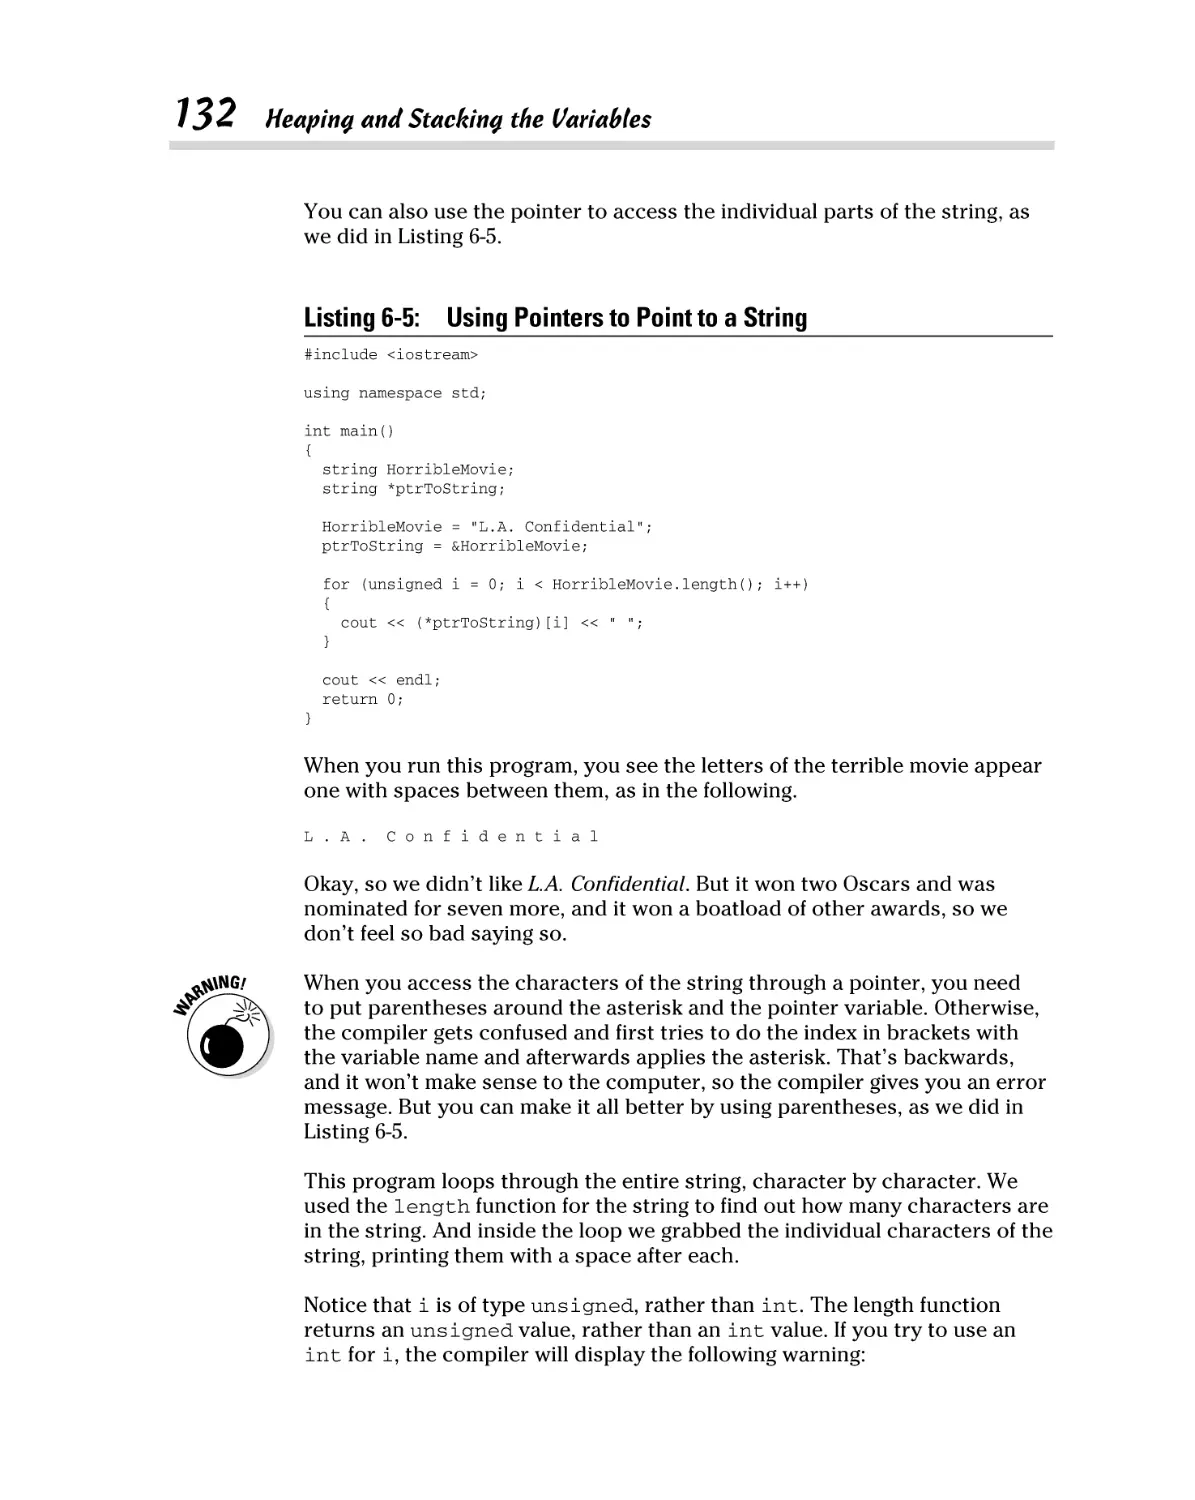
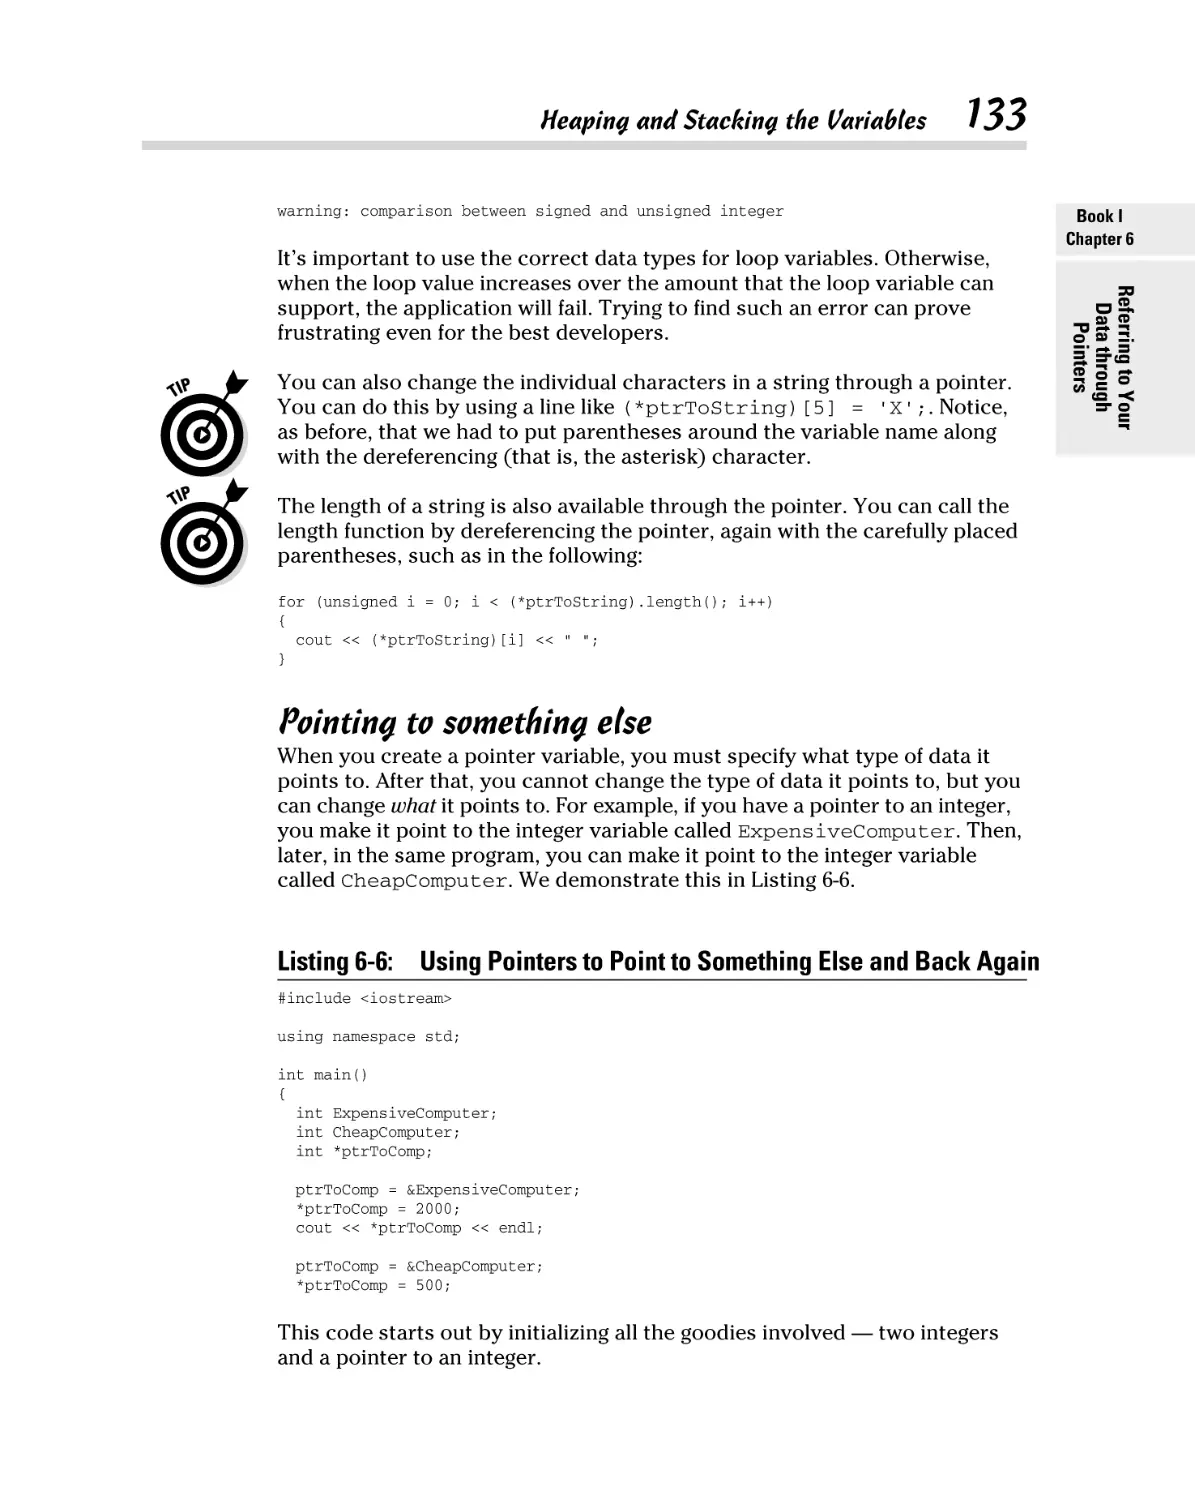


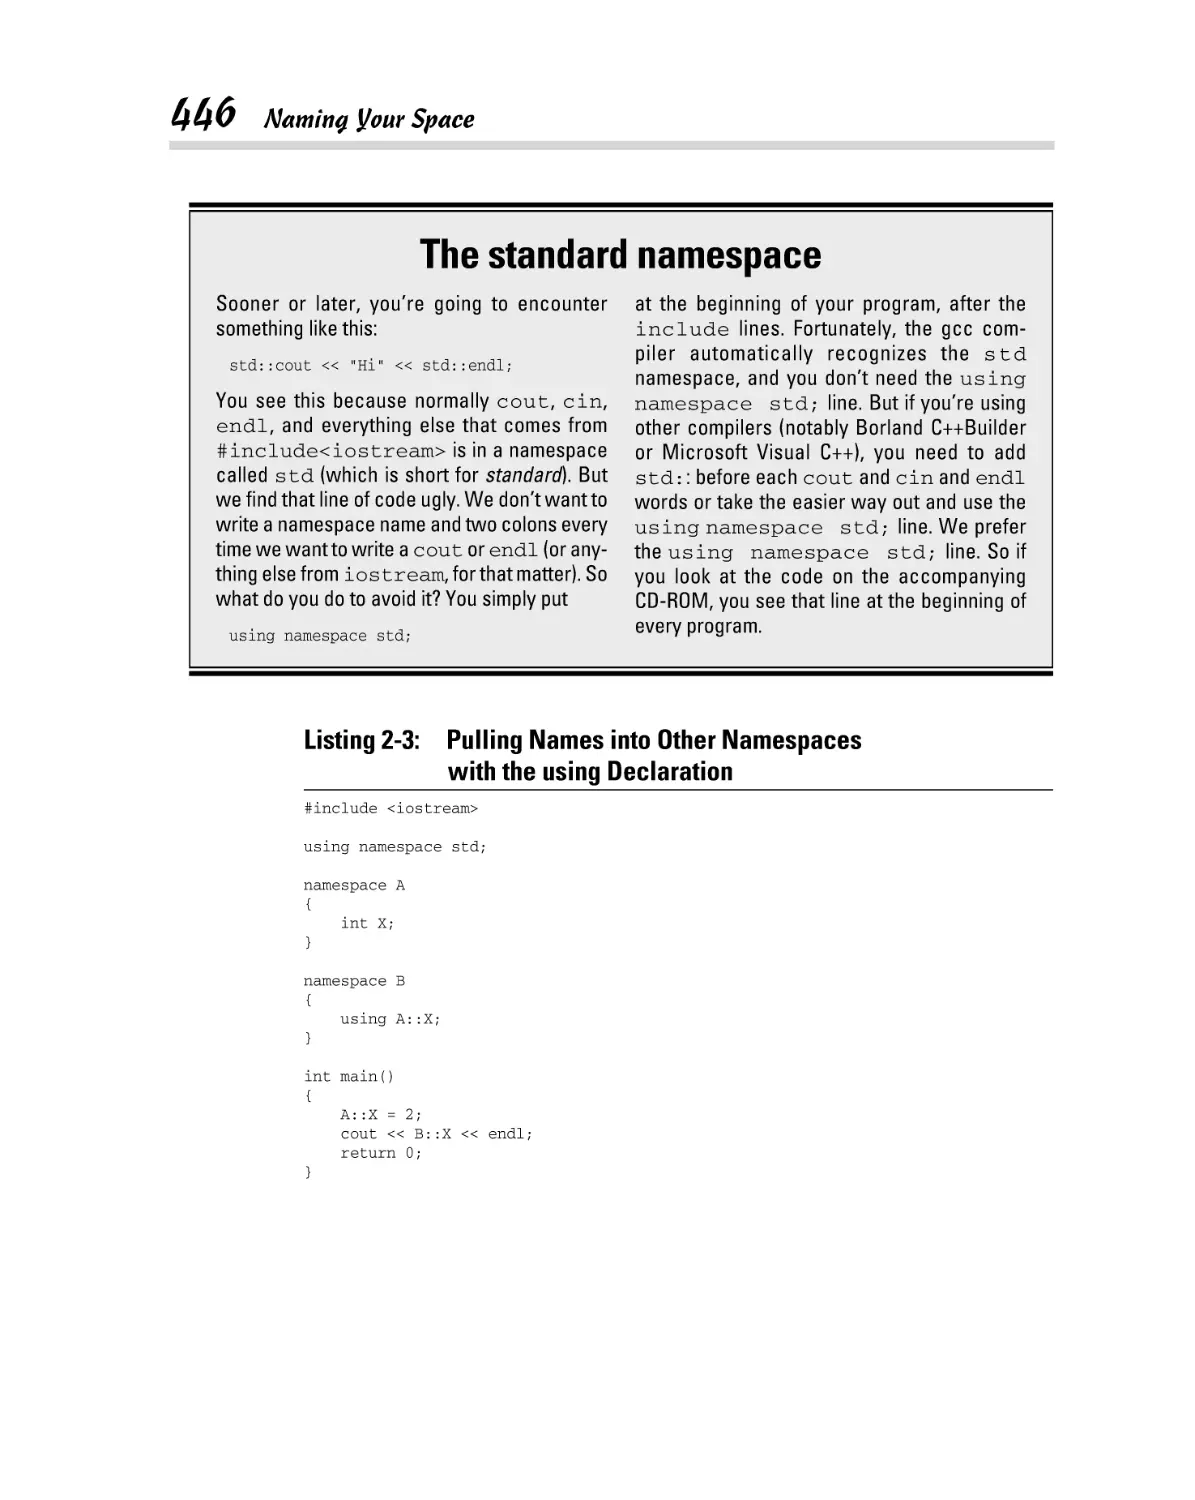


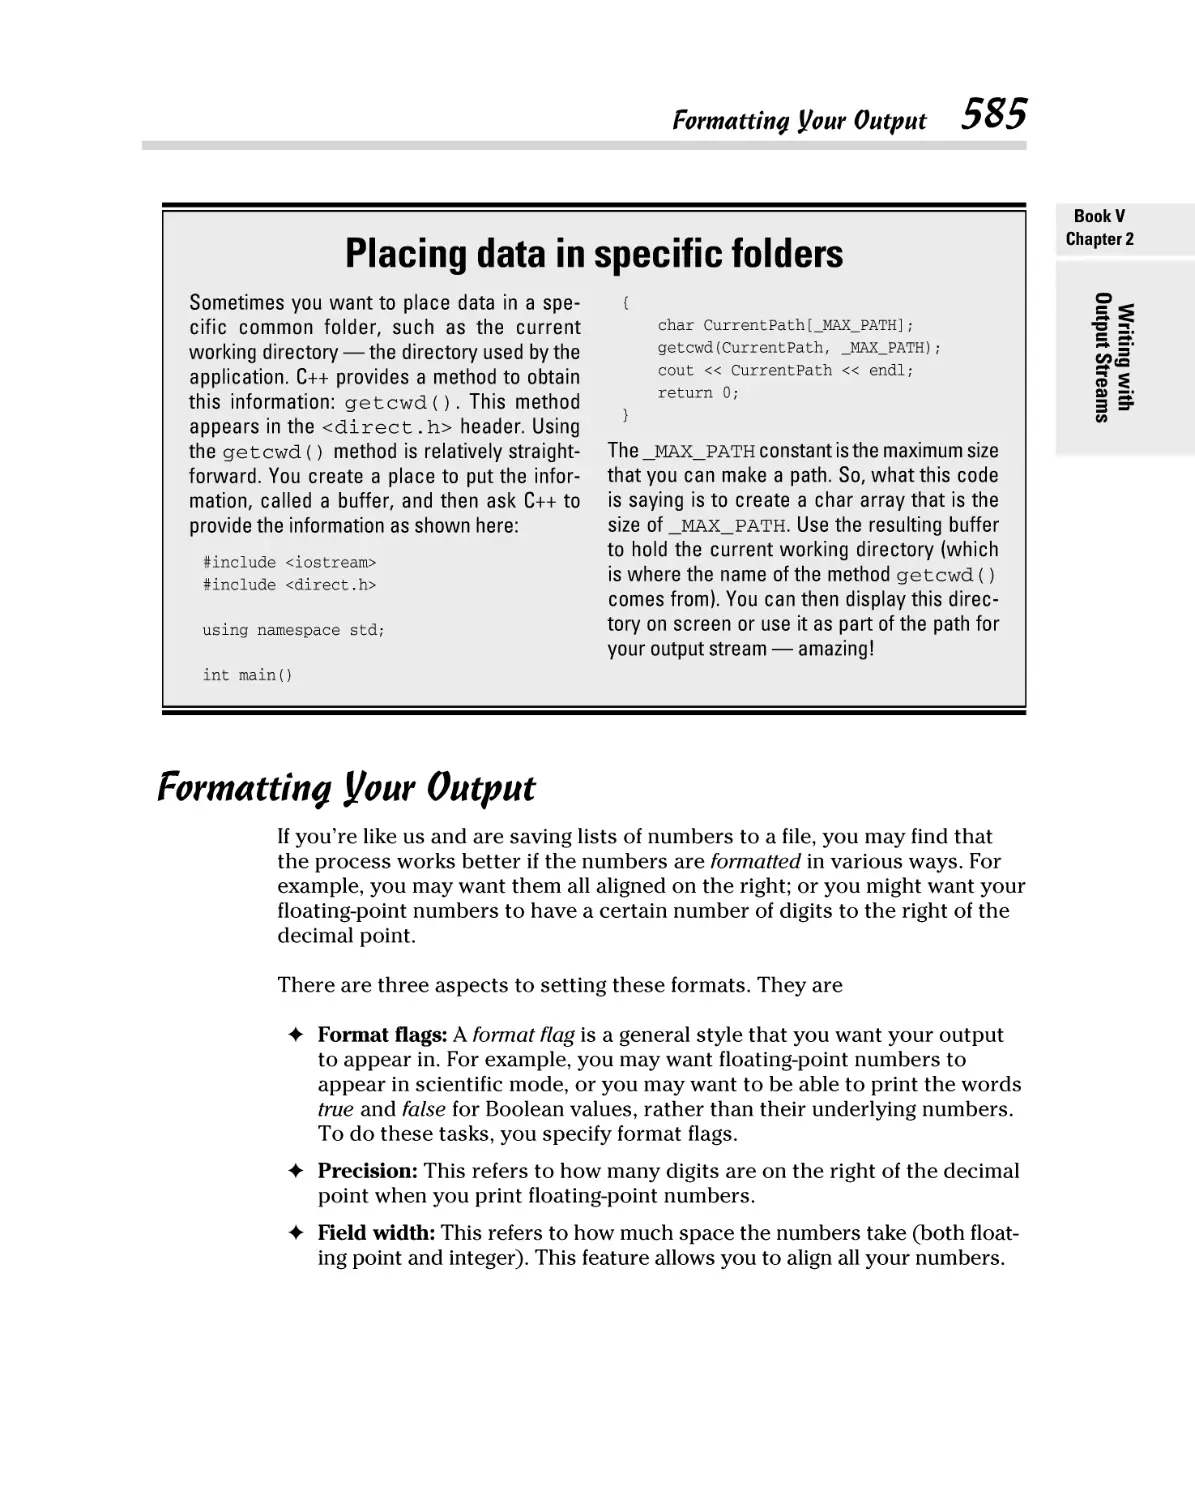


Текст
Get More and Do More at Dummies.com ®
Start with FREE Cheat Sheets
Cheat Sheets include
• Checklists
• Charts
• Common Instructions
• And Other Good Stuff!
To access the Cheat Sheet created specifically for this book, go to
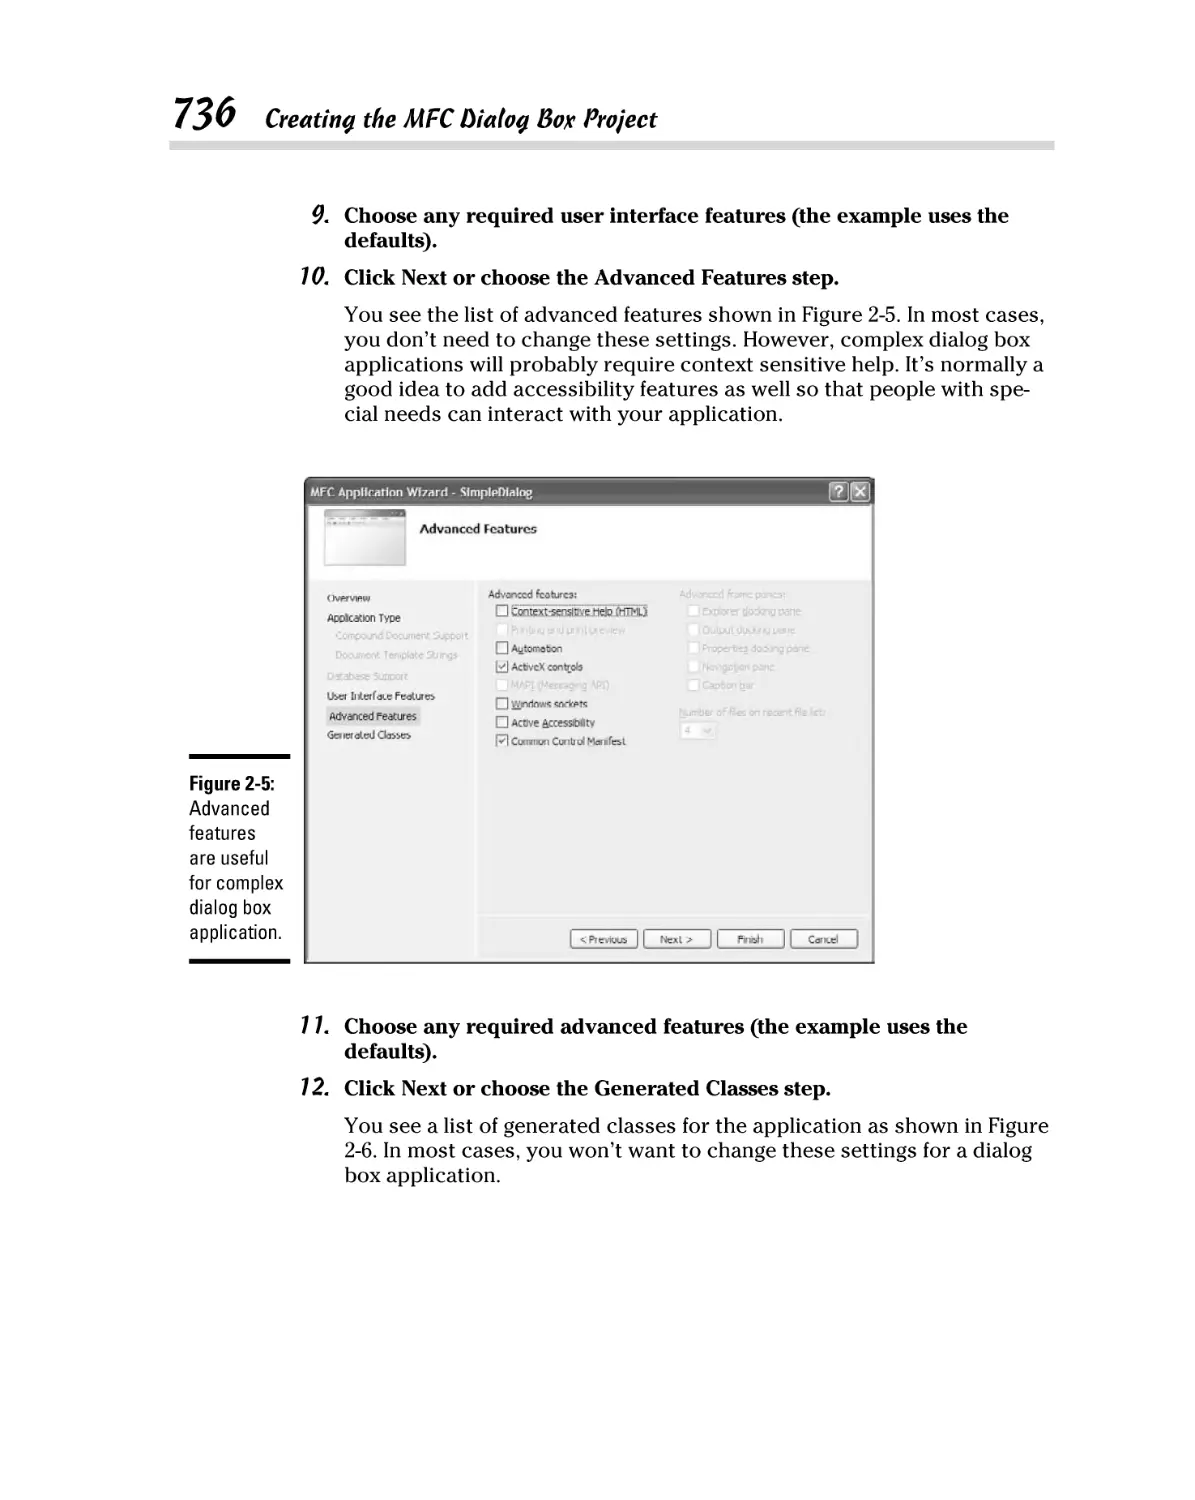
www.dummies.com/cheatsheet/cplusplusaio
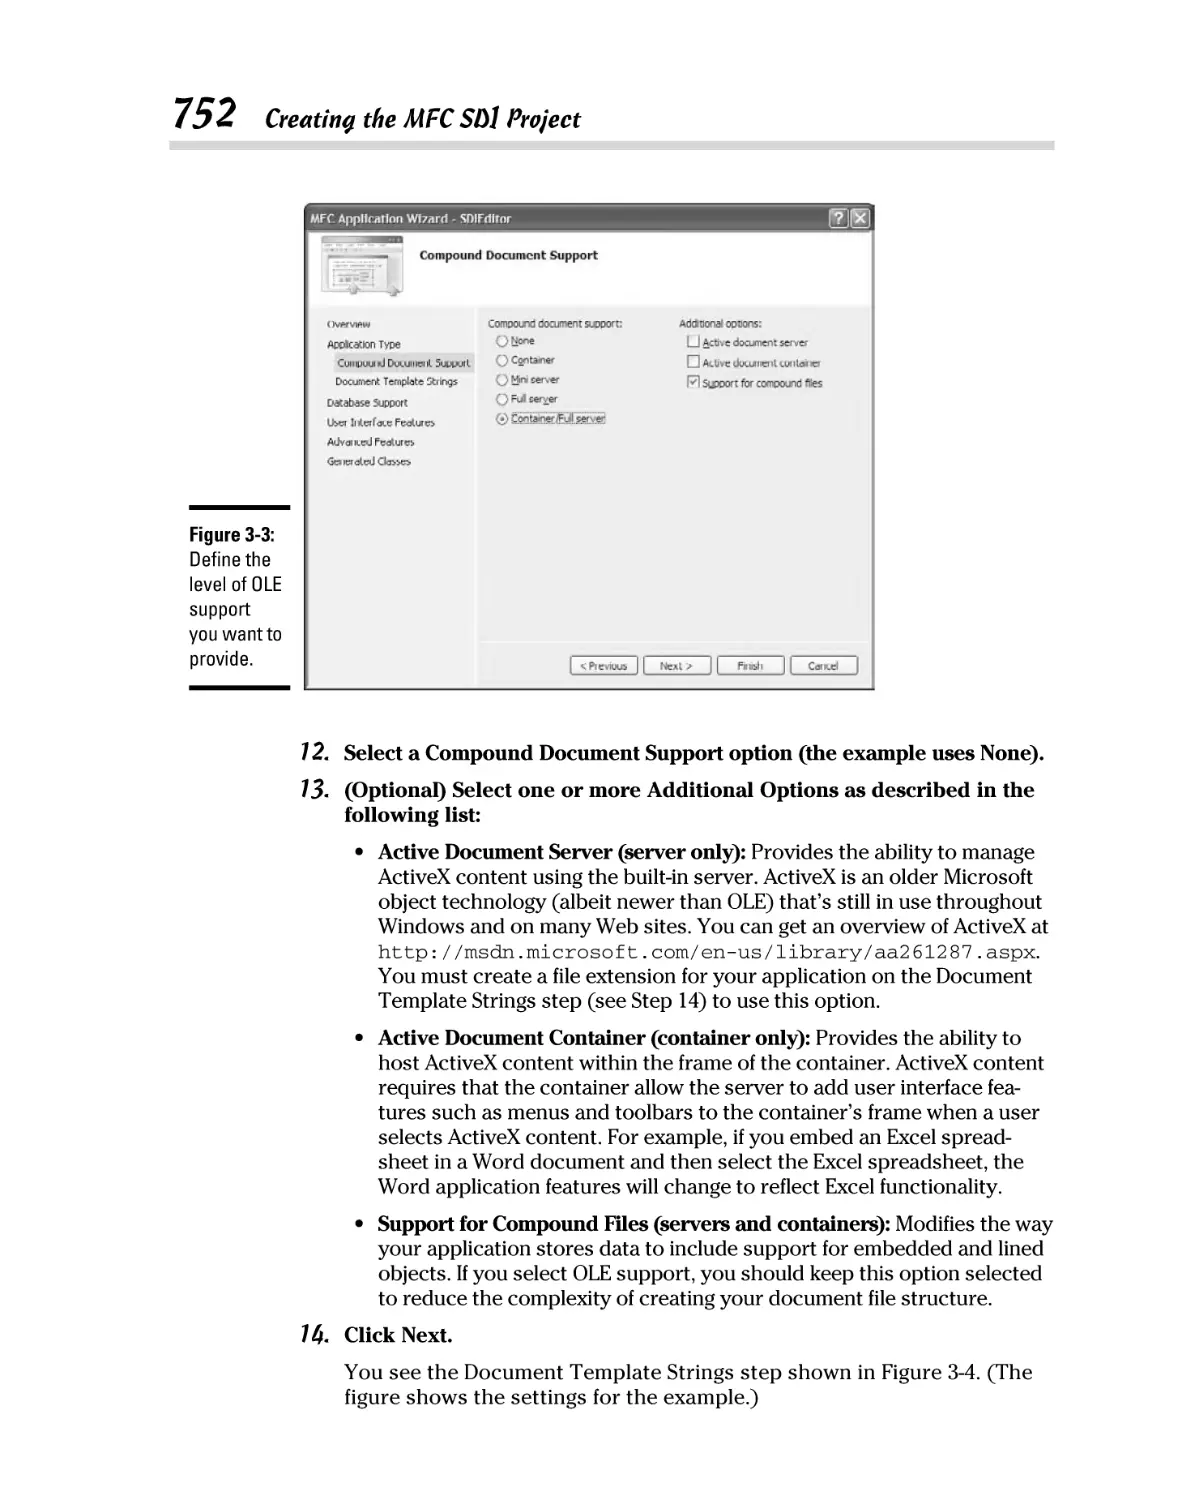
Get Smart at Dummies.com
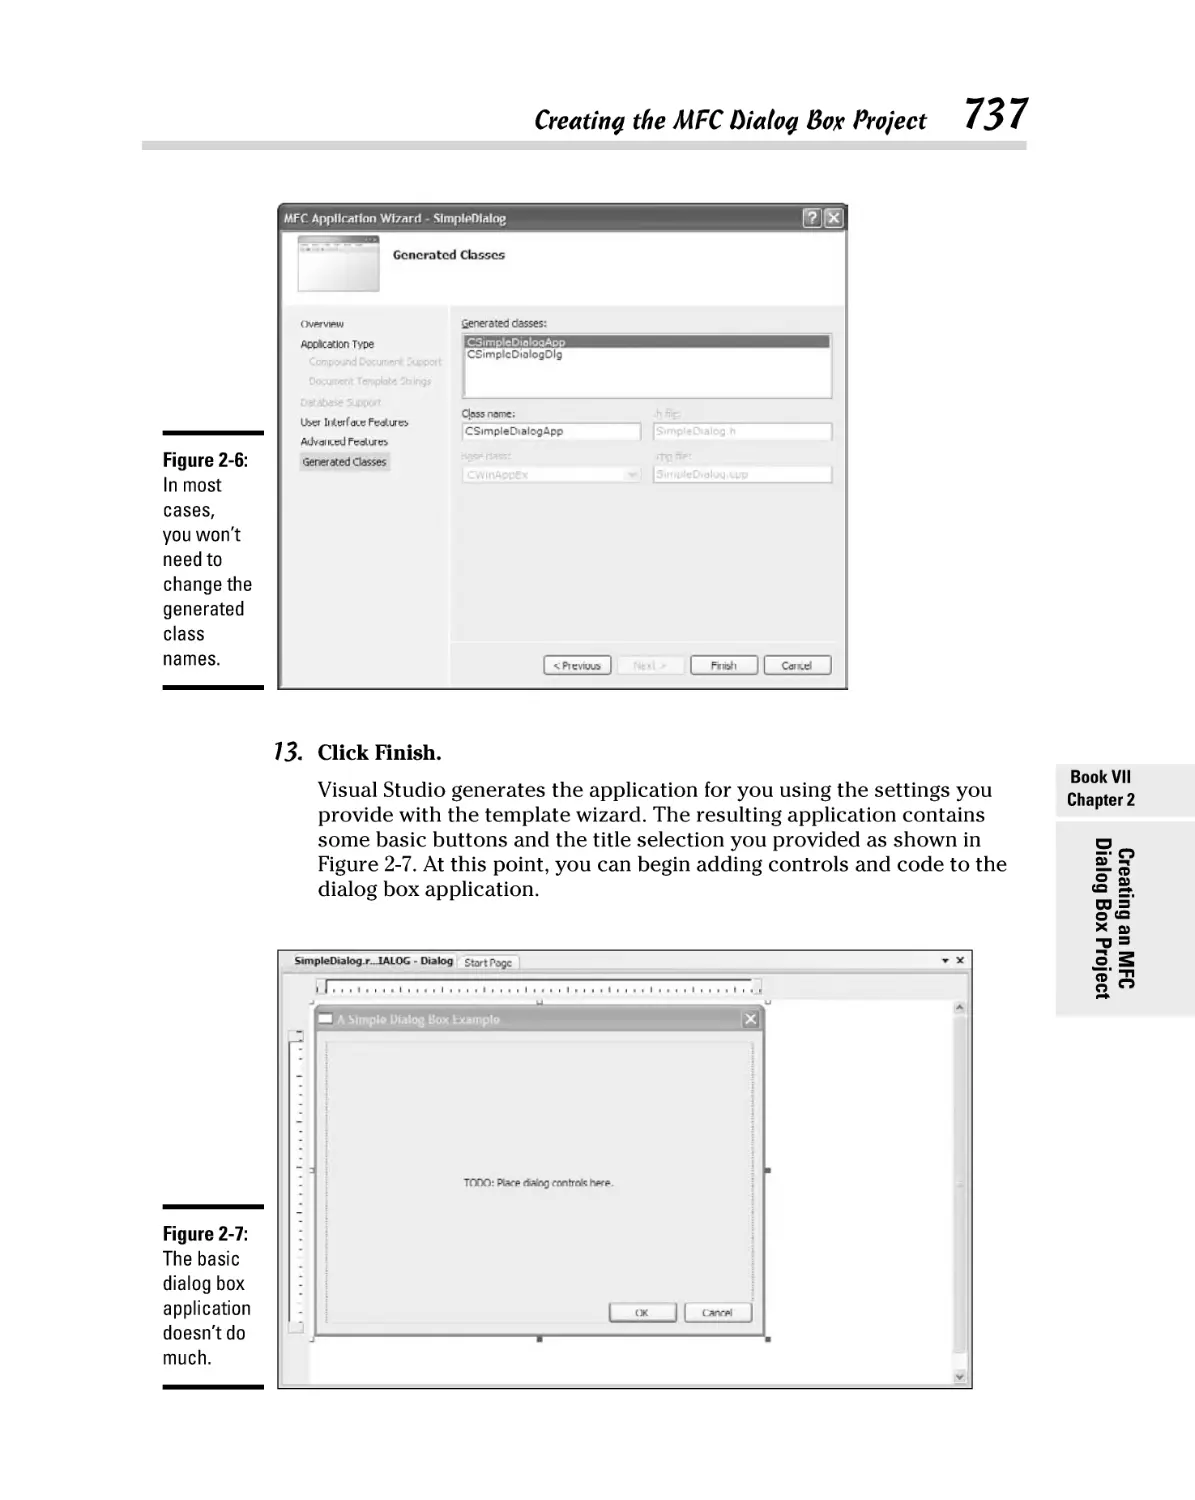
Dummies.com makes your life easier with 1,000s
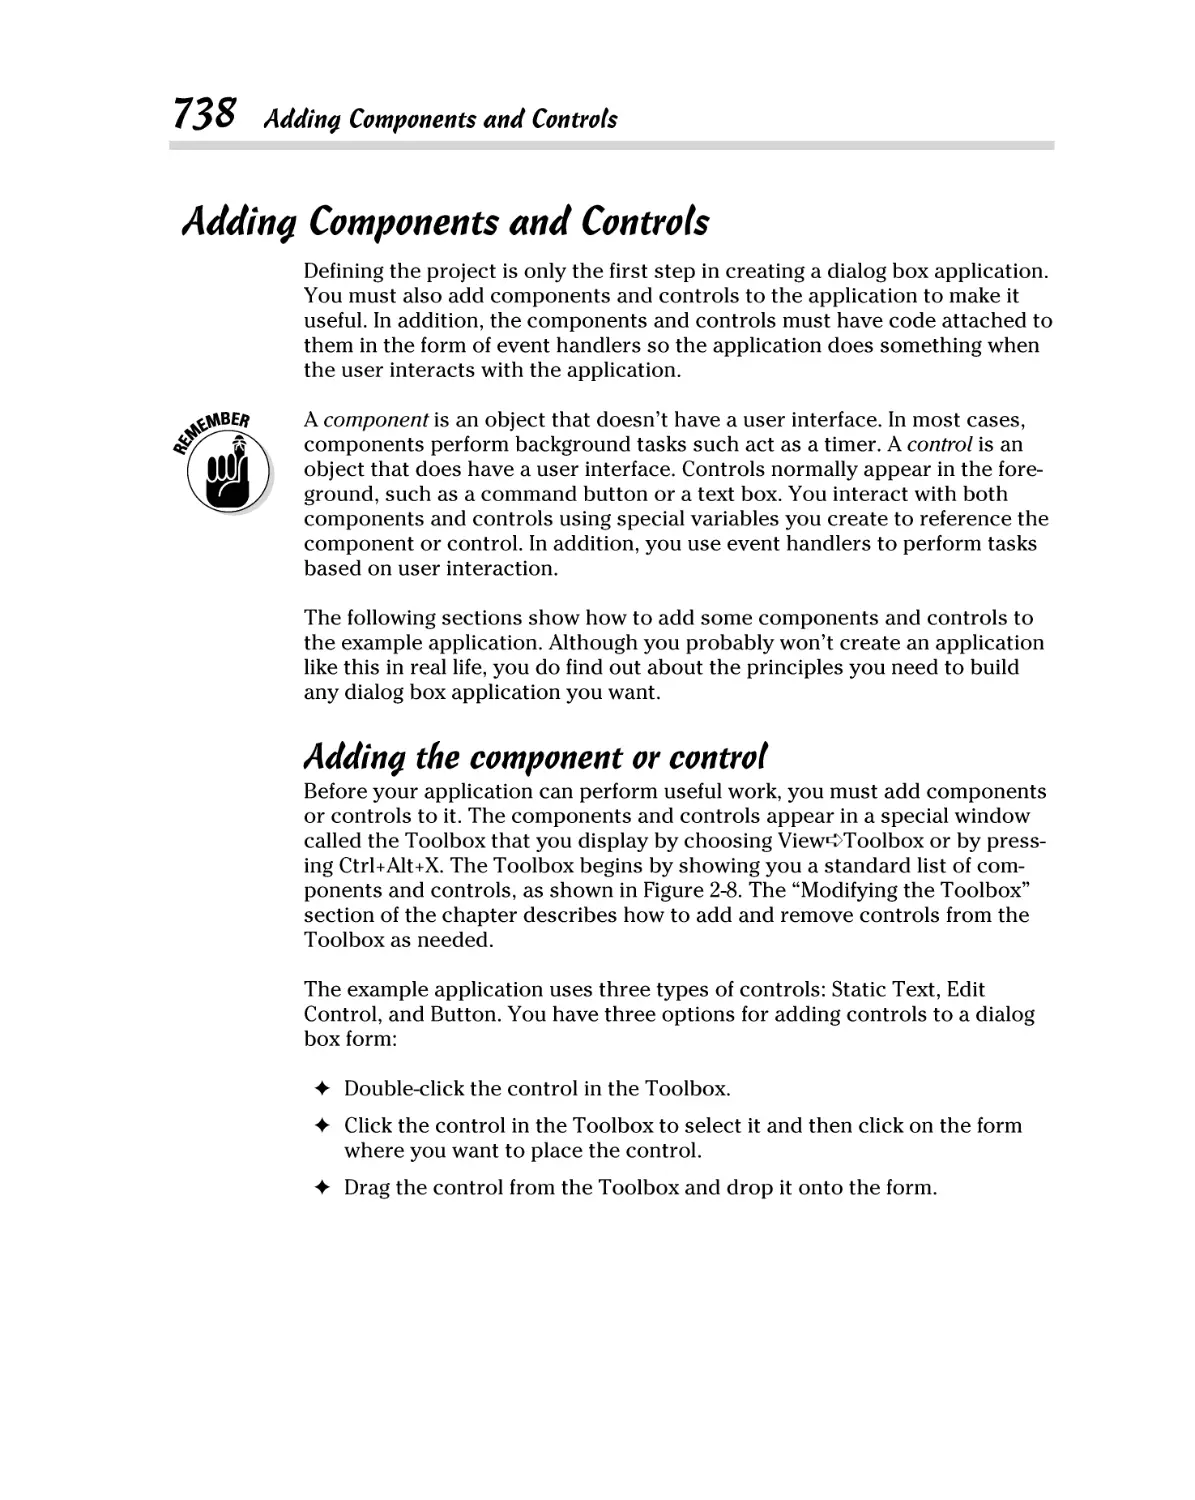
of answers on everything from removing wallpaper
to using the latest version of Windows.
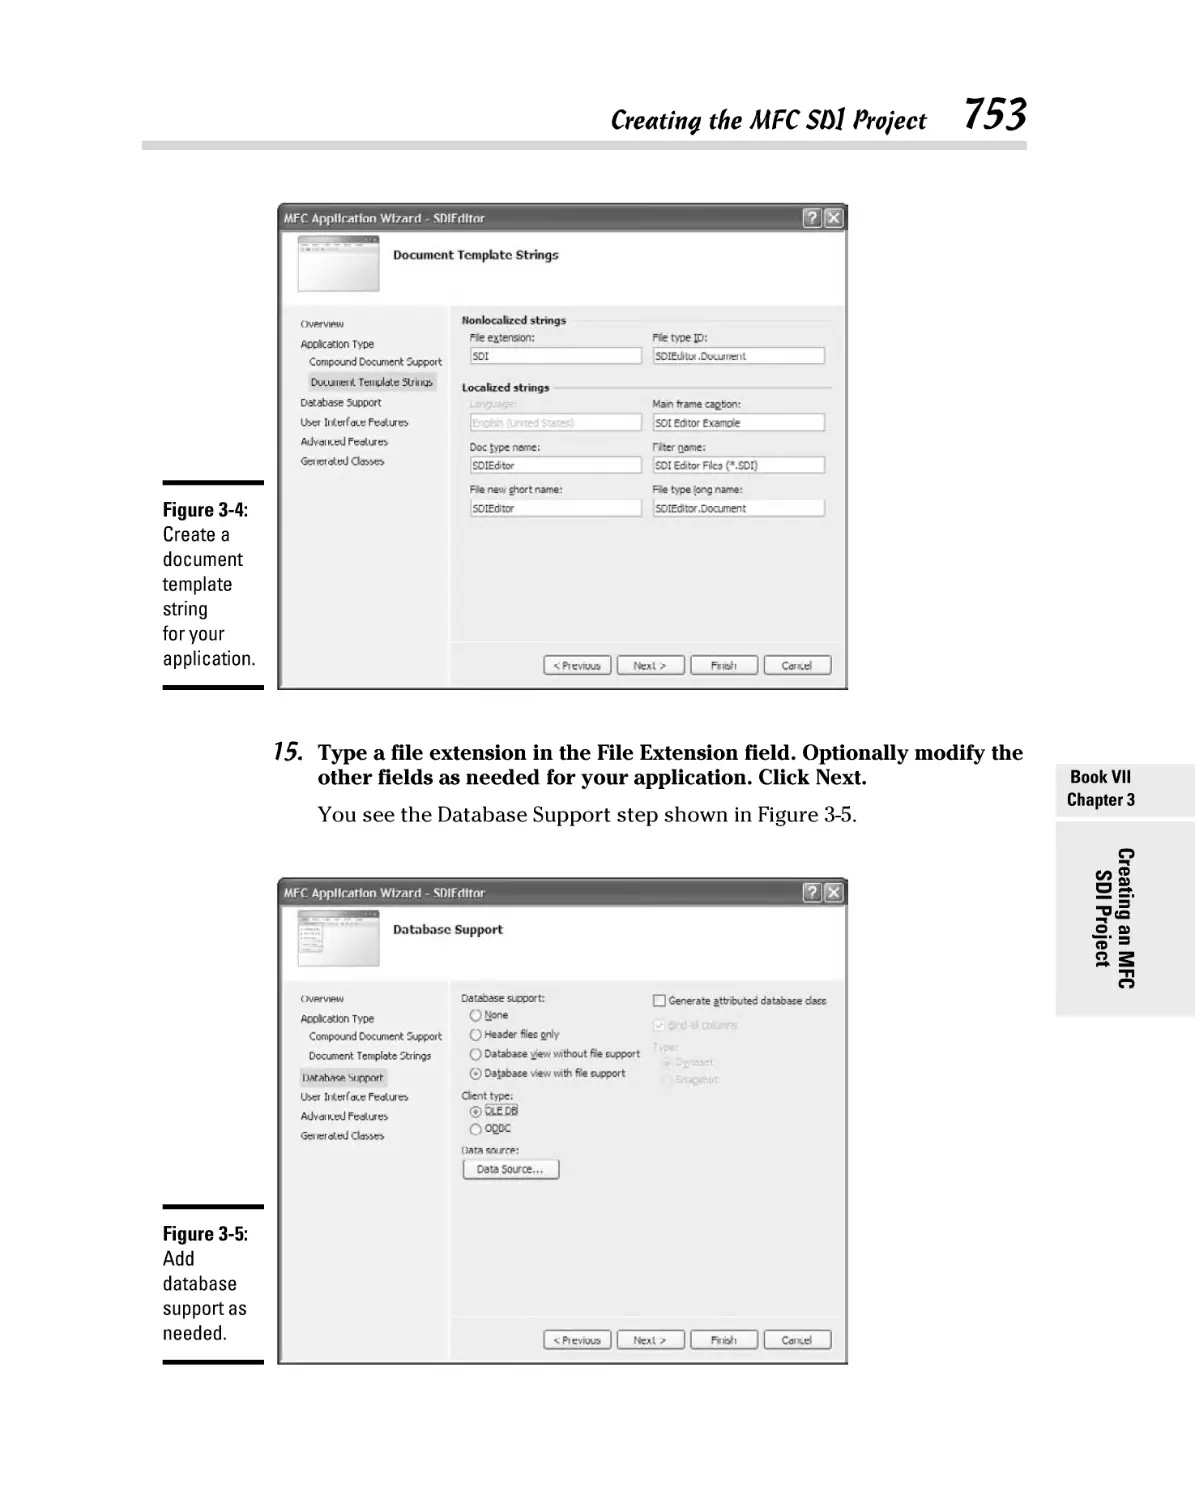
Check out our
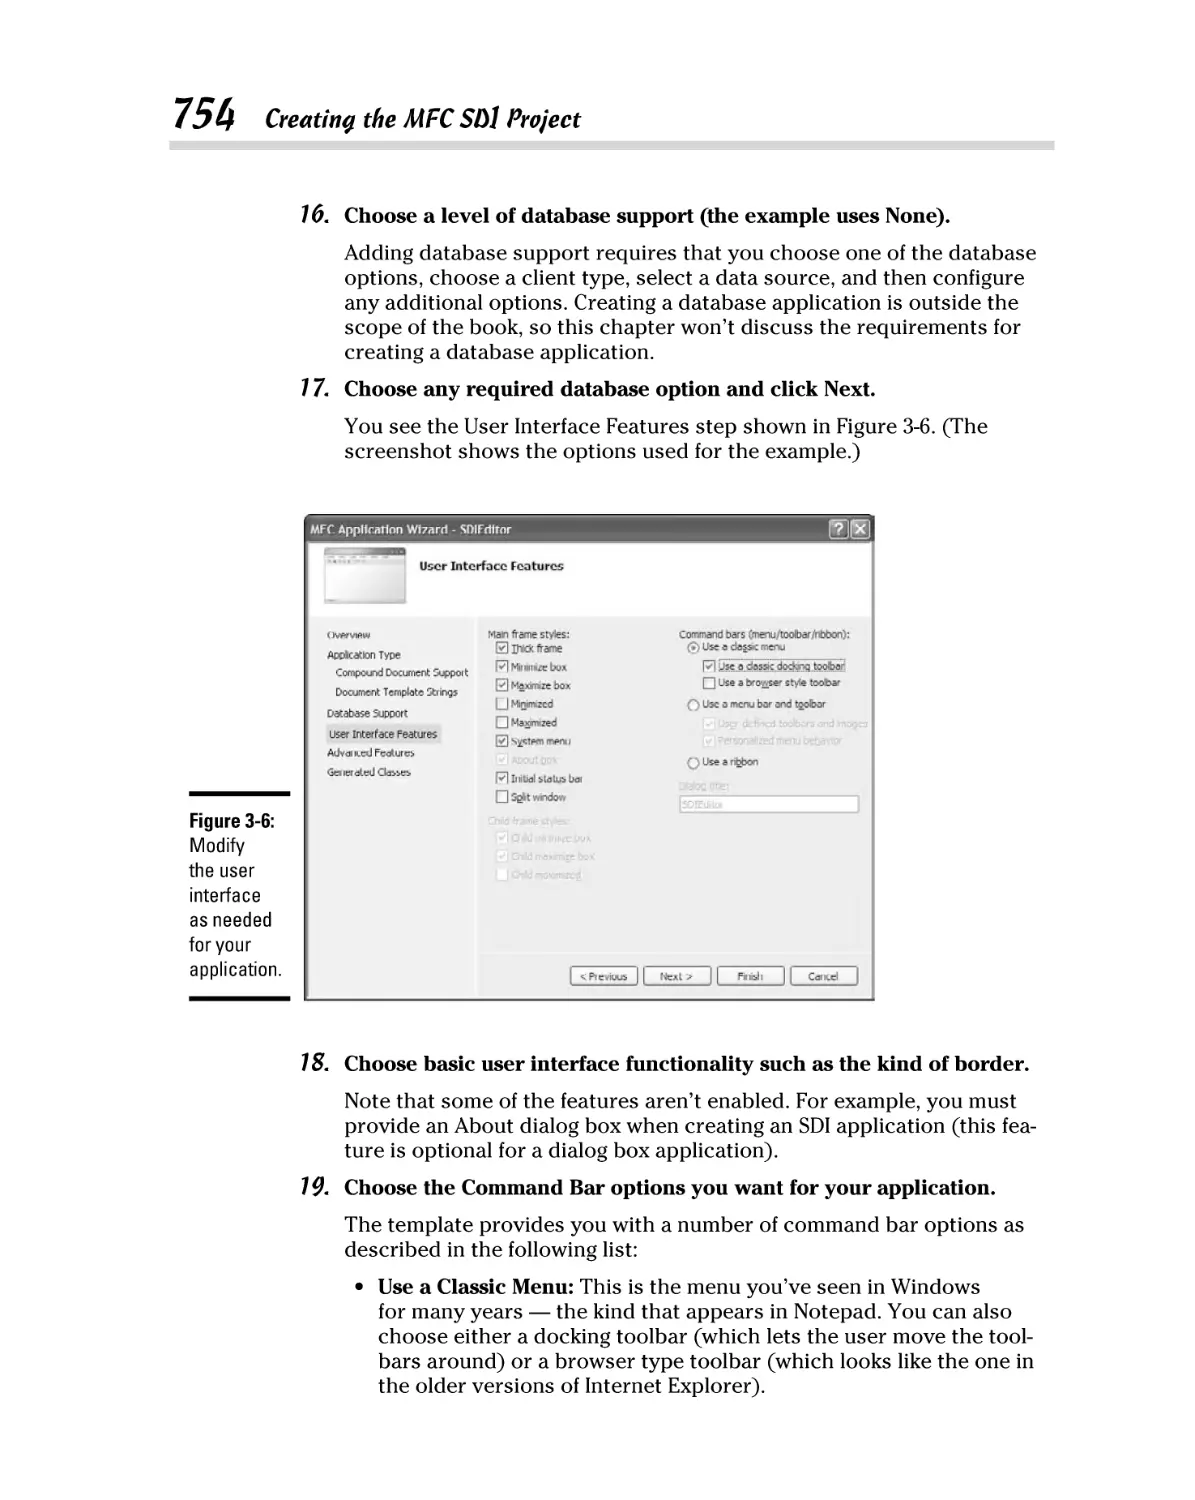
• Videos
• Illustrated Articles
• Step-by-Step Instructions
Plus, each month you can win valuable prizes by entering
our Dummies.com sweepstakes. *
Want a weekly dose of Dummies? Sign up for Newsletters on
• Digital Photography
• Microsoft Windows & Office
• Personal Finance & Investing
• Health & Wellness
• Computing iPods & Cell Phones
• eBay
• Internet
• Food, Home & Garden
Find out “HOW” at Dummies.com
*Sweepstakes not currently available in all countries; visit Dummies.com for official rules.
C++
ALL-IN-ONE
FOR
DUMmIES
‰
2ND
EDITION
by John Paul Mueller and Jeff Cogswell
Disclaimer: This eBook does not include ancillary media that was packaged with the
printed version of the book.
C++ All-in-One For Dummies®, 2nd Edition
Published by
Wiley Publishing, Inc.
111 River Street
Hoboken, NJ 07030-5774
www.wiley.com
Copyright © 2009 by Wiley Publishing, Inc., Indianapolis, Indiana
Published by Wiley Publishing, Inc., Indianapolis, Indiana
Published simultaneously in Canada
No part of this publication may be reproduced, stored in a retrieval system or transmitted in any form
or by any means, electronic, mechanical, photocopying, recording, scanning or otherwise, except as
permitted under Sections 107 or 108 of the 1976 United States Copyright Act, without either the prior
written permission of the Publisher, or authorization through payment of the appropriate per-copy fee
to the Copyright Clearance Center, 222 Rosewood Drive, Danvers, MA 01923, (978) 750-8400, fax (978)
646-8600. Requests to the Publisher for permission should be addressed to the Permissions Department,
John Wiley & Sons, Inc., 111 River Street, Hoboken, NJ 07030, (201) 748-6011, fax (201) 748-6008, or online
at http://www.wiley.com/go/permissions.
Trademarks: Wiley, the Wiley Publishing logo, For Dummies, the Dummies Man logo, A Reference for the
Rest of Us!, The Dummies Way, Dummies Daily, The Fun and Easy Way, Dummies.com, Making Everything
Easier, and related trade dress are trademarks or registered trademarks of John Wiley & Sons, Inc. and/
or its affiliates in the United States and other countries, and may not be used without written permission.
All other trademarks are the property of their respective owners. Wiley Publishing, Inc., is not associated
with any product or vendor mentioned in this book.
LIMIT OF LIABILITY/DISCLAIMER OF WARRANTY: THE PUBLISHER AND THE AUTHOR MAKE NO
REPRESENTATIONS OR WARRANTIES WITH RESPECT TO THE ACCURACY OR COMPLETENESS OF
THE CONTENTS OF THIS WORK AND SPECIFICALLY DISCLAIM ALL WARRANTIES, INCLUDING WITHOUT LIMITATION WARRANTIES OF FITNESS FOR A PARTICULAR PURPOSE. NO WARRANTY MAY BE
CREATED OR EXTENDED BY SALES OR PROMOTIONAL MATERIALS. THE ADVICE AND STRATEGIES
CONTAINED HEREIN MAY NOT BE SUITABLE FOR EVERY SITUATION. THIS WORK IS SOLD WITH THE
UNDERSTANDING THAT THE PUBLISHER IS NOT ENGAGED IN RENDERING LEGAL, ACCOUNTING, OR
OTHER PROFESSIONAL SERVICES. IF PROFESSIONAL ASSISTANCE IS REQUIRED, THE SERVICES OF
A COMPETENT PROFESSIONAL PERSON SHOULD BE SOUGHT. NEITHER THE PUBLISHER NOR THE
AUTHOR SHALL BE LIABLE FOR DAMAGES ARISING HEREFROM. THE FACT THAT AN ORGANIZATION
OR WEBSITE IS REFERRED TO IN THIS WORK AS A CITATION AND/OR A POTENTIAL SOURCE OF FURTHER INFORMATION DOES NOT MEAN THAT THE AUTHOR OR THE PUBLISHER ENDORSES THE INFORMATION THE ORGANIZATION OR WEBSITE MAY PROVIDE OR RECOMMENDATIONS IT MAY MAKE.
FURTHER, READERS SHOULD BE AWARE THAT INTERNET WEBSITES LISTED IN THIS WORK MAY HAVE
CHANGED OR DISAPPEARED BETWEEN WHEN THIS WORK WAS WRITTEN AND WHEN IT IS READ.
For general information on our other products and services, please contact our Customer Care
Department within the U.S. at 877-762-2974, outside the U.S. at 317-572-3993, or fax 317-572-4002.
For technical support, please visit www.wiley.com/techsupport.
Wiley also publishes its books in a variety of electronic formats. Some content that appears in print may
not be available in electronic books.
Library of Congress Control Number: 2009932710
ISBN: 978-0-470-31735-8
Manufactured in the United States of America
10 9 8 7 6 5 4 3 2 1
About the Authors
John Paul Mueller is a freelance author and technical editor. He has writing
in his blood, having produced 83 books and over 300 articles to date. The
topics range from networking to artificial intelligence and from database
management to heads-down programming. Some of his current books include
a C# design and development guide and a complete reference for LINQ. John
also writes about areas other than programming, such as Exchange Server.
His technical editing skills have helped more than 63 authors refine the content of their manuscripts. John has provided technical editing services to
both Data Based Advisor and Coast Compute magazines. He’s also contributed
articles to the following magazines: CIO.com, DevSource, InformIT, Informant,
DevX, SQL Server Professional, Visual C++ Developer, Hard Core Visual Basic,
asp.netPRO, Software Test and Performance, and Visual Basic Developer.
When John isn’t working at the computer, he enjoys spending time in his
workshop crafting wood projects or making candles. On any given afternoon,
you can find him working at a lathe or putting the finishing touches on a
bookcase. He also likes making glycerin soap, which comes in handy for gift
baskets. You can reach John on the Internet at JMueller@mwt.net. John is
also setting up a Web site and blog at http://www.johnmuellerbooks.
com/. Feel free to look and make suggestions on how he can improve it.
Jeff Cogswell is an experienced teacher, writer, and software engineer. He
worked 15 years as a professional programmer and software engineer before
leaving that field to write and edit full time. He is currently a senior editor
with Ziff Davis Enterprise, writing and editing for DevSource.com and eWEEK.
com. His skills include C++ as well as several other languages and platforms,
such as C# and ASP.NET. In his spare time he enjoys traveling, playing the
guitar, and photography.
Dedication
This book is dedicated to Dr. Michael Shonfeld and Nurse Barb McPherson,
two special people who may not always get the thanks they deserve. Thank
you so much for your help in returning my beautiful wife to me!
— John Paul Mueller
To my wife Angie, and my son Dylan, with love.
— Jeff Cogswell
Authors’ Acknowledgments
I really appreciate Jeff having the confidence to work with me on this book.
We’ve known each other for quite some time now and I always enjoy working
with him.
Russ Mullen deserves thanks for his technical edit of this book. He added
greatly to the accuracy and depth of the material that you see here. I appreciated the time he devoted to checking my code for accuracy. As I wrote this
book, I also spent a good deal of time bouncing ideas off Russ, who is a valuable aid to any author.
Matt Wagner, my agent, deserves credit for helping me get the contract in the
first place and taking care of all the details that most authors don’t consider.
I always appreciate his assistance. It’s good to know that someone wants to
help. Matt also helped me through an extremely difficult time in my life —
this book is a tribute to the perseverance of us both.
A number of people read all or part of this book to help me refine the
approach, test the examples, and generally provide input that every reader
wishes they could have. These unpaid volunteers helped in ways too numerous to mention here. I especially appreciate the efforts of Eva Beattie,
Osvaldo Téllez Almirall, and all the others who provided input on C++. I'd
like to thank each person who wrote me with an idea by name, but there are
simply too many.
Finally, I would like to thank Katie Feltman, Susan Pink, Blair Pottenger,
and the rest of the editorial and production staff for their assistance in bringing this book to print. It’s always nice to work with such a great group of
professionals.
— John Paul Mueller
I first want to thank John Mueller for taking up such a difficult task and writing the second edition of this book, as well as his wife, Rebecca, for staying
strong. Also, another book brings another big thanks to my agent and friend,
Margot Hutchison, for the usual great work. And special thanks to Katie
Feltman and editors Susan Pink and Blair Pottenger for their meticulous
work in making this project reality. Finally, thanks to my wife Angie and my
son Dylan for supporting me in all my projects.
— Jeff Cogswell
Publisher’s Acknowledgments
We’re proud of this book; please send us your comments through our online registration form located
at http://dummies.custhelp.com. For other comments, please contact our Customer Care
Department within the U.S. at 877-762-2974, outside the U.S. at 317-572-3993, or fax 317-572-4002.
Some of the people who helped bring this book to market include the following:
Acquisitions, Editorial, and
Media Development
Composition Services
Project Editor: Susan Pink
(Previous Edition: Pat O’Brien)
Acquisitions Editor: Katie Feltman
Copy Editor: Susan Pink
(Previous Edition: Diana Conover,
Barry Childs-Helton)
Project Coordinator: Kristie Rees
Layout and Graphics: Carl Byers, Ronald Terry
Proofreaders: David Faust, Amanda Graham,
John Greenough, Christine Sabooni
Indexer: Broccoli Information Management
Special Help: Marilyn Hummel
Technical Editor: Russ Mullen
Editorial Manager: Jodi Jensen
Media Development Project Manager:
Laura Moss-Hollister
Media Development Assistant Project
Manager: Jenny Swisher
Media Development Associate Producer:
Shawn Patrick
Sr. Editorial Assistant: Cherie Case
Cartoons: Rich Tennant
(www.the5thwave.com)
Publishing and Editorial for Technology Dummies
Richard Swadley, Vice President and Executive Group Publisher
Andy Cummings, Vice President and Publisher
Mary Bednarek, Executive Acquisitions Director
Mary C. Corder, Editorial Director
Publishing for Consumer Dummies
Diane Graves Steele, Vice President and Publisher
Composition Services
Debbie Stailey, Director of Composition Services
Contents at a Glance
Introduction ................................................................ 1
Book I: Introducing C++............................................... 7
Chapter 1: Creating a First C++ Program ........................................................................ 9
Chapter 2: Storing Data in C++ ....................................................................................... 29
Chapter 3: Directing Your C++ Program Flow .............................................................. 59
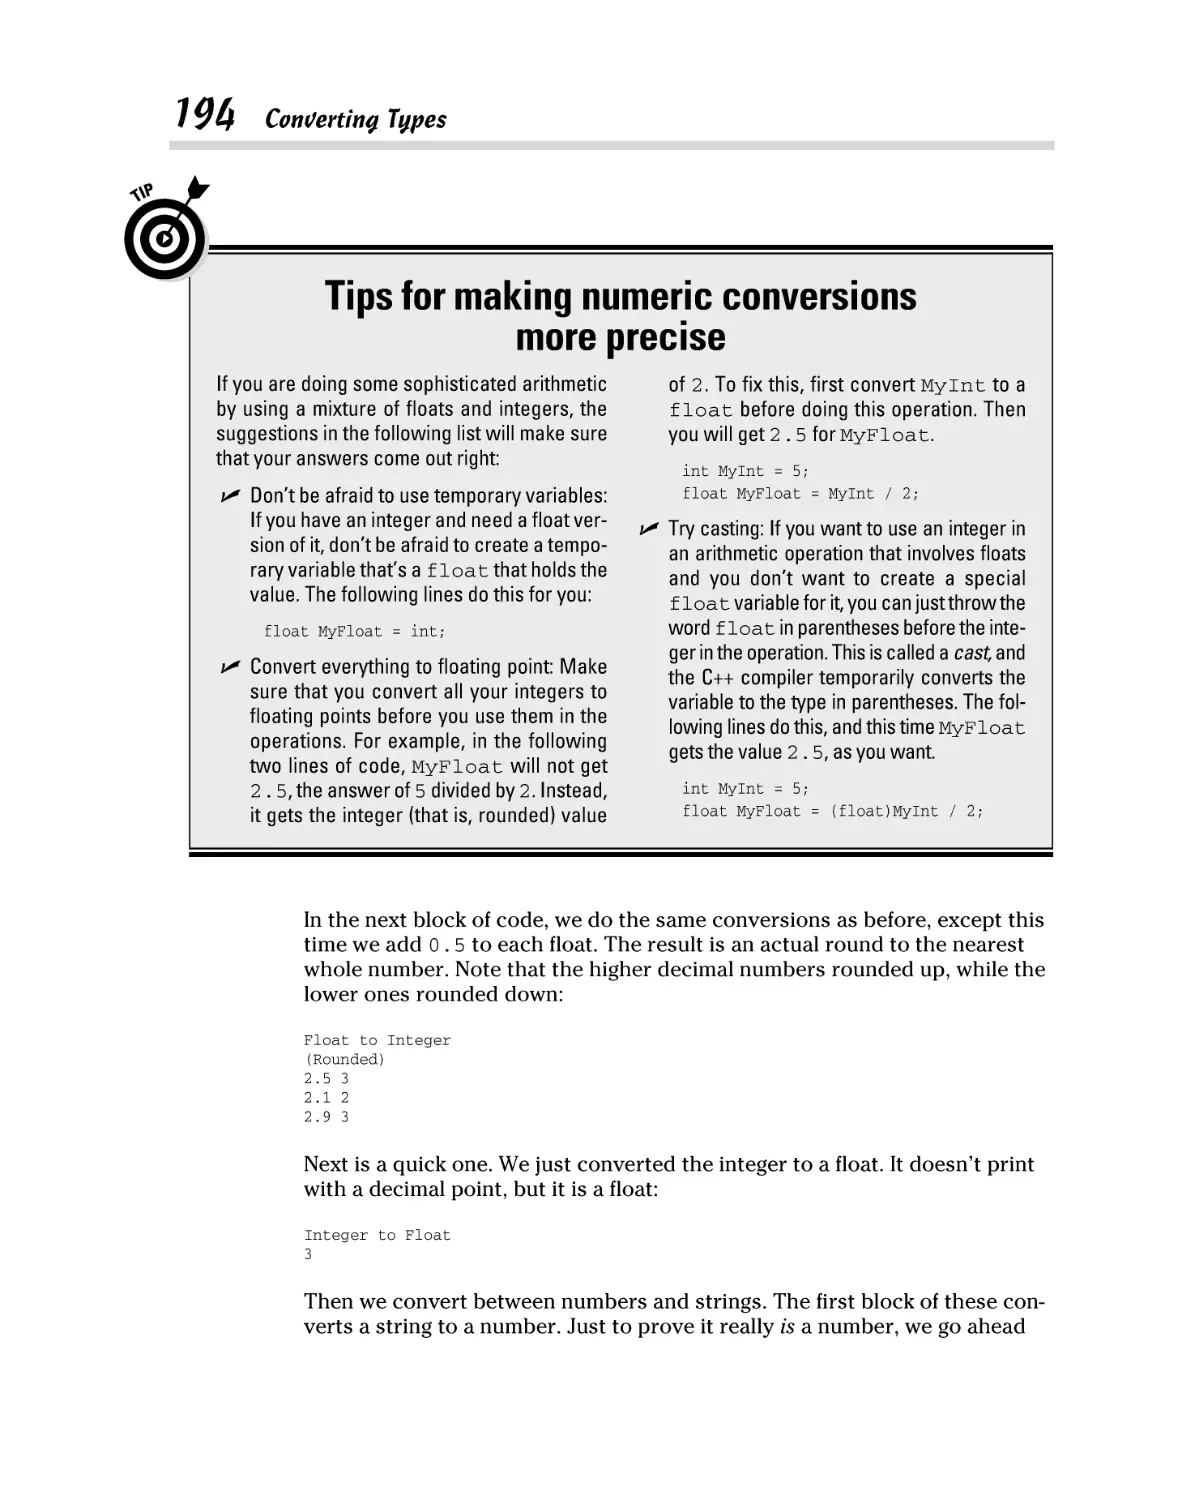
Chapter 4: Dividing Your Work with Functions ........................................................... 83
Chapter 5: Dividing Between Source-Code Files ........................................................ 109
Chapter 6: Referring to Your Data through Pointers ................................................ 123
Chapter 7: Working with Classes ................................................................................. 151
Chapter 8: Using Advanced C++ Features ................................................................... 187
Book II: Understanding Objects and Classes .............. 223
Chapter 1: Planning and Building Objects .................................................................. 225
Chapter 2: Describing Your Program with UML ........................................................ 255
Chapter 3: Structuring Your Classes with UML ......................................................... 275
Chapter 4: Demonstrating Behavior with UML .......................................................... 287
Chapter 5: Modeling Your Programs with UML ......................................................... 305
Chapter 6: Building with Design Patterns ................................................................... 317
Book III: Fixing Problems ......................................... 347
Chapter 1: Dealing with Bugs ....................................................................................... 349
Chapter 2: Debugging a Program ................................................................................. 361
Chapter 3: Stopping and Inspecting Your Code ......................................................... 373
Chapter 4: Traveling About the Stack ......................................................................... 385
Book IV: Advanced Programming .............................. 395
Chapter 1: Working with Arrays, Pointers, and References ..................................... 397
Chapter 2: Creating Data Structures ........................................................................... 427
Chapter 3: Constructors, Destructors, and Exceptions ............................................ 449
Chapter 4: Advanced Class Usage ............................................................................... 477
Chapter 5: Creating Classes with Templates.............................................................. 503
Chapter 6: Programming with the Standard Library ................................................. 535
Book V: Reading and Writing Files ............................ 567
Chapter 1: Filing Information with the Streams Library ........................................... 569
Chapter 2: Writing with Output Streams .................................................................... 583
Chapter 3: Reading with Input Streams ...................................................................... 597
Chapter 4: Building Directories and Contents ........................................................... 609
Chapter 5: Streaming Your Own Classes .................................................................... 619
Book VI: Advanced C++ ........................................... 631
Chapter 1: Exploring the Standard Library Further .................................................. 633
Chapter 2: Building Original Templates ...................................................................... 651
Chapter 3: Investigating Boost ..................................................................................... 671
Chapter 4: Boosting up a Step ...................................................................................... 697
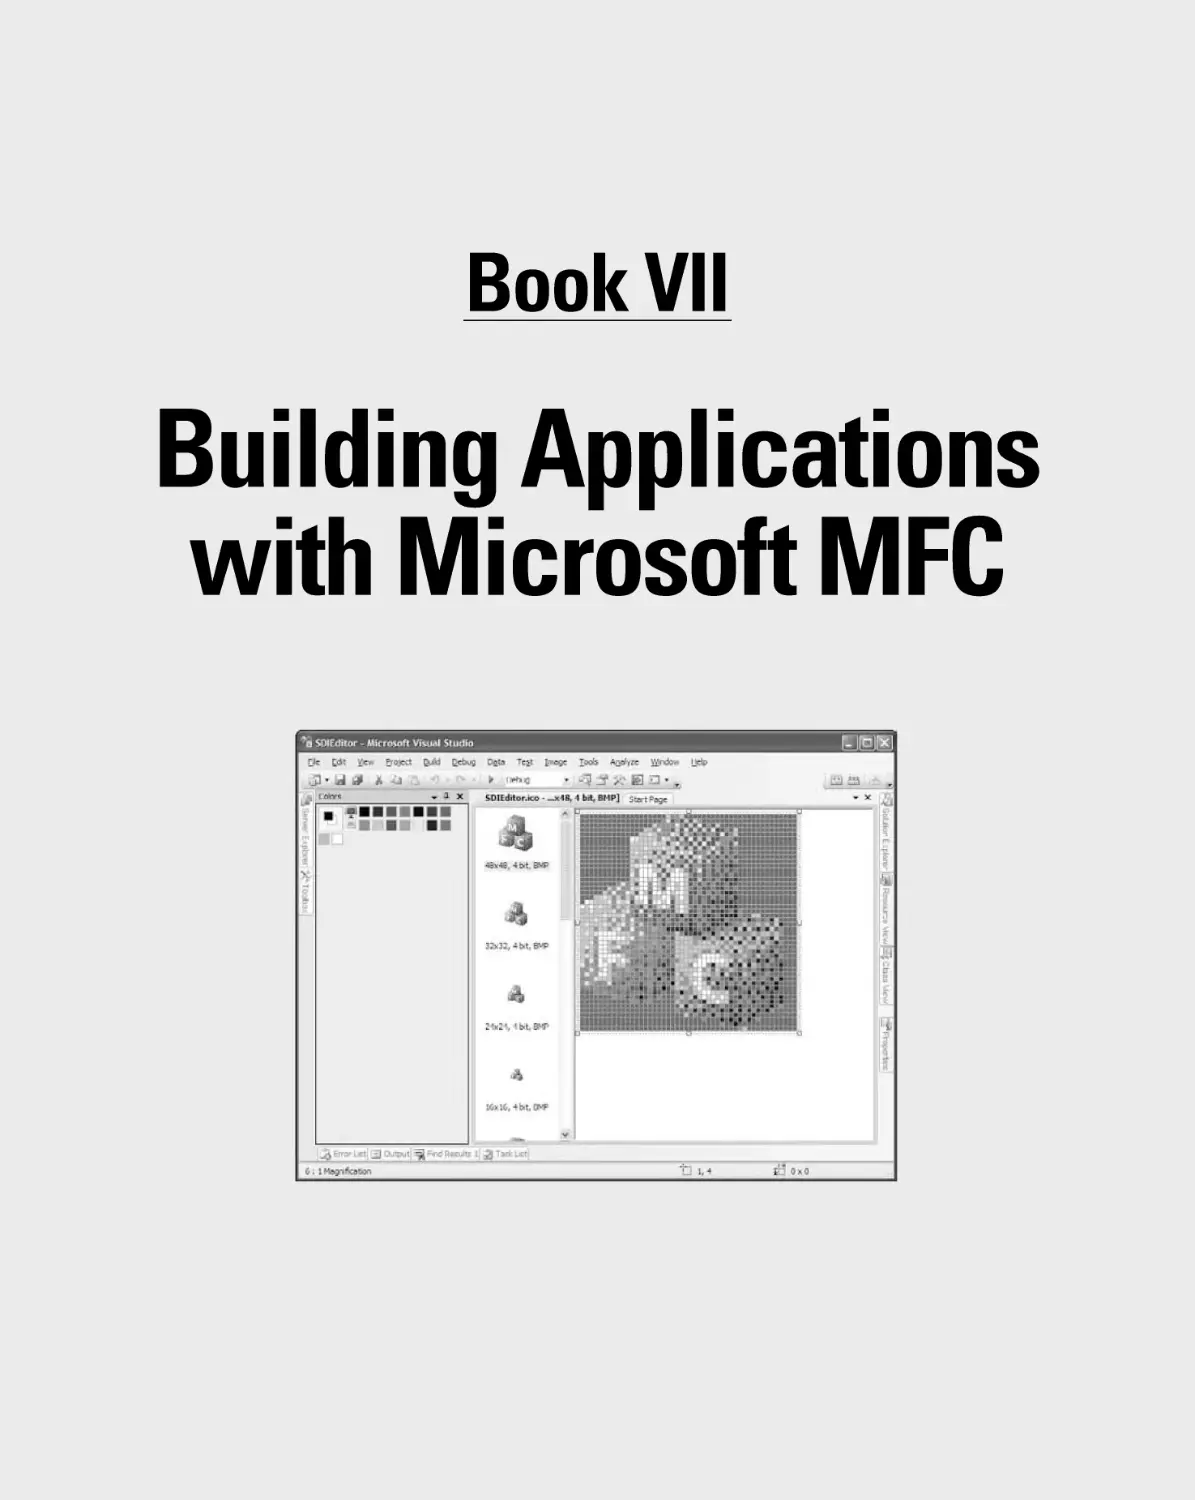
Book VII: Building Applications with Microsoft MFC ... 713
Chapter 1: Working with the Visual C++ 2008 IDE and Projects .............................. 715
Chapter 2: Creating an MFC Dialog Box Project ........................................................ 731
Chapter 3: Creating an MFC SDI Project ..................................................................... 747
Chapter 4: Using the Visual C++ 2008 Debugger ........................................................ 769
Chapter 5: Analyzing Your Visual C++ 2008 Code...................................................... 779
Appendix A: Automating Your
Programs with Makefiles .......................................... 785
Appendix B: About the CD ........................................ 797
Index ...................................................................... 801
Table of Contents
Introduction ................................................................. 1
No Experience Necessary ............................................................................... 1
Great for Advanced Folks, Too! ..................................................................... 1
For All Computers ........................................................................................... 2
Conventions ..................................................................................................... 2
Organization ..................................................................................................... 3
Icons Galore ..................................................................................................... 4
What’s Next?..................................................................................................... 5
Book I: Introducing C++ ............................................... 7
Chapter 1: Creating a First C++ Program . . . . . . . . . . . . . . . . . . . . . . . . . .9
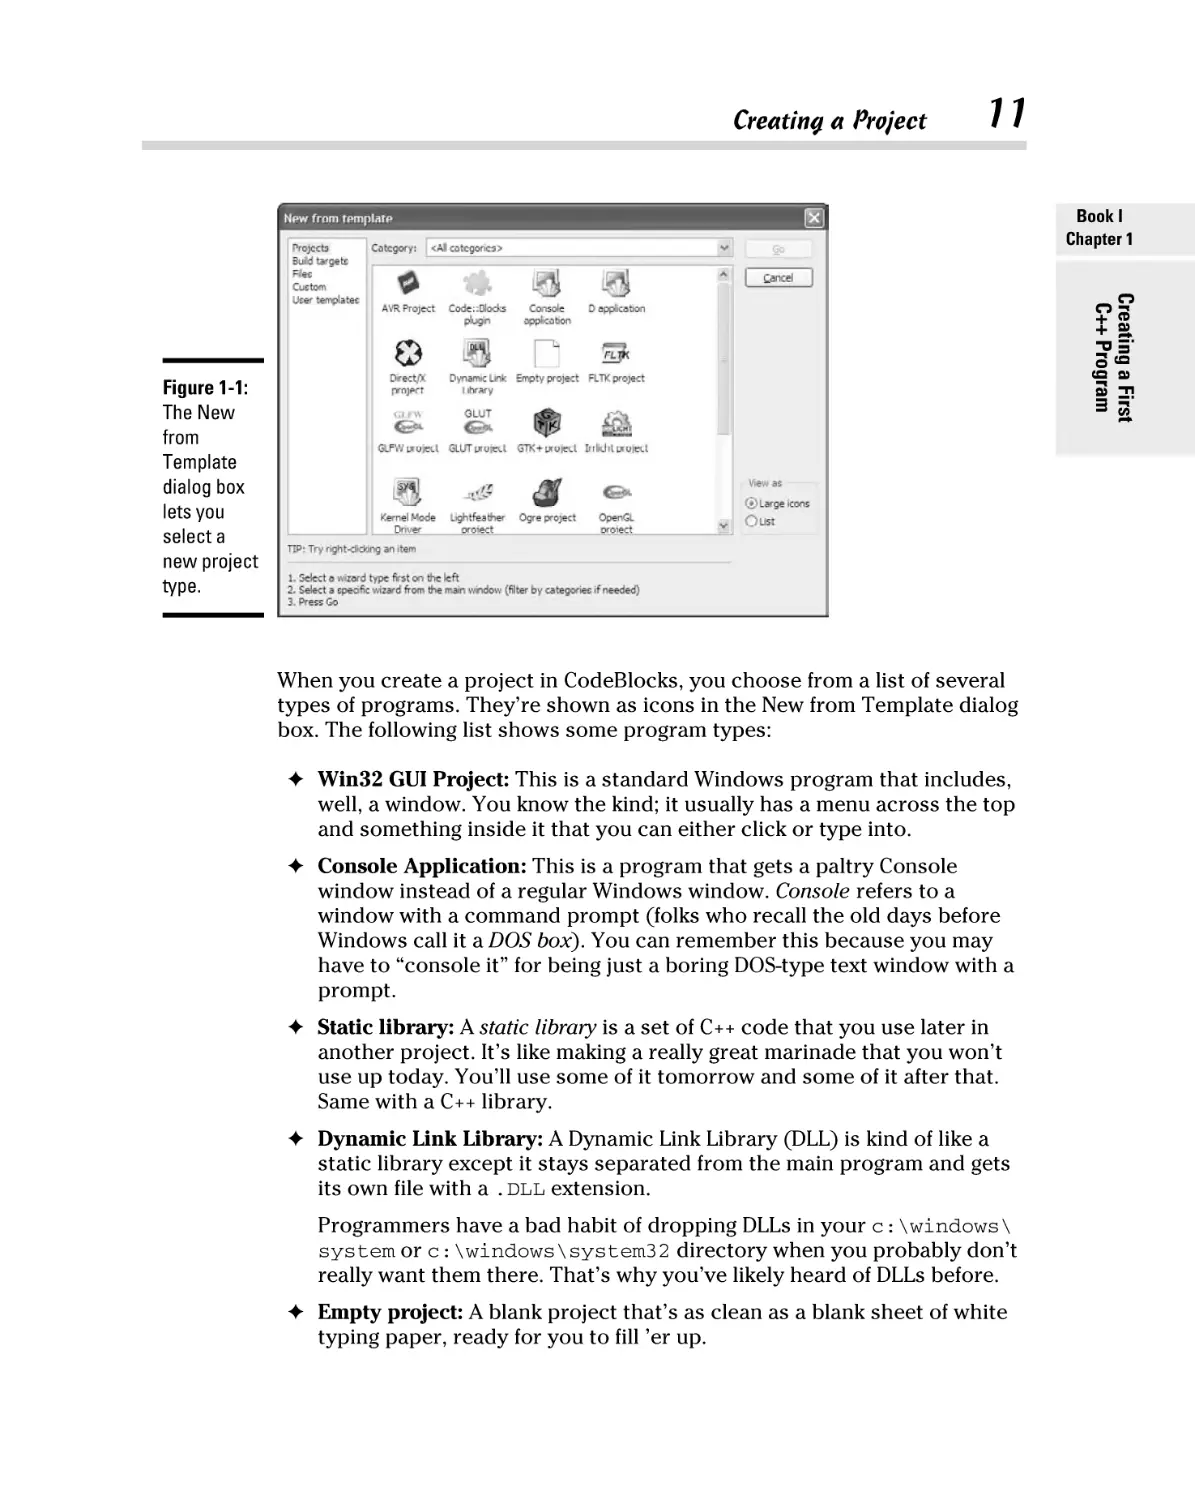
Creating a Project ............................................................................................ 9
Understanding projects ...................................................................... 10
Defining your first project................................................................... 10
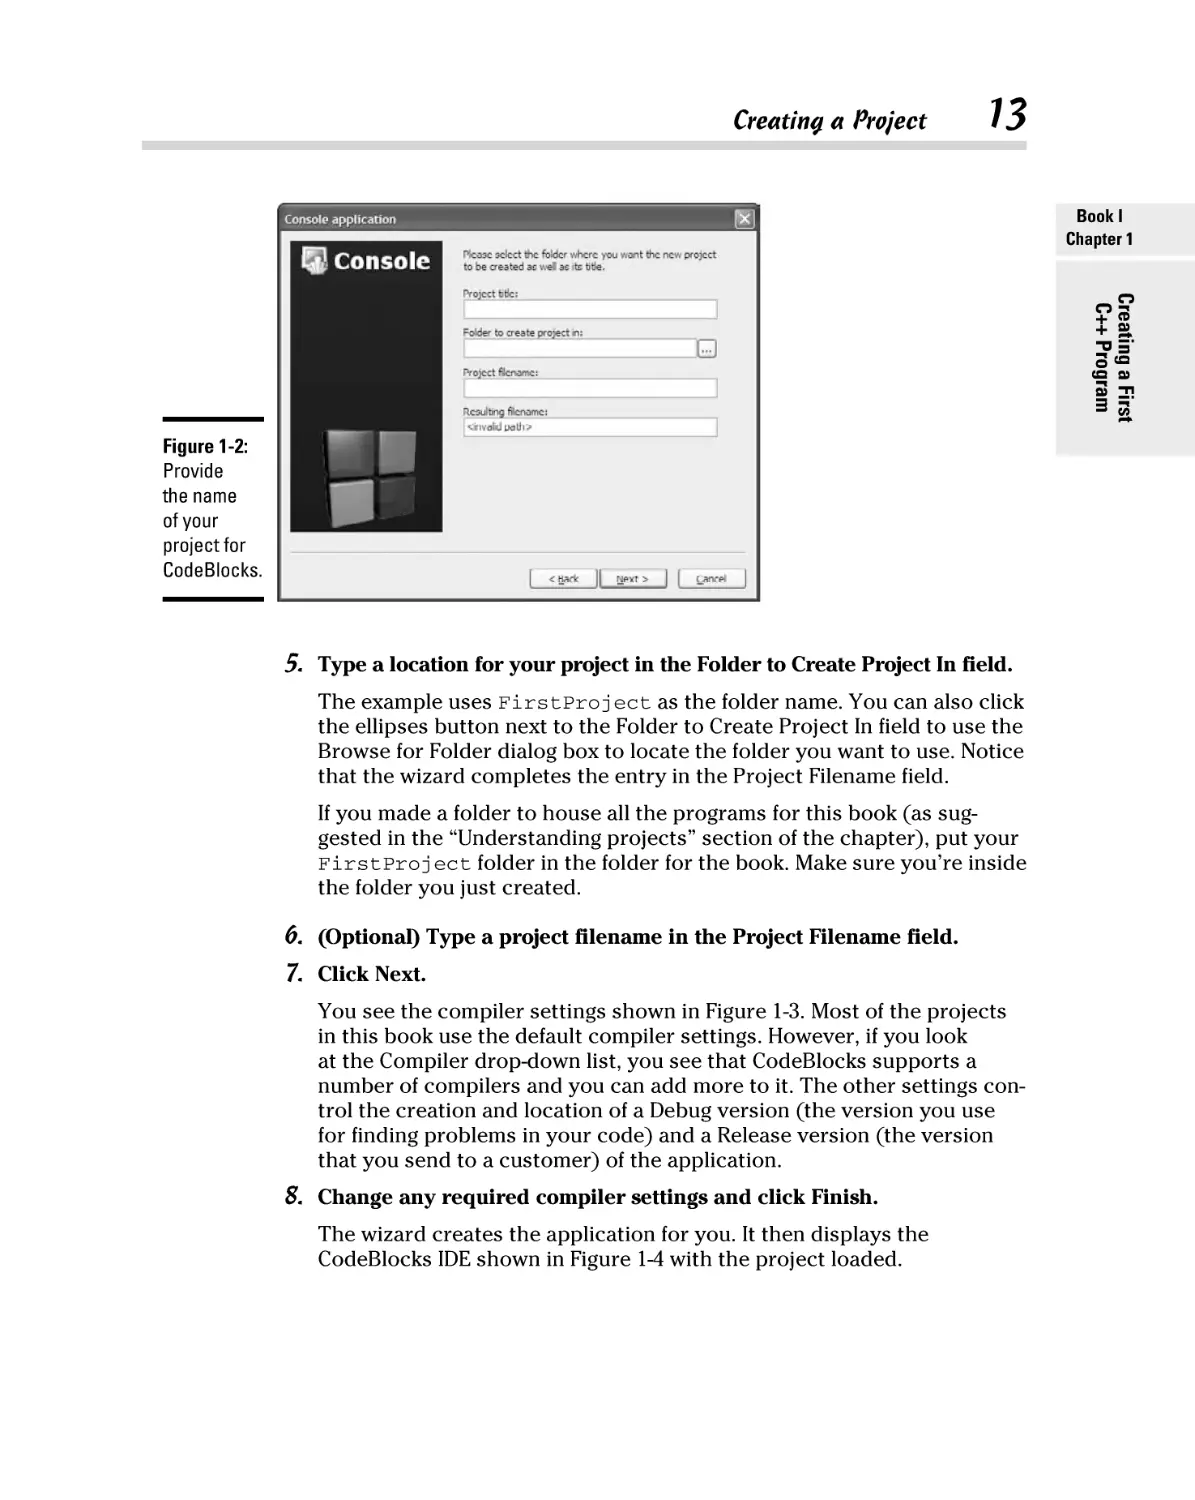
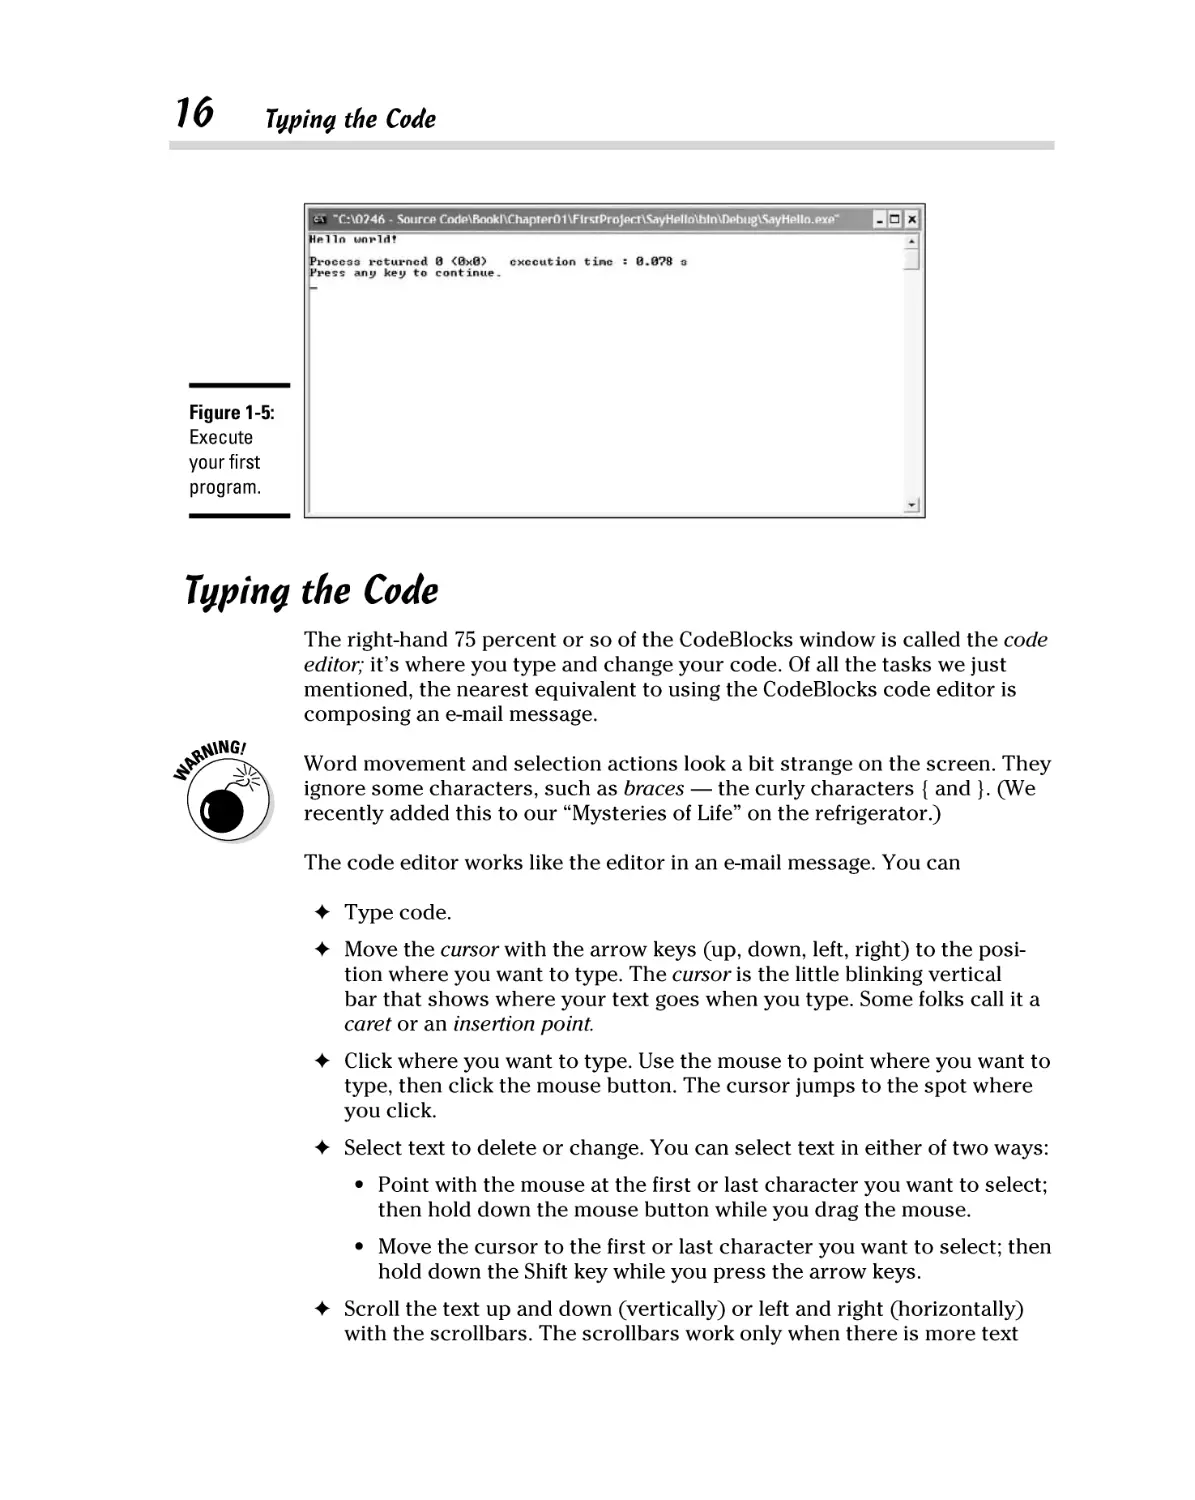
Building and executing your first application .................................. 15
Typing the Code............................................................................................. 16
Starting with Main ......................................................................................... 17
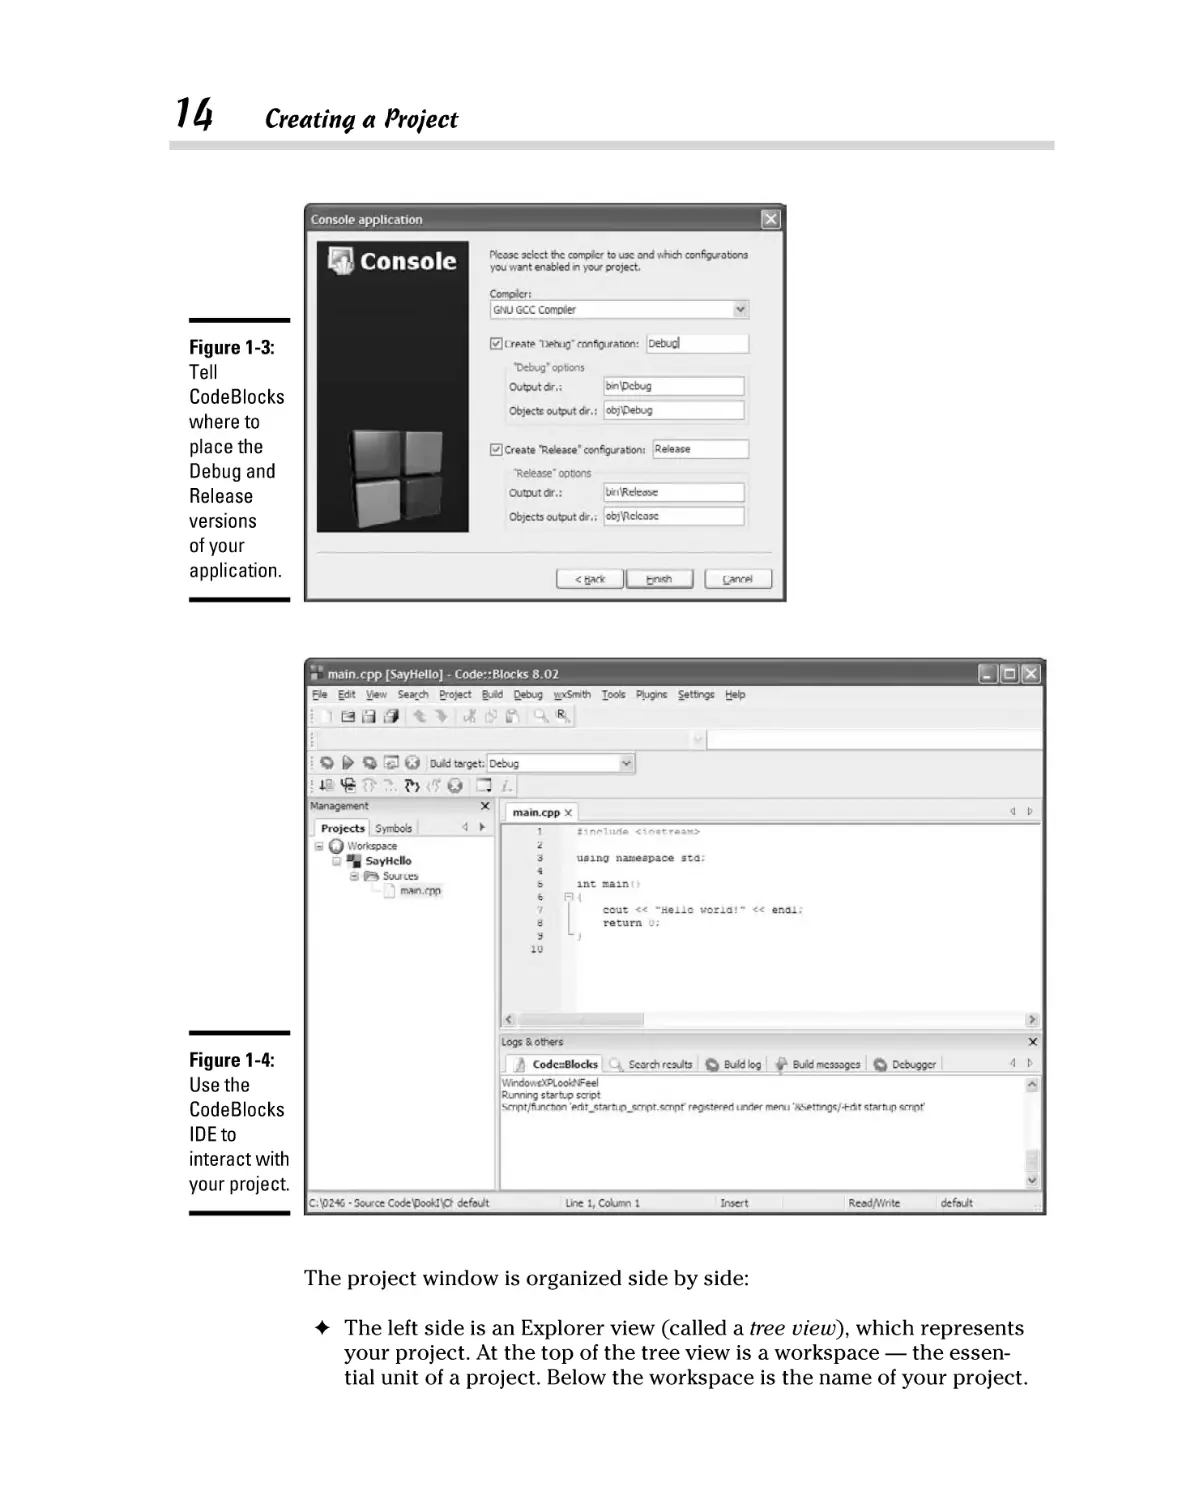
Showing Information ..................................................................................... 18
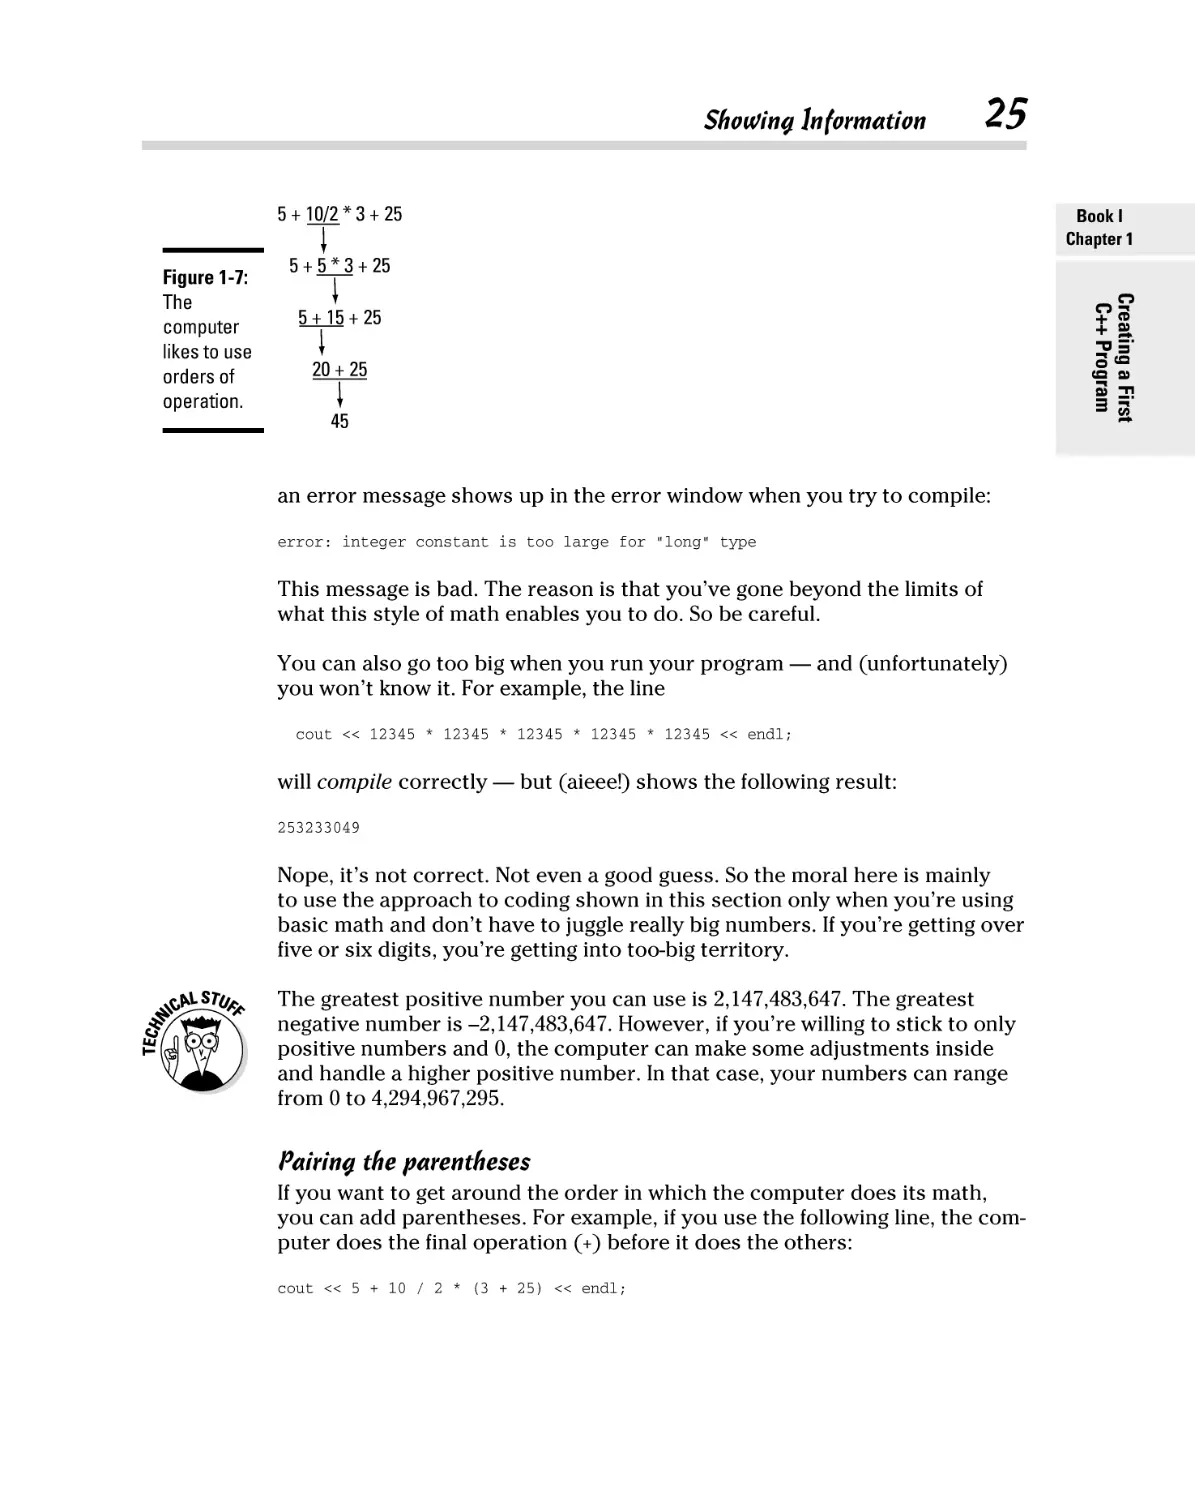
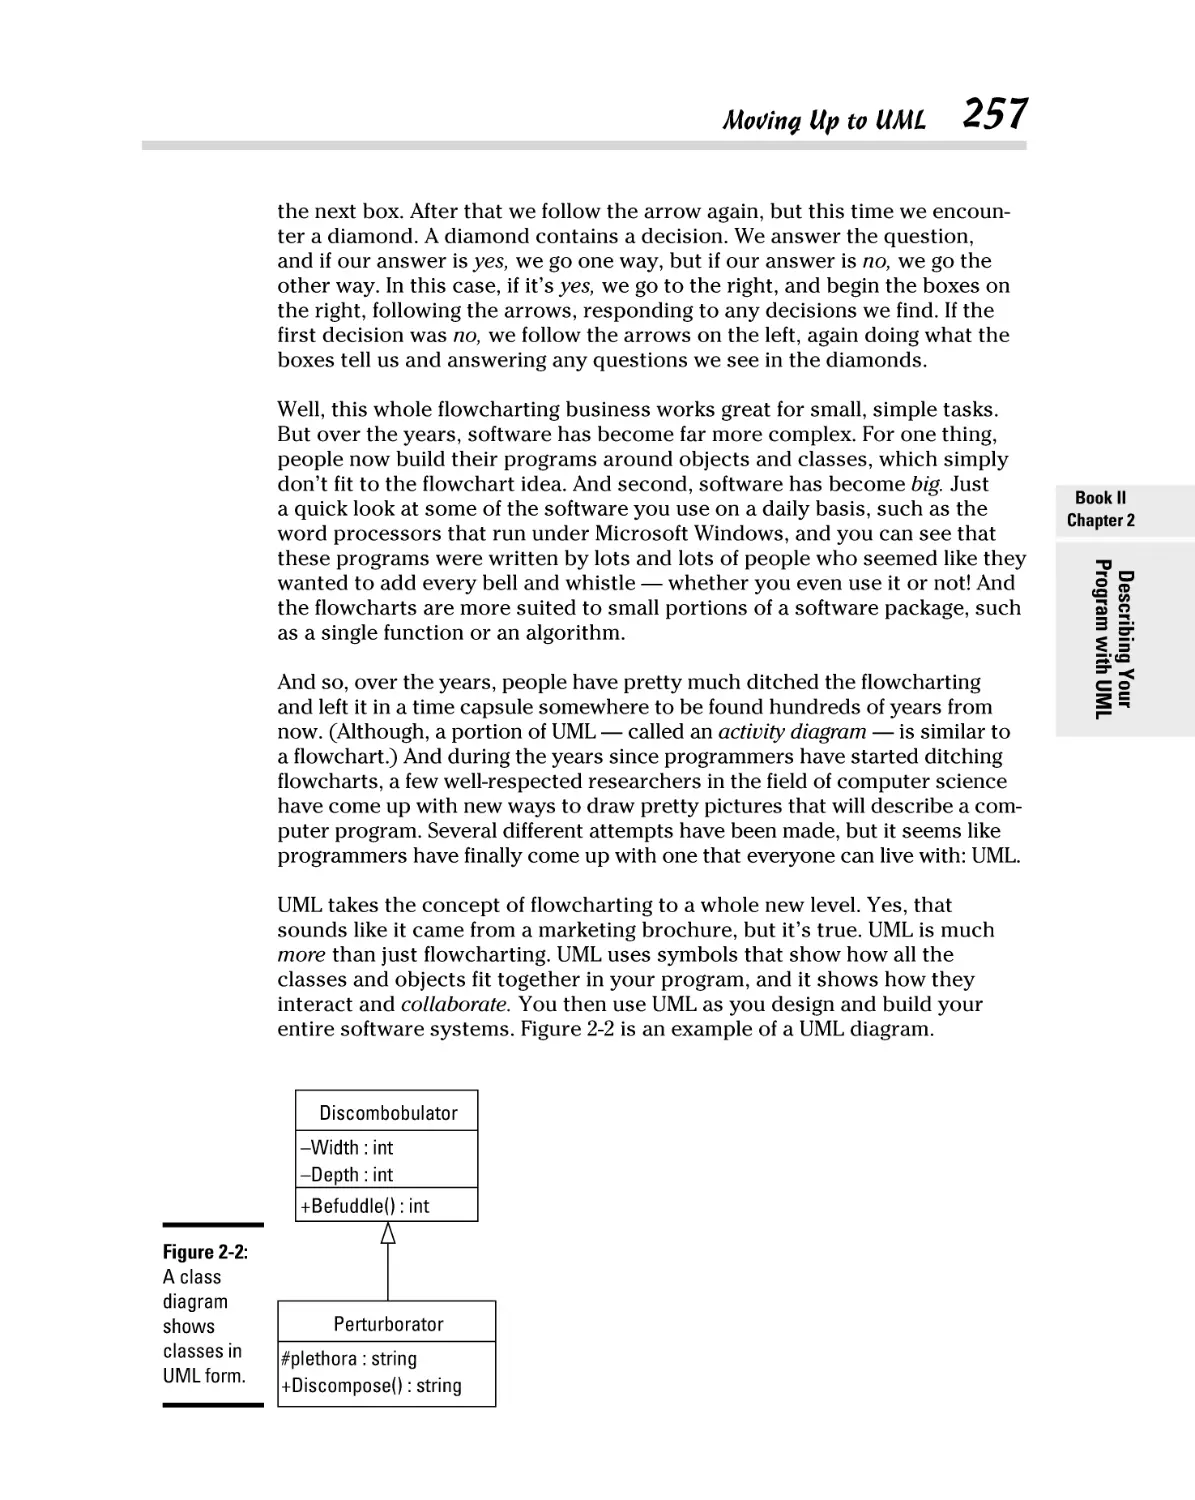
Doing some math ................................................................................. 22
Tabbing your output ........................................................................... 26
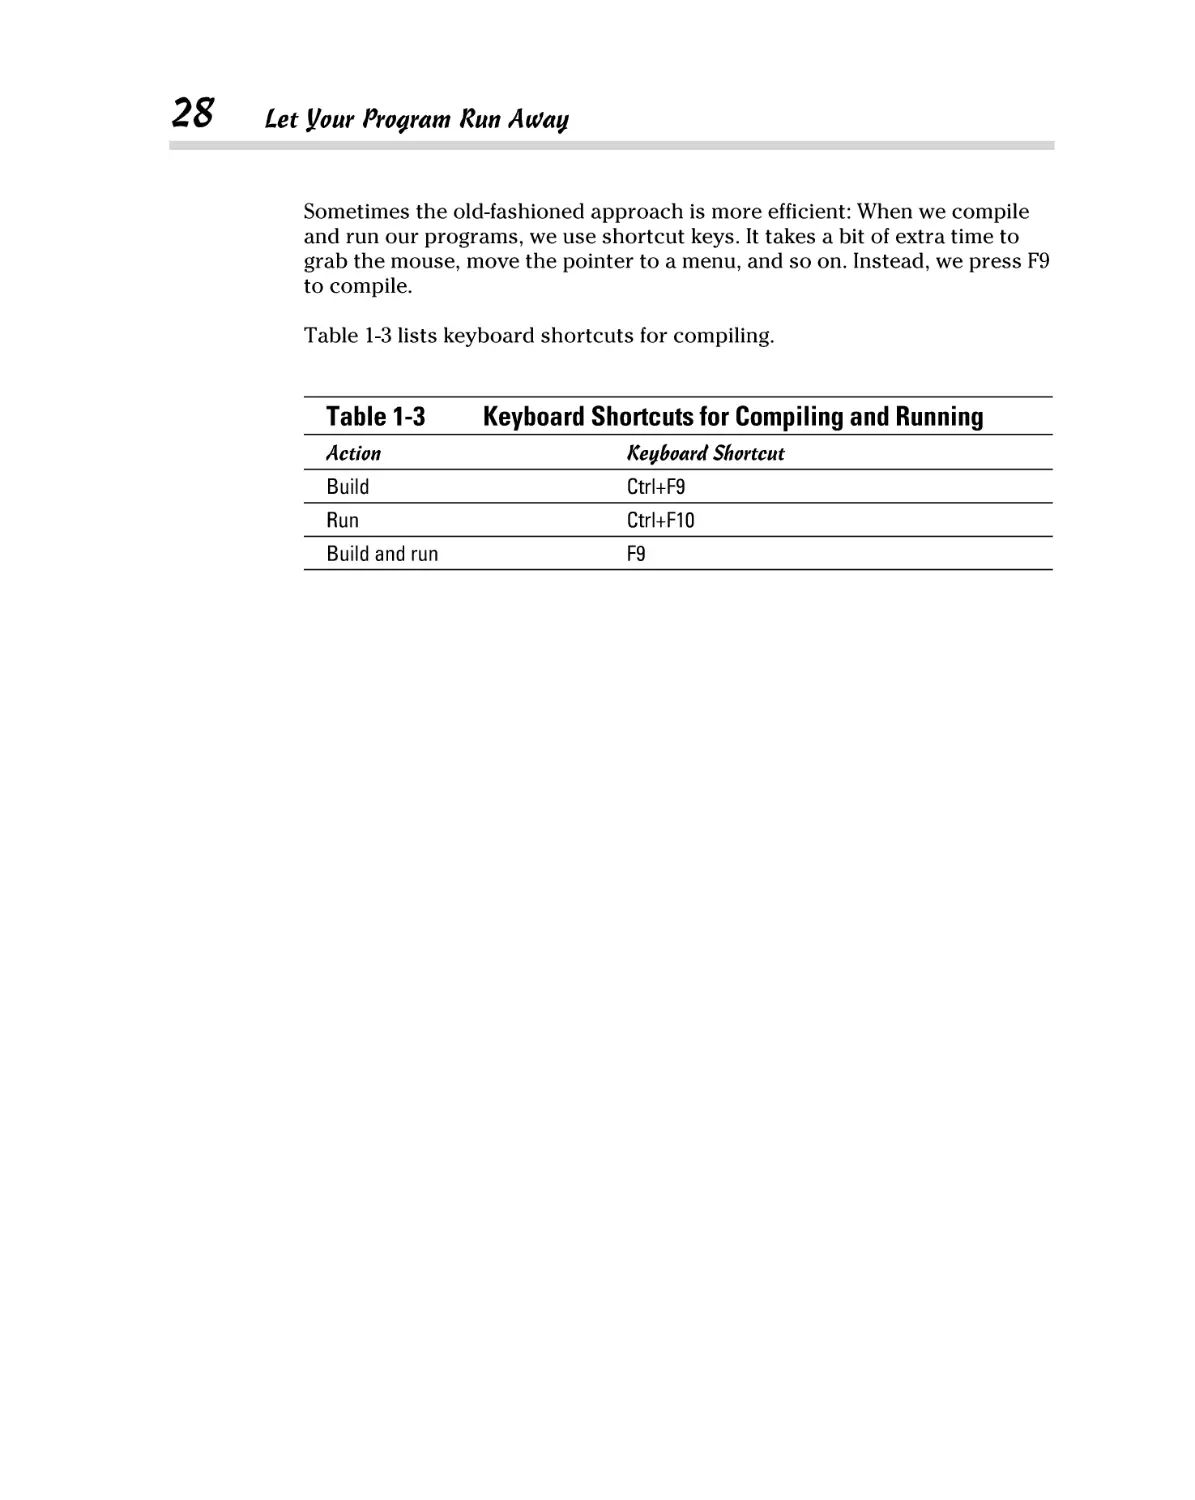
Let Your Program Run Away ........................................................................ 27
Chapter 2: Storing Data in C++. . . . . . . . . . . . . . . . . . . . . . . . . . . . . . . . . .29
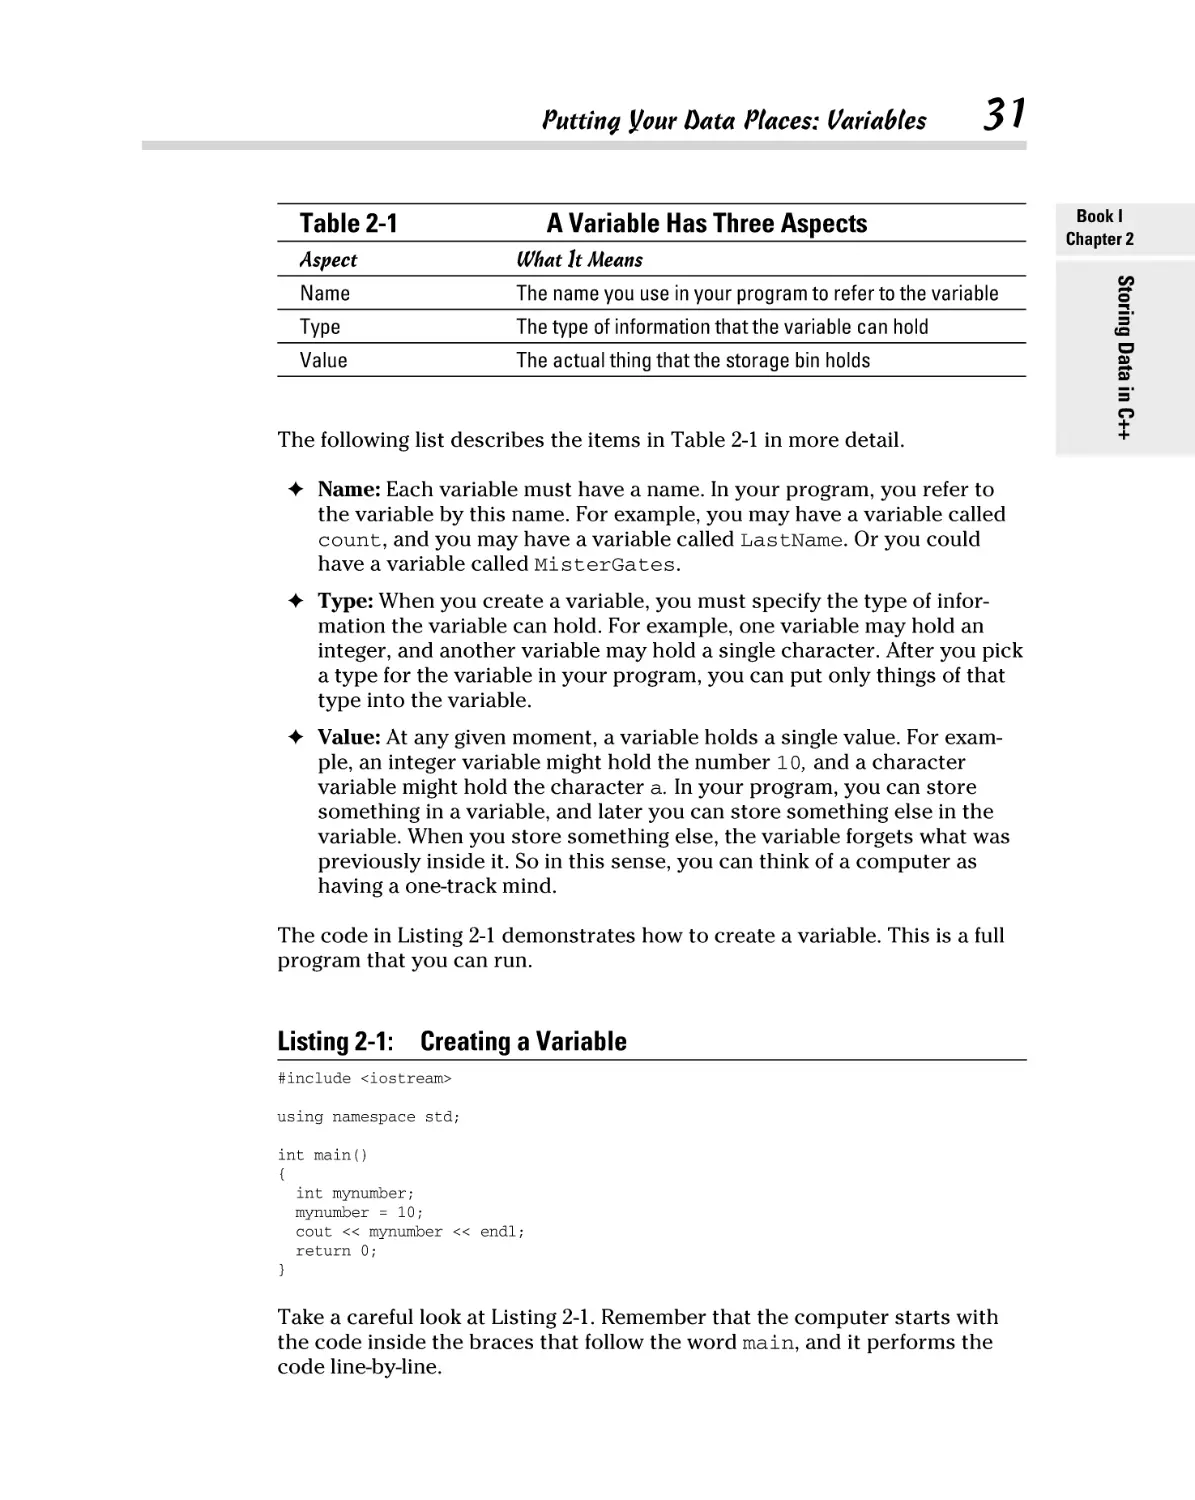
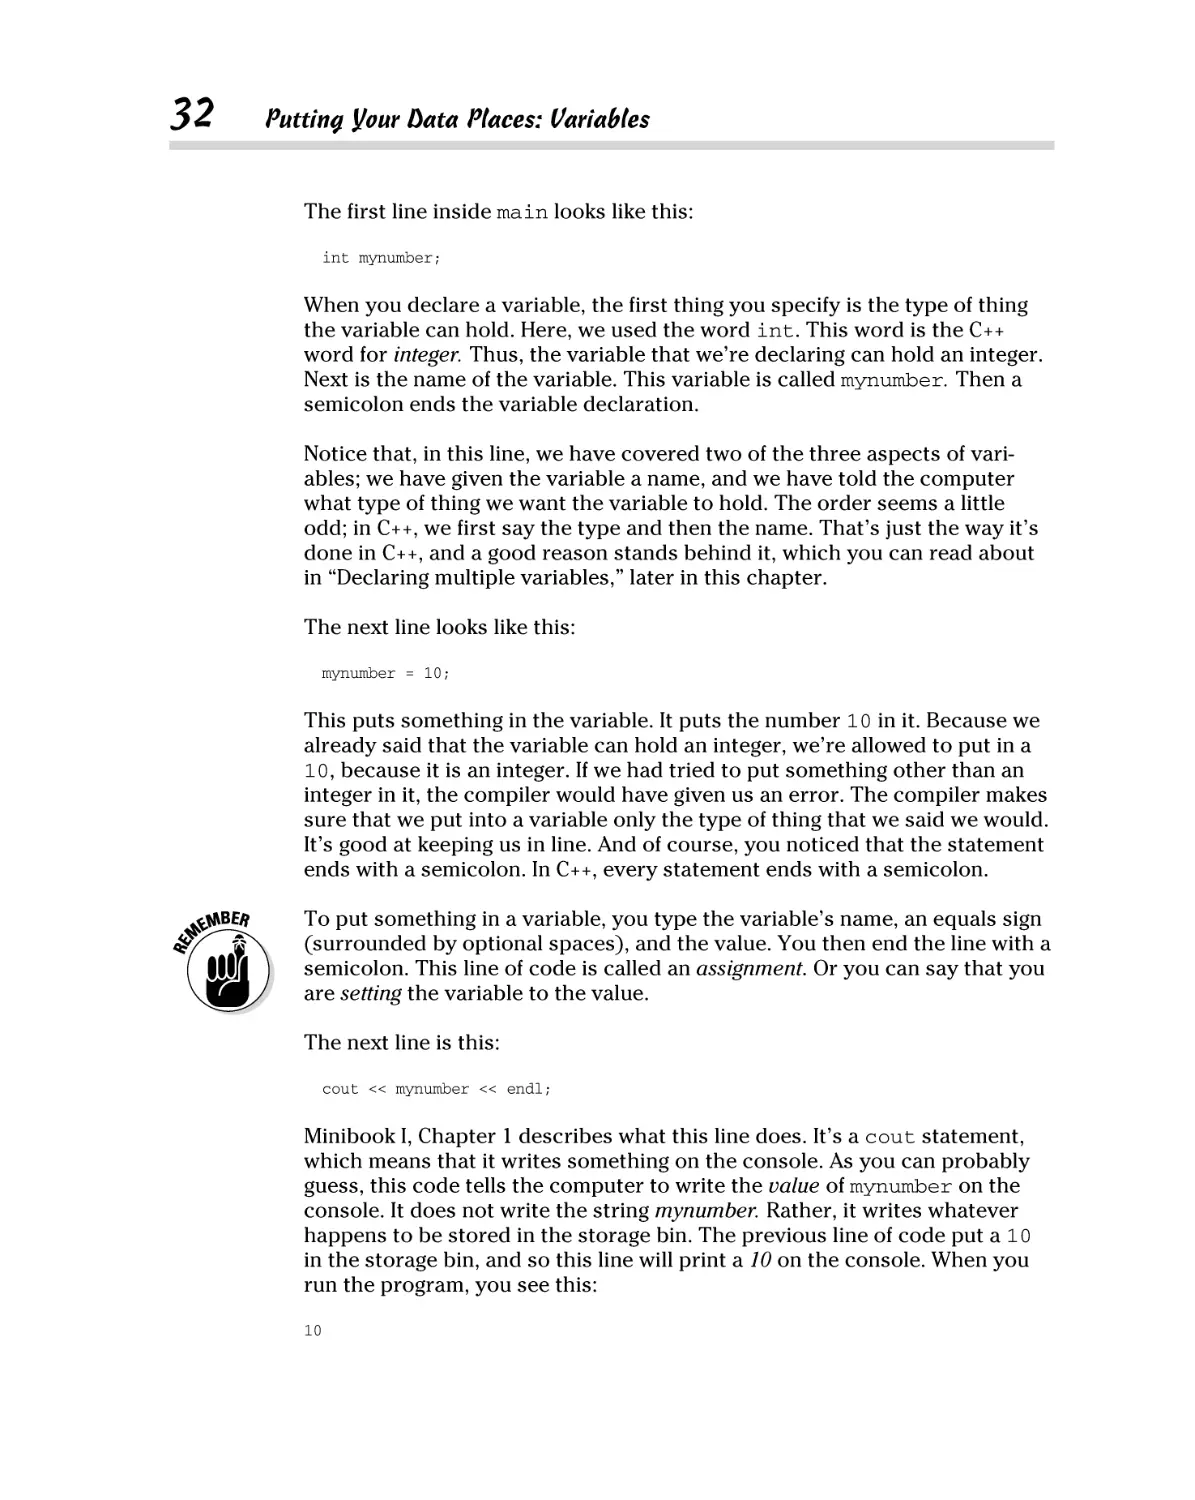
Putting Your Data Places: Variables ........................................................... 30
Creating an integer variable ............................................................... 30
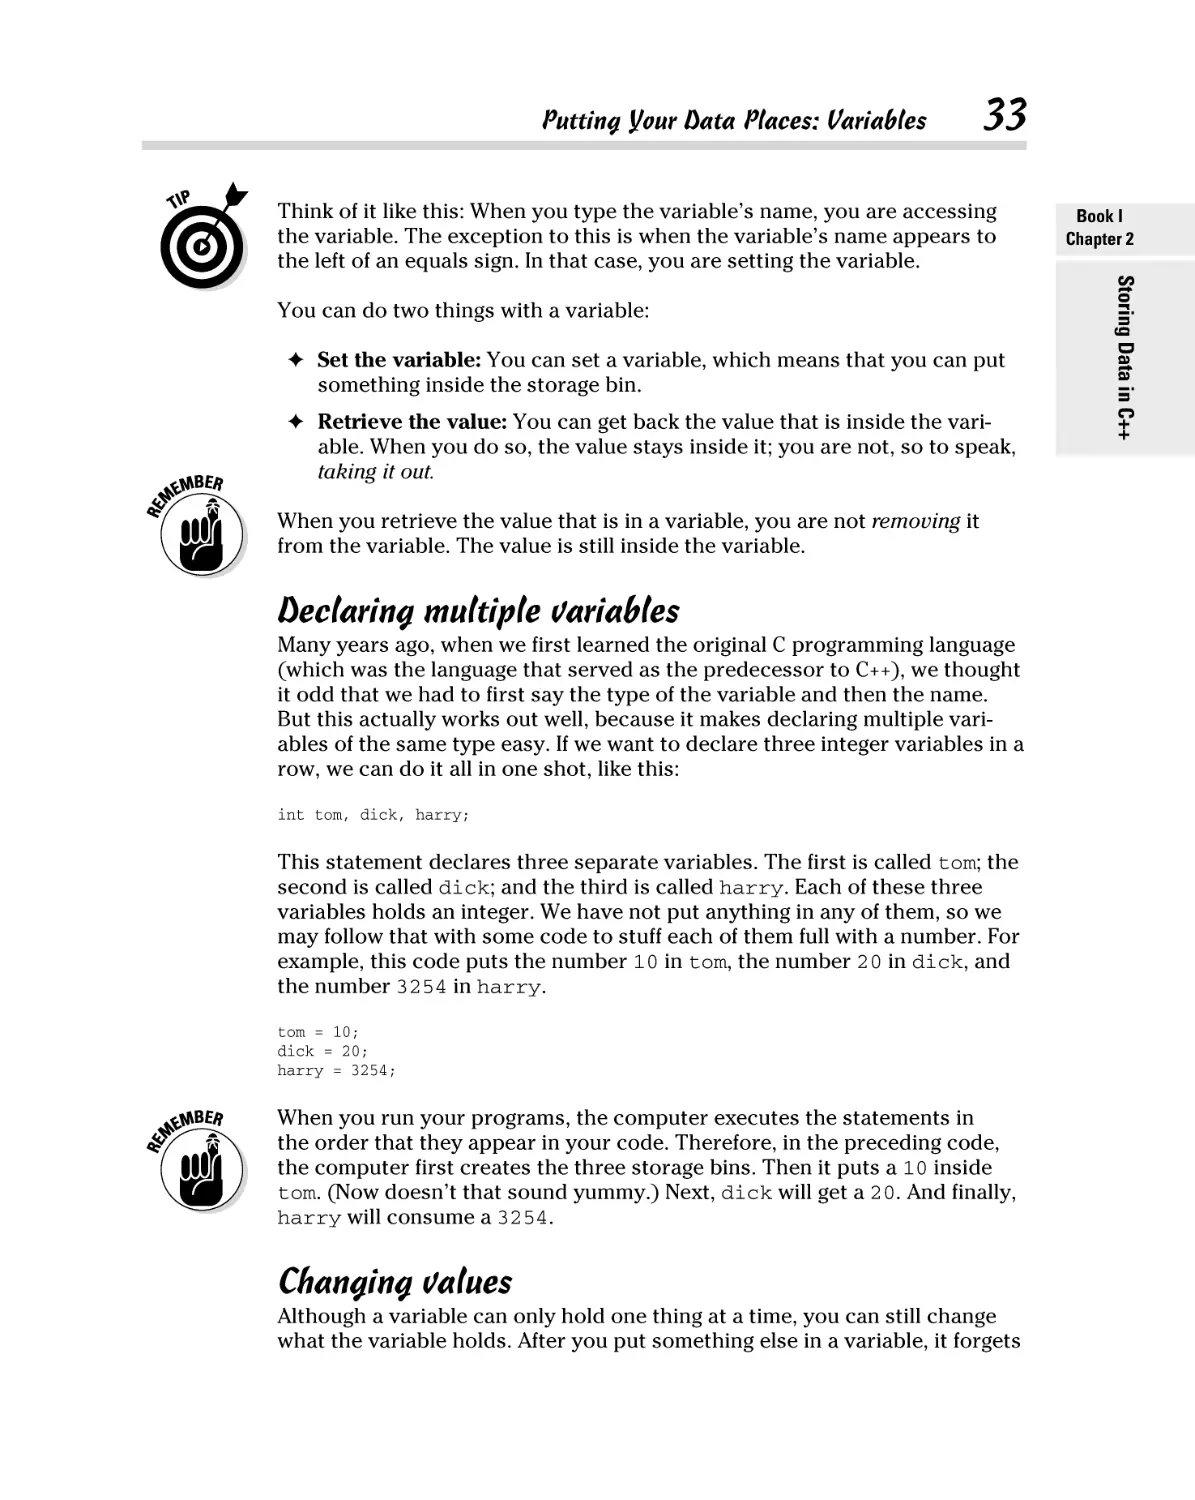
Declaring multiple variables............................................................... 33
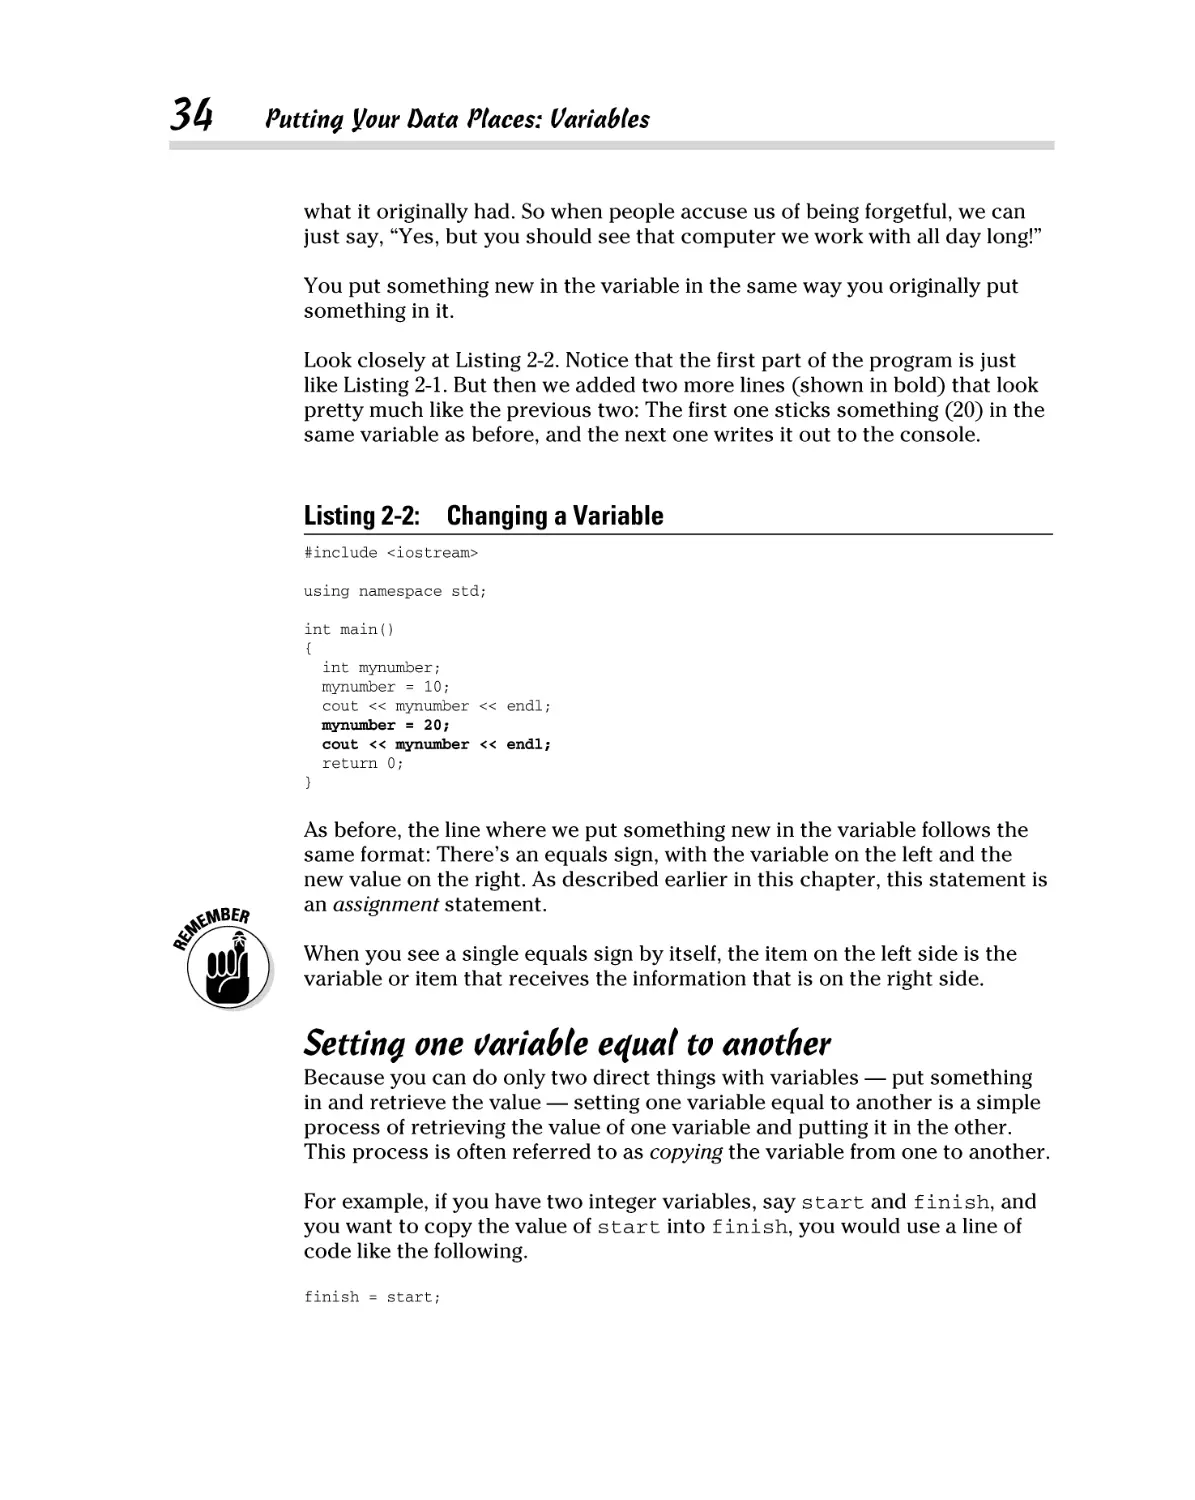
Changing values ................................................................................... 33
Setting one variable equal to another ............................................... 34
Initializing a variable ........................................................................... 35
Creating a great name for yourself .................................................... 36
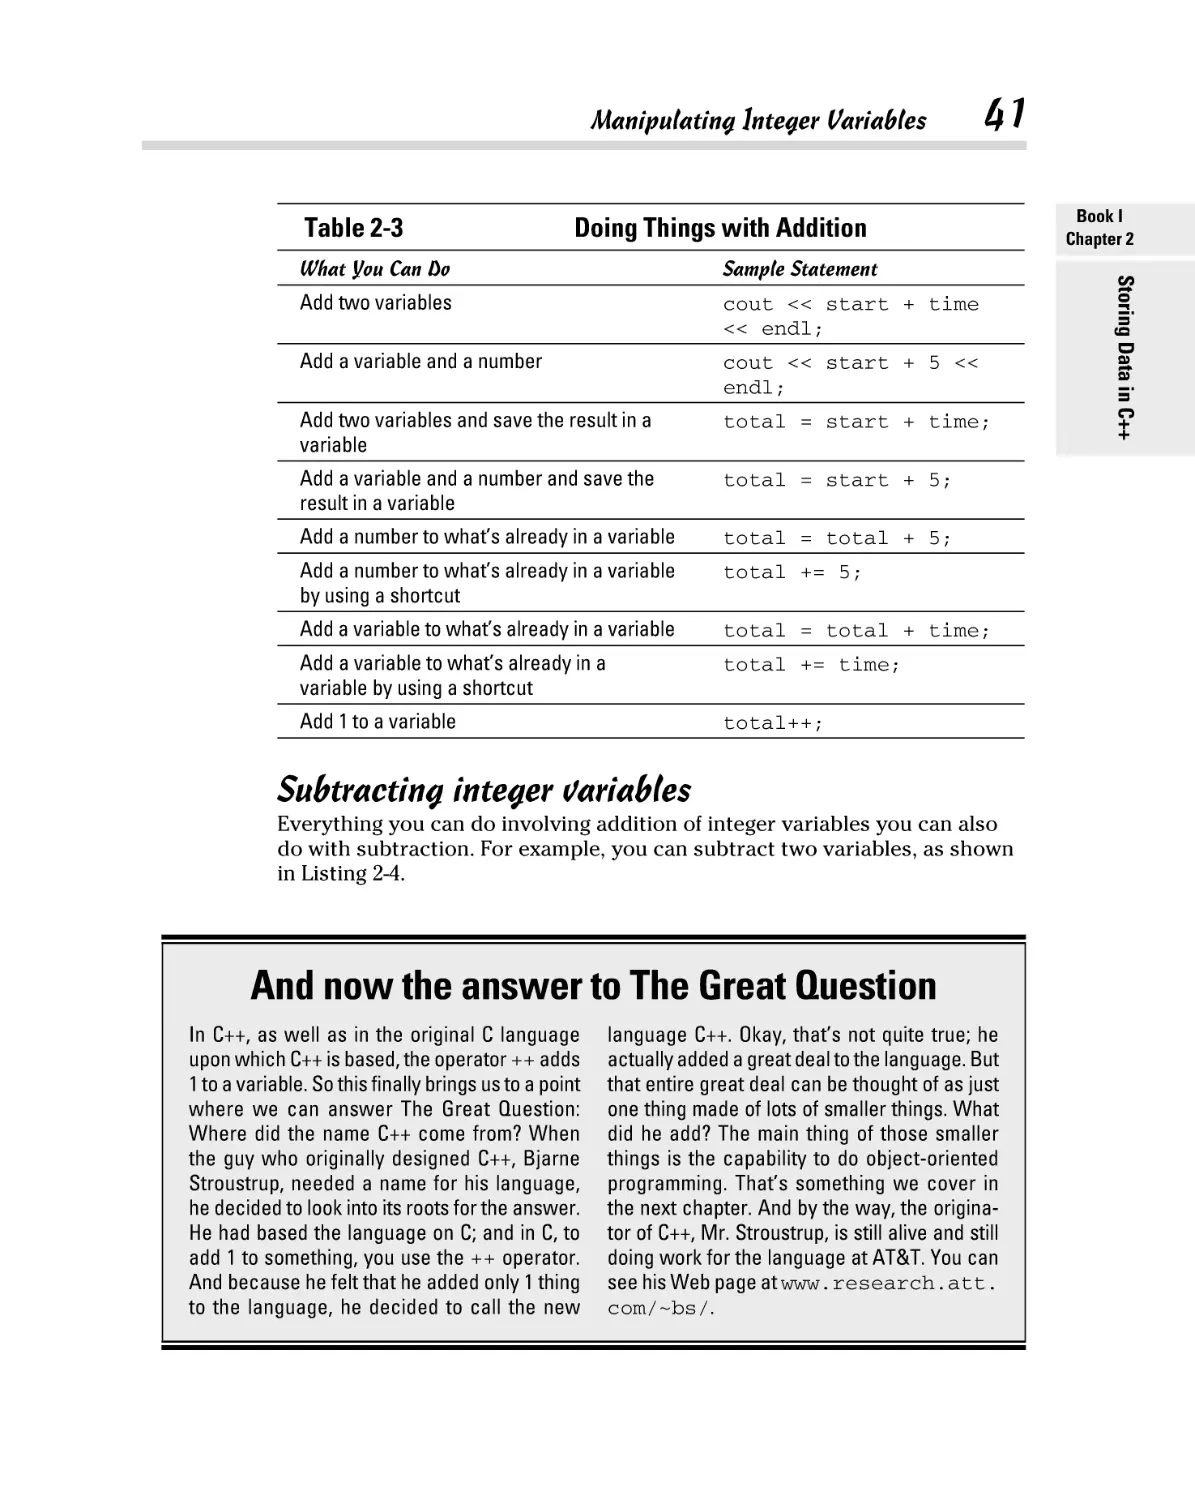
Manipulating Integer Variables .................................................................... 37
Adding integer variables ..................................................................... 38
Subtracting integer variables ............................................................. 41
Multiplying integer variables.............................................................. 43
Dividing integer variables ................................................................... 43
Characters ...................................................................................................... 45
Null character ....................................................................................... 46
Nonprintable and other cool characters .......................................... 46
x
C++ All-in-One For Dummies, 2nd Edition
Strings ............................................................................................................. 48
Getting a part of a string ..................................................................... 49
Changing part of a string..................................................................... 51
Adding onto a string ............................................................................ 51
Adding two strings ............................................................................... 52
Deciding between Conditional Operators .................................................. 52
Telling the Truth with Boolean Variables .................................................. 55
Reading from the Console ............................................................................ 56
Chapter 3: Directing Your C++ Program Flow . . . . . . . . . . . . . . . . . . . . .59
Doing This or Doing That ............................................................................. 60
Evaluating Conditions in C++ ....................................................................... 60
Finding the right C++ operators ......................................................... 61
Combining multiple evaluations ........................................................ 62
Including Evaluations in C++ Conditional Statements .............................. 63
Deciding what if and also what else .................................................. 64
Going further with the else and if ...................................................... 65
Repeating Actions with Statements That Loop ......................................... 67
Looping situations ............................................................................... 67
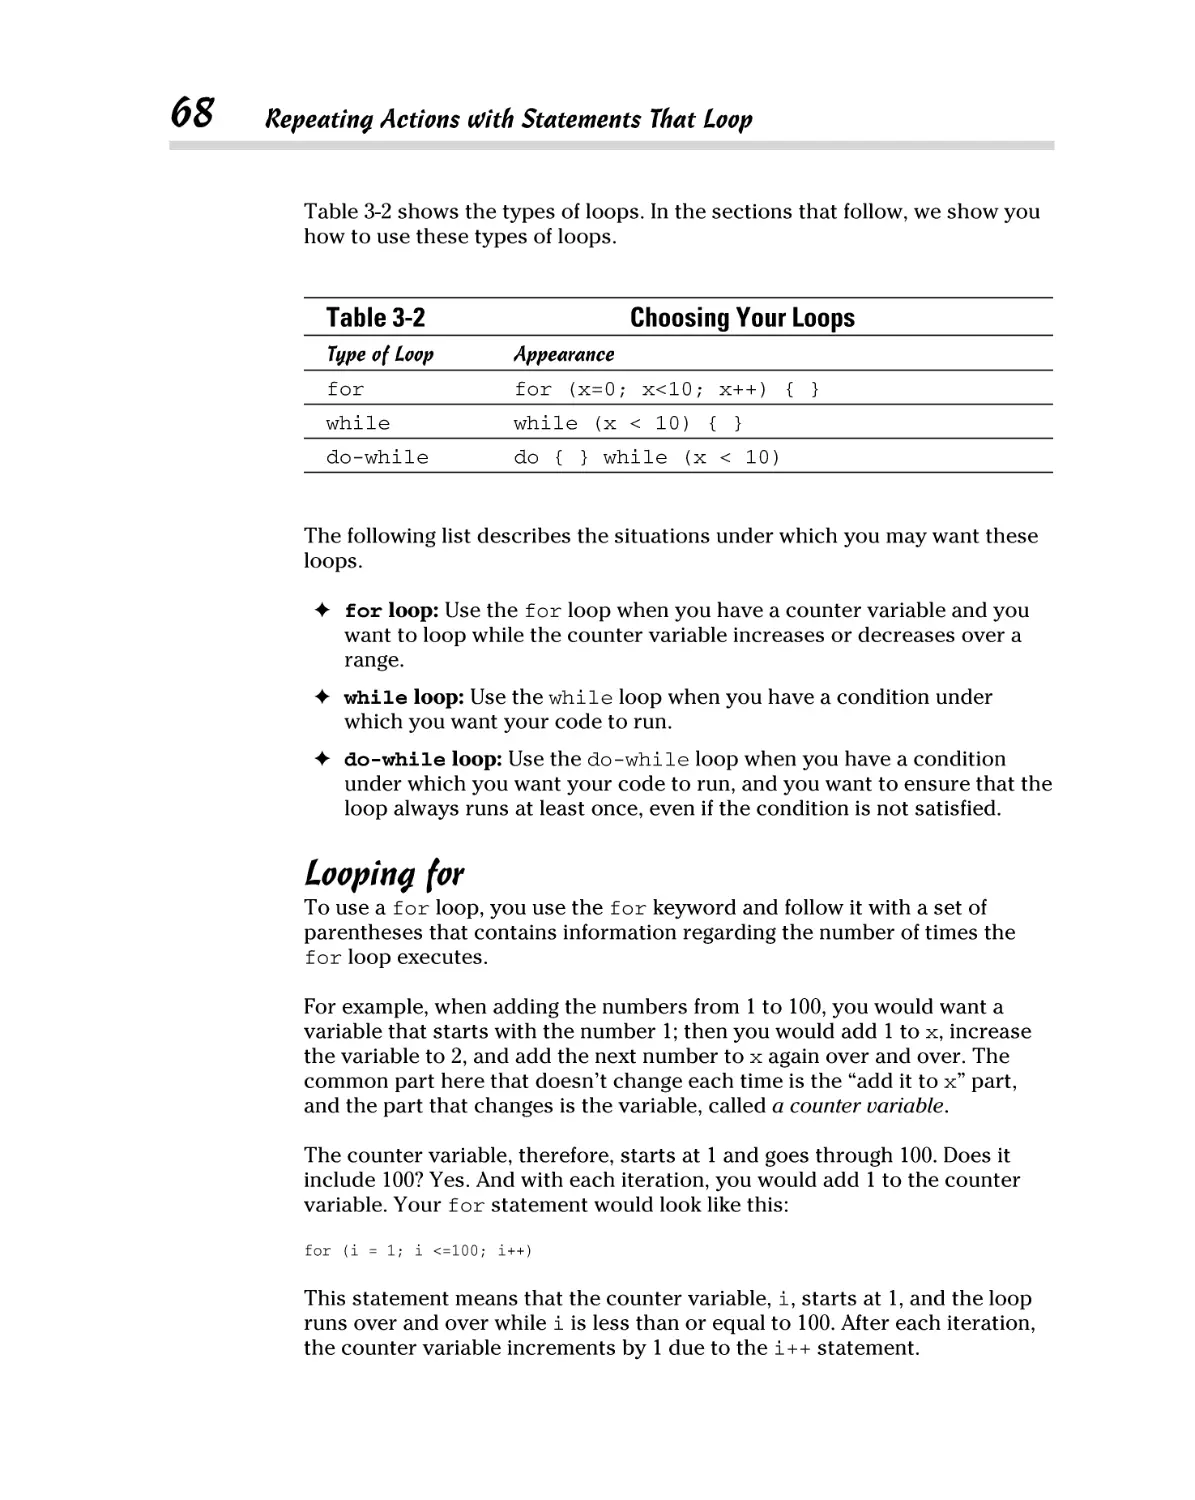
Looping for ........................................................................................... 68
Looping while ....................................................................................... 74
Doing while ........................................................................................... 77
Breaking and continuing ..................................................................... 77
Nesting loops ........................................................................................ 79
Chapter 4: Dividing Your Work with Functions . . . . . . . . . . . . . . . . . . .83
Dividing Your Work ....................................................................................... 83
Calling a Function .......................................................................................... 88
Passing a variable ................................................................................ 89
Passing multiple variables .................................................................. 90
Writing Your Own Functions........................................................................ 91
Multiple parameters or no parameters ............................................. 95
Returning nothing ................................................................................ 97
Keeping your variables local .............................................................. 98
Forward references and function prototypes ................................ 100
Writing two versions of the same function..................................... 101
Calling All String Functions ........................................................................ 103
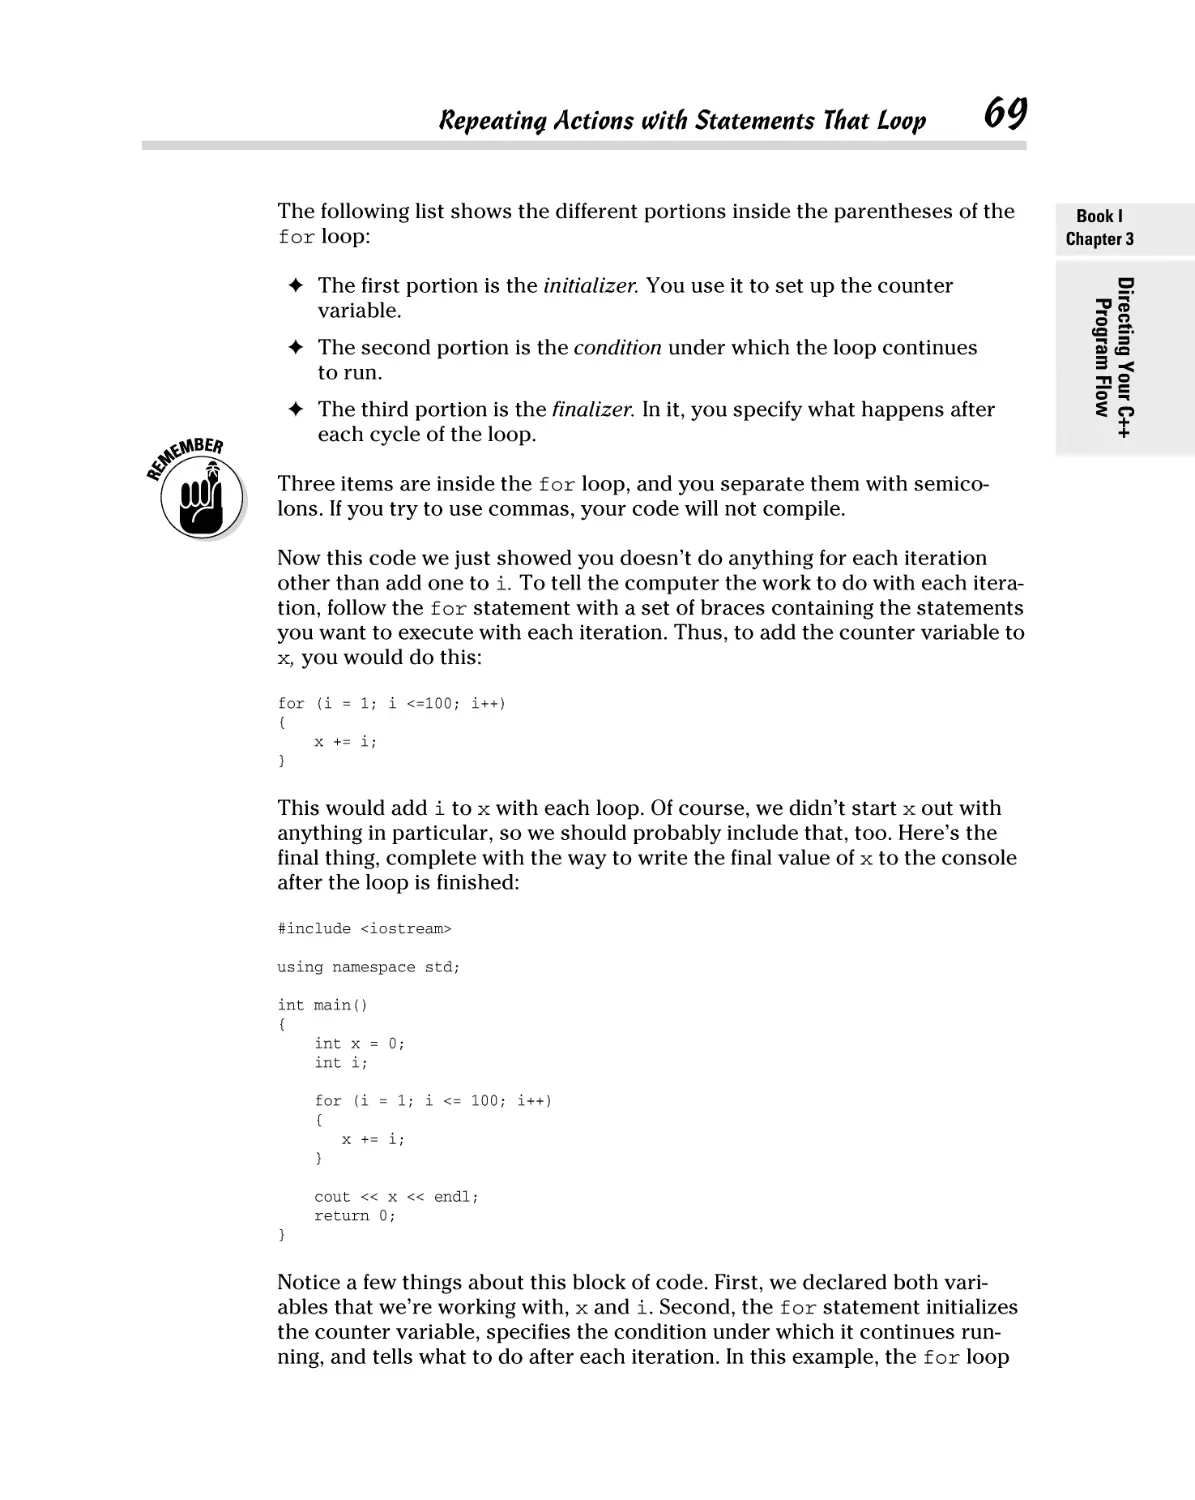
Understanding main .................................................................................... 105
Chapter 5: Dividing Between Source-Code Files. . . . . . . . . . . . . . . . .109
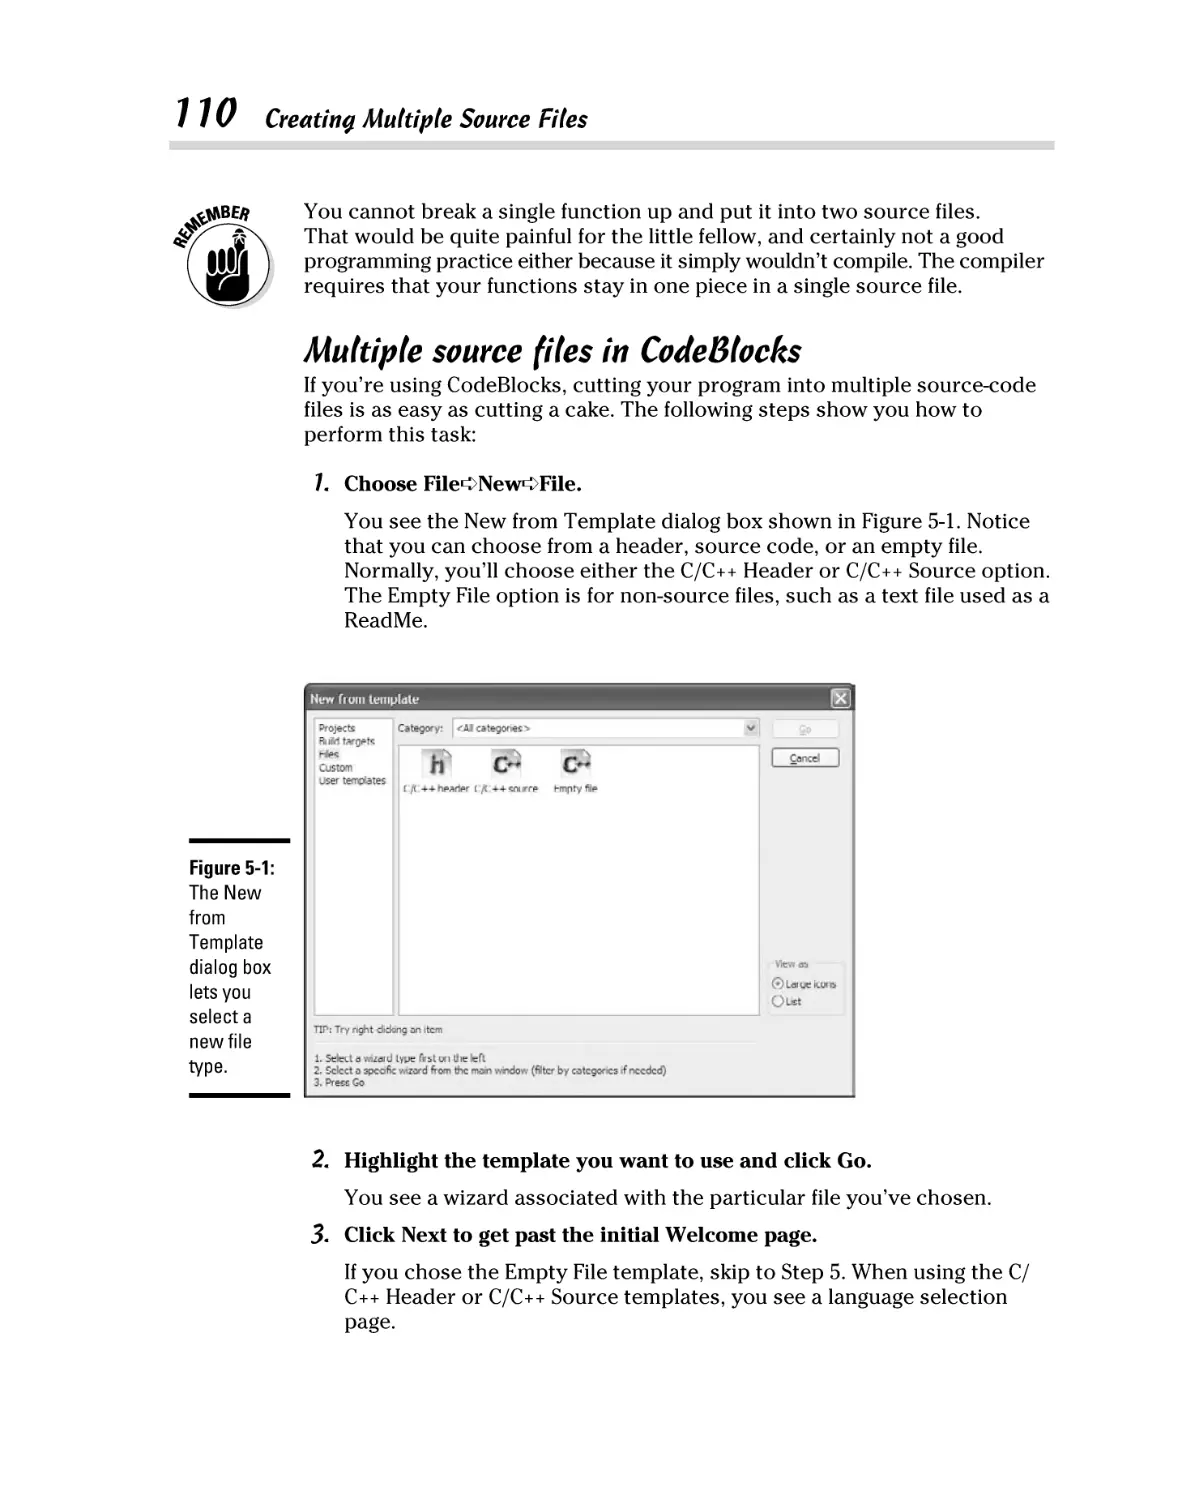
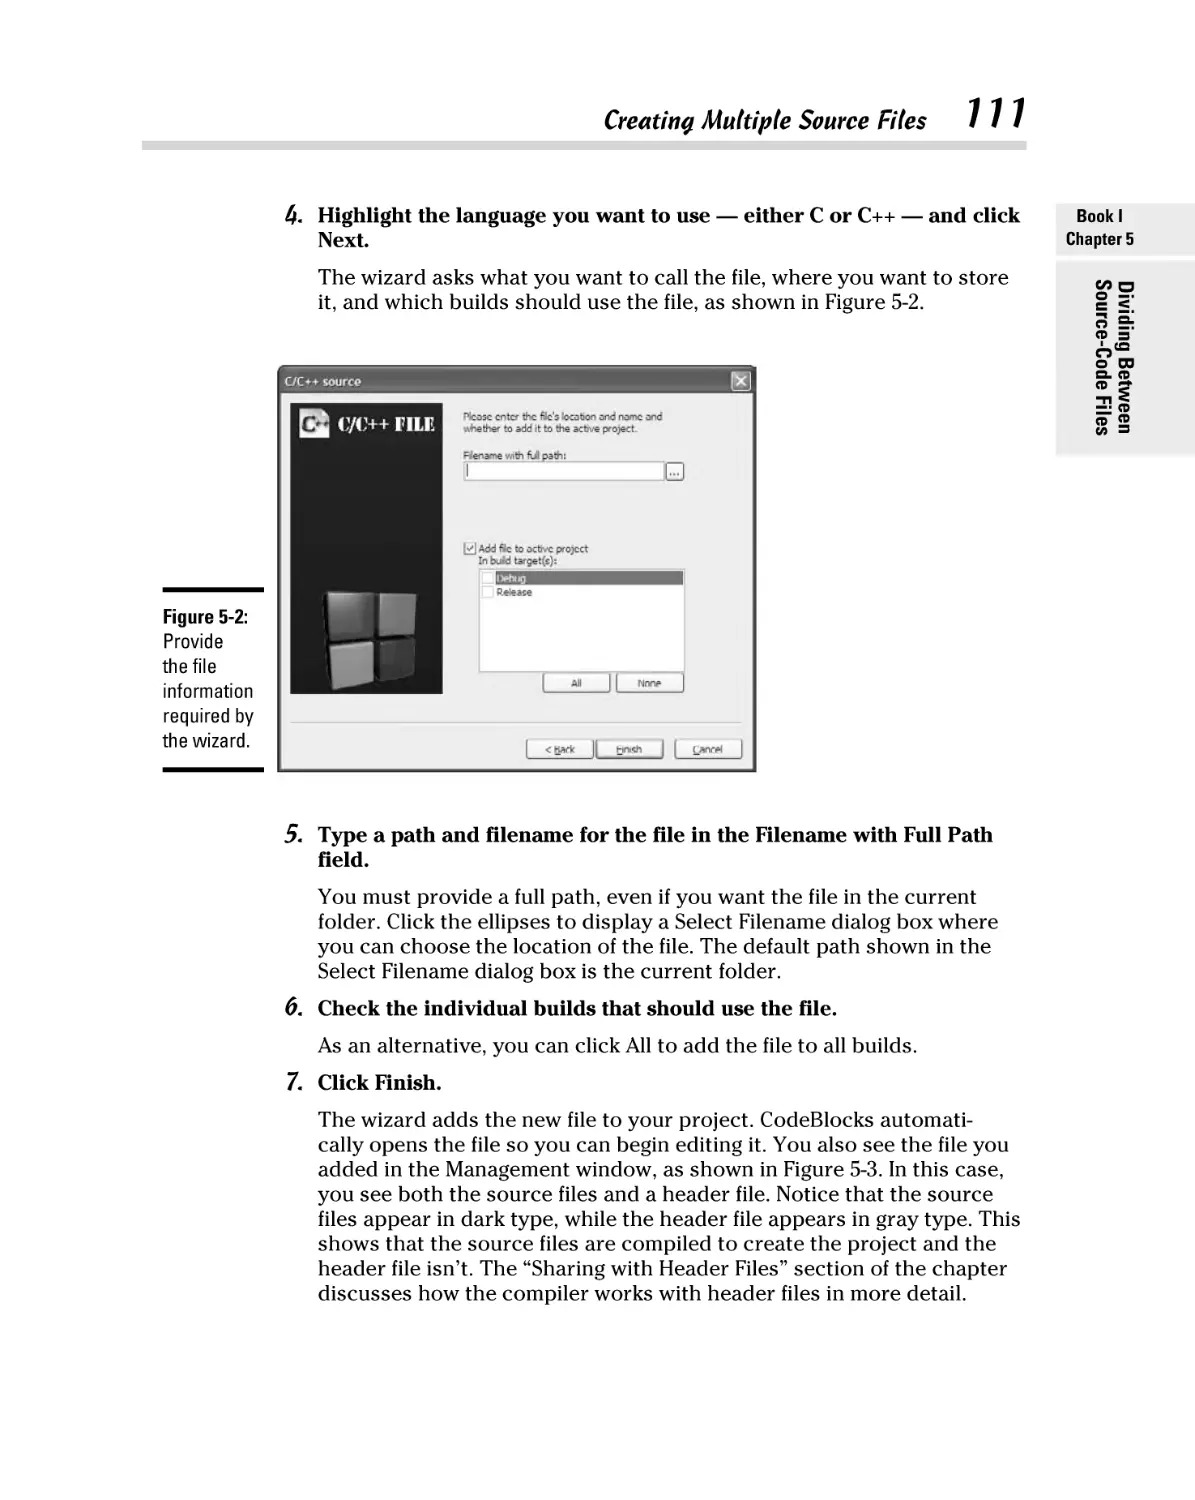
Creating Multiple Source Files ................................................................... 109
Multiple source files in CodeBlocks ................................................ 110
Multiple source files in other compilers ......................................... 112
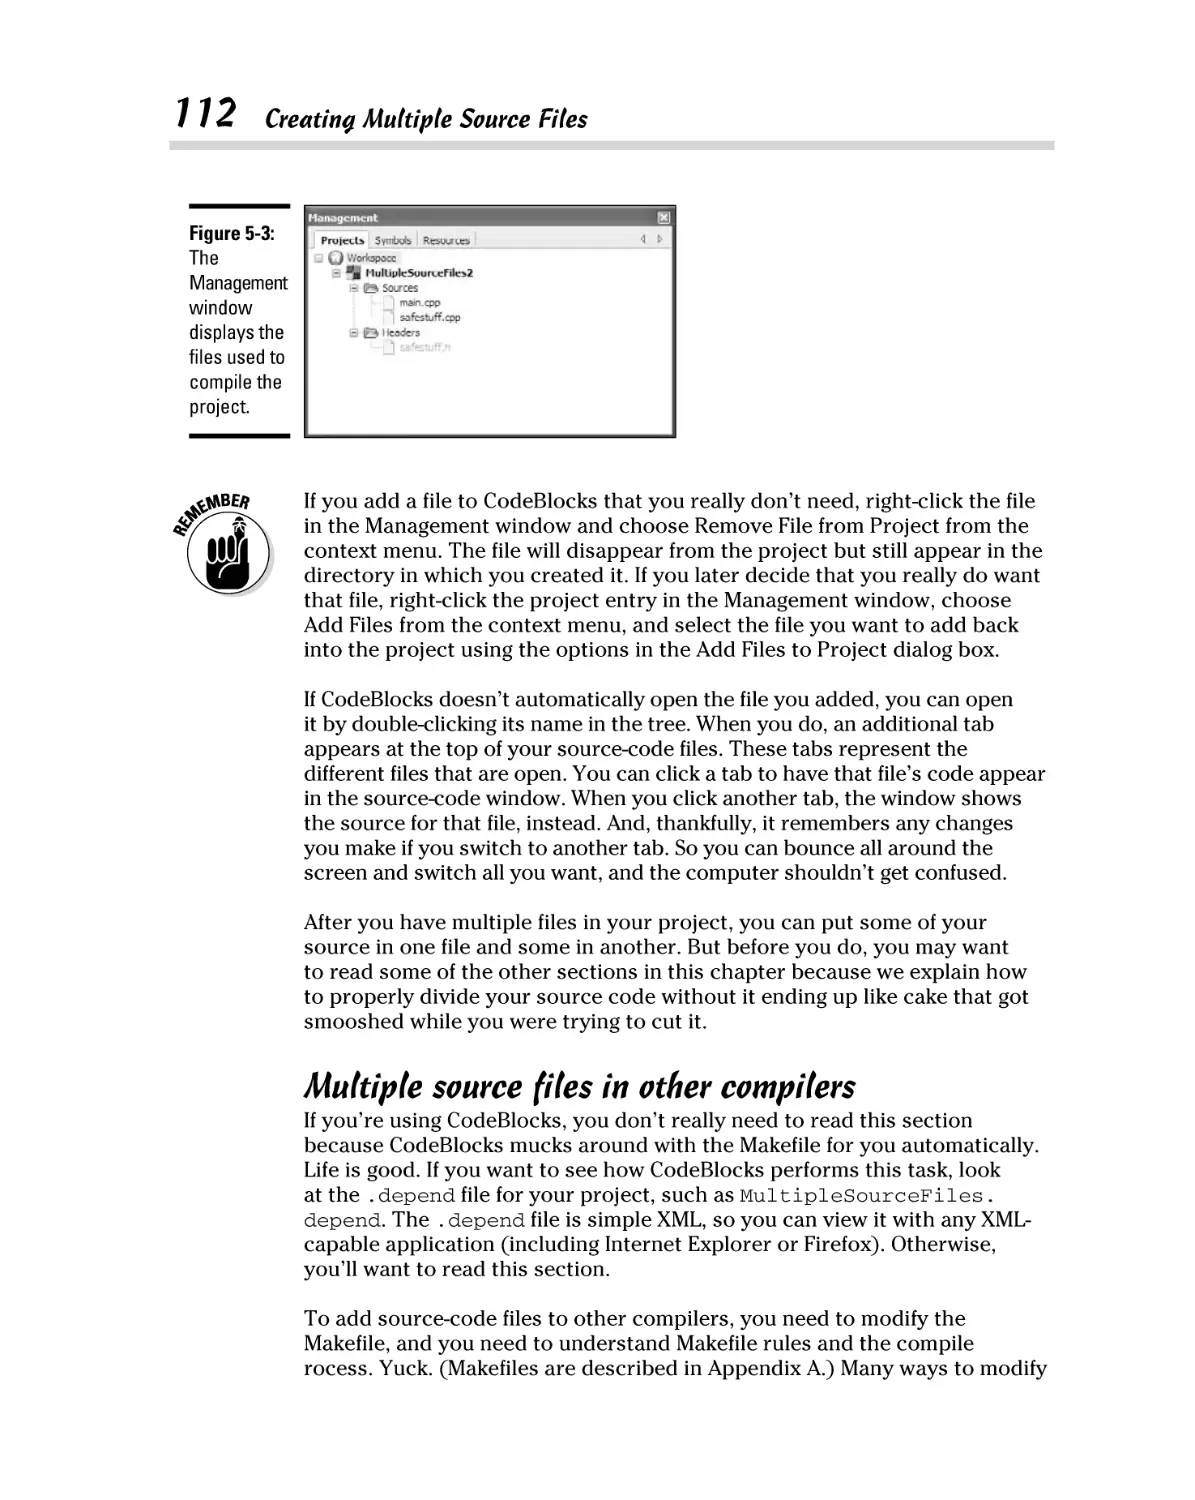
Creating multiple files ....................................................................... 113
Table of Contents
xi
Sharing with Header Files ........................................................................... 115
Adding the header only once ........................................................... 118
Using brackets or quotes .................................................................. 118
Sharing Variables Among Source Files ..................................................... 119
Using the Mysterious Header Wrappers .................................................. 121
Chapter 6: Referring to Your Data through Pointers . . . . . . . . . . . . . .123
Heaping and Stacking the Variables .......................................................... 124
Getting a variable’s address ............................................................. 127
Changing a variable by using a pointer........................................... 129
Pointing at a string............................................................................. 131
Pointing to something else ............................................................... 133
Tips on pointer variables .................................................................. 134
Dynamically Allocating with new .............................................................. 135
Using new ............................................................................................ 135
Using an initializer ............................................................................. 137
Making new strings ............................................................................ 138
Freeing Pointers ........................................................................................... 139
Passing Pointer Variables to Functions .................................................... 141
Changing variable values with pointers.......................................... 141
Modifying string parameters ............................................................ 144
Returning Pointer Variables from Functions ........................................... 145
Returning a Pointer as a Nonpointer ........................................................ 148
Passing by Reference .................................................................................. 149
Remembering the Rules .............................................................................. 150
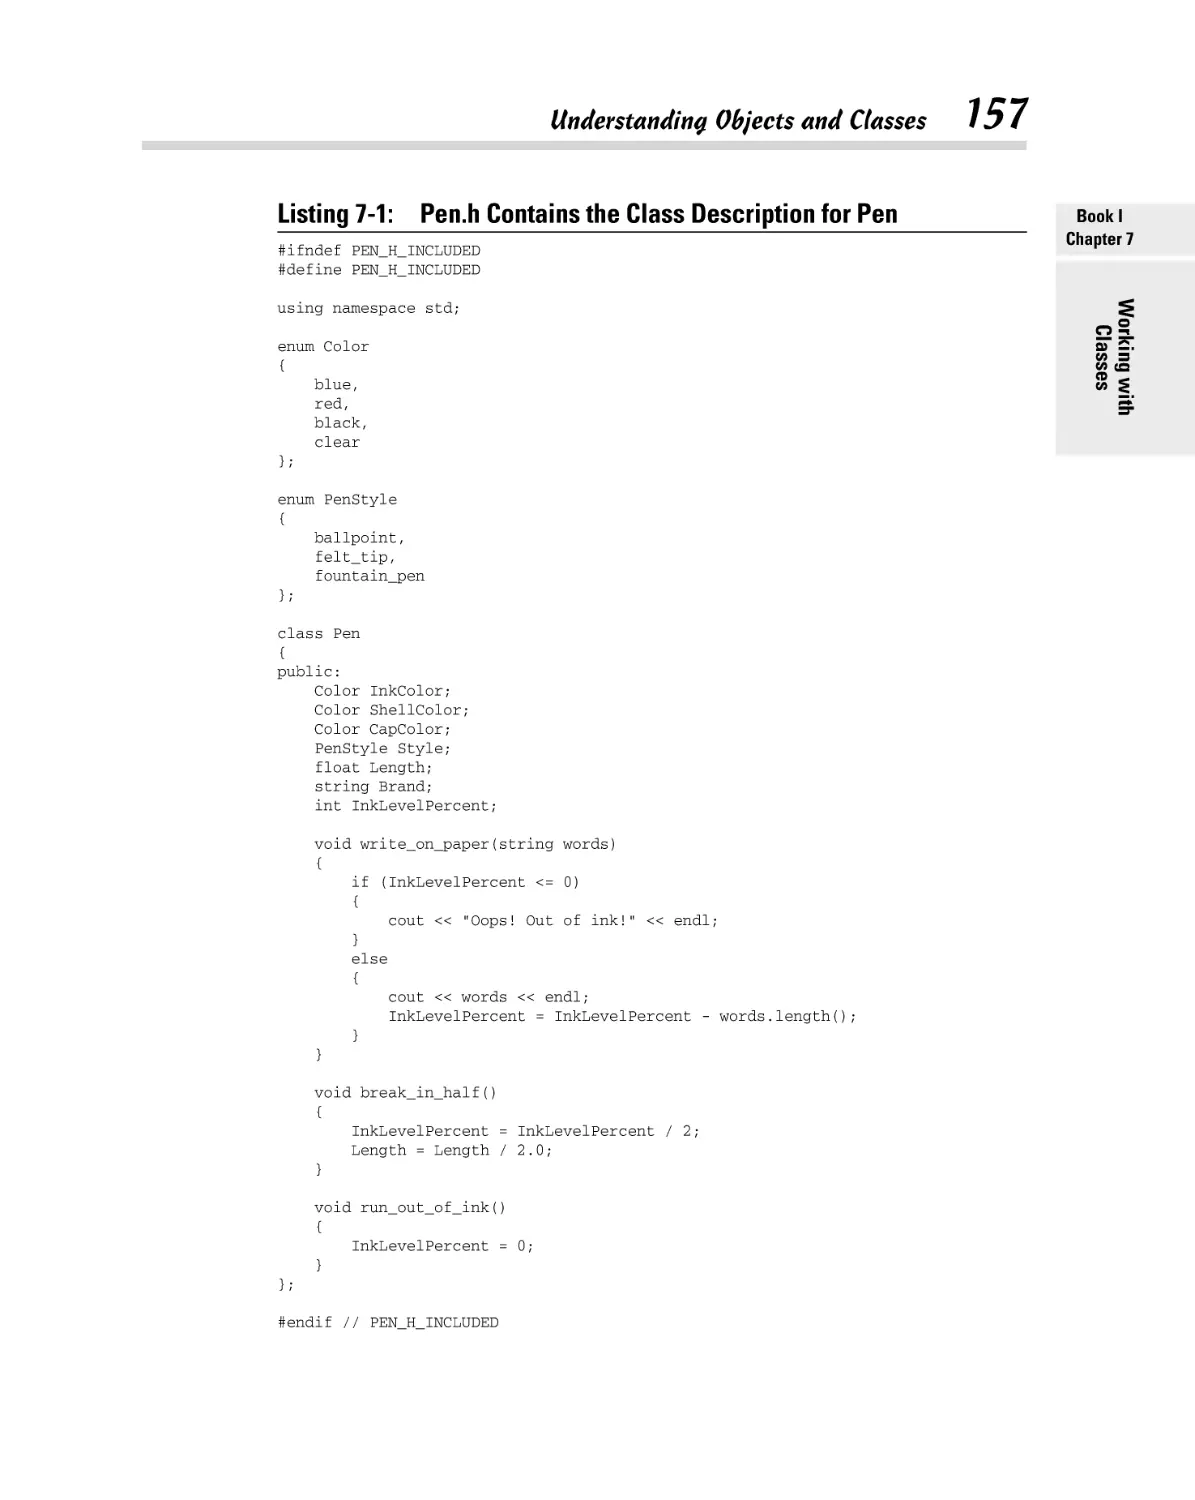
Chapter 7: Working with Classes . . . . . . . . . . . . . . . . . . . . . . . . . . . . . .151
Understanding Objects and Classes ......................................................... 151
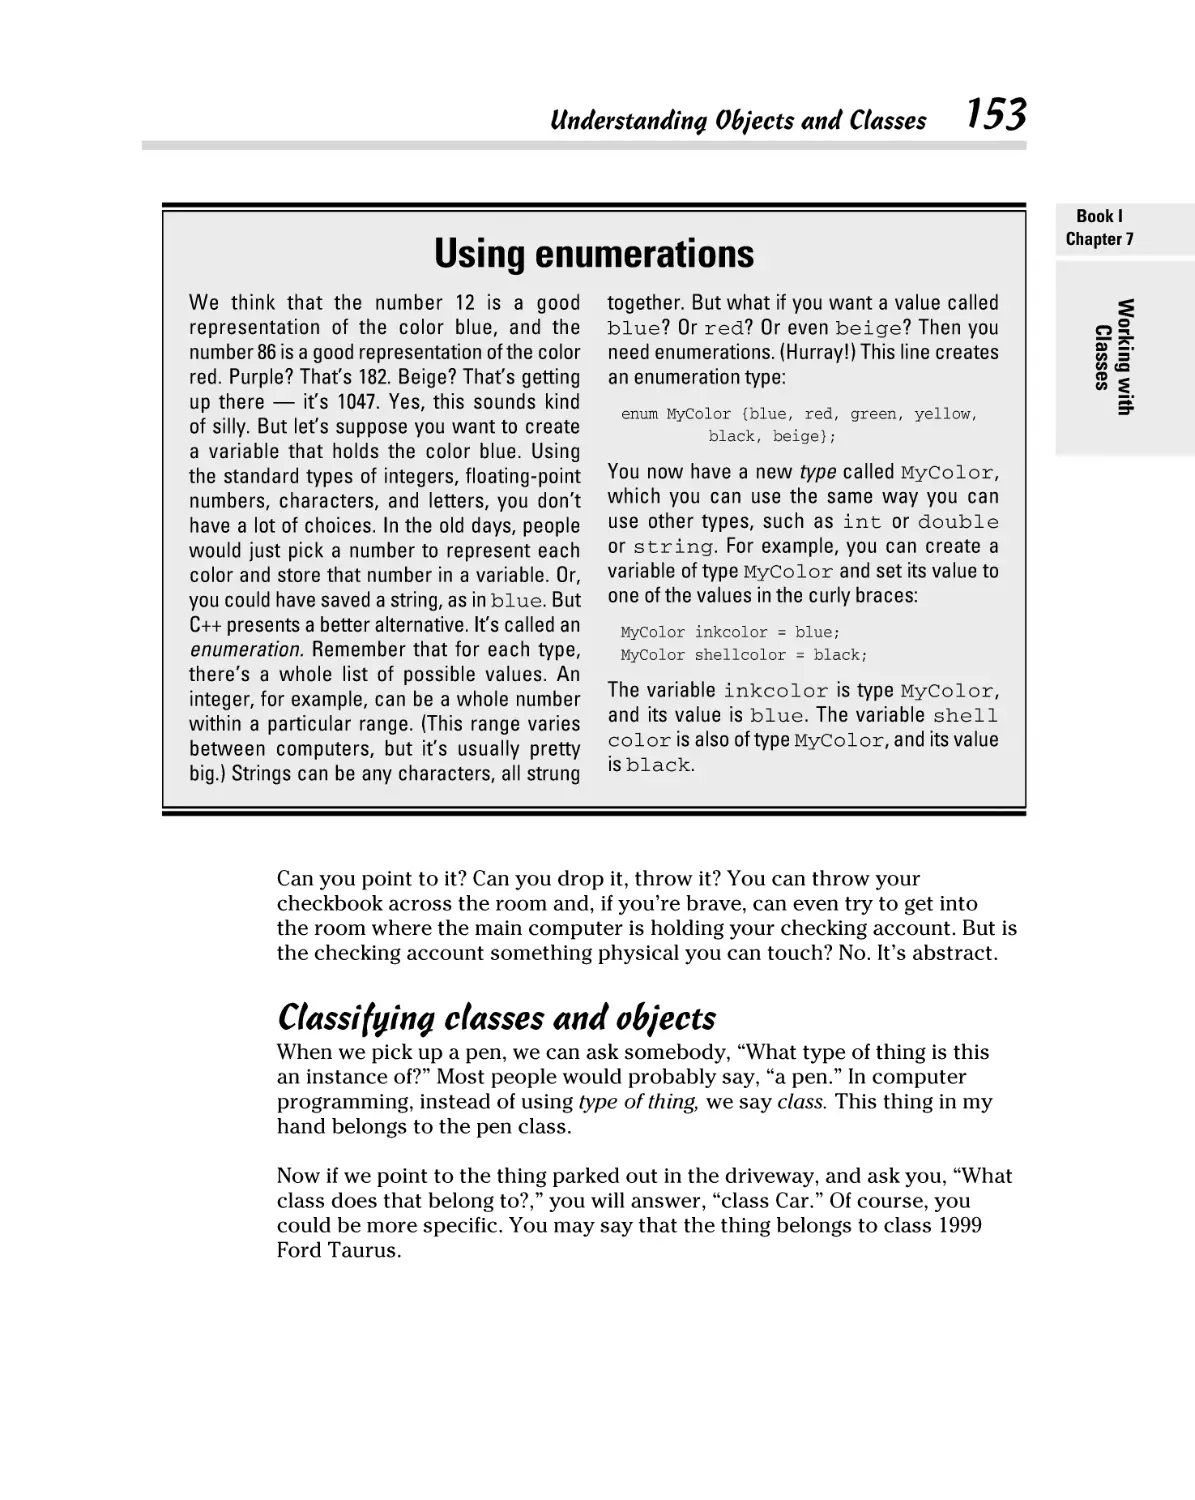
Classifying classes and objects ........................................................ 153
Describing member functions and data .......................................... 154
Implementing a class ......................................................................... 156
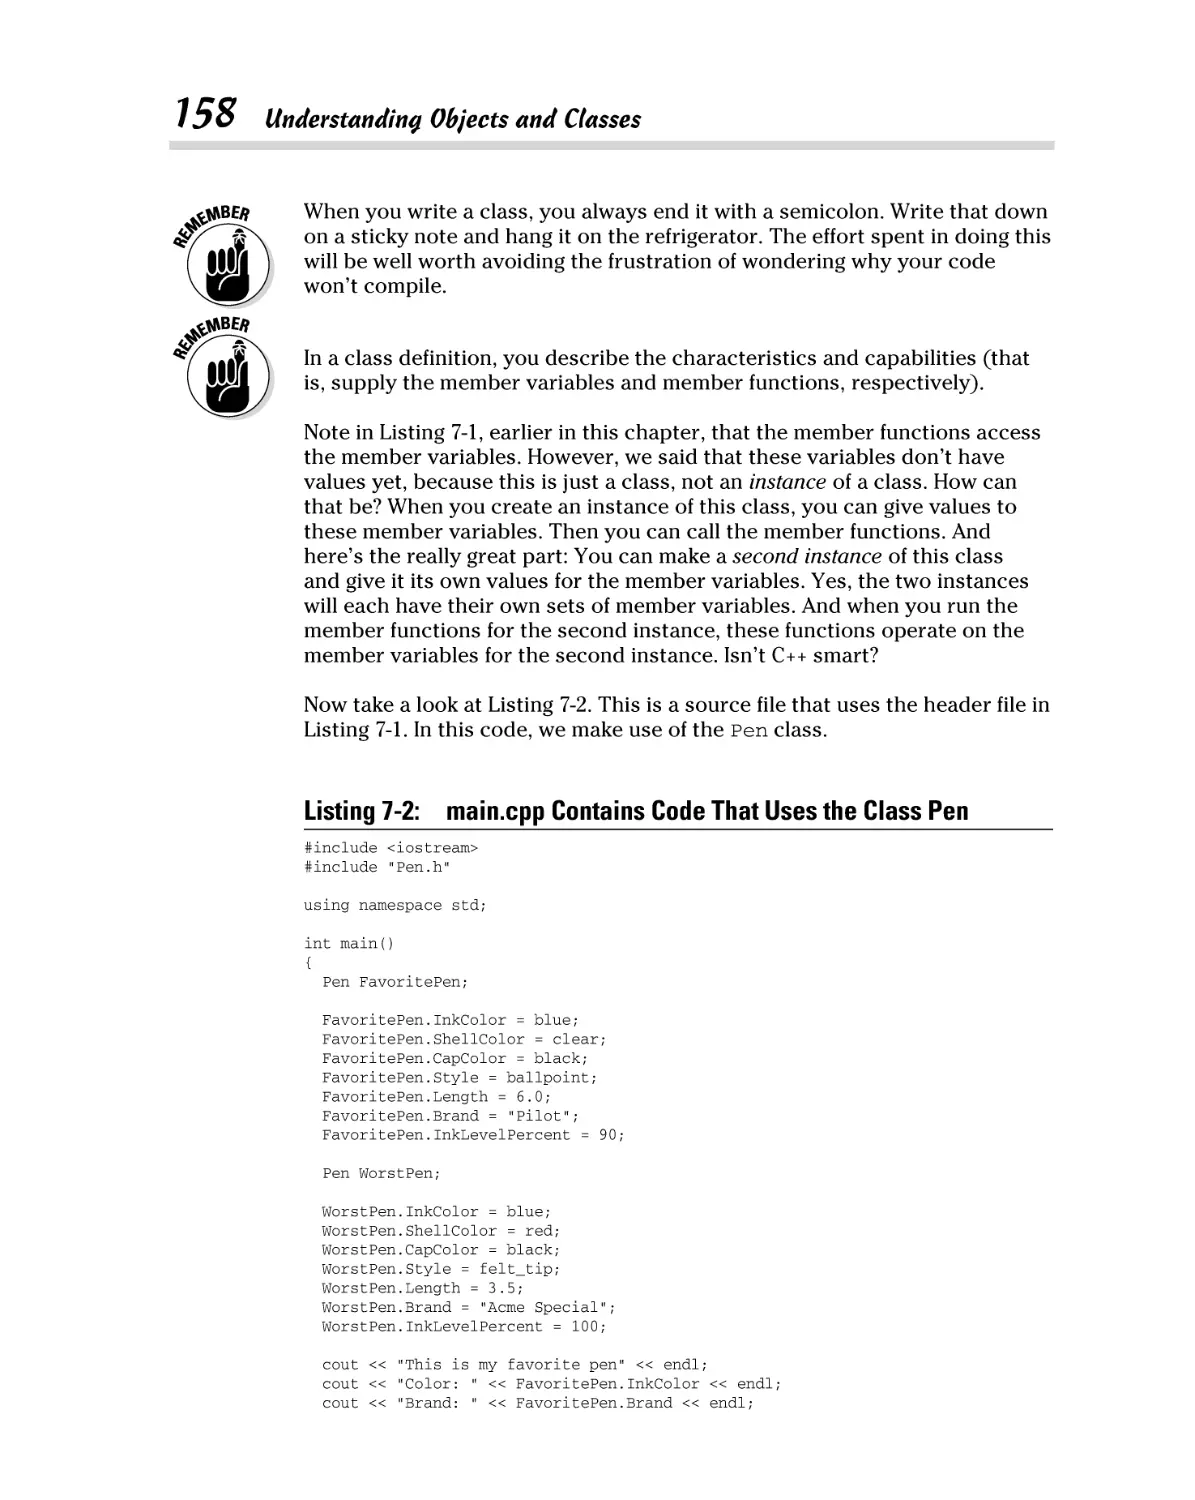
Separating member function code .................................................. 160
The parts of a class............................................................................ 163
Working with a Class ................................................................................... 164
Accessing members ........................................................................... 164
Using classes and pointers ............................................................... 167
Passing objects to functions............................................................. 170
Using const parameters in functions .............................................. 172
Using the this pointer ........................................................................ 173
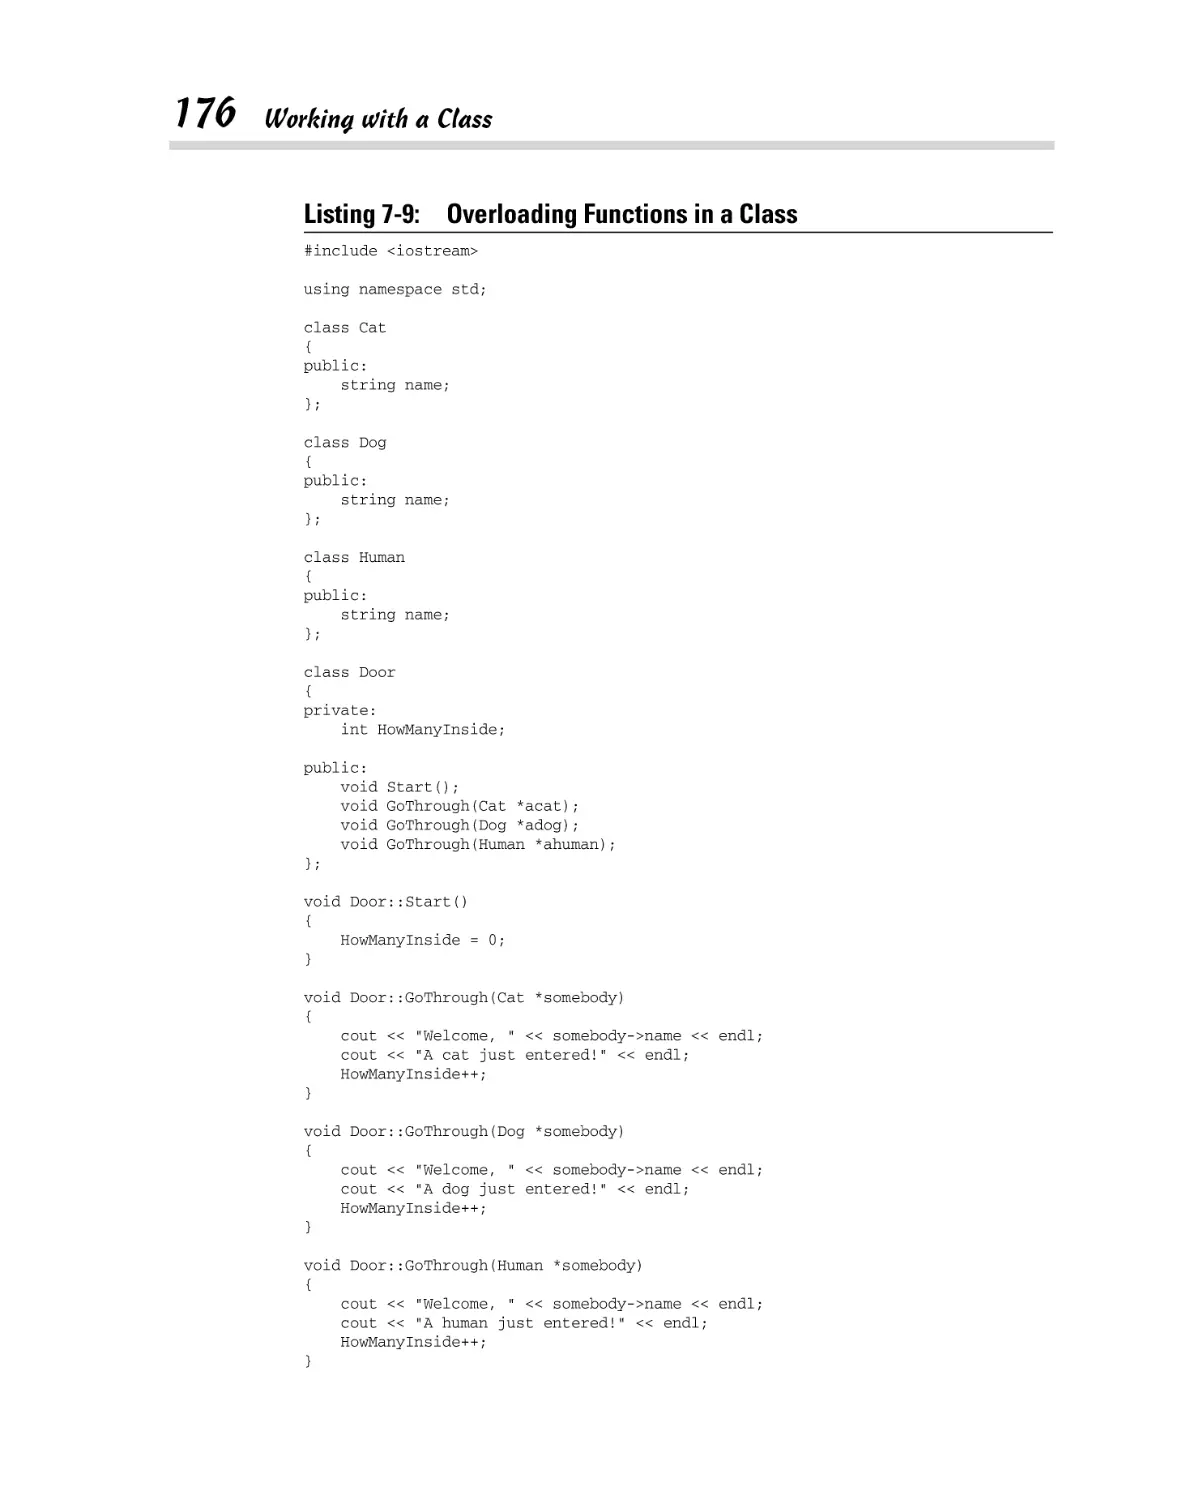
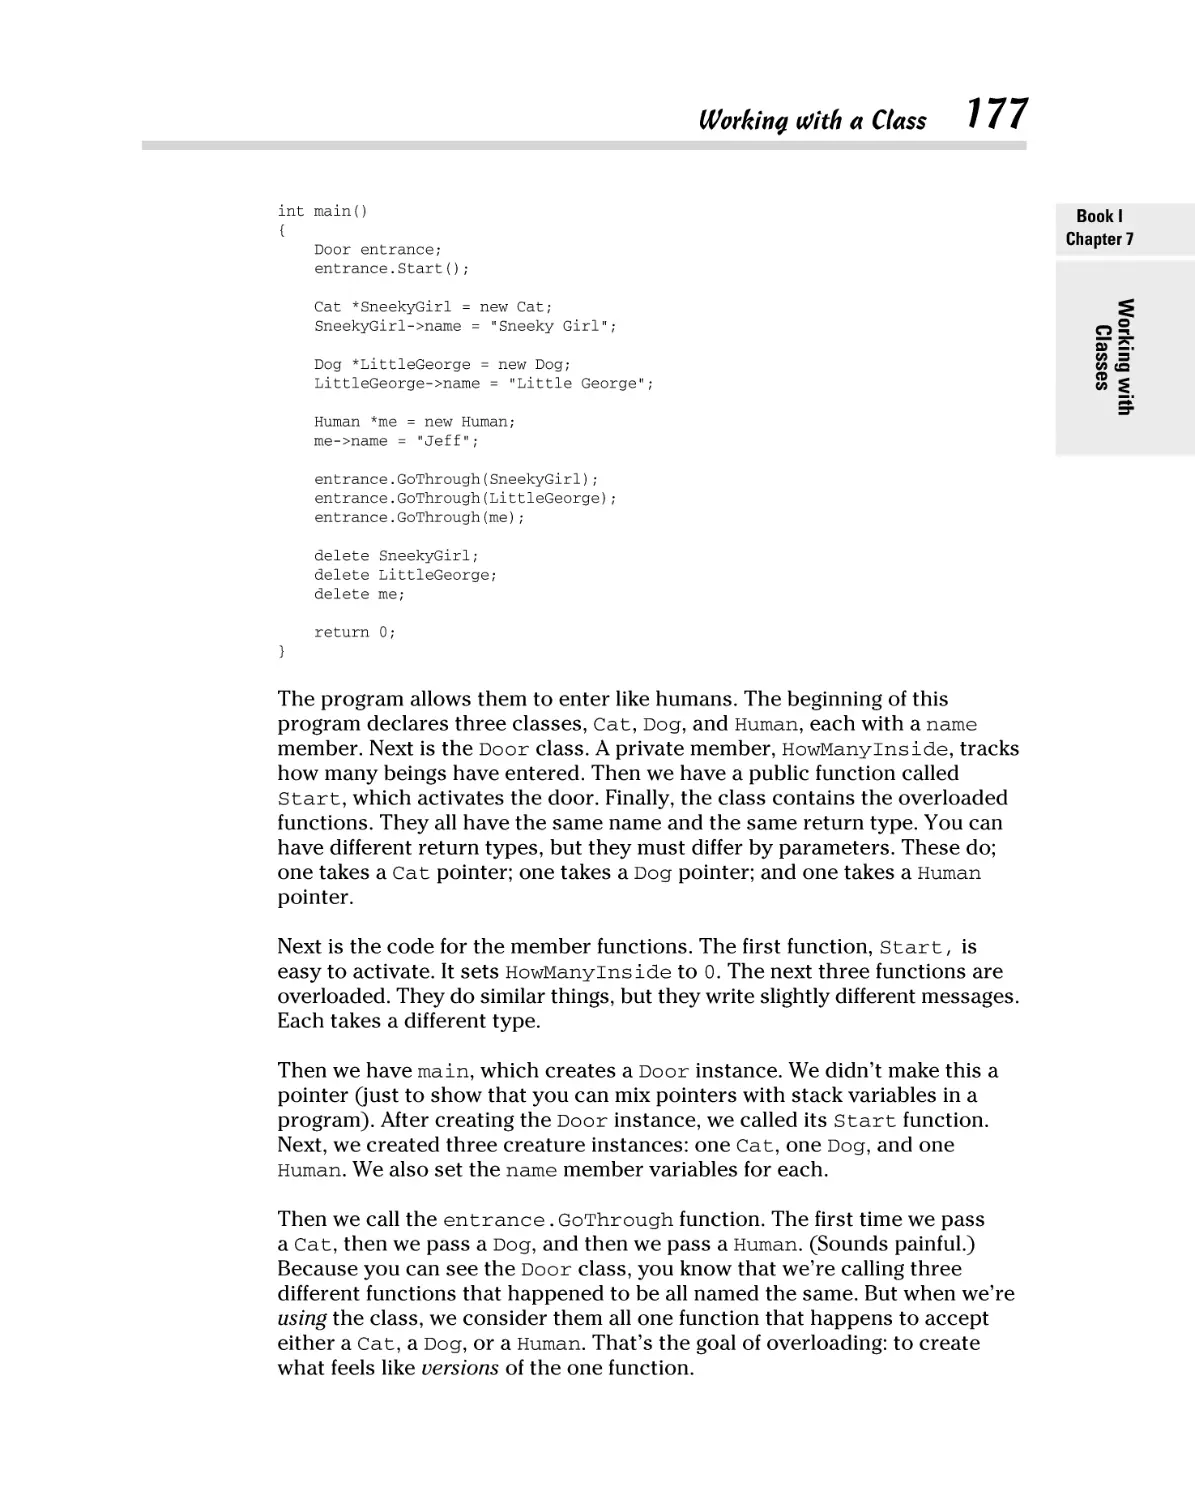
Overloading member functions ....................................................... 175
Starting and Ending with Constructors and Destructors ....................... 178
Starting with constructors ................................................................ 178
Ending with destructors ................................................................... 178
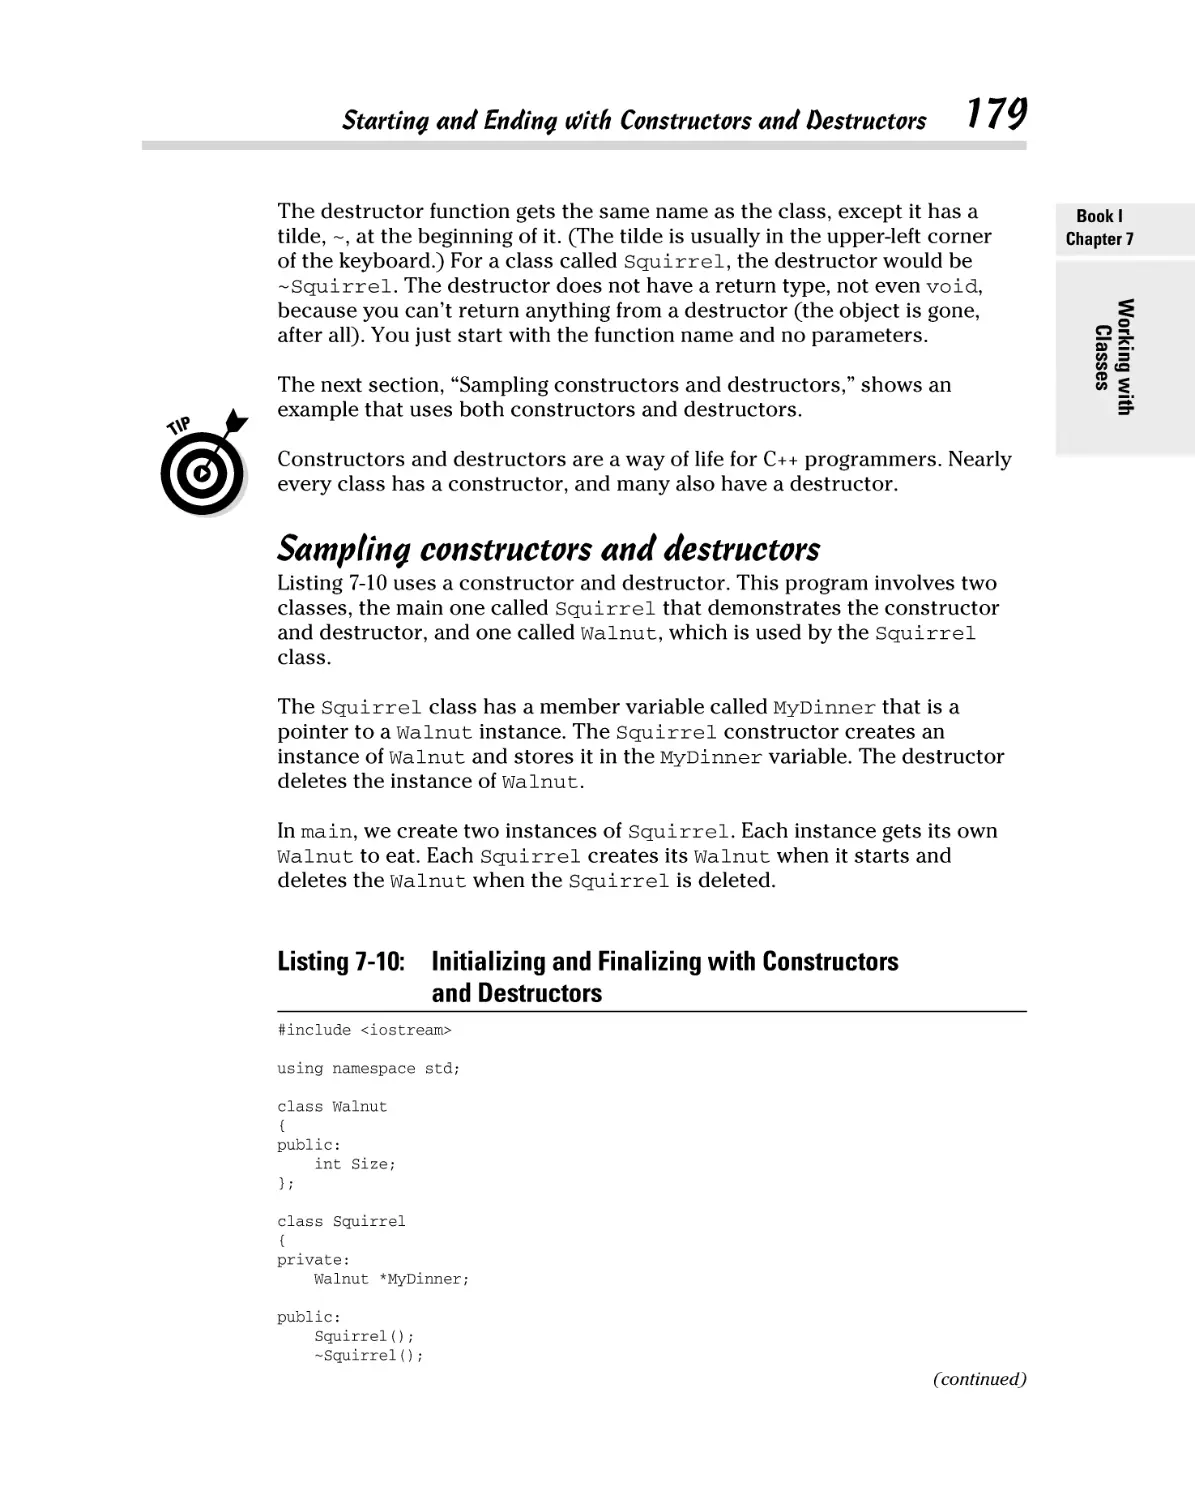
Sampling constructors and destructors ......................................... 179
Adding parameters to constructors ................................................ 181
xii
C++ All-in-One For Dummies, 2nd Edition
Building Hierarchies of Classes ................................................................. 182
Creating a hierarchy in C++ .............................................................. 183
Understanding types of inheritance ................................................ 184
Chapter 8: Using Advanced C++ Features . . . . . . . . . . . . . . . . . . . . . . .187
Filling Your Code with Comments ............................................................. 187
Converting Types ........................................................................................ 189
Reading from the Console .......................................................................... 195
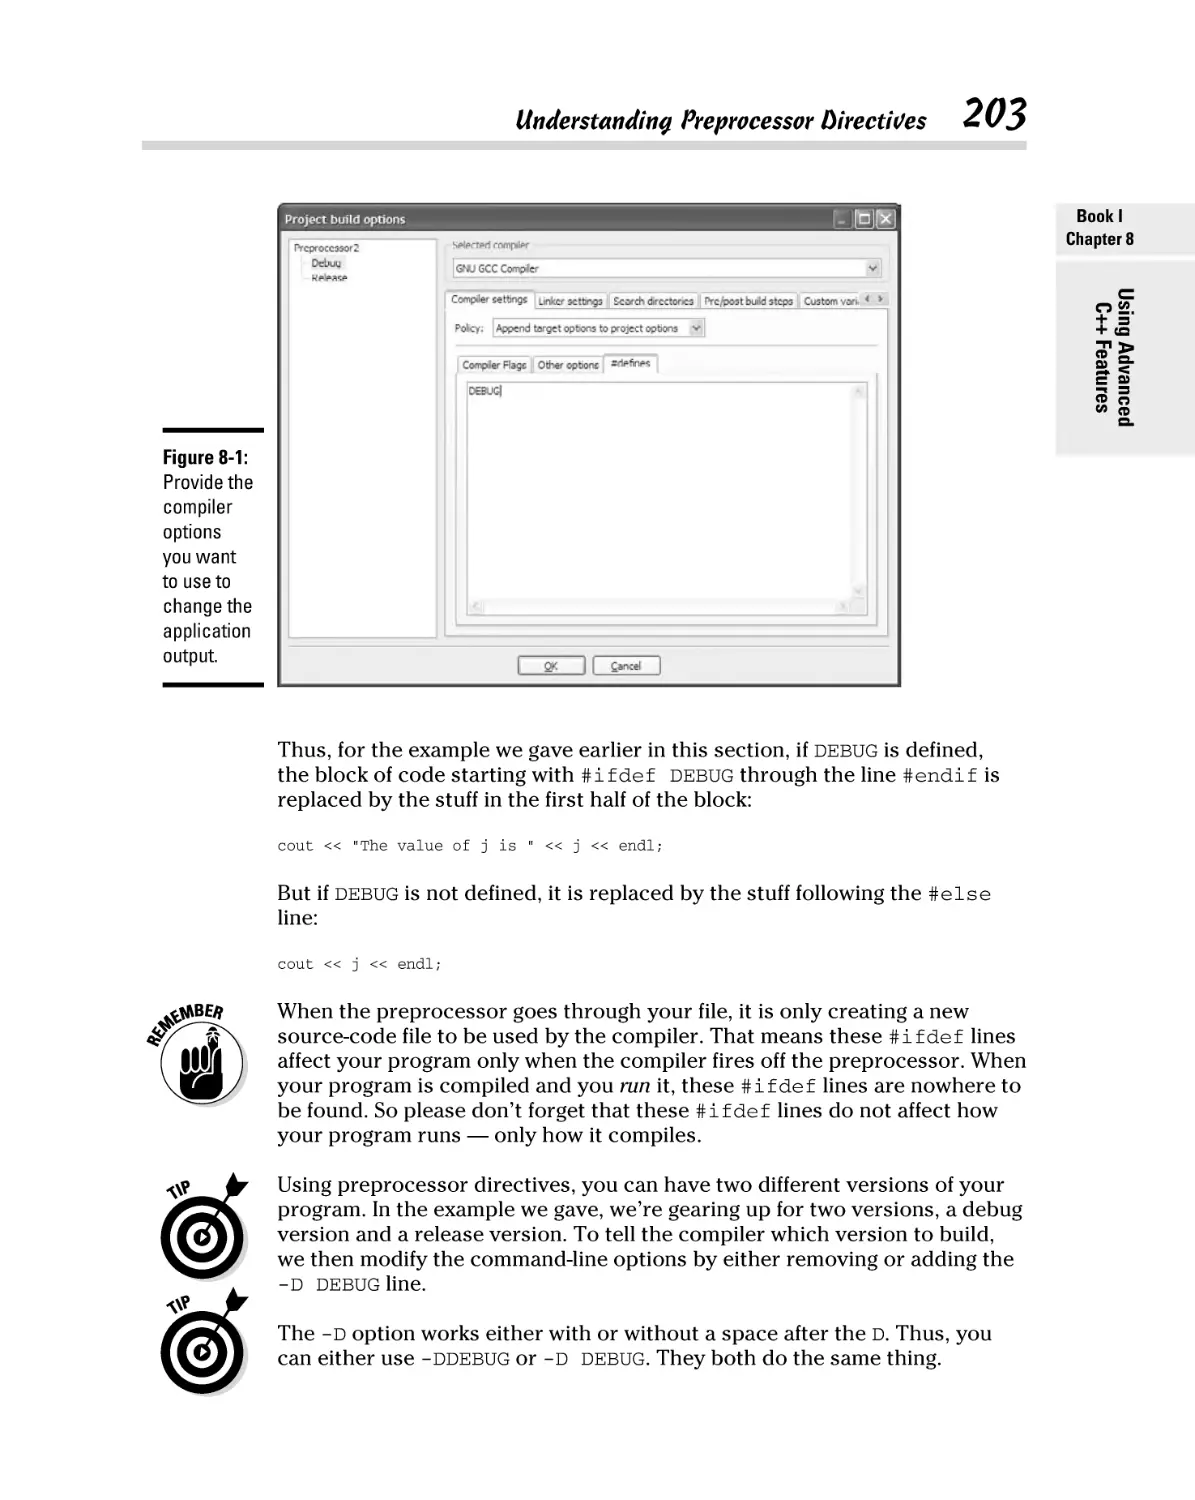
Understanding Preprocessor Directives .................................................. 199
Using Constants ........................................................................................... 207
Using Switch Statements ............................................................................ 209
Supercharging enums with Classes........................................................... 212
Working with Random Numbers ............................................................... 215
Storing Data in Arrays ................................................................................. 216
Declaring and accessing an array .................................................... 217
Arrays of pointers .............................................................................. 218
Passing arrays to functions .............................................................. 219
Adding and subtracting pointers ..................................................... 221
Book II: Understanding Objects and Classes ............... 223
Chapter 1: Planning and Building Objects. . . . . . . . . . . . . . . . . . . . . . .225
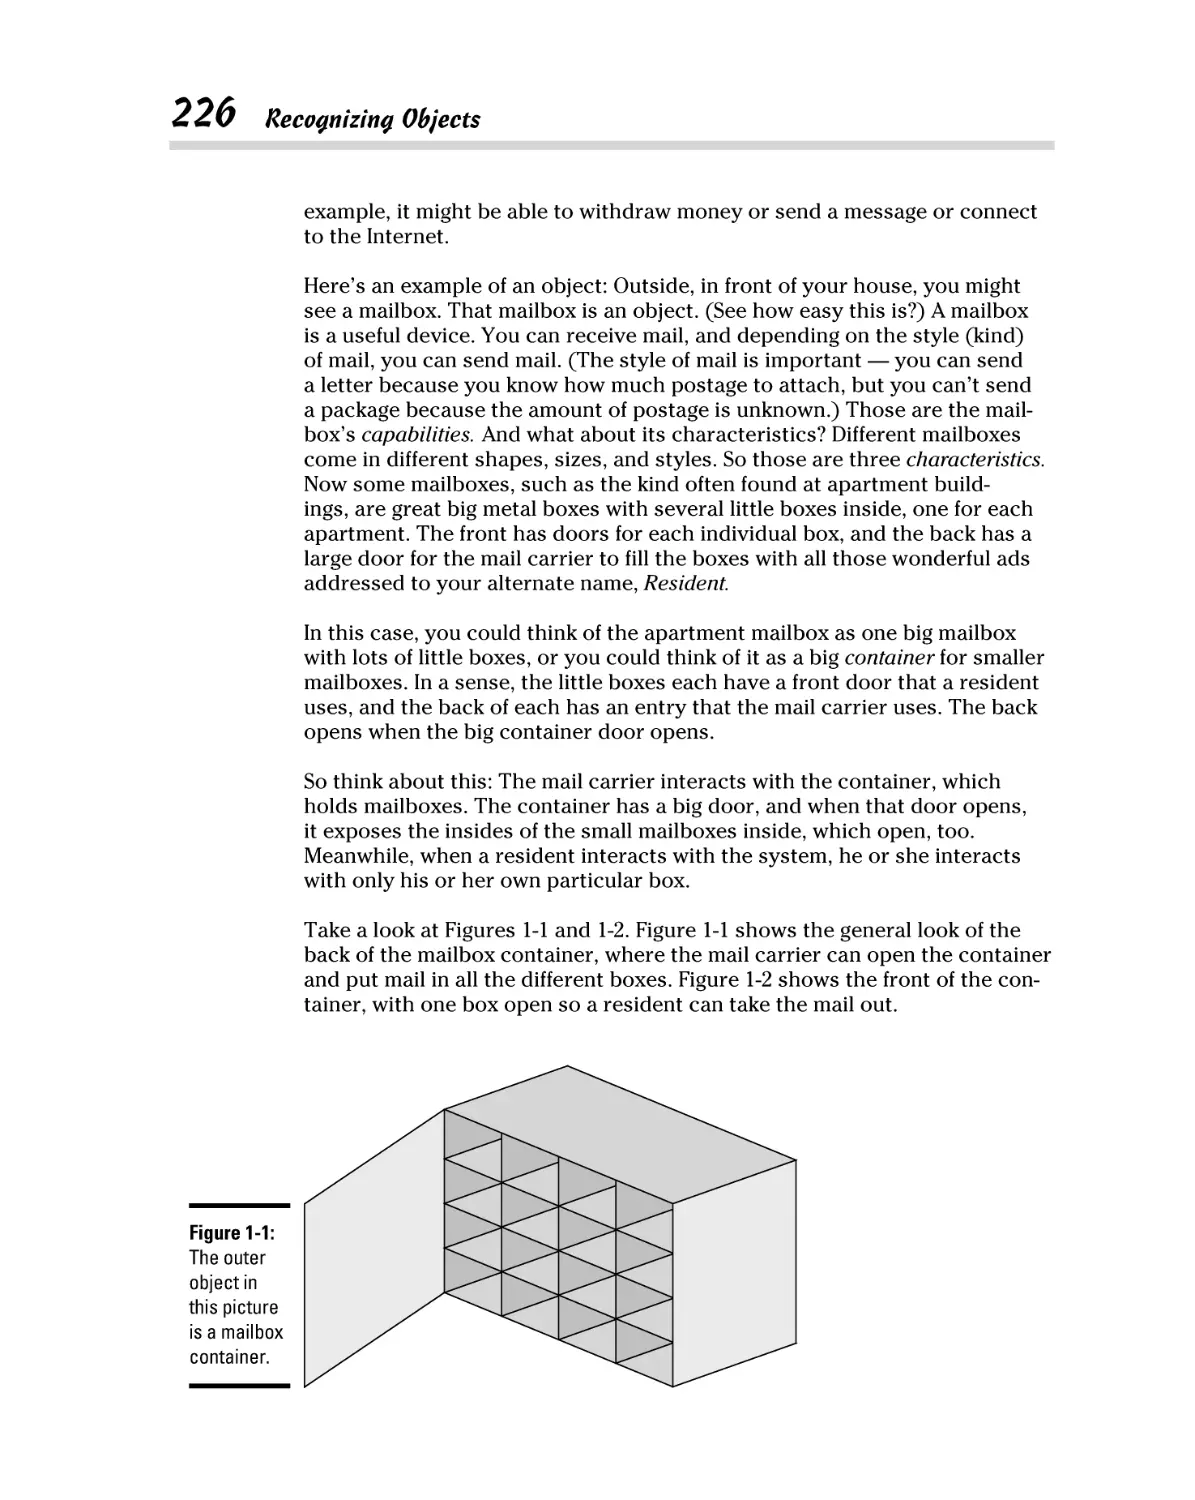
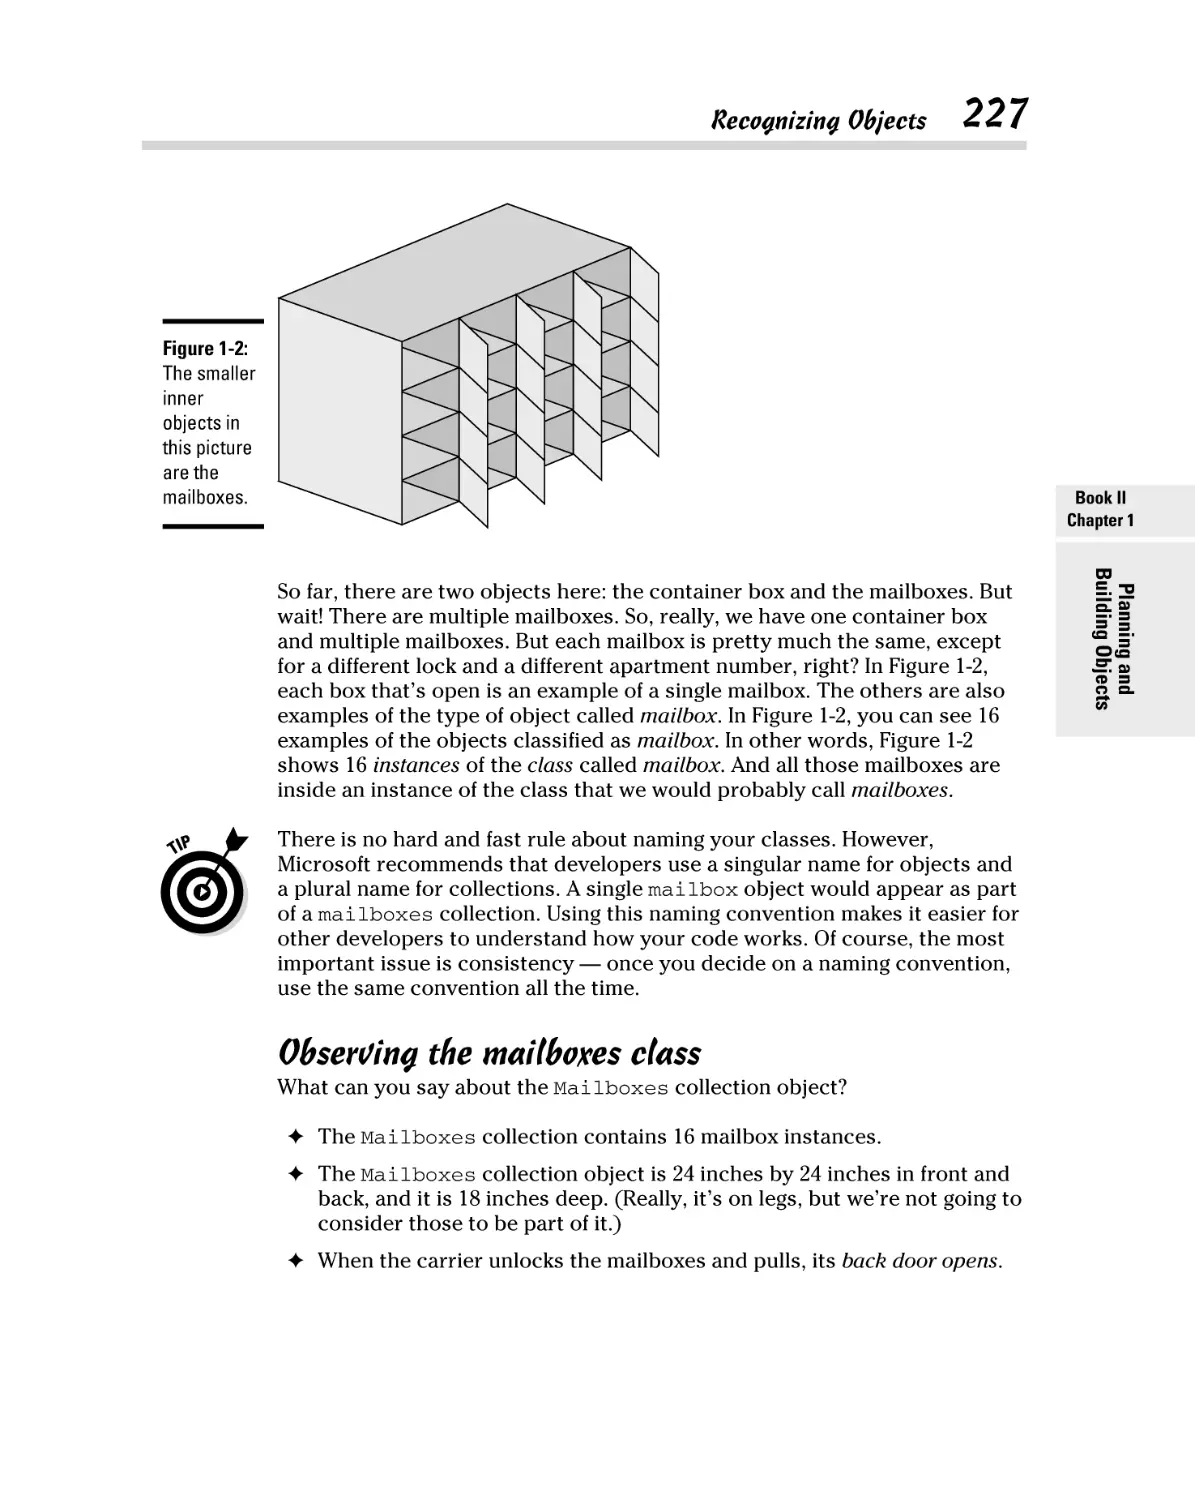
Recognizing Objects .................................................................................... 225
Observing the mailboxes class ........................................................ 227
Observing the mailbox class ............................................................ 229
Finding other objects ........................................................................ 230
Encapsulating Objects ................................................................................ 230
Building Hierarchies .................................................................................... 236
Establishing a hierarchy ................................................................... 236
Protecting members when inheriting.............................................. 238
Overriding member functions .......................................................... 243
Specializing with polymorphism...................................................... 245
Getting abstract about things .......................................................... 247
Discovering Classes..................................................................................... 248
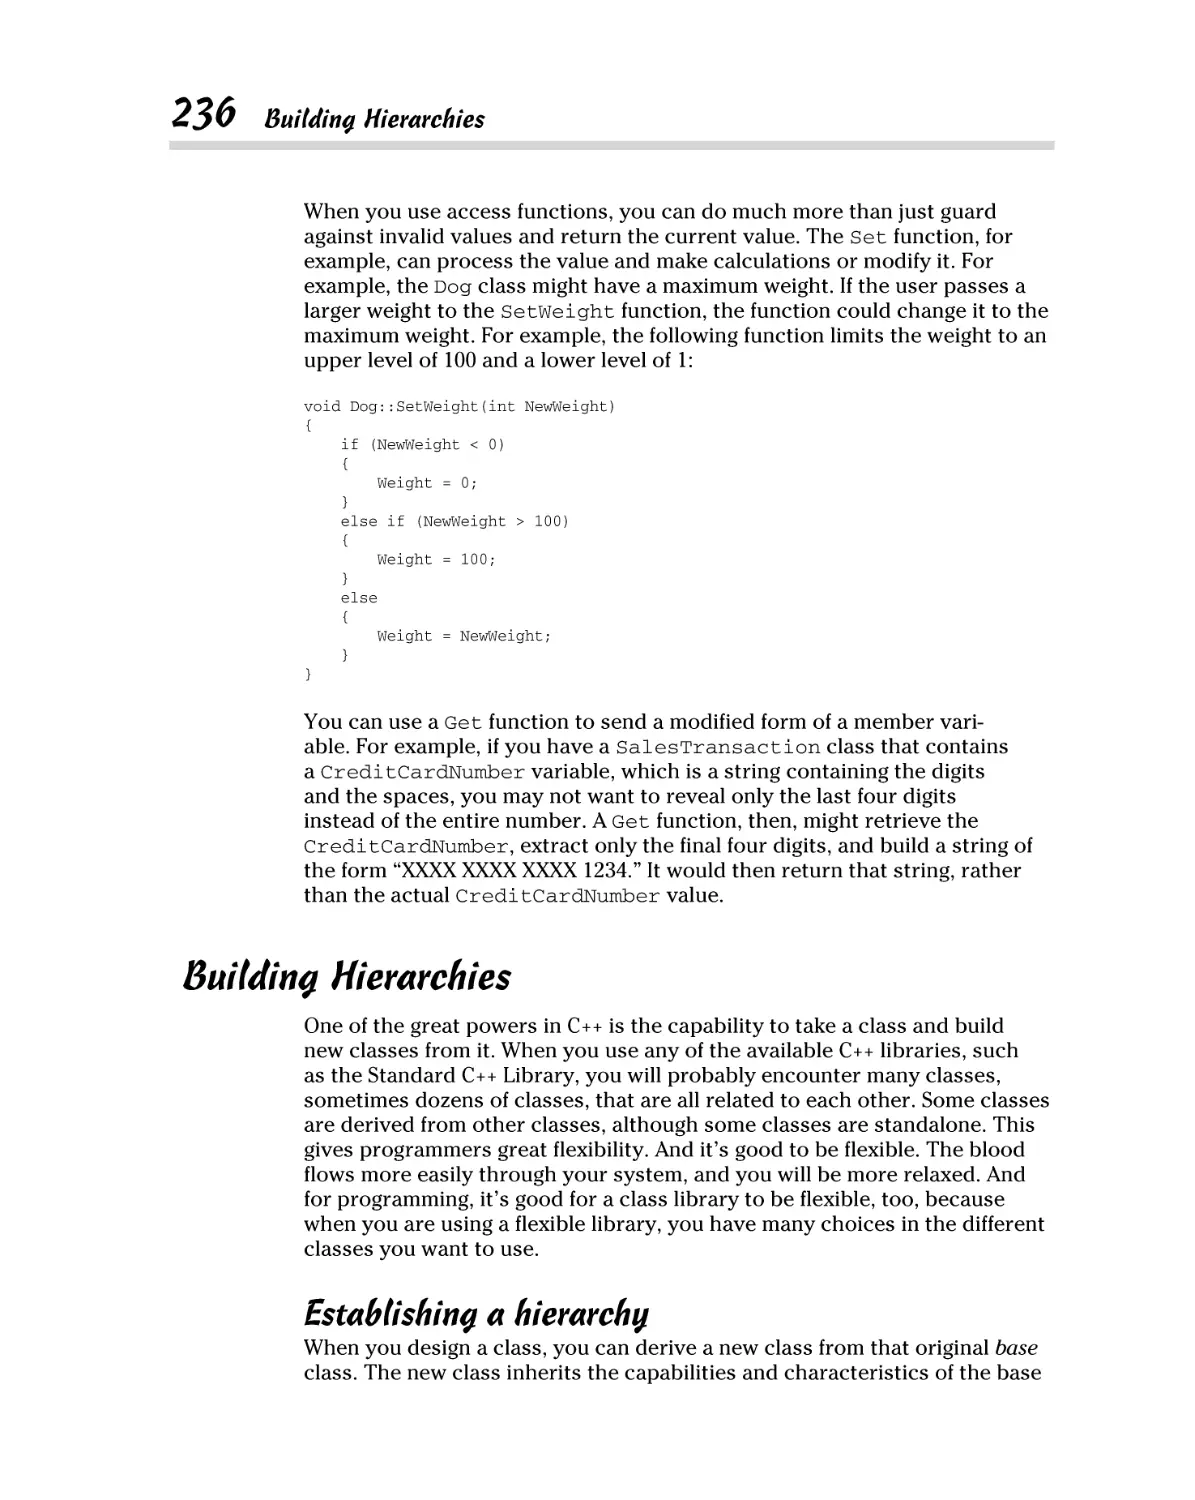
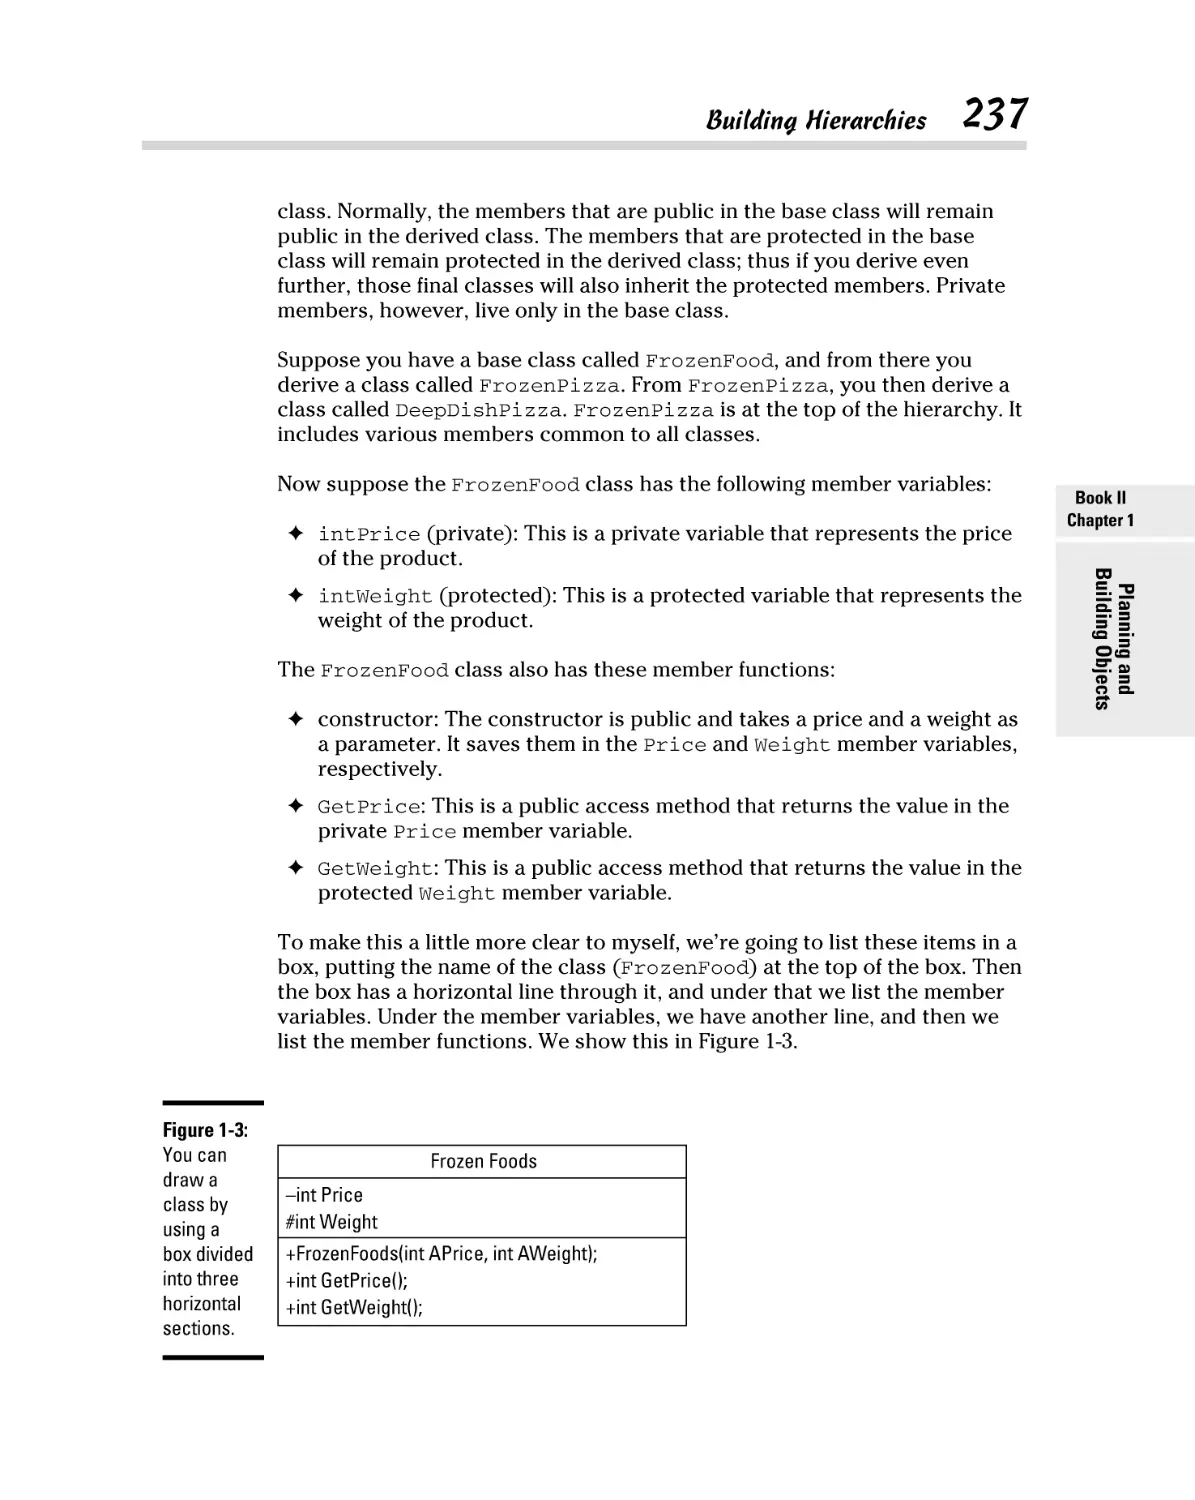
Engineering your software ................................................................ 249
Finding those pesky classes ............................................................. 252
Chapter 2: Describing Your Program with UML . . . . . . . . . . . . . . . . . .255
Moving Up to UML ....................................................................................... 255
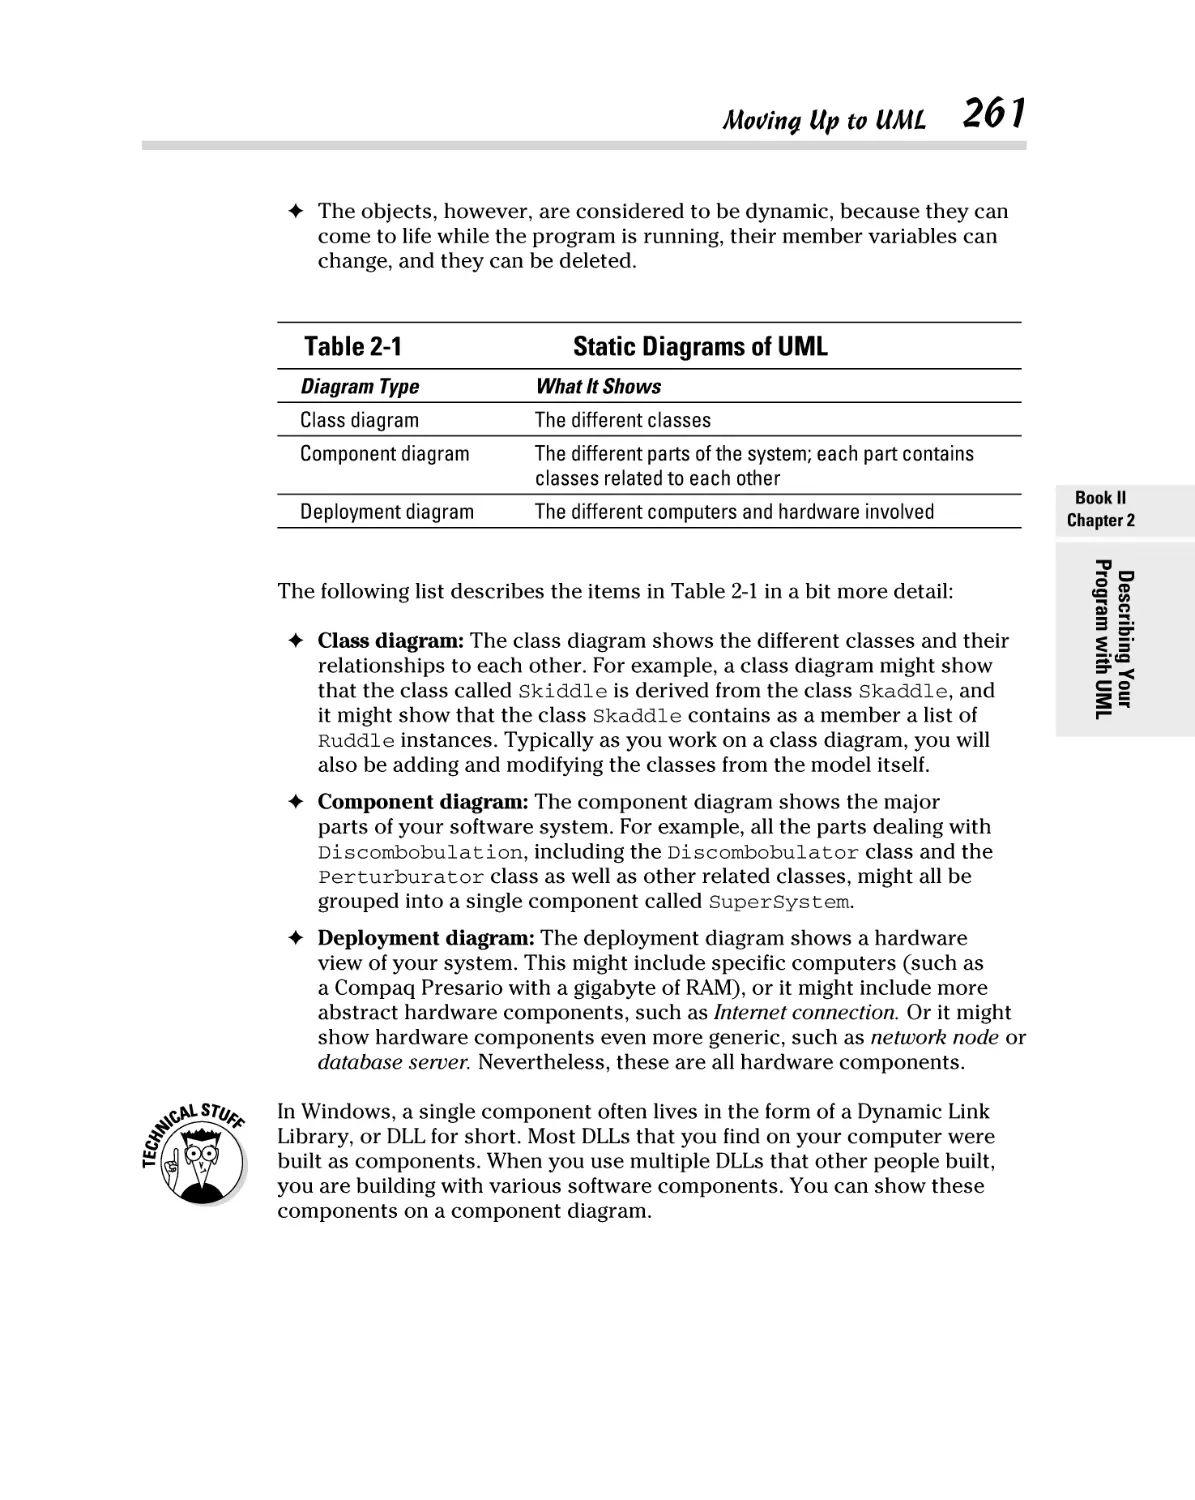
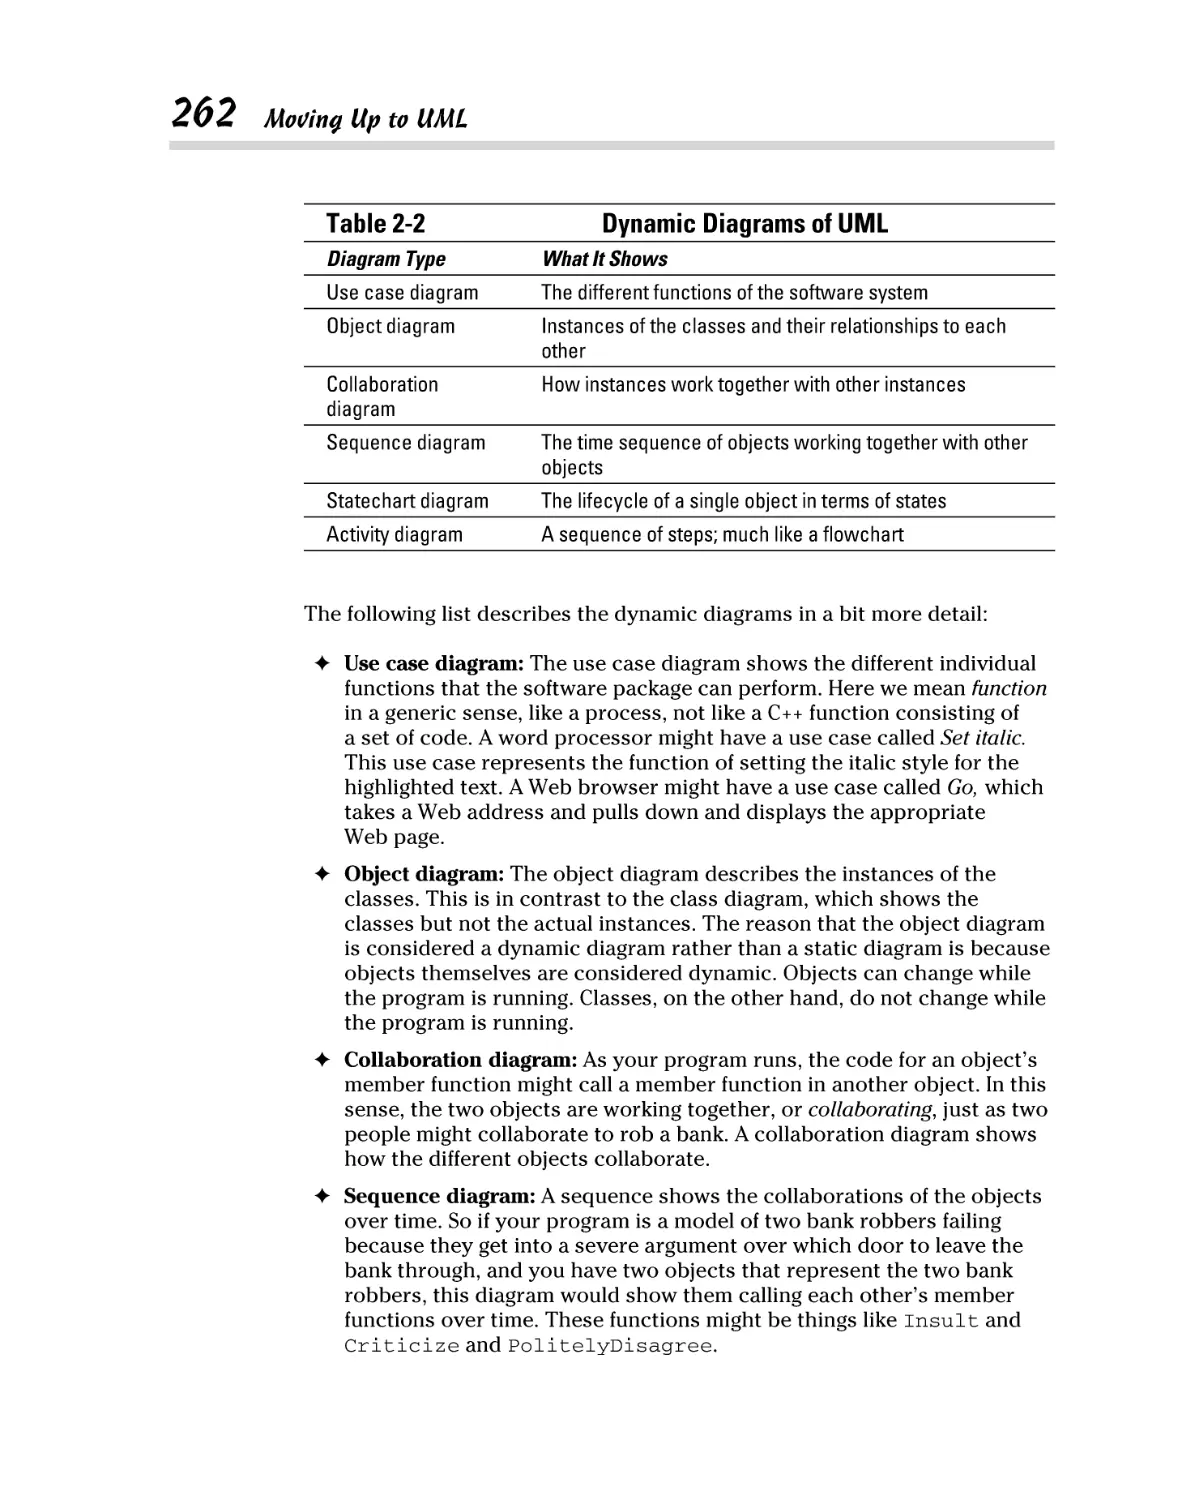
Modeling with UML ............................................................................ 259
Diagramming and designing with UML ........................................... 259
Building with UML and the Unified Process ............................................. 264
Speaking iteratively ........................................................................... 266
Phasing in and out ............................................................................. 267
Table of Contents
xiii
The inception phase .......................................................................... 269
The elaboration phase ...................................................................... 270
The construction phase .................................................................... 271
The transition phase ......................................................................... 272
Moving Forward with UML ......................................................................... 273
Chapter 3: Structuring Your Classes with UML . . . . . . . . . . . . . . . . . .275
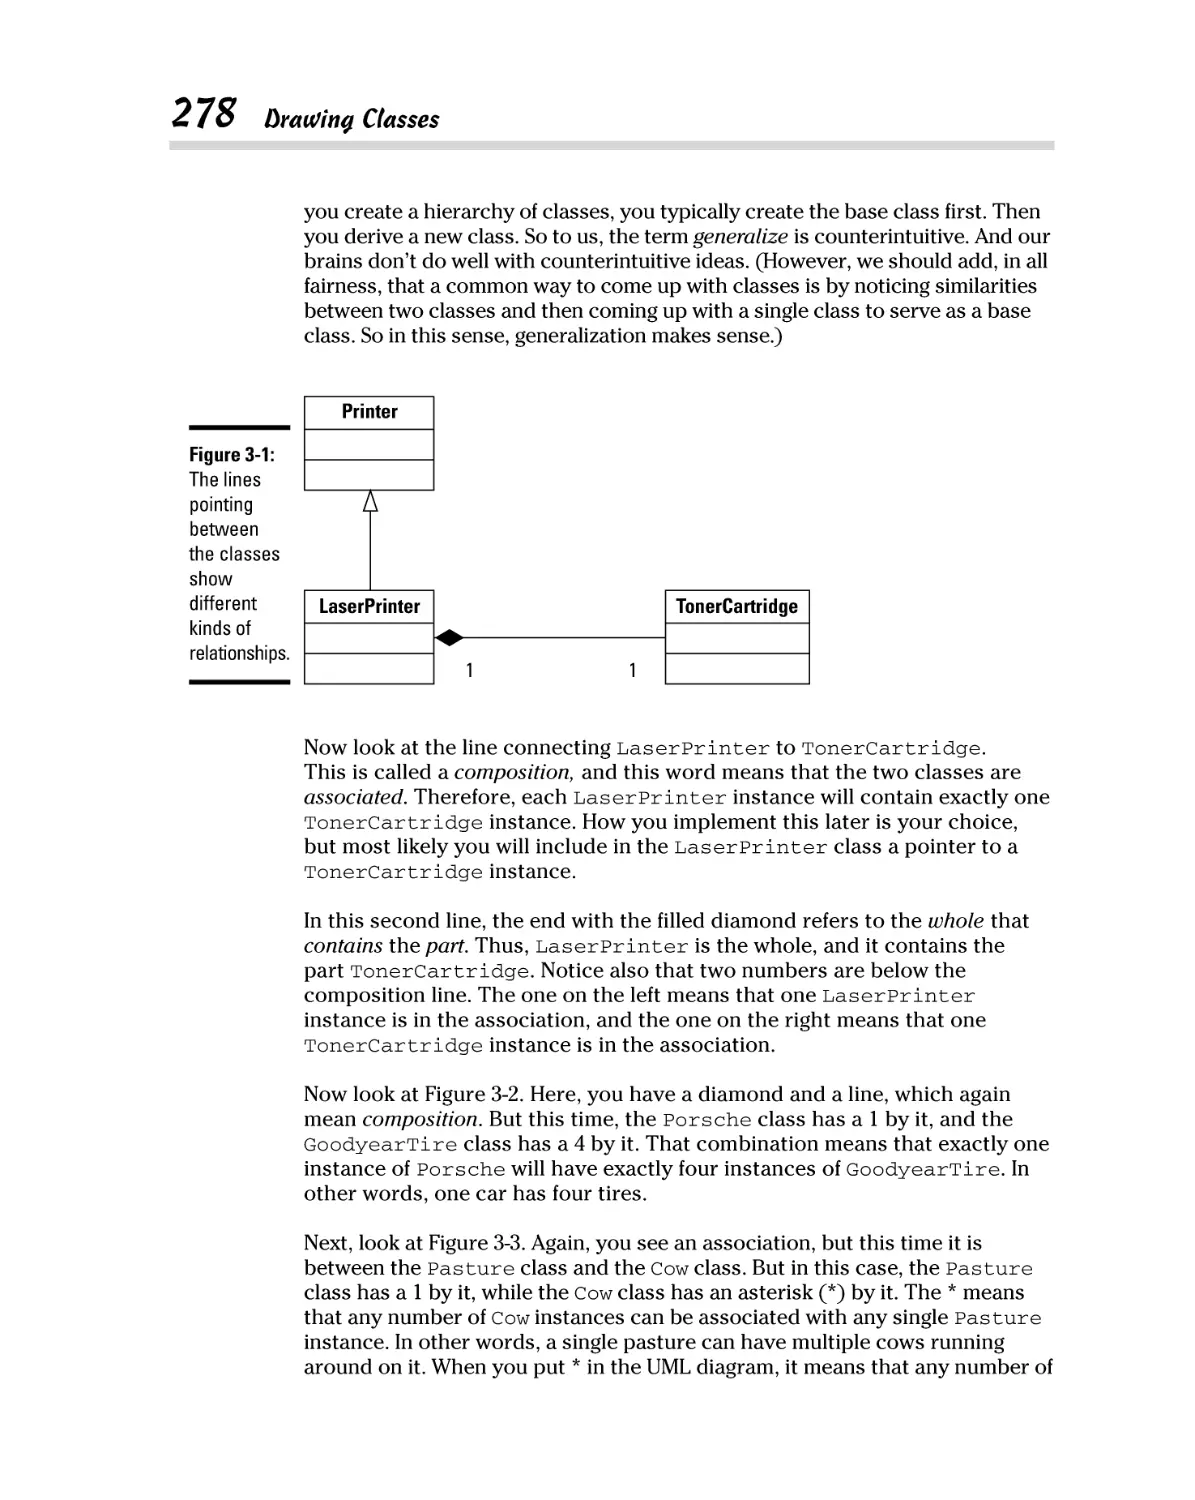
Drawing Classes ........................................................................................... 276
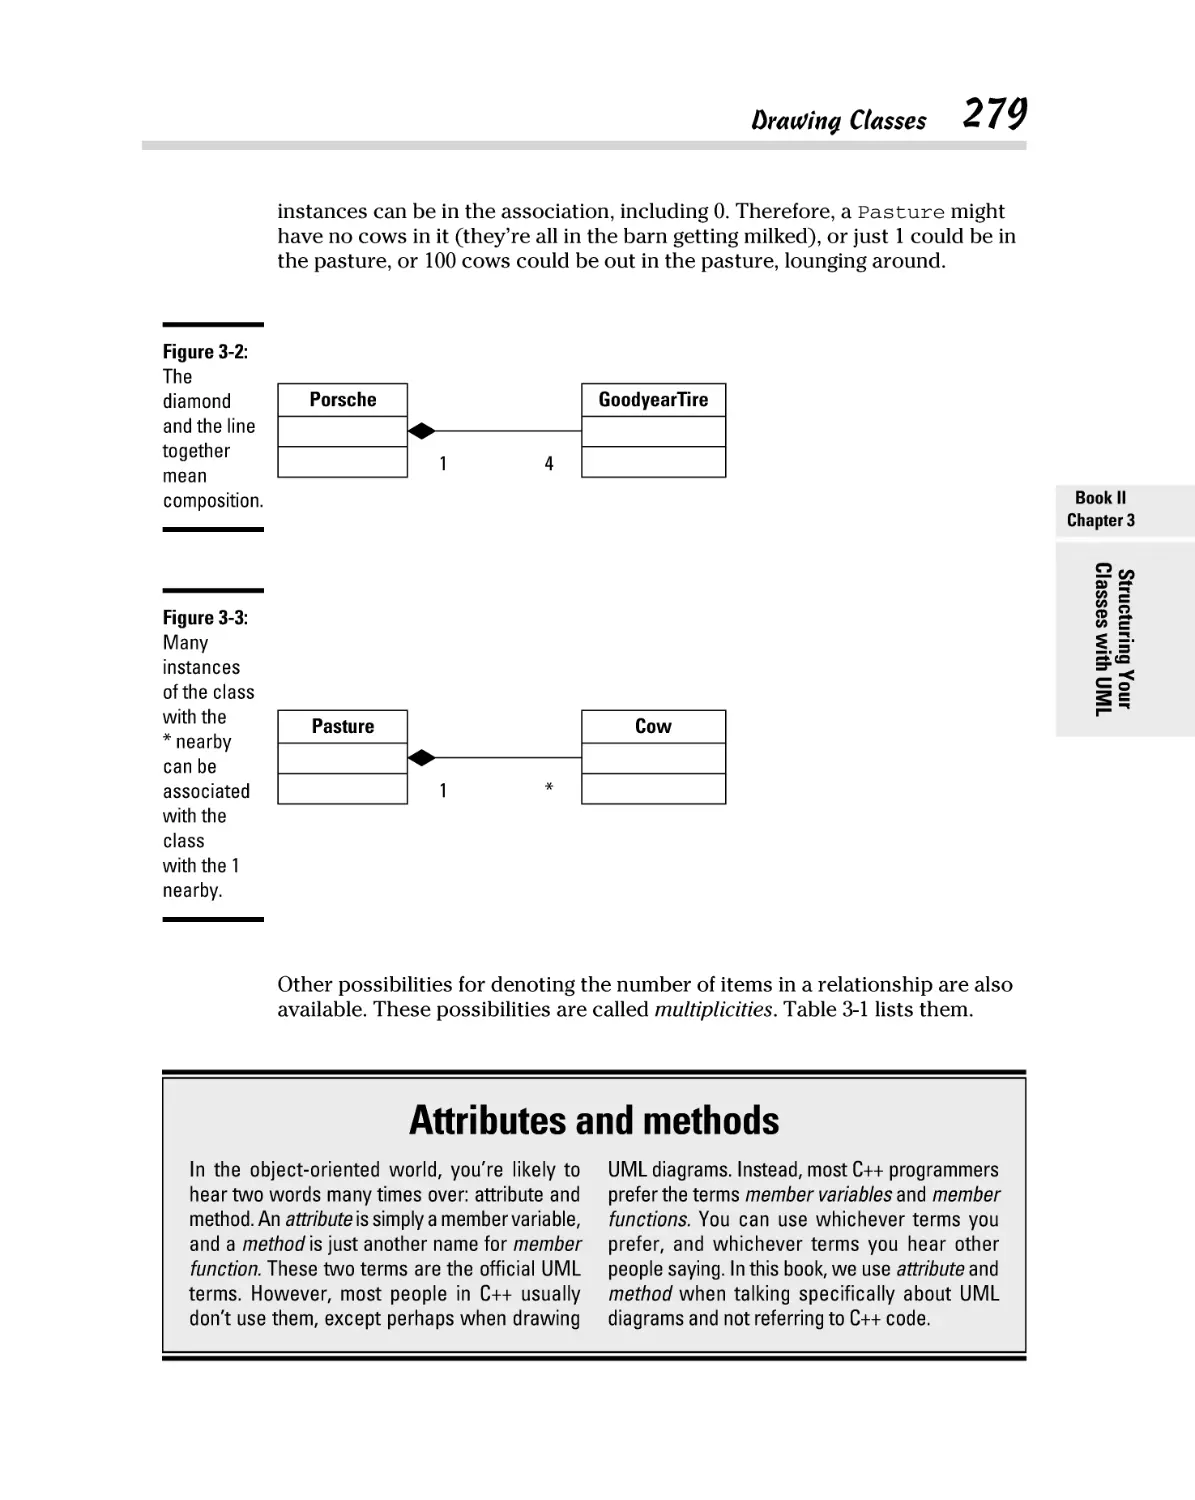
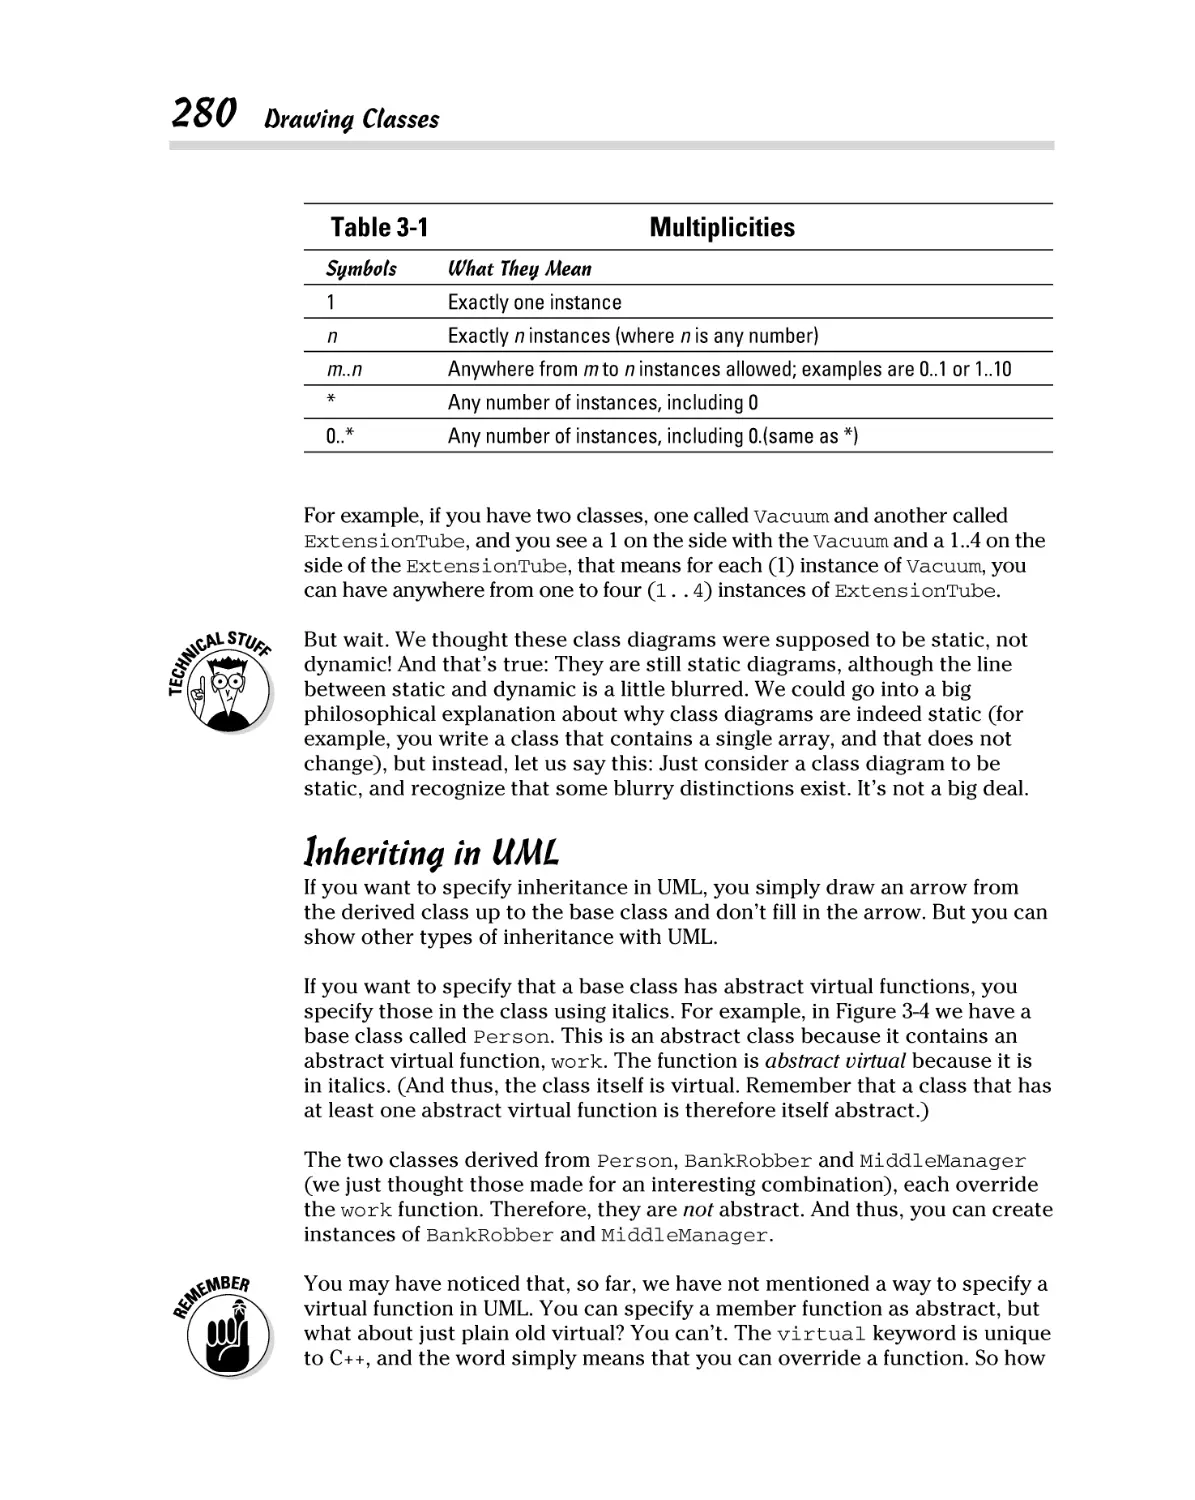
Mapping classes with UML ............................................................... 277
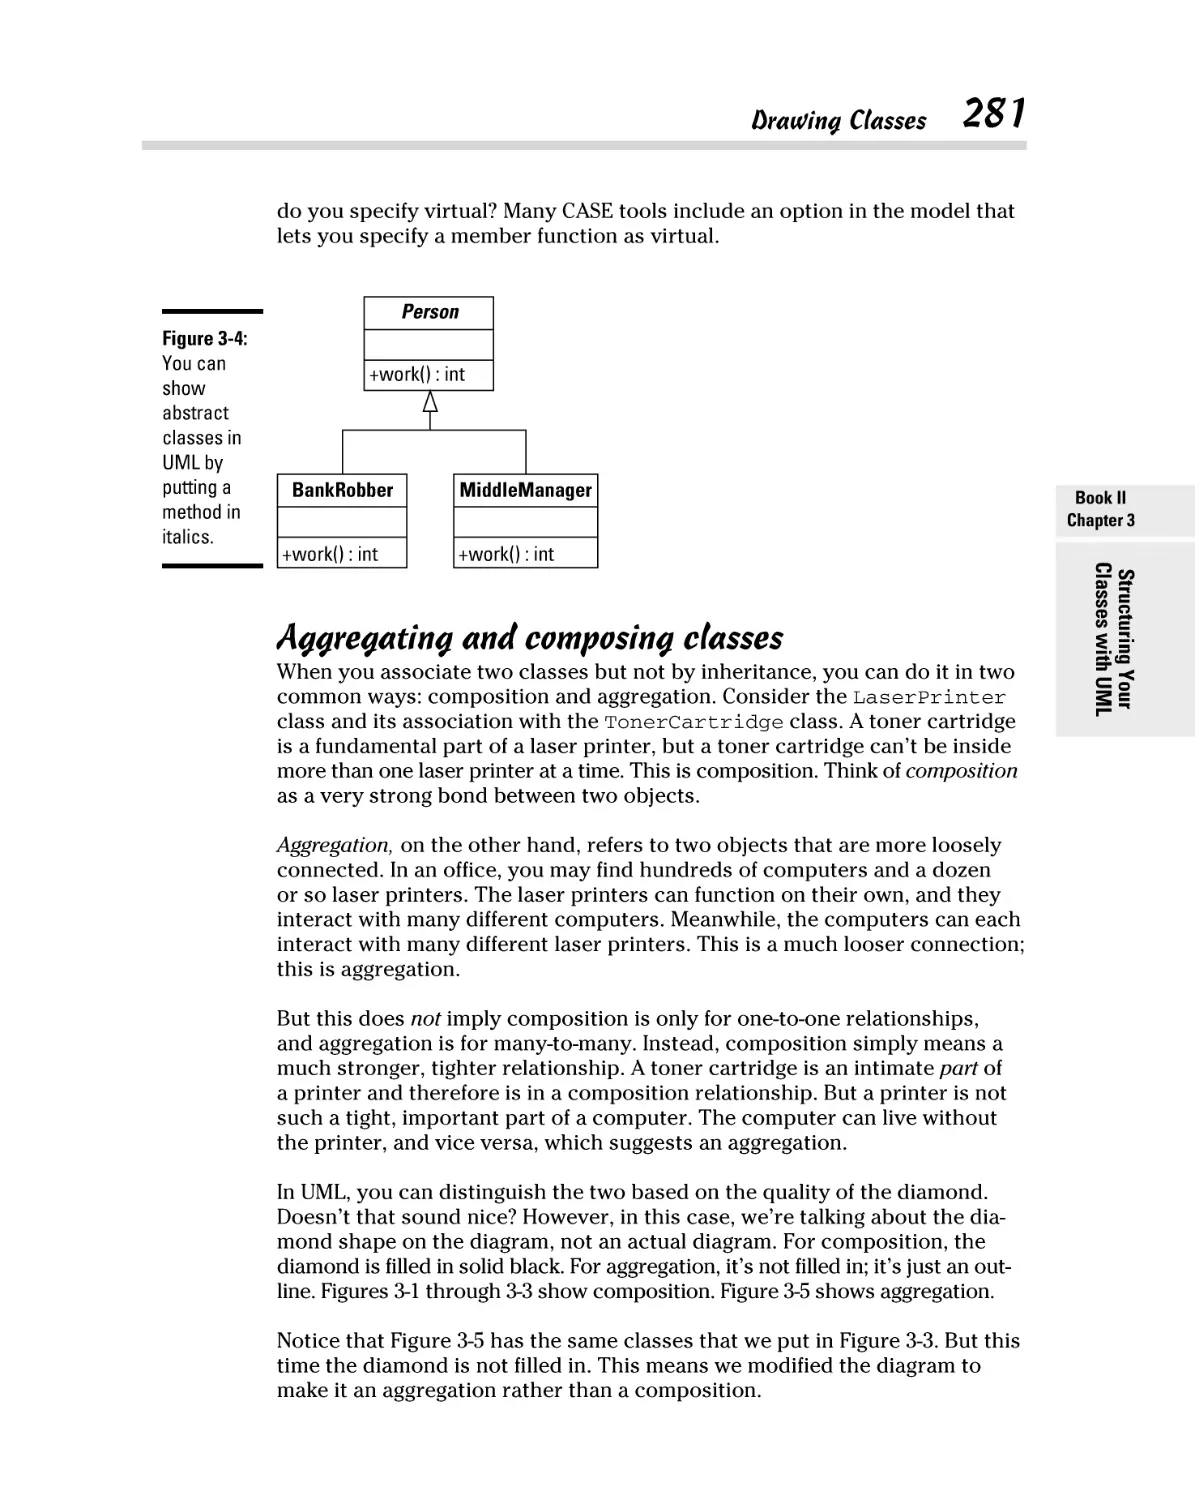
Inheriting in UML ............................................................................... 280
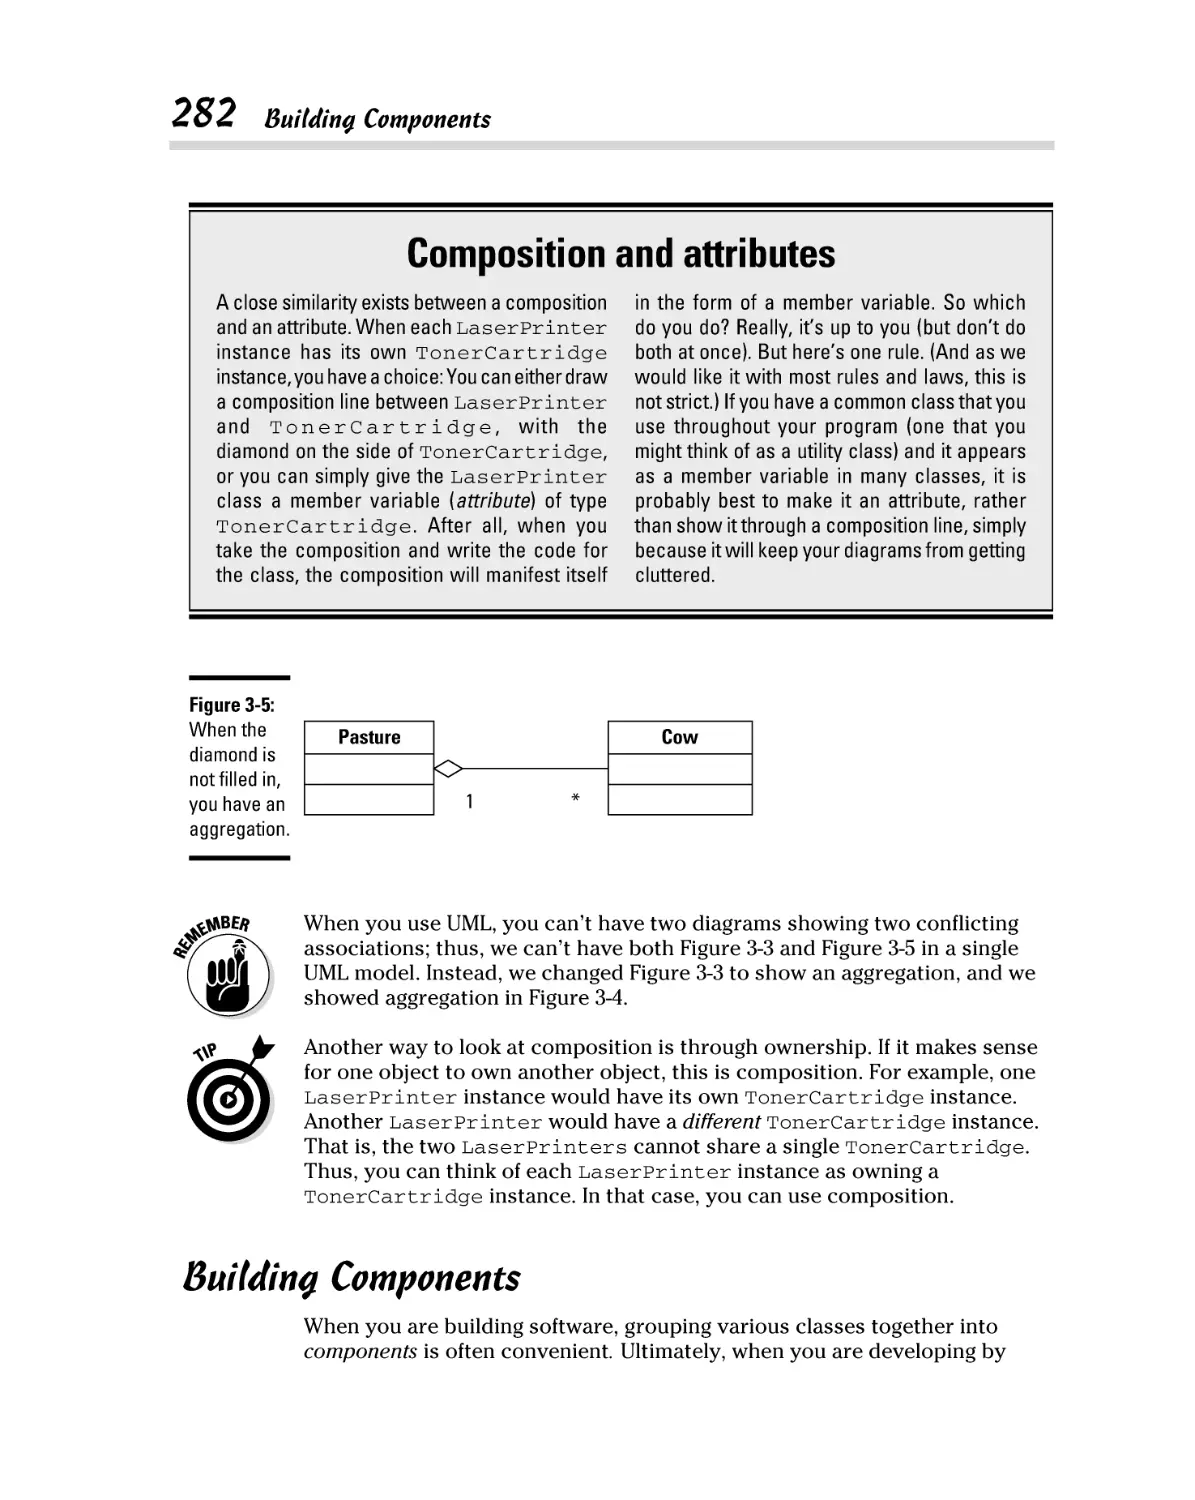
Aggregating and composing classes ............................................... 281
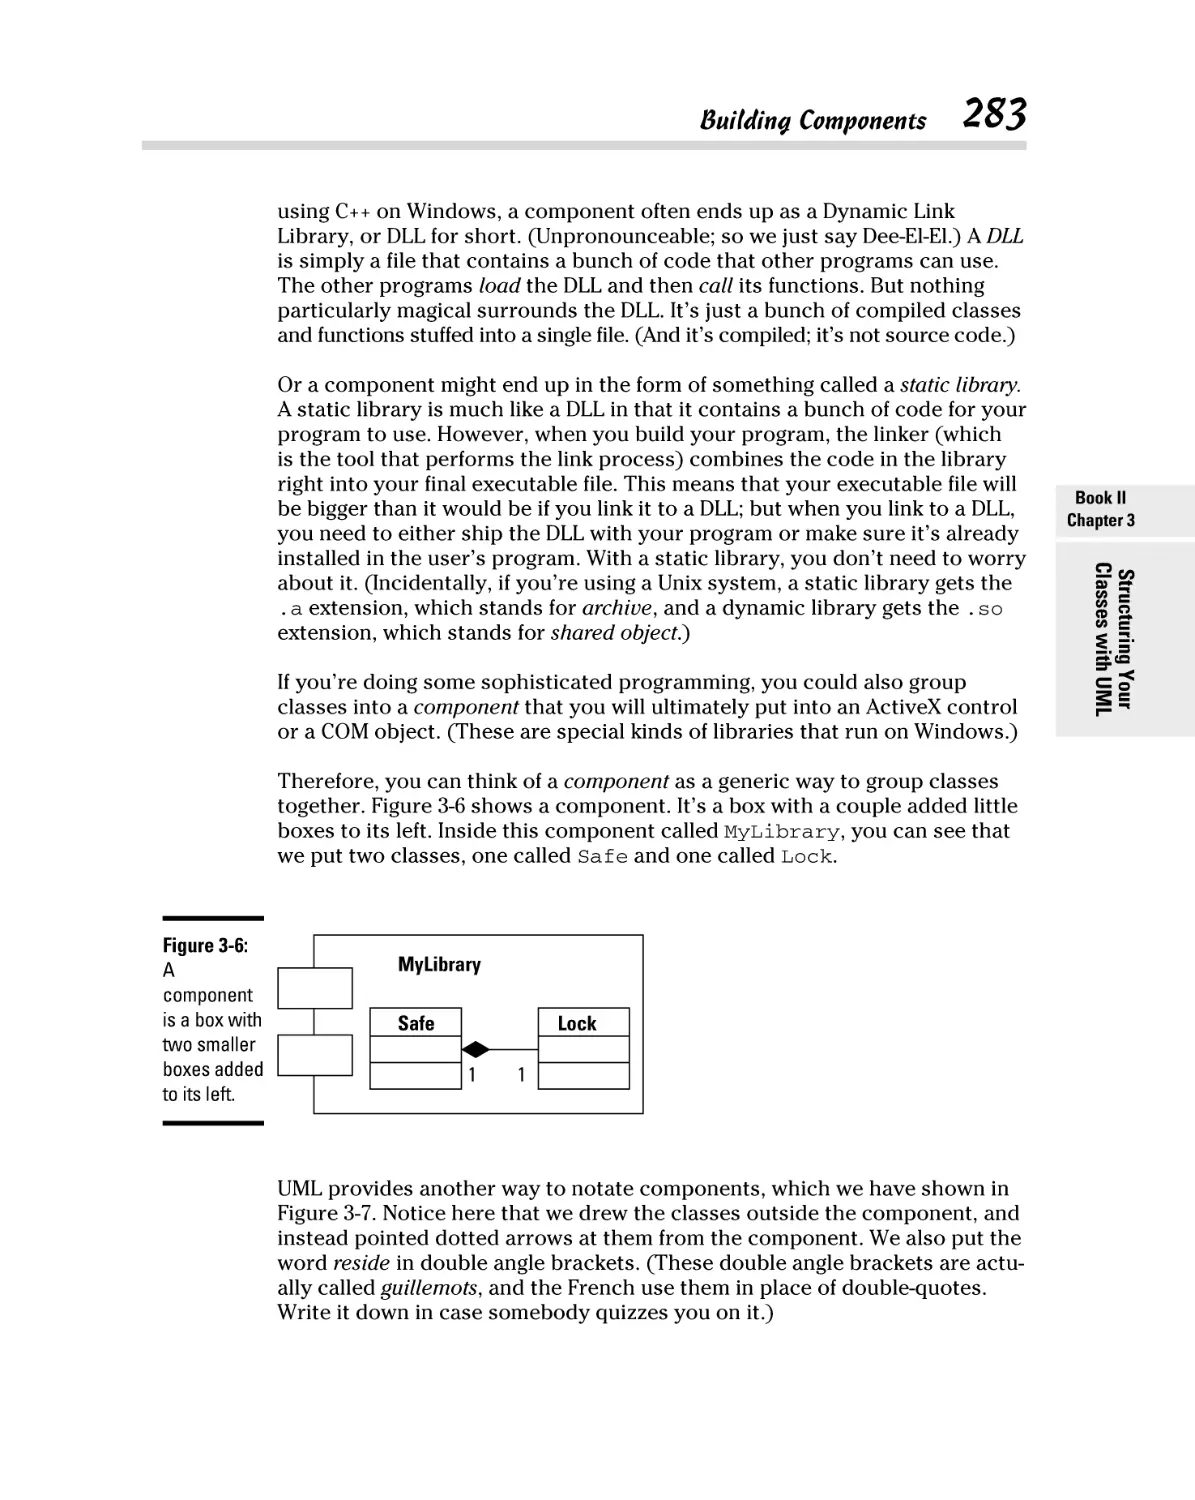
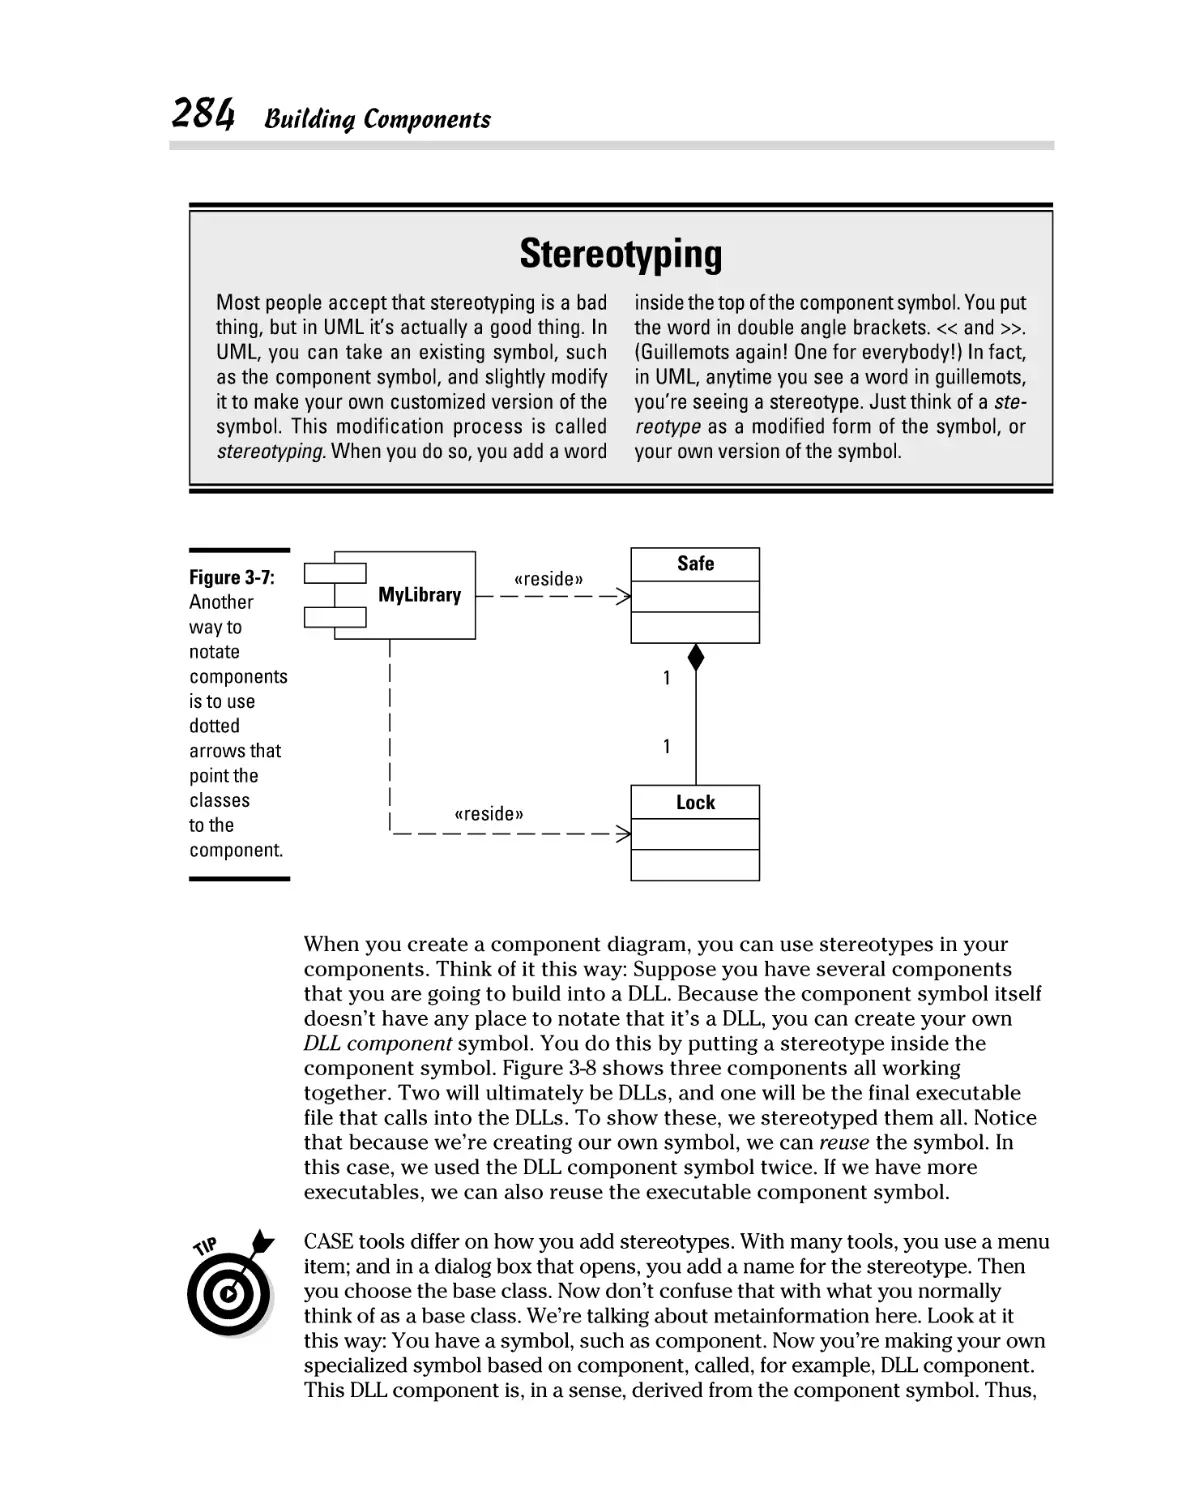
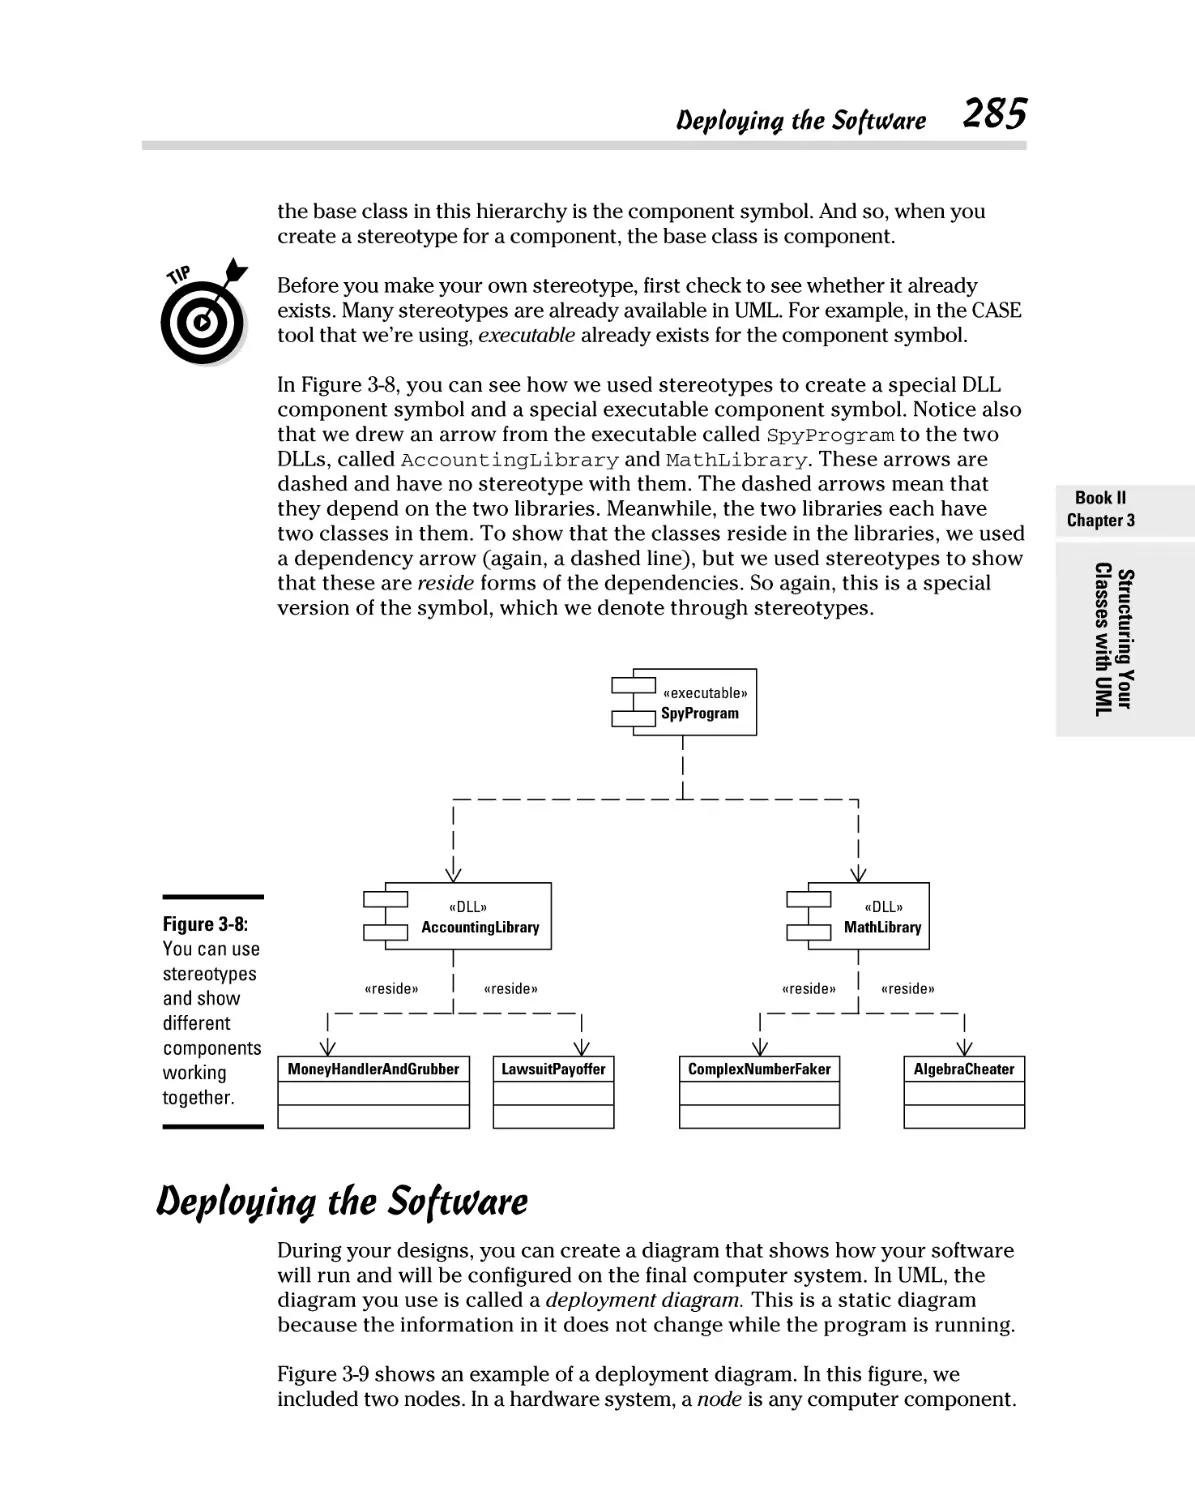
Building Components .................................................................................. 282
Deploying the Software ............................................................................... 285
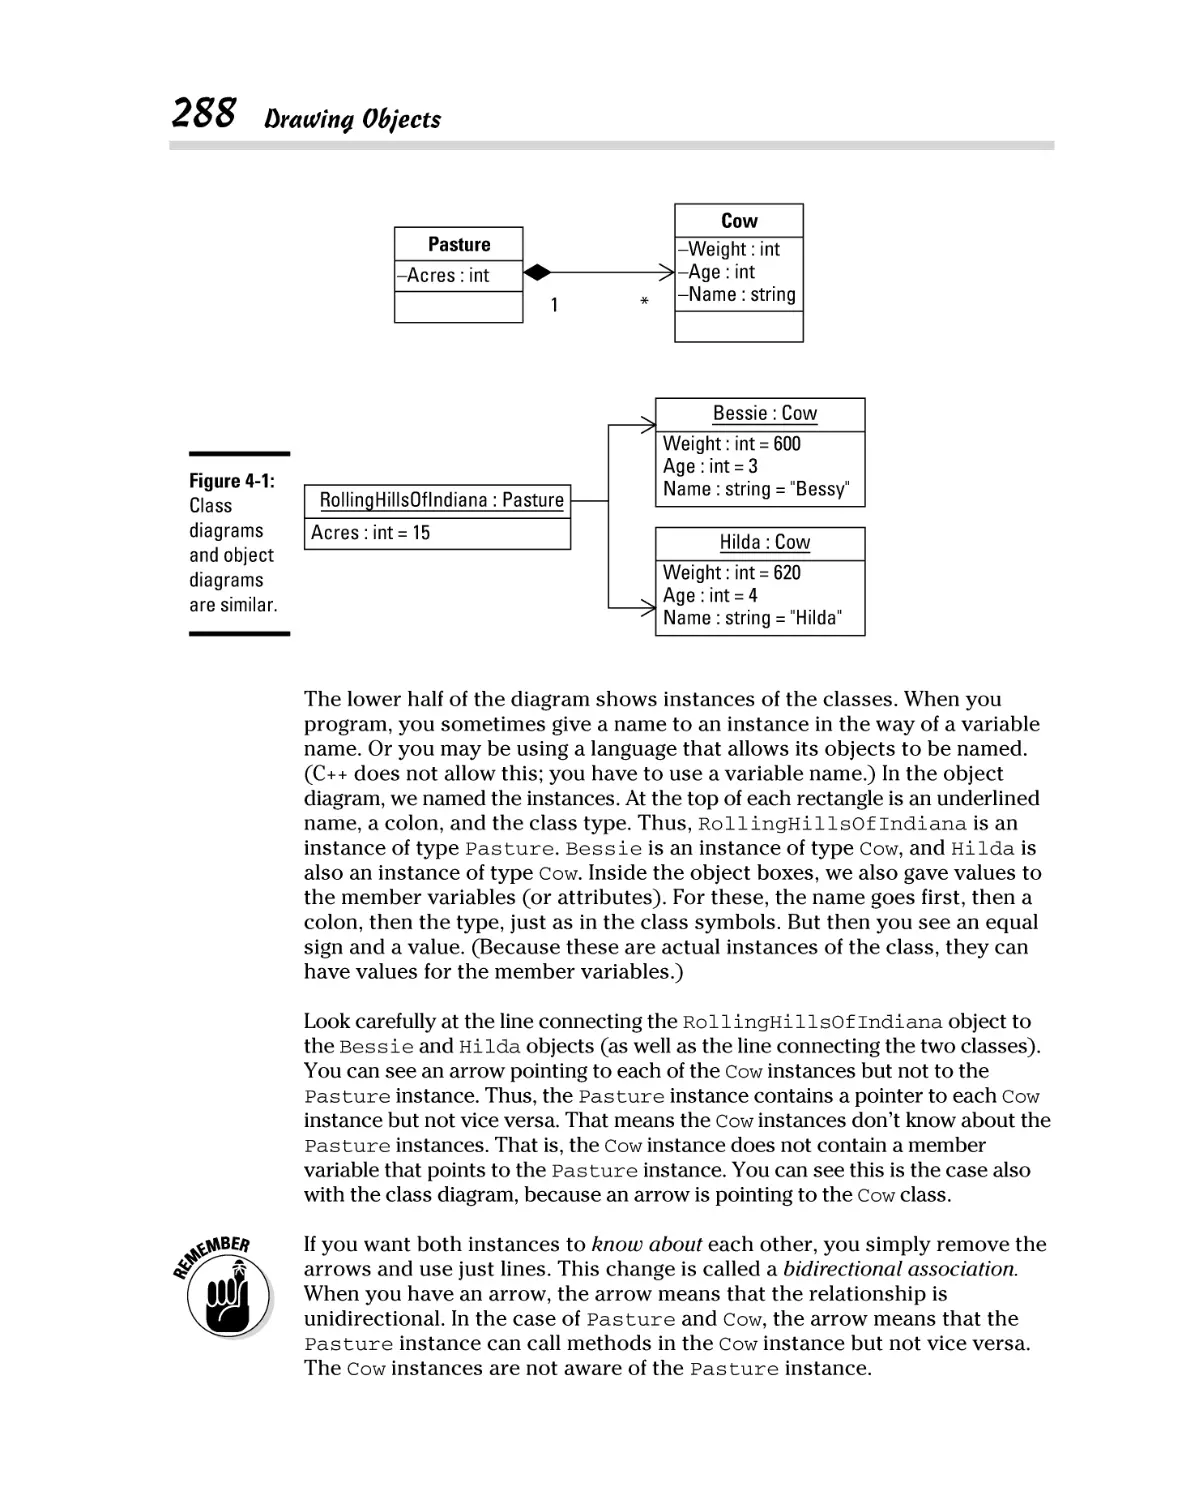
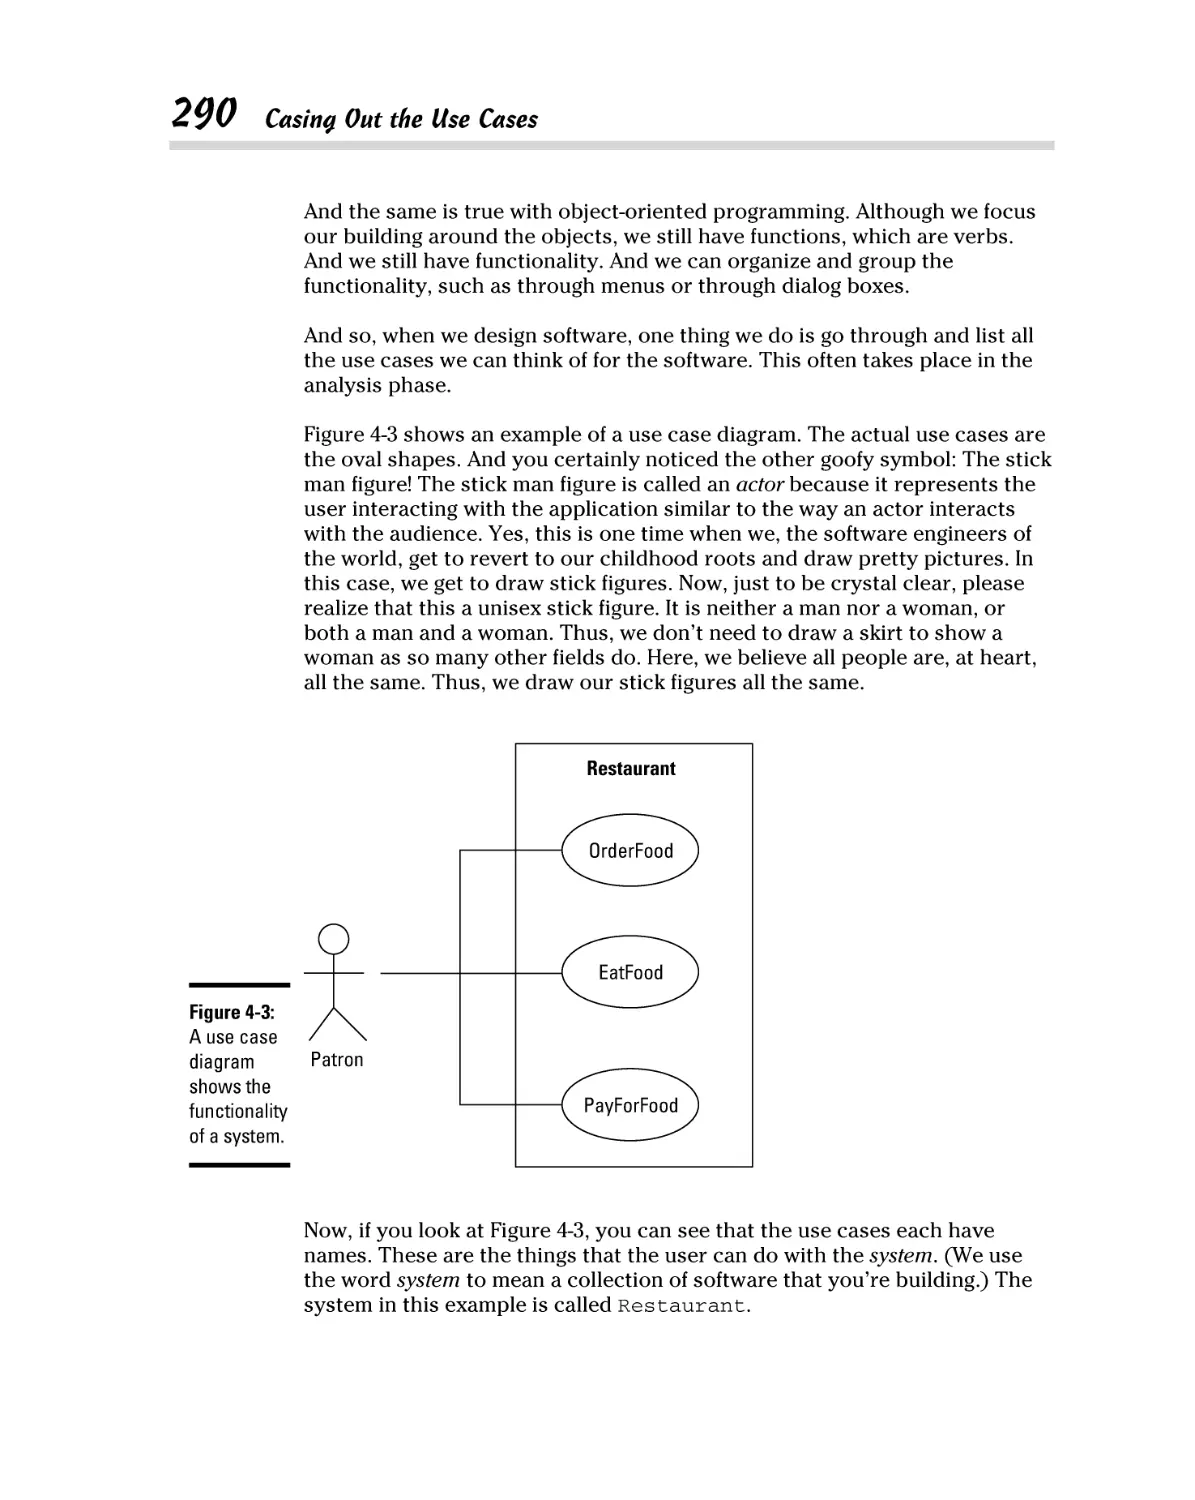
Chapter 4: Demonstrating Behavior with UML . . . . . . . . . . . . . . . . . . .287
Drawing Objects .......................................................................................... 287
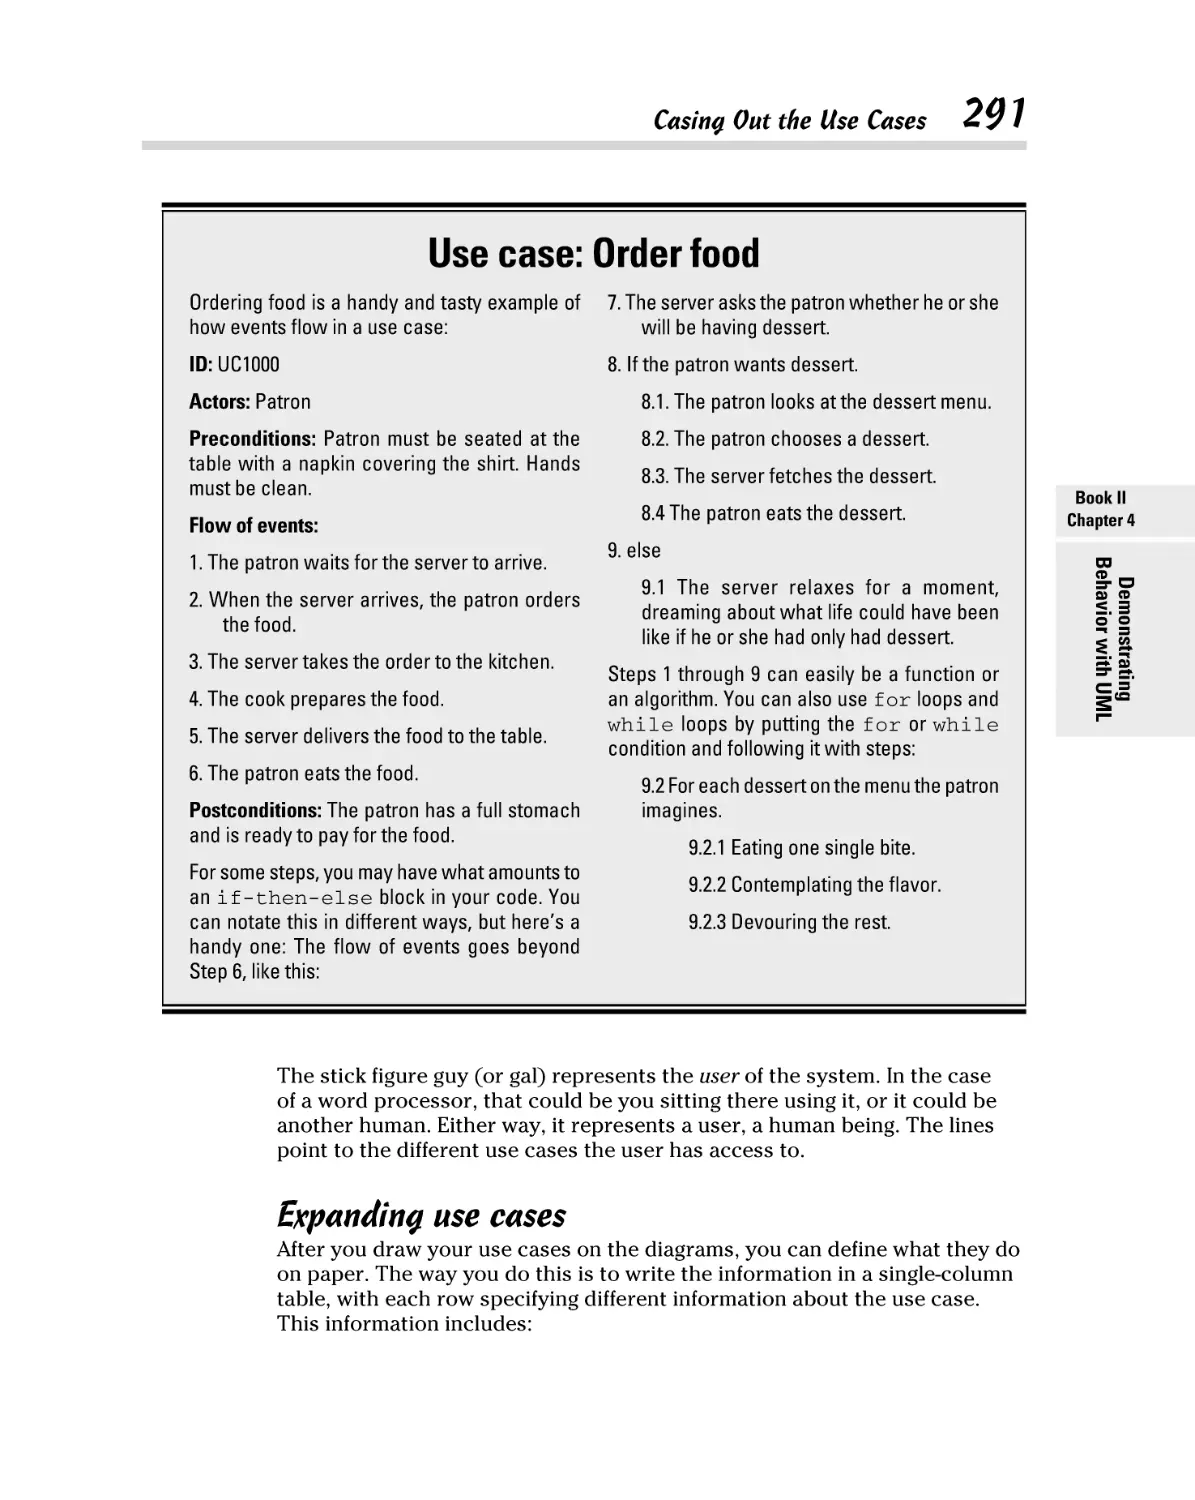
Casing Out the Use Cases ........................................................................... 289
Expanding use cases.......................................................................... 291
Matching use cases and requirements ........................................... 292
Sequence Diagrams ..................................................................................... 293
Notating sequence diagrams ............................................................ 295
Looping and comparing in sequence diagrams ............................. 296
Collaboration Diagrams .............................................................................. 299
Activity Diagrams ........................................................................................ 300
State Diagrams ............................................................................................. 302
Chapter 5: Modeling Your Programs with UML . . . . . . . . . . . . . . . . . .305
Using UML Goodies ..................................................................................... 305
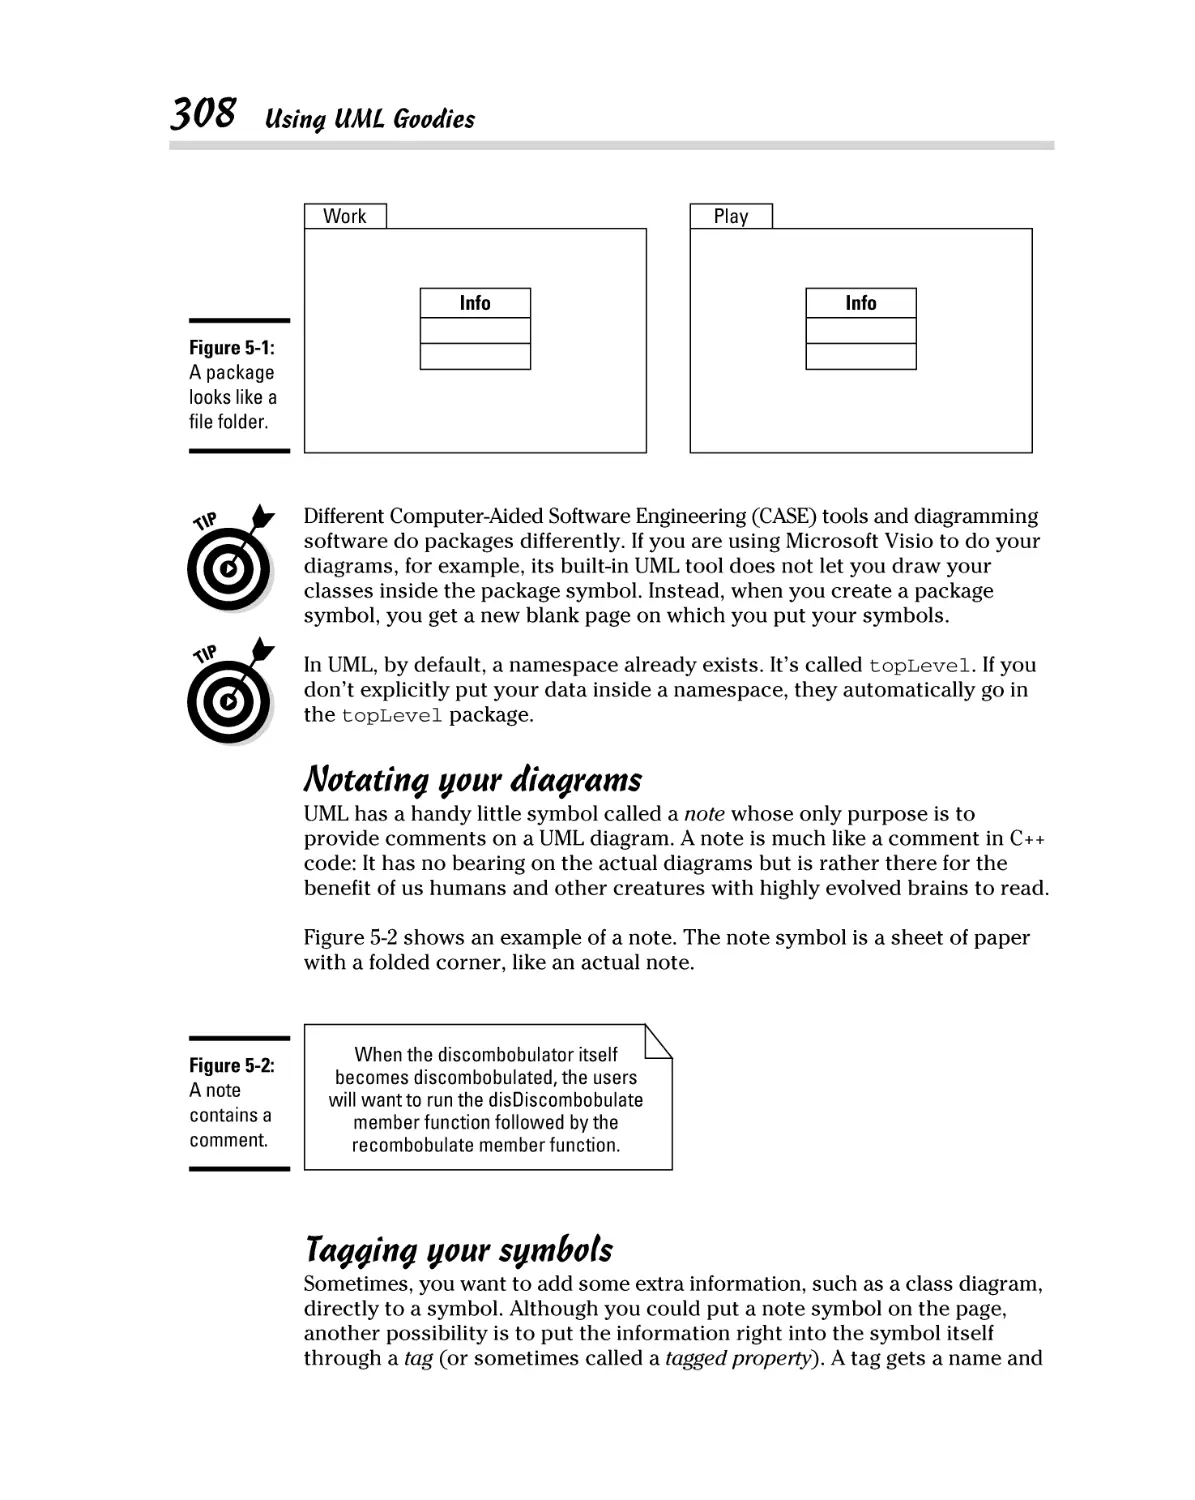
Packaging your symbols ................................................................... 305
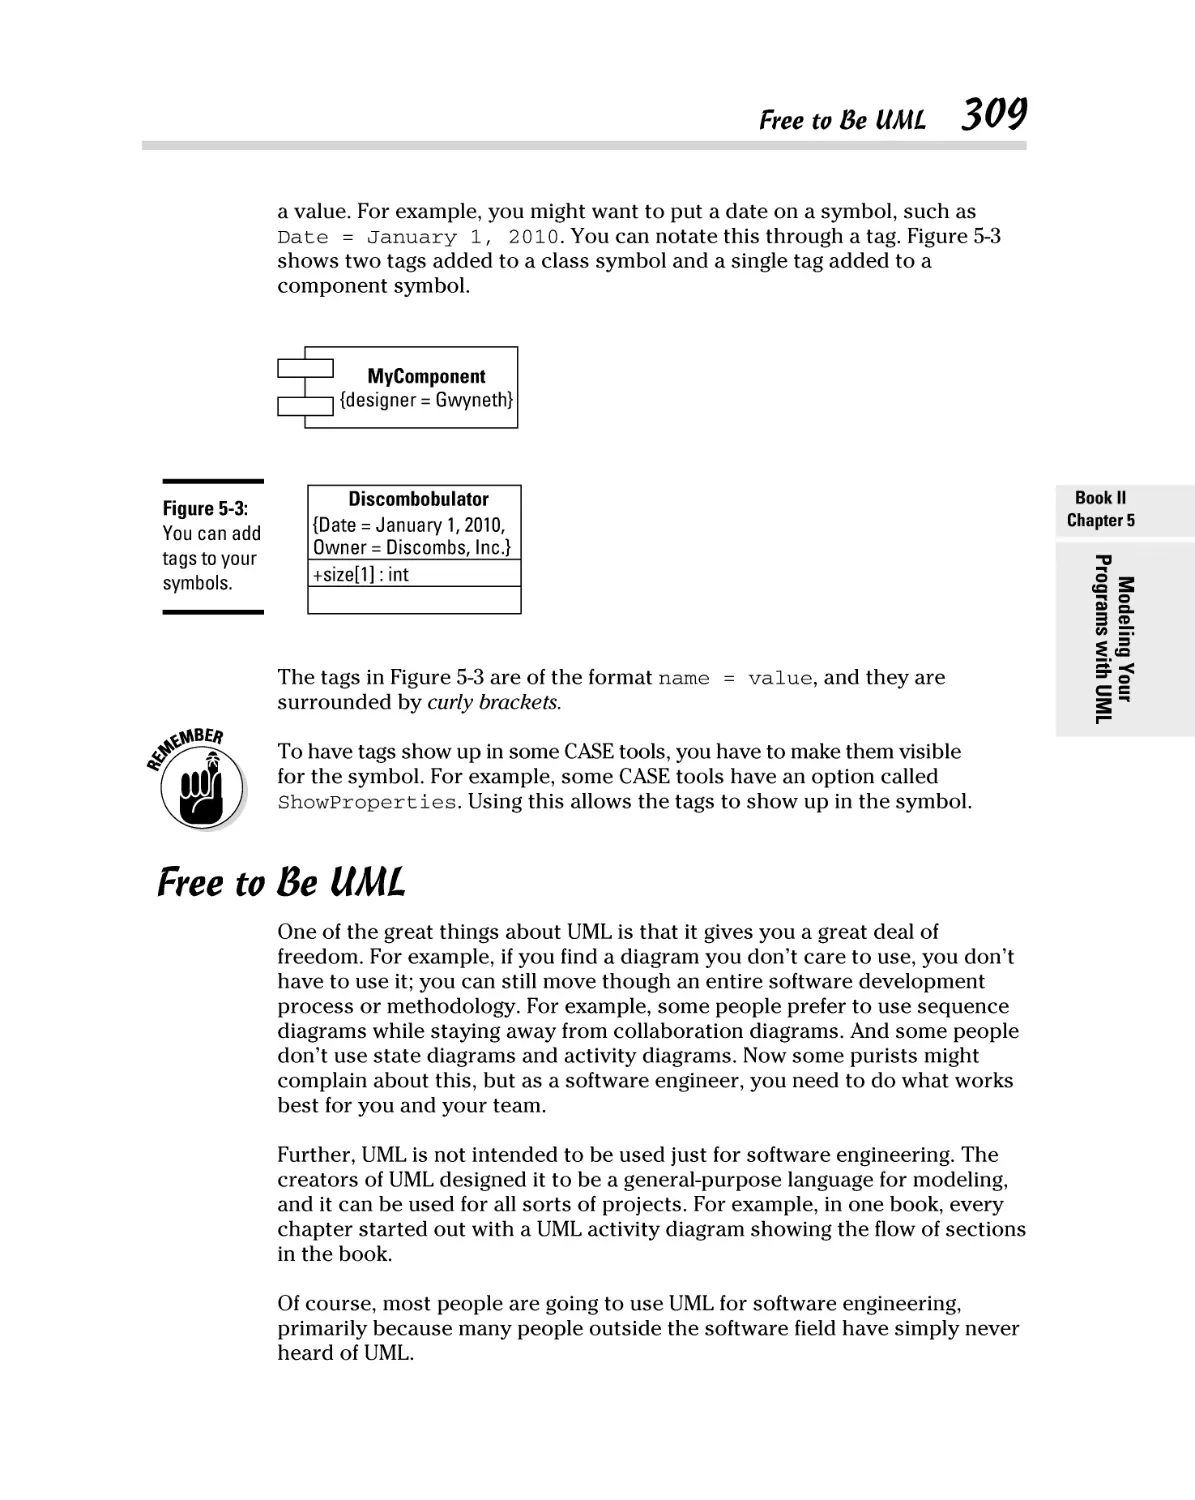
Notating your diagrams .................................................................... 308
Tagging your symbols ....................................................................... 308
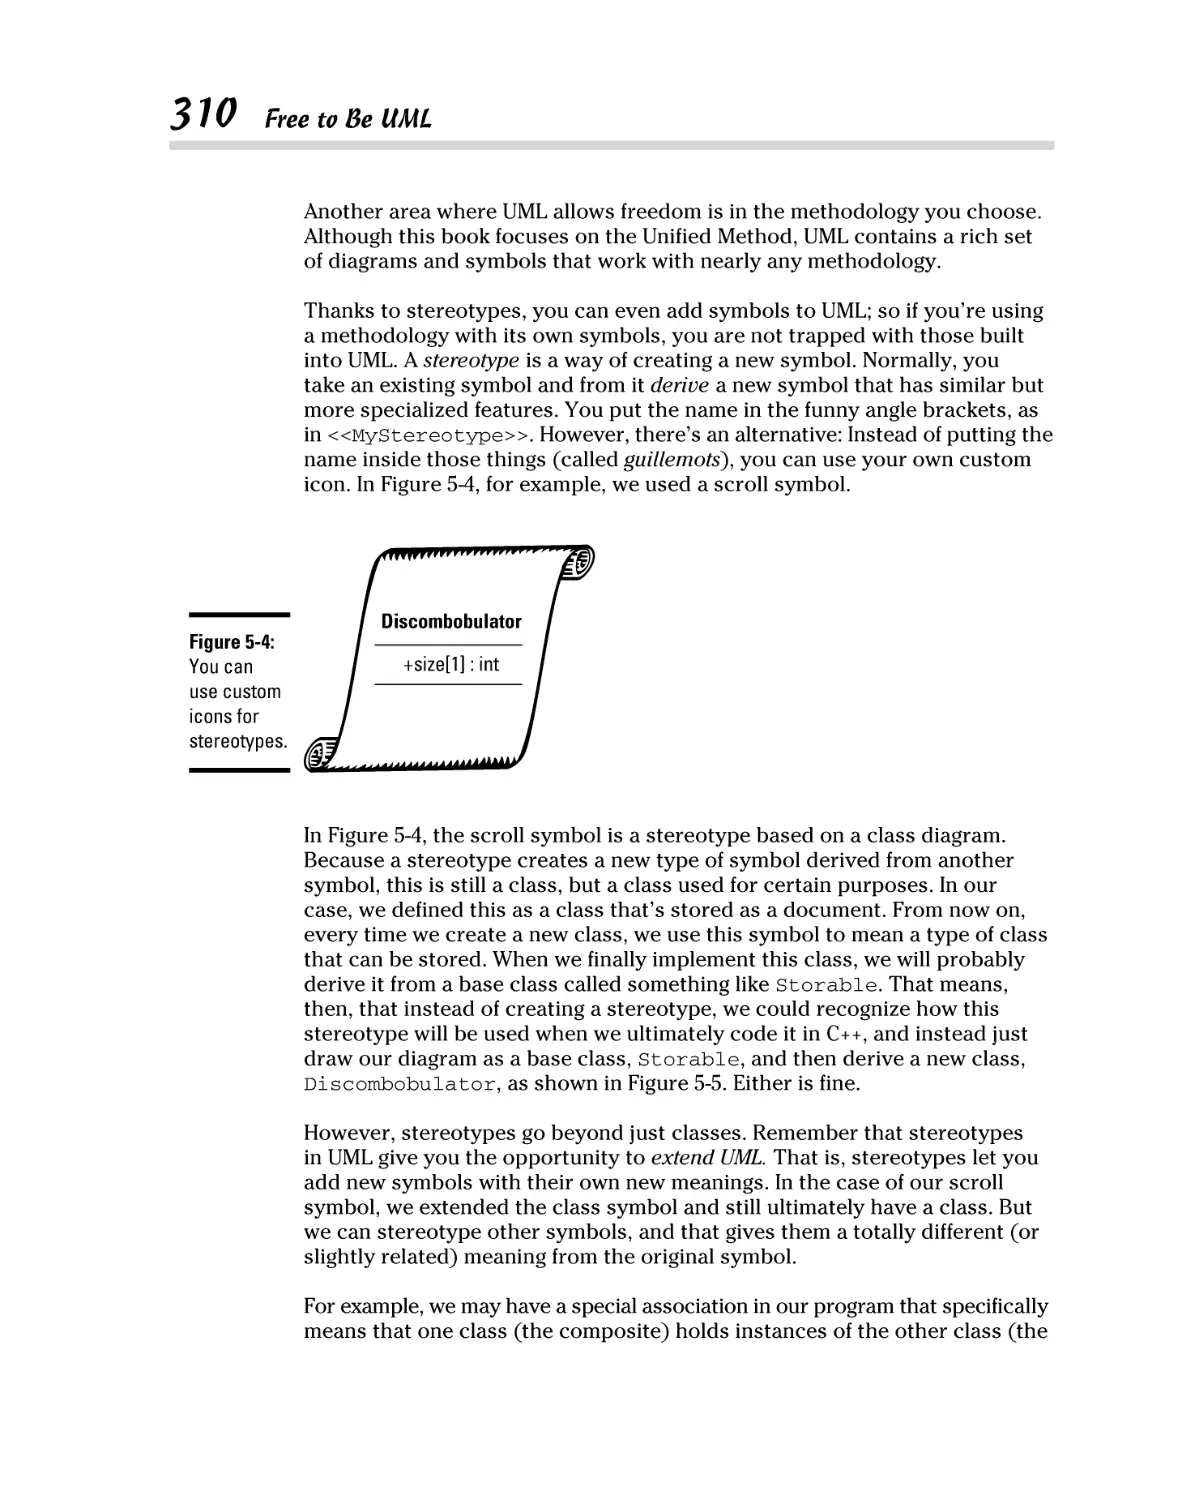
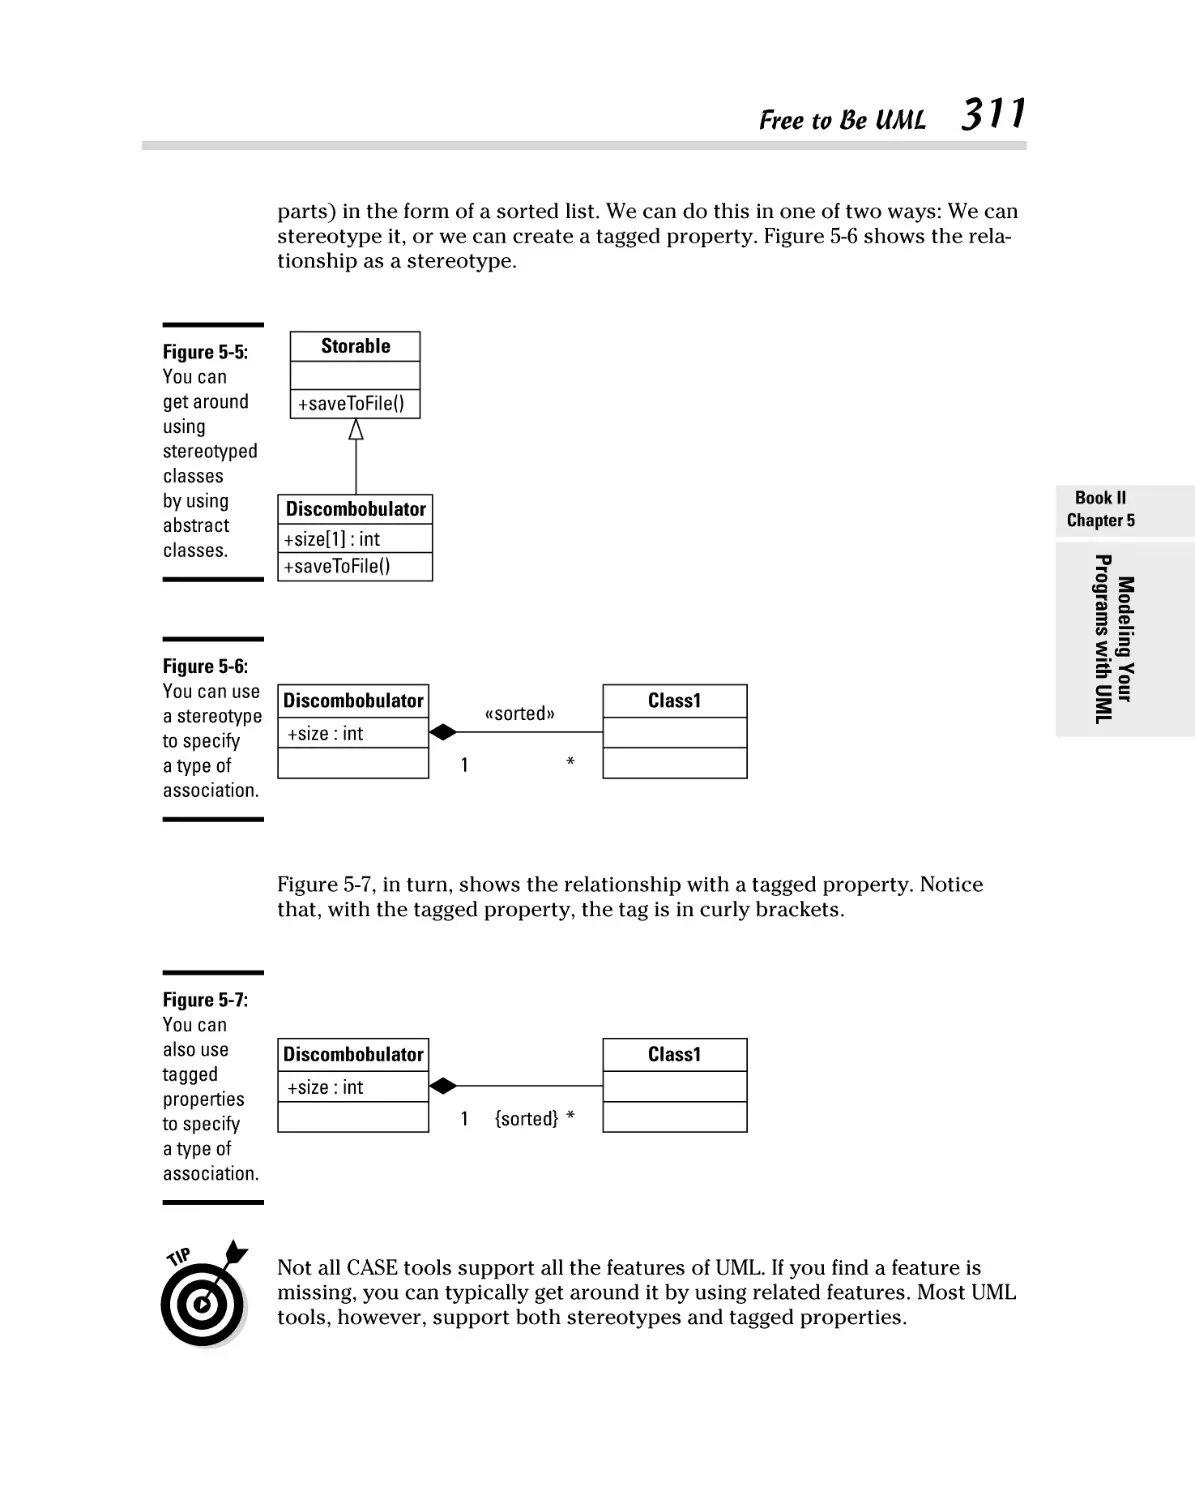
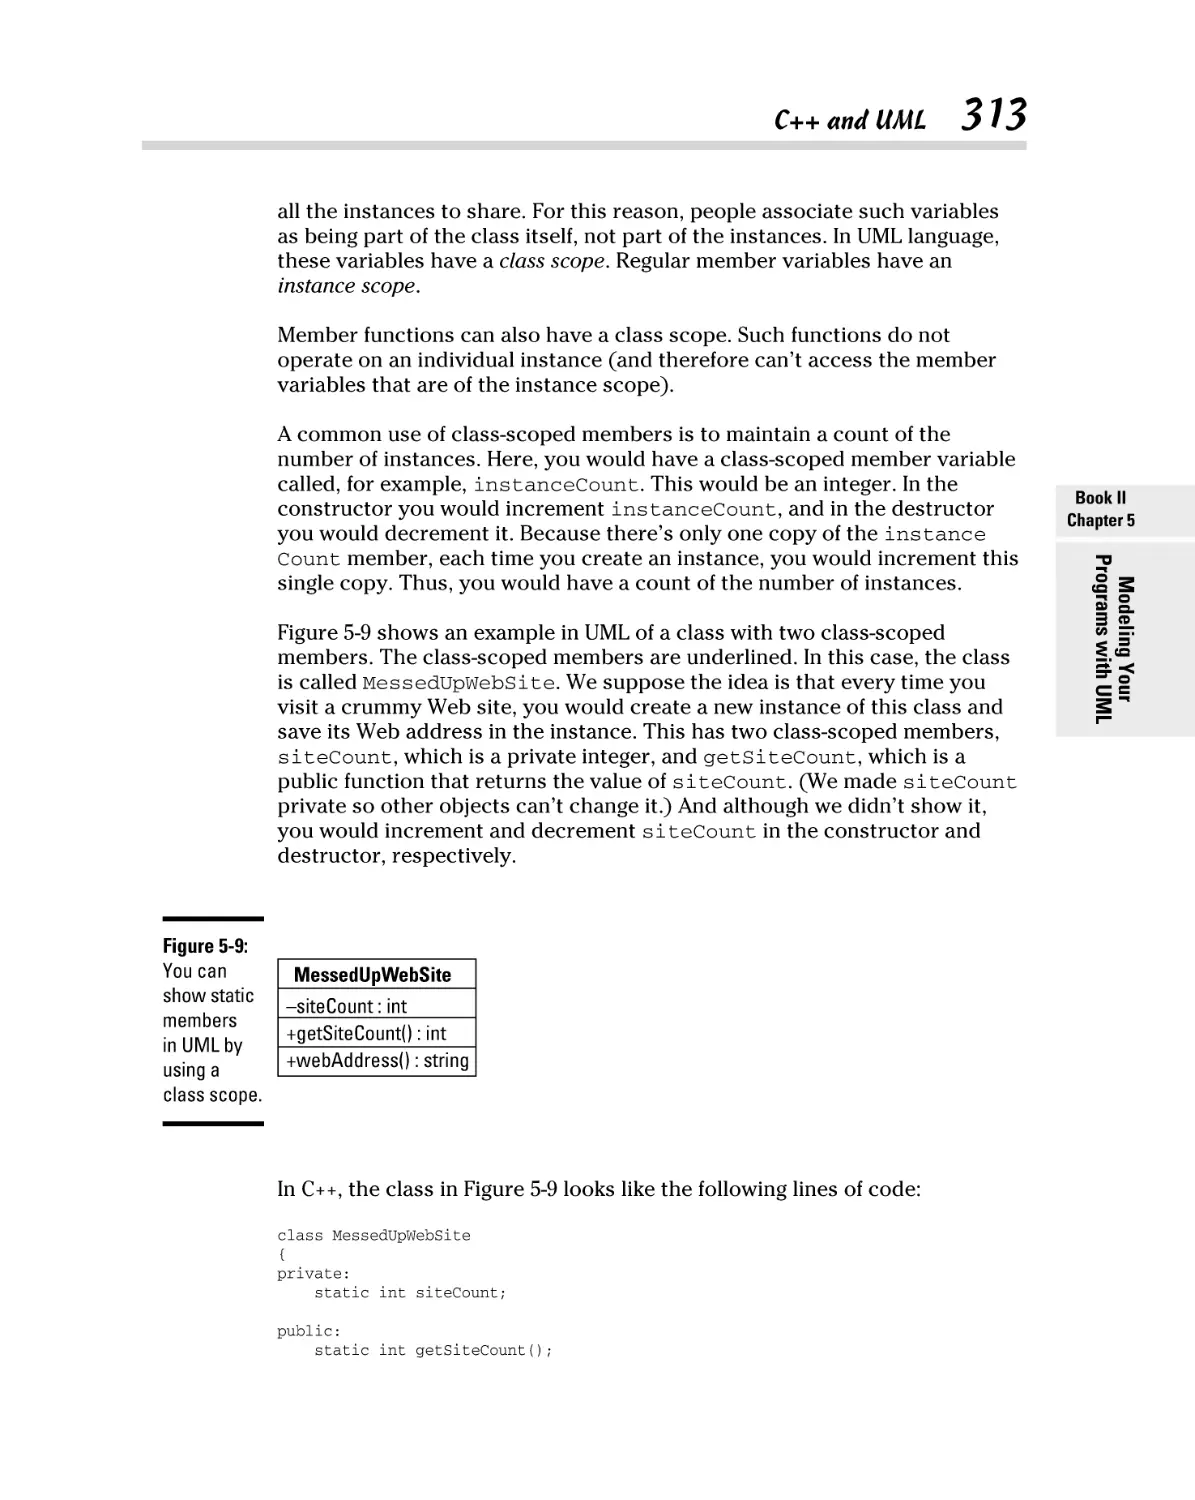
Free to Be UML............................................................................................. 309
C++ and UML ................................................................................................ 312
Drawing enumerations ...................................................................... 312
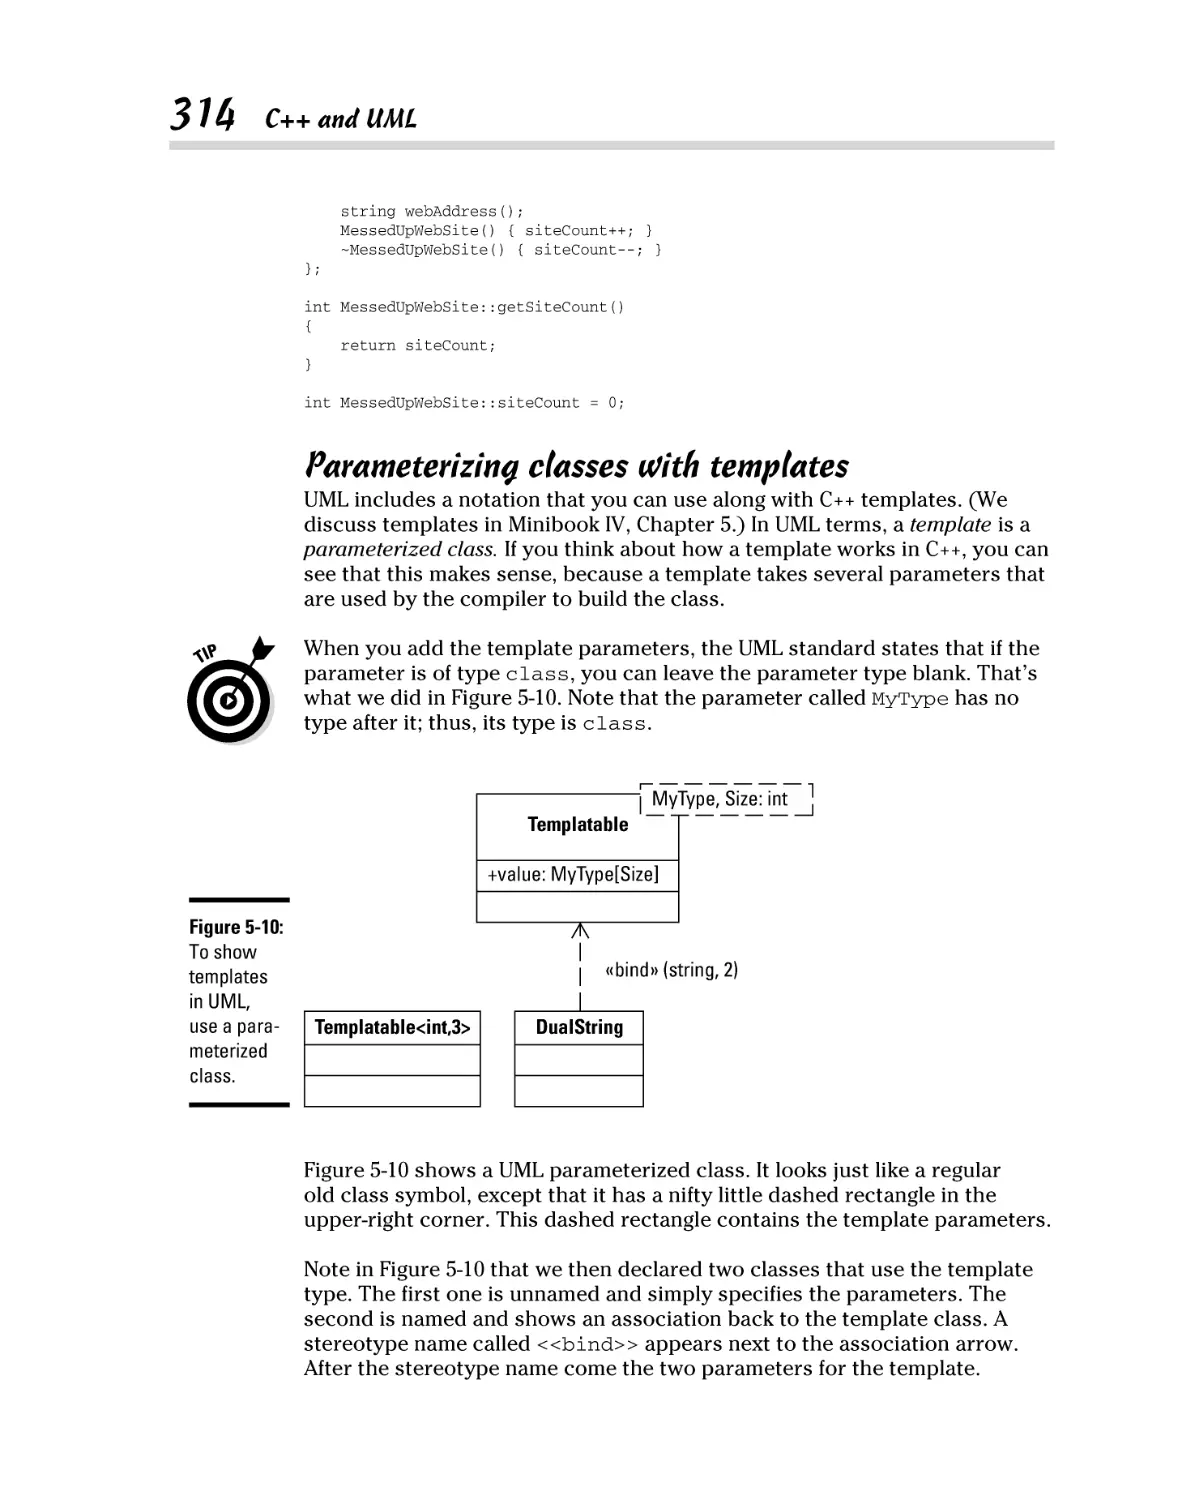
Including static members ................................................................. 312
Parameterizing classes with templates........................................... 314
Chapter 6: Building with Design Patterns . . . . . . . . . . . . . . . . . . . . . . .317
Introducing a Simple Pattern: the Singleton ............................................ 318
Watching an Instance with an Observer................................................... 322
Observers and the Standard C++ Library ....................................... 326
Automatically adding an observer .................................................. 327
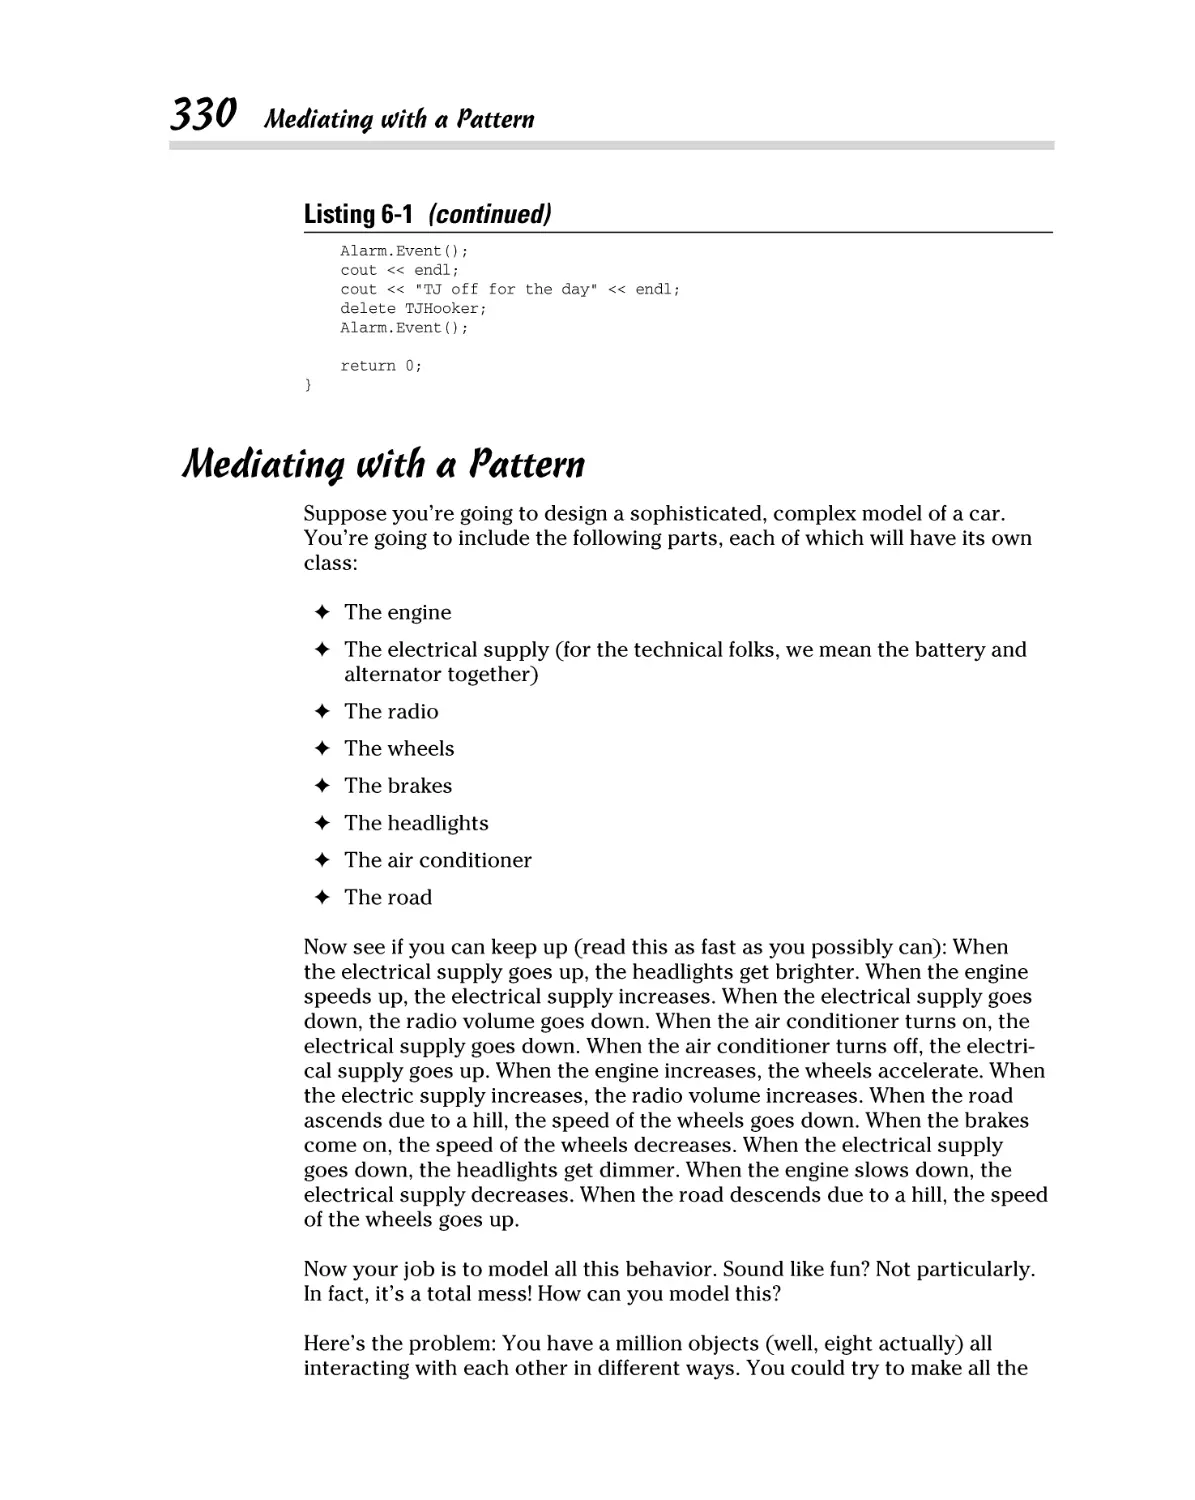
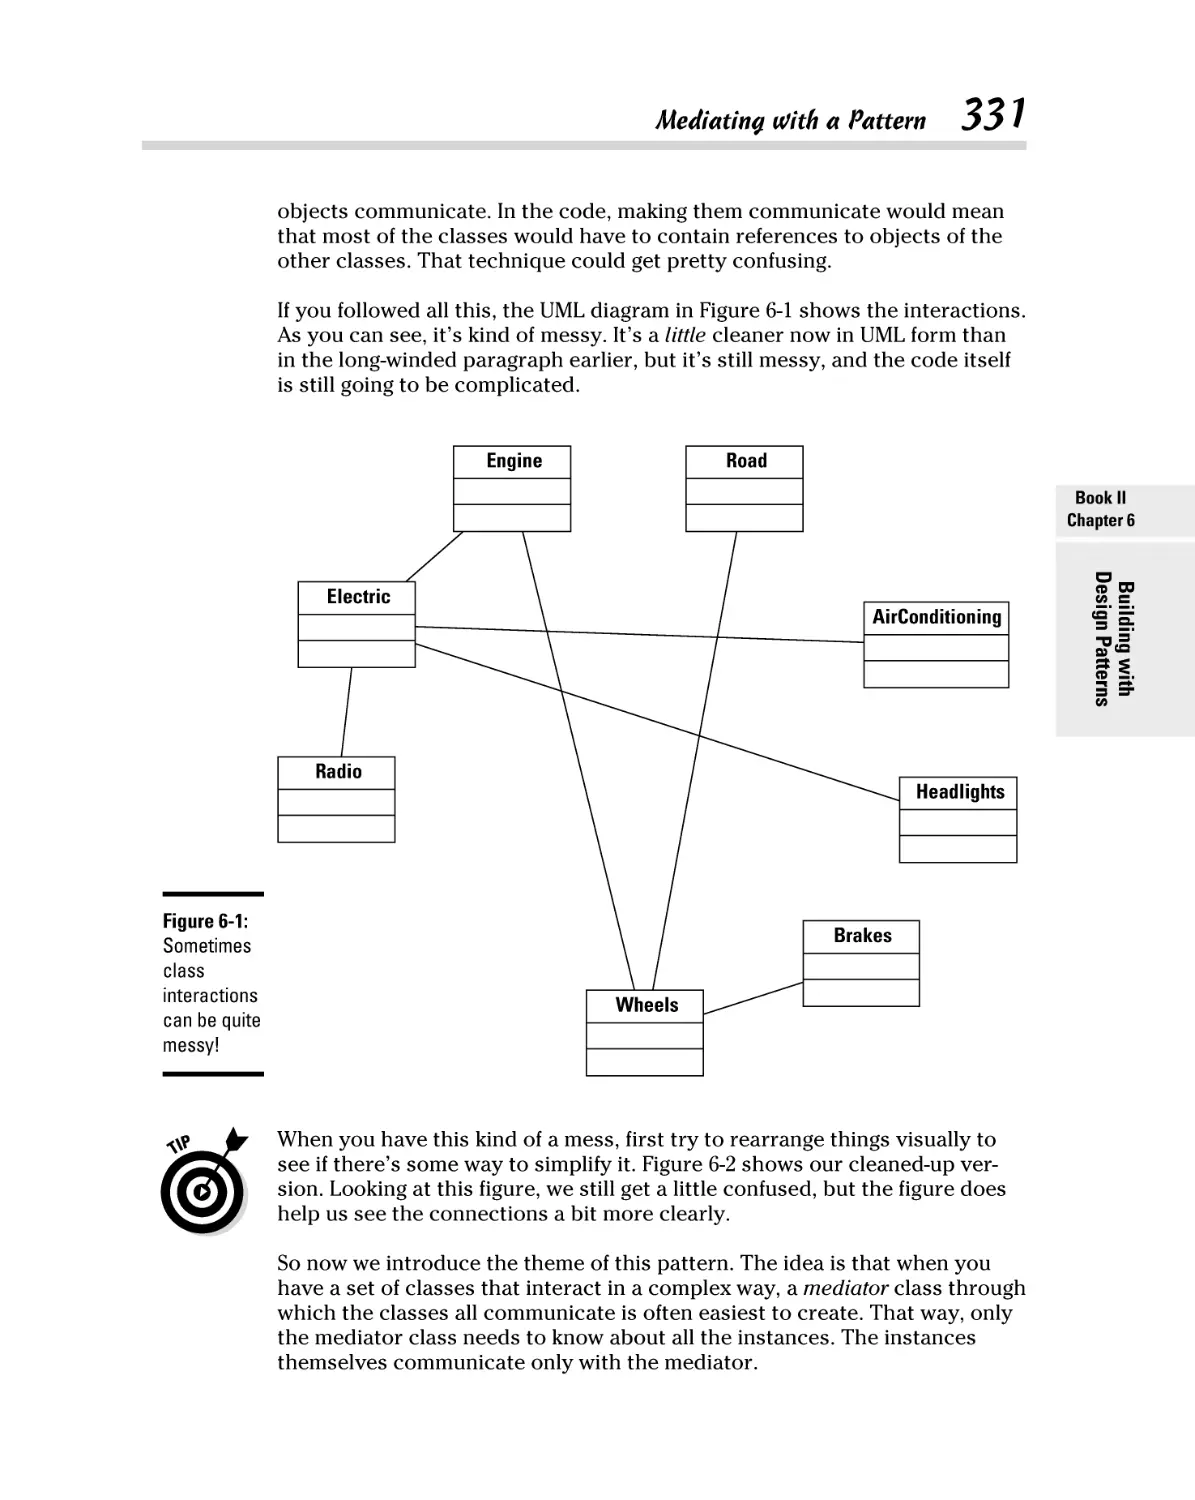
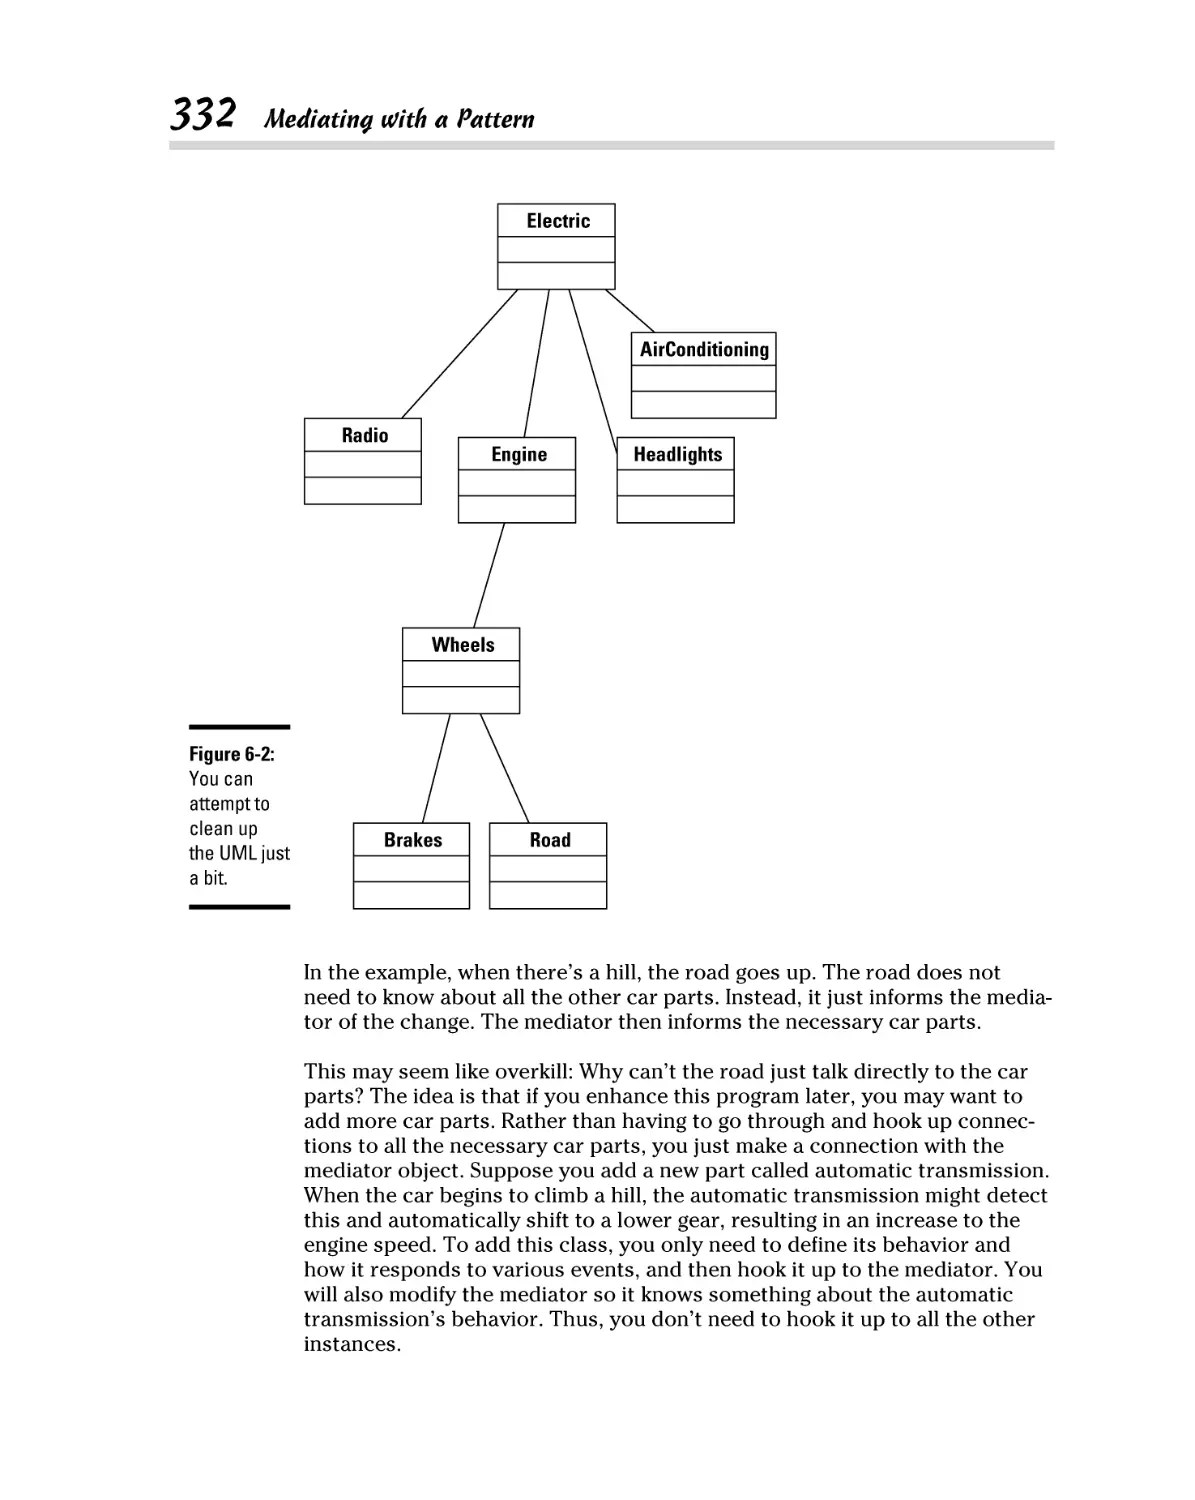
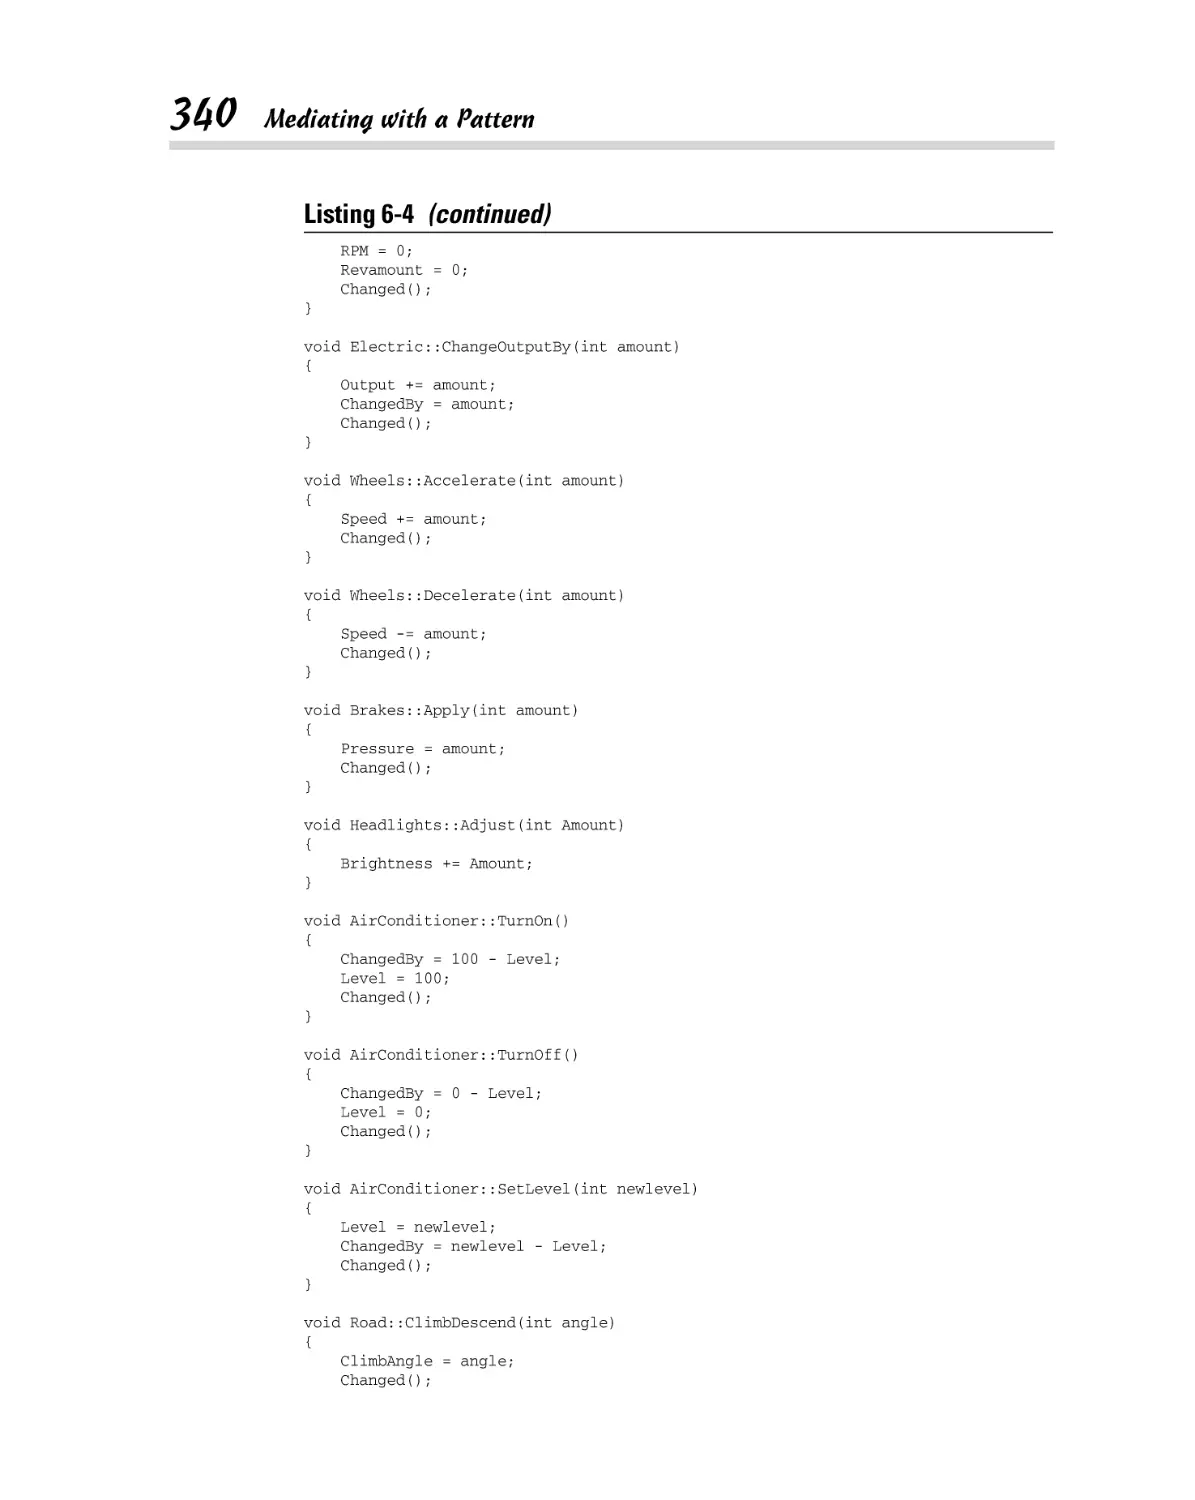
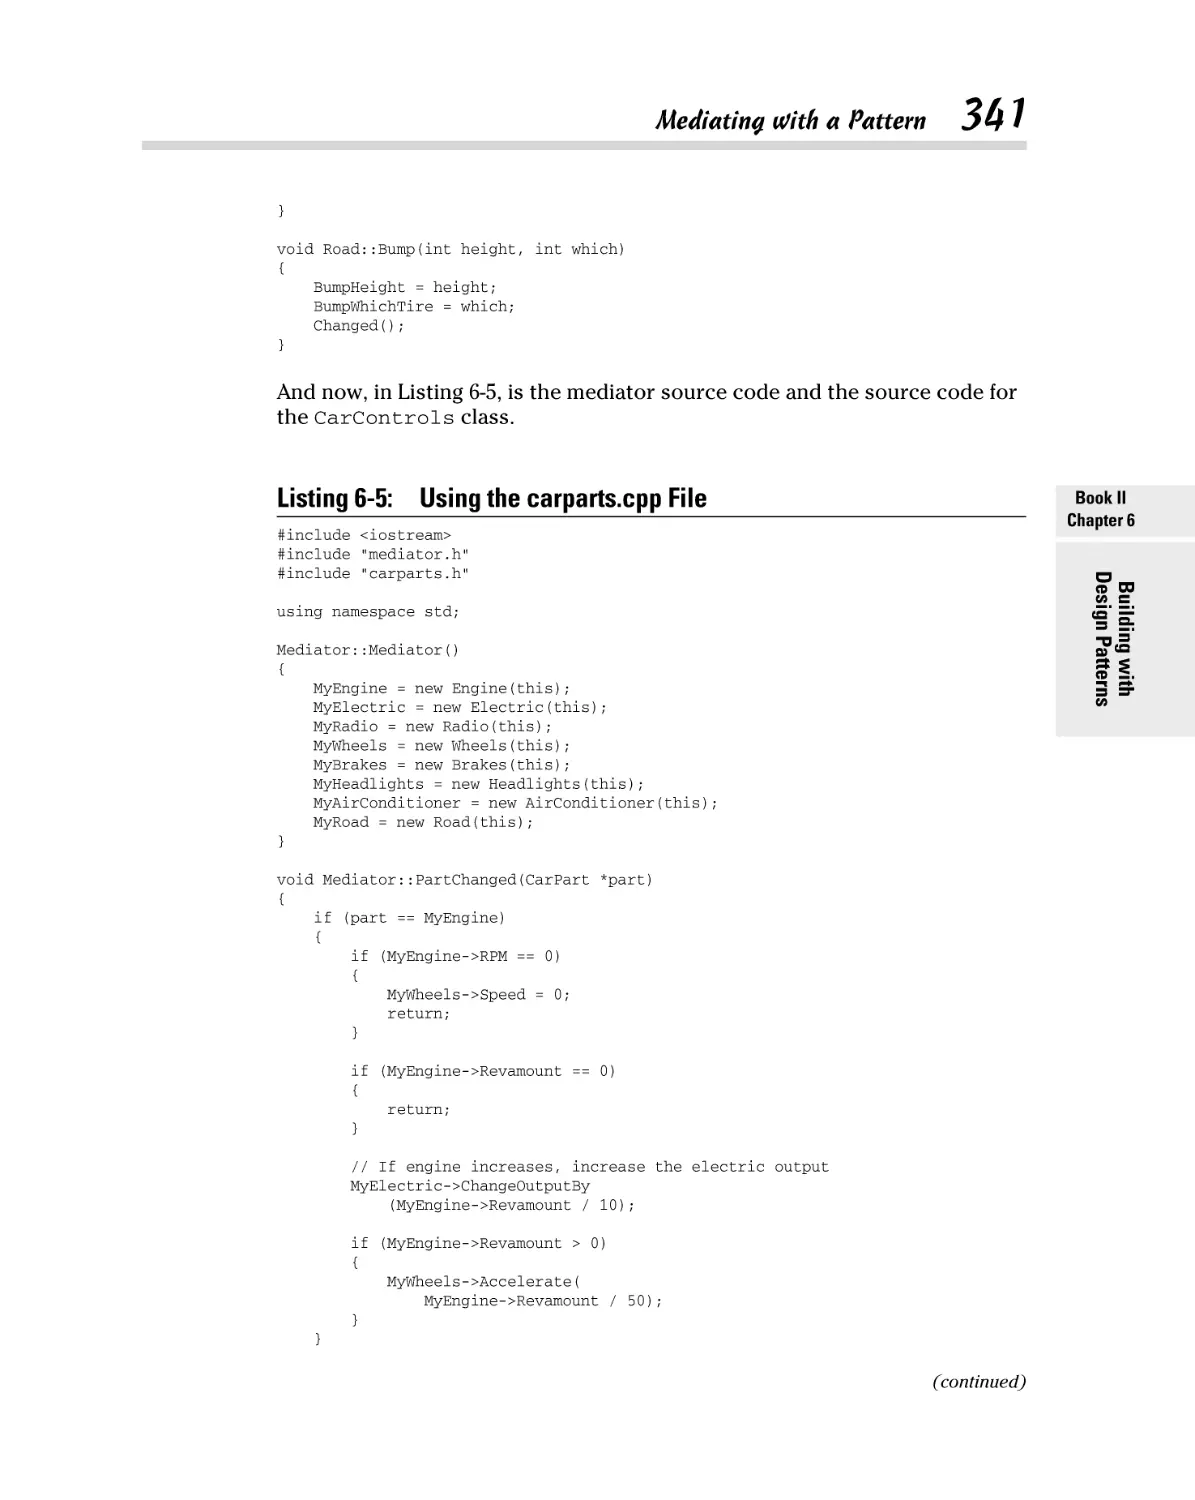
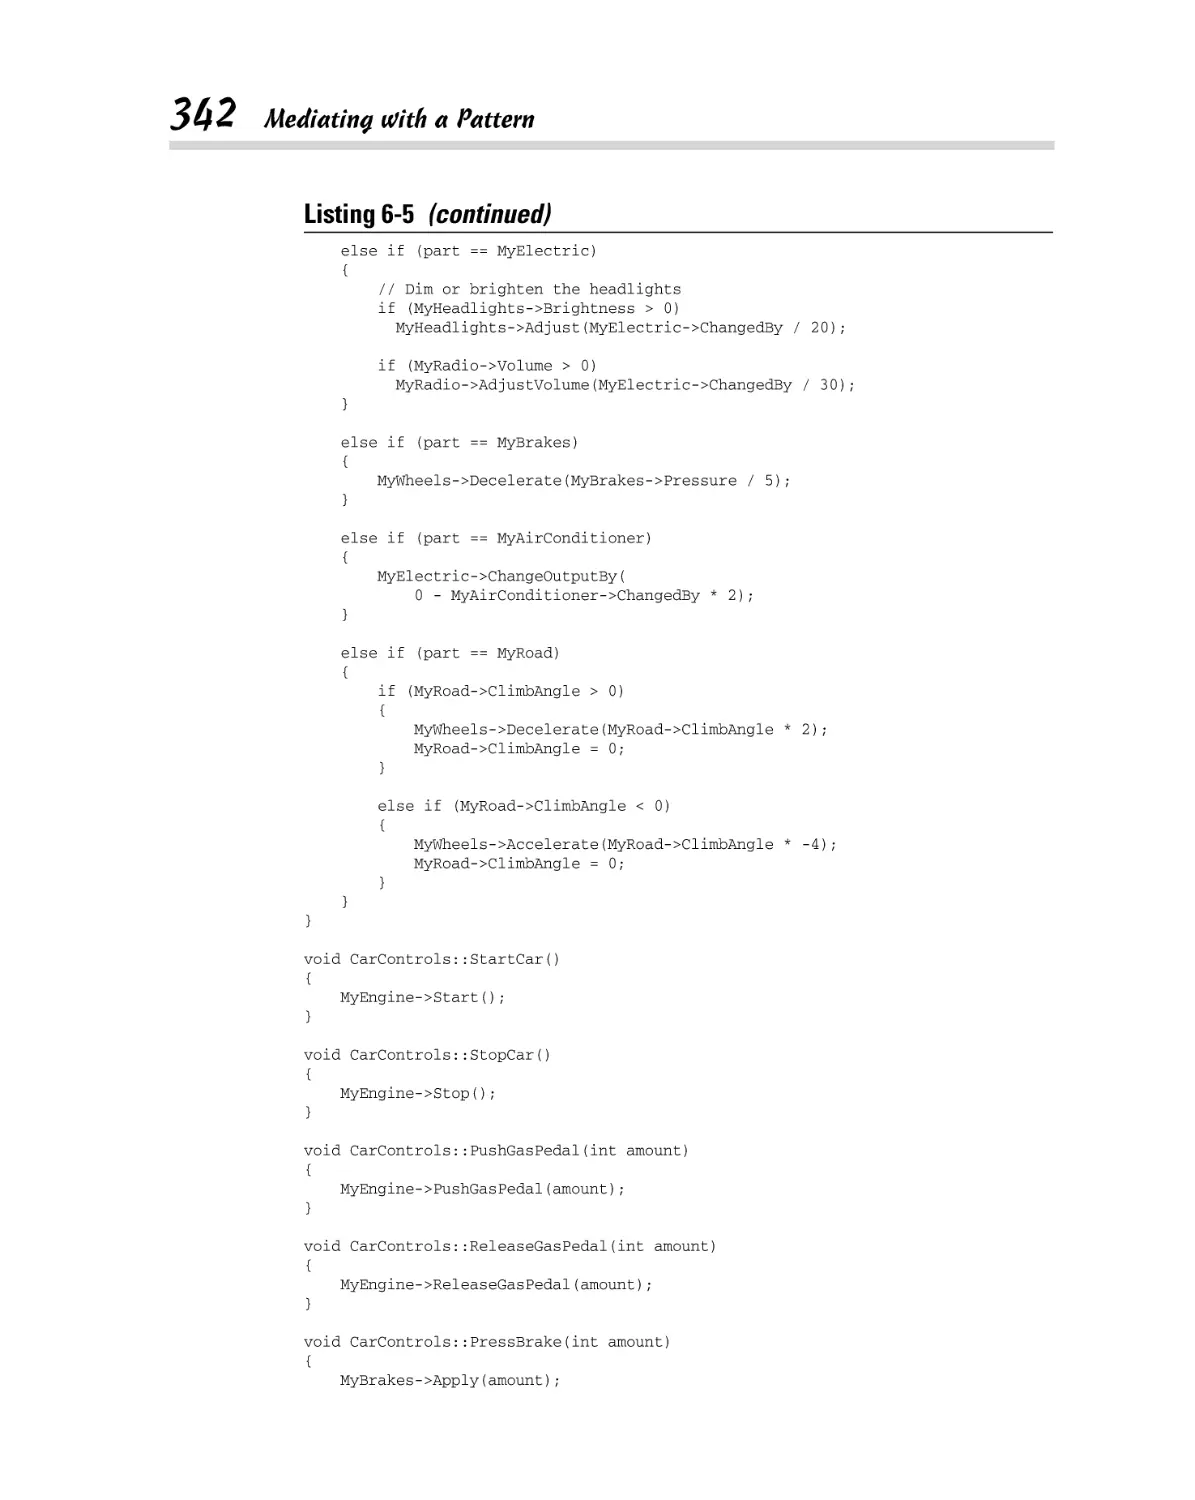
Mediating with a Pattern ............................................................................ 330
xiv
C++ All-in-One For Dummies, 2nd Edition
Book III: Fixing Problems .......................................... 347
Chapter 1: Dealing with Bugs . . . . . . . . . . . . . . . . . . . . . . . . . . . . . . . . .349
It’s Not a Bug, It’s a Feature! ....................................................................... 349
Make Your Programming Features Look Like Features .......................... 351
Anticipating (Almost) Everything.............................................................. 352
Avoiding Mistakes, Plain and Simple ........................................................ 359
Chapter 2: Debugging a Program. . . . . . . . . . . . . . . . . . . . . . . . . . . . . . .361
Programming with Debuggers ................................................................... 361
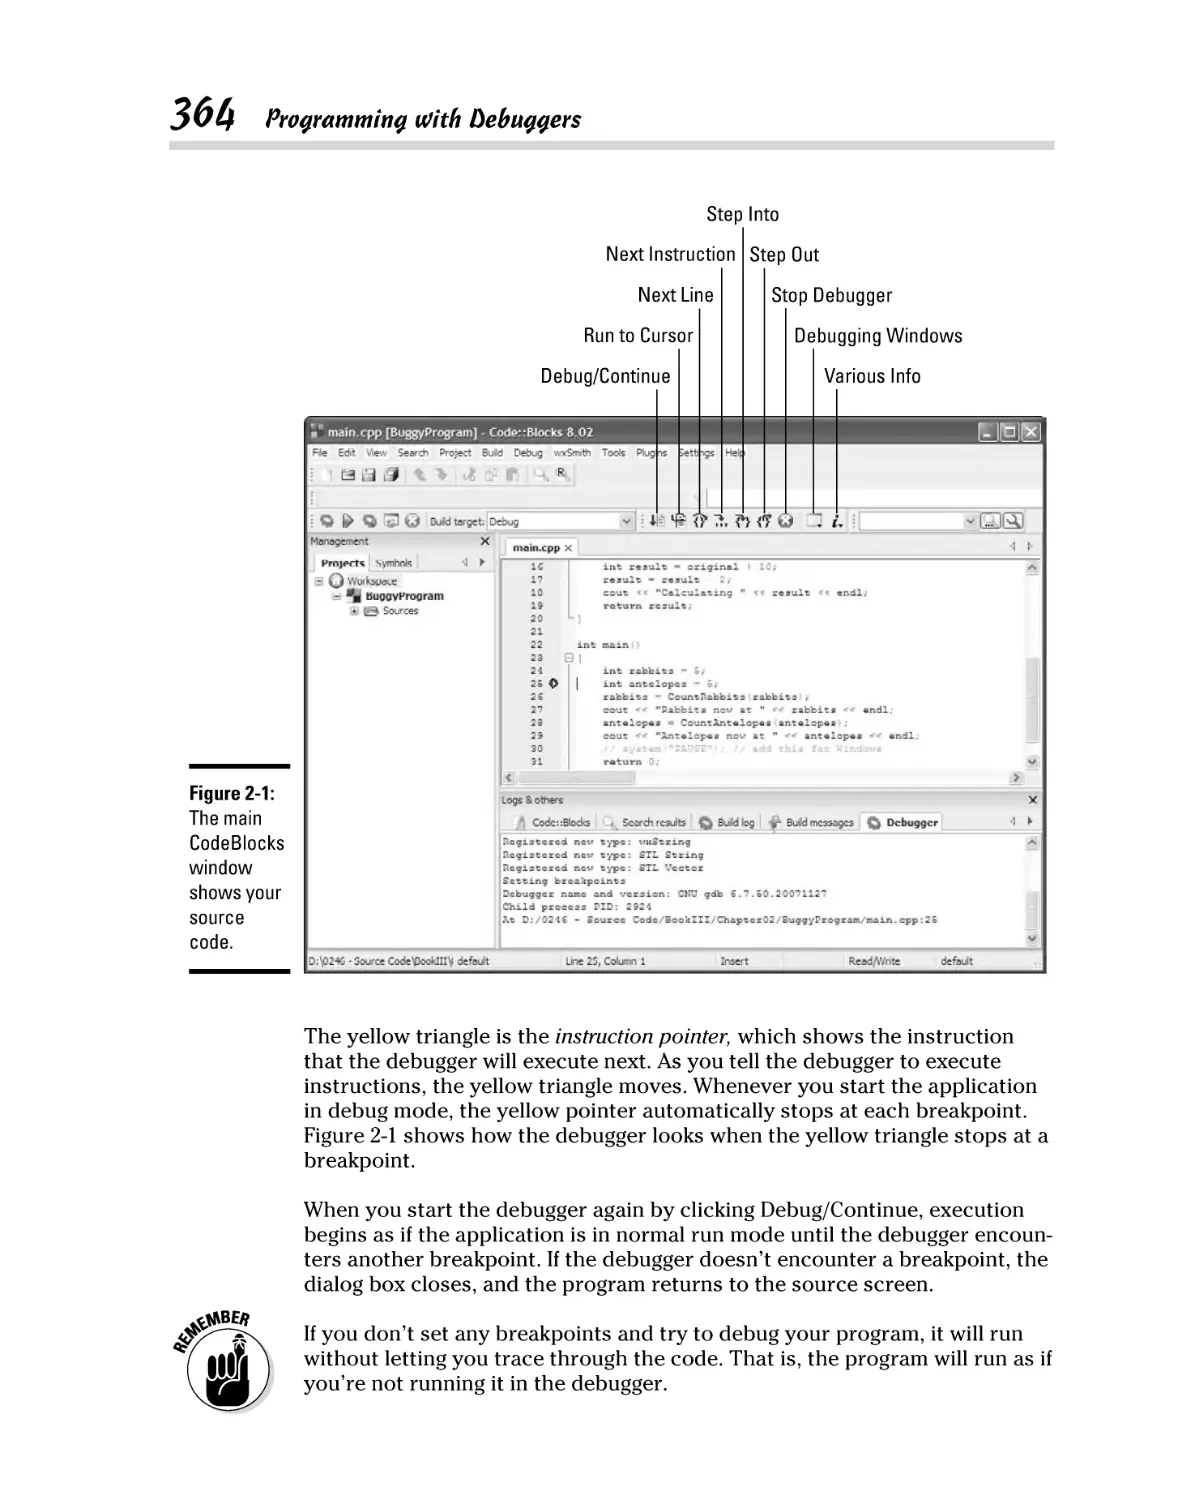
Running the debugger ....................................................................... 363
Recognizing the parts of the CodeBlocks debugger...................... 369
Debugging with Different Tools ................................................................. 371
Standard debuggers........................................................................... 371
Chapter 3: Stopping and Inspecting Your Code . . . . . . . . . . . . . . . . . .373
Setting and Disabling Breakpoints ............................................................ 374
Setting a breakpoint in CodeBlocks................................................. 375
Enabling and disabling breakpoints ................................................ 376
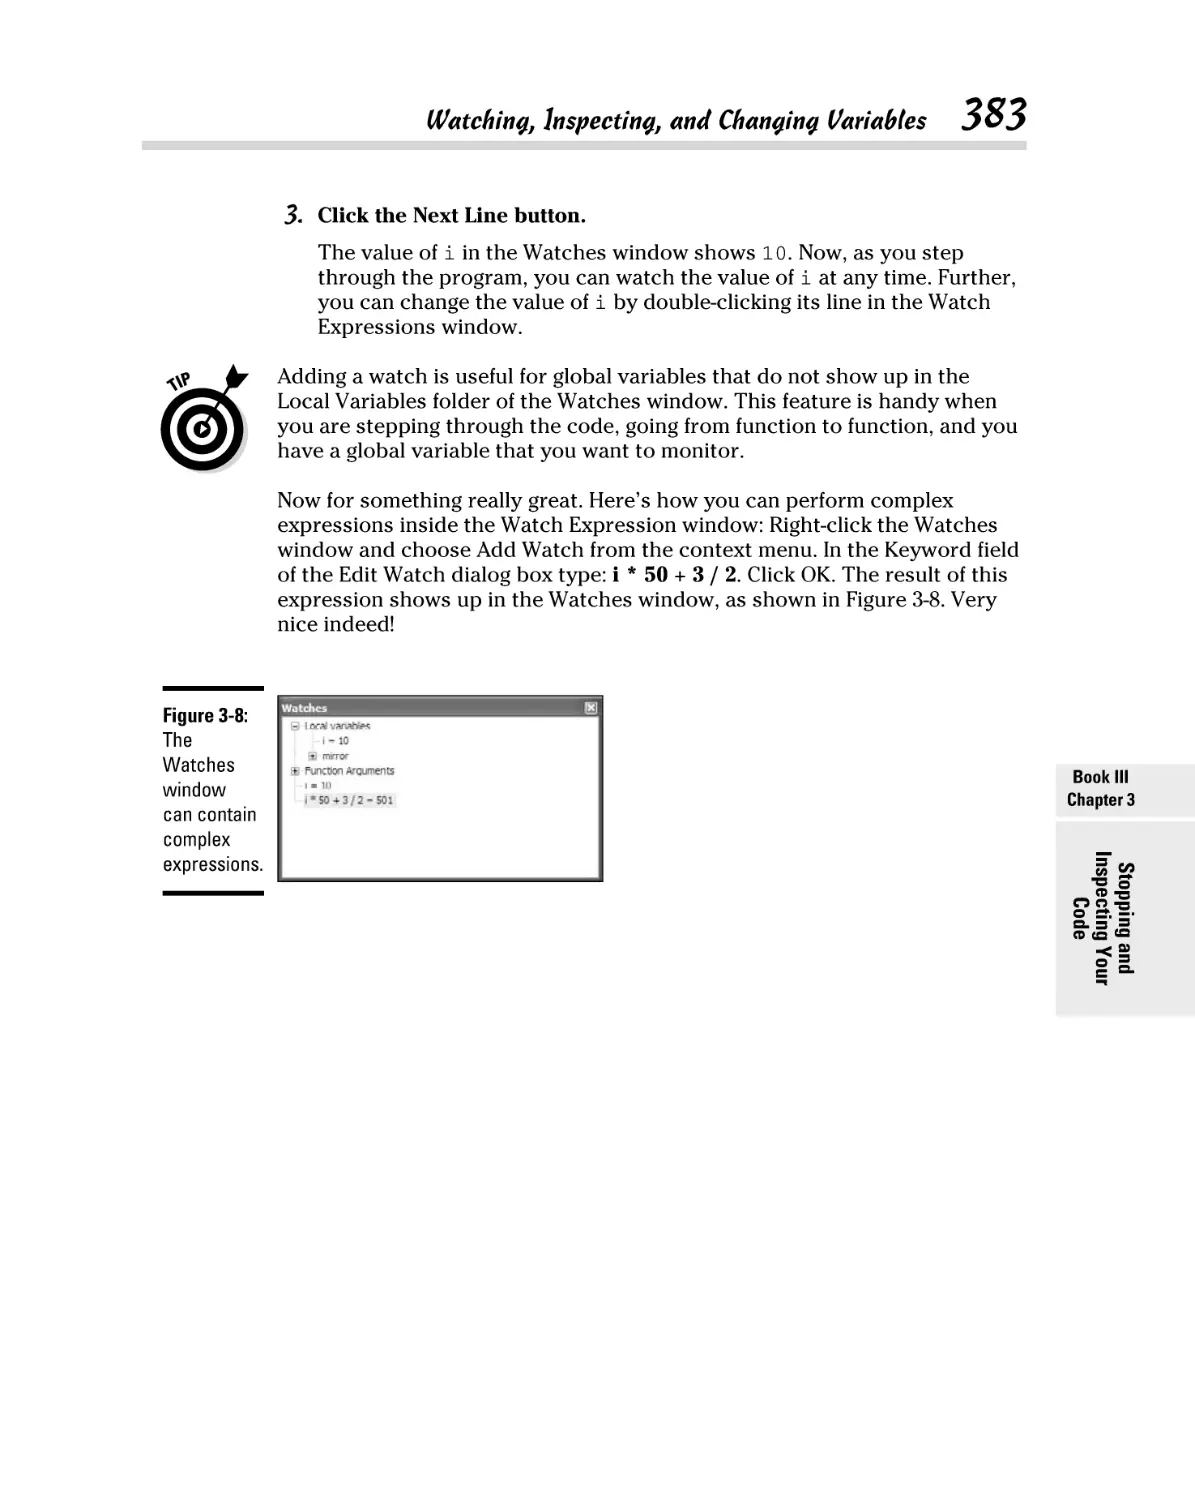
Watching, Inspecting, and Changing Variables ....................................... 378
Watching the local variables ............................................................ 380
Watching other variables.................................................................. 382
Chapter 4: Traveling About the Stack. . . . . . . . . . . . . . . . . . . . . . . . . . .385
Stacking Your Data ...................................................................................... 385
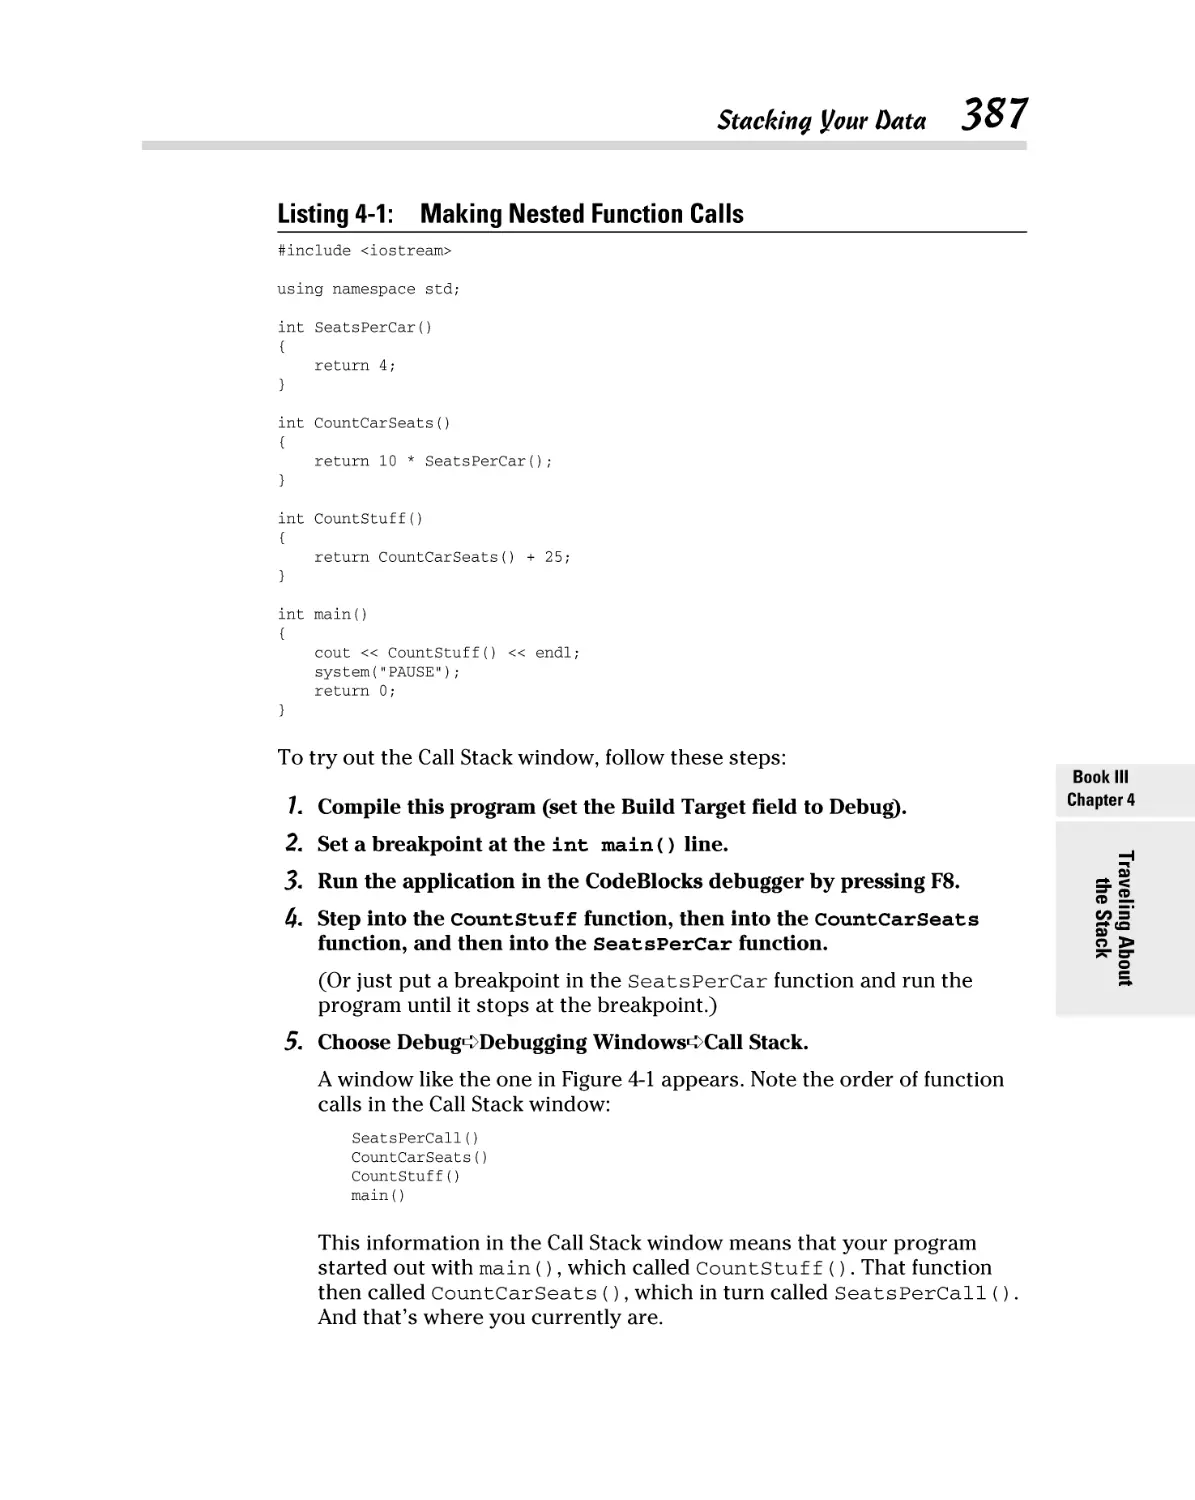
Moving about the stack ..................................................................... 386
Storing local variables ....................................................................... 388
Debugging with Advanced Features .......................................................... 390
Viewing threads ................................................................................. 390
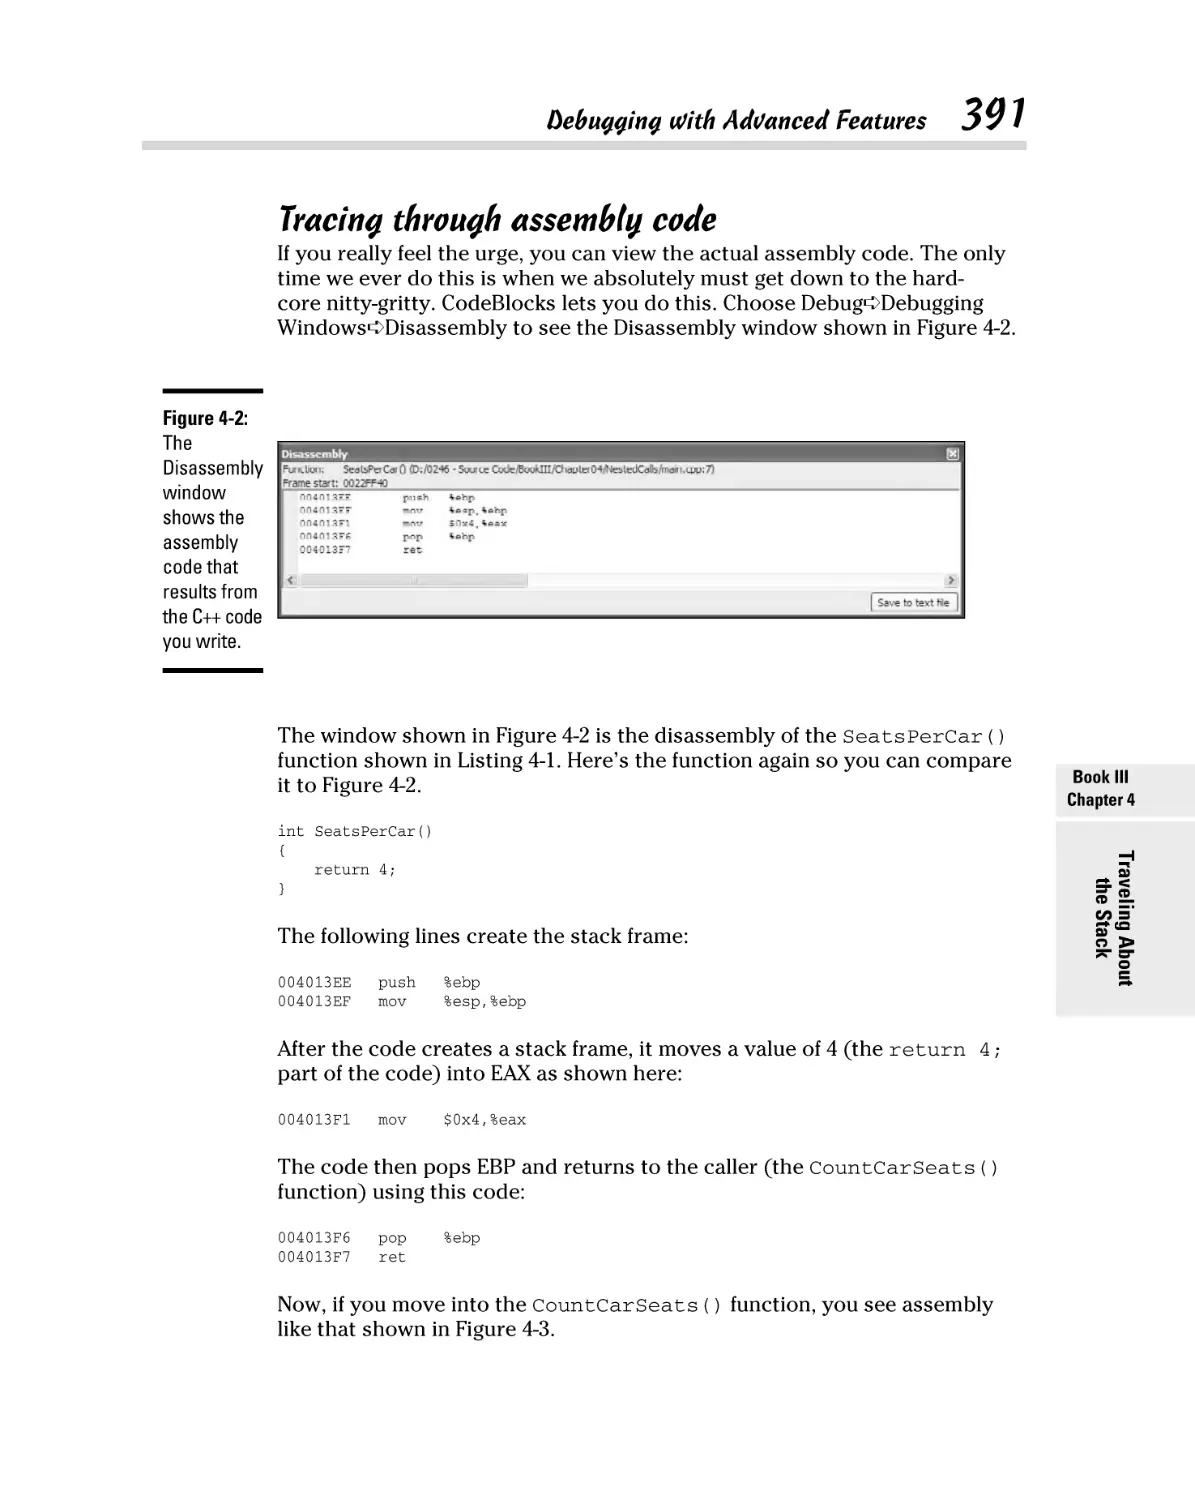
Tracing through assembly code ...................................................... 391
Book IV: Advanced Programming ............................... 395
Chapter 1: Working with Arrays, Pointers, and References . . . . . . .397
Building Up Arrays ...................................................................................... 397
Declaring arrays ................................................................................. 398
Arrays and pointers ........................................................................... 400
Using multidimensional arrays ........................................................ 403
Arrays and command-line parameters............................................ 406
Allocating an array on the heap ....................................................... 407
Storing arrays of pointers and arrays of arrays ............................. 409
Building constant arrays ................................................................... 411
Table of Contents
xv
Pointing with Pointers ................................................................................ 413
Becoming horribly complex ............................................................. 413
Pointers to functions ......................................................................... 418
Pointing a variable to a member function ...................................... 419
Pointing to static member functions ............................................... 422
Referring to References .............................................................................. 422
Reference variables ........................................................................... 423
Returning a reference from a function ............................................ 424
Chapter 2: Creating Data Structures . . . . . . . . . . . . . . . . . . . . . . . . . . . .427
Working with Data ....................................................................................... 427
The great variable roundup.............................................................. 427
Expressing variables from either side............................................. 429
Casting a spell on your data ............................................................. 431
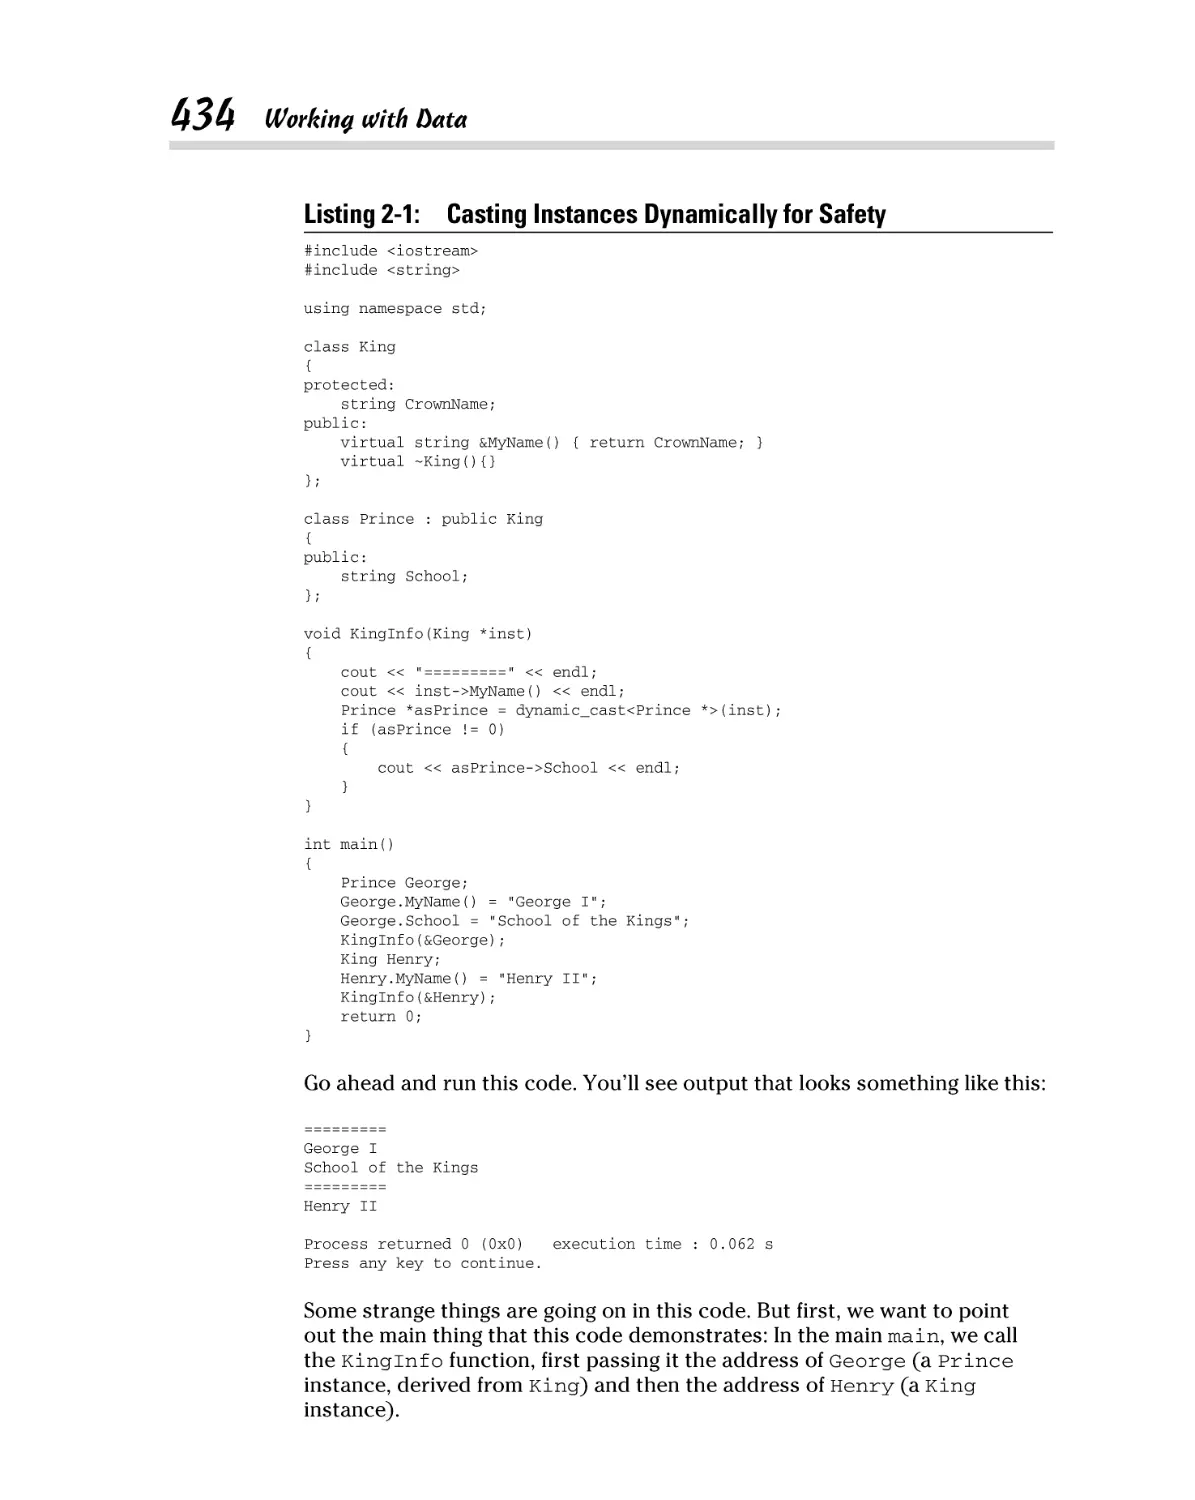
Casting safely with C++ ..................................................................... 433
Dynamically casting with dynamic_cast ......................................... 433
Statically casting with static_cast.................................................... 437
Structuring Your Data ................................................................................. 438
Structures as component data types .............................................. 439
Equating structures ........................................................................... 440
Returning compound data types ..................................................... 441
Naming Your Space ..................................................................................... 442
Using variables and part of a namespace ....................................... 445
Chapter 3: Constructors, Destructors, and Exceptions . . . . . . . . . . . .449
Constructing and Destructing Objects ..................................................... 449
Overloading constructors................................................................. 450
Initializing members .......................................................................... 451
Adding a default constructor ........................................................... 455
Functional constructors.................................................................... 458
Calling one constructor from another ............................................ 460
Copying instances with copy constructors .................................... 461
When constructors go bad: failable constructors? ....................... 464
Destroying your instances ................................................................ 465
Virtually inheriting destructors ....................................................... 466
Programming the Exceptions to the Rule................................................. 469
Throwing direct instances ................................................................ 472
Catching any exception ..................................................................... 473
Rethrowing an exception .................................................................. 474
Chapter 4: Advanced Class Usage . . . . . . . . . . . . . . . . . . . . . . . . . . . . .477
Inherently Inheriting Correctly .................................................................. 477
Morphing your inheritance............................................................... 477
Adjusting access ................................................................................ 480
Returning something different, virtually speaking ........................ 482
Multiple inheritance .......................................................................... 486
xvi
C++ All-in-One For Dummies, 2nd Edition
Virtual inheritance ............................................................................. 489
Friend classes and functions ............................................................ 492
Using Classes and Types within Classes .................................................. 493
Nesting a class .................................................................................... 494
Types within classes ......................................................................... 499
Chapter 5: Creating Classes with Templates . . . . . . . . . . . . . . . . . . . .503
Templatizing a Class ................................................................................... 503
Separating a template from the function code............................... 510
Including static members in a template.......................................... 512
Parameterizing a Template ........................................................................ 514
Putting different types in the parameter ........................................ 514
Including multiple parameters ......................................................... 518
Typedefing a Template ............................................................................... 521
Deriving Templates ..................................................................................... 522
Deriving classes from a class template ........................................... 522
Deriving a class template from a class ............................................ 524
Deriving a class template from a class template ........................... 525
Templatizing a Function ............................................................................. 528
Overloading and function templates ............................................... 530
Templatizing a member function ..................................................... 533
Chapter 6: Programming with the Standard Library . . . . . . . . . . . . . .535
Architecting the Standard Library ............................................................ 536
Containing Your Classes ............................................................................. 536
Storing in a vector.............................................................................. 536
Mapping your data............................................................................. 538
Containing instances, pointers, or references ............................... 539
Comparing instances ......................................................................... 543
Iterating through a container ........................................................... 547
A map of pairs in your hand ............................................................. 551
The Great Container Showdown................................................................ 551
Associating and storing with a set................................................... 552
Unionizing and intersecting sets...................................................... 554
Listing with list ................................................................................... 557
Stacking the deque ............................................................................ 561
Waiting in line with stacks and queues ........................................... 562
Copying Containers ..................................................................................... 564
Book V: Reading and Writing Files ............................ 567
Chapter 1: Filing Information with the Streams Library . . . . . . . . . . .569
Seeing a Need for Streams .......................................................................... 570
Programming with the Streams Library ................................................... 571
Getting the right header file ............................................................. 572
Opening a file ...................................................................................... 573
Table of Contents
xvii
Handling Errors When Opening a File ....................................................... 576
Flagging the ios Flags .................................................................................. 578
Chapter 2: Writing with Output Streams . . . . . . . . . . . . . . . . . . . . . . . .583
Inserting with the << Operator................................................................... 583
Formatting Your Output ............................................................................. 585
Formatting with flags ......................................................................... 586
Specifying a precision ....................................................................... 590
Setting the width and creating fields ............................................... 592
Chapter 3: Reading with Input Streams . . . . . . . . . . . . . . . . . . . . . . . . .597
Extracting with Operators .......................................................................... 597
Encountering the End of File ...................................................................... 599
Reading Various Types ............................................................................... 604
Reading Formatted Input ............................................................................ 607
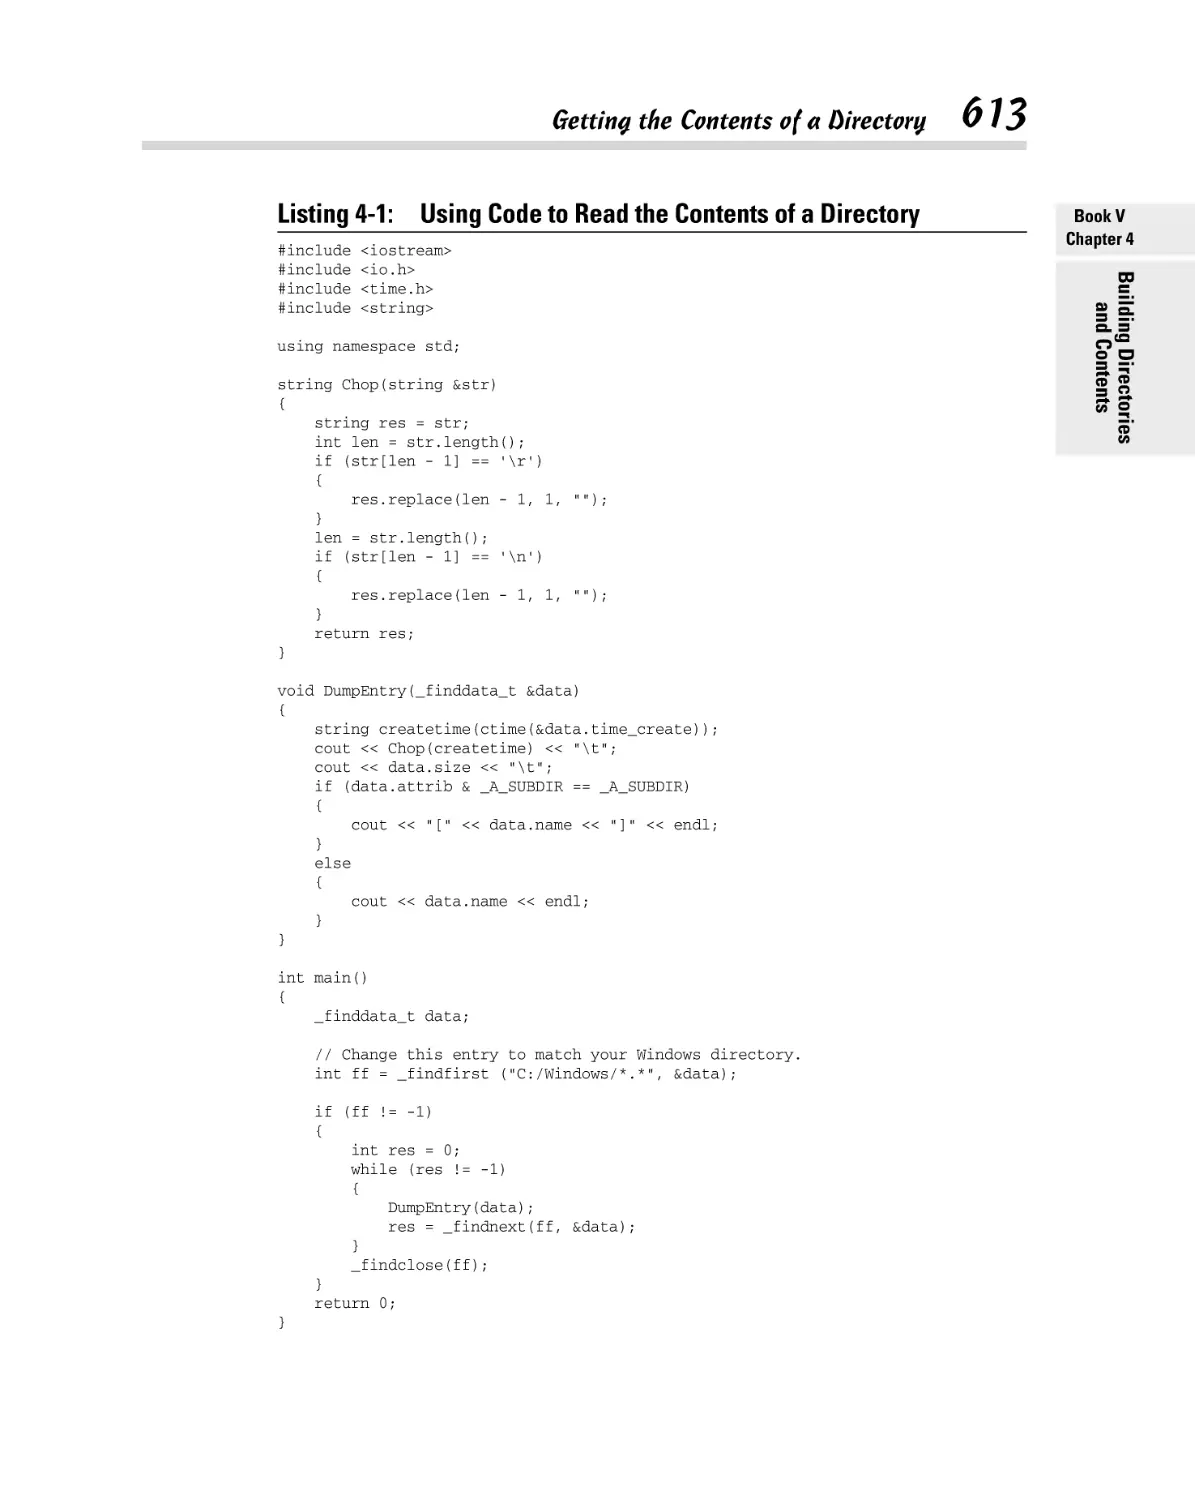
Chapter 4: Building Directories and Contents . . . . . . . . . . . . . . . . . . .609
Manipulating Directories ............................................................................ 610
Creating a directory........................................................................... 610
Deleting a directory ........................................................................... 611
Getting the Contents of a Directory .......................................................... 611
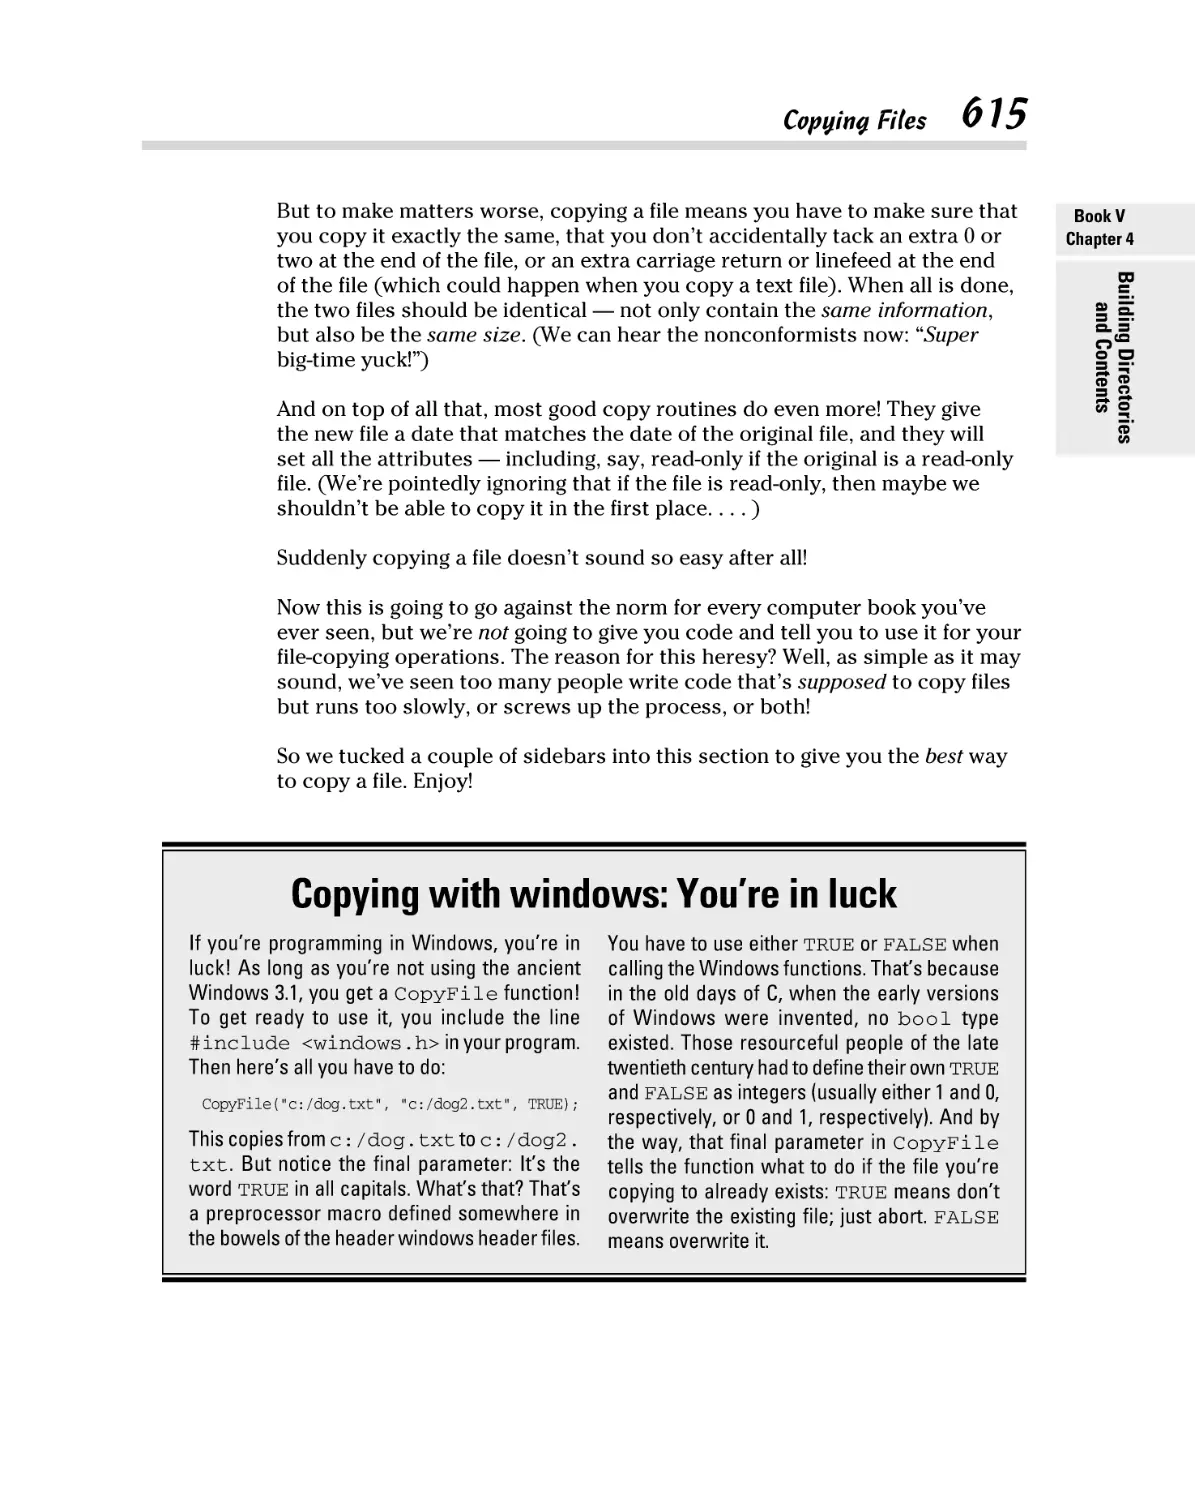
Copying Files ................................................................................................ 614
Moving and Renaming Files and Directories............................................ 616
Chapter 5: Streaming Your Own Classes . . . . . . . . . . . . . . . . . . . . . . . .619
Streaming a Class for Text Formatting ..................................................... 620
Manipulating a Stream ................................................................................ 623
What’s a manipulator? ...................................................................... 623
Writing your own manipulator ......................................................... 626
Book VI: Advanced C++ ............................................ 631
Chapter 1: Exploring the Standard Library Further. . . . . . . . . . . . . . . .633
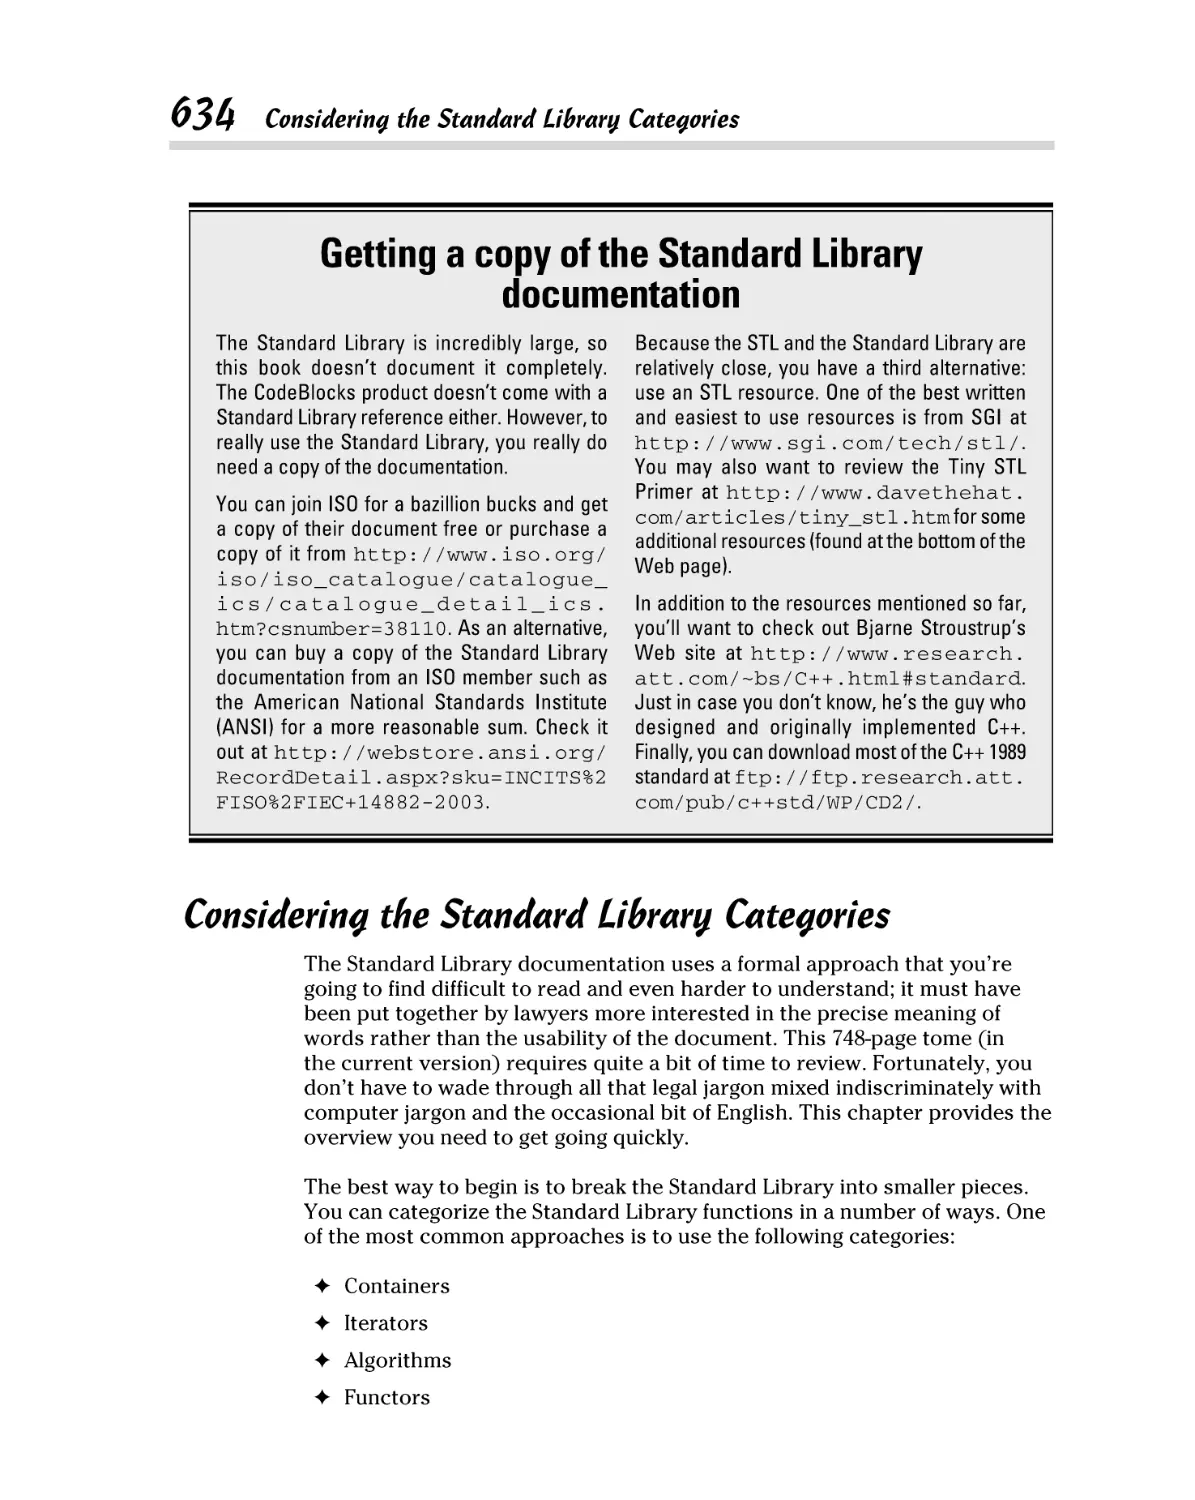
Considering the Standard Library Categories ......................................... 634
Containers........................................................................................... 635
Iterators............................................................................................... 635
Algorithms .......................................................................................... 636
Functors .............................................................................................. 637
Utilities ................................................................................................ 639
Adaptors ............................................................................................. 639
Allocators ............................................................................................ 639
Parsing Strings Using a Hash...................................................................... 640
Obtaining Information Using a Random Access Iterator ........................ 643
Locating Values Using the Find Algorithm ............................................... 645
Using the Random Number Generator...................................................... 647
xviii
C++ All-in-One For Dummies, 2nd Edition
Performing Comparisons Using min and max ......................................... 648
Working with Temporary Buffers .............................................................. 649
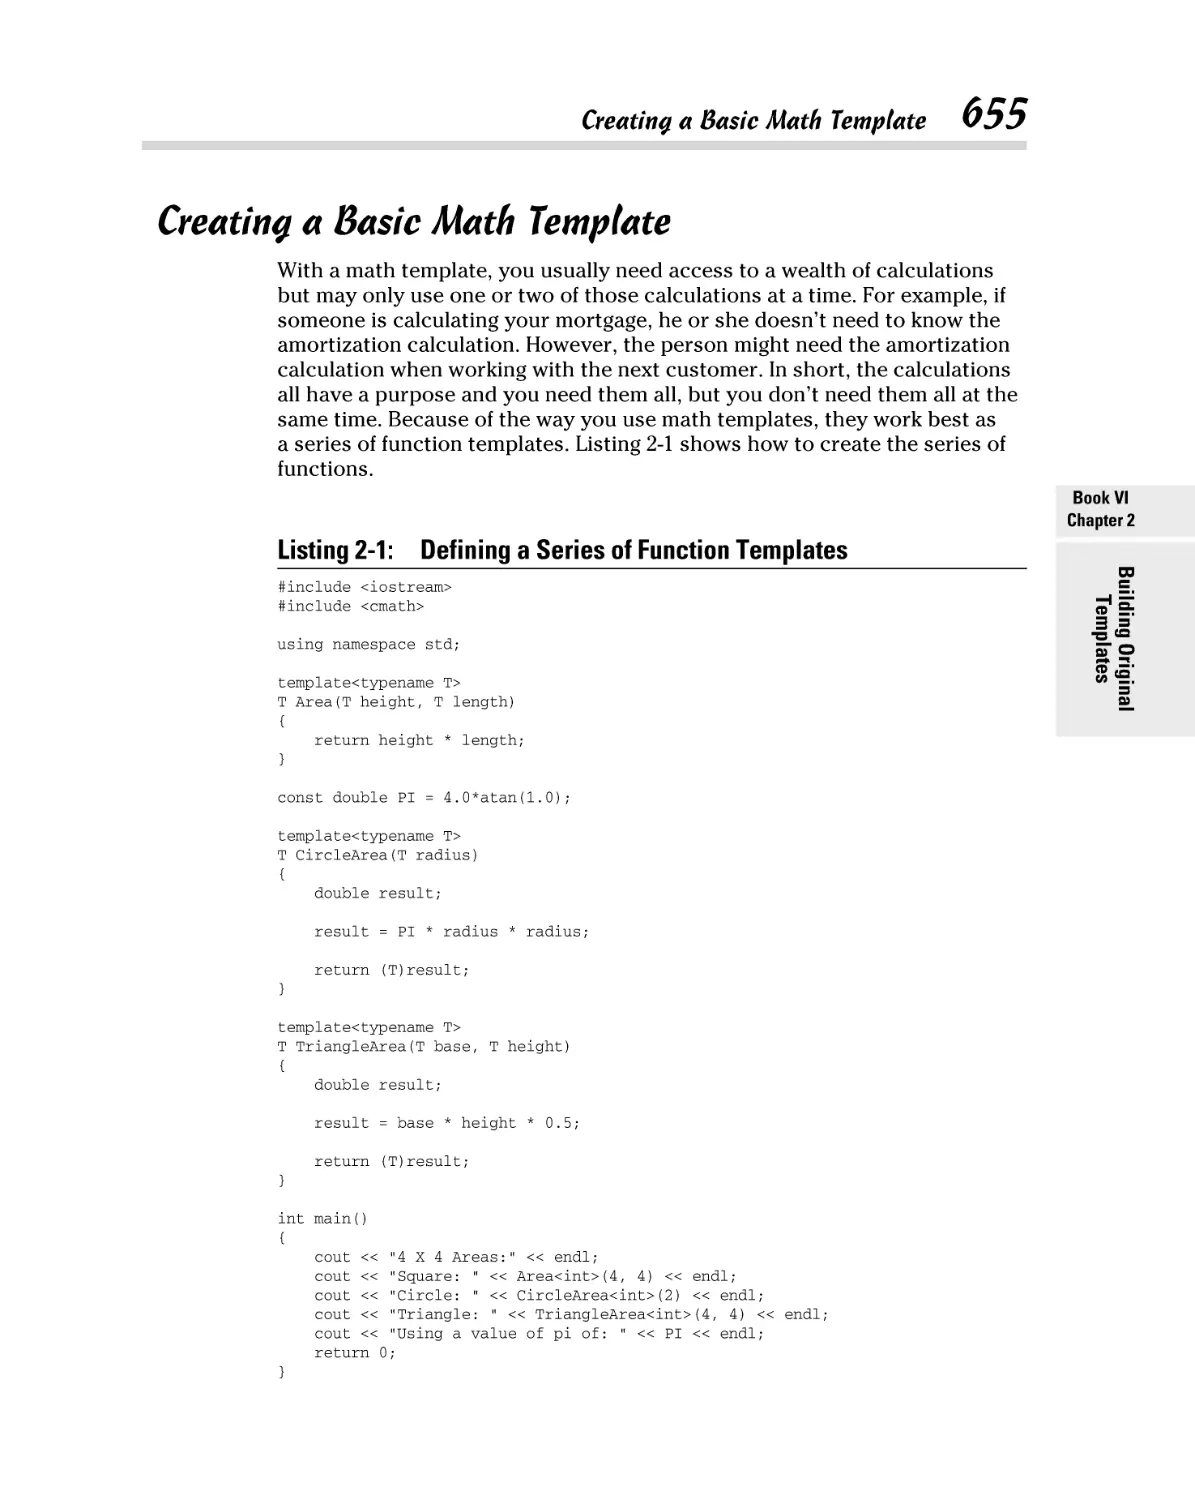
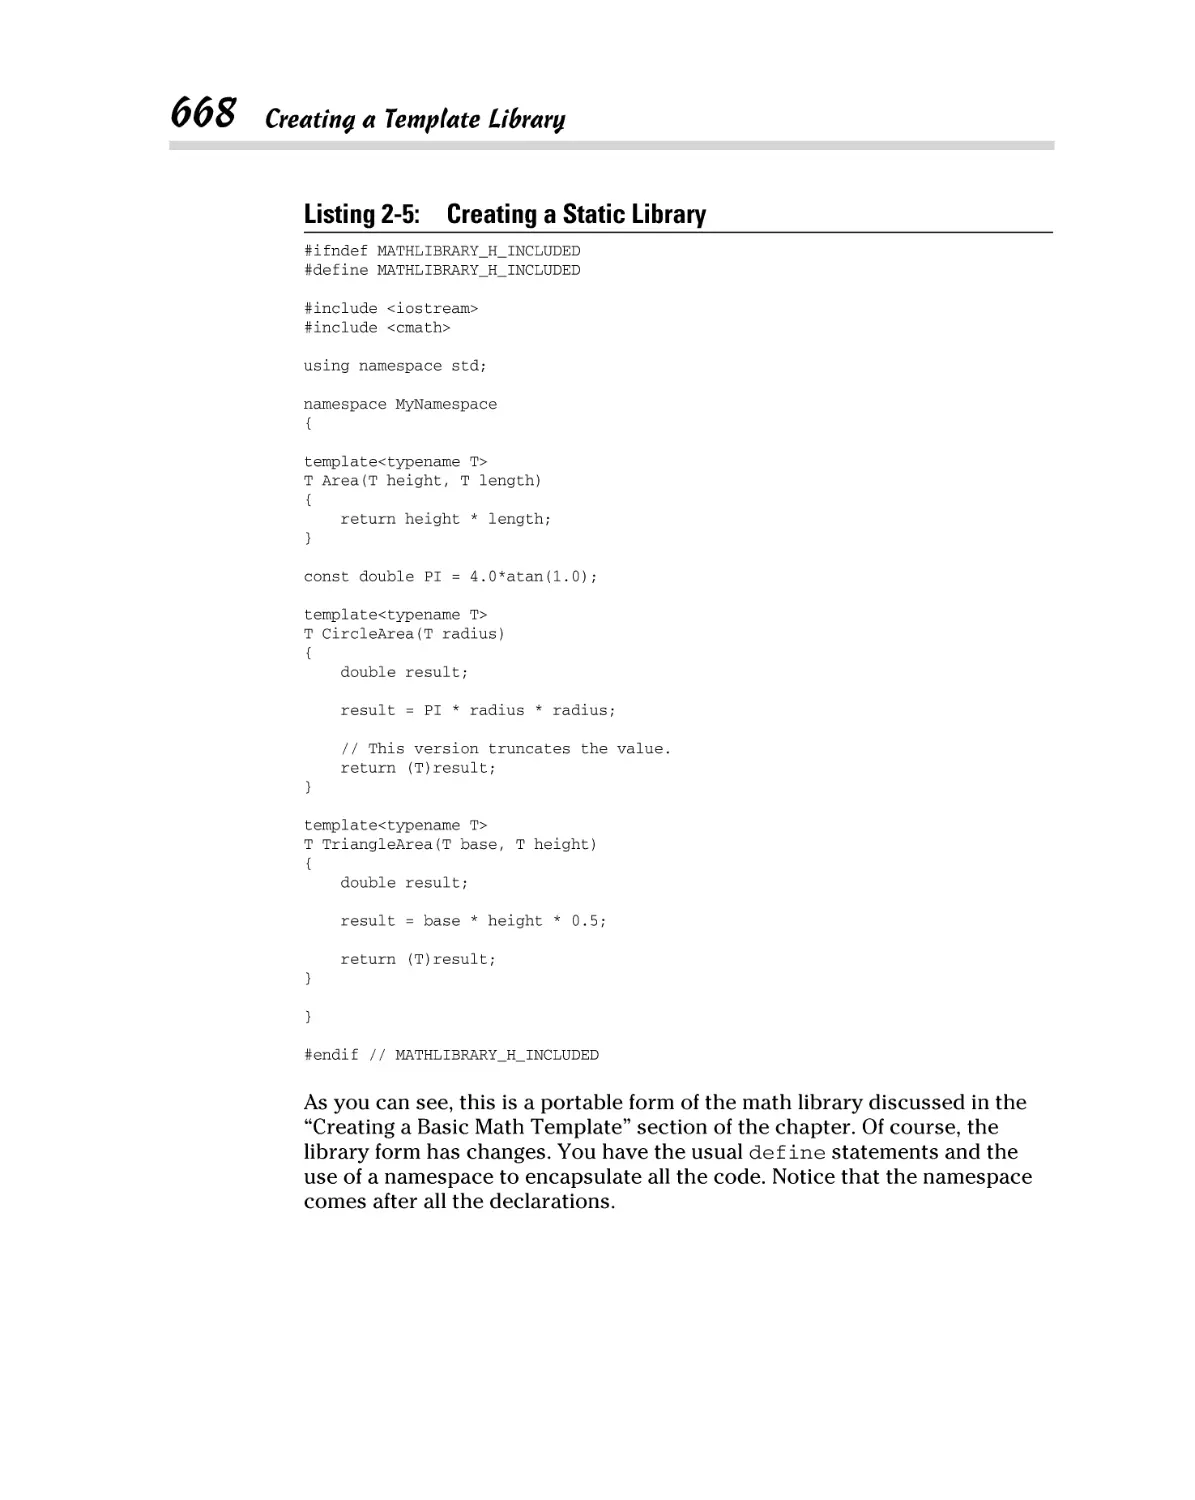
Chapter 2: Building Original Templates. . . . . . . . . . . . . . . . . . . . . . . . .651
Deciding When to Create a Template ....................................................... 652
Defining the Elements of a Good Template .............................................. 653
Creating a Basic Math Template ................................................................ 655
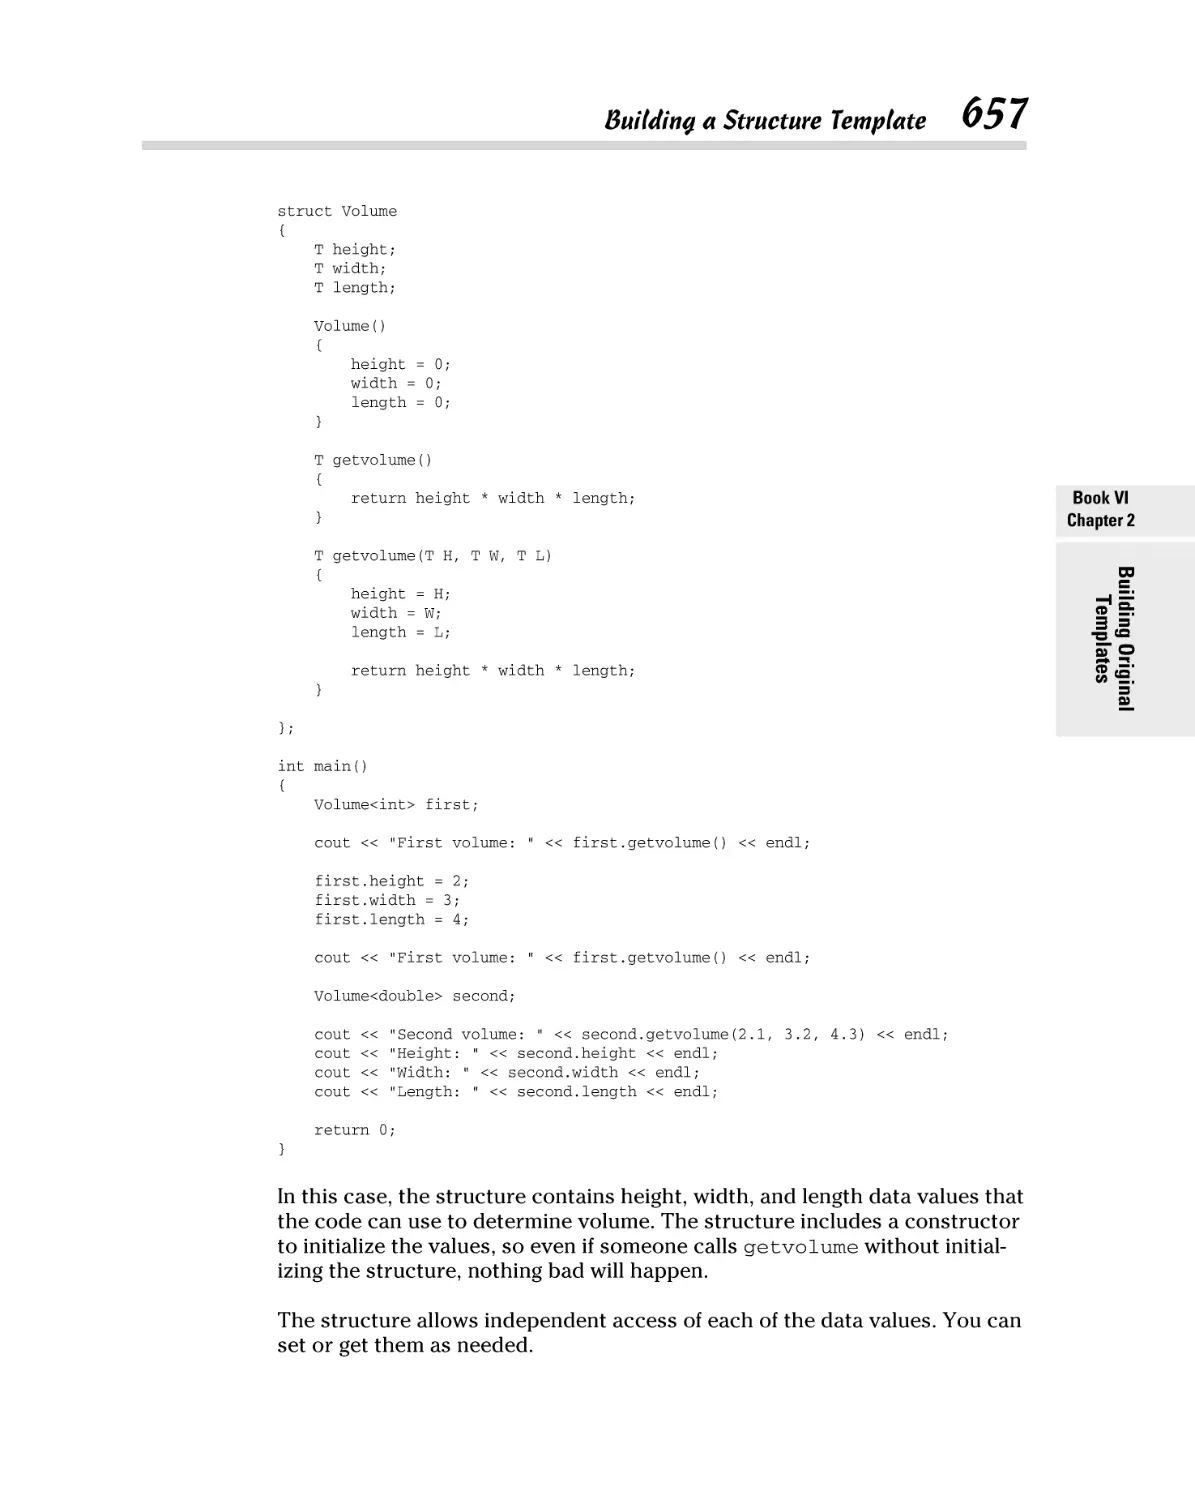
Building a Structure Template ................................................................... 656
Developing a Class Template ..................................................................... 659
Considering Template Specialization ....................................................... 662
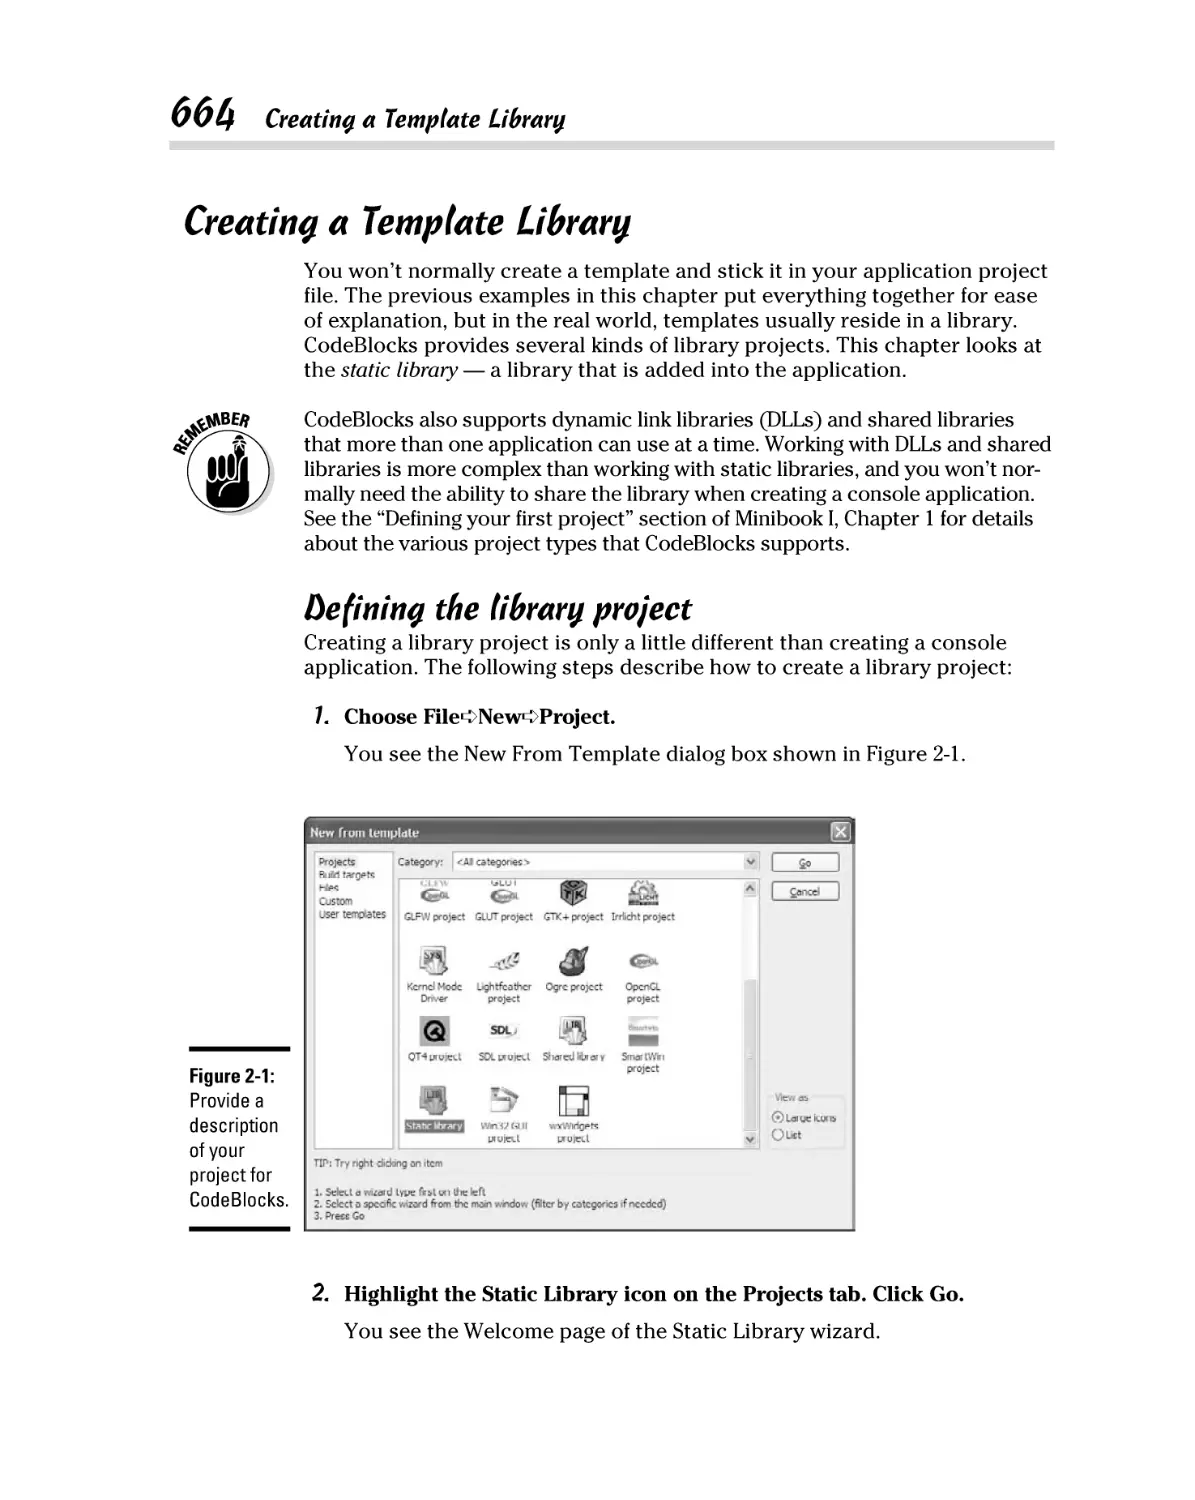
Creating a Template Library ...................................................................... 664
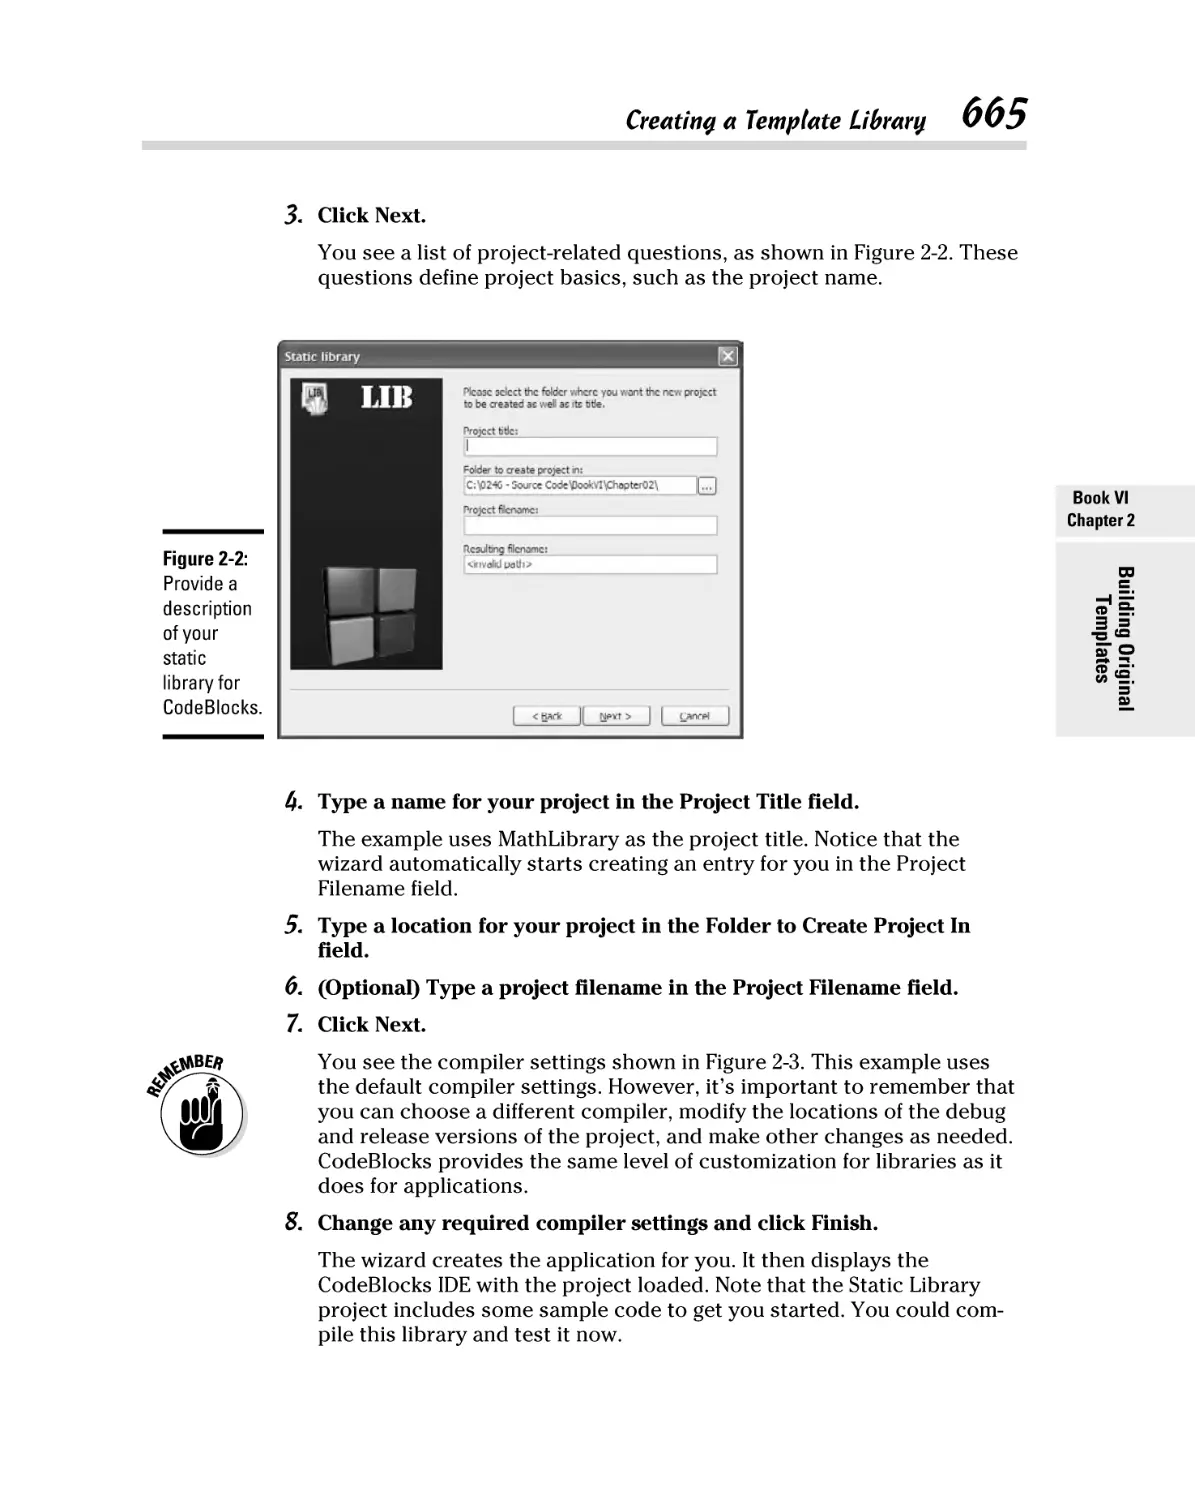
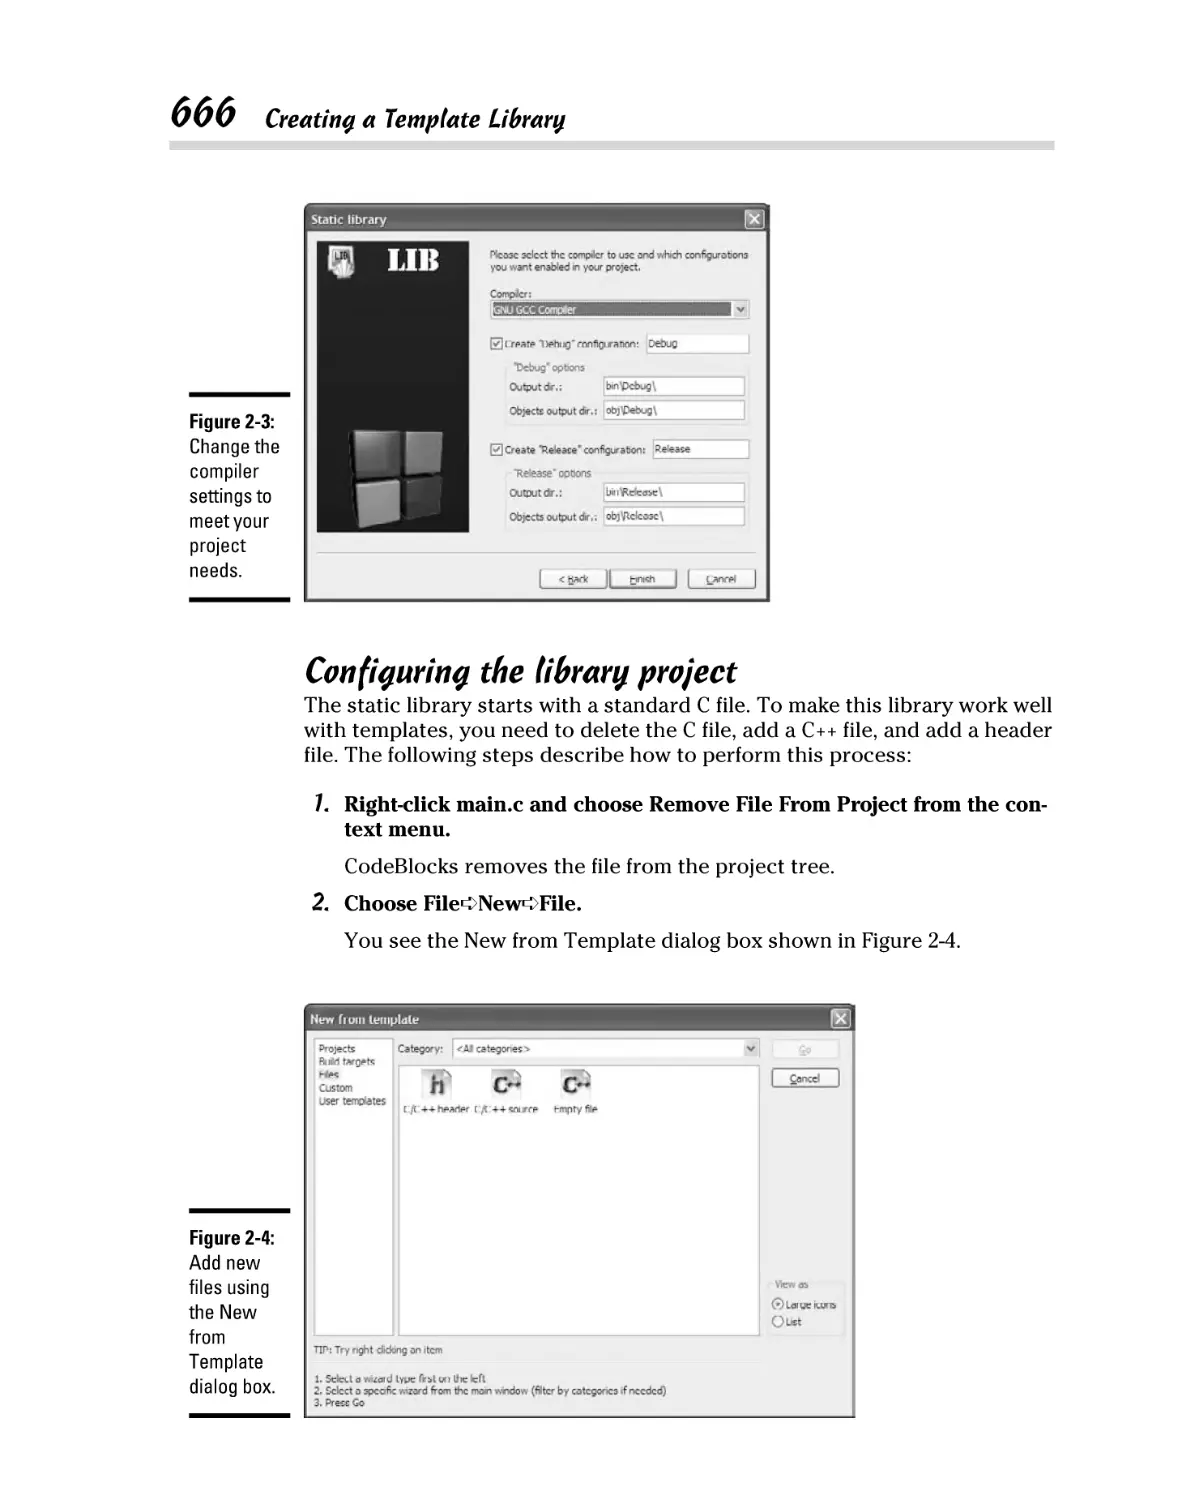
Defining the library project .............................................................. 664
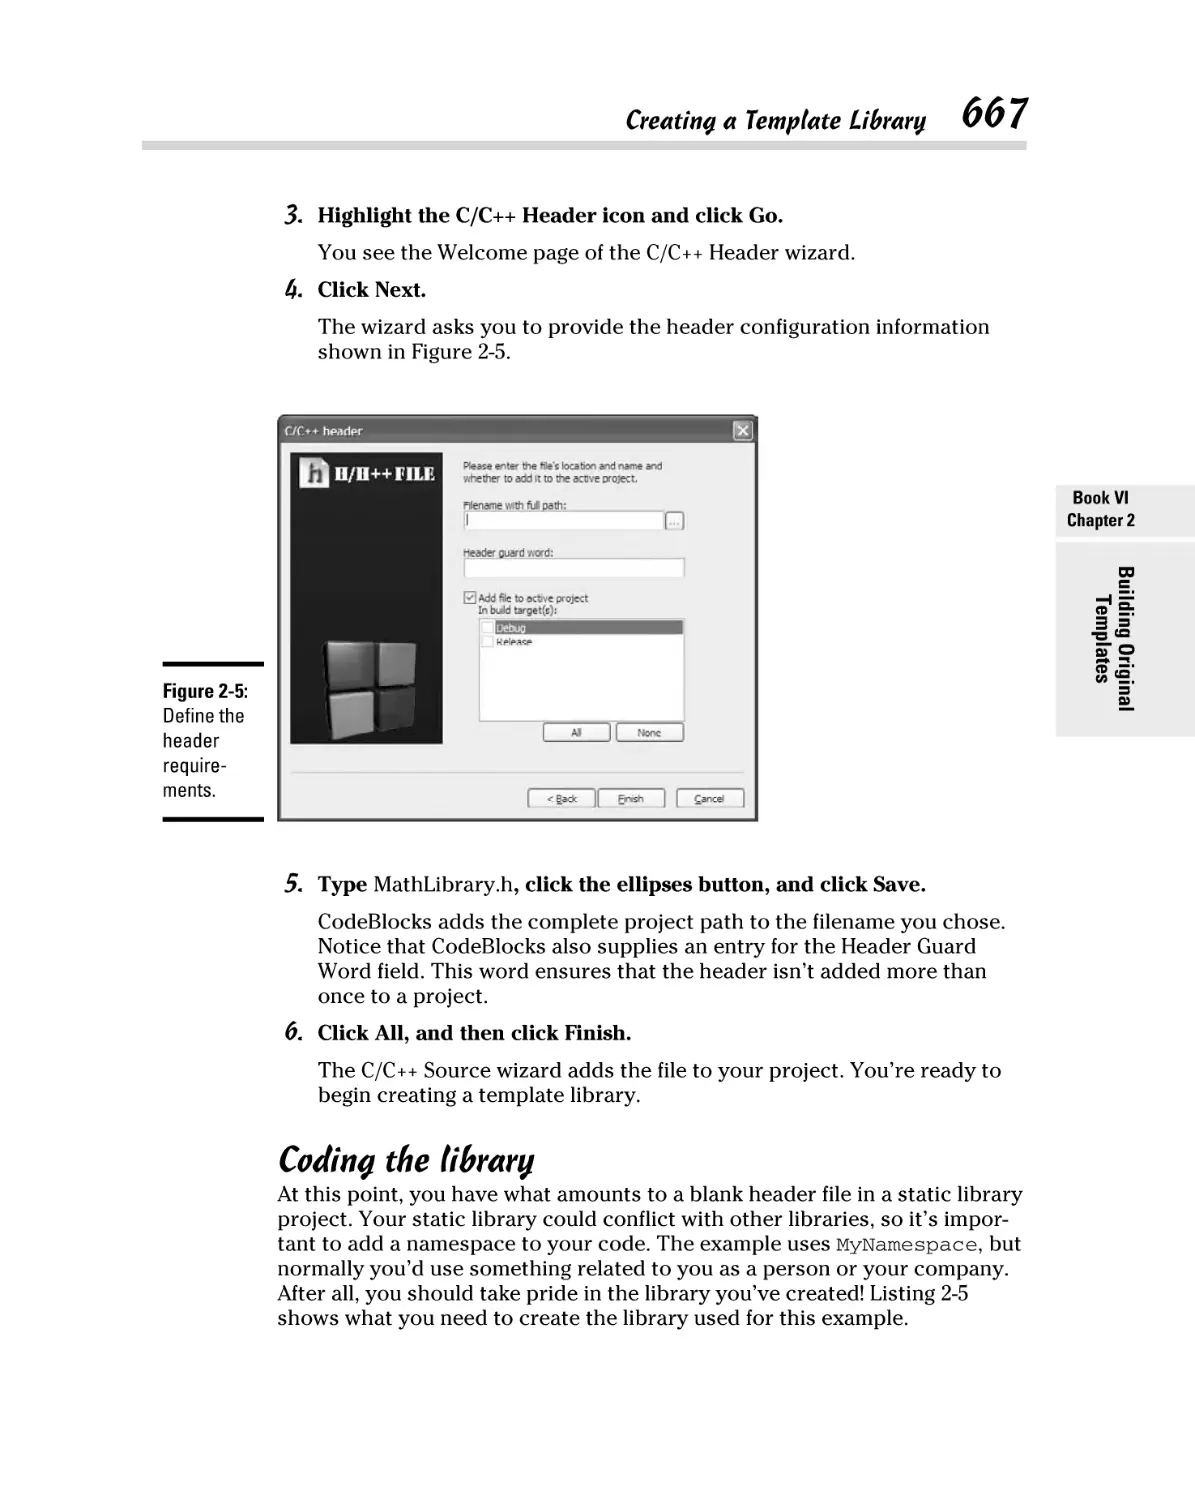
Configuring the library project ........................................................ 666
Coding the library .............................................................................. 667
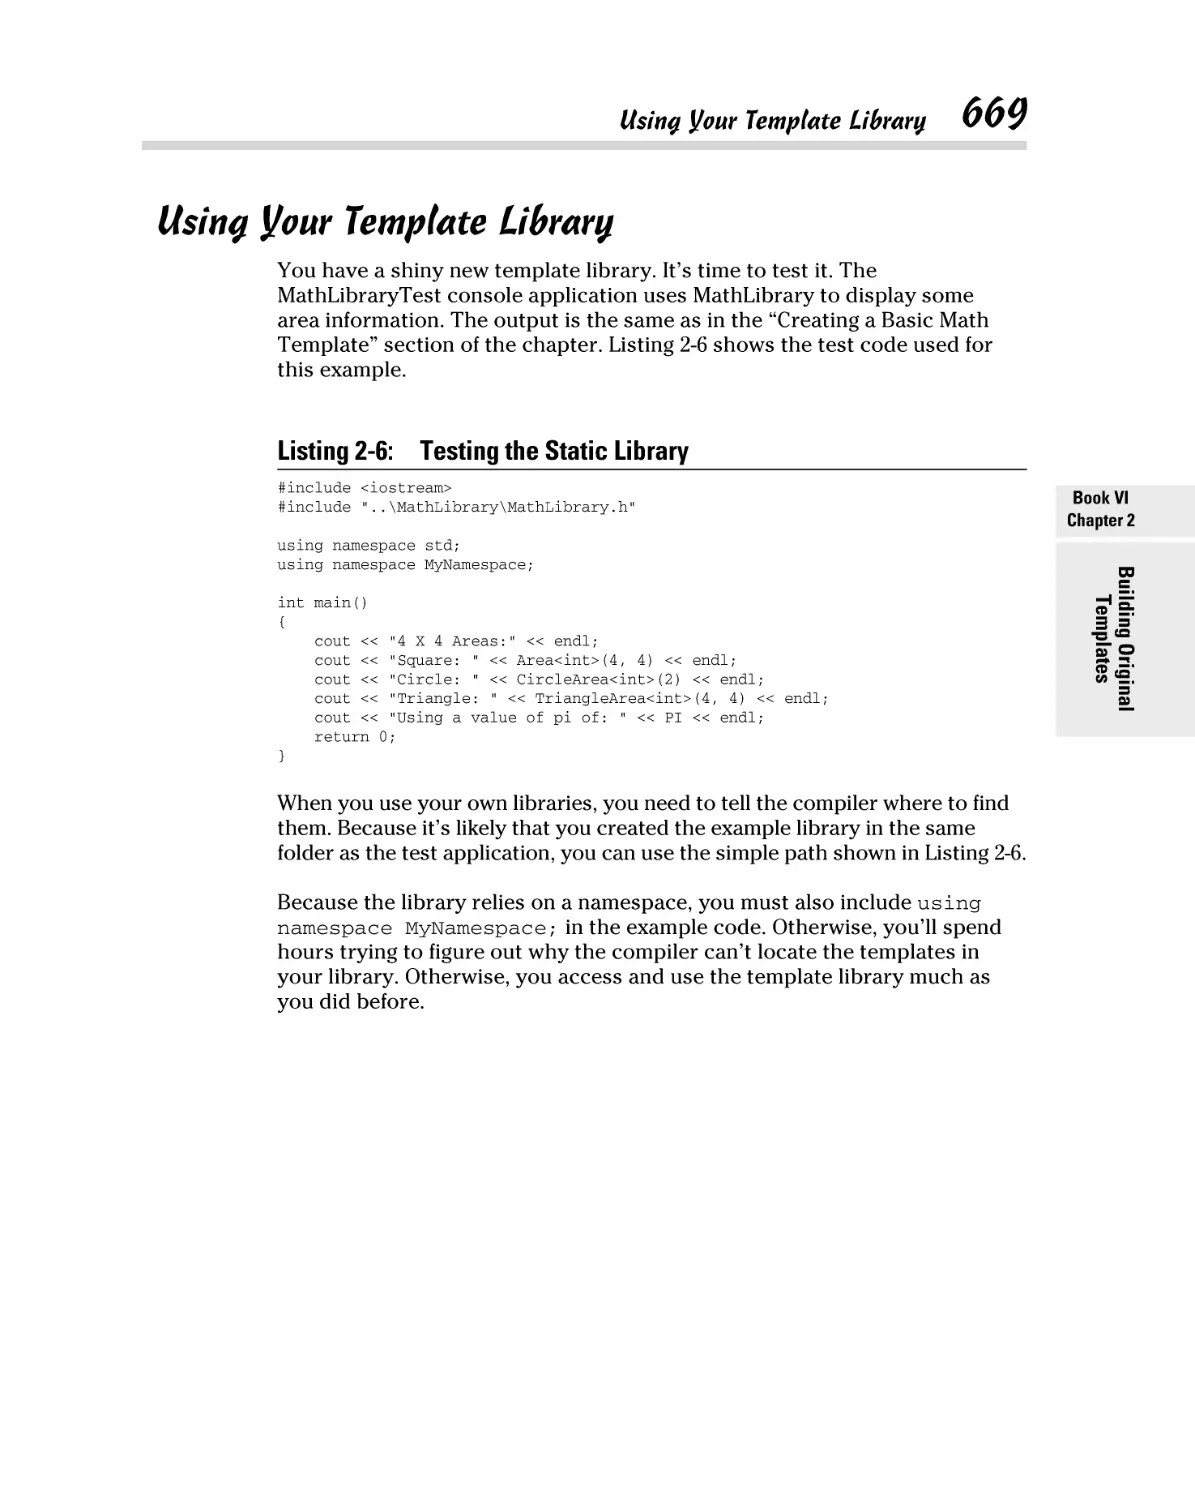
Using Your Template Library..................................................................... 669
Chapter 3: Investigating Boost. . . . . . . . . . . . . . . . . . . . . . . . . . . . . . . . .671
Understanding Boost .................................................................................. 672
Boost features .................................................................................... 672
Licensing ............................................................................................. 673
Paid support ....................................................................................... 673
Obtaining and Installing Boost for CodeBlocks ....................................... 673
Unpacking Boost ................................................................................ 674
Building the libraries ......................................................................... 675
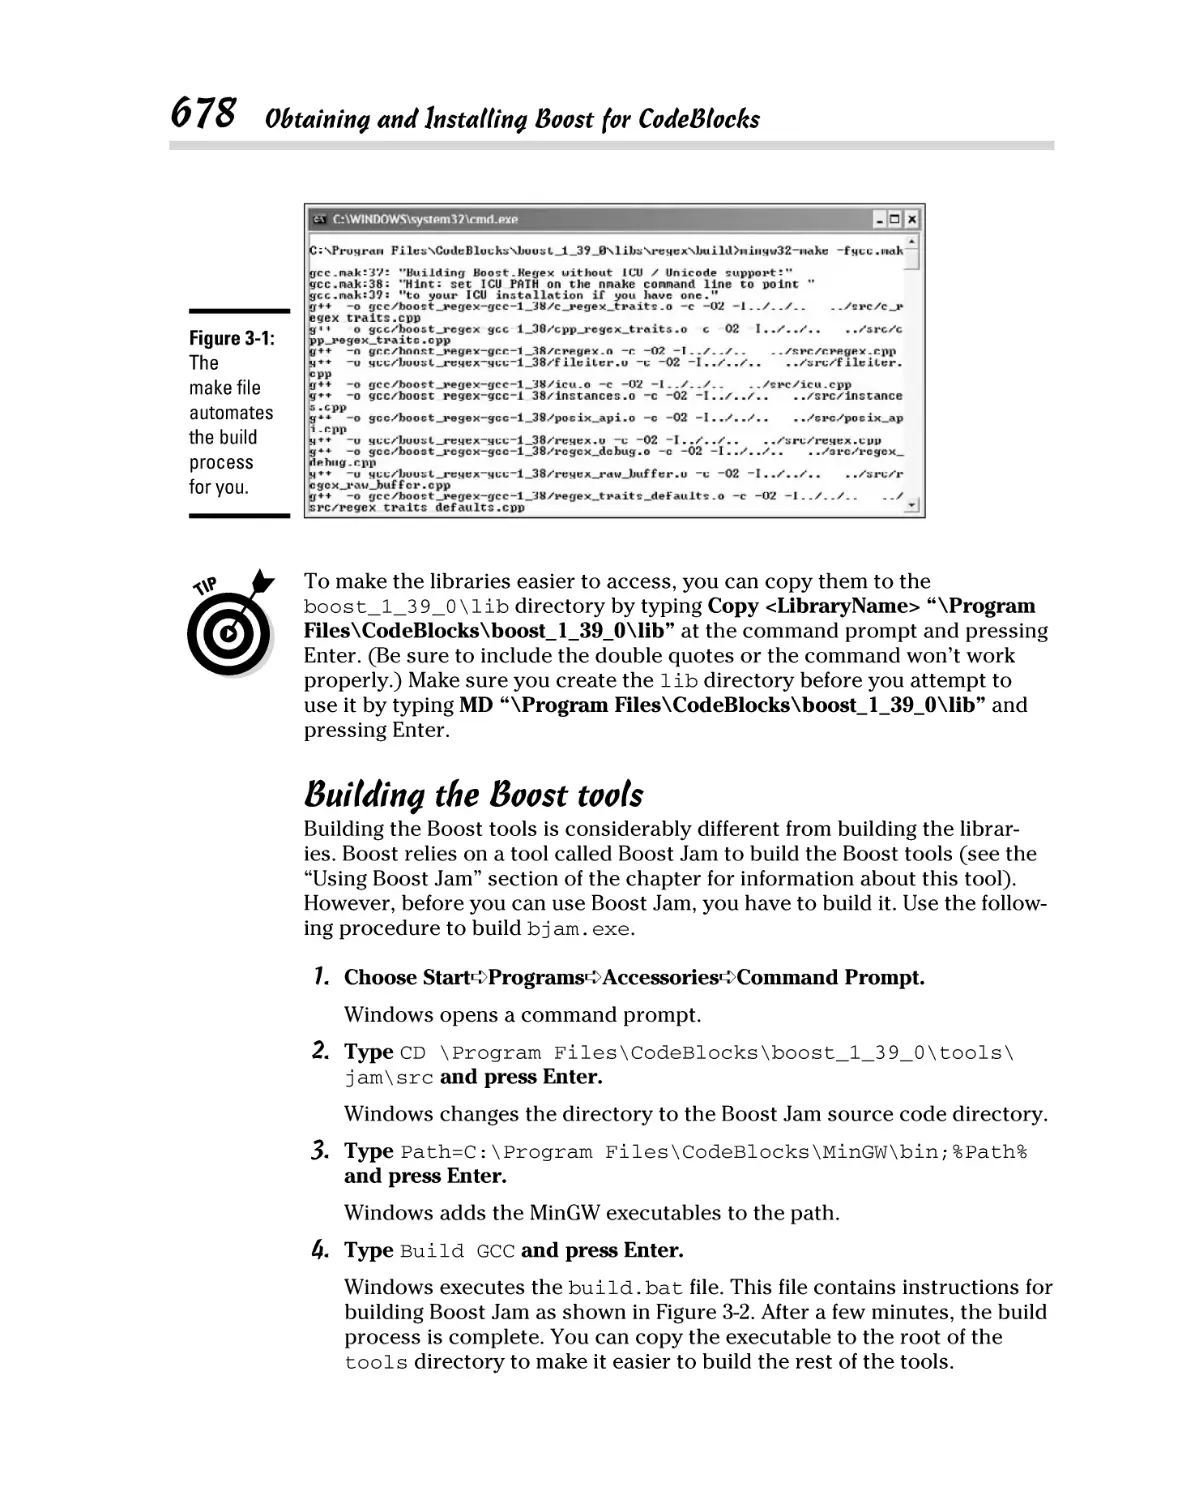
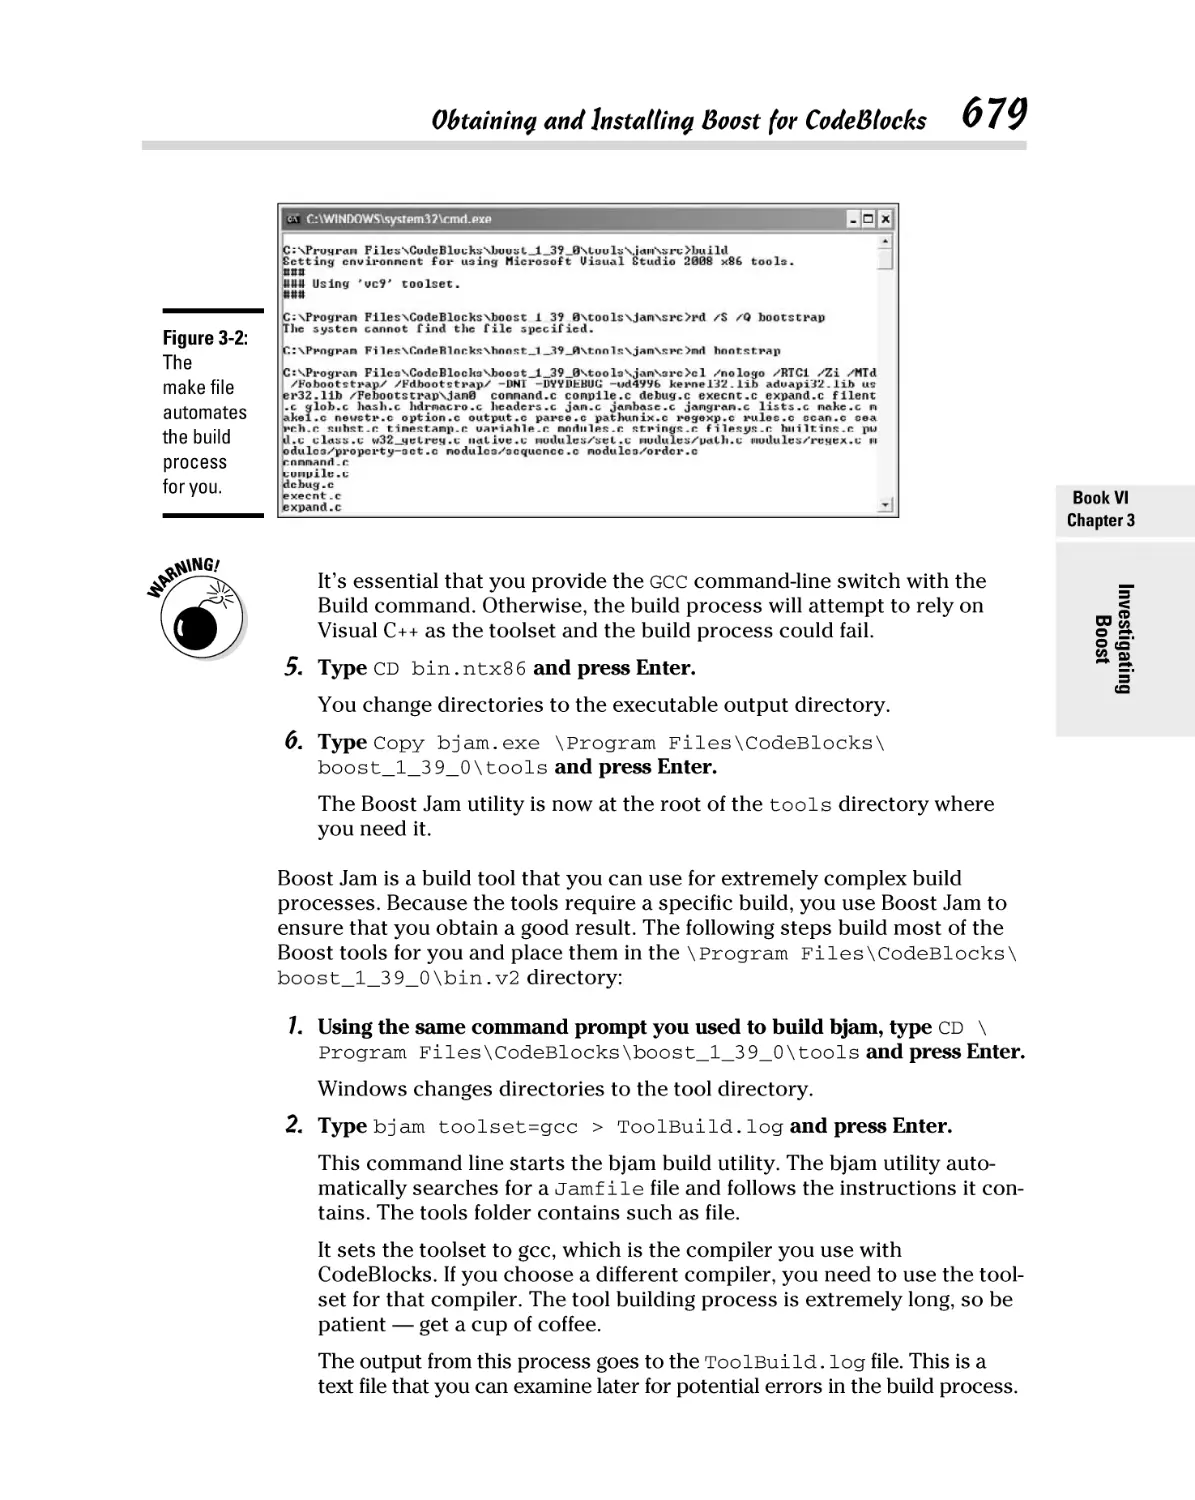
Building the Boost tools.................................................................... 678
Using Boost Jam........................................................................................... 680
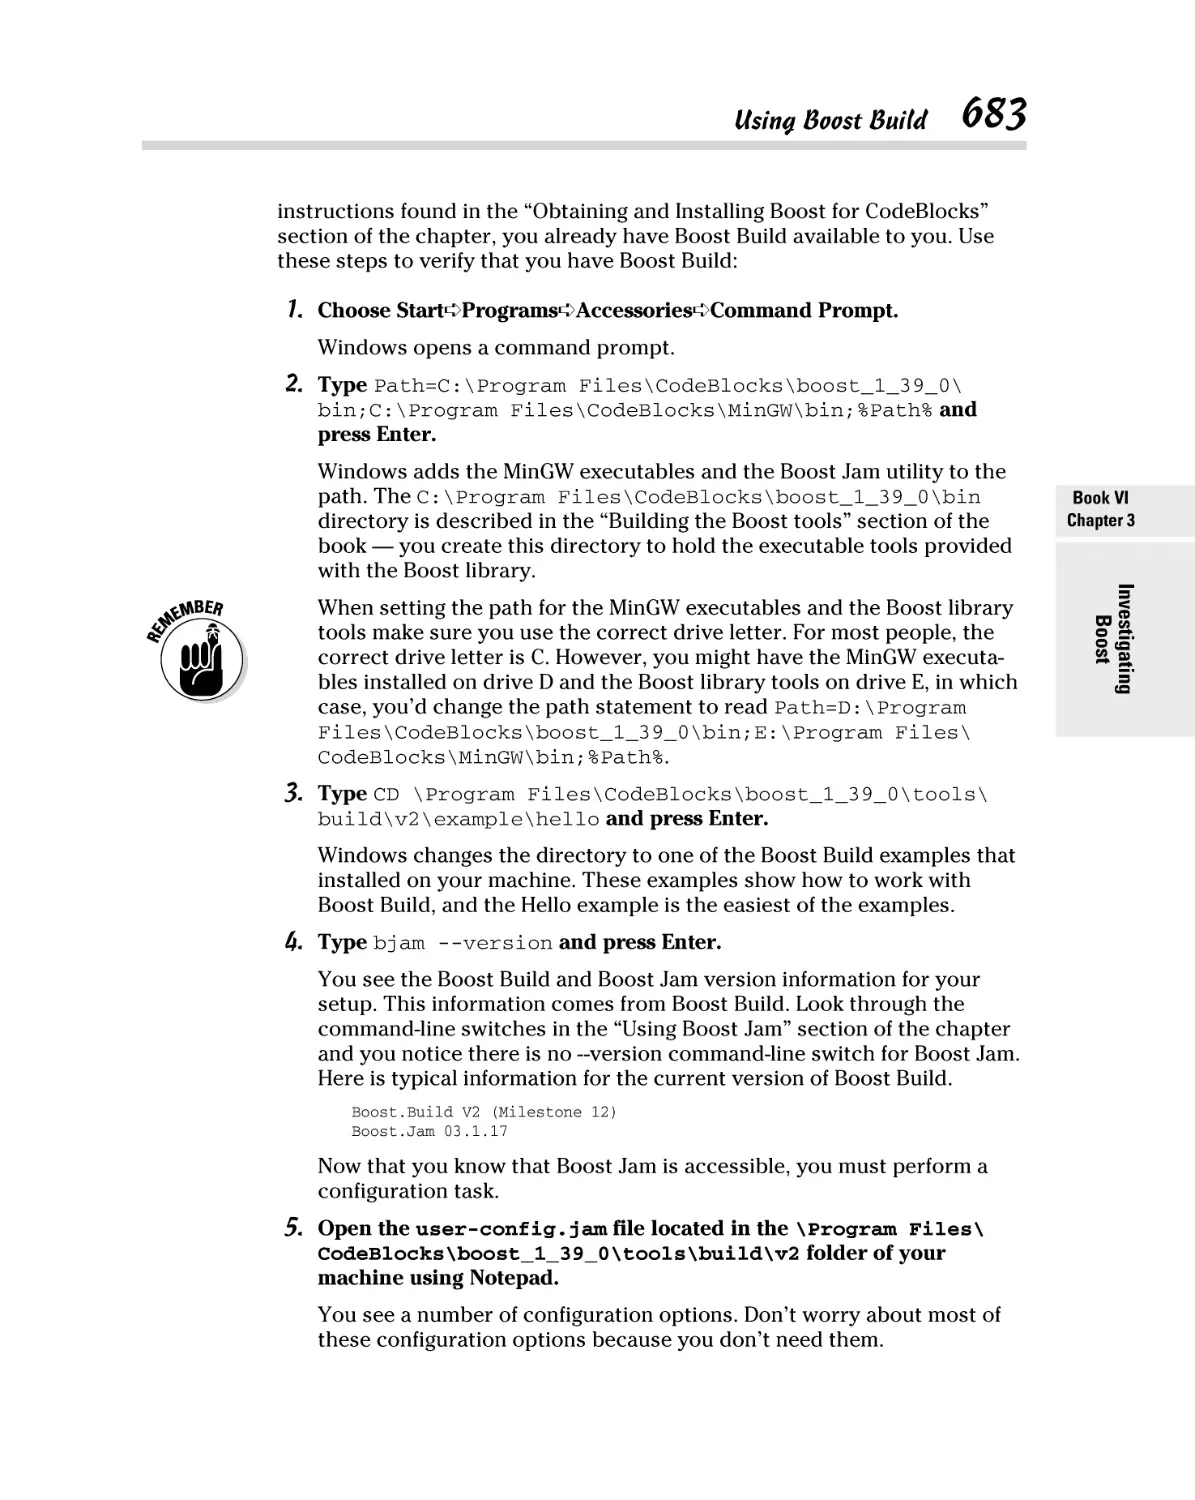
Using Boost Build ........................................................................................ 682
Using Regression ......................................................................................... 685
Using Inspect ................................................................................................ 685
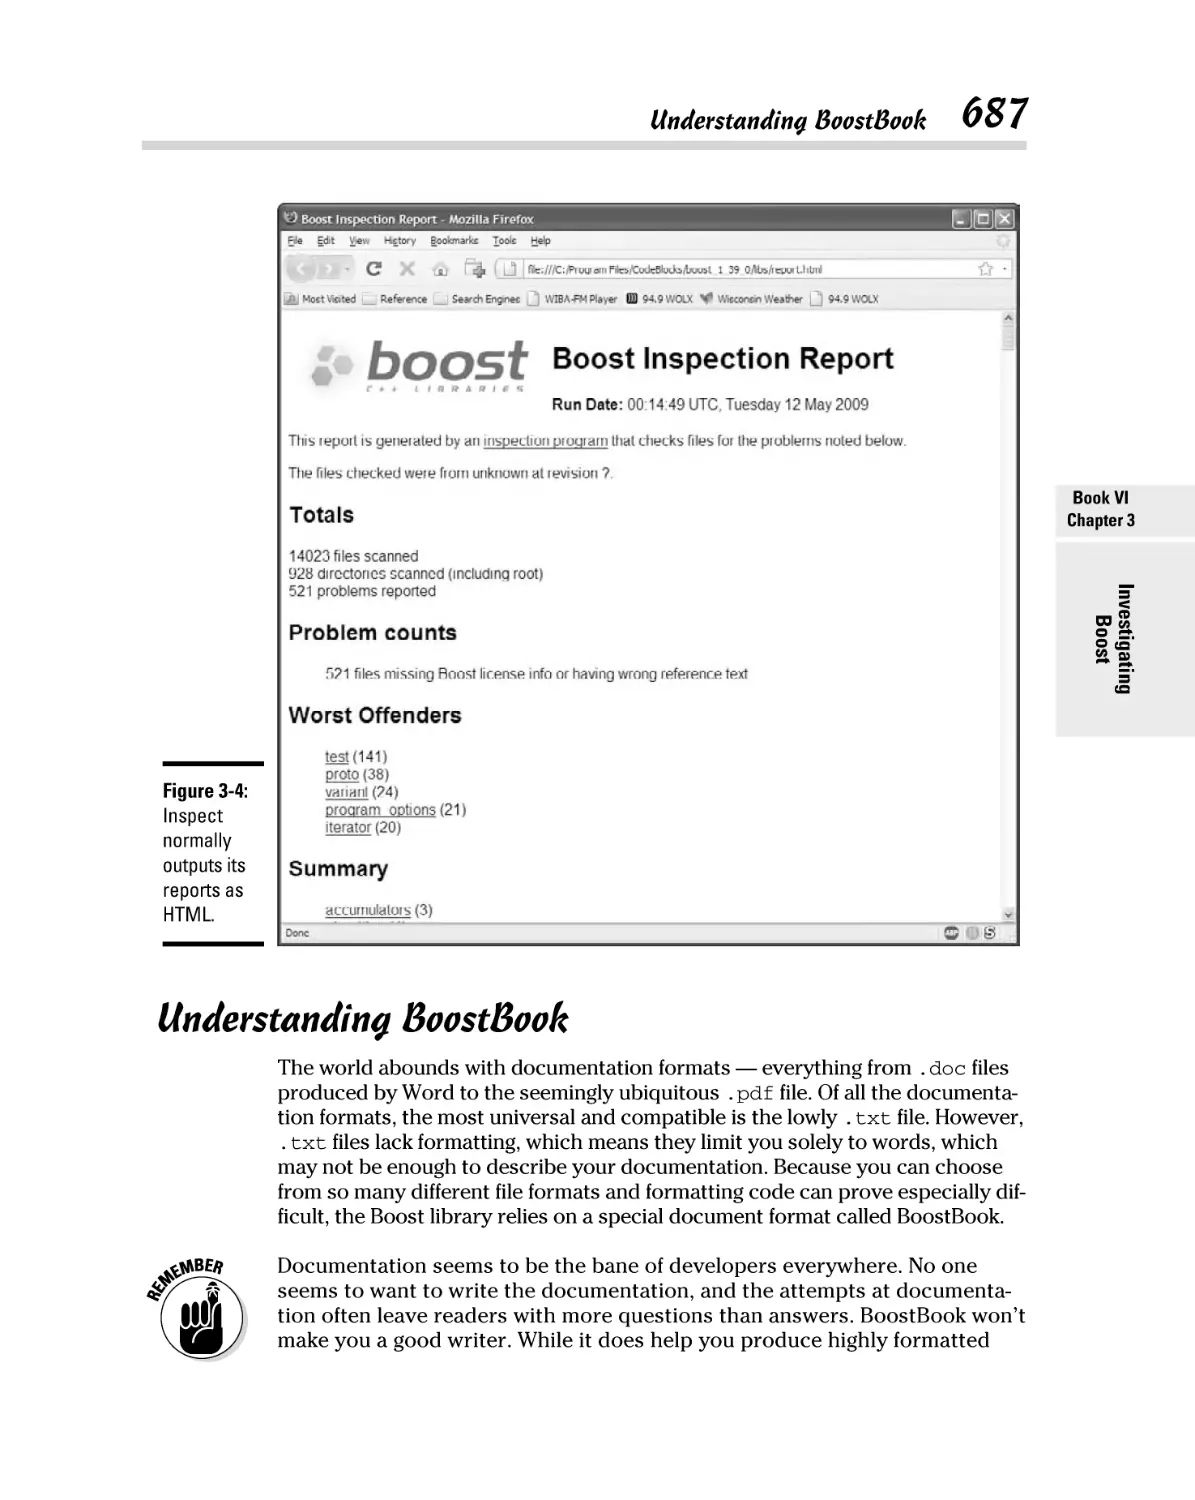
Understanding BoostBook ......................................................................... 687
Using QuickBook.......................................................................................... 689
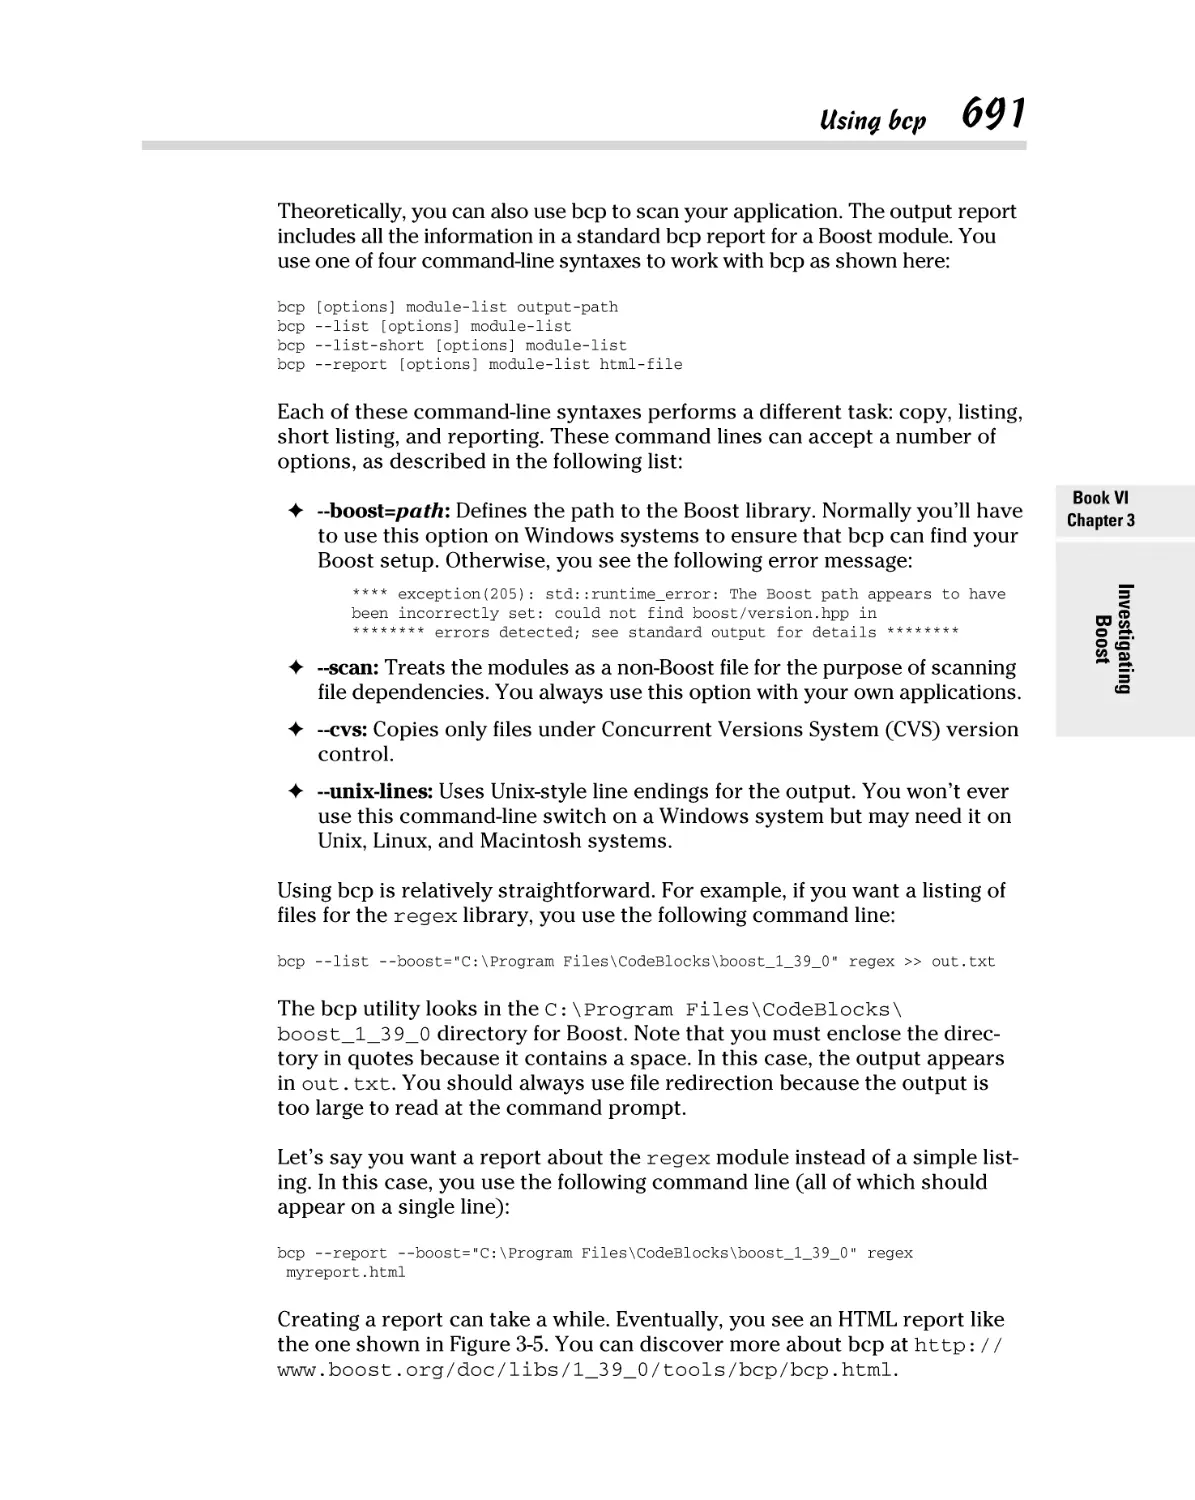
Using bcp ...................................................................................................... 690
Using Wave ................................................................................................... 692
Building Your First Boost Application Using Date Time ........................ 693
Chapter 4: Boosting up a Step . . . . . . . . . . . . . . . . . . . . . . . . . . . . . . . . .697
Parsing Strings Using RegEx ....................................................................... 698
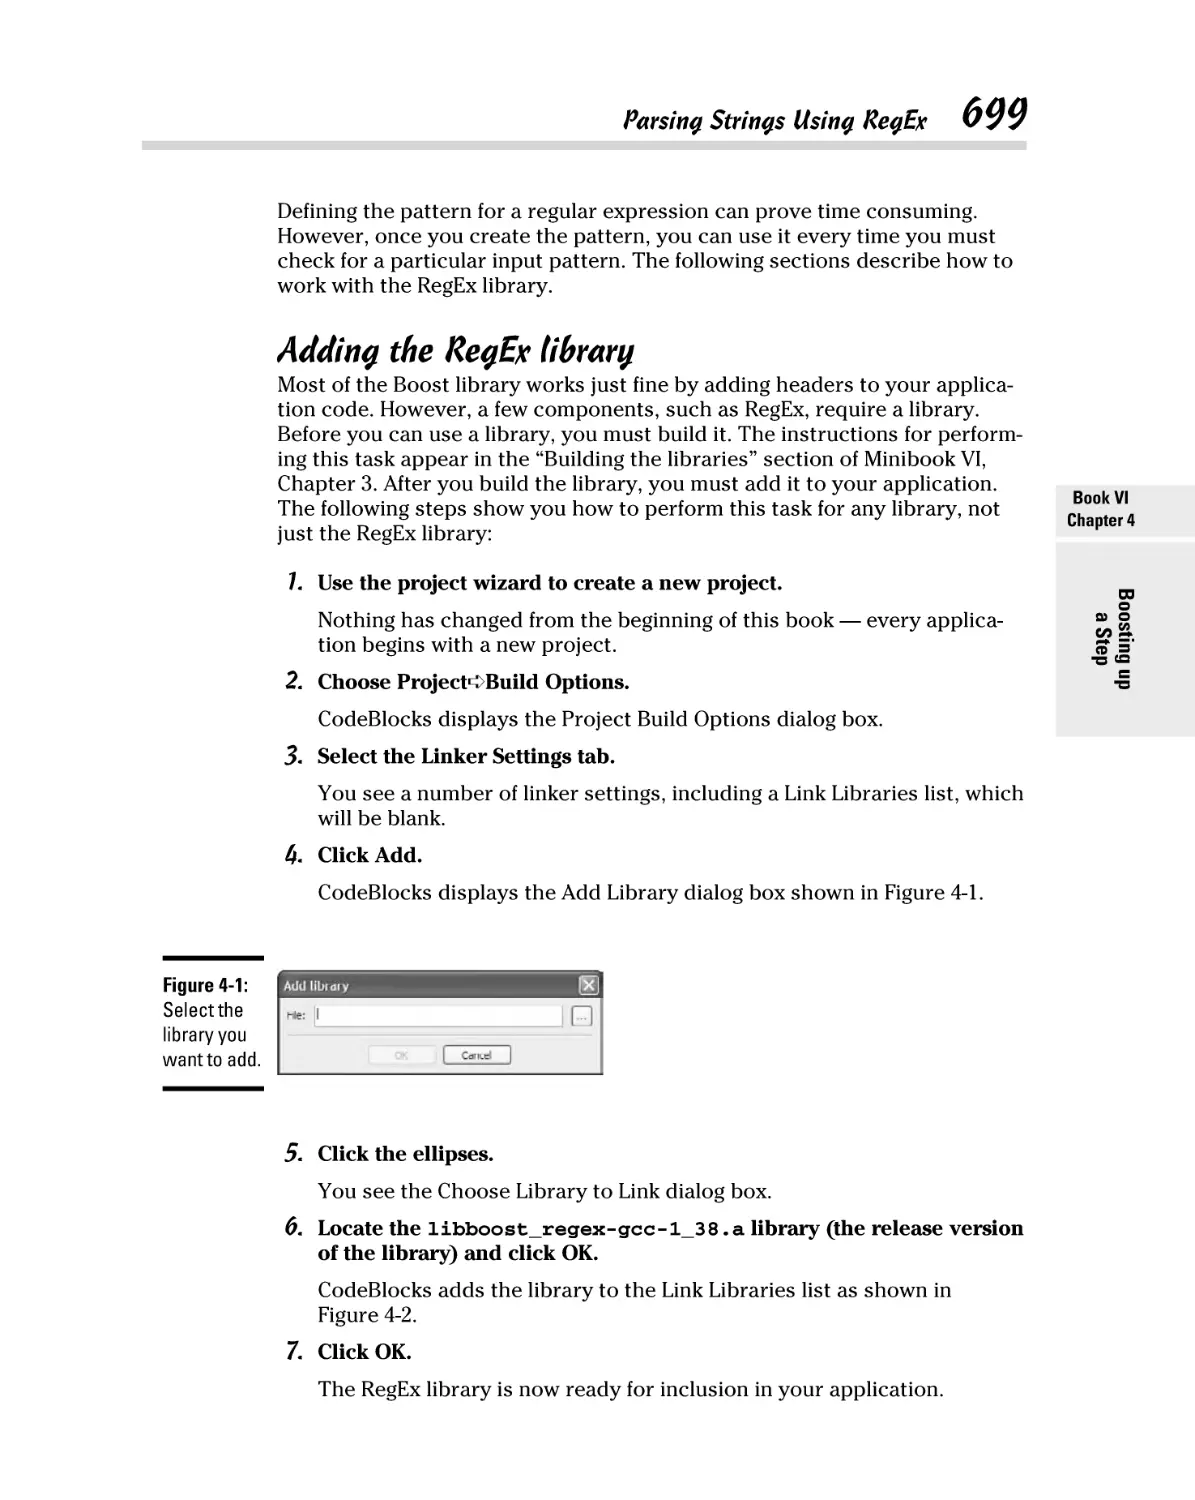
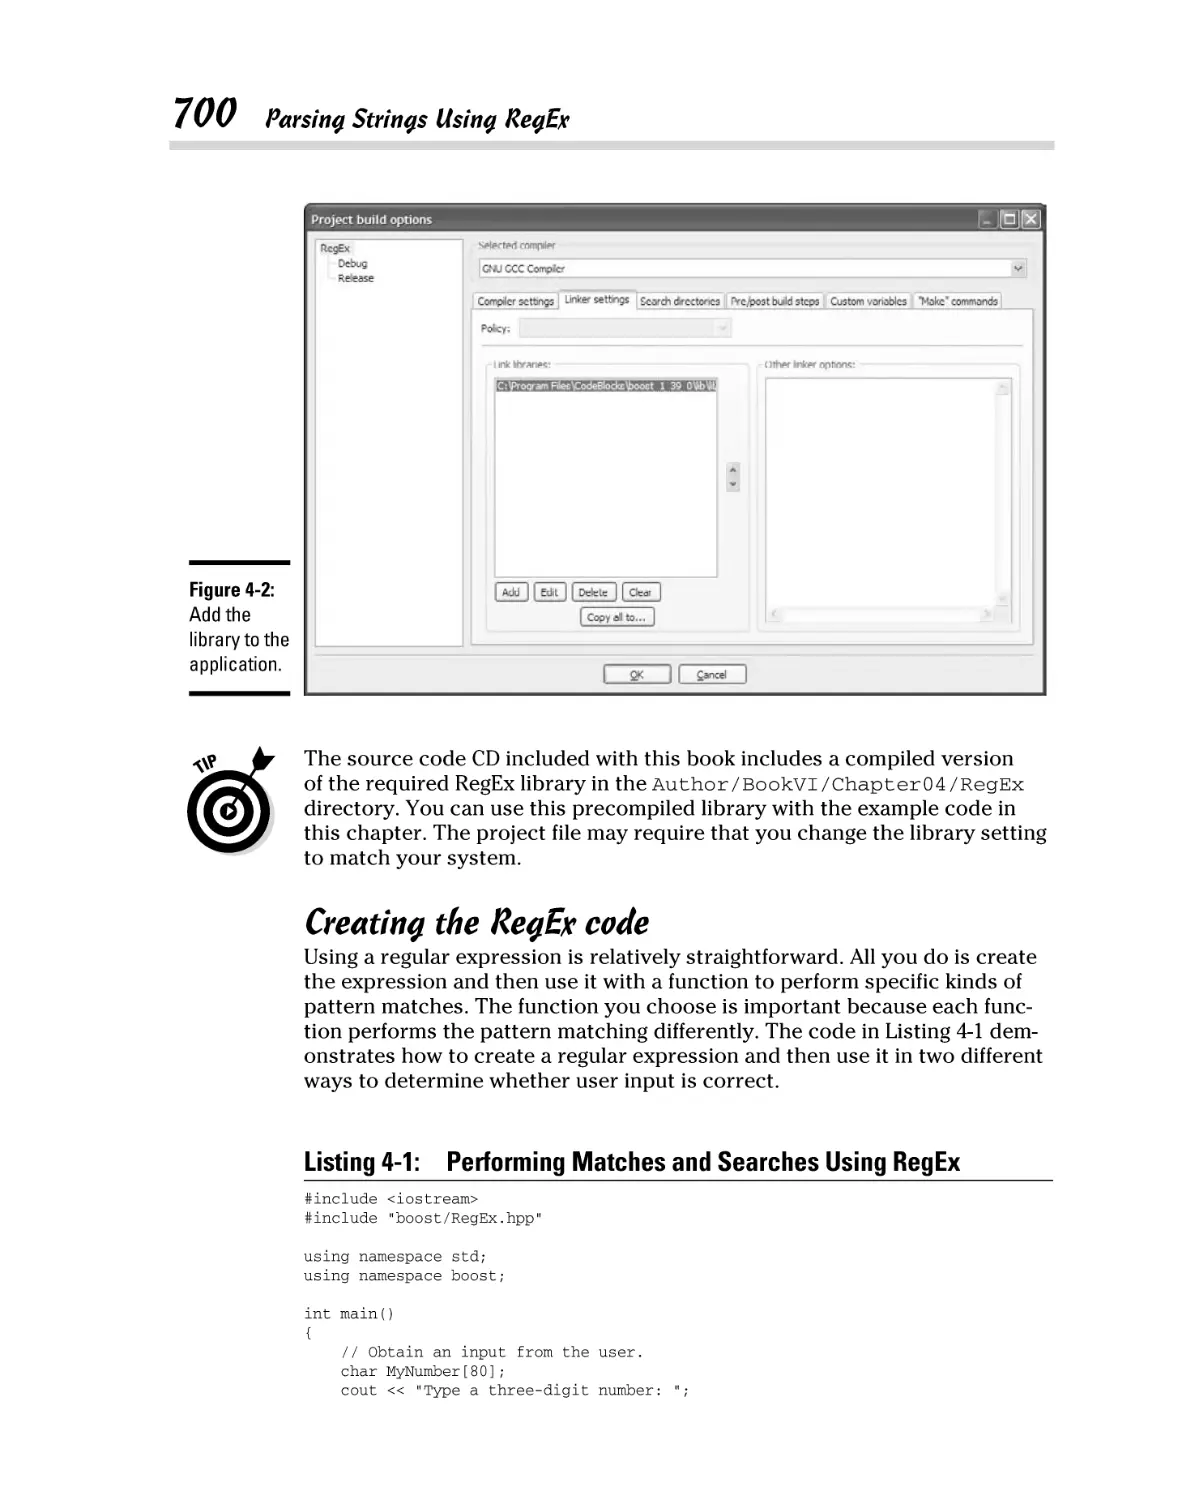
Adding the RegEx library .................................................................. 699
Creating the RegEx code ................................................................... 700
Breaking Strings into Tokens Using Tokenizer ........................................ 702
Performing Numeric Conversion ............................................................... 703
Creating Improved Loops Using Foreach ................................................. 706
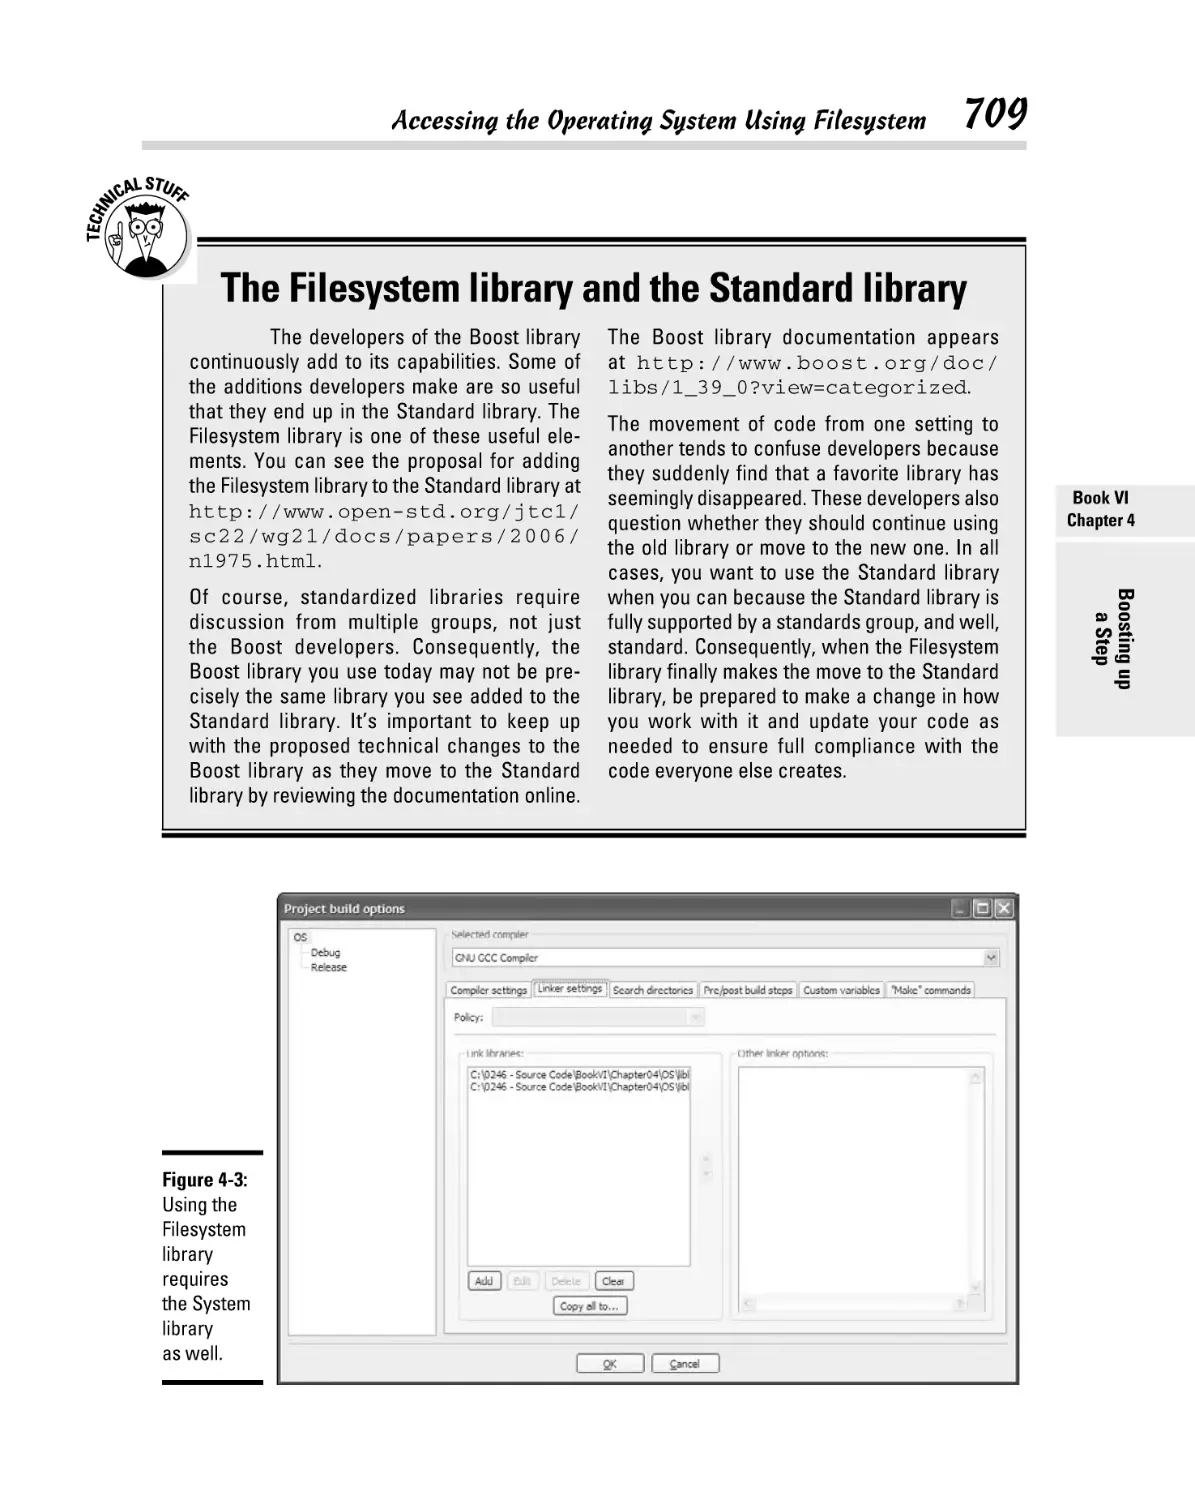
Accessing the Operating System Using Filesystem ................................. 708
Table of Contents
xix
Book VII: Building Applications with Microsoft MFC ... 713
Chapter 1: Working with the Visual C++ 2008 IDE and Projects . . . .715
Understanding the Project Types.............................................................. 716
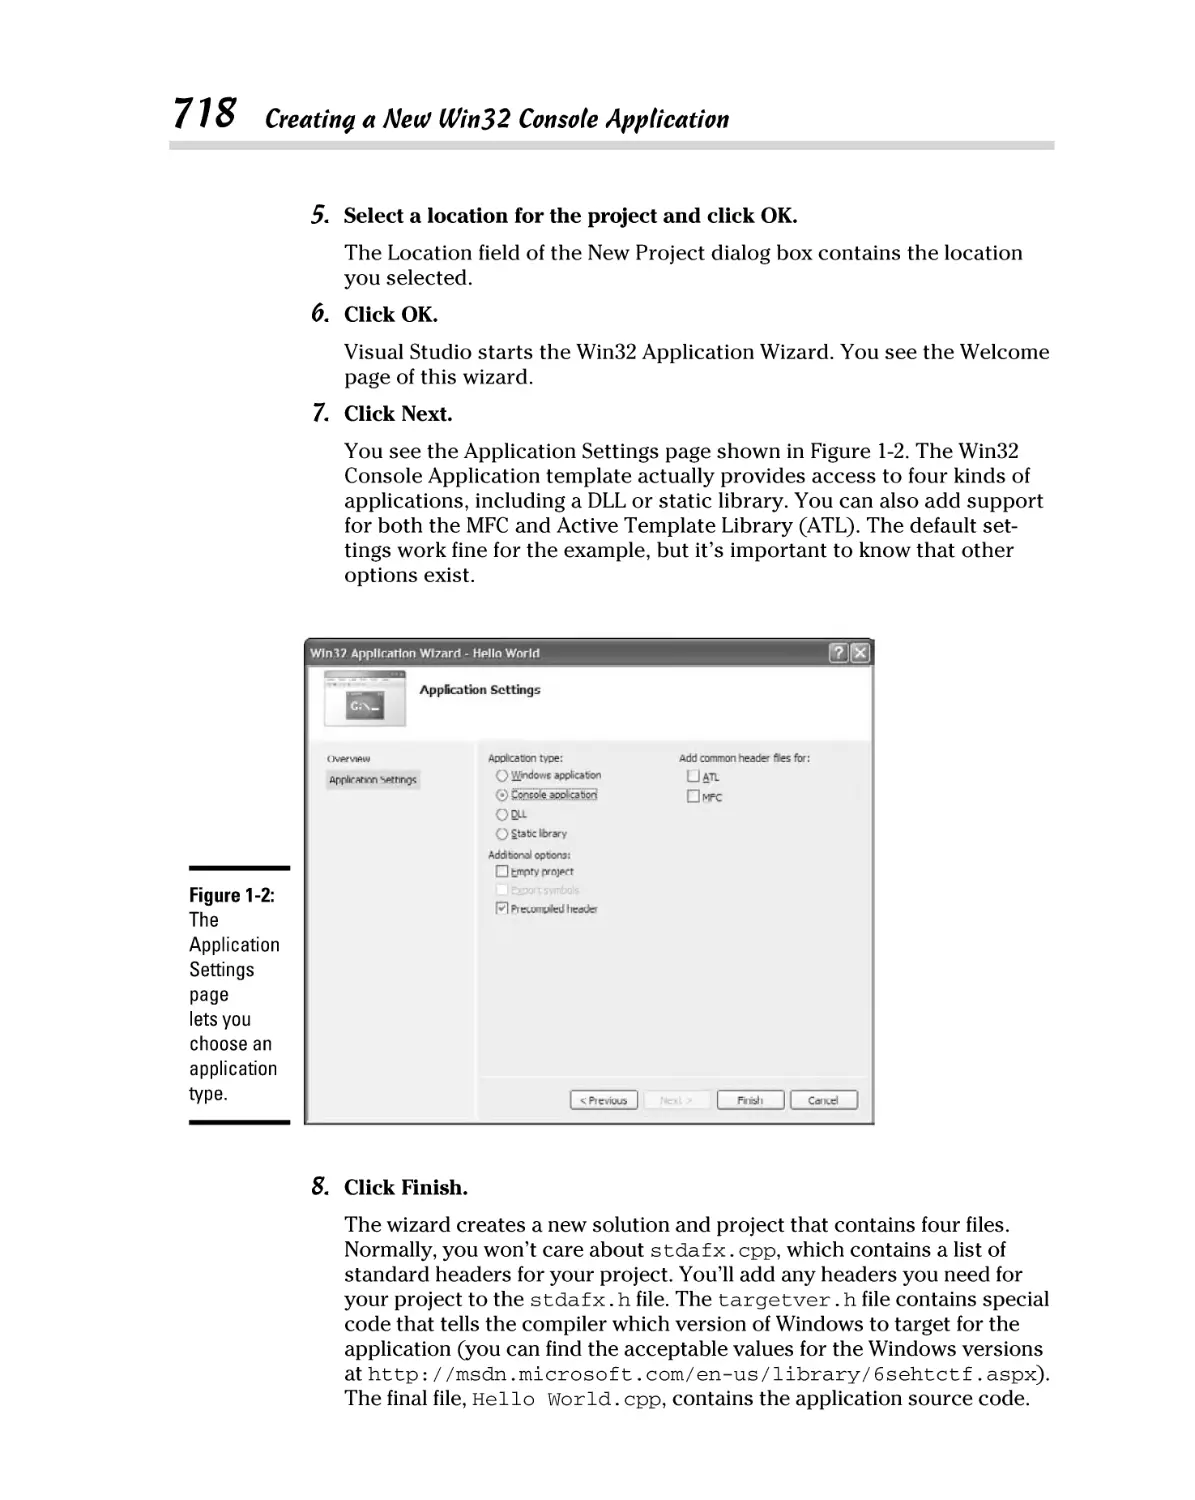
Creating a New Win32 Console Application ............................................. 717
Defining the project ........................................................................... 717
Adding code ........................................................................................ 719
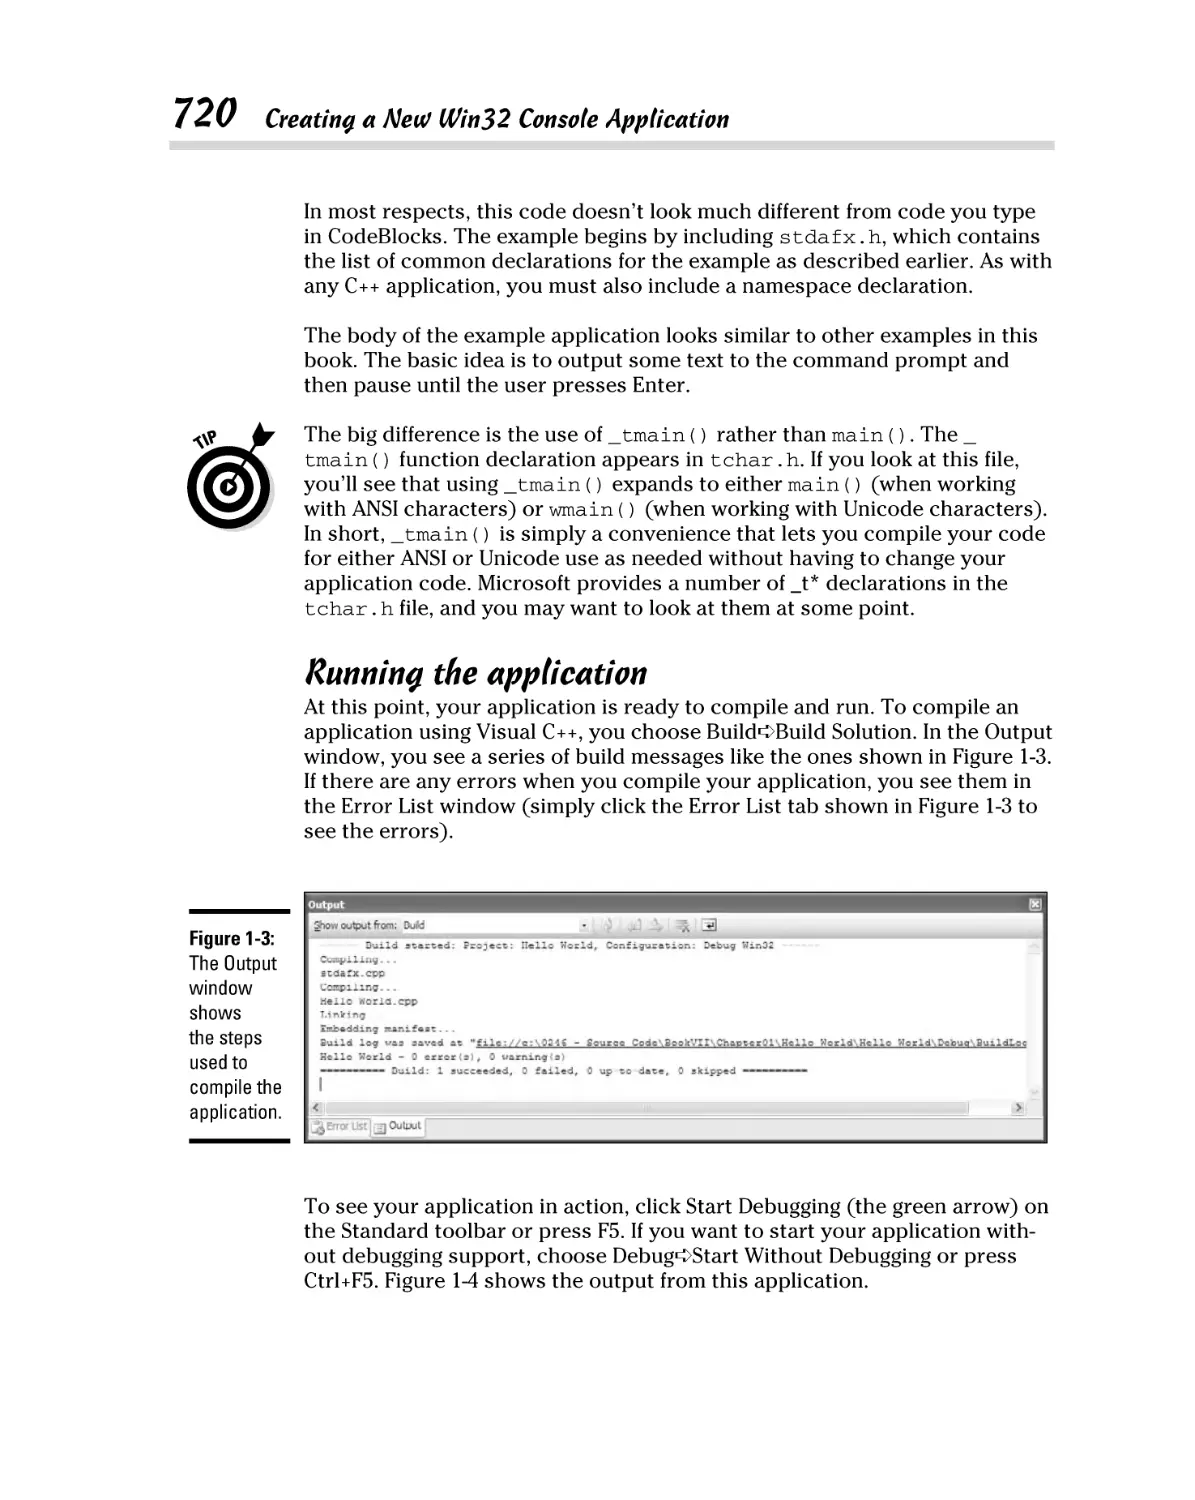
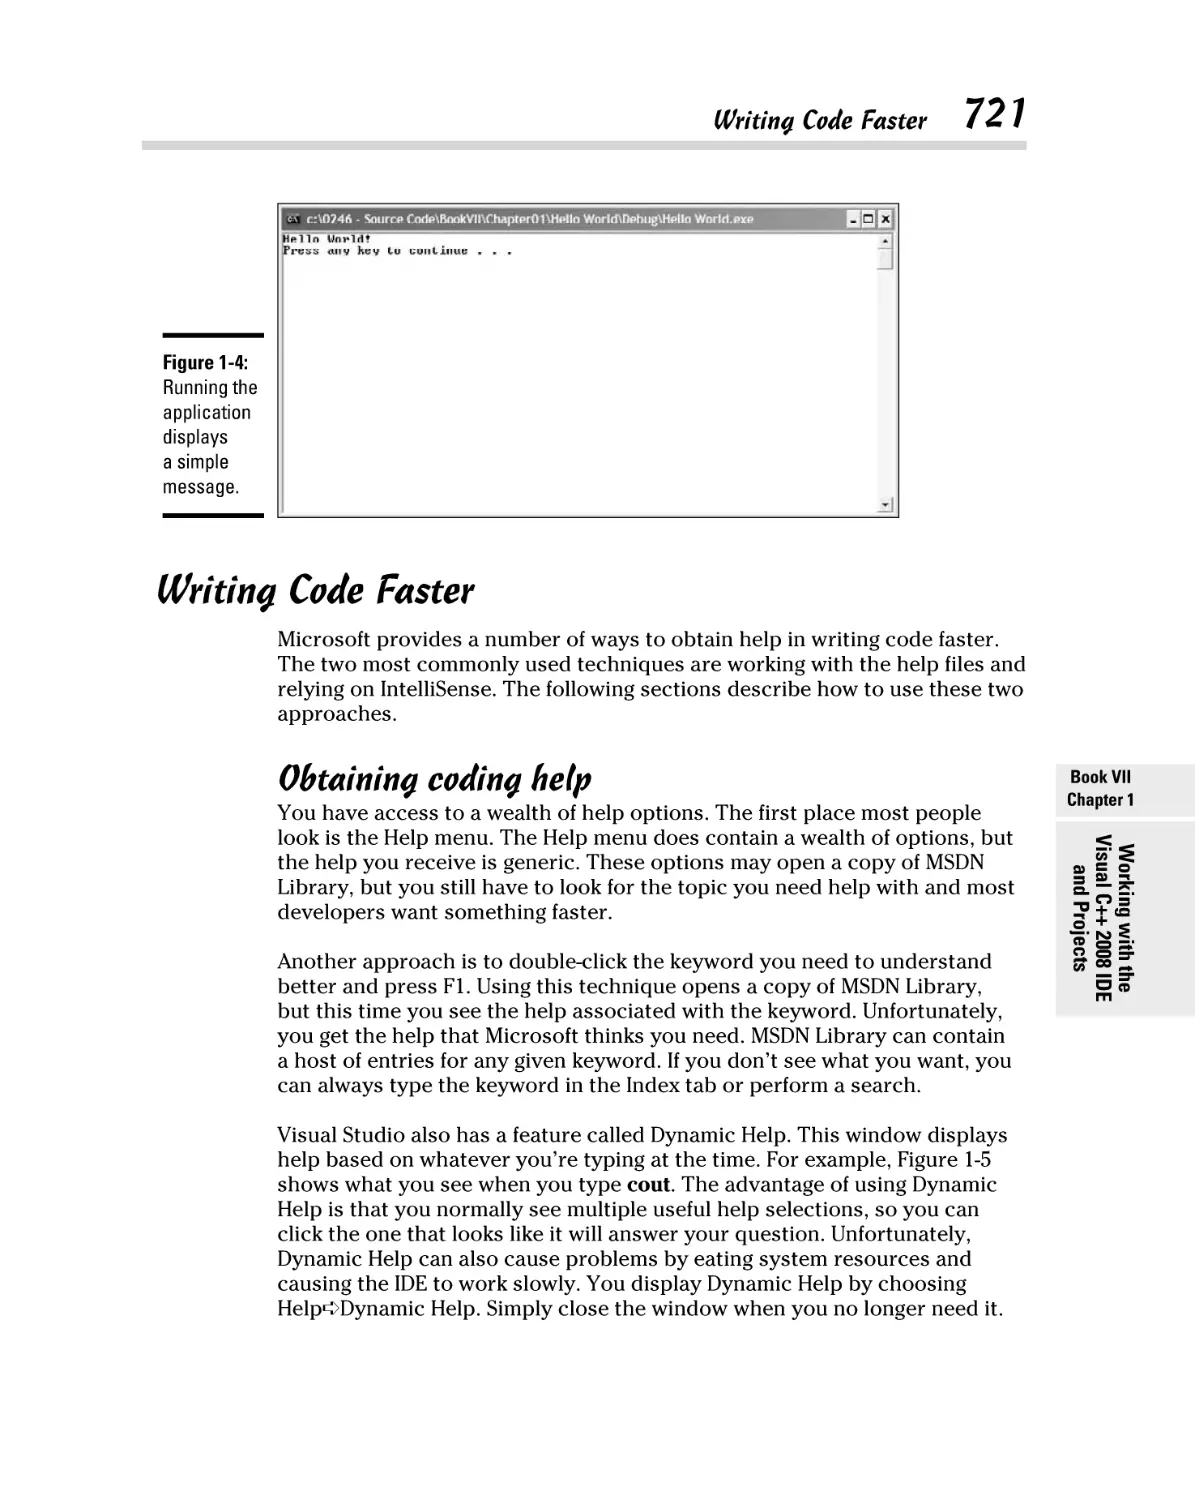
Running the application .................................................................... 720
Writing Code Faster..................................................................................... 721
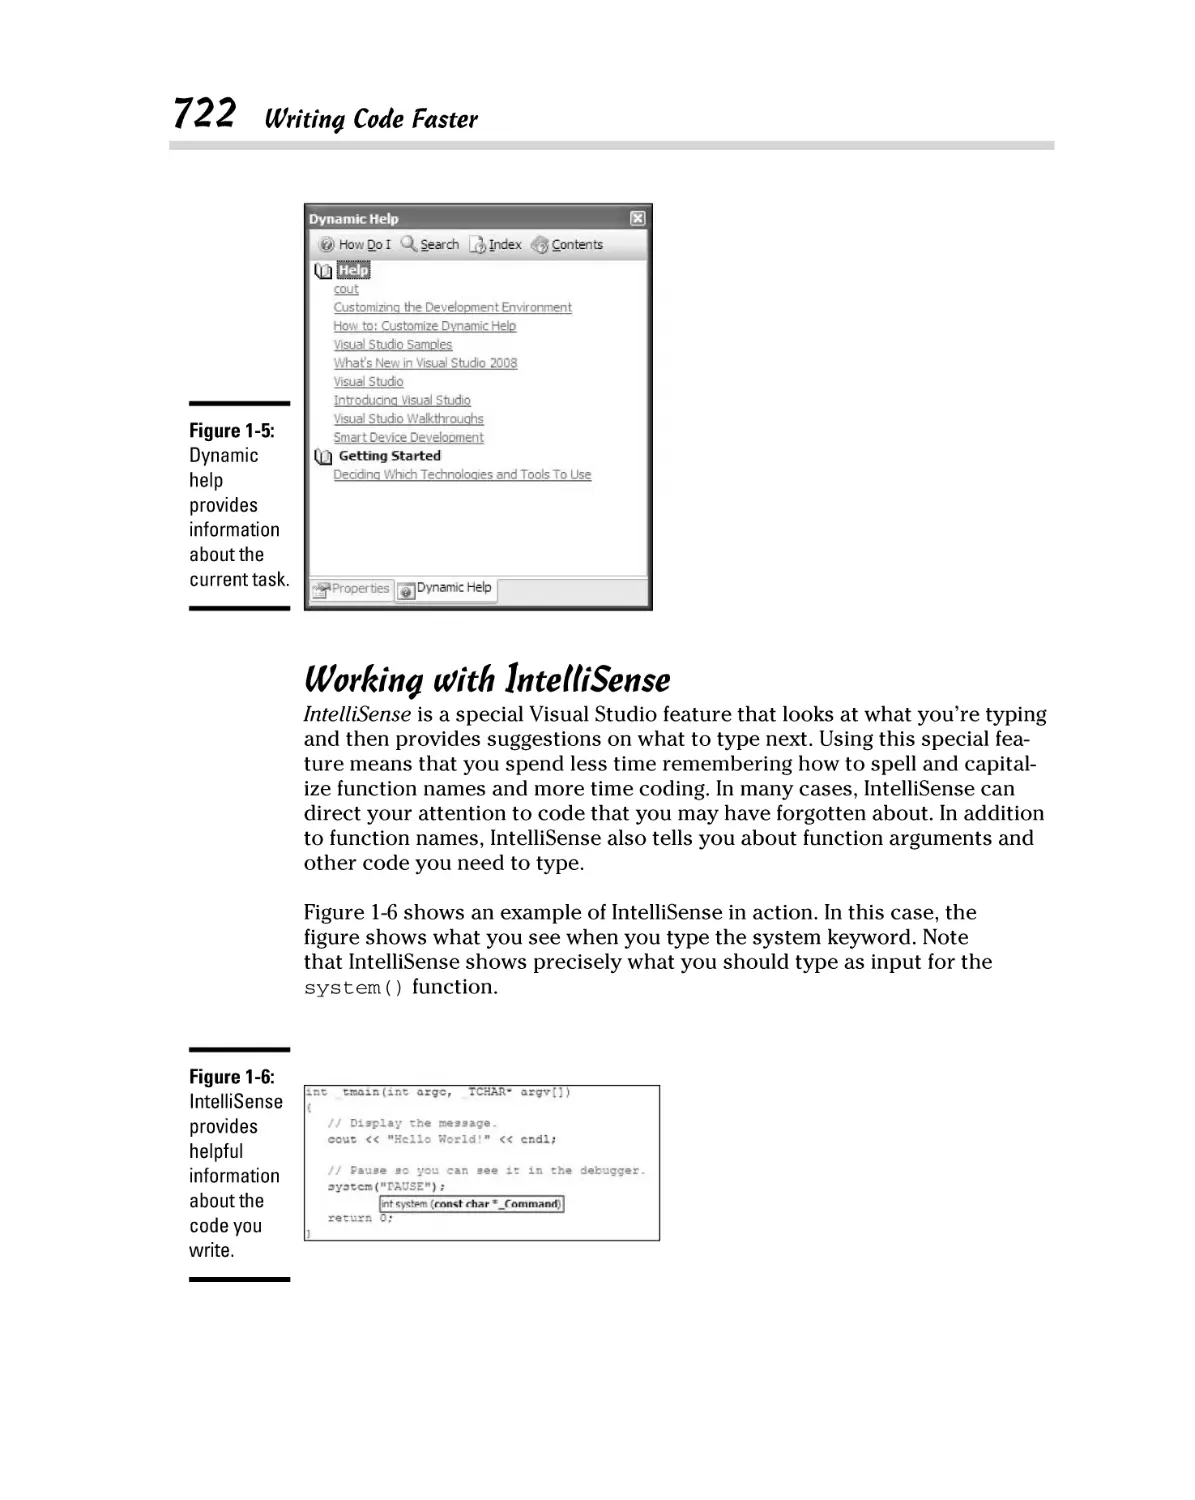
Obtaining coding help ....................................................................... 721
Working with IntelliSense ................................................................. 722
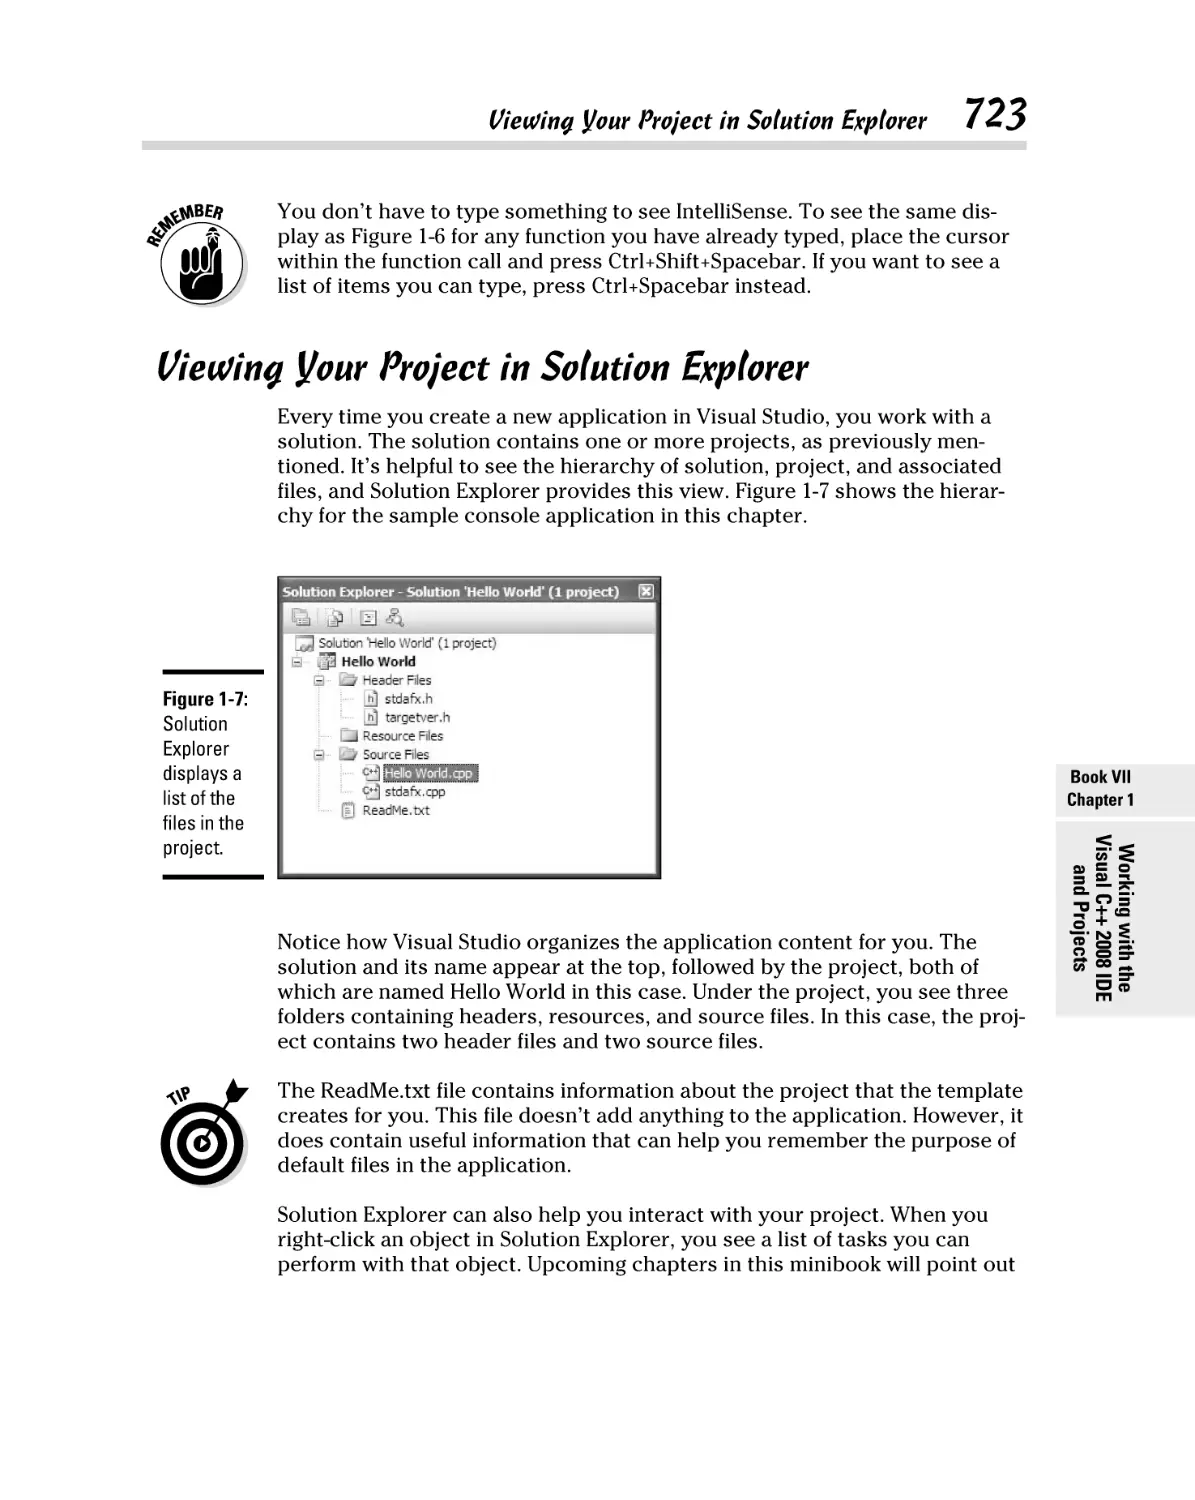
Viewing Your Project in Solution Explorer .............................................. 723
Using the Standard Toolbars ..................................................................... 724
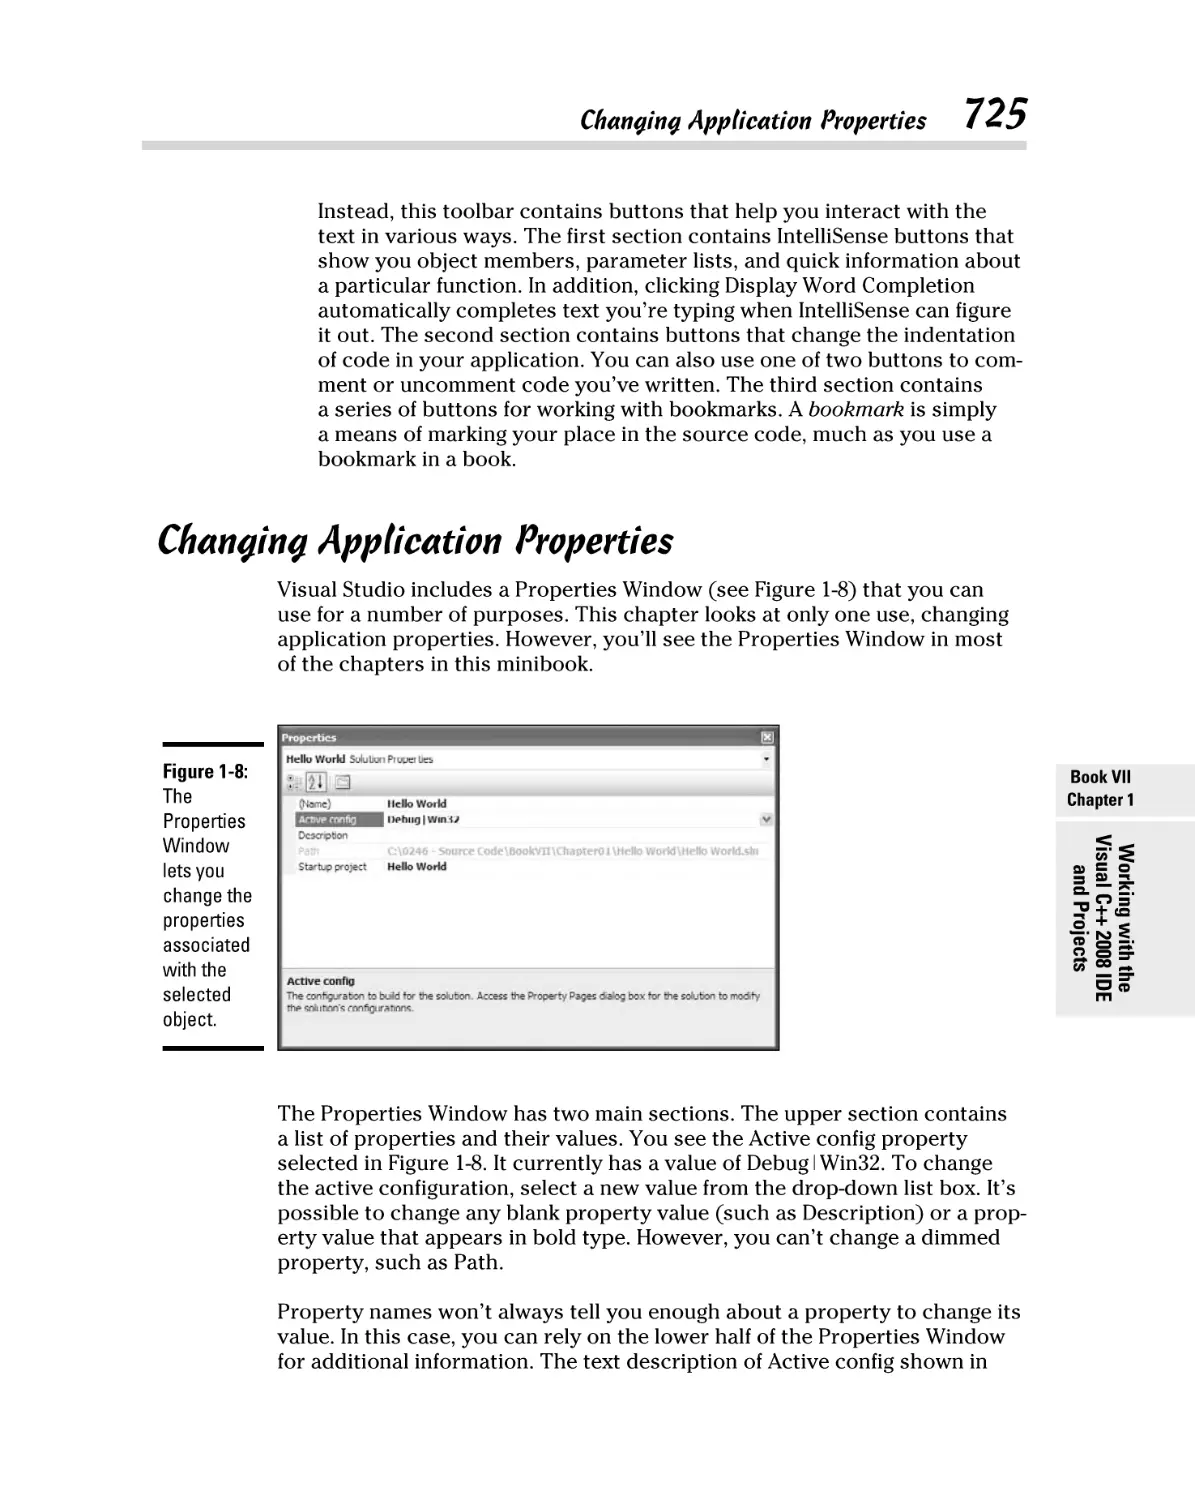
Changing Application Properties .............................................................. 725
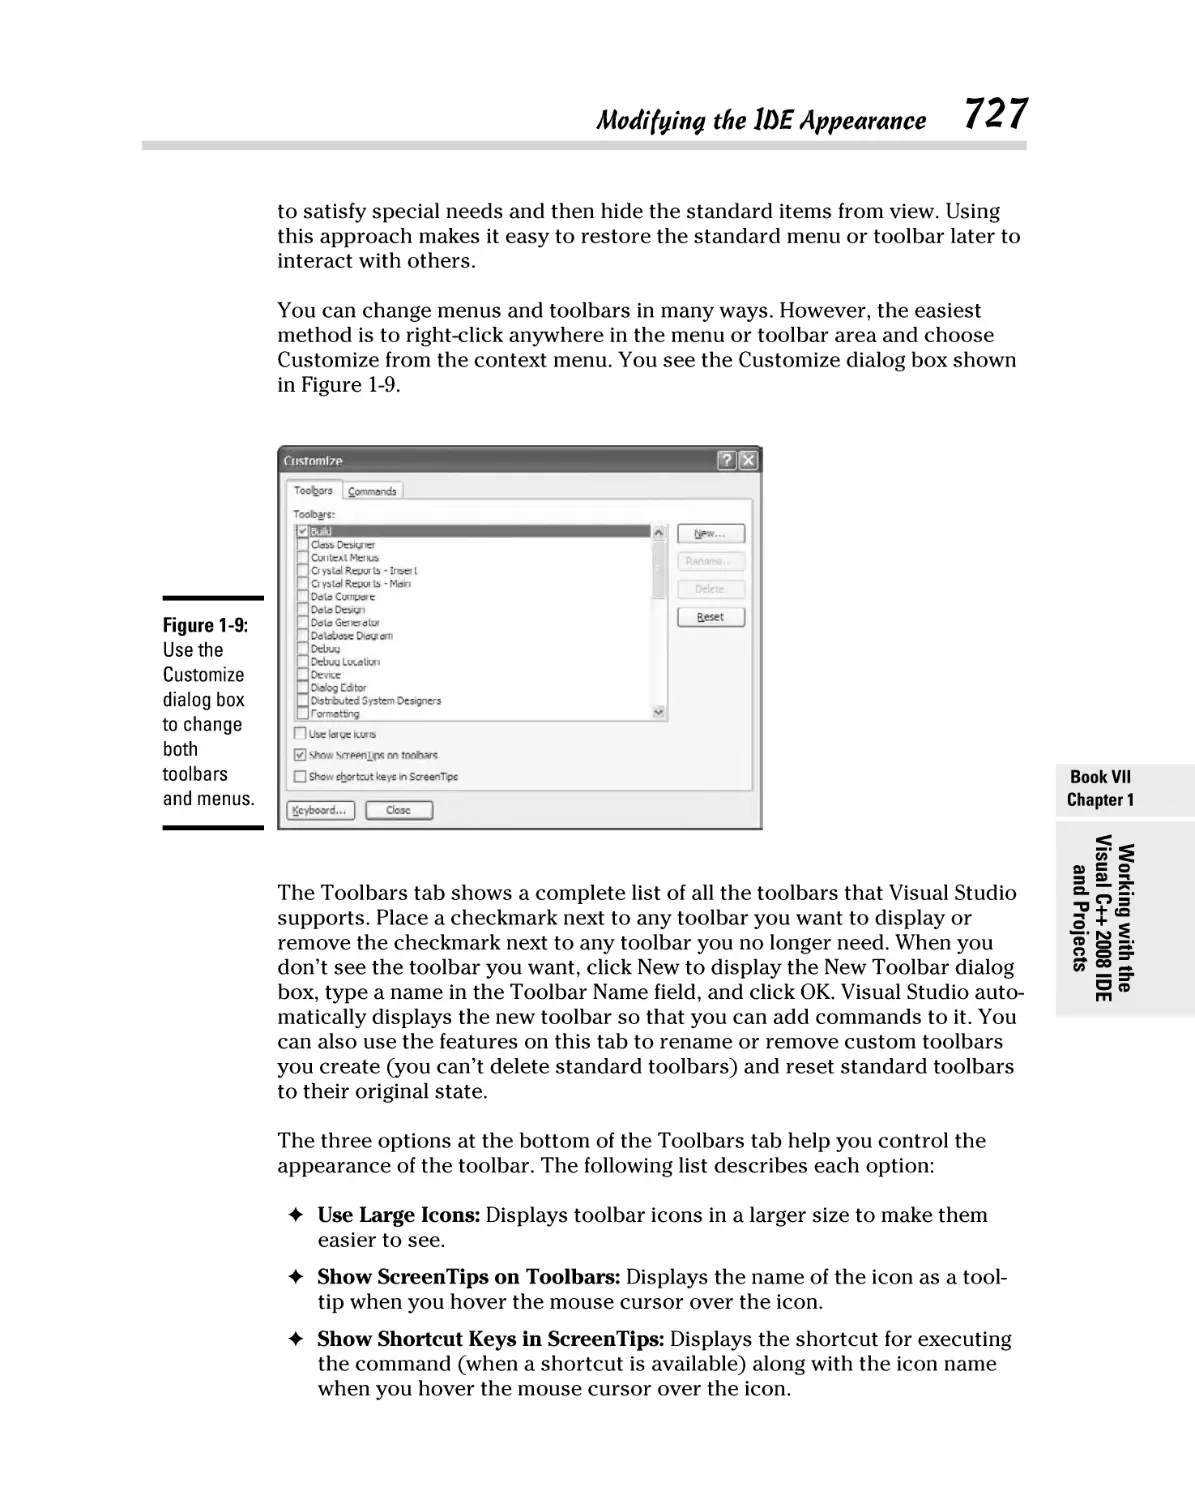
Modifying the IDE Appearance .................................................................. 726
Changing toolbars and menus.......................................................... 726
Modifying windows ............................................................................ 728
Chapter 2: Creating an MFC Dialog Box Project . . . . . . . . . . . . . . . . .731
Understanding the MFC Dialog Box Project ............................................. 731
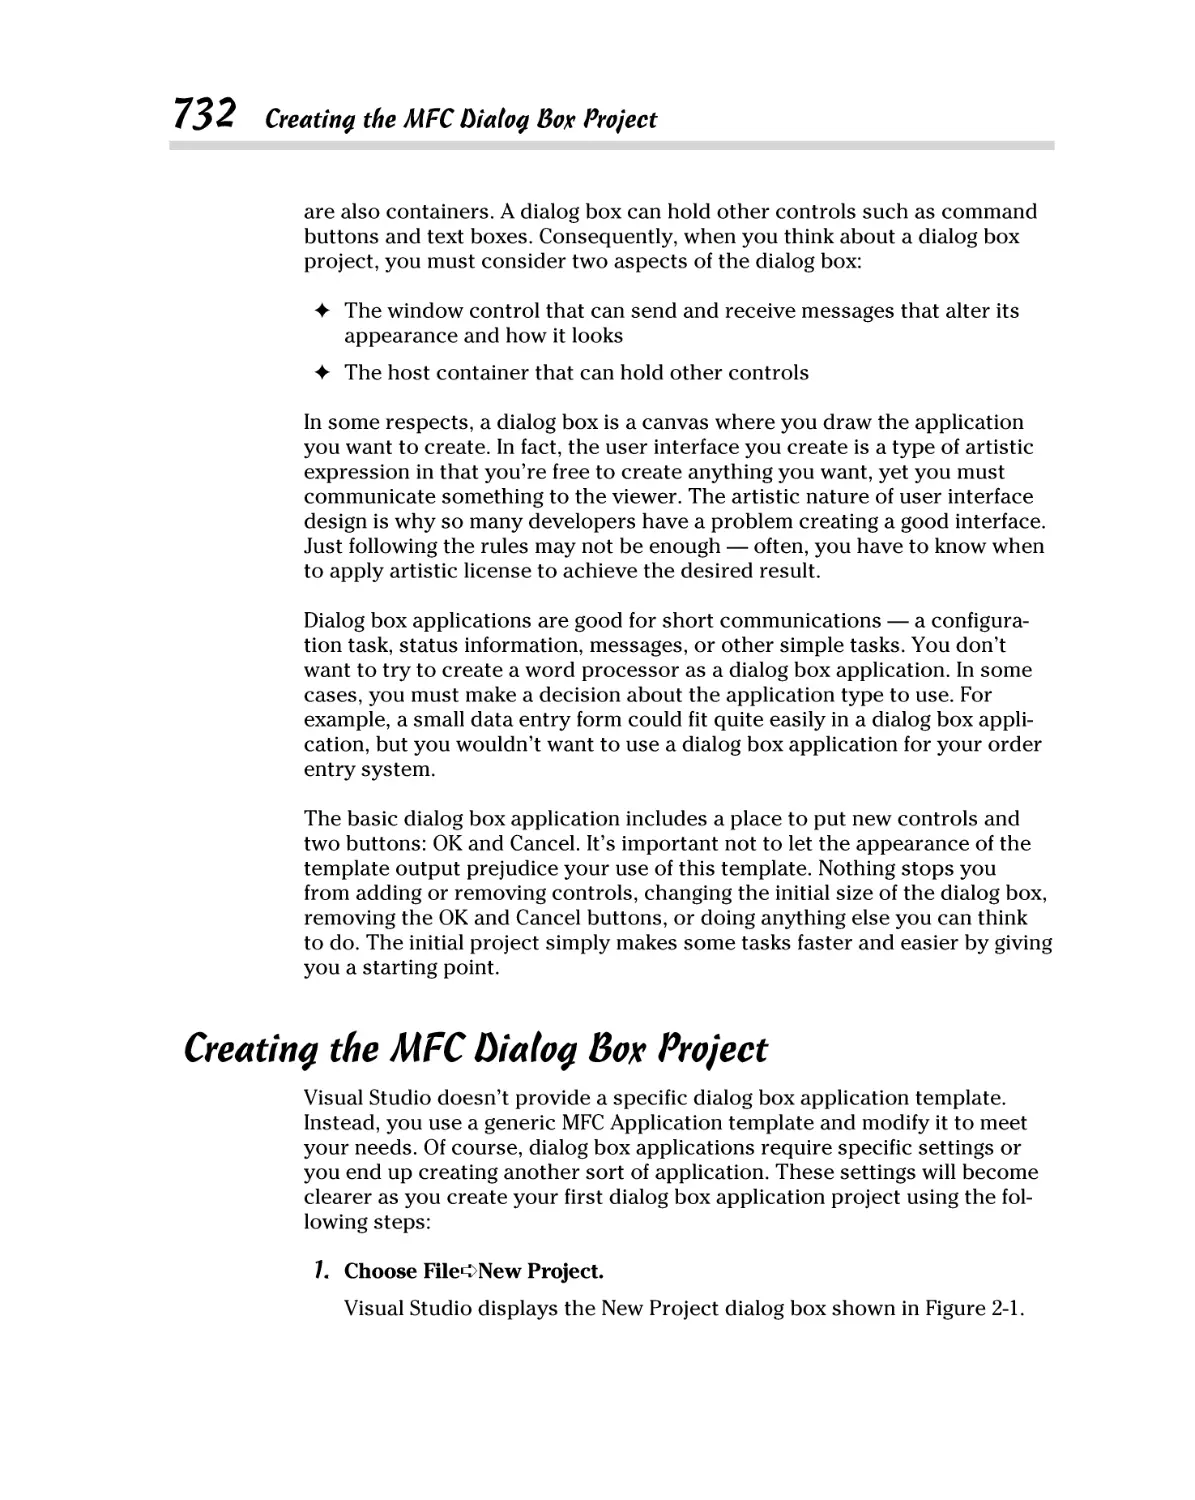
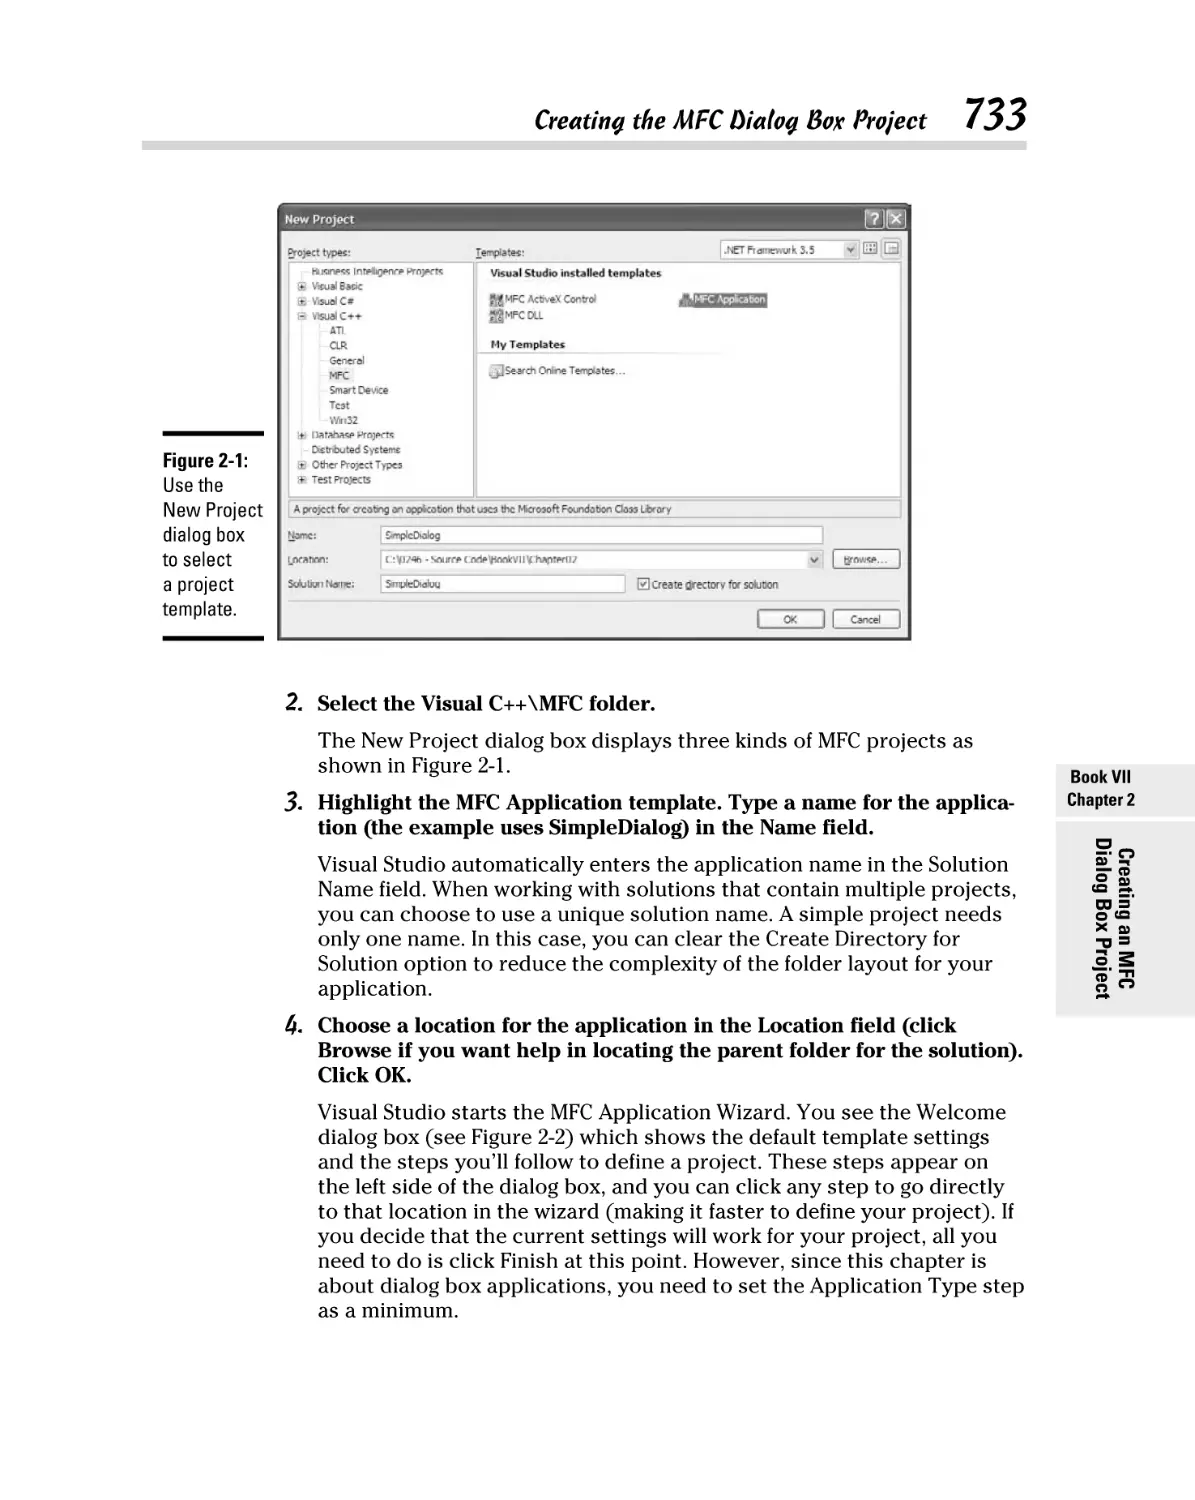
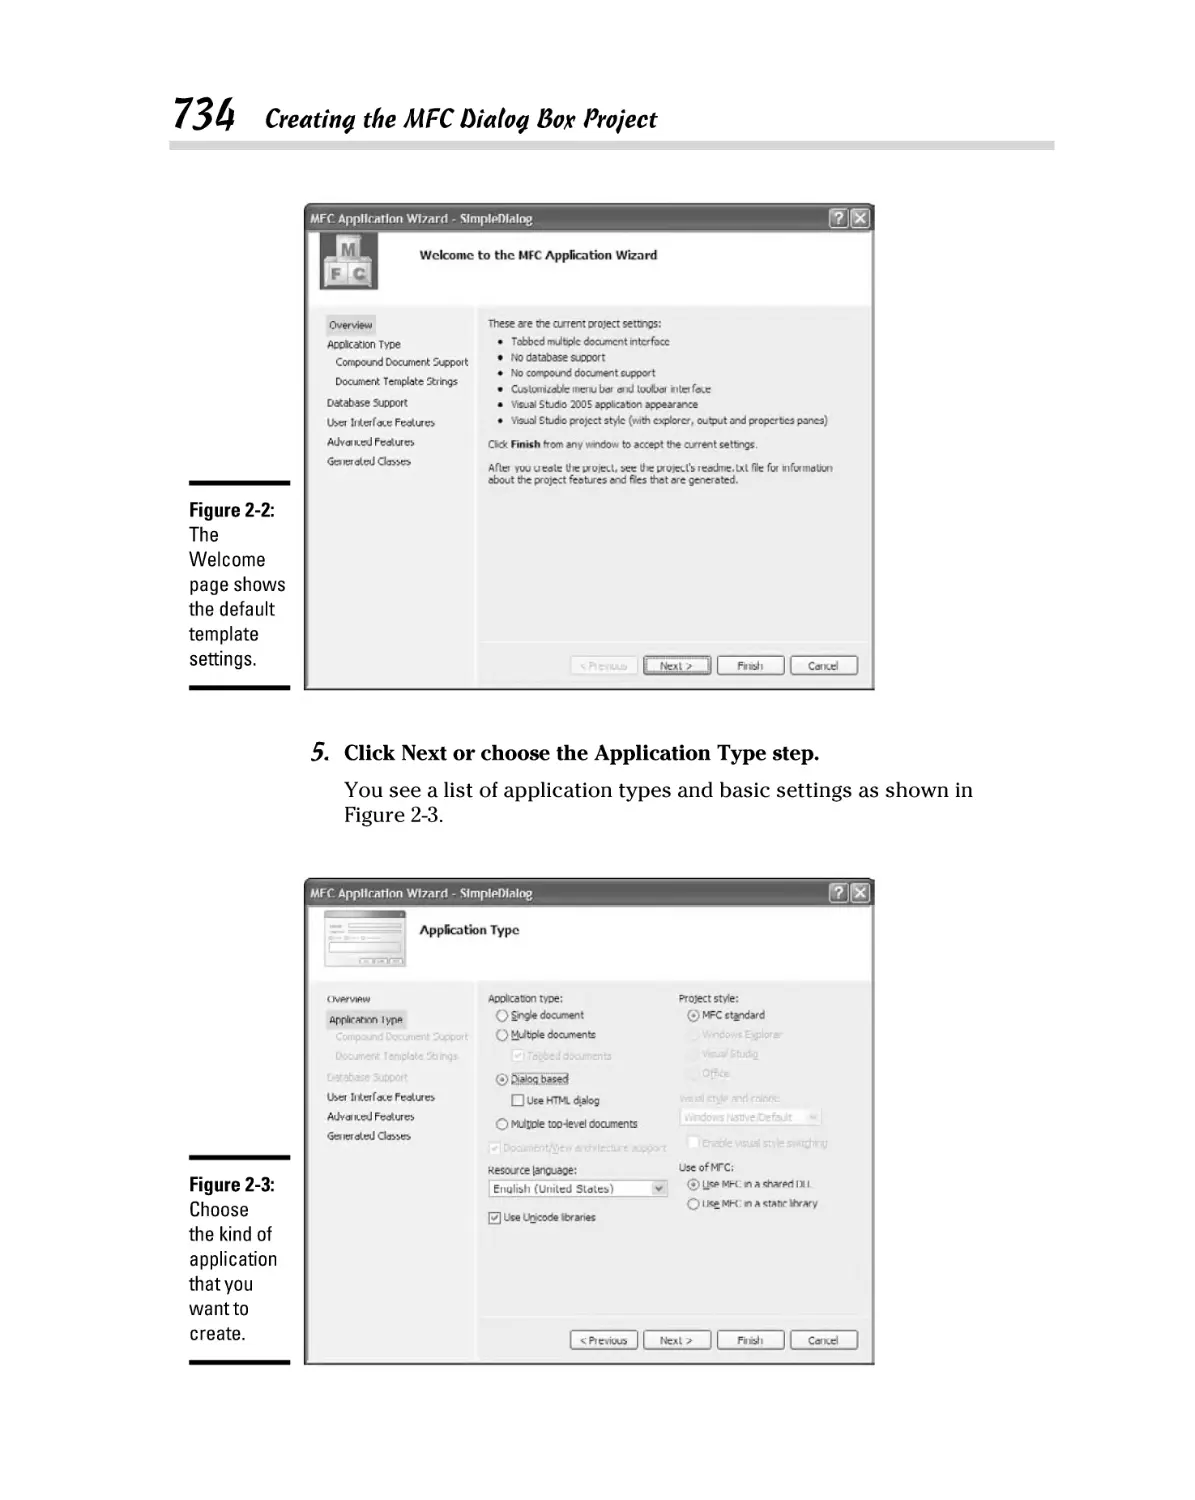
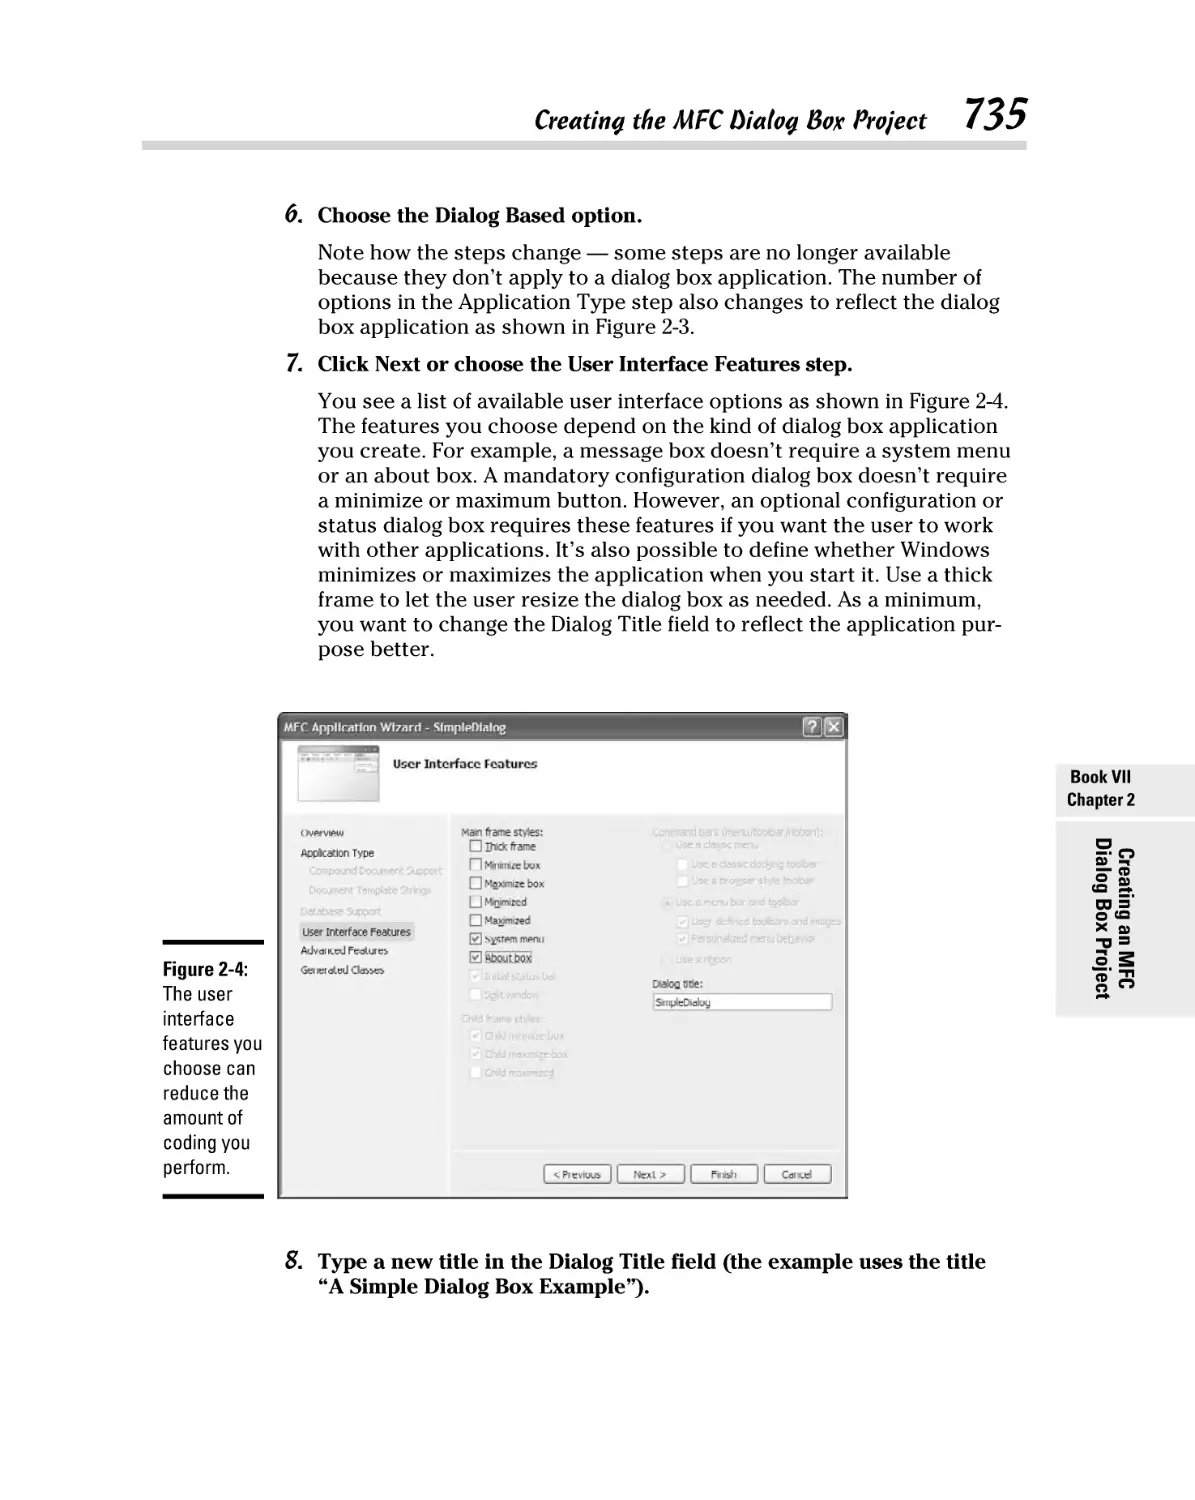
Creating the MFC Dialog Box Project ........................................................ 732
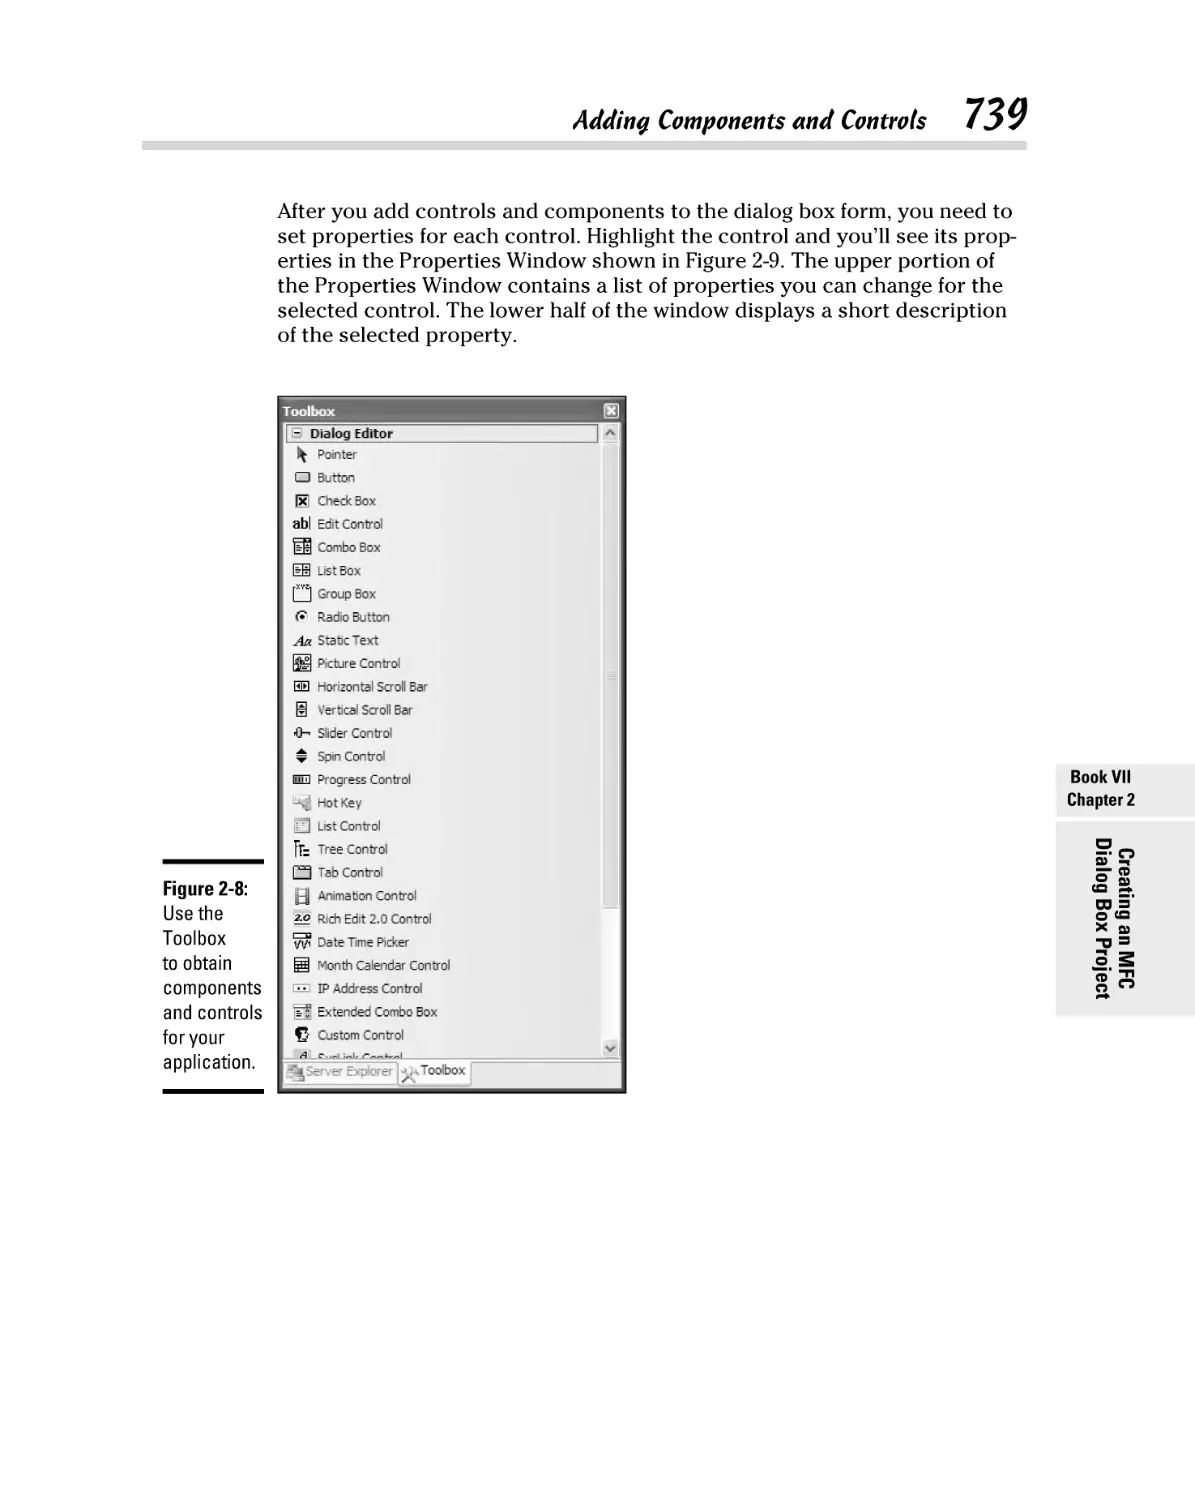
Adding Components and Controls ............................................................ 738
Adding the component or control ................................................... 738
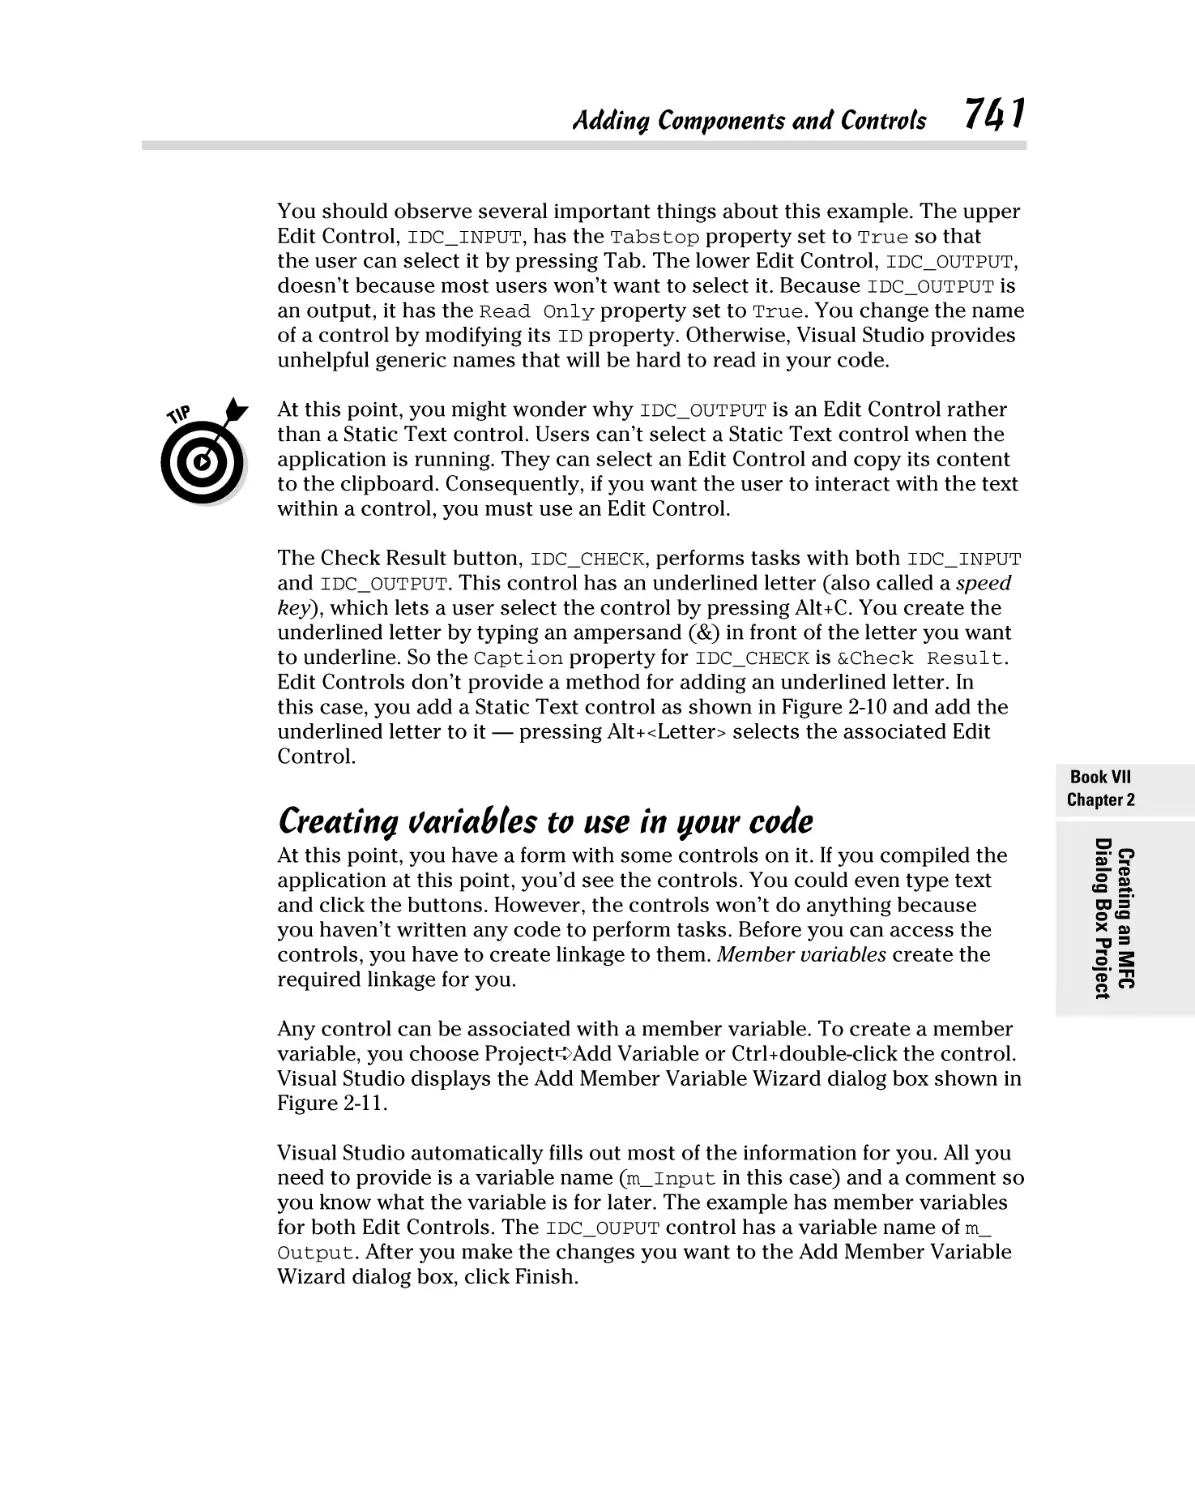
Creating variables to use in your code ........................................... 741
Defining methods to react to control events ................................. 742
Defining the Dialog Box Code ..................................................................... 743
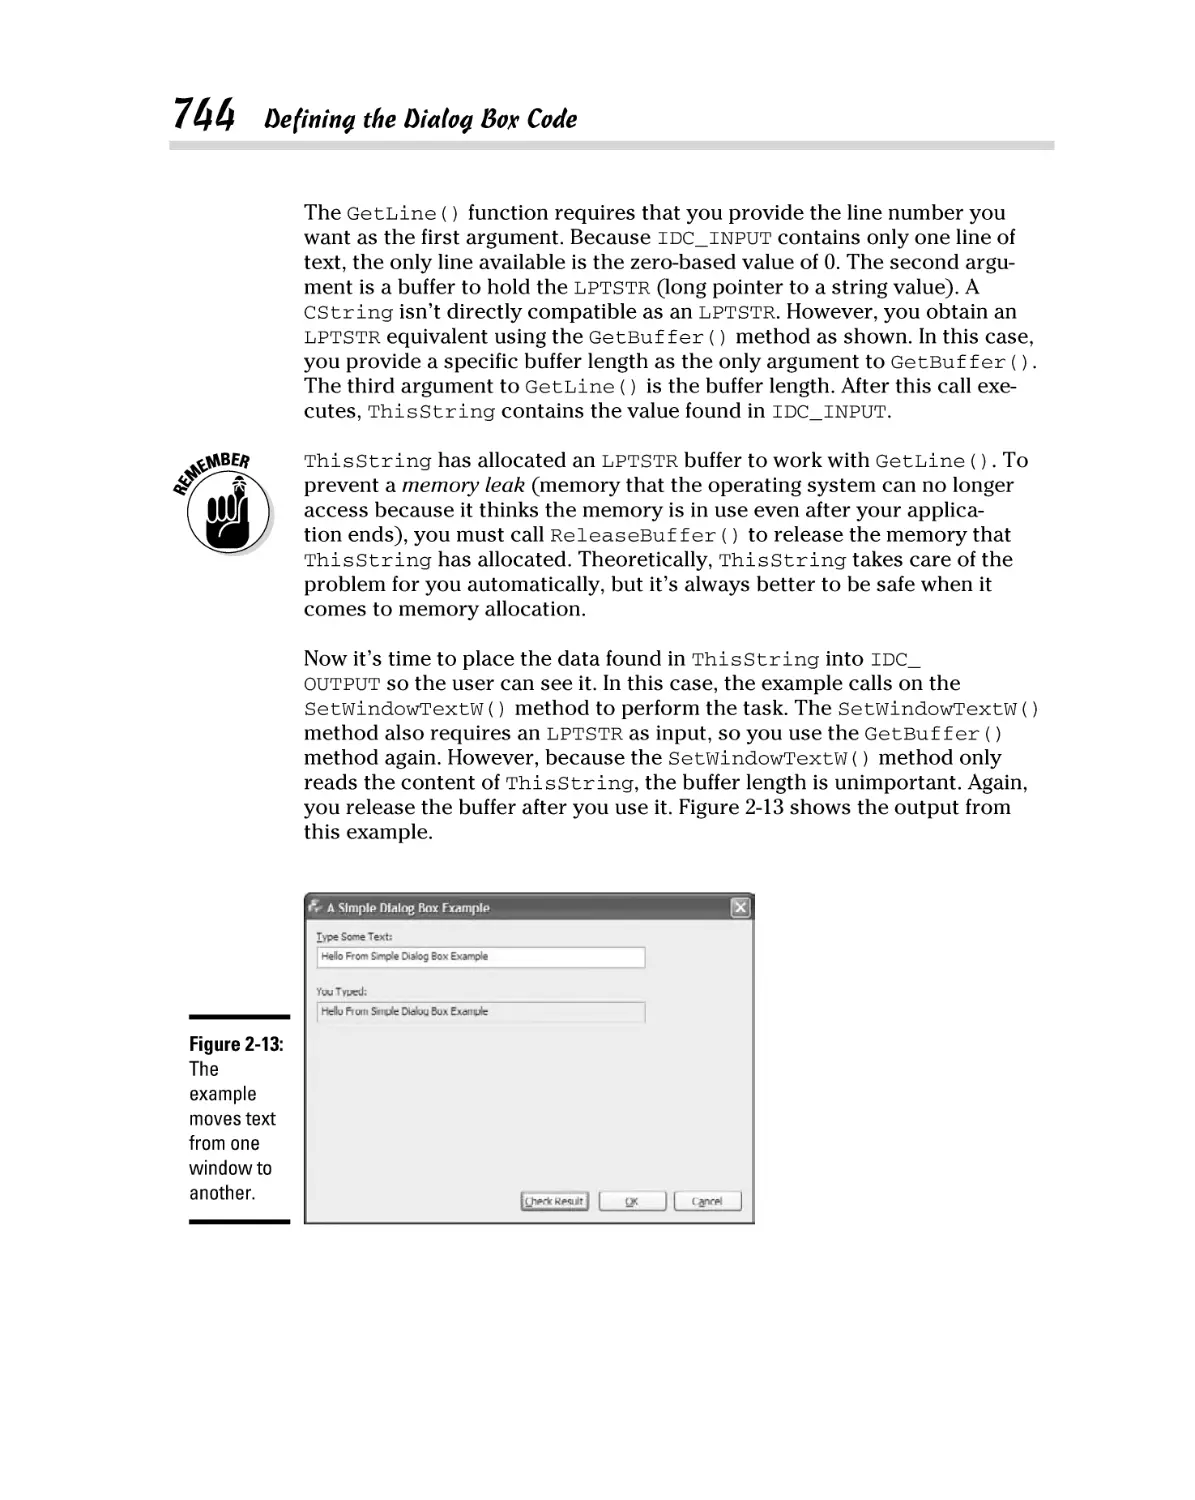
Understanding the Essential Windows ..................................................... 745
Working with Class View................................................................... 745
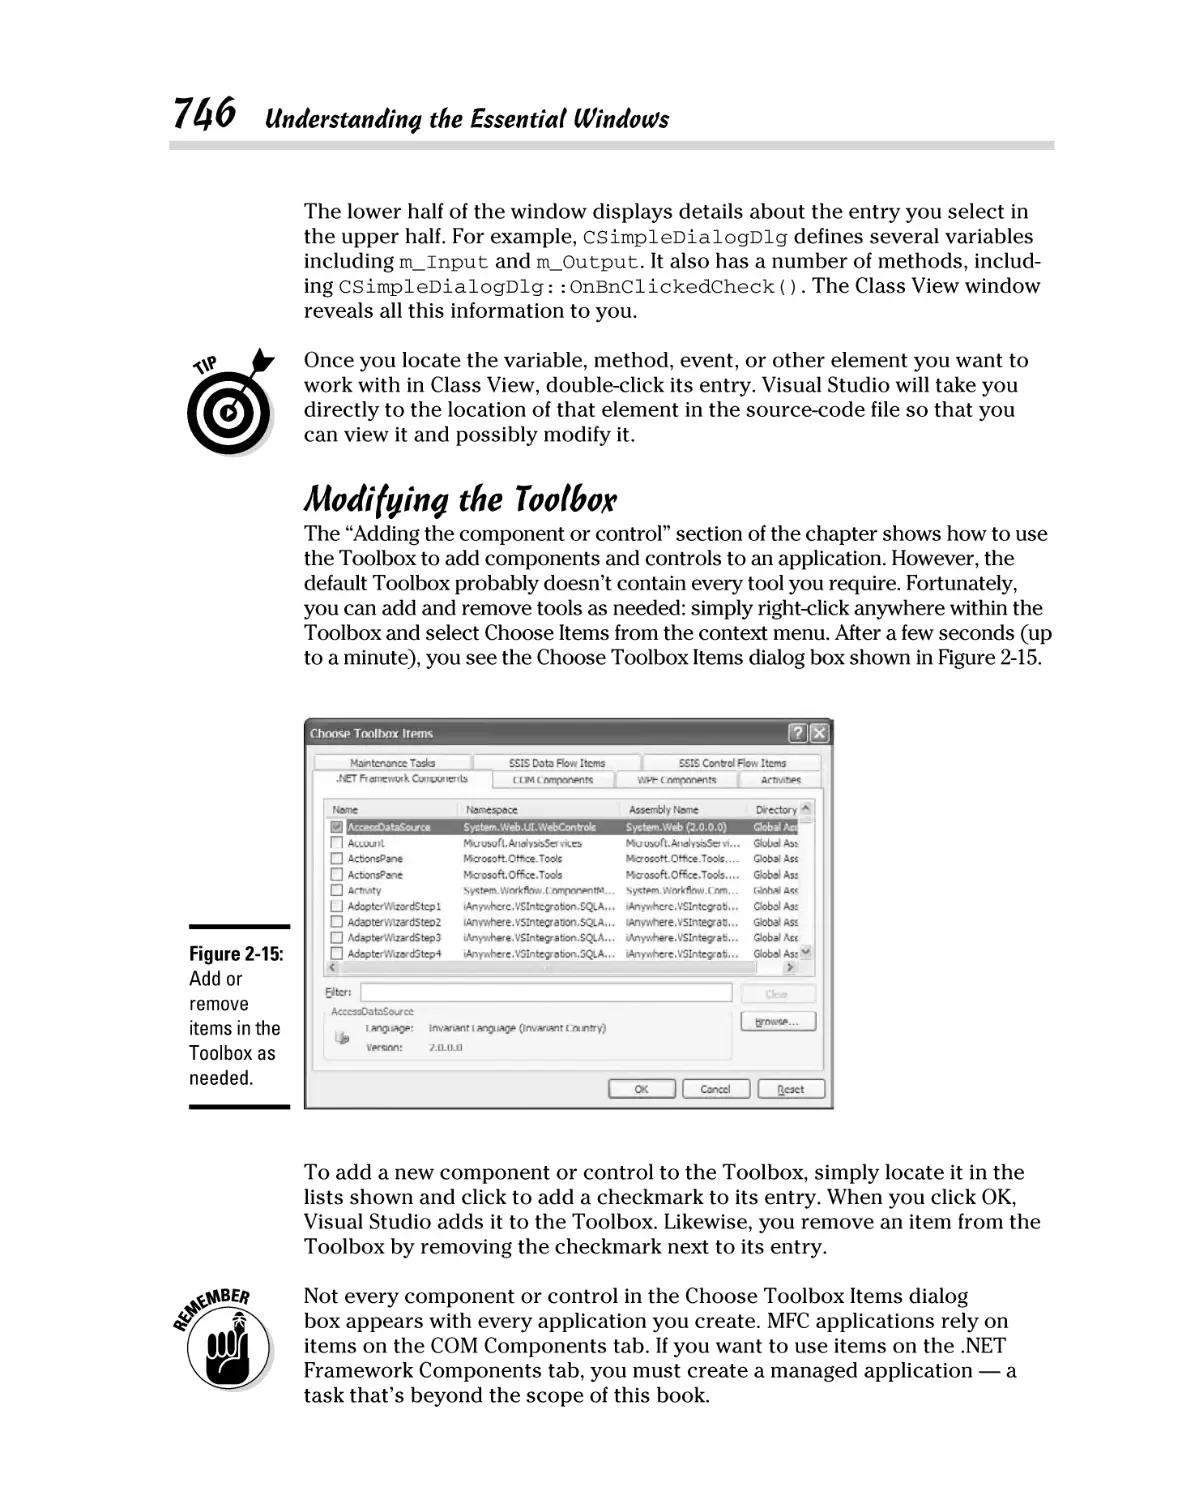
Modifying the Toolbox ...................................................................... 746
Chapter 3: Creating an MFC SDI Project . . . . . . . . . . . . . . . . . . . . . . . .747
Understanding the MFC SDI Project .......................................................... 747
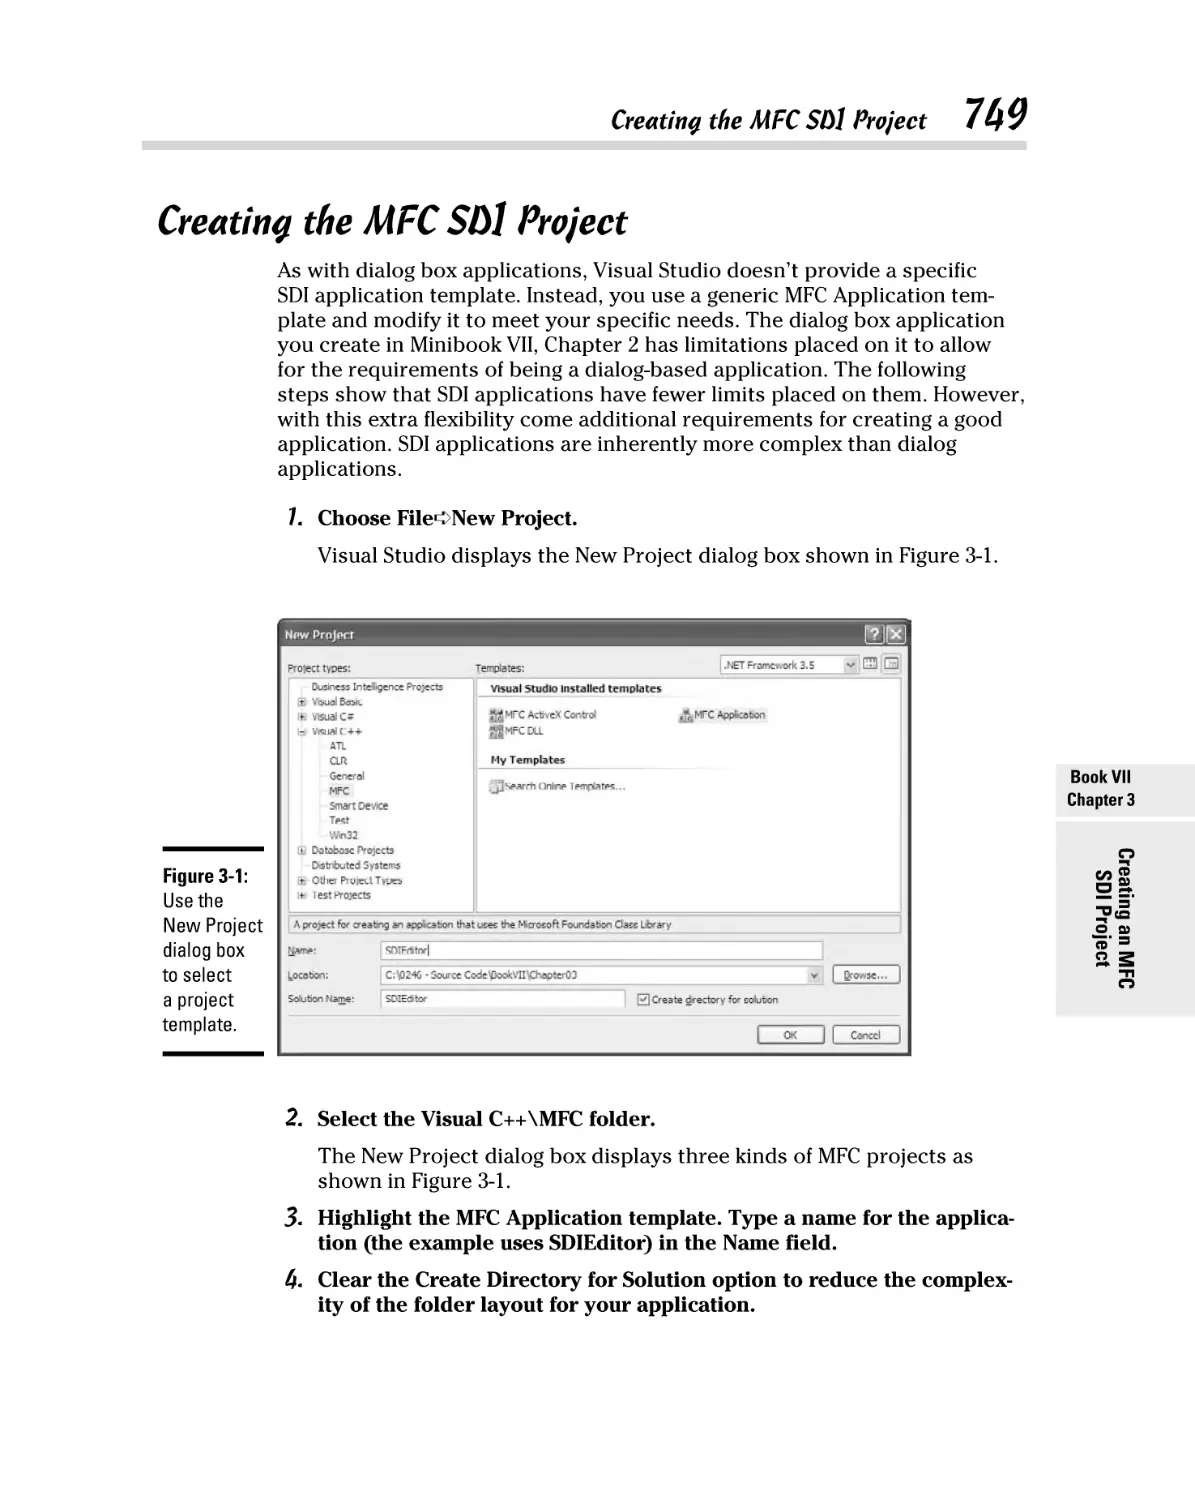
Creating the MFC SDI Project ..................................................................... 749
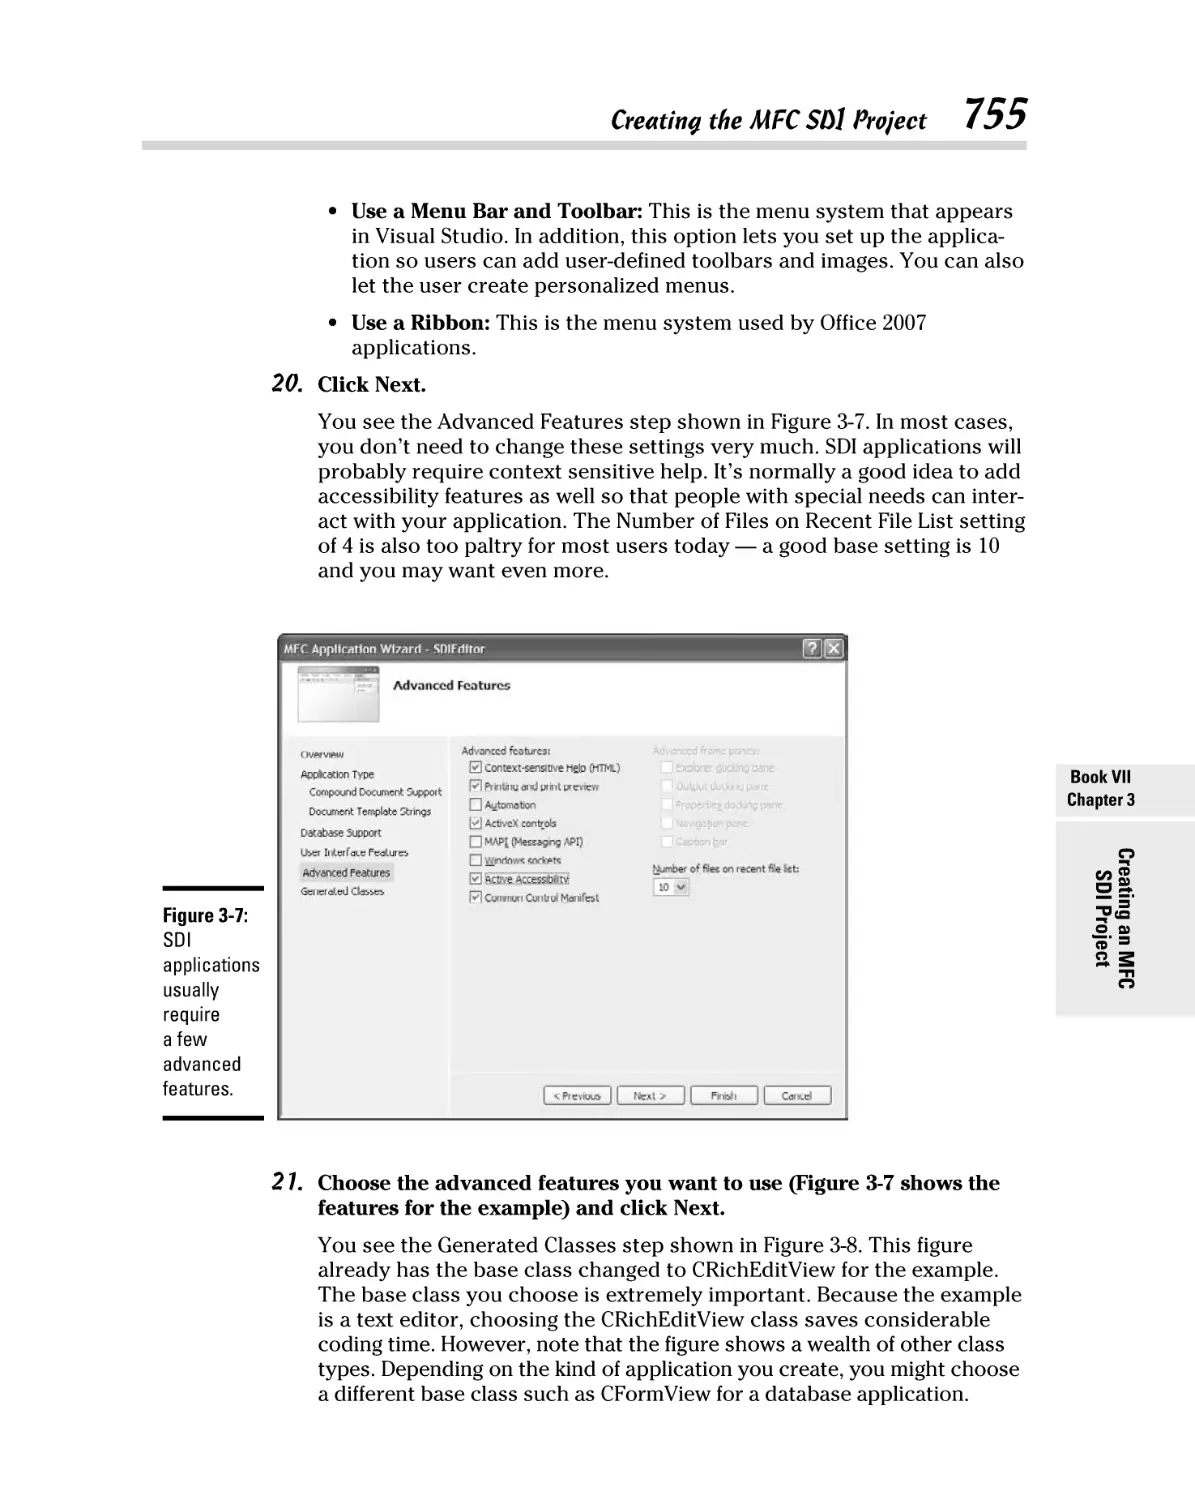
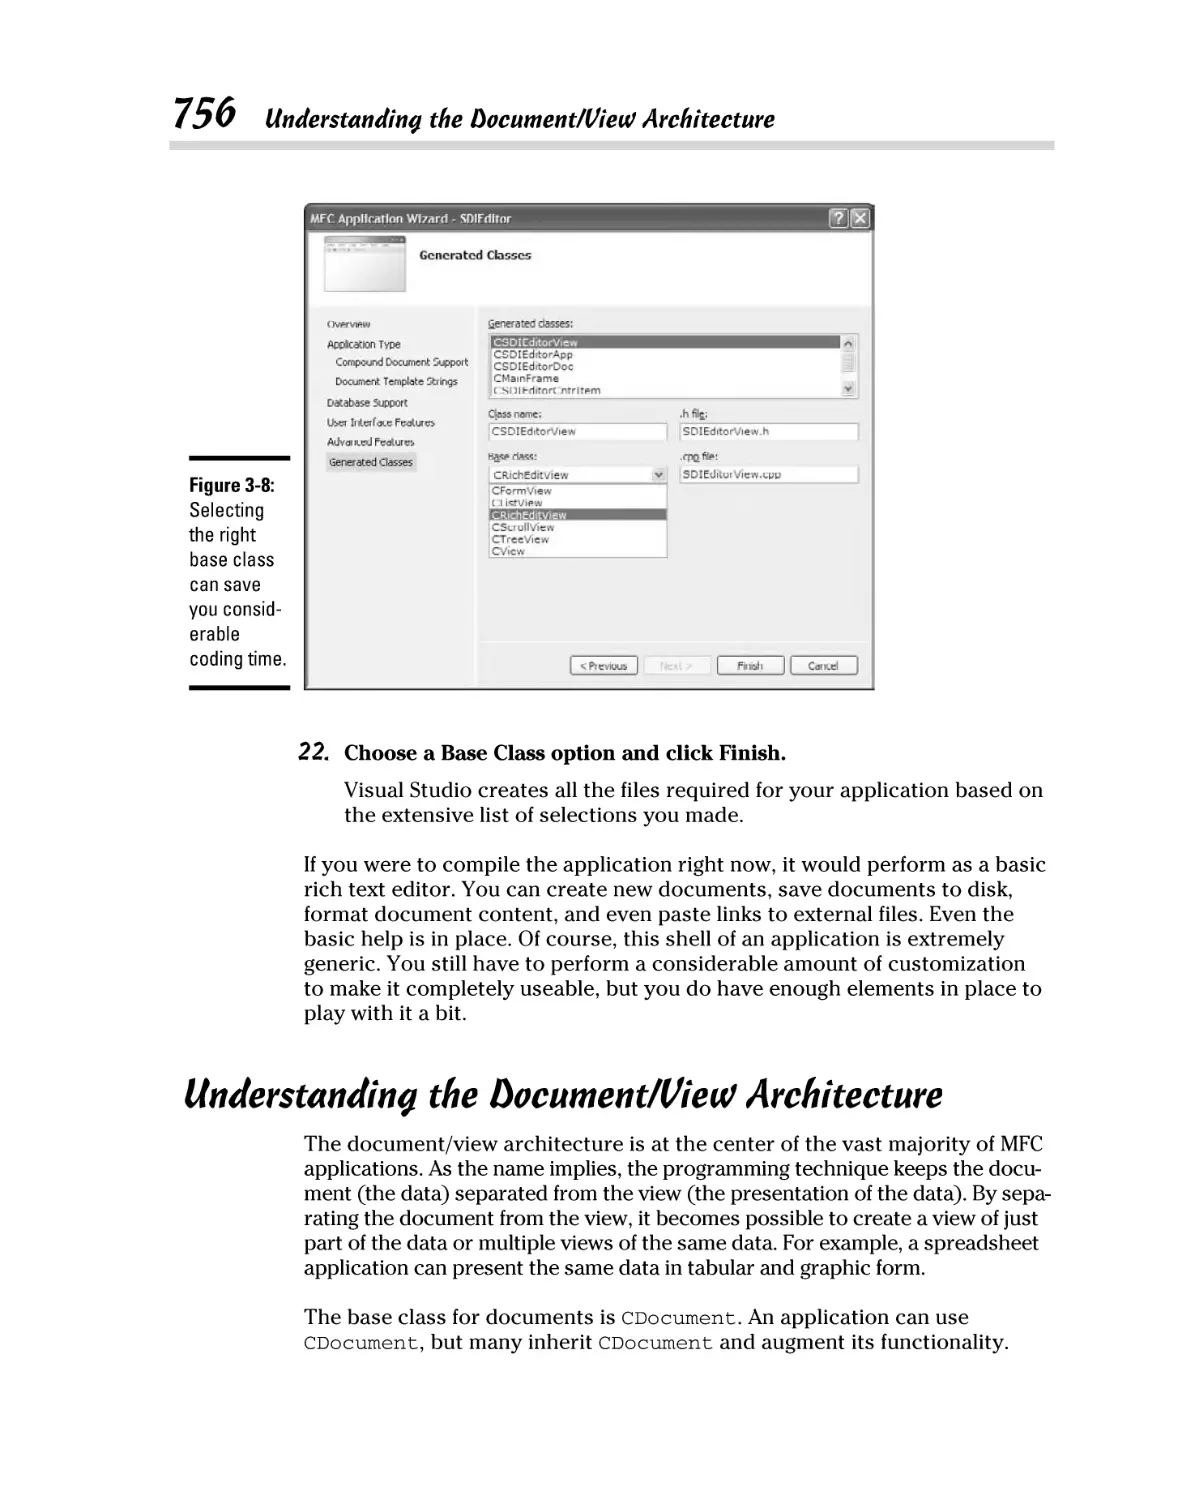
Understanding the Document/View Architecture ................................... 756
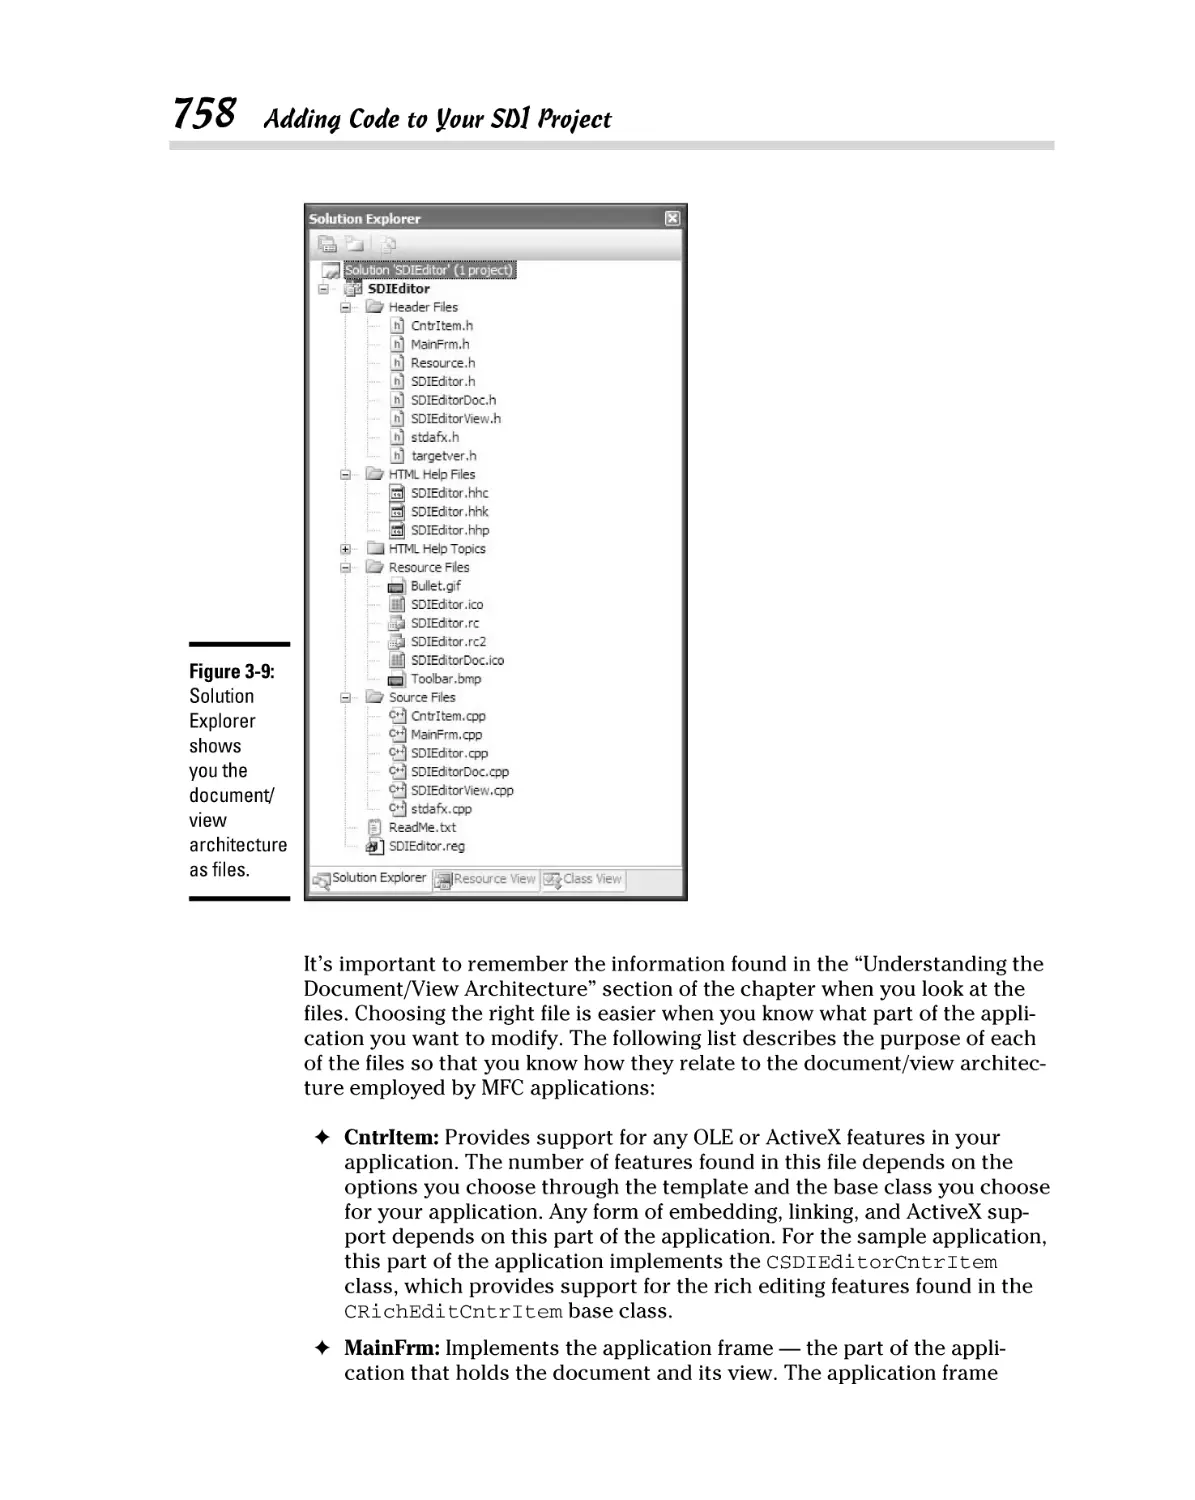
Adding Code to Your SDI Project .............................................................. 757
An overview of the essential application files................................ 757
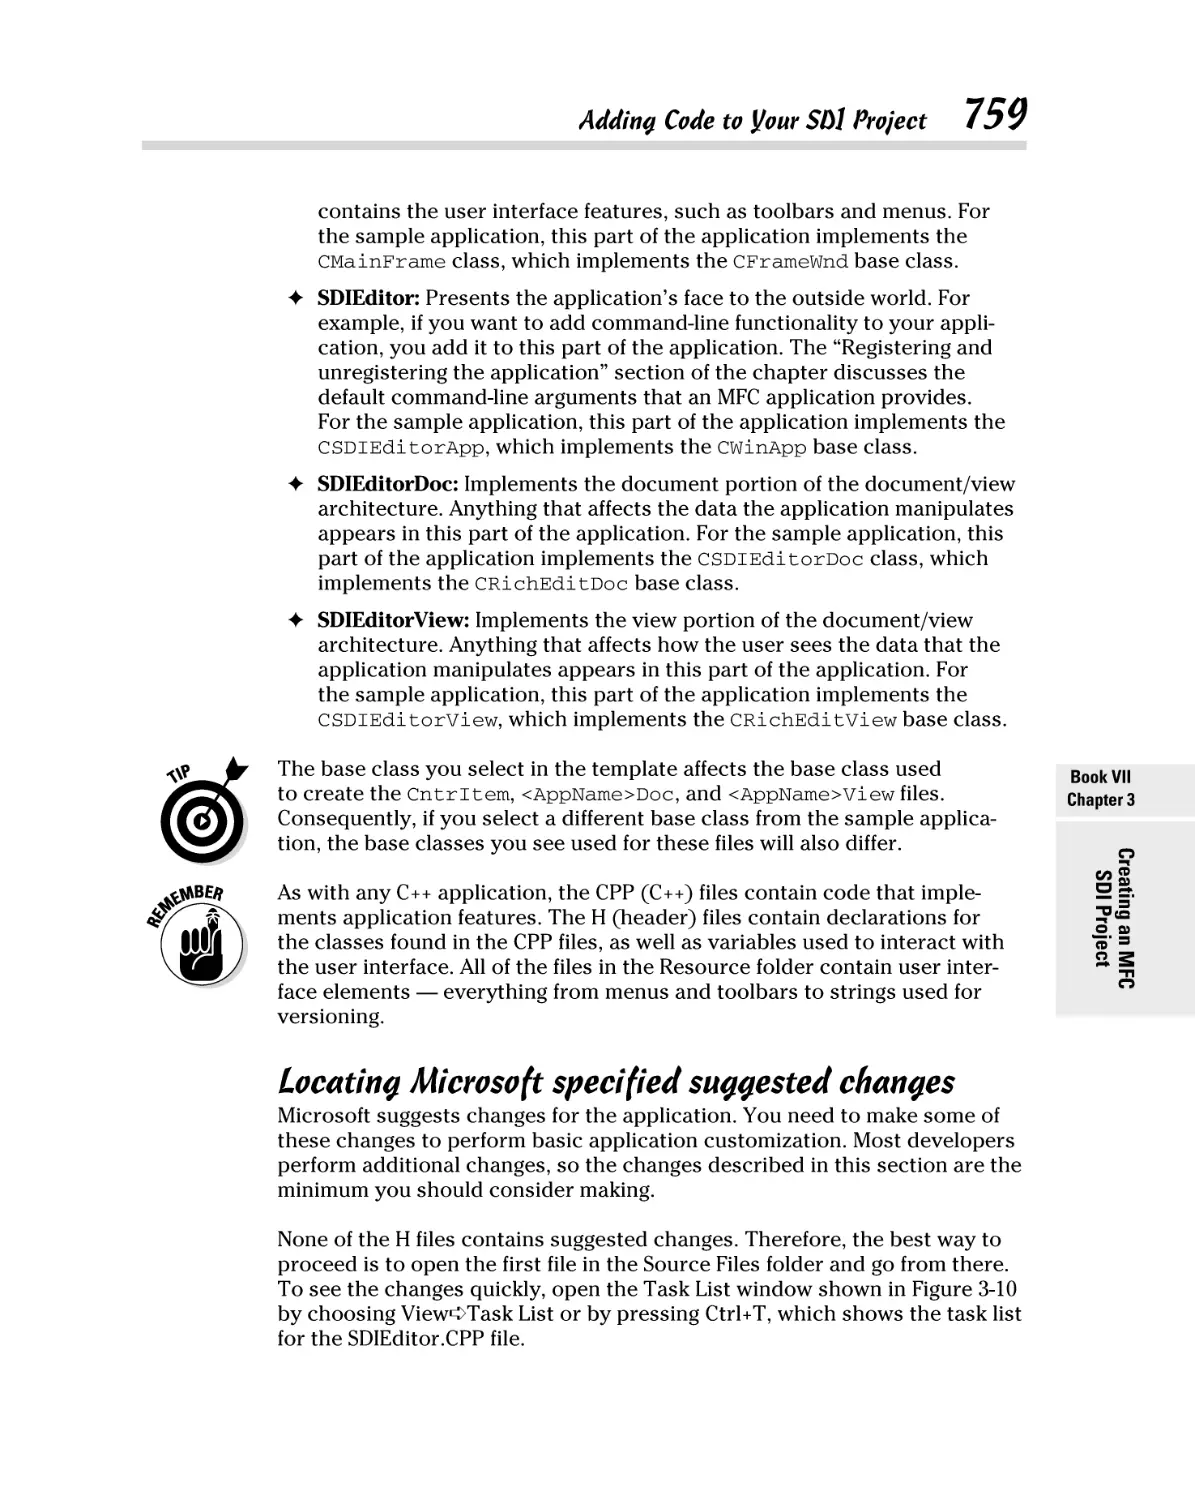
Locating Microsoft specified suggested changes .......................... 759
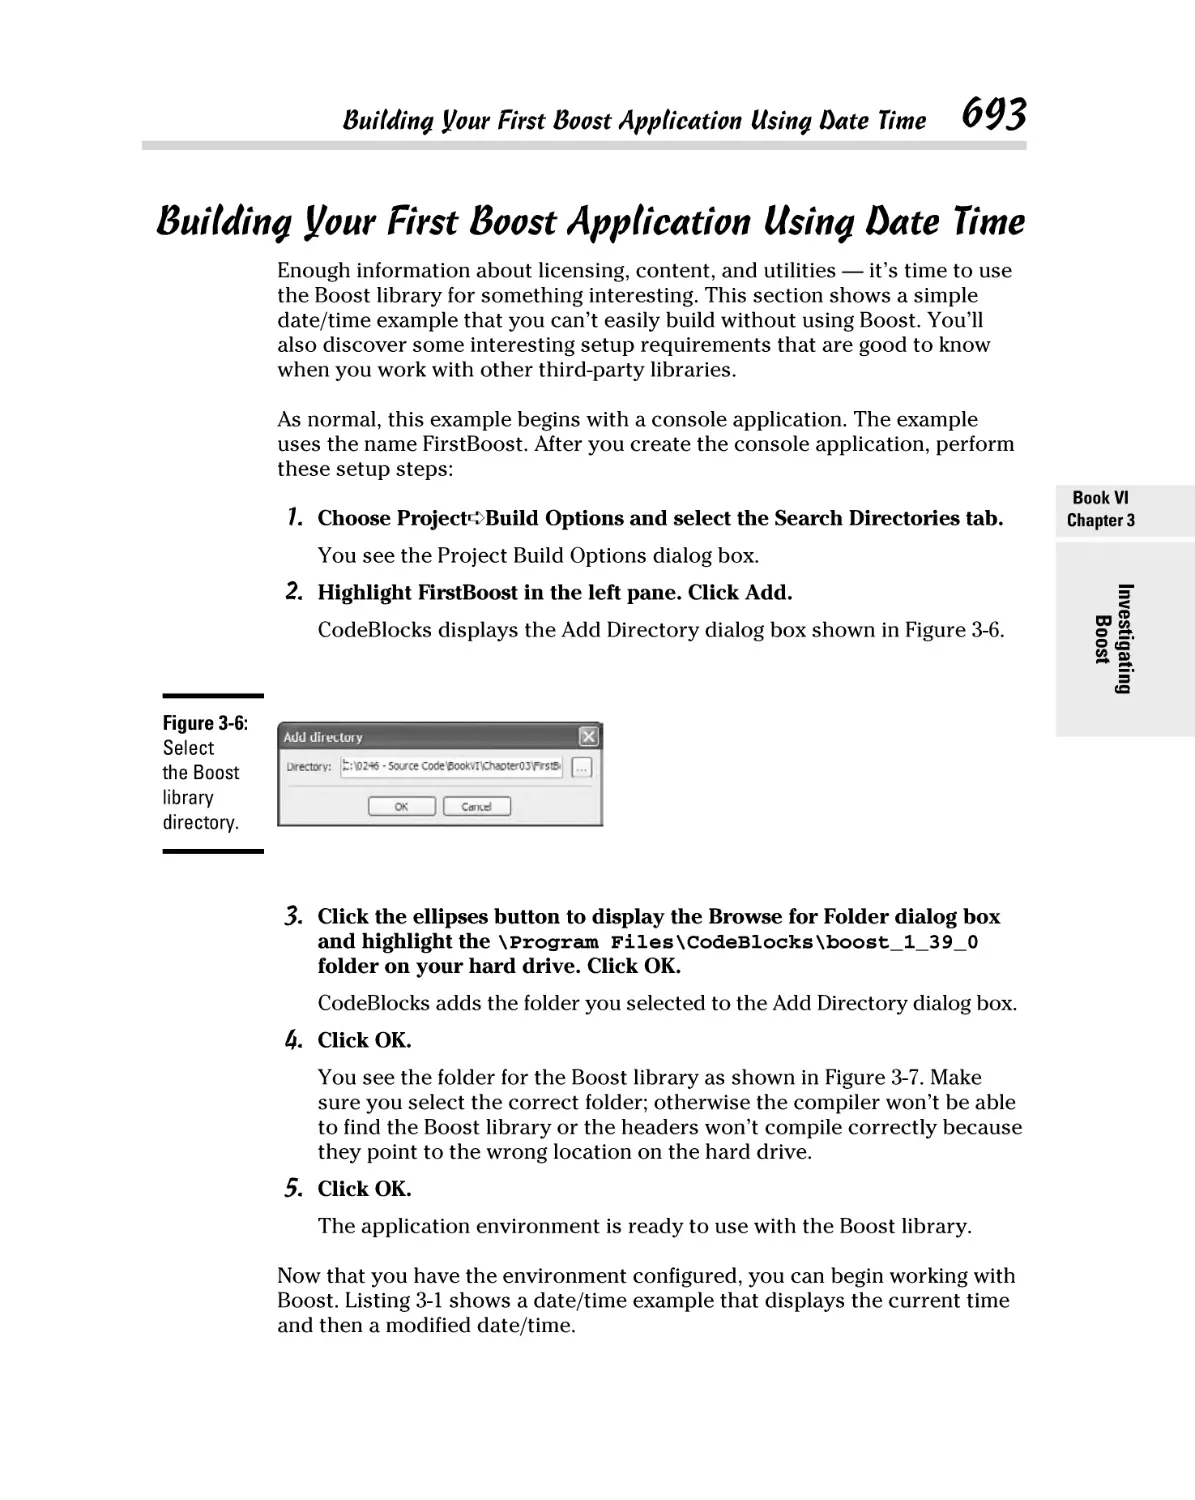
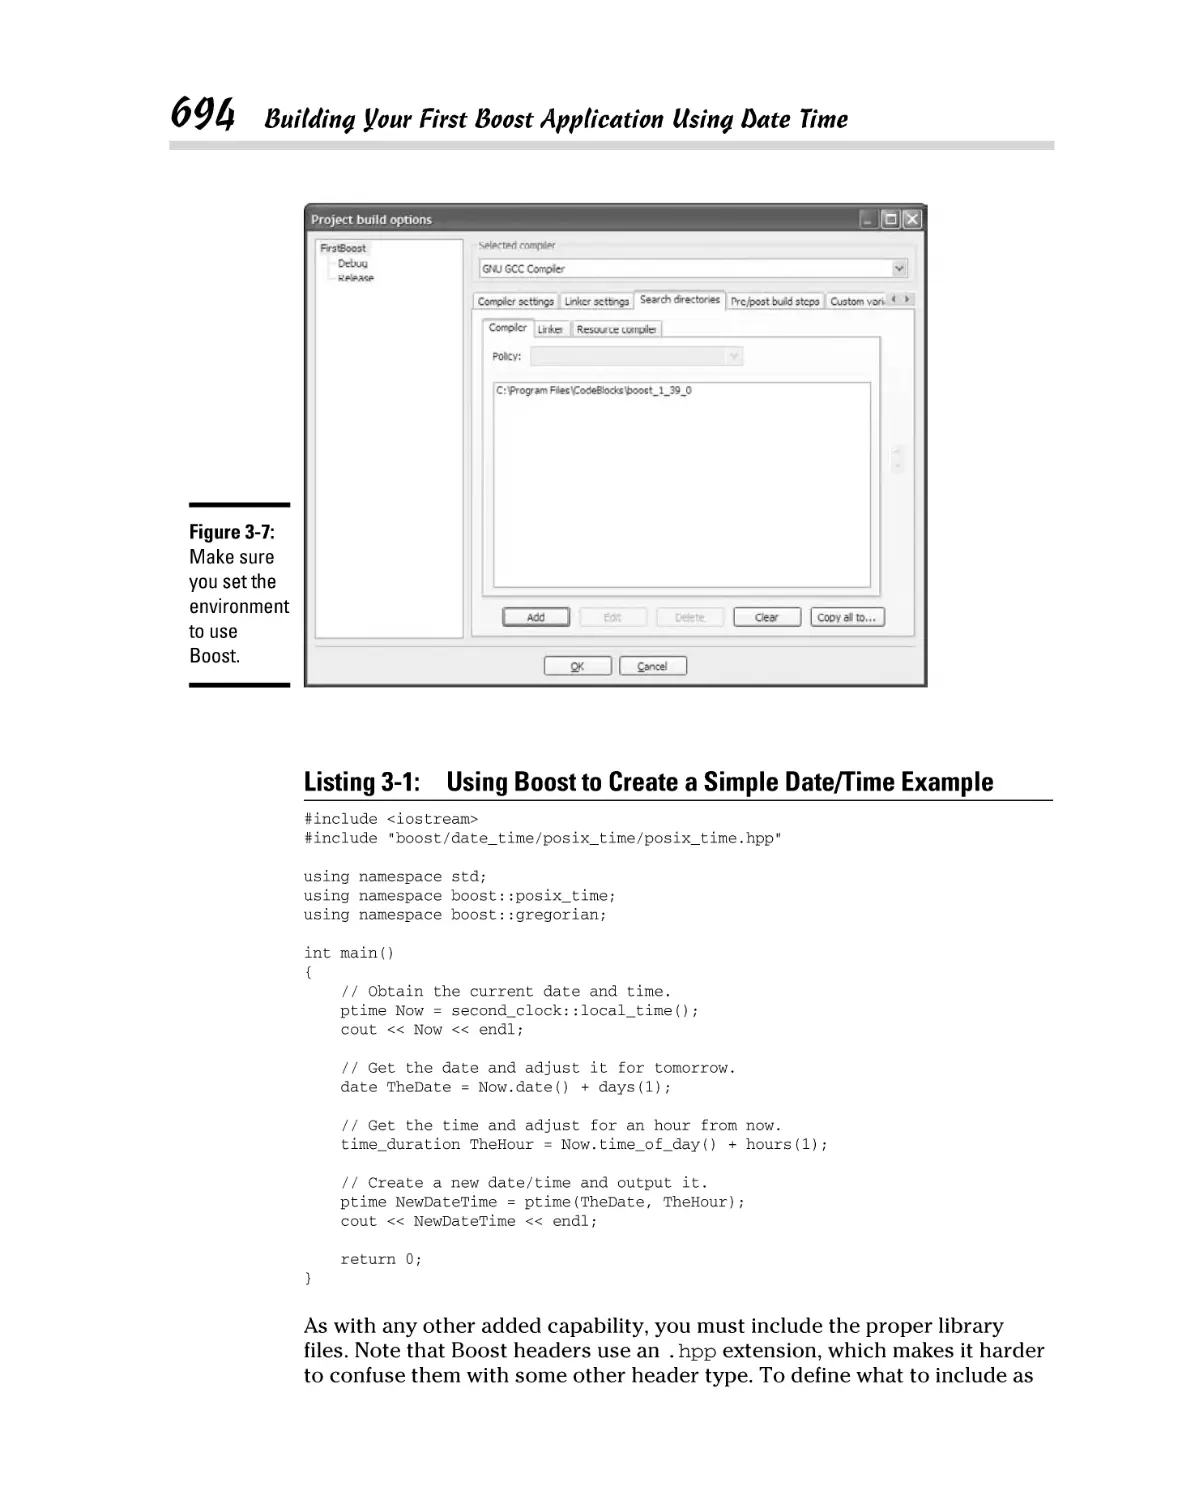
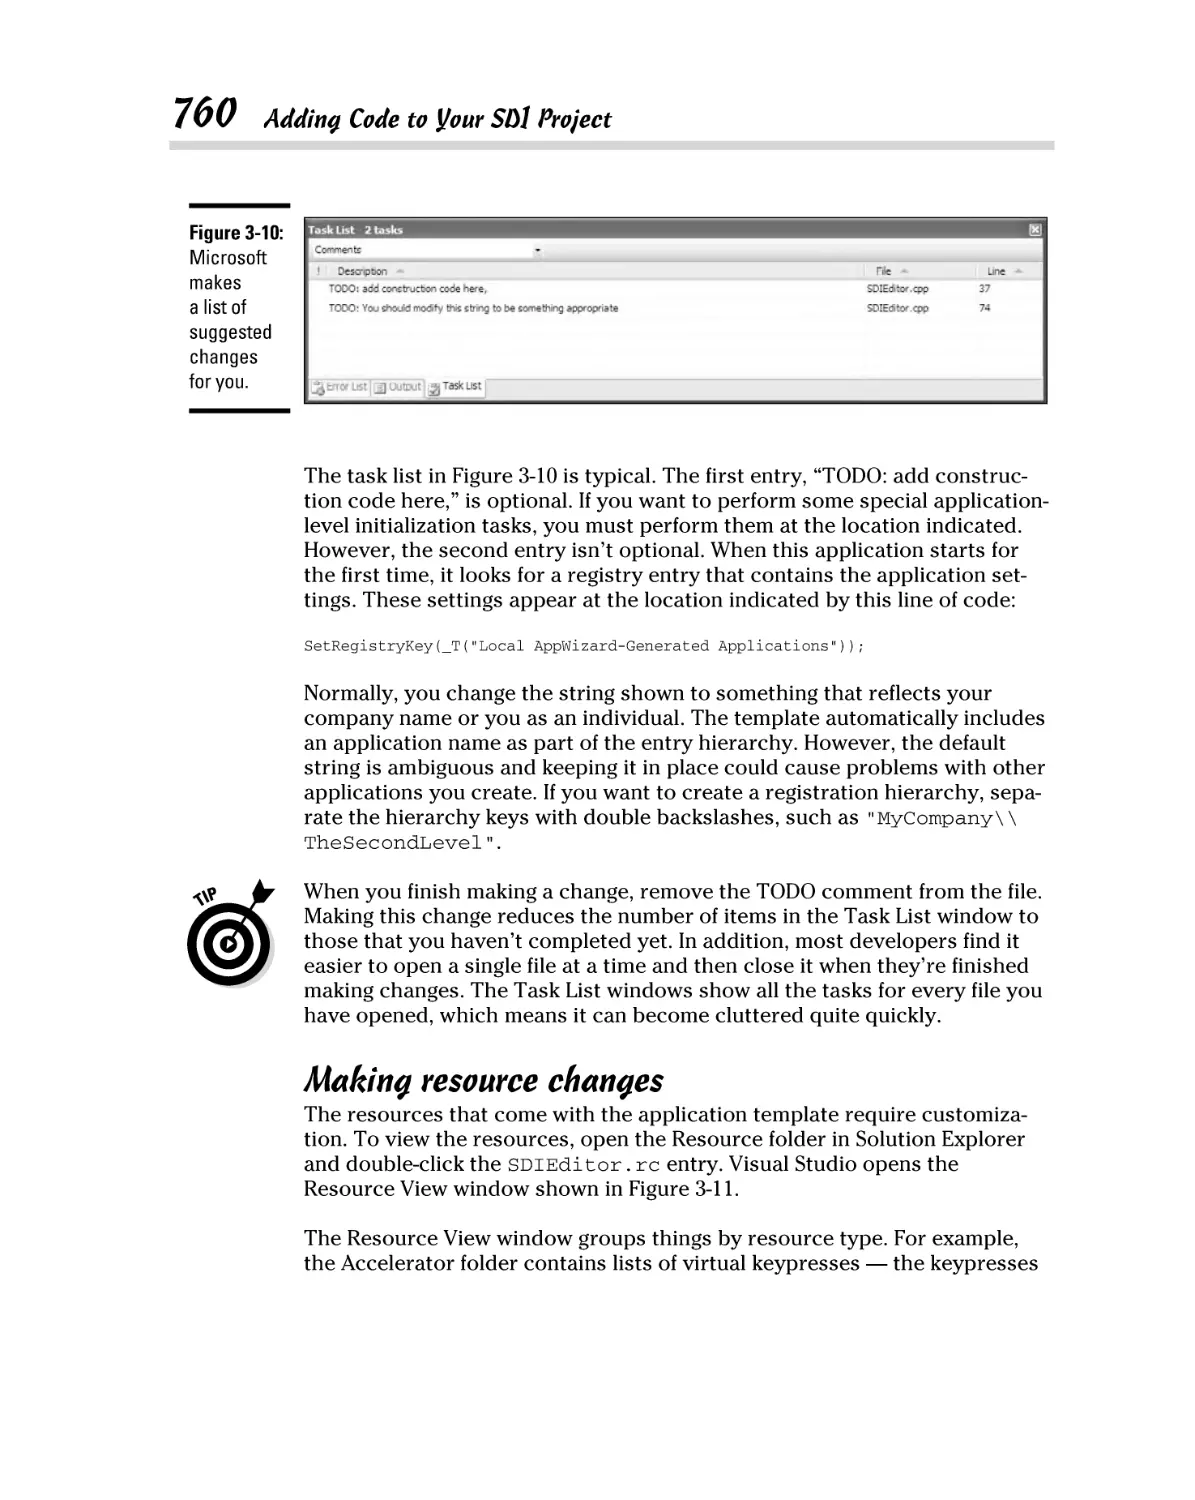
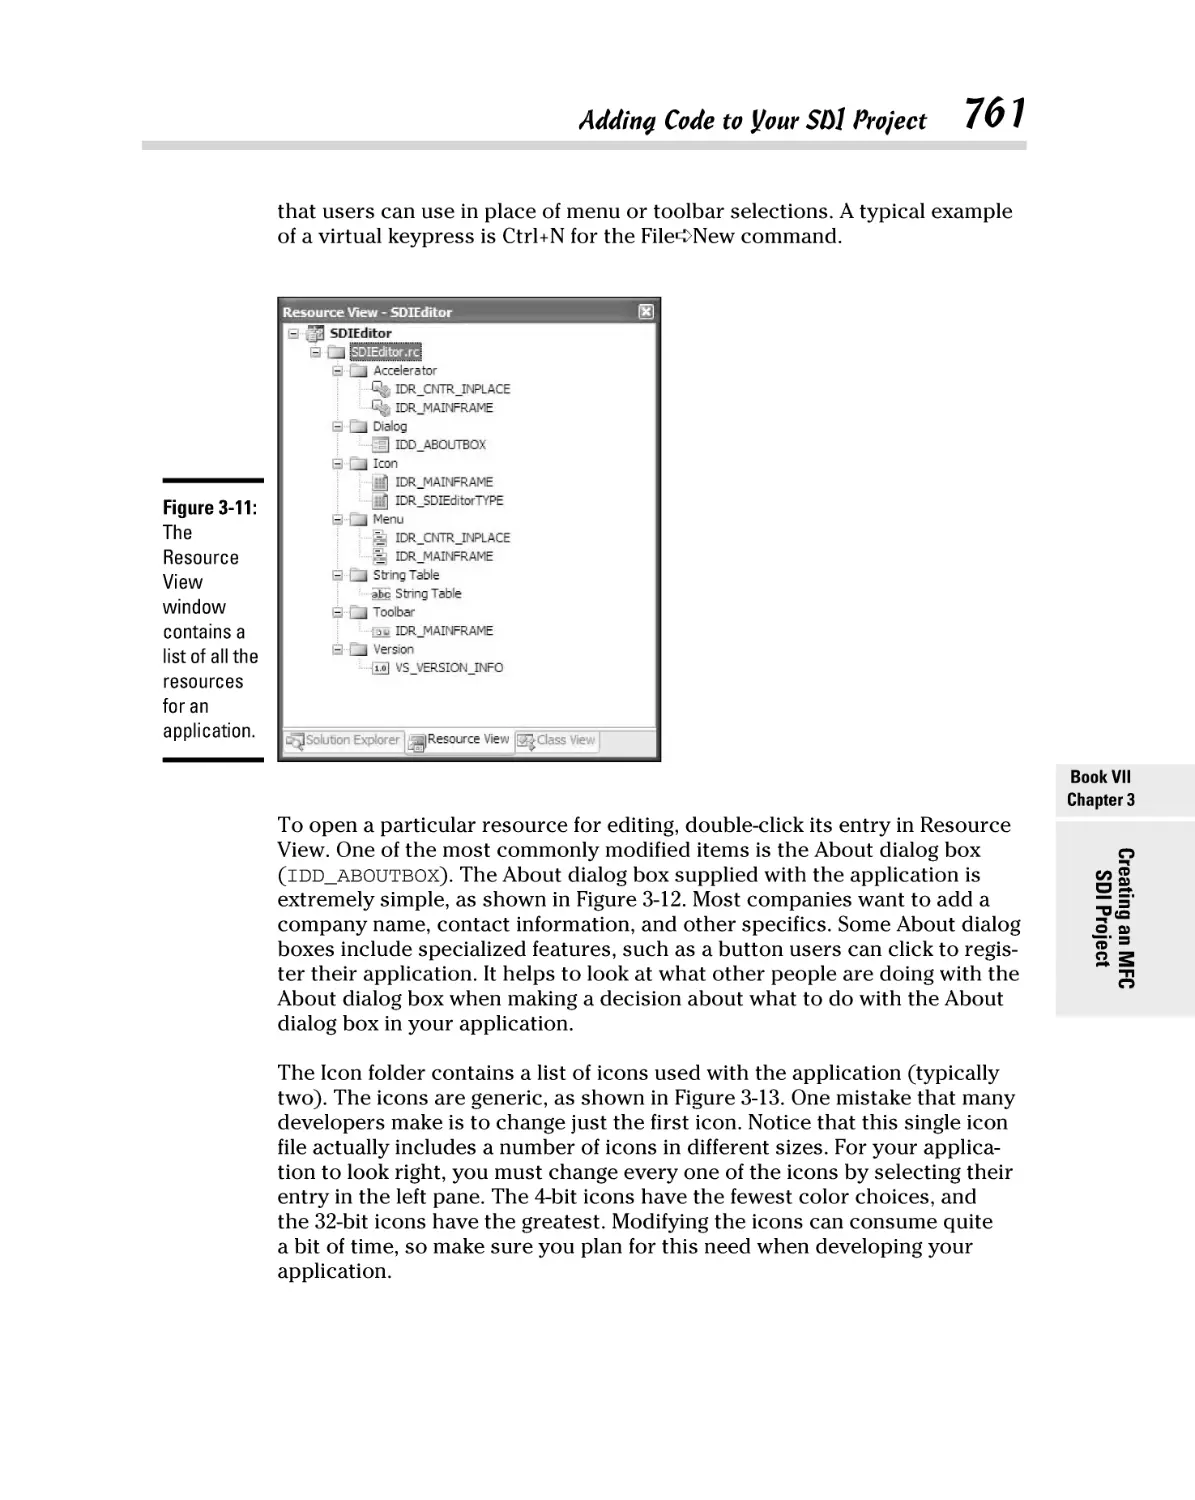
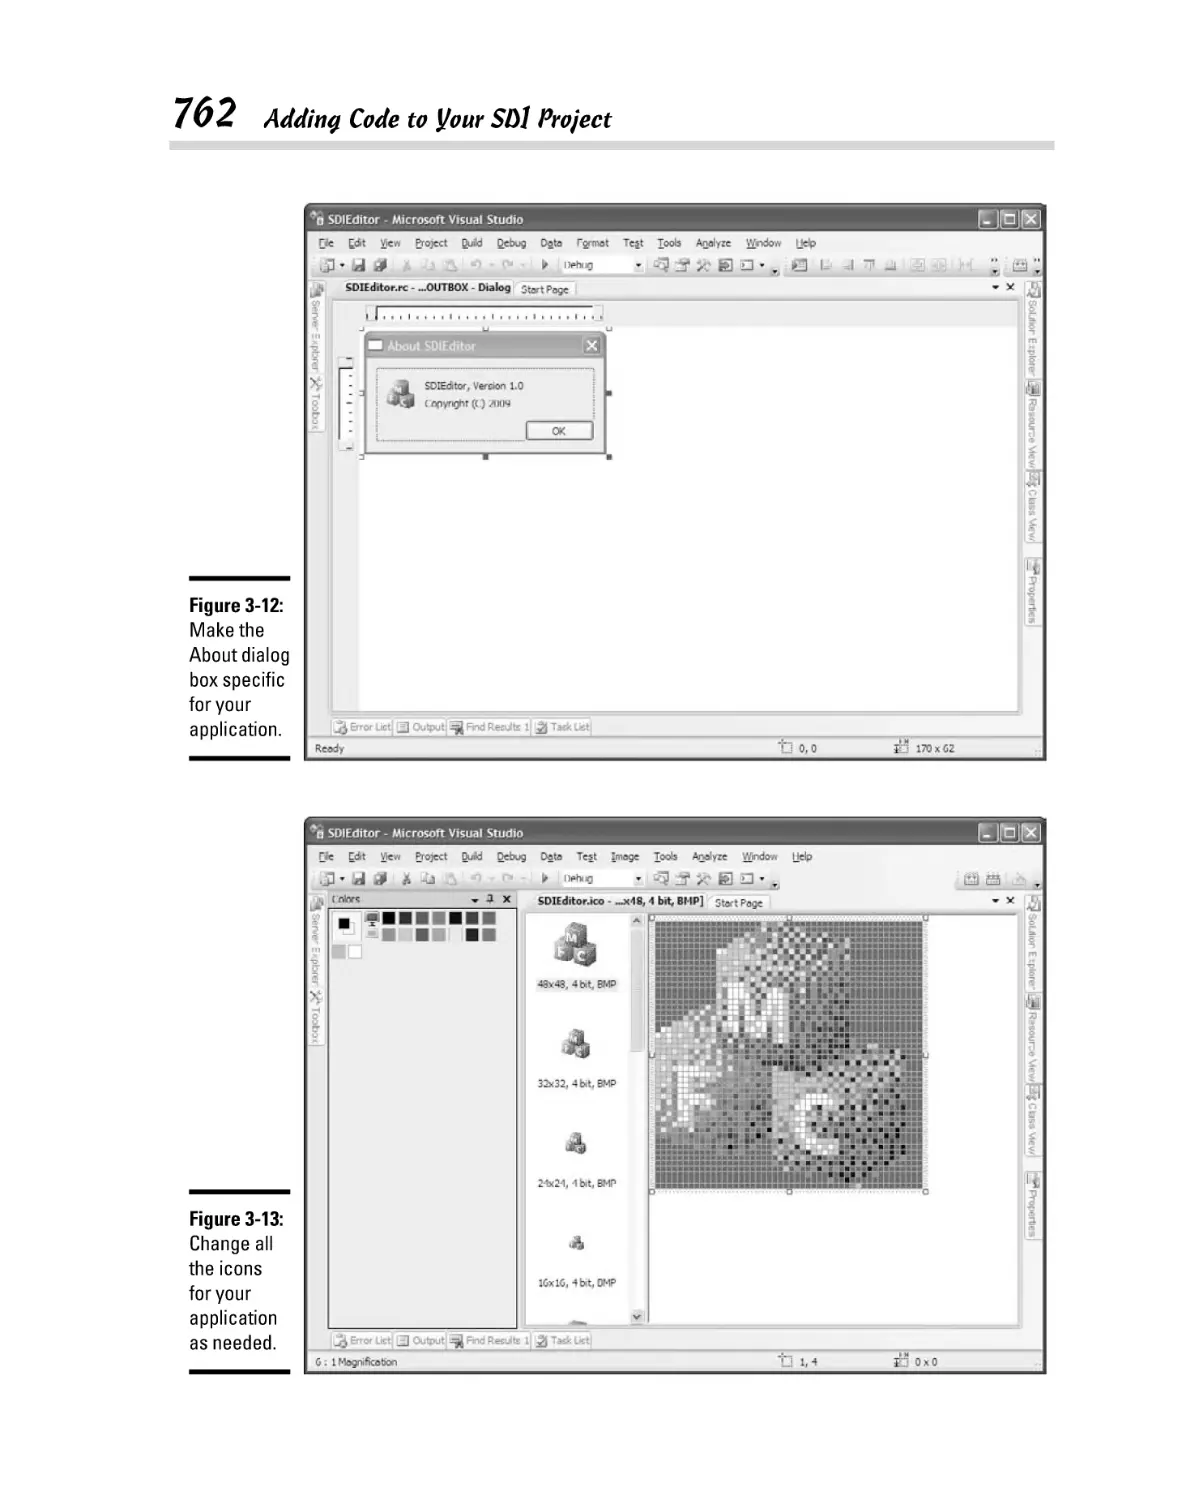
Making resource changes ................................................................. 760
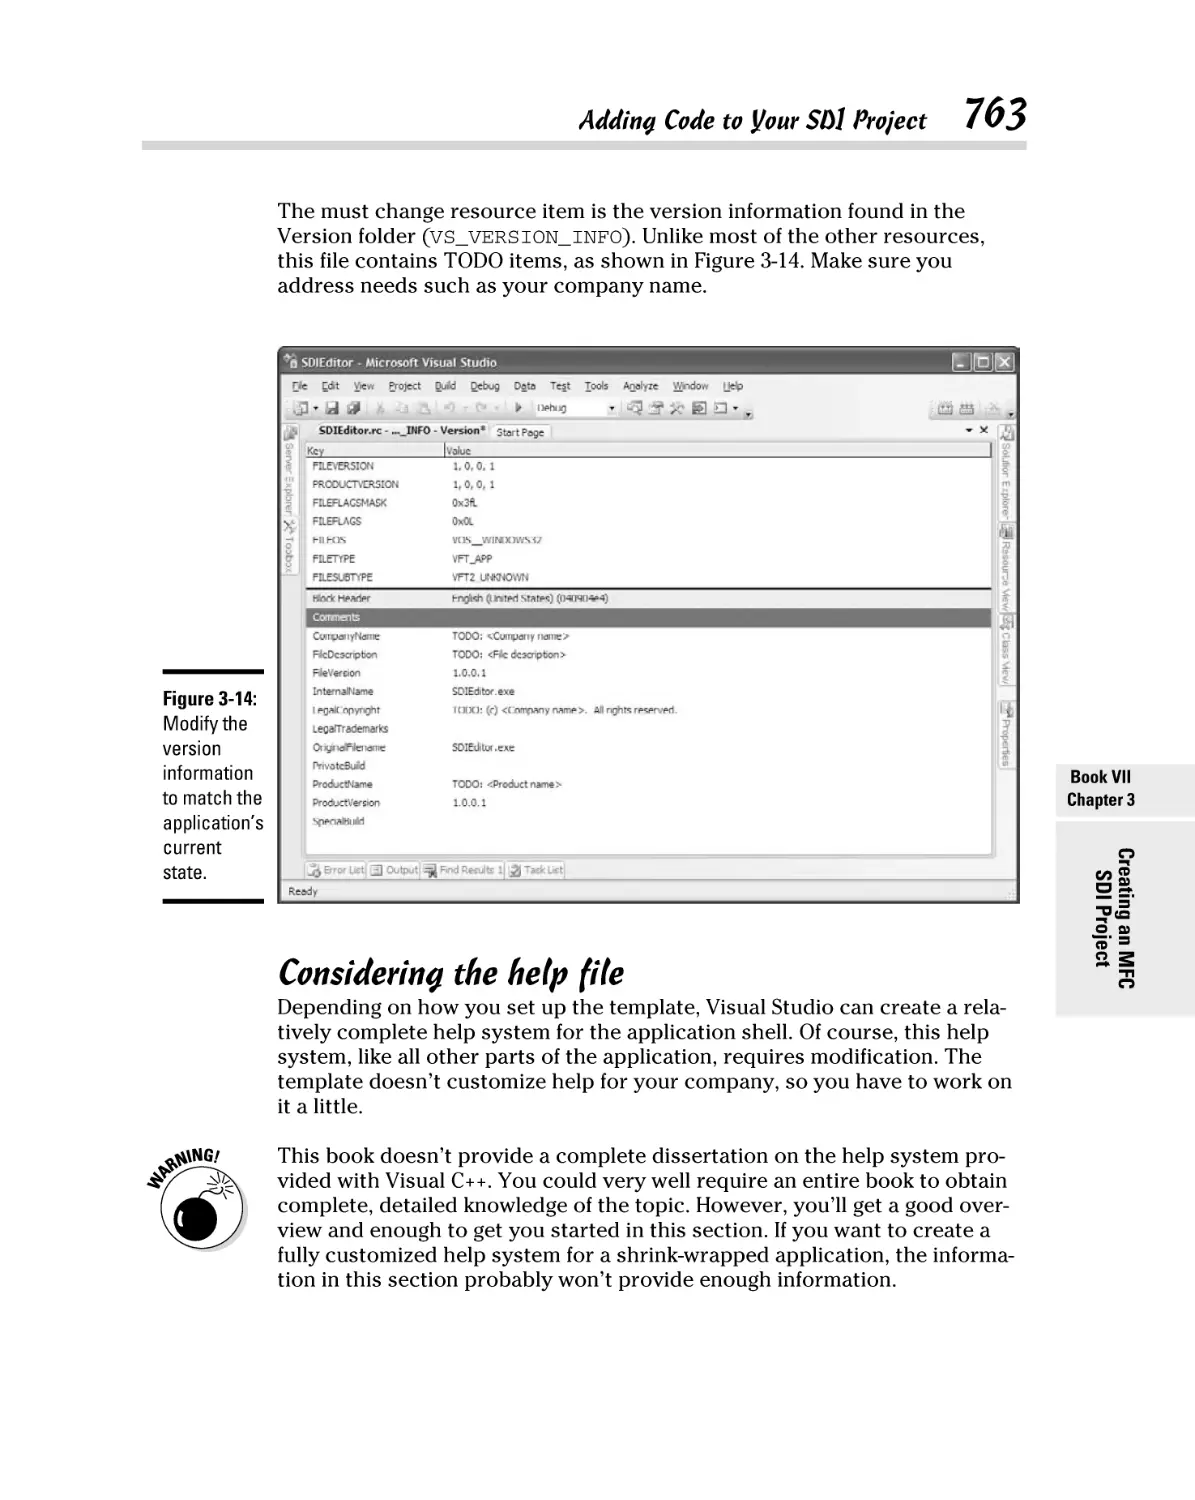
Considering the help file ................................................................... 763
Registering and unregistering the application ............................... 765
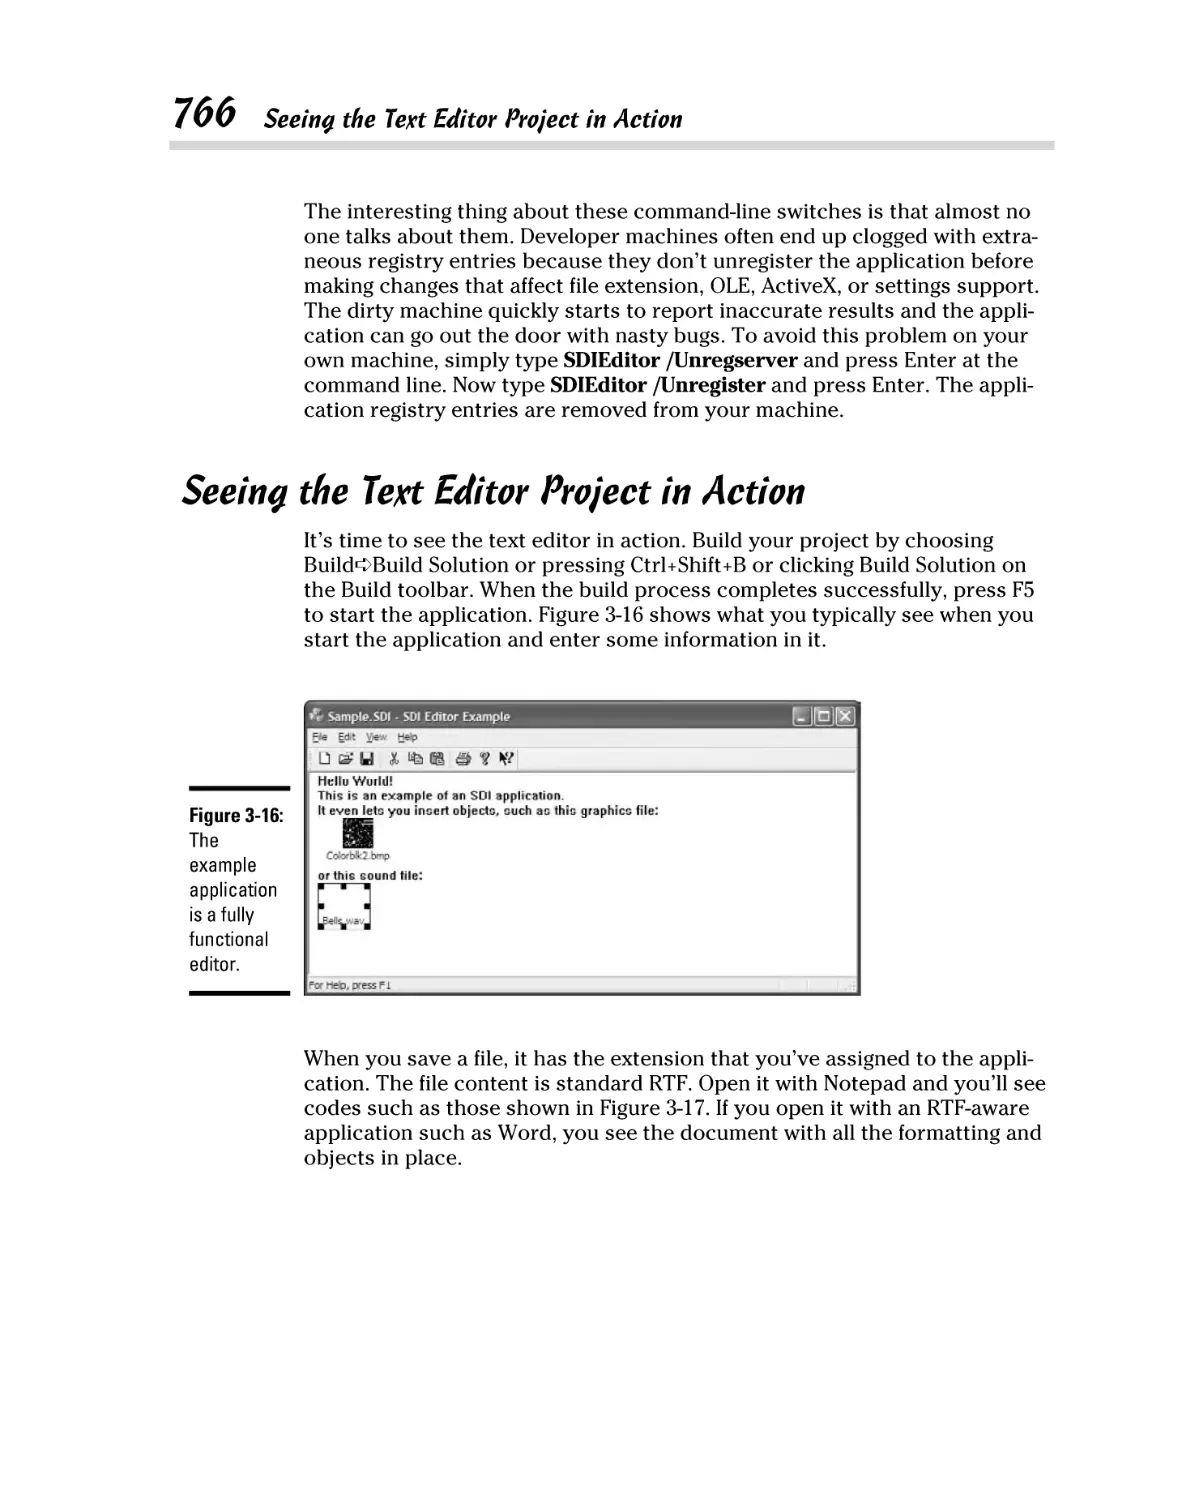
Seeing the Text Editor Project in Action .................................................. 766
xx
C++ All-in-One For Dummies, 2nd Edition
Chapter 4: Using the Visual C++ 2008 Debugger. . . . . . . . . . . . . . . . . .769
A Quick Look at the Error Application ..................................................... 770
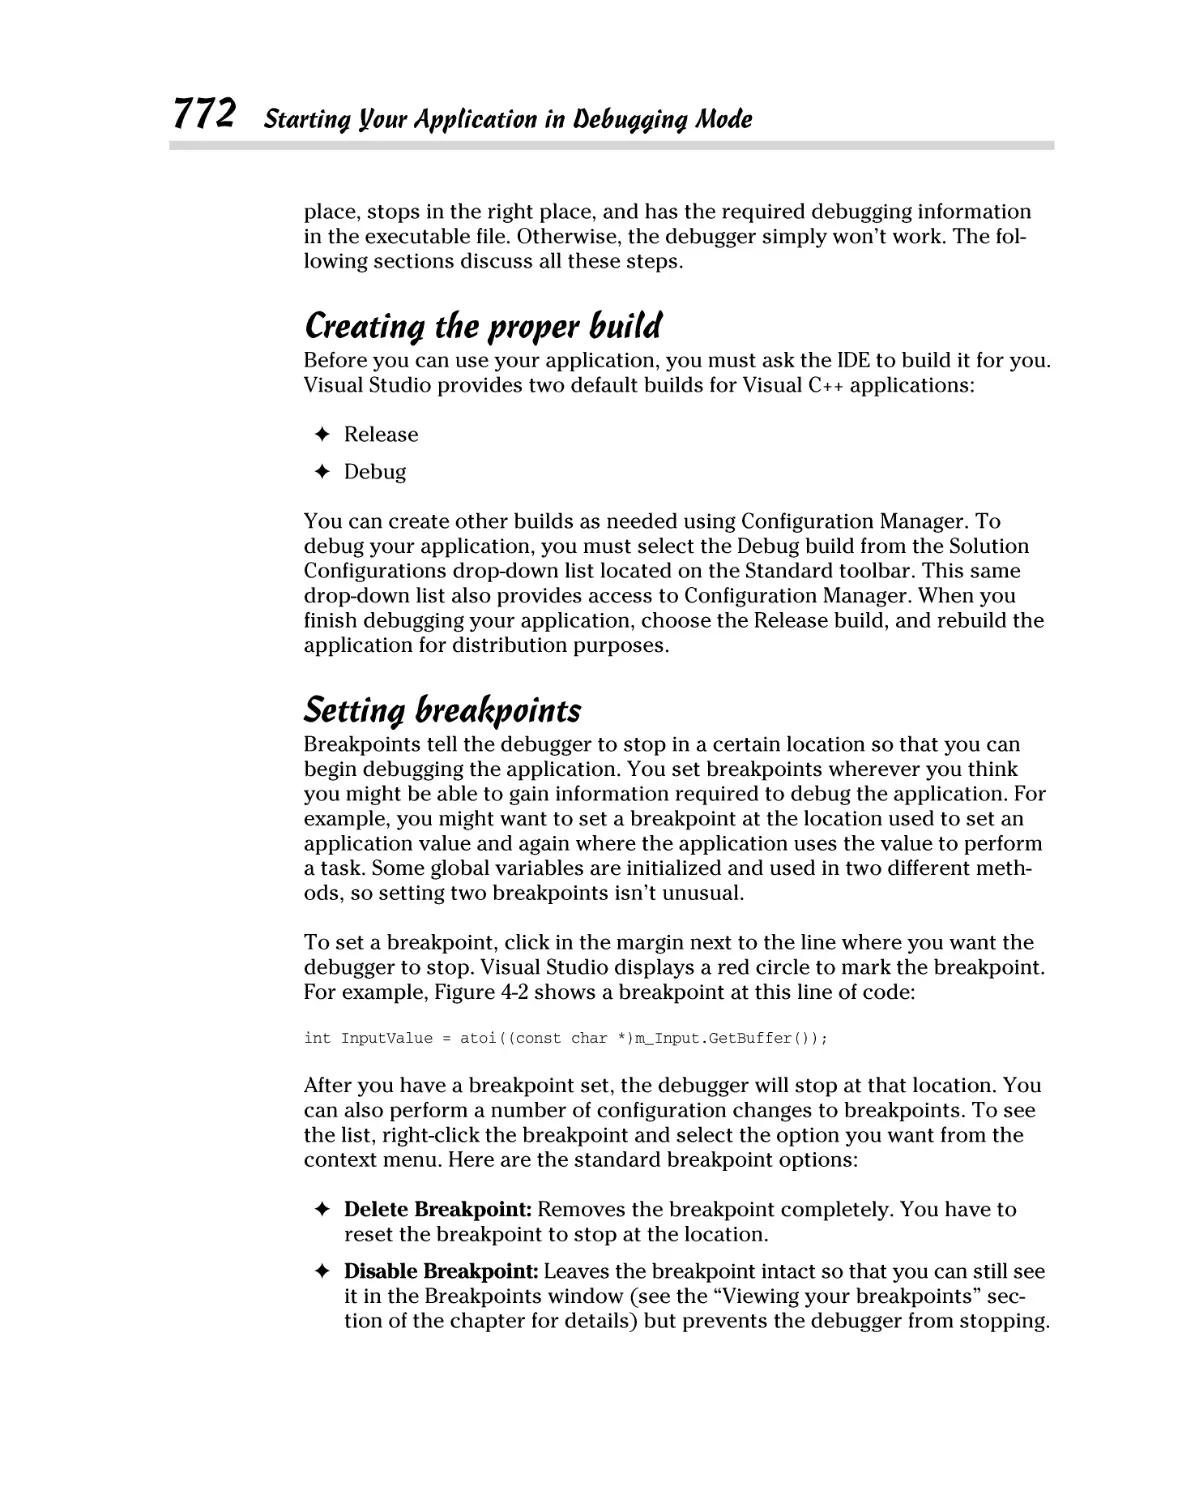
Starting Your Application in Debugging Mode ........................................ 771
Creating the proper build ................................................................. 772
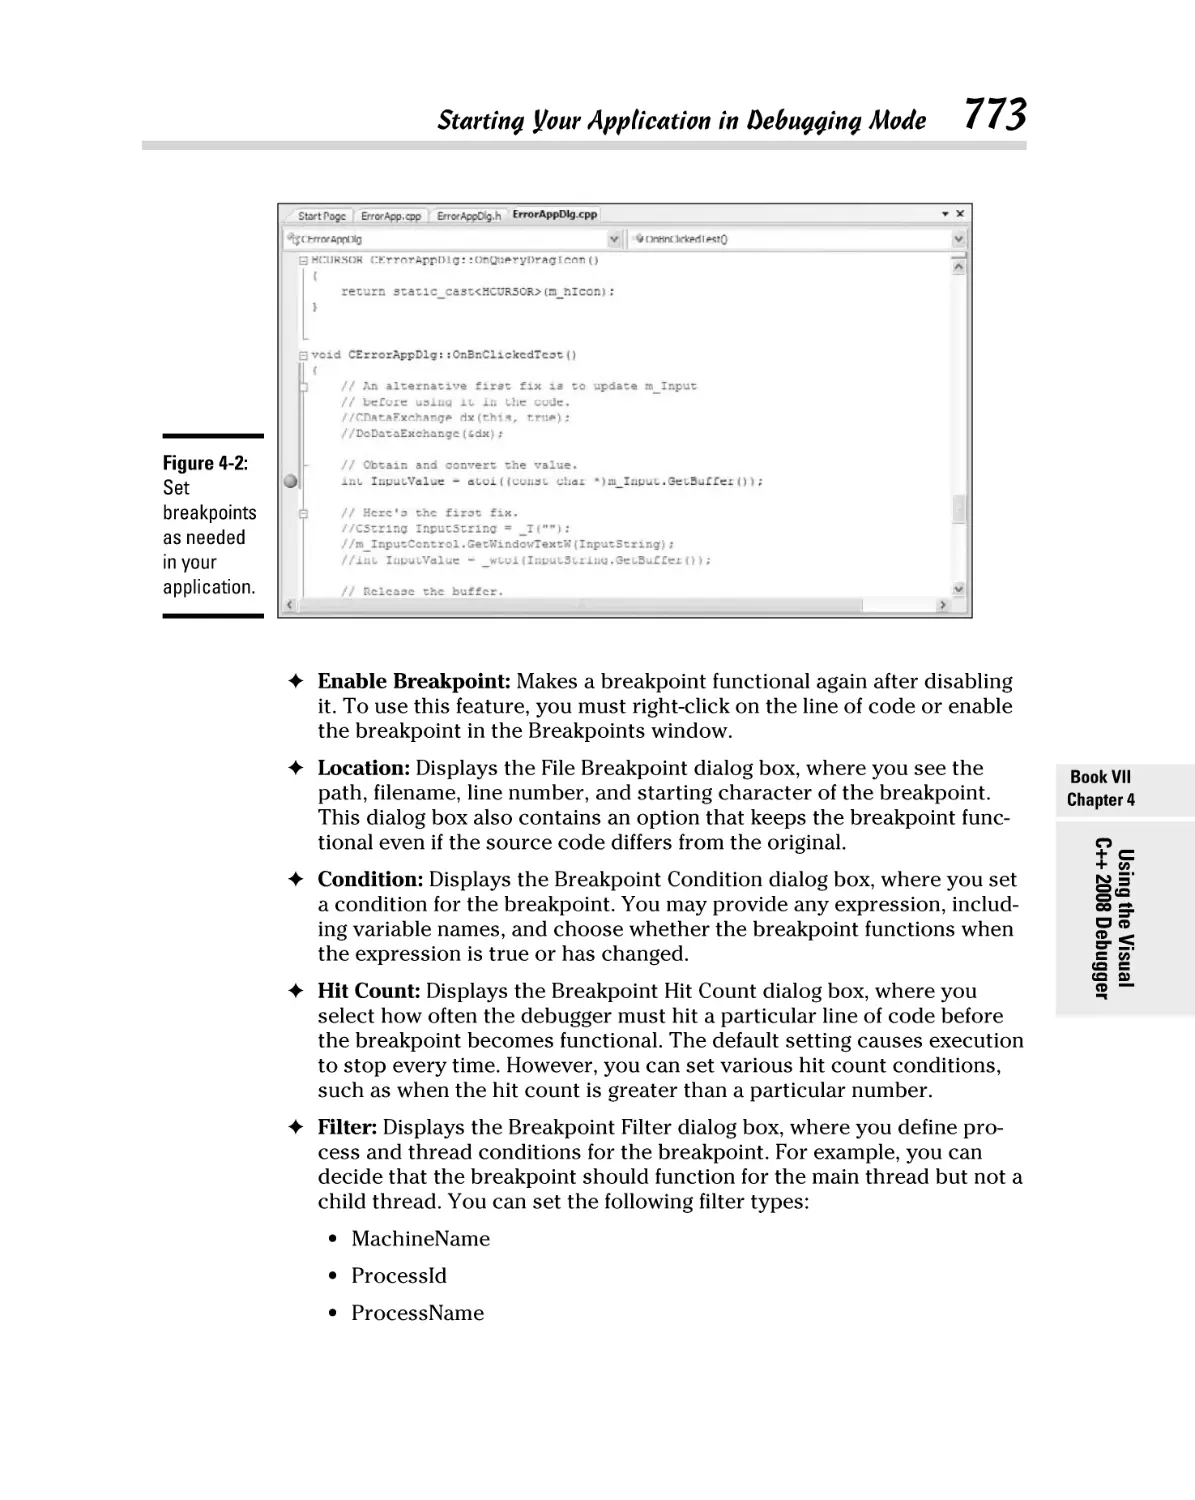
Setting breakpoints............................................................................ 772
Viewing your breakpoints ................................................................. 774
Starting the debugger ........................................................................ 775
Working with the Debugging Windows ..................................................... 775
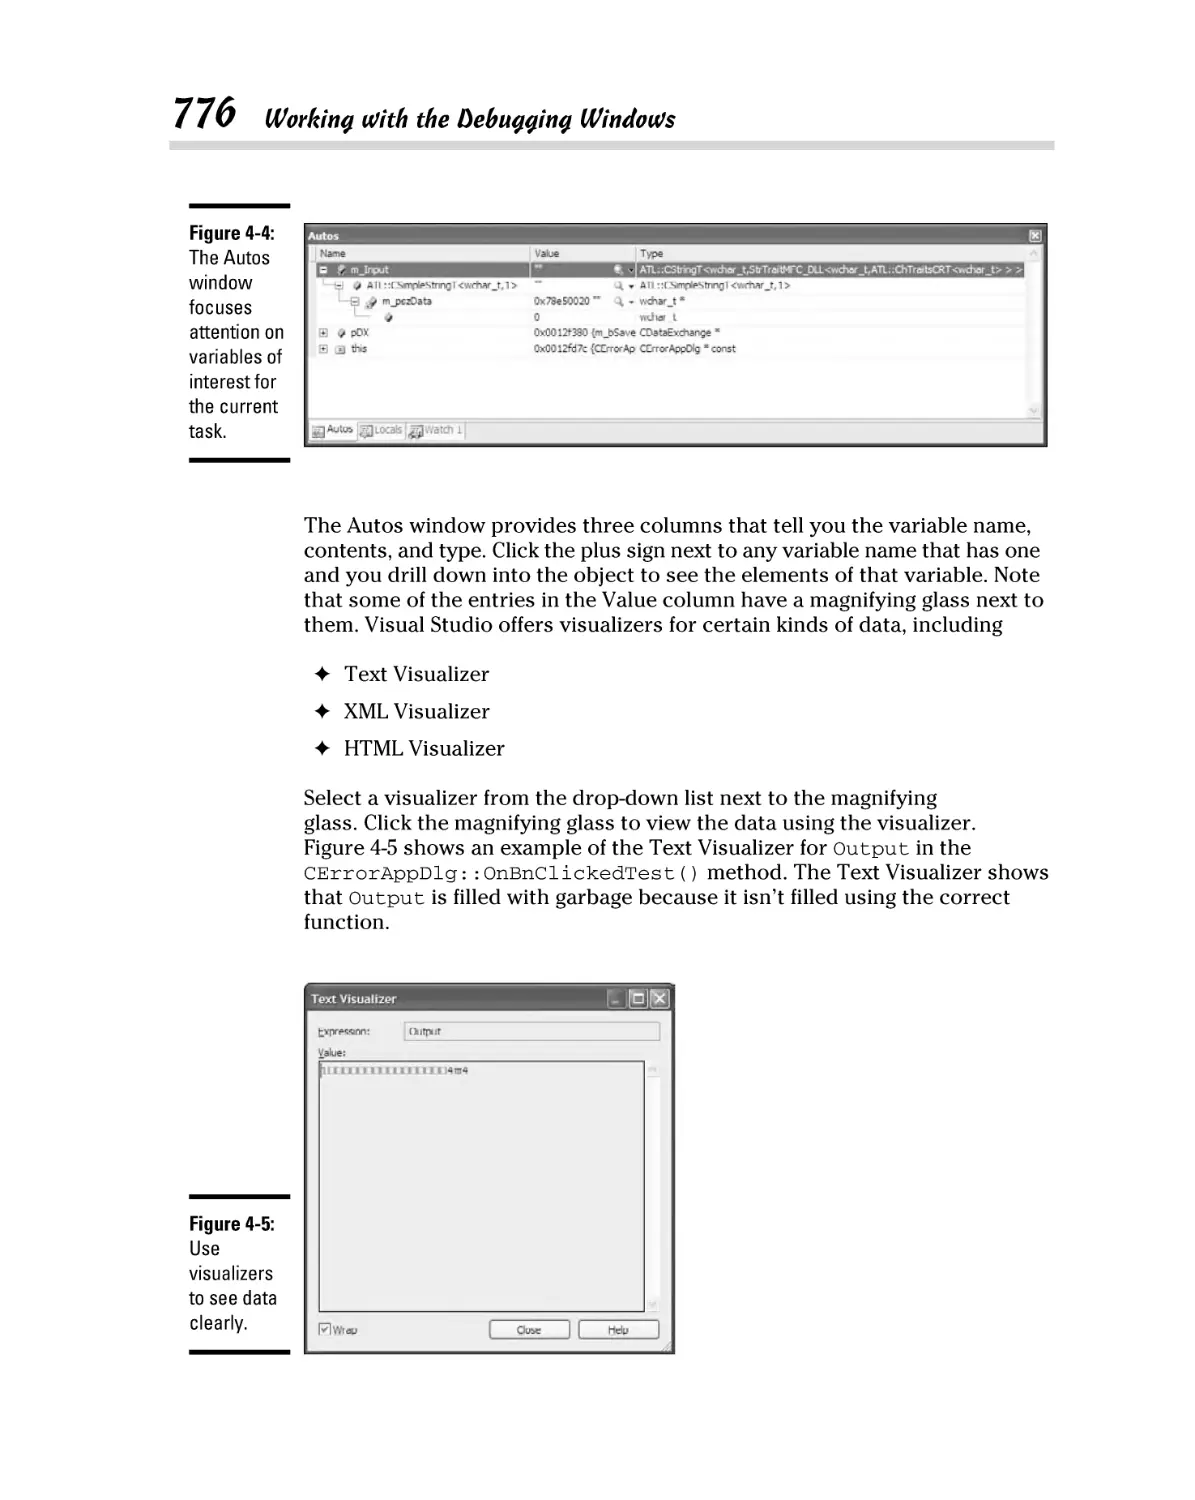
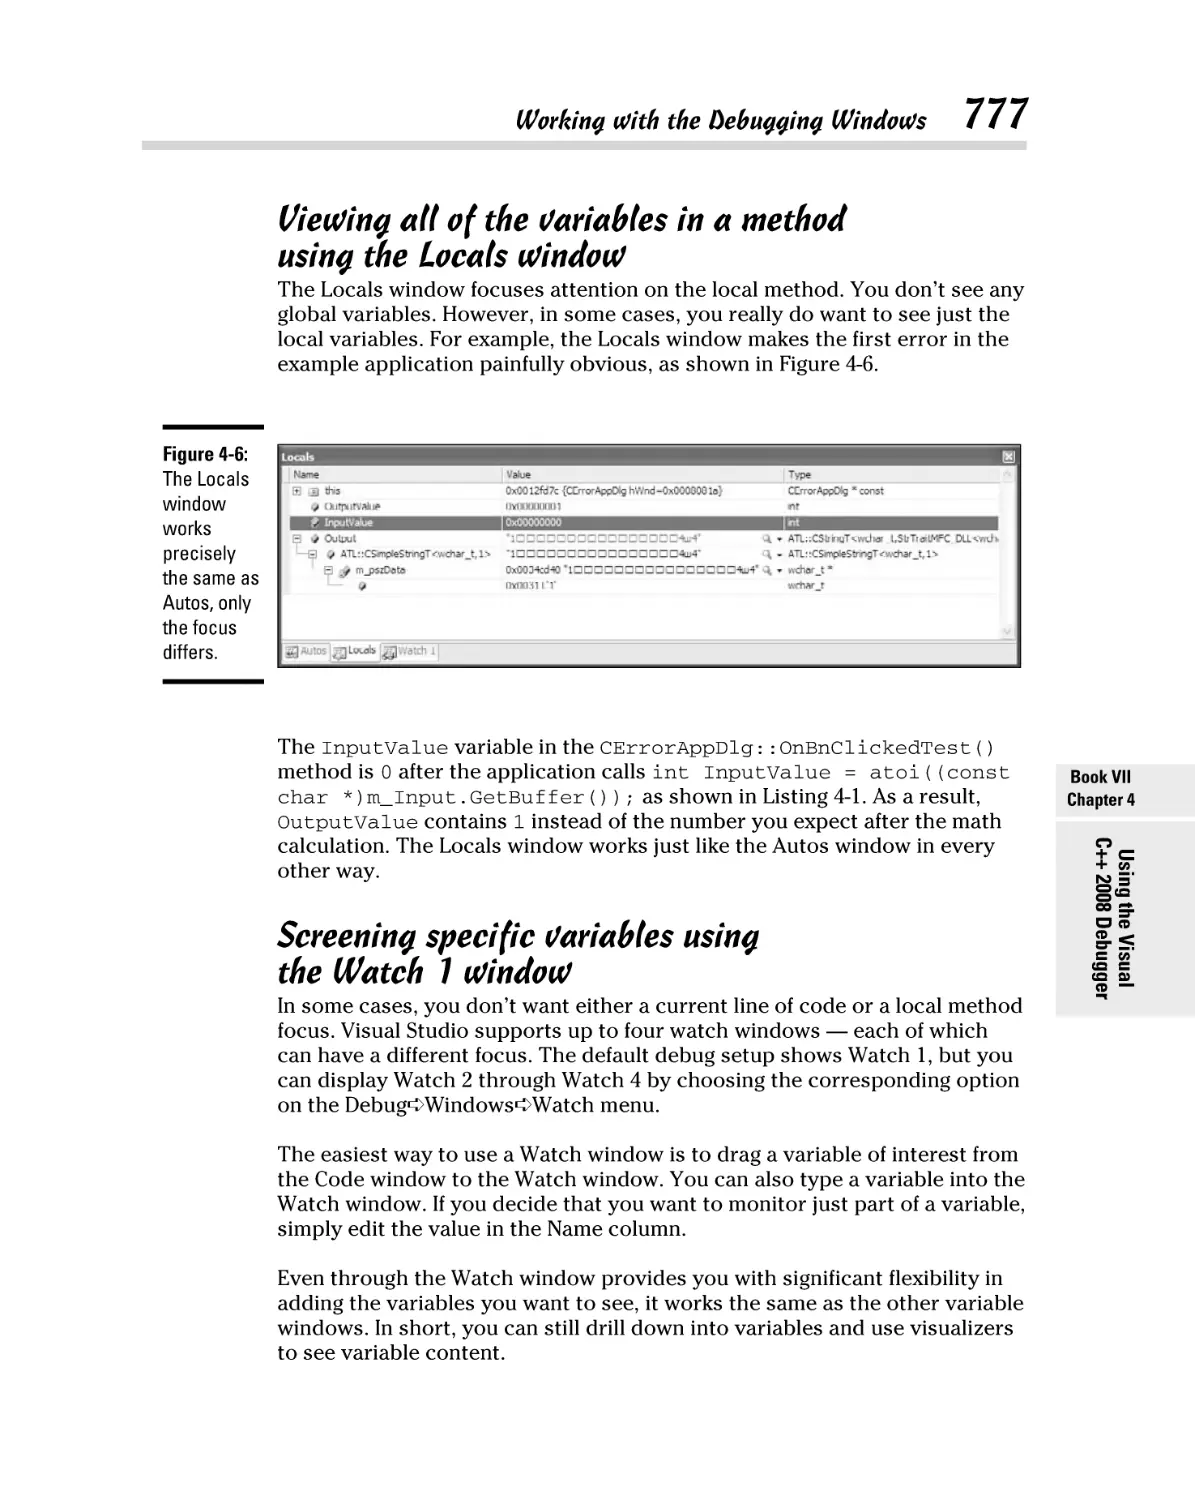
Viewing the focus variables using the Autos window ................... 775
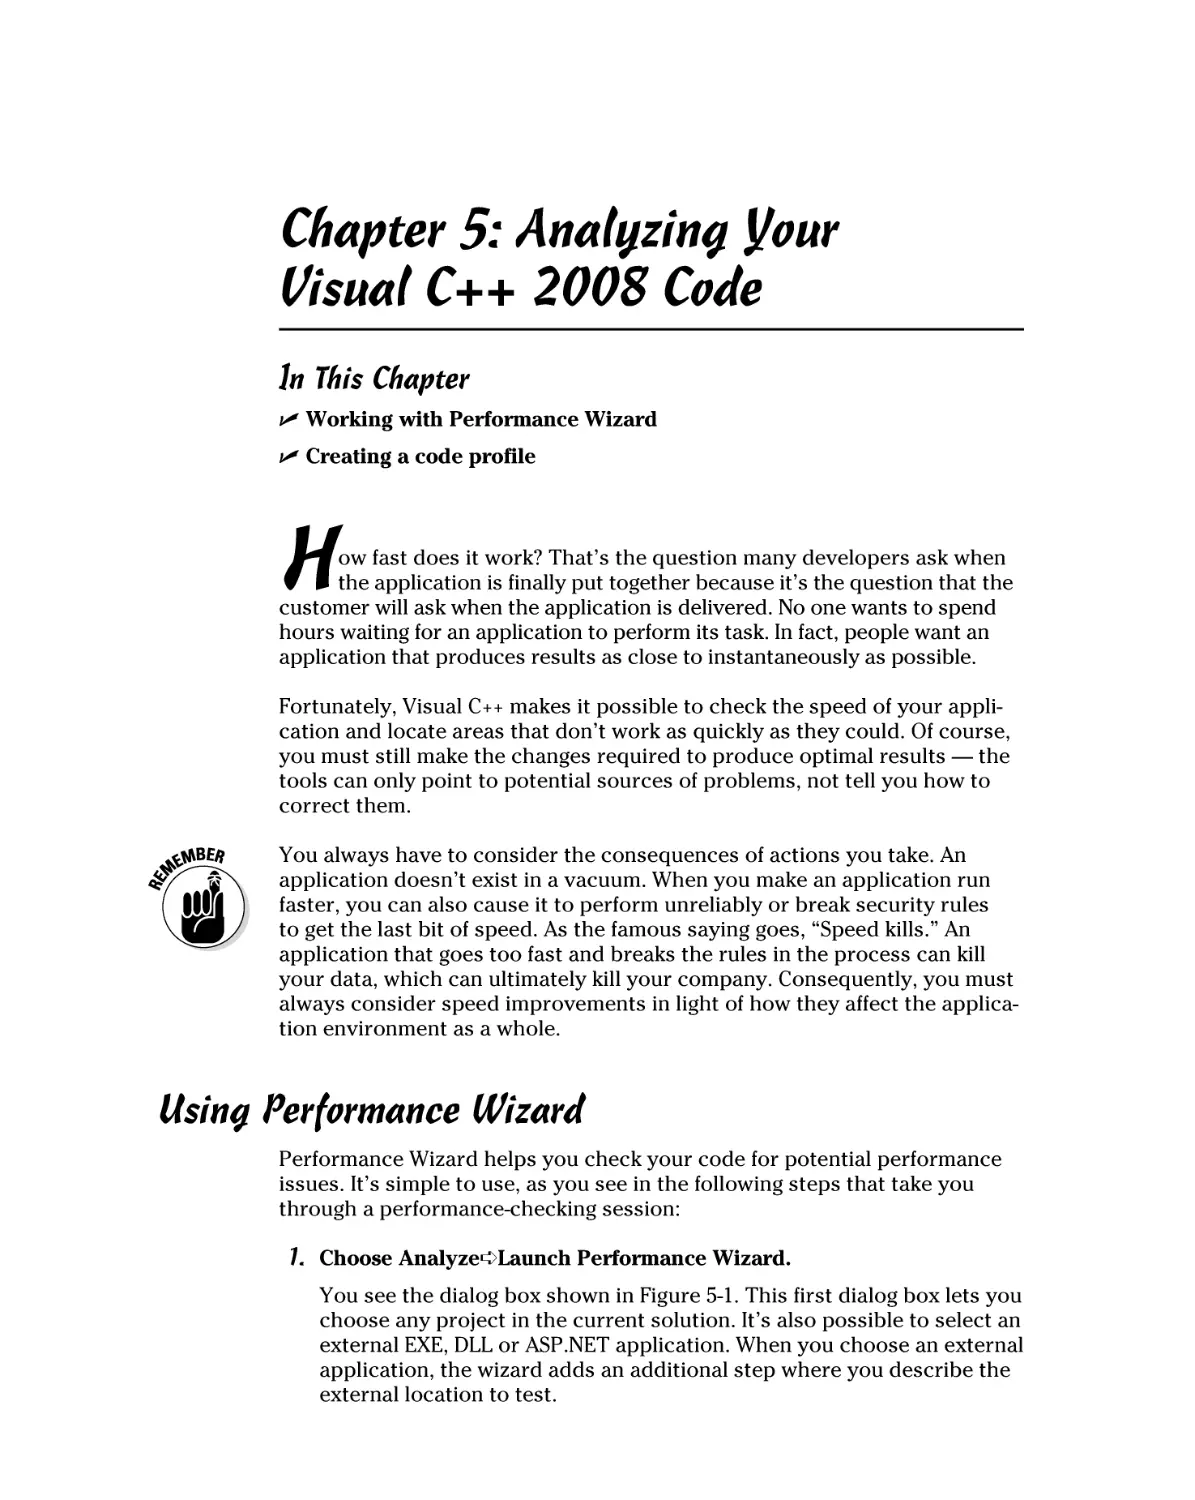
Viewing all of the variables in a method
using the Locals window ............................................................... 777
Screening specific variables using the Watch 1 window .............. 777
Working with the Call Stack window ............................................... 778
Chapter 5: Analyzing Your Visual C++ 2008 Code. . . . . . . . . . . . . . . . .779
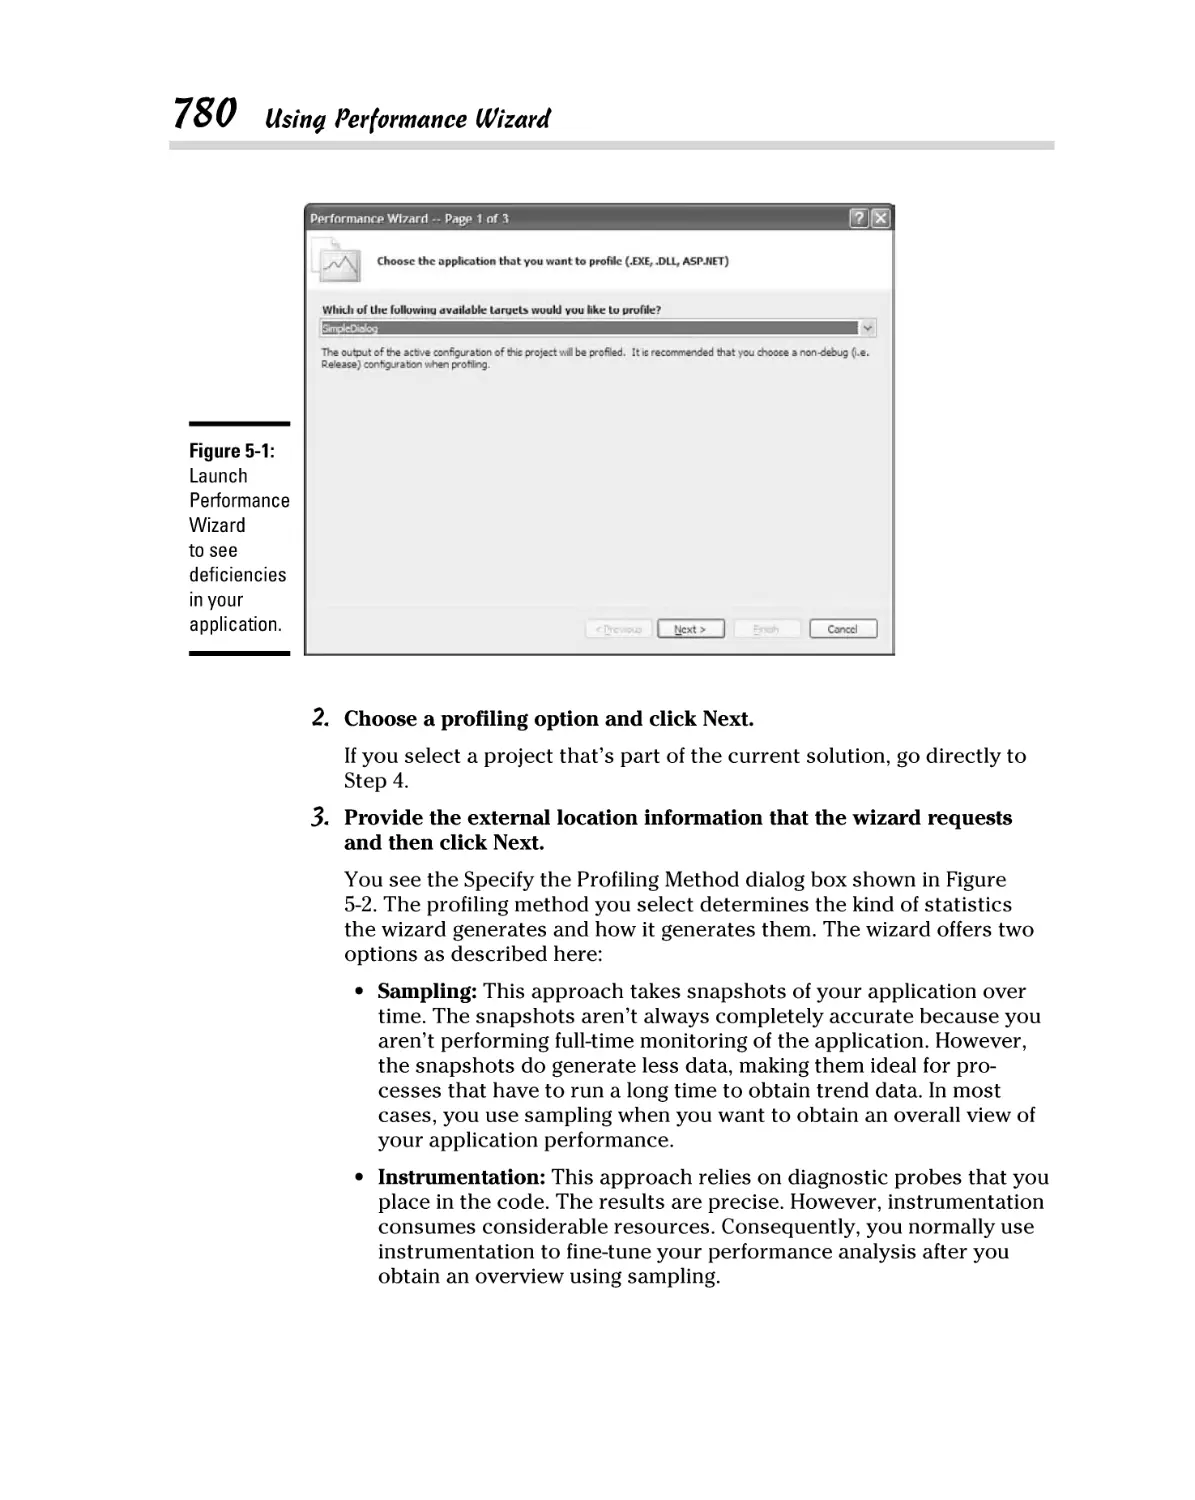
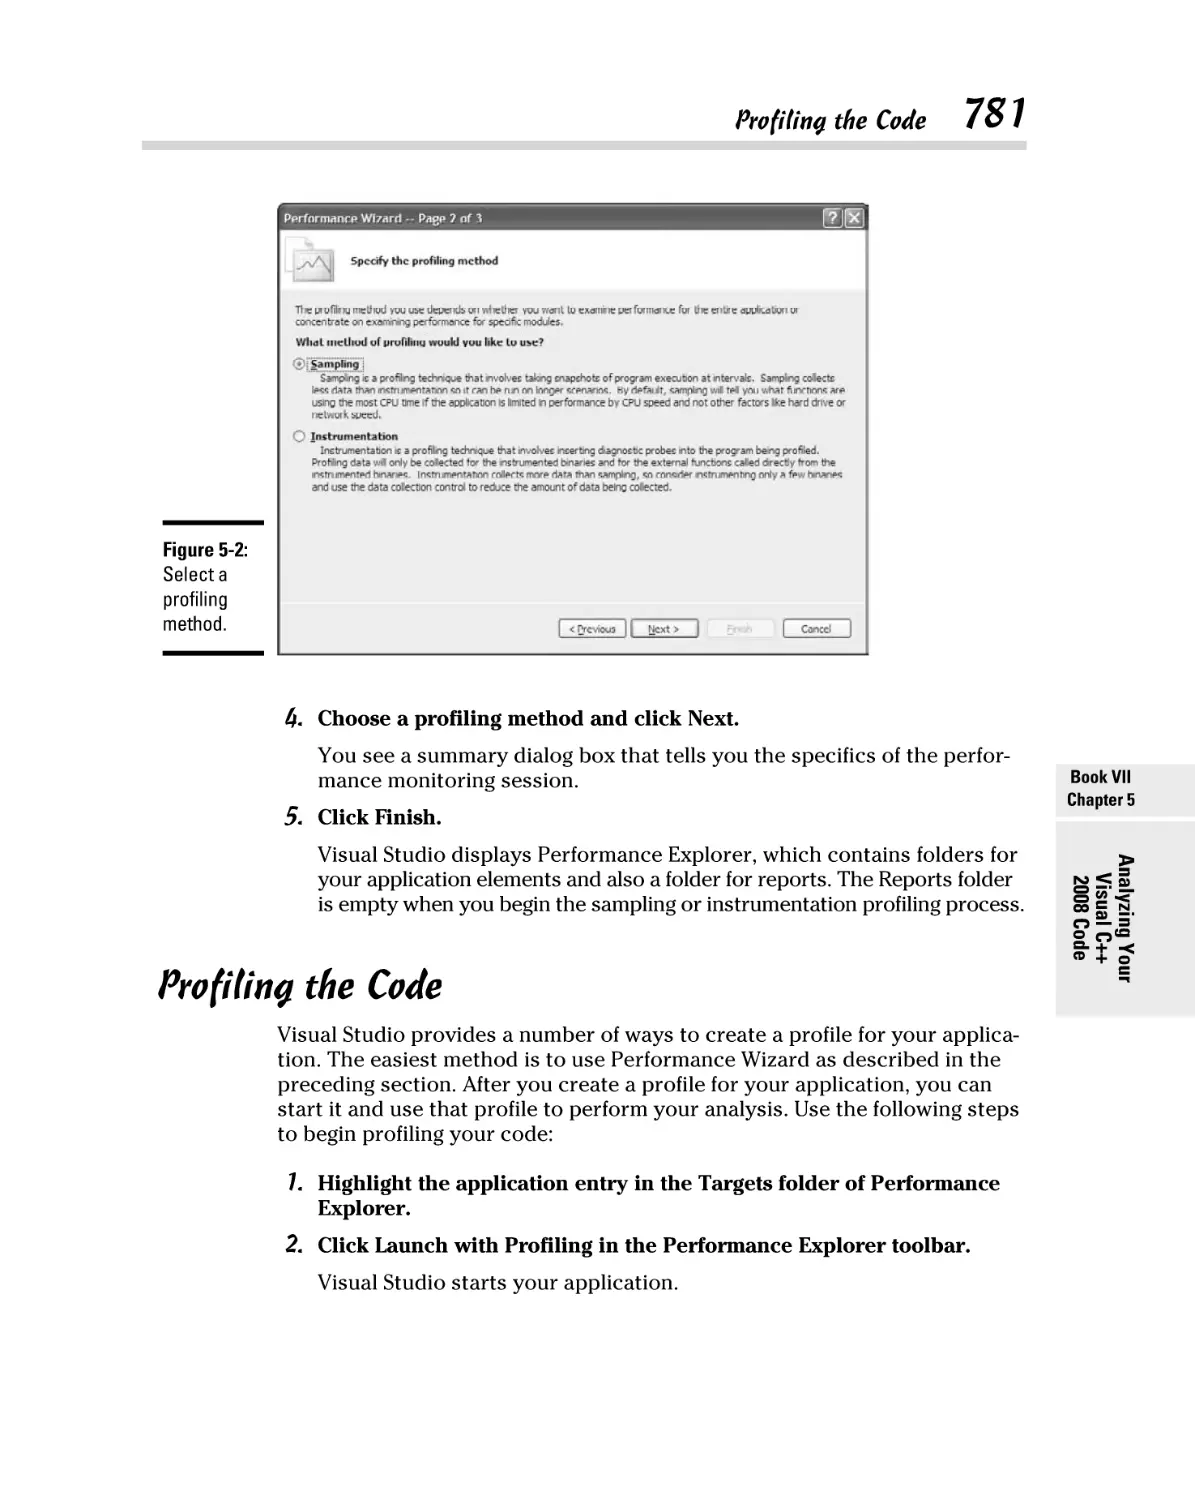
Using Performance Wizard ......................................................................... 779
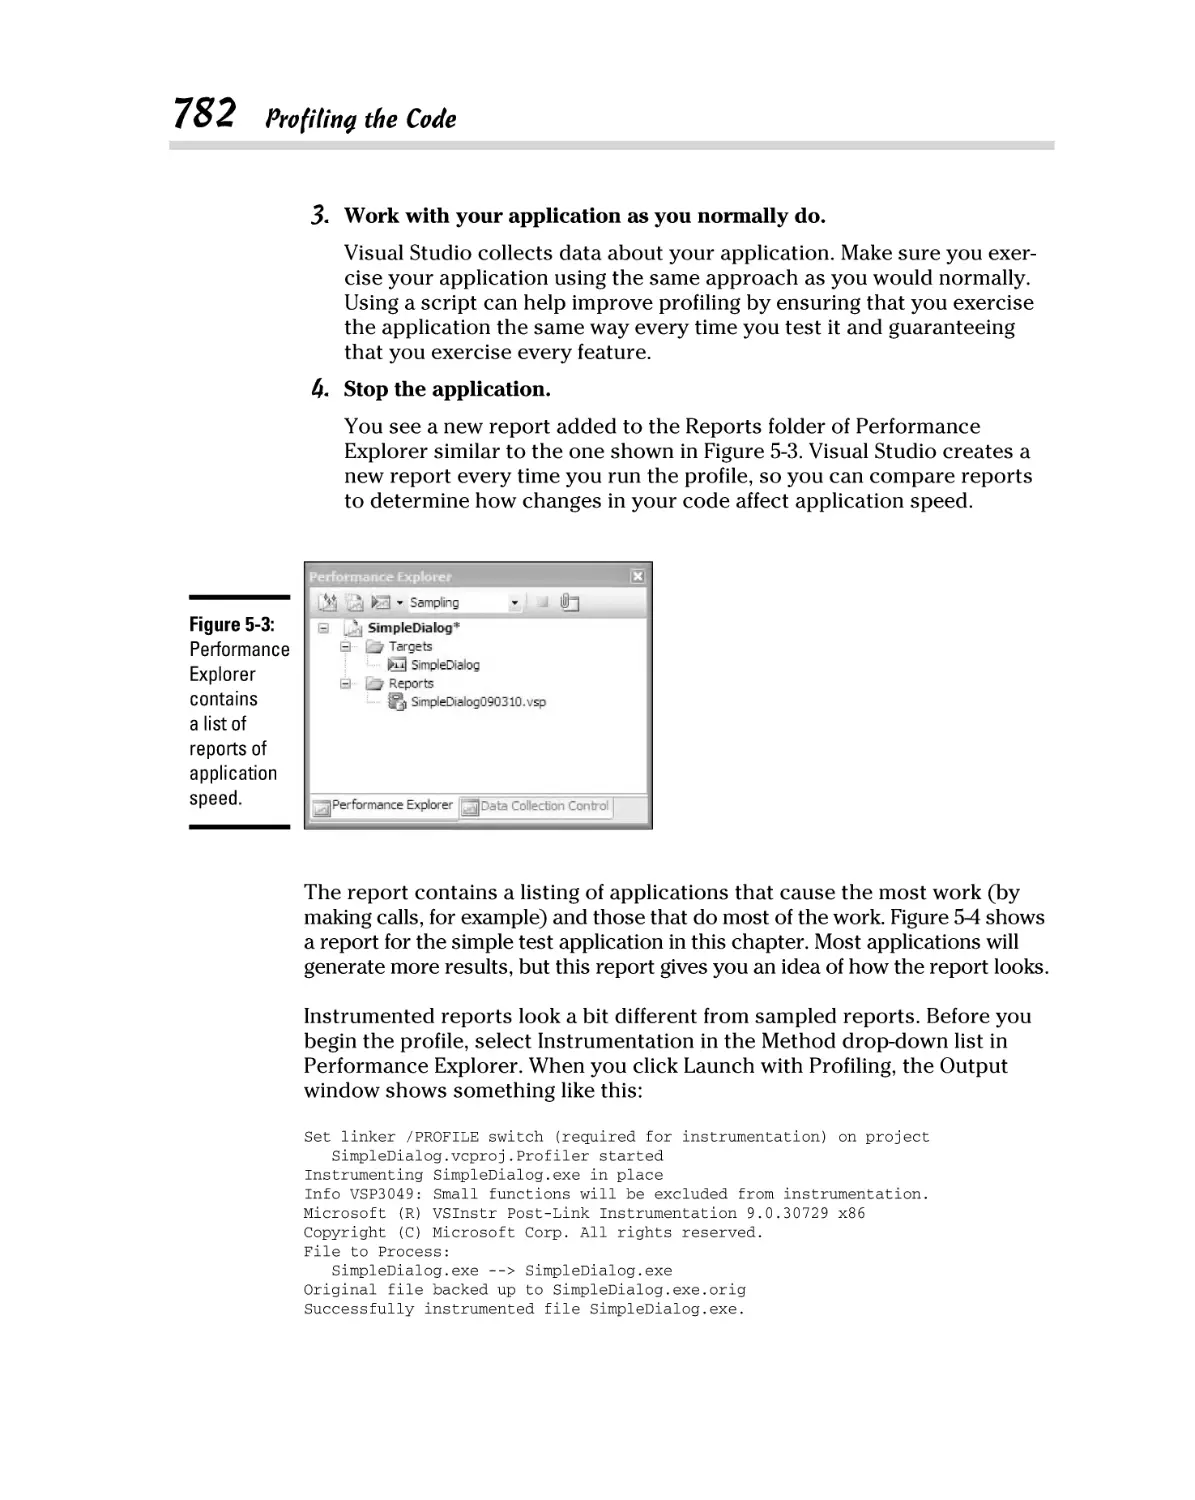
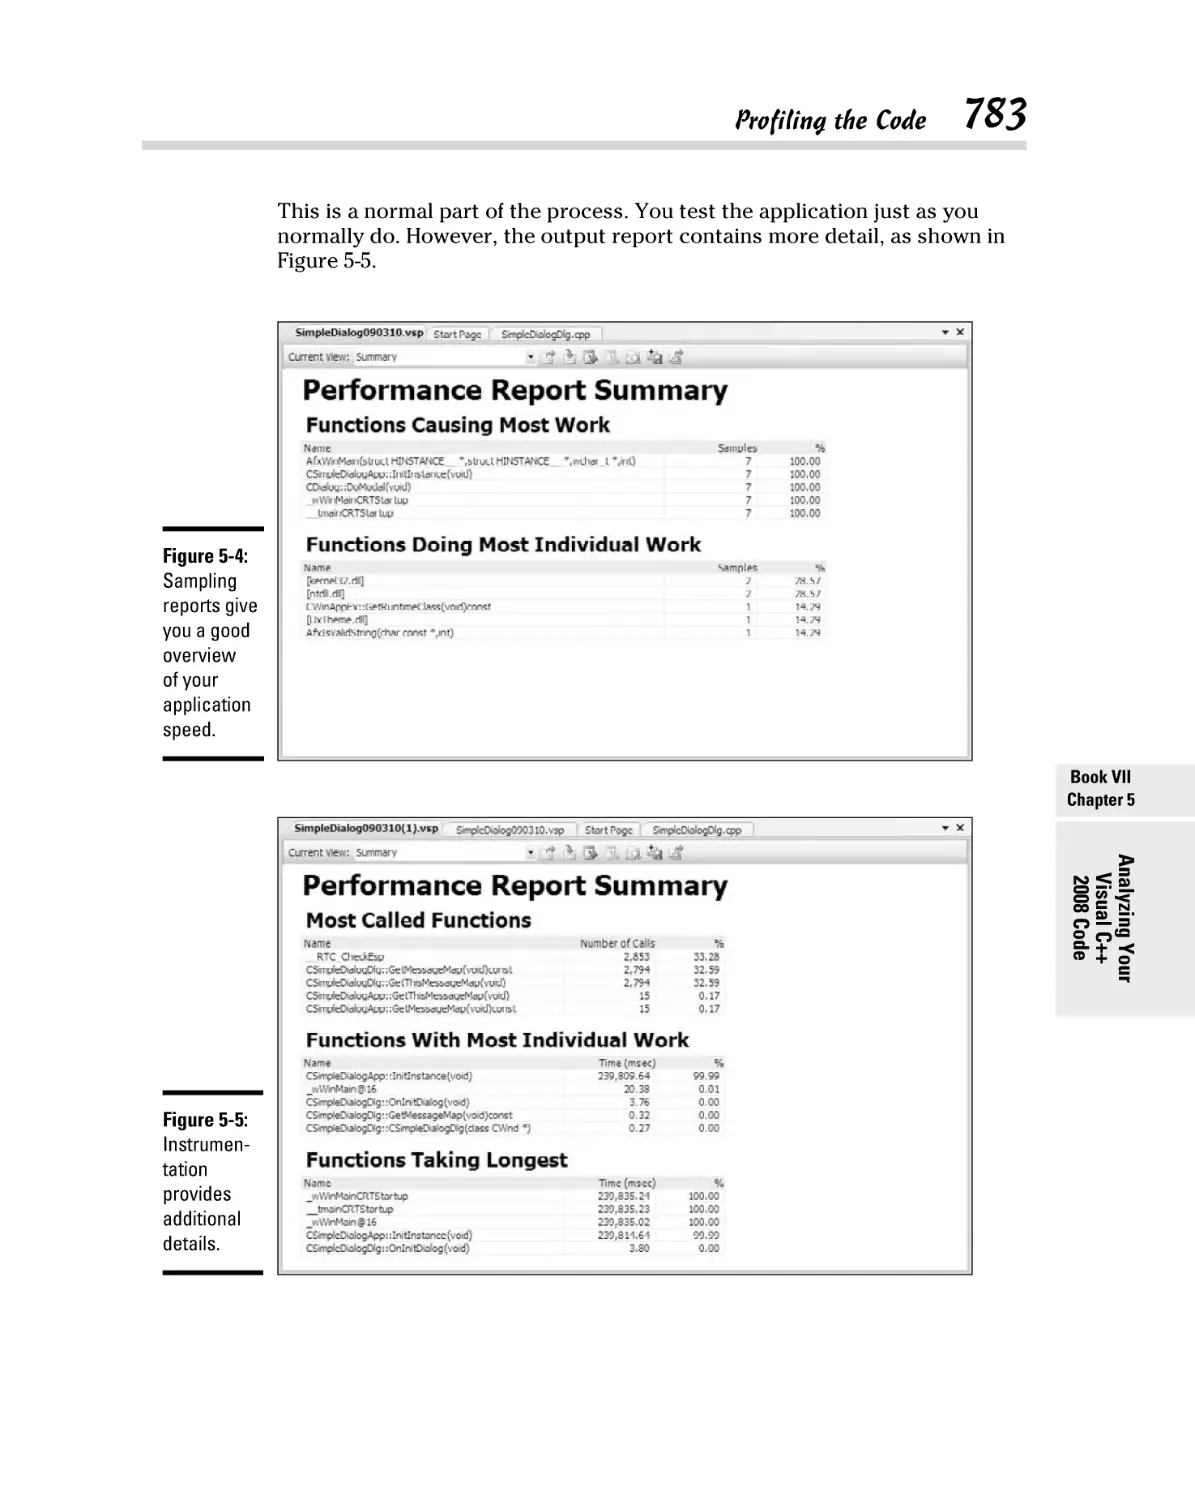
Profiling the Code ........................................................................................ 781
Appendix A: Automating Your
Programs with Makefiles........................................... 785
Compiling and Linking ................................................................................ 785
Automating Your Work ............................................................................... 787
Implying with Inference Rules.................................................................... 788
Using rules that depend on other rules .......................................... 790
Making specific items ........................................................................ 791
Depending on multiple files .............................................................. 791
Compiling and linking with make ..................................................... 793
Cleaning up and making it all ........................................................... 793
Using macros ...................................................................................... 794
Getting the most out of Makefiles .................................................... 795
Appendix B: About the CD ......................................... 797
System Requirements ................................................................................. 797
Using the CD ................................................................................................ 798
What You’ll Find on the CD ........................................................................ 798
CodeBlocks Compiler ........................................................................ 799
Author-created material ................................................................... 799
Troubleshooting .......................................................................................... 799
Customer Care ............................................................................................. 800
Index ....................................................................... 801
Introduction
C
++ is the language of the millennium. Why is C++ so
popular?
✦ It’s powerful. You can write almost any program in it.
✦ It’s fast, and it’s fully compiled. That’s a good thing.
✦ It’s easy to use — if you have this book.
✦ It’s object-oriented. If you’re not sure what that is, don’t worry. You can
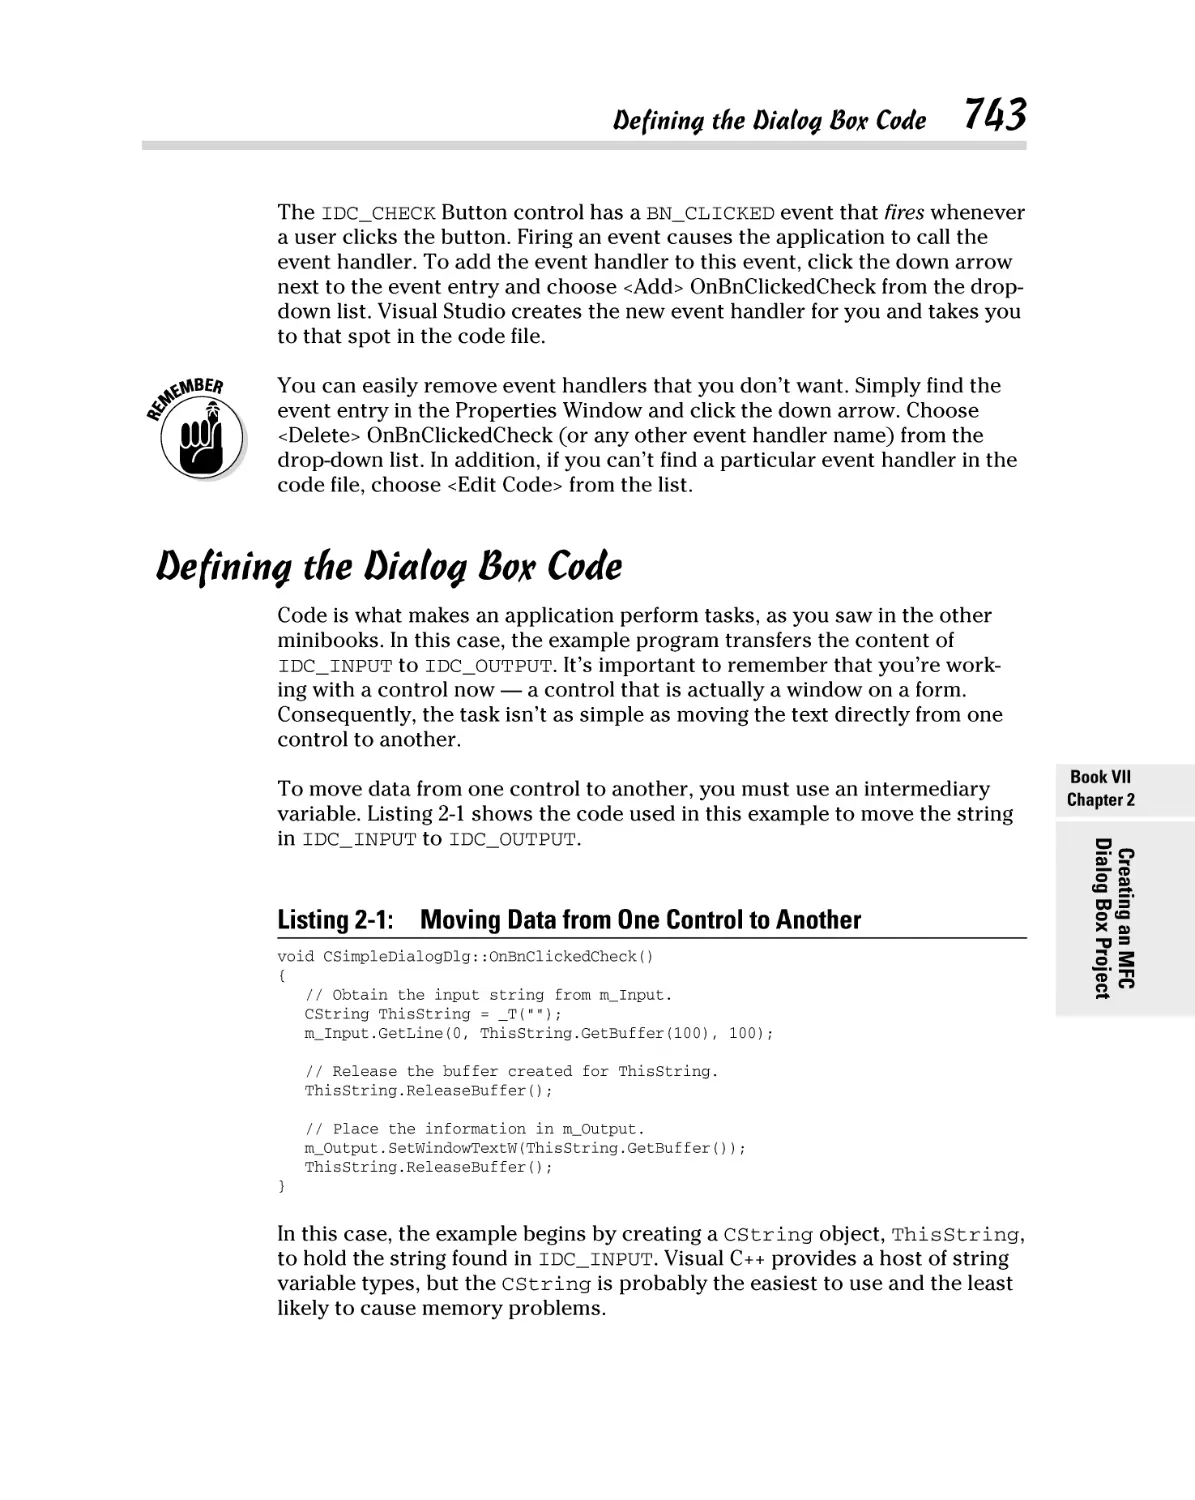
find out about it by reading this very book you’re holding.
✦ It’s portable. Versions are available for nearly every computer.
✦ It’s standardized. The American National Standards Institute and the
International Standards Organization both approve an official version.
✦ It’s popular. More people are using C++ because so many other people
use it.
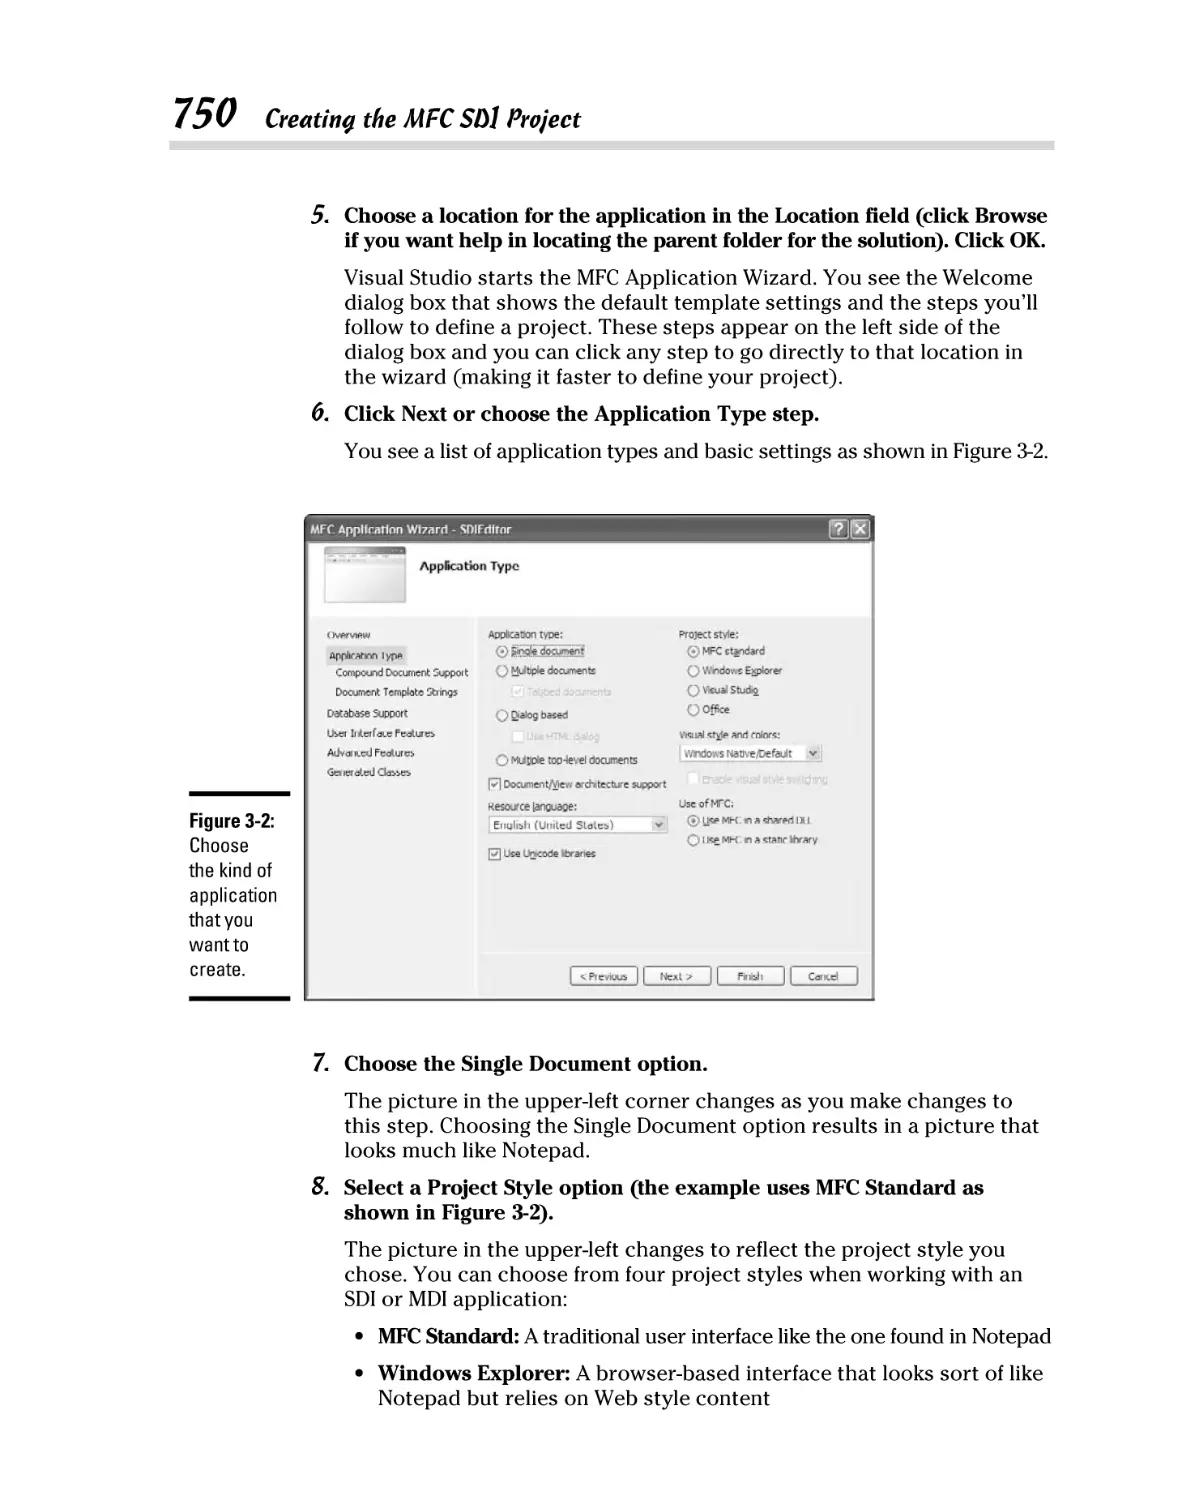
Sure, some people criticize C++. But most of these people don’t truly understand C++ or are just having a bad day. Or both.
No Experience Necessary
This book is not a big rant about C++. Rather, it’s a hands-on, roll-up-yoursleeves book, where you will truly learn C++.
At the very beginning, we start you out from square one. We don’t assume
any programming experience whatsoever. Everybody has to start somewhere. You can start here. Not to brag, but you are in the hands of highly
successful C++ users who have shown thousands of people how to program,
many of whom started out from square one.
Great for Advanced Folks, Too!
You already know C++? This book is great for you, too, because although we
start discussing C++ from the beginning, we go all the way through it.
Want to know how to derive a nontemplatized class from a class template?
Check out Minibook IV, Chapter 5.
2
For All Computers
Want to see how to create an observer pattern in C++? See Minibook II,
Chapter 6.
Want to find out the difference between deque and vector in the C++
Standard Library? Look at Minibook IV, Chapter 6.
Want to know how to make a class persistent? Minibook V, Chapter 5.
Want to know about the Boost library, the library that has added more to
the Standard Template Library (STL) than just about any other source?
Check out Minibook VI, Chapters 3 and 4. If you use C++ and don’t use Boost,
you’re really missing out!
For All Computers
Although one of the minibooks in C++ All-in-For Dummies, 2nd Edition is
devoted to Microsoft-specific topics (Minibook VII on Visual Studio 6.0 and
MFC), the rest of the book is for C++ in general. C++ is now standardized, and
you can use the information in this book for many different platforms. We
wrote the samples on Microsoft Windows. But for most samples, we used a
compiler called CodeBlocks that runs on almost every computer (Windows,
Linux, and Macintosh). It doesn’t matter which computer you’re using!
All the code in this book, except that in Minibook VII, has been tested on
both Windows and Linux. (Don’t let the Windows screenshots fool you;
CodeBlocks works great on just about any platform.) Even though we didn’t
have a Macintosh available for testing at the time of writing, we’re sure that
the examples will also work fine in the Macintosh environment if you use the
CodeBlocks compiler as described in the book.
Conventions
As a guy who is about to head off to a convention, we thought it would be
appropriate to share with you some tidbits about the conventions in this
book. However, this time we’re talking about the text format.
✦ When you see something in monofont, it’s a computer word that you
type into the computer or read on a computer screen. If we discuss a computer term but it’s not a word that you type into the computer, it is in
the usual font. You also see monofont for URLs and e-mail addresses.
✦ When you see something in bold, you can type it into the computer.
✦ When you see a word in italics, it’s new and we explain its meaning.
✦ When code is on a single line, it looks like this:
MyClass.IsCool();
Organization
3
✦ When code appears on multiple lines, it looks like this:
MyClass.IsCool();
AndSo.IsYours();
✦ Lengthy program listings have a header and a listing number. These are
entire programs you can type, and they should run as-is. However, you
save time and effort by using the code supplied as part of the book’s CD.
The CD also contains a full copy of the Windows version of CodeBlocks.
Organization
This book is divided into seven minibooks. Each one covers a separate,
broad topic, with chapters devoted to individual subtopics.
You can either read this book cover to cover or you can look topics up and
treat the book as a reference guide — whichever works best for you. Keep it
on your shelf and have it ready to grab when you need to look something up.
Here are the seven minibooks and what they cover:
✦ Minibook I, Introducing C++: Here, we start at the very beginning,
showing you all you need to know to get up and running with C++. This
is also the minibook that gets you started with CodeBlocks. If you don’t
have a copy of CodeBlocks installed on your system, you definitely want
to start by reviewing Chapter 1.
✦ Minibook II, Understanding Objects and Classes: In this minibook, we
present all the latest information about object-oriented programming
and how to use various diagrams to design your programs. Advanced
readers should especially appreciate this minibook because we cover
such topics as UML and design patterns. But beginners should be able
to understand it, too, and find out how to get up to speed with the best
software engineering ideas around.
✦ Minibook III, Fixing Problems: Here, we show you how to debug your
programs by using a special program called a debugger. If you’re a
beginner, this minibook gets you started on fixing the problems in your
code. If you’re advanced, you can appreciate how we use the debugger supplied with CodeBlocks to locate any problems your application
might have.
✦ Minibook IV, Advanced Programming: In this minibook, we move
through advanced C++ topics. After reading Minibook IV, the beginners
become intermediate or advanced programmers, and the intermediate
and advanced programmers can master the C++ language.
✦ Minibook V, Reading and Writing Files: Yes, this entire minibook is
devoted to the issues of reading and writing files. In this book, we cover
stream programming, which is a special way C++ treats files.
4
Icons Galore
✦ Minibook VI, Advanced C++: This advanced minibook includes two
chapters each on STL (Standard Template Library) and Boost. The STL
chapters describe some of the advanced classes not used in other areas
of the book and help you create your own templates. The Boost library
chapters describe all the tools found in Boost, show how to build a full
set of libraries for your own use, and then provide an overview of some
interesting Boost capabilities. You really miss out on a lot if you don’t at
least visit this minibook after you build your programming skills.
✦ Minibook VII, Building Applications with Microsoft MFC: Many, many
people use the native code capabilities of Microsoft Visual C++. In this
minibook, we show you how to create workspaces and projects in Visual
Studio 2008. We then show you how to write software for Windows by
using Microsoft Foundation Classes. This minibook doesn’t include any
discussion of Microsoft’s latest offering for C++ developers, the .NET
Framework.
Icons Galore
Hey, what would a For Dummies book be without all the great icons? These
are the second best part, next to the cartoons. Here’s what they mean:
We have lots of experience as both C++ programmers and instructors, and
so we pass on tidbits here and there to help you along.
This icon identifies things you may want to remember to do when you’re
programming.
These icons can save you a lot of headaches. They’re suggestions to help
keep you from really messing up — the way that we probably already did.
You won’t cause the computer to explode if you skip these, but you’ll sleep
better knowing you won’t accidentally lose all your code or overwrite a file.
Computer people often search for extra knowledge, even when it may not
be necessary. These Technical Stuff paragraphs are fascinating information,
primarily to cover your serious curiosity.
What’s Next?
5
What’s Next?
If you want to e-mail us, please do! We have special e-mail addresses for you:
readers@jeffcogswell.com
jmueller@mwt.net
We both get a lot of e-mail from readers, so we can’t always reply, nor can
we promise to have a quick-and-easy answer. Please don’t be offended if you
don’t hear back. You can check out our Web sites, www.jeffcogswell.
com and http://www.johnmuellerbooks.com/.
Jeff has a newsletter that dishes out tips and tricks for C++ programmers.
Send an e-mail to newsletter@jeffcogswell.com, and you’ll get back an
e-mail on how to subscribe. We think that you’ll be pleased with the information. Oh yes, and it’s free.
In the pages that follow you will see just how easy it is to program in C++.
When you finish this book you will have a full mastery of the language!
6
C++ All-in-One For Dummies, 2nd Edition
Book I
Introducing C++
Contents at a Glance
Chapter 1: Creating a First C++ Program . . . . . . . . . . . . . . . . . . . . . . . . . . . . . . . . . . . . . . 9
Creating a Project.................................................................................................................... 9
Typing the Code .................................................................................................................... 16
Starting with Main ................................................................................................................. 17
Showing Information............................................................................................................. 18
Let Your Program Run Away ............................................................................................... 27
Chapter 2: Storing Data in C++ . . . . . . . . . . . . . . . . . . . . . . . . . . . . . . . . . . . . . . . . . . . . . . 29
Putting Your Data Places: Variables ................................................................................... 30
Manipulating Integer Variables ........................................................................................... 37
Characters .............................................................................................................................. 45
Strings ..................................................................................................................................... 48
Deciding between Conditional Operators.......................................................................... 52
Telling the Truth with Boolean Variables .......................................................................... 55
Reading from the Console .................................................................................................... 56
Chapter 3: Directing Your C++ Program Flow . . . . . . . . . . . . . . . . . . . . . . . . . . . . . . . . . 59
Doing This or Doing That ..................................................................................................... 60
Evaluating Conditions in C++ ............................................................................................... 60
Including Evaluations in C++ Conditional Statements ...................................................... 63
Repeating Actions with Statements That Loop ................................................................. 67
Chapter 4: Dividing Your Work with Functions. . . . . . . . . . . . . . . . . . . . . . . . . . . . . . . . 83
Dividing Your Work .............................................................................................................. 83
Calling a Function.................................................................................................................. 88
Writing Your Own Functions ............................................................................................... 91
Calling All String Functions ................................................................................................ 103
Understanding main ........................................................................................................... 105
Chapter 5: Dividing Between Source-Code Files . . . . . . . . . . . . . . . . . . . . . . . . . . . . . 109
Creating Multiple Source Files........................................................................................... 109
Sharing with Header Files .................................................................................................. 115
Sharing Variables Among Source Files ............................................................................. 119
Using the Mysterious Header Wrappers .......................................................................... 121
Chapter 6: Referring to Your Data through Pointers. . . . . . . . . . . . . . . . . . . . . . . . . . . 123
Heaping and Stacking the Variables ................................................................................. 124
Dynamically Allocating with new ...................................................................................... 135
Freeing Pointers .................................................................................................................. 139
Passing Pointer Variables to Functions ........................................................................... 141
Returning Pointer Variables from Functions ................................................................... 145
Returning a Pointer as a Nonpointer ................................................................................ 148
Passing by Reference .......................................................................................................... 149
Remembering the Rules ..................................................................................................... 150
Chapter 7: Working with Classes . . . . . . . . . . . . . . . . . . . . . . . . . . . . . . . . . . . . . . . . . . 151
Understanding Objects and Classes ................................................................................. 151
Working with a Class .......................................................................................................... 164
Starting and Ending with Constructors and Destructors............................................... 178
Building Hierarchies of Classes ......................................................................................... 182
Chapter 8: Using Advanced C++ Features . . . . . . . . . . . . . . . . . . . . . . . . . . . . . . . . . . . 187
Filling Your Code with Comments .................................................................................... 187
Converting Types ................................................................................................................ 189
Reading from the Console .................................................................................................. 195
Understanding Preprocessor Directives .......................................................................... 199
Using Constants................................................................................................................... 207
Using Switch Statements .................................................................................................... 209
Supercharging enums with Classes .................................................................................. 212
Working with Random Numbers ....................................................................................... 215
Storing Data in Arrays ........................................................................................................ 216
Chapter 1: Creating a
First C++ Program
In This Chapter
✓ Organizing your programs into projects
✓ Typing code into the code editor
✓ Writing a program that writes to the screen
✓ Doing basic math
✓ Running your program
I
t’s your lucky day. You have decided to learn the most popular programming language on the planet. From the biggest skyscrapers housing huge
Fortune-500 companies all the way down to the garages with the self-starting
kids grinding out the next generation of software, people are using C++. Yes,
there are other languages, but more programmers use C++ than any other
language. In this chapter, you start right out writing a C++ program.
For this chapter we use CodeBlocks, a full-featured system for easily creating
C++ code — and it’s free! You don’t need to spend hundreds of dollars to get
up and running. Instead, you can install it right from the CD-ROM that came
with this book. However, you’re not limited to using CodeBlocks. Several
other tools are available to you, but in this chapter we suggest working with
CodeBlocks because it’s easy to use. In fact, you may find you like it so well
that you wind up almost neglecting the other tools.
We assume that you have already installed CodeBlocks. If you have not, you
can find instructions in Appendix B.
Creating a Project
Creating a computer program is usually a bigger job than you’d want to
organize in your head. Program code is saved in files much like the documents in a word processor. But programs often have more than one sourcecode file. At big companies in big buildings in big cities, some programs are
really big — hundreds of source-code files for just one program.
10
Creating a Project
Understanding projects
Projects can contain a lot of source code. To keep all that source code
together, programmers use a file that manages it all called a project. Projects
have a few key elements:
✦ A set of source-code files
✦ (Optionally) Resource information such as icons and sound files
✦ A description of how to compile (build) the application
✦ Integrated Development Environment (IDE) settings that tell how to set
up the editor you use to write the application
✦ Some general descriptions of the program being built, such as its name
and what type of program it is
By type of program, we don’t mean “word processor” or “really cool earthshattering software,” even if that’s what your program is. We use type to
mean your program’s overall relationship with other programs:
✦ Does this program run by itself?
✦ Does this program add to or extend the functionalities of another program (such as Microsoft Excel)?
✦ Does this program serve as a library (a bunch of code that you make
available to another program)?
All this information, along with your source-code files, represents a project.
In the CodeBlocks tool, you create a new project each time you start work
on a new program. You provide a little information about the program you’re
working on, and then you begin writing your code. All the code for your program goes in one place — stored in the project.
This book presents a lot of sample programs, so you may want to create
a directory (or folder) on your hard drive to house all the programs you
create as you work through this book. Call it MyProjects, or something
specific like CPPAllInOne, or whatever you prefer.
Defining your first project
To create a new project in CodeBlocks, start CodeBlocks and choose
File➪New➪Project or click Create a New Project on the Start Here page that
appears when you start the program. A dialog box appears, as shown in
Figure 1-1.
Creating a Project
11
Book I
Chapter 1
Creating a First
C++ Program
Figure 1-1:
The New
from
Template
dialog box
lets you
select a
new project
type.
When you create a project in CodeBlocks, you choose from a list of several
types of programs. They’re shown as icons in the New from Template dialog
box. The following list shows some program types:
✦ Win32 GUI Project: This is a standard Windows program that includes,
well, a window. You know the kind; it usually has a menu across the top
and something inside it that you can either click or type into.
✦ Console Application: This is a program that gets a paltry Console
window instead of a regular Windows window. Console refers to a
window with a command prompt (folks who recall the old days before
Windows call it a DOS box). You can remember this because you may
have to “console it” for being just a boring DOS-type text window with a
prompt.
✦ Static library: A static library is a set of C++ code that you use later in
another project. It’s like making a really great marinade that you won’t
use up today. You’ll use some of it tomorrow and some of it after that.
Same with a C++ library.
✦ Dynamic Link Library: A Dynamic Link Library (DLL) is kind of like a
static library except it stays separated from the main program and gets
its own file with a .DLL extension.
Programmers have a bad habit of dropping DLLs in your c:\windows\
system or c:\windows\system32 directory when you probably don’t
really want them there. That’s why you’ve likely heard of DLLs before.
✦ Empty project: A blank project that’s as clean as a blank sheet of white
typing paper, ready for you to fill ’er up.
12
Creating a Project
What about all of those other projects?
CodeBlocks supports a host of other application
types. This book doesn’t discuss them because
they won’t add to your initial understanding of
C++ programming. However, these other projects are valuable in the right environment. For
example, the GIMP Tool Kit Plus (GTK+) Project
relies on a graphical user interface designed
for the X Windowing system (see more at
http://www.gtk.org/).
You’ll find that CodeBlocks uses a considerable
number of acronyms and abbreviations for project and resource names without defining any
of them. We define all the acronyms that we
employ on first use in the book. However, some
of these acronyms and abbreviations go on
and on. For example, you might wonder about
the GIMP part of the GTK+ definition. GIMP
stands for GNU Image Manipulation Program.
Of course, now you need to know GNU, which
stands for Gnu’s Not Unix. Okay, now that
we’ve exhausted that bit of fun, if you ever do
run across an interesting acronym or abbreviation, you can always get it defined for you on
the Acronym Finder Web site (http://www.
acronymfinder.com/). The bottom line
is that you need to research both projects and
resources before you use them.
Frankly, it’s kind of a pain to use an empty project, because you have to
tweak and set a bunch of things. So we never use this option.
For the samples in this chapter, create a Console Application. Follow these
steps:
1. In the New from Template dialog box, click the Console Application
icon found in the Projects tab. Click Go.
You see the Welcome page of the Console Application wizard.
2. Click Next.
The wizard asks which language you want to use.
3. Highlight C++ and click Next.
You see a list of project-related questions, as shown in Figure 1-2. These
questions define project basics, such as the project name.
4. Type a name for your project in the Project Title field.
The example uses SayHello as the project title. Notice that the wizard
automatically starts creating an entry for you in the Project Filename
field.
Creating a Project
13
Book I
Chapter 1
Creating a First
C++ Program
Figure 1-2:
Provide
the name
of your
project for
CodeBlocks.
5. Type a location for your project in the Folder to Create Project In field.
The example uses FirstProject as the folder name. You can also click
the ellipses button next to the Folder to Create Project In field to use the
Browse for Folder dialog box to locate the folder you want to use. Notice
that the wizard completes the entry in the Project Filename field.
If you made a folder to house all the programs for this book (as suggested in the “Understanding projects” section of the chapter), put your
FirstProject folder in the folder for the book. Make sure you’re inside
the folder you just created.
6. (Optional) Type a project filename in the Project Filename field.
7. Click Next.
You see the compiler settings shown in Figure 1-3. Most of the projects
in this book use the default compiler settings. However, if you look
at the Compiler drop-down list, you see that CodeBlocks supports a
number of compilers and you can add more to it. The other settings control the creation and location of a Debug version (the version you use
for finding problems in your code) and a Release version (the version
that you send to a customer) of the application.
8. Change any required compiler settings and click Finish.
The wizard creates the application for you. It then displays the
CodeBlocks IDE shown in Figure 1-4 with the project loaded.
14
Creating a Project
Figure 1-3:
Tell
CodeBlocks
where to
place the
Debug and
Release
versions
of your
application.
Figure 1-4:
Use the
CodeBlocks
IDE to
interact with
your project.
The project window is organized side by side:
✦ The left side is an Explorer view (called a tree view), which represents
your project. At the top of the tree view is a workspace — the essential unit of a project. Below the workspace is the name of your project.
Creating a Project
15
✦ The right side (which actually takes up about three-quarters of the
screen) is the source-code file itself.
This part works much like a word processor or an e-mail editor, and you
can type the code into the window. You notice that you already have
some code there — a sort of starter code that came into being when you
chose Console Application and created the project.
✦ At the bottom of the display are a number of status windows. The
Code::Blocks window tells you how the wizard created your application.
Don’t worry about these windows for right now. You see them in action
as the book progresses.
Building and executing your first application
Okay, it’s time to work with your first application. Use the following steps
to save the file, build the program (make it into an executable that Windows
can use), and execute the program.
1. Save the code file by choosing File➪Save Everything.
Saving the files ensures you have a good copy on disk should something
go wrong. For example, you could completely crash the IDE if your application does the wrong thing.
2. Choose Build➪Build or press Ctrl+F9.
This action creates the executable file. Building the code converts
words you understand into code that Windows understands. Notice that
CodeBlocks automatically selects the Build Log window for you and you
see the steps that CodeBlocks takes to create your application. At the
end of the process, you should see 0 Errors, 0 Warnings as the output.
3. Choose Build➪Run or press Ctrl+F10.
An output window like the one shown in Figure 1-5 opens and you see
your first program execute.
4. Press Enter to stop program execution.
The program window disappears and you see the CodeBlocks IDE again.
Well that wasn’t interesting, was it? But that’s okay! The program starts out
in a basic situation: We have a console window, and then when the program
is finished doing whatever it must do, it shows the message Press any key
to continue — and when you do so, the program ends.
Book I
Chapter 1
Creating a First
C++ Program
Underneath that are the components of your project. In this case, only
one component exists so far: the source-code file whose filename is
main.cpp. Remember that to program in C++, you enter code into
a source-code file; this file, called main.cpp, is such a file for your
SayHello project.
16
Typing the Code
Figure 1-5:
Execute
your first
program.
Typing the Code
The right-hand 75 percent or so of the CodeBlocks window is called the code
editor; it’s where you type and change your code. Of all the tasks we just
mentioned, the nearest equivalent to using the CodeBlocks code editor is
composing an e-mail message.
Word movement and selection actions look a bit strange on the screen. They
ignore some characters, such as braces — the curly characters { and }. (We
recently added this to our “Mysteries of Life” on the refrigerator.)
The code editor works like the editor in an e-mail message. You can
✦ Type code.
✦ Move the cursor with the arrow keys (up, down, left, right) to the position where you want to type. The cursor is the little blinking vertical
bar that shows where your text goes when you type. Some folks call it a
caret or an insertion point.
✦ Click where you want to type. Use the mouse to point where you want to
type, then click the mouse button. The cursor jumps to the spot where
you click.
✦ Select text to delete or change. You can select text in either of two ways:
• Point with the mouse at the first or last character you want to select;
then hold down the mouse button while you drag the mouse.
• Move the cursor to the first or last character you want to select; then
hold down the Shift key while you press the arrow keys.
✦ Scroll the text up and down (vertically) or left and right (horizontally)
with the scrollbars. The scrollbars work only when there is more text
Starting with Main
17
than you can see in the window, just like most other places in the
Windows and Macintosh worlds. You can scroll up and down (if there’s
enough text in the editor) by using Ctrl+↑ and Ctrl+↓ key combinations.
After you play around a bit with the editor, you can use Table 1-1 to do a
few of your favorite tasks. (Of course, if you’re new to programming, you
may not know yet whether these are your favorites — but they will be soon.
Trust me.)
Table 1-1
Navigation and Edit Commands
Command
Keystroke or Action
Cursor movement
↑, ↓, ←, or →, Home, End
Moving from word to word
Ctrl+← or Ctrl+→
Selecting with the mouse
Click the mouse in the text, and while the
mouse button is down, drag the mouse
Selecting with the cursor
Shift+↑, Shift+↓, Shift+←, or Shift+→
Selecting the next word
Shift+Ctrl+→
Selecting the previous word
Shift+Ctrl+←
Selecting everything
Ctrl+A
Going to the top
Ctrl+Home
Going to the bottom
Ctrl+End
Starting with Main
When a computer runs code, it does so in a step-by-step, line-by-line manner.
But your code is organized into pieces, and one of these pieces is called the
main function, or simply main. main is the part that runs first. main tells
the computer which other parts of the program you want to use. main is the
head honcho, the big boss.
How does the computer know what is main? You type lines of code between
the brace characters, { and }. Here is the default program that CodeBlocks
produces when you create a Console Application project.
int main()
{
cout << “Hello world!” << endl;
return 0;
}
Creating a First
C++ Program
✦ Scrolling changes only what you see. You must use the mouse or the
arrow keys to select what you see.
Book I
Chapter 1
18
Showing Information
The word main is required, and it tells the computer where main is. You
might also see main shown as:
int main(int argc, char *argv[])
Don’t worry about the words around main for now. You discover what these
words mean later in the chapter. For now, all you need to know is that every
C++ program has a main function.
The computer performs the code line by line. If a line is blank, the computer
just goes to the next line. When you write lines of code, you are instructing
the computer to do something (which is why some people refer to lines of
code as instructions).
Showing Information
Ready to type some code and try it out? Let’s do it! This code will open the
famous console window and write some words to it.
First, make sure that you still have the CodeBlocks tool open and the
SayHello project open, as in this chapter’s preceding examples. If not,
follow these steps:
1. Start CodeBlocks if it’s not already running.
You see a Start page for the CodeBlocks IDE.
2. Click the SayHello.cbp project found in the Recent Projects list.
CodeBlocks opens the project for you.
If the main.cpp code isn’t showing in the right 75 percent of the window,
click main.cpp in the tree view on the left. It will immediately open. (If you
don’t see the tree view, click the little tab at the top that says Projects; it’s
next to a tab that says Symbols.)
Follow these steps carefully. Make sure that you type everything exactly as
given here:
1. Position the cursor on the line with the opening brace.
In this case, that’s line 6. You can see the line number on the left side of
the code editor.
2. Press the Enter key.
The cursor should be in the fifth column. If it isn’t — if it stays in the
first column — then press the spacebar four times.
Showing Information
19
3. Type the following line of code exactly as it appears here.
Put no spaces between the two less-than (<) symbols. Make sure that
you remember the final semicolon at the end. Here’s the line:
4. Delete the line of code that looks like this:
cout << “Hello world!” << endl;
In the end, your code will look like the following example (the new line that
you typed is shown here in bold):
#include <iostream>
using namespace std;
int main()
{
cout << “Hello, I am your computer talking.” << endl;
return 0;
}
If you don’t type your code correctly, the computer can tell you. This step
compiles the program: the computer makes sure that what you wrote is okay
and then translates it into a runnable program. (Don’t worry too much about
what that means. For now just think of it as making sure that your program
is okay. Appendix A gives you the whole story about compiling.)
To find out whether your program is good to go, choose Build➪Build.
If all is well, you see a window in the lower-left of the main CodeBlocks
window with the really happy message, 0 errors, 0 warnings. A message like You rock! might be nicer, but 0 errors, 0 warnings ain’t all
that bad, we guess.
If you didn’t type the line correctly, all is not lost because the computer will
tell you what you did wrong. In this case, you will see something like what
is shown in Figure 1-6. A list with columns appears at the bottom of your
screen.
Figure 1-6:
CodeBlocks
tells you
about errors
in your
program.
Creating a First
C++ Program
cout << “Hello, I am your computer talking.” << endl;
Book I
Chapter 1
20
Showing Information
✦ The leftmost column shows the name of the file where the error was. In
this case the error was in main.cpp, the only file we were working on.
✦ The second column shows the line number of the problem (in this
case, 7).
✦ The third column of the list makes a basic attempt to tell us what we did
wrong, like this:
error: ‘couts’ was not declared in this scope
When the compiler doesn’t recognize a word, it says that the word is
not declared. In other words, the compiler doesn’t know what couts
is. (The word should be cout.)
If we want to see the problem, we can point at the error report line and
double-click. The bad line appears in the code editor, with a little red box
next to the line. The line is also highlighted. As soon as we press an arrow
key, the highlight vanishes.
Thus, if we press the → key a few times and get to the word couts and then
delete the letter s, we can try again. If we choose Build➪Build, this time we
see the happy message 0 errors, 0 warnings. Excellent!
No errors means that the program is good enough to run. So run it!
Choose Build➪Run. A console appears with text that looks like this:
Hello, I am your computer talking.
Process returned 0 (0x0)
execution time : 0.015 s
Press any key to continue.
See what happened? There is now a message that says, Hello, I am your
computer talking. Apparently the thing you typed caused that message
to appear. (Go ahead and press Enter to close the console.)
And in fact, that’s exactly what happened. That’s how you make a message
appear on the console screen. The steps look like this:
1. Type cout.
Although cout looks like it’s pronounced “cowt,” most programmers
say “see-out.” Think of it as shorthand for console output. (But don’t type
console output in its place, because the compiler won’t accept that.)
2. After the word cout, type a space and then type two less-than signs
(make sure to leave that one space before them).
These less-than signs just mean, the thing that follows is going to appear
on the console. The thing that follows, you will notice, is in double
quotes. That’s the way the computer knows where it starts and ends.
The words and stuff inside these double quotes is called a string because
Showing Information
21
Then some weirdness follows. There’s another set of less-than signs,
which means you want to write more to the console. But what follows?
It’s endl. Notice this is not in quotes. Therefore we are not saying that
we want the strange barely pronounceable word “endl” to appear on
the screen. Instead, we’re using a special notation that tells the computer that we want to start fresh on the next line. And if you look at
the output, you’ll notice that the words that follow (the message about
pressing the any key) are, indeed, on the next line. Note that endl is
pronounced “end-el.”
So that’s not so bad after all. Let us recap:
✦ The word cout means you want to write to the console.
✦ The << symbols together (with no space between them!) mean the thing
that follows is what you want to write.
✦ After the << symbol, you tell the computer what you want to write. It
can either be a string of letters, symbols, and other characters (all inside
quotes), or it can be the word endl.
✦ You can put multiple items in a row and have them appear on the console that way, provided you start the line with cout and precede each
item with the << symbols.
Oh, and if you have a sharp eye, you may notice one more thing we haven’t
mentioned yet: we included a semicolon at the end of the line. In C++, every
line must end with a semicolon. That’s just the way it’s done.
Statements in C++ end with a semicolon.
It’s not quite accurate to say that every line must end with a semicolon. You
can break any line into multiple lines. The computer doesn’t mind. We could
just as easily have written our line as the following two lines:
cout << “Hello, I am your computer talking.”
<< endl;
This is fine, provided that you don’t split any individual word (such as cout
and endl), or the << symbols, or the string. In effect, anyplace you have a
space occurring “naturally” in the code (for example, between I and am),
you can start a new line if you want. Then, when the whole statement is finished, you end with a semicolon. Think of the semicolon as a signal to the
computer that the old statement is finished.
Book I
Chapter 1
Creating a First
C++ Program
it’s a bunch of letters strung together. (I’m not making this up.) The
computer knows where the string starts because there’s a double quote,
and it knows where the string ends because there’s a double quote. The
computer doesn’t display these two sets of double quotes when the program runs.
22
Showing Information
Doing some math
You can get the computer to do some math for you; you can use the same
cout approach we described in the preceding section, and you throw in
some numbers and arithmetic symbols.
Although addition uses the familiar plus sign (+) and subtraction uses the
familiar minus (–) sign, multiplication and division use symbols you might
not be familiar with. To multiply, you use the asterisk (*); to divide, you use
the forward-slash (/).
Table 1-2 shows the math symbols.
Table 1-2
Math Symbols
Symbol
Function
+
Addition (plus)
–
Subtraction (minus)
*
Multiplication (times)
/
Division (divided by)
Yep, it’s now math-with-weird-symbols time. Continue with the source code
you already have. Click somewhere on the line you typed — you know, the
one that looks like this:
cout << “Hello, I am your computer talking.” << endl;
Press End so the cursor moves to the end of the line. Then press Enter so
you can start a new line in between the cout line and the line that starts
with the word return.
Whenever you want to insert a line between two other lines, the easiest
way to get it right is to go to the first of those two lines, press End, and then
press Enter. This will insert a new blank line in the right place.
After you press Enter, you will notice that something happened: The cursor
is not at the start of the newly inserted line; instead, there are four spaces
and it’s indented flush with the other lines. That’s not a mistake. Believe it or
not, it’s a serious lifesaver. Well, okay, maybe not a lifesaver, but it’s almost
as good as those little candies that everybody loves. The reason is that often
you indent your code (this particular code is indented four spaces); if you’re
typing lots of code, it’s a bummer to have to type four spaces (or press the
Tab key) every time you start a new line. So CodeBlocks considerately (and
automatically) does the indentation for you.
Showing Information
23
If, for some reason, your code didn’t automatically indent and the cursor is
loitering at the beginning of the line, the auto-indent feature is not turned on.
It should be on by default, but if it isn’t, here’s how to turn it on:
The Configure Editor dialog box appears.
2. Make sure that the Tab Indents check box is selected, then click OK.
3. Once back in the code, press Backspace to delete your new line, then
try pressing Enter again.
Behold! The code automatically indents.
4. After your new blank line appears and indents itself, type the
following:
cout << 5 + 10 << endl;
The beginning and the end of this line are just like those of the line you
typed earlier. The difference is the middle — instead of typing a string,
you type a math problem: 5 plus 10. Note that we put spaces around the
5, around the +, and around the 10 — but not between the 1 and 0. If
you put a space there, the computer gets confused (it doesn’t know that
you meant to write a single two-digit number). When you’re finished,
your code should look like the following code snippet (here the new line
you typed is shown in bold):
#include <iostream>
using namespace std;
int main()
{
cout << “Hello, I am your computer talking.” << endl;
cout << 5 + 10 << endl;
return 0;
}
5. Save your work by choosing File➪Save Everything.
Instead of choosing File➪Save Everything, you can recognize that the only
thing that changed is the source-code file you’re currently working on. If you
see the blinking cursor in the code editor, you know that the code editor is
active. If not, click somewhere in your code to activate the editor. When you
see the blinking cursor, press Ctrl+S. This saves your file.
In the computer world, there’s an adage that goes something like this: “Save
early, save often.” Get in the habit of pressing Ctrl+S every so often. You
won’t wear out your hard drive, and the keyboard is pretty durable. Every
time we type a few lines of code, we press Ctrl+S. Before we compile, we
press Ctrl+S. When we’re feeling paranoid that the last Ctrl+S didn’t stick,
we press Ctrl+S. When we’re stuck at a traffic light, we press Ctrl+S.
Creating a First
C++ Program
1. Choose Settings➪Editor Options.
Book I
Chapter 1
24
Showing Information
Now you can tell the computer to compile your code. If you haven’t saved
it, do so now by pressing Ctrl+S. Then choose Build➪Build. If you typed
everything correctly, you should see the magical message 0 errors,
0 warnings appear in the Build Log window. But if not, don’t worry; you
can easily fix it. Look at your code and find the difference between the line
we wrote earlier and your code. Here it is again, just for safe measure:
cout << 5 + 10 << endl;
There is a space after cout, a space after <<, a space after 5, a space after +,
a space after 10, and a space after <<. And there is a semicolon at the end.
Make sure that these are all correct.
Then when you successfully compile and see the happy message 0 errors,
0 warnings, you are ready to run your program. Choose Build➪Run.
A console window opens, and you should see the following:
Hello, I am your computer talking.
15
Process returned 0 (0x0)
execution time : 0.000 s
Press any key to continue.
Notice the second line is the answer to the math problem 10 + 5. That means
the computer knows how to do math, more or less correctly. (Okay, it had
better be correct, or we’re going to demand a refund from our teachers.)
Ordering the operations
If you want, you can play around with some more complicated problems. For
example, you can try something like this:
cout << 5 + 10 / 2 * 3 + 25 << endl;
What do you think the answer will be? The answer depends on computer
rules for the order in which it performs math problems. These are called
orders of operation. Multiplication and division take precedence over addition and subtraction. Therefore, the computer does all the multiplication
and division first from left to right; then it does the addition and subtraction
from left to right. Figure 1-7 shows the order in which the computer does
this particular math problem.
Going overboard
The computer actually has various limits, including when it comes to math.
If you try something like this
cout << 8762547892451 * 10 / 2 * 3 + 25 << endl;
Showing Information
25
5 + 10/2 * 3 + 25
5 + 5 * 3 + 25
5 + 15 + 25
20 + 25
45
an error message shows up in the error window when you try to compile:
error: integer constant is too large for “long” type
This message is bad. The reason is that you’ve gone beyond the limits of
what this style of math enables you to do. So be careful.
You can also go too big when you run your program — and (unfortunately)
you won’t know it. For example, the line
cout << 12345 * 12345 * 12345 * 12345 * 12345 << endl;
will compile correctly — but (aieee!) shows the following result:
253233049
Nope, it’s not correct. Not even a good guess. So the moral here is mainly
to use the approach to coding shown in this section only when you’re using
basic math and don’t have to juggle really big numbers. If you’re getting over
five or six digits, you’re getting into too-big territory.
The greatest positive number you can use is 2,147,483,647. The greatest
negative number is –2,147,483,647. However, if you’re willing to stick to only
positive numbers and 0, the computer can make some adjustments inside
and handle a higher positive number. In that case, your numbers can range
from 0 to 4,294,967,295.
Pairing the parentheses
If you want to get around the order in which the computer does its math,
you can add parentheses. For example, if you use the following line, the computer does the final operation (+) before it does the others:
cout << 5 + 10 / 2 * (3 + 25) << endl;
Creating a First
C++ Program
Figure 1-7:
The
computer
likes to use
orders of
operation.
Book I
Chapter 1
26
Showing Information
Whereas previously, without the parentheses, this thing came out to be 45,
now it comes out to be 145. First the computer does the 3 + 25 to get 28.
Then it begins with the multiplication and division, from left to right. So it
takes 10 / 2 to get 5, then multiples that by (3 + 25), or 28, to get 140. Then it
starts with the addition and subtraction from left to right. So it adds 5 to this
to get the final number, 145.
Tabbing your output
Just as you can write a string of letters and numbers to the console, you can
also write a tab. For example, take the following line from your program
cout << “Hello, I am your computer talking.” << endl;
and change it to the line shown in bold in the following code:
#include <iostream>
using namespace std;
int main()
{
cout << “Hello\tI am your computer talking.” << endl;
return 0;
}
In the preceding code, we replaced the comma and space with a backslash
and then a lowercase t. (We also removed the extra line about math, just in
case you tried the math things from the preceding section.) But when you
compile and run this program (remember to compile it first!), it won’t print
exactly what’s in the double quotes. Here’s what you see:
Hello
I am your computer talking.
The extra space in the displayed line is a tab space, just as if you had
pressed the Tab key while typing this. (Is that slick, or what?)
There’s a complication to using the backslash: You can’t just type a backslash or a double quote and expect to see it on the screen. A couple of workarounds will show the actual characters:
✦ Really want to display a backslash, not a special character? Use a backslash followed by another backslash. (Yes, it’s bizarre.) The compiler
treats only the first backslash as special. When a string has two backslashes in a row, the compiler treats the second backslash as, well, a
backslash.
For example, the following line of code has two backslashes:
cout << “\\tabc” << endl;
Let Your Program Run Away
27
The following text shows up at the console:
\tabc
cout << “Backslash and double quote equal \” in C++.” << endl;
When that code runs in a program, you see this on the screen:
Backslash and double quote equal “ in C++.
C++ programmers use the term escape-sequence to refer to any special
character in a string that starts with a backslash. This is an outdated bit of
vocabulary — maybe not as old as “methinks,” but it does date back to the
original C language of the 1970s. Back then, you made special characters
appear on console screens by first pressing the Esc key.
Let Your Program Run Away
The word execute refers to running your program, but you need to compile
(or build using the CodeBlocks terminology) the program before you run it.
The compilation process transforms your program into an executable file. An
executable file is a special type of file that contains a program that you can
run on your computer. When you run your word processor program, you
run an executable file containing the word processor program.
After the computer compiles (builds) your program, it performs a step
called linking. People often refer to these two steps together as simply
compiling. Indeed, in this book, we often use the term to mean both steps
together. If you’re curious about what goes on here, take a look at Appendix
A. It has a section devoted to the compiling and linking processes.
Whenever you want to run your program, you first compile it, and then you
run it. If you make more changes to your program, you must compile it again
before running it. Otherwise, the executable file won’t have your changes.
Because you almost always use Build and Run in sequence, the kind people
who built CodeBlocks included a special menu item called Build and Run on
the Build menu. The computer first compiles your code, then it immediately
runs the program if there are no errors. If there are errors, the compiler
doesn’t run the program, and the errors are reported as usual.
We almost always use the Build and Run option, rather than clicking Build
and then Run separately.
Creating a First
C++ Program
✦ If a string starts with a double quote and ends with a double quote, how
in the world would you actually print a double quote? Type a backslash,
then a double quote, as in the following code:
Book I
Chapter 1
28
Let Your Program Run Away
Sometimes the old-fashioned approach is more efficient: When we compile
and run our programs, we use shortcut keys. It takes a bit of extra time to
grab the mouse, move the pointer to a menu, and so on. Instead, we press F9
to compile.
Table 1-3 lists keyboard shortcuts for compiling.
Table 1-3
Keyboard Shortcuts for Compiling and Running
Action
Keyboard Shortcut
Build
Ctrl+F9
Run
Ctrl+F10
Build and run
F9
Chapter 2: Storing Data in C++
In This Chapter
✓ Using storage bins called variables
✓ Working with integer variables
✓ Using character variables
✓ Manipulating strings
✓ Using Boolean variables
✓ Using conditional operators
✓ Reading from the console
W
e all love to store things away. Our closets are a perfect example
of a place to store things. We have boxes in there that we have not
opened in years. Perhaps we inadvertently created a time capsule. Or just a
fire hazard. When you program a computer, you can also store things away.
Most people know that computers have two kinds of memory: memory
inside the chips and memory in the hard drive. But most people use the
term memory in reference to the memory chips; the other is just referred to
as the hard drive. When you type a business letter in a word processor, the
letter is stored in the memory. After you choose File➪Save, the letter gets
stored to the hard drive, but as long as you still have it open in the word
processor, it’s generally still in memory.
The best way to think of memory is as a set of storage bins, much like the
ones in the closet that we are afraid of. When you write a computer program, you reserve some storage bins, and you give each storage bin a name.
You also say what type of thing can go inside the storage bin. The technical
term for such a storage bin is a variable.
In this chapter, we show you how you can use these storage bins in your
programs.
The programs in this and the remaining chapters work with the free compiler included on this book’s CD-ROM. You can also use any other compiler, such as the C++ compiler supplied with Visual Studio. In this chapter,
we’re assuming that (by now) you know how to use the compiler of your
choice. Chapter 1 shows you how to use CodeBlocks; to find out more about
CodeBlocks see Appendix B.
30
Putting Your Data Places: Variables
Putting Your Data Places: Variables
When you write a program, you specify that you want to make use of one
or more storage bins called variables. You can put different kinds of things
in these storage bins. The difference with these computer storage bins and
those in your closet, however, is that each computer storage bin can hold
only one thing at a time.
You can put many different types of things into your variables, too. For
example, you can put numbers in a storage bin, or you can put a string in a
storage bin. Minibook I, Chapter 1 advises that a string is simply a bunch of
letters, numbers, or other characters all strung together. As for numbers,
they can either be integers (which are positive whole numbers, negative
whole numbers, and 0) or they can be numbers with a decimal point, such as
3.11 or 10.0, which (for various reasons) are called floating-point numbers.
The term floating-point number means a number that has a decimal point and
something to the right of the decimal point (even if it’s just a 0). When you
see the term floating point, you can remember what it means by the word
point in its name. Think of decimal point.
If you are already familiar with the term variable from other fields, be careful
that you do not apply their definitions here. Although similar, some significant differences are involved. For example, in algebra, a variable represents
an unknown quantity, and you can solve for a variable. But in programming,
it’s simpler than that: A variable is simply a storage bin with an associated
name.
Creating an integer variable
In your C++ program, you can easily write a line of code that creates a variable. Although what you’re doing at that point is just writing code (and
the variable won’t actually get created until you run the program), people
often refer to this process as creating a variable. When we are working with
another programmer that we like, we will often say, “We’ll go ahead and
make a variable.” What we’re really doing is writing code that tells the computer to go ahead and make the variable. And of course, the computer won’t
actually make the variable until the program runs. If, on the other hand,
we’re working with a programmer we don’t like, we probably won’t say anything at all.
A variable has three aspects, as shown in Table 2-1.
Putting Your Data Places: Variables
Table 2-1
31
A Variable Has Three Aspects
What It Means
Name
The name you use in your program to refer to the variable
Type
The type of information that the variable can hold
Value
The actual thing that the storage bin holds
The following list describes the items in Table 2-1 in more detail.
✦ Name: Each variable must have a name. In your program, you refer to
the variable by this name. For example, you may have a variable called
count, and you may have a variable called LastName. Or you could
have a variable called MisterGates.
✦ Type: When you create a variable, you must specify the type of information the variable can hold. For example, one variable may hold an
integer, and another variable may hold a single character. After you pick
a type for the variable in your program, you can put only things of that
type into the variable.
✦ Value: At any given moment, a variable holds a single value. For example, an integer variable might hold the number 10, and a character
variable might hold the character a. In your program, you can store
something in a variable, and later you can store something else in the
variable. When you store something else, the variable forgets what was
previously inside it. So in this sense, you can think of a computer as
having a one-track mind.
The code in Listing 2-1 demonstrates how to create a variable. This is a full
program that you can run.
Listing 2-1: Creating a Variable
#include <iostream>
using namespace std;
int main()
{
int mynumber;
mynumber = 10;
cout << mynumber << endl;
return 0;
}
Take a careful look at Listing 2-1. Remember that the computer starts with
the code inside the braces that follow the word main, and it performs the
code line-by-line.
Storing Data in C++
Aspect
Book I
Chapter 2
32
Putting Your Data Places: Variables
The first line inside main looks like this:
int mynumber;
When you declare a variable, the first thing you specify is the type of thing
the variable can hold. Here, we used the word int. This word is the C++
word for integer. Thus, the variable that we’re declaring can hold an integer.
Next is the name of the variable. This variable is called mynumber. Then a
semicolon ends the variable declaration.
Notice that, in this line, we have covered two of the three aspects of variables; we have given the variable a name, and we have told the computer
what type of thing we want the variable to hold. The order seems a little
odd; in C++, we first say the type and then the name. That’s just the way it’s
done in C++, and a good reason stands behind it, which you can read about
in “Declaring multiple variables,” later in this chapter.
The next line looks like this:
mynumber = 10;
This puts something in the variable. It puts the number 10 in it. Because we
already said that the variable can hold an integer, we’re allowed to put in a
10, because it is an integer. If we had tried to put something other than an
integer in it, the compiler would have given us an error. The compiler makes
sure that we put into a variable only the type of thing that we said we would.
It’s good at keeping us in line. And of course, you noticed that the statement
ends with a semicolon. In C++, every statement ends with a semicolon.
To put something in a variable, you type the variable’s name, an equals sign
(surrounded by optional spaces), and the value. You then end the line with a
semicolon. This line of code is called an assignment. Or you can say that you
are setting the variable to the value.
The next line is this:
cout << mynumber << endl;
Minibook I, Chapter 1 describes what this line does. It’s a cout statement,
which means that it writes something on the console. As you can probably
guess, this code tells the computer to write the value of mynumber on the
console. It does not write the string mynumber. Rather, it writes whatever
happens to be stored in the storage bin. The previous line of code put a 10
in the storage bin, and so this line will print a 10 on the console. When you
run the program, you see this:
10
Putting Your Data Places: Variables
33
Think of it like this: When you type the variable’s name, you are accessing
the variable. The exception to this is when the variable’s name appears to
the left of an equals sign. In that case, you are setting the variable.
✦ Set the variable: You can set a variable, which means that you can put
something inside the storage bin.
✦ Retrieve the value: You can get back the value that is inside the variable. When you do so, the value stays inside it; you are not, so to speak,
taking it out.
When you retrieve the value that is in a variable, you are not removing it
from the variable. The value is still inside the variable.
Declaring multiple variables
Many years ago, when we first learned the original C programming language
(which was the language that served as the predecessor to C++), we thought
it odd that we had to first say the type of the variable and then the name.
But this actually works out well, because it makes declaring multiple variables of the same type easy. If we want to declare three integer variables in a
row, we can do it all in one shot, like this:
int tom, dick, harry;
This statement declares three separate variables. The first is called tom; the
second is called dick; and the third is called harry. Each of these three
variables holds an integer. We have not put anything in any of them, so we
may follow that with some code to stuff each of them full with a number. For
example, this code puts the number 10 in tom, the number 20 in dick, and
the number 3254 in harry.
tom = 10;
dick = 20;
harry = 3254;
When you run your programs, the computer executes the statements in
the order that they appear in your code. Therefore, in the preceding code,
the computer first creates the three storage bins. Then it puts a 10 inside
tom. (Now doesn’t that sound yummy.) Next, dick will get a 20. And finally,
harry will consume a 3254.
Changing values
Although a variable can only hold one thing at a time, you can still change
what the variable holds. After you put something else in a variable, it forgets
Storing Data in C++
You can do two things with a variable:
Book I
Chapter 2
34
Putting Your Data Places: Variables
what it originally had. So when people accuse us of being forgetful, we can
just say, “Yes, but you should see that computer we work with all day long!”
You put something new in the variable in the same way you originally put
something in it.
Look closely at Listing 2-2. Notice that the first part of the program is just
like Listing 2-1. But then we added two more lines (shown in bold) that look
pretty much like the previous two: The first one sticks something (20) in the
same variable as before, and the next one writes it out to the console.
Listing 2-2: Changing a Variable
#include <iostream>
using namespace std;
int main()
{
int mynumber;
mynumber = 10;
cout << mynumber << endl;
mynumber = 20;
cout << mynumber << endl;
return 0;
}
As before, the line where we put something new in the variable follows the
same format: There’s an equals sign, with the variable on the left and the
new value on the right. As described earlier in this chapter, this statement is
an assignment statement.
When you see a single equals sign by itself, the item on the left side is the
variable or item that receives the information that is on the right side.
Setting one variable equal to another
Because you can do only two direct things with variables — put something
in and retrieve the value — setting one variable equal to another is a simple
process of retrieving the value of one variable and putting it in the other.
This process is often referred to as copying the variable from one to another.
For example, if you have two integer variables, say start and finish, and
you want to copy the value of start into finish, you would use a line of
code like the following.
finish = start;
Putting Your Data Places: Variables
35
When you copy the value of one variable to another the two variables must
be the same type. You cannot, for instance, copy the value from a string variable into an integer variable. If you try, the compiler issues an error message
and stops.
After the computer runs this copy statement, the two variables hold the
same thing. Listing 2-3 is an example of copying one variable to another.
Listing 2-3: Copying a Value from One Variable to Another
#include <iostream>
using namespace std;
int main()
{
int start = 50;
int finish;
finish = start;
cout << finish << endl;
return 0;
}
Initializing a variable
When you create a variable, it starts out as an empty storage bin. Before it
can be of much use, you need to put something in it.
If you try to retrieve the contents of a variable before you actually put anything in it, you end up with what computer people fondly call unpredictable
results. What they really mean to say is, don’t do this because who knows
what’s in it. It’s kind of like if you go in the attic and you discover the former
owners left a big, ominous box. Do you really want to look inside it? With
variables, the problem you run into is that the computer memory has something stored in that particular place where the variable now sits, and that
stored item is probably just some number left over from something else. But
you can’t know in advance what it is. So always make sure that you place
a value inside a variable before you try to retrieve its contents, a process
called initializing the variable.
You can initialize a variable in two ways. The first way is by declaring the
variable and then assigning something into it, which takes two lines of code:
int mynumber;
mynumber = 153;
Book I
Chapter 2
Storing Data in C++
Although we said copy the value of start into finish, notice that the first
thing we typed was finish, and then the equals sign, and then start. Don’t
let the language confuse you. The left side of the equals sign is what receives
the value; it is an assignment statement.
36
Putting Your Data Places: Variables
MyThis and MyThat
As you progress through your computer programming life (which is, we hope, in addition
to your life as a millionaire), you are likely to
notice that, for some reason, some computer
programmers seem to favor variable names
that start with the word My. Other computer programmers despise this practice and
completely distance themselves from it. We have
seen such computer identifiers as MyClass,
MyNumber, MyHeight, MyName, MyCar,
MyWhatASurprise, MyLar, MyStro,
and MyOpic. Personally, we have no problem
using names that start with My, especially in
training exercises.
But the other way is a bit quicker. It looks like this:
int mynumber = 153;
This method combines both worlds into one neat little package that is available for you to use whenever you want. You see us initializing variables both
ways in this book, depending on how we feel at the moment.
Creating a great name for yourself
Every variable needs to have a name. But what names can you use? Although
you are free to use names such as Fred or Zanzibar or Supercount1000M,
there are limits to what you are allowed to use.
Although most C++ code is in lowercase, you are free to use uppercase letters in your variable names. However, C++ distinguishes between the two.
Therefore, if you have a variable called count, you cannot access it later
in your program by calling it Count with a capital C. The compiler treats
the two names as two different variables, which makes C++ case sensitive.
But on the other hand, please don’t use two separate variables in the same
program, one called count and one called Count. Although the compiler
doesn’t mind, the mere humans that may have to read your code or work on
it later might get confused.
Here are the rules you need to follow when creating a variable name:
✦ Characters: You can use any uppercase letter, lowercase letter, number,
or underscore in your variable names. Other symbols (such as spaces or
the ones above the number keys on your keyboard) are not allowed in
variable names. The only catches are that
• The first character cannot be a number.
• The variable name cannot consist of only numbers.
✦ Length: Most compilers these days allow you to have as many characters in the variable name as you want. Just to be sure, and to prove
Manipulating Integer Variables
37
Examples of acceptable variable names include Count, current_name,
address_1000, and LookupAmount. Table 2-2 lists some variable names
that are not allowed.
Table 2-2
Examples of Bad Variable Names
Bad Variable Name
Why It’s Not Allowed
12345
It has only numbers (plus it starts with a number, which
is wrong as well).
A&B
The only special character allowed is the underscore, _.
The & (ampersand) is not allowed.
1abc
A variable name cannot start with a number.
Manipulating Integer Variables
Just like your friends, integer variables can be manipulated. But in this case,
manipulation means simply that you can do arithmetic. You can easily do
the usual addition, subtraction, multiplication, and division.
In Minibook I, Chapter 1, we introduced the characters that you use for the
arithmetic operations. They are
✦ + for addition
✦ - for subtraction
✦ * for multiplication
✦ / for division
You can, however, perform another operation with integers, and it has to
do with remainders and division. The idea is that if you divide, for example,
16 by 3, the answer in whole numbers is 5 remainder 1. Another way of
saying this is that 16 doesn’t divide by 3 evenly, but 3 goes into 16 five times,
leaving a remainder of 1. This remainder is sometimes called a modulus.
Computer people actually have an important reason for calling it modulus
rather than remainder, and that’s because people in the computer field like
to use confusing terms.
Book I
Chapter 2
Storing Data in C++
we’re easily amused, in CodeBlocks we successfully created a variable with a name that was over 1000 characters in length. However,
we wouldn’t want to have to type that thing over and over. Instead, we
recommend keeping your variable names long enough to make sense
but short enough that you can type them easily. Most people prefer anywhere from five to ten characters or so.
38
Manipulating Integer Variables
When working with integer variables, remember the two basic things that
you can do with variables: You can put something in a variable, and you can
retrieve it from a variable. Therefore, when working with an integer variable,
the idea is that you can retrieve the contents, do some arithmetic on it, and
then print the answer or store it back into the same variable or another
variable.
Adding integer variables
If you want to add two integer variables, use the + symbol. You can take the
result and either print it or put it back into a variable.
The following example adds two variables (start and time) and then prints
the answer to the console. The addition operation is shown in bold.
#include <iostream>
using namespace std;
int main()
{
int start;
int time;
start = 37;
time = 22;
cout << start + time
return 0;
}
<< endl;
This code starts with two integer variables called start and time. It then
sets start to 37, and time to 22. Finally, it adds the two variables (to get
59) and prints the results.
In this example, however, the computer doesn’t actually do anything with
the final sum, 59, except print it. If you want to use this value later, you can
save it in its own variable. The following code demonstrates this; the storage
operation is shown in bold:
#include <iostream>
using namespace std;
int main()
{
int start;
int time;
int total;
start = 37;
time = 22;
total = start + time;
cout << total << endl;
return 0;
}
Manipulating Integer Variables
39
You can also add numbers themselves to variables. The following line adds 5
to start and prints the result.
cout << start + 5 << endl;
Or, you can save the value back in another variable, as in the following
fragment:
total = start + 5;
cout << total << endl;
This adds 5 to start and saves the new value in total.
When you use such code as total = start + 5;, although you are
adding 5 to start, you are not actually changing the value stored in start.
The start variable itself remains the same as it was before this statement
runs. Rather, the computer figures out the result of start + 5 and saves
that value inside total. Thus, total is the only variable that changes here.
Now here’s where things get a little tricky in the logical arena. This might
seem a strange at first, but you can actually do something like this:
total = total + 5;
If you have taken some math courses, you might find this statement a little
bizarre, just like the math courses themselves. But remember, total is a
variable in computer programming, and that definition is a bit different from
in the math world.
This statement really just means we’re going to add 5 to the value stored in
total, and we’ll take the value we get back and store it back in total. In
other words, total will now be 5 greater than it was to begin with.
The following code shows this in action:
#include <iostream>
using namespace std;
int main()
{
int total;
total = 12;
cout << total << endl;
total = total + 5;
cout << total << endl;
return 0;
}
Book I
Chapter 2
Storing Data in C++
In this code, we declared the integer variable total along with the others.
Then, after we stored 37 in start and 22 in time, we added the two and
saved the total in the variable called total. Then we finally printed the
value stored in total.
40
Manipulating Integer Variables
When you run this program, you see the following output on the console:
12
17
Notice what took place. First, we put the value 12 inside total and printed
the value to the console. Then we added 5 to total, stored that back in
total, and printed the new value of total to the console.
Now it’s no big secret that we computer people are lazy. After all, why would
we own computers if we weren’t? And so the great makers of the C++ language gave us a bit of a shortcut for adding a value to a variable and storing
it back in the variable. The line
total = total + 5;
is the same as
total += 5;
We computer folks also have a special way of pronouncing +=. We say plus
equal. So for this line, we would say, total plus equal five.
Think of the total += 5 notation as simply a shortcut for total =
total + 5;.
You can also use the += notation with other variables. For example, if you
want to add the value in time to the value in total and store it back in
total, you can either do this
total = total + time;
or you can use this shortcut:
total += time;
If you are adding just 1 to a variable, you can use an even shorter shortcut. It
looks like this:
total++;
This is the same as total = total + 1;.
Table 2-3 summarizes the different things that you can do that involve the
addition of variables.
Manipulating Integer Variables
Table 2-3
41
Doing Things with Addition
Sample Statement
Add two variables
cout << start + time
<< endl;
Add a variable and a number
cout << start + 5 <<
endl;
Add two variables and save the result in a
variable
total = start + time;
Add a variable and a number and save the
result in a variable
total = start + 5;
Add a number to what’s already in a variable
total = total + 5;
Add a number to what’s already in a variable
by using a shortcut
total += 5;
Add a variable to what’s already in a variable
total = total + time;
Add a variable to what’s already in a
variable by using a shortcut
total += time;
Add 1 to a variable
total++;
Subtracting integer variables
Everything you can do involving addition of integer variables you can also
do with subtraction. For example, you can subtract two variables, as shown
in Listing 2-4.
And now the answer to The Great Question
In C++, as well as in the original C language
upon which C++ is based, the operator ++ adds
1 to a variable. So this finally brings us to a point
where we can answer The Great Question:
Where did the name C++ come from? When
the guy who originally designed C++, Bjarne
Stroustrup, needed a name for his language,
he decided to look into its roots for the answer.
He had based the language on C; and in C, to
add 1 to something, you use the ++ operator.
And because he felt that he added only 1 thing
to the language, he decided to call the new
language C++. Okay, that’s not quite true; he
actually added a great deal to the language. But
that entire great deal can be thought of as just
one thing made of lots of smaller things. What
did he add? The main thing of those smaller
things is the capability to do object-oriented
programming. That’s something we cover in
the next chapter. And by the way, the originator of C++, Mr. Stroustrup, is still alive and still
doing work for the language at AT&T. You can
see his Web page at www.research.att.
com/~bs/.
Storing Data in C++
What You Can Do
Book I
Chapter 2
42
Manipulating Integer Variables
Listing 2-4: Subtracting Two Variables
#include <iostream>
using namespace std;
int main()
{
int final;
int time;
final = 28;
time = 18;
cout << final - time << endl;
return 0;
}
When this program runs, the console shows the number 10, which is 28 – 18.
Remember that, as with addition, the value of neither final nor time actually changed. The computer just figured out the difference and printed the
answer on the console without modifying either variable.
You can also subtract a number from a variable, and (as before) you still
aren’t actually changing the value of the variable, as in the following
example:
cout << final - 5 << endl;
You can subtract one variable from another and save the result in a third
variable:
start = final - time;
And you can change the value in a variable by using subtraction, as in the
following four sample lines of code. This first subtracts time from start
and saves it back in start:
final = final - time;
Or you can do the same thing by using the shortcut notation:
final -= time;
Or you can do the same thing with a number:
final = final - 12;
And (as before) you can alternatively do the same thing with a shortcut:
final -= 12;
Manipulating Integer Variables
43
Finally, as with addition, you have a shortcut to a shortcut. If you want to
just subtract one, you can simply use two minus signs, as in
This is pronounced, minus minus.
Multiplying integer variables
To do multiplication in C++, you use the asterisk (*) symbol. Like addition
and subtraction, you can multiply two variables, or you can multiply a variable by a number. You can take the result and either print it or save it in a
variable.
For example, you can multiply two variables and print the results to the console with the following:
cout << length * width << endl;
Or you can multiply a variable by a number as in this:
cout << length * 5 << endl;
And as with addition and subtraction, you can multiply two variables and
save the result in a third variable:
area = length * width;
And you can use multiplication to modify a variable’s value, as in the
following:
total = total * multiplier;
or to use the shortcut
total *= multiplier;
And (as before) you can do the same with just a number
total = total * 25;
or
total *= 25;
Dividing integer variables
Although addition, subtraction, and multiplication are pretty straightforward
with integer variables, division is a bit trickier. The chief reason is that, with
whole numbers, sometimes you just can’t divide evenly. It’s like trying to
Storing Data in C++
final--;
Book I
Chapter 2
44
Manipulating Integer Variables
divide 21 tortilla chips evenly between 5 people. You just can’t do it. Either
somebody will feel cheated, or everyone will get 4, and 1 chip will be left
over for everyone to fight over. Of course, you could break every chip into 5
pieces, and then each person gets 1/5 of each chip, but then you’re no longer
working with whole numbers — just a bunch of crumbs.
If we use a calculator and type 21 divided by 5, we get 4.2, which is not a
whole number. If we want to stick to whole numbers, we have to use the
notion of a remainder. In the case of 21 divided by 5, the remainder is 1, as
we figured out with the tortilla chips. The reason is that the highest multiple
of 5 in 21 is 20 (since 5 times 4 is 20), and 1 is left over. That lonely 1 is the
remainder.
So in terms of strictly whole numbers, the answer to 21 divided by 5 is 4
remainder 1. And that’s how the computer does arithmetic with integers: It
gets two different answers: The quotient and the remainder. In math terms,
the main answer (in our example, 4) is called the quotient. And what’s left
over is the remainder.
Because two different answers to a division problem may occur, C++ uses
two different operators for figuring these two different answers.
To find the quotient, use the slash (/). Think of this as the usual division
operator, because when you deal with numbers that divide evenly, this
operator gives you the correct answer. Thus, 10 / 2 gives you 5 as you would
expect. Further, most people just call this the division operator, anyway.
To find the remainder, use the percent sign (%). This is often called the
modulus operator.
The sample program in Listing 2-5 takes two numbers and prints their quotient and remainder. Then it does it again for another pair of numbers. The
first pair has no remainder, but the second pair does.
Listing 2-5: Finding Quotients and Remainders
#include <iostream>
using namespace std;
int main()
{
int first, second;
cout << “Dividing 28
first = 28;
second = 14;
cout << “Quotient “
cout << “Remainder “
cout << “Dividing 32
first = 32;
by 14.” << endl;
<< first / second << endl;
<< first % second << endl;
by 6.” << endl;
Characters
45
}
When you run this program, you see the following output:
Dividing 28 by 14.
2
0
Dividing 32 by 6.
5
2
Notice, in Listing 2-5, that we used a couple new tricks in addition to (or
divided by?) the division tricks. For one, we combined our variable declarations of first and second variables into one statement. A comma separates the variable names, and we wrote the type (int) only once. Next, we
combined the output of strings and numbers into a single cout statement.
We did this for four of the cout statements. That’s acceptable, as long as
you string them together with the << signs between each of them.
You can do all the usual goodies with both the division (/) and remainder
(%) operators. For example, you can store the quotient in another variable,
as you can with the remainder:
myQuotient = first / second;
myRemainder = first % second;
And you have shortcuts available, as well:
int first = 30;
first /= 5;
cout << first << endl;
In this case, first becomes 6, because 30 / 5 is 6.
int first = 33;
first %= 5;
cout << first << endl;
And in this case, first becomes 3, because the remainder of 33 divided
by 6 is 3.
Characters
Another type of variable you can have is a character variable. A character
variable can hold a single — just one — character. A character is anything
that can be typed, such as the letters of the alphabet, the digits, and the
other symbols you see on the computer keyboard.
Book I
Chapter 2
Storing Data in C++
second = 6;
cout << “Quotient “ << first / second << endl;
cout << “Remainder “ << first % second << endl;
return 0;
46
Characters
To use a character variable, you use the type name char. To initialize a
character variable, you put your character inside single quotes. (If you use
double quotes, the compiler issues an error message.) The following is an
example of a character:
char ch;
ch = ‘a’;
cout << ch << endl;
The character variable here is called ch. We initialized it to the character
a, which, you notice, is surrounded by single quotes. We then printed it by
using cout.
Null character
One important character in the programming world is the null character. Deep
down inside the computer’s memory, the computer stores each character by
using a number, and the null character’s number is 0. There’s nothing to actually see with the null character; we can’t draw a picture of it in this book for
you to hang on your wall. (Bummer.) All we can do is describe it. Yes, every
once in a while computer people have to become philosophers. But the null
character is important because it is often used to signify the end of something.
Not the end of the world or anything big like that, but the end of some data.
To notate the null character in C++, use \0, as in
char mychar = ‘\0’;
Nonprintable and other cool characters
In addition to the null character, several other cool characters are available,
some that have a look to them and can be printed and some that do not and
cannot. The null character is an example of a nonprintable character. You
can try to print one, but you will get either a blank space or nothing at all,
depending on the compiler.
But some characters are special in that they do something when you print,
but you can’t type them directly. One example is the newline character. A
newline character symbolizes the start of a new line of text. In all cases, the
computer places the insertion point, the place where it adds new characters,
on the next line. If you are printing some text to the console and then you
print a newline character, any text that follows will be on the next line. Most
compilers these days start the text at the far left of the next line (column
1), but some compilers start the text in the next column on the next line, as
in the following output. In this case, the text appears on the next line, but it
starts at column 4, rather than at the far left (column 1).
abc
def
Characters
47
Never known to turn down the chance to invent
a new word, computer people have come up
with names for characters that may not always
match the names you know. You’ve already
heard the use of the word dot for a period when
surfing the Internet. And for some characters
that already have multiple names, computer
folks may use one name and not the other. And
sometimes, just to throw you off, they use the
usual name for something. The following are
some of the names of symbols that computer
people like to use:
. dot (but not period or decimal point)
* star (not asterisk)
( left paren or left parenthesis
) right paren or right parenthesis
[ left square bracket or left bracket
] right square bracket or right bracket
== equal-equal (not double equal)
++ plus-plus (not double plus)
– – minus-minus (not double minus)
/ forward slash
\ backslash
@ at
& ampersand (but not and)
# pound (but not number sign)
! bang, but most people still say exclamation point
{ left brace or left curly brace or open
brace
} right brace or right curly brace or close
brace
~ tilde
^ caret, but a few people say hat (for
real — no joke here!)
% percent
“ double quote
Here, we printed abc, then a newline, and then def. Notice that the def continued in the same position it would have been had it been on the first line.
For the compilers that we use in this book, however, printing abc, then a
newline, and finally def results in this output:
abc
def
But to accommodate the fact that some other compilers sometimes treat a
newline as just that (start a new line but don’t go anywhere else), the creators of the computers gave us another special character: the carriage return.
(Can you hear the crowd say, “ooooh!”?)
The carriage return places the insertion point at the start of the line, but not
on a new line. (Which means that if you use just a carriage return on a computer expecting both a carriage return and a newline, you’ll overwrite what’s
already on the line.) That’s true with pretty much every C++ compiler.
Storing Data in C++
What is that symbol?
Book I
Chapter 2
48
Strings
In Minibook I, Chapter 1, we describe the tab character and other characters
that start with a backslash. These are individual characters, and you can
have them inside a character variable, as in the following, which prints the
letter a, then a tab, and then the letter b. Notice that, to get the tab character
to go into the character variable, we had to use the \ then a t.
char ch = ‘\t’;
cout << “a” << ch << “b” << endl;
In Minibook II, Chapter 1, we mention that to put a double quote inside a
string, you needed to precede the double quote with a backslash so the computer won’t think that the double quote is the end of the string. But because
a character is surrounded by single quotes, you don’t need to do this: You
can just put a double quote inside the character, as in the following.
char ch = ‘“‘;
Of course, now that raises an important question: What about single quotes?
This time you do have to use the backslash:
char ch = ‘\’’;
And finally, to put a backslash inside a character, you use two backslashes:
char ch = ‘\\’;
When the compiler sees a backslash inside a string or a character, it treats
the backslash as special and looks at whatever follows it. If you have something like ‘\’ with no other character inside the single quotes following it,
the compiler thinks the final quote is to be combined with the backslash.
And then it moves forward, expecting a single quote to follow, representing
the end. Because a single quote doesn’t appear, the compiler gets confused
and issues an error. Compilers are easily confused. Kind of gives you more
respect for the human brain.
Strings
If any single computer word has become so common in programming that
most computer people forget that it’s a computer word, it would be string.
Minibook I, Chapter 1 introduces strings and what they are, and it gives
examples of them. In short, a string is simply a set of characters strung
together. The compiler knows the start and end of a string in your code
based on the location of the double quotes.
You can create a variable that can hold a string. The type you use is
string. The example program in Listing 2-6 shows you how to use a
string variable.
Strings
49
When you read an English sentence, you can
tell where one word starts and one word ends
by looking at the spaces and the punctuation.
The same is true in a computer program. Words
are normally separated by spaces, but other
characters also denote the beginning and end
of a word. With a string, this character is the
double quote. Such word dividers are called
delimiters (pronounced dee-LIM-it-ers). And
just to make sure we stay confused, computer
people use the word token to mean the individual words in a program that are set apart
by delimiters. However, you won’t hear us use
that term again in this book, as we prefer the
word word.
Listing 2-6: Using the string Type to Create a String Variable
#include <iostream>
using namespace std;
int main()
{
string mystring;
mystring = “Hello there”;
cout << mystring << endl;
return 0;
}
When you run this program, the string Hello there appears on the console. The first line inside main creates a string variable called mystring.
The second line initializes it to “Hello there”. The third line prints the
string to the console.
Getting a part of a string
Accessing the individual characters within a string is easy. Take a look at
Listing 2-7.
Listing 2-7: Using Brackets to Access Individual Characters in a String
#include <iostream>
using namespace std;
int main()
{
string mystring;
mystring = “abcdef”;
cout << mystring[2] << endl;
return 0;
}
Storing Data in C++
Delimiters limit de tokens
Book I
Chapter 2
50
Strings
Those strange # lines
Now for those strange-looking lines that start
with a # symbol. In Minibook I, Chapter 5, we
talk about how you can divide your code into
multiple pieces, each in its own source file.
That is a powerful way to create large software
programs, because different people can work
on the different parts at the same time. But to
do so, somehow each file must know what the
other files can do. And the way you tell the files
about the other files is by putting a line toward
the top of your file that looks like this:
#include <string>
This line means that your program is making
use of another file somewhere, and that file has
a filename of string. Inside that other file
is a bunch of C++ code that essentially gives
your program the ability to understand strings.
To see this file in CodeBlocks, right-click the
filename and choose Open Include File: <filename> from the context menu. The line
#include <iostream>
gives your program the ability to write to the
console, among other things. And finally, the
line
#include <stdlib.h>
provides some general C++ features that you
aren’t yet using. As you progress through C++,
you discover more lines that you can include
at the top of your program, each starting with
#include and each giving your program
more features and capabilities. We use many
of these throughout this book. Now how is that
for a teaser?
Notice that the seventh line, the cout line, has the word mystring followed
by a 2 inside brackets. When you run this program, here’s what you see:
c
That’s it, just a letter c, hanging out all by itself. The 2 inside brackets means
that you want to take the second character of the string and only that character. But wait! Is c the second character? Our eyes may deceive us, but it
looks to us like that’s the third character. What gives?
Turns out, C++ starts numbering the positions inside the string at 0. So for
this string, mystring[0] is the first character, which happens to be a. And
so really mystring[2] gets the third character. Yes, life gets confusing
when trying to hold conversations with programmers, because sometimes
they use the phrase the third character to really mean the third position; but
sometimes they use it to mean what’s really the fourth position. But to those
people, the fourth position is actually the fifth position, which is actually the
sixth position. Life among computer programmers can be confusing. In general, in this book, we use fourth position to really mean the fourth position,
which you access through mystring[3]. (The number inside brackets is
called an index.)
Strings
51
A string is made of characters. Thus, a single character within a string has
the type char. This means that you can do something like this:
In the preceding example, mychar is a variable of type char. The
mystring[2] expression returns an item of type char. Thus, the assignment is valid. When you run this, you once again see the single character in
the third position:
c
Changing part of a string
Using the bracket notation, you can also change a character inside a string.
The following code, for example, changes the second character in the string
(that is, the one with index 1) from a c to a q:
string x = “abcdef”;
x[1] = ‘q’;
cout << x << endl;
This code writes the string aqcdef to the console.
Adding onto a string
Any good writer can keep adding more and more letters to a page. And the
same is true with the string type: You can easily add to it. The following
lines of code use the += operator, which was also used in adding numbers.
What do you think this code will do?
string mystring;
mystring = “Hi “;
mystring += “there”;
cout << mystring << endl;
The first line declares the string mystring. The second line initializes it to
“Hi ”. But what does the third line do? The third line uses the += operator,
which appends something to the string, in this case “there”. Thus, after
this line runs, the string called mystring contains the string “Hi there”,
and that’s what appears on the console when the cout line runs. The fancy
programmer term for adding something to a string is concatenation.
You can also do something similar with characters. The following code snippet takes a string and adds a single character onto it:
string mystring;
mystring = “abcdef”;
mystring += ‘g’;
cout << mystring << endl;
Storing Data in C++
string mystring;
mystring = “abcdef”;
char mychar = mystring[2];
cout << mychar << endl;
Book I
Chapter 2
52
Deciding between Conditional Operators
This code creates a string with “abcdef”, and then adds a ‘g’ character
on to the end to get “abcdefg”. Then it writes the full “abcdefg” to the
console.
Adding two strings
You can take two strings and add them together by using a + sign just as you
can do with integers. The final result is a string that is simply the two strings
pushed together side by side. For example, the following code adds first
to second to get a string called third.
string first = “hello “;
string second = “there”;
string third = first + second;
cout << third << endl;
This code prints the value of third, which is simply the two strings pushed
together, in other words, “hello there”. (Notice the string called first
has a space at its end, which is inside quotes and, therefore, part of the
string.)
You can also add a string constant (that is, an actual string in your program
surrounded by quotes) to an existing string variable, as in the following.
string first = “hello “;
string third = first + “there”;
cout << third << endl;
You may be tempted to try to add two string constants together, like so:
string bigstring = “hello “ + “there”;
cout << bigstring << endl;
Unfortunately, this won’t work. The reason is that (deep down inside its
heart) the compiler just wants to believe that a string constant and a string
are fundamentally different. But really, you don’t have a good reason to do
this, because you could accomplish the same thing with this code:
string bigstring = “hello there”;
cout << bigstring << endl;
You can do a lot more with strings. But first, you need to understand something called a function. If you’re curious about functions, read Minibook I,
Chapter 4, where we cover all the nitty-gritty details.
Deciding between Conditional Operators
One of the most important features of computers, besides allowing
you to surf the Web and allowing telemarketers to dial your telephone
Deciding between Conditional Operators
53
You can use many ways to write a C++ program that can make decisions; see
Minibook I, Chapter 3, for a discussion about this topic. But one way that is
quite handy is through the use of the conditional operator.
Think about this process: If two integer variables are equal, set a string variable to the string “equal”. Otherwise, set it to the string “not equal”.
In other words, suppose we have two integer variables, called first and
second. first has the value 10 in it, and second has the value 20 in it. We
also have a string variable called result. Now, to follow the little process
that we just described: Are the two variables equal? No, they are not, so we
set result to the string “not equal”.
Now we do this in C++. Look carefully at the following code. First, we are
going to declare our variables first, second, and result:
int first = 10;
int second = 20;
string result;
So far, so good. Notice that we didn’t yet initialize the string variable
result. But now, we’re going to write a single line of code that performs the
process we just described. First, look the following over, and see whether
you can figure out what it is doing. Look carefully at the variables and what
they may do, based on the process we described earlier. Then we explain
what the code does.
result = (first == second) ? “equal” : “not equal”;
This is probably one of the more bizarre looking lines of C++ code you’ll see
in this book. First, we’ll tell you what it means. Then we’ll break it into parts
to show you why it means what it does.
In English, this means result will get “equal” if first is equal to second;
otherwise it will get “not equal”.
So now, break it into two parts. A single equals sign indicates that the left
side, result, receives what is on the right side. So we need to figure out
that crazy business on the right side:
(first == second) ? “equal” : “not equal”
Book I
Chapter 2
Storing Data in C++
automatically while you’re eating, is the capability to make comparisons.
Although this topic may not seem like a big deal, computer technology
did not start to take off until the engineers realized that computers could
become much more powerful if they could test a situation and do one task
or another task, depending on the situation.
54
Deciding between Conditional Operators
When you see this strange setup, consider the question mark to be the
divider. The stuff on the left of the question mark is usually put in parentheses, as shown in the following:
(first == second)
This actually compares first to second and determines whether they
are equal. Yes, the code shows two equals signs. In C++, that’s how you test
whether two things are equal.
Now the part on the right of the question mark:
“equal” : “not equal”
This is, itself, two pieces divided by a colon. This means that if first is indeed
equal to second, result gets the string “equal”. Otherwise, it gets the
string “not equal”.
So take a look at the whole thing one more time:
result = (first == second) ? “equal” : “not equal”;
And once again, consider what it means: If first is equal to second,
result gets “equal”; otherwise, it gets “not equal”.
Remember that the storage bin on the left side of the single equals sign
receives what is on the right side. The right side is an expression, which
comes out to be a string of either “equal” or “not equal”.
Now here’s the whole program in Listing 2-8.
Listing 2-8: Using the Conditional Operator to Do Comparisons
#include <iostream>
using namespace std;
int main()
{
int first = 10;
int second = 20;
string result;
result = first == second ? “equal” : “not equal”;
cout << result << endl;
return 0;
}
Telling the Truth with Boolean Variables
55
You can use Boolean variables with conditional
operators. In a conditional operator such as
result = (first == second) ?
“equal” : “not equal”;
the item (first == second) actually
works out to be a Boolean value, either true
or false. Therefore, you can break this code
up into several lines. We know: Breaking
something into several lines seems a little
backwards. The reason for breaking code into
lines is that sometimes, when you are programming, you may have an expression that is
extremely complex, much more complex than
first == second. As you grow in your
C++ programming ability, you start to build
more complex expressions, and then you start
to realize just how complex they can become.
And often, breaking expressions into multiple
smaller pieces is more manageable.
To break this example into multiple lines, you
can do the following:
bool isequal;
isequal = (first == second);
result = isequal ? “equal” :
“not equal”;
The first line declares a Boolean variable
called isequal. The second line sets this
to the value first == second. In other
words, if first is equal to second, then
isequal gets the value true. Otherwise,
isequal gets the value false. In the third
line, result gets the value “equal” if
isequal is true; or result gets the value
“not equal” if isequal is false.
The reason that this code works is that the
item on the left side of the question mark is a
Boolean expression, which is just a fancy way
of saying that the code requires a Boolean
value. Therefore, you can throw in a Boolean
variable if you prefer, because a Boolean variable holds a Boolean value.
Telling the Truth with Boolean Variables
In addition to integers and strings, another type in C++ can be pretty useful.
This type is called a Boolean variable. Whereas an integer variable is a storage bin that can hold any integer value, a Boolean variable can hold only one
of two different values, a true or a false. Boolean values take their name
from George Boole, the father of Boolean logic (you can read about him at
http://en.wikipedia.org/wiki/George_Boole).
The type name for a Boolean variable is bool. Therefore, to declare a
Boolean variable, you use a statement like this:
bool finished;
Storing Data in C++
Boolean variables and conditional operators
Book I
Chapter 2
56
Reading from the Console
This declares a Boolean variable called finished. Then, you can either put
a true or a false in this variable, as in the following:
finished = true;
or
finished = false;
When you print the value of a Boolean variable by using code like the
following
cout << finished << endl;
you see either a 1 for true or a 0 for false. The reason is that, deep down
inside, the computer stores a 1 to represent true and a 0 to represent
false.
Reading from the Console
Throughout this chapter and the preceding chapter, we have given many
examples of how to write information to the console. But just writing information is sort of like holding a conversation where one person does all the
talking and no listening. Getting some feedback from the users of your programs would be nice. Fortunately, getting feedback is easy in C++.
Writing to the console involves the use of cout in a form like this:
cout << “hi there” << endl;
Reading from the console (that is, getting a response from the user of your
program) uses the cin (pronounced see-in, as in, “When I see out the door,
I’m a-seein’ the mountain from here”) object. Next, instead of using the goofy
looking << operator, you use the equally but backwardly goofy > operator.
The << operator is often called an insertion operator because you are writing
to (or inserting into) a stream, which is nothing more than a bunch of characters going out somewhere. In the case of cout, those characters are going
out to the console. The >> operator, on the other hand, is often called the
extraction operator. The idea here is that you are extracting stuff from the
stream. In the case of cin, you are pulling letters from the stream that the
user is, in a sense, sending into your program through the console.
Listing 2-9 shows how you can read a string from the console.
Reading from the Console
57
Listing 2-9: Using the Conditional Operator to Make Comparisons
#include <iostream>
int main()
{
string name;
cout << “Type your name: “;
cin >> name;
cout << “Your name is “ << name << endl;
return 0;
}
When you run this code, you see the console ask you to type your name,
then it stops. That’s because it’s waiting for your input. Notice that the insertion point appears immediately after “Type your name:”. That’s because the
first cout statement lacks the usual endl. It’s normal to leave the insertion
point, the cursor, on the same line as the question to avoid confusing the
user. Type a name, such as Fred, without spaces and press Enter. The console then looks like this:
Type your name: Fred
Your name is Fred
The first line is the line you typed (or whatever name you chose to go by),
and the second line is what appears after you press Enter.
Notice what happened: When you typed a word and pressed Enter, the
computer placed that word in the name variable, which is a string. Then you
were able to print it to the console by using cout.
You can also read integers, as in the following code:
int x;
cin >> x;
cout << “Your favorite number is “ << x << endl;
This sample code reads a single integer into the variable x and then prints it
to the console.
By default, cin reads in characters from the console based on spaces. If you
put spaces in your entry, only the first word gets read. cin reads the second
word the next time the program encounters a cin >>.
Storing Data in C++
using namespace std;
Book I
Chapter 2
58
Book I: Introducing C++
Chapter 3: Directing Your
C++ Program Flow
In This Chapter
✓ Comparing numbers and evaluating other conditions
✓ Doing things based on a comparison
✓ Repeating code a certain number of times
✓ Repeating code while certain things are true
✓ Repeating code that repeats code that . . . well, you get the idea
A
s you program in C++, many times you need to present the computer
with a choice, allowing it to do one thing for one situation and something else in another situation. For example, you may have a program that
asks for a user’s password. If the password is correct, the program continues; but if the password is incorrect, the program asks the user to reenter
the password. After some number of times, usually three, the program performs yet another task when the user enters the incorrect password. Such
situations are called conditions. In the case of the password, the condition is
whether the password matches.
You may also encounter situations where you want several lines of code to
run over and over. These are called loops, and you can specify conditions
under which the loop runs. For example, you may want to check the password only three times; and if the user fails to enter it correctly on the third
time you may bar access to the system. This would be a loop, and the loop
would run under the condition that a counter has not exceeded the value of 3.
In this chapter, we take you through different ways to evaluate conditions
within your programs and cause different sections of code to run based on
those conditions. We talk about how you can use C++ commands called if
statements, which are very similar to what-if situations in real life. And we
show you how to use other C++ statements (such as do-while) to performs
loops (repeating the same program sections a number of times).
To make the explanations clear, this chapter gives you real-world examples
that you can feel free to incorporate into your life. The examples usually
refer to groups of friends and how you can get money from them. So, you
see, the benefits of this chapter are twofold: you find out how to program by
using conditions and loops, and you find out how to make money off your
unsuspecting friends.
60
Doing This or Doing That
Doing This or Doing That
As you go through life, you’re always faced with decisions. For example,
when you bought this book, you faced the following decision: Should I buy
this really great For Dummies book where I’m sure to find out just what I
need to know, or should I buy some other book?
When you are faced with a decision, you usually have options that offer
different results — say plan A and plan B. Making a decision really means
making a choice that results in the execution of either plan A or plan B. For
example, if you approach a stoplight that just turned yellow, you must either
slam on the brakes or nail the accelerator. If you slam on the brakes, the
car will stop just in time (you hope). If you nail the accelerator, the car will
speed up, and you’ll go sailing through the intersection just before the stoplight turns red (right?). The choice is this: Should I press the brake or the
accelerator? And the plan looks like this:
If I press the brake, I will stop just in time.
If I press the accelerator, I will speed through the intersection.
Computers are faced with making decisions too, although their decisions are
usually a little less exciting and, we hope, don’t yield the possibility of police
interaction. And computer decisions are usually simpler in nature. That is, a
computer’s decisions usually focus around such issues as comparing numbers and strings of characters. For example, you may be writing a computer
program for a bank where the user of your program (that is, the bank customer) has a choice of plan A: Making a Deposit or plan B: Receiving a Cash
Withdrawal. If the user chooses to make a deposit your program adds to the
balance the amount of the deposit. If the user chooses to make a withdrawal,
your program instead subtracts the withdrawal amount from the balance.
In C++, decisions usually take the form of an if statement, which is code that
starts with the if keyword followed by a condition, which is often a numerical condition wherein two numbers are compared, and then two blocks of
code appear: one that runs if the condition is satisfied and one that runs if it
is not.
Evaluating Conditions in C++
Most decisions that the computer makes are based on conditions evaluated
by comparing either two numbers or two characters. For numerical comparisons, you may compare a variable to a number, as in the following
statement:
x > 10
Evaluating Conditions in C++
61
We often use the word satisfied with conditions. For the condition x > 10,
if x really is greater than 10, we say that the condition is satisfied. It’s kind
of like, “We’re satisfied if our IRS tax refund is five figures.” For this, if the
condition is x > 9999, and if we really did get that much money back from
Uncle Sam, the condition is satisfied (and so are we).
For character comparisons, you may compare if two characters are equal or
not, as in the following statement:
mychar == ‘A’
This comparison evaluates whether mychar contains the letter A. Notice
that you use two equals signs, not just one. Using just one equals sign would
assign the value A to mychar.
To test whether the character is not equal to something, you use the somewhat cryptic-looking != operator. Think of the ! as meaning not, as in:
mychar != ‘X’
Finding the right C++ operators
Each statement in the previous section uses an operator to specify what
comparison to make between the numbers or the strings. Table 3-1 shows
you the types of operators available in C++ and the comparisons that they
help you make in your programs.
Table 3-1
Evaluating Numerical Conditions
Operator
What It Means
<
Less than
<=
Less than or equal to
>
Greater than
>=
Greater than or equal to
==
Equal to
!=
Not equal to
Book I
Chapter 3
Directing Your C++
Program Flow
This comparison evaluates whether the variable x is greater than the
number 10. If x is indeed greater than 10, the computer sees this condition
as true. If x is not greater than 10, the computer sees the condition as not
true.
62
Evaluating Conditions in C++
Some operators in this table — and how you use them — can be a bit annoying or downright frightening. The following list gives examples:
✦ The operator that tests for equality is two equals signs. It looks like this:
x == 10
When the computer finds this statement, it checks whether x equals 10.
If you put just one equals sign in your statements, most C++ compilers
will not give you an error — though a statement like x = 10 is not really
a condition! Instead, x = 10 is an assignment, setting the variable x to
10. When code contains such a statement, the result of the evaluation is
always the same, regardless of what value x has.
✦ The operator that tests for inequality is an exclamation mark followed
by an equals sign. For the condition x != 10, the condition evaluates as
true only if x is not equal to 10 (x is equal to something other than 10).
✦ When you’re testing for greater than or less than conditions, the condition x > 10 is not true if x is 10. The condition x > 10 is true only if
x is actually greater than, but not equal to, 10. To also test for x being
equal to 10, you have two choices:
• If you’re working with integers, you can test whether x > 9. In that
case, the condition is true if x is 10, or 11, or 12, and so on.
• You can use the greater-than-or-equal-to operator to x >= 10. This
condition also is true if x is 10, 11, and so on.
To test for all numbers greater than or equal to 10, the condition x > 9
works only if you’re working with integers. If you’re working with floating-point numbers (refer to Minibook I, Chapter 2, for information on the
types of numbers you can work with in C++), the statement x > 9 won’t
work like you want. The number 9.1 is greater than 9, and it’s not greater
than or equal to 10. So if you really want greater than or equal to and
you’re not working with integers, use the >= operator.
Combining multiple evaluations
When you make evaluations for program decisions, you may have more
than one condition to evaluate. For example, you might say, “If I get a million
dollars, or if I decide to go into debt up to my eyeballs, then I will buy that
Lamborghini.” In this case, you would buy the car under two conditions, and
either can be true. Combining conditions like this is called an or situation: If
this is true or if that is true, something happens.
To evaluate two conditions together in C++, you write them in the same
statement and separate them with the or symbol (||), which looks like two
vertical bars. Other programming languages get to use the actual word or,
Including Evaluations in C++ Conditional Statements
63
but C++ uses the strange, unpronounceable symbol that we call The Operator
Previously Known as Or. The following statement shows it performing live:
This condition is not of much use. If you use the or operator (||), accidentally ending up with a condition that is always true is easy. For example, the
condition (x < 100 || x > 0) is always going to be true. When x is -50,
it’s less than 100, so the condition is true. When x is 500, it’s greater than 0,
so it’s true.
In addition to an or situation, you can have something like this: “If I get a million dollars and I really feel bold, then I will buy a Lamborghini.” Notice that
we’re using the word and: In this case, you will do it only if both situations
are true. (Remember that with or, you will do it if either situation is true.) In
C++, the and operator is two ampersands, &&. This makes more sense than
the or operator, because the & symbol is often associated with the word and.
The and comparison in C++ looks like the following:
(i > 10 && i < 100)
This example checks whether a number is both more than 10 and less than
100. That would mean the number is in the range 11 through 99.
Combining conditions by using the && and || operators is a use of logical
operators.
To determine if a number is within a certain range, you can use the and operator (&&), as we did earlier in this chapter.
With the and operator, accidentally creating a condition that is never true
is easy. For example, the condition (x < 10 && x > 100) will never be
true. No single number can be both less than 10 and simultaneously greater
than 100.
Including Evaluations in C++ Conditional Statements
Computers, like humans, evaluate conditions and use the results of the
evaluations as input for making a decision. For humans, the decision usually
involves alternative plans of action, and the same is true for computers. The
computer needs to know what to do if a condition is true and what to do if
a condition is not true. To decide a plan of action based on a condition that
your program evaluates, you use an if statement, which looks like this:
if (x > 10)
{
cout << “Yuppers, it’s greater than 10!” << endl;
}
Directing Your C++
Program Flow
(i < 10 || i > 100)
Book I
Chapter 3
64
Including Evaluations in C++ Conditional Statements
This translates into English as: If x is greater than 10, write the message
“Yuppers, it’s greater than 10!”
In an if statement, the part inside the parentheses is called either the test or
the condition. We usually apply condition to this part of the if statement and
use the word test as a verb, as in “I will test whether x is greater than 10.”
In C++, the condition for an if statement always goes inside parentheses. If
you forget the parentheses, you get a compile error.
You can also have multiple plans of action. The idea is simply that if a condition is true, you will do plan A. Otherwise, you will do plan B. This is called
an if-else block, which we discuss in the next section.
Deciding what if and also what else
When you are writing the code for a comparison, usually you want to tell the
computer to do something if the condition is true and to do something else
if the condition is not true. For example, you may say, “If I’m really hungry I
will buy the Biggiesupersizemondohungryperson french fries with my meal
for an extra nickel; otherwise, I’ll go with the small.” In the English language,
you will often see this kind of logic with the otherwise word: If such-and-such
is true, I will do this; otherwise, I will do that.
In C++, you use the else keyword for the otherwise situation. It looks like the
following:
#include <iostream>
using namespace std;
int main()
{
int i;
cout << “Type any number: “;
cin >> i;
if (i > 10)
{
cout << “It’s greater than 10.” << endl;
}
else
{
cout << “It’s not greater than 10.” << endl;
}
return 0;
}
In this code, you test whether a number is greater than 10. If it is, you
print one message. If it is not, you print a different message. Notice how the
two blocks of code are distinct. The first block immediately follows the if
Including Evaluations in C++ Conditional Statements
65
statement; it’s the code that runs if the condition is true. The next block is
preceded by an else keyword, and it runs if the condition is not true.
Going further with the else and if
When you are working with comparisons, you often have multiple comparisons going on. For example, you may say, “If I go to Mars, I will look for a
cool red rock; otherwise, if I go to the moon, I will jump up really high; otherwise, I will just look around wherever I end up, but I hope there will be air.”
This type of sentence has several ifs in it; and in C++, the sentence looks like
the following:
#include <iostream>
using namespace std;
int main()
{
int i;
cout << “Type any number: “;
cin >> i;
if (i > 10)
{
cout << “It’s greater than 10.” << endl;
}
else if (i == 10)
{
cout << “It’s equal to 10” << endl;
}
else
{
cout << “It’s less than 10.” << endl;
}
return 0;
}
Here you can see how we have several different conditions, and only one
can be true. The computer first checks to see if i is greater than 10. If i is
greater, the computer prints a message saying that i is greater than 10. But
if not, the computer checks to see whether i equals 10. If so, the computer
prints a message saying that i is equal to 10. Finally, the computer assumes
Directing Your C++
Program Flow
Think carefully about your else situation when dealing with numbers. If you
are testing whether a number is greater than 10, for instance, and it turns
out that the number is not greater than 10, the tendency of most people is to
assume it must, therefore, be less than 10. But that’s not true. The number 10
itself is not greater than 10, but it’s not less than 10 either. So the opposite of
greater than 10 is simply not greater than 10. If you need to test the full range
of numbers using a simple if statement, create an if statement that uses
either >= or <= (see Table 3-1 for a listing of operators).
Book I
Chapter 3
66
Including Evaluations in C++ Conditional Statements
that i must be less than 10, and it prints a message accordingly. Notice, for
the final else statement, we didn’t put a condition (and, in fact, you cannot
have a condition with else statements). But because the other conditions
failed, we know that i must be less than 10 by our careful logic.
Be careful when you are thinking through such if statements. You could
have a situation where more than one condition could occur. For example,
you may have something like this:
#include <iostream>
using namespace std;
int main()
{
int i;
cout << “Type any number: “;
cin >> i;
if (i > 100)
{
cout << “It’s greater than 100.” << endl;
}
else if (i > 10)
{
cout << “It’s greater than 10” << endl;
}
else
{
cout <<
“It’s neither greater than 100 nor greater than 10.”
<< endl;
}
return 0;
}
Think about what would happen if i is the number 150. The first condition,
i > 100, is true. But so is the second condition, i > 10. 150 is greater than
100, and 150 is also greater than 10. So which block will the computer do? Or
will it do both blocks?
The computer only does the first condition that is satisfied. Thus, when i
is 150, the computer prints the message “It’s greater than 100.”
It does not print the other messages. In fact, the computer doesn’t even
bother checking the other conditions at that point. It just continues with
the program.
Repeating Actions with Statements That Loop
67
Repeating Actions with Statements That Loop
int
x =
x =
x =
x
x
x
x
=
+
+
+
1;
2;
3;
4;
and so on until you get to x = x + 100. As you can see, this code could
take a long time to type, and you would probably find it a tad frustrating,
too, no matter how quickly you can choose the Edit➪Paste command (or
press Ctrl+V). Fortunately, the great founders of the computer world recognized that not every programmer is a virtuoso at the piano with flying fingers and that programs often need to do the same thing over and over. Thus,
they gave us a really great tool called a for loop. A for loop does the same
piece of code over and over for a certain number of times. And that’s just
what you wanted to do in this example.
Looping situations
Several types of loops are available, and next you’ll see how they work.
Which type of loop you use depends on the situation. We’ve already mentioned the first type, called a for loop. The idea behind a for loop is to have
a counter variable that either increases or decreases, and the loop runs as
long as the counter variable satisfies a particular condition. For example, the
counter variable might start at 0, and the loop runs as long as the counter is
less than 10. The counter variable increments each time the loop runs, and
after the counter variable is not less than 10, the loop stops.
But another way to loop is to simplify the logic a bit and say, “I want this
loop to run as long as some condition is true.” This is called a while loop,
and you simply specify a condition under which the loop continues to run.
When the condition is true, the loop keeps running. After the condition is no
longer true, the loop stops.
Finally, there’s a slight modification to the while loop called a do-while
loop. The do-while loop is used to handle one particular situation that
could arise. When you have a while loop, if the condition is not true when
everything starts, the computer will skip over the code in the while loop
and not even bother executing it. But sometimes you may have a situation
where you would want the code to always execute at least once. In that case,
you can use a do-while loop.
Directing Your C++
Program Flow
Suppose that you’re writing a program that needs to add all the numbers
from 1 to 100. For example, you may want to know how much money you will
get if you tell 100 people, “give me one dollar more than the person to your
left.” With a mastery of copy and paste, you could do something like this
Book I
Chapter 3
68
Repeating Actions with Statements That Loop
Table 3-2 shows the types of loops. In the sections that follow, we show you
how to use these types of loops.
Table 3-2
Choosing Your Loops
Type of Loop
Appearance
for
for (x=0; x<10; x++) { }
while
while (x < 10) { }
do-while
do { } while (x < 10)
The following list describes the situations under which you may want these
loops.
✦ for loop: Use the for loop when you have a counter variable and you
want to loop while the counter variable increases or decreases over a
range.
✦ while loop: Use the while loop when you have a condition under
which you want your code to run.
✦ do-while loop: Use the do-while loop when you have a condition
under which you want your code to run, and you want to ensure that the
loop always runs at least once, even if the condition is not satisfied.
Looping for
To use a for loop, you use the for keyword and follow it with a set of
parentheses that contains information regarding the number of times the
for loop executes.
For example, when adding the numbers from 1 to 100, you would want a
variable that starts with the number 1; then you would add 1 to x, increase
the variable to 2, and add the next number to x again over and over. The
common part here that doesn’t change each time is the “add it to x” part,
and the part that changes is the variable, called a counter variable.
The counter variable, therefore, starts at 1 and goes through 100. Does it
include 100? Yes. And with each iteration, you would add 1 to the counter
variable. Your for statement would look like this:
for (i = 1; i <=100; i++)
This statement means that the counter variable, i, starts at 1, and the loop
runs over and over while i is less than or equal to 100. After each iteration,
the counter variable increments by 1 due to the i++ statement.
Repeating Actions with Statements That Loop
69
The following list shows the different portions inside the parentheses of the
for loop:
✦ The second portion is the condition under which the loop continues
to run.
✦ The third portion is the finalizer. In it, you specify what happens after
each cycle of the loop.
Three items are inside the for loop, and you separate them with semicolons. If you try to use commas, your code will not compile.
Now this code we just showed you doesn’t do anything for each iteration
other than add one to i. To tell the computer the work to do with each iteration, follow the for statement with a set of braces containing the statements
you want to execute with each iteration. Thus, to add the counter variable to
x, you would do this:
for (i = 1; i <=100; i++)
{
x += i;
}
This would add i to x with each loop. Of course, we didn’t start x out with
anything in particular, so we should probably include that, too. Here’s the
final thing, complete with the way to write the final value of x to the console
after the loop is finished:
#include <iostream>
using namespace std;
int main()
{
int x = 0;
int i;
for (i = 1; i <= 100; i++)
{
x += i;
}
cout << x << endl;
return 0;
}
Notice a few things about this block of code. First, we declared both variables that we’re working with, x and i. Second, the for statement initializes
the counter variable, specifies the condition under which it continues running, and tells what to do after each iteration. In this example, the for loop
Directing Your C++
Program Flow
✦ The first portion is the initializer. You use it to set up the counter
variable.
Book I
Chapter 3
70
Repeating Actions with Statements That Loop
starts with i = 1, and it runs as long as i is less than or equal to 100. For
each iteration, the computer adds the value of the counter to x; the process
that adds the value to x is the code inside the braces. Finally, the computer
adds 1 to x, which we specified as the third item inside the parentheses. The
computer does this part, adding 1 to x, only after it finishes the stuff inside
the braces.
Meddling with the middle condition
The middle portion of the for statement specifies a condition under which
to continue doing the stuff inside the for loop. In the case of the preceding example, the condition is i <= 100, which means the stuff inside the
braces continues to run as long as i is less than or equal to 100.
If you’re familiar with other computer languages, the middle condition specifies a condition under which to continue the loop, not a condition under
which to terminate the loop. Other languages will say do this until such-andsuch is true, but that is not the case in C++.
In our example, we want the loop to iterate for the special case where i is
100, which still satisfies the condition i <= 100. If we had instead said i
< 100, the loop would not have executed for the case where i is 100. The
loop would have stopped short of the final iteration. In other words, the
computer would only add the numbers 1 through 99. And if our friends are
gathering money for us, we would be cheated out of that final $100. And,
by golly, that could make the difference between whether we pay rent this
month or not.
The question of when the loop stops can get kind of confusing. If we had
gone crazy (but can we really go crazy since we’re crazy to begin with?) and
said that we wanted to add the numbers 1 up to but not including 100, we
would have wanted a condition such as i < 100. If we had just said up to
100, it would not have been clear exactly which we wanted to do, include the
100 or not. If that had been the case and you were writing the program for
us, you would want to ask us for clarification. (Unless we’re the 100th friend,
in which case we may get out of paying our dues.)
In the example we’ve been using, the condition i <= 100 and the condition i < 101 have essentially the same meaning. If our condition were i <
101, the program would operate the same. But the only reason that’s true
is because we’re working with integers counting up to and including 100. If
we were instead adding, for instance, floating-point numbers, and we incremented the counter by 0.1 after each iteration, these two conditions (i <=
100 and i < 101) wouldn’t be the same. With i <=100, we would get up to
99.5, 99.6, 99.7, 99.8, 99.9, and finally 100, after which we would stop. But i <
101 would also include 100.1, 100.2, up to and including 100.9. You can see
they are not the same.
Repeating Actions with Statements That Loop
71
Going backwards
To count backwards, you set up the three portions of the for loop. The first
is the initial setup, the second is the condition under which it continues to
run, and the third is the action after each iteration. For the first portion, you
set the counter to the starting value, the top number. For the condition, you
check whether the number continues to be greater than or equal to the final
number. And for the third portion, you decrement the counter instead of
increment it. Thus, you would have this:
for (i=10; i>=5; i--)
This starts the counter variable i at 10. After each iteration, i becomes 1
less, and thus it moves to 9, then 8, then 7, and so on. And this process continues as long as i is at least 5. Thus, i will count 10, 9, 8, 7, 6, 5. The whole
program might look like this:
#include <iostream>
using namespace std;
int main()
{
int i;
for (i=10; i>=5; i--)
{
cout << i << endl;
}
return 0;
}
When you run this code, you see the following output.
10
9
8
7
6
5
Directing Your C++
Program Flow
If you need to count backwards, you can do that with a for loop as well. For
example, you may be counting down the number of days left before you get
to quit your job because you learned C++ programming and are moving on
to an awesome new job. Or you may be writing a program that can manipulate that cool countdown timer they show when the Space Shuttle launches.
Counting up just isn’t always the right action. It would be a bummer if every
day were one day longer before you get to quit your job and move to an
island. Sometimes counting backwards is best.
Book I
Chapter 3
72
Repeating Actions with Statements That Loop
Incrementing one step at a time
In our example, we declared the counter variable before the for loop.
However, you can actually declare the counter variable inside the loop, as in
for (int i = 0; i <= 100; i++). The end result is identical to declaring the counter variable beforehand. You must declare the variable each
time you use it in a loop, as shown in the following example:
int x = 0;
for (int i = 0; i <= 100; i++)
{
x += i;
}
for (int i = 200; i <= 300; i++)
{
x += i;
}
In our earlier example under “Going backwards,” we were working with integers, and after each iteration we added 1 to the counter variable. But we can
do other things with each iteration. We already hinted that we could work
with floating-point numbers and add 0.1 with each iteration. To do this, we
can use a program like the following:
#include <iostream>
using namespace std;
int main()
{
double x = 0.0;
double i;
for (i = 0.0; i <= 100.0; i+=0.1)
{
x += i;
}
cout << x << endl;
return 0;
}
Now notice the third item in the for statement, i += 0.1. Remember
that this item is the same as i = i + 0.1. Therefore, this third item is a
complete statement. A common mistake is to instead include just a partial
statement, as in i + 0.1. Unfortunately, some compilers allow that to get
through with only a warning. C++ is notorious for letting you do things that
really don’t make a whole lot of sense, but newer compilers tend to fix these
errors.
Yes, it’s true: The entire statement i = i + 1 is considered to have a side
effect. In medicine, a side effect is some extra little goodie you get when you
Repeating Actions with Statements That Loop
73
The final portion of the for statement must be a complete statement in
itself. If the statement simply evaluates to something, it will not be used
in your for loop. In that case, your for loop can run forever unless you
stop it.
Getting sneaky (and too complicated)
If you need multiple counter variables, the for loop can handle it. Each
portion of the for statement can have multiple items in it, separated by
commas. For example, the following line of code uses two counter variables.
Look carefully at it because it’s a bit confusing. In fact, we’re going to say a
little something about that shortly.
for (i = 0, j=10; i <= 5, j <=20; i++, j=j+2)
{
cout << i << “ “ << j << endl;
x += i + j;
}
To understand this, look at each portion separately. The first portion starts
the loop. Here, the code creates two counters, i and j — i starts at 0, and
j starts at 10.
So far, easy enough. The second portion says that the loop will run as long
as the following two conditions are true: i must be less than or equal to 5,
and j must be less than or equal to 20.
Again, not too bad. The final portion says what must happen at the end of
each iteration: i is incremented by 1, and j is incremented by 2.
And thus you have two counter variables. And it’s not too bad, except . . .
imagine if we did something like this instead:
for (i = 0, j=20; i <= 5, j >= 10 ; i++, j=j-2)
{
cout << i << “ “ << j << endl;
x += i + j;
}
Book I
Chapter 3
Directing Your C++
Program Flow
take a pill the doctor prescribes. For example, to cure your headache with a
medicine, one side effect may be that you get severe abdominal pains — not
something you really want. But in computers, a side effect can be something
that you may want. In this case, we want the counter to get incremented.
The partial statement i + 0.1 just returns a value and doesn’t put it anywhere; that is, the partial statement doesn’t change the value of i — it has
no side effects. (If you try this at home by replacing one of the for loops in
the earlier examples with just i + 0.1, your loop will run forever until you
manually stop the program. The reason for this action is that the counter
always stays put right where it started, and it never increments. Thus the
condition i <= 100 will always be satisfied.)
74
Repeating Actions with Statements That Loop
If you look carefully, you’ll notice that aside from i, j starts out at 20, the
loop runs as long as j is at least 10, and that with each iteration, 2 is subtracted from j. In other words, j is counting down by 2s from 20 to 10.
But i is counting up from 0 to 5. Thus, we have two loops: one counting up
and one counting down. (Does it seem to you that just maybe we’re starting
to make this a little confusing?)
But wait, there’s more. If you think this is confusing, take a look at the following gem, which we took great pride in putting together:
for (i=0, j=10; i<=5, j <=20 ; i++, j=j+2, cout<<i+j, x+=i+j)
{
}
If you type this, you can see that it does do something. But can you tell what
it does just by looking at it? Probably not. (If you can, that’s probably not
a good thing either.) The truth is, this kind of code is just too complicated.
Best to stick to simpler code. Although you may know what this code means,
your coworkers will only get frustrated trying to decode it. And if you just
write code for fun at home, six months from now — when you go back and
look at this code — you might have trouble figuring it out yourself!
Putting too much inside the for statement itself is easy to do. In fact, if
you’re really clever, you can put almost everything inside the for loop and
leave nothing but an empty pair of braces, as we did in our preceding example. But remember, just because your code is clever doesn’t mean that what
you did was the best way to do it. Instead, sticking to the common practice
of using only one variable in the for statement is a good idea (as is not
using multiple statements within each portion).
Keeping your programs clear so that other people can figure out what you
were trying to do when you wrote the code is always a good idea. Some people
seem to think that if they keep their programs complicated, they’re guaranteeing themselves job security. Oddly, all the people we know like that tend to
leave their jobs and have trouble getting good references. (Imagine that!)
You may recall that with the ++, you can have both i++ and ++i. The first
is called a post-increment and the second is called a pre-increment. You may
be tempted to try something like this: for (int i = 0; i <= 5; ++i).
Although that looks cool and some people actually prefer it, the truth is that
it doesn’t change anything. The ++i still takes place at the end of the loop,
not at the beginning as you might hope. To me, that setup just makes code
confusing, so we use i++ in our for loops, and we avoid ++i.
Looping while
Often, you find that for loops only work so well. Sometimes, you don’t want
a counter variable; you just want to run a loop over and over as long as a
Repeating Actions with Statements That Loop
75
certain situation is true. Then, after that situation is no longer the case, you
want to stop the loop.
Book I
Chapter 3
For example, instead of saying that you’ll have 100 people line up and each
will give you one more dollar than the person to his or her left, you may say
that you will continue accepting money like this as long as they’re willing to
give it.
Directing Your C++
Program Flow
In this case, you can see that the condition under which the thing continues
to operate is the “as long as they’re willing to give it.”
To do this in C++, you use a while statement. The while keyword is followed by a set of parentheses containing the condition under which the
program is to continue running the loop. Whereas the for statement’s
parentheses include three portions that show how to change the counter
variable, the while statement’s parentheses contain only a condition.
For example, you may have
#include <iostream>
using namespace std;
int main()
{
int i = 0;
while (i <= 10)
{
cout << i << endl;
i++;
}
cout << “All Finished!” << endl;
return 0;
}
This code runs while i is less than or equal to 10. Thus, the output of this
program is
0
1
2
3
4
5
6
7
8
9
10
All Finished!
76
Repeating Actions with Statements That Loop
The while loop is handy if you don’t have a particular number of times you
need the loop to run. For example, let’s consider a situation where your
application is reading data from the Internet. Unless you control the Internet
data source, you won’t know how much data it can provide. (There are many
other situations where you don’t know how much data to read, but Internet
applications commonly experience this problem.) Using a while loop, the
code can continue reading data until your application has read it all. The
Internet data source can simply stream the data to your application until the
data transfer is complete.
Often, for this kind of situation, we make a Boolean variable called done, and
we start it out as false. My while statement is simply
while (!done)
This translates easily to English as while not done do the following. Then,
inside the while loop, when the situation happens that we know the loop
must finish (such as the Internet data source has no more data to read),
we set
done = true;
For example, the following would do this sort of process:
#include <iostream>
using namespace std;
int main()
{
int i = 0;
bool done = false;
while (!done)
{
cout << i << endl;
i++;
if (i == 10)
done = true;
}
cout << “All Finished!” << endl;
return 0;
}
In the case of the Internet data example, after you encounter no more data,
you would set done to true. In the case of your friends giving you money,
after one of them refuses, you would set done to true.
If you have worked in other languages, you may have come across the notion
of while loops always executing at least once. This is not the case in C++.
If the condition in the while statement evaluates to false, the while loop
will not execute at all.
Repeating Actions with Statements That Loop
77
Doing while
#include <iostream>
using namespace std;
int main()
{
int i = 0;
do
{
cout << i << endl;
i++;
}
while (i <= 10);
cout << “All Finished!” << endl;
return 0;
}
Notice here that the loop starts with the do keyword, then the material for
the loop follows inside braces, and finally the while statement comes at the
end. The idea is that you’re telling the computer do this while such-and-such
is true, where this is the stuff inside braces and the such-and-such is the condition inside parentheses.
The do-while loop has one important caveat: Unlike the while loop, the
do-while loop always runs at least once. In other words, even if the condition isn’t satisfied the first time you run the loop, it runs anyway. That can
be a problem sometimes, and if you don’t want that behavior, you should
consider using a while loop instead of a do-while loop.
Breaking and continuing
Sometimes, you may write a program that includes a loop that does more
than just add numbers. You may find that you want the loop to end under a
certain condition that’s separate. Or you may want the loop to suddenly skip
out of the current loop and continue with the next item in the loop. When
you stop a loop and continue with the code after the loop, you use a break
statement. When you quit the current cycle of the loop and continue with
the next cycle, you use a continue statement. The next sections show you
how to do this.
Breaking
For example, you may be writing a program that reads data over the
Internet, and the loop runs for the amount of data that’s supposed to come.
Directing Your C++
Program Flow
The while statement has a cousin in the family called the do-while statement. A loop of this form is very similar to the while loop, but with an interesting little catch: The while statement goes at the end. It looks like this:
Book I
Chapter 3
78
Repeating Actions with Statements That Loop
But midway through the process, you may encounter some data that has an
error in it, and you may want to get out of the for loop immediately.
C++ includes a handy little statement that can rescue you in such a situation.
The statement is called break. Now nothing actually breaks, and it seems a
bit frightening to write a program that instructs the computer to break. But
this use of the term break is more like in break out of prison than break the
computer. But instead of breaking out of prison, it breaks you out the loop.
This can be any kind of loop — a for loop, a while loop, or a do-while
loop.
The following code demonstrates this. This sample actually just checks for
the special case of i being 5. We could have accomplished the same thing
by simply changing the end condition of our for loop, but at least it shows
you how the break statement works.
#include <iostream>
using namespace std;
int main()
{
int i;
for (i=0; i<10; i++)
{
cout << i << “ “;
if (i == 5)
{
break;
}
cout << i * 2 << endl;
}
cout << “All Finished!” << endl;
return 0;
}
In the preceding code, the first line inside the for loop, cout << i << “
“;, runs when i is 5. But the final line in the for loop, cout << i * 2 <<
endl;, does not run when i is 5 because we told it to break out of the loop
between the two cout statements.
Also notice that when you break out of the loop, the program does not quit.
It continues with the statements that follow the loop. In this case, it still
prints the message, “All Finished!”.
You can actually leave the second portion of the for statement (the condition) empty by just putting a blank between the spaces. Then, to get out of
the loop, you can use a break statement. However, doing this makes for
messy code. And treat messy code like a messy house: Although sometimes
we don’t mind, the truth is that most people really don’t care for a messy
Repeating Actions with Statements That Loop
79
house. And you really don’t want other people to see your messy house —
or your messy code. Yes, as a programmer, sometimes being a little selfconscious is a good thing.
In addition to the times when you may need to break out of your loop for a
special situation, you can also cause the loop to end its current iteration; but
instead of breaking out of it, the loop resumes with the next iteration.
For example, you may be, again, reading data from over the Internet, and
you are doing this by looping a specified number of times. In the middle of
the loop, you may encounter some bad data. But instead of quitting out of
the loop, you may want to just ignore the current piece of bad data and then
continue reading more data.
To do this trick, you use a C++ statement called continue. The continue
statement means end the current iteration but continue running the loop with
the next iteration.
The following code is a slightly modified version of the previous example
in the section called “Breaking.” When the loop gets to 5, it doesn’t do the
second cout line. But instead of breaking out of the loop, it continues with
6, then 7, and so on until the loop finishes on its own.
#include <iostream>
using namespace std;
int main()
{
int i;
for (i=0; i<10; i++)
{
cout << i << “ “;
if (i == 5)
{
cout << endl;
continue;
}
cout << i * 2 << endl;
}
cout << “All Finished!” << endl;
return 0;
}
Nesting loops
Many times, you need to work with more than one loop. For example, you
may have several groups of friends, and you want to bilk the individual
Directing Your C++
Program Flow
Continuing
Book I
Chapter 3
80
Repeating Actions with Statements That Loop
friends of each group for all you can get. You may host a party for the first
group of friends and make them each give you as much money as they have.
Then, the next week, you may hold another party with a different group of
friends. You would do this for each group of friends. Oh wait, we just said
the word for, so that’s probably what we’re onto with this.
We could draw out the logic like this:
For each group of friends,
for each person in that group
bilk the friend for all he or she is worth
This is called a nested loop. But if you do this, don’t be surprised if this is
the last time your friends visit your nest.
A nested loop simply means a loop inside a loop. Because computers aren’t
good at making friends, although they can be used to bilk people, we’ll use
an example that’s a bit nicer: Suppose you want to multiply each of the numbers 1 through 10 by 1 and print the answer of each multiplication, and then
you want to multiply each of the numbers 1 through 10 by 2 and print the
answer of each multiplication, and so on, up to a multiplier of 10. Your C++
code would look like the following.
#include <iostream>
using namespace std;
int main()
{
int x,y;
for (x = 1; x <= 10; x++)
{
cout << “Products of “ << x <<endl;
for (y = 1; y <= 10; y++)
{
cout << x * y << endl;
}
cout << endl;
}
return 0;
}
In this example, we simply have a loop inside a loop. The inner loop can
make use of the counter variable from the outer loop. Beyond that, nothing
is magical or bizarre about this kind of thing. It’s just a loop inside a loop.
And yes, you can have a loop inside a loop inside a loop inside a loop. You
can also have any loop inside any other loop, like a while loop inside a for
loop.
Repeating Actions with Statements That Loop
81
And notice that we have stuff going on outside the inner loop, but inside the
outer loop. That is, we have a cout calls before and after the inner loop. You
can do this; your inner loop need not be the only thing inside the outer loop.
If you put a break statement or a continue statement inside a nested loop,
the statement applies to the innermost loop it sits in. For example, the following code contains three loops: an outer loop, a middle loop, and an inner
loop. The break statement applies to the middle loop.
#include <iostream>
using namespace std;
int main()
{
int x,y,z;
for (x = 1; x <= 3;
{
for (y = 1; y <
{
if (y == 2)
break;
for (z = 1;
{
cout <<
cout <<
}
}
}
x++)
3; y++)
z < 3; z++)
x << “ “ << y;
“ “ << z << endl;
return 0;
}
You can see that when y is 2, the for loop with the y in it breaks. But the
outer loop continues to run with the next iteration.
Directing Your C++
Program Flow
Although you can certainly have a loop inside a loop inside a loop inside
a loop, the deeper you get, the more potentially confusing your code can
become. It’s like the dozens of big cities in America that are promising to
build an outer loop. Eventually, that outer loop won’t be big enough, so the
cities have to build yet another and another. That’s kind of a frightening
prospect, so try not to get carried away with nesting.
Book I
Chapter 3
82
Book I: Introducing C++
Chapter 4: Dividing Your
Work with Functions
In This Chapter
✓ Calling a function
✓ Passing things, such as variables
✓ Writing your own great functions
✓ Fun with strings
✓ Manipulating main
P
eople generally agree that most projects throughout life are easier
when you divide them into smaller, more manageable tasks. That’s also
the case with computer programming. If you break your code into smaller
pieces, it becomes more manageable.
C++ provides many ways to divide code into smaller portions. One way is
through the use of what are called functions. A function is a set of lines of
code that performs a particular job.
In this chapter, we show you what functions are and how you can use them
to make your programming job easier.
Dividing Your Work
If you have a big job to do that doesn’t involve a computer, you can divide
your work in many ways. Over the years of studying process management,
people have pretty much narrowed division of a job down to two ways:
using nouns and using verbs.
Yes, that’s right. Back to good old English class, where we all learned about
nouns and verbs. The idea is this: Suppose that we’re going to go out back
and build a flying saucer. We can approach the designing of the flying
saucer in two ways.
84
Dividing Your Work
First, we could just draw up a plan of attack, listing all the steps to build the
flying saucer from start to finish. That would, of course, be a lot of steps. But
to simplify it, we could instead list all the major tasks without getting into
the details. It might go something like this:
1.
2.
Build the outer shell.
Build and attach the engine.
That’s it. Only two steps. But when you hire a couple dozen people to do
the grunt work for you while you focus on your daytrading, would that be
enough for them to go on? No, probably not. Instead, you could take these
two tasks and divide them into smaller tasks. For example, Step 2 might look
like this:
2a.
2b.
2c.
2d.
Build the antigravity lifter.
Build the thruster.
Connect the lifter to the thruster to form the final engine.
Attach the engine to the outer shell.
That’s a little better; it has more detail. But, it still needs more. How do
we do the Build the antigravity lifter part? That’s easy, but it requires more
detail, as in the following:
2aa.
2ab.
2ac.
2ad.
Unearth the antigravity particles from the ground.
Compress them tightly into a superatomizing conductor.
Surround with coils.
Connect 9-volt battery clip to the coils.
And, of course, each of these requires even more detail. Eventually, after you
have planned the whole thing, you will have many, many steps, but they will
be organized into a hierarchy of sorts, as shown in Figure 4-1. In this drawing, the three dots represent places where other steps go, but we chose to
leave them off so the diagram could fit on the page.
This type of design is called a top-down design. The idea is that you start at
the uppermost step of your design (in this case, Build flying saucer) and continue to break the steps into more and more detailed steps until you have
something manageable. For many years, this was how computer programming was taught.
Dividing Your Work
85
Book I
Chapter 4
Build Flying Saucer
Figure 4-1:
A process
can be
divided into
a hierarchy.
more steps
...
...
Dividing Your Work
with Functions
Build the outer shell
Build and attach engine
more steps
Build antigravity
lifter
...
...
...
Attach engine to
outer shell
...
Although this process works, people have found a slightly better way. First,
before breaking the steps (which are the verbs), you divide the thing you’re
building into parts (the nouns). In this case, we kind of did that already in
the first two steps. But instead of calling them steps, we call them objects:
One object is the outer shell, and one object is the engine. This way, two different factories can work on these in sort of a division of labor. Of course,
the factories would have to coordinate their activities; otherwise, the two
parts may not fit together when they’re ready to go. And before figuring
out exactly how to build each of these objects, it would be a good idea to
describe each object: What it does, its features, its dimensions, and so on.
Then, when we finally have all that done, we can list the exact features and
their details. And finally, we can divide the work with each person designing
or building a different part.
As you can see, this second approach makes more sense. And that’s the way
programmers divide their computer programs. But at the bottom of each
method is something in common: The methods are made of several little
processes. These processes are called functions. When you write a computer
program, after you divide your job into smaller things called objects, you
eventually start giving these objects behaviors. And to code these behaviors,
you do just as we did in the first approach: You break them into manageable
parts, again, called functions. In computer programming terms, a function is
simply a small set of code that performs a specific task. But it’s more than
that: Think of a function as a machine. You can put one or more things into
the machine; it processes them, and then it spits out a single answer, if anything at all. One of the most valuable diagrams we have seen draws a function in this manner, like a machine, as shown in Figure 4-2.
86
Dividing Your Work
Figure 4-2:
You can
think of a
function as
a machine.
Possibly one
item comes
out, or no
items come
out.
Data goes
into function
Function
(machine)
This machine (or function) has three main parts:
✦ Inputs: The function can receive data through its inputs. These data elements can be numbers, strings, or any other type. When you create such
a machine, you can have as many inputs as you want (or even zero if
necessary).
✦ Processor: The processor is the function itself. In terms of C++, this is
actually a set of code lines.
✦ Output: A function can return something when it has finished doing its
thing. In C++, this is in the form of numbers, strings, or any other type.
To make all this clear, try out the code in Listing 4-1. (Don’t forget the
second line, #include <math.h>, which gives you some math capabilities.)
Listing 4-1: Seeing a Function in Action
#include <iostream>
#include <math.h>
using namespace std;
int main()
{
cout << fabs(-10.5) << endl;
cout << fabs(10.5) << endl;
return 0;
}
When you run this program, you see the following output:
10.5
10.5
Dividing Your Work
87
So the first line inside main calls fabs for the value –10.5. The cout then
takes the output of this function (that is, the result) and prints it to the
console.
Then the second line does the same thing again, except it takes the absolute
value of the number 10.5.
And where is the processor for this function? It’s not in your code; it’s in
another file, and the following line ensures that your program can use this
function:
#include <math.h>
You have seen functions in many places. If you use a calculator and enter a
number and press the square root button, the calculator runs a function that
calculates the square root.
But functions can be more sophisticated than just working with numbers.
Consider this carefully: When you are using a word processor and you highlight a word and do a spelling check on the word, the program calls a function that handles the spelling check. This function does something like the
following:
This is a function to check the spelling of a single word.
Inputs: A single word.
Look up the word
If the word is not found
Find some suggestions.
Open a dialog box through which you (the user)
can change the word by either typing a new word
or picking one of the selections, or just leaving
it the same.
If you made a change,
Return the new spelling.
Otherwise
Return nothing.
Otherwise
Return nothing
Notice how we grouped the if statements with indentations. The final otherwise goes with the first if statement because its indentation matches
that of the if statement.
Book I
Chapter 4
Dividing Your Work
with Functions
In this code, you used a function or machine called fabs (usually pronounced ef-abs for floating-point absolute). This function takes a number as
input and returns as output the absolute value of the number. Remember
that the absolute value of a number is simply the positive version of the
number. The absolute value, for example, of –5 is simply 5. The absolute
value of 12 is still 12. An absolute value is always positive. And the absolute
value of 0 is 0. (The reason for the f before the name abs is that it uses floating-point numbers, which are simply numbers with decimal points.)
88
Calling a Function
So that’s a function that performs a spelling check. But consider this: When
you do not highlight a word but run the spelling checker, the spelling
checker runs for the whole document. That’s another function. Here it is.
This is a function to check the spelling of the entire document
For each word in the document
Check the spelling of the single word
How does the computer do the step inside the for loop, Check the spelling
of the single word? It calls the function we described earlier. This process is
called code reuse. We have no reason to rewrite the entire function again if
we already have it somewhere else. And that’s the beauty of functions.
Calling a Function
When you run the code in a function, computer people say you are calling
the function. And just like every good person, a good function has a name.
When you call a function, you do so by name.
Often, when we’re writing a program and write code to call a function, we
will say that We are calling a function. This is just partly computerspeak, and
partly a strange disorder in which we computer programmers start to relate
just a little too much with the computer.
To call a function, you type its name and then a set of parentheses. Inside
the parentheses, you list the items you want to send to the inputs of the
function. The term we use here is pass, as in you pass the values to the
function.
For example, if you want to call the fabs function, you type the name, fabs,
an open parenthesis, the number you want to pass to it, and then a close
parenthesis, as in the following:
fabs(-10.5)
But by itself, this does not do anything. The fabs function returns a value —
the absolute value of –10.5, which comes out to be 10.5 — and you probably
want to do something with that value. You could, for example, print it to the
console:
cout << fabs(-10.5) << endl;
Or you could store it away in another variable. But there’s a catch. Before
you can do that, you need to know the type the function returns. Just as with
variables, function return values have a type. In this case, the type is a special type called double. The double type is a floating-point type that can
hold many digits in a single number. To save the result of fabs, you need to
have a variable of type double. The code in Listing 4-2 does this.
Calling a Function
89
Listing 4-2: Seeing Another Function in Action
using namespace std;
int main()
{
double mynumber;
mynumber = fabs(-23.87);
cout << mynumber << endl;
return 0;
}
This code declares a double variable called mynumber. Then it calls fabs,
passing it –23.87, and returning the value into mynumber. Next it prints the
value in mynumber out to the console.
When you run this program you see the following, which is the absolute
value of –23.87.
23.87
Passing a variable
You can also pass the value of a variable into a function. The code in Listing
4-3 creates two variables; one is passed into the function, and the other
receives the results of the function.
Listing 4-3: Seeing Yet Another Function in Action
#include <iostream>
#include <math.h>
using namespace std;
int main()
{
double start;
double finish;
start = -253.895;
finish = fabs(start);
cout << finish << endl;
return 0;
}
(We separated the parts of the code with blank lines to make it a little easier
to follow.) This code first creates two variables; the first is called start,
and the second is called finish. It then initializes start with a value of
–253.895. Next, it calls fabs, passing it the value of start. It saves the return
Dividing Your Work
with Functions
#include <iostream>
#include <math.h>
Book I
Chapter 4
90
Calling a Function
value in the finish variable, and it finally prints the value in finish. When
it runs, you see the following appear on the console:
253.895
Saving a function result to a variable is useful if you need to use the result
several times over. For example, if you need the absolute value of –253.895
for whatever reason and then a few lines later you need it again, you have
a choice: You can either call fabs(-253.895) each time or you can call it
once, save it in a variable, and then use the variable each time you need it.
The advantage to saving it in a variable is that if you later, for example, say,
“Oh wait! I didn’t just want the absolute value! I wanted the negative of the
absolute value!” you only have to change one line of code — the line where
it calls fabs. If, instead, you had called fabs several times, you would have
had to change it every time you called it. And by the way, in case you’re curious about how to take the negative of the absolute value and store it in a
variable, you just throw a minus sign in front of it, like so:
finish = -fabs(start);
Passing multiple variables
Some functions like to have all sorts of goodies thrown their way, such as
multiple parameters. As with functions that take a single value, you put the
values inside a single set of parentheses. Because you have multiple values,
you separate them with commas. Listing 4-4 uses a function called pow to
calculate the third power of 10. (That is, it calculates 10 times 10 times 10.
Yes, POW!). Make sure that you include the math.h line in the includes section so that you can use the pow function.
Listing 4-4: Seeing Yet One More Function in Action
#include <iostream>
#include <math.h>
using namespace std;
int main()
{
double number = 10.0;
double exponent = 3.0;
cout << pow(number, exponent) << endl;
return 0;
}
When you run the program, you see 10 to the third power, which is 1,000:
1000
Writing Your Own Functions
91
You can also pass a mixture of variables and numbers, or just numbers. The
following code snippet also calculates the third power of 10 but passes an
actual number, 3.0, for the power.
Or you can pass only numbers:
cout << pow(10.0, 3.0) << endl;
Writing Your Own Functions
And now the fun begins! Calling functions is great, but you get real power
(ooh!) when you write your own specialized functions. Before writing a function, remember the parts: the inputs, the main code or processor, and the
single output (or no output). The inputs, however, are actually called parameters, and the output is called a return value.
Listing 4-5 shows both a custom function and code in main that calls the
custom function. (The function goes outside main — before it, in fact.)
Listing 4-5: Writing Your Very Own Function
#include <iostream>
using namespace std;
int AddOne(int start)
{
int newnumber;
newnumber = start + 1;
return newnumber;
}
int main()
{
int testnumber;
int result;
testnumber = 20;
result = AddOne(testnumber);
cout << result << endl;
return 0;
}
After you get all this typed in and your fingers are feeling nice and exercised,
go ahead and run it. Because there’s a good bit of code, you may get some
compiler errors at first; look carefully at the lines with the errors and find
the difference between your code and what’s here in the book.
Dividing Your Work
with Functions
double number = 10.0;
cout << pow(number, 3.0) << endl;
Book I
Chapter 4
92
Writing Your Own Functions
After you run it, you see
21
Now before we explain the code for the function, we’ll save the fun for last.
Take a look at these three lines of main:
testnumber = 20;
result = AddOne(testnumber);
cout << result << endl;
You can probably put together some facts and determine what the function
does. First, we called it AddOne, which is a pretty good indication in itself.
Second, when you ran the program, the number 21 appear on the console,
which is one more than the value in testnumber; it added one. And that, in
fact, is what the function does. It’s amazing what computers can do these days.
When you write your own functions, try to choose a name that makes sense
and describes what the function does. Writing a function and calling it something like process or TheFunction is easy, but those names do not accurately describe the function.
So now take a look at the function itself. First, here are a few high-level
observations about it:
✦ Position: The function appears before main. Because of the way the
compiler works, it must know about a function before you call it. And
thus, we put it before main. (You can do this in another way, which we
discuss in “Forward references and function prototypes,” later in this
chapter.)
✦ Format: The function starts with a line that seems to describe the function (which we explain later in this section), and then it has an open
brace and, later, a closing brace.
✦ Code: The function has code in it that is just like the type of code you
could put inside a main.
After noting these high-level things, take a look at the code inside the function. The first part of it looks like this:
int newnumber;
newnumber = start + 1;
So far, this is pretty straightforward. It declares an integer variable called
newnumber. Then it initializes it to start plus one. But what is start?
That’s one of the inputs.
Finally, this line is at the end of the function, before the closing brace:
return newnumber;
Writing Your Own Functions
93
But what is the parameter? It’s called start. And where did that come from?
Here’s the very first line of the function:
int AddOne(int start)
The stuff in parentheses is the list of parameters. Notice that it looks just like
a variable declaration; it’s the word int (the type, or integer) followed by a
variable name, start. That’s the parameter — the input — to the function,
and you can access this parameter throughout the function by simply using
a variable called start.
We think that’s rather ingenious, if we do say so ourselves. Okay, so we
didn’t invent it, but nevertheless, we think it’s ingenious: You can use the
input to the function as a variable itself.
And so, if down in main we had written
result = AddOne(25);
then throughout the function, the value of start would be 25.
But if we had written
result = AddOne(152);
then throughout the function, the value of start would be 152.
But here’s the really great thing about functions. Or, at least, one of the
loads of really great things about functions! We can call the function several
times over. In the same main, we can have the following lines
cout << AddOne(100) << endl;
cout << AddOne(200) << endl;
cout << AddOne(300) << endl;
which would result in this output:
101
201
301
Book I
Chapter 4
Dividing Your Work
with Functions
This is the output of the function, or the return value. When you want to
return something from a function, you just put the word return and then
indicate what you want to return. From the preceding two lines, you can
see that newnumber is one more than the number passed into the function.
So this line returns the newnumber. Thus, we have covered all three parts:
We have taken the input or parameter; we have processed it by creating a
variable and adding one to the parameter; and we have returned the output,
which is one more than the parameter.
94
Writing Your Own Functions
Arguing over parameters
Technically, the term parameter refers strictly
to the inputs to the function, from the function’s perspective. When you call the function,
the things you place in parentheses in the call
line are not called parameters; rather, they are
called arguments. Thus, in the following function header the variables first and last
are parameters. But in the following call to this
function
ConnectNames(“Bill”, “Murray”)
the strings “Bill” and “Murray” are arguments of the call.
In the first call to AddOne, the value of start would be 100. During the
second call, the value would be 200, and during the third call, it would
be 300.
Now take another look at the header:
int AddOne(int start)
The word AddOne is the name of the function, as you probably figured out
already. And that leaves that thing at the beginning, the int. That’s the type
of the return value. The final line in the function before the closing brace is
return newnumber;
The variable newnumber inside the function is an integer. And the return
type is integer. That’s no accident: As we’ve all heard before, friends don’t
let friends return something other than the type specified in the function
header. The two must match in type. And further, take a look at this line
from inside main:
result = AddOne(testnumber);
What type is the result variable? It’s also an integer. All three match.
Again, no accident. You can copy one thing to another (in this case the function’s return value to the variable called result) only if they match in type.
And here, they do. They’re both integers.
And notice one more thing about the function header: It has no semicolon
after it. This is one of the places you do not put a semicolon. If you do, the
compiler gets horribly confused. The CodeBlocks compiler shows an error
that says, “error: expected unqualified-id before ‘{‘ token.”
Here’s a recap of some of the rules we just mentioned regarding functions:
✦ Header line: The header line starts with a value for the return type, the
name of the function, and the list of parameters.
Writing Your Own Functions
95
✦ Parameters: The parameters are written like variable declarations, and
indeed, you can use them as variables inside the function.
✦ More on format: The function header does not have a semicolon after it.
✦ Even more on format: After the function header, you use an open brace.
The function ends with a closing brace. The final brace tells the compiler where the function ends.
Finally, ponder this line of code for a moment:
testnumber = AddOne(testnumber);
This takes the value stored inside testnumber, passes it into AddOne, and
gets back a new number. It then takes that new number and stores it back
into testnumber. Thus, testnumber’s value changes based on the results
of the function AddOne.
Multiple parameters or no parameters
You don’t need to write your functions with only one parameter each. You
can have several parameters, or you can have none at all. It may seem a little
strange that you would want a function — a machine — that takes no inputs.
But you may run into lots of cases where this may be a good idea. Here are
some ideas:
✦ Day function: This would be a function that figures out the day and
returns it as a string, as in “Monday” or “Tuesday”.
✦ Number-of-users function: This could be a function that figures out the
current number of users logged into a Web-server computer.
✦ Current font function: This function would be in a text editor program
(such as Notepad) and would return a string containing the current font
name, such as “Arial”.
✦ Editing time function: This function would return the amount of time
you have been using the word processor program.
✦ Username function: If you are logged onto a computer, this function
would give back your username as a string, such as “Elisha”.
All the functions in this list have something in common: They look something up. Because no parameters are in the code, for the functions to process some information, they have to go out and get it themselves. It’s like
sending people out into the woods to find food but not giving them any
tools: It’s totally up to them to do it, and all you can do is sit back and watch
and wait for your yummy surprise.
Dividing Your Work
with Functions
✦ Return type: Whatever you return from the function must match in type
with the type you specified in your function header.
Book I
Chapter 4
96
Writing Your Own Functions
If a function takes no parameters, you write the function header as you
would for one that takes parameters, and you include the parentheses; you
just don’t put anything in the parentheses, as Listing 4-6 shows. So if nothing good is going in, there really can be something good coming back out, at
least in the case of a function with no parameters.
Listing 4-6: Taking No Parameters
#include <iostream>
using namespace std;
string Username()
{
return “Elisha”;
}
int main()
{
cout << Username() << endl;
return 0;
}
When you run Listing 4-6, you see the following output:
Elisha
Your function can also take multiple parameters. Listing 4-7 shows this.
Notice that the function, ConnectNames, takes the two strings as parameters and combines them, along with a space in the middle. Notice also that
the function uses the two strings as variables.
Listing 4-7: Taking Multiple Parameters
#include <iostream>
using namespace std;
string ConnectNames(string first, string last)
{
return first + “ “ + last;
}
int main()
{
cout << ConnectNames(“Richard”, “Nixon”) << endl;
return 0;
}
In the function header in Listing 4-7, we had to put the type name string
for each parameter. If we only listed it for the first, we would get a compile
error. (Okay, we admit it — we did forget it, and that’s how we remembered
Writing Your Own Functions
97
to tell you. But that shows that even experienced programmers came make
mistakes. Occasionally.)
✦ We didn’t create variables for the two names in main. Instead, we just
typed them as string constants (that is, as actual strings surrounded by
quotes).
✦ You can do calculations and figuring right inside the return statement.
That saves the extra work of creating a variable. In the function, we
could have created a return variable of type string, set it to first +
“ “ + last, and then returned that variable, as in the following code:
string result = first + “ “ + last;
return result;
But instead, we chose to do it all on one line, as in this:
return first + “ “ + last;
Although you can save yourself the work of creating an extra variable and
just put the whole expression in the return statement, sometimes this is a
bad thing. If the expression is really long like the following
return (mynumber * 100 + somethingelse / 200) *
(yetanother + 400 / mynumber) / (mynumber + evenmore);
then it can get just a tad complicated. Breaking it into variables, such as this,
is best:
double
double
double
return
a
b
c
a
=
=
=
*
mynumber * 100 + somethingelse / 200;
yetanother + 400 / mynumber;
mynumber + evenmore;
b / c;
Returning nothing
In the preceding section, “Multiple parameters or no parameters,” we presented a list of functions that take no parameters; these functions go and bring
back something, whether it’s a number, a string, or some other type of food.
One such example gets the username of the computer you’re logged into.
But what if you are the great computer guru, and you are writing the program that actually logs somebody in? In that case, your program doesn’t
ask the computer what the username is — your program tells the computer
what the username is, by golly!
In that case, your program would call a function, like SetUsername, and
pass the new username. And would this function return anything? It could;
it could return the name back, or it could return a message saying that the
Dividing Your Work
with Functions
Now here are some points about this code:
Book I
Chapter 4
98
Writing Your Own Functions
username is not valid or something like that. Or, it may not return anything
at all.
Take a look at the case where a function doesn’t return anything at all. In
C++, the way you state that the function doesn’t return anything is by using
the word void as the return type in the function header. Listing 4-8 shows
this.
Listing 4-8: Returning Nothing at All
#include <iostream>
using namespace std;
void SetUsername(string newname)
{
cout << “New user is “ << newname << endl;
}
int main()
{
SetUsername(“Harold”);
return 0;
}
When you run the program, you see
New user is Harold
Notice the function header: It starts with the word void, which means that
it returns nothing at all. It’s like in outer space: There’s just a big void with
nothing there, and nothing is returned, except for static from the alien airwaves, but we won’t go there. Also notice that, because this function does
not return anything, there is no return statement.
Now, of course, this function really doesn’t do a whole lot other than print
the new username to the console, but that’s okay; it shows you how you can
write a function that does not return anything.
A function of return type void returns nothing at all.
Do not try to return something in a function that has a return type of void.
Void means the function returns nothing at all. If you try to put a return
statement in your function, you get a compile error.
Keeping your variables local
Everybody likes to have their own stuff, and functions are no exception.
When you create a variable inside the code for a function, that variable will
be known only to that particular function. When you create such variables,
Writing Your Own Functions
99
they are called local variables, and people say that they are local to that particular function. (Well, computer people say that, anyway.)
#include <iostream>
using namespace std;
void PrintName(string first, string last)
{
string fullname = first + “ “ + last;
cout << fullname << endl;
}
int main()
{
PrintName(“Thomas”, “Jefferson”);
return 0;
}
Notice in the PrintName function that we declared a variable called
fullname. We then use that variable in the second line in that function,
the one starting with cout. But we cannot use the variable inside main.
If we try to, as in the following code, we would get a compile error:
int main()
{
PrintName(“Thomas”, “Jefferson”);
cout << fullname << endl;
return 0;
}
However, we can declare a variable called fullname inside main, as in the
following code. But, if we do that, this fullname is local only to main, while
the other variable, also called fullname, is local only to the PrintName
function. In other words, each function has its own variable; they just
happen to share the same name. But they are two separate variables.
int main()
{
string fullname = “Abraham Lincoln”;
PrintName(“Thomas”, “Jefferson”);
cout << fullname << endl;
return 0;
}
When two functions declare variables by the same name, they are two separate variables. If you store a value inside one of them, the other function will
not know about it. The other function only knows about its own variable by
that name. Think of it the way two people could each have a storage bin in
the closet labeled “tools.” If Sally puts a hammer in her bin labeled “tools”
and Hal opens another bin also labeled “tools” at his house, he won’t see the
very same hammer in Sally’s bin, will he? We hope not, or something is seriously awry in the universe. With variables it works the same way.
Dividing Your Work
with Functions
For example, consider the following code:
Book I
Chapter 4
100
Writing Your Own Functions
If you use the same variable name in two different functions, forgetting that
you’re working with two different variables is very easy. Only do this if
you’re sure that no confusion can occur.
If you use the same variable name in two different functions (such as a counter variable called index, which you use in a for loop), matching the case is
usually a good idea. Don’t use count in one function, and Count in another.
Although you can certainly do that, you may find yourself typing the name
wrong when you need it. But that won’t cause you to access the other one.
(You can’t because it’s in a different function.) Instead, you get a compile
error, and you have to go back and fix it. Being consistent is a timesaver.
Forward references and function prototypes
In all the examples in this chapter, we have put the code for any function
we write above the code for main. The reason is that the compiler scans
through the code from start to finish. If it has not encountered a function yet
but sees a call to it, it won’t know what it’s seeing, and it issues a good old
compile error.
Such an error can be especially frustrating and could cause you to spend
hours yelling at your computer (or, if you’re like us, running to the refrigerator and getting something sweet and fattening). Nothing is more frustrating
than looking at your program, being told by the compiler it’s wrong, yet
knowing it’s right because you know you wrote the function.
You can, however, put your functions after main; or you can even use this
method to put your functions in other source-code files (something we talk
about in Minibook I, Chapter 5).
What you can do is include a function prototype. A function prototype is nothing more than a copy of the function header. But instead of following it with
an open brace and then the code for the function, you follow the function
header with a semicolon and are finished. A function prototype, for example,
looks like this:
void PrintName(string first, string last);
Then you actually write the full function (header, code, and all) later. The
full function can even be later than main or later than any place that makes
calls to it.
Notice that this looks just like the first line of a function. In fact, we cheated!
To write it, we simply copied the first line of the original function we wrote
and added a semicolon.
So where would you use this fellow? Take a look at Listing 4-9.
Writing Your Own Functions
101
Listing 4-9: Using a Function Prototype
#include <iostream>
void PrintName(string first, string last);
int main()
{
PrintName(“Thomas”, “Jefferson”);
return 0;
}
void PrintName(string first, string last)
{
string fullname = first + “ “ + last;
cout << fullname << endl;
}
Notice, in this listing, that we have the function header copied above main
and ending with a semicolon. Then we have main. Finally we have the function itself (again, with the header but no semicolon this time). Thus, the
function comes after main.
“Whoop-de-do,” we can hear you saying. The function comes after. But why
bother when now we have to type the function header twice?
But rest assured, dear readers, that this step is useful. If you have a source
code file with, say, 20 functions, and these functions all make various calls to
each other, it could be difficult to carefully order them so that each function
calls only functions that are above it in the source code file. Instead, most
programmers put the functions in some logical order (or maybe not), but
they don’t worry much about the calling order. Then they have all the function prototypes toward the top of the source code file, as we did earlier in
Listing 4-9.
When you type a function prototype, many people say that you are specifying a forward reference. This phrase simply means that you are providing a
reference to something that happens later. It’s not a big deal, and it mainly
comes from some of the older programming languages. But some people use
the jargon, and we hope that if you hear that phrase, it will trigger happy
memories of this book.
Writing two versions of the same function
There may be times when you want to write two versions of the same function, the only difference being that they take different parameter types. For
example, you may want a function called Combine. One version takes two
strings and puts the two strings together, but with a space in the middle. It
then prints the resulting string to the console. Another version takes two
Dividing Your Work
with Functions
using namespace std;
Book I
Chapter 4
102
Writing Your Own Functions
numbers, adds them, and writes all three numbers — the first two and the
sum — to the console.
The first version would look like this:
void Combine(string first, string second)
{
cout << first << “ “ << second << endl;
}
There’s nothing magical or particularly special about this function. It’s called
Combine; it takes two strings as parameters; it does not return anything.
The code for the function prints the two strings with a space between them.
Now the second version looks like this:
void Combine(int first, int second)
{
int sum = first + second;
cout << first << “ “ << second << “ “ << sum << endl;
}
Again, nothing spectacular here. The function name is Combine, and it does
not return anything. But this version takes two integers, not two strings, as
parameters. The code is also different from the previous code in that it first
figures the sum of the two and then it prints the different numbers.
Well this is all fine and dandy, but can you have two functions by the same
name like this? Yup! Listing 4-10 shows the entire code. Both functions are
present in the listing.
Listing 4-10: Writing Two Versions of a Function
#include <iostream>
using namespace std;
void Combine(string first, string second)
{
cout << first << “ “ << second << endl;
}
void Combine(int first, int second)
{
int sum = first + second;
cout << first << “ “ << second << “ “ << sum << endl;
}
int main()
{
Combine(“David”,”Letterman”);
Combine(15,20);
return 0;
}
Calling All String Functions
103
Note in main that we called each function. How did we specify which one we
want? By simply passing the right types. Take a close look at the first call:
This call includes two strings. so the compiler knows to use the first version,
which takes two strings. Now look at the second function call:
Combine(15,20);
This call takes two integers, so the compiler knows to use the second version of the function.
This process of writing two versions of the same function is called overloading the function. Normally, overloading is a bad thing, like when we go to a
nice restaurant and overload our stomachs. But here it’s a good thing and
even useful.
When you overload a function, the parameters must differ. For example, the
functions can take the same type of information but use a different number
of parameters. Of course, the previous example shows that the parameters
can also vary by type. You can also have different return types, but they
must differ by more than just the return type.
Calling All String Functions
To get the most out of strings, you need to make use of some special functions that cater to the strings. However, using these functions is a little different from the other functions used so far in the chapter. Instead of just
calling the function, you type first the variable name that holds the string,
then a period (or dot, as the netheads prefer to call it), and then the function
name along with any parameters (arguments, if any purists are reading).
The reason you code string functions differently is because you’re making
use of some object-oriented programming features. Minibook I, Chapter 7
describes in detail how these types of functions (called member functions)
work.
One function that you can use is called insert. You can use this function if
you want to insert more characters into another string. For example, if you
have the string “Something interesting and bizarre” and you insert
the string “seriously ” (with a space at the end) into the middle of it starting at index 10, you’ll get the string “Something seriously interesting
and bizarre”.
When you work with strings, the first character is the 0th index, and the
second character is the 1st index, and so on.
Dividing Your Work
with Functions
Combine(“David”,”Letterman”);
Book I
Chapter 4
104
Calling All String Functions
The following lines of code perform an insert by using the insert function:
string words = “Something interesting and bizarre”;
words.insert(10, “seriously “);
The first of these lines simply creates a string called words and stuffs it full
with the phrase “Something interesting and bizarre”. The second
line does the insert. Notice the strange way of calling the function: You first
specify the variable name, words, and then a dot, and then the function
name, insert. Next, you follow it with the parameters in parentheses, as
usual. For this function, the first parameter is the index where you want to
insert the string. The second parameter is the actual string you are going to
insert.
After these two lines run, the string variable called words contains the string
“Something seriously interesting and bizarre”.
You can also erase parts of a string by using a similar function called, believe
it or not, erase. Although computer folks like to obfuscate through their
parlance (that is, confuse people through choices of words!), they do occasionally break down and pick names that actually make sense.
The following line of code erases from the string called words 16 characters
starting with the 20th index:
words.erase(19,16);
Consequently, if the variable called words contains the string “Something
seriously interesting and bizarre”, after this line runs, it will contain “Something seriously bizarre”.
Another useful function is replace. This function replaces a certain part of
the string with another string. To use this, you specify where in the string
you want to start the replacement and how many characters you want to
replace. Then you specify the string you want to replace the old, worn-out
parts with.
So, for example, if your string is “Something seriously bizarre” and
you want to replace the word “thing” with the string “body”, you would
tell replace to start at index 4, and replace 5 characters with the word
“body”. To do this, you would enter:
words.replace(4, 5, “body”);
Notice the number of characters you replace does not have to be the same
as the length of the new string. If the string starts out with “Something
seriously bizarre”, after this replace statement runs, the string will
contain “Somebody seriously bizarre”. But the string will not actually
contain somebody who is seriously bizarre; it contains just the string.
Understanding main
105
Listing 4-11 shows all these functions working together.
#include <iostream>
using namespace std;
int main()
{
string words = “Something interesting and bizarre”;
cout << words << endl;
words.insert(10, “seriously “);
cout << words << endl;
words.erase(19,16);
cout << words << endl;
words.replace(4, 5, “body”);
cout << words << endl;
return 0;
}
When you run this program, you see the following output:
Something interesting and bizarre
Something seriously interesting and bizarre
Something seriously bizarre
Somebody seriously bizarre
The first line is the original string. The second line is the result of the
insert function. The third line is the result of the erase function. And the
final line is the result of the replace function.
Understanding main
All the programs so far have had a main. This main is actually a function.
Notice its header, which is followed by code inside braces:
int main()
You can see that this is definitely a function header: It starts out with a
return type, then the function name, main. This is just one form of the main
function — the form that CodeBlocks uses by default. However, you may
decide that you want to give users the ability to provide input when they
type the name of your program at the console. In this case, you use this
alternative form of the main function that includes two parameters.
int main(int argc, char *argv[])
Dividing Your Work
with Functions
Listing 4-11: Operating on Strings
Book I
Chapter 4
106
Understanding main
Who, what, where, and why return?
The main function header starts with the type
int. This means the function main returns
something. But what? And to whom? And why
and when and all those w words?
The result of main is sometimes used by the
computer to return error messages if the program, for some reason, didn’t work or didn’t
do what it was supposed to do. But here’s the
inside scoop: Outputting a return value just
doesn’t work — at least, not in the graphical
environment that most of you use.
It’s true. For many computers, particularly
Windows computers, the return value is of very
little use to anybody. The return type is specifically designed to work with batch files (files
with a BAT extension that originally appeared
as part of DOS, or Disk Operating System).
Consequently, unless you plan to work with
batch files (and many people still do), just
return 0.
On some high-powered Unix systems, the return value of main is used. Some
of these systems running so-called mission-critical applications (a fancy
word that means the computer programmers feel like what they’re doing
is important to the safety of the universe) do indeed use the return values
from main. These computers may run hundreds of programs. If one of these
programs returns something other than 0, another program detects this and
notifies somebody (usually by sending the poor sap a page in the middle of
the night). When you’re still learning C++, you’re not likely to need to return
things other than 0, but if you’re lucky enough to be working for a company
that builds applications vital to the well-being of the universe, you may want
to find out from your teammates if you do, in fact, need to return something
other than 0.
So what about those seriously bizarre looking parameters in main? The first
is reasonably straightforward; it’s an integer variable with the goofy name
argv, which sounds like something Scooby-Doo would say. But what about
that second goofiness? To understand the second, you need to know that
these two parameters are actually used as command-line parameters. When
you run a program, especially from the command prompt, you type the
name of the program and press Enter. But before pressing Enter, you can
follow the program name with other words. Many of the commands you use
in Unix and in the Windows command-line tool (also known as DOS) have a
program name and then various parameters. For example, on Unix you could
type the following command to copy the file called myfile to a new file
called yourfile:
cp myfile yourfile
Understanding main
107
On Windows, you could type the following command to copy the file called
myfile to a new file called yourfile:
When you run such a command, you are actually running a program called
copy. The program takes two command-line parameters, in this case
“myfile” and “yourfile” and passes these two strings into the main
function as parameters.
For the main function, the first parameter in the header is argc, pronounced arg-SEE, which represents the number of command-line parameters. In the case of the copy or cp command (see the two preceding lines of
code), you have two (“myfile” and “yourfile”), so argc would be 2.
The second parameter in the main function is the cryptic-looking char
*argv[]. The name of the variable is called argv, and it is pronounced argVEE. Minibook I, Chapter 8, deals with a topic called an array. An array is a
sequence of variables stored under one name. The argv variable is one such
animal. To access the individual variables stored under the single umbrella
known as argv, you do something like this:
cout << argv[0] << endl;
cout << argv[1] << endl;
(In the preceding example, you’re using brackets as you did similarly with
accessing the individual characters in a string.)
In the case of the two command-line parameters myfile and yourfile,
these two lines of code would print the lines
myfile
yourfile
You can access the command-line parameters using a for loop. Listing 4-12
shows how.
Listing 4-12: Accessing the Command-Line Parameters
#include <iostream>
#include <stdlib.h>
int main(int argc, char *argv[])
{
for (int index=0; index < argc; index++)
{
cout << argv[index] << endl;
}
return 0;
}
Dividing Your Work
with Functions
copy myfile yourfile
Book I
Chapter 4
108
Understanding main
When we run this program from the prompt using the following commandline parameters
CommandLineParameters Command Line Parameters
we see the following output:
c:\CommandLineParameters Command Line Parameters
CommandLineParameters
Command
Line
Parameters
The first item in the argv list is always the name of the program.
Chapter 5: Dividing Between
Source-Code Files
In This Chapter
✓ Creating multiple source-code files
✓ Creating header files
✓ Sharing variables among source files
✓ Making use of the mysterious header wrappers
J
ust as you can divide your work into functions, you can also divide your
work into multiple source-code files. The main reason to do so is, simply,
to help keep your project more manageable. Also, with multiple source-code
files, you can have several people working on a single project, each working
on a different source-code file at the same time. The goal, of course, is to
make sure that your coworkers work on the harder parts that are more
grueling and no fun while you get all the credit.
The key to multiple source files is knowing where to break the source code
into pieces. Like anything else, if you break the source code in the wrong
place, it will, well, break.
In this chapter, we show you how to divide your source code into multiple
files (and in all the right places). The examples we give use CodeBlocks;
however, we also provide a few Makefile tips if you’re using other tools.
Creating Multiple Source Files
In this section, we talk about how to create multiple source-code files, first
for CodeBlocks and then for other compilers. This process is far simpler in
CodeBlocks, and we highly recommend that approach.
When you create a second source-code file, this code becomes part of your
project. And when you compile, the compiler compiles all the source-code
files in your project, assuming that you have changed them since the last
time you compiled. You can put your functions in separate source-code
files, and they can call each other. In this way, they all work together in the
single program. In the section “Sharing with Header Files,” later in this
chapter, we talk about how you can have a function call another function in
a different source file.
110
Creating Multiple Source Files
You cannot break a single function up and put it into two source files.
That would be quite painful for the little fellow, and certainly not a good
programming practice either because it simply wouldn’t compile. The compiler
requires that your functions stay in one piece in a single source file.
Multiple source files in CodeBlocks
If you’re using CodeBlocks, cutting your program into multiple source-code
files is as easy as cutting a cake. The following steps show you how to
perform this task:
1. Choose File➪New➪File.
You see the New from Template dialog box shown in Figure 5-1. Notice
that you can choose from a header, source code, or an empty file.
Normally, you’ll choose either the C/C++ Header or C/C++ Source option.
The Empty File option is for non-source files, such as a text file used as a
ReadMe.
Figure 5-1:
The New
from
Template
dialog box
lets you
select a
new file
type.
2. Highlight the template you want to use and click Go.
You see a wizard associated with the particular file you’ve chosen.
3. Click Next to get past the initial Welcome page.
If you chose the Empty File template, skip to Step 5. When using the C/
C++ Header or C/C++ Source templates, you see a language selection
page.
Creating Multiple Source Files
111
4. Highlight the language you want to use — either C or C++ — and click
Next.
Figure 5-2:
Provide
the file
information
required by
the wizard.
5. Type a path and filename for the file in the Filename with Full Path
field.
You must provide a full path, even if you want the file in the current
folder. Click the ellipses to display a Select Filename dialog box where
you can choose the location of the file. The default path shown in the
Select Filename dialog box is the current folder.
6. Check the individual builds that should use the file.
As an alternative, you can click All to add the file to all builds.
7. Click Finish.
The wizard adds the new file to your project. CodeBlocks automatically opens the file so you can begin editing it. You also see the file you
added in the Management window, as shown in Figure 5-3. In this case,
you see both the source files and a header file. Notice that the source
files appear in dark type, while the header file appears in gray type. This
shows that the source files are compiled to create the project and the
header file isn’t. The “Sharing with Header Files” section of the chapter
discusses how the compiler works with header files in more detail.
Dividing Between
Source-Code Files
The wizard asks what you want to call the file, where you want to store
it, and which builds should use the file, as shown in Figure 5-2.
Book I
Chapter 5
112
Creating Multiple Source Files
Figure 5-3:
The
Management
window
displays the
files used to
compile the
project.
If you add a file to CodeBlocks that you really don’t need, right-click the file
in the Management window and choose Remove File from Project from the
context menu. The file will disappear from the project but still appear in the
directory in which you created it. If you later decide that you really do want
that file, right-click the project entry in the Management window, choose
Add Files from the context menu, and select the file you want to add back
into the project using the options in the Add Files to Project dialog box.
If CodeBlocks doesn’t automatically open the file you added, you can open
it by double-clicking its name in the tree. When you do, an additional tab
appears at the top of your source-code files. These tabs represent the
different files that are open. You can click a tab to have that file’s code appear
in the source-code window. When you click another tab, the window shows
the source for that file, instead. And, thankfully, it remembers any changes
you make if you switch to another tab. So you can bounce all around the
screen and switch all you want, and the computer shouldn’t get confused.
After you have multiple files in your project, you can put some of your
source in one file and some in another. But before you do, you may want
to read some of the other sections in this chapter because we explain how
to properly divide your source code without it ending up like cake that got
smooshed while you were trying to cut it.
Multiple source files in other compilers
If you’re using CodeBlocks, you don’t really need to read this section
because CodeBlocks mucks around with the Makefile for you automatically.
Life is good. If you want to see how CodeBlocks performs this task, look
at the .depend file for your project, such as MultipleSourceFiles.
depend. The .depend file is simple XML, so you can view it with any XMLcapable application (including Internet Explorer or Firefox). Otherwise,
you’ll want to read this section.
To add source-code files to other compilers, you need to modify the
Makefile, and you need to understand Makefile rules and the compile
rocess. Yuck. (Makefiles are described in Appendix A.) Many ways to modify
Creating Multiple Source Files
113
For example, you may have separate rules for each source file, as in the
following:
main.o: main.cpp
$(CC) -c main.cpp -o main.o $(CFLAGS)
In this case, you need to add another line similar to this one for your new
file. If your new file is orangegoo.cpp, your new rule will look like this:
orangegoo.o: orangegoo.cpp
$(CC) -c orangegoo.cpp -o orangegoo.o $(CFLAGS)
Note that you must indent the second line by using a tab. If you use spaces,
it may not work properly.
You probably also have a rule listing the object files. Remember that it will
likely be the object files and not the source files, because the object files are
the temporary things that the compiler generates — or makes. Thus, you
may have a macro such as this:
OBJ
= main.o orangegoo.o
This macro would be listed in the rule for the final executable file. That way,
when you make the executable file, the make utility first sees whether these two
.o files are up-to-date. If not, make first makes these two .o files, based on the
rules you supplied earlier. Nice and simple; too bad Makefiles are so ugly.
Creating multiple files
Before two source files can work together, they must somehow find out
about each other. Just because they’re both sitting on the computer doesn’t
mean that they know about each other. Computers are kind of goofy about
that sort of thing. So to get two source files to finally open up and get to
know each other, you need to tell each of them about what’s in the other file.
When you write a function, normally the function must appear before any
calls to it appear within the same source file. That’s because of the way the
compiler goes through the code: If it encounters a call to a function but has
not yet heard of that function, it issues an error. But the way around this is
to use a function prototype. A function prototype is simply the header line
from a function, ending with a semicolon, as in the following:
Book I
Chapter 5
Dividing Between
Source-Code Files
a Makefile are available. If you use implicit rules, you probably just need to
add the name of the file to the list of source files. If you use a separate rule
for each file, you need to add another rule for this new file. In that case, you
may still have a list of all source-code files or a list of all object files (which
are just the source-code filenames with either an .o or .obj extension), in
which case you’ll have to make another entry.
114
Creating Multiple Source Files
void BigDog(int KibblesCount);
Later in the source file is the actual function, with this header line duplicated. But instead of a semicolon, the function would have an open brace,
the function code, and a closing brace, as in the following:
void BigDog(int KibblesCount)
{
cout << “I’m a lucky dog” << endl;
cout << “I have “ << KibblesCount << “ pieces of food” << endl;
}
So after the function prototype, you can call the function whether the function code itself is before or after the call.
For the compiler to understand a function call, all it needs at the point the
code makes the call is a function prototype. It’s up to the linker to determine
whether that function really exists.
Because the function call only needs a function prototype, you can put the
function itself in another source-code file. You could, therefore, have two
separate source-code files, as in the following example. The first sourcecode file, main.cpp, is shown in Listing 5-1. The second source-code file,
mystuff.cpp, is shown in Listing 5-2.
Listing 5-1: Calling a Function with Only a Prototype
#include <iostream>
using namespace std;
void BigDog(int KibblesCount);
int main()
{
BigDog(3);
return 0;
}
Listing 5-2: Using a Function from a Separate File
#include <iostream>
using namespace std;
void BigDog(int KibblesCount)
{
cout << “I’m a lucky dog” << endl;
cout << “I have “ << KibblesCount << “ pieces of food” << endl;
}
Sharing with Header Files
115
A quick overview of namespaces
every use of the classes or functions found
in std by typing std::<class or
function>. For example, to use a string
you need to type std::string. Because
this is a painful way to write code, you add the
using namespace std; line.
In Listings 5-1 and 5-2, we broke the function away from the prototype. When
you compile these two files together as a single program (either by pressing
F9 in CodeBlocks or by using the methods described in the “Multiple source
files in other compilers” section, earlier in this chapter), they all fit together
nicely. You can then run the program, and you see this somewhat interesting
output:
I’m a lucky dog
I have 3 pieces of food
Notice also that we had to put the same #include lines at the start of the
mystuff.cpp file. That’s because mystuff.cpp uses cout, and to use
cout, it needs the #include <iostream> line.
Sharing with Header Files
Breaking source code apart into multiple files is easy, but soon you may run
into a problem. If you have a function, say, SafeCracker, and this function
is extremely useful and is likely to be called many times from within several
other source-code files, you would need a prototype for SafeCracker in
every file that calls it. The prototype may look like this:
string SafeCracker(int SafeID);
But instead of putting this line in every file that uses the function, we know
of an easier way. (We computer people are always looking for the easier
way so we can finally retire.) Simply put this line inside its own file, called
a header file, and give the filename an .h or an .hpp extension. (It’s your
choice which extension you use, because it really doesn’t matter; we usually
just go with .h.) For example, we might save the line string SafeCracker
(int SafeID); in a file called safestuff.h.
Dividing Between
Source-Code Files
The using namespace std; line in
Listing 5-2 tells the compiler to use a specific
namespace, std. A namespace is a grouping
of classes and functions. The std, or standard,
namespace contains a host of useful classes
and functions, such as string. If you don’t
include this declaration, you need to preface
Book I
Chapter 5
116
Sharing with Header Files
Then, instead of typing the header line at the start of each file that needs the
function, you type
#include “safestuff.h”
You would then have three source-code files, which we have shown in
Listings 5-3, 5-4, and 5-5. The first is main.cpp, which calls the function.
The second is safestuff.h, which contains the function prototype. The
third is safestuff.cpp, which contains the actual code for the function
whose prototype appears in the header file. Lots of files, but now the code
is broken into manageable pieces. Also, make sure that you save all three of
these files in the same directory.
Listing 5-3: Including the Header File in the main File
#include <iostream>
#include “safestuff.h”
using namespace std;
int main()
{
cout << “Surprise, surprise!” << endl;
cout << “The combination is (once again)” << endl;
cout << SafeCracker(12) << endl;
return 0;
}
Listing 5-4: Containing the Function Prototype in the Header File
using namespace std;
#ifndef SAFESTUFF_H_INCLUDED
#define SAFESTUFF_H_INCLUDED
string SafeCracker(int SafeID);
#endif // SAFESTUFF_H_INCLUDED
Listing 5-5: Containing the Actual Function Code
#include <iostream>
using namespace std;
string SafeCracker(int SafeID)
{
return “13-26-16”;
}
Sharing with Header Files
117
To get this code to compile, remember the following rules:
✦ Makefiles: If you are using a compiler where you have to handle your
own Makefiles, do not add a rule for compiling the header files, which
usually start with .hpp or .h. Only compile the source files, which
usually start with .cpp or .cc.
✦ Visual C++: Although we’ve said very little so far about Microsoft Visual
C++ (VC++), if you use VC++, do not add header files to your project.
Only add source files. VC++ will keep a listing of the header files in a tree
called dependencies, but you don’t add them yourself.
✦ CodeBlocks: What could be easier? You just make the files, and
CodeBlocks handles all the file connectivity for you. Nothing to worry
about. The header and source files all show in the project list, and
CodeBlocks also handles the details of which ones need to be compiled.
After you follow these rules, you can go ahead and compile and run the code
in Listings 5-3 through 5-5. When you run the program, you see the following
output:
Surprise, surprise!
The combination is (once again)
13-26-16
If you have a source file containing some functions, creating a header file
that contains the associated function prototypes is generally a good practice.
Then you can name the header file the same as the source file, except with a
different extension. We did this in Listings 5-4 and 5-5: We named the header
file safestuff.h, and the source file safestuff.cpp.
Instead of saying header file, some people prefer to say include file. We
usually say header file because, to us, include is usually a verb, and it gets
kind of awkward to say something like this: “We’re pretty sure that we
included the include file, but if we didn’t include the correct include file,
would you please include us in your meeting; and in the discussion, we will
be sure to include a few questions about how to include the proper include
file. Then you can include an answer to our inclusions about the inclusions
of an include file.” It’s just difficult to say, you know? So we say header file.
Book I
Chapter 5
Dividing Between
Source-Code Files
Before you compile this program, however, we need to give you a couple
pointers. First, the compiler does not compile the header file into a separate
.o or .obj file. With the program in Listings 5-3 through 5-5, the compiler
compiles only two files: main.cpp and mystuff.cpp. Instead of compiling
the header file, when it reads through the main.cpp file and gets to the
#include line for the header file, it temporarily switches over and reads
that file, pretending that it’s still reading the same main.cpp file. As it
continues, it compiles everything as if it’s all part of the main.cpp file. And
if you include this header file in other source-code files, it does the same
thing again for those source files.
118
Sharing with Header Files
Adding the header only once
CodeBlocks includes several lines in the header file by default. These lines
create a symbol that tells the compiler whether a header file is already
included in the source file so that the compiler doesn’t add it twice. Adding a
header twice is an error because then you’d define the forward reference for
a function twice. Here is what you see when you initially create a header file
with CodeBlocks:
#ifndef SAFESTUFF_H_INCLUDED
#define SAFESTUFF_H_INCLUDED
#endif // SAFESTUFF_H_INCLUDED
When you type the header code into CodeBlocks, type it between the
#define SAFESTUFF_H_INCLUDED and #endif // SAFESTUFF_H_
INCLUDED lines. The “Using the Mysterious Header Wrappers” section of the
chapter describes these automatic entries in detail.
Using brackets or quotes
You may have noticed something about the code in Listing 5-3. When we
included the safestuff.h file, we did not put it inside brackets as we did
in the other #include lines. Instead, we put it inside quotes:
#include “safestuff.h”
That’s because programmers for years have been fighting over the rules of
where exactly on the hard drive to put the header files. Do you put them in
the same directory or folder as your project? Or do you put them in a special
directory all by themselves? Or do you just put them out in the back yard to
dry out?
Regardless of where you put your header files, here is the rule for when
to use quotes and when to use brackets: The compiler looks in several
directories to find include files. And it can, possibly, look in the same
directory as the source file. If you use angled brackets (that is, less-than and
greater-than signs), as in #include <string>, the compiler does not look
in the same directory as the source file. But if you use double quotes, as in
#include “safestuff.h”, the compiler first looks in the same directory
as the source file. And if the compiler doesn’t find the header file there, it
looks in the remaining directories, as it would with angle brackets.
Some people always like to use double quotes. That way, whether the
header file is in the same file as the source file or not, the compiler should
find it.
Sharing Variables Among Source Files
119
For small projects, some people like to lump all the source and header files
into a single directory. These people typically use angle brackets around
system header files (such as #include <string>) and double quotes
around their own header files. In the projects in this book, we generally
follow this rule. The header files that we write are in the same directory as
the source files, and we use double quotes for #include lines of our own
files and angle brackets for the #include lines of system headers.
If you follow the same approach that we use here, you immediately know
whether the #include line refers to one of your own header files or another
header file. If it refers to your own, it has double quotes.
If you start working on a large C++ project, you will probably find that
project managers use the rule of always using angle brackets. For large
projects, this is typically the best policy.
If you try to compile and you get a No such file or directory error on
the #include line, it’s probably because you put the header file in a source
file directory but used angle brackets instead of double quotes. Try switching
that line to double quotes.
Sharing Variables Among Source Files
When you declare a variable inside a function, it remains local to the function.
But you may want functions to share a single variable: One function may
store something, and another may read its contents and write it to the
console. To do this, declare the variable outside a function. That works
until you try to share a variable between multiple source files. If you’re not
careful, the source files end up with a separate copy of the variable. Within
a single source file, the variable can be shared between functions but not
between source files. That could be confusing.
There’s a trick to making this work. Declare the variable inside one and
only one of the source files. Then, you declare it again inside one (and only
one) header file, but you precede it with the word extern, as in extern int
DoubleCheeseburgers;.
Book I
Chapter 5
Dividing Between
Source-Code Files
Most professional programmers today always use angle brackets. This
forces programmers to put their header files in a common area. With really
big projects, programmers like to have a directory dedicated to source files
and another directory dedicated to header files. No header file is ever in the
same directory as the source file.
120
Sharing Variables Among Source Files
Listings 5-6, 5-7, and 5-8 demonstrate the use of a single variable that is
shared between multiple source files.
Listing 5-6: Making Use of a Global Variable
#include <iostream>
#include “sharealike.h”
using namespace std;
int main()
{
DoubleCheeseburgers = 20;
EatAtJoes();
return 0;
}
Listing 5-7: Using a Header File to Declare a Global Variable
#ifndef SHAREALIKE_H_INCLUDED
#define SHAREALIKE_H_INCLUDED
extern int DoubleCheeseburgers;
void EatAtJoes();
#endif // SHAREALIKE_H_INCLUDED
Listing 5-8: Declaring the Actual Storage for the Global Variable
#include <iostream>
#include “sharealike.h”
using namespace std;
int DoubleCheeseburgers;
void EatAtJoes() {
cout << “How many cheeseburgers today?” << endl;
cout << DoubleCheeseburgers << endl;
}
Be careful when you do this; getting it exactly right is very tricky. You
declare the variable once inside the header file, but you must remember the
word extern. That tells the various files, “This variable is declared elsewhere,
but here’s its name and type so you can use it.” Then you declare the
variable in one of the source files, without the word extern; this creates
the actual storage bin for the variable. Finally, you include the header file in
each of your source files that use the global variable.
Using the Mysterious Header Wrappers
121
Use the word extern in your header file when using a global variable. If you
forget to do that, you give each source file its own variable that happens to
have the same name.
Using the Mysterious Header Wrappers
When you include a header file, you usually only want to include it once per
source file. But that can create a problem: Suppose we have a huge software
project, and several header files include another of our header files, called
superheader.h. If we include all these other header files, how can we be
sure to pick up the superheader.h file only once?
The answer looks strange but does the trick. We start each header file with
these lines:
#ifndef SHAREALIKE_H
#define SHAREALIKE_H
#endif
Depending on which C++ IDE you use, your editor may add these lines
automatically, just as CodeBlocks does. In this case, you type the header file
content between the #define SHAREALIKE_H and #endif lines. However,
if your IDE doesn’t add the lines automatically, be sure to add them so your
code looks like the code in Listing 5-7. Otherwise, the compiler may spout
errors that you may not recognize immediately.
These header wrappers, as they are often called, ensure that the code in the
header gets processed only once per source-code file each time you compile.
The wrappers use special lines called preprocessor directives. Basically, the
second line defines something that is sort of like a variable but is used only
during compilation; this something is called a symbol. The symbol is called
SHAREALIKE_H, and we picked it by taking the filename, making it all caps,
and replacing the dot with an underscore.
The first line checks to see whether this symbol has been defined. If not, it
proceeds with the lines of code that follow. The next line goes ahead and
defines the symbol, so now it’s actually defined for later. Then the compiler
does all the rest of the lines in the file. Finally, the last line, #endif, simply
finishes the very first line.
Book I
Chapter 5
Dividing Between
Source-Code Files
When you share a variable among multiple source files, it is a global variable.
A variable used by a single function is called a local variable. If you share a
variable between functions within a single source file but not between
multiple source files, people call this a global variable or a global variable
that is local to the source file.
122
Using the Mysterious Header Wrappers
Now consider what could happen if you include this same file twice, as in
#include “sharealike.h”
#include “sharealike.h”
(That can happen indirectly if you include two different files that each
include sharealike.h.) The second time the compiler goes through
sharealike.h, it sees the first line, which checks to see whether the
SHAREALIKE_H symbol is defined. But this time it is! So instead of going
through all the lines again, the compiler skips to the #endif line at the very
end of the file. Thus, your header file gets processed only once per sourcecode file. Tricky, no? And confusing? Yes, a bit. So remember the following
rule.
When you create a header file, be sure to put the header wrappers around it.
You can use any symbol name you like, provided it uses only letters, numbers,
and underscores and doesn’t start with a number, and provided it’s not already
a variable name in your source or a C++ word. But most people base their
choice on some variation of the filename itself, such as MYFILE_H or
MYFILE_H_ or even _MYFILE_H_.
Chapter 6: Referring to Your
Data through Pointers
In This Chapter
✓ Using two types of memory: the stack and heap
✓ Accessing variable addresses through pointers
✓ Creating variables on the heap by using the new keyword
✓ Taking pointers as parameters and returning pointers
✓ Modifying variables the easy way
W
here do you live? Don’t say it out loud because thousands of people
are reading this book, and you don’t want them all to know. So just
think about your address. Most places have some sort of address so the
mail service will know where to deliver your packages and the cable guy
can show up sometime between now and 5:00 next Thursday. (So make sure
that you’re there.)
Other things have addresses too. For example, a big corporation in an office
building likely has all its cubes numbered. And offices in buildings usually
have numbers; and apartments normally have numbers, too.
Now suppose someone named Sam works in office number 180. Last week,
however, Sam got booted out the door for spending too much time surfing
the Web. Now Sally gets first dibs on office number 180, even though she’s
not taking over Sam’s position. Sam moved out; Sally moved in. Same
office — different person staying there.
The computer’s memory works similarly. Every little part of the computer’s
memory is associated with a number that represents its location, or address.
In this chapter, we show you that after you determine the address of a
variable stored in memory, you can do powerful things with it, which gives
you the tools to create powerful programs.
If any single topic in C++ programming is most important, it is the notion of
pointers. Therefore, if you want to become a millionaire, read this chapter.
Okay, so it may not make you a millionaire, but suggesting it could give
you the incentive to master this chapter. Then you can become an ace
programmer and make lots of money.
124
Heaping and Stacking the Variables
Heaping and Stacking the Variables
C++ programs use two kinds of memory: heap and stack. The heap is a
common area of memory that your program allocates — that is, sets aside —
for the different functions in your program to use. Global variables go in this
heap.
Whenever your program calls a function, however, the function gets its own
little private area of memory storage in an area of memory known as a stack.
The reason that this is called a stack is because it’s treated like a stack of
papers: You can put something on the stack, and you can take something off,
but you can’t put anything in the middle or take anything from the middle.
The computer uses this stack to keep track of all your function calls.
For example, suppose you have a function called GoFishing. The function
GoFishing calls StopAndBuyBait, which then calls PayForBait, which
calls GetOutCreditCard, which calls UseFakeCreditCard. How can
the computer keep track of all this mess? It uses the stack metaphor. First
it saves the original function, GoFishing. Then when that function calls
StopAndBuyBait, the computer remembers that function by putting it on
top of GoFishing — not in the same storage bin, but in one on top of the
preceding item so that the preceding item is still there. Then, when that
function calls PayForBait, the computer once again remembers that
function by putting it on top of StopAndBuyBait, and so on, until it has all
the items piled one on top of the other, with UseFakeCreditCard on the
top and GoFishing on the bottom. This process pushes items onto the top
of the stack.
Next, when the computer is finished with UseFakeCreditCard, it pops
off the top of the stack. What it picks up is the place it left off before calling
UseFakeCreditCard, which happens to be GetOutCreditCard. And
when that function is finished, once again the computer pops the top off
the stack to find PayForBait. And, as before, that’s where it left off last.
It continues this until it gets all the way back to the beginning, which was
GoFishing.
Every position in memory has a number associated with it. When your
program starts, the computer sets aside a large chunk of memory and then
works closely with the microprocessor itself to assign a bunch of numbers
to the memory. Your program’s variables and your program’s code goes
in this memory. And consider this: If your program sits in memory, each
function sits in a particular place in memory, a place with a number or
address associated with it. In other words, each function has an address.
Each function and each variable in your program has a place where it
resides in memory. That place has a number associated with it. Therefore,
each function and each variable has an address.
Heaping and Stacking the Variables
125
Placing a hex on C++
next digit to the left goes up by 1. For example,
when you reach 00000999, the next digit to the
left goes up by 1 as each 9 goes back to 0, to
get 00001000.
With hex numbers, you count this same way,
except instead of stopping at 9 to loop back,
you then go to A, then B, and then up to F. And
then you loop back. So the first 17 hex numbers are, using eight digits, 00000000, 00000001,
00000002, 00000003, 00000004, 00000005,
00000006, 00000007, 00000008, 00000009,
0000000A, 0000000B, 0000000C, 0000000D,
0000000E, 0000000F, 00000010. Notice when we
hit F toward the end there, we wrapped around
again, adding 1 to the next digit to the left. When
working with hex numbers, you may see such
numbers as 0xAAAA0000 and 0X0000A3FF. (We
included the 0x for C++ notation.) And incidentally, 1 more than each of these is 0xAAAA0001
and 0x0000A400.
The stack where the computer keeps track of the function calls is just a
bunch of memory, too. What the computer considers the top of the stack
is really the next position in memory. And the way the computer puts a
function on the stack is by putting on the stack the address of where the
computer left off in the preceding function.
When the computer calls one of your functions, not only does it save the
address of the return location on the stack, it also reserves some space on
the stack for your local variables.
This means that your variables can live in two places:
✦ Heap: The heap is a common area in memory where you can store
global variables.
✦ Stack: The stack is the area where the computer stores both the information about the functions being called and the local variables for those
functions.
Referring to Your
Data through
Pointers
Sooner or later in your computer programming,
you will encounter a strange way of notating
numbers on the computer. This strange way is
called hexadecimal, or sometimes just hex. In
C++, you can recognize a hex number because
it starts with the characters 0x. These characters aren’t actually part of the number; they just
notate it in the same way double quotes denote
a string. Whereas our usual decimal numbers
consist of the digits 0, 1, 2, 3, 4, 5, 6, 7, 8, and 9,
a hex number consists of these digits plus six
more: A, B, C, D, E, and F. That makes a total of
16 digits. (Yes, we know, the letters A through
F are not digits. But in hex, they are considered digits.) A good way to picture counting
with regular decimal numbers is by using the
odometer in a car, which (if you’re honest)
only goes forward, not backward. It starts out
with 00000000 (assuming eight digits, which is
a lot). The rightmost digit runs from 0 through
9, over and over. When any digit reaches 9
and all digits to the right of that are nine, the
Book I
Chapter 6
126
Heaping and Stacking the Variables
A stack is an example of all sorts of wonderful things called data structures.
Computer programmers have a tendency to try to model things from real life
on the computer. A stack of papers apparently wasn’t good enough for the
computer folk; they wanted to be able to do the same type of thing with their
data in the computer, and they called this thing a stack. They have come up
with many types of data structures, including a similar one called a queue:
With a queue, you put data in one end and take it out the other. It’s like
putting sheets of paper on top but taking them only from the bottom. You
experience a queue when you wait in line at a store. The people are forming
a queue, and some even call a line of people a queue.
Every hex number has a decimal equivalent. When you make a list showing
decimal numbers side by side with hex numbers, you see, for example, that
0x0000001F is next to the decimal number 31. Thus, these two numbers
represent the same quantity of items, such as apples. Remember that when
you want to buy some apples: “I would like to buy one-ef apples.”
Looks can be deceiving. The hex number 10 represents the same number of
apples as the decimal number 16. That’s why it’s a good idea to use the 0x
notation. Thus instead of hex 10, we would write 0x10, making it clear that
we’re not talking about a decimal number.
Converting between hexadecimal and decimal
If you want to convert between hex and decimal, you can use the calculator program that
comes with Windows. However, you need to
make sure it’s running in scientific mode. To
turn on this mode, choose View➪Scientific (if
it’s not already chosen). When you do, you will
see the calculator magically transform into a
much bigger, more powerful calculator.
To convert a hex number to decimal, click the
Hex option in the upper left. Then type the hex
number by using the number keys and the letters A through F, such as FB1263. (You don’t
need to type the zeros at the beginning, such
as 00FB1263 — they won’t show up — nor do
you type the 0x used in C++.) After you finish
typing it all in, click the Dec option, which is
next to the Hex option. The calculator instantly
transforms this beautiful hex thing into an
equally beautiful thing — a decimal number!
In this case, you see 16454243. You can go the
other way, too: If you have a decimal number,
such as 16454243, you can click the Hex option
to convert it to hex. If you convert 16454243 to
hex, you get back FB1263, which is what you
started with.
You can convert words, too (if you’re bored).
The hex number and disco group ABBA is
43962 in decimal. And the hex number FADE
is 64222. And Jeff’s house, which he calls hex
number FACADE, is 16435934. Have fun!
Heaping and Stacking the Variables
127
You can represent hex numbers by using either uppercase or lowercase
letters. However, do not mix cases within a single number. Don’t use
0xABab0000. Instead use either 0xabab0000 or 0xABAB0000.
Because every variable lives somewhere in memory, every variable has
an address. If you have a function that declares an integer variable called
NumberOfPotholes, then when your program calls this function, the
computer will allocate space for NumberOfPotholes somewhere in
memory.
If you want to take the address of (which is computerspeak for find the
address of) the variable NumberOfPotholes, you simply throw an
ampersand, &, in front of it.
Listing 6-1 shows an example of taking the address of a variable and
printing it.
Listing 6-1: Using the & Character to Take the Address of a Variable
#include <iostream>
using namespace std;
int main()
{
int NumberOfPotholes = 532587;
cout << &NumberOfPotholes << endl;
return 0;
}
When you run this program, a hexadecimal number appears on the console.
This may or may not match ours, and it may or may not be the same each
time you run the program. The result depends on exactly how the computer
allocated your variable for you and the order in which it did things. This
could be very different between versions of compilers. When we run Listing
6-1, we see
0x22ff74
The output you see from this program is the address of the variable called
NumberOfPotholes. In other words, that number is the hex version of the
place where the NumberOfPotholes variable is stored in memory. The
output is not the contents of the variable or the contents of the variable
converted to hex; rather, it’s the address of the variable converted to hex.
Referring to Your
Data through
Pointers
Getting a variable’s address
Book I
Chapter 6
128
Heaping and Stacking the Variables
A pointer example
Suppose NumberOfPotholes contains
the number 5000. That means the computer
stores the number 5000 somewhere in memory.
When you take the address of NumberOf
Potholes, you are taking the address of the
memory where you can find the number 5000.
And so, when you set
ptr = &NumberOfPotholes;
ptr points to a memory location that contains
the number 5000.
That output is not very useful, unless you want to sound like a computer
techie. You could walk around announcing that the variable lives at 0x22ff74,
but that’s not going to get you very far in life. (It may get you some interesting
looks, though, which may be worth it.) But when you take that address, you
can use it for other purposes. For example, you can use it to modify the
variable itself by using what are called pointer variables. A pointer variable
is just like any other variable except that it stores the address of another
variable.
To declare a pointer variable, you need to specify the type of variable it will
point to. Then you precede the variable’s name with an asterisk, as in the
following:
int *ptr;
This declares a variable that points to an integer. In other words, it can
contain the address of an integer variable. And how do you grab the address
of an integer variable? Easy! By using the & notation! Thus, you can do
something like this:
ptr = &NumberOfPotholes;
This puts the address of the variable NumberOfPotholes in the ptr
variable. Remember that ptr doesn’t hold the number of potholes; rather,
it holds the address of the variable called NumberofPotholes.
You specify the type of a pointer by the type of item it points to. If a pointer
variable points to an integer, its type is pointer to integer. In C++ notation,
its type is int * (with a space between them) or int* (no space); you are
allowed to enter it with or without a space. If a pointer variable points to a
string, then its type is pointer to string, and notation for this type is string *.
The ptr variable holds an address, but what’s at that address? That address
is the location in memory of the storage bin known as NumberOfPotholes.
Right at that spot in memory is the data stored in NumberOfPotholes.
Heaping and Stacking the Variables
129
Changing a variable by using a pointer
After you have a pointer variable holding another variable’s address, you
can use the pointer to access the information in the other variable. That
means that we have two ways to get to the information in a variable: We can
use the variable name itself (such as NumberOfPotholes) or we can use
the pointer variable that points to it.
If we want to store the number 6087 in NumberOfPotholes, we could do this:
NumberOfPotholes = 6087;
Or we could use the pointer. To use the pointer, we first declare it as follows.
ptr = &NumberOfPotholes;
Then, to change NumberOfPotholes, we don’t just assign a value to it.
Instead, we throw an asterisk in front of it, like so:
*ptr = 6087;
If ptr points to NumberOfPotholes, these two lines of code will have the
same effect: Both will change the value to 6087. This process of sticking
the asterisk before a pointer variable is called dereferencing the pointer. By
the time you’re finished with this book, you will know gobs of words that
nobody else does. (And your newly enriched vocabulary makes talking on
the telephone difficult at first.)
Take a look at Listing 6-2, which demonstrates all this.
Listing 6-2: Modifying the Original Variable with a Pointer Variable
#include <iostream>
using namespace std;
int main()
{
int NumberOfPotholes;
int *ptr;
ptr = &NumberOfPotholes;
*ptr = 6087;
cout << NumberOfPotholes << endl;
return 0;
}
Book I
Chapter 6
Referring to Your
Data through
Pointers
Think this pointer concept through carefully. If you have to, read this section
over a few times until it’s in your head. Then meditate on it. Wake up in the
night thinking about it. Call strangers on the telephone and chitchat about it.
But the more you understand pointers, the better off your programming
career will be — and the more likely you will make a million dollars.
130
Heaping and Stacking the Variables
In Listing 6-2, the first line declares an integer variable, while the second
line declares a pointer to an integer. The next line takes the address of the
integer variable and stores it in the pointer. Then the fourth line modifies the
original integer by dereferencing the pointer. And just to make sure that the
process really worked, the next line prints the value of NumberOfPotholes.
When you run the program, you will see the following output:
6087
This is correct; it is the value that the program stored in the original variable
by using the pointer variable.
You can also read value of the original variable through the pointer. Take
a look at Listing 6-3. This code accesses the value of NumberOfPotholes
through the pointer variable, ptr. When the code gets the value, it saves it
in another variable called SaveForLater.
Listing 6-3: Accessing a Value through a Pointer
#include <iostream>
using namespace std;
int main()
{
int NumberOfPotholes;
int *ptr = &NumberOfPotholes;
int SaveForLater;
*ptr = 6087;
SaveForLater = *ptr;
cout << SaveForLater << endl;
*ptr = 7000;
cout << *ptr << endl;
cout << SaveForLater << endl;
return 0;
}
When you run this program, you see the following output.
6087
7000
6087
Notice also in this listing that we changed the value through ptr again,
this time to 7000. When we run the program, you can see that the value did
indeed change, but the value in SaveForLater remained the same. That’s
because SaveForLater is a separate variable and is not connected to the
other two. The other two, however, are connected to each other.
Heaping and Stacking the Variables
131
Pointing at a string
To create a pointer to a string, you simply make the type of the variable
string *. You can then set it equal to the address of a string variable.
Listing 6-4 demonstrates this.
Listing 6-4: Pointing to a String with Pointers
#include <iostream>
using namespace std;
int main()
{
string GoodMovie;
string *ptrToString;
GoodMovie = “Best in Show”;
ptrToString = &GoodMovie;
cout << *ptrToString << endl;
return 0;
}
In Listing 6-4, you can see that the pointer variable called ptrToString
points to the variable called GoodMovie. But when you want to use the
pointer to access the string itself, you need to dereference the pointer by
putting an asterisk, *, in front of it.
When you run this code, you see the results of the dereferenced pointer,
which is the value of the GoodMovie variable:
Best in Show
You can change the value of the string through the pointer, again by
dereferencing it, as in the following code:
*ptrToString = “Galaxy Quest”;
cout << GoodMovie << endl;
Here, we dereferenced the pointer to set it equal to the string “Galaxy
Quest” (a fine movie, we might add). Then to show that it really changed,
we printed the variable itself, GoodMovie. The result of this code, when
added at the end of Listing 6-4 (but prior to the return 0) is
Galaxy Quest
Referring to Your
Data through
Pointers
Pointer variables enjoy pointing. Pointer variables can point to any type,
including strings. However, after you say that a variable points to a certain
type, it can only point to that type. That is, like any variable, you cannot
change its type out from underneath it. The compiler won’t let you do it.
Book I
Chapter 6
132
Heaping and Stacking the Variables
You can also use the pointer to access the individual parts of the string, as
we did in Listing 6-5.
Listing 6-5: Using Pointers to Point to a String
#include <iostream>
using namespace std;
int main()
{
string HorribleMovie;
string *ptrToString;
HorribleMovie = “L.A. Confidential”;
ptrToString = &HorribleMovie;
for (unsigned i = 0; i < HorribleMovie.length(); i++)
{
cout << (*ptrToString)[i] << “ “;
}
cout << endl;
return 0;
}
When you run this program, you see the letters of the terrible movie appear
one with spaces between them, as in the following.
L . A .
C o n f i d e n t i a l
Okay, so we didn’t like L.A. Confidential. But it won two Oscars and was
nominated for seven more, and it won a boatload of other awards, so we
don’t feel so bad saying so.
When you access the characters of the string through a pointer, you need
to put parentheses around the asterisk and the pointer variable. Otherwise,
the compiler gets confused and first tries to do the index in brackets with
the variable name and afterwards applies the asterisk. That’s backwards,
and it won’t make sense to the computer, so the compiler gives you an error
message. But you can make it all better by using parentheses, as we did in
Listing 6-5.
This program loops through the entire string, character by character. We
used the length function for the string to find out how many characters are
in the string. And inside the loop we grabbed the individual characters of the
string, printing them with a space after each.
Notice that i is of type unsigned, rather than int. The length function
returns an unsigned value, rather than an int value. If you try to use an
int for i, the compiler will display the following warning:
Heaping and Stacking the Variables
133
warning: comparison between signed and unsigned integer
You can also change the individual characters in a string through a pointer.
You can do this by using a line like (*ptrToString)[5] = ‘X’;. Notice,
as before, that we had to put parentheses around the variable name along
with the dereferencing (that is, the asterisk) character.
The length of a string is also available through the pointer. You can call the
length function by dereferencing the pointer, again with the carefully placed
parentheses, such as in the following:
for (unsigned i = 0; i < (*ptrToString).length(); i++)
{
cout << (*ptrToString)[i] << “ “;
}
Pointing to something else
When you create a pointer variable, you must specify what type of data it
points to. After that, you cannot change the type of data it points to, but you
can change what it points to. For example, if you have a pointer to an integer,
you make it point to the integer variable called ExpensiveComputer. Then,
later, in the same program, you can make it point to the integer variable
called CheapComputer. We demonstrate this in Listing 6-6.
Listing 6-6: Using Pointers to Point to Something Else and Back Again
#include <iostream>
using namespace std;
int main()
{
int ExpensiveComputer;
int CheapComputer;
int *ptrToComp;
ptrToComp = &ExpensiveComputer;
*ptrToComp = 2000;
cout << *ptrToComp << endl;
ptrToComp = &CheapComputer;
*ptrToComp = 500;
This code starts out by initializing all the goodies involved — two integers
and a pointer to an integer.
Referring to Your
Data through
Pointers
It’s important to use the correct data types for loop variables. Otherwise,
when the loop value increases over the amount that the loop variable can
support, the application will fail. Trying to find such an error can prove
frustrating even for the best developers.
Book I
Chapter 6
134
Heaping and Stacking the Variables
Next, the code points the pointer to ExpensiveComputer and uses the
pointer to put something inside ExpensiveComputer. It then writes the
contents of ExpensiveComputer, again by using the pointer.
Then the code changes what the pointer points to. To do this, we set the
pointer to the address of a different variable, &CheapComputers. Pretty
simple. And the next line stores 500 in whatever the pointer points to. But
that’s CheapComputers. And again we print it.
Now just to drive the point home in case the computer isn’t listening, we
then point the pointer back to the original variable, ExpensiveComputer.
But we don’t store anything in it. This time we just print what’s already
inside this high-powered supermachine. We do this again by dereferencing the pointer. And when we run the program, we see that
ExpensiveComputer still has 2000 in it, which is what we originally put in
it. That means that after we pointed the pointer to something else and did
some finagling, the original variable remained unchanged. That’s a good
thing, considering that nobody was pointing at it and it was just being left
alone, totally ignored in a world all by itself, feeling neglected.
Be careful if you use one pointer to bounce around several different
variables. It’s easy to lose track of which variable the pointer is pointing to.
Tips on pointer variables
Here are some pretty good tips on using pointer variables.
You can declare two pointer variables of the same type by putting them
together in a single statement, as you can with regular variables. However,
you must precede each one with an asterisk, as in the following line.
int *ptrOne, *ptrTwo;
If you try to declare multiple pointers on a single line but put an asterisk
only before the first pointer, only that one will be a pointer. The rest will not
be. This can cause serious headaches and muscle spasms later because this
line will compile fine. The following line is just such an example:
int *ptrOne, Confused;
Here, Confused is not a pointer to an integer; rather, it’s just an integer. So
beware!
Some people like to put the asterisk right after the type, as in the following,
to emphasize the fact that the type is pointer to integer.
int* ptrOne;
Dynamically Allocating with new
135
However, we prefer not to do that simply because it makes it easy for a forgetful
persons like ourselves to not remember that any variables that follow,
separated by a comma, need their own asterisks if they are to be pointers.
Book I
Chapter 6
When we declare a pointer variable, we usually start its name with the
letters ptr, which is an abbreviation for pointer. That way, we immediately
know (when we’re looking at our code) that it’s a pointer variable. That
makes life a little easier sometimes, at least in the sanity areas of life.
Referring to Your
Data through
Pointers
Dynamically Allocating with new
The heap is a special place where you can declare storage. However, to use
this storage, you take a different approach from just declaring a variable.
When you create a variable, you go through the process of actually typing
a variable, giving it a type, a name, and (sooner or later) a value. When you
write the code, that’s when you decide that you want a variable. However,
you can also write code that can cause the computer to allocate space only
after it’s running. The computer allocates this space on the heap. This
process is called dynamic allocation.
Using new
To declare a storage bin on the heap, first you need to set up a variable that
will help you keep track of the storage bin. This variable must be a pointer
variable.
For example, suppose you already have an integer declared out on the heap
somewhere. (We show you how to do that in the next paragraph.) We won’t
give it a name, because such variables don’t have names. Just think of it as
an integer on the heap. Then, with the integer variable, you could have a
second variable. This second variable is not on the heap, and it’s a pointer
holding the address of the integer variable. So if you want to access the
integer variable, you do so by dereferencing the pointer variable.
To allocate memory on the heap, you need to do two things: First, declare
a pointer variable. Second, call a function called new. The new function is a
little different from other functions in that you don’t put parentheses around
its parameter. For this reason, it’s actually considered to be an operator.
Other operators are + and - for adding and subtracting integers. These
other operators behave similar to functions, but you don’t use parentheses.
To use the new function, you specify the type of variable you want to create.
For example, the following line creates a new integer variable:
int *somewhere = new int;
136
Dynamically Allocating with new
After the computer creates the new integer variable on the heap, it stores
the address of the integer variable in the somewhere variable. And that
makes sense: The somewhere variable is a pointer to an integer. Thus, it
holds the address of an integer variable. Listing 6-7 demonstrates this.
Listing 6-7: Allocating Memory by Using new
#include <iostream>
using namespace std;
int main()
{
int *ptr = new int;
*ptr = 10;
cout << *ptr << endl;
return 0;
}
When you run this program, you see the sweet and simple output:
10
In this program, we first allocated a pointer variable, which we called ptr.
Then we called new with an int type, which returns a pointer to an integer.
We saved that return value in the ptr variable.
Then we started doing our magic on it. Okay, so it’s not all that magical, but
we saved a 10 in the thing that ptr points to. And then we printed the value
stored in the thing that ptr points to.
But what exactly is the thing that ptr points to, and why does it fancy itself
so important as to justify italics? It’s the memory that was allocated by the
new operator. Think of it as a variable out there somewhere. But unlike
regular variables, this variable doesn’t have a name. And because it doesn’t
have a name, the only way you can access it is through the pointer. It’s kind
of like an anonymous author with a publicist. If you want to send fan mail to
the author, you have to go through the publicist. Here, the only way to reach
this unnamed but famous variable is through the pointer.
But this doesn’t mean that the variable has a secret name such as
BlueCheese and that, if you dig deep enough, you might discover it; it just
means that the variable has no name. Sorry.
When you call new, you get back a pointer. This pointer is of the type that
you specify in your call to new. You can then store the pointer only in a
pointer variable of the same type.
Dynamically Allocating with new
137
When you use the new operator, the usual terminology is that you are
allocating memory on the heap.
Book I
Chapter 6
Now at this point, you may be asking the all-important question: Why? Why
would we go through the trouble of creating an integer variable somewhere
out on the heap, a variable that has no name, if we just have to create a
second variable to point to it? Doesn’t that seem counterproductive?
Referring to Your
Data through
Pointers
The answer is this: You can take advantage of many features if you allocate
your variables on the heap. You can use pointers along with something
called an array. An array is simply a large storage bin that has multiple slots,
each of which holds one item. And if you set up an array that holds pointers,
you can store away all these pointers without having to name them individually.
And these pointers can point to complex things, called objects. (We cover
objects in Minibook I, Chapter 7, and arrays in Minibook I, Chapter 8.) And
then if you want to, for example, pass all these variables (which could be
quite large, if they’re strings) to a function, you need to pass only the array,
not the strings themselves. That step saves memory on the stack.
In addition to objects and arrays, you can also have a function create and
return a variable. Then, when you get the variable back from the function, you
can use it, and when you are finished with the variable, delete it. Finally, you
can pass a pointer into a function. When you do so, the function can actually
modify the pointer for you. See “Passing Pointer Variables to Functions” and
“Returning Pointer Variables from Functions,” later in this chapter.
Using an initializer
When you call new, you can provide an initial value for the memory you are
allocating. For example, if you are allocating a new integer, you can, in one
swoop, also store the number 10 in the integer.
Listing 6-8 demonstrates this.
Listing 6-8: Putting a Value in Parentheses to Initialize Memory That
You Allocate
#include <iostream>
using namespace std;
int main()
{
int *ptr = new int(10);
cout << *ptr << endl;
return 0;
}
138
Dynamically Allocating with new
In this code, we called new, but we also put a number in parentheses. That
number will get put in the memory initially. This line of code is equivalent to
the following two lines of code:
int *ptr = new int;
*ptr = 10;
When you initialize a value in the new operator, the technical phrase for
what you are doing is invoking a constructor. The reason is that the compiler
adds a bunch of code to your program, code that operates behind the
scenes. This code is called the runtime library. The library includes a function
that initializes an integer variable if you pass an initial value. The function
that does this is known as a constructor. When you run it, you are invoking it.
Thus, you are invoking the constructor. For more information on constructors,
see Minibook I, Chapter 7.
Making new strings
You can use new to allocate almost any type, including strings. You simply
type new followed by string.
You cannot allocate one special type with new. If a function has no return,
you specify the return type as void. You cannot use new to allocate a void
type. For that matter, you also cannot create a variable of type void. The
compiler won’t let you do it.
Listing 6-9 is an example of calling new for a string. As usual, remember the
include line for <string>.
Listing 6-9: Using the new Operator with Strings
#include <iostream>
using namespace std;
int main()
{
string *Password = new string;
*Password = “The egg salad is not fresh.”;
cout << *Password << endl;
return 0;
}
This code allocates a new string by using the new keyword and saves the
results in the Password variable. Next, it stores an interesting commentary
in the newly allocated string by dereferencing the pointer. Finally, it prints
the commentary, again by dereferencing the pointer. Remember, the string
variable itself is off in the heap somewhere and has no name. And if it’s going
to make comments like those heard at a fine restaurant, it’s probably best
that it remain nameless.
Freeing Pointers
139
When you are working with strings, you can use a shortcut to the somewhat
cumbersome method of putting parentheses around the name preceded by
an asterisk in order to call the various string functions. (That was even hard
to type!) Instead of typing (*Password).length(), for example, you can
use a shortcut notation that looks like the following line of code. (The characters after Password are a minus sign and then a greater than sign, which
together resemble an arrow.)
cout << Password->length() << endl;
You can initialize a string by using parentheses when you call new for a
string type. To do this, simply put the string in quotes and then in parentheses
after the word string, as in the following line of code:
string *Password = new string(“The egg salad is still not fresh.”);
This line of code is equivalent to the first two lines of code inside main in
Listing 6-9, shown previously.
Even though the pointer points to a string, the pointer itself still holds a
number (in particular, the address of the string it’s pointing to). This is a
number, but do not confuse it with an integer. However, you can do some
basic arithmetic with pointers, as detailed in Minibook I, Chapter 8.
Freeing Pointers
When you allocate memory on the heap by calling the new function and
you’re finished using the memory, you need to let the computer know,
whether it’s just a little bit of memory or a lot. The computer doesn’t look
ahead into your code to find out if you’re still going to use the memory. So in
your code, when you are finished with the memory, you free the memory.
The way you free the memory is by calling the delete function and passing
the name of the pointer:
delete MyPointer;
This line would appear after you’re finished using a pointer that you allocated by using new. (Like the new operator, delete is also an operator and
does not require parentheses around the parameter.)
Book I
Chapter 6
Referring to Your
Data through
Pointers
When you store a string of characters in a string variable that you allocated
by using new, you are storing the string in the allocated memory, not in the
pointer variable. The pointer variable still holds the address of the allocated
memory. The pointer is just the publicist for the memory, handling all its
deals and transactions for it, whether ethical or not.
140
Freeing Pointers
Listing 6-10 shows a complete example that allocates a pointer, uses it, and
then frees it.
Listing 6-10: Using delete to Clean Up Your Pointers
#include <iostream>
using namespace std;
int main()
{
string *phrase = new string(“All presidents are cool!!!”);
cout << *phrase << endl;
(*phrase)[20] = ‘r’;
phrase->replace(22, 4, “oked”);
cout << *phrase << endl;
delete phrase;
return 0;
}
When you run this program, you see the following output:
All presidents are cool!!!
All presidents are crooked
In this code, we first allocated a new string and initialized it, saving its
address in the pointer variable called phrase. Then we wrote the phrase,
manipulated it (providing some editorial content), and then wrote it again.
Finally, we freed the memory used by the phrase.
Although people usually say that you’re deleting the pointer or freeing the
pointer, really you’re freeing the memory that the pointer points to. The
pointer can still be used for subsequent new operations. Nevertheless, we
will abide by tradition and use these phrases.
You can actually get away with not freeing your pointers because the
computer frees all the memory used by your program when it ends. That
way, your memory is available to all the other cool programs you want
to run. However, getting into the habit of freeing your pointers when you
are finished using them is a good practice; otherwise, you may use all the
memory allotted for the heap while your program is running. And some big
software systems at big companies run on and on, shutting down maybe
once a week or every two weeks. If one part of the program continues to
refuse to free its data, eventually the heap probably fills and the whole
program shuts down.
Passing Pointer Variables to Functions
141
Whenever you free a pointer, a good habit is to set the pointer to the value 0.
(Some people set it to the value null, but that’s the same thing, and 0 is
guaranteed to work on all compilers.) Then, whenever you use a pointer,
first check whether it’s equal to 0 and only use it if it’s not 0. This always
works because the computer will never allocate memory for you at address
0. So the number 0 can be reserved to mean I point to nothing at all.
The following code sample shows this. First, this code frees the pointer and
then clears it by setting it to 0:
delete ptrToSomething;
ptrToSomething = 0;
This code checks if the pointer is not 0 before using it:
ptrToComp = new int;
*ptrToComp = 10;
if (ptrToComp != 0)
{
cout << *ptrToComp << endl;
}
Only call delete on memory that you allocated by using new. Although the
free compiler that ships with this book doesn’t seem to complain when you
delete a pointer that points to a regular variable, it serves no purpose to do
so. You can free only memory on the heap, not local variables on the stack.
Passing Pointer Variables to Functions
One of the most important uses for pointers is this: If they point to a variable,
you can pass the pointer to a function, and the function can modify the
original variable. This lets you write functions that can actually modify the
variables passed to them.
Changing variable values with pointers
Normally, when you call a function and you pass a few variables to the
function, the computer just grabs the values out of the variables and passes
those values. Take a close look at Listing 6-11.
Book I
Chapter 6
Referring to Your
Data through
Pointers
If you free a pointer, the memory it points to is now free. However,
immediately after the call to delete, the pointer still points to that particular
memory location, even though it’s no longer being used. Therefore, do not
try to use the pointer after that until you set it to point to something else
through a call to new or by setting it to another variable.
142
Passing Pointer Variables to Functions
Listing 6-11: A Function Cannot Change the Original Variables Passed
into It
#include <iostream>
using namespace std;
void ChangesAreGood(int myparam)
{
myparam += 10;
cout << “Inside the function:” << endl;
cout << myparam << endl;
}
int main()
{
int mynumber = 30;
cout << “Before the function:” << endl;
cout << mynumber << endl;
ChangesAreGood(mynumber);
cout << “After the function:” << endl;
cout << mynumber << endl;
return 0;
}
Listing 6-11 includes a function called ChangesAreGood that modifies the
parameter it receives. (It adds 10 to its parameter called myparam.) It then
prints the new value of the parameter.
The main function initializes an integer variable, mynumber, to 30 and prints
its value. It then calls the ChangesAreGood function, which changes its
parameter. After coming back from the ChangesAreGood function, main
prints the value again.
When you run this program, you see the following output:
Before the function:
30
Inside the function:
40
After the function:
30
Before the function call, mynumber is 30. And after the function call, it’s still
30. But the function added 10 to its parameter. This means that when the
function modified its parameter, the original variable remained untouched.
The two are separate entities. Only the value 30 went into the function. The
actual variable did not. It stayed in main.
That keeps mean and nasty functions from messing things up in the outside
world. But what if you write a function that you want to modify the original
variable?
Passing Pointer Variables to Functions
143
That’s how you let a function modify data in a variable: You pass a pointer.
But when you call a function, the process is easy, because you don’t need to
make a pointer variable. Instead, you can just call the function, putting an &
in front of the variable. Then, you are not passing the variable or its value —
instead, you are passing the address of the variable.
Listing 6-12 is a modified form of Listing 6-11; this time the function actually
manages to modify the original variable.
Listing 6-12: Using Pointers to Modify a Variable Passed into a
Function
#include <iostream>
using namespace std;
void ChangesAreGood(int *myparam)
{
(*myparam) += 10;
cout << “Inside the function:” << endl;
cout << (*myparam) << endl;
}
int main()
{
int mynumber = 30;
cout << “Before the function:” << endl;
cout << mynumber << endl;
ChangesAreGood(&mynumber);
cout << “After the function:” << endl;
cout << mynumber << endl;
return 0;
}
When you run this program, you see the following output:
Before the function:
30
Inside the function:
40
After the function:
40
Book I
Chapter 6
Referring to Your
Data through
Pointers
A pointer contains a number, which represents the address of a variable. If
you pass this address into a function and the function stores that address
into one of its own variables, its own variable also points to the same variable
that the original pointer did. Make sense? The pointer variable in main and
the pointer variable in the function both point to the same variable because
both pointers hold the same address.
144
Passing Pointer Variables to Functions
Notice the important difference between this and the output from Listing 6-11:
The final line of output is 40, not 30. The variable was modified by the
function!
To understand how this happened, first look at main. The only difference we
had to make to main was a little one: We threw an ampersand, &, in front of
the mynumber argument in the call to ChangesAreGood. That’s it: Instead of
passing the value stored in mynumber, we passed the address of mynumber.
Now the function has some major changes. We rewrote the function header
so it takes a pointer rather than a number. We did this by adding an asterisk, *,
so the parameter is a pointer variable. This pointer receives the address
being passed into it. Thus, it points to the variable mynumber. Therefore,
any modifications we make by dereferencing the pointer will attack the
original variable. And attack it, it does: It changes it! The following line
changes the original variable. Excellent!
(*myparam) += 10;
When you pass a pointer to a function, you are still passing a number. In
Listing 6-11, you are passing to the function the value stored in mynumber.
In Listing 6-12, you aren’t somehow passing the variable itself. Instead, you
are passing the value of mynumber’s address. The value is still a number
either way. However, in Listing 6-12, because the number is an address now,
we had to modify the function header so it expects an address, not just a
number. To do that, we used a pointer variable because it is a storage bin
that holds an address. Then we had to modify the remainder of the function
to make use of the pointer, instead of a number.
The ChangesAreGood function in Listing 6-12 no longer modifies its
own parameter. The parameter starts holding the address of the original
mynumber variable, and that never changes. Throughout the function, the
pointer variable myparam holds the mynumber address. And any changes
the function performs are on the dereferenced variable, which is mynumber.
The pointer variable does not change.
Modifying string parameters
Modifying a string parameter is just as easy as modifying an integer variable.
But with string variables, you have the added benefit that if you’re working
with pointers, you can use the shortcut -> notation.
Listing 6-13 is an example of a function that modifies the original string
variable that is passed into it. The function expects a pointer to a string.
Inside, the function uses the -> notation to access the string functions.
Then the function returns. main creates a string, initializes it, prints the
Returning Pointer Variables from Functions
145
string’s value, calls the function, and prints the value again. As you see
when you run the program, the value of the string has changed.
#include <iostream>
using namespace std;
void Paranoid(string *realmessage)
{
(*realmessage)[6] = ‘i’;
realmessage->replace(9, 1, “”);
realmessage->insert(18, “ad”);
realmessage->replace(15, 2, “in”);
realmessage->replace(23, 7, “!”);
realmessage->replace(4, 3, “ali”);
}
int main()
{
string message = “The friends are having dinner”;
cout << message << endl;
Paranoid(&message);
cout << message << endl;
return 0;
}
In Listing 6-13, we chose to not make the message variable a pointer. It’s just a
string variable. We then put a string into it and called the Paranoid function. But instead of passing the value stored in message, we passed the address
of message. The function then receives a pointer as a parameter. Because
it’s a string pointer, we made extensive use of the shortcut notation, ->.
Remember, (*realmessage). equals the pointer.
When you run this program, you see the original value stored in message
and then the revised value after the function has its way with it:
The friends are having dinner
The aliens are invading!
Returning Pointer Variables from Functions
Functions can return values, including pointers. To set up a function to
return a pointer, specify the type followed by an asterisk at the beginning of
the function header. Listing 6-14 shows this. The function returns a pointer
that is the result of a new operation.
Referring to Your
Data through
Pointers
Listing 6-13: Using a Function to Modify a String Passed into It by
Using Pointers
Book I
Chapter 6
146
Returning Pointer Variables from Functions
Listing 6-14: Returning a Pointer from a String Involves Using an
Asterisk in the Return Type
#include <iostream>
#include <sstream>
using namespace std;
string *GetSecretCode()
{
string *code = new string;
code->append(“CR”);
int randomnumber = rand();
ostringstream converter;
converter << randomnumber;
code->append(converter.str());
code->append(“NQ”);
return code;
}
int main()
{
string *newcode;
int index;
for (index = 0; index < 10; index++)
{
newcode = GetSecretCode();
cout << *newcode << endl;
}
return 0;
}
In this code, we wedged the asterisk against the function name in the function
header. This is a common way of doing it. If you prefer, you can do any of
the following lines:
string *GetSecretCode() {
string* GetSecretCode() {
string * GetSecretCode() {
In the main function, we created a pointer to a string, not just a string. My
function is returning a pointer to a string, and we needed the pointer and
the string to match. When we used the string, we had to dereference it.
When you run this program, you see something like the following output.
CR41NQ
CR18467NQ
CR6334NQ
CR26500NQ
Returning Pointer Variables from Functions
147
CR19169NQ
CR15724NQ
CR11478NQ
CR29358NQ
CR26962NQ
CR24464NQ
Book I
Chapter 6
Just as the parameters to a function are normally values, a function normally
returns a value. In the case of returning a pointer, the function is still returning
just a value — it is returning the value of the pointer, which is a number
representing an address.
Random numbers and strings
Some special code is right smack in the middle
of the function in Listing 6-14, and we need to
explain that. It’s a little trick we used for generating a random number and putting it into
the middle of the string. First, we had to add
another include line. This one is
#include <sstream>
This line provides some of the special features we’re about to talk about, specifically the
ostringstream type. Now here are the
three lines that perform the magic:
int randomnumber = rand();
ostringstream converter;
converter << randomnumber;
The first of these creates a random number
by calling a function called rand. You get
back from this function an integer, which is
random. The next one creates a variable of
a type called ostringstream, which is a
type that’s handy for converting numbers to
strings. A variable of this type has features
similar to that of a console. You can use the
insertion operator, <<, except instead of
going to the console, anything you write goes
into the string itself. But this isn’t just any old
string; it’s a special string of type ostringstream (which comes from the words output,
string, and stream; usually things that allow the
insertion operator << or the extraction operator >> to perform input and output are called
streams). After we do this, we can add the
resulting string onto our string variable called
code. To do that, we use the line
code->append(converter.str());
The part inside parentheses, converter.
str(), returns an actual string version
of the converter variable. And that we can
easily append to our code variable by using
the append function. It’s kind of tricky, but it
works quite nicely.
Referring to Your
Data through
Pointers
Never return from a function the address of a local variable in the function.
The local variables live in the stack space allocated for the function, not in
the heap. When the function is finished, the computer frees the stack space
used for the function, making room for the next function call. If you try this,
the variables will be okay for a while, but after enough function calls that
follow, the variable’s data will get overwritten. Wiped out. Gone to the great
variable home in the sky.
148
Returning a Pointer as a Nonpointer
Returning a Pointer as a Nonpointer
You may find it annoying to dereference a pointer returned from a function
every time you want to use it. Listing 6-14, in the preceding section, is an
example of how you need to dereference a pointer each time. But you can
avoid this issue by dereferencing the pointer as soon as it comes cranking
out of the machine. Listing 6-15 shows this: We preceded the call to the
function with an asterisk, which dereferences the result immediately. We
then place the result in a local nonpointer variable. After that, we have the
value in the variable, and we don’t need to dereference the pointer when
we want to use the value. Thus, when we call cout, we just use the variable
directly without the use of asterisks and other pointer paraphernalia.
Listing 6-15: Dereferencing Your Return Value Immediately So You
Don’t Need to Use It as a Pointer
#include <iostream>
using namespace std;
string *GetNotSoSecretCode()
{
string *code = new string(“ABCDEF”);
return code;
}
int main()
{
string newcode;
int index;
for (index = 0; index < 10; index++)
{
newcode = *GetNotSoSecretCode();
cout << newcode << endl;
}
return 0;
}
When you run this program, you see the following secret but highly enticing
output:
ABCDEF
ABCDEF
ABCDEF
ABCDEF
ABCDEF
ABCDEF
ABCDEF
ABCDEF
ABCDEF
ABCDEF
Passing by Reference
149
Passing by Reference
Take a look at Listing 6-16 and notice how we didn’t use any pointers.
Listing 6-16: With References, You Don’t Need Pointers!
#include <iostream>
using namespace std;
void MessMeUp(int &myparam)
{
myparam = myparam * 2 + 10;
}
int main()
{
int mynumber = 30;
MessMeUp(mynumber);
cout << mynumber << endl;
return 0;
}
Look at that code! No more pointers! In main, we don’t need to take the
address of anything, and we don’t need to use that dereference word, which
the spelling checker insists is wrong. And the function itself has no pointers
either. We just throw the old ampersand thing in front of the parameter
name in the function header.
If you have string parameters, and you use the & to pass them by reference,
skip the shortcut -> notation to call the string functions. And don’t dereference
anything. There are no pointers. Just type the dot (or period) and the function.
No asterisks needed.
If you write a function that uses a reference and somebody else uses your
function in code (see Minibook I, Chapter 5, for information on how to do
this), you could end up making that other person angry. The other person
may not realize that Hey man, this thing just messed up my variable! WHAM!
Their variable gets changed. How do you avoid this? Warn them. Make it
clear to anybody using your function that it uses references and will modify
variables, even the unsuspecting little ones.
Referring to Your
Data through
Pointers
C++ is based on the old C language, which was a simple language. C++ has
some features to make it cushier. One feature is references. A reference is
another way of specifying a parameter in a function whereby the function
can modify the original variable. Instead of following the parameter type
with an asterisk, *, to denote a pointer, you follow it with an ampersand, &.
Then, throughout your function, you can use the parameter just as you
normally would, not as a pointer. But every change you make to the parameter
affects the original variable! A concept ahead of its time. Or behind its time,
considering that other languages have had this feature for years.
Book I
Chapter 6
150
Remembering the Rules
Remembering the Rules
When you use pointers and references, make your life easier:
✦ Understand pointers and references: Your C++ programming ventures
will be much happier.
✦ Free your pointers: Whenever you call new, you should (sooner or later)
call delete. Don’t leave memory in the heap when you’re finished with it.
✦ Know your references: If you write a function that has references, make
sure that everybody knows it. And if you use a function that somebody
else wrote, make sure that you check both the person’s references and
the function’s references.
Chapter 7: Working with Classes
In This Chapter
✓ Understanding objects and classes and the difference between the two
✓ Becoming familiar with member functions and variables in a class
✓ Making parts of a class public, private, and protected
✓ Using constructors and destructors
✓ Building hierarchies of classes
B
ack in the early 1990s, the big buzzword in the computer world was
object-oriented. For anything to sell, it had to be object-oriented,
whatever that meant. Programming languages were object-oriented.
Software applications were object-oriented. Computers were object-oriented.
Refrigerators were object-oriented. What did that all mean? Nothing. It was
simply a catchphrase that was cool at the time.
Those days are gone, and now we can explore what object-oriented really
means and how you can use it to organize your C++ programs. In this
chapter, we introduce object-oriented programming and show how you
can do it in C++. Although people disagree on the strict definition of objectoriented, in this book it means programming with objects and classes.
Understanding Objects and Classes
Consider a pen, a regular, old pen. One of us actually has a pen on our desk.
Here’s what we can say about it:
✦ Ink Color: Black
✦ Shell Color: Light gray
✦ Cap Color: Black
✦ Style: Ballpoint
✦ Length: Six inches
✦ Brand: Office Depot
✦ Ink Level: 50 percent full
✦ Capability #1: Write on paper
152
Understanding Objects and Classes
✦ Capability #2: Break in half
✦ Capability #3: Run out of ink
Now, look around for other things. We see a printer. Let us describe that:
✦ Kind: Laser
✦ Brand: Lexmark
✦ Model: E260
✦ Ink Color: Black
✦ Case Color: Cream
✦ Input trays: Two
✦ Output trays: Two
✦ Connection: USB
✦ Capability #1: Reads print job requests from the computer
✦ Capability #2: Prints on sheets of paper
✦ Capability #3: Prints a test page
✦ Capability #4: Needs the toner cartridge replaced when empty
We’re just describing the things we see. We’re giving dimensions, color,
model, brand. And we’re also describing what the things can do. The pen
can break in half and run out of ink. The printer can take print jobs, print
pages, and have its cartridge replaced.
When we describe what the things can do, we’re carefully writing it from the
perspective of the thing itself, not from the perspective of the person using
the thing. A good way to name the capability is to test it by preceding it with
the words “I can” and see if it makes sense. Thus, because “I can write on
paper” works from the perspective of a pen, we chose write on paper for one
of the pen’s capabilities.
Instead of saying the word thing, we will say the word object. The two
meanings are the same: An object is just a thing. Anything, really. A book.
A dirty plate. A stack of writeable CD-ROMs. These are all objects.
But is seeing all the objects in the universe possible, or are some of those
objects hidden? Certainly some objects are physical, like atoms or the dark
side of the moon, and we can’t see them. But other objects are abstract. For
example, we have a checking account. What is a checking account, exactly?
Understanding Objects and Classes
153
Using enumerations
together. But what if you want a value called
blue? Or red? Or even beige? Then you
need enumerations. (Hurray!) This line creates
an enumeration type:
enum MyColor {blue, red, green, yellow,
black, beige};
You now have a new type called MyColor,
which you can use the same way you can
use other types, such as int or double
or string. For example, you can create a
variable of type MyColor and set its value to
one of the values in the curly braces:
MyColor inkcolor = blue;
MyColor shellcolor = black;
The variable inkcolor is type MyColor,
and its value is blue. The variable shell
color is also of type MyColor, and its value
is black.
Can you point to it? Can you drop it, throw it? You can throw your
checkbook across the room and, if you’re brave, can even try to get into
the room where the main computer is holding your checking account. But is
the checking account something physical you can touch? No. It’s abstract.
Classifying classes and objects
When we pick up a pen, we can ask somebody, “What type of thing is this
an instance of?” Most people would probably say, “a pen.” In computer
programming, instead of using type of thing, we say class. This thing in my
hand belongs to the pen class.
Now if we point to the thing parked out in the driveway, and ask you, “What
class does that belong to?,” you will answer, “class Car.” Of course, you
could be more specific. You may say that the thing belongs to class 1999
Ford Taurus.
Working with
Classes
We think that the number 12 is a good
representation of the color blue, and the
number 86 is a good representation of the color
red. Purple? That’s 182. Beige? That’s getting
up there — it’s 1047. Yes, this sounds kind
of silly. But let’s suppose you want to create
a variable that holds the color blue. Using
the standard types of integers, floating-point
numbers, characters, and letters, you don’t
have a lot of choices. In the old days, people
would just pick a number to represent each
color and store that number in a variable. Or,
you could have saved a string, as in blue. But
C++ presents a better alternative. It’s called an
enumeration. Remember that for each type,
there’s a whole list of possible values. An
integer, for example, can be a whole number
within a particular range. (This range varies
between computers, but it’s usually pretty
big.) Strings can be any characters, all strung
Book I
Chapter 7
154
Understanding Objects and Classes
Class names and class files
In Listings 7-3 and 7-4, nearby in this chapter,
we chose filenames that match the name of
our class. That’s usually the way we like to do
it: When we create a class, we put the class
definition in a header file of the same name as
the class but with an .h extension. And we put
the class member function code in a sourcecode file of the same name as the class but
this time with a .cpp extension. We usually
like our filenames capitalized the same as the
class name; thus, we called the files Pen.h
and Pen.cpp. Naming the files the same as
classes has lots of advantages that can help
you in your quest to become a millionaire.
First, you automatically know the name of the
header file you need to include if you want to
use a certain class. Second, it provides a general consistency, which is always good in life,
whether dealing with programming or pancake
syrup. And finally, if we see a header file, we
know what class is probably inside it.
When we show you the pen, we are asking you what class this object belongs
to. If we then pick up another pen, we’re showing you another example of the
same class. One class, several examples. If we stand next to a busy street, we
see many examples of the class called car. Or we may see many examples of
the class Ford Explorer, a few instances of the class Volkswagen Beetle, and
so on. It depends on how you classify those things roaring down the road. But
regardless, we likely see several examples of any given class.
So when you organize things, you specify a class, which is the type of object.
And when you’re ready, you can start picking out examples (or instances)
of the class. Each class may have several instances. Some classes have only
one instance. That’s a singleton class. For example, at any given time, the
class United States President would have one instance.
Describing member functions and data
If we choose a class, we can describe some characteristics. However,
because we’re only describing the class characteristics, we don’t actually
specify them. We may say the pen has an ink color, but we don’t actually say
what color. That’s because we don’t yet have an example of the class pen.
We have only the class itself. When we finally find an example, it may be one
color, or it may be another. So, if we’re describing a class called pen, we may
list the following characteristics:
✦ Ink Color
✦ Shell Color
✦ Cap Color
✦ Style
Understanding Objects and Classes
155
✦ Length
Book I
Chapter 7
✦ Brand
We don’t specify ink color, shell color, length, or any of these. We’re listing
only general characteristics for all instances of the class pen. That is, every
pen has these characteristics. But the actual values for these characteristics
might vary from instance to instance. One pen may have a different ink color
from another, but both might have the same brand. Nevertheless, they are
both separate instances of the class pen.
After we actually have an instance of class pen, we can give the specifics for
the characteristics. For example, Table 7-1 lists the characteristics of three
actual pens.
Table 7-1 Specifying Characteristics of Instances of Class Pen
Characteristic
First Pen
Second Pen
Third Pen
Ink Color
Blue
Red
Black
Shell Color
Grey
Red
Grey
Cap Color
Blue
Black
Black
Style
Ballpoint
Felt-tip
Ballpoint
Length
5.5 inches
5 inches
6 inches
Brand
Office Depot
Superrite
Easy-Ink
Ink Level
30%
60%
90%
In Table 7-1, the first column holds the names of the characteristics. The
second column holds values for those characteristics for the first pen. The
third column holds the values of characteristics for the second pen, and the
final column holds the values for the third pen.
All the pens in the class share characteristics. But the values for these characteristics may differ from pen to pen. When we build a new pen (assuming
that we could do such a thing), we would follow the list of characteristics,
giving the new pen its own values. We may make the shell purple with yellow
speckles, or we may make it transparent. But we would give it a shell that
has some color, even if that color is transparent.
In Table 7-1, we didn’t list capabilities. But all these pens have the same
capabilities:
✦ Capability #1: Write on paper
Working with
Classes
✦ Ink Level
156
Understanding Objects and Classes
✦ Capability #2: Break in half
✦ Capability #3: Run out of ink
Unlike characteristics, these capabilities don’t change from instance to
instance. They are the same for each class.
In computer programming, capabilities are member functions. That’s because
you’ll be writing functions to perform these, and they are part of a class. The
characteristics are member variables, because they are variables that are
part of the class.
When you describe classes to build a computer program using a class, you
are modeling. In the preceding examples, we modeled a class called Pen. In
the following section, we implement this model by writing a program that
mimics a pen.
If you work with enums (the code form of enumerations), you need to decide
what to name your new type. For example, you can choose MyColor or
MyColors. Many people, when they write a line such as enum MyColor
{blue, red, green, yellow, black, beige};, make the name
plural (MyColors) because this is a list of colors. We make it singular, as
in MyColor. When you declare a variable, it makes more sense: MyColor
inkcolor; would mean that inkcolor is a color — not a group of colors.
Implementing a class
To implement a class in C++, you use the word class. We know it’s profound. And then you add the name of the class, such as Pen. You then add
an open brace, list your member variables and member functions, and end
with a closing brace.
Most people capitalize the first letter of a class name in C++, and if their
class name is a word, they don’t capitalize the remaining letters. Although
you don’t have to follow this rule, many people do. You can choose any
name for a C++ class provided it is not a C++ word; it consists only of letters,
digits, and underscores; and it does not start with a number.
The code in Listing 7-1 shows a class in C++, which we put inside a header
file called Pen.h. (See Minibook I, Chapter 5, for information on how to put
code in a header file.) Take a look at the header file, and you can see how we
implemented the different characteristics. The characteristics of a header
file are just like variables: They have a type and a name. And we implemented the capabilities simply as functions. But all this stuff goes inside
curly brackets and is preceded by a class header. The header gives the name
of the class. And, oh yes, the word public is stuck in there, and it has a colon
after it. We explain the word public in “Accessing members,” later in this
chapter. By itself, this code isn’t very useful, but we put it to use in Listing
7-2, a program that you can compile and run.
Understanding Objects and Classes
Listing 7-1: Pen.h Contains the Class Description for Pen
#ifndef PEN_H_INCLUDED
#define PEN_H_INCLUDED
enum Color
{
blue,
red,
black,
clear
};
enum PenStyle
{
ballpoint,
felt_tip,
fountain_pen
};
class Pen
{
public:
Color InkColor;
Color ShellColor;
Color CapColor;
PenStyle Style;
float Length;
string Brand;
int InkLevelPercent;
void write_on_paper(string words)
{
if (InkLevelPercent <= 0)
{
cout << “Oops! Out of ink!” << endl;
}
else
{
cout << words << endl;
InkLevelPercent = InkLevelPercent - words.length();
}
}
void break_in_half()
{
InkLevelPercent = InkLevelPercent / 2;
Length = Length / 2.0;
}
void run_out_of_ink()
{
InkLevelPercent = 0;
}
};
#endif // PEN_H_INCLUDED
Book I
Chapter 7
Working with
Classes
using namespace std;
157
158
Understanding Objects and Classes
When you write a class, you always end it with a semicolon. Write that down
on a sticky note and hang it on the refrigerator. The effort spent in doing this
will be well worth avoiding the frustration of wondering why your code
won’t compile.
In a class definition, you describe the characteristics and capabilities (that
is, supply the member variables and member functions, respectively).
Note in Listing 7-1, earlier in this chapter, that the member functions access
the member variables. However, we said that these variables don’t have
values yet, because this is just a class, not an instance of a class. How can
that be? When you create an instance of this class, you can give values to
these member variables. Then you can call the member functions. And
here’s the really great part: You can make a second instance of this class
and give it its own values for the member variables. Yes, the two instances
will each have their own sets of member variables. And when you run the
member functions for the second instance, these functions operate on the
member variables for the second instance. Isn’t C++ smart?
Now take a look at Listing 7-2. This is a source file that uses the header file in
Listing 7-1. In this code, we make use of the Pen class.
Listing 7-2: main.cpp Contains Code That Uses the Class Pen
#include <iostream>
#include “Pen.h”
using namespace std;
int main()
{
Pen FavoritePen;
FavoritePen.InkColor = blue;
FavoritePen.ShellColor = clear;
FavoritePen.CapColor = black;
FavoritePen.Style = ballpoint;
FavoritePen.Length = 6.0;
FavoritePen.Brand = “Pilot”;
FavoritePen.InkLevelPercent = 90;
Pen WorstPen;
WorstPen.InkColor = blue;
WorstPen.ShellColor = red;
WorstPen.CapColor = black;
WorstPen.Style = felt_tip;
WorstPen.Length = 3.5;
WorstPen.Brand = “Acme Special”;
WorstPen.InkLevelPercent = 100;
cout << “This is my favorite pen” << endl;
cout << “Color: “ << FavoritePen.InkColor << endl;
cout << “Brand: “ << FavoritePen.Brand << endl;
Understanding Objects and Classes
159
cout << “Ink Level: “ << FavoritePen.InkLevelPercent << “%” << endl;
FavoritePen.write_on_paper(“Hello I am a pen”);
cout << “Ink Level: “ << FavoritePen.InkLevelPercent << “%” << endl;
There are two variables of class Pen: FavoritePen and WorstPen. To
access the member variables of these objects, we type the name of the variable, a dot (or period), and then the member variable name. For example, to
access the InkLevelPercent member of WorstPen, we type:
WorstPen.InkLevelPercent = 100;
Remember, WorstPen is the variable name, and this variable is an object. It
is an object or instance of class Pen. This object has various member variables, including InkLevelPercent.
You can also run some of the member functions that are in these objects. In
the code, we called
FavoritePen.write_on_paper(“Hello I am a pen”);
This called the function write_on_paper for the object FavoritePen.
Take a look at the code for this function, which is in the header file,
Listing 7-1:
void write_on_paper(string words)
{
if (InkLevelPercent <= 0)
{
cout << “Oops! Out of ink!” << endl;
}
else
{
cout << words << endl;
InkLevelPercent = InkLevelPercent - words.length();
}
}
This function uses the variable called InkLevelPercent. But
InkLevelPercent is not declared in this function. The reason is that
InkLevelPercent is part of the object and is declared in the class.
Suppose you call this method for two different objects, as in the following:
FavoritePen.write_on_paper(“Hello I am a pen”);
WorstPen.write_on_paper(“Hello I am another pen”);
The first of these lines calls write_on_paper for the FavoritePen object;
thus, inside the code for write_on_paper, the InkLevelPercent refers
to InkLevelPercent for the FavoritePen object. It looks at and possibly
decreases the variable for that object only. But WorstPen has its own
Working with
Classes
return 0;
}
Book I
Chapter 7
160
Understanding Objects and Classes
InkLevelPercent member variable, separate from that of FavoritePen.
So in the second of these two lines, write_on_paper accesses and possibly
decreases the InkLevelPercent that lives inside WorstPen.
In other words, each object has its own InkLevelPercent. When you call
write_on_paper, the function modifies the member variable based on
which object you are calling it with. The first line calls it with FavoritePen.
The second calls it with WorstPen. When you run this program, you see the
following output:
This is my favorite pen
Color: 0
Brand: Pilot
Ink Level: 90%
Hello I am a pen
Ink Level: 74%
Now notice something about the color line. Here’s the line of code that
writes it:
cout << “Color: “ << FavoritePen.InkColor << endl;
We’re writing the InkColor member for FavoritePen. But what type is
InkColor? It’s the new enumerated type we created called Color. But
something is wrong. It printed 0. Yet here’s the line where we set it:
FavoritePen.InkColor = blue;
We set it to blue, not 0. Unfortunately, that’s the breaks with using enum.
You can use it in your code, but under the hood, it just stores numbers. And
when we print it, we get a number. Well, that stinks. The compiler chooses
the numbers for you, and it starts the first in the enum list as 0, the second
as 1, then 2, then 3, and so on. Thus, blue is stored as 0, red as 1, black
as 2, and clear as 3. But, as we always say (because we’re forever the
optimists), fear not! People have found a way to create a new class that
handles the enum for you (that is, it wraps around the enum), and then you
can print what you really want: blue, red, black, and clear. Take a look at
Minibook I, Chapter 8 for tips on how to do this astounding feat.
Remember that you can create several objects (also called instances) of a
single class. Each object gets its own member variables, which you declare
in the class. To access the members of an object, you use a period, or dot.
Separating member function code
When you work with functions, you can either make sure that the code to
your function is positioned before any calls to the function, or you can use a
forward reference, also called a function prototype. We talk about this handy
little feature in Minibook I, Chapter 4.
Understanding Objects and Classes
161
The string class
the member functions. (See “Using classes and
pointers,” later in this chapter, for more information.) When working with newer versions
of C++, the string class is part of the std
namespace, which is why you add using
namespace std; to the beginning of your
code. If you use an older version of C++, the
string class appears as part of the string
file. In this case, you include <string> to
provide the necessary header files to declare
the string class.
When you work with classes and member functions, you have a similar
option. Most C++ programmers prefer to keep the code for their member
functions outside the class definition. The class definition contains only
function prototypes, or, at least, mostly function prototypes. If the function
is one or two lines of code, people may leave it in the class definition.
When you use a function prototype in a class definition, you write the
prototype by ending the function header with a semicolon where you would
normally have the open brace and code. If your member function looks like
void break_in_half()
{
InkLevelPercent = InkLevelPercent / 2;
Length = Length / 2.0;
}
a function prototype would look like
void break_in_half();
Yes, it’s true: To type this, we just copied the first line of the function, put
the cursor at the end, pressed backspace a couple times, and typed a
semicolon. We’re telling you that not to brag about our prowess with the
keyboard when writing books but rather because that’s how we do it when
we actually write code. That way, we can be assured that the two lines
match. Ah, the beauty of computers. Imagine how hard it would be to write a
computer program without the help of computers.
Now after you have the function prototype in the class, you write the function
again outside the class definition. However, you need to doctor it up just
Working with
Classes
If you’ve been reading the previous chapters of
Minibook I and trying the programs, you have
seen the string type. Now for the big secret:
string is actually a class. When you create
a variable of type string, you are creating
an object of class string. That’s why, to use
the string functions, you first type the variable name, a dot, and then the function name:
You are really calling a member function for
the string object that you created. Similarly,
when you work with pointers to strings, instead
of a dot you can use the -> notation to access
Book I
Chapter 7
162
Understanding Objects and Classes
a bit. In particular, you need to throw in the name of the class, so that the
compiler knows which class this function goes with.
The following is the same function we described earlier but souped-up with
the class information:
void Pen::break_in_half()
{
InkLevelPercent = InkLevelPercent / 2;
Length = Length / 2.0;
}
You would put this after your class definition. And you would want to put this
inside one of your source-code files if your class definition is in a header file.
You can use the same function name in different classes. Like variables in
different functions, function names are totally separate things. Although you
don’t want to go overboard on duplicating your function names, if you feel a
need to, you can certainly do it without a problem.
Listings 7-3 and 7-4 show the modified version of the Pen class, which
originally appeared earlier in this chapter in Listing 7-1. You can use these
two files together with Listing 7-2, which did not change.
Listing 7-3: Using Member Function Prototypes with
the Modified Pen.h file
#ifndef PEN_H_INCLUDED
#define PEN_H_INCLUDED
using namespace std;
enum Color
{
blue,
red,
black,
clear
};
enum PenStyle
{
ballpoint,
felt_tip,
fountain_pen
};
class Pen
{
public:
Color InkColor;
Color ShellColor;
Color CapColor;
PenStyle Style;
Understanding Objects and Classes
163
float Length;
string Brand;
int InkLevelPercent;
};
#endif // PEN_H_INCLUDED
Listing 7-4: Containing the Member Functions for Class Pen
in the New Pen.cpp File
#include <iostream>
#include “Pen.h”
using namespace std;
void Pen::write_on_paper(string words)
{
if (InkLevelPercent <= 0)
{
cout << “Oops! Out of ink!” << endl;
}
else
{
cout << words << endl;
InkLevelPercent = InkLevelPercent - words.length();
}
}
void Pen::break_in_half()
{
InkLevelPercent = InkLevelPercent / 2;
Length = Length / 2.0;
}
void Pen::run_out_of_ink()
{
InkLevelPercent = 0;
}
All the functions from the class are now in a separate source (.cpp) file.
The header file now just lists prototypes and is a little easier for us humans
to scan through. And for the source file, we included the header file at the
top. That’s required; otherwise, the compiler won’t know that Pen is a class
name, and it will get confused (as it so easily can).
The parts of a class
Here is a summary of the parts of a class and the different ways classes can
work together.
✦ Class: A class is a type. It includes characteristics and capabilities.
Characteristics describe the class, and capabilities describe its behavior.
Working with
Classes
void write_on_paper(string words);
void break_in_half();
void run_out_of_ink();
Book I
Chapter 7
164
Working with a Class
✦ Object (or instance): An object is an example of a class. Or, to put it
another way, an object’s type is the class. If you like analogies, the
object Fred is to the Human class as 17 is to int.
✦ Class definition: The class definition describes the class. It starts with
the word class, then has the name of the class, and then an open brace
and closing brace. Inside the braces are the members of the class.
✦ Member variable: A member variable is the C++ version of a characteristic in a class. You list the member variables inside the class. Each
instance of the class gets its own copy of each member variable.
✦ Member function: A member function is the C++ version of a capability
of a class. Like member variables, you list the member functions inside
the class. When you call a member function for a particular instance, the
function accesses the member variables for the instance.
When you divide the class, you put part in the header file and part in the
source-code file. The following list describes what goes where:
✦ Header file: Put the class definition in the header file. You can include the
function code inside the class definition itself if it’s a short function. Most
people prefer not to put any function code longer than a line or two in
the header or don’t put any function code in the header. You may want to
name the header file the same as the class but with an .h or .hpp extension. Thus, the class Pen, for instance, might be in the file Pen.h.
✦ Source file: If your class has member functions, and you did not put the
code in the class definition, you need to put the code in a source file.
When you do, precede the function name with the class name and two
colons. (Do not put any spaces between the two colons, but you can put
spaces on either side of the pair of colons.) If you named the header file
the same as the class, you probably want to name the source file the
same as the class as well but with a .cpp or .cc extension.
Working with a Class
Many handy tricks are available for working with classes. In this section, we
explore several clever ways of working with classes, starting with the way
you can hide certain parts of your class from other functions that are
accessing them.
Accessing members
When you work with an object in real life, there are often parts of the object
that you interact with and other parts that you don’t. For example, when we
use the computer, we type on the keyboard but don’t open the box and poke
around with a wire attached to a battery. For the most part, the stuff inside
is off-limits except when we’re upgrading it.
Working with a Class
165
In object terminology, we use the words public and private to refer to characteristics and capabilities. When you design a class, you might want to make
some member variables and functions freely accessible by users of the class.
You may want to keep other classes tucked away.
If you’re designing a class, it’s possible that you want only these users
calling certain member functions. Other member functions you may want
to keep hidden away, to be called only by other member functions within
the class. Suppose you’re writing a class called Oven. This class includes a
method called Bake, which takes a number as a parameter representing the
desired oven temperature. Now you may also have a member function called
TurnOnHeatingElement and one called TurnOffHeatingElement.
Here’s how it would work. The Bake method starts out calling TurnOn
HeatingElement. Then it keeps track of the temperature, and when the
temperature is correct, it calls TurnOffHeatingElement.
Now would you want somebody walking in the kitchen and calling the Turn
OnHeatingElement function without touching any of the dials, only to
leave the room as the oven gets hotter and hotter with nobody watching it? No.
You allow the users of the class to call only Bake. The other two member
functions, TurnOnHeatingElement and TurnOffHeatingElement, are
reserved for use only by the Bake function.
You bar users from calling functions by making specific functions private.
Functions that you want to allow access to you make public.
After you have such a class designed, if you write a function (not a member
function) that has an object and you try to call one of an object’s private
member functions, you get a compiler error when you try to compile it. The
compiler won’t allow you to call it.
Listing 7-5 shows a sample Oven class and a main that uses it. Take a look
at the class definition. It has two sections: one private and the other public.
After the class definition, we put the code for the functions. The two private
functions don’t do much other than print a message. (Although they’re also
free to call other private functions in the class.) The public function, Bake,
calls each of the private functions, because it’s allowed to.
Working with
Classes
First, let us explain what we mean by users of the class. When the main
function of your program creates an instance of a class and calls one
of its member functions, main is a user of the class. If you have a function
called FlippityFlop, and it creates an instance of your class and does
a few things to the instance, like change some its member variables,
FlippityFlop is a user of your class. In short, a user is any function that
accesses your class.
Book I
Chapter 7
166
Working with a Class
Listing 7-5: Using the Public and Private Words to Hide
Parts of Your Class
#include <iostream>
using namespace std;
class Oven
{
private:
void TurnOnHeatingElement();
void TurnOffHeatingElement();
public:
void Bake(int Temperature);
};
void Oven::TurnOnHeatingElement()
{
cout << “Heating element is now ON! Be careful!” << endl;
}
void Oven::TurnOffHeatingElement()
{
cout << “Heating element is now off. Relax!” << endl;
}
void Oven::Bake(int Temperature)
{
TurnOnHeatingElement();
cout << “Baking!” << endl;
TurnOffHeatingElement();
}
int main()
{
Oven fred;
fred.Bake(875);
return 0;
}
When you run this program, you see some messages:
Heating element is now ON! Be careful!
Baking!
Heating element is now off. Relax!
Nothing too fancy here. Now if you tried to include a line in your main such
as the one in the following code, where you call a private function
fred.TurnOnHeatingElement();
you see an error message telling you that you can’t do it because the
function is private. In CodeBlocks, we see this message:
error: `void Oven::TurnOnHeatingElement()’ is private
Working with a Class
167
You don’t necessarily need to list the private members first followed by the
public members. You can put the public members first if you prefer. Some
people put the public members at the top so they see them first. That makes
sense. Also, you can have more than one private section and more than one
public section. For example, you can have a public section, a private section,
and then another public section, as in the following code:
class Oven
{
public:
void Bake(int Temperature);
private:
void TurnOnHeatingElement();
void TurnOffHeatingElement();
public:
void Broil();
};
But we recommend having only one public section and only one private
section (or no private sections). This minimalism keeps your code neater.
Using classes and pointers
As with any variable, you can have a pointer variable that points to an
object. As usual, the pointer variable’s type must match the type of the
class. This creates a pointer variable that points to a Pen instance:
Pen *ptrMyPen;
The variable ptrMyPen is a pointer, and it can point to an object of type
Pen. The variable’s own type is pointer to Pen, or in C++ notation, Pen *.
A line of code like Pen *ptrMyPen; creates a variable that serves as a
pointer to an object. But this line, by itself, does not actually create an
instance. By itself, it points to nothing. To create an instance, you have to
call new. This is a common mistake among C++ programmers; sometimes
people forget to call new and wonder why their programs crash.
After you create the variable ptrMyPen, you can create an instance of class
Pen, and point ptrMyPen to it using the new keyword like so:
Book I
Chapter 7
Working with
Classes
When you design your classes, consider making all the functions private by
default, and then only make those public that you want users to have access
to. Some people, however, prefer to go the other way around: Make them all
public, and only make those private that you are sure you don’t want users
to access. There are good arguments for either way; however, we prefer to
make public only what must be public. That way, we minimize the risk of
some other program, that’s using your class, messing things up by calling
things the programmer doesn’t really understand.
168
Working with a Class
ptrMyPen = new Pen;
Or you can combine both Pen *ptrMyPen; and the preceding line:
Pen *ptrMyPen = new Pen;
Now you have two variables: You have the actual object, which is unnamed
and sitting on the heap (see Minibook I, Chapter 6, for more information on
pointers and heaps). You also have the pointer variable, which points to the
object: two variables working together.
Because the object is out on the heap, the only way to access it is through
the pointer. To access the members through the pointer, you use a special
notation that is a minus sign followed by a greater-than sign, which looks like
an arrow, as in the following line:
ptrMyPen->InkColor = red;
This goes through the pointer to set the InkColor of the object to red.
Get used to working with pointers and using the pointer notation for
accessing the members of an object. It’s not just a programming language;
it’s a way of life!
Although we like to begin a pointer variable’s name with ptr, we sometimes
forgo that when we’re working with objects. Most object work involves
objects on the heap, so you are always accessing objects through pointers.
In our minds, we connect the two into one, and we feel like the pointer
variable is the object, so we don’t use the ptr prefix.
If we decide not to start our pointer variable names with ptr, the previous
lines of code would look like this instead:
Pen *MyPen = new Pen;
MyPen->InkColor = red;
As with other variables you created with new, after you are finished using an
object, you should call delete. To do so, start with the word delete and
then the name of the object, as in this:
delete MyPen;
Store a 0 in the pointer after you delete it (which really means delete the
object it’s pointing to). When you call delete on a pointer to an object, you
are deleting the object itself, not the pointer. If you don’t store a 0 in the
pointer, it still points to where the object used to be.
Working with a Class
169
Listing 7-6 shows a process of declaring a pointer, creating an object and
pointing to it, accessing the object’s members through the pointer, deleting
the object, and clearing the pointer back to 0.
Working with
Classes
Listing 7-6: Managing an Object’s Life
#include <iostream>
#include “Pen.h”
using namespace std;
int main()
{
Pen *MyPen;
MyPen = new Pen;
MyPen->InkColor = red;
cout << MyPen->InkColor << endl;
delete MyPen;
MyPen = 0;
return 0;
}
Table 7-2 reiterates the process (steps) shown in Listing 7-6 in a more formal
way. We call Table 7-2 “Steps to Using Objects,” rather than something more
specific such as “Using Objects with Pointers,” because the majority of
your work with objects will be through pointers. Therefore, this is the most
common way of using pointers.
Table 7-2
Book I
Chapter 7
Steps to Using Objects
Step
Sample Code
Action
1
Pen *MyPen;
Declares the pointer
2
MyPen = new Pen;
Calls new to create the object
3
MyPen->InkColor = red;
Accesses the members of the
object through the pointer
4
delete MyPen;
Deletes the object
5
MyPen = 0;
Clears the pointer
Now that you have an overview of the process through Listing 7-6 and
understand the basics through Table 7-2, let’s formalize the procedure. The
following steps describe precisely how to work with pointers and objects:
170
Working with a Class
1. Declare the pointer.
The pointer must match the type of object you are going to work with,
except the pointer’s type name in C++ is followed by an asterisk, *.
2. Call new, passing the class name, and store the results of new in the
pointer.
You can combine Steps 1 and 2 into a single step.
3. Access the object’s members through the pointer with the shorthand
notation ->.
You could dereference the pointer and put parentheses around it, but
everyone uses the shorthand notation.
4. When you are finished with the pointer, call delete.
This step frees the object from the heap. Remember that this does not
delete the pointer itself, although programmers usually say that they’re
deleting the pointer.
5. Clear the pointer by setting it to 0.
If your delete statement is at the end of the program, you don’t need to
clear the pointer to 0.
Passing objects to functions
When you write a function, normally you base your decision about using
pointers on whether or not you want to change the original variables passed
into the function. Suppose you have a function called AddOne, and it takes
an integer as a parameter. If you want to modify the original variable, you
can use a pointer (or you can use a reference). If you don’t want to modify
the variable, just pass the variable by value as it’s called.
The following prototype represents a function that can modify the variable
passed into it:
void AddOne(int *number);
And this prototype represents a function that cannot modify the variable
passed into it:
void AddOne(int number);
With objects, you can do something similar. For example, this function takes
a pointer to an object and can, therefore, modify the object:
void FixFlatTire(Car *mycar);
But what do you suppose this would do:
void FixFlatTire(Car mycar);
Working with a Class
171
When you work with objects, a copy is not always a sure thing. What if the
object has member variables that are pointers to other objects? Will the
copy get copies of those pointers, which in turn point to those same other
objects? Or does this object’s members point to its own other objects? Are
those objects copies or the originals?
Always pass objects as pointers. Don’t pass objects directly into functions.
Yes, it risks bad code changing the object, but careful C++ programmers
want the actual object, not a copy. That outweighs the risk of an accidental
change. This chapter explains how to prevent accidental changes by using
the const parameters.
So just do this:
void FixFlatTire(Car *mycar);
If you like references, you are welcome to do this:
void FixFlatTire(Car &mycar);
But don’t just pass the object. It’s messy and not nice.
Because your function receives its objects as pointers, you continue
accessing them by using the -> notation. For example, the function
FixFlatTire may do this:
void FixFlatTire(Car *mycar)
{
mycar->RemoveTire();
mycar->AddNewTire();
}
Or, if you prefer references, you would do this:
void FixFlatTire2(Car &mycar)
{
mycar.RemoveTire();
mycar.AddNewTire();
}
In this code, because you’re dealing with a reference, you access the object’s
members using the dot rather than the -> notation.
Book I
Chapter 7
Working with
Classes
Based on what we said previously, most likely the function gets its own
Car instance that cannot be modified. That’s correct, but consider that for
a moment: The function gets its own instance. In other words, every time
you call this function, it creates an entirely new instance of class Car. This
instance would be a duplicate of class Car — except that it wouldn’t be the
same instance. Just a copy of it.
172
Working with a Class
Another reason to use only pointers and references as parameters for
objects is that a function that takes an object as a parameter usually wants
to change the function. Such changes require pointers or references. When
you don’t want the function to modify the object, use const, which is
covered in the following section.
Using const parameters in functions
If a function takes an object as a parameter and you’re passing it by using a
pointer or reference but don’t want the function modifying the object, use
the word const in the function header. If you insert const before the type
in the parameter list, the compiler does not let the function code modify the
object. Such code causes a compiler error.
The const word is useful because you generally don’t want to pass an
object directly. That involves copying the object, which is messy. Instead,
you normally pass by using a pointer or reference, which would allow you
to change the object. If you put the word const before the parameter, the
compiler will not allow you to change the parameter. In Listing 7-7, we have
inserted const before the parameter. The function can look at the object
but can’t change it.
Listing 7-7: The Inspect Function Is Not Allowed to
Modify Its Parameter
#include <iostream>
#include “Pen.h”
using namespace std;
void Inspect(const Pen *Checkitout)
{
cout << Checkitout->Brand << endl;
}
int main()
{
Pen *MyPen = new Pen();
MyPen->Brand = “Spy Plus Camera”;
Inspect(MyPen);
return 0;
}
Now suppose that you tried to change the object in the Inspect function.
You may have put a line in that function like this:
Checkitout->Length = 10.0;
Working with a Class
173
If you try this, the compiler issues an error. In CodeBlocks, we get
Book I
Chapter 7
error: assignment of data-member `Pen::Length’ in read-only structure
void Inspect(const Pen *Checkitout, Spy *one, const Spy *two);
Using the this pointer
Consider a function called OneMoreCheeseGone. It’s not a member function,
but it takes an object of instance Cheese as a parameter. Its prototype looks
like this:
void OneMoreCheeseGone(Cheese *Block);
This is just a simple function with no return type. It takes an object pointer
as a parameter. For example, after you eat a block of cheese, you can call:
OneMoreCheeseGone(MyBlock);
Now consider this: If you have an object on the heap, it has no name. You
access it through a pointer variable that points to it. But what if the code is
currently executing inside a member function of an object? How do you refer
to the object itself?
C++ has a secret variable that exists inside every member function: this. It’s
a pointer variable. The this variable always points to the current object. So
if code execution is occurring inside a member function and you want to call
OneMoreCheeseGone, passing in the current object (or block of cheese),
you would pass this.
Listing 7-8 demonstrates this. The this listing has four main parts. First
is the definition for the class called Cheese. The class contains a couple of
member functions.
Next is the function OneMoreCheeseGone along with a global variable that
it modifies. This function subtracts one from the global variable and stores a
string in a member variable, status, of the object passed to it.
Next come the actual member functions for class Cheese. (We put these
functions after the OneMoreCheeseGone function because they call it. If we
used a function prototype as a forward reference for OneMoreCheeseGone,
the order wouldn’t matter.)
Working with
Classes
If you have multiple parameters, you can mix const and non-const. If you
go overboard, this can be confusing. The following line shows two parameters
that are const and another that is not. The function can modify only the
members of the object called one.
174
Working with a Class
Finally we have main, which creates two new instances of Cheese. Then it
sets the global variable to 2, which keeps track of the number of blocks
left. Next, it calls the eat function for the asiago cheese and rot for the
limburger cheese. And then it prints the results of everything that
happened: It displays the Cheese count, and it displays the status
variable of each object.
Listing 7-8: Passing an Object from Inside Its Member
Functions by Using the this Variable
#include <iostream>
using namespace std;
class Cheese
{
public:
string status;
void eat();
void rot();
};
int CheeseCount;
void OneMoreCheeseGone(Cheese *Block)
{
CheeseCount--;
Block->status = “Gone”;
};
void Cheese::eat()
{
cout << “Eaten up! Yummy” << endl;
OneMoreCheeseGone(this);
}
void Cheese::rot()
{
cout << “Rotted away! Yuck” << endl;
OneMoreCheeseGone(this);
}
int main()
{
Cheese *asiago = new Cheese();
Cheese *limburger = new Cheese();
CheeseCount = 2;
asiago->eat();
limburger->rot();
cout
cout
cout
cout
<<
<<
<<
<<
endl;
“Cheese count: “ << CheeseCount << endl;
“asiago: “ << asiago->status << endl;
“limburger: “ << limburger->status << endl;
return 0;
}
Working with a Class
175
When you run the program in Listing 7-8, you see this output:
Book I
Chapter 7
Eaten up! Yummy
Rotted away! Yuck
The first line is the result of calling asiago->eat(), which prints one
message. The second line is the result of calling limburger->rot(), which
prints another message.
The third line is simply the value in the variable CheeseCount. This
variable was decremented once each time the computer called the
OneMoreCheeseGone function. Because the function was called twice,
CheeseCount went from 2 to 1 to 0.
The final two lines show the contents of the status variable in the two
objects. (The OneMoreCheeseGone function had stored the string Gone in
these variables.)
Take a careful look at the OneMoreCheeseGone function. It operated on the
current object that came in as a parameter by setting its status variable to
the string Gone. Where did the parameter come from? The member function
eat called it, passing the object itself by using the this pointer. The
member function rot also called it, again passing the object itself via the
this pointer.
Overloading member functions
You may want a member function in a class to handle different types of
parameters. For example, you might have a class called Door and a member
function called GoThrough. You might want the GoThrough function to
take as parameters an object of class Dog, an object of class Human, or an
object of class Cat. Depending on which class is entering, you might want to
change the GoThrough function’s behavior.
A way to handle this is by overloading the GoThrough function. C++ lets you
design a class that has multiple member functions that are all named the
same. However, the parameters must differ between these functions. With
the GoThrough function, one version will take a Human, another a Dog, and
another a Cat.
Go through the code in Listing 7-9 and notice the GoThrough functions.
There are three of them. Now look at main. It creates four different objects —
a cat, a dog, a human, and a door. It then sends each creature through the
door.
Working with
Classes
Cheese count: 0
asiago: Gone
limburger: Gone
176
Working with a Class
Listing 7-9: Overloading Functions in a Class
#include <iostream>
using namespace std;
class Cat
{
public:
string name;
};
class Dog
{
public:
string name;
};
class Human
{
public:
string name;
};
class Door
{
private:
int HowManyInside;
public:
void
void
void
void
};
Start();
GoThrough(Cat *acat);
GoThrough(Dog *adog);
GoThrough(Human *ahuman);
void Door::Start()
{
HowManyInside = 0;
}
void Door::GoThrough(Cat *somebody)
{
cout << “Welcome, “ << somebody->name << endl;
cout << “A cat just entered!” << endl;
HowManyInside++;
}
void Door::GoThrough(Dog *somebody)
{
cout << “Welcome, “ << somebody->name << endl;
cout << “A dog just entered!” << endl;
HowManyInside++;
}
void Door::GoThrough(Human *somebody)
{
cout << “Welcome, “ << somebody->name << endl;
cout << “A human just entered!” << endl;
HowManyInside++;
}
Working with a Class
177
int main()
{
Door entrance;
entrance.Start();
Dog *LittleGeorge = new Dog;
LittleGeorge->name = “Little George”;
Human *me = new Human;
me->name = “Jeff”;
entrance.GoThrough(SneekyGirl);
entrance.GoThrough(LittleGeorge);
entrance.GoThrough(me);
delete SneekyGirl;
delete LittleGeorge;
delete me;
return 0;
}
The program allows them to enter like humans. The beginning of this
program declares three classes, Cat, Dog, and Human, each with a name
member. Next is the Door class. A private member, HowManyInside, tracks
how many beings have entered. Then we have a public function called
Start, which activates the door. Finally, the class contains the overloaded
functions. They all have the same name and the same return type. You can
have different return types, but they must differ by parameters. These do;
one takes a Cat pointer; one takes a Dog pointer; and one takes a Human
pointer.
Next is the code for the member functions. The first function, Start, is
easy to activate. It sets HowManyInside to 0. The next three functions are
overloaded. They do similar things, but they write slightly different messages.
Each takes a different type.
Then we have main, which creates a Door instance. We didn’t make this a
pointer (just to show that you can mix pointers with stack variables in a
program). After creating the Door instance, we called its Start function.
Next, we created three creature instances: one Cat, one Dog, and one
Human. We also set the name member variables for each.
Then we call the entrance.GoThrough function. The first time we pass
a Cat, then we pass a Dog, and then we pass a Human. (Sounds painful.)
Because you can see the Door class, you know that we’re calling three
different functions that happened to be all named the same. But when we’re
using the class, we consider them all one function that happens to accept
either a Cat, a Dog, or a Human. That’s the goal of overloading: to create
what feels like versions of the one function.
Working with
Classes
Cat *SneekyGirl = new Cat;
SneekyGirl->name = “Sneeky Girl”;
Book I
Chapter 7
178
Starting and Ending with Constructors and Destructors
Starting and Ending with Constructors and Destructors
You can add two special functions to your class that let you provide special
startup and shutdown functionality. These are called a constructor and a
destructor. The following sections provide the secret details about these nifty
functions.
Starting with constructors
When you create a new instance of a class, you may want to do some basic
setup on the object. Suppose you have a class called Apartment, with a private member variable called NumberOfOccupants and a member function
called ComeOnIn. The code for ComeOnIn adds 1 to NumberOfOccupants.
When you create a new instance of Apartment, you probably want to start
NumberOfOccupants at 0. The best way to do this is by adding a special
member function, a constructor, to your class. This member function has a
line of code such as
NumberOfOccupants = 0;
Whenever you create a new instance of the class Apartment, the
computer first calls this constructor for your new object, thereby setting
NumberOfOccupants to 0.
Think of the constructor as an initialization function: The computer calls it
when you create a new object.
To write a constructor, you add it as another member function to your class,
and you make it public. You name the constructor the same as your class.
For the class Apartment, we would name our constructor Apartment. The
constructor has no return type, not even void. You can have parameters in
a constructor; see “Adding parameters to constructors,” later in this chapter.
Listing 7-10, later in this section, shows a sample constructor along with a
destructor, which we cover in the next section.
Ending with destructors
When you delete an instance of a class, you might want some cleanup code
to straighten things out before the object goes off to the classroom in the
sky. For example, your object may have member variables that are pointers
to other objects. You may want to delete those other objects.
You put cleanup code in a special function called a destructor. A destructor is
a finalization function that the computer calls before it deletes your object.
179
Starting and Ending with Constructors and Destructors
The next section, “Sampling constructors and destructors,” shows an
example that uses both constructors and destructors.
Constructors and destructors are a way of life for C++ programmers. Nearly
every class has a constructor, and many also have a destructor.
Sampling constructors and destructors
Listing 7-10 uses a constructor and destructor. This program involves two
classes, the main one called Squirrel that demonstrates the constructor
and destructor, and one called Walnut, which is used by the Squirrel
class.
The Squirrel class has a member variable called MyDinner that is a
pointer to a Walnut instance. The Squirrel constructor creates an
instance of Walnut and stores it in the MyDinner variable. The destructor
deletes the instance of Walnut.
In main, we create two instances of Squirrel. Each instance gets its own
Walnut to eat. Each Squirrel creates its Walnut when it starts and
deletes the Walnut when the Squirrel is deleted.
Listing 7-10: Initializing and Finalizing with Constructors
and Destructors
#include <iostream>
using namespace std;
class Walnut
{
public:
int Size;
};
class Squirrel
{
private:
Walnut *MyDinner;
public:
Squirrel();
~Squirrel();
(continued)
Book I
Chapter 7
Working with
Classes
The destructor function gets the same name as the class, except it has a
tilde, ~, at the beginning of it. (The tilde is usually in the upper-left corner
of the keyboard.) For a class called Squirrel, the destructor would be
~Squirrel. The destructor does not have a return type, not even void,
because you can’t return anything from a destructor (the object is gone,
after all). You just start with the function name and no parameters.
180
Starting and Ending with Constructors and Destructors
Listing 7-10: (continued)
};
Squirrel::Squirrel()
{
cout << “Starting!” << endl;
MyDinner = new Walnut;
MyDinner->Size = 30;
}
Squirrel::~Squirrel()
{
cout << “Cleaning up my mess!” << endl;
delete MyDinner;
}
int main()
{
Squirrel *Sam = new Squirrel;
Squirrel *Sally = new Squirrel;
delete Sam;
delete Sally;
return 0;
}
Notice in this code that the constructor has the same name as the class,
Squirrel. The destructor also has the same name, but with a tilde, ~,
tacked on to the beginning of it. Thus, the constructor is Squirrel and the
destructor is ~Squirrel.
When you run this program, you can see the following lines, which were spit
up by the Squirrel in its constructor and destructor. (You see two lines of
each because we created two squirrels.)
Starting!
Starting!
Cleaning up my mess!
Cleaning up my mess!
If our Walnut class also had a constructor and destructor, and we made the
MyDinner member an actual variable in the Squirrel class rather than a
pointer, the computer would create the Walnut instance after it creates the
Squirrel instance but before it calls the Squirrel constructor. It then
deletes the Walnut instances when it is deleting the Squirrel instance,
after it finishes calling the ~Squirrel destructor. It would do this for each
instance of Squirrel, so that each Squirrel gets its own Walnut, as
before.
Starting and Ending with Constructors and Destructors
181
Constructors and destructors with stack variables
Squirrel *Sam = new Squirrel;
Squirrel *Sally = new Squirrel;
But we could have made them on the stack by
just declaring them without pointers:
You can do this, and the program will run fine,
provided you remove the delete lines. You
do not delete stack variables. The computer
calls the destructor when the main function
ends. That’s the general rule with objects on
the stack: They are created when you declare
them, and they stay until the function ends.
Squirrel Sam;
Squirrel Sally;
Adding parameters to constructors
Like other functions, constructors allow you to include parameters. When
you do, you can use these parameters in constructors in your initialization
process. To use them, you list the arguments inside parentheses when you
create the object.
Although int has a constructor, it is not actually a class. However, the
runtime library (that big mass of code that gets put in with your program by
the linker) includes a constructor and destructor that you can use when
calling new for an integer.
Suppose that you want the Squirrel class to have a member variable
called name. Although you could create an instance of Squirrel and then
set its name variable, you can specify the name directly by using a constructor.
The constructor’s prototype would look like this:
Squirrel(string StartName);
Then, you would create a new instance like so:
Squirrel *Sam = new Squirrel(“Sam”);
The constructor is expecting a string, so you pass a string when you
create the object.
Listing 7-11 shows a program that includes all the basic elements of a class
with a constructor that accepts parameters.
Working with
Classes
In Listing 7-10, we created the two Squirrels
on the heap by using pointers and calling
Book I
Chapter 7
182
Building Hierarchies of Classes
Listing 7-11: Placing Parameters in Constructors
#include <iostream>
using namespace std;
class Squirrel
{
private:
string Name;
public:
Squirrel(string StartName);
void WhatIsMyName();
};
Squirrel::Squirrel(string StartName)
{
cout << “Starting!” << endl;
Name = StartName;
}
void Squirrel::WhatIsMyName()
{
cout << “My name is “ << Name << endl;
}
int main()
{
Squirrel *Sam = new Squirrel(“Sam”);
Squirrel *Sally = new Squirrel(“Sally”);
Sam->WhatIsMyName();
Sally->WhatIsMyName();
delete Sam;
delete Sally;
return 0;
}
In main, we passed a string into the constructors. In the code for the
constructor, we’re taking the string parameter called StartName and
copying it to the member variable called Name. In the WhatIsMyName
function, we write it to the console.
You cannot include parameters in a destructor. The C++ language does not
allow it.
Building Hierarchies of Classes
When you start going crazy describing classes, you usually discover
hierarchies of classes. For example, you might say you have a class Vehicle.
But we might say, we can divide your class Vehicle into classes Car,
Pickup Truck, Tractor Trailer, and SUV.
Building Hierarchies of Classes
183
Then you might say that you can take the Car class and divide it into such
classes as Station Wagon, Four-door Sedan, and Two-door Hatchback.
You can create similar groupings of objects for the other class hierarchies;
your decision depends on how you categorize things and how the hierarchy
is used.
In the hierarchy, class Vehicle is at the top. This class has characteristics
that you find in every brand or model of vehicles. For example, all vehicles
have wheels. How many they have varies, but it doesn’t matter at this point
because classes don’t have specific values for the characteristics.
Each brand has certain characteristics that might be unique to it, but each
has all the characteristics of class Vehicle. That’s called inheritance. The
class Toyota, for example, has all the characteristics found in Vehicle.
And the class Celica has all the characteristics found in Toyota, which
includes those inherited from Vehicle.
Creating a hierarchy in C++
In C++, you can create a hierarchy of classes. When you take one class and
create a new one under it, such as creating Toyota from Vehicle, you are
deriving a new class.
To derive a class from an existing class, you write the new class as you
would any other class, but you extend the header after the class name with a
colon, :, the word public, and then the class you’re deriving from, as in the
following class header line:
class Toyota : public Vehicle {
When you do so, the class you create (Toyota) inherits the member variables
and functions from the previous class (Vehicle). For example, if Vehicle
has a public member variable called NumberOfWheels and a public member
function called Drive, the class Toyota has these members, although you
didn’t write the members in Toyota.
Listing 7-12 shows a class inheritance. We started with a class called
Vehicle, and we derived a class called Toyota. In main, we created an
instance of Toyota, and we called two member functions for the instance,
MeAndMyToyota and Drive. The definition of the Toyota class does
not show a Drive function. The Drive function was inherited from the
Vehicle class. You can call this function like a member of the Toyota class
because in many ways it is.
Working with
Classes
Or we could divide Vehicle into car brands, such as Ford, Honda, and
Toyota. Then we could divide the class Toyota into models, such as
Tercel, Celica, Camry, and Corolla.
Book I
Chapter 7
184
Building Hierarchies of Classes
Listing 7-12: Deriving One Class from Another
#include <iostream>
using namespace std;
class Vehicle
{
public:
int NumberOfWheels;
void Drive()
{
cout << “Driving, driving, driving...” << endl;
}
};
class Toyota : public Vehicle
{
public:
void MeAndMyToyota()
{
cout << “Just me and my Toyota!” << endl;
}
};
int main()
{
Toyota MyCar;
MyCar.MeAndMyToyota();
MyCar.Drive();
return 0;
}
When you run this program, you see the output from two functions:
Just me and my Toyota!
Driving, driving, driving...
Some people use the term parent class for the first class in a hierarchy and
child for the one that is derived. However, these are not the best terms
because some people use them to mean that one class has an instance of
another class as a member variable. In that case, the parent class has as a
member the child class. A better term is base class and derived class. You
derive a class from the base class. The result is a derived class.
Understanding types of inheritance
When you create a class, member functions can access both public and
private member variables and functions. Users of the class can access only
the public member variables and functions. But when you derive a new
class, the picture changes. The derived class cannot access the private
members in its own class. Private members are reserved for a class itself
and not for any derived class.
Building Hierarchies of Classes
185
When members need to be accessible by derived classes, there’s a specification
you can use beyond public and private: protected.
We avoid private members unless we know that we won’t derive classes
from a member. When we’ve derived classes from other people’s classes
with private unprotected members, we couldn’t add all the cool features we
wanted. My derived class required access to those private members, so we
had to mess up the original code to modify the original class. If the original
programmer had used protected members, our derived class could access
the members without changing the original code!
Working with
Classes
Protected members and private members work the same way, but derived
classes can access only protected members, not private members. Users
can’t access either class.
Book I
Chapter 7
186
Book I: Introducing C++
Chapter 8: Using Advanced
C++ Features
In This Chapter
✓ Using comments
✓ Working with conversions, consoles, and preprocessor directives
✓ Manipulating constants, enums, and random numbers
✓ Structuring your code with switch statements
✓ Managing arrays of data
C
++ has so much to offer that we thought we’d give you a mixture of
advanced topics you can explore in C++. So for starters, we’re going to
talk a bit about some fundamental issues in C++ that become important as
you advance your programming career.
Filling Your Code with Comments
We have a task for a friend of ours. We want him to turn our refrigerator
around and repair the compressor. We’re not going to give him any details
about how to do this, and we don’t want him to look in a manual. Just grab
the tools, go at it, and try to fix the thing. Now doesn’t that sound like fun?
Unless he happens to be an expert on refrigeration devices, it’s doubtful
that he’d get very far, especially without hurting himself.
Now in computer programming, the risk of hurting yourself is pretty low,
barring things like monitors falling on you or keyboards jumping up and
attacking you. Nevertheless, other people occasionally have to fix your programs, so it’s a good idea for you to provide adequate explanations of what
your programs do.
How do you explain your programs? You put what are called comments in
your code. A comment is simply some words in the code that the compiler
ignores and you put in for the benefit of the humans reading the code.
188
Filling Your Code with Comments
For example, you may have some code like this:
total = 10;
for (i = 0; i < 10; i++)
{
total = (total + i) * 3;
}
But this code may not be very clear to your coworkers (or to you if you put
it away for six months and come back later to look at it). So instead, you can
add some comments. You denote a comment in C++ by starting a line with
two slashes, as follows:
// Initialize total to the number
// of items involved.
total = 10;
// Calculate total for the
// first ten sets.
for (i = 0; i < 10; i++)
{
total = (total + i) * 3;
}
Now the people working on the project can understand what the code does.
Note the white space between the groups of code. Using white space helps
someone looking at the code see where one thought ends and another
begins. You should always include white space in your code so that other
developers can read the code more easily.
Of course, you could put comments like this:
// My salary is too low
// I want a raise
total = 10;
// Someday they’ll recognize
// my superior talents!
for (i = 0; i < 10; i++)
{
total = (total + i) * 3;
}
However, comments like this don’t have much use in the code; besides, they
may have the reverse effect from what you’re hoping for!
A comment is ignored by a compiler (but not always by other humans). You
can write whatever you want as comments, and the compiler pretends that
it’s not even there. (Your boss, however, may notice, so use discretion.)
Converting Types
189
int subtotal = 10;
// Initialize the subtotal value to 10.
This comment gives a little more explanation of what the line does. You
normally use line comments like this when you want to tell others what kind
of information a variable holds or explain a complex task. Normally, you
explain blocks of code as shown earlier in this section.
You can use two kinds of comments in C++. One is the double-slash (as
we’ve already described). When the compiler sees two slashes, it treats
the rest of that line as a comment. That is, the comment runs from the two
slashes to the end of the line. The other kind of comment begins with a
slash-asterisk, /*, and ends with an asterisk-slash, */. The comments go
between these delimiters and can span several lines, as in the following
example:
/* This program separates the parts of the
sandwich into its separate parts. This
process is often called “separation of
parts”.
(c) 1964 Sandwich Parts Separators, Inc.
*/
This is all one comment, and it spans multiple lines. You normally use this
kind of comment to provide an overview of a task or describe the purpose
of a function. This kind of comment also works well for the informational
headings that some large company applications require. As with other comments, you can put these anywhere in your code, provided you don’t break
a string or word in two by putting a comment in the middle. Nobody likes to
be broken in two, and C++ words are no different.
Much of the code in the remainder of this chapter has comments in it so you
can see how we use comments and so you can get a few more ideas about
how the code works.
Some beginning programmers get the mistaken idea that comments appear
in the program window when the program runs. That is not the case. A comment does not write anything to the console. To write things to the console,
use cout.
Converting Types
Sometimes you just don’t have the type of things you want. You might want
to trade in your 1999 Ford Taurus for that brand-new Porsche. But, needless
to say, unless you have plenty of money, that might be pretty hard.
Book I
Chapter 8
Using Advanced
C++ Features
A comment begins with //, and it can begin anywhere on the line. In fact,
contrary to what you might think, you can even put comments at the end of
a line containing C++ code, instead of on a separate line. Using comments on
a code line lets you focus a comment on just that line, as follows:
190
Converting Types
But converting between different types in C++, now that’s a lot easier. For
example, suppose you have a string variable called digits, and it holds the
string “123”. Further, you want to somehow get the numbers inside that
string into an integer variable called amount. Thus, you want amount to
hold the value 123; that is, you want to convert the string to a number.
In Listing 8-1, later in this chapter, we show you how you can convert
between numbers and strings. Minibook I, Chapter 6 shows some sample
code for converting a number to a string. Here we employ that same technique along with a similar technique for converting a string back to a
number.
Converting strings is an interesting concept in C++ because a really great
feature lets you write to and read from a string just as you would to and from
a console. For example, although you can write a number 12 out to a console
by using code like this:
cout << 12;
you can actually do the same thing with strings: You can write a number 12
to a string, as in
mystring << 12;
After this line runs, the string contains the value “12”. However, to do this,
you need to use a special form of string called a stringstream. In the
never-ending world of computer terminology, a stream is something that
you can write to and read from in a flowing fashion (think about bits flowing
through a wire — much as a stream flows along a waterbed). For example,
you might write the word “hello” to a stringstream, then the number
87, and then the word “goodbye”. After those three operations, the string
contains the value “hello87goodbye”.
And you can similarly read from a stream. In the section “Reading from the
Console,” later in this chapter, we show you how you can read from a console by using the > notation. When you read from the console, although your
program stops and waits for the user to enter something, the real stream
technology takes place after the user types something: After the console has
a series of characters, your program reads in the characters as a stream, one
data type after other. You can read a string, then a series of numbers, and
another string, and so on.
With stringstream, you can do something similar. You would fill the string
with something, rather than having the user fill it, as in the case of a console.
From there, you can begin to read from the string, placing the values into
variables of different types. One of these types is integer. But because the
stringstream is, at heart, just a string, that’s how you convert a string of
digits to an integer: You put the digit characters in the string, and read the
string as a stream into your integer. Pretty snazzy!
191
Converting Types
Listing 8-1 includes two handy functions that you may want to save for your
own programming experience later. One is called StringToNumber, and the
other is called NumberToString.
Listing 8-1: Converting Between Types Is Easy
#include <iostream>
#include <sstream>
// for istringstream, ostringstream
using namespace std;
int StringToNumber(string MyString)
{
istringstream converter(MyString); // Converts from string to number.
int result;
// Contains the operation results.
// Perform the conversion and return the results.
converter >> result;
return result;
}
string NumberToString(int Number)
{
ostringstream converter; // Converts from number to string.
// Perform the conversion and return the results.
converter << Number;
return converter.str();
}
int main()
{
float NumberOfKids; // Contains the theoretical number of kids.
int ActualKids;
// Contains an actual number of kids.
/* You can theoretically have 2.5 kids, but in the real world,
you can’t. Convert the theoretical number of kids to a real
number by truncating NumberOfKids and display the results. */
cout << “Float to Integer” << endl;
cout << “(Truncated)” << endl;
NumberOfKids = 2.5;
ActualKids = (int)NumberOfKids;
cout << NumberOfKids << “ “ << ActualKids << endl;
// Perform the same task as before, but use a theoretical 2.1
// kids this time.
NumberOfKids = 2.1;
ActualKids = (int)NumberOfKids;
cout << NumberOfKids << “ “ << ActualKids << endl;
// This time we’ll use 2.9 kids.
(continued)
Book I
Chapter 8
Using Advanced
C++ Features
The only catch to using these is that you need to know in advance which
kind of streaming you want to do. If you want to write to the stringstream,
you create an instance of a class called ostringstream. (The o is for
output.) If you want to read from a stringstream, you create an instance of
a class called istringstream. (The i is for input.)
192
Converting Types
Listing 8-1 (continued)
NumberOfKids = 2.9;
ActualKids = (int)NumberOfKids;
cout << NumberOfKids << “ “ << ActualKids << endl;
cout << “Float to Integer” << endl;
// This process rounds the number, instead of truncating it.
// We do it using the same three numbers as before.
cout << “(Rounded)” << endl;
NumberOfKids = 2.5;
ActualKids = (int)(NumberOfKids + .5);
cout << NumberOfKids << “ “ << ActualKids << endl;
// Do it again using 2.1 kids.
NumberOfKids = 2.1;
ActualKids = (int)(NumberOfKids + .5);
cout << NumberOfKids << “ “ << ActualKids << endl;
// Do it yet again using 2.9 kids.
NumberOfKids = 2.9;
ActualKids = (int)(NumberOfKids + .5);
cout << NumberOfKids << “ “ << ActualKids << endl;
cout << endl << “Integer to Float” << endl;
// In this case, use the StringToNumber() function to perform the
// conversion.
ActualKids = 3;
NumberOfKids = ActualKids;
cout << NumberOfKids << endl << endl;
cout << “String to number” << endl;
int x = StringToNumber(“12345”) * 50;
cout << x << endl << endl;
// In this case, use the NumberToString() function to perform the
// conversion.
cout << “Number to string” << endl;
string mystring = NumberToString(80525323);
cout << mystring << endl;
return 0;
}
StringToNumber takes a string, copies it into an istringstream, and
then reads it into an integer. NumberToString takes an integer, writes it to
an ostringstream, and then copies it to a string.
Feel free to use the StringToNumber and NumberToString functions in
your own code. Sooner or later, you are likely to need to convert between
integers and strings, and these functions can help you out without having to
go search for the answers yourself.
Another kind of conversion that’s useful is converting floating-point numbers (that is, numbers with a decimal point) and integers and vice versa. In
C++, this conversion is easy: You just copy one to the other, and C++ takes
care of the rest. The only catch is that when C++ converts from a float to an
integer, it always truncates. That is, it doesn’t round up: When it converts
Converting Types
193
So, for example, if you start with 4.6, just converting it gets you a 4. But if
you add .5, you first get 5.1, and then when you convert that, you get 5. It
works!
Going the other direction is even easier: To convert an integer to a float, you
just copy it. If i is an integer, and f is a float, you just set it as follows to convert it:
f = i;
Whenever you convert from a float to an int or from an int to float,
you must tell the compiler that you know what you’re doing by adding
(int) or (float) in front of the variable. Adding these keywords is called
coercion or type conversion. The act of coercing one type to another is called
casting. For example, the following tells the compiler that you know you’re
converting from a float to an int:
ActualKids = (int)NumberOfKids;
If you leave the (int) part out, the compiler displays a warning like this one:
warning: converting to ‘int’ from ‘float’
Using the proper coercion code is important because it also tells other
developers that you really do mean to perform the type conversion.
Otherwise, other developers will point to that area of your code and deem
it the source of an error, when it might not be the true source. Using proper
coding techniques saves everyone time.
When you run this program, you see the results of all these conversions.
The first big batch inside main puts different floating-point values into
NumberOfKids (starting with the usual 2.5 number of kids, of course) and
then converts these two integers. In the first batch, we didn’t add 0.5, so
it just rounds it down. You can see in the output for this section that all the
numbers were rounded down. The first number in each pair is the original
floating-point value, and the second number is the number converted to an
integer. Notice that the program always rounded down:
Float to Integer
(Truncated)
2.5 2
2.1 2
2.9 2
Book I
Chapter 8
Using Advanced
C++ Features
5.99 to an integer, it doesn’t go up to 6; it goes down to 5. But there’s an
easy trick around that: Add 0.5 to the number before you convert it. If the
number in the upper half (that is, from .5 to .9999 and so on), that 0.5 first
takes the number above or equal to the upper whole number. Then, when
the function rounds the number, the number will round down to the upper
whole number.
194
Converting Types
Tips for making numeric conversions
more precise
If you are doing some sophisticated arithmetic
by using a mixture of floats and integers, the
suggestions in the following list will make sure
that your answers come out right:
✓ Don’t be afraid to use temporary variables:
If you have an integer and need a float version of it, don’t be afraid to create a temporary variable that’s a float that holds the
value. The following lines do this for you:
float MyFloat = int;
✓ Convert everything to floating point: Make
sure that you convert all your integers to
floating points before you use them in the
operations. For example, in the following
two lines of code, MyFloat will not get
2.5, the answer of 5 divided by 2. Instead,
it gets the integer (that is, rounded) value
of 2. To fix this, first convert MyInt to a
float before doing this operation. Then
you will get 2.5 for MyFloat.
int MyInt = 5;
float MyFloat = MyInt / 2;
✓ Try casting: If you want to use an integer in
an arithmetic operation that involves floats
and you don’t want to create a special
float variable for it, you can just throw the
word float in parentheses before the integer in the operation. This is called a cast, and
the C++ compiler temporarily converts the
variable to the type in parentheses. The following lines do this, and this time MyFloat
gets the value 2.5, as you want.
int MyInt = 5;
float MyFloat = (float)MyInt / 2;
In the next block of code, we do the same conversions as before, except this
time we add 0.5 to each float. The result is an actual round to the nearest
whole number. Note that the higher decimal numbers rounded up, while the
lower ones rounded down:
Float to Integer
(Rounded)
2.5 3
2.1 2
2.9 3
Next is a quick one. We just converted the integer to a float. It doesn’t print
with a decimal point, but it is a float:
Integer to Float
3
Then we convert between numbers and strings. The first block of these converts a string to a number. Just to prove it really is a number, we go ahead
Reading from the Console
195
and work some mathematical arithmetic on it — something you can’t do
with a string.
And finally, we convert a number to a string:
Number to string
80525323
The output of these digits, of course, would look the same whether we print
them as a string or a number, but you can see in the code that what we
printed is indeed a string, not a number.
Reading from the Console
Throughout this book, we have used the console to demonstrate several
topics. Many of the programs write some sort of output to the console. You
can also use the console to get information from the user, something we
briefly mention in Minibook I, Chapter 2.
To do this, instead of using the usual << with cout to write to the console,
you use the >> operator along with cin (pronounced see-in).
In the old days of the C programming language, reading data from the console and placing its variables was somewhat nightmarish because it required
you to use pointers. Now, in C++, that’s no longer the case. If you want to
read a set of characters into a string called MyName, you just type
cin >> MyName;
That’s it! The program pauses, and the user can type something at the console. When the user presses Enter, the string he or she typed will go into the
string called MyName.
Reading from the console has some catches. First, the console uses spaces
as delimiters. That means that if you put spaces in what you type, only the
letters up to the space are put into the string. Anything after the space, the
console saves for the next time your program calls cin. That situation can
be confusing. Second, if you want to read into a number, the user can type
any characters, not just numbers. The computer then goes through some
bizarre process and converts any letters into a meaningless number. Not
good.
But fear not. As usual, we have found ways around such problems! Listing
8-2 shows you how to read a string and then a number from the console.
Using Advanced
C++ Features
String to number
617250
Book I
Chapter 8
196
Reading from the Console
Next, it shows you how you can force the user to type only numbers. And
finally, it shows how you can ask for a password with only asterisks appearing when the user types.
To make these last two tasks work correctly, we had to use a library
called conio. This library gives you more direct access to the console,
bypassing cin. But that’s okay. We also used a special function called
StringToNumber that is described in “Converting Types,” earlier in this
chapter.
Listing 8-2: Having the User Type Something
#include <iostream>
#include <sstream>
#include <conio.h>
using namespace std;
int StringToNumber(string MyString)
{
istringstream converter(MyString); // Holds the string.
int result;
// Holds the integer result.
// Perform the conversion.
converter >> result;
return result;
}
string EnterOnlyNumbers()
{
string numAsString = “”; // Holds the numeric string.
char ch = getch();
// Obtains a single character from the user.
// Keep requesting characters until the user presses Enter.
while (ch != ‘\r’) // \r is the enter key
{
// Add characters only if they are numbers.
if (ch >= ‘0’ && ch <= ‘9’)
{
cout << ch;
numAsString += ch;
}
// Get the next character from the user.
ch = getch();
}
return numAsString;
}
string EnterPassword()
{
string numAsString = “”; // Holds the password string.
char ch = getch();
// Obtains a single character from the user.
// Keep requesting characters until the user presses Enter.
while (ch != ‘\r’) // \r is the enter key
{
Reading from the Console
197
// Display an asterisk instead of the input character.
cout << ‘*’;
// Get the next character from the user.
ch = getch();
}
return numAsString;
}
int main()
{
// Just a basic name-entering
string name;
cout << “What is your name? “;
cin >> name;
cout << “Hello “ << name << endl;
// Now you are asked to enter a number,
// but the computer allows you to enter anything!
int x;
cout << endl;
cout << “Enter a number, any number! “;
cin >> x;
cout << “You chose “ << x << endl;
// This time you can only enter a number.
cout << endl;
cout << “This time you’ll only be able to enter a number!” << endl;
cout << “Enter a number, any number! “;
string entered = EnterOnlyNumbers();
int num = StringToNumber(entered);
cout << endl << “You entered “ << num << endl;
// Now enter a password!
cout << endl;
cout << “Enter your password! “;
string password = EnterPassword();
cout << endl << “Shhhh, it’s “ << password << endl;
return 0;
}
The first parts of main are straightforward. You can see that we called
cin >> name; to read a string from the console; then we printed it. Then
we called cin >> x; to read an integer from the console, and we again
printed it.
Next, we made sure that the user could enter only digits by calling the
EnterOnlyNumbers function. Take a close look at that function. The first
thing it does is declare a string called numAsString. When the user types
things, they come in as characters, so we save them one by one in a string
variable (because a string is really a character string). To find out what the
user types, we call the getch function. That function returns a single character. (For example, if the user presses Shift-A to get a capital A, the getch
function will return the character A.)
Using Advanced
C++ Features
// Add the character to the password string.
numAsString += ch;
Book I
Chapter 8
198
Reading from the Console
Avoiding getch function problems
Some compilers will complain if you use the
getch function. In this case, try the _getch
function instead. Both functions perform the
same task. Some vendors claim that _getch
is International Standards Organization (ISO)
compliant, but it isn’t. The getch and _getch
functions are useful low-level library functions
that you can use without hesitation, but they
don’t appear as part of any standard. The GNU
GCC compiler provided with CodeBlocks can
use either form of the function.
After retrieving a single character, we start a loop, watching for the ‘\r’
character. (Remember that the backslash in a character or string means that
the character is special.) The loop continues processing characters until the
user presses the Enter key. At that point, the character we get from getch is
\r, so we exit the loop and return the number as a string.
Inside the loop, we test the value of the character, seeing if it’s in the range
‘0’ through ‘9’. Yes, characters are associated with a sequence, and fortunately, the digits are all grouped together. So we can determine if we have
a digit character by checking to see if it’s in the range ‘0’ through ‘9’ as
follows:
if (ch >= ‘0’ && ch <= ‘9’)
If the user presses a number key, we wind up inside this if statement, or
at least the computer does. Because the user pressed a number key, we go
ahead and write that out to the console and add the digit character to the
end of our string. We have to write it to the console because, when you call
getch, the computer doesn’t automatically print anything. But that’s a good
thing here, because after we’re out of the if statement, we go ahead and call
getch again for another round. Thus, if the user pressed something other
than the Enter key, the character the user pressed doesn’t even appear on
the console, and it won’t get added to the string either. Nifty, huh?
The EnterPassword routine is similar to the EnterOnlyNumbers routine,
except it allows the user to enter any character (including spaces). So no if
statement is filtering out certain letters. And further, instead of just printing
the character that the user types, it just prints an asterisk, *. That gives the
feeling of a password entry, which is a good feeling. People want to feel good
when they’re entering their passwords.
Understanding Preprocessor Directives
199
When you run this program, you get output like the following:
Book I
Chapter 8
What is your name? Hank
Hello Hank
This time you’ll only be able to enter a number!
Enter a number, any number! 5001
You entered 5001
Enter your password! *****
Shhhh, it’s hello
The first line went well; we didn’t type any spaces, and the name Hank made
it into our variable. But then, when we were asked to enter a number, we got
sneaky and typed something we weren’t supposed to, abc123. And boy, the
computer got confused! But the next section didn’t allow us to type anything
but numbers because it called our EnterOnlyNumbers routine. And finally,
we entered a password, and you can see that the computer displayed asterisks when we pressed each key. Then the program kept the secret password
and wrote it on the screen anyway.
Understanding Preprocessor Directives
When you compile a program, the first thing the compiler does is run your
code through something called a preprocessor. The preprocessor simply
looks for certain statements in your code that start with a # symbol. You
have already seen one such statement in every one of your programs,
#include. These preprocessor statements are known as directives because
they tell the preprocessor to do something; they direct it.
Think of the preprocessor as just a machine that transforms your code into
a temporary, fixed-up version that’s all ready to be compiled. For example,
take a look at this preprocessor directive:
#include <iostream>
If the preprocessor sees this line, it inserts the entire text from the file called
iostream (yes, that’s a filename; it has no extension) into the fixed-up version of the source code.
For example, suppose the file called iostream looks like this:
int hello = 10;
int goodbye = 20;
Using Advanced
C++ Features
Enter a number, any number! abc123
You chose 2293728
200
Understanding Preprocessor Directives
Just two lines are all that’s in it. (Of course, the real iostream file is much
more sophisticated.) And suppose your own source file, MyProgram.cpp,
has this in it:
#include <string>
int main()
{
cout << “Hello” << endl;
}
Then, after the preprocessor gets through with its preprocessing, it creates
a temporary fixed-up file (which has the lines from the string file inserted
into the MyProgram.cpp file where the #include line had been) to look
like this:
int hello = 10;
int goodbye = 20;
int main()
{
cout << “Hello” << endl;
}
In other words, the preprocessor replaced the #include line with the
contents of that file. Now, the string file itself could have #include lines,
and those lines would be replaced by the contents of the files they refer
to. As you may imagine, what started out as a simple program with just a
few lines could actually have hundreds of lines after the preprocessor gets
through with it. (In fact, that’s a conservative estimate: We ran the default
CodeBlocks code through the preprocessor, and it contained 25,613 lines!
Many of those are blank lines for various reasons, but nevertheless, it’s a
very big file!)
Don’t worry: Your original source code file doesn’t change when the preprocessor goes at it. The preprocessor builds a temporary file, and that’s what
the compiler compiles. Also, you don’t have to run the preprocessor manually; the compiler runs it for you.
Although you don’t have to run the preprocessor yourself, you can if you’re
curious to see what its output looks like. The CodeBlocks compiler actually calls on gcc.exe to perform the compilation process. However, gcc
is really just a small program that launches the compiler. But before it
launches the compiler, it runs the preprocessor. The preprocessor command is cpp (for C preprocessor). If your paths are set up correctly and you
want to try it out, just type cpp, the name of your source file, the redirection
symbol (>>), and the name of an output file at the command line, such as
cpp main.cpp >> main.txt. In most cases, you can set up the path correctly by typing the following at the command line and pressing Enter:
path=C:\Program Files\CodeBlocks\MinGW\bin;%path%
Understanding Preprocessor Directives
201
And prepare yourself for a lot of lines. But seeing the output and how your
code looks when it’s ready to be pushed through the compiler is interesting!
#define MYSPECIALNUMBER 42
After the preprocessor sees this line, every time it encounters the word
MYSPECIALNUMBER, it replaces it with the word 42 (that is, whatever
sequence of letters, numbers, and other characters follow the definition).
But #define also lets you create what are called macros. Take a look at this
line:
#define oldmax(x, y) ((x)>(y)?(x):(y))
After the preprocessor learns this line, every time it sees the word oldmax
followed by two things in parentheses separated by a comma, it replaces
it with the form ((x)>(y)?(x):(y)), substituting the thing before the
comma for x and the thing after the comma for y. For example, if you then
have this line
q = oldmax(abc, 123);
the preprocessor replaces the line with
q = ((abc)>(123)?(abc):(123));
and does nothing more with the line.
Minibook I, Chapter 2, refers to these as conditional operators. The variable
q is set to the value in abc if the abc value is greater than 123; otherwise,
the q gets set to 123.
However, the preprocessor doesn’t have an understanding of the conditional
operator, and q doesn’t get set to anything during preprocessing. All the
preprocessor knows is how to replace text in your source-code file. The preprocessor replaced the earlier line of code that contained oldmax with the
next line containing the conditional operator. That’s it. The preprocessor
doesn’t run any code, it doesn’t make the comparison, and it doesn’t put
anything in q. The preprocessor just changes the code.
Although you can still use #define statements in C++, in general you should
simply create a function instead of a macro or use a constant instead of a
symbol. Using symbols and macros are older and outdated styles of programming. However, they do have their place in programming in the form of
conditional compilation, which we discuss next.
Using Advanced
C++ Features
The preprocessor also provides you with a lot of other directives besides
#include. One of the more useful ones is the #define directive. Here’s a
sample #define line:
Book I
Chapter 8
202
Understanding Preprocessor Directives
You may have times when you want to compile one version of your program
for one situation, and compile another for a different situation. For example,
you may want to have a debug version of your program that has some extra
goodies in it that spit out special information for you that you can use during
the development of your program. Then, after your program is ready to ship
to the masses so millions of people can use it, you no longer want that extra
debug information.
To accomplish this, you can use a conditional compilation. Take a look at
these lines:
#ifdef DEBUG
cout << “The value of j is “ << j << endl;
#else
cout << j << endl;
#endif
The lines that begin with # are preprocessor directives. The preprocessor
has its own version of if statements. In your code, you can have a line like
the following with nothing after it:
#define DEBUG
This simply defines a symbol. It works just like the symbols we described
earlier, except that it’s not set to be replaced by anything. It’s just a symbol.
You can also define such symbols in the command-line options to gcc
or whichever compiler you use. (In CodeBlocks, you choose Project➪
Build Options. In the Project Build Options dialog box that opens, click the
Compiler Settings tab, followed by the #defines subtab, as shown in Figure
8-1. You type your compiler options as shown in the figure.) To define the
DEBUG symbol through a command-line option, you add
-D DEBUG
to your command, either in the gcc command or in the Project Build
Options dialog box in CodeBlocks. Then, when you include this compiler
option, the DEBUG symbol is defined throughout your program, just as if you
had included a #define DEBUG line at the very beginning.
Now when the preprocessor starts going through your program and gets
to the #ifdef DEBUG line, it checks whether the DEBUG symbol is defined.
If the symbol is defined, it spits out to its fixed-up file the lines that follow,
up until the #else line. Then it skips any lines that follow that, up until the
#endif line.
But if the DEBUG symbol is not defined, the preprocessor skips over the lines
up until the #else, and spits out the lines that follow, up until the #endif.
Understanding Preprocessor Directives
203
Book I
Chapter 8
Using Advanced
C++ Features
Figure 8-1:
Provide the
compiler
options
you want
to use to
change the
application
output.
Thus, for the example we gave earlier in this section, if DEBUG is defined,
the block of code starting with #ifdef DEBUG through the line #endif is
replaced by the stuff in the first half of the block:
cout << “The value of j is “ << j << endl;
But if DEBUG is not defined, it is replaced by the stuff following the #else
line:
cout << j << endl;
When the preprocessor goes through your file, it is only creating a new
source-code file to be used by the compiler. That means these #ifdef lines
affect your program only when the compiler fires off the preprocessor. When
your program is compiled and you run it, these #ifdef lines are nowhere to
be found. So please don’t forget that these #ifdef lines do not affect how
your program runs — only how it compiles.
Using preprocessor directives, you can have two different versions of your
program. In the example we gave, we’re gearing up for two versions, a debug
version and a release version. To tell the compiler which version to build,
we then modify the command-line options by either removing or adding the
-D DEBUG line.
The -D option works either with or without a space after the D. Thus, you
can either use -DDEBUG or -D DEBUG. They both do the same thing.
204
Understanding Preprocessor Directives
Listing 8-3 demonstrates all the things that we covered in this section.
Listing 8-3: Using Many Different Preprocessor Directives
#include <iostream>
using namespace std;
#ifdef UNIVAC
const int total = 200;
const string compname = “UNIVAC”;
#elif defined(HAL2000)
const int total = 300;
const string compname = “HAL2000”;
#else
const int total = 400;
const string compname = “My Computer”;
#endif
// This is outdated, but you might
// see it on occasion. Don’t write
// code yourself that does this!
#define oldmax(x, y) ((x)>(y)?(x):(y))
#define MYSPECIALNUMBER 42
int main()
{
cout << “Welcome to “ << compname << endl;
cout << “Total is:” << endl;
cout << total << endl << endl;
// Try out the outdating things.
cout << “*** max ***” << endl;
cout << oldmax(5,10) << endl;
cout << oldmax(20,15) << endl;
cout << MYSPECIALNUMBER << endl << endl;
// Here are some standard
// predefined macros.
cout << “*** Predefined Macros ***” << endl;
cout << “This is file “ << __FILE__ << endl;
cout << “This is line “ << __LINE__ << endl;
cout << “Compiled on “ << __DATE__ << endl;
cout << “Compiled at “ << __TIME__ << endl << endl;
// Here’s how some people use #define,
// to specify a “debug” version or
// “release” version.
cout << “*** total ***” << endl;
int i;
int j = 0;
for (i = 0; i<total; i++)
{
j = j + i;
}
#ifdef DEBUG
cout << “The value of j is “ << j << endl;
#else
cout << j << endl;
Understanding Preprocessor Directives
205
#endif
return 0;
Book I
Chapter 8
}
Welcome to My Computer
Total is:
400
*** max ***
10
20
42
*** Predefined Macros ***
This is file C:\0246 - Source Code\BookI\Chapter08\Preprocessor2\main.cpp
This is line 37
Compiled on Apr 7 2009
Compiled at 13:54:09
*** total ***
79800
But note, at the beginning, we’re testing for the symbol UNIVAC. But that if
block is a bit more complex because we also have an #elif (else if) construct. The language of the preprocessor has no elseifdef or anything like
it. Instead, you have to write it like so:
#elif defined(HAL2000)
Now with this block, the preprocessor checks for the symbol UNIVAC; if the
preprocessor finds UNIVAC, it spits out the lines
const int total = 200;
const string compname = “UNIVAC”;
Otherwise, the preprocessor looks for HAL2000; if the preprocessor finds it,
it adds these lines to the fixed-up code:
const int total = 300;
const string compname = “HAL2000”;
And finally, if neither UNIVAC nor HAL2000 is set, the preprocessor adds
these lines:
const int total = 400;
const string compname = “My Computer”;
Now remember that, in each case, these two lines are sent out to the fixedup version in place of the entire block starting with #ifdef UNIVAC and
ending with #endif.
Using Advanced
C++ Features
When we run Listing 8-3 without any symbols (we did not set DEBUG), we see
this output:
206
Understanding Preprocessor Directives
So if we include the command-line option -D UNIVAC, we see different
output:
Welcome to UNIVAC
Total is:
200
*** max ***
10
20
42
*** Predefined Macros ***
This is file C:\0246 - Source Code\BookI\Chapter08\Preprocessor2\main.cpp
This is line 37
Compiled on Apr 7 2009
Compiled at 14:05:19
*** total ***
19900
To see this different output, remember that these #define lines affect only
the compilation of your program. Therefore, you need to recompile your
program to see the changes. But a catch is involved: If the object file for your
source-code file is newer than your source, the compiler won’t rebuild the
object file, even though you changed the command-line options. You need
to type makeclean first, if you are using a command-line compiler such as
MinGW or Cygwin. In CodeBlocks, you choose Build➪Clean. Then you can
compile your program again and run it to see the new output.
And now, here’s a different set of options:
-D HAL2000 -D DEBUG
When we again clean, compile, and run, we see this output. Notice that the
final line is a bit different now that we have DEBUG defined.
Welcome to HAL2000
Total is:
300
*** max ***
10
20
42
*** Predefined Macros ***
This is file C:\0246 - Source Code\BookI\Chapter08\Preprocessor2\main.cpp
This is line 37
Compiled on Apr 7 2009
Compiled at 14:07:14
*** total ***
The value of j is 44850
Using Constants
207
Using Constants
Book I
Chapter 8
You can create such constants in C++ by using the const keyword. When
you create a constant, it works just like a variable, except you cannot change
it later in the program. For example, to declare your company name, you
might use
const string CompanyName = “Bobs Fixit Anywhere Anyhoo”;
Of course, you can modify this string in your code, but later in your code,
you cannot do something like this:
CompanyName = CompanyName + “, Inc.”;
The compiler issues an error for that line, complaining that it’s a constant
and you can’t change it.
After you declare the constant, then, you can use the string called
CompanyName to refer to your company throughout your code. Listing 8-4
shows you how to do this. Note the three constants toward the top called
ParkingSpaces, StoreName, and pi. In the rest of the program, we use
these just like any other variables — except that we don’t try to change
them.
Listing 8-4: Using Constants for Permanent Values
That Do Not Change
#include <iostream>
using namespace std;
const int ParkingSpaces = 80;
const string StoreName = “Joe’s Food Haven”;
const float pi = 3.1415926;
int main()
{
cout <<
cout <<
cout <<
cout <<
cout <<
“Important Message” << endl;
“Here at “ << StoreName << endl;
“we believe you should know” << endl;
“that we have “ << ParkingSpaces;
“ full-sized” << endl;
(continued)
Using Advanced
C++ Features
When you are programming, you may sometimes want a certain fixed value
that you plan to use throughout the program. For example, you might want a
string containing the name of your company, such as “Bobs Fixit Anywhere
Anyhoo”. And you don’t want someone else working on your program to
pass this string into a function as a reference and modify it by mistake,
turning it into the name of your global competitor, “Jims Fixum Anyhoo
Anytime”. That could be bad. Or, if you’re writing a scientific application,
you might want a fixed number, such as pi = 3.1415926 or PeachPi=4.1415926.
208
Using Constants
Listing 8-4 (continued)
cout << “parking spaces for your parking” << endl;
cout << “pleasure.” << endl;
cout << endl;
cout
cout
cout
cout
cout
cout
<<
<<
<<
<<
<<
<<
“We do realize, however, that parking” << endl;
“is tight at “ << StoreName << endl;
“and so we are going to double our” << endl;
“spaces from “ << ParkingSpaces << “ to “;
ParkingSpaces * 2;
“. Thank you again!” << endl << endl;
float radius = 5;
float area = radius * pi * pi;
cout
cout
cout
cout
<<
<<
<<
<<
“And remember, we sell “ << radius;
“ inch apple pies” << endl;
“for a full “ << area << “ square” << endl;
“inches of eating pleasure!” << endl;
return 0;
}
When you run this program, you see the following:
Important Message
Here at Joe’s Food Haven
we believe you should know
that we have 80 full-sized
parking spaces for your parking
pleasure.
We do realize, however, that parking
is tight at Joe’s Food Haven
and so we are going to double our
spaces from 80 to 160. Thank you again!
And remember, we sell 5 inch apple pies
for a full 49.348 square
inches of eating pleasure!
The biggest advantage to using constants is this: If you need to make a
change to a string or number throughout your program, you make the
change only once. For example, if you have the string “Bobs Fixit
Anywhere Anyhoo” pasted a gazillion times throughout your program,
and suddenly you incorporate and need to change your program so the
string says, “Bobs Fixit Anywhere Anyhoo, LLC”, you would need to
do some serious search-and-replace work. But if you have a single constant
in the header file for use by all your source-code files, you need to change
it only once. You modify the header file with the new constant definition,
recompile your program, and you’re ready to go.
There’s a common saying in the programming world that goes like this (sing
along now): “Don’t use any magic numbers.” The idea is that if, somewhere
in your code, you need to calculate the number of cows that have crossed
over the bridge to see if the bridge will hold up and you happen to know
Using Switch Statements
209
const int AverageCowWeight = 632;
Before C++, the original C language did not have constants. The way to use
constants was through preprocessor directives. For example, in C++, you
could have a constant, such as
const int DuckCrossing = 500;
But in C, you couldn’t do this. Your choice would be to use either a nonconstant variable, as in
int DuckCrossing = 500;
or a preprocessor directive, as in
#define DuckCrossing 500
Then you can use DuckCrossing as a substitute for 500 in your program.
The problem here is that if you try to debug your program (see Minibook III,
Chapter 1), the debugger (yes, that’s really the word) knows nothing of the
word DuckCrossing. Therefore, if you see a #define used this way, you
know what it means; however, we recommend that you don’t write new code
that uses this. Use the const keyword instead.
Using Switch Statements
Many times in programming you may want to compare a variable to one
thing, and if it doesn’t match, compare it to another and another and
another. To do this with an if statement, you need to use a whole bunch
of else if lines.
That works out pretty well, but you can do it in another way; you can use the
switch statement.
The approach we’re showing you in this section does not work for all types
of variables. In fact, it works only with the various types of integers and
characters. It won’t even work with character strings. However, when you
Book I
Chapter 8
Using Advanced
C++ Features
the average weight of a cow is 632 pounds, don’t just put the number 632 in
your code. Somebody else reading it may wonder where that number came
from. Instead, make a constant called, perhaps, AverageCowWeight and
set that equal to 632. Then, in your code, use AverageCowWeight anytime
you need that number. Plus, if cows evolve into a more advanced species
and their weight changes, all you need to do is make one change in your
code — you change the header file containing the const declaration. Here’s
a sample line that declares AverageCowWeight:
210
Using Switch Statements
need to do multiple comparisons for integers and characters, using this
approach is very useful.
First, here’s a complete switch statement that you can refer to as we
describe the individual parts in the paragraphs that follow. This compares
x to 1, then 2, and finally includes a catchall section called default if x is
neither 1 nor 2.
int x;
cin > x;
switch (x)
{
case 1:
cout << “It’s 1!” << endl;
break;
case 2:
cout << “It’s 2!” << endl;
break;
default:
cout << “It’s something else!” << endl;
break;
}
To use the switch statement, you type the word switch and then the variable or expression you want to test in parentheses. Suppose x is type int,
and you want to compare it to several different values. You would first type
switch (x) {
The preceding item in parentheses is not a comparison. It’s simply a variable.
You can also put more complex expressions inside the parentheses, but they
must evaluate to either an integer or a character. So, for example, if x is an
integer, you can test
switch (x + 5) {
because x + 5 is still an integer.
After the header line for the switch statement, you list the items you want
to compare the expression to. These have a rather strange format. They
start with the word case, then have the value to compare the expression
against, and then a colon, as in
case 1:
Next is the code to run in the event the expression matches this case (here, 1).
cout << “It’s 1” << endl;
Finally (here’s where it gets really strange) you have the word break. Every
case in the switch statement usually has a break line, which means get out
of the switch statement now! And here’s the exceedingly strange part: If you
forget the break statement, when the computer runs this case, it continues
running the code for the next case! Yes, C++ can seem stupid at times. And
this is one of those rare and less-than-beautiful moments.
Using Switch Statements
211
Note something peculiar at the end of the switch block: The final case is
default. It applies to the situation when none of the preceding cases apply.
With the sample code we gave at the beginning of this section, you can enter
in a number, which gets put in the x variable. The code then tests the value
x against 1; if it matches, it performs the line after the case 1: line. But if it
doesn’t match, it tests it against 2 and performs its lines if it matches. But if
none of those match, it does the code after the default line.
When the computer encounters the break line, it exits the switch statement altogether. So you may be wondering: Why did those goofball authors
include a break line at the very end? Our answer: Tradition. That’s all. It’s
consistent with the other blocks of code. But you certainly don’t need it.
However, if you leave it off, you must remember that if you decide to add any
other cases, you will probably want to put it back in. But on the other hand,
people typically put the default at the end. (You don’t have to, but most
people expect to see it at the end and not in the middle.)
A switch statement only compares a single variable or expression against
several different items. If you have more complex comparisons, you can
instead use a compound if statement.
In many other programming languages, a switch statement is called a case
block. That’s because in those languages, the word that starts the whole
thing is case. Here, however, the whole shebang gets off with a bang on the
word switch. Thus, in C and C++, we call it a switch statement. It’s fun to
be different. Sometimes.
Listing 8-5 is a complete program that demonstrates a switch statement.
It also shows you how you can make a simple antiquated-looking menu program on the console. You don’t need to press Enter after you choose your
menu item; you just press the key for your menu selection. That’s thanks to
the use of getch rather than cin.
Listing 8-5: Making Multiple Comparisons in One Big Block
#include <iostream>
#include <conio.h>
using namespace std;
int main()
{
// Display a list of options.
cout << “Choose your favorite:” << endl;
(continued)
Using Advanced
C++ Features
The default case isn’t required; you can leave it off if you don’t need it.
However, if you do include it, we recommend putting it at the end of the
switch block because that’s where most people expect to find it.
Book I
Chapter 8
212
Supercharging enums with Classes
Listing 8-5 (continued)
cout
cout
cout
cout
cout
<<
<<
<<
<<
<<
“1.
“2.
“3.
“4.
“5.
Apples “ << endl;
Bananas “ << endl;
Fried worms “ << endl;
Poison Apples “ << endl;
Lobster “ << endl;
// Obtain the user’s selection.
char ch = getch();
// Continue getting user selections until the user
// enters a valid number.
while (ch < ‘1’ || ch > ‘5’)
{
ch = getch();
}
// Use a switch to display the user’s selection.
cout << “You chose “ << ch << endl;
switch (ch) {
case ‘1’:
cout << “Apples are good for you!” << endl;
break;
case ‘2’:
cout << “Bananas have plenty of potassium!” << endl;
break;
case ‘3’:
cout << “That’s disgusting!” << endl;
break;
case ‘4’:
cout << “All I wanna know is WHY?” << endl;
break;
case ‘5’:
cout << “Expensive but good taste you have!” << endl;
break;
}
return 0;
}
Supercharging enums with Classes
When you work with classes, you can use a technique called wrapping. In
Minibook I, Chapter 7, we discuss the enum keyword and how you can use
it to create your own types. However, when you print the enumeration, you
don’t see the word, such as red or blue; you see a number. Listing 8-6 is
a simple class that wraps an enum type. You can use this class with enum
ColorEnum, as main demonstrates. When you run this program, you see the
single word red in the console.
Supercharging enums with Classes
213
Listing 8-6: Creating a Class for enums
#include <iostream>
class Colors
{
public:
enum ColorEnum {blue, red, green, yellow, black};
Colors(Colors::ColorEnum value);
string AsString();
protected:
ColorEnum value;
};
Colors::Colors(Colors::ColorEnum initvalue)
{
value = initvalue;
}
string Colors::AsString()
{
switch (value)
{
case blue:
return “blue”;
case red:
return “red”;
case green:
return “green”;
case yellow:
return “yellow”;
case black:
return “black”;
default:
return “Not Found”;
}
}
int main()
{
Colors InkColor = Colors::red;
cout << InkColor.AsString() << endl;
return 0;
}
In the preceding section, “Using Switch Statements,” our switch statement
did not include any break statements. Instead we have a return statement.
The return causes the computer to exit the function entirely, so you have
no reason to worry about getting out of the switch statement. You may
wonder why the switch statement includes a default clause. After all, it
will never get called. In this case, if you don’t supply a default clause, the
compiler displays the following message:
warning: control reaches end of non-void function
Using Advanced
C++ Features
using namespace std;
Book I
Chapter 8
214
Supercharging enums with Classes
Adding cout capabilities
It would be nice if the Colors class allowed
you to just call cout, as in cout << Ink
Color << endl; without having to call Ink
Color.AsString() to get a string version. C++ has
a capability called operator overloading. When
you type something cout << followed
by a variable, you are calling a function: <<.
Several versions of the << functions (they are
overloaded) are available; each has a different type. For example, int handles the cases
when you write out an integer, as in int x
= 5;, and then cout << x;. Because the
<< function doesn’t use parentheses, it is an
operator.
To add cout capabilities to your class, just
write another << function for your class. Here’s
the code. This is not a class member function;
it goes outside your class. Add it to Listing 8-6
anywhere after the class declaration but
before main. Here goes:
ostream& operator << (ostream& out,
Colors& inst)
{
out << inst.AsString();
return out;
}
Because this function is an operator, you have
to throw in the word operator. The type of
cout is ostream, incidentally; thus, you take
an ostream as a parameter, and you return
the same ostream. The other parameter is
the type you are printing: in this case, it’s a
Colors instance, and once again, it’s passed
by reference. After you add this code, you can
change the line cout << InkColor.As
String() << endl; to simply
cout << InkColor << endl;
Whenever possible, add the code required for your application to compile
without warnings. Adding the default clause simply ensures that the
AsString function always returns a value, no matter what happens.
The expression Colors::red may be unfamiliar to you. That means we’re
using the red value of the ColorEnum type. However, because ColorEnum
is declared inside the class Color, we cannot just say red. We have to
first say the class name, then two colons, and then the value. Thus we type
Colors::red.
In main, we created the InkColor instance and set it not to a Color object
but to an enum! We just violated An Important Rule about setting things
equal to something of the same type. Why? C++ has a neat little trick: You
can create a constructor that takes a certain type. In this case we have a constructor that takes a ColorEnum. Then when you create a stack variable
(not a pointer) you can just set it equal to a value of that type. The computer
will implicitly call the constructor, passing it that value.
Working with Random Numbers
215
Working with Random Numbers
Book I
Chapter 8
The computer geniuses of the last century have come up with algorithms
that generate pseudorandom numbers. These are numbers that are almost
random or seemingly random. They’re sufficiently random for many
purposes.
The only catch with these random number generators is that you need to
seed them. But a computer scientist beheld a great idea. The current time is
random. If we run a program and you run a program, most likely we won’t
start running them at precisely the same moment in time. Our scientist realized that would be a good starting point for a random number generator. In
Listing 8-7, we obtain the current time to start the random number generator. To do that, we include time.h. We create a variable called now of a special type called time_t (which is just a number), and then we call the time
function, passing the address of now. That gives us the number of seconds
since January 1, 1970. Then we call srand, passing that time. That process
seeds the generator.
Then we print several random numbers by calling rand, which returns
a random number. But we noticed something strange when we ran this
program. Each time, the first call to rand got just a little bit bigger, and it
seemed to be affected by the current time. With each second that passed,
the supposedly random number got just a bit bigger. The rest seemed fine,
so we decided to skip the first random number. Thus, right after we seed the
random number, we call rand and ignore the return value.
Then we go ahead and print five random numbers. But we wanted to limit
the numbers in the range from 0 through 99, so we took the modulus 100 of
the number. (That’s the remainder when we divide the number by 100.) You
can choose a different number than 100 if you need a different range.
Listing 8-7: Seeding the Random Number Generator
#include <iostream>
using namespace std;
int main()
{
// Re-seed the random-number generator
time_t now;
time(&now);
(continued)
Using Advanced
C++ Features
Sometimes, you need the computer to generate random numbers for you.
But computers aren’t good at doing things at random. We humans can toss
dice or flip a coin, but the computer must do things in a predetermined
fashion.
216
Storing Data in Arrays
Listing 8-7 (continued)
srand(now);
rand();
// Print out a list of random numbers
for (int i=0; i<5; i++)
{
cout << rand() % 100 << endl;
}
return 0;
}
The first time we ran Listing 8-7, we saw the following output:
19
69
85
83
47
The second time, we saw this output. It’s very different than before:
79
67
38
72
73
Storing Data in Arrays
Most programming languages support a data structure called an array. An
array is a list of variables, all stored side by side in a row. You access them
through a single name. Each variable in the array must be of the same type.
When you create an array, you specify how many items the array holds. For
example, you can have an array of 100 integers. Or you can have an array of
35 strings or an array of 10 pointers to the class BrokenBottle. If the code
you’re working with represents a type, you can create an array out of it.
When you create an array, you give it a name. You can access the array’s
elements (items) by using that name followed by an index number in brackets. The first element is always 0. Thus, if you have an array of five integers
called AppendixAttacks, the first element is AppendixAttacks[0]. The
second is AppendixAttacks[1], then AppendixAttacks[2], Appendix
Attacks[3], and finally AppendixAttacks[4].
Because an array starts with element number 0, the final element in the
array has an index that is 1 less than the size of the array. Thus, an array of
89 elements has indexes ranging from 0 to 88.
Storing Data in Arrays
217
Declaring and accessing an array
Here’s how you declare an array:
This declares an array of 10 integers called GrilledShrimp. You first
put the type (which is really the type of each element in the array), then
the name for the array, and then the number of elements in brackets. And
because this declares 10 integers, their indexes range from 0 to 9.
To access the first element of the array, you put the number 0 in brackets
after the type name, as in
GrilledShrimp[0] = 10;
Sometimes people call the act of referring to a single element in the array as
subscripting. But we avoid that word. Our brains prefer simpler words.
Often people use a loop to fill in an array or access each member. People
usually call this looping through the array. Listing 8-8 shows an example.
Listing 8-8: Using a Loop to Loop Through the Array
#include <iostream>
using namespace std;
int main()
{
int GrilledShrimp[5];
for (int i=0; i<5; i++)
{
GrilledShrimp[i] = i * 2;
cout << GrilledShrimp[i] << endl;
}
return 0;
}
If you use a for loop to go through all the elements in the array, start your
loop at 0. You end the loop with 1 less than the size of the array. If you store
the array size in the variable size and your loop index is i, the middle
clause in your for loop can be either i < size or i <= size - 1. Do
not use i <= size. That goes 1 more than you want.
When you use arrays, don’t go beyond the array bounds. Due to some old
rules of the early C language, the compiler does not warn you if you write a
loop that goes beyond the upper boundary of an array. You may not get an
error when you run your program, either.
Using Advanced
C++ Features
int GrilledShrimp[10];
Book I
Chapter 8
218
Storing Data in Arrays
Arrays of pointers
Arrays are particularly useful for storing pointers to objects. If you have lots
of objects of the same type, you can store them in an array.
Although you can store the actual objects in the array, most people don’t.
Most people fill the array with pointers to the objects. To declare an array of
pointers to objects, remember the asterisk in the type declaration, like this:
CrackedMusicCD *missing[10];
Listing 8-9 declares an array of pointers. In this example, after declaring the
array, we fill the elements of the array with 0’s. Remember, each element is
a pointer; that way, we can immediately know whether the element points
to something by just comparing it to 0. If it’s 0, it’s not being used. If it has
something other than 0, it has a pointer in it.
Listing 8-9: Using an Array to Store a List of Pointers to Your Objects
#include <iostream>
using namespace std;
class CrackedMusicCD
{
public:
string FormerName;
int FormerLength;
int FormerProductionYear;
};
int main()
{
CrackedMusicCD *missing[10];
for (int i=0; i<10; i++)
{
missing[i] = 0;
}
return 0;
}
If you want to create a whole group of objects and fill the array with pointers
to these objects, you can do this kind of thing:
for (int i=0; i<10; i++)
{
missing[i] = new CrackedMusicCD;
}
Storing Data in Arrays
219
Because each element in the array is a pointer, if you want to access the
member variables or member functions of one of the objects pointed to by
the array, dereference the pointer by using the shortcut -> notation:
This example line accesses the FormerName member variable of the object
whose address is in the first position of the array.
Though the array contains pointers to objects, because of the mental connection between a pointer and the object it points to, some people just refer
to the objects in the array.
When you’re finished with the objects in the array, you can delete the
objects by calling delete for each member of the array, as in this code:
for (int i=0; i<10; i++)
{
delete missing[i];
missing[i] = 0;
}
In the preceding code, we clear each array element to 0. When you are working with arrays of pointers, we recommend that you do the same. That way,
the pointer is reset to 0 and no longer points to anything after its object is
gone.
Passing arrays to functions
Sometimes you need to pass an entire array to a function. While passing
entire objects to arrays can be unwieldy, passing an entire array can be
dangerous. Arrays can be enormous, with thousands of elements. If each element is a pointer, each element can be several bytes. If you pass a really big
array onto the stack, you may overflow your program’s stack.
As with passing objects, your best bet is to pass an array’s address. You
pass to a function a pointer to the array. But passing an array’s address to a
function is confusing to code. Listing 8-10 is a sample that passes an array,
without worrying about any pointers and addresses.
Listing 8-10: Passing an Array to a Function by Declaring
the Array in the Function Header
#include <iostream>
using namespace std;
const int MyArraySize = 10;
void Crunch(int myarray[], int size)
(continued)
Using Advanced
C++ Features
missing[0]->FormerName = “Shadow Dancing by Andy Gibb”;
Book I
Chapter 8
220
Storing Data in Arrays
Listing 8-10 (continued)
{
for (int i=0; i<size; i++)
{
cout << myarray[i] << endl;
}
}
int main()
{
int BigArray[MyArraySize];
for (int i=0; i<MyArraySize; i++)
{
BigArray[i] = i * 2;
}
Crunch(BigArray, MyArraySize);
return 0;
}
When you run this program, it prints the nine members of the array. We
declared the parameter in the function header: We declared an array but
did not specify a size. This means that you can pass an array of any size to
the function. We included a size parameter, so the function knows the size
of the array that we’re passing in. Therefore, we included the array size
when we called this function from main. Also, we used a constant rather
than 10 for the array size; then if we decide later to modify the program
by changing the size of the array, we need to change only the one constant
at the top of the program. Otherwise, we risk missing one of the 10s.
How do you pass a pointer to an array? There’s a pointer symbol in the data
type for argv. argv is a pointer to a set of character pointers.
That’s exactly what we did in Listing 8-10. We did not actually pass the array
itself. We passed the array’s address. When you pass an array this way, the
compiler writes code to pass a pointer to the array. You don’t worry about it.
The name of an array is actually a pointer to the first element in the array.
In the main of Listing 8-10, when we call the function, we pass the array
name, BigArray. The compiler treats this name as the first array element
address.
Thus, BigArray is the same as &(BigArray[0]). (We put parentheses
around the BigArray[0] part so the computer knows that the & refers to
the combination of BigArray[0], not just BigArray.) So you could have
used this in the call:
Crunch(&(BigArray[0]), MyArraySize);
221
Storing Data in Arrays
But there’s no reason to do that. Just pass BigArray. It’s the same thing!
Book I
Chapter 8
The name of the array is a pointer to the array.
You can do interesting things when you add numbers to and subtract numbers from a pointer to an array element that is stored in a pointer variable as
an address. If you take the address of an element in an array and store it in a
variable, such as one called cur (for current), as in
cur = &(Numbers[5]);
where Numbers is an array of integers, you can access the element at
Numbers[5] by dereferencing the pointer, as in the following:
cout << *cur << endl;
Then you can add and subtract numbers from the pointer, like these lines:
cur++;
cout << *cur << endl;
The compiler knows how much memory space each array element takes.
When you add 1 to cur, it advances to the next element in the array. And so
the cout that follows prints the next element, in this case, Numbers[6].
Listing 8-11 shows an example of moving about an array. Note that we
declare a variable called cur, which is a pointer to an integer. The array
holds integers, so this pointer can point to elements in the array.
We start cur out pointing to the first element. The array name is the address
of the first element, so to accomplish that we just typed
cur = Numbers;
That puts the address of the first element of the array in the variable cur.
Listing 8-11:
Moving by Using Pointer Arithmetic
#include <iostream>
using namespace std;
int main()
{
int Numbers[100];
for (int i=0; i<100; i++)
{
(continued)
Using Advanced
C++ Features
Adding and subtracting pointers
222
Storing Data in Arrays
Listing 8-11 (continued)
Numbers[i] = i * 10;
}
int *cur;
cur = Numbers;
cout << *cur
cur++;
cout << *cur
cur++;
cout << *cur
cur += 3;
cout << *cur
cur--;
cout << *cur
<< endl;
<< endl;
<< endl;
<< endl;
<< endl;
return 0;
}
When you run the program, here is the output you see:
0
10
20
50
40
In the code, the ++ and -- operators add 1 to and subtract 1 from the pointer.
We also directly added a 3 to the pointer to advance it three “notches” in the
array. You can also subtract from a pointer, as in
cur -= 2;
You cannot do multiplication and division with pointers.
Book II
Understanding
Objects and Classes
Engine
Electric
Road
AirConditioning
Mediator
Headlights
+PartChanged(inPart : CarPart)
Radio
Wheels
Brakes
Contents at a Glance
Chapter 1: Planning and Building Objects. . . . . . . . . . . . . . . . . . . . . . .225
Recognizing Objects .................................................................................... 225
Encapsulating Objects ................................................................................ 230
Building Hierarchies .................................................................................... 236
Discovering Classes..................................................................................... 248
Chapter 2: Describing Your Program with UML . . . . . . . . . . . . . . . . . .255
Moving Up to UML ....................................................................................... 255
Building with UML and the Unified Process............................................. 264
Moving Forward with UML ......................................................................... 273
Chapter 3: Structuring Your Classes with UML . . . . . . . . . . . . . . . . . .275
Drawing Classes ........................................................................................... 276
Building Components .................................................................................. 282
Deploying the Software ............................................................................... 285
Chapter 4: Demonstrating Behavior with UML . . . . . . . . . . . . . . . . . . .287
Drawing Objects .......................................................................................... 287
Casing Out the Use Cases ........................................................................... 289
Sequence Diagrams ..................................................................................... 293
Collaboration Diagrams .............................................................................. 299
Activity Diagrams ........................................................................................ 300
State Diagrams ............................................................................................. 302
Chapter 5: Modeling Your Programs with UML . . . . . . . . . . . . . . . . . .305
Using UML Goodies ..................................................................................... 305
Free to Be UML............................................................................................. 309
C++ and UML ................................................................................................ 312
Chapter 6: Building with Design Patterns . . . . . . . . . . . . . . . . . . . . . . .317
Introducing a Simple Pattern: the Singleton ............................................ 318
Watching an Instance with an Observer................................................... 322
Mediating with a Pattern ............................................................................ 330
Chapter 1: Planning and
Building Objects
In This Chapter
✓ Recognizing objects so you can create classes
✓ Encapsulating classes into self-contained capsules
✓ Building hierarchies of classes through inheritance
✓ Discovering classes
S
tep outside for a moment and look down. What is the thing you are
standing on? (Hint: It’s giant, it’s made of rock and sand and stone and
molten lava, and it’s covered with oceans and land.) The answer? A thing!
(Even a planet is a thing.) And now go back inside. What’s the thing that you
opened, the thing with a doorknob? It’s a thing, too! It’s a slightly different
kind of thing, but a thing nevertheless. And what are you inside? Okay, you
get the idea. Everything you can imagine is a thing. Or, to use another term,
an object. Remember that word: object.
Over the years, researchers in the world of computer programming (now,
doesn’t that sound like an exciting job?) have figured out that the best way
to program computers is to divide whatever it is you’re trying to model into
a bunch of objects. These objects have capabilities and characteristics.
(Eventually they have relationships, but that comes later.)
In this chapter, we show you how to make use of objects to create a software application. In the process, you get to twist some of the nuts and bolts
of C++ that relate to objects and get tips on how to get the most out of them.
Recognizing Objects
Let’s get to the meat of it: Think of an object as any thing that a computer
can describe. (Object = thing. How’s that for an obvious definition?) Just as
physical things have characteristics, such as size, weight, or color, objects
in a program can have attributes — say, a particular number of accounts, an
engine, or even other objects that it contains, just as a car contains engines,
doors, and other objects.
Further, just as real-world things have uses — for example, serving as containers, vehicles, or tools — an object in a program has capabilities. For
226
Recognizing Objects
example, it might be able to withdraw money or send a message or connect
to the Internet.
Here’s an example of an object: Outside, in front of your house, you might
see a mailbox. That mailbox is an object. (See how easy this is?) A mailbox
is a useful device. You can receive mail, and depending on the style (kind)
of mail, you can send mail. (The style of mail is important — you can send
a letter because you know how much postage to attach, but you can’t send
a package because the amount of postage is unknown.) Those are the mailbox’s capabilities. And what about its characteristics? Different mailboxes
come in different shapes, sizes, and styles. So those are three characteristics.
Now some mailboxes, such as the kind often found at apartment buildings, are great big metal boxes with several little boxes inside, one for each
apartment. The front has doors for each individual box, and the back has a
large door for the mail carrier to fill the boxes with all those wonderful ads
addressed to your alternate name, Resident.
In this case, you could think of the apartment mailbox as one big mailbox
with lots of little boxes, or you could think of it as a big container for smaller
mailboxes. In a sense, the little boxes each have a front door that a resident
uses, and the back of each has an entry that the mail carrier uses. The back
opens when the big container door opens.
So think about this: The mail carrier interacts with the container, which
holds mailboxes. The container has a big door, and when that door opens,
it exposes the insides of the small mailboxes inside, which open, too.
Meanwhile, when a resident interacts with the system, he or she interacts
with only his or her own particular box.
Take a look at Figures 1-1 and 1-2. Figure 1-1 shows the general look of the
back of the mailbox container, where the mail carrier can open the container
and put mail in all the different boxes. Figure 1-2 shows the front of the container, with one box open so a resident can take the mail out.
Figure 1-1:
The outer
object in
this picture
is a mailbox
container.
Recognizing Objects
227
Figure 1-2:
The smaller
inner
objects in
this picture
are the
mailboxes.
Book II
Chapter 1
There is no hard and fast rule about naming your classes. However,
Microsoft recommends that developers use a singular name for objects and
a plural name for collections. A single mailbox object would appear as part
of a mailboxes collection. Using this naming convention makes it easier for
other developers to understand how your code works. Of course, the most
important issue is consistency — once you decide on a naming convention,
use the same convention all the time.
Observing the mailboxes class
What can you say about the Mailboxes collection object?
✦ The Mailboxes collection contains 16 mailbox instances.
✦ The Mailboxes collection object is 24 inches by 24 inches in front and
back, and it is 18 inches deep. (Really, it’s on legs, but we’re not going to
consider those to be part of it.)
✦ When the carrier unlocks the mailboxes and pulls, its back door opens.
Planning and
Building Objects
So far, there are two objects here: the container box and the mailboxes. But
wait! There are multiple mailboxes. So, really, we have one container box
and multiple mailboxes. But each mailbox is pretty much the same, except
for a different lock and a different apartment number, right? In Figure 1-2,
each box that’s open is an example of a single mailbox. The others are also
examples of the type of object called mailbox. In Figure 1-2, you can see 16
examples of the objects classified as mailbox. In other words, Figure 1-2
shows 16 instances of the class called mailbox. And all those mailboxes are
inside an instance of the class that we would probably call mailboxes.
228
Recognizing Objects
✦ When the mailboxes’ back door opens, it exposes the insides of each contained mailbox.
✦ When the mail carrier pushes on the door, the door shuts and relocks.
(Okay, really, the mail carrier probably has to lock it, but we’re not
going to worry about that part. We’d rather keep this example nice and
simple.)
By using this list, you can discover some of the characteristics and capabilities of mailboxes. The following list shows its characteristics:
✦ Width: 24 inches
✦ Height: 24 inches
✦ Depth: 18 inches
✦ Mailboxes: 16 mailbox objects are inside it
And here’s a list of some of the mailboxes’ capabilities:
✦ It can open its door. (Well, some external thing — such as a human —
opens the door, but we’ll get to that shortly.)
✦ It can give the mail carrier access to the mailboxes.
✦ It can close its door. (And yes, again, some external force such as a push
causes the door to close, but again, we’ll get to that . . . right now!)
Think about the process of the carrier opening or closing the door. Here we
seem to have a bizarre thing: The mail carrier asks mailboxes to close its door,
and the door closes. That’s the way you need to look at modeling objects:
Nobody does anything to an object. Rather, someone asks the object to do
something, and the object does it itself.
For example, when you reach up to shove a slice of pizza into your mouth,
your brain sends signals to the muscles in your arm. Your brain just sends
out the signals, and your arms just move up, and so does the pizza. The
point is that you make the command; then the arms carry it out, even though
you feel like you’re causing your arms to do it.
Objects are the same way: They have their capabilities, and we tell them to
do their job. We don’t do it for them. At least, that’s the way computer scientists view it. We know: It’s a stretch sometimes. But the more you think in
this manner, the better you understand object-oriented programming.
The mailboxes contain 16 mailboxes. In C++, that means the Mailboxes
collection would have as member variables 16 different Mailbox instances.
These Mailbox instances could be an array or some other collection, and
most likely the array would hold pointers to Mail instances.
Recognizing Objects
229
Observing the mailbox class
Consider the characteristics and capabilities of the mailboxes. Each mailbox
has these characteristics:
✦ Width: 6 inches
✦ Height: 6 inches
✦ Depth: 18 inches
✦ Address: A unique integer. But what number exactly? That depends on
which mailbox you’re talking about.
And each mailbox has these capabilities:
✦ It can close its door.
Notice we wrote the capabilities from the perspective of the mailbox, not
from the person opening the mailbox.
Now think about the question regarding the address printed on the mailbox.
What number goes on it? There are 16 different mailboxes, and each one
gets a different number. So we can say this: The mailbox class includes an
address, which is an integer. Each instance of the mailbox class gets its own
number. The first may get 1, the second may get 2, and so on.
And so you have two concepts here for the mailboxes:
✦ Mailbox class: This is the general description of a mailbox. It includes
no specifics, such as the actual address. It simply states that each mailbox has an address.
✦ Mailbox instance: This is the actual object. The mailbox instance
belongs to the class mailbox. There can be several instances of the mailbox class.
Think of the mailbox class as a cookie cutter. Or, in C++ terminology, the
type. The mailbox instance is an actual example of the class. In C++, we can
create a variable of class Mailbox, and set its Address integer to 1. Then
we can create another variable of class Mailbox and set its Address integer to 2. Thus, we’ve created two distinct mailbox objects, each of class
Mailbox.
But all these have a width of 6, a height of 6, and a depth of 18. These are the
same throughout the mailbox. Thus, we would probably not set those manually; instead, we would probably set them in the constructor for the class
Mailbox. Nevertheless, the values of width, height, and depth go with each
instance, not with the class; and the instances could, conceivably, each have
Planning and
Building Objects
✦ It can open its door.
Book II
Chapter 1
230
Encapsulating Objects
their own width, height, and depth. However, when we design the class, we
would probably put some stipulation in the class that these member variables cannot be changed. (We would do that by making them private and
including a single function for each of them that retrieves their values.)
Finding other objects
If you are dealing with a Mailboxes instance and an instance of Mailbox,
you can probably come up with some other classes. When we start considering the parts involved, we can think of the following objects:
✦ Lock: Each Mailbox instance would have a Lock, and so would the
Mailboxes instance.
✦ Key: Each lock would require a Key.
✦ Mail: Each Mailbox instance can hold several Mail instances. The
carrier puts these in the Mailbox instances, and the residents take
them out.
✦ LetterOpener: Some residents would use these to open the Mail.
So you now have four more types of objects (Lock, Key, Mail, and
LetterOpener). But are these classes necessary? Their need depends on
the application you’re building. In this case, we’re modeling the mailbox
system simply as an exercise. Therefore, we can pretty much choose which
classes we need. But if this were an actual program for a post office, for
example, you would have to determine whether the classes are necessary
for the people using the software. If the application is a training exercise for
people learning to be mail carriers, the application may need more detail,
such as the Key objects. If the application were a video game, it may need all
the classes we mentioned and even more.
In deciding if you need certain classes, you can follow some general rules.
First, some classes are so trivial or simple that it doesn’t make sense to
include them. For example, a letter opener serves little purpose beyond
opening mail. If you’re designing a Mail class, you would probably have
a capability Open the envelope. Because some people would use a letter
opener and others wouldn’t, you have little reason to pass into that function a LetterOpener instance. Therefore, you would probably not include
a class as trivial as LetterOpener. But then again, if the program teaches
residents how to use the mailbox (a strange idea, we know), it might include
a section on How to use your letter opener. Yes, that’s kind of silly, but you
get the idea: Whether you include the class depends on the situation.
Encapsulating Objects
People have come up with various definitions for what exactly object-oriented
means. And the phrase various definitions in the last sentence really means
Encapsulating Objects
231
that there aren’t simple discussions around a table at a coffeehouse about
what the term means. Rather, there are outright arguments! Believe it or not,
one of the central points of contention is whether C++ is object-oriented.
And in such arguments (sorry, discussions), one of the words that usually
pops up is encapsulation. People who defend C++ as being object-oriented
point out that it supports encapsulation.
Instead of arguing, let’s just all agree that yes, C++ lets you program objects
and classes. Now that we’ve put that argument to rest and can all live peacefully, what exactly does encapsulation mean?
For example, to model a cash register, it would likely be a class. We’d encapsulate the cash register by putting everything about the register (its capabilities and characteristics) into a single class. In C++, the capabilities would be
member functions and the characteristics would be member variables.
When we create the class, we would make some of the member variables
and member functions public; we would make others private. (Some members can be protected, so derived classes could access them, but they still
would not be public.) What exactly would private and protected member
variables and member functions be?: the parts that you don’t want other
functions modifying. For example, the cash register would probably have
a value inside it representing the total dollar amount that the register
contains. But the functions that use the class would not directly modify
that value. Instead, they would call various member functions to perform
transactions. One transaction might be Sale. Another transaction might be
Refund; another might be Void. These would be the capabilities of the register in the form of public methods, and they would modify the cash value
inside the register, making sure that it balances with the sales and returns.
If a function could just modify the cash value directly, the balance would get
out of whack.
The cash amount, therefore, would be a private or protected member variable. It would be hidden from the other functions and classes. As for which
it would be, private or protected, that depends on whether we expect to
derive new classes from the cash register class and whether we want these
new classes to have access to the members. In the situation of a cash register, we would probably not want other parts of the program to access
the cash register if we’re worried about security. But on the other hand,
if we think that we’ll be creating derived classes that have added features
involving the cash (such as automatically sending the money to a bank via
an electronic transaction), we would want the members to be protected. (In
Book II
Chapter 1
Planning and
Building Objects
First, think about the word itself. A big part of it is capsule. A capsule is a
small container. In the bigger picture, it’s, well, a self-contained container
that contains things. On the computer world, encapsulation refers to the process of creating a standalone object that can take care of itself and do what
it must do, while holding on to information.
232
Encapsulating Objects
general, we choose protected, rather than private, as we have been bitten
too many times by using classes that have a gazillion private members. In
those cases we’re unable to derive useful classes because everything is
private!)
Encapsulation, then, is this: You combine the methods and member variables into a single entity, hiding some of them and making some accessible.
The accessible ones together make up the interface of the object. And finally
(this is important!), when you create an object, you create one that can
perform on its own. In other words, the users of the class tell it what to do
(such as perform a sales transaction) by calling its member functions and
supplying parameters, and the object does the work. The calling function
doesn’t care how the object does its thing, just that it can do it. For example,
a cash register class knows how to perform a sales transaction. As the
designer of the class, don’t force users to first call Sale, and then call separate functions to manually modify the amount of cash in the register and
modify the running total. Rather, the Sale function does all the hard work,
and users of the class don’t have to worry about how that work takes place.
And now the really big question: Why do you need to know the word encapsulation? Because it’s a common term that computer scientists like to throw
around. If they use it, however, they are likely to use it as a verb: “Look at
me! I am going to encapsulate this information into an object!”
But the process matters more than the word itself. When you design objects
and classes, you encapsulate your information into individual objects. If you
keep the process in mind, you will be better off. Here are the things you need
to do each time you design a class:
✦ Encapsulate the information. Combine the information into a single
entity that becomes the class. This single entity has member variables
representing its characteristics and member functions representing its
capabilities.
✦ Clearly define the public interface of the class. Provide a set of functions that are public (and possibly member variables that are public,
although it’s best to keep them protected or private), and make the rest
of the members either protected or private.
✦ Write the class so that it knows how to do its own work. The class’s
users should need only to call the functions in the public interface, and
these public functions should be simple to use.
✦ Think of your class as a black box. The object has an interface that
provides a means so that others can use it. The class includes details of
how it does its thing; users only care that it does it. In other words, the
users don’t see into the class.
Encapsulating Objects
233
Accessing read-only member variables
Suppose that you have a class that contains a
member variable, and you want to allow users
to retrieve the value of the variable but not
change it. For example, in the Dog class, you
might set the weight in the constructor, and
that’s it — after that, users can get the weight
but can’t change it. The way to do that is to
simply not have a method that sets the value.
Instead, you have a method that only retrieves
the value. Thus, the Dog class would have the
GetWeight method, but you would not have
the SetWeight method. Then users can only
read the value, not set it.
Book II
Chapter 1
A common saying in object-oriented programming is that you should never
make your member variables public. The idea is that if users of the object
can easily make changes to the object’s member variables, a big mess
could result. (For example, making the cash member variable public in a
CashRegister class is asking for functions that just modify it directly,
screwing up the balance.) By allowing users to only call member functions,
you can put checking code inside to handle bad situations. For example, if you
have a class called Dog that contains a member variable called Weight,
you wouldn’t want a user of the class to take a Dog object and set the Weight
to a negative number. But if you make the Weight member public, that’s
exactly what any user can do.
So instead, you make the Weight member either private or protected, and
then give the class access methods (other languages use the term properties
instead of access methods — see the “Access methods versus properties”
sidebar for details). For example, you might have a method called SetWeight.
It would take an integer parameter and then check the parameter to make
sure that it’s greater than 0. If it is, only then would it save the number in the
Weight member variable. For example, the class might look like this:
class Dog
{
protected:
int Weight;
public:
void SetWeight(int NewWeight);
};
Planning and
Building Objects
✦ Never change the class interface after you publish the class. Many
application errors occur when a developer changes how methods,
events, or access methods in the class work after publishing the class.
If application developers rely on one behavior and the class developer
introduces a new behavior, all applications that rely on the original
behavior will break. You can always add to a class interface but never
subtract from it or modify it. If you find that you must introduce a new
behavior to Sale, add the new behavior to a new method, Sale2.
234
Encapsulating Objects
And the code for the function that sets the weight might look like this:
void Dog::SetWeight(int NewWeight)
{
if (NewWeight > 0)
{
Weight = NewWeight;
}
}
Note that the Weight member is protected, and the SetWeight is public.
Thus the users of the class can’t modify the Weight member directly; they
can only call SetWeight to set it, which provides built-in checking. Now
this works all fine and dandy, except when the users of the class need to find
Fido’s weight to make sure that he’s not rapidly shrinking. The only problem
is that Weight is protected, so the user can’t read it. So you need to add a
function that retrieves the value of Weight, as in the following:
int Dog::GetWeight()
{
return Weight;
}
We must modify the class to accommodate this function:
class Dog
{
protected:
int Weight;
public:
void SetWeight(int NewWeight);
int GetWeight();
};
Now when you use this class, instead of accessing the Weight variable
directly, you use the access methods, as in the following sample lines:
int main()
{
Dog fido;
fido.SetWeight(10);
cout << fido.GetWeight() << endl;
fido.SetWeight(-5);
cout << fido.GetWeight() << endl;
return 0;
}
To set the weight, you call SetWeight. Note in the first call to SetWeight,
we’re passing a legitimate value, 10. And when the next line runs, we see
the number 10 appear on the console. But in the second call to SetWeight,
we’re passing an invalid weight, –5. The SetWeight function rejects this
value and doesn’t change the weight. So the second time we write the weight
by calling GetWeight, we still see 10. The number did not change. The –5
value was rejected, and the weight remained the same.
Encapsulating Objects
235
Access methods versus properties
In C++, the way to impose such limitations is
to make the member variable private, and then
write two member methods, one for reading
the value of the variable and one for setting the
value. The method that sets the value would
impose the limits; if the caller tries to set the
value to 101, for example, the method might
automatically knock the value down to 100, if
that’s the limit you’re imposing. And similarly, if
you want people to be able to read the value but
not change it, you might provide only a method
that returns the value, and not a method for
modifying the variable.
These two methods — one for setting a member
variable, and one for “getting” (that is, reading) a member variable — are called accessor
methods. Some languages besides C++ let you
combine these member methods into what are
called properties. Since C++ doesn’t support
properties, we can’t really show you sample
code, but the idea would be like this:
mydog.weight = 10
cout << mydog.weight << endl;
Although the first line looks like we’re just storing a 10 in the weight variable, if this were a
property-based language, instead such code
would cause your “property setter” method
to get called. In that method you’d write code
that tests the value and makes sure it’s a valid
value before storing it. Similarly, the second
line, which appears to just read the weight
variable, would indirectly call the method that
retrieves the value of weight. So the code
would perform just like this code:
mydog.SetWeight(10);
cout << mydog.GetWeight() <<
endl;
See how we’re calling two methods, one that
sets the weight and one that gets the weight?
That’s the idea behind properties. They let
you write code that appears to read and write
member variables, but in fact the code calls
“getter” and “setter” methods, respectively.
(When working with other languages, you can
write properties such that they let the user read
values, write values, or read and write values,
so the background functionality still relies on
what amounts to two methods — one for setting the value and one for getting the value.)
C++ doesn’t have properties, but many modern
languages do. Learning about them now while
studying objects will help you understand properties should you end up using other languages
that support them.
Book II
Chapter 1
Planning and
Building Objects
Many modern languages support a third aspect
to classes called properties, in addition to the
usual member methods and member variables.
C++ doesn’t support a named entity called
properties, but it does support the equivalent methodality. In your programming career
you’re likely to move between lots of different
languages. And so we want to take a moment
to introduce you to properties, which are found
in languages such as C#, VB.NET, and Object
Pascal. Properties are essentially a combination of member variables and methods. Think
of a public member variable in C++. Anyone
using an object can freely modify a member
variable. But sometimes when you’re creating
a class, you want to place restrictions on what
people can do with the member variables. For
example, you might want to limit the access to
reading the member variable but not changing
it. Or you might want to restrict what values
the variable can take on, such as limiting the
variable to integers between 1 and 100 and not
allowing it to contain any other integers.
236
Building Hierarchies
When you use access functions, you can do much more than just guard
against invalid values and return the current value. The Set function, for
example, can process the value and make calculations or modify it. For
example, the Dog class might have a maximum weight. If the user passes a
larger weight to the SetWeight function, the function could change it to the
maximum weight. For example, the following function limits the weight to an
upper level of 100 and a lower level of 1:
void Dog::SetWeight(int NewWeight)
{
if (NewWeight < 0)
{
Weight = 0;
}
else if (NewWeight > 100)
{
Weight = 100;
}
else
{
Weight = NewWeight;
}
}
You can use a Get function to send a modified form of a member variable. For example, if you have a SalesTransaction class that contains
a CreditCardNumber variable, which is a string containing the digits
and the spaces, you may not want to reveal only the last four digits
instead of the entire number. A Get function, then, might retrieve the
CreditCardNumber, extract only the final four digits, and build a string of
the form “XXXX XXXX XXXX 1234.” It would then return that string, rather
than the actual CreditCardNumber value.
Building Hierarchies
One of the great powers in C++ is the capability to take a class and build
new classes from it. When you use any of the available C++ libraries, such
as the Standard C++ Library, you will probably encounter many classes,
sometimes dozens of classes, that are all related to each other. Some classes
are derived from other classes, although some classes are standalone. This
gives programmers great flexibility. And it’s good to be flexible. The blood
flows more easily through your system, and you will be more relaxed. And
for programming, it’s good for a class library to be flexible, too, because
when you are using a flexible library, you have many choices in the different
classes you want to use.
Establishing a hierarchy
When you design a class, you can derive a new class from that original base
class. The new class inherits the capabilities and characteristics of the base
Building Hierarchies
237
class. Normally, the members that are public in the base class will remain
public in the derived class. The members that are protected in the base
class will remain protected in the derived class; thus if you derive even
further, those final classes will also inherit the protected members. Private
members, however, live only in the base class.
Suppose you have a base class called FrozenFood, and from there you
derive a class called FrozenPizza. From FrozenPizza, you then derive a
class called DeepDishPizza. FrozenPizza is at the top of the hierarchy. It
includes various members common to all classes.
Now suppose the FrozenFood class has the following member variables:
✦ intWeight (protected): This is a protected variable that represents the
weight of the product.
The FrozenFood class also has these member functions:
✦ constructor: The constructor is public and takes a price and a weight as
a parameter. It saves them in the Price and Weight member variables,
respectively.
✦ GetPrice: This is a public access method that returns the value in the
private Price member variable.
✦ GetWeight: This is a public access method that returns the value in the
protected Weight member variable.
To make this a little more clear to myself, we’re going to list these items in a
box, putting the name of the class (FrozenFood) at the top of the box. Then
the box has a horizontal line through it, and under that we list the member
variables. Under the member variables, we have another line, and then we
list the member functions. We show this in Figure 1-3.
Figure 1-3:
You can
draw a
class by
using a
box divided
into three
horizontal
sections.
Frozen Foods
–int Price
#int Weight
+FrozenFoods(int APrice, int AWeight);
+int GetPrice();
+int GetWeight();
Planning and
Building Objects
✦ intPrice (private): This is a private variable that represents the price
of the product.
Book II
Chapter 1
238
Building Hierarchies
Note that, in this figure, we did one other thing: Before each member variable and function, we place either a plus sign (+), a minus sign (-), or a
pound sign (#). This is shorthand notation: The + means the item is public,
the - means it’s private, and the # means it’s protected.
In Figure 1-3, note that we wrote the lines for the member variables and functions in C++ form. Normally, you don’t do this; you use a special notation
called UML in place of the C++, which we introduce a little of later in this
chapter and then discuss for the remainder of this minibook.
Protecting members when inheriting
In C++, you have options for how you derive a class. To understand this, you
need to remember that when you derive a class, the derived class inherits
the members from the base class. With the different ways to derive a class,
you can specify whether those inherited members will be public, protected,
or private in the derived class. Here are the options:
✦ Public: When you derive a new class as public, all the members that
were public in the base class will remain public in this derived class.
✦ Protected: When you derive a new class as protected, all the members
that were public in the base class will now be protected in this new
class. This means the members that were public in the base class will
not be accessible by users of this new class.
✦ Private: When you derive a new class as private, all the members in the
base class that this new class can access will be private. This means
these members will not be accessible by any classes that you later
derive from this new class — they are private, after all.
Think of it as an order: The highest access is public. When a member is
public, users can access the member. The middle access is protected. Users
cannot access protected members, but derived classes will have access to
the protected members. The lowest access is private. Users cannot access
private members, and derived classes can’t either.
We’re talking about inheritance here: Thus, if we have a base class called
FrozenFood and a derived class called FrozenPizza, the derived class is a
combination of the members in FrozenFood and additional FrozenPizza
members. However, only the methods in the FrozenFood portion of
FrozenPizza can access the private members of the FrozenFood portion.
Nevertheless, the methods in the FrozenFood portion of FrozenPizza and
the private members of FrozenFood are part of the derived class.
When you derive a class as public, the base class portion of the derived
class remains unchanged: Those items that were private remain in the base
class portion; therefore, the derived class does not have access to them.
Those that were protected are still protected, and those that were public are
still public.
Building Hierarchies
239
But when you derive a class as protected, the base class portion is different
from the original base class: Its public members are now protected members
of this derived class. (But remember, the actual base class itself did not
change! We’re talking only about the base class portion of the derived class.)
Thus, the members that were public in the base class but are now protected
in the derived class are not accessible to other functions and classes: They
are now protected.
And finally, if you derive a class as private, the base class portion is again
different from the original base class: All its members are now private.
Because its members are private, any classes you derive from this newly
derived class can’t access these members: They’re private. However, as
before, the original base class itself didn’t change; we’re still talking about
the base class portion of the derived class.
In C++, you specify the type of inheritance you want in the header line for the
derived class. Take a look at Listing 1-1. Notice the three classes at the top
of the listing: FrozenFood, FrozenPizza, and DeepDishPizza. Frozen
Food is the base class of FrozenPizza, and FrozenPizza is the base class
of DeepDishPizza. Figure 1-4 shows this by using a special notation called
UML, where the arrows point toward the base class.
Listing 1-1: Specifying the Access Levels of the Inherited Members
#include <iostream>
using namespace std;
class FrozenFood
{
private:
int Price;
protected:
int Weight;
public:
FrozenFood(int APrice, int AWeight);
int GetPrice();
int GetWeight();
};
class FrozenPizza : public FrozenFood
{
protected:
int Diameter;
public:
FrozenPizza(int APrice, int AWeight, int ADiameter);
(continued)
Planning and
Building Objects
All these derivation approaches can be complicated. Remember that when
you derive a class, you are specifying what level the inherited public and
protected members will have in the derived class.
Book II
Chapter 1
240
Building Hierarchies
Listing 1-1 (continued)
void DumpInfo();
};
class DeepDishPizza : public FrozenPizza
{
private:
int Height;
public:
DeepDishPizza(int APrice, int AWeight, int ADiameter, int AHeight);
void DumpDensity();
};
FrozenFood::FrozenFood(int APrice, int AWeight)
{
Price = APrice;
Weight = AWeight;
}
int FrozenFood::GetPrice()
{
return Price;
}
int FrozenFood::GetWeight()
{
return Weight;
}
FrozenPizza::FrozenPizza(int APrice, int AWeight, int ADiameter) :
FrozenFood(APrice, AWeight)
{
Diameter = ADiameter;
}
void FrozenPizza::DumpInfo()
{
cout << “\tFrozen pizza info:” << endl;
cout << “\t\tWeight: “ << Weight << “ ounces” << endl;
cout << “\t\tDiameter: “ << Diameter << “ inches” << endl;
}
DeepDishPizza::DeepDishPizza(int APrice, int AWeight,
int ADiameter, int AHeight) :
FrozenPizza(APrice, AWeight, ADiameter)
{
Height = AHeight;
}
void DeepDishPizza::DumpDensity()
{
// Calculate pounds per cubic foot of deep-dish pizza
cout << “\tDensity: “;
cout << Weight * 12 * 12 * 12 * 14 / (Height * Diameter * 22 * 16);
cout << “ pounds per cubic foot” << endl;
}
int main(int argc, char *argv[])
{
cout << “Thin crust pepperoni” << endl;
Building Hierarchies
241
FrozenPizza pepperoni(450, 12, 14);
pepperoni.DumpInfo();
cout << “\tPrice: “ << pepperoni.GetPrice() << “ cents” << endl;
cout << “Deep dish extra-cheese” << endl;
DeepDishPizza extracheese(650, 21592, 14, 3);
extracheese.DumpInfo();
extracheese.DumpDensity();
cout << “\tPrice: “ << extracheese.GetPrice() << “ cents” << endl;
return 0;
}
Book II
Chapter 1
Frozen Foods
Planning and
Building Objects
Figure 1-4:
The arrows
in this UML
diagram
point toward
the base
class.
Frozen Foods
Frozen Foods
When you run Listing 1-1, you see the following output:
Thin crust pepperoni
Frozen pizza info:
Weight: 12 ounces
Diameter: 14 inches
Price: 450 cents
Deep dish extra-cheese
Frozen pizza info:
Weight: 21592 ounces
Diameter: 14 inches
Density: 35332 pounds per cubic foot
Price: 650 cents
The first five lines show information about the object of class FrozenPizza.
The remaining lines show information about the object of class DeepDishPizza,
including the fact that it weighs 21592 ounces (which happens to be 1349.5
pounds) and has a density of 35,332 pounds per cubic foot (35,332 pounds
per cubic foot is a bit more than 17 tons per cubic foot, which is still nowhere
near that of a neutron star, which measures about three trillion tons per
cubic foot. Nevertheless, that’s one serious pizza).
The derivations are all public. Thus, the items that were public in Frozen
Food are still public in FrozenPizza and DeepDishPizza. Note where
242
Building Hierarchies
the different information in the output comes from. The line Frozen pizza
info: and the two lines that follow (Weight: and Diameter:) come from
the public function DumpInfo, which is a member of FrozenPizza.
DumpInfo is public in the FrozenPizza class. Since DeepDishPizza
derives from FrozenPizza as public, DumpInfo is also a public member of
DeepDishPizza.
Now try changing the header for DeepDishPizza from
class DeepDishPizza : public FrozenPizza
to
class DeepDishPizza : protected FrozenPizza
You’re changing the word public to protected. Make sure that you
change the right line, or it will spoil the effect of this nifty thing we’re showing you.
Now try compiling the program. You will get an error. We got
In function `int main(int, char**)’:
error: `void FrozenPizza::DumpInfo()’ is inaccessible
error: within this context
error: `FrozenPizza’ is not an accessible base of `DeepDishPizza’
error: `int FrozenFood::GetPrice()’ is inaccessible
error: within this context
error: `FrozenFood’ is not an accessible base of `DeepDishPizza’
This refers to the line in main:
extracheese.DumpInfo();
Why is that an error now? Because DumpInfo is now a protected member
of DeepDishPizza, thanks to the word protected in the class header.
By putting the word protected in the class definition, you are saying
that inherited members that are public are instead going to be protected.
Because the DumpInfo member is protected, you can’t call it from main.
However, DumpInfo is still public in the FrozenPizza class, so this call
is fine:
pepperoni.DumpInfo();
Go ahead and change the line back to a public inheritance as it was in
Listing 1-1:
class DeepDishPizza : public FrozenPizza
And now change the header of FrozenPizza, so it looks like this:
class FrozenPizza : private FrozenFood
Building Hierarchies
243
Again, make sure you change the right lines. Now try compiling the program.
When we do so in CodeBlocks, we get the following error:
In function `int main(int, char**)’:|
error: `void FrozenPizza::DumpInfo()’ is inaccessible|
error: within this context|
error: `FrozenPizza’ is not an accessible base of `DeepDishPizza’|
error: `int FrozenFood::GetPrice()’ is inaccessible|
error: within this context|
error: `FrozenFood’ is not an accessible base of `DeepDishPizza’|
Overriding member functions
One of the cool things about classes is that you can declare a member function in one class, and then when you derive a new class, you can give that
class a different version of the same function. This is called overriding the
function. For example, if you have a class FrozenFood and a derived class
FrozenPizza, you may want to include a member function in FrozenFood
called BakeChemistry, which modifies the food when it’s baked. Because
all foods are different, the BakeChemistry function would be different for
each class derived from FrozenFood.
In C++, you can provide a different version of the function for the different
derived classes by dropping the word virtual before the function name in
the base class declaration, as in this line of code:
virtual void BakeChemistry();
This line is the prototype inside the class definition. Later, you would provide the code for this function.
In the class for your derived class, you would then just put the function
prototype, without the word virtual:
void BakeChemistry();
And as before, you would include the code for the function later on. For
example, you might have something like this. First, here are the classes:
class FrozenFood
{
private:
Book II
Chapter 1
Planning and
Building Objects
This error refers to the line inside DeepDishPizza::DumpDensity where
the code is trying to access the Weight member. Why doesn’t the compiler
let us access the member now? Because the member, which was public in
the original FrozenFood class, became private when it became a part of
FrozenPizza. And because it’s private in FrozenPizza, the derived class
DeepDishPizza cannot access it from within its own member functions.
Remember: The rule with private members is that derived classes will not
have access to them. And that was the case here.
244
Building Hierarchies
int Price;
protected:
int Weight;
public:
FrozenFood(int APrice, int AWeight);
int GetPrice();
int GetWeight();
virtual void BakeChemistry();
};
class FrozenPizza : public FrozenFood
{
protected:
int Diameter;
public:
FrozenPizza(int APrice, int AWeight, int ADiameter);
void DumpInfo();
void BakeChemistry();
};
You can see that we put the word virtual in the FrozenFood class, and
then we put the function declaration again in the FrozenPizza class. Now
here are the BakeChemistry functions:
void FrozenFood::BakeChemistry()
{
cout << “Baking, baking, baking!” << endl;
}
void FrozenPizza::BakeChemistry()
{
cout << “I’m getting crispy!” << endl;
}
Note we did not put the word virtual in front of the functions; that only
goes in the class declaration. Now, when you make an instance of each class
and call BakeChemistry for each instance, you call the one for the given
class. Consider the following two lines of code:
FrozenPizza pepperoni(450, 12, 14);
pepperoni.BakeChemistry();
Because pepperoni is an instance of FrozenPizza, this code calls the
BakeChemistry for the FrozenPizza class, not for the FrozenFood class.
You may not want any code in your base class for the BakeChemistry function. If so, you can do this:
virtual void BakeChemistry() {}
Wait! Now why would you want a function that has no code? Well, we’re not
as goofy as we look. Okay, we are goofy. But regardless, you may not want
Building Hierarchies
245
any code here, but you do want code in the derived classes, and you want
them to be different versions of the same code. The idea then is to provide
a basic, default set of code that the classes inherit if they don’t override the
function. And sometimes, that basic, default set of code is simply nothing.
And so, you would just put an open brace and a closing brace, and you can
do that inside the class itself:
class FrozenFood
{
private:
int Price;
protected:
int Weight;
Some people prefer to put the word virtual in the overridden function’s prototype in the derived class. Technically speaking, this step is not
required, although many people who have been programming in C++ for a
long time do this. You can if you want, if you think that it looks cool. We do
it for one reason besides looking cool: It reminds us that the function is
virtual. Thus, in the FrozenPizza class definition, your function prototype would look like this, just as it did in the FrozenFood class:
virtual void BakeChemistry();
Specializing with polymorphism
Suppose you have a function called Bake, and you want it to take as a
parameter a FrozenFood instance. If you derive FrozenPizza from
FrozenFood and then derive DeepDishPizza from FrozenPizza, then
by the “is a” rule, objects of the class FrozenPizza and DeepDishPizza
are both examples of FrozenFood objects. This is true in general: If you
have a class called Base and you derive from that a class called Derived,
instances of class Derived are also instances of class Base. Think of it
like a family name. If your last name is Swaddlebug and you have a child
who grows up, marries, and takes the name Higglequack, then although the
child bears the name Higglequack, at heart he or she is and always will be a
Swaddlebug.
And so it is with frozen foods and C++, too. You can treat an object of
any class derived from FrozenFood as if it is a FrozenFood instance.
Therefore, if you have a function called Bake and you declare it as follows,
you are free to pass to this function a FrozenFood instance or to pass an
Planning and
Building Objects
public:
FrozenFood(int APrice, int AWeight);
int GetPrice();
int GetWeight();
virtual void BakeChemistry() {}
};
Book II
Chapter 1
246
Building Hierarchies
instance of any class derived from FrozenFood, such as FrozenPizza or
DeepDishPizza:
void Bake(FrozenFood *)
{
cout << “Baking” << endl;
}
But here’s where the fun begins: Suppose that in this Bake function you’re
going to set the oven temperature to a fixed amount, turn on the oven, and
then cook the food. Every food behaves differently in the oven. For example,
a deep-dish frozen pizza might rise and become thicker, but a regular frozen
pizza will become crispier but not get any thicker.
Now you don’t really want to put all the different food types inside the Bake
function, with a million if statements: If it’s this type of food, have it rise;
if it’s that type of food, have it brown; and if it’s another type of food, have
it scream and yell. Instead — and this is where things start to get seriously
cool — you can put the actual baking chemistry in the class for the food
itself! Yes! The FrozenPizza would have its own BakeChemistry member
function, and the DeepDishPizza would also have its own BakeChemistry
function. Then the Bake function would simply call BakeChemistry for
whatever object it receives as a parameter! And how does C++ know how
to do this? By virtue of the virtual functions! The BakeFunction itself
doesn’t even know or care what type of FrozenFood it receives. It just calls
BakeChemistry for whatever object it receives. And thanks to the miraculous beauty of C++, it automatically calls the correct BakeChemistry function, whether it’s the one for FrozenPizza or the one for DeepDishPizza
or even a class that you add later when you modify the program! And when
you modify the program, if you write a new class and derive it from Frozen
Food and give it its own BakeChemistry function, then you can pass an
instance of this class to Bake, without even having to modify Bake! In other
words, you don’t need to tell Bake about this class! Isn’t that great! Can you
tell we’re excited?
In short, what this means is that the Bake function can take an object
of class FrozenFood (or any class derived from FrozenFood) and
call its BakeChemistry function. Each class can have its own version of BakeChemistry, and the computer will call the appropriate
BakeChemistry function. This whole process is called polymorphism.
Polymorphism is one of the most powerful aspects of object-oriented programming. The idea is that you can expand and enhance your program by
simply adding new classes derived from a common base class. Then you
have to make very few (if any) modifications to the rest of your program.
Because you used virtual functions and polymorphism, the rest of your program automatically understands the new class you created. In essence, you
are able to snap in the new class, and the program will run just fine.
Building Hierarchies
247
Getting abstract about things
When you create a base class with a virtual function and then derive other
classes, you may want to override the virtual function in all the derived
classes. Furthermore, you may want to make sure that nobody — and we
mean nobody — ever creates an instance of the base class!
Now, why would you do that? Because the base class might contain basic
things that are common to all the other classes, but the class itself doesn’t
make much sense as an instance. For example, we want you to go to the
store and pick up a frozen food. We hear they’re on sale at the grocery store
down the street. We like the purple kind. See, it doesn’t make much sense
to have an instance of a class called FrozenFood. What kind of frozen
food? Well, it could be a (you guessed it!) FrozenPizza, or even better, a
DeepDishPizza. But by itself, a FrozenFood item isn’t realistic.
Now this is where things get a little strange: In C++, you don’t actually specify that the class itself is abstract. The word abstract does not appear in the
language. Instead, you have to be, well, more abstract about it. To specify
that the class is abstract, you must have at least one virtual function that
has no code. But instead of just putting an empty code block, as in {}, you
follow the function prototype in the class definition with = 0, as in:
class FrozenFood
{
private:
int Price;
protected:
int Weight;
public:
FrozenFood(int APrice, int AWeight);
int GetPrice();
int GetWeight();
virtual void BakeChemistry() = 0;
};
In this class definition, the function BakeChemistry has = 0 after it (but
before the semicolon — don’t forget the semicolon). The = 0 magically transforms the virtual function into an abstract virtual function. And if you have an
abstract virtual function inside you, then, face it, you are an abstract class.
No ifs, ands, or buts. You’re abstract.
This is the rule for creating an abstract class: You must have at least one
abstract virtual function in your class. If you don’t, the class will not be
abstract, and users of the class will be able to create instances of it. But if
you do have at least one abstract virtual function, the compiler will issue
Planning and
Building Objects
Philosophers have a word for such things: abstract. The class FrozenFood
is abstract; it doesn’t make sense to create an instance of it. In C++, you can
make a class abstract, but when you do, the compiler will not allow you to
make any instances of the class.
Book II
Chapter 1
248
Discovering Classes
an error message when you and other users try to create an instance of the
class.
In your extensive travels throughout the virtual world of C++, you are likely
to encounter a slightly different term for abstract virtual function. That term
is pure virtual function. Although the name sounds all pristine and pure, it
means the same thing. You can use either term.
So now that you have your abstract class and can’t make an instance of it,
are you home free? Nope. Now in your derived classes, you must override
the abstract virtual function. Otherwise, the derived classes will also be
abstract. And when your class is abstract, you can’t create instances of it.
To override the abstract virtual function, you override as you would with
any virtual function. This class includes a function that overrides the
BakeChemistry function:
class FrozenPizza : public FrozenFood
{
protected:
int Diameter;
public:
FrozenPizza(int APrice, int AWeight, int ADiameter);
void DumpInfo();
void BakeChemistry();
};
Then you provide the code for the BakeChemistry function, as in
void FrozenPizza::BakeChemistry()
{
cout << “I’m getting crispy under this heat!” << endl;
}
There’s nothing magical about defining the override function, but you are
required to override it if you want to create an instance of this class.
Discovering Classes
In your studies of object-oriented programming, you could spend weeks and
weeks searching for the answer to this question: How do you know what
classes to put in your program? Oddly, many of the books on object-oriented
programming don’t even tackle this question. Too many people, even selfproclaimed experts, simply don’t know the answer to this question.
In this section, we show you how to discover the classes you need for your
project, and we put the concepts in the context of the bigger picture of software engineering.
Discovering Classes
249
Engineering your software
Ready to write your program? Okay, sit down and start coding. And call us
in six months. Oh, and in case we forgot to mention, this software that you
build has to do exactly what we, your customers, need. And please, please
don’t let it mess up, okay?
Well now isn’t that nice? How are you supposed to know what we need, and
much less, how are you supposed to get it perfect the first time? Yet, believe
it or not, many young programmers build their software this way. The shootfrom-the-hip approach goes something like this:
“Hey! I have a really great idea!”
Open up the compiler.
Write the code.
Sell it.
And people wonder why so many programs crash and screw up. Have you
ever seen a program mess up? Who hasn’t? But fortunately, your software
doesn’t have to be in this group! You have, in your hands, an instruction
guide for building software.
When you have a great idea, the first thing you need to ask yourself is this:
Who will be using your software? You? Your friends? Business people?
Children? People at home? Teachers? Non-profit agencies? Airline pilots?
Doctors in the middle of surgery? Hackers? The dog?
Ask yourself this question and be honest. The truth is this: No software
package will be used by everyone. Yes, certain programs are used by a lot
of people. Examples of this are the software that runs the telephone system
or the software in your cable TV box. But even then, we could probably find
a couple dozen people on some island somewhere who will never use your
software. So when you answer this question, be realistic. And be as detailed
as possible. For example, one answer might be the following: This software
will be used by VPs and CEOs at Fortune 500 companies who need to divide
time between surfing the Web and playing solitaire.
Once upon a time, people believed that, to create software, you should
create a complete model that duplicates the real world. But people designing software quickly realized a slight, shall we say, difficulty in this approach:
What if the real-world process you’re modeling is, frankly, screwed up and
a total joke? Want to find out for sure? Ask the workers who actually use the
process you’re trying to computerize. And this spawned an interesting profession that a lot of computer programmers took up: Business process reengineering. Sounds pretty cool. “What do you do?” “I’m a business process
reengineer.” “Cool. We bet you have a big house.”
Book II
Chapter 1
Planning and
Building Objects
1.
2.
3.
4.
250
Discovering Classes
Business process reengineering simply means helping a company fix its internal processes so that they actually function correctly. And we’re talking
about the actual processes, not just the computer software they use. One
of the creators of the software modeling language we advocate in this book
(UML), a guy named Ivar Jacobson, even wrote one of the early great books
on business process reengineering. (And we suppose he probably does have
a big house, although we’ve never seen it.)
It boils down to this: When you model a process, you may find inefficiencies
in the process. So you probably won’t want to model the process exactly.
Besides, if the process were exactly the same, why bother? The computer
should make the process better. So think of ways that the people who use
your software will find that it not only automates what they do but makes
their life easier, too. Here are the steps, then, to engineering your software.
The following are the general steps in building good software. Each step
is called a workflow. As you gain experience, you will get better at actually
doing these steps. Like anything else in the real world, building software that
works and is good requires practice and patience.
1. Determine who will be using the software and gather the requirements.
In other words, find out what the people who will be using it need the
software to do. This is called the requirements workflow. In doing so,
build a glossary of terms. That’s important! The glossary contains all
the words involved in the process you are modeling. For instance, if
you are writing the software that will automate a beach, you will probably encounter terms such as surfboard, sand castle, high tide, undertow,
shark, broken glass, foot, swimsuit, umbrella, volleyball, net, and volleyball
court. These are all nouns. But your glossary can also have verbs (possibly with a noun tacked on to the end — that’s called a direct object,
by the way), as in dive, swim, ward off shark, avoid broken glass, rent
umbrella, and throw volleyball.
2. Next, begin the analysis workflow. To do this, determine your analysis
classes. For more information on this, see “Finding those pesky classes,”
later in this chapter. Note that while doing this, you may realize some
things were missing or not quite right in Step 1. That’s okay — you can
go back to Step 1 and fix things. Then, after you fix things in Step 1, you
can return to Step 2. And remember that in this workflow, you are not
worrying about the details of how you’re going to be writing the code. In
fact, you won’t be writing any code here, nor will you be worrying about
things like how you will be storing your files, how you’re going to sort a
list of numbers, and so on. Save all that for the implementation workflow
described in Step 4. Here, you’re just designing some classes. After you
have your analysis classes, have the people who will be using the software (or at least some of them if there are millions) review your classes
and see if these are the general parts of the software they imagined.
Discovering Classes
251
During this second step, you can do one thing related to programming:
Design some screens. Although many of the textbooks on objectoriented analysis and design do not put that step here, doing so has
many benefits. First, it allows you to show the potential users of the
program what the program might look like when it’s finished. And this
allows them to begin analyzing whether or not what you’re building
will be useful. (And if they don’t find it useful, don’t quit and don’t yell
at them. They are, after all, using this thing and paying you mondo-big
bucks, so do what they want and laugh all the way to the bank.) And
second, doing this lets you show them that, yes, you really are building
software and not just surfing the Web.
3. Now comes the design workflow. This is where you take the analysis
4. And finally the implementation workflow has arrived! That’s just a fancy
term for coding time. Now that you’ve made it this far, you will realize
that much of your work is already completed. The first several steps
took care of much of the hard work, and now you can do the fun part of
focusing on the coding part. And once again, you may have to backtrack
a few steps if you find some things that aren’t quite right.
5. But you’re not finished yet. Nope. Can anyone guess what comes next?
That’s right: the testing workflow. During this workflow, you try to use
your program in all the possible ways you intended it to be used. And
you can also choose a few other people who you trust to use it. We say
trust because this is a vital stage of your software. You want to make
sure that the people who test it really know what they’re doing and are
going to seriously put the program through the wringer. And further,
you want these people to give you honest, objective comments, not
things like, “You messed up! You’re fired!” Rather, you want them to
report actual problems and difficulties they found in the software so
that you, the programmer, can fix them. But remember: Having others
help you test your program is to your benefit. Just like editing your own
papers; you are likely to miss certain things, and having at least one
more set of eyes and fingers trying it out is a good thing.
Our experience in the testing world tells us that most of the bugs you
and the other testers find result in you going back to Step 4 and working
on the coding to fix problems. However, occasionally you find you have
Planning and
Building Objects
classes and begin building the classes you will use in your program.
For this stage, you use UML notation and describe the classes in your
program, how they all interact, and the steps that various processes in
your program take. You can start thinking about the code now, but you
still won’t actually write any code! And by the way, it’s very possible
(or even likely) that you’ll discover that something you did in Step 2 or
3 is wrong, or at least not quite right. If so . . . that’s right — go ahead
and return to those steps and fix the things. But if you go back to Step
2, please revisit Step 3 before coming back to Step 4. You may end up
having to change some things there, too.
Book II
Chapter 1
252
Discovering Classes
to backtrack to Step 3, or even once in a while to Step 2. But that’s okay:
Your goal is to build the software and build it correctly.
Finding those pesky classes
When you set out to determine the classes to use in your program as part
of the analysis workflow, the first thing you end up with is a set of analysis
classes. These are not classes in a final form that you would type into an
editor and compile as a C++ program. Rather, they are more of a descriptive
style that depict what you are modeling. Then, after you have these classes,
you move to the design workflow of your development: That’s when you
refine the class descriptions you can easily transform into C++ code.
People use three general ways to determine the classes. None of these
approaches are perfect; if they were, a computer could program itself automatically. (Assuming that somebody programmed the computer to program,
but that’s a separate philosophy altogether, something we won’t get into
here.) Here are the three general ways people discover classes:
✦ Look at the glossary you developed during the requirements workflow,
searching out the nouns and the verbs.
✦ Use CRC cards, which stands for Class, Responsibilities, and
Collaborators (as described in “Using CRC cards,” later in this chapter).
✦ Look for hidden or missing classes.
We recommend doing all three; or do either of the first two along with the
final one. The final item on the list is important in case you missed anything.
Searching for nouns and verbs
As much as it sounds like a drag, searching for nouns and verbs is actually a
fun process. Not all computer programmers are known for their love for the
English language. (There are exceptions, and we tend to write books!), but
you don’t have to be a grammar whiz to make it through this stage.
First, go through the glossary and any other documents you accumulated
during the requirements workflow, and begin making two lists: all the important nouns and all the important verbs.
After you have compiled your list, think about which of the nouns are particularly important; for instance, some nouns may be major aspects of the program. If you’re writing a program that models a grocery store, for example,
cash register is probably a pretty important noun. If you’re writing a program
to control an intergalactic space ship, everybody knows that the antigravity
booster is vital. These, then, are good candidates for classes. You will make
most of the remaining nouns characteristics in your classes. (Remember
that, ultimately, characteristics and capabilities will be member variables
Discovering Classes
253
and functions, but you’re not thinking about programming at this point.) If,
however, you find a characteristic that just doesn’t seem to work with any
class, you probably want to make it a class as well. Finally, the verbs will
become the capabilities of the classes. You should not have any capabilities that are without a class: Either you don’t need the capability, or you are
probably missing a class. Go ahead and add it.
Using CRC cards
People love CRC (Class, Responsibilities, and Collaborators) cards because
they find that creating them is fun. Big corporations like to do this type of
thing during team-building exercises to help employees get along. In addition
to climbing ropes and such, they design software with CRC cards.
A CRC card consists of three parts. The top part is the name of the class.
The left side shows the responsibilities (what we call capabilities) of the
class. The right side features the collaborations, which means you just list
other classes that this class works together with. For example, an antigravity
booster class certainly works together with a high-energy proton accelerator
class, as everybody knows. You list the names of these classes on the right
side of the card because they are collaborations.
Some people prefer to put their CRC cards as sticky notes right on a whiteboard; then instead of writing the names of the related classes on the right
side of the card, they just draw a line between the cards. You can either list
the classes or draw lines, whichever you like best.
By coming up with collaborations, you will spot missing classes. For example, because you know that the antigravity booster works with a high-energy
proton accelerator, when you fill in the collaborators for the antigravity
booster class, you will know whether you forgot about the high-energy
proton accelerator class.
Look for hidden or missing classes
It’s possible that when you do a class analysis, you will have left out some
classes. Some of these missing classes may not be obvious, and to find
them, you will probably have to get back with the people who helped suggest requirements. This is a good time to have them review the classes.
Remember, the classes that you are building right now are not final classes
ready for C++. Instead, these are less technical classes that are understandable by people who don’t program. Therefore, the people who offered the
requirements and the people who will be using the program can probably
look over the classes and help you determine if you are missing anything.
Planning and
Building Objects
People often use sticky notes for CRC cards, although we usually just draw
them on a whiteboard. (But we’re not supposed to admit that because our
fellow object-oriented people will be angry with us.)
Book II
Chapter 1
254
Discovering Classes
After you determine that you have missing classes, go ahead and add them
by making another CRC card.
Completing the analysis with the design workflow
After you have your classes, you can move to the design workflow and write
the classes in UML form. This is a simple form in that you will have a box
with the class name at the top followed by the characteristics of the class
and finally followed by the capabilities of the class. (Refer to Figure 1-3 for
an example of a class in this form.) These are the classes you will use in the
coding phase (implementation workflow), where you actually transform them
into real, breathing C++ classes. The remaining chapters in this minibook
show you how to do all this!
Chapter 2: Describing Your
Program with UML
In This Chapter
✓ Moving up to UML and modeling with it
✓ Designing with diagrams
✓ Going through iterations
✓ Stepping through phases
✓ Performing workflows
T
he ancient people knew something that we don’t know. Instead of wasting their time writing these big, long sentences and descriptions, they
used hieroglyphics, pictures that just got right to the point. One picture =
one statement. It wasn’t until the twentieth century that people in the computer world started getting back to their ancient roots and realized that
maybe there was something to be said for all those drawings and pictures.
One day, while working late, a small group of researchers realized that a
nifty way to describe software is through drawings. And thus they came up
with the Unified Modeling Language, or UML for short (pronounced, well,
just You-Em-Ell).
In this chapter, we talk about what UML is and how you can use it to
model your programs. We give a brief overview of the types of diagrams
it includes, and we talk about the difference between a methodology and a
modeling language.
Moving Up to UML
The Unified Modeling Language has an interesting history. When objectoriented programming was just getting off the ground in the late 1980s,
several people came up with different ways to draw various diagrams to
help people design their classes. This, of course, was nothing new. In addition to ancient people who used drawings in their hieroglyphics, people
have always had a tendency to draw diagrams to describe something. For
example, people might draw a chart listing the different parts of their programs. Or they might draw a chart that shows the steps that a program goes
through, using a form called a flowchart.
256
Moving Up to UML
A flowchart is simply a diagram that shows the step-by-step nature of a process, complete with the decision making that the process might involve. For
example, we might have a step-by-step process (or algorithm) we use that
helps us decide what to do on Mondays. This might look like Figure 2-1.
Start
Wake up in the morning
Look out the window
Is it sunny?
Yes
Call in sick
Go to work
Yes
Am I really
sick?
No
Figure 2-1:
A flowchart
shows
simple
steps in a
process.
Go to video store and
rent a really great movie
Go to the beach
remembering SPF 35
sunscreen
Stop
In Figure 2-1, we start at the top in the spot called Start, and then we follow
the arrow down to the first box. The first box is a command or statement —
something that we do. Then after we do that, we follow the arrow down to
Moving Up to UML
257
the next box. After that we follow the arrow again, but this time we encounter a diamond. A diamond contains a decision. We answer the question,
and if our answer is yes, we go one way, but if our answer is no, we go the
other way. In this case, if it’s yes, we go to the right, and begin the boxes on
the right, following the arrows, responding to any decisions we find. If the
first decision was no, we follow the arrows on the left, again doing what the
boxes tell us and answering any questions we see in the diamonds.
And so, over the years, people have pretty much ditched the flowcharting
and left it in a time capsule somewhere to be found hundreds of years from
now. (Although, a portion of UML — called an activity diagram — is similar to
a flowchart.) And during the years since programmers have started ditching
flowcharts, a few well-respected researchers in the field of computer science
have come up with new ways to draw pretty pictures that will describe a computer program. Several different attempts have been made, but it seems like
programmers have finally come up with one that everyone can live with: UML.
UML takes the concept of flowcharting to a whole new level. Yes, that
sounds like it came from a marketing brochure, but it’s true. UML is much
more than just flowcharting. UML uses symbols that show how all the
classes and objects fit together in your program, and it shows how they
interact and collaborate. You then use UML as you design and build your
entire software systems. Figure 2-2 is an example of a UML diagram.
Discombobulator
–Width : int
–Depth : int
+Befuddle() : int
Figure 2-2:
A class
diagram
shows
classes in
UML form.
Perturborator
#plethora : string
+Discompose() : string
Book II
Chapter 2
Describing Your
Program with UML
Well, this whole flowcharting business works great for small, simple tasks.
But over the years, software has become far more complex. For one thing,
people now build their programs around objects and classes, which simply
don’t fit to the flowchart idea. And second, software has become big. Just
a quick look at some of the software you use on a daily basis, such as the
word processors that run under Microsoft Windows, and you can see that
these programs were written by lots and lots of people who seemed like they
wanted to add every bell and whistle — whether you even use it or not! And
the flowcharts are more suited to small portions of a software package, such
as a single function or an algorithm.
258
Moving Up to UML
The three amigos
In your explorations of UML, sooner or later
you’re going to come across the term Three
Amigos. Although that was a goofy movie
back in the Greatest Decade (why, the 1980s of
course), in the context of UML, it refers to the
three guys who developed UML. Why are they
called that? Because after about seven years
or so, they finally became friends. It’s true.
For several years, there were three guys who
wrote books on object-oriented programming,
and they each had their own way of doing
things. But worse, the rumor is that these guys
couldn’t stand each other. (Who knows if that’s
even true.) “My way is better, and I don’t like
you, anyway.” Come on guys, can’t we all just
get along? Well, in fact, they did end up getting
along.
One day, it dawned on them: “Hey! You know
what? Like Superman, Batman, and Spiderman,
we can all just join forces in one great big hall
of justice and make it a better world for all!”
That and, “Hey, you know what? Our ideas
really aren’t all that different. Let’s combine
them into a new, better way of doing objectoriented programming.” Like any time three
greats join and put their heads together, the
result was something pretty nifty: UML.
By the way, movieland’s Three Amigos are
Chevy Chase, Steve Martin, and Martin Short.
In UML circles, the three amigos are Grady
Booch, Ivar Jacobson, and James Rumbaugh.
This shows two classes, one called Discombobulator and another called
Perturborator. Each is inside a box divided into three rows, with the class
name at the top, the member variables in the middle, and the member functions at the bottom. The format is slightly different from regular C++ format;
the types go at the end, after a colon. (Remember that in C++ you put the
types first, as in int Height;).
The first class, Discombobulator, has two member variables, Width and
Depth. (Everybody knows that an actual discombobulator has no height;
thus, we didn’t include one in this class.) The two member variables are private; therefore, they start with a minus sign, (–), and each is an integer type.
The Befuddle member function is public, and therefore starts with a plus
sign, +. In the Perturborator class, the plethora member variable is protected, and therefore it starts with a # sign.
Notice the arrow. The arrow shows inheritance, but it goes in the opposite
direction of what a lot of people might expect. It points toward the base class.
Thus, in this diagram, Pertuborator is derived from Discombobulator.
The Unified Modeling Language has been accepted by millions of engineers
as the standard way for modeling software. The Object Management Group
(or OMG, found at www.omg.org) has adopted UML as its official modeling
language. The OMG is a consortium of hundreds of software companies that
have all joined to oversee the big sea of software development standards.
Moving Up to UML
259
Modeling a methodology
UML is not a methodology. It’s not a set of rules
and steps for building software. Rather, UML
is simply a set of diagrams that you can use
while modeling your software. That’s actually
a point that many software engineers don’t
realize. “What methodology do you use?” “We
use UML.” If that’s their answer, it proves they
don’t really know what UML is. You use UML
with a methodology, and then you have a powerful set of tools for building software.
Modeling with UML
The idea behind UML is that it can be used for modeling pretty much any
type of information — not just object-oriented systems — even information
not computer-related. As such, UML has many parts. But the great thing
about UML is that you don’t need to learn all the parts to use it. You need to
learn only the parts useful to your projects.
UML covers all the aspects of the usual software development process. Now
we have said that UML itself is not a step-by-step process or methodology
for building software. However, the designers of UML have provided enough
diagram types and symbols that it can be used with all the different steps
of software development. Therefore, to learn UML, learning a methodology
along with it is a good idea. In fact, the people who designed UML, The Three
Amigos (see the nearby sidebar by that name), have also designed a methodology. Theirs is called the Unified Process. That’s the methodology we use.
(And to be quite frank, most methodologies are more-or-less the same.)
Diagramming and designing with UML
The diagrams in UML are simple enough that they can be drawn by hand on
a sheet of paper. Of course, this is the age of computers, and using a computer makes sense, so why resort to the old-fashioned method of pencil and
paper? But beyond that, there’s a slight technicality as to why paper drawings are not suited to a software design.
When you use UML to design a system, you typically use a computer program called a Computer-Aided Software Engineering (CASE) tool. When you
use the CASE tool, you specify all your objects; and as you do, you create
your diagrams that describe the classes and how they interact. However, the
model itself is the collection of classes — not the diagrams. You can change
Book II
Chapter 2
Describing Your
Program with UML
A lot of people will start reading a book on UML
and become a bit disoriented at the beginning
because they quickly realize that an important
question sometimes goes unanswered: How
do you use UML to actually design a complete
software package from start to finish? How
do you use UML to go through the process of
determining what classes you need, building
those classes, writing your software, testing it,
and all that good stuff? Some books on UML
seem to avoid this question for a good reason:
260
Moving Up to UML
the diagrams and create new diagrams, but underneath it all is the collection of classes. The collection of classes itself is known as the model. When
you draw a diagram, you are simply providing a visual representation of the
model. Most of the better CASE tools (such as Rational Rose or Paradigm
Plus) include a way to create and modify the model itself. You can usually do
so directly or by using the drawing tools included in the CASE program.
When you build a software system by using UML, you work out your classes
by using the drawings. In the process, you are creating and modifying the
model and the drawings simultaneously. But the model itself is still a separate entity from the diagrams.
A good CASE tool has two ways of looking at your system: The first is
through the model itself, which is often depicted as an Explorer-style tree,
with the classes and their members listed. The second is through the
diagrams. You can use the diagrams to add information to the model; for
example, you can use a class diagram to add classes and modify the member
variables and functions.
Most CASE tools have a slight catch: If you remove a class from a diagram,
you don’t actually remove it from the model. The class is still in the model,
just in case you still want to continue working on it and add it to more diagrams. If you really want to remove a class, you have to go to the model itself
and remove the class. Fortunately, this applies only to removing classes.
You can modify and add classes from the diagrams.
In UML, you can use nine types of diagrams. As you work on these diagrams,
your model will evolve. You can make changes to the diagrams, and thereby
make changes to the underlying model.
Tables 2-1 and 2-2 show you the nine models. We grouped them into two
kinds: static and dynamic. The static diagrams represent the parts of the software system you are building. The dynamic diagrams show how the parts
work together and how things take place over time.
The words static and dynamic come up again and again in the computer
world. Static refers to something fixed and unchanging, while dynamic refers
to something that changes:
✦ In your program, a class is static because you describe it in your code;
and after you have described your class, it does not change while the
program is running. A class has a certain set of member variables and
member functions that you specify in the code. Although the program is
running, the members of a class do not change.
Moving Up to UML
261
✦ The objects, however, are considered to be dynamic, because they can
come to life while the program is running, their member variables can
change, and they can be deleted.
Table 2-1
Static Diagrams of UML
Diagram Type
What It Shows
Class diagram
The different classes
Component diagram
The different parts of the system; each part contains
classes related to each other
Deployment diagram
The different computers and hardware involved
✦ Class diagram: The class diagram shows the different classes and their
relationships to each other. For example, a class diagram might show
that the class called Skiddle is derived from the class Skaddle, and
it might show that the class Skaddle contains as a member a list of
Ruddle instances. Typically as you work on a class diagram, you will
also be adding and modifying the classes from the model itself.
✦ Component diagram: The component diagram shows the major
parts of your software system. For example, all the parts dealing with
Discombobulation, including the Discombobulator class and the
Perturburator class as well as other related classes, might all be
grouped into a single component called SuperSystem.
✦ Deployment diagram: The deployment diagram shows a hardware
view of your system. This might include specific computers (such as
a Compaq Presario with a gigabyte of RAM), or it might include more
abstract hardware components, such as Internet connection. Or it might
show hardware components even more generic, such as network node or
database server. Nevertheless, these are all hardware components.
In Windows, a single component often lives in the form of a Dynamic Link
Library, or DLL for short. Most DLLs that you find on your computer were
built as components. When you use multiple DLLs that other people built,
you are building with various software components. You can show these
components on a component diagram.
Describing Your
Program with UML
The following list describes the items in Table 2-1 in a bit more detail:
Book II
Chapter 2
262
Moving Up to UML
Table 2-2
Dynamic Diagrams of UML
Diagram Type
What It Shows
Use case diagram
The different functions of the software system
Object diagram
Instances of the classes and their relationships to each
other
Collaboration
diagram
How instances work together with other instances
Sequence diagram
The time sequence of objects working together with other
objects
Statechart diagram
The lifecycle of a single object in terms of states
Activity diagram
A sequence of steps; much like a flowchart
The following list describes the dynamic diagrams in a bit more detail:
✦ Use case diagram: The use case diagram shows the different individual
functions that the software package can perform. Here we mean function
in a generic sense, like a process, not like a C++ function consisting of
a set of code. A word processor might have a use case called Set italic.
This use case represents the function of setting the italic style for the
highlighted text. A Web browser might have a use case called Go, which
takes a Web address and pulls down and displays the appropriate
Web page.
✦ Object diagram: The object diagram describes the instances of the
classes. This is in contrast to the class diagram, which shows the
classes but not the actual instances. The reason that the object diagram
is considered a dynamic diagram rather than a static diagram is because
objects themselves are considered dynamic. Objects can change while
the program is running. Classes, on the other hand, do not change while
the program is running.
✦ Collaboration diagram: As your program runs, the code for an object’s
member function might call a member function in another object. In this
sense, the two objects are working together, or collaborating, just as two
people might collaborate to rob a bank. A collaboration diagram shows
how the different objects collaborate.
✦ Sequence diagram: A sequence shows the collaborations of the objects
over time. So if your program is a model of two bank robbers failing
because they get into a severe argument over which door to leave the
bank through, and you have two objects that represent the two bank
robbers, this diagram would show them calling each other’s member
functions over time. These functions might be things like Insult and
Criticize and PolitelyDisagree.
Moving Up to UML
263
✦ Statechart diagram: A statechart diagram is like a sequence diagram,
but it shows only one object. It shows how an object changes over time,
from the time it is created until it is deleted.
✦ Activity diagram: An activity diagram shows the step-by-step nature of a
single member function. It is actually a type of statechart:
• A statechart diagram shows how an object changes from state to
state.
• An activity diagram shows how a member function moves from one
activity to the next. In that sense, each state in the activity diagram
is an activity.
A popular word among software engineers is lifecycle. Really, the word basically means life. A software development process has a lifecycle: You start
building the software, go until it’s all built, update the software as needed,
and then retire the software when you’re finished using it; that’s the lifecycle
of the project. However, in many senses, it does cycle back: You get bug
reports from customers, and you fix the bugs, and you eventually release
another version of the software. Objects have lifecycles too: When you
create an instance, you are beginning the life of the object. Then, during the
object’s lifecycle, you do things to the object like call its member functions
and modify its member variables. Then, when you’re finished, you delete the
object. That finishes the lifecycle.
Software engineers like to think in terms of states. A state is simply the
current situation in which something exists, like the state of the nation or
the state of affairs. These represent the current situation for the nation or
the affairs. Or somebody could be in a state of all-out confusion. That represents the current state the person is in. An object also has a particular
state: The Caboodle class might have member variables PenCount and
NotebookCount, which represent the number of pens and the number of
notebooks inside an instance of the Caboodle class. A particular instance
of the Caboodle class might have the value 7 for PenCount and the value
3 for NotebookCount. Thus, the current state of this particular instance is
PenCount=7, NotebookCount=3. The Caboodle class might also include
a member function called AddPen, which takes no parameters and simply
adds 1 to PenCount. When you call AddPen, you are changing the state of the
object.
Book II
Chapter 2
Describing Your
Program with UML
In the world of UML, when an object’s member function calls a member
function of a second object, the process is called sending a message. The
first object sends a message to the second object. This terminology is not
new to UML; the original object-oriented language, Smalltalk, used the same
terminology. In Smalltalk, objects sent messages to other objects. You use a
collaboration diagram to show how one object sends a message to another
object. Or you can say that the collaboration diagram shows member functions calling the member functions of other objects. They both mean the
same thing.
264
Building with UML and the Unified Process
When you consider the state of an object, you need to look at only the
member variables. The values of the member variables together represent
the state. The member functions may modify the state, but because the functions themselves do not change during the life of the program, they do not
represent part of the object’s state. Also, remember that one object can contain as a member another object. The current state of the outer object would
include the state of the object that it contains.
In the world of UML, the concept of a metadescription comes up again and
again. Meta is a prefix to a word, and it usually means the next level up. For
example, with metadescription, we could first describe a tree by writing
information about the tree. Then we could describe the description: “It was
a beautiful paragraph with flowing words that brought the tree to life.” Now
that previous sentence itself is what we are referring to right now in this
sentence. Do you see what is happening here? We’re describing something,
and then we describe the description, and then we describe that description.
Each time we move up “one level of abstraction.” The term metadescription,
then, means a description of a description.
In UML, you encounter meta terminology all the time. For example, a class
represents a type of object. But the word class is a kind of classifier. Another
kind of classifier is type. So consider this somewhat philosophical concept:
A class is a kind of classifier, at least from the perspective of the UML diagrams. But a particular class itself has certain attributes about it, such as
the class name and the names and types of the members. That information
is a metaclass. If you’re not totally confused and you find this fascinating,
we highly recommend reading Gödel, Escher, Bach: An Eternal Golden Braid,
by Douglass R. Hofstadter (Basic Books, 1999) or, for a slightly easier read,
Metamagical Themas: Questing for the Essence of Mind and Pattern, also by
Hofstadter (Basic Books, 1996).
Building with UML and the Unified Process
UML is not a methodology. That means that UML, by itself, is not a stepby-step process for building software. Rather, you can think of UML as a
language you use for describing your software as you are building it. The language, however, is not a verbal talking language with a bunch of engineers in
a room yelling and arguing. Yes, that sometimes happens, but fortunately it’s
neither a part of UML nor required. UML is a visual language. There’s that
adage about a picture being worth a whole bunch of words, or something
like that, and it holds up here, too. You describe your software with diagrams. These diagrams provide a full description of your software.
But you create the diagrams as you move through a process. The process is
a methodology that you use; the one that we use and describe in this book
is the Unified Process. There are five main steps (which tend to be the same
for most methodologies). These main steps, which are called workflows,
Building with UML and the Unified Process
265
are as follows: requirements, analysis, design, implementation, and testing.
When you think of the steps you would do to accomplish pretty much anything that’s not computer-related, you can probably see that you often use
these steps.
For example, suppose that you’re going to build a time warp device so you
can skip that dentist appointment next week. First, you decide what you
need to build; this is called the requirement collection. In this case, you need
a device that takes you forward into time, probably a specified amount of
time. So you’ll want a display on the device and a keypad so you can enter
the amount of time to move forward. And you’ll probably need a button to
start the time warp. Those are the requirements for the project.
Next, you begin carefully designing the invention but not actually building
it. This is the meat of your work, where you draw diagrams of what you’ll be
building and how the different parts work out. You draw how your particular
version of the relativistic universe bender works and the parts involved in it
as well as all the other major components of the system. This is the design
step.
Then you build, or implement, the thing. This is the fun part, where you go
into the shop and start hammering and pounding and defying gravity to
build the device! And of course, this step is called the implementation.
But you’re not finished yet; finally, you have to test it. For this, you pay off
the guy next door to take a ride in your time machine to see whether it
works. If not, he can report back to you and let you know what went wrong.
(Assuming that he makes it back.)
Now this is all good, but some issues can come up that these basic five steps
don’t handle. For example, many people who try building a large software
system quickly discover the chicken-and-egg syndrome. The problem is this:
If we’re in the middle of the analysis workflow and we’re supposed to be getting our rough classes down, how can we possibly know all the classes we’re
going to need until we get down into the code and start writing the thing?
For this reason, many people have the attitude skip engineering and just code
the stupid thing! But just imagine what your time warp device would be like
if you tried to build it without planning it. After you get the thing completely
built (more or less), do you really trust it? Would you take a ride in it, rather
than just pay the unsuspecting neighbor? Well the same is true for software.
If you just dive in and start grinding out code, racing for the finish line, how
Describing Your
Program with UML
Then you think about how you’re going to do the time warp and what you’ll
need, and you analyze the project. In this case, you’ll need the actual time
warping portion consisting of the relativistic universe bender as well as the
main interface portion, where you get to control the thing. This step is called
the analysis.
Book II
Chapter 2
266
Building with UML and the Unified Process
can you be sure that you covered everything? Did you miss anything? Most
likely. And does what you wrote run perfectly? Doubtful.
Fortunately, there’s a way to fit everything together. It uses steps called
iterations.
Speaking iteratively
Suppose we want to build a new kind of Web browser. This Web browser
will be super-smart and will just automatically know what Web site you
want to go to by tapping into your brain waves. When you wake up in the
morning, you will hear your ears ringing with the message of a faint distant
phrase, “Where do you want to go?” You think, “Wouldn’t it be fun to see
the Smithsonian?” Then you walk to your computer, sit down, and first the
browser brings up the site for the Smithsonian, and then it brings up a site
that shows flights, hotels, rental car information, and maps to get there. Now
wouldn’t that be a seriously cool Web browser?
So, being a good engineer, you follow the formal steps of building it. You
draw your requirements, and you even interview your friends to see what
ideas they have about such an amazing work of software. Then you analyze
the different parts and come up with the functionality of the software, and
you even draw some sample screens. Next, you move into the design workflow, fleshing out the basic classes you built in the analysis workflow. And
finally, you begin coding. You code for weeks, when suddenly — WHAM! —
you discover that something is seriously wrong: You completely forgot that
you need to write a portion of the software that does the grunt work of connecting to the Internet, then to a specific site, anddownloading the appropriate Web page. In effect, you failed to consider the low-level communications
portion of your super-cool program. And while ruminating over this problem,
you also start to think of some other things you failed to consider earlier:
After you receive the Web page, are you going to draw it on the screen, or
are you going to buy some C++ library that will display it in a window for
you? The latter would make your life easier, but regardless, you had not
considered this.
That’s when you get frustrated and start considering that position your
cousin offered you to be a mime out in front of City Hall downtown, drawing
customers in to buy hotdogs from your cousin’s hotdog stand in front of the
Hall of Justice.
What exactly happened? Here’s what happened:
1. You didn’t realize until coding time that the display part of the browser,
the part that shows the Web page on the screen, would be extremely
complicated and might require the purchase of a library that displays
the browser pages for you.
Building with UML and the Unified Process
267
2. You didn’t even consider that you would need a low-level communications system. Or did you? Maybe Windows already provides it. But
either way, you hadn’t thought of that during the analysis or design
workflow.
As you dwell on these problems, you notice more bad things. For starters, if
you decide to do the low-level communications system, do you make it its
own library that you could potentially use in other programs? Or do you buy
a library? Or is one already available on the computer? You’ve heard that
Windows has such things built-in, but you’re not sure.
Although this might sound horribly apocryphal, it happens all the time in
the software world. If you want to see tempers flare, visit some software
engineers when such an abysmal situation arises.
Well, we think we’ve made our point, but before you rush off to the psychiatrist for a nice, big supply of antidepressants, fear not: The Unified Process
is here to save the day!
The designers of the Unified Process knew well that these problems occur.
And thus, they made a set of higher-level processes called phases, and put
the five workflows inside these higher levels. During each phase, you cycle
through several of the five workflows. Then when you’re finished, you can
cycle through them again, or you can move on to the next phase. And you
once again cycle through several of the five workflows.
The idea is that each time you cycle through several of the workflows, you
finish an iteration.
Phasing in and out
The Unified Process consists of four main phases. In each phase, you focus
on various workflows, such as analysis or design, but you are free to move
forward to later workflows. The only catch is that, although you can start
and stop at any workflow, you must complete all the workflows in between
for a single iteration. For example, you can’t jump from analysis to test; you
must first do analysis, then design, then implementation, and finally test.
Here are the phases of the Unified Process:
Book II
Chapter 2
Describing Your
Program with UML
So you know what happened, but why did it happen? Finally, you put your
finger on it: It’s another chicken-and-egg syndrome, and it goes like this: How
could you have known you needed a low-level communications system until
you finally started coding the thing? Yet, you needed that information while
you were in the analysis and design workflows, before you started coding it!
In effect, which comes first, the chicken (the analysis and design) or the egg
(the realization that you need a low-level communications system)?
268
Building with UML and the Unified Process
✦ Inception: During this phase, you determine the objectives of your
software.
✦ Elaboration: In this phase, you analyze and design your software.
✦ Construction: This is when you focus primarily on coding the software.
✦ Transition: This final phase is when you deliver the software. For retail
software, this means sending it to the disc duplicators and packagers;
for in-house software, it means shipping it to the groups who will be
using it.
And here’s the really great part: Each of these four phases can be a whole
set of workflows: Requirements, analysis, design, implementation, and testing. But how can that be, my dear friend, you ask? It goes like this: In the
inception phase, you gather requirements and go through the process of
getting some basic analysis and design down. And if need be, you even do
some rough prototypes of the software, where you basically play around and
try out some things. In effect, you do a basic coding (implementation). And
yes, you might even spend a little time testing it. But you’re not building a
full-scale software system, by any means! You’re just doing pieces and parts
and parts and pieces. But more so, you’re doing a proof of concept just to see
if you think, as a professional engineer, this idea is going to fly. And undoubtedly, you will run into some issues that the original requirements failed to
take into account.
For example, suppose that you’re going to build a word processor program
that beats Microsoft Word hands down. Now, if you have used Microsoft
Word and opened up a really big document (like several hundred pages),
you may have noticed something happens on occasion. Sometimes when
you make a substantial change that will drastically affect the page count,
such as changing the margins, Microsoft Word repaginates. And as it repaginates, you might find that some vital paragraphs get split, with maybe one
line of text at the end of one page and the rest of the paragraph on the next
page. That can create an ugly document, and thus, Microsoft Word includes
a feature called Keep paragraphs together as an option in a dialog box.
Now if you’re building a word processor, it’s possible that you won’t think
of this hair-splitting, paragraph-splitting issue until well into the coding. So
what do you do? Most likely, during one of the first two phases, after you
have a basic prototype, you might notice that sometimes paragraphs are
getting broken up at inconvenient places. The solution? Include an option
to keep paragraphs together. And so you go back to the requirements and
add a piece to the required functionality: an option for keeping paragraphs
together!
Now if you’re building a super-cool Web browser that specializes in mindreading, during the inception phase you might do a basic prototype that has
all the major features, even if they don’t work well. But during that time, you
Building with UML and the Unified Process
269
spot something you left out: the communications system. But now you know
that you need it! So you return to the analysis phase, where you can actually
add it, perhaps as a component! Cool, no?
Now each time you backtrack through your workflows and change something, you begin a new iteration. Therefore, you can see that the phases are
broken up into iterations, each with several of the five workflows. And you
may go through several iterations within a single phase.
You don’t have to get all the way to the end, to the testing workflow,
before you back up. Thus, each iteration might consist of only one or
two workflows.
The inception phase
The inception phase is the first phase, where you start getting things off the
ground. During this phase, you may not make it to the point where you’re
coding a prototype and finding problems. But if you’re building a big project,
you just may make it to the point of coding a prototype. However, if you are,
you will probably be writing small prototypes of only various portions of the
project.
And during the inception phase, you try to do the following:
✦ Determine whether the project is feasible. The term feasibility is a word
that comes up again and again, and it’s primarily the result of people
having great ideas but later determining that, well, frankly, those ideas
are not practical or reasonable. But instead, businesses prefer the
kinder, gentler term, feasible.
✦ Determine the primary requirements.
Requirements gathering is a particularly touchy issue because, during that
time, people are going to want to include everything. Not only will they
want the software to browse the Web, but they will also want it to inject the
Web page back into your brain and also give you the ability to download
it straight from your brain to your friends’ brains and print a copy by just
laying your finger on the printer. They want the software to do everything.
But thankfully, during this time, you start to map out the project, probably
build some prototypes, and determine what it really should do. Is it feasible
to transfer the pages back into the brain, or is that technology not going to
come for another year or two? If not, it probably isn’t feasible.
Describing Your
Program with UML
If all this sounds a little strange, look at it this way: If you discover that you
don’t have something quite right, what do you do? You go back and fix it! But
software engineers like to sound a bit more technical than that, so instead
they say that they begin a new iteration.
Book II
Chapter 2
270
Building with UML and the Unified Process
The goal in this phase is to solidify the requirements and do some basic
analysis. During this time, you will get people to agree to what it is you’re
going to build. (These people are called stakeholders because they hold a
big stake — like their jobs — in the success of this software. And when you
finish writing it for them and they become millionaires, they will treat themselves to a nice, big steak.) You will also get them to agree on things such as
what computers the software will run on and the software’s limits. For example, can the browser read multiple people’s brains or just one person’s brain
at a time? (That’s a limit.) And will it run on Windows, or will it also run on
Macintosh, Unix, and Linux?
And, of course, the business folks will want a bit of say in all this, too. So the
goals of this phase will also include things such as a schedule and cost for
the project: How soon will you have it completed, and how much will it cost
the business? Will you need to hire more engineers to work on the project?
And will you need to buy more computers and tools, such as compilers?
And finally at the end of this phase, you will want to have a basic architecture of the system, consisting of UML diagrams. Now these diagrams may be
rough and basic, but they will provide an overall outline of the system.
The elaboration phase
During the elaboration phase, you solidify the functionality of your software.
You use tools called use cases — descriptions of individual pieces of the
software functionality. For example, a word processor would have use cases
such as set italic on, set italic off, print, set left-align, and delete a page. The
use cases are all the things you can do with the software.
Also during the elaboration phase, you develop a plan for when you build
the thing. This means elaborating on the basic designs you created in the
inception phase by going through more analysis and design.
Some of the major goals of the elaboration phase are to finalize the scope of
the software and to incorporate any changes to the software (for example,
after further inspection, you may have determined that more things were not
feasible and that other parts were); to finalize the project plan, including the
number of people you need and how long it will take; and to make sure the
stakeholders are all happy and hunky-dory with the project.
And during the elaboration phase, you also create a first, rough-draft version
of the software. Yes, you may have built some code in the inception phase, but
that was just prototyping for determining feasibility. You don’t use that rough
code from the inception phase in the real coding. Here, however, you make
a first run of coding the real program. To get there, you continue with your
analysis and design, and get into coding (implementation). Of course, the software is just a rough draft, but it is more than a prototype; unlike the preceding
phase, in the elaboration phase you’ll be saving much of the code and reusing
Building with UML and the Unified Process
271
it for the next phase. Thus, you once again move through iterations, cycling
through workflows, such as analysis, design, and implementation.
The construction phase
If you were involved with computers in the early 1990s, when things were
finally settling down and we were starting to see practical, real software,
you probably also saw something else: little error messages that popped
up called general protection faults (GPFs). GPFs appeared when the program
really screwed up bad, and the only way to fix the program was to attempt
to click the Ignore button to ignore the error (an option that, trust us, never
worked) or abort the program. We remember those days well because they
made us start to consider job offers from distant cousins who rented beach
umbrellas on the Gulf of Mexico.
Now why did these errors happen? Because the software wasn’t stable. You
managed to put the software into a situation that the programmers didn’t
expect, and the thing choked, coughing up a general protection fault. And
why did the programmers create software that allowed this situation to
occur? Because they didn’t thoroughly go through the construction phase!
The construction phase includes implementation and testing workflows. You
may have some analysis and design flaws, but they will be little; the main
time you’ll see these flaws is if you find you forgot something or need to
change something in the classes. By now, you will be going through iterations of writing code, testing, testing, testing, and finally more testing. When
the testers encounter errors, you go back and fix the code. Then, eventually,
the testers determine that they can’t find any more bugs! The day is done!
You are ready to ship!
Thus, if you follow the construction phase properly, you will limit the
number of operating system errors that pop up when your program goes
haywire — because if you did everything correctly, it shouldn’t go haywire!
Book II
Chapter 2
Describing Your
Program with UML
During the construction phase, you continue with the implementation. But by
now, all your analysis and design should be pretty much finished. Everybody
(including the famous stakeholders) agrees by now on what the software will
and won’t do, how much it will cost, how long it will take to build it, and how
many people will work on it. But further, you have drawn up your groups
of classes that you will be designing and have decided how the classes fit
together and how they communicate with each other. The analysis and
design is ready for prime time, and now you can focus on actually making
the system work. Here you look for parts that don’t quite fit together, and
you fix problems to make them fit together. You make sure that your system
has no major holes whereby the entire thing could come to a crashing halt
under a strange, unexpected situation. In a word, you make your software
stable.
272
Building with UML and the Unified Process
If you are heading up a project where you will be using the Unified Process
to design a large-scale software system, you will want to give your testers
a certain amount of authority. Think of the testers as the quality assurance
people. And in fact, some companies call them Q/A engineers instead of testers. Your testers shouldn’t allow your company to put its name on the software until they say it works. This has multiple benefits because it allows the
Q/A engineers to feel a certain amount of authority, and it also puts a heavy
responsibility on them, which will help ensure that they do a thorough job.
And that will help ensure that your software is both good and stable. Sounds
like a good plan to us!
The transition phase
The transition phase is both the happiest time and the scariest. As a software engineer, we know that this can be a frightening time because the final
moment of truth has arrived: Did you and the rest of the team build a product that is actually going to work? Or is it going to get out on the customer’s
computer and crash and burn?
Most likely, because you did everything correctly in the first three phases,
the software will run on the customer’s computers. However, just because
you did it right doesn’t mean that you won’t be anxious. But relax: If you are
shipping a piece of software to one specific customer, you and the other
engineers will probably be on hand that day for the big installation. It may
not go perfectly at first, but in our experience most of the problems will not
involve faulty software. Rather, the customer’s computers will not be set
up quite right. Fortunately, such problems are pretty easy to track down
and fix.
But if you’re shipping software that will be sold through the retail chains to
potentially millions of people, the transition phase has an important step that
many companies don’t think of. In this final step, you choose a workday and
invite all the employees who want to come in for a giant beat-up-the-software
party! Yeah! They all come in, and you pass out CD-ROMs containing your
software. These are copies of the CD-ROM you intend to ship, assuming that
all goes well today. The employees get free pizza and soft drinks (beer isn’t
allowed on company property; besides you want them thinking clearly!), and
they get to beat the stuffing out of your software. They install it, play with it,
manipulate it, use it, fiddle with it, and do everything they can with it; and
in the process, give it a pounding it will never forget. And if they encounter
a problem, they let you know (politely, of course). But your personal job, on
this day, is not to join them in testing the software. Your job is to get to work
fixing any problems they find. Generally, they will be minor problems, and
you’ll be able to crank out the fixes in no time.
Moving Forward with UML
273
If you actually have a big test day like this, try to make it as exciting as possible. Free pizza, free soft drinks, maybe loud, fun music blasting, and maybe
a relaxation room where people can go and goof off for a few minutes and
forget about the project. Believe us, these folks will enjoy this special day if
you make it exciting for them. And the result, of course, is a successful software package!
Moving Forward with UML
The next two chapters focus on the nine types of diagrams you use
during your requirements gathering, analysis, and design. The first chapter
focuses on the static diagrams, and the next chapter focuses on the dynamic
diagrams.
Book II
Chapter 2
Describing Your
Program with UML
Although you spend much of the time on the construction phase, a lot of the
brainwork is in the analysis and design phases. That’s where UML comes
into play. You use UML to map your classes, draw them, work with them,
and design them. Therefore, for the rest of Minibook II, you find various discussions about UML and processes that usually take place during analysis
and design. However, some take place during the requirements phase.
274
Book II: Understanding Objects and Classes
Chapter 3: Structuring Your
Classes with UML
In This Chapter
✓ Drawing classes in UML
✓ Drawing inheritance and other relationships
✓ Building components with UML
✓ Deploying the software
W
hen you use the Unified Modeling Language (UML) to design software,
your diagrams have two aspects. One is static, and the other is
dynamic. The static diagrams represent the things that do not change while
your program is running. For example, a class does not change while the
program is running. When you write the code, you write the class name,
member variables, and member functions, and you notate what is private,
protected, and public. After you compile the program, this information
does not change; it remains static. This is in contrast to the information
you represent in the dynamic diagrams, where the information can change.
Dynamic diagrams include things like object creation and deletion as well as
object collaborations (objects working together, or collaborating, conspiring,
plotting, and scheming like good little classes).
In this chapter, we discuss the different types of static diagrams. These are
✦ Class diagram: A class diagram represents the different classes in your
program.
✦ Component diagram: A component diagram represents the major parts,
or components, of your program.
✦ Deployment diagram: A deployment diagram represents the different
computers and hardware that your program will ultimately run on.
In this chapter, we talk about the UML diagrams. And although you’ll rarely
hear us say this, there is one thing we don’t talk about much — at least,
not in this chapter: We do not cover the methodology. (We cover that in
Minibook II, Chapter 2.) UML is a language that you use to design software. A
methodology is the process you use to design software. The process that we
recommend is the Unified Process. In this chapter, we discuss the diagrams
and we mention the parts of the process where you might use the diagrams.
So in this chapter, you get to make lots of pretty pictures.
276
Drawing Classes
Drawing Classes
Like so many things around us, objects can have other objects inside of
them. For instance, an alligator object could have inside it . . . well, that’s
probably not the best example. Rather, a printer object would have a toner
cartridge inside it. These could be separate objects, each belonging to its
own class. One might be the LaserPrinter class, and the other might be
the TonerCartridge class.
In this sense, the two classes are connected. The connection is not by
inheritance; nevertheless, they have a relationship.
You can take this relationship a step further. We have a container of blank,
writeable CD-ROMs (or CD-Rs). The container could be an instance of class
CDROMHolder. The items inside the container might each be an instance
of class CDR. In this case, a single instance of CDROMHolder might contain
several instances of CDR. So whereas the LaserPrinter instance contained
a single TonerCartridge instance, the CDROMHolder contains several CDR
instances. Another example is the class Porsche parked in our driveways.
It contains exactly four instances of GoodyearTire. (Yes, we’re dreaming.)
And so you can see there are several possibilities here:
✦ Exactly one instance: An instance of a class might contain exactly one
instance of another class.
✦ Fixed amount of instances, greater than 1: Each instance of a class
might contain an exact number of instances of another class. This
number does not change between instances.
✦ Varying number of instances: Each instance of a class might have a
different number of instances of another class. This amount might vary
from instance to instance, and it might even change over time for a
single instance.
As for the final item, you can see that when we remove a CDR instance from the
CDROMHolder instance, the number of instances the holder contains decreases
by 1. Or if we put a CDR instance back, the holder goes up by 1. If we buy more
and refill the holder, it goes up by more than 1. But with the Porsche that we
really believe is parked outside, the number of tires stays the same.
As you analyze the classes to build your program, you might find some
disagreement here: When we go in to get new tires, the car will be raised up,
and the mechanics will remove the old tires, one by one, until no tires are
on the car. Then they will put new ones on, one by one. Thus, the number of
tires isn’t fixed throughout the life of the instance. But how you build your
class depends on the needs of the people using the program. It’s possible
that you won’t need to consider that aspect and can therefore treat the
number of tires as fixed. Or you may need to include the tire replacements,
in which case you would not treat the number as fixed.
Drawing Classes
277
And here’s another example: If you’re writing a program for a racing game or
simulator, you may want to have the ability for wrecks to occur and tires to
come off the car. Then you would need to vary the tire count.
How you design your classes depends on the situation. Always assuming the
same thing for a similarly named class as it appears in different programs
is not practical. Some programs may require a class to be different from a
class in another program, even though both classes happen to have a similar
name.
Another kind of relationship is inheritance. The LaserPrinter class might
be derived from the Printer class.
You can look at design issues in another way. A class is a kind of classifier. In this regard, you can imagine an inheritance showing different words
for kind. One would be class and one would be classifier. Then class is
derived from classifier. Another classifier is type, and therefore type would
be derived from classifier as well. (Remember, that integers are types, for
example.) So from this perspective of the metainformation or metadata, you
can think of int as an instance of the classifier type. And you can think of
LaserPrinter as an instance of the classifier class. And the particular
printer on our desks, then, is an instance of LaserPrinter. This requires
an abstract way of looking at things, but if you can keep up with this, you’re
ready for some serious class designs. That’s because you’ll understand how
classes all fit together in the greater scheme of things.
Mapping classes with UML
You can create a UML diagram that shows several classes and their various relationships. Take a look at Figure 3-1. This figure shows three classes,
Printer, LaserPrinter, and TonerCartridge. Pay close attention to the
lines connecting these three classes. The lines are different because these
classes relate to each other in different ways.
First, the line connecting Printer and LaserPrinter shows inheritance.
The fat, hollow arrow points to the base class. Thus, LaserPrinter is
derived from Printer.
Although you won’t hear us use this term much, an opposite to the term derived
from is generalizes. Thus, if LaserPrinter is derived from Printer, another
way to say this is Printer generalizes LaserPrinter. The idea is that Printer
is a general form of LaserPrinter, while LaserPrinter is a specific form of
Printer. The reason why we prefer not to use the term generalize is that when
Structuring Your
Classes with UML
Inheritance can also be complex. You may have a class and also have two
classes derived from it. One of these two classes might have two classes
derived from it, and another might have only one. And from there, you might
have no more classes derived. C++ offers great flexibility.
Book II
Chapter 3
278
Drawing Classes
you create a hierarchy of classes, you typically create the base class first. Then
you derive a new class. So to us, the term generalize is counterintuitive. And our
brains don’t do well with counterintuitive ideas. (However, we should add, in all
fairness, that a common way to come up with classes is by noticing similarities
between two classes and then coming up with a single class to serve as a base
class. So in this sense, generalization makes sense.)
Printer
Figure 3-1:
The lines
pointing
between
the classes
show
different
kinds of
relationships.
LaserPrinter
TonerCartridge
1
1
Now look at the line connecting LaserPrinter to TonerCartridge.
This is called a composition, and this word means that the two classes are
associated. Therefore, each LaserPrinter instance will contain exactly one
TonerCartridge instance. How you implement this later is your choice,
but most likely you will include in the LaserPrinter class a pointer to a
TonerCartridge instance.
In this second line, the end with the filled diamond refers to the whole that
contains the part. Thus, LaserPrinter is the whole, and it contains the
part TonerCartridge. Notice also that two numbers are below the
composition line. The one on the left means that one LaserPrinter
instance is in the association, and the one on the right means that one
TonerCartridge instance is in the association.
Now look at Figure 3-2. Here, you have a diamond and a line, which again
mean composition. But this time, the Porsche class has a 1 by it, and the
GoodyearTire class has a 4 by it. That combination means that exactly one
instance of Porsche will have exactly four instances of GoodyearTire. In
other words, one car has four tires.
Next, look at Figure 3-3. Again, you see an association, but this time it is
between the Pasture class and the Cow class. But in this case, the Pasture
class has a 1 by it, while the Cow class has an asterisk (*) by it. The * means
that any number of Cow instances can be associated with any single Pasture
instance. In other words, a single pasture can have multiple cows running
around on it. When you put * in the UML diagram, it means that any number of
Drawing Classes
279
instances can be in the association, including 0. Therefore, a Pasture might
have no cows in it (they’re all in the barn getting milked), or just 1 could be in
the pasture, or 100 cows could be out in the pasture, lounging around.
Figure 3-2:
The
diamond
and the line
together
mean
composition.
GoodyearTire
1
4
Book II
Chapter 3
Structuring Your
Classes with UML
Figure 3-3:
Many
instances
of the class
with the
* nearby
can be
associated
with the
class
with the 1
nearby.
Porsche
Pasture
Cow
1
*
Other possibilities for denoting the number of items in a relationship are also
available. These possibilities are called multiplicities. Table 3-1 lists them.
Attributes and methods
In the object-oriented world, you’re likely to
hear two words many times over: attribute and
method. An attribute is simply a member variable,
and a method is just another name for member
function. These two terms are the official UML
terms. However, most people in C++ usually
don’t use them, except perhaps when drawing
UML diagrams. Instead, most C++ programmers
prefer the terms member variables and member
functions. You can use whichever terms you
prefer, and whichever terms you hear other
people saying. In this book, we use attribute and
method when talking specifically about UML
diagrams and not referring to C++ code.
280
Drawing Classes
Table 3-1
Multiplicities
Symbols
What They Mean
1
Exactly one instance
n
Exactly n instances (where n is any number)
m..n
Anywhere from m to n instances allowed; examples are 0..1 or 1..10
*
Any number of instances, including 0
0..*
Any number of instances, including 0.(same as *)
For example, if you have two classes, one called Vacuum and another called
ExtensionTube, and you see a 1 on the side with the Vacuum and a 1..4 on the
side of the ExtensionTube, that means for each (1) instance of Vacuum, you
can have anywhere from one to four (1..4) instances of ExtensionTube.
But wait. We thought these class diagrams were supposed to be static, not
dynamic! And that’s true: They are still static diagrams, although the line
between static and dynamic is a little blurred. We could go into a big
philosophical explanation about why class diagrams are indeed static (for
example, you write a class that contains a single array, and that does not
change), but instead, let us say this: Just consider a class diagram to be
static, and recognize that some blurry distinctions exist. It’s not a big deal.
Inheriting in UML
If you want to specify inheritance in UML, you simply draw an arrow from
the derived class up to the base class and don’t fill in the arrow. But you can
show other types of inheritance with UML.
If you want to specify that a base class has abstract virtual functions, you
specify those in the class using italics. For example, in Figure 3-4 we have a
base class called Person. This is an abstract class because it contains an
abstract virtual function, work. The function is abstract virtual because it is
in italics. (And thus, the class itself is virtual. Remember that a class that has
at least one abstract virtual function is therefore itself abstract.)
The two classes derived from Person, BankRobber and MiddleManager
(we just thought those made for an interesting combination), each override
the work function. Therefore, they are not abstract. And thus, you can create
instances of BankRobber and MiddleManager.
You may have noticed that, so far, we have not mentioned a way to specify a
virtual function in UML. You can specify a member function as abstract, but
what about just plain old virtual? You can’t. The virtual keyword is unique
to C++, and the word simply means that you can override a function. So how
Drawing Classes
281
do you specify virtual? Many CASE tools include an option in the model that
lets you specify a member function as virtual.
Person
Figure 3-4:
You can
show
abstract
classes in
UML by
putting a
method in
italics.
+work() : int
BankRobber
+work() : int
Aggregating and composing classes
When you associate two classes but not by inheritance, you can do it in two
common ways: composition and aggregation. Consider the LaserPrinter
class and its association with the TonerCartridge class. A toner cartridge
is a fundamental part of a laser printer, but a toner cartridge can’t be inside
more than one laser printer at a time. This is composition. Think of composition
as a very strong bond between two objects.
Aggregation, on the other hand, refers to two objects that are more loosely
connected. In an office, you may find hundreds of computers and a dozen
or so laser printers. The laser printers can function on their own, and they
interact with many different computers. Meanwhile, the computers can each
interact with many different laser printers. This is a much looser connection;
this is aggregation.
But this does not imply composition is only for one-to-one relationships,
and aggregation is for many-to-many. Instead, composition simply means a
much stronger, tighter relationship. A toner cartridge is an intimate part of
a printer and therefore is in a composition relationship. But a printer is not
such a tight, important part of a computer. The computer can live without
the printer, and vice versa, which suggests an aggregation.
In UML, you can distinguish the two based on the quality of the diamond.
Doesn’t that sound nice? However, in this case, we’re talking about the diamond shape on the diagram, not an actual diagram. For composition, the
diamond is filled in solid black. For aggregation, it’s not filled in; it’s just an outline. Figures 3-1 through 3-3 show composition. Figure 3-5 shows aggregation.
Notice that Figure 3-5 has the same classes that we put in Figure 3-3. But this
time the diamond is not filled in. This means we modified the diagram to
make it an aggregation rather than a composition.
Book II
Chapter 3
Structuring Your
Classes with UML
+work() : int
MiddleManager
282
Building Components
Composition and attributes
A close similarity exists between a composition
and an attribute. When each LaserPrinter
instance has its own TonerCartridge
instance, you have a choice: You can either draw
a composition line between LaserPrinter
and T o n e r C a r t r i d g e , with the
diamond on the side of TonerCartridge,
or you can simply give the LaserPrinter
class a member variable (attribute) of type
TonerCartridge. After all, when you
take the composition and write the code for
the class, the composition will manifest itself
Figure 3-5:
When the
diamond is
not filled in,
you have an
aggregation.
Pasture
in the form of a member variable. So which
do you do? Really, it’s up to you (but don’t do
both at once). But here’s one rule. (And as we
would like it with most rules and laws, this is
not strict.) If you have a common class that you
use throughout your program (one that you
might think of as a utility class) and it appears
as a member variable in many classes, it is
probably best to make it an attribute, rather
than show it through a composition line, simply
because it will keep your diagrams from getting
cluttered.
Cow
1
*
When you use UML, you can’t have two diagrams showing two conflicting
associations; thus, we can’t have both Figure 3-3 and Figure 3-5 in a single
UML model. Instead, we changed Figure 3-3 to show an aggregation, and we
showed aggregation in Figure 3-4.
Another way to look at composition is through ownership. If it makes sense
for one object to own another object, this is composition. For example, one
LaserPrinter instance would have its own TonerCartridge instance.
Another LaserPrinter would have a different TonerCartridge instance.
That is, the two LaserPrinters cannot share a single TonerCartridge.
Thus, you can think of each LaserPrinter instance as owning a
TonerCartridge instance. In that case, you can use composition.
Building Components
When you are building software, grouping various classes together into
components is often convenient. Ultimately, when you are developing by
Building Components
283
using C++ on Windows, a component often ends up as a Dynamic Link
Library, or DLL for short. (Unpronounceable; so we just say Dee-El-El.) A DLL
is simply a file that contains a bunch of code that other programs can use.
The other programs load the DLL and then call its functions. But nothing
particularly magical surrounds the DLL. It’s just a bunch of compiled classes
and functions stuffed into a single file. (And it’s compiled; it’s not source code.)
If you’re doing some sophisticated programming, you could also group
classes into a component that you will ultimately put into an ActiveX control
or a COM object. (These are special kinds of libraries that run on Windows.)
Therefore, you can think of a component as a generic way to group classes
together. Figure 3-6 shows a component. It’s a box with a couple added little
boxes to its left. Inside this component called MyLibrary, you can see that
we put two classes, one called Safe and one called Lock.
Figure 3-6:
A
component
is a box with
two smaller
boxes added
to its left.
MyLibrary
Safe
Lock
1
1
UML provides another way to notate components, which we have shown in
Figure 3-7. Notice here that we drew the classes outside the component, and
instead pointed dotted arrows at them from the component. We also put the
word reside in double angle brackets. (These double angle brackets are actually called guillemots, and the French use them in place of double-quotes.
Write it down in case somebody quizzes you on it.)
Book II
Chapter 3
Structuring Your
Classes with UML
Or a component might end up in the form of something called a static library.
A static library is much like a DLL in that it contains a bunch of code for your
program to use. However, when you build your program, the linker (which
is the tool that performs the link process) combines the code in the library
right into your final executable file. This means that your executable file will
be bigger than it would be if you link it to a DLL; but when you link to a DLL,
you need to either ship the DLL with your program or make sure it’s already
installed in the user’s program. With a static library, you don’t need to worry
about it. (Incidentally, if you’re using a Unix system, a static library gets the
.a extension, which stands for archive, and a dynamic library gets the .so
extension, which stands for shared object.)
284
Building Components
Stereotyping
Most people accept that stereotyping is a bad
thing, but in UML it’s actually a good thing. In
UML, you can take an existing symbol, such
as the component symbol, and slightly modify
it to make your own customized version of the
symbol. This modification process is called
stereotyping. When you do so, you add a word
Figure 3-7:
Another
way to
notate
components
is to use
dotted
arrows that
point the
classes
to the
component.
MyLibrary
inside the top of the component symbol. You put
the word in double angle brackets. << and >>.
(Guillemots again! One for everybody!) In fact,
in UML, anytime you see a word in guillemots,
you’re seeing a stereotype. Just think of a stereotype as a modified form of the symbol, or
your own version of the symbol.
Safe
«reside»
1
1
«reside»
Lock
When you create a component diagram, you can use stereotypes in your
components. Think of it this way: Suppose you have several components
that you are going to build into a DLL. Because the component symbol itself
doesn’t have any place to notate that it’s a DLL, you can create your own
DLL component symbol. You do this by putting a stereotype inside the
component symbol. Figure 3-8 shows three components all working
together. Two will ultimately be DLLs, and one will be the final executable
file that calls into the DLLs. To show these, we stereotyped them all. Notice
that because we’re creating our own symbol, we can reuse the symbol. In
this case, we used the DLL component symbol twice. If we have more
executables, we can also reuse the executable component symbol.
CASE tools differ on how you add stereotypes. With many tools, you use a menu
item; and in a dialog box that opens, you add a name for the stereotype. Then
you choose the base class. Now don’t confuse that with what you normally
think of as a base class. We’re talking about metainformation here. Look at it
this way: You have a symbol, such as component. Now you’re making your own
specialized symbol based on component, called, for example, DLL component.
This DLL component is, in a sense, derived from the component symbol. Thus,
Deploying the Software
285
the base class in this hierarchy is the component symbol. And so, when you
create a stereotype for a component, the base class is component.
Before you make your own stereotype, first check to see whether it already
exists. Many stereotypes are already available in UML. For example, in the CASE
tool that we’re using, executable already exists for the component symbol.
«executable»
SpyProgram
Figure 3-8:
You can use
stereotypes
and show
different
components
working
together.
«DLL»
AccountingLibrary
«reside»
MoneyHandlerAndGrubber
«reside»
LawsuitPayoffer
«DLL»
MathLibrary
«reside»
ComplexNumberFaker
«reside»
AlgebraCheater
Deploying the Software
During your designs, you can create a diagram that shows how your software
will run and will be configured on the final computer system. In UML, the
diagram you use is called a deployment diagram. This is a static diagram
because the information in it does not change while the program is running.
Figure 3-9 shows an example of a deployment diagram. In this figure, we
included two nodes. In a hardware system, a node is any computer component.
Book II
Chapter 3
Structuring Your
Classes with UML
In Figure 3-8, you can see how we used stereotypes to create a special DLL
component symbol and a special executable component symbol. Notice also
that we drew an arrow from the executable called SpyProgram to the two
DLLs, called AccountingLibrary and MathLibrary. These arrows are
dashed and have no stereotype with them. The dashed arrows mean that
they depend on the two libraries. Meanwhile, the two libraries each have
two classes in them. To show that the classes reside in the libraries, we used
a dependency arrow (again, a dashed line), but we used stereotypes to show
that these are reside forms of the dependencies. So again, this is a special
version of the symbol, which we denote through stereotypes.
286
Deploying the Software
In this case, one node is a PC, and the other node is some shared drive on the
network. You can see in the diagram that the shared drive contains the two
DLLs. The executable itself, however, resides on the user’s PC. Note also that
the components have connections between them because we used the same
CASE model that we used in Figure 3-8. When we added the components to the
two nodes, the CASE tool automatically drew the lines to connect them.
SharedDrive
PC
«DLL»
AccountingLibrary
Figure 3-9:
This
deployment
diagram has
two modes.
«executable»
SpyProgram
«DLL»
MathLibrary
One particularly fun thing about deployment diagrams is that the UML
standard lets you make your own versions of the symbols. However, this
creative capability goes beyond just stereotyping, where you add a word
inside those funny angle brackets. Instead, you can actually use clip art! Yes,
clip art! Take a peek at Figure 3-10 to see an example.
Figure 3-10:
You can be
creative
when
designing
your
deployment
diagrams!
Macintosh G4
HP Laserjet 8550 color
Dell Optiplex
Chapter 4: Demonstrating Behavior
with UML
In This Chapter
✓ Drawing out objects in UML
✓ Expanding use cases into use case diagrams
✓ Ordering steps with sequence diagrams
✓ Showing how objects collaborate
✓ Noting the flow of activities
✓ Stating the different states of an object
I
n this chapter, we take you through the five dynamic diagrams in UML.
These are the diagrams that show how objects work together and change
over time. Some of them you may find more useful than others, and that’s
fine — you don’t have to use all the diagrams you see in this chapter. You
are free to use those that you find the most useful.
Drawing Objects
In UML, you can draw class diagrams that show the classes in your system,
or you can get right down to it and draw an object diagram, which contains
actual instances or objects. Because you are drawing instances, you might
have multiple objects of a single class on a single object diagram.
When you draw objects on a UML diagram, they look pretty much the same
as class diagrams, but with one important difference: For an object, the
name at the top of the rectangle is underlined. With classes, the name is
not underlined. Be sure to remember this difference so your diagrams don’t
confuse other people. Probably the best way to explore an object diagram is
to see it compared to a class diagram. Take a peek at Figure 4-1, and you can
see a class diagram at the top and an object diagram at the bottom.
Two classes are in the diagram. The names are not underlined and the two
classes are related by composition. The composition is one-to-many —
one Pasture instance to multiple Cow instances. In effect, instances of the
Pasture class contain 0 or more instances of Cow. We included some
attributes for each class.
288
Drawing Objects
Pasture
–Acres : int
1
*
Cow
–Weight : int
–Age : int
–Name : string
Bessie : Cow
Figure 4-1:
Class
diagrams
and object
diagrams
are similar.
RollingHillsOfIndiana : Pasture
Acres : int = 15
Weight : int = 600
Age : int = 3
Name : string = "Bessy"
Hilda : Cow
Weight : int = 620
Age : int = 4
Name : string = "Hilda"
The lower half of the diagram shows instances of the classes. When you
program, you sometimes give a name to an instance in the way of a variable
name. Or you may be using a language that allows its objects to be named.
(C++ does not allow this; you have to use a variable name.) In the object
diagram, we named the instances. At the top of each rectangle is an underlined
name, a colon, and the class type. Thus, RollingHillsOfIndiana is an
instance of type Pasture. Bessie is an instance of type Cow, and Hilda is
also an instance of type Cow. Inside the object boxes, we also gave values to
the member variables (or attributes). For these, the name goes first, then a
colon, then the type, just as in the class symbols. But then you see an equal
sign and a value. (Because these are actual instances of the class, they can
have values for the member variables.)
Look carefully at the line connecting the RollingHillsOfIndiana object to
the Bessie and Hilda objects (as well as the line connecting the two classes).
You can see an arrow pointing to each of the Cow instances but not to the
Pasture instance. Thus, the Pasture instance contains a pointer to each Cow
instance but not vice versa. That means the Cow instances don’t know about the
Pasture instances. That is, the Cow instance does not contain a member
variable that points to the Pasture instance. You can see this is the case also
with the class diagram, because an arrow is pointing to the Cow class.
If you want both instances to know about each other, you simply remove the
arrows and use just lines. This change is called a bidirectional association.
When you have an arrow, the arrow means that the relationship is
unidirectional. In the case of Pasture and Cow, the arrow means that the
Pasture instance can call methods in the Cow instance but not vice versa.
The Cow instances are not aware of the Pasture instance.
Casing Out the Use Cases
289
Sometimes, people really like to show that the objects are instances of the
class by drawing a dashed arrow from the instance to the class and adding
the <<instantiate>> stereotype. When you have lots of instances, this
technique can make for a messy diagram, but if you have only one instance
per class, you can easily show it in the diagram. We did just that in Figure
4-2. Notice that the word <<instantiate>> is present and the arrow points
to the class. To us, this setup seems a little backward, but lots of stuff seems
backwards in the world of computers, so we’re not surprised.
Pasture
–Acres : int
*
«instantiate»
Figure 4-2:
You can
show that
an object is
an instance
of a class.
GreenLands : Pasture
«instantiate»
Object2
Acres : int = 25
Casing Out the Use Cases
Talk about disagreement. People have argued and bickered about use cases
for years. The term use case (pronounced with a soft s, as in use, because use
is a noun here) refers to one single case or instance of functionality in your
program. Most programs have many, many things you can do with them; for
example, a Web browser enables you to click the Go button to go to a Web
address that you typed into a box; or it enables you to click a link to go to a
page. These two things are each a single use case.
Use cases have become an important aspect in modeling software. So why
the contention? Because use cases focus on the functions (that is, verbs!) of
a software package, while objects focus on the things, or nouns. So it would
make sense by that argument that use cases have no big place in objectoriented analysis and design. However, the flaw in this argument is in saying
that object-oriented means you focus only on the nouns. It’s true that it’s
oriented to the objects, but that doesn’t mean you ignore or have a disdain
for verbs. Personally, we like verbs. Life without verbs boring. Talking
difficult with no verbs. Me car grocery store.
Book II
Chapter 4
Demonstrating
Behavior with UML
1
Cow
–Weight : int
–Age : int
–Name : string
290
Casing Out the Use Cases
And the same is true with object-oriented programming. Although we focus
our building around the objects, we still have functions, which are verbs.
And we still have functionality. And we can organize and group the
functionality, such as through menus or through dialog boxes.
And so, when we design software, one thing we do is go through and list all
the use cases we can think of for the software. This often takes place in the
analysis phase.
Figure 4-3 shows an example of a use case diagram. The actual use cases are
the oval shapes. And you certainly noticed the other goofy symbol: The stick
man figure! The stick man figure is called an actor because it represents the
user interacting with the application similar to the way an actor interacts
with the audience. Yes, this is one time when we, the software engineers of
the world, get to revert to our childhood roots and draw pretty pictures. In
this case, we get to draw stick figures. Now, just to be crystal clear, please
realize that this a unisex stick figure. It is neither a man nor a woman, or
both a man and a woman. Thus, we don’t need to draw a skirt to show a
woman as so many other fields do. Here, we believe all people are, at heart,
all the same. Thus, we draw our stick figures all the same.
Restaurant
OrderFood
EatFood
Figure 4-3:
A use case
diagram
shows the
functionality
of a system.
Patron
PayForFood
Now, if you look at Figure 4-3, you can see that the use cases each have
names. These are the things that the user can do with the system. (We use
the word system to mean a collection of software that you’re building.) The
system in this example is called Restaurant.
Casing Out the Use Cases
291
Use case: Order food
Ordering food is a handy and tasty example of
how events flow in a use case:
7. The server asks the patron whether he or she
will be having dessert.
ID: UC1000
8. If the patron wants dessert.
Actors: Patron
8.1. The patron looks at the dessert menu.
Preconditions: Patron must be seated at the
table with a napkin covering the shirt. Hands
must be clean.
8.2. The patron chooses a dessert.
Flow of events:
2. When the server arrives, the patron orders
the food.
3. The server takes the order to the kitchen.
4. The cook prepares the food.
5. The server delivers the food to the table.
6. The patron eats the food.
Postconditions: The patron has a full stomach
and is ready to pay for the food.
For some steps, you may have what amounts to
an if-then-else block in your code. You
can notate this in different ways, but here’s a
handy one: The flow of events goes beyond
Step 6, like this:
8.4 The patron eats the dessert.
9. else
9.1 The server relaxes for a moment,
dreaming about what life could have been
like if he or she had only had dessert.
Steps 1 through 9 can easily be a function or
an algorithm. You can also use for loops and
while loops by putting the for or while
condition and following it with steps:
9.2 For each dessert on the menu the patron
imagines.
9.2.1 Eating one single bite.
9.2.2 Contemplating the flavor.
9.2.3 Devouring the rest.
The stick figure guy (or gal) represents the user of the system. In the case
of a word processor, that could be you sitting there using it, or it could be
another human. Either way, it represents a user, a human being. The lines
point to the different use cases the user has access to.
Expanding use cases
After you draw your use cases on the diagrams, you can define what they do
on paper. The way you do this is to write the information in a single-column
table, with each row specifying different information about the use case.
This information includes:
Book II
Chapter 4
Demonstrating
Behavior with UML
1. The patron waits for the server to arrive.
8.3. The server fetches the dessert.
292
Casing Out the Use Cases
✦ Name: The name of the use case as you described it in the diagram.
✦ Unique Identifier: Some people like to include a special code, such as
UC (which stands for use case), followed by a number, as in UC1000.
✦ Actors: The actors involved with the use case.
✦ Preconditions: The situation that must exist before the use case can
begin to operate.
✦ Flow of events: A step-by-step flow of the events that take place when
the use case runs.
✦ Postconditions: The situation that will exist after the use case runs.
A sample use case makes an exclusive guest appearance in a nearby sidebar.
Matching use cases and requirements
When you are designing software, making sure that every requirement has
at least one use case associated with it is a good idea. Remember: The
requirements describe what the software does.
Table 4-1 shows an example of how to ensure that each requirement has at
least one associated use case. Remember that you normally give each use
case an identifier (the need for the identifier increases as project complexity
increases). You can do the same with the requirements.
Table 4-1
Sample Requirements
UC1
UC2
REQ1
✓
✓
REQ2
✓
UC3
REQ3
✓
REQ4
✓
UC4
✓
In this grid, each requirement has at least one use case associated with it.
Further, each use case satisfies at least one requirement. If a requirement
was missing, you would need to add a use case. If you have a use case that
does not satisfy a requirement, you must make a decision: Either you
discovered a new use case and, therefore, a new requirement, and you need
to add that requirement; or you went overboard and added an unnecessary
feature, in which case you can eliminate the use case.
Sequence Diagrams
293
Sequence Diagrams
When you are working with objects, showing a time sequence of how
objects interact with each other is helpful. You can do this by using a
sequence diagram. A sequence diagram can be a little mind-boggling when
you first look at it (at least it was for us), but after you understand the
layout, a sequence diagram makes more sense. In a sequence diagram
✦ Time moves from top to bottom. In effect, things positioned higher on
the diagram happen earlier; things positioned lower happen later.
✦ Objects are drawn side by side, left to right.
Refer to Figure 4-3 for a moment, and you can see how this sequencing
business works. We took the use case shown in that figure and built a
sequence diagram from it. Note, however, that we did not include the added
part about the dessert. We will add that shortly, because the process of
adding it is a bit more complex. Also, note that to build this sequence
diagram, we first had to come up with some classes. They are as follows:
✦ Server: This is a class whose instances receive an order, send it to a
Cook instance for preparation, and then take the order and deliver it to
the patron.
✦ Cook: This is a class that can receive an order and prepare it.
✦ Food: This is a class that represents, well, food!
Notice that we did not create a class for the Patron. That’s because the
Patron is outside the system and not a part of it. The Patron, instead, uses
the system.
Figure 4-4 is an example of a sequence diagram. Remember, the stuff at
the top takes place earlier in time, and as you move your eyes down the
diagram, you are advancing forward in time. And you can even move your
eyes up on the diagram, although be careful because you don’t want to go
back in time and relive your past!
Book II
Chapter 4
Demonstrating
Behavior with UML
✦ When one object sends a message to (calls a member function of)
another object, you show this as a solid arrow with a filled-in arrowhead.
Above the arrow, you put the name of the function (or the name of the
message if you prefer that jargon).
294
Sequence Diagrams
Irona: Server
Mel: Cook
Patron
orderFood("Hamburger")
prepareFood("Hamburger")
«create»
MyHamburger: Food
Figure 4-4:
A sequence
diagram
shows
activity over
a range of
time.
MyHamburger: Food
MyHamburger: Food
«destroy»
Here’s how this diagram works. The objects are listed at the top, along with
the user who initiates the use case. Below the objects are dashed lines that
represent the lifeline of the object. The top of the lifeline represents the time
the object is created. For example, if you create an object in the middle of a
use case, you would begin the object at that time position (that is, vertical
position) on the use case. Here, most of our objects existed before the use
case (because they’re at the top of the diagram) and their lifeline stretches
to the bottom of the diagram; it does not end. That means the objects are
around for the full duration of the use case. However, one object, the Food
instance, comes to life in the middle of the use case.
Now, notice that a bar (a tall, thin rectangle) replaces the lifeline in some
places. This is where the object has focus in the use case. Or you can say the
object is active. Before and after, the object is sitting there, but this use case
isn’t actually using the object. Although the bar is present, the use case is
using the object.
Sequence Diagrams
295
Finally, look at the horizontal arrows. This is where an object to the left
calls a member function in an object to the right. The first arrow has a label
orderFood(“Hamburger”). This arrow starts on the bar for the user
(called Patron) and points to the Server object called Irona. In effect,
the user calls the orderFood member function in the Server object. Then
right under that, the Server lifeline becomes a bar, which means it’s active.
The Server then calls prepareFood(“Hamburger”) for the Cook object
called Mel.
Then the returns follow: The Cook object returns an object called
MyHamburger (which is of class Food). The Server object receives this and
returns it back to the user.
Now think about this: How can the user call a function? A user can do it
through a user interface, such as a window on the screen with buttons on it
or perhaps a menu item. That is, the user interface is the part that you see
on the screen! And the name makes sense: It’s the interface to the program
for the user. Thus, you have a deeply philosophical concept here: Through
the screen, keyboard, and mouse, you are interfacing with the computer
program, calling member functions. Pretty good!
And finally, notice that the user deletes the object. How can this be?
Remember that this use case has a function that the user called. That
function then calls destroy. The object’s lifeline ends with the deletion,
and you see a big X to show that the line ends.
When an object on a sequence diagram calls a member function of an object
to the right, a common term for this process is that the first object is sending
a message to the second object. If you are using a tool to help you draw UML
diagrams, the arrows might be called something like message arrows.
Notating sequence diagrams
When you create a sequence diagram, you are free to put some notes to the
left of the sequence diagram. These notes on the left describe what the thing
does. Figure 4-5 shows an example of this.
Book II
Chapter 4
Demonstrating
Behavior with UML
When the Mel object receives the prepareFood(“Hamburger”) message, it
creates a new instance of Food. Notice that the arrow to the right of the Mel
lifeline calls a function in the Food object, but this is not a typical function.
Instead, it’s a stereotype with the word create in double angle brackets.
This means that the Mel object creates a new instance of Food and calls
it MyHamburger. Because the object was just created, its lifeline begins
midway down the diagram.
296
Sequence Diagrams
MySquid::Squuddle
The MySquid object
creates a new
Kladdbuggle object
Figure 4-5:
You can
notate a
sequence
diagram by
putting text
along the
left side.
The MySquid object
sends the skidaddle
message to the
Kladdy object
«create»
Kladdy: Kladdbuggle
skidaddle()
Looping and comparing in sequence diagrams
To show a loop (such as a for loop or a while loop) in a sequence diagram,
you enclose part of your sequence diagram in a rectangle and put the loop
condition immediately below the rectangle. You can see this in Figure 4-6,
where we put the rectangle around the point when the Server object calls
the payBill method on the CashRegister object.
Irona: Server
Register: CashRegister
Patron
PayAllBills()
Figure 4-6:
To show a
loop, use a
rectangle
with a loop
expression
following it.
payBill(i)
*[i := 1..n]
Sequence Diagrams
297
Believe it or not, UML does not have a standard syntax for specifying a loop
condition beyond the fact that you must start it with an asterisk. However, a
common approach is to use notation, such as i := 1..5, which means the
loop counter i increases from 1 to 5. Thus, there are five iterations; in the
first, i is 1; in the second, i is 2; and so on; and in the final i is 5. So you can
see in Figure 4-6 that Patron sends a message to the Server to pay for all
the meals in the restaurant. (Apparently this Patron just won the lottery
or something.) The Server then goes to the CashRegister object and
processes all the orders.
Irona: Server
Mel: Cook
Patron
orderFood("French fries")
h := doWeHave("French fries")
Figure 4-7:
To show
conditions
and
comparisons,
use
brackets.
[h] fries := prepareFood("French fries")
[h] fries
[!h] outOfFries
Look at how this works. First, the Server object sends the message
doWeHave(“French fries”) to the Cook object. (We simplified this part
of the diagram by not showing how the Cook object does this.) The result
of this comes back as either true or false, which we store in the h symbol.
Then, in the next step, the Server calls prepareFood only if h is true.
That’s what the brackets with the h in them mean.
Book II
Chapter 4
Demonstrating
Behavior with UML
Now suppose in our little restaurant model that the restaurant is out of a
particular food, such as french fries. In that case, the Server object might
go back and ask the cook if any french fries are still available. If they are,
the Server will request that they be included in the order. The Server will
then return the order of fries to the Patron; otherwise the Server will send
a message back to the Patron (that is, return a message, in computerese)
that there are no more fries. You can show this as we did in Figure 4-7.
298
Sequence Diagrams
Colons in assignment statements?
In UML, you often see an assignment statement with a colon, rather than just an equals
sign. For example, you might see index :=
10. Why the colon? Well, it turns out that this
syntax is borrowed from some languages other
than C and C++. Lucky us. C++ is probably the
single most popular language on the planet, and
the designers of UML used another language
for some of its syntax. In the two languages,
Pascal (which is the underlying language for
a programming tool called Delphi) and Ada
(which is supposedly used a lot by the military),
the colon always precedes the equals sign in
an assignment statement. And to make matters
more complicated, these two languages also
use a single equals sign for comparison. C++,
of course, uses two equals signs for a comparison. Maybe someday we’ll have a standard
computer programming language. Until then,
life is messy in the programming world. But
we’ll survive.
Finally, if h is true, the Server object returns the order of fries in the form of
a new Food object. This is the return line that starts with [h], which means
that h is true. (We didn’t show the process of the Cook creating the Food
object; you can see that kind of thing in Figure 4-3.) But if h is not true, the
Server object returns a symbol that represents there are no more french
fries. (You will probably make this symbol an enum in C++, or perhaps a 0.)
At this point, we’re actually getting into some local variable names, such as
the value of whether there are french fries. However, most CASE tools aren’t
sophisticated enough to take a sequence diagram such as this and generate C++
code that works. Most can generate some basic code, and some let you type
the code through the CASE tool. You will most likely take this diagram and
use it as a guide to write your own code. Designing it through the diagram is
a lot easier than with the code. And other people — those who don’t
program — can get a basic idea of the flow of events by looking at the
sequence diagram. It’s less likely that they would understand code. That
way, the people called stakeholders (those who run the company and eat lots
of steak) can look at the diagram and tell you if you’re building what they
want you to build.
As you refine your sequence diagrams, you may discover member functions
that you didn’t include in a class, or you might even discover new classes. As we
built the sequence diagrams in this section, we discovered that we didn’t have
methods for paying the bills. And so we ended up adding a CashRegister
object and some methods in various objects for paying the bills. We also
discovered that we needed some methods for finding out whether a certain
food item existed. As you can see, we refined the software system as we worked
on these diagrams. And that’s the goal of UML: To refine it and get it all right! If
you’re curious, check out Figure 4-8, which is the updated class diagram we
created as we were working on these sequence diagrams.
Collaboration Diagrams
Server
+orderFood(in foodName : String) : string
+payBill()
+payAllBills()
299
CashRegister
+payBill(in itemNumber : int)
*
1
1..*
Figure 4-8:
Your class
diagrams
will evolve
over time.
1
Cook
Food
–name : String
–Price : int
+prepareFood(in foodName : String) : Food
+doWeHave(in foodName : String)
Collaboration diagrams are similar to sequence diagrams, but they don’t
show the time ordering. The idea is that they give an overview of the
interactions between the diagrams. Frankly, we always opt for sequence
diagrams and tend to skip the collaboration diagram; in many ways, a
sequence diagram is a type of collaboration diagram that has the benefit of
showing a time sequence. However, if you don’t want to show time sequence
and instead want to focus on interactions between the objects, you can use a
collaboration diagram.
If you look back at Figure 4-7, earlier in this chapter, you can see an example
of a sequence diagram. Now in Figure 4-9, we have the same information, but
it is in the form of a collaboration diagram.
1. orderFood("French fries")
Figure 4-9:
Irona: Server
[h] fries
A
collaboration
[!h] outOfFries
diagram
Patron
shows
information
similar to
that in a
1.2. [h] fries := prepareFood("French fries")
1.1. h := doWeHave("French fries")
sequence
diagram
but focuses
on object
interactions.
Mel: Cook
Demonstrating
Behavior with UML
Collaboration Diagrams
Book II
Chapter 4
300
Activity Diagrams
In Figure 4-9, no time sequence is given. The diagram focuses on the
interactions between the objects and between the user and the objects.
However, we did give a basic notion of steps by numbering the messages (1,
1.1, and 1.2). First, the user sends a message to the Server object; second,
the Server asks the Cook if there are more fries. And third, if there are, the
Server puts in the order for the fries.
We didn’t just number these things 1, 2, 3. We started with 1, then 1.1, and
then 1.2. The reason is that we imagine the second and third steps as being
substeps to Step 1. Ultimately, these will be inside a single function, such as
this pseudocode (simplified code that illustrates the basic point):
orderFood() {
h = doWeHave(“French fries”)
if (h) {
fries = prepareFood(“French fries”)
return fries
}
else {
return outOfFries
}
}
This is almost C++ code, and it would be easy to change it to real C++ code
(such as declaring the variables and making this an actual member function
with a return type and a parameter list). This is partly how we envision the
collaboration diagram looking in C++ code; the calls to doWeHave and
prepareFood are inside the code for orderFood. And thus, they get substep
numbers 1.1 and 1.2 (like an outline) rather than their own Steps 2 and 3.
Activity Diagrams
An activity diagram is essentially a flowchart. It shows a sequence of steps.
Yes, so does a sequence diagram and, in some senses, a collaboration
diagram. However, there’s a slight difference: You normally use a sequence
diagram to show the steps in a use case. You can use an activity diagram
to show individual parts of a sequence diagram, such as a single member
function.
The idea behind an activity diagram is that it shows the lowest level of
steps possible. In effect, the steps (activities) in an activity diagram can’t be
divided into substeps. The word that computer people like here is that the
activities are atomic and cannot be divided, as people once believed atoms
could not be divided. (But this time the theory will stick.)
Figure 4-10 shows an example of an activity diagram. The diagram shows the
starting point with a filled-in circle (in this case, at the top of the diagram).
Then an arrow points to the first activity (Eat first bite), which is
Activity Diagrams
301
inside an oval. Next comes a decision. Unlike traditional flowcharting, you
do not put any text inside the decision. Instead, you show arrows extending
away from the diamond; beside them, you put a Boolean condition inside
brackets. Or you can put the word else for all other cases. Thus, in this
diagram, if the food is yummy, you can move down to the oval on the lower
right (Eat another bite). Otherwise you move down to the oval on the
lower left (Throw food away).
Book II
Chapter 4
Eat first bite
Throw food away
Demonstrating
Behavior with UML
else
[tastes good]
Eat another bite
[more food]
Figure 4-10:
An activity
chart is
similar to a
flowchart.
else
We followed the Eat another bite activity with a decision. If the condition
[more food] is true, you go back to Eat another bite. Otherwise you
move to the final diamond.
The final diamond shows all the steps coming together. A diamond represents
a return from a decision, where the different paths come back together. We
did not put any conditions around it. We show two arrows going in but only
one coming out.
And then the final thing is a filled circle with a border around it. That
represents the final state or, more simply put, the end of the activity diagram.
302
State Diagrams
Sometimes, you might want your activity diagram to include a step that is
not atomic; you might want to show that you perform a complex step next,
but you just give the name of the step without showing all the steps. Such a
step is called a subactivity. A subactivity is not atomic, and it can be broken
up into further subactivities. In Figure 4-11, we created a subactivity called
Eat Food. We don’t show the detailed steps on eating the food; we just
point out that the computer must perform the function called Eat Food. To
make this clear, we used a slightly different diagram. It’s an oval with two
ovals inside, with one pointing up to the other.
Eat first bite
else
Throw food away
[tastes good]
Eat food
Figure 4-11:
A
subactivity
can contain
other
subactivities.
State Diagrams
A state diagram shows the different states in which an object can live. We
don’t mean Nebraska or California, but a state such as this collection:
✦ The food name is Hamburger.
✦ The burger’s top bun is present (or true).
✦ The burger’s meat is present (or true).
State Diagrams
303
✦ The burger’s bottom bun is present (or true).
✦ The food is accompanied by ketchup and mustard.
✦ There are ten remaining bites.
These items together all show the current state of an object. An object’s
state is represented by the values in the member variables, what function
the object is presently running (if any), and how it is currently associated
with other objects. For example, this Hamburger object might be in the
hands of the Server and not the Patron. That is one part of the object’s
current state.
A state diagram is similar to an activity diagram. A state diagram shows flow
from state to state. But it also shows how to get from one state to the next.
We show a basic state diagram in Figure 4-12. The burger has two states:
Hamburger present (meaning it’s all there) and Bottom-only Burger
(meaning the top bun has been eaten away by somebody or something). These
two states are shown in rounded rectangles, and their names are present.
Figure 4-12:
A state
diagram
shows the
different
states an
object can
be in.
Hamburger present
biteTopBun[didn't miss] / Remove Top Bun
Bottom-only Burger
How does the burger transform from one state to the next? In the diagram,
you can see an arrow pointing from one state, Hamburger present, to the
next, Bottom-only Burger. That arrow is the only one in the diagram,
which means that it’s the only possible state transition. That is, the burger
can be in the Hamburger present state, and next it can move to the
Bottom-only Burger state, but not back. And the burger gets there when
the situation written above the arrow takes place. Here’s what that means:
1. The first portion of the text is biteTopBun. This is a process or activity
or step that takes place.
2. The next portion is [didn’t miss]. That’s a condition. If the bite
worked (and the assailant didn’t miss), you get to go on to the new state.
Demonstrating
Behavior with UML
States on a diagram are rounded rectangles (rectangles with rounded corners).
Book II
Chapter 4
304
State Diagrams
3. To go on to the new state, you do what follows: removeTopBun. Of
course, the biting and the removing really are one step. But in computers,
we can break it up. The biting is the process of starting to remove the
bun, and it’s possible that the biting will fail (if you miss the bun, that
is). But if the biting doesn’t fail, the computer must perform the activity
called removeTopBun.
Finally, notice how this is all divided. First is the process that takes place.
Next is the condition in brackets. Then there’s a slash, and finally the activity that puts the object in the next state appears. Thus the state diagram
shows an entire transition between two states.
Chapter 5: Modeling Your
Programs with UML
In This Chapter
✓ Using some UML extras, such as packages, notes, and tags
✓ Taking advantage of the freedom UML gives you
✓ Creating C++ enumerations in UML
✓ Using static members in UML
✓ Notating templates with UML
I
n this chapter, we give you some miscellaneous details about using UML.
After you understand how to use the diagrams and have a feel for a
methodology or process, read this chapter for interesting details about
UML. For example, you can use several symbols in any of your diagrams to
make them more descriptive; we discuss those here. We also talk about how
to show various C++ features in UML.
Using UML Goodies
The UML specification is huge. We’re talking big. So in this section we give
you some additional information you can use when creating UML diagrams.
Packaging your symbols
In computer programming, a common term is namespace. When you have
functions and classes and variables, you can put them into their own
namespace, which is nothing more than just a grouping. When you do so,
the names of the functions, classes, and variables must be unique within
the namespace. But if you create another namespace, you can reuse any of
the names from the other namespace. In technical terms, identifiers must be
unique within a namespace.
To make this clear, let us show you a C++ example. In C++, you can create
a namespace by using none other than the namespace keyword. Have a
gander at Listing 5-1 — and bear in mind that using namespace std; line
you see in each of these programs, too.
306
Using UML Goodies
Listing 5-1: Using the Namespace Keyword to Create a Namespace
in C++
#include <iostream>
using namespace std;
namespace Work
{
int FavoriteNumber;
class Info
{
public:
string CompanyName;
string Position;
};
void DoStuff()
{
cout << “Doing some work!” << endl;
}
}
namespace Play
{
int FavoriteNumber;
class Info
{
public:
string FullName;
string Hobby;
};
void DoStuff()
{
cout << “Having fun!” << endl;
}
}
int main()
{
// Work stuff
Work::FavoriteNumber = 7;
Work::Info WorkInformation;
WorkInformation.CompanyName = “Spaceley Sprockets”;
WorkInformation.Position = “Worker”;
Work::DoStuff();
// Play stuff
Play::FavoriteNumber = 13;
Play::Info PlayInformation;
PlayInformation.FullName = “George Jetson”;
PlayInformation.Hobby = “Playing with the dog”;
Play::DoStuff();
return 0;
}
Using UML Goodies
307
In Listing 5-1, we created two different namespaces, one called Work and one
called Play. Just to prove the point, we created a global variable, a class
name, and a function inside each namespace, and they are each named the
same as in the other namespace. To make use of these items, down in main
we precede them with the namespace name and two colons. So you can see
we have two separate global variables:
Work::FavoriteNumber = 7;
Play::FavoriteNumber = 13;
And we created instances of two separate classes:
Work::Info WorkInformation;
Play::Info PlayInformation;
Think of a namespace as a grouping mechanism. You can group related
items, and it frees you from having to worry about whether the name you
came up with is unique.
To keep everything neat and tidy, the designers of C++ have put all their
own features, such as cout, in their own namespace. This namespace is
called std, which is short for standard. To make use of cout and other
standard features, you need to use the std namespace. This means you
would normally type std::cout to access cout. However, having a lot of
cout entries in your code can be cumbersome. To simplify access to the
std namespace, then, you can just put using namespace std; near the
start of your code. Then each time the compiler comes across an identifier
it doesn’t recognize, it follows up by checking the std namespace. Thus you
can have cout without the std::cout before it. The compiler at first won’t
recognize cout, but then the compiler will check the std namespace, thus
locating cout.
And now on to UML. In UML, you can show namespaces in your diagrams by
using packages. In UML, a package is equivalent to a namespace in C++ and
other languages. A package looks like a file folder. (Not the kind in your
computer, but the kind in those wondrous and archaic things past generations
of the late twentieth century called file cabinets.)
Figure 5-1 shows an example of a package. You can see that it’s a file-folderlooking thing, and the classes are inside it. We put two packages in this
diagram, one called Work and one called Play, to match the classes in
Listing 5-1.
Modeling Your
Programs with UML
These are completely separate classes and variables; they just happen to
have the same name. But they’re inside their own namespaces, so this is
perfectly legal. And you can see that we also called the function in each
namespace. Again, we put the namespace name, two colons, and then the
function name. As before, these are each separate functions; they just
happen to share the same name.
Book II
Chapter 5
308
Using UML Goodies
Work
Play
Info
Info
Figure 5-1:
A package
looks like a
file folder.
Different Computer-Aided Software Engineering (CASE) tools and diagramming
software do packages differently. If you are using Microsoft Visio to do your
diagrams, for example, its built-in UML tool does not let you draw your
classes inside the package symbol. Instead, when you create a package
symbol, you get a new blank page on which you put your symbols.
In UML, by default, a namespace already exists. It’s called topLevel. If you
don’t explicitly put your data inside a namespace, they automatically go in
the topLevel package.
Notating your diagrams
UML has a handy little symbol called a note whose only purpose is to
provide comments on a UML diagram. A note is much like a comment in C++
code: It has no bearing on the actual diagrams but is rather there for the
benefit of us humans and other creatures with highly evolved brains to read.
Figure 5-2 shows an example of a note. The note symbol is a sheet of paper
with a folded corner, like an actual note.
Figure 5-2:
A note
contains a
comment.
When the discombobulator itself
becomes discombobulated, the users
will want to run the disDiscombobulate
member function followed by the
recombobulate member function.
Tagging your symbols
Sometimes, you want to add some extra information, such as a class diagram,
directly to a symbol. Although you could put a note symbol on the page,
another possibility is to put the information right into the symbol itself
through a tag (or sometimes called a tagged property). A tag gets a name and
Free to Be UML
309
a value. For example, you might want to put a date on a symbol, such as
Date = January 1, 2010. You can notate this through a tag. Figure 5-3
shows two tags added to a class symbol and a single tag added to a
component symbol.
MyComponent
{designer = Gwyneth}
Discombobulator
{Date = January 1, 2010,
Owner = Discombs, Inc.}
+size[1] : int
The tags in Figure 5-3 are of the format name = value, and they are
surrounded by curly brackets.
To have tags show up in some CASE tools, you have to make them visible
for the symbol. For example, some CASE tools have an option called
ShowProperties. Using this allows the tags to show up in the symbol.
Free to Be UML
One of the great things about UML is that it gives you a great deal of
freedom. For example, if you find a diagram you don’t care to use, you don’t
have to use it; you can still move though an entire software development
process or methodology. For example, some people prefer to use sequence
diagrams while staying away from collaboration diagrams. And some people
don’t use state diagrams and activity diagrams. Now some purists might
complain about this, but as a software engineer, you need to do what works
best for you and your team.
Further, UML is not intended to be used just for software engineering. The
creators of UML designed it to be a general-purpose language for modeling,
and it can be used for all sorts of projects. For example, in one book, every
chapter started out with a UML activity diagram showing the flow of sections
in the book.
Of course, most people are going to use UML for software engineering,
primarily because many people outside the software field have simply never
heard of UML.
Book II
Chapter 5
Modeling Your
Programs with UML
Figure 5-3:
You can add
tags to your
symbols.
310
Free to Be UML
Another area where UML allows freedom is in the methodology you choose.
Although this book focuses on the Unified Method, UML contains a rich set
of diagrams and symbols that work with nearly any methodology.
Thanks to stereotypes, you can even add symbols to UML; so if you’re using
a methodology with its own symbols, you are not trapped with those built
into UML. A stereotype is a way of creating a new symbol. Normally, you
take an existing symbol and from it derive a new symbol that has similar but
more specialized features. You put the name in the funny angle brackets, as
in <<MyStereotype>>. However, there’s an alternative: Instead of putting the
name inside those things (called guillemots), you can use your own custom
icon. In Figure 5-4, for example, we used a scroll symbol.
Discombobulator
Figure 5-4:
You can
use custom
icons for
stereotypes.
+size[1] : int
In Figure 5-4, the scroll symbol is a stereotype based on a class diagram.
Because a stereotype creates a new type of symbol derived from another
symbol, this is still a class, but a class used for certain purposes. In our
case, we defined this as a class that’s stored as a document. From now on,
every time we create a new class, we use this symbol to mean a type of class
that can be stored. When we finally implement this class, we will probably
derive it from a base class called something like Storable. That means,
then, that instead of creating a stereotype, we could recognize how this
stereotype will be used when we ultimately code it in C++, and instead just
draw our diagram as a base class, Storable, and then derive a new class,
Discombobulator, as shown in Figure 5-5. Either is fine.
However, stereotypes go beyond just classes. Remember that stereotypes
in UML give you the opportunity to extend UML. That is, stereotypes let you
add new symbols with their own new meanings. In the case of our scroll
symbol, we extended the class symbol and still ultimately have a class. But
we can stereotype other symbols, and that gives them a totally different (or
slightly related) meaning from the original symbol.
For example, we may have a special association in our program that specifically
means that one class (the composite) holds instances of the other class (the
Free to Be UML
311
parts) in the form of a sorted list. We can do this in one of two ways: We can
stereotype it, or we can create a tagged property. Figure 5-6 shows the relationship as a stereotype.
Figure 5-6:
You can use
a stereotype
to specify
a type of
association.
Storable
+saveToFile()
Book II
Chapter 5
Discombobulator
+size[1] : int
+saveToFile()
Discombobulator
Class1
«sorted»
+size : int
1
*
Figure 5-7, in turn, shows the relationship with a tagged property. Notice
that, with the tagged property, the tag is in curly brackets.
Figure 5-7:
You can
also use
tagged
properties
to specify
a type of
association.
Discombobulator
Class1
+size : int
1
{sorted} *
Not all CASE tools support all the features of UML. If you find a feature is
missing, you can typically get around it by using related features. Most UML
tools, however, support both stereotypes and tagged properties.
Modeling Your
Programs with UML
Figure 5-5:
You can
get around
using
stereotyped
classes
by using
abstract
classes.
312
C++ and UML
C++ and UML
When you study UML, you may come across various items that you know are
present but you can’t find in UML. Here we direct you toward some smaller
parts of UML that have a direct connection to something in C++. Specifically
we talk about enumerated types, static members, and templates.
Drawing enumerations
If you want to show an enumeration in UML, you can use a symbol similar
to a class symbol. Remember that in C++, an enumeration is a type. In UML,
symbols for types are called classifiers. Thus, in UML you use a special
classifier to show an enumeration. (However, note that this classifier is
really a class diagram that has been stereotyped. This is a good example of
how you can use stereotypes!)
Figure 5-8 shows an example of an enumeration in UML. At the top is the
stereotype name, <<enumeration>>. Under the name is the type, in this
case Color. In the compartment following are the enumerations themselves.
Figure 5-8:
UML
includes
a special
classifier
for enumerations.
«enumeration»
Color
–red
–green
–yellow
–blue
–orange
–violet
«enumeration»
Color2
–red2 = 10
–green2 = 20
–yellow2 = 30
–blue2 = 40
–orange2 = 50
–violet2 = 60
In Figure 5-8, we gave two enumerations. The first one, called Color, simply
lists the symbols for the enumeration. The second one, called Color2,
includes values for each enumeration. In C++, these two enumerations would
look like this:
enum Color {red, green, yellow, blue, orange, violet};
enum Color2 {red2 = 10, green2 = 20, yellow2 = 30, blue2 = 40,
orange2 = 50, violet2 = 60};
Including static members
In C++, you can include static members in a class. Static members are those
members that are part of the class but shared among all instances of the
class. Normally, instances of a class all get their own member variables.
But if a member variable is static, there is only one copy of the variable for
C++ and UML
313
all the instances to share. For this reason, people associate such variables
as being part of the class itself, not part of the instances. In UML language,
these variables have a class scope. Regular member variables have an
instance scope.
Member functions can also have a class scope. Such functions do not
operate on an individual instance (and therefore can’t access the member
variables that are of the instance scope).
Figure 5-9 shows an example in UML of a class with two class-scoped
members. The class-scoped members are underlined. In this case, the class
is called MessedUpWebSite. We suppose the idea is that every time you
visit a crummy Web site, you would create a new instance of this class and
save its Web address in the instance. This has two class-scoped members,
siteCount, which is a private integer, and getSiteCount, which is a
public function that returns the value of siteCount. (We made siteCount
private so other objects can’t change it.) And although we didn’t show it,
you would increment and decrement siteCount in the constructor and
destructor, respectively.
Figure 5-9:
You can
show static
members
in UML by
using a
class scope.
MessedUpWebSite
–siteCount : int
+getSiteCount() : int
+webAddress() : string
In C++, the class in Figure 5-9 looks like the following lines of code:
class MessedUpWebSite
{
private:
static int siteCount;
public:
static int getSiteCount();
Book II
Chapter 5
Modeling Your
Programs with UML
A common use of class-scoped members is to maintain a count of the
number of instances. Here, you would have a class-scoped member variable
called, for example, instanceCount. This would be an integer. In the
constructor you would increment instanceCount, and in the destructor
you would decrement it. Because there’s only one copy of the instance
Count member, each time you create an instance, you would increment this
single copy. Thus, you would have a count of the number of instances.
314
C++ and UML
string webAddress();
MessedUpWebSite() { siteCount++; }
~MessedUpWebSite() { siteCount--; }
};
int MessedUpWebSite::getSiteCount()
{
return siteCount;
}
int MessedUpWebSite::siteCount = 0;
Parameterizing classes with templates
UML includes a notation that you can use along with C++ templates. (We
discuss templates in Minibook IV, Chapter 5.) In UML terms, a template is a
parameterized class. If you think about how a template works in C++, you can
see that this makes sense, because a template takes several parameters that
are used by the compiler to build the class.
When you add the template parameters, the UML standard states that if the
parameter is of type class, you can leave the parameter type blank. That’s
what we did in Figure 5-10. Note that the parameter called MyType has no
type after it; thus, its type is class.
MyType, Size: int
Templatable
+value: MyType[Size]
Figure 5-10:
To show
templates
in UML,
use a parameterized
class.
«bind» (string, 2)
Templatable<int,3>
DualString
Figure 5-10 shows a UML parameterized class. It looks just like a regular
old class symbol, except that it has a nifty little dashed rectangle in the
upper-right corner. This dashed rectangle contains the template parameters.
Note in Figure 5-10 that we then declared two classes that use the template
type. The first one is unnamed and simply specifies the parameters. The
second is named and shows an association back to the template class. A
stereotype name called <<bind>> appears next to the association arrow.
After the stereotype name come the two parameters for the template.
C++ and UML
315
Here is the C++ equivalent of this UML diagram. Notice the MyType
parameter is of type class:
template <class MyType, int Size> class Templatable
{
public:
MyType value[Size];
};
And here is some sample code that uses this template. In this code we also
use the two classes based on the template. Note that, to get the named
template instantiation, we use a typedef:
Book II
Chapter 5
Modeling Your
Programs with UML
Templatable<int,3> inst;
inst.value[0] = 10;
inst.value[1] = 20;
inst.value[2] = 30;
cout << inst.value[2] << endl;
typedef Templatable<string,2> DualString;
DualString inst2;
inst2.value[0] = “abc”;
inst2.value[1] = “def”;
cout << inst2.value[1] << endl;
316
Book II: Understanding Objects and Classes
Chapter 6: Building with
Design Patterns
In This Chapter
✓ Understanding what design patterns are and how you can use them
✓ Implementing an Observer pattern
✓ Building a Mediator pattern
W
hen you work as a software designer, eventually you start to notice
that you do certain things over and over. For example, you may get
mad and shut off the computer. But that’s not directly related to software
design.
For an example related to software design, whenever we need to keep track
of how many instances of a certain class get created, we always create a
static member variable called something like int InstanceCount; and in
the constructor, we include a line that increments InstanceCount; and in
the destructor, we put a line that decrements InstanceCount. Further, we
typically make InstanceCount private and include a static method that
retrieves the value, such as int GetInstanceCount().
We have used this design so many times we know that it works. The first
time we used it, we had to think about it and how we would design and
implement it. Now, we barely have to think about it; we just do it, sometimes
even when we’re driving down the road. Well, maybe not then, but we do
use it when we’re designing software. Thus it’s a design pattern that we use.
Way back in 1995, a book came out that became an instant best seller in
the computer programming world. It was called Design Patterns: Elements
of Reusable Object-Oriented Software, by Erich Gamma, Richard Helm, Ralph
Johnson, and John Vlissides. The four authors of this groundbreaking book
would become known in the field of programming as The Gang of Four. They
drew on a body of knowledge in the field of architecture — not software
architecture, but rather the field of those people who build tall buildings,
brick-and-mortar style, for Superman to leap over and see through. That
kind of architecture has been around for at least two and a half centuries, so
the field is just a wee bit more mature than the field of software engineering.
And, in the field of designing buildings, people have come up with common
ways to design and build buildings and towns, without having to start over
from scratch each time with a new set of designs. Some guy (apparently
318
Introducing a Simple Pattern: the Singleton
famous in that field) named Christopher Alexander wrote a book in 1977 that
teaches building architecture by using patterns. The Gang of Four drew on
this knowledge and applied it to software engineering principles. They then
wrote their Design Patterns book.
In it, they pointed out something that seems obvious in hindsight (but then
again, great discoveries are often deceptively simple): The best software
engineers reuse techniques in the sense of patterns. Our description of the
class that keeps an instance count is an example of a technique that can be
used over and over.
Now, if you heavily explore the field of object-oriented programming (and
computer science in general, really), you will keep seeing the term reusable.
One of the goals of object-oriented programming is to make code reusable by putting it in classes. You then derive your own classes from these
classes, thereby reusing the code in the base classes.
That’s all fine and dandy, but it doesn’t always work. Yes, we could probably put our instance-counting class in a base class and always derive from
it. But for some other designs, this doesn’t always work. Instead, software
engineers simply apply the same design to a new set of classes. Yes, they
reused the design by pulling it from the back dusty caverns of their brains
(isn’t that pleasant), but they didn’t actually reuse any code. That’s okay!
They drew on experience. And that’s the idea behind design patterns. You
don’t just write up your design patterns and stuff them into a bunch of base
classes. Instead, you simply know the patterns. Or you keep a list or catalog
of them. So in this chapter, we present you with some of the more common
design patterns.
Introducing a Simple Pattern: the Singleton
In this section we take you step-by-step through creating a design pattern, so
you can see what it is and, more important, how you can use it.
Here’s the situation: You are designing this truly great piece of software that
is so good that everybody from the North Pole to the South Pole will not
only buy a copy but will invest in your company as well. And while designing
the software, you discover many situations where you need a class such that
only one instance can exist at any given time.
You’ve come across this many times. For example, you may have a class
that represents the computer itself. You want only one instance of it. You
also may have a class that represents the planet Earth. Again, you need only
one instance. And you might want a class that models the great leader of
the universe (you). Again, only one instance. If people try to create a second
instance of the class in their code, they will receive a compiler error. How do
you do this?
Introducing a Simple Pattern: the Singleton
319
You could spend a couple hours coming up with an approach. Or you could
look at a pattern that already exists somewhere, such as what we’re about to
show you.
To understand how to create a pattern, you need to first understand an
unusual concept that a lot of C++ programmers don’t usually consider:
You can make a constructor of a class private or protected! Now why would
you do that? It turns out that making a constructor private prevents you
from directly creating an instance of a class. We can hear you now, Oh boy!
Doesn’t that sound like a useful class, if you can’t make an instance of it? This
guy’s a nutjob! But you can make an instance of the class. There’s a trick: You
include a static member function that creates the instance for you.
One of the more popular examples for basic pattern creation is a singleton
class — a class that lets you instantiate only one object. A singleton class is
useful because it ensures that only one object is available across an application. Developers often use a singleton to coordinate the activities of other
parts of the application.
Here’s how you make a singleton class: First, make the constructor private.
Next, add a public static member function that does the following:
1. Checks if a single instance of the class already exists. If so, it returns the
instance’s pointer.
2. Creates a new instance and returns its pointer if an instance doesn’t
already exist.
Finally, where do you store this single instance? You store its pointer in a
static member of the class. Because it’s static, only one member variable is
shared throughout the class, rather than a separate variable for each class.
Also, make the variable private so that users can’t just modify it at will.
And voilà! You have a singleton class! Here’s how it works: Whenever you
need the single instance of the class, you don’t try to create it. (You’ll get a
compile error! Yes, the compiler itself won’t let you do it.) Instead, you call
the static member function.
The following lines of code are an example of such a class:
class Planet
{
private:
Building with
Design Patterns
Remember: Static member functions do not have an instance associated
with them. You call them directly by giving the class name, two colons, and
the function name. But as it happens, the static member function is itself a
member of the class, so it can call the constructor and create an instance for
you.
Book II
Chapter 6
320
Introducing a Simple Pattern: the Singleton
static Planet *inst;
Planet() {}
public:
static Planet *GetInstance();
};
Planet *Planet::inst = 0;
Planet *Planet::GetInstance()
{
if (inst == 0)
{
inst = new Planet();
}
return inst;
}
To use this class, you do not just create an instance directly. Instead, you
call the GetInstance member function:
Planet *MyPlanet = Planet::GetInstance();
You call this any time you want to get a copy of the single instance.
Each time you call GetInstance, you will always get a pointer to the same
instance.
Now, take a look at the constructor: It’s private. Therefore, if you attempt
something like this somewhere outside the class (such as in main)
Planet MyPlanet;
you get a compiler error. In CodeBlocks, we get this error:
error: `Planet::Planet()’ is private
error: within this context
Or if you try to create a pointer, you get the same error when you call new:
Planet *MyPlanet = new Planet();
When you have a class such as this, you probably also want to ensure that
nobody attempts to delete the single instance. Just as you would make the
constructor private, you would also make the destructor private, as in the
following:
class Planet
{
private:
static Planet *inst;
Planet() {}
~Planet() {}
public:
Introducing a Simple Pattern: the Singleton
321
static Planet *GetInstance();
};
If you try to delete an instance after you obtain it, as in the following
Planet *MyPlanet = Planet::GetInstance();
delete MyPlanet;
then once again you receive an error message, this time for the destructor:
`Planet::~Planet()’ is private
class Planet
{
private:
static Planet *inst;
Planet(string name)
{
cout << “Welcome to “ << name << endl;
}
~Planet() {}
public:
static Planet *GetInstance(string name);
};
and your GetInstance method has this code in it:
Planet *Planet::GetInstance(string name)
{
if (inst == 0)
{
inst = new Planet(name);
}
return inst;
}
and you make two calls like this:
Planet *MyPlanet = Planet::GetInstance(“Earth”);
Planet *MyPlanet2 = Planet::GetInstance(“Venus”);
the results may not be as you expect. You end up with only one instance,
which will get created with the first line, the one with “Earth” passed in. In
your second call to the GetInstance function, GetInstance will see that
an instance already exists and will not even use the “Venus” parameter. So
be careful if you’re using parameters in constructors.
Book II
Chapter 6
Building with
Design Patterns
You may be tempted to make a constructor that takes a parameter. You
could pass parameters into the GetInstance member function, which
would in turn pass them to the constructor. This would work the first time,
but there’s a catch: Remember that after the GetInstance function creates
the instance, it never does so again. That means it won’t call the constructor
again. Therefore, if you have a class that looks like this:
322
Watching an Instance with an Observer
Watching an Instance with an Observer
A common task in computer programming is when one or more instances
of a class (or different classes) need to keep an eye on a certain object and
perform various actions when that object changes. For example, you may be
writing a program that monitors various activities around your house when
you’re away. Your program could be configurable; you could set it up so the
user can choose various actions to take if something goes awry. You might
have the following options:
✦ The program saves a note in a file so you can later review it.
✦ The program sends an e-mail to you.
✦ If the computer is linked to a telephone security system, it can notify the
police.
✦ The robotic dog can receive a signal to go on high alert.
. . . and so on. Each of these different things can exist in a different class,
each with its own code for handling the situation. The one about saving a
note to a file is easy; you would open a file, write to it, and close the file. The
e-mail one might involve launching Microsoft Outlook, somehow telling it
to compose an e-mail, and sending it. To notify the police, your computer
would have to be hooked up to an online security system accessible via the
phone lines or perhaps via the Internet, and the police would need a similar
system at their end. The class for this would send a signal out the lines to
the police, much like the way a secret button that notifies the police of a
robbery at a gas station works. Finally, you might have a similar contraption
hooked up into the brain of your little robotic watchdog, Fido; and when he
receives a high-voltage jolt, he can go on high alert and ward off the intruders. Sounds like fun, no? We call all these classes Observer classes (and
by this we mean that each class will be derived from a base class called
Observer).
Now, you would also have a class whose object detects the problem in the
house. This object might be hooked up to an elaborate security system, and
when the change takes place, the computer calls a method inside this object.
We call this class the Subject class.
So think about what is happening here:
1. When a security issue happens, the computer calls a method inside the
single Subject instance.
2. The Observer classes have objects that watch the Subject instance.
The method in the Subject class then calls methods in each of the
Observer objects. These methods do the appropriate action, whether
it’s write to a file, notify the police, zap the robotic dog, or whatever.
Watching an Instance with an Observer
323
Now here’s the catch: The people using your computer program can determine which Observer classes they want to respond to the event (possibly
through an options dialog box). But just to be difficult and to make sure
that we design this with great flexibility, we’re going to add the following
requirement: Over the next year, you might add new Observer classes as
they come up. One might signal a helicopter to fly in and chase a robber as
he’s making his getaway. But you can’t be sure what you’ll come up with
over the next year. All you know is that you may add Observer subclasses
and instances of these subclasses. So the point is this: You want to make the
Subject class as flexible as possible.
But on the other hand, you could have each Observer instance constantly
check the Subject instance, looking for an event. (This process is called
polling.) The problem here is that this process can push the computer to its
limits, believe it or not: If every single Observer instance is constantly calling into the Subject class, you’re going to have a lot of activity going on for
possibly hours on end, keeping the CPU nice and toasty. That’s not a good
idea either.
The way you can perform polling without overextending the CPU is by using
the Observer pattern. In this pattern, the Observer class contains a method
called Respond. Meanwhile, the Subject class includes a list of Observer
instances. Further, the Subject class includes a method called Event,
which the computer calls whenever something happens, such as a break-in.
Now here’s the twist that makes it work: Your program will add and remove
Observer instances to and from the Subject’s list of Observer instances,
based on the options the people choose when using your program.
As you can imagine, this is a recurring pattern that a lot of programs use.
Although zapping a robotic dog might not be common, other programs use
this general model. For example, in some C++ editors, we can open the same
document in multiple windows, all under one instance of the editor program. When we change the code in one window, we can immediately see the
change in the other windows. Each class probably has a window, and these
windows are the Observer classes. The Subject represents the underlying
document. Or, for another example, you can open multiple browser windows
all looking at the same Web page. As the page comes down from the Internet,
Book II
Chapter 6
Building with
Design Patterns
Here are the issues that come up when designing such a set of classes. First,
you could just keep a big list of instances inside the Subject class, and
whenever an event takes place, the event handler calls a routine in all the
Observer instances. The Observer instances then decide whether or not
they want to use the information. The problem with this situation is that
you have to call into the Observer classes, even if the individual instances
don’t want the information. The robotic dog might be sleeping and not want
to be bothered by the break-in. Or the police might be on break themselves.
(Because this is a serious book, we’ll avoid any donut shop jokes.)
324
Watching an Instance with an Observer
it gradually appears in all windows. Again, the windows are associated with
the Observer classes, and the actual Web document is associated with a
Subject class.
So on to the code already! First, the Observer class contains a member
function called Respond. In the Observer class itself, this is a pure abstract
function; it’s up to the derived classes to respond to the event in their own
ways.
The following lines are an example of the Observer class:
class Observer
{
public:
virtual void Respond() = 0;
};
As you can see, there’s not much there. So we’re going to add some derived
classes. Here are a couple:
class Dog : public Observer
{
public:
void Respond();
};
class Police : public Observer
{
protected:
string name;
public:
Police(string myname) { name = myname; }
void Respond();
};
And here are the Respond member functions for these two classes. For now,
to keep it simple, we’re just writing something to the console:
void Dog::Respond()
{
cout << “Bark bark” << endl;
}
void Police::Respond()
{
cout << name << “: ‘Drop the weapon! Now!’” << endl;
}
Again, so far there’s nothing particularly interesting about this. These lines
of code represent just a couple member functions that do their thing, really.
But next, things get exciting. Here we make the Subject class:
class Subject
{
Watching an Instance with an Observer
325
protected:
int Count;
Observer *List[100];
public:
Subject() { Count = 0; }
void AddObserver(Observer *Item);
void RemoveObserver(Observer *Item);
void Event();
};
This class has a list of Observer instances in its List member. The
Count member is the number of items in the list. Two methods for adding
and removing Observer instances are available: AddObserver and
RemoveObserver. A constructor initializes the list (by just setting its count
to 0, really), and there’s the famous Event member function.
void Subject::AddObserver(Observer *Item)
{
List[Count] = Item;
Count++;
}
void Subject::RemoveObserver(Observer *Item)
{
int i;
bool found = false;
for (i=0; i < Count; i++)
{
if (found)
{
}
else if (List[i] == Item)
{
found = true;
List[i] = List[i+1];
}
}
if (found)
{
Count--;
}
}
The RemoveObserver function uses some little tricks (again, a pattern!) to
remove the item. It searches through the list until it finds the item; after that,
it continues through the list, pulling items back one slot in the array. And
finally, if it found the item, it decreases Count by 1.
And now here’s the fun part! The Event method looks like this:
void Subject::Event()
{
int i;
Building with
Design Patterns
Here’s the code for the AddObserver and RemoveObserver methods.
These functions just manipulate the arrays:
Book II
Chapter 6
326
Watching an Instance with an Observer
for (i=0; i < Count; i++)
{
List[i]->Respond();
}
}
This code just climbs through the list, calling Respond for each item in the
list. When you put this all together, you can have a main that sets up these
items. Here’s one possibility:
Dog Fido;
Police TJHooker(“TJ”);
Police JoeFriday(“Joe”);
Subject Alarm;
Alarm.AddObserver(&Fido);
Alarm.AddObserver(&TJHooker);
Alarm.AddObserver(&JoeFriday);
Alarm.RemoveObserver(&TJHooker);
Alarm.Event();
We make three Observer instances (one dog and two cops) and a Subject
instance called Alarm. We then add all three instances to the list; but then
TJ Hooker backs out, so we remove him from the list.
Then we call Event. (If this were an actual system, we wouldn’t call Event
right now; we would call Event when an actual break-in event occurs.)
And when we run this code, we get the responses of each of the registered
observers:
Bark bark
Joe: ‘Drop the weapon! Now!’
Notice that TJHooker didn’t respond because he was no longer interested.
And so he didn’t receive a notification. He is, however, still an instance.
In this example, the three observers (Fido, TJ Hooker, and Joe Friday) are
watching the alarm, ready to respond to it. They are observers, ready for
action. The alarm is their subject of observation. That’s why we use the
metaphor of Observer and Subject.
Observers and the Standard C++ Library
If you’re interested in using templates and the Standard C++ Library, you can
make the Subject class a bit more sophisticated by using a list rather than
an array. You can do this by using the standard list class. The only catch
is that the list class doesn’t seem to do well with abstract classes. So you
need to “de-abstractify” your Observer class by setting it up like this:
class Observer
{
public:
virtual void Respond() {}
};
Watching an Instance with an Observer
327
Then, you can modify the Subject class and its methods like so:
class Subject
{
protected:
list<Observer *> OList;
public:
void AddObserver(Observer *Item);
void RemoveObserver(Observer *Item);
void Event();
};
void Subject::AddObserver(Observer *Item)
{
OList.push_back(Item);
}
void Subject::Event()
{
list<Observer *>::iterator iter;
for (iter = OList.begin(); iter != OList.end(); iter++)
{
Observer *item = (*iter);
item->Respond();
}
}
Note that, in the list, we’re saving pointers to Observer; we’re not saving
the Observer instances themselves. That’s because, by default, the list
class makes a copy of whatever you put in the array. If you put in an actual
instance, the list class will make a copy (which creates problems with
derived classes because the list just copies the object being stored as an
Observer instance, not a class derived from Observer). With pointers, a
copy of a pointer still points to the original object, and therefore the items in
the list are the originals (at least their addresses are in the list).
Automatically adding an observer
When you have a program that lets the users configure various observers,
you may want to create and delete observers based on the configurations. In
that case, it’s possible to add an Observer to a Subject’s list automatically
when you create the Observer, and remove the Observer from the list
when you delete the Observer. To do this, you can call the AddObserver
method from within the constructor and the RemoveObserver method
from within the destructor. But to make this work, you need to tell the
object who the Subject is. That’s easy; just pass the name as a parameter
to the constructor. The following code does this. Note that we had to move
the Subject class above the Observer class because the Observer’s
constructor and destructor call into Subject. Also, note that we made the
Building with
Design Patterns
void Subject::RemoveObserver(Observer *Item)
{
OList.remove(Item);
}
Book II
Chapter 6
328
Watching an Instance with an Observer
AddObserver and RemoveObserver functions protected. But because we
want the Observer class to use these functions, we used a little trick called
a friend: We put the word friend followed by the word Observer in the
Subject class; now the Observer member functions can call the protected
and private member functions of Subject. The code for the complete program is in Listing 6-1.
Listing 6-1: Using the Add and Remove Items in the Constructor
and Destructor
#include <iostream>
using namespace std;
class Observer;
class Subject
{
friend class Observer;
protected:
int Count;
Observer *List[100];
void AddObserver(Observer *Item);
void RemoveObserver(Observer *Item);
public:
Subject() { Count = 0; }
void Event();
};
class Observer
{
protected:
Subject *subj;
public:
virtual void Respond() = 0;
Observer(Subject *asubj)
{
subj = asubj;
subj->AddObserver(this);
}
virtual ~Observer() { subj->RemoveObserver(this); }
};
class Dog : public Observer
{
public:
void Respond();
Dog(Subject *asubj) : Observer(asubj) {}
};
class Police : public Observer
{
protected:
Watching an Instance with an Observer
329
string name;
public:
Police(Subject *asubj, string myname) : Observer(asubj) { name = myname; }
void Respond();
};
void Dog::Respond()
{
cout << “Bark bark” << endl;
}
void Police::Respond()
{
cout << name << “: ‘Drop the weapon! Now!’” << endl;
}
Book II
Chapter 6
Building with
Design Patterns
void Subject::AddObserver(Observer *Item)
{
List[Count] = Item;
Count++;
}
void Subject::RemoveObserver(Observer *Item)
{
int i;
bool found = false;
for (i=0; i < Count; i++)
{
if (found)
{
}
else if (List[i] == Item)
{
found = true;
List[i] = List[i+1];
}
}
if (found)
{
Count--;
}
}
void Subject::Event()
{
int i;
for (i=0; i < Count; i++)
{
List[i]->Respond();
}
}
int main()
{
Subject Alarm;
Police *TJHooker = new Police(&Alarm, “TJ”);
cout << “TJ on the beat” << endl;
(continued)
330
Mediating with a Pattern
Listing 6-1 (continued)
Alarm.Event();
cout << endl;
cout << “TJ off for the day” << endl;
delete TJHooker;
Alarm.Event();
return 0;
}
Mediating with a Pattern
Suppose you’re going to design a sophisticated, complex model of a car.
You’re going to include the following parts, each of which will have its own
class:
✦ The engine
✦ The electrical supply (for the technical folks, we mean the battery and
alternator together)
✦ The radio
✦ The wheels
✦ The brakes
✦ The headlights
✦ The air conditioner
✦ The road
Now see if you can keep up (read this as fast as you possibly can): When
the electrical supply goes up, the headlights get brighter. When the engine
speeds up, the electrical supply increases. When the electrical supply goes
down, the radio volume goes down. When the air conditioner turns on, the
electrical supply goes down. When the air conditioner turns off, the electrical supply goes up. When the engine increases, the wheels accelerate. When
the electric supply increases, the radio volume increases. When the road
ascends due to a hill, the speed of the wheels goes down. When the brakes
come on, the speed of the wheels decreases. When the electrical supply
goes down, the headlights get dimmer. When the engine slows down, the
electrical supply decreases. When the road descends due to a hill, the speed
of the wheels goes up.
Now your job is to model all this behavior. Sound like fun? Not particularly.
In fact, it’s a total mess! How can you model this?
Here’s the problem: You have a million objects (well, eight actually) all
interacting with each other in different ways. You could try to make all the
Mediating with a Pattern
331
objects communicate. In the code, making them communicate would mean
that most of the classes would have to contain references to objects of the
other classes. That technique could get pretty confusing.
If you followed all this, the UML diagram in Figure 6-1 shows the interactions.
As you can see, it’s kind of messy. It’s a little cleaner now in UML form than
in the long-winded paragraph earlier, but it’s still messy, and the code itself
is still going to be complicated.
Engine
Road
Book II
Chapter 6
AirConditioning
Radio
Headlights
Figure 6-1:
Sometimes
class
interactions
can be quite
messy!
Brakes
Wheels
When you have this kind of a mess, first try to rearrange things visually to
see if there’s some way to simplify it. Figure 6-2 shows our cleaned-up version. Looking at this figure, we still get a little confused, but the figure does
help us see the connections a bit more clearly.
So now we introduce the theme of this pattern. The idea is that when you
have a set of classes that interact in a complex way, a mediator class through
which the classes all communicate is often easiest to create. That way, only
the mediator class needs to know about all the instances. The instances
themselves communicate only with the mediator.
Building with
Design Patterns
Electric
332
Mediating with a Pattern
Electric
AirConditioning
Radio
Engine
Headlights
Wheels
Figure 6-2:
You can
attempt to
clean up
the UML just
a bit.
Brakes
Road
In the example, when there’s a hill, the road goes up. The road does not
need to know about all the other car parts. Instead, it just informs the mediator of the change. The mediator then informs the necessary car parts.
This may seem like overkill: Why can’t the road just talk directly to the car
parts? The idea is that if you enhance this program later, you may want to
add more car parts. Rather than having to go through and hook up connections to all the necessary car parts, you just make a connection with the
mediator object. Suppose you add a new part called automatic transmission.
When the car begins to climb a hill, the automatic transmission might detect
this and automatically shift to a lower gear, resulting in an increase to the
engine speed. To add this class, you only need to define its behavior and
how it responds to various events, and then hook it up to the mediator. You
will also modify the mediator so it knows something about the automatic
transmission’s behavior. Thus, you don’t need to hook it up to all the other
instances.
Mediating with a Pattern
333
Figure 6-3 is the revised UML with the addition of a mediator. Now it looks a
bit cleaner!
Engine
Road
AirConditioning
Book II
Chapter 6
Mediator
Headlights
+PartChanged(inPart : CarPart)
Figure 6-3:
A mediator
certainly
cleans
things up!
Radio
Wheels
Brakes
One thing we’re not showing in Figure 6-3 (for the purpose of keeping things
uncluttered) is that we’re going to derive all the various car parts (including
the road!) from a base class called CarPart. This class will have a single
member: a pointer to a Mediator instance. Each of the car parts, then, will
inherit a pointer to the Mediator instance.
The Mediator class has a member function called PartChanged. This is
the key function: Any time any of the car parts experiences a change, it calls
PartChanged. But remember, a car part can experience a change in only
two ways: either through an outside force unrelated to the existing classes
(such as the driver pushing the gas pedal or turning the steering wheel) or
through the Mediator instance. If the change comes from the Mediator
instance, it was triggered through one of the other objects.
For example, look at the following steps:
Building with
Design Patterns
Electric
334
Mediating with a Pattern
1. The driver pushes the gas pedal by calling a method in the Engine
instance.
2. The Engine instance changes its speed and then tells the Mediator of
the change.
3. The Mediator instance knows which objects to notify of the change.
For this change, it notifies the wheels to spin faster.
Here’s another possible sequence:
1. The road has a hill. To tell the car about the hill, the main routine calls a
member function in the Road instance. The hill has a ten-degree incline.
2. The Road instance notifies Mediator of the change.
3. The Mediator instance handles this by figuring out how much to decelerate; it then notifies the wheels to slow down.
So you can see most of the smarts are in the Mediator class.
You may have noticed what seems like a contradiction in things we have
told you and other OOP (Object-Oriented People) have told you. Here we’re
saying to put the smarts in the Mediator class. Elsewhere you are hearing
that objects must be able to do their own work. But that’s not really a contradiction. In fact, the Mediator class is handling all smarts dealing with collaborations between objects. After the Mediator instance figures out, for
example, that the wheels must spin faster, it notifies the wheels and tells
them to spin faster. That’s when the wheels take over and do their thing. At
that point, they know how to spin faster without outside help from other
classes and objects. So it’s not a contradiction after all.
Putting up a Façade (pattern)
In the car system example, we felt as though it
would be cumbersome to have to manipulate
the car system by paying separate attention
to all the different parts, such as the engine
and the wheels, simultaneously. Imagine
what life would be like if you had to drive a
car while constantly worrying about every
little thing. Instead, we created a class called
CarControls through which you can interact
with the system. The CarControls class
is a pattern itself, called a Façade pattern. A
façade is a front of something. (It’s a French
word.) This pattern is also a front: It’s the interface into the system through which you interact. That way, you don’t have to keep track of
the individual classes. When you add a class
through which users can interact with the
system, you are using a Façade pattern.
Mediating with a Pattern
335
Now take a look at Listing 6-2. This is a header file that contains the class
declarations for the car parts.
Listing 6-2: Using the carparts.h File
#ifndef CARPARTS_H_INCLUDED
#define CARPARTS_H_INCLUDED
#include “mediator.h”
class CarControls; // forward reference
class CarPart
{
protected:
Mediator *mediator;
CarPart(Mediator *med) : mediator(med) {}
void Changed();
};
Book II
Chapter 6
Building with
Design Patterns
class Engine : public CarPart
{
protected:
friend class Mediator; friend class CarControls;
int RPM;
int Revamount;
public:
Engine(Mediator *med) : CarPart(med),
RPM(0), Revamount(0) {}
void Start();
void PushGasPedal(int amount);
void ReleaseGasPedal(int amount);
void Stop();
};
class Electric : public CarPart
{
protected:
friend class Mediator; friend class CarControls;
int Output;
int ChangedBy;
public:
Electric(Mediator *med) : CarPart(med),
Output(0), ChangedBy(0) {}
void ChangeOutputBy(int amount);
};
class Radio : public CarPart
{
protected:
friend class Mediator; friend class CarControls;
(continued)
336
Mediating with a Pattern
Listing 6-2 (continued)
int Volume;
public:
Radio(Mediator *med) : CarPart(med),
Volume(0) {}
void AdjustVolume(int amount) { Volume += amount; }
void SetVolume(int amount) { Volume = amount; }
int GetVolume() { return Volume; }
};
class Wheels : public CarPart
{
protected:
friend class Mediator; friend class CarControls;
int Speed;
public:
Wheels(Mediator *med) : CarPart(med),
Speed(0) {}
int GetSpeed() { return Speed; }
void Accelerate(int amount);
void Decelerate(int amount);
};
class Brakes : public CarPart
{
protected:
friend class Mediator; friend class CarControls;
int Pressure;
public:
Brakes(Mediator *med) : CarPart(med),
Pressure(0) {}
void Apply(int amount);
};
class Headlights : public CarPart
{
protected:
friend class Mediator; friend class CarControls;
int Brightness;
public:
Headlights(Mediator *med) : CarPart(med),
Brightness(0) {}
void TurnOn() { Brightness = 100; }
void TurnOff() { Brightness = 0; }
void Adjust(int Amount);
int GetBrightness() { return Brightness; }
};
class AirConditioner : public CarPart
{
protected:
friend class Mediator; friend class CarControls;
int Level;
int ChangedBy;
public:
AirConditioner(Mediator *med) : CarPart(med),
Mediating with a Pattern
337
Level(0), ChangedBy(0) {}
TurnOn();
TurnOff();
GetLevel() { return Level; }
SetLevel(int level);
void
void
bool
void
};
class Road : public CarPart
{
protected:
friend class Mediator; friend class CarControls;
int ClimbAngle;
int BumpHeight;
int BumpWhichTire;
#endif
These classes know little of each other. That’s a good thing. However, they
do know all about the mediator, which is fine. In this source, we used an
important small feature of the latest ANSI version of C++. Notice the constructor line in the Engine class definition:
Engine(Mediator *med) : CarPart(med),
RPM(0), Revamount(0) {}
After the constructor definition, you see a colon and the name of the base
class, CarPart. This calls the base class constructor. Then there’s a comma
and the name of a member variable (RPM) and a value in parentheses, which
together form an initializer. When you create an instance of Engine, the RPM
variable will get set to the value 0. Further, the Revamount variable will also
get set to the value 0. Using the constructor with an initializer causes the
constructor to behave just like this code:
Engine(Mediator *med)
{
RPM = 0;
Revamount = 0;
}
Next, in Listing 6-3, is the header file for the mediator along with a special class called CarControls, which provides a central place through
which you can control the car. You may have noticed that we gave the
CarControls class friend access to the car parts in the carparts.h file.
We also included in this file several forward declarations. Remember: This
class knows about the various CarParts classes. This file also includes a
class derived from Mediator that provides a general interface to the whole
system.
Book II
Chapter 6
Building with
Design Patterns
public:
Road(Mediator *med) : CarPart(med) {}
void ClimbDescend(int angle);
void Bump(int height, int which);
};
338
Mediating with a Pattern
Listing 6-3: Using the mediator.h File
#ifndef MEDIATOR_H_INCLUDED
#define MEDIATOR_H_INCLUDED
// Define all of the required forward references.
class CarPart;
class Engine;
class Electric;
class Radio;
class SteeringWheel;
class Wheels;
class Brakes;
class Headlights;
class AirConditioner;
class Road;
class Mediator
{
public:
Engine *MyEngine;
Electric *MyElectric;
Radio *MyRadio;
SteeringWheel *MySteeringWheel;
Wheels *MyWheels;
Brakes *MyBrakes;
Headlights *MyHeadlights;
AirConditioner *MyAirConditioner;
Road *MyRoad;
Mediator();
void PartChanged(CarPart *part);
};
class CarControls : public Mediator {
public:
void StartCar();
void StopCar();
void PushGasPedal(int amount);
void ReleaseGasPedal(int amount);
void PressBrake(int amount);
void Turn(int amount);
void TurnOnRadio();
void TurnOffRadio();
void AdjustRadioVolume(int amount);
void TurnOnHeadlights();
void TurnOffHeadlights();
void ClimbHill(int angle);
void DescendHill(int angle);
void TurnOnAC();
void TurnOffAC();
void AdjustAC(int amount);
int GetSpeed();
CarControls() : Mediator() {}
};
#endif
Next is the code for the member functions for all the car parts. These are in
Listing 6-4. Note in these functions that we never, ever call the functions in
other car parts. We do, however, call a general Changed method that’s in the
car parts base class, CarParts. This calls into the Mediator to let it know
that a change took place.
Mediating with a Pattern
339
The magic words: high cohesion, low coupling
In the world of software engineering, two buzzwords are cohesion and coupling.
Cohesion refers to the process of keeping
similarly minded functions grouped together.
If you create good classes, this shouldn’t be a
problem. Functions involving the wheels should
go in the Wheels class, not, for example, the
Engine class.
Listing 6-4: Presenting the carparts.cpp File
#include <iostream>
#include “carparts.h”
using namespace std;
void CarPart::Changed()
{
mediator->PartChanged(this);
}
void Engine::Start()
{
RPM = 1000;
Changed();
}
void Engine::PushGasPedal(int amount)
{
Revamount = amount;
RPM += Revamount;
Changed();
}
void Engine::ReleaseGasPedal(int amount)
{
Revamount = amount;
RPM -= Revamount;
Changed();
}
void Engine::Stop()
{
(continued)
Book II
Chapter 6
Building with
Design Patterns
Coupling is a bit more complex. It refers to
the process of tying together classes so they
can’t function independently. In effect, the
classes are coupled. In good object-oriented
programming, having lots of coupling is not
good. You want your classes to be as independent as possible; you want low coupling. The
Mediator pattern helps a great deal toward
the low-coupling goal. In the car system example, if we had instead given the Electric
class pointers to an Engine instance and a
Radio instance, and so on, then we would be
forcing these classes to all work dependently.
In effect, we would have coupled them. But
by using the Mediator instance, each class
works only with the Mediator. We have low
coupling. You should, therefore, try to design
for high cohesion and low coupling. It’s a good
thing!
340
Mediating with a Pattern
Listing 6-4 (continued)
RPM = 0;
Revamount = 0;
Changed();
}
void Electric::ChangeOutputBy(int amount)
{
Output += amount;
ChangedBy = amount;
Changed();
}
void Wheels::Accelerate(int amount)
{
Speed += amount;
Changed();
}
void Wheels::Decelerate(int amount)
{
Speed -= amount;
Changed();
}
void Brakes::Apply(int amount)
{
Pressure = amount;
Changed();
}
void Headlights::Adjust(int Amount)
{
Brightness += Amount;
}
void AirConditioner::TurnOn()
{
ChangedBy = 100 - Level;
Level = 100;
Changed();
}
void AirConditioner::TurnOff()
{
ChangedBy = 0 - Level;
Level = 0;
Changed();
}
void AirConditioner::SetLevel(int newlevel)
{
Level = newlevel;
ChangedBy = newlevel - Level;
Changed();
}
void Road::ClimbDescend(int angle)
{
ClimbAngle = angle;
Changed();
Mediating with a Pattern
341
}
void Road::Bump(int height, int which)
{
BumpHeight = height;
BumpWhichTire = which;
Changed();
}
And now, in Listing 6-5, is the mediator source code and the source code for
the CarControls class.
Listing 6-5: Using the carparts.cpp File
Book II
Chapter 6
Building with
Design Patterns
#include <iostream>
#include “mediator.h”
#include “carparts.h”
using namespace std;
Mediator::Mediator()
{
MyEngine = new Engine(this);
MyElectric = new Electric(this);
MyRadio = new Radio(this);
MyWheels = new Wheels(this);
MyBrakes = new Brakes(this);
MyHeadlights = new Headlights(this);
MyAirConditioner = new AirConditioner(this);
MyRoad = new Road(this);
}
void Mediator::PartChanged(CarPart *part)
{
if (part == MyEngine)
{
if (MyEngine->RPM == 0)
{
MyWheels->Speed = 0;
return;
}
if (MyEngine->Revamount == 0)
{
return;
}
// If engine increases, increase the electric output
MyElectric->ChangeOutputBy
(MyEngine->Revamount / 10);
if (MyEngine->Revamount > 0)
{
MyWheels->Accelerate(
MyEngine->Revamount / 50);
}
}
(continued)
342
Mediating with a Pattern
Listing 6-5 (continued)
else if (part == MyElectric)
{
// Dim or brighten the headlights
if (MyHeadlights->Brightness > 0)
MyHeadlights->Adjust(MyElectric->ChangedBy / 20);
if (MyRadio->Volume > 0)
MyRadio->AdjustVolume(MyElectric->ChangedBy / 30);
}
else if (part == MyBrakes)
{
MyWheels->Decelerate(MyBrakes->Pressure / 5);
}
else if (part == MyAirConditioner)
{
MyElectric->ChangeOutputBy(
0 - MyAirConditioner->ChangedBy * 2);
}
else if (part == MyRoad)
{
if (MyRoad->ClimbAngle > 0)
{
MyWheels->Decelerate(MyRoad->ClimbAngle * 2);
MyRoad->ClimbAngle = 0;
}
else if (MyRoad->ClimbAngle < 0)
{
MyWheels->Accelerate(MyRoad->ClimbAngle * -4);
MyRoad->ClimbAngle = 0;
}
}
}
void CarControls::StartCar()
{
MyEngine->Start();
}
void CarControls::StopCar()
{
MyEngine->Stop();
}
void CarControls::PushGasPedal(int amount)
{
MyEngine->PushGasPedal(amount);
}
void CarControls::ReleaseGasPedal(int amount)
{
MyEngine->ReleaseGasPedal(amount);
}
void CarControls::PressBrake(int amount)
{
MyBrakes->Apply(amount);
Mediating with a Pattern
343
}
void CarControls::TurnOnRadio()
{
MyRadio->SetVolume(100);
}
void CarControls::TurnOffRadio()
{
MyRadio->SetVolume(0);
}
void CarControls::AdjustRadioVolume(int amount)
{
MyRadio->AdjustVolume(amount);
}
Book II
Chapter 6
Building with
Design Patterns
void CarControls::TurnOnHeadlights()
{
MyHeadlights->TurnOn();
}
void CarControls::TurnOffHeadlights()
{
MyHeadlights->TurnOff();
}
void CarControls::ClimbHill(int angle)
{
MyRoad->ClimbDescend(angle);
}
void CarControls::DescendHill(int angle)
{
MyRoad->ClimbDescend( 0 - angle );
}
int CarControls::GetSpeed()
{
return MyWheels->Speed;
}
void CarControls::TurnOnAC()
{
MyAirConditioner->TurnOn();
}
void CarControls::TurnOffAC()
{
MyAirConditioner->TurnOff();
}
void CarControls::AdjustAC(int amount)
{
MyAirConditioner->SetLevel(amount);
}
int main()
{
// Create a new car.
Mediator *MyCar = new Mediator();
(continued)
344
Mediating with a Pattern
Listing 6-5 (continued)
// Start the engine.
MyCar->MyEngine->Start();
cout << “Engine Started!” << endl;
// Accelerate.
MyCar->MyWheels->Accelerate(20);
cout << “The car is going: “ << MyCar->MyWheels->GetSpeed() << endl;
// Apply the brakes.
MyCar->MyBrakes->Apply(20);
cout << “Applying the brakes.” << endl;
cout << “The car is going: “ << MyCar->MyWheels->GetSpeed() << endl;
// Stop the car.
MyCar->MyBrakes->Apply(80);
cout << “Applying the brakes.” << endl;
cout << “The car is going: “ << MyCar->MyWheels->GetSpeed() << endl;
// Shut off the engine.
MyCar->MyEngine->Stop();
cout << “Engine Stopped” << endl;
return 0;
}
The CarControls part runs a bit long, but it’s handy because it provides a
central interface through which you’ll be able to operate the car. The workhorse of the pattern, however, is in the Mediator class. This is a bunch
of if statements that look at the change that took place and then call into
other classes to modify the objects of the other classes. That’s the whole
goal with the Mediator pattern: It has a Mediator class containing a general
function that looks for changes and then changes other classes.
If you look back at Listing 6-4, you can see that, after each change, we call
the Changed function. This function is in the base class, and it calls into
the Mediator’s PartChanged function, which does all the hard work. Also
note that in some of the car parts classes, the Mediator doesn’t respond
to their changes (such as the Wheel class); however, we still call Change in
the member functions for the class. The reason is that we may add features
whereby the Mediator would respond to these changes. Then we wouldn’t
have to check to see whether or not we included a Change method; it’s
already there. This helps avoid the bug of wondering why the Mediator
isn’t doing what it’s supposed to do if we forgot the call to Change.
At some point, you’ll want to test the new class. The main function in this
example does precisely that. The code doesn’t provide a complete test, but
it does demonstrate some of what you can do. In this case, the code turns
the engine once, accelerates the car, applies the brake a little, applies the
brake more to come to a stop, and then stops the engine.
Mediating with a Pattern
345
Documenting your work
The answer is no. Instead, clearly document
your classes. Somewhere, put together a simple
document (no more than a page or two) that
explains how to use your class library. Write
this document for other programmers to use
(but make it readable, please!), and explicitly
state that programmers are to interact with
the system through the CarControls class.
You should then describe the public member
functions (the interface) to the CarControls
class and provide concrete examples. You
might also include a reference section
for advanced programmers who want to
understand how the whole thing works. But
whatever you do, don’t just hand over the
classes and expect other people to understand
them without sufficient documentation!
Book II
Chapter 6
Building with
Design Patterns
Imagine that somebody else will use your set of
car classes. You have saved your header files
and your source files, along with a static library
containing the compiled code, on a network
drive. Your coworker begins looking at your
header files. What does he or she see? A big
collection of classes. How does the coworker
know how to use the classes? Does the
coworker know to use the main Façade class
called CarControls? Or will he or she have
to just dig through the code to figure out which
classes to use and which ones not to?
346
Book II: Understanding Objects and Classes
Book III
Fixing Problems
Contents at a Glance
Chapter 1: Dealing with Bugs . . . . . . . . . . . . . . . . . . . . . . . . . . . . . . . . .349
It’s Not a Bug, It’s a Feature! ....................................................................... 349
Make Your Programming Features Look Like Features .......................... 351
Anticipating (Almost) Everything.............................................................. 352
Avoiding Mistakes, Plain and Simple ........................................................ 359
Chapter 2: Debugging a Program. . . . . . . . . . . . . . . . . . . . . . . . . . . . . . .361
Programming with Debuggers ................................................................... 361
Debugging with Different Tools ................................................................. 371
Chapter 3: Stopping and Inspecting Your Code . . . . . . . . . . . . . . . . . .373
Setting and Disabling Breakpoints ............................................................ 374
Watching, Inspecting, and Changing Variables ....................................... 378
Chapter 4: Traveling About the Stack. . . . . . . . . . . . . . . . . . . . . . . . . . .385
Stacking Your Data ...................................................................................... 385
Debugging with Advanced Features .......................................................... 390
Chapter 1: Dealing with Bugs
In This Chapter
✓ Distinguishing bugs from features
✓ Anticipating every move the user makes
✓ Avoiding mistakes the easy way
✓ Dealing with errors
W
ho knows whether it’s true, but as the story goes, back when the
first computer was built over a half century ago, it filled an entire
room with circuitry (yet was about as powerful as one of today’s digital
wristwatches). One day, the thing was misbehaving, and some brave engineers climbed deep into the thing. (The version we’re thinking of has them
wearing white radiation suits, of course.) Deep in The Bowels of the Machine
(sounds like a movie title), they found none other than . . . an insect! A bug!
It was a great big bug that had gotten messed up in the circuitry, causing
the computer to malfunction. So the story goes, anyway. Today, we use the
term bug to mean something that is wrong with a program. In this minibook,
we show you how to track down bugs and fix them in your software. In this
chapter, we talk about what exactly a bug is (and is not!), how bugs occur,
and how you can try to avoid them.
It’s Not a Bug. It’s a Feature!
So we’re using Microsoft Word, and all of a sudden, the program freaks out
and saves our file automatically. We didn’t tell it to do that; we didn’t ask
for it. Then we’re using the same copy of Word, and we try to do a copyand-paste procedure (that’s called a use case, by the way), and suddenly the
Font dialog box pops up. And then later, we’re sitting with our laptops at
Starbucks, and it automatically begins the shutdown procedure. We didn’t
tell it to do that.
Bugs! Bugs! They’re all bugs! Or are they? Seems that these pesky little incidents might be considered features by some programmers.
Turns out that Microsoft Word has an optional autosave feature that causes
it to automatically save recovery information in case our computer goes
dead. And that Font dialog box that popped up was a mistake of ours: we
meant to press Ctrl+V, but our fingers slipped and caught the D key instead.
As it happens, by default Ctrl+D opens the Font dialog box in Microsoft
350
It’s Not a Bug. It’s a Feature!
Word. (Why D? We have no idea.) And newer versions of Windows understand laptop computers: When the battery is just about to be completely
drained, Windows saves the entire state of your machine to a giant file on
the hard drive and shuts down. This is called hibernation. So these aren’t
bugs after all. We guess we can close up that bug report we just sent to
Microsoft.
Now consider this: Suppose you’re using some program that we won’t name
here, and in the middle of it, you get a message box that says something like
Exception Error, and the program just closes. All your work was lost. So
you call tech support, and the helpful friend on the other end says, “You
must have typed something it didn’t like. This program has a built-in protection scheme whereby if you type something you’re not supposed to, it shuts
down.”
Oh, yeah. We get it. That’s when the guy says, “It’s a feature, not a bug!” Tell
me another one. But sometimes situations walk the fine line between bug
and feature. We don’t think that a program crashing could be considered
a feature, but consider this instead: When Microsoft Internet Explorer 6.0
messes up, a message asks if you want it to send Microsoft a trouble report.
That’s a feature that handles bugs.
But the unnamed program that shut down definitely has a bug. And other
programs have bugs. For example (we can pick on Internet Explorer, right?),
we have been quickly switching between Internet Explorer windows, typing,
resizing, doing things quickly as we go back and forth between the windows
(too much caffeine perhaps), when suddenly the thing crashes, and we get
the trouble-report message. That really was a bug: The program choked
when we, the user, did something that the programmers did not anticipate.
Now why did the program choke? Well, in addition to what we did that the
programmers hadn’t expected, it’s possible that the programmers simply
messed up. Either they didn’t include code to handle a rough situation (rapidly switching, resizing, that sort of thing), or perhaps they wrote code that
did something wrong, such as freed a pointer but then continued to use the
memory address.
Here’s an example of programmers not expecting something. Suppose we’re
writing a program that reads a number from the console. You should type
a single character for your first choice and then another character for your
second choice. The code might look like this:
char x, y;
cout << “Enter your first choice” << endl;
cin >> x;
cout << “Enter your second choice” << endl;
cout << x << endl;
cin >> y;
cout << y << endl;
Make Your Programming Features Look Like Features
351
A simple little code, but suppose that you respond to the first request by
typing an entire word for what you want, such as Read rather than a single
letter such as R. Our program would then take the letters e, a, and d and
use those for the subsequent cin calls, something we might not have anticipated. The e would go into the cin > y line and get put in y. That’s the bug
of not anticipating something: You, the programmer, must make sure that
your program can handle all situations. All of them. Every single one. But
fortunately, there are ways around such problems, and we share these with
you in this chapter.
You can group these situations into the following categories:
✦ Real features, not bugs at all
✦ A situation that the programmers didn’t anticipate
✦ A mistake, plain and simple
Make Your Programming Features Look Like Features
But as programmers, we want to make everybody’s lives easier (starting
with our own, of course!), so building our software so that it’s easy to use
and makes sense is best. The key, then, in creating software where the features actually look like features is to make it all sensible. Don’t have your
software start the Zapper automatically unless the user explicitly asks that
the Zapper come on:
Smiling technical support representative: “It’s a feature! The Zapper comes
on after the computer has been sitting idle for ten minutes.”
Angry customer: “Yes, but I would kind of like to be at least ten feet away
from the thing when the Zapper starts up!”
Smiling technical support representative: “But why would you be sitting
there for ten minutes not using the computer if you’re not away from it?”
Angry customer: “I was reading the manual on how to configure the Zapper!”
You know the rest: Lawsuits follow and people get fired. Not a pretty sight,
and that says nothing for the poor customer who was in the vicinity of the
computer when the Zapper kicked in at full force.
Book III
Chapter 1
Dealing with Bugs
The last thing you want is to get calls from users complaining about a bug in
your program that was, in fact, a feature. This can happen, and it does. But
the technical support people are embarrassed when they have to explain,
“No, sir/ma’am. That really is the way it’s supposed to work.” And it’s also
not fun for the technical support people to get called mean names after this,
especially when they didn’t write the software — you did.
352
Anticipating (Almost) Everything
With features, the rules are simple: Let the user choose which features they
want to happen when. If they don’t want autosave, then let them turn it off.
Let them configure the software, and don’t let it do anything surprising.
Anticipating (Almost) Everything
When you write a program, try to anticipate the different things that users
can do to your program — much of which may not exactly be associated
with the proper use of your program. Most of this kind of protection — that
is, ensuring that your program doesn’t choke when the users do something
you don’t anticipate — you build into your software centers around the user
interface, the area where the users interact with your program.
If your program is a console-based application or if users can enter things
into text boxes in a windowing program, you must guard against invalid
input. Take a look at this output from a hypothetical program:
What would you like to do?
A. Add random information to the system
B. Boil information
C. Compress information
D. Delete the information
Your choice:
Now suppose that the user chose D for Delete, and the following menu
appeared:
What would you
A. None of
B. Some of
C. Most of
D. All the
like to delete?
the data — forget it!
the data.
the data.
data! Get rid of it all!
Now imagine that a user just starts this program and sees the first menu.
The user doesn’t know whether to type A for the first choice or Add for the
first choice. The user types Add and presses Enter. Oops. The A went to the
first choice, and the system added the random information and printed the
same first menu again. The d (the second character the user typed) then
went to choice Delete the information. That caused the second menu,
the Delete menu to appear. The third character the user typed, d, caused the
second menu’s D selection to take place, All the data! Get rid of it
all!, all in one shot, without the user realizing what happened.
Oops! What was supposed to be Add turned into Add, Delete, Delete all
the data. Not good! How can you avoid this kind of thing?
✦ Restrict the user’s choices.
✦ Clearly state what the user should do.
Anticipating (Almost) Everything
353
✦ Support multiple options.
✦ Anticipate what could go wrong.
For example, you might tell the user to type only a single character, with a
message such as this:
Please enter a single character for your choice:
But now, does the user have to press Enter afterwards? This message suggests so. But maybe not. So you must be more specific. Maybe one of these
would be better:
Type a single character and do not press Enter:
Type a single character and then press Enter:
But even these aren’t good enough. First, you should generally allow the
user to press Enter. Doing something automatically with a single keystroke
may surprise the user. Further, you may want to support multiple options. If
the user wants to choose option A in the menu, then you might support any
of the following for input:
✦ A
✦ a
✦ ADD
✦ add
This can all be wrapped up into some short code that looks like this:
string choice;
cin >> choice;
char ch = choice[0];
ch = toupper(ch);
switch (ch)
{
case ‘A’:
cout << “Adding random data...” << endl;
break;
case ‘B’:
cout << “Boiling it down!” << endl;
break;
case ‘C’:
cout << “Compressing!” << endl;
break;
case ‘D’:
cout << “Deleting...” << endl;
break;
}
Dealing with Bugs
✦ Add
Book III
Chapter 1
354
Anticipating (Almost) Everything
Now the user can type any word, and the only thing that the program checks
is the first letter. But if you don’t like the idea that aompress can be taken as
add and not compress (who knows what they meant to type?), you can do
something like this:
string choice;
cin >> choice;
choice = MyUppercase(choice);
if (choice == “A” || choice == “ADD”)
{
cout << “Adding random data...” << endl;
}
else if (choice == “B” || choice == “BOIL”)
{
cout << “Boiling it down!” << endl;
}
else if (choice == “C” || choice == “COMPRESS”)
{
cout << “Compressing!” << endl;
}
else if (choice == “D” || choice == “DELETE”)
{
cout << “Deleting...” << endl;
}
else
{
cout << “I don’t know that word” << endl;
}
Now this code looks for only the first letter, or the exact word, and the
letter or word can be in either uppercase or lowercase. This choice is probably the best one. However, you may notice that we used a function called
MyUppercase. That’s our own function because support in C++ for converting an entire string to uppercase leaves a bit to be desired. So we wrote our
own function. Here it is:
string MyUppercase(string str)
{
char *buf = new char[str.length() + 1];
strcpy(buf, str.c_str());
strupr(buf);
return string(buf);
}
But be careful if you’re dealing with a sophisticated program. Suppose you
are writing a program that looks up information in a database for a particular customer name. You could run into the following situations:
✦ The names in the database are all in uppercase (for example, GEORGE
WASHINGTON), and the user can enter names in mixed case (for example, George Washington).
✦ The first and last names are stored separately, so your program must
look in the database for the situation where the last name is Washington
and the first name is George. The user doesn’t know to enter just the last
Anticipating (Almost) Everything
355
name, and may enter both names into a single text box. Or you might
allow the user to enter both names at once, but the user didn’t know he
or she was supposed to put last name first, or perhaps last name, then a
comma, then the first name.
✦ The user can type some spaces at the beginning or end of the name. The
program will then look for George Washington and not find it because it’s
stored as George Washington (with no spaces before or aft).
✦ The user might include middle initials when the name is not stored in
the database with middle initials.
All these problems are easy to avoid. Here are some tips:
✦ You must know how the names are stored in the database before you go
looking for them. If they are stored in all caps, you shouldn’t require the
user to enter them in all caps. Instead, accept words in any case and convert them to all uppercase.
✦ You must know if the names are stored with first name separate from last.
Then allow any format. If the user types George Washington (no comma),
you can split the string at the space and pull out the first and last name. But
if the user types the name with a comma between the first and last name,
you can split it at the comma and extract the last name and then the first.
✦ Spaces should not be a problem. You can strip the spaces off a string
after a user types it in.
All these steps will help make your program bulletproof. The idea is to encourage the users to do things the way they prefer, but to prevent them from doing
things in ways that your program doesn’t like. If your program doesn’t want
middle initials, don’t give the users the opportunity to enter them.
Listing 1-1 shows you how you can strip spaces, strip a possible period
off the end of a middle initial, and split a string based on either spaces or
commas. In this listing, we used a special class called vector. The vector
class is much like an array, except that the vector class is a bit more powerful: vector is a class, and you can add things to it and remove things from
it easily by using member functions. vector is also a template, so when you
declare it, you must state what type of variables you want it to hold. You put
the type of variables in angled brackets. We’re putting strings in it, so we
declared it as vector<string>. But to make our lives simpler, we used a
typedef to make an easier name for this type: StringList.
Dealing with Bugs
✦ Are middle initials required? Document things well. Your program
should clearly tell the user whether to enter a middle name, a middle
initial, or neither. If you are using text controls, don’t even include a
middle name field if you don’t want a middle name. Or if you do, specify
right on the window whether the user should type a middle initial or an
entire middle name. If the entry is just an initial, you can remove a trailing period, or add it, depending on what’s stored in the database.
Book III
Chapter 1
356
Anticipating (Almost) Everything
The myth of the bulletproof application
Anyone who has spent time reviewing the
trade press knows that Internet Explorer
and many other applications seem to have
a recurring problem with bugs. Just as soon
as the vendor fixes one bug, another bug
turns up. Some developers may think that the
developers at these companies are morons and
are giving us all a black eye. However, these
developers, more often than not, are just like
us. Because they’re human and humans make
mistakes — both at the developer and user end
of the application @md applications will never
become bug free. Sure, you may be able to
create a nearly bulletproof simple application,
but as application complexity increases, so do
the number of interactions and the number of
potential bugs. At some point, the number of
interactions between application parts
increases to the point that a bug-free application becomes impossible.
Over the years we have read any number of
articles and books that purport to give you the
magic required to create an application that not
only lacks bugs but also prevents unanticipated
user actions. The bulletproof application is
a myth. If you buy into this myth, you may be
tempted to stop looking for bugs the moment
the development staff can’t find anymore.
Unfortunately, this attitude leads to headlines
proclaiming your application as the next
significant Windows security hole. Don’t buy
into the bulletproof application myth — always
be alert for potential errors.
Listing 1-1: Processing Strings to Reduce Bugs
#include <iostream>
#include <vector>
using namespace std;
typedef vector<string> StringList;
StringList Split(string orig, string delims)
{
StringList list;
int pos;
while((pos = orig.find_first_of(delims)) != -1)
{
list.push_back(orig.substr(0, pos));
orig = orig.substr(pos + 1);
}
list.push_back(orig);
return list;
}
string MyUppercase(string str)
{
char *buf = new char[str.length() + 1];
strcpy(buf, str.c_str());
strupr(buf);
Anticipating (Almost) Everything
357
return string(buf);
}
string stripspaces(string orig)
{
int left;
int right;
// If string is empty, just return it.
if (orig.length() == 0)
return orig;
// Strip right
right = orig.find_last_not_of(“ \t”);
if (right > -1)
orig.resize(right + 1);
// Strip left
left = orig.find_first_not_of(“ \t”);
if (left > -1)
orig.erase(0, left);
//
//
//
if
{
If left still has a space, it
means the whole string is whitespace.
So just remove it all.
(orig[0] == ‘ ‘ || orig[0] == ‘\t’)
orig = “”;
}
Book III
Chapter 1
return orig;
Dealing with Bugs
}
void ProcessName(string name)
{
StringList list;
string first, middle, last;
int size, commapos;
name = stripspaces(name);
commapos = name.find(“,”);
if (commapos > 0)
{
// Name has a comma, so start with last name.
name.erase(commapos, 1);
list = Split(name, “ “);
size = list.size();
if (size > 0)
last = list[0];
if (size > 1)
first = list[1];
if (size > 2)
middle = list[2];
}
else
{
// Name has no comma, so start with first name.
list = Split(name, “ “);
size = list.size();
(continued)
358
Anticipating (Almost) Everything
Listing 1-1 (continued)
if (size > 0)
first = list[0];
if (size > 2)
{
middle = list[1];
last = list[2];
}
if (size == 2)
{
last = list[1];
}
}
// If middle name is just initial and period,
// then remove the initial.
if (middle.length() == 2)
{
if (middle[1] == ‘.’)
{
middle.erase(1,1);
}
}
// Convert all to uppercase
first = MyUppercase(first);
middle = MyUppercase(middle);
last = MyUppercase(last);
cout
cout
cout
cout
<<
<<
<<
<<
“first: “ << first << endl;
“middle: “ << middle << endl;
“last: “ << last << endl;
endl;
}
int main()
{
string name;
name = “
Washington, George Zeus
ProcessName(name);
name = “Washington, George Z.”;
ProcessName(name);
name = “George Z. Washington”;
ProcessName(name);
name = “George Zeus Washington”;
ProcessName(name);
name = “George Washington”;
ProcessName(name);
return 0;
}
“;
Avoiding Mistakes, Plain and Simple
359
Listing 1-1 is rather bugproof, but it still won’t handle some situations properly. For example, if somebody tries to process a string with a middle name
such as Zeus. (notice a period is present after the name), the program won’t
remove the period. But is that correct or not? Who knows, but people don’t
normally format names like that. And so here are some improvements you
might make to this program:
✦ Eliminate improper characters: You could make sure that no improper
characters appear in the names. We would probably do this after we
found the first, middle, and last names; that way, we wouldn’t kill the
attempt to find the data based on the presence of a single comma that
might be needed to specify the name order. You can use various if
statements to do this kind of thing.
✦ Handle more names than three: We would probably have a special precaution for the case of more than three names. Some people have lots of
names — like 10 or 11 — especially if they’re British royalty. But if this
program is to be used, for example, in an oil change operation, we don’t
think you’ll see Charles Philip Arthur George, Prince of Wales coming
through (although it’s possible). And so, as usual, how you handle the
names depends on your particular situation.
✦ Perform initial processing: We would also do some initial processing.
Right after the user enters the names, we would make sure that the
names are not empty strings, that is, “” (one pair of quotation marks
with no space between them).
Even though many programmers take measures to prevent bugs, programmers still sometimes let problems slip through. However, if you’re careful, you can avoid a lot of these problems. When you create software, you
should be in the right frame of mind to watch for potential problems as
you’re writing the code. (Getting into the right frame of mind includes ensuring you have enough sleep, avoiding distractions, and doing other things
that help you concentrate on your work, but this section also describes
some specifics you should consider.)
The list of potential problems that we’re giving you here could probably go
on and on for thousands of pages. However, the point is not to have a big
checklist but rather for you to go through this list and start to recognize the
things you need to do to write good code. Writing code is conscious and
deliberate. It’s like when you are going down a sidewalk and are vaguely
aware of such things as whether cars are coming or whether you need to
step over any holes. These hazards are always in the back of your mind
as you carefully walk along. Writing code is the same way: Certain gotchas
should stay in the back of your mind, too:
Dealing with Bugs
Avoiding Mistakes, Plain and Simple
Book III
Chapter 1
360
Avoiding Mistakes, Plain and Simple
✦ Indexes: Strings and arrays run from index 0 to 1 less than the length.
Using a loop, such as for (i=0; i<=size; i++), is a common mistake. The less-than-or-equal-to symbol is incorrect, yet people make this
mistake a lot. The scary thing is that sometimes the code will still function, and you’ll just end up overwriting something else. And worse, you
might not immediately catch this coding error, so it will manifest itself
as a bug in the program later.
✦ For every new, there’s a delete: Whenever you allocate an object using
new, remember to free it. But forgetting the delete doesn’t usually
create noticeable bugs in your program; read the next item to see what’s
more likely to cause a noticeable bug.
✦ Remember what you deleted: Worse than forgetting to delete an object
is forgetting that you deleted it and continuing to use it. When you delete
a pointer, make sure that you didn’t pass it to some other object that
stored it away and plans to use it again.
✦ Don’t forget to create an object: You may have seen this one: An error
message pops up that says:
The instruction at 0x00402119 referenced memory at 0x00000000. The memory
could not
be written.
This means someone had a pointer variable and forgot to call new. We
generated this message easily on purpose with the following code:
int *x = 0;
*x = 10;
We created a pointer variable and initialized it to 0, meaning it’s not
being used. But before calling new or setting the variable equal to some
object’s address, we tried to stuff something into the memory it points
to (which is address 0, something the operating system doesn’t like).
And the operating system responded with the error message. This is a
bug we see far more than we would expect in commercial software.
These are just a few items to think about, but you can see that they mostly
deal with memory issues, such as allocating memory and using it incorrectly. Most important, you can avoid them if you’re conscientious with your
programming. As you code, bear in mind the repercussions of what you’re
doing. And as crazy as this sounds, remember what you might be forgetting!
Ask yourself, am I forgetting to delete some pointers or that someone else
has a copy of this pointer I’m about to delete? If you keep these things in
mind, you should avoid some of the most common bugs.
Chapter 2: Debugging a Program
In This Chapter
✓ Working with debuggers
✓ Using the CodeBlocks debugger
✓ Tracing through a program and in and out of functions
✓ Using other debuggers
✓ Getting seriously advanced debuggers
I
n this chapter, we talk about how you can use a debugger to track down
problems and bugs in your program. Sooner or later, things don’t work
the way you planned them. In this case, you have several plans of attack.
One plan involves a hammer and the computer, but we don’t recommend
that one. Instead, we suggest using a debugger to try to fix the program.
Programming with Debuggers
A debugger is a special tool that you use for tracing line by line through your
program. Take a look at Listing 2-1. This is just a basic program with a main
and a couple of functions that we use to demonstrate the debugger.
Listing 2-1: Tracing a Simple Program
#include <iostream>
using namespace std;
int CountRabbits(int original)
{
int result = original * 2;
result = result + 10;
result = result * 4;
cout << “Calculating “ << result << endl;
return result * 10;
}
int CountAntelopes(int original)
{
int result = original + 10;
result = result - 2;
cout << “Calculating “ << result << endl;
(continued)
362
Programming with Debuggers
Listing 2-1 (continued)
return result;
}
int main()
{
int rabbits = 5;
int antelopes = 5;
rabbits = CountRabbits(rabbits);
cout << “Rabbits now at “ << rabbits << endl;
antelopes = CountAntelopes(antelopes);
cout << “Antelopes now at “ << antelopes << endl;
// system(“PAUSE”); // add this for Windows
return 0;
}
When you type and run this program, you see the following output:
Calculating 80
Rabbits now at 800
Calculating 13
Antelopes now at 13
Now look closely at main and follow it through, line by line. The first
thing main does is declare a couple of integers. Then main calls into the
CountRabbits functions. The CountRabbits function declares an integer
and does a few lines of calculations. Then the CountRabbits function
prints a message. Finally it returns. Once back in main, the program prints
another message and then calls into the CountAntelopes function. This
function also declares an integer, does some calculations, prints a message,
and then returns. Back in main, the program prints another message, and
the program finally finishes.
What we just gave you is a linear description of the entire process of this
program. You can see these same steps by using a debugger. With a debugger, you see the computer going line by line through your code. A debugger
performs the first line of your program and then waits for you to tell it to
perform the next line — then the next, and the next, and so on, until the end
of the program.
In this example, we use the debugger that comes with the CodeBlocks application. If you prefer to use some other debuggers, we recommend that, for
most of this chapter, you at least try the CodeBlocks debugger. It is a nice
tool, and we think that you’ll be happy with it. But besides that, it allows you
to follow through the examples we give. Then you can return to whatever
other tool you’re using.
You must know one important aspect before using a debugger. For the
debugger to understand your code, you must compile it with debugging
information. The compiler adds extra information into the final executable
so that the debugger can locate your source code and variable information.
Here’s how you turn on debug information:
Programming with Debuggers
363
Adding debug and symbol information
When you compile with debug information, you
are adding debug and symbol information to the
final executable file. This information includes
data about the source-code files, including
the line numbers and the variable names. This
is the primary difference between a debug
version and a release version of your product:
People typically don’t include debug and
symbol information in a version of the product
that they release to the general public. One
reason is that including it makes it too easy for
competitors and hackers to reverse-engineer
the product. (Another reason is that including
the debug and symbol information makes the
application run slower and consume more
system resources.) However, the actual source
code is not in the debug and symbol information;
that stays in the source-code file. The debug
information, instead, just contains line
numbers, which serve as references (pointers,
if you will!) into the source-code file. So
hackers and competitors won’t have the
complete source to your program, but they will
have variable names and other information
that could make their job easier (and yours
harder).
✦ CodeBlocks: Choose Debug in the Build Target drop-down list box.
✦ Dev-C++ 5.0: Open the project and choose Tools➪Compiler Options. In the
Linker tab, make sure that Generate Debugging Information is turned on.
✦ gcc under MinGW and Cygwin: Add the -g option to the compiler. You
will probably do this inside a Makefile.
Running the debugger
After you have rebuilt your project, you can run the debugger. To start the
debugger, click Debug/Continue, choose Debug➪Start, or press F8. (If you
click Run, the application runs as normal without entering debug mode.)
When you start the debugger, you should see a screen like that shown in
Figure 2-1. (You also get a console window behind that screen. This console
window contains the output for the program you are debugging.)
Figure 2-1 shows two special features you need to know to debug programs.
The first is the red circle and the second is the yellow triangle. The red
circle is a breakpoint — a place where you want the debugger to stop. You
add breakpoints to the Editing window by clicking the left side next to the
instruction where you want to stop. When you click that spot again, the red
circle goes away, showing that you have cleared the breakpoint. You can
place as many breakpoints as you want in the application, but you can place
breakpoints only on instructions.
Debugging a
Program
After you change the compiler options to generate debug information, you
must rebuild your project. The reason is that the compiler and linker must
regenerate object files and executable files with the debug information.
Book III
Chapter 2
364
Programming with Debuggers
Step Into
Next Instruction Step Out
Next Line
Run to Cursor
Debug/Continue
Stop Debugger
Debugging Windows
Various Info
Figure 2-1:
The main
CodeBlocks
window
shows your
source
code.
The yellow triangle is the instruction pointer, which shows the instruction
that the debugger will execute next. As you tell the debugger to execute
instructions, the yellow triangle moves. Whenever you start the application
in debug mode, the yellow pointer automatically stops at each breakpoint.
Figure 2-1 shows how the debugger looks when the yellow triangle stops at a
breakpoint.
When you start the debugger again by clicking Debug/Continue, execution
begins as if the application is in normal run mode until the debugger encounters another breakpoint. If the debugger doesn’t encounter a breakpoint, the
dialog box closes, and the program returns to the source screen.
If you don’t set any breakpoints and try to debug your program, it will run
without letting you trace through the code. That is, the program will run as if
you’re not running it in the debugger.
Programming with Debuggers
365
Look at the Debugger tab of the Logs and Others window shown in
Figure 2-1. This tab contains debugging messages from your application.
Whenever you see the At message, you know that the debugger has stopped
at a particular location. The remainder of the message tells you where the
debugger has stopped. In Figure 2-1, the debugger has stopped at line 25 of
the D:/0246 - Source Code/BookIII/Chapter02/BuggyProgram/
main.cpp file.
So go ahead and run the program. Begin by setting a breakpoint at line 22,
the int main() entry. Click Debug/Continue, choose Debug➪Start, or press
F8 to start the debugger. You’ll see a number of messages appear in the
Debugger tab and then you’ll see the At message when the debugger stops at
line 23. (If you spaced your program slightly different from the way we did in
Listing 2-1, you may see a slightly different line number.) The yellow triangle
should appear on line 23, which contains a curly bracket, meaning that the
program is stopped at that line. The instruction pointer stopped at the curly
bracket because it is the first instruction after the main() entry.
Click Next Line, which is the third button on the Debugger toolbar. The
button you want is the one with an icon with two braces, {}, and an arrow
pointing over it from the left side to the right side. (You can also press F7.)
The yellow triangle (instruction pointer) moves to the first assignment statement on line 24, which is
int rabbits = 5;
int antelopes = 5;
Click Next Line again. Now the instruction pointer is on the third line of
main(), which looks like this:
rabbits = CountRabbits(rabbits);
This third line of main() is a function call, and now you have a choice.
(Don’t click Next Line!) You can either tell the computer to just perform
what’s inside this function without stopping on each line for you to see, or
you can “step into it” and see the individual lines.
Click the fifth button from the left, the one called Step Into, which shows two
braces, {}, and an arrow going from the left into them. (Or press Shift+F7.)
When you do, the instruction pointer moves into the CountRabbits()
function. The highlight will be on the first line in that function:
int result = original * 2;
Debugging a
Program
Click Next Line. When you click the button, the instruction pointer advances
to the next line. The computer just performed the first line in main(), and
next the computer will perform the second line in main(), which is this:
Book III
Chapter 2
366
Programming with Debuggers
When the highlight moved into the function, the computer stepped into
the function. Now think about the symbol for the icon that caused this to
happen: The icon has two braces, {}, and an arrow pointing into them. The
two braces represent a function. (They’re supposed to be the open and
closing brace for the function.) And the arrow points into the middle of the
braces, which means that you’re going to step into the function. That’s the
idea behind the odd symbols. The one you’ve been clicking before, the Next
Line icon that has an arrow going over, means stepping over the function.
Now, before stepping into this function, because you were clicking lines that
were not functions but just individual lines, you used the Next Line (that is,
the step over) button. But you could have used either the Next Line button
or the Step Into button, because stepping into a function doesn’t bear much
meaning on statements that are not functions.
Normally, we use the Next Line button by default and choose the Step Into
button only when we specifically want to go into a function. The reason is
that some lines of code that may not appear to be functions really are. For
example, cout << “a”; is, in fact, a function, and you might not want to step
into that code, because either the source code for it might not be present or
you simply might not be interested in the details of the function.
It’s time to see how these debugging features work. The following procedure takes you through the debugging process so that you can see the
CodeBlocks debugger in action:
1. Click Next Line three times until the instruction pointer appears on
the cout line:
cout << “Calculating “ << result << endl;
This line writes output to the console. Remember, in addition to the
main CodeBlocks window, you also have a console window. That’s
where the output from this line goes.
2. Click Next Line.
3. Click the console window.
You see the results of the cout statement:
Calculating 80.
Then the instruction pointer lands on the return statement.
4. Click Next Line again.
The instruction pointer is on the closing brace of the function. Note that
CodeBlocks highlights both the opening brace and the closing brace in
blue. This feature helps you see where a function begins and ends in the
Integrated Development Environment (IDE).
Programming with Debuggers
367
5. Click Next Line yet again.
The instruction pointer returns to main(), on the line following the call
to the CountRabbits() function:
cout << “Rabbits now at “ << rabbits << endl;
6. Click Next Line again.
The instruction pointer is on the second function call:
antelopes = CountAntelopes(antelopes);
7. But this time, instead of stepping into the function, just press Next
Line to step over it.
The instruction pointer advances to the next line, which is this:
cout << “Antelopes now at “ << antelopes << endl;
Take a look at the console. The CountAntelopes() function itself contained a call to cout. You can see on the console that this cout line did
its stuff:
Calculating 13
You saw the output from the CountAntelopes() function because,
although you stepped over the function, you didn’t actually skip it: The
function ran in its entirety during that one click of the Next button. The
debugger just didn’t go through it line by line, that’s all.
8. Click Next Line to do the final cout line.
Book III
Chapter 2
Your entire output now looks like this:
and the instruction pointer ends on the final return statement:
return 0;
9. Click Next Line one more time and the highlight is on the closing
brace of main().
Now things get just a little strange. Unbeknownst to us, there’s really
more code than we see. When you compile and link your program, the
linker includes some special startup code that calls your main() function.
10. Click Next Line one more time, and you are timewarped out of your
source file and into some assembly language code. The Debugger
window shows the following message:
In __mingw_CRTStartup () ()
11. To see the assembly language code, you must click a new button, Next
Instruction (four buttons from the left on the Debugger toolbar).
Debugging a
Program
Calculating 80
Rabbits now at 800
Calculating 13
Antelopes now at 13
368
Programming with Debuggers
CodeBlocks automatically displays a new window called Disassembly,
as shown in Figure 2-2. The numbers in your figure may differ from ours,
but the code is the same.
Figure 2-2:
The
Disassembly
window
displays the
assembly
language
version of
your code.
Yuck. This is assembly, a human-readable form of the language that the
computer understands. You don’t have to know what all this means, but
you can probably figure out that the line
(hexadecimal number) call
(another hexadecimal number) <__main>
is where this code stuff calls into your main.
12. To get out of this, just click the first button (called Debug/Continue)
or the sixth button (called Step Out), the one with an arrow pointing
to the left of the two braces, {}. (Or just press Ctrl+F7 or Ctrl+Shift+F7,
respectively.)
Clicking Debug/Continue causes the program to run to the real end of
your program (or the next breakpoint) and then finish. Clicking Step Out
tells the debugger to step out of the current function, which in this case
is the same as running to the end of the program.
13. If you want to avoid going into the crazy assembly-code stuff, you can
avoid it by clicking Debug/Continue when you get to the final return
line of your program.
And that’s how you trace through your program line by line. But you can do
a lot more with the program when you’re tracing through it. You can look at
the values in your variables, you can change the values of the variables, and
you can get a list of all the function calls that led up to the current position
in your program. You can do plenty, and we explain all this in the remainder
of this minibook.
Programming with Debuggers
369
Recognizing the parts of the CodeBlocks debugger
The CodeBlocks debugger displays the Debugger toolbar whenever you
debug an application. The previous sections of this chapter have discussed
many of the buttons on the Debugger toolbar: Debug/Continue, Next Line,
Next Instruction, Step Into, and Step Out. However, the toolbar contains a
number of other interesting buttons you should know about.
Sometimes you examine a piece of code in the editor and want to see what
the variables look like when you get to that point. To see what happens,
place your text cursor at the place you want to stop (using only the mouse
cursor isn’t enough) and click Run to Cursor (the second button on the
Debugger toolbar). The debugger stops at the line where your cursor is resting. In this case, the text cursor acts as a kind of breakpoint for the debugger.
After you debug your application for a while and locate problems you want
to fix, you may not want to run the rest of the application. When this situation occurs, simply click Stop Debugger (the button that looks like a stop
sign). The debugger stops immediately. You can make any required changes
and restart the debugger as normal.
CodeBlocks provides access to a number of debugging windows. In fact,
you saw one of these windows previously in the chapter — the Disassembly
window. You access these windows by clicking the Debugging Windows
button (the one that looks like a window, to the right of the stop sign buttons). Later chapters in this minibook describe these windows in detail.
Here is a quick summary of the windows for now:
✦ Call Stack: Displays the function calls used to get to the current point in
the code.
✦ CPU Registers: Shows the contents of the hardware registers in the processor. You won’t normally need to view these registers unless you’re
performing low-level programming tasks.
✦ Disassembly: Let’s you see the underlying machine code used to make
your code work. You won’t normally need to view this information
unless you’re performing low-level programming tasks.
✦ Memory Dump: Displays the precise way that the application stores data in
memory, which may not look very much like the C++ view. This is a useful
window because it helps you better understand how memory works and
how your application uses memory. In some cases, knowing how a variable
stores memory can help you locate problems with your code.
Debugging a
Program
✦ Breakpoints: Presents all the breakpoints you’ve set in your application. Double-clicking a breakpoint entry takes you to that breakpoint in
the editor. You can use this window also to remove one or more breakpoints.
Book III
Chapter 2
370
Programming with Debuggers
✦ Running Threads: Shows a list of threads, other than the main thread,
associated with the current application. You use this window for debugging multithreaded applications.
✦ Watches: Displays a list of local variables and function arguments.
You can also add other variables to monitor as a watch. The Watches
window is probably the most useful debugger window because it illustrates the C++ view of your data and shows how the application code
manipulates that data.
The debugger also provides access to a number of information windows.
You access these windows by clicking the Various Info button (the one with
an i in italics far down on the left). Here is a quick summary of the information windows:
✦ Current Stack Frame: Shows the current stack frame information. C++
creates something called a stack frame when certain events occur, such
as calling a function. This stack frame contains the data and data references for the current function. You won’t normally need to view this
information unless you’re performing low-level programming tasks.
✦ Loaded Libraries: Contains a list of all of the libraries loaded to run your
application. It’s important to know which libraries your application uses
when you deploy (load) it on other machines. In many cases, you may
not even know that C++ requires certain libraries to run your application, so this is an exceptionally useful window.
✦ Targets and Files: Provides a detailed view of how the loaded libraries
are used in your application. You won’t normally need to view this information unless you’re performing low-level programming tasks.
✦ FPU Status: Displays the register information for the Floating-Point Unit
(FPU) in your processor. At one time, the FPU was a separate chip, but
now it appears as part of your main processor. The FPU is exceptionally
adept at performing real number (versus integer) math. You won’t normally need to view this information unless you’re performing low-level
programming tasks.
✦ Signal Handling: Shows how CodeBlocks handles signals between the
hardware and your application, such as an arithmetic exception or a
segmentation fault. You won’t normally need to view this information
unless you’re performing low-level programming tasks.
Debugging with Different Tools
371
Debugging with Different Tools
You can use several tools for debugging your code. However, which compiler you usually use dictates which debugging tools you can use. For example, Microsoft Visual C++ has a really good debugger. But getting it to debug
a program compiled with Dev-C++, for example, is difficult because different
compilers use different forms of debugging and symbol information. The
type used by the various breeds of gcc compilers is different from the type
used by Microsoft Visual C++.
Standard debuggers
Here’s a quick rundown of some of the debuggers that are available:
✦ Visual C++: This debugger works similarly to the CodeBlocks debugger.
It’s primarily for debugging programs that were built by using Visual
C++. However, if you are brave and need to debug something for which
you have no code or symbol information, its support for assembly-code
debugging is good.
✦ gdb: This is the standard debugger that ships with MinGW and Cygwin.
It’s a command-line tool, but we don’t recommend using it as such.
Instead, we suggest using the Insight debugger with it so you can use a
graphical front end. This makes life a lot easier. But if you insist on using
the command-line version, you can learn about it by typing gdb at the
command prompt and then typing help.
Debugging a
Program
✦ Dev-C++ 5.0: Starting with Version 5.0, Dev-C++ has an integrated debugger that works similarly to the Insight debugger. You may want to give
this a try. (If you’re using a version of Dev-C++ prior to 5.0, you have to
use the Insight debugger.)
Book III
Chapter 2
372
Book III: Fixing Problems
Chapter 3: Stopping and
Inspecting Your Code
In This Chapter
✓ Setting, enabling, and disabling breakpoints
✓ Temporarily setting or disabling a breakpoint
✓ Inspecting a variable
✓ Watching all the local variables
✓ Watching any variable
S
ometimes, things break. But what we’re talking about here is the code.
Now this is one of those instances when a word or phrase has lots of
different meanings. Programmers talk about breaking the code. This phrase
usually means one of two things: It may mean that the programmer made
a mistake and the code no longer works. But in this chapter, we’re using a
different definition for the term. When you’re debugging a program, you can
have the program run until it gets to a certain line in the code. The debugger
then stops at that line, and you can look at the values of variables, inspect
things about the code, or even change the variables. When the program
stops, that’s called breaking. The reason it stops on that particular line is
because you put a breakpoint on that line.
In this chapter, we talk about setting and manipulating breakpoints in your
code (if nothing else in your code is broken) and inspecting and modifying
various aspects of your code, such as variables, after your code stops at a
breakpoint.
In the examples in this chapter, we use the debugger supplied with the
CodeBlocks IDE. If you use a different product, the debugger will probably
work about the same but not precisely the same. For example, everything we
show you how to do here you can do in Microsoft Visual C++. The keystrokes
and mouse clicks may be different, but the features are present. Make sure you
check the vendor documentation for precise details on using your debugger.
To work through the examples in this chapter, make sure that you
compile with debug information turned on. (In CodeBlocks, you can compile
with debug information by choosing Debug in the Build Target field of the
Compiler toolbar. If you can’t see the Compiler toolbar, choose View➪
Toolbars➪Compiler to place a checkmark next to the Compiler entry.)
374
Setting and Disabling Breakpoints
When you are developing software, you should always have debug information on. That way, you’re always ready to debug your code and fix things.
Only when you’re ready to release the product formally should you recompile it without debug information. (Although we do recommend doing a full
test of the software again without debug information, just to make sure that
it still functions correctly.)
Setting and Disabling Breakpoints
A breakpoint is a place in your code where you tell the debugger to stop.
In the sections that follow, we talk about breakpoints. Please use the code in
Listing 3-1 for these sections. Remember what you’re supposed to do? Make
sure that you compile it with debug information on!
Listing 3-1: Using a Program for Breakpoints and Inspections
#include <iostream>
using namespace std;
class BrokenMirror
{
private:
int NumberOfPieces;
public:
int GetNumberOfPieces();
void SetNumberOfPieces(int newamount);
BrokenMirror() : NumberOfPieces(100) {}
};
int BrokenMirror::GetNumberOfPieces()
{
return NumberOfPieces;
}
void BrokenMirror::SetNumberOfPieces(int newamount)
{
newamount = newamount * 20;
NumberOfPieces = newamount;
}
int main()
{
BrokenMirror mirror;
mirror.SetNumberOfPieces(10);
cout << mirror.GetNumberOfPieces() << endl;
return 0;
}
Setting and Disabling Breakpoints
375
Setting a breakpoint in CodeBlocks
Go ahead and compile the program in Listing 3-1 (with debug information
turned on). Look at the left margin of the window, to the right of the line
numbers. Figure 3-1 shows a small circle on line 16. When you view the IDE,
this circle is red. The red circle is a breakpoint that we set. To set this breakpoint in your code, click in the area between the left margin and the code, as
shown in the figure on line 16. (It’s line 16 on our screens, but if you formatted your code differently, you may see it on a different line number.) If you
haven’t done so, go ahead and click the mouse in the left margin of the int
BrokenMirror::GetNumberOfPieces() line. You see a red circle appear
in the left margin. You just placed a breakpoint on that line! Hurray!
Book III
Chapter 3
Stopping and
Inspecting Your
Code
Figure 3-1:
CodeBlocks
displays any
breakpoints
you set
using a red
circle.
Click again in the left margin of the same line. The red circle disappears.
When the circle disappears, the breakpoint is gone.
Finally, click a third time, because for now you do want a breakpoint there.
Now, run the program by clicking the Debug/Continue button (it
looks like a sheet of paper with a down-pointing arrow next to it) on
the Debugger toolbar. If you don’t see the Debugger toolbar, choose
376
Setting and Disabling Breakpoints
View➪Toolbars➪Debugger to place a checkmark next to the Debugger entry.
(Don’t click the Run button, the blue right-pointing triangle, on the Compiler
toolbar because choosing this option simply runs the program without
debugging it.) When you click Debug/Continue, the console window may pop
in front, so just click the CodeBlocks window to bring it back to the front.
The program runs until it gets to the breakpoint you chose for the int
BrokenMirror::GetNumberOfPieces line, as shown in Figure 3-2. Note
that execution actually ends with the opening curly brace because this is the
beginning of execution for this function. The yellow right-pointing triangle
tells you the current instruction that the CodeBlocks debugger will execute.
You can now click the Next Line button (it’s the button with two braces, {},
and an arrow pointing over it from the left to the right) to move to the next
line, or you can click Debug/Continue to run the rest of the program.
Figure 3-2:
Debug
mode tells
CodeBlocks
to stop
execution
when it
reaches the
breakpoint.
Enabling and disabling breakpoints
You may have times when you have several breakpoints set, and you want
to turn them off momentarily, but you don’t want to lose them because you
may want to turn them back on later. You can do this by disabling the
breakpoints. Disabling the breakpoint is faster than removing the breakpoints
and then going back and finding them again to turn them back on. Use the
following steps to disable a breakpoint:
Setting and Disabling Breakpoints
377
1. Right-click the red circle and choose Edit Breakpoint from the context
menu.
You see the Edit Breakpoint dialog box, as shown in Figure 3-3.
Figure 3-3:
Use the Edit
Breakpoint
dialog box
to enable
and disable
breakpoints.
2. Clear the Enabled option and click OK.
CodeBlocks disables the breakpoint so that it no longer stops
application execution.
In some cases, you want to enable or disable a number of breakpoints. Use
the following steps to perform this task:
1. Choose Debug➪Debugging Windows➪Breakpoints.
You see the Breakpoints window shown in Figure 3-5. The window
shows the kind of breakpoint, the breakpoint location, and the line in
the code file where the breakpoint appears.
2. Right-click the breakpoint entry and choose Breakpoint Properties
from the context menu.
You see the Edit Breakpoint dialog box (refer to Figure 3-3), where you
can change the breakpoint status.
Book III
Chapter 3
Stopping and
Inspecting Your
Code
Many debuggers show a disabled breakpoint using a hollow red circle.
Unfortunately, CodeBlocks doesn’t provide this visual cue. To see that
disabling the breakpoint actually does work, set a new breakpoint at the line
that reads return NumberOfPieces;. Click Debug/Continue and you’ll see
that the debugger bypasses the first breakpoint and stops at the second, as
shown in Figure 3-4.
378
Watching, Inspecting, and Changing Variables
Figure 3-4:
Disabled
breakpoints
don’t stop
program
execution.
Figure 3-5:
Use the
Breakpoints
window to
access a
number of
breakpoints
at once.
Watching, Inspecting, and Changing Variables
When you stop at a breakpoint in a program, you can do more than just look
at the code. You can have fun with it! You can look at the current values of
the variables, and you can change them.
Listing 3-2 is a sample program that you can use to try out these examples of
inspecting, changing, and watching variables. Please note that this program
is similar to Listing 3-1, earlier in this chapter, but you should see some
differences. Specifically, we added a line to the SetNumberOfPieces
member function
newamount = newamount * 20;
Watching, Inspecting, and Changing Variables
379
We added a new function called SpecialMath, and we added an i variable
to main that is initialized to 10; then we doubled it, and we passed it into the
SetNumberOfPieces function.
Listing 3-2: Using a Program for Breakpoints and Inspections
#include <iostream>
using namespace std;
class BrokenMirror
{
private:
int NumberOfPieces;
public:
int GetNumberOfPieces();
void SetNumberOfPieces(int newamount);
BrokenMirror() : NumberOfPieces(100) {}
};
int BrokenMirror::GetNumberOfPieces()
{
return NumberOfPieces;
}
void BrokenMirror::SetNumberOfPieces(int newamount)
{
newamount = newamount * 20;
NumberOfPieces = newamount;
}
int main()
{
int i = 10;
BrokenMirror mirror;
i = i + SpecialMath(i);
mirror.SetNumberOfPieces(i);
cout << mirror.GetNumberOfPieces() << endl;
// Clear this comment if you want the application to stop to
// display the results.
// system(“PAUSE”);
return 0;
}
Stopping and
Inspecting Your
Code
int SpecialMath(int x)
{
return x * 10 - 5;
}
Book III
Chapter 3
380
Watching, Inspecting, and Changing Variables
Watching the local variables
To watch the local variables in your program, follow these steps:
1.
2.
3.
4.
Compile this program with debug information on.
Set a breakpoint at the int i = 10; line in main.
Click Debug/Continue.
When the debugger stops at the breakpoint, click the Next Line button
on the Debugger toolbar so that you are one line beyond the following
line:
int i = 10;
5. Choose Debug➪Debugging Windows➪Watches.
You see the Watches window, as shown in Figure 3-6.
Figure 3-6:
The
Watches
window
shows the
value of
variables
and objects.
6. Open the Local Variables folder.
You see the current value of i, which is 10.
Figure 3-6 also shows the mirror variable because it’s a local variable.
When we click the plus symbol next to the mirror variable, we see what’s
inside the object. In this case, you see something like:
NumberOfPieces
4246660
(Your number may not precisely match the one shown in Figure 3-6.) Oops!
That’s a strange value. Well, the reason is this: We haven’t run the following
line yet:
BrokenMirror mirror;
The debugger is sitting on this line, waiting to perform it. It turns out that
C++ allocates the space for all the local variables at the beginning of the
function. And so the space for mirror is there, but the space is not set up
Watching, Inspecting, and Changing Variables
381
yet. Meanwhile, there’s just garbage in the space. (Yes, that is really the
term programmers use for whatever may be in something before it’s initialized: garbage. We’re not making this up!)
To run the next line and see the results, follow these steps:
1. Position your windows so that you can see both the Watches window
(at least the line showing NumberOfPieces) and the source-code
window.
At this point, you have several options:
• You can click Next Line and the debugger proceeds directly to the
next line of main, skipping through all the code required to initialize
NumberOfPieces.
• As an alternative, you can click Step Into on the Debugger toolbar to
see how the application initializes NumberOfPieces.
2. In the source-code window, click Next Line so the BrokenMirror
mirror; line runs.
The value in the NumberOfPieces member variable has changed. In the
Watches window, the value for NumberOfPieces now says:
NumberOfPieces = 100
The line showing the value is now red. That color change gives you a
visual indication that the value has changed.
3. Click the Next Line button again to run this line:
i = i + SpecialMath(i);
The NumberOfPieces line in the Local Variables window changes
back to black. The reason is that with the running of this single line of
code, the NumberOfPieces value did not change. Only the values that
changed under the most recent running of the code get red. The others
get black. The yellow triangle will now point to this line:
mirror.SetNumberOfPieces(i);
4. Click the Step Into button to go into the function.
The Watches window changes drastically. The Local Variables
folder shows that there aren’t any local variables. Open the Function
Arguments folder, however, and you see the variables for the current
function, including the this pointer, which is the pointer to the current
object. Figure 3-7 shows the new information (the precise numbers you
see may vary from those shown in the figure).
Stopping and
Inspecting Your
Code
When you look at an object in the Watches window, you are looking at
a particular instance, not the class. Therefore, all the member variables
have values stored in them. (But if the member variables are uninitialized, those values will be garbage.)
Book III
Chapter 3
382
Watching, Inspecting, and Changing Variables
Figure 3-7:
Function
arguments
appear in
a special
folder.
5. Click the Next Line button so that the instruction pointer is on the line
that reads
NumberOfPieces = newamount;
6. Take a look at the newamount value in the Watches window.
It now says 2100.
7. Right-click the newamount line in the Watches window and choose
Change Value from the context menu.
Voilà! A Change Variable’s Value dialog box appears, and you can
actually type a new value for newamount! Excellent!
8. Type 1000 and press Enter.
You just changed the value of newamount.
9. Go back to the main CodeBlocks window and click Next Line a few
more times until you’re one line past the cout line.
10. Take a look at the console window, and you will see the output from
this line:
cout << mirror.GetNumberOfPieces() << endl;
The output looks like this:
1000
Yes, that is the value you stuffed inside the newamount variable, not the
value that it used to have, which was 2100.
Watching other variables
You can watch any variables you want by using the Watches window. To
watch any variables, not necessarily the locals, follow these steps:
1. Go ahead and run the program in Listing 3-2 inside CodeBlocks from
the beginning, stopping at the int i = 10; line.
2. Right-click i and choose Watch ‘i’ from the context menu.
CodeBlocks adds a watch for i to the Watches window.
Watching, Inspecting, and Changing Variables
383
3. Click the Next Line button.
The value of i in the Watches window shows 10. Now, as you step
through the program, you can watch the value of i at any time. Further,
you can change the value of i by double-clicking its line in the Watch
Expressions window.
Adding a watch is useful for global variables that do not show up in the
Local Variables folder of the Watches window. This feature is handy when
you are stepping through the code, going from function to function, and you
have a global variable that you want to monitor.
Now for something really great. Here’s how you can perform complex
expressions inside the Watch Expression window: Right-click the Watches
window and choose Add Watch from the context menu. In the Keyword field
of the Edit Watch dialog box type: i * 50 + 3 / 2. Click OK. The result of this
expression shows up in the Watches window, as shown in Figure 3-8. Very
nice indeed!
Book III
Chapter 3
Stopping and
Inspecting Your
Code
Figure 3-8:
The
Watches
window
can contain
complex
expressions.
384
Book III: Fixing Problems
Chapter 4: Traveling About
the Stack
In This Chapter
✓ Moving about the stack
✓ How local variables are stored
✓ Viewing threads
✓ Tracing through assembly code
✓ Viewing memory
D
ebuggers can be powerful things. They can leap tall computer programs in a single bound and see through them to find all their flaws.
The more you know about these little debuggers, the more you can put
them to use. In this chapter, we show you how to move about the stack and
to make use of advanced debugger features.
Stacking Your Data
A stack is a common thing in the computer world. We have stacks of bills,
and stacks of paychecks, and stacks of data. The stacks of data are interesting because, unlike the bills and paychecks, they live inside the computer’s
memory. But the stack metaphor is appropriate. When the operating system
runs a program, it gives that program a stack, which is simply a big chunk
of memory. But the data is stored just like a stack of cards: With a stack
of real cards, you can put a card on the top, then another, and do that six
times over; then you can take a card off and take another card off. You can
put cards on the top and take them off the top. And if you follow these rules,
you can’t insert them into the middle or bottom of the stack. You can only
look at what’s on the top. A stack data structure works the same way: You
can store data in it by pushing the data onto the stack, and you can take data
off by popping it off the stack. And yes, because the stack is really just a
bunch of computer memory, sneaking around and accessing memory in the
middle of the stack is possible. But under normal circumstances, you don’t
do that: You put data on and take data off.
But what’s interesting about the stack is that it works closely with the main
CPU, such as the Intel Pentium, AMD Athlon 64, or whatever is inside your
computer. The CPU has its own little storage bin right on the chip itself.
386
Stacking Your Data
(This isn’t in the system memory or RAM; it’s inside the CPU itself.) This
storage bin holds what are called registers. One such register is the stack
pointer, called the ESP. (That stands for Extended Stack Pointer, because the
earlier Intel processors just had a Stack Pointer, or SP. Then, when the folks
at Intel replaced that chip, they made the registers bigger and just stuck on
the letter E for extended to denote the bigger registers.)
The stack is useful in many situations and is used extensively behind the
scenes in the programs you write. The compiler generates code that uses
the stack to store local variables, to function parameters, and the order that
functions are called. It’s all stacked onto the stack and stuck in place, ready
to be unstacked.
Moving about the stack
The CodeBlocks debugger, like most debuggers, lets you look at the stack.
But really, you’re not looking directly at the stack. When a debugger shows
you the stack, it is showing you the list of function calls that led up to the
application’s current position in the program code. However, that information is stored in the stack, and the debugger uses the stack to get that
information. So that’s why programmers always call the list of function calls
the stack, even though you’re not actually looking at the stack.
Figure 4-1 shows an example of the Call Stack window in CodeBlocks. To see
the Call Stack window, simply choose Debug➪Debugging Windows➪Call
Stack. You can see the Call Stack window in front of the main CodeBlocks
window. No information appears in the Call Stack window until you start
running a program.
Figure 4-1:
The Call
Stack
window
shows the
function
calls that
led up to
the current
position.
You can try viewing the stack yourself. Take a look at Listing 4-1. This listing
shows a simple program that makes several nested function calls.
Stacking Your Data
387
Listing 4-1: Making Nested Function Calls
#include <iostream>
using namespace std;
int SeatsPerCar()
{
return 4;
}
int CountCarSeats()
{
return 10 * SeatsPerCar();
}
int CountStuff()
{
return CountCarSeats() + 25;
}
int main()
{
cout << CountStuff() << endl;
system(“PAUSE”);
return 0;
}
To try out the Call Stack window, follow these steps:
Compile this program (set the Build Target field to Debug).
Set a breakpoint at the int main() line.
Run the application in the CodeBlocks debugger by pressing F8.
Step into the CountStuff function, then into the CountCarSeats
function, and then into the SeatsPerCar function.
(Or just put a breakpoint in the SeatsPerCar function and run the
program until it stops at the breakpoint.)
5. Choose Debug➪Debugging Windows➪Call Stack.
A window like the one in Figure 4-1 appears. Note the order of function
calls in the Call Stack window:
SeatsPerCall()
CountCarSeats()
CountStuff()
main()
This information in the Call Stack window means that your program
started out with main(), which called CountStuff(). That function
then called CountCarSeats(), which in turn called SeatsPerCall().
And that’s where you currently are.
Traveling About
the Stack
1.
2.
3.
4.
Book III
Chapter 4
388
Stacking Your Data
This window is handy if you want to know what path the program took to get
to a particular routine. For example, you might see a routine that is called
from many places in your program and you’re not sure which part is calling
the routine when you perform a certain task. To find out which part calls the
routine, set a breakpoint in the function. When you run the program and the
debugger stops at that line, the Call Stack window shows you the path the
computer took to get there, including the name of the function that called
the function in question.
In the Call Stack window, you can double-click any function name, and the
Debugger moves the cursor to the function’s body in the source code. This
feature makes it easy for you to locate any function within the call stack and
see why the code followed the path it did.
Stack features are common to almost all debuggers. We won’t say all
because we’re sure some really bad debuggers that don’t have stack features
are out there. But the good debuggers, including those built into CodeBlocks
and Microsoft Visual C++, include features for moving about the stack.
Debuggers use different terminology for the window that shows stack
information. Borland C++ Builder and Borland Delphi (a Pascal tool) both
use the term Call Stack, just like CodeBlocks. To get the Call Stack window in
C++ Builder, choose View➪Debug Windows➪Call Stack. The Insight debugger
uses the term Stack window; you access it by choosing View➪Stack. No
matter what a particular product calls the window that contains stack
information, the essential functionality is the same — to show how you
arrived at a particular point in the code.
Storing local variables
As you get heavily into debugging, it always helps to fully understand what
goes on under the hood of your program. Now at this point, we’re going to
be speaking on two levels — one level is your C++ code, and the other level
is the resulting assembly code that the compiler generates based on your
C++ code. (Assembly is the human-readable form of machine code that the
processor on your machine understands.) So throughout this chapter, we
make sure that we clearly state which level we’re referring to.
Suppose you write a function in C++, and you call the function in another
part of your program. When the compiler generates the assembly code for
the function, it inserts some special code at the beginning and at the end of
the function. At the start of the function, this special code allocates space for
the local variables. At the end of the function, the special code deallocates the
space. This space for the variables is called the stack frame for the function.
Now this space for the local variables lives on the stack. The storage process
works as follows: When you call your function, the computer pushes the
return address onto the stack. After the computer is running inside the
Stacking Your Data
389
function, the special code the compiler inserted saves some more of the
stack space — just enough for the variables. This extra space becomes the
local storage for the variables; and just before the function returns, the
special code removes this local space. Thus, the top of the stack is now the
return address. The return then functions correctly.
This process with the stack frame takes place with the help of the internal
registers in the CPU. Before a function call, the assembly code pushes the
arguments to the function onto the stack. Then it calls the function by using
the CPU’s built-in call statement. (That’s an assembly-code statement.)
This call statement pushes the return address onto the stack and then
moves the instruction pointer to the function address. After the execution is
inside the function, the stack contains the function arguments and then the
return address. The special function startup code (called a prolog) saves the
value in one of the CPU registers, called the Extended Base Pointer, or EBP
register.
Where does the prolog save the value? On the stack! The prolog code first
pushes the EBP value onto the stack. Then the prolog code takes the current
stack pointer (which points to the top of the stack in memory) and saves
that back in the EBP register for later use. Then the prolog code adjusts the
stack pointer to make room for the local variable storage. The code inside
the function then accesses the local variables as offsets above the position
of EBP on the stack and the arguments as offsets below the position of EBP
on the stack.
Inside the computer, the stack actually runs upside down. When you push
something on the stack, the stack pointer goes down in memory — it gets
decremented. When you pop something off the stack, the stack pointer gets
incremented. Therefore, in the stack frame, the local variables are actually
below EBP in memory, and you access their addresses by subtracting from
the value stored in the EBP register. The function arguments, in turn, are
above the EBP in memory, and you get their addresses by adding to the
value stored in EBP.
Traveling About
the Stack
Finally at the end of the function, the special code (now called an epilog)
undoes the work: The epilog copies the value in EBP back into the stack
pointer; this deallocates the local variable storage. Then it pops the top of
the stack off (as opposed to blow the top of the stack off) and restores this
value back into EBP. (That was, after all, the original value in EBP when the
function started.) Now the top of the stack contains the function return
address, which is back to the way it was when the function began. The next
assembly statement is a return, which pulls the top of the stack off and
goes back to the address that the epilog code pulled off the stack. Now just
think: Every single time a function call takes place in your computer, this
process takes place. Kinda gives you new respect for this big pile of bits and
bytes, doesn’t it!
Book III
Chapter 4
390
Debugging with Advanced Features
The one thing we didn’t discuss in the previous technical discussion is the
return value of a function. In C++, the standard way to return a value from a
function is for the function’s assembly code to move the value into the
Extended Accumulator, or EAX, register. Then the calling code can simply
inspect the EAX register after the function is finished. However, if you are
returning something complex, such as a class instance, things get a more
complex. Suppose you have a function that returns an object, but not as a
pointer, as in the function header MyClass MyFunction();. Different
compilers handle this differently, but when the gcc compiler that’s part of
CodeBlocks, Dev-C++, MinGW, and Cygwin encounters something such as
MyClass inst = MyFunction();, it takes the address of inst and puts
that in EAX. Then, in the function, it allocates space for a local variable, and
in the return line it copies the object in the local variable into the object
whose address is in EAX. So when you return a nonpointer object, you are,
in a sense, passing your object into the function as a pointer!
Debugging with Advanced Features
Most debuggers, including CodeBlocks, have some advanced features that
are handy when going through your program. These features include the
capability to look at threads and assembly code.
Viewing threads
If you are writing a program that uses multiple threads and you stop at a
breakpoint, you can get a list of all the current threads by using the Running
Threads window. To open the Running Threads window, in the main
CodeBlocks window choose Debug➪Debugging Windows➪Running Threads.
A window showing the currently running threads opens. Each line looks
something like this:
2 thread 2340.0x6cc
test() at main.cpp:7
The first number indicates which thread this is in the program; for example,
this is the second thread. The two numbers after the word thread are the
process ID and the thread ID, separated by a dot. Then you see the name
of the function where the thread is currently stopped along with the line
number where the thread is currently stopped.
Interestingly enough, CodeBlocks shows only running threads, so if your
application has just one thread (as the example in Listing 4-1), the Running
Threads window is blank when you pause the application for debugging.
Consequently, you can’t see the main (and only) thread of the application
because the thread isn’t running.
Debugging with Advanced Features
391
Tracing through assembly code
If you really feel the urge, you can view the actual assembly code. The only
time we ever do this is when we absolutely must get down to the hardcore nitty-gritty. CodeBlocks lets you do this. Choose Debug➪Debugging
Windows➪Disassembly to see the Disassembly window shown in Figure 4-2.
Figure 4-2:
The
Disassembly
window
shows the
assembly
code that
results from
the C++ code
you write.
The window shown in Figure 4-2 is the disassembly of the SeatsPerCar()
function shown in Listing 4-1. Here’s the function again so you can compare
it to Figure 4-2.
The following lines create the stack frame:
004013EE
004013EF
push
mov
%ebp
%esp,%ebp
After the code creates a stack frame, it moves a value of 4 (the return 4;
part of the code) into EAX as shown here:
004013F1
mov
$0x4,%eax
The code then pops EBP and returns to the caller (the CountCarSeats()
function) using this code:
004013F6
004013F7
pop
ret
%ebp
Now, if you move into the CountCarSeats() function, you see assembly
like that shown in Figure 4-3.
Traveling About
the Stack
int SeatsPerCar()
{
return 4;
}
Book III
Chapter 4
392
Debugging with Advanced Features
Figure 4-3:
This
Disassembly
window
shows the
CountCar
Seats()
function
code.
As before, the assembly begins by creating a stack frame. It then issues a call
to the SeatsPerCar() function. When the function returns, the assembly
performs the multiplication part of the task. Finally, the code performs the
usual task of placing the return value in EAX, popping EBP, and returning to
the caller. Notice that what appears to be simple multiplication to you may
not be so simple in assembler. Let’s say you changed the code to read
int CountCarSeats()
{
return 4 * SeatsPerCar();
}
The math is simpler now because you’re using 4, which is easily converted
into a binary value. Figure 4-4 shows the assembly that results from this
simple change.
Figure 4-4:
Small
C++ code
changes
can result
in large
assemblycode
changes.
Now all the code does is perform a shift left (SHL) instruction. Shifting the
value in EAX left by 2 is the same as multiplying it by 4. The reason the
assembler uses the SHL instruction is that shifting takes far fewer clock
cycles than multiplication, which makes the code run faster. The result is
the same, even if the assembler code doesn’t quite match your C++ code.
Debugging with Advanced Features
393
If you want to see the values in the registers so you can more easily follow
the assembler code, choose Debug➪Debugging Windows➪CPU Registers.
You see the CPU Registers window shown in Figure 4-5. This window
reflects the state of the registers at the current stopping point in the code.
Consequently, you can’t see each step of the assembler shown in the
Disassembly window reflected in these registers.
Figure 4-5:
Viewing
the CPU
registers
can give you
insights into
how code
interacts
with the
processor.
Book III
Chapter 4
Traveling About
the Stack
394
Book III: Fixing Problems
Book IV
Advanced
Programming
Contents at a Glance
Chapter 1: Working with Arrays, Pointers, and References . . . . . . .397
Building Up Arrays ...................................................................................... 397
Pointing with Pointers ................................................................................ 413
Referring to References .............................................................................. 422
Chapter 2: Creating Data Structures . . . . . . . . . . . . . . . . . . . . . . . . . . . .427
Working with Data ....................................................................................... 427
Structuring Your Data ................................................................................. 438
Naming Your Space ..................................................................................... 442
Chapter 3: Constructors, Destructors, and Exceptions . . . . . . . . . . . .449
Constructing and Destructing Objects ..................................................... 449
Programming the Exceptions to the Rule................................................. 469
Chapter 4: Advanced Class Usage . . . . . . . . . . . . . . . . . . . . . . . . . . . . .477
Inherently Inheriting Correctly .................................................................. 477
Using Classes and Types within Classes .................................................. 493
Chapter 5: Creating Classes with Templates . . . . . . . . . . . . . . . . . . . .503
Templatizing a Class ................................................................................... 503
Parameterizing a Template ........................................................................ 514
Typedefing a Template ............................................................................... 521
Deriving Templates ..................................................................................... 522
Templatizing a Function ............................................................................. 528
Chapter 6: Programming with the Standard Library . . . . . . . . . . . . . .535
Architecting the Standard Library ............................................................ 536
Containing Your Classes ............................................................................. 536
The Great Container Showdown................................................................ 551
Copying Containers ..................................................................................... 564
Chapter 1: Working with Arrays,
Pointers, and References
In This Chapter
✓ Working with arrays and multidimensional arrays
✓ Understanding the connection between arrays and pointers
✓ Dealing with pointers in all their forms
✓ Using reference variables
W
hen the C programming language, predecessor to C++, came out in
the early 1970s, it was a breakthrough because it was small. C had
only a few keywords. Tasks like printing to the console were handled not by
built-in keywords but by functions.
Technically, C++ is still small. So what makes C++ big?
✦ The language itself is small, but its libraries are huge.
✦ The language is small, but it’s extremely sophisticated, resulting in millions of things you can do with the language.
In this chapter, we give you the full rundown of topics that lay the foundation for C++: arrays, pointers, and references. In C++, these items come up
again and again.
We assume that you have a basic understanding of C++ — that is, that you
understand the material in Minibook I and Minibook II, Chapter 1. You know
the basics of pointers and arrays (and maybe just a teeny bit about references) and you’re ready to grasp them thoroughly.
Building Up Arrays
As you work with arrays, it seems like you can do a million things with them.
This section provides the complete details on arrays. The more you know
about arrays, the less likely you are to use them incorrectly, resulting in a bug.
Know how to get the most out of arrays when necessary — not just because
they’re there. Avoid using arrays in the most complex way imaginable.
398
Building Up Arrays
Declaring arrays
The usual way of declaring an array is to simply put the type name, followed
by a variable name, followed by a size in brackets, as in this line of code:
int Numbers[10];
This declares an array of 10 integers. The first element gets index 0, and the
final element gets index 9. Always remember that in C++ arrays start at 0,
and the highest index is one less than the size. (Remember, index refers to
the position within the array, and size refers to the number of elements in
the array.)
A common question that the usual programming student asks is, Can I just
declare an array without specifying a size, like this:
int Numbers[]
In certain situations, you can declare an array without putting a number in
the brackets. For example, you can initialize an array without specifying the
number of elements:
int MyNumbers[] = {1,2,3,4,5,6,7,8,9,10};
The compiler is smart enough to count how many elements you put inside
the braces, and then the compiler makes that count the array size.
Another time you can skip the number in brackets is when you use the
extern word. (Remember, the extern statement refers to variables in
other source files. See Minibook I, Chapter 5 for more information.) Suppose
you have one source file, perhaps numbers.cpp, that contains this line:
int MyNumbers[] = {1,2,3,4,5,6,7,8,9,10};
Then, in another source file, say main.cpp, you can declare an external reference to the array in numbers.cpp:
#include <iostream>
using namespace std;
extern int MyNumbers[];
int main(int argc, char *argv[])
{
cout << MyNumbers[5] << endl;
return 0;
}
Building Up Arrays
399
When you compile these two source files (numbers.cpp and main.cpp),
you get the correct result for MyNumbers[5]:
6
(Remember that MyNumbers[5] refers to the sixth element because the first
element has index 0. The sixth element has a 6 in it.)
Although you can get away with leaving out the size in an external array declaration, we do not recommend doing so because you would be asking for
errors. Instead, include it. In fact, we would rewrite numbers.cpp to have
an explicit array size as well, as in
int MyNumbers[10] = {1,2,3,4,5,6,7,8,9,10};
Then main.cpp would look like this:
extern int MyNumbers[10];
Specifying the array size helps decrease your chances of having bugs, bugs,
everywhere bugs. Plus, it has the added benefit that, in the actual declaration, if the number in brackets does not match the number of elements
inside braces, the compiler issues an error, at least if the number is smaller
anyway. The following
int MyNumbers[5] = {1,2,3,4,5,6,7,8,9,10};
yields this compiler error
excess elements in aggregate initializer
But if the number in brackets is greater than the number of elements, as in
the following code, you will not get an error. So be careful!
int MyNumbers[15] = {1,2,3,4,5,6,7,8,9,10};
You also can skip specifying the array size when you pass an array into a
function, like this:
This technique is particularly powerful because the AddUp function can
work for any size array. You can call the function like this:
cout << AddUp(MyNumbers, 10) << endl;
Working with
Arrays, Pointers,
and References
int AddUp(int Numbers[], int Count) {
int loop;
int sum = 0;
for (loop = 0; loop < Count; loop++) {
sum += Numbers[loop];
}
return sum;
}
Book IV
Chapter 1
400
Building Up Arrays
But this is kind of annoying because you have to specify the size each time
you call into the function. However, you can get around this. Look at this line
of code:
cout << AddUp(MyNumbers, sizeof(MyNumbers) / 4) << endl;
With the array, the sizeof operator tells you how many bytes it uses. But
the size of the array is usually the number of elements, not the number of
bytes. So you divide the result of sizeof by 4 (the size of each element).
But now you have that magic number, 4, sitting there. (By magic number,
we mean a seemingly arbitrary number that is stuffed somewhere into your
code.) So a slightly better approach would be to enter this:
cout << AddUp(MyNumbers, sizeof(MyNumbers) / sizeof(int)) << endl;
Now this line of code works, and here’s why: The sizeof the array divided
by the sizeof each element in the array gives the number of elements in
the array.
Arrays and pointers
The name of the array is a pointer to the array itself. The array is a sequence
of variables stored in memory. The array name points to the first item.
This is an interesting question about pointers: Can we have a function
header, such as the following line, and just use sizeof to determine how
many elements are in the array? If so, this function wouldn’t need to have
the caller specify the size of the array.
int AddUp(int Numbers[]) {
Consider this function and a main that calls it:
void ProcessArray(int Numbers[]) {
cout << “Inside function: Size in bytes is “
<< sizeof(Numbers) << endl;
}
int main(int argc, char *argv[])
{
int MyNumbers[] = {1,2,3,4,5,6,7,8,9,10};
cout << “Outside function: Size in bytes is “;
cout << sizeof(MyNumbers) << endl;
ProcessArray(MyNumbers);
return 0;
}
When you run this program, here’s what you see:
Outside function: Size in bytes is 40
Inside function: Size in bytes is 4
Building Up Arrays
401
Outside the function, the code knows that the size of the array is 40 bytes.
But why does the code think that the size is 4 after it is inside the array? The
reason is that even though it appears that you’re passing an array, you’re
really passing a pointer to an array. The size of the pointer is just 4, and so
that’s what the final cout line prints.
Declaring arrays has a slight idiosyncrasy. When you declare an array by
giving a definite number of elements, such as this:
int MyNumbers[5];
the compiler knows that you have an array, and the sizeof operator gives
you the size of the entire array. The array name, then, is both a pointer and
an array! But if you declare a function header without an array size like this
void ProcessArray(int Numbers[]) {
the compiler treats this as simply a pointer and nothing more. This last line
is, in fact, equivalent to this:
void ProcessArray(int *Numbers) {
Thus, inside the functions that either line declares, the following two lines of
code are equivalent:
Numbers[3] = 10;
*(Numbers + 3) = 10;
This equivalence means that if you use an extern declaration on an array,
such as this:
extern int MyNumbers[];
and then take the size of this array, the compiler will get confused. Here’s an
example: If you have two files, numbers.cpp and main.cpp, where numbers.cpp declares an array and main.cpp externally declares it, you will
get a compiler error if you call sizeof:
Book IV
Chapter 1
#include <iostream>
extern int MyNumbers[];
int main(int argc, char *argv[])
{
cout << sizeof(MyNumbers) << endl;
return 0;
}
In CodeBlocks (which is the compiler we’re using for most of this book; see
Appendix B for more information), the gcc compiler gives us this error:
error: invalid application of `sizeof’ to incomplete type `int[]’
Working with
Arrays, Pointers,
and References
using namespace std;
402
Building Up Arrays
The solution is to put the size of the array inside brackets. Just make sure
that the size is the same as in the other source-code file! You can fake out
the compiler by changing the number, and you won’t get an error. But that’s
bad programming style and just asking for errors.
Although an array is simply a sequence of variables all adjacent to each
other in memory, the name of an array is really just a pointer to the first element in the array. You can use the name as a pointer. However, do that only
when you really need to work with a pointer. After all, you really have no
reason to write code that is cryptic, such as *(Numbers + 3) = 10;.
The converse is also true. Look at this function:
void ProcessArray(int *Numbers) {
cout << Numbers[1] << endl;
}
This function takes a pointer as a parameter, yet we access it as an array.
Again, we do not recommend writing code like this; instead, we recommend
that you understand why code like this works. That way, you gain a deeper
knowledge of arrays and how they live inside the computer, and this knowledge, in turn, can help you write code that works properly.
Even though, throughout this chapter, we’re telling you that the array name
is just a pointer, the name of an array of integers isn’t the exact same thing
as a pointer to an integer. Check out these lines of code:
int LotsONumbers[50];
int x;
LotsONumbers = &x;
We’re trying to point the LotsONumbers pointer to something different:
something declared as an integer. The compiler doesn’t let you do this; you
get an error. That wouldn’t be the case if LotsONumbers were declared as
int *LotsONumbers; then this code would work. But as written, you get
a compiler error. And believe it or not, here’s the compiler error we get in
CodeBlocks:
error: incompatible types in assignment of `int*’ to `int[50]’
This error implies the compiler does see a definite distinction between
the two types, int * and int[]. Nevertheless, the array name is indeed a
pointer, and you can use it as one; you just can’t do everything with it that
you can with a normal pointer, such as reassign it. (If we were philosophers,
we might argue that an array name’s type is not equivalent to its equivalent.
But we’re not philosophers, so when we suggest something like that, we’re
only being equivalent to philosophers.)
Building Up Arrays
403
When using arrays, then, we suggest the following tips. These will help you
keep your arrays bug-free:
✦ Keep your code consistent. If you declare, for example, a pointer to an
integer, do not treat it as an array.
✦ Keep your code clear and understandable. If you pass pointers, it’s okay
to take the address of the first element, as in &(MyNumbers[0]) if this
makes the code clearer — though it’s equivalent to just MyNumbers.
✦ When you declare an array, always try to put a number inside the brackets, unless you are writing a function that takes an array.
✦ When you use the extern keyword to declare an array, go ahead and
also put the array size inside brackets. But be consistent! Don’t use one
number one time and a different number another time. The easiest way
to be consistent is to use a constant, such as const int ArraySize
= 10; in a common header file and then use that in your array declaration: int MyArray[ArraySize];.
Using multidimensional arrays
Arrays do not have to be just one-dimensional. You can declare a multidimensional array, as shown in Listing 1-1.
Listing 1-1: Using a Multidimensional Array
#include <iostream>
using namespace std;
int MemorizeThis[10][20];
When you run this, MemorizeThis gets filled with the multiplication tables
(thus the clever name!). Here’s the output for the program, which is the
contents of MemorizeThis[9][13], and then the size of the entire twodimensional array:
117
200
Book IV
Chapter 1
Working with
Arrays, Pointers,
and References
int main(int argc, char *argv[])
{
int x,y;
for (x = 0; x < 10; x++) {
for (y = 0; y < 20; y++ ) {
MemorizeThis[x][y] = x * y;
}
}
cout << MemorizeThis[9][13] << endl;
cout << sizeof(MemorizeThis) / sizeof(int) << endl;
system(“PAUSE”);
return 0;
}
404
Building Up Arrays
And indeed, 9 times 13 is 117. The size of the array is 200 elements. Because
each element, being an integer, is 4 bytes, that means that the size in bytes
is 800.
You can have many, many dimensions, but be careful. Every time you add a
dimension, the size multiplies by the size of that dimension. Thus an array
declared like the following line has 48,600 elements, for a total of 194,400 bytes:
int BigStuff[4][3][5][3][5][6][9];
And the following array has 4,838,400 elements, for a total of 19,353,600
bytes. That’s about 19 megabytes!
int ReallyBigStuff[8][6][10][6][5][7][12][4];
If you really have this kind of a data structure, consider redesigning it. Any
data stored like this would be downright confusing. And fortunately, the
compiler will stop you from going totally overboard. Just for fun we tried
this giant monster:
int GiantMonster[18][16][10][16][15][17][12][14];
This is the error we got:
error: size of array `GiantMonster’ is too large
(That would be 1,974,067,200 bytes: more than a gigabyte!)
Initializing multidimensional arrays
Just as you can initialize a single-dimensional array by using braces and separating the elements by commas, you can initialize a multidimensional array
with braces and commas and all that jazz, too. But to do this, you combine
arrays inside arrays, as in this code:
int Numbers[5][6] = {
{1,2,3,4,5,6},
{7,8,9,10,12},
{13,14,15,16,17,18},
{19,20,21,22,23,24},
{25,26,27,28,29,30}
};
The hard part is remembering whether you put five batches of six or six batches
of five. Think of it like this: Each time you add another dimension, it goes inside
the previous. That is, you can write a single-dimensional array like this:
int MoreNumbers[5] = {
100,
200,
300,
400,
500,
};
Building Up Arrays
405
Then, if you add a dimension to this, each number in the initialization is
replaced by an array initializer of the form {1,2,3,4,5,6}. Then you end up
with a properly formatted multidimensional array.
Passing multidimensional arrays
If you have to pass a multidimensional array to a function, things can get just
a bit hairy. That’s because you don’t have as much freedom in leaving off the
array sizes as you do with single-dimensional arrays. Suppose you have this
function:
int AddAll(int MyGrid[5][6]) {
int x,y;
int sum = 0;
for (x = 0; x < 5; x++) {
for (y = 0; y < 6; y++) {
sum += MyGrid[x][y];
}
}
return sum;
}
So far, the function header is fine because we’re explicitly stating the size of
each dimension. But you may want to do this:
int AddAll(int MyGrid[][]) {
or maybe pass the sizes as well:
int AddAll(int MyGrid[][], int rows, int columns) {
But unfortunately, when we compile either of these two lines, we get this
error:
declaration of `MyGrid’ as multidimensional array
must have bounds for all dimensions except the first
That’s strange: The compiler is telling us that we must explicitly list all the
dimensions, but it’s okay if we leave the first one blank as with one-dimensional
arrays.
int AddAll(int MyGrid[][6]) {
How about that? The reason is that the compiler treats multidimensional arrays
in a special way. A multidimensional array is not really a two-dimensional
array, for example; rather, it’s an array of an array. Thus, deep down
inside C++, the compiler treats the statement MyGrid[5][6] as if it were
MyGrid[5] where each item in the array is itself an array of size 6. And
you’re free to not specify the size of a one-dimensional array. Well, the first
brackets represent the one-dimensional portion of the array. So you can
leave that space blank, as you can with other one-dimensional arrays. But
Working with
Arrays, Pointers,
and References
So that means this crazy thing will compile:
Book IV
Chapter 1
406
Building Up Arrays
then, after that, you have to give the array bounds. Sounds strange, we know.
And perhaps just a bit contrived. But it’s C++, and it’s the rule: You can leave
the first dimension blank in a function header, but you must specify the
remaining dimension sizes.
When using multidimensional arrays, it’s often easier on our brains if we
think of them as an array of arrays. Then we use a typedef so that, instead
of it being an array of arrays, it’s an array of some user-defined type, such as
GridRow. Either of the following function headers are confusing:
int AddAll(int MyGrid[][6]) {
int AddAll(int MyGrid[][6], int count) {
Here’s our recommendation: Use a typedef! So here’s a cleaner way:
typedef int GridRow[6];
int AddAll(GridRow MyGrid[], int Size) {
int x,y;
int sum = 0;
for (x = 0; x < Size; x++) {
for (y = 0; y < 6; y++) {
sum += MyGrid[x][y];
}
}
return sum;
}
The typedef line defines a new type called GridRow. This type is an array
of six integers. Then, in the function, you are passing an array of GridRows.
Using this typedef is the same as simply using two brackets, except it
emphasizes that you are passing an array of an array — that is, an array in
which each member is itself an array of type GridRow.
Arrays and command-line parameters
In a typical C++ program, the main function receives an array and a count
as parameters. However, to beginning programmers, the parameters can
look intimidating. But they’re not: Think of the parameters as an array of
strings and a size of the array. However, each string in this array of strings
is actually a character array. In the old days of C, and earlier breeds of C++,
no string class was available. Thus, strings were always character arrays,
usually denoted as char *MyString. (Remember, an array and a pointer
can be used interchangeably for the most part). Thus, you could take this
thing and turn it into an array either by throwing brackets at the end char
*MyString[ ] or by making use of the fact that an array is a pointer and
adding a second pointer symbol, as in char **MyString. The following
code shows how you can get the command-line parameters:
Building Up Arrays
407
#include <iostream>
using namespace std;
int main(int argc, char *argv[])
{
int loop;
for (loop = 0; loop < argc; loop++) {
cout << argv[loop] << endl;
}
return 0;
}
When you compile this program, name the executable
CommandLineParams, and then run it from the command prompt using the
following command
CommandLineParams abc def “abc 123”
You see the following output. (Note that the program name comes in as the
first parameter and the quoted items come in as a single parameter.)
CommandLineParams
abc
def
abc 123
You can also specify command-line arguments using the IDE for debugging
purposes when working with the CodeBlocks compiler. Choose Project➪
Set Program’s Arguments. CodeBlocks displays the Select Target dialog box,
where you choose a target in the first field and type the arguments in the
Program Arguments field. Click OK and then click Run. CommandLineParams
displays the command-line arguments in the command window as it did
when you typed the command at the command prompt.
Allocating an array on the heap
Arrays are useful, but it would be a bummer if the only way you could use
them were as stack variables. If you could allocate an array on the heap by
using the new keyword, that would be nice. Well, good news! You can! But
you need to know about a couple little tricks to make it work.
Working with
Arrays, Pointers,
and References
First, you can easily declare an array on the heap by using new int[50],
for example. But think about what this is doing: It declares 50 integers on the
heap, and the new word returns a pointer to the allocated array. But, unfortunately, the makers of C++ didn’t see it that way. For some reason, they
made the array pointer type based on the first element of the array (which
is, of course, the same as all the elements in the array).
Book IV
Chapter 1
408
Building Up Arrays
Thus, the call
new int[50]
returns a pointer of type int *, not something that explicitly points to an
array, just like this call does:
new int;
Nice, huh? But that’s okay. We can deal with it. So if you want to save the
results of new int [50] in a variable, you have to have a variable of type int
*, as in the following:
int *MyArray = new int[50];
But here’s the bizarre part: An array name is a pointer and vice versa. So
now that you have a pointer to an integer, you can treat it like an array:
MyArray[0] = 25;
And now for the really bizarre part. When you’re all finished with the array,
you can call delete. But you can’t just call delete MyArray;. The reason
is that the compiler knows only that MyArray is a pointer to an integer; it
doesn’t know that it’s an array! Thus, delete MyArray will only delete the
first item in the array, leaving the rest of the elements sitting around on the
heap, wondering when their time will come. So the makers of C++ gave us a
special form of delete to handle this situation. It looks like this:
delete[] MyArray;
Whenever you allocate an array by using the new keyword, remember to
delete the array by using delete[] rather than just plain old delete.
If you’re really curious about the need for delete[] and delete, recognize
the distinction between allocating an array and allocating a single element
on the stack. Look closely at these two lines:
int *MyArray = new int[50];
int *somenumber = new int;
The first allocates an array of 50 integers, while the second allocates a single
array. But look at the types of the pointer variables: They are both the same!
How about that? They are both a pointer to an integer. And so the statement
delete something;
is ambiguous if something is a pointer to an integer: Is it an array, or is it a
single number? The designers of C++ knew this was a problem, so they unambiguated it. They declared and proclaimed that delete shall only delete
Building Up Arrays
409
a single member. Then they invented a little extra that must have given
the compiler writers a headache; they said that if you want to delete an
array instead, just throw on an opening and closing bracket after the word
delete. And all will be good.
All this stuff about pointers and arrays raises an interesting question: How
do you specify a pointer to an array? Well, remember that if you have a line
like this
int LotsONumbers[50];
LotsONumbers is really a pointer to an integer — it points to the first position in the array. So, by that regard, you already have a pointer to an array.
In fact, if you were to write a function declared with a header like this
int AddUp(int Numbers[], int Count) {
and look at the generated assembly code, you would see that the Numbers
array really does get passed in as a pointer. To view the disassembly in
CodeBlocks, create a breakpoint, start the debugger by pressing F8, and
choose Debug➪Debugging Windows➪Disassembly. CodeBlocks displays the
Disassembly window, which contains an assembler view of the code.
So the real question is this: When you have an array, how do you not use a
pointer with it? The answer? You don’t! C++ simply does not have a fundamental array type. Other languages do (Pascal, for example), but C and C++
don’t. Yet, even though that’s the case, the compiler does have a basic feel
for the brackets and does seem to understand arrays. Strange, but true.
Storing arrays of pointers and arrays of arrays
Because of the similarities between arrays and pointers, you are likely to
encounter some strange notation. For example, in main itself, we have seen
both of these at different times:
Book IV
Chapter 1
char **argc
char *argc[]
char NameArray[][6]
{‘T’, ‘o’, ‘m’,
{‘S’, ‘u’, ‘z’,
{‘H’, ‘a’, ‘r’,
};
= {
‘\0’, ‘\0’, ‘\0’},
‘y’ , ‘\0’, ‘\0’},
‘r’ , ‘y’, ‘\0’}
Working with
Arrays, Pointers,
and References
If you work with arrays of arrays and arrays of pointers, the best bet is to
make sure that you completely understand what these kinds of statements
mean. Remember that, although you can treat an array name as a pointer,
you’re in for some technical differences. The following lines of code show
these differences. First, think about what happens if you initialize a twodimensional array of characters like this:
410
Building Up Arrays
This is an array of an array. Each inner array is an array of 6 characters. The
outer array stores the 3 inner arrays. (The individual content of an array is
sometimes called a member — the inner array has 6 members and the outer
array has 3 members.) Inside memory, the 18 characters are stored in one
consecutive row, starting with T, then o, and ending with y and finally \0,
which is the null character.
But now take a look at this:
char* NamePointers[] = {
“Tom”,
“Suzy”,
“Harry”
};
This is an array of character arrays as well, except that it’s not the same
as the code that came just before it. This is actually an array holding three
pointers: The first points to a character string in memory containing Tom
(which is followed by a null-terminator, \0); the second points to a string in
memory containing Suzy ending with a null-terminator; and so on. Thus, if
you look at the memory in the array, you won’t see a bunch of characters;
instead, you see three numbers, each being a pointer.
It’s often helpful to see the content of memory as you work with arrays.
To see memory in CodeBlocks, choose Debug➪Debugging Windows➪
Examine Memory. You see the Memory window. Type the name of the
variable you want to view in the Address field and click Go.
So where on earth (or in the memory, anyway) are the three strings, Tom,
Suzy, and Harry when you have an array of three pointers to these strings?
When the compiler sees string constants such as these, it puts them in a special area where it stores all the constants. These then get added to the executable file at link time, along with the compiled code for the source module.
(For information on linking, see Appendix A.) And that’s where they reside
in memory. The array, therefore, contains pointers to these three constant
strings in memory.
Now if you try to do the following (notice the type of PointerToPointer)
char **PointerToPointer = {
“Tom”,
“Suzy”,
“Harry”
};
you will get an error:
error: initializer for scalar variable requires one element
A scalar is just another name for a regular variable that is not an array. In
other words, the PointerToPointer variable is a regular variable (that is,
a scalar), not an array!
Building Up Arrays
411
Yet, inside the function header for main, you can use char **, and you can
access this as an array. What’s going on? As usual, there’s a slight but definite difference between an array and a pointer. You cannot always just treat
a pointer as an array; for example, you can’t initialize a pointer as an array.
But you can go the other way: You can take an array and treat it as a pointer
most of the time. Thus, you can do this:
char* NamePointers[] = {
“Tom”,
“Harry”,
“Suzy”
};
char **AnotherArray = NamePointers;
This compiles, and you can access the strings through AnotherArray[0],
for example. Yet, you’re not allowed to skip a step and just start out initializing the AnotherArray variable like so because this is the same as the code
just before this example, and it yields a compiler error!
char** AnotherArray = {
“Tom”,
“Harry”,
“Suzy”
};
Thus, this is an example of where slight differences between arrays and
pointers occur. But it does explain why you can see something like this
int main(int argc, char **argv)
and you are free to use the argv variable to access an array of pointers —
specifically, in this case, an array of character pointers, also called strings.
Building constant arrays
If you have an array and you don’t want its contents to change, you can
make it a constant array. The following lines of code demonstrate this:
const int Permanent[5] = { 1, 2, 3, 4, 5 };
cout << Permanent[1] << endl;
Permanent[2] = 5;
Here’s the error we got when we tried this in CodeBlocks:
error: assignment of read-only location
Working with
Arrays, Pointers,
and References
This array works like any other array, except you cannot change the numbers inside it. If you add a line like the following line, you get a compiler
error, because the compiler is aware of constants:
Book IV
Chapter 1
412
Building Up Arrays
Being the inquisitive sorts, we asked ourselves this question: What about a
constant array of nonconstants? Can we do that? Well, sometimes, depending on the compiler. As horrible as the following looks (and it’s not ANSIstandard!), you are allowed to do this with the gcc compilers. (Microsoft
Visual C++ and Borland C++ Builder don’t allow it, and the CodeBlocks compiler presents you with an error: ISO C++ forbids assignment of
arrays error message.)
int NonConstant[5] = { 1, 2, 3, 4, 5 };
int OtherList[5] = { 10, 11, 12, 13, 14 };
OtherList = NonConstant;
In other words, that third line is saying, “Forget what OtherList points to;
instead, make it point to the first array, {1,2,3,4,5}!” Now, we really don’t
recommend writing code like this (remember, keep things simple and understandable!), so if you want to prevent this kind of thing, you can make the
array constant:
const int NonConstant[5] = { 1, 2, 3, 4, 5 };
const int OtherList[5] = { 10, 11, 12, 13, 14 };
OtherList = NonConstant;
Now when the compiler gets to the third line, it gives us an error:
error: assignment of read-only variable `OtherList’
But you may notice that the way we made the array constant was the same
way that we made its elements constant in the code that came just before
this example! Oops! What’s that all about? Turns out there are some rules.
The following list describes the rules, in detail, for making arrays constant:
✦ If you want to make an array constant, you can precede its type with the
word const. When you do so, the array name is constant, and the elements inside the array are also constant. Thus, you cannot have a constant array with nonconstant elements, nor can you have a nonconstant
array with constant elements.
✦ The notion of a nonconstant array exists only in gcc and is not ANSIstandard.
If you really want to get technical, the C++ ANSI standard says that when you
put the word const in front of an array declaration, you’re not making the
array constant; you’re saying that the array holds only constants. Yet, when
you do this, most compilers also make the array itself constant. But that’s
fine; people shouldn’t be taking an array name and copying it to something
else. It’s not good programming style, and it’s just asking for bugs — or, at
the very least, confusion — later.
Pointing with Pointers
413
Pointing with Pointers
To fully understand C++ and all its strangeness and wonders, you need to
become an expert in pointers. One of the biggest sources of bugs is when
programmers who have a so-so understanding of C++ work with pointers and
mess them up. But what’s bad in such cases is that the program may run properly for a while, and then suddenly not work. Those bugs are the hardest bugs
to catch, because the user may see the problem occur and then report it; but
when the programmer tries to reproduce the problem, he or she can’t make
the bug happen! (It’s just like when you take your car in to be fixed and suddenly it doesn’t misbehave.) Both the car repair person and the programmer
together say, “Worked fine when I tried it!” How frustrating is that?
In this section, we show you how you can get the most out of pointers and use
them correctly in your programs, so you won’t have these strange problems.
Becoming horribly complex
We’re not making this up, we have seen a function header like this:
void MyFunction(char ***a) {
Yikes! What are all those asterisks for? Looks like a pointer to a pointer
to a pointer to . . . something! How confusing. Now we suppose that some
humans have brains that are more like computers, and they can look at that
code and understand it just fine. Not us. So don’t worry if you don’t either.
So to understand the code, think about this: Suppose that you have a pointer
variable, and you want a function to change what the pointer variable points
to. Now be careful: We’re not saying that the function wants to change the
contents of the thing it points to. Rather, we’re saying the function wants to
make the pointer point to something else. There’s a difference. So how do you
do that? Well, any time you want a function to change a variable, you have
to either pass it by reference or pass its address. And this can get confusing
with a pointer. So what we like to do is take a detour. First, we’re going to
define a new type using our friend, the typedef word. It goes like this:
This is a new type called PChar that is equivalent to char *. That is, PChar
is a pointer to a character.
Now look at this function:
void MyFunction(PChar &x)
{
x = new char(‘B’);
}
Working with
Arrays, Pointers,
and References
typedef char *PChar;
Book IV
Chapter 1
414
Pointing with Pointers
This function takes a pointer variable and points it to the result of new
char(‘B’). That is, it points it to a newly allocated character variable
containing the letter B. Now think this through carefully: A PChar simply
contains a memory address, really. We pass it by reference into the function,
and the function modifies the PChar so that the PChar contains a different
address. That is, the PChar now points to something different from what it
previously did.
To try out this function, here’s some code you can put in main that tests
MyFunction:
char *ptr = new char(‘A’);
char *copy = ptr;
MyFunction(ptr);
cout << “ptr points to “ << *ptr << endl;
cout << “copy points to “ << *copy << endl;
Think it through carefully: The first line declares a variable called ptr that is
a pointer to a character. (Notice that we’re just using char * this time, but
that’s okay — char * is the same as PChar because of our typedef.) The
first line also allocates a new character A on the heap and stores its address
in the ptr variable.
The second line allocates a second variable that’s also a pointer to a character. The variable is called copy, and it gets the same value stored in ptr;
thus it also points to that character A that’s floating around out in the heap.
Next we call MyFunction. That function is supposed to change what the
pointer points to. Then we come back from the function and print the character that ptr points to and the character that copy points to. Here’s what
we get when we run it:
ptr points to B
copy points to A
This means that it worked! The ptr variable now points to the character allocated in MyFunction (a B), while the copy variable still points
to the original A. In other words, they no longer point to the same thing:
MyFunction managed to change what the variable points to.
Now consider the same function, but instead of using references, try it with
pointers. Here’s a modified form:
void AnotherFunction(PChar *x)
{
*x = new char(‘C’);
}
Now because the parameter is a pointer, we have to dereference it to modify
its value. Thus, we have an asterisk, *, at the beginning of the middle line.
Pointing with Pointers
415
And here’s a modified main that calls this function:
char *ptr = new char(‘A’);
char *copy = ptr;
AnotherFunction(&ptr);
cout << “ptr points to “ << *ptr << endl;
cout << “copy points to “ << *copy << endl;
Because our function uses a pointer rather than a reference, we have to pass
the address of the ptr variable, not the ptr variable directly. So notice the
call to AnotherFunction has an ampersand, &, in front of the ptr. And this
code works as expected. When we run it, we see this output:
ptr points to C
copy points to A
This version of the function, called AnotherFunction, made a new character called C. And indeed it’s working correctly: ptr now points to a C
character, while copy hasn’t changed. Again, the function pointed ptr to
something else.
Now we can unravel things. We created a typedef, and honestly, we
would prefer to keep it in our code because we think that using typedefs
makes it much easier to understand what the functions are doing. However,
not everybody does it that way; therefore, we have to understand what
other people are doing when we have to go in and fix their code. You
may have to, too. So here are the same two functions, MyFunction and
AnotherFunction, but without typedef. Instead of using the new PChar
type, they directly use the equivalent char * type:
void MyFunction(char *&x)
{
x = new char(‘B’);
}
void AnotherFunction(char **x)
{
*x = new char(‘C’);
}
But think about char ** x for a moment. Because char * is also the same
as a character array in many regards, char **x is a pointer to a character
array. In fact, sometimes you may see the header for main written like this
int main(int argc, char **argv)
Working with
Arrays, Pointers,
and References
To remove the use of the typedefs, all we did was replace the PChar in the
two function headers with its equivalent char *. You can see that the headers now look goofier. But they mean exactly the same as before: The first is a
reference to a pointer, and the second is a pointer to a pointer.
Book IV
Chapter 1
416
Pointing with Pointers
instead of
int main(int argc, char *argv[])
Notice the argv parameter in the first of these two is the same type as we’ve
been talking about: a pointer to a pointer (or, in a more easily understood
manner, the address of a Pchar). But you know that the argument for main
is an array of strings.
So now follow this somewhat convoluted thought. Go slowly if you have to:
What if you have a pointer that points to an array of strings, and you have a
function that is going to make it point to a different array of strings?
Better typedef this one; it’s going to get ugly. And just as a reminder, we’re
still using the previous typedef, PChar, too:
typedef char **StringArray;
typedef char *PChar;
Make sure that you believe us when we tell you that StringArray is a type
equivalent to an array of strings. In fact, if you put these two lines of code
before your main, you can actually change your main header into the following and it will compile!
int main(int argc, StringArray argv)
Now here’s a function that will take as a parameter an array of strings, create
a new array of strings, and set the original array of strings to point to this
new array of strings. (Whew!)
void ChangeAsReference(StringArray &array)
{
StringArray NameArray = new PChar[3];
NameArray[0] = “Tom”;
NameArray[1] = “Suzy”;
NameArray[2] = “Harry”;
array = NameArray;
}
Just to make sure that it works, here’s something you can put in main:
StringArray OrigList = new PChar[3];
OrigList[0] = “John”;
OrigList[1] = “Paul”;
OrigList[2] = “George”;
StringArray CopyList = OrigList;
ChangeAsReference(OrigList);
cout << OrigList[0] << endl;
cout << OrigList[1] << endl;
cout << OrigList[2] << endl << endl;
cout << CopyList[0] << endl;
cout << CopyList[1] << endl;
cout << CopyList[2] << endl;
Pointing with Pointers
417
This time in main, we’re using the typedef types, because, frankly, the
code is getting a bit confusing, and that helps keep what we’re doing clear.
Note that we first create a pointer to an array of three strings. Then we store
three strings in the array. Next, we save a copy of the pointer in the variable
called CopyList, and we print all the values.
Now when you run this main, you see the following:
Tom
Suzy
Harry
John
Paul
George
The first three are the elements in OrigList, which we passed into the
function: But they no longer have the values John, Paul, and George. The
three original Beatles names have been replaced by three new names: Tom,
Harry, and Suzy. However, the Copy variable still points to the original
string list. Thus, once again, it worked.
Now we did this change by reference. Next, we do it with pointers. Here’s the
modified version of the function, this time using pointers:
void ChangeAsPointer(StringArray *array)
{
StringArray NameArray = new PChar[3];
NameArray[0] = “Tom”;
NameArray[1] = “Harry”;
NameArray[2] = “Suzy”;
*array = NameArray;
}
As before, here’s the slightly modified sample code that tests the function:
You can see that when we call ChangeAsPointer, we’re passing the address
of OrigList. The output of this version is the same as the previous version.
Book IV
Chapter 1
Working with
Arrays, Pointers,
and References
StringArray OrigList = new PChar[3];
OrigList[0] = “John”;
OrigList[1] = “Paul”;
OrigList[2] = “George”;
StringArray CopyList = OrigList;
ChangeAsPointer(&OrigList);
cout << OrigList[0] << endl;
cout << OrigList[1] << endl;
cout << OrigList[2] << endl << endl;
cout << CopyList[0] << endl;
cout << CopyList[1] << endl;
cout << CopyList[2] << endl;
418
Pointing with Pointers
And now, as before, we unravel all this. Here are the two function headers
without using the typedefs:
int ChangeAsReference(char **&array) {
and
int ChangeAsPointer(char ***array) {
We have seen code like these two lines from time to time. They’re not the
easiest to understand, but after you know what they mean, you can interpret
them.
Our preference is to go ahead and use a typedef, even if it’s just before the
function in question. That way, it’s much more clear to other people what
the function does. You are welcome to follow suit. But if you do, make sure
that you’re familiar with the non-typedef version so you understand that
version when somebody else writes it without using typedef. (Or if the
person says to you, “This function takes a pointer to a pointer to a pointer.”
Yes, we’ve heard people say that!)
Pointers to functions
When a program is running, the functions in the program exist in the
memory; so just like anything else in memory, they have an address. And
having an address is good, because that way, people can find you.
You can take the address of a function by taking the name of it and putting
the address-of operator (&) in front of the function name, like this:
address = &MyFunction;
But to make this work, you need to know what type to declare address. The
address variable is a pointer to a function, and the cleanest way to assign
a type is to use a typedef. (Fortunately, this is one time when most people
are willing to use a typedef.)
Here’s the typedef, believe it or not:
typedef int(*FunctionPtr)(int);
It’s hard to follow, but the name of the new type is FunctionPtr. This
defines a type called FunctionPtr that returns an integer (the leftmost
int) and takes an integer as a parameter (the rightmost int, which must
be in parentheses). The middle part of this statement is the name of the new
type, and you must precede it by an asterisk, which means that it’s a pointer
to all the rest of the expression. Also, you must put the type name and its
preceding asterisk inside parentheses.
Pointing with Pointers
419
And then you’re ready to declare some variables! Here goes:
FunctionPtr address = &MyFunction;
This line declares address as a pointer to a function and initializes it to
MyFunction. Now for this to work, the code for MyFunction must have the
same prototype declared in the typedef: In this case, it must take an integer as a parameter and return an integer.
So, for example, you may have a function like this:
int TheSecretNumber(int x) {
return x + 1;
}
Then, you could have a main that stores the address of this function in a
variable and then calls the function by using the variable:
int main(int argc, char *argv[])
{
typedef int (*FunctionPtr)(int);
int MyPasscode = 20;
FunctionPtr address = &TheSecretNumber;
cout << address(MyPasscode) << endl;
}
Now just so you can say that you’ve seen it, here’s what the address declaration would look like without using a typedef:
int (*address)(int) = &TheSecretNumber;
The giveaway should be that you have two things in parentheses side by side,
and the set on the right has only types inside it. The one on the left has a variable name. So this is not declaring a type; rather, it’s declaring a variable.
Pointing a variable to a member function
It’s surprising to find out that most C++ programmers have no idea that
this exists. So this is a big secret! Revel in it! What is the secret? The secret
is that you can take the address of an object’s member function. Ooh-wee!
Working with
Arrays, Pointers,
and References
Now remember that each instance of a class gets its own copy of the
member variables, unless the variables are static. But functions are shared
throughout the class. Yes, you can distinguish static functions from nonstatic functions. But that just refers to what types of variables they access:
Static functions can access only static member variables, and you don’t need
to refer to them with an instance. Nonstatic (that is, normal, regular) member
functions work with a particular instance. However, inside the memory,
really only one copy of the function exists.
Book IV
Chapter 1
420
Pointing with Pointers
So how does the member function know which instance to work with? A
secret parameter gets passed into the member function: the this pointer.
Suppose you have a class called Gobstopper that has a member function
called Chew. Next, you have an instance called MyGum, and you call the Chew
function like so:
MyGum.Chew();
When the compiler generates assembly code for this, it actually passes
a parameter into the function — the address of the MyGum instance, also
known as the this pointer. Therefore, only one Chew function is in the code,
but to call it you must use a particular instance of the class.
Because only one copy of the Chew function is in memory, you can take its
address. But to do it requires some sort of cryptic-looking code. Here it is,
quick and to the point. Suppose your class looks like this:
class Gobstopper {
public:
int WhichGobstopper;
int Chew(string name) {
cout << WhichGobstopper << endl;
cout << name << endl;
return WhichGobstopper;
}
};
The Chew function takes a string and returns an integer. Here’s a typedef
for a pointer to the Chew function:
typedef int (Gobstopper::*GobMember)(string);
And here’s a variable of the type GobMember:
GobMember func = &Gobstopper::Chew;
If you look closely at the typedef, it looks similar to a regular function
pointer. The only difference is that the classname and two colons precede
the asterisk. Other than that, it’s a regular old function pointer.
But whereas a regular function pointer is limited to pointing to functions of
a particular set of parameter types and a return type, this function pointer
shares those restrictions but is further limited in that it can point to only
member functions within the class Gobstopper.
To call the function stored in the pointer, you need to have a particular
instance. Notice that in the assignment of func in the earlier code there
was no instance, just the classname and function, &Gobstopper::Chew. So
to call the function, grab an instance, add func, and go! Listing 1-2 shows
a complete example with the class, the member function address, and two
separate instances.
Pointing with Pointers
421
Listing 1-2: Taking the Address of a Member Function
#include <iostream>
#include <string>
using namespace std;
class Gobstopper
{
public:
int WhichGobstopper;
int Chew(string name) {
cout << WhichGobstopper << endl;
cout << name << endl;
return WhichGobstopper;
}
};
int main()
{
typedef int (Gobstopper::*GobMember)(string);
GobMember func = &Gobstopper::Chew;
Gobstopper inst;
inst.WhichGobstopper = 10;
Gobstopper another;
another.WhichGobstopper = 20;
(inst.*func)(“Greg W.”);
(another.*func)(“Jennifer W.”);
return 0;
}
You can see in main that first we create the type for the function, which we
call GobMember, and then we create a variable, func, of that type. Then we
create two instances of the Gobstopper class, and we give them each a different WhichGobstopper value.
Finally, we call the member function, first for the first instance and then for
the second instance. Just to show that you can take the addresses of functions with parameters, we pass in a string with some names.
When you run the code, you can see from the output that it is indeed calling
the correct member function for each instance:
Now when we say “the correct member function for each instance,” really
what that means is the code is calling the same member function each time
but using a different instance. However, when thinking in object-oriented
terms, consider each instance as having its own copy of the member function. Therefore, it’s okay to say “the correct member function for each
instance.”
Working with
Arrays, Pointers,
and References
10
Greg W.
20
Jennifer W.
Book IV
Chapter 1
422
Referring to References
Pointing to static member functions
A static member function is, in many senses, just a plain old function. The
difference is that you have to use a class name to call a static function. But
remember that a static member function does not go with any particular
instance of a class; therefore, you don’t need to specify an instance when
you call the static function.
Here’s an example class with a static function:
public:
static string MyClassName() {
return “Gobstopper!”;
}
int WhichGobstopper;
int Chew(string name) {
cout << WhichGobstopper << endl;
cout << name << endl;
return WhichGobstopper;
}
};
And here’s some code that takes the address of the static function and calls
it by using the address:
typedef string (*StaticMember)();
StaticMember staticfunc = &Gobstopper::MyClassName;
cout << staticfunc() << endl;
Note in the final line that, to call staticfunc, we didn’t have to refer to a
specific instance, and we didn’t need to refer to the class, either. We just call
it. Because the truth is that deep down inside, the static function is just a
plain old function.
Referring to References
In this section, we reveal all the ins, outs, upsides, and downsides of using
references. And we tell you a few things about them, too.
We’re assuming in this section that you already know how to pass a parameter by reference when you’re writing a function. (For more information about
passing parameters by reference, see Minibook I, Chapter 6.) But you can
use references for more than just parameter lists. You can declare a variable
as a reference type. And just like job references, they can be both good and
devastating. So be careful when you use them.
Referring to References
423
Reference variables
Declaring a variable that is a reference is easy. Whereas the pointer uses an
asterisk, *, the reference uses an ampersand, &. But there’s a twist to it. You
cannot just declare it like this:
int &BestReference; // Nope! This won’t work!
If you try this, you see an error that says BestReference declared as
reference but not initialized. That sounds like a hint: Looks like you
need to initialize it.
Yes, references need to be initialized. As the name implies, reference refers
to another variable. Therefore, you need to initialize the reference so it
refers to some other variable, like so:
int ImSomebody;
int &BestReference = ImSomebody;
Now from this point on, forever until the end of eternity (or at least
as long as the function containing these two lines runs), the variable
BestReference will refer to — that is, be an alias for — ImSomebody.
And so if you do this:
BestReference = 10;
Then you will really be setting ImSomebody to 10. So take a look at this code
that could go inside a main:
int ImSomebody;
int &BestReference = ImSomebody;
BestReference = 10;
cout << ImSomebody << endl;
When you run this, you see the output
10
That’s what a reference is: A reference refers to another variable.
Because a reference refers to another variable, that implies that you cannot
have a reference to just a number, as in int &x = 10. And, in fact, the offending line has been implicated: You are not allowed to do that. You can only
have a reference that refers to another variable.
Working with
Arrays, Pointers,
and References
That is, setting BestReference to 10 caused ImSomebody to change to 10,
which you can see when you print out the value of ImSomebody.
Book IV
Chapter 1
424
Referring to References
Returning a reference from a function
It’s possible to return a reference from a function. But be careful if you try
to do this: You do not want to return a reference to a local variable within
a function, because when the function ends, the storage space for the local
variables goes away. Not good!
But you can return a reference to a global variable. Or, if the function is a
member function, you can return a reference to a member variable.
For example, here’s a class that has a function that returns a reference to
one of its variables:
class DigInto
{
private:
int secret;
public:
DigInto() { secret = 150; }
int &GetSecretVariable() { return secret; }
void Write() { cout << secret << endl; }
};
Notice the constructor stores 150 in the secret variable, which is private.
The GetSecretVariable function returns a reference to the private variable called secret. And the Write function writes out the value of the
secret variable. Lots of secrets here! And some surprises too, which we tell
you about shortly. You can use this class like so:
int main(int argc, char *argv[])
{
DigInto inst;
inst.Write();
int &pry = inst.GetSecretVariable();
pry = 30;
inst.Write();
return 0;
}
When you run this, you see the following output:
150
30
The first line is the value in the secret variable right after the program creates the instance. But look at the code carefully: The variable called pry is a
reference to an integer, and it gets the results of GetSecretVariable. And
what is that result? It’s a reference to the private variable called secret.
That means that pry itself is now a reference to that variable. Yes, a variable
outside the class now refers directly to a private member of the instance!
After that, we set pry to 30. When we call Write again, the private variable
will indeed change.
Referring to References
425
Referring to someone else
And now for the $1,000,000 question: After you
have a reference referring to a variable, how
can you change that reference so it refers
to something else? Brace yourself for a wild
answer! Here goes: You can’t. Yes, it’s true,
and yes, you may know some people who, nevertheless, have managed to do it. Here’s the
whole story.
Back when C++ first came out, companies that
made compilers gave their compilers some
sophisticated capabilities in terms of references.
Many of them let you unseat a reference — that
is, make the reference refer to something else.
But, lo and behold, when the ANSI standard
came out in the late 1990s, the standard outlawed this practice! So now the rule is that you
cannot unseat a reference. Further, you cannot
have a pointer to a reference, nor can you have
a reference that refers to another reference.
This somewhat restrictive rule actually resolves
some ambiguity: Suppose you wrote a line
of code asking for the address of a reference
with the hope of storing it in a pointer to
reference variable: Because a reference
refers to another variable, does that mean you
want the address of the other variable, or do you
somehow want the address of the reference
itself?
The standard clears this up: You don’t have a
pointer to a reference. But interestingly, the
gcc does let you write code that seems to take
the address of a reference; however, in fact,
you are taking the address of the variable the
reference refers to. So, again, no pointers to
references, and that means that you can’t even
take the address of a reference!
Is it just us, or does that seem like a bad idea? We made the variable private.
And now the GetSecretVariable function pretty much wiped out any
sense of the variable actually remaining private. The main function was able
to grab a reference to it and poke around and change it however it wanted,
as if it were not private! Trouble in C++ land!
Because functions returning references can leave unsuspecting and lessexperienced C++ programmers with just a wee bit too much power on
their hands, we recommend using caution with references. No, we suggest
just plain being careful. Use them only if you really feel that you must. But
remember also that a better approach in classes is to have member access
functions that can guard the private variables.
Book IV
Chapter 1
Working with
Arrays, Pointers,
and References
That’s a problem with references: They can potentially leave your code
wide open. Therefore, think twice before returning a reference to a variable.
One of the biggest risks is this: Somebody else might be using this code and
may not understand references, and may not realize that the variable called
pry has a direct link to the private secret variable. Such an inexperienced
programmer might then write code that uses and changes pry without realizing that the member variable is changing along with it. Later on, then, a bug
results — a pretty nasty one at that!
426
Referring to References
However, having issued the usual warnings, references can be a very powerful thing, provided you understand what they do. When you have a reference, you can easily modify another variable without having to go through
pointers. Using references makes life much easier sometimes. So please: use
your newfound powers carefully.
Chapter 2: Creating
Data Structures
In This Chapter
✓ Discovering all the different data types
✓ Casting and converting
✓ Using structures with your data
✓ Comparing and manipulating structures
C
++, being a computer language and all, provides you with a lot of ways
to manipulate data — numbers, letters, strings, arrays — anything you
can store inside the computer memory. To get the most out of C++, you
should know as much as you can about the fundamental data types. This
chapter covers them and how to use them.
In this chapter, we refer to the ANSI standard of C++. ANSI is the American
National Standards Institute. The information we provide in this chapter
deals with the ANSI standard (singular) of C++. Fortunately, the GNU gcc
compiler that comes with CodeBlocks is ANSI-standard compliant. (Little
nuances show up, but not often.)
Working with Data
In the sections that follow, we tell you how you can manipulate your data,
including the types of data available to you and how you can change them.
The great variable roundup
The ANSI C++ standard dictates these fundamental C++ types:
✦ char: This is a single character. On most computers, it takes 1 byte.
✦ int: This is an integer. On most of the computers in the late 1990s and
early 2000s, a single integer takes 4 bytes. With 4 bytes, this gives you a
range from –2147483648 to 2147483647.
✦ short int: This is a half-sized integer. Just a little 2-byte fellow, which
leaves just enough room for –32768 to 32767.
428
Working with Data
✦ long int: You would expect a long int to be longer than, well, an
int. But it’s not with the gcc compiler. The compiler recognizes two
types: short int (2 bytes) and long int (4 bytes). If you leave off the
first word, the compiler considers it a long int. So a long int is an int.
✦ bool: This can take on a value of either true or false. Inside the computer, it’s a single byte, stored as a number. Normally true is stored as 1,
and false is stored as 0. However, you shouldn’t have to convert bool to
a number; you should only compare it to the values true or false.
✦ float: This is a number with a decimal point (a floating-point number).
The ANSI standard doesn’t define this, but gcc uses 4 bytes.
✦ double: This is another floating-point type, and it means double-precision
floating-point. Again, the ANSI standard doesn’t say how long it should be.
The gcc compiler uses 8 bytes for a double.
✦ long double: This is a humongous size, a real space hog. In gcc (at the
time of this writing), it takes up a whole 12 bytes of space.
✦ void: The ANSI standard considers this an incomplete type. You’re not
allowed to declare a variable of type void. However, you can declare a
type pointer to void.
✦ wchar_t: Many computers today support a wide character set, primarily for international and non-English characters. The characters in these
sets usually are 2 bytes. wchar_t represents these characters. Some
operating systems (such as Windows CE) require you to use wchar_t.
You can use some variations of these. You can have arrays of any of these.
And you can also modify some of these just a bit:
✦ signed: You can tack the word signed to the beginning of char,
short int, int, and long int to get signed char, signed short
int, signed int, and signed long int. If you put signed in front,
the numbers (and underlying numbers for the char type) can include
negatives or positives.
✦ unsigned: You can put the word unsigned at the beginning of these
types to get unsigned char, unsigned short int, unsigned int,
and unsigned long int. Unsigned means that the numbers (and
underlying numbers for the char type) cannot be negative.
Now when you use signed and unsigned, the size of the variable doesn’t
change: It takes the same number of bytes. Instead, the range shifts. For
example, a signed short int ranges from –32768 to 32767, so there are 65536
possibilities. An unsigned short int ranges from 0 to 65535; again, there
are 65536 possibilities.
The easiest way to see how the signed integers are stored is to use hexadecimal (hex). The hex numbers line themselves up nicely with the bytes. An
unsigned short int can hold any hex values from 0x0000 through 0xffff.
Working with Data
429
These two numbers correspond to the decimal numbers 0 through 65535.
Now if you put these same numbers into a signed short int, you can see
how they’re stored. Here’s how:
short int hoopla;
hoopla = 0x0000;
cout << “0x0000: “
hoopla = 0x0001;
cout << “0x0001: “
hoopla = 0x7fff;
cout << “0x7fff: “
hoopla = 0x8000;
cout << “0x8000: “
hoopla = 0xffff;
cout << “0xffff: “
<< hoopla << endl;
<< hoopla << endl;
<< hoopla << endl;
<< hoopla << endl;
<< hoopla << endl;
When you run this code, here’s what you see:
0x0000:
0x0001:
0x7fff:
0x8000:
0xffff:
0
1
32767
-32768
-1
These numbers in the output are out of order. Here they are in the correct
order:
✦ Negative numbers from –32768 to –1 are stored from 0x8000 to 0xffff.
✦ The number 0 is stored as 0x0000, as you would expect.
✦ Positive numbers from 1 to 32767 are stored from 0x0001 to 0x7ffff.
The larger integers behave similarly. For signed long int, the negatives are stored from 0x800000000 to 0xffffffff. The number 0 is 0x00000000.
Positives go from 0x00000001 to 0x7fffffff.
When you are working with the different floating-point types, remember this
rule: It’s not about range, it’s about precision. The double doesn’t just hold a
bigger range of numbers than the float type; it holds more decimal places.
Expressing variables from either side
Occasionally when you look at error messages (or if you read the ANSI standard!) you see the terms lvalue and rvalue. The l and r refer to left and
Creating Data
Strructures
void * is just a generic type pointer. If you want a pointer and don’t want
to specify what type it points to, you can make it a void * . If you’re writing
a C++ program that uses structures from an older C program, you may see
void * crop up. When you use a void * pointer, normally you must cast it
to another pointer type (such as MyStruct *).
Book IV
Chapter 2
430
Working with Data
right, respectively. In an assignment statement, an lvalue is any expression
that can be on the left side of the equals sign, and an rvalue is an expression that can be on the right side of an equals sign.
The terms lvalue and rvalue do not refer to what happens to be on the
left side and right side of an assignment statement. They refer to what is
allowed or not allowed on the left side of an assignment statement. You can
only have lvalues on the left side of an assignment statement and rvalues
on the right side of an assignment statement.
Here are some examples, where ploggle is an int type. This is allowed,
because ploggle is an lvalue:
ploggle = 3;
On the left side, you cannot have items that are strictly an rvalue. The following is not allowed, because 2 is strictly an rvalue:
2 = ploggle;
Now how do we know ploggle is an lvalue? Because it’s allowed to
appear on the left side of an assignment statement. The number 2 can’t
appear on the left (setting it equal to something else makes no sense!), therefore it isn’t an rvalue. In fact, anything you can set equal to something else is
an lvalue.
The main reason you need to know these terms is their tendency to show
up in error messages. If you try to compile the line 2 = ploggle, here are
some error messages that appear (one for each of three compilers):
✦ Borland C++ Builder: Lvalue required
✦ gcc (whether CodeBlocks, MinGW, or Cygwin): non-lvalue in
assignment
✦ Visual C++: left operand must be l-value
If you don’t know what the term lvalue means, these messages can be
confusing. And while seeing the problem with 2 = ploggle is pretty easy,
sometimes the problem is not that obvious. Look at this:
ChangeMe() = 10;
DontKnow() = 20;
Do these even make sense? Putting a function call on the left side? In other
words: Are the expressions ChangeMe() and DontKnow() lvalues?
Working with Data
431
It depends. Take a look at this code:
int uggle;
int &ChangeMe()
{
return uggle;
}
int DontKnow()
{
return uggle;
}
The function ChangeMe returns a reference to an integer; this line is valid:
ChangeMe() = 10;
The expression ChangeMe() refers to the variable uggle, and thus this line
of code stores 10 in uggle. But the second function, DontKnow, returns just
an integer value (a number, not a variable). Therefore, this line is not valid:
DontKnow() = 20;
The left side, DontKnow() is not an lvalue — it’s an rvalue — therefore it
cannot appear on the left side of an equation, and that line is an error.
Indeed, when we try to compile these lines, the compiler is happy with the
ChangeMe() = 10; line. But for the DontKnow() = 20; line, it gives us
the following error message.
error: non-lvalue in assignment
The words lvalue and rvalue are not C++ words. You do not type these
into a program. (Well, yeah, we suppose you could use them as variable
names, but we’d really rather not — and we suggest you don’t, either.)
Casting a spell on your data
The way you cast is to take a variable of one type and type the variable’s
name preceded with the other type you would like it to be. You put the other
type in parentheses.
char buddy = ‘A’;
int underneath = (int)buddy;
cout << underneath << endl;
Creating Data
Strructures
Although C++ has all these great data types, such as integer and char, the
fact is this: Underneath they are just stored as numbers. And sometimes you
may have a character and need to use its underlying number. To do this, you
can cast the data.
Book IV
Chapter 2
432
Working with Data
Comparing casting and converting
The idea behind casting is to take some data
and, without changing it (and with nothing
up our sleeves), use it in another way. For
example, we could have an array containing
the characters Applecrisp. But inside the
memory, each letter is stored as a number. For
example, the A is stored as 65, p is stored as
112, and l as 108. Therefore, if we wanted
to, we could cast each character to an integer,
using such code as
cout << (int)(str[loop]) << endl;
where str is the string (Applecrisp) and
loop is a loop counter that cycles through
the string. This would print out the numerical
equivalents of each letter. In other words, we
cast the characters to integers — but we did
not actually change any data. Now we can
copy the data like this:
int num = str[0];
This code would copy the data, but again, it
wouldn’t change it. We’d just have two copies
of the same data. That’s what casting is all
about: using data as a different data type from
what it was originally.
Converting, however, is different. If we want to
take the number 123, casting it to a string will not
create a string 123. The string 123 is made up
of three underlying byte-sized snacks of numbers. The numbers for the string 123 are 49,
50, and 51, respectively. Casting the number
123 just won’t give us that. Instead, you would
need to convert the number to a string.
But, like most rules, this one has an exception,
and that exception comes into play when converting between floats and integers. Instead of
using a conversion function, the C++ compiler
automatically converts from float to integer and
vice versa if you try to cast one to the other.
Ugh. That goes against the rest of the rules, so
be careful. Here’s an example of converting a
float to an integer:
float f = 6.3;
int i = (int)f;
But the crazy part is that you can also do
the same thing without even using the cast,
although you will get a compiler warning:
float f = 6.3;
int i = f;
When you run this code, you obtain an output value of 65. If you substituted
a lowercase a, the output would be 97 because uppercase and lowercase letters have different numeric values.
Back in the old days of the C programming language, casting was a common
way of converting data — but it’s actually somewhat dangerous. In C, you
could take any data type and directly cast it to any other data type. The idea
was that if you wanted to burrow into the system and manipulate something
(just about anything), you could. But over the years, people started to figure
out that maybe, just maybe, this wasn’t such a good idea. (As in, “Hey, bugs,
welcome to my computer!”) So although we’re showing you how to cast, you
should try to avoid casting. Instead, focus on converting (which sometimes
uses castlike syntax) or using safe casts. See Chapter 8 in Minibook 1as well
as the next section (“Casting safely with C++”) in this chapter.
Working with Data
433
Casting safely with C++
With the ANSI standard of C++ came all kinds of new goodies that make life
easier than it used to be. Casting is one example. Originally, you could just
cast all you wanted and change from one data type to another, possibly
causing a mess, especially if you take existing code and compile it under
a different operating system or perhaps even under a different compiler
on the same operating system. One type may have a different underlying
representation, and then, when you convert it on one system, you get one
thing; take it to a different system and you get something else. That’s bad.
It creates bugs!
So the ANSI standard for C++ gives some newer and better ways of casting
between data. These include dynamic_cast and static_cast.
Dynamically casting with dynamic_cast
When the makers of C++ came up with these new ways of casting, their motivation was this: Think in terms of conversions. A cast simply takes one data
type and tells the compiler to treat it as another data type. So first ask yourself if one of the conversions will work for you. If not, you can consider one
of the new ways of casting.
But remember, a cast tells the compiler to treat some data as another type of
data. But the new ways of casting prevent you from doing a cast that doesn’t
make sense. For example, you may have a class hierarchy, and you have a
pointer to a base class. But because an instance of a derived class can be
treated as an instance of a base class, it’s possible that this instance that
you’re looking at could actually be an instance of a derived class.
In the old style of C and C++ programming, you could just cast the instance
and have at it:
DoSomethingCool( (derivedclass *) someptr);
But have no fear: ANSI is here! With the new ways of casting, you can be
sure. Listing 2-1 is a complete program that demonstrates a proper downcast, where we take a pointer to a base class and cast it down to a pointer of
a derived class.
Book IV
Chapter 2
Creating Data
Strructures
In this case, we’re assuming that someptr is of type pointer-to-base-class,
but we’re hoping that, in fact, it points to a derivedclass instance. Does it?
It may, depending on how we wrote the rest of the program. But maybe not.
And when the word hope meets the word program, the word disaster tends to
show up. Tempers fly and people lose their jobs. It’s not a pretty sight.
434
Working with Data
Listing 2-1: Casting Instances Dynamically for Safety
#include <iostream>
#include <string>
using namespace std;
class King
{
protected:
string CrownName;
public:
virtual string &MyName() { return CrownName; }
virtual ~King(){}
};
class Prince : public King
{
public:
string School;
};
void KingInfo(King *inst)
{
cout << “=========” << endl;
cout << inst->MyName() << endl;
Prince *asPrince = dynamic_cast<Prince *>(inst);
if (asPrince != 0)
{
cout << asPrince->School << endl;
}
}
int main()
{
Prince George;
George.MyName() = “George I”;
George.School = “School of the Kings”;
KingInfo(&George);
King Henry;
Henry.MyName() = “Henry II”;
KingInfo(&Henry);
return 0;
}
Go ahead and run this code. You’ll see output that looks something like this:
=========
George I
School of the Kings
=========
Henry II
Process returned 0 (0x0)
execution time : 0.062 s
Press any key to continue.
Some strange things are going on in this code. But first, we want to point
out the main thing that this code demonstrates: In the main main, we call
the KingInfo function, first passing it the address of George (a Prince
instance, derived from King) and then the address of Henry (a King
instance).
Working with Data
435
The KingInfo function first prints the information that is common to both
due to inheritance; it calls the MyName function and prints the resulting
name. Then comes the important part, the dynamic cast. To do this, we call
dynamic_cast and save it in a pointer variable called asPrince. Notice the
syntax of dynamic_cast. It looks like a template in that you include a type
in angled brackets. Then you put the thing you want to cast in parentheses
(in this case, the instance that was passed into the function).
If the dynamic cast worked, it returns a pointer that you can save as the type
inside angled brackets. Otherwise, the dynamic cast will return 0. You can
see that after we called dynamic_cast, we tested it against 0. If the result is
not 0, the dynamic cast worked, which means that we successfully cast the
data to the desired type. And then, in the if block, we retrieve the School
member, which is part of Prince, not King.
You may notice the unique design of the King class. Take a look at just the
King class:
class King
{
protected:
string CrownName;
public:
virtual string &MyName() { return CrownName; }
virtual ~King(){}
};
For dynamic_cast to work, the base class involved must have at least one
virtual function. Thus the base class — and each of its derived classes — has
a virtual table (also needed for dynamic_cast to work). In addition, the
CodeBlocks compiler raises a warning message when you don’t provide a
virtual destructor:
warning: `class King’ has virtual functions but non-virtual destructor
Consequently, the example includes a virtual destructor as well.
You don’t need to use references in a class as we did here just to make
dynamic_cast work. But you do need at least one virtual function.
Book IV
Chapter 2
Creating Data
Strructures
Originally, we wanted CrownName to be public. But because we needed to
add a virtual function to class King, we decided to make the function useful,
rather than just add a function that does nothing at all. So we made it access
the CrownName member. And for that, we wanted to give the function a
reason for its existence, so we made the CrownName protected. Then we had
the MyName function return a reference to it. The end result is that it’s like
CrownName is public, which is the way we wanted the class in the beginning.
436
Working with Data
Some compilers (including Microsoft Visual C++) do not, by default, handle
dynamic_cast. To use a dynamic cast in Visual C++, you have to go into the
project settings and select Enable Run-time Type Information (RTTI) found
in C++ Language Settings. Then you need to recompile your program for the
change to take effect. Note that if you don’t select this setting, you get a
warning (not an error) that says, dynamic_cast used on polymorphic
type ‘class King’ with /GR-; unpredictable behavior may
result. The program will still compile and link, but when you run it, a runtime error message pops up.
Remember, here’s the fundamental difference between an old-style direct
cast and the new dynamic_cast: The compiler generates code that automatically does an old-style cast, regardless of whether the cast is valid. That
is, the cast is hardcoded. But dynamic_cast, on the other hand, tests the
types at runtime. The dynamic cast may or may not work depending on the
type of the object.
When you use a dynamic cast, you can cast either a pointer or a reference.
The KingInfo function back in Listing 2-1 uses a pointer. Here’s a modified
form that uses a reference:
void KingInfoAsReference(King &inst)
{
cout << “=========” << endl;
cout << inst.MyName() << endl;
try
{
Prince &asPrince = dynamic_cast<Prince &>(inst);
cout << asPrince.School << endl;
}
catch (...)
{
}
}
To make this work, we had to use an exception handler (which is a way to
deal with unusual situations; see Chapter 3 in this Minibook for more information on exception handlers). The reason for using an exception handler
is that with a pointer, you can simply test the result against 0. But with
references, you have no such thing as a null reference or 0 reference. The
reference must work, or you get a runtime error. And in C++, the way you
can catch a situation that didn’t work is by typing the word try, followed by
your code that attempts to do the job, in braces. Follow that with the word
catch and a set of parentheses containing three periods. Following that,
you put braces — and possibly any code you want to run — just in case the
earlier code didn’t work.
In this code, you can see that we didn’t do anything inside the catch block.
We want to do something only if the code works. We would just leave off the
catch block because we didn’t have it do anything, but, alas, C++ doesn’t
allow that: If you have a try block, you must have a catch block. Them’s
the rules.
Working with Data
437
Statically casting with static_cast
The ANSI C++ standard includes a special type of cast that does no type
checking. If you have to cast directly without the help of dynamic_cast,
you should opt for static_cast instead of the old C-style cast.
When you want to do a static cast, call static_cast and follow it with
angled brackets containing the type you want to cast to. Then put the item
being cast inside parentheses, as in the following:
FinalType *f = static_cast<FinalType *>(orig);
The advantage of using static_cast is that it does some type checking at
compile time, whereas old C-style casts do not. The compiler allows you to
do static_cast only between related objects. For example, you can do a
static_cast from an instance of one class to an instance of a derived or
base class. But if two classes are not related, you will get a compiler error.
For example, suppose that you have these two lines of code:
class FinalType {};
class AnotherType {};
They are unrelated classes. Then if you have these lines of code
AnotherType *orig = new AnotherType;
FinalType *f = static_cast<FinalType *>(orig);
and you try to compile it, you get an error:
static_cast from `AnotherType *’ to `FinalType *’
But if you instead make the classes related
class FinalType {};
class AnotherType : public FinalType {};
then these two lines will compile (if you’re using the CodeBlocks compiler,
you will receive a message, warning: unused variable ‘f’):
A lot of people think that static_cast is useless and is essentially identical to old-style C casts. This is not true. Tell them they’re wrong! (But be
nice, now. Friends come before software, after all.) The mistaken notion is
that static_cast does no type checking, when in fact it does. The difference between static_cast and dynamic_cast is that static_cast does
its type checking at compile time; the compiler makes sure the cast is okay.
dynamic_cast, however, also does the same type checking at compile time,
Creating Data
Strructures
AnotherType *orig = new AnotherType;
FinalType *f = static_cast<FinalType *>(orig);
Book IV
Chapter 2
438
Structuring Your Data
but when it runs, it does more checking to make sure that the instance is
precisely what you’re converting to. Old C-style casts do none of this type
checking.
If you’re just doing a conversion between floating-point numbers and integers, you can do an old-style cast. (That’s because an old-style cast is really
a conversion, not a cast.) Alternatively, of course, you’re welcome to use
static_cast to get the same job done:
float f = static_cast<float>(x);
Structuring Your Data
Before C++ came to life, C had something that was similar to classes, called
structures. The difference was that structures had only member variables —
no member functions. Here’s an example of a structure:
struct Dimensions
{
int height;
int width;
int depth;
int weight;
int price;
};
This block of code is similar to a class; as you can see, it has some member
variables but no member functions. Nor does it have any access control
(such as public, private, or protected).
But not only did the designers of C++ add classes to C++, they also enhanced
the structures in C++. So now in C++, you can use structures more powerfully than you could in C. The main change to structures in C++ is that they
can have member functions and access control. Thus, we can add to the
Dimensions structure like so:
struct Dimensions
{
private:
int price;
public:
int height;
int width;
int depth;
int weight;
int GetPrice() { return price; }
};
Then we can create an instance of Dimensions in our code like this:
Dimensions FirstIem;
Dimensions *SecondItem = new Dimensions;
Structuring Your Data
439
Well now, isn’t that interesting? This struct business is looking suspiciously
like a class, wouldn’t you say? Hmmm. As it happens, the struct code is a
class. It’s the same thing.
When the great founder of the C++ language (Bjarne Stroustrup) created C++,
he enhanced structures to the point that classes and structures are identical,
with one exception. Members of a structure are public by default. Members
of a class, however, are private by default.
That’s nice. But why would you use a structure? Really, it doesn’t matter.
Most C++ programmers today never even touch a structure.
However, some C++ programmers use a special convention concerning
structures. If a class has only public member variables and no member functions, then make it a structure.
In other words, programmers use structure for simple data types that are
themselves a collection of smaller data types. (That is, they use structures in
the same way C originally had it.) That’s actually a pretty good idea. In the sections that follow, we tell you about some of these data structure issues. (And
for what it’s worth, keeping structures around in C++ was a good idea because
a lot of people originally took C programs and recompiled them with a C++
compiler. It was good that the C++ compiler handled the structures.)
If you’re familiar with C and just learning C++, you may be interested to know
that when you declare a variable that is a structure type, in C++ you need to
give only the name of the structure. You no longer need the word struct in
the declaration. Thus, the following line will still compile in C++
struct Dimensions another;
but all you really need is
Dimensions another;
Structures as component data types
You might declare such a structure like this:
struct Point
{
int x;
int y;
};
Creating Data
Strructures
A common use of structures is as an advanced data type made up of underlying data types. For example, a lot of operating systems that deal with
graphics include some libraries that require a Point structure. Typically, a
Point structure is simply a grouping of an X-coordinate and a Y-coordinate,
all in one package.
Book IV
Chapter 2
440
Structuring Your Data
Then, when you need to call a function that requires such a structure, such
as one we made up for this example called DrawDot, you would simply
declare a Point and call the function, as in the following.
Point onedot;
onedot.x = 10;
onedot.y = 15;
DrawDot(onedot);
The DrawDot function would have a prototype that looks like this:
void DrawDot(Point pt);
Note that the function doesn’t take a pointer to a Point, nor does it take a
reference to a Point. It just gets right to the Point directly.
If you want, you can initialize the members of a structure the same way you
would an array:
Point seconddot = { 30, 50 };
DrawDot(seconddot);
Equating structures
Setting simple structures that are equal to another structure is easy. The
C++ compiler automatically handles this by copying the members one by
one. Listing 2-2 is an example of this process in action.
Listing 2-2: Copying Structures Easily
#include <iostream>
using namespace std;
struct Point3D
{
double x;
double y;
double z;
};
int main()
{
Point3D FirstPoint = { 10.5, 22.25, 30.8 };
Point3D SecondPoint = FirstPoint;
cout << SecondPoint.x << endl;
cout << SecondPoint.y << endl;
cout << SecondPoint.z << endl;
return 0;
}
Structuring Your Data
441
Because structures are almost identical to classes, you can take Listing 2-2
and change the structure definition to the following class definition, and the
program will continue to function the same:
class Point3D
{
public:
double x;
double y;
double z;
};
No matter which form of the application you use, the output is simple. When
you run this application, you see output similar to this:
10.5
22.25
30.8
Process returned 0 (0x0)
execution time : 0.015 s
Press any key to continue.
Returning compound data types
Because simple structures are just a grouping of smaller data items, you can
treat them as one chunk of data. For that reason, you can easily return them
from functions without having to use pointers.
The following function is an example of this:
Point3D StartingPoint(float x)
{
Point3D start;
start.x = x;
start.y = x * 2;
start.z = x * 3;
return start;
}
This function relies on the Point3D struct defined in the “Equating
structures” section of the chapter. You can easily call this guy, then, by
using code like this:
MyPoint = StartingPoint(5.2);
OtherPoint = StartingPoint(6.5);
MyPoint.x << endl;
MyPoint.y << endl;
MyPoint.z << endl;
endl;
OtherPoint.x << endl;
OtherPoint.y << endl;
OtherPoint.z << endl;
Creating Data
Strructures
Point3D
Point3D
cout <<
cout <<
cout <<
cout <<
cout <<
cout <<
cout <<
Book IV
Chapter 2
442
Naming Your Space
These cout statements produce the following output:
5.2
10.4
15.6
6.5
13
19.5
Process returned 0 (0x0)
execution time : 0.125 s
Press any key to continue.
Note that in the function, we simply created a local variable of type
Point3D. This variable is not a pointer, nor is it a reference. And at the end
of the function, we just returned it. When we called it, we copied the value
of the returned structure into our own variables, first MyPoint and then
OtherPoint.
You may start to see some trouble in paradise when returning structures (or
class instances, because they’re the same thing). Does returning a structure
work? Why yes, it does, but what happens is sophisticated. When you create
an instance of the structure in the function, you’re just creating a local variable. That’s definitely not something you want to return; it would sit on the
stack as a local variable. But consider this call:
Point3D MyPoint = StartingPoint(5.2);
At the assembly level, the StartingPoint function receives the address of
MyPoint. Then at the end of the function, again at the assembly level, the
compiled code copies the contents of the local variable (called start in this
case) into the MyPoint structure by using the pointer to MyPoint. So nothing
is actually returned, per se; instead, the data is copied. That means, then, that
if your structure includes a pointer variable, for example, you will get a copy
of the pointer variable as well — that is, your pointer variable will point to the
same thing as the one in the function. That may be what you want, or it may
not be, depending on your situation. So be careful and make sure you fully
understand what you’re doing when you return a structure from a function!
Naming Your Space
It’s often nice to be able to use a common name for a variable or other item
without fear of the name clashing with a preexisting identifier. For example,
somewhere in a header file you may have a global variable called Count,
and somebody else may want to make a variable called Count in one of his
or her functions that uses your global header file. Or you may want to name
a function GetData — but how can you be sure the people who use your
function won’t include a header file somebody else wrote that already has
a GetData function? Is it the great Battle of the GetDatas, where only one
will survive? Not good! What can you do to avoid the clash?
Naming Your Space
443
You can use namespaces. A namespace is simply a way to group identifiers,
such as all your classes. If you called this group Menagerie, for example,
Menagerie would be your namespace. You would then put your classes
inside it, like this:
namespace Menagerie
{
class Oxen {
public:
int Weight;
int NumberOfTeeth;
};
class Cattle {
public:
int Weight;
int NumberOfChildren;
};
}
The names Oxen and Cattle are unique within the Menagerie namespace.
You are free to reuse these names in other namespaces without worrying about
a clash. Then, if you want to use either of the two classes inside the Menagerie
namespace, you would fully qualify the names of the classes, like so:
Menagerie::Cattle bessie;
bessie.Weight = 643;
Unlike class and structure declarations, a namespace declaration doesn’t
have to end with a semicolon.
If you plan to use the names in the Menagerie namespace without reusing
them, just put a line after the namespace declaration (but somewhere preceding the use of the names Cattle and Oxen in your code), like this:
using namespace Menagerie;
Then you can access the names as if they’re not in a namespace:
Cattle bessie;
bessie.Weight = 643;
void cattleranch()
{
Cattle x;
}
using namespace Menagerie;
void dairy()
{
Cattle x;
}
Creating Data
Strructures
When you include a line that has using namespace, the compiler knows
the namespace is only for lines that follow the using namespace declaration. Consider the following code:
Book IV
Chapter 2
444
Naming Your Space
Here the first function won’t compile because the compiler won’t know
the name Cattle. To get it to work, you have to replace Cattle with
Menagerie::Cattle. But the second function will compile, thanks to some
help from our buddy using namespace.
The using namespace line is good only for lines that follow it. If you put
using namespace inside a code block — inside curly braces { and }, as you
would inside a function — the line applies only to lines that follow it within
the same code block. Thus, in this case
void cattleranch()
{
using namespace Menagerie;
Cattle x;
}
void dairy() {
Cattle x;
}
the compiler will be happy with the first function, cattleranch but not
with the second function, dairy. The using namespace line is good only
for the length of the cattleranch function; it’s inside that function’s code
block.
When you have a using namespace line, any variables or identifiers you
create after that line don’t become part of the namespace you’re using. The
using namespace line simply tells the compiler that if it finds an identifier it
doesn’t recognize, it should check next inside the namespaces you’re using.
When you have a using namespace line, you can follow it with more using
namespace lines for other namespaces — and doing so won’t cause the compiler to forget the previous using namespace line. Thus, if you have
using namespace Menagerie;
using namespace Ocean;
you can successfully refer to identifiers in both the Menagerie and the
Ocean namespaces.
Creating one namespace in many places
After you create a namespace, you can add
to it later in your code if necessary. All you
have to do is start the first block of code with
(for example) namespace Menagerie {
and then finish it with a closing brace. Then
later in your code, do the same line again —
starting the block again with namespace
Menagerie { and ending it with a closing
brace. The identifiers in both blocks become
part of the namespace Menagerie.
Naming Your Space
445
Using variables and part of a namespace
You can put variables in a namespace and then later refer to them through
the namespace, as in the following:
namespace Menagerie
{
int CattleCount;
}
And then again later (for example, in your main) like this:
Menagerie::CattleCount = 10;
But remember: A namespace is not a class! Only one instance of the
CattleCount variable exists; it just happens to have a full name of
Menagerie::CattleCount. This doesn’t mean you can get away with
creating multiple instances of Menagerie: You can’t. It’s a namespace.
(Think of it like a surname: There could be multiple people named John,
and to distinguish between them in a meeting at work, you might tack on
their last names: John Squibbledash and John Poltzerbuckin.) Although the
namespace name comes first in Menagerie::CattleCount, it’s analogous to the last name. Two variables can be called CattleCount: one in
the Menagerie namespace and one in the Farm namespace. Thus their full
names would be Menagerie::CattleCount and Farm::CattleCount.
If you want to use only a portion of a namespace, you are free to do that, too.
With the Menagerie namespace that we declared earlier in this section, you
could do something like this outside the namespace:
using Menagerie::Oxen;
Oxen ollie;
(Notice that no namespace word appears after using.) The first line tells
the compiler about the name Oxen, and the second line creates an instance
of Oxen. Of course, if you have using namespace Menagerie, the using
Menagerie::Oxen isn’t very useful because the Oxen name is already available from the using namespace Menagerie line.
To understand how one name becomes a part of two namespaces, take a
look at Listing 2-3.
Creating Data
Strructures
Think of a using declaration as pulling a name into the current namespace.
Therefore a declaration such as using Menagerie::Oxen pulls the
name Oxen into the current namespace. The single name then lives in both
namespaces.
Book IV
Chapter 2
446
Naming Your Space
The standard namespace
Sooner or later, you’re going to encounter
something like this:
std::cout << “Hi” << std::endl;
You see this because normally cout, cin,
endl, and everything else that comes from
#include<iostream> is in a namespace
called std (which is short for standard). But
we find that line of code ugly. We don’t want to
write a namespace name and two colons every
time we want to write a cout or endl (or anything else from iostream, for that matter). So
what do you do to avoid it? You simply put
using namespace std;
at the beginning of your program, after the
include lines. Fortunately, the gcc compiler automatically recognizes the s t d
namespace, and you don’t need the using
namespace std; line. But if you’re using
other compilers (notably Borland C++Builder
or Microsoft Visual C++), you need to add
std:: before each cout and cin and endl
words or take the easier way out and use the
using namespace std; line. We prefer
the using namespace std; line. So if
you look at the code on the accompanying
CD-ROM, you see that line at the beginning of
every program.
Listing 2-3: Pulling Names into Other Namespaces
with the using Declaration
#include <iostream>
using namespace std;
namespace A
{
int X;
}
namespace B
{
using A::X;
}
int main()
{
A::X = 2;
cout << B::X << endl;
return 0;
}
Naming Your Space
447
This code has two namespaces, A and B. The first namespace, A, has a variable called X. The second namespace, B, has a using statement that pulls
the name X into that namespace. The single variable that lives inside A is
now part of both namespaces, A and B. main verifies this: It saves a value
in the X variable of A and prints the value in the X variable of B. And lo and
behold, the result on the screen is this:
2
Yes indeed, A::X and B::X refer to the same variable, thanks to the using
declaration!
Book IV
Chapter 2
Creating Data
Strructures
448
Book IV: Advanced Programming
Chapter 3: Constructors,
Destructors, and Exceptions
In This Chapter
✓ Writing constructors
✓ Using different kinds of constructors
✓ Writing destructors
✓ Understanding the order that takes place in construction and
destruction
✓ Throwing and catching exceptions
N
ow’s the time to seriously master C++. In this chapter, we talk about
three vital topics: constructors, destructors, and exceptions. Fully
understanding what goes on with constructors and destructors is very
important. The better you understand how constructors and destructors
work, the less likely you are to write code that doesn’t function the way that
you expected and the more likely you are to avoid bugs.
Exceptions are important also in that they let you handle error situations —
that is, you can handle problems when they do come up.
Many developers feel that constructors, destructors, and exceptions are
extremely simple. In fact, many developers would doubt that these three
topics could fill an entire chapter, but they can. After you read this chapter,
you should have a good mastery of constructors, destructors, and exceptions.
So without further ado, you can begin to construct your reading as you
destruct any old ways of programming, without exception.
Constructing and Destructing Objects
Classes are goofy little things. They like to have some say in how their
instances get started. But that’s okay. We’re programmers, and we like to do
what the computer wants us to do (as opposed to the other way around).
And so the great founders of the C++ language gave us constructors.
Constructors are member functions that the program calls when it creates an
instance. Destructors, on the other hand, are member functions that the program calls when it deletes an instance.
450
Constructing and Destructing Objects
A single class can have multiple constructors. In fact, several kinds of constructors are available. There aren’t as many kinds of destructors. (In fact,
there’s really only one.) In the sections that follow, we give you all the necessary information so that, when your classes want constructors, you will be
able to happily add them.
If you see some older C++ code, you are more than likely to see the word
virtual before a constructor in a class definition. The idea was that you can
override a constructor when you derive a new class, so you should make it
virtual. However, in ANSI C++, this construction is not right. You cannot
make a constructor virtual. If you put the word virtual before a constructor, you get a compiler error. If you see an older class that has a virtual constructor, create constructors as you normally would in the derived classes,
and all will be fine. (Unfortunately, all is not fine for those million or so C++
programmers who spent years writing code that had the word virtual
before a constructor. They get to practice using that Backspace key.)
Overloading constructors
You are allowed to put multiple constructors in your class. The way the user
of your class chooses a constructor is by setting up the parameters in the
variable declaration. Suppose you have a class called Clutter, and suppose
you see the following two lines of code:
Clutter inst1(“Jim”);
Clutter inst2(123, “Sally”);
These two lines have different types of parameters in the list. Each one is
making use of a different constructor for the single class.
You can put multiple constructors in your class. The process of putting multiple constructors is called overloading the constructors. Here’s an example
of a Clutter class that has two constructors:
class Clutter
{
protected:
string ChildName;
int Toys;
public:
Clutter(int count, string name)
{
ChildName = name;
Toys = count;
}
Clutter(string name)
{
ChildName = name;
Toys = 0;
}
};
Constructing and Destructing Objects
451
The compiler will figure out which overloaded constructor to use based
on the parameters. Therefore, the overloaded constructors must differ in
their parameter lists — specifically, this means the types of parameters; just
changing the names doesn’t count! If the parameter lists don’t differ, the
compiler won’t be able to distinguish them, and you will get an error when it
tries to compile the class definition.
If your constructor doesn’t have a parameter provided by other constructors, you should initialize the associated variable within the constructor
code. For example, the second constructor doesn’t include a parameter for
Toys, so the constructor code initializes this variable to 0. As an alternative,
you can use an initializer as described in the “Initializing members” section
of the chapter.
Having multiple constructors makes your class much more flexible and easy
to use. Multiple constructors give the users of your class more ways to use
the class, allowing them to configure the instances differently, depending
on their situations. Further, the constructors force the user to configure the
instances only in the ways your constructors allow.
Initializing members
When C++ originally came out, any time you wanted to initialize a member
variable, you had to put it inside a constructor. This created some interesting problems. The main problem had to do with references. You can put
reference variables in a class, but normally reference variables must be initialized. You can’t just have a reference variable floating around that doesn’t
refer to anything. But if you put a reference variable inside a class and create
an instance of the class, the program will first create the instance and then
call the constructor. Even if you initialize the reference in the first line of the
constructor, there’s still a moment when you have an uninitialized reference!
Oh, what to do, what to do?
The ANSI standard uses a single approach for setting up member variables:
initializers. An initializer goes on the same line as the constructor in the
class definition; or, if the constructor isn’t inline, the initializer goes with the
constructor in the code outside the class definition.
class MySharona
{
protected:
int OneHitWonders;
int NumberRecordings;
public:
MySharona() : OneHitWonders(1), NumberRecordings(10) {}
};
Constructors,
Destructors, and
Exceptions
Here’s an example where we have the initializers right inside the class definition:
Book IV
Chapter 3
452
Constructing and Destructing Objects
When you create an instance of this class, the OneHitWonders member
gets the value 1 and the NumberRecordings member gets the value 10.
Note the syntax: The constructor name and parameter list (which is empty
in this case) is followed by a single colon. The member variables appear
after that, each followed by an initial value in parentheses. Commas separate the member variables.
After the member variables is the open brace for any code you would want
in the constructor. In this case, we had no code, so we immediately put a
closing brace.
You can put any of the class member variables in the initializer list, but you
don’t have to include them all. If you don’t care to initialize some, you don’t
have to. Note also that you cannot put inherited members in the initializer
list; you can include only members that are in the class itself.
You can also pass these initial values in through the constructor. Here’s a
slightly modified version of this same class. This time the constructor has a
parameter that we save in the NumberRecordings member:
class MySharona
{
protected:
int OneHitWonders;
int NumberRecordings;
public:
MySharona(int Records) : OneHitWonders(1),
NumberRecordings(Records) {}
};
By associating an initializer list with a constructor, you can have different
initializers with different constructors. You are not limited to initializing the
data the same way for all your constructors.
You may have noticed that the member initialization follows a format similar
to the way you initialize an inherited constructor. Take a look at how we’re
calling the base class constructor in this code:
class MusicInfo
{
public:
int PhoneNumber;
MusicInfo(int Phone) : PhoneNumber(Phone) {}
};
class MySharona : public MusicInfo
{
protected:
int OneHitWonders;
int NumberRecordings;
public:
MySharona(int Records) : OneHitWonders(1),
NumberRecordings(Records),
MusicInfo(8675309) {}
};
Constructing and Destructing Objects
453
In the MySharona class, the member variables get initialized, and the base
class constructor gets called, all in the initialization. The call to the base
class constructor is this portion:
MusicInfo(8675309)
But note that we’re passing a number into the constructor. The MusicInfo
constructor takes a single number for a parameter, and it uses the number it
receives to initialize the Phone member:
MusicInfo(int Phone) : PhoneNumber(Phone) {}
Therefore, every time someone creates an instance of the class MySharona,
the inherited PhoneNumber member is automatically initialized to 8675309.
Thus, you can create an instance of MySharona like this:
MySharona CD(20);
This instance starts out having the member values OneHitWonders = 1,
NumberRecordings = 20, and Phone = 8675309. The only thing that the
user can specify here for a default value is the NumberRecordings member.
The other two members are set automatically by the class.
However, you don’t have to do it this way. Perhaps you want the users
of this class to be able to specify the PhoneNumber when they create an
instance. Here’s a modified form that does it for you:
class MusicInfo
{
public:
int PhoneNumber;
MusicInfo(int Phone) : PhoneNumber(Phone) {}
};
Look carefully at the difference: The MySharona class now has two parameters. The second is an integer, and we pass that one into the base class
through the portion:
MusicInfo(Phone)
So to use this class, you might do something like this:
MySharona CD(20, 5551212);
Book IV
Chapter 3
Constructors,
Destructors, and
Exceptions
class MySharona : public MusicInfo
{
protected:
int OneHitWonders;
int NumberRecordings;
public:
MySharona(int Records, int Phone) : OneHitWonders(1),
NumberRecordings(Records), MusicInfo(Phone) {}
};
454
Constructing and Destructing Objects
This code snippet creates an instance of MySharona, with the members
initialized to OneHitWonders = 1, NumberRecordings = 20, and
PhoneNumber = 5551212.
If you have overloaded constructors, you can have different sets of initializations. For example, take a look at yet one more modification to the class:
class MusicInfo
{
public:
int PhoneNumber;
MusicInfo(int Phone) : PhoneNumber(Phone) {}
};
class MySharona : public MusicInfo
{
protected:
int OneHitWonders;
int NumberRecordings;
public:
MySharona(int Records, int Phone) : MusicInfo(Phone),
OneHitWonders(1), NumberRecordings(Records) {}
MySharona(int Records) : MusicInfo(8675309),
OneHitWonders(1), NumberRecordings(Records)
{}
};
Now this class has two constructors. We combined the previous two versions, so now you can use either constructor. You can, then, have the following two variables, for example, each using a different constructor:
MySharona CD(20, 5551212);
MySharona OldCD(30);
cout << CD.PhoneNumber << endl;
cout << OldCD.PhoneNumber << endl;
When you run the cout lines, they have different values for the
PhoneNumber member. The first passes a specific value; the second accepts
a default value:
5551212
8675309
You should initialize the base class values first. Otherwise, the compiler is
likely to display warning messages when you compile the application.
If the only real difference in the different constructors is whether or not the
user supplies a value (as was the case in the previous example), you can use
a slightly better approach. Constructors (and any function in C++, really) can
have default values. The following example shortens the previous ones by
using default values. The result is the same:
Constructing and Destructing Objects
455
class MusicInfo
{
public:
int PhoneNumber;
MusicInfo(int Phone) : PhoneNumber(Phone) {}
};
class MySharona : public MusicInfo
{
protected:
int OneHitWonders;
int NumberRecordings;
public:
MySharona(int Records, int Phone=8675309) :
MusicInfo(Phone), OneHitWonders(1),
NumberRecordings(Records) {}
};
In the preceding code, the second parameter to the constructor has an
equals sign and a number after it. That means the user of the class doesn’t
have to specify this parameter. If the parameter is not present, it automatically gets the value 8675309.
You can have as many default parameters as you want in a constructor or
any other function, but the rule is that the default parameters must come at
the end. After you have a default parameter, all the parameters that follow
must have a default value. Therefore, the following type of code is not
allowed:
MySharona(int Records = 6, int Phone) :
MusicInfo(Phone), OneHitWonders(1),
NumberRecordings(Records) {}
There’s a practical reason for this: When the user calls the constructor (by creating a variable of type MySharona, there is no way to leave
out just a first parameter and have only a second one. It’s not possible,
unless C++ were to allow an empty parameter followed by a comma, as in
MySharona(,8675309). But that’s not allowed.
Adding a default constructor
You’ve probably seen a default constructor before. This class has no constructor, so the compiler generates an implicit one for you. It works like this:
Constructors,
Destructors, and
Exceptions
A default constructor is a constructor that takes no parameters. You can have
a default constructor in a class in either of two ways: by coding it or by letting the compiler implicitly build one for you. By implicitly build one for you,
we mean that you don’t actually have a constructor in your code, but the
compiler gives you one when it compiles the code for you.
Book IV
Chapter 3
456
Constructing and Destructing Objects
class Simple
{
public:
int x,y;
void Write()
{
cout << x << “ “ << y << endl;
}
};
Of course, the preceding class doesn’t do much. It’s the same as this:
class Simple
{
public:
int x,y;
void Write()
{
cout << x << “ “ << y << endl;
}
Simple() {}
};
However, recognizing that the default constructor is there is important.
And you need to realize when the compiler doesn’t create one automatically
because you may run into some problems. Take a look at this modified version of the class:
class Simple
{
public:
int x,y;
void Write()
{
cout << x << “ “ << y << endl;
}
Simple(int startx) { x = startx; }
};
We included in this code our own constructor that takes a parameter. After
we do this, the class no longer gets an implicit default constructor. If we
have a line later like this:
Simple inst;
the compiler will give us an error message like this:
In function `int main()’
error: no matching function for call to `Simple::Simple()’
note: candidates are: Simple::Simple(const Simple&)
note:
Simple::Simple(int)
Yet, if we take out the constructor we added (so it goes back to an earlier
example), this error goes away! Therefore, if you provide no constructors,
the compiler gives you an implicit default constructor.
Constructing and Destructing Objects
457
If you’re using the CodeBlocks compiler, you obtain some helpful additional
information. In this case, you see two note lines that tell you about the available constructor candidates. You can use this information as part of your
troubleshooting efforts.
Now here’s where you could run into trouble: Suppose you build a class and
provide no constructors for it. You give the class to other people to use.
They’re using it in their code, all happy, making use of the default constructor. Then one day somebody else (not you — you don’t make mistakes)
decides that he wants to enhance the class by adding a special constructor
with several parameters. The rogue programmer adds the constructor and
then makes use of it. Mr. Rogue thinks all is fine, because he’s using only
his new constructor. But little does he know: All the other people who were
using the implicit default constructor suddenly start getting compiler errors!
Believe it or not, we have seen this happen. One day, all of a sudden, your
code won’t compile. Any time you try to create an instance of a class, you
start getting errors stating that the compiler can’t find Simple::Simple().
Oops. Somebody changed it.
But you can avoid this problem by making sure that you explicitly include a
default constructor, even if it does nothing:
class Simple
{
public:
int x,y;
void Write()
{
cout << x << “ “ << y << endl;
}
Simple() {}
};
Then when Mr. Rogue adds his own constructor, the default constructor will
still be there (assuming, of course, that he doesn’t remove it. But if he does,
move him to that nice secluded inner office that has no windows and no
doors). When he adds his extra constructor, he will be overloading it:
Note that now this class has two constructors! And all will be happy,
because everybody’s code will still compile.
Constructors,
Destructors, and
Exceptions
class Simple
{
public:
int x,y;
void Write()
{
cout << x << “ “ << y << endl;
}
Simple() {}
Simple(int startx) { x = startx; }
};
Book IV
Chapter 3
458
Constructing and Destructing Objects
Functional constructors
Every once in a while, you may come across something that looks like this:
Simple inst = Simple(5);
What is that? It looks like a function call. Or it looks like the way you would
declare a pointer variable, except there’s no asterisk and no new word. So
what is it? It’s a functional syntax for calling a default constructor. The right
side creates a new instance of Simple, passing 5 into the constructor. Then
this new instance gets copied into the variable called inst.
This approach can be handy if you’re creating an array of objects, where the
array contains actual objects, not pointers to objects:
Simple MyList[] = { Simple(1), Simple(50), Simple(80),
Simple(100), Simple(150) };
The approach seems a little strange because the variable MyList is not
a pointer, yet you’re setting it equal to something on the right. But this
approach is handy because every once in a while you need a temporary variable. Listing 3-1 shows how you can use the functional syntax to create a
temporary instance of the class string.
Listing 3-1: Creating Temporary Instances with Functional
Constructors
#include <iostream>
#include <string>
using namespace std;
void WriteMe(string str)
{
cout << “Here I am: “ << str << endl;
}
int main()
{
WriteMe(string(“Sam”));
return 0;
}
When you compile and run this, you see this output:
Here I am: Sam
In main, we created a temporary instance of the string class. (Remember,
string is a class!) But as it turns out, an even shorter version of this is
available. If we had called WriteMe, we could have just done this:
WriteMe(“Sam”);
Constructing and Destructing Objects
459
This code works out well because you don’t even feel like you’re working
with a class called string. The parameter just seems like a basic type,
and you’re passing a character array, Sam. However, the parameter is an
instance of a class. Here’s how the code works. Suppose you have a class
like this, and a function to go with it:
class MyNumber
{
public:
int First;
MyNumber(int TheFirst) : First(TheFirst) {}
};
void WriteNumber(MyNumber num)
{
cout << num.First << endl;
}
(WriteNumber is not a member of MyNumber.) You can do any of the following calls to WriteNumber.
MyNumber prime = 17;
WriteNumber(prime);
WriteNumber(MyNumber(23));
WriteNumber(29);
The first call uses a previously declared variable of type MyNumber. The
second call creates a temporary instance, passing the value 23 into the
constructor. The third one also creates a temporary instance, but it does so
implicitly! The output from this example is
17
23
29
You may wonder when your temporary variables get destroyed. For
instance, if you call WriteNumber(MyNumber(23));, how long does the
temporary MyNumber instance live on? The ANSI standard proudly proclaims that the instance will get deleted at the end of the full expression. In
other words, after the line is done, the temporary instance will be done for.
class MyName
{
public:
string First;
MyName(string TheFirst) : First(TheFirst) {}
};
void WriteName(MyName name)
{
cout << “Hi I am “ << name.First << endl;
}
Constructors,
Destructors, and
Exceptions
Be careful when using implicit temporary objects. Consider the following
class and function:
Book IV
Chapter 3
460
Constructing and Destructing Objects
Seems straightforward. The MyName constructor takes a string, so it seems
like we should be able to do this when we call the WriteName function:
WriteName(“George”);
Except we can’t. The compiler gives us an error message:
In function `int main()’
error: conversion from `const char*’ to non-scalar type `MyName’ requested
Here’s the problem: The compiler got shortsighted. The compiler considers the type of the string constant a const char * (that is, a pointer to a
const character, or really a constant character array). Although we don’t
have any constructors that take a const char * parameter, we do have
one that takes a string, and it has a constructor that takes a const char
* parameter. Unfortunately, the compiler doesn’t fall for that, and it complains. So we have to adjust our function call just a tad, like so:
WriteName(string(“George”));
And this time it works. Now we explicitly create a temporary string instance.
And by using that, we implicitly create a temporary instance of our own class,
MyName. It would be nice if the compiler could wade through this and implicitly create the string instance for us, but it doesn’t seem to want to. Oh
well. Calling WriteName(string(“George”)); works well enough for us.
Calling one constructor from another
If you have some initialization code and you want several constructors to
call it, you might try putting the code in one constructor and then having the
other constructors call the constructor that has the initialization code.
Unfortunately, that won’t work. Some things in life we just can’t have, and
this is one of them. If you have a constructor and write code to call another
constructor, such as this
CallOne::CallOne(int ax)
{
y = 20;
CallOne();
}
where CallOne is your class, then this will compile but won’t behave the
way you may expect. The line CallOne(); is not calling a constructor for
the same instance! The compiler treats this line as a functional constructor.
Thus the line creates a separate, temporary instance. And then at the end of
the line CallOne(), the program deletes the instance.
Constructing and Destructing Objects
461
You can see this behavior with the following class:
class CallOne
{
public:
int x,y;
CallOne();
CallOne(int ax);
};
CallOne::CallOne()
{
x = 10;
y = 10;
}
CallOne::CallOne(int ax)
{
y = 20;
CallOne();
}
When you create an instance by using the second constructor like this, the
value of the y member of the instance will be 20, not 10:
CallOne Mine(10);
To people who don’t know any different, it may look like the y would first
get set to 20 in the second constructor, and then the call to the default
constructor would cause it to get changed to 10. But that’s not the case:
The second constructor is not calling the default constructor for the same
object; it’s creating a separate, temporary instance.
If you have common initialization code that you want in multiple constructors, put the code in its own private or protected function (called, for
example, Init), and have each constructor call the Init function. If you
have one constructor call another constructor, it won’t work. The second
constructor will be operating on a separate instance.
Copying instances with copy constructors
Copyable first;
Copyable second = first;
This will create two instances, and second will be a duplicate of first. The
program will accomplish this by simply copying all the member variables
from first to second.
Constructors,
Destructors, and
Exceptions
One nice thing about C++ is that it lets you copy instances of classes. For
example, if you have a class called Copyable, you can write code like this:
Book IV
Chapter 3
462
Constructing and Destructing Objects
That works pretty well, except sometimes you want to customize the behavior just a bit. For example, you may have a member variable that contains
a unique ID for each instance. In your constructor, you may have code that
generates a unique ID. The problem is that the previous sample will not call
your constructor: It will just make a duplicate of the object. Thus, your two
objects will have the same number for their supposedly “unique” IDs. So
much for diversity.
So if you want to have control over the copying, you can create a copy constructor. A copy constructor is just a constructor that takes as a parameter a
reference to another instance of the same class, as in this example:
Copyable(const Copyable& source);
When you copy an instance, your program will call this constructor. The
parameter to this constructor will be the instance you are copying. Thus,
in the case of Copyable second = first;, the source parameter will be
first. And because it’s a reference (which is required for copy constructors), you can access its members by using the dot notation (.) rather than
the pointer notation (->).
Listing 3-2 is a complete program that demonstrates copy constructors.
Listing 3-2: Customizing the Copying of Instances
#include <iostream>
using namespace std;
class Copyable
{
protected:
static int NextAvailableID;
int UniqueID;
public:
int SomeNumber;
int GetID() { return UniqueID; }
Copyable();
Copyable(int x);
Copyable(const Copyable& source);
};
Copyable::Copyable()
{
UniqueID = NextAvailableID;
NextAvailableID++;
}
Copyable::Copyable(int x)
{
UniqueID = NextAvailableID;
NextAvailableID++;
SomeNumber = x;
}
Constructing and Destructing Objects
463
Copyable::Copyable(const Copyable& source)
{
UniqueID = NextAvailableID;
NextAvailableID++;
SomeNumber = source.SomeNumber;
}
int Copyable::NextAvailableID;
int main()
{
Copyable take1 = 100;
Copyable take2;
take2.SomeNumber = 200;
Copyable take3 = take1;
cout << take1.GetID() <<
<< take1.SomeNumber
cout << take2.GetID() <<
<< take2.SomeNumber
cout << take3.GetID() <<
<< take3.SomeNumber
return 0;
“ “
<< endl;
“ “
<< endl;
“ “
<< endl;
}
Go ahead and run this application to see how it works. The output from this
example is
0 100
1 200
2 100
We need to tell you two things about the copy constructor in this code. First,
we included const in the parameter of the copy constructor. That’s because of
a small rule in C++ where, if you have a constant instance, you won’t be able
to copy it otherwise. If we left off const, this line would not compile properly. And as it happens, that’s the case in the following line:
Copyable take1 = 100;
Listing 3-2 uses a static member to keep track of what the next available UniqueID is. Remember that a class shares a single static member
among all instances of the class. Therefore, you have only one instance of
NextAvailableID, and it’s shared by all the instances of class Copyable.
For a long, happy life
✦ Put a const in your copy constructor.
✦ Copy the items manually.
Book IV
Chapter 3
Constructors,
Destructors, and
Exceptions
The second thing we need to tell you is that, in the code for the copy constructor, we had to manually copy the member variables from one instance
to the other. That’s because now that we’re supplying our own copy constructor, the computer will not copy the members as it would when we
supply no copy constructor at all.
464
Constructing and Destructing Objects
When constructors go bad: failable constructors?
Suppose that you’re writing a class that will connect to the Internet and
automatically download the latest weather report for the country of Upper
Zamboni. The question is this: Do you put the code to connect to the
Internet in the constructor or not?
People are often faced with this common design issue. Putting the initialization code in the constructor provides many advantages. For one, you can just
create the instance without having to first create it and then call a separate
member function that does the initialization. And in general, that works fine.
But what if that initialization code can result in an error? For example, suppose that the constructor is unable to connect to the Internet. Then what?
Remember: A constructor doesn’t return a value. So you can’t have it return,
for example, a bool that would state whether it successfully did its work.
You have many choices for this, and different people seem to have rather
strong opinions about which choice is best. (Programmers with strong opinions? Now there’s an unlikely concept.) Here are the ones we’ve seen:
✦ Just don’t do it: Write your constructors so they create the object but
don’t do any work. Instead, put the work code in a separate member function, which can return a bool representing whether it was successful.
✦ Let the constructor do the work: If the work fails (such as it can’t connect to the Internet), have the constructor save an error code in a
member variable. When you create an instance, you can check the
member variable to see whether it works.
✦ Let the constructor do the work: If the work fails, throw an exception.
In your code, then, you would wrap the creation of the instance with
a try block and include an exception handler. (See “Programming the
Exceptions to the Rule,” later in this chapter, for more information on
try blocks and exception handlers.)
We don’t like this choice. If other people are using the class that we
wrote, we don’t want them to have to go through the motions of wrapping it in a try block and exception handler. But other than being a nice
guy, there’s a practical reason for avoiding this choice: If we have teammates who are beginners at programming, they may just skip that part.
“Oh shoot. It’ll never fail,” might be their attitude. And when it does fail
on a customer’s computer (if it can, then it will, Mr. Murphy!) the customer will be very unhappy that his or her program couldn’t connect to
the Internet and crashed.
Constructing and Destructing Objects
465
Destroying your instances
Although constructors are versatile and it seems like people could write
entire books on them (good for family story time reading), destructors are
simple, and there’s not a whole lot to say about them. But you do need to
know some information to make them work properly.
First, destructors don’t get parameters, and (like constructors) they do not
have return types. So not much more to say about that.
Suppose you have a class that contains, as members, instances of other
classes. When you delete an instance of the main class, will the contained
instances be deleted automatically? That depends. If your class contains
actual instances (as opposed to pointers), they will get deleted. Look at this
code:
class LittleInst
{
public:
int MyNumber;
~LittleInst() { cout << MyNumber << endl; }
};
class Container
{
public:
LittleInst first;
LittleInst *second;
Container();
};
Container::Container()
{
first.MyNumber = 1;
second = new LittleInst;
second->MyNumber = 2;
}
Now suppose you use these classes like so:
Container *inst = new Container;
delete inst;
Book IV
Chapter 3
Constructors,
Destructors, and
Exceptions
We have two classes, LittleInst and Container. The Container class
holds an instance of LittleInst (the member variable called first) and a
pointer to LittleInst. In the constructor we set up the two LittleInst
instances. For first, it already exists, and all we have to do is set up its
MyNumber member. But second is just a pointer, so we have to create the
instance before we can set up its MyNumber member. Thus, we have two
instances, one a pointer and one a regular instance.
466
Constructing and Destructing Objects
We gave Container no destructor. So will its members, first and second,
get destroyed? Here’s what we see after these two lines run:
1
That’s the output from the LittleInst destructor. The number 1 goes with
the first member. So you can see that first was deleted, but second
wasn’t.
Here’s the rule: When you delete an instance of a class, the members that
are direct (that is, not pointers) are deleted as well. Any pointers, however,
you must manually delete in your destructor (or elsewhere).
Sometimes, you may want an object to hold an instance of another class but
want to keep the instance around after you delete the containing object. In
that case, you wouldn’t delete the other instance in the destructor.
Here’s a modification to the Container class that deletes the second
instance:
class Container
{
public:
LittleInst first;
LittleInst *second;
Container();
~Container() { delete second; }
};
Then when you run these two lines again
Container *inst = new Container;
delete inst;
you see this output, which deletes both instances:
2
1
In the preceding output, you can see that it deleted the second instance
first. The reason is that the program calls the destructor before it destroys
the direct members. In this case, when we deleted our Container instance,
the program first called our destructor before deleting our first member.
That’s actually a good idea, because in the code for our destructor, we may
want to do some work on our member variables before they get wiped out.
Virtually inheriting destructors
Unlike constructors, you can (and should) make destructors virtual. The
reason is that you can pass an instance of a derived class into a function that
takes a base class, like this:
Constructing and Destructing Objects
467
void ProcessAndDelete(DeleteMe *inst)
{
cout << inst->Number << endl;
delete inst;
}
This function takes an instance of class DeleteMe, does some work on it,
and deletes it. Now suppose you have a class derived from DeleteMe, say
class Derived. Because of the rules of inheritance, you’re allowed to pass
the instance of Derived into this function. But by the rules of polymorphism,
if you want the ProcessAndDelete function to call an overloaded member
function of Derived, you need to make the member function virtual. And
that’s the case with all destructors as well. Listing 3-3 shows this.
Listing 3-3: Making the Destructors Virtual
#include <iostream>
using namespace std;
class DeleteMe
{
public:
int Number;
virtual ~DeleteMe();
};
class Derived : public DeleteMe
{
public:
virtual ~Derived();
};
DeleteMe::~DeleteMe()
{
cout << “DeleteMe::~DeleteMe()” << endl;
}
Derived::~Derived()
{
cout << “Derived::~Derived()” << endl;
}
int main()
{
DeleteMe *MyObject = new(Derived);
MyObject->Number = 10;
ProcessAndDelete(MyObject);
return 0;
}
Constructors,
Destructors, and
Exceptions
void ProcessAndDelete(DeleteMe *inst)
{
cout << inst->Number << endl;
delete inst;
}
Book IV
Chapter 3
468
Constructing and Destructing Objects
Ordering your constructors and destructors
When you have constructors and destructors
in a base and derived class and you create
an instance of the derived class, remember
the ordering: The computer first creates the
members for the base class, and then the computer calls the constructor for the base class.
Next, the computer creates the members of the
derived class, and then the computer calls the
constructor for the derived class.
The order for destruction is opposite. When
you destroy an instance of a base class, first
the computer calls the destructor for the
derived class and then deletes the members of
the derived class. Next the computer calls the
destructor for the base class and then deletes
the members of the base class.
When you run this program, thanks to the cout calls in the destructors,
delete is calling the destructor for Derived (which in turn calls the base
class destructor). Here’s the output:
10
Derived::~Derived()
DeleteMe::~DeleteMe()
The first line is the output from the ProcessAndDelete function. The
middle line is the output from the Derived destructor, and the third line
is the output from the DeleteMe destructor. We passed in a Derived
instance, and the program called the Derived destructor.
Now try this: Remove virtual from the DeleteMe destructor:
class DeleteMe
{
public:
int Number;
~DeleteMe();
};
Then when you compile and run the program, the program calls the
base class destructor. Because the ProcessAndDelete function takes a
DeleteMe instance, you see this output:
10
DeleteMe::~DeleteMe()
In the preceding example, the destructor isn’t virtual; it’s not able to find the
proper destructor when you pass in a Derived instance. So it just calls the
destructor for whatever type is listed in the parameter.
Programming the Exceptions to the Rule
469
Getting into the habit of always making your destructors virtual is a good
idea. That way, if somebody else writes a function, such as
ProcessAndDelete, you can be assured that his or her function will automatically call the correct destructor.
Programming the Exceptions to the Rule
An exception is a bad situation that occurs in your software, causing your
program to have to handle the bad situation. For example, if you try to write
to a file but somehow that file got corrupted and you can’t, the operating
system might throw an exception. Or you might have a function that processes some data, and if the function encounters corrupted data, it might
throw an exception.
Exceptions were new to C++; they did not exist in C. People were a little suspicious of them when they first came out, and some people even consider
them to be Bad (that’s with a capital B). The reason is this: People who
oppose exceptions feel that writing code that relies too heavily on exceptions is too easy. But you should use them because they help you handle
situations that you might not otherwise anticipate.
Listing 3-4 is an example of a function that we wrote that throws an exception and an entire program that uses the function.
Listing 3-4: Throwing and Catching Exceptions
#include <iostream>
#include <string>
using namespace std;
void ProcessData()
{
throw new string(“Oops, I found some bad data!”);
}
Book IV
Chapter 3
Constructors,
Destructors, and
Exceptions
int main()
{
try
{
ProcessData();
cout << “No problems!” << endl;
}
catch (string *excep)
{
cout << “Found an error. Here’s the message.”;
cout << endl;
cout << *excep;
cout << endl;
}
(continued)
470
Programming the Exceptions to the Rule
Listing 3-4: (continued)
cout << “All finished.” << endl;
return 0;
}
Go ahead and run this application. You see the following text as output:
Found an error. Here’s the message.
Oops, I found some bad data!
All finished.
Look closely at what this program does. In main, there’s a call to
ProcessData, which we put inside a try block. Because the call is inside
a try block, the computer calls the function; and if the function throws an
exception, the program automatically comes back out of the function and
goes into the catch block. The catch block receives the item that was
thrown as a parameter, much like a parameter to a function.
But if the ProcessData function didn’t encounter any problems and therefore didn’t throw an exception, the function will complete its work and the
program will continue with the code after the function call. In this case, one
more line is inside the try block. If there was no exception, upon completion of the ProcessData function, the computer will do the cout line after
the ProcessData call.
Think of an exception handler as a way to catch errors: If an exception gets
thrown, your program can catch the error by including a catch block.
After the try/catch block is complete, the program will run any lines that
follow, regardless of whether or not an exception was present. Thus, in all
cases, Listing 3-4 will execute the line
cout << “All finished.” << endl;
Now in the listing, note that our ProcessData function calls throw, meaning that it generates an exception. Normally, you probably wouldn’t just
have a function throw an exception for no reason, as this function does
(unless you’re trying to have fun with your users), but we do that just to
demonstrate how the exceptions work. And besides, this is fun!
This particular throw looks like this:
throw new string(“Oops, I found some bad data!”);
We create a new string instance, and that’s what we throw. You can create
an instance of any class you want, and it can be either a pointer or a direct
instance, depending on whether you prefer to work with pointers or references (it’s your choice).
Programming the Exceptions to the Rule
471
Now look at the catch block in Listing 3-4. Notice that it starts with this:
catch (string *excep)
Because in the function we threw a pointer to a string instance, here we
catch a pointer to a string instance. Everything must match.
You can have more than one catch block. Suppose different types of exceptions could get thrown. For example, you might have another function like
this:
void ProcessMore()
{
throw new int(10);
}
Whereas the other function threw a pointer to a string, this throws a pointer
to an integer. Watch out! Lots of things getting thrown around!
Then, when you call the two functions, your try/catch block can look like
this:
try
{
ProcessData();
ProcessMore();
cout << “No problems!” << endl;
}
catch (string *excep)
{
cout << “Found an error. Here’s the message.”;
cout << endl;
cout << *excep;
cout << endl;
}
catch (int *num)
{
cout << “Found a numerical error. Here it is.”;
cout << endl;
cout << *num;
cout << endl;
}
cout << “All finished.” << endl;
Constructors,
Destructors, and
Exceptions
If you add this code and the ProcessMore function to Listing 3-4, you probably want to comment out the throw line from the ProcessData function if
you want to see this program handle the integer exception. That’s because
the execution of the lines in the try block cease as soon as a throw statement occurs, and control will be transferred to the appropriate catch block.
Which catch block depends on the type of the object thrown.
Book IV
Chapter 3
472
Programming the Exceptions to the Rule
Throwing direct instances
You can throw a direct instance that is not a pointer. In your throw line, you
would do this
void ProcessData()
{
throw string(“Oops, I found some bad data!”);
}
or this
void ProcessMore()
{
throw 10;
}
Instead of throwing pointers, we’re throwing the object or value itself. In the
catch block, then, you can catch the type itself without a pointer:
try
{
ProcessData();
ProcessMore();
}
catch (string excep)
{
cout << excep;
}
catch (int num)
{
cout << num;
}
Or if you prefer, you can use references in the catch block. (The throw line
does not change.)
try
{
ProcessData();
ProcessMore();
}
catch (string &excep)
{
cout << excep;
}
catch (int &num)
{
cout << num;
}
You may notice something just a little strange. For the integer version, the
throw statement looks like this:
throw 10;
Programming the Exceptions to the Rule
473
That is, the line of code is throwing a value, not an object. But the catch
line looks like this:
catch (int &num) {
The catch statement is catching a reference. Normally you can have references to only variables, not values! But it works here because inside the
computer, the program makes a temporary variable, and that’s what you’re
referring to in the catch block. So all is fine.
Catching any exception
If you want to write a general catch handler that will catch any exception
and you don’t care to actually catch the object that was thrown, you can
write your handler like this:
try
{
ProcessData();
ProcessMore();
cout << “No problems!” << endl;
}
catch (...)
{
cout << “An unknown exception occurred.” << endl;
}
That is, instead of putting what is effectively a function parameter in the
catch header, you just put three dots, called an ellipsis.
Some word processors (Microsoft Word being one) can transform three
typed periods into a single ellipses character. Don’t paste that character into
the code editor because the compiler won’t know what to do with it. Instead,
type three periods.
You can use the ellipses also as a general exception catcher in addition to
your other handlers. Here’s an example:
try
{
}
catch (string excep)
{
cout << “Found an error. Here’s the message.”;
cout << endl;
cout << excep;
cout << endl;
}
catch (int num)
Constructors,
Destructors, and
Exceptions
ProcessData();
ProcessMore();
cout << “No problems!” << endl;
Book IV
Chapter 3
474
Programming the Exceptions to the Rule
{
cout
cout
cout
cout
<<
<<
<<
<<
“Found a numerical error. Here it is.”;
endl;
num;
endl;
}
catch (...)
{
cout << “An unknown exception occurred.” << endl;
}
If your function calls throw an exception and you don’t have any exception
handler for it (because your catch blocks don’t handle the type of exception being thrown or you don’t have any try/catch blocks), your program
will stop. The gcc compiler that comes with CodeBlocks, Dev-C++, MinGW,
and Cygwin prints the following message on the console and then immediately terminates the program:
abnormal program termination
That’s not good at all! Imagine the looks on your users’ faces if they saw this.
We know that we wouldn’t want to be standing there with them, knowing
that we’re the ones who wrote the program.
Visual C++ also prints this same message but shows it in a message box.
Borland C++ Builder shows the same message, too, and writes it to the
console.
Two programming rules keep your users happily ignorant of exceptions:
✦ Know when you are calling a function that could throw an exception.
✦ When you are calling a function that could throw an exception, include
an exception handler.
It doesn’t matter how deep the exception is thrown; somewhere, somebody needs to catch it. A function could call a function that calls a function that calls a function that calls a function that throws an exception.
If no intermediate function has an exception handler, put one in your
outer function.
Rethrowing an exception
When inside a catch block, a throw statement without anything after it will
simply rethrow the same exception. Although this may seem a bit convoluted (and indeed it can be), you may have a function that contains a try/
catch block. But this function might also be called by another function that
has a try/catch block. In other words, you might have something like this:
Programming the Exceptions to the Rule
475
#include <iostream>
using namespace std;
void Inner()
{
throw string(“Error!”);
}
void Outer()
{
try
{
Inner();
}
catch (string excep)
{
cout << “Outer caught an exception: “;
cout << excep << endl;
throw;
}
}
int main()
{
try
{
Outer();
}
catch (string excep)
{
cout << “main caught an exception: “;
cout << excep << endl;
}
return 0;
}
In the preceding code, main calls Outer. Outer, in turn, calls Inner. Inner
throws an exception, and Outer catches it. But main also wants to catch
the exception. So we had inner rethrow the exception. You do that by calling
throw without anything after it, like this:
throw;
Book IV
Chapter 3
When you run this program, you see the following output.
Constructors,
Destructors, and
Exceptions
Outer caught an exception: Error!
main caught an exception: Error!
476
Book IV: Advanced Programming
Chapter 4: Advanced Class Usage
In This Chapter
✓ Using polymorphism effectively
✓ Adjusting member access between private, protected, and public when
deriving new classes
✓ Multiple-inheriting new classes
✓ Making virtual inheritance work correctly
✓ Keeping your friends straight, especially in class
✓ Putting one class or type inside another
C
lasses are amazingly powerful. You can do so much with them. In this
chapter, we talk about many of the extra features you can use in your
classes. But these aren’t just little extras that you may want to use on occasion. If you follow the instructions in this chapter, you should find that your
understanding of classes in C++ will greatly improve, and you will want to
use many of these topics throughout your programming.
We also talk about many issues that come up when you are deriving new
classes and inheriting members. This discussion includes virtual inheritance
and multiple inheritance, topics that people mess up a lot. We describe the
ways you can put classes and types inside other classes, too.
Inherently Inheriting Correctly
Without inheritance, doing object-oriented programming would be nearly
impossible. Yes, you could divide your work into objects, but the real power
comes from inheritance. However, you have to be careful when using inheritance, or you can really mess things up. In the sections that follow, we talk
about different ways to use inheritance and how to keep it all straight.
Morphing your inheritance
Polymorphism refers to using one object as an instance of a base class.
For example, if you have the class Creature and from that you derive the
class Platypus, you can treat the instances of class Platypus as if they’re
instances of class Creature. This concept is useful if you have a function
that takes as a parameter a pointer to Creature. You can pass a pointer to
Platypus.
478
Inherently Inheriting Correctly
However, you can’t go further than that. You can’t take a pointer to a pointer
to Creature. (Remember: When you say a “pointer to a pointer,” the first
pointer really means “the address of the second pointer variable.” We need
to phrase things like that, or our brains might explode under certain situations.)
So if you have a function such as this:
void Feed(Creature *c)
{
cout << “Feed me!” << endl;
}
you are free to pass the address of a Platypus object, as in the following:
Platypus *plato = new Platypus;
Feed(plato);
With a function that takes the address of a pointer variable, like this:
void Eat(Creature **c)
{
cout << “Feed me!” << endl;
}
(note the two asterisks in the parameter), you cannot pass the address of a
pointer to a Platypus instance, as in this example:
Platypus *plato = new Platypus;
Eat(&plato);
If you try to compile this code, you get a compiler error.
You don’t always use polymorphism when you declare a variable. If you do,
you would be declaring variables like this:
Creature *plato = new Platypus;
The type plato is a pointer to Creature. But the object is a Platypus.
You can do this because a pointer to a base class can point to an object of
a derived class. But now the compiler thinks that plato is a pointer to a
Creature instance, so you can’t use plato to call a member function of
Platypus — you can use plato to call only members of Creature! For
example, if your two classes look like this:
class Creature
{
public:
void EatFood()
{
cout << “I’m eating!” << endl;
}
};
Inherently Inheriting Correctly
479
class Platypus : public Creature
{
public:
void SingLikeABird()
{
cout << “I’m siiiiiinging in the rain!” << endl;
}
};
the following would not work:
Creature *plato = new Platypus;
plato->SingLikeABird();
Although the first line would compile, the second wouldn’t. When the
compiler gets to the second line, it thinks that plato is only an object
of class type Creature. And Creature does not have a member called
SingLikeABird, so the compiler gets upset. You can fix the situation by
casting like this:
Creature *plato = new Platypus;
static_cast <Platypus *>(plato)->SingLikeABird();
If you save work and start by declaring plato as what it is:
Platypus *plato = new Platypus;
plato->SingLikeABird();
You may need to do it at times. For example, you may have a variable that
can hold an instance of an object or its derived object. Then you would have
to use polymorphism, as in the following code:
Creature *plato;
if (HasABeak == true)
{
plato = new Platypus;
}
else
{
plato = new Creature;
}
But if you use an if statement like that, you shouldn’t follow it with a call to
SingLikeABird, even if you cast it:
static_cast <Platypus *>(plato)->SingLikeABird();
Advanced
Class Usage
In this code, we have a pointer to Creature. In that pointer, we store the
address of either a Platypus instance or a Creature instance, depending
on what’s in the HasABeak variable.
Book IV
Chapter 4
480
Inherently Inheriting Correctly
The reason is that if the else clause took place and plato holds an
instance of Creature, not Platypus, then the Creature instance won’t
have a SingLikeABird member function. Either you get some type of error
message when you run the program or you don’t, but the program will mess
up later. And those messing-up-later errors are the worst kind to try to fix.
Adjusting access
You may have a class that has protected members; and in a derived class,
you may want to make the member public. You do this by adjusting the
access. You have two ways to do this: One is the older way, and the other is
the newer ANSI way. If your compiler supports the newer way, the creators
of the ANSI standard ask that you use the ANSI way.
In the following classes, Secret has a member, X, that is protected. The
derived class, Revealed, makes the member X public. Here’s the older way:
class Secret
{
protected:
int X;
};
class Revealed : public Secret
{
public:
Secret::X;
};
We declared the member X: We used the base classname, two colons,
and then the member name. We didn’t include any type information; that
was implied. So in the class Secret, the member X is protected. But in
Revealed, it is public.
Here’s the ANSI way. We’ve thrown in the word using. Otherwise, it’s the
same:
class Secret
{
public:
int X;
};
class Revealed : public Secret
{
public:
using Secret::X;
};
And now, when you use the Revealed class, the inherited member X is
public (but X is still protected in the base class, Secret).
Inherently Inheriting Correctly
481
If you want to make a protected member public in a derived class, don’t just
redeclare the member. If you do, you end up with two member variables of
the same name within the class; and needless to say, that can be confusing!
Take a look at the following two classes:
class Secret
{
protected:
int X;
public:
void SetX()
{
X = 10;
}
void GetX()
{
cout << “Secret X is “ << X << endl;
}
};
class Revealed : public Secret
{
public:
int X;
};
The Revealed class has two int X members! Suppose you try this code
with it:
Revealed me;
me.SetX();
me.X = 30;
me.GetX();
The first line declares the variable. The second line calls SetX, which stores
10 in . . . which variable? The inherited X, because SetX is part of the base
class! The third line stores 10 in . . . which one? The new X declared in the
derived class! So then GetX is again part of the base class, but will it print 10
or 30? It will print 10!
Now think about this: Suppose you have a class that has several public members, and when you derive a new class, you want all the public members to
become protected, except for one. You can do this task in a couple of ways.
Advanced
Class Usage
Personally, having two member variables of the same name is downright
confusing. (Fortunately, our brains didn’t quite explode because we’re still
here, writing away.) We think that it would be best if the compiler didn’t
allow you to have two variables of the same name. But even though the
compiler allows it, that doesn’t mean you should do it; having two variables
of the same name is a perfect way to increase the chances of bugs creeping
into your program.
Book IV
Chapter 4
482
Inherently Inheriting Correctly
You could adjust the access of all the members except for the one you want
left public. Or if you have lots of members, you can take the opposite
approach. Look at this code:
class Secret
{
public:
int Code, Number, SkeletonKey, System, Magic;
};
class AddedSecurity : protected Secret
{
public:
using Secret::Magic;
};
Notice what we did: We derived the class as protected, as you can see in
the header line for the AddedSecurity class. That means all the inherited public members of Secret will be protected in the derived class. But
then we promoted Magic back to public by adjusting its member access.
Thus, after all is said and done, Magic is the only public member of
AddedSecurity. All the rest are protected.
If you have a member that is private and you try to adjust its access to protected or public in a derived class, you quickly discover that the compiler
won’t let you do it. The reason is that the derived class doesn’t even know
about the member because the member is public. And because the derived
class doesn’t know about the member, you can’t adjust its access.
Returning something different, virtually speaking
Two words that sound similar and have similar meanings but are, nevertheless, different are overload and override. Although both words appear in
movies (“Danger, danger! The system is overloaded, so we need to override
the built-in security!”), they’re less glamorous in computer programming.
But the real danger that results in an overloading of your brain is in confusing the two words where one meaning overrides the other. Whew!
So first, let us clarify: To override means to take an existing function in a
base class and give the function new code in a derived class. The function in
the derived class has the same prototype as the base class: It takes the same
parameters and returns the same type.
To overload means to take a function and write another function of the same
name that takes a different set of parameters. An overloaded function can
optionally return a different type, but the parameters must be different,
whether in number or type or both. The overloaded function can live in the
same class or in a derived class. The idea here is to create what appears to be
a single function that can take several types of parameters. For example, you
may have a function called Append that works on strings. By using Append,
you would be able to append a string to the end of the string represented by
Inherently Inheriting Correctly
483
the instance, or you could append a single character to the end of the string
represented by the instance. Now, although it feels like one function called
Append, really you would implement it as two separate functions, one that
takes a string parameter and one that takes a character parameter.
In this section, we talk about one particular issue dealing with overriding
functions (that is, replacing a function in a derived class). We said something a few paragraphs back that many others have said: We mentioned that
the function must have the same parameter types and must return the same
type.
A situation exists under which you can violate this rule, although only
slightly. You can violate the rule of an overridden function returning the
same type as the original function if all three of the following are true:
✦ The overridden function returns an instance of a class derived from the
type returned by the original function.
✦ You return either a pointer or a reference, not an object.
✦ If you return a pointer, the pointer doesn’t refer to yet another pointer.
Typically, you want to use this approach when you have a container class
that holds multiple instances of another class. For example, you may have
a class called Peripheral. You may also have a container class called
PeripheralList, which holds instances of Peripheral. You may later
derive a new class from Peripheral, called Printer, and a new class from
PeripheralList, called PrinterList. If PeripheralList has a function
that returns an instance of Peripheral, you would override that function in
PrinterList. But instead of having it return an instance of Peripheral,
you would have it return an instance of Printer.
We did exactly this in Listing 4-1.
Listing 4-1: Overriding and Returning a Derived Class
Book IV
Chapter 4
#include <iostream>
#include <string>
#include <map>
Advanced
Class Usage
using namespace std;
class Peripheral
{
public:
string Name;
int Price;
int SerialNumber;
Peripheral(string aname, int aprice, int aserial) :
Name(aname), Price(aprice),
SerialNumber(aserial) {}
(continued)
484
Inherently Inheriting Correctly
Listing 4-1 (continued)
};
class Printer : public Peripheral
{
public:
enum PrinterType {laser, inkjet};
PrinterType Type;
Printer(string aname, PrinterType atype, int aprice,
int aserial) : Type(atype),
Peripheral(aname, aprice, aserial) {}
};
typedef map<string, Peripheral *> PeripheralMap;
class PeripheralList
{
public:
PeripheralMap list;
virtual Peripheral *GetPeripheralByName(string name);
void AddPeripheral(string name, Peripheral *per);
};
class PrinterList : public PeripheralList
{
public:
Printer *GetPeripheralByName(string name);
};
Peripheral *PeripheralList::GetPeripheralByName
(string name)
{
return list[name];
}
void PeripheralList::AddPeripheral(string name, Peripheral *per)
{
list[name] = per;
}
Printer *PrinterList::GetPeripheralByName(string name)
{
return static_cast<Printer *>(
PeripheralList::GetPeripheralByName(name));
}
int main(int argc, char *argv[])
{
PrinterList list;
list.AddPeripheral(string(“Koala”),
new Printer(“Koala”, Printer::laser,
150, 105483932)
);
list.AddPeripheral(string(“Bear”),
new Printer(“Bear”, Printer::inkjet,
80, 5427892)
);
Inherently Inheriting Correctly
485
Printer *myprinter = list.GetPeripheralByName(“Bear”);
if (myprinter != 0)
{
cout << myprinter->Price << endl;
}
return 0;
}
We used a special type called map, which is simply a container or list that
holds items in pairs. The first item in the pair is called a key, and the second
item is called a value. You can then retrieve items from the map based on the
key. In this example, we’re storing peripherals (the value) based on a name,
which is a string (the key). To create the map, we use a typedef and specify
the two types involved: first the key and then the value. The key is a string,
and the value is a pointer to Peripheral. The typedef, then, looks like
this:
typedef map<string, Peripheral *> PeripheralMap;
This creates a type of a map that enables us to store a set of Peripheral
instances, and we can look them up based on a name. To put an item in the
map, we use a notation similar to that of an array, where list is the map,
name is a string, and per is a pointer to Peripheral. The key goes inside
square brackets, like this:
list[name] = per;
To retrieve the item, we simply refer to the map using brackets again, as in
this line from the listing:
return list[name];
Even though we overrode it, we’re allowed to return from the function a
slightly different (but related) type. And it works!
Book IV
Chapter 4
Advanced
Class Usage
In Listing 4-1, we have a Peripheral class, and from that we derive a
Printer class. We then have a container class that we created called
PeripheralList, and from that we derived a class called PrinterList.
The idea is that the PrinterList holds only instances of the class called
Printer. So in the code, we overrode the GetPeripheralByName function. The version inside PrinterList casts the item to a Printer. We did
this because the items in the list are instances of PeripheralList. But if
we were to leave this function as is, then every time we want to retrieve a
Printer, we would get back a pointer to a Peripheral instance, and we
would have to cast it to a (Printer *) type. But that’s annoying. We don’t
want to have to do that every time because we’re lazy. Instead, we overrode
the GetPeripheralByName function and did the cast right in there.
486
Inherently Inheriting Correctly
The code in Listing 4-1 has a small bug: Nothing is stopping you from putting
an instance of Peripheral in the PrinterList container. Or, for that
matter, you could put an instance of any other class derived from
Peripheral if there were more. But when we retrieve the instance in the
GetPeripheralByName, we automatically cast it to a Printer. That would
be a problem if somebody had stuffed something else in there other than a
Printer instance. To prevent that, create a special AddPeripheral function for the PrinterList class that takes, specifically, a Printer. To do
that, you would make the AddPeripheral function in PrinterList virtual
and then override it, modifying the parameter to take a Printer rather than
a Peripheral. When you do so, you will hide the function in the base class.
But that’s okay: You don’t want people calling that one because that can
take any Peripheral, not just a Printer instance. When you run this
application, you should get an output value of 80.
Multiple inheritance
In C++, having a single base class from which your class inherits is generally
best. However, it is possible to inherit from multiple base classes, a process
called multiple inheritance.
One class may have some features that you want in a derived class, and
another class may have other features you want in the same derived class. If
that’s the case, you can inherit from both through multiple inheritance.
Multiple inheritance is messy and difficult to pull off properly. But when
used with care, you can make it work.
Listing 4-2 is a complete example of multiple inheritance.
Listing 4-2: Deriving from Two Different Classes
#include <iostream>
using namespace std;
class Mom
{
public:
void Brains()
{
cout << “I’m smart!” << endl;
}
};
class Dad
{
public:
void Beauty()
{
cout << “I’m beautiful!” << endl;
}
};
Inherently Inheriting Correctly
487
class Derived : public Mom, public Dad
{
};
int main(int argc, char *argv[])
{
Derived child;
child.Brains();
child.Beauty();
return 0;
}
When you run this code, you see this output:
I’m smart!
I’m beautiful!
In the preceding code, the class Derived inherited the functions of both
classes Mom and Dad. Because it did, the compiler allowed us to call both
functions for the instance child. Also notice how we caused that to happen:
class Derived : public Mom, public Dad
We put the base classes to the right of the single colon as with a single inheritance, and we separated the classes with a comma. We also preceded each
class with the type of inheritance, in this case public.
As with single inheritance, you can use inheritance other than public. But
you don’t have to use the same access for all the classes. For example, the
following, although a bit confusing, is acceptable:
class Derived : public Mom, protected Dad
What this means is that the public members that are derived from Dad are
now protected in the class called Derived. This means users cannot call the
member functions inherited from Dad, nor can they access any member variables inherited from Dad. If you used this type of inheritance in Listing 4-2,
this line would no longer be allowed:
child.Beauty();
`void Dad::Beauty()’ is inaccessible
When you are working with multiple inheritance, be careful that you understand what your code is doing. Although it may compile correctly, it still
may not function correctly. That leads to the famous creepy crawling thing
called a bug.
Advanced
Class Usage
If you try to compile it, you will see the following error, because the Beauty
member is protected now:
Book IV
Chapter 4
488
Inherently Inheriting Correctly
Strange, bizarre, freaky things can happen with multiple inheritance. What
if both base classes have a member variable called Bagel. What happens if
you multiply derive a class from both of these classes? The answer is this:
The compiler gets confused. Suppose you enhance the two base classes with
a Bagel effect:
class Mom
{
public:
int Bagel;
void Brains()
{
cout << “I’m smart!” << endl;
}
};
class Dad
{
public:
int Bagel;
void Beauty()
{
cout << “I’m beautiful!” << endl;
}
};
class Derived : public Mom, public Dad
{
};
In the preceding code, each of the two base classes, Mom and Dad, has a
Bagel member. The compiler will let you do this. But if you try to access the
member as in the following code, you get an error:
Derived child;
child.Bagel = 42;
Here’s the error message we see in CodeBlocks:
Error: request for member `Bagel’ is ambiguous
Aha! We’re being ambiguous! It means the compiler isn’t sure which Bagel
we’re referring to: The one inherited from Mom or the one inherited from
Dad! If you write code like this, make sure you know which inherited member
you’re referring to. Now this is going to look bizarre, but we promise that it’s
correct. Suppose we’re referring to the Bagel inherited from Mom. Then we
can put the name Mom before the word Bagel, separated by two colons:
child.Mom::Bagel = 42;
Yes, that really is correct, even though it seems a little strange. And if we
want to refer to the one by Dad, we do this:
child.Dad::Bagel = 17;
Inherently Inheriting Correctly
489
Both lines compile properly because we’re removing any ambiguities.
When you use multiple inheritance, remove any ambiguities by specifying the
name of the base class. But don’t worry if you forget: The compiler will give
you an error message because it won’t know which item you’re referring to.
Virtual inheritance
At times, you may see the word virtual thrown in when deriving a new
class, as in the following:
class Diamond : virtual public Rock
This inclusion of virtual is to fix a strange problem that can arise. When
you use multiple inheritance, you can run into a crazy situation where you
have a diamond-shaped inheritance, as in Figure 4-1.
Rock
Diamond
Figure 4-1:
Using
diamond
inheritance
can be hard.
Jade
MeltedMess
Book IV
Chapter 4
Think about this: Suppose Rock has a public member called Weight.
Then both Diamond and Jade inherit that member. Now when you derive
MeltedMess and try to access its Weight member, you get an ambiguously
melted mess: The compiler claims that it doesn’t know which Weight you
are referring to: the one inherited from Diamond or the one inherited from
Advanced
Class Usage
In Figure 4-1, you can see the base class is Rock. From that we derived two
classes, Diamond and Jade. So far, so good. But then something strange
happened: We used multiple inheritance to derive a class MeltedMess from
Diamond and Jade. Yes, you can do this. But you have to be careful.
490
Inherently Inheriting Correctly
Jade. Now you know and we know that there should only be one instance
of Weight, because it came from a single base class, Rock. But the compiler
sees the situation differently and has trouble with it.
To understand how to fix the problem, recognize what happens when you
create an instance of a class derived from another class: Deep down inside
the computer, the instance has a portion that is itself an instance of the base
class. Now when you derive a class from multiple base classes, instances of
the derived class have one portion for each base class. Thus, an instance of
MeltedMess has a portion that is a Diamond and a portion that is a Jade,
as well as a portion for anything MeltedMess added that wasn’t inherited.
But remember, Diamond is derived from Rock. Therefore, Diamond has a
portion inside it that is a Rock. Similarly, Jade is derived from Rock. That
means Jade has a portion inside it that is a Rock.
And melting all these thoughts together, if an instance of MeltedMess has
both a Diamond in it and a Jade in it, and each of those in turn has a Rock
in it, then by the powers of logic vested in us, we declare that MeltedMess
must have two Rocks in it! And with each Rock comes a separate Weight
instance. Listing 4-3 shows the problem. In this listing, we declare the
classes Rock, Diamond, Jade, and MeltedMess.
Listing 4-3: Cracking up Diamonds
#include <iostream>
using namespace std;
class Rock
{
public:
int Weight;
};
class Diamond : public Rock
{
public:
void SetDiamondWeight(int newweight)
{
Weight = newweight;
}
int GetDiamondWeight()
{
return Weight;
}
};
class Jade : public Rock
{
public:
void SetJadeWeight(int newweight)
Inherently Inheriting Correctly
491
{
Weight = newweight;
}
int GetJadeWeight()
{
return Weight;
}
};
class MeltedMess : public Diamond, public Jade
{
};
int main(int argc, char *argv[])
{
MeltedMess mymess;
mymess.SetDiamondWeight(10);
mymess.SetJadeWeight(20);
cout << mymess.GetDiamondWeight() << endl;
cout << mymess.GetJadeWeight() << endl;
return 0;
}
There is one member called Weight, and it’s part of Rock. In the Diamond
class, we included two accessor methods, one to set the value of Weight
and one to get it. We did the same thing in the Jade class.
We derived the class MeltedMess from both Diamond and Jade. We created an instance of it and called the four member functions that access the
Weight member. First, we called the one for Diamond, setting Weight to
10. Then we called the one for Jade, setting the Weight to 20.
In a perfect world where each object only has one Weight, this would have
first set the Weight to 10 and then to 20. When we print it, we should see
20 both times. But we don’t. Here’s the output:
10
20
To fix it, add the word virtual when you inherit it. According to the ANSI
standard, you put virtual in the two middle classes. In our case, that
means Diamond and Jade. Thus, you need to modify the class headers back
in Listing 4-3 for Diamond and Jade to look like this:
class Diamond : virtual public Rock {
class Jade : virtual public Rock {
Book IV
Chapter 4
Advanced
Class Usage
When we asked the Diamond portion to cough up its Weight, we saw 10.
But when we asked the Jade portion to do the same, we saw 20. They’re different! Therefore, we have two different Weight members. That’s not a good
thing.
492
Inherently Inheriting Correctly
Polymorphism with multiple inheritances
If you have multiple inheritance, you can safely
treat your object as any of the base classes. In
the case of the diamond example, you can treat
an instance of MeltedMess as a Diamond
instance or as a Jade instance. For example,
if you have a function that takes as a parameter a pointer to a Diamond instance, you
can safely pass a pointer to a MeltedMess
instance. Casting also works: You can cast
a MeltedMess instance to a Diamond
instance or to a Jade instance. However, if
you do, we suggest using the static_cast
keyword, rather than the old C-style casts
where you simply put the type name in parentheses before the variable you are casting.
When you do that and then run the program, you find that you have only
one instance of Weight in the final class MeltedMess! It’s not such a mess
after all! Here’s the output after we made the change:
20
20
Now this makes sense: Only one instance of Weight is in the MeltedClass
object, so the following line changes the Weight to 10:
mymess.SetDiamondWeight(10);
Then the following line changes the same Weight to 20:
mymess.SetJadeWeight(20);
Then the following line prints the value of the one Weight instance, 20:
cout << mymess.GetDiamondWeight() << endl;
The following line again prints the value of the one Weight instance!
cout << mymess.GetJadeWeight() << endl;
With a diamond inheritance, use virtual inheritance in the middle classes to
clean them. Although you can also add the word virtual to the final class
(in the example’s case, that’s MeltedClass), you don’t need to.
Friend classes and functions
You may encounter a situation where you want one class to access the private and protected members of another class.
Using Classes and Types within Classes
493
Friends of a same class
Can an instance of a class access the private
and protected members of other instances of
the same class? Yes, the compiler allows you
to do it. Should you? That depends on your situation. Now think about how you would do that:
Inside a member function for a class you would
have a pointer to another instance of the same
class, perhaps passed in as a parameter. The
member function is free to modify any of its
members or the object passed in. For your situation, you may need to use friend classes,
but always be careful.
Normally, this isn’t allowed. But it is if you make the two classes best
friends. Okay, that sounds corny, but C++ gives us that word: friend.
Only use friend when you really need to. If you have a class, say Square,
that needs access to the private and protected members of a class called
DrawingBoard, you can add a line inside the class DrawingBoard that
looks like this:
friend class Square;
This will allow the member functions in Square to access the private and
protected members of any instance of type DrawingBoard. (Remember that
ultimately we’re talking about instances here.)
The friend word is powerful because it allows object two to grind up
object three, possibly against the will of object one (the object that created
object three). And that can create bugs! As Grandma always warned us,
“Please use discretion when picking your friends, especially when writing
object-oriented programming code in C++.”
Some compilers will let you declare a friend without the word class, like so:
friend Square;
However, the gnu compiler under CodeBlocks doesn’t allow this. Instead,
you must use the class keyword:
Using Classes and Types within Classes
Sometimes a program needs a fairly complex internal structure to get its
work done. Three ways to accomplish this goal with relatively few headaches are nesting classes, embedding classes, and declaring types within
Advanced
Class Usage
friend class Square;
Book IV
Chapter 4
494
Using Classes and Types within Classes
classes. The following sections discuss the two most common goals: nesting
classes and declaring types within classes. The “Nesting a class” section also
discusses protection for embedded classes.
Nesting a class
You may have times when you create a set of classes, and in the set you
have a primary class that people will be using, while the other classes are
supporting classes. For example, you may be a member of a team of programmers, and your job is to write a set of classes that log on a competitor’s
computer at night and lower all the prices on the products. Other members
of your team will use your classes in their programs. You’re just writing a set
of classes; the teammates are writing the rest of a program.
In the classes you are creating, you want to make the task easy on
your coworkers. In doing so, you may make a primary class, such as
EthicalCompetition, that they will instantiate to use your set of classes.
This primary class will include the methods for using the system. In other
words, it serves as an interface to the set of classes.
In addition to the main EthicalCompetition class, you might create additional auxiliary classes that the EthicalCompetition class will use, but
your coworkers will not directly create instances of. One might be a class
called Connection that handles the tasks of connecting to the competitor’s
computer.
Here’s the first problem: The class Connection may be something you
write, but another class somewhere may be called Connection, and your
coworkers might need to use that class. And here’s the second problem: If
you have that Connection class, you may not want your coworkers using
it. You just want them using the main interface, the EthicalCompetition
class.
To solve the unique name problem, you have several choices. For one,
you can just rename the class something a bit more unique, such as
EthicalCompetitionConnection. But that’s a bit long. And why go
through all that trouble if it’s not even going to be used except internally
in the code for EthicalCompetition? However, you could shorten
the classname and call it something that’s likely to be unique, such as
ECConnection.
Yet at the same time, if the users of your classes look at the header file and
see a whole set of classes, which classes they should be using may not be
clear. (Of course, you would write some documentation to clear this up, but
you do want the code to be at least somewhat self-explanatory.)
Using Classes and Types within Classes
495
One solution is to use nested classes. With a nested class, you write the
declaration for the main class, EthicalCompetition, and then, inside the
class, you write the supporting classes, as in the following:
class EthicalCompetition
{
private:
class Connection
{
public:
void Connect();
};
public:
void HardWork();
};
Note that we wrote a class inside a class. We did not provide the code for
the functions themselves, so here they are:
void EthicalCompetition::HardWork()
{
Connection c;
c.Connect();
cout << “Connected” << endl;
}
void EthicalCompetition::Connection::Connect()
{
cout << “Connecting...” << endl;
}
The header for the Connect function in the ConnectionClass requires
first the outer classname, then two colons, then the inner classname, then
two colons again, and finally the function name. This follows the pattern you
normally use where you put the classname first, then two colons, and then
the function name. But in this case, you have two classnames separated with
a colon.
If you want to declare an instance of the Connection class, you do it differently, depending on where you are when you declare it. By that we don’t
mean whether you’re in an office cube or sitting on the beach with a laptop;
rather, we mean where in the code you are trying to declare an instance.
Connection c;
Advanced
Class Usage
If you are inside a member function of the outer class, EthicalCompetition,
you simply refer to the class by its name, Connection. You can see we did
that in the member function HardWork, with this line:
Book IV
Chapter 4
496
Using Classes and Types within Classes
If you’re outside the member functions, you can declare an instance of
the inner class, Connection, without an instance of the outer class,
EthicalCompetition. To do this, you fully qualify the classname, like this:
EthicalCompetition::Connection myconnect;
This line would go, for instance, in the main of your program if you want to
create an instance of the inner class, Connection.
However, you may recall that one of the reasons for putting the class
inside the other was to shield it from the outside world, to keep your nosey
coworkers from creating an instance of it. But so far, what you’ve done
doesn’t really stop them from using the class. They can just use it by referring to its fully qualified name, EthicalCompetition::Connection.
In a sense, so far, you’ve created a handy grouping of the class, and you also
set your grouping up so you can use a simpler name that won’t conflict with
other classes. If you just want to group your classes, you can use a nested
class.
You can add higher security to a class that will prevent others from using
your inner class. For that, you use a few tricks.
Don’t put the inner class definition inside a private or protected section of
the outer class definition. It doesn’t work.
Here’s how you create the inner class definition. For the first trick, we need
to show you how you can declare the class with a forward definition but put
the class definition outside the outer class. The following code does this:
class EthicalCompetition
{
private:
class Connection;
public:
void HardWork();
};
class EthicalCompetition::Connection
{
public:
void Connect();
};
Inside the outer class, we wrote a header for the inner class and a semicolon
instead of writing the whole inner class; that’s a forward declaration. Then
we wrote the rest of the inner class after the outer class. To make this work,
we had to again fully qualify the name of the class, like this:
class EthicalCompetition::Connection
Using Classes and Types within Classes
497
If we skipped the word EthicalCompetition and two colons, the compiler
compiles this class like a different class. Later, the compiler would complain
that it can’t find the rest of the declaration for the ConnectionClass. The
error is aggregate ‘class EthicalCompetition::Connection c’
has incomplete type and cannot be initialized. Remember that
message, so you know how to correct it when you forget the outer classname.
By declaring the inner class after the outer class, you can now employ
another trick. The idea is to write it so that only the outer class can access
the members. To accomplish this, you can make all the members of the
inner class either private or protected and then make the outer class,
EthicalCompetition, a friend of the inner class, Connection.
Here’s the modified version of the Connection class:
class EthicalCompetition::Connection
{
protected:
friend class EthicalCompetition;
void Connect();
};
Only the outer class can access most of its members. But we say most
because we left something out. Although the members are protected, nothing stops users outside EthicalConnection from creating an instance
of the class. To add this security, you need a constructor for the class that
is either private or protected. And when you do that with a constructor, following suit with a destructor is a good idea. Make the destructor private
or protected too. Even if the constructor and destructor don’t do anything,
by making them private or protected you prevent others from creating an
instance of the class — others, that is, except any friends to the class.
So here’s yet one more version of the class:
This does the trick. When we try to make an instance of the class outside
EthicalCompetition (such as in main), as in this:
EthicalCompetition::Connection myconnect;
we see the message
Book IV
Chapter 4
Advanced
Class Usage
class EthicalCompetition::Connection
{
protected:
friend class EthicalCompetition;
void Connect();
Connection() {}
~Connection() {}
};
498
Using Classes and Types within Classes
EthicalCompetition::Connection::~Connection()’ is protected
Yet, we can still make an instance from within the member functions of
EthicalCompetition. It worked! Listing 4-4 shows the final program.
Listing 4-4: Protecting Embedded Classes
#include <iostream>
using namespace std;
class EthicalCompetition
{
private:
class Connection;
public:
void HardWork();
};
class EthicalCompetition::Connection
{
protected:
friend class EthicalCompetition;
void Connect();
Connection() {}
~Connection() {}
};
void EthicalCompetition::HardWork()
{
Connection c;
c.Connect();
cout << “Connected” << endl;
}
void EthicalCompetition::Connection::Connect()
{
cout << “Connecting...” << endl;
}
int main(int argc, char *argv[])
{
// EthicalCompetition::Connection myconnect;
EthicalCompetition comp;
comp.HardWork();
return 0;
}
We purposely left in a commented-out line where we attempted to make an
instance of the inner class, Connection. Previously, we had the line there,
but not commented out, so we could see what error message it would print
and then tell you about it. If you want to see the error message, you can
remove the two slashes so the compiler will try to compile the line.
Using Classes and Types within Classes
499
Types within classes
When you declare a type, such as an enum, associating it with a class can
be convenient. For example, you may have a class called Cheesecake.
In this class, you may have the member variable SelectedFlavor. The
SelectedFlavor member can be your own enumerated type, such as
Flavor, like this:
enum Flavor
{
ChocolateSuicide,
SquishyStrawberry,
BrokenBanana,
PrettyPlainVanilla,
CoolLuah,
BizarrePurple
};
To associate these with a class, you can put them in a class, like this:
class Cheesecake
{
public:
enum Flavor
{
ChocolateSuicide, SquishyStrawberry, BrokenBanana,
PrettyPlainVanilla, CoolLuah, BizarrePurple
};
Flavor SelectedFlavor;
int AmountLeft;
void Eat()
{
AmountLeft = 0;
}
};
The type Flavor now can be used anywhere in your program, but to use
it outside the member functions of the Cheesecake class, you must fully
qualify its name by putting the classname, two colons, then the type name
like this:
Book IV
Chapter 4
Cheesecake::Flavor myflavor = Cheesecake::CoolLuah;
Listing 4-5 shows an example of where we use the Cheesecake class.
Advanced
Class Usage
As you can see, for an enum, we also had to fully qualify the enumeration
itself. If we had just put CoolLuah on the right side of the equals sign, the
compiler would complain and say that CoolLuah is undeclared.
500
Using Classes and Types within Classes
Listing 4-5: Using Types within a Class
#include <iostream>
using namespace std;
class Cheesecake
{
public:
enum Flavor
{
ChocolateSuicide, SquishyStrawberry, BrokenBanana,
PrettyPlainVanilla, CoolLuah, BizarrePurple
};
Flavor SelectedFlavor;
int AmountLeft;
void Eat()
{
AmountLeft = 0;
}
};
int main()
{
Cheesecake yum;
yum.SelectedFlavor = Cheesecake::SquishyStrawberry;
yum.AmountLeft = 100;
yum.Eat();
cout << yum.AmountLeft << endl;
return 0;
}
Notice in Listing 4-5 that I had to fully qualify the name
SquishyStrawberry.
When you declare a type (using a typedef or an enum) inside a class, you
do not need an instance of the class present to use the type. But you must
fully qualify the name. Thus, you can set up a variable of type
Cheesecake::Flavor and use it in your program without creating an
instance of Cheesecake.
Do you have types that you want used only within the class? Make them protected or private. That way, you cannot use them outside the class.
Unlike nested classes, you can make a type within a class private or protected. If you do, you can use the type only within the member functions
of the class. If you try to use the type outside the class (including setting a
member variable, as in yum.SelectedFlavor = Cheesecake::Squishy
Strawberry;), you get a compiler error.
Using Classes and Types within Classes
501
You can also put a typedef inside your class in the same way you would
put an enum, as in the following example:
class Spongecake
{
public:
typedef int SpongeNumber;
SpongeNumber weight;
SpongeNumber diameter;
};
int main(int argc, char *argv[])
{
Spongecake::SpongeNumber myweight = 30;
Spongecake fluff;
fluff.weight = myweight;
return 0;
}
Book IV
Chapter 4
Advanced
Class Usage
502
Book IV: Advanced Programming
Chapter 5: Creating Classes
with Templates
In This Chapter
✓ Creating class templates
✓ Using parameters in templates
✓ Deriving with templates
✓ Creating function templates
I
f C++ programming has any big secret, it would have to be templates.
Templates seem to be the topic that beginning programmers strive to
understand because they’ve heard about them and seem to think that templates are the big wall over which they must climb to ultimately become
The C++ Guru.
We can’t say whether understanding templates will make you a C++ guru
(we like to think that it will!), but we can say that it will open your abilities to a whole world out there, primarily because the entire Standard C++
Library is built around templates. Further, understanding templates can
help you understand all that cryptic code that you see other people posting
on the Internet. (And it will help you realize that it didn’t have to be so cryptic! Simplify, simplify, we always say!)
So, in this chapter, we show you how to program templates in C++.
Templates have an interesting history. Back when people started building
C++ compilers, no standard for how to do templates existed. As a result,
different compilers supported different ways of doing templates. The whole
template thing was a mess and very confusing. So if you’re using a compiler
that’s older than around 1999 or 2000 and you’re interested in using templates, you should seriously consider upgrading to a newer compiler (such
as the GNU gcc compiler included with CodeBlocks on the CD that comes
with this book).
Templatizing a Class
Templates are complicated and difficult to understand. That was a lie. We
don’t know why people make creating and using templates so hard, but
they’re really not. In this section, we show you just how simple templates
are to understand.
504
Templatizing a Class
First, think of a class. Pick one, any class. We’ll pick OldGasStation.
That’s a class, and it has some members. Remember, a class is a type. You
can declare variables of the type. Thus, we can declare a variable of type
OldGasStation called, for example HanksGetGas. We can also create
another variable of type OldGasStation; maybe this one would be called
FillerUp. And, of course, we could create a third one; this one might be
called GotGasWeCanFillIt.
Each of these variables, HanksGetGas, FillerUp, and
GotGasWeCanFillIt, are each instances of the type (or class)
OldGasStation.
In the same way, we can take an existing type, say int, and make some
instances of it. We can name one CheckingAccountBalance, and we can
name another BuriedTreasuresFound. Each of these is an instance of the
type called int. Although int isn’t a class, it is a type.
Now, think about this so far: You have the two different types available to
you that we mentioned; one is called OldGasStation, and the other is
called int. One of these is a type you make; the other is built into C++.
We want to focus on the one you create, OldGasStation. This is a type that
you create by declaring it in your program when you write the code. The
compiler takes your declaration and builds some data inside the resulting
program that represents this type. After the program runs, the type is created, and it does not change throughout the course of the program.
The variables in your program may change at runtime; you can create new
instances of a type and delete them and change their contents. But the type
itself is created at compile time and does not change at runtime. Remember
this as one property of types in general. You will need to keep this in mind
when dealing with templates.
Suppose that you have a class called MyHolder. This class is going to hold
some integers. Nothing special, but it looks like this:
class MyHolder
{
public:
int first;
int second;
int third;
int sum()
{
return first + second + third;
}
};
This class is easy to use; you just create an instance of it and set the values
of its members. But remember: After the program is running, the class is a
done deal. But at runtime, you’re free to create new instances of this class.
Templatizing a Class
505
For example, the following creates ten instances of the class, calls sum, and
prints the return value of sum:
MyHolder *hold;
int loop;
for (loop = 0; loop < 10; loop++)
{
hold = new MyHolder;
hold->first = loop * 100;
hold->second = loop * 110;
hold->third = loop * 120;
cout << hold->sum() << endl;
delete hold;
}
This creates an instance at runtime, does some work with it, and then
deletes the instance. It then repeats this over and over for a total of ten
times. Instances (or variables) are created, changed, and deleted — all at
runtime. But the class, which we’ll say one more time, is created at compile
time.
Suppose you’re coding away, and you discover that this class MyHolder is
pretty handy, except it would be nice if you had a version of it that holds
floats instead of ints. You could create a second class just like the first
that uses the word float instead of int, like this:
class AnotherHolder
{
public:
float first;
float second;
float third;
float sum()
{
return first + second + third;
}
};
Take a look at this code:
template <typename T>
class CoolHolder
{
public:
T first;
T second;
T third;
Book IV
Chapter 5
Creating Classes
with Templates
This works the same way as the previous class, but it stores three float
types instead of int types. But you can see, if you have a really big class,
this method would essentially require a lot of copying and pasting followed
by some search-and-replacing — in other words, busywork. But you can
minimize this busywork by using templates. Instead of typing two different
versions of the class, type one version of the class that you can, effectively,
modify when you need different versions of the class.
506
Templatizing a Class
T sum()
{
return first + second + third;
}
};
Think of this as a rule for a class that does exactly what the previous two
classes did. In this rule is a placeholder called T that is a placeholder for a
type. Imagine, in your mind, this set of code; then remove the first line and
replace all the remaining Ts with the word int. If you did that, you would
end up with this:
class CoolHolder
{
public:
int first;
int second;
int third;
int sum()
{
return first + second + third;
}
};
This is, of course, the same as the earlier class called MyHolder, just with a
different name. Now imagine doing the same thing but replacing each T with
the word float. You can probably see where we’re going with this. Here it
is:
class CoolHolder
{
public:
float first;
float second;
float third;
float sum()
{
return first + second + third;
}
};
And once again, this is, of course, the same as the earlier class called
AnotherHolder, but with a different name.
That’s what a template does: It specifies a placeholder for a class. But it
doesn’t actually create a class . . . yet. You have to do one more thing to tell
the compiler to take this template and create a class. The way you do this is
by writing code to create a variable or by using the class somehow. Look at
this code:
CoolHolder<int> IntHolder;
IntHolder.first = 10;
IntHolder.second = 20;
IntHolder.third = 30;
Templatizing a Class
507
Do you see what’s happening? This code is telling the compiler to take the
CoolHolder template and make a version of it where T is replaced by the
word int. In other words, the compiler creates a class. What is the class
called? It’s called CoolHolder<int>. And then these four lines of code first
create an instance of CoolHolder<int> called IntHolder; then they set
the members of IntHolder.
And when does the computer create this class? (That is, not the instance,
but the class itself?) At compile time. Remember, types are created at compile time, and this is no exception to this rule.
Here’s an easy way to look at a template. When you see a line like
CoolHolder<int> IntHolder; you can think of it like CoolHolderint
IntHolder. Although that’s not really what the template is called, you are
telling the compiler to create a new class. In your mind, you may think of
the class as being called CoolHolderint, that is, a name without the angle
brackets. (But remember that the name really isn’t CoolHolderint. It’s
CoolHolder<int>.)
Listing 5-1 shows a complete program that uses the CoolHolder template.
Listing 5-1: Using Templates to Create Several Versions of a Class
#include <iostream>
using namespace std;
template <typename T>
class CoolHolder
{
public:
T first;
T second;
T third;
T sum()
{
return first + second + third;
}
};
Book IV
Chapter 5
Creating Classes
with Templates
int main()
{
CoolHolder<int> IntHolder;
IntHolder.first = 10;
IntHolder.second = 20;
IntHolder.third = 30;
CoolHolder<int> AnotherIntHolder;
AnotherIntHolder.first = 100;
AnotherIntHolder.second = 200;
AnotherIntHolder.third = 300;
CoolHolder<float> FloatHolder;
FloatHolder.first = 3.1415;
(continued)
508
Templatizing a Class
Listing 5-1 (continued)
FloatHolder.second = 4.1415;
FloatHolder.third = 5.1415;
cout << IntHolder.first << endl;
cout << AnotherIntHolder.first << endl;
cout << FloatHolder.first << endl;
CoolHolder<int> *hold;
for (int loop = 0; loop < 10; loop++)
{
hold = new CoolHolder<int>;
hold->first = loop * 100;
hold->second = loop * 110;
hold->third = loop * 120;
cout << hold->sum() << endl;
delete hold;
}
return 0;
}
When you run this program, you see a bunch of results from calls to sum():
10
100
3.1415
0
330
660
990
1320
1650
1980
2310
2640
2970
Look closely at the code. Near the beginning is the same template that we
showed you earlier. Remember that the compiler doesn’t create a type for
this template. Instead, the compiler uses it as a rule to follow to create additional types. That is, the code indeed serves as a template for other types,
thus its name.
Here’s the first line of the template:
template <typename T>
All this means is that a template class is going to follow, and that it has a
type with a placeholder called T. That means that inside the class anywhere
a T appears, it will be replaced by the typename. (The T is standalone; if you
have it as part of a word, it won’t be replaced.) The standard practice is for
people to use T for the placeholder, but you can use any identifier (starting
with a letter or underscore, followed by any combination of letters, numbers, or underscores).
Templatizing a Class
509
Down inside the main for this class, we then declare several variables of
types based on this template. Here’s one such line:
CoolHolder<int> IntHolder;
This line declares a variable called IntHolder. For this variable, the compiler creates a type called CoolHolder<int>, which is a type based on the
CoolHolder template, where T is replaced by int.
Here’s another line where we declare a variable:
CoolHolder<int> AnotherIntHolder;
This time, the compiler doesn’t have to create another type because it just
created the CoolHolder<int> type earlier. But again, this line uses the
same type based on the template, where T is replaced by int.
Here we create another class based on the template, and we declare a variable of this new type:
CoolHolder<float> FloatHolder;
When the compiler sees this line, it creates another type by using the template, and it replaces T with the word float. So in this case, the three members of the instance FloatHolder, called first, second, and third, each
hold a floating-point number. And the member function called sum returns a
floating-point number.
The following line uses the type created earlier called CoolHolder<int>,
and it declares a pointer to CoolHolder<int>. Yes, you can do that; pointers are allowed:
CoolHolder<int> *hold;
Then the code that follows cycles through a loop where we call new to
create instances of type CoolHolder<int> by using the line
Book IV
Chapter 5
hold = new CoolHolder<int>;
hold->first = loop * 100;
And that’s the basics of templates. They’re really not as bad as people make
them out to be. Just remember that when you see an identifier followed by
angle brackets containing a type or class, it’s a template. So see what you
think of this line of code:
vector<string> MyList;
Creating Classes
with Templates
We access the members using the pointer notation, ->, like so:
510
Templatizing a Class
Any idea what this code does? It uses some template called vector and
tells vector to use the string type inside it. In fact, vector is part of the
Standard C++ Library, and it works similar to an array. Its template parameter
(the thing in angle brackets) represents the type of the items the vector
holds. So this declares a variable called MyList, which is a vector that
holds string instances.
Separating a template from the function code
In the earlier days of templates and C++, the rule was that you had to put
member function code for a class template inside the template itself; you
couldn’t put a forward declaration and then put the function code outside
the template as you could do with classes. However, the ANSI standard
changed this and made putting the code outside the template legal. If you
are using an ANSI-compliant compiler, you can put the function code outside
the template. The GNU gcc compiler is, for the most part, ANSI-compliant;
with it, you can put the code outside the template. However, you have to
place the code carefully to get it to compile correctly. The code in Listing 5-2
shows you how to do this.
Listing 5-2: Separating a Template from Function Code
#include <iostream>
using namespace std;
template <typename T>
class ImFree
{
protected:
T x;
public:
T& getx();
void setx(T);
};
template <typename T>
T &ImFree<T>::getx()
{
return x;
}
template <typename T>
void ImFree<T>::setx(T newx)
{
x = newx;
}
int main()
{
ImFree<int> separate;
separate.setx(10);
cout << separate.getx() << endl;
return 0;
}
Templatizing a Class
511
As you can see, the format is ugly. To be honest, whenever we do this, we
have to look up the format; it’s hard to memorize. (Maybe you can memorize
it, but our brains are too prone to explosions.)
Look closely at one of the member functions:
template <typename T>
T &ImFree<T>::getx()
{
return x;
}
The first line is the same as the first line of the template definition. It’s just
the word template followed by the parameter in angle brackets.
The next line looks almost like you might expect it to. With classes you
put the function prototype, adding the classname and two colons before
the function name itself, but after the return type. Here you do that too;
the sticky part is how you write the template name. You don’t just give the
name; instead, you follow the name by two angle brackets, with the parameter inside, like this: T &ImFree<T>::getx(). Note the <T> part.
Earlier compilers didn’t allow you to separate the function code the way we
did in Listing 5-2. Instead, you would have to put the function code inside the
template itself, as in the following:
template <typename T>
class ImFree
{
protected:
T x;
public:
T& getx()
{
return x;
}
void setx(T newx)
{
x = newx;
}
};
T getx()
we declared the function as
T& getx()
Creating Classes
with Templates
Note one little thing that we did in both Listing 5-2 and in the old type of
code: For the getx member function, instead of just returning a variable of
type T, we returned a reference. That is, instead of this:
Book IV
Chapter 5
512
Templatizing a Class
(We added the ampersand.) Although that has the potential of upsetting
some people, there’s a good reason for doing it. In the main of Listing 5-2, we
created the class based on the template with an integer parameter:
ImFree<int> separate;
However, we could instead create the class with some other class:
ImFree<SomeOtherClass> separate;
If we do that, we don’t really want to return just an instance from the function, as in
T& getx()
{
return x;
}
Returning just an instance copies the instance rather than just returning the
instance itself. The solution might be to use a pointer, as in
T* getx()
{
return &x;
}
And, in fact, we tried that when we first wrote the code. But then the code
gets annoying because we would have to dereference the result when we use
the function, even if the result is just an integer. Our cout statement ended
up looking like this when we used a pointer:
cout << *(separate.getx()) << endl;
And frankly, we found that code, shall we say, yucky. So, as in a presidential
election, we picked the lesser of the evils by making it a reference. We figured a reference was less evil because the user of the class wouldn’t have to
do any bizarre coding. Instead, the cout is rather straightforward:
cout << separate.getx() << endl;
Including static members in a template
You can include static members in a template, but you need to be careful
when you do so. Remember that all instances of a class share a single static
member of the class. You can think of the static member as being a member of
the class itself, whereas the nonstatic members are members of the instances.
Now, from a single template, you can potentially create multiple classes.
This means that to maintain the notion of static members, you need to either
get creative with your rules or make life easy by just assuming that each
class based on the template gets its own static members. And the easy way
is exactly how this process works.
Templatizing a Class
513
When you include a static member in a template, each class that you create
based on the template gets its own static member. Further, you need to tell
the compiler how to store the static member just as you do with static members of classes that aren’t created from templates.
Listing 5-3 shows an example of static members in a template.
Listing 5-3: Using Static Members in a Template
#include <iostream>
using namespace std;
template <typename T>
class Electricity
{
public:
static T charge;
};
template <typename T>
T Electricity<T>::charge;
int main()
{
Electricity<int>::charge = 10;
Electricity<float>::charge = 98.6;
Electricity<int> inst;
inst.charge = 22;
cout << Electricity<int>::charge << endl;
cout << Electricity<float>::charge << endl;
cout << inst.charge << endl;
return 0;
}
In this code, you can also see that we created two classes based on the
templates Electricity <int> and Electricity <float>. Each of
these classes has its own instance of the static member; for the <int>
version, we put a 10 in it, and for the <float> version, we put a 98.6 in
it. Then, just to show that there’s only a single static member per class,
we created an instance of Electricity<int> and set its static member
to 22. Then we wrote them to the console with the cout statement. And,
Book IV
Chapter 5
Creating Classes
with Templates
First, see how we declared the storage for the static member; it’s the two
lines in between the template and main. The syntax is somewhat difficult to
remember: First, you supply the same template header you would for the
class. (That is, notice that the line template <typename T> appears both
before the class template and the storage line.) Then, you specify the type
of the static member (in this case T, which is the template parameter). Next,
you refer to the static member by using the usual class name::member
name syntax. But remember that the class name gets the template parameter
in angle brackets after it. Done deal.
514
Parameterizing a Template
indeed, the two lines for Electricity<int> are the same, and the one for
Electricity<float> is different from the two for Electricity<int>.
Done deal!
Parameterizing a Template
A template consists of a template name followed by one or more parameters
inside angled brackets. Then comes the class definition. When you politely
ask the compiler to create a new class based on this template, the compiler
happily obliges by making a substitution for whatever you supply as the
parameter. At least we think that the compiler is happy. It doesn’t complain
much beyond the occasional error message.
Focus your eyes on this template:
template <typename T>
class SomethingForEveryone
{
public:
T member;
};
Not much to it: It’s just a simple template with one member called, conveniently enough, member. Life is simple sometimes.
But what we want you to notice in particular is what’s inside the angled
brackets. This is the parameter: typename T. Like parameters in a function,
first is the type of the parameter (typename), and second is the name of the
parameter (T).
But is typename a, um, typename? Not really; it’s a special C++ word
reserved for use in templates. typename means that what follows (in this
case, T) is a type. So when you politely tell the compiler to create a new class
based on this template, you specify a type for T. For example, this line tells
the compiler to create the new class and make a variable named JustForMe
that is of the new class:
SomethingForEveryone<int> JustForMe;
Now the compiler looks at what you supplied inside angle brackets and uses
that as a parameter for the template. Here, int goes with the T in the template. The compiler will take each instance of T that isn’t inside a word, and
replace it with the parameter, which is int.
Putting different types in the parameter
It turns out there’s more to this parameter thing than meets the computer
screen. You can put many more things inside the parameter beyond just the
boring word typename. For example, suppose you have a class that does
Parameterizing a Template
515
some comparisons to make sure that a product isn’t too expensive for a
person’s budget. Each person would have several instances of this class, one
for each product. This class would have a constant in it that represents the
maximum price the person is willing to spend.
But there’s a twist: Although you would have multiple instances of this class,
one for each product the person wants to buy, the maximum price would be
different for each person.
You can create such a situation with or without templates. Here’s a way you
can do it with a template:
template <int MaxPrice>
class PriceController
{
public:
int Price;
void TestPrice()
{
if (Price > MaxPrice)
{
cout << “Too expensive” << endl;
}
}
};
Before we show you an example that uses this template, we’ll quickly explain
what’s going on with it. This time, the template parameter isn’t a type at
all — it’s an integer value, an actual number. Then, inside the class, we use
that number as a constant. As you can see in the TestPrice function, we
compare the Price member to the constant, which is called MaxPrice. So
this time, instead of using T for the name of the template parameter, we used
something a little more sensible, MaxPrice. And MaxPrice is a value, not a
type.
Listing 5-4 shows a complete example that uses this template.
Book IV
Chapter 5
Listing 5-4: Using Different Types for a Template Parameter
Creating Classes
with Templates
#include <iostream>
using namespace std;
template <typename T>
class SomethingForEveryone
{
public:
T member;
};
template <int MaxPrice>
class PriceController
{
(continued)
516
Parameterizing a Template
Listing 5-4 (continued)
public:
int Price;
void TestPrice()
{
if (Price > MaxPrice)
{
cout << “Too expensive” << endl;
}
}
};
int main()
{
SomethingForEveryone<int> JustForMe;
JustForMe.member = 2;
cout << JustForMe.member << endl;
const int FredMaxPrice = 30;
PriceController<FredMaxPrice> FredsToaster;
FredsToaster.Price = 15;
FredsToaster.TestPrice();
PriceController<FredMaxPrice> FredsDrawingSet;
FredsDrawingSet.Price = 45;
FredsDrawingSet.TestPrice();
const int JulieMaxPrice = 60;
PriceController<JulieMaxPrice> JuliesCar;
JuliesCar.Price = 80;
JuliesCar.TestPrice();
return 0;
}
Each person gets a different class. You can see that Fred gets a class called
PriceController <FredMaxPrice>. Julie, however, gets a class called
PriceController <JulieMaxPrice>. And remember, these really are
different classes. The compiler created two different classes, one for each
item passed in as a template parameter. And notice that the parameters are
constant integer values. FredMaxPrice is a constant integer holding 30.
JulieMaxPrice is a constant integer holding 60.
For the first one, PriceController <FredMaxPrice>, we created
two instances of that class. And for the second one, PriceController
<JulieMaxPrice>, we created one instance.
The compiler really does create two separate classes, one called
PriceController <FredMaxPrice> and one called PriceController
<JulieMaxPrice>. These are as separate as they would be if you typed in
two separate classes, one called PriceControllerFredMaxPrice and one
called PriceControllerJulieMaxPrice. They aren’t separate instances
of a class — they are separate classes.
Parameterizing a Template
517
So far in this section, we’ve shown you that you can use a type as a template
parameter or a value of a certain type. You can also use a class as a template
parameter. The following list describes each type of parameter:
✦ Value parameters: (The ANSI standard calls these non-type parameters,
but we like value better.) You can give the type and name for a value
in the parameter, as in template <int MaxPrice>. But for some
reason, the ANSI standard forbids you from using a floating-point value
here, as in template <float MaxPrice>, or a class, as in template
<MyClass inst>, or a void type, as in template <void nothing>.
But you’re free to use pointers, so template <float MaxPrice> is
allowed, and so are template <MyClass *inst> and template <void
*MaxPrice>. (Although, in general, you should avoid void * because
it’s not very useful; try to be more specific with your pointers, as in int
*MaxPrice.)
✦ typename parameters: You can use a type as a parameter to a class,
as in template <typename T>. You then use a type when you ask
the compiler to create the class based on the template. And when you
use typename, you have to make sure that you actually use it as a type
inside the class; don’t just pass a variable for the parameter.
✦ Class parameters: Remember that a class is in itself a type, so you can
pass a classname when your template requires a type. But remember
that we’re not talking about passing an instance of a class to the template; We’re talking about passing a class itself by specifying its name in
the template parameter.
Parameterizing with a class
template <class T>
class MyContainer
{
public:
T member;
};
But whichever you use, typename or class,
really doesn’t matter: According to the C++
ANSI standard, the word typename and the
word class are interchangeable when used
in a template parameter.
Book IV
Chapter 5
Creating Classes
with Templates
When your template is expecting a class for its
parameter (remember, a class, not an instance
of a class), you can use the word typename in the template parameter as we did in
the examples in this chapter. You would then
instruct the compiler to create a class based on
the template by passing a classname into the
template, as in MyContainer<MyClass>
inst;. Typically, you would use a class,
called a container, as a template parameter
if you have a template that you intend to hold
instances of a class. However, instead of using
the word typename, you can instead use the
word class, like so:
518
Parameterizing a Template
The GNU gcc compiler that’s used for CodeBlocks corrects a strange error
message that other compilers sometimes provide when you use something
you’re not supposed to inside a template. The problem is, these older compilers don’t give an error message for the line that has the word template in
it, such as template <float MaxPrice>; instead, they give two error
messages for the line that tries to create the class based on the template,
such as PriceController<FredMaxPrice> FredsToaster;. Here are
the two messages we saw:
non-constant `FredMaxPrice’ cannot be used as template argument
ANSI C++ forbids declaration `FredsToaster’ with no type
When working with CodeBlocks, you still see the message associated with
the class creation. However, you also see the following message, which tells
you precisely where the problem lies:
error: `float’ is not a valid type for a template constant parameter
Including multiple parameters
You’re not limited to only one parameter when you create a template. For
example, the Standard C++ Library has a template called map. The map template works like an array, but instead of storing things based on an index as
you would in an array, you store them based on an object called a key. In
other words, you store things in an array in pairs; the first item in the pair is
called a key and the second item is called a value. To retrieve an item from
map, you specify the key, and you get back the value. When you create a
class based on the map template, you specify the two types map will hold,
one for the key and one for the value. Note that we said the types that map
will hold, not the objects or instances it will hold. After you specify the types,
the compiler creates a class, and inside that class you can put the instances.
To show how this works, instead of using the actual map template, we’re
going to make our own template that works similarly to a map. Instances of
classes based on this template will hold only as many items as you specify
when you create the class, whereas a real map doesn’t have any limitations
beyond the size of the computer’s memory. These days that means map can
hold just about as much as you want! So load up on map items! Listing 5-5
shows our map template.
Listing 5-5: Using Multiple Parameters with Templates
#include <iostream>
using namespace std;
template<typename K, typename V, int S>
class MyMap
{
Parameterizing a Template
519
protected:
K key[S];
V value[S];
bool used[S];
int Count;
int Find(K akey)
{
int i;
for (i=0; i<S; i++)
{
if (used[i] == false)
continue;
if (key[i] == akey)
{
return i;
}
}
return -1;
}
int FindNextAvailable()
{
int i;
for (i=0; i<S; i++)
{
if (used[i] == false)
return i;
}
return -1;
}
public:
MyMap()
{
int i;
for (i=0; i<S; i++)
{
used[i] = false;
}
}
void Set(K akey, V avalue)
{
int i = Find(akey);
if (i > -1)
{
value[i] = avalue;
}
else
{
i = FindNextAvailable();
if (i > -1)
{
key[i] = akey;
value[i] = avalue;
used[i] = true;
}
else
cout << “Sorry, full!” << endl;
}
}
Book IV
Chapter 5
Creating Classes
with Templates
(continued)
520
Parameterizing a Template
Listing 5-5 (continued)
V Get(K akey)
{
int i = Find(akey);
if (i == -1)
{
return 0;
}
else
{
return value[i];
}
}
};
int main()
{
MyMap<char,int,10> mymap;
mymap.Set(‘X’,5);
mymap.Set(‘Q’,6);
mymap.Set(‘X’,10);
cout << mymap.Get(‘X’) << endl;
cout << mymap.Get(‘Q’) << endl;
return 0;
}
When you run this program, you will see this output:
10
6
This listing is a good exercise — not just for your fingers as you type it in,
but in understanding templates. Notice the first line of the template definition:
template<typename K, typename V, int S>
This template takes not one, not two, but (count them!) three parameters.
The first is a type, and we use it as the key for map, so we call it K. The
second is a type, and we use it as the value for map, so we call it V. The final
is S, and it’s not a type. Instead, S is an integer value; it represents the maximum number of pairs that map can hold.
The member functions that follow allow the user of any class based on this
map to add items to map and retrieve items from map. We didn’t include
any functions for removing items; you might think about ways you could
add such an item. You might even take a look at the header files for the map
template in the Standard C++ Library to see how the designers of the library
implemented a removal system.
Typedefing a Template
521
Typedefing a Template
If there’s a template that you use with particular parameters over and over,
often just using typedef for the thing is the easiest way to go. For example,
if you have a template like this
template <typename T>
class Cluck
{
public:
T Chicken;
};
and you find yourself using Cluck <int> over and over, you can typedef
this, as in the following:
typedef Cluck<int> CluckNum;
Then, anytime you need to use Cluck<int>, you can use CluckNum
instead. This main demonstrates the use of ClickNum:
int main()
{
CluckNum foghorn;
foghorn.Chicken = 1;
return 0;
}
We like to typedef our templates, because then the classname looks like
a regular old classname, rather than a template name. In the preceding
example, we get to use the classname CluckNum instead of the somewhat
cryptic Cluck<int>. And interestingly, if you’re working as part of a team
of programmers and the other programmers aren’t as knowledgeable about
templates as you are, they tend to be less intimidated if you typedef the
template. That way, you get to use a regular name, and they won’t have a
brain overload when they see your code. But don’t tell them we said that.
When you use a typedef to give a simpler name to a specific class based on
a template, the compiler instantiates the class based on the template. Or, to
put it another way, the compiler instantiates the template class.
Book IV
Chapter 5
Creating Classes
with Templates
When the compiler creates a class based on a template, people say that the
compiler is instantiating the template. we know, we know, most people use
the word instantiate to mean that you create an object based on a class. But
if you stretch your imagination, you can see how the template itself is a type
from which you can create other types. And thus, a class based on a template is actually an instance of a template! And the process of creating a class
based on a template is called template instantiation.
522
Deriving Templates
Deriving Templates
If you think about it, you can involve a class template in a derivation in at
least three ways. You can
✦ Derive a class from a class template
✦ Derive a class template from a class
✦ Derive a class template from a class template
Or you could do none of these three items. But if you want to find out about
them, read the following sections, where we show you how they work.
Deriving classes from a class template
You can derive a class from a template, and in doing so, specify the parameters for the template. In other words, think of it like this, if it’s not too roundabout: From a template, you create a class, and from that created class, you
derive your final class.
Suppose you have a template called MediaHolder, and the first two lines of
its declaration look like this:
template <typename T>
class MediaHolder
Then, you could derive a class from a particular case of this template, as in
this header for a class:
class BookHolder : public MediaHolder<Book>
Here we created a new class (based on MediaHolder) called MediaHolder
<Book>. And from that class, we derived our final class, BookHolder.
Listing 5-6 is an example of the class MediaHolder, and the listing includes
some good books and magazines to add to your reading list as well.
Listing 5-6 Deriving a Class from a Class Template
#include <iostream>
using namespace std;
class Book
{
public:
string Name;
string Author;
string Publisher;
Deriving Templates
523
Book(string aname, string anauthor, string apublisher) :
Name(aname), Author(anauthor), Publisher(apublisher)
{}
};
class Magazine
{
public:
string Name;
string Issue;
string Publisher;
Magazine(string aname, string anissue,
string apublisher) :
Name(aname), Issue(anissue), Publisher(apublisher)
{}
};
template <typename T>
class MediaHolder
{
public:
T *array[100];
int Count;
void Add(T *item)
{
array[Count] = item;
Count++;
}
MediaHolder() : Count(0) {}
};
class BookHolder : public MediaHolder<Book> {
public:
enum GenreEnum
{childrens, scifi, romance,
horror, mainstream, hownotto};
GenreEnum GenreOfAllBooks;
};
class MagazineHolder : public MediaHolder<Magazine>
{
public:
bool CompleteSet;
};
Book IV
Chapter 5
Creating Classes
with Templates
int main()
{
MagazineHolder dl;
dl.Add(new Magazine(
“Dummies Life”, “Vol 1 No 1”, “Wile E.”));
dl.Add(new Magazine(
“Dummies Life”, “Vol 1 No 2”, “Wile E.”));
dl.Add(new Magazine(
“Dummies Life”, “Vol 1 No 3”, “Wile E.”));
dl.CompleteSet = false;
cout << dl.Count << endl;
(continued)
524
Deriving Templates
Listing 5-6 (continued)
BookHolder bh;
bh.Add(new Book(
“CEOing for Dumdums”, “Gookie Dan”, “Wile E.”));
bh.Add(new Book(
“Carsmashing for Dumdums”, “Woodie and Buzz”,
“Wile E.”));
bh.Add(new Book(
“Turning off the Computer for Dumdums”,
“Wrath of Andy”,
“Wile E.”));
bh.GenreOfAllBooks = BookHolder::hownotto;
cout << bh.Count << endl;
return 0;
}
Deriving a class template from a class
A template doesn’t have to be at the absolute top of your hierarchy, the total
king of the hill. No, a template can be derived from another class that’s not a
template. The brain acrobatics work like this: When you have a template and
the compiler creates a class based on this template, the resulting class will
be derived from another class.
For example, suppose you have a class called SuperMath that is not a template. You could derive a class template from SuperMath. Listing 5-7 shows
how you can do this.
Listing 5-7: Deriving a Class Template from a Class Template
#include <iostream>
using namespace std;
class SuperMath
{
public:
int IQ;
};
template <typename T>
class SuperNumber : public SuperMath
{
public:
T value;
T &AddTo(T another)
{
value += another;
return value;
}
T &SubtractFrom(T another)
{
value -= another;
return value;
}
};
Deriving Templates
525
void IncreaseIQ(SuperMath &inst)
{
inst.IQ++;
}
int main()
{
SuperNumber<int> First;
First.value = 10;
First.IQ = 206;
cout << First.AddTo(20) << endl;
SuperNumber<float> Second;
Second.value = 20.5;
Second.IQ = 201;
cout << Second.SubtractFrom(1.3) << endl;
IncreaseIQ(First);
IncreaseIQ(Second);
cout << First.IQ << endl;
cout << Second.IQ << endl;
return 0;
}
Note something really great that we did here! The base class is called
SuperMath, and it has a member called IQ. From SuperMath, we derived
a class template called SuperNumber that does some arithmetic. Later, we
put an Incredible IQ-Inflating Polymorphism to use in this function:
void IncreaseIQ(SuperMath &inst)
{
inst.IQ++;
}
Note what this function takes: A reference to SuperMath. Because the
SuperNumber class template is derived from SuperMath, that means any
class we create based on the template is, in turn, derived from SuperMath.
And that means that if we have an instance of a class based on the template,
we can pass the instance into the IncreaseIQ function. (Remember, when
a function takes a pointer or reference to a class, you can instead pass an
instance of a derived class.)
If you have a class template and you want to derive another class template
from it, first you need to think about exactly what you’re doing. Not like what
you’re doing spending all your days programming when you could be out
enjoying the sunshine; rather, what we mean is, “What process takes place
when you attempt to derive a class template from another class template?”
Remember that a class template isn’t a class: A class template is a cookie
cutter that the compiler uses to build a class. If, in a derivation, the base
class and the derived classes are both templates, really what you have is the
following:
Creating Classes
with Templates
Deriving a class template from a class template
Book IV
Chapter 5
526
Deriving Templates
1. The first class is a template from which the compiler builds classes.
2. The second class is a template from which the compiler will build
classes that are derived from classes built from the first template.
Now think about this: You create a class based on the base class template.
Then you create a second class based on the second template. Does this
automatically mean that the second class is derived from the first class?
Nope! Here’s why: From the first template, you can create many classes. Now
if you create a class from the second template, which of those many classes
will it be derived from?
To understand what is happening, take a look at Listing 5-8. To keep the
code simple, we put the jokes aside and just gave the identifiers basic
names. (And notice that we commented one of the lines out. If you’re typing
this, go ahead and type that line in, too, with the comment slashes, because
we want you to try something in a moment.)
Listing 5-8: Deriving a Class Template from a Class Template
#include <iostream>
using namespace std;
template <typename T>
class Base
{
public:
T a;
};
template <typename T>
class Derived : public Base<T>
{
public:
T b;
};
void TestInt(Base<int> *inst)
{
cout << inst->a << endl;
}
void TestDouble(Base<double> *inst)
{
cout << inst->a << endl;
}
int main()
{
Base<int> base_int;
Base<double> base_double;
Derived<int> derived_int;
Derived<double> derived_double;
Deriving Templates
527
TestInt(&base_int);
TestInt(&derived_int);
TestDouble(&base_double);
TestDouble(&derived_double);
//TestDouble(&derived_int);
return 0;
}
Now compile the program. The preceding example has two functions, each
taking a different class and each class based on the first template called
Base. The first takes Base<int> * as a parameter, and the second takes
Base<double> * as a parameter.
If a function takes a pointer to a class, we can legally pass a pointer to an
instance of a derived class. Now note that we created this variable:
Derived<int> derived_int;
And we pass this variable to the function that takes a Base<int>. And it
compiles. That means Derived<int> is derived from Base<int>. In the
same way, Derived<double> is derived from Base<double>.
Now just to make sure that this is correct, if you look at the commented out
line, you should see that if you uncomment the line, it should not compile.
Go ahead and try uncommenting the line TestDouble(&derived_int).
When you do this, and you try to compile the listing, you see this message:
error: cannot convert `Derived<int>*’ to `Base<double>*’ for argument `1’ to
`void TestDouble(Base<double>*)’
Thus, you can’t pass a pointer to Derived<int> to a function that takes
a pointer to Base<double>. That’s because Derived<int> isn’t derived
from Base<double>. Yet, it would appear from the code that the template
is derived from the template for Base<double>. But that’s not true. Here’s
why.
Now that we have that cleared up, look closely at how we declared the
second template class. Its header looks like this:
template <typename T>
class Derived : public Base<T>
The clue here is that the Derived template takes a template parameter
called T. Then the class based on the template is derived from a class called
Base<T>. But in this case, T is the parameter for the Derived template.
Book IV
Chapter 5
Creating Classes
with Templates
Templates are not derived from other templates. You can’t derive templates
because templates are not classes. Rather, templates are cookie cutters for
classes, and the class resulting from a template can be derived from a class
resulting from another template.
528
Templatizing a Function
So if we create a class based on Derived, such as this one:
Derived<int> x;
We just created a class called Derived<int>; then, in this case, the
parameter is int. And thus, the compiler replaces the Ts so that Base<T>
in this case becomes Base<int>. And so Derived<int> is derived from
Base<int>.
And that’s how this template derivation stuff works!
When you derive a template class from another template class, you actually
make use of the template parameter, and that gets passed into the base class
template as a parameter.
Templatizing a Function
A function template is a function that allows the user to essentially modify
the types used by a function as needed. For example, take a look at these
two functions:
int AbsoluteValueInt(int x)
{
if (x >= 0)
return x;
else
return -x;
}
float AbsoluteValueFloat(float x)
{
if (x >= 0)
return x;
else
return -x;
}
If the user of the functions needs to take the absolute value of an integer, he
or she would use the AbsoluteValueInt function. But to take the absolute
value of a float, he or she would instead use the AbsoluteValueFloat
function. What about a double? Or some other numerical type?
But instead of having a separate function for double and a separate function
for every other type, we would suggest using a template, as in this:
template <typename T> T AbsoluteValue(T x)
{
if (x >= 0)
return x;
else
return -x;
}
Templatizing a Function
529
Now you need only one version of the function, which handles any numeric
type, including double. The users of the function can, effectively, create
their own versions of the function as they need them. For example, to use an
integer version of this function, we just put the typename, int, inside angle
brackets after the function name when calling the function:
int n = -3;
cout << AbsoluteValue<int>(n) << endl;
And if we want to use the function for a float, we just do this:
float x = -4.5;
cout << AbsoluteValue<float>(x) << endl;
Note how we declared the function template itself. The real difference
between the function template and a regular run-of-the-mill function is in the
header:
template <typename T> T AbsoluteValue(T x)
First we put the word template. Then we follow it with any number of
optional spaces, and then an open angle bracket (that is, a less-than sign).
Following the angle bracket, we put the word typename, a close angle
bracket (that is, a greater-than sign), and then an identifier name. Most
people like to use the name T (since it’s the first letter in type), so that’s
what we did, being ones to follow the crowd. Then we put the rest of the
function header, which, taken by itself, looks like this:
T AbsoluteValue(T x)
Remember, T represents a type. Therefore, this portion of the function
header shows a function called AbsoluteValue that takes T as a parameter
and returns T. So if we create a function based on this template by using
an integer, the function will take an integer as a parameter and return an
integer. Remember, T is basically a placeholder for a typename. So when the
compiler encounters a line like this:
cout << AbsoluteValue<float>(x) << endl;
However, if you have two lines that use the same type, as in this
cout << AbsoluteValue<float>(x) << endl;
cout << AbsoluteValue<float>(10.0) << endl;
the compiler only creates a single function for both lines. (And these two
lines don’t need to be one after the other.)
Creating Classes
with Templates
it creates a function based on the template, substituting float anywhere it
sees T.
Book IV
Chapter 5
530
Templatizing a Function
Overloading and function templates
If you really want to go out on a limb and create flexibility in your program,
you can use overloading with a function template. Remember, overloading
a function means that you create two different versions of a single function.
Really, what you’re doing is creating two separate functions that have different parameters (that is, either a different number of parameters or different
types of parameters), but they share the same name.
Look at these two functions:
int AbsoluteValue(int x)
{
if (x >= 0)
return x;
else
return -x;
}
float AbsoluteValue(float x)
{
if (x >= 0)
return x;
else
return -x;
}
These functions are an example of overloading. They take different types as
parameters. (One takes an int, and the other takes a float.) Of course, you
could combine these functions into a template:
template <typename T> T AbsoluteValue(T x)
{
if (x >= 0)
return x;
else
return -x;
}
But is this really any different? After all, you can use the following two lines
of code either after the overloaded functions or after the function template:
cout << AbsoluteValue<int>(n) << endl;
cout << AbsoluteValue<float>(x) << endl;
(We’re assuming that n is an integer and x is a float.) However, the template
is a better choice. First, if you use the overloaded form and then try this,
you’ll get a problem:
cout << AbsoluteValue(10.5) << endl;
Templatizing a Function
531
We all know that 10.5 is a float; therefore, the compiler should just call
the float version of the overloaded function. However, the GNU gcc compiler that ships with CodeBlocks gives us this error message:
error: call of overloaded `AbsoluteValue(double)’ is ambiguous
Ambiguous? But look! The message is saying AbsoluteValue(double)!
Hmmm . . . Apparently, the GNU gcc compiler thinks that our 10.5 is a
double, not a float. And you can actually pass a double into either a function
that takes an int or a function that takes a float. The compiler will just
convert it to an int or a float, whichever it needs. And because the compiler thinks that 10.5 is a double, it figures it can pass it to either version
of the overloaded function. So that leaves you a choice: You can either cast
it to a float or create a third overloaded version of the function, one that
takes a double.
Yuck. At least CodeBlocks gives you some clue as to the problem because
the extended error information is
note: candidates are: int AbsoluteValue(int)
note:
float AbsoluteValue(float)
Creating a template is easier. And that brings us to the second reason the
template version is better: If you want a new type of the function, you don’t
need to write another version of the function.
But what if you want to overload a function template? That sounds kind of
scary, but you can do it. Listing 5-9 shows an overloaded function template.
Listing 5-9: Overloading a Function Template
Provides Even Greater Flexibility
#include <iostream>
using namespace std;
Book IV
Chapter 5
Creating Classes
with Templates
template <typename T> T AbsoluteValue(T x)
{
cout << “(using first)” << endl;
if (x >= 0)
return x;
else
return -x;
}
template <typename T> T AbsoluteValue(T *x)
{
(continued)
532
Templatizing a Function
Listing 5-9 (continued)
cout << “(using second)” << endl;
if (*x >= 0)
return *x;
else
return -(*x);
}
int main()
{
int n = -3;
cout << AbsoluteValue<int>(n) << endl;
float *xptr = new float(-4.5);
cout << AbsoluteValue<float>(xptr) << endl;
cout << AbsoluteValue<float>(10.5) << endl;
return 0;
}
When we pass a pointer (as in the second call to AbsoluteValue in main),
the compiler figures out that it needs to use the second version of the template. And just to be sure which version gets used and at what time during
application execution, we threw in a cout line at the beginning of each function template. When you run this code, here’s what you see:
(using first)
3
(using second)
4.5
(using first)
10.5
From the middle two lines you can see that the computer did indeed call the
second version of the template.
You can make life a little easier by using a little trick. Most compilers let you
leave out the type in angle brackets in the function template call itself. The
compiler is smart enough to figure out what type of function to build from the
template, based on the types that you pass into the function call! Pretty wild.
Here’s an example main that you can substitute for the main in Listing 5-9:
int main()
{
int n = -3;
cout << AbsoluteValue(n) << endl;
float *xptr = new float(-4.5);
cout << AbsoluteValue(xptr) << endl;
cout << AbsoluteValue(10.5) << endl;
return 0;
}
In this code, we replaced AbsoluteValue<int>(n) with just
AbsoluteValue(n). When you run the modified Listing 5-9, you see the
same output as when you run Listing 5-9.
Templatizing a Function
533
Templatizing a member function
When you write a template for a class, you can put function templates inside
the class template. To people who were familiar with some of the early
versions of C++ where template support was minimal, this seems a little
shocking. But when the electrical current wears off, we all see that putting a
template function inside a template class is possible. You simply declare a
function template inside a class, as in the following:
class MyMath
{
public:
string name;
MyMath(string aname) : name(aname) {}
template <typename T> void WriteAbsoluteValue(T x)
{
cout << “Hello “ << name << endl;
if (x >= 0)
cout << x << endl;
else
cout << -x << endl;
}
};
The WriteAbsoluteValue member function is a template. It’s preceded by
the word template and a template parameter in angle brackets. Then it
has a return type, void, the function name, and the function parameter.
When you create an instance of the class, you can call the member function,
providing a type as need be, as in the following:
int main()
{
MyMath inst = (string(“George”));
inst.WriteAbsoluteValue(-50.5);
inst.WriteAbsoluteValue(-35);
return 0;
}
Although you can use function templates as class members, you cannot
make them virtual. The compiler will not allow it, and the ANSI standard
forbids (“Forbids, we say!”) you from doing it. In fact, we tried it with
CodeBlocks just to see what friendly message we would get. Here it is:
`virtual’ can only be specified for functions
We guess by functions it means actual functions — not function templates.
Book IV
Chapter 5
Creating Classes
with Templates
In the first call, the function takes a double (because, by default, the C++
compiler considers -50.5 a double). In the second call, the function takes
an integer. The compiler then generates two different forms of the function,
and they both become members of the class.
534
Book IV: Advanced Programming
Chapter 6: Programming with
the Standard Library
In This Chapter
✓ Architecting the Standard C++ Library
✓ Storing data in vector or map
✓ Containing data with a list or set
✓ Stacking and queuing
✓ Copying containers
W
hen you get around in the world of C++ programming (a fun world
indeed!), you’re going to encounter two different libraries that
people use to make their lives easier. That is, after all, the ultimate point of
computers — to make our lives easier, right? These two libraries are
✦ Standard C++ Library
✦ Standard Template Library (STL)
Some people say, “We use STL.” Others say, “We use the Standard C++
Library.” In this case, library means a set of classes that you can use in
your programs. These libraries include handy classes, such as string
and vector (which is like an array in that it’s a list in which you can store
objects).
The difference between the Standard C++ Library and STL is that STL came
first. STL was used by so many developers that the American National
Standards Institute (ANSI) decided to standardize it. The result is the similar
Standard C++ Library that is part of the official ANSI standard and now part
of most modern C++ compilers (including CodeBlocks, Microsoft Visual C++,
Borland C++ Builder, MinGW, Cygwin, and Dev-C++). We use the Standard
C++ Library in this chapter. Because we know that this is C++, we just call it
the Standard Library.
The concepts that we present here apply to STL, so if you’re using STL, you
can use this chapter.
536
Architecting the Standard Library
Architecting the Standard Library
When people start using the Standard C++ Library, they often ask: Where’s
the source code? We see the header files, but where are the .cpp files? This
question has an easy answer: There are no .cpp files! ANSI architected the
Standard C++ Library for ease of use and reliability.
The classes contain their functions inside the class definitions; there are no
forward declarations. You don’t add source files to your project or linking in
compiled libraries. Just add an include line for the libraries you want.
Containing Your Classes
Computers need a place to store things, so the Standard Library includes
containers in which you can put things. The classes for containing things are
called container classes. These classes are templates. When you create an
instance of a container class, you specify what class it holds.
When you specify the class in a container, you are saying that the container
will contain instances of your specified class or of classes derived from your
specified class. You must decide whether the container will hold instances
of the class, pointers to the instances, or references to the instances.
Storing in a vector
Listing 6-1 is an example of a container class. This particular container is a
datatype called a vector, and it works much like an array.
Listing 6-1: Using Vectors as Examples of Container Classes
#include <iostream>
#include <vector>
using namespace std;
int main()
{
vector<string> names;
names.push_back(“Tom”);
names.push_back(“Dick”);
names.push_back(“Harry”);
names.push_back(“April”);
names.push_back(“May”);
names.push_back(“June”);
cout << names[0] << endl;
cout << names[5] << endl;
return 0;
}
Containing Your Classes
537
Now, note how we used vector. First, it’s a template! That means it’s going
to have a template parameter! And what is the template parameter? Why, you
guessed it. (Or you looked at the code.) The template parameter is the type that
the template will hold. Thus, the following declares a vector that holds strings:
vector<string> names;
Note also the header files that we included. Among them, we included
<vector> (with no .h after the filename). In general, you include the header
file that matches the name of the container you are using. Thus, if there
were such a thing as a container called rimbucklebock, you would type
#include <rimbucklebock>. Or, if there were such thing as a container
called set (which there is), you would type #include <set>.
At this point, you may be wondering, what’s the advantage to using a
vector instead of a regular, plain old, no-frills array? The advantage is that,
when you declare the vector instance, you don’t need to know up front
how many items will be going in it. With an array, you need to know the size
when you declare it.
A vector is the closest thing the Standard Library has to an array. In fact, a
vector is very much like an array, except (being a class template) you get
all the goodies that go with a class, such as member functions that operate
on vector.
Here are some things you can do with vector:
✦ Add items to the end of it
✦ Access its members by using bracket notation
✦ Iterate through it, either from beginning to end or from end back to
beginning
Listing 6-2 is another example of a vector. In this one, we set up several
vectors, and you can see that each one holds a different type, which we
specified in the template parameter.
Book IV
Chapter 6
Programming with
the Standard Library
Listing 6-2: Containing the Type You Specify in Classes
#include <iostream>
#include <vector>
using namespace std;
class Employee
{
public:
string Name;
string FireDate;
int GoofoffDays;
(continued)
538
Containing Your Classes
Listing 6-2 (continued)
Employee(string aname, string afiredate,
int agoofdays) : Name(aname), FireDate(afiredate),
GoofoffDays(agoofdays) {}
};
int main()
{
// A vector that holds strings
vector<string> MyAliases;
MyAliases.push_back(string(“Bud The Sailor”));
MyAliases.push_back(string(“Rick Fixit”));
MyAliases.push_back(string(“Bobalou Billow”));
cout << MyAliases[0] << endl;
cout << MyAliases[1] << endl;
cout << MyAliases[2] << endl;
// A vector that holds integers
vector<int> LuckyNumbers;
LuckyNumbers.push_back(13);
LuckyNumbers.push_back(26);
LuckyNumbers.push_back(52);
cout << LuckyNumbers[0] << endl;
cout << LuckyNumbers[1] << endl;
cout << LuckyNumbers[2] << endl;
// A vector that holds Employee instances
vector<Employee> GreatWorkers;
GreatWorkers.push_back(Employee(“George Washington”,”123100”, 50));
GreatWorkers.push_back(Employee(“Thomas Jefferson”,”052002”, 40));
cout << GreatWorkers[0].Name << endl;
cout << GreatWorkers[1].Name << endl;
return 0;
}
After you compile and run this program, you see the following output from
the cout statements:
Bud The Sailor
Rick Fixit
Bobalou Billow
13
26
52
George Washington
Thomas Jefferson
Mapping your data
Listing 6-3 is an example of a type of container called map. map works much
like vector, except for one main difference: Whereas you look up items in
vector by putting a number inside brackets as in this
cout << names[0] << endl;
with map, you can use any class or type you want for the index, not just numbers. This feature lets you associate objects. Take a gander at Listing 6-3 to
see where we’re coming from.
Containing Your Classes
539
Listing 6-3: Associating Objects with map
#include <iostream>
#include <map>
using namespace std;
int main()
{
map<string, string> marriages;
marriages[“Tom”] = “Suzy”;
marriages[“Harry”] = “Harriet”;
cout << marriages[“Tom”] << endl;
cout << marriages[“Harry”] << endl;
return 0;
}
First, you can see that to use map, we declare a variable of class map, supplying to the template the types of first the keys and then the values:
map<string, string> marriages;
Then we store something in map by putting a key inside brackets and setting
it equal to a value:
marriages[“Tom”] = “Suzy”;
And to retrieve that particular item, we grab it based on the key:
cout << marriages[“Tom”] << endl;
And voilà! We get back the item stored in map for that particular key. Think
of map like an array, except the indices, which are called keys, can be any
object, not just a string.
Containing instances, pointers, or references
One of the most common discussions you encounter when people start talking about how to use the container templates is whether to put instances in
the containers, pointers, or references. For example, which of these should
you type:
vector<MyClass>
vector<MyClass *>
vector<MyClass &>
Book IV
Chapter 6
Programming with
the Standard Library
Even though the keys can be any type or class, you must specify the type
or class you’re using when you set up map. And after you do that, you can
use only that type for the particular map. Thus, if you say the keys will be
strings, you cannot then use an integer for a key, as in marriages[3] =
“Suzy”;.
540
Containing Your Classes
In other words, do you want your container to store the actual instance
(whatever that might mean), a reference to the actual instance, or a pointer
to the instance?
To explore this idea, have a look at Listing 6-4. Here, we’re trying out the different ways of storing things in map: instances, pointers, and references.
Listing 6-4: Making Decisions: Oh, What to Store?
#include <iostream>
#include <map>
using namespace std;
class StoreMe
{
public:
int Item;
};
bool operator < (const StoreMe & first,
const StoreMe & second)
{
return first.Item < second.Item;
}
int main()
{
// First try storing the instances
map<StoreMe, StoreMe> instances;
StoreMe
StoreMe
StoreMe
StoreMe
key1 =
value1
key2 =
value2
{10}; // braces notation!
= {20};
{30};
= {40};
instances[key1] = value1;
instances[key2] = value2;
value1.Item = 12345;
cout << instances[key1].Item << endl;
instances[key1].Item = 34567;
cout << instances[key1].Item << endl;
// Next try storing pointers to the instances
map<StoreMe*, StoreMe*> pointers;
StoreMe
StoreMe
StoreMe
StoreMe
key10 =
value10
key11 =
value11
{10};
= {20};
{30};
= {40};
pointers[&key10] = &value10;
pointers[&key11] = &value11;
value10.Item = 12345;
cout << (*pointers[&key10]).Item << endl;
Containing Your Classes
541
// Finally try storing references to the instances.
// (I commented it out because it will
// get an error. See the text!)
// map<StoreMe&, StoreMe&> pointers;
return 0;
}
First, note that to create the instances of StoreMe, we used the braces notation. You can do that when you have no constructors. So the line
StoreMe key1 = {10};
creates an instance of StoreMe and puts 10 in the Item member variable.
Also note that we commented out the single line
// map<StoreMe&, StoreMe&> pointers;
This is where we attempt to declare a map that holds references. But the line
gets a compiler error. When you type this listing, you can try uncommenting
the commented line and see the error message. We get several error messages as a result of this line, the main one was
error: conflicting declaration ‘std::map<StoreMe&, StoreMe&,
std::less<StoreMe&>, std::allocator<std::pair<StoreMe&, StoreMe&> > > pointers’
Apparently references are out of the question. But why is that?
Here’s why: It turns out map is making a copy of everything you put in it.
How do we know this? By the output. Here’s what you see when you type
this program (and recomment out the line that you uncommented out so
that it’s a recommented-decommented line).
20
34567
12345
Aha! Tricky. Tricky indeed! But now we need to determine what this output
means. For the first line, we stored a pair in map for key1 and value1:
And then we changed the Item member variable in value1:
value1.Item = 12345;
Next we retrieved the value from the pair in map and printed the Item
member:
cout << instances[key1].Item << endl;
Programming with
the Standard Library
instances[key1] = value1;
Book IV
Chapter 6
542
Containing Your Classes
When we did, we saw 20, not 12345. That means the value stored in map
is a copy, not the original. We changed the Item member of the original to
12345, but the copy still had the previous value of 20.
But then, we did this:
instances[key1].Item = 34567;
The hope here was that this action would change the Item member of the
value stored in map. And so we printed the value again:
cout << instances[key1].Item << endl;
And this time it did indeed change. We saw 34567. Excellent! Where there’s
a will, there’s a way, and where there’s a value, there’s a change. (Or something like that.)
And now that we’ve figured out that map is storing copies of what we put in
it, the idea of storing a pointer should be pretty clear: If we have a pointer
variable and then we make a copy of it, although we have a separate pointer
variable now, the original and the copy both point to the same thing. And
that’s the idea behind the second part of Listing 6-4. We created map like this:
map<StoreMe*, StoreMe*> pointers;
Now this map stores pointer variables. Remember that a pointer variable just
holds a number that represents an address. If two separate pointer variables
hold the same number, it means they point to the same thing. Furthermore,
because this map is holding pointers, really it’s holding numbers, not
instances — something to think about.
And so we next set up some instances and then made one association:
pointers[&key10] = &value10;
Note the ampersand (&) — we’re storing the addresses in map. Then we
changed the Item member of one the value objects:
value10.Item = 12345;
And this time, when we printed it by using this carefully parenthesized line
cout << (*pointers[&key10]).Item << endl;
We see this
12345
Containing Your Classes
543
And once again . . . aha! This time the change stuck. Why is that? Because
even though map holds a copy, it’s holding a copy of a pointer. And that
pointer happens to point to the original value10 object. So when we
changed the Item member of value10, map picked up the change. map itself
didn’t change, but map is pointing to that value.
From all this discussion about the containers holding copies, you can come
to the following conclusion. Because map holds copies, you can remember
these two rules about deleting your original objects:
✦ The container holds instances: If you’re putting instances in map, you
can delete the original instances after they’re in map. This is okay
because map has its own copies of the instances.
✦ The container holds pointers: If you’re putting pointers in map, you don’t
want to delete the original instances because the pointers in map still
point to these instances.
So which method is best? It’s up to you. But here are a couple of things to
consider:
✦ Keeping instances around: If you don’t want to keep instances lying
around, you can put the instances in the container, and it will make
copies.
✦ Copyability: Are your classes copyable? Some classes, such as classes
filled with pointers to other classes or classes that are enormous, don’t
copy well. In that case, you may want to put pointers in the container.
Comparing instances
When you work with classes that contain other classes (such as vector),
you need to provide the class with a way to compare two things. For us
humans, having the superbrains that we do, comparing is easy. But it’s not
that easy for a computer. For example, suppose you have two pointers to
string objects. The first points to a string containing abc. The second points
to another string containing abc. Are these two pointers the same?
string *pointer1 = new string(“abc”);
string *pointer2 = new string(“abc”);
Are pointer1 and pointer2 equal? Again, it depends on how you look at it.
If you mean do they point to strings that are equivalent, then, yes, they are
equal in that sense. If you mean do they point to the same object, then, no,
they are not equal in that sense. Now look at this code:
Programming with
the Standard Library
Well, that depends on how you look at it. If you mean do they point to the
same sequence of characters, then, yes, they are the same. But if you mean do
they point to the same object, then maybe or maybe not. Look at this code:
Book IV
Chapter 6
544
Containing Your Classes
string *pointer3 = new string(“abc”);
string *pointer4 = pointer3;
These two pointers point to the same object. So in that sense, they are
equal. And because they point to the same object, they also point to the
same string of characters. So, again, in that sense, they are equal.
As you can see, you have two kinds of comparisons when dealing with
objects:
✦ You are comparing two objects and determining whether they are identical, even though they’re separate objects. If the two objects are separate
but identical, you would say that they are equal.
✦ You are comparing two objects and determining if they are the same
object. This can happen if you have two pointers and they both point to
the same object. In that case, you say that they are equal.
So why do you need to know this besides to drive people batty? (“You say
your car and our cars are the same, but in fact, they are different: One is
yours, and the others are ours!”) You need to know this distinction because
when you create a container class that holds instances of your object, often
the class needs to know how to compare objects. This is particularly true in
the case of map, which holds pairs of items, and you locate the items based
on the first of the pair (called the key). When you tell map to find an item
based on a key, map must search through its list of pairs until it finds one
such that the key in the pair is equal to the one you passed in to the search.
Well, that’s all fine and dandy; but now, how can the computer know whether
two objects are identical? That is, suppose that you are doing your comparison based on whether two separate objects are identical. How does the computer compare the two objects to determine if they are, in fact, identical?
And because we like to get people thinking, how about this: What if you have
a list of objects, and you want to keep them in a sorted order? How does the
computer determine a sort order?
Here’s an example. We create a class called Employee. That’s a standard
example that you see in lots of books, but in this case it makes for a good
example, for once. Now our Employee class contains these member variables: FirstName, LastName, and SocialSecurityNumber.
Next, we have a Salary class that contains payroll information for
an employee. This class has member variables MonthlySalary and
Deductions. (Yes, in real life, you would probably have more member variables, but this is good enough for now.)
Containing Your Classes
545
Next, we have a map instance, where each key,value pair contains an
Employee instance for the key and a Salary instance for the value. So
the big question is this: If we want to look up an employee, we would
make an instance of Employee and fill in the FirstName, LastName, and
SocialSecurityNumber member variables. We would then retrieve the
value based on this key. But we can think of two issues here:
✦ We would create an instance and allow map to find the key that matches
the instance. Is map looking for the exact same instance or one identical
to it?
✦ If map is looking for an instance identical to the object we filled in, what
happens if the employee changed his or her name (such as during a marriage). Can you cause map to still find the right key if map has one name
and the search object has another? Most likely. In such cases, you would
want the value to match only based on the SocialSecurityNumber,
without worrying about the others. So in that case, can you tell map to
treat the two objects as identical?
Here’s how to resolve these two issues: If you’re dealing with your own
classes, in addition to setting up a container class, you also provide a function that compares two instances of your own class. Your comparison function can determine whether two classes are equal, if the first is less than the
second, or if the first is greater than the second.
Listing 6-5 shows an example of a map class, along with a comparison function that determines whether two keys are equal.
Book IV
Chapter 6
Programming with
the Standard Library
At first, how less than and greater than can apply to things like an Employee
class may not seem apparent. But the idea behind less than and greater than
is to give the container class a way to determine a sort order. If you have a
list class holding Employee instances, for example, and you tell the list to
keep them in a sorted order, how does the list know how to sort them? By
using the notion of less than and greater than. The list can determine if one
is greater than another and can group them in a sorted order. But if you’re
dealing with an Employee class, you would choose how to sort them: Should
an Employee instance with a social security number of 111-11-1111 be less
than 999-99-9999? Or should they be sorted based on name, so that the
person with social security number 111-11-1111 but the name Zoë Zusseldörf
come after the person with social security number 999-99-9999 but the name
Aaron Aackman? Well, the answer is this: It’s your decision. And after you
decide how you want them sorted, you would create a function that determines if one is less than, equal to, or greater than the other. If you want
the list to sort by name, you would make your function look strictly at the
names. (And will it look at last name, first name, or both? That’s your decision.) But if you want your list to sort by social security number, you would
write your function to compare the social security numbers.
546
Containing Your Classes
Listing 6-5: Containing Instances and Needing
Functions That Compare Them
#include <iostream>
#include <map>
using namespace std;
class Employee
{
public:
string Nickname;
string SocialSecurityNumber;
Employee(string anickname, string asocial) :
Nickname(anickname),
SocialSecurityNumber(asocial) {}
Employee() : Nickname(“”), SocialSecurityNumber(“”) {}
};
class Salary
{
public:
int AnnualRipoff;
int IRSDeductionsCheat;
Salary(int aannual, int adeductions) :
AnnualRipoff(aannual),
IRSDeductionsCheat(adeductions) {}
Salary() : AnnualRipoff(0), IRSDeductionsCheat(0) {}
};
bool operator < (const Employee& first, const Employee& second)
{
return first.Nickname < second.Nickname;
}
int main()
{
map<Employee, Salary> employees;
Employee emp1(“sparky”, “123-22-8572”);
Salary sal1(135000, 18);
employees[emp1] = sal1;
Employee emp2(“buzz”, “234-33-5784”);
Salary sal2(150000, 23);
employees[emp2] = sal2;
// Now test it out!
Employee emptest(“sparky”, “”);
cout << employees[emptest].AnnualRipoff << endl;
return 0;
}
When you run this program, you will see the AnnualRipoff member of the
Salary value, where the key is an Employee with the name sparky:
135000
Containing Your Classes
547
Now notice a couple things about this code. First, to locate the salary for
Sparky, we didn’t need the Employee instance for Sparky. Instead, we created an instance of Employee and set up the Nickname member without
worrying about the SocialSecurityNumber member. Then we retrieved
the value by using the bracket notation for map:
cout << employees[emptest].AnnualRipoff << endl;
Now why did this work? Because the map code uses our less-than function
that we provided. And in that function, we compared only the Nickname
members, not the SocialSecurityNumber member. We could, however,
change things around a bit. Instead of comparing the Nickname members,
we could compare the SocialSecurityNumber members. We could
change the less-than function like so:
bool operator < (const Employee& first,
const Employee& second)
{
return first.SocialSecurityNumber <
second.SocialSecurityNumber;
}
And then we can locate Sparky’s salary based on his social security number:
Employee emptest(“”, “123-22-8572”);
cout << employees[emptest].AnnualRipoff << endl;
Iterating through a container
When your house is full of things, sometimes being able to climb over it all
so you can look down on it and see what all is there is nice. Containers in the
Standard Library are the same way: If you have a container filled with things,
being able to climb through it would be nice.
Book IV
Chapter 6
Programming with
the Standard Library
Wait! This can’t be right! How can the computer locate the item with the
matching key if all you’re giving it is a less-than comparison? Good question.
Here’s how: Suppose you want to find out if two numbers, say 5 and 5, are
equal. (We know, they are equal, but bear with us.) But suppose the only
comparison you have available is less-than. How can you determine if they
are equal? You first see if the first is less than the second: Is 5 less than 5?
Nope. Then you see if the second is less than the first: Is the second 5 less
than the first 5? Nope. And because neither is less than the other, they must
be equal! Aha! And that’s how the code for the various containers matches
objects: It calls your less-than function twice, the second time flip-flopping
the order of the parameters; and if your function returns false both times,
the computer determines that they are equal. That approach makes life
easier because you need to provide only a single comparison function! Yay!
548
Containing Your Classes
To climb through a container, you use an iterator. And iterator works with a
container to let you step one-by-one through the container, seeing what all is
in it.
Each container class contains an embedded type called iterator.
To create an iterator instance, then, you need to use the fully qualified
name. For example, if you have a map that holds integers and strings as in
map<int, string>, you would create an iterator instance like this:
map<string, int>::iterator loopy
Although loopy is an instance of iterator, some serious typedefing
is going on, and, in fact, loopy is a pointer to an item stored inside the
container.
Less<MyClass> is more
When we create a class that we will be using
in a container, we prefer to write our own
overloaded less-than function. The containers in the Standard Library work as follows:
When you create a class based on a container
template, you provide the types that the container holds, and you also provide a class (or
struct) that includes a less-than member
function. However, this class doesn’t have a
function called <. Instead, it’s called (), and it
takes two parameters, one for each of the two
items you’re comparing. The container class
then calls this function to compare instances.
Well that’s all great, but why haven’t we seen
this in action? The reason is the containers have default template parameters. If you
don’t supply this magical less-than class, the
container supplies one for you. What does it
supply? It supplies a class based on a template called less. This template is simple; it
includes a single member function that returns
the Boolean value
x < y
For most basic types, that’s fine. The compiler
can easily use that if, for example, you’re working
with integers. But what if you’re working with
one of your own classes? The compiler doesn’t
understand the < operator unless you provide
your own < operator function, as we did everywhere else in this chapter. However, because
the container takes a class in its parameter
that defaults to the class less, you can put
together your own class and use that instead
of writing your own < operator function. Here’s
a sample:
class MyLess
{
public:
bool operator()(const MyClass &x,
const MyClass &y) const
{
return x.Name < y.Name;
}
};
Then when you create, for example, a map,
you would pass this class as a third parameter,
rather than relying on the default:
map<MyClass, MyClass, MyLess> mymap;
And, of course, then you don’t need your own
less-than function.
Containing Your Classes
549
Now, you want to initialize loopy to point to the first item in the container.
And you can do this by calling the container’s begin member function and
storing the results in loopy. Then loopy will point to the first item in the
container. You can access the item by dereferencing loopy; then when you’re
finished, you can move to the next item by incrementing loopy like this:
loopy++;
That’s pretty easy. And you can tell whether you’re finished by checking to
see whether loopy points to the end of the items. To do this, you call the
container’s end member function and compare loopy to the results of end.
If it’s equal, you’re done.
The following few lines of code do these steps:
vector<string>::iterator vectorloop = Words.begin();
while (vectorloop != Words.end())
{
cout << *vectorloop << endl;
vectorloop++;
}
You can see the type we used for the iterator, in this case called vectorloop. And you can see that we initialized it by calling begin. We dereferenced it to get to the data itself, and then incremented vectorloop to get
to the next item. And in the while loop we tested vectorloop against the
results of end to see if we’re all done.
Many people seem to forget how to use iterators. We suggest keeping the code
in Listing 6-6 handy somewhere. (Print it and hang it on the wall, or save a copy
in a directory on your hard drive where you can find it quickly, or maybe print it
on really big paper and paste it to the front windshield of your car.) Then if you
forget how to put together a simple iterator, you can easily find the answer.
Book IV
Chapter 6
Listing 6-6: Iterating
Programming with
the Standard Library
#include <iostream>
#include <map>
#include <vector>
using namespace std;
int main()
{
// Iterating through a map
map<string, int> NumberWords;
NumberWords[“ten”] = 10;
NumberWords[“twenty”] = 20;
NumberWords[“thirty”] = 30;
map<string, int>::iterator loopy = NumberWords.begin();
(continued)
550
Containing Your Classes
Listing 6-6 (continued)
while (loopy != NumberWords.end())
{
cout << loopy->first << “ “;
cout << loopy->second << endl;
loopy++;
}
// Iterating through a vector
vector<string> Words;
Words.push_back(“hello”);
Words.push_back(“there”);
Words.push_back(“ladies”);
Words.push_back(“and”);
Words.push_back(“aliens”);
vector<string>::iterator vectorloop = Words.begin();
while (vectorloop != Words.end())
{
cout << *vectorloop << endl;
vectorloop++;
}
return 0;
}
When you create a vector, it allocates some space for the data you put in
it. But after all that space gets filled up and vector is stuffed to the brim,
vector will resize itself, adding more space. But in doing so, it uses the old
memory-shuffle trick where it first allocates a bigger chunk of memory; then
it copies the existing data into the beginning of that bigger chunk of memory,
and finally it frees the original chunk of memory. Now if you use the various iterator functions to home in on a certain item in vector (giving you a
pointer to the item) and you save that pointer, then after vector reallocates
itself, that pointer will no longer be valid! It will point to somewhere in the
original memory block that’s no longer being used. So be careful.
For example, suppose you have the following code to set up a vector
vector<int> test;
test.push_back(1);
test.push_back(2);
test.push_back(3);
and then you use an iterator to get to the beginning; from there you go to the
second item in vector; then you print the address of the second item:
vector<int>::iterator i1 = test.begin();
i1++;
cout << i1 << endl;
The Great Container Showdown
551
Then you decide to add a whole bunch of items:
for (int loop = 0; loop < 5000; loop++)
{
test.push_back(loop);
}
And now, if you once again use an iterator to get to the second item and then
print the address like so
vector<int>::iterator i2 = test.begin();
i2++;
cout << i2 << endl;
you will likely see a different number than you previously did. If so, it means
vector reallocated itself, and that means the original pointer is no longer
valid.
A map of pairs in your hand
When you iterate through map, you get back not just the value of each item
nor the key of each item. Instead, you get back a pair of things — the key
and the value together. These live inside an instance of a class called Pair.
(Although, really, it’s a template.) This pair instance has two member variables, first and second. The first member refers to the key in the pair, and
the second member refers to the value in the pair. When you iterate through
map, the iterator points to an instance of Pair, so you can grab the key by
looking at first and the value by looking at second. But be careful, because
Pair is the internal storage bin inside map. You’re not looking at copies;
you’re looking at the actual data in map. If you change the data as in this
while (loopy != NumberWords.end())
{
loopy->second = loopy->second * 2;
loopy++;
}
you will be changing the value stored in map — not a copy of it. So use
caution!
In the sections that follow, we give a rundown of the containers available in
the Standard Library. Different containers have different places in life. Some
are tall, some are short — wait a minute, that’s not right. They each have a
different purpose, and in the following sections we show you where you can
use each of them.
Programming with
the Standard Library
The Great Container Showdown
Book IV
Chapter 6
552
The Great Container Showdown
Associating and storing with a set
First things first. set is not a set. If you have any background in mathematics, you’ve likely come across the notion of a set. And in math, a set doesn’t
have an order to it. It’s a group of items stored in, well, a set.
In the Standard Library, set has an order to it. However, like a math set, set
doesn’t allow duplicates. If you try to put an item in set that’s already there,
set will ignore your attempt to do so.
Listing 6-7 shows you how to use set.
Listing 6-7: Using set to Look up Items
#include <iostream>
#include <set>
using namespace std;
class Employee
{
public:
string Nickname;
string SocialSecurityNumber;
Employee(string anickname, string asocial) :
Nickname(anickname),
SocialSecurityNumber(asocial) {}
Employee() : Nickname(“”), SocialSecurityNumber(“”) {}
};
bool operator < (const Employee& first,
const Employee& second)
{
return first.SocialSecurityNumber <
second.SocialSecurityNumber;
}
ostream& operator << (ostream &out, const Employee &emp)
{
cout << “(“ << emp.Nickname;
cout << “,” << emp.SocialSecurityNumber;
cout << “)”;
return out;
}
int main()
{
set<Employee> employees;
Employee emp1(“sparky”, “123-22-8572”);
employees.insert(emp1);
Employee emp2(“buzz”, “234-33-5784”);
employees.insert(emp2);
The Great Container Showdown
553
Employee emp3(“coollie”, “123-22-8572”);
employees.insert(emp3);
Employee emp4(“sputz”, “199-19-0000”);
employees.insert(emp4);
// List the items
set<Employee>::iterator iter = employees.begin();
while (iter != employees.end())
{
cout << *iter << endl;
iter++;
}
// Find an item
cout << “Finding...” << endl;
Employee findemp(“”, “123-22-8572”);
iter = employees.find(findemp);
cout << *iter << endl;
return 0;
}
In Listing 6-7, we included an Employee class, along with a less-than function. The less-than function compares the SocialSecurityNumber
member of two Employee instances. This results in two things:
✦ Ordering: The items in set will be ordered according to social security
number. This is not true with all containers, but it is the way a set
works.
✦ Duplicates: If we try to add two employees with matching
SocialSecurityNumber members (but the other members can be different), the second addition won’t take. The set will ignore it.
You can see in this listing that we tried to add two employees with the same
SocialSecurityNumber members:
Employee emp1(“sparky”, “123-22-8572”);
employees.insert(emp1);
Employee emp3(“coollie”, “123-22-8572”);
employees.insert(emp3);
Later, when we print all the items in set, we see only the one for “sparky”,
not the one for “coollie”. set ignored the second employee.
Finding an item in set is interesting. Look at how we did it: We created an
instance of Employee, and we filled in only the SocialSecurityNumber
member, because that’s the only member that the less-than function looks
Programming with
the Standard Library
and
Book IV
Chapter 6
554
The Great Container Showdown
at. Then we called find. But what did we get back? If you look at the function header, you will see that the find function returns an iterator. But that
seems silly. Why an iterator? We’re not iterating, by cracky!
The reason we get back an iterator is because the iterator type is really
a typedef for a pointer to an item inside set. Oh, okay; that makes sense
then: When we call find, we get back a pointer to an item in set, even if
its typename is iterator. And so to access the item, we dereference the
pointer.
In Listing 6-7, we did something handy: We created a function that lets us
use our Employee instance with cout. We did this by overloading the insertion function. This function’s header looks like this:
ostream& operator << (ostream &out, const Employee &emp) {
The first parameter represents cout, and the second is the item we’re
couting. And so, inside this function, we write to cout the individual members of the Employee. Not a problem.
Unionizing and intersecting sets
Everybody has an opinion on unionizing, but fortunately, we’re not talking
about workers’ unions in this section. Instead, we’re talking about sets and
how you can combine two sets to get the union, or you can find the common
elements to get the intersection.
When you #include <set>, you automatically get a couple of handy functions for finding the union and intersection of some sets.
Showdown: maps versus sets
And for the first showdown, we’d like to offer
you a philosophical (yet practical!) discussion on the difference between map and set.
map lets you store information based on a
key, through which you can retrieve a value.
Elsewhere in this chapter, we use an example
where the key is an Employee instance and
the value is a Salary instance. But with set,
you can achieve something similar: In Listing
6-7, we could have had a single class containing both Employee and Salary information.
And you can see in Listing 6-7 that we were
able to look up the Employee instance based
on nothing but a social security number. So in
this sense, we created a map where the key is
a social security number and the value is the
rest of the employee information. Tricky, no?
The fact is, you can often accomplish associations with set, as you can with map. But the
advantage to set is that you need to store only
one instance for each item, whereas with map,
you must have two instances, both a key and
a value. But the advantage to map is that you
can use the nice bracket notation. The choice
is yours.
The Great Container Showdown
555
set does not allow duplicates. A union of two sets is a set that consists of
all the elements of the two sets combined, but without any duplicates. The
intersection is also itself a set, and therefore it has no duplicates.
Listing 6-8 shows how you can find the intersection and union of two sets.
Listing 6-8: Finding an Intersection and a Union Is Easy!
#include <iostream>
#include <set>
using namespace std;
void DumpClass(set<string> *myset)
{
set<string>::iterator iter = myset->begin();
while (iter != myset->end())
{
cout << *iter << endl;
iter++;
}
}
int main()
{
set<string> EnglishClass;
set<string> HistoryClass;
EnglishClass.insert(“Zeus”);
EnglishClass.insert(“Magellan”);
EnglishClass.insert(“Vulcan”);
EnglishClass.insert(“Ulysses”);
EnglishClass.insert(“Columbus”);
HistoryClass.insert(“Vulcan”);
HistoryClass.insert(“Ulysses”);
HistoryClass.insert(“Ra”);
HistoryClass.insert(“Odin”);
set<string> Union;
set<string> Intersection;
Book IV
Chapter 6
Programming with
the Standard Library
insert_iterator<set<string> >
IntersectIterate(Intersection, Intersection.begin());
insert_iterator<set<string> >
UnionIterate(Union, Union.begin());
set_intersection(EnglishClass.begin(),
EnglishClass.end(),
HistoryClass.begin(), HistoryClass.end(),
IntersectIterate);
cout << “===Intersection===” << endl;
DumpClass(&Intersection);
set_union(EnglishClass.begin(),
EnglishClass.end(),
HistoryClass.begin(), HistoryClass.end(),
(continued)
556
The Great Container Showdown
Listing 6-8 (continued)
UnionIterate);
cout << endl << “===Union===” << endl;
DumpClass(&Union);
return 0;
}
When you run the code in Listing 6-8, you see this output:
===Intersection===
Ulysses
Vulcan
===Union===
Columbus
Magellan
Odin
Ra
Ulysses
Vulcan
Zeus
But as you can see, something a little bizarre is in the code. Specifically, this
part isn’t exactly simple:
insert_iterator<set<string> >
IntersectIterate(Intersection, Intersection.begin());
This is used in the call to set_intersection. First, recognize that this
crazy code is a variable declaration. The first line is the type of the variable,
a template called insert_iterator. The template parameter is the type of
set, in this case set<string>.
The next line is the instance name, IntersectIterate, and the constructor requires two things: the set that will hold the intersection
(called Intersection) and an iterator pointing to the beginning of the
Intersection set (even though set is empty).
The variable that these two lines create is an iterator, and it is basically a
helper object through which some function that needs to insert multiple
items into a list can use. In this case, the function is set_intersection.
Now the set_intersection function doesn’t take as parameters the sets
directly; instead, it takes the beginning and ending iterators of the two sets,
along with the IntsersectIterate thingamabob declared earlier. And
you can see in Listing 6-8 that those are the five items we passed to the set_
intersection function.
Then after calling the set_intersection function, the Intersection
object will contain the intersection of the two sets.
The set_union function works precisely the same way, except it figures out
the union of the two sets, not the intersection.
The Great Container Showdown
557
To use the set_intersection and set_union functions, you need to
#include <algorithm>. This is one of the header files in the Standard
C++ Library.
If you find the code in Listing 6-8 particularly ugly, a slightly easier way to
call set_intersection where you don’t need to directly create an
instance of insert_iterator is available. It turns out there’s a function
that will do it for you. To use this function, you can remove the declaration
for IntersectIterate and UnionIterate, and then instead call set_
intersection like this:
set_intersection(EnglishClass.begin(),
EnglishClass.end(),
HistoryClass.begin(), HistoryClass.end(),
inserter(Intersection, Intersection.begin()));
The fourth line simply calls a function called inserter, which creates an
instance of insert_iterator for you. Then you can do the same for set_
union:
set_union(EnglishClass.begin(),
EnglishClass.end(),
HistoryClass.begin(), HistoryClass.end(),
inserter(Union, Union.begin()));
Listing with list
A list is a simple container similar to an array, except you can’t access the
members of list by using a bracket notation as you can in vector or an
array. You don’t use list when you don’t need access to only one item in
the list; you use it when you plan to traverse through the list, item-by-item.
You can also insert an item before an existing item if you have a pointer to
the item inside the list.
For operations where you need a pointer to an item in the list, you need to
use an iterator. An iterator is simply a typedef for a pointer to an item in
the list; however, it points to the item in the list, not the original item you
added to the list. Remember, the containers hold copies. Thus, if you do an
insert into a list and point to an original item, that item won’t be a member
of the list, and the insert won’t work.
Book IV
Chapter 6
Programming with
the Standard Library
To add items to a list, use the list’s push_front member function or its
push_back member function. The push_front function inserts the item
in the beginning of the list, in front of all the others that are presently in the
list. If you use push_front several times in a row, the items will be in the
reverse order from which you put them in. The push_back function adds
the item to the end of the list. So if you put items in a list by using push_
back, their order will be the same as the order in which you added them.
558
The Great Container Showdown
Although the list template includes an insert function, this function has
only very special uses. To use insert, you must have a pointer to an item in
the list — that is, you need to have an iterator. But how do you get this
pointer? By traversing the list. It has no find function, and so really the only
time you would use the insert function is if you’re already working your
way through the list. But if you do need to do an insert and you’re willing to
use iterators to move through the list to find the location where you want to
put the new item, insert will do the job.
In Listing 6-9, we demonstrate lists by using a duck metaphor. (They’re all
in a row.) In this example, we create a list, add our ducks to it, and then
reverse it. Next, we create a second list and splice its members into the first
list.
Listing 6-9: Handling Items in a List Template
#include <iostream>
#include <list>
using namespace std;
class Duck
{
public:
string name;
int weight;
int length;
};
ostream& operator << (ostream &out, const Duck &duck)
{
cout << “(“ << duck.name;
cout << “,” << duck.weight;
cout << “,” << duck.length;
cout << “)”;
return out;
}
void DumpDucks(list<Duck> *mylist)
{
list<Duck>::iterator iter = mylist->begin();
while (iter != mylist->end())
{
cout << *iter << endl;
iter++;
}
}
list<Duck>::iterator MoveToPosition(list<Duck> *mylist, int pos)
{
list<Duck>::iterator res = mylist->begin();
for (int loop = 1; loop <= pos; loop++)
{
res++;
}
The Great Container Showdown
559
return res;
}
int main()
{
list<Duck> Inarow;
// Push some at the beginning
Duck d1 = {“Jim”, 20, 15}; // Braces notation!
Inarow.push_front(d1);
Duck d2 = {“Sally”, 15, 12};
Inarow.push_front(d2);
// Push some at the end
Duck d3 = {“Squakie”, 18, 25};
Inarow.push_front(d3);
Duck d4 = {“Trumpeter”, 19, 26};
Inarow.push_front(d4);
Duck d5 = {“Sneeky”, 12, 13};
Inarow.push_front(d5);
// Display the ducks
cout << “===========” << endl;
DumpDucks(&Inarow);
// Reverse
Inarow.reverse();
cout << “===========” << endl;
DumpDucks(&Inarow);
// Splice
// Need another list for this
list<Duck> extras;
Duck d6 = {“Grumpy”, 8, 8};
extras.push_back(d6);
Duck d7 = {“Sleepy”, 8, 8};
extras.push_back(d7);
Duck d8 = {“Ornery”, 8, 8};
extras.push_back(d8);
Book IV
Chapter 6
Programming with
the Standard Library
Duck d9 = {“Goofy”, 8, 8};
extras.push_back(d9);
cout << “===========” << endl;
cout << “extras:” << endl;
DumpDucks(&extras);
list<Duck>::iterator first =
MoveToPosition(&extras, 1);
list<Duck>::iterator last =
MoveToPosition(&extras, 3);
list<Duck>::iterator into =
MoveToPosition(&Inarow, 2);
Inarow.splice(into, extras, first, last);
(continued)
560
The Great Container Showdown
Listing 6-9 (continued)
cout << “===========” << endl;
cout << “extras after splice:” << endl;
DumpDucks(&extras);
cout << “===========” << endl;
cout << “Inarow after splice:” << endl;
DumpDucks(&Inarow);
return 0;
}
We made a function, MoveToPosition, that moves to a position in the list.
This may seem counterproductive because the list template doesn’t allow
random access. But we needed three iterators to perform the splice: The
start and end position of the second list (the one we’re splicing members
from) and the position in the first list where we want to put the spliced members. For that, we needed an iterator, which MoveToPosition finds for us.
The function we created, MoveToPosition, is a template function. But
when we called the function, we didn’t provide the typename in angle brackets. The compiler can figure out which class version we need; the compiler
knows that it can look at what we pass into the function as a parameter and
use its type to decide the template parameter. (Without the template type in
the function parameter, the compiler can’t figure it out.) Here’s the program
output:
===========
(Sneeky,12,13)
(Trumpeter,19,26)
(Squakie,18,25)
(Sally,15,12)
(Jim,20,15)
===========
(Jim,20,15)
(Sally,15,12)
(Squakie,18,25)
(Trumpeter,19,26)
(Sneeky,12,13)
===========
extras:
(Grumpy,8,8)
(Sleepy,8,8)
(Ornery,8,8)
(Goofy,8,8)
===========
extras after splice:
(Grumpy,8,8)
(Goofy,8,8)
===========
Inarow after splice:
(Jim,20,15)
(Sally,15,12)
(Sleepy,8,8)
(Ornery,8,8)
(Squakie,18,25)
(Trumpeter,19,26)
(Sneeky,12,13)
The Great Container Showdown
561
Showdown: lists versus vectors
With a list, you do not have random access
to the list, which is a fancy-schmancy way of
saying that you can’t drop into the middle of the
list and look at whatever item is stored there
as you can with a vector. If you want to look
at the items in the list, you must either start at
the beginning or the end and work your way
through it one by one. But with a vector, you
can refer to any element by using brackets,
as in MyVector[3}. This may seem like a
disadvantage for the list, but the ANSI document claims that “many algorithms only need
sequential access anyway.” We suppose that
there are times when you don’t need to drop
into the middle of an array, and then a list might
do. But lists have definite advantages. The list
template allows you to splice together multiple
lists, and it has good support for sorting the list,
for splicing members out of one list and into
another, and for merging multiple lists.
You can see the elements that were inside the two lists before and after the
splice; the ducks moved from one list to another.
When you specify the positions for the splice operation, the splice includes
the start position up to but not including the ending position. Listing 6-9
shows this: We spliced from position 1 to 3 in the second list (extras). But
we got the ducks from positions 1 and 2 because the code spliced position 1
up to but not including 3 — which is 2.
Stacking the deque
A deque (pronounced “deck”) container is a sequential list of items like
vector and list. Like vectors and unlike lists, deques allow bracket
notation for random access. Unlike vector, deque lets you insert items at
the beginning and pop items off the beginning. To create a deque that holds
integers, do something like this:
Then you can loop through the deque, accessing its members with a
bracket, as if it’s an array:
int loop;
for (loop = 0; loop < mydek.size(); loop++)
{
cout << mydek[loop] << endl;
}
Book IV
Chapter 6
Programming with
the Standard Library
deque<int> mydek;
mydek.push_front(10);
mydek.push_front(20);
mydek.push_front(30);
mydek.push_back(40);
mydek.push_back(50);
mydek.push_back(60);
562
The Great Container Showdown
You can also grab items off the front or back of the deque. Here’s an example from the front:
while (mydek.size() > 0)
{
cout << mydek.front() << endl;
mydek.pop_front();
}
Two functions show up here, front and pop_front. The front function
returns a reference to the item at the front of the deque. The pop_front
function removes the item that’s at the front of the deque.
Waiting in line with stacks and queues
Two common programming data structures are in the Standard Library:
✦ Stack: With a stack, you put items one-by-one on top of it, and you only
take items one-by-one off the top of it. You can add several items, one
after the other, before taking an item off the top. This process is sometimes called a First In Last Out (FILO) algorithm.
✦ Queue: A queue is like waiting in line at the post office (and some people
call such a line a queue). The line gets longer and longer as people
arrive, and the new people each go to the back of the line. But people
leave only by the front of the line. The queue data structure is like that:
You add data at the back of the queue, and take data off one-by-one at
the front of the queue. Like the stack, the queue also has an alternate
name: it’s a First In First Out (FIFO) algorithm.
To use the Standard Library to make a stack, you can use a deque, a list,
or a vector as the underlying storage bin. Then you declare the stack, as in
the following example:
stack<int, vector<int> > MyStack;
Or you can optionally use the default, which is queue:
stack<int> MyStack;
For a queue, you can’t use vector because vectors don’t include operations for dealing with a front. So, for that situation, you can use either deque
or list. For example, here’s a line of code that uses list:
queue<int, list<int> > MyQueue;
Or here’s a line of code that uses deque by default:
queue<int> MyQueue;
The Great Container Showdown
563
Showdown: deques versus vectors
If you go online to any discussion board and use
a search phrase like C++ deque vector, you will
see a lot of discussion, arguments, and confusion between when to use deque and when to
use vector. To know which to use when, you
need to understand the differences between
the two. Under the hood, vector usually
stores all its data in a regular old array, making
it easy to directly access the members. But
that also means that, to insert items, vector
must slide everything over to make room for the
inserted items. deque, however, does not use
the contiguous approach that vector does.
Inserting is then easier for it because it doesn’t
need to shuffle things around. Also, deque
doesn’t have to regrow itself if it runs out of
space, whereas vector does. And finally,
deque includes a push_front member
function that allows you to easily add an item
at the beginning. The vector template does
not include this member.
You normally perform three operations with a stack and a queue:
✦ push: When you add an item to a stack or queue, you push the item. This
puts the item on top of the stack or at the back of the queue.
✦ peek: When you look at the top item of the stack or the front of the
queue, you peek. The peek operation doesn’t remove the item, however.
✦ pop: When you remove an item from a stack or from the front of the
queue, you pop it off. For some libraries, this gives you the item. For the
Standard Library, it removes the item. To use an item off the top or front
of the stack or queue, first you peek at it and then you pop it off.
In the Standard Library, for peeking at the front of a queue, you call the
front member function. For a stack, you call the top member function.
For pushing and popping, the Standard Library uses these terms. The queue
and stack each include a push function and a pop function. Listing 6-10
demonstrates both a stack and a queue.
Book IV
Chapter 6
Programming with
the Standard Library
Listing 6-10: Creating a Stack and a Queue
#include <iostream>
#include <stack>
#include <queue>
using namespace std;
void StackDemo()
{
cout << “===Stack Demo===” << endl;
stack<int, vector<int> > MyStack;
(continued)
564
Copying Containers
Listing 6-10 (continued)
// Remember the space between the > >
MyStack.push(5);
MyStack.push(10);
MyStack.push(15);
MyStack.push(20);
cout << MyStack.top() << endl;
MyStack.pop();
cout << MyStack.top() << endl;
MyStack.pop();
MyStack.push(40);
cout << MyStack.top() << endl;
MyStack.pop();
}
void QueueDemo()
{
cout << “===Queue Demo===” << endl;
queue<int> MyQueue;
// No container specified in the queue, so it
// uses deque by default. The same goes for stack.
MyQueue.push(5);
MyQueue.push(10);
MyQueue.push(15);
cout << MyQueue.front() << endl;
MyQueue.pop();
cout << MyQueue.front() << endl;
MyQueue.pop();
MyQueue.push(40);
cout << MyQueue.front() << endl;
MyQueue.pop();
}
int main()
{
StackDemo();
QueueDemo();
return 0;
}
When you specify a container to use inside the stack or queue, remember
to put a space between the closing angle brackets. Otherwise, the compiler
reads it as a single insertion operator, >>, and gets confused.
Copying Containers
565
Copying Containers
Structures are easy to copy when class libraries are well designed. The
Standard C++ Library is that well designed. Each container class contains both
a copy constructor and an equal operator. To copy a container, you either set
one equal to the other or pass the first container into the constructor of the
second (which copies the first into the second). Listing 6-11 shows this.
Listing 6-11: Copying Containers Couldn’t Be Easier
#include <iostream>
#include <map>
using namespace std;
class Scrumptious
{
public:
string Dessert;
};
bool operator < (const Scrumptious & first,
const Scrumptious & second)
{
return first.Dessert < second.Dessert;
}
class Nutrition
{
public:
int VitaminC;
int Potassium;
};
int main()
{
map<Scrumptious, Nutrition> ItsGoodForMe;
Scrumptious ap = {“Apple Pie”}; // Braces notation!
Nutrition apn = {7249, 9722};
Book IV
Chapter 6
Scrumptious ic = {“Ice Cream”};
Nutrition icn = {2459, 19754};
Programming with
the Standard Library
Scrumptious cc = {“Chocolate Cake”};
Nutrition ccn = {9653, 24905};
Scrumptious ms = {“Milk Shake”};
Nutrition msn = {46022, 5425};
ItsGoodForMe[ap] = apn;
ItsGoodForMe[ic] = icn;
(continued)
566
Copying Containers
Listing 6-11 (continued)
ItsGoodForMe[cc] = ccn;
ItsGoodForMe[ms] = msn;
map<Scrumptious,Nutrition> Duplicate = ItsGoodForMe;
map<Scrumptious,Nutrition> AnotherDuplicate(ItsGoodForMe);
ItsGoodForMe[ap].Potassium = 20;
cout << ItsGoodForMe[ap].Potassium << endl;
cout << Duplicate[ap].Potassium << endl;
cout << AnotherDuplicate[ap].Potassium << endl;
return 0;
}
You can see in this listing that we created two classes, Scrumptious and
Nutrition. We then created a map called ItsGoodForMe that associates
Scrumptious instances with Nutrition instances.
We copied map twice, using both an equals sign and a copy constructor:
map<Scrumptious,Nutrition> Duplicate = ItsGoodForMe;
map<Scrumptious,Nutrition> AnotherDuplicate(ItsGoodForMe);
And that was it! We then changed one of the elements in the original map, to
see what would happen. Then we printed that element, as well as the corresponding element in the two copies. Here’s the output:
20
9722
9722
Yep, they’re different: This implies that the maps each have their own copies
of the instances — that there’s no sharing of instances between the maps.
Containers hold copies, not originals. That’s true when you copy containers,
too. If you put a structure in a container and copy the container, the latter
container has its own copy of the structure. To change the structure, you
must change all copies of it. The way around this is to put pointers inside
the containers. Then the containers each have their own copies of the pointers, but these pointers point to the same one-and-only object.
Book V
Reading and
Writing Files
Contents at a Glance
Chapter 1: Filing Information with the Streams Library . . . . . . . . . . .569
Seeing a Need for Streams .......................................................................... 570
Programming with the Streams Library ................................................... 571
Handling Errors When Opening a File ....................................................... 576
Flagging the ios Flags .................................................................................. 578
Chapter 2: Writing with Output Streams . . . . . . . . . . . . . . . . . . . . . . . .583
Inserting with the << Operator................................................................... 583
Formatting Your Output ............................................................................. 585
Chapter 3: Reading with Input Streams . . . . . . . . . . . . . . . . . . . . . . . . .597
Extracting with Operators .......................................................................... 597
Encountering the End of File ...................................................................... 599
Reading Various Types ............................................................................... 604
Reading Formatted Input ............................................................................ 607
Chapter 4: Building Directories and Contents . . . . . . . . . . . . . . . . . . .609
Manipulating Directories ............................................................................ 610
Getting the Contents of a Directory .......................................................... 611
Copying Files ................................................................................................ 614
Moving and Renaming Files and Directories............................................ 616
Chapter 5: Streaming Your Own Classes . . . . . . . . . . . . . . . . . . . . . . . .619
Streaming a Class for Text Formatting ..................................................... 620
Manipulating a Stream ................................................................................ 623
Chapter 1: Filing Information
with the Streams Library
In This Chapter
✓ Seeing the need for a streams library
✓ Using the right header files
✓ Opening a file
✓ Dealing with errors
✓ Working with flags to customize your file opening
F
irst things first. We’ve all heard of rivers and lakes and streams, and
it’s interesting just how many common words are used in computer
programming. That’s handy, because it lets us use words we already know
with similar meaning, but it’s also a bummer in that it’s harder to impress
strangers. While we don’t have gluggerbumbles and plickershops in
computer programming — words most people have never even heard of,
mainly because we made them up — we do have streams!
Most programmers think of a stream as the same thing as a file. You know —
a file that’s stored on your hard drive or maybe on a floppy disk or Zip drive.
But streams go beyond just files. A stream is any type of data structure that
you stream your data into and out of in a sequence of bytes.
For example, if we open an Internet connection to a top-secret computer
that stores all our top-secret data (ooooh), and we start putting our data on
the remote computer, we might use a stream-based data structure. By that
we mean we write the data in sequence one byte after another as the data
goes over the Internet like a stream of water, reaching the remote computer.
The data we wrote first gets there first and so on. It’s kind of like a stream of
water.
You can use the same approach for storing data into a file. Rather than just
filling a huge 5MB data structure and then dropping it onto the hard drive,
you write your data piece after piece; the information goes into the file.
In this chapter, we talk about different kinds of streams available to you, the
C++ programmer.
570
Seeing a Need for Streams
Seeing a Need for Streams
When you write a program that deals with files, you must use a specific
order:
1. Open the file.
Before you can use a file, you must open it. In doing so, you specify a
filename.
2. Access the file.
After you open a file, you either store data into it (this is called writing
data to the file) or get data out of it (this is called reading data from the
file).
3. Close the file.
After you have finished reading from and writing to a file, you must close
the file.
For example, a program that tracks your stocks and writes your portfolio to
a file at the end of the day might do these steps:
1.
2.
3.
4.
Ask the user for a name of a file.
Open the file.
For each stock object, write the stock data to the file.
Close the file.
The next morning, when the program starts, it might want to read the information back in. Here’s what it might do:
1. Ask the user for the name of the file.
2. Open the file.
3. While there’s more data in the file, create a new Stock object, read the
data from the file, and put the data into the Stock object.
4. Close the file.
Here are a couple of reasons to close a file after you have finished using it:
✦ Other programs might be waiting to use the file. Some operating systems, such as Windows 2000, allow a program to lock a file, meaning that
no other programs can open the file while the program that locked the
file is using it. Thus, in these situations, after you close a file, another
program can use it.
Programming with the Streams Library
571
You have two ways to write to a file:
✦ Sequential access: In sequential access, you write to a file or read from
a file from beginning to end. With this approach, when you open the file,
you normally specify whether you plan to read from or write to the file,
but not both at the same time. After you open the file, if you are writing
to the file, the data you write continually gets added to the end of the
file. Or if you are reading from the file, you read the data at the beginning, then you read the data that follows, then you read the data that follows that data, and so on, up to the end.
✦ Random access: With random access, you can read and write to any
byte in a file, regardless of which byte you previously read or wrote. In
other words, you can skip around. You can read some bytes, then move
to another portion of the file and write some bytes, and then move elsewhere and write some more.
Back in the days of the C programming language, several library functions let
you work with files. However, they stunk. They were cumbersome and made
life difficult. And so, when C++ came along, people quickly created a set of
classes that made life with files much easier. These people used the stream
metaphor we’ve been raving about.
In the sections that follow, we show you how to open files, write to them,
read from them, and close them.
Programming with the Streams Library
Before we begin talking about the streams library (the actual libraries
include fstream, iostream, and sstream, but don’t worry about that
now — we’ll get into the specifics later), we need to tell you about some
compatibility issues. The ANSI C++ standard document gives a complete
library of classes that handle streams and general input/output. (There is a
joint ANSI/ISO standard today, but we’ll focus on the ANSI standard in this
book since that is the standard that appears in the GNU gcc documentation.) However, not all compiler systems (commonly called implementations)
have the header files for these new classes. At the time of this writing, many
implementations of the gcc for Windows do have them as an update or as
part of the current release. However, some older compilers, perhaps the one
on your hard drive, might not be compatible. That’s because gcc 2.95 did
Book V
Chapter 1
Filing Information
with the Streams
Library
✦ When you write to a file, the operating system decides whether to
immediately write the information onto the hard drive or floppy disk
or to hold on to it and gather more information, finally writing it all as
a single batch. When you close a file, the operating system puts all your
remaining data into the file. This is called flushing the file.
572
Programming with the Streams Library
not yet have full support for the Standard Library, particularly in the stream
classes. Newer versions of the gcc compiler are available from 3.1 on up.
And a version of MinGW includes gcc3.1.
Fortunately, most of the classes in the Standard Library are available with
almost all the compilers currently available. Therefore, in most of this book,
we limit ourselves to the classes you can find in most compilers. That way,
everyone can be happy (even us!). However, because you may have compilers that use the newer classes, we sometimes discuss them in sidebars.
Getting the right header file
The streams library includes several classes that make your life much easier.
It also has several classes that can make your life more complicated, mainly
because these are auxiliary classes that you’ll probably rarely use. Here are
two of the more common classes that you will use. (And remember: These
classes are available in pretty much all C++ implementations, whether the
complete Standard Library is present or not.)
✦ ifstream: This is a stream you instantiate if you want to read from a file.
✦ ofstream: This is a stream you instantiate if you want to write to a file.
Before you can use the ifstream and ofstream classes, you include the
proper header file. This is where things get ugly. In the early days of C++,
people used the header file <fstream.h>. But somewhere in the mid1990s, people started using the Standard Template Library (and in the late
1990s, the Standard C++ Library), both of which required you to include
<fstream> (without the .h extension).
Because we want to stay up to date, in this book we use the ones without
the .h. However, the Standard Template Library and the Standard Library
put all their classes and objects inside the std namespace. (The Standard
Template Library and Standard Library are both C++ libraries but implement
some functionality differently — the article at http://en.wikipedia.
org/wiki/Standard_Template_Library describes these differences,
but you won’t need to worry about them when working through the examples in this book.) Thus, when you want to use an item from the streams
library, you must either
✦ Prepend its name with std, as in this example:
std::ofstream outfile(“MyFile.dat”);
✦ Include a using directive before the lines where you use the stream
classes, as in this example:
using namespace std;
ofstream outfile(“MyFile.dat”);
Programming with the Streams Library
573
In the spirit of the rest of this book, if you are using a compiler other than
gcc, we recommend that you follow your #include lines with the line
using namespace std;. Then you can type all the sample code as-is
throughout this book, including the stream examples, without needing to put
std:: before every class or object from the Standard Library.
Opening a file
Let’s see, what did we call the name of this file? We think it was
MyGreatChapter.doc. So we go to the word processor, choose File➪Open,
and type MyGreatChapter.doc.
Oops. We get an error message. That file doesn’t exist.
Oh, that’s right; we haven’t written it yet. Instead, we create a new document
inside the word processor, type 800 cool pages over the course of a relaxing
evening, and then (when we’re all finished) we save the file. We give it the
name MyGreatChapter.doc. Then we shut down the word processor, hang
out by the pool, brag to our friends about the new novels we’re writing, and
go to bed.
The next morning, we open the document. This time it exists, so the word
processor opens it and reads in the information.
As you can see, two issues present themselves in opening a file:
✦ Create a new file
✦ Open an existing file
Here’s where life gets a little strange: Some operating systems treat these
two items as a single entity. The reason is that when you create a new file,
normally you want to immediately start using it, which means you want to
create a new file and then open it. And so the process of creating a file is
often embedded right into the process of opening a file.
And when you open an existing file that you want to write to, you have two
choices:
✦ Erase the current contents; then write to the file.
✦ Keep the existing contents and write your information to the end of the
file. This is called appending to a file.
Book V
Chapter 1
Filing Information
with the Streams
Library
By default, the gcc compiler automatically recognizes the std namespace
(it’s as if you had a line using namespace std; even when you don’t). We
focus on the gcc compiler, we don’t use either of the two preceding methods — putting std:: before our stream class names or including a using
namespace std; line.
574
Programming with the Streams Library
Separating a path name
Everybody wants to be different and unique.
The people who wrote Microsoft’s MS-DOS
operating system, instead of following in the
tradition of using Unix’s / for a path name
separator, decided to use \, thus adding the
word backslash to the vocabularies of millions of people. So today, on Windows, you see
such path names as C:\MyDataFolder\
MyMessyPath\DifficultToType\
LetterToEditor.doc. But on Unix, you
see forward slashes, as in /usr/something/LetterToEditor.doc. And if
this difference isn’t bad enough, think about
what the backslash means in a string in C++.
It means that a letter follows, and the compiler interprets the two characters together as
something else. For example, \t means a tab,
and \n means a newline character. And how
do you put a backslash into a string? You put
two backslashes. Ugh! That means the earlier
MS-DOS-style string (the one with Windows in
it, Mr. Bill Gates!) must look like this if you use
it in a C++ program:
“C:\\MyDataFolder\\MyMessyPath\\
DifficultToType\\
LetterToEditor.doc”
Yes, you must type every backslash twice if
you want the compiler to get the correct string.
But instead of doing this, we’d like to propose
a much better solution! Don’t use backslashes
at all, even if you’re programming for Windows
(or, we suppose, MS-DOS). Yes, it’s true! Stop
the press! Call the talk radio show! Announce
it to the world! When you write a C++ program
on Windows, the libraries are smart enough to
know that a forward slash works instead of a
backslash! Therefore, you can use this string:
“C:/MyDataFolder/MyMessyPath/
DifficultToType/LetterToEditor.
doc”
In this book, you see us using forward paths.
That way, our samples work on both Unix and
Windows.
The code in Listing 1-1 shows you how to open a brand-new file, write some
information to it, and then close it. (But wait, there’s more: This version
works whether you have the newer ANSI-compliant compilers or the older!)
Listing 1-1: Using Code That Opens a File and Writes to It
#include <iostream>
#include <fstream>
using namespace std;
int main()
{
ofstream outfile(“MyFile.dat”);
outfile << “Hi” << endl;
outfile.close();
return 0;
}}
Programming with the Streams Library
575
When we’re finished writing to the file, we close it by calling the close
member function. This is important!
If you want to open an existing file and append to it, you can modify Listing
1-1 slightly. All you do is change the arguments passed to the constructor as
follows. This one is for those of you with a slightly older (such as gcc2.95)
compiler:
ofstream outfile(“MyFile.dat”, ios::app);
And this is for those of you with a newer compiler, such as gcc3.1 or later:
ofstream outfile(“MyFile.dat”, ios_base::app);
The ios::app item is an enumeration inside a class called ios, and the
ios_base::app item is an enumeration in the class called ios_base.
The ios class is the base class from which the ofstream class is derived.
The ios class also serves as a base class for ifstream, which is for reading
files.
For newer compilers, the ios_base class is a base for ofstream and
ifstream. (A couple of classes are in between. ofstream is a template
class derived from a template class called basic_ofstream, which is
derived from a template class called basic_ios, which is derived from
the class ios_base. You can view a simplified diagram of these classes at
http://www.cplusplus.com/reference/iostream/.)
You can also read from an existing file. This works just like the cin object.
Listing 1-2 opens the file created by Listing 1-1 and reads the string back
in. The easiest way to read the file for now is to copy it from the Listing 1-1
folder to the Listing 1-2 folder you create. The book’s source code includes
the file in the proper folder for you.
If you try to run Listing 1-2, it’s possible that your program will not find the
file created by Listing 1-1. If so, you may want to add a path name to both
Listing 1-1 and Listing 1-2, such as:
ofstream outfile(“/MyFile.dat”);
ifstream infile(“/MyFile.dat”);
Book V
Chapter 1
Filing Information
with the Streams
Library
The short program in Listing 1-1 opens a file called MyFile.dat. It does this
by creating a new instance of ofstream, which is a class for writing to a file.
The next line of code writes the string “Hi” to the file. It uses the insertion
operator, >>, just as cout does. In fact, ofstream is derived from the very
class that cout is an instance of, and so that means all the things you can do
with cout you can also do with your file! Wow! We know we’re excited!
576
Handling Errors When Opening a File
Finding your files
Whenever you open a new file, you must know
where the file is, not just what the file is called.
In other words, you need to supply both a path
and a filename, not just a filename. You can
obtain a path for your file in different ways,
depending on your program. For example,
you may be saving all your files in a particular
directory; you would then precede your filenames with that directory (that is, path) name.
The string class makes this easy, as in this
code:
const string MyPath = “c:\\
GreatSoftwareInc”;
string Filename = MyPath + “\\” +
“MyFile.dat”;
ofstream outfile(Filename.c_str());
The reason we had to call c_str on the
string is that the ofstream class doesn’t
have a constructor for a string instance,
only a C-style string. The c_str function returns a pointer to a C-style string
equivalent of the string. Also, remember
to #include <string> when you use the
string class!
Also, when you are using a constant path as
we did in this example, you may, instead, store
the path name in some initialization file that
lives somewhere on your user’s computer,
rather than hard code it in your program as we
did in this example. You may also include an
Options window where your users can change
the value of this path.
Listing 1-2: Using Code to Open a File and Read from It
#include <iostream>
#include <fstream>
#include <string>
using namespace std;
int main()
{
string word;
ifstream infile(“MyFile.dat”);
infile >> word;
cout << word << endl;
infile.close();
return 0;
}}
When you run this program, the string you wrote to the file from Listing 1-1,
“Hi,” appears on the screen. It worked! It read the string in from the file!
Handling Errors When Opening a File
When you open a file, all kinds of things can go wrong. A file lives on a physical
device — a fixed disk, for example, or perhaps on a floppy disk — and you
can run into problems when working with physical devices. For example,
Handling Errors When Opening a File
577
part of the disk might be damaged, causing an existing file to become corrupted. Or, less disastrous, you might run out of disk space. Or, even less
disastrous, you might try to open a file in a directory that doesn’t exist.
On our Windows 2000 system, if we attempt to create a file in a directory
that doesn’t exist, the system does not create the directory. That’s because
deep down inside, the program ultimately calls an operating system function
that does the dirty work of creating the file. And this particular operating
system function (it’s called CreateFile, if you even care) has a rule that it
will not create a directory for you.
If you want to determine whether the ostream class was unable to create
a file, you can call its fail member function. This function returns true if
the object couldn’t create the file. And that’s what happens when a directory
doesn’t exist. Listing 1-3 shows an example of this.
Listing 1-3: Returning True When ostream Cannot Create a File
#include <iostream>
#include <fstream>
using namespace std;
int main()
{
ofstream outfile(“/abc/def/ghi/MyFile.dat”);
if (outfile.fail()) {
cout << “Couldn’t open the file!” << endl;
return 0;
}
outfile << “Hi” << endl;
outfile.close();
return 0;
}}
When you run this code, assuming that you don’t have a directory called
/abc/def/ghi on your system, you should see the message Couldn’t
open the file! We’re assuming also that your particular operating
system doesn’t create a directory in this case; if it does, your computer will
open the file, write Hi to it, and move on with its happy life after closing
things out.
Filing Information
with the Streams
Library
If you try to open a file for writing by specifying a full path and filename but
the directory does not exist, the computer responds differently, depending
on the operating system you are using. If you are unsure how your particular operating system will respond, try writing a simple test program that
tries to create and open something like /abc/def/ghi/jkl/abc.txt. (Of course,
you’ll want to be sure to use a directory that doesn’t exist; we’re assuming
/abc/def/ghi/jkl doesn’t exist on your hard drive.) Then one of two things
will happen: Either the directory and the file will get created or nothing will
happen.
Book V
Chapter 1
578
Flagging the ios Flags
As an alternative to calling the fail member function, you can use an operator available in various stream classes. This is the bang operator, !, and you
would use it in place of calling fail, as in this code:
if (!outfile)
{
cout << “Couldn’t open the file!” << endl;
return 0;
}
Most people prefer to use !outfile instead of outfile.fail(), although
our opinion is that !outfile stinks. In addition to its aromatic properties,
we think it makes confusing code. The reason is that outfile is an object,
and in our brains, the notion of !outfile, which we would pronounce “not
outfile,” simply doesn’t make sense. In fact, !outfile trips up many beginning programmers. They know that outfile is not a pointer in this sample
code, and they wonder how you could test it against 0 as you normally can
only do with a pointer. (Remember, by saying !x, where x is some pointer,
you’re testing x against 0.) And that simply doesn’t make sense! And so to
avoid confusion, we prefer to just call fail. It makes more sense.
Here are some reasons your file creation may choke:
✦ The directory doesn’t exist.
✦ You’re out of disk space and out of luck.
✦ Your program doesn’t have the right permissions to create a file.
✦ The filename was invalid — that is, it contained characters the operating
system doesn’t allow in a filename, such as * or ?.
Like any good program, your program should do two things:
1. Check whether a file creation succeeded.
2. If the file creation failed, handle it appropriately. Don’t just print a horrible message like Oops! Aborting!, leaving your poor users with no
choice but to toss the monitor onto the floor. Instead, do something
friendlier, like present a message telling them there’s a problem and suggest that they might free more disk space.
Flagging the ios Flags
When you open a file by constructing either an ofstream or ifstream
instance, you can modify the way the file will open by supplying what are
called flags. In computer terms, a flag is simply a small item whose presence
or lack of presence tells a function how to do something. With the ofstream
and ifstream classes, the function in question is the constructor.
Flagging the ios Flags
579
ofstream outfile(“AppendableFile.txt”, ios::app);
ofstream outfile(“AppendableFile.txt”, ios_base::app);
You can see that we added the flag as a second parameter to the constructor. Other flags exist besides app, and you can combine them by using
the or operator, |. For example, one flag is ios::nocreate (which isn’t
included in newer compilers, but we show you how to overcome this limitation later in this section). This one means “only open the file if it already
exists.” That is, don’t create the file if it doesn’t exist. (Remember, ofstream
creates a file if it doesn’t already exist.) If the file doesn’t exist, the open will
fail, and when you call fail, you will get back a true.
The ios::nocreate flag is handy with ios::app. Together, these mean
open an existing file and append to it. That is, the two together will work
only if the file already exists, and the call will open the file for an append
operation. If the file doesn’t already exist, the file won’t be created. Here’s a
sample call:
ofstream outfile(“/MyFile.dat”, ios::app | ios::nocreate);
if (outfile.fail()) {
cout << “Couldn’t open the file!” << endl;
return 0;
}
outfile << “Hi” << endl;
outfile.close();
If MyFile.dat doesn’t exist when you run this code, you get the message
Couldn’t open the file! But if MyFile.dat does exist, the program
opens it, appends the string Hi to it, and finally closes it.
It turns out that the nocreate flag is not available in the new Standard
Library. Bummer. Therefore, the code we just gave you works only if you’re
using an earlier version of the library. When using the CodeBlocks compiler,
you see the following error message:
error: `nocreate’ is not a member of `std::ios’
However, you will want to test whether or not your particular compiler
includes a library that supports ios::nocreate. Your compiler may support it anyway, even if it includes the new Standard Library. As an alternative to ios::nocreate, you can use the following code:
Book V
Chapter 1
Filing Information
with the Streams
Library
A flag looks like ios::app if you’re using a compiler that is not fully ANSIcompliant, or like ios_base::app if you’re using one that is fully ANSIcompliant. This particular flag means that you want to write to a file, but you
want to append to any existing data that may already be in a file. You supply
this flag as an argument of the constructor for ofstream, as in either of the
following examples:
580
Flagging the ios Flags
ifstream infile(“/MyFile.dat”);
if (infile.fail())
{
cout << “Couldn’t open the file!” << endl;
return 0;
}
infile.close();
ofstream outfile(“/MyFile.dat”, ios::app);
outfile << “Hi” << endl;
outfile.close();
In this case, you begin by attempting to open the file for reading. If the file
doesn’t exist, you can’t read from it and the code exits with a failure message. If the code can read from the file, it reopens the file for writing. This is
a cumbersome workaround, but it works.
Following is a list of the available flags. First, here are the ones for ios, in
case you’re using a compiler that is not completely ANSI compliant:
✦ ios::app: This flag means that you want to open a file and append to it.
✦ ios::in: Include this flag if you want to read from a file.
✦ ios::out: Include this flag if you want to write to a file.
✦ ios::trunc: Include this flag if you want to wipe out the contents of
the file before writing to it. It’s the opposite of append, and it’s also the
default if you don’t specifically include ios::app.
✦ ios::nocreate: Use this flag if you want to ensure that the file will not
be created if it doesn’t exist, resulting in the file not being opened.
✦ ios::noreplace: This flag is the opposite of nocreate. Use this flag if
you only want to create a new file. If you use this flag and the file already
exists, the file will not open, and fail will return true.
ANSI-compliant compilers don’t support the ios::noreplace flag either. In
this case, you can use the opposite of the fix for the ios:nocreate flag, as
shown here:
ifstream infile(“/MyFile.dat”);
if (!infile.fail())
{
cout << “The file already exists!” << endl;
return 0;
}
infile.close();
ofstream outfile(“/MyFile.dat”);
outfile << “Hi” << endl;
outfile.close();
Flagging the ios Flags
581
In this case, the code attempts to open the file for reading. If the file exists,
the code shows an error message and exits. Otherwise, the code creates a
new file and writes to it.
✦ ios::ate: Use this flag to go to the end of the file after you open it.
Normally, you use this flag when you want to append data to the file.
✦ ios_base::binary: Use this flag to specify that the file you’re opening
will hold binary data — that is, data that does not represent character
strings.
✦ ios_base::in: Specify this flag when you want to read from a file.
✦ ios_base::out: Include this flag when you want to write to a file.
✦ ios_base::trunc: Include this flag if you want to wipe out the contents of a file before writing to it.
✦ ios_base::app: Include this flag if you want to append to the file. It’s
the opposite of trunc — that is, the information that’s already in the file
when you open it will stay there.
Why do you need an in flag and an out flag? It seems that the computer
should know whether you’re writing to a file or reading from it based on
whether you use ofstream or ifstream. The answer to why you have an
in flag and an out flag is that other classes are available besides ofstream
and ifstream. The compilers that don’t yet fully support the ANSI standard
have a generic class in their libraries called fstream. The ANSI-compliant
compilers have in their libraries a template class called basic_filebuf
and a class called filebuf. If you use these classes, you can use the in and
out flags.
Filing Information
with the Streams
Library
The following flags are available in a complier that’s absolutely ANSIcompliant!
Book V
Chapter 1
582
Book V: Reading and Writing Files
Chapter 2: Writing with
Output Streams
In This Chapter
✓ Using the insertion operator
✓ Working with manipulators
✓ Formatting your output
✓ Using flags to format your output
✓ Specifying a precision for writing numbers
✓ Setting field widths
Y
ears ago, one of us had an old computer that had 3000 bytes of
memory. (Yes, that’s three thousand bytes, not 3MB.) As an option, this
computer came with a floppy disk drive that sat outside it. It did not have a
hard drive. Therefore, if you didn’t have a disk drive but you wanted to use
a program, you had to type it! Ah, those were the days.
Nowadays, the notion of a computer without a hard drive seems almost
unthinkable. Not only do your programs sit on the hard drive in the form of
files, but your programs also create files to store on the hard drive.
When you use a word processor, you save your documents to a file. Imagine
if every time you needed the same document, you had to retype it. In this
chapter, we show you the different ways you can write to a file.
Inserting with the << Operator
Writing to a file is easy in C++. You’re probably already familiar with how
you can write to the console by using the cout object, like this:
cout << “Hey, I’m on TV!” << endl;
584
Inserting with the << Operator
Operating the insertion operator
The insertion operator, <<, is an overloaded
operator function. For the 100 percent ANSIcompliant libraries, inside the basic_
ostream class (or, for the non-100 percent
ANSI libraries, inside the ostream class),
you can find several overloaded forms of the
<< operator function. Each one provides input
for a basic type as well as for some of the standard C++ classes, such as string or one of
its base classes. (We say or because most
libraries that ship with compilers are written
by compiler vendors — who may implement
their code slightly differently but get the same
results.)
Well, guess what! The cout object is a file stream! Amazing! And so to write
to a file, you can do it the same way you would with cout: You just use the
double-less-than symbol, called the insertion operator, like this: <<.
If you open a file for writing by using the ofstream class, you can write to it
by using the insertion operator, as in Listing 2-1.
Listing 2-1: Using Code to Open a File and Write to It
#include <iostream>
#include <fstream>
using namespace std;
int main()
{
ofstream outfile(“outfile.txt”);
outfile << “Lookit me! I’m in a file!” << endl;
int x = 200;
outfile << x << endl;
outfile.close();
return 0;
}}
The first line inside the main creates an instance of ofstream, passing to it
the name of a file called outfile.txt.
We then write to the file, first giving it the string, Lookit me! I’m in a
file!, then a newline, then the integer 200, and finally a newline. And after
that, we show the world what good programmers we are by closing our file.
Formatting Your Output
585
Placing data in specific folders
#include <iostream>
#include <direct.h>
using namespace std;
{
char CurrentPath[_MAX_PATH];
getcwd(CurrentPath, _MAX_PATH);
cout << CurrentPath << endl;
return 0;
}
The _MAX_PATH constant is the maximum size
that you can make a path. So, what this code
is saying is to create a char array that is the
size of _MAX_PATH. Use the resulting buffer
to hold the current working directory (which
is where the name of the method getcwd()
comes from). You can then display this directory on screen or use it as part of the path for
your output stream — amazing!
int main()
Formatting Your Output
If you’re like us and are saving lists of numbers to a file, you may find that
the process works better if the numbers are formatted in various ways. For
example, you may want them all aligned on the right; or you might want your
floating-point numbers to have a certain number of digits to the right of the
decimal point.
There are three aspects to setting these formats. They are
✦ Format flags: A format flag is a general style that you want your output
to appear in. For example, you may want floating-point numbers to
appear in scientific mode, or you may want to be able to print the words
true and false for Boolean values, rather than their underlying numbers.
To do these tasks, you specify format flags.
✦ Precision: This refers to how many digits are on the right of the decimal
point when you print floating-point numbers.
✦ Field width: This refers to how much space the numbers take (both floating point and integer). This feature allows you to align all your numbers.
Writing with
Output Streams
Sometimes you want to place data in a specific common folder, such as the current
working directory — the directory used by the
application. C++ provides a method to obtain
this information: getcwd(). This method
appears in the <direct.h> header. Using
the getcwd() method is relatively straightforward. You create a place to put the information, called a buffer, and then ask C++ to
provide the information as shown here:
Book V
Chapter 2
586
Formatting Your Output
The next three sections discuss each of these in all their glory and grandeur.
You can use the format flags (detailed in the upcoming section), as well as
precision and width specifiers, when writing to your files — and also when
writing to cout. Because cout is a stream object in the iostream hierarchy, it accepts the same specifiers as output files. So have at it!
Formatting with flags
The folks who made the ISO C++ standard gave us a slew of format flags.
If you’re using a compiler that includes a library that’s not fully ANSIcompliant, you will be able to use most of these format flags but not all of
them. Therefore, in this section, we’re giving you lists for
✦ ios_base (for ANSI-compliant libraries)
✦ ios (for non-compliant libraries)
To use the following format flags, you call the setf member function for the
file object. (This can be either your own file object or the cout object.) For
example, to turn on scientific notation, you would do this:
cout.setf(ios_base::scientific);
cout << 987654.321 << endl;
or, if you’re using a non-ANSI-compliant library:
cout.setf(ios::scientific);
cout << 987654.321 << endl;
To turn off scientific mode, you call the unsetf member function:
cout.unsetf(ios_base::scientific);
cout << 987654.321 << endl;
or, if you’re using a non-ANSI library:
cout.unsetf(ios::scientific);
cout << 987654.321 << endl;
And if you’re using your own file, you would do something like this:
ofstream myfile(“numbers.txt”);
myfile.setf(ios_base::scientific);
myfile << 154272.524 << endl;
myfile.close();
Formatting Your Output
587
or, for the non-ANSI folks:
When you run this code for writing to a file, the numbers.txt file will contain one of the following examples, depending on your particular compiler
and library:
1.542725e+005
1.542725e+05
Each of the ios_base flags exists both as a format specifier and as a manipulator. (Don’t worry about the precise differences for right now; Book V,
Chapter 5 explains manipulators in detail.) Therefore, you can, for example,
use either of the following lines to set boolalpha:
cout.setf(ios_base::boolalpha);
cout << boolalpha;
We’re talking only about the ios_base flags here. The ios flags do not
coexist as manipulators. You can use these flags as manipulators only with
an ANSI-compliant library.
If you use the manipulator form of a format specifier, don’t put an endl at
the end of the line unless you want an endline to print, as in this:
cout << boolalpha << endl;
Following is a rundown of the format flags available in both the ANSIcompliant and non-ANSI compliant libraries. To set these, you call setf. To
turn off the flag, you either call unsetf, or for some flags, you set a different
flag. For example, both of these turn off scientific mode:
cout.unsetf(ios_base::scientific);
cout.setf(ios_base::fixed);
In the following list, we point out when you can set another flag to turn off a
particular flag. One of these, boolalpha, is available only to you ANSI-style
folks. Remember, “ANSI-people” must use ios_base:: before each of these,
while “non-ANSI-people” must use ios:: before each of these.
Writing with
Output Streams
ofstream myfile(“numbers.txt”);
myfile.setf(ios::scientific);
myfile << 154272.524 << endl;
myfile.close();
Book V
Chapter 2
588
Formatting Your Output
✦ boolalpha: (ANSI only) Setting this flag causes Boolean variables to
write with the words true or false (or the equivalent words for your particular locale). Clearing this flag causes Boolean variables to write 0 for
false or 1 for true. (The default is for this flag to be cleared.)
✦ fixed: This flag specifies that, when possible, the output of floatingpoint numbers will not appear in scientific notation. (We say when possible because large numbers always appear as scientific notation, whether
you specified scientific or fixed.)
✦ scientific: When you specify this flag, your floating-point numbers
always appear in scientific notation.
✦ dec: When you set this flag, your integers will appear as decimal numbers. To turn this off, you turn on a different base, either hex (for hexadecimal) or oct (for octal).
✦ hex: With this flag, all your integers appear in hexadecimal format. To
turn this on, choose a different base — dec or oct. Computer people
like hexadecimal because it looks cool to see letters in your numbers.
✦ oct: When you turn on this flag, your integers will appear in octal
format. Oh fun, fun.
✦ left: When you turn on this flag, all numbers will be left-aligned with
a width field. (See “Setting the width and creating fields,” later in this
chapter, for information on how to set the width.)
✦ right: With this flag, all your numbers will be right-aligned with a width
field.
✦ showbase: When you turn on this flag and print an integer, the integer
will be preceded with a super-special character that represents none
other than the base — decimal, hexadecimal, or octal. That can be good
because the number 153 can represent 153 in decimal or 153 in hexadecimal (which is equivalent to 339 in decimal) or 153 in octal (which is
equivalent to 107 in decimal). Yikes.
✦ showpoint: With this flag, your floating-point numbers have a decimal
point, even if they happen to be whole numbers. (That is, a floatingpoint variable that contains 10.0 will print as 10. with a decimal point
after it. Without this flag, it will just print as 10 with no decimal point.)
✦ showpos: Normally, negative numbers get a minus sign before them,
and positive numbers get no sign before them. But when you turn on
this flag, your positive numbers will get a plus sign before them. Cool!
✦ unitbuf: This is for the advanced people. When you turn this on, your
output will flush after each output operation. In other words, the library
will not accumulate a certain amount of output before writing it in
batches. Instead, the library will write the output all out each time you
use the insertion operator, <<.
Formatting Your Output
589
Table 2-1 shows the manipulator forms of some flags. We’re providing three
columns in this table: First is the flag; then the manipulator to turn on the
flag. Then comes the manipulator to turn off the flag. Yes, you need a way to
turn it off. (We coined a new word: demanipulator. Yeah, that sounds good.)
Remember, if you’re pre-ANSI, you don’t have access to these manipulators.
Instead, you have to call setf.
Table 2-1
Using ANSI-Standard Manipulators
and Demanipulators
Flag
Manipulator
Demanipulator
boolalpha
boolalpha
noboolalpha
showbase
showbase
noshowbase
showpoint
showpoint
noshowpoint
showpos
showpos
noshowpos
skipws
skipws
noskipws
uppercase
uppercase
nouppercase
fixed
fixed
scientific
scientific
scientific
fixed
The scientific flag and fixed flag are opposites: fixed turns off
scientific, and scientific turns off fixed. The default if you don’t
specify either is fixed.
Six manipulators aren’t in Table 2-1 because they don’t have a demanipulator. Instead, they are three-way:
✦ Bases: dec, hex, and oct. Only one base can be active at a time.
Activating a base automatically switches off the other bases.
✦ Alignments: internal, left, and right. Only one alignment can be
active at a time. Activating an alignment automatically switches off the
other alignments.
Book V
Chapter 2
Writing with
Output Streams
✦ uppercase: When you write hexadecimal or scientific numbers, the
various letters in the number will appear as uppercase. Thus, the letters
A, B, C, D, E, and F will appear in capitals in a hexadecimal number, and
the E representing the exponent in scientific notation will print as a capital E. When this is not set, you will get a, b, c, d, e, and f for hexadecimal
numbers and e for the exponent in scientific notation.
590
Formatting Your Output
Specifying a precision
When you are writing floating-point numbers to a file or to cout (that is,
numbers stored in float or double variables), having all the numbers
print with the same number of digits to the right of the decimal point is often
handy. This feature is called the precision.
Do not confuse this form of the word precision with the idea that double
variables have a greater precision than float variables. Here, we’re just
talking about the number of digits printed to either the file or cout. The
value inside the variable does not change, nor does the precision of the variable’s type.
To set or read the precision, call the stream’s precision function. If you
call precision with no parameters, you can find out the current precision.
Or to set the precision, pass a number specifying how many digits you want
to appear to the right of the decimal point.
For example, the following line sets the precision of an output:
cout.precision(4);
The output would take this form:
0.3333
If you don’t set the precision, the stream will have a default precision, probably six, depending on your particular compiler.
Precision has an interesting effect if you use it with the showpoint format flag.
In the scientific community, these three numbers have the same precision:
3.5672
8432.2259
0.55292
Even though the first two of the preceding numbers have the same number
of digits to the right of the decimal point, scientists consider precision to
mean the same number of total digits not counting leftmost 0s to the left of
the decimal (as in the final of the three). Therefore, a scientist would consider the three following numbers to have the same precision because they
all have four digits. (Again, for the final one, you don’t count the 0 because
it’s to the left of the decimal point.) Scientific folks call these significant
digits. You can accomplish significant digits with an output stream by combining precision with the showpoint flag. Listing 2-2 shows an example of
showpoint and precision working together in perfect harmony.
3.567
8432.
0.1853
Formatting Your Output
591
Listing 2-2: Using the Precision Function to Work with the showpoint
Format Flag
Book V
Chapter 2
#include <iostream>
int main()
{
int i;
cout.setf(ios_base::showpoint);
cout.precision(4);
for (i=1; i<=10; i++) {
cout << 1.0 / i << endl;
}
cout << 2.0 << endl;
cout << 12.0 << endl;
cout << 12.5 << endl;
cout << 123.5 << endl;
cout << 1234.9 << endl;
cout << 12348.8 << endl;
cout << 123411.5 << endl;
cout << 1234111.5 << endl;
return 0;
}}
If you’re using a non-ANSI-compliant compiler, you need to change ios_
base to ios in the third line in main. Also, because Listing 2-2 is for a fullyANSI-compliant compiler, we included the using namespace std; line.
(You can always have this line, whether your compiler requires it or not.)
When you run this program, here’s the output you see:
1.000
0.5000
0.3333
0.2500
0.2000
0.1667
0.1429
0.1250
0.1111
0.1000
2.000
12.00
12.50
123.5
1235.
1.235e+004
1.234e+005
1.234e+006
Writing with
Output Streams
using namespace std;
592
Formatting Your Output
The preceding output has a couple of interesting cases:
✦ The last three lines of the preceding output are scientific notation to
maintain four significant digits.
✦ The fourth line from the end, 1235., is rounded up from 1234.9 because
of this line:
cout << 1234.9 << endl;
The precision function has an associated manipulator. Instead of calling
precision as a function, you can use it as a manipulator. But the manipulator’s name is slightly different: It’s setprecision. To use it, you include
this header:
#include <iomanip>
These two lines cause the same thing to happen:
cout.precision(4);
cout << setprecision(4);
And these two lines are available for all the recent more-or-less-ANSI-compliant
compilers, even those that aren’t fully compliant! Yay! Just make sure you
remember to #include <iomanip>, or you will get a compiler error.
Setting the width and creating fields
This is where you can start making the numbers and data all nice and neat
by aligning them in columns. To align your data, use the width member
function for the stream or cout, passing the width of the field, like this:
cout.width(10);
Then, when you print a number, think of the number as sitting inside a field
10 spaces wide, with the number wedged against the right side of these 10
spaces. For example, look at this:
cout.width(10);
cout << 20 << endl;
This code produces this output:
20
Although seeing this in the printed text is hard, this 20 is pushed to the right
of a field of spaces 10 characters wide. That is, because the 20 takes 2 character spaces, there are 8 spaces to the left of it.
Formatting Your Output
593
If you prefer, you can have the numbers pushed to the left of the field. To do
this, set the left format flag by using setf. (Or, for absolutely perfectly
ANSI-compliant libraries, you can use the left manipulator.)
cout << setw(10);
This works for both the newer 100 percent ANSI-compliant compilers and
the slightly older, slightly less compliant compilers.
Due to some oddities in the libraries, when you set the width, it stays that
way only for the next output operation. Call it forgetful if you will. Therefore,
suppose you have code that looks like this:
cout.width(10);
cout << 20 << 30 << endl;
Only the first output, 20, will have a field width of 20. The 30 will just take as
much space as it needs. Therefore, these lines of code produce this output,
which is probably not what most people would intend:
2030
This is why we prefer to use the manipulator form: You precede each output
item with a width specification. Try this instead:
cout << setw(10) << 20 << setw(10) << 30 << endl;
which writes this to cout:
20
30
That looks a little nicer!
Listing 2-3 shows the great things you can do when you set the width. This
listing is for the absolute money-back-guarantee ANSI compilers. If yours is
slightly less than ANSI compliant, you have to change these two lines:
sals << fixed;
sals << left;
to this:
sals.setf(ios::fixed);
sals.setf(ios::left);
Writing with
Output Streams
For the width function, you can alternatively #include <iomanip> and
then use a manipulator:
Book V
Chapter 2
594
Formatting Your Output
Listing 2-3: Setting the Width of a Field Using the setw Manipulator
or Width Function
#include <iostream>
#include <iomanip>
#include <fstream>
using namespace std;
int main()
{
ofstream sals(“salaries.txt”);
sals << setprecision(2);
sals << fixed;
sals << left;
sals << setw(20) << “Name” << setw(10) << “Salary”;
sals << endl;
sals
sals
sals
sals
<<
<<
<<
<<
“------------------- “; // 19 hyphens, one space
“----------” << endl;
// 10 hyphens
setw(20) << “Hank Williams”;
setw(10) << 28422.82 << endl;
sals << setw(20) << “Buddy Holly”;
sals << setw(10) << 39292.22 << endl;
sals << setw(20) << “Otis Redding”;
sals << setw(10) << 43838.55 << endl;
sals.close();
return 0;
}}
When you run Listing 2-3, you get a file called salaries.txt, like this:
Name
------------------Hank Williams
Buddy Holly
Otis Redding
Salary
---------28422.82
39292.22
43838.55
See how it’s neatly lined up? That’s pretty! Notice one thing we did, however:
The first field, Name, is 20 characters wide. For the hyphens, we put only 19
to give the appearance of a space between the two fields. In fact, the two
fields are wedged against each other with no space between them.
If you ran Listing 2-3 and each salary printed in a scientific format as in
2.8e+04, you need to use sals.setf(ios::fixed); and sals.
setf(ios::left);.
Formatting Your Output
595
We used the left format flag so that the data in each field is aligned to the
left end of the field. By default, each field is aligned to the right.
Name
Salary
------------------- ---------Hank WilliamsABCDEFGHIJ28422.82
Buddy Holly
39292.22
Otis Redding
43838.55
Writing with
Output Streams
Although you can specify the field width, really you’re specifying a minimum.
If the characters in the output are less than the field width, the runtime
library will pad them with spaces to make them that minimum size. If they
are bigger than that width, the library will not chop them off to make them
fit. If you add letters to the Hank Williams line in Listing 2-3 (like this: sals
<< setw(20) << “Hank WilliamsABCDEFGHIJ”;), the output looks like
the following example instead. The Hank Williams line runs beyond the 20
characters into the next field.
Book V
Chapter 2
596
Book V: Reading and Writing Files
Chapter 3: Reading with
Input Streams
In This Chapter
✓ Reading with the extraction operators
✓ Dealing with the end of the file
✓ Reading various data types
✓ Reading data that is formatted with text
W
ell, isn’t this nice. You have a file that you wrote to, but you need to
read from it! After all, what good is a file if it’s just sitting on your
hard drive collecting dust?
In this chapter, we show you how you can read from a file. Reading a file is
tricky because you can run into some formatting issues. For example, you
may have a line of text in a file with a sequence of 50 digits. Do those 50
digits correspond to 50 one-digit numbers, or maybe 25 two-digit numbers,
or some other combination? If you created the file, you probably know; but
the fun part is getting your C++ program to properly read from them. The
file might contain 25 two-digit numbers, in which case you make sure that
the C++ code doesn’t just try to read one enormous 50-digit number. In this
chapter, we give you all the dirt on getting the dust off your hard drive and
the file into memory. Have at it!
Extracting with Operators
When you read from a file, you can use the extraction operator, >>. This
operator is very easy to use, provided you recognize that the phrase, “Look
mom, no caveats!” just doesn’t apply to the extraction operator.
Suppose you have a file called Numbers.txt with the following text on one
line:
100 50 30 25
598
Extracting with Operators
You can easily read in these numbers with the following code. First, make
sure you #include <fstream> (but not fstream.h, as you’ll pick up
an old, outdated, yucky file). And you probably will need the line using
namespace std; if you’re using a newer compiler and library. Then this
code will do the work:
ifstream MyFile(“Numbers.txt”);
MyFile >> weight;
MyFile >> height;
MyFile >> width;
MyFile >> depth;
In the preceding code, the input file, Numbers.txt, had its numbers separated with spaces. You can also separate them with newlines, like this:
100
50
30
25
The program doesn’t care. It looks for white space, which is any number of
spaces, tabs, and newlines. You could have the data like the following example, and the program will still read them in correctly.
100
50
30
25
When you are dealing with the standard input object, cin, the same rules
about white space apply: If you read in four numbers, like the following
example, the cin object, like the ifstream object, will separate the numbers based on the white space.
cin
cin
cin
cin
>>
>>
>>
>>
weight;
height;
width;
depth;
If the user accidentally inserts a space, the computer will apply the separated values in two places — both incorrectly. Be careful!
When you are reading information from a file, make sure that you have
clearly defined the order of the information. In other words, make sure that
you have agreed upon a protocol for the information. Otherwise, you will
likely end up with errors and mistakes, and your coworkers will want to
blame somebody. That’s the way computer people are, after all.
Encountering the End of File
599
What’s a protocol?
As it happens, the first number in the set of
numbers we provided is the street address of
the White House in Washington, DC, and the
second number is the zip code for the White
House. The third number is the street address
of the main office for the National Park Service
headquarters, and the fourth is the National
Park Service zip code. Of course, you probably
didn’t realize that (unless you happen to work
for the Park Service and recognized parts of
your address!).
But now suppose you tell us, “Send me the
White House street address, then its zip code,
then the National Park Service street address,
and then its zip code.” Then we would go ahead
and send the four numbers to you. At that point,
we wouldn’t have any need to send a bunch
of extra information, such as English words
describing what each number is. If we give
them to you in the exact order you requested
them, that will be all you need. In fact, if you’re
writing a computer program that receives this
information and we pad it with other information, such as descriptions, your program may
not be equipped to handle all that info, and you
have a problem. In other words, our program
and your program must agree on a protocol.
A protocol dictates the order of the information and how it’s formatted. Further, a protocol
dictates how you’ll respond: You may send
back a single number 1, which means that you
received the data properly, and we may send a
single 0, which means that you’ll be getting no
further information. That’s a protocol, and protocols are useful when reading data, whether
it’s from a file or over the Internet.
Encountering the End of File
When we get to the end of a really good novel, we often feel disappointed
that it’s done, and we wish that we could just keep reading. But alas, we
have encountered the EON (end of novel) condition.
Files have an ending as well, called the EOF, which stands for End of File.
When you are reading from a file, you need to know when you reach the end.
If you know how big the file is going to be, you can write your program so it
knows exactly when to stop. So here are the cases we cover in this section:
First, how you can read to the end of the file simply because you know how
big the file is and, therefore, when to stop reading; and second, how you can
keep reading until you reach the EOF without having to know the file size in
advance.
Reading with
Input Streams
Okay, we’re going to give you a list of numbers:
1600 20500 1849 20240. Go ahead and use them
the way we intend you to use them, and then
send us back the answer, at which point we’ll
send you our response. What’s that? You’re
not sure what we want you to do with them?
Aha! You need a protocol. As defined in this
chapter, a protocol is simply a rule for how data
is ordered. A protocol in general defines rules
for exchanging information of any sort between
computers (think of it as a diplomatic role).The
two systems negotiate the exchange of data
based on standardized rules.
Book V
Chapter 3
600
Encountering the End of File
You, the programmer, know the format of the file you are reading. (Perhaps
your program even wrote the file and now you’re writing the part of the
program that reads it.) And it’s possible your format starts with a size. For
example, you may be reading in a file, and you start by reading a number
from the file, where the number represents how many pieces of information
you are to read from the file. This requires that whoever created the file
started by writing the size before the rest of the data, and that you agree to
this format.
Here’s an example. First, Listing 3-1 writes two files that you can later read in.
Listing 3-1: Using Code to Open a File and Write to It
#include <iostream>
#include <fstream>
#include <string>
using namespace std;
void WriteFile(string filename, int count, int start)
{
ofstream outfile(filename.c_str());
outfile << count << endl;
int i;
for (i=0; i<count; i++)
{
outfile << start + i << endl;
}
outfile.close();
}
int main()
{
WriteFile(“/MyData/nums1.txt”, 5, 100);
WriteFile(“/MyData/nums2.txt”, 6, 200);
return 0;
}
You can see that this program writes two files. Create the \MyData folder
before you run the application the first time. We gave a path in the files (/
MyData/nums1.txt) to prevent problems with newer operating systems
that don’t allow root directory access, such as Linux and Windows Vista.
The reason we’re giving a path is that the next listing reads from the files,
and we want to make sure that the program can find the files.
Note that the WriteFile function takes a filename, a count, and a start. It
uses this information to write a series of numbers to the file. But before it
writes those numbers, it writes the count, like this:
outfile << count << endl;
Then it uses a loop to write count numbers to the file.
Encountering the End of File
601
And, of course, when the WriteFile function is all done, it closes the file.
Good program, good.
Book V
Chapter 3
Listing 3-2 is an example of how to read this data back in.
#include <iostream>
#include <fstream>
#include <string>
using namespace std;
void ReadFile(string filename)
{
ifstream infile(filename.c_str());
int count;
int i;
int num;
cout << “File: “ << filename << endl;
infile >> count;
cout << “This file has “ << count << “ items.” << endl;
for (i=0; i<count; i++)
{
infile >> num;
cout << num << endl;
}
infile.close();
}
int main()
{
ReadFile(“/MyData/nums1.txt”);
ReadFile(“/MyData/nums2.txt”);
return 0;
}
You can see in Listing 3-2, like Listing 3-1, filename includes the path
names for the files the program is reading in.
Now look at the ReadFile function. This function opens the file and then
immediately reads in a number. This number represents the number of
items to read in. It’s the first number that was written by the WriteFile
function in the previous listing, Listing 3-1.
As the writer of both the program that writes the file and the program that
reads the file, we agreed (both sides of us agreed, that is, or so we think) on
the format of the file both for reading it and for writing it. And by sticking to
this format, we can assure ourselves that we can read in the file that we previously wrote. When you run this program, you’ll see the following output.
File: /MyData/nums1.txt
This file has 5 items.
100
Reading with
Input Streams
Listing 3-2: Using Code to Open a File and Read It Back In
602
Encountering the End of File
101
102
103
104
File: /MyData/nums2.txt
This file has 6 items.
200
201
202
203
204
205
Process returned 0 (0x0)
execution time : 0.000 s
Press any key to continue.
Now another possibility for reading and writing a file is that you continue
reading data from the file until you reach the end of the file. How do you do
this? You test the istream or ifstream object for the EOF.
Listings 3-3 and 3-4 show you how you can do this. As with the earlier listings, the first writes a couple of files, and the second reads them in.
First, here’s Listing 3-3.
Listing 3-3: Using Code to Write to a File but Not Record a Count
#include <iostream>
#include <fstream>
#include <string>
using namespace std;
void WriteFile(string filename, int count, int start)
{
ofstream outfile(filename.c_str());
int i;
for (i=0; i<count; i++)
{
outfile << start + i << endl;
}
outfile.close();
}
int main()
{
WriteFile(“/MyData/nums1.txt”, 5, 100);
WriteFile(“/MyData/nums2.txt”, 6, 200);
return 0;
}
As you can probably see, Listing 3-3 is like Listing 3-1, except Listing 3-3 does
not start out by writing out a count.
Listing 3-4 reads the numbers back in.
Encountering the End of File
603
Listing 3-4: Reading from a File and Looking for the EOF Condition
#include <iostream>
#include <fstream>
#include <string>
void ReadFile(string filename)
{
ifstream infile(filename.c_str());
int num;
cout << “File: “ << filename << endl;
bool done = false;
while (!done)
{
infile >> num;
if (infile.eof() == true)
{
done = true;
}
else
{
cout << num << endl;
}
}
infile.close();
}
int main()
{
ReadFile(“/MyData/nums1.txt”);
ReadFile(“/MyData/nums2.txt”);
return 0;
}
This listing is like Listing 3-2. However, instead of first reading a count, it just
dives in and starts reading.
Note carefully how Listing 3-4 does its thing: The listing first tries to read in
a number, and then it checks if it encountered an EOF. If you’re familiar with
other styles of reading in files, this approach may seem a little backwards to
you. But that’s the way the streams do it: First read, and if the read doesn’t
work, then abort.
Therefore, you have to have some strange logic in your code. Here’s the general algorithm:
set done to false
while not done
read a number
if encounter an end of file
set done to true
else
process the number read in
end-if
end-while
Reading with
Input Streams
using namespace std;
Book V
Chapter 3
604
Reading Various Types
Something bothers us about this approach: We need a big if statement,
and the process the number part goes in an else block. We like having
a Boolean variable called done, because then we can use a while loop that
reads like this:
while (!done) // pronounced “while not done”
If lots of processing is needed, the processing will all be piled inside the
else portion of the if block. And that can get ugly with a million indentations. In this case, check for EOF and then break out of the loop, like this:
if (infile.eof() == true)
break;
But if you do that, you have no reason for the done variable. So what do you
put in the while loop? A lot of people do this:
while (1)
{
infile >> num;
if (infile.eof() == true)
break;
cout << num << endl;
}
Yes, they put while (1). In other words, the while loop spins forever until a
break statement comes along. We’re not particularly fond of the while (1)
construct because it’s a bit counterintuitive for our little tiny brains, but a lot
of people do it; and we have to admit that we like the short if statement, just
breaking if the EOF is true. You choose which method you want to use. And
heck, you may even be able to dream up a couple more ways to do this.
Reading Various Types
Reading a file is fun, but it can get complicated when you want to read
spaces. Suppose we have these two strings that we want to write to a file:
“That’s the steak by the poodle that I’ll have for dinner.”
“I will have the Smiths for dinner, too.”
Now suppose you wrote these to a file as one big long line to get, “That’s the
steak by the poodle that I’ll have for dinner. I will have the Smiths for dinner,
too.”
Now later, you want to read back in these two strings. How can you do that?
You can’t just do this:
string first, second;
infile >> first;
infile >> second;
Reading Various Types
605
If you do this, the variable first will hold That’s, and the variable second
will hold the. Why? Because, when you read in strings, the ifstream and
istream classes use spaces to break (or delimit) the strings. Bummer.
And that protocol is fine, because ending with a period is the case with these
two strings that we wrote to the file. But what if they were just sequences of
words, like this:
“poodle steak eat puddle”
“dinner Smiths yummy”
And then, when you write these two strings to a file, you may end up with
this inside the file:
poodle steak eat puddle dinner Smiths yummy
Or worse, you may get this, which contains no space between the two
strings:
poodle steak eat puddledinner Smiths yummy
Here’s what we suggest that you do: First, you must agree on a protocol.
This, of course, may just mean agreeing with yourself. (Always a good idea.
No, it’s not! Yes, it is!) Here are some choices for your protocols:
✦ You can write each string on a separate line, and when you read the file,
you will know that each line is a separate string.
✦ You can delimit each string with a particular character. Then you would
split your strings based on those delimiters.
Writing a string to a separate line is very easy; you simply do this:
cout << mystring << endl;
Nothing earth shattering there. Reading it in is pretty easy, too; you just use
the getline function in the ifstream or istream class. The catch is that
the getline function wants a character array, not a string object. So go
ahead and read it into a character array, and then convert it to a string
object like so:
char buf[1024];
infile.getline(&(buf[0]), 1024);
string str(buf);
Reading with
Input Streams
But even if you could somehow get the ifstream class to go past the
spaces, how does the ifstream class know when it has reached the end of
the first string? Now in this case, you may write your program to follow this
protocol: A string ends with a period.
Book V
Chapter 3
606
Reading Various Types
You don’t have to convert the array to a string object; if you want, you can
just work with the character array. But we prefer to work with string
objects because they’re instances of classes and you get all kinds of nice
member functions that can manipulate the strings. We’re all about making
our lives easier.
Listing 3-5 shows how to write the strings with a delimiter. You can see that
this has nothing particularly magical about it (other than the quantum physics involved in running the microprocessor, but we don’t care about that).
Listing 3-5: Writing Strings with a Delimiter Is Easy
#include <iostream>
#include <string>
#include <fstream>
using namespace std;
void WriteString(ofstream &file, string words)
{
file << words;
file << “;”;
}
int main()
{
ofstream delimfile(“/MyData/delims.txt”);
WriteString(delimfile,
WriteString(delimfile,
WriteString(delimfile,
WriteString(delimfile,
WriteString(delimfile,
WriteString(delimfile,
WriteString(delimfile,
“This is a dog”);
“Some dogs bite”);
“Some dogs don’t bite”);
“Humans that is”);
“All dogs bite”);
“Food that is”);
“I say, food food food.”);
delimfile.close();
return 0;
}
Listing 3-6 shows you how to read in the file strings. We used a trick for this.
The ifstream class inherits from the istream class the getline function.
Most people use this to read a line of text. However, a little-known fact is
that you can specify the delimiter you prefer to use instead of the end-of-line
character. You pass the delimiter as the third parameter. And so we passed
a semicolon character for the third character, and lo and behold, the thing
worked!
Listing 3-6: Specifying a Delimiter with the getline Function
#include <iostream>
#include <string>
#include <fstream>
Reading Formatted Input
607
using namespace std;
int main()
{
ifstream delimfile(“/MyData/delims.txt”);
while (1)
{
string words = ReadString(delimfile);
if (delimfile.eof() == true)
break;
cout << words << endl;
}
delimfile.close();
return 0;
}
When you run Listing 3-6, you see this output:
This is a dog
Some dogs bite
Some dogs don’t bite
Humans that is
All dogs bite
Food that is
I say, food food food.
Yay! That’s the correct list of strings!
Reading Formatted Input
Sooner or later, you may be reading a file that has this kind of information
in it:
Hello there my favorite number is 13. When I go to the
store I buy 52 items each week, except on dates that
start with 2, in which case I buy 53 items.
Hello there my favorite number is 18. When I go to the
store I buy 72 items each week, except on dates that
start with 1, in which case I buy 73 items.
Hello there my favorite number is 10. When I go to the
store I buy 40 items each week, except on dates that
start with 2, in which case I buy 41 items.
Reading with
Input Streams
string ReadString(ifstream &file)
{
char buf[1024]; // Make sure this is big enough!
file.getline(&(buf[0]), 1024, ‘;’);
return string(buf);
}
Book V
Chapter 3
608
Reading Formatted Input
This file has a general format (or protocol!). How can you read in the numbers?
One way is to read strings for each of the words and skip them. Here’s a
sample piece of code that reads up to the first number, the favorite number:
ifstream infile(“words.txt”);
string skip;
for (int i=0; i<6; i++)
infile >> skip;
int favorite;
infile >> favorite;
This code reads in six strings and just ignores them. You can see how we do
this through a loop that counts from 0 up to but not including 6. (Ah, you
gotta love computers. Most people would just count 1 to 6. We suppose we
could have, but we’re computer guys, no more, no less.)
Then, after we read the six strings that we just ignored, we finally read the
favorite number. You can then repeat the same process to get the remaining
numbers.
Chapter 4: Building Directories
and Contents
In This Chapter
✓ Creating and deleting directories
✓ Getting the contents of a directory
✓ Copying and moving, and why they are related
✓ Moving and renaming files and why they are similar
W
e’re about to say something you might not believe: C++ provides no
functions for creating directories and getting the contents of a directory.
Really! We know it’s hard to believe, but we can say two points about this:
✦ There really is a (more-or-less) good reason for this lack: C++ is a
general-purpose language; issues that deal with directories are specific
to individual operating systems. Thus, it doesn’t make sense to include
such features in C++. (Supposedly. So they say. We guess. Whatever.)
✦ Some brave rebels have added some functions — and these functions
exist in most C++ implementations. Whew! That’s a good thing — otherwise you’d have to call into the operating system to create or modify a
directory.
C++ has a holdover from the C programming language in the header file
stdio.h that includes functions for renaming and removing files and directories. (Interesting.) Oh yes, and there’s another one in there for creating a
temporary file. (Even more interesting.)
In this chapter we present you with ways to manipulate directories and files.
(We have tested these routines only for the GNU gcc compiler that comes
with the CodeBlocks product. If you’re working with a different compiler or
operating system, try them out. They probably will work.)
For the examples in this chapter, you need to add both #include <stdio.
h> and #include <io.h> to the beginning of the source-code file. (Please
do not confuse this file with ios.h. That’s another header file but not the
right one to mess with just now.) Now again, if you’re working with a compiler
other than CodeBlocks, we cannot guarantee that you’ll find io.h in your
include directory. However, there’s a good chance you will. Look for it!
610
Manipulating Directories
Manipulating Directories
There are a couple functions you can use for creating and deleting directories. These functions are in the io.h header file.
Creating a directory
If you want to create a directory, you can call the mkdir function. If the function can create the directory for you, it returns a 0. Otherwise it returns a
nonzero value. (When we ran it we got a –1, but your best bet — always — is
to test it against 0.)
Here’s some sample code that uses this function:
#include <iostream>
#include <stdio.h>
#include <io.h>
using namespace std;
int main()
{
if (mkdir(“c:/abc”) != 0)
{
cout << “I’m so sorry. I was not” << endl;
cout << “able to create your directory” <<
cout << “as you asked of me. I do hope” <<
cout << “you are still able to achieve” <<
cout << “your goals in life. Now go away.”
}
return 0;
}
endl;
endl;
endl;
<< endl;
Notice (as usual) that we used a forward slash (/) in the call to mkdir. In
Windows, you can use either a forward slash or a backslash. But if you use
a backslash, you have to use two of them (as you normally would to get
a backslash into a C++ string). For the sake of portability, we recommend
always using a forward slash.
Clearing up a directory of confusion
We want to make sure we’re all clear about a
few terms. Back in 1994 when Microsoft created
Windows 94 — oops, we mean Windows 95 (it
shipped late and had to be renamed) — the kind
folks at Microsoft started telling us that we had
to use the term folder instead of directory. Blah,
blah, blah. We say they’re called directories,
and in our little private universe that includes
only us and revolves around us, we use that
term. In fact, that’s what most programmers
call them, so in this chapter we’re calling them
directories.
Getting the Contents of a Directory
611
If you do want to make all the directories at once, you can use the system
function, as we describe in “Using the quick-and-dirty method” sidebar,
later in this chapter. If you execute system(“mkdir \\abc\\def\\ghi\\
jkl”);, you will be able to make the directory in one fell swoop.
Deleting a directory
It’s fun to go on a cleaning spree and just toss everything out. And so it
makes sense that deleting a directory is easy. To do it, you just call the
rmdir function, passing the name of the directory. If you want to find out
whether it worked, test its results against 0. Here’s some sample code:
#include <iostream>
#include <stdio.h>
#include <io.h>
using namespace std;
int main()
{
if (rmdir(“c:/abc”) != 0)
{
cout << “Life is difficult sometimes, and” << endl;
cout << “sometimes you just don’t get what” << endl;
cout << “you asked for. And this is one” << endl;
cout << “such case. I just couldn’t remove” << endl;
cout << “the directory for you. Better” << endl;
cout << “luck next time, my dear friend.” << endl;
}
return 0;
}
This approach works only if the directory is not empty. If the directory has
at least one file in it, the function can’t remove the directory — and returns
a nonzero result. Then you get to see the nice, friendly message that we’re
particularly proud of.
Getting the Contents of a Directory
If you want to read the contents of a directory, you’re really going against
what’s available in the standard C++ language. However, the Kind Souls of
Book V
Chapter 4
Building Directories
and Contents
It would be nice to create an entire directory-tree structure in one fell
swoop — doing a call such as mkdir(“/abc/def/ghi/jkl”) without
having any of the abc, def, or ghi directories already existing. But, alas,
you can’t. The function won’t create a jkl directory unless the /abc/def/
ghi directory exists. That means you have to break this call into multiple
calls: First create /abc. Then create /abc/def, and so on.
612
Getting the Contents of a Directory
the Great Libraries of C++ (that is, the people who wrote most of the available C++ libraries) usually built in some handy functions for getting the
contents of a directory.
A directory usually contains multiple files as well as other directories.
Getting a list of contents is involved. You don’t just call a function and get
something back — we’re not sure what that something would be, other than
a pretty basic list.
Of course, if the Standard C++ Library included a function for getting information, it would likely be a template class that contains the directory contents.
Alas, the library doesn’t support it. (Delphi, supports it, but don’t get us going.)
Instead, you have to climb through some functions. Here’s how it works.
1. Call _findfirst, passing it a pathname and a pattern for the files
whose names you want to find.
For example, pass *.* to get all files in the directory, or *.txt to get all
files ending in .txt. Also pass it a pointer to a _finddata_t structure.
2. Check the results of _findfirst.
If _findfirst returned –1, it didn’t find any files (which means you’re
finished). Otherwise it fills the _finddata_t structure with the first file
it found, and it will return a number that you use in subsequent calls to
the various find functions.
3. Look at the _finddata_t structure to determine the name of the file,
and other information such as create date, last access date, and size.
4. Call _findnext and pass it the following values: the number returned
from _findfirst and the address of a _finddata_t structure
If _findnext returns –1, it found no more files; you can go to Step 5.
Otherwise look at the _finddata_t structure to get the information for
the next file found. Then repeat Step 4.
5. Call _findclose and pass it the number returned from _findfirst.
You’re all finished.
Youch! That’s kind of bizarre, but it’s the way things used to be done in the
old days of programming, before the mainstream languages developed such
civilized features as classes and objects. We just had structures; we had to
pass a bunch of information around by hand (and walk to school, uphill both
ways, in the snow).
Listing 4-1 shows how we implemented this elegant, old-fashioned process.
Getting the Contents of a Directory
Listing 4-1: Using Code to Read the Contents of a Directory
<iostream>
<io.h>
<time.h>
<string>
using namespace std;
string Chop(string &str)
{
string res = str;
int len = str.length();
if (str[len - 1] == ‘\r’)
{
res.replace(len - 1, 1, “”);
}
len = str.length();
if (str[len - 1] == ‘\n’)
{
res.replace(len - 1, 1, “”);
}
return res;
}
void DumpEntry(_finddata_t &data)
{
string createtime(ctime(&data.time_create));
cout << Chop(createtime) << “\t”;
cout << data.size << “\t”;
if (data.attrib & _A_SUBDIR == _A_SUBDIR)
{
cout << “[“ << data.name << “]” << endl;
}
else
{
cout << data.name << endl;
}
}
int main()
{
_finddata_t data;
// Change this entry to match your Windows directory.
int ff = _findfirst (“C:/Windows/*.*”, &data);
if (ff != -1)
{
int res = 0;
while (res != -1)
{
DumpEntry(data);
res = _findnext(ff, &data);
}
_findclose(ff);
}
return 0;
}
Book V
Chapter 4
Building Directories
and Contents
#include
#include
#include
#include
613
614
Copying Files
You can see how in main we followed the steps we just outlined. And for
each of the data structures, we used our own function called DumpEntry.
The DumpEntry function prints out the information about the file. Here are
some sample lines from when we ran the program:
Wed Jul 26 10:00:00 2000
Thu Sep 28 12:01:54 2000
Fri Dec 08 06:05:10 2000
16730
21692
0
FeatherTexture.bmp
FOLDER.HTT
[Fonts]
Note how, in the DumpEntry function, we’re testing whether the item is a
directory. This is another old (but reliable) way to program: We check for
the presence of one particular tiny little bit in the middle of the attrib
member of the structure, like this:
if (data.attrib & _A_SUBDIR == _A_SUBDIR)
{
cout << “[“ << data.name << “]” << endl;
}
And finally, you’ll notice a strange function we included called Chop. That’s
because when we wrote the program, we discovered that the ctime function — otherwise handy for formatting the time — adds a carriage return (or
newline) to the end of the string it creates. So we chop that off. Otherwise
the information after the date has to start on the next line of text, which
wasn’t what we wanted.
You might not have a C:/Windows directory on your computer, so you
may want to change this code to include some directory you do have, such
as C:/WinNT. (And as usual, you can see how we get to use those forward
slashes!)
Copying Files
Ah, copying a file — something so simple, it happens all the time. Copy this
file there; copy that file here. But what exactly takes place when you copy a
file? You actually create a new file, and fill it with the same contents as the
original file. And how do you do that? Well, from what we just said it sounds
like you have to read each and every byte from the first file, and write it to
the second. Big-time yuck.
Copying Files
615
And on top of all that, most good copy routines do even more! They give
the new file a date that matches the date of the original file, and they will
set all the attributes — including, say, read-only if the original is a read-only
file. (We’re pointedly ignoring that if the file is read-only, then maybe we
shouldn’t be able to copy it in the first place. . . . )
Suddenly copying a file doesn’t sound so easy after all!
Now this is going to go against the norm for every computer book you’ve
ever seen, but we’re not going to give you code and tell you to use it for your
file-copying operations. The reason for this heresy? Well, as simple as it may
sound, we’ve seen too many people write code that’s supposed to copy files
but runs too slowly, or screws up the process, or both!
So we tucked a couple of sidebars into this section to give you the best way
to copy a file. Enjoy!
Copying with windows: You’re in luck
If you’re programming in Windows, you’re in
luck! As long as you’re not using the ancient
Windows 3.1, you get a CopyFile function!
To get ready to use it, you include the line
#include <windows.h> in your program.
Then here’s all you have to do:
CopyFile(“c:/dog.txt”, “c:/dog2.txt”, TRUE);
This copies from c:/dog.txt to c:/dog2.
txt. But notice the final parameter: It’s the
word TRUE in all capitals. What’s that? That’s
a preprocessor macro defined somewhere in
the bowels of the header windows header files.
You have to use either TRUE or FALSE when
calling the Windows functions. That’s because
in the old days of C, when the early versions
of Windows were invented, no bool type
existed. Those resourceful people of the late
twentieth century had to define their own TRUE
and FALSE as integers (usually either 1 and 0,
respectively, or 0 and 1, respectively). And by
the way, that final parameter in CopyFile
tells the function what to do if the file you’re
copying to already exists: TRUE means don’t
overwrite the existing file; just abort. FALSE
means overwrite it.
Book V
Chapter 4
Building Directories
and Contents
But to make matters worse, copying a file means you have to make sure that
you copy it exactly the same, that you don’t accidentally tack an extra 0 or
two at the end of the file, or an extra carriage return or linefeed at the end
of the file (which could happen when you copy a text file). When all is done,
the two files should be identical — not only contain the same information,
but also be the same size. (We can hear the nonconformists now: “Super
big-time yuck!”)
616
Moving and Renaming Files and Directories
Using the quick-and-dirty method
Okay, time for a secret: There’s another way
you can copy a file, and you can use this to
also move, delete, and rename files. However,
this method we’re about to show you is absolutely not portable: in effect, if you do this on
Windows, for example, you won’t be able to run
the same program on Unix, and vice versa. That
is, you have to make a version for the operating system you’re using. Now, if you’re familiar
with DOS (remember that?) or the Unix shell,
you can execute any DOS or Unix-shell commands by using the system function. If you
use Dev-C++, you’ve already seen the system
function many times:
system(“PAUSE”);
This runs the DOS pause command, which
prints the message
Press any key to continue . . .
and waits for you to press the Any key (or
any other key for that matter). Because the
system function can run any DOS or shell
command, you can use it to call the DOS copy
command, like this:
Note that we had to use the backslash, not a
forward slash; DOS really doesn’t like forward
slashes. To make the command DOS-friendly,
we had to use two backslashes inside the
string.
When you use this approach, you can run into
some strange situations. For example, if you
write a program that calls system and you’re
planning to run it under the Cygwin environment in Windows, you can use the Unix-style cp
command instead of the DOS copy command.
The resulting weird command looks like this:
system(“cp c:\\abc.txt c:\\def.txt”);
But you can only use this command under the
Cygwin environment. Otherwise it gives you a
huffy error message:
‘cp’ is not recognized as an internal
or external command, operable
program or batch file.
Moral: You have to make sure that whatever
command you call in the system function
really exists in the environment from which you
issue the call.
system(“copy c:\\abc.txt c:\\def.txt”);
Moving and Renaming Files and Directories
Think about this: We have a file called
c:\dog.txt
and we’re going to rename it to
c:\temp\dog.txt
Is that a valid way to rename a file? If you notice, the file started out being
called dog.txt, and afterwards it was called dog.txt. Did we rename it or
did we just move it? Indeed, we moved it from the root directory on the C:
drive to the temp directory on the C: drive. Why did we call this operation
a rename? Because that’s also what we did! We’re thinking of the file’s real
Moving and Renaming Files and Directories
617
For that reason, you can move and rename by using the same function. If you
want to move a file, rename it with a different path. Of course, the path must
exist (details, details). If we try to rename c:\dog.txt to c:\temp\dog.
txt and there’s no c:\temp directory, the rename fails and we get an error
message.
The following example renames a file:
#include <iostream>
#include <stdio.h>
using namespace std;
int main()
{
if (rename(“/mydata/dog.txt”,”/mydata/dog.dat”) != 0)
{
cout << “I quit.” << endl;
}
if (rename(“/mydata/dog.dat”,”/mydata/temp/dog.dat”) != 0)
{
cout << “Same old story. No respect at all.” << endl;
}
return 0;
}
We used the rename function, passing first the old filename and then the
new filename. The first call renames the file from /mydata/dog.txt to /
mydata/dog.dat. The second call renames it from /mydata/dog.dat to /
mydata/temp/dog.dat, which (in effect) moves the file.
You can also give the file a new filename when you move it, as in this code:
rename(“/mydata/dog.dat”,”/mydata/temp/cat.txt”)
There are conditions under which the rename operation won’t work:
✦ You’re renaming the file to move it to a new directory, but that directory
does not exist. In this case, create the directory before you move the file.
✦ You’re renaming a file but some other file already exists under that
name. In this case, either delete the other file or (better yet) make your
program ask its users what they want it to do: Delete the old file (that
is, “overwrite it”)? Abort the operation? Abort! Abort! Abort! (No, wait,
that’s only for the self-destruct. Never mind.)
✦ You’re renaming a file to move it to a new directory, but there’s already a
file by that name in that directory. In this case, as in the previous example,
get your program to ask the users what to do — overwrite or abort?
Book V
Chapter 4
Building Directories
and Contents
name as the entire pathname and filename together. Thus, the file’s name at
first is c:\dog.txt, not just dog.txt. When we moved the file, it got a new
name, c:\temp\dog.txt.
618
Moving and Renaming Files and Directories
Now for some really exciting news! Renaming also works with directories!
You can move directory names around just as if they were files! But there’s a
catch: If any program has a file open within that directory, the rename function won’t work. The operating system lets you move or rename a directory
only if you’re not accessing any files inside the directory. That’s still true if
you’re using a DOS window and staying inside the C: directory like this:
C:\>cd dog
C:\dog>
If you have a DOS window open with this sort of operation in it, you can’t
move the dog directory unless you either move out of the dog directory first
or close the DOS window before you move the dog directory. (Or you can
just make a new directory and move everything out of the old directory.)
Chapter 5: Streaming
Your Own Classes
In This Chapter
✓ Streaming a class to a text file
✓ Getting the most out of manipulators
✓ Writing your own manipulators
T
he C++ stream classes can read and write all sorts of goodies, such as
integers, characters, strings, floating-point numbers, and Boolean variables. But sooner or later, being able to stream one of your own classes
(like the following) would be nice:
MyClass x;
cout << x << endl;
Now C++ has a good reason not to have done this already: The compiler and
library can’t know how to stream your class. What should cout write? The
name of the class followed by the values of the public member variables? Or
maybe just the private member variables? None of the above?
Therefore, you should make the class streamable. In this chapter, we show
you how to do it. But recognizing that you have two separate reasons why
you may want to make a class streamable is important:
✦ To provide a format for writing the object to a text stream.
✦ To save the information in an object so you can read it back in at a later
date, thereby reconstructing the object. A class with this feature is
called a persistent class.
We cover both topics in this chapter. We also show how you can create
your own manipulators. Remember, a manipulator is this kind of code:
cout << endl;
That is, the endl is the manipulator. You can make your own manipulators
that manipulate the stream in various ways, as we show you later in this
chapter.
620
Streaming a Class for Text Formatting
Streaming a Class for Text Formatting
When dealing with instances of one of your classes, the ability to use the
insertion and extraction operators << and >> is nice.
To use these operators, you overload them to take parameters of your class.
Sounds easy, doesn’t it? When people first find out about overloading the
insertion and extraction operators, the process often seems so much harder
than it really is.
Here’s the scoop: If you have a class, say MicrowaveOven, and you have an
instance of this class, say myoven, all you do to accomplish the overloading
of an operator is code a function that takes as a parameter a stream and an
object and writes the members of the object to the stream. Then you will be
able to code one of the following lines:
cout << myoven;
outfile << myoven;
Now what if you want to code an operator that reads from a stream? Then all
you do is write a function that reads the members from a stream if you want
to code one of the following lines:
cin >> myoven;
infile >> myoven;
Again, no biggie. The key is what to call the function.
Remember that cout << myoven actually calls a function called <<. Here’s
the function header:
ostream &operator <<(ostream &out, MicrowaveOven &oven)
This technique isn’t as hard to remember as you may think. First, always
remember that every type in this is a reference. (That makes sense when
you look at cout << myoven. The second parameter, myoven, is not a
pointer. And you normally don’t want to pass objects around directly, so
that leaves only one possibility: passing it by reference.)
Second, remember that the function must return the stream that it’s working
with. Returning the stream allows you to chain together operators like this:
cout << “hi” << myoven << 123 << endl;
Streaming a Class for Text Formatting
621
ostream &operator <<(ostream &out, MicrowaveOven &oven)
Now what do you do with this function that you wrote? You just write to
the stream passed into it! What do you write? Whatever you want! It’s true:
Because you designed the class that the function takes as a parameter, you
decide how the output looks when you write the object to a stream. So pretend that this is your MicrowaveOven class:
class MicrowaveOven
{
public:
int HighVoltageRadiation;
int RadioactiveFoodCount;
int LeakLevel;
string OvenName;
};
Then your insertion function may look like this:
ostream &operator <<(ostream &out, MicrowaveOven &oven)
{
out << “High Voltage Radiation: “;
out << oven.HighVoltageRadiation << endl;
out << “Radioactive Food Count: “;
out << oven.RadioactiveFoodCount << endl;
out << “Leak Level: “;
out << oven.LeakLevel << endl;
out << “Oven Name: “;
out << oven.OvenName << endl;
return out;
}
Now for some points about the preceding code:
✦ We took complete liberty on how we wanted the object to look on the
stream. For each member variable, we wrote a description, a colon, a
space, and then a value. We then put an endl. Would you like the output
to look different? Then go for it! It’s your choice how you want the
output to look.
✦ We returned the same output stream that came in as the first parameter.
This is important!
✦ When we wrote to the stream, we wrote to out, not to cout. If we
messed up and wrote to cout, this function would not work properly
when used with a file. If we tried myfile << myoven, the information
would just go to cout, not into the file. Oops!
Book V
Chapter 5
Streaming Your
Own Classes
Finally, remember that the operator function takes two parameters. You can
see their order when you look at the order of cout << myoven. The first
is the stream, and the second is your class. And thus, when you put this all
together, you get the function header we just described, that is
622
Streaming a Class for Text Formatting
In this function, we accessed only the public member variables of the oven
instance. As it stands, we can’t access the private members because this
function is not a member of MicrowaveOven. (Now of course, MicrowaveOven
doesn’t actually have any private members, but most of your classes probably do.) To access the private members, make this function a friend of
MicrowaveOven by adding this inside the MicrowaveOven class:
friend ostream &operator <<(ostream &out,
MicrowaveOven &oven);
Here’s a similar function for reading from a stream:
istream &operator >(istream &in, MicrowaveOven &oven)
{
in >> oven.HighVoltageRadiation;
in >> oven.RadioactiveFoodCount;
in >> oven.LeakLevel;
in >> oven.OvenName;
return in;
}
You can see that the format of this function is like that of the insertion operator: The function returns a reference to the stream, and for parameters, the
function takes a reference to a stream and a reference to a MicrowaveOven
object.
And as before, we had complete freedom on how we wanted to read this in.
We chose to just read in each member separately. That means that if we call
this function by using cin like this
cin > myoven;
then when we run this line, we could type the member values on one line
with spaces, or on separate lines, or any combination:
1234 5555
1054 “Buzz”
And that’s it! Using the insertion and extraction operators isn’t really magical at all.
To use the insertion and extraction operators, remember that you simply
write two functions, one for each operator. These functions write to a stream
or read from it. And always remember the two most important aspects of
these functions:
✦ Remember to return the stream at the end!
✦ Remember to use references!
Manipulating a Stream
623
Manipulating a Stream
Book V
Chapter 5
A lot of people see this kind of thing:
and wonder what on Earth endl is. Is it a variable? Is it a keyword? What is
it? And how can you add your own things like it? In this section, we answer
this and every other question you ever had about these strange little creatures called manipulators.
What’s a manipulator?
What exactly is endl? Here’s the answer, and it might surprise you: endl
is a function. However, you may notice that it has no parentheses. And so,
you’re not actually calling the function.
So what are you doing? (Seems as though we’ve made the story even more
complicated.) In this section, we show you that a manipulator is actually the
address of a function. How’s that for a strange thought? Read on.
To clarify exactly what endl is, think about this:
cout << endl;
And think about the operator function, <<. By writing cout << endl, you
are calling an overloaded insertion operator function and passing in two
parameters, cout and endl. The first parameter, cout, is an instance of
ostream. The second parameter, endl, is the address of a function. Yes,
when you type a function name but don’t include parentheses, you are
giving the address of the function rather than calling the function.
And so, somewhere out there (in the standard header files, actually) is an
overloaded insertion function that takes both an ostream and the address
of a function. Now the thing about function addresses is that the type of a
function pointer is based on the function’s return type and parameter types.
Thus, pointers to these two functions have the same type:
void WriteMe(int x, char c);
void AlwaysAndForever(int y, char x);
Even though the names of the parameters are different, the types of the parameters are the same. That’s why pointers to the two functions have the same type.
But pointers to the following two functions do not have the same type:
void SomethingForNothing(int x);
int LeaveMeAlone(int y, int z);
Streaming Your
Own Classes
cout << “Hello” << endl;
624
Manipulating a Stream
The functions do not have the same type because their prototypes are different. The first takes a single integer as a parameter and returns a void. The
second takes two integers as parameters and returns an integer.
Now here’s the prototype for the endl function:
ostream& endl(ostream& outs);
This function takes a reference to ostream and returns a reference to
ostream. And here’s a sufficient typedef for a pointer to this function:
typedef ostream& (*omanip)(ostream&);
This defines a new type called omanip, which is a pointer to a function that
takes as a parameter a reference to ostream and returns a reference to
ostream. Perfect! Therefore, if we have a variable of type omanip, we can
set it to the address of the endl function.
So now back to this:
cout << endl;
For this manipulator to work, you need an overloaded insertion operator
function that takes two parameters: first a reference to ostream (for the
cout) and then omanip. Yes, the second parameter must be a reference to
omanip because the second item in cout << endl is omanip.
If you’re not clear on why endl is omanip, think about this: There’s a function called endl, and to call that function, you would type its name, an opening parenthesis, some parameters, and then a closing parenthesis. But if
you leave off the parentheses, you’re just taking the address of the function.
And the type omanip, which we defined earlier, is exactly that: an address
to a function. But on top of being an address, the endl function’s prototype
matches that for the omanip type. Therefore, we can say that endl is of the
type omanip. Whew.
Here’s a possibility for the header of the overloaded insertion operator:
ostream& operator<<(ostream& out, omanip func);
You can see the parameters that this function takes: First, it takes a reference to ostream and then omanip.
But remember what we’re doing. We’re trying to explain how this manipulator works:
cout << endl;
Manipulating a Stream
625
Two functions are involved. Here are their headers:
Book V
Chapter 5
ostream& endl(ostream& outs);
When you type cout << endl, you are not calling the endl function. Instead,
you are calling this operator<< function because endl by itself — without
parentheses — is nothing more than the address of the endl function. And the
address is of type omanip.
Thus, when you type cout << endl, you are calling this operator<< function,
passing in cout and endl.
Here’s the operator<< function in its entirety:
ostream& operator<<(ostream &out, omanip func)
{
return (*func)(out);
}
The second parameter is called func. When you call cout << endl, you
are passing endl in as the func parameter. And what does this operator<<
function do? It calls the function passed into it. Thus, it calls endl. Huh?
Why did we go through all this rigmarole, if, ultimately, we’re just calling this
mysterious endl function? Here’s why. Believe it or not, the use of endl is
all about aesthetics. The following line is short and clear:
cout << “hello” << endl;
And to make this line work, you need an overloaded insertion operator.
Fortunately, the operator<< function we’ve been talking about does the
trick.
Finally, the computer eventually calls the endl function itself, and that function does the actual work of adding a newline character to the stream. Wow,
all that just for a newline! And you thought you had it rough! Imagine being
the compiler!
Now this isn’t the only way to accomplish coding a manipulator, as we
explain in the following section, “Writing your own manipulator.” In that section, we use a slightly different approach that works equally well. But the
technique we’ve been describing works, too.
Time for some honesty: We did doctor the overloaded insertion operator
function a bit, because, really, this function is a member of ostream. But the
overloaded insertion operator function works equally well as a standalone
function, as we’ve described in this section.
Streaming Your
Own Classes
ostream& operator<<(ostream& out, omanip func);
626
Manipulating a Stream
Writing your own manipulator
You can write your own manipulators in several ways. The goal is to allow
for this type of code
cout << mymanipulator;
which causes a function, such as this, to get called:
ostream &operator << (ostream &out, somespecialtype a);
Now think about the overloading that goes on here: Several operator <<
functions are available; ultimately, they all differ in the type of the second
parameter, where we wrote somespecialtype. And whatever mymanipulator is, it must be the somespecialtype type as well. But on top of it,
this type must be unique: There cannot already be an overloaded function
that has that type! Unique, unique, unique!
Although in the “What’s a manipulator?” section, earlier in this chapter, we
give all the gory details on how the endl manipulator works, we think that
amount of detail is a bit too complicated. We’d rather use a slightly different
approach for our own manipulators. Here’s what we’re going to do in the following example: We want to make sure that we have a unique type and that
the manipulator is an object of that type. As with other manipulators, function
pointers work well. But for the function pointer to be unique, its return type
and parameter types must be unique. That’s not too hard; to guarantee that
no other function has that prototype, we’re going to make our own special
type — a structure — and use that as the parameter for the function, like this:
struct FullOvenManip {};
void FullOvenInfo(FullOvenManip x) {}
Check this sample carefully. We created a structure called FullOvenManip.
This structure has nothing in it; its sole purpose in life is to provide for a unique
parameter experience. Yee-hah! And the function FullOvenInfo takes this
structure as a parameter. Considering that we just invented this structure, we
can be quite certain that no other function in the C++ header files matches this
prototype. More than certain, in fact. We’d be willing to bet our Hollywood Hills
mansion (which we don’t have, so we have nothing to lose!).
Now we can provide an overloaded operator >> function. That function
takes a pointer to the FullOvenInfo function. But to do that, we had better
typedef:
typedef void(*FullPtr)(FullOvenManip);
This line of code creates a type called FullPtr, which is a pointer to a function that takes a FullOvenManip parameter and returns a void. We can
think of only one function that does that! It’s the FullOvenInfo function.
Woo-Hoo!
Manipulating a Stream
627
When writing your own manipulators, don’t shy away from using typedef.
The manipulator concept is confusing and can be a serious struggle for many
of us to keep straight. By using a typedef, you can simplify your life a bit.
ostream &operator << (ostream &out, FullPtr);
You can see the second parameter: It’s a FullPtr. And look at this code:
cout << FullOvenInfo;
The FullOvenInfo item is also a FullPtr because it’s a pointer to a function that takes a FullOvenManip. Voilà. That does the trick.
Listing 5-1 is a really great example of all this!
Listing 5-1: Using Manipulators
#include
#include
#include
#include
<iostream>
<string>
<fstream>
<map>
using namespace std;
class MicrowaveOven
{
friend ostream &operator <<(ostream &out,
MicrowaveOven &oven);
public:
typedef map<ostream *, bool> FlagMap;
int HighVoltageRadiation;
int RadioactiveFoodCount;
int LeakLevel;
string OvenName;
static FlagMap Flags;
};
MicrowaveOven::FlagMap MicrowaveOven::Flags;
ostream &operator <<(ostream &out, MicrowaveOven &oven)
{
bool full = true;
MicrowaveOven::FlagMap::iterator iter =
MicrowaveOven::Flags.find(&out);
if (iter != MicrowaveOven::Flags.end())
{
full = iter->second;
}
if (full)
{
out <<
out <<
out <<
out <<
“High Voltage Radiation: “;
oven.HighVoltageRadiation << endl;
“Radioactive Food Count: “;
oven.RadioactiveFoodCount << endl;
(continued)
Streaming Your
Own Classes
Here’s the overloaded operator >> function header:
Book V
Chapter 5
628
Manipulating a Stream
Listing 5-1 (continued)
out
out
out
out
<<
<<
<<
<<
“Leak Level: “;
oven.LeakLevel << endl;
“Oven Name: “;
oven.OvenName;
<<
<<
<<
<<
oven.HighVoltageRadiation << “,”;
oven.RadioactiveFoodCount << “,”;
oven.LeakLevel << “,”;
oven.OvenName;
}
else
{
out
out
out
out
}
return out;
}
istream &operator >(istream &in, MicrowaveOven &oven)
{
in >> oven.HighVoltageRadiation;
in >> oven.RadioactiveFoodCount;
in >> oven.LeakLevel;
in >> oven.OvenName;
return in;
}
struct FullOvenManip {};
void FullOvenInfo(FullOvenManip x) {}
typedef void(*FullPtr)(FullOvenManip);
ostream &operator << (ostream &out, FullPtr)
{
MicrowaveOven::Flags[&out] = true;
return out;
}
struct MinOvenManip {};
void MinOvenInfo(MinOvenManip x) {}
typedef void(*MinPtr)(MinOvenManip);
ostream &operator << (ostream &out, MinPtr)
{
MicrowaveOven::Flags[&out] = false;
return out;
}
int main()
{
MicrowaveOven myoven;
myoven.HighVoltageRadiation = 9832;
myoven.RadioactiveFoodCount = 7624;
myoven.LeakLevel = 3793;
myoven.OvenName = “Burnmaster”;
cout << myoven << endl;
cout << “============” << endl;
cout << FullOvenInfo << myoven << endl;
Manipulating a Stream
629
cout << “============” << endl;
cout << MinOvenInfo << myoven << endl;
Book V
Chapter 5
return 0;
The code in Listing 5-1 creates two manipulators, one called FullOvenInfo
and one called MinOvenInfo. When you use one of these manipulators, as
in the following line, you call our overloaded operator >> function:
cout << FullOvenInfo << myoven << endl;
That function works with a map to keep track of which stream you are
manipulating. The map lives as a static member in the MicrowaveOven
class. So when you use the FullOvenInfo manipulator on cout, the map’s
item for cout gets a true. And when you use the MinOvenInfo manipulator on cout, the map’s item for cout gets a false.
So why did we bother with the map? The idea is that you may be working with multiple streams, such as one for an ofstream file and one
for cout, and you may want some to show the full information via the
FullOvenInfo manipulator and some to show the minimal information
via the MinOvenInfo. And so we keep a map based on the stream. And the
really great thing is that the code actually works. In the overloaded operator >> function that prints a MicrowaveOven object, you can see how we
check the map for a true or false for the current stream.
When you run this program, you see this output:
High Voltage Radiation: 9832
Radioactive Food Count: 7624
Leak Level: 3793
Oven Name: Burnmaster
============
High Voltage Radiation: 9832
Radioactive Food Count: 7624
Leak Level: 3793
Oven Name: Burnmaster
============
9832,7624,3793,Burnmaster
We printed the same object three times. The first one demonstrates the
default: If you provide no manipulators, you get a full listing. We handled
that in the overloaded operator >> for printing a MicrowaveOven object:
bool full = true;
MicrowaveOven::FlagMap::iterator iter =
MicrowaveOven::Flags.find(&out);
if (iter != MicrowaveOven::Flags.end())
{
full = iter->second;
}
Streaming Your
Own Classes
}
630
Manipulating a Stream
Remember that iterator is really a pointer to the map entry. And so we call
find to determine if the item is inside the map entry. If it’s not, find returns
Flags.end(). (That’s just the way the find function works. If we’d written
the map class, we would have done things differently. Can you say simplify,
simplify, simplify rather than obfuscate, obfuscate, obfuscate?)
And if we don’t get back Flags.end(), that means we found the item in the
map. So in that case, we use iter->second to obtain the value.
But notice what happens if we do get back Flags.end(), meaning the
stream wasn’t found in the map. Then we just stick with the default value
for full, which was true:
bool full = true;
And so you can see that these output lines will function properly:
cout
cout
cout
cout
cout
<<
<<
<<
<<
<<
myoven << endl;
“============” << endl;
FullOvenInfo << myoven << endl;
“============” << endl;
MinOvenInfo << myoven << endl;
The first line with myoven line uses the default, which is a full listing. The
second line with myoven says to definitely give us a full listing, using the
FullOvenInfo manipulator. And the third line with myoven gives a minimal
listing, which we chose with the MinOvenInfo manipulator.
Life is good.
Book VI
Advanced C++
Contents at a Glance
Chapter 1: Exploring the Standard Library Further. . . . . . . . . . . . . . . .633
Considering the Standard Library Categories ......................................... 634
Parsing Strings Using a Hash...................................................................... 640
Obtaining Information Using a Random Access Iterator ........................ 643
Locating Values Using the Find Algorithm ............................................... 645
Using the Random Number Generator...................................................... 647
Performing Comparisons Using min and max ......................................... 648
Working with Temporary Buffers .............................................................. 649
Chapter 2: Building Original Templates. . . . . . . . . . . . . . . . . . . . . . . . .651
Deciding When to Create a Template ....................................................... 652
Defining the Elements of a Good Template .............................................. 653
Creating a Basic Math Template ................................................................ 655
Building a Structure Template ................................................................... 656
Developing a Class Template ..................................................................... 659
Considering Template Specialization ....................................................... 662
Creating a Template Library ...................................................................... 664
Using Your Template Library..................................................................... 669
Chapter 3: Investigating Boost. . . . . . . . . . . . . . . . . . . . . . . . . . . . . . . . .671
Understanding Boost .................................................................................. 672
Obtaining and Installing Boost for CodeBlocks ....................................... 673
Using Boost Jam........................................................................................... 680
Using Boost Build ........................................................................................ 682
Using Regression ......................................................................................... 685
Using Inspect ................................................................................................ 685
Understanding BoostBook ......................................................................... 687
Using QuickBook.......................................................................................... 689
Using bcp ...................................................................................................... 690
Using Wave ................................................................................................... 692
Building Your First Boost Application Using Date Time ........................ 693
Chapter 4: Boosting up a Step . . . . . . . . . . . . . . . . . . . . . . . . . . . . . . . . .697
Parsing Strings Using RegEx ....................................................................... 698
Breaking Strings into Tokens Using Tokenizer ........................................ 702
Performing Numeric Conversion ............................................................... 703
Creating Improved Loops Using Foreach ................................................. 706
Accessing the Operating System Using Filesystem ................................. 708
Chapter 1: Exploring the Standard
Library Further
In This Chapter
✓ Categorizing the Standard Library functions
✓ Working with container functions such as hash
✓ Performing random access with iterator functions
✓ Working with algorithms such as find
✓ Creating random numbers with functors
✓ Working with utilities such as min and max
✓ Creating temporary buffers with allocators
T
he Standard Library is one of the most important parts of the C++ developer’s toolkit because it contains a host of interesting functions that let
you write great applications. The Standard Library originally started as the
Standard Template Library (STL), and a number of companies, including
Silicon Graphics, Inc. (SGI) and IBM, distributed it for everyone to use. The
International Standards Organization (ISO) eventually took over STL, made a
few minor changes to it, and renamed it the Standard Library. Consequently,
when you see the STL online, don’t get confused; it’s merely an older version of the Standard Library.
For the purposes of this book, the differences between the Standard Library
and the STL are so small that you can probably use them interchangeably.
Just remember that the Standard Library is newer and does contain some
changes to make the various versions of the STL work together.
This chapter provides an overview of the Standard Library and shows you
some examples of how to use it. However, if you don’t see what you want
here, don’t worry, we discuss more examples in later chapters and you can
always refer to the Standard Library documentation for additional examples.
Before the chapter moves on to any examples, however, it’s important to
know what the Standard Library contains, so the first section of this chapter
provides you with a list of Standard Library function categories.
634
Considering the Standard Library Categories
Getting a copy of the Standard Library
documentation
The Standard Library is incredibly large, so
this book doesn’t document it completely.
The CodeBlocks product doesn’t come with a
Standard Library reference either. However, to
really use the Standard Library, you really do
need a copy of the documentation.
You can join ISO for a bazillion bucks and get
a copy of their document free or purchase a
copy of it from http://www.iso.org/
iso/iso_catalogue/catalogue_
ics/catalogue_detail_ics.
htm?csnumber=38110. As an alternative,
you can buy a copy of the Standard Library
documentation from an ISO member such as
the American National Standards Institute
(ANSI) for a more reasonable sum. Check it
out at http://webstore.ansi.org/
RecordDetail.aspx?sku=INCITS%2
FISO%2FIEC+14882-2003.
Because the STL and the Standard Library are
relatively close, you have a third alternative:
use an STL resource. One of the best written
and easiest to use resources is from SGI at
http://www.sgi.com/tech/stl/.
You may also want to review the Tiny STL
Primer at http://www.davethehat.
com/articles/tiny_stl.htm for some
additional resources (found at the bottom of the
Web page).
In addition to the resources mentioned so far,
you’ll want to check out Bjarne Stroustrup’s
Web site at http://www.research.
att.com/~bs/C++.html#standard.
Just in case you don’t know, he’s the guy who
designed and originally implemented C++.
Finally, you can download most of the C++ 1989
standard at ftp://ftp.research.att.
com/pub/c++std/WP/CD2/.
Considering the Standard Library Categories
The Standard Library documentation uses a formal approach that you’re
going to find difficult to read and even harder to understand; it must have
been put together by lawyers more interested in the precise meaning of
words rather than the usability of the document. This 748-page tome (in
the current version) requires quite a bit of time to review. Fortunately, you
don’t have to wade through all that legal jargon mixed indiscriminately with
computer jargon and the occasional bit of English. This chapter provides the
overview you need to get going quickly.
The best way to begin is to break the Standard Library into smaller pieces.
You can categorize the Standard Library functions in a number of ways. One
of the most common approaches is to use the following categories:
✦ Containers
✦ Iterators
✦ Algorithms
✦ Functors
Considering the Standard Library Categories
635
✦ Utilities
✦ Adaptors
✦ Allocators
The following sections provide a brief description of each of these categories and tell what you can expect to find in them. Knowing the category can
help you locate the function you need quickly on Web sites that use these
relatively standard category names.
Containers
basic_string
bit_vector
bitset
char_producer
deque
hash
list
map
multimap
multiset
priority_queue
queue
rope
set
slist
stack
vector
Iterators
Iterators enumerate something. When you create a list of items, and then go
through that list checking items off, you’re enumerating the list. Using iterators helps you create lists of items and manipulate them in specific ways.
The kind of iterator you create is important because some iterators let you
go forward only, some can go in either direction, and some can choose items
at random. Each kind of iterator has its specific purpose.
SGI color-coding
The SGI Web site at http://www.sgi.
com/tech/stl/stl_index_cat.
html uses color-coding to tell you about the
content. Here are the categories you’ll see and
their associated color:
✓ Concept is red
✓ Type is yellow
✓ Function is green
✓ Overview is purple
Book VI
Chapter 1
Exploring the
Standard Library
Further
Containers work just like the containers in your home — they hold something. You’ve already seen containers at work in other areas of this book. For
example, both queues and deques are kinds of containers. The Containers
category doesn’t contain any functions, but it does contain a number of
types including those in the following table:
636
Considering the Standard Library Categories
The Iterators category includes a number of types. These types determine
the kind of iterator you create in your code and the capabilities of that iterator. The following is a list of the iterator types:
back_insert_iterator
bidirectional_iterator
bidirectional_iterator_tag
forward_iterator
forward_iterator_tag
front_insert_iterator
input_iterator
input_iterator_tag
insert_iterator
istream_iterator
iterator_traits
ostream_iterator
output_iterator
output_iterator_tag
random_access_iterator
random_access_
iterator_tag
raw_storage_iterator
reverse_bidirectional_
iterator
reverse_iterator
sequence_buffer
The Standard Library also includes a number of iterator-specific functions. These
functions help you perform tasks such as advance (increment) the iterator by
a certain number of positions. You can also measure the distance between the
beginning and end of the iterator. The following is a list of iterator functions:
advance
distrance
iterator_category
value_type
distance_type
Algorithms
Algorithms perform data manipulations such as replacing, locating, or sorting
information. You’ve already seen some algorithms used in the book because
it’s hard to create a substantial application without using one. There aren’t any
types in the Algorithms category. The following is a list of algorithm functions:
accumulate
adjacent_difference
adjacent_find
advance
binary_search
copy
copy_backward
copy_n
count
count_if
distance
equal
equal_range
fill
fill_n
find
find_end
find_first_of
find_if
for_each
generate
generate_n
includes
inner_product
inplace_merge
iota
is_heap
is_sorted
iter_swap
lexicographical_compare
Considering the Standard Library Categories
lexicographical_
compare_3way
lower_bound
make_heap
max
max_element
merge
min
min_element
mismatch
next_permutation
nth_element
partial_sort
partial_sort_copy
partial_sum
partition
pop_heap
power
prev_permutation
push_heap
random_sample
random_sample_n
637
random_shuffle
remove
remove_copy
remove_copy_if
remove_if
replace
replace_copy
replace_copy_if
replace_if
reverse
reverse_copy
rotate
rotate_copy
search
search_n
set_difference
set_intersection
set_symmetric_difference
set_union
sort
sort_heap
stable_sort
swap
transform
uninitialized_copy
uninitialized_copy_n
uninitialized_fill
uninitialized_fill_n
unique
unique_copy
upper_bound
Functors
Functors are a special class of object that acts as if it’s a function. You call a functor using the same syntax that you use for a function in most cases, but functors
possess all the good elements of objects as well. Functors come in a number of
forms. For example, a binary function functor accepts two arguments as input
and provides a result as output. Functors include a number of types that determine the kind of function the code creates, as shown in the following table:
binary_compose
binary_function
binary_negate
binder1st
binder2nd
divides
equal_to
greater
greater_equal
hash
identity
less
less_equal
logical_and
logical_not
logical_or
mem_fun1_ref_t
mem_fun1_t
mem_fun_ref_t
mem_fun_t
minus
modulus
multiplies
negate
(continued)
Exploring the
Standard Library
Further
stable_partition
swap_ranges
Book VI
Chapter 1
638
Considering the Standard Library Categories
not_equal_to
plus
pointer_to_binary_function
pointer_to_unary_function
project1st
project2nd
select1st
select2nd
subtractive_rng
unary_compose
unary_function
unary_negate
The Functors category contains only one function, ptr_fun. This function
accepts a function pointer as input and outputs a function pointer adapter,
which is a kind of function object. You use ptr_fun when you need to pass
a function as input to another function such as transform. Here is an example of such code:
#include <iostream>
#include <math.h>
#include <ext/functional>
using namespace std;
using namespace __gnu_cxx;
int main()
{
const int N = 10;
double A[N];
fill(A, A+N, 100);
cout << A[0] << endl;
transform(A, A+N, A, compose1(negate<double>(), ptr_fun(fabs)));
cout << A[0] << endl;
return 0;
}
This example begins by creating a constant that determines the number of
elements in the array A. The code then fills every element in A with the value
100 and displays just one of those elements on screen.
The tricky part comes next. The transform algorithm accepts the beginning of an input iterator, the end of an input iterator, and output iterator,
and the transformation you want to perform. The transform algorithm
takes each of the values in the input iterator, performs the transformation
you requested, and places the result in the output iterator.
In this case, the code uses the nonstandard SGI functor compose1, which
takes two adaptable unary functions as input. Because fabs is a standard
function, you must use ptr_fun to change it into a function pointer adapter
before you can use it with compose1. The result is that A contains the negation of the absolute value of the original value in A or -100 when the transformation is complete.
Considering the Standard Library Categories
639
The GNU gcc compiler supports a number of STL features that don’t appear
as part of the Standard Library. In this case, compose1 appears in the ext/
functional header, so you must provide the #include <ext/functional> line of code. In addition, because compose1 is nonstandard, it
appears as part of a different namespace. Consequently, you must also provide the using namespace __gnu_cxx; line of code to access the functor
without having to precede it with the namespace information.
Many C++ examples rely on the nonstandard parts of STL to perform tasks.
If you want maximum compatibility and transportability for your code, you
should avoid these nonstandard features.
Book VI
Chapter 1
Utilities
Adaptors
Adapters perform conversions of a sort. They make it possible to adapt one
kind of data to another. In some cases, adaptors perform data conversion,
such as negating numbers. The Adaptors category includes one function,
ptr_fun, which is explained in the “Functors” section of the chapter. In addition, the Adaptors category includes the types shown in the following table:
back_insert_iterator
binary_compose
binary_negate
binder1st
binder2nd
front_insert_iterator
insert_iterator
mem_fun1_ref_t
mem_fun1_t
mem_fun_ref_t
mem_fun_t
pointer_to_binary_
function
pointer_to_unary_function
priority_queue
queue
raw_storage_iterator
reverse_bidirectional_
iterator
reverse_iterator
sequence_buffer
stack
unary_compose
unary_negate
Allocators
Allocators manage resources, normally memory. In most cases, you won’t
ever need to use the members of the Allocators category. For example, you
normally create new objects using the new operator. The new operator
Exploring the
Standard Library
Further
Utilities are functions and types that perform small service tasks within the
Standard Library. The functions are min, max, and the relational operators. The types are chart_traits (the traits of characters used in other
Standard Library features, such as basic_string) and pair (a pairing of
two heterogeneous values).
640
Parsing Strings Using a Hash
allocates memory for the object and then creates it by calling the object’s
constructor. In rare cases, such as when you want to implement a form of
object pooling, you may want to separate the memory allocation process
from the construction process. In this case, you call construct to perform
the actual task of construction the object based on its class definition. The
Allocators category has the following functions.
construct
destroy
get_temporary_buffer
return_temporary_buffer
uninitialized_copy
uninitialized_copy_n
uninitialized_fill
uninitialized_fill_n
The Allocators category also includes a couple of types. These types help
you manage memory, and you may find more use for them than you will the
functions in this category. The types are
raw_storage_iterator
temporary_buffer
Parsing Strings Using a Hash
Hashes are an important security requirement for applications today. A hash
creates a unique numeric equivalent of any string you feed it. Theoretically,
you can’t duplicate the number the hash creates by using another string. A
hash isn’t reversible — it isn’t the same as encryption and decryption.
A common use for hashes is to send passwords from a client to a server.
The client converts the user’s password into a numeric hash and sends that
number to the server. The server verifies the number, not the password.
Even if people are listening in, they have no way to ascertain the password
from the number and therefore can’t steal the password for use with the
target application.
Unfortunately, hashes are part of the STL but not part of the Standard
Library. However, hashes are so important that you really do need to know
how to use them. As with the ptr_fun example shown in the “Functors”
section of the chapter, you need to do a little extra work to make hashes
work with CodeBlocks, as shown in the following example:
#include <iostream>
#include <ext/hash_set>
using namespace std;
using namespace __gnu_cxx;
int main()
Parsing Strings Using a Hash
641
{
hash<const char*> MyHash;
cout
cout
cout
cout
<<
<<
<<
<<
“The hash of \”Hello World\” is:” << endl;
MyHash(“Hello World”) << endl;
“while the hash of \”Goodbye Cruel World\” is:” << endl;
MyHash(“Goodbye Cruel World”) << endl;
return 0;
}
The example begins by creating a hash function object, MyHash. You use
this function object to convert input text to a hash value. The function
object works just like any other function, so you might provide the input text
as MyHash(“Hello World”). Hashes always output precisely the same
value given a particular input. Consequently, you should see the following
output from this example.
Hashes have uses other than security requirements. For example, you can
create a container that relies on a hash to make locating a particular value
easier. In this case, you use a key/value pair in a hash map. The following
code shows how to create a hash map:
#include <iostream>
#include <ext/hash_map>
using namespace std;
using namespace __gnu_cxx;
struct eqstr
{
bool operator()(const char* s1, const char* s2) const
{
return strcmp(s1, s2) == 0;
}
};
int main()
{
hash_map<const char*, int, hash<const char*>, eqstr> Colors;
Colors[“Blue”] = 1;
Colors[“Green”] = 2;
Colors[“Teal”] = 3;
Colors[“Brick”] = 4;
Colors[“Purple”] = 5;
Colors[“Brown”] = 6;
Colors[“LightGray”] = 7;
cout << “Brown = “ << Colors[“Brown”] << endl;
cout << “Brick = “ << Colors[“Brick”] << endl;
// This key isn’t in the hash map, so it returns a
// value of 0.
Exploring the
Standard Library
Further
The hash of “Hello World” is:
952921740
while the hash of “Goodbye Cruel World” is:
1126809588
Book VI
Chapter 1
642
Parsing Strings Using a Hash
cout << “Red = “ << Colors[“Red”] << endl;
return 0;
}
A hash map requires four inputs:
✦ Key type
✦ Data type
✦ Hashing function
✦ Equality key
The first three inputs are straightforward. In this case, the code uses a string
as a key type, an integer value as a data type, and hash<const char*>
as the hashing function. You already know how the hashing function works
from the previous example in this section.
The equality key class is a little more complex. You must provide the hash
map with a means of determining equality. In this case, the code compares
the input string with the string stored as the key. The eqstr structure performs the task of comparing the input string to the key. The structure must
return a Boolean value, so the code compares the strcmp function to 0.
When the two are equal, meaning the strings are equal, eqstr returns true.
The example goes on to check for three colors, only two of which appear in
the hash map Colors. In the first two cases, you see the expected value. In
the third case, you see 0, which indicates that Colors doesn’t contain the
desired key. Always reserve 0 as an error indicator when using a hash map
because the hash map will always return a value, even if it doesn’t contain
the desired key.
Standard Library versus STL headers
You’ll find a wealth of STL examples on the
Internet because STL was around for a long
time before the Standard Library appeared. In
fact, some developers continue to prefer the
STL simply because they’re familiar with it.
Here’s a little secret: The STL headers use a
.h extension and the Standard Library headers don’t have an extension. For example,
the now familiar iostream header used in
every previous example in the book is actually
the Standard Library form — the STL form is
iostream.h.
Here’s another secret. The Standard Library
headers often call on the STL headers, so
you’ve also been using STL throughout the
book. It’s amazing to see how these things
work out.
Obtaining Information Using a Random Access Iterator
643
Obtaining Information Using a Random
Access Iterator
Most containers let you perform random access of data they contain. For
example, the following code shows that you can create an iterator and
then add to or subtract from the current offset to obtain values within the
container that iterator supports:
#include <iostream>
#include <vector>
using namespace std;
Words.push_back(“Blue”);
Words.push_back(“Green”);
Words.push_back(“Teal”);
Words.push_back(“Brick”);
Words.push_back(“Purple”);
Words.push_back(“Brown”);
Words.push_back(“LightGray”);
// Define a random iterator.
vector<string>::iterator Iter = Words.begin();
// Access random points.
Iter += 5;
cout << *Iter << endl;
Iter -= 2;
cout << *Iter << endl;
return 0;
}
In this case, the vector, Words, contains a list of seven items. The code creates an iterator for Words named Iter. It then adds to or subtracts from
the iterator offset and displays the output on screen. Here is what you see
when you run this example:
Brown
Brick
Sometimes you need to perform a special task using a random access iterator. For example, you might want to create a special function to summate
the members of vector or just a range of members within vector. In this
case, you must create a specialized function to perform the task as follows
because the Standard Library doesn’t include any functions to do it for you:
Exploring the
Standard Library
Further
int main()
{
vector<string> Words;
Book VI
Chapter 1
644
Obtaining Information Using a Random Access Iterator
#include <iostream>
#include <vector>
using namespace std;
template <class RandomAccessIterator>
float AddIt(RandomAccessIterator begin, RandomAccessIterator end)
{
float Sum = 0;
RandomAccessIterator Index;
// Make sure that the values are in the correct order.
if (begin > end)
{
RandomAccessIterator temp;
temp = begin;
begin = end;
end = temp;
}
for (Index = begin; Index != end; Index++)
Sum += *Index;
return Sum;
}
int main()
{
vector<float> Numbers;
Numbers.push_back(1.0);
Numbers.push_back(2.5);
Numbers.push_back(3.75);
Numbers.push_back(1.26);
Numbers.push_back(9.101);
Numbers.push_back(11.3);
Numbers.push_back(1.52);
// Sum the individual members.
float Sum;
Sum = AddIt(Numbers.begin(), Numbers.end());
cout << Sum << endl;
Sum = AddIt(Numbers.end(), Numbers.begin());
cout << Sum << endl;
// Sum a range.
vector<float>::iterator Iter = Numbers.begin();
Iter += 5;
Sum = AddIt(Iter, Numbers.end());
cout << Sum << endl;
return 0;
}
This example builds on the previous example. You still create vector,
Numbers, and fill it with data. However, in this case, you create an output
variable, Sum, that contains the summation of the elements contained in
Numbers.
Locating Values Using the Find Algorithm
645
AddIt is a special function that accepts two RandomAccessIterator
values as input. These two inputs represent a range within the vector that
you want to manipulate in some way. The example simply adds them, but
you can perform any task you want. The output is a float that contains the
summation.
AddIt works as you expect. You call it as you would any other function and
provide a beginning point and an end point within vector. The first two
calls to AddIt sum the entire vector, while the third creates an iterator,
changes its offset, and then sums a range within vector. Here is the output
from this example:
30.431
30.431
12.82
Locating Values Using the Find Algorithm
The Standard Library contains a number of functions to find something you
need within a container. Locating what you need as efficiently as possible is
always a good idea. Unlike your closet, you want your applications well organized and easy to manage! The four common find algorithms are
✦ find
✦ find_end
✦ find_first_of
✦ find_if
The algorithm you use depends on what you want to find and where you
expect to find it. You’ll likely use the plain find algorithm most often. The
following example shows how to locate a particular string within vector —
you can use the same approach to locate something in any container type:
#include <iostream>
#include <vector>
#include <algorithm>
using namespace std;
int main()
{
Exploring the
Standard Library
Further
A random access iterator can go in either direction. In addition, you can
work with individual members within the container supplied to iterator.
As a result, the functions you create for iterator must be able to work
with the inputs in any order. How you handle this requirement depends on
the kind of function you create.
Book VI
Chapter 1
646
Locating Values Using the Find Algorithm
vector<string> Words;
Words.push_back(“Blue”);
Words.push_back(“Green”);
Words.push_back(“Teal”);
Words.push_back(“Brick”);
Words.push_back(“Purple”);
Words.push_back(“Brown”);
Words.push_back(“LightGray”);
vector<string>::iterator Result =
find(Words.begin(), Words.end(), “LightGray”);
if (Result != Words.end())
cout << *Result << endl;
else
cout << “Value not found!” << endl;
Result = find(Words.begin(), Words.end(), “Black”);
if (Result != Words.end())
cout << *Result << endl;
else
cout << “Value not found!” << endl;
}
The example starts with vector containing color strings. In both cases, the
code attempts to location a particular color within vector. The first time
the code is successful because LightGray is one of the colors listed in
vector. However, the second attempt is thwarted because Black isn’t one
of the colors in vector. Here’s the output from this example:
LightGray
Value not found!
Never assume that the code will find a particular value. Always assume that
someone is going to provide a value that doesn’t exist and then provide a
means of handling the nonexistent value. In this example, you simply see a
message stating the value wasn’t found. However, in real-world code, you
often must react to situations where the value isn’t found by
✦ Indicating an error condition
✦ Adding the value to the container
✦ Substituting a standard value
✦ Defining an alternative action based on invalid input
The find algorithm is a personal favorite because it’s so flexible. You can
use it for external and internal requirements. Even though the example
shows how you can locate information in an internal vector, you can also
use find for external containers, such as disk drives. Have some fun with
this one — experiment with all the containers you come across.
Using the Random Number Generator
647
Using the Random Number Generator
Random number generators fulfill a number of purposes. Everything from
games to simulations require a random number generator to work properly.
Randomness finds its way into business what-if scenarios as well. In short,
you need to add random output to your application in many situations.
Creating a random number isn’t hard. All you need to do is call a random
number function as shown in the following code:
#include <iostream>
using namespace std;
int RandomValue = rand() % 12;
cout << “The random month number is: “ << RandomValue + 1 << endl;
return 0;
}
Actually, none of the random number generators in the Standard Library
works properly — imagine that! Every random number generator is a
pseudorandom number generator. The numbers are distributed such that
it appears that you see a random sequence, but given enough time and
patience, the sequence repeats. In fact, if you don’t set a seed value for your
random number generator, you can obtain predictable sequences of numbers every time. How boring.
The first line of code in main sets the seed by using the system time. Using
the system time ensures a certain level of randomness in the starting value
and, therefore, a level of randomness for your application as a whole. If you
comment out this line of code, you see the same output every time you run
the application. In our case, our system output 6 every time.
The example application uses rand to create the random value. When
you take the modulus of the random number, you obtain an output that is
within a specific range, 12 in this case. The example ends by adding 1 to the
random number because there isn’t any month 0 in the calendar, and then
outputs the month number for you.
The Standard Library provides access to two types of pseudorandom
number generators. The first type requires that you set a seed value. The
second type requires that you provide an input value with each call and
doesn’t require a seed value. Each outputs a different data type, so you can
choose the kind of random number you obtain. Table 1-1 lists the random
number generators and tells you what data type they output.
Exploring the
Standard Library
Further
int main()
{
// Always set a seed value.
srand((unsigned int)time(NULL));
Book VI
Chapter 1
648
Performing Comparisons Using min and max
Table 1-1
Pseudorandom Number Generator Functions
Function
Output Type
Seed Required?
rand
integer
yes
drand48
double
yes
erand48
double
no
lrand48
long
yes
nrand48
long
no
mrand48
signed long
yes
jrand48
signed long
no
Now that you know about the pseudorandom number generators, look at
the seed functions used to prime them. Table 1-2 lists the seed functions and
their associated pseudorandom number generator functions.
Table 1-2
Seed Functions
Function
Associated Pseudorandom Number Generator Function
srand
rand
srand48
drand48
seed48
mrand48
lcong48
lrand48
Performing Comparisons Using min and max
Computer programs perform many comparisons. In most cases, you don’t
know what the values are in advance or you wouldn’t be interested in performing the comparison in the first place. The min and max functions make
it possible to look at two values and determine the minimum or maximum
value. Here’s how you use these two functions:
#include <iostream>
using namespace std;
int main()
{
int Number1, Number2;
cout << “Type the first number: “;
cin >> Number1;
cout << “Type the second number: “;
Working with Temporary Buffers
649
cin >> Number2;
cout << “The minimum number is: “ << min(Number1, Number2) << endl;
cout << “The maximum number is: “ << max(Number1, Number2) << endl;
return 0;
}
In this case, the code accepts two numbers as input and then compares
them using min and max. The output you see depends on what you provide
as input, but the first output line tells you which number is smaller and the
second tells you which is larger.
Working with Temporary Buffers
#include <iostream>
#include <vector>
#include <memory>
using namespace std;
int main()
{
vector<string> Words;
Words.push_back(“Blue”);
Words.push_back(“Green”);
Words.push_back(“Teal”);
Words.push_back(“Brick”);
Words.push_back(“Purple”);
Words.push_back(“Brown”);
Words.push_back(“LightGray”);
int Count = Words.size();
cout << “Words contains: “ << Count << “ elements.” << endl;
// Create the buffer and copy the data to it.
pair<string*, ptrdiff_t> Mem = get_temporary_buffer<string>(Count);
uninitialized_copy(Words.begin(), Words.end(), Mem.first);
// Perform a sort and display the results.
sort(Mem.first, Mem.first+Mem.second);
for (int i = 0; i < Mem.second; i++)
cout << Mem.first[i] << endl;
return 0;
}
Exploring the
Standard Library
Further
Temporary buffers are useful for all kinds of tasks. Normally, you use them
when you want to preserve the original data, yet you need to manipulate the
data in some way. For example, creating a sorted version of your data is a
perfect use of a temporary buffer. The following example shows how to use a
temporary buffer to sort some strings.
Book VI
Chapter 1
650
Working with Temporary Buffers
The example starts with the now familiar list of color names. It then counts
the number of entries in vector and displays the count on screen.
At this point, the code creates the temporary buffer using get_temporary_
buffer. The output is pair, with the first value containing a pointer to the
string values and the second value containing the count of data elements.
Mem doesn’t contain anything — you have simply allocated memory for it.
The next task is to copy the data from vector (Words) to pair (Mem) using
uninitialized_copy. Now that Mem contains a copy of your data, you can
organize it using the sort function. The final step is to display the Mem content on screen. Here is what you’ll see:
Words contains: 7 elements.
Blue
Brick
Brown
Green
LightGray
Purple
Teal
Chapter 2: Building
Original Templates
In This Chapter
✓ Determining when to create a template
✓ Understanding the elements of good template design
✓ Developing a basic math template
✓ Creating a structure template
✓ Defining a class template
✓ Using template specialization to your advantage
✓ Building a library of templates
✓ Using your custom built template libraries
C
++ has been around for many years. Because of its longevity, C++ templates abound. In fact, it may seem that there is a template for every
practical purpose. However, the templates that are available to the developer
community through standardized and third-party resources usually reflect
generalized needs. The individual company you work for or you as a developer
may have specialized needs that a generalized template can’t address.
Every programming tool in existence offers a certain amount of flexibility.
The reason why you see so many generalized tools is that someone developed them and the community as a whole decided to adopt them. Never
think that you can’t create your own tools. After all, someone created the
generalized tools you work with daily — creating a custom tool requires
nothing special, just time and thought on your part.
The trick to creating a customized tool is to think the process through, just
as you would for any application you create. The fact that you’ll use this
customized tool to create multiple applications means that you must apply
a higher standard than used for one-time applications to its design and the
code it contains. A mistake in a customized tool can spell errors in every
application you create using it, so this code must work well.
This chapter addresses the thought process behind templates first, and then
shows some typical template examples. The examples will help demonstrate
ways in which you can use templates to create better applications that
require less code because the templates you create meet your needs more
completely than any generalized template can. After you see the template
652
Deciding When to Create a Template
examples, you discover the techniques used to place a number of templates
in a library. Finally, you discover how to use the template library to create
applications.
Deciding When to Create a Template
The first step in creating a template is deciding whether your idea will generate a useful template. Most developers have thousands of creative thoughts
that translate into ideas during their careers; however, only a few of these
ideas are exceptionally useful. By determining whether the template you
want to create is a good idea at the outset, you waste less time on bad ideas
and have more time to create that truly useful idea that will help you ascend
to the pinnacle of development notoriety (and the astronomical amount of
cash that such as position tends to generate).
Before you begin creating the next template to awe and inspire developers
everywhere, consider the following questions:
✦ Is there a generic template that is close enough to meet your needs? A
good template idea is unique — it does something more than perform a
useful task; it performs a new kind of useful task. Template ideas that fail
the uniqueness test usually consume many resources for a small payoff.
✦ Will you use the template more than once? Some template ideas are so
tuned to a particular project that the developer ends up using them precisely once, which means that the template never provides a payback on
the investment to create it.
✦ Will the template save more time than you use to create it? Templates
can become complex. In fact, some templates are complex enough that
you’d save time by not writing them at all. The reason to use templates
is to save time and effort, so a complex template tends to require a
larger payback period than a simple one.
✦ Is there a third-party template you can buy or, better yet, obtain free
that nearly meets you need? Someone else may have already had your
good idea. Before you invest time in creating a template, you should
spend time researching online. Someone else may have created a template that nearly matches your idea. Obtaining a third-party template
that’s close to what you want is always more time efficient than creating
a custom template on your own.
✦ How generic is the template you want to create? Many good template
ideas are simply too specific, which limits their adaptability to other
situations. You want to create a unique template, but a unique template
that can meet a range of organizational needs.
✦ Is your template concept complete? Developers often envision only
a piece of a template. For example, if you create a math template, you
should actually create a library that contains all the equations you plan
Defining the Elements of a Good Template
653
to use with your applications. Designing a template that contains a
single equation is never worthwhile because other developers will have
to finish the work you started.
✦ Do you have the skills to create the template? Not everyone is a good
template designer. A template designer must define a template that goes
beyond the original expectations because someone will almost certainly
use the template in unexpected ways. The best templates adapt to new
situations that the originator never considered. Consequently, creating a
template requires a different sort of mindset than creating an application.
Defining the Elements of a Good Template
Minibook IV, Chapter 5 provides you with some insights into basic template
creation techniques. However, this introductory chapter doesn’t address
what makes for a good template. After all, you don’t want to appear like the
guy who builds in his garage. The template you create has to look professional and work as expected.
The first decision you have to make is what kind of template to create. You
can choose between these three types:
✦ Function: A function represents the simplest way to create a template
and eases debugging requirements. You can group functions in libraries to make them easier to access. However, functions often lack depth
and you can’t coordinate activities between them as easily as you can
between the elements of an object.
✦ Structure: A structure provides the best speed in many cases and can
reduce the amount of system resources required, depending on how you
define the structure. Remember that C++ allocates memory for the entire
structure, but structures also present opportunities for optimization
that you don’t get with a class.
✦ Class: A class provides the greatest flexibility because you can express the
template using all the elements that a class can provide — methods, properties, and events. You can inherit classes to create new classes. In short, if
you have a complex idea to implement, classes are the way to do it.
The second decision you have to make is how to weight design factors when
creating the template. C++ offers myriad ways to accomplish any given task. For
example, you have multiple ways to create a function. However, one method is
Book VI
Chapter 2
Building Original
Templates
A little research at the outset can save significant time, effort, and replicated
development. C++ has been around for a long time (at least in computer
terms) so you can choose from a wealth of existing code. Always determine
in advance whether the template you want to create is worth the effort and
will make life easier for other developers.
654
Defining the Elements of a Good Template
normally superior to the others simply because it offers some particular benefit.
Consider these requirements when choosing the kind of template to create:
✦ Security: Simplicity often translates into easier to secure. In general,
functions are easier to secure than structures, which are easier to
secure than classes. However, you can easily write an insecure class if
you use the wrong approach. Secure templates often require additional
checks that can affect reliability (the template tends not to allow specific
actions when these actions affect security) and speed (additional code
always slows template execution).
✦ Reliability: The options you choose will affect the reliability of the template you create. A reliable template produces consistent results for any
data type supplied to it. In some cases, ensuring reliability means adding
checks to the template, which increases complexity. The additional code
affects both the security and the speed of the template.
✦ Speed: Templates save the developer time. However, if the resulting template produces slow code, you can be sure that users will complain and
the developer will end up rewriting some code to improve application
speed. A fast template is usually small and performs the task precisely.
The additional checks required to ensure secure and reliable operation
always affect speed negatively, so you must work to achieve a balance.
✦ Usage: Some templates are so difficult to use that we doubt very much
even the originator uses them. If a developer can’t determine how to
use your template, no one will ever use it and your effort is wasted.
Consequently, you must design the template such that it meets security,
reliability, and speed goals without becoming overly difficult to use.
✦ Maintenance: Someone will have to maintain the code used to create
the template. A good template is one in which the code is relatively
straightforward. Of course, you need to add comments to the code that
explain how the code works and fully document the template design.
Most templates see some level of redesign during their lifecycle — they
evolve as developers use the template and discover new ways to incorporate it into applications.
The best template is the one that seems obvious. We were recently reading
an article about the invention of the safety pin. The safety pin seems obvious, but someone still had to invent it because no one else had thought
about it. When you create a template and someone tells you that it seems
like an obvious idea, don’t get mad. Be glad. You’ve joined the ranks of
people who thought of something that fulfills an obvious need, but no one
thought about it before you did.
The third decision you must make is how inclusive to make the template. In
some cases, you want to create a template that can handle a range of situations. However, a template can quickly become unwieldy and difficult to
manage. A good template is balanced — it includes the elements you need,
but nothing beyond.
Creating a Basic Math Template
655
Creating a Basic Math Template
With a math template, you usually need access to a wealth of calculations
but may only use one or two of those calculations at a time. For example, if
someone is calculating your mortgage, he or she doesn’t need to know the
amortization calculation. However, the person might need the amortization
calculation when working with the next customer. In short, the calculations
all have a purpose and you need them all, but you don’t need them all at the
same time. Because of the way you use math templates, they work best as
a series of function templates. Listing 2-1 shows how to create the series of
functions.
Book VI
Chapter 2
Listing 2-1: Defining a Series of Function Templates
using namespace std;
template<typename T>
T Area(T height, T length)
{
return height * length;
}
const double PI = 4.0*atan(1.0);
template<typename T>
T CircleArea(T radius)
{
double result;
result = PI * radius * radius;
return (T)result;
}
template<typename T>
T TriangleArea(T base, T height)
{
double result;
result = base * height * 0.5;
return (T)result;
}
int main()
{
cout << “4 X 4 Areas:” << endl;
cout << “Square: “ << Area<int>(4, 4) << endl;
cout << “Circle: “ << CircleArea<int>(2) << endl;
cout << “Triangle: “ << TriangleArea<int>(4, 4) << endl;
cout << “Using a value of pi of: “ << PI << endl;
return 0;
}
Building Original
Templates
#include <iostream>
#include <cmath>
656
Building a Structure Template
The calculations could consist of any math calculation — the point of the
example is that using functions makes each of the calculations discrete, easy
to use, and easy to manage. When you run this example, you see the following output:
4 X 4 Areas:
Square: 16
Circle: 12
Triangle: 8
Using a value of pi of: 3.14159
Note that CircleArea<int>(2) uses half the value of the other calculations as input. That’s because you calculate the area of a circle using the
equation π × r2. If you want to see other area and volume equations, check
out the Web site at http://www.aquatext.com/calcs/calculat.htm.
For consistency, you could change the circle equation to read like this:
radius = radius / 2;
result = PI * radius * radius;
Dividing the input by 2, essentially changing the diameter to a radius, means
that you could call the equation using the same number as all the other area
calculations: CircleArea<int>(4). Whichever approach you choose, you
need to document how the template works so that other developers know
how to use it.
You should also note that the circle and triangle calculations perform a bit
of type coercion to ensure that the user gets the expected results back by
modifying the return statement to read return (T)result;. The type
conversions are needed to keep your templates from generating warning
messages. It’s important to note that the approach used in the example truncates the result when the template returns an int.
Building a Structure Template
Structure templates have many interesting uses, such as creating a data
repository that doesn’t depend on a particular type. The example in Listing
2-2 shows one such use.
Listing 2-2: Creating a Template from a Structure
#include <iostream>
using namespace std;
template<typename T>
Building a Structure Template
657
struct Volume
{
T height;
T width;
T length;
Volume()
{
height = 0;
width = 0;
length = 0;
}
T getvolume()
{
return height * width * length;
}
return height * width * length;
}
};
int main()
{
Volume<int> first;
cout << “First volume: “ << first.getvolume() << endl;
first.height = 2;
first.width = 3;
first.length = 4;
cout << “First volume: “ << first.getvolume() << endl;
Volume<double> second;
cout
cout
cout
cout
<<
<<
<<
<<
“Second volume: “ << second.getvolume(2.1, 3.2, 4.3) << endl;
“Height: “ << second.height << endl;
“Width: “ << second.width << endl;
“Length: “ << second.length << endl;
return 0;
}
In this case, the structure contains height, width, and length data values that
the code can use to determine volume. The structure includes a constructor
to initialize the values, so even if someone calls getvolume without initializing the structure, nothing bad will happen.
The structure allows independent access of each of the data values. You can
set or get them as needed.
Building Original
Templates
T getvolume(T H, T W, T L)
{
height = H;
width = W;
length = L;
Book VI
Chapter 2
658
Building a Structure Template
The getvolume function is overloaded. You can call it with or without input
values. The code in main tests the structure thoroughly. Here’s what you
see as output from this example:
First volume: 0
First volume: 24
Second volume: 28.896
Height: 2.1
Width: 3.2
Length: 4.3
You can use structures for another interesting purpose. The C++ standard
says you can’t create a typedef template. For example, the following code
produces an error when you try to compile it:
template<typename T>
typedef map<string, T> MyDef;
When you try to compile this code, you see the following error in
CodeBlocks:
error: template declaration of `typedef’
However, you can define a typedef within a structure template. The code in
Listing 2-3 shows a variation of the example found in Listing 6-3 of Minibook
IV, Chapter 6.
Listing 2-3: Using a Structure to Define a typedef
#include <iostream>
#include <map>
using namespace std;
template<typename T>
struct MyDef
{
typedef map<string, T> Type;
};
int main()
{
MyDef<string>::Type marriages;
marriages[“Tom”] = “Suzy”;
marriages[“Harry”] = “Harriet”;
cout << marriages[“Tom”] << endl;
cout << marriages[“Harry”] << endl;
return 0;
}
Developing a Class Template
659
This example overcomes the C++ limitations by placing the typedef within
the struct, MyDef. The same structure can hold any number of typedef
entries.
Using a typedef in this manner makes it easier to work with map. All you
need to worry about is the value type — the key type is already defined as
string.
Except for the marriages declaration, this example works precisely the same
as the example in Minibook IV, Chapter 6. It still outputs the following results:
Suzy
Harriet
Book VI
Chapter 2
Class templates perform the heavy lifting of the template types. You use a
class template to define objects of nearly any size. Classes are larger and
more complex than the other techniques demonstrated in the chapter so far.
In most cases, you use classes to represent complex objects or to perform
tasks ill suited for function or structure templates.
You normally code classes in a separate file using the name of the class as the
filename. The class definition appears in a header file, while the code appears
in a code file. To make things a bit easier to understand, this chapter eschews
the normal setup and shows the entire example using a single file.
The example shows a specialized queue implementation. It includes many
of the features of a standard queue and then adds a few features to meet
special development needs. Queues and other containers tend to contain
complex code, but you also need to use them with a variety of data types,
making a class template the perfect implementation. Listing 2-4 shows the
code for this example.
Listing 2-4: Creating a Specialized Queue
#include <iostream>
#include <vector>
using namespace std;
template<typename T>
class MyQueue
{
protected:
vector<T> data;
public:
void Add(T const &input);
(continued)
Building Original
Templates
Developing a Class Template
660
Developing a Class Template
Listing 2-4 (continued)
void Remove();
void PrintString();
void PrintInt();
bool IsEmpty();
};
template<typename T>
void MyQueue<T>::Add(T const &input)
{
data.push_back(input);
}
template<typename T>
void MyQueue<T>::Remove()
{
data.erase(data.begin());
}
template<typename T>
void MyQueue<T>::PrintString()
{
vector<string>::iterator PrintIt = data.begin();
while (PrintIt != data.end())
{
cout << *PrintIt << endl;
PrintIt++;
}
}
template<typename T>
void MyQueue<T>::PrintInt()
{
vector<int>::iterator PrintIt = data.begin();
while (PrintIt != data.end())
{
cout << *PrintIt << endl;
PrintIt++;
}
}
template<typename T>
bool MyQueue<T>::IsEmpty()
{
return data.begin() == data.end();
}
int main()
{
MyQueue<string> StringQueue;
cout << StringQueue.IsEmpty() << endl;
StringQueue.Add(“Hello”);
StringQueue.Add(“Goodbye”);
cout << “Printing strings: “ << endl;
Developing a Class Template
661
StringQueue.PrintString();
cout << StringQueue.IsEmpty() << endl;
StringQueue.Remove();
cout << “Printing strings: “ << endl;
StringQueue.PrintString();
StringQueue.Remove();
cout << StringQueue.IsEmpty() << endl;
MyQueue<int> IntQueue;
IntQueue.Add(1);
IntQueue.Add(2);
cout << “Printing ints: “ << endl;
IntQueue.PrintInt();
Book VI
Chapter 2
return 0;
}
This example uses an iterator for printing, so it relies on a vector, rather
than a queue as a starting point. Whenever you create your own specialized
version of a common construct, make sure you begin with the right object.
Otherwise, you might find the experience of creating the new class frustrating as a minimum, impossible in the worst case.
MyQueue includes the ability to add, remove, and print elements. In addition, you can check whether a queue is empty or full. You have already seen
the code for these tasks in other parts of the book.
You might wonder about the code used for printing. The example includes
separate methods for printing strings and integers, which might seem counterintuitive. After all, why not simply declare the iterator as follows so that it
accepts any data type:
vector<T>::iterator PrintIt = data.begin();
The problem is that the iterator requires a specific data type. Consequently,
you must declare it as shown in Listing 2-4. Otherwise, you get this unhelpful
error message:
error: expected `;’ before “PrintIt”
At some point, you want to test this new class using steps similar to those
found in main. The test checks whether the queue actually does detect
Building Original
Templates
The example starts with the class MyQueue. Note that data is a vector, not
a queue as you might expect. A queue is an adapter — as such, it doesn’t
provide support for many of the features found in containers, such as
vector — one of which is the use of iterators.
662
Considering Template Specialization
the empty and filled states, how adding and removing elements works, and
whether the print routines work. Here is the output from this example:
1
Printing strings:
Hello
Goodbye
0
Printing strings:
Goodbye
1
Printing ints:
1
2
Considering Template Specialization
Some templates don’t go together quite as easily as you might expect
because they express a concept that doesn’t translate the same way for
every data type. For example, when you stringify a data type (turn the
data type into its string representation), the technique differs based on data
type. For example, when you want to stringify an int, you might use the
following template:
#include <iostream>
#include <sstream>
using namespace std;
template<typename T> inline string stringify(const T& input)
{
ostringstream output;
output << input;
return output.str();
}
int main()
{
// This call works as expected.
cout << stringify<int>(42) << endl;
// This call truncates.
cout << stringify<double>(45.6789012345) << endl;
return 0;
}
The stringify function accepts any data type and simply uses an
ostringstream to convert input to a string. This approach works fine
for the first call in main, which is an int. However, when the code uses it for
a double, the result is truncated as shown here:
42
45.6789
Considering Template Specialization
663
You can fix this problem by adding special handing for a double. Here is the
modified form of the example that accommodates a double.
#include <iostream>
#include <sstream>
#include <iomanip>
using namespace std;
template<typename T> inline string stringify(const T& input)
{
ostringstream output;
output << input;
return output.str();
}
int main()
{
cout << stringify<int>(42) << endl;
cout << stringify<double>(45.6789012345) << endl;
return 0;
}
When you run this example, you see the expected result because the
double form of the template uses setprecision to modify the
ostringstream value. As a result, you see the following output:
42
45.6789012345
As things sit with C++ today, you must create a special template for each
data type that requires it. Theoretically, if C++ ever gets a typeof function,
you could detect the data type and add a switch to perform specialized
processing within a single template.
You may have also noticed the inline keyword used for the template in this
example. The inline keyword tells the compiler to place the code created by
the template in line with the code in which it appears, rather than out of line
as a separate function call. In some cases, such as this stringify function,
the result is code that executes faster. The compiler is under no obligation to
comply with the inline keyword. In addition, you want template code placed
out of line when it must perform some level of instantiation or it doesn’t represent critical path code that the application can call often.
Building Original
Templates
template <> inline string stringify<double> (const double& input)
{
ostringstream output;
const int sigdigits = numeric_limits<double>::digits10;
output << setprecision(sigdigits) << input;
return output.str();
}
Book VI
Chapter 2
664
Creating a Template Library
Creating a Template Library
You won’t normally create a template and stick it in your application project
file. The previous examples in this chapter put everything together for ease
of explanation, but in the real world, templates usually reside in a library.
CodeBlocks provides several kinds of library projects. This chapter looks at
the static library — a library that is added into the application.
CodeBlocks also supports dynamic link libraries (DLLs) and shared libraries
that more than one application can use at a time. Working with DLLs and shared
libraries is more complex than working with static libraries, and you won’t normally need the ability to share the library when creating a console application.
See the “Defining your first project” section of Minibook I, Chapter 1 for details
about the various project types that CodeBlocks supports.
Defining the library project
Creating a library project is only a little different than creating a console
application. The following steps describe how to create a library project:
1. Choose File➪New➪Project.
You see the New From Template dialog box shown in Figure 2-1.
Figure 2-1:
Provide a
description
of your
project for
CodeBlocks.
2. Highlight the Static Library icon on the Projects tab. Click Go.
You see the Welcome page of the Static Library wizard.
Creating a Template Library
665
3. Click Next.
You see a list of project-related questions, as shown in Figure 2-2. These
questions define project basics, such as the project name.
Book VI
Chapter 2
Building Original
Templates
Figure 2-2:
Provide a
description
of your
static
library for
CodeBlocks.
4. Type a name for your project in the Project Title field.
The example uses MathLibrary as the project title. Notice that the
wizard automatically starts creating an entry for you in the Project
Filename field.
5. Type a location for your project in the Folder to Create Project In
field.
6. (Optional) Type a project filename in the Project Filename field.
7. Click Next.
You see the compiler settings shown in Figure 2-3. This example uses
the default compiler settings. However, it’s important to remember that
you can choose a different compiler, modify the locations of the debug
and release versions of the project, and make other changes as needed.
CodeBlocks provides the same level of customization for libraries as it
does for applications.
8. Change any required compiler settings and click Finish.
The wizard creates the application for you. It then displays the
CodeBlocks IDE with the project loaded. Note that the Static Library
project includes some sample code to get you started. You could compile this library and test it now.
666
Creating a Template Library
Figure 2-3:
Change the
compiler
settings to
meet your
project
needs.
Configuring the library project
The static library starts with a standard C file. To make this library work well
with templates, you need to delete the C file, add a C++ file, and add a header
file. The following steps describe how to perform this process:
1. Right-click main.c and choose Remove File From Project from the context menu.
CodeBlocks removes the file from the project tree.
2. Choose File➪New➪File.
You see the New from Template dialog box shown in Figure 2-4.
Figure 2-4:
Add new
files using
the New
from
Template
dialog box.
Creating a Template Library
667
3. Highlight the C/C++ Header icon and click Go.
You see the Welcome page of the C/C++ Header wizard.
4. Click Next.
The wizard asks you to provide the header configuration information
shown in Figure 2-5.
Book VI
Chapter 2
Building Original
Templates
Figure 2-5:
Define the
header
requirements.
5. Type MathLibrary.h, click the ellipses button, and click Save.
CodeBlocks adds the complete project path to the filename you chose.
Notice that CodeBlocks also supplies an entry for the Header Guard
Word field. This word ensures that the header isn’t added more than
once to a project.
6. Click All, and then click Finish.
The C/C++ Source wizard adds the file to your project. You’re ready to
begin creating a template library.
Coding the library
At this point, you have what amounts to a blank header file in a static library
project. Your static library could conflict with other libraries, so it’s important to add a namespace to your code. The example uses MyNamespace, but
normally you’d use something related to you as a person or your company.
After all, you should take pride in the library you’ve created! Listing 2-5
shows what you need to create the library used for this example.
668
Creating a Template Library
Listing 2-5: Creating a Static Library
#ifndef MATHLIBRARY_H_INCLUDED
#define MATHLIBRARY_H_INCLUDED
#include <iostream>
#include <cmath>
using namespace std;
namespace MyNamespace
{
template<typename T>
T Area(T height, T length)
{
return height * length;
}
const double PI = 4.0*atan(1.0);
template<typename T>
T CircleArea(T radius)
{
double result;
result = PI * radius * radius;
// This version truncates the value.
return (T)result;
}
template<typename T>
T TriangleArea(T base, T height)
{
double result;
result = base * height * 0.5;
return (T)result;
}
}
#endif // MATHLIBRARY_H_INCLUDED
As you can see, this is a portable form of the math library discussed in the
“Creating a Basic Math Template” section of the chapter. Of course, the
library form has changes. You have the usual define statements and the
use of a namespace to encapsulate all the code. Notice that the namespace
comes after all the declarations.
Using Your Template Library
669
Using Your Template Library
You have a shiny new template library. It’s time to test it. The
MathLibraryTest console application uses MathLibrary to display some
area information. The output is the same as in the “Creating a Basic Math
Template” section of the chapter. Listing 2-6 shows the test code used for
this example.
Listing 2-6: Testing the Static Library
#include <iostream>
#include “..\MathLibrary\MathLibrary.h”
int main()
{
cout << “4 X 4 Areas:” << endl;
cout << “Square: “ << Area<int>(4, 4) << endl;
cout << “Circle: “ << CircleArea<int>(2) << endl;
cout << “Triangle: “ << TriangleArea<int>(4, 4) << endl;
cout << “Using a value of pi of: “ << PI << endl;
return 0;
}
When you use your own libraries, you need to tell the compiler where to find
them. Because it’s likely that you created the example library in the same
folder as the test application, you can use the simple path shown in Listing 2-6.
Because the library relies on a namespace, you must also include using
namespace MyNamespace; in the example code. Otherwise, you’ll spend
hours trying to figure out why the compiler can’t locate the templates in
your library. Otherwise, you access and use the template library much as
you did before.
Building Original
Templates
using namespace std;
using namespace MyNamespace;
Book VI
Chapter 2
670
Book VI: Advanced C++
Chapter 3: Investigating Boost
In This Chapter
✓ Considering what Boost can do for you
✓ Getting Boost and installing it
✓ Working with the Boost Jam tool
✓ Integrating the Boost Build add-on
✓ Integrating the Boost Regression add-on
✓ Working with the Boost Inspect tool
✓ Using the BoostBook document format
✓ Integrating the Boost QuickBook add-on
✓ Working with the Boost bcp tool
✓ Working with the Boost Wave tool
✓ Creating your first application using Boost
A
s your skill with C++ improves, you find that you need additional functionality that doesn’t come with the Standard Library or with the Standard
Template Library (STL). For example, the simple act of checking a string for
specific character sequences (such as a telephone number pattern) can prove
difficult. You can do it, but most developers will think that someone else has
certainly crossed this bridge before. The answer to the question of where to
find the additional code you need is third-party libraries. One of the most
popular C++ libraries is Boost, which is the topic of this chapter and the next.
Two book chapters can’t serve as a complete reference to an entire library —
especially not a set of libraries the size of Boost. This chapter introduces you
to Boost. It helps you understand why Boost may be helpful to your development efforts, shows you how to obtain and install Boost, demonstrates some
Boost tools, and finally helps you create your first application using Boost.
Chapter 4 picks up where this chapter leaves off and helps you use Boost to
build some interesting applications. In short, these two chapters combined
provide you with an overview of a library that you should consider spending
more time discovering.
672
Understanding Boost
Libraries are simply repositories of code. Consequently, any library can help
you produce applications faster and with fewer errors. However, not all
libraries are created with the same quality of code. Many developers use the
Boost libraries because it provides high-quality code — so high quality that
some of Boost is being standardized for inclusion in the Standard Library.
The bottom line is that you must choose the libraries you want with care
and look at both quality and price (when price is an issue).
Understanding Boost
One of the best things about Boost is that the library itself is free. The Boost
Web site, http://www.boost.org/, makes a point of letting developers
know that they won’t pay anything for using Boost, even in a commercial
setting. In addition, Boost doesn’t have any expenses, so you probably won’t
ever need to pay for it. A number of people and organizations contribute to
Boost, including (but not limited to)
✦ Open Systems Lab at Indiana University
✦ SourceForge
✦ Boost Consulting
✦ MetaCommunications
✦ Individuals, companies, and other organizations that run the regression
tests
However, don’t get the idea that Boost is completely free. If you want
commercial-level support, you’ll pay for it, just as you would with any other
product. Only the library itself is free. The following sections describe some
of the details of Boost.
Boost features
You might think that Boost isn’t really all that complete because you can get
it free. Actually, Boost includes a significant number of features — far more
features than the average developer will use in writing typical applications.
It’s interesting to note that you probably have an application on your system
that relies on Boost, Adobe Acrobat 7.0. That’s right, major applications do
rely on Boost because it’s a feature-rich application development library.
The current version of Boost contains 81 libraries in categories that meet an
incredible number of needs. In some cases, you’ll need only Boost to meet
all your development needs. Because these libraries meet specific conformity requirements, you never find yourself calling a function one way with
one library and another way when using a different library. Some of the
libraries are so useful that they’ll eventually find their way into the Standard
Library, so you might have already used Boost without knowing it.
Obtaining and Installing Boost for CodeBlocks
673
In addition to libraries, Boost also provides a number of tools to make your
development experience more enjoyable. Most of this chapter discusses these
specialized tools. Because you get the source for all the tools, you can build a
version of the tool for every platform in your organization, which means that
every developer can use the same toolset. Using a common toolset reduces
training time and tends to improve the consistency of development output.
Licensing
The Boost license is friendly to individual users, consultants, and organizations. Even if you work in an enterprise environment, you can use Boost
for free. The developers behind Boost are concerned enough about legal
matters that they continue working on the license so that usage requirements are easy to understand. You can find a copy of the current license at
http://www.boost.org/users/license.html.
Paid support
When working with Boost, you gain access to the source code and community support. For some organizations, the lack of a formal support mechanism is a problem. Fortunately, you can also get paid support from BoostPro
Computing (http://www.boostpro.com/). Most importantly, BoostPro
Computing offers formal training in using Boost, which means your organization can get up to speed quickly. You can find additional companies that provide Boost support at http://www.boost.org/support/index.html.
Obtaining and Installing Boost for CodeBlocks
Before you can use Boost, you need to download it. The examples in this
chapter rely on version 1.39 of the library, which you can obtain at http://
sourceforge.net/project/showfiles.php?group_id=7586. Just
the Boost library requires a 58MB download (all file sizes are for the ZIP
file). The Web site also contains links for downloading other Boost features,
including the following (there may be more when you read this):
✦ Boost Build (2MB)
✦ Boost Docs (20MB)
✦ Boost Jam (1.2MB)
✦ Other Boost components, Boost-subparts (5.3MB)
Investigating
Boost
The Boost license and the GNU General Public License (GPL) differ in some
important ways. The most important consideration for organizations is that
the Boost license lets you make changes to the libraries without having to
share these changes with anyone. You get to keep your source code secret,
which is a big plus for organizations that create commercial applications.
Book VI
Chapter 3
674
Obtaining and Installing Boost for CodeBlocks
Boost for the Visual Studio Developer
Boost works with a wide variety of programming
products, so you shouldn’t get the idea that just
because we use CodeBlocks in this chapter
that you can’t use Boost with other products
such as Visual Studio. In fact, there is special
support for other development products.
Visual Studio developers often find that their
development environment is complex enough
that getting a good Boost install is difficult.
BoostPro Computing remedies this problem
by providing the BoostPro Installer (http://
w w w . b o o s t p r o . c o m / d o w n l o a d ).
Download this product and follow the installation instructions on the Web site to get a better
Visual Studio installation for Boost. It’s important to note that BoostPro Computing currently
lacks an installer for the 1.39 version of Boost,
but you can use the 1.38 version.
Unpacking Boost
The first step in gaining access to Boost is to unpack the Boost 1.39 library
file (boost_1_39_0.zip) that you downloaded earlier. When working with
CodeBlocks, you’ll want to unpack this library into the \Program Files\
CodeBlocks\boost_1_39_0\ folder for ease of access. The documentation often refers to the boost_1_39_0\ folder as the Boost root directory or
$BOOST_ROOT. When you unpack the ZIP file, you see the following folders:
✦ boost\: Contains all the Boost header files.
✦ doc\: Provides a subset of the Boost documentation. If you want complete documentation, you must either download the separate Boost
Docs file or use the Web site directly.
✦ lib\: Contains all the Boost precompiled libraries after you build them.
This folder won’t exist when you unpack the Boost library.
✦ libs\: Provides a root folder for all the Boost library headers.
• libs\accumulators\: Contains a library of incremental statistical
computation functions. In addition, you use this library for general
incremental calculations.
• libs\algorithm\: Contains algorithms that build on the string functionality found in the Standard Library. These algorithms provide
functionality such as trimming, case conversion, predicates, and
find/replace functions. You’ll also find a min/max library that lets
you determine the minimum and maximum of an expression in a
single call (among other things).
• libs\any\: Contains a library that helps you interact with variables in
a manner reminiscent of scripting languages. You don’t need this capability all the time, but it’s handy when you want to do things such as
convert between an int and string using a simple lexical_cast.
Obtaining and Installing Boost for CodeBlocks
675
• libs\array\: Provides an extension to basic array functionality so
that you get some of the advantages of using a vector without the
performance hit that using a vector can introduce.
• libs\more libraries: Boost contains 81 libraries. You’ll want to check
them all out.
✦ more\: Holds policy and other important documents. The most important
document at the outset is getting_started.html, which provides
essential information for getting started using Boost. The index.htm file
provides access to basic information about Boost, such as the licensing
policy.
✦ people\: Tells you about all the people who worked on Boost, which
might not seem like a big deal initially, but most of the entries include
e-mail addresses. If you want to contact the makers of Boost, this is the
place to look.
✦ tools\: Contains a wealth of tools you use when working with Boost.
Much of this chapter tells you about these tools. You must build the tools
before you can use them. Each folder contains complete instructions, but
you’ll also find an example of building the tools later in this section.
✦ wiki\: Provides a shortcut to the Boost wiki. Opening index.html
takes you directly to the wiki site.
Building the libraries
The Boost library relies on code in headers. Using this approach means that
if you include the header in your code, you already have everything you
need to use the Boost library. However, these few Boost libraries require
separate compilation:
✦ Boost.Filesystem
✦ Boost.IOStreams
✦ Boost.ProgramOptions
✦ Boost.Python
✦ Boost.Regex
✦ Boost.Serialization
✦ Boost.Signals
✦ Boost.System
✦ Boost.Thread
✦ Boost.Wave
Investigating
Boost
✦ status\: Provides access to a Boost-wide test suite. Generally, you won’t
need the contents of this folder unless you plan to augment the Boost
libraries in some way.
Book VI
Chapter 3
676
Obtaining and Installing Boost for CodeBlocks
You build these libraries using a make (.mak) file at the command prompt. All
the examples in this book require a build — a combination of compiling and
linking to create an executable file that you can run, so building is nothing new
or scary. The only difference in this chapter is that you perform the build using
a make file instead of relying on CodeBlocks to perform the process. The make
file contains instructions that tell the make utility how to create the executable
file. Actually, the libraries are object files that you must add to your application
to use them. The command prompt is a special window you use to type commands that tell Windows to perform certain tasks or let applications perform
the tasks for you. You see how all this works later in the chapter, so don’t worry
too much about the process for building libraries now.
In addition to required builds for some libraries, a few libraries require that
you build external components before you can use them, but only if you
use specific features. For example, when working with Boost.DateTime, you
must compile an external component when using the to_string or from_
string functions. The documentation tells you when you need to perform a
separate compile. Here are the libraries that have external dependencies:
✦ Boost.DateTime
✦ Boost.Graph
✦ Boost.Test
The make files that come with the Boost library are meant for use with Unix
and Linux. These files contain a MkDir (make directory) command that is
incompatible with Windows. Consequently, if you don’t create the required
directory structure manually, you’ll see the following error message:
The syntax of the command is incorrect.
Make sure you check the individual build instructions for each library before
you build it. However, you must modify the instructions as described in this
section or the library won’t compile. The following procedure shows how to
build an example library. In this case, you’ll build the RegEx library used in
Chapter 4:
1. Choose Start➪Programs➪Accessories➪Command Prompt.
Windows opens a command prompt. The command prompt is where you
type commands to tell the Minimalist GNU for Windows (MinGW) installation that comes with CodeBlocks to build the library you want to use.
2. Type CD \Program Files\CodeBlocks\boost_1_39_0\libs\
regex\build and press Enter.
This command tells Windows to Change Directories (CD) to the directory (folder) that contains the build instructions for the RegEx library.
You must be in the correct directory to execute the build commands.
Otherwise, the build process will fail because the make program won’t
Obtaining and Installing Boost for CodeBlocks
677
be able to find the resources it needs. You may have to modify the directory we’ve specified if you placed Boost in a different location from our
installation or you’re using a different version of Boost.
3. Type Path=C:\Program Files\CodeBlocks\MinGW\bin;%Path%
and press Enter.
The Path command tells Windows where to find executable programs
you want to use. In this case, you tell Windows where to locate the
MinGW executables used to build the library. The %Path% part of the
instruction tells Path to add all the old path elements onto the path you
have described. If you don’t do this, you may find that you can’t access
other Windows executables.
4. Type MD gcc and press Enter.
5. Type CD gcc and press Enter.
To create subdirectories, you must go to the gcc directory you just created.
6. Type MD boost_regex-gcc-1_38 and press Enter.
This new directory holds the gcc version of the Boost RegEx library, and
it’s version 1.38 of that library. This directory contains the release version of the library.
7. Type MD boost_regex-gcc-d-1_38 and press Enter.
This new directory holds the debug version of the RegEx library. You
use the debug version of the library when you first create your application and then change to the release version after you get rid of the bugs.
8. Type CD.. and press Enter.
Now that you’re finished creating the directory structure for the library,
you can go back to the build directory. It’s time to build the library.
9. Type mingw32-make -fgcc.mak and press Enter.
The Minimalist GNU for Windows 32-bit Make (mingw32-make) utility
reads the instructions found in gcc.mak and creates the RegEx library
using them. Figure 3-1 shows what you should see as the mingw32-make
utility does its work.
The -f command-line switch specifies which make file to use for the build
process. The mingw32-make utility includes other command-line switches;
you can discover them by typing mingw32-make -? and pressing Enter.
All the libraries follow a similar process. You build the library after creating
a directory structure for it. It’s possible to obtain the directory structure by
searching for all the MkDir commands in the gcc.mak file.
Investigating
Boost
The Make Directory (MD) command creates a new directory. In this
case, you create a GNU Compiler Collection (GCC) folder to hold the
library when the make program builds it.
Book VI
Chapter 3
678
Obtaining and Installing Boost for CodeBlocks
Figure 3-1:
The
make file
automates
the build
process
for you.
To make the libraries easier to access, you can copy them to the
boost_1_39_0\lib directory by typing Copy <LibraryName> “\Program
Files\CodeBlocks\boost_1_39_0\lib” at the command prompt and pressing
Enter. (Be sure to include the double quotes or the command won’t work
properly.) Make sure you create the lib directory before you attempt to
use it by typing MD “\Program Files\CodeBlocks\boost_1_39_0\lib” and
pressing Enter.
Building the Boost tools
Building the Boost tools is considerably different from building the libraries. Boost relies on a tool called Boost Jam to build the Boost tools (see the
“Using Boost Jam” section of the chapter for information about this tool).
However, before you can use Boost Jam, you have to build it. Use the following procedure to build bjam.exe.
1. Choose Start➪Programs➪Accessories➪Command Prompt.
Windows opens a command prompt.
2. Type CD \Program Files\CodeBlocks\boost_1_39_0\tools\
jam\src and press Enter.
Windows changes the directory to the Boost Jam source code directory.
3. Type Path=C:\Program Files\CodeBlocks\MinGW\bin;%Path%
and press Enter.
Windows adds the MinGW executables to the path.
4. Type Build GCC and press Enter.
Windows executes the build.bat file. This file contains instructions for
building Boost Jam as shown in Figure 3-2. After a few minutes, the build
process is complete. You can copy the executable to the root of the
tools directory to make it easier to build the rest of the tools.
Obtaining and Installing Boost for CodeBlocks
679
Figure 3-2:
The
make file
automates
the build
process
for you.
Book VI
Chapter 3
5. Type CD bin.ntx86 and press Enter.
You change directories to the executable output directory.
6. Type Copy bjam.exe \Program Files\CodeBlocks\
boost_1_39_0\tools and press Enter.
The Boost Jam utility is now at the root of the tools directory where
you need it.
Boost Jam is a build tool that you can use for extremely complex build
processes. Because the tools require a specific build, you use Boost Jam to
ensure that you obtain a good result. The following steps build most of the
Boost tools for you and place them in the \Program Files\CodeBlocks\
boost_1_39_0\bin.v2 directory:
1. Using the same command prompt you used to build bjam, type CD \
Program Files\CodeBlocks\boost_1_39_0\tools and press Enter.
Windows changes directories to the tool directory.
2. Type bjam toolset=gcc > ToolBuild.log and press Enter.
This command line starts the bjam build utility. The bjam utility automatically searches for a Jamfile file and follows the instructions it contains. The tools folder contains such as file.
It sets the toolset to gcc, which is the compiler you use with
CodeBlocks. If you choose a different compiler, you need to use the toolset for that compiler. The tool building process is extremely long, so be
patient — get a cup of coffee.
The output from this process goes to the ToolBuild.log file. This is a
text file that you can examine later for potential errors in the build process.
Investigating
Boost
It’s essential that you provide the GCC command-line switch with the
Build command. Otherwise, the build process will attempt to rely on
Visual C++ as the toolset and the build process could fail.
680
Using Boost Jam
3. Copy the tools you want to use to a common \Program Files\
CodeBlocks\boost_1_39_0\bin directory.
The build process places the executables where you’re least likely
to find them. For example, the bcp utility appears in the \Program
Files\CodeBlocks\boost_1_39_0\bin.v2\tools\bcp\gccmingw-3.4.5\release\link-static directory on our machines.
The procedure in this section doesn’t build all the tools. For example, if
you want to work with Boost Build, you need to build it separately. In this
case, you change directories to the \Program Files\CodeBlocks\
boost_1_39_0\tools\build\v2 directory and use Boost Jam to build
Boost Build for you.
Using Boost Jam
Boost Jam is a build tool that you can use to build applications at the command line. Normally, you rely on CodeBlocks to perform this task. However,
the “Building the Boost tools” section of the chapter has already shown you
that building applications at the command prompt need not be difficult —
it’s more difficult than using CodeBlocks, but it’s still quite doable.
The main reason to use a command-line build tool is portability. Not everyone will have a copy of CodeBlocks available to build your application
should you decide to release it to the public. In addition, not everyone will
use the same platform that you do — the person working with your application might use Windows or Linux or the Macintosh. Standardized C++ code
and a command-line make file combine to produce a project that you can
move just about anywhere.
Boost Jam relies on the bjam.exe file to perform building. You can call
bjam.exe alone and it automatically locates the Jamfile file that contains
the building instructions. A Jamfile can include a version number, such as
Jamfile.v2 for version 2 of the Jamfile format.
You may want to modify the behavior of Boost Jam. For example, in the
“Building the Boost tools” section of the chapter, you used the toolset command-line switch to tell Boost Jam to use gcc, rather than Microsoft Visual
C++. Here is a list of the command-line switches that Boost Jam understands:
✦ -a: Rebuilds the entire application, even if the existing files are up-to-date.
✦ -d n: Specifies the debugging level you want to use while building the
project. You specify a value for n from 1 through 13 (the default level is 1).
The following list describes each debugging level:
• 1: Shows the standard actions that Boost Jam performs to build the
project, but doesn’t include any detailed information.
Using Boost Jam
681
• 2: Shows both the standard and quiet actions that Boost Jam performs to build the project. Quiet actions are events that Boost Jam
normally doesn’t tell you about.
• 3: In addition to the actions, shows the dependency analysis that
Boost Jam performs, along with the target and source timestamps
and paths.
• 4: Adds the build arguments and timing of shell invocations to the
output.
• 5: Includes rule invocations and variable expansions as part of the
output.
• 6: Displays input file information: directory, header file, archive
scans, and attempts to bind to the targets.
Book VI
Chapter 3
• 7: Displays all the variable settings as the build progresses.
• 9: Provides maximum variable information by adding variable manipulation, scanner tokens, and memory usage.
• 10: Displays profile information for build rules. This output includes
both timing and memory.
• 11: Informs you about the parsing progress of the Jamfiles.
• 12: Outputs a text graph of the target dependencies.
• 13: Displays all available information, including the change target
status.
✦ -d +n: Enables a specific debugging level. See the -d n entry for a list of
debugging levels.
✦ -d 0: Disables all debugging. Boost Jam displays only actual errors experienced during the build process.
✦ -f Jambase: Specifies an alternative Jambase file to read. You use this
command line switch when your Jamfile uses an alternative name.
Boost Jam allows just one -f command-line switch. If you specify a
Jamfile name of - (hyphen), Boost Jam accepts input from the console
until you close the input by pressing Ctrl+Z. When you close the input,
Boost Jam treats the input you provided as a Jamfile.
✦ -j n: Performs up to n shell commands concurrently. Normally, Boost
Jam performs one command at a time. Using multiple commands on a
machine that supports it can improve build speed.
✦ -l n: Stops an action after n seconds. This feature prevents your build
from becoming stopped by actions that can’t complete. You can use this
command-line switch only on Windows.
Investigating
Boost
• 8: Increases variable output information by adding variable fetches,
variable expansions, and the evaluation results of if expressions
within the Jamfile.
682
Using Boost Build
✦ -n: Executes everything but updating actions. Using this command-line
switch changes the default debug level to 2. See the -d n entry for a list
of debugging levels.
✦ -o file: Defines the name of the output file — the file that Boost Jam
updates as a result of the build process. The output file should have an
executable file extension.
✦ -q: Forces Boost Jam to quit immediately after any target failure. Using
this feature ensures that you don’t wait extended periods while Boost
Jam tries to complete a build that can’t succeed.
✦ -s var=value: Sets a Boost Jam variable to a specific value. You can
override both internal variables and variables that Boost Jam normally
imports from environment variables. An example of an internal variable
is JAMVERSION, which tells you the version of the product in use. An
example of an environment variable is Path, which should contain the
location of the compiler you want to use to build the project. The Web
site at http://www.boost.org/doc/tools/jam/jam/language.
html#jam.language.variables provides additional information
about variables and their use.
✦ -t target: Rebuilds both the target and all the dependencies for the
target. Therefore, if you create an application that relies on the RegEx
library, Boost Jam rebuilds the RegEx library in addition to your application when you use this command-line switch.
✦ -- value: Boost Jam ignores this command-line switch and its associated
value. However, you can access the value using the $(ARGV) variable,
which means you can use this feature to pass values to your build script
without affecting normal Boost Jam operation.
✦ -v: Prints version information for Boost Jam and then exits.
In addition to the command-line switches, Boost Jam supports a complex
scripting language. You use the scripting language to create a Jamfile.
A discussion of the scripting language is outside the scope of this book.
However, you can discover more about the scripting language at http://
www.boost.org/doc/tools/jam/jam/language.html.
Using Boost Build
Boost Build (http://www.boost.org/doc/tools/build/index.html)
isn’t a separate executable. It’s an add-on product for Boost Jam. Boost Build
adds to the capabilities already provided in Boost Jam, making the task of
creating and using build files considerably easier.
The instructions at http://www.boost.org/doc/tools/build/doc/
html/bbv2/installation.html tell you how to install the current version of Boost Build. However, if you installed and built Boost using the
Using Boost Build
683
instructions found in the “Obtaining and Installing Boost for CodeBlocks”
section of the chapter, you already have Boost Build available to you. Use
these steps to verify that you have Boost Build:
1. Choose Start➪Programs➪Accessories➪Command Prompt.
Windows opens a command prompt.
2. Type Path=C:\Program Files\CodeBlocks\boost_1_39_0\
bin;C:\Program Files\CodeBlocks\MinGW\bin;%Path% and
press Enter.
Windows adds the MinGW executables and the Boost Jam utility to the
path. The C:\Program Files\CodeBlocks\boost_1_39_0\bin
directory is described in the “Building the Boost tools” section of the
book — you create this directory to hold the executable tools provided
with the Boost library.
3. Type CD \Program Files\CodeBlocks\boost_1_39_0\tools\
build\v2\example\hello and press Enter.
Windows changes the directory to one of the Boost Build examples that
installed on your machine. These examples show how to work with
Boost Build, and the Hello example is the easiest of the examples.
4. Type bjam --version and press Enter.
You see the Boost Build and Boost Jam version information for your
setup. This information comes from Boost Build. Look through the
command-line switches in the “Using Boost Jam” section of the chapter
and you notice there is no --version command-line switch for Boost Jam.
Here is typical information for the current version of Boost Build.
Boost.Build V2 (Milestone 12)
Boost.Jam 03.1.17
Now that you know that Boost Jam is accessible, you must perform a
configuration task.
5. Open the user-config.jam file located in the \Program Files\
CodeBlocks\boost_1_39_0\tools\build\v2 folder of your
machine using Notepad.
You see a number of configuration options. Don’t worry about most of
these configuration options because you don’t need them.
Investigating
Boost
When setting the path for the MinGW executables and the Boost library
tools make sure you use the correct drive letter. For most people, the
correct drive letter is C. However, you might have the MinGW executables installed on drive D and the Boost library tools on drive E, in which
case, you’d change the path statement to read Path=D:\Program
Files\CodeBlocks\boost_1_39_0\bin;E:\Program Files\
CodeBlocks\MinGW\bin;%Path%.
Book VI
Chapter 3
684
Using Boost Build
6. Locate the following lines of configuration information:
# -----------------# GCC configuration.
# -----------------# Configure gcc (default version).
using gcc ;
7. Remove the # symbol from in front of using gcc ; and save the file.
Boost Build is now configured for CodeBlocks.
8. At the command prompt, type bjam and press Enter.
Boost Build builds the Hello example for you using gcc as shown in
Figure 3-3.
Figure 3-3:
Use the
--version
commandline switch
to ensure
you have
Boost Build.
At this point, if you go into the \Program Files\CodeBlocks\boost_1_
39_0\tools\build\v2\example\hello\bin\gcc-mingw-3.4.5 directory, you see debug and release subdirectories, which contain the debug
and release versions of the Hello.exe application, respectively. Before you can
use Boost Build to build your own applications, you must make it accessible
from more than the Boost Build folder. For example, if you try to execute bjam
--version in the root directory of your computer right now, you receive the
following error message:
Unable to load Boost.Build: could not find “boost-build.jam”
--------------------------------------------------------------Attempted search from C:\ up to the root
Please consult the documentation at ‘http://www.boost.org’.
To make Boost Build generally available, you need to perform an additional
configuration task. Type SET BOOST_BUILD_PATH=C:\Program Files\
CodeBlocks\boost_1_39_0\tools\build\v2\ at the command prompt
and press Enter. Now when you execute bjam --version in the root
Using Inspect
685
directory, you see the proper version information. Boost Build provides
an array of configuration options that you can read about at http://
www.boost.org/doc/tools/build/doc/html/bbv2/advanced/
configuration.html.
The example in this section shows just one of many reasons you want to use
Boost Build — ease of building your applications. Unlike Boost Jam, Boost Build
relies on .jam files to hold both build and configuration information. The .jam
files provide significant additional flexibility over using Boost Jam alone. The
overview at http://www.boost.org/doc/tools/build/index.html
provides you with a list of the added functionality that Boost Build provides.
Using Regression
As with Boost Build, you get Regression when you install Boost according to
the instructions found in the “Obtaining and Installing Boost for CodeBlocks”
section of the chapter. Regression is an advanced tool that requires that you
know a little something about Python as well as C++. Because Regression is
such a complex tool, incomplete, and currently in beta, it’s well outside the
scope of this book to describe. However, you can find the requirements and
step-by-step instructions for using Regression at http://beta.boost.
org/development/running_regression_tests.html.
The Regression add-on provides a number of specific capabilities that you may
want to know about. The main Regression Web site at http://www.boost.
org/doc/libs/1_39_0/tools/regression/doc/index.html provides
access to this information. If you do decide to try Regression, make sure you
obtain the correct version of Python and perform all required setup testing.
Using Inspect
Many organizations want to make changes to the Boost library to ensure
that the library meets their needs or to augment the Boost library to meet a
new requirement. Whenever you change something, there is a chance that
the change will cause compatibility issues because it doesn’t meet the Boost
library guidelines. In addition, it’s possible for a developer to introduce
errors into the Boost library that others will find difficult to fix. The Inspect
utility makes it possible for you to scan for potential Boost library errors
after you make a change to it.
Investigating
Boost
Regression is an add-on for Boost Build that lets you perform regression
testing as part of the build process. Regression testing ensures that your
application meets specific requirements and that changes you make to your
application don’t add potential bugs. Larger organization usually employ
regression testing as part of major application projects because the testing
environment becomes so complex. You never need a product of this sort for
smaller applications or for discovering new C++ features.
Book VI
Chapter 3
686
Using Inspect
Normally, the tools build process described in the “Building the Boost
tools” section of the chapter builds Inspect for you. However, you can build
Inspect manually as well. You find a .jar file for building it in the \Program
Files\CodeBlocks\boost_1_39_0\tools\inspect\build directory.
Start Inspect from the directory that you want to check. Inspect looks for
errors in the current directory and all subdirectories. Normally, Inspect performs a complete check of the libraries. However, you can modify Inspect
behavior using the following command-line switches to perform specific tests:
✦ -license
✦ -copyright
✦ -crlf
✦ -link
✦ -path_name
✦ -tab
✦ -ascii
✦ -minmax
✦ -unnamed
You can use any number of these command-line switches. If you forget the
Inspect command-line switches, type Inspect -help and press Enter.
Inspect shows you a list of the command-line switches you can use for testing.
Inspect also provides a number of command-line switches that affect how it
performs tests. The following list describes these command line switches:
✦ -cvs: Performs a check of only the cvs directory and ignores all other files.
✦ -text: Outputs the results in pure text format. This option is especially
useful when you to save the results to a text file for later analysis.
Otherwise, Inspect formats the output as HTML. Figure 3-4 shows a typical report. Click on the links to see details about a particular test, such
as the licensed status of each file within a particular directory.
✦ -brief: Reduces the amount of output text to the minimum required to
indicate success or failure of the various tests.
Inspect is sensitive about the ordering of command-line switches. You must
place the -cvs, -text, or -brief command-line switch first, and then the
test switches; otherwise Inspect displays an error message. The Web site at
http://www.boost.org/doc/libs/1_39_0/tools/inspect/index.
html tells you more about working with Inspect.
Understanding BoostBook
687
Book VI
Chapter 3
Investigating
Boost
Figure 3-4:
Inspect
normally
outputs its
reports as
HTML.
Understanding BoostBook
The world abounds with documentation formats — everything from .doc files
produced by Word to the seemingly ubiquitous .pdf file. Of all the documentation formats, the most universal and compatible is the lowly .txt file. However,
.txt files lack formatting, which means they limit you solely to words, which
may not be enough to describe your documentation. Because you can choose
from so many different file formats and formatting code can prove especially difficult, the Boost library relies on a special document format called BoostBook.
Documentation seems to be the bane of developers everywhere. No one
seems to want to write the documentation, and the attempts at documentation often leave readers with more questions than answers. BoostBook won’t
make you a good writer. While it does help you produce highly formatted
688
Understanding BoostBook
documentation with a standardized format, it can’t overcome deficiencies in
writing skill. When creating documentation for your project, the best writer
in your group is still the unsurpassed choice for documentation tasks.
If you have installed the Boost library using the instructions in the
“Obtaining and Installing Boost for CodeBlocks” section of this chapter,
you already have access to BoostBook. However, as with some other Boost
utilities, you need to know a bit about Python to use this feature. In addition,
you need an Apache server setup and must also download a number of other
utilities. In short, even though BoostBook is accessible from a Boost library
perspective, you still need to do some work to make this feature useful. The
instructions at http://www.boost.org/doc/libs/1_39_0/doc/html/
boostbook/getting/started.html describe the additional steps you
need to perform.
BoostBook relies on XML to hold the content you want to place in the document. The use of XML is the reason you must install the DocBook eXtensible
Stylesheet Language (XSL) (http://docbook.sourceforge.net/) and
DocBook Document Type Definition (DTD) (http://www.oasis-open.org/
docbook/xml/4.2/) support. You can see the XML used for BoostBook at
http://www.boost.org/doc/libs/1_39_0/doc/html/boostbook/
documenting.html. Check the main BoostBook page at http://www.
boost.org/doc/libs/1_39_0/doc/html/boostbook.html for additional information.
After you configure BoostBook, you need to open a command prompt and
test it. The instructions supplied on the Web site only partially work with
BoostBook and CodeBlocks. Use these instructions to help configure the
command prompt for use:
1. Choose Start➪Programs➪Accessories➪Command Prompt.
Windows opens a command prompt.
2. Type Path=C:\Program Files\CodeBlocks\boost_1_39_0\
bin;C:\Program Files\CodeBlocks\MinGW\bin;%Path% and
press Enter.
Windows adds the MinGW executables and the Boost Jam utility to the
path.
3. Type \Program Files\CodeBlocks\boost_1_39_0\doc and press
Enter.
Windows changes directory to the Boost document directory.
Using QuickBook
689
4. Type bjam --v2 and press Enter.
BoostBook generates the documentation for the Boost library and
places it in the html subdirectory. If BoostBook passes this test, then
you know you have a working setup.
Even if you choose not to use BoostBook for your project, you do need to
create a common documentation format. Using BoostBook may prove complicated for the Windows developer — it seems that the originators meant
this documentation format more for Unix and Linux developers. However,
it’s still a useful documentation format and you should consider it. If you
find BoostBook lacking, you need to create a custom format or suffer the
consequences of a poorly documented application.
QuickBook is an add-on for BoostBook. This utility started as someone’s
weekend project. Originally, QuickBook outputted simple HTML documents.
However, now it outputs XML in BoostBook format so that you can quickly
generate documentation that links with the rest of the documentation for
your project. As described by the author at http://www.boost.org/doc/
libs/1_39_0/doc/html/quickbook.html, QuickBook is a WikiWiki style
documentation tool. It’s important to note that some people simply call it a
Wiki (http://en.wikipedia.org/wiki/Wiki) or Wiki-Wiki or even Wiki
Wiki. All the terms mean the same thing.
Before you use QuickBook, you generate a documentation file. You can see
an example of such a file at http://www.boost.org/doc/libs/1_39_0/
tools/quickbook/doc/quickbook.qbk. For a complete syntax summary
for QuickBook, look at http://www.boost.org/doc/libs/1_39_0/doc/
html/quickbook/syntax.html.
At this point, you’re probably wondering why you should use QuickBook
at all, since you have to generate a document file for it anyway. Here are
the reasons why many developers use QuickBook instead of relying on
BoostBook directly:
✦ The QuickBook syntax is easier to read and use than writing XML.
✦ You can use QuickBook to generate non-Boost documentation.
✦ It’s relatively easy to convert other documentation formats into
QuickBook syntax.
Investigating
Boost
Using QuickBook
Book VI
Chapter 3
690
Using bcp
QuickBook is a command-line utility. You find it in the \Program Files\
CodeBlocks\boost_1_39_0\bin.v2\tools\quickbook\gcc-mingw3.4.5\release\link-static directory after generating the Boost tools
(see the “Building the Boost tools” section of the chapter for details). If you
plan to use this utility, make sure you copy it to the common bin directory
you set up as part of building the Boost tools. Here are the command-line
switches you can access when working with QuickBook:
✦ --help: Displays a help message showing all the command-line switches,
as well as the command-line syntax.
✦ --version: Displays version information about QuickBook.
✦ --no-pretty-print: Disables XML printing and uses plain text instead.
✦ --indent arg: Defines the number of spaces to use for indents (as specified by arg).
✦ --linewidth arg: Defines the number of characters in a single line.
✦ --input-file arg: Specifies the name of the input file.
✦ --output-file arg: Specifies the name of the output file.
✦ --debug: Places QuickBook in debug mode (useful only for developers
who want to tinker with the executable).
✦ --ms-errors: Specifies that QuickBook should use the Microsoft Visual
Studio style of errors and warnings in the output message format. This
option can make QuickBook easier for Microsoft Visual Studio developers to use and understand.
Using bcp
The bcp (Boost copy) utility helps you make Boost more manageable. You
can use it to
✦ Copy one or more Boost modules to another location so that you can
use a subset within an application.
✦ List all the elements within a module.
✦ Create an HTML report about module content that includes:
• License information
• Files without licensing information
• Files without copyright information
• Copyright information
• Dependency information for individual files
Using bcp
691
Theoretically, you can also use bcp to scan your application. The output report
includes all the information in a standard bcp report for a Boost module. You
use one of four command-line syntaxes to work with bcp as shown here:
bcp
bcp
bcp
bcp
[options] module-list output-path
--list [options] module-list
--list-short [options] module-list
--report [options] module-list html-file
Each of these command-line syntaxes performs a different task: copy, listing,
short listing, and reporting. These command lines can accept a number of
options, as described in the following list:
✦ --boost=path: Defines the path to the Boost library. Normally you’ll have
to use this option on Windows systems to ensure that bcp can find your
Boost setup. Otherwise, you see the following error message:
✦ --scan: Treats the modules as a non-Boost file for the purpose of scanning
file dependencies. You always use this option with your own applications.
✦ --cvs: Copies only files under Concurrent Versions System (CVS) version
control.
✦ --unix-lines: Uses Unix-style line endings for the output. You won’t ever
use this command-line switch on a Windows system but may need it on
Unix, Linux, and Macintosh systems.
Using bcp is relatively straightforward. For example, if you want a listing of
files for the regex library, you use the following command line:
bcp --list --boost=”C:\Program Files\CodeBlocks\boost_1_39_0” regex >> out.txt
The bcp utility looks in the C:\Program Files\CodeBlocks\
boost_1_39_0 directory for Boost. Note that you must enclose the directory in quotes because it contains a space. In this case, the output appears
in out.txt. You should always use file redirection because the output is
too large to read at the command prompt.
Let’s say you want a report about the regex module instead of a simple listing. In this case, you use the following command line (all of which should
appear on a single line):
bcp --report --boost=”C:\Program Files\CodeBlocks\boost_1_39_0” regex
myreport.html
Creating a report can take a while. Eventually, you see an HTML report like
the one shown in Figure 3-5. You can discover more about bcp at http://
www.boost.org/doc/libs/1_39_0/tools/bcp/bcp.html.
Investigating
Boost
**** exception(205): std::runtime_error: The Boost path appears to have
been incorrectly set: could not find boost/version.hpp in
******** errors detected; see standard output for details ********
Book VI
Chapter 3
692
Using Wave
Figure 3-5:
The bcp
utility can
output some
nice-looking
reports
about Boost
modules.
Using Wave
The Wave utility is a preprocessor for the Boost library. Using a preprocessor can significantly speed the compilation process because a preprocessor
compiles the library portion of the application. After you compile it the first
time, you need not compile the library again. Theoretically, you can use
Wave with any C++ compiler; however, you probably won’t need it with compilers such as CodeBlocks and Microsoft Visual Studio because these products include their own preprocessor. You can find more information about
the Wave utility at http://www.boost.org/doc/libs/1_39_0/libs/
wave/doc/wave_driver.html.
There is more to the Wave utility than meets the eye, however. The Wave
utility relies on the Wave library. This library ships as part of Boost and you
can use it in your applications as you do any other library. The Web site at
http://www.boost.org/doc/libs/1_39_0/libs/wave/index.html
tells you more about the Wave library.
Building Your First Boost Application Using Date Time
693
Building Your First Boost Application Using Date Time
Enough information about licensing, content, and utilities — it’s time to use
the Boost library for something interesting. This section shows a simple
date/time example that you can’t easily build without using Boost. You’ll
also discover some interesting setup requirements that are good to know
when you work with other third-party libraries.
As normal, this example begins with a console application. The example
uses the name FirstBoost. After you create the console application, perform
these setup steps:
1. Choose Project➪Build Options and select the Search Directories tab.
Book VI
Chapter 3
You see the Project Build Options dialog box.
CodeBlocks displays the Add Directory dialog box shown in Figure 3-6.
Figure 3-6:
Select
the Boost
library
directory.
3. Click the ellipses button to display the Browse for Folder dialog box
and highlight the \Program Files\CodeBlocks\boost_1_39_0
folder on your hard drive. Click OK.
CodeBlocks adds the folder you selected to the Add Directory dialog box.
4. Click OK.
You see the folder for the Boost library as shown in Figure 3-7. Make
sure you select the correct folder; otherwise the compiler won’t be able
to find the Boost library or the headers won’t compile correctly because
they point to the wrong location on the hard drive.
5. Click OK.
The application environment is ready to use with the Boost library.
Now that you have the environment configured, you can begin working with
Boost. Listing 3-1 shows a date/time example that displays the current time
and then a modified date/time.
Investigating
Boost
2. Highlight FirstBoost in the left pane. Click Add.
694
Building Your First Boost Application Using Date Time
Figure 3-7:
Make sure
you set the
environment
to use
Boost.
Listing 3-1: Using Boost to Create a Simple Date/Time Example
#include <iostream>
#include “boost/date_time/posix_time/posix_time.hpp”
using namespace std;
using namespace boost::posix_time;
using namespace boost::gregorian;
int main()
{
// Obtain the current date and time.
ptime Now = second_clock::local_time();
cout << Now << endl;
// Get the date and adjust it for tomorrow.
date TheDate = Now.date() + days(1);
// Get the time and adjust for an hour from now.
time_duration TheHour = Now.time_of_day() + hours(1);
// Create a new date/time and output it.
ptime NewDateTime = ptime(TheDate, TheHour);
cout << NewDateTime << endl;
return 0;
}
As with any other added capability, you must include the proper library
files. Note that Boost headers use an .hpp extension, which makes it harder
to confuse them with some other header type. To define what to include as
Building Your First Boost Application Using Date Time
695
the path to your library, simply look at the hierarchy in Windows Explorer.
Locate the .hpp file you want to use and then copy that information from
the Address bar.
Boost provides namespaces for each of the libraries. In this case, the
ptime and time_duration classes appear in the boost::posix_time
namespace and the date class appears in the boost::gregorian
namespace. If you find that your application won’t compile, it usually means
that you’ve missed a namespace and need to consider where each of the
classes in your application comes from.
The Boost library doesn’t compile cleanly with CodeBlocks for some reason.
According to CodeBlocks, there is an error in the filetime_functions.
hpp header. You see a warning message of
warning: left shift count >= width of type
After working with Boost for a while, we haven’t noticed any errors due to
this issue. However, you do need to be aware of it. We hope the next version
of the Boost library will fix this problem. If you find other bugs when working
with Boost, make sure you report them using the process found at http://
www.boost.org/support/bugs.html.
Book VI
Chapter 3
Investigating
Boost
The application code begins by creating a variable, Now, that contains the
current time, which you obtain using the second_clock::local_time()
method. It then displays the current time. The ptime class includes methods for interacting with every time element: years, months, days, hours, minutes, seconds, and so on. The example shows a few of the interactions you
can perform. When you run this application, the second time you see is one
day and one hour ahead of the current time.
696
Book VI: Advanced C++
Chapter 4: Boosting up a Step
In This Chapter
✓ Using RegEx to parse strings
✓ Using Tokenizer to break strings into tokens
✓ Converting numbers to other data types
✓ Using Foreach to create improved loops
✓ Using Filesystem to access the operating system
T
he Boost library is vast. It’s doubtful that a typical developer will ever
use everything that Boost has to offer. Of course, before you can use
something, you need to know it exists. Browsing through the help file can
reveal classes that you need to add to your toolkit to produce good applications. This chapter helps by taking you on a whirlwind tour of the major
Boost categories. Don’t expect this chapter to discuss everything — Boost
is simply too large for that. If you want to see a list of what Boost has to
offer, check out
✦ All classes in alphabetical order: http://www.boost.org/doc/
libs/1_39_0
✦ Categorized list: http://www.boost.org/doc/libs/1_39_0?
view=categorized
In addition to reviewing the examples in this chapter and looking through
the help file, it also pays to browse the Boost directory for examples.
For example, if you look at the \Program Files\CodeBlocks\boost_
1_39_0\libs\RegEx\example directory, you find three examples of how
to use RegEx. Every example directory contains a Jamfile you can use to
build the examples using Boost Jam (see the “Using Boost Jam” section of
Minibook VI, Chapter 3 for details). If you still haven’t found the example
you need, check online for more examples — Boost is extremely popular.
Even Microsoft has gotten into the act by providing examples at http://
msdn.microsoft.com/library/aa288739.aspx.
Before you begin working through the examples in this chapter, make sure
you know how to configure your development environment to use Boost.
The “Building Your First Boost Application Using Date Time” section of
Minibook VI, Chapter 3 tells how to configure CodeBlocks to use Boost. This
section also provides you with a simple example that gets you started working with Boost.
698
Parsing Strings Using RegEx
Parsing Strings Using RegEx
Regular expressions are an important part of today’s computing environment. You use them to perform pattern matching. For example, if you want
the user to enter values from 0 through 9 and nothing else, you can create a
pattern that prevents the user from entering anything else. Using patterns in
the form of regular expressions serves a number of important purposes:
✦ Ensures that your application receives precisely the right kind of input
✦ Enforces a particular data input format (such as the way you input a
telephone number)
✦ Reduces security risks (for example, a user can’t input a script in place
of the data you wanted)
Some developers make the mistake of thinking that a regular expression can
prevent every sort of data input error. However, regular expressions are
only one tool in an arsenal you must build against errant input. For example, a regular expression can’t perform range checking. If you want values
between 101 and 250, a regular expression will ensure that the user enters
three digits; however, you must use range checking to prevent the user from
entering a value of 100.
Defining the pattern
The RegEx library provides a number of methods for creating a pattern. For example, if you
want the user to input only lowercase letters,
you can create a range by using [a-z]. The
example in this chapter shows how to create
a simple three-digit numeric input. However,
you can create a pattern for nearly any use.
For example, a telephone number pattern
might appear as ([0-9] [0-9] [0-9])
[0-9] [0-9] [0-9]- [0-9] [0-9]
[0-9] [0-9], where a telephone number
of (555)555-5555 is acceptable, but a telephone number of 555-555-5555 isn’t. The
RegEx library reference appears at http://
www.boost.org/doc/libs/1_39_0/
libs/regex/doc/html/index.html.
This chapter doesn’t provide you with a full
explanation of all the patterns you can create.
The best place to start discovering the basics
of patterns is at http://www.boost.
org/doc/libs/1_34_1/libs/
regex/doc/syntax_perl.html. Boost
provides a wealth of pattern types. You can see
the full reference of information at http://
www.boost.org/doc/libs/1_39_0/
libs/regex/doc/html/boost_
regex/syntax.html.
How you use the pattern is just as important as
how you create the pattern. For example, you
can use RegEx_match to obtain a precise
match. However, if you want to only search
for a value, you use RegEx_search instead.
The usage reference appears at http://
www.boost.org/doc/libs/1_39_0/
libs/regex/doc/html/boost_
regex/ref.html.
Parsing Strings Using RegEx
699
Defining the pattern for a regular expression can prove time consuming.
However, once you create the pattern, you can use it every time you must
check for a particular input pattern. The following sections describe how to
work with the RegEx library.
Adding the RegEx library
Most of the Boost library works just fine by adding headers to your application code. However, a few components, such as RegEx, require a library.
Before you can use a library, you must build it. The instructions for performing this task appear in the “Building the libraries” section of Minibook VI,
Chapter 3. After you build the library, you must add it to your application.
The following steps show you how to perform this task for any library, not
just the RegEx library:
Nothing has changed from the beginning of this book — every application begins with a new project.
2. Choose Project➪Build Options.
CodeBlocks displays the Project Build Options dialog box.
3. Select the Linker Settings tab.
You see a number of linker settings, including a Link Libraries list, which
will be blank.
4. Click Add.
CodeBlocks displays the Add Library dialog box shown in Figure 4-1.
Figure 4-1:
Select the
library you
want to add.
5. Click the ellipses.
You see the Choose Library to Link dialog box.
6. Locate the libboost_regex-gcc-1_38.a library (the release version
of the library) and click OK.
CodeBlocks adds the library to the Link Libraries list as shown in
Figure 4-2.
7. Click OK.
The RegEx library is now ready for inclusion in your application.
Boosting up
a Step
1. Use the project wizard to create a new project.
Book VI
Chapter 4
700
Parsing Strings Using RegEx
Figure 4-2:
Add the
library to the
application.
The source code CD included with this book includes a compiled version
of the required RegEx library in the Author/BookVI/Chapter04/RegEx
directory. You can use this precompiled library with the example code in
this chapter. The project file may require that you change the library setting
to match your system.
Creating the RegEx code
Using a regular expression is relatively straightforward. All you do is create
the expression and then use it with a function to perform specific kinds of
pattern matches. The function you choose is important because each function performs the pattern matching differently. The code in Listing 4-1 demonstrates how to create a regular expression and then use it in two different
ways to determine whether user input is correct.
Listing 4-1: Performing Matches and Searches Using RegEx
#include <iostream>
#include “boost/RegEx.hpp”
using namespace std;
using namespace boost;
int main()
{
// Obtain an input from the user.
char MyNumber[80];
cout << “Type a three-digit number: “;
Parsing Strings Using RegEx
701
cin >> MyNumber;
// Define the regular expression.
RegEx Expression(“[0-9][0-9][0-9]”);
// Create a variable to hold the matches.
cmatch Matches;
// Preform a matching check.
if (RegEx_match(MyNumber, Matches, Expression))
{
cout << “You typed: “ << Matches << endl;
}
else
{
cout << “Not a three-digit number!” << endl;
}
return 0;
}
In this case, the code begins by adding the proper header, RegEx.hpp, and
the proper namespace boost. In many cases, you can get by without doing
much more than performing these two steps in your code.
The first step in the code is to get some user input. Even though the prompt
tells the user to enter a three-digit number, C++ doesn’t enforce this
requirement.
The second step is to create the regular expression. What we need for this
example is a set of three ranges for numbers: [0-9][0-9][0-9]. Using
ranges works well for a number of tasks, and you use them often when creating a regular expression.
The third step is to perform the pattern match. The example uses RegEx_
match, which performs a precise match, and RegEx_search, which looks
for the right input anywhere in the input. Both functions require three input
values: the value you want to check, an output variable of type cmatch that
tells where the match is found, and the regular expression.
To see how this code works, you must perform a series of three tests. First,
run the application and type 0 as the input. Naturally, typing 0 means that
the code will fail and you see this output:
Not a three-digit number!
No three-digit number found!
Boosting up
a Step
// Perform a search check.
if (RegEx_search(MyNumber, Matches, Expression))
{
cout << “Found: “ << Matches << endl;
}
else
{
cout << “No three-digit number found!” << endl;
}
Book VI
Chapter 4
702
Breaking Strings into Tokens Using Tokenizer
Second, let’s see a success. Run the application again and type 123 as the
input. This time you see
You typed: 123
Found: 123
So far, there isn’t much difference between the two functions, which is why
you need the third test. Run the application a third time and type ABC123XYZ
as the input. Now you see the difference between a match and a search:
Not a three-digit number!
Found: 123
This final test shows that the RegEx_search function finds the three-digit
value in the string. Obviously, the RegEx_search function is great when
you need to locate information but not good when you need to secure it.
When you need a precise pattern match, use RegEx_match instead.
Breaking Strings into Tokens Using Tokenizer
As humans, we view strings as a sentence or at least a phrase. Mixtures of
words create meaning that we can see in a moment.
Computers, on the other hand, understand nothing. A computer can perform pattern matching and do math, but it can’t understand Kipling (read
more about this fascinating author at http://en.wikipedia.org/wiki/
Rudyard_Kipling). It’s because of this lack of understanding that you
must tokenize text for the computer. A computer can perform comparisons
on individual tokens, usually single words or symbols, and create output
based on those comparisons.
The compiler you use relies on a tokenizer, an application component that
breaks text into tokens, to turn the text you type into machine code the computer can execute. However, the tokenizer appears in all sorts of applications.
For example, when you perform a spelling check on a document, the word
processing application breaks the text into individual words using a tokenizer,
and then compares those words to words in its internal dictionary.
The example in Listing 4-2 shows a method for creating tokens from strings.
This basic technique works with any phrase, string, or series of strings.
You’ll normally process the tokens once you finish creating them.
Listing 4-2: Creating Tokens from Strings
#include <iostream>
#include “boost/tokenizer.hpp”
using namespace std;
Performing Numeric Conversion
703
using namespace boost;
int main()
{
// Define the test string.
string MyString = “This is a test string!”;
// Obtain tokens from the string.
tokenizer<> Tokens(MyString);
// Display each token on screen.
tokenizer<>::iterator Iterate;
for (Iterate = Tokens.begin(); Iterate != Tokens.end(); Iterate++)
cout << *Iterate << endl;
return 0;
}
This
is
a
test
string
This example shows a basic routine you can use for just about any
need. However, you might need some of the extended capabilities of the
tokenizer class. Check out the materials at http://www.boost.org/
doc/libs/1_39_0/libs/tokenizer/index.html for more information
about both the tokenizer and the tokenizer<>::iterator.
Performing Numeric Conversion
Numeric conversion isn’t hard to perform — it’s accurate numeric conversion that’s hard to perform. Getting the right result as you move from one
type of number to another is essential. Sure, you probably won’t notice too
much if your game score is off a point or two, but you’ll definitely notice the
missing dollars from your savings account. Worse yet, when you finally get
to take that rocket into space, a rounding error can definitely ruin your day
as you head off toward the sun, rather than planet earth.
The Boost library includes the converter template, which makes converting from one kind of number to another relatively easy. The converter
template includes all kinds of flexibility. The example shown in Listing 4-3
presents two different levels of converter template usage, but really only
scratches the surface of an infinitely more complex Boost library feature.
Boosting up
a Step
The tokenizer template places the tokenized form of MyString in Tokens.
The application now has a set of tokens with which to work. To see the tokens,
you must iterate through them by creating a tokenizer<>::iterator,
Iterate. The application uses iterator to output the individual tokens.
When you run this application, you see the following output:
Book VI
Chapter 4
704
Performing Numeric Conversion
Why numeric conversion is necessary
Humans don’t make any differentiation between
one kind of number and another — seeing 1 is
about the same as seeing 1.0. The computer,
however, does make a differentiation between
numbers at two levels:
✓ Integer versus floating point
✓ Size
The integer part of the equation comes into
play because of the early processors in PCs,
which could perform only integer math. For
floating-point math, you had to buy a separate
math coprocessor. Today, the math coprocessor comes with the processor, but integer and
floating-point math still occur in different areas
of the processor. When the processor performs
integer math, it uses different registers and
capabilities than when it performs floating-point
math. So the conversion between integer and
floating-point data is more than philosophical —
it involves using physically different areas of the
processor.
The size issue determines how large the integer or floating-point value is. Again, the difference is physical. Early processors could
handle only 8 bits of data at a time, then 16
bits, and on to 32 bits, and finally the 64 bits of
today. Using larger numbers in older processors required a number of additional tasks in
software, so using larger numbers incurred a
significant performance penalty.
Today, with memory and processor register
size no longer a concern, large numbers are
also no longer a concern, except that you
must observe the historical reasons for using
numbers of a specific size. In addition, there
are sometimes benefits from a reliability, security, or speed perspective in using a smaller
number. The important consideration in working with numbers is that you must observe the
correct conversion techniques when you want
to obtain the correct results.
Listing 4-3: Converting from double to int
#include <iostream>
#include “boost/numeric/conversion/converter.hpp”
using namespace std;
using namespace boost;
using namespace boost::numeric;
int main()
{
// Create the converter.
typedef converter<int, double> Double2Int;
// Define the variables for the example.
double MyDouble = 2.1;
int MyInt = Double2Int::convert(MyDouble);
// Display the results.
cout << “The double value is: “ << MyDouble << endl;
cout << “The int value is: “ << MyInt << endl;
// See what happens with a larger value.
MyDouble = 3.8;
Performing Numeric Conversion
705
MyInt = Double2Int::convert(MyDouble);
cout << “The double value is: “ << MyDouble << endl;
cout << “The int value is: “ << MyInt << endl;
// We don’t want truncation, so lets round.
typedef conversion_traits<int, double> Traits;
typedef converter<int, double, Traits, def_overflow_handler,
RoundEven<double> > Double2Rounded;
MyInt = Double2Rounded::convert(MyDouble);
cout << “The int value is: “ << MyInt << endl;
return 0;
}
The converter template includes support for four kinds of rounding. You
must use the correct kind of rounding to match your application requirements. Imagine what would happen to calculations if you used truncation
when rounding is really the required operation. The following list describes
all four kinds of rounding that converter supports:
✦ Trunc: Removes the decimal portion of the value (rounds toward 0)
✦ RoundEven: Rounds values up or down as needed
✦ Ceil: Rounds the value up toward positive infinity when the decimal
portion is greater than 0
✦ Floor: Rounds the value down toward negative infinity when the decimal portion is greater than 0
The second converter object, Double2Rounded, shows the template requirements to choose the kind of rounding that the object performs. In this case,
you supply five arguments to the template (the converter template actually
accepts up to seven arguments, discover more about them at http://www.
boost.org/doc/libs/1_39_0/libs/numeric/conversion/doc/html/
boost_numericconversion/converter___function_object.html):
✦ Target
✦ Source
✦ conversion_traits, which include the target and source types as a
minimum
✦ Overflow handler, which determines how the object handles conversions
that result in an overflow (the default is def_overflow_handler)
✦ Rounding template object (which includes the rounding source type)
Book VI
Chapter 4
Boosting up
a Step
The example begins by creating a converter object, Double2Int. This
first object shows the minimum information you can provide — the target
(int) and source (double) values. The default setting truncates floatingpoint values (float and double among them) to obtain an int value.
To perform a conversion, the code relies on the convert method, which
requires a variable of the required source type as an argument.
706
Creating Improved Loops Using Foreach
The process for using the extended form of the converter template is the
same as the simple form shown earlier in the example. However, you must
now create a conversions_traits object (Traits in this case) and
provide the required input information. (See more examples of using
conversion_traits at http://www.boost.org/doc/libs/1_39_0/
libs/numeric/conversion/doc/html/boost_numericconversion/
conversion_traits___traits_class.html.) As before, you rely on the
convert method to perform the conversion process. Here is the output you
see when you run the application:
The
The
The
The
The
double value is: 2.1
int value is: 2
double value is: 3.8
int value is: 3
int value is: 4
Note that the last two lines show the difference in rounding the value 3.8.
In the first case, you see the default Trunc, and in the second, you see the
effects of RoundEven. Discover more about performing numeric conversion using Boost at http://www.boost.org/doc/libs/1_39_0/libs/
numeric/conversion/doc/html/index.html.
Creating Improved Loops Using Foreach
Writing efficient loops is a requirement if you want your application to perform optimally. Interestingly enough, many loops use a certain amount of
boilerplate code (code that is essentially the same every time you write it,
but with small nuances).
Templates and other methodologies described in this book provide a means
to overcome the boredom of writing essentially the same code. However, none
of the examples to date has shown a tried and true method, macros. A macro
is essentially a substitution technique that replaces a keyword with the boilerplate code you’d normally write. Macros normally appear in uppercase, such
as BOOST_FOREACH, which is the macro used in this section of the chapter.
Instead of typing all the code associated with a macro, you simply type the
macro name and the compiler does the rest of the work for you.
The magic behind the BOOST_FOREACH macro is that it creates all the iteration code you normally create by hand. In other words, you aren’t providing any less code to the compiler, you simply let the macro write it for you.
The Boost library still relies on the Standard library for_each algorithm;
you simply avoid writing all the code you used to write when using the algorithm. You can discover more about the BOOST_FOREACH macro at http://
www.boost.org/doc/libs/1_35_0/doc/html/foreach.html.
You may recognize Listing 4-4 partially from Listing 6-1 in Minibook IV,
Chapter 6. However, instead of choosing specific items, the example now
uses a BOOST_FOREACH loop to iterate through the vector.
Creating Improved Loops Using Foreach
707
Listing 4-4: Creating a BOOST_FOREACH Loop
#include <iostream>
#include <vector>
#include “boost/foreach.hpp”
using namespace std;
using namespace boost;
int main()
{
// Create a vector and store values in it.
vector<string> names;
names.push_back(“Tom”);
names.push_back(“Dick”);
names.push_back(“Harry”);
names.push_back(“April”);
names.push_back(“May”);
names.push_back(“June”);
// Iterate backward too!
cout << endl << “Backward:” << endl;
BOOST_REVERSE_FOREACH(string Name, names)
cout << Name << endl;
return 0;
}
This example begins by creating a vector. In fact, it’s the same vector as
the one used for the example in Minibook IV, Chapter 6, Listing 6-1. In this
case, the example then creates a BOOST_FOREACH loop that iterates through
names. Each iteration places a single value from names into Name. The code
then prints the single name.
An interesting feature of the Boost library is that you can reverse the order of
iteration. In this case, the code uses a BOOST_REVERSE_FOREACH loop to go in
the opposite direction — from end to beginning. The technique is precisely the
same as going forward. Here is what you see when you run this application.
Tom
Dick
Harry
April
May
June
Backward:
June
May
April
Harry
Dick
Tom
Boosting up
a Step
// Iterate through the vector.
BOOST_FOREACH(string Name, names)
cout << Name << endl;
Book VI
Chapter 4
708
Accessing the Operating System Using Filesystem
As you can see, iterating forward and backward works precisely as you
expect. The BOOST_FOREACH and BOOST_REVERSE_FOREACH macros support a number of container types:
✦ Any Standard Template Library (STL) container
✦ Arrays
✦ Null-terminated strings (char and wchar_t)
✦ STL iterator pair (essentially a range)
✦ boost::iterator_range<> and boost::sub_range<>
The macro STL container support is generalized. Any object type that supports these two requirements will work:
✦ Nested iterator and const_iterator types
✦ begin() and end() member functions
Accessing the Operating System Using Filesystem
Working with files and directories is an important part of any application
you create. Minibook V shows some standard techniques you use to work
with both files and directories. However, these methods can become cumbersome and somewhat limited. Boost augments your ability to work with
the file system using the Filesystem library. Creating and deleting both files
and directories becomes a single call process. You can also perform tasks
such as moving and renaming both files and directories.
The most important addition that Boost makes is defining a method to
obtain error information from the operating system. This feature is found
in the System library, which you must include as part of your application.
Among other capabilities, the System library makes it possible to convert
a numeric error that the operating system returns into a human readable
form. Unfortunately, the System library is still a work in progress, so this
chapter doesn’t demonstrate how to use it.
The source code CD included with this book has a compiled version of
the required System and Filesystem libraries in the Author/BookVI/
Chapter04/OS directory. You can use this precompiled library with the
example code in this chapter. The project file may require that you change
the library setting to match your system. When you set up this application properly, you should see two libraries on the Linker Settings tab of the
Project Build Options dialog box shown in Figure 4-3. (See the “Adding the
RegEx library” section of the chapter for additional information.)
Accessing the Operating System Using Filesystem
709
The Filesystem library and the Standard library
The developers of the Boost library
continuously add to its capabilities. Some of
the additions developers make are so useful
that they end up in the Standard library. The
Filesystem library is one of these useful elements. You can see the proposal for adding
the Filesystem library to the Standard library at
http://www.open-std.org/jtc1/
sc22/wg21/docs/papers/2006/
n1975.html.
Figure 4-3:
Using the
Filesystem
library
requires
the System
library
as well.
The movement of code from one setting to
another tends to confuse developers because
they suddenly find that a favorite library has
seemingly disappeared. These developers also
question whether they should continue using
the old library or move to the new one. In all
cases, you want to use the Standard library
when you can because the Standard library is
fully supported by a standards group, and well,
standard. Consequently, when the Filesystem
library finally makes the move to the Standard
library, be prepared to make a change in how
you work with it and update your code as
needed to ensure full compliance with the
code everyone else creates.
Book VI
Chapter 4
Boosting up
a Step
Of course, standardized libraries require
discussion from multiple groups, not just
the Boost developers. Consequently, the
Boost library you use today may not be precisely the same library you see added to the
Standard library. It’s important to keep up
with the proposed technical changes to the
Boost library as they move to the Standard
library by reviewing the documentation online.
The Boost library documentation appears
at http://www.boost.org/doc/
libs/1_39_0?view=categorized.
710
Accessing the Operating System Using Filesystem
The example shown in Listing 4-5 shows only a modicum of the capabilities
of the Filesystem library. The big thing to remember when using this example is that it requires both Filesystem and System libraries since the System
library provides error-handling support. The example begins by creating a
directory and a file, adding data to the file, reading the file back in and displaying it, and then deleting both file and directory.
Listing 4-5: Interacting with the File System Using Boost
#include <iostream>
#include “boost/filesystem.hpp”
using namespace std;
using namespace boost::filesystem;
int main()
{
// Check for the existence of the directory.
if (! exists(“Test”))
{
// Create the directory.
create_directory(path(“Test”));
cout << “Created Directory Test” << endl;
}
else
cout << “Directory Test Exists” << endl;
// Check for the existence of the file.
if (! exists(“Test/Data.txt”))
{
// Create the file.
ofstream File(“Test/Data.txt”);
File << “This is a test!”;
File.close();
cout << “Created File Data.txt” << endl;
}
else
cout << “File Data.txt Exists” << endl;
// Read the file.
if (exists(“Test/Data.txt”))
{
cout << “Data.txt contains “ << file_size(“Test/Data.txt”)
<< “ bytes.” << endl;
ifstream File(“Test/Data.txt”);
string Data;
while (! File.eof())
{
File >> Data;
cout << Data << “ “;
}
cout << endl;
File.close();
}
Accessing the Operating System Using Filesystem
711
else
cout << “File Data.txt Doesn’t Exist!” << endl;
// Delete the file and directory.
if (exists(“Test/Data.txt”))
{
remove(path(“Test/Data.txt”));
cout << “Deleted Data.txt” << endl;
}
if (exists(“Test”))
{
remove(path(“Test”));
cout << “Deleted Test” << endl;
}
}
To create a directory, you use create_directory, which accepts a path
as input. You create a path object using path. Many of the other Filesystem
library calls require a path object as well. For example, when you want to
remove (delete) either a file or directory, you must supply a path object to
remove. Interestingly enough, remove does remove a file without creating a
path object, but it won’t remove a directory. The inconsistent behavior can
make an application that incorrectly uses remove devilishly difficult to debug.
You won’t throw elements of the Standard library out when working with the
file system. For example, you still use ofstream and ifstream to work with
file content, just as you did in Minibook V, Chapters 2 and 3. The Filesystem
library only augments what you already have available. Here is what you see
when you run this application:
Created Directory Test
Created File Data.txt
Data.txt contains 15 bytes.
This is a test!
Deleted Data.txt
Deleted Test
One final element to look at in this example is file_size, which reports
the size of the file in bytes. The Filesystem library provides a number of
helpful statistics you can use to make your applications robust and reliable.
As previously mentioned, you want to spend time working with this library
because it contains so many helpful additions to the standard capabilities
that C++ provides.
Boosting up
a Step
The first feature you should notice about this example is that it constantly
checks to verify that the file or directory exists using the exists function.
Your applications should follow this pattern because you can’t know that a file
or directory will exist when you need to work with it, even if your application
created it. A user or external application can easily delete the file or directory
between the time you create it and when you need to work with it again.
Book VI
Chapter 4
712
Book VI: Advanced C++
Book VII
Building Applications
with Microsoft MFC
Contents at a Glance
Chapter 1: Working with the Visual C++ 2008 IDE and Projects . . . .715
Understanding the Project Types.............................................................. 716
Creating a New Win32 Console Application ............................................. 717
Writing Code Faster..................................................................................... 721
Viewing Your Project in Solution Explorer .............................................. 723
Using the Standard Toolbars ..................................................................... 724
Changing Application Properties .............................................................. 725
Modifying the IDE Appearance .................................................................. 726
Chapter 2: Creating an MFC Dialog Box Project . . . . . . . . . . . . . . . . .731
Understanding the MFC Dialog Box Project ............................................. 731
Creating an MFC Dialog Box Project ......................................................... 732
Adding Components and Controls ............................................................ 738
Defining the Dialog Box Code..................................................................... 743
Understanding the Essential Windows ..................................................... 745
Chapter 3: Creating an MFC SDI Project . . . . . . . . . . . . . . . . . . . . . . . .747
Understanding the MFC SDI Project .......................................................... 747
Creating an MFC SDI Project ...................................................................... 749
Understanding the Document/View Architecture ................................... 756
Adding Code to Your SDI Project .............................................................. 757
Seeing the Text Editor Project in Action .................................................. 766
Chapter 4: Using the Visual C++ 2008 Debugger. . . . . . . . . . . . . . . . . .769
A Quick Look at the Error Application ..................................................... 770
Starting Your Application in Debugging Mode ........................................ 771
Working with the Debugging Windows ..................................................... 775
Chapter 5: Analyzing Your Visual C++ 2008 Code. . . . . . . . . . . . . . . . .779
Using Performance Wizard ......................................................................... 779
Profiling the Code ........................................................................................ 781
Chapter 1: Working with the
Visual C++ 2008 IDE and Projects
In This Chapter
✓ Considering the Visual C++ 2008 project types
✓ Developing a simple application
✓ Using help to write code faster
✓ Working with Solution Explorer
✓ Interacting with the standard toolbars
✓ Modifying application properties
✓ Changing the IDE appearance
M
icrosoft’s Visual C++ 2008 is an incredibly full-featured product, and
this minibook can’t even begin to discuss most of the tasks you can
perform using Visual C++. What you’ll discover in this minibook, starting
with this chapter, are the traditional options that Visual C++ 2008 offers,
including Win32 console applications and Microsoft Foundation Classes
(MFC) graphical applications. You won’t find any coverage of Microsoft’s
.NET Framework and managed coding.
Visual C++ 2008 is the Microsoft view of what C++ should offer, which may
or may not be the same as your view. Let’s just say that Microsoft adds a
wealth of features to Visual C++, some of which you’ll like and others that
you might want to do without. (We know of some developers who go out of
their way to overcome the less-liked features in Visual C++ 2008.) For the
most part, this minibook goes with the flow and shows you what Visual C++
2008 has to offer so you can make your own decisions.
The focus of this chapter is the Integrated Development Environment (IDE).
As you progress through the chapter, you discover how Visual C++ differs
from the CodeBlocks IDE used for the other minibooks. In addition, you’ll
create your first Visual C++ application, a simple console application that
shows, even in this regard, that Microsoft is a bit different.
This minibook relies on Visual Studio 2008 Service Pack 1 (SP1), Visual
Studio Team System 2008 Edition. If you’re using a different version, some
of your screenshots will vary from those shown here. In addition, you may
find that your edition requires slightly different menu commands to perform
716
Understanding the Project Types
tasks or that your version has fewer capabilities. Even with these differences, the examples in this minibook should work fine with any version of
Visual Studio.
Understanding the Project Types
One of the first things you’ll notice is that Visual C++ offers a lot of different
projects, all of which interact with Windows. To see the projects that Visual
C++ has to offer, choose File➪New➪Project in Visual Studio. You see the
New Project dialog box shown in Figure 1-1. The templates used to create
new projects appear in the Visual C++ folder.
Figure 1-1:
You use the
New Project
dialog box
to create a
new empty
project with
nothing in it.
Figure 1-1 shows all the templates installed on the target system. Note that
you can add new projects to the list by clicking Search Online Templates. It’s
also possible to create your own templates or to modify existing templates
to meet your needs. However, creating a new template requires quite a bit of
skill, so the chapter doesn’t discuss this option in any detail.
The list in Figure 1-1 could be overwhelming. Microsoft categorizes these
projects according to task. For example, when you select the Visual C++\
Win32 folder, you see two templates:
✦ Win32 Console Application
✦ Win32 Project
Creating a New Win32 Console Application
717
Some templates create more than one kind of application. In this case, a
wizard guides you through the process of defining the application type. For
example, even though you see only one MFC Application template in the
Visual C++\MFC folder, this one template creates a number of application
types, as you discover in Chapters 2 and 3.
Creating a New Win32 Console Application
The Win32 Console Application template shown in Figure 1-1 helps you
create an application that executes at the command prompt. The application
won’t have any fancy Windows interface elements. In fact, the result is very
much like the majority of the CodeBlocks applications created in the other
minibooks. However, console applications do provide useful services and
they’re a good place to begin discussing Visual C++ and the Visual Studio
IDE. The following sections describe how you can create your own Win32
console application.
Defining the project
Before you can begin writing code for a project, you need to define the
project itself. The following steps describe how to create a Win32 Console
Application project:
1. Choose File➪New➪Project.
You see the New Project dialog box (refer to Figure 1-1).
2. Select the Visual C++\Win32 folder in the Project Types list.
Highlight the Win32 Console Application template in the Templates
list.
3. Type a project name in the Name field (the example uses Hello
World).
The New Project dialog box automatically changes the Solution Name
field content to match the project name. You can always type a different
solution name if desired.
4. Click Browse.
You see a Project Location dialog box.
Book VII
Chapter 1
Working with the
Visual C++ 2008 IDE
and Projects
Visual Studio provides two levels of application management. The top level
is a solution. A solution is the set of executables needed to create a complete
application. Every application has only one solution. The second level is the
project. A project contains the files needed to create a single executable. A
solution can contain as many projects as needed to create a complete application. This example requires only one project — the executable used to
display “Hello World” at the command prompt.
718
Creating a New Win32 Console Application
5. Select a location for the project and click OK.
The Location field of the New Project dialog box contains the location
you selected.
6. Click OK.
Visual Studio starts the Win32 Application Wizard. You see the Welcome
page of this wizard.
7. Click Next.
You see the Application Settings page shown in Figure 1-2. The Win32
Console Application template actually provides access to four kinds of
applications, including a DLL or static library. You can also add support
for both the MFC and Active Template Library (ATL). The default settings work fine for the example, but it’s important to know that other
options exist.
Figure 1-2:
The
Application
Settings
page
lets you
choose an
application
type.
8. Click Finish.
The wizard creates a new solution and project that contains four files.
Normally, you won’t care about stdafx.cpp, which contains a list of
standard headers for your project. You’ll add any headers you need for
your project to the stdafx.h file. The targetver.h file contains special
code that tells the compiler which version of Windows to target for the
application (you can find the acceptable values for the Windows versions
at http://msdn.microsoft.com/en-us/library/6sehtctf.aspx).
The final file, Hello World.cpp, contains the application source code.
Creating a New Win32 Console Application
719
Adding code
One of the first things you must decide is which version of Windows to
target with your application. Open the targetver.h file and you’ll see an
explanation of its purpose. Microsoft always assumes that you’ll want to
target the latest version of Windows and will ignore anything older, which
isn’t a reasonable approach. Consequently, you normally need to change
this file to match the version of Windows you want to work with. All you
need to do is change the version number as shown here:
#ifndef _WIN32_WINNT
#define _WIN32_WINNT 0x0501
#endif
Using a version number of 0x0501 means that you’re targeting Windows
XP. If you’d wanted to target Windows 2000, you would have used a value of
0x0500. Windows Server 2003 uses a version number value of 0x0502.
The application will use standard input and output functionality, so you
need to open the stdafx.h file next. You might wonder why Microsoft uses
this separate file to store headers. Using a centralized location for declarations you plan to use for the entire application makes sense because you
need to make changes only once. To the standard header declarations, you
add #include <iostream> as shown here:
#pragma once
#include <stdio.h>
#include <tchar.h>
#include <iostream>
It’s time to add the code to the Hello World.cpp file. Here’s the simple
code used for this example:
#include “stdafx.h”
using namespace std;
int _tmain(int argc, _TCHAR* argv[])
{
// Display the message.
cout << “Hello World!” << endl;
// Pause so you can see it in the debugger.
system(“PAUSE”);
return 0;
}
Working with the
Visual C++ 2008 IDE
and Projects
#include “targetver.h”
Book VII
Chapter 1
720
Creating a New Win32 Console Application
In most respects, this code doesn’t look much different from code you type
in CodeBlocks. The example begins by including stdafx.h, which contains
the list of common declarations for the example as described earlier. As with
any C++ application, you must also include a namespace declaration.
The body of the example application looks similar to other examples in this
book. The basic idea is to output some text to the command prompt and
then pause until the user presses Enter.
The big difference is the use of _tmain() rather than main(). The _
tmain() function declaration appears in tchar.h. If you look at this file,
you’ll see that using _tmain() expands to either main() (when working
with ANSI characters) or wmain() (when working with Unicode characters).
In short, _tmain() is simply a convenience that lets you compile your code
for either ANSI or Unicode use as needed without having to change your
application code. Microsoft provides a number of _t* declarations in the
tchar.h file, and you may want to look at them at some point.
Running the application
At this point, your application is ready to compile and run. To compile an
application using Visual C++, you choose Build➪Build Solution. In the Output
window, you see a series of build messages like the ones shown in Figure 1-3.
If there are any errors when you compile your application, you see them in
the Error List window (simply click the Error List tab shown in Figure 1-3 to
see the errors).
Figure 1-3:
The Output
window
shows
the steps
used to
compile the
application.
To see your application in action, click Start Debugging (the green arrow) on
the Standard toolbar or press F5. If you want to start your application without debugging support, choose Debug➪Start Without Debugging or press
Ctrl+F5. Figure 1-4 shows the output from this application.
Writing Code Faster
721
Figure 1-4:
Running the
application
displays
a simple
message.
Writing Code Faster
Microsoft provides a number of ways to obtain help in writing code faster.
The two most commonly used techniques are working with the help files and
relying on IntelliSense. The following sections describe how to use these two
approaches.
Obtaining coding help
Another approach is to double-click the keyword you need to understand
better and press F1. Using this technique opens a copy of MSDN Library,
but this time you see the help associated with the keyword. Unfortunately,
you get the help that Microsoft thinks you need. MSDN Library can contain
a host of entries for any given keyword. If you don’t see what you want, you
can always type the keyword in the Index tab or perform a search.
Visual Studio also has a feature called Dynamic Help. This window displays
help based on whatever you’re typing at the time. For example, Figure 1-5
shows what you see when you type cout. The advantage of using Dynamic
Help is that you normally see multiple useful help selections, so you can
click the one that looks like it will answer your question. Unfortunately,
Dynamic Help can also cause problems by eating system resources and
causing the IDE to work slowly. You display Dynamic Help by choosing
Help➪Dynamic Help. Simply close the window when you no longer need it.
Working with the
Visual C++ 2008 IDE
and Projects
You have access to a wealth of help options. The first place most people
look is the Help menu. The Help menu does contain a wealth of options, but
the help you receive is generic. These options may open a copy of MSDN
Library, but you still have to look for the topic you need help with and most
developers want something faster.
Book VII
Chapter 1
722
Writing Code Faster
Figure 1-5:
Dynamic
help
provides
information
about the
current task.
Working with IntelliSense
IntelliSense is a special Visual Studio feature that looks at what you’re typing
and then provides suggestions on what to type next. Using this special feature means that you spend less time remembering how to spell and capitalize function names and more time coding. In many cases, IntelliSense can
direct your attention to code that you may have forgotten about. In addition
to function names, IntelliSense also tells you about function arguments and
other code you need to type.
Figure 1-6 shows an example of IntelliSense in action. In this case, the
figure shows what you see when you type the system keyword. Note
that IntelliSense shows precisely what you should type as input for the
system() function.
Figure 1-6:
IntelliSense
provides
helpful
information
about the
code you
write.
Viewing Your Project in Solution Explorer
723
You don’t have to type something to see IntelliSense. To see the same display as Figure 1-6 for any function you have already typed, place the cursor
within the function call and press Ctrl+Shift+Spacebar. If you want to see a
list of items you can type, press Ctrl+Spacebar instead.
Viewing Your Project in Solution Explorer
Every time you create a new application in Visual Studio, you work with a
solution. The solution contains one or more projects, as previously mentioned. It’s helpful to see the hierarchy of solution, project, and associated
files, and Solution Explorer provides this view. Figure 1-7 shows the hierarchy for the sample console application in this chapter.
Figure 1-7:
Solution
Explorer
displays a
list of the
files in the
project.
Book VII
Chapter 1
The ReadMe.txt file contains information about the project that the template
creates for you. This file doesn’t add anything to the application. However, it
does contain useful information that can help you remember the purpose of
default files in the application.
Solution Explorer can also help you interact with your project. When you
right-click an object in Solution Explorer, you see a list of tasks you can
perform with that object. Upcoming chapters in this minibook will point out
Working with the
Visual C++ 2008 IDE
and Projects
Notice how Visual Studio organizes the application content for you. The
solution and its name appear at the top, followed by the project, both of
which are named Hello World in this case. Under the project, you see three
folders containing headers, resources, and source files. In this case, the project contains two header files and two source files.
724
Using the Standard Toolbars
several ways to use context menus. For now, just realize that you can perform a number of tasks with each object in Solution Explorer.
Across the top of Solution Explorer, you see four buttons. These buttons
provide quick access to some application features as described in the following list (not every button is enabled for every object in the Solution Explorer
hierarchy):
✦ Properties: Displays information associated with the file or other object.
✦ Show All Files: By default, Solution Explorer displays only essential files
to keep the display from becoming cluttered. This option displays all the
files so that you can modify less-used files, such as a project file.
✦ View Code: Opens a source-code file for editing.
✦ View Class Diagram: Creates a class diagram for an application that
contains classes. Although this button is always available, it produces a
result only when working with an application that creates objects.
Using the Standard Toolbars
You can quickly become confused by the plethora of toolbars that Visual
Studio provides. Fortunately, you work with only a few of these toolbars at
any given time. In fact, the toolbar you need normally pops up in response
to the task you want to perform. This minibook doesn’t show you how to use
every toolbar. It focuses mainly on the three toolbars described in the following list:
✦ Build: The Build toolbar contains just three buttons. The first builds the
project you have selected in Solution Explorer. The second builds an
entire solution. The third cancels a build and is disabled unless you’re
building a project or a solution.
✦ Standard: The Standard toolbar contains a number of buttons grouped
into six sections. The first section contains buttons for creating new
projects and saving your files. The second section contains the Cut,
Copy, and Paste buttons that you see in nearly every Windows application. The third section contains buttons for undoing and redoing actions
within the editors. The fourth section contains a single button containing a green arrow that lets you start debugging the application. The fifth
section chooses the kind of build you’ll create when you build the application (the default is a Debug build, which contains debugging information). The sixth section contains buttons that provide access to common
Visual Studio windows, such as Solution Explorer and Properties.
✦ Text Editor: The Text Editor toolbar may not contain the buttons you’d
think it would. After all, you won’t format your source code, so you
won’t find a font selection here or the ability to add color to your text.
Changing Application Properties
725
Instead, this toolbar contains buttons that help you interact with the
text in various ways. The first section contains IntelliSense buttons that
show you object members, parameter lists, and quick information about
a particular function. In addition, clicking Display Word Completion
automatically completes text you’re typing when IntelliSense can figure
it out. The second section contains buttons that change the indentation
of code in your application. You can also use one of two buttons to comment or uncomment code you’ve written. The third section contains
a series of buttons for working with bookmarks. A bookmark is simply
a means of marking your place in the source code, much as you use a
bookmark in a book.
Changing Application Properties
Visual Studio includes a Properties Window (see Figure 1-8) that you can
use for a number of purposes. This chapter looks at only one use, changing
application properties. However, you’ll see the Properties Window in most
of the chapters in this minibook.
Figure 1-8:
The
Properties
Window
lets you
change the
properties
associated
with the
selected
object.
Book VII
Chapter 1
Working with the
Visual C++ 2008 IDE
and Projects
The Properties Window has two main sections. The upper section contains
a list of properties and their values. You see the Active config property
selected in Figure 1-8. It currently has a value of Debug|Win32. To change
the active configuration, select a new value from the drop-down list box. It’s
possible to change any blank property value (such as Description) or a property value that appears in bold type. However, you can’t change a dimmed
property, such as Path.
Property names won’t always tell you enough about a property to change its
value. In this case, you can rely on the lower half of the Properties Window
for additional information. The text description of Active config shown in
726
Modifying the IDE Appearance
Figure 1-8 is usually enough to jog your memory. However, if you still don’t
understand the purpose of the property, you can press F1 for additional
information. Highlighting a new property always changes the property information in the lower half of the Properties Window.
As you change selections in Solution Explorer, the content of the Properties
Window changes to reflect the properties of the newly selected object. Some
objects, such as the Header Files folder, won’t have any properties you can
modify, but it’s helpful to look at the property values anyway to understand
how the Solution Explorer object works.
Visual Studio normally opens the Properties Window by default. However, if
you don’t see the Properties Window, you can open it using any of the following techniques:
✦ Click Properties Window on the Standard toolbar
✦ Choose View➪Properties Window
✦ Press F4
Modifying the IDE Appearance
It’s possible to bend Visual Studio to your will. If you don’t like how
Microsoft arranged the display, change it. You can add or remove menus
and toolbars, create new menus or toolbars, change the position of windows, hide windows from view, or make windows disappear completely.
You’re the master of everything to do with the appearance of your Visual
Studio setup.
Because the IDE is so flexible, your screen may not always precisely match
the screenshots in this minibook. The important thing is to look for the feature or option illustrated in the figure, rather than a precise match of every
figure element. The following sections describe how to work with toolbars,
menus, and windows.
Changing toolbars and menus
You can modify any menu or toolbar that Visual Studio provides. In addition,
you can create new menus and toolbars as needed. Most developers leave
the Visual Studio menus alone and work exclusively with toolbars because
toolbars are easier to use. However, you have the option of performing any
kind of change you want to the IDE.
It’s important to modify menus and toolbars with care. In most cases, you
don’t want to remove existing commands from menus or toolbars because
people won’t be able to help you with problems. For example, if you remove
the File menu, someone won’t be able to tell you how to create a new project
of a specific type. Experienced developers create custom menus or toolbars
Modifying the IDE Appearance
727
to satisfy special needs and then hide the standard items from view. Using
this approach makes it easy to restore the standard menu or toolbar later to
interact with others.
You can change menus and toolbars in many ways. However, the easiest
method is to right-click anywhere in the menu or toolbar area and choose
Customize from the context menu. You see the Customize dialog box shown
in Figure 1-9.
Figure 1-9:
Use the
Customize
dialog box
to change
both
toolbars
and menus.
Book VII
Chapter 1
The three options at the bottom of the Toolbars tab help you control the
appearance of the toolbar. The following list describes each option:
✦ Use Large Icons: Displays toolbar icons in a larger size to make them
easier to see.
✦ Show ScreenTips on Toolbars: Displays the name of the icon as a tooltip when you hover the mouse cursor over the icon.
✦ Show Shortcut Keys in ScreenTips: Displays the shortcut for executing
the command (when a shortcut is available) along with the icon name
when you hover the mouse cursor over the icon.
Working with the
Visual C++ 2008 IDE
and Projects
The Toolbars tab shows a complete list of all the toolbars that Visual Studio
supports. Place a checkmark next to any toolbar you want to display or
remove the checkmark next to any toolbar you no longer need. When you
don’t see the toolbar you want, click New to display the New Toolbar dialog
box, type a name in the Toolbar Name field, and click OK. Visual Studio automatically displays the new toolbar so that you can add commands to it. You
can also use the features on this tab to rename or remove custom toolbars
you create (you can’t delete standard toolbars) and reset standard toolbars
to their original state.
728
Modifying the IDE Appearance
The Commands tab displays a categorized list of commands that you can
execute using either a menu entry or a toolbar icon, as shown in Figure 1-10.
The Categories list helps you locate a command more quickly.
Figure 1-10:
The
Commands
tab shows
all the
commands
you can
execute
in Visual
Studio.
To use Commands tab, select an entry in the Categories list. Locate the
command you want to add, drag it to a menu or toolbar, and drop it. At that
point, you can right-click the command and configure it as desired.
You may wonder at this point how you add a new menu. The Categories list
contains a special New Menu category. Simply drag the New Menu command
to the location you want, even a top-level location, and drop it in place.
Configuring your custom menu is the same as using any other command.
If you make a mistake changing a command, which includes menus, you can
return the commands to their default state by right-clicking the command
and choosing Reset from the context menu. Be careful about where you
use Reset. If you reset a custom command, what you’ll see is a blank entry,
rather than an unmodified version of the command you expect because a
custom command has no default state.
Modifying windows
Visual Studio provides considerable flexibility in working with windows.
Windows have two states: hidden or visible. You can’t hide an editing
window, but you can hide any other window simply by clicking the Auto
Hide button in the upper-right corner (the icon looks like a thumbtack).
The window will slide out of view except for a label identifying its position.
When you move the mouse over to the label, the window reappears. Hiding
Modifying the IDE Appearance
729
windows creates more space for working with editors without making the
window inaccessible.
Figure 1-11 shows three kinds of windows. The editor window appears in the
center. You can close it, but you can’t hide it. The Server Explorer, Toolbox,
Error List, and Output windows are all hidden. If you hover the mouse
cursor over their labels, the windows will reappear. Solution Explorer and
Properties Window are both visible. Notice the thumbtack icon in the upperright corner of these windows. Clicking that icon will hide the window; clicking it again will make it visible.
Figure 1-11:
Windows
have
different
states
depending
on their use
in Visual
Studio and
how you
configure
them.
Book VII
Chapter 1
Working with the
Visual C++ 2008 IDE
and Projects
You can undock any visible window simply by grabbing its title bar with the
mouse and dragging it anywhere you like — even outside the Visual Studio
IDE window. When you drag a dockable window within the Visual Studio IDE
confines, you see the docking indicators shown in Figure 1-12. Simply dragand-drop the dockable window onto any of the docking indicators to dock it.
Visual Studio shows where the window will dock by showing a highlighted
area within the IDE. Windows can appear as separate areas within the IDE or
as a tab with another window (where you select the window you want to see
by selecting its tab).
730
Modifying the IDE Appearance
Figure 1-12:
Use docking
indicators to
determine
where a
window
appears in
the IDE.
Dockable windows need not be dockable. Right-click the title bar of the
window and you can choose to make the window floating, which means it
never docks, or a tabbed document in the editor.
Editor windows also provide some choices. You can right-click a document
tab and choose New Horizontal Tab Group or New Vertical Tab Group from
the context menu to create a new editing area. Normally, these additional
editing areas simply chew up screen real estate that you could better use to
edit your code. However, using multiple editing areas can be helpful when
you want to compare the content of two files.
Chapter 2: Creating an
MFC Dialog Box Project
In This Chapter
✓ Working with the MFC Dialog Box project template
✓ Defining a simple MFC Dialog Box application
✓ Providing a user interface for the MFC Dialog Box application
✓ Making the user interface functional
✓ Considering essential GUI application windows
S
ay “dialog box” and many developers immediately think of the message
boxes that appear everywhere in Windows applications. A message box
is certainly a special kind of dialog box application, but it hardly scratches
the surface of what you can do with dialog box applications. In fact, some
applications consist solely of one or more dialog boxes. For example, most
utility applications are dialog boxes. Configuration tools commonly appear
as dialog box applications as well.
Dialog boxes appear just about everywhere in Windows. When you view the
properties of the Windows display, you’re viewing a dialog box. The icons
in the notification area often display dialog boxes where you can discover
more about the associated service. Even the properties pages used to configure some types of controls in your application are a kind of dialog box, so
it’s easy to see how important a dialog box application can be.
This chapter doesn’t show everything you can do with the dialog box
application — you’d need an entire book to do the topic justice. However,
you’ll see how to create and use a simple dialog box application that you
can expand later as needed for your C++ development projects. In most
cases, all you really do when working with a dialog box application is start
with the simple project shown here and add controls and associated code
as needed.
Understanding the MFC Dialog Box Project
Every Graphical User Interface (GUI) element in Windows is a window,
including the dialog box background. Dialog boxes send and receive window
messages and work like a window in most regards. However, dialog boxes
732
Creating the MFC Dialog Box Project
are also containers. A dialog box can hold other controls such as command
buttons and text boxes. Consequently, when you think about a dialog box
project, you must consider two aspects of the dialog box:
✦ The window control that can send and receive messages that alter its
appearance and how it looks
✦ The host container that can hold other controls
In some respects, a dialog box is a canvas where you draw the application
you want to create. In fact, the user interface you create is a type of artistic
expression in that you’re free to create anything you want, yet you must
communicate something to the viewer. The artistic nature of user interface
design is why so many developers have a problem creating a good interface.
Just following the rules may not be enough — often, you have to know when
to apply artistic license to achieve the desired result.
Dialog box applications are good for short communications — a configuration task, status information, messages, or other simple tasks. You don’t
want to try to create a word processor as a dialog box application. In some
cases, you must make a decision about the application type to use. For
example, a small data entry form could fit quite easily in a dialog box application, but you wouldn’t want to use a dialog box application for your order
entry system.
The basic dialog box application includes a place to put new controls and
two buttons: OK and Cancel. It’s important not to let the appearance of the
template output prejudice your use of this template. Nothing stops you
from adding or removing controls, changing the initial size of the dialog box,
removing the OK and Cancel buttons, or doing anything else you can think
to do. The initial project simply makes some tasks faster and easier by giving
you a starting point.
Creating the MFC Dialog Box Project
Visual Studio doesn’t provide a specific dialog box application template.
Instead, you use a generic MFC Application template and modify it to meet
your needs. Of course, dialog box applications require specific settings or
you end up creating another sort of application. These settings will become
clearer as you create your first dialog box application project using the following steps:
1. Choose File➪New Project.
Visual Studio displays the New Project dialog box shown in Figure 2-1.
Creating the MFC Dialog Box Project
733
Figure 2-1:
Use the
New Project
dialog box
to select
a project
template.
2. Select the Visual C++\MFC folder.
The New Project dialog box displays three kinds of MFC projects as
shown in Figure 2-1.
3. Highlight the MFC Application template. Type a name for the applicaVisual Studio automatically enters the application name in the Solution
Name field. When working with solutions that contain multiple projects,
you can choose to use a unique solution name. A simple project needs
only one name. In this case, you can clear the Create Directory for
Solution option to reduce the complexity of the folder layout for your
application.
4. Choose a location for the application in the Location field (click
Browse if you want help in locating the parent folder for the solution).
Click OK.
Visual Studio starts the MFC Application Wizard. You see the Welcome
dialog box (see Figure 2-2) which shows the default template settings
and the steps you’ll follow to define a project. These steps appear on
the left side of the dialog box, and you can click any step to go directly
to that location in the wizard (making it faster to define your project). If
you decide that the current settings will work for your project, all you
need to do is click Finish at this point. However, since this chapter is
about dialog box applications, you need to set the Application Type step
as a minimum.
Creating an MFC
Dialog Box Project
tion (the example uses SimpleDialog) in the Name field.
Book VII
Chapter 2
734
Creating the MFC Dialog Box Project
Figure 2-2:
The
Welcome
page shows
the default
template
settings.
5. Click Next or choose the Application Type step.
You see a list of application types and basic settings as shown in
Figure 2-3.
Figure 2-3:
Choose
the kind of
application
that you
want to
create.
Creating the MFC Dialog Box Project
735
6. Choose the Dialog Based option.
Note how the steps change — some steps are no longer available
because they don’t apply to a dialog box application. The number of
options in the Application Type step also changes to reflect the dialog
box application as shown in Figure 2-3.
7. Click Next or choose the User Interface Features step.
You see a list of available user interface options as shown in Figure 2-4.
The features you choose depend on the kind of dialog box application
you create. For example, a message box doesn’t require a system menu
or an about box. A mandatory configuration dialog box doesn’t require
a minimize or maximum button. However, an optional configuration or
status dialog box requires these features if you want the user to work
with other applications. It’s also possible to define whether Windows
minimizes or maximizes the application when you start it. Use a thick
frame to let the user resize the dialog box as needed. As a minimum,
you want to change the Dialog Title field to reflect the application purpose better.
Book VII
Chapter 2
Creating an MFC
Dialog Box Project
Figure 2-4:
The user
interface
features you
choose can
reduce the
amount of
coding you
perform.
8. Type a new title in the Dialog Title field (the example uses the title
“A Simple Dialog Box Example”).
736
Creating the MFC Dialog Box Project
9. Choose any required user interface features (the example uses the
defaults).
10. Click Next or choose the Advanced Features step.
You see the list of advanced features shown in Figure 2-5. In most cases,
you don’t need to change these settings. However, complex dialog box
applications will probably require context sensitive help. It’s normally a
good idea to add accessibility features as well so that people with special needs can interact with your application.
Figure 2-5:
Advanced
features
are useful
for complex
dialog box
application.
11. Choose any required advanced features (the example uses the
defaults).
12. Click Next or choose the Generated Classes step.
You see a list of generated classes for the application as shown in Figure
2-6. In most cases, you won’t want to change these settings for a dialog
box application.
Creating the MFC Dialog Box Project
737
Figure 2-6:
In most
cases,
you won’t
need to
change the
generated
class
names.
13. Click Finish.
Figure 2-7:
The basic
dialog box
application
doesn’t do
much.
Book VII
Chapter 2
Creating an MFC
Dialog Box Project
Visual Studio generates the application for you using the settings you
provide with the template wizard. The resulting application contains
some basic buttons and the title selection you provided as shown in
Figure 2-7. At this point, you can begin adding controls and code to the
dialog box application.
738
Adding Components and Controls
Adding Components and Controls
Defining the project is only the first step in creating a dialog box application.
You must also add components and controls to the application to make it
useful. In addition, the components and controls must have code attached to
them in the form of event handlers so the application does something when
the user interacts with the application.
A component is an object that doesn’t have a user interface. In most cases,
components perform background tasks such act as a timer. A control is an
object that does have a user interface. Controls normally appear in the foreground, such as a command button or a text box. You interact with both
components and controls using special variables you create to reference the
component or control. In addition, you use event handlers to perform tasks
based on user interaction.
The following sections show how to add some components and controls to
the example application. Although you probably won’t create an application
like this in real life, you do find out about the principles you need to build
any dialog box application you want.
Adding the component or control
Before your application can perform useful work, you must add components
or controls to it. The components and controls appear in a special window
called the Toolbox that you display by choosing View➪Toolbox or by pressing Ctrl+Alt+X. The Toolbox begins by showing you a standard list of components and controls, as shown in Figure 2-8. The “Modifying the Toolbox”
section of the chapter describes how to add and remove controls from the
Toolbox as needed.
The example application uses three types of controls: Static Text, Edit
Control, and Button. You have three options for adding controls to a dialog
box form:
✦ Double-click the control in the Toolbox.
✦ Click the control in the Toolbox to select it and then click on the form
where you want to place the control.
✦ Drag the control from the Toolbox and drop it onto the form.
Adding Components and Controls
739
After you add controls and components to the dialog box form, you need to
set properties for each control. Highlight the control and you’ll see its properties in the Properties Window shown in Figure 2-9. The upper portion of
the Properties Window contains a list of properties you can change for the
selected control. The lower half of the window displays a short description
of the selected property.
Book VII
Chapter 2
Creating an MFC
Dialog Box Project
Figure 2-8:
Use the
Toolbox
to obtain
components
and controls
for your
application.
740
Adding Components and Controls
Figure 2-9:
Modify
control
behavior by
changing
property
values.
Now that you have an idea of how controls work on a form, it’s time to look
at the example form. Figure 2-10 shows the simple form used for the dialog
box application in this example.
Figure 2-10:
Use
controls and
property
modifications to
create
the user
interface.
Adding Components and Controls
741
You should observe several important things about this example. The upper
Edit Control, IDC_INPUT, has the Tabstop property set to True so that
the user can select it by pressing Tab. The lower Edit Control, IDC_OUTPUT,
doesn’t because most users won’t want to select it. Because IDC_OUTPUT is
an output, it has the Read Only property set to True. You change the name
of a control by modifying its ID property. Otherwise, Visual Studio provides
unhelpful generic names that will be hard to read in your code.
At this point, you might wonder why IDC_OUTPUT is an Edit Control rather
than a Static Text control. Users can’t select a Static Text control when the
application is running. They can select an Edit Control and copy its content
to the clipboard. Consequently, if you want the user to interact with the text
within a control, you must use an Edit Control.
The Check Result button, IDC_CHECK, performs tasks with both IDC_INPUT
and IDC_OUTPUT. This control has an underlined letter (also called a speed
key), which lets a user select the control by pressing Alt+C. You create the
underlined letter by typing an ampersand (&) in front of the letter you want
to underline. So the Caption property for IDC_CHECK is &Check Result.
Edit Controls don’t provide a method for adding an underlined letter. In
this case, you add a Static Text control as shown in Figure 2-10 and add the
underlined letter to it — pressing Alt+<Letter> selects the associated Edit
Control.
At this point, you have a form with some controls on it. If you compiled the
application at this point, you’d see the controls. You could even type text
and click the buttons. However, the controls won’t do anything because
you haven’t written any code to perform tasks. Before you can access the
controls, you have to create linkage to them. Member variables create the
required linkage for you.
Any control can be associated with a member variable. To create a member
variable, you choose Project➪Add Variable or Ctrl+double-click the control.
Visual Studio displays the Add Member Variable Wizard dialog box shown in
Figure 2-11.
Visual Studio automatically fills out most of the information for you. All you
need to provide is a variable name (m_Input in this case) and a comment so
you know what the variable is for later. The example has member variables
for both Edit Controls. The IDC_OUPUT control has a variable name of m_
Output. After you make the changes you want to the Add Member Variable
Wizard dialog box, click Finish.
Creating an MFC
Dialog Box Project
Creating variables to use in your code
Book VII
Chapter 2
742
Adding Components and Controls
Figure 2-11:
Add
member
variables
to access
controls on
a form in
your code.
Defining methods to react to control events
Controls have events associated with them. An event occurs whenever a
user performs specific interactions with the control, such as clicking it. The
event is always present. However, nothing happens when the event occurs
unless you provide an event handler — special code that does something
when the event occurs. To create an event handler, select the control and
click Control Events in the Properties Window toolbar. You see a list of
events associated with the control as shown in Figure 2-12.
Figure 2-12:
Add event
handlers
to do
something
when
the user
interacts
with your
application.
Defining the Dialog Box Code
743
The IDC_CHECK Button control has a BN_CLICKED event that fires whenever
a user clicks the button. Firing an event causes the application to call the
event handler. To add the event handler to this event, click the down arrow
next to the event entry and choose <Add> OnBnClickedCheck from the dropdown list. Visual Studio creates the new event handler for you and takes you
to that spot in the code file.
You can easily remove event handlers that you don’t want. Simply find the
event entry in the Properties Window and click the down arrow. Choose
<Delete> OnBnClickedCheck (or any other event handler name) from the
drop-down list. In addition, if you can’t find a particular event handler in the
code file, choose <Edit Code> from the list.
Defining the Dialog Box Code
Code is what makes an application perform tasks, as you saw in the other
minibooks. In this case, the example program transfers the content of
IDC_INPUT to IDC_OUTPUT. It’s important to remember that you’re working with a control now — a control that is actually a window on a form.
Consequently, the task isn’t as simple as moving the text directly from one
control to another.
Listing 2-1: Moving Data from One Control to Another
void CSimpleDialogDlg::OnBnClickedCheck()
{
// Obtain the input string from m_Input.
CString ThisString = _T(“”);
m_Input.GetLine(0, ThisString.GetBuffer(100), 100);
// Release the buffer created for ThisString.
ThisString.ReleaseBuffer();
// Place the information in m_Output.
m_Output.SetWindowTextW(ThisString.GetBuffer());
ThisString.ReleaseBuffer();
}
In this case, the example begins by creating a CString object, ThisString,
to hold the string found in IDC_INPUT. Visual C++ provides a host of string
variable types, but the CString is probably the easiest to use and the least
likely to cause memory problems.
Book VII
Chapter 2
Creating an MFC
Dialog Box Project
To move data from one control to another, you must use an intermediary
variable. Listing 2-1 shows the code used in this example to move the string
in IDC_INPUT to IDC_OUTPUT.
744
Defining the Dialog Box Code
The GetLine() function requires that you provide the line number you
want as the first argument. Because IDC_INPUT contains only one line of
text, the only line available is the zero-based value of 0. The second argument is a buffer to hold the LPTSTR (long pointer to a string value). A
CString isn’t directly compatible as an LPTSTR. However, you obtain an
LPTSTR equivalent using the GetBuffer() method as shown. In this case,
you provide a specific buffer length as the only argument to GetBuffer().
The third argument to GetLine() is the buffer length. After this call executes, ThisString contains the value found in IDC_INPUT.
ThisString has allocated an LPTSTR buffer to work with GetLine(). To
prevent a memory leak (memory that the operating system can no longer
access because it thinks the memory is in use even after your application ends), you must call ReleaseBuffer() to release the memory that
ThisString has allocated. Theoretically, ThisString takes care of the
problem for you automatically, but it’s always better to be safe when it
comes to memory allocation.
Now it’s time to place the data found in ThisString into IDC_
OUTPUT so the user can see it. In this case, the example calls on the
SetWindowTextW() method to perform the task. The SetWindowTextW()
method also requires an LPTSTR as input, so you use the GetBuffer()
method again. However, because the SetWindowTextW() method only
reads the content of ThisString, the buffer length is unimportant. Again,
you release the buffer after you use it. Figure 2-13 shows the output from
this example.
Figure 2-13:
The
example
moves text
from one
window to
another.
Understanding the Essential Windows
745
Understanding the Essential Windows
You need to know about several essential windows when working with
Visual C++. One of these windows is the Properties Window that you have
already worked with in the “Adding the component or control” section of the
chapter. You also need to use other windows when creating complex applications or you’ll spend a lot of time looking for things that you know exist,
but can’t find readily.
Working with Class View
Every MFC application relies on a number of classes. The dialog box application is the easiest application you create, and even it contains three classes.
Each of these classes contains a number of methods, variables, and other
features that you need to create the application, as shown in Figure 2-14. You
reveal this window by choosing View➪Class View or by pressing Ctrl+Shift+C.
Book VII
Chapter 2
Creating an MFC
Dialog Box Project
Figure 2-14:
Add event
handlers
to do
something
when
the user
interacts
with your
application.
The upper half of this window provides a hierarchical view of your application. You can drill down and see how Visual C++ puts the classes together. For
example, CSimpleDialogDlg derives from the CDialog base type. Several
layers down you find the base type for all Visual C++ objects, CObject.
746
Understanding the Essential Windows
The lower half of the window displays details about the entry you select in
the upper half. For example, CSimpleDialogDlg defines several variables
including m_Input and m_Output. It also has a number of methods, including CSimpleDialogDlg::OnBnClickedCheck(). The Class View window
reveals all this information to you.
Once you locate the variable, method, event, or other element you want to
work with in Class View, double-click its entry. Visual Studio will take you
directly to the location of that element in the source-code file so that you
can view it and possibly modify it.
Modifying the Toolbox
The “Adding the component or control” section of the chapter shows how to use
the Toolbox to add components and controls to an application. However, the
default Toolbox probably doesn’t contain every tool you require. Fortunately,
you can add and remove tools as needed: simply right-click anywhere within the
Toolbox and select Choose Items from the context menu. After a few seconds (up
to a minute), you see the Choose Toolbox Items dialog box shown in Figure 2-15.
Figure 2-15:
Add or
remove
items in the
Toolbox as
needed.
To add a new component or control to the Toolbox, simply locate it in the
lists shown and click to add a checkmark to its entry. When you click OK,
Visual Studio adds it to the Toolbox. Likewise, you remove an item from the
Toolbox by removing the checkmark next to its entry.
Not every component or control in the Choose Toolbox Items dialog
box appears with every application you create. MFC applications rely on
items on the COM Components tab. If you want to use items on the .NET
Framework Components tab, you must create a managed application — a
task that’s beyond the scope of this book.
Chapter 3: Creating an
MFC SDI Project
In This Chapter
✓ Working with MFC SDI projects
✓ Defining a new MFC SDK project
✓ Using the document/view architecture
✓ Creating the code for the example SDI project
✓ Using the resulting example application
M
any applications rely on the Single Document Interface (SDI). The SDI
is an application that opens just one document at a time and presents a single view of that document. For example, Notepad is an example of
an SDI application. SDI applications are extremely useful because they can
simplify user tasks and make working with the application considerably
easier. However, they also have drawbacks that this chapter discusses.
The Microsoft Foundation Classes (MFC) architecture for the SDI and
Multiple Document Interface (MDI) application are separate documents and
views. A document is the data portion of the application. However, most
users need to see the data contained in the document, which is where the
view comes into play. You find a complete discussion of the document/view
architecture later in this chapter.
One of the best ways to see SDI applications in action is to build one of your
own. The example in this chapter is a basic text editor. After you create
the example, you can augment it as desired to handle any text file on your
system. The amazing thing is that there are many forms of text file out there
right now that you might not quickly think about. For example, an XML file
is simply a text file in disguise. Having the basic text editor in this chapter
as a starting point will let you create a custom editor for any need you have.
Understanding the MFC SDI Project
As with the dialog box application described in Chapter 2, an SDI application is essentially a container. However, in this case, the application holds
748
Understanding the MFC SDI Project
a special framework. The framework describes the menus and toolbars the
users can interact with. In addition, the framework provides a client area in
which a view presents data found in a document.
Because the framework generally gobbles up all the visible area of the
application, an SDI application has a different appearance from the dialog
box application presented in Minibook VII, Chapter 2. You add controls to
the framework rather than to the application itself. The framework places
limits on the kind and appearance of controls. An SDI application has toolbars, menus, and a status bar for you to use. The SDI application dictates
the kinds of controls you see based on the type of application support you
want to provide. It would be unusual to see a command button placed in the
middle of an SDI application unless that application is a form.
Because SDI applications are more structured than dialog box applications,
they tend to produce consistent results that help users learn the application
faster. The user sees certain common constructs and can anticipate their
meaning to an extent. However, SDI applications are also more complicated
to write than dialog box applications and they don’t offer the same level of
flexibility. In short, you trade complexity and flexibility for a more powerful
and consistent application approach.
Considering the MDI difference
Visual C++ lets you create either SDI or MDI
applications. While an SDI application can
open only one document with a single view at
a time, an MDI application can open multiple
documents, potentially with multiple views, at
a time. An MDI application essentially uses a
host application to hold zero or more forms that
have a document/view combination.
Another form of window management lets the
user minimize windows within the host application. The user can still see a window icon within
the host, but the document content is hidden
from view. This kind of window management
lets the user move windows around. The user
can then focus attention on just one or two
document/view combinations at a time.
Because MDI applications have multiple documents or views or both in play at a time, it also
requires some form of window management,
where a single window contains a document/
view combination. Normally, the window management takes several forms. For example, the
user may see a Window menu that contains
a list of the open windows in the application.
Selecting an entry opens that window for use
in the application. The Window menu may also
contain options for arranging the windows on
screen and even creating new windows with a
different view of the document.
From a developer perspective, working with an
MDI application is akin to working with multiple
SDI applications, plus some additional code
for window management. The developer still
needs to open the document and then create
a view of the document content. The view then
appears within a window just as it would for an
SDI application. The main difference is that this
window appears within the host and the host
provides the window management (which the
project template adds automatically for the
most part).
Creating the MFC SDI Project
749
Creating the MFC SDI Project
As with dialog box applications, Visual Studio doesn’t provide a specific
SDI application template. Instead, you use a generic MFC Application template and modify it to meet your specific needs. The dialog box application
you create in Minibook VII, Chapter 2 has limitations placed on it to allow
for the requirements of being a dialog-based application. The following
steps show that SDI applications have fewer limits placed on them. However,
with this extra flexibility come additional requirements for creating a good
application. SDI applications are inherently more complex than dialog
applications.
1. Choose File➪New Project.
Visual Studio displays the New Project dialog box shown in Figure 3-1.
Book VII
Chapter 3
Creating an MFC
SDI Project
Figure 3-1:
Use the
New Project
dialog box
to select
a project
template.
2. Select the Visual C++\MFC folder.
The New Project dialog box displays three kinds of MFC projects as
shown in Figure 3-1.
3. Highlight the MFC Application template. Type a name for the application (the example uses SDIEditor) in the Name field.
4. Clear the Create Directory for Solution option to reduce the complexity of the folder layout for your application.
750
Creating the MFC SDI Project
5. Choose a location for the application in the Location field (click Browse
if you want help in locating the parent folder for the solution). Click OK.
Visual Studio starts the MFC Application Wizard. You see the Welcome
dialog box that shows the default template settings and the steps you’ll
follow to define a project. These steps appear on the left side of the
dialog box and you can click any step to go directly to that location in
the wizard (making it faster to define your project).
6. Click Next or choose the Application Type step.
You see a list of application types and basic settings as shown in Figure 3-2.
Figure 3-2:
Choose
the kind of
application
that you
want to
create.
7. Choose the Single Document option.
The picture in the upper-left corner changes as you make changes to
this step. Choosing the Single Document option results in a picture that
looks much like Notepad.
8. Select a Project Style option (the example uses MFC Standard as
shown in Figure 3-2).
The picture in the upper-left changes to reflect the project style you
chose. You can choose from four project styles when working with an
SDI or MDI application:
• MFC Standard: A traditional user interface like the one found in Notepad
• Windows Explorer: A browser-based interface that looks sort of like
Notepad but relies on Web style content
Creating the MFC SDI Project
751
• Visual Studio: An interface that looks very much like the one found
in Visual Studio that includes Explorer, Output, and Properties panes
• Office: An Office 2007 style interface that includes the Ribbon,
Navigation pane, and Caption bar
9. Choose a Visual Style and Colors option (the example uses Windows
Native/Default).
The visual style you choose determines how the user views the application. When using the Windows Native/Default option, the colors reflect
those made by the user for Windows as a whole. This is the safest
option if you want to ensure maximum accessibility. All other options
reflect a specific Microsoft product such as Office 2007. When you
choose these other options, you can also select the Enable Visual Style
Switching option to allow the user to choose a different visual style and
color for the application.
10. Select the Document/View Architecture Support option.
If you don’t select this option, the application won’t have any document/view support built into it, which means you’ll have to add custom
classes to add this support later. Unless your application has very special needs, it’s usually easier to add the required support as supplied by
Microsoft.
11. Click Next.
• None: The application doesn’t provide any OLE support.
• Container: The user can embed objects into documents the application produces, but the application can’t act as a server for other
containers.
• Mini Server: The application acts only as a server. The user can’t
launch this application separately. The application always acts as a
server for objects embedded into containers.
• Full Server: The application can act as a standalone application. In
addition, a container can launch the server to support either linked
or embedded objects.
• Container/Full Server: The user can embed objects into documents
the application produces. In addition, the application provides full
server support for both linked and embedded objects.
Creating an MFC
SDI Project
You see the Compound Document Support step shown in Figure 3-3.
This step is important because it determines the Object Linking and
Embedding (OLE) support your application provides. Microsoft divides
OLE into servers and containers. A server provides data to a container.
If a user embeds an object into the container, the container calls on the
server to render and interact with the object. The container is a host for
the embedded object. An application can have various levels of server
and container support as listed here:
Book VII
Chapter 3
752
Creating the MFC SDI Project
Figure 3-3:
Define the
level of OLE
support
you want to
provide.
12. Select a Compound Document Support option (the example uses None).
13. (Optional) Select one or more Additional Options as described in the
following list:
• Active Document Server (server only): Provides the ability to manage
ActiveX content using the built-in server. ActiveX is an older Microsoft
object technology (albeit newer than OLE) that’s still in use throughout
Windows and on many Web sites. You can get an overview of ActiveX at
http://msdn.microsoft.com/en-us/library/aa261287.aspx.
You must create a file extension for your application on the Document
Template Strings step (see Step 14) to use this option.
• Active Document Container (container only): Provides the ability to
host ActiveX content within the frame of the container. ActiveX content
requires that the container allow the server to add user interface features such as menus and toolbars to the container’s frame when a user
selects ActiveX content. For example, if you embed an Excel spreadsheet in a Word document and then select the Excel spreadsheet, the
Word application features will change to reflect Excel functionality.
• Support for Compound Files (servers and containers): Modifies the way
your application stores data to include support for embedded and lined
objects. If you select OLE support, you should keep this option selected
to reduce the complexity of creating your document file structure.
14. Click Next.
You see the Document Template Strings step shown in Figure 3-4. (The
figure shows the settings for the example.)
Creating the MFC SDI Project
753
Figure 3-4:
Create a
document
template
string
for your
application.
15. Type a file extension in the File Extension field. Optionally modify the
other fields as needed for your application. Click Next.
You see the Database Support step shown in Figure 3-5.
Book VII
Chapter 3
Creating an MFC
SDI Project
Figure 3-5:
Add
database
support as
needed.
754
Creating the MFC SDI Project
16. Choose a level of database support (the example uses None).
Adding database support requires that you choose one of the database
options, choose a client type, select a data source, and then configure
any additional options. Creating a database application is outside the
scope of the book, so this chapter won’t discuss the requirements for
creating a database application.
17. Choose any required database option and click Next.
You see the User Interface Features step shown in Figure 3-6. (The
screenshot shows the options used for the example.)
Figure 3-6:
Modify
the user
interface
as needed
for your
application.
18. Choose basic user interface functionality such as the kind of border.
Note that some of the features aren’t enabled. For example, you must
provide an About dialog box when creating an SDI application (this feature is optional for a dialog box application).
19. Choose the Command Bar options you want for your application.
The template provides you with a number of command bar options as
described in the following list:
• Use a Classic Menu: This is the menu you’ve seen in Windows
for many years — the kind that appears in Notepad. You can also
choose either a docking toolbar (which lets the user move the toolbars around) or a browser type toolbar (which looks like the one in
the older versions of Internet Explorer).
Creating the MFC SDI Project
755
• Use a Menu Bar and Toolbar: This is the menu system that appears
in Visual Studio. In addition, this option lets you set up the application so users can add user-defined toolbars and images. You can also
let the user create personalized menus.
• Use a Ribbon: This is the menu system used by Office 2007
applications.
20. Click Next.
You see the Advanced Features step shown in Figure 3-7. In most cases,
you don’t need to change these settings very much. SDI applications will
probably require context sensitive help. It’s normally a good idea to add
accessibility features as well so that people with special needs can interact with your application. The Number of Files on Recent File List setting
of 4 is also too paltry for most users today — a good base setting is 10
and you may want even more.
Book VII
Chapter 3
Creating an MFC
SDI Project
Figure 3-7:
SDI
applications
usually
require
a few
advanced
features.
21. Choose the advanced features you want to use (Figure 3-7 shows the
features for the example) and click Next.
You see the Generated Classes step shown in Figure 3-8. This figure
already has the base class changed to CRichEditView for the example.
The base class you choose is extremely important. Because the example
is a text editor, choosing the CRichEditView class saves considerable
coding time. However, note that the figure shows a wealth of other class
types. Depending on the kind of application you create, you might choose
a different base class such as CFormView for a database application.
756
Understanding the Document/View Architecture
Figure 3-8:
Selecting
the right
base class
can save
you considerable
coding time.
22. Choose a Base Class option and click Finish.
Visual Studio creates all the files required for your application based on
the extensive list of selections you made.
If you were to compile the application right now, it would perform as a basic
rich text editor. You can create new documents, save documents to disk,
format document content, and even paste links to external files. Even the
basic help is in place. Of course, this shell of an application is extremely
generic. You still have to perform a considerable amount of customization
to make it completely useable, but you do have enough elements in place to
play with it a bit.
Understanding the Document/View Architecture
The document/view architecture is at the center of the vast majority of MFC
applications. As the name implies, the programming technique keeps the document (the data) separated from the view (the presentation of the data). By separating the document from the view, it becomes possible to create a view of just
part of the data or multiple views of the same data. For example, a spreadsheet
application can present the same data in tabular and graphic form.
The base class for documents is CDocument. An application can use
CDocument, but many inherit CDocument and augment its functionality.
Adding Code to Your SDI Project
757
The CDocument class does provide some essential features, such as the
UpdateAllViews() method. This method makes it possible for the document to notify all views that the document has changed, no matter what the
source of the change might be. The simple AddView() method lets an application add a new view of the data to a list of views.
The base class for views is CView. As with CDocument, many applications
inherit CView functionality and augment it. As with CDocument, CView also
implements some basic functionality you need to create a robust application. For example, CView provides the GetDocument() method which
requests a copy of the current document. Many of the CView methods
define what happens when the user performs a certain task, such as dropping an object on the view. Of course, many of the calls also handle rendering and determine how the user can scroll through the document when the
view provides a partial presentation.
Some people think that an application needs only a document and a view to
provide complete functionality. However, it’s important to remember that
the document/view architecture affects only the data and the user’s view of
that data. An application also requires some kind of framework in which to
present the data and an application shell to interact with Windows.
This section provides an overview of the document/view architecture essentials. In most cases, this is all you really need to know to write MFC applications. However, you can get a more complete description of this architecture
at http://msdn.microsoft.com/en-us/library/4x1xy43a.aspx.
Careful selection of options when you use the application template will
reduce the amount of coding you must perform to create a functional application. In fact, it’s quite possible to get close to a working application by
using precise selections. The sample application is an example of such selections. You can use the application right now. It won’t have any customization, but it will work. The following sections describe how to add code to the
application shell that that template creates for you.
An overview of the essential application files
One of the major areas of confusion for anyone working with MFC is the
number of files that the template creates. When you view Solution Explorer
(as shown in Figure 3-9), you see a hoard of files. In fact, Figure 3-9 doesn’t
include the massive number of help topic files needed to create the help file
associated with this application.
Creating an MFC
SDI Project
Adding Code to Your SDI Project
Book VII
Chapter 3
758
Adding Code to Your SDI Project
Figure 3-9:
Solution
Explorer
shows
you the
document/
view
architecture
as files.
It’s important to remember the information found in the “Understanding the
Document/View Architecture” section of the chapter when you look at the
files. Choosing the right file is easier when you know what part of the application you want to modify. The following list describes the purpose of each
of the files so that you know how they relate to the document/view architecture employed by MFC applications:
✦ CntrItem: Provides support for any OLE or ActiveX features in your
application. The number of features found in this file depends on the
options you choose through the template and the base class you choose
for your application. Any form of embedding, linking, and ActiveX support depends on this part of the application. For the sample application,
this part of the application implements the CSDIEditorCntrItem
class, which provides support for the rich editing features found in the
CRichEditCntrItem base class.
✦ MainFrm: Implements the application frame — the part of the application that holds the document and its view. The application frame
Adding Code to Your SDI Project
759
contains the user interface features, such as toolbars and menus. For
the sample application, this part of the application implements the
CMainFrame class, which implements the CFrameWnd base class.
✦ SDIEditor: Presents the application’s face to the outside world. For
example, if you want to add command-line functionality to your application, you add it to this part of the application. The “Registering and
unregistering the application” section of the chapter discusses the
default command-line arguments that an MFC application provides.
For the sample application, this part of the application implements the
CSDIEditorApp, which implements the CWinApp base class.
✦ SDIEditorDoc: Implements the document portion of the document/view
architecture. Anything that affects the data the application manipulates
appears in this part of the application. For the sample application, this
part of the application implements the CSDIEditorDoc class, which
implements the CRichEditDoc base class.
✦ SDIEditorView: Implements the view portion of the document/view
architecture. Anything that affects how the user sees the data that the
application manipulates appears in this part of the application. For
the sample application, this part of the application implements the
CSDIEditorView, which implements the CRichEditView base class.
As with any C++ application, the CPP (C++) files contain code that implements application features. The H (header) files contain declarations for
the classes found in the CPP files, as well as variables used to interact with
the user interface. All of the files in the Resource folder contain user interface elements — everything from menus and toolbars to strings used for
versioning.
Locating Microsoft specified suggested changes
Microsoft suggests changes for the application. You need to make some of
these changes to perform basic application customization. Most developers
perform additional changes, so the changes described in this section are the
minimum you should consider making.
None of the H files contains suggested changes. Therefore, the best way to
proceed is to open the first file in the Source Files folder and go from there.
To see the changes quickly, open the Task List window shown in Figure 3-10
by choosing View➪Task List or by pressing Ctrl+T, which shows the task list
for the SDIEditor.CPP file.
Book VII
Chapter 3
Creating an MFC
SDI Project
The base class you select in the template affects the base class used
to create the CntrItem, <AppName>Doc, and <AppName>View files.
Consequently, if you select a different base class from the sample application, the base classes you see used for these files will also differ.
760
Adding Code to Your SDI Project
Figure 3-10:
Microsoft
makes
a list of
suggested
changes
for you.
The task list in Figure 3-10 is typical. The first entry, “TODO: add construction code here,” is optional. If you want to perform some special applicationlevel initialization tasks, you must perform them at the location indicated.
However, the second entry isn’t optional. When this application starts for
the first time, it looks for a registry entry that contains the application settings. These settings appear at the location indicated by this line of code:
SetRegistryKey(_T(“Local AppWizard-Generated Applications”));
Normally, you change the string shown to something that reflects your
company name or you as an individual. The template automatically includes
an application name as part of the entry hierarchy. However, the default
string is ambiguous and keeping it in place could cause problems with other
applications you create. If you want to create a registration hierarchy, separate the hierarchy keys with double backslashes, such as “MyCompany\\
TheSecondLevel”.
When you finish making a change, remove the TODO comment from the file.
Making this change reduces the number of items in the Task List window to
those that you haven’t completed yet. In addition, most developers find it
easier to open a single file at a time and then close it when they’re finished
making changes. The Task List windows show all the tasks for every file you
have opened, which means it can become cluttered quite quickly.
Making resource changes
The resources that come with the application template require customization. To view the resources, open the Resource folder in Solution Explorer
and double-click the SDIEditor.rc entry. Visual Studio opens the
Resource View window shown in Figure 3-11.
The Resource View window groups things by resource type. For example,
the Accelerator folder contains lists of virtual keypresses — the keypresses
Adding Code to Your SDI Project
761
that users can use in place of menu or toolbar selections. A typical example
of a virtual keypress is Ctrl+N for the File➪New command.
Figure 3-11:
The
Resource
View
window
contains a
list of all the
resources
for an
application.
Book VII
Chapter 3
The Icon folder contains a list of icons used with the application (typically
two). The icons are generic, as shown in Figure 3-13. One mistake that many
developers make is to change just the first icon. Notice that this single icon
file actually includes a number of icons in different sizes. For your application to look right, you must change every one of the icons by selecting their
entry in the left pane. The 4-bit icons have the fewest color choices, and
the 32-bit icons have the greatest. Modifying the icons can consume quite
a bit of time, so make sure you plan for this need when developing your
application.
Creating an MFC
SDI Project
To open a particular resource for editing, double-click its entry in Resource
View. One of the most commonly modified items is the About dialog box
(IDD_ABOUTBOX). The About dialog box supplied with the application is
extremely simple, as shown in Figure 3-12. Most companies want to add a
company name, contact information, and other specifics. Some About dialog
boxes include specialized features, such as a button users can click to register their application. It helps to look at what other people are doing with the
About dialog box when making a decision about what to do with the About
dialog box in your application.
762
Adding Code to Your SDI Project
Figure 3-12:
Make the
About dialog
box specific
for your
application.
Figure 3-13:
Change all
the icons
for your
application
as needed.
Adding Code to Your SDI Project
763
The must change resource item is the version information found in the
Version folder (VS_VERSION_INFO). Unlike most of the other resources,
this file contains TODO items, as shown in Figure 3-14. Make sure you
address needs such as your company name.
Figure 3-14:
Modify the
version
information
to match the
application’s
current
state.
Book VII
Chapter 3
Depending on how you set up the template, Visual Studio can create a relatively complete help system for the application shell. Of course, this help
system, like all other parts of the application, requires modification. The
template doesn’t customize help for your company, so you have to work on
it a little.
This book doesn’t provide a complete dissertation on the help system provided with Visual C++. You could very well require an entire book to obtain
complete, detailed knowledge of the topic. However, you’ll get a good overview and enough to get you started in this section. If you want to create a
fully customized help system for a shrink-wrapped application, the information in this section probably won’t provide enough information.
Creating an MFC
SDI Project
Considering the help file
764
Adding Code to Your SDI Project
The help files appear in two folders in Solution Explorer: HTML Help Files
and HTML Help Topics. The HTML Help Files folder contains the structural
help elements, such as the help file index. The only file you need to modify
in this folder is SDIEditor.hhc, which contains a few entries that don’t
reflect the application. For example, you must change the following entry to
reflect the application name:
<param name=”Name” value=”<<YourApp>> Help Index”>
You need to replace YourApp with the name of your application. This same
file has other changes you need to make. As you add help topics, modify the
functionality of the shell application, and perform other tasks, you need to
make other changes to this file. For example, adding a major menu requires
that you add an entry for it to the SDIEditor.hhc file.
The second folder, HTML Help Topics, contains one HTML file for each help
topic in the help file. As you add features to your application, you need to
add HTML files here to accommodate those features. However, at the outset,
you need to worry first about the main_index.htm file, which contains a
number of undefined entries such as the one shown here:
<TITLE>(<<YourApp>> Help Index)</TITLE>
As with the SDIEditor.hhc file, you must replace YourApp with the name
of your application. This file also contains placeholders for any ancillary
topics you want to include in your application, such as tutorials or troubleshooting information.
The YourApp entry appears frequently in the template-generated help files.
It’s embarrassing to have one of these entries escape notice and make it
into the final product. To keep this from happening, choose Edit➪Find and
Replace➪Find in Files to display the Find and Replace dialog box. Type
YourApp in the Find What field and click Find All. You see a Find Results
window like the one shown in Figure 3-15 that shows all the files that contain
the YourApp entries you have to change. To locate a particular entry, doubleclick it in the Find Results window and Visual Studio will open the associated
file for you.
For some reason, Visual Studio doesn’t always rebuild the help file after you
make changes to the content files. To ensure that your help file is updated,
delete the CHM (Compiled Help Module) file in the application output folder
before you perform a build. Deleting this file will force Visual Studio to
rebuild the help file.
Adding Code to Your SDI Project
765
Figure 3-15:
Make sure
you find all
the YourApp
entries.
Registering and unregistering the application
Unfortunately, the registry entries stay in place until you tell the application
to remove them. Every SDI application supports four default command-line
switches. For the example application, these switches are documented in the
SDIEditor.cpp file. Here’s a short description of each command-line switch:
✦ /RegServer: Registers the application file extension support, as well as
any OLE or ActiveX support it provides
✦ /Register: Registers the application’s settings
✦ /Unregserver: Removes the application file extension support, as well as
any OLE or ActiveX support it provides
✦ /Unregister: Removes the application’s settings
Book VII
Chapter 3
Creating an MFC
SDI Project
Every time you start the example application, it checks the registry to
ensure that it’s registered. The SDI application performs two kinds of registration. First, it registers its file extension so that when you double-click a
file with that extension, it opens in the appropriate application. Second, it
registers the application settings. Registration is good because it helps your
application to perform tasks properly.
766
Seeing the Text Editor Project in Action
The interesting thing about these command-line switches is that almost no
one talks about them. Developer machines often end up clogged with extraneous registry entries because they don’t unregister the application before
making changes that affect file extension, OLE, ActiveX, or settings support.
The dirty machine quickly starts to report inaccurate results and the application can go out the door with nasty bugs. To avoid this problem on your
own machine, simply type SDIEditor /Unregserver and press Enter at the
command line. Now type SDIEditor /Unregister and press Enter. The application registry entries are removed from your machine.
Seeing the Text Editor Project in Action
It’s time to see the text editor in action. Build your project by choosing
Build➪Build Solution or pressing Ctrl+Shift+B or clicking Build Solution on
the Build toolbar. When the build process completes successfully, press F5
to start the application. Figure 3-16 shows what you typically see when you
start the application and enter some information in it.
Figure 3-16:
The
example
application
is a fully
functional
editor.
When you save a file, it has the extension that you’ve assigned to the application. The file content is standard RTF. Open it with Notepad and you’ll see
codes such as those shown in Figure 3-17. If you open it with an RTF-aware
application such as Word, you see the document with all the formatting and
objects in place.
Seeing the Text Editor Project in Action
767
Figure 3-17:
The
application
uses
standard
RTF to store
data.
Book VII
Chapter 3
Creating an MFC
SDI Project
This editor is easy to extend. You can add features such as font support.
Anything you can do in RTF, you can do with this editor. It’s even possible to
convert the output to other formats, such as XML. In short, the example as it
exists in this chapter is only the beginning.
768
Book VII: Building Applications with Microsoft MFC
Chapter 4: Using the Visual C++
2008 Debugger
In This Chapter
✓ Understanding the error application
✓ Getting started with debugging
✓ Using the debugging windows
A
s with any good programming environment, Visual C++ offers a debugger that helps you locate and squash bugs in your application. In fact,
the Visual C++ debugger is one of the highlights of Visual Studio. You get a
world-class debugger that can help you locate nearly any type of bug in your
application and with a minimum of effort.
The Visual C++ debugger works the same as most other debuggers. You can
single-step through the application or use breakpoints to stop at locations
you think might contain errors. Visual C++ provides a number of debugging
windows that show the application state and provide a means for watching
variables as the application executes.
The thing that sets this debugger apart is that everything is well integrated
so that you don’t have to work quite so hard to figure things out. In addition, Visual C++ provides a number of additional windows that you won’t
find with other debuggers. For example, you can create more than one
Watch window.
In this chapter, you discover the Visual C++ debugger. The sections split
debugging into running the application and working with the debugging
windows.
770
A Quick Look at the Error Application
A debugger is a debugger
Minibook III spends considerable time discussing application debugging techniques.
No matter what IDE you use, debuggers tend
to work the same way and the techniques you
use to debug an application are essentially the
same. What differs is the number of debugger
resources the IDE provides. The Visual Studio
debugger works the same as the debugger
for CodeBlocks but has additional functionality. For example, Visual Studio gives you four
Watch windows to debug your code. It also
has features such as visualizers. However,
when all is said and done, the basic principles
are the same, so the techniques you discover in
Minibook III apply to Visual Studio as well.
Visual Studio includes many of the same windows
as CodeBlocks (as do many other debuggers).
For example, if you include Debug statements in
your code, you still see the output in the Output
window. This chapter doesn’t discuss windows
that have the same functionality in both IDEs.
A Quick Look at the Error Application
The example application has two errors in it. The application is supposed
to obtain the value from the user, add 1 to it, and then display the result. As
you can see from Figure 4-1, the application doesn’t work quite right.
Figure 4-1:
The error
application
is simply
broken.
The purpose of this chapter isn’t to keep the problems a deep hidden secret —
the purpose is to show how the debugger helps you locate these problems.
This application has the following two errors:
✦ It relies on a variable, rather than a control, to provide access to the
input value.
✦ It uses the wrong function to perform a conversion.
Starting Your Application in Debugging Mode
771
The example code shows both the errors and the fixes required to make
the application work properly. Listing 4-1 shows the target function for this
example.
Listing 4-1: Creating an Application That Contains Two Errors
void CErrorAppDlg::OnBnClickedTest()
{
// Obtain and convert the value.
int InputValue = atoi((const char *)m_Input.GetBuffer());
// Here’s the first fix.
//CString InputString = _T(“”);
//m_InputControl.GetWindowTextW(InputString);
//int InputValue = _wtoi(InputString.GetBuffer());
// Release the buffer.
m_Input.ReleaseBuffer();
// Add 1 to it.
int OutputValue = InputValue + 1;
// Convert the result to a string.
CString Output = _T(“0”);
_itoa_s(OutputValue, (char *)Output.GetBuffer(10), 10, 10);
// Here’s the second fix.
//_itow_s(OutputValue, Output.GetBuffer(10), 10, 10);
// Output the results.
m_Output.SetWindowTextW(Output);
}
The application begins by using a CString variable instead of a CEdit
control for IDC_INPUT. As a result, m_Input contains a blank string instead
of the value the user typed. The example fixes this error by using a CEdit
control instead and then obtaining the value from the window. At this
point, the code places the value the user typed into a CString variable,
InputString.
The second error is the use of the _itoa_s() function to convert the integer value into a string. The error is somewhat obvious because the code has
to coerce the output of the Output.GetBuffer() method. The fix for this
problem is to use the _itow_s() function instead.
Starting Your Application in Debugging Mode
Debugging an application in Visual Studio requires that you first perform
the right setups. These setups ensure that the application starts in the right
Using the Visual
C++ 2008 Debugger
// Make sure you release the buffer.
Output.ReleaseBuffer();
Book VII
Chapter 4
772
Starting Your Application in Debugging Mode
place, stops in the right place, and has the required debugging information
in the executable file. Otherwise, the debugger simply won’t work. The following sections discuss all these steps.
Creating the proper build
Before you can use your application, you must ask the IDE to build it for you.
Visual Studio provides two default builds for Visual C++ applications:
✦ Release
✦ Debug
You can create other builds as needed using Configuration Manager. To
debug your application, you must select the Debug build from the Solution
Configurations drop-down list located on the Standard toolbar. This same
drop-down list also provides access to Configuration Manager. When you
finish debugging your application, choose the Release build, and rebuild the
application for distribution purposes.
Setting breakpoints
Breakpoints tell the debugger to stop in a certain location so that you can
begin debugging the application. You set breakpoints wherever you think
you might be able to gain information required to debug the application. For
example, you might want to set a breakpoint at the location used to set an
application value and again where the application uses the value to perform
a task. Some global variables are initialized and used in two different methods, so setting two breakpoints isn’t unusual.
To set a breakpoint, click in the margin next to the line where you want the
debugger to stop. Visual Studio displays a red circle to mark the breakpoint.
For example, Figure 4-2 shows a breakpoint at this line of code:
int InputValue = atoi((const char *)m_Input.GetBuffer());
After you have a breakpoint set, the debugger will stop at that location. You
can also perform a number of configuration changes to breakpoints. To see
the list, right-click the breakpoint and select the option you want from the
context menu. Here are the standard breakpoint options:
✦ Delete Breakpoint: Removes the breakpoint completely. You have to
reset the breakpoint to stop at the location.
✦ Disable Breakpoint: Leaves the breakpoint intact so that you can still see
it in the Breakpoints window (see the “Viewing your breakpoints” section of the chapter for details) but prevents the debugger from stopping.
Starting Your Application in Debugging Mode
773
Figure 4-2:
Set
breakpoints
as needed
in your
application.
✦ Enable Breakpoint: Makes a breakpoint functional again after disabling
it. To use this feature, you must right-click on the line of code or enable
the breakpoint in the Breakpoints window.
✦ Condition: Displays the Breakpoint Condition dialog box, where you set
a condition for the breakpoint. You may provide any expression, including variable names, and choose whether the breakpoint functions when
the expression is true or has changed.
✦ Hit Count: Displays the Breakpoint Hit Count dialog box, where you
select how often the debugger must hit a particular line of code before
the breakpoint becomes functional. The default setting causes execution
to stop every time. However, you can set various hit count conditions,
such as when the hit count is greater than a particular number.
✦ Filter: Displays the Breakpoint Filter dialog box, where you define process and thread conditions for the breakpoint. For example, you can
decide that the breakpoint should function for the main thread but not a
child thread. You can set the following filter types:
• MachineName
• ProcessId
• ProcessName
Book VII
Chapter 4
Using the Visual
C++ 2008 Debugger
✦ Location: Displays the File Breakpoint dialog box, where you see the
path, filename, line number, and starting character of the breakpoint.
This dialog box also contains an option that keeps the breakpoint functional even if the source code differs from the original.
774
Starting Your Application in Debugging Mode
• ThreadId
• ThreadName
✦ When Hit: Displays the When Breakpoint Is Hit dialog box, where you
define an action to perform when the debugger encounters the breakpoint. You can Print a Message, Run a Macro, Continue Execution, or
perform any combination of these tasks (you must Print a Message or
Run a Macro to enable the Continue Execution option).
Viewing your breakpoints
Sometimes you want to see a list of the breakpoints you have set. Choose
Debug➪Windows➪Breakpoints or press Ctrl+Alt+B to display the
Breakpoints window. Figure 4-3 shows a typical example.
Figure 4-3:
The
Breakpoints
window
shows a
complete
list of the
breakpoints
you’ve set.
The default breakpoint appears like the first one in this list with a red circle.
When you add a condition of some sort, the red circle has a plus sign added
like the second breakpoint in the list. Disabled breakpoints appear with a
hollow circle, as shown for the third entry.
You can interact with the breakpoints in a number of ways. Double-clicking
a breakpoint takes you to that location in the file. As an alternative, you can
click Go To Source Code or press Alt+F9, then press S to go to the breakpoint location in the file.
Click Disable All Breakpoints to keep breakpoints in place but prevent the
debugger from stopping at them. You can also delete individual breakpoints
or all of the breakpoints at once. Right-click a breakpoint and you see a context menu where you can set conditions.
Figure 4-3 shows the default columns. The Breakpoints window provides
a considerable list of additional columns. Simply choose the columns you
want to see from the Columns drop-down list. The example application
relies on the three breakpoints shown in Figure 4-3 without any conditions
attached — all three breakpoints are active.
Working with the Debugging Windows
775
Starting the debugger
You can start the debugger in a number of ways. For example, you can
simply click Step Over in the Debug toolbar or press F10. However, the standard method to start debugging is to set a breakpoint and then use one of
these techniques:
✦ Click Start Debugging in the Debug toolbar
✦ Press F5
✦ Choose Debug➪Start Debugging
Working with the Debugging Windows
The debugging windows tell you things about your application. Precisely
what the windows tell you depends on where you set breakpoints and the
particular window. Most debugging windows provide some means of viewing
variables and their content. Because some variables are complex, you can
also drill down into the variables to see the content of objects and properties they contain. The following sections describe the debugging windows.
Viewing the focus variables using the Autos window
The example application has a problem obtaining the value the
user typed into the form. The first breakpoint takes you to the
CErrorAppDlg::DoDataExchange() method, where the application
obtains data from the form and places it in a variable at this line:
DDX_Text(pDX, IDC_INPUT, m_Input);
This line of code shows the data exchange between IDC_INPUT
and m_Input. When you follow the code, you find that the
CErrorAppDlg::DoDataExchange() method is called only when the
program starts and again when you close the form. Consequently, the first
problem with the application is that m_Input is always a blank as shown in
Figure 4-4. As you discover if you look at the other debugging windows, the
Autos window is the only one that provides this view and makes it possible
to see the first error in this application.
Using the Visual
C++ 2008 Debugger
The most commonly used window is Autos. In fact, this window appears
by default when you start the application in debugging mode. The Autos
window is exceptionally useful because it helps you focus on the variables in
use at a particular line of code. It shows all the variables in use, regardless of
whether these variables are local or global.
Book VII
Chapter 4
776
Working with the Debugging Windows
Figure 4-4:
The Autos
window
focuses
attention on
variables of
interest for
the current
task.
The Autos window provides three columns that tell you the variable name,
contents, and type. Click the plus sign next to any variable name that has one
and you drill down into the object to see the elements of that variable. Note
that some of the entries in the Value column have a magnifying glass next to
them. Visual Studio offers visualizers for certain kinds of data, including
✦ Text Visualizer
✦ XML Visualizer
✦ HTML Visualizer
Select a visualizer from the drop-down list next to the magnifying
glass. Click the magnifying glass to view the data using the visualizer.
Figure 4-5 shows an example of the Text Visualizer for Output in the
CErrorAppDlg::OnBnClickedTest() method. The Text Visualizer shows
that Output is filled with garbage because it isn’t filled using the correct
function.
Figure 4-5:
Use
visualizers
to see data
clearly.
Working with the Debugging Windows
777
Viewing all of the variables in a method
using the Locals window
The Locals window focuses attention on the local method. You don’t see any
global variables. However, in some cases, you really do want to see just the
local variables. For example, the Locals window makes the first error in the
example application painfully obvious, as shown in Figure 4-6.
Figure 4-6:
The Locals
window
works
precisely
the same as
Autos, only
the focus
differs.
Screening specific variables using
the Watch 1 window
In some cases, you don’t want either a current line of code or a local method
focus. Visual Studio supports up to four watch windows — each of which
can have a different focus. The default debug setup shows Watch 1, but you
can display Watch 2 through Watch 4 by choosing the corresponding option
on the Debug➪Windows➪Watch menu.
The easiest way to use a Watch window is to drag a variable of interest from
the Code window to the Watch window. You can also type a variable into the
Watch window. If you decide that you want to monitor just part of a variable,
simply edit the value in the Name column.
Even through the Watch window provides you with significant flexibility in
adding the variables you want to see, it works the same as the other variable
windows. In short, you can still drill down into variables and use visualizers
to see variable content.
Book VII
Chapter 4
Using the Visual
C++ 2008 Debugger
The InputValue variable in the CErrorAppDlg::OnBnClickedTest()
method is 0 after the application calls int InputValue = atoi((const
char *)m_Input.GetBuffer()); as shown in Listing 4-1. As a result,
OutputValue contains 1 instead of the number you expect after the math
calculation. The Locals window works just like the Autos window in every
other way.
778
Working with the Debugging Windows
Working with the Call Stack window
The Visual Studio Call Stack window is about the same as the Call Stack
window found in any other debugger. However, in this case, you obtain additional information such as the name of the file that holds the code for the
call, as well as the class and method name. When you double-click an entry
in the Call Stack window, Visual Studio opens the required file and places
the cursor at the point the call occurs so you can examine the surrounding
code with ease.
Chapter 5: Analyzing Your
Visual C++ 2008 Code
In This Chapter
✓ Working with Performance Wizard
✓ Creating a code profile
H
ow fast does it work? That’s the question many developers ask when
the application is finally put together because it’s the question that the
customer will ask when the application is delivered. No one wants to spend
hours waiting for an application to perform its task. In fact, people want an
application that produces results as close to instantaneously as possible.
Fortunately, Visual C++ makes it possible to check the speed of your application and locate areas that don’t work as quickly as they could. Of course,
you must still make the changes required to produce optimal results — the
tools can only point to potential sources of problems, not tell you how to
correct them.
You always have to consider the consequences of actions you take. An
application doesn’t exist in a vacuum. When you make an application run
faster, you can also cause it to perform unreliably or break security rules
to get the last bit of speed. As the famous saying goes, “Speed kills.” An
application that goes too fast and breaks the rules in the process can kill
your data, which can ultimately kill your company. Consequently, you must
always consider speed improvements in light of how they affect the application environment as a whole.
Using Performance Wizard
Performance Wizard helps you check your code for potential performance
issues. It’s simple to use, as you see in the following steps that take you
through a performance-checking session:
1. Choose Analyze➪Launch Performance Wizard.
You see the dialog box shown in Figure 5-1. This first dialog box lets you
choose any project in the current solution. It’s also possible to select an
external EXE, DLL or ASP.NET application. When you choose an external
application, the wizard adds an additional step where you describe the
external location to test.
780
Using Performance Wizard
Figure 5-1:
Launch
Performance
Wizard
to see
deficiencies
in your
application.
2. Choose a profiling option and click Next.
If you select a project that’s part of the current solution, go directly to
Step 4.
3. Provide the external location information that the wizard requests
and then click Next.
You see the Specify the Profiling Method dialog box shown in Figure
5-2. The profiling method you select determines the kind of statistics
the wizard generates and how it generates them. The wizard offers two
options as described here:
• Sampling: This approach takes snapshots of your application over
time. The snapshots aren’t always completely accurate because you
aren’t performing full-time monitoring of the application. However,
the snapshots do generate less data, making them ideal for processes that have to run a long time to obtain trend data. In most
cases, you use sampling when you want to obtain an overall view of
your application performance.
• Instrumentation: This approach relies on diagnostic probes that you
place in the code. The results are precise. However, instrumentation
consumes considerable resources. Consequently, you normally use
instrumentation to fine-tune your performance analysis after you
obtain an overview using sampling.
Profiling the Code
781
Figure 5-2:
Select a
profiling
method.
4. Choose a profiling method and click Next.
You see a summary dialog box that tells you the specifics of the performance monitoring session.
5. Click Finish.
Profiling the Code
Visual Studio provides a number of ways to create a profile for your application. The easiest method is to use Performance Wizard as described in the
preceding section. After you create a profile for your application, you can
start it and use that profile to perform your analysis. Use the following steps
to begin profiling your code:
1. Highlight the application entry in the Targets folder of Performance
Explorer.
2. Click Launch with Profiling in the Performance Explorer toolbar.
Visual Studio starts your application.
Analyzing Your
Visual C++
2008 Code
Visual Studio displays Performance Explorer, which contains folders for
your application elements and also a folder for reports. The Reports folder
is empty when you begin the sampling or instrumentation profiling process.
Book VII
Chapter 5
782
Profiling the Code
3. Work with your application as you normally do.
Visual Studio collects data about your application. Make sure you exercise your application using the same approach as you would normally.
Using a script can help improve profiling by ensuring that you exercise
the application the same way every time you test it and guaranteeing
that you exercise every feature.
4. Stop the application.
You see a new report added to the Reports folder of Performance
Explorer similar to the one shown in Figure 5-3. Visual Studio creates a
new report every time you run the profile, so you can compare reports
to determine how changes in your code affect application speed.
Figure 5-3:
Performance
Explorer
contains
a list of
reports of
application
speed.
The report contains a listing of applications that cause the most work (by
making calls, for example) and those that do most of the work. Figure 5-4 shows
a report for the simple test application in this chapter. Most applications will
generate more results, but this report gives you an idea of how the report looks.
Instrumented reports look a bit different from sampled reports. Before you
begin the profile, select Instrumentation in the Method drop-down list in
Performance Explorer. When you click Launch with Profiling, the Output
window shows something like this:
Set linker /PROFILE switch (required for instrumentation) on project
SimpleDialog.vcproj.Profiler started
Instrumenting SimpleDialog.exe in place
Info VSP3049: Small functions will be excluded from instrumentation.
Microsoft (R) VSInstr Post-Link Instrumentation 9.0.30729 x86
Copyright (C) Microsoft Corp. All rights reserved.
File to Process:
SimpleDialog.exe --> SimpleDialog.exe
Original file backed up to SimpleDialog.exe.orig
Successfully instrumented file SimpleDialog.exe.
Profiling the Code
783
This is a normal part of the process. You test the application just as you
normally do. However, the output report contains more detail, as shown in
Figure 5-5.
Figure 5-4:
Sampling
reports give
you a good
overview
of your
application
speed.
Book VII
Chapter 5
Analyzing Your
Visual C++
2008 Code
Figure 5-5:
Instrumentation
provides
additional
details.
784
Book VII: Building Applications with Microsoft MFC
Appendix A: Automating Your
Programs with Makefiles
In This Appendix
✓ Compiling and linking your programs
✓ Automating your work
✓ Implying work with inference rules in your Makefiles
✓ Getting the most out of Makefiles
S
ince the beginning of time, or at least since the beginning of the Unix
operating system, programmers have used a utility called make to build
their programs. And it’s still often used today. The make utility looks at
which of your source-code files have changed and decides what needs to be
compiled and built.
Development tools, such as CodeBocks and Microsoft Visual C++, don’t
require you to use a make utility because they have such decision-making
features built in. But many free compilers use them. Fortunately, the process for creating and using make files is no longer as difficult as it once was.
Third-party libraries come with make utilities (such as the Boost library’s
Boost Jam and Boost Build; see Minibook VI, Chapter 3) that greatly reduce
the complexity of creating and using make files.
Before using make, understanding the compile and link processes is important. In this appendix, we cover the compile and link processes and advise
how to use make to automate your building. Please note, however, that
make itself is a complex tool, and enough information is available about it to
fill an entire For Dummies book. Therefore, we suggest that you don’t worry
about mastering make and what are called Makefiles. Instead, read this
appendix so you understand them. Then, if you work with Makefiles in
your projects, start with an existing one. If you understand it, you can easily
modify it for your project.
Compiling and Linking
When you create a program, you write your code in various source-code files.
For one program, you can have many different source-code files. Some large
corporate projects may have hundreds (or even thousands) of source-code
786
Compiling and Linking
files with dozens of programmers working on the different files. As you can
imagine, dozens of strong-willed programmers working together makes for
quite an adventure; but by using tools like make, these programmers are
able to easily work together without a single disagreement ever taking place.
Okay, we lied. But nevertheless, make makes their lives easier.
To transform these source-code files into a single program, you need to compile and link them.
Compiling means transforming your C++ code (or whatever language you are
using) into a machine-readable language called Assembler. The Assembler
language differs among types of processors. Most of you reading this book
are probably working on some version of an AMD or Intel processor, so the
C++ compilers you use normally translate your programs into Assembler language appropriate for the processor on your system. (You can also tell the
compiler to target some other processor in many cases.) The compiler stuffs
all this Assembler code into a file called an object file and typically names
the file the same as the original source-code file but with an .obj or .o
extension. For each source-code file, the compiler makes a single object file
After you have compiled all your source-code files, you run the linker. The
linker takes the object files and combines them into a single file that you can
run on your computer. This single file usually gets an .exe extension, which
stands for executable. The origin of this term comes from execution, which
refers to the running of a program and probably had something to do with
what the user of the first computer program wanted to do to the programmer after using the program. But we’re only guessing.
The linker can produce other kinds of output file. For example, you can
create a .lib (library) or .dll (Dynamic Link Library, or DLL) file. These
files contain executable code, just as the .exe file does, but you don’t execute them as standalone files — an .exe file normally loads them and uses
the executable code they contain.
The compiler also inserts into the object files a great deal of information in
addition to the assembler code. For example, when you are still in the process of developing your program, you can instruct the compiler to put debug
information in the file. (Although sometimes the debug information goes
in a separate file; it depends on the compiler.) Debug information includes
the names of your variables and the line numbers of the source code. When
you use a debugger tool, that tool knows about your code by looking at the
debug information.
The compiler also puts information about the code, such as the names of
items that occur, in other source-code files. For example, if you are writing
code that calls code in another source-code file, the compiler includes the
name of that code in the object file. That way, the linker can connect the two.
Automating Your Work
787
Understanding external linkage
An example of where you may encounter
external linkage is when code in one sourcecode file calls a function in another sourcecode file. When the compiler compiles the
first source-code file, it doesn’t know where in
the compiled assembler code the routine will
be when it compiles the second source-code
file. And even if the second source-code file is
already compiled, the compiler isn’t particularly
interested in digging around the other object file
to figure out where it is. So instead, the compiler simply creates a reference to the routine. It
places this reference inside the first object file.
Later, the linker replaces the reference with the
address of the call, and that address is what
will end up in the final executable. This address,
however, is just temporary and serves as a
placeholder until the final program is loaded
into memory. When you run the executable
and the program gets loaded into memory, a
special application called the loader replaces
the address with the actual memory address
where the routine is located. Whew!
Your code may also call code that lives outside
your program, such as a routine in a DLL. In that
case, the compiler still puts the name of the
routine inside the object file. But at link time,
the linker includes a placeholder that notes the
name of the item (or perhaps a unique number)
and the name of the DLL file. The linker puts
that information inside the executable file.
When you run the executable file and the program gets loaded into memory, the computer
first makes sure that the DLL is loaded (following the same steps here that it’s using to load
the executable! Oh my!) and then replaces the
information with the real live address of the
DLL’s routine. Again, Whew!
Finally, a compiler can add resources to the object files, such as graphics
and sounds that your application requires. These resources appear as data
that the application accesses later. Data appears in separate areas from
executable code within the file, but you don’t need to worry about the object
file organization — the compiler takes care of managing both code and data
for you.
Automating Your Work
When you’re developing a program and working with, say, ten different
source-code files and you’re ready to compile and link your work, you could
compile each source-code file separately and then link them all together.
However, it would be nice if you had to compile only the source files that
have changed since the last time you compiled. After all, if one of the sourcecode files was compiled to an object file earlier and hasn’t changed since the
last compile, why bother compiling it again?
788
Implying with Inference Rules
The solution is to use some kind of special program that checks to find out
which source files have changed and compiles only those. Or if none of the
source files have changed, the special program checks only to see whether
any external libraries have changed and, if necessary, does only a link. Or if
nothing has changed at all, do nothing and call the program up to date.
That is exactly what the make utility does. Using make, you can be sure that
only the object files and executables that are out of date get updated. How
does make do this? It just compares the dates on the files, that’s all. It looks
at a source-code file and its associated object file. If no object file is associated with the source code, it definitely compiles the source-code files. If an
object file is available, and the object file is newer than the source-code file,
make knows that the source-code file hasn’t changed since the last compile,
and therefore there’s no reason to recompile it. But if the source-code file is
newer than the object file, it must have changed since the last compile, and
thus the make utility compiles it.
To build your program by using make, you just type this at the console
(that is, either the Unix prompt on Unix computers or the DOS window on
Windows computers):
make
Note that different make applications have different names. For example,
Microsoft provides the nmake utility that you can read about at http://
msdn.microsoft.com/en-us/library/dd9y37ha.aspx. When using
these other kinds of make utilities, simply type its name instead of make.
If anything in your project needs building, make will do it. Otherwise, it
prints the simple but sweet little message:
make: `myprogram’ is up to date.
Well, this is all fine and dandy, except for one little catch: the make utility needs something called a Makefile. The Makefile lists information
about what exactly it’s supposed to make. Unfortunately, Makefiles aren’t
exactly simple. The make utility and its Makefile concept was, after all,
invented something like 30 years ago, back in the dark ages when computers
were made of stone and cars had square wheels. But that’s okay. Today’s
computers still handle Makefiles, and you can find out how to use them.
The next section covers what exactly goes inside these animals. The things
in the files are themselves interesting little animals called inference rules.
Implying with Inference Rules
Everybody loves rules, and so does the make utility. Before make knows
what to make, you need to supply it with a set of rules. Programmers have
Implying with Inference Rules
789
decided to call these rules inference rules for lack of a better term. Well,
actually, tons of better terms that take up less space are available. But they
chose inference because the make utility will infer what it’s supposed to do
based on the rules implied by the Makefile.
In general, an inference rule specifies the file you want to create (such as an
object file) and the file or files it depends on (such as its associated sourcecode file). Next the rule states how exactly to create that file. For example, if
you have an object file that depends on a source-code file, the way to create
it is by running the compiler command.
A typical inference rule looks like this. The first line specifies the name of the
file you want to create, then it has a colon, and then the files it depends on
are listed. The next line starts with a tab and then lists the commands to run
to create that new file, with one command per line. The following example is
a rule for creating a text file:
test.out: test.txt
cp test.txt test.out
echo WORKED >> test.out
The first line means that we want to create a file called test.out, and it
depends on the file called test.txt. If test.txt is newer than test.out
(meaning it has changed since the last time this rule was run), make executes the two commands that follow. In this case, the first one copies test.
txt into the test.out file, and the second one appends the word WORKED
at the end of test.out.
You may notice something interesting about the preceding inference rule.
Instead of using the usual Windows/DOS command copy, here we used the
command cp, which is the equivalent under Unix. Many of the free make
utilities on the market, such as Cygwin, rely on Unix-style commands. If you
prefer to work with the MinGW compiler or the Borland compiler, you can
use the DOS copy command instead.
If you want to try out this Makefile, create a text file called Makefile, and
put the following in it:
test.out: test.txt
cp test.txt test.out
echo WORKED >> test.out
(Note that the second and third lines begin with a single tab; do not start the
first line with any tabs.) Next, make a text file in the same directory and call
the file test.txt. Finally, while in the same directory, type the following
command:
make
790
Implying with Inference Rules
Note that you will need to have a make command installed. For example, you
can obtain Cygwin at http://www.cygwin.com/. Minibook VI, Chapter 3
describes the Boost Jam and Boost Build compilers. You can also obtain the
Borland compiler from http://www.codegear.com/downloads/free/
cppbuilder.
If you do some exploring, you are likely to discover that you can optionally
name your Makefile something other than Makefile and then specify
your filename in the make command. For most versions of make, you do this
by typing
make -f filename
However, we do not recommend doing this. Most programmers always use
the filename Makefile, and if you call yours something different, you are
likely to rattle their chains a little. Computer people are not known for their
flexibility; and if you do this, your coworkers probably won’t pay for your
pizza this Friday.
Using rules that depend on other rules
Some special situations arise when working with inference rules. For example, test.out may not exist at all. In that case, the commands will definitely
run because the idea is that this rule tells how to create a test.out file.
Another special situation deals with test.txt itself in the previous examples. Does it depend on anything? For example, another rule may say this:
test.txt: originalfile.txt
cp originalfile.txt test.txt
This rule states that test.txt depends on originalfile.txt. If
originalfile.txt has changed, make creates test.txt based on the
command, which is a cp command.
As it turns out, make is surprisingly smart for such an old computer tool.
Before it ventures into the rule to create test.txt, it sees that test.txt
depends on originalfile.txt, and checks if originalfile.txt has
any rules. If so, make keeps tracing backwards until it gets to a rule with no
prior dependencies.
So these two rules would all be lumped together into a single Makefile:
test.out: test.txt
cp test.txt test.out
echo WORKED >> test.out
test.txt: originalfile.txt
cp originalfile.txt test.txt
Implying with Inference Rules
791
You can have multiple rules in your Makefile, and they don’t all have to
depend on each other. If you have multiple rules without such interdependencies in your file, however, make starts by running the first rule that it
encounters.
Making specific items
When you have a Makefile filled with all sorts of rules, you may possibly
want to build only one particular item inside it. For example, if you have
dozens of source-code files, you may just want to compile the source-code
file you’re working on, without building the whole shebang all the way to the
final executable.
To specify exactly what you want to build, just throw in the name of the item
after the word make:
make test.txt
If you are working with the Makefile with rules for both test.out and
test.txt, then when you issue this command, you create only test.txt;
you will not create test.out. However, if make requires other rules to be
built before this rule can run, it will run those rules.
So with the example we gave regarding multiple source-code files, if you
want to compile only the one called NiftyFeature.cpp, you would type
make NiftyFeature.o
Note that the file extension in this line is .o. The reason is that, although
you’re compiling the source file (NiftyFeature.cpp), you are making the
object file (NiftyFeature.o). Therefore, you specify the name of the object
file in the make command when you want to compile a particular source file.
Depending on multiple files
Not only can you have multiple rules in your Makefiles, but you can have
one rule that depends on multiple files. This is common when building files,
particularly in the link step. For example, the final program itself, such as
myprogram.exe, is going to depend on many files, including all the object
files in your project, as well as any libraries.
To list multiple dependencies, you create your Makefile rule, listing all the
dependencies on the right of the colon, separated by spaces, as in the following example. (Don’t use commas or semicolons to separate them.)
test.out: test1.txt test2.txt
echo hello > test.out
792
Implying with Inference Rules
Here, test.out depends on both test1.txt and test2.txt. When you
run make, if either of these two latter files has changed since the last time
you ran make, the echo line executes.
If you have lots of files to the right of the colon, you can put them on multiple lines if you prefer by ending each line except the final one with a backslash (\), as in the following example.
test.out: test1.txt \
test2.txt
echo hello > test.out
Often, people indent the following lines with a single space, as we did there,
primarily for readability. Although using a tab here is okay, we don’t recommend doing that because the tabbed line makes it harder for us mere humans
to read because the tabbed line will be aligned with the commands that follow.
If a header file changes and your source-code file uses it, you will want your
source-code file to be rebuilt the next time you run make. Therefore, including header files in your list of dependencies is a good idea. But it can be difficult to figure out what header files your source file depends on. It turns out
that there’s a nifty little trick that can help you do this. Compilers such as
Cygwin and MinGW can build such a list for you. To do this, you use the -M
option, as in the following example:
g++ -M main.cpp
When we ran this on one of our source-code files, we saw the following
appear on the screen:
main.o: main.cpp /usr/include/g++-3/iostream.h \
/usr/include/g++-3/streambuf.h /usr/include/g++-3/libio.h \
/usr/include/_G_config.h \
/usr/lib/gcc-lib/i686-pc-cygwin/2.95.3-5/include/stddef.h \
/usr/include/sys/cdefs.h main.h
Notice the left of the colon is the object file, main.o. To the right are the
files it depends on, starting with our source-code file (main.cpp). The several include files follow, including their paths. To use these, you would then
paste them into your Makefile; they represent the first line of the rule.
If you want to use the -M option to generate your dependencies (but only want
to list the header files in your project and not all those other bizarre ones that
live inside the main include directory), you can throw an extra M in, as follows.
g++ -MM main.cpp
Implying with Inference Rules
793
When we run this, we see only the header files in our project. Here’s the
output we get:
main.o: main.cpp main.h
Often, this is more useful because it’s rare that the system header files
change.
Compiling and linking with make
To really use make in your projects, you need rules that tell make to run the
compiler. For each of your source-code files, you want to build an object file;
and from there, you want to link the object files into a single executable. You
can write a Makefile that specifies these rules, such as the following:
mystuff.o: mystuff.cpp
g++ -c mystuff.cpp -o mystuff.o
The first line says that our object file depends on the source file. The second
line is the command to run to create the object file.
Linking is a bit more complex because to successfully link a program, you
need to include several libraries. Which libraries you include depends on
which compiler you use.
The beauty of using Makefile, however, is that after the information for
compiling and linking is there, you don’t need to do anything else. When it’s
time to build your program, you simply type
make
Certainly, you will be compiling and linking. Remember that with
Makefiles, the best way to use them is to simply understand them. That
way, you can take an existing one and fix them up so they work with your
particular project. Writing one from scratch requires a strong knowledge of
the intricate workings of the inference rules. Toward the end of this appendix (in the “Discovering more about make” sidebar), we tell you where you
can find that information if you really want to study it.
Cleaning up and making it all
When you have a Makefile and a huge project, you may want to periodically start over fresh, cleaning out all your object files and the final executable, before you do a build. For example, you may be working on a project,
and so much has changed that you would prefer to start out fresh with your
794
Implying with Inference Rules
next build. To do this, you can include a clean section in your Makefile
that looks like this, if you’re using Cygwin:
clean :
rm -f *.o
rm -f *.obj
rm -f myprogram.exe
Note that no files are listed after the colon. Thus, when you type
make clean
the rm commands (which delete the files) will always run.
If you’re using either the MinGW or Borland compilers, you want your clean
section to look like this:
clean :
del *.o *.obj myprogramexe
Using macros
Environment variables can include macros. A macro is basically a word that
represents something else that is probably more complicated. For example,
you may have something like this:
MYFILES = one.cpp two.cpp three.cpp four.cpp
Then, any place in your Makefile where you want to refer to the four files
one.cpp, two.cpp, three.cpp, and four.cpp, you can instead simply write
$(MYFILES)
When you access a macro, you precede it with a dollar sign ($), and you
put the name inside parentheses. The make utility then knows that this is a
macro and needs to be expanded.
Discovering more about make
If you want to be a serious, diehard, late-intothe-night, big-time maker, you can read its
online manual. You can do tons and tons of
things with make, and you could easily stay up
all night playing with it all — or, at least, trying
to learn it all. You may not ever have a need for
all the things you learn, but you never know.
Here’s the site: www.gnu.org/manual/.
Scroll down to find the entry on make. (make
will be followed by a hyphen and some numbers representing the version number.) When
you click it, you will see an enormous page
filled with the wonders of make. Trust us: It’s
long and boring.
Implying with Inference Rules
795
Getting the most out of Makefiles
Here are some other features you can use when working with Makefiles:
✦ If your lines run long and you want to continue them on the next line
without confusing poor old make, you can end a line with a backslash
(\), and then continue it on the next line.
✦ Your best bet when working with Makefiles is to start with one you
know works and then change it so it applies to your current project.
The truth is, almost no programmer creates a Makefile from scratch.
They don’t like to work that hard on auxiliary projects like messing with
Makefiles. They’d rather get to their programming. So if you need a
starting point, you can find a sample in this appendix.
✦ Most Makefiles will have a rule called all. The idea behind this rule
is that it encompasses all the other rules. When you type make all, you
can build your whole project.
✦ You can include comments in your Makefiles by starting them with a
# character. These comments are not used by the Makefile.
✦ Makefiles can include what are called implicit rules, which are rules
that pertain to a whole set of files with the same file extension (such
as .cpp). These comments can help you understand the Makefiles
when working with them.
✦ If you don’t like Makefiles, you don’t have to use them. Development
environments such as CodeBlocks and Microsoft Visual C++ make it possible to create great applications without ever touching a Makefile.
796
C++ All-in-One For Dummies, 2nd Edition
Appendix B: About the CD
In This Appendix
✓ System requirements
✓ Using the CD with Windows, Linux, and Mac
✓ What you’ll find on the CD
✓ Troubleshooting
E
veryone likes free stuff. Well, that’s what the CD is all about. All that
code you thought you were going to have to type is included on the
CD, so now you don’t have to type it. Likewise, you get the CodeBlocks
compiler. Just install it and start reading. Of course, you do need to know a
bit more about the CD before you use it. The following sections tell you all
about the CD to ensure that you have the most pleasant computing experience possible.
System Requirements
Make sure that your computer meets the minimum system requirements
shown in the following list. If your computer doesn’t match up to most of
these requirements, you may have problems using the software and files on
the CD. For the latest and greatest information, please refer to the ReadMe
file located at the root of the CD-ROM.
✦ A PC running Microsoft Windows or Linux with kernel 2.4 or later or a
Macintosh running Apple OS X or later (the screen shots in the book
show the Microsoft Windows version of CodeBlocks).
✦ At least 512MB of RAM.
✦ The disk space you need depends on packages you install. The configuration used in this book requires 538MB, not including the source code. The
fully compiled source code uses an additional 430MB of hard drive space.
✦ An Internet connection.
✦ A CD-ROM drive.
If you need more information on the basics, check out these books published by Wiley Publishing, Inc.: PCs For Dummies, 11th Edition by Dan
Gookin; Macs For Dummies, 9th Edition by Edward C. Baig; iMacs For
Dummies, 5th Edition by Mark L. Chambers; Windows XP For Dummies,
2nd Edition and Windows Vista For Dummies, both by Andy Rathbone.
798
Using the CD
Using the CD
To install the items from the CD to your hard drive, follow these steps.
1. Insert the CD into your computer’s CD-ROM drive.
The license agreement appears.
Note to Windows users: The interface won’t launch if you have autorun
disabled. In that case, choose Start➪Run. (For Windows Vista, choose
Start➪All Programs➪Accessories➪Run.) In the dialog box that appears,
type D:\Start.exe. (Replace D with the proper letter if your CD drive
uses a different letter. If you don’t know the letter, see how your CD
drive is listed under My Computer.) Click OK.
Note for Mac users: When the CD icon appears on your desktop, double-click the icon to open the CD and double-click the Start icon.
Note for Linux users: The specifics of mounting and using CDs vary
greatly between different versions of Linux. Please see the manual or
help information for your specific system if you experience trouble using
this CD.
2. Read through the license agreement and then click the Accept button
if you want to use the CD.
The CD interface appears. The interface allows you to browse the contents and install the programs with just a click of a button (or two).
What You’ll Find on the CD
The following sections are arranged by category and provide a summary of
the software and other goodies you’ll find on the CD. If you need help with
installing the items provided on the CD, refer to the installation instructions
in the preceding section.
This CD includes the source code found in the book, plus the CodeBlocks
compiler. The source code works fine with Windows, Linux, and the
Macintosh. You must have a special version of CodeBlocks for your platform
of choice.
The programs fall into one of the following categories:
✦ Shareware programs are fully functional, free, trial versions of copyrighted programs. If you like particular programs, register with their
authors for a nominal fee and receive licenses, enhanced versions, and
technical support.
✦ Freeware programs are free, copyrighted games, applications, and utilities. You can copy them to as many computers as you like — for free —
but they offer no technical support.
Troubleshooting
799
✦ GNU software is governed by its own license, which is included inside the
folder of the GNU software. There are no restrictions on distribution of
GNU software. See the GNU license at the root of the CD for more details.
✦ Trial, demo, or evaluation versions of software are usually limited either
by time or functionality (such as not letting you save a project after you
create it).
CodeBlocks Compiler
Freeware version.
For Windows, Linux, and Mac. CodeBlocks is a free compiler you can download at http://www.codeblocks.org/downloads/5. (You can send a
donation for CodeBlocks if you desire, but you are under no obligation to
do so.) This CD includes the 8.02 version of CodeBlocks, which was used to
create the examples in this book. CodeBlocks is distributed under the GPL
v3.0 license, which you can read about at http://www.codeblocks.org/
license/3.
Author-created material
For Windows, Linux, and Mac. All the examples provided in this book are
located in the Author directory on the CD and work with Windows, Linux,
and Macintosh computers. These files contain all the sample code from the
book.
During the writing of this book, a few of our beta readers reported some
odd behavior from their anti-virus programs. It seems that some anti-virus
programs don’t like a few of the source-code files. Just what the anti-virus
programs dislike about the source-code files is unclear, but we assure you
that the source-code files are clean. In fact, you can view the content of most
of these files using a simple text editor and see that there isn’t anything to
warrant concern.
The structure of the directory that holds the examples is Author/BookX/
ChapterYY, where X is the book or chapter number.
Troubleshooting
We tried our best to compile programs that work on most computers with
the minimum system requirements. Alas, your computer may differ, and
some programs may not work properly for some reason.
The two likeliest problems are that your system doesn’t have enough
memory (RAM) for the programs you want to use, or you have other programs running that are affecting installation or running of a program. If you
get an error message such as Not enough memory or Setup cannot
800
Customer Care
continue, try one or more of the following suggestions and then try using
the software again:
✦ Turn off any anti-virus software running on your computer. Installation
programs sometimes mimic virus activity and may make your computer
incorrectly believe that it’s being infected by a virus.
✦ Close all running programs. The more programs you have running, the
less memory is available to other programs. Installation programs typically update files and programs; so if you keep other programs running,
installation may not work properly.
✦ Have your local computer store add more RAM to your computer. This
is, admittedly, a drastic and somewhat expensive step. However, adding
more memory can really help the speed of your computer and allow
more programs to run at the same time.
Customer Care
If you have trouble with the CD-ROM, please call Wiley Product Technical
Support at 800-762-2974. Outside the United States, call 317-572-3993. You
can contact Wiley Product Technical Support also at http://support.
wiley.com. Wiley Publishing will provide technical support only for installation and other general quality-control items. For technical support on the
applications themselves, consult the program’s vendor or author.
To place additional orders or to request information about other Wiley products, please call 877-762-2974.
Index
• Symbols & Numerics •
- - operator, 43
! (bang) operator, 578
!= operator, 61–62
# (pound), 50, 199
% (percent sign), 44–45
& (ampersand), 127–128, 149
&& (and) operator, 63
( ) (parentheses)
arithmetic, 25–26
for loops, 69–70
new operator
initializing value in, 138
using with strings, 139
pointer variables, 132
while loops, 74
* (asterisk)
for multiplication, 22, 43
in pointer variables, 128–129, 131–132,
134–135, 146
UML diagrams, 278–279
... (ellipsis), 473
// (double-slash) comments, 188–189
/ (forward slash), 22, 44–45, 574
/* */ (comment delimiters), 189
: (colon), 298
; (semicolon), 21, 158
[ ] (brackets), 49–51
\ (backslash), 26–27, 48, 574, 792
\0 (null character), 46
\t (tab character), 48
^ (caret), 16, 46
{ } (braces), 17, 69–70
| (or operator), 579
|| (or) operator, 62–63
~ (tilde), 179
+ (plus sign), 22, 38, 52
++ operator, 41, 74
+= (plus equal) operator, 40, 51
<< (insertion) operator, 56, 147, 214,
583–585, 620–623
<< >> (double angle brackets), 283–284
<> (angle brackets), 118–119, 283–284, 310
= (equals sign), 34, 61–62
= (0) operator, 247
== (equal to) operator, 61–62
> (greater than) operator, 62
-> notation, 139, 144–145, 168, 170
>= (greater-than-or-equal-to operator), 62
>> (extraction) operator, 56, 147, 195,
597–599, 620–622
“ (double quotes), 20–21, 27, 48, 118–119
– (minus sign), 22
‘ (single quotes), 46, 48
0 (zero), setting pointers to, 141
•A•
.a (archive) extension, 283
-a command-line switch, 680
abbreviations, 12
About dialog box, 761–762
absolute value, 87
abstract classes, 247–248
abstract virtual functions, 247–248,
280–281
Accelerator folder, 760–761
access methods, 233–236
Acronym Finder Web site, 12
Active Document Container (container
only) option, MFC Application
Wizard, 752
Active Document Server (server only)
option, MFC Application Wizard, 752
active objects, 294
ActiveX content, 752
activity diagrams, 263, 300–302
actors, 290–292
Ada, 298
adaptors, 639
Add Directory dialog box, 693
Add Files option, 112
Add Library dialog box, 699
Add Member Variable Wizard
dialog box, 741–742
802
C++ All-in-One For Dummies, 2nd Edition
adding
pointers, 221–222
variables, 38–41
AddIt function, 645
AddObserver method, 325, 327–330
AddOne function, 91–95
address variable, 418–419
addresses
array, passing to functions, 219–220
function, 418
pointers, 143
in stack, 123–125
AddUp function, 399–400
AddView( ) method, 757
Advanced Features step, MFC Application
Wizard, 736, 755
algorithms, overview, 636–637
aliases, 423
alignments, 589
all rule, 795
allocation of memory, 124
allocators, 639–640
ambiguities, 488–489
American National Standards Institute
(ANSI) standard, 427–429, 433, 571
ampersand (&), 127–128, 149
analysis workflow, 250–254, 265
and (&&) operator, 63
angle brackets (<>), 118–119, 283–284, 310
ANSI (American National Standards
Institute) standard, 427–429, 433, 571
app flag, 579–581
appending to files, 573
application frame, 758–759
application properties, changing, 725–726
Application Settings page, Win32
Application Wizard, 718
Application Type step, MFC Application
Wizard, 733–735, 750
archive (.a) extension, 283
argc parameter, 107
arguments, 94
argv variable, 107–108, 411
$(ARGV) variable, 682
arithmetic
integer variables
adding, 38–41
dividing, 37, 43–45
multiplying, 43
overview, 37–38
subtracting, 41–43
limitations, 24–25
orders of operation, 24
overview, 22–24
parentheses, 25–26
pointers, 221–222
array name, 400, 402
arrays
accessing, 217
allocating on heaps, 407–409
of arrays, 405–406
command-line parameters, 406–407
constant, 411–412
declaring, 217, 398–400
defined, 107
memory use, 137
multidimensional
initializing, 404–405
overview, 403–404
passing, 405–406
overview, 216, 397
passing to functions, 219–221
of pointers, 218–219
pointers to, 400–403
storing, 409–411
of strings, pointers to, 416–418
vector datatype versus, 537
arrows, in use case diagrams, 295
Assembler language, 786
assembly code, 367–368, 388–389, 391–393
assignment statements, 32, 34–35, 62, 298
associated classes, 278–279
associating objects, 538–539
asterisk (*)
for multiplication, 22, 43
in pointer variables, 128–129, 131–132,
134–135, 146
UML diagrams, 278–279
At message, 365
attributes
composition versus, 282
object, 225
UML diagrams, 279
auto-indent feature, CodeBlocks, 22–23
automating work, 787–788
Autos window, 775–776
autosave feature, 349
Index
•B•
backslash (\), 26–27, 48, 574, 792
bang (!) operator, 578
base class
abstract, 247
defined, 184
hierarchies, 236–239
multiple inheritance, 486–489
stereotypes, 284
in UML diagram, 241
virtual inheritance, 489–492
bases, 589
basic_filebuf template class, 581
bcp (Boost copy) utility, 690–692
bidirectional association, 288
bjam.exe file, 678–680
BN_CLICKED event, 743
boilerplate code, 706
bold text, use of in book, 2
Booch, Grady, 258
bookmarks, 725
boolalpha format flag, 587–589
Boolean (bool) variables, 55–56, 428
Boost
applications, building, 693–695
bcp, 690–692
Boost Build, 682–685
Boost Jam, 680–682
BoostBook, 687–689
downloading, 673–680
features of, 672–673
Filesystem, 708–711
Foreach, 706–708
Inspect, 685–687
libraries, building, 675–678
licensing, 673
numeric conversion, 703–706
overview, 671–672, 697
paid support, 673
QuickBook, 689–690
RegEx
creating code, 700–702
library, 699–700
overview, 698–699
803
Regression, 685
tokenizer, 702–703
tools, building, 678–680
unpacking, 674–675
Wave, 692
Boost Build, 682–685
Boost copy (bcp) utility, 690–692
boost\: folder, 674
Boost Jam, 678–682
BOOST_FOREACH macro, 706–708
BOOST_REVERSE_FOREACH loop, 707–708
- -boost=path command-line switch, 691
BoostBook, 687–689
BoostPro Computing, 673
BoostPro Installer, 674
bounds, array, 406
braces ({ }), 17, 69–70
brackets ([ ]), 49–51
break statement, 77–79, 81, 210–211
breaking, 373
Breakpoint Condition dialog box, 773
Breakpoint Filter dialog box, 773–774
Breakpoint Hit Count dialog box, 773
breakpoints
defined, 363
disabling, 376–378
enabling, 376–378
inspecting code, 378–379
overview, 373–374
setting, 375–376, 772–774
viewing, 774
Breakpoints window, 369, 377–378, 774
-brief command-line switch, 686
Browse for Folder dialog box,
CodeBlocks, 13, 693
browser type toolbar, 754
buffers, 649–650, 744
Build and Run option, CodeBlocks, 27–28
Build Log window, CodeBlocks, 15, 19–20, 24
Build option, CodeBlocks, 15, 19, 24, 27–28
Build toolbar, Visual Studio, 724
build.bat file, 678
bulletproof applications, 356
business process reengineering, 249–250
804
C++ All-in-One For Dummies, 2nd Edition
•C•
C++
main function, 17–18
math
limitations, 24–25
orders of operation, 24
overview, 22–24
parentheses, 25–26
name of, 41
projects
defining, 10–15
overview, 9–10
SayHello program
building, 15–16
defining, 10–15
executing, 15–16
main function, 17–18
running, 27–28
typing code, 18–21
tabbing output, 26–27
typing code, 16–17
C++ (.cpp) files, 154, 759
calculations, for math templates, 655–656
calculators, 126
Call Stack window, 369, 386–388, 778
call statement, 389
capabilities
class, 155–156, 163, 253
object, 225–226
capital letters
anticipating user input, 354–355
in class names, 156
in variables, 36
caret (^), 16, 46
carriage return character, 47
CASE (Computer-Aided Software
Engineering) tools, 259–260, 284,
308–309
case blocks, 211
case sensitivity, 36
casting
with C++, 433
with dynamic_cast, 433–436
overview, 193–194, 431–432
with static_cast, 437–438, 492
catch block, 436, 470–474
Categories list, Visual Studio, 728
C/C++ Header wizard, 667
CD (Change Directories) command,
676–677
CD, included with book
contents of, 798–799
customer care, 800
system requirements for, 797
troubleshooting, 799–800
using, 798
CDocument class, 756–757
Ceil rounding, 705
central processing units (CPUs),
385–386, 389
Change Directories (CD) command,
676–677
Change Variable’s Value dialog box, 382
char * type name, 406, 414–416
char ** type name, 411, 415–416
char type name, 46, 51, 427
characteristics
class, 154–156, 163
object, 226
characters
accessing in string variables, 49
adding to strings, 51–52
backslash, 48
carriage return, 47
changing
in strings, 51
through pointers, 133
comparing, 61
double quotes, 48
improper, 359
newline, 46–47
nonprintable, 46
null, 46
overview, 45–46
single quotes, 48
tab, 48
in variable name, 36
wide, 428
chart_traits type, 639
Check Result button, 741
checking code, 233
Index
child classes, 184
CHM (Compiled Help Module) file, 764
Choose Library to Link dialog box,
Boost, 699
Choose Toolbox Items dialog box,
Boost, 746
Chop function, 614
cin object, 56–57, 195, 598
Class, Responsibilities, and Collaborators
(CRC) cards, 253
class definition, 158, 161–162, 164
class diagrams, 261, 275, 287–288
class scope, 313
class templates, 653, 659–662
Class View windows, 745–746
class word, 517
classes. See also streams library; UML
abstract, 247–248
const keyword, 172–173
constructors
adding parameters to, 181–182
overview, 178
sampling, 179–181
deriving class templates from, 524–525
deriving from class templates, 522–524
destructors
overview, 178–179
sampling, 179–181
determining
CRC cards, 253
hidden or missing classes, 253–254
searching for nouns and verbs, 252–253
documentation, 345
engineering software, 249–252
hierarchies of
creating, 183–184
inheritance, types of, 184–185
overview, 182–183
implementing, 156–160
inheritance
adjusting access, 480–482
friend classes, 492–493
multiple, 486–489
overloading, 482–486
overriding, 482–486
polymorphism, 477–480
virtual, 489–492
805
member functions
accessing, 164–167
overloading, 175–177
overview, 154–156
separating, 160–163
member variables
accessing, 164–167
overview, 154–156
naming, 227
nesting, 494–498
objects
overview, 151–153
passing to functions, 170–172
pointing to, 167–170
Observer
automatically adding, 327–330
overview, 322–326
Standard C++ Library, 326–327
overview, 153–154, 248–254
parts of, 163–164
recognizing, 229–230
singleton, 318–321
static, 260
static members, 312–313
stereotypes and UML diagrams, 310–311
streaming
manipulating, 623–630
overview, 619
for text formatting, 620–622
structures versus, 439
templatizing, 503–514
this pointer variable, 173–175
types within, 493, 499–501
UML
aggregating, 281–282
composing, 281–282
inheritance, 280–281
mapping, 277–280
overview, 276–277
classic menu, 754
classifiers, 277, 312
clean section, 794
cleanup code, 178
close member function, 575
closing files, 570–571
CntrItem file, 758–759
806
C++ All-in-One For Dummies, 2nd Edition
code
assembly, 367–368, 388–389, 391–393
boilerplate, 706
in book, 2–3
comments in, 187–189
in custom functions, 92
functions without, 244–245
lines of, 18
pseudocode, 300
reusable, 318
reusing, 88
simplicity of, 74
typing, 16–17
writing faster
help resources, 721–722
IntelliSense, 722–723
code editor, CodeBlocks, 16–17, 23
CodeBlocks
applications
building, 15–16
executing, 15–16
code editor, 16–17, 23
creating multiple source-code files,
110–112
debugger
parts of, 369
programming with, 361–369
running, 363–368
standard, 371
header files, 117–118
main function, 17–18
math, 22–26
Open Include File option, 50
overview, 2–3, 9, 799
projects
defining, 10–15
overview, 10
running program, 27–28
showing information, 18–21
tabbing output, 26–27
using different types for template
parameter, 518
coercion, 193
Cogswell, Jeff, 5
cohesion, 339
collaboration diagrams, 262–263, 299–300
collaborations, class, 253
collections, recognizing, 227–228
colons (:), 298
Columns drop-down list, 774
Combine function, 101–103
Command Bar options, MFC Application
Wizard, 754–755
command prompt, 676, 683–684, 688–689
command-line parameters, 106–108,
406–407
command-line switches
-a, 680
bcp, 691
Boost Jam, 680–682
- -boost=path , 691
-brief, 686
-cvs, 686
- -cvs , 691
-d +n , 681
-d 0 , 681
-d n, 680
- -debug , 690
-f, 677
-f Jambase , 681
GCC, 679
- -help, 690
- -indent arg , 690
- -input-file arg , 690
Inspect utility, 686
-j n , 681
-l n , 681
- -linewidth arg , 690
mingw32-make utility, 677
- -ms-errors , 690
-n , 682
- -no-pretty-print, 690
-o file , 682
- -output-file arg , 690
-q , 682
QuickBook, 690
/Register, 765
/RegServer, 765
-s var=value , 682
- -scan , 691
SDI application, 765–766
-t target , 682
-text, 686
- -unix-lines , 691
/Unregister, 765
/Unregserver, 765
Index
-v , 682
- - value , 682
- -version, 683–684, 690
Commands tab, 728
comment delimiters (/* */), 189
comments, 187–189, 795
compact disc, included with book
contents of, 798–799
customer care, 800
system requirements for, 797
troubleshooting, 799–800
using, 798
comparisons, 52–55, 61
compilation, conditional, 202–203
Compiled Help Module (CHM) file, 764
Compiler drop-down list, Console
Application wizard, 13–14
compilers
CodeBlocks
applications, 15–16
code editor, 16–17, 23
creating multiple source-code files,
110–112
debugger, 361–371
header files, 117–118
main function, 17–18
math, 22–26
Open Include File option, 50
overview, 2–3, 9, 799
projects, 10–15
running program, 27–28
showing information, 18–21
tabbing output, 26–27
using different types for template
parameter, 518
preprocessors, 200–201
streams library, 571–572
compiling
automating process, 787–788
with debug information, 362–363
with make, 793
overview, 19, 27, 785–787
component data types, 439–440
component diagrams, 261, 275
components, 282–285
compose1 functor, 638–639
composition, 278–279
807
compound data types, returning, 441–442
Compound Document Support step, MFC
Application Wizard, 751–752
Computer-Aided Software Engineering
(CASE) tools, 259–260, 284, 308–309
concatenation, 51–52
Condition option, 773
conditional compilation, 202–203
conditional operators, 52–55, 201
conditional statements, 63–66
conditions, defined, 59
Configure Editor dialog box, 23
conio library, 196
ConnectNames function, 96–97
Console Application wizard, 12–14
Console Applications
creating, 12–15
defined, 11
console output, 20
console output (cout) keyword
formatting output, 586
operator overloading, 214
overview, 20
std namespace, 307
writing to console, 56–57, 583–584
const keyword, 172–173, 207, 412, 463
constant arrays, 411–412
constants, 207–209
construction phase, Unified Process,
268, 271–272
constructors
calling one from another, 460–461
copy, 461–463, 564–566
default, 455–457
defined, 138
failable, 464
functional, 458–460
initializing members, 451–455
nested classes, 497
observers, adding to, 327–330
ordering, 468
overloading, 450–451
overview, 178, 449–450
parameters, adding to, 181–182
private and protected, 319–321
sampling, 179–181
808
C++ All-in-One For Dummies, 2nd Edition
container classes
instances
comparing, 543–547
containing, 539–543
iterating through container, 547–551
map, 538–539, 551
overriding, 483
parameterizing, 517
pointers, 539–543
references, 539–543
vector datatype, 536–538
Container/Full Server option, MFC
Application Wizard, 751
containers, 635, 751–752
continue statement, 79, 81
Control Events option, Properties
Window, 742
controls, moving data from one
to another, 743–744
conventions, used in book, 2–3
conversion_traits argument, 705–706
convert method, 705–706
converter template, 703–706
converting
casting versus, 432–433
types, 189–195
copies, of objects, 171
copy constructors, 461–463, 564–566
copy variable, 414–415
CopyFile function, 615
copying
files, 614–616
structures, 440
variables, 34–35
counter variables, 68–75
coupling, 339
cout (console output) keyword
formatting output, 586
operator overloading, 214
overview, 20
std namespace, 307
writing to console, 56–57, 583–584
cp command, 616
.cpp (C++) files, 154, 759
cpp command, 200
CPU Registers window, 369, 393
CPUs (central processing units),
385–386, 389
CRC (Class, Responsibilities, and
Collaborators) cards, 253
Create Directory for Solution option, 733
create_directory keyword, 711
CString object, 743–744
ctime function, 614
cur variable, 221
curly braces ({ }), 17, 69–70
current font function, 95
Current Stack Frame window, 370
cursor, 16, 46
custom functions
forward references, 100–101
function prototypes, 100–101
local variables, 98–100
overview, 91–95
parameters, 95–97
returning nothing, 97–98
writing two versions of, 101–103
Customize dialog box, 727
CView class, 757
-cvs command-line switch, 686
- -cvs command-line switch, 691
•D•
-d +n command-line switch, 681
-d 0 command-line switch, 681
-D DEBUG line, 203
-d n command-line switch, 680
data casting
with C++, 433
with dynamic_cast, 433–436
overview, 193–194, 431–432
with static_cast, 437–438, 492
data storage
arrays
accessing, 217
adding pointers, 221–222
declaring, 217
overview, 216, 409–411
passing to functions, 219–221
of pointers, 218–219
subtracting pointers, 221–222
characters
backslash, 48
carriage return, 47
double quotes, 48
Index
newline, 46–47
nonprintable, 46
null, 46
overview, 45–46
single quotes, 48
tab, 48
conditional operators, 52–55
local variables, 388–390
overview, 29
reading from console, 56–57
strings
accessing part of, 49–51
adding onto, 51–52
adding two, 52
changing part of, 51
overview, 48–49
variables
Boolean, 55–56
copying, 34–35
creating, 30–33
declaring multiple, 33
initializing, 35–36
manipulating, 37–45
naming, 36–37
values, changing, 33–34
data structuring
casting data
with C++, 433
with dynamic_cast, 433–436
overview, 431–432
with static_cast, 437–438
namespaces, 442–447
structures
as component data types, 439–440
equating, 440–441
overview, 438–439
returning compound data types,
441–442
variables
expressing from either side, 429–431
overview, 427–429
Database Support step, MFC Application
Wizard, 753–754
databases, looking up names in, 354–359
day function, 95
Debug build, 772
- -debug command-line switch, 690
debug information, 786
809
DEBUG symbol, 202–203, 206
Debug version, 13–14, 202–203
Debug/Continue button, 368, 375–377
Debugger toolbar, 365–370, 375–376
debugging
CodeBlocks debugger
parts of, 369
programming with, 361–369
running, 363–368
standard, 371
tracing through assembly code, 391–393
viewing threads, 390
Visual C++ 2008 debugger
builds, 772
overview, 769–771
setting breakpoints, 772–774
starting debugger, 775
viewing breakpoints, 774
windows, 775–778
debugging levels, 680–681
Debugging Windows button, 369
dec format flag, 588
decimal numbers, 126
decimal point, 30
decrementing stack pointer, 389
default case, 211, 213–214
default constructors, 455–457
#define directive, 201–202, 206, 209
Delete Breakpoint option, 772
delete function, 139–141, 168, 170, 219, 360
delete[ ] function, 408–409
deleting directories, 611
delimiters
comment, 189
defined, 49
spaces as in console, 195
string, 605–607
demanipulators, 589
demo versions of software, 799
.depend file, 112
deployment diagrams, 261, 275
deque container, 561–563
dereferencing pointers, 129, 131, 148
derived classes
hierarchies, 183–184
multiple inheritance, 486–489
overriding, 483–485
overview, 184–185
810
C++ All-in-One For Dummies, 2nd Edition
derived classes (continued)
protecting members when inheriting,
238–239
virtual inheritance, 489–492
design patterns
mediating with, 330–345
Observer classes
automatically adding, 327–330
overview, 322–326
Standard C++ Library, 326–327
overview, 317–318
singleton classes, 318–321
Design Patterns: Elements of Reusable
Object-Oriented Software, 317–318
design workflow, 251–254, 265
destructors
overview, 178–179, 449–450, 465–466
private and protected, 320–321, 497
removing observers, 327–330
sampling, 179–181
virtually inheriting, 466–469
Dev-C++ 5.0, 363, 371
diagrams. See also UML
activity, 263, 300–302
class, 261, 275, 287–288
collaboration, 262–263, 299–300
component, 261, 275
deployment, 261, 275
dynamic, 260–263, 275
notating, 308
object, 262
overview, 259–264
sequence
comparing in, 296–299
looping in, 296–299
notating, 295–296
overview, 262, 293–295
state, 302–304
statechart, 263
static, 260–261, 275
use case, 262
Dialog Based option, MFC Application
Wizard, 735
Dialog Title field, MFC Application
template, 735
directories
accessing contents of, 611–614
creating, 610–611
deleting, 611
moving, 616–618
overview, 609–618
renaming, 616–618
Disable All Breakpoints option, 774
Disable Breakpoint option, 772
Disassembly window,
368–369, 391–392, 409
dividing variables, 37, 43–45
DLL (Dynamic Link Library), 11, 261,
283–285
doc\: folder, 674
dockable windows, 729–730
docking toolbar, 754
Document Template Strings step, MFC
Application Wizard, 752–753
documentation
BoostBook, 687–689
class, 345
Standard Library, 634
documents, defined, 747
Document/View Architecture Support
option, MFC Application Wizard, 751
DOS, copying files with, 616
DOS box, 11
double angle brackets (<< >>), 283–284
double quotes ("), 20–21, 27, 48, 118–119
double type, 88–89, 428–429, 662–663,
704–705
double-precision floating-point, 428
double-slash (//) comments, 188–189
do-while loops, 67–68, 77
downcast, 433
downloading Boost, 673
DumpEntry function, 614
duplicates, 553
dynamic allocation, 135–139
dynamic diagrams, 260–263, 275
Dynamic Help, Visual Studio, 721–722
Dynamic Link Library (DLL), 11, 261,
283–285
dynamic_cast keyword, 433–436
•E•
EAX (Extended Accumulator) register,
390–392
EBP (Extended Base Pointer) register,
389, 391
Index
Edit Breakpoint dialog box, 377
edit commands, CodeBlocks, 17
Edit Watch dialog box, 383
editing time function, 95
editor windows, Visual Studio, 730
elaboration phase, Unified Process,
268, 270–271
elements, array, 216
#elif construct, 205
ellipsis (...), 473
else keyword, 64–66, 291
empty projects, 11–12
Enable Breakpoint option, 773
Enable Visual Style Switching option, MFC
Application Wizard, 751
encapsulation, 230–236
End of File (EOF), 599–604
endl keyword, 21, 587, 623–625
EnterOnlyNumbers function, 197
enum keyword, 156, 160, 212–214, 499
enumerations, 153, 156, 312
EOF (End of File), 599–604
epilog, 389
equal operator, 564–566
equal to operator (==), 61–62
“equal” value, 53–55
equality key class, 642
equals sign (=), 34, 61–62
equating structures, 440–441
erase function, 104–105
error handling, 576–578
Error List window, 720
error reports, CodeBlocks, 19–20
escape-sequence, 27
ESP (Extended Stack Pointer) register, 386
evaluating conditions
combining evaluations, 62–63
including evaluations in conditional
statements, 63–66
operators, 61–62
overview, 60–61
evaluation versions of software, 799
event handlers, 742–743
Event method, 325–326
exception handlers, 436
exceptions
catching any, 473–474
overview, 469–471
811
rethrowing, 474–475
throwing direct instances, 472–473
.exe (executable) files, 15–16, 27, 786
exists function, 711
explicit default constructors, 457
Explorer view, CodeBlocks, 14–15
expressions, 54
Extended Accumulator (EAX)
register, 390–392
Extended Base Pointer (EBP)
register, 389, 391
Extended Stack Pointer (ESP) register, 386
extending UML, 310–311
extern statement, 119–121, 398–399, 401
external linkage, 787
extraction (>>) operator, 56, 147, 195,
597–599, 620–622
•F•
-f command-line switch, 677
-f Jambase command-line switch, 681
fabs function, 86–90
Façade pattern, 334
fail member function, 577–578
failable constructors, 464
FALSE parameter, 615
false value, 55–56
feasibility, 269
features
bugs versus, 349–351
configuring, 351–352
fields
creating, 592–595
width, setting, 585, 592–595
FIFO (First In First Out) algorithm, 562
File Breakpoint dialog box, 773
File Extension field, MFC Application
Wizard, 753
file_size keyword, 711
filebuf class, 581
Filename with Full Path field, CodeBlocks
file wizard, 111
filenames, 154, 576
files. See also streams library
copying, 614–616
moving, 616–618
renaming, 616–618
812
C++ All-in-One For Dummies, 2nd Edition
Filesystem library, 708–711
FILO (First In Last Out) algorithm, 562
Filter option, 773–774
finalization function, 178–179
finalizer, 69
find algorithms, 645–646
Find and Replace dialog box, 764–765
find function, 630
_findclose function, 612
_finddata_t structure, 612
_findfirst function, 612
finding files, 576
_findnext function, 612
finish variable, 89–90
firing events, 743
First In First Out (FIFO) algorithm, 562
First In Last Out (FILO) algorithm, 562
fixed format flag, 588–589
flags, 585–589
float type, 428–429
floating-point numbers
converting, 192–194
defined, 30
float, 428
greater-than-or-equal-to operator, 62
for loop, 72–73
numeric conversion, 704
Floating-Point Unit (FPU), 370
Floor rounding, 705
flow of events, in use case
diagrams, 291–292
flowcharts, 256–257
flushing files, 571
focus, object, 294
Folder to Create Project In field
Console Application wizard, 13
Static Library wizard, 665
folders
Accelerator, 760–761
boost\:, 674
directories versus, 610
doc\:, 674
HTML Help Files, 764
HTML Help Topics, 764
Icon, 761–762
lib\:, 674–675
libs\:, 674
libs\accumulators\:, 674
libs\algorithm\:, 674
libs\any\:, 674
libs\array\:, 675
libs\more libraries:, 675
more\:, 675
people\:, 675
placing data in specific, 585
Resource, 759–760
status\:, 675
tools\:, 675
Version, 763
wiki\:, 675
for loops
accessing command-line parameters
with, 107–108
breaking, 78
counting backwards, 71
declaring counter variable inside, 72–73
looping through arrays, 217
middle condition, 70
multiple counter variables, 73–74
overview, 67–70
use cases, 291
for_each algorithm, 706
FOREACH loops, 706–708
format flags, 585–589
forward declaration, 496
forward references, 101, 160–163
forward slash (/), 22, 44–45, 574
fourth position, 50
FPU (Floating-Point Unit), 370
FPU Status window, 370
freeing memory, 139–141
freeware programs, 798
friend classes, 492–493
friends, 328, 622
front function, 562
fstream class, 581
Full Server option, MFC Application
Wizard, 751
func parameter, 625
function calls, 124, 143, 386–388
function prototypes, 100–101, 113–117,
160–163, 245
function templates, 653, 655–656
functional constructors, 458–460
FunctionPtr type, 418
Index
functions. See also stacks
calling
overview, 88–89
passing multiple variables, 90–91
passing variables, 89–90
comparison, 545–547
iterator-specific, 636
main, 105–108
member
accessing, 164–167
activity diagrams, 263
defined, 164
hierarchies, 237–238
implementing classes, 158–160
overloading, 175–177
overriding, 243–245
overview, 103
pointing variables to, 419–421
private and protected, 231
prototypes, 161–163
static, 319, 422
templatizing, 533
this variable, 173–175
multiple source files, 113–117
overriding, 482–486
overview, 52, 83–88
passing arrays to, 219–221
passing objects to, 170–172
passing pointer variables to
string parameters, modifying, 144–145
values, changing, 141–144
private, 165–167
public, 165–167
references, 149
return value, 88, 91, 93, 95, 106, 390
returning pointer variables from
as nonpointer, 148
overview, 145–147
returning references from, 424–426
string, 103–105
structures, 441–442
templatizing
member functions, 533
overloading, 530–532
overview, 528–529
writing
forward references, 101
function prototypes, 100–101
813
local variables, 98–100
overview, 91–95
parameters, 95–97
returning nothing, 97–98
two versions of same, 101–103
functors, 637–639
•G•
Gamma, Erich, 317–318
garbage, 381
GCC command-line switch, 679
gcc compiler, 200, 363, 390, 518, 571–573
gdb debugger, 371
general protection faults (GPFs), 271
generalization, 277–278
generalized tools, 651
Generated Classes step, MFC Application
Wizard, 736–737, 755–756
Get function, 236
GetBuffer( ) method, 744
getch function, 197–198
getcwd( ) method, 585
GetDocument( ) method, 757
GetInstance member function, 320–321
GetLine( ) function, 744
getline function, 605–607
getting_started.html document, 675
GIMP Tool Kit Plus (GTK+) Project, 12
global variables, 119–121, 125
glossary of terms, 250
GNU software, 799
GPFs (general protection faults), 271
greater than (>) operator, 62
greater than function, 545
greater-than-or-equal-to (>=) operator, 62
GTK+ (GIMP Tool Kit Plus) Project, 12
guillemots, 118–119, 283–284, 310
•H•
.h (header) files
adding once, 118
angle brackets, 118–119
class, 154, 156–160, 164
contents of, 759
dependencies, 792
814
C++ All-in-One For Dummies, 2nd Edition
.h (header) files (continued)
double quotes, 118–119
global variables, 119–120
in Management window, 111
overview, 115–117
streams library, 572–573
hardcoded casting, 436
hash maps, 641–642
hashes, 640–642
header (.h) files
adding once, 118
angle brackets, 118–119
class, 154, 156–160, 164
contents of, 759
dependencies, 792
double quotes, 118–119
global variables, 119–120
in Management window, 111
overview, 115–117
streams library, 572–573
header wrappers, 121–122
headers
function, 94
STL versus Standard Library, 642
heaps
allocating arrays on, 407–409
dynamic allocation, 135–139
overview, 124–127
Hello World.cpp file, 718
Helm, Richard, 317–318
- -help command-line switch, 690
hex format flag, 588
hexadecimal (hex) numbers, 125–127,
428–429
hibernation, 350
hidden classes, 253–254
hidden windows, 728–729
hierarchies
of classes
creating, 183–184
inheritance, types of, 184–185
overview, 182–183
of objects
abstract classes, 247–248
establishing, 236–238
overriding member functions, 243–245
polymorphism, 245–246
protecting members when
inheriting, 238–243
high cohesion, 339
Hit Count option, 773
.hpp files, 694–695
HTML Help Files folder, 764
HTML Help Topics folder, 764
HTML reports, bcp, 690–692
•I•
Icon folder, 761–762
icons, used in book, 4
ID property, 741
IDC_CHECK control, 741
IDC_INPUT control, 741, 743–744
IDC_OUTPUT control, 741, 743–744
identifiers, 291–292, 305
if keyword
defined, 59–60
End of File, 604
entering passwords, 198
overview, 63–66
use cases, 291
#ifdef lines, 203
if-else block, 64–66
ifstream class, 572, 575, 578, 581, 605–606
implementation workflow, 251, 265
implementations, 571
implicit default constructors, 455–457
implicit rules, 795
implicit temporary objects, 459–460
improper characters, 359
in flag, 580–581
inception phase, Unified Process, 268–270
include files, 117
#include lines, 50, 119, 199–200
incomplete type, 428
incrementing stack pointer, 389
- -indent arg command-line switch, 690
indentation, 22–23
indexes
array, 216, 398
avoiding mistakes, 360
defined, 50
index.htm file, 675
inference rules
cleaning up, 793–794
compiling, 793
features, 795
Index
macros, 794
making specific items, 791
overview, 788–790
that depend on multiple files, 791–793
that depend on other rules, 790–791
information windows, debugger, 370
inheritance
adjusting access, 480–482
friend classes, 492–493
hierarchies, establishing, 236–239
multiple, 486–492
overloading, 482–486
overriding, 482–486
overview, 183–184, 277–278
polymorphism, 477–480
protecting members, 238–243
types of, 184–185
UML, drawing classes, 280–281
virtual, 489–492
initial processing, 359
initialization code, 464
initialization function, 178
initializers, 69, 337, 451–455
initializing
references, 423
variables, 35–36
inline keyword, 663
inner arrays, 410
inner class definition, 496–497
inner loops, 80–81
input, user, 352–355
input streams
EOF, 599–604
extraction operator, 597–599
reading formatted input, 607–608
reading types, 604–607
- -input-file arg command-line switch, 690
inputs, function, 86, 91
insert function, 103–105, 557–558
inserter function, 557
insertion (<<) operator, 56, 147, 214,
583–585, 620–623
insertion point, 16, 46
Insight debugger, 371
Inspect utility, 685–687
inspecting variables, 378–379
installing CD items, 798–800
instance scope, 313
instances. See also objects
comparing, 543–547
containing, 539–543
creating, 504–505
example of, 229
member variables, 158
overview, 154–155
relationships, 276
several, of single class, 160
<<instantiate>> stereotype, 289
instantiating templates, 520
instruction pointers, debugger, 364
instructions, 18
instrumentation, 780, 782–783
int keyword, 32, 128, 427, 704–705
integer variables
adding, 38–41
creating, 30–33
dividing, 43–45
multiplying, 43
pointing at, 133–134
subtracting, 41–43
integers, 30
IntelliSense, 722–723, 725
interface
class, 232–233
object, 232
Internet applications, 76
intersecting sets, 554–557
invoking constructors, 138
io.h header file, 609–610
ios class, 575, 586–587
ios flags, 578–581
ios_base class, 575, 586–587
ios_base::app flag, 579, 581
ios_base::binary flag, 581
ios_base::in flag, 581
ios_base::out flag, 581
ios_base::trunc flag, 581
ios::app flag, 579–580
ios::ate flag, 581
ios::in flag, 580
ios::nocreate flag, 579–580
ios::noreplace flag, 580
ios::out flag, 580
ios::trunc flag, 580
isequal Boolean variable, 55
istringstream class, 191–192
815
816
C++ All-in-One For Dummies, 2nd Edition
italics
specifying abstract virtual functions with
in UML, 280–281
use of in book, 2
iterations, 269, 706–707
iterators
overview, 635–636
random access, 643–645
•J•
-j n command-line switch, 681
Jacobson, Ivar, 258
.jam files, 685
Jamfile files, 680–681
JAMVERSION internal variable, 682
.jar files, 686
Johnson, Ralph, 317–318
•K•
keyboard shortcuts
for building, 28
for running, 28
keypresses, 760–761
keys, 485, 518, 539, 544–545, 551
keywords, help options for, 721
•L•
-l n command-line switch, 681
Launch with Profiling option, Performance
Explorer, 781
leaks, memory, 744
left format flag, 588, 593, 595
length
string, 133
variable name, 36–37
less template, 548
less than function, 545, 547–548, 553
lib\: folder, 674–675
libraries
Boost
applications, building, 693–695
downloading, 673–680
features of, 672–673
libraries, building, 675–678
licensing, 673
overview, 671–672
paid support, 673
unpacking, 674–675
defined, 10, 535
Dynamic Link Library, 11, 261, 283–285
information window, debugger, 370
overview, 672
runtime, 138, 181
Standard C++ Library
architecting, 536
categories, 634–640
classes, 572
container classes, 536–551
copying containers, 564–566
deque, 561–562
Filesystem library, 709
find algorithm, 645–646
hashes, 640–642
list, 557–561
min and max functions, 648–649
overview, 535, 633
queues, 562–564
random access iterator, 643–645
random number generator, 647–648
set, 552–557
stacks, 562–564
temporary buffers, 649–650
Standard Template Library, 535, 572,
633–634, 639, 642
static
coding, 667–668
configuring projects, 666–667
defined, 11
defining projects, 664–666
overview, 283, 664
using, 669
streams library
header files, 572–573
opening files, 573–576
overview, 571–572
Wave, 692
libs\: folder, 674
libs\accumulators\: folder, 674
libs\algorithm\: folder, 674
libs\any\: folder, 674
Index
libs\array\: folder, 675
libs\more libraries: folder, 675
lifecycle, 263
lifelines, in use case diagrams, 294
limits, software, 270
line comments, 189
lines of code, 18
- -linewidth arg command-line switch, 690
linking
with make, 793
overview, 27, 785–787
Linux, using included CD with, 798
list class, 326–327
list container, 557–561
Loaded Libraries window, 370
loaders, 787
local variables
global versus, 121
overview, 98–100
stacks, 125, 147
storing, 388–390
watching, 380–382
Locals window, 777
Location option, 773
locking files, 570
logical operators, 63
long double type, 428
long int type, 428
loops
break statement, 77–79
continue statement, 79
defined, 59
do-while, 67–68, 77
for
accessing command-line parameters
with, 107–108
breaking, 78
counting backwards, 71
declaring counter variable inside, 72–73
looping through arrays, 217
middle condition, 70
multiple counter variables, 73–74
overview, 68–70
FOREACH, 706–708
inner, 80–81
nested, 79–81
outer, 80–81
817
overview, 67–68
pointer variables, 132–133
in sequence diagrams, 296–299
while, 67–68, 74–76, 291, 604
low coupling, 339
lowercase, in variables, 36
LPTSTR buffer, 744
lvalue term, 429–431
•M•
-M option, 792
macros, 201, 706–708, 794
Macs, using included CD with, 798
magic numbers, 400
main function, 17–18, 91–92, 100–101,
105–108, 326
main_index.htm file, 764
MainFrm file, 758–759
maintenance, custom template, 654
.mak files, 676
Make Directory (MD) command, 677
make utility, 113, 785, 788, 794. See also
Makefiles
Makefiles
automating work, 787–788
compiling, 785–787
inference rules
cleaning up, 793–794
compiling, 793
depending on multiple files, 791–793
features, 795
linking, 793
macros, 794
making specific items, 791
overview, 788–790
that depend on other rules, 790–791
linking, 785–787
modifying, 112–113
sharing with header files, 117
Management window, CodeBlocks, 111–112
manipulators
defined, 619
flags, 589
overview, 623–625
writing, 626–630
map container, 538–539, 551
818
C++ All-in-One For Dummies, 2nd Edition
map type
associating objects with, 538–539
comparing instances, 544–547
multiple parameters, 518, 520
overview, 485
Pair class, 551
set versus, 554
storing items in, 540–543
writing manipulators, 629–630
matches, performing using RegEx, 700–702
math
integer variables
adding, 38–41
dividing, 37, 43–45
multiplying, 43
overview, 37–38
subtracting, 41–43
limitations, 24–25
orders of operation, 24
overview, 22–24
parentheses, 25–26
pointers, 221–222
math templates, 655–656
max function, 648–649
_MAX_PATH constant, 585
MD (Make Directory) command, 677
MDI (Multiple Document Interface)
application, 747–748
mediator class, 330–345
member functions
accessing, 164–167
activity diagrams, 263
defined, 164
hierarchies, 237–238
implementing classes, 158–160
overloading, 175–177
overriding, 243–245
overview, 103
pointing variables to, 419–421
private and protected, 231
prototypes, 161–163
static, 319, 422
templatizing, 533
this variable, 173–175
member variables
accessing, 164–167
defined, 164
for dialog box application code, 741–742
hierarchies, 237–238
implementing classes, 158–160
object state, 264
overview, 154–156
private and protected, 231
read-only, 233
memory. See also heaps; stacks
freeing, 139–141
leaks, 744
overview, 29
Memory Dump window, 369
Memory window, 410
menus, Visual C++ 2008, 726–728
messages
returning, 297
sending, 263, 295
metaclass, 264
metadescription, 264
methodology, 259, 275, 310
methods, 279
MFC (Microsoft Foundation Classes)
MFC Dialog Box project
components, 738–741
controls, 738–743
creating, 732–737
defining code, 743–744
overview, 731–732
windows, 745–746
MFC SDI project
in action, 766–767
adding code, 757–766
creating, 749–756
document/view architecture, 756–757
overview, 747–748
MFC Application template, 732–737, 749
MFC Application Wizard, 733–737, 750–752
MFC Dialog Box project
components, adding, 738–741
controls
adding, 738–741
methods, defining, 742–743
variables, creating, 741–742
creating, 732–737
defining code, 743–744
overview, 731–732
windows
Class View, 745–746
Toolbox, 746
Index
MFC SDI project
in action, 766–767
adding code
essential application files, 757–759
help file, 763–765
Microsoft specified suggested changes,
759–760
registering/unregistering, 765–766
resource changes, 760–763
creating, 749–756
document/view architecture, 756–757
overview, 747–748
MFC Standard project style, 750
Microsoft Foundation Classes (MFC)
MFC Dialog Box project
components, 738–741
controls, 738–743
creating, 732–737
defining code, 743–744
overview, 731–732
windows, 745–746
MFC SDI project
in action, 766–767
adding code, 757–766
creating, 749–756
document/view architecture, 756–757
overview, 747–748
Microsoft Visual C++ 2008
appearance, modifying
menus, 726–728
toolbars, 726–728
windows, 728–730
application properties, changing, 725–726
debugger
builds, 772
overview, 371, 769–771
setting breakpoints, 772–774
starting debugger, 775
viewing breakpoints, 774
windows, 775–778
dynamic_cast keyword, 436
header files, 117
overview, 715–716
Performance Wizard, 779–781
profiling code, 781–783
project types, 716–717
Solution Explorer, 723–724
standard toolbars, 724–725
819
Win32 Console Application template
adding code, 719–720
defining project, 717–718
running application, 720–721
writing code faster
help resources, 721–722
IntelliSense, 722–723
Microsoft Visual Studio. See also Microsoft
Visual C++ 2008
Boost, 674
Build toolbar, 724
Categories list, 728
Dynamic Help, 721–722
editor windows, 730
Properties Window,
725–726, 739–740, 742
Standard toolbar, 724
Text Editor toolbar, 724–725
Toolbox, 738–739
min function, 648–649
Mini Server option, MFC Application
Wizard, 751
Minimalist GNU for Windows 32-bit Make
(mingw32-make) utility, 677–678
minus (–) sign, 22
missing classes, 253–254
mission-critical applications, 106
MkDir command, 676
mkdir function, 610–611
-MM option, 792–793
modeling, 156, 259–260
modulus, 37, 44
monofont, use of in book, 2
more\: folder, 675
- -ms-errors command-line switch, 690
Mueller, John, 5
multidimensional arrays
initializing, 404–405
overview, 403–404
passing, 405–406
multiple dependencies, 791–792
Multiple Document Interface (MDI)
application, 747–748
multiple inheritance
polymorphism, 492
virtual, 489–492
multiplicities, 279–280
multiplying variables, 43
820
C++ All-in-One For Dummies, 2nd Edition
My, variable names starting with, 36
MyQueue class, 661
•N•
-n command-line switch, 682
names
array, 400, 402
class, 227
directory, 616–618
file, 616–618
looking up in database, 354–359
object, 227
symbol, 47
variable, 31–32, 36–37
namespaces
Boost, 695
grouping identifiers with, 443–444
overview, 115, 305–308, 442–447
static library, 667, 669
navigation commands, CodeBlocks code
editor, 17
nested function calls, 386–388
nested loops, 79–81
nesting classes, 494–498
New from Template dialog box, 11, 110,
664, 666–667
new function
allocating arrays on heaps, 407–408
delete function, 360
freing pointers, 139–141, 150
initializers, 137–138
initializing value in, 137–138
overview, 135–137
using pointers with classes, 167–168, 170
using with strings, 138–139
New Menu command, 728
New Project dialog box,
716–718, 732–733, 749
New Toolbar dialog box, 727
newline character, 46–47
newsletter, author, 5
Next Instruction button, 367
Next Line button, 365–366, 376, 381
nmake utility, 788
nocreate flag, 579–580
nodes, 285–286
nonconstant arrays, 412
nonprintable characters, 46
nonstatic member functions, 419
non-type parameters, 517
- -no-pretty-print command-line switch, 690
noreplace flag, 580
not equal value, 53–55
null (\0) character, 46
null value, setting pointers to, 141
number-of-users function, 95
numbers
converting, 190–195, 703–706
decimal, 126
floating-point
converting, 192–194
defined, 30
float, 428
greater-than-or-equal-to operator, 62
for loop, 72–73
numeric conversion, 704
forcing users to enter, 197–198
hexadecimal, 125–127, 428–429
magic, 400
pseudorandom, 215, 647–648
random, 147, 215–216, 647–648
storing in variables, 30
NumberToString function, 191–192
numerical comparisons, 60–61
•O•
-o file command-line switch, 682
object diagrams, 262
object files, 786–787, 791
Object Linking and Embedding
(OLE), 751–752
Object Management Group (OMG), 258
object-oriented programming,
103, 151, 230–231
objects
associating with map, 538–539
const word, 172–173
defined, 164
dynamic, 261
encapsulating, 230–236
Index
hierarchies of
abstract classes, 247–248
establishing, 236–238
overriding member functions, 243–245
polymorphism, 245–246
protecting members when
inheriting, 238–243
member variables, 159
naming, 227
overview, 85, 151–153
passing to functions, 170–172
pointers to, 167–170
pointing to, 167–170
recognizing
classes, 229–230
collections, 227–228
overview, 225–227
this variable, 173–175
UML, 287–289
Observer classes
automatically adding, 327–330
overview, 322–326
Standard C++ Library, 326–327
oct format flag, 588
Office project style, 751
ofstream class, 572, 575, 578, 581, 584
OLE (Object Linking and Embedding),
751–752
omanip type, 624
OMG (Object Management Group), 258
Open Include File option, CodeBlocks, 50
opening files, 600–601
operator overloading, 214
operator<< function, 625–627, 629
or operator (|), 579
or operator (||), 62–63
ordering
constructors and destructors, 468
set, 553
orders of operation, 24–25
ostream class, 577
ostringstream type, 147, 191–192
out flag, 580–581
outer arrays, 410
outer classes, 496–497
outer loops, 80–81
outfile object, 578
821
output files, 682
output streams
fields, creating, 592–595
flags, 585–589
insertion operator, 583–585
precision function, 585, 590–592
Output window, 720
- -output-file arg command-line switch, 690
outputs, function, 86, 91
overflow handler, 705
overloaded insertion operator function,
623–627, 629
overloading
constructors, 454
functions, 103
inheritance, 482–486
member functions, 175–177
operators, 214
overriding versus, 482–483
templatizing functions, 530–532
overriding
abstract virtual functions, 248
inheritance, 482–486
member functions, 243–245
ownership, 282
•P•
packages, 307–308
Pair class, 551
pair type, 639
parameterized classes, 314–315
parameterizing templates, 514–520
parameters
adding to constructors, 181–182
class, 517
command-line, 106–108, 406–407
in constructors, 321
function, 91, 93–97, 103
overloading constructors, 450–451
references, 149
string, modifying, 144–145
parent classes, 184
parentheses (( ))
arithmetic, 25–26
for loops, 69–70
822
C++ All-in-One For Dummies, 2nd Edition
parentheses (( )) (continued)
new operator
initializing value in, 138
using with strings, 139
pointer variables, 132
while loops, 74
Pascal, 298
passing
arrays
to functions, 219–221
multidimensional, 405–406
objects to functions, 170–172
pointer variables to functions
string parameters, modifying, 144–145
values, changing, 141–144
by references, 149, 170–172
variables
multiple, 90–91
overview, 89–90
passwords, 198–199
path, file, 576
Path command, 677
Path environment variable, 682
path names, 574
patterns, regular expression, 698–699
PChar type, 413–416
peeking, 563
people\: folder, 675
percent sign (%), 44–45
Performance Explorer, 781–782
Performance Wizard, Visual C++ 2008,
779–781
persistent classes, 619
plus equal (+=) operator, 40, 51
plus sign (+), 22, 38, 52
Point structure, 439–440
Point3D struct, 441–442
pointer (ptr) variables
common mistakes, 360
defined, 128
list class, 327
passing objects to functions, 170–172
passing to arrays, 219–220
passing to functions
string parameters, modifying, 144–145
values, changing, 141–144
returning from functions
as nonpointer, 148
overview, 145–147
returning structures from functions, 442
specifying to arrays, 409
this, 173–175
pointers
adding, 221–222
addresses, 127–129
arrays, 400–403
arrays of, 218–219
changing variables using, 129–130
complex, 413–418
containing, 539–543
freeing, 139–141
to functions, 418–419
heaps, 124–127
integer variables, pointing at, 133–134
member functions
pointing variables to, 419–421
static, 422
new function
initializers, 137–138
overview, 135–137
using with strings, 138–139
objects, pointing to, 167–170
overview, 123
references, 149
rules of, 150
stacks, 124–127
strings, pointing at, 131–133
subtracting, 221–222
tips on, 134–135
polling, 323
polymorphism, 245–246, 477–480, 492
pop_front function, 562
popping, 563
position, custom function, 92
postconditions, in use case
diagrams, 291–292
post-increment, 74
pound (#), 50, 199
pow function, 90–91
precision function, 585, 590–592
preconditions, in use case
diagrams, 291–292
pre-increment, 74
preprocessor directives, 121, 199–206
preprocessors, 692
primary classes, 494
private constructors, 319, 497
private destructors, 320–321
Index
private functions
encapsulating objects, 231–234
hierarchies, 237–239, 242–243
inheritance, 184–185
overview, 165–167
private types, 500
problem-solving
anticipating problems, 352–359
avoiding problems, 359–360
breakpoints
enabling, 376–378
overview, 373–374
setting, 375–376
CD, accompanying book, 799–800
debuggers
parts of, 369
programming with, 361–369
running, 363–368
standard, 371
debugging
tracing through assembly code, 391–393
viewing threads, 390
features
versus bugs, 349–351
configuring, 351–352
inspecting variables, 378–379
stacks
moving about, 386–388
overview, 385–386
storing local variables, 388–390
watching variables, 380–383
profiling method, 780–781
program flow
evaluating conditions
combining evaluations, 62–63
including evaluations in conditional
statements, 63–66
operators, 61–62
overview, 60–61
loops
break statement, 77–79
continue statement, 79
do-while, 77
for, 68–74
nested, 79–81
overview, 67–68
while, 74–76
overview, 59–60
823
program listings, 3
Project Build Options dialog box, 693–694,
699–700, 708–709
Project Filename field
Console Application wizard, 13
Static Library wizard, 665
Project Location dialog box, 717–718
Project Style options, MFC Application
Wizard, 750–751
Project Title field
Console Application wizard, 12
Static Library wizard, 665
project window, CodeBlocks, 14–15
projects
defining, 10–15
overview, 9–10
prolog, 389
proof of concept, 268
properties, 233, 235
Properties button, Solution Explorer, 724
Properties Window, Visual Studio, 725–726,
739–740, 742
protected constructors, 319, 497
protected members
adjusting access, 480–482
encapsulating objects, 231–234
hierarchies, 237–239, 242
overview, 185
protected types, 500
protocols, 599, 605
pseudocode, 300
pseudorandom numbers, 215, 647–648
ptr (pointer) variables
common mistakes, 360
defined, 128
list class, 327
passing objects to functions, 170–172
passing to arrays, 219–220
passing to functions
string parameters, modifying, 144–145
values, changing, 141–144
returning from functions
as nonpointer, 148
overview, 145–147
returning structures from functions, 442
specifying to arrays, 409
this, 173–175
ptr_fun function, 638–639
824
C++ All-in-One For Dummies, 2nd Edition
public functions
adjusting access, 480–482
encapsulating objects, 231–234
hierarchies, 237–239, 241–242
overview, 165–167
pure virtual functions, 248
push_back function, 557
push_front function, 557
pushing, 563
•Q•
-q command-line switch, 682
Q/A engineers, 272
queues, 126, 562–564, 659–662
QuickBook, 689–690
quiet actions, 681
quotient, 44
•R•
RAM, 800
random access, 561, 571, 643–645
random numbers, 147, 215–216, 647–648
ReadFile function, 601
reading
from console, 56–57, 195–199
directory contents, 613–614
from files, 570, 575–576, 601–603
from strings, 190
ReadMe.txt file, 723
read-only member variables, 233
rectangles, in use case diagrams, 296
reference variables, 423
references
casting, 436
containing, 539–543
external linkage, 787
initializers, 451–455
overview, 422
passing by, 149, 170–172
reference variables, 423
returning from functions, 424–426
rules for use of, 150
separating template from function
code, 511–512
unseating, 425
RegEx
creating code, 700–702
library, 699–700
overview, 698–699
/Register command-line switch, 765
registers, 386, 393
Regression add-on, 685
regression testing, 685
/RegServer command-line switch, 765
regular expressions. See RegEx
relationships, 276–278
Release build, 772
Release version, 13–14, 363
ReleaseBuffer( ) method, 744
reliability, custom template, 654
remainders, 37, 44–45
Remember icon, 4
Remove File from Project option,
CodeBlocks, 112, 666
remove type, 711
RemoveObserver method, 325, 327–330
rename function, 617–618
replace function, 104–105
reports, Performance Explorer, 782–783
requirement collection, 265
requirements gathering, 269–270
requirements workflow, 250
Reset option, Customize dialog box, 728
resetting pointers, 219
Resource folder, 759–760
Resource View window, 760–763
Respond function, 323–324, 326
responsibilities, class, 253
result Boolean variable, 55
retreiving values in variables, 33
return statement, 97, 213, 389
return value, function, 88, 91,
93, 95, 106, 390
returning
derived classes, 483–485
messages, 297
pointer variables from functions
as nonpointer, 148
overview, 145–147
references from functions, 424–426
structures from functions, 442
reusable code, 318
reusing code, 88
Index
ribbon, 755
right format flag, 588
rmdir function, 611
RoundEven rounding, 705
rounding, 705
Rumbaugh, James, 258
Run option, CodeBlocks, 15, 20, 24, 27–28
Run to Cursor button, 369
runnable programs, 19
Running Threads window, 370, 390
runtime, testing types at, 436
runtime library, 138, 181
rvalue term, 429–431
•S•
-s var=value command-line switch, 682
sampling, 780, 782–783
satisfied conditions, 61
Save Everything option, CodeBlocks, 15
saving, in CodeBlocks, 23
SayHello program
building, 15–16
defining, 10–15
executing, 15–16
main function, 17–18
running, 27–28
typing code, 18–21
scalars, 410
- -scan command-line switch, 691
scientific format flag, 588–589
scientific mode, calculator, 126
scripting language, Boost Jam, 682
scrolling, in CodeBlocks code editor, 16–17
SDI (Single Document Interface) project
in action, 766–767
adding code
essential application files, 757–759
help file, 763–765
Microsoft specified suggested changes,
759–760
registering/unregistering, 765–766
resource changes, 760–763
creating, 749–756
document/view architecture, 756–757
overview, 747–748
SDIEditor file, 759, 764, 765
SDIEditorDoc file, 759
825
SDIEditorView file, 759
searches, using RegEx, 700–702
security, custom template, 654
seeding random number generators,
215–216, 648
Select Filename dialog box, 111
Select Target dialog box, 407
selecting text, in CodeBlocks
code editor, 16–17
semicolons (;), 21, 158
sending messages, 263, 295
sequence diagrams
comparing in, 296–299
looping in, 296–299
notating, 295–296
overview, 262, 293–295
sequential access, 571
servers, OLE, 751–752
set container
intersecting, 554–557
overview, 552–554
unionizing, 554–557
Set function, 236
set_intersection function, 555–557
set_union function, 555–557
setf member function, 586–587
setprecision manipulator, 592
setting variables, 32–33
setw manipulator, 594
SetWindowTextW( ) method, 744
SGI Web site, 635
shared object (.so) extension, 283
shareware programs, 798
shift left (SHL) instruction, 392
short int type, 427
Show All Files button, Solution
Explorer, 724
Show ScreenTips on Toolbars option,
Customize dialog box, 727
Show Shortcut Keys in ScreenTips option,
Customize dialog box, 727
showbase format flag, 588–589
showpoint format flag, 588–591
showpos format flag, 588–589
ShowProperties option, 309
side effects, 72–73
Signal Handling window, 370
signed type, 428–429
826
C++ All-in-One For Dummies, 2nd Edition
significant digits, 590
Single Document Interface (SDI) project
in action, 766–767
adding code
essential application files, 757–759
help file, 763–765
Microsoft specified suggested changes,
759–760
registering/unregistering, 765–766
resource changes, 760–763
creating, 749–756
document/view architecture, 756–757
overview, 747–748
Single Document option, MFC Application
Wizard, 750
single quotes (‘), 46, 48
singleton classes, 154, 318–321
size
array, 398–402
numeric conversion, 704
skipws format flag, 589
Smalltalk, 263
snapshots, application, 780
.so (shared object) extension, 283
Solution Explorer, 723–724, 726, 757–758
solutions, 717, 733
sorting, with temporary buffer, 649–650
source-code files
classes, 163–164
in CodeBlocks, 15
compiling, 785–788
creating multiple
in CodeBlocks, 110–112
in other compilers, 112–113
overview, 109–110, 113–115
function prototypes, 101
header files
adding once, 118
angle brackets, 118–119
double quotes, 118–119
overview, 115–117
header wrappers, 121–122
linking, 785–787
sharing variables among, 119–121
spaces, as delimiters, 195
specialized queues, 659–662
Specify the Profiling Method
dialog, 780–781
speed
application, 779
custom templates, 654
writing code faster, 721-723
speed keys, 741
spelling checks, 87–88
splicing, 561
stability, software, 271
stack frames, 370, 388–389, 391
stack pointer, 386
stacks
constructors with, 181
debugging
tracing through assembly code, 391–393
viewing threads, 390
deque, 561–562
destructors with, 181
moving about, 386–388
overview, 124–127, 385–386, 562–564
storing local variables, 388–390
stakeholders, 270, 298
standalone files, 786
Standard C++ Library
architecting, 536
categories
adaptors, 639
algorithms, 636–637
allocators, 639–640
containers, 635
functors, 637–639
iterators, 635–636
overview, 634–635
utilities, 639
classes, 572
container classes
instances, 539–547
iterating through container, 547–551
map, 538–539, 551
pointers, 539–543
references, 539–543
vector, 536–538
copying containers, 564–566
deque, 561–562
Filesystem library, 709
find algorithm, 645–646
hashes, 640–642
list, 557–561
min and max functions, 648–649
Index
overview, 535, 633
queues, 562–564
random access iterator, 643–645
random number generator, 647–648
set, 552–557
stacks, 562–564
temporary buffers, 649–650
Standard Template Library (STL), 535, 572,
633–634, 639, 642
Standard toolbar, Visual Studio, 724
Start Debugging option, 720
start variable, 89–90, 93–94
Start Without Debugging option, 720
state diagrams, 302–304
state transition, 303
statechart diagrams, 263
statements, 21
states, object, 263–264
static diagrams, 260–261, 275
static libraries
coding, 667–668
configuring projects, 666–667
defined, 11
defining projects, 664–666
overview, 283, 664
using, 669
Static Library wizard, 664–666
static member functions, 319, 419, 463
static members, 312–314, 512–514
Static Text control, 741
static_cast keyword, 437–438
status\: folder, 675
status windows, CodeBlocks, 15
std namespace, 115, 307, 446, 572–573
stdafx.cpp file, 718
stdafx.h file, 718–720
Step Into button, 365–366, 381
Step Out button, 368
Step Over button, 775
stereotypes, 284–285, 310–311
STL (Standard Template Library), 535, 572,
633–634, 639, 642
Stop Debugger button, 369
storing data
arrays
accessing, 217
adding pointers, 221–222
declaring, 217
overview, 216, 409–411
passing to functions, 219–221
of pointers, 218–219
subtracting pointers, 221–222
characters
backslash, 48
carriage return, 47
double quotes, 48
newline, 46–47
nonprintable, 46
null, 46
overview, 45–46
single quotes, 48
tab, 48
conditional operators, 52–55
local variables, 388–390
overview, 29
reading from console, 56–57
strings
accessing part of, 49–51
adding onto, 51–52
adding two, 52
changing part of, 51
overview, 48–49
variables
Boolean, 55–56
copying, 34–35
creating, 30–33
declaring multiple, 33
initializing, 35–36
manipulating, 37–45
naming, 36–37
values, changing, 33–34
stream classes
manipulating, 623–630
overview, 619
for text formatting, 620–622
streams
error handling, 576–578
input
EOF, 599–604
extraction operator, 597–599
reading formatted input, 607–608
reading types, 604–607
ios flags, 578–581
need for, 570–571
827
828
C++ All-in-One For Dummies, 2nd Edition
output
field width, setting, 585, 592–595
fields, creating, 592–595
flags, 585–589
insertion operator, 583–585
precision function, 585, 590–592
overview, 569
streams library
header files, 572–573
opening files, 573–576
overview, 571–572
string * type, 128, 131
string class, 161
string constants, 52, 97
string functions, 103–105
string variable, 48–49
stringify function, 662–663
strings
accessing part of, 49–51
adding onto, 51–52
adding two, 52
arrays and command-line parameters,
406–407
changing part of, 51
converting to numbers, 190–192, 194–195
new function, 138–139
overview, 20–21, 30, 48–49
pointers to arrays of, 416–418
pointing at, 131–133
processing to reduce bugs, 355–358
random numbers, 147
reading, 604–607
references, 149
returning pointers from, 146
stringstream form, 190–191
StringToNumber function, 191–192, 196
Stroustrup, Bjarne, 41, 634
structure templates, 653, 656–659
structuring data
casting data
with C++, 433
with dynamic_cast, 433–436
overview, 431–432
with static_cast, 437–438
namespaces, 442–447
structures
as component data types, 439–440
equating, 440–441
overview, 438–439
returning compound data types,
441–442
variables
expressing from either side, 429–431
overview, 427–429
subactivities, 302
Subject class
automatically adding observer, 327–330
overview, 322–326
Standard C++ Library, 326–327
subscripting, 217
subtracting
pointers, 221–222
variables, 41–43
Support for Compound Files (servers and
containers) option, MFC Application
Wizard, 752
switch statements, 209–212, 213–214
switches, command-line
-a, 680
bcp, 691
Boost Jam, 680–682
- -boost=path , 691
-brief, 686
-cvs, 686
- -cvs , 691
-d +n , 681
-d 0 , 681
-d n, 680
- -debug , 690
-f, 677
-f Jambase , 681
GCC, 679
- -help, 690
- -indent arg , 690
- -input-file arg , 690
Inspect utility, 686
-j n , 681
-l n , 681
- -linewidth arg , 690
mingw32-make utility, 677
- -ms-errors , 690
-n , 682
- -no-pretty-print, 690
-o file , 682
- -output-file arg , 690
-q , 682
Index
QuickBook, 690
/Register, 765
/RegServer, 765
-s var=value , 682
- -scan , 691
SDI application, 765–766
-t target , 682
-text, 686
- -unix-lines , 691
/Unregister, 765
/Unregserver, 765
-v , 682
- - value , 682
- -version, 683–684, 690
symbol information, in debug version, 363
symbols
names of, 47
packaging, 305–308
tagging, 308–309
system function, 611, 616
System library, 708–710
systems, 290
•T•
T placeholder, 508, 514, 529
-t target command-line switch, 682
tab character (\t), 48
tab space, 26
tabbing output, 26–27
tabs, CodeBlocks, 112
tagging, 308–311
Targets and Files window, 370
targetver.h file, 718–719
Task List window, 759–760
tchar.h file, 720
Technical Stuff icon, 4
template library
coding, 667–668
configuring project, 666–667
defining project, 664–666
Standard Template Library, 535, 572,
633–634, 639, 642
using, 669
templates
class, 503–514, 659–662
defining elements of, 653–654
829
deriving
deriving class from class template,
522–524
deriving class template from class,
524–525
deriving class template from class
template, 525–528
functions
member functions, 533
overloading, 530–532
overview, 528–529
including static members in, 512–514
math, 655–656
MFC Application, 732–737, 749
overview, 651–652
parameterizing, 514–520
parameterizing classes, 314–315
separating from function code, 510–512
specialization, 662–663
structure, 656–659
typedef, 521
Visual C++, 716–717
when to create, 652–653
Win32 Console Application
adding code, 719–720
defining project, 717–718
running application, 720–721
temporary buffers, 649–650
temporary instances, 458–460
temporary variables, 194
terms, glossary of, 250
testing
regression, 685
static library, 669
types at runtime, 436
workflow, 251–252, 265, 271–272
tests, 64
-text command-line switch, 686
text editor, 747
Text Editor toolbar, Visual Studio, 724–725
Text Visualizer, 776
third position, 50
this pointer, 173–175, 419–421
ThisString object, 743–744
threads, viewing, 390
three-way manipulators, 589
throwing exceptions, 469–471, 474–475
tilde (~), 179
830
C++ All-in-One For Dummies, 2nd Edition
Tip icon, 4
_tmain( ) function, 720
TODO comment, Task List window, 760
tokenizer, 702–703
tokens, 49
toolbars, Visual C++ 2008, 724–728
Toolbars tab, Customize dialog box, 727
Toolbox, Visual Studio, 738–739
Toolbox windows, 746
ToolBuild.log file, 679
tools\: folder, 675
top-down design, 84
topLevel namespace, 308
transform algorithm, 638
transition phase, Unified Process, 268,
272–273
tree view, CodeBlocks, 14–15, 18
trial versions of software, 799
troubleshooting
anticipating problems, 352–359
avoiding problems, 359–360
breakpoints
enabling, 376–378
overview, 373–374
setting, 375–376
CD, accompanying book, 799–800
debuggers
parts of, 369
programming with, 361–369
running, 363–368
standard, 371
debugging
tracing through assembly code, 391–393
viewing threads, 390
features
versus bugs, 349–351
configuring, 351–352
inspecting variables, 378–379
stacks
moving about, 386–388
overview, 385–386
storing local variables, 388–390
watching variables, 380–383
TRUE parameter, 615
true value, 55–56
trunc flag, 580–581
Trunc rounding, 705
try keyword, 436, 470–471
type checking, 437–438
type conversion, 193
typedef type
multidimensional arrays, 406
pointer variables, 413, 415–419
structure templates, 658–659
templates, 521
types within classes, 501
writing manipulators, 626–627
typename type, 514, 517
types
within classes, 493, 499–501
classes as, 229, 504
classes versus, 277
containing in vector, 537–538
function return values, 88, 94–95
private, 500
protected, 500
testing at runtime, 436
variable, 31–32, 35
typing code, 16–17
•U•
UML (Unified Modeling Language)
base class, 241
classes
aggregating, 281–282
composing, 281–282
inheritance, 280–281
mapping, 277–280
overview, 276–277
components, 282–285
deploying software, 285–286
diagramming with
activity diagrams, 300–302
collaboration diagrams, 299–300
notating diagrams, 308
overview, 259–264
sequence diagrams, 293–295, 295–296,
296–299
state diagrams, 302–304
enumerations, 312
freedom within, 309–311
modeling with, 259
objects, 287–289
overview, 255–258, 275
parameterized classes, 314–315
Index
static members, 312–314
symbols
packaging, 305–308
tagging, 308–309
Unified Process
iterations, 266–267
overview, 264–266
phases of, 267–273
use cases
expanding, 291–292
matching with requirements, 292
overview, 289–291
using UML Goodies, 305–309
underlined letters, 741
Unified Modeling Language. See UML
Unified Process
iterations, 266–267
overview, 264–266
phases of
construction, 271–272
elaboration, 270–271
inception, 269–270
overview, 267–269
transition, 272–273
unionizing sets, 554–557
unitbuf format flag, 588
Unix systems, 106, 616
- -unix-lines command-line switch, 691
/Unregister command-line switch, 765
/Unregserver command-line switch, 765
unseating references, 425
unsetf member function, 586–587
unsigned type, 428–429
UpdateAllViews( ) method, 757
uppercase
anticipating user input, 354–355
in class names, 156
in variables, 36
uppercase format flag, 589
usage, custom template, 654
use cases
defined, 270
diagrams, 262
expanding, 291–292
matching with requirements, 292
overview, 289–291
Use Large Icons option, Customize
dialog box, 727
831
user input, 352–355
user interface, 295, 352
User Interface Features step, MFC
Application Wizard, 735, 754–755
user-config.jam file, 683–684
username function, 95
users, 165–167, 196–197, 291
using declaration, 445–447
using namespace declaration, 443–445,
572–573
utilities, 639
•V•
-v command-line switch, 682
- -value command-line switch, 682
value parameters, 517
values
accessing variable through pointer, 130
map, 551
pair, 485
variable, 31–32
variables. See also stacks
Boolean, 55–56
Boost Jam, 682
copying, 34–35
counter, 68–75
declaring multiple, 33
defined, 29
directing pointers from one
to another, 133–134
initializing, 35–36
inspecting, 378–379
integer
adding, 38–41
creating, 30–33
dividing, 37, 43–45
manipulating, 37–38
multiplying, 43
pointing at, 133–134
subtracting, 41–43
local, 98–100
storing, 388–390
member
accessing, 164–167
defined, 164
for dialog box application code, 741–742
hierarchies, 237–238
832
C++ All-in-One For Dummies, 2nd Edition
variables (continued)
implementing classes, 158–160
object state, 264
overview, 154–156
private and protected, 231
read-only, 233
naming, 36–37
passing into functions
multiple, 90–91
overview, 89–90
pointer
common mistakes, 360
defined, 128
list class, 327
passing objects to functions, 170–172
passing to arrays, 219–220
passing to functions, 141–145
returning from functions, 145–148
returning structures from functions, 442
specifying to arrays, 409
this, 173–175
pointing to member functions, 419–421
references, 423–425
sharing among source-code files, 119–121
structuring data
expressing from either side, 429–431
overview, 427–429
values, changing, 33–34
watching, 380–383
Various Info button, 370
VC++ (Visual C++) 2008
appearance, modifying
menus, 726–728
toolbars, 726–728
windows, 728–730
application properties, changing, 725–726
debugger
builds, 772
overview, 371, 769–771
setting breakpoints, 772–774
starting debugger, 775
viewing breakpoints, 774
windows, 775–778
dynamic_cast keyword, 436
header files, 117
overview, 715–716
Performance Wizard, 779–781
profiling code, 781–783
project types, 716–717
Solution Explorer, 723–724
standard toolbars, 724–725
Win32 Console Application template
adding code, 719–720
defining project, 717–718
running application, 720–721
writing code faster
help resources, 721–722
IntelliSense, 722–723
vector datatype
container classes, 536–538
deque versus, 563
find algorithm, 645–646
iterating, 550–551
lists versus, 561
overview, 355–358
random access iterator, 643–645
specialized queues, 661
- -version command-line switch,
683–684, 690
Version folder, 763
version number, Windows, 719
versions, function, 243
View Class Diagram button, Solution
Explorer, 724
View Code button, Solution Explorer, 724
views, 747
virtual functions
abstract, 247–248, 280–281
dynamic cast, 435
overview, 243–245
in UML, 280–281
virtual inheritance, 489–492
virtual keypresses, 760–761
virtual keyword, 450, 489–492
visible windows, 728–729
Visual C++ (VC++) 2008
appearance, modifying
menus, 726–728
toolbars, 726–728
windows, 728–730
Index
application properties, changing, 725–726
debugger
builds, 772
overview, 371, 769–771
setting breakpoints, 772–774
starting debugger, 775
viewing breakpoints, 774
windows, 775–778
dynamic_cast keyword, 436
header files, 117
overview, 715–716
Performance Wizard, 779–781
profiling code, 781–783
project types, 716–717
Solution Explorer, 723–724
standard toolbars, 724–725
Win32 Console Application template
adding code, 719–720
defining project, 717–718
running application, 720–721
writing code faster
help resources, 721–722
IntelliSense, 722–723
Visual Studio. See also Visual C++ 2008
Boost, 674
Build toolbar, 724
Categories list, 728
Dynamic Help, 721–722
editor windows, 730
Properties Window,
725–726, 739–740, 742
Standard toolbar, 724
Text Editor toolbar, 724–725
Toolbox, 738–739
Visual Studio project style, 751
Visual Style and Colors options, MFC
Application Wizard, 751
visualizers, 776
Vlissides, John, 317–318
void * pointer, 429
void type, 98, 138, 428
833
•W•
Warning! icon, 4
Watch 1 window, 777
Watches window, 370, 380–383
watching variables, 380–383
Wave, 692
wchar_t keyword, 428
Web site, author, 5
When Hit option, 774
while loops, 67–68, 74–76, 291, 604
white space, in code, 188, 598
wide character set, 428
width member function, 592–595
wiki\: folder, 675
Wiley Product Technical Support, 800
Win32 Application Wizard, 718
Win32 Console Application template
adding code, 719–720
defining project, 717–718
running application, 720–721
Win32 GUI Project program type, 11
window management, MDI application, 748
Windows
copying files with, 615
using included CD with, 798
version of, for use with Visual C++, 719
windows, Visual C++ 2008
Autos, 775–776
Call Stack, 778
Locals, 777
modifying, 728–730
Watch 1, 777
Windows Explorer project style, 750
Windows Native/Default option, MFC
Application Wizard, 751
workflow
analysis, 250–254, 265
design, 251–254, 265
implementation, 251, 265
requirements, 250
testing, 251–252, 265, 271–272
Unified Process, 264–265, 267–269
834
C++ All-in-One For Dummies, 2nd Edition
wrapping enums, 212–214
WriteFile function, 600–601
writing
code faster
help resources, 721–722
IntelliSense, 722–723
to console, 56–57, 583–584
to files, 570–571, 574–575, 600–603
functions
forward references, 101
function prototypes, 100–101
local variables, 98–100
overview, 91–95
parameters, 95–97
returning nothing, 97–98
two versions of same, 101–103
manipulators
map type, 629–630
typedef type, 626–627
to strings, 190
strings with delimiters, 606
•X•
XML, 688
•Y•
YourApp entry, 764
•Z•
zero (0), setting pointers to, 141
Wiley Publishing, Inc.
End-User License Agreement
READ THIS. You should carefully read these terms and conditions before opening the software
packet(s) included with this book “Book”. This is a license agreement “Agreement” between you
and Wiley Publishing, Inc. “WPI”. By opening the accompanying software packet(s), you acknowledge that you have read and accept the following terms and conditions. If you do not agree and do
not want to be bound by such terms and conditions, promptly return the Book and the unopened
software packet(s) to the place you obtained them for a full refund.
1. License Grant. WPI grants to you (either an individual or entity) a nonexclusive license to
use one copy of the enclosed software program(s) (collectively, the “Software”) solely for
your own personal or business purposes on a single computer (whether a standard computer or a workstation component of a multi-user network). The Software is in use on a computer when it is loaded into temporary memory (RAM) or installed into permanent memory
(hard disk, CD-ROM, or other storage device). WPI reserves all rights not expressly granted
herein.
2. Ownership. WPI is the owner of all right, title, and interest, including copyright, in and to
the compilation of the Software recorded on the physical packet included with this Book
“Software Media”. Copyright to the individual programs recorded on the Software Media is
owned by the author or other authorized copyright owner of each program. Ownership of
the Software and all proprietary rights relating thereto remain with WPI and its licensers.
3. Restrictions on Use and Transfer.
a) You may only (i) make one copy of the Software for backup or archival purposes, or
(ii) transfer the Software to a single hard disk, provided that you keep the original for
backup or archival purposes. You may not (i) rent or lease the Software, (ii) copy or
reproduce the Software through a LAN or other network system or through any computer subscriber system or bulletin-board system, or (iii) modify, adapt, or create derivative works based on the Software.
(b) You may not reverse engineer, decompile, or disassemble the Software. You may transfer the Software and user documentation on a permanent basis, provided that the transferee agrees to accept the terms and conditions of this Agreement and you retain no
copies. If the Software is an update or has been updated, any transfer must include the
most recent update and all prior versions.
4. Restrictions on Use of Individual Programs. You must follow the individual requirements
and restrictions detailed for each individual program in the “About the CD” appendix of this
Book or on the Software Media. These limitations are also contained in the individual license
agreements recorded on the Software Media. These limitations may include a requirement
that after using the program for a specified period of time, the user must pay a registration
fee or discontinue use. By opening the Software packet(s), you agree to abide by the licenses
and restrictions for these individual programs that are detailed in the “About the CD” appendix and/or on the Software Media. None of the material on this Software Media or listed in
this Book may ever be redistributed, in original or modified form, for commercial purposes.
5. Limited Warranty.
(a) WPI warrants that the Software and Software Media are free from defects in materials
and workmanship under normal use for a period of sixty (60) days from the date of purchase of this Book. If WPI receives notification within the warranty period of defects in
materials or workmanship, WPI will replace the defective Software Media.
(b) WPI AND THE AUTHOR(S) OF THE BOOK DISCLAIM ALL OTHER WARRANTIES,
EXPRESS OR IMPLIED, INCLUDING WITHOUT LIMITATION IMPLIED WARRANTIES OF
MERCHANTABILITY AND FITNESS FOR A PARTICULAR PURPOSE, WITH RESPECT TO
THE SOFTWARE, THE PROGRAMS, THE SOURCE CODE CONTAINED THEREIN, AND/
OR THE TECHNIQUES DESCRIBED IN THIS BOOK. WPI DOES NOT WARRANT THAT THE
FUNCTIONS CONTAINED IN THE SOFTWARE WILL MEET YOUR REQUIREMENTS OR
THAT THE OPERATION OF THE SOFTWARE WILL BE ERROR FREE.
(c) This limited warranty gives you specific legal rights, and you may have other rights that
vary from jurisdiction to jurisdiction.
6. Remedies.
(a) WPI’s entire liability and your exclusive remedy for defects in materials and workmanship shall be limited to replacement of the Software Media, which may be returned to
WPI with a copy of your receipt at the following address: Software Media Fulfillment
Department, Attn.: C++ All-in-One, 2nd Edition, Wiley Publishing, Inc., 10475 Crosspoint
Blvd., Indianapolis, IN 46256, or call 1-800-762-2974. Please allow four to six weeks for
delivery. This Limited Warranty is void if failure of the Software Media has resulted from
accident, abuse, or misapplication. Any replacement Software Media will be warranted
for the remainder of the original warranty period or thirty (30) days, whichever is longer.
(b) In no event shall WPI or the author be liable for any damages whatsoever (including
without limitation damages for loss of business profits, business interruption, loss of
business information, or any other pecuniary loss) arising from the use of or inability
to use the Book or the Software, even if WPI has been advised of the possibility of such
damages.
(c) Because some jurisdictions do not allow the exclusion or limitation of liability for consequential or incidental damages, the above limitation or exclusion may not apply to you.
7.U.S. Government Restricted Rights. Use, duplication, or disclosure of the Software for
or on behalf of the United States of America, its agencies and/or instrumentalities “U.S.
Government” is subject to restrictions as stated in paragraph (c)(1)(ii) of the Rights in
Technical Data and Computer Software clause of DFARS 252.227-7013, or subparagraphs (c)
(1) and (2) of the Commercial Computer Software - Restricted Rights clause at FAR 52.227-19,
and in similar clauses in the NASA FAR supplement, as applicable.
8.General. This Agreement constitutes the entire understanding of the parties and revokes
and supersedes all prior agreements, oral or written, between them and may not be modified
or amended except in a writing signed by both parties hereto that specifically refers to this
Agreement. This Agreement shall take precedence over any other documents that may be in
conflict herewith. If any one or more provisions contained in this Agreement are held by any
court or tribunal to be invalid, illegal, or otherwise unenforceable, each and every other provision shall remain in full force and effect.
GNU General Public License
Version 3, 29 June 2007
Copyright © 2007 Free Software Foundation, Inc. <http://fsf.org/>
Everyone is permitted to copy and distribute verbatim copies of this license document, but changing it is not allowed.
Preamble
The GNU General Public License is a free, copyleft license for software and other kinds of
works.
The licenses for most software and other practical works are designed to take away your
freedom to share and change the works. By contrast, the GNU General Public License is
intended to guarantee your freedom to share and change all versions of a program—to
make sure it remains free software for all its users. We, the Free Software Foundation, use
the GNU General Public License for most of our software; it applies also to any other work
released this way by its authors. You can apply it to your programs, too.
When we speak of free software, we are referring to freedom, not price. Our General
Public Licenses are designed to make sure that you have the freedom to distribute copies
of free software (and charge for them if you wish), that you receive source code or can
get it if you want it, that you can change the software or use pieces of it in new free programs, and that you know you can do these things.
To protect your rights, we need to prevent others from denying you these rights or
asking you to surrender the rights. Therefore, you have certain responsibilities if you distribute copies of the software, or if you modify it: responsibilities to respect the freedom
of others.
For example, if you distribute copies of such a program, whether gratis or for a fee, you
must pass on to the recipients the same freedoms that you received. You must make sure
that they, too, receive or can get the source code. And you must show them these terms
so they know their rights.
Developers that use the GNU GPL protect your rights with two steps: (1) assert copyright
on the software, and (2) offer you this License giving you legal permission to copy, distribute and/or modify it.
For the developers’ and authors’ protection, the GPL clearly explains that there is no
warranty for this free software. For both users’ and authors’ sake, the GPL requires that
modified versions be marked as changed, so that their problems will not be attributed
erroneously to authors of previous versions.
Some devices are designed to deny users access to install or run modified versions of the
software inside them, although the manufacturer can do so. This is fundamentally incompatible with the aim of protecting users’ freedom to change the software. The systematic
pattern of such abuse occurs in the area of products for individuals to use, which is precisely where it is most unacceptable. Therefore, we have designed this version of the GPL
to prohibit the practice for those products. If such problems arise substantially in other
domains, we stand ready to extend this provision to those domains in future versions of
the GPL, as needed to protect the freedom of users.
Finally, every program is threatened constantly by software patents. States should not
allow patents to restrict development and use of software on general-purpose computers,
but in those that do, we wish to avoid the special danger that patents applied to a free
program could make it effectively proprietary. To prevent this, the GPL assures that patents cannot be used to render the program non-free.
The precise terms and conditions for copying, distribution and modification follow.
Terms and Conditions
0. Definitions. “This License” refers to version 3 of the GNU General Public License. “Copyright”
also means copyright-like laws that apply to other kinds of works, such as semiconductor masks.
“The Program” refers to any copyrightable work licensed under this License. Each licensee
is addressed as “you”. “Licensees” and “recipients” may be individuals or organizations. To
“modify” a work means to copy from or adapt all or part of the work in a fashion requiring copyright permission, other than the making of an exact copy. The resulting work is called a “modified version” of the earlier work or a work “based on” the earlier work. A “covered work” means
either the unmodified Program or a work based on the Program.
To “propagate” a work means to do anything with it that, without permission, would make you
directly or secondarily liable for infringement under applicable copyright law, except executing it
on a computer or modifying a private copy. Propagation includes copying, distribution (with or without modification), making available to the public, and in some countries other activities as well.
To “convey” a work means any kind of propagation that enables other parties to make or receive
copies. Mere interaction with a user through a computer network, with no transfer of a copy, is
not conveying.
An interactive user interface displays “Appropriate Legal Notices” to the extent that it includes
a convenient and prominently visible feature that (1) displays an appropriate copyright notice,
and (2) tells the user that there is no warranty for the work (except to the extent that warranties
are provided), that licensees may convey the work under this License, and how to view a copy
of this License. If the interface presents a list of user commands or options, such as a menu, a
prominent item in the list meets this criterion.
1.
Source Code. T he “source code” for a work means the preferred form of the work for making
modifications to it. “Object code” means any non-source form of a work. A “Standard Interface”
means an interface that either is an official standard defined by a recognized standards body, or,
in the case of interfaces specified for a particular programming language, one that is widely used
among developers working in that language.
The “System Libraries” of an executable work include anything, other than the work as a whole, that
(a) is included in the normal form of packaging a Major Component, but which is not part of that
Major Component, and (b) serves only to enable use of the work with that Major Component, or to
implement a Standard Interface for which an implementation is available to the public in source code
form. A “Major Component”, in this context, means a major essential component (kernel, window
system, and so on) of the specific operating system (if any) on which the executable work runs, or a
compiler used to produce the work, or an object code interpreter used to run it.
The “Corresponding Source” for a work in object code form means all the source code needed
to generate, install, and (for an executable work) run the object code and to modify the work,
including scripts to control those activities. However, it does not include the work’s System
Libraries, or general-purpose tools or generally available free programs which are used
unmodified in performing those activities but which are not part of the work. For example,
Corresponding Source includes interface definition files associated with source files for the
work, and the source code for shared libraries and dynamically linked subprograms that the
work is specifically designed to require, such as by intimate data communication or control flow
between those subprograms and other parts of the work.
The Corresponding Source need not include anything that users can regenerate automatically
from other parts of the Corresponding Source.
The Corresponding Source for a work in source code form is that same work.
2. Basic Permissions. All rights granted under this License are granted for the term of copyright on the
Program, and are irrevocable provided the stated conditions are met. This License explicitly affirms
your unlimited permission to run the unmodified Program. The output from running a covered work
is covered by this License only if the output, given its content, constitutes a covered work. This
License acknowledges your rights of fair use or other equivalent, as provided by copyright law.
You may make, run and propagate covered works that you do not convey, without conditions so long
as your license otherwise remains in force. You may convey covered works to others for the sole purpose of having them make modifications exclusively for you, or provide you with facilities for running
those works, provided that you comply with the terms of this License in conveying all material for
which you do not control copyright. Those thus making or running the covered works for you must
do so exclusively on your behalf, under your direction and control, on terms that prohibit them from
making any copies of your copyrighted material outside their relationship with you.
Conveying under any other circumstances is permitted solely under the conditions stated below.
Sublicensing is not allowed; section 10 makes it unnecessary.
3.
Protecting Users’ Legal Rights From Anti-Circumvention Law. No covered work shall be
deemed part of an effective technological measure under any applicable law fulfilling obligations
under article 11 of the WIPO copyright treaty adopted on 20 December 1996, or similar laws prohibiting or restricting circumvention of such measures.
When you convey a covered work, you waive any legal power to forbid circumvention of technological measures to the extent such circumvention is effected by exercising rights under this
License with respect to the covered work, and you disclaim any intention to limit operation or
modification of the work as a means of enforcing, against the work’s users, your or third parties’
legal rights to forbid circumvention of technological measures.
4. Conveying Verbatim Copies. You may convey verbatim copies of the Program’s source code as
you receive it, in any medium, provided that you conspicuously and appropriately publish on each
copy an appropriate copyright notice; keep intact all notices stating that this License and any nonpermissive terms added in accord with section 7 apply to the code; keep intact all notices of the
absence of any warranty; and give all recipients a copy of this License along with the Program.
You may charge any price or no price for each copy that you convey, and you may offer support
or warranty protection for a fee.
5. Conveying Modified Source Versions. You may convey a work based on the Program, or the
modifications to produce it from the Program, in the form of source code under the terms of section 4, provided that you also meet all of these conditions:
a) The work must carry prominent notices stating that you modified it, and giving a relevant date.
b) The work must carry prominent notices stating that it is released under this License and any
conditions added under section 7. This requirement modifies the requirement in section 4 to
“keep intact all notices”.
c) You must license the entire work, as a whole, under this License to anyone who comes into
possession of a copy. This License will therefore apply, along with any applicable section 7
additional terms, to the whole of the work, and all its parts, regardless of how they are packaged. This License gives no permission to license the work in any other way, but it does not
invalidate such permission if you have separately received it.
d) If the work has interactive user interfaces, each must display Appropriate Legal Notices;
however, if the Program has interactive interfaces that do not display Appropriate Legal
Notices, your work need not make them do so.
A compilation of a covered work with other separate and independent works, which are not by
their nature extensions of the covered work, and which are not combined with it such as to form
a larger program, in or on a volume of a storage or distribution medium, is called an “aggregate”
if the compilation and its resulting copyright are not used to limit the access or legal rights of the
compilation’s users beyond what the individual works permit. Inclusion of a covered work in an
aggregate does not cause this License to apply to the other parts of the aggregate.
6. Conveying Non-Source Forms. You may convey a covered work in object code form under the
terms of sections 4 and 5, provided that you also convey the machine-readable Corresponding
Source under the terms of this License, in one of these ways:
a) Convey the object code in, or embodied in, a physical product (including a physical distribution medium), accompanied by the Corresponding Source fixed on a durable physical
medium customarily used for software interchange.
b) Convey the object code in, or embodied in, a physical product (including a physical distribution medium), accompanied by a written offer, valid for at least three years and valid for as
long as you offer spare parts or customer support for that product model, to give anyone
who possesses the object code either (1) a copy of the Corresponding Source for all the software in the product that is covered by this License, on a durable physical medium customarily used for software interchange, for a price no more than your reasonable cost of physically
performing this conveying of source, or (2) access to copy the Corresponding Source from a
network server at no charge.
c) Convey individual copies of the object code with a copy of the written offer to provide the
Corresponding Source. This alternative is allowed only occasionally and noncommercially,
and only if you received the object code with such an offer, in accord with subsection 6b.
d) Convey the object code by offering access from a designated place (gratis or for a charge),
and offer equivalent access to the Corresponding Source in the same way through the same
place at no further charge. You need not require recipients to copy the Corresponding
Source along with the object code. If the place to copy the object code is a network server,
the Corresponding Source may be on a different server (operated by you or a third party)
that supports equivalent copying facilities, provided you maintain clear directions next to
the object code saying where to find the Corresponding Source. Regardless of what server
hosts the Corresponding Source, you remain obligated to ensure that it is available for as
long as needed to satisfy these requirements.
e) Convey the object code using peer-to-peer transmission, provided you inform other peers
where the object code and Corresponding Source of the work are being offered to the general public at no charge under subsection 6d.
A separable portion of the object code, whose source code is excluded from the Corresponding
Source as a System Library, need not be included in conveying the object code work.
A “User Product” is either (1) a “consumer product”, which means any tangible personal
property which is normally used for personal, family, or household purposes, or (2) anything
designed or sold for incorporation into a dwelling. In determining whether a product is a con-
sumer product, doubtful cases shall be resolved in favor of coverage. For a particular product
received by a particular user, “normally used” refers to a typical or common use of that class of
product, regardless of the status of the particular user or of the way in which the particular user
actually uses, or expects or is expected to use, the product. A product is a consumer product
regardless of whether the product has substantial commercial, industrial or non-consumer uses,
unless such uses represent the only significant mode of use of the product.
“Installation Information” for a User Product means any methods, procedures, authorization
keys, or other information required to install and execute modified versions of a covered work
in that User Product from a modified version of its Corresponding Source. The information must
suffice to ensure that the continued functioning of the modified object code is in no case prevented or interfered with solely because modification has been made.
If you convey an object code work under this section in, or with, or specifically for use in, a User
Product, and the conveying occurs as part of a transaction in which the right of possession and
use of the User Product is transferred to the recipient in perpetuity or for a fixed term (regardless of how the transaction is characterized), the Corresponding Source conveyed under this
section must be accompanied by the Installation Information. But this requirement does not
apply if neither you nor any third party retains the ability to install modified object code on the
User Product (for example, the work has been installed in ROM).
The requirement to provide Installation Information does not include a requirement to continue
to provide support service, warranty, or updates for a work that has been modified or installed
by the recipient, or for the User Product in which it has been modified or installed. Access to a
network may be denied when the modification itself materially and adversely affects the operation of the network or violates the rules and protocols for communication across the network.
Corresponding Source conveyed, and Installation Information provided, in accord with this section must be in a format that is publicly documented (and with an implementation available to
the public in source code form), and must require no special password or key for unpacking,
reading or copying.
7. Additional Terms. “Additional permissions” are terms that supplement the terms of this License
by making exceptions from one or more of its conditions. Additional permissions that are applicable to the entire Program shall be treated as though they were included in this License, to the
extent that they are valid under applicable law. If additional permissions apply only to part of
the Program, that part may be used separately under those permissions, but the entire Program
remains governed by this License without regard to the additional permissions.
When you convey a copy of a covered work, you may at your option remove any additional
permissions from that copy, or from any part of it. (Additional permissions may be written to
require their own removal in certain cases when you modify the work.) You may place additional
permissions on material, added by you to a covered work, for which you have or can give appropriate copyright permission.
Notwithstanding any other provision of this License, for material you add to a covered work,
you may (if authorized by the copyright holders of that material) supplement the terms of this
License with terms:
a) Disclaiming warranty or limiting liability differently from the terms of sections 15 and 16 of
this License; or
b) Requiring preservation of specified reasonable legal notices or author attributions in that
material or in the Appropriate Legal Notices displayed by works containing it; or
c) Prohibiting misrepresentation of the origin of that material, or requiring that modified versions
of such material be marked in reasonable ways as different from the original version; or
d) Limiting the use for publicity purposes of names of licensors or authors of the material; or
e) Declining to grant rights under trademark law for use of some trade names, trademarks, or
service marks; or
f)
Requiring indemnification of licensors and authors of that material by anyone who conveys
the material (or modified versions of it) with contractual assumptions of liability to the recipient, for any liability that these contractual assumptions directly impose on those licensors
and authors.
All other non-permissive additional terms are considered “further restrictions” within the meaning
of section 10. If the Program as you received it, or any part of it, contains a notice stating that it is
governed by this License along with a term that is a further restriction, you may remove that term.
If a license document contains a further restriction but permits relicensing or conveying under this
License, you may add to a covered work material governed by the terms of that license document,
provided that the further restriction does not survive such relicensing or conveying.
If you add terms to a covered work in accord with this section, you must place, in the relevant
source files, a statement of the additional terms that apply to those files, or a notice indicating
where to find the applicable terms.
Additional terms, permissive or non-permissive, may be stated in the form of a separately written license, or stated as exceptions; the above requirements apply either way.
8.
Termination. You may not propagate or modify a covered work except as expressly provided
under this License. Any attempt otherwise to propagate or modify it is void, and will automatically terminate your rights under this License (including any patent licenses granted under the
third paragraph of section 11).
However, if you cease all violation of this License, then your license from a particular copyright
holder is reinstated (a) provisionally, unless and until the copyright holder explicitly and finally
terminates your license, and (b) permanently, if the copyright holder fails to notify you of the
violation by some reasonable means prior to 60 days after the cessation.
Moreover, your license from a particular copyright holder is reinstated permanently if the copyright holder notifies you of the violation by some reasonable means, this is the first time you
have received notice of violation of this License (for any work) from that copyright holder, and
you cure the violation prior to 30 days after your receipt of the notice.
Termination of your rights under this section does not terminate the licenses of parties who
have received copies or rights from you under this License. If your rights have been terminated
and not permanently reinstated, you do not qualify to receive new licenses for the same material
under section 10.
9. Acceptance Not Required for Having Copies. You are not required to accept this License in
order to receive or run a copy of the Program. Ancillary propagation of a covered work occurring solely as a consequence of using peer-to-peer transmission to receive a copy likewise does
not require acceptance. However, nothing other than this License grants you permission to
propagate or modify any covered work. These actions infringe copyright if you do not accept
this License. Therefore, by modifying or propagating a covered work, you indicate your acceptance of this License to do so.
10. Automatic Licensing of Downstream Recipients. Each time you convey a covered work, the
recipient automatically receives a license from the original licensors, to run, modify and propagate that work, subject to this License. You are not responsible for enforcing compliance by
third parties with this License.
An “entity transaction” is a transaction transferring control of an organization, or substantially
all assets of one, or subdividing an organization, or merging organizations. If propagation of a
covered work results from an entity transaction, each party to that transaction who receives a
copy of the work also receives whatever licenses to the work the party’s predecessor in interest
had or could give under the previous paragraph, plus a right to possession of the Corresponding
Source of the work from the predecessor in interest, if the predecessor has it or can get it with
reasonable efforts.
You may not impose any further restrictions on the exercise of the rights granted or affirmed
under this License. For example, you may not impose a license fee, royalty, or other charge for
exercise of rights granted under this License, and you may not initiate litigation (including a
cross-claim or counterclaim in a lawsuit) alleging that any patent claim is infringed by making,
using, selling, offering for sale, or importing the Program or any portion of it.
11. Patents. A “contributor” is a copyright holder who authorizes use under this License of the
Program or a work on which the Program is based. The work thus licensed is called the contributor’s “contributor version”.
A contributor’s “essential patent claims” are all patent claims owned or controlled by the
contributor, whether already acquired or hereafter acquired, that would be infringed by some
manner, permitted by this License, of making, using, or selling its contributor version, but do
not include claims that would be infringed only as a consequence of further modification of the
contributor version. For purposes of this definition, “control” includes the right to grant patent
sublicenses in a manner consistent with the requirements of this License.
Each contributor grants you a non-exclusive, worldwide, royalty-free patent license under the
contributor’s essential patent claims, to make, use, sell, offer for sale, import and otherwise run,
modify and propagate the contents of its contributor version.
In the following three paragraphs, a “patent license” is any express agreement or commitment,
however denominated, not to enforce a patent (such as an express permission to practice a patent
or covenant not to sue for patent infringement). To “grant” such a patent license to a party means
to make such an agreement or commitment not to enforce a patent against the party.
If you convey a covered work, knowingly relying on a patent license, and the Corresponding Source
of the work is not available for anyone to copy, free of charge and under the terms of this License,
through a publicly available network server or other readily accessible means, then you must either
(1) cause the Corresponding Source to be so available, or (2) arrange to deprive yourself of the
benefit of the patent license for this particular work, or (3) arrange, in a manner consistent with the
requirements of this License, to extend the patent license to downstream recipients. “Knowingly relying” means you have actual knowledge that, but for the patent license, your conveying the covered
work in a country, or your recipient’s use of the covered work in a country, would infringe one or
more identifiable patents in that country that you have reason to believe are valid.
If, pursuant to or in connection with a single transaction or arrangement, you convey, or propagate by procuring conveyance of, a covered work, and grant a patent license to some of the parties receiving the covered work authorizing them to use, propagate, modify or convey a specific
copy of the covered work, then the patent license you grant is automatically extended to all
recipients of the covered work and works based on it.
A patent license is “discriminatory” if it does not include within the scope of its coverage, prohibits the exercise of, or is conditioned on the non-exercise of one or more of the rights that are
specifically granted under this License. You may not convey a covered work if you are a party to
an arrangement with a third party that is in the business of distributing software, under which
you make payment to the third party based on the extent of your activity of conveying the work,
and under which the third party grants, to any of the parties who would receive the covered
work from you, a discriminatory patent license (a) in connection with copies of the covered work
conveyed by you (or copies made from those copies), or (b) primarily for and in connection with
specific products or compilations that contain the covered work, unless you entered into that
arrangement, or that patent license was granted, prior to 28 March 2007.
Nothing in this License shall be construed as excluding or limiting any implied license or other
defenses to infringement that may otherwise be available to you under applicable patent law.
12. No Surrender of Others’ Freedom. If conditions are imposed on you (whether by court order, agreement or otherwise) that contradict the conditions of this License, they do not excuse you from the
conditions of this License. If you cannot convey a covered work so as to satisfy simultaneously your
obligations under this License and any other pertinent obligations, then as a consequence you may
not convey it at all. For example, if you agree to terms that obligate you to collect a royalty for further
conveying from those to whom you convey the Program, the only way you could satisfy both those
terms and this License would be to refrain entirely from conveying the Program.
13. Use with the GNU Affero General Public License. Notwithstanding any other provision of this
License, you have permission to link or combine any covered work with a work licensed under
version 3 of the GNU Affero General Public License into a single combined work, and to convey
the resulting work. The terms of this License will continue to apply to the part which is the covered work, but the special requirements of the GNU Affero General Public License, section 13,
concerning interaction through a network will apply to the combination as such.
14. Revised Versions of this License. The Free Software Foundation may publish revised and/or new
versions of the GNU General Public License from time to time. Such new versions will be similar
in spirit to the present version, but may differ in detail to address new problems or concerns.
Each version is given a distinguishing version number. If the Program specifies that a certain
numbered version of the GNU General Public License “or any later version” applies to it, you
have the option of following the terms and conditions either of that numbered version or of any
later version published by the Free Software Foundation. If the Program does not specify a version number of the GNU General Public License, you may choose any version ever published by
the Free Software Foundation.
If the Program specifies that a proxy can decide which future versions of the GNU General Public
License can be used, that proxy’s public statement of acceptance of a version permanently
authorizes you to choose that version for the Program.
Later license versions may give you additional or different permissions. However, no additional
obligations are imposed on any author or copyright holder as a result of your choosing to follow
a later version.
15. Disclaimer of Warranty. THERE IS NO WARRANTY FOR THE PROGRAM, TO THE EXTENT
PERMITTED BY APPLICABLE LAW. EXCEPT WHEN OTHERWISE STATED IN WRITING THE
COPYRIGHT HOLDERS AND/OR OTHER PARTIES PROVIDE THE PROGRAM “AS IS” WITHOUT
WARRANTY OF ANY KIND, EITHER EXPRESSED OR IMPLIED, INCLUDING, BUT NOT LIMITED
TO, THE IMPLIED WARRANTIES OF MERCHANTABILITY AND FITNESS FOR A PARTICULAR
PURPOSE. THE ENTIRE RISK AS TO THE QUALITY AND PERFORMANCE OF THE PROGRAM
IS WITH YOU. SHOULD THE PROGRAM PROVE DEFECTIVE, YOU ASSUME THE COST OF ALL
NECESSARY SERVICING, REPAIR OR CORRECTION.
16. Limitation of Liability. IN NO EVENT UNLESS REQUIRED BY APPLICABLE LAW OR AGREED TO
IN WRITING WILL ANY COPYRIGHT HOLDER, OR ANY OTHER PARTY WHO MODIFIES AND/OR
CONVEYS THE PROGRAM AS PERMITTED ABOVE, BE LIABLE TO YOU FOR DAMAGES, INCLUDING
ANY GENERAL, SPECIAL, INCIDENTAL OR CONSEQUENTIAL DAMAGES ARISING OUT OF THE
USE OR INABILITY TO USE THE PROGRAM (INCLUDING BUT NOT LIMITED TO LOSS OF DATA
OR DATA BEING RENDERED INACCURATE OR LOSSES SUSTAINED BY YOU OR THIRD PARTIES
OR A FAILURE OF THE PROGRAM TO OPERATE WITH ANY OTHER PROGRAMS), EVEN IF SUCH
HOLDER OR OTHER PARTY HAS BEEN ADVISED OF THE POSSIBILITY OF SUCH DAMAGES.
17. Interpretation of Sections 15 and 16. If the disclaimer of warranty and limitation of liability provided above cannot be given local legal effect according to their terms, reviewing courts shall
apply local law that most closely approximates an absolute waiver of all civil liability in connection with the Program, unless a warranty or assumption of liability accompanies a copy of the
Program in return for a fee.
END OF TERMS AND CONDITIONS
Programming Languages/C++
C++ is the “in” language!
Find out why, and
how to use it, right here
C++ is fast, powerful, and fully compiled — three great
reasons why it’s #1. There are more reasons, and in this
guide you discover them as you dig in and really learn to
use C++. Each handy minibook covers what you need to
know about a key aspect of C++. If you’re a C++ newbie,
start with Book I; experienced folks can jump in anywhere
to learn more!
Open the book and find:
• Tips on managing arrays of data
• What to do with constructors and
destructors
• How local variables are stored
• What packages, notes, and tags
are for
• One size fits most — see how to use C++ for Windows®, Mac®, and
Linux®, using the CodeBlocks compiler
• Secrets of architecting the
Standard Library
• Explore objects and classes — understand object-oriented
programming and how to use various diagrams to design your
programs
• The difference between deque and
vector
• Banish bugs — learn to use a debugger and how the CodeBlocks
debugger ferrets out problems in your applications
• How to make a class persistent
• Where to obtain the free Visual
Studio® Express
• Reading and writing — Minibook V covers it all, including stream
programming
• Advance to the Library — understand how to create your own
templates and build a full set of libraries for your own use
Bonus CD Includes
All source code from the examples used in the book
CodeBlocks compiler
Go to Dummies.com®
for videos, step-by-step examples,
how-to articles, or to shop!
Please see the CD appendix for details and complete system requirements.
$39.99 US / $47.99 CN / £27.99 UK
John Paul Mueller has written more than 300 articles and 80 books on
technology, including LINQ For Dummies. Jeff Cogswell has been an
application developer and trainer for 13 years, working with clients from
startups to Fortune 500 companies. He has developed courses on C++ and
other technologies.
ISBN 978-0-470-31735-8