


Текст
LIPPINCOTT®
Nursing
Procedures
EIGHTH EDITION
Chief Nurse: Anne Dabrow Woods, DNP, RN, CRNP, ANP-BC, AGACNP-BC
Acquisitions Editor: Nicole Dernoski Clinical Director: Joan M. Robinson, RN, MSN
Clinical Project Manager: Collette Bishop Hendler, RN, MS, CIC
Clinical Editor: Beverly Ann Tscheschlog, RN, MS
Editorial Director: David Moreau Senior Managing Editor: Diane Labus Managing
Editor: Ellen Sellers
Editor: Rosanne Hallowell
Editorial Assistant: Linda K. Ruhf Art Director: Elaine Kasmer
Design: Joseph John Clark
Production Project Manager: Kim Cox Manufacturing Manager: Kathleen Brown
Production Services: Aptara, Inc.
Copyright © 2019 Wolters Kluwer
All rights reserved. This book is protected by copyright. No part of this book may
be reproduced or transmitted in any form or by any means, including as
photocopies or scanned-in or other electronic copies, or utilized by any
information storage and retrieval system without written permission from the
copyright owner, except for brief quotations embodied in critical articles and
reviews. Materials appearing in this book prepared by individuals as part of their
official duties as U.S . government employees are not covered by the above-
mentioned copyright. To request permission, please contact Wolters Kluwer at
Two Commerce Square, 2001 Market Street, Philadelphia, PA 19103, via email at
permissions@lww.com, or via website at shop.lww.com (products and services).
987654321
Printed in China
Library of Congress Cataloging-in-Publication Data
Names: Wolters Kluwer (Firm), publisher.
Title: Lippincott nursing procedures.
Description: Eighth edition. | Philadelphia : Wolters Kluwer, [2019] | Includes
bibliographical references and index.
Identifiers: LCCN 2018035632 | ISBN 9781469815299 (paperback) Subjects:
LCSH: Nursing. | Evidence-based nursing. | BISAC: MEDICAL /Nursing
/Fundamentals & Skills. | MEDICAL /Nursing /Assessment & Diagnosis. |
MEDICAL /Nursing /General.
Classification: LCC RT41 .L57 2019 | DDC 610.73–dc23 LC record available at
https://lccn.loc.gov/2018035632
This work is provided “as is,” and the publisher disclaims any and all warranties,
express or implied, including any warranties as to accuracy, comprehensiveness,
or currency of the content of this work.
This work is no substitute for individual patient assessment based upon
healthcare professionals’ examination of each patient and consideration of,
among other things, age, weight, gender, current or prior medical conditions,
medication history, laboratory data and other factors unique to the patient. The
publisher does not provide medical advice or guidance and this work is merely a
reference tool. Healthcare professionals, and not the publisher, are solely
responsible for the use of this work including all medical judgments and for any
resulting diagnosis and treatments.
Given continuous, rapid advances in medical science and health information,
independent professional verification of medical diagnoses, indications,
appropriate pharmaceutical selections and dosages, and treatment options
should be made and healthcare professionals should consult a variety of
sources. When prescribing medication, healthcare professionals are advised to
consult the product information sheet (the manufacturer’s package insert)
accompanying each drug to verify, among other things, conditions of use,
warnings and side effects and identify any changes in dosage schedule or
contraindications, particularly if the medication to be administered is new,
infrequently used or has a narrow therapeutic range. To the maximum extent
permitted under applicable law, no responsibility is assumed by the publisher for
any injury and/or damage to persons or property, as a matter of products
liability, negligence law or otherwise, or from any reference to or use by any
person of this work.
shop.lww.com
Contents
Contributors and consultants
How to use this book
ALPHABETICAL LISTING OF NURSING PROCEDURES
A
Abdominal paracentesis, assisting
Admission
Admixture of drugs in a syringe
Advance directives
Airborne precautions
Air-fluidized therapy bed use
Alignment and pressure-reducing devices
Antiembolism stocking application
Aquapheresis
Arterial and venous sheath removal
Arterial pressure monitoring
Arterial puncture for blood gas analysis
Assessment techniques
Autologous blood collection, preoperative
Autologous blood transfusion, perioperative
Automated external defibrillation
B
Back care
Balloon valvuloplasty care
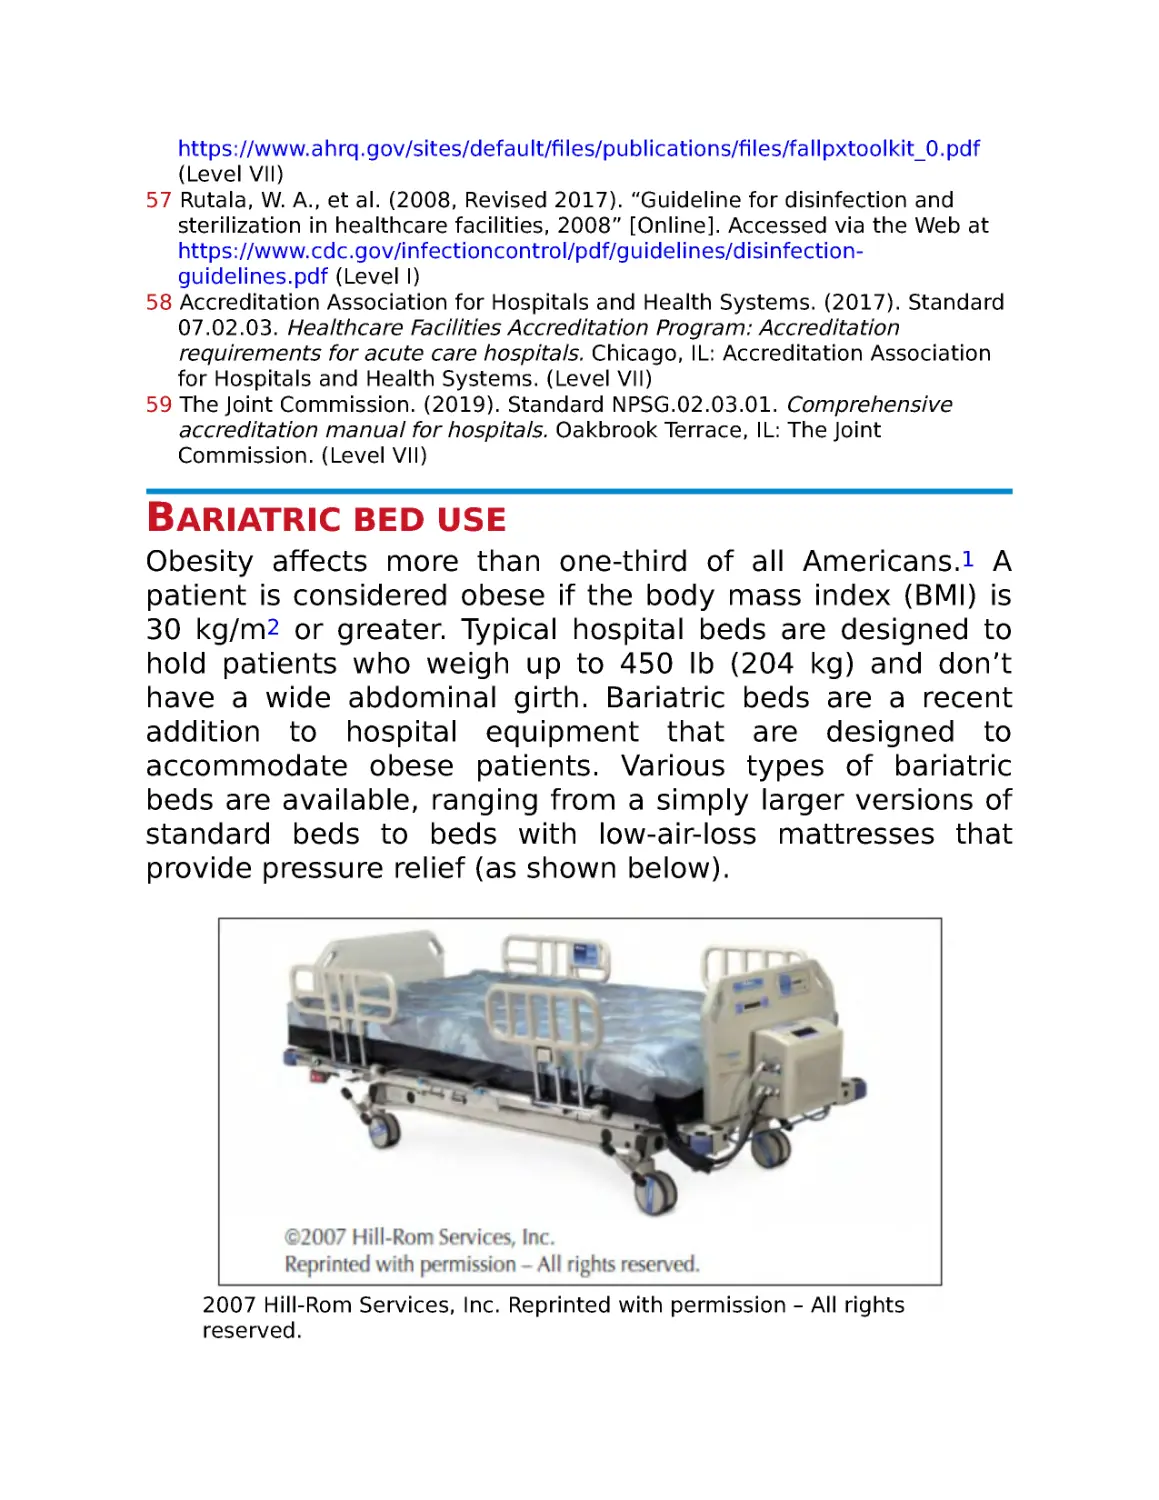
Bariatric bed use
Bed bath
Bed equipment, supplemental
Bed-making, occupied
Bed-making, unoccupied
Bedpan and urinal use
Bedside spirometry
Biliary drainage catheter care
Binder application
Bispectral index monitoring
Bladder ultrasonography
Blood culture sample collection
Blood glucose monitoring
Blood pressure assessment
Body jewelry removal
Body mechanics
Bone marrow aspiration and biopsy
Brain tissue oxygen monitoring and care
Brain tissue oxygen monitoring device, insertion, assisting
Bronchoscopy, assisting
Buccal and sublingual drug administration
Burn care
Burn dressing application, biological and synthetic
C
Canes
Capillary blood gas sampling
Carbon monoxide oximetry
Cardiac monitoring
Cardiac output measurement
Cardiopulmonary resuscitation, adult
Cardiopulmonary resuscitation, child
Cardiopulmonary resuscitation, infant
Cardioversion, synchronized
Care plan preparation
Cast application
Cast removal
Central venous access catheter
Central venous pressure monitoring
Cerebrospinal fluid drainage management
Cervical collar application
Chemotherapeutic drug administration
Chemotherapeutic drug preparation and handling
Chest physiotherapy
Chest tube drainage system monitoring and care
Chest tube drainage system setup
Chest tube insertion, assisting
Chest tube removal, assisting
Clavicle strap application
Closed-wound drain management
Code management
Cold application
Colostomy and ileostomy care
Colostomy irrigation
Contact lens care
Contact precautions
Continent ileostomy care
Continuous ambulatory peritoneal dialysis
Continuous bladder irrigation
Continuous passive motion device use
Continuous positive airway pressure use
Continuous renal replacement therapy
Credé maneuver
Cricothyrotomy, assisting
Crutch use
D
Defibrillation
Discharge
Documentation
Doppler use
Droplet precautions
Drug and alcohol specimen collection
Dying patient care
E
Eardrop instillation
Ear irrigation
Elastic bandage application
Electrical bone growth stimulation
Electrocardiogram, 12-lead
Electrocardiogram, right chest lead
Electrocardiogram, posterior chest lead
Electrocardiogram, signal-averaged
Endoscopic therapy, assisting
Endotracheal drug administration
Endotracheal intubation
Endotracheal tube care
End-tidal carbon dioxide monitoring
Enema administration
Epicardial pacing and care
Epidural analgesic administration
Esophagogastric tamponade tube care
Esophagogastric tamponade tube insertion and removal
External fixation management
Eye care
Eye compress application
Eye irrigation
Eye medication administration
F
Fall prevention and management
Fecal impaction removal, digital
Fecal occult blood tests
Feeding
Feeding tube insertion and removal
Femoral compression
Foot care
Foreign-body airway obstruction and management
Functional assessment
G
Gait belt use
Gastric lavage
Gastrostomy feeding button reinsertion
H
Hair care
Halo-vest traction management
Hand hygiene
Hearing aid care
Heat application
Height and weight measurement
Hemodialysis
Hemoglobin testing, bedside
Hip arthroplasty care
Hour-of-sleep care
Humidifier therapy
Hyperthermia-hypothermia blanket use
I
IM injection
Impaired swallowing and aspiration precautions
Implanted port use
Incentive spirometry
Incontinence device application, male
Incontinence management, fecal
Incontinence management, urinary
Indwelling urinary catheter care and removal
Indwelling urinary catheter insertion
Indwelling urinary catheter irrigation
Intermittent infusion device drug administration
Intermittent infusion device flushing and locking
Intermittent infusion device insertion
Intermittent positive-pressure breathing
Intermittent urinary catheterization
Internal fixation management
Intra-abdominal pressure monitoring
Intra-aortic balloon counterpulsation
Intracranial pressure monitoring
Intradermal injection
Intraosseous infusion
Intrapleural drug administration
Iontophoresis
IV bolus injection
IV catheter insertion and removal
IV catheter maintenance
IV infusion rates and manual control
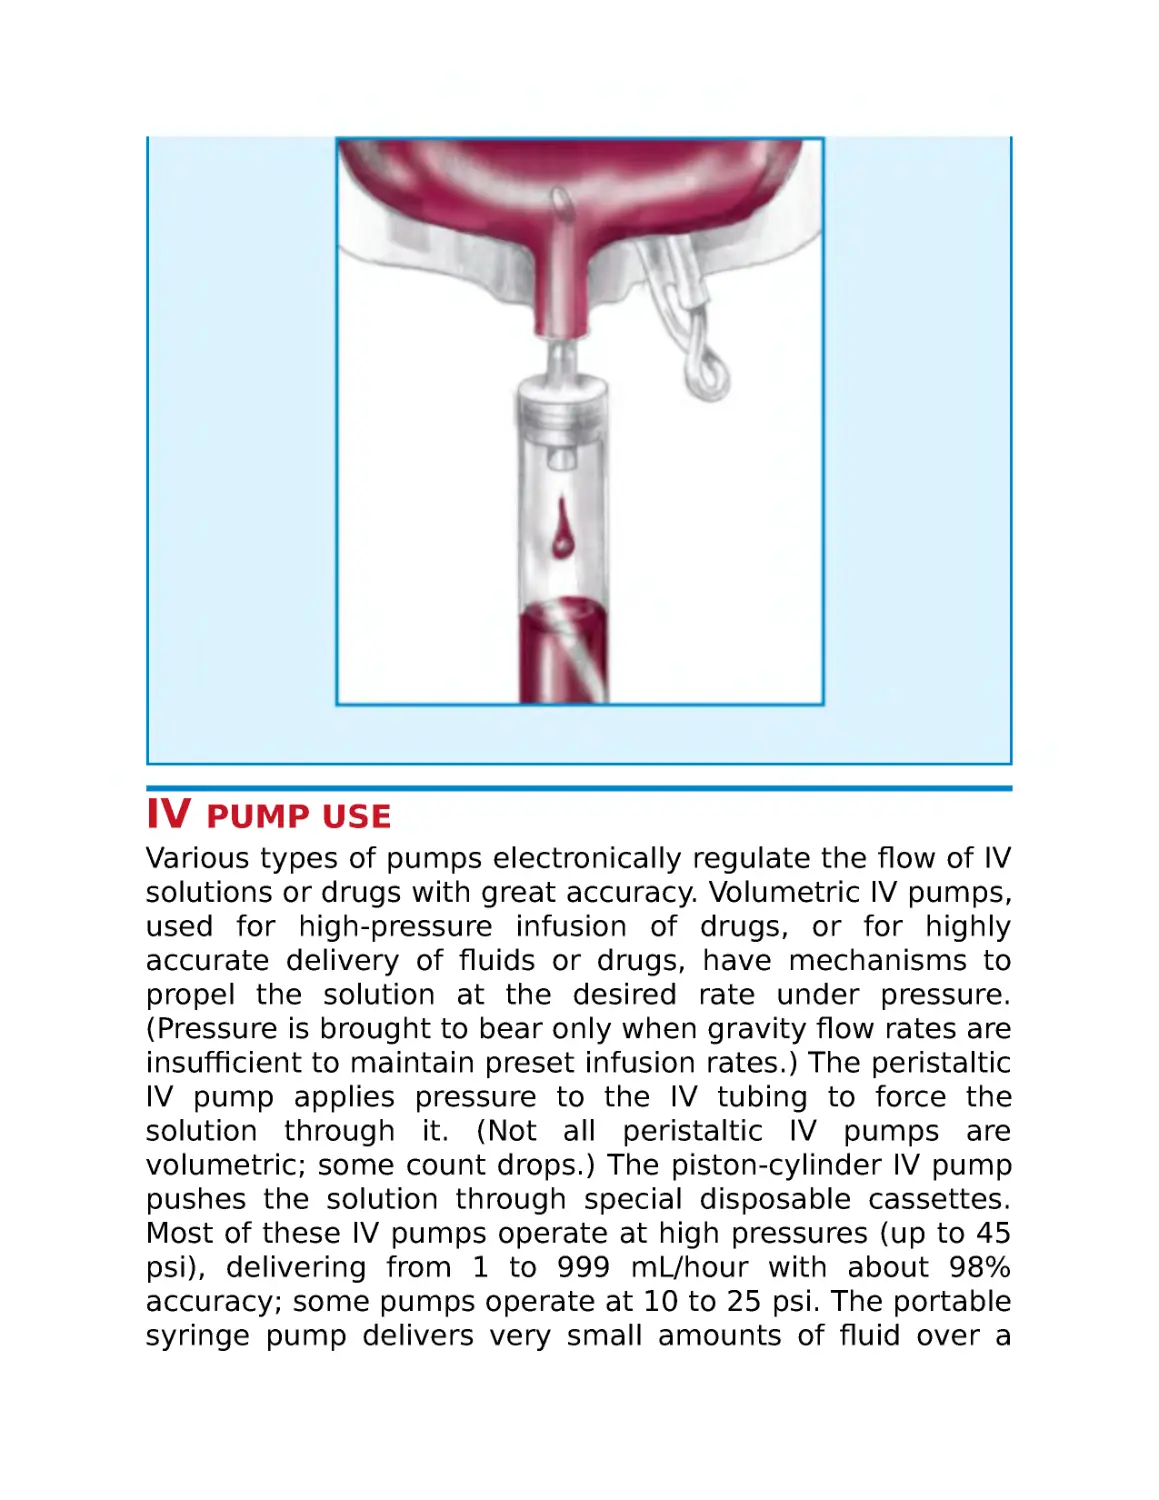
IV pump use
IV secondary line drug infusion
IV therapy preparation
J
Jugular venous oxygen saturation monitoring
K
Knee arthroplasty postprocedure care
L
Laryngeal mask airway insertion
Laser therapy, assisting
Latex allergy protocol
Lipid emulsion administration
Low-air-loss therapy bed use
Lumbar puncture, assisting
M
Manual ventilation
Massive infusion device use
Mechanical traction management
Mechanical ventilation, positive pressure
Metered-dose inhaler use
Mixed venous oxygen saturation monitoring
Moderate sedation
Mucus clearance device
N
Nasal bridle insertion and removal
Nasal irrigation
Nasal medication administration
Nasal packing, assisting
Nasoenteric-decompression tube care
Nasoenteric-decompression tube insertion and removal
Nasogastric tube care
Nasogastric tube drug instillation
Nasogastric tube insertion and removal
Nasopharyngeal airway insertion and care
Nebulizer therapy
Negative-pressure wound therapy
Nephrostomy and cystostomy tube dressing changes
Neurologic assessment
Nutritional screening
O
Ommaya reservoir drug infusion
Oral care
Oral drug administration
Organ donor, identification
Oronasopharyngeal suction
Oropharyngeal airway insertion and care
Oxygen administration
P
Pain management
Parenteral nutrition administration
Parenteral nutrition monitoring
Passive range-of-motion exercises
Patient-controlled analgesia
Percutaneous coronary intervention care
Pericardiocentesis, assisting
Perineal care
Peripherally inserted central catheter use
Peripheral nerve stimulation
Peritoneal dialysis
Peritoneal lavage, assisting
Permanent pacemaker care
Personal protective equipment
Postmortem care
Postoperative care
Preoperative care
Preoperative skin preparation
Pressure dressing application
Pressure injury care
Progressive ambulation
Prone positioning
Protective environment guidelines
Pulmonary artery pressure and pulmonary artery occlusion
pressure monitoring
Pulse amplitude monitoring
Pulse assessment
Pulse oximetry
R
Radiation implant therapy
Radiation therapy, external
Radioactive iodine therapy
Rectal suppositories and ointments
Rectal tube insertion and removal
Residual limb care
Respiration assessment
Restraint application
Ring removal
Rotation beds
S
Safe medication administration practices, general
Seizure management
Self-catheterization
Sequential compression therapy
Sexual assault examination
Sharp debridement
Shaving
Sitz bath
Skin biopsy
Skin graft care
Skin staple and clip removal
Soaks
Spiritual care
Splint application
Sponge bath
Sputum collection
Standard precautions
Sterile technique, basic
Stool specimen collection
ST-segment monitoring
Subcutaneous injection
Subdermal drug implants
Surgical drain removal
Surgical wound management
Suture removal
Swab specimen collection
T
Temperature assessment
Therapeutic bath
Thoracentesis, assisting
Thoracic electrical bioimpedance monitoring
Tilt table
Topical skin drug application
Tracheal cuff pressure measurement
Tracheal suctioning, intubated patient
Tracheostomy and ventilator speaking valve
Tracheostomy care
Tracheotomy, assisting
Transabdominal tube feeding and care
Transcranial Doppler monitoring
Transcutaneous electrical nerve stimulation
Transcutaneous pacing
Transdermal drug application
Transducer system setup
Transfer within a facility
Transfusion of blood and blood products
Transfusion reaction management
Transvenous pacing
Traumatic wound management
Tub baths and showers
Tube feedings
U
Ultraviolet light therapy
Unna boot application
Urinary diversion stoma care
Urine collection, 12- or 24-hour timed
Urine glucose and ketone tests
Urine pH
Urine specimen collection
Urine straining, for calculi
V
Vaginal medication administration
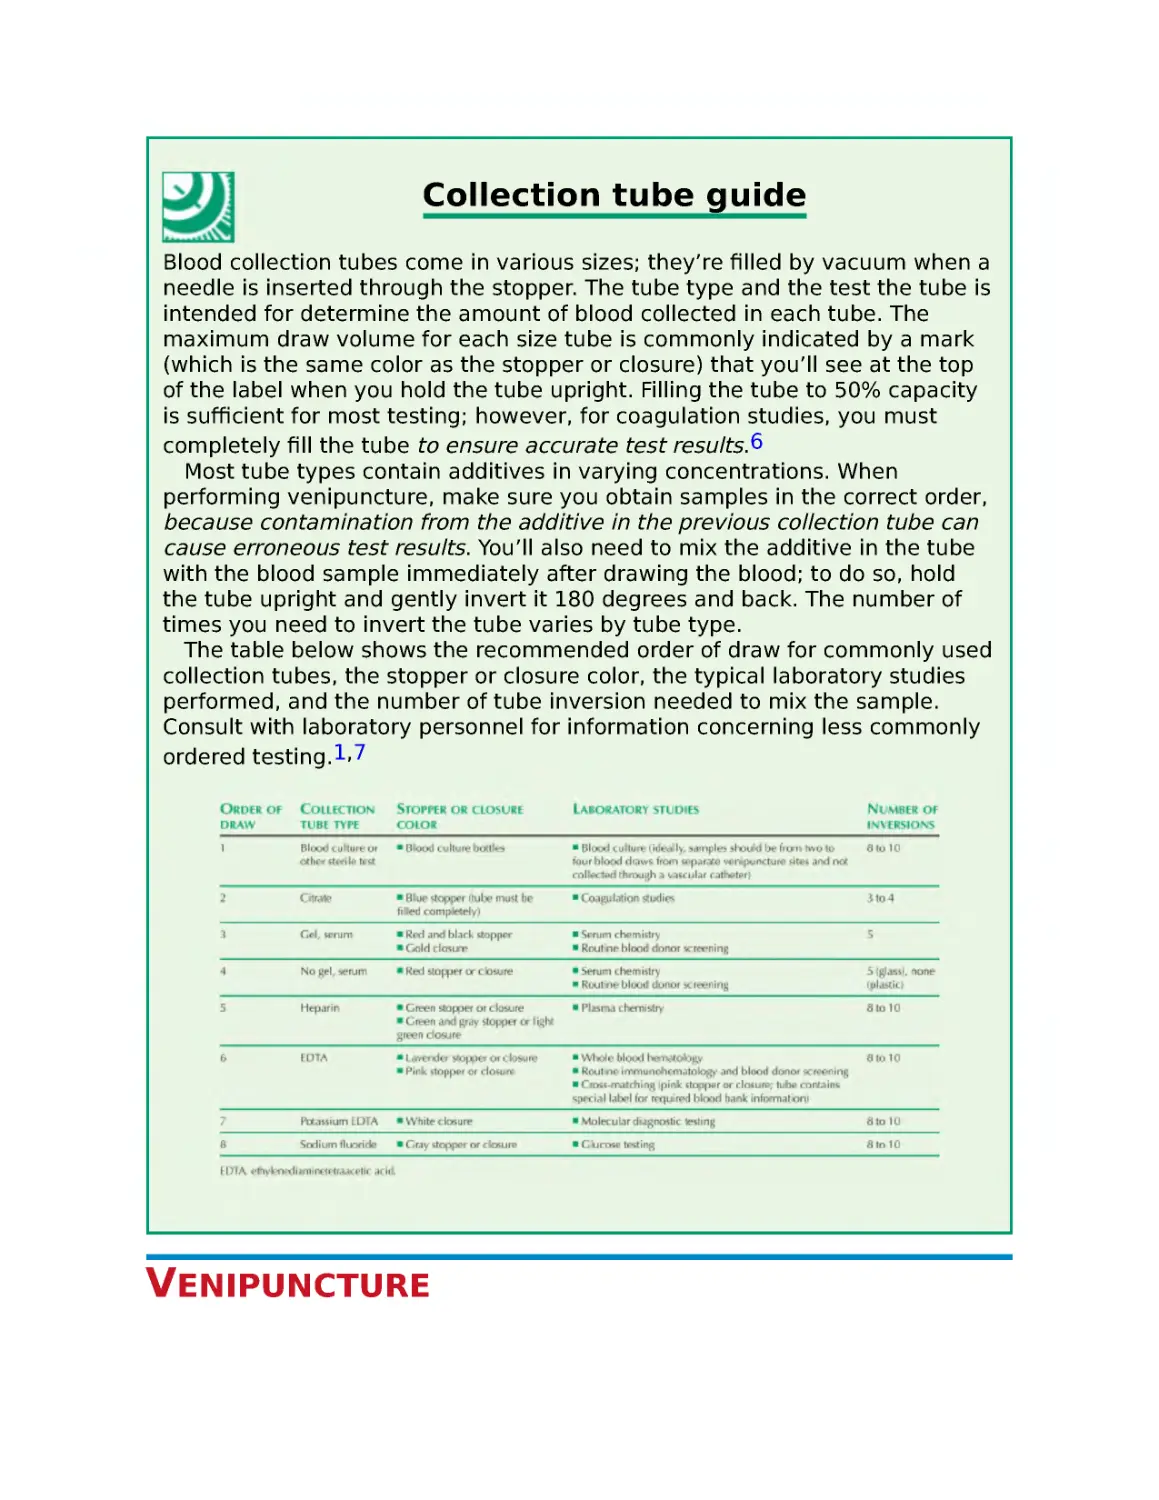
Venipuncture
Ventricular assist device care
Ventricular drain insertion, assisting
Volume-control set preparation
W
Walkers
Water intoxication assessment
Weaning a patient from a ventilator
Wound dehiscence and evisceration management
Wound irrigation
Z
Z-track injection
Index
Contributors and
consultants
Tuesday Adams, BSN, MSN, RN-BC, WCC
Department Head, Inpatient Services Naval Hospital Camp
Lejeune
Jacksonville, NC
Michelle Ahnberg, DNP, RN, PCNS-BC, CPON, CPN
Pediatric Clinical Nurse Specialist Sanford Children’s
Hospital
Sioux Falls, SD
Erin Alden, MN, RN-BC, CMSRN, ACNS-BC
Acute Care Clinical Nurse Specialist/Stroke Coordinator
UW Medicine Valley Medical Center Renton, WA
Deborah Hutchinson Allen, PhD, RN, CNS, FNP-BC, AOCNP
Director of Nursing Research and Evidence Based Practice
Duke University Health System
Durham, NC
Katherine Balkema, MM, BSN, BA, RN-BC, CMSRN
Clinical Nurse Manager
Holland Hospital
Holland, MI
Patricia Barrella, MSN, RN, CHFN
Heart Failure Coordinator
Abington Memorial Hospital
Abington, PA
Donna Barto, DNP, RN, CCRN
Advanced Nurse Clinician
Virtua Health
Marlton, NJ
Patricia Beam, DNP, RN-BC
Coordinator, Pediatric Nursing Staff Development
University Hospitals of Cleveland, Rainbow Babies and
Children’s Hospital Cleveland, OH
Emerald Bilbrew, DNP, MSN, BSN, RN, CMSRN
Nursing Faculty
Fayetteville Technical Community College Fayetteville, NC
Melanie Bradford, RN, ADN, BSN, MSN
Clinical Nurse Manager, Medical-Surgical Watauga Medical
Center
Boone, NC
Christina Canfield, MSN, APRN, ACNS-BC, CCRN-E
eHospital Program Manager
Cleveland Clinic
Cleveland, OH
Tiffany Carollo, RN, MS, CNS
Nurse Educator, Patient Education Long Island Jewish
Medical Center New Hyde Park, NY
Jodi Cerar, MSN, RN, CNOR
Nursing Education Specialist, Surgical Services Mayo
Medical Center
Rochester, MN
Jennifer Coates, MSN, MBA, ACNPC, ACNP-BC
Critical Care Nurse Practitioner/Assistant Clinical
Professor Chester County Hospital
West Chester, PA
Tina Collins, MSN, RN, CCRN, CNS
Critical Care Clinical Nurse Specialist/Sepsis Coordinator
Henrico Doctors’ Hospital
Richmond, VA
Melinda Constantine, RN, MSN, CMSRN, ONC
Assistant Director, Nursing Education & Operations North-
Shore Long Island Jewish Medical Center New Hyde
Park, NY
Jiajoyce Conway, DNP, CRNP, AOCNP, FNP-BC
Doctor of Clinical Nursing Practice, Oncology Nurse
Practitioner Cancer Care Associates of York York, PA
Laurie Donaghy, MSN, RN, CEN
Assistant Nurse Manager
Temple University Hospital
Philadelphia, PA
Shelba Durston, RN, MSN, CCRN, SAFE
Staff Nurse
San Joaquin General Hospital
French Camp, CA
Professor of Nursing
San Joaquin Delta College
Stockton, CA
Ellie Franges, DNP, CRNP, CNRN
Nurse Practitioner—Neurosurgery Lehigh Valley Physician
Group Neurosurgery Allentown, PA
Anthodith Garganera, MSN/MHA, RN, CMSRN, CNL
Clinical Nurse Leader
Texas Health Presbyterian Hospital of Plano Plano, TX
Theresa Garren-Grubbs, MSN, RN, CMSRN, CNL
Undergraduate Nursing Instructor South Dakota State
University
Brookings, SD
Leona Elizabeth (Beth) Hawkes, MSN, RN-BC
Nursing Professional Development Specialist Adventist
Health Bakersfield
Bakersfield, CA
Genevieve Holmen, PhD, RN
Emergency RN
Sacred Heart Hospital
Eau Claire, WI
Laura Susan Hudson, RN, MSN, MS
Owner
Hudson Consulting
Flint, MI
Blaine Jumper, BSN, RN, CMSRN
Clinical Education
Jackson County Memorial Hospital Altus, OK
Tamara Kear, PhD, MSN, RN, CNN, CNS
Associate Professor of Nursing/Nephrology Nurse Villanova
University
Villanova, PA
Karen Knight-Frank, MSN, RN, CNS, CCRN, CCNS
Clinical Nurse Specialist, Critical Care San Joaquin General
Hospital
French Camp, CA
Jennifer M. Lee, RN, MSN, FNP-C
Nurse Practitioner
Carolina Cardiology Consultants Greenville, SC
Elisa Mangosing-Lemmon, BSN, MSN, RN, CMSRN
RN–Staff Development Coordinator Riverside Doctors’
Hospital Williamsburg Williamsburg, VA
Patricia Manning, RN, BSN, OCN, CRNI, CNN
Oncology Clinical Claims Specialist Head of Clinical
Oncology Education/Oncology Research Eastern Maine
Medical Center, Lafayette Family Cancer Center Brewer,
ME
Donna Martin, DNP, RN-BC, CMSRN, CDE
Associate Professor of Nursing Lewis University
Romeoville, IL
Lillian McAteer, MBA, BSN, BHA, RN, CPAN
Nurse Auditor
Seton Healthcare
Austin, TX
Colleen McCracken, BSN, RN, CMSRN, CHPN, OCN
Staff Registered Nurse Educator Froedtert Hospital
Milwaukee, WI
Pamela Moody, DNP, PhD, RN, FNP-BC
Nurse Administrator, Public Health Alabama Department of
Public Health Tuscaloosa, AL
Karen Page, RN, MSN, ACNS-BS, CMSRN, RN-BC
Nursing Professional Development Specialist Lakeland
Regional Medical Center Lakeland, FL
Rexann G. Pickering, RN, BSN, MS, MSN, PhD, CIM, CIP
Administrator, Human Protection Director of Continuing
Education Methodist University Hospital
Memphis, TN
Joan Rembacz, RN, MS, APN, CCRN, CCNS, CEN, TNS, TNCC
Clinical Nurse Specialist, Trauma Nurse Specialist
Coordinator Centegra Health System
McHenry, IL
Cynthia Rothenberger, DNP, RN, ACNS, BC
Assistant Professor of Nursing Prelicensure Program
Coordinator Alvernia University
Reading, PA
Paula Roy, BSN, RN, CMSRN
Clinical Nurse Educator
Southern Maine Health Care
Biddeford, ME
Noraliza Salazar, MSN, RN-BC, CCNS, CCRN-K
Cardiovascular Clinical Nurse Specialist Seton Medical
Center/Verity Health System Daly City, CA
Rachel Schroy, DNP, MSN, ACNP-BC, CRNP
St. Luke’s University Hospital Bethlehem, PA
Jere Shear, MSN, RN, CMSRN
Nurse Manager
Eastern Oklahoma VA Health Care System Muskogee, OK
Jody K. Smith, DNP, MSN, FNP-C
Family Nurse Practitioner/Adjunct Nursing Instructor
Trident Technical College
Charleston, SC
Johanna Soyebo, RN, MSN, CCRN, WCC
Adjunct Faculty
Malcolm X College
Chicago, IL
Allison Terry, PhD, RN
Assistant Dean of Clinical Practice Auburn University
Montgomery, AL
Karen Wessels, MSN, RN, CMSRN, CCRN (Alumnus) Nursing
Professional Development Specialist Swedish
American, A Division of UW Health Rockford, IL
Wendy Woodall, MSN, CMSRN, CNE
Secretary of the General Staff Office of the Surgeon
General
Falls Church, VA
How to use this book
As a nurse, you’re expected to know how to perform or
assist with literally hundreds of procedures. From the most
basic patient care, to complex treatments, to assisting with
the most intricate surgical procedures, you need to be able
to carry out nursing procedures with skill and confidence.
But mastering so many procedures is a tall order.
Newly updated with the latest evidence-based research,
this eighth edition of Lippincott Nursing Procedures provides
step-by-step guidance on the most commonly performed
nursing procedures you need to know, making it the ideal
resource for providing the professional, hands-on care your
patients deserve.
The A to Zs of organization
With over 400 procedures covered in detail, the current
edition of Lippincott Nursing Procedures presents this wealth
of information in the most efficient way possible. Many
procedures books use such categories as fundamental
procedures, body systems, and other types of procedures
(such as psychiatric care) to organize the material. But with
the proliferation in the number and types of procedures you
need to understand, such an organization can become
difficult to manage.
To address this, Lippincott Nursing Procedures organizes
all procedures into an A-to-Z listing, making the book fast
and easy to use. When you need to find a particular
procedure quickly, you can simply look it up by name. No
need to scan through the table of contents. No time lost
turning to the index, looking for the name of the procedure
you want, and then finding the right page in the book.
Once you’ve found the entry for a particular procedure in
the alphabetical listing, you’ll find that each entry uses the
same clear, straightforward structure. An introductory
section appears first. After that, most or all of the following
sections appear, depending on the particular procedure:
■ The Equipment section lists all the equipment you’ll need,
including all the variations in equipment that might be
needed. For instance, in the “endotracheal intubation”
entry, you’ll see a general equipment list, which is followed
by separate lists of the additional equipment you’ll need for
direct visualization intubation and blind nasotracheal
intubation.
■ As the name implies, the Preparation of equipment
section guides you through preparing the equipment for the
procedure.
■ In the Implementation section—the heart of each entry—
you’ll find the step-by-step guide to performing the
particular procedure.
■ Special considerations alerts you to factors to keep in
mind that can affect the procedure.
■ Patient teaching covers procedure-related and home care
information you need to teach to the patient and family.
■ Complications details procedure-related complications to
watch for.
■ The Documentation section helps you keep track of
everything you need to document related to the procedure.
■ The expanded References section includes numbered
citations keyed to the main text of each entry. These
numbered citations serve as the clinical evidence that
underpins the information and step-by-step procedures
presented in the entry. (There’ll be more on this in the next
section of this “how to” guide.)
The continued use of the A-to-Z organization in the eighth
edition and the clear structure of each entry make this book
a powerful tool for finding and understanding the
procedures you need to know.
Evidently speaking...
Lippincott Nursing Procedures strengthens its evidence-
based approach to nursing care with an expanded
numbered References section that appears in each entry. As
mentioned earlier, the numbered citations are keyed to
information that appears throughout each procedure.
As you read through an entry and come across a bullet
describing a particular step in a procedure, you’ll notice one
or more red superscript numbers following the bullet. These
numbers are citations for studies listed in the References
section; the studies supply clinical evidence or detail “best
practices” related to that bulleted step in the procedure.
This is what is meant by evidence-based practice: a
particular practice—say, performing hand hygiene—is
supported by the clinical evidence. This evidence-based
approach means the procedures you’ll read about in
Lippincott Nursing Procedures are best-practice procedures
that rely on solid, authoritative evidence.
As you look at the numbered references in each entry, you
may notice that many of them are followed by a level
number. This level number appears in parentheses after the
reference as the word “Level” followed by a Roman numeral
that ranges from I to VII. These level numbers give you an
indication of the strength of the particular reference, with
Level I being the strongest and Level VII the weakest.
Here’s how the rating system for this hierarchy of
evidence works:
■ Level I: Evidence comes from a systematic review or
meta-analysis of all relevant randomized, controlled trials.
■ Level II: Evidence comes from at least one well-designed
randomized, controlled trial.
■ Level III: Evidence comes from well-designed, controlled
trials without randomization.
■ Level IV: Evidence comes from well-designed case-control
and cohort studies.
■ Level V: Evidence comes from systematic reviews of
descriptive and qualitative studies.
■ Level VI: Evidence comes from a single descriptive or
qualitative study.
■ Level VII: Evidence comes from the opinion of authorities,
reports of expert committees, or both.
In this book, the majority of cited references followed by a
level are rated “Level I.” These Level I references provide
the strongest level of evidence to support a particular
practice. You can use these levels to gauge the strength of
supporting evidence for any particular practice or
procedure.
Another important way Lippincott Nursing Procedures
provides a more evidence-based approach is by offering
rationales for many procedure steps. These rationales are
set off from the main text in italics. For instance, you may
see a bullet like this: “Explain the procedure to the patient
and family (if appropriate) according to their individual
communication and learning needs to increase their
understanding, allay their fears, and enhance cooperation.”
The second part of that bullet—the italicized portion—is the
rationale, or reason, for performing the first part. The
practice of answering the patient’s questions is supported
by the clinical evidence of the patient’s decreased anxiety
and increased cooperation.
Just the highlights, please
Lippincott Nursing Procedures, Eighth Edition, also benefits
from other features that make it easy to use. Throughout,
you’ll find highlighting that greatly enhances the main text.
Some examples:
■ As mentioned earlier, footnotes appear in red for easier
spotting.
■ Colored letter tabs at the top of each page make finding a
particular entry quick and easy.
■ Full-color photos and diagrams highlight the main text,
illustrating many of the step-by-step procedures in the
Implementation section of each entry.
■ Special alerts—with colorful, eye-catching logos—appear
in many entries:
NURSING ALERT lets you know about potentially dangerous actions
or clinically significant findings related to a procedure.
PEDIATRIC ALERT warns you of particular precautions to take
concerning infants, young children, and adolescents.
ELDER ALERT cautions you about the special needs of this growing
population.
HOSPITAL-ACQUIRED CONDITION ALERT warns you about conditions
that the Centers for Medicare and Medicaid Services has identified as
conditions that can occur as the result of hospitalization. Following
various best practices can reasonably help to prevent such conditions;
when these conditions do occur, they have payment implications for
health care facilities.
■ Short, boxed-off items appear throughout the book. These
short pieces run the gamut, from explaining procedures in
more detail, to highlighting equipment, to offering tips for
clearer documentation, to name just a few. Several are set
off with their own eye-catching icons and are enhanced with
illustrations or full-color photos:
EQUIPMENT profiles an essential piece of equipment
needed to help diagnose or treat the patient.
TROUBLESHOOTING helps you to quickly identify problems
and complications, isolate their probable cause, and
guide you with step-by-step interventions.
PATIENT TEACHING provides helpful tips, reminders, and
follow-up instructions to share with patients being
discharged following their procedure.
Your go-to guide
Now that you know what the eighth edition of Lippincott
Nursing Procedures has to offer—and have learned how to
use it quickly and adeptly—you’re ready to take on the task
of performing a variety of nursing procedures. Whether
you’re a nursing student, a recent graduate, or an
experienced practitioner, you’re ready to provide all your
patients with expert nursing care, with your go-to guide at
your fingertips.
A
ABDOMINAL PARACENTESIS, ASSISTING
As a bedside procedure, abdominal paracentesis involves
the aspiration of fluid from the peritoneal space through a
needle, trocar, or angiocatheter1 inserted in the abdominal
wall. Used to diagnose and treat massive ascites resistant to
other therapies, the procedure helps to determine the cause
of ascites while relieving the resulting pressure.
Abdominal paracentesis may also precede other
procedures, including radiography, peritoneal dialysis, and
surgery; detect intra-abdominal bleeding after a traumatic
injury; and be used to obtain a peritoneal fluid specimen for
laboratory analysis. The procedure must be performed
cautiously in pregnant patients as well as in patients with
bleeding tendencies, severely distended bowel, or infection
at the intended insertion site.
Equipment
Stethoscope ▪ blood pressure monitor ▪ pulse oximeter ▪
thermometer ▪ scale ▪ tape measure ▪ sterile gloves ▪
mask ▪ gloves ▪ gown ▪ goggles ▪ fluid-impermeable pads
▪ four laboratory tubes ▪ drainage bag ▪ laboratory
biohazard transport bag ▪ laboratory request forms ▪
antiseptic cleaning solution (povidone-iodine, chlorhexidine)
▪ local anesthetic (multidose vial of 1% or 2% lidocaine with
epinephrine) ▪ sterile 4′′ × 4′′ (10-cm × 10-cm) gauze pads
▪ tape ▪ sterile paracentesis tray ▪ sterile drapes ▪ marking
pen ▪ 5-mL syringe with 21G or 25G needle ▪ disinfectant
pad ▪ Optional: alcohol sponge, 50-mL syringe, suture
materials, IV albumin, IV insertion kit, indwelling urinary
catheter insertion equipment.
If a preassembled tray isn’t available, gather the following
sterile supplies: trocar with stylet, 16G to 20G needle, or
angiocatheter; 25G or 27G 11⁄2′′ (3.8 cm) needle; 20G or 22G
spinal needle; scalpel; #11 knife blade; three-way stopcock.
Preparation of equipment
Check the expiration date on each sterile package, inspect
each for tears, and replace as necessary.
Implementation
■ Verify the practitioner’s order.
■ Gather the necessary equipment.
■ Confirm the practitioner has obtained written informed
consent and that the consent is in the patient’s medical
record.2,3,4,5
■ Check the patient’s history for hypersensitivity to latex or
to the local anesthetic.
■ Conduct a preprocedure verification to make sure that all
relevant documentation, related information, and equipment
are available and correctly identified to the patient’s
identifiers.6,7
■ Verify that laboratory and imaging studies have been
completed as ordered and that the results are in the
patient’s medical record. Notify the practitioner of any
unexpected results.6
■ Perform hand hygiene and put on gloves.8,9,10,11,12,13
■ Confirm the patient’s identity using at least two patient
identifiers.14
■ Provide privacy.15,16,17,18
■ Reinforce the practitioner’s explanation of the procedure
according to the individual communication and learning
needs to increase understanding, allay fears, and enhance
cooperation.19 Reassure the patient that the he or she
should feel no pain but may feel a stinging sensation from
the local anesthetic injection and pressure from the needle,
trocar, or angiocatheter insertion. The patient may also
sense pressure when the practitioner aspirates abdominal
fluid.
■ Instruct the patient to void before the procedure.
Alternatively, insert an indwelling urinary catheter, if
ordered, to minimize the risk of accidental bladder injury
from insertion of the needle, trocar, or angiocatheter.1
■ Obtain the patient’s weight.
■ Raise the patient’s bed to waist level when performing
patient care to prevent back strain.20
■ Perform hand hygiene.8,9,10,11,12,13
■ Obtain the patient’s vital signs, oxygen saturation level,
weight, and abdominal girth to serve as a baseline for
comparison during and after the procedure.1 Use the tape
measure to measure the patient’s abdominal girth at the
umbilical level. Use a felt-tipped marker to indicate the
abdominal area measured.
■ Perform a comprehensive pain assess using techniques
appropriate for the patient’s age, condition, and ability to
understand to serve as a baseline for comparison during
and after the procedure.1,21
■ Make sure the patient has a patent IV catheter in place, if
ordered; insert a new IC catheter, if necessary to provide
access for administration of IV fluid and sedation, as
needed.
■ Position the patient in the supine position or on the side
to allow the fluid to pool in dependent areas.1
■ Expose the patient’s abdomen from diaphragm to pubis.
Keep the rest of the patient covered to avoid chilling.
■ Make the patient as comfortable as possible and place a
fluid-impermeable pad under him or her for protection from
drainage.
■ Remind the patient to stay as still as possible during the
procedure to prevent injury from the needle, trocar, or
angiocatheter.
■ Perform hand hygiene.8,9,10,11,12,13
■ Open the paracentesis tray using sterile technique to
ensure a sterile field.
■ Put on a gown, a mask, goggles, and gloves to comply
with standard precautions.22,23,24
■ Label all medications, medication containers, and other
solutions on and off the sterile field.25,26
■ Assist the practitioner during preparation of then
patient’s abdomen with antiseptic cleaning solution, draping
the insertion site with sterile drapes, and administering the
local anesthetic.
■ Conduct a time-out immediately before starting the
procedure to perform a final assessment that the correct
patient, site, positioning, and procedure are identified and,
as applicable, that all relevant information and necessary
equipment are available.27
■ Using the scalpel, the practitioner may make a small
incision before inserting the needle, trocar, or angiocatheter
(usually 1′′ to 2′′ [2.5 to 5 cm] below the umbilicus). Listen
for a popping sound, which signifies that the needle, trocar,
or angiocatheter has pierced the peritoneum.
■ Assist the practitioner with collecting specimens in the
proper containers. If the practitioner orders substantial
drainage, aseptically connect the three-way stopcock and
tubing to the needle, trocar, or angiocatheter. Run the other
end of the tubing to the drainage bag. Alternatively,
aspirate the fluid with a three-way stopcock and 50-mL
syringe.
■ Label the specimen tubes in the presence of the patient
to prevent mislabeling,14 and send them to the laboratory in
a laboratory biohazard transport bag24 with the appropriate
laboratory request forms. If the patient is receiving
antibiotics, note this information on the request form for
consideration during the fluid analysis.
■ Gently turn the patient from side to side to enhance
drainage, if necessary.1
■ As the fluid drains, monitor the patient’s vital signs and
oxygen saturation level frequently. Observe the patient
closely for vertigo, faintness, diaphoresis, pallor, heightened
anxiety, tachycardia, dyspnea, and hypotension, especially
if more than 5 L of peritoneal fluid was aspirated at one
time. In rare cases, this loss may induce a fluid shift and
hypovolemic shock.28 Immediately report signs of shock to
the practitioner.
■ Administer IV albumin, as ordered, to prevent
hypovolemia and a decline in renal function.21,28,29,30,31,32
■ When the procedure ends and the practitioner removes
the needle, trocar, or angiocatheter, apply pressure to the
wound using sterile 4′′ × 4′′ (10-cm × 10-cm) gauze pads. If
there is still wound leakage after 5 minutes, the practitioner
may suture the incision.1 Alternatively, if permitted in your
facility, remove the paracentesis catheter, as directed:
some facilities permit a specially trained nurse to remove
the catheter.
■ Remove and discard your gloves,22,24 perform hand
hygiene,8,9,10,11,12,13 and put on sterile gloves.22,24
■ When drainage becomes minimal, remove and discard
the pressure dressing, apply dry sterile gauze pads, and
tape them to the site.
NURSING ALERT If the patient has fragile skin, use dressings and
tape specifically formulated for fragile skin to prevent skin stripping
during removal.33
■ Help the patient assume a comfortable position.
■ Monitor the patient’s vital signs and oxygen saturation
level, and check the dressing for drainage as determined by
the patient’s condition and at an interval determined by
your facility because no evidence-based research is
available to indicate best practice for the frequency of vital
sign assessment after a procedure.34 Make sure that alarm
limits are set properly for the patient’s current conditions
and that alarms are turned on, functioning properly, and
audible to staff.35,36,37,38
■ Check the dressing for drainage. Be sure to note drainage
color, amount, and character.
■ Perform a comprehensive pain assessment using
techniques appropriate for the patient’s age, condition, and
ability to understand.21 Administer pain medication as
needed and ordered, following safe medication
administration practice.30,31,32,39
■ Return the bed to the lowest position to prevent falls and
maintain patient safety.40
■ Dispose of used supplies in the appropriate receptacles.24
■ Remove and discard your gloves and personal protective
equipment.22,24
■ Perform hand hygiene.8,9,10,11,12,13
■ Clean and disinfect your stethoscope using a disinfectant
pad.41,42
■ Perform hand hygiene.8,9,10,11,12,13
■ Document the procedure.43,44,45,46
Special considerations
■ Throughout this procedure, help the patient remain still to
prevent accidental perforation of abdominal organs.
■ If the patient shows signs of hypovolemic shock, reduce
the vertical distance between the needle, trocar, or
angiocatheter and the drainage collection container to slow
the drainage rate. If necessary, stop the drainage.
■ If peritoneal fluid doesn’t flow easily, try repositioning the
patient to facilitate drainage.
■ After the procedure, observe for peritoneal fluid leakage.
If this develops, notify the practitioner.
■ Obtain the patient’s weight (using the same scale) and
abdominal girth daily. Compare these values with the
baseline figures to detect recurrent ascites.
■ Ultrasound may be used to assist in locating the fluid and
inserting the needle, trocar, or angiocatheter. Ultrasound-
guided paracentesis has been shown to result in fewer
adverse events than paracentesis performed without
ultrasound guidance.1,47
■ Monitor for respiratory changes during the procedure.
Ascites may place pressure on the diaphragm, leading to
respiratory distress. Removal of ascitic fluid should help
relieve this pressure and distress.1,29
■ The Joint Commission has issued a sentinel event alert
concerning medical device alarm safety because alarm-
related events have been associated with permanent loss of
function or death. Among major contributing factors were
improper alarm settings, alarm settings inappropriately
turned off, and alarm signals not audible to staff. Make sure
that alarm limits are set properly and that alarms are turned
on, functioning properly, and audible to staff. Follow facility
guidelines for preventing alarm fatigue.35
Complications
Removing large amounts of fluid may cause hypotension,
oliguria, and hyponatremia, although this is rare. Ascitic
fluid may form again, drawing fluid from extracellular tissue
throughout the body. Other possible procedural
complications include perforation of abdominal organs,
including of the bowel or bladder by the needle, trocar, or
angiocatheter; wound infection; internal bleeding; and
peritonitis.28,29
Documentation
Record the date and time of the procedure, puncture site
location, and whether the wound was sutured. Document
the amount, color, viscosity, and odor of aspirated fluid in
your notes as well as in the fluid intake and output record.
Record the patient’s vital signs, oxygen saturation, weight,
and abdominal girth measurements before and after the
procedure. Also note the patient’s tolerance of the
procedure, his or her vital signs, and any signs or symptoms
of complications during the procedure. Note the number of
specimens sent to the laboratory. Document any patient
teaching provided and the patient’s understanding.
REFERENCES
1 Wiegand, D. L. (2017). AACN procedure manual for high acuity, progressive,
and critical care (7th ed.). Philadelphia, PA: Saunders.
2 The Joint Commission. (2019). Standard RI.01.03 .01. Comprehensive
accreditation manual for hospitals. Oakbrook Terrace, IL: The Joint
Commission. (Level VII)
3 DNV GL-Healthcare USA, Inc. (2016). PR.1 .SR.3 . NIAHO® accreditation
requirements: Interpretive guidelines & surveyor guidance (version 11).
Milford, OH: DNV GL-Healthcare USA, Inc. (Level VII)
4 Centers for Medicare and Medicaid Services, Department of Health and
Human Services. (2015). Condition of participation: Patient’s rights. 42 C.F.R.
§ 482.13(b)(2).
5 Accreditation Association for Hospitals and Health Systems. (2017). Standard
15.01.11. Healthcare Facilities Accreditation Program: Accreditation
requirements for acute care hospitals. Chicago, IL: Accreditation Association
for Hospitals and Health Systems. (Level VII)
6 The Joint Commission. (2019). Standard UP.01.01.01. Comprehensive
accreditation manual for hospitals. Oakbrook Terrace, IL: The Joint
Commission. (Level VII)
7 Accreditation Association for Hospitals and Health Systems. (2017). Standard
30.00 .14. Healthcare Facilities Accreditation Program: Accreditation
requirements for acute care hospitals. Chicago, IL: Accreditation Association
for Hospitals and Health Systems. (Level VII)
8 The Joint Commission. (2019). Standard NPSG.07.01.01. Comprehensive
accreditation manual for hospitals. Oakbrook Terrace, IL: The Joint
Commission. (Level VII)
9 Centers for Disease Control and Prevention. (2002). Guideline for hand
hygiene in health-care settings: Recommendations of the Healthcare Infection
Control Practices Advisory Committee and the HICPAC/SHEA/APIC/IDSA Hand
Hygiene Task Force. MMWR Recommendations and Reports, 51(RR-16), 1–45.
Accessed via the Web at https://www.cdc.gov/mmwr/pdf/rr/rr5116.pdf (Level
II)
10 World Health Organization. (2009). “WHO guidelines on hand hygiene in
health care: First global patient safety challenge, clean care is safer care”
[Online]. Accessed via the Web at
http://apps.who.int/iris/bitstream/10665/44102/1/9789241597906_eng.pdf
(Level IV)
11 Centers for Medicare and Medicaid Services, Department of Health and
Human Services. (2015). Condition of participation: Infection control. 42 C.F.R.
§ 482.42.
12 Accreditation Association for Hospitals and Health Systems. (2017). Standard
07.01.21. Healthcare Facilities Accreditation Program: Accreditation
requirements for acute care hospitals. Chicago, IL: Accreditation Association
for Hospitals and Health Systems. (Level VII)
13 DNV GL-Healthcare USA, Inc. (2016). IC.1 .SR.1 . NIAHO® accreditation
requirements: Interpretive guidelines & surveyor guidelines (version 11).
Milford, OH: DNV GL-Healthcare USA, Inc. (Level VII)
14 The Joint Commission. (2019). Standard NPSG.01.01.01. Comprehensive
accreditation manual for hospitals. Oakbrook Terrace, IL: The Joint
Commission. (Level VII)
15 The Joint Commission. (2019). Standard RI.01.01.01. Comprehensive
accreditation manual for hospitals. Oakbrook Terrace, IL: The Joint
Commission. (Level VII)
16 Centers for Medicare and Medicaid Services, Department of Health and
Human Services. (2015). Condition of participation: Patient’s rights. 42 C.F.R.
§ 482.13(c)(1).
17 Accreditation Association for Hospitals and Health Systems. (2017). Standard
15.01.16. Healthcare Facilities Accreditation Program: Accreditation
requirements for acute care hospitals. Chicago, IL: Accreditation Association
for Hospitals and Health Systems. (Level VII)
18 DNV GL-Healthcare USA, Inc. (2016). PR.1.SR.5 . NIAHO® accreditation
requirements: Interpretive guidelines & surveyor guidance (version 11).
Milford, OH: DNV GL-Healthcare USA, Inc. (Level VII)
19 The Joint Commission. (2019). Standard PC.02.01.21. Comprehensive
accreditation manual for hospitals. Oakbrook Terrace, IL: The Joint
Commission. (Level VII)
20 Waters, T. R., et al. (2009). “Safe patient handling training for schools of
nursing” [Online]. Accessed via the Web at
https://www.cdc.gov/niosh/docs/2009-127/pdfs/2009-127.pdf (Level VII)
21 Siegel, J. D ., et al. (2007, revised 2017). “2007 guideline for isolation
precautions: Preventing transmission of infectious agents in healthcare
settings” [Online]. Accessed via the Web at
https://www.cdc.gov/infectioncontrol/pdf/guidelines/isolation-guidelines.pdf
(Level II)
22 Accreditation Association for Hospitals and Health Systems. (2017). Standard
07.01.10. Healthcare Facilities Accreditation Program: Accreditation
requirements for acute care hospitals. Chicago, IL: Accreditation Association
for Hospitals and Health Systems. (Level VII)
23 Occupational Safety and Health Administration. (n.d .). “Bloodborne
pathogens, standard number 1910.1030” [Online]. Accessed via the Web at
https://www.osha.gov/pls/oshaweb/owadisp.show_document?
p_id=10051&p_table=STANDARDS (Level VII)
24 The Joint Commission. (2019). Standard NPSG.03 .04.01. Comprehensive
accreditation manual for hospitals. Oakbrook Terrace, IL: The Joint
Commission. (Level VII)
25 Accreditation Association for Hospitals and Health Systems. (2017). Standard
25.01.27. Healthcare Facilities Accreditation Program: Accreditation
requirements for acute care hospitals. Chicago, IL: Accreditation Association
for Hospitals and Health Systems. (Level VII)
26 The Joint Commission. (2019). Standard UP.01.03.01. Comprehensive
accreditation manual for hospitals. Oakbrook Terrace, IL: The Joint
Commission. (Level VII)
27 Runyon, B. A. Diagnostic and therapeutic abdominal paracentesis. (2015). In:
UpToDate, Chopra, S., & Travis, A. C . (Eds.). Accessed via the Web at
http://www.uptodate.com
28 Phillip, V., et al. (2014). Effects of paracentesis on hemodynamic parameters
and respiratory function in critically ill patients. BMC Gastroenterology,
14(18). Accessed September 2016 via the Web at
http://www.biomedcentral.com/content/pdf/1471-230X-14 -18.pdf (Level VI)
29 The Joint Commission. (2019). Standard PC.01.02.07. Comprehensive
accreditation manual for hospitals. Oakbrook Terrace, IL: The Joint
Commission. (Level VII)
30 Centers for Medicare and Medicaid Services, Department of Health and
Human Services. (2015). Condition of participation: Nursing services. 42
C.F.R. § 482.23(c).
31 Accreditation Association for Hospitals and Health Systems. (2017). Standard
16.01.03. Healthcare Facilities Accreditation Program: Accreditation
requirements for acute care hospitals. Chicago, IL: Accreditation Association
for Hospitals and Health Systems. (Level VII)
32 The Joint Commission. (2019). Standard MM.06.01.01. Comprehensive
accreditation manual for hospitals. Oakbrook Terrace, IL: The Joint
Commission. (Level VII)
33 LeBlanc, K., et al. (2013). International skin tear advisory panel: A tool kit to
aid in the prevention, assessment, and treatment of skin tears using a
simplified classification system. Advances in Skin & Wound Care, 26, 459–
476. (Level IV)
34 American Society of PeriAnesthesia Nurses. (2018). 2017–2018
Perianesthesia nursing standards, practice recommendations and
interpretative statements. Cherry Hill, NJ: American Society of PeriAnesthesia
Nurses. (Level VII)
35 The Joint Commission. (2013). “Sentinel event alert: Medical device alarm
safety in hospitals” [Online]. Accessed via the Web at
https://www.jointcommission.org/assets/1/6/SEA_50_alarms_4 _26_16.pdf
(Level VII)
36 The Joint Commission. (2019). Standard NPSG.06 .01.01. Comprehensive
accreditation manual for hospitals. Oakbrook Terrace, IL: The Joint
Commission. (Level VII)
37 Graham, K. C., & Cvach, M. (2010). Monitor alarm fatigue: Standardizing use
of physiological monitors and decreasing nuisance alarms. American Journal
of Critical Care, 19, 28–37. Accessed via the Web at
http://ajcc.aacnjournals.org/content/19/1/28.full.pdf
38 American Association of Critical-Care Nurses (AACN). (2013). “A ACN practice
alert: Alarm management” [Online]. Accessed via the Web at
https://www.aacn.org/aacn-website/shared/content/practice-
alerts/2015/11/25/alarm-management (Level VII)
39 DNV GL-Healthcare USA, Inc. (2016). MM.1 .SR.2. NIAHO® accreditation
requirements: Interpretive guidelines & surveyor guidance (version 11).
Milford, OH: DNV GL-Healthcare USA, Inc. (Level VII)
40 Ganz, D. A., et al. (2013). Preventing falls in hospitals: A toolkit for improving
quality of care (AHRQ Publication No. 13-0015-EF). Rockville, MD: Agency for
Healthcare Research and Quality. Accessed via the Web at
http://www.ahrq.gov/sites/default/files/publications/files/fallpxtoolkit.pdf
(Level VII)
41 Rutala, W. A., et al. (2008, revised 2017). “Guideline for disinfection and
sterilization in healthcare facilities, 2008” [Online]. Accessed via the Web at
https://www.cdc.gov/infectioncontrol/pdf/guidelines/disinfection-
guidelines.pdf (Level I)
42 Accreditation Association for Hospitals and Health Systems. (2017). Standard
07.02.03. Healthcare Facilities Accreditation Program: Accreditation
requirements for acute care hospitals. Chicago, IL: Accreditation Association
for Hospitals and Health Systems. (Level VII)
43 The Joint Commission. (2019). Standard RC.01.03 .01. Comprehensive
accreditation manual for hospitals. Oakbrook Terrace, IL: The Joint
Commission. (Level VII)
44 Centers for Medicare and Medicaid Services, Department of Health and
Human Services. (2015). Condition of participation: Medical record services.
42 C.F.R. § 482.24(b).
45 Accreditation Association for Hospitals and Health Systems. (2017). Standard
10.00 .03. Healthcare Facilities Accreditation Program: Accreditation
requirements for acute care hospitals. Chicago, IL: Accreditation Association
for Hospitals and Health Systems. (Level VII)
46 DNV GL-Healthcare USA, Inc. (2016). MR.2 .SR.1 . NIAHO® accreditation
requirements: Interpretive guidelines & surveyor guidance (version 11).
Milford, OH: DNV GL-Healthcare USA, Inc. (Level VII)
47 Patel, P. A., et al. (2012). Evaluation of hospital complications and costs
associated with using guidance during abdominal paracentesis procedures.
Journal of Medical Economics, 15, 1–7 . (Level IV)
ADMISSION
Admission to a nursing unit prepares a patient for his or her
stay in a health care facility. Whether the admission is
scheduled or follows emergency treatment, effective
admission procedures should include certain steps to
accomplish important goals. These steps include verifying
the patient’s identity using at least two patient identifiers,1
assessing the clinical status, making the patient as
comfortable as possible, introducing the patient to
roommates (if possible) and staff, orienting the patient to
the environment and routine, and providing supplies and
special equipment needed for daily care.
The Joint Commission and DNV GL-Healthcare require that
each patient undergo an admission assessment by a
registered nurse within 24 hours after inpatient
admission.2,3,4 The Healthcare Facilities Accreditation
Program requires that an initial assessment be performed by
a registered nurse within the timeframe established by the
individual facility.5 During this assessment, the nurse should
prioritize the patient’s needs, always remaining aware of the
patient’s levels of fatigue and comfort, and should maintain
the patient’s privacy while obtaining the health history.
According to the American Hospital Association’s Patient
Care Partnership (which replaced the Patient’s Bill of Rights),
the patient has the right to expect that examinations,
consultations, and treatment will be conducted in a manner
that protects the patient’s privacy.6
Admission routines that are efficient and show appropriate
concern for the patient can ease the patient’s anxiety and
promote cooperation and receptivity to treatment.
Conversely, admission routines that the patient perceives as
careless or excessively impersonal can heighten anxiety,
reduce cooperation, impair the patient’s response to
treatment, and perhaps aggravate symptoms.
Equipment
Patient gown ▪ blankets ▪ bath towel ▪ washcloth ▪
personal property form ▪ valuables envelope ▪ admission
form ▪ nursing assessment form ▪ vital signs monitoring
equipment ▪ stethoscope ▪ thermometer ▪ hospital-grade
disinfectant pad ▪ patient scale ▪ identification band ▪
validated screening questionnaire for unhealthy alcohol use
▪ standard fall risk assessment tool ▪ standardized suicide
screening tool ▪ Optional: gloves; personal care items
(emesis basin, bedpan, urinal, bath basin); emergency
equipment (code cart with cardiac medications, defibrillator,
handheld resuscitation bag with mask, intubation
equipment); oxygen delivery system; suction equipment;
equipment for obtaining blood or urine specimens; patient
care reminders; friction-reducing device or lateral transfer
board (for a patient who weighs less than 200 lb [91 kg]),
ceiling lift with supine sling, mechanical transfer device, or
air-assisted device (for a patient who weighs more than 200
lb [91 kg]);7 advance directive information; alert bracelets.
Preparation of equipment
Position the bed as the patient’s condition requires. If the
patient is ambulatory, place the bed in the low position; if
the patient’s arriving on a stretcher, place the bed in the
high position. Fold down the top linens. Prepare emergency
or special equipment, such as oxygen or suction, as needed.
Implementation
■ Adjust the lights, temperature, and ventilation in the
room.
■ Quickly review the admission form and the practitioner’s
orders. Note the reason for admission, restrictions on
activity and diet, and any orders for diagnostic tests
requiring specimen collection.
Managing emergency admissions
After emergency department (ED) treatment, the patient is transported to
the nursing unit. The patient arrives on the nursing unit with a temporary
identification bracelet, the practitioner’s orders, and a record of treatment.
Provide privacy.17,18,19,20 Read this record and receive hand-off
communication from the person who was responsible for the patient’s care in
the ED. Ask questions, as necessary, to avoid miscommunications that can
cause patient care errors during transitions of care.21,22 Expect to receive
the patient’s weight in kilograms during the hand-off to prevent medication
errors.23 Trace each tubing and catheter from the patient to its point of
origin as part of the hand-off process; use a standard line reconciliation
process using high-reliability practices.24,25
Tape the connections to prevent accidental disconnection of the tubing. If
the patient has more than one connection to a port of entry into the body
(e.g ., if an IV catheter has more than one infusion infusing through it), label
each tube near the insertion site. Label the infusion bag, ensuring that the
label faces out so it can be read easily.26 Route tubing and catheters having
different purposes in a standardized approach—for example, keeping IV lines
routed toward the head and enteric lines routed toward the feet to prevent
dangerous misconnections.25 If different access sites are used, label each
tubing at the distal end (near the patient connection) and proximal end (near
the source container) to distinguish the different tubing and prevent
misconnections.25 If the patient has an electronic infusion device or other
patient equipment with alarms, make sure that alarm limits are set according
to the patient’s current condition and that alarms are turned on, functioning
properly, and audible to staff.27,28,29
Obtain and record the patient’s vital signs, and follow the practitioner’s
orders for treatment. If the patient is conscious and not in distress, explain
any treatment orders. If family members accompany the patient, ask them to
wait in the lounge while you assess the patient and begin treatment. Permit
them to visit the patient after the patient is settled in the room. When the
patient’s condition allows, proceed with routine admission procedures.
■ Gather and prepare the appropriate equipment.
■ Perform hand hygiene.8,9,10,11,12,13
■ Put on gloves, as needed, to comply with standard
precautions.14,15
■ Speaking slowly and clearly, greet the patient by the
patient’s proper name and introduce yourself and any other
staff members present.16
■ Confirm the patient’s identity using at least two patient
identifiers.1 Apply an identification band, verifying that the
identifiers are correct, including the patient’s name and its
spelling. Notify the admission office of any corrections.
■ Escort the patient to his or her room and, if the patient
isn’t in great distress, introduce the patient to the
roommate. Alternatively, if the patient is being admitted
from the emergency department and is on a stretcher,
summon the help of coworkers to transfer the patient from
the stretcher to the bed using appropriate transfer device.7
Keep in mind that, depending on the patient’s condition, he
or she may require immediate treatment; treatment takes
priority over routine admission procedures. (See Managing
emergency admissions.)
■ Provide privacy.17,18,19,20
■ Help the patient change into a hospital gown or pajamas
from home if appropriate.30
■ Itemize all valuables, clothing, and prostheses in the
medical record on the personal property form if your facility
uses such a form. Encourage the patient to store valuables
or money in the safe or, preferably, to send them home
along with any medications the patient may have brought.
■ Orient the patient to the room. Show the patient how to
use the equipment in the room, including the call system,
bed controls, TV controls, telephone, and lights. Show an
ambulatory patient where the bathroom and closets are
located.
■ Explain the routine at your health care facility. Mention
when to expect meals, vital signs assessments, and
medications. Review visiting hours and any restrictions.
■ Obtain and record the patient’s vital signs.
■ Measure the patient’s height and weight. If the patient
can’t stand, use a chair or bed scale and ask the patient his
or her height. Knowing the patient’s height and weight is
important for planning treatments and diet and for
calculating medication and anesthetic dosages. Record the
patient’s weight in kilograms and document it prominently
in the patient’s medical record to help prevent medication
errors.23,31
■ Collect blood and urine specimens, if ordered. Label
specimens in the presence of the patient to prevent
mislabeling, place them in a laboratory transport bag, and
send them to the laboratory.1
■ Notify the patient’s practitioner of the patient’s arrival.
Report emergency or unexpected assessment findings.
■ Obtain a complete patient history. Include all previous
hospitalizations, illnesses, surgeries, and food and drug
allergies.
■ Screen the patient for tobacco and unhealthy alcohol
use.32 Use a validated screening tool.32,33,34
■ Make sure that a complete list of the medications the
patient was taking at home (including doses, routes, and
frequency) is documented in the patient’s medical record.
Compare this list with the patient’s current medications and
reconcile and document any discrepancies (omissions,
duplications, adjustments, deletions, or additions) in the
patient’s medical record to reduce the risk of transition-
related adverse drug events.35,36
■ Determine whether the patient has an advance directive
and, if so, ask for a copy to place in the medical record. If
the patient doesn’t have one, provide information about
advance directives to the patient.37,38,39 (See the “Advance
directives” procedure, page 9.)
■ Review patient rights with the patient and family
members.6,19
■ Perform an admission assessment. Ask the patient to tell
you the reason he or she came to the facility. Record the
answers (in the patient’s own words) as the chief complaint.
Follow up with a physical assessment, emphasizing
complaints. Record any marks, bruises, discolorations, and
wounds on the nursing assessment form.
■ Screen the patient for suicide ideation using a brief,
standardized, evidence-based screening tool.40 If at risk for
suicide, address the patient’s immediate safety needs, and
collaborate with the multidisciplinary team to determine the
most appropriate setting for treatment.41
■ Perform a structured pressure injury risk assessment
within 8 hours of admission.42,43
HOSPITAL-ACQUIRED CONDITION ALERT Keep in mind thata stage 3
or 4 pressure injury is considered a hospital-acquired condition
because it can be reasonably prevented using best practices. Make
sure to follow pressure injury prevention practices (such as
performing a structured pressure injury risk assessment, using skin
moisturizers, providing adequate hydration and nutrition, and
avoiding prolonged positional immobilization) to reduce the risk of
pressure injuries.43,44
■ Determine the patient’s risk of falling, using either a
standardized risk assessment tool or one developed by your
facility, and institute fall precautions.43,45,46
HOSPITAL-ACQUIRED CONDITION ALERT Keep in mind that an injury
from a fall is considered a hospital-acquired condition because it can
be reasonably prevented using best practices. Make sure to follow fall
prevention practices (such as determining the patient’s risk of falling
and instituting fall precautions) to reduce the risk of falls.43,44,46
■ Screen and assess the patient’s pain using facility-defined
criteria that are consistent with the patient’s age, condition,
and ability to understand.47
■ If required by your facility, attach an alert bracelet to the
patient’s arm if the patient has a drug allergy, is at risk for
falls, or has another condition that requires an alert
bracelet; also place an alert in the patient’s medical
record.48
■ Assess and address the patient’s safety needs.
■ After the assessment, inform the patient about any
ordered tests and their scheduled times. Describe what the
patient should expect for each test.
■ Develop an interdisciplinary care plan and review it with
the patient.49,50
■ Before leaving the patient’s room, make sure the patient
is comfortable. Adjust the bed, and place the call light and
other personal items within the patient’s easy reach.
■ Post patient care reminders (concerning such topics as
allergies and special needs) at the patient’s bedside, as
needed, to notify coworkers. (See Using patient care
reminders.)
■ Remove and discard your gloves, if worn, and perform
hand hygiene.8,9,10,11,12,13
■ Clean and disinfect your stethoscope and other
equipment, as needed, using a hospital-grade disinfectant
pad.51,52
■ Perform hand hygiene.8,9,10,11,12,13
■ Document the procedure.53,54,55,56
Special considerations
■ The Joint Commission issued a sentinel event alert to
assist clinicians in all care settings to better identify and
treat individuals with suicide ideation. The alert addresses
methods for screening, assessing risk, and detecting suicide
ideation, and for providing safety, treatment, discharge, and
follow-up care for individuals at risk for suicide. It also
includes suggestions for educating staff about suicide risk,
keeping the health care environment safe for those at risk
for suicide, and documenting care.40
■ If you’re caring for a patient who brought medications
from home, take an inventory and record this information on
the nursing assessment form.36 Instruct the patient not to
take any medications unless authorized by the practitioner.
Send authorized medications to the pharmacy for
identification and relabeling.57 Send other medication home
with a responsible family member, or store them in the
designated area outside the patient’s room until the patient
is discharged. Use of unauthorized medications may
interfere with treatment or cause an overdose.
■ The Joint Commission issued a sentinel event alert
concerning medical device alarm safety because alarm-
related events have been associated with permanent loss of
function and death. Among the major contributing factors
were improper alarm settings, inappropriately turned off
alarms, and alarm signals that were not audible to staff.
Make sure alarm limits are appropriately set and that alarms
are turned on, functioning properly, and audible to staff.
Follow facility guidelines for preventing alarm fatigue.58
■ Find out the patient’s normal routine, and ask if
adjustments should be made to the facility regimen; for
instance, the patient may prefer to shower at night instead
of in the morning. By accommodating the patient with such
adjustments whenever possible, you can ease the patient’s
anxiety and help him or her feel more in control of a
potentially threatening situation.
■ Place the patient who requires airborne precautions in an
infection isolation room to reduce the risk of
transmission.14,59
■ Teach the patient and family about the importance of
proper hand hygiene in preventing the spread of
infection.8,11 Encourage them to speak up if a health care
worker fails to perform hand hygiene before having contact
with the patient or the patient’s environment.
■ Arrange for an interpreter, if necessary, to ensure that
the patient and family can communicate their concerns and
understand information provided by the health care
providers.60
Documentation
After leaving the patient’s room, document your assessment
findings, including the patient’s vital signs, height, weight,
allergies, and drug and health history; a list of the patient’s
belongings and those sent home with family members; the
results of your physical assessment; and a record of
specimens collected for laboratory tests.
REFERENCES
1 The Joint Commission. (2019). Standard NPSG.01.01.01. Comprehensive
accreditation manual for hospitals. Oakbrook Terrace, IL: The Joint
Commission. (Level VII)
2 The Joint Commission. (2019). Standard PC.01.02.03 . Comprehensive
accreditation manual for hospitals. Oakbrook Terrace, IL: The Joint
Commission. (Level VII)
3 Centers for Medicare and Medicaid Services, Department of Health and
Human Services. (2015). Condition of participation: Nursing services. 42
C.F.R. § 482.23.
4 DNV GL-Healthcare USA, Inc. (2016). NS.3 .SR.2 . NIAHO® accreditation
requirements: Interpretive guidelines & surveyor guidance (version 11).
Milford, OH: DNV GL-Healthcare USA, Inc. (Level VII)
5 Accreditation Association for Hospitals and Health Systems. (2017). Standard
10.01.24. Healthcare Facilities Accreditation Program: Accreditation
requirements for acute care hospitals. Chicago, IL: Accreditation Association
for Hospitals and Health Systems. (Level VII)
6 American Hospital Association. (2003). “The patient care partnership:
Understanding expectation, rights and responsibilities” [Online]. Accessed via
the Web at http://www.aha.org/aha/content/2003/pdf/pcp_english_030730.pdf
Using patient care reminders
Patient care reminders are specially designed cards or signs that are used to
post important information about a patient. When placed at the head of the
patient’s bed or other location designated by your facility, these care
reminders call attention to the patient’s special needs and help ensure
consistent care by communicating these needs to the hospital’s staff, the
patient’s family, and other visitors. Examples of information that might be
placed on a patient care reminder include:
■ allergies
■ aspiration risk
■ dietary restrictions
■ high risk of falls
■ fluid restrictions
■ specimen collection needs
■ infection prevention or isolation procedures
■ hearing impairments, including whether the patient is deaf or hearing
impaired and in what ear
■ foreign language spoken.
Patient care reminders can also include special instructions, such as:
■ complete bed rest
■ no blood pressure on right arm
■ turn every hour
■ nothing by mouth.
Although patient care reminders serve as useful tools, health care providers
should be careful not to violate the patient’s privacy by posting the patient’s
name, diagnosis, details about surgery, or other information the patient
might find embarrassing.
7 Waters, T. R., et al. (2009). “Safe patient handling training for schools of
nursing” [Online]. Accessed via the Web at
https://www.cdc.gov/niosh/docs/2009-127/pdfs/2009-127.pdf (Level VII)
8 The Joint Commission. (2019). Standard NPSG.07.01.01. Comprehensive
accreditation manual for hospitals. Oakbrook Terrace, IL: The Joint
Commission. (Level VII)
9 Centers for Disease Control and Prevention. (2002). Guideline for hand
hygiene in health-care settings: Recommendations of the Healthcare Infection
Control Practices Advisory Committee and the HICPAC/SHEA/APIC/IDSA Hand
Hygiene Task Force. MMWR Recommendations and Reports, 51(RR-16), 1–45.
Accessed via the Web at https://www.cdc.gov/mmwr/pdf/rr/rr5116.pdf (Level
II)
10 World Health Organization. (2009). “WHO guidelines on hand hygiene in
health care: First global patient safety challenge, clean care is safer care”
[Online]. Accessed via the Web at
http://apps.who.int/iris/bitstream/10665/44102/1/9789241597906_eng.pdf
(Level IV)
11 Centers for Medicare and Medicaid Services, Department of Health and
Human Services. (2015). Condition of participation: Infection control. 42 C.F.R.
§ 482.42.
12 Accreditation Association for Hospitals and Health Systems. (2017). Standard
07.01.21. Healthcare Facilities Accreditation Program: Accreditation
requirements for acute care hospitals. Chicago, IL: Accreditation Association
for Hospitals and Health Systems. (Level VII)
13 DNV GL-Healthcare USA, Inc. (2016). IC.1 .SR.1 . NIAHO® accreditation
requirements: Interpretive guidelines & surveyor guidance (version 11).
Milford, OH: DNV GL-Healthcare USA, Inc. (Level VII)
14 Siegel, J. D ., et al. (2007, revised 2017). “2007 guideline for isolation
precautions: Preventing transmission of infectious agents in healthcare
settings” [Online]. Accessed via the Web at
https://www.cdc.gov/infectioncontrol/pdf/guidelines/isolation-guidelines.pdf
(Level II)
15 Accreditation Association for Hospitals and Health Systems. (2017). Standard
07.01.10. Healthcare Facilities Accreditation Program: Accreditation
requirements for acute care hospitals. Chicago, IL: Accreditation Association
for Hospitals and Health Systems. (Level VII)
16 The Joint Commission. (2019). Standard PC.02.01.21. Comprehensive
accreditation manual for hospitals. Oakbrook Terrace, IL: The Joint
Commission. (Level VII)
17 Accreditation Association for Hospitals and Health Systems. (2017). Standard
15.01.16. Healthcare Facilities Accreditation Program: Accreditation
requirements for acute care hospitals. Chicago, IL: Accreditation Association
for Hospitals and Health Systems. (Level VII)
18 Centers for Medicare and Medicaid Services, Department of Health and
Human Services. (2015). Condition of participation: Patient’s rights. 42 C.F.R.
§ 482.13(c)(1).
19 The Joint Commission. (2019). Standard RI.01.01.01. Comprehensive
accreditation manual for hospitals. Oakbrook Terrace, IL: The Joint
Commission. (Level VII)
20 DNV GL-Healthcare USA, Inc. (2016). PR.1.SR.5 . NIAHO® accreditation
requirements: Interpretive guidelines & surveyor guidance (version 11).
Milford, OH: DNV GL-Healthcare USA, Inc. (Level VII)
21 The Joint Commission. (2012). “Hot Topics in Health Care, Transitions of Care:
The need for a more effective approach to continuing patient care” [Online].
Accessed via the Web at
http://www.jointcommission.org/assets/1/18/Hot_Topics_Transitions_of_Care.p
df (Level VII)
22 The Joint Commission. (2019). Standard PC.02.02.01. Comprehensive
accreditation manual for hospitals. Oakbrook Terrace, IL: The Joint
Commission. (Level VII)
23 Emergency Nurses Association. (2016). “Position statement: Weighing all
patients in kilograms” [Online]. Accessed via the Web at
https://www.ena.org/SiteCollectionDocuments/Position%20Statements/Weighi
ng AllPatientsKilograms.pdf
24 U.S . Food and Drug Administration. (n.d .). “Look. Check. Connect. Safe
medical device connections save lives” [Online]. Accessed via the Web at
http://www.fda.gov/downloads/MedicalDevices/Safety/Alerts
andNotices/UCM134873.pdf
25 The Joint Commission. (2014). “Sentinel event alert: Managing risk during
transition to new ISO tubing connector standards” [Online]. Accessed via the
Web at http://www.jointcommission.org/assets/1/18/SEA_53_Connectors_
8_19_14 _FINAL.pdf (Level VII)
26 Institute for Safe Medication Practices. (2010). Preventing catheter/tubing
misconnections: Much needed help is on the way! Nurse Advise-ERR, 8(12),
1–2 . Accessed via the Web at
http://www.ismp.org/Newsletters/nursing/Issues/NurseAdviseERR201012.pdf
27 American Association of Critical-Care Nurses (AACN). (2013). “A ACN practice
alert: Alarm management” [Online]. Accessed via the Web at
https://www.aacn.org/clinical-resources/practice-alerts/alarm-management
(Level VII)
28 Graham, K. C., & Cvach, M. (2010). Monitor alarm fatigue: Standardizing use
of physiological monitors and decreasing nuisance alarms. American Journal
of Critical Care, 19, 28–37. Accessed via the Web at
http://ajcc.aacnjournals.org/content/19/1/28.full.pdf
29 The Joint Commission. (2019). Standard NPSG.06 .01.01. Comprehensive
accreditation manual for hospitals. Oakbrook Terrace, IL: The Joint
Commission. (Level VII)
30 The Joint Commission. (2019). Standard RI.01.06 .05. Comprehensive
accreditation manual for hospitals. Oakbrook Terrace, IL: The Joint
Commission. (Level VII)
31 Institute for Safe Medication Practices. (2016). “2016-2017 targeted
medication safety best practices for hospitals” [Online]. Accessed via the
Web at http://www.ismp.org/tools/bestpractices/TMSBP-for-Hospitals.pdf
32 Centers for Medicare and Medicaid Services, & The Joint Commission. (2017).
“The specifications manual for national hospital inpatient quality measures
(version 5.2a)” [Online]. Accessed via the Web at
https://www.jointcommission.org/specifications_manual_for_national_hospital_
inpatient_ quality_measures.aspx
33 National Institute on Alcohol Abuse and Alcoholism. (2002). “CAGE
questionnaire” [Online]. Accessed via the Web at
http://pubs.niaaa.nih.gov/publications/inscage.htm
34 Ewing, J. A. (1984). Detecting alcoholism: The CAGE questionnaire. Journal of
the American Medical Association, 252, 1905–1907.
35 The Joint Commission. (2019). Standard NPSG.03 .06 .01. Comprehensive
accreditation manual for hospitals. Oakbrook Terrace, IL: The Joint
Commission. (Level VII)
36 Accreditation Association for Hospitals and Health Systems. (2017). Standard
25.02.13. Healthcare Facilities Accreditation Program: Accreditation
requirements for acute care hospitals. Chicago, IL: Accreditation Association
for Hospitals and Health Systems. (Level VII)
37 Centers for Medicare and Medicaid Services, Department of Health and
Human Services. (2015). Condition of participation: Patient’s rights. 42 C.F.R.
§ 482.13(b).
38 The Joint Commission. (2019). Standard RI.01.05.01. Comprehensive
accreditation manual for hospitals. Oakbrook Terrace, IL: The Joint
Commission. (Level VII)
39 DNV GL-Healthcare USA, Inc. (2016). PR.2.SR.1 . NIAHO® accreditation
requirements: Interpretive guidelines & surveyor guidance (version 11).
Milford, OH: DNV GL-Healthcare USA, Inc. (Level VII)
40 The Joint Commission. (2016). “Sentinel event alert: Detecting and treating
suicide ideation in all settings” [Online]. Accessed via the Web at
https://www.jointcommission.org/assets/1/18/SEA_56_Suicide.pdf
41 The Joint Commission. (2019). Standard NPSG.15.01.01. Comprehensive
accreditation manual for hospitals. Oakbrook Terrace, IL: The Joint
Commission. (Level VII)
42 National Pressure Ulcer Advisor Panel, et al. (2014). “Prevention and
treatment of pressure ulcers: Quick reference guide” [Online]. Accessed via
the Web at http://www.npuap.org/wp-content/uploads/2014/08/Quick-
Reference-Guide-DIGITAL-NPUAP-EPUAP-PPPIA.pdf (Level VII)
43 Accreditation Association for Hospitals and Health Systems. (2017). Standard
16.02.02. Healthcare Facilities Accreditation Program: Accreditation
requirements for acute care hospitals. Chicago, IL: Accreditation Association
for Hospitals and Health Systems. (Level VII)
44 Jarrett, N., & Callaham, M. (2016). “Evidence-based guidelines for selected
hospital-acquired conditions: Final report” [Online]. Accessed via the Web at
https://www.cms.gov/Medicare/Medicare-Fee-for-Service-
Payment/HospitalAcqCond/Downloads/2016-HAC-Report.pdf
45 Ganz, D. A., et al. (2013). Preventing falls in hospitals: A toolkit for improving
quality of care (AHRQ Publication No. 13-0015-EF). Rockville, MD: Agency for
Healthcare Research and Quality. Accessed via the Web at
https://www.ahrq.gov/sites/default/files/publications/files/fallpxtoolkit_0 .pdf
(Level VII)
46 The Joint Commission. (2019). Standard PC.01.02.08 . Comprehensive
accreditation manual for hospitals. Oakbrook Terrace, IL: The Joint
Commission. (Level VII)
47 The Joint Commission. (2019). Standard PC.01.02.07. Comprehensive
accreditation manual for hospitals. Oakbrook Terrace, IL: The Joint
Commission. (Level VII)
48 The Joint Commission. (2019). Standard RC.02.01.01. Comprehensive
accreditation manual for hospitals. Oakbrook Terrace, IL: The Joint
Commission. (Level VII)
49 The Joint Commission. (2019). Standard PC.01.02.05. Comprehensive
accreditation manual for hospitals. Oakbrook Terrace, IL: The Joint
Commission. (Level VII)
50 Centers for Medicare and Medicaid Services, Department of Health and
Human Services. (2015). Condition of participation: Medical record services.
42 C.F.R. § 482.23(b)(4).
51 Rutala, W. A., et al. (2008, revised 2017). “Guideline for disinfection and
sterilization in healthcare facilities, 2008” [Online]. Accessed via the Web at
https://www.cdc.gov/infectioncontrol/pdf/guidelines/disinfection-
guidelines.pdf (Level I)
52 Accreditation Association for Hospitals and Health Systems. (2017). Standard
07.02.03. Healthcare Facilities Accreditation Program: Accreditation
requirements for acute care hospitals. Chicago, IL: Accreditation Association
for Hospitals and Health Systems. (Level VII)
53 The Joint Commission. (2019). Standard RC.01.03 .01. Comprehensive
accreditation manual for hospitals. Oakbrook Terrace, IL: The Joint
Commission. (Level VII)
54 Centers for Medicare and Medicaid Services, Department of Health and
Human Services. (2015). Condition of participation: Medical record services.
42 C.F.R. § 482.24(b).
55 Accreditation Association for Hospitals and Health Systems. (2017). Standard
10.00 .03. Healthcare Facilities Accreditation Program: Accreditation
requirements for acute care hospitals. Chicago, IL: Accreditation Association
for Hospitals and Health Systems. (Level VII)
56 DNV GL-Healthcare USA, Inc. (2016). MR.2 .SR.1 . NIAHO® accreditation
requirements: Interpretive guidelines & surveyor guidance (version 11).
Milford, OH: DNV GL-Healthcare USA, Inc. (Level VII)
57 The Joint Commission. (2017). Standard MM.03.01.05. Comprehensive
accreditation manual for hospitals. Oakbrook Terrace, IL: The Joint
Commission. (Level VII)
58 The Joint Commission. (2013). “Sentinel event alert: Medical device alarm
safety in hospitals” [Online]. Accessed via the Web at
http://www.jointcommission.org/assets/1/6/SEA_53_Connectors_8 _19_14 _final.
pdf (Level VII)
59 Centers for Disease Control and Prevention. (2005). Guidelines for preventing
the transmission of Mycobacterium tuberculosis in health-care settings, 2005.
MMWR Recommendations and Reports, 54(RR-17), 1–140. Accessed via the
Web at http://www.cdc.gov/mmwr/PDF/rr/rr5417.pdf (Level II)
60 The Joint Commission. (2019). Standard RI.01.01.03 . Comprehensive
accreditation manual for hospitals. Oakbrook Terrace, IL: The Joint
Commission. (Level VII)
ADMIXTURE OF DRUGS IN A SYRINGE
Combining two drugs in one syringe avoids the discomfort
of two injections. Usually, drugs can be mixed in a syringe in
one of four ways: they may be combined from two
multidose vials (e.g., regular and long-acting insulin), from
one multidose vial and one ampule, from two ampules, or
from a cartridge-injection system combined with either a
multidose vial or an ampule. Such combinations are
contraindicated when the drugs aren’t compatible and when
combined doses exceed the amount of solution that can be
absorbed from a single injection site.
The Association of Professionals in Infection Control and
Epidemiology and the World Health Organization
recommend using single-use or single-dose vials whenever
possible. The risk of transmission posed by inappropriate
handling of multidose vials has been clearly demonstrated
and mandates a practice of one vial per one patient
whenever possible.1,2 Infection transmission risk is reduced
when multidose vials are dedicated to a single patient.2 The
Infusion Nurses Society also recommends that nurses
administer pharmacy-prepared or commercially available
products whenever possible.3
Equipment
■ Medication record ▪ prescribed medications ▪ alcohol
pads ▪ syringe and needle ▪ Optional: safety needle, 5-
micron filter needle or straw,3,4,5 needless transfer device,6
gauze pad, ampule breaker
The type and size of syringe and needle depend on the
volume and viscosity of prescribed medications, the
patient’s body mass, and the injection site.
Implementation
■ Before preparing the injection, make sure the preparation
area is free from clutter2, and clean the preparation surface
with an alcohol pad.1,7
■ Avoid distractions and interruptions when preparing
medication to prevent medication errors.8,9
■ Verify the order on the patient’s medication record by
checking it against the practitioner’s order.10,11,12,13
■ Reconcile the patient’s medications when a new
medication is ordered to reduce the risk of medication
errors, including omissions, duplications, dosing errors, and
drug interactions.14,15
■ Perform hand hygiene before assessing supplies and
preparing medications to prevent the transmission of
infection.2
■ Gather the medications and equipment.
■ Compare the medication labels with the order in the
patient’s medical record.10,11,12,13
■ Verify the compatibility of the drugs to be combined.
■ Check the patient’s medical record for an allergy or a
contraindication to the prescribed medications. If an allergy
or a contraindication exists, don’t administer the
medications; notify the practitioner.10,11,12,13
■ Check the expiration date on each of the medications. If
either of the medications is expired, return the expired
medication to the pharmacy and obtain new
medication.10,11,12,13
■ Visually inspect each solution for particles or discoloration
or other loss of integrity; don’t administer the medications if
either has compromised integrity.10,11,12,13
■ Discuss any unresolved concerns about the medications
with the patient’s practitioner.10,11,12,13
■ Calculate the doses to be administered.
■ Have another nurse double-check your calculations if
necessary.
NURSING ALERT High-alert medications can cause significant patient
harm when used in error. If either of the prescribed medications is
considered a high-alert medication, have another nurse perform an
independent double-check before administering the medications, if
required by your facility, to verify the patient’s identity and make sure
that the correct medications are drawn up in the prescribed
concentrations, the indications for both medications correspond with
the patient’s diagnosis, the dosage calculations are correct and the
dosing formula used to derive the final dose is correct, and the route
of administration is safe and proper for the patient.16,17
■ Perform hand hygiene.1,18,19,20,21,22,23
■ When preparing the medications, read the medication
labels as you select the medications, as you draw each up,
and after you have drawn each up to verify the correct dose.
Mixing drugs from a multidose vial and an
ampule
■ Remove the medication vial’s lid.
■ Disinfect the stopper with an alcohol pad.2 Allow it to
dry.1,3
■ Pull back the syringe plunger until the volume of air
drawn into the syringe equals the volume to be withdrawn
from the drug vial.
■ Insert the needle or transfer device with syringe into the
top of the vial and inject the air. Then invert the vial and
keep the needle’s bevel tip below the level of the solution as
you withdraw the prescribed dose.
■ Put the sterile needle cover over the needle.
■ Tap the stem of the ampule to move any medication from
the stem into the body of the ampule.
■ Disinfect the neck of the ampule to remove any
medication from the stem into the body of the ampule.
■ Disinfect the neck of the ampule using the alcohol pad,
and allow it to dry completely.2
■ If you’re using an ampule that requires use of a metal file
to open, wrap a sterile gauze pad or an alcohol pad around
the ampule’s neck to protect yourself from injury in case the
glass splinters.1 Alternatively, insert the ampule’s head into
an ampule breaker.
■ Break open the ampule, directing the force away from
you.
■ Change to a 5-micron filter needle or straw to filter out
any glass splinters.3,5,24
■ Insert the needle or straw into the ampule. Be careful not
to touch the outside of the ampule with the needle.
■ Draw the correct dose into the syringe.
■ Change the filter needle or straw to a safety needle to
administer the injection.
■ Discard the needles and the ampule in a puncture-
resistant sharps container, and discard all additional
equipment appropriately.1,25
Mixing drugs from two multidose vials
■ Remove the vial lid and disinfect the rubber stopper on
the first drug vial with an alcohol pad and allow it to dry1,2,3
to decrease the risk of contaminating the medication as you
insert the needle into the vial.
■ Pull back the syringe plunger until the volume of air
drawn into the syringe equals the volume to be withdrawn
from the drug vial.
■ Without inverting the vial, insert the needle (or needleless
access device) into the top of the vial, making sure that the
needle’s bevel tip doesn’t touch the solution. Inject the air
into the vial and withdraw the needle (or needleless access
device). This step replaces air in the vial, which prevents the
creation of a partial vacuum when you withdraw the drug.
■ Repeat the steps above for the second vial. Then, after
injecting the air into the second vial, invert the vial,
withdraw the prescribed dose, and then withdraw the
needle (as shown below).
■ Disinfect the rubber stopper of the first vial again, allow it
to dry, and insert the needle (or needleless access device),
taking care not to depress the plunger. Invert the vial,
withdraw the prescribed dose, and then withdraw the
needle (or needleless access device).
■ Change the needle (or needleless access device) on the
syringe, if indicated, to a safety needle.
■ Discard any needle (or needleless access device) in a
puncture-resistant sharps container, and discard all
additional equipment appropriately.22
Mixing drugs from two ampules
■ Tap the stems of the ampules to move any medication
from the stems into the body of the ampules.
■ Disinfect the neck of each ampule with an alcohol pad
and allow to dry.2,3
■ If you’re using ampules that require use of a metal file to
open, open each ampule by wrapping a small gauze pad or
alcohol pad around the neck of the ampule and quickly snap
off the top of each ampule along the scored line at the
neck.1 Alternatively, insert the ampule’s head into a ampule
breaker. Snap the neck in the direction away from your
body.
■ Insert a syringe (with a filter needle or straw attached to
filter out any glass splinters) into the ampule without
allowing the needle to come into contact with the rim of the
ampule. Be sure the needle is in the solution.2,4,24
■ Withdraw the amount ordered from the first ampule and
remove the needle from the solution.
■ Repeat the previous four steps with the second ampule,
changing the needle before drawing up the medication from
the ampule if possible.
■ When the syringe is prepared, change to a regular safety
needle to administer the medication.
Completing the procedure
■ Discard all equipment in appropriate receptacles.1,25
■ Perform hand hygiene.1,18,19,20,21,22,23
■ Document the procedure.26,27,28,29
Special considerations
■ Insert the needle through the vial’s rubber stopper at a
slight angle, bevel up, and exert slight lateral pressure. This
way you won’t cut a piece of rubber out of the stopper,
which can then be pushed into the vial.
■ When mixing drugs from a multidose vial and ampule, be
careful not to contaminate one drug with the other. Ideally,
the needle should be changed after drawing the first
medication into the syringe, although this isn’t always
possible because many disposable syringes don’t have
removable needles.
■ Never combine drugs if you’re unsure of their
compatibility, and never combine more than two drugs.
Although drug incompatibility usually causes a visible
reaction, such as clouding, bubbling, or precipitation, some
incompatible combinations produce no visible reaction, even
though they alter the chemical nature and action of the
drugs. Check appropriate references and consult a
pharmacist when you’re unsure about specific compatibility.
When in doubt, administer two separate injections.
■ Some medications are compatible for only a brief time
after being combined and should be administered within 10
minutes after mixing. After this time, environmental factors,
such as temperature, exposure to light, and humidity, may
alter compatibility.
■ Always follow manufacturer’s instructions for storage and
use of medication vials, and label multidose vials with the
date immediately upon opening.
■ Keep multidose vials away from the immediate patient
environment.1,2
■ To reduce the risk of contamination, most facilities
dispense parenteral medications in single-dose vials. Insulin
is one of the few drugs still packaged in multidose vials. Be
careful when mixing regular and long-acting insulin. Draw
up the regular insulin first to avoid contamination with the
long-acting suspension. (If a minute amount of the regular
insulin is accidentally mixed with the long-acting insulin, it
won’t appreciably change the effect of the long-acting
insulin.)
■ Multidose vials should only if there is no other alternative,
and should be dedicated for a single patient if possible.
Immediately after piercing, label multidose vials with the
date and time, your name and signature, and the patient’s
name.1,30
■ Use vials labeled by the manufacturer as “single dose” or
“single use” for a single patient. These medications may
lack antimicrobial preservatives and can become
contaminated and serve as a source of infection if used
inappropriately. Evidence shows that improper use of single-
dose vials for more than one patient increases the risk of
infection.31
■ To reduce the risk of contamination, most facilities
dispense parenteral medications in single-dose vials.
Complications
Infection may result from failure to adhere to sterile
technique.
Documentation
Record the drugs administered, injection site, and time of
administration. Document any adverse drug reactions and
other pertinent information.
REFERENCES
1 World Health Organization. (2010). “WHO best practices for injections and
related procedures toolkit” [Online]. Accessed via the Web at
http://apps.who.int/iris/bitstream/10665/44298/1/9789241599252_eng.pdf
2 Dolan, S. A., et al. (2016). “APIC position paper: Safe injection, infusion and
medication vial practices in healthcare” [Online].
http://www.apic.org/Resource_/TinyMceFileManager/Position_Statements/2016
APICSIPPosition Paper.pdf (Level VII)
3 Standard 17. Compounding of parenteral solutions and medications. Infusion
therapy standards of practice. (2016). Journal of Infusion Nursing, 39, S39-
S40. (Level VII)
4 Hafez, M. A., & Al-Dars, A. M . (2012). Glass foreign bodies inside the knee
joint following intra-articular injection. American Journal of Case Reports, 13,
238–240. Accessed via the Web at
http://www.ncbi.nlm.nih.gov/pmc/articles/PMC3616057/
5 Institute for Safe Medication Practices. (2015). “Safe practice guidelines for
adult IV push medications” [Online]. Accessed via the Web at
http://www.ismp.org/Tools/guidelines/ivsummitpush/ivpushmedguidelines.pdf
(Level VII)
6 Infusion Nurses Society. (2016). Policies and procedures for infusion therapy
(5th ed.). Boston, MA: Infusion Nurses Society.
7 Accreditation Association for Hospitals and Health Systems. (2017). Standard
07.02.03. Healthcare Facilities Accreditation Program: Accreditation
requirements for acute care hospitals. Chicago, IL: Accreditation Association
for Hospitals and Health Systems. (Level VII)
8 Westbrook, J., et al. (2010). Association of interruptions with an increased risk
and severity of medication administration errors. Archives of Internal
Medicine, 170, 683–690. (Level IV)
9 Institute for Safe Medication Practices. (2012). Side tracks on the safety
express: Interruptions lead to errors and unfinished . . . Wait what was I
doing? Nurse Advise-ERR, 11(2), 1–4 . Accessed via the Web at
https://www.ismp.org/Newsletters/acutecare/showarticle.aspx?id=37
10 The Joint Commission. (2019). Standard MM.06.01.01. Comprehensive
accreditation manual for hospitals. Oakbrook Terrace, IL: The Joint
Commission. (Level VII)
11 Accreditation Association for Hospitals and Health Systems. (2017). Standard
16.01.03. Healthcare Facilities Accreditation Program: Accreditation
requirements for acute care hospitals. Chicago, IL: Accreditation Association
for Hospitals and Health Systems. (Level VII)
12 Centers for Medicare and Medicaid Services, Department of Health and
Human Services. (2015). Condition of participation: Nursing services. 42
C.F.R. § 482.23(c).
13 DNV GL-Healthcare USA, Inc. (2016). MM.1 .SR.2. NIAHO® accreditation
requirements: Interpretive guidelines & surveyor guidance (version 11).
Milford, OH: DNV GL-Healthcare USA, Inc. (Level VII)
14 Institute for Healthcare Improvement. (2011). How-to guide: Prevent adverse
drug events (medication reconciliation). Cambridge, MA: Institute for
Healthcare Improvement. (Level VII)
15 Standard 57. Parenteral medication and solution administration. Infusion
therapy standards of practice. (2016). Journal of Infusion Nursing, 39, S125–
S127. (Level VII)
16 Institute for Safe Medication Practices. (2014). Independent double-checks:
Undervalued and misused. ISMP Medication Safety Alert! Nurse Advise-ERR,
12(3), 1. Accessed via the Web at
http://www.ismp.org/newsletters/nursing/issues/NurseAdviseERR201403.pdf
(Level VII)
17 Institute for Safe Medication Practices. (2014). “ISMP list of high-alert
medications in acute care settings” [Online]. Accessed via the Web at
http://www.ismp.org/tools/highalertmedications.pdf (Level VII)
18 The Joint Commission. (2019). Standard NPSG.07.01.01. Comprehensive
accreditation manual for hospitals. Oakbrook Terrace, IL: The Joint
Commission. (Level VII)
19 Centers for Disease Control and Prevention. (2002). Guideline for hand
hygiene in health-care settings: Recommendations of the Healthcare Infection
Control Practices Advisory Committee and the HICPAC/SHEA/APIC/IDSA Hand
Hygiene Task Force. MMWR Recommendations and Reports, 51(RR-16), 1–45.
Accessed via the Web at https://www.cdc.gov/mmwr/pdf/rr/rr5116.pdf (Level
II)
20 World Health Organization. (2009). “WHO guidelines on hand hygiene in
health care: First global patient safety challenge, clean care is safer care”
[Online]. Accessed via the Web at
http://apps.who.int/iris/bitstream/10665/44102/1/9789241597906_eng.pdf
(Level IV)
21 Centers for Medicare and Medicaid Services, Department of Health and
Human Services. (2015). Condition of participation: Infection control. 42 C.F.R.
§ 482.42.
22 Accreditation Association for Hospitals and Health Systems. (2017). Standard
07.01.10. Healthcare Facilities Accreditation Program: Accreditation
requirements for acute care hospitals. Chicago, IL: Accreditation Association
for Hospitals and Health Systems. (Level VII)
23 DNV GL-Healthcare USA, Inc. (2016). IC.1 .SR.1 . NIAHO® accreditation
requirements: Interpretive guidelines & surveyor guidance (version 11).
Milford, OH: DNV GL-Healthcare USA, Inc. (Level VII)
24 Standard 35. Filtration. Infusion therapy standards of practice. (2016). Journal
of Infusion Nursing, 39, S70–S71. (Level VII)
25 Occupational Safety and Health Administration. (n.d .). “Bloodborne
pathogens, standard number 1910.1030” [Online]. Accessed July 2017 via the
Web at http://www.osha.gov/pls/oshaweb/owadisp.show_document?
p_id=10051&p_table=STANDARDS (Level VII)
26 Accreditation Association for Hospitals and Health Systems. (2017). Standard
10.00 .03. Healthcare Facilities Accreditation Program: Accreditation
requirements for acute care hospitals. Chicago, IL: Accreditation Association
for Hospitals and Health Systems. (Level VII)
27 Centers for Medicare and Medicaid Services, Department of Health and
Human Services. (2015). Condition of participation: Medical record services.
42 C.F.R. § 482.24(b).
28 The Joint Commission. (2017). Standard RC.01.03 .01. Comprehensive
accreditation manual for hospitals. Oakbrook Terrace, IL: The Joint
Commission. (Level VII)
29 DNV GL-Healthcare USA, Inc. (2016). MR.2 .SR.1 . NIAHO® accreditation
requirements: Interpretive guidelines & surveyor guidance (version 11).
Milford, OH: DNV GL-Healthcare USA, Inc. (Level VII)
30 Accreditation Association for Hospitals and Health Systems. (2017). Standard
25.01.18. Healthcare Facilities Accreditation Program: Accreditation
requirements for acute care hospitals. Chicago, IL: Accreditation Association
for Hospitals and Health Systems. (Level VII)
31 Centers for Disease Control and Prevention. (2012). “Single-dose/single-use
vial position and messages” [Online]. Accessed via the Web at
http://www.cdc.gov/injectionsafety/PDF/CDC-SDV-Position05022012.pdf
ADVANCE DIRECTIVES
The Patient Self-Determination Act of 1990 requires health
care facilities to provide information about the patient’s
right to choose and refuse treatment.1 An advance directive
is a legal document used as a guideline for providing life-
sustaining medical care to a patient with an advanced
disease or disability who is no longer able to indicate his or
her own wishes.2 Advance directives include living wills and
health care proxies.
A living will instructs health care providers about a
patient’s preferences for receiving life-sustaining treatment
in the event that a patient becomes unable to communicate
his or her choices owing to such conditions as terminal
illness, persistent vegetative state, or coma. In making a
living will, a legally competent patient states which
procedures the patient does or doesn’t want carried out,
such as intubation and mechanical ventilation, feeding tube
insertion, parenteral or enteral nutrition and hydration,
antibiotic therapy, dialysis,
and
cardiopulmonary
resuscitation. The living will goes into effect when a patient
can no longer communicate his or her choices regarding
medical care. (See Understanding the living will, page 10.)
In the health care proxy (also called durable power of
attorney for health care), the patient designates another
person to make decisions; this person is commonly referred
to as a health care agent. (See Understanding the health
care proxy, page 11.)
Equipment
Advance directive forms or a copy of the previously
established advance directive ▪ Optional: written or
audiovisual information on advance directives.
Implementation
■ Perform hand hygiene.3,4,5,6,7,8
■ Confirm the patient’s identity using at least two patient
identifiers.9
■ Provide privacy.10,11,12,13
■ Ask the patient whether the patient has an advance
directive.1
If the patient has an advance directive
■ Review the advance directive with the patient and
confirm that it still reflects the patient’s wishes.
■ Place the advance directive in the medical record so that
it’s easily accessible to all health care providers.2,14,15,16,17
■ Notify the practitioner and the rest of the health care
team that the patient has an advance directive so that it
can be used to guide care.2,18
■ Determine whether the health care agent has a copy of
the advance directive.
■ Encourage the patient to discuss the advance directive
with family and health care agent so that they understand
the patient’s wishes and can ask questions while the patient
is competent and can explain his decisions.
■ Perform hand hygiene.3,4,5,6,7,8
■ Document the procedure and that the patient has an
advance directive.2,14,16,19,20,21,22
If the patient doesn’t have an advance directive
■ Provide the patient with verbal and written information
about advance directives so that the patient can make an
informed decision about developing one.2,18,23
■ Answer the patient’s questions about advance directives
or have a social worker or patient representative discuss
advance directives with the patient to provide accurate
information.2,18
■ Assist in the assessment of the patient’s level of
competency to ensure that the patient can make decisions.
This process may include assessing the patient’s ability to
understand information, consider the alternatives, evaluate
the alternatives in relation to his or her own situation, make
a decision, and communicate his or her choice. A doctor or
advanced practice nurse may determine the patient’s
capacity for making decisions.
■ As necessary, determine the need for a multidisciplinary
conference to provide the patient and the patient’s family
with complete, comprehensive, and accurate information to
prevent them from receiving conflicting or confusing
information from various health care providers.
■ Encourage the patient to discuss developing an advance
directive with family.24 If the patient would like to make an
advance directive, assist the patient and family with coming
to terms with the patient’s decisions.
■ If indicated, have the patient sign the advance directive
and obtain witness signatures as required by state law.24
■ Perform hand hygiene.3,4,5,6,7,8
■ Document the procedure and note that the patient
doesn’t have an advance directive.2,14,16,19,20,21,22
Special considerations
■ Arrange for a translator, if necessary, to ensure that the
patient and the patient’s family can communicate their
concerns and understand health care providers’
explanations.25,26
■ If family members express opposition to the patient’s
advance directive, notify the patient’s practitioner, the
nursing supervisor, and the risk manager. Encourage family
members to discuss their feelings with the patient and these
individuals. A consult with the facility’s ethics committee
may be requested, as indicated.
■ The patient may revoke or change an advance directive
at any time.18,24 For example, the patient may revoke the
directive if the patient has a change of mind about the
previous decision or if the patient’s condition mandates that
the directive be revised. The patient can revoke an advance
directive either orally or in writing.
Documentation
Document the presence of an advance directive and that
the practitioner was notified of its presence.2,18 Include the
name of the practitioner and the time of notification. Include
the name, address, and telephone number of the health
care agent. If the patient’s wishes differ from those of the
practitioner or family, note the discrepancies.
If the patient doesn’t have an advance directive,
document that the patient was given written information
concerning rights under state law to make decisions
regarding health care. If the patient refuses information on
an advance directive, document this refusal using the
patient’s own words, in quotes, if possible. Record any
conversations with the patient regarding this decision
making. Document that proof of competence was obtained.
REFERENCES
1 Patient Self-Determination Act of 1990, 42 U.S.C . §§ 4206, 4751. (1990).
2 Centers for Medicare and Medicaid Services, Department of Health and
Human Services. (2015). Condition of participation: Patient’s rights. 42 C.F.R.
§ 482.13(b)(3).
Understanding the Living Will
A living will is an advance care document that specifies a patient’s wishes
with regard to medical care should the patient become terminally ill,
incompetent, or unable to communicate. A living will is commonly used in
combination with a health care agent.
All states and the District of Columbia have laws that outline the
documentation requirements for living wills. The sample document below is
from Ohio.
Living Will
If my attending doctor and one other practitioner who examines me
determine, to a reasonable degree of medical certainty and in accordance
with reasonable medical standards, that I am in a terminal condition or in
a permanently unconscious state, and if my attending doctor determines
that at that time I no longer am able to make informed decisions
regarding the administration of life-sustaining treatment, and that, to a
reasonable degree of medical certainty and in accordance with reasonable
medical standards, there is no reasonable possibility that I will regain the
capacity to make informed decisions regarding the administration of life-
sustaining treatment, then I direct my attending doctor to withhold or
withdraw medical procedures, treatment, interventions, or other measures
that serve principally to prolong the process of my dying, rather than
diminish my pain or discomfort.
I have used the term “terminal condition” in this declaration to mean
an irreversible, incurable, and untreatable condition caused by disease,
illness, or injury from which, to a reasonable degree of medical certainty
as determined in accordance with reasonable medical standards of my
attending doctor and one other practitioner who has examined me, both
of the following apply:
1. There can be no recovery.
2. Death is likely to occur within a relatively short time if life-sustaining
treatment is not administered.
I have used the term “permanently unconscious state” in this
declaration to mean a state of permanent unconsciousness that, to a
reasonable degree of medical certainty, is determined in accordance with
reasonable medical standards by my attending doctor and one other
practitioner who has examined me, as characterized by both of the
following:
1. I am irreversibly unaware of myself and my environment.
2. There is a total loss of cerebral cortical functioning, resulting in my
having no capacity to experience pain or suffering.
Nutrition and hydration
I hereby authorize my attending doctor to withhold or withdraw nutrition
and hydration from me when I am in a permanent unconscious state if my
attending doctor and at least one other practitioner who has examined
me determine, to a reasonable degree of medical certainty and in
accordance with reasonable medical standards, that nutrition or hydration
will not or no longer will serve to provide comfort to me or alleviate my
pain.
Adapted from: Midwest Care Alliance. (2010). “State of Ohio living will
declaration” [Online]. Accessed via the Web at
http://ohiohospitals.org/OHA/media/Images/Membership%20Services/Ener
gy/Choices-Advance-Directives-Packet.pdf
3 The Joint Commission. (2019). Standard NPSG.07.01.01. Comprehensive
accreditation manual for hospitals. Oakbrook Terrace, IL: The Joint
Commission. (Level VII)
4 Centers for Disease Control and Prevention. (2002). Guideline for hand
hygiene in health-care settings: Recommendations of the Healthcare Infection
Control Practices Advisory Committee and the HICPAC/SHEA/APIC/IDSA Hand
Hygiene Task Force. MMWR Recommendations and Reports, 51(RR-16), 1–45.
Accessed via the Web at https://www.cdc.gov/mmwr/pdf/rr/rr5116.pdf (Level
II)
5 World Health Organization. (2009). “WHO guidelines on hand hygiene in
health care: First global patient safety challenge, clean care is safer care”
[Online]. Accessed via the Web at
http://apps.who.int/iris/bitstream/10665/44102/1/9789241597906_eng.pdf
(Level IV)
6 Centers for Medicare and Medicaid Services, Department of Health and
Human Services. (2015). Condition of participation: Infection control. 42 C.F.R.
§ 482.42.
7 Accreditation Association for Hospitals and Health Systems. (2017). Standard
07.01.21. Healthcare Facilities Accreditation Program: Accreditation
requirements for acute care hospitals. Chicago, IL: Accreditation Association
for Hospitals and Health Systems. (Level VII)
8 DNV GL-Healthcare USA, Inc. (2016). IC.1.SR.1 . NIAHO® accreditation
requirements: Interpretive guidelines & surveyor guidance (version 11).
Milford, OH: DNV GL-Healthcare USA, Inc. (Level VII)
9 The Joint Commission. (2019). Standard NPSG.01.01.01. Comprehensive
accreditation manual for hospitals. Oakbrook Terrace, IL: The Joint
Commission. (Level VII)
10 DNV GL-Healthcare USA, Inc. (2016). PR.1.SR.5 . NIAHO® accreditation
requirements: Interpretive guidelines & surveyor guidance (version 11).
Milford, OH: DNV GL-Healthcare USA, Inc. (Level VII)
11 The Joint Commission. (2019). Standard RI.01.01.01. Comprehensive
accreditation manual for hospitals. Oakbrook Terrace, IL: The Joint
Commission. (Level VII)
12 Centers for Medicare and Medicaid Services, Department of Health and
Human Services. (2015). Condition of participation: Patient’s rights. 42 C.F.R.
§ 482.13(c)(1).
13 Accreditation Association for Hospitals and Health Systems. (2017). Standard
15.01.16. Healthcare Facilities Accreditation Program: Accreditation
requirements for acute care hospitals. Chicago, IL: Accreditation Association
for Hospitals and Health Systems. (Level VII)
Understanding the Health Care
Proxy
The sample document below is an example of a health care proxy, which
allows a competent patient to delegate to another person the authority to
consent to or refuse health care treatment for the patient. This document
helps the patient ensure that the patient’s wishes will be carried out if the
patient should become incompetent.
Each state with a health care proxy law has specific requirements for
executing the document. The sample form below is from Nebraska.
Power of attorney for health care
Adapted from: Nebraska Department of Health & Human Services,
Division of Medicaid & Long-Term Care. (n.d .). “Nebraska Power of
Attorney for Health Care” [Online]. Accessed via the Web at
http://dhhs.ne.gov/medicaid/Documents/Power-of-Attorney.pdf
14 DNV GL-Healthcare USA, Inc. (2016). PR.2.SR.1a. NIAHO® accreditation
requirements: Interpretive guidelines & surveyor guidance (version 11).
Milford, OH: DNV GL-Healthcare USA, Inc. (Level VII)
15 The Joint Commission. (2019). Standard RC.02.01.01. Comprehensive
accreditation manual for hospitals. Oakbrook Terrace, IL: The Joint
Commission. (Level VII)
16 Accreditation Association for Hospitals and Health Systems. (2017). Standard
15.01.12. Healthcare Facilities Accreditation Program: Accreditation
requirements for acute care hospitals. Chicago, IL: Accreditation Association
for Hospitals and Health Systems. (Level VII)
17 Accreditation Association for Hospitals and Health Systems. (2017). Standard
15.01.10. Healthcare Facilities Accreditation Program: Accreditation
requirements for acute care hospitals. Chicago, IL: Accreditation Association
for Hospitals and Health Systems. (Level VII)
18 The Joint Commission. (2019). Standard RI.01.05.01. Comprehensive
accreditation manual for hospitals. Oakbrook Terrace, IL: The Joint
Commission. (Level VII)
19 The Joint Commission. (2019). Standard RC.01.03 .01. Comprehensive
accreditation manual for hospitals. Oakbrook Terrace, IL: The Joint
Commission. (Level VII)
20 Centers for Medicare and Medicaid Services, Department of Health and
Human Services. (2015). Condition of participation: Medical record services.
42 C.F.R. § 482.24(b).
21 Accreditation Association for Hospitals and Health Systems. (2017). Standard
10.00 .03. Healthcare Facilities Accreditation Program: Accreditation
requirements for acute care hospitals. Chicago, IL: Accreditation Association
for Hospitals and Health Systems. (Level VII)
22 DNV GL-Healthcare USA, Inc. (2016). MR.2 .SR.1 . NIAHO® accreditation
requirements: Interpretive guidelines & surveyor guidance (version 11).
Milford, OH: DNV GL-Healthcare USA, Inc. (Level VII)
23 DNV GL-Healthcare USA, Inc. (2016). PR.2.SR.1 . NIAHO® accreditation
requirements: Interpretive guidelines & surveyor guidance (version 11).
Milford, OH: DNV GL-Healthcare USA, Inc. (Level VII)
24 Martin, R. H. (2013) “Advance directives: Nursing implications in ensuring the
right of patient self-determination” [Online]. Accessed via the Web at
http://nursing.advanceweb.com/Continuing-Education/CE-Articles/Advance-
Directives.aspx
25 The Joint Commission. (2019). Standard RI.01.01.03 . Comprehensive
accreditation manual for hospitals. Oakbrook Terrace, IL: The Joint
Commission. (Level VII)
26 DNV GL-Healthcare USA, Inc. (2016). PR.3.SR.1 . NIAHO® accreditation
requirements: Interpretive guidelines & surveyor guidance (version 11).
Milford, OH: DNV GL-Healthcare USA, Inc. (Level VII)
AIRBORNE PRECAUTIONS
Airborne precautions, used in addition to standard
precautions, prevent the spread of infectious droplet nuclei,
which are small particles (less than 5 micrometers)
suspended in the air and disperse over long distances by air
currents. Susceptible individuals can inhale these
suspended particles even without having face-to-face
contact with the source of the particles (i.e., the infected
individual).1 (See Conditions requiring airborne precautions.)
NURSING ALERT Please refer to the latest recommendations from the
Centers for Disease Control and Prevention (CDC), located at
http://www.cdc.gov/vhf/ebola/hcp/index.html, when caring for a patient
with known or suspected Ebola virus infection.
Effective airborne precautions require an airborne
infection isolation room—a single-patient room that’s
equipped with monitored negative pressure (in relation to
the surrounding area). An airborne infection isolation room
should have 12 air exchanges/hour if the room has been
newly constructed or renovated, or 6 air exchanges/hour if
it’s an existing room. The air is either vented directly to the
outside of the building or filtered through high-efficiency
particulate air (HEPA) filtration before recirculation.1,5
According to the Centers for Disease Control and Prevention
(CDC), air pressure should be monitored daily, using visual
indicators, while the room is in use.5 The door to the room
should be kept closed to maintain the proper air pressure
balance between the isolation room and the adjoining
hallway or corridor. An anteroom is preferred.
All people who enter an airborne infection isolation room
must wear respiratory protection, provided by a disposable
respirator (such as an N95 respirator or a HEPA respirator)
or a reusable respirator (such as HEPA respirator or a
powered air-purifying respirator [PAPR]).1,5 Regardless of the
type, ensure proper fit to your face each time you wear a
respirator by performing a user seal check.1,5 When using a
PAPR, ensure proper functioning of the unit.
NURSING ALERT When a patient comes to your facility complaining
of respiratory symptoms and an airborne infection is suspected, put a
surgical mask on the patient (if tolerated) and immediately place him
or her in a private room with the door closed until an airborne
infection isolation room is available. If the patient is unable to
tolerate a mask, place him or her in a private room with the door
closed and wear a respirator during care.
Equipment
Respirators (either disposable N95 or HEPA respirators, or
reusable HEPA respirators or PAPRs) ▪ surgical masks ▪
isolation sign ▪ patient care reminders ▪ tissues ▪ no-touch
receptacle.
Preparation of equipment
Keep all airborne precaution supplies outside the patient’s
room in a wall- or door-mounted cabinet, a cart, or an
anteroom.
Implementation
■ Review the patient’s medical record and verify the need
for airborne precautions.
■ Gather and prepare the necessary equipment.
■ Perform hand hygiene.6,7,8,9,10,11
■ Confirm the patient’s identify using at least two patient
identifiers.12
■ Situate the patient in a single-patient airborne infection
isolation room with the door closed to maintain negative
pressure.1,13 If possible, the room should have an anteroom.
If a private bathroom is available, make sure the bathroom
is also under negative air pressure. Monitor negative
pressure according to regulations.
■ Explain isolation precautions to the patient and family to
ease patient anxiety and promote cooperation.
■ Keep the patient’s door (and the anteroom door) closed at
all times to maintain negative pressure and contain the
airborne pathogens.1 Put an AIRBORNE PRECAUTIONS sign on the
door to notify anyone entering the room of the situation.
■ Put on a respirator according to the manufacturer’s
instructions.1 Adjust the straps for a firm but comfortable fit.
Check the seal. (See Respirator seal check, page 14.)
■ If you’re using a PAPR, check for proper function, battery
life, and air flow.
■ Enter the patient’s room and remove the patient’s mask,
if the patient is wearing one.
■ Provide the patient with tissues, and instruct the patient
to cover the nose and mouth with a tissue when coughing or
sneezing. Place a sign in the patient’s room as a reminder.1
■ Provide the patient with a no-touch receptacle for used
tissue disposal. Instruct the patient to dispose of tissues in
the receptacle after use and to perform hand hygiene after
contact with respiratory secretions and contaminated
objects.15
■ Perform hand hygiene.6,7,8,9,10,11
■ Remove your respirator after leaving the patient’s room
and closing the door. To remove your respirator, grasp the
bottom and then the top elastic; avoid touching the front of
the respirator because the front is considered
contaminated.14
■ Discard the respirator in the appropriate receptacle, or
store it for reuse. You may reuse an N95 respirator
according to the manufacturer’s recommendations if it’s not
damaged or soiled.
■ Perform hand hygiene.6,7,8,9,10,11
■ Document the procedure.16,17,18,19
Special considerations
■ All health care workers should wear a respirator when
entering an airborne infection isolation room to minimize
the transmission of airborne organisms such as
Mycobacterium tuberculosis.5
■ Fit testing is performed to confirm that the respirator
adequately fits the user. It’s performed initially and then
periodically at a frequency determined by federal, state, and
local regulations.5,20 Fit testing should also be performed
with changes in physical features that could affect the
respirator (such as scarring, weight loss or gain, or dental
changes).20
■ Teach visitors the proper way to wear respiratory
protection, and make sure that they wear respiratory
protection while in the patient’s room.5
■ Limit the patient’s movement from the room. If the
patient must leave for essential procedures, make sure the
patient wears a surgical mask that covers the nose and
mouth.1,5,13 Notify the receiving staff of the patient’s
isolation precautions so that the precautions will be
maintained and the patient will be promptly returned to the
patient’s room.
■
Depending on the type of respirator and
recommendations from the manufacturer, discard your
respirator or store it until the next use.1 A reusable
respirator should be stored in a dry, well-ventilated place
(not a plastic bag) to prevent microbial growth and should
be cleaned
according to the
manufacturer’s
recommendations.
■ If a patient on airborne precautions requires surgery,
schedule the procedure when a minimal number of health
care workers and other patients are present. If possible,
schedule it as the last case of the day so that more time is
available to clean and disinfect the operating room. Use an
operating room with an anteroom, if possible. Ensure that all
health care workers involved in the surgery wear respiratory
protection.5,13
■ After a patient with suspected or confirmed M.
tuberculosis leaves an airborne infection isolation room,
allow adequate time to elapse before allowing entry of
another patient to ensure removal of contaminated air from
the room. The CDC recommends that a room with 6 air
exchanges/hour be left empty for 69 minutes to effectively
remove 99.9% of airborne contaminants.5
Complications
Social isolation is a complication of airborne precautions.
Documentation
Record the need for airborne precautions on the nursing
care plan and as otherwise determined by your facility.
Document initiation and maintenance of the precautions,
the patient’s tolerance of the procedure, and any patient or
family teaching performed and the patient’s and family’s
understanding of that teaching. Also document the date
airborne precautions were discontinued.
Conditions requiring airborne
precautions
If a patient is known to have a condition requiring airborne precautions, the
facility should follow the Centers for Disease Control and Prevention’s (CDC’s)
isolation precautions to prevent the spread of organisms spread by the
airborne route.2 This table outlines some common conditions that require
airborne precautions, including the required duration and any special
considerations.1
REFERENCES
1 Siegel, J. D., et al. (2007, revised 2017). “2007 guideline for isolation
precautions: Preventing transmission of infectious agents in healthcare
settings” [Online]. Accessed via the Web at
https://www.cdc.gov/infectioncontrol/pdf/guidelines/isolation-guidelines.pdf
(Level II)
2 The Joint Commission. (2019). Standard IC.01.05.01. Comprehensive
accreditation manual for hospitals. Oakbrook Terrace, IL: The Joint
Commission. (Level VII)
3 Centers for Disease Control and Prevention. (2016). “Shingles (herpes zoster):
Clinical overview” [Online]. Accessed via the Web at
https://www.cdc.gov/shingles/hcp/clinical-overview.html
4 Centers for Disease Control and Prevention. (2012). “Tuberculosis (TB) fact
sheet: Infection control in health-care settings” [Online]. Accessed via the
Web at http://www.cdc.gov/tb/publications/factsheets/prevention/ichcs.htm
5 Centers for Disease Control and Prevention. (2005). Guidelines for preventing
the transmission of Mycobacterium tuberculosis in health-care settings, 2005.
MMWR Recommendations and Reports, 54(RR-17), 1–141 . Accessed via the
Web at http://www.cdc.gov/mmwr/PDF/rr/rr5417.pdf (Level II)
6 Centers for Disease Control and Prevention. (2002). Guideline for hand
hygiene in health-care settings: Recommendations of the Healthcare Infection
Control Practices Advisory Committee and the HICPAC/SHEA/APIC/IDSA Hand
Hygiene Task Force. MMWR Recommendations and Reports, 51(RR-16), 1–45.
Accessed via the Web at https://www.cdc.gov/mmwr/pdf/rr/rr5116.pdf (Level
II)
7 The Joint Commission. (2019). Standard NPSG.07.01.01. Comprehensive
accreditation manual for hospitals. Oakbrook Terrace, IL: The Joint
Commission. (Level VII)
8 World Health Organization. (2009). “WHO guidelines on hand hygiene in
health care: First global patient safety challenge, clean care is safer care”
[Online]. Accessed via the Web at
http://apps.who.int/iris/bitstream/10665/44102/1/9789241597906_eng.pdf
(Level IV)
9 Centers for Medicare and Medicaid Services, Department of Health and
Human Services. (2015). Condition of participation: Infection control. 42 C.F.R.
§ 482.42.
EQUIPMENT
Respirator seal check
After you put on your respirator, perform a seal check by placing your hands
over the face piece, as shown below, and then exhale gently. The seal is
considered satisfactory if a slight positive pressure builds up inside the face
piece without air leaking from the seal.14 Air leaking is evidenced by the
fogging of your glasses, a feeling of air trickling down your uncovered face,
and lack of pressure buildup under the face piece.
If the respirator has an exhalation valve, cover the filter surface with your
hands as much as possible and then inhale. The seal is considered
satisfactory if the face piece collapses on your face and you don’t feel air
passing between your face and the face piece.
10 Accreditation Association for Hospitals and Health Systems. (2017). Standard
07.01.21. Healthcare Facilities Accreditation Program: Accreditation
requirements for acute care hospitals. Chicago, IL: Accreditation Association
for Hospitals and Health Systems. (Level VII)
11 DNV GL-Healthcare USA, Inc. (2016). IC.1 .SR.1 . NIAHO® accreditation
requirements: Interpretive guidelines & surveyor guidance (version 11).
Milford, OH: DNV GL-Healthcare USA, Inc. (Level VII)
12 The Joint Commission. (2019). Standard NPSG.01.01.01. Comprehensive
accreditation manual for hospitals. Oakbrook Terrace, IL: The Joint
Commission. (Level VII)
13 Accreditation Association for Hospitals and Health Systems. (2017). Standard
07.01.10. Healthcare Facilities Accreditation Program: Accreditation
requirements for acute care hospitals. Chicago, IL: Accreditation Association
for Hospitals and Health Systems. (Level VII)
14 Centers for Disease Control and Prevention. (n.d .) “How to properly put on
and take off a disposable respirator” [Online]. Accessed via the Web at
http://www.bepreparedcalifornia.ca .gov/Documents/N95%20Proper%20Use.p
df
15 Centers for Disease Control and Prevention. (2012). “Respiratory
hygiene/cough etiquette in healthcare settings” [Online]. Accessed via the
Web at http://www.cdc.gov/flu/professionals/infectioncontrol/resphygiene.htm
16 The Joint Commission. (2017). Standard RC.01.03 .01. Comprehensive
accreditation manual for hospitals. Oakbrook Terrace, IL: The Joint
Commission. (Level VII)
17 Centers for Medicare and Medicaid Services, Department of Health and
Human Services. (2015). Condition of participation: Medical record services.
42 C.F.R. § 482.24(b).
18 Accreditation Association for Hospitals and Health Systems. (2017). Standard
10.00 .03. Healthcare Facilities Accreditation Program: Accreditation
requirements for acute care hospitals. Chicago, IL: Accreditation Association
for Hospitals and Health Systems. (Level VII)
19 DNV GL-Healthcare USA, Inc. (2016). MR.2 .SR.1 . NIAHO® accreditation
requirements: Interpretive guidelines & surveyor guidance (version 11).
Milford, OH: DNV GL-Healthcare USA, Inc. (Level VII)
20 Occupational Safety and Health Administration. (2011). “Respiratory
protection, standard number 1910.134” [Online]. Accessed via the Web at
https://www.osha.gov/pls/oshaweb/owadisp.show_document?
p_table=STANDARDS&p_id=12716 (Level VII)
AIR-FLUIDIZED THERAPY BED USE
Originally designed for managing burns, the air-fluidized
therapy bed is now used for patients with various debilities.
By allowing harmless contact between the bed’s surface and
grafted sites, the bed promotes comfort and healing. The
surface of the bed conforms to the patient’s body as it is
immersed into the bed’s surface, which lowers the interface
pressure by increasing the surface pressure distribution
area.1
The traditional air-fluidized therapy bed is actually a large
tub that supports the patient on a thick layer of silicone-
coated microspheres of lime glass. Another version
combines the air-fluidized section with a low-air-loss or
cushioned section. (See The air-fluidized therapy bed.) A
monofilament polyester filter sheet covers the microsphere-
filled tub. Warmed air, propelled by a blower beneath the
bed, passes through it. The resulting fluid-like surface
reduces pressure on the skin to avoid obstructing capillary
blood flow, which helps to prevent pressure ulcers and to
promote wound healing.2,3 The air-fluidized bed’s air
temperature can be adjusted to help control hypothermia
and hyperthermia. The microprocessor technology also
allows manipulation of various sections of the unit for
optimum adjustment. Some models come with adjustable
back and leg supports to promote positioning.
An air-fluidized therapy bed may be indicated for patients
with large Stage 3 or 4 pressure injuries or injuries on
multiple turning surfaces.4 An air-fluidized therapy bed may
be contraindicated in a patient with an unstable spine. It
also may be contraindicated in a patient who can’t mobilize
and expel pulmonary secretions, because the bed’s lack of
back support impairs productive coughing. Operation of an
air-fluidized therapy bed is complex and requires special
training.
Equipment
Air-fluidized therapy bed with microspheres ▪ filter sheet ▪
flat sheet ▪ elastic cord ▪ friction-reducing device or lateral
transfer board for a patient who weighs less than 200 lb (91
kg); celling lift with spine sling, mechanical transfer device,
or air-assisted device for a patient who weighs more than
200 lb (91 kg)5 ▪ cushioning device or pillows ▪ Optional:
gloves, gown, mask with face shield, mask, goggles, foam
wedge, breathable underpad.
Preparation of equipment
A manufacturer’s representative or a trained staff member
usually prepares the bed for use. If you must help with the
preparation, make sure the microspheres reach to within 1⁄2′′
(1.3 cm) of the top of the tank. Then position the filter sheet
on the bed with its printed side facing up. Match the holes in
the sheet to the holes in the edge of the bed’s frame. If the
bed has detachable aluminum rails, place them on the
frame, with the studs in the proper holes. Depress the rails
firmly, and then secure them by tightening the knurled
knobs to seal the filter sheet. Place a flat sheet over the
filter sheet or use the specialized sheet provided by the bed
company, and secure it with the elastic cord. If using a flat
sheet, place only one sheet so that the patient is as close to
the therapeutic surface as possible.6 If an underpad is
necessary, don’t use a reusable underpad; use only a
breathable underpad so that the permeability of the filter
sheet is not altered.6,7 Turn on the air current to activate the
microspheres and to ensure that the bed is working
properly; then turn off the air current.
Implementation
■ Consult with a wound, ostomy, and continence nurse or
an educated skin care team member before using an air-
fluidized bed to make sure it’s the best choice of support
surface for the patient.
■ Gather the equipment and help prepare the air-fluidized
therapy bed, if necessary.
■ Perform hand hygiene,8,9,10,11,12,13 then put on gloves
and, as needed, other personal protective equipment to
comply with standard precautions.14,15
■ Confirm the patient’s identity using at least two patient
identifiers.16
■ Provide privacy.17,18,19,20
■ Explain and, if possible, demonstrate the operation of the
air-fluidized therapy bed. Tell the patient the reason for its
use and explain that the patient will feel as though floating
while on the bed.
■ With the help of three or more coworkers, transfer the
patient to the bed using an appropriate patient transfer
device.
■ If the patient has an enteral feeding tube, use a foam
wedge to elevate the head of the bed at least 30 degrees,
unless contraindicated, to help prevent aspiration.21
■ Place cushioning devices or pillows between the patient’s
legs, ankles, and other bony prominences to help maintain
alignment and prevent bony prominences from touching.4
■ Turn on the air current pressure to activate the air-
fluidized therapy bed.
■ Remove the patient transfer device.
■ Monitor the patient’s fluid and electrolyte status because
an air-fluidized therapy bed increases evaporative water
loss.
■ Reposition the patient at a frequency determined by the
patient’s condition and the support surface.22 Specialty
beds don’t eliminate the need for frequent assessment and
position changes.
■ Adjust the bed’s temperature for patient comfort
according to the manufacturer’s instructions. (Usual comfort
range is 88°F [31°C] to 94°F [34.5°C].6
■ Remove and discard your gloves and any other personal
protective equipment if worn.
■ Perform hand hygiene.8,9,10,11,12,13
■ Document the procedure.23,24,25,26
Special considerations
■ Because of the bed’s drying effect, always cover a
patient’s mesh graft for the first 2 to 8 days, as ordered. If
the patient has excessive upper respiratory tract dryness,
use a humidifier and mask, as ordered. Encourage coughing
and deep breathing.
■ To position a bedpan, roll the patient away from you;
place the bedpan on the flat sheet and push it into the
microspheres, then reposition the patient. To remove the
bedpan, hold it steady and roll the patient away from you.
Turn off the air pressure and remove the bedpan. Then turn
the air on and reposition the patient.
■ Take care to avoid puncturing the bed when giving
injections. Repair holes or tears that occur with iron-on
patching tape. Sieve the microspheres in the fluidized tank
of the bed monthly or between patients to remove any
clumped microspheres. Handle them carefully to avoid
spills; spilled microspheres may cause falls. Treat a soiled
filter sheet and clumped microspheres as contaminated
items. Change the filter sheet and operate the unit
unoccupied for 24 hours between patients.
■ Note that the air-fluidized therapy bed has an emergency
STOP/DEFLATE button that stops the action of the bed in the
event the patient needs cardiopulmonary resuscitation.
■ Perform a pressure injury risk assessment and skin
assessment upon a patient’s admission to the health care
setting, and repeat the assessments on a regularly
scheduled basis, or when there’s a significant change in the
patient’s condition (e.g .,
surgery, a decline in health
status).4 Use a standardized pressure injury risk assessment
tool.22
HOSPITAL-ACQUIRED CONDITION ALERT Keep in mind that a Stage 3
or 4 pressure injury is considered a hospital-acquired condition,
because it may be prevented reasonably using best practices. Make
sure to follow pressure injury prevention practices (e.g., performing
risk assessments, moisturizing the patient’s skin, providing adequate
hydration and nutrition, using specialty support surfaces) to reduce
the risk of pressure injuries.22,27,28,29
Documentation
Record the duration of therapy and the patient’s response to
it. Document the condition of the patient’s skin, pressure
injuries, and other wounds.
REFERENCES
1 Baranoski, S., & Ayello, E. A. (2016). Wound care essentials: Practice
principles (4th ed.). Philadelphia, PA: Wolters Kluwer.
2 Ochs, R. F., et al. (2005). Comparison of air-fluidized therapy with other
support surfaces used to treat pressure ulcers in nursing home residents.
Ostomy/Wound Management, 51, 38–68 .
3 Hickerson, W. L ., et al. (2004). Comparison of total body tissue interface
pressure of specialized pressure-relieving mattresses. Journal of Long-Term
Effects of Medical Implants, 14, 81–94.
4 Wound Ostomy and Continence Nurses Society (WOCN). (2016). Guideline for
prevention and management of pressure ulcers (injuries): WOCN clinical
practice guideline series 2. Mount Laurel, NJ; WOCN.
EQUIPMENT
The air-fluidized therapy bed
The air-fluidized therapy bed is a large tub filled with microspheres that are
suspended by air pressure and give the patient fluid-like support. The bed
provides the advantages of flotation without the disadvantages of instability,
patient positioning difficulties, and immobility.
5 Waters, T. R., et al. (2009). “Safe patient handling training for schools of
nursing” [Online]. Accessed via the Web at
https://www.cdc.gov/niosh/docs/2009-127/pdfs/2009-127.pdf (Level VII)
6 Hill-Rom Services. (2008). “Hill-Rom® eLearning safety solutions suite:
Clinitron® bed eLearning” [Online]. Accessed via the Web at http://www.hill-
rom.com/eLearningCourses/Clinitron/startOffline.html
7 Covidien. (n.d.) . “Underpad Selection for Airflow Beds” [Online]. Accessed via
the Web at http://www.covidien.com/imageServer.aspx?
contentID=31671&contenttype=application/pdf
8 The Joint Commission. (2019). Standard NPSG.07.01.01. Comprehensive
accreditation manual for hospitals. Oakbrook Terrace, IL: The Joint
Commission. (Level VII)
9 Centers for Disease Control and Prevention. (2002). Guideline for hand
hygiene in health-care settings: Recommendations of the Healthcare Infection
Control Practices Advisory Committee and the HICPAC/SHEA/APIC/IDSA Hand
Hygiene Task Force. MMWR Recommendations and Reports, 51(RR-16), 1–45.
Accessed via the Web at https://www.cdc.gov/mmwr/pdf/rr/rr5116.pdf (Level
II)
10 World Health Organization. (2009). “WHO guidelines on hand hygiene in
health care: First global patient safety challenge, clean care is safer care”
[Online]. Accessed via the Web at
http://apps.who.int/iris/bitstream/10665/44102/1/9789241597906_eng.pdf
(Level IV)
11 Centers for Medicare and Medicaid Services, Department of Health and
Human Services. (2015). Condition of participation: Infection control. 42 C.F.R.
§ 482.42.
12 Accreditation Association for Hospitals and Health Systems. (2017). Standard
07.01.21. Healthcare Facilities Accreditation Program: Accreditation
requirements for acute care hospitals. Chicago, IL: Accreditation Association
for Hospitals and Health Systems. (Level VII)
13 DNV GL-Healthcare USA, Inc. (2016). IC.1 .SR.1 . NIAHO® accreditation
requirements: Interpretive guidelines & surveyor guidance (version 11).
Milford, OH: DNV GL-Healthcare USA, Inc. (Level VII)
14 Accreditation Association for Hospitals and Health Systems. (2017). Standard
07.01.10. Healthcare Facilities Accreditation Program: Accreditation
requirements for acute care hospitals. Chicago, IL: Accreditation Association
for Hospitals and Health Systems. (Level VII)
15 Siegel, J. D ., et al. (2007, revised 2017). “2007 guideline for isolation
precautions: Preventing transmission of infectious agents in healthcare
settings” [Online]. Accessed via the Web at
https://www.cdc.gov/infectioncontrol/pdf/guidelines/isolation-guidelines.pdf
(Level II)
16 The Joint Commission. (2017). Standard NPSG.01.01.01. Comprehensive
accreditation manual for hospitals. Oakbrook Terrace, IL: The Joint
Commission. (Level VII)
17 The Joint Commission. (2019). Standard RI.01.01.01. Comprehensive
accreditation manual for hospitals. Oakbrook Terrace, IL: The Joint
Commission. (Level VII)
18 Centers for Medicare and Medicaid Services, Department of Health and
Human Services. (2015). Condition of participation: Patient’s rights. 42 C.F.R.
§ 482.13(c)(1).
19 Accreditation Association for Hospitals and Health Systems. (2017). Standard
15.01.16. Healthcare Facilities Accreditation Program: Accreditation
requirements for acute care hospitals. Chicago, IL: Accreditation Association
for Hospitals and Health Systems. (Level VII)
20 DNV GL-Healthcare USA, Inc. (2016). PR.1.SR.5 . NIAHO® accreditation
requirements: Interpretive guidelines & surveyor guidance (version 11).
Milford, OH: DNV GL-Healthcare USA, Inc. (Level VII)
21 Boullata, J. I., et al. (2016). ASPEN safe practices for enteral nutrition therapy.
Journal of Parenteral and Enteral Nutrition, 41, 15–103. Accessed via the Web
at http://journals.sagepub.com/doi/full/10.1177/0148607116673053 (Level
VII)
22 National Pressure Ulcer Advisory Panel, et al. (2014). “Prevention and
treatment of pressure ulcers: Quick reference guide” [Online]. Accessed via
the Web at http://www.npuap.org/wp-content/uploads/2014/08/Quick-
Reference-Guide-DIGITAL-NPUAP-EPUAP-PPPIA.pdf (Level VII)
23 The Joint Commission. (2019). Standard RC.01.03 .01. Comprehensive
accreditation manual for hospitals. Oakbrook Terrace, IL: The Joint
Commission. (Level VII)
24 Centers for Medicare and Medicaid Services, Department of Health and
Human Services. (2015). Condition of participation: Medical record services.
42 C.F.R. § 482.24(b).
25 Accreditation Association for Hospitals and Health Systems. (2017). Standard
10.00 .03. Healthcare Facilities Accreditation Program: Accreditation
requirements for acute care hospitals. Chicago, IL: Accreditation Association
for Hospitals and Health Systems. (Level VII)
26 DNV GL-Healthcare USA, Inc. (2016). MR.2 .SR.1 . NIAHO® accreditation
requirements: Interpretive guidelines & surveyor guidance (version 11).
Milford, OH: DNV GL-Healthcare USA, Inc. (Level VII)
27 Jarrett, N., & Callaham, M. (2016). “Evidence-based guidelines for selected
hospital-acquired conditions: Final report” [Online]. Accessed via the Web at
https://www.cms.gov/Medicare/Medicare-Fee-for-Service-
Payment/HospitalAcqCond/Downloads/2016-HAC-Report.pdf
28 Accreditation Association for Hospitals and Health Systems. (2017). Standard
16.02.02. Healthcare Facilities Accreditation Program: Accreditation
requirements for acute care hospitals. Chicago, IL: Accreditation Association
for Hospitals and Health Systems. (Level VII)
29 Centers for Medicare and Medicaid Services, Department of Health and
Human Services. (2017). “Appendix I: Hospital-acquired conditions (HACS)
list” [Online]. Accessed via the Web at
https://www.cms.gov/ICD10Manual/version33-fullcode-
cms/fullcode_cms/P0386.html
ALIGNMENT AND PRESSURE-REDUCING
DEVICES
Various assistive devices can be used to maintain correct
body positioning and to help prevent complications that
commonly arise when a patient must be on prolonged bed
rest. Alignment and pressure-reducing devices, or pressure-
redistribution devices, include the cradle boot, abduction
pillow, trochanter roll, hand roll, and wheelchair cushion.
(See Common alignment and pressure-reducing devices.)
Several of these devices—the cradle boot, trochanter roll,
hand roll, and wheelchair cushion—are especially useful
when caring for patients who have a loss of sensation,
mobility, or consciousness.
Equipment
Cradle boots ▪ abduction pillow ▪ trochanter rolls ▪ hand
rolls ▪ wheelchair cushion ▪ Optional: washcloth, blanket or
towel, roller gauze, hypoallergenic or adhesive tape.
Implementation
■ Gather the appropriate equipment. If you’re using a
device that’s available in different sizes, select the
appropriate size for the patient.
■ Perform hand hygiene.2,3,4,5,6,7
■ Confirm the patient’s identity using at least two patient
identifiers.8
■ Provide privacy.9,10,11,12
■ Explain the purpose of the alignment and pressure-
reducing device.
■ Assess the patient’s skin and perform a pressure injury
risk assessment,13 paying special attention to the
location(s) where you’ll be applying the device. Note and
record any areas of redness or swelling, and pay close
attention to pressure points at the elbows, heels,
trochanters, sacrum, and ischium because these areas are
more likely to develop pressure injuries.14
HOSPITAL-ACQUIRED CONDITION ALERT Keep in mind that a stage 3
or 4 pressure injury is considered a hospital-acquired condition by the
Centers for Medicare and Medicaid Services because it can be
reasonably prevented using best practices. Make sure to follow
pressure injury prevention practices (such as performing a skin
assessment, using support surfaces, and managing moisture) to
reduce the risk of pressure injury.13,15,16,17
Applying a cradle boot
■ Position the patient comfortable in either a sitting or
supine position with the legs in a neutral position.
■ Open the slit on the superior surface of the boot, place
the patient’s heel in the circular cutout area, then fasten the
Velcro strap(s) according to the brand of boot used. Check
that you can insert two fingers beneath the strap(s) to
prevent a tight fit that might impair circulation.
■ Repeat the procedure with the patient’s other foot, as
needed.
■ Position the patient’s legs in a comfortable, neutral
position to prevent internal and external rotation.
■ Make sure that both knees are flexed 5 to 10 degrees to
prevent hyperextension of the knee and to decrease the risk
of deep vein thrombosis. Ensure that both heels are
suspended off the bed, and that there isn’t any pressure on
the Achilles tendon.13
Applying an abduction pillow
■ Place the patient in the supine position, slide the pillow
between the patient’s legs, and gently arrange the straps
beneath the patient’s legs, making sure the straps are flat
on the bed.
■ Place the upper part of both of the patient’s legs in the
pillow’s lateral indentations.
■ Bring the straps around the patient’s legs, securing them
to the top of the pillow.
■ Place the patient’s legs in a neutral position to prevent
external hip rotation.
Applying a trochanter roll
■ Place the patient in a supine position.
■ Position a trochanter roll, rolled towel, or blanket along
the outside of the patient’s thigh from the iliac crest to the
mid-thigh. If you’re using a rolled towel or blanket, tuck a
few inches of material under the patient’s hip and thigh to
hold the roll in place.
■ Place another roll along the other thigh.
■ Make sure neither roll extends to the knee to prevent
peroneal nerve compression and palsy, which can lead to
footdrop.
■ Place the patient’s legs in a neutral position to prevent
external hip rotation.
Applying hand rolls
■ Place a hand roll or rolled washcloth in each of the
patient’s hands to maintain a neutral position.
■ Secure the straps, if present, or apply roller gauze and
secure with hypoallergenic or adhesive tape.
Applying a pressure-reducing wheelchair
cushion
■ Place the cushion into the wheelchair seat before the
patient sits.
■ Ensure the wheelchair width is adequate by checking that
the patient’s hips don’t touch the sides of the wheelchair at
their widest point.
Completing the procedure
■ Reposition the patient periodically, at a frequency
determined by the patient’s condition and the support
surface,13 to reduce the duration and magnitude of pressure
over affected body surfaces.13,17,18,19 If the patient can
reposition himself, teach the patient how to make small,
frequent position changes.17 Avoid positioning the patient
on reddened areas.13
■ Perform structured pressure injury risk assessments at a
frequency determined by the patient’s condition.13
■ Perform hand hygiene.2,3,4,5,6,7
■ Document the procedure.20,21,22,23
Special considerations
■ Remember that the use of assistive devices doesn’t
preclude regularly scheduled patient positioning, range-of-
motion exercises, and skin care. Turn the patient a minimum
of every 2 hours, removing the device as needed.17
EQUIPMENT
Common alignment and pressure-
reducing devices
Some common alignment and pressure-reducing devices include the cradle
boot, abduction pillow, trochanter roll, hand roll, and wheelchair cushion.
Cradle boot
A cradle boot, made with a heel cutout, cushions the ankle and foot without
completely enclosing it. It helps to prevent footdrop, skin breakdown, internal
and external rotation of the hip, strain on hip ligaments, and pressure on
bony prominences.
Abduction pillow
An abduction pillow is a wedge-shaped piece of sponge rubber with lateral
indentations for the patient’s thighs. Its straps wrap around the patient’s
thighs and maintain correct positioning by preventing internal rotation and
adduction of the hip. Although a properly shaped bed pillow may temporarily
substitute for a commercial abduction pillow, it’s difficult to apply and fails to
maintain proper lateral alignment.
Trochanter roll
A trochanter roll is used to prevent hip external rotation by keeping the hip
and thigh in a neutral position. A commercial trochanter roll is made of
sponge rubber. You can also improvise a trochanter roll using a rolled blanket
or towel if a commercial one is not available. To hold an improvised roll in
place, gently tuck a few inches of the material beneath the patient’s hip and
thigh as he lies in a supine position, allowing his leg to rest against the rolled
blanket or towel (as shown below)
Hand roll
A hand roll, designed to prevent hand contractures, is available in hard and
soft materials and is held in place by fixed or adjustable strap(s). You can
improvise one from a rolled washcloth secured with roller gauze and
adhesive tape if a commercial device is unavailable.
Wheelchair cushion
A wheelchair cushion is a pressure-reducing device filled with air, viscous
fluid and foam, or gel and foam. When used with a properly fitted wheelchair,
a pressure-reducing cushion can significantly reduce pressure injury
formation at the sacrum and ischium in patients who need to use a
wheelchair for 6 or more hours per day.1 A convoluted foam cushion should
be avoided because it doesn’t protect the patient’s skin from pressure
injuries while seated.
■ Monitor the skin integrity of skin underneath a strap.
■ Consult with a wound, ostomy, and continence nurse, as
needed.
Patient teaching
Explain the use of appropriate devices to the patient and
caregiver, Demonstrate the proper use of each device,
emphasizing proper alignment of extremities, and have the
patient or caregiver give a return demonstration so you can
check for proper technique. Emphasize measures needed to
prevent pressure injuries.
Complications
Contractures and pressure injuries can occur with the use of
a hand roll and possibly other assistive devices. To avoid
these problems, remove hand rolls every 2 hours.
Documentation
Record the use of alignment and pressure-reducing devices
in the patient’s medical record and in the nursing care plan,
including the reason for the device. Include your
assessment for complications. Document the findings of
pressure injury risk assessments.13 In addition, document
any patient teaching performed and the patient’s
understanding of that teaching. Reevaluate the patient care
goals as needed.
REFERENCES
1 Brienza, D., et al. (2010). A randomized clinical trial on preventing pressure
ulcers with wheelchair seat cushions. Journal of the American Geriatrics
Society, 58, 2308–2314.
2 The Joint Commission. (2019). Standard NPSG.07.01.01. Comprehensive
accreditation manual for hospitals. Oakbrook Terrace, IL: The Joint
Commission. (Level VII)
3 Centers for Disease Control and Prevention. (2002). Guideline for hand
hygiene in health-care settings: Recommendations of the Healthcare Infection
Control Practices Advisory Committee and the HICPAC/SHEA/APIC/IDSA Hand
Hygiene Task Force. MMWR Recommendations and Reports, 51(RR-16), 1–45.
Accessed via the Web at https://www.cdc.gov/mmwr/pdf/rr/rr5116.pdf (Level
II)
4 World Health Organization. (2009). “WHO guidelines on hand hygiene in
health care: First global patient safety challenge, clean care is safer care”
[Online]. Accessed via the Web at
http://apps.who.int/iris/bitstream/10665/44102/1/9789241597906_eng.pdf
(Level IV)
5 Centers for Medicare and Medicaid Services, Department of Health and
Human Services. (2015). Condition of participation: Infection control. 42 C.F.R.
§ 482.42.
6 Accreditation Association for Hospitals and Health Systems. (2017). Standard
07.01.21. Healthcare Facilities Accreditation Program: Accreditation
requirements for acute care hospitals. Chicago, IL: Accreditation Association
for Hospitals and Health Systems. (Level VII)
7 DNV GL-Healthcare USA, Inc. (2016). IC.1.SR.1 . NIAHO® accreditation
requirements: Interpretive guidelines & surveyor guidance (version 11).
Milford, OH: DNV GL-Healthcare USA, Inc. (Level VII)
8 The Joint Commission. (2019). Standard NPSG.01.01.01. Comprehensive
accreditation manual for hospitals. Oakbrook Terrace, IL: The Joint
Commission. (Level VII)
9 Accreditation Association for Hospitals and Health Systems. (2017). Standard
15.01.16. Healthcare Facilities Accreditation Program: Accreditation
requirements for acute care hospitals. Chicago, IL: Accreditation Association
for Hospitals and Health Systems. (Level VII)
10 Centers for Medicare and Medicaid Services, Department of Health and
Human Services. (2015). Condition of participation: Patient’s rights. 42 C.F.R.
§ 482.13(c)(1).
11 The Joint Commission. (2019). Standard RI.01.01.01. Comprehensive
accreditation manual for hospitals. Oakbrook Terrace, IL: The Joint
Commission. (Level VII)
12 DNV GL-Healthcare USA, Inc. (2016). PR.1.SR.5 . NIAHO® accreditation
requirements: Interpretive guidelines & surveyor guidance (version 11).
Milford, OH: DNV GL-Healthcare USA, Inc. (Level VII)
13 National Pressure Ulcer Advisor Panel, et al. (2014). “Prevention and
treatment of pressure ulcers: Quick reference guide” [Online]. Accessed via
the Web at http://www.npuap.org/wp-content/uploads/2014/08/Quick-
Reference-Guide-DIGITAL-NPUAP-EPUAP-PPPIA.pdf (Level VII)
14 National Pressure Ulcer Advisory Panel. (2007). “Pressure ulcer prevention
points” [Online]. Accessed via the Web at
http://www.npuap.org/PU_Prev_Points.pdf
15 Jarrett, N., & Callaham, M. (2016). “Evidence-based guidelines for selected
hospital-acquired conditions: Final report” [Online]. Accessed via the Web at
https://www.cms.gov/Medicare/Medicare-Fee-for-Service-
Payment/HospitalAcqCond/Downloads/2016-HAC-Report.pdf
16 Accreditation Association for Hospitals and Health Systems. (2017). Standard
16.02.02. Healthcare Facilities Accreditation Program: Accreditation
requirements for acute care hospitals. Chicago, IL: Accreditation Association
for Hospitals and Health Systems. (Level VII)
17 Perry, D., et al. (2012, reviewed 2014). “Institute for Clinical Systems
Improvement: Pressure ulcer prevention and treatment protocol, 3rd edition”
[Online]. Accessed via the Web at
https://www.icsi.org/_asset/6t7kxy/PressureUlcer.pdf (Level VII)
18 Baranoski, S., & Ayello, E. A. (2016). Wound care essentials: Practice
principles (4th ed.). Philadelphia, PA: Wolters Kluwer.
19 Black, J. (2012). Technology update: Preventing pressure ulcers occurring on
the heel. Wounds International, 3(3), 1–4. Accessed via the Web at
http://www.woundsinternational.com/pdf/content_10517.pdf
20 The Joint Commission. (2019). Standard RC.01.03 .01. Comprehensive
accreditation manual for hospitals. Oakbrook Terrace, IL: The Joint
Commission. (Level VII)
21 Centers for Medicare and Medicaid Services, Department of Health and
Human Services. (2015). Condition of participation: Medical record services.
42 C.F.R. § 482.24.
22 Accreditation Association for Hospitals and Health Systems. (2017). Standard
10.00 .03. Healthcare Facilities Accreditation Program: Accreditation
requirements for acute care hospitals. Chicago, IL: Accreditation Association
for Hospitals and Health Systems. (Level VII)
23 DNV GL-Healthcare USA, Inc. (2016). MR.2 .SR.1 . NIAHO® accreditation
requirements: Interpretive guidelines & surveyor guidance (version 11).
Milford, OH: DNV GL-Healthcare USA, Inc. (Level VII)
ANTIEMBOLISM STOCKING APPLICATION
Elastic antiembolism stockings help prevent venous
thromboembolism (VTE), a disorder that includes deep vein
thrombosis (DVT) and pulmonary embolism. They do so by
compressing superficial leg veins. This compression
increases venous return by forcing blood into the deep
venous system rather than allowing it to pool in the legs and
form clots. Antiembolism stockings should provide
graduated compression and produce a calf pressure of 14 to
15 mm Hg.1,2
HOSPITAL-ACQUIRED CONDITION ALERT Keep in mind that VTE in
patients who underwent total knee replacement or hip replacement is
considered a hospital-acquired condition because it can be reasonably
prevented using best practices.3,4 Be sure to follow VTE prevention
practices (such as using mechanical compression devices, including
antiembolism stockings and an intermittent pneumatic compression
device, early ambulation, and pharmacologic prophylaxis) to reduce
the risk of VTE.5,6,7
Patients who usually require antiembolism stockings
include postoperative patients, elderly patients, and those
who are bedridden, have varicose veins, or are otherwise at
risk for DVT. Compression therapy has proven beneficial for
the treatment of venous ulcers and chronic venous
insufficiency and, therefore, is considered a standard of care
for patients with these conditions.8 For patients with chronic
venous problems, practitioners may order the use of
intermittent pneumatic compression stockings for the
duration of surgery and postoperatively. (See the
“Sequential compression therapy” procedure.)
Guidelines caution against using antiembolism stockings
in patients with dermatoses or open skin lesions, gangrene,
severe arteriosclerosis or other ischemic vascular diseases,
pulmonary edema or any massive edema, recent vein
ligation, vascular or skin grafts, and severe leg deformity.1
Studies show that graduated compression stockings don’t
reduce the risk of DVT in stroke patients and may even
increase the risk of skin complications in these patients.9
There’s no evidence to support the use of one type of
antiembolism stocking (knee-length, thigh-length, or waist-
length) over another. Thus, patient compliance, ease of use,
and cost will indicate the best choice of stocking type.10
Equipment
Tape measure ▪ antiembolism stockings of correct size.
Preparation of equipment
Before applying a knee-length stocking
Measure the patient using a tape measure to ensure a
proper fit. (See Measuring for antiembolism stockings.)
Before applying a thigh-length stocking
Measure the upper thigh circumference at the gluteal fold,
then the calf circumference at the greatest dimension, and
lastly the leg length from the gluteal fold to the base of the
heel.1
Before applying a waist-length stocking
To measure for a waist-length stocking, first measure the
upper thigh circumference at the gluteal fold.1 Next,
measure the calf circumference at the greatest dimension.1
Last, measure the leg length by measuring from the gluteal
fold to the base of the heel.1
If the patient’s thigh measurements are outside of the
specified recommended range, consider knee-length
stockings as another option.1
Implementation
■ Gather and prepare the necessary equipment
■ Verify the practitioner’s order.
■ Review the patient’s medical record for contraindications
to antiembolism stocking use.
■ Perform hand hygiene.11,12,13,14,15,16
■ Confirm the patient’s identity using at least two patient
identifiers.17
■ Provide privacy.18,19,20
■ Explain the procedure to the patient and family (if
appropriate) according to their individual communication
and learning needs to increase their understanding, allay
their fears, and enhance cooperation.21
■ Help the patient lie down if the patient isn’t already doing
so.
■ Raise the patient’s bed to waist level when providing care
to prevent caregiver back strain.22
■ Assess the condition of the patient’s legs. If you suspect
arterial disease, notify the practitioner before applying the
stockings.2
Applying a knee-length stocking
■ Insert your hand into the stocking from the top and grasp
the heel pocket from the inside. Holding the heel, turn the
stocking inside out. This method allows easier application
than gathering the entire stocking and working it up over
the foot and ankle.1
■ Position the stocking over the foot and heel, making sure
the heel is centered in the heel pocket.1
■ Grasp a few inches of the stocking up around the
patient’s ankle and calf,1 as shown below.
■ Continue pulling the stocking up the patient’s leg using
short, alternating front and back pulls, as shown below. The
bottom of the band (or change in the stocking’s stitching)
should fall 1′′ to 2′′ (2.5 to 5 cm) below the popliteal fold.1
■ Continue easing the stocking upward. As you apply the
thigh portion of the stocking, start rotating the stocking
inward so the panel (if present) is slightly toward the inside
of the patient’s leg, as shown below. When the stocking is
fully applied, the top band of the stocking should rest at the
patient’s gluteal fold.1
■ Smooth out wrinkles in the stocking fabric to prevent skin
breakdown.1
■ Make sure the patient’s toes are visible through the toe
inspection area, if present; the patient’s toes shouldn’t stick
out of the inspection area opening.1
Measuring for antiembolism
stockings
Measure the patient carefully to ensure that the antiembolism stockings
provide enough compression for adequate venous return. Measure both legs,
because if the right and left leg measure differently, you many need to order
two different stocking sizes.1
To choose the correct knee-length antiembolism stocking, measure the
circumference of the calf at its widest point (top)1 and the leg length from
the popliteal fold (bend of the knee) to the base of the heel (bottom).1
To choose a thigh-length stocking, measure the calf as for a knee-length
stocking and the thigh at its widest point (top). Then measure leg length from
the bottom of the heel to the gluteal fold (bottom).
■ Repeat the procedure for the second stocking, if ordered.
■ Return the bed to the lowest position to prevent falls and
maintain patient safety.23
■ Perform hand hygiene.11,12,13,14,15,16
■ Document the procedure.24,25,26,27
Applying a thigh-length stocking
■ Follow the procedure for applying a knee-length stocking,
taking care to distribute the fabric evenly below the knee
before continuing the procedure.
■ As you apply the thigh portion of the stocking, start
rotating the stocking inward so the panel (if present) is
slightly toward the inside of the patient’s leg. When you’ve
applied the stocking fully, the top band of the stocking
should rest at the patient’s gluteal fold.
■ Smooth out any wrinkles in the stocking fabric to prevent
skin breakdown.1
■ Make sure the patient’s toes are visible through the toe
inspection area, if present; the patient’s toes shouldn’t stick
out of the inspection area opening.1
■ Repeat the procedure for the second stocking, if ordered.
■ Perform hand hygiene.11,12,13,14,15,16
■ Document the procedure.24,25,26,27
Applying a waist-length stocking
■ When the stocking reaches the patient’s knee, begin
turning the stocking to position the side panel. The stocking
should be positioned so that the upper thigh hem rests in
the groin and at the gluteal fold. Make sure the seam is flat
against the body and the side panel is at the hip bone.1
■ Repeat the procedure for the second stocking.
■ Unfold the waist belt and bring it around the patient’s
waist. The smooth side of the belt should rest against the
patient’s skin. Fasten the waist belt snaps to the stockings.1
■ Connect the waste belt buckle and adjust the waist belt
so that it’s tight enough to secure the stockings in place.1
■ Smooth out wrinkles in the stocking fabric to prevent skin
breakdown.1
■ Pull the toe area forward to smooth the ankle and instep
area to promote toe comfort.1 Make sure the patient’s toes
are visible through the toe inspection area, if present; the
toes shouldn’t stick out of the inspection area opening.1
■ Perform hand hygiene.11,12,13,14,15,16
■ Document the procedure.24,25,26,27
Special considerations
■ If the patient has a fluctuation in weight or develops
edema or postoperative swelling, remeasure the patient and
obtain stockings of the appropriate size.1,2
■ Encourage the patient to wear the stockings day and
night until the patient no longer has significantly reduced
mobility.2
■ Remove the stockings at least once daily to bathe the
skin and observe for irritation and breakdown. Inspect the
skin, provide skin care, and then reapply the stockings.1,2
Inspect the skin (especially the ankles and heels) at least
every 8 hours.1
■ Discontinue the use of antiembolism stockings if you note
marking, blistering, or discoloration of the skin, especially
over heels and bony prominences, or if the patient
experiences pain or discomfort. Notify the practitioner; a
foot impulse device or a sequential compression device may
be prescribed as an alternative to antiembolism stockings.2
■ Don’t allow the stockings to roll or turn down at the top or
toe because the excess pressure could cause venous
strangulation. Have the patient wear the stockings in bed
and during ambulation to provide continuous protection
against VTE.
■ Be alert for an allergic reaction because some patients
can’t tolerate the sizing in new stockings. Laundering the
stockings before applying them reduces the risk of an
allergic reaction to sizing.
■ Using warm water and mild soap, wash the stockings
when they become soiled. Keep a second pair handy so that
the patient can wear them while the other pair is being
laundered.
Patient teaching
If the patient will require antiembolism stockings after
discharge, teach the patient or a family member how to
apply them correctly and explain why the patient needs to
wear them to increase compliance, which maximizes the
effectiveness of treatment.28 Instruct the patient, family
member, or caregiver to wash the stockings every 2 to 3
days, or more frequently if they become visibly soiled.1,29
Advise the patient, family, or caregiver to follow the
manufacturer’s washing instructions. Inform them that, with
proper care, stockings commonly last for 2 to 3 months.
Complications
Obstruction of arterial blood flow—characterized by cold and
bluish toes, dusky toenail beds, decreased or absent pedal
pulses, and leg pain or cramps—can result from application
of antiembolism stockings. Less serious complications, such
as an allergic reaction and skin irritation, can also occur.
Documentation
Record the date and time of stocking application, stocking
style and size, the condition of the leg, foot, and toes before
application. Document any patient and family or caregiver
teaching performed and their understanding of the
teaching.
REFERENCES
1 Covidien. (2014). “T.E.D. anti-embolism stockings: Nursing procedure guide”
[Online]. Accessed via the Web at
http://www.covidien.com/imageServer.aspx/doc233679.pdf?
contentID=75122&contenttype=application/pdf
2 National Institute for Health and Care Excellence. (2010, updated 2015).
“Venous thromboembolism: Reducing the risk for patients in hospital”
[Online]. Accessed via the Web at http://www.nice.org.uk/guidance/cg92
(Level VII)
3 Centers for Medicare and Medicaid Services, Department of Health and
Human Services. (2017). “Appendix I: Hospital-acquired conditions (HACS)
list” [Online]. Accessed via the Web at
https://www.cms.gov/ICD10Manual/version33-fullcode-
cms/fullcode_cms/P0386.html
4 Centers for Medicare and Medicaid Services & The Joint Commission. (2017).
“The specifications manual for national hospital inpatient quality measures
(version 5.2a)” [Online]. Accessed via the Web at
https://www.jointcommission.org/specifications_manual_for_national_hospital_
inpatient_quality_measures.aspx4
5 National Clinical Guideline Centre for Acute and Chronic Conditions. (2007,
revised 2015). Guideline summary: Venous thromboembolism in adults
admitted to hospital: Reducing the risk. Rockville, MD: Agency for Healthcare
Research and Quality. Accessed via the Web at
https://www.guideline.gov/summaries/summary/49437/venous-
thromboembolism-in-adults-admitted-to-hospital-reducing-the-risk?
q=prevent+venous+thromboembolism (Level I)
6 American College of Chest Physicians. (2001, revised 2012). Prevention of
VTE in orthopedic surgery patients: Antithrombotic therapy and prevention of
thrombosis (9th ed.): American College of Chest Physicians evidence-based
clinical practice guidelines. Rockville, MD: Agency for Healthcare Research.
Accessed via the Web at
https://www.guideline.gov/summaries/summary/35265/prevention-of-vte-in-
orthopedic-surgery-patients-antithrombotic-therapy-and-prevention-of-
thrombosis-9th-ed-american-college-of-chest-physicians-evidencebased-
clinical-practice-guidelines (Level I)
7 Jarrett, N., & Callaham, M. (2016). “Evidence-based guidelines for selected
hospital-acquired conditions: Final report” [Online]. Accessed via the Web at
https://www.cms.gov/Medicare/Medicare-Fee-for-Service-
Payment/HospitalAcqCond/Downloads/2016-HAC-Report.pdf
8 Nelson, E., & Bell-Syer, S. E. M . (2014). Compression hosiery (stockings) for
preventing venous leg ulcers returning. Cochrane Database of Systematic
Reviews, 2014(9), CD002303. (Level VII)
9 Kappelle, L. J . (2011). Preventing deep vein thrombosis after stroke:
Strategies and recommendations. Current Treatment Options in Neurology,
13, 629–635. Accessed via the Web at
http://www.ncbi.nlm.nih.gov/pmc/articles/PMC3207135/ (Level V)
10 Sajid, M. S ., et al. (2012). Knee length versus thigh length graduated
compression stockings for prevention of deep vein thrombosis in
postoperative surgical patients. Cochrane Database of Systematic Reviews,
2012(5), CD007162. (Level I)
11 The Joint Commission. (2019). Standard NPSG.07.01.01. Comprehensive
accreditation manual for hospitals. Oakbrook Terrace, IL: The Joint
Commission. (Level VII)
12 Centers for Disease Control and Prevention. (2002). Guideline for hand
hygiene in health-care settings: Recommendations of the Healthcare Infection
Control Practices Advisory Committee and the HICPAC/SHEA/APIC/IDSA Hand
Hygiene Task Force. MMWR Recommendations and Reports, 51(RR-16), 1–45.
Accessed via the Web at https://www.cdc.gov/mmwr/pdf/rr/rr5116.pdf (Level
II)
13 World Health Organization. (2009). “WHO guidelines on hand hygiene in
health care: First global patient safety challenge, clean care is safer care”
[Online]. Accessed via the Web at
http://apps.who.int/iris/bitstream/10665/44102/1/9789241597906_eng.pdf
(Level IV)
14 Centers for Medicare and Medicaid Services, Department of Health and
Human Services. (2015). Condition of participation: Infection control. 42 C.F.R.
§ 482.42.
15 Accreditation Association for Hospitals and Health Systems. (2017). Standard
07.01.21. Healthcare Facilities Accreditation Program: Accreditation
requirements for acute care hospitals. Chicago, IL: Accreditation Association
for Hospitals and Health Systems. (Level VII)
16 DNV GL-Healthcare USA, Inc. (2016). IC.1 .SR.1 . NIAHO® accreditation
requirements: Interpretive guidelines & surveyor guidance (version 11).
Milford, OH: DNV GL-Healthcare USA, Inc. (Level VII)
17 The Joint Commission. (2019). Standard NPSG.01.01.01. Comprehensive
accreditation manual for hospitals. Oakbrook Terrace, IL: The Joint
Commission. (Level VII)
18 Centers for Medicare and Medicaid Services, Department of Health and
Human Services. (2015). Condition of participation: Patient’s rights. 42 C.F.R.
§ 482.13(c)(1).
19 Accreditation Association for Hospitals and Health Systems. (2017). Standard
15.01.16. Healthcare Facilities Accreditation Program: Accreditation
requirements for acute care hospitals. Chicago, IL: Accreditation Association
for Hospitals and Health Systems. (Level VII)
20 DNV GL-Healthcare USA, Inc. (2016). PR.1.SR.5 . NIAHO® accreditation
requirements: Interpretive guidelines & surveyor guidance (version 11).
Milford, OH: DNV GL-Healthcare USA, Inc. (Level VII)
21 The Joint Commission. (2019). Standard PC.02.01.21. Comprehensive
accreditation manual for hospitals. Oakbrook Terrace, IL: The Joint
Commission. (Level VII)
22 Waters, T. R., et al. (2009). “Safe patient handling training for schools of
nursing” [Online]. Accessed via the Web at
https://www.cdc.gov/niosh/docs/2009-127/pdfs/2009-127.pdf (Level VII)
23 Ganz, D. A., et al. (2013). Preventing falls in hospitals: A toolkit for improving
quality of care (AHRQ Publication No. 13-0015-EF). Rockville, MD: Agency for
Healthcare Research and Quality. Accessed via the Web at
http://www.ahrq.gov/sites/default/files/publications/files/fallpxtoolkit.pdf
(Level VII)
24 The Joint Commission. (2019). Standard RC.01.03 .01. Comprehensive
accreditation manual for hospitals. Oakbrook Terrace, IL: The Joint
Commission. (Level VII)
25 Centers for Medicare and Medicaid Services, Department of Health and
Human Services. (2015). Condition of participation: Medical record services.
42 C.F.R. § 482.24(b).
26 Accreditation Association for Hospitals and Health Systems. (2017). Standard
10.00 .03. Healthcare Facilities Accreditation Program: Accreditation
requirements for acute care hospitals. Chicago, IL: Accreditation Association
for Hospitals and Health Systems. (Level VII)
27 DNV GL-Healthcare USA, Inc. (2016). MR.2 .SR.1 . NIAHO® accreditation
requirements: Interpretive guidelines & surveyor guidance (version 11).
Milford, OH: DNV GL-Healthcare USA, Inc. (Level VII)
28 Kanaan, A. O., et al. (2012). Evaluating the role of compression stockings in
preventing post thrombotic syndrome: A review of the literature. Thrombosis,
2012, 694851. Accessed via the Web at
http://www.hindawi.com/journals/thromb/2012/694851/ (Level I)
29 Covidien. (2014). “T.E .D. anti-embolism stockings” [Online]. Accessed via the
Web at http://www.covidien.com/imageServer.aspx/doc274386.pdf?
contentID=75123&contenttype=application/pdf
AQUAPHERESIS
Aquapheresis is a therapy that involves using ultrafiltration
to remove fluid from the blood. It provides an alternative
method for relieving congestion caused by fluid overload in
patients with decompensated heart failure who are resistant
to diuretics.1
Aquapheresis is provided using venovenous access and a
device known as the Aquadex FlexFlow ultrafiltration system
(as shown on top right). This device mechanically withdraws
blood through a catheter and passes it through a hemofilter,
which removes excess sodium and water, restoring fluid
balance. After the patient’s blood is filtered, it’s returned to
the patient through the infusion port of the catheter. Sterile
technique must be followed during therapy.2
NURSING ALERT Only individuals who have received specialized
training in administering Aquapheresis therapy are permitted to
administer the therapy.
Equipment
Aquadex FlexFlow pump ▪ sterile, disposable, single-use
extracorporeal blood circuit set ▪ scale ▪ electronic infusion
device (preferably a smart pump with dose-error reduction
software) ▪ prescribed IV heparin bolus ▪ prescribed heparin
infusion ▪ 500-mL bag of normal saline solution ▪ 10-mL
prefilled syringes containing preservative-free normal saline
solution ▪ graduated liquid waste receptacle ▪ gloves ▪
sterile end caps ▪ disinfectant (10% bleach solution or 95%
isopropyl alcohol) ▪ soft cloth ▪ tape ▪ vital signs monitoring
equipment ▪ stethoscope ▪ disinfectant pad ▪ appropriately
sized venovenous access device (common sizes include #6
French dual-lumen extended-length peripheral catheter; #7
or #8 French dual-lumen central venous access catheter;
and #8.5 French dual-lumen central venous access catheter
[14G or 16G lumens])3 ▪ Optional: IV tubing labels, blood
sampling equipment.
Preparation of equipment
Before therapy begins, the practitioner inserts a venovenous
access device. The catheter must be able to accommodate
a blood flow of 10 to 40 mL/minute.2,4
Inspect the sterile packages to make sure they’re intact.
Don’t use a blood circuit system that’s damaged.
Implementation
■ Verify the practitioner’s order for Aquapheresis in the
patient’s medical record, and ensure that diuretic and
electrolyte replacement therapy has been discontinued
before initiating therapy.
■ Make sure that preprocedure laboratory test results are
available and documented in the patient’s medical record;
report any abnormalities.
■ Verify that the practitioner has obtained written informed
consent and that the consent form is in the patient’s
medical record.5,6,7,8
■ Gather and prepare the necessary equipment in the
patient’s room.
■ Perform hand hygiene.9,10,11,12,13,14
■ Confirm the patient’s identity using at least two patient
identifiers.15
■ Provide privacy.16,17,18,19
■ Explain the procedure to the patient to allay fears and
promote cooperation.
■ Obtain the patient’s weight in kilograms to prevent
medication dosing errors.20
EQUIPMENT
A look at the Aquapheresis circuit
Aquapheresis requires a circuit such as the one below to filter fluid and
sodium from the blood of patients with fluid overload.
■ Raise the bed to waist level during patient care to prevent
caregiver back strain.21
■ Perform hand hygiene.9,10,11,12,13,14
■ Put on gloves.22,23,24
■ Perform a vigorous mechanical scrub of the access port
for at least 5 seconds using an antiseptic pad25 and allow it
to dry completely.25,26
■ While maintaining sterility of the syringe tip, attach a
prefilled syringe containing preservative-free normal saline
solution to the access port. (Use a 10-mL syringe or a
syringe specially designed to generate lower injection
pressure.) Unclamp the catheter and slowly aspirate for a
blood return that is the color and consistency of whole
blood. If you don’t obtain a blood return, take steps to locate
an external cause of the obstruction.
■ If you obtain a blood return, slowly inject preservative-
free normal saline solution into the catheter. Use a minimum
volume of twice the internal volume of the catheter system.
Don’t forcibly flush the device; further evaluate the device if
you meet resistance.27
Priming the blood circuit
■ Plug the power cord into a grounded electrical outlet.
■ Press the ON/OFF key on the front panel. (See A look at the
Aquapheresis circuit.)
■ Place the blood pump cartridge into the blood pump on
the machine console and snap it into place. Then turn the
knob clockwise until you hear a beep.
■ Insert the ultrafiltrate cartridge in the side of the console
and snap it into place. Then turn the knob clockwise until
you hear a beep.
■ Insert the tubing into the blood leak and air sensors.
■ Put the pressure sensor cables into their proper
connectors, located on the console.
■ Insert the data key provided with the blood circuit system
into the reader on the front of the console; this data key
facilitates many of the system’s functions.2
■ Hang the empty ultrafiltrate collection bag on the
machine’s weight scale hook, and close the drain valve
located at the bottom of the bag.
■ Remove the end caps from the infusion tubing of the
circuit and the priming adapter on the ultrafiltrate drainage
bag, and then attach the circuit infusion tubing to the
priming adapter on the ultrafiltrate drainage bag.
■ Remove the end caps from the withdrawal tubing and the
priming spike adapter, and then attach the withdrawal
tubing to the withdrawal priming spike adapter.
■ Spike the 500-mL priming bag of normal saline solution
with the priming spike, and then hang the bag on the
priming hook, making sure that the ultrafiltrate bag hangs
freely.
■ Open the clamps on the withdrawal tubing, infusion
tubing, and ultrafiltrate bag priming adapter.
■ Press the PRIME key and follow the onscreen instructions;
priming should be completed and the system should be free
from air in about 4 minutes.
■ Empty the priming solution from the fluid collection bag
before starting therapy. Priming solution drains into the
collection bag; emptying the collection bag ensures
accuracy of the patient’s output measurement.
■ Close the clamps on the blood circuit set, remove the end
cap on the withdrawal catheter lumen, disconnect the
withdrawal line from the IV spike, and connect the
withdrawal line to the withdrawal catheter lumen.
■ Remove the end cap from the infusion catheter lumen,
disconnect the infusion line from the ultrafiltrate priming
adapter, and connect the infusion line to the infusion
catheter lumen.
■ Trace the tubings from the patient to their points of origin
to make sure that you’ve attached them to the proper
catheter lumens.28,29
■ If the patient has multiple infusions, route tubing using a
standardized approach, keeping IV lines routed toward the
head and enteric lines routed toward the feet, to prevent
dangerous misconnections.30 If you’re using different access
sites, label each tube at the distal end (near the patient
connection) and proximal end (near the source container) to
distinguish the different
tubes
and
prevent
misconnections.30
■ Put sterile end caps on the priming spike and the
ultrafiltrate priming adapter.
Beginning anticoagulant therapy
■ Begin anticoagulant therapy at least 30 minutes before
the procedure, as ordered, following safe medication
administration practices. Typically, an IV bolus dose of
heparin is given, followed by a continuous heparin infusion
to reduce the risk of clot formation within the system.
■ Avoid distractions and interruptions when preparing and
administering medication to prevent medication errors.31,32
■ Compare the medication label with the order in the
patient’s medical record.33,34,35,36
■ Check the patient’s medical record for an allergy or
contraindication to the prescribed medication. If an allergy
or contraindications exist, don’t administer the medication
and instead notify the practitioner.33,34,35,36
■ Check the expiration date on the medication. If the
medication is expired, return it to the pharmacy and obtain
new medication.33,34,35,36
■ Visually inspect the solution for particles or discoloration
or other loss of integrity; don’t administer the medication if
integrity is compromised.33,34,35,36
■ Discuss any unresolved concerns about the medication
with the patient’s practitioner.33,34,35,36
■ If the patient is receiving the medication for the first time,
teach him or her about potential adverse reactions, and
discuss any
other
concerns
related to the
medication.33,34,35,36
■ Verify that the medication is being administered at the
proper time, in the prescribed dose, and by the correct route
to reduce the risk of medication errors.33,34,35,36
■ If your facility uses a barcode technology, scan your
identification badge, the patient’s identification bracelet,
and the medication’s bar code.35
NURSING ALERT Heparin, when administered IV, is considered a
high-alert medication because it can cause significant patient harm
when used in error.37
■ Before beginning the heparin infusion, have another
nurse perform an independent double-check if required by
your facility. (See Double-checking high-alert medications.)
■ If an independent double-check is required, compare the
results. If no discrepancies exist, begin infusing the heparin
through the withdrawal port of the access device. If
discrepancies exist, rectify them before beginning the
infusion.38
■ Make sure that the infusion pump alarm limits are set
appropriately for the patient’s condition and that the alarms
are turned on, functioning properly, and audible to
staff.39,40,41
Beginning Aquapheresis therapy
■ Open the withdrawal and infusion tubing clamps.
■ Press the RUN key to begin therapy.2
■ If your unit has a hematocrit (HCT) monitor, make sure
that the sensor clip is attached to the blood chamber on the
blood circuit. Allow 5 to 10 minutes to elapse in the RUN
mode to complete the initial baseline measurement of the
patient’s HCT. The text “Baselining” will appear; after
baselining is complete, press the HCT key and then set the
HCT limit, using the up and down arrows. The HCT limit
automatically restricts the fluid removal rate to help prevent
excessive volume depletion.2
■ Set the blood flow rate by pressing the BLOOD FLOW key. Use
the arrow keys to adjust the value. For a central venous
catheter, begin the flow rate at 40 mL/minute. For a
peripheral dual-lumen extended-length catheter, begin the
flow rate at 25 mL/minute.
■ After the blood flow rate is stable, increase the rate in
increments of 10 mL/hour until an adequate rate is
determined. Use the arrow keys to adjust the rate. The
average removal rate is 250 mL/hour.42 Patients in volume-
sensitive states, such as those with right-sided heart failure,
hepatic disease, or cardiogenic shock, usually require lower
rates (50 to 100 mL/hr).2,3
■ Monitor the patient and the system for 10 minutes after
beginning therapy. If after 10 minutes the system functions
without alarming, secure the catheter.
■ Monitor and record vital signs every 15 minutes during
the first hour of treatment, and then hourly or more
frequently as indicated by the patient’s condition.43,44
■ Record intake and output hourly; include the ultrafiltrate
in the patient’s output volume.2,43,44
■ Monitor the system and respond to any alarms according
to the manufacturer’s guidelines. The system has sensors to
detect air bubbles in the blood circuit line, blood leaks in the
ultrafiltrate line, and pressure in both lines.2
■ Monitor the system for signs of clotting, such as frequent
and unexpected infusion or withdrawal occlusions.2
■ Maintain the patient’s fluid restriction.
■ Monitor the patient for signs of hypovolemia, such as
tachycardia, hypotension, and diminished urinary output.
Obtain blood samples for blood urea nitrogen and creatinine
levels, as ordered, and monitor the results. (See the
“Venipuncture” procedure.)45
■ Return the bed to the lowest level to prevent falls and
maintain patient safety.46
■ When the system alarms (indicating that the ultrafiltrate
collection bag is full), empty the bag into a graduated liquid
waste receptacle.2
Discontinuing Aquapheresis therapy
■ Press the STOP key to stop the pumps.2
■ Trace each tubing from the patient to its point of origin
before clamping to make sure that you’re clamping the
correct tubing.28,29
■ Clamp the withdrawal catheter extension tubing.
■ Disconnect the withdrawal blood circuit connection from
the withdrawal catheter extension.
■ Flush the withdrawal catheter IV access and cap with
preservative-free normal saline solution.
■ Clamp the infusion line.
■ Disconnect the infusion line.
■ Flush the infusion IV access and cap with preservative-
free normal saline solution.
■ Return the HCT sensor to its dock on the back of the
console.
■ Remove the blood circuit from the console by pressing
the clips on the front and side cartridges and rotating the
knobs while removing the tubing. Discard the system in an
appropriate biohazard waste container.2,47
■ Power off the console by holding the ON/OFF key for 1
second.
■ Obtain the patient’s weight in kilograms.20
■ Discard used supplies in appropriate receptacles.23
Double-checking high-alert
medications
If required by your facility, have another nurse perform an independent
double-check of your preparation of a high-alert medication such as heparin
to ensure safe administration.38 The second nurse must perform the
following tasks:
■ Verify the patient’s identity.
■ Ensure that the correct medication is being administered and is in the
prescribed concentration.
■ Ensure that the medication’s indication corresponds with the patient’s
diagnosis.
■ Verify that the dosage calculations are correct and that the dosing formula
used to derive the final dose is correct.
■ Verify that the route of administration is safe and appropriate for the
patient.
■ Ensure that pump settings are correct and that the infusion line is attached
to the correct port.
■ Remove and discard your gloves.
■ Perform hand hygiene.9,10,11,12,13,14
■ Clean and disinfect your stethoscope using a disinfectant
pad.48,49
■ Perform hand hygiene.9,10,11,12,13,14
■ Document the procedure.50,51,52,53
Cleaning the unit after each use
■ Put on clean gloves.22,23
■ Using a mild soap solution, clean the surface of the
console.
■ Disinfect the console surfaces using 10% bleach solution
or 95% isopropyl alcohol. Apply the solution to a soft cloth
to clean the console.2,54
■ Clean the tubing path through the air and blood leak
sensors; use a “flossing” action to clean inside the detector
with a lint-free cloth and warm water. Dry thoroughly.2
■ Remove the pumps, clean them, and reassemble them.
Refer to the manual for instructions on removing and
cleaning pumps. In some facilities, this is performed in the
biomedical department.2,54
■ Remove and discard your gloves.
■ Perform hand hygiene.9,10,11,12,13,14
Special considerations
■ When flushing the access catheter, consider using a
pulsatile flushing technique; short boluses of 1 mL each
interrupted by brief pauses may be more effective at
removing deposits (such as fibrin, drug precipitate, and
intraluminal bacteria) than a continuous low-flow
technique.27
■ The Joint Commission issued a sentinel event alert
concerning medical device alarm safety because alarm-
related events have been associated with permanent loss of
function and death. Among the major contributing factors
were
improper
alarm
settings,
alarm
settings
inappropriately turned off, and alarm signals not audible to
staff. Make sure alarm limits are set appropriately and that
alarms are turned on, functioning properly, and audible to
staff. Follow facility guidelines for preventing alarm
fatigue.55
■ Monitor partial thromboplastin time at specific intervals
during therapy, as ordered; the recommended therapeutic
range for therapy is 80 to 100 seconds.44
■ Patients receiving warfarin who have an International
Normalized Ratio greater than 2 typically start on a
continuous heparin infusion and aren’t given an initial bolus
of the drug. If heparin is contraindicated, the practitioner
may prescribe argatroban.2,56
■ Aquapheresis can safely remove up to 500 mL or 0.5 kg
of fluid per hour. The average treatment is 24 hours, with 6
L or 6 kg of fluid removed.2
■ Although patients can sit up in a chair and walk to the
bathroom using the unit’s battery backup, blood is pumped
more efficiently through the filter with less patient
movement, decreasing the length of the procedure.2,37
■ Magnetic resonance imaging (MRI) is contraindicated with
the use of a dual-lumen catheter, because the
reinforcement coil may experience rotational or translational
forces or temperature increases due to the magnetic field
and pulsed radio-frequency fields. Affix an AVOID MRI label to
these catheters to denote this risk. Check with the MRI
provider and the catheter manufacturer for MRI safety
information.
■ Adjust the ultrafiltration rates if the patient’s blood
pressure drops 10 mm Hg below baseline or if the patient’s
heart rate is greater than 130 beats/minute after two
consecutive measurements within 5 minutes. Obtain orders
to reduce the ultrafiltration or briefly stop ultrafiltration to
allow the patient time to recover.
■ The Joint Commission has issued a sentinel event alert
related to managing risk during transition to new
International Organization for Standardization tubing
standards designed to prevent dangerous tubing
misconnections, which can lead to serious patient injury and
death. During the transition, trace the tubing and catheter
from the patient to the point of origin before connecting or
reconnecting any device or infusion, at any care transition
(such as a new setting or service), and as part of the
handoff process. Route tubes and catheters with different
purposes in different standardized directions. Label the
tubing at the distal and proximal ends when there are
different access sites or several bags hanging. Use tubing
and equipment only as intended. Store medications for
different delivery routes in separate locations.30
Complications
An ultrafiltration alarm activates when ultrafiltrate pressure
deviates from the usual range; this usually means clotting of
the filter has occurred, requiring that the filter be replaced.
In this situation, contact the practitioner to determine if the
practitioner wants to continue treatment. Then, as
applicable, follow the manufacturer’s procedure for
replacement of the circuit and filter, as outlined in the
Aquadex FlexFlow User’s Guide.2
Documentation
Record the date and time that therapy began; the reason for
the therapy; the patient’s weight before and after the
treatment; vital signs and withdrawal, infusion, and
ultrafiltrate pressures throughout the treatment; patency
and condition of catheter access sites; initial Aquadex
FlexFlow settings, changes made, and the reasons for such
changes; intake and output; laboratory values; and the
patient’s tolerance of the procedure.
REFERENCES
1 De Maria, E., et al. (2010). Ultrafiltration for the treatment of diuretic-
resistant, recurrent, acute decompensated heart failure: Experience in a
single center. Journal of Cardiovascular Medicine, 11, 599–604.
2 Aquadex FlexFlow user’s guide. (2007). Brooklyn Park, MN: CHF Solutions, Inc.
3 Sunshine Heart. (2016). “Aquapheresis® prescription” [Online]. Accessed via
the Web at https://www.sunshineheart.com/wp-content/uploads/2016/04/16-
05599-A_AQS-Prescription-Card-FINAL.pdf
4 The Centre for Evidence-Based Purchasing. (2008). “Evaluation report: CHF
solutions, Aquadex Flexflow Ultrafiltration System” [Online]. Accessed via the
Web at http://nhscep.useconnect.co.uk/ShowDocument.ashx?id=118&i=true
5 The Joint Commission. (2019). Standard RI.01.03 .01. Comprehensive
accreditation manual for hospitals. Oakbrook Terrace, IL: The Joint
Commission. (Level VII)
6 Centers for Medicare and Medicaid Services, Department of Health and
Human Services. (2015). Condition of participation: Patient’s rights. 42 C.F.R.
§ 482.13(b)(2).
7 Accreditation Association for Hospitals and Health Systems. (2017). Standard
15.01.11. Healthcare Facilities Accreditation Program: Accreditation
requirements for acute care hospitals. Chicago, IL: Accreditation Association
for Hospitals and Health Systems. (Level VII)
8 DNV GL-Healthcare USA, Inc. (2016). PR.1 .SR.3 . NIAHO® accreditation
requirements: Interpretive guidelines & surveyor guidance (version 11).
Milford, OH: DNV GL-Healthcare USA, Inc. (Level VII)
9 The Joint Commission. (2019). Standard NPSG.07.01.01. Comprehensive
accreditation manual for hospitals. Oakbrook Terrace, IL: The Joint
Commission. (Level VII)
10 Centers for Disease Control and Prevention. (2002). Guideline for hand
hygiene in health-care settings: Recommendations of the Healthcare Infection
Control Practices Advisory Committee and the HICPAC/SHEA/APIC/IDSA Hand
Hygiene Task Force. MMWR Recommendations and Reports, 51(RR-16), 1–45.
Accessed via the Web at https://www.cdc.gov/mmwr/pdf/rr/rr5116.pdf (Level
II)
11 World Health Organization. (2009). “WHO guidelines on hand hygiene in
health care: First global patient safety challenge, clean care is safer care”
[Online]. Accessed via the Web at
http://apps.who.int/iris/bitstream/10665/44102/1/9789241597906_eng.pdf
(Level IV)
12 Centers for Medicare and Medicaid Services, Department of Health and
Human Services. (2015). Condition of participation: Infection control. 42 C.F.R.
§ 482.42.
13 Accreditation Association for Hospitals and Health Systems. (2017). Standard
07.01.21. Healthcare Facilities Accreditation Program: Accreditation
requirements for acute care hospitals. Chicago, IL: Accreditation Association
for Hospitals and Health Systems. (Level VII)
14 DNV GL-Healthcare USA, Inc. (2016). IC.1 .SR.1 . NIAHO® accreditation
requirements: Interpretive guidelines & surveyor guidance (version 11).
Milford, OH: DNV GL-Healthcare USA, Inc. (Level VII)
15 The Joint Commission. (2019). Standard NPSG.01.01.01. Comprehensive
accreditation manual for hospitals. Oakbrook Terrace, IL: The Joint
Commission. (Level VII)
16 Accreditation Association for Hospitals and Health Systems. (2017). Standard
15.01.16. Healthcare Facilities Accreditation Program: Accreditation
requirements for acute care hospitals. Chicago, IL: Accreditation Association
for Hospitals and Health Systems. (Level VII)
17 Centers for Medicare and Medicaid Services, Department of Health and
Human Services. (2015). Condition of participation: Patient’s rights. 42 C.F.R.
§ 482.13(c)(1).
18 The Joint Commission. (2019). Standard RI.01.01.01. Comprehensive
accreditation manual for hospitals. Oakbrook Terrace, IL: The Joint
Commission. (Level VII)
19 DNV GL-Healthcare USA, Inc. (2016). PR.1.SR.5 . NIAHO® accreditation
requirements: Interpretive guidelines & surveyor guidance (version 11).
Milford, OH: DNV GL-Healthcare USA, Inc. (Level VII)
20 Institute for Safe Medication Practices. (2016). “2016–2017 targeted
medication safety best practices for hospitals” [Online]. Accessed via the
Web at http://www.ismp.org/tools/bestpractices/TMSBP-for-Hospitals.pdf
21 Waters, T. R., et al. (2009). “Safe patient handling training for schools of
nursing” [Online]. Accessed via the Web at
https://www.cdc.gov/niosh/docs/2009-127/pdfs/2009-127.pdf (Level VII)
22 Siegel, J. D ., et al. (2007, revised 2017). “2007 guideline for isolation
precautions: Preventing transmission of infectious agents in healthcare
settings” [Online]. Accessed via the Web at
https://www.cdc.gov/infectioncontrol/pdf/guidelines/isolation-guidelines.pdf
(Level II)
23 Occupational Safety and Health Administration. (n.d .). “Bloodborne
pathogens, standard number 1910.1030” [Online]. Accessed via the Web at
http://www.osha.gov/pls/oshaweb/owadisp.show_document?
p_table=STANDARDS& p_id=10051 (Level VII)
24 Accreditation Association for Hospitals and Health Systems. (2017). Standard
07.01.10. Healthcare Facilities Accreditation Program: Accreditation
requirements for acute care hospitals. Chicago, IL: Accreditation Association
for Hospitals and Health Systems. (Level VII)
25 Marschall, J., et al. (2014). SHEA/IDSA practice recommendation: Strategies
to prevent central line-associated bloodstream infections in acute care
hospitals. Infection Control and Hospital Epidemiology, 35, 753–771 .
Accessed via the Web at http://www.jstor.org/stable/10.1086/676533 (Level I)
26 Standard 34. Needleless connectors. Infusion therapy standards of practice.
(2016). Journal of Infusion Nursing, 39, S68–S70. (Level VII)
27 Standard 40. Flushing and locking. Infusion therapy standards of practice.
(2016). Journal of Infusion Nursing, 39, S77–S81. (Level VII)
28 U.S . Food and Drug Administration. (n.d .). “Look. Check. Connect. Safe
medical device connections save lives” [Online]. Accessed via the Web at
http://www.fda.gov/downloads/MedicalDevices/Safety/AlertsandNotices/UCM1
34873.pdf
29 Standard 57. Parenteral medication and solution administration. Infusion
standards of practice. (2016). Journal of Infusion Nursing, 39, S125–S127.
(Level VII)
30 The Joint Commission. (2014). “Sentinel event alert: Managing risk during
transition to new ISO tubing connector standards” [Online]. Accessed via the
Web at http://www.jointcommission.org/assets/1/6/SEA_53_Connectors_
8_19_14 _final.pdf (Level VII)
31 Westbrook, J., et al. (2010). Association of interruptions with an increased risk
and severity of medication administration errors. Archives of Internal
Medicine, 170, 683–690. (Level IV)
32 Institute for Safe Medication Practices. (2012). Side tracks on the safety
express: Interruptions lead to errors and unfinished...Wait, what was I doing?
Nurse Advise-ERR, 11(2), 1–4 . Accessed via the Web at
https://www.ismp.org/Newsletters/acutecare/showarticle.aspx?id=37
33 The Joint Commission. (2019). Standard MM.06.01.01. Comprehensive
accreditation manual for hospitals. Oakbrook Terrace, IL: The Joint
Commission. (Level VII)
34 Accreditation Association for Hospitals and Health Systems. (2017). Standard
16.01.03. Healthcare Facilities Accreditation Program: Accreditation
requirements for acute care hospitals. Chicago, IL: Accreditation Association
for Hospitals and Health Systems. (Level VII)
35 Centers for Medicare and Medicaid Services, Department of Health and
Human Services. (2015). Condition of participation: Nursing services. 42
C.F.R. § 482.23(c).
36 DNV GL-Healthcare USA, Inc. (2016). MM.1 .SR.2. NIAHO® accreditation
requirements: Interpretive guidelines & surveyor guidance (version 11).
Milford, OH: DNV GL-Healthcare USA, Inc. (Level VII)
37 Institute for Safe Medication Practices. (2014). “ISMP list of high-alert
medications in acute care settings” [Online]. Accessed via the Web at
http://www.ismp.org/tools/highalertmedications.pdf (Level VII)
38 Institute for Safe Medication Practices. (2008). Conducting an independent
double-check. ISMP Medication Safety Alert! Nurse Advise-ERR, 6(12), 1.
Accessed via the Web at
http://www.ismp.org/newsletters/nursing/Issues/NurseAdviseERR200812.pdf
39 Graham, K. C., & Cvach, M. (2010). Monitor alarm fatigue: Standardizing use
of physiological monitors and decreasing nuisance alarms. American Journal
of Critical Care, 19, 28–37. Accessed via the Web at
http://ajcc.aacnjournals.org/content/19/1/28.full.pdf
40 American Association of Critical-Care Nurses. (2013). “A ACN practice alert:
Alarm management” [Online]. Accessed April 2017 via the Web at
https://www.aacn.org/clinical-resources/practice-alerts/alarm-management
(Level VII)
41 The Joint Commission. (2019). Standard NPSG.06 .01.01. Comprehensive
accreditation manual for hospitals. Oakbrook Terrace, IL: The Joint
Commission. (Level VII)
42 Sunshine Heart. (n.d .) “Effective treatment for fluid overload” [Online].
Accessed April 2017 via the Web at
https://www.sunshineheart.com/aquapheresis/
43 The Joint Commission. (2019). Standard RC.02.01.01. Comprehensive
accreditation manual for hospitals. Oakbrook Terrace, IL: The Joint
Commission. (Level VII)
44 Wick, C., & Bakhai, A. (2012). Aquapheresis: A therapeutic option for fluid-
overloaded patients. British Journal of Cardiac Nursing, 7, 20–24.
45 Mielniczuk, L. M., et al. (2010). Ultrafiltration in the management of acute
decompensated heart failure. Current Opinion in Cardiology, 25, 155–160.
46 Ganz, D. A., et al. (2013). Preventing falls in hospitals: A toolkit for improving
quality of care (AHRQ Publication No.13-0015-EF) [Online]. Accessed via the
Web at
http://www.ahrq.gov/sites/default/files/publications/files/fallpxtoolkit.pdf
(Level VII)
47 National Health Service, Purchasing and Supply Agency, Centre for Evidence-
Based Purchasing. (2008). Evaluation report—CHF solutions: Aquadex
FlexFlow ultrafiltration system (report no. CEP 07017). Newcastle upon Tyne:
Centre for Evidence-Based Purchasing.
48 Accreditation Association for Hospitals and Health Systems. (2017). Standard
07.02.03. Healthcare Facilities Accreditation Program: Accreditation
requirements for acute care hospitals. Chicago, IL: Accreditation Association
for Hospitals and Health Systems. (Level VII)
49 Rutala, W. A., et al. (2008, revised 2017). “Guideline for disinfection and
sterilization in healthcare facilities, 2008” [Online]. Accessed via the Web at
https://www.cdc.gov/infectioncontrol/pdf/guidelines/disinfection-
guidelines.pdf (Level I)
50 The Joint Commission. (2017). Standard RC.01.03 .01. Comprehensive
accreditation manual for hospitals. Oakbrook Terrace, IL: The Joint
Commission. (Level VII)
51 Centers for Medicare and Medicaid Services, Department of Health and
Human Services. (2015). Condition of participation: Medical record services.
42 C.F.R. § 482.24(b).
52 Accreditation Association for Hospitals and Health Systems. (2017). Standard
10.00 .03. Healthcare facilities accreditation program: Accreditation
requirements for acute care hospitals. Chicago, IL: Accreditation Association
for Hospitals and Health Systems. (Level VII)
53 DNV GL-Healthcare USA, Inc. (2016). MR.2 .SR.1 . NIAHO® accreditation
requirements: Interpretive guidelines & surveyor guidance (version 11).
Milford, OH: DNV GL-Healthcare USA, Inc. (Level VII)
54 Accreditation Association for Hospitals and Health Systems. (2017). Standard
07.02.03. Healthcare Facilities Accreditation Program: Accreditation
requirements for acute care hospitals. Chicago, IL: Accreditation Association
for Hospitals and Health Systems. (Level VII)
55 The Joint Commission. (2013). “Sentinel event alert: Medical device alarm
safety in hospitals” [Online]. Accessed via the Web at
http://www.jointcommission.org/assets/1/18/SEA_50_alarms_4 _5 _13_FINAL1 .P
DF (Level VII)
56 Costanzo, M. R. (2008). Ultrafiltration in the management of heart failure.
Current Opinion in Critical Care, 14, 524–530.
ARTERIAL AND VENOUS SHEATH REMOVAL
The number of endovascular procedures performed by
cardiologists and vascular surgeons has increased
dramatically in the past decade. During these procedures,
surgeons may place an arterial sheath, venous sheath, or
both. Sheath removal can improve patient comfort and
shorten the required time on bed rest, resulting in positive
patient outcomes. Only those who have received special
training should perform sheath removal because of its
association with potentially life-threatening adverse events.
Methods used to control bleeding following sheath
removal include manual compression (used alone or with a
hemostasis pad), mechanical compression devices, staple or
clip-mediated closure devices, and percutaneous suture-
mediated closure devices. Manual compression can cause a
nurse fatigue and injury, which can result in carpal tunnel
syndrome. Mechanical compression techniques effectively
prevent hematoma formation, and the incidence of bleeding
doesn’t differ significantly for different methods of
compression.1 When using a plug-type device, staple-
mediated closure device, or suture-mediated closure device,
sheath removal can happen immediately after the
procedure, regardless of the patient’s coagulation status.
Equipment
Gloves ▪ gown ▪ mask and goggles or mask with face shield
▪ sterile gloves ▪ cardiac monitor ▪ blood pressure monitor
▪ permanent marker ▪ antiseptic solution (chlorhexidine-
based, povidone-iodine) ▪ sterile gauze ▪ hypoallergenic
tape ▪ fluid-impermeable pad ▪ prescribed analgesic ▪
emergency resuscitation equipment (code cart with cardiac
medications, defibrillator, handheld resuscitation bag with
mask, intubation equipment ▪ Optional: suture removal kit,
IV catheter insertion equipment, sterile normal saline
solution, transparent dressing, mechanical compression
device, noninvasive hemostasis pad, prescribed local
anesthetic (10 to 20 mL of 1% lidocaine).2
Preparation of equipment
Make sure resuscitation equipment is readily available and
functioning properly. Administer an analgesic 20 to 30
minutes before the procedure3, and assist with local
anesthetic administration,2 as ordered, following safe
medication administration practices to promote patient
comfort.4,5,6,7
Implementation
■ Verify the practitioner’s order for sheath removal.
■ Review the patient’s medical record to assess for
conditions that increase the patient’s risk of bleeding and
check the patient’s platelet count, prothrombin time,
international normalized ratio, partial thromboplastin time,
complete blood count, blood urea nitrogen and creatinine
levels, and activated clotting time to ensure that hemostasis
can be achieved.3
NURSING ALERT Keep in mind that patients receiving potent oral and
IV antiplatelet and antithrombin medications who have conditions
such as hypertension and renal dysfunction (defined as creatinine
clearance of less than 60 mL/minute) are at increased risk for
bleeding during percutaneous coronary intervention.8
■ Gather and prepare the necessary equipment.
■ Perform hand hygiene.9,10,11,12,13,14,15,16
■ Confirm the patient’s identity using at least two patient
identifiers.17
Preparing for sheath removal
■ Provide privacy.18,19,20,21
■ Explain the procedure to the patient and family (if
appropriate) according to their individual communication
and learning needs to increase their understanding, allay
their fears, and enhance cooperation.22 Include anticipated
postprocedure activity restrictions, discomfort caused by
pressure to the site, and signs and symptoms to report.
■ Raise the patient’s bed to waist level when providing care
to prevent caregiver back strain.23
■ Perform hand hygiene.9,10,11,12,13,14,15,16
■ Put on gloves as needed.24,25,26,27,28
■ Ensure the patient is connected to the cardiac monitor to
enable prompt recognition and treatment of complications
that may occur during the procedure. Make sure that alarm
limits are set properly for the patient’s current condition and
that the alarms are turned on, functioning, and audible to
staff.29,30,31,32
■ Obtain the patient’s vital signs and assess the ECG
tracing on the cardiac monitor to establish baselines. Notify
the practitioner if the patient’s blood pressure is elevated
because the practitioner may order medication to lower the
patient’s blood pressure before sheath removal, to decrease
postprocedure bleeding.3,8
■ Assess neurovascular status in the extremity distal to the
sheath insertion site to establish a baseline.3
■ Mark the pulses distal to the sheath insertion site using a
permanent marker to facilitate finding the pulses for
subsequent assessment.3
■ Confirm that the patient has a patent IV catheter in place
in case the patient requires emergency IV fluids or
medications. If a catheter is not in place, insert one.2,3,33
(See the “IV catheter insertion and removal” procedure.)
■ Position the patient with the head of the bed flat to
promote hemostasis.3
■ Place a fluid-impermeable pad under the affected
extremity to keep the bed linens clean and to provide a
place to set the sheath after removal.
■ Remove and discard your gloves, if worn, in the
appropriate receptacle.24,27,34
■ Perform hand hygiene.9,10,11,12,13,14,15,16
■ Put on gloves and personal protective equipment, if you
have not already done so, to comply with standard
precautions.24,25,26,27,28
■ If you’re using a mechanical compression device, place it
under the patient before sheath removal to reduce patient
movement and the risk of bleeding after sheath removal.3 If
you’re using a hemostasis pad, open it using sterile, no-
touch technique, and open the sterile normal saline solution.
(See the “Sterile technique, basic” procedure.)
■ If the sheath is sutured in place, open a suture removal
kit using sterile no-touch technique.
■ Carefully remove the dressing covering the sheath
insertion site.
■ Clean the insertion site with the antiseptic solution.3
■ Remove and discard your gloves in the appropriate
receptacle.24,27,34
■ Perform hand hygiene.9,10,11,12,13,14,15,16
■ Put on sterile gloves.3
■ Remove the sutures, if present. (See the “Suture
removal” procedure.)
Arterial sheath removal using manual or
mechanical compression
■ Locate the femoral pulse proximal to the insertion site so
that you can properly position compression (manual or
mechanical) 1 to 2 cm above the insertion site.3
■ Hold the sheath with one hand while applying firm
manual or mechanical pressure over the femoral artery with
the other hand to reduce bleeding.
■ Remove the sheath slowly while the patient exhales to
prevent the patient from bearing down during removal,
which can cause a vasovagal response. Continue to apply
pressure manually or with the mechanical device.3
NURSING ALERT If you meet resistance while withdrawing the
sheath, stop the procedure and notify the practitioner.3
■ Apply continuous, firm pressure to the artery for
approximately 20 minutes.3 Ensure that the pressure is
strong enough to stop the bleeding but not so strong that it
obscures the pedal pulse. Continue to assess pulses distal to
the insertion site (you might need a coworker to do this).
Arterial sheath removal using a noninvasive
hemostasis pad with manual compression
■ Apply pressure 1 to 2 cm proximal to the insertion site.3
■ Place the pad directly over the insertion site.
■ Remove the sheath slowly while the patient exhales to
prevent the patient from bearing down during removal,
which can cause a vasovagal response.
■ Momentarily reduce proximal pressure to let a small
amount of blood from the insertion site moisten the
noninvasive hemostasis pad to activate the hemostasis
mechanism, and then reapply proximal pressure.3
■ After 3 to 4 minutes, slowly decrease pressure proximal to
the insertion site while continuing to apply pressure to the
insertion site for no less than 10 minutes. Continue to
assess pulses distal to the insertion site (you might need a
coworker to do this).3
■ Leave the hemostasis pad in place for 24 hours.3
■ Remove manual pressure after hemostasis is achieved.
Venous sheath removal
■ Remove the venous sheath, if present, 5 to 10 minutes
after removal of the arterial sheath because pressure at the
arterial site must be maintained for a longer time.3
■ Apply pressure over the venous and arterial sites for 10
more minutes or until the bleeding stops.3
■ If a hemostasis pad is used, momentarily reduce proximal
pressure to let a small amount of blood from the insertion
site moisten the noninvasive hemostasis pad to activate the
hemostasis mechanism and then reapply proximal
pressure.3 After 3 to 4 minutes, slowly decrease pressure
proximal to the insertion site while continuing to apply
pressure to the insertion site for no less than 10 minutes.
Then apply another sterile gauze pad over the hemostasis
pad, cover the site with a transparent dressing, and leave it
in place for 24 hours.
NURSING ALERT Avoid prolonged pressure on the femoral vein.
Prolonged venous occlusion, especially with pressure devices, may
cause venous thrombosis. Assess for neurovascular changes.2
Follow-up care
■ Apply sterile dressings to the arterial and venous
insertion sites to keep the areas clean and reduce the risk of
infection.35
■ Assess the patient’s neurovascular status, vital signs, and
the insertion site in the affected limb every 15 minutes for 1
hour, every 30 minutes for the next hour, and then every
hour for 4 hours to detect signs of complications.3
■ Tell the patient not to elevate the head of the bed greater
than 30 degrees to reduce the risk of disrupting
homeostasis and relieve back discomfort.
■ Return the bed to the lowest position to prevent falls and
maintain safety.36
■ Instruct the patient to report any bleeding from the site,
saturation of the dressing, or wetness or warmth on the
groin or leg.
■ Tell the patient to report coolness, numbness, tingling, or
pain in the affected extremity.
■ Keep the patient on bed rest for 2 to 6 hours when
applying mechanical or manual pressure after arterial
sheath removal to reduce the complications of bed rest and
back discomfort.3,37
■ Keep the patient on bed rest for 1 to 4 hours when
achieving hemostasis through percutaneous suture–
mediated closure and hemostasis pads.
■ Keep the patient on bed rest for no more than 4 hours
following venous sheath removal.
■
Discard used supplies in the appropriate
receptacle.24,27,34
■ Remove and discard your gloves and other personal
protective equipment, if worn.24,27,34
■ Perform hand hygiene.9,10,11,12,13,14,15,16
■ Perform a comprehensive pain assessment using
techniques appropriate for the patient’s age, conditions, and
ability to understand.38 Administer pain medication as
ordered and indicated, using safe medication administration
practices.4,5,6,7
■ Document the procedure.39,40,41,42,43
Special considerations
■ Some practitioners prefer to use the radial artery for
catheterization. Because the radial artery is much smaller
and located closer to the skin surface, accessing this artery
eliminates internal bleeding and enables easy compression
of any external bleeding. After the catheter and sheath are
removed from the radial artery, a compression device is
placed around the wrist to apply pressure. Radial
catheterization also eliminates the need for the patient to
remain immobile. In general, patients find radial
catheterization
more
comfortable than
femoral
catheterization because they are able to sit up, walk, and
eat immediately following removal.44
■ If the patient is obese, you may need a second person to
assist in holding back skin and abdominal folds.3
■ In a patient with hypertension, you may need to apply
pressure for a longer period of time to ensure hemostasis.3
■ Be sure to read the manufacturer’s instructions for
correct use of mechanical compression devices. Tissue
damage can occur with incorrect use of the devices.
■ The compression time required to control bleeding
depends on several factors, including the size of the sheath,
administration of heparin and antiplatelet drugs, and blood
coagulation levels.2,3
■ If you can’t stop the bleeding following sheath removal,
notify the practitioner.3
■ The Joint Commission issued a sentinel event alert
concerning medical device alarm safety because alarm-
related events have been associated with permanent loss of
function or death. Among the major contributing factors
were improper alarm settings, alarm settings turned off
inappropriately, and alarm signals not audible to staff. Make
sure alarm limits are set appropriately and that alarms are
turned on, functioning properly, and audible to staff. Follow
facility guidelines for preventing alarm fatigue.39
Patient teaching
Provide the patient and his family with written and oral
discharge instructions. Tell the patient to avoid lifting
anything heavier than 10 lb (4.5 kg) for 3 days and to avoid
driving or operating machinery for 24 hours. Tell the patient
that it’s permissible to remove the dressing and shower
after 24 hours, but that a tub bath or swimming is to be
avoided until the skin is healed. After the initial 24 hours,
the patient may clean the site with soap and water and
apply a small adhesive bandage. Tell the patient to inspect
the site daily and to notify the practitioner as soon as
possible of any bleeding, redness, or discharge at the site or
if a fever develops.
Complications
The most common complication following sheath removal is
bleeding, which occurs most commonly at the femoral
artery access site. Retroperitoneal bleeding may also occur.
Vascular
complications
include
hematoma,
pseudoaneurysm, arteriovenous fistula, embolus, and
thrombus formation.45 Sensory or motor impairment may
occur in the affected limb. Vasovagal complications may
also occur.
Documentation
Record the date and time of sheath removal. Note whether
an arterial sheath, a venous sheath, or both were removed
and their locations. Record patient and family teaching
about the removal procedure and activity restrictions
following sheath removal, as well as their understanding of
the teaching. Note the patient’s pain assessment, any
interventions you provided, and the patient’s response to
those interventions. Document the laboratory values before
sheath removed and that they were within normal limits.
Record vital signs, neurovascular status, and heart rhythm
before sheath removal. Record vital signs, neurovascular
status, and heart rhythm before sheath removal. State
whether pulses distal to the sheath insertion sites were
marked.
Note whether the patient has a patent IV line. Include that
the patient was placed in a flat position for sheath removal.
Describe the condition of the sheath insertion sites, noting
redness, skin breakdown, drainage, bleeding, or hematoma
formation. Note how many sutures were removed, if
applicable. Explain any difficulties encountered during
sheath removal. Record the method of hemostasis used and
the time required for hemostasis to be achieved. Document
your assessments of neurovascular status, vital signs, and
sheath insertion site. Note the patient’s tolerance of the
procedure.
Record any complications, the time and name of the
person notified, practitioner’s orders, your interventions,
and the patient’s response to those interventions. Include
the patient’s position following sheath removal and the
duration of bed rest.
REFERENCES
1 Benson, L. M., et al. (2005). Determining best practice: Comparison of three
methods of femoral sheath removal after cardiac interventional procedures.
Heart and Lung, 34, 115–121. (Level II)
2 Kern, M. J . (2017). The interventional cardiac catheterization handbook (4th
ed.). Philadelphia, PA: Saunders.
3 Wiegand, D.L. (2017). AACN procedure manual for high acuity, progressive,
and critical care (7th ed.). Philadelphia, PA: Saunders.
4 Centers for Medicare and Medicaid Services, Department of Health and
Human Services. (2015). Condition of participation: Nursing services. 42
C.F.R. § 482.23(c).
5 Accreditation Association for Hospitals and Health Systems. (2017). Standard
16.01.03. Healthcare Facilities Accreditation Program: Accreditation
requirements for acute care hospitals. Chicago, IL: Accreditation Association
for Hospitals and Health Systems. (Level VII)
6 The Joint Commission. (2019). Standard MM.06 .01.01. Comprehensive
accreditation manual for hospitals. Oakbrook Terrace, IL: The Joint
Commission. (Level VII)
7 DNV GL-Healthcare USA, Inc. (2016). MM .1 .SR.2 . NIAHO® accreditation
requirements: Interpretive guidelines & surveyor guidance (version 11).
Milford, OH: DNV GL-Healthcare USA, Inc. (Level VII)
8 Merriweather, N., & Sulzbach-Hoke, L. M . (2012). Managing risk of
complications at femoral vascular access sites in percutaneous coronary
intervention. Critical Care Nurse, 32(5), 16–29. Accessed via the Web at
http://ccn.aacnjournals.org/content/32/5/16.full.pdf+html (Level VII)
9 Centers for Disease Control and Prevention. (2002). Guideline for hand
hygiene in health-care settings: Recommendations of the Healthcare Infection
Control Practices Advisory Committee and the HICPAC/SHEA/APIC/IDSA Hand
Hygiene Task Force. MMWR Recommendations and Reports, 51(RR-16), 1–45.
Accessed via the Web at https://www.cdc.gov/mmwr/pdf/rr/rr5116.pdf (Level
II)
10 World Health Organization. (2009). “WHO guidelines on hand hygiene in
health care: First global resident safety challenge, clean care is safer care”
[Online]. Accessed via the Web at
http://apps.who.int/iris/bitstream/10665/44102/1/9789241597906_eng.pdf
(Level IV)
11 The Joint Commission. (2019). Standard NPSG.07.01.01. Comprehensive
accreditation manual for hospitals. Oakbrook Terrace, IL: The Joint
Commission. (Level VII)
12 Standard 16. Hand hygiene. Infusion therapy standards of practice. (2016).
Journal of Infusion Nursing, 39, S38–S39 . (Level VII)
13 Centers for Disease Control and Prevention. (2011, revised 2017). “Guidelines
for the prevention of intravascular catheter–related infections” [Online].
Accessed via the Web at
https://www.cdc.gov/infectioncontrol/pdf/guidelines/bsi-guidelines.pdf (Level
I)
14 Centers for Medicare and Medicaid Services, Department of Health and
Human Services. (2015). Condition of participation: Infection control. 42 C.F.R.
§ 482.42.
15 Accreditation Association for Hospitals and Health Systems. (2017). Standard
07.01.21. Healthcare Facilities Accreditation Program: Accreditation
requirements for acute care hospitals. Chicago, IL: Accreditation Association
for Hospitals and Health Systems. (Level VII)
16 DNV GL-Healthcare USA, Inc. (2016). IC.1 .SR.1 . NIAHO® accreditation
requirements: Interpretive guidelines & surveyor guidance (version 11).
Milford, OH: DNV GL-Healthcare USA, Inc. (Level VII)
17 The Joint Commission. (2019). Standard NPSG.01.01.01. Comprehensive
accreditation manual for hospitals. Oakbrook Terrace, IL: The Joint
Commission. (Level VII)
18 The Joint Commission. (2019). Standard RI.01.01.01. Comprehensive
accreditation manual for hospitals. Oakbrook Terrace, IL: The Joint
Commission. (Level VII)
19 Centers for Medicare and Medicaid Services, Department of Health and
Human Services. (2015). Condition of participation: Patient’s rights. 42 C.F.R.
§ 482.13(c)(1).
20 Accreditation Association for Hospitals and Health Systems. (2017). Standard
15.01.16. Healthcare Facilities Accreditation Program: Accreditation
requirements for acute care hospitals. Chicago, IL: Accreditation Association
for Hospitals and Health Systems. (Level VII)
21 DNV GL-Healthcare USA, Inc. (2016). PR.1.SR.5 . NIAHO® accreditation
requirements: Interpretive guidelines & surveyor guidance (version 11).
Milford, OH: DNV GL-Healthcare USA, Inc. (Level VII)
22 The Joint Commission. (2019). Standard PC.02.01.21. Comprehensive
accreditation manual for hospitals. Oakbrook Terrace, IL: The Joint
Commission. (Level VII)
23 Waters, T. R., et al. (2009). “Safe patient handling training for schools of
nursing” [Online]. Accessed via the Web at
https://www.cdc.gov/niosh/docs/2009-127/pdfs/2009-127.pdf (Level VII)
24 Siegel, J. D ., et al. (2007, revised 2017). “2007 guideline for isolation
precautions: Preventing transmission of infectious agents in healthcare
settings” [Online]. Accessed via the Web at
https://www.cdc.gov/infectioncontrol/pdf/guidelines/isolation-guidelines.pdf
(Level II)
25 Standard 19. Standard precautions. Infusion therapy standards of practice.
(2016). Journal of Infusion Nursing, 39, S41–S42. (Level VII)
26 Accreditation Association for Hospitals and Health Systems. (2017). Standard
07.01.10. Healthcare Facilities Accreditation Program: Accreditation
requirements for acute care hospitals. Chicago, IL: Accreditation Association
for Hospitals and Health Systems. (Level VII)
27 Occupational Safety and Health Administration. (n.d .). “Bloodborne
pathogens, standard number 1910.1030” [Online]. Accessed via the Web at
https://www.osha.gov/pls/oshaweb/owadisp.show_document?
p_id=10051&p_table=STANDARDS (Level VII)
28 DNV GL-Healthcare USA, Inc. (2016). IC.1 .SR.2 . NIAHO® accreditation
requirements: Interpretive guidelines & surveyor guidance (version 11).
Milford, OH: DNV GL-Healthcare USA, Inc. (Level VII)
29 The Joint Commission. (2013). “Sentinel event alert: Medical device alarm
safety in hospitals” [Online]. Accessed via the Web at
https://www.jointcommission.org/assets/1/6/SEA_50_alarms_4 _26_16.pdf
(Level VII)
30 The Joint Commission. (2019). Standard NPSG.06 .01.01. Comprehensive
accreditation manual for hospitals. Oakbrook Terrace, IL: The Joint
Commission. (Level VII)
31 Graham, K. C., & Cvach, M. (2010). Monitor alarm fatigue: Standardizing use
of physiological monitors and decreasing nuisance alarms. American Journal
of Critical Care, 19, 28–37. Accessed via the Web at
http://ajcc.aacnjournals.org/content/19/1/28.full.pdf
32 American Association of Critical-Care Nurses. (2013). “A ACN practice alert:
Alarm management” [Online]. Accessed via the Web at
https://www.aacn.org/aacn-website/shared/content/practice-
alerts/2015/11/25/alarm-management (Level VII)
33 Standard 33. Vascular access site preparation and device placement. Infusion
therapy standards of practice. (2016). Journal of Infusion Nursing, 39, S64–
S67. (Level VII)
34 Standard 18. Medical waste and sharps safety. Infusion therapy standards of
practice. (2016). Journal of Infusion Nursing, 39, S40–S41. (Level VII)
35 Standard 41. Vascular access device (VAD) assessment, care and dressing
changes. Infusion therapy standards of practice. (2016). Journal of Infusion
Nursing, 39, S81–S84. (Level VII)
36 Ganz, D. A., et al. (2013). Preventing falls in hospitals: A toolkit for improving
quality of care (AHRQ Publication No. 13-0015-EF). Rockville, MD: Agency for
Healthcare Research and Quality. Accessed via the Web at
http://www.ahrq.gov/sites/default/files/publications/files/fallpxtoolkit.pdf
(Level VII)
37 Walker, S., et al. (2008). Comparison of complications in percutaneous
coronary intervention patients mobilized at 3, 4, and 6 hours after femoral
arterial sheath removal. Journal of Cardiovascular Nursing, 23, 407–413.
(Level II)
38 The Joint Commission. (2019). Standard PC.01.02.07. Comprehensive
accreditation manual for hospitals. Oakbrook Terrace, IL: The Joint
Commission. (Level VII)
39 The Joint Commission. (2019). Standard RC.01.03 .01. Comprehensive
accreditation manual for hospitals. Oakbrook Terrace, IL: The Joint
Commission. (Level VII)
40 Centers for Medicare and Medicaid Services, Department of Health and
Human Services. (2015). Condition of participation: Medical record services.
42 C.F. R. § 482.24(b).
41 Accreditation Association for Hospitals and Health Systems. (2017). Standard
10.00 .03. Healthcare Facilities Accreditation Program: Accreditation
requirements for acute care hospitals. Chicago, IL: Accreditation Association
for Hospitals and Health Systems. (Level VII)
42 DNV GL-Healthcare USA, Inc. (2016). MR.2 .SR.1 . NIAHO® accreditation
requirements: Interpretive guidelines & surveyor guidance (version 11).
Milford, OH: DNV GL-Healthcare USA, Inc. (Level VII)
43 Standard 10. Documentation in the medical record. Infusion therapy
standards of practice. (2016). Journal of Infusion Nursing, 39, S28–S30 . (Level
VII)
44 Balaji, N. R., & Shah, P. B. (2011). Radial artery catheterization. Circulation,
124, e407–e408. Accessed via the Web at
http://circ.ahajournals.org/content/124/16/e407.full.pdf+html (Level VII)
45 Sulzbach-Hoke, L. M., et al. (2010). Predictors of complications following
sheath removal with percutaneous coronary intervention. Journal of
Cardiovascular Nursing, 25(3), E1–E8. (Level IV)
ARTERIAL PRESSURE MONITORING
Arterial catheters provide direct arterial pressure
monitoring, which permits continuous measurement of
systolic, diastolic, and mean arterial pressures and allows
for arterial blood sampling. Because direct measurement
reflects systemic vascular resistance (SVR) as well as blood
flow, it’s generally more accurate than indirect methods
(such as palpation and auscultation of Korotkoff [audible
pulse] sounds), which are based on blood flow.
Direct monitoring is indicated when highly accurate or
frequent blood pressure measurements are required, such
as for patients with low cardiac output and high SVR. It can
also be used for hospitalized patients who are obese or have
severe edema—conditions that make indirect measurement
difficult to perform—as well as for patients receiving titrated
doses of vasoactive drugs and for those who require
frequent blood sampling.
Arterial pressure monitoring is used in critical care
settings. Catheter insertion, which can be performed at the
beside under surgically sterile conditions, is performed by a
practitioner. Guidelines recommend the radial, brachial, and
dorsalis pedis sites over the femoral and axillary sites to
reduce the risk of infection.1,2 The catheter should be
removed as soon as possible to decrease the risk of
complications.1,3,4
HOSPITAL-ACQUIRED CONDITION ALERT Keep in mind that vascular
catheter–associated infection is considered a hospital-acquired
condition because various best practices can reasonably prevent it.
Make sure to follow infection prevention techniques (such as
performing hand hygiene, maintaining sterile technique, limiting
catheter manipulations, and removing the catheter as soon as it’s no
longer needed) when maintaining an arterial line to reduce the risk of
vascular catheter–associated infection.1,5,6
A nurse caring for a patient undergoing arterial pressure
monitoring must have an understanding of cardiac anatomy
and physiology, the physiology of fluid and electrolyte
balance, the pathophysiology of heart disease, and the
hemodynamic
alterations
expected
with cardiac
interventions and surgery. Competence in setting up and
maintaining arterial monitoring equipment, evaluating
waveforms, and making clinical decisions about changes in
a patient’s therapy are also crucial. (See Understanding an
arterial waveform.)
Equipment
Disposable pressure transducer system ▪ bag of IV flush
solution ▪ arterial catheter ▪ sterile nonvented or dead-end
caps ▪ pressure tubing ▪ pressure infuser bag ▪ transducer
holder in an IV pole ▪ monitoring system and equipment
(module, bedside monitor, and cable ▪
vital signs
monitoring equipment ▪ labeling device ▪ Optional: single-
patient-use joint stabilization device.
Preparation of equipment
If necessary, set up and prime the disposable pressure
transducer system. (See the “Transducer system setup”
procedure.) Make sure you keep all parts of the pressure
monitoring system sterile.1 When you’ve completed
equipment preparation, turn on the bedside monitor and set
the appropriate scale to visualize the correct waveform.3
Implementation
■ Gather and prepare the necessary equipment.
■ Perform hand hygiene.1,7,8,9,10,11,12,13
■ Confirm the patient’s identity using at least two patient
identifiers.14
■ Provide privacy.15,16,17,18
■ Explain the procedure to the patient and family (if
appropriate) according to their individual communication
and learning needs to increase their understanding, allay
their fears, and enhance cooperation.19. Include the purpose
of arterial pressure monitoring and the anticipated duration
of catheter placement.
■ Raise the patient’s bed to waist level when providing care
to prevent caregiver back strain.20
■ Position the patient for easy access to the catheter
insertion site.
■ Obtain vital signs to provide baseline date for
comparison.
■ If the patient doesn’t already have an arterial catheter in
place, assist the practitioner, as needed, during catheter
insertion.
■ Immobilize the insertion site if necessary. With a radial or
brachial site, use a single-patient-use joint stabilization
device to facilitate infusion delivery and maintain device
patency.21 With a femoral site, maintain the patient on bed
rest with the head of the bed raised no more than 30
degrees to prevent the catheter from kinking.
NURSING ALERT Keep the catheter site visible at all times. Don’t
allow linens to cover the site. Arterial catheter dislodgement requires
prompt recognition and intervention to reduce the risk of
exsanguination.
Zeroing the transducer
■ Using the leveling device, level the zeroing stopcock of
the transducer with the phlebostatic axis (fourth intercostal
space, at the midpoint of the anterior-posterior diameter of
the chest wall), which reflects central arterial pressure.3,22
■ Zero the system to atmospheric pressure to negate the
effects of atmospheric pressure and prepare the monitoring
system for accurate arterial pressure monitoring.3 Zero the
transducer system only with initial setup, if the transducer
system is disconnected from the monitoring cable, if the
monitoring cable is disconnected from the monitor, and
when blood pressure values don’t correspond with the
patient’s clinical status to minimize the number of entries
into the pressure monitoring system and subsequently
reduce the risk of vascular catheter–associated infection.1,3
■ Observe the monitor for the arterial waveform and
pressure reading. Perform a square wave test to determine
whether the system correctly reflects arterial pressure; note
that the square wave test is affected by such system
problems as air bubbles in the tubing, excessive tubing
length, loose connections, and catheter patency.3 (See
Performing a square wave test.)
Completing the procedure
■ Make sure that alarms are set appropriately for the
patient’s current condition, and that alarms are turned on,
functioning properly, and audible to staff.23,24,25,26
■ Continuously observe the arterial waveform quality on the
monitor and record variances to ensure the accuracy of the
waveform and detect changes in the patient’s
hemodynamic status. A normal waveform has a peak
systole, clear dicrotic notch, and end diastole.3
■ Monitor the patient’s vital signs and note trends in
arterial pressure waveform readings at least every 2 hours.
Correlate pressure readings with the patient’s clinical
condition and response to therapies.
■ Evaluate the patient regularly for signs and symptoms of
fluid imbalance and vascular catheter–associated infection,
which can include (but are not limited to) fever, chills,
tachycardia, increased white blood cell count, redness and
swelling at the catheter insertion site, and positive blood
cultures.
■ Monitor for potential complications of the arterial
catheter, such as impaired circulation distal to the catheter
insertion site; immediately notify the practitioner if any
occur.
■ Evaluate the arterial pressure monitoring system
regularly for air bubble formation, which can lead to
potentially lethal air emboli. Remove air bubbles by flushing
them through a system stopcock.
■ Troubleshoot the arterial waveform, as needed. Notify the
practitioner, as appropriate. If the waveform suddenly
becomes dampened, check the patient before attempting to
determine its cause or fix the problem because a sudden
hypotensive episode can look like a dampened waveform on
the monitor and can be potentially life-threatening if not
treated properly. (See Recognizing abnormal waveforms,
page 30.)
■ Return the bed to the lowest position to prevent falls and
maintain patient safety.27
■ Perform hand hygiene.1,7,8,9,10,11,12,13
■ Document the procedure.28,29,30,31,32
Special considerations
■ Be aware that erroneous pressure readings can result
from a catheter that’s clotted or positional, loose
connections, addition of extra stopcocks or extension
tubing, inadvertent entry of air into the system, or improper
calibrating, leveling, or zeroing of the monitoring system. If
the catheter lumen clots, the flush system may be
pressurized improperly. Regularly assess the amount of flush
solution in the IV bag, and maintain 300 mm Hg of pressure
in the pressure infuser bag.3
■ Change disposable transducer systems, including flush
device and flush solution used for invasive hemodynamic
monitoring every 96 hours, immediately upon suspected
contamination, or when integrity of the system has been
compromised. Limit the number of manipulations and
entries to the system.1,33
■ Note that you shouldn’t perform routine site care and
dressing changes on short peripheral catheters unless the
dressing is damp, loosened, or visibly soiled.34
■ Perform hand hygiene before performing dressing
changes, and use sterile technique and sterile gloves when
redressing the site.1,34 When removing the current dressing,
observe for signs of infection (such as redness, warmth,
swelling, and purulent drainage) and note complaints of
tenderness.
■ Don’t routinely change arterial catheters to reduce the
risk of vascular catheter–associated infections.1
Understanding an arterial waveform
Normal arterial blood pressure produces a characteristic waveform,
representing ventricular systole and diastole. The waveform has five distinct
components: the anacrotic limb, the systolic peak, the dicrotic limb, the
dicrotic notch, and end diastole.
The anacrotic limb marks the waveform’s initial upstroke, which results as
blood is rapidly ejected from the ventricle through the open aortic valve into
the aorta. This rapid ejection causes a sharp rise in arterial pressure, which
appears as the waveform’s highest point, called the systolic peak.
As blood continues into the peripheral vessels, arterial pressure falls, and
the waveform begins a downward trend. This part is called the dicrotic limb.
Arterial pressure usually will continue to fall until pressure in the ventricle is
less than pressure in the aortic root. When this decrease occurs, the aortic
valve closes. This event appears as a small notch (called the dicrotic notch)
on the waveform’s downside. When the aortic valve closes, diastole begins,
progressing until the aortic root pressure gradually descends to its lowest
point. On the waveform, this point is known as end diastole.
Normal arterial waveform
■ The Joint Commission issued a sentinel event alert
concerning medical device alarm safety because alarm-
related events have been associated with permanent loss of
function and death. Among the major contributing factors
were improper alarm settings, alarms turned off
inappropriately, and alarm signals not audible to staff
members. Make sure that alarm limits are set appropriately
and that alarms are turned on, functioning properly, and
audible to staff. Follow facility guidelines for preventing
alarm fatigue.23
Complications
Arterial catheter insertion and pressure monitoring can
cause such complications as arterial bleeding; infection at
the insertion site, which can spread into the bloodstream;
clot formation within the catheter, which can then be carried
into the general circulation; catheter perforation of the
vessel wall, which can be associated with excessive
bleeding and extravasation of flush solution into the
surrounding tissue; air embolism; arterial spasm; and
impaired circulation to the extremity distal to the catheter
insertion site, which, if not treated promptly, can lead to loss
of tissue and, ultimately, loss of limb.
Additionally, if insertion uses the radial artery, prolonged
hyperextension of the wrist can cause transient median
nerve conduction deficits.
Documentation
If you assisted with insertion, record the insertion site
location; specific site preparation; local anesthetic (if used);
infection prevention and safety precautions taken; the type,
length, and gauge of the catheter inserted; date and time of
insertion; device functionality; method of catheter
stabilization; type of flush solution used; and the patient’s
tolerance of the procedure. Document the color, warmth,
sensation, and pulse strength of the extremity distal to the
catheter insertion site before insertion, immediately after
insertion, and at regular intervals determined by your
facility. Note alarm settings and confirmation that the
alarms are turned on. Record the patient’s position for
zeroing the transducer so that other health care team
members can replicate the placement. Record the patient’s
vital signs, including manual blood pressure in comparison
to the blood pressure obtained through the arterial catheter.
Document dressing, tubing, and flush solution changes
when appropriate. Note patient and family (if applicable)
teaching and their understanding of your teaching.
Recognizing abnormal waveforms
Understanding a normal arterial waveform is relatively straightforward.
However, an abnormal waveform is more difficult to decipher. Abnormal
patterns and markings may provide important diagnostic clues to the
patient’s cardiovascular status, or they may simply signal trouble in the
monitor. Use this chart to help you recognize and resolve waveform
abnormalities.
REFERENCES
1 Centers for Disease Control and Prevention. (2011, revised 2017). “Guidelines
for the prevention of intravascular catheter–related infections” [Online].
Accessed via the Web at
https://www.cdc.gov/infectioncontrol/pdf/guidelines/bsi-guidelines.pdf (Level
I)
2 Standard 27. Site selection. Infusion therapy standards of practice. (2016).
Journal of Infusion Nursing, 39, S54–S58. (Level VII)
3 Wiegand, D. L. (2017). AACN procedure manual for high acuity, progressive,
and critical care (7th ed.). Philadelphia, PA: Saunders.
4 Standard 26. Vascular access device (VAD) planning. Infusion therapy
standards of practice. (2016). Journal of Infusion Nursing, 39, S51–S54. (Level
VII)
5 Jarrett, N., & Callaham, M. (2016). “Evidence-based guidelines for selected,
candidate, and previously considered hospital-acquired conditions: Final
report” [Online]. Accessed via the Web at
https://www.cms.gov/Medicare/Medicare-Fee-for-Service-
Payment/HospitalAcqCond/Downloads/2016-HAC-Report.pdf
6 Marschall, J., et al. (2014). SHEA/IDSA practice recommendation: Strategies to
prevent central line–associated bloodstream infections in acute care hospitals
—2014 update. Infection Control and Hospital Epidemiology, 35, 753–771 .
Accessed via the Web at http://www.jstor.org/stable/10.1086/676533 (Level I)
7 The Joint Commission. (2019). Standard NPSG.07.01.01. Comprehensive
accreditation manual for hospitals. Oakbrook Terrace, IL: The Joint
Commission. (Level VII)
8 Centers for Disease Control and Prevention. (2002). Guideline for hand
hygiene in health-care settings: Recommendations of the Healthcare Infection
Control Practices Advisory Committee and the HICPAC/SHEA/APIC/IDSA Hand
Hygiene Task Force. MMWR Recommendations and Reports, 51(RR-16), 1–45.
Accessed via the Web at https://www.cdc.gov/mmwr/pdf/rr/rr5116.pdf (Level
II)
9 World Health Organization. (2009). “WHO guidelines on hand hygiene in
health care: First global patient safety challenge, clean care is safer care”
[Online]. Accessed via the Web at
http://apps.who.int/iris/bitstream/10665/44102/1/9789241597906_eng.pdf
(Level IV)
10 Centers for Medicare and Medicaid Services, Department of Health and
Human Services. (2015). Condition of participation: Infection control. 42 C.F.R.
§ 482.42.
11 Accreditation Association for Hospitals and Health Systems. (2017). Standard
07.01.21. Healthcare Facilities Accreditation Program: Accreditation
requirements for acute care hospitals. Chicago, IL: Accreditation Association
for Hospitals and Health Systems. (Level VII)
12 Standard 16. Hand hygiene. Infusion therapy standards of practice. (2016).
Journal of Infusion Nursing, I, S38–S39 . (Level VII)
13 DNV GL-Healthcare USA, Inc. (2016). IC.1 .SR.1 . NIAHO® accreditation
requirements: Interpretive guidelines & surveyor guidance (version 11).
Milford, OH: DNV GL-Healthcare USA, Inc. (Level VII)
14 The Joint Commission. (2019). Standard NPSG.01.01.01. Comprehensive
accreditation manual for hospitals. Oakbrook Terrace, IL: The Joint
Commission. (Level VII)
15 The Joint Commission. (2019). Standard RI.01.01.01. Comprehensive
accreditation manual for hospitals. Oakbrook Terrace, IL: The Joint
Commission. (Level VII)
16 Centers for Medicare and Medicaid Services, Department of Health and
Human Services. (2015). Condition of participation: Patient’s rights. 42 C.F.R.
§ 482.13(c)(1).
17 Accreditation Association for Hospitals and Health Systems. (2017). Standard
15.01.16. Healthcare Facilities Accreditation Program: Accreditation
requirements for acute care hospitals. Chicago, IL: Accreditation Association
for Hospitals and Health Systems. (Level VII)
18 DNV GL-Healthcare USA, Inc. (2016). PR.1.SR.5 . NIAHO® accreditation
requirements: Interpretive guidelines & surveyor guidance (version 11).
Milford, OH: DNV GL-Healthcare USA, Inc. (Level VII)
19 The Joint Commission. (2019). Standard PC.02.01.21. Comprehensive
accreditation manual for hospitals. Oakbrook Terrace, IL: The Joint
Commission. (Level VII)
20 Waters, T. R., et al. (2009). “Safe patient handling training for schools of
nursing” [Online]. Accessed via the Web at
https://www.cdc.gov/niosh/docs/2009-127/pdfs/2009-127.pdf (Level VII)
21 Standard 38. Joint stabilization. Infusion therapy standards of practice.
(2016). Journal of Infusion Nursing, 39, S74–S75. (Level VII)
22 American Association of Critical-Care Nurses (AACN). (2016). “A ACN practice
alert: Pulmonary artery/central venous pressure monitoring in adults”
[Online]. Accessed via the Web at
http://ccn.aacnjournals.org/content/36/4/e12.extract (Level VII)
23 The Joint Commission. (2013). “Sentinel event alert: Medical device alarm
safety in hospitals” [Online]. Accessed via the Web at
https://www.jointcommission.org/assets/1/6/SEA_50_alarms_4 _26_16.pdf
(Level VII)
24 The Joint Commission. (2019). Standard NPSG.06 .01.01. Comprehensive
accreditation manual for hospitals. Oakbrook Terrace, IL: The Joint
Commission. (Level VII)
25 Graham, K. C., & Cvach, M. (2010). Monitor alarm fatigue: Standardizing use
of physiological monitors and decreasing nuisance alarms. American Journal
of Critical Care, 19, 28–37. Accessed via the Web at
http://ajcc.aacnjournals.org/content/19/1/28.full.pdf
26 American Association of Critical-Care Nurses. (2013). “A ACN practice alert:
Alarm management” [Online]. Accessed via the Web at
https://www.aacn.org/aacn-website/shared/content/practice-
alerts/2015/11/25/alarm-management (Level VII)
27 Ganz, D. A., et al. (2013). Preventing falls in hospitals: A toolkit for improving
quality of care (AHRQ Publication No. 13-0015-EF). Rockville, MD: Agency for
Healthcare Research and Quality. Accessed via the Web at
http://www.ahrq.gov/sites/default/files/publications/files/fallpxtoolkit.pdf
(Level VII)
28 The Joint Commission. (2019). Standard RC.01.03 .01. Comprehensive
accreditation manual for hospitals. Oakbrook Terrace, IL: The Joint
Commission. (Level VII)
29 Centers for Medicare and Medicaid Services, Department of Health and
Human Services. (2015). Condition of participation: Medical record services.
42 C.F.R. § 482.24(b).
30 Accreditation Association for Hospitals and Health Systems. (2017). Standard
10.00 .03. Healthcare Facilities Accreditation Program: Accreditation
requirements for acute care hospitals. Chicago, IL: Accreditation Association
for Hospitals and Health Systems. (Level VII)
31 DNV GL-Healthcare USA, Inc. (2016). MR.2 .SR.1 . NIAHO® accreditation
requirements: Interpretive guidelines & surveyor guidance (version 11).
Milford, OH: DNV GL-Healthcare USA, Inc. (Level VII)
32 Standard 10. Documentation in the medical record. Infusion therapy
standards of practice. (2016). Journal of Infusion Nursing, 39, S28–S30 . (Level
VII)
33 Standard 42. Administration set change. Infusion therapy standards of
practice. (2016). Journal of Infusion Nursing, 39, S84–S85. (Level VII)
34 Standard 41. Vascular access device (VAD) assessment, care and dressing
changes. Infusion therapy standards of practice. (2016). Journal of Infusion
Nursing, 39, S81–S84. (Level VII)
ARTERIAL PUNCTURE FOR BLOOD GAS
ANALYSIS
Arterial blood gas (ABG) analysis evaluates ventilation by
measuring blood pH and the partial pressures of arterial
oxygen (PaO2) and carbon dioxide (PaCO2). Blood pH
measurement reveals the blood’s acid-base balance, PaO2
indicates the amount of oxygen in the blood, and PaCO2
indicates the lungs’ capacity to eliminate carbon dioxide.
ABG samples can also be analyzed for total hemoglobin,
oxygen saturation,
saturation of dyshemoglobins,
bicarbonate values, and base excess or deficit.1 Obtaining
an arterial blood sample requires percutaneous puncture of
the brachial, radial, or femoral artery or withdrawal of a
sample from an arterial line.
Typically, ABG analysis is ordered when respiratory
distress or failure is suspected. It’s also performed during
episodes of shock and after coronary artery bypass surgery,
resuscitation from cardiac arrest, changes in respiratory
therapy or status, and prolonged anesthesia.
Most ABG samples can be drawn by a respiratory therapist
or specially trained nurse; however, collection from the
femoral artery is usually performed by a practitioner. The
radial artery is the preferred site because it is small and
easy to stabilize.2,3
Equipment
Preheparinized ABG plastic Luer-lock syringe specially made
for drawing blood for ABG analysis ▪ 20G to 25G 1′′ to 11⁄2′′
(2.5 -cm to 3.8-cm) needle ▪ gloves ▪ antiseptic pad or swab
(alcohol, chlorhexidine, or povidone-iodine)2,3,4 ▪ two 2′′ ×
2′′ (5-cm × 5-cm) gauze pads ▪ rubber cap for syringe hub ▪
laboratory biohazard transport bag ▪ label ▪ laboratory
request form ▪ small towel ▪ adhesive bandage ▪ Optional:
Mask and goggles or mask with face shield, gown, sterile
gloves, 1% lidocaine solution without epinephrine or
eutectic mixture of local anesthetics cream, 1-mL syringe
with 22G needle, 1-mL ampule of aqueous heparin
(1:1,000), plastic bag, crushed ice, Doppler ultrasound
device, pulse oximeter.
Many health care facilities use a commercial ABG kit that
contains some of the equipment listed above.
Preparation of equipment
If time allows, administer local anesthetic cream at least 1
hour before the procedure because it requires at least 1
hour to achieve its effect.
Open the ABG kit and remove the sample label and the
plastic bag. If the syringe isn’t heparinized, you will have to
heparinize it to prevent the sample from clotting. To do so,
first attach the 22G needle to the syringe. Then open the
ampule of heparin. Draw all the heparin into the syringe.
Hold the syringe upright, and rotate the barrel while pulling
the plunger back to allow the heparin to coat the entire
inside surface of the syringe. Then slowly force the heparin
toward the hub of the syringe, and expel all of the heparin.
ABG analysis should be performed within 10 minutes of
obtaining the blood sample.6 Fill a plastic bag with enough
crushed ice to contain the syringe if you anticipate a delay
in analysis.
Implementation
■ Verify the practitioner’s order.
■ Review the patient’s medical record for current
anticoagulation therapy, clotting disorders, and pertinent
laboratory values to determine the patient’s risk of
prolonged bleeding after the procedure. Discuss any
concerns with the patient’s practitioner.
■ Confirm steady state conditions to ensure accurate test
results. If the patient is receiving oxygen, make sure that
this therapy has been underway for 20 to 30 minutes before
collecting an arterial sample. If the patient has received a
nebulizer treatment, wait 20 minutes before collecting the
sample. If the patient recently underwent suctioning or was
placed on mechanical ventilation or the fraction of inspired
oxygen concentration has been changed, wait at least 15
minutes before collecting a blood sample.4,6
■ Gather and prepare the necessary equipment.
■ Perform hand hygiene.7,8,9,10,11,12
■ Confirm the patient’s identity using at least two patient
identifiers.13
■ Explain the procedure to the patient to help ease anxiety
and promote cooperation. Tell the patient that the needle
stick will cause some discomfort but that the patient must
remain still during the procedure.
Performing an Allen test
The Allen test is a collateral circulation test performed to assess whether
ulnar collateral blood flow is sufficient to allow for puncture of the radial
artery. To perform the Allen test, position the patient with the wrist extended
about 30 degrees. Place a rolled towel under the wrist to provide support.
Instruct the patient to make a fist. Occlude the radial and ulnar arteries with
your index and middle fingers while the patient’s fist remains clenched. Then
ask the patient to slowly unclench his fist. The palm will be blanched from the
lack of arterial blood flow, as shown below.
Release the pressure on the patient’s ulnar artery. If the patient’s hand
becomes immediately flushed, indicating that the arterial circulation has
resumed, you can safely proceed with radial artery puncture at that site. If
the hand doesn’t appear flushed, the test is negative, indicating that blood
flow is inadequate; you’ll need to select an alternative puncture site, such as
the other radial artery or a brachial artery.2 If you choose the other radial
artery, you’ll need to perform the Allen test before proceeding. If both radial
sites are inadequate, consider using the femoral artery, if permitted by your
facility.2 If the patient is unable to cooperate with the Allen test, assess
circulation manually with the help of an assistant.
■ Raise the bed to waist level while providing care to
prevent caregiver back strain.18
■ Perform hand hygiene.7,8,9,10,11,12
■ Assess the radial pulse in both wrists to determine the
best site from which to draw the specimen.
■ Assess circulation to the patient’s hand by assessing the
radial and ulnar pulses or by performing the Allen test, pulse
oximetry, or a Doppler flow study.19 If the test is negative,
do not use the radial artery; instead, select another site.4
(See Performing an Allen Test.)
■ Position the patient and place a rolled towel under the
patient’s wrist for support, if one is not already present.
Once you have identified a site, note anatomic landmarks to
be able to find the site again.2
■ If visibly soiled, clean the intended puncture site with
soap and water and then dry it with a towel.
■ Perform hand hygiene.7,8,9,10,11,12
■ Put on gloves and, as needed, a gown and a mask and
goggles or a mask with face shield to comply with standard
precautions.2,20,21
■ If indicated and ordered, administer a local anesthetic,
such as lidocaine, following safe medication administration
practices.22,23 Consider the use of lidocaine carefully
because it delays the procedure, the patient might be
allergic to the drug, and the resulting vasoconstriction might
prevent successful puncture.24 To administer lidocaine, draw
up 0.5 mL of 1% lidocaine into a 1-mL syringe with a 25G
needle. Disinfect the site with an antiseptic pad and then
allow it to dry. Inject 0.2 to 0.3 mL intradermally around the
artery. Wait for the anesthetic to take effect.
■ Clean the intended puncture site with an antiseptic pad or
swab2,4,5,25
according
to
the
manufacturer’s
recommendations and then allow it to dry completely.3,5,25
■ Stabilize the artery with the index and middle fingers of
your nondominant hand while holding the syringe over the
puncture site with the other hand. If you need to palpate the
site again, put on sterile gloves.2,3,19
■ Hold the needle bevel up at a 30- to 60-degree angle (as
shown below).
■ Puncture the skin and the arterial wall in one motion,
following the path of the artery.
■ Watch for blood backflow in the syringe. Don’t pull back
on the plunger, because arterial blood should enter the
syringe automatically. Obtain 1 mL of blood.
■ Withdraw the needle while stabilizing the syringe
■ Press a gauze pad firmly over the puncture site for 5
minutes or until the bleeding stops. If the patient is
receiving anticoagulant therapy or has a blood dyscrasia,
apply pressure for 10 to 15 minutes; if necessary, ask a
coworker to hold the gauze pad in place while you prepare
the sample for transport to the laboratory. Don’t ask the
patient to hold the pad because failure to apply sufficient
pressure can lead to formation of a painful hematoma,
hindering future arterial punctures at that site.
■ Check the syringe for air bubbles. If any appear, remove
them by holding the syringe upright and slowly ejecting
some of the blood onto a 2′′ × 2′′ (5-cm × 5-cm) gauze pad
to prevent alteration of the test results.1
■ Use the syringe safety device to cover the needle, and
then remove the needle and place a rubber cap directly on
the syringe tip to prevent the sample from leaking and to
keep air out of the syringe.
■ Gently roll the syringe in your hands for 30 seconds to
mix the heparin, which prohibits the sample from clotting.
■ Label the syringe in the presence of the patient to
prevent mislabeling.13 The label should contain the patient’s
full name, another patient identifier (such as the patient’s
date of birth or medical record number), the date and time
you collected the sample, and the measured fraction of
inspired oxygen (FIO2) or supplemental oxygen liter flow.1
■ Put the labeled sample in the laboratory biohazard
transport bag and attach a properly completed laboratory
request form, and immediately send the sample to the
laboratory.1,26 If the sample can’t be sent to the laboratory
immediately, put it on ice.6
■ When the site stops bleeding, apply a small adhesive
bandage to the site.
■ Monitor the patient for signs of circulatory impairment,
such as swelling, discoloration, pain, numbness, and tingling
in the arm or leg. Also watch for bleeding at the puncture
site.
■ Return the bed to the lowest position to prevent falls and
maintain patient safety.27
■ Discard used equipment in the appropriately.28
■ Remove and discard your gloves and other personal
protective equipment, if worn.
■ Perform hand hygiene.7,8,9,10,11,12
■ Document the procedure.29,30,31,32
Special considerations
■ Chilling the sample extends the time to test the sample
for up to 1 hour; if more than an hour has elapsed since
collection, discard the sample.4,6
■ Unless ordered, don’t turn off existing oxygen therapy
before collecting an arterial blood sample.
■ Be sure to indicate on the laboratory request slip the
amount and type of oxygen therapy the patient is receiving.
If the patient isn’t receiving oxygen, indicate that he’s
breathing room air.
Complications
If you use too much force when attempting to puncture an
artery, the needle may touch the periosteum of the bone,
causing the patient considerable pain. You may advance the
needle through the opposite wall of the artery. If this
happens, slowly pull the needle back a short distance and
check to see if you obtain blood return. If blood still fails to
enter the syringe, withdraw the needle completely and
attempt the puncture with a new needle and syringe. Don’t
make more than two attempts to withdraw blood from the
same site. Probing the artery may injure it and the radial
nerve. Also, hemolysis will occur, altering test results.
If arterial spasm occurs, blood won’t flow into the syringe
and you won’t be able to collect the sample. If this happens,
replace the needle with a smaller one and try the puncture
again because a smaller-bore needle is less likely to cause
arterial spasm.
Documentation
Record the results of the Allen test, the time the sample was
drawn, the patient’s temperature, the site of the arterial
puncture, the amount of time that pressure was applied to
the site to control bleeding, and the type and amount of
oxygen therapy the patient was receiving. Also document
specific preparation, the type and amount of local
anesthetic administered (if used), the size of the needle
used, and the number of attempts.33
REFERENCES
1 American Association for Respiratory Care (AARC). (2013). AARC clinical
practice guideline: Blood gas analysis and hemoximetry 2013. Respiratory
Care, 58, 1694–1703. Accessed via the Web at
http://www.rcjournal.com/cpgs/pdf/blood_gas_hexometry.pdf (Level VII)
2 World Health Organization (WHO). (2010). WHO guidelines on drawing blood:
Best practices in phlebotomy. Geneva, Switzerland: WHO. Accessed via the
Web at http://whqlibdoc.who.int/publications/2010/9789241599221_eng.pdf
(Level IV)
3 Wiegand, D. L. (2017). AACN procedure manual for high acuity, progressive,
and critical care (7th ed.). Philadelphia, PA: Saunders.
4 Kacmarek, R. M., et al. (2017). Egan’s fundamentals of respiratory care (11th
ed.). St Louis, MO: Mosby.
5 Centers for Disease Control and Prevention. (2011). “Guidelines for the
prevention of intravascular catheter-related infections” [Online]. Accessed via
the Web at https://www.cdc.gov/infectioncontrol/pdf/guidelines/bsi-
guidelines.pdf (Level I)
6 Fischbach, F., & Dunning, M. B. (2015). A manual of laboratory and diagnostic
tests (9th ed.). Philadelphia, PA: Wolters Kluwer.
7 Centers for Disease Control and Prevention. (2002). Guideline for hand
hygiene in health-care settings: Recommendations of the Healthcare Infection
Control Practices Advisory Committee and the HICPAC/SHEA/APIC/IDSA Hand
Hygiene Task Force. MMWR Recommendations and Reports, 51(RR-16), 1–45.
Accessed via the Web at https://www.cdc.gov/mmwr/pdf/rr/rr5116.pdf (Level
II)
8 The Joint Commission. (2019). Standard NPSG.07.01.01. Comprehensive
accreditation manual for hospitals. Oakbrook Terrace, IL: The Joint
Commission. (Level VII)
9 World Health Organization. (2009). “WHO guidelines on hand hygiene in
health care: First global patient safety challenge, clean care is safer care”
[Online]. Accessed via the Web at
http://apps.who.int/iris/bitstream/10665/44102/1/9789241597906_eng.pdf
(Level IV)
10 Centers for Medicare and Medicaid Services, Department of Health and
Human Services. (2015). Condition of participation: Infection control. 42 C.F.R.
§ 482.42.
11 Accreditation Association for Hospitals and Health Systems. (2017). Standard
07.01.21. Healthcare Facilities Accreditation Program: Accreditation
requirements for acute care hospitals. Chicago, IL: Accreditation Association
for Hospitals and Health Systems. (Level VII)
12 DNV GL-Healthcare USA, Inc. (2016). IC.1 .SR.1 . NIAHO® accreditation
requirements: Interpretive guidelines & surveyor guidance (version 11).
Milford, OH: DNV GL-Healthcare USA, Inc. (Level VII)
13 The Joint Commission. (2019). Standard NPSG.01.01.01. Comprehensive
accreditation manual for hospitals. Oakbrook Terrace, IL: The Joint
Commission. (Level VII)
14 Accreditation Association for Hospitals and Health Systems. (2017). Standard
15.01.16. Healthcare Facilities Accreditation Program: Accreditation
requirements for acute care hospitals. Chicago, IL: Accreditation Association
for Hospitals and Health Systems. (Level VII)
15 Centers for Medicare and Medicaid Services, Department of Health and
Human Services. (2015). Condition of participation: Patient’s rights. 42 C.F.R.
§ 482.13(c)(1).
16 The Joint Commission. (2019). Standard RI.01.03 .01. Comprehensive
accreditation manual for hospitals. Oakbrook Terrace, IL: The Joint
Commission. (Level VII)
17 DNV GL-Healthcare USA, Inc. (2016). PR.1.SR.5 . NIAHO® accreditation
requirements: Interpretive guidelines & surveyor guidance (version 11).
Milford, OH: DNV GL-Healthcare USA, Inc. (Level VII)
18 Waters, T. R., et al. (2009). “Safe patient handling training for schools of
nursing” [Online]. Accessed via the Web at
https://www.cdc.gov/niosh/docs/2009-127/pdfs/2009-127.pdf (Level VII)
19 Standard 43. Phlebotomy. Infusion therapy standards of practice. (2016).
Journal of Infusion Nursing, 39, S85–S91. (Level VII)
20 Siegel, J. D ., et al. (2007, revised 2017). “2007 guideline for isolation
precautions: Preventing transmission of infectious agents in healthcare
settings” [Online]. Accessed via the Web at
https://www.cdc.gov/infectioncontrol/pdf/guidelines/isolation-guidelines.pdf
(Level II)
21 Accreditation Association for Hospitals and Health Systems. (2017). Standard
07.01.10. Healthcare Facilities Accreditation Program: Accreditation
requirements for acute care hospitals. Chicago, IL: Accreditation Association
for Hospitals and Health Systems. (Level VII)
22 Centers for Medicare and Medicaid Services, Department of Health and
Human Services. (2015). Condition of participation: Nursing services. 42
C.F.R. § 482.23(c).
23 DNV GL-Healthcare USA, Inc. (2016). MM.1 .SR.2. NIAHO® accreditation
requirements: Interpretive guidelines & surveyor guidance (version 11).
Milford, OH: DNV GL-Healthcare USA, Inc. (Level VII)
24 Aaron, S. D., et al. (2003). Topical tetracaine prior to arterial puncture: A
randomized, placebo-controlled clinical trial. Respiratory Medicine, 97, 1195–
1199. (Level II)
25 Marschall, J., et al. (2014). SHEA/IDSA practice recommendation: Strategies
to prevent central line-associated bloodstream infections in acute care
hospitals. Infection Control and Hospital Epidemiology, 35, 753–771 .
Accessed via the Web at http://www.jstor.org/stable/10.1086/676533 (Level I)
26 Knowles, T. P., et al. (2006). Effects of syringe material, sample storage time,
and temperature on blood gases and oxygen saturation in arterialized human
blood samples. Respiratory Care, 51, 732–736.
27 Ganz, D. A., et al. (2013). Preventing falls in hospitals: A toolkit for improving
quality of care (AHRQ Publication No. 13-0015-EF). Rockville, MD: Agency for
Healthcare Research and Quality. Accessed via the Web at
http://www.ahrq.gov/sites/default/files/publications/files/fallpxtoolkit.pdf
(Level VII)
28 Occupational Safety and Health Administration. (n.d .). “Bloodborne
pathogens, standard number 1910.1030” [Online]. Accessed via the Web at
https://www.osha.gov/pls/oshaweb/owadisp.show_document?
p_id=10051&p_table =STANDARDS (Level VII)
29 The Joint Commission. (2019). Standard RC.01.03 .01. Comprehensive
accreditation manual for hospitals. Oakbrook Terrace, IL: The Joint
Commission. (Level VII)
30 Centers for Medicare and Medicaid Services, Department of Health and
Human Services. (2015). Condition of participation: Medical record services.
42 C.F.R. § 482.24(b).
31 Accreditation Association for Hospitals and Health Systems. (2017). Standard
10.00 .03. Healthcare Facilities Accreditation Program: Accreditation
requirements for acute care hospitals. Chicago, IL: Accreditation Association
for Hospitals and Health Systems. (Level VII)
Performing palpation
You should be familiar with four palpation techniques: light palpation, deep
palpation, light ballottement, and deep ballottement. Remember to use the
flattened finger pads for palpating tender tissues, feeling for crepitus
(crackling) at the joints, and lightly probing the abdomen. Use the thumb and
index finger for assessing hair texture, grasping tissues, and feeling for
lymph node enlargement. Use the back, or dorsal, surface of the hand when
feeling for warmth.
Light palpation
With the tips of two or three fingers held close together, depress the skin,
indenting 1⁄2′′ (1.3 cm). Use the lightest touch possible, because too much
pressure blunts your sensitivity.15
Deep palpation (bimanual palpation)
If the patient tolerates light palpation and you need to assess deeper
structures, palpate deeply by increasing your fingertip pressure, indenting
the skin about 3⁄4′′ to 11⁄2′′ (2 to 4 cm). Place your other hand on top of the
palpating hand, to control and guide your movements.15
Light ballottement
Apply light, rapid pressure to the abdomen, moving from one quadrant to
another. Keep your hand on the skin surface to detect tissue rebound.
Deep ballottement
Apply abrupt, deep pressure on the patient’s abdomen. Release the pressure
completely, but maintain fingertip contact with the skin.
32 DNV GL-Healthcare USA, Inc. (2016). MR.2 .SR.1 . NIAHO® accreditation
requirements: Interpretive guidelines & surveyor guidance (version 11).
Milford, OH: DNV GL-Healthcare USA, Inc. (Level VII)
33 Standard 10. Documentation in the medical record. Infusion therapy
standards of practice. (2016). Journal of Infusion Nursing, 39, S28–S30 . (Level
VII)
ASSESSMENT TECHNIQUES
A physical assessment involves four basic techniques:
inspection, palpation, percussion, and auscultation.
Performing these techniques correctly helps elicit valuable
information about a patient’s condition.
Inspection requires the use of vision to observe the details
of the patient’s appearance, behavior, and movement.1
Special lighting and various pieces of equipment—such as
an otoscope, a tongue blade, and an ophthalmoscope—may
be used to enhance vision or examine an otherwise hidden
area. Inspection begins during the first patient contact and
continues throughout the assessment.
Palpation usually follows inspection, except when
examining the abdomen or assessing infants and children,
in which case auscultation precedes percussion and
palpation. Palpation involves touching the body to
determine the size, shape, and position of structures; to
detect and evaluate temperature, pulsations, and other
movement; and to elicit tenderness. The four palpation
techniques include light palpation, deep palpation, light
ballottement, and deep ballottement. Ballottement is the
technique used to evaluate a flowing or movable structure.
It involves gently bouncing the structure by applying
pressure against it and then waiting to feel it rebound. This
technique may be used, for example, to check the position
of an organ or a fetus.
Percussion involves quick, sharp tapping of the fingers or
hands against body surfaces to produce sounds, detect
tenderness, or assess reflexes. Percussing for sound helps
locate organ borders, identify organ shape and position, and
determine whether an organ is solid or filled with fluid or
gas. Organs and tissues produce sounds of varying
loudness, pitch, and duration, depending on their density.
For example, air-filled cavities such as the lungs produce
markedly different sounds from those produced by the liver
and other dense organs and tissues. Percussion techniques
include indirect percussion, direct percussion, and blunt
percussion.
Identifying percussion sounds
Percussion produces sounds that vary according to the tissue being
percussed. This chart lists important percussion sounds along with their
characteristics and typical sources.
Auscultation involves listening to various sounds of the
body—particularly those produced by the heart, lungs,
vessels, stomach, and intestines. Most auscultated sounds
result from the movement of air or fluid through these
structures. Auscultation is usually performed after the other
assessment techniques. When examining the abdomen,
however, auscultation occurs after inspection but before
percussion and palpation, which can alter bowel sounds.
Auscultation is also best performed first on infants and
young children, who may start to cry when palpated or
percussed. Auscultation is most successful when performed
in a quiet environment with a properly fitted stethoscope.
Equipment
Flashlight or gooseneck lamp ▪ patient drape ▪ stethoscope
▪ disinfectant pad ▪ Optional: gloves.
Implementation
■ Gather all of the necessary equipment.
■ Perform hand hygiene.2,3,4,5,6,7
■ Confirm the patient’s identity using at least two patient
identifiers.8
■ Provide privacy.9,10,11,12
■ Explain all aspects of the procedure to the patient.
■ Ask the patient to undress, and then drape the patient
appropriately.
■ Make sure the room is warm and adequately lit to make
the patient comfortable and aid visual inspection.
■ Warm your hands and the stethoscope.
■ Put on gloves if needed to comply with standard
precautions.13,14
Inspection
■ Use your eyes to observe the patient. Pay close attention
to the details of the patient’s appearance, behavior, and
movement, such as facial expressions, mood, physique, and
conditioning.1 Focus on areas related to the patient’s chief
complaint.
■ To inspect a specific body area, first make sure the area is
sufficiently exposed. Survey the entire area, noting key
landmarks and checking its overall condition. Focus on
specifics—color, shape, texture, size, and movement. Note
unusual findings as well as predictable ones.
Palpation
■ Tell the patient what to expect, such as occasional
discomfort as you apply pressure. Encourage the patient to
relax, because muscle tension and guarding can interfere
with performance and results of palpation.
■ Provide just enough pressure to assess the tissue beneath
one or both hands. Then release pressure and gently move
to the next area, systematically covering the entire surface
to be assessed. (See Performing palpation.)
■ Use both hands (bimanual palpation) to trap a deep,
underlying, hard-to-palpate organ (such as the kidney or
spleen) or to fix or stabilize an organ (such as the uterus)
with one hand while you palpate it with the other.
Percussion
■ First, decide which of the percussion techniques best suits
your assessment needs. Indirect percussion helps reveal the
size and density of underlying thoracic and abdominal
organs and tissues. Direct percussion helps assess an
adult’s sinuses for tenderness and elicits sounds in a child’s
thorax. Blunt percussion aims to elicit tenderness over
organs, such as the kidneys, gallbladder, or liver. When
percussing, note the characteristic sounds produced. (See
Identifying percussion sounds.)
■ To perform indirect percussion, place one hand on the
patient and tap the middle finger with the middle finger of
the other hand. (See Performing indirect percussion.)
■ To perform direct percussion, tap your hand or fingertip
directly against the body surface.
■ To perform blunt percussion, strike the ulnar surface of
your fist against the body surface. Alternatively, place the
palm of one hand against the body, make a fist with the
other hand, and strike the back of the first hand.
Auscultation
■ First, determine whether to use the diaphragm or bell of
the stethoscope. Use the diaphragm to detect high-pitched
sounds, such as breath and bowel sounds. Keep in mind that
bowel sounds shouldn’t be described as absent until no
sound is heard for 5 minutes.16 Use the bell to detect lower-
pitched sounds, such as heart and vascular sounds.
■ Place the diaphragm or bell of the stethoscope over the
appropriate area of the patient’s body and place the
earpieces in your ears.
■ Listen intently to individual sounds, and try to identify
their characteristics. Determine the intensity, pitch, and
duration of each sound, and check the frequency of
recurring sounds.
Completing the procedure
■ Remove and discard your gloves if worn and perform
hand hygiene.2,3,4,6,7
■ Clean and disinfect your stethoscope using a disinfectant
pad.17,18
■ Perform hand hygiene.2,3,4,6,7
■ Document the procedure.19,20,21,22
Special considerations
■ Avoid palpating or percussing an area of the body known
to be tender at the start of your examination. Instead, work
around the area, and then gently palpate or percuss it at the
end of the examination. This progression minimizes the
patient’s discomfort and apprehension.
■ To pinpoint an inflamed area deep within the patient’s
body, perform a variation on deep palpation: Press firmly
with one hand over the area you suspect is involved, and
then lift your hand away quickly. If the patient reports that
pain increases when you release the pressure, then you’ve
identified rebound tenderness.
NURSING ALERT Suspect peritonitis if you elicit rebound tenderness
when examining the abdomen.
■ If you can’t palpate because the patient fears pain, try
distracting the patient with conversation. Then perform
auscultation and gently press your stethoscope into the
affected area to try to elicit tenderness.
Performing indirect percussion
To perform indirect percussion, place your nondominant hand firmly against
the patient’s body surface. With your wrist flexed loosely, use the middle
finger of your dominant hand to tap the middle finger beneath the distal joint
of your nondominant hand (as shown). Tap lightly and quickly, removing your
dominant middle finger as soon as you deliver each tap. Move your
nondominant hand and repeat the procedure, coving the entire area to be
percussed.
Complications
Palpation may cause an enlarged spleen or infected
appendix to rupture.
Documentation
Document your assessment findings and the technique used
to elicit each finding—for example, “Right lower quadrant
tenderness on deep palpation, no rebound tenderness.”
Indicate who you notified of any abnormal findings and the
time of the notification. Document interventions required to
treat those findings as well as the patient’s response to
them.
REFERENCES
1 Bickley, L. (2017). Bates’ guide to physical examination and health history
taking (12th ed.). Philadelphia, PA: Wolters Kluwer.
2 The Joint Commission. (2019). Standard NPSG.07.01.01. Comprehensive
accreditation manual for hospitals. Oakbrook Terrace, IL: The Joint
Commission. (Level VII)
3 Centers for Disease Control and Prevention. (2002). Guideline for hand
hygiene in health-care settings: Recommendations of the Healthcare Infection
Control Practices Advisory Committee and the HICPAC/SHEA/APIC/IDSA Hand
Hygiene Task Force. MMWR Recommendations and Reports, 51(RR-16), 1-45.
Accessed via the Web at https://www.cdc.gov/mmwr/pdf/rr/rr5116.pdf (Level
II)
4 World Health Organization. (2009). “WHO guidelines on hand hygiene in
health care: First global patient safety challenge, clean care is safer care”
[Online]. Accessed via the Web at
http://apps.who.int/iris/bitstream/10665/44102/1/9789241597906_eng.pdf
(Level IV)
5 Centers for Medicare and Medicaid Services, Department of Health and
Human Services. (2015). Condition of participation: Infection control. 42 C.F.R.
§ 482.42.
6 Accreditation Association for Hospitals and Health Systems. (2017). Standard
07.01.21. Healthcare Facilities Accreditation Program: Accreditation
requirements for acute care hospitals. Chicago, IL: Accreditation Association
for Hospitals and Health Systems. (Level VII)
7 DNV GL-Healthcare USA, Inc. (2016). IC.1.SR.1 . NIAHO® accreditation
requirements: Interpretive guidelines & surveyor guidance (version 11).
Milford, OH: DNV GL-Healthcare USA, Inc. (Level VII)
8 The Joint Commission. (2019). Standard NPSG.01.01.01. Comprehensive
accreditation manual for hospitals. Oakbrook Terrace, IL: The Joint
Commission. (Level VII)
9 Centers for Medicare and Medicaid Services, Department of Health and
Human Services. (2015). Condition of participation: Patient’s rights. 42 C.F.R.
§ 482.13(c)(1).
10 Accreditation Association for Hospitals and Health Systems. (2017). Standard
15.01.16. Healthcare Facilities Accreditation Program: Accreditation
requirements for acute care hospitals. Chicago, IL: Accreditation Association
for Hospitals and Health Systems. (Level VII)
11 The Joint Commission. (2019). Standard RI.01.01.01. Comprehensive
accreditation manual for hospitals. Oakbrook Terrace, IL: The Joint
Commission. (Level VII)
12 DNV GL-Healthcare USA, Inc. (2016). PR.1.SR.5 . NIAHO® accreditation
requirements: Interpretive guidelines & surveyor guidance (version 11).
Milford, OH: DNV GL-Healthcare USA, Inc. (Level VII)
13 Siegel, J. D ., et al. (2007, revised 2017). “2007 guideline for isolation
precautions: Preventing transmission of infectious agents in healthcare
settings” [Online]. Accessed via the Web at
https://www.cdc.gov/infectioncontrol/pdf/guidelines/isolation-guidelines.pdf
(Level II)
14 Accreditation Association for Hospitals and Health Systems. (2017). Standard
07.01.10. Healthcare Facilities Accreditation Program: Accreditation
requirements for acute care hospitals. Chicago, IL: Accreditation Association
for Hospitals and Health Systems. (Level VII)
15 Jensen, S. (2015). Nursing health assessment: A best practice approach (2nd
ed.). Philadelphia, PA: Lippincott Williams & Wilkins.
16 Craven, H. (Ed.) . (2016). Core curriculum for medical-surgical nursing (5th
ed.). Pitman, NJ: Academy of Medical-Surgical Nurses.
17 Rutala, W. A., et al. (2008, revised 2017). “Guideline for disinfection and
sterilization in healthcare facilities, 2008” [Online]. Accessed via the Web at
https://www.cdc.gov/infectioncontrol/pdf/guidelines/disinfection-
guidelines.pdf (Level I)
18 Accreditation Association for Hospitals and Health Systems. (2017). Standard
07.02.03. Healthcare Facilities Accreditation Program: Accreditation
requirements for acute care hospitals. Chicago, IL: Accreditation Association
for Hospitals and Health Systems. (Level VII)
19 The Joint Commission. (2019). Standard RC.01.03 .01. Comprehensive
accreditation manual for hospitals. Oakbrook Terrace, IL: The Joint
Commission. (Level VII)
20 Centers for Medicare and Medicaid Services, Department of Health and
Human Services. (2015). Condition of participation: Medical record services.
42 C.F.R. § 482.24(b).
21 Accreditation Association for Hospitals and Health Systems. (2017). Standard
10.00 .03. Healthcare Facilities Accreditation Program: Accreditation
requirements for acute care hospitals. Chicago, IL: Accreditation Association
for Hospitals and Health Systems. (Level VII)
22 DNV GL-Healthcare USA, Inc. (2016). MR.2 .SR.1 . NIAHO® accreditation
requirements: Interpretive guidelines & surveyor guidance (version 11).
Milford, OH: DNV GL-Healthcare USA, Inc. (Level VII)
AUTOLOGOUS BLOOD COLLECTION,
PREOPERATIVE
Preoperative autologous blood collection is the collection,
processing, and storage of the patient’s own blood before a
scheduled procedure that’s likely to cause significant
bleeding.1
Autologous blood transfusion has several advantages over
transfusion of blood from a blood bank. First, it minimizes
the risk of infectious disease transmission (with the
exception of bacterial sepsis) and alloimmunization of red
cell, platelet, and leukocyte antigens. It also provides a
source of blood for individuals who have rare blood types or
antibodies that make it difficult to find compatible blood.
Last, some individuals who refuse blood from donors
because of religious or other beliefs may be willing to accept
a transfusion of their own blood.1
Despite the advantages, there may be rare adverse
effects associated with autologous blood transfusion,
including septic transfusion reactions that can result from
white blood cell cytokine release during storage. In addition,
if the recipient is misidentified before transfusion, a
hemolytic reaction may occur or the patient may be
exposed to a transfusion-transmitted disease.1,2
Sepsis or suspected bacteremia is a contraindication to
autologous donation. The practitioner may also prefer not to
use blood from a patient who has an infectious disease or
active infection, and patients with certain other medical
conditions may not be candidates for preoperative donation.
There are no specific age requirements; children younger
than age 17 and older adult patients may participate. The
hemoglobin level of the patient should be 11 g/dL or higher,
or the hematocrit, if used, should be 33% or higher.
Moreover, if the patient weighs less than 110 lb (50 kg), it
may be necessary to reduce the volume of blood obtained.1
Equipment
Gloves ▪ vital signs monitoring equipment ▪ 18G or 20G
catheter and equipment for venipuncture and IV catheter
insertion ▪
blood collection bags with phlebotomy
administration set ▪ AUTOLOGOUS BLOOD label ▪ laboratory
biohazard transport bag ▪ Optional: prescribed IV fluids,
mask, protective eyewear or mask with face shield, gowns
or aprons, blood scale, vascular visualization technology.
Preparation of equipment
Inspect all IV equipment and supplies; if a product is
expired, has compromised integrity, or is defective, remove
it from patient use, label it as expired or defective, and
report the expiration or defect as directed by your facility.3
Implementation
■ Verify the practitioner’s order for autologous blood
collection.1
■ Review the patient’s medical record for factors that may
affect peripheral vasculature, such as conditions that result
in structural vessel changes (such as diabetes and
hypertension), history of frequent venipuncture or lengthy
infusion therapy, skin variations, skin alterations (such as
scars or tattoos), patient age, obesity, fluid volume deficit,
or history of IV drug abuse, to determine the need for
vascular visualization technology.4
■ Verify that the patient’s hemoglobin level is 11 g/dL or
higher and that hematocrit, if used, is 33% or higher.1
■ Confirm that the practitioner has obtained written
informed consent and that the consent form is in the
patient’s medical record.1,5,6,7,8,9
■ Perform hand hygiene.10,11,12,13,14,15,16
■ Confirm the patient’s identity using at least two patient
identifiers.17
■ Provide privacy.18,19,20,21
■ Explain the procedure to the patient and family (if
appropriate) according to their individual communication
and learning needs to increase their understanding, allay
their fears, and enhance cooperation.22,23 Make sure the
patient understands that autologous blood may not be
received exclusively if there’s unexpected blood loss, if
there’s an emergency need for more units than collected, or
if a less-than-desired number of units was collected. Also,
make sure the patient understands that a risk of certain
adverse effects still exists with autologous blood
transfusion. Explain that all collections should be completed
more than 72 hours before the anticipated surgery or
transfusion.1
■ To prevent hypovolemia, encourage the patient to drink
plenty of fluids before collection. Explain that he may feel
light-headed during the collection but that the problem can
be treated.1
■ Obtain and record vital signs before starting the collection
to provide a baseline.1
■ Help the patient into a reclining supine position.
■ Raise the bed to waist level when providing care to
prevent caregiver back strain.24
■ Perform hand hygiene.10,11,12,13,14,15,16
■ Prepare the collection bags according to the
manufacturer’s instructions.
■ Place the blood collection bag below the venipuncture
site; close the clamp on the administration set.25
■ Prepare replacement IV fluids, if ordered.
■ Perform hand hygiene.10,11,12,13,14,15,16
■ Put on gloves, as needed, and other personal protective
equipment to comply with standard precautions.26,27,28,29,30
■ Select an appropriate IV catheter insertion site.31
■ Prepare the patient’s arm and IV catheter insertion site.
Insert an 18G or 20G catheter.32 (See the “IV catheter
insertion and removal” procedure.)
■ Connect the collecting system to the IV catheter
according to the manufacturer’s instructions; slowly open
the clamp to allow retrograde blood flow into the
administration set and blood collection bag.25
■ Monitor the patient for adverse reactions.
NURSING ALERT Monitor the patient’s vital signs closely for signs of
hypotension during this process.
■ Administer replacement IV fluids, if ordered.
■ Monitor the volume or weight of the collected blood until
the prescribed quantity is withdrawn.25
■ When blood collection is complete, reclamp the
administration set tubing, remove the IV catheter, and
perform site care.
■ Recheck the patient’s vital signs to evaluate the patient’s
response to the procedure.25
■ Obtain a blood sample from the patient for a coagulation
profile, hemoglobin, hematocrit, and calcium level. Label the
specimens in the presence of the patient to prevent
mislabeling.2,17 Place the sample in a laboratory biohazard
transport bag26 and sent it to the laboratory immediately.
■ Clearly label the blood collection bag with the patient’s
name, at least two patient identifiers, and an AUTOLOGOUS
BLOOD label. Make sure there’s a mechanism to clearly
determine the date of collection and the identity of the
person who collected the blood to prevent blood
administration errors.1,25
■ Send the blood to the blood bank.
■ Return the bed to the lowest position to prevent falls and
maintain safety.33
■
Discard all used supplies in appropriate
receptacles.26,27,34
■ Remove and discard your gloves and any other personal
protective equipment, if worn.26,27,34
■ Perform hand hygiene.10,11,12,13,14,15,16
■ Document the procedure.35,36,37,38,39
Special considerations
■ In the 4 to 6 weeks before surgery, the patient may be
prescribed iron supplements to improve preoperative
hemoglobin levels.2
■ Monitor the patient closely during and after the collection.
Although vasovagal reactions are usually mild and easy to
treat, they can quickly progress to severe reactions, such as
loss of consciousness and seizures.
■ Have the patient remain in a reclining supine position for
10 minutes after the collection. If the patient feels light-
headed or dizzy, advise the patient to sit down immediately
and to lower the head between the knees. The patient may
also lie down with the head lower than the body until
symptoms resolve.
■ Instruct the patient to drink more fluids than usual for a
few hours after the collection and to eat heartily at the next
meal.
■ Instruct the patient to monitor the IV site for a few hours
after the collection. If some bleeding occurs, the patient
should apply firm pressure for 5 to 10 minutes. If the
bleeding continues, instruct the patient to notify his
practitioner.
■ The practitioner should order discontinuance of
anticoagulation drugs before elective or nonemergent
surgery.2
Complications
Preoperative collection may cause vasovagal reactions and
hypovolemia.
Documentation
Document the time the collection began and ended; the
amount of blood the patient collected; your assessments
before and after the procedure, including vital signs; and the
patient’s tolerance of the procedure. Note the condition of
the IV site and the dressing applied. Record that the blood
sample was sent to the laboratory and that the blood was
sent to the blood bank. Document patient teaching topics
covered and the patient’s understanding of this
teaching.25,36
REFERENCES
1 AABB. (2012). Primer of blood administration. Bethesda, MD: AABB. Accessed
via the Web at
http://www.bloodcenter.org/webres/File/Hospital%20.pdf%20forms/primerofbl
oodadministration.pdf (Level VII)
2 American Society of Anesthesiologists. (2015). Practice guidelines for
perioperative blood management: An updated report by the American Society
of Anesthesiologists Task Force on Perioperative Blood Management.
Anesthesiology, 122, 241–275. (Level VII)
3 Standard 12. Product evaluation, integrity, and defect reporting. Infusion
therapy standards of practice. (2016). Journal of Infusion Nursing, 39, S32–
S34. (Level VII)
4 Standard 22. Vascular visualization. Infusion therapy standards of practice.
(2016). Journal of Infusion Nursing, 39, S44–S46. (Level VII)
5 DNV GL-Healthcare USA, Inc. (2016). PR.1 .SR.3 . NIAHO® accreditation
requirements: Interpretive guidelines & surveyor guidance (version 11).
Milford, OH: DNV GL-Healthcare USA, Inc. (Level VII)
6 The Joint Commission. (2019). Standard RI.01.03 .01. Comprehensive
accreditation manual for hospitals. Oakbrook Terrace, IL: The Joint
Commission. (Level VII)
7 Centers for Medicare and Medicaid Services, Department of Health and
Human Services. (2014). Condition of participation: Patient’s rights. 42 C.F.R.
§ 482.13(b)(2).
8 Accreditation Association for Hospitals and Health Systems. (2017). Standard
15.01.11. Healthcare Facilities Accreditation Program: Accreditation
requirements for acute care hospitals. Chicago, IL: Accreditation Association
for Hospitals and Health Systems. (Level VII)
9 Standard 9. Informed consent. Infusion therapy standards of practice. (2016).
Journal of Infusion Nursing, 39, S26–S28. (Level VII)
10 World Health Organization. (2009). “WHO guidelines on hand hygiene in
health care: First global patient safety challenge, clean care is safer care”
[Online]. Accessed via the Web at
http://apps.who.int/iris/bitstream/10665/44102/1/9789241597906_eng.pdf
(Level IV)
11 The Joint Commission. (2019). Standard NPSG.07.01.01. Comprehensive
accreditation manual for hospitals. Oakbrook Terrace, IL: The Joint
Commission. (Level VII)
12 Centers for Disease Control and Prevention. (2002). Guideline for hand
hygiene in health-care settings: Recommendations of the Healthcare Infection
Control Practices Advisory Committee and the HICPAC/SHEA/APIC/IDSA Hand
Hygiene Task Force. MMWR Recommendations and Reports, 51(RR-16), 1–45.
Accessed via the Web at https://www.cdc.gov/mmwr/pdf/rr/rr5116.pdf (Level
II)
13 Standard 16. Hand hygiene. Infusion therapy standards of practice. (2016).
Journal of Infusion Nursing, 39, S38–S39 . (Level VII)
14 Centers for Medicare and Medicaid Services, Department of Health and
Human Services. (2014). Condition of participation: Infection control. 42 C.F.R.
§ 482.42.
15 Accreditation Association for Hospitals and Health Systems. (2017). Standard
07.01.21. Healthcare Facilities Accreditation Program: Accreditation
requirements for acute care hospitals. Chicago, IL: Accreditation Association
for Hospitals and Health Systems. (Level VII)
16 DNV GL-Healthcare USA, Inc. (2016). IC.1 .SR.1 . NIAHO® accreditation
requirements: Interpretive guidelines & surveyor guidance (version 11).
Milford, OH: DNV GL-Healthcare USA, Inc. (Level VII)
17 The Joint Commission. (2019). Standard NPSG.01.01.01. Comprehensive
accreditation manual for hospitals. Oakbrook Terrace, IL: The Joint
Commission. (Level VII)
18 The Joint Commission. (2019). Standard RI.01.01.01. Comprehensive
accreditation manual for hospitals. Oakbrook Terrace, IL: The Joint
Commission. (Level VII)
19 DNV GL-Healthcare USA, Inc. (2016). PR.1.SR.5 . NIAHO® accreditation
requirements: Interpretive guidelines & surveyor guidance (version 11).
Milford, OH: DNV GL-Healthcare USA, Inc. (Level VII)
20 Centers for Medicare and Medicaid Services, Department of Health and
Human Services. (2015). Condition of participation: Patient’s rights. 42 C.F.R.
§ 482.13(c)(1).
21 Accreditation Association for Hospitals and Health Systems. (2017). Standard
15.01.16. Healthcare Facilities Accreditation Program: Accreditation
requirements for acute care hospitals. Chicago, IL: Accreditation Association
for Hospitals and Health Systems. (Level VII)
22 The Joint Commission. (2019). Standard PC.02.01.21. Comprehensive
accreditation manual for hospitals. Oakbrook Terrace, IL: The Joint
Commission. (Level VII)
23 Standard 8. Patient education. Infusion therapy standards of practice. (2016).
Journal of Infusion Nursing, 39, S25–S26. (Level VII)
24 Waters, T. R., et al. (2009). “Safe patient handling training for schools of
nursing” [Online]. Accessed via the Web at
https://www.cdc.gov/niosh/docs/2009-127/pdfs/2009-127.pdf (Level VII)
25 Infusion Nurses Society. (2016). Policies and procedures for infusion therapy
(5th ed.). Boston, MA: Infusion Nurses Society.
26 Occupational Safety and Health Administration. (n.d .). “Bloodborne
pathogens, standard number 1910.1030” [Online]. Accessed via the Web at
https://www.osha.gov/pls/oshaweb/owadisp.show_document?
p_id=10051&p_table=STANDARDS (Level VII)
27 Siegel, J. D ., et al. (2007, revised 2017). “2007 guidelines for isolation
precautions: Preventing transmission of infectious agents in healthcare
settings” [Online]. Accessed via the Web at
https://www.cdc.gov/infectioncontrol/pdf/guidelines/isolation-guidelines.pdf
(Level II)
28 Standard 19. Standard precautions. Infusion therapy standards of practice.
(2016). Journal of Infusion Nursing, 39, S41–S42. (Level VII)
29 Accreditation Association for Hospitals and Health Systems. (2017). Standard
07.01.10. Healthcare Facilities Accreditation Program: Accreditation
requirements for acute care hospitals. Chicago, IL: Accreditation Association
for Hospitals and Health Systems. (Level VII)
30 DNV GL-Healthcare USA, Inc. (2016). IC.1 .SR.2 . NIAHO® accreditation
requirements: Interpretive guidelines & surveyor guidance (version 11).
Milford, OH: DNV GL-Healthcare USA, Inc. (Level VII)
31 Standard 27. Site selection. Infusion therapy standards of practice. (2016).
Journal of Infusion Nursing, 39, S54–S58. (Level VII)
32 Standard 64. Therapeutic phlebotomy. Infusion therapy standards of practice.
(2016). Journal of Infusion Nursing, 39, S138–S139. (Level VII)
33 Ganz, D. A., et al. (2013). Preventing falls in hospitals: A toolkit for improving
quality of care (AHRQ Publication No. 13-0015-EF). Rockville, MD: Agency for
Healthcare Research and Quality. Accessed via the Web at
http://www.ahrq.gov/sites/default/files/publications/files/fallpxtoolkit.pdf
(Level VII)
34 Standard 18. Medical waste and sharps safety. Infusion therapy standards of
practice. (2016). Journal of Infusion Nursing, 39, S40–S41 (Level VII)
35 The Joint Commission. (2019). Standard RC.01.03 .01. Comprehensive
accreditation manual for hospitals. Oakbrook Terrace, IL: The Joint
Commission. (Level VII)
36 Standard 10. Documentation in the medical record. Infusion therapy
standards of practice. (2016). Journal of Infusion Nursing, 39, S28–S30 . (Level
VII)
37 Centers for Medicare and Medicaid Services, Department of Health and
Human Services. (2015). Condition of participation: Medical record services.
42 C.F.R. § 482.24(b).
38 Accreditation Association for Hospitals and Health Systems. (2017). Standard
10.00 .03. Healthcare Facilities Accreditation Program: Accreditation
requirements for acute care hospitals. Chicago, IL: Accreditation Association
for Hospitals and Health Systems. (Level VII)
39 DNV GL-Healthcare USA, Inc. (2016). MR.2 .SR.1 . NIAHO® accreditation
requirements: Interpretive guidelines & surveyor guidance (version 11).
Milford, OH: DNV GL-Healthcare USA, Inc. (Level VII)
AUTOLOGOUS BLOOD TRANSFUSION,
PERIOPERATIVE
Perioperative autologous blood transfusion is the collection
and transfusion of the patient’s own blood collected
intraoperatively from the operative site or from an
extracorporeal circuit. One benefit of this procedure is that
the patient can receive autologous blood, thereby,
minimizing the need for allogenic blood transfusion.1,2 It
may be used during vascular or orthopedic surgery because
considerable bleeding can result from these surgeries, and
during the treatment of traumatic injury.
Perioperative
autologous blood transfusion
is
contraindicated in situations (such as trauma) that increase
the risk of blood contamination with bacteria, tumor cells, or
other harmful substances.1
Various types of devices can be used to retrieve blood
from the operative site; apheresis devices are available to
prepare the components intraoperatively. (See Autologous
blood recovery systems.) Follow the manufacturer’s
instructions when collecting, storing, and transfusing the
patient’s blood using an autologous blood recovery system.1
Equipment
Gloves ▪ data recoding form ▪ vital signs monitoring
equipment ▪ antiseptic pad (chlorhexidine-based, povidone-
iodine, or alcohol) ▪ 250-mL bag of normal saline solution ▪
blood administration set with microaggregate filter ▪ 14G to
24G venous access catheter ▪ IV pole ▪ wall suction with
pressure gauge, as needed ▪ autologous blood recovery
system device system with necessary supplies; for a Cell
Saver® 5+ unit, suction tubing and collection kit (an
autotransfusion drain usually has stand-alone functioning) ▪
AUTOLOGOUS BLOOD label ▪ Optional: mask with face shield or
mask and goggles, gown, labels, IV catheter insertion
equipment.
Preparation of equipment
Inspect all IV equipment and supplies; if a product is
expired, has compromised integrity, or is defective, remove
it from patient use, label it as expired or defective, and
report the expiration or defect as directed by your facility.3
Implementation
■ Verify the practitioner’s order for the rate of reinfusion
and the amount of blood to be reinfused.
■ Confirm that the practitioner has obtained written
informed consent for blood and blood product transfusion
and that the consent form is in the patient’s medical
record.4,5,6,7,8
■ Call the perfusionist to set up the autologous blood
recovery system device and connect the tubing to the setup
following the manufacturer’s instructions. (Note that the
person responsible for this step may vary by facility. The
perioperative nurse or anesthesia care provider may set up
the device in some facilities.)
■ Perform hand hygiene.9,10,11,12,13,14,15,16
■ Confirm the patient’s identity using at least two patient
identifiers.17
■ Put on gloves and, as needed, other personal protective
equipment
to
comply
with
standard
precautions.18,19,20,21,22,23
■ Make sure the collection chamber and the blood transfer
bag are clearly marked with the patient’s first and last
name, identifying numbers, date and time of the collection
initiation, and an AUTOLOGOUS BLOOD label. If applicable,
include the time of, or condition for, expiration.1,24
■ Obtain and record the patient’s vital signs before the
transfusion to serve as a baseline for comparison.
■ Ensure that the patient has adequate venous access,
either peripheral or central, with an appropriate-size
catheter (14G to 24G).25 Verify patency by aspirating for a
blood return. Insert an IV catheter if necessary. (See the “IV
catheter insertion” procedure.)
■ Insert one spike of the standard Y-type blood
administration set into the 250-mL bag of normal saline
solution. Close all clamps and hang the blood administration
set on an IV pole.
■ The anesthesia care provider, perioperative nurse, or
perfusionist will start blood collection according to the
device manufacturer’s instructions. (Some devices process
and centrifuge the blood automatically.)
■ Monitor the patient’s vital signs closely for signs of
hypotension during this process. Hypotension may occur as
the result of hypovolemia.26
■ Monitor the status of the blood collection.
■ When enough blood has been collected to transfuse,
spike the blood transfer bag with the open port of the blood
administration set, remove all air from the blood transfer
bag, and hang the bag on the IV pole.
■ Open the clamp from the normal saline solution and
prime the filter and tubing to remove all air from the tubing.
Close the clamp from the normal saline solution.
■ Open the clamp from the blood transfer bag to the drip
chamber of the blood administration set and prime the filter
and tubing with blood to remove all air from the tubing.
■ If you’re using a postprocedure transfusion device, follow
the manufacturer’s instructions to properly connect the
device to the patient. (Staff members should receive
training on all transfusion devices before use.)
■ Perform a vigorous mechanical scrub of the needleless
connector for at least 5 seconds using an antiseptic pad.
Allow it to dry completely.27,28
■ Attach the blood administration set to the venous access
device and trace the tubing from the patient to its point of
origin before beginning the transfusion to make sure it’s
connected to the proper port.29 Route the tubing in a
standardized direction if the patient has other tubing and
catheters that have different purposes. Label the tubing at
the distal (near the patient connection) and proximal (near
the source container) ends to reduce misconnection if
multiple IV lines will be used.30
■ Begin the transfusion, as ordered.
■ Monitor the patient throughout the procedure.2
■ Obtain vital signs during the transfusion at an interval
indicated by the patient’s condition or at a frequency
determined by your facility.25
■ Make sure the reinfusion is completed in the surgery suite
or postanesthesia care unit within the time period defined
by the system used1 or within your facility’s recommended
time frame.
■ Obtain the patient’s vital signs after the transfusion is
complete.
■ Disconnect the blood recovery system from the patient’s
drains or have the anesthesia care provider, perioperative
nurse, or perfusionist do so.
■ Recheck the laboratory data for coagulation profile,
hemoglobin, hematocrit, and calcium levels after the
transfusion is complete, or as the practitioner orders. Notify
the practitioner of critical test results within your facility’s
established time frame so that the patient can be treated
promptly.31
EQUIPMENT
Respirator seal check
Autologous blood recovery systems are used in surgical procedures to
salvage red blood cells (RBCs) when there’s rapid bleeding or high-volume
blood loss. Shed blood is collected and stored in a reservoir, where waste is
separated from the healthy RBCs. The waste collects into a separate bag;
healthy RBCs are then returned to the patient. This process can be performed
in 3 to 7 minutes. In emergencies, the autologous blood recovery system can
process up to 800 mL of blood each minute.
Advantages to autologous blood recovery systems include:
■ up-to-date microprocessor and sensor technologies
■ automated operation and manual operation options
■ platelet sequestration
■ RBC bags with integrated microaggregate filters
■ features to ensure consistent processing and a high-quality blood product
■ fast processing
■ built-in safety features.
■ Discard used supplies in appropriate receptacles.18,19,32
■ Remove and discard your personal protective
equipment18,19,32
and
perform
hand
hygiene.9,10,11,12,13,14,15,16
■ Document the procedure.33,34,35,36,37
Special considerations
■ If multiple units are to be transfused, change the blood
administration setup and filter after the completion of each
unit or every 4 hours. If more than one unit can be infused
within 4 hours, the administration set can be used for 4
hours.25
■ Be aware that you may need to replace clotting factors,
fresh frozen plasma, or platelets if you’re reinfusing large
volumes of blood.
■ Certain religious groups refuse blood transfusions
because of their beliefs. However, many of these groups
permit autologous blood transfusion if it’s kept in a
continuous closed circuit.26
■ The Joint Commission issued a sentinel event alert related
to managing risk during transition to the new International
Organization for Standardization tubing standards; the new
standards were designed to prevent dangerous tubing
misconnections, which can lead to serious patient injury and
death. During the transition, make sure to trace all tubing
and catheters from the patient to their points of origin
before connecting or reconnecting any device or infusion, at
any care transition (such as to a new setting or service), and
as part of the handoff process. Additional protective
measures include routing tubes and catheters having
different purposes in different, standardized directions;
labeling the tubing at the distal and proximal ends when
there are different access sites or several bags hanging;
using tubing and equipment only as intended; and storing
medications for different delivery routes in separate
locations.30
Complications
More complications are associated with the reinfusion of
filtered, unwashed blood than with the transfusion of
filtered, washed blood. These complications include fever,
hypotension, myocardial infarction, infections, particulate
and air embolism, and thrombocytopenia. Complications are
more pronounced when the time from salvage to transfusion
is greater than 6 hours. (See Managing problems of
autologous blood transfusion, page 40.)
Documentation
Document the time the collection began, the time the
transfusion started and ended, and the venous access site
used for the transfusion. Include the patient’s vital signs
before, during, and after transfusion. Note the amount of
blood collected and transfused and the system used. Also,
document any posttransfusion laboratory studies obtained.
Document the patient’s tolerance of the procedure, any
patient teaching, and the patient’s understanding of your
teaching.24
Managing problems of autologous
blood transfusion
This chart describes the problems related to autologous blood transfusion,
their possible causes, and interventions to manage them.
REFERENCES
1 AABB. (2012). Primer of blood administration. Bethesda, MD: AABB. Accessed
via the Web at http://www.bloodcenter.org/webres/File/Hospital%
20.pdf%20forms/primerofbloodadministration.pdf (Level VII)
2 American Society of Anesthesiologists. (2015). Practice guidelines for
perioperative blood management: An updated report by the American Society
of Anesthesiologists Task Force on Perioperative Blood Management.
Anesthesiology, 122, 241–275. Accessed via the Web at
http://anesthesiology.pubs.asahq.org/article.aspx?articleid=2088825 (Level
VII)
3 Standard 12. Product evaluation, integrity, and defect reporting. Infusion
therapy standards of practice. (2016). Journal of Infusion Nursing, 39, S32–
S34. (Level VII)
4 The Joint Commission. (2019). Standard RI.01.03 .01. Comprehensive
accreditation manual for hospitals. Oakbrook Terrace, IL: The Joint
Commission. (Level VII)
5 Centers for Medicare and Medicaid Services, Department of Health and
Human Services. (2015). Condition of participation: Patient’s rights. 42 C.F.R.
§ 482.13(b)(2).
6 Accreditation Association for Hospitals and Health Systems. (2017). Standard
15.01.11. Healthcare Facilities Accreditation Program: Accreditation
requirements for acute care hospitals. Chicago, IL: Accreditation Association
for Hospitals and Health Systems. (Level VII)
7 DNV GL-Healthcare USA, Inc. (2016). PR.1 .SR.3 . NIAHO® accreditation
requirements: Interpretive guidelines & surveyor guidance (version 11).
Milford, OH: DNV GL-Healthcare USA, Inc. (Level VII)
8 Standard 9. Informed consent. Infusion therapy standards of practice. (2016).
Journal of Infusion Nursing, 39, S26–S28. (Level VII)
9 The Joint Commission. (2019). Standard NPSG.07.01.01. Comprehensive
accreditation manual for hospitals. Oakbrook Terrace, IL: The Joint
Commission. (Level VII)
10 Centers for Disease Control and Prevention. (2002). Guideline for hand
hygiene in health-care settings: Recommendations of the Healthcare Infection
Control Practices Advisory Committee and the HICPAC/SHEA/APIC/IDSA Hand
Hygiene Task Force. MMWR Recommendations and Reports, 51(RR-16), 1–45.
Accessed via the Web at https://www.cdc.gov/mmwr/pdf/rr/rr5116.pdf (Level
II)
11 World Health Organization. (2009). “WHO guidelines on hand hygiene in
health care: First global patient safety challenge, clean care is safer care”
[Online]. Accessed via the Web at
http://apps.who.int/iris/bitstream/10665/44102/1/9789241597906_eng.pdf
(Level IV)
12 Van Wicklin, S. A., & Conner, R. (2018). Guideline for hand hygiene. In R.
Conner (Ed.), Guidelines for perioperative practice: 2018 edition. Denver, CO:
AORN, Inc. (Level VII)
13 Standard 16. Hand hygiene. Infusion therapy standards of practice. (2016).
Journal of Infusion Nursing, 39, S38–S39 . (Level VII)
14 Centers for Medicare and Medicaid Services, Department of Health and
Human Services. (2015). Condition of participation: Infection control. 42 C.F.R.
§ 482.42.
15 Accreditation Association for Hospitals and Health Systems. (2017). Standard
07.01.21. Healthcare Facilities Accreditation Program: Accreditation
requirements for acute care hospitals. Chicago, IL: Accreditation Association
for Hospitals and Health Systems. (Level VII)
16 DNV GL-Healthcare USA, Inc. (2016). IC.1 .SR.1 . NIAHO® accreditation
requirements: Interpretive guidelines & surveyor guidance (version 11).
Milford, OH: DNV GL-Healthcare USA, Inc. (Level VII)
17 The Joint Commission. (2019). Standard NPSG.01.01.01. Comprehensive
accreditation manual for hospitals. Oakbrook Terrace, IL: The Joint
Commission. (Level VII)
18 Siegel, J. D ., et al. (2007, revised 2017). “2007 guideline for isolation
precautions: Preventing transmission of infectious agents in healthcare
settings” [Online]. Accessed via the Web at
https://www.cdc.gov/infectioncontrol/pdf/guidelines/isolation-guidelines.pdf
(Level II)
19 Occupational Safety and Health Administration (n.d .). “Bloodborne
pathogens, standard number 1910.1030” [Online]. Accessed via the Web at
https://www.osha.gov/pls/oshaweb/owadisp.show_document?
p_id=10051&p_table=STANDARDS (Level VII)
20 Accreditation Association for Hospitals and Health Systems. (2017). Standard
07.01.10. Healthcare Facilities Accreditation Program: Accreditation
requirements for acute care hospitals. Chicago, IL: Accreditation Association
for Hospitals and Health Systems. (Level VII)
21 DNV GL-Healthcare USA, Inc. (2016). IC.1 .SR.2 . NIAHO® accreditation
requirements: Interpretive guidelines & surveyor guidance (version 11).
Milford, OH: DNV GL-Healthcare USA, Inc. (Level VII)
22 Van Wicklin, S. A., & Conner, R. (2018). Guideline for prevention of
transmissible infections. In R. Conner (Ed.), Guidelines for perioperative
practice: 2018 edition. Denver, CO: AORN, Inc. (Level VII)
23 Standard 19. Standard precautions. Infusion therapy standards of practice.
(2016). Journal of Infusion Nursing, 39, S41–S42. (Level VII)
24 The Joint Commission. (2019). Standard NPSG.01.03 .01. Comprehensive
accreditation manual for hospitals. Oakbrook Terrace, IL: The Joint
Commission. (Level VII)
25 Standard 62. Transfusion therapy. Infusion therapy standards of practice.
(2016). Journal of Infusion Nursing, 39, S135–S137. (Level VII)
26 John, T., et al. (2008). Blood conservation in a congenital cardiac surgery
program. AORN Journal, 87, 1180–1190. Accessed via the Web at
http://www.aornjournal.org/article/S0001-2092(08)00183-X/fulltext (Level IV)
27 Standard 34. Needleless connectors. Infusion therapy standards of practice.
(2016). Journal of Infusion Nursing, 39, S68–S70. (Level VII)
28 Marschall, J., et al. (2014). SHEA/IDSA practice recommendation: Strategies
to prevent central line–associated bloodstream infections in acute care
hospitals: 2014 update. Infection Control and Hospital Epidemiology, 35, 753–
771. Accessed via the Web at http://www.jstor.org/stable/10.1086/676533
(Level I)
29 U.S . Food and Drug Administration. (n.d .). “Look. Check. Connect. Safe
medical device connections save lives” [Online]. Accessed via the Web at
http://www.fda.gov/downloads/MedicalDevices/Safety/AlertsandNotices/UCM1
34873.pdf
30 The Joint Commission. (2014). “Sentinel event alert: Managing risk during
transition to new ISO tubing connector standards” [Online]. Accessed via the
Web at http://www.jointcommission.org/assets/1/6/SEA_53_Connectors_
8_19_14 _final.pdf (Level VII)
31 The Joint Commission. (2019). Standard NPSG.02.03 .01. Comprehensive
accreditation manual for hospitals. Oakbrook Terrace, IL: The Joint
Commission. (Level VII)
32 Standard 18. Medical waste and sharps safety. Infusion therapy standards of
practice. (2016). Journal of Infusion Nursing, 39, S40–S41. (Level VII)
33 The Joint Commission. (2019). Standard RC.01.03 .01. Comprehensive
accreditation manual for hospitals. Oakbrook Terrace, IL: The Joint
Commission. (Level VII)
34 Standard 10. Documentation in the medical record. Infusion therapy
standards of practice. (2016). Journal of Infusion Nursing, 39, S28–S30 . (Level
VII)
35 Centers for Medicare and Medicaid Services, Department of Health and
Human Services. (2015). Condition of participation: Medical record services.
42 C.F.R. § 482.24(b).
36 Accreditation Association for Hospitals and Health Systems. (2017). Standard
10.00 .03. Healthcare Facilities Accreditation Program: Accreditation
requirements for acute care hospitals. Chicago, IL: Accreditation Association
for Hospitals and Health Systems. (Level VII)
37 DNV GL-Healthcare USA, Inc. (2016). MR.2 .SR.1 . NIAHO® accreditation
requirements: Interpretive guidelines & surveyor guidance (version 11).
Milford, OH: DNV GL-Healthcare USA, Inc. (Level VII)
AUTOMATED EXTERNAL DEFIBRILLATION
Automated external defibrillators (AEDs) are commonly used
to meet the need for early defibrillation, which is currently
considered the most effective treatment for ventricular
fibrillation (VF) and pulseless ventricular tachycardia. Some
facilities now require every noncritical care unit to have an
AED. These devices provide a means to facilitate early
defibrillation in areas of a health care facility where staff
members have no rhythm recognition skills and
defibrillators aren’t frequently used. When AEDs are used in
health care facilities, first-responding staff should have
training to use the AED and have a goal of delivering the
first shock within 3 minutes of the patient’s collapse.1 AEDs
are also commonly used in such public places as shopping
malls, sports stadiums, and airplanes. Instruction in using an
AED is required as part of both basic life support (BLS) and
advanced cardiac life support (ACLS) training, pediatric
advanced life support (PALS) training, and HeartSaver AED
courses.
AEDs provide early defibrillation even when no health care
provider is present. The AED interprets the victim’s cardiac
rhythm and gives the operator step-by-step directions on
how to proceed if defibrillation is indicated. (See
Understanding an AED, page 42.) Studies have shown that
when laypersons with AED training use public defibrillation
equipment to resuscitate victims of sudden cardiac arrest
resulting from VF, the survival rate is 41% to 74% when
cardiopulmonary resuscitation (CPR) is initiated immediately
and defibrillation occurs within 5 minutes.2
The American Heart Association guidelines for CPR and
emergency cardiovascular care
recommend
rapid
integration of CPR with the use of an AED, as follows:1,2,3
■ For a witnessed adult cardiac arrest when an AED is
immediately available, use the defibrillator as soon as
possible. For adults with unmonitored cardiac arrest or for
whom an AED isn’t immediately available, initiate CPR, and
then use the AED as soon as it is available.1
■ When two rescuers are available, one rescuer should
begin CPR immediately while the second rescuer activates
the emergency response system and obtains and prepares
the defibrillator.1,2
■ CPR and defibrillation should be coordinated to minimize
the time between stopping compressions and administering
the shock.1,4
■ First-responding personnel should receive AED training
with the goal of delivering the first shock for any
spontaneous cardiac arrest within 3 minutes of collapse.1,4
■ For children ages 1 to 8, the use of a pediatric dose
attenuator system along with an AED is preferable. If one
isn’t available, a standard AED can be used.3
■ If pediatric pads aren’t available, adult pads can be used
on a child. Place the pads at least 1′′ (2.5 cm) apart, or use
an anterior-posterior pad position.5
■ For infants, the use of a manual defibrillator is preferred
over an AED. However, if one isn’t available, an AED with a
pediatric dose attenuator system may be used. If neither
defibrillator is available, an AED without a dose attenuator
may be used as a last resort.2,3
Equipment
AED ▪ two prepackaged, unopened AED electrodes ▪ gloves
▪ Optional: clippers.
Preparation of equipment
Verify that the AED is charging when not in use. Examine
cables, connectors, and accessories for tears, cuts, and
exposed wires, and replace as needed. Verify that the
electrode pads are in sealed packages and haven’t expired;
obtain new ones if the integrity of the packaging is
compromised or if the electrodes have expired.
Implementation
■ Perform hand hygiene.6,7,8,9,10,11
■ Put on gloves and follow standard precautions throughout
the procedure.12,13,14
■ After determining that the patient is unresponsive to
questions and is apneic or only gasping, start CPR and
follow BLS and ACLS protocols.1,3
■ While you are performing CPR, ask a colleague to activate
the emergency response system, bring the AED into the
patient’s room, and set it up as described below before the
code team arrives.
■ Turn on the AED and follow the visual or audible prompts.
■ Open the foil packets containing the two electrode pads.
■ Expose the patient’s chest.
■ Make sure the patient is in a dry environment and that
the patient’s chest is dry, because if personnel or the
patient’s skin comes in contact with water, personnel may
receive a shock and the patient may receive skin burns
during defibrillation. In addition, make sure that the areas
where the electrodes will be applied are dry, because
moisture under the pads can decrease the effectiveness of
contact with the skin.5
■ Remove metal objects that the patient may be wearing,
because metal conducts electricity and could cause burns
during defibrillation.5
■ Remove transdermal patches from the patient’s chest
(and back, if using anterior–posterior placement), because
the medication may interfere with current conduction and
produce burns.2,5
EQUIPMENT
Understanding an AED
Each automated external defibrillator (AED) is equipped with a
microcomputer that senses and analyzes a patient’s heart rhythm at the
push of a button. It then audibly or visually prompts the user to deliver a
shock. AED models all have the same basic function, but each offers different
operating options. For example, all AEDs communicate display directions via
messages on a display screen or give voice commands, or both, but some
AEDs simultaneously display a patient’s heart rhythm as well.
All devices record the operator’s interactions with the patient during
defibrillation, either on a cassette tape or in a solid-state memory module.
Some AEDs have an integral printer for immediate event documentation. The
patient’s practitioner may review the documented events. Local and state
regulations govern who is responsible for collecting AED case data for
reporting purposes.
There are two types of automated defibrillators: one with monophasic
waveforms and one with biphasic waveforms. Monophasic waveform
defibrillators were introduced first, and some are still in use today. The
energy level on this type of device is usually preset by the manufacturer.
Most AEDs use biphasic waveforms. These devices are typically set to deliver
escalating energy levels for the first three shocks and then, after the third
shock, deliver subsequent shocks at the same energy as the third shock.
Energy levels are commonly preconfigured at 120 to 200 joules.2 The optimal
energy level for a biphasic waveform defibrillator hasn’t been determined.
The optimal dose for each device that has proven most effective in
eliminating ventricular fibrillation should be noted on the device.
■ Remove the plastic backing film from the AED electrodes.
■ Place one electrode pad on the right side of the patient’s
bare, dry chest just below the clavicle. Place the second
electrode pad on the left side of the patient’s bare, dry
chest to the left of the heart’s apex.2 Typically, images
showing proper placement are located on the anterior
surface of the electrodes (depending on the manufacturer).
NURSING ALERT Don’t interrupt CPR for electrode placement; even a
few seconds of interruption can decrease coronary blood flow.4,15
NURSING ALERT Don’t place the electrode pads directly over an
implantable cardioverter-defibrillator or implanted pacemaker; this
placement may damage the device. Keep the electrodes about 3′′ (7.6
cm) from the device, as recommended.5
■ Attach one AED electrode to each electrode cable (if not
already attached), and then connect the cable to the AED.
■ Now the machine is ready to analyze the patient’s heart
rhythm. Ask everyone to stand clear, and press the ANALYZE
button when the machine prompts you to do so. Be careful
not to touch or move the patient while the AED is in analysis
mode, because doing so may cause a delay in the AED’s
ability to analyze the rhythm.5 (If you get a CHECK ELECTRODES
message, make sure the electrodes are correctly placed and
the patient cable is securely attached; then press the ANALYZE
button again.)
■ Wait for the AED to analyze the patient’s heart rhythm.
When the patient needs a shock, the AED will prompt you
with a STAND CLEAR message and emit a beep that changes
into a steady tone as it’s charging. If no shock is needed,
the AED will display a NO SHOCK INDICATED message and prompt
you to CHECK PATIENT.
■ When the AED is fully charged and prompts you to deliver
a shock, make sure no one is touching the patient or bed,
and call out “Stand clear.” Then press the SHOCK button on
the AED. Most AEDs are ready to deliver a shock within 15
seconds. (Note that some fully automated AEDS
automatically deliver a shock within 15 seconds after
analyzing the patient’s rhythm.)
■ After the first shock, immediately continue CPR for about
five cycles, beginning with chest compressions, for about 2
minutes. Don’t delay compressions to recheck rhythm or
pulse. After five cycles of CPR, the AED should analyze the
rhythm again and deliver another shock, if indicated.1,2
■ If a nonshockable heart rhythm is detected, the AED
should instruct you to resume CPR. Then continue the
algorithm sequence until the code leader arrives.
■ After the code, remove and transcribe the AED’s
computer memory module or tape, or prompt the AED to
print a rhythm strip with code data. Analyze and store the
code data as directed by your facility.
■ Be sure to clean and disinfect the AED after use and
replace electrodes.16,17
■ Remove and discard your gloves.12
■ Perform hand hygiene.6,7,8,9,10,11
■ Document the procedure.18,19,20,21
Special considerations
■ AEDs vary by manufacturer, so familiarize yourself with
your facility’s equipment.
■ AED operation should be checked at an interval
established by your facility, usually after each use and every
8 hours. Consider using a checklist to maintain AED in a
state of readiness.2
■ Acceptable alternative electrode placement includes bi-
axillary positioning with pads placed on the right and left
lateral chest walls, or placement of one pad in the standard
apical position with the other pad on the right or left upper
back.2
■ Excessive chest hair can interfere with optimal AED
electrode adhesion and may need to be removed. Use
clippers to remove the hair, or rapidly remove the AED
electrode and apply a new one.2
■ Avoid placing the AED electrode pad on the sternum,
because bone blocks some of the energy and decreases
effectiveness.5
■ After using an AED, give a synopsis to the code team
leader that includes the patient’s name, age, medical
history, and chief complaint; time you found the patient in
cardiac arrest, time you started CPR, and time you applied
the AED; number of shocks the patient received; any time
the patient regained a pulse; any post-arrest care provided;
and physical assessment findings.
Complications
Defibrillation can cause accidental electric shock to those
providing care and skin burns to the patient. Radio-
frequency (RF) interference may result in improper device
operation, a distorted electrocardiogram (ECG), or failure to
detect a shockable rhythm. Avoid operation of the device
near cauterizers, diathermy equipment, cellular phones, or
other portable and mobile RF communication equipment.
Documentation
Document the procedure, including the patient’s ECG
rhythm before and after defibrillation; the number of times
defibrillation was performed; the energy used with each
attempt; whether a pulse returned; the dosage, route, and
time of drug administration; whether CPR was performed;
how the patient’s airway was maintained; and the patient’s
outcome.
REFERENCES
1 American Heart Association. (2015). 2015 American Heart Association
guidelines update for cardiopulmonary resuscitation and emergency
cardiovascular care. Circulation, 132, S414–S435. (Level II)
2 American Heart Association. (2010). 2010 American Heart Association
guidelines for cardiopulmonary resuscitation and emergency cardiovascular
care. Circulation, 122, S706–S719. (Level II)
3 American Heart Association. (2015). 2015 American Heart Association
guidelines update for cardiopulmonary resuscitation and emergency
cardiovascular care. Circulation, 132, S519–S525. (Level II)
4 American Heart Association. (2013). Strategies for improving survival after in-
hospital cardiac arrest in the United States: 2013 consensus
recommendations. Circulation, 127, 1538–1563. Accessed via the Web at
http://circ.ahajournals.org/content/127/14/1538.full (Level VII)
5 Wiegand, D. L. (2017). AACN procedure manual for high acuity, progressive,
and critical care (7th ed.). Philadelphia, PA: Saunders.
6 World Health Organization. (2009). “WHO guidelines on hand hygiene in
health care: First global patient safety challenge, clean care is safer care”
[Online]. Accessed via the Web at
http://apps.who.int/iris/bitstream/10665/44102/1/9789241597906_eng.pdf
(Level IV)
7 The Joint Commission. (2019). Standard NPSG.07.01.01. Comprehensive
accreditation manual for hospitals. Oakbrook Terrace, IL: The Joint
Commission. (Level VII)
8 Centers for Disease Control and Prevention. (2002). Guideline for hand
hygiene in health-care settings: Recommendations of the Healthcare Infection
Control Practices Advisory Committee and the HICPAC/SHEA/APIC/IDSA Hand
Hygiene Task Force. MMWR Recommendations and Reports, 51(RR-16), 1–45.
Accessed via the Web at https://www.cdc.gov/mmwr/pdf/rr/rr5116.pdf (Level
II)
9 Centers for Medicare and Medicaid Services, Department of Health and
Human Services. (2015). Condition of participation: Infection control. 42 C.F.R.
§ 482.42.
10 Accreditation Association for Hospitals and Health Systems. (2017). Standard
07.01.21. Healthcare Facilities Accreditation Program: Accreditation
requirements for acute care hospitals. Chicago, IL: Accreditation Association
for Hospitals and Health Systems. (Level VII)
11 DNV GL-Healthcare USA, Inc. (2016). IC.1 .SR.1 . NIAHO® accreditation
requirements: Interpretive guidelines & surveyor guidance (version 11).
Milford, OH: DNV GL-Healthcare USA, Inc. (Level VII)
12 Siegel, J. D ., et al. (2007, revised 2017). “2007 guideline for isolation
precautions: Preventing transmission of infectious agents in healthcare
settings” [Online]. Accessed via the Web at
https://www.cdc.gov/infectioncontrol/pdf/guidelines/isolation-guidelines.pdf
(Level II)
13 Accreditation Association for Hospitals and Health Systems. (2017). Standard
07.01.10. Healthcare Facilities Accreditation Program: Accreditation
requirements for acute care hospitals. Chicago, IL: Accreditation Association
for Hospitals and Health Systems. (Level VII)
14 DNV GL-Healthcare USA, Inc. (2016). IC.1 .SR.2 . NIAHO® accreditation
requirements: Interpretive guidelines & surveyor guidance (version 11).
Milford, OH: DNV GL-Healthcare USA, Inc. (Level VII)
15 Meaney, P. A. (2013). Cardiopulmonary resuscitation quality: Improving
cardiac resuscitation outcomes both inside and outside the hospital.
Circulation, 128, 417–435. Accessed via the Web at
http://circ.ahajournals.org/content/128/4/417.full (Level VII)
16 Rutala, W. A., et al. (2008, revised 2017). “Guideline for disinfection and
sterilization in healthcare facilities, 2008” [Online]. Accessed via the Web at
https://www.cdc.gov/infectioncontrol/pdf/guidelines/disinfection-
guidelines.pdf (Level I)
17 Accreditation Association for Hospitals and Health Systems. (2017). Standard
07.02.03. Healthcare Facilities Accreditation Program: Accreditation
requirements for acute care hospitals. Chicago, IL: Accreditation Association
for Hospitals and Health Systems. (Level VII)
18 The Joint Commission. (2019). Standard RC.01.03 .01. Comprehensive
accreditation manual for hospitals. Oakbrook Terrace, IL: The Joint
Commission. (Level VII)
19 Centers for Medicare and Medicaid Services, Department of Health and
Human Services. (2015). Condition of participation: Medical record services.
42 C.F.R. § 482.24(b).
20 Accreditation Association for Hospitals and Health Systems. (2017). Standard
10.00 .03. Healthcare Facilities Accreditation Program: Accreditation
requirements for acute care hospitals. Chicago, IL: Accreditation Association
for Hospitals and Health Systems. (Level VII)
21 DNV GL-Healthcare USA, Inc. (2016). MR.2 .SR.1 . NIAHO® accreditation
requirements: Interpretive guidelines & surveyor guidance (version 11).
Milford, OH: DNV GL-Healthcare USA, Inc. (Level VII)
B
BACK CARE
Regular bathing and massage of a patient’s neck, back,
buttocks, and upper arms allows assessment of the
patient’s skin condition. Massage increases the blood supply
to skin and muscles, promotes comfort and relaxation, and
improves sleep.1 However, massage is no longer
recommended for bedridden patients at high risk for
pressure injury,2 and back massage is contraindicated in
patients with rib or vertebral fractures, open wounds, stage I
pressure injuries, or burns.1,2
Equipment
Skin cleaner ▪ bath blanket ▪ bath towel ▪ washcloth ▪
warm water ▪ skin moisturizer3 ▪ Optional: bath basin,
gloves (if the patient has open lesions or has been
incontinent), bed linens, hypoallergenic moisturizer, no-rinse
pH-neutral skin cleanser
Preparation of equipment
Fill a bath basin with warm water. Alternatively, soak a
washcloth with warm water directly from the patient’s sink.
Implementation
■ Gather and prepare the necessary equipment at the
patient’s bedside.
■ Perform hand hygiene.4,5,6,7,8,9
■ Put on gloves to comply with standard precautions.10,11
■ Confirm the patient’s identity using at least two patient
identifiers.12
■ Provide privacy.13,14,15,16
■ Explain the procedure to the patient.17 Instruct the
patient to tell you if you’re applying too much or too little
pressure.
■ Raise the patient’s bed to waist level while providing care
to help prevent caregiver back strain.18
■ Place the patient in the prone position, if possible, or on
his or her side, and lower the head of the patient’s bed, if
the patient’s condition allows. Position the patient along the
edge of the bed nearest to you to help prevent caregiver
back strain.
■ Untie the patient’s gown, and expose the back, shoulders,
and buttocks. Then drape the patient with a bath blanket to
prevent chills and minimize exposure. Place a bath towel
next to or under the patient’s side to protect bed linens from
moisture.
■ Fold the washcloth around your hand to form a mitt to
prevent the loose ends of the cloth from dripping water onto
the patient and to keep the cloth warm longer. (See Making
a washcloth mitt, page 44.)
■ Dip the washcloth mitt into the basin of warm water and
apply a skin cleanser to the washcloth. Alternatively, wet
the washcloth at the patient’s sink.
■ Using long, firm strokes, bathe the patient’s back,
beginning at the neck and shoulders and moving downward
to the buttocks.
■ After washing the patient’s back, rinse and dry the skin
well. Pay special attention to the patient’s buttocks because
moisture trapped between the buttocks may cause chafing,
which increases the risk of pressure injury. Residual cleanser
on the patient’s skin may also cause itching and dryness.
■ Examine the patient’s skin closely, especially the bony
prominences of the shoulders, the scapulae, and the coccyx,
for redness or abrasions.
■ Pour a small amount of moisturizer into your palm. Rub
your hands together to warm and distribute the moisturizer.
Then apply the moisturizer to the patient’s back, using long,
firm strokes. The moisturizer moisturizes the patient’s skin
and reduces friction, making back massage easier. Use
moisturizer from a separate container for each patient to
prevent cross-contamination.
■ If permitted by the patient’s condition, massage the back,
beginning at the base of the spine and moving upward to
the shoulders. For a relaxing effect, massage slowly; for a
stimulating effect, massage quickly. Avoid vigorous massage
over bony prominences to reduce the risk of pressure
injuries.3 Alternate the three basic strokes: effleurage,
friction, and petrissage. (See How to perform a back
massage, page 44.) Add moisturizer as needed, keeping one
hand on the patient’s back to avoid interrupting the
massage.
Making a washcloth mitt
To make a washcloth mitt, take a clean, dry washcloth and fold it in thirds
lengthwise around your hand. Fold the top of the washcloth down and tuck it
into the bottom of the mitt.
How to perform a back massage
Three strokes commonly used when giving a back massage are effleurage,
friction, and petrissage. Start with effleurage, go on to friction, and then to
petrissage. Perform each stroke at least six times before moving on to the
next; then repeat the whole series if desired. When performing effleurage
and friction, keep your hands parallel to the vertebrae to avoid tickling the
patient. For all three strokes, maintain a regular rhythm and steady contact
with the patient’s back to help the patient relax.
Effleurage
Using your palms, stroke from the buttocks up to the shoulders, over the
upper arms, and back to the buttocks. Use slightly less pressure on the
downward strokes.
Friction
Use circular thumb strokes to move from buttocks to shoulders; then, using a
smooth stroke, return to the buttocks, as shown below.
Petrissage
Using your thumbs to oppose your fingers, knead and stroke half the back
and upper arms, starting at the buttocks and moving toward the shoulder.
Then knead and stroke the other half of the back, rhythmically alternating
your hands.
■ Compress, squeeze, and lift the trapezius muscle to help
relax the patient.
■ Finish the massage by using long, firm strokes.
■ Blot any excess lotion from the patient’s back with a
towel.
■ Retie the patient’s gown and straighten or change the
bed linens as necessary.
■ Return the bed to its original position to prevent falls and
maintain patient safety.20
■ Empty and clean the basin, and store it with other
supplies for single-patient use.
■ Dispose of the bath blanket, towel, and washcloth in the
appropriate receptacle.
■ Remove and discard your gloves, if worn.
■ Perform hand hygiene.4,5,6,7,8,9
■ Document the procedure.21,22,23,24
Special considerations
■ Before giving back care, assess the patient’s body
structure and skin condition, and tailor the duration and
intensity of the massage accordingly. If you’re giving back
care at bedtime, have the patient ready for bed beforehand
so that the massage can help the patient fall asleep.
■ Develop a turning schedule and perform back care at
each position change.
Complications
■ Friction that occurs during massage may cause pain and
tissue destruction as well as provoke an inflammatory
response.2
Documentation
Document the performance of back care in the patient’s
medical record. Record any redness, abrasions, or change in
skin condition and the patient’s tolerance of the procedure
in your notes.
REFERENCES
1 Craven, R. F., et al. (2017). Fundamentals of nursing: Human health and
function (8th ed.). Philadelphia, PA: Wolters Kluwer.
2 National Pressure Ulcer Advisory Panel, et al. (2014). “Prevention and
treatment of pressure ulcers: Quick reference guide” [Online]. Accessed via
the Web at http://www.npuap.org/wp-content/uploads/2014/08/Quick-
Reference-Guide-DIGITAL-NPUAP-EPUAP-PPPIA.pdf (Level VII)
3 Wound Ostomy and Continence Nurses Society (WOCN). (2016). Guideline for
prevention and management of pressure ulcers (injuries): WOCN clinical
practice guideline series 2. Mount Laurel, NJ: WOCN.
4 The Joint Commission. (2019). Standard NPSG.07.01.01. Comprehensive
accreditation manual for hospitals. Oakbrook Terrace, IL: The Joint
Commission. (Level VII)
5 Centers for Disease Control and Prevention. (2002). Guideline for hand
hygiene in health-care settings: Recommendations of the Healthcare Infection
Control Practices Advisory Committee and the HICPAC/SHEA/APIC/IDSA Hand
Hygiene Task Force. MMWR Recommendations and Reports, 51(RR-16), 1–45.
Accessed via the Web at https://www.cdc.gov/mmwr/pdf/rr/rr5116.pdf (Level
II)
6 World Health Organization. (2009). “WHO guidelines on hand hygiene in
health care: First global patient safety challenge, clean care is safer care”
[Online]. Accessed via the Web at
http://apps.who.int/iris/bitstream/10665/44102/1/9789241597906_eng.pdf
(Level IV)
7 Centers for Medicare and Medicaid Services, Department of Health and
Human Services. (2015). Condition of participation: Infection control. 42 C.F.R.
§ 482.42.
8 Accreditation Association for Hospitals and Health Systems. (2017). Standard
07.01.21. Healthcare Facilities Accreditation Program: Accreditation
requirements for acute care hospitals. Chicago, IL: Accreditation Association
for Hospitals and Health Systems. (Level VII)
9 DNV GL-Healthcare USA, Inc. (2016). IC.1.SR.1 . NIAHO® accreditation
requirements: Interpretive guidelines & surveyor guidance (version 11).
Milford, OH: DNV GL-Healthcare USA, Inc. (Level VII)
10 Siegel, J. D ., et al. (2007, revised 2017). “2007 guideline for isolation
precautions: Preventing transmission of infectious agents in healthcare
settings” [Online]. Accessed via the Web at
https://www.cdc.gov/infectioncontrol/pdf/guidelines/isolation-guidelines.pdf
(Level II)
11 Accreditation Association for Hospitals and Health Systems. (2017). Standard
07.01.10. Healthcare Facilities Accreditation Program: Accreditation
requirements for acute care hospitals. Chicago, IL: Accreditation Association
for Hospitals and Health Systems. (Level VII)
12 The Joint Commission. (2019). Standard NPSG.01.01.01. Comprehensive
accreditation manual for hospitals. Oakbrook Terrace, IL: The Joint
Commission. (Level VII)
13 Accreditation Association for Hospitals and Health Systems. (2017). Standard
15.01.16. Healthcare Facilities Accreditation Program: Accreditation
requirements for acute care hospitals. Chicago, IL: Accreditation Association
for Hospitals and Health Systems. (Level VII)
14 Centers for Medicare and Medicaid Services, Department of Health and
Human Services. (2015). Condition of participation: Patient’s rights. 42 C.F.R.
§ 482.13(c)(1).
15 The Joint Commission. (2017). Standard RI.01.01.01. Comprehensive
accreditation manual for hospitals. Oakbrook Terrace, IL: The Joint
Commission. (Level VII)
16 DNV GL-Healthcare USA, Inc. (2016). PR.1.SR.5 . NIAHO® accreditation
requirements: Interpretive guidelines & surveyor guidance (version 11).
Milford, OH: DNV GL-Healthcare USA, Inc. (Level VII)
17 American Hospital Association. (2003). “The Patient Care Partnership:
Understanding expectations, rights and responsibilities” [Online]. Accessed
via the Web at http://www.aha.org/content/00-10/pcp_english_030730.pdf
18 Waters, T. R., et al. (2009). “Safe patient handling training for schools of
nursing” [Online]. Accessed via the Web at
https://www.cdc.gov/niosh/docs/2009-127/pdfs/2009-127.pdf (Level VII)
19 LeBlanc, K., et al. (2013). International skin tear advisory panel: A tool kit to
aid in the prevention, assessment, and treatment of skin tears using a
simplified classification system. Advances in Skin & Wound Care, 26, 459–
476. (Level IV)
20 Ganz, D. A., et al. (2013). Preventing falls in hospitals: A toolkit for improving
quality of care (AHRQ Publication No. 13-0015-EF). Rockville, MD: Agency for
Healthcare Research and Quality. Accessed via the Web at
https://www.ahrq.gov/sites/default/files/publications/files/fallpxtoolkit_0 .pdf
(Level VII)
21 The Joint Commission. (2019). Standard RC.01.03 .01. Comprehensive
accreditation manual for hospitals. Oakbrook Terrace, IL: The Joint
Commission. (Level VII)
22 Centers for Medicare and Medicaid Services, Department of Health and
Human Services. (2015). Condition of participation: Medical record services.
42 C.F.R. § 482.24(b).
23 Accreditation Association for Hospitals and Health Systems. (2017). Standard
10.00 .03. Healthcare Facilities Accreditation Program: Accreditation
requirements for acute care hospitals. Chicago, IL: Accreditation Association
for Hospitals and Health Systems. (Level VII)
24 DNV GL-Healthcare USA, Inc. (2016). MR.2 .SR.1 . NIAHO® accreditation
requirements: Interpretive guidelines & surveyor guidance (version 11).
Milford, OH: DNV GL-Healthcare USA, Inc. (Level VII)
BALLOON VALVULOPLASTY CARE
Although surgery is the treatment of choice for valvular
heart disease, balloon valvuloplasty is an alternative to
valve replacement in patients with critical stenoses.1 This
technique enlarges the orifice of a heart valve that has been
narrowed by a congenital defect, calcification, rheumatic
fever, or aging. It evolved from percutaneous transluminal
coronary angioplasty and uses the same balloon-tipped
catheters for dilatation. Restenosis and clinical deterioration
commonly occur within 12 months.2
Balloon valvuloplasty is performed in the cardiac
catheterization laboratory under local anesthesia. The
practitioner inserts a balloon-tipped catheter through the
patient’s femoral vein or artery, threads it into the heart,
and repeatedly inflates it against the leaflets of the diseased
valve. This process increases the size of the orifice,
improving valvular function and helping prevent
complications from decreased cardiac output. (See How
balloon valvuloplasty works, page 46.) Studies have shown
that balloon valvuloplasty can provide excellent results for
many years with stenotic valves.3
Equipment
Before and during balloon valvuloplasty
Antiseptic solution ▪ local anesthetic ▪ vital signs
monitoring equipment ▪ valvuloplasty or balloon-tipped
catheter ▪ sheath ▪ IV insertion supplies ▪ IV solution and
tubing ▪ cardiac monitor and electrodes ▪ oxygen source ▪
oxygen delivery device ▪ sterile label ▪ sterile marker ▪
prescribed sedative ▪ emergency medications ▪ scissors ▪
heparin (or other anticoagulant) for injection5 ▪ introducer
kit for balloon catheter ▪ sterile gown, gloves, mask, cap,
and drapes ▪ sterile dressings ▪ pulse oximeter and probe ▪
Optional: disposable head clippers, prescribed antiplatelet
or antithrombotic medications, pulmonary artery (PA)
catheter, Doppler ultrasound blood flow detector.
After balloon valvuloplasty
Stethoscope ▪ blood pressure equipment ▪ pulse oximeter
and probe ▪ prescribed IV solution ▪ IV administration set ▪
cardiac monitor ▪ electrodes ▪ pulmonary artery monitoring
system ▪ oxygen source ▪ oxygen delivery device ▪
prescribed medications ▪ Doppler ultrasound blood flow
detector ▪ electronic infusion device (preferably a smart
pump with dose-error reduction software)6 ▪ disinfectant
pad ▪ Optional: compression device, supplies for arterial
blood gas (ABG) analysis, glove, gown, mask with face
shield or mask and goggles, prescribed analgesic, labels.
Implementation
Before balloon valvuloplasty
■ Conduct a preprocedure verification to make sure that all
relevant documentation, related information, and equipment
are available and correctly identified to the patient’s
identifiers.7,8
■ Verify that the laboratory and imaging studies have been
completed and that the results are in the patient’s medical
record. Notify the practitioner of critical test results within
your facility’s established timeframe so that the patient can
be promptly treated. Ensure that results of coagulation
studies, complete blood count, serum electrolyte studies,
and blood typing and crossmatching are available.7,8
How balloon valvuloplasty works
In balloon valvuloplasty, the practitioner chooses an appropriate-sized
balloon-tipped catheter using the following formula:
balloon size =patient’s height (in cm) ÷10 + 10
Alternatively, the practitioner may directly measure the value diameter using
two-dimensional echocardiography.4 The practitioner then inserts the
balloon-tipped catheter through the patient’s femoral vein or artery, threads
it into the heart, and locates the stenotic valve.
After locating the stenotic valve, the practitioner inflates the balloon, which
increases the size of the valve opening.
■ Review baseline hemodynamic parameters and patient
medications for contraindications to the procedure.9,10
■ Review the medical record to ensure that the patient isn’t
allergic to contrast media.
■ Confirm that written informed consent has been obtained
by the practitioner and is in the patient’s medical
record.11,12,13,14
■ Perform hand hygiene.15,16,17,18,19,20
■ Confirm the patient’s identity using at least two patient
identifiers.21
■ Reinforce the practitioner’s explanation of the procedure,
taking into account the patient’s and family’s (if
appropriate) individual communication needs to increase
understanding, allay fears, and enhance cooperation.22
■ Reassure the patient that, although the patient will be
awake during the procedure, he or she will receive a
sedative and a local anesthetic beforehand for comfort.
■ Teach the patient what to expect to ease anxiety and
enhance cooperation. For example, inform the patient that
the hair in the groin area will be clipped and the skin
cleaned with an antiseptic; that a brief stinging sensation
will be felt when the local anesthetic is injected; and that
there may be pressure as the catheter moves along the
vessel. Describe the warm, flushed feeling that the patient
will likely experience from injection of the contrast medium.
■ Tell the patient that the procedure may last up to 4 hours,
and that he or she may feel discomfort from lying on a hard
table for that long.
■ If the procedure isn’t an emergency, confirm the patient’s
nothing-by-mouth status before the procedure; minimum
fasting recommendations include 2 hours for clear liquids, 6
or more hours for a light meal or nonhuman milk, and 8 or
more hours for fried or fatty foods or meat.23
■ Obtain vital signs and oxygen saturation level using pulse
oximetry to serve as a baselines for comparison during and
after the procedure.
■ Perform a neurovascular assessment on all extremities.
Assess the presence or absence and quality of all distal
pulses. Assess faint or nonpalpable pulses using a Doppler
ultrasound blood flow detector, as indicated. (See the
“Doppler use” procedure.)10
■ Perform hand hygiene.15,16,17,18,19,20
■ Put on gloves to comply with standard precautions.24,25,26
■ Insert an IV catheter, as ordered, to provide access for
medications. (See the “IV catheter insertion and removal”
procedure.)
■ Clip hair from the insertion site, as needed; clean the site
with antiseptic solution and allow it to dry completely.27
■ Have the patient void.
■ Administer an antiplatelet or antithrombotic agent, as
ordered, following safe medication administration
practices.9,28,29,30,31
NURSING ALERT Aspirin reduces the frequency of ischemic
complications after percutaneous coronary intervention (PCI).
Although the minimum effective aspirin dosage in the setting of PCI
hasn’t been established, 325 mg of aspirin given at least 2 hours, and
preferably 24 hours, before PCI is recommended.9
■ Administer a sedative, as ordered, following safe
medication administration practices.28,29,30,31
■ Remove and discard your gloves.22
■ Perform hand hygiene.15,16,17,18,19,20
■ Provide handoff communication regarding the patient’s
history, condition, and care to the nurse who will assume
responsibility for the patient’s care during the procedure.
Allow time for questions, as necessary, to avoid
miscommunication that can cause patient care errors during
transitions of care.32
■ Document the procedure.33,34,35,36
During balloon valvuloplasty
■ Receive handoff communication from the person who was
responsible for the patient’s care before the procedure. Ask
questions, as necessary, to avoid miscommunications that
can cause patient care errors during transitions of care.32,37
■ Perform hand hygiene.15,16,17,18,19,20
■ Confirm the patient’s identity using at least two patient
identifiers.21
■ Put on a cap, a mask, a gown, and gloves to comply with
standard precautions.24,25,26
■ Attach the patient to the monitoring equipment. Make
sure that the alarm limits are set appropriately for the
patient’s current condition, and that the alarms are turned
on, functioning properly, and audible to staff.38,39,40,41
■ Administer supplemental oxygen, as ordered.
■ The practitioner will put on a sterile gown and gloves, a
mask, and a cap and will then open the sterile supplies.
Assist as necessary.
■ Confirm that the correct procedure has been identified for
the correct patient at the correct site.7,8
■ Label all medications, medication containers, and other
solutions on and off the sterile field.42,43
■ The practitioner will use maximal barrier precautions and
prepare and anesthetize the catheter insertion site (usually
at the femoral artery). The practitioner may insert a PA
catheter if one isn’t already in place.44
■ Conduct a time-out immediately before starting the
procedure as a final assessment to ensure that the correct
patient, site, positioning, and procedure are identified and,
as applicable, that all relevant information and necessary
equipment are available.45
■ The practitioner will then insert a sheath into the site and
thread a valvuloplasty or balloon-tipped catheter up into the
heart.
■ The practitioner will inject a contrast medium to visualize
the heart valves and assess the stenosis; the practitioner
will also inject heparin or another anticoagulant5 to prevent
the catheter from clotting.9,44,46
■ Using low pressure, the practitioner will repeatedly inflate
the balloon on the valvuloplasty catheter for a short time,
usually 15 to 30 seconds, gradually increasing the time and
pressure. If these actions don’t reduce the stenosis, the
practitioner may use a larger balloon.
■ After completion of valvuloplasty, a series of angiograms
is taken to evaluate the effectiveness of the treatment.
Assist as necessary.
■ The practitioner may then suture the sheath in place and
cover the insertion site with a sterile dressing, which is
usually removed within 4 hours after the effects of the
anticoagulant have worn off.
■ Remove and discard your gloves and perform hand
hygiene.15,16,17,18,19,20
■ Continue to closely monitor the patient.
■ Document the procedure.33,34,35,36
After balloon valvuloplasty
■ Receive handoff communication from the person who was
responsible for the patient’s care during the procedure. Ask
questions, as necessary, to avoid miscommunications that
can cause patient care errors during transitions of care.32 As
part of the handoff process, trace each tubing and catheter
from the patient to its point of origin using a standardized
line reconciliation process.37
■ Verify the practitioner’s orders.
■ Perform hand hygiene.15,16,17,18,19,20
■ Reconcile the patient’s medications at the care transition
to reduce the risk for medication errors, including omissions,
duplications, dosing errors, and drug interactions.47
■ Confirm the patient’s identity using at least two patient
identifiers.21
■ Put on gloves and other personal protective equipment as
needed to comply with standard precautions.24,25,26
■ Explain the procedure to the patient according to the
patient’s communication and learning needs to increase
understanding, allay fears, and enhance cooperation.22
■ Raise the patient’s bed to waist level when providing care
to prevent caregiver back strain.48
■ Attach the patient to a cardiac monitor and pulse
oximeter. Make sure that the alarm limits are set
appropriately for the patient’s current condition and that the
alarms are turned on, functioning properly, and audible to
staff.38,39,40,41
■ Obtain the patient’s vital signs to serve as a baseline for
comparison, and continue to monitor them frequently at an
interval determined by your facility and the patient’s
condition to promptly recognize changes in the patient’s
condition. Note that there’s no evidence-based research to
indicate best practice for the frequency of vital signs
monitoring.49
■ Assess the sheath insertion site for bleeding, hematoma,
and ecchymosis. If the sheath remains in place, refer to the
“Arterial and venous sheath removal” procedure when
removal is indicated. If the sheath was removed and a
compression device remains in place over the insertion site,
make sure that the device is applied properly.
■ For a patient who is receiving IV heparin,9 nitroglycerin,
or another medicated infusion, administer the medication
using an electronic infusion device50 following safe
medication administration practices to prevent life-
threatening dosing errors.28 Make sure that the infusion
device alarm limits are set appropriately and that the alarms
are turned on, functioning properly, and audible to
staff.38,39,40 Next, trace the tubing from the patient to its
point of origin.51 Route the tubing in a standardized
direction if the patient has other tubing and catheters that
have different purposes. If multiple IV lines will be used,
label the tubing at the distal end (near the patient
connection) and proximal end (near the source container) to
reduce the risk of misconnection.37 If required by your
facility, have another nurse perform an independent double-
check to verify the patient’s identity and to ensure that the
correct medication is hanging in the prescribed
concentration, that the medication’s indication corresponds
with the patient’s diagnosis, that the dosage calculations
are correct and the dosing formula used to derive the final
dose is correct, that the route of administration is safe and
proper for the patient, that the pump settings are correct,
and that the infusion line is attached to the correct port.52,53
Compare the results of the independent double-check with
the other nurse (if required) and, if no discrepancies exist,
continue infusing the medication. If discrepancies exist,
rectify them before continuing the infusion.53
■ Assess the patient’s cardiac status to obtain a baseline
for comparison; continue to monitor the patient’s heart rate
and rhythm, and auscultate regularly for murmurs, which
may indicate worsening valvular insufficiency. Notify the
practitioner if you detect a new or worsening murmur.
■ Assess the patient’s respiratory status, including oxygen
saturation level using pulse oximetry, to obtain baselines for
comparison; continue to monitor respiratory status for
changes, because changes in respiratory rate and pattern
can be the first signs of a complication such as an
embolism. Monitor ABG results, as ordered.10
■ Monitor the patient’s arterial pressure, pulmonary artery
pressure, and other hemodynamic parameters as
indicated.10
■ Continue to monitor the insertion site for bleeding and to
assess peripheral pulses distal to the insertion site; also
monitor the color, sensation, temperature, and capillary
refill time of the affected extremity. Use a Doppler
ultrasound blood flow detector to assess pedal pulses
because they may be difficult to assess, especially if the
sheath remains in place. Compare findings bilaterally.
■ Administer IV fluids, as prescribed, typically at a rate of at
least 100 mL/hour, to help the kidneys excrete the contrast
medium used during the procedure. Closely monitor intake
and output and watch for signs of fluid overload, such as
distended neck veins, atrial and ventricular gallops,
dyspnea, pulmonary congestion, tachycardia, hypertension,
and hypoxemia.
■ Assess for signs and symptoms of complications of the
procedure, such as embolism (dyspnea, tachypnea, altered
mental status, and tachycardia), hemorrhage (including
retroperitoneal bleeding),10 myocardial ischemia (chest pain
caused by obstruction of blood flow during valvuloplasty),
and cardiac tamponade (decreased or absent peripheral
pulses, pale or cyanotic skin, hypotension, and paradoxical
pulse). Immediately report signs and symptoms of any of
these complications.
■ Encourage the patient to perform deep-breathing
exercises to prevent atelectasis, which can occur with
immobility. Note that this step is especially important in
older adult patients.
■ Keep the patient positioned with the affected leg straight
and the head of bed elevated no more than 30 degrees to
prevent excessive hip flexion and to reduce the risk of
vascular complications.54
■ Perform a comprehensive pain assessment using
techniques appropriate for the patient’s age, condition, and
ability to understand.55
■ Administer pain medications, as needed and prescribed,
following safe medication administration practices.28,29,30,31
■ Assist the patient during meals, bedpan use, and position
changes that are appropriate to the patient’s activity
limitations.10
■ Reassess the patient’s pain and respond appropriately.55
■ Discard used supplies in appropriate receptacles.21
■ Return the patient’s bed to the lowest position to prevent
falls and maintain patient safety.56
■ Discard used supplies in appropriate receptacles.24
■ Remove and discard any gloves or other personal
protective equipment worn.21
■ Perform hand hygiene.15,16,17,18,19,20
■ Clean and disinfect your stethoscope using a disinfectant
pad.57,58
■ Perform hand hygiene.15,16,17,18,19,20
■ Document the procedure.33,34,35,36
Special considerations
■ Be aware that using heparin and a large-bore catheter
can lead to arterial hemorrhage. Monitor the patient closely.
■ If the patient is receiving heparin, monitor partial
thromboplastin time or activated clotting timer and maintain
the infusion according to your facility’s protocol or the
practitioner’s orders.10,44,50 Notify the practitioner of critical
test results within your facility’s established time frame so
that the patient can receive prompt treatment.59
■ The Joint Commission issued a sentinel event alert
concerning medical device alarm safety because alarm-
related events have been associated with permanent loss of
function and death. Among the major contributing factors
were
improper
alarm
settings,
alarm
settings
inappropriately turned off, and alarm signals not audible to
staff. Make sure that alarm limits are set appropriately and
that alarms are turned on, functioning properly, and audible
to staff. Follow facility guidelines for preventing alarm
fatigue.37
■ The Joint Commission has issued a sentinel event alert
related to managing risk during transition to new
International Organization for Standardization tubing
standards that were designed to prevent dangerous tubing
misconnections, which can lead to serious patient injury and
death. During the transition, make sure to trace the tubing
and catheter from the patient to the point of origin before
connecting or reconnecting any device or infusion, at any
care transition (such as a new setting or service), and as
part of the handoff process; route tubes and catheters
having different purposes in different standardized
directions; when there are different access sites or several
bags hanging, label the tubing at both the distal and
proximal ends; use tubing and equipment only as intended;
and store medications for different delivery routes in
separate locations.36
■ Assess the patient’s vital signs and oxygen saturation
levels continually during the procedure,39 especially for an
aortic valvuloplasty. During balloon inflation, the aortic
outflow tract is completely obstructed, causing blood
pressure to fall dangerously low. Ventricular ectopy is also
common during balloon positioning and inflation. Start
treatment for ectopy when signs and symptoms develop or
when ventricular tachycardia is sustained.
■ Carefully assess the patient’s respiratory status; changes
in rate and pattern can be the first sign of a complication
such as embolism.
■ Assess the insertion site frequently throughout the
procedure for bleeding, and monitor the International
Normalized Ratio, prothrombin time, partial thromboplastin
time and activated clotting time, and platelet count, as
ordered.5,9,43
Complications
Severe complications, such as myocardial infarction or
calcium emboli (embolization of debris released from the
calcified valve), are rare. Other complications include
bleeding or hematoma at the insertion site, arrhythmias,
circulatory disorders distal to the insertion site, guide wire
perforation of the ventricle leading to tamponade, disruption
of the valve ring, restenosis of the valve, and valvular
insufficiency, which can contribute to heart failure and
reduced cardiac output. Infection and an allergic reaction to
the contrast medium can also occur.
Documentation
Document vital signs and oxygen saturation levels before
and after the procedure, assessment findings, diagnostic
test results, complications and resulting interventions, and
the patient’s tolerance of the procedure. Document patient
teaching provided and the patient’s understanding of the
teaching.
REFERENCES
1 Nishimura, R. A., et al. (2014). 2014 AHA/ACC guideline for the management
of patients with valvular heart disease: Executive summary: A report of the
American College of Cardiology/American Heart Association Task Force on
Practice Guidelines. Circulation, 129, 2440–2492. Accessed via the Web at
http://circ.ahajournals.org/content/129/23/2440.full (Level VII)
2 Joint Task Force on the Management of Valvular Heart Disease of the
European Society of Cardiology (ESC) and the European Association for
Cardio-Thoracic Surgery (EACTS). (2012). Guidelines on the management of
valvular heart disease (version 2012). European Heart Journal, 33, 2451–
2496. Accessed via the Web at
http://eurheartj.oxfordjournals.org/content/ehj/33/19/2451.full.pdf (Level VII)
3 Fawzy, M. E., et al. (2009). Long-term (up to 18 years) clinical and
echocardiographic results of mitral balloon valvuloplasty in 531 consecutive
patients and predictors of outcome. Cardiology, 113(3), 213–221. (Level VI)
4 Nobuyoshi, M., et al. (2009). Percutaneous balloon mitral valvuloplasty: A
review. Circulation, 119, e211–e219. Accessed via the Web at
http://circ.ahajournals.org/content/119/8/e211.full (Level VII)
5 Merriweather, N., & Sulzbach-Hoke, L. M . (2012). Managing risk of
complications at femoral vascular access sites in percutaneous coronary
intervention. Critical Care Nurse, 32(5), 16–29. Accessed via the Web at
http://ccn.aacnjournals.org/content/32/5/16.full.pdf (Level VII)
6 Standard 24. Flow-control devices. Infusion therapy standards of practice.
(2016). Journal of Infusion Nursing, 39, S48–S49. (Level VII)
7 The Joint Commission. (2019). Standard UP.01.01.01. Comprehensive
accreditation manual for hospitals. Oakbrook Terrace, IL: The Joint
Commission. (Level VII)
8 Accreditation Association for Hospitals and Health Systems. (2017). Standard
30.00 .14. Healthcare Facilities Accreditation Program: Accreditation
requirements for acute care hospitals. Chicago, IL: Accreditation Association
for Hospitals and Health Systems. (Level VII)
9 Dehmer, G. J ., et al. (2014). SCAI/ACC/AHA expert consensus document: 2014
update on percutaneous coronary intervention without on-site surgical
backup. Circulation, 129, 2610–2626. Accessed via the Web at
http://circ.ahajournals.org/content/129/24/2610.full (Level VII)
10 Gulanick, M., & Myers, J. L. (2014). Nursing care plans: Diagnoses,
interventions, and outcomes (8th ed.). St. Louis, MO: Mosby.
11 The Joint Commission. (2019). Standard RI.01.03 .01. Comprehensive
accreditation manual for hospitals. Oakbrook Terrace, IL: The Joint
Commission. (Level VII)
12 Centers for Medicare and Medicaid Services, Department of Health and
Human Services. (2015). Condition of participation: Patient’s rights. 42 C.F.R.
§ 482.13(b)(2).
13 Accreditation Association for Hospitals and Health Systems. (2017). Standard
30.01.11. Healthcare Facilities Accreditation Program: Accreditation
requirements for acute care hospitals. Chicago, IL: Accreditation Association
for Hospitals and Health Systems. (Level VII)
14 DNV GL-Healthcare USA, Inc. (2016). PR.1.SR.3 . NIAHO® accreditation
requirements: Interpretive guidelines & surveyor guidance (version 11).
Milford, OH: DNV GL-Healthcare USA, Inc. (Level VII)
15 The Joint Commission. (2019). Standard NPSG.07.01.01. Comprehensive
accreditation manual for hospitals. Oakbrook Terrace, IL: The Joint
Commission. (Level VII)
16 Centers for Disease Control and Prevention. (2002). Guideline for hand
hygiene in health-care settings: Recommendations of the Healthcare Infection
Control Practices Advisory Committee and the HICPAC/SHEA/APIC/IDSA Hand
Hygiene Task Force. MMWR Recommendations and Reports, 51(RR-16), 1–45.
Accessed via the Web at https://www.cdc.gov/mmwr/pdf/rr/rr5116.pdf (Level
II)
17 World Health Organization. (2009). “WHO guidelines on hand hygiene in
health care: First global patient safety challenge, clean care is safer care”
[Online]. Accessed via the Web at
http://apps.who.int/iris/bitstream/10665/44102/1/9789241597906_eng.pdf
(Level IV)
18 Centers for Medicare and Medicaid Services, Department of Health and
Human Services. (2015). Condition of participation: Infection control. 42 C.F.R.
§ 482.42.
19 Accreditation Association for Hospitals and Health Systems. (2017). Standard
07.01.21. Healthcare Facilities Accreditation Program: Accreditation
requirements for acute care hospitals. Chicago, IL: Accreditation Association
for Hospitals and Health Systems. (Level VII)
20 DNV GL-Healthcare USA, Inc. (2016). IC.1 .SR.1 . NIAHO® accreditation
requirements: Interpretive guidelines & surveyor guidance (version 11).
Milford, OH: DNV GL-Healthcare USA, Inc. (Level VII)
21 The Joint Commission. (2019). Standard NPSG.01.01.01. Comprehensive
accreditation manual for hospitals. Oakbrook Terrace, IL: The Joint
Commission. (Level VII)
22 The Joint Commission. (2019). Standard PC.02.01.21. Comprehensive
accreditation manual for hospitals. Oakbrook Terrace, IL: The Joint
Commission. (Level VII)
23 American Society of Anesthesiologists. (2011). “Practice guidelines for
preoperative fasting and the use of pharmacologic agents to reduce the risk
of pulmonary aspiration: Application to healthy patients undergoing elective
procedures.” Anesthesiology, 126, 376–393 . (Level V)
24 Siegel, J. D ., et al. (2007, revised 2017). “2007 guideline for isolation
precautions: Preventing transmission of infectious agents in healthcare
settings” [Online]. Accessed via the Web at
https://www.cdc.gov/infectioncontrol/pdf/guidelines/isolation-guidelines.pdf
(Level II)
25 Accreditation Association for Hospitals and Health Systems. (2017). Standard
07.01.10. Healthcare Facilities Accreditation Program: Accreditation
requirements for acute care hospitals. Chicago, IL: Accreditation Association
for Hospitals and Health Systems. (Level VII)
26 DNV GL-Healthcare USA, Inc. (2014). IC.1 .SR.2 . NIAHO® accreditation
requirements: Interpretive guidelines & surveyor guidance (version 11).
Milford, OH: DNV GL-Healthcare USA, Inc. (Level VII)
27 The Joint Commission. (2019). Standard NPSG.07.05.01. Comprehensive
accreditation manual for hospitals. Oakbrook Terrace, IL: The Joint
Commission. (Level VII)
28 Centers for Medicare and Medicaid Services, Department of Health and
Human Services. (2015). Condition of participation: Nursing services. 42
C.F.R. § 482.23(c).
29 Accreditation Association for Hospitals and Health Systems. (2017). Standard
16.01.03. Healthcare Facilities Accreditation Program: Accreditation
requirements for acute care hospitals. Chicago, IL: Accreditation Association
for Hospitals and Health Systems. (Level VII)
30 The Joint Commission. (2019). Standard MM.06.01.01. Comprehensive
accreditation manual for hospitals. Oakbrook Terrace, IL: The Joint
Commission. (Level VII)
31 DNV GL-Healthcare USA, Inc. (2014). MM.1 .SR.2. NIAHO® accreditation
requirements: Interpretive guidelines & surveyor guidance (version 11).
Milford, OH: DNV GL-Healthcare USA, Inc. (Level VII)
32 The Joint Commission. (2019). Standard PC.02.02.01. Comprehensive
accreditation manual for hospitals. Oakbrook Terrace, IL: The Joint
Commission. (Level VII)
33 The Joint Commission. (2019). Standard RC.01.03 .01. Comprehensive
accreditation manual for hospitals. Oakbrook Terrace, IL: The Joint
Commission. (Level VII)
34 Centers for Medicare and Medicaid Services, Department of Health and
Human Services. (2015). Condition of participation: Medical record services.
42 C.F.R. § 482.24(b).
35 Accreditation Association for Hospitals and Health Systems. (2017). Standard
10.00 .03. Healthcare Facilities Accreditation Program: Accreditation
requirements for acute care hospitals. Chicago, IL: Accreditation Association
for Hospitals and Health Systems. (Level VII)
36 DNV GL-Healthcare USA, Inc. (2014). MR.2 .SR.1 . NIAHO® accreditation
requirements: Interpretive guidelines & surveyor guidance (version 11).
Milford, OH: DNV GL-Healthcare USA, Inc. (Level VII)
37 The Joint Commission. (2014). “Sentinel event alert: Managing risk during
transition to new ISO tubing connector standards” [Online]. Accessed via the
Web at
http://www.jointcommission.org/assets/1/6/SEA_53_Connectors_8 _19_14 _final.
pdf (Level VII)
38 The Joint Commission. (2013). “Sentinel event alert: Medical device alarm
safety in hospitals” [Online]. Accessed via the Web at
https://www.jointcommission.org/assets/1/6/SEA_50_alarms_4 _26_16.pdf
(Level VII)
39 The Joint Commission. (2019). Standard NPSG.06 .01.01. Comprehensive
accreditation manual for hospitals. Oakbrook Terrace, IL: The Joint
Commission. (Level VII)
40 Graham, K. C., & Cvach, M. (2010). Monitor alarm fatigue: Standardizing use
of physiological monitors and decreasing nuisance alarms. American Journal
of Critical Care, 19, 28–37. Accessed via the Web at
http://ajcc.aacnjournals.org/content/19/1/28.full.pdf
41 American Association of Critical-Care Nurses (AACN). (2013). “A ACN practice
alert: Alarm management” [Online]. Accessed via the Web at
https://www.aacn.org/aacn-website/shared/content/practice-
alerts/2015/11/25/alarm-management (Level VII)
42 The Joint Commission. (2019). Standard NPSG.03 .04.01. Comprehensive
accreditation manual for hospitals. Oakbrook Terrace, IL: The Joint
Commission. (Level VII)
43 Accreditation Association for Hospitals and Health Systems. (2017). Standard
25.01.27. Healthcare Facilities Accreditation Program: Accreditation
requirements for acute care hospitals. Chicago, IL: Accreditation Association
for Hospitals and Health Systems. (Level VII)
44 Agu, N. C ., & Rao, P. S . (2012). Balloon aortic valvuloplasty. Pediatrics &
Therapeutics, S5, 004. Accessed via the Web at
http://www.omicsonline.org/balloon-aortic-valvuloplasty-2161-0665.S5-
004.pdf (Level VII)
45 The Joint Commission. (2019). Standard UP.01.03.01. Comprehensive
accreditation manual for hospitals. Oakbrook Terrace, IL: The Joint
Commission. (Level VII)
46 Ben-Dor, I., et al. (2010). Complications and outcome of balloon aortic
valvuloplasty in high-risk or inoperable patients. Journal of American College
of Cardiology Interventions, 3(11), 1150–1156. Accessed via the Web at
http://interventions.onlinejacc.org/article.aspx?articleid=1112045 (Level IV)
47 Standard 13. Medication verification. Infusion therapy standards of practice.
(2016). Journal of Infusion Nursing, 39, S34–S35. (Level VII)
48 Waters, T. R., et al. (2009). “Safe patient handling training for schools of
nursing” [Online]. Accessed via the Web at
https://www.cdc.gov/niosh/docs/2009-127/pdfs/2009-127.pdf (Level VII)
49 American Society of PeriAnesthesia Nurses. (2018). 2017–2018
Perianesthesia nursing standards, practice recommendations and interpretive
statements. Cherry Hill, NJ: American Society of PeriAnesthesia Nurses. (Level
VII)
50 The Joint Commission. (2019). Standard NPSG.03 .05.01. Comprehensive
accreditation manual for hospitals. Oakbrook Terrace, IL: The Joint
Commission. (Level VII)
51 U.S . Food and Drug Administration. (n.d .). “Look. Check. Connect. Safe
medical device connections save lives” [Online]. Accessed July 2017 via the
Web at
http://www.fda.gov/downloads/MedicalDevices/Safety/AlertsandNotices/UCM1
34873.pdf
52 Institute for Safe Medication Practices. (2014). “ISMP list of high-alert
medications in acute care settings” [Online]. Accessed via the Web at
http://www.ismp.org/Tools/highalertmedications.pdf (Level VII)
53 Institute for Safe Medication Practices. (2014). Independent double-check:
Undervalued and misused. ISMP Medication Safety Alert! Nurse Advise-ERR,
12(3), 1. Accessed via the Web at
http://www.ismp.org/newsletters/nursing/issues/NurseAdviseERR201403.pdf
(Level VII)
54 Wiegand, D. L. (2017). AACN procedure manual for high acuity, progressive,
and critical care (7th ed.). St. Louis, MO: Elsevier.
55 The Joint Commission. (2019). Standard PC.01.02.07. Comprehensive
accreditation manual for hospitals. Oakbrook Terrace, IL: The Joint
Commission. (Level VII)
56 Ganz, D. A., et al. (2013). Preventing falls in hospitals: A toolkit for improving
quality of care (AHRQ Publication No. 13-0015-EF). Rockville, MD: Agency for
Healthcare Research and Quality. Accessed via the Web at
https://www.ahrq.gov/sites/default/files/publications/files/fallpxtoolkit_0 .pdf
(Level VII)
57 Rutala, W. A., et al. (2008, Revised 2017). “Guideline for disinfection and
sterilization in healthcare facilities, 2008” [Online]. Accessed via the Web at
https://www.cdc.gov/infectioncontrol/pdf/guidelines/disinfection-
guidelines.pdf (Level I)
58 Accreditation Association for Hospitals and Health Systems. (2017). Standard
07.02.03. Healthcare Facilities Accreditation Program: Accreditation
requirements for acute care hospitals. Chicago, IL: Accreditation Association
for Hospitals and Health Systems. (Level VII)
59 The Joint Commission. (2019). Standard NPSG.02.03 .01. Comprehensive
accreditation manual for hospitals. Oakbrook Terrace, IL: The Joint
Commission. (Level VII)
BARIATRIC BED USE
Obesity affects more than one-third of all Americans.1 A
patient is considered obese if the body mass index (BMI) is
30 kg/m2 or greater. Typical hospital beds are designed to
hold patients who weigh up to 450 lb (204 kg) and don’t
have a wide abdominal girth. Bariatric beds are a recent
addition to hospital equipment that are designed to
accommodate obese patients. Various types of bariatric
beds are available, ranging from a simply larger versions of
standard beds to beds with low-air-loss mattresses that
provide pressure relief (as shown below).
2007 Hill-Rom Services, Inc. Reprinted with permission – All rights
reserved.
Bariatric beds provide more comfort for obese patients
than standard-size beds. They help preserve self-esteem by
providing these patients with a bed that easily fits their
larger body size as well as special side rails that help them
turn and reposition themselves. Bariatric beds allow
caregivers to perform such routine care as boosting, turning,
and transferring in and out of bed with greater ease and less
risk of injury. Most bariatric beds have a built-in scale that
allows the nurse to more easily weigh the patient. Some
bariatric beds also convert to a cardiac chair.
Equipment
Bariatric bed ▪ Optional: overhead trapeze, special sheets.
Preparation of equipment
Obtain a bariatric bed from central supply or contact the
company representative to have a bed delivered. Prepare
the bed according to the manufacturer’s guidelines. A
manufacturer’s representative may be involved in the
patient assessment to ensure that the appropriate type and
size of bariatric bed are provided. Choose the appropriate
type of mattress to meet your patient’s needs. Specialized
sheets may be necessary. Attach an overhead trapeze, if
indicated.
Implementation
■ Verify the practitioner’s order for a bariatric bed.
■ Perform hand hygiene.2,3,4,5,6,7
■ Confirm the patient’s identity using at least two patient
identifiers.8
■ Provide privacy.9,10,11,12
■ Discuss the need for a specialized bed with the patient so
that the patient understands its benefits and therapeutic
effects.
■ Assess the condition of the patient’s skin, and perform a
structured pressure injury risk assessment within 8 hours of
the patient’s admission and repeated at a frequency
determined by the patient’s condition to help determine the
type of mattress that meets the patient’s needs.13 (See the
“Pressure injury prevention” procedure.)
HOSPITAL-ACQUIRED CONDITION ALERT Keep in mind that a stage 3
or 4 pressure injury is considered a hospital-acquired condition by the
Centers for Medicare and Medicaid Services, because it can be
prevented reasonably using best practices. Make sure to follow
pressure injury prevention practices (e.g., performing skin and risk
assessments, using support surfaces) to help reduce the risk of
pressure injury.13,14,15
■ Consult with other health care team members, such as
the practitioner, surgical team, physical therapist,
occupational therapist, wound care specialist, and
respiratory therapist, to choose the appropriate type of bed
for the patient’s needs.
■ Prepare the equipment for the patient.
■ If the bed is rented, ask the manufacturer’s
representative to conduct an in-service training program to
help all health care team members understand the bed’s
use and provide safe care.
■ Make sure that written instructions come with the bed,
and keep them at the bedside.
■ Provide the patient with product information, and orient
the patient to the bed’s functions and controls so that the
patient understands its many features and how to use the
bed safely.
■ Perform hand hygiene.2,3,4,5,6,7
■ Document the procedure.16,17,18,19
Special considerations
■ Provide for other bariatric equipment, as needed, such as
hospital gowns, commodes, wheelchairs, lifts, scales, and
stretchers to ensure patient comfort and safety.
■ When transferring a patient to another department, call
first to ensure they can accommodate a larger bed and that
staff members are familiar with its use.
Documentation
Document the type of bariatric bed and the date and time of
its delivery. Indicate that the manufacturer’s representative
oriented the staff how to safely use the bed. Document that
the patient was oriented to safely use the bed and that the
patient completed a return demonstration. Note if written
product information was given to the patient or left at the
bedside. Also, record other bariatric equipment provided,
such as an overhead trapeze or special sheets. Note the
type of mattress on the bariatric bed. Document the
patient’s skin condition when placed on the bed. Record the
patient’s response to the bed.
REFERENCES
1 Ogden, C. L., et al. (2015). Prevalence of obesity among adults and youth:
United States, 2011–2014. NCHS Data Brief, 219, 1–8 . Accessed via the Web
at https://www.cdc.gov/nchs/data/databriefs/db219.pdf
2 The Joint Commission. (2019). Standard NPSG.07.01.01. Comprehensive
accreditation manual for hospitals. Oakbrook Terrace, IL: The Joint
Commission. (Level VII)
3 Centers for Disease Control and Prevention. (2002). Guideline for hand
hygiene in health-care settings: Recommendations of the Healthcare Infection
Control Practices Advisory Committee and the HICPAC/SHEA/APIC/IDSA Hand
Hygiene Task Force. MMWR Recommendations and Reports, 51(RR-16), 1–45.
Accessed via the Web at https://www.cdc.gov/mmwr/pdf/rr/rr5116.pdf (Level
II)
4 World Health Organization. (2009). “WHO guidelines on hand hygiene in
health care: First global patient safety challenge, clean care is safer care”
[Online]. Accessed via the Web at
http://apps.who.int/iris/bitstream/10665/44102/1/9789241597906_eng.pdf
(Level IV)
5 Centers for Medicare and Medicaid Services, Department of Health and
Human Services. (2015). Condition of participation: Infection control. 42 C.F.R.
§ 482.42.
6 Accreditation Association for Hospitals and Health Systems. (2017). Standard
07.01.21. Healthcare Facilities Accreditation Program: Accreditation
requirements for acute care hospitals. Chicago, IL: Accreditation Association
for Hospitals and Health Systems. (Level VII)
7 DNV GL-Healthcare USA, Inc. (2016). IC.1.SR.1 . NIAHO® accreditation
requirements: Interpretive guidelines & surveyor guidance (version 11).
Milford, OH: DNV GL-Healthcare USA, Inc. (Level VII)
8 The Joint Commission. (2019). Standard NPSG.01.01.01. Comprehensive
accreditation manual for hospitals. Oakbrook Terrace, IL: The Joint
Commission. (Level VII)
9 The Joint Commission. (2019). Standard RI.01.01.01. Comprehensive
accreditation manual for hospitals. Oakbrook Terrace, IL: The Joint
Commission. (Level VII)
10 DNV GL-Healthcare USA, Inc. (2016). PR.1.SR.5 . NIAHO® accreditation
requirements: Interpretive guidelines & surveyor guidance (version 11).
Milford, OH: DNV GL-Healthcare USA, Inc. (Level VII)
11 Centers for Medicare and Medicaid Services, Department of Health and
Human Services. (2015). Condition of participation: Patient’s rights. 42 C.F.R.
§ 482.13(c)(1).
12 Accreditation Association for Hospitals and Health Systems. (2017). Standard
15.01.16. Healthcare Facilities Accreditation Program: Accreditation
requirements for acute care hospitals. Chicago, IL: Accreditation Association
for Hospitals and Health Systems. (Level VII)
13 National Pressure Ulcer Advisory Panel, et al. (2014). “Prevention and
treatment of pressure ulcers: Quick reference guide” [Online]. Accessed via
the Web at http://www.npuap.org/wp-content/uploads/2014/08/Quick-
Reference-Guide-DIGITAL-NPUAP-EPUAP-PPPIA.pdf (Level VII)
14 Accreditation Association for Hospitals and Health Systems. (2017). Standard
16.02.02. Healthcare Facilities Accreditation Program: Accreditation
requirements for acute care hospitals. Chicago, IL: Accreditation Association
for Hospitals and Health Systems. (Level VII)
15 Jarrett, N., & LaBresh, K. A. (2015). “Evidence-based guidelines for selected,
candidate, and previously considered hospital-acquired conditions: Final
report” [Online]. Accessed via the Web at
https://www.cms.gov/Medicare/Medicare-Fee-for-Service-
Payment/HospitalAcqCond/Downloads/Evidence-Based-Guidelines.zip
16 The Joint Commission. (2019). Standard RC.01.03 .01. Comprehensive
accreditation manual for hospitals. Oakbrook Terrace, IL: The Joint
Commission. (Level VII)
17 Centers for Medicare and Medicaid Services, Department of Health and
Human Services. (2015). Condition of participation: Medical record services.
42 C.F.R. § 482.24(b).
18 Accreditation Association for Hospitals and Health Systems. (2017). Standard
10.00 .03. Healthcare Facilities Accreditation Program: Accreditation
requirements for acute care hospitals. Chicago, IL: Accreditation Association
for Hospitals and Health Systems. (Level VII)
19 DNV GL-Healthcare USA, Inc. (2016). MR.2 .SR.1 . NIAHO® accreditation
requirements: Interpretive guidelines & surveyor guidance (version 11).
Milford, OH: DNV GL-Healthcare USA, Inc. (Level VII)
BED BATH
A complete bed bath cleans the patient’s skin, stimulates
circulation, provides mild exercise, and promotes comfort.
Bathing also allows assessment of skin condition, joint
mobility, and muscle strength. Depending on the patient’s
overall condition and duration of hospitalization, the patient
may have a complete or partial bath daily. A partial bath,
including hands, face, axillae, back, genitalia, and anal
region, may replace a complete bath for the patient with
dry, fragile skin or extreme weakness and can supplement a
complete bath for the diaphoretic or incontinent patient.
Equipment
Bath blanket ▪ skin cleaner ▪ towels ▪ washcloths ▪ bath
basin ▪ gloves ▪ hospital-grade disinfectant ▪ bed linens ▪
clean patient gown ▪ hair brush or comb ▪ Optional:
personal protective equipment, bedpan, urinal, moisture
barrier and skin protectant, perineal pad, scrotal support,
hypoallergenic moisturizer, no-rinse pH-neutral skin
cleanser, bath bag package.
Preparation of equipment
Determine the patient’s preference for skin cleanser and
other hygiene aids because some patients are allergic to
soap or prefer bath oil or lotions. Use a no-rinse pH-neutral
cleanser as needed to prevent skin breakdown.1
Perform a bag bath (bag bath package contains 8 to 10
premoistened disposable cloths that contain a no-rinse
surfactant), if available, to bathe the patient. A bag bath
costs less and saves time compared with a conventional bed
bath, because no rinsing is required. Before use, warm the
cloths in a microwave or a special warming unit supplied by
the manufacturer. Use a separate premoistened cloth to
wash each part of the patient’s body.2
Implementation
■ Gather the equipment on an overbed table or bedside
stand.
■ Perform hand hygiene.3,4,5,6,7,8
■ Confirm the patient’s identity using at least two patient
identifiers.9
■ Provide privacy.10,11,12,13
■ Explain the bed bathing procedure to the patient.
■ Offer the patient a bedpan or urinal, if needed.
■ If the patient’s condition permits, encourage the patient
to assist with bed bathing to provide exercise and promote
independence.
■ Fill a basin two-thirds full of tepid water (115°F [46.1°C])
and bring it to the patient’s bedside. Alternatively, use tepid
water directly from the patient’s spigot.14
■ Put on gloves and other personal protective equipment as
needed to comply with standard precautions.15,16
■ Raise the patient’s bed to waist level while providing care
to prevent caregiver back strain.17
■ Help the patient into the supine position, if possible.
■ If the bed linens will be changed after the bath, remove
the top linen. If not, fanfold it to the foot of the bed.
■ Remove the patient’s gown and other equipment or
supplies, such as elastic stockings, elastic bandages, and
restraints.
■ Cover the patient with a bath blanket to provide warmth
and privacy.
■ Place a towel under the patient’s chin.
■ Wrap a washcloth folded around your hand to form a mitt;
dip the washcloth into the water and squeeze out the excess
water. This technique keeps the cloth warm longer and
helps avoid dribbling water on the patient from the cloth’s
loose ends.
■ Wash the patient’s face. Begin with the eyes, working
from the inner to the outer canthus without soap. Use a
separate section of the washcloth for each eye to avoid
spreading ocular infection.
■ If the patient can tolerates a skin cleanser, apply it to the
cloth and wash the rest of the patient’s face, ears, and neck,
using firm, gentle strokes. Rinse thoroughly because
residual soap can cause itching and dryness. (See Bathing a
patient at risk for skin tears.)
■ Dry the area thoroughly, taking special care in skinfolds
and creases. Observe the skin for irritation, scaling, and
other abnormalities.
■ Remove the bath blanket from under the patient’s chin.
■ Turn down the bath blanket and drape the patient’s chest
with a new bath towel.
■ Wash, rinse, and dry the chest and axillae, observing the
patient’s respirations throughout the procedure. Wash
skinfolds under the female patient’s breasts by lifting each
breast. If the patient tolerates deodorant, apply it. Replace
the bath blanket to cover the patient’s chest and axillae.
■ Uncover the patient’s arm farthest from you and place a
bath towel under it.
■ Wash the arm, using long, smooth strokes and moving
from wrist to shoulder to stimulate venous circulation. If
possible, soak the patient’s hand in the basin to remove dirt
and soften the nails. Observe the color of the hand and nail
beds to assess peripheral circulation. Repeat the same
procedure for the other arm and hand.
■ Turn down the bath blanket to expose the patient’s
abdomen and groin, keeping a bath towel across his or her
chest to prevent chills. Bathe, rinse, and dry the patient’s
abdomen and groin while checking for abdominal distention
or tenderness. Then turn back the bath blanket to cover the
patient’s chest and abdomen.
■ Uncover the patient’s leg farthest from you and place a
bath towel under it. Flex this leg and wash it, moving from
ankle to hip to stimulate venous circulation. Don’t massage
the leg, because massaging could dislodge any existing
thrombus, possibly causing a pulmonary embolus. Rinse and
dry the leg.
Bathing a patient at risk for skin
tears
Caring for a patient with fragile skin who’s at risk for skin tears can pose a
special challenge because mechanical trauma can result from even such
routine care as bathing. When caring for the patient at risk, limit baths when
possible; instead, as the patient’s condition allows, encourage showering
with warm, tepid water. When a bed bath is necessary, use a no-rinse, pH-
neutral skin cleanser and use gentle technique during bathing.14 After
bathing, allow the skin to remain damp, but not wet, and then hydrate the
skin with a hypoallergenic moisturizer.14 Provide the patient with protective
clothing, such as shirts with long sleeves, long pants, knee-high socks, or
shin and elbow guard pads.
■ If possible, place a basin on the patient’s bed, flex the leg
at the knee, and place the foot in the basin. Soak the foot,
and then wash and rinse it thoroughly. Remove the foot from
the basin, dry it, and clean the toenails. Observe the
patient’s skin condition and color during cleaning to assess
peripheral circulation. Repeat the procedure for the other
leg and foot.
■ Cover the patient with the bath blanket to prevent
chilling. Then lower the bed to the lowest position to prevent
falls and maintain patient safety.
■ Change the bath water.
■ Remove and discard your gloves and perform hand
hygiene.3,4,5,6,7,8
■ Put on new gloves.15,16
■ Raise the patient’s bed to waist level while providing care
to prevent caregiver back strain.17
■ Roll the patient onto his or her side or stomach, place a
towel beneath the patient, and cover the patient to prevent
chilling.
■ Wash, rinse, and dry the patient’s back and buttocks.
■ Wash the anal area from front to back to avoid
contaminating the perineum. Rinse and dry the area well.
■ Remove and discard your gloves.
■ Return the bed to the lowest position to prevent falls and
maintain patient safety.18
■ After lowering the bed, raise the side rails to ensure the
patient’s safety.18
■ Perform hand hygiene3,4,5,6,7,8 and change the bath water
again.
■ Put on new gloves.15,16
■ Raise the patient’s bed to waist level while providing care
to prevent caregiver back strain.17
■ Turn the patient onto his or her back and wash the genital
area thoroughly but gently, using a different section of the
washcloth for each downward stroke. Wash from front to
back, avoiding the anal area. Rinse thoroughly and pat dry.
Use a moisture barrier/skin protectant on the skin, as
needed, to protect and maintain intact skin.1
■ If applicable, perform indwelling urinary catheter care.
Apply perineal pads or scrotal supports as needed.
■ Remove and discard your gloves and perform hand
hygiene.3,4,5,6,7,8
■ Apply a hypoallergenic moisturizer as needed to areas of
dry skin to prevent skin breakdown.1
■ Dress the patient in a clean gown, and reapply any elastic
bandages, elastic stockings, or restraints removed before
the bed bath.
■ Remake the patient’s bed or change the linens, and
remove the bath blanket.
■ Place a bath towel beneath the patient’s head to catch
loose hair, and then brush and comb the hair.
■ Help the patient to feel comfortable.
■ Return the bed to its lowest position to prevent falls and
maintain patient safety.18
■ Put on gloves, if you aren’t already wearing them.15,16
■ Empty, clean, and disinfect the bath basin, using a
hospital-grade disinfectant.
■ Carry soiled linens to the hamper with outstretched arms,
not letting the soiled linens touch your clothing to avoid
spreading microorganisms.
■ Remove and discard your gloves and other personal
protective equipment, if worn, and perform hand
hygiene.3,4,5,6,7,8
■ Document the procedure.19,20,21,22
Special considerations
■ In areas in your facility where central line–associated
bloodstream infection (CLABSI) rates are higher than
desired, bathe patients daily who are older than age 2
months with a chlorhexidine-impregnated cloth according to
the manufacturer’s guidelines to help reduce the risk of
CLABSIs.23,24,25
■ Carefully dry skinfold areas, such as under breasts, in the
groin area, and between fingers, toes, and buttocks.
Separate skinfolds and apply a moisture barrier/skin
protectant to help prevent skin breakdown.1
■ If the patient is incontinent, use absorbent underpads or
briefs to wick incontinence-associated moisture away from
the skin because moisture trapped against the skin can
cause maceration.
HOSPITAL-ACQUIRED CONDITION ALERT Keep in mind that a stage 3
or 4 pressure injury is considered a hospital-acquired condition by the
Centers for Disease Control and Prevention, because it can be
prevented reasonably using best practices. Make sure to follow
pressure injury prevention practices (e.g., using a pH-neutral skin
cleanser, a skin moisturizer, absorbent underpads or briefs, and a
moisture barrier/skin protectant) as needed to help reduce the risk of
pressure injury.1,26,27
■ Raise the side rails of the patient’s bed during a bed bath
as needed to aid in turning and repositioning, and lower the
side rails with care to prevent any of the patient’s body
parts from getting caught between the rails or between the
rails and the mattress.28
■ To improve circulation, maintain joint mobility, and
preserve muscle tone, move the body joints through their
full range of motion during the bed bath.
■ When bathing an older adult with dementia, focus on
getting to know the person rather than just the task of
bathing to help reduce discomfort and anxiety.29,30
Documentation
Record the date and time of the bed bath in the flowchart.
Note the patient’s tolerance of the bath, range of motion,
and self-care abilities, and document any unusual findings.
REFERENCES
1 National Pressure Ulcer Advisory Panel, et al. (2014). “Prevention and
treatment of pressure ulcers: Quick reference guide” [Online]. Accessed via
the Web at http://www.npuap.org/wp-content/uploads/2014/08/Quick-
Reference-Guide-DIGITAL-NPUAP-EPUAP-PPPIA.pdf (Level VII)
2 Nøddeskou, L. H., et al. (2015). Elderly patients’ and nurses’ assessment of
traditional bed bath compared to prepacked single units—Randomised
controlled trial. Scandinavian Journal of Caring Sciences, 29, 347–352. (Level
II)
3 The Joint Commission. (2019). Standard NPSG.07.01.01. Comprehensive
accreditation manual for hospitals. Oakbrook Terrace, IL: The Joint
Commission. (Level VII)
4 Centers for Disease Control and Prevention. (2002). Guideline for hand
hygiene in health-care settings: Recommendations of the Healthcare Infection
Control Practices Advisory Committee and the HICPAC/SHEA/APIC/IDSA Hand
Hygiene Task Force. MMWR Recommendations and Reports, 51(RR-16), 1–45.
Accessed via the Web at https://www.cdc.gov/mmwr/pdf/rr/rr5116.pdf (Level
II)
5 World Health Organization. (2009). “WHO guidelines on hand hygiene in
health care: First global patient safety challenge, clean care is safer care”
[Online]. Accessed via the Web at
http://apps.who.int/iris/bitstream/10665/44102/1/9789241597906_eng.pdf
(Level IV)
6 Centers for Medicare and Medicaid Services, Department of Health and
Human Services. (2015). Condition of participation: Infection control. 42 C.F.R.
§ 482.42.
7 Accreditation Association for Hospitals and Health Systems. (2017). Standard
07.01.21. Healthcare Facilities Accreditation Program: Accreditation
requirements for acute care hospitals. Chicago, IL: Accreditation Association
for Hospitals and Health Systems. (Level VII)
8 DNV GL-Healthcare USA, Inc. (2016). IC.1.SR.1 . NIAHO® accreditation
requirements: Interpretive guidelines & surveyor guidance (version 11).
Milford, OH: DNV GL-Healthcare USA, Inc. (Level VII)
9 The Joint Commission. (2019). Standard NPSG.01.01.01. Comprehensive
accreditation manual for hospitals. Oakbrook Terrace, IL: The Joint
Commission. (Level VII)
10 Accreditation Association for Hospitals and Health Systems. (2017). Standard
15.01.16. Healthcare Facilities Accreditation Program: Accreditation
requirements for acute care hospitals. Chicago, IL: Accreditation Association
for Hospitals and Health Systems. (Level VII)
11 Centers for Medicare and Medicaid Services, Department of Health and
Human Services. (2015). Condition of participation: Patient’s rights. 42 C.F.R.
§ 482.13(c)(1).
12 The Joint Commission. (2019). Standard RI.01.01.01. Comprehensive
accreditation manual for hospitals. Oakbrook Terrace, IL: The Joint
Commission. (Level VII)
13 DNV GL-Healthcare USA, Inc. (2016). PR.1.SR.5 . NIAHO® accreditation
requirements: Interpretive guidelines & surveyor guidance (version 11).
Milford, OH: DNV GL-Healthcare USA, Inc. (Level VII)
14 LeBlanc, K., et al. (2013). International skin tear advisory panel: A tool kit to
aid in the prevention, assessment, and treatment of skin tears using a
simplified classification system. Advances in Skin & Wound Care, 26, 459–
476. Accessed via the Web at
http://journals.lww.com/aswcjournal/Fulltext/2013/10000/International_Skin_T
ear_Advisory_Panel_A-Tool_Kit.7 .aspx (Level IV)
15 Siegel, J. D ., et al. (2007, revised 2017). “2007 guideline for isolation
precautions: Preventing transmission of infectious agents in healthcare
settings” [Online]. Accessed via the Web at
https://www.cdc.gov/infectioncontrol/pdf/guidelines/isolation-guidelines.pdf
(Level II)
16 Accreditation Association for Hospitals and Health Systems. (2017). Standard
07.01.10. Healthcare Facilities Accreditation Program: Accreditation
requirements for acute care hospitals. Chicago, IL: Accreditation Association
for Hospitals and Health Systems. (Level VII)
17 Waters, T. R., et al. (2009). “Safe patient handling training for schools of
nursing” [Online]. Accessed via the Web at
https://www.cdc.gov/niosh/docs/2009-127/pdfs/2009-127.pdf (Level VII)
18 Ganz, D. A., et al. (2013). Preventing falls in hospitals: A toolkit for improving
quality of care (AHRQ Publication No. 13-0015-EF). Rockville, MD: Agency for
Healthcare Research and Quality. Accessed via the Web at
https://www.ahrq.gov/sites/default/files/publications/files/fallpxtoolkit_0 .pdf
(Level VII)
19 The Joint Commission. (2019). Standard RC.01.03 .01. Comprehensive
accreditation manual for hospitals. Oakbrook Terrace, IL: The Joint
Commission. (Level VII)
20 Centers for Medicare and Medicaid Services, Department of Health and
Human Services. (2015). Condition of participation: Medical record services.
42 C.F.R. § 482.24(b).
21 Accreditation Association for Hospitals and Health Systems. (2017). Standard
10.00 .03. Healthcare Facilities Accreditation Program: Accreditation
requirements for acute care hospitals. Chicago, IL: Accreditation Association
for Hospitals and Health Systems. (Level VII)
22 DNV GL-Healthcare USA, Inc. (2016). MR.2 .SR.1 . NIAHO® accreditation
requirements: Interpretive guidelines & surveyor guidance (version 11).
Milford, OH: DNV GL-Healthcare USA, Inc. (Level VII)
23 Evans, H. L., et al. (2010). Effect of chlorhexidine whole-body bathing on
hospital-acquired infections among trauma patients. Archives of Surgery,
145, 240–246.
24 Dixon, J. M., & Carver, R. L. (2010). Daily chlorhexidine gluconate bathing
with impregnated cloths results in statistically significant reduction in central
line-associated bloodstream infections. American Journal of Infection Control,
38, 817–821.
25 Marschall, J., et al. (2014). SHEA/IDSA Practice Recommendation: Strategies
to prevent central line–associated bloodstream infections in acute care
hospitals: 2014 update. Infection Control and Hospital Epidemiology, 35, 753–
771. Accessed via the Web at http://www.jstor.org/stable/10.1086/676533
(Level I)
26 Jarrett, N., & Callaham, M. (2016). “Evidence-based guidelines for selected
hospital-acquired conditions: Final report” [Online]. Accessed via the Web at
https://www.cms.gov/Medicare/Medicare-Fee-for-Service-
Payment/HospitalAcqCond/Downloads/2016-HAC-Report.pdf
27 Accreditation Association for Hospitals and Health Systems. (2017). Standard
16.02.02. Healthcare Facilities Accreditation Program: Accreditation
requirements for acute care hospitals. Chicago, IL: Accreditation Association
for Hospitals and Health Systems. (Level VII)
28 U.S . Food and Drug Administration. (2010). “A guide to bed safety—Bed rails
in hospitals, nursing homes and home health care: The facts” [Online].
Accessed via the Web at
http://www.fda.gov/downloads/MedicalDevices/ProductsandMedicalProcedure
s/GeneralHospitalDevicesandSupplies/HospitalBeds/ucm125857.pdf
29 Rader, J., et al. (2006). The bathing of older adults with dementia. American
Journal of Nursing, 106(4), 40–48.
30 Konno, R., et al. (2013). The best evidence for assisted bathing of older
people with dementia: A comprehensive systematic review. JBI Database of
Systematic Reviews and Implementation Reports, 11, 123–212. Accessed via
the Web at
http://journals.lww.com/jbisrir/Abstract/2013/11010/The_best_evidence_for_as
sisted_bathing_of_older.3 .aspx (Level I)
BED EQUIPMENT, SUPPLEMENTAL
Certain equipment can promote a bedridden patient’s
comfort and help prevent pressure injury and other
complications of immobility. A wood or hard plastic
footboard, for example, helps prevent footdrop by
maintaining proper alignment; it also raises bed linens off of
the patient’s feet. The foot cradle, a horizontal or arched bar
over the end of the bed, keeps bed linens off of the patient’s
feet, preventing skin irritation and breakdown, especially in
patients with peripheral vascular disease or neuropathy. A
bed board, made of wood or wood covered with canvas,
firms the mattress and is especially useful for the patient
with spinal injuries. The metal basic frame and the metal
trapeze (a triangular piece attached to this frame) allow the
patient with arm mobility and strength to lift off the bed,
facilitating bed-making and bedpan positioning.
A vinyl water mattress exerts less pressure on the skin
than a standard hospital mattress, helping to prevent or
treat pressure ulcers. An alternating pressure pad (a vinyl
pad divided into chambers filled with air or water and
attached to an electric pump) serves the same purpose, but
it also stimulates circulation by alternately inflating and
deflating its chambers. Although recommended, pressure
distribution devices should serve as adjuncts to—not
replacement for—patient repositioning and skin care
protocols.1
A reusable water mattress replaces the standard hospital
mattress and rests on a sheet of heavy cardboard placed
over the bedsprings; the smaller, less bulky disposable
mattress rests on top of the standard hospital mattress. All
supplemental bed equipment is optional, depending on the
patient’s needs. (See Types of supplemental bed equipment,
page 54.)
Equipment
The exact equipment needed depends on what
supplemental bed equipment is being added to the patient’s
bed.
Footboard and cover ▪ drawsheet ▪ bath blanket ▪ foot
cradle ▪ bed board ▪ basic frame with trapeze ▪ roller gauze
▪ water mattress ▪ stretcher ▪ alternating pressure pad ▪
pump and tubing ▪ footstool ▪ fluid-impermeable pad ▪
sandbag, bath blanket, or pillow ▪ Optional: safety pins.
Preparation of equipment
If you’re preparing a footboard for use, place a cover over it
to provide padding. Alternatively, pad it with a folded
drawsheet or bath blanket by bringing the top and side
edges of the sheet or blanket to the back of the footboard,
mitering the corners, and securing them at the center with
safety pins. Padding cushions the patient’s feet against
pressure from the hard footboard, helping to prevent skin
irritation and breakdown.
If you’re preparing to use a portable water mattress,
check with the maintenance department before transferring
the mattress because its weight may rule out use on some
electric beds.
Make sure that all supplemental bed equipment is
compatible with the bed frame, mattress, and rails to ensure
safety and prevent injury.2
Implementation
■ Perform hand hygiene.3,4,5,6,7,8
■ Confirm the patient’s identity using at least two patient
identifiers.9
■ Provide privacy.10,11,12,13
■ Tell the patient what you’re going to do, and describe the
equipment.
■ Raise the patient’s bed to waist level to prevent caregiver
back strain.14
■ Put on gloves, if necessary, to comply with standard
precautions.15,16
Using a footboard
■ Move the patient up in bed to allow room for the
footboard.
■ Loosen the top linens at the foot of the bed, and then fold
them back over the patient to expose the patient’s feet.
■ Lift the mattress at the foot of the bed.
■ Place the lip of the footboard between the mattress and
the bedsprings, or secure the footboard under both sides of
the mattress.
■ Adjust the footboard so that the patient’s feet rest
comfortably against it. If the footboard isn’t adjustable, tuck
a folded bath blanket between the board and the patient’s
feet.
■ Unless the footboard has side supports, place a sandbag,
a folded bath blanket, or a pillow alongside each foot to
maintain 90-degree foot alignment.
■ Fold the top linens over the footboard, tuck them under
the mattress, and miter the corners.
Using a foot cradle
■ Move the patient up in bed to allow room for the foot
cradle.
■ Loosen the top linens at the foot of the bed, and then fold
them over the patient or to one side.
■ When using a one-piece cradle, place one side arm under
the mattress, carefully extend the arch over the bed, and
place the other side arm under the mattress on the opposite
side. Adjust the tension rods so that they rest securely over
the edge of the mattress.
■ When using a sectional cradle with two side arms, place
the side arms under the mattress. Secure the tension rods
over the edge of the mattress. Then carefully place the arch
over the bed and connect it to the side arms.
■ When using a sectional cradle with one side arm, connect
the side arm and horizontal cradle bar before placement.
Then place the side arm under the mattress on one side of
the bed.
■ Cover the cradle with the top linens, tuck them under the
mattress at the foot of the bed, and miter the corners.
Using a bed board
■ Transfer the patient from the bed to a stretcher or a chair.
Obtain assistance if necessary.
■ Strip the linens from the bed. If you plan to reuse them,
fold each piece neatly and hang it over the back of a chair.
Otherwise, place soiled linens in a laundry bag.
■ If the bed board consists of wooden slats encased in
canvas, lift the mattress at the head of the bed and center
the board over the bedsprings to prevent it from jutting out
and causing accidental injury. Unroll the slats to cover the
bedsprings at the head of the bed. Then lift the mattress at
the foot of the bed and unroll the remaining slats.
■ If the bed board consists of one solid or two hinged pieces
of wood, lift the mattress on one side of the bed and center
the board over the bedsprings.
■ After positioning the bed board, replace the linens.
■ Return the patient to bed.
Using a basic frame with trapeze
■ If an orthopedic technician isn’t available to secure the
frame and trapeze to the patient’s bed, get assistance to
attach these devices to the bed, as necessary. Hang the
trapeze within the patient’s easy reach so the patient won’t
need to strain to reach it.
Using a portable water mattress
■ Ensure that the patient isn’t prone to motion sickness
because the movement of the water in the mattress may
cause nausea.
■ Obtain several coworkers to help transfer the mattress
from the stretcher to the patient’s bed because the mattress
is heavy and bulky.
■ Position the mattress over the bed and then place a
protective cover over it.
■ Place a bottom sheet over the cover and tuck it in loosely.
■ Place a fluid-impermeable pad, or drawsheet over the
bottom sheet, as needed. Note that adding these items
doesn’t decrease the effectiveness of this mattress.
■ If the patient isn’t ambulatory, assist him or her into bed.
■ Position the patient comfortably on the mattress.
■ Cover the patient with the top linens and tuck them in
loosely.
EQUIPMENT
Types of supplemental bed equipment
Sectional cradle with two side arms
Sectional cradle with one side arm
Adjustable footboard
Trapeze and basic frame
Alternating pressure pad
One-piece cradle
L-shaped footboard
■ Check the water mattress daily to ensure adequate
flotation. To do so, place your hand under the patient’s
thighs. If you can feel the bottom of the mattress, arrange
to have water added.
Using an alternating pressure pad
■ If possible, transfer the patient from the bed to a chair or
stretcher. Get help, if necessary.
■ Strip the linens from the bed.
■ Inspect the plug and electrical cord of the alternating
pressure pad for defects. Don’t use the unit if it appears
damaged.
■ Unfold the pad on top of the mattress with the
appropriate side facing up.
■ Place the motor on a fluid-impermeable pad on the floor
or on a footstool near the mattress outlets.
■ Connect the tubing securely to the motor and to the
mattress outlets.
■ Plug the cord into an electrical outlet.
■ Turn on the motor.
■ After several minutes, observe the emptying and filling of
the pad’s chambers, and check the tubing for kinks because
they could interfere with the pad’s function.
■ Place a bottom sheet over the pad and tuck it in loosely.
To avoid tube constriction, don’t miter the corner where the
tubing is attached.
■ Position the patient comfortably on the pad.
■ Cover the patient with the top linens, and tuck them in
loosely.
■ If the pad becomes soiled, clean it with a damp cloth and
mild soap, and then dry it well. To avoid damaging the pad’s
surface, don’t use alcohol.
■ When the patient no longer needs the pad or is
discharged, turn off the motor, disconnect the tubing, and
unplug the cord from the wall outlet. Remove the pad from
the patient’s bed, and either fold and discard it or send it
home with the patient if the patient will be using it at home.
■ If the patient will be using an alternating pressure pad at
home, inform the patient that the motor needed to power
the pad can usually be rented from a surgical supply store.
Explain to the patient or a caregiver how to operate the pad
at home.
■ Coil the tubing and electrical cord, and then strap them to
the motor. Return the motor unit to the central supply
department.
Completing the procedure
■ Return the bed to the lowest position to prevent falls and
maintain patient safety.17
■ Remove and discard your gloves if worn.15,16
■ Perform hand hygiene.3,4,5,6,7,8
■ Document the procedure.18,19,20,21
Special considerations
■ Place the patient in bed before positioning and securing
an overbed or foot cradle to ensure its proper placement
and to prevent patient injury. Similarly, remove the cradle
before the patient gets out of bed. When turning or
positioning the patient on his or her side, make sure the foot
cradle’s tension rod doesn’t rest against the skin because
this may cause pressure and predispose the patient to skin
breakdown.
■ Avoid placing excessive layers of draw sheets or fluid-
impermeable pads between an alternating pressure pad and
the patient because these items decrease the pad’s
effectiveness and increases the risk of pressure injury. Avoid
using pins and other sharp instruments near an alternating
pressure pad or water mattress to prevent accidental
puncture.
Documentation
In your notes and care plan, record the type of supplemental
bed equipment used, the time and date of use, and the
patient’s response to treatment. Document any patient
teaching provided, the patient’s understanding of the
teaching, and whether the patient requires follow-up
teaching.
REFERENCES
1 National Pressure Ulcer Advisory Panel, et al. (2014). “Prevention and
treatment of pressure ulcers: Quick reference guide” [Online]. Accessed via
the Web at http://www.npuap.org/wp-content/uploads/2014/08/Quick-
Reference-Guide-DIGITAL-NPUAP-EPUAP-PPPIA.pdf (Level VII)
2 U.S. Food and Drug Administration. (2006, updated 2015). “Hospital bed
system dimensional and assessment guidance to reduce entrapment”
[Online]. Accessed via the Web at
http://www.fda.gov/MedicalDevices/DeviceRegulationandGuidance/GuidanceD
ocuments/ucm072662.htm
3 The Joint Commission. (2019). Standard NPSG.07.01.01. Comprehensive
accreditation manual for hospitals. Oakbrook Terrace, IL: The Joint
Commission. (Level VII)
4 Centers for Disease Control and Prevention. (2002). Guideline for hand
hygiene in health-care settings: Recommendations of the Healthcare Infection
Control Practices Advisory Committee and the HICPAC/SHEA/APIC/IDSA Hand
Hygiene Task Force. MMWR Recommendations and Reports, 51(RR-16), 1–45.
Accessed via the Web at https://www.cdc.gov/mmwr/pdf/rr/rr5116.pdf (Level
II)
5 World Health Organization. (2009). “WHO guidelines on hand hygiene in
health care: First global patient safety challenge, clean care is safer care”
[Online]. Accessed via the Web at
http://apps.who.int/iris/bitstream/10665/44102/1/9789241597906_eng.pdf
(Level IV)
6 Accreditation Association for Hospitals and Health Systems. (2017). Standard
07.01.21. Healthcare Facilities Accreditation Program: Accreditation standards
for acute care hospitals. Chicago, IL: Accreditation Association for Hospitals
and Health Systems. (Level VII)
7 Centers for Medicare and Medicaid Services, Department of Health and
Human Services. (2015). Condition of participation: Infection control. 42 C.F.R.
§ 482.42.
8 DNV GL-Healthcare USA, Inc. (2016). IC.1.SR.1 . NIAHO® accreditation
requirements: Interpretive guidelines & surveyor guidance (version 11).
Milford, OH: DNV GL-Healthcare USA, Inc. (Level VII)
9 The Joint Commission. (2019). Standard NPSG.01.01.01. Comprehensive
accreditation manual for hospitals. Oakbrook Terrace, IL: The Joint
Commission. (Level VII)
10 DNV GL-Healthcare USA, Inc. (2016). PR.1.SR.5 . NIAHO® accreditation
requirements: Interpretive guidelines & surveyor guidance (version 11).
Milford, OH: DNV GL-Healthcare USA, Inc. (Level VII)
11 Centers for Medicare and Medicaid Services, Department of Health and
Human Services. (2015). Condition of participation: Patient’s rights. 42 C.F.R.
§ 482.13(c)(1).
12 Accreditation Association for Hospitals and Health Systems. (2017). Standard
15.01.16. Healthcare Facilities Accreditation Program: Accreditation
requirements for acute care hospitals. Chicago, IL: Accreditation Association
for Hospitals and Health Systems. (Level VII)
13 The Joint Commission. (2019). Standard RI.01.01.01. Comprehensive
accreditation manual for hospitals. Oakbrook Terrace, IL: The Joint
Commission. (Level VII)
14 Waters, T. R., et al. (2009). “Safe patient handling training for schools of
nursing” [Online]. Accessed via the Web at
https://www.cdc.gov/niosh/docs/2009-127/pdfs/2009-127.pdf (Level VII)
15 Accreditation Association for Hospitals and Health Systems. (2017). Standard
07.01.10. Healthcare Facilities Accreditation Program: Accreditation
requirements for acute care hospitals. Chicago, IL: Accreditation Association
for Hospitals and Health Systems. (Level VII)
16 Siegel, J. D ., et al. (2007, revised 2017). “2007 guideline for isolation
precautions: Preventing transmission of infectious agents in healthcare
settings” [Online]. Accessed via the Web at
https://www.cdc.gov/infectioncontrol/pdf/guidelines/isolation-guidelines.pdf
(Level II)
17 Ganz, D. A., et al. (2013). Preventing falls in hospitals: A toolkit for improving
quality of care (AHRQ Publication No. 13-0015-EF). Rockville, MD: Agency for
Healthcare Research and Quality. Accessed via the Web at
https://www.ahrq.gov/sites/default/files/publications/files/fallpxtoolkit_0 .pdf
(Level VII)
18 The Joint Commission. (2019). Standard RC.01.03 .01. Comprehensive
accreditation manual for hospitals. Oakbrook Terrace, IL: The Joint
Commission. (Level VII)
19 Centers for Medicare and Medicaid Services, Department of Health and
Human Services. (2015). Condition of participation: Medical record services.
42 C.F.R. § 482.24(b).
20 Accreditation Association for Hospitals and Health Systems. (2017). Standard
10.00 .03. Healthcare Facilities Accreditation Program: Accreditation standards
for acute care hospitals. Chicago, IL: Accreditation Association for Hospitals
and Health Systems. (Level VII)
21 DNV GL-Healthcare USA, Inc. (2016). MR.2 .SR.1 . NIAHO® accreditation
requirements: Interpretive guidelines & surveyor guidance (version 11).
Milford, OH: DNV GL-Healthcare USA, Inc. (Level VII)
BED-MAKING, OCCUPIED
For a bedridden patient, linen changes promote comfort and
help prevent skin breakdown and health care–associated
infection. Such changes require the use of side rails to
prevent the patient from rolling out of bed and, depending
on the patient’s condition, the use of a turning sheet to
move from side to side.
Making an occupied bed may require more than one
person. It also entails loosening the bottom sheet on one
side and fanfolding it to the center of the mattress instead
of loosening the bottom sheet on both sides and removing
it, as in an unoccupied bed. Also, the foundation of the bed
must be made before the top sheet is applied instead of
both the foundation and top being made on one side before
being completed on the other side.
Equipment
Two sheets (one fitted, if available) ▪ pillowcase ▪
bedspread ▪ one or two bath blankets ▪ laundry bag ▪
Optional: fluid-impermeable pads, gloves, other personal
protective equipment, overhead trapeze bar.
Implementation
■ Gather and prepare the necessary equipment.
■ Perform hand hygiene1,2,3,4,5,6 and put on personal
protective equipment as needed to comply with standard
precautions.7,8
■ Confirm the patient’s identity using at least two patient
identifiers.9
■ Tell the patient you will be changing the bed linens.
Explain how the patient can help if able, adjusting the plan
according to the patient’s abilities and needs.
■ Obtain the help of a coworker as needed to prevent
injuring yourself.10 Have the coworker stand on the opposite
side of the bed from you.
■ Provide privacy.11,12,13,14
■ Move furniture away from the bed to ensure ample
working space.
■ Raise the side rail on the far side of the bed to prevent
falls.
■ Raise the bed to waist level while performing patient care
to prevent caregiver back strain.10
■ If permitted, lower the head of the bed to ensure tight-
fitting, wrinkle-free linens.
■ When stripping the bed, watch for belongings among the
linens.
■ Cover the patient with a bath blanket to avoid exposure
and provide warmth and privacy.
■ Fanfold the top sheet and spread from beneath the bath
blanket, and then bring them back over the blanket.
■ Loosen the top linens at the foot of the bed and remove
them separately. If reusing the top linens, fold each piece
and hang each piece over the back of the chair. Otherwise,
place each piece in a laundry bag. To avoid dispersing
microorganisms, don’t fan the linens; hold them against
your clothing, or place them on the floor.
■ If the mattress slid down when the head of the bed was
raised, elicit the help of a coworker to pull it up again.
Adjusting the mattress after the bed is made loosens the
linens.
■ Roll the patient to the far side of the bed, and turn the
pillow lengthwise under the head to support the neck. Ask
the patient to help (if possible) by grasping the far side rail
as the patient turns so that the patient’s positioned at the
far side of the bed. Alternatively, have the patient use an
overhead trapeze bar to assist with positioning.15
■ Loosen the soiled bottom linens on the side of the bed
nearest you. Then roll the linens toward the patient’s back
in the middle of the bed (as shown below).
■ Place a clean bottom sheet on the bed, with its center
fold in the middle of the mattress. For a fitted sheet, secure
the top and bottom corners over the side of the mattress
nearest you. For a flat sheet, place its end even with the
foot of the mattress. Miter the top corner as you would for
an unoccupied bed to keep linens firmly tucked under the
mattress, preventing wrinkling.
■ Fanfold or roll the remaining clean bottom sheet toward
the patient with its center fold in the middle of the mattress
(as shown below).
■ If necessary, position a fluid-impermeable pad on the
drawsheet to absorb excretions or surgical drainage, and
fanfold it toward the patient.
■ Raise the other side rail, and roll the patient to the clean
side of the bed. Alternatively, have the patient use an
overhead trapeze bar to assist with repositioning.
■ Move to the unfinished side of the bed and lower the side
rail nearest you. (If a coworker is assisting, you can either
remain on your side of the bed or switch sides with the
coworker.)
■ Loosen and remove the soiled bottom linens separately
and place them in the laundry bag.16
■ Pull the clean bottom sheet taut. Secure the fitted sheet,
or place the end of a flat sheet even with the foot of the
bed, and miter the top corner. Unfold and smooth the fluid-
impermeable pad, if used.
■ Assist the patient to the supine position if the patient’s
condition permits.
■ Remove the soiled pillowcase and place it in the laundry
bag.16
■ Slip the pillow into a clean pillowcase, tucking in the
corners to ensure a smooth fit. Place the pillow beneath the
patient’s head, with its seam toward the top of the bed to
prevent it from rubbing against the patient’s neck, causing
irritation. Place the pillow’s open edge away from the door
to give the bed a finished appearance.
■ Unfold the clean top sheet over the patient with the rough
side of the hem facing away from the bed to avoid irritating
the patient’s skin. Allow enough sheet to form a cuff over
the spread.
■ Remove the bath blanket from beneath the sheet and
center the spread over the top sheet.
■ Loosen the top linens around the patient’s feet to allow
room for the patient’s feet and to prevent pressure that can
cause discomfort, skin breakdown, and footdrop.
■ Tuck the top sheet and spread under the foot of the bed,
and miter the bottom corners. Fold the top sheet over the
spread to give the bed a finished appearance.
■ Return the bed to its lowest position to prevent falls and
maintain patient safety.17
■ Raise the head of the bed to a comfortable position.
■ Raise side rails only if appropriate for the patient, and
lock the bed’s wheels to ensure patient safety.18,19 Assess
the patient’s body alignment.
■ Return the furniture to its proper place (if moved), and
place the call light within the patient’s easy reach.
■ Remove the laundry bag from the room.16
■ Remove and discard your gloves and any other personal
protective equipment if worn.16
■ Perform hand hygiene.1,2,4,3,5,6
■ Document the procedure, as applicable.20,21,22,23
Special considerations
■ Use a fitted sheet when available because a flat sheet
can slip out from under the mattress easily, especially if the
mattress is covered with plastic.
■ If the patient can’t assist with repositioning, use a lift
sheet or lift equipment for patient repositioning to prevent
friction injuries to the patient’s skin.15
■ If the patient has a support surface, avoid or limit placing
excess linens and fluid-impermeable pads on top of the
support surface because they can interfere with support
surface functioning.15
■ To prevent pressure injuries to the heels of an at-risk
patient, use heel suspension devices that elevate (float) and
offload the heels completely, and redistribute the weight of
the leg along the calf without putting pressure on the
Achilles tendon. Make sure that the patient’s knees are
flexed 5 to 10 degrees.15
■ If the patient is being treated with traction, enlist the help
of a coworker to make the bed. The patient may also assist
by using an overhead trapeze bar during the bed-making
procedure. (See Making a traction bed.)
Documentation
Although linen changes aren’t usually documented, record
the dates and times of linen changes in your notes for
patients with incontinence, excessive wound drainage,
pressure ulcers, or diaphoresis.
REFERENCES
1 The Joint Commission. (2019). Standard NPSG.07.01.01. Comprehensive
accreditation manual for hospitals. Oakbrook Terrace, IL: The Joint
Commission. (Level VII)
2 Centers for Disease Control and Prevention. (2002). Guideline for hand
hygiene in health-care settings: Recommendations of the Healthcare Infection
Control Practices Advisory Committee and the HICPAC/SHEA/APIC/IDSA Hand
Hygiene Task Force. MMWR Recommendations and Reports, 51(RR-16), 1–45.
Accessed via the Web at https://www.cdc.gov/mmwr/pdf/rr/rr5116.pdf (Level
II)
3 World Health Organization. (2009). “WHO guidelines on hand hygiene in
health care: First global patient safety challenge, clean care is safer care”
[Online]. Accessed via the Web at
http://apps.who.int/iris/bitstream/10665/44102/1/9789241597906_eng.pdf
(Level IV)
4 Centers for Medicare and Medicaid Services, Department of Health and
Human Services. (2015). Condition of participation: Infection control. 42 C.F.R.
§ 482.42.
5 Accreditation Association for Hospitals and Health Systems. (2017). Standard
07.01.21. Healthcare Facilities Accreditation Program: Accreditation
requirements for acute care hospitals. Chicago, IL: Accreditation Association
for Hospitals and Health Systems. (Level VII)
6 DNV GL-Healthcare USA, Inc. (2016). IC.1.SR.1 . NIAHO® accreditation
requirements: Interpretive guidelines & surveyor guidance (version 11).
Milford, OH: DNV GL-Healthcare USA, Inc. (Level VII)
Making a traction bed
Making a bed for a patient in traction requires specific measures for
preparation as well as for the linen change. Obtain help from a coworker, and
work from head to toe to minimize the risk of traction misalignment. A
patient in upper body traction won’t be able to use a trapeze; you’ll need to
support the extremity the traction is applied to (the head for cervical traction
or the arm for arm traction) when you’re removing the pillows or sheets from
under the patient’s extremity, and you’ll need to assist the patient with
movement as needed.
Preparation
■ Perform hand hygiene and follow standard precautions.1,2,3,4,5,6
■ Put on gloves and other personal protective equipment as needed to
comply with standard precautions.7,8
■ Bring clean linens and arrange them in the order of use on the bedside
stand or a chair.
■ Explain the procedure, obtain assistance from a coworker, and provide
privacy.11,12
■ Raise the bed to waist level while providing care to prevent caregiver back
strain.10
Changing the linens
■ Lower both side rails.
■ Stand near the headboard, opposite your coworker.
■ Gently pull the mattress to the head of the bed. Avoid sudden movements;
they can misalign traction and cause patient discomfort.
■ Remove the pillow from the bed.
■ Loosen the bottom linens and roll them from the headboard toward the
patient’s head.
■ Remove the soiled pillowcase and replace it with a clean one.
■ Fold a clean bottom sheet crosswise and place the sheet across the head
of the bed. Tell the patient to raise his or her head and upper shoulders by
grasping the trapeze above the bed. With your coworker, quickly fanfold the
bottom sheet from the head of the bed under the patient’s shoulders so that
it meets the soiled linen. Tuck at least 12′′ (30.5 cm) of the bottom sheet
under the head of the mattress. Miter the corners and tuck in the sides.
■ Tell the patient to raise his or her buttocks by grasping the trapeze (as
shown on top right). As a team, move toward the foot of the bed and, in one
movement, quickly and carefully roll soiled linens and clean linens under the
patient.
■ Instruct the patient to release the trapeze and to rest. Place a pillow under
the patient’s head for comfort.
■ If allowed, remove any pillows from under the patient’s extremity. If pillow
removal is contraindicated, continue to move linens toward the foot of the
bed and under the patient’s legs and traction while your coworker lifts the
pillows and supports the patient’s extremity.
■ Put soiled linens in a laundry bag or pillowcase.
■ Tuck the remaining loose linens securely under the mattress. To ensure a
tight-fitting bottom sheet, have the patient raise off the bed by
simultaneously grasping the trapeze and raising his or her buttocks while you
pull the sheet tight. As needed, place a drawsheet or fluid-impermeable pad
under the patient.
■ If the bottom sheet doesn’t cover the foot of the mattress, cover it with a
drawsheet. Miter its corners and tuck in the sides.
■ Replace the pillows under the patient’s extremity, and then cover the
patient with a clean top sheet. Fold over the top hem of the sheet
approximately 8′′ (20.5 cm). If one or both legs are in traction, fit the lower
end of the sheet loosely over the traction apparatus; don’t press on the
traction ropes. To secure the sheet, tuck in the corner opposite the traction
under the foot of the bed and miter the corner. Neatly tuck in the lower
corner of the sheet on the traction side to expose the leg and foot.
■ If the traction equipment exposes the patient’s sides, cover the patient
with a drawsheet—not a full sheet or spread.
■ Return the bed to the lowest position to prevent falls and ensure patient
safety,17 but don’t allow the traction weights to touch the floor.
■ Raise the side rails only if appropriate for the patient, and lock the bed
wheels to ensure patient safety.18,19
■ Remove and discard your gloves and other personal protective equipment,
if worn.16
■ Perform hand hygiene.1,2,3,4,5,6
7 Siegel, J. D., et al. (2007, revised 2017). “2007 guideline for isolation
precautions: Preventing transmission of infectious agents in healthcare
settings” [Online]. Accessed via the Web at
https://www.cdc.gov/infectioncontrol/pdf/guidelines/isolation-guidelines.pdf
(Level II)
8 Accreditation Association for Hospitals and Health Systems. (2017). Standard
07.01.10. Healthcare Facilities Accreditation Program: Accreditation
requirements for acute care hospitals. Chicago, IL: Accreditation Association
for Hospitals and Health Systems. (Level VII)
9 The Joint Commission. (2019). Standard NPSG.01.01.01. Comprehensive
accreditation manual for hospitals. Oakbrook Terrace, IL: The Joint
Commission. (Level VII)
10 Waters, T. R., et al. (2009). “Safe patient handling training for schools of
nursing” [Online]. Accessed via the Web at
https://www.cdc.gov/niosh/docs/2009-127/pdfs/2009-127.pdf (Level VII)
11 Accreditation Association for Hospitals and Health Systems. (2017). Standard
15.01.16. Healthcare Facilities Accreditation Program: Accreditation
requirements for acute care hospitals. Chicago, IL: Accreditation Association
for Hospitals and Health Systems. (Level VII)
12 Centers for Medicare and Medicaid Services, Department of Health and
Human Services. (2015). Condition of participation: Patient’s rights. 42 C.F.R.
§ 482.13(c)(1).
13 The Joint Commission. (2019). Standard RI.01.01.01. Comprehensive
accreditation manual for hospitals. Oakbrook Terrace, IL: The Joint
Commission. (Level VII)
14 DNV GL-Healthcare USA, Inc. (2016). PR.1.SR.5 . NIAHO® accreditation
requirements: Interpretive guidelines & surveyor guidance (version 11).
Milford, OH: DNV GL-Healthcare USA, Inc. (Level VII)
15 Wound Ostomy and Continence Nurses Society (WOCN). (2016). Guideline for
prevention and management of pressure ulcers (injuries): WOCN clinical
practice guidelines series 2. Mount Laurel, NJ: WOCN Society.
16 Occupational Safety and Health Administration. (n.d .). “Bloodborne
pathogens, standard number 1910.1030” [Online]. Accessed via the Web at
https://www.osha.gov/pls/oshaweb/owadisp.show_document?
p_id=10051&p_table=STANDARDS (Level VII)
17 Ganz, D. A., et al. (2013). Preventing falls in hospitals: A toolkit for improving
quality of care (AHRQ Publication No. 13-0015-EF). Rockville, MD: Agency for
Healthcare Research and Quality. Accessed via the Web at
https://www.ahrq.gov/sites/default/files/publications/files/fallpxtoolkit_0 .pdf
(Level VII)
18 U.S . Food & Drug Administration. (2016). “Recommendations for health care
providers about bed rails” [Online]. Accessed via the Web at
http://www.fda.gov/MedicalDevices/ProductsandMedicalProcedures/HomeHeal
thandConsumer/ConsumerProducts/BedRailSafety/ucm362848.htm
19 Food and Drug Administration. (2010). “A guide to bed safety: Bed rails in
hospitals, nursing homes and home health care: The facts” [Online].
Accessed via the Web at
http://www.fda.gov/downloads/MedicalDevices/ProductsandMedicalProcedure
s/GeneralHospitalDevicesandSupplies/HospitalBeds/ucm125857.pdf
20 The Joint Commission. (2019). Standard RC.01.03 .01. Comprehensive
accreditation manual for hospitals. Oakbrook Terrace, IL: The Joint
Commission. (Level VII)
21 Centers for Medicare and Medicaid Services, Department of Health and
Human Services. (2015). Condition of participation: Medical record services.
42 C.F.R. § 482.24(b).
22 Accreditation Association for Hospitals and Health Systems. (2017). Standard
10.00 .03. Healthcare Facilities Accreditation Program: Accreditation
requirements for acute care hospitals. Chicago, IL: Accreditation Association
for Hospitals and Health Systems. (Level VII)
23 DNV GL-Healthcare USA, Inc. (2016). MR.2 .SR.1 . NIAHO® accreditation
requirements: Interpretive guidelines & surveyor guidance (version 11).
Milford, OH: DNV GL-Healthcare USA, Inc. (Level VII)
BED-MAKING, UNOCCUPIED
Although considered routine, daily changing and periodic
straightening of bed linens promotes patient comfort and
prevents skin breakdown. When preceded by hand hygiene,
performed using clean technique, and followed by proper
handling and disposal of soiled linens, this procedure helps
control health care–associated infections.
Equipment
Two sheets (one fitted, if available) ▪ pillowcase ▪
bedspread ▪ laundry bag ▪ Optional: gloves, other personal
protective equipment, fluid-impermeable pads, drawsheet.
Preparation of equipment
Obtain clean linens, which should be folded in half
lengthwise and then folded again. If the linens are folded
incorrectly, refold them. The bottom sheet should be folded
so the rough side of the hem is facedown when placed on
the bed; this helps prevent skin irritation caused by the
rough hem edge rubbing against the patient’s heels. The
top sheet should be folded similarly, so that the smooth side
of the hem is face up when folded over the spread, giving
the bed a finished appearance.
Implementation
■ Gather and prepare the necessary equipment.
■ Perform hand hygiene1,2,3,4,5,6 and put on gloves and
other personal protective equipment as needed to comply
with standard precautions.7,8
■ Confirm the patient’s identity using at least two patient
identifiers.9
■ Tell the patient that you’re going to change the bed. Help
the patient to a chair if necessary.
■ Move furniture away from the bed to provide ample
working space.
■ Lower the head of the bed and side rails to make the
mattress level and ensure tight-fitting, wrinkle-free linens.
■ Raise the bed to waist level to prevent caregiver back
strain.10
■ When stripping the bed, watch for any belongings that
may have fallen among the linens.
■ Remove the pillowcase and place it in the laundry bag or
in the middle of the bed. Set the pillow aside.
■ Lift the mattress edge slightly and work around the bed,
untucking the linens. If you plan to reuse the top linens, fold
the top hem of the spread down to the bottom hem. Then
pick up the hemmed corners, fold the spread into quarters,
and hang it over the back of the chair. Do the same for the
top sheet. Otherwise, carefully remove and place the top
linens in the laundry bag or pillowcase. To avoid spreading
microorganisms, don’t fan the linens, hold them against
your clothing, or place them on the floor.11
■ Remove the soiled bottom linens and place them in the
laundry bag.11
■ If the mattress has slid downward, push it to the head of
the bed. Adjusting it after bed making loosens the linens.
■ Place the bottom sheet with its center fold in the middle
of the mattress.
■ For a fitted sheet, secure the top and bottom corners over
the mattress corners on the side of the bed nearest you. For
a flat sheet, align the end of the sheet with the foot of the
mattress and miter the top corner to keep the sheet firmly
tucked under the mattress. To miter the corner, first tuck the
top end of the sheet evenly under the mattress at the head
of the bed. Then lift the side edge of the sheet about 12′′
(30.5 cm) from the mattress corner and hold it at a right
angle to the mattress. Tuck in the bottom edge of the sheet
hanging below the mattress. Finally, drop the top edge and
tuck it under the mattress. (See Making a mitered corner.)
■ After tucking under one side of the bottom sheet, place
the drawsheet or fluid-impermeable pad (if needed) about
15′′ (38 cm) from the top of the bed, with its center fold in
the middle of the bed. Then tuck in the entire edge of the
drawsheet on that side of the bed.
■ Place the top sheet with its center fold in the middle of
the bed and its wide hem even with the top of the bed.
Position the rough side of the hem face up so that the
smooth side shows after folding. Allow enough sheet at the
top of the bed to form a cuff over the spread.
■ Place the bed spread over the top sheet, with its center
fold in the middle of the bed. If the patient will be returning
from surgery, use the alternative technique. (See Making a
surgical bed, page 60.)
■ Fit all remaining corners of the bottom sheet or tuck them
under the mattress, and then pull the sheet at an angle
from the head toward the foot of the bed. Doing so tightens
the linens, making the bottom sheet taut and wrinkle-free
and promoting patient comfort.
■ Tuck the top sheet and bedspread under the foot of the
mattress. Then miter the bottom corners.
■ Fold the top sheet over the bedspread at the head of the
bed to form a cuff and to give the bed a finished
appearance. When making an open bed, fanfold the top
linens to the foot of the bed.
■ Slip the pillow into a clean pillowcase, tucking in the
corners. Then place the pillow with its seam toward the top
of the bed to prevent it from rubbing against the patient’s
neck, causing irritation, and its open edge facing away from
the door to give the bed a finished appearance.
■ Return the bed to its lowest position to prevent falls and
maintain patient safety.12
■ Return furniture to its proper place.
■ Assist the patient into bed and position the patient
comfortably as needed.
■ Place the call light within the patient’s easy reach.
■ Remove the laundry bag from the room.11
■ Remove and discard your gloves and any other personal
protective equipment if worn.
■ Perform hand hygiene1,2,3,4,5,6
■ Document the procedure as applicable.13,14,15,16
Special considerations
■ Because a hospital mattress is usually covered with
plastic to protect it and to facilitate cleaning between
patients, a flat-bottom sheet tends to loosen and become
untucked. Use a fitted sheet, if available.
■ If a fitted sheet isn’t available, consider tying the top
corners of a flat sheet together under the top of the
mattress to prevent the sheet from becoming dislodged.
Documentation
Although linen changes aren’t usually documented, record
the dates and times of linen changes for patients with
incontinence, excessive wound drainage, or diaphoresis.
REFERENCES
1 The Joint Commission. (2019). Standard NPSG.07.01.01. Comprehensive
accreditation manual for hospitals. Oakbrook Terrace, IL: The Joint
Commission. (Level VII)
2 Centers for Disease Control and Prevention. (2002). Guideline for hand
hygiene in health-care settings: Recommendations of the Healthcare Infection
Control Practices Advisory Committee and the HICPAC/SHEA/APIC/IDSA Hand
Hygiene Task Force. MMWR Recommendations and Reports, 51(RR-16), 1–45.
Accessed via the Web at https://www.cdc.gov/mmwr/pdf/rr/rr5116.pdf (Level
II)
3 World Health Organization. (2009). “WHO guidelines on hand hygiene in
health care: First global patient safety challenge, clean care is safer care”
[Online]. Accessed via the Web at
http://apps.who.int/iris/bitstream/10665/44102/1/9789241597906_eng.pdf
(Level IV)
4 Centers for Medicare and Medicaid Services, Department of Health and
Human Services. (2015). Condition of participation: Infection control. 42 C.F.R.
§ 482.42.
5 Accreditation Association for Hospitals and Health Systems. (2017). Standard
07.01.21. Healthcare Facilities Accreditation Program: Accreditation
requirements for acute care hospitals. Chicago, IL: Accreditation Association
for Hospitals and Health Systems. (Level VII)
Making a mitered corner
■ To make a mitered corner, after placing the sheet on the bed, grasp the
side edge of the sheet and lift it up to form a triangle.
■ Then, place the sheet on the top of the bed, making a flat triangular fold.
■ While holding the point of the triangle on the bed, tuck the sheet under the
mattress.
■ Take the triangular fold from the mattress and place it over the side of the
mattress.
■ Tuck the remaining end of the triangular linen fold under the mattress.
6 DNV GL-Healthcare USA, Inc. (2016). IC.1.SR.1 . NIAHO® accreditation
requirements: Interpretive guidelines & surveyor guidance (version 11).
Milford, OH: DNV GL-Healthcare USA, Inc. (Level VII)
7 Siegel, J. D., et al. (2007, revised 2017). “2007 guideline for isolation
precautions: Preventing transmission of infectious agents in healthcare
settings” [Online]. Accessed via the Web at
https://www.cdc.gov/infectioncontrol/pdf/guidelines/isolation-guidelines.pdf
(Level II)
8 Accreditation Association for Hospitals and Health Systems. (2017). Standard
07.01.10. Healthcare Facilities Accreditation Program: Accreditation
requirements for acute care hospitals. Chicago, IL: Accreditation Association
for Hospitals and Health Systems. (Level VII)
9 The Joint Commission. (2019). Standard NPSG.01.01.01. Comprehensive
accreditation manual for hospitals. Oakbrook Terrace, IL: The Joint
Commission. (Level VII)
10 Waters, T. R., et al. (2009). “Safe patient handling training for schools of
nursing” [Online]. Accessed via the Web at
https://www.cdc.gov/niosh/docs/2009-127/pdfs/2009-127.pdf (Level VII)
11 Occupational Safety and Health Administration. (n.d .). “Bloodborne
pathogens, standard number 1910.1030” [Online]. Accessed via the Web at
https://www.osha.gov/pls/oshaweb/owadisp.show_document?
p_id=10051&p_table=STANDARDS (Level VII)
Making a surgical bed
Preparation of a surgical bed permits easy patient transfer from surgery and
promotes cleanliness and comfort. To make such a bed, take the following
steps:
■ Assemble linens as you would for making an unoccupied bed, including
two clean sheets (one fitted, if available), a drawsheet, a bath blanket, a
spread or sheet, a pillowcase, facial tissues, an emesis basin, a plastic trash
bag, fluid-impermeable pads, extra pillows, and other special equipment
(such as an IV pole and suction apparatus) as needed.
■ Raise the bed to waist level to prevent caregiver back strain.10
■ Slip the pillow into a clean pillowcase and place it on a nearby table or
chair.
■ Make the foundation of the bed using the bottom sheet and drawsheet.
■ Place an open bath blanket about 15′′ (38 cm) from the head of the bed
with its center fold positioned in the middle of the bed. The blanket warms
the patient and counteracts the decreased body temperature caused by
anesthesia.
■ Place a top sheet or bedspread on the bath blanket, and position it as you
did the blanket. Then fold the blanket and sheet back from the top so that
the blanket shows over the sheet. Similarly, fold the sheet and blanket up
from the bottom (as shown in illustration 1).
■ On the side of the bed where you’ll receive the patient, fold up the two
outer corners of the sheet and blanket so they meet in the middle of the bed
(as shown in illustration 2).
■ Pick up the point hanging over this side of the bed and fanfold the linens
back to the other side of the bed so the linens won’t interfere with patient
transfer (as shown in illustration 3).
■ Position the bed a hip level to transfer the patient, lock the wheels, and
lower the side rails.10
■ Move the bedside stand and other objects out of the stretcher’s path to
facilitate easy transfer when the patient arrives.
■ After the patient is transferred to the bed, position the pillow for comfort
and safety. Cover the patient by pulling the top point of the sheet and
blanket over him or her and opening the folds. After covering the patient,
tuck in the linens at the foot of the bed and miter the corners.
■ To make the patient comfortable and to prevent unnecessary movement
and linen changes, try to anticipate and be ready for any special needs. For
nausea, keep an emesis basin, facial tissues, and fluid-impermeable pads at
the bedside. Also, remove all liquids from the bedside. If you expect bleeding
or discharge, place one or more fluid-impermeable pads on the bed.
■ Keep extra pillows handy to elevate arms and legs and to promote
circulation, thereby preventing edema. If necessary, have IV equipment,
suction apparatus, a roller for patient transfer, or other special equipment
ready.
■ Return the bed to the lowest position to prevent falls and maintain patient
safety.12
12 Ganz, D. A., et al. (2013). Preventing falls in hospitals: A toolkit for improving
quality of care (AHRQ Publication No. 13-0015-EF) [Online]. Accessed via the
Web at
https://www.ahrq.gov/sites/default/files/publications/files/fallpxtoolkit_0 .pdf
(Level VII)
13 The Joint Commission. (2019). Standard RC.01.03 .01. Comprehensive
accreditation manual for hospitals. Oakbrook Terrace, IL: The Joint
Commission. (Level VII)
14 Centers for Medicare and Medicaid Services, Department of Health and
Human Services. (2015). Condition of participation: Medical record services.
42 C.F.R. § 482.24(b).
15 Accreditation Association for Hospitals and Health Systems. (2017). Standard
10.00 .03. Healthcare Facilities Accreditation Program: Accreditation
requirements for acute care hospitals. Chicago, IL: Accreditation Association
for Hospitals and Health Systems. (Level VII)
16 DNV GL-Healthcare USA, Inc. (2016). MR.2 .SR.1 . NIAHO® accreditation
requirements: Interpretive guidelines & surveyor guidance (version 11).
Milford, OH: DNV GL-Healthcare USA, Inc. (Level VII)
BEDPAN AND URINAL USE
Bedpans and urinals permit bedridden patients to eliminate
and allow you to observe and measure their urine and stool
accurately. Female patients use bedpans for defecation and
urination; male patients use bedpans for defecation and
urinals for urination. Either device should be offered
frequently—before meals, visiting hours, morning and
evening care, and treatments or procedures. Whenever
possible, allow the patient privacy.
Equipment
Bedpan (either regular bedpan or fracture pan) or urinal
with cover ▪ toilet tissue ▪ two washcloths ▪ soap and water
▪ two pairs of gloves ▪ towel ▪ fluid-impermeable pads ▪
hospital-grade disinfectant solution ▪
Optional: air
freshener, cleaning wipes, bath blanket, small pillow,
graduated cylinder, specimen container, bed linens.
Available in adult and pediatric sizes, a bedpan may be
disposable or reusable (the latter can be sterilized). A
fracture pan, a type of bedpan, is used when spinal injuries,
body or leg casts, or other conditions prohibit or restrict
turning the patient. Like a bedpan, the urinal may be
disposable or reusable. Consider the use of disposable
bedpans to prevent the spread of Clostridium difficile
infection.1,2
Implementation
■ Gather the appropriate equipment.
■ Perform hand hygiene3,4,5,6,7,8 and put on gloves to
comply with standard precautions.9,10
■ Confirm the patient’s identity using at least two patient
identifiers.11
■ Provide privacy.12,13,14,15
■ Explain the procedure to the patient.
Placing a bedpan
■ Raise the bed to waist level while providing care to
prevent caregiver back strain.16
■ If allowed, elevate the head of the bed slightly to prevent
hyperextension of the spine when the patient raises the
buttocks.
■ Rest the bedpan on the edge of the bed. Then, turn down
the corner of the top linens and draw up the patient’s gown
under the buttocks.
■ Ask the patient to raise the buttocks by flexing the knees
and pushing down on the heels. Place a fluid-impermeable
pad under the patient’s buttocks and then, while supporting
the patient’s lower back with one hand, center the curved,
smooth edge of the bedpan beneath the buttocks.
■ If the patient can’t raise the buttocks, lower the head of
the bed to horizontal and help the patient roll onto one side,
with the buttocks toward you. Place a fluid-impermeable
pad under the patient’s buttocks, position the bedpan
properly against the buttocks, and then help the patient roll
back onto the bedpan.
■ After positioning the bedpan, elevate the head of the bed
further to 30 degrees or higher, if allowed, until the patient
is sitting erect to allow the patient to assume a normal
elimination posture. (See Using a commode, for information
on another device that permits normal elimination posture.)
■ If elevating the head of the bed is contraindicated, tuck a
small pillow or folded bath blanket under the patient’s back
to cushion the sacrum against the edge of the bedpan and
support the lumbar region.
■ If the patient can be left alone, place the bed in a low
position and raise the side rails to prevent falls and maintain
patient safety.17 Place toilet tissue and the call light within
the patient’s reach, and instruct the patient to push the call
light button after elimination. If the patient is weak or
disoriented, remain with the patient.
■ Before removing the bedpan, raise the bed to waist level
to prevent caregiver back strain.16
■ Lower the head of the bed slightly. Then ask the patient
to raise the buttocks off the bed. Support the patient’s lower
back with one hand, and gently remove the bedpan with the
other to avoid skin injury caused by friction.
■ If the patient can’t raise the buttocks, ask the patient to
roll to the opposite side so that the buttocks are toward you
while you assist with one hand. Hold the pan firmly with the
other hand to avoid spills.
■ Cover the bedpan with a fluid-impermeable pad, and
place the bedpan on the chair.
■ Help clean the patient’s anal and perineal area, as
necessary, to prevent irritation, infection, and skin
breakdown. As needed, turn the patient on his or her side;
wipe carefully with toilet tissue; clean the area with a pH-
balanced cleanser, disposable cleaning wipes,18 or soap and
warm water; and dry well with a towel to reduce the risk of
pressure injury. Clean a female patient from front back to
avoid introducing rectal contaminants into the vaginal or
urethral openings.
HOSPITAL-ACQUIRED CONDITION ALERT A stage 3 or 4 pressure
injury is considered a hospital-acquired condition by the Centers for
Medicare and Medicaid Services because it can be reasonably
prevented using best practices. Follow pressure injury prevention
practices (keeping the skin clean and dry) to reduce the risk of
pressure injuries.19,20,21
■ Remove and discard your gloves and perform hand
hygiene.3,4,5,6,7,8 Put on a new pair of gloves.9,10
Using a commode
An alternative to a bedpan, a commode is a portable chair made of plastic or
metal with a large opening in the center of the seat. It may have a bedpan or
bucket that slides underneath the opening, or it may slide directly over the
toilet, adding height to the standard toilet seat. Unlike a bedpan, a commode
allows the patient to assume his normal elimination posture, which aids in
defecation.
Before the patient uses it, inspect the commode’s condition and make sure
it’s clean. Roll or carry the commode to the patient’s room. Place it parallel
and as close as possible to the patient’s bed, and secure its brakes or wheel
locks. If necessary, block its wheels with sandbags. Assist the patient onto
the commode, provide toilet tissue, and place the call light within his reach.
Instruct the patient to push the call light when he has finished.
If necessary, assist the patient with cleaning, returning to bed, and getting
comfortable. Offer the patient a clean washcloth dampened with soap and
warm water or cleaning wipes and a towel to wash and dry the hands. Then
close the lid of the commode or cover the bucket. Roll the commode or carry
the bucket to the bathroom. If ordered, observe and measure the contents
before disposal. Rinse and clean the bucket, and then spray or wipe the
bucket and commode seat with disinfectant. Use an air freshener, if
appropriate.
Placing a urinal
■ Lift the corner of the top linens, hand the urinal to the
patient, and allow the patient to position it.
■ If the patient can’t position the urinal without help,
spread the patient’s legs slightly and hold the urinal in place
to prevent spills.
■ After the patient voids, carefully withdraw the urinal and
cover it or close the lid.
After use of a bedpan or urinal
■ Give the patient either a clean washcloth dampened with
soap and warm water or cleaning wipes, and a towel to
wash and dry the hands. Check the bed linens for wetness
or soiling, and straighten or change them, as needed.
■ Make the patient comfortable. Return the bed to the
lowest position if it was raised, and raise the side rails if
appropriate to prevent falls and maintain patient safety.17
■ Take the bedpan or urinal to the bathroom or utility room.
Observe the color, odor, amount, and consistency of its
contents.
■ If ordered, measure urine output or liquid stool in a
graduated cylinder and place a specimen in a specimen
container for laboratory analysis.
■ Empty the contents of the bedpan or urinal into the toilet
or designated waste area.
■ Rinse the bedpan or urinal with water and clean it
thoroughly, using a disinfectant solution. Dry, cover, and
return it to the patient’s bathroom for storage.
■ Remove and discard your gloves and perform hand
hygiene.3,4,5,6,7,8
■ Use an air freshener, if necessary, to eliminate offensive
odors and minimize embarrassment.
■ Document the procedure.22,23,24,25
Special considerations
■ Explain to the patient that drug treatment and changes in
his or her environment, diet, and activities may disrupt the
patient’s usual elimination schedule. Try to anticipate
elimination needs, and offer the bedpan or urinal frequently
to help reduce embarrassment and minimize the risk of
incontinence.
■ Don’t place a bedpan or urinal on top of the bedside
stand or overbed table to avoid contaminating clean
equipment and food trays. Similarly, don’t place it on the
floor to prevent the spread of microorganisms from the floor
to the patient’s bed linens when the patient uses the device.
■ If the patient feels pain during turning or feels
uncomfortable on a standard bedpan, use a fracture pan.
Unlike the standard bedpan, the fracture pan is slipped
under the buttocks from the front rather than the side.
Because it’s shallower than the standard bedpan, you need
only lift the patient slightly to position it. If the patient is
obese or otherwise difficult to lift, ask a coworker to help
you.
■ If the patient has an indwelling urinary catheter in place,
carefully position and remove the bedpan to avoid tension
on the catheter, which could dislodge it or irritate the
urethra. After the patient defecates, wipe, clean, and dry the
anal region, taking care to avoid catheter contamination. If
necessary, clean the urinary meatus.
■ Don’t leave the urinal, fracture pan, or regular bedpan in
place for extended periods to prevent skin breakdown.
■ For a thin patient, place a fluid-impermeable pad at the
edge of the bedpan or use a fracture pan to minimize
pressure on the coccyx.
Documentation
Record the time, date, and type of elimination in the
flowchart and the amount of urine output or liquid stool on
the intake and output record, as needed. In your notes,
document the amount, color, clarity, and odor of the urine
or stool and the presence of blood, pus, or other abnormal
characteristics in urine or stool. Document the condition of
the perineum.
REFERENCES
1 Public Health Agency of Canada. (2013). “Clostridium difficile Infection:
Infection Prevention and Control Guidance for Management in Acute Care
Settings” [Online]. Accessed via the Web at http://www.phac-aspc.gc.ca/nois-
sinp/guide/c-dif-acs-esa/index-eng.php#tphp (Level VII)
2 Metcalf, D., et al. (2015). Clostridium difficile contamination of reprocessed
hospital bedpans. Canadian Journal of Infection Control, 30, 33–36 . (Level VI)
3 The Joint Commission. (2019). Standard NPSG.07.01.01. Comprehensive
accreditation manual for hospitals. Oakbrook Terrace, IL: The Joint
Commission. (Level VII)
4 Centers for Disease Control and Prevention. (2002). Guideline for hand
hygiene in health-care settings: Recommendations of the Healthcare Infection
Control Practices Advisory Committee and the HICPAC/SHEA/APIC/IDSA Hand
Hygiene Task Force. MMWR Recommendations and Reports, 51(RR-16), 1–45.
Accessed via the Web at https://www.cdc.gov/mmwr/pdf/rr/rr5116.pdf (Level
II)
5 World Health Organization. (2009). “WHO guidelines on hand hygiene in
health care: First global patient safety challenge, clean care is safer care”
[Online]. Accessed via the Web at
http://apps.who.int/iris/bitstream/10665/44102/1/9789241597906_eng.pdf
(Level IV)
6 Centers for Medicare and Medicaid Services, Department of Health and
Human Services. (2015). Condition of participation: Infection control. 42 C.F.R.
§ 482.42.
7 Accreditation Association for Hospitals and Health Systems. (2017). Standard
07.01.21. Healthcare Facilities Accreditation Program: Accreditation
requirements for acute care hospitals. Chicago, IL: Accreditation Association
for Hospitals and Health Systems. (Level VII)
8 DNV GL-Healthcare USA, Inc. (2016). IC.1.SR.1 . NIAHO® accreditation
requirements: Interpretive guidelines & surveyor guidance (version 11).
Milford, OH: DNV GL-Healthcare USA, Inc. (Level VII)
9 Siegel, J. D., et al. (2007, revised 2017). “2007 guideline for isolation
precautions: Preventing transmission of infectious agents in healthcare
settings” [Online]. Accessed via the Web at
https://www.cdc.gov/infectioncontrol/pdf/guidelines/isolation-guidelines.pdf
(Level II)
10 Accreditation Association for Hospitals and Health Systems. (2017). Standard
07.01.10. Healthcare Facilities Accreditation Program: Accreditation
requirements for acute care hospitals. Chicago, IL: Accreditation Association
for Hospitals and Health Systems. (Level VII)
11 The Joint Commission. (2019). Standard NPSG.01.01.01. Comprehensive
accreditation manual for hospitals. Oakbrook Terrace, IL: The Joint
Commission. (Level VII)
12 DNV GL-Healthcare USA, Inc. (2016). PR.1.SR.5 . NIAHO® accreditation
requirements: Interpretive guidelines & surveyor guidance (version 11).
Milford, OH: DNV GL-Healthcare USA, Inc. (Level VII)
13 Accreditation Association for Hospitals and Health Systems. (2017). Standard
15.01.16. Healthcare Facilities Accreditation Program: Accreditation
requirements for acute care hospitals. Chicago, IL: Accreditation Association
for Hospitals and Health Systems. (Level VII)
14 Centers for Medicare and Medicaid Services, Department of Health and
Human Services. (2015). Condition of participation: Patient’s rights. 42 C.F.R.
§ 482.13(c)(1). (Level VII)
15 The Joint Commission. (2019). Standard RI.01.01.01. Comprehensive
accreditation manual for hospitals. Oakbrook Terrace, IL: The Joint
Commission. (Level VII)
16 Waters, T. R., et al. (2009). “Safe patient handling training for schools of
nursing” [Online]. Accessed via the Web at
https://www.cdc.gov/niosh/docs/2009-127/pdfs/2009-127.pdf (Level VII)
17 Ganz, D. A., et al. (2013). Preventing falls in hospitals: A toolkit for improving
quality of care (AHRQ Publication No. 13-0015-EF). Rockville, MD: Agency for
Healthcare Research and Quality. Accessed via the Web at
https://www.ahrq.gov/sites/default/files/publications/files/fallpxtoolkit_0 .pdf
(Level VII)
18 Wound, Ostomy and Continence Nurses Society (WOCN). (2016). WOCN
clinical practice guideline series 2: Guideline for prevention and management
of pressure ulcers (injuries). Mount Laurel, NJ: WOCN. (Level VII)
19 National Pressure Ulcer Advisory Panel, et al. (2014). “Prevention and
treatment of pressure ulcers: Quick reference guide [Online]. Accessed via
the Web at http://www.npuap.org/wp-content/uploads/2014/08/Quick-
Reference-Guide-DIGITAL-NPUAP-EPUAP-PPPIA.pdf (Level VII)
20 Accreditation Association for Hospitals and Health Systems. (2017). Standard
16.02.02. Healthcare Facilities Accreditation Program: Accreditation
requirements for acute care hospitals. Chicago, IL: Accreditation Association
for Hospitals and Health Systems. (Level VII)
21 Jarrett, N., & Callaham, M. (2016). “Evidence-based guidelines for selected
hospital-acquired conditions: Final report” [Online]. Accessed via the Web at
https://www.cms.gov/Medicare/Medicare-Fee-for-Service-
Payment/HospitalAcqCond/Downloads/2016-HAC-Report.pdf
22 The Joint Commission. (2019). Standard RC.01.03 .01. Comprehensive
accreditation manual for hospitals. Oakbrook Terrace, IL: The Joint
Commission. (Level VII)
23 Centers for Medicare and Medicaid Services, Department of Health and
Human Services. (2015). Condition of participation: Medical record services.
42 C.F.R. § 482.24(b).
24 Accreditation Association for Hospitals and Health Systems. (2017). Standard
10.00 .03. Healthcare Facilities Accreditation Program: Accreditation
requirements for acute care hospitals. Chicago, IL: Accreditation Association
for Hospitals and Health Systems. (Level VII)
25 DNV GL-Healthcare USA, Inc. (2016). MR.2 .SR.1 . NIAHO® accreditation
requirements: Interpretive guidelines & surveyor guidance (version 11).
Milford, OH: DNV GL-Healthcare USA, Inc. (Level VII)
BEDSIDE SPIROMETRY
Bedside spirometry uses portable equipment to measure
forced vital capacity (FVC) and forced expiratory volume
(FEV). These measurements, in turn, allow for the
calculation of other pulmonary function indexes, such as
timed forced expiratory flow rate. Depending on the type of
spirometer used, bedside spirometry can also allow direct
measurement of vital capacity (VC) and tidal volume.
Bedside spirometry identifies the presence and severity of
airflow obstruction. It’s recommended for use in patients
with respiratory signs and symptoms to determine whether
their signs and symptoms result from respiratory disease or
another condition.1 Bedside spirometry can help diagnose
chronic obstructive pulmonary disease by demonstrating
obstructed airflow that isn’t fully reversible.1 It’s also useful
for evaluating a patient’s preoperative anesthesia risk.
Because the required breathing patterns can aggravate
conditions such as bronchospasm, use of the bedside
spirometer requires a review of the patient’s history and
close observation during testing.
Performing bedside spirometry requires proper education
and training in the procedure to make sure that test results
are accurate and aid in diagnosis.2,3
Equipment
Portable spirometer ▪ disposable mouthpiece ▪ stethoscope
▪ blood pressure monitoring equipment ▪ disinfectant pad ▪
scale ▪ stadiometer ▪ Optional: breathing tube, gloves,
gown, mask and goggles or mask with face shield, nose clip.
Preparation of equipment
Review the manufacturer’s instructions for assembly and
use of the spirometer. If necessary, firmly insert the
breathing tube to ensure a tight connection. If the tube
comes preconnected, check the seals for tightness and the
tubing for leaks. Insert the disposable mouthpiece and make
sure that sure it’s sealed tightly. Make sure that the unit has
been calibrated according to the manufacturer’s guidelines.
Implementation
■ Review the patient’s medical record to confirm that his or
her
inhaled long-acting beta-adrenergic agonist
bronchodilator and oral beta-adrenergic agonist medications
were withheld before spirometry testing, as ordered.2,4
NURSING ALERT Oral and inhaled bronchodilators may be withheld
from the patient before spirometry testing to establish baseline lung
function and to optimally evaluate bronchodilator response. Be aware
that the risk of bronchospasm is increased if these medications are
withheld.5
■ Gather and prepare the necessary equipment.
■ Perform hand hygiene.6,7,8,9,10,11
■ Confirm the patient’s identity using at least two patient
identifiers.12
■ Explain the procedure to the patient. Emphasize that his
or her cooperation is essential to ensure accurate results.
■ Provide privacy.13,14,15,16
■ Explain the procedure to the patient. Emphasize that
cooperation is essential to ensure accurate results.
■ Instruct the patient to remove or loosen bras, belts, and
other constricting clothing to prevent alteration of test
results from restricted thoracic expansion and abdominal
mobility.
■ Instruct the patient to void to prevent abdominal
discomfort.
■ Obtain the patient’s weight and height without shoes to
calculate predicted lung volumes.
■ If the patient wears dentures that fit well, leave them in
place to promote a tight seal around the mouthpiece.
However, if the dentures fit poorly, have the patient remove
them to prevent incomplete closure of his mouth around the
mouthpiece, which could allow air to leak around the
mouthpiece.
■ If the patient smokes, confirm that the patient hasn’t
smoked for at least 1 hour before the bedside spirometry
procedure.2
■ Perform hand hygiene.6,7,8,9,10,11
■ Put on gloves and other personal protective equipment as
needed to comply with standard precautions.17,18
■ Enter the required information into the spirometer’s
computer system.
■ Obtain the patient’s blood pressure, pulse, and
respiratory rate, and auscultate the patient’s breath sounds
to serve as a baseline for comparison.2
■ Ensure that the patient is sitting straight in a chair or
standing with the head slightly elevated, not looking down.
■ If desired, allow the patient to practice the required
breathing technique with the breathing tube unhooked.
After practice, replace the tube and check the seal.
■ Instruct the patient not to breathe through the nose. If
the patient has difficulty complying, apply a nose clip.
■ To measure VC, instruct the patient to inhale as deeply as
possible, and then insert the mouthpiece so that the
patient’s lips are sealed tightly around it to prevent air
leakage and to ensure an accurate digital readout or
spirogram recording.
■ Tell the patient to exhale normally but completely, and
then remove the mouthpiece to avoid recording the next
inspiration.
■ Repeat the maneuver at least three times, allowing
adequate rest (more than 1 minute) between each
maneuver. Typically, no more than four maneuvers are
required to achieve acceptable repeatability. Acceptable
repeatability is achieved when the difference between the
largest and the next-largest VC values for the maneuvers is
0.15 L or less.2,3
■ To measure FEV and FVC, adjust the spirometer settings
to the appropriate mode according to the manufacturer’s
instructions.
■ Repeat the procedure followed for VC measurement, but
instruct the patient to exhale as forcefully and completely
as possible in one exhalation. Tell the patient when to start,
and activate the spirometer’s recorder at the same time.
Coach the patient throughout inspiration and exhalation.
■ Repeat the maneuver at least three times, allowing
adequate rest (more than 1 minute) between each
maneuver. Typically, no more than eight maneuvers are
required to achieve acceptable repeatability for FVC and
FEV. Acceptable repeatability is achieved when the
difference between the largest and the next largest FVC and
FEV values for the maneuvers is 0.15 L or less.2,3
■ Monitor the patient for increased shortness of breath,
light-headedness, paroxysmal coughing, and chest pain.
■ Compare VC values between the maneuvers.
NURSING ALERT If a subsequent VC value is 20% lower than the
original value and you’re confident that there’s no leak in the system,
terminate the study because dangerous air trapping may result from
forced exhalation.
■ After completing the procedure, generate a summary
report from the spirometer’s computer system.
■ Obtain the patient’s vital signs and assess the patient’s
respiratory status to make sure the patient’s condition is
stable before leaving the bedside. Notify the practitioner of
any changes in the patient’s conditions.
■ Discard the mouthpiece, and follow the manufacturer’s
instructions for cleaning and sterilizing the spirometer.19,20
■ Remove and discard your gloves and any other personal
protective equipment worn.17,18
■ Perform hand hygiene.6,7,8,9,10,11
■ Clean and disinfect your stethoscope using a disinfectant
pad.19,20
■ Perform hand hygiene.6,7,8,9,10,11
■ Document the procedure.21,22,23,24
Special considerations
■ Don’t perform pulmonary function tests, including
bedside spirometry, immediately after a large meal because
the patient may experience abdominal discomfort.
■ Encourage the patient to perform maximally during the
test; doing so may help the patient to exhale more
forcefully. If the patient coughs during expiration, wait until
coughing subsides before repeating the measurement.
■ Older adults patients with significant cognitive
impairment and apraxia are less likely to perform spirometry
correctly; however, advanced age alone shouldn’t interfere
with the ability to achieve accurate test results.25
■ Patients as young as age 5 may be able to perform
spirometry maneuvers well enough to produce accurate
results. Some spirometry software manufacturers offer
developmentally appropriate visual incentives to enhance
test performance in children. Currently, newer methods of
obtaining reliable pulmonary function tests in infants and
toddlers are being used in some facilities.26
■ Although FVC and VC are normally approximately equal,
in patients with obstructive lung disease, FVC may be
reduced but VC remains normal. In patients with restrictive
lung disease, VC and FVC may be reduced.
■ Although the reference data programmed in current
spirometry software allows for automatic computation of
predicted values, the interpretation of bedside spirometry
results shouldn’t rely on the software alone. Bedside
spirometry results should be forwarded to the appropriate
practitioner for interpretation.3 If software isn’t available, a
properly trained practitioner can calculate predicted values
and compare patient results with a reference table of
predicted normal values to aid in diagnosis.3
Complications
Forced exhalation can cause dizziness or light-headedness,
precipitate or worsen bronchospasm, rapidly increase
exhaustion (possibly to the point where the patient requires
mechanical support), and increase air trapping in a patient
with emphysema.
Documentation
Record the date and time of the bedside spirometry; the
patient’s gender, age, height, and weight at the time of the
testing; the patient’s respiratory status before and after
bedside spirometry; any complications and nursing actions
taken; and the patient’s tolerance of the procedure.
Document if the patient was unable to complete the
maneuvers, and record that the appropriate practitioner was
notified of bedside spirometry results.3
REFERENCES
1 Qaseem, A., et al. (2011). Diagnosis and management of stable chronic
obstructive pulmonary disease: A clinical practice guideline update from the
American College of Physicians, American College of Chest Physicians,
American Thoracic Society, and European Respiratory Society. Annals of
Internal Medicine, 155, 179–191. (Level VII)
2 Miller, M. R., et al. (2005). ATS/ERS task force: Standardisationof lung function
testing. Standardisation of spirometry. European Respiratory Journal, 26, 319–
338. Accessed via the Web at
http://www.thoracic.org/statements/resources/pft/PFT2.pdf (Level VII)
3 Hill, S., & Winter, R. (2013). “A guide to performing quality assured diagnostic
spirometry” [Online]. Accessed via the Web at
http://www.educationforhealth.org/wp-
content/uploads/2015/03/spirometry_guide_16-4 -13.pdf
4 Jones, T. E., et al. (2013). Drugs potentially affecting the extent of airways
reversibility on pulmonary function testing are frequently consumed despite
guidelines. International Journal of Chronic Obstructive Pulmonary Disease, 8,
383–388 . Accessed via the Web at
http://www.ncbi.nlm.nih.gov/pmc/articles/PMC3745286/
5 McCarthy, K. (2015). “Pulmonary function testing” [Online]. Accessed via the
Web at http://emedicine.medscape.com/article/303239-overview
6 The Joint Commission. (2019). Standard NPSG.07.01.01. Comprehensive
accreditation manual for hospitals. Oakbrook Terrace, IL: The Joint
Commission. (Level VII)
7 Centers for Disease Control and Prevention. (2002). Guideline for hand
hygiene in health-care settings: Recommendations of the Healthcare Infection
Control Practices Advisory Committee and the HICPAC/SHEA/APIC/IDSA Hand
Hygiene Task Force. MMWR Recommendations and Reports, 51(RR-16), 1–45.
Accessed via the Web at https://www.cdc.gov/mmwr/pdf/rr/rr5116.pdf (Level
II)
8 World Health Organization. (2009). “WHO guidelines on hand hygiene in
health care: First global patient safety challenge, clean care is safer care”
[Online]. Accessed via the Web at
http://apps.who.int/iris/bitstream/10665/44102/1/9789241597906_eng.pdf
(Level IV)
9 Accreditation Association for Hospitals and Health Systems. (2017). Standard
07.01.21. Healthcare Facilities Accreditation Program: Accreditation
requirements for acute care hospitals. Chicago, IL: Accreditation Association
for Hospitals and Health Systems. (Level VII)
10 Centers for Medicare and Medicaid Services, Department of Health and
Human Services. (2015). Condition of participation: Infection control. 42 C.F.R.
§ 482.42.
11 DNV GL-Healthcare USA, Inc. (2016). IC.1 .SR.1 . NIAHO® accreditation
requirements: Interpretive guidelines & surveyor guidance (version 11).
Milford, OH: DNV GL-Healthcare USA, Inc. (Level VII)
12 The Joint Commission. (2019). Standard NPSG.01.01.01. Comprehensive
accreditation manual for hospitals. Oakbrook Terrace, IL: The Joint
Commission. (Level VII)
13 Accreditation Association for Hospitals and Health Systems. (2017). Standard
15.01.16. Healthcare Facilities Accreditation Program: Accreditation
requirements for acute care hospitals. Chicago, IL: Accreditation Association
for Hospitals and Health Systems. (Level VII)
14 The Joint Commission. (2019). Standard RI.01.01.01. Comprehensive
accreditation manual for hospitals. Oakbrook Terrace, IL: The Joint
Commission. (Level VII)
15 Centers for Medicare and Medicaid Services, Department of Health and
Human Services. (2015). Condition of participation: Patient’s rights. 42 C.F.R.
§ 482.13(c)(1).
16 DNV GL-Healthcare USA, Inc. (2016). PR.1.SR.5 . NIAHO® accreditation
requirements: Interpretive guidelines & surveyor guidance (version 11).
Milford, OH: DNV GL-Healthcare USA, Inc. (Level VII)
17 Accreditation Association for Hospitals and Health Systems. (2017). Standard
07.01.10. Healthcare Facilities Accreditation Program: Accreditation
requirements for acute care hospitals. Chicago, IL: Accreditation Association
for Hospitals and Health Systems. (Level VII)
18 Siegel, J. D ., et al. (2007, revised 2017). “2007 guideline for isolation
precautions: Preventing transmission of infectious agents in healthcare
settings” [Online]. Accessed via the Web at
https://www.cdc.gov/infectioncontrol/pdf/guidelines/isolation-guidelines.
(Level II)
19 Rutala, W. A., et al. (2008, revised 2017). “Guideline for disinfection and
sterilization in healthcare facilities, 2008” [Online]. Accessed via the Web at
http://www.cdc.gov/hicpac/pdf/guidelines/Disinfection_Nov_2008.pdf (Level I)
20 Accreditation Association for Hospitals and Health Systems. (2017). Standard
07.02.03. Healthcare Facilities Accreditation Program: Accreditation
requirements for acute care hospitals. Chicago, IL: Accreditation Association
for Hospitals and Health Systems. (Level VII)
21 The Joint Commission. (2019). Standard RC.01.03 .01. Comprehensive
accreditation manual for hospitals. Oakbrook Terrace, IL: The Joint
Commission. (Level VII)
22 Accreditation Association for Hospitals and Health Systems. (2017). Standard
10.00 .03. Healthcare Facilities Accreditation Program: Accreditation
requirements for acute care hospitals. Chicago, IL: Accreditation Association
for Hospitals and Health Systems. (Level VII)
23 Centers for Medicare and Medicaid Services, Department of Health and
Human Services. (2015). Condition of participation: Medical record services.
42 C.F.R. § 482.24(b).
24 DNV GL-Healthcare USA, Inc. (2016). MR.2 .SR.1 . NIAHO® accreditation
requirements: Interpretive guidelines & surveyor guidance (version 11).
Milford, OH: DNV GL-Healthcare USA, Inc. (Level VII)
25 Haynes, J. M. (2014). Pulmonary function test quality in the elderly: A
comparison with younger adults. Respiratory Care, 59(1), 16–21. Accessed
via the Web at
https://c.aarc.org/education/webcast_central/archives/2014/01_10_2014_jour
nal.pdf
26 Lesnick, B. L., & Davis, S. D. (2011). Infant pulmonary function testing:
Overview of technology and practical considerations—New current procedural
terminology codes effective 2010. Chest, 139(5), 1197–1202. Accessed via
the Web at http://www.ncbi.nlm.nih.gov/pmc/articles/PMC3198380/
BILIARY DRAINAGE CATHETER CARE
The biliary drainage catheter (also called a T tube) may be
inserted in the common bile duct after cholecystectomy,
choledochostomy, or liver transplant, and during treatment
for cholelithiasis to promote biliary drainage.
The practitioner inserts the biliary drainage catheter into
the common bile duct and draws the long end through the
incision. The catheter is then connected to a closed
drainage system. (See Understanding biliary drainage
catheter placement.) The catheter typically remains in place
postoperatively for between 7 and 14 days—potentially
longer after a liver transplant. An interventional radiologist
may also insert a biliary drainage catheter to drain excess
bile if he or she identifies a blockage or narrowing of the bile
ducts during percutaneous transhepatic cholangiography. In
preparation for removal, the practitioner may request that
the nurse clamp the catheter to assess the patient’s
tolerance of the return of bile flow and to aid digestion.
Biliary drainage catheter dressings are changed routinely,
as ordered, to prevent infection and skin excoriation from
bile.
Equipment
Gloves ▪ sterile gloves ▪ sterile drape ▪ sterile 4′′ × 4′′ (10-
cm × 10-cm) gauze pads ▪ normal saline solution ▪
prescribed antiseptic cleaning agent ▪ two sterile basins ▪
sterile precut drain dressings ▪ hypoallergenic paper tape ▪
indelible marker ▪ Optional: prescribed pain medication,
gown, protective eyewear, transparent dressing, skin
protectant, clamp or stopcock, stethoscope, graduated
collection container, vital signs monitoring equipment,
disinfectant pad.
Preparation of equipment
Check the expiration date on each sterile package and
inspect each package for tears. Using an indelible marker,
label all solution containers with the patient’s name and the
date and the time you opened it.
Implementation
■ Verify the practitioner’s order.
■ Check the patient’s medical recorder for a history of
allergies.
■ Gather and prepare the equipment
■ Perform hand hygiene.1,2,3,4,5,6
■ Confirm the patient’s identity using at least two patient
identifiers.7
■ Provide privacy.8,9,10,11
■ Explain the procedure to the patient to decrease anxiety
and ensure cooperation.
Changing the dressing
■ Perform a comprehensive pain assessment using
techniques appropriate for the patient’s age, condition, and
ability to understand.12 Before the dressing change,
administer pain medications, as needed and ordered,
following safe medication practices.13,14,15,16
■ Raise the bed to waist level when providing patient care
to prevent caregiver back strain.17
■ Put on gloves and other personal protective equipment as
needed to comply with standard precautions.18,19,20
■ Without dislodging the biliary drainage catheter, carefully
remove the old dressing to prevent skin stripping or
tearing.21
■ Dispose of the old dressing in the appropriate
receptacle.19
■ Remove and discard your gloves.18,19,20
■ Perform hand hygiene.1,2,3,4,5,6
■ Open the sterile packages, and pour the prescribed
antiseptic cleaning agent into a sterile basin and the normal
saline solution into another sterile basin.
■ Put on sterile gloves and follow strict sterile no-touch
technique to prevent contamination of the incision.18,19,20,22
Understanding biliary drainage
catheter placement
The biliary drainage catheter is inserted in the common bile duct by a
surgeon, anchored to the abdominal wall, and connected to a closed
drainage system.
■ Inspect the incision and biliary drainage catheter
insertion site for signs of infection, including redness,
edema, warmth, tenderness, induration, and skin
excoriation. Also assess the catheter and site for wound
dehiscence or evisceration, if applicable.
■ Use a sterile 4′′ × 4′′ (10-cm × 10-cm) gauze pad soaked
in the prescribed antiseptic cleaning agent to clean and
remove dried matter or bile drainage from around the biliary
drainage catheter. Starting always at the catheter insertion
site, gently wipe outward in a continuous circular motion to
prevent recontamination of the catheter insertion site.
■ Use a sterile 4′′ × 4′′ (10-cm × 10-cm) gauze pad soaked
in normal saline solution to rinse the area. Dry the area with
another sterile 4′′ × 4′′ (10-cm × 10-cm) gauze pad.
■ Apply a thin layer of skin protectant, if necessary, to
protect the skin from injury caused by bile drainage.
■ Apply sterile precut drain dressings, one extending from
either side of the biliary drainage catheter, to absorb bile
drainage.
■ Apply a sterile 4′′ × 4′′ (10-cm × 10-cm) gauze pad over
the incision.
■ Apply a sterile 4′′ × 4′′ (10-cm × 10-cm) gauze pad or
transparent dressing over the biliary drainage catheter and
the incision dressings. Don’t kink the tubing to avoid
blocking bile drainage. Secure the dressings with
hypoallergenic paper tape.
■ Return the patient’s bed to the lowest position to prevent
falls and maintain patient safety.23,24
Emptying the drainage bag
■ Put on gloves.18,20
■ Trace the biliary drainage catheter from the patient to its
point of origin to make sure you’re emptying the correct
drainage bag.25
■ Place the graduated collection container under the outlet
valve of the drainage bag.
■ Supporting the biliary drainage bag to prevent traction on
the biliary drainage catheter and accidental removal,26 open
the outlet valve, empty the bag’s contents completely into
the container, and close the valve, without contaminating
the valve, tubing, or clamp (if used).
■ Wipe the end of the outlet valve with a clean gauze pad
to remove residual drainage that may remain after closing.
■ Carefully measure and record the character, color, and
amount of drainage. (Check bile drainage amounts regularly
to ensure patient comfort and safety.)
■ Discard bile drainage, and rinse or discard the collection
container appropriately.18
■ Remove and discard your gloves.18,19,20
■ Perform hand hygiene.1,2,3,4,5,6
■ Obtain the patient’s vital signs; monitor intake and
output; and assess for such signs or symptoms of
obstructed bile flow as chills; fever; tachycardia; nausea;
right-upper-quadrant fullness and pain; jaundice; dark,
foamy urine; and clay-colored stools. Report any such signs
or symptoms to the practitioner immediately.
Clamping the tube
■ Put on gloves as needed to comply with standard
precautions.18,20
■ Trace the biliary drainage catheter from the patient to its
point of origin to make sure you’re emptying the correct
drainage bag.25
■ Occlude the biliary drainage catheter with a clamp, or
close the stopcock, if present. Clamping the tube 1 hour
before and after meals diverts bile back to the duodenum to
aid digestion.
■ Monitor the patient’s response to having the catheter
clamped.
■ Supporting the biliary drainage bag to prevent traction on
the catheter and accidental removal, unclamp the biliary
drainage catheter or open the stopcock as ordered.27
■ Check bile drainage amounts regularly, and empty the
drainage bag into a graduated collection container for
measurement, as needed, to ensure patient comfort and
safety.
Completing the procedure
■ Dispose of used equipment and materials appropriately.
■ Remove and discard your gloves18,19,20 and perform hand
hygiene.1,2,3,4,5,6
■ Document the procedure.28,29,30,31
Special considerations
■ The biliary drainage catheter usually drains from 300 to
500 mL of blood-tinged bile in the first 24 hours after
surgery. Report drainage within that time that exceeds 500
mL; if drainage is 50 mL or less or if you note bile drainage
around the tube, notify the practitioner because the tube
may be obstructed. (See Managing biliary drainage catheter
obstruction, page 66.)
Managing biliary drainage catheter
obstruction
If the patient’s biliary drainage catheter becomes obstructed after
cholecystectomy, notify the practitioner and take these steps while you wait
for him or her to arrive:
■ Unclamp the biliary drainage catheter (if it was clamped 1 hour before or
after a meal), and connect the catheter to a closed gravity-drainage system.
■ Inspect the catheter carefully to detect any kinks or obstructions.
■ Prepare the patient for possible biliary drainage catheter irrigation or direct
X-ray of the common bile duct (cholangiography). Describe these measures
briefly to the patient to reduce the patient’s apprehension and promote
cooperation.
■ Provide encouragement and support to the patient.
■ Bile drainage typically declines to 200 mL or less 4 days
after surgery and the color changes to green-brown. Monitor
the patient’s fluid, electrolyte, and acid-base status
carefully.
■ Secure the biliary drainage system at the patient’s
abdominal level to prevent excessive bile loss (over 500 mL
in the first 24 hours) and backflow contamination. Bile flows
into the drainage bag only when biliary pressure increases.
■ Provide meticulous skin care and frequent dressing
changes. Observe for bile leakage around the biliary
drainage catheter, which may indicate obstruction.
■ Assess biliary drainage catheter patency and catheter
insertion site condition hourly for the first 8 hours
postoperative and then every 4 hours until the practitioner
removes the catheter.
■ If the patient has fragile skin, use dressings and tape
specifically formulated for fragile skin to prevent skin
stripping and tearing during removal.21
■ Monitor all urine and stool for color changes. Assess for
icteric skin and sclera, which may indicate jaundice.
■ The Joint Commission issued a sentinel event alert related
to managing risk during transition to new International
Organization for Standardization tubing standards designed
to prevent dangerous tubing misconnections, which can
lead to serious patient injury and death. During the
transition, be sure to trace the tubing and catheter from the
patient to the point of origin before connecting or
reconnecting any device or infusion, at any care transition
(such as a new setting or service), and as part of the hand-
off process. Route tubes and catheters having different
purposes in different standardized directions. When there
are different access sites or several bags hanging, label the
tubing at the distal and proximal ends. Use tubing and
equipment only as intended. Store medications for different
delivery routes in separate locations.32
Patient teaching
Inform the patient that loose bowel movements commonly
occur in the first few weeks after surgery. Teach the patient
how to care for the biliary drainage catheter at home,
including providing meticulous skin care and dressing
changes, to prevent infection and skin breakdown. Also
instruct the patient how to flush the tube daily (or more
frequently if ordered) with 5 to 10 mL of sterile normal
saline or water, as ordered by the practitioner, to prevent
blockage.26,33 Also inform the patient about the signs and
symptoms of catheter and biliary obstruction that the
patient should report to the practitioner. Teach the patient
how to manage the catheter when turning, walking, and
performing activities of daily living. Caution the patient that
direct pulling or traction on the catheter27 should be
avoided, and that bile stains clothing. Instruct the patient to
keep the drainage bag lower that the catheter insertion site
to help with drainage.
Complications
Obstructed bile flow, skin excoriation or breakdown,
catheter dislodgment, drainage reflux, and infection are the
most common complications related to biliary drainage
catheters.
Documentation
Record the appearance of the dressing and surrounding
skin. Record the color, character, and volume of bile
collected. Record the appearance of the dressing and
surrounding skin. Keep a precise record of the patient’s
temperature and the amount and frequency of urination and
bowel movements. Document any patient teaching provided
and the patient’s understanding of your teaching.
REFERENCES
1 Centers for Disease Control and Prevention. (2002). Guideline for hand
hygiene in health-care settings: Recommendations of the Healthcare Infection
Control Practices Advisory Committee and the HICPAC/SHEA/APIC/IDSA Hand
Hygiene Task Force. MMWR Recommendations and Reports, 51(RR-16), 1–45.
Accessed via the Web at https://www.cdc.gov/mmwr/pdf/rr/rr5116.pdf (Level
II)
2 The Joint Commission. (2019). Standard NPSG.07.01.01. Comprehensive
accreditation manual for hospitals. Oakbrook Terrace, IL: The Joint
Commission. (Level VII)
3 World Health Organization. (2009). “WHO guidelines on hand hygiene in
health care: First global patient safety challenge, clean care is safer care”
[Online]. Accessed via the Web at
http://apps.who.int/iris/bitstream/10665/44102/1/9789241597906_eng.pdf
(Level IV)
4 Accreditation Association for Hospitals and Health Systems. (2017). Standard
07.01.21. Healthcare Facilities Accreditation Program: Accreditation
requirements for acute care hospitals. Chicago, IL: Accreditation Association
for Hospitals and Health Systems. (Level VII)
5 Centers for Medicare and Medicaid Services, Department of Health and
Human Services. (2015). Condition of participation: Infection control. 42 C.F.R.
§ 482.42.
6 DNV GL-Healthcare USA, Inc. (2016). IC.1.SR.1 . NIAHO® accreditation
requirements: Interpretive guidelines & surveyor guidance (version 11).
Milford, OH: DNV GL-Healthcare USA, Inc. (Level VII)
7 The Joint Commission. (2019). Standard NPSG.01.01.01. Comprehensive
accreditation manual for hospitals. Oakbrook Terrace, IL: The Joint
Commission. (Level VII)
8 Accreditation Association for Hospitals and Health Systems. (2017). Standard
15.01.16. Healthcare Facilities Accreditation Program: Accreditation
requirements for acute care hospitals. Chicago, IL: Accreditation Association
for Hospitals and Health Systems. (Level VII)
9 Centers for Medicare and Medicaid Services, Department of Health and
Human Services. (2015). Condition of participation: Patient’s rights. 42 C.F.R.
§ 482.13(c)(1).
10 DNV GL-Healthcare USA, Inc. (2016). PR.1.SR.5 . NIAHO® accreditation
requirements: Interpretive guidelines & surveyor guidance (version 11).
Milford, OH: DNV GL-Healthcare USA, Inc. (Level VII)
11 The Joint Commission. (2019). Standard RI.01.01.01. Comprehensive
accreditation manual for hospitals. Oakbrook Terrace, IL: The Joint
Commission. (Level VII)
12 The Joint Commission. (2019). Standard PC.01.02.07. Comprehensive
accreditation manual for hospitals. Oakbrook Terrace, IL: The Joint
Commission. (Level VII)
13 The Joint Commission. (2019). Standard MM.06.01.01. Comprehensive
accreditation manual for hospitals. Oakbrook Terrace, IL: The Joint
Commission. (Level VII)
14 Accreditation Association for Hospitals and Health Systems. (2017). Standard
16.01.03. Healthcare Facilities Accreditation Program: Accreditation
requirements for acute care hospitals. Chicago, IL: Accreditation Association
for Hospitals and Health Systems. (Level VII)
15 Centers for Medicare and Medicaid Services, Department of Health and
Human Services. (2015). Condition of participation: Nursing services. 42
C.F.R. § 482.23(c).
16 DNV GL-Healthcare USA, Inc. (2016). MM.1 .SR.2. NIAHO® accreditation
requirements: Interpretive guidelines & surveyor guidance (version 11).
Milford, OH: DNV GL-Healthcare USA, Inc. (Level VII)
17 Waters, T. R., et al. (2009). “Safe patient handling training for schools of
nursing” [Online]. Accessed via the Web at
https://www.cdc.gov/niosh/docs/2009-127/pdfs/2009-127.pdf (Level VII)
18 Siegel, J. D ., et al. (2007, revised 2017). “2007 guideline for isolation
precautions: Preventing transmission of infectious agents in healthcare
settings” [Online]. Accessed via the Web at
https://www.cdc.gov/infectioncontrol/pdf/guidelines/isolation-guidelines.pdf
(Level II)
19 Occupational Safety and Health Administration. (n.d .). “Bloodborne
pathogens, standard number 1910.1030” [Online]. Accessed via the Web at
https://www.osha.gov/pls/oshaweb/owadisp.show_document?
p_id=10051&p_table=STANDARDS (Level VII)
20 Accreditation Association for Hospitals and Health Systems. (2017). Standard
07.01.10. Healthcare Facilities Accreditation Program: Accreditation
requirements for acute care hospitals. Chicago, IL: Accreditation Association
for Hospitals and Health Systems. (Level VII)
21 LeBlanc, K., et al. (2013). International skin tear advisory panel: A tool kit to
aid in the prevention, assessment, and treatment of skin tears using a
simplified classification system. Advances in Skin and Wound Care, 26, 459–
476. (Level IV)
22 Accreditation Association for Hospitals and Health Systems. (2017). Standard
07.01.20. Healthcare Facilities Accreditation Program: Accreditation
requirements for acute care hospitals. Chicago, IL: Accreditation Association
for Hospitals and Health Systems. (Level VII)
23 Ganz, D. A., et al. (2013). Preventing falls in hospitals: A toolkit for improving
quality of care (AHRQ Publication No. 13-0015-EF). Rockville, MD: Agency for
Healthcare Research and Quality. Accessed via the Web at
https://www.ahrq.gov/sites/default/files/publications/files/fallpxtoolkit_0 .pdfpd
f (Level VII)
24 Accreditation Association for Hospitals and Health Systems. (2017). Standard
16.02.02. Healthcare Facilities Accreditation Program: Accreditation
requirements for acute care hospitals. Chicago, IL: Accreditation Association
for Hospitals and Health Systems. (Level VII)
25 U.S . Food and Drug Administration. (n.d .). “Look. Check. Connect. Safe
medical device connections save lives” [Online]. Accessed via the Web at
http://www.fda.gov/downloads/MedicalDevices/Safety/AlertsandNotices/UCM1
34873.pdf
26 Dawood, A. (2014). “Percutaneous biliary drainage” [Online]. Accessed via
the Web at http://emedicine.medscape.com/article/1828052-overview#a1
27 LeMone, P., et al. (2014). Medical-surgical nursing: Critical thinking in patient
care (6th ed.). Cranbury, NJ: Prentice Hall.
28 The Joint Commission. (2019). Standard RC.01.03 .01. Comprehensive
accreditation manual for hospitals. Oakbrook Terrace, IL: The Joint
Commission. (Level VII)
29 Accreditation Association for Hospitals and Health Systems. (2017). Standard
10.00 .03. Healthcare Facilities Accreditation Program: Accreditation
requirements for acute care hospitals. Chicago, IL: Accreditation Association
for Hospitals and Health Systems. (Level VII)
30 Centers for Medicare and Medicaid Services, Department of Health and
Human Services. (2015). Condition of participation: Medical record services.
42 C.F.R. § 482.24(b).
31 DNV GL-Healthcare USA, Inc. (2016). MR.2 .SR.1 . NIAHO® accreditation
requirements: Interpretive guidelines & surveyor guidance (version 11).
Milford, OH: DNV GL-Healthcare USA, Inc. (Level VII)
32 The Joint Commission. (2014). “Sentinel event alert: Managing risk during
transition to new ISO tubing connector standards” [Online]. Accessed via the
Web at
http://www.jointcommission.org/assets/1/6/SEA_53_Connectors_8 _19_14 _final.
pdf (Level VII)
33 Stanford Health Care. (2014). “Interventional Radiology Patient Discharge
Education: Biliary Drain/Stent Placement or Exchange” [Online]. Accessed via
the Web at
https://stanfordhealthcare.org/content/dam/SHC/clinics/interventional-
radiology-clinic/docs/biliary-drain-patient-discharge-education.pdf
BINDER APPLICATION
An abdominal binder contains lengths of elasticized material
that encircle the abdomen to provide support, keep
dressings in place (especially for patients allergic to tape),
reduce edema, and decrease tension on wounds and suture
lines. An abdominal binder can also promote early
mobilization and patient comfort and satisfaction as well as
healing.1,2 Studies have shown that properly using an
abdominal binder postoperatively doesn’t adversely impede
lung function.1 Elasticized abdominal binders are typically
fastened with Velcro.
Equipment
Tape measure ▪ abdominal binder ▪ gloves ▪ sterile
dressings.
Preparation of equipment
If you need to obtain an abdominal binder, measure the
area that the binder must fit using a tape measure and then
obtain the proper size and type of binder from the central
supply department.
Implementation
■ Verify the practitioner’s order.
■ Gather and prepare the necessary equipment.
■ Perform hand hygiene.3,4,5,6,7,8
■ Confirm the patient’s identity using at least two patient
identifiers.9
■ Provide privacy.10,11,12,13
■ Explain the procedure to the patient and family (if
appropriate) according to their individual communication
and learning needs to increase their understanding, allay
their fears, and enhance cooperation.14
■ Raise the patient’s bed to waist level when providing care
to prevent caregiver back strain.15
■ Perform hand hygiene.3,4,5,6,7,8
■ Put on gloves, as needed, to comply with standard
precautions.16,17,18,19
■ Position the patient in the supine position with the head
slightly elevated and knees slightly flexed to decrease
tension on the abdomen.
■ Assess the patient’s condition.
■ Remove and discard the dressing.17
■ Assess the wound or suture line, as appropriate.
■ Remove and discard your gloves,16,17,11 perform hand
hygiene,3,4,5,6,7,8 and put on new gloves.16,17
■ Cover the wound with a new sterile dressing.
■ Accordion-fold one half of the binder, slip it under the
patient, and pull it through from the other side. Make sure
the binder is straight, free of wrinkles, and evenly
distributed under the patient. Its lower edge should extend
well below the hips.
■ Overlap one side snugly onto the other (as shown below).
■ Starting at the lower edge, close the Velcro closure.
Fastening the abdominal binder from the lower edge upward
in postsurgical application helps to relieve gravitational pull
on the wound.
■ Check the binder’s fit by inserting one finger under the
binder’s edge to ensure a snug but not-too-tight fit—it
should be loose enough to avoid impaired circulation and
respiration as well as patient discomfort. Avoid making the
binder too tight around the diaphragm because it can
interfere with breathing.
■ For maximum support, wrap the binder so that it applies
even pressure across the body section. Eliminate all
wrinkles, and avoid placing pressure over bony
prominences.
■ Ask the patient whether the binder feels comfortable.
Explain that the binder might feel tight initially but should
feel comfortable shortly. Adjust the binder as needed.
■ Instruct the patient to notify a nurse immediately if the
binder comes apart or feels too tight or too loose.
■ Return the bed to its lowest position to prevent falls and
maintain patient safety.20
■ Ask the patient to ambulate, if possible, to evaluate the
fit of the binder.
■ Remove and discard your gloves.16,17
■ Perform hand hygiene.3,4,5,6,7,8
■ Document the procedure.21,22,23,24
Special considerations
■ Be careful not to compress or kink any tubes, drains, or
catheters and not to position them so that they are working
against gravity.
■ Make sure that abdominal binder placement doesn’t
interfere with elimination.
■ Observe the patient and check abdominal binder
placement every 4 hours or more frequently as needed.
Check the skin for color, palpate it for warmth, check pulses,
and assess for tingling or numbness. Check respiratory
status, and encourage coughing, deep breathing, and
incentive spirometry, if ordered.1,25
■ Assess the patient’s lower extremities for color, pulses,
and edema. Encourage movement of the patient’s feet and
legs to prevent deep venous thromboembolism.
■ Reapply the abdominal binder when a dressing needs
changing, when the binder becomes loose or too tight, and
at other times according to the practitioner’s orders. When
changing the binder, observe the skin for signs of irritation.
Provide appropriate skin care before reapplying the binder.
Patient teaching
If the patient will need an abdominal binder after discharge,
teach the patient and a family member or caregiver how to
remove the binder, inspect the skin, bathe the area, and
reapply the binder. Tell the patient and family member or
caregiver where to purchase binders and how to care for
them. Note that the American Cancer Society may provide
assistance in obtaining binders for a patient with cancer. If
commercially manufactured binders are unavailable, advise
the patient and family or caregiver that a clean towel or
sheeting material can be used instead. Periodically reinforce
previous teaching and instructions.
Complications
Irritation of the underlying skin can result from perspiration
or friction.
Documentation
Record the date and time of abdominal binder application,
reapplication, and removal; purpose of application; skin
condition before and after application; dressing changes and
wound assessment or skin care; complications; the patient’s
tolerance of the treatment; and any patient teaching
provided, and the patient’s understanding of that teaching.
REFERENCES
1 Cheifetz, O., et al. (2010). The effect of abdominal support on functional
outcomes in patients following major abdominal surgery: A randomized
controlled trial. Physiotherapy Canada, 62(3), 242–253. Accessed via the Web
at http://www.ncbi.nlm.nih.gov/pmc/articles/PMC2909864/ (Level II)
2 Arici, E., et al. (2016). The effect of using an abdominal binder on
postoperative gastrointestinal function, mobilization, pulmonary function, and
pain in patients undergoing major abdominal surgery: A randomized
controlled trial. International Journal of Nursing Studies, 62, 108–117. (Level
II)
3 Centers for Disease Control and Prevention. (2002). Guideline for hand
hygiene in health-care settings: Recommendations of the Healthcare Infection
Control Practices Advisory Committee and the HICPAC/SHEA/APIC/IDSA Hand
Hygiene Task Force. MMWR Recommendations and Reports, 51(RR-16), 1–45.
Accessed via the Web at https://www.cdc.gov/mmwr/pdf/rr/rr5116.pdf (Level
II)
4 The Joint Commission. (2019). Standard NPSG.07.01.01. Comprehensive
accreditation manual for hospitals. Oakbrook Terrace, IL: The Joint
Commission. (Level VII)
5 World Health Organization. (2009). “WHO guidelines on hand hygiene in
health care: First global patient safety challenge, clean care is safer care”
[Online]. Accessed via the Web at
http://apps.who.int/iris/bitstream/10665/44102/1/9789241597906_eng.pdf
(Level IV)
6 Centers for Medicare and Medicaid Services, Department of Health and
Human Services. (2015). Condition of participation: Infection control. 42 C.F.R.
§ 482.42.
7 Accreditation Association for Hospitals and Health Systems. (2017). Standard
07.01.21. Healthcare Facilities Accreditation Program: Accreditation
requirements for acute care hospitals. Chicago, IL: Accreditation Association
for Hospitals and Health Systems. (Level VII)
8 DNV GL-Healthcare USA, Inc. (2016). IC.1.SR.1 . NIAHO® accreditation
requirements: Interpretive guidelines & surveyor guidance (version 11).
Milford, OH: DNV GL-Healthcare USA, Inc. (Level VII)
9 The Joint Commission. (2019). Standard NPSG.01.01.01. Comprehensive
accreditation manual for hospitals. Oakbrook Terrace, IL: The Joint
Commission. (Level VII)
10 Accreditation Association for Hospitals and Health Systems. (2017). Standard
15.01.16. Healthcare Facilities Accreditation Program: Accreditation
requirements for acute care hospitals. Chicago, IL: Accreditation Association
for Hospitals and Health Systems. (Level VII)
11 The Joint Commission. (2019). Standard RI.01.01.01. Comprehensive
accreditation manual for hospitals. Oakbrook Terrace, IL: The Joint
Commission. (Level VII)
12 Centers for Medicare and Medicaid Services, Department of Health and
Human Services. (2015). Condition of participation: Patient’s rights. 42 C.F.R.
§ 482.13(c)(1).
13 DNV GL-Healthcare USA, Inc. (2016). PR.1.SR.5 . NIAHO® accreditation
requirements: Interpretive guidelines and surveyor guidance (version 11).
Milford, OH: DNV GL-Healthcare USA, Inc. (Level VII)
14 The Joint Commission. (2019). Standard PC.02.01.21. Comprehensive
accreditation manual for hospitals. Oakbrook Terrace, IL: The Joint
Commission. (Level VII)
15 Waters, T. R., et al. (2009). “Safe patient handling training for schools of
nursing” [Online]. Accessed via the Web at
https://www.cdc.gov/niosh/docs/2009-127/pdfs/2009-127.pdf (Level VII)
16 Siegel, J. D ., et al. (2007, revised 2017). “2007 guideline for isolation
precautions: Preventing transmission of infectious agents in healthcare
settings” [Online]. Accessed via the Web at
https://www.cdc.gov/infectioncontrol/pdf/guidelines/isolation-guidelines.pdf
(Level II)
17 Occupational Safety and Health Administration. (n.d .). “Bloodborne
pathogens, standard number 1910.1030” [Online]. Accessed via the Web at
https://www.osha.gov/pls/oshaweb/owadisp.show_document?
p_id=10051&p_table=STANDARDS (Level VII)
18 Accreditation Association for Hospitals and Health Systems. (2017). Standard
07.01.10. Healthcare Facilities Accreditation Program: Accreditation
requirements for acute care hospitals. Chicago, IL: Accreditation Association
for Hospitals and Health Systems. (Level VII)
19 DNV GL-Healthcare USA, Inc. (2016). IC.1 .SR.2 . NIAHO® accreditation
requirements: Interpretive guidelines & surveyor guidance (version 11).
Milford, OH: DNV GL-Healthcare USA, Inc. (Level VII)
20 Ganz, D. A., et al. (2013). Preventing falls in hospitals: A toolkit for improving
quality of care (AHRQ Publication No. 13-0015-EF). Rockville, MD: Agency for
Healthcare Research and Quality. Accessed via the Web at
https://www.ahrq.gov/sites/default/files/publications/files/fallpxtoolkit_0 .pdf
(Level VII)
21 The Joint Commission. (2019). Standard RC.01.03 .01. Comprehensive
accreditation manual for hospitals. Oakbrook Terrace, IL: The Joint
Commission. (Level VII)
22 Centers for Medicare and Medicaid Services, Department of Health and
Human Services. (2015). Condition of participation: Medical record services.
42 C.F.R. § 482.24(b).
23 Accreditation Association for Hospitals and Health Systems. (2017). Standard
10.00 .03. Healthcare Facilities Accreditation Program: Accreditation
requirements for acute care hospitals. Chicago, IL: Accreditation Association
for Hospitals and Health Systems. (Level VII)
24 DNV GL-Healthcare USA, Inc. (2016). MR.2 .SR.1 . NIAHO® accreditation
requirements: Interpretive guidelines & surveyor guidance (version 11).
Milford, OH: DNV GL-Healthcare USA, Inc. (Level VII)
25 Restrepo, R. D., et al. (2011). AARC clinical practice guideline: Incentive
spirometry: 2011. Respiratory Care, 56(10), 1600–1604. Accessed via the
Web at http://www.rcjournal.com/cpgs/pdf/10.11 .1600.pdf (Level VII)
BISPECTRAL INDEX MONITORING
Bispectral index monitoring involves the use of an electronic
device that converts EEG waves into a number. This
number, statistically derived from raw EEG data, indicates
the depth or level of a patient’s sedation and provides a
direct measure of the effects of sedatives and anesthetics
on the brain. Unlike reliance on subjective assessments and
vital signs, bispectral index monitoring provides objective,
reliable data the practitioner can use to make care
decisions, minimizing the risks of oversedation and
undersedation. When used appropriately, bispectral index
monitoring can decrease the total amount of sedation
needed to keep a patient adequately sedated.1,2
The bispectral index monitor is attached to a sensor
applied to the patient’s forehead. The sensor obtains
information about the patient’s electrical brain activity and
then translates this information into a number from 0
(indicating no brain activity) to 100 (indicating a patient
who’s awake and alert). On the critical care unit and in the
operating room, bispectral index monitoring is used to
assess sedation when the patient is receiving mechanical
ventilation or neuromuscular blockers, or during barbiturate
coma or bedside procedures.3
EQUIPMENT
Bispectral index monitoring
In bispectral index monitoring, the monitor is connected by a cable to a
sensor applied to the patient’s forehead (as shown below).
Equipment
Bispectral index monitor and cable ▪ bispectral index sensor
▪ soap and water ▪ Optional: gloves.
Implementation
■ Gather the necessary equipment.
■ Place the bispectral index monitor close to the patient’s
bed and plug the power cord into the wall outlet.
■ Turn on the monitor to allow it to initiate a self-test
according to the manufacturer’s instructions to ensure that
the equipment is functioning properly.4
■ Perform hand hygiene.5,6,7,8,9,10
■ Put on gloves as needed to comply with standard
precautions.11,12
■ Confirm the patient’s identity using at least two patient
identifiers.13
■ Provide privacy.14,15,16,17
■ Explain the procedure and rationale to the patient and
the patient’s family. (See Bispectral index monitoring.)
■ Raise the patient’s bed to waist level when providing
patient care to prevent caregiver back strain.18
■ Clean the patient’s forehead with soap and water and
allow it to dry.4
■ Open the sensor package and apply the sensor to the
patient’s forehead. Position the circle labeled “1” midline,
approximately 2′′ (about 5 cm) above the bridge of the
nose.4
■ Position the circle labeled “3” vertically on the right or left
temple area, at the level of the outer canthus of the eye,
between the corner of the eye and the patient’s hairline.
■ Ensure that the circle labeled “4” and the line below it are
parallel to the eye on the appropriate side.4
■ Position the circle labeled “2” between the circles labeled
“1” and “4” on the patient’s forehead.
■ Apply gentle but firm pressure around the edges of the
sensor, including the areas in between the numbered
circles, to ensure proper adhesion.4
■ Press firmly on each of the numbered circles for about 5
seconds to ensure that the electrodes adhere to the skin.4
■ Connect the sensor to the interface cable and monitor.
■ Watch the monitor for information related to impedance
(electrical resistance) testing.
NURSING ALERT For the monitor to display a reading, impedance
values must be below a specified threshold. If they aren’t, be ready to
troubleshoot sensor problems. (See Troubleshooting sensor problems,
page 70.)
■ Select a smoothing rate (the time during which data is
analyzed for calculation of the bispectral index; usually 15
or 30 seconds) using the ADVANCE SETUP button.
■ Read and record the bispectral index value.
■ Return the bed to the lowest position to prevent falls and
maintain patient safety.19
■ Check the sensor site. Change the sensor every 24 hours
or more frequently, as needed, to ensure adequate
electrical contact.4
■ Remove and discard your gloves, if worn.
■ Perform hand hygiene.5,6,7,8,9,10
■ Document the procedure.20,21,22,23
Special considerations
■ Always evaluate the bispectral index value in conjunction
with other patient assessment findings. Don’t rely on the
bispectral index value alone.2 (See Interpreting bispectral
index values, page 70.)
■ Keep in mind that patient movement may occur with low
bispectral index values. Be alert for artifacts that could
falsely elevate bispectral index values.
NURSING ALERT Bispectral index values may be elevated because of
muscle shivering, tightening, or twitching, or with the use of
electromechanical devices in close proximity to the patient, the
bispectral index monitor, or the sensor. Interpret the bispectral index
value cautiously in these situations.2
■ Anticipate the need to adjust the dosage of sedation
based on the patient’s bispectral index value.2
■ Minimize patient position changes during bispectral index
monitoring. Studies have shown that changing a patient’s
position during monitoring can significantly affect the
bispectral values.
NURSING ALERT Keep in mind that a decrease in stimulation,
increased sedation, recent administration of a neuromuscular
blocking agent or analgesia, or hypothermia may decrease the
bispectral index, indicating the need for a decrease in sedative agents.
Pain may cause an elevated bispectral index, indicating a need for an
increase in sedation.2,24
TROUBLESHOOTING
Troubleshooting sensor problems
When initiating bispectral index monitoring, be aware that the monitor may
display a message that indicates a problem. The chart below highlights these
messages and offers possible solutions.
Interpreting bispectral index values
Use the following guidelines to interpret your patient’s bispectral index value:
Documentation
Document initiation of bispectral index monitoring, including
the baseline bispectral index value and location of the
sensor. Record assessment findings with the bispectral
index value to provide a clear overall picture of the patient’s
condition.
Record any increases or decreases in bispectral index
values, along with actions instituted based on values and
any changes in sedative agents administered.
REFERENCES
1 Olson, D. M., et al. (2009). A randomized evaluation of bispectral index–
augmented sedation assessment in neurological patients. Neurocritical Care,
11(1), 20–27. (Level III)
2 Kelly, S. D. (2012). Monitoring consciousness using the bispectral index
during anesthesia: A pocket guide for clinicians (2nd ed.) . Boulder, CO:
Covidien.
3 Goodwin, H., et al. (2012). ‘Cooperative sedation’: Optimizing comfort while
maximizing systemic and neurological function. Critical Care, 16, 217.
Accessed via the Web at
http://www.ncbi.nlm.nih.gov/pmc/articles/PMC3681362/pdf/cc11231.pdf
4 Wiegand, D. L. (2017). AACN procedure manual for high acuity, progressive,
and critical care (7th ed.). St: Louis, MO: Elsevier.
5 Centers for Disease Control and Prevention. (2002). Guideline for hand
hygiene in health-care settings: Recommendations of the Healthcare Infection
Control Practices Advisory Committee and the HICPAC/SHEA/APIC/IDSA Hand
Hygiene Task Force. MMWR Recommendations and Reports, 51(RR-16), 1–45.
Accessed via the Web at https://www.cdc.gov/mmwr/pdf/rr/rr5116.pdf (Level
II)
6 World Health Organization. (2009). “WHO guidelines on hand hygiene in
health care: First global patient safety challenge, clean care is safer care”
[Online]. Accessed via the Web at
http://apps.who.int/iris/bitstream/10665/44102/1/9789241597906_eng.pdf
(Level IV)
7 The Joint Commission. (2019). Standard NPSG.07.01.01. Comprehensive
accreditation manual for hospitals. Oakbrook Terrace, IL: The Joint
Commission. (Level VII)
8 Accreditation Association for Hospitals and Health Systems. (2017). Standard
07.01.21. Healthcare Facilities Accreditation Program: Accreditation
requirements for acute care hospitals. Chicago, IL: Accreditation Association
for Hospitals and Health Systems. (Level VII)
9 Centers for Medicare and Medicaid Services, Department of Health and
Human Services. (2015). Condition of participation: Infection control. 42 C.F.R.
§ 482.42.
10 DNV GL-Healthcare USA, Inc. (2016). IC.1 .SR.1 . NIAHO® accreditation
requirements: Interpretive guidelines & surveyor guidance (version 11).
Milford, OH: DNV GL-Healthcare USA, Inc. (Level VII)
11 Siegel, J. D ., et al. (2007, revised 2017). “2007 guideline for isolation
precautions: Preventing transmission of infectious agents in healthcare
settings” [Online]. Accessed via the Web at
https://www.cdc.gov/infectioncontrol/pdf/guidelines/isolation-guidelines.pdf
(Level II)
12 Accreditation Association for Hospitals and Health Systems. (2017). Standard
07.01.10. Healthcare Facilities Accreditation Program: Accreditation
requirements for acute care hospitals. Chicago, IL: Accreditation Association
for Hospitals and Health Systems. (Level VII)
13 The Joint Commission. (2019). Standard NPSG.01.01.01. Comprehensive
accreditation manual for hospitals. Oakbrook Terrace, IL: The Joint
Commission. (Level VII)
14 Centers for Medicare and Medicaid Services, Department of Health and
Human Services. (2015). Condition of participation: Patient’s rights. 42 C.F.R.
§ 482.13(c)(1).
15 The Joint Commission. (2019). Standard RI.01.01.01. Comprehensive
accreditation manual for hospitals. Oakbrook Terrace, IL: The Joint
Commission. (Level VII)
16 Accreditation Association for Hospitals and Health Systems. (2017). Standard
15.01.16. Healthcare Facilities Accreditation Program: Accreditation
requirements for acute care hospitals. Chicago, IL: Accreditation Association
for Hospitals and Health Systems. (Level VII)
17 DNV GL-Healthcare USA, Inc. (2016). PR.1.SR.5 . NIAHO® accreditation
requirements: Interpretive guidelines & surveyor guidance (version 11).
Milford, OH: DNV GL-Healthcare USA, Inc. (Level VII)
18 Waters, T. R., et al. (2009). “Safe patient handling training for schools of
nursing” [Online]. Accessed via the Web at
https://www.cdc.gov/niosh/docs/2009-127/pdfs/2009-127.pdf (Level VII)
19 Ganz, D. A., et al. (2013). Preventing falls in hospitals: A toolkit for improving
quality of care (AHRQ Publication No. 13-0015-EF). Rockville, MD: Agency for
Healthcare Research and Quality. Accessed via the Web at
https://www.ahrq.gov/sites/default/files/publications/files/fallpxtoolkit_0 .pdf
(Level VII)
20 The Joint Commission. (2019). Standard RC.01.03 .01. Comprehensive
accreditation manual for hospitals. Oakbrook Terrace, IL: The Joint
Commission. (Level VII)
21 Centers for Medicare and Medicaid Services, Department of Health and
Human Services. (2015). Condition of participation: Medical record services.
42 C.F.R. § 482.24(b).
22 Accreditation Association for Hospitals and Health Systems. (2017). Standard
10.00 .03. Healthcare Facilities Accreditation Program: Accreditation
requirements for acute care hospitals. Chicago, IL: Accreditation Association
for Hospitals and Health Systems. (Level VII)
23 DNV GL-Healthcare USA, Inc. (2016). MR.2 .SR.1 . NIAHO® accreditation
requirements: Interpretive guidelines & surveyor guidance (version 11).
Milford, OH: DNV GL-Healthcare USA, Inc. (Level VII)
24 Coleman, R. M., et al. (2015). The use of the bispectral index in the detection
of pain in mechanically ventilated adults in the intensive care unit: A review
of the literature. Pain Research and Management, 20(1), e33–e37. Accessed
via the Web at http://www.ncbi.nlm.nih.gov/pmc/articles/PMC4325898/ (Level
V)
BLADDER ULTRASONOGRAPHY
Urine retention, a potentially life-threatening condition, may
result from neurologic or psychological disorders or
obstruction of urine flow. It’s also a common complication of
some types of surgery.1
Medications such as
anticholinergics, antihistamines, and antidepressants, and
analgesia (especially spinal and epidural) may also cause
urine retention. Traditionally, the amount of urine retained in
the bladder was measured by urinary catheterization, which
placed the patient at risk for catheter-associated urinary
tract infection (CAUTI). Bladder ultrasonography is a
noninvasive method of assessing bladder volume with a
lower risk of urinary tract infection (UTI).2
HOSPITAL-ACQUIRED CONDITION ALERT Keep in mind that a CAUTI
is considered a hospital-acquired condition because it can be
reasonably prevented
using best practices.
Use bladder
ultrasonography instead of catheterization to assess bladder volume,
as indicated, to reduce the risk of CAUTI.3,4,5,6,7
Equipment
Bladder ultrasonography unit with probe ▪ ultrasonic
transmission gel ▪ gauze pads ▪ disinfectant pad ▪
Optional: washcloth, gloves.
Implementation
■ Verify the practitioner’s order.
■ Perform hand hygiene.8,9,10,11,12,13
■ Confirm the patient’s identity using at least two patient
identifiers.14
■ Bring the bladder ultrasonography unit to the bedside.
■ Provide privacy.15,16,17
■ Explain the procedure to the patient to help reduce
anxiety.
■ If this is a postvoiding scan, ask the patient to void; assist
as necessary.
■ Raise the patient’s bed to waist level when providing care
to prevent caregiver back strain.18
■ Position the patient in the supine position with the head
resting on a pillow to prevent tightening of abdominal
muscles, which may prevent scanning.
■ Perform hand hygiene.8,9,10,11,12,13
■ Put on gloves as needed to comply with standard
precautions.19,20
■ Clean the rounded end of the ultrasonography probe with
a disinfectant pad following the manufacturer’s instructions.
■ Expose the patient’s suprapubic area.
■ Turn on the bladder ultrasonography unit by pressing the
POWER button, and then select the proper examination mode
to ensure the accuracy of your scan.
■ Place ultrasonic transmission gel on the end of the probe
to promote an airtight seal for optimal sound wave
transmission.
■ Tell the patient that the gel will feel cold when placed on
the abdomen.
■ Locate the symphysis pubis, and place the probe about 1′′
(2.5 cm) superior to the symphysis pubis.
■ Locate the icon (a rough figure of a patient) on the probe
and make sure the head of the icon points toward the head
of the patient.
■ Press the SCAN button, marked with a sound-wave pattern,
to activate the scan. Hold the probe steady until you hear
the beep.
■ Look at the aiming icon and the screen, which displays
the bladder position and volume. Reposition the probe, and
scan until the bladder is centered in the aiming screen. The
largest measurement will be saved.
■ Press DONE when finished.
■ The bladder ultrasonography unit will display the
measured urine volume and the longitudinal and horizontal
axis scans.
■ Press PRINT to obtain a hard copy of your results.
■ Turn off the unit. Use a gauze pad to clean the gel off the
probe.
■ Using a gauze pad or washcloth, remove the gel from the
patient’s skin.
■ Remove and discard your gloves, if worn.19,20
■ Perform hand hygiene.8,9,10,11,12,13
■ Return the bed to the lowest position to prevent falls and
maintain patient safety.21
■ Use a disinfectant pad to clean and disinfect the unit,
incluyding the probe, according to the manufacturer’s
instructions.22,23
■ Notify the practitioner of the scan results, as indicated.24
■ Document the procedure.25,26,27,28
Special considerations
■ Some scanners require you to indicate the patient’s
gender. If a female patient has had a hysterectomy, select
MALE.24
■ If the postvoid residual volume (PRV) is more than 200
mL, assess the patient, repeat the bladder ultrasound, and
encourage the patient to double void; acceptable PVR varies
depending on the patient.24
■ Be aware that high PRV recorded by a bladder ultrasound
scanner should correlate closely with the volume resulting
from catheterization. Any discrepancy in PRV between these
two methods may indicate cystic or pelvic issues, which can
cause falsely elevated PRV readings.29
■ Results may be inaccurate in obese patients or in a
patient who has a lower abdominal scar.24
Documentation
Record the patient’s name, the date, and the time on the
printout, and attach the printout to the patient’s medical
record.24 In the patient’s medical record, also document the
procedure, voided volume (if applicable), bladder scan urine
volume, intermittent catheterization volume (if applicable),
and the practitioner who was notified of the results, as well
any prevoid or postvoid scan. Also document any treatment
provided and the patient’s response to the treatment.
REFERENCES
1 Griesdale, D. E ., et al. (2011). Risk factors for urinary retention after hip or
knee replacement: A cohort study. Canadian Journal of Anaesthesia, 58(12),
1097–1104. (Level VI)
2 Johansson, R. M., et al. (2012). Guidelines for preventing urinary retention
and bladder damage during hospital care. Journal of Clinical Nursing, 22(3–4),
347–355. (Level VII)
3 Jarrett, N., & LaBresh, K. A. et al. (2015). “Evidence-based guidelines for
selected, candidate, and previously considered hospital-acquired conditions:
Final report” [Online]. Accessed via the Web at
https://www.cms.gov/Medicare/Medicare-Fee-for-Service-
Payment/HospitalAcqCond/Downloads/Evidence-Based-Guidelines.zip
4 Lo, E., et al. (2014). SHEA/IDSA practice recommendation: Strategies to
prevent catheter-associated urinary tract infections in acute care hospitals:
2014 update. Infection Control and Hospital Epidemiology, 35(5), 464–479.
Accessed via the Web at http://www.jstor.org/stable/pdfplus/10.1086/675718
(Level I)
5 Association of Professionals in Infection Control and Epidemiology (APIC).
(2014). “APIC implementation guide: Guide to preventing catheter-associated
urinary tract infections” [Online]. Accessed via the Web at
http://apic.org/Resource_/EliminationGuideForm/6473ab9b-e75c-457a-8d0f-
d57d32bc242b/File/APIC_CAUTI_web_0603 .pdf (Level IV)
6 Accreditation Association for Hospitals and Health Systems. (2017). Standard
07.01.02. Healthcare Facilities Accreditation Program: Accreditation
requirements for acute care hospitals. Chicago, IL: Accreditation Association
for Hospitals and Health Systems. (Level VII)
7 The Joint Commission. (2019). Standard NPSG.07.06 .01. Comprehensive
accreditation manual for hospitals. Oakbrook Terrace, IL: The Joint
Commission. (Level VII)
8 The Joint Commission. (2019). Standard NPSG.07.01.01. Comprehensive
accreditation manual for hospitals. Oakbrook Terrace, IL: The Joint
Commission. (Level VII)
9 World Health Organization (2009). “WHO guidelines on hand hygiene in
health care: First global patient safety challenge, clean care is safer care”
[Online]. Accessed via the Web at
http://apps.who.int/iris/bitstream/10665/44102/1/9789241597906_eng.pdf
(Level IV)
10 Centers for Disease Control and Prevention. (2002). Guideline for hand
hygiene in health-care settings: Recommendations of the Healthcare Infection
Control Practices Advisory Committee and the HICPAC/SHEA/APIC/IDSA Hand
Hygiene Task Force. MMWR Recommendations and Reports, 51(RR-16), 1–45.
Accessed via the Web at https://www.cdc.gov/mmwr/pdf/rr/rr5116.pdf (Level
II)
11 Accreditation Association for Hospitals and Health Systems. (2017). Standard
07.01.21. Healthcare Facilities Accreditation Program: Accreditation
requirements for acute care hospitals. Chicago, IL: Accreditation Association
for Hospitals and Health Systems. (Level VII)
12 Centers for Medicare & Medicaid Services, Department of Health and Human
Services. (2015). Condition of participation: Infection control. 42 C.F.R. §
482.42.
13 DNV GL-Healthcare USA, Inc. (2016). IC.1 .SR.1 . NIAHO® accreditation
requirements: Interpretive guidelines & surveyor guidance (version 11).
Milford, OH: DNV GL-Healthcare USA, Inc. (Level VII)
14 The Joint Commission. (2019). Standard NPSG.01.01.01. Comprehensive
accreditation manual for hospitals. Oakbrook Terrace, IL: The Joint
Commission. (Level VII)
15 Accreditation Association for Hospitals and Health Systems. (2017). Standard
15.01.16. Healthcare Facilities Accreditation Program: Accreditation
requirements for acute care hospitals. Chicago, IL: Accreditation Association
for Hospitals and Health Systems. (Level VII)
16 The Joint Commission. (2019). Standard RI.01.01.01. Comprehensive
accreditation manual for hospitals. Oakbrook Terrace, IL: The Joint
Commission. (Level VII)
17 Centers for Medicare & Medicaid Services, Department of Health and Human
Services. (2015). Condition of participation: Patient’s rights. 42 C.F.R. §
482.13(c)(1).
18 Waters, T. R., et al. (2009). “Safe patient handling training for schools of
nursing” [Online]. Accessed via the Web at
https://www.cdc.gov/niosh/docs/2009-127/pdfs/2009-127.pdf (Level VII)
19 Siegel, J. D ., et al. (2007, revised 2017). “2007 guideline for isolation
precautions: Preventing transmission of infectious agents in healthcare
settings” [Online]. Accessed via the Web at
https://www.cdc.gov/infectioncontrol/pdf/guidelines/isolation-guidelines.pdf
(Level II)
20 Accreditation Association for Hospitals and Health Systems. (2017). Standard
07.01.10. Healthcare Facilities Accreditation Program: Accreditation
requirements for acute care hospitals. Chicago, IL: Accreditation Association
for Hospitals and Health Systems. (Level VII)
21 Ganz, D. A., et al. (2013). Preventing falls in hospitals: A toolkit for improving
quality of care (AHRQ Publication No. 13-0015-EF). Rockville, MD: Agency for
Healthcare Research and Quality. Accessed via the Web at
https://www.ahrq.gov/sites/default/files/publications/files/fallpxtoolkit_0 .pdf
(Level VII)
22 Rutala, W. A., et al. (2008, revised 2017). “Guideline for disinfection and
sterilization in healthcare facilities, 2008” [Online]. Accessed via the Web at
https://www.cdc.gov/infectioncontrol/pdf/guidelines/disinfection-
guidelines.pdf (Level I)
23 Accreditation Association for Hospitals and Health Systems. (2017). Standard
07.02.03. Healthcare Facilities Accreditation Program: Accreditation
requirements for acute care hospitals. Chicago, IL: Accreditation Association
for Hospitals and Health Systems. (Level VII)
24 Agency for Clinical Innovation Urology Network Nurses Working Group.
(2014). “Bladder scanning (non-real time)-adult clinical guideline” [Online].
Accessed via the Web at
http://www.aci.health.nsw.gov.au/__data/assets/pdf_file/0019/191062/ACI_Bla
dder_Scanning.pdf (Level VII)
25 The Joint Commission. (2019). Standard RC.01.03 .01. Comprehensive
accreditation manual for hospitals. Oakbrook Terrace, IL: The Joint
Commission. (Level VII)
26 Accreditation Association for Hospitals and Health Systems. (2017). Standard
10.00 .03. Healthcare Facilities Accreditation Program: Accreditation
requirements for acute care hospitals. Chicago, IL: Accreditation Association
for Hospitals and Health Systems. (Level VII)
27 Centers for Medicare & Medicaid Services, Department of Health and Human
Services. (2015). Condition of participation: Medical record services. 42 C.F.R.
§ 482.24(b).
28 DNV GL-Healthcare USA, Inc. (2016). MR.2 .SR.1 . NIAHO® accreditation
requirements: Interpretive guidelines & surveyor guidance (version 11).
Milford, OH: DNV GL-Healthcare USA, Inc. (Level VII)
29 Alagiakrishnan, K., & Valpreda, M. (2009). Ultrasound bladder scanner
presents falsely elevated postvoid residual volumes. Canadian Family
Physician, 55(2), 163–164. Accessed via the Web at
http://www.cfp.ca/content/55/2/163.full.pdf+html
BLOOD CULTURE SAMPLE COLLECTION
Blood cultures are used to detect bacterial invasion in the
blood (bacteremia) and the systemic spread of such an
infection (septicemia) through the bloodstream. Blood
culture sample collection involves collecting a venous blood
sample by venipuncture at the patient’s bedside and
transferring the sample into two bottles, one containing an
anaerobic medium and the other, an aerobic medium. The
bottles undergo incubation, which encourages organisms
present in the sample to grow in the media. Blood cultures
allow identification of about 67% of pathogens within 24
hours and up to 90% within 72 hours. If possible, blood
cultures should be collected before starting antimicrobial
therapy, because antimicrobial therapy may interfere with
bacterial growth.1,2 A dedicated phlebotomy team is
recommended for obtaining blood cultures by venipuncture
to reduce the risk of blood culture contamination.2,3
Ideally, you should obtain blood specimens for culture
from two to four blood draws from separate venipuncture
sites, not through a vascular catheter.2 Perform these blood
sample collections simultaneously or within a few hours.4,5,6
Although blood culture specimens collected from central
venous catheters are associated with higher false-positive
rates,4,7 they may be used if you suspect a catheter-related
bloodstream infection. If you suspect such an infection,
withdraw one set of blood cultures through the device and
one set from a separate venipuncture.2 Blood cultures from
both the catheter and venipuncture should be positive for
the same organism, with associated clinical signs and
symptoms and no other recognized source. A positive
culture from the catheter only most likely stems from a
contaminant on the device, and in that case the patient
shouldn’t receive treatment.1
Equipment
Gloves ▪ antiseptic pad (alcohol, chlorhexidine-based, or
tincture of iodine) ▪ alcohol pad ▪ 20-mL syringes (one
syringe for each set of cultures) ▪ 20G 11⁄2′′ (3.8 -cm) straight
or winged needles ▪ blood culture bottles (aerobic and
anaerobic) ▪ laboratory request form ▪ laboratory biohazard
transport bag ▪ 2′′ × 2′′ (5-cm × 5-cm) gauze pads ▪ small
adhesive bandages ▪ labels ▪ needleless transfer devices ▪
Optional: sterile blood culture collection kit, sterile gloves,
single-patient tourniquet.3
Note: Consider the use of a standardized sterile blood
culture collection kit to reduce the risk for sample
contamination.3
Preparation of equipment
Check the expiration dates on the culture bottles and
replace outdated bottles.
Implementation
■ Verify the practitioner’s order.
■ Gather and prepare the appropriate equipment.
■ Perform hand hygiene8,9,10,11,12,13 and put on gloves to
comply with standard precautions.14,15
■ Confirm the patient’s identity using at least two patient
identifiers.16
■ Provide privacy.17,18,19,20
■ Tell the patient that you need to collect a series of blood
samples to check for infection. Explain the procedure to
ease patient anxiety and promote cooperation. Explain that
the procedure usually requires two blood samples collected
from two different sites.
■ Raise the bed to waist level when providing patient care
to prevent caregiver back strain.21
■ Choose a venipuncture site on the opposite extremity of
an infusion. If venipuncture must be performed on the
extremity with an infusion, use a vein below or distal to the
site of infusion. Avoid venipuncture on the side of an axillary
node dissection and in upper extremities with lymphedema,
with compromised circulation, or affected by radiation
therapy or paralysis or hemiparesis from a stroke. When
possible, restrict venipuncture to the dorsum of the hand in
a patient with an actual or planned dialysis fistula or graft.3
■ Avoid use of a tourniquet, if possible.3 If a tourniquet is
necessary, apply it 2′′ (5 cm) proximal to the area chosen for
the venipuncture; limit tourniquet time to less than 1
minute.3 (See the “Venipuncture” procedure.)
■ Clean the venipuncture site with an antiseptic pad
following the manufacturer’s instructions (if using
chlorhexidine, apply using a back-and-forth scrubbing
motion for at least 30 seconds), and allow it to dry
completely.12,22,23,24,25 Don’t palpate the site again to avoid
transfer of microorganism to the venipuncture site. If
palpation is necessary, put on a sterile glove.25
■ If you’re also drawing blood for other laboratory tests,
draw blood for culture before drawing the sample for other
tests.3 Perform a venipuncture using a straight or winged
needle and discard the initial volume (i.e., 1 to 5 mL) of the
blood sample, if directed by your facility, to prevent
induction of contaminant organisms contained on the
skin.3,23,25 Then draw a quantity of blood that is sufficient
for isolating organisms (i.e.,
20 to 30 mL); follow the
manufacturer’s recommendations for the blood sample
volume required per collection bottle.3,5,23,25,26 Immediately
release the tourniquet, if used, when blood begins to flow
into the collection container.3
Collecting blood culture samples
from a central venous access
catheter
If the patient has no obvious source of infection and you suspect a catheter-
related bloodstream infection, withdraw one set of samples from the distal
lumen of the catheter and one set of samples peripherally. If you need to
obtain two sets from the central venous access catheter, withdraw two blood
samples through different lumens, if available.4 If only one lumen is
available, withdraw two separate samples through the same lumen on
separate occasions.4
Implementation
■ Verify the practitioner’s orders.
■ Gather the appropriate equipment.
■ Check the expiration dates on the culture bottles and replace outdated
bottles.
■ Perform hand hygiene.8,9,10,11,12,13 and put on gloves to comply with
standard precautions.14,15
■ Confirm the patient’s identity using at least two patient identifiers.16
■ Tell the patient you need to collect a series of blood samples to check for
infection.
■ Stop all infusions for a designated period of time depending on the
patient’s condition. (Research hasn’t established the length of time for
stopping fluid flow; one study suggests a wait time of 10 minutes after
stopping the infusion before obtaining the sample.)3
■ Clamp the catheter to prevent accidental exposure to blood and to reduce
the risk of air embolism.22,24
■ Change the needleless connector of the lumen you’ll be using to obtain the
blood culture specimen to reduce the risk of contamination and false-positive
results.3,22,24,36
■ Perform a vigorous mechanical scrub of the needleless connector for at
least 5 seconds using an antiseptic pad.37,38,39 Allow it to dry.37,38
■ If you’re also drawing blood for other laboratory tests, draw blood for
culture before drawing the sample for other tests.3,25 Maintaining sterility of
the syringe tip, connect the empty syringe to the catheter, release the
clamp, and withdraw a quantity of blood that is sufficient for isolating
organisms (i.e ., 20 to 30 mL); follow the manufacturer’s recommendations for
the blood sample volume required per collection bottle.1,3,5 Don’t discard
this first-drawn blood; this is the blood sample that you’ll be injecting into the
culture bottle.22,24,25,36
■ Clamp the catheter and remove the syringe.
■ Perform a vigorous mechanical scrub of the needleless connector for at
least 5 seconds using an antiseptic pad.37,38,39 Allow it to dry.37,38
■ Maintaining sterility of the syringe tip, connect the syringe with
preservative-free normal saline solution, open the clamp, and flush and lock
the device or resume the infusion, as ordered.22,24,40 Consider using a
pulsatile flushing technique, because short boluses of flush solution
interrupted by short pauses may be more effective at removing deposits
(e.g ., fibrin, drug precipitate, intraluminal bacteria) than a continuous low-
flow technique.40
■ If available at your facility, place a disinfectant-containing end cap on the
needleless connector to reduce the risk of vascular catheter–associated
infection.39
HOSPITAL-ACQUIRED CONDITION ALERT Keep in mind that the
Centers for Medicare and Medicaid Services considers a vascular
catheter–associated infection to be a hospital-acquired condition,
because a variety of best practices can reasonably prevent it. Use
infection prevention techniques (such as performing hand hygiene,
thoroughly disinfecting the needleless connector with an antiseptic
pad using friction for at least 5 seconds, and using disinfectant-
containing end caps, if available) to reduce the risk of vascular
catheter–associated infections.41,42,43,44
■ Clean the diaphragm tops of the culture bottles with an alcohol pad; avoid
using iodine-containing products because they can degrade the diaphragm
tops.1,3
■ Inject the blood into each bottle using a needleless transfer device,
dividing it between the two bottles.1
■ Label the culture bottles with the patient’s name and identification
number, the date and time of specimen collection, and the contents of the
culture bottles in the presence of the patient to prevent mislabeling.16,22,24
■ Discard used supplies in the appropriate containers.29
■ Remove and discard your gloves and perform hand
hygiene.8,9,10,11,12,13
■ Place the samples in a laboratory biohazard transport bag and, along with
the laboratory request form, send them to the laboratory within 2 hours of
collection.2,25 Specimens should be held at room temperature. They should
never be refrigerated or frozen because this may kill some of the
microorganisms.25
■ Perform hand hygiene.8,9,10,11,12,13
■ Document the procedure.31,32,33,34
■ After you’ve drawn the blood sample, place a 2′′ × 2′′ (5-
cm × 5-cm) gauze pad over the puncture site (taking care
not to contaminate the needle), and slowly and gently
remove the needle from the vein. Apply gentle pressure to
the site for 2 to 3 minutes or until bleeding stops to prevent
extravasation into the surrounding tissue, which can cause a
hematoma.27 Then cover the site with a small adhesive
bandage.
■ Disinfect the diaphragm tops of the culture bottles with
an alcohol pad and allow them to dry; avoid use of iodine-
containing products because they can degrade the
diaphragm tops.1,3,25
■ Divide the blood by injecting the appropriate amount into
each culture bottle using a needleless transfer device to
ensure the most accurate test results.1
■ Label the culture bottles with the patient’s name and
identification number, the date and time of the specimen
collection, and the contents of the culture bottles in the
presence of the patient to prevent mislabeling.16,22,24
■ Invert the bottles 8 to 10 times gently to mix the blood
adequately with the medium inside the bottles.27,28
■ Discard syringes and needles in a puncture-resistant
sharps container.29
■ Return the bed to the lowest position to prevent falls and
maintain patient safety.30
■ Remove and discard your gloves and perform hand
hygiene.8,9,10,11,12,13
■ Place the samples in a laboratory biohazard transport bag
and, along with the laboratory request form, send them to
the laboratory within 2 hours of collection.2,25 Specimens
should be held at room temperature. They should never be
refrigerated or frozen because this may kill some of the
microorganisms.25
■ Perform hand hygiene.8,9,10,11,12,13
■ Document the procedure.31,32,33,34
Special considerations
■ User blood conservation strategies when drawing blood to
reduce phlebotomy-related loss, which is a major cause of
hospital-acquired anemia. Collaborate with the laboratory
staff about the minimum volume of blood required for each
test.3
■ If a patient has severe sepsis, obtain blood cultures
before administering antimicrobial therapy if doing so won’t
cause a significant delay (greater than 45 minutes) in
starting therapy. Obtain at least two sets of blood cultures
(aerobic and anaerobic bottles), with at least one drawn
percutaneously and one drawn through each vascular
access device, unless the device was inserted within the
past 48 hours. (See Collecting blood culture samples from a
central venous access catheter.)35
Complications
The most common complication of venipuncture is the
formation of a hematoma. Improper technique may cause
false-positive results, leading to inappropriate antimicrobial
use.
Documentation
Record the date and time of blood sample collection, the
name of the test, the amount of blood collected, the number
of bottles used, the patient’s temperature, and any adverse
reactions to the procedure.
REFERENCES
1 Septimus, E. (2015). “Clinician guide for collecting cultures” [Online].
Accessed via the Web at
http://www.cdc.gov/getsmart/healthcare/implementation/clinicianguide.html
2 Haag, D. G., & Dent, B. (2016). Blood culture collection. South Australia:
Joanna Briggs Institute. (Level VII)
3 Infusion Nurses Society (INS). (2016). Infusion therapy standards of practice.
Standard 43: Phlebotomy. Journal of Infusion Nursing, 39(Suppl. 1), S85–S91.
(Level VII)
4 Centers for Disease Control and Prevention. (2014). “Device-associated
module: Central line–associated bloodstream infection (CLABSI) event”
[Online]. Accessed via the Web at
http://www.cdc.gov/nhsn/pdfs/pscmanual/4psc_clabscurrent.pdf
5 Clinical and Laboratory Standards Institute (CLSI). (2007). Principles and
procedure for blood cultures: Approved guideline (CLSI document M47-A).
Wayne, PA: CLSI.
6 Baron, E. J ., et al. (2005). Cumitech 1C: Blood cultures IV. Washington, DC:
American Society for Microbiology.
7 Boyce, J. M., et al. (2013). Obtaining blood cultures by venipuncture versus
from central lines: Impact on blood culture contamination rates and potential
effect on central line-associated bloodstream infection reporting. Infection
Control and Hospital Epidemiology, 34(10), 1042–1046. Accessed via the Web
at http://www.jstor.org/stable/pdf/10.1086/673142.pdf?acceptTC=true (Level
VI)
8 The Joint Commission. (2019). Standard NPSG.07.01.01. Comprehensive
accreditation manual for hospitals. Oakbrook Terrace, IL: The Joint
Commission. (Level VII)
9 Centers for Disease Control and Prevention. (2002). Guideline for hand
hygiene in health-care settings: Recommendations of the Healthcare Infection
Control Practices Advisory Committee and the HICPAC/SHEA/APIC/IDSA Hand
Hygiene Task Force. MMWR Recommendations and Reports, 51(RR-16), 1–45.
Accessed via the Web at https://www.cdc.gov/mmwr/pdf/rr/rr5116.pdf (Level
II)
10 World Health Organization. (2009). “WHO guidelines on hand hygiene in
health care: First global patient safety challenge, clean care is safer care”
[Online]. Accessed via the Web at
http://apps.who.int/iris/bitstream/10665/44102/1/9789241597906_eng.pdf
(Level IV)
11 Centers for Medicare and Medicaid Services, Department of Health and
Human Services. (2015). Condition of participation: Infection control. 42 C.F.R.
§ 482.42.
12 Accreditation Association for Hospitals and Health Systems. (2017). Standard
07.01.21. Healthcare Facilities Accreditation Program: Accreditation
requirements for acute care hospitals. Chicago, IL: Accreditation Association
for Hospitals and Health Systems. (Level VII)
13 DNV GL-Healthcare USA, Inc. (2016). IC.1 .SR.1 . NIAHO® accreditation
requirements: Interpretive guidelines & surveyor guidance (version 11).
Milford, OH: DNV GL-Healthcare USA, Inc. (Level VII)
14 Siegel, J. D ., et al. (2007, revised 2017). “2007 guideline for isolation
precautions: Preventing transmission of infectious agents in healthcare
settings” [Online]. Accessed via the Web at
https://www.cdc.gov/infectioncontrol/pdf/guidelines/isolation-guidelines.pdf
(Level II)
15 Accreditation Association for Hospitals and Health Systems. (2017). Standard
07.01.10. Healthcare Facilities Accreditation Program: Accreditation
requirements for acute care hospitals. Chicago, IL: Accreditation Association
for Hospitals and Health Systems. (Level VII)
16 The Joint Commission. (2019). Standard NPSG.01.01.01. Comprehensive
accreditation manual for hospitals. Oakbrook Terrace, IL: The Joint
Commission. (Level VII)
17 The Joint Commission. (2019). Standard RI.01.01.01. Comprehensive
accreditation manual for hospitals. Oakbrook Terrace, IL: The Joint
Commission. (Level VII)
18 Centers for Medicare and Medicaid Services, Department of Health and
Human Services. (2015). Condition of participation: Patient’s rights. 42 C.F.R.
§ 482.13(c)(1).
19 Accreditation Association for Hospitals and Health Systems. (2017). Standard
15.01.16. Healthcare Facilities Accreditation Program: Accreditation
requirements for acute care hospitals. Chicago, IL: Accreditation Association
for Hospitals and Health Systems. (Level VII)
20 DNV GL-Healthcare USA, Inc. (2016). PR.1.SR.5 . NIAHO® accreditation
requirements: Interpretive guidelines & surveyor guidance (version 11).
Milford, OH: DNV GL-Healthcare USA, Inc. (Level VII)
21 Waters, T. R., et al. (2009). “Safe patient handling training for schools of
nursing” [Online]. Accessed via the Web at
https://www.cdc.gov/niosh/docs/2009-127/pdfs/2009-127.pdf (Level VII)
22 Infusion Nurses Society (INS). (2016). Policies and procedures for infusion
therapy (5th ed.) . Boston, MA: INS.
23 Emergency Nurses Association (ENA). (2012, revised 2016). “Clinical Practice
Guideline: Prevention of Blood Culture Contamination” [Online]. Accessed via
the Web at https://www.ena.org/docs/default-source/resource-library/practice-
resources/cpg/bcccpg2c37f1815b664d2fa8d7e9fd0f475a41.pdf?
sfvrsn=6d1899fb_8 (Level VII)
24 Infusion Nurses Society (INS). (2017). Policies and procedures for infusion
therapy of the older adult (3rd ed.) . Boston, MA: INS.
25 Garcia, R. A., et al. (2015). Multidisciplinary team review of best practices for
collection and handling of blood cultures to determine effective interventions
for increasing the yield of true-positive bacteremias, reducing contamination,
and eliminating false-positive central line-associated bloodstream infections.
American Journal of Infection Control, 43(11), 1222–1237. (Level VII)
26 Emergency Nurses Association. (n.d .). “Clinical practice guideline synopsis:
Prevention of blood culture contamination” [Online]. Accessed via the Web at
https://www.ena.org/docs/default-source/resource-library/practice-
resources/cpg/bccsynopsis.pdf?sfvrsn=c46c438a_8 (Level VII)
27 Clinical Laboratory and Standards Institute (CLSI). (2007). Procedures for the
collection of diagnostic blood specimens by venipuncture (6th ed.). Wayne,
PA: CLSI.
28 Johnson, L. (2016). “Phlebotomy order of draw: Who, what, when, where,
why, and how” [Online]. Accessed via the Web at
http://www.ncctinc.com/documents/Phlebotomy%20Order%20of%20Draw.pdf
29 Occupational Safety and Health Administration. (n.d .). “Bloodborne
pathogens, standard number 1910.1030” [Online]. Accessed via the Web at
http://www.osha.gov/pls/oshaweb/owadisp.show_document?
p_table=STANDARDS&p_id=10051 (Level VII)
30 Ganz, D. A., et al. (2013). Preventing falls in hospitals: A toolkit for improving
quality of care (AHRQ Publication No. 13-0015-EF). Rockville, MD: Agency for
Healthcare Research and Quality. Accessed via the Web at
https://www.ahrq.gov/sites/default/files/publications/files/fallpxtoolkit_0 .pdf
(Level VII)
31 The Joint Commission. (2019). Standard RC.01.03 .01. Comprehensive
accreditation manual for hospitals. Oakbrook Terrace, IL: The Joint
Commission. (Level VII)
32 Centers for Medicare and Medicaid Services, Department of Health and
Human Services. (2015). Condition of participation: Medical record services.
42 C.F.R. § 482.24(b).
33 Accreditation Association for Hospitals and Health Systems. (2017). Standard
10.00 .03. Healthcare Facilities Accreditation Program: Accreditation
requirements for acute care hospitals. Chicago, IL: Accreditation Association
for Hospitals and Health Systems. (Level VII)
34 DNV GL-Healthcare USA, Inc. (2016). MR.2 .SR.1 . NIAHO® accreditation
requirements: Interpretive guidelines & surveyor guidance (version 11).
Milford, OH: DNV GL-Healthcare USA, Inc. (Level VII)
35 Dellinger, R. P. (2013). Surviving sepsis campaign: International guidelines for
management of severe sepsis and septic shock: 2012. Critical Care Medicine,
41(2), 580–637. Accessed via the Web at
http://www.sccm.org/Documents/SSC-Guidelines.pdf (Level I)
36 Infusion Nurses Society (INS). (2016). Infusion therapy standards of practice.
Standard 49: Infection. Journal of Infusion Nursing, 39(Suppl. 1), S106–S108.
(Level VII)
37 Infusion Nurses Society (INS). (2016). Infusion therapy standards of practice.
Standard 34: Needleless connectors. Journal of Infusion Nursing, 39(Suppl. 1),
S68–S70. (Level VII)
38 Centers for Disease Control and Prevention. (2011, revised 2017). “Guidelines
for the prevention of intravascular catheter–related infections” [Online].
Accessed via the Web at
https://www.cdc.gov/infectioncontrol/pdf/guidelines/bsi-guidelines.pdf (Level
I)
39 Marschall, J., et al. (2014). SHEA/IDSA practice recommendation: Strategies
to prevent central line-associated bloodstream infections in acute care
hospitals. Infection Control and Hospital Epidemiology, 35(7), 753–771 .
Accessed via the Web at http://www.jstor.org/stable/10.1086/676533 (Level I)
40 Infusion Nurses Society (INS). (2016). Infusion therapy standards of practice.
Standard 40: Flushing and locking. Journal of Infusion Nursing, 39(Suppl. 1),
S77–S81. (Level VII)
41 Accreditation Association for Hospitals and Health Systems. (2017). Standard
07.01.19. Healthcare Facilities Accreditation Program: Accreditation
requirements for acute care hospitals. Chicago, IL: Accreditation Association
for Hospitals and Health Systems. (Level VII)
42 Accreditation Association for Hospitals and Health Systems. (2017). Standard
07.01.02. Healthcare Facilities Accreditation Program: Accreditation
requirements for acute care hospitals. Chicago, IL: Accreditation Association
for Hospitals and Health Systems. (Level VII)
43 The Joint Commission. (2019). Standard NPSG.07.04.01. Comprehensive
accreditation manual for hospitals. Oakbrook Terrace, IL: The Joint
Commission. (Level VII)
44 Jarrett, N., & Callaham, M. (2016). “Evidence-based guidelines for selected
hospital-acquired conditions: Final report” [Online]. Accessed via the Web at
https://www.cms.gov/Medicare/Medicare-Fee-for-Service-
Payment/HospitalAcqCond/Downloads/2016-HAC-Report.pdf
BLOOD GLUCOSE MONITORING
Blood glucose
meters
measure
blood glucose
concentrations. A drop of blood is placed on a blood glucose
test strip either before or after the strip is inserted into the
meter, depending on the type of blood glucose meter used.
A portable blood glucose meter provides quantitative
measurements that compare in accuracy with other
laboratory tests. Most meters store successive test results
electronically to help determine glucose patterns. If a
glucose result doesn’t correlate with the patient’s clinical
condition, the result should be confirmed through
conventional laboratory sampling of blood glucose.1
NURSING ALERT Avoid using capillary whole blood specimens (eg,
those obtained by fingerstick) for glucose monitoring in patients
receiving intensive medical intervention therapy because of the risk of
collection error. Specimens from patients with decreased peripheral
blood flow (severe hypotension, shock, hyperosmolar hyperglycemia,
and severe dehydration) may not reflect the patient’s true physiologic
state. If you obtain an arterial or venous sample for testing, use only
fresh whole blood or blood collected in lithium heparin collection
devices if directed by the glucose meter manufacturer.2
For a patient who’s receiving nutrition, perform glucose
monitoring before meals. For a patient who isn’t receiving
nutrition, perform blood glucose monitoring every 4 to 6
hours.1 More frequent monitoring, ranging from every 30
minutes to every 2 hours, is required for a patient receiving
an IV insulin infusion.1
In a hospitalized patient, hyperglycemia is defined as a
blood glucose level greater than 140 mg/dL (7.8 mmol/L).
Levels significantly and persistently higher than this may
require treatment. The American Diabetes Association
defines clinically significant hypoglycemia as glucose values
of less than 54 mg/dL (3 mmol/L), and severe hypoglycemia
as glucose values of less than 54 mg/dL with accompanying
severe cognitive impairment.1 A plan for preventing and
treating hypoglycemia should be established for each
patient. Hypoglycemic episodes in the hospital should be
documented in the medical record and tracked.1
The Centers for Disease Control and Prevention
recommends that, whenever possible, blood glucose meters
shouldn’t be shared among patients. If a device must be
shared, it should be cleaned and disinfected after every use,
following the manufacturer’s instructions, to prevent
carryover of blood and infectious agents. If the
manufacturer doesn’t specify how the device should be
cleaned and disinfected, then it shouldn’t be shared.3
Single-use, auto-disabling fingerstick devices should also be
used to prevent the spread of bloodborne pathogens.1,3,4,5
Equipment
Gloves ▪ portable blood glucose meter ▪ alcohol pads ▪
disinfectant pads ▪ gauze pads ▪ single-use, auto-disabling
lancet5 ▪ blood glucose test strips ▪ Optional: small
adhesive bandage, warm moist compresses, soap, water,
towel.
Preparation of equipment
Check the expiration date on the test strips. Make sure that
the cap on the vial of strips is properly secured, and observe
the strip for discoloration. Strips are sensitive to light and
humidity and may become inactivated. Calibrate and run
the blood glucose meter with a quality-control test following
the manufacturer’s instructions to ensure accurate test
results.6 Most facility-based glucose meters must have
quality-control tests performed every 24 hours. Follow the
manufacturer’s instructions for calibration.
Before testing, turn on the meter. If appropriate, ensure
that the code strip number on the test strip matches the
code number on the meter. Enter your operator
identification and password, if required. Enter and then
confirm the patient’s identification information, either
manually or by using a barcode scanner, if available; if the
patient information has already been entered by another
user, confirm it.
Implementation
■ Verify the practitioner’s order.
■ Gather and prepare the appropriate equipment
■ Perform hand hygiene and put on gloves.7,8,9,10,11,12
■ Confirm the patient’s identity using at least two patient
identifiers.13
■ Provide privacy.14,15,16,17
■ Explain the procedure to the patient.
■ Put on gloves.18,19
■ Select the puncture site—usually the fingertip in adults.20
Some devices allow for collection from alternative sites;
consult the manufacturer’s instructions.
■ If necessary, dilate the capillaries by applying warm,
moist compresses to the area for about 10 minutes.
■ If feasible, have the patient wash his or her hands with
soap and water and then dry them to remove any sugar that
may remain on the patient’s skin after exposure to sugar-
containing products.21 If the patient can’t wash his or her
hands, clean the intended puncture site with an alcohol pad
(as shown below) and allow it to dry completely, because
alcohol may interfere with test results if not permitted to dry
completely.20
■ Insert the test strip into the blood glucose meter,
according to the manufacturer’s instructions.
Note that some meters require that you insert the test
strip after applying the blood sample (as shown below).
■ To collect a sample from the fingertip, use a single-use,
auto-disabling lancet on the side of the patient’s fingertip
perpendicular to the lines of the fingerprints.22 Puncture the
skin with a quick, continuous, and deliberate stroke (as
shown on next page, top left) to achieve a good flow of
blood and to prevent the need to repeat the puncture.20
■ If required by your facility, wipe away the first drop of
blood using a gauze pad, because it may be contaminated
with tissue, fluid, or debris.20
■ Touch a drop of blood to the test area of the test strip;
make sure the entire test area is covered. Some meters
require a hanging drop; refer to the manufacturer’s
instructions for use. Don’t squeeze the patient’s finger too
tightly, because doing so may dilute the specimen with
plasma.20
■ After collecting the blood sample, apply firm pressure to
the puncture site to stop the bleeding.20
■ Read the digital display on the blood glucose meter when
the alarm sounds.
■ Discard the lancet in a puncture-resistant sharps
container.22
■ Remove the test strip and dispose of it properly.22
■ After bleeding has stopped, you may apply a small
adhesive bandage to the puncture site, if necessary.
■ Remove and discard your gloves, and perform hand
hygiene.7,8,9,10,11,12
NURSING ALERT If you obtain an extremely low or high blood glucose
meter result, obtain a serum blood glucose level immediately to
confirm the result.1,2
■ Clean and disinfect the blood glucose meter with a
disinfectant
pad, following
the
manufacturer’s
instructions.1,23,24 Contaminated blood glucose monitoring
equipment increases the risk of infection by such
bloodborne pathogens as hepatitis B, hepatitis C, and
human immunodeficiency viruses.3,24
■ Perform hand hygiene.7,8,9,10,11,12
■ Report critical test results to the practitioner within the
time period specified by your facility to ensure prompt
treatment.25
■ Document the procedure.26,27
Special considerations
■ Bedside blood glucose testing is considered a waived
test, meaning that the U.S . Food and Drug Administration
approved the test system for waiver under the Clinical
Laboratory Improvement Amendments of 1988. To qualify
for waived test status, the test must be simple to perform
and have low risk for erroneous test results. Even so, keep
in mind that errors can occur anywhere in the testing
process. Be sure to follow the manufacturer’s instructions
for use to prevent testing errors that could result in
treatment errors.28
■ Avoid selecting cold, cyanotic, or swollen puncture sites
to ensure an adequate blood sample. If you can’t obtain a
capillary sample, perform a venipuncture and place a large
drop of venous blood on the test strip. If you want to test
blood from a refrigerated sample, allow the blood to return
to room temperature before testing it.
■ A patient admitted with diabetes or hyperglycemia may
have a hemoglobin A1c test ordered if one hasn’t been
performed within the past 3 months.1
■ To help detect abnormal glucose metabolism and
diagnose diabetes mellitus, the practitioner may order other
blood glucose tests. (See Oral and IV glucose tolerance
tests.)
■ Store the test strips away from heat and humidity,
because these conditions can affect the accuracy of the
results.
Patient teaching
Teach the patient who will be performing blood glucose
monitoring at home the proper use of the lancet and
portable blood glucose meter, as necessary. Also teach the
importance of washing the hands with soap and water,
drying them, and then using the first drop of blood for self-
monitoring of blood glucose level. If handwashing isn’t
possible and the patient’s hands aren’t visibly soiled or
exposed to sugar-containing products, advise the patient to
use the second drop of blood after wiping away the first
drop.21 Provide the patient with written instructions.
Oral and IV glucose tolerance tests
For monitoring trends in glucose metabolism, two tests may offer benefits
over test strips.
Oral glucose tolerance test
The most sensitive test for detecting borderline diabetes mellitus, the oral
glucose tolerance test (OGTT) measures carbohydrate metabolism after
ingestion of a challenge dose of glucose. The body absorbs this dose rapidly,
causing plasma glucose levels to rise and peak within 30 minutes to 1 hour.
The pancreas responds by secreting insulin, causing glucose levels to return
to normal within 2 to 3 hours. During this period, plasma and urine glucose
levels are monitored to assess insulin secretion and the body’s ability to
metabolize glucose.
Although you may not collect the blood and urine specimens (usually five
of each) required for this test, you will be responsible for preparing the
patient for the test and monitoring his or her physical condition during the
test.
Begin by explaining the OGTT to the patient. Then, tell the patient to
maintain a high-carbohydrate diet for 3 days and to fast for 10 to 16 hours
before the test, as ordered. The patient must not smoke, drink coffee or
alcohol, or exercise strenuously for 8 hours before or during the test. Inform
the patient that he or she will then receive a challenge dose of 100 g of
carbohydrate (usually a sweetened carbonated beverage or gelatin).
Inform the patient who will perform the venipunctures and when, and
explain that the needle punctures and the pressure of the tourniquet may
cause slight discomfort. Reassure the patient that collecting each blood
sample usually takes less than 3 minutes. As ordered, withhold drugs that
may affect test results. Remind the patient to save the first urine specimen
voided after waking on the day of the test.
During the test period, watch for signs and symptoms of hypoglycemia—
weakness, restlessness, nervousness, hunger, and sweating—and report
these to the practitioner immediately. Encourage the patient to drink plenty
of water to promote adequate urine excretion. Provide a bedpan, urinal, or
specimen container when necessary.
IV glucose tolerance test
This test may be chosen for patients who can’t absorb an oral dose of
glucose—for example, those with malabsorption disorders or short-bowel
syndrome, or those who have undergone a gastrectomy. This test measures
blood glucose after an IV infusion of 50% glucose over 3 or 4 minutes. Blood
samples are then drawn after 30 minutes, 1 hour, 2 hours, and 3 hours. After
an immediate glucose peak of 300 to 400 mg/dL (16.7 to 22.2 mmol/L)
accompanied by glycosuria, the normal glucose curve falls steadily, reaching
fasting levels within 11⁄4 hours. Failure to achieve fasting glucose levels within
2 to 3 hours typically confirms diabetes.
Documentation
Record the date and the time of testing and the results in
the patient’s medical records. Document the date, the time,
and the name of the practitioner notified of the test results,
if necessary. Record any prescribed interventions and the
patient’s response to those interventions. Document
teaching provided to the patient and family and their
comprehension of the teaching.
REFERENCES
1 American Diabetes Association. (2017). Diabetes care in the hospital.
Diabetes Care, 40(Suppl. 1), S120–S127. Accessed via the Web at
http://care.diabetesjournals.org/content/40/Supplement_1/S120 (Level VII)
2 Nova Biomedical. (2014). 55890 StatStrip glucose hospital meter test strips
package insert. Waltham, MA: Nova Biomedical.
3 Centers for Disease Control and Prevention. (2017). “Infection prevention
during blood glucose monitoring and insulin administration” [Online].
Accessed via the Web at https://www.cdc.gov/injectionsafety/blood-glucose-
monitoring.html
4 Klonoff, D. C ., & Perz, J. F. (2010). Assisted monitoring of blood glucose:
Special safety needs for a new paradigm in testing glucose. Journal of
Diabetes Science and Technology, 4(5), 1027–1031.
5 Centers for Disease Control and Prevention. (2011). “CDC clinical reminder:
Use of fingerstick devices on more than one person poses risk for
transmitting bloodborne pathogens” [Online]. Accessed via the Web at
http://www.cdc.gov/injectionsafety/Fingerstick-DevicesBGM.html
6 The Joint Commission. (2019). Standard WT.04.01.01. Comprehensive
accreditation manual for hospitals. Oakbrook Terrace, IL: The Joint
Commission. (Level VII)
7 The Joint Commission. (2019). Standard NPSG.07.01.01. Comprehensive
accreditation manual for hospitals. Oakbrook Terrace, IL: The Joint
Commission. (Level VII)
8 Centers for Disease Control and Prevention. (2002). Guideline for hand
hygiene in health-care settings: Recommendations of the Healthcare Infection
Control Practices Advisory Committee and the HICPAC/SHEA/APIC/IDSA Hand
Hygiene Task Force. MMWR Recommendations and Reports, 51(RR-16), 1–45.
Accessed via the Web at https://www.cdc.gov/mmwr/pdf/rr/rr5116.pdf (Level
II)
9 World Health Organization. (2009). “WHO guidelines on hand hygiene in
health care: First global patient safety challenge, clean care is safer care”
[Online]. Accessed via the Web at
http://apps.who.int/iris/bitstream/10665/44102/1/9789241597906_eng.pdf
(Level IV)
10 Accreditation Association for Hospitals and Health Systems. (2017). Standard
07.01.21. Healthcare Facilities Accreditation Program: Accreditation
requirements for acute care hospitals. Chicago, IL: Accreditation Association
for Hospitals and Health Systems. (Level VII)
11 Centers for Medicare and Medicaid Services, Department of Health and
Human Services. (2015). Condition of participation: Infection control. 42 C.F.R.
§ 482.42.
12 DNV GL-Healthcare USA, Inc. (2016). IC.1 .SR.1 . NIAHO® accreditation
requirements: Interpretive guidelines & surveyor guidance (version 11).
Milford, OH: DNV GL-Healthcare USA, Inc. (Level VII)
13 The Joint Commission. (2019). Standard NPSG.01.01.01. Comprehensive
accreditation manual for hospitals. Oakbrook Terrace, IL: The Joint
Commission. (Level VII)
14 Centers for Medicare and Medicaid Services, Department of Health and
Human Services. (2015). Condition of participation: Patient’s rights. 42 C.F.R.
§ 482.13(c)(1).
15 The Joint Commission. (2019). Standard RI.01.01.01. Comprehensive
accreditation manual for hospitals. Oakbrook Terrace, IL: The Joint
Commission. (Level VII)
16 Accreditation Association for Hospitals and Health Systems. (2017). Standard
15.01.16. Healthcare Facilities Accreditation Program: Accreditation
requirements for acute care hospitals. Chicago, IL: Accreditation Association
for Hospitals and Health Systems. (Level VII)
17 DNV GL-Healthcare USA, Inc. (2016). PR.1.SR.5 . NIAHO® accreditation
requirements: Interpretive guidelines & surveyor guidance (version 11).
Milford, OH: DNV GL-Healthcare USA, Inc. (Level VII)
18 Siegel, J. D ., et al. (2007, revised 2017). “2007 guideline for isolation
precautions: Preventing transmission of infectious agents in healthcare
settings” [Online]. Accessed via the Web at
https://www.cdc.gov/infectioncontrol/pdf/guidelines/isolation-guidelines.pdf
(Level II)
19 Accreditation Association for Hospitals and Health Systems. (2017). Standard
07.01.10. Healthcare Facilities Accreditation Program: Accreditation
requirements for acute care hospitals. Chicago, IL: Accreditation Association
for Hospitals and Health Systems. (Level VII)
20 World Health Organization. (2010). “WHO guidelines on drawing blood: Best
practices in phlebotomy” [Online]. Accessed via the Web at
http://apps.who.int/iris/bitstream/10665/44294/1/9789241599221_eng.pdf
21 Hortnesius, J., et al. (2011). Self-monitoring of blood glucose: The use of the
first or the second drop of blood. Diabetes Care, 34(3), 556–560. Accessed via
the Web at http://care.diabetesjournals.org/content/34/3/556.full (Level II)
22 Occupational Safety and Health Administration. (n.d .). “Bloodborne
pathogens, standard number 1910.1030” [Online]. Accessed via the Web at
https://www.osha.gov/pls/oshaweb/owadisp.show_document?
p_id=10051&p_table=STANDARDS (Level VII)
23 Rutala, W. A., et al. (2008, revised 2017). “Guideline for disinfection and
sterilization in healthcare facilities, 2008” [Online]. Accessed via the Web at
https://www.cdc.gov/infectioncontrol/pdf/guidelines/disinfection-
guidelines.pdf (Level I)
24 Accreditation Association for Hospitals and Health Systems. (2017). Standard
07.02.03. Healthcare Facilities Accreditation Program: Accreditation
requirements for acute care hospitals. Chicago, IL: Accreditation Association
for Hospitals and Health Systems. (Level VII)
25 The Joint Commission. (2019). Standard NPSG.02.03 .01. Comprehensive
accreditation manual for hospitals. Oakbrook Terrace, IL: The Joint
Commission. (Level VII)
26 Centers for Medicare and Medicaid Services, Department of Health and
Human Services. (2015). Condition of participation: Medical record services.
42 C.F.R. § 482.24(b).
27 DNV GL-Healthcare USA, Inc. (2016). MR.2 .SR.1 . NIAHO® accreditation
requirements: Interpretive guidelines & surveyor guidance (version 11).
Milford, OH: DNV GL-Healthcare USA, Inc. (Level VII)
28 Centers for Disease Control and Prevention (2017). “Clinical laboratory
improvement amendments: Waived tests” [Online]. Accessed via the Web at
http://wwwn.cdc.gov/CLIA/Resources/WaivedTests/default.aspx
BLOOD PRESSURE ASSESSMENT
Defined as the lateral force exerted by blood on the arterial
walls, blood pressure depends on the force of ventricular
contractions, arterial wall elasticity, peripheral vascular
resistance, and blood volume and viscosity. Systolic, or
maximum, pressure occurs during left ventricular
contraction and reflects the integrity of the heart, arteries,
and arterioles. Diastolic, or minimum, pressure occurs
during left ventricular relaxation and directly indicates blood
vessel resistance.
Pulse pressure, the difference between systolic and
diastolic pressures, varies inversely with arterial elasticity.
Rigid vessels, incapable of distention and recoil, produce
high systolic pressure and low diastolic pressure. Normally,
systolic pressure exceeds diastolic pressure by about 40 mm
Hg. Narrowed pulse pressure—a difference of less than 30
mm Hg—occurs when systolic pressure falls and diastolic
pressure rises. These changes reflect reduced stroke
volume, increased peripheral resistance, or both. Widened
pulse pressure—a difference of more than 50 mm Hg
between systolic and diastolic pressures—occurs when
systolic pressure rises and diastolic pressure remains
constant, or when systolic pressure rises and diastolic
pressure falls. These changes reflect increased stroke
volume, decreased peripheral resistance, or both.
Frequent blood pressure measurement is critical after
serious injury, surgery, or anesthesia and during any illness
or condition that threatens cardiovascular stability.
(Frequent measurement may be performed with an
automated blood pressure device.) Guidelines recommend
regular measurement for patients with a history of
hypertension or hypotension, and annual screening is
recommended for all adults.
To measure blood pressure in the upper arm, use the
auscultatory or oscillatory method. To obtain a baseline
measurement, measure blood pressure in both arms. If
there’s a significant difference in blood pressure between
the arms, use the arm with the higher pressure,1 and for
subsequent measurement, monitor blood pressure in the
same arm, using the same device to ensure accurate
measurement.
Equipment
Aneroid sphygmomanometer ▪ stethoscope ▪ hospital-
grade disinfectant pads ▪ Optional: automated vital signs
monitor.
A sphygmomanometer consists of an inflatable
compression cuff linked to a manual air pump and an
aneroid gauge. Use a recently calibrated aneroid gauge.2 To
obtain an accurate reading, you can rest the gauge in any
position, but view it directly from the front.
Cuffs come in sizes ranging from newborn to extra-large
adult. Disposable cuffs and thigh cuffs are available. Use an
appropriate-sized cuff and follow the manufacturer’s
instructions for proper fit and placement.1
An automated blood pressure device is a noninvasive
device that measures pulse rate, systolic and diastolic
pressures, and mean arterial pressure at preset intervals.
(See Using an automated blood pressure device, page 78.)
Preparation of equipment
Carefully choose a cuff of appropriate size for the patient;
the bladder should encircle at least 80% of the upper
arm.1,7 An excessively narrow cuff may cause a falsely high
pressure reading; an excessively wide one, a falsely low
reading.8 (For information on other situations that can cause
false-high or false-low readings, see Correcting problems of
blood pressure measurement.)
Using an automated blood pressure
device
An automated blood pressure device is a noninvasive device that measures
systolic, diastolic, and mean arterial pressures at preset intervals. This
electronic device allows you to track a patient’s blood pressure continually
without having to reapply a blood pressure cuff. In addition, the patient won’t
need an invasive arterial line to gather similar data.
Some automated blood pressure devices are lightweight and battery-
operated, and can be attached to an IV pole for continuous monitoring even
during patient transfers. Make sure you know the capacity of the monitor’s
battery and plug the machine in whenever possible to keep it charged.
Regularly calibrate the monitor to ensure accurate readings.
Oscillatory devices aren’t as accurate as auscultatory blood pressure
measurement because the devices can overestimate or underestimate blood
pressure.3 Before using any monitor, check its accuracy. Oscillatory devices
should meet the Association for the Advancement of Medical Instrumentation
standards when compared with the auscultatory method.1
Determine the patient’s pulse rate and blood pressure manually, using the
same arm you’ll use for the monitor cuff. Compare your results when you get
initial readings from the monitor. If the results differ, call your supply
department or the manufacturer’s representative.
Check the manufacturer’s guidelines, because most automated monitoring
devices are intended for serial monitoring only and may be inaccurate for a
one-time measurement.
Preparing the device
■ Explain the procedure to the patient. Describe the alarm system so the
patient won’t be frightened if it’s triggered.
■ Make sure the power switch is off. Then plug the monitor into a properly
grounded wall outlet.
■ Secure the dual air hose to the front of the monitor.
■ Connect the pressure cuff’s tubing into the other ends of the dual air hose,
and tighten connections to prevent air leaks. Keep the air hose away from
the patient to avoid accidental dislodgment.
■ Squeeze all air from the cuff and wrap it loosely around the patient’s arm
about 3⁄4′′ to 1′′ (2 to 2.5 cm) above the antecubital fossa. Never apply the cuff
to a limb that has an IV catheter in place. Position the cuff’s “artery” arrow
over the palpated brachial artery. Then secure the cuff for a snug fit.1
Selecting parameters
■ When you turn on the monitor, it will default to a manual mode. (In this
mode, you can obtain vital signs yourself before switching to the automatic
mode.) Press the AUTO/MANUAL button to select the automatic mode. The
monitor will give you baseline data for the pulse rate, systolic and diastolic
pressures, and mean arterial pressure.
■ Compare your previous manual results with these baseline data. If they
match, you’re ready to set the alarm parameters. Press the SELECT button to
blank out all displays except systolic pressure.
■ Use the HIGH and LOW limit buttons to set the specific parameters for
systolic pressure. (These limits range from a high of 240 mm Hg to a low of 0
mm Hg.) You’ll also do this three more times for mean arterial pressure, pulse
rate, and diastolic pressure. After you’ve set the parameters for diastolic
pressure, press the SELECT button again to display all current data. Even if you
forget to do this last step, the monitor will automatically display current data
10 seconds after you set the last parameters.
■ Make sure the alarm limits are set appropriately for the patient’s condition
and that the alarms are turned on, functioning properly, and audible to
staff.4,5,6
Collecting data
■ You also need to program the monitor according to the manufacturer’s
instructions to determine the desired frequency. Press the SET button until you
reach the desired time interval in minutes. To minimize complications, use
the maximum (least frequent) cycle time for the shortest time period.1
■ You can obtain a set of vital signs at any time by pressing the START button.
■ Pressing the CANCEL button will stop the interval and deflate the cuff.
■ You can retrieve stored data by pressing the PRIOR DATA button. The monitor
will display the last data obtained, along with the time elapsed since then.
Scrolling backward, you can retrieve data from the previous 99 minutes.
■ Make sure that the patient’s vital signs are documented frequently on a
vital sign assessment sheet.
To use an automated vital signs monitor, collect the
monitor, dual air hose, and pressure cuff. Then make sure
the monitor unit is firmly positioned near the patient’s bed.
Implementation
■ Gather and prepare the appropriate equipment.
■ Perform hand hygiene.9,10,11,12,13,14
■ Confirm the patient’s identity using at least two patient
identifiers.15
■ Have the patient rest for at least 5 minutes before
measuring the blood pressure. Make sure the patient hasn’t
smoked or had caffeine for at least 30 minutes.
■ Provide privacy.16,17,18,19
■ Tell the patient that you’re going to obtain a blood
pressure measurement.
■ Place the patient in the supine or with the head of the
bed at a comfortable level, or have the patient sit erect
during blood pressure measurement in the upper arms. If
the patient is sitting erect, make sure the patient’s back and
arms are supported, legs are uncrossed, and both feet are
on the floor, because crossing the legs may increase blood
pressure.1,20,21,22 The patient’s arm should be extended at
heart level (the phlebostatic axis, fourth intercostal space,
halfway between the anterior and posterior diameter of the
chest) and well supported.1 If the artery is below heart level,
you may get a false-high reading.23
■ Make sure the patient is relaxed and comfortable when
you measure the blood pressure so it stays at its normal
level.
■ Remain quiet during blood pressure measurement and
instruct the patient to do the same, because systolic and
diastolic blood pressure increase with talking.1
■ Wrap the deflated cuff snugly around the patient’s upper
arm. (See Positioning the blood pressure cuff, page 80.)
NURSING ALERT Don’t apply a blood pressure cuff over an extremity
with deep vein thrombosis, grafts, or ischemic changes. Don’t apply a
blood pressure cuff over a peripherally inserted central catheter or
midline catheter; instead, apply the cuff distal to the insertion site.
Avoid blood pressure measurement in extremities with a peripheral IV
catheter while fluid is infusing, and in extremities that have an
incision or that have undergone trauma. Don’t measure blood
pressure in an extremity that’s affected by lymphedema after
mastectomy or lumpectomy, because doing so can further compromise
lymphatic circulation and worsen edema. Likewise, don’t take a blood
pressure on the same arm as an arteriovenous fistula or hemodialysis
shunt, because blood flow through the vascular device might become
compromised.1
■ If you’re using the calf for blood pressure measurement,
place the patient in the supine position and then apply an
appropriate-sized cuff. Position the lower edge of the cuff
about 1′′ (2.5 cm) above the malleoli. Keep in mind that calf
pressures aren’t interchangeable with upper arm pressures.1
■ If necessary, connect the appropriate tube to the rubber
bulb of the air pump and the other tube to the gauge.
■ Determine how high to pump the blood pressure cuff by
estimating the systolic blood pressure by palpation. As you
feel the radial artery with the fingers of one hand, inflate the
cuff until the radial pulse disappears. Read this pressure on
the gauge and add 30 mm Hg to it.7 Use this sum as the
target inflation to prevent discomfort from overinflation.
Deflate the cuff.
■ Close the valve of the sphygmomanometer. Using the
thumb and index finger of your other hand, turn the
thumbscrew on the rubber bulb of the air pump clockwise to
close the valve.
■ Pump up the cuff to the predetermined level.
TROUBLESHOOTING
Correcting problems of blood pressure
measurement
■ Carefully open the valve of the air pump, and then slowly
deflate the cuff—no faster than 3 mm Hg/second.7 While
releasing air, watch the mercury column or aneroid gauge
and auscultate for the sound over the artery.
■ When you hear the first beat or clear tapping sound, note
the pressure on the column or gauge; this is the systolic
pressure. (The beat or tapping sound is the first of five
Korotkoff sounds. The second sound resembles a murmur or
swish; the third sound, crisp tapping; the fourth sound, a
soft, muffled tone; and the fifth, the point at which sound
disappears.)25
■ Continue to release air gradually while auscultating for
the sound over the artery.
■ Note the pressure when the sound disappears; this is the
diastolic pressure—the fifth Korotkoff sound.25
■ After you hear the last Korotkoff sound, deflate the cuff
slowly for at least another 10 mm Hg to ensure that no
further sounds are audible.
■ Rapidly deflate the cuff. Record the pressure.8
■ Remove the cuff.
■ Assess the patient’s skin integrity under the blood
pressure cuff.1
■ If the cuff isn’t dedicated for single-patient use, clean and
disinfect it with a disinfectant pad.26,27
■ Clean and disinfect your stethoscope using an
disinfectant pad.26,27
■ Dispose of waste in the appropriate receptacle.
■ Perform hand hygiene.9,10,11,12,13,14
■ Document the procedure.28,29,30,31
Special considerations
■ If the upper arm can’t be used for blood pressure
measurement, or if the maximum size cuff won’t fit the
patient’s arm properly, measure blood pressure using the
forearm, but keep in mind that forearm and upper arm blood
pressure measurements aren’t interchangeable.1 Studies
have shown that upper arm systolic and diastolic blood
pressure measurements with an appropriate size cuff were
significantly lower than forearm blood pressure
measurements with a standard cuff.32,33,34,35 When
measuring blood pressure in the forearm, choose the cuff of
an adequate size. (A cuff with a bladder large enough to go
around 80% of the forearm is recommended.) Position the
cuff midway between the elbow and the wrist and position
the forearm at heart level.1,36
■ If the patient’s upper arms and forearms can’t be used,
measure blood pressure using the thigh or calf.1 Keep in
mind that blood pressure measurements in the thigh or calf
aren’t interchangeable with upper arm measurements.37
Use the same attention to selecting a proper cuff size as you
would for blood pressure measurement at other sites. For
calf blood pressure measurement, position the patient
supine, and place the cuff about 1′′ (2.5 cm) above the
malleoli. Auscultate Korotkoff sounds over the dorsalis pedis
or posterior tibial artery.1 For thigh measurement, position
the patient prone and position the cuff over the lower third
of the thigh so that the lower edge of the cuff is about 3⁄4′′ to
11⁄4′′ (2 cm to 3 cm) above the popliteal fossa. Auscultate
Korotkoff sounds over the popliteal artery.1 If the patient
can’t tolerate prone positioning, place the patient supine
with the knee slightly bent.1
■ If you can’t auscultate blood pressure, you may estimate
systolic pressure. To do this, first palpate the brachial or
radial pulse. Then inflate the cuff until you no longer detect
the pulse. Slowly deflate the cuff and, when you detect the
pulse again, record the pressure as the palpated systolic
pressure.
■ Be aware that patients with aortic dissection, congenital
heart disease, coarctation of the aorta, peripheral vascular
disease, or unilateral neurologic or musculoskeletal
abnormalities may demonstrate an inter-arm difference in
blood pressure. If you detect an inter-arm difference in blood
pressure, use the arm with the higher pressure.1
■ If the patient is crying or anxious, delay blood pressure
measurement, if possible, until the patient becomes calm to
avoid falsely elevated readings.
■ Occasionally, blood pressure must be measured in both
arms or with the patient in two different positions (such as
lying and standing or sitting and standing). In such cases,
observe and record any significant difference between the
two readings and record the blood pressure as well as the
extremity and position used.
■ Measure the blood pressure of patients taking
antihypertensive medications while they’re in a sitting
position to ensure accurate measurements.
■ The Joint Commission issued a sentinel event alert
concerning medical device alarm safety because alarm-
related events have been associated with permanent loss of
function or death. Among the major contributing factors
were
improper
alarm
settings,
alarm
settings
inappropriately turned off, and alarm signals not audible to
staff. Make sure alarm limits are set appropriately, and that
alarms are turned on, functioning properly, and audible to
staff. Follow facility guidelines for preventing alarm
fatigue.38
Positioning the blood pressure cuff
Wrap the cuff snugly around the patient’s upper forearm so that the end of
the cuff is 3⁄4′′ to 11⁄4′′ (2 to 3 cm) above the antecubital fossa to allow for
placement of your stethoscope. Align the cuff to make sure that the mark on
the cuff for “artery” is positioned over the artery. The cuff should fit snugly
but should still allow for two fingers to slide beneath it.7,24
Complications
The most common complications include bruising and skin
irritation.1 Improper technique can cause inaccurate
readings, which can lead to unnecessary or inadequate
treatment. Measuring blood pressure on the same arm as an
arteriovenous fistula or hemodialysis shunt can compromise
blood flow through the vascular device. Prolonged use of
automated electronic blood pressure devices and frequent
blood pressure measurement can cause pain, limb edema,
phlebitis, compartment syndrome, peripheral neuropathy,
thrombophlebitis,
venous stasis, ecchymosis, and
petechiae.1
Documentation
In the patient’s medical record, record blood pressure as
systolic over diastolic pressure, such as 120/78 mm Hg.
Document an auscultatory gap, if present. If required by
your facility, document blood pressures on a graph, using
dots or checkmarks. Also, document the extremity used and
the patient’s position. Include patient teaching about
lifestyle modifications, drug therapy, and follow-up care.
Record the name of any practitioner notified about blood
pressure results, prescribed interventions, and the patient’s
response to those interventions.
REFERENCES
1 American Association of Critical-Care Nurses. (2016). “AACN practice alert:
Obtaining accurate noninvasive blood pressure measurements in adults”
[Online]. Accessed via the Web at https://www.aacn.org/clinical-
resources/practice-alerts/obtaining-accurate-noninvasive-blood-pressure-
measurements-in-adults (Level VII)
2 Canzanello, V. J ., et al. (2001). Are aneroid sphygmomanometers accurate in
hospital and clinic settings? Archives of Internal Medicine, 161(5), 729–731.
(Level VI)
3 Barnason, S., et al. (2012). “Emergency Nurses Association clinical practice
guideline: Non-invasive blood pressure measurement with automated
devices” [Online]. Accessed via the Web at https://www.ena.org/docs/default-
source/resource-library/practice-resources/cpg/nibpmcpg.pdf?
sfvrsn=8fe4af94_12 (Level VII)
4 The Joint Commission. (2019). Standard NPSG.06 .01.01. Comprehensive
accreditation manual for hospitals. Oakbrook Terrace, IL: The Joint
Commission. (Level VII)
5 Graham, K. C ., & Cvach, M. (2010). Monitor alarm fatigue: Standardizing use
of physiological monitors and decreasing nuisance alarms. American Journal
of Critical Care, 19(1), 28–37. Accessed via the Web at
http://ajcc.aacnjournals.org/content/19/1/28.full.pdf
6 American Association of Critical-Care Nurses. (2013). “AACN practice alert:
Alarm management” [Online]. Accessed via the Web at
https://www.aacn.org/aacn-website/shared/content/practice-
alerts/2015/11/25/alarm-management (Level VII)
7 Pickering, T. G ., et al. (2005). Recommendations for blood pressure
measurement in humans and experimental animals, part 1: Blood pressure
measurement in humans. Hypertension, 45(1), 142–161. (Level I)
8 Long Khanh Doe Le, B. (2016). Vital signs. Australia: Joanna Briggs Institute.
(Level VII)
9 The Joint Commission. (2019). Standard NPSG.07.01.01. Comprehensive
accreditation manual for hospitals. Oakbrook Terrace, IL: The Joint
Commission. (Level VII)
10 Centers for Disease Control and Prevention. (2002). Guideline for hand
hygiene in health-care settings: Recommendations of the Healthcare Infection
Control Practices Advisory Committee and the HICPAC/SHEA/APIC/IDSA Hand
Hygiene Task Force. MMWR Recommendations and Reports, 51(RR-16), 1–45.
Accessed via the Web at http://www.cdc.gov/mmwr/pdf/rr/rr5116.pdf (Level II)
11 World Health Organization. (2009). “WHO guidelines on hand hygiene in
health care: First global patient safety challenge, clean care is safer care”
[Online]. Accessed via the Web at
http://apps.who.int/iris/bitstream/10665/44102/1/9789241597906_eng.pdf
(Level IV)
12 Centers for Medicare and Medicaid Services, Department of Health and
Human Services. (2015). Condition of participation: Infection control. 42 C.F.R.
§ 482.42.
13 Accreditation Association for Hospitals and Health Systems. (2017). Standard
07.01.21. Healthcare Facilities Accreditation Program: Accreditation
requirements for acute care hospitals. Chicago, IL: Accreditation Association
for Hospitals and Health Systems. (Level VII)
14 DNV GL-Healthcare USA, Inc. (2016). IC.1 .SR.1 . NIAHO® accreditation
requirements: Interpretive guidelines & surveyor guidance (version 11).
Milford, OH: DNV GL-Healthcare USA, Inc. (Level VII)
15 The Joint Commission. (2019). Standard NPSG.01.01.01. Comprehensive
accreditation manual for hospitals. Oakbrook Terrace, IL: The Joint
Commission. (Level VII)
16 The Joint Commission. (2019). Standard RI.01.01.01. Comprehensive
accreditation manual for hospitals. Oakbrook Terrace, IL: The Joint
Commission. (Level VII)
17 Centers for Medicare and Medicaid Services, Department of Health and
Human Services. (2015). Condition of participation: Patient’s rights. 42 C.F.R.
§ 482.13(c)(1).
18 Accreditation Association for Hospitals and Health Systems. (2017). Standard
15.01.16. Healthcare Facilities Accreditation Program: Accreditation
requirements for acute care hospitals. Chicago, IL: Accreditation Association
for Hospitals and Health Systems. (Level VII)
19 DNV GL-Healthcare USA, Inc. (2016). PR.1.SR.5 . NIAHO® accreditation
requirements: Interpretive guidelines & surveyor guidance (version 11).
Milford, OH: DNV GL-Healthcare USA, Inc. (Level VII)
20 Foster-Fitzpatrick, L., et al. (1999). The effects of crossed leg on blood
pressure measurement. Nursing Research, 48(2), 105–108. (Level III)
21 Keele-Smith, R., & Price-Daniel, C. (2001). Effects of crossing legs on blood
pressure measurement. Clinical Nursing Research, 10(2), 202–213.
22 Pinar, R., et al. (2004). Effects of crossed leg on blood pressure. Blood
Pressure, 13(4), 252–254. (Level III)
23 Mourad, A., et al. (2003). Arm position and blood pressure: A risk factor for
hypertension? Journal of Human Hypertension, 17(6), 389–395. (Level III)
24 Williams, J. S ., et al. (2009). Blood-pressure measurement. New England
Journal of Medicine, 360(5), e6. Accessed via the Web at
http://www.nejm.org/doi/pdf/10.1056/NEJMvcm0800157
25 Ramnarine, M. (2018). “Blood pressure assessment” [Online]. Accessed via
the Web at http://emedicine.medscape.com/article/1948157-overview
26 Rutala, W. A., et al. (2008, revised 2017). “Guideline for disinfection and
sterilization in healthcare facilities, 2008” [Online]. Accessed via the Web at
https://www.cdc.gov/infectioncontrol/pdf/guidelines/disinfection-
guidelines.pdf (Level I)
27 Accreditation Association for Hospitals and Health Systems. (2017). Standard
07.02.03. Healthcare Facilities Accreditation Program: Accreditation
requirements for acute care hospitals. Chicago, IL: Accreditation Association
for Hospitals and Health Systems. (Level VII)
28 The Joint Commission. (2019). Standard RC.01.03 .01. Comprehensive
accreditation manual for hospitals. Oakbrook Terrace, IL: The Joint
Commission. (Level VII)
29 Centers for Medicare and Medicaid Services, Department of Health and
Human Services. (2015). Condition of participation: Medical record services.
42 C.F.R. § 482.24(b).
30 Accreditation Association for Hospitals and Health Systems. (2017). Standard
10.00 .03. Healthcare Facilities Accreditation Program: Accreditation
requirements for acute care hospitals. Chicago, IL: Accreditation Association
for Hospitals and Health Systems. (Level VII)
31 DNV GL-Healthcare USA, Inc. (2016). MR.2 .SR.1 . NIAHO® accreditation
requirements: Interpretive guidelines & surveyor guidance (version 11).
Milford, OH: DNV GL-Healthcare USA, Inc. (Level VII)
32 Pierin, A.M. & et al. (2004). Blood pressure measurement in obese patients:
Comparison between upper arm and forearm measurements. Blood Pressure
Monitoring, 9(3), 101–105.
33 Palatini, P., et al. (2004). Wrist blood pressure over estimates blood pressure
measured at the upper arm. Blood Pressure Monitoring, 9(2), 77–81.
34 Li, W.Y., et al. (2013). Discrepancy of blood pressure between the brachial
artery and radial artery. World Journal of Emergency Medicine, 4(4), 294–297.
35 Domiano, K., et al. (2008). Comparison of upper arm and forearm blood
pressure. Clinical Nursing Research, 17(4), 241–250.
36 Kallioinen, N., et al. (2017). Sources of inaccuracy in the measurement of
adult patients’ resting blood pressure in clinical settings: A systematic review.
Journal of Hypertension, 35(3), 421–441. Accessed via the Web at
https://www.ncbi.nlm.nih.gov/pmc/articles/PMC5278896/
37 Wilkes, J. M ., & DiPalma, J. A. (2004). Brachial blood pressure monitoring
versus ankle monitoring during colonoscopy. Southern Medical Journal,
97(10), 939–941.
38 The Joint Commission. (2013). “Sentinel event alert: Medical device alarm
safety in hospitals” [Online]. Accessed via the Web at
http://www.jointcommission.org/assets/1/6/SEA_50_alarms_4 _26_16.PDF
(Level VII)
BODY JEWELRY REMOVAL
Piercings and body jewelry may be present on virtually any
body part. The most common sites are the ears, nose,
tongue, eyebrows, lips, and umbilicus. Less common sites
include the nipples and genitals.
Depending on the risk to the patient and the medical
interventions to be performed, the practitioner may order
body jewelry removed to reduce the risk of such
complications as electrical burns, aspiration, and pressure or
tissue injures.1,2,3 However, urgent medical care should
never be delayed while attempting to remove body jewelry.
During the process of helping a patient to remove body
jewelry or of removing it from an unconscious patient, make
sure that the patient isn’t harmed and the patient’s dignity
is preserved. Also, take steps to avoid damaging the body
jewelry during the removal process and to retain the jewelry
for reinsertion later.
Equipment
Gloves ▪ antiseptic solution ▪ personal belongings envelope
▪ Optional: ring-opening or ring-spreading pliers, ring
forceps, ball-grabber, bead tweezer, lubricating gel, insert
plastic retainer, sterile dressing.
Implementation
■ Verify the practitioner’s order for body jewelry removal,
and review the patient’s medical record for scheduled
diagnostic tests or surgical procedures.
■ If required by your facility, ensure that written consent to
remove the body jewelry has been obtained and included in
the patient’s medical record.4,5,6
■ Perform hand hygiene.7,8,9,10,11,12
■ Confirm the patient’s identity using at least two patient
identifiers.13
■ Provide privacy.14,15,16,17
■ Ask the patient whether he or she is wearing any body
jewelry, especially jewelry that isn’t readily visible. If the
patient is unconscious, ask the patient’s family members
about known body jewelry, and note the presence of body
jewelry during the physical examination.
■ Explain to the patient the reason why the body jewelry
must be removed, and encourage the patient to ask
questions as needed.
■ Determine the type of body jewelry to be removed.
■ Ask the patient how long the piercings have been
present, and whether retainers are required to maintain
their patency.
■ Gather the appropriate equipment.
■ Perform hand hygiene7,8,9,10,12 and put on gloves to
comply with standard precautions.18,19
■ Ask the patient to remove the jewelry if the patient is
able to do so; offer to assist as needed.
■ If the patient is unconscious, remove the jewelry,
following the proper technique for the type of jewelry or
body piercing present. (See Removing body jewelry, page
82.)
NURSING ALERT When removing jewelry from the nostril, nasal
septum, cheek, tongue, or lip, use special care to prevent the jewelry
from slipping into the airway because this may result in aspiration.
■ Assess the skin at the body piercing site for signs of
infection (redness, swelling, purulent drainage), because
jewelry harbors microorganisms that may become
entrapped in area skin. Body jewelry removal provides an
opportunity to effectively remove microorganisms from the
piercing site.
■ Clean all open wounds and apply a sterile dressing, if
needed.
■ Since removing jewelry from a piercing may result in
closure of the piercing or make reinsertion difficult, help the
patient insert a retainer (or insert one on an unconscious
patient) to maintain patency of the piercing.20
■ Clean soiled body jewelry with antiseptic solution,
because all piercings should be considered contaminated
with body fluids.
■ Place the body jewelry in a personal belongings envelope
that’s labeled with the patient’s name and identification
number; give the envelope to a family member or secure it
as directed by your facility.
■ Remove and discard your gloves and perform hand
hygiene.7,8,9,10,12
■ Document the procedure.21,22,23,24
Special considerations
■ If the patient refuses to remove the jewelry, notify the
practitioner so that the risks of proceeding with any
scheduled procedures can be reevaluated.
■ Gloves can provide additional traction and grip when
removing body jewelry.
■ Aspiration can occur during intubation if body jewelry
located in and around the mouth loosens and dislodges.
■ Burns can result if metal body jewelry heats up as a result
of exposure to electrical currents during electrocauterization
in the operating room.
■ Pressure injuries can result if an unconscious patient is
positioned on a body part with body jewelry in place.
■ Traumatic injury can occur if body jewelry accidentally
becomes entangled in bedding or caught on equipment.
■ Body jewelry located on the patient’s face, eyebrows,
nose, or mouth should be removed while the patient is
sitting upright to minimize the risk of aspiration.
■ For procedures requiring electrocauterization, metal body
jewelry located between the active and dispersive
electrodes should be removed to minimize the risk of burns
in the operating room.25
■ Body jewelry located near the surgical site should be
removed preoperatively and before the skin is prepped
because jewelry harbors microorganisms.26
■ Notify the practitioner if your patient has a surface
anchor, a type of jewelry placed under the skin. It’s usually
made from implant-grade materials that may not need to be
removed for medical tests and procedures, such as X-rays,
magnetic resonance imaging, computed tomography scans,
and surgical procedures.20
Complications
Body jewelry removed from a piercing site may have rough,
burred edges that may damage tissue during removal,
creating a source for possible infection. Infection may also
occur as a result of an incompletely healed piercing.
Removing tongue jewelry can result in tissue trauma and
create airway management problems.
Aspiration may occur during intubation if body jewelry
located in and around the mouth loosens and dislodges.
Documentation
Record patient teaching provided, any questions asked by
the patient, and your responses to such questions.
Document whether you or the patient removed the body
jewelry, the type of body jewelry removed and its location
on the body, the condition of the skin at the piercing site,
any drainage noted at the piercing site, the disposition of
the body jewelry, and measures taken to prevent closure
and infection at the site.
Removing body jewelry
REFERENCES
1 DeBoer, S., et al. (2008). Body piercing and airway management: Photo guide
to tongue jewelry removal techniques. AANA Journal, 76(1), 19–23.
2 DeBoer, S., et al. (2006). Managing body jewelry in emergency situations:
Misconceptions, patient care, and removal techniques. Journal of Emergency
Nursing, 32(2), 159–164.
3 DeBoer S., et al. (2008). Puncturing myths about body piercing and tattooing.
Nursing2008, 38(11), 50–54.
4 The Joint Commission. (2019). Standard RI.01.03 .01. Comprehensive
accreditation manual for hospitals. Oakbrook Terrace, IL: The Joint
Commission. (Level VII)
5 Centers for Medicare and Medicaid Services, Department of Health and
Human Services. (2015). Condition of participation: Patient’s rights. 42 C.F.R.
§ 482.13(b)(2).
6 DNV GL-Healthcare USA, Inc. (2016). PR.1 .SR.3 . NIAHO® accreditation
requirements: Interpretive guidelines & surveyor guidance (version 11).
Milford, OH: DNV GL-Healthcare USA, Inc. (Level VII)
7 Centers for Disease Control and Prevention. (2002). Guideline for hand
hygiene in health-care settings: Recommendations of the Healthcare Infection
Control Practices Advisory Committee and the HICPAC/SHEA/APIC/IDSA Hand
Hygiene Task Force. MMWR Recommendations and Reports, 51(RR-16), 1–45.
Accessed via the Web at https://www.cdc.gov/mmwr/pdf/rr/rr5116.pdf (Level
II)
8 The Joint Commission. (2019). Standard NPSG.07.01.01. Comprehensive
accreditation manual for hospitals. Oakbrook Terrace, IL: The Joint
Commission. (Level VII)
9 World Health Organization. (2009). “WHO guidelines on hand hygiene in
health care: First global patient safety challenge, clean care is safer care”
[Online]. Accessed via the Web at
http://apps.who.int/iris/bitstream/10665/44102/1/9789241597906_eng.pdf
(Level IV)
10 Centers for Medicare and Medicaid Services, Department of Health and
Human Services. (2015). Condition of participation: Infection control. 42 C.F.R.
§ 482.42.
11 Accreditation Association of Hospitals and Health Systems. (2017). Standard
07.01.21. Healthcare Facilities Accreditation Program: Accreditation
requirements for acute care hospitals. Chicago, IL: Accreditation Association
of Hospitals and Health Systems. (Level VII)
12 DNV GL-Healthcare USA, Inc. (2016). IC.1 .SR.1 . NIAHO® accreditation
requirements: Interpretive guidelines & surveyor guidance (version 11).
Milford, OH: DNV GL-Healthcare USA, Inc. (Level VII)
13 The Joint Commission. (2019). Standard NPSG.01.01.01. Comprehensive
accreditation manual for hospitals. Oakbrook Terrace, IL: The Joint
Commission. (Level VII)
14 The Joint Commission. (2019). Standard RI.01.01.01. Comprehensive
accreditation manual for hospitals. Oakbrook Terrace, IL: The Joint
Commission. (Level VII)
15 Centers for Medicare and Medicaid Services, Department of Health and
Human Services. (2015). Condition of participation: Patient’s rights. 42 C.F.R.
§ 482.13(c)(1).
16 Accreditation Association of Hospitals and Health Systems. (2017). Standard
15.01.16. Healthcare Facilities Accreditation Program: Accreditation
requirements for acute care hospitals. Chicago, IL: Accreditation Association
of Hospitals and Health Systems. (Level VII)
17 DNV GL-Healthcare USA, Inc. (2016). PR.1.SR.5 . NIAHO® accreditation
requirements: Interpretive guidelines & surveyor guidance (version 11).
Milford, OH: DNV GL-Healthcare USA, Inc. (Level VII)
18 Siegel, J. D ., et al. (2007, revised 2017). “2007 guideline for isolation
precautions: Preventing transmission of infectious agents in healthcare
settings” [Online]. Accessed via the Web at
https://www.cdc.gov/infectioncontrol/pdf/guidelines/isolation-guidelines.pdf
(Level II)
19 Accreditation Association of Hospitals and Health Systems. (2017). Standard
07.01.10. Healthcare Facilities Accreditation Program: Accreditation
requirements for acute care hospitals. Chicago, IL: Accreditation Association
of Hospitals and Health Systems. (Level VII)
20 Association of Professional Piercers. (2013). “Preparing for Medical and Dental
Procedures” [Online]. Accessed via the Web at
https://www.safepiercing.org/docs/APP_MedProcPrep-web.pdf
21 The Joint Commission. (2019). Standard RC.01.03 .01. Comprehensive
accreditation manual for hospitals. Oakbrook Terrace, IL: The Joint
Commission. (Level VII)
22 Centers for Medicare and Medicaid Services, Department of Health and
Human Services. (2015). Condition of participation: Medical record services.
42 C.F.R. § 482.24.
23 Accreditation Association of Hospitals and Health Systems. (2017). Standard
10.00 .03. Healthcare Facilities Accreditation Program: Accreditation
requirements for acute care hospitals. Chicago, IL: Accreditation Association
of Hospitals and Health Systems. (Level VII)
24 DNV GL-Healthcare USA, Inc. (2016). MR.2 .SR.1 . NIAHO® accreditation
requirements: Interpretive guidelines & surveyor guidance (version 11).
Milford, OH: DNV GL-Healthcare USA, Inc. (Level VII)
25 Van Wicklin, S. A., et al. (2017). Guideline for safe use of energy-generating
devices. In R. Conner (Ed.), Guidelines for perioperative practice: Vol. 1.
Denver, CO: AORN, Inc. (Level VII)
26 Van Wicklin, S. A., et al. (2017). Guideline for preoperative patient skin
antisepsis. In R. Conner (Ed.), Guidelines for perioperative practice: Vol. 1 .
Denver, CO: AORN, Inc. (Level VII)
BODY MECHANICS
Many patient care activities require you to push, pull, lift,
and carry. By using proper body mechanics, you can avoid
musculoskeletal injury and fatigue and reduce the risk of
injuring patients. Proper body mechanics can be summed up
in four principles:
■ Keep a low center of gravity by flexing your hips and
knees instead of bending at the waist. This position
distributes weight evenly between the upper and lower body
and helps maintain balance.1
■ When providing patient care to a patient in bed, position
the bed at the correct height (waist level when providing
care; hip level when moving the patient).1
■ Maintain a wide, stable base of support with your feet.1
This tactic provides lateral stability and lowers the body’s
center of gravity.
■ Maintain proper body alignment and keep your body’s
center of gravity directly over the base of support by
moving your feet rather than twisting and bending at the
waist. Keep the back, neck, pelvis, and feet aligned. Keep
your work directly in front of you to avoid rotating the spine.
When caring for a patient, keep the patient as close to your
body as possible to minimize reaching.1
Equipment
None needed.
Implementation
Follow the directions below to push, pull, stoop, lift, and
carry correctly.
Pushing and pulling correctly
■ Stand close to the object and place one foot slightly
ahead of the other, as in a walking position. Tighten your leg
muscles and set your pelvis by simultaneously contracting
the abdominal and gluteal muscles.
■ To push, place your hands on a stable part of the object
and flex your elbows. Lean into the object by shifting weight
from your back leg to your front leg, and apply smooth,
continuous pressure (as shown below).
■ To pull, grasp the object and flex your elbows. Lean away
from the object by shifting weight from your front leg to
your back leg. Pull smoothly, avoiding sudden, jerky
movements.
■ After you’ve started to move the object, keep it in motion;
stopping and starting uses more energy.
Stooping correctly
■ Stand with your feet 10′′ to 12′′ (25.5 to 30.5 cm) apart
with one foot slightly ahead of the other to widen the base
of support.
■ Lower yourself by flexing your knees, and place more
weight on your front foot than on your back foot. Keep your
upper body straight by not bending at the waist (as shown
below).
■ To stand up again, straighten your knees and keep your
back straight.
Lifting and carrying correctly
■ Assume the stooping position directly in front of the
object to minimize back flexion and avoid spinal rotation
when lifting.
■ Grasp the object and tighten your abdominal muscles.
■ Stand up by straightening your knees, using your leg and
hip muscles. Always keep your back straight to maintain a
fixed center of gravity. Keep the weight of the object as
close to your body as possible (as shown below).
■ Carry the object close to your body at waist height—near
the body’s center of gravity—to avoid straining your back
muscles.
Special considerations
■ Wear shoes with low heels, flexible nonslip soles, and
closed backs to promote correct body alignment, promote
proper body mechanics, and prevent accidents.
■ When possible, pull rather than push an object, because
the elbow flexors are stronger than the extensors. Pulling an
object allows the use of hip and leg muscles and avoids the
use of lower back muscles.
■ When doing heavy lifting or moving, remember to use
assistive or mechanical devices, if available, or obtain
assistance from coworkers to prevent the risk of
musculoskeletal injury.2 Mechanical and other assistive
devices have been shown to significantly decrease the
incidences of low back injury in nursing personnel.3,4
Documentation
None needed.
REFERENCES
1 Waters, T. R., et al. (2009). “Safe patient handling training for schools of
nursing” [Online]. Accessed via the Web at
https://www.cdc.gov/niosh/docs/2009-127/pdfs/2009-127.pdf (Level VII)
2 Occupational Safety and Health Administration. (n.d .). “Safe patient handling
programs” [Online]. Accessed via the Web at
https://www.osha.gov/dsg/hospitals/documents/3.5 _SPH_effectiveness_508.pd
f
3 Collins, J. W., & Owen, B. D. (1996). NIOSH research initiatives to prevent back
injuries to nursing assistants, aides, and orderlies in nursing homes. American
Journal of Industrial Medicine, 29(4), 421–424.
4 Vieira, E. R., et al. (2006). Low back problems and possible improvements in
nursing jobs. Journal of Advanced Nursing, 55(1), 79–89 .
BONE MARROW ASPIRATION AND BIOPSY
Bone marrow is the major site of blood cell formation. A
practitioner may obtain a bone marrow specimen by
aspiration or needle biopsy. The specimen enables
evaluation of overall blood composition, blood elements,
precursor cells, and abnormal or malignant cells. (See
Obtaining a bone marrow specimen.)
Aspiration and biopsy help diagnose leukemia, multiple
myeloma, anemias, and other blood disorders. It can also
help assess bone marrow cellularity, cellular morphology,
and maturation.1 In this procedure, the practitioner removes
cells through a needle inserted into the marrow cavity of the
bone. In a needle biopsy, the practitioner removes a small,
solid core of marrow tissue through the needle.
A physician, an advanced practice nurse, or another
specially trained practitioner can perform both procedures,
usually at the same time, to stage the disease and monitor
the patient’s response to treatment. However, bone marrow
biopsy is contraindicated in patients with severe bleeding
disorders.
Bone marrow aspiration and biopsy require a sedative,
pain medication, or moderate sedation, depending on the
patient’s condition.2,3,4
Equipment
Bone marrow tray (includes sterile gauze or cotton balls;
sterile forceps; sterile scalpel; sterile bowl; sterile marker;
antiseptic solution [chlorhexidine-based preparation]2; two
sterile fenestrated drapes; 4′′ × 4′′ [10-cm × 10-cm] gauze
pads; 2′′ × 2′′ [5-cm × 5-cm] gauze pads; 10-mL or 20-mL
syringes; 22G 1′′ [2.5-cm] or 2′′ [5-cm] needle; specimen
container with appropriate fixative; bone marrow needle;
biopsy needle; specimen tubes; glass slides and cover glass;
heparin; sterile labels; adhesive tape; 26G or 27G, 1⁄2′′ [1.3 -
cm] to 5⁄8′′ [1.6 -cm] needle; and sterile gloves) ▪ gloves ▪
sterile and nonsterile personal protective equipment (gowns
and masks with face shield or masks and goggles) ▪ vital
signs monitoring equipment ▪ pulse oximeter ▪ cardiac
monitoring equipment ▪ stethoscope ▪ disinfectant pad ▪
70% isopropyl alcohol ▪ 1% or 2% lidocaine with syringe
and needle ▪ labels ▪ laboratory biohazard transport bag ▪
Optional: prescribed antibiotic ointment, prescribed pain
medication, emergency equipment (code cart with
emergency medications, defibrillator, handheld resuscitation
bag with mask, and intubation equipment), moderate
sedation medication.
Most of the equipment above is available in a sterile,
prepackaged tray. Familiarize yourself with your facility’s
tray and obtain any additional equipment needed.
Preparation of equipment
If the patient is receiving moderate sedation, make sure that
emergency equipment is functioning properly and readily
available.
Implementation
■ Verify the practitioner’s order.
■ Gather and prepare the appropriate equipment.
■ Confirm that written informed consent has been obtained
by the practitioner and is in the patient’s medical
record.5,6,7,8
■ Check the patient’s history for hypersensitivity to the
local anesthetic.
■ Assess the patient’s risk of bleeding; assess coagulation
studies and complete blood count, as ordered.2
■ Conduct a preprocedure verification to make sure that all
relevant documentation, information, and equipment are
available and correctly identified to the patient’s
identifiers.9,10
■ Perform hand hygiene.11,12,13,14,15,16
■ Confirm the patient’s identity by using at least two
patient identifiers.17
■ Provide privacy.18,19,20,21
■ Tell the patient that the practitioner will collect a bone
marrow specimen, and explain the procedure to ease
patient anxiety and ensure cooperation. Tell the patient
which bone will be aspirated. Inform the patient that her or
she will receive a local anesthetic and feel heavy pressure
from insertion of the biopsy or aspiration needle, as well as
a brief pulling sensation. Tell the patient the practitioner
may make a small incision to avoid tearing the skin.
■ If the patient has osteoporosis, tell him or her that the
needle pressure may be minimal; if the patient has
osteopetrosis, inform him or her that a drill may be needed.
■ Inform the patient that the procedure normally takes
about 20 minutes, and that more than one marrow
specimen may be required.
■ Verify that the practitioner has marked the aspiration site
with his or her initials or another unambiguous mark as
determined by your facility.22
■ If the patient will be receiving moderate sedation, ensure
IV access.2
■ Attach the patient to a cardiac monitor, a pulse oximeter,
and vital signs monitoring equipment, if not already
attached.2 Make sure that alarm limits are set appropriately
for the patient’s current condition, and that alarms are
turned on, functioning properly, and audible to staff.23,24,25
■ Assess the patient’s cardiac rhythm, oxygen saturation
level, and vital signs to provide baselines for monitoring for
changes during and after the procedure.26
■ Administer a sedative or pain medication, as ordered,
following
safe
medication
administration
practices.2,27,28,29,30,31
■ Perform hand hygiene11,12,13,14,15,16 and put on
gloves.32,33
■ The practitioner performs hand hygiene and puts on
sterile gloves and personal protective equipment.
■ Prepare the sterile field, open the prepackaged tray, and
prepare the supplies.
■ Assist with labeling all medications, medication
containers, and other solutions on and off the sterile
field.34,35
■ If ordered, administer moderate sedation. (See the
“Moderate sedation” procedure.)2
■ Raise the bed to waist level while providing care to
prevent caregiver back strain.36
■ Position the patient according to the selected puncture
site and instruct the patient to remain as still as possible.
(See Preferred site for bone marrow aspiration and biopsy,
page 86.)
■ Conduct a time-out immediately before starting the
procedure to ensure that the correct patient, site,
positioning, and procedure are identified and that, as
applicable, all relevant information and necessary
equipment are available during and after the procedure.37
■ Using sterile forceps and sterile gauze or cotton balls, the
practitioner cleans the puncture site with antiseptic solution
and allows it to dry; then the practitioner covers the area
with sterile drapes.
■ Assist the practitioner, as needed, during the procedure.
■ To anesthetize the site, the practitioner infiltrates it with
1% or 2% lidocaine, using a 26G or 27G 1⁄2′′ to 5⁄8′′ (1.3 -cm to
1.6 -cm) needle to inject a small amount intradermally and
then a larger 22G 1′′ or 2′′ (2.5 -cm to 5-cm) needle to
anesthetize the tissue down to the bone.
■ When the needle tip reaches the bone, the practitioner
anesthetizes the periosteum by injecting a small amount of
lidocaine in a circular area about 3⁄4′′ (2 cm) in diameter. The
practitioner should withdraw the needle from the
periosteum after each injection.
■ After allowing about 1 minute for the lidocaine to take
effect, the practitioner may use a scalpel to make a small
stab incision in the patient’s skin to accommodate the bone
marrow needle. This technique avoids pushing skin into the
bone marrow and also helps avoid unnecessary skin tearing
to help reduce the risk of infection.
■ Monitor the patient’s cardiac rhythm, vital signs, level of
consciousness, and oxygen saturation and pain level
throughout the procedure and until the effects of sedation
have fully resolved.2,26
Bone marrow aspiration
■ The practitioner inserts the bone marrow needle and
lodges it firmly in the bone cortex. If the patient feels sharp
pain instead of pressure when the needle first touches bone,
the practitioner probably inserted the needle outside the
anesthetized area. If this happens, the practitioner should
withdraw the needle slightly and moved to the anesthetized
area.
■ The practitioner advances by applying an even,
downward force with the heel of the hand or the palm, while
twisting the needle back and forth slightly. A crackling
sensation means that the needle has entered the marrow
cavity.
■ Next, the practitioner removes the inner cannula,
attaches the syringe to the needle, aspirates the required
specimen (usually 3 to 5 mL), and withdraws the needle.
The practitioner places the specimen (usually 3 to 5 mL)
and removes the syringe.2
■ The practitioner or assistant places a small portion of the
specimen on a glass slide to verify the presence of spicules.
The remainder of the specimen is placed in the
ethylenediaminetetraacetic acid (EDTA) tubes for clot
sections or molecular studies.2
■ Assist by inverting all the tubes several times to
thoroughly mix and prevent clotting.2
■ Label the specimen in the presence of the patient with
the patient’s name, identification number, and the date to
prevent mislabeling.17
Obtaining a bone marrow specimen
Aspiration removes cells through a needle inserted into the marrow cavity of
the bone; a biopsy removes a small, solid core of marrow tissue through the
needle. The illustration below shows the removal of bone marrow from the
posterior iliac crest.
■ After needle removal, if bone marrow biopsy isn’t being
performed, the practitioner applies pressure to the
aspiration site with a gauze pad for 5 minutes to control
bleeding.2
■ Clean the area with an antiseptic solution and apply an
antibiotic ointment, if prescribed.2
■ Apply a sterile pressure dressing.
■ Have the patient remain in a supine position for 10 to 15
minutes to maintain pressure at the aspiration site.2
Bone marrow biopsy
■ The practitioner inserts the biopsy needle into the
periosteum and advances it steadily until the outer needle
passes into the marrow cavity.
■ The practitioner directs the biopsy needle into the marrow
cavity by alternately rotating the inner needle clockwise and
counterclockwise.
■ The practitioner removes a plug of tissue, withdraws the
needle assembly, and expels the bone core specimen on a
glass slide or nonadherent dressing.2
■ After needle removal, the practitioner firmly presses a
sterile 2′′ × 2′′ (5 cm × 5 cm) gauze pad against the incision
for 5 minutes or until bleeding has stopped.
■ Clean the area around the biopsy with an antiseptic
solution and apply an antibiotic ointment, if prescribed.2
■ Apply a sterile pressure dressing.
■ Assist the practitioner with gently touching six glass
slides against the bone core biopsy sample to make six
imprints. Then help place the bone core sample in a
specimen container with the appropriate solution (10%
formalin fixative or sterile saline solution–soaked gauze) for
processing.2
■ Label the specimen in the presence of the patient with
the patient’s name, identification number, and the date to
prevent mislabeling.17
■ Have the patient lie in the supine position for 10 to 15
minutes to maintain pressure at the biopsy sire.2
Completing the procedure
■ Dispose of used supplies appropriately.38
■ Assist the patient into a comfortable position.
■ Return the bed to the lowest position to prevent falls and
maintain patient safety.39
Preferred site for bone marrow
aspiration and biopsy
The iliac crest is the only site at which both aspiration and biopsy may be
safely performed in an adult.1 The posterior superior iliac crest is the
preferred site for aspiration, because the risk of pain is decreased,
accessibility is increased, and no vital organs or vessels are nearby. The
patient is placed either in the lateral position with one leg flexed, or in the
prone position. The anterior iliac crest may be used with a patient who can’t
lie prone, or when the posterior iliac crest is unapproachable or not available
because of infection, injury, or morbid obesity. This location is generally not
preferred, however, because of its dense cortical layer, which makes
obtaining specimens more difficult, necessitates smaller specimens, and
increases the risk of pain.
■ Place the specimen in a biohazard transport bag and send
it to the laboratory,
■ Remove and discard your gloves and perform hand
hygiene.11,12,13,14,15,16
■ Continue to assess the patient until the patient is fully
awake. Note that the duration of medications administered
for sedation may extend the length of time needed to
complete the procedure.
■ Perform a comprehensive pain assessment using
techniques appropriate for the patient’s age, condition, and
ability to understand. Administer medications, following safe
medication administration practices.28,29,30,31,40
■ Perform hand hygiene.11,12,13,14,15,16
■ Clean and disinfect your stethoscope using a disinfectant
pad.41,42
■ Perform hand hygiene.11,12,13,14,15,16
■ Document the procedure.43,44,45,46
Special considerations
■ Faulty needle placement may yield too little aspirate. If no
specimen is produced, the needle must be withdrawn from
the bone (but not from the overlying soft tissue), the stylet
replaced, and the needle inserted into a second site within
the anesthetized field.
■ The Joint Commission has issued a sentinel event alert
concerning medical device alarm safety because alarm-
related events have been associated with permanent loss of
function and death. Among the major contributing factors
were improper alarm settings, alarms inappropriately turned
off, and alarm signals not audible to staff members. Make
sure that alarm limits are set appropriately and that alarms
are turned on, functioning properly, and audible to staff.
Follow facility guidelines for preventing alarm fatigue.47
■ If the patient has received sedation, caution him or her
about safety concerns and driving restrictions. Monitor the
patient closely.
■ Bone marrow specimens shouldn’t be collected from
irradiated areas, because radiation may have altered or
destroyed the marrow.
■ Apply ice to the site, as needed and ordered, to reduce
discomfort and the risk of bleeding.2
Patient teaching
Instruct the patient to leave the sterile pressure dressing in
place for 24 hours, according to the practitioner’s orders.2
Advise the patient to avoid strenuous activity, tub baths, hot
tubs, swimming pools, and whirlpool baths for 48 hours after
the procedure to allow the biopsy site adequate time to
heal. Tell the patient that he or she may experience mild to
moderate discomfort at the site for 24 to 48 hours. The
patient may take analgesics as needed; however, instruct
the patient to avoid aspirin and nonsteroidal anti-
inflammatory drugs for 24 hours to minimize the risk of
bleeding from the site.2 Tell the patient to call the
practitioner if there is any bleeding or fever after discharge.
Complications
Bleeding and infection are potentially life-threatening
complications of aspiration or biopsy at any site.
Complications of sternal needle puncture are uncommon but
include puncture of the heart and major vessels, causing
severe hemorrhage; puncture of the mediastinum, causing
mediastinitis or pneumomediastinum; and puncture of the
lung, causing pneumothorax.
Documentation
Document the time and date of the procedure, the location
of the aspiration and biopsy site, and the patient’s tolerance
of the procedure. Note the amount and color of marrow
aspirated, laboratory tests ordered, and time the specimen
was sent to the laboratory. Record the patient’s vital signs,
oxygen saturation level, pain level, level of consciousness,
and cardiac arrhythmias or other complications that
occurred during the procedure as well as the type of
dressing applied. Also document patient teaching.
REFERENCES
1 Zehnder, J. L. Bone marrow aspiration and biopsy: Indications and technique.
(2016). In: UpToDate, Schrier, S. L., & Rosmarin, A. G. (Eds.). Accessed via the
Web at http://www.uptodate.com
2 Wiegand, D. L. (2017). AACN procedure manual for high acuity, progressive,
and critical care (7th ed.). St: Louis, MO: Elsevier.
3 McGrath, P., et al. (2013). Procedural care for adult bone marrow aspiration
and biopsy: Qualitative research findings from Australia. Cancer Nursing,
36(4), 309–316. (Level VI)
4 Tanasale, B., et al. (2013). Pain and anxiety during bone marrow biopsy. Pain
Management Nursing, 14(4), 310–317. (Level VI)
5 The Joint Commission. (2019). Standard RI.01.03 .01. Comprehensive
accreditation manual for hospitals. Oakbrook Terrace, IL: The Joint
Commission. (Level VII)
6 Accreditation Association for Hospitals and Health Systems. (2017). Standard
15.01.11. Healthcare Facilities Accreditation Program: Accreditation
requirements for acute care hospitals. Chicago, IL: Accreditation Association
for Hospitals and Health Systems. (Level VII)
7 Centers for Medicare and Medicaid Services, Department of Health and
Human Services. (2015). Condition of participation: Patient’s rights. 42 C.F.R.
§ 482.13(b)(2).
8 DNV GL-Healthcare USA, Inc. (2016). PR.1 .SR.3 . NIAHO® accreditation
requirements: Interpretive guidelines & surveyor guidance (version 11).
Milford, OH: DNV GL-Healthcare USA, Inc. (Level VII)
9 The Joint Commission. (2019). Standard UP.01.01.01. Comprehensive
accreditation manual for hospitals. Oakbrook Terrace, IL: The Joint
Commission. (Level VII)
10 Accreditation Association for Hospitals and Health Systems. (2017). Standard
30.00 .14. Healthcare Facilities Accreditation Program: Accreditation
requirements for acute care hospitals. Chicago, IL: Accreditation Association
for Hospitals and Health Systems. (Level VII)
11 Centers for Disease Control and Prevention. (2002). Guideline for hand
hygiene in health-care settings: Recommendations of the Healthcare Infection
Control Practices Advisory Committee and the HICPAC/SHEA/APIC/IDSA Hand
Hygiene Task Force. MMWR Recommendations and Reports, 51(RR-16), 1–45.
Accessed via the Web at https://www.cdc.gov/mmwr/pdf/rr/rr5116.pdf (Level
II)
12 The Joint Commission. (2019). Standard NPSG.07.01.01. Comprehensive
accreditation manual for hospitals. Oakbrook Terrace, IL: The Joint
Commission. (Level VII)
13 World Health Organization. (2009). “WHO guidelines on hand hygiene in
health care: First global patient safety challenge, clean care is safer care”
[Online]. Accessed via the Web at
http://apps.who.int/iris/bitstream/10665/44102/1/9789241597906_eng.pdf
(Level IV)
14 Centers for Medicare and Medicaid Services, Department of Health and
Human Services. (2015). Condition of participation: Infection control. 42 C.F.R.
§ 482.42.
15 Accreditation Association for Hospitals and Health Systems. (2017). Standard
07.01.21. Healthcare Facilities Accreditation Program: Accreditation
requirements for acute care hospitals. Chicago, IL: Accreditation Association
for Hospitals and Health Systems. (Level VII)
16 DNV GL-Healthcare USA, Inc. (2016). IC.1 .SR.1 . NIAHO® accreditation
requirements: Interpretive guidelines & surveyor guidance (version 11).
Milford, OH: DNV GL-Healthcare USA, Inc. (Level VII)
17 The Joint Commission. (2019). Standard NPSG.01.01.01. Comprehensive
accreditation manual for hospitals. Oakbrook Terrace, IL: The Joint
Commission. (Level VII)
18 The Joint Commission. (2019). Standard RI.01.01.01. Comprehensive
accreditation manual for hospitals. Oakbrook Terrace, IL: The Joint
Commission. (Level VII)
19 Centers for Medicare and Medicaid Services, Department of Health and
Human Services. (2015). Condition of participation: Patient’s rights. 42 C.F.R.
§ 482.13(c)(1).
20 Accreditation Association for Hospitals and Health Systems. (2017). Standard
15.01.16. Healthcare Facilities Accreditation Program: Accreditation
requirements for acute care hospitals. Chicago, IL: Accreditation Association
for Hospitals and Health Systems. (Level VII)
21 DNV GL-Healthcare USA, Inc. (2016). PR.1.SR.5 . NIAHO® accreditation
requirements: Interpretive guidelines & surveyor guidance (version 11).
Milford, OH: DNV GL-Healthcare USA, Inc. (Level VII)
22 The Joint Commission. (2019). Standard UP.01.02.01. Comprehensive
accreditation manual for hospitals. Oakbrook Terrace, IL: The Joint
Commission. (Level VII)
23 The Joint Commission. (2019). Standard NPSG.06 .01.01. Comprehensive
accreditation manual for hospitals. Oakbrook Terrace, IL: The Joint
Commission. (Level VII)
24 Graham, K. C., & Cvach, M. (2010). Monitor alarm fatigue: Standardizing use
of physiological monitors and decreasing nuisance alarms. American Journal
of Critical Care, 19(1), 28–37. Accessed via the Web at
http://ajcc.aacnjournals.org/content/19/1/28.full.pdf
25 American Association of Critical-Care Nurses. (2013). “A ACN practice alert:
Alarm management” [Online]. Accessed via the Web at
https://www.aacn.org/aacn-website/shared/content/practice-
alerts/2015/11/25/alarm-management (Level VII)
26 The Joint Commission. (2019). Standard PC.01.02.03 . Comprehensive
accreditation manual for hospitals. Oakbrook Terrace, IL: The Joint
Commission. (Level VII)
27 Talamo, G., et al. (2010). Oral administration of analgesia and anxiolysis for
pain associated with bone marrow biopsy. Supportive Care in Cancer, 18(3),
301–305.
28 The Joint Commission. (2019). Standard MM.06.01.01. Comprehensive
accreditation manual for hospitals. Oakbrook Terrace, IL: The Joint
Commission. (Level VII)
29 Centers for Medicare and Medicaid Services, Department of Health and
Human Services. (2015). Condition of participation: Nursing services. 42
C.F.R. § 482.23(c).
30 Accreditation Association for Hospitals and Health Systems. (2017). Standard
16.01.03. Healthcare Facilities Accreditation Program: Accreditation
requirements for acute care hospitals. Chicago, IL: Accreditation Association
for Hospitals and Health Systems. (Level VII)
31 DNV GL-Healthcare USA, Inc. (2016). MM.1 .SR.2. NIAHO® accreditation
requirements: Interpretive guidelines & surveyor guidance (version 11).
Milford, OH: DNV GL-Healthcare USA, Inc. (Level VII)
32 Siegel, J. D ., et al. (2007, revised 2017). “2007 guideline for isolation
precautions: Preventing transmission of infectious agents in healthcare
settings” [Online]. Accessed via the Web at
https://www.cdc.gov/infectioncontrol/pdf/guidelines/isolation-guidelines.pdf
(Level II)
33 Accreditation Association for Hospitals and Health Systems. (2017). Standard
07.01.10. Healthcare Facilities Accreditation Program: Accreditation
requirements for acute care hospitals. Chicago, IL: Accreditation Association
for Hospitals and Health Systems. (Level VII)
34 The Joint Commission. (2019). Standard NPSG.03 .04.01. Comprehensive
accreditation manual for hospitals. Oakbrook Terrace, IL: The Joint
Commission. (Level VII)
35 Accreditation Association for Hospitals and Health Systems. (2017). Standard
25.01.27. Healthcare Facilities Accreditation Program: Accreditation
requirements for acute care hospitals. Chicago, IL: Accreditation Association
for Hospitals and Health Systems. (Level VII)
36 Waters, T. R., et al. (2009). “Safe patient handling training for schools of
nursing” [Online]. Accessed via the Web at
https://www.cdc.gov/niosh/docs/2009-127/pdfs/2009-127.pdf (Level VII)
37 The Joint Commission. (2019). Standard UP.01.03.01. Comprehensive
accreditation manual for hospitals. Oakbrook Terrace, IL: The Joint
Commission. (Level VII)
38 Occupational Safety and Health Administration. (n.d .). “Bloodborne
pathogens, standard number 1910.1030” [Online]. Accessed via the Web at
http://www.osha.gov/pls/oshaweb/owadisp.show_document?
p_table=STANDARDS&p_id=10051 (Level VII)
39 Ganz, D. A., et al. (2013). Preventing falls in hospitals: A toolkit for improving
quality of care (AHRQ Publication No. 13-0015-EF). Rockville, MD: Agency for
Healthcare Research and Quality. Accessed via the Web at
https://www.ahrq.gov/sites/default/files/publications/files/fallpxtoolkit_0 .pdf
(Level VII)
40 The Joint Commission. (2019). Standard NPSG.01.02.07. Comprehensive
accreditation manual for hospitals. Oakbrook Terrace, IL: The Joint
Commission. (Level VII)
41 Accreditation Association for Hospitals and Health Systems. (2017). Standard
07.02.03. Healthcare Facilities Accreditation Program: Accreditation
requirements for acute care hospitals. Chicago, IL: Accreditation Association
for Hospitals and Health Systems. (Level VII)
42 Rutala, W. A., et al. (2008, revised 2017). “Guideline for disinfection and
sterilization in healthcare facilities, 2008” [Online]. Accessed via the Web at
https://www.cdc.gov/infectioncontrol/pdf/guidelines/disinfection-
guidelines.pdf (Level I)
43 The Joint Commission. (2019). Standard RC.01.03 .01. Comprehensive
accreditation manual for hospitals. Oakbrook Terrace, IL: The Joint
Commission. (Level VII)
44 Centers for Medicare and Medicaid Services, Department of Health and
Human Services. (2015). Condition of participation: Medical record services.
42 C.F.R. § 482.24.
45 Accreditation Association for Hospitals and Health Systems. (2017). Standard
10.00 .03. Healthcare Facilities Accreditation Program: Accreditation
requirements for acute care hospitals. Chicago, IL: Accreditation Association
for Hospitals and Health Systems. (Level VII)
46 DNV GL-Healthcare USA, Inc. (2016). MR.2 .SR.1 . NIAHO® accreditation
requirements: Interpretive guidelines & surveyor guidance (version 11).
Milford, OH: DNV GL-Healthcare USA, Inc. (Level VII)
47 The Joint Commission. (2013). “Sentinel event alert: Medical device alarm
safety in hospitals” [Online]. Accessed via the Web at
http://www.jointcommission.org/assets/1/18/SEA_50_alarms_4 _5 _13_FINAL1 .P
DF (Level VII)
BRAIN TISSUE OXYGEN MONITORING AND CARE
Brain tissue oxygen (PbtO2) monitoring is used to measure
oxygen delivery to the cerebral tissue and to identify
cerebral ischemia and hypoxia in patients with traumatic
brain injury, stroke, or aneurysmal or traumatic
subarachnoid hemorrhage as well as in those at risk for
secondary brain injury.1 Secondary brain injury typically
occurs when complications such as elevated intracranial
pressure (ICP), shivering, agitation, seizures, fever,
hypotension, hypovolemia, anemia, and hypoxia lead to
cerebral hypoxia. In turn, cerebral hypoxia can lead to
cerebral ischemia.
PbtO2g monitoring is achieved using a PbtO2 probe that’s
inserted through an intracranial bolt or tunneled under the
scalp using a probe guide and trocar. When used with an
intracranial bolt, the system measures ICP, brain tissue
temperature, and PbtO2 saturation. By detecting early
changes in ICP and PbtO2, this system allows treatment
interventions to be performed before secondary brain injury
occurs.2 Contraindications to PbtO2 monitoring include
anticoagulation therapy, insertion site infection, and
coagulopathy.1
The normal value for PbtO2 ranges between 20 and 35
mm Hg.1 Decreased PbtO2 values occur when there’s an
increase in oxygen demand or a decrease in oxygen
delivery.1 Increased PbtO2 values occur when there’s
increased oxygen delivery or decreased oxygen demand.1
Equipment
PbtO2 monitor ▪ monitor-to-patient connecting cables ▪
PbtO2 probe ▪ cardiopulmonary monitor ▪ blood pressure
monitoring device ▪ thermometer ▪ stethoscope ▪
disinfectant pad ▪ Optional: sedatives, neuromuscular
blocking agents, other medications as prescribed, cooling
device, gloves, cap, gown, goggles or mask with face shield.
Preparation of equipment
If the PbtO2 monitor you’re using isn’t self-calibrating,
calibrate the unit according to the manufacturer’s
instructions, because failure to calibrate the device can lead
to false readings.
Implementation
■ Verify the practitioner’s order.
■ Gather and prepare the equipment.
■ Perform hand hygiene.3,4,5,6,78
■ Confirm the patient’s identity using at least two patient
identifiers.9
■ Provide privacy.10,11,12,13
■ Explain the procedure to the patient and family (if
appropriate) according to their individual communication
and learning needs to increase their understanding, allay
their fears, and enhance cooperation.14 Answer any
questions to promote their understanding of the information
provided.
■ Raise the bed to waist level while providing care to
prevent caregiver back strain.15
■ Perform hand hygiene.3,4,5,6,7,8
■ Put on personal protective equipment as needed to
comply with standard precautions.16,17
■ Assess the patient’s ICP (see the “Intracranial pressure
monitoring” procedure), neurologic status, vital signs, and
PbtO2 to obtain baseline measurements. Continue to
monitor these parameters every 15 minutes until the
patient’s condition stabilizes, then hourly or as ordered, to
provide ongoing assessment.1,18 Ensure that all monitor
alarm limits are set appropriately for the patient’s current
condition, and that the alarms are turned on, functioning
properly, and audible to staff.19,20,21,22
■ Perform an oxygen challenge test, as ordered, if the
patient’s PbtO2 value is unexpectedly low or if you question
the PbtO2 probe’s accuracy. This can be done by setting the
fraction of inspired oxygen on the ventilator at 100% for 2 to
5 minutes; if the probe is accurate, the PbtO2 value will be
increased.1,23
■ Maintain the PbtO2 value between 20 and 35 mm Hg, or
as ordered by the practitioner.1
■ Obtain the patient’s temperature every 1 to 2 hours and
compare it with the cerebral temperature.1 Institute cooling
measures, as indicated and ordered by the practitioner, to
reduce metabolic demand resulting from hyperthermia.
NURSING ALERT The use of noninvasive and invasive cooling
measures may result in patient shivering, which can increase skeletal
muscle oxygen consumption and reduce valuable cerebral oxygen
reserves. A sedative and neuromuscular blocking agent may be
required to maintain hypothermia and minimize systemic oxygen
consumption.3
■ Administer and titrate a sedative and neuromuscular
blocking agent as ordered, following safe medication
administration practices.24,25,26,27 Maintain target sedation
levels to avoid oversedation and undersedation.28
Remember that a patient receiving a neuromuscular
blocking agent requires close observation because of the
inability to breathe or communicate.
■ Administer other medications as prescribed; antipyretics
and anti-inflammatory agents may be prescribed to reduce
hyperthermia.24,25,26,27
■ Remove and discard any personal protective equipment,
if worn.16,17
■ Return the bed to the lowest position to prevent falls and
maintain patient safety.29
■ Perform hand hygiene.3,4,5,6,7,8
■ Disinfect your stethoscope using a disinfectant pad.30,31
■ Perform hand hygiene.3,4,5,6,7,8
■ Document the procedure.32,33,34,35
Special considerations
■ The Joint Commission has issued a sentinel event alert
concerning medical device alarm safety because alarm-
related events have been associated with permanent loss of
function or death. Among the major contributing factors
were
improper
alarm
settings,
alarm
settings
inappropriately turned off, and alarm signals not audible to
staff. Make sure that alarm limits are set appropriately and
that alarms are turned on, functioning properly, and audible
to staff. Follow facility guidelines for preventing alarm
fatigue.19
■ PbtO2 probes are compatible with magnetic resonance
imaging (MRI) scanners not equipped with fiberoptic ICP
devices. Follow the manufacturer’s guidelines regarding MRI
compatibility with the PbtO2 probe. As directed, disconnect
all cables and patient monitoring devices from the probe
before entering the MRI environment to avoid serious
patient injury.36
■ For most patients, the goal is to achieve a PbtO2 value of
greater than 20 mm Hg.
■ PbtO2 probes may remain in place for 5 to 7 days; check
the manufacturer’s guidelines.1
Complications
Possible complications of PbtO2 monitoring include infection,
cerebrospinal fluid leak, and bleeding.
Documentation
Document neurologic assessment findings; vital signs; ICP;
temperature; the patient’s tolerance of the procedure;
insertion site assessment; and any unexpected
complications or outcomes if applicable. Record PbtO2
readings at least every hour. Also, document any
medications administered including medication strength,
dose, route of administration, and date and time of
administration.37 Record teaching provided to the patient
and family and their understanding of the teaching.
REFERENCES
1 Wiegand, D. L. (2017). AACN procedure manual for high acuity, progressive,
and critical care (7th ed.). St. Louis, MO: Elsevier.
2 Wilensky, E. M ., et al. (2005). Brain tissue oxygen practice guidelines using
the LICOX® CMP monitoring system. Journal of Neuroscience Nursing, 37(5),
278–288. (Level VII)
3 Centers for Disease Control and Prevention. (2002). Guideline for hand
hygiene in health-care settings: Recommendations of the Healthcare Infection
Control Practices Advisory Committee and the HICPAC/SHEA/APIC/IDSA Hand
Hygiene Task Force. MMWR Recommendations and Reports, 51(RR-16), 1–45.
Accessed via the Web at https://www.cdc.gov/mmwr/pdf/rr/rr5116.pdf (Level
II)
4 The Joint Commission. (2019). Standard NPSG.07.01.01. Comprehensive
accreditation manual for hospitals. Oakbrook Terrace, IL: The Joint
Commission. (Level VII)
5 World Health Organization. (2009). “WHO guidelines on hand hygiene in
health care: First global patient safety challenge, clean care is safer care”
[Online]. Accessed via the Web at
http://apps.who.int/iris/bitstream/10665/44102/1/9789241597906_eng.pdf
(Level IV)
6 Accreditation Association for Hospitals and Health Systems. (2017). Standard
07.01.21. Healthcare Facilities Accreditation Program: Accreditation
requirements for acute care hospitals. Chicago, IL: Accreditation Association
for Hospitals and Health Systems. (Level VII)
7 Centers for Medicare and Medicaid Services, Department of Health and
Human Services. (2015). Condition of participation: Infection control. 42 C.F.R.
§ 482.42.
8 DNV GL-Healthcare USA, Inc. (2016). IC.1.SR.1 . NIAHO® accreditation
requirements: Interpretive guidelines & surveyor guidance (version 11).
Milford, OH: DNV GL-Healthcare USA, Inc. (Level VII)
9 The Joint Commission. (2019). Standard NPSG.01.01.01. Comprehensive
accreditation manual for hospitals. Oakbrook Terrace, IL: The Joint
Commission. (Level VII)
10 Accreditation Association for Hospitals and Health Systems. (2017). Standard
15.01.16. Healthcare Facilities Accreditation Program: Accreditation
requirements for acute care hospitals. Chicago, IL: Accreditation Association
for Hospitals and Health Systems.(Level VII)
11 Centers for Medicare and Medicaid Services, Department of Health and
Human Services. (2015). Condition of participation: Patient’s rights. 42 C.F.R.
§ 482.13(c)(1).
12 DNV GL-Healthcare USA, Inc. (2016). PR.1.SR.5 . NIAHO® accreditation
requirements: Interpretive guidelines & surveyor guidance (version 11).
Milford, OH: DNV GL-Healthcare USA, Inc. (Level VII)
13 The Joint Commission. (2019). Standard RI.01.01.01. Comprehensive
accreditation manual for hospitals. Oakbrook Terrace, IL: The Joint
Commission. (Level VII)
14 The Joint Commission. (2019). Standard PC.02.01.21. Comprehensive
accreditation manual for hospitals. Oakbrook Terrace, IL: The Joint
Commission. (Level VII)
15 Waters, T. R., et al. (2009). “Safe patient handling training for schools of
nursing” [Online]. Accessed via the Web at
https://www.cdc.gov/niosh/docs/2009-127/pdfs/2009-127.pdf (Level VII)
16 Siegel, J. D ., et al. (2007, revised 2017). “2007 guideline for isolation
precautions: Preventing transmission of infectious agents in healthcare
settings” [Online]. Accessed via the Web at
https://www.cdc.gov/infectioncontrol/pdf/guidelines/isolation-guidelines.pdf
(Level II)
17 Accreditation Association for Hospitals and Health Systems. (2017). Standard
07.01.10. Healthcare Facilities Accreditation Program: Accreditation
requirements for acute care hospitals. Chicago, IL: Accreditation Association
for Hospitals and Health Systems. (Level VII)
18 American Association of Neuroscience Nurses (AANN). (2014). Care of the
patient undergoing intracranial pressure monitoring/external ventricular
drainage or lumbar drainage: AANN clinical practice guideline series.
Glenview, IL: AANN. (Level VII)
19 The Joint Commission. (2013). “Sentinel event alert: Medical device alarm
safety in hospitals” [Online]. Accessed via the Web at
https://www.jointcommission.org/assets/1/6/SEA_50_alarms_4 _26_16.pdf
(Level VII)
20 The Joint Commission. (2019). Standard NPSG.06 .01.01. Comprehensive
accreditation manual for hospitals. Oakbrook Terrace, IL: The Joint
Commission. (Level VII)
21 American Association of Critical-Care Nurses (AACN). (2013). “A ACN practice
alert: Alarm management” [Online]. Accessed via the Web at
https://www.aacn.org/aacn-website/shared/content/practice-
alerts/2015/11/25/alarm-management (Level VII)
22 Graham, K. C., & Cvach, M. (2010). Monitor alarm fatigue: Standardizing use
of physiological monitors and decreasing nuisance alarms. American Journal
of Critical Care, 19(1), 28–37. Accessed via the Web at
http://ajcc.aacnjournals.org/content/19/1/28.full.pdf
23 Martini, R. P., et al. (2013). Targeting brain tissue oxygenation in traumatic
brain injury. Respiratory Care, 58(1), 162–172. Accessed via the Web at
http://rc.rcjournal.com/content/58/1/162.full.pdf (Level V)
24 Accreditation Association for Hospitals and Health Systems. (2017). Standard
16.01.03. Healthcare Facilities Accreditation Program: Accreditation
requirements for acute care hospitals. Chicago, IL: Accreditation Association
for Hospitals and Health Systems. (Level VII)
25 Centers for Medicare and Medicaid Services, Department of Health and
Human Services. (2015). Condition of participation: Nursing services. 42
C.F.R. § 482.23(c).
26 The Joint Commission. (2019). Standard MM.06.01.01. Comprehensive
accreditation manual for hospitals. Oakbrook Terrace, IL: The Joint
Commission. (Level VII)
27 DNV GL-Healthcare USA, Inc. (2016). MM.1 .SR.2. NIAHO® accreditation
requirements: Interpretive guidelines & surveyor guidance (version 11).
Milford, OH: DNV GL-Healthcare USA, Inc. (Level VII)
28 Grap, M. J ., et al. (2012). Sedation in adults receiving mechanical ventilation:
Physiological and comfort outcomes. American Journal of Critical Care, 21(3),
e53–e64. (Level IV)
29 Ganz, D. A., et al. (2013). Preventing falls in hospitals: A toolkit for improving
quality of care (AHRQ Publication No. 13-0015-EF). Rockville, MD: Agency for
Healthcare Research and Quality. Accessed via the Web at
https://www.ahrq.gov/sites/default/files/publications/files/fallpxtoolkit_0 .pdf
(Level VII)
30 Rutala, W. A., et al. (2008, revised 2017). “Guideline for disinfection and
sterilization in healthcare facilities, 2008” [Online]. Accessed via the Web at
https://www.cdc.gov/infectioncontrol/pdf/guidelines/disinfection-
guidelines.pdf (Level I)
31 Accreditation Association for Hospitals and Health Systems. (2017). Standard
07.02.03. Healthcare Facilities Accreditation Program: Accreditation
requirements for acute care hospitals. Chicago, IL: Accreditation Association
for Hospitals and Health Systems. (Level VII)
32 The Joint Commission. (2019). Standard RC.01.03 .01. Comprehensive
accreditation manual for hospitals. Oakbrook Terrace, IL: The Joint
Commission. (Level VII)
33 Accreditation Association for Hospitals and Health Systems. (2017). Standard
10.00 .03. Healthcare Facilities Accreditation Program: Accreditation
requirements for acute care hospitals. Chicago, IL: Accreditation Association
for Hospitals and Health Systems. (Level VII)
34 Centers for Medicare and Medicaid Services, Department of Health and
Human Services. (2015). Condition of participation: Medical record services.
42 C.F.R. § 482.24(b).
35 DNV GL-Healthcare USA, Inc. (2016). MR.2 .SR.1 . NIAHO® accreditation
requirements: Interpretive guidelines & surveyor guidance (version 11).
Milford, OH: DNV GL-Healthcare USA, Inc. (Level VII)
36 Shellock, F. G. (2017). “Safety information article: Licox CC1.P1 oxygen and
temperature probe, brain tissue oxygen monitoring system” [Online].
Accessed via the Web at http://www.mrisafety.com/SafetyInfov.asp?
SafetyInfoID=264 (Level VII)
37 The Joint Commission. (2019). Standard RC.02.01.01. Comprehensive
accreditation manual for hospitals. Oakbrook Terrace, IL: The Joint
Commission. (Level VII)
BRAIN TISSUE OXYGEN MONITORING DEVICE,
INSERTION, ASSISTING
Brain tissue oxygen (PbtO2) monitoring is used to measure
oxygen delivery to the cerebral tissue and identify cerebral
ischemia and hypoxia in patients with traumatic brain injury,
stroke, or aneurysmal or traumatic subarachnoid
hemorrhage as well as in those at risk for secondary brain
injury. Secondary brain injury commonly occurs when
complications such as elevated intracranial pressure (ICP),
shivering, agitation,
seizures, fever,
hypotension,
hypovolemia, anemia, and hypoxia lead to cerebral hypoxia.
In turn, cerebral hypoxia can lead to cerebral ischemia.
PbtO2 monitoring is used in conjunction with ICP
monitoring to detect early changes in ICP and PbtO2 so that
treatment interventions can be performed before secondary
brain injury occurs.1 Contraindications to PbtO2 monitoring
include anticoagulation therapy, insertion site infection, and
coagulopathy.2
In this procedure, the practitioner inserts a PbtO2 probe
through an intracranial bolt that the practitioner then inserts
through a burr hole. Alternatively, the practitioner may
tunnel the probe under the scalp using a probe guide and
trocar. When used with an intracranial bolt, the system
measures ICP, PbtO2, and brain tissue temperature. The
practitioner determines the insertion method and placement
location after studying a computed tomography (CT) scan of
the patient’s brain and considering the patient’s diagnosis.2
(See Brain tissue oxygen monitoring systems, page 90)
Equipment
Sterile gloves ▪ sterile gowns ▪ sterile drapes ▪ goggles and
mask or mask and face shield ▪ surgical head covers ▪
antiseptic solution ▪ 4′′ × 4′′ (10-cm × 10-cm) gauze ▪ PbtO2
monitor ▪ monitor-to-patient connecting cables ▪ cranial
access tray ▪ PbtO2 probe ▪ tape ▪ sterile occlusive
dressing ▪ transparent adhesive dressing ▪ cardiopulmonary
monitor ▪ pulse oximeter and probe ▪ blood pressure
monitoring equipment ▪ prescribed sedative ▪ prescribed
analgesia ▪ Optional: electric or battery-operated hair
clippers with a single-use head or a reusable head that can
be disinfected, arm board, towels, washcloths, intracranial
bolt system.
Preparation of equipment
Gather the PbtO2 monitor and plug it into an AC wall outlet.
Next, attach the cables to the PbtO2 monitor. Some monitors
and cables are color-coded.
Implementation
■ Verify the practitioner’s orders.
■ Gather the appropriate equipment.
■ Confirm that written informed consent has been obtained
by the practitioner and is in the patient’s medical
record.3,4,5,6
■ Conduct a preprocedure verification to make sure that all
relevant documentation, related information, and equipment
are available and correctly identified to the patient’s
identifiers.7,8
■ Verify that the laboratory and imaging studies have been
completed, as ordered, and that the results are in the
patient’s medical record. Notify the practitioner of any
unexpected results.
■ Perform hand hygiene to comply with standard
precautions.9,10,11,12,13,14
■ Confirm the patient’s identity using at least two patient
identifiers.15
■ Provide privacy.16,17,18,19
■ Ensure that the patient, as appropriate, and family
understand the procedure. Answer any questions to
increase their understanding of the information provided.
■ Verify that the practitioner has marked the insertion site
using an unambiguous mark according to the method
determined by your facility.20
■ Assess the patient’s neurologic status before insertion so
that you can recognize any changes during and after
insertion of the PbtO2 probe.2
■ Administer analgesia, sedation, or both, as ordered,
following safe medication administration practices, before
beginning the insertion procedure to facilitate the insertion
process.21,22,23,24
■ Keep the door to the room closed to maintain sterility.25
Brain tissue oxygen monitoring
systems
Brain tissue oxygen (PbtO2) can be monitored using a tunneled system or a
bolt system.
Tunneled system
With the tunneled system, shown at right, an oxygen catheter probe is
tunneled under the scalp using a probe guide and trocar. It may be inserted
during a cranial procedure at the margins of an existing bone flap, or it may
be inserted through a burr hole.
Bolt system
A bolt system, shown at right, is inserted through a burr hole and has the
capability of monitoring PbtO2, brain tissue temperature, and intracranial
pressure.
■ Prepare the equipment, being careful not to contaminate
the sterile field. Label all medications, medication
containers, and other solutions on and off the sterile field
while maintaining sterility of the sterile field.26,27
■ Elevate the head of the bed to 30 degrees and place the
patient’s head in the neutral position. This position helps
decrease ICP by promoting jugular venous outflow, which
provides for optimal insertion accessibility.2,25
■ Immobilize the patient’s head to prevent movement and
facilitate device insertion.25
■ Raise the patient’s bed to waist level while providing
patient care to prevent caregiver back strain.28
■ Perform hand hygiene.9,10,11,12,13,14
■ Assist the practitioner with putting on a surgical head
cover, a mask, protective eyewear, a sterile gown, and
sterile gloves, as necessary. Put on the same personal
protective equipment.25,29,30
■ Braid or clip the patient’s hair; if clipping hair, use tape to
remove residual hair clippings.25
■ Assist the practitioner with site preparation using
antiseptic solution to prepare the patient for a sterile
procedure. Use antiseptic solution to clean the intended
insertion site using a circular motion.25 Make sure that the
antiseptic is dry before the practitioner starts the incision.2
NURSING ALERT Use of chlorhexidine is disputed because studies
suggest chlorhexidine is neurotoxic.2
■ Assist the practitioner with draping the patient’s head,
neck, and chest to maintain a sterile field.2,25
■ Conduct a time-out immediately before starting the
procedure to perform a final assessment that the correct
patient, site, positioning, and procedure are identified and
that all relevant information and necessary equipment are
available.25,31
■ Assist the practitioner with opening sterile trays,
packaged probes, and other equipment to help maintain a
sterile environment and provide efficiency.2
■ Turn on the PbtO2 monitor and follow the manufacturer’s
guidelines to prepare the monitor.2
■ If you are using a Licox monitor, place the smart card into
the card slot located on the front of the monitor. This
monitor requires the smart card numbers to match those on
the oxygen probe that the practitioner will insert.2
■ During insertion, continually monitor the patient’s heart
rate and rhythm, respiratory rate, and pulse oximetry, and
frequently monitor blood pressure. Perform neurologic
assessments every 15 minutes to ensure prompt recognition
and treatment of neurologic changes.2,25
■ Assist the practitioner with intracranial bolt insertion,
which may occur before or after PbtO2 probe insertion. (See
the “Intracranial pressure monitoring” procedure.)
■ Assist the practitioner with the oxygen and temperature
probe insertions.
■ After the practitioner inserts the oxygen and temperature
probes, connect them to the monitor cables.
■ Look at the monitor for temperature and PbtO2 values.
Temperature values will be accurate, but PbtO2 values may
take as long as 2 hours to be accurate as brain tissue settles
after the trauma of probe placement.2
■ Depending on the beside monitor, you may be able to use
a cable to capture the values from the PbtO2 monitor to the
bedside monitor to allow integration between monitoring
systems.
■ Make sure that all monitor alarm limits are set
appropriately for the patient’s current condition, and that
the alarms are turned on, functioning properly, and audible
to staff.32,33,34,35
■ Apply a sterile occlusive dressing at the insertion site to
reduce the risk of infection.2,25
■ Secure the PbtO2 monitor cables to prevent tension at the
insertion site.2 Anchor cables from the patient’s head and
shoulder with a transparent adhesive dressing. It’s
important to make sure that the entire setup is supported
but to also allow enough slack for the patient to be turned
and moved. You may use an arm board to support and
secure the cables2 and also place towels or washcloths
under the setup for support. Make sure that the cables
aren’t dragging on the ground.
■ After the brain tissue has adjusted to device insertion,
maintain the patient’s PbtO2 value between 20 and 35 mm
Hg or as ordered by the practitioner.2 (See “Brain tissue
oxygen monitoring and care”.)
■ Return the bed to the lowest possible position to prevent
falls and maintain patient safety.36 Discard used supplies in
the appropriate containers.29,30
■ Remove and discard your personal protective
equipment.29,30
■ Perform hand hygiene.9,10,11,12,13,14
■ Document the procedure.37,38,39,40
Special considerations
■ The Joint Commission has issued a sentinel event alert
concerning medical device alarm safety because alarm-
related events have been associated with permanent loss of
function or death. Among the major contributing factors
were
improper
alarm
settings,
alarm
settings
inappropriately turned off, and alarm signals not audible to
staff. Make sure that alarm limits are set appropriately, and
that alarms are turned on, functioning properly, and audible
to staff. Follow facility guidelines for preventing alarm
fatigue.35
■ PbtO2 probes are compatible with magnetic resonance
imaging (MRI) machines unless they have a fiberoptic ICP
device. As directed, disconnect all cables and patient
monitoring devices from the probe before entering the MRI
environment to avoid serious patient injury.41
■ A CT scan may be performed to confirm catheter
placement.25
■ Probes may remain in place for 5 to 7 days. Check the
manufacturer’s guidelines.2
Complications
Possible complications include infection, cerebrospinal fluid
leak, and bleeding.
Documentation
Document neurologic assessments, ICP, and vital signs,
including temperature; pulse oximetry; medications
administered; the patient’s tolerance of the procedure;
insertion site assessment; the patient’s tolerance of the
procedure; insertion site assessment findings; and any
unexpected complications or outcomes. Record PbtO2
readings at least every hour. Also, document teaching
provided to the patient, as appropriate, and family, and
their understanding of that teaching.
REFERENCES
1 Wilensky, E. M ., et al. (2005). Brain tissue oxygen practice guidelines using
the LICOX CMP monitoring system. Journal of Neuroscience Nursing, 37(5),
278–288.
2 Wiegand, D. L. (2017). AACN procedure manual for high acuity, progressive,
and critical care (7th ed.). St: Louis, MO: Elsevier.
3 The Joint Commission. (2019). Standard RI.01.03 .01. Comprehensive
accreditation manual for hospitals. Oakbrook Terrace, IL: The Joint
Commission. (Level VII)
4 Centers for Medicare and Medicaid Services, Department of Health and
Human Services. (2015). Condition of participation: Patient’s rights. 42 C.F.R.
§ 482.13(b)(2).
5 Accreditation Association for Hospitals and Health Systems. (2017). Standard
15.01.11. Healthcare Facilities Accreditation Program: Accreditation
requirements for acute care hospitals. Chicago, IL: Accreditation Association
for Hospitals and Health Systems. (Level VII)
6 DNV GL-Healthcare USA, Inc. (2014). PR.1 .SR.3 . NIAHO® accreditation
requirements: Interpretive guidelines & surveyor guidance (version 11).
Milford, OH: DNV GL-Healthcare USA, Inc. (Level VII)
7 The Joint Commission. (2019). Standard UP.01.01.01. Comprehensive
accreditation manual for hospitals. Oakbrook Terrace, IL: The Joint
Commission. (Level VII)
8 Accreditation Association for Hospitals and Health Systems. (2017). Standard
30.00 .14. Healthcare Facilities Accreditation Program: Accreditation
requirements for acute care hospitals. Chicago, IL: Accreditation Association
for Hospitals and Health Systems. (Level VII)
9 Centers for Disease Control and Prevention. (2002). Guideline for hand
hygiene in health-care settings: Recommendations of the Healthcare Infection
Control Practices Advisory Committee and the HICPAC/SHEA/APIC/IDSA Hand
Hygiene Task Force. MMWR Recommendations and Reports, 51(RR-16), 1–45.
Accessed via the Web at https://www.cdc.gov/mmwr/pdf/rr/rr5116.pdf (Level
II)
10 The Joint Commission. (2019). Standard NPSG.07.01.01. Comprehensive
accreditation manual for hospitals. Oakbrook Terrace, IL: The Joint
Commission. (Level VII)
11 World Health Organization. (2009). “WHO guidelines on hand hygiene in
health care: First global patient safety challenge, clean care is safer care”
[Online]. Accessed via the Web at
http://apps.who.int/iris/bitstream/10665/44102/1/9789241597906_eng.pdf
(Level IV)
12 Centers for Medicare and Medicaid Services, Department of Health and
Human Services. (2015). Condition of participation: Infection control. 42 C.F.R.
§ 482.42.
13 Accreditation Association for Hospitals and Health Systems. (2017). Standard
07.01.21. Healthcare Facilities Accreditation Program: Accreditation
requirements for acute care hospitals. Chicago, IL: Accreditation Association
for Hospitals and Health Systems. (Level VII)
14 DNV GL-Healthcare USA, Inc. (2016). IC.1 .SR.1 . NIAHO® accreditation
requirements: Interpretive guidelines & surveyor guidance (version 11).
Milford, OH: DNV GL-Healthcare USA, Inc. (Level VII)
15 The Joint Commission. (2019). Standard NPSG.01.01.01. Comprehensive
accreditation manual for hospitals. Oakbrook Terrace, IL: The Joint
Commission. (Level VII)
16 Accreditation Association for Hospitals and Health Systems. (2017). Standard
15.01.16. Healthcare Facilities Accreditation Program: Accreditation
requirements for acute care hospitals. Chicago, IL: Accreditation Association
for Hospitals and Health Systems (Level VII)
17 Centers for Medicare and Medicaid Services, Department of Health and
Human Services. (2015). Condition of participation: Patient’s rights. 42 C.F.R.
§ 482.13(c)(1).
18 DNV GL-Healthcare USA, Inc. (2016). PR.1.SR.5 . NIAHO® accreditation
requirements: Interpretive guidelines & surveyor guidance (version 11).
Milford, OH: DNV GL-Healthcare USA, Inc. (Level VII)
19 The Joint Commission. (2019). Standard RI.01.01.01. Comprehensive
accreditation manual for hospitals. Oakbrook Terrace, IL: The Joint
Commission. (Level VII)
20 The Joint Commission. (2019). Standard UP.01.02.01. Comprehensive
accreditation manual for hospitals. Oakbrook Terrace, IL: The Joint
Commission. (Level VII)
21 Centers for Medicare and Medicaid Services, Department of Health and
Human Services. (2015). Condition of participation: Nursing services. 42
C.F.R. § 482.23(c).
22 The Joint Commission. (2019). Standard MM.06.01.01. Comprehensive
accreditation manual for hospitals. Oakbrook Terrace, IL: The Joint
Commission. (Level VII)
23 Accreditation Association for Hospitals and Health Systems. (2017). Standard
16.01.03. Healthcare Facilities Accreditation Program: Accreditation
requirements for acute care hospitals. Chicago, IL: Accreditation Association
for Hospitals and Health Systems. (Level VII)
24 DNV GL-Healthcare USA, Inc. (2016). MM.1 .SR.2. NIAHO® accreditation
requirements: Interpretive guidelines & surveyor guidance (version 11).
Milford, OH: DNV GL-Healthcare USA, Inc. (Level VII)
25 American Association of Neuroscience Nurses (AANN). (2012). Care of the
patient undergoing intracranial pressure monitoring/external ventricular
drainage or lumbar drainage: AANN clinical practice guideline series.
Glenview, IL: AANN.
26 The Joint Commission. (2019). Standard NPSG.03 .04.01. Comprehensive
accreditation manual for hospitals. Oakbrook Terrace, IL: The Joint
Commission. (Level VII)
27 Accreditation Association for Hospitals and Health Systems. (2017). Standard
25.01.27. Healthcare Facilities Accreditation Program: Accreditation
requirements for acute care hospitals. Chicago, IL: Accreditation Association
for Hospitals and Health Systems. (Level VII)
28 Waters, T. R., et al. (2009). “Safe patient handling training for schools of
nursing” [Online]. Accessed via the Web at
https://www.cdc.gov/niosh/docs/2009-127/pdfs/2009-127.pdf (Level VII)
29 Siegel, J. D ., et al. (2007). “2007 guideline for isolation precautions:
Preventing transmission of infectious agents in healthcare settings” [Online].
Accessed via the Web at
https://www.cdc.gov/infectioncontrol/pdf/guidelines/isolation-guidelines.pdf
(Level II)
30 Accreditation Association for Hospitals and Health Systems. (2017). Standard
07.01.10. Healthcare Facilities Accreditation Program: Accreditation
requirements for acute care hospitals. Chicago, IL: Accreditation Association
for Hospitals and Health Systems. (Level VII)
31 The Joint Commission. (2019). Standard UP.01.03.01. Comprehensive
accreditation manual for hospitals. Oakbrook Terrace, IL: The Joint
Commission. (Level VII)
32 Graham, K. C., & Cvach, M. (2010). Monitor alarm fatigue: Standardizing use
of physiological monitors and decreasing nuisance alarms. American Journal
of Critical Care, 19(1), 28–37. Accessed via the Web at
http://ajcc.aacnjournals.org/content/19/1/28.full.pdf
33 American Association of Critical-Care Nurses (AACN). (2013). “A ACN practice
alert: Alarm management” [Online]. Accessed via the Web at
http://www.aacn.org/wd/practice/docs/practicealerts/alarm-management-
practice-alert.pdf (Level VII)
34 The Joint Commission. (2019). Standard NPSG.06 .01.01. Comprehensive
accreditation manual for hospitals. Oakbrook Terrace, IL: The Joint
Commission. (Level VII)
35 The Joint Commission. (2013). “Sentinel event alert: Medical device alarm
safety in hospitals” [Online]. Accessed via the Web at
https://www.jointcommission.org/assets/1/6/SEA_50_alarms_4 _26_16.pdf
(Level VII)
36 Ganz, D. A., et al. (2013). Preventing falls in hospitals: A toolkit for improving
quality of care (AHRQ Publication No. 13-0015-EF). Rockville, MD: Agency for
Healthcare Research and Quality. Accessed via the Web at
https://www.ahrq.gov/sites/default/files/publications/files/fallpxtoolkit_0 .pdf
(Level VII)
37 The Joint Commission. (2019). Standard RC.01.03 .01. Comprehensive
accreditation manual for hospitals. Oakbrook Terrace, IL: The Joint
Commission. (Level VII)
38 Centers for Medicare and Medicaid Services, Department of Health and
Human Services. (2015). Condition of participation: Medical record services.
42 C.F.R. § 482.24(b).
39 Accreditation Association for Hospitals and Health Systems. (2017). Standard
10.00 .03. Healthcare Facilities Accreditation Program: Accreditation
requirements for acute care hospitals. Chicago, IL: Accreditation Association
for Hospitals and Health Systems. (Level VII)
40 DNV GL-Healthcare USA, Inc. (2016). MR.2 .SR.1 . NIAHO® accreditation
requirements: Interpretive guidelines & surveyor guidance (version 11).
Milford, OH: DNV GL-Healthcare USA, Inc. (Level VII)
41 Shellock, F. G. (2015). “Safety information article: Licox CC1.P1 oxygen and
temperature probe, brain tissue oxygen monitoring system (Integra
NeuroSciences)” [Online]. Accessed via the Web at
http://www.mrisafety.com/SafetyInfov.asp?SafetyInfoID=264
BRONCHOSCOPY, ASSISTING
Bronchoscopy is an invasive procedure that’s used to
diagnose and manage various inflammatory, infectious, and
malignant diseases of the airways and lungs.1 The
procedure involves using a flexible fiberoptic scope
connected to a light source to visualize the upper and lower
airways. (See A look at the bronchoscope, page 92.)
Bronchoscopy may be used for the retrieval of tissue
specimens, cell washings, bronchoalveolar lavage,
coagulation, or the laser removal of abnormal tissue.1
EQUIPMENT
A look at the bronchoscope
The practitioner can insert the bronchoscope through the patient’s nose or
mouth to view the upper and lower airways. The fiberoptic bronchoscope,
equipped with a light source, transmits images to a screen to facilitate
visualization, as shown below. The device also contains an irrigation channel,
instrument channel, and suction apparatus to aid the examination. The
practitioner can record still images, video sequences, and audio during the
examination.
(© Antonia Reeve/Photo Researchers, Inc.)
Bronchoscopy is indicated for various diagnostic and
therapeutic purposes.1 However, it should be performed
only when the relative benefits outweigh the risks. (See
Indications for bronchoscopy.)1
Bronchoscopy is contraindicated in patients with severe
refractory hypoxemia, hemodynamic instability, and
coagulopathy or bleeding diathesis that can’t be corrected.1
To assists the practitioner during a bronchoscopy, you
must have knowledge of the technique, the purpose of the
procedure,
and
associated
complications.
Your
responsibilities may include patient preparation and
monitoring, handling specimens, and postprocedure care
and monitoring.1
Equipment
Bronchoscope ▪ suction apparatus ▪ specimen containers ▪
labels ▪ cytology brush ▪ biopsy forceps ▪ water-soluble
lubricant ▪ sterile gauze sponges ▪ topical anesthetic
(viscous lidocaine, 1% lidocaine, and 1% lidocaine with
epinephrine) ▪ local anesthetic spray ▪ syringes (5 mL, 10
mL, and 30 mL) ▪ pulse oximeter ▪ nebulizer equipment or
atomizer with mask ▪ cardiac monitor ▪ blood pressure
monitor ▪ oxygen delivery equipment ▪ emergency
equipment (code cart with cardiac medications, defibrillator,
handheld resuscitation bag with mask, intubation
equipment) ▪ personal protective equipment (gown, gloves,
mask and goggles or mask with face shield) ▪ 150-mL bottle
of normal saline solution ▪ prescribed sedative and its
reversal agent ▪ laboratory biohazard transport bag ▪ fully
enclosed labeled container or watertight polyethylene bag ▪
oral care supplies ▪ soft, lint-free, disposable cloth or
sponge ▪ enzymatic detergent solution ▪ stethoscope ▪
disinfectant pad ▪ capnography equipment ▪ Optional: bite
block, ventilator, IV catheter insertion equipment,
endotracheal tube (ET) adapter, prescribed medications, N-
95 particulate respirator or powered air purifying respirator,
lavage equipment, standardized sedation scale.
Preparation of equipment
Prepare intubation equipment if endotracheal intubation is
necessary. Set up oxygen delivery equipment in case you
need it. Apply water-soluble lubricant to the gauze sponges
for lubricating the bronchoscope. Fill syringes with normal
saline solution according to the practitioner’s preference.
Label all medications appropriately to prevent medication
errors.2 Set up and test suction apparatus and make sure
it’s functioning properly. Fill specimen containers with
normal saline solution. Make sure other emergency
equipment, such as a defibrillator and code cart with cardiac
medications, is readily available in case complications
arise.1,3
Implementation
■ Verify the practitioner’s orders.
■ Gather and prepare the equipment.
■ Confirm that written informed consent has been obtained
by the practitioner and is in the patient’s medical
record.4,5,6,7
■ Conduct a preprocedure verification to make sure that all
relevant documentation, related information, and equipment
are available and correctly identified to the patient’s
identifiers.8,9
■ Perform hand hygiene.10,11,12,13,14,15
■ Confirm the patient’s identity using at least two patient
identifiers.16
■ Provide privacy.17,18,19,20
■ Confirm the patient’s nothing-by-mouth status before the
procedure; if not an emergency, minimum fasting
recommendations include 2 hours for clear liquids, 6 or
more hours for a light meal or nonhuman milk, and 8 hours
or more for fried or fatty foods or meat. If the need for
bronchoscopy is emergent, collaborate with the practitioner
to compare the risks and benefits of the procedure,
considering the amount and type of fluids or solids
ingested.21
■ Make sure that the patient and family understand the
procedure; answer any questions they may have to make
sure that they understand the information provided.
■ Make sure that the patient has patent IV access. Insert an
IV catheter if the patient doesn’t already have one in place.
(See the “IV catheter insertion and removal” procedure.)
■ If ordered, administer preprocedure medications following
safe medication administration practices.1,22,23,24,25 Note
that guidelines no longer recommend routine premedication
with anticholinergics or other medications because of
insufficient evidence for its use.3
■ Perform hand hygiene.10,11,12,13,14
■ Put on gloves and other personal protective equipment,
including a gown, a mask (a fit-tested N-95 particulate
respirator or powered air purifying respirator if
Mycobacterium tuberculosis, severe acute respiratory
syndrome [SARS], or avian or pandemic influenza viruses
are suspected or conformed by the practitioner), and
goggles or mask with face shield, as needed.26,27
■ Make sure the patient is attached to a cardiac monitor,
pulse oximeter, blood pressure monitor, and capnograph.1,28
Make sure that alarm limits are set according to the
patient’s current condition, and that the alarms are turned
on, functioning properly, and audible to staff.29,30,31
■ Remove the patient’s eyeglasses and any removable
devices from the patient’s mouth, such as dentures, partial
plates, or retainers, if applicable.
■ Provide oral care to avoid introducing microorganisms
from the patient’s mouth into the airway during the
procedure.32
■ Obtain the patient’s vital signs, and assess the patient’s
level of consciousness (LOC), breath sounds, cardiac
rhythm, oxygen saturation level, and end-tidal carbon
dioxide (ETCO2) to serve as a baseline for comparison during
and after the procedure. If the patient is receiving
mechanical ventilation, also assess ventilation parameters,
such as tidal volume, peak inspiratory pressure, and
inspiratory flow, to evaluate the patient’s response to the
procedure.1
■ Position the patient in the supine position.33
■ Conduct a time-out immediately before the procedure to
ensure that the correct patient, site, positioning, and
procedure are identified and that all relevant information
and necessary equipment are available.34
■ Administer oxygen therapy, as ordered, to prevent
hypoxia.
■ Administer moderate sedation, as ordered, following safe
medication administration practices, to relieve the patient’s
anxiety and promote cooperation.22,23,24,25 (See the
“Moderate sedation” procedure.)
■ If the patient is intubated, insert a bite block to prevent
the patient from biting down on the endotracheal tube
during the procedure.
■ Hand the bronchoscope to the practitioner and turn on its
light source. Assist with lubricating the bronchoscope, as
needed.1
■ The practitioner sprays a local anesthetic into the
patient’s mouth and throat.
■ The practitioner introduces the bronchoscope through the
patient’s mouth, nose, tracheostomy, or ET tube adapter.
When the bronchoscope is just above the vocal cords,
lidocaine is flushed through the inner channel of the scope
to the vocal cords to anesthetize deeper areas.
■ The practitioner inspects the trachea and bronchi,
observes the color of the mucosal lining, and notes masses
or inflamed areas. The practitioner may use biopsy forceps
to remove a tissue specimen from a suspect area, a
cytology brush to obtain cells from the surface of a lesion, or
a suction apparatus to remove foreign bodies or mucus
plugs.
■ Assist the practitioner with lavage, if necessary, to
remove thickened secretions. Record the lavage volumes
delivered and retrieved.1
■ Assist with specimen collection. Place the specimens in
appropriate containers and then label the specimen
containers in the presence of the patient to prevent
mislabeling.16 Send the specimens to the laboratory in a
laboratory biohazard transport bag.
■ Assess the patient’s vital signs, LOC, subjective response
to the procedure (pain, discomfort, dyspnea), breath
sounds, cardiac rhythm, oxygen saturation level, and ETco2.
If the patient is intubated, monitor tidal volume, peak
inspiratory pressure, and inspiratory flow. Continuously
monitor the patient until the patient returns to a presedation
LOC. Inform the practitioner immediately of any
abnormalities.1,35
■ Continuously monitor the patient’s oxygen saturation and
provide supplemental oxygen when desaturation is
significant, as ordered.3
■ Discard used supplies in the appropriate receptacles.36
■ Clean the bronchoscope and send it for formal
reprocessing to prevent transmission of microorganisms.37
Start mechanical cleaning by wiping the external surface of
the bronchoscope with a soft, lint-free, disposable cloth or
sponge soaked in the freshly prepared enzymatic detergent
solution.38,39,40 Insert the distal portion of the bronchoscope
into the solution container and use the suction device to
suction the solution through the air, water, and biopsy
channels. Alternate suctioning the solution and suctioning
air until the return solution is visibly clean. Then flush or
blow air through the channels, according to the
bronchoscope manufacturer’s instructions.38,39,40
■ Detach the bronchoscope from the light source and
suction setup. If it’s a video bronchoscope, attach the
protective video cap to the device.38
■ Place the bronchoscope in a container for transportation
to the reprocessing area. If the reprocessing area is adjacent
to the area where the bronchoscope was used, an open
container is sufficient; if the reprocessing area is distant,
use a fully enclosed, labeled container or watertight
polyethylene bag for transportation.38,39,40
■ Clean and disinfect all furniture and equipment used
during the procedure to prevent transmission of
microorganisms.38,40
■ Remove and discard your personal protective equipment
and perform hand hygiene.10,11,12,13,14
■ Clean and disinfect your stethoscope using a disinfectant
pad.38,40
■ Perform hand hygiene.10,11,12,13,14
■ Document the procedure.41,42,43,44
Special considerations
■ The Joint Commission issued a sentinel event alert
concerning medical device alarm safety because alarm-
related events have been associated with permanent loss of
function or death. Among the major contributing factors
were
improper
alarm
settings,
alarm
settings
inappropriately turned off, and alarm signals not audible to
staff. Make sure alarm limits are set appropriately, and that
alarms are turned on, functioning properly, and audible to
staff. Follow facility guidelines for preventing alarm
fatigue.45
■ In addition to standard precautions, institute airborne
precautions if a mycobacterial infection is suspected or
confirmed. (See the “Airborne precautions” procedure, page
12.) If SARS or avian or pandemic influenza is suspected or
confirmed, institute both airborne
and
contact
precautions.26
■ After the procedure, position the patient in the semi-
Fowler position to prevent aspiration. If the patient is
unconscious, position the patient on one side with the head
of the bed elevated.
■ After the procedure, encourage the patient to expectorate
saliva instead of swallowing it. Notify the practitioner if the
patient develops fever, chest pain or discomfort, shortness
of breath, abnormal breath sounds, or hemoptysis.1
■ If a transbronchial biopsy was performed, arrange for a
chest X-ray 1 hour after the procedure, as ordered, to
determine whether a pneumothorax is present.1
Indications for bronchoscopy1
Bronchoscopy helps diagnose and treat conditions that may affect the
patient’s airway. Bronchoscopy may be used to:
■ evaluate persistent atelectasis or pulmonary infiltrates
■ evaluate recurrent pneumonia
■ assess upper airway patency
■ assess upper airway function
■ investigate the cause of hemoptysis, unexplained cough, dyspnea,
localized wheezing, or stridor
■ obtain lower respiratory tract secretions, cell washings, and biopsies for
histologic and microbiological evaluation
■ determine the extent and location of injury from toxic inhalation or
aspiration
■ evaluate problems associated with endotracheal or tracheostomy tubes
■ assist with difficult intubation or percutaneous tracheotomy
■ determine whether mucus plugs are responsible for lobar or segmental
atelectasis
■ perform balloon dilatation to treat tracheobronchial stenosis
■ remove abnormal endobronchial tissue or foreign material.
■ A patient with respiratory failure who can’t breathe
adequately alone may require intubation and mechanical
ventilation during the procedure.
Patient teaching
Provide a patient who’s undergoing bronchoscopy on an
outpatient basis with written instructions regarding
postbronchoscopy fever, which is usually a noninfective
acute inflammatory response.3 Tell the patient that if she
experiences a fever that continues for longer than 24 hours
or is higher than 101°F (38.3°C), she should notify the
practitioner.46 Instruct the patient not to drive or operate
heavy machinery for 24 hours, and to expect a mild sore
throat, muscle aches, and cough.46
Complications
Complications include bleeding, respiratory depression,
airway obstruction, cardiopulmonary arrest, arrhythmias,
esophagotracheal fistula, and pneumothorax. Other adverse
events
may
include hypoxemia,
hypercapnia,
bronchospasm, hypotension, laryngospasm, bradycardia,
epistaxis, and hemoptysis.1,47 Transbronchial biopsies are
associated with hemorrhage and pneumothorax.
NURSING ALERT The risk of complications is higher in patients with
coagulopathy, refractory hypoxemia, and unstable hemodynamic
status, but the procedure may still be performed if the benefits
outweigh the risks.1
Documentation
Record the date, time, and duration of the procedure. Also
document vital signs before, during, and after the
procedure. Include any preprocedure activities, such as
teaching provided to the patient and family and their
understanding of that teaching. Document all assessment
findings before and during the procedure, as well as any
medications administered and the patient’s response to
them. Document the patient’s response to the procedure.
After the procedure, document the patient’s LOC, airway
patency, respiratory rate and depth, pulse oximetry levels,
and whether supplemental oxygen was used.
REFERENCES
1 American Association for Respiratory Care. (2007). AARC clinical practice
guideline: Bronchoscopy assisting—2007 revision and update. Respiratory
Care, 52(1), 74–80. Accessed via the Web at
http://www.rcjournal.com/cpgs/pdf/bronchoscopy_assisting.pdf (Level VII)
2 Accreditation Association for Hospitals and Health Systems. (2017). Standard
25.01.18. Healthcare Facilities Accreditation Program: Accreditation
requirements for acute care hospitals. Chicago, IL: Accreditation Association
for Hospitals and Health Systems. (Level VII)
3 Du Rand, I. A., et al. (2013). British Thoracic Society guideline for diagnostic
flexible bronchoscopy in adults. Thorax, 68(Suppl. 1), i1–i44. Accessed via the
Web at https://www.brit-thoracic.org.uk/document-library/clinical-
information/bronchoscopy/flexible-bronchoscopy/diagnostic-flexible-
bronchoscopy-in-adults-guideline-2013/ (Level I)
4 Accreditation Association for Hospitals and Health Systems. (2017). Standard
15.01.11. Healthcare Facilities Accreditation Program: Accreditation
requirements for acute care hospitals. Chicago, IL: Accreditation Association
for Hospitals and Health Systems. (Level VII)
5 The Joint Commission. (2019). Standard RI.01.03 .01. Comprehensive
accreditation manual for hospitals. Oakbrook Terrace, IL: The Joint
Commission. (Level VII)
6 Centers for Medicare and Medicaid Services, Department of Health and
Human Services. (2015). Condition of participation: Patient’s rights. 42 C.F.R.
§ 482.13(b)(2).
7 DNV GL-Healthcare USA, Inc. (2016). PR.1 .SR.3 . NIAHO® accreditation
requirements: Interpretive guidelines & surveyor guidance (version 11).
Milford, OH: DNV GL-Healthcare USA, Inc. (Level VII)
8 The Joint Commission. (2019). Standard UP.01.01.01. Comprehensive
accreditation manual for hospitals. Oakbrook Terrace, IL: The Joint
Commission. (Level VII)
9 Accreditation Association for Hospitals and Health Systems. (2017). Standard
30.00 .14. Healthcare Facilities Accreditation Program: Accreditation
requirements for acute care hospitals. Chicago, IL: Accreditation Association
for Hospitals and Health Systems. (Level VII)
10 Centers for Disease Control and Prevention. (2002). Guideline for hand
hygiene in health-care settings: Recommendations of the Healthcare Infection
Control Practices Advisory Committee and the HICPAC/SHEA/APIC/IDSA Hand
Hygiene Task Force. MMWR Recommendations and Reports, 51(RR-16), 1–45.
Accessed via the Web at https://www.cdc.gov/mmwr/pdf/rr/rr5116.pdf (Level
II)
11 The Joint Commission. (2019). Standard NPSG.07.01.01. Comprehensive
accreditation manual for hospitals. Oakbrook Terrace, IL: The Joint
Commission. (Level VII)
12 World Health Organization. (2009). “WHO guidelines on hand hygiene in
health care: First global patient safety challenge, clean care is safer care”
[Online]. Accessed via the Web at
http://apps.who.int/iris/bitstream/10665/44102/1/9789241597906_eng.pdf
(Level IV)
13 Centers for Medicare and Medicaid Services, Department of Health and
Human Services. (2015). Condition of participation: Infection control. 42 C.F.R.
§ 482.42.
14 Accreditation Association for Hospitals and Health Systems. (2017). Standard
07.01.21. Healthcare Facilities Accreditation Program: Accreditation
requirements for acute care hospitals. Chicago, IL: Accreditation Association
for Hospitals and Health Systems. (Level VII)
15 DNV GL-Healthcare USA, Inc. (2016). IC.1 .SR.1 . NIAHO® accreditation
requirements: Interpretive guidelines & surveyor guidance (version 11).
Milford, OH: DNV GL-Healthcare USA, Inc. (Level VII)
16 The Joint Commission. (2019). Standard NPSG.01.01.01. Comprehensive
accreditation manual for hospitals. Oakbrook Terrace, IL: The Joint
Commission. (Level VII)
17 The Joint Commission. (2019). Standard RI.01.01.01. Comprehensive
accreditation manual for hospitals. Oakbrook Terrace, IL: The Joint
Commission. (Level VII)
18 Centers for Medicare and Medicaid Services, Department of Health and
Human Services. (2015). Condition of participation: Patient’s rights. 42 C.F.R.
§ 482.13(c)(1).
19 Accreditation Association for Hospitals and Health Systems. (2017). Standard
15.01.16. Healthcare Facilities Accreditation Program: Accreditation
requirements for acute care hospitals. Chicago, IL: Accreditation Association
for Hospitals and Health Systems. (Level VII)
20 DNV GL-Healthcare USA, Inc. (2016). PR.1.SR.5 . NIAHO® accreditation
requirements: Interpretive guidelines & surveyor guidance (version 11).
Milford, OH: DNV GL-Healthcare USA, Inc. (Level VII)
21 American Society of Anesthesiologists. (2017). Practice guidelines for
preoperative fasting and the use of pharmacologic agents to reduce the risk
of pulmonary aspiration: Application to healthy patients undergoing elective
procedures. Anesthesiology, 126(3), 376–393 . (Level V)
22 Centers for Medicare and Medicaid Services, Department of Health and
Human Services. (2015). Condition of participation: Nursing services. 42
C.F.R. § 482.23(c)
23 The Joint Commission. (2019). Standard MM.06.01.01. Comprehensive
accreditation manual for hospitals. Oakbrook Terrace, IL: The Joint
Commission. (Level VII)
24 Accreditation Association for Hospitals and Health Systems. (2017). Standard
16.01.03. Healthcare Facilities Accreditation Program: Accreditation
requirements for acute care hospitals. Chicago, IL: Accreditation Association
for Hospitals and Health Systems. (Level VII)
25 DNV GL-Healthcare USA, Inc. (2016). MM.1 .SR.2. NIAHO accreditation
requirements: Interpretive guidelines & surveyor guidance (version 11).
Milford, OH: DNV GL-Healthcare USA, Inc. (Level VII)
26 Siegel, J. D ., et al. (2007, revised 2017). “2007 guideline for isolation
precautions: Preventing transmission of infectious agents in healthcare
settings” [Online]. Accessed via the Web at
https://www.cdc.gov/infectioncontrol/pdf/guidelines/isolation-guidelines.pdf
(Level II)
27 Accreditation Association for Hospitals and Health Systems. (2017). Standard
07.01.10. Healthcare Facilities Accreditation Program: Accreditation
requirements for acute care hospitals. Chicago, IL: Accreditation Association
for Hospitals and Health Systems. (Level VII)
28 Kacmarek, R. M ., et al. (2017). Egan’s fundamentals of respiratory care (11th
ed.). St. Louis, MO: Mosby.
29 The Joint Commission. (2019). Standard NPSG.06 .01.01. Comprehensive
accreditation manual for hospitals. Oakbrook Terrace, IL: The Joint
Commission. (Level VII)
30 American Association of Critical-Care Nurses. (2013). “A ACN practice alert:
Alarm management” [Online]. Accessed via the Web at
https://www.aacn.org/aacn-website/shared/content/practice-
alerts/2015/11/25/alarm-management (Level VII)
31 Graham, K. C., & Cvach, M. (2010). Monitor alarm fatigue: Standardizing use
of physiological monitors and decreasing nuisance alarms. American Journal
of Critical Care, 19(1), 28–37. Accessed via the Web at
http://ajcc.aacnjournals.org/content/19/1/28.full.pdf
32 Jelic, S., et al. (2008). Clinical review: Airway hygiene in the intensive care
unit. Critical Care, 12(2), 209.
33 van Zwam, J. P., et al. (2010). Flexible bronchoscopy in supine or sitting
position: A randomized prospective analysis of safety and patient comfort.
Journal of Bronchology and Interventional Pulmonology, 17(1), 29–32. (Level
II)
34 The Joint Commission. (2019). Standard UP.01.03.01. Comprehensive
accreditation manual for hospitals. Oakbrook Terrace, IL: The Joint
Commission. (Level VII)
35 Centers for Medicare and Medicaid Services. (2014). “Requirements for
hospital medication administration, particularly intravenous (IV) medications
and post-operative care of patients receiving IV opioids” [Online]. Accessed
via the Web at http://www.cms.gov/Medicare/Provider-Enrollment-and-
Certification/SurveyCertificationGenInfo/Downloads/Survey-and-Cert-Letter-
14-15.pdf
36 Occupational Safety and Health Administration. (n.d .). “Bloodborne
pathogens, standard number 1910.1030” [Online]. Accessed via the Web at
https://www.osha.gov/pls/oshaweb/owadisp.show_document?
p_id=10051&p_table=STANDARDS (Level VII)
37 U.S . Food & Drug Administration. (2015). “Infections Associated with
Reprocessed Flexible Bronchoscope: FDA Safety Communication—Risk of
Infection” [Online]. Accessed via the Web at
https://www.fda.gov/Safety/MedWatch/SafetyInformation/SafetyAlertsforHum
anMedicalProducts/ucm462979.htm
38 Rutala, W. A., et al. (2008, revised 2017). “Guideline for disinfection and
sterilization in healthcare facilities, 2008” [Online]. Accessed via the Web at
https://www.cdc.gov/infectioncontrol/pdf/guidelines/disinfection-
guidelines.pdf (Level I)
39 Mehta, A. C., et al. (2005). American College of Chest Physicians and
American Association for Bronchoscopy [corrected] consensus statement:
Prevention of flexible bronchoscopy-associated infection. Chest, 128(3),
1742–1755. Accessed via the Web at
http://journal.publications.chestnet.org/article.aspx?articleid=1083754
40 Accreditation Association for Hospitals and Health Systems. (2017). Standard
07.02.03. Healthcare Facilities Accreditation Program: Accreditation
requirements for acute care hospitals. Chicago, IL: Accreditation Association
for Hospitals and Health Systems. (Level VII)
41 The Joint Commission. (2019). Standard RC.01.03 .01. Comprehensive
accreditation manual for hospitals. Oakbrook Terrace, IL: The Joint
Commission. (Level VII)
42 Centers for Medicare and Medicaid Services, Department of Health and
Human Services. (2015). Condition of participation: Medical record services.
42 C.F.R. § 482.24(b).
43 Accreditation Association for Hospitals and Health Systems. (2017). Standard
10.00 .03. Healthcare Facilities Accreditation Program: Accreditation
requirements for acute care hospitals. Chicago, IL: Accreditation Association
for Hospitals and Health Systems. (Level VII)
44 DNV GL-Healthcare USA, Inc. (2016). MR.2 .SR.1 . NIAHO® accreditation
requirements: Interpretive guidelines & surveyor guidance (version 11).
Milford, OH: DNV GL-Healthcare USA, Inc. (Level VII)
45 The Joint Commission. (2013). “Sentinel event alert: Medical device alarm
safety in hospitals” [Online]. Accessed via the Web at
https://www.jointcommission.org/assets/1/6/SEA_50_alarms_4 _26_16.pdf
(Level VII)
46 Sheski, F. D. Patient information: Flexible bronchoscopy (beyond the basics).
(2017). In: UpToDate, Mathur, P. N., & Finlay, G. (Eds.) . Accessed via the Web
at http://www.uptodate.com
47 Jin, F., et al. (2008). Severe complications of bronchoscopy. Respiration, 76(4),
429–433. (Level V)
BUCCAL AND SUBLINGUAL DRUG
ADMINISTRATION
Certain drugs are given buccally or sublingually to prevent
their destruction or transformation in the stomach or small
intestine. These drugs act quickly because the oral
mucosa’s thin epithelium and abundant vasculature allow
direct absorption into the bloodstream. Most drugs
administered by this route reach peak levels in 10 to 15
minutes of administration—typically much faster than with
oral administration of those same drugs.1
Other benefits of buccal and sublingual administration
include ease of administration in patients who refuse to
swallow a tablet, such as pediatric, geriatric, and psychiatric
patients; convenience of drug administration; and accurate
dosing compared with liquid formulations. Because
sublingual and buccal administration interferes with eating,
drinking, and talking, long-term administration by these
routes may be undesirable. Buccal and sublingual drugs
shouldn’t be administered to uncooperative or unconscious
patients, and they may be inappropriate for use in patients
with dry mouth, oral cavity injuries, or cognitive
impairment.2
Drugs given buccally include nitroglycerin and
methyltestosterone; drugs given sublingually include
ergotamine tartrate, isosorbide dinitrate, fentanyl,
nitroglycerin, and some benzodiazepines.
Equipment
Prescribed medication ▪ gloves.
Implementation
■ Avoid distractions and interruptions when preparing and
administering
medications
to prevent
medication
administration errors.3,4
■ Verify the practitioner’s order.5,6,7,8
■ Reconcile the patient’s medications when the practitioner
orders a new medication to reduce the risk of medication
errors, including omissions, duplications, dosing errors, and
drug interactions.
■ Compare the medication label with the order in the
patient’s medication record.5,6,7,8
■ Check the patient’s medical record for an allergy or a
contraindication to the prescribed medication. If an allergy
or contraindication exists, don’t administer the medication;
instead, notify the practitioner.5,6,7,8
■ Check the expiration date on the medication. If the
medication is expired, return it to the pharmacy and obtain
a new medication.5,6,7,8
■ Visually inspect the medication for discoloration or other
signs of loss of integrity; don’t administer the medication if
it’s integrity is compromised.5,6,7,8
■ Discuss any unresolved concerns about the medication
with the patient’s practitioner.5,6,7,8
■ Perform hand hygiene.9,10,11,12,13,14
■ Confirm the patient’s identity using at least two patient
identifiers.15
■ Provide privacy.16,17,18,19
■ Explain the procedure to the patient and family (if
appropriate) according to their individual communication
and learning needs to increase their understanding, allay
their fears, and enhance cooperation.20
■ If the patient is receiving the medication for the first time,
teach the patient about potential adverse reactions and
discuss other concerns related to the medication.5,6,7,8
■ Verify that the medication is being administered at the
proper time, in the prescribed dose, and by the correct route
to reduce the risk of medication errors.5,6,7,8
■ If your facility uses a bar code technology, scan your
identification badge, the patient’s identification bracelet,
and the medication’s bar code.
■ Raise the patient’s bed to waist level when providing care
to prevent caregiver back strain.21
Placing drugs in the oral mucosa
Buccal and sublingual administration routes allow some drugs, such as
nitroglycerin and methyltestosterone, to enter the bloodstream rapidly
without being degraded in the GI tract. To give a drug buccally, insert it
between the patient’s cheek and gum (as shown below). Instruct the patient
to close the mouth and hold the tablet against the cheek until the tablet is
absorbed.
To give a drug sublingually, place it under the patient’s tongue (as shown
below), and ask the patient to leave it there until it’s dissolved.
■ Assist the patient to a sitting position to avoid aspiration
of medication.
■ Perform hand hygiene.9,10,11,12,13,14
■ Put on gloves to comply with standard precautions.22,23,24
■ Assess the patient’s buccal or sublingual mucosa for
redness or altered integrity. If the integrity of the mucosa is
compromised, don’t proceed with the medication
administration. Instead, notify the practitioner.
■ For buccal administration, place the tablet in the buccal
pouch, between the cheek and gum. For sublingual
administration, place the tablet under the patient’s tongue.
(See Placing drugs in the oral mucosa.)
■ Instruct the patient to keep the medication in place until
it dissolves completely to ensure absorption.
■ Caution the patient against chewing the tablet or
touching it with the tongue to prevent accidental
swallowing.
■ If a sublingual spray is ordered, have the patient open the
mouth for administration. Remind the patient not to breathe
while the medication is being sprayed.
■ Return the bed to then lowest position to prevent falls
and maintain patient safety.25
■ Remove and discard your gloves.22
■ Perform hands hygiene.9,10,11,12,13,14
■ Document the procedure.26,27,28,29
Special considerations
■ Don’t give liquids to a patient who’s receiving buccal
medication, because some buccal tablets can take up to 1
hour to be absorbed. Tell the patient not to rinse the mouth
until the tablet has been absorbed.
■ Tell the patient with angina to wet the nitroglycerin tablet
with saliva and to keep it under the tongue until it has been
fully absorbed.
■ If the patient smokes, advise him or her not to smoke
before the drug has dissolved because nicotine’s
vasoconstrictive effects slow absorption.
Patient teaching
Teach the patient about the medication, dosing, correct
administration technique, and any potential adverse
reactions, and when to report them to the practitioner.
Complications
Some buccal medications may irritate the mucosa. Alternate
sides of the mouth for repeat doses to prevent continuous
irritation of the same site. Sublingual medications, such as
nitroglycerin, may cause a tingling sensation under the
tongue. If the patient finds this sensation bothersome, try
placing the drug in the buccal pouch instead.
Documentation
Record the name of the medication, the dose and route of
administration, the date and time of administration, and the
patient’s reaction, if any.26 Document the appearance and
integrity of the patient’s oral mucosa before medication
administration. Note any adverse reactions experienced by
the patient, as well as any prescribed interventions and
implementations and the patient’s response to your
interventions. Document any patient teaching and the
patient’s understanding of the teaching.
REFERENCES
1 Narang, N., & Sharma, J. (2011). Sublingual mucosa as a route for systemic
drug delivery. International Journal of Pharmacy and Pharmaceutical Sciences,
3(Suppl. 2), 18–22 . Accessed via the Web at
http://www.ijppsjournal.com/Vol3Suppl2/1092.pdf (Level V)
2 Nibha, K. P., & Pancholi, S. S . (2012). An overview on: Sublingual route for
systemic drug delivery. International Journal of Research in Pharmaceutical
and Biomedical Sciences, 3(2), 913–923.
3 Westbrook, J., et al. (2010). Association of interruptions with an increased risk
and severity of medication administration errors. Archives of Internal
Medicine, 170(8), 683–690 . (Level IV)
4 Institute for Safe Medication Practices. (2012). Side tracks on the safety
express: Interruptions lead to errors and unfinished...Wait, what was I doing?
Nurse Advise-ERR, 11(2), 1–4 . Accessed via the Web at
http://www.ismp.org/Newsletters/acutecare/showarticle.aspx?id=37
5 The Joint Commission. (2019). Standard MM.06 .01.01. Comprehensive
accreditation manual for hospitals. Oakbrook Terrace, IL: The Joint
Commission. (Level VII)
6 Centers for Medicare and Medicaid Services, Department of Health and
Human Services. (2015). Condition of participation: Nursing services. 42
C.F.R. § 482.23(c).
7 Accreditation Association for Hospitals and Health Systems. (2017). Standard
16.01.03. Healthcare Facilities Accreditation Program: Accreditation
requirements for acute care hospitals. Chicago, IL: Accreditation Association
for Hospitals and Health Systems. (Level VII)
8 DNV GL-Healthcare USA, Inc. (2016). MM .1 .SR.2 . NIAHO® accreditation
requirements: Interpretive guidelines & surveyor guidance (version 11).
Milford, OH: DNV GL-Healthcare USA, Inc. (Level VII)
9 The Joint Commission. (2019). Standard NPSG.07.01.01. Comprehensive
accreditation manual for hospitals. Oakbrook Terrace, IL: The Joint
Commission. (Level VII)
10 Centers for Disease Control and Prevention. (2002). Guideline for hand
hygiene in health-care settings: Recommendations of the Healthcare Infection
Control Practices Advisory Committee and the HICPAC/SHEA/>APIC/IDSA
Hand Hygiene Task Force. MMWR Recommendations and Reports, 51(RR-16),
1–45. Accessed via the Web at https://www.cdc.gov/mmwr/pdf/rr/rr5116.pdf
(Level II)
11 World Health Organization. (2009). “WHO guidelines on hand hygiene in
health care: First global patient safety challenge, clean care is safer care”
[Online]. Accessed via the Web at
http://apps.who.int/iris/bitstream/10665/44102/1/9789241597906_eng.pdf
(Level IV)
12 Centers for Medicare and Medicaid Services, Department of Health and
Human Services. (2015). Condition of participation: Infection control. 42 C.F.R.
§ 482.42.
13 Accreditation Association for Hospitals and Health Systems. (2017). Standard
07.01.21. Healthcare Facilities Accreditation Program: Accreditation
requirements for acute care hospitals. Chicago, IL: Accreditation Association
for Hospitals and Health Systems. (Level VII)
14 DNV GL-Healthcare USA, Inc. (2016). IC.1 .SR.1 . NIAHO® accreditation
requirements: Interpretive guidelines & surveyor guidance (version 11).
Milford, OH: DNV GL-Healthcare USA, Inc. (Level VII)
15 The Joint Commission. (2019). Standard NPSG.01.01.01. Comprehensive
accreditation manual for hospitals. Oakbrook Terrace, IL: The Joint
Commission. (Level VII)
16 The Joint Commission. (2019). Standard RI.01.01.01. Comprehensive
accreditation manual for hospitals. Oakbrook Terrace, IL: The Joint
Commission. (Level VII)
17 Centers for Medicare and Medicaid Services, Department of Health and
Human Services. (2015). Condition of participation: Patient’s rights. 42 C.F.R.
§ 482.13(c)(1).
18 Accreditation Association for Hospitals and Health Systems. (2017). Standard
15.01.16. Healthcare Facilities Accreditation Program: Accreditation
requirements for acute care hospitals. Chicago, IL: Accreditation Association
for Hospitals and Health Systems. (Level VII)
19 DNV GL-Healthcare USA, Inc. (2016). PR.1.SR.5 . NIAHO® accreditation
requirements: Interpretive guidelines & surveyor guidance (version 11).
Milford, OH: DNV GL-Healthcare USA, Inc. (Level VII)
20 The Joint Commission. (2019). Standard PC.02.01.21. Comprehensive
accreditation manual for hospitals. Oakbrook Terrace, IL: The Joint
Commission. (Level VII)
21 Waters, T. R., et al. (2009). “Safe patient handling training for schools of
nursing” [Online]. Accessed via the Web at
https://www.cdc.gov/niosh/docs/2009-127/pdfs/2009-127.pdf (Level VII)
22 Siegel, J. D ., et al. (2007, revised 2017). “2007 guideline for isolation
precautions: Preventing transmission of infectious agents in healthcare
settings” [Online]. Accessed via the Web at
https://www.cdc.gov/infectioncontrol/pdf/guidelines/isolation-guidelines.pdf
(Level II)
23 Accreditation Association for Hospitals and Health Systems. (2017). Standard
07.01.10. Healthcare Facilities Accreditation Program: Accreditation
requirements for acute care hospitals. Chicago, IL: Accreditation Association
for Hospitals and Health Systems. (Level VII)
24 DNV GL-Healthcare USA, Inc. (2016). IC.1 .SR.2 . NIAHO® accreditation
requirements: Interpretive guidelines & surveyor guidance (version 11).
Milford, OH: DNV GL-Healthcare USA, Inc. (Level VII)
25 Ganz, D. A., et al. (2013). Preventing falls in hospitals: A toolkit for improving
quality of care (AHRQ Publication No. 13-0015-EF). Rockville, MD: Agency for
Healthcare Research and Quality. Accessed via the Web at
https://www.ahrq.gov/sites/default/files/publications/files/fallpxtoolkit_0 .pdf
(Level VII)
26 The Joint Commission. (2019). Standard RC.01.03 .01. Comprehensive
accreditation manual for hospitals. Oakbrook Terrace, IL: The Joint
Commission. (Level VII)
27 Centers for Medicare and Medicaid Services, Department of Health and
Human Services. (2015). Condition of participation: Medical record services.
42 C.F.R. § 482.24(b).
28 Accreditation Association for Hospitals and Health Systems. (2017). Standard
10.00 .03. Healthcare Facilities Accreditation Program: Accreditation
requirements for acute care hospitals. Chicago, IL: Accreditation Association
for Hospitals and Health Systems. (Level VII)
29 DNV GL-Healthcare USA, Inc. (2016). MR.2 .SR.1 . NIAHO® accreditation
requirements: Interpretive guidelines & surveyor guidance (version 11).
Milford, OH: DNV GL-Healthcare USA, Inc. (Level VII)
BURN CARE
The goals of burn care are to maintain the patient’s
physiologic stability, repair skin integrity, prevent infection,
and promote maximal functioning and psychosocial health.
Competent care immediately after a burn occurs can
dramatically improve the success of overall treatment. (See
Burn care at the scene.)
Every burn victim should be evaluated initially as a
trauma patient. Focus on the primary trauma survey, while
maintaining the patient’s CAB. When the burn is caused by
a chemical agent, the priority is to remove the offending
agent and irrigate the affected area with copious amounts of
water. After the primary trauma survey, do a head-to-toe
assessment, followed by efforts to stop the burn and contain
the injury.
Burn severity is determined by the depth and extent of
the burn in conjunction with other factors, such as age,
complications, coexisting illnesses, and the possibility of
abuse. (See Estimating burn surfaces in adults and children
and Evaluating burn severity, pages 98 and 99.)
To promote stability, you’ll need to carefully monitor the
patient’s respiratory status, especially if the patient has
suffered smoke inhalation. Be aware that a patient with
partial- to full-thickness burns involving more than 20% of
the total body surface area usually needs fluid resuscitation,
which aims to support the body’s compensatory
mechanisms without overwhelming them.2 Expect to give
fluids (for instance, a crystalloid solution such as lactated
Ringer solution3 to keep the patient’s urine output at 0.5 to
1 mL/kg/hour for children and 1 to 1.5 mL/kg/hour for adults,
and expect to monitor blood pressure and heart rate.2 You’ll
also need to control body temperature, because skin loss
interferes with temperature regulation. Use warm fluids,
heat lamps, and hyperthermia blankets, as appropriate, to
keep the patient’s temperature above 97°F (36.1°C), if
possible. Additionally, you’ll frequently review laboratory
values such as serum electrolyte levels to detect early
changes in the patient’s condition.
Infection can increase wound depth, cause rejection of
skin grafts, slow healing, worsen pain, prolong
hospitalization, and even lead to death. To help prevent
infection, dress the burn site as ordered, monitor and rotate
IV lines regularly, and carefully assess the burn extent, body
system functions, and the patient’s emotional status.
Early positioning after a burn is extremely important to
prevent contractures. Careful positioning and regular
exercise for burned extremities help maintain joint function
and minimize deformity. When the extremities aren’t being
exercised, they should be maintained in maximal extension,
using splints, if necessary. Focus particular attention on the
patient’s hands and neck because they are the most prone
to rapid contracture. (See Positioning a burn patient to
prevent deformity, page 99.)
An escharotomy is usually performed by the practitioner
within the first 24 hours of the burn injury.4 This procedure
releases the constricting necrotic skin (eschar) and allows
the body tissue and organs to maintain normal perfusion
and function. Debridement of the wound, a procedure that
removes loose necrotic tissue, is performed by the
practitioner 2 to 7 days after the burn injury.4 Debridement
cleans the surfaces of the wound, allowing the wound to
heal more quickly. Burn wound excision is a procedure that
removes all necrotic tissue and prepares the wound surface
for closure using wound care (such as topical antimicrobials
or biological or synthetic wound covers), grafting, or flap
closure. These procedures are usually used by the
practitioner only on deep partial-thickness or full-thickness
burns.4
For wound care, use clean technique and wear a clean
gown, a cap, and a mask whenever the burn would is
exposed.5,6,7 Wear gloves to remove a soiled dressing and
to clean the wound. Wear sterile gloves to apply topical
agents and inner dressings,6,7 and to perform sharp bedside
debridement.8 Further research is needed to determine
which wound cleaning and dressing products optimize
healing.9 Most wounds require dressing changes one to
three times per day.4
A patient may have multiple burn wounds at different
stages of healing. Appropriate care requires multiple
treatment modalities and daily evaluation.4
Equipment
Normal saline solution ▪ warm water ▪ sterile drape ▪ sterile
bowl ▪ sterile tissue forceps ▪ sterile scissors ▪ prescribed
topical medication ▪
prescribed pain medication ▪
prescribed eye ointment or drops ▪ sterile tongue depressor
▪ sterile cotton-tipped applicator ▪ sterile burn gauze ▪
elastic netting or tape ▪ sterile 4′′ × 4′′ (10-cm × 10-cm)
gauze pads ▪ gloves ▪ sterile gloves ▪ gowns ▪ mask ▪ cap
▪ heat lamps ▪ cotton bath blanket ▪ impervious plastic
trash bag ▪ Optional: disposable hair clippers, specialty vest
dressing, splint, tracheostomy ties, moisture chambers for
eyes, eye dropper.
Burn care at the scene
By acting promptly when a burn injury occurs, you can improve a person’s
chance of uncomplicated recovery. Emergency care at the scene should
include steps to stop the burn from worsening; assessment of the person’s
circulation, airway, and breathing (CAB); a call for help from an emergency
medical team; and emotional and physiologic support.
Stop the burning process
■ If the victim is on fire, tell him or her to fall to the ground and roll to put
out the flames. (If the person panics and runs, air will fuel the flames,
worsening the burn and increasing the risk of inhalation injury.) Or, if you
can, wrap the victim in a blanket or other large covering to smother the
flames and protect the burned area from dirt. Keep the person’s head outside
the blanket so that he or she doesn’t breathe toxic fumes. As soon as the
flames are out, unwrap the person so that the heat can dissipate.
■ Cool the burned area with any nonflammable liquid to decrease pain and
stop the burn from growing deeper or larger. Do not use ice to cool the
burned area because it causes vasoconstriction and hypothermia.1
■ If possible, remove any potential sources of heat, such as jewelry, belt
buckles, and some types of clothing. In addition to adding to the burning
process, these items may cause constriction as edema develops. If the
person’s clothing adheres to the skin, don’t try to remove it. Rather, cut
around it.
■ Cover the wound with a clean, dry, sheet or other smooth, nonfuzzy
material. If available, cover the wound with plastic cling wrap to protect it
from bacterial colonization and excessive fluid and heat loss.1
Assess the damage
■ Assess the person’s CAB and perform cardiopulmonary resuscitation, if
necessary. Then check for other serious injuries, such as fractures, spinal
cord injury, lacerations, blunt trauma, and head contusions.
■ Estimate the extent and depth of the burns. If flames caused the burns,
and the injury occurred in a closed space, assess for signs of inhalation
injury: singed nasal hairs, burns on the face or mouth, soot-stained sputum,
coughing or hoarseness, wheezing, or respiratory distress. Also assess for
signs of carbon monoxide poisoning: dizziness, nausea, headache, and
seizures.
Call for help
■ Call for help as quickly as possible. Send someone to contact the
emergency medical service (EMS).
■ If the victim is conscious and alert, try to get a brief medical history as
soon as possible.
Provide support
■ Reassure the person that help is on the way. Provide emotional support by
staying with the person, answering questions, and explaining what’s being
done.
■ When help arrives, give the EMS a report on the person’s status.
A sterile field is required, and all equipment and supplies
used in the dressing should be sterile.
Preparation of equipment
Warm normal saline solution by immersing unopened
bottles in warm water. Gather equipment on the dressing
table. Make sure the treatment area has adequate light to
allow accurate wound assessment.
Implementation
■ Verify the practitioner’s orders.
■ Gather and prepare the appropriate equipment.
■ Perform hand hygiene.10,11,12,13,14,15
■ Confirm the patient’s identity using at least two patient
identifiers.16
■ Provide privacy.17,18,19,20
■ Perform a comprehensive pain assessment using
techniques appropriate for the patient’s age, condition, and
ability to understand.21
Estimating burn surfaces in adults
and children
You need to use different formulas to compute burned body surface area
(BSA) in adults and children because the proportion of BSA varies with
growth.
Rule of Nines
You can quickly estimate the extent of an adult patient’s burn by using the
“Rule of Nines.” This method quantifies BSA in percentages, in fractions of
nine or in multiples of nine. To use this method, mentally assess your
patient’s burns using the body chart shown below. Add the corresponding
percentages for each body section burned. Use the total—a rough estimate of
burn extent—to calculate initial fluid replacement needs.
Lund and Browder chart
The Rule of Nines isn’t accurate for infants and children because their body
shapes differ from those of adults. An infant’s head, for example, accounts
for about 17% of total BSA, compared with 7% for an adult. Instead, use the
Lund and Browder chart shown here.
Percentage of burned body surface by age
■ Administer an analgesic, as prescribed, following safe
medication administration practices to increase the
patient’s comfort and tolerance levels.22,23,24,25 Oral
analgesics should be given at an appropriate time before
the procedure, depending on the medication’s onset and
peak of action. An IV analgesic may be given immediately
before the procedure.
■ Explain the procedure to the patient to allay anxiety and
promote cooperation with the procedure.
■ Raise the bed to waist level while providing patient carte
to prevent caregiver back strain.26
■ Turn on overhead heat lamps to keep the patient warm.
Make sure that the lamps don’t overheat the patient. Cover
the patient with a cotton bath blanket to prevent chilling.7
■ Perform hand hygiene.10,11,12,13,14,15
■ Put on a cap, a mask, a gown, and gloves.5,6,27,28
■ Prepare the sterile field and supplies. Open equipment
packages using sterile technique and arrange supplies on a
sterile field in order of use. Pour warmed normal saline
solution into the sterile bowl on the sterile field.
■ Remove the old dressings, if present, and dispose of them
in the trash bag.29
■ Remove and discard your gloves.
■ Put on a clean pair of gloves.7,27,28
■ Clean the wound with 4′′ × 4′′ (10-cm × 10-cm) gauze
pads and normal saline solution, removing exudate and
crusts, as necessary, with the sterile forceps and sterile
scissors.
■ Assess the wound for color, size, odor, depth, drainage,
bleeding, cellulitis, epithelial budding, eschar separation,
peripheral pulses, and sensation.7
■ Remove and discard your gloves and gown.
■ Perform hand hygiene10,11,12,13,14,15 and put on sterile
gloves.6,7,27,28
Providing arm and leg care
■ Wrap the burn gauze once around the patient’s arm or
leg, overlapping the edges slightly, until the wound is
covered.
■ Apply a dry roller gauze dressing, wrapping from the
distal area to the proximal area to stimulate circulation.
■ Secure the dressing with elastic netting or tape.
Providing hand and foot care
■ Wrap each finger or toe individually with a single layer of
a 4′′ × 4′′ (10-cm × 10-cm) gauze pad, or place gauze
between the toes, as appropriate, to facilitate range of
motion.30
■ Place the patient’s hand in a functional position and
secure this position with a dressing.
■ Apply splints as ordered.
Evaluating burn severity1
To judge a burn’s severity, assess its depth and extent as well as other
factors.
Superficial or epidermal (first-degree) burn
Does the burned area appear pink or red with minimal edema? Is the area
sensitive to touch and temperature changes? If so, the patient most likely
has a superficial or epidermal (first-degree) burn, affecting only the
epidermal skin layer (shown below).
Partial-thickness (second-degree) burn
Does the burned area appear pink or red, with a mottled appearance? Do red
areas blanch when you touch them? Does the skin have large, thick-walled
blisters with subcutaneous edema? Does touching the burn cause severe
pain? Is the hair still present? If so, the patient most likely has a partial-
thickness (second-degree) burn (shown below), affecting the epidermal and
dermal layers.
Full-thickness (third-degree) burn
Does the burned area appear red, waxy white, brown, or black? Does red skin
remain red with no blanching when you touch it? Is the skin leathery with
extensive subcutaneous edema? Is the skin insensitive to touch? Does the
hair fall out easily? If so, the patient most likely has a full-thickness (third-
degree) burn that affects all skin layers (shown below).
Positioning a burn patient to
prevent deformity
For each of the potential deformities listed below, you can use the
corresponding positioning and interventions to help prevent the deformity.
Neck flexion contracture
Preventive positioning: Extension
Nursing intervention: Remove pillow from bed.
Neck extensor contracture
Preventive positioning: Prone with head slightly raised
Nursing intervention: Place pillow or rolled towel under upper chest to flex
cervical spine, or apply cervical collar, as ordered.
Axilla adduction and internal rotation
Preventive positioning: Shoulder joint in external rotation and 100- to 130-
degree abduction
Nursing intervention: Use an IV pole, bedside table, or sling to suspend arm.
Axilla adduction and external rotation
Preventive positioning: Shoulder joint in forward flexion and 100- to 130-
degree abduction
Nursing intervention: Use an IV pole, bedside table, or sling to suspend arm.
Shoulder protraction
Preventive positioning: Shoulders abducted and externally rotated
Nursing intervention: Remove pillow from bed.
Kyphosis
Preventive positioning: Shoulders abducted and externally rotated with hips
neutral, not flexed
Nursing interventions: Avoid placing a pillow under head or legs.
Scoliosis
Preventive positioning: Supine; affected arm abducted
Nursing interventions: Put pillows, blanket rolls, or other positioning devices
at sides.
Elbow flexion and pronation
Preventive positioning: Arm extended and supinated
Nursing intervention: Use an elbow splint or arm board.
Wrist flexion
Preventive positioning: Splint in 15-degree extension
Nursing interventions: Apply a wrist and hand splint.
Wrist extension
Preventive positioning: Splint in 15-degree flexion
Nursing intervention: Apply a wrist and hand splint.
Extensor tendons adhesions and loss of palmar grasp
Preventive positioning: Metacarpophalangeal joints in maximum flexion;
interphalangeal joints in slight flexion; thumb in maximum abduction
Nursing intervention: Apply a hand splint; wrap fingers separately.
Hip internal rotation, flexion, and adduction
Preventive positioning: Neutral rotation and abduction; maintain extension by
prone position
Nursing intervention: Place a pillow under buttocks when supine or use
trochanter rolls or knee or long leg splints.
Knee flexion
Preventive positioning: Knee extended
Nursing intervention: Apply a knee splint and avoid pillows under legs.
Plantar flexion
Preventive positioning: Ankle 90-degree dorsiflexion
Nursing intervention: Apply an ankle splint.
Providing chest, abdomen, and back care
■ Apply prescribed topical medication to the wound using
the sterile tongue depressor;7 follow safe medication
administration practices.22,23,24,25
■ Cover the entire burn area with sheets of burn gauze.
■ Wrap the area with roller gauze or apply a specialty vest
dressing.
■ Secure the dressing with elastic netting or tape.
■ Make sure the dressing doesn’t restrict the patient’s
respiratory function.
Providing facial care
■ If the patient has scalp burns, clip the hair around the
burn, as ordered. Clip other hair until it’s about 2′′ (5 cm)
long to prevent contamination of burned scalp areas.
■ Remove facial hair daily if it comes in contact with burned
areas.
■ Apply prescribed topical medication (such as triple
antibiotic ointment) to facial burns and leave them open to
dry; following
safe
medication
administration
practices.22,23,24,25 If dressings are required, make sure they
don’t cover the patient’s eyes, nostrils, or mouth.
Successful burn self-care after
discharge
You can help the patient make a successful transition from the health care
facility to home by encouraging the patient to follow the wound care and self-
care guidelines below.
■ To enhance healing, instruct the patient to eat well-balanced meals with
adequate carbohydrates and proteins, to eat between-meal snacks, and to
include at least one protein source in each meal and snack. Tell the patient to
avoid tobacco, alcohol, and caffeine because they constrict peripheral blood
flow.
■ Advise the patient to wash new skin with mild soap and water. To prevent
excessive skin dryness, instruct the patient to use a water-based lubricating
lotion and to avoid lotions containing alcohol or perfume.6,30 Caution the
patient to avoid bumping or scratching regenerated skin tissue.
■ Recommend nonrestrictive, nonabrasive clothing, which should be
laundered in a mild detergent. Advise the patient to wear protective clothing
during cold weather to prevent frostbite.
■ Warn the patient not to expose new skin to strong sunlight, and to always
use a sunblock with a high sun protection factor.6,30 Also, tell the patient not
to expose new skin to irritants, such as paint, solvent, strong detergents, and
antiperspirants. Recommend cool baths or ice packs to relieve itching.
■ To minimize scar formation, the patient may need to wear a pressure
garment—usually for 23 hours a day for 6 months to 1 year. Instruct the
patient to remove it only during daily hygiene. Suspect that the garment is
too tight if it causes cold, numbness, or discoloration in the fingers or toes, or
if its seams and zippers leave deep, red impressions for more than 10
minutes after the garment is removed.
■ Restoring function to the burned area is a major goal for a patient with a
burn. Tell the patient to follow the exercise regimen prescribed by the
physical and occupational therapist and to go to follow-up visits with the
practitioner.4
■ As the burn wound heals, itching can be minor or it can interfere with daily
activity and sleep. Tell the patient to consult with the practitioner if itching
occurs; itching can be relieved with antihistamines, massage, and cold
application.4
Providing ear care
■ Clip the hair around the affected ear, as needed.
■ Place a layer of 4′′ × 4′′ (10-cm × 10-cm) gauze behind
the auricle to prevent webbing.
■ Apply the prescribed topical medication to 4′′ × 4′′ (10-cm
× 10-cm) gauze pads, and place the pads over the burned
area or leave open to air, as ordered; following safe
medication administration practices.22,23,24,25 Before
securing the dressing with a roller bandage, position the
patient’s ears normally to avoid damaging the auricular
cartilage.
■ Assess the patient’s hearing ability.
Providing eye care
■ Note that cleaning of the area should be done as needed
to remove crusts and drainage.
■ After cleaning, administer ordered eye ointment or drops
using a sterile cotton-tipped applicator or eyedropper and
following safe medication administration practices to keep
the eyes moist.22,23,24,25 Use moisture chambers as needed,
especially if the patient can’t close the eyes completely.
■ Close the patient’s eyes before applying eye pads to
prevent corneal abrasion. Don’t apply topical ointments
near the eyes without a practitioner’s order.
Providing nasal care
■ Check the patient’s nostrils for inhalation injury: inflamed
mucosa, singed vibrissae, and soot.
■ Apply the prescribed topical medications using a sterile
tongue depressor; use safe medication administration
practices.22,23,24,25
■ If the patient has a nasogastric tube, use tracheostomy
ties to secure the tube. Check the ties frequently for
tightness resulting from swelling of facial tissue. Clean the
area around the tube, as needed.
Completing burn care
■ Raise the bed to the lowest position to prevent falls and
maintain patient safety.31
■ Dispose of equipment and supplies appropriately.29
■ Remove and discard your gloves and other personal
protective equipment.27,28
■ Perform hand hygiene.10,11,12,13,14,15
■ Document the procedure.32,33,34,35
Special considerations
■ To prevent cross-contamination, clean and dress the
cleanest areas first and the dirtiest or most contaminated
areas last. Make sure you remove and discard your gloves,
perform hand hygiene, and put on new gloves each time
you move from one area to another. To help prevent
excessive pain or cross-contamination, you may need to
perform the dressing in stages to avoid exposing all wounds
at the same time.
■ Thorough assessment and documentation of the wound’s
appearance are essential to detect infection and other
complications. A purulent wound or green-gray exudate
indicates infection, an overly dry wound suggests
dehydration, and a wound with a swollen, red edge suggests
cellulitis. Suspect a fungal infection if the wound is white
and powdery. Healthy granulation tissue appears clean,
pinkish, and faintly shiny with no exudate.
■ You can leave blisters intact or debride them; studies
support both interventions.30 Intact blisters protect
underlying tissue and create a clean, moist wound
environment. Debriding blisters prevents bacterial growth
and possible infection. If ordered, blisters can be debrided
with sterile forceps or in the shower.
■ Keep in mind that the patient with healing burns has
increased nutritional needs. The patient will require extra
protein and carbohydrates to accommodate an almost
doubled basal metabolism.
■ If you must manage a burn with topical medications,
exposure to air, and no dressing, be sure to watch for such
problems as wound adherence to bed linens, poor drainage
control, and partial loss of topical medications.
Patient teaching
Begin discharge planning as soon as the patient enters the
facility to help the patient (and the patient’s family) make a
smooth transition from facility to home. To encourage
therapeutic compliance, prepare the patient to expect
scarring, teach the patient wound management and pain
control, and urge the patient to follow the prescribed
exercise regimen. Provide encouragement and emotional
support, and urge the patient to join a burn survivor support
group. Also, teach the family or caregivers how to
encourage, support, and provide care for the patient. (See
Successful burn self-care after discharge.)
Complications
Infection is the most common burn complication.
Documentation
Record the date and time of all care provided. Describe
wound condition, special dressing-change techniques,
topical medications administered, positioning of the burned
area, and the patient’s tolerance of the procedure. Record
the preprocedure pain medication administered and its
effectiveness. Note patient teaching provided and the
patient’s response to instruction.
REFERENCES
1 Connolly, S. (2014). Clinical practice guidelines: Burn patient management.
ACI Statewide Burn Injury Service. Chatswood, NSW: Agency for Clinical
Innovation. Accessed via the Web at
http://www.aci.health.nsw.gov.au/__data/assets/pdf_file/0009/250020/Burn_Pa
tient_Management_ - _C linical_Practice_Guidelines.pdf
2 Pham, T. N ., et al. (2008). American Burn Association practice guidelines:
Burn shock resuscitation. Journal of Burn Care & Research, 29(1), 257–266.
Accessed via the Web at
http://www.downstate.edu/emergency_medicine/documents/burncare.pdf
(Level VII)
3 Perel, P., et al. (2013). Colloids versus crystalloids for fluid resuscitation in
critically ill patients. Cochrane Database of Systematic Reviews, 2013(4),
CD000567. (Level I)
4 Kagan, R. J ., et al. (2013). Surgical management of the burn wound and use of
skin substitutes: An expert panel white paper. Journal of Burn Care &
Research, 34(2), e60–e79. (Level VII)
5 Weber, J., & McManus, A. (2004). Infection control in burn patients. Burns,
30(8), A16–A24.
6 Knighton, J. (n.d .). “Wound management: Wound care for the adult burn
patient” [Online]. Accessed via the Web at
http://burnresource.com/pdfs/wound_management.pdf
7 Wiegand, D. L. (2017). AACN procedure manual for high acuity, progressive,
and critical care (7th ed.). St: Louis, MO: Elsevier.
8 Wound Ostomy and Continence Nurses Society Wound Committee and the
Association for Professionals in Infection Control and Epidemiology, Inc. 2000
Guidelines Committee. (2011). Clean vs. sterile dressing techniques for
management of chronic wounds: A fact sheet. Journal of Wound, Ostomy and
Continence Nursing, 39(Suppl. 2), S30–S34. (Level VII)
9 Hayek, S., et al. (2010). Burn wound cleansing—A myth or a scientific
practice. Annals of Burns and Fire Disasters, 23(1), 19–24.
10 The Joint Commission. (2019). Standard NPSG.07.01.01. Comprehensive
accreditation manual for hospitals. Oakbrook Terrace, IL: The Joint
Commission. (Level VII)
11 World Health Organization. (2009). “WHO guidelines on hand hygiene in
health care: First global patient safety challenge, clean care is safer care”
[Online]. Accessed via the Web at
http://apps.who.int/iris/bitstream/10665/44102/1/9789241597906_eng.pdf
(Level IV)
12 Centers for Disease Control and Prevention. (2002). Guideline for hand
hygiene in health-care settings: Recommendations of the Healthcare Infection
Control Practices Advisory Committee and the HICPAC/SHEA/APIC/IDSA Hand
Hygiene Task Force. MMWR Recommendations and Reports, 51(RR-16), 1–45.
Accessed via the Web at https://www.cdc.gov/mmwr/pdf/rr/rr5116.pdf (Level
II)
13 Accreditation Association for Hospitals and Health Systems. (2017). Standard
07.01.21. Healthcare Facilities Accreditation Program: Accreditation
requirements for acute care hospitals. Chicago, IL: Accreditation Association
for Hospitals and Health Systems. (Level VII)
14 Centers for Medicare and Medicaid Services, Department of Health and
Human Services. (2015). Condition of participation: Infection control. 42 C.F.R.
§ 482.42.
15 DNV GL-Healthcare USA, Inc. (2016). IC.1 .SR.1 . NIAHO® accreditation
requirements: Interpretive guidelines & surveyor guidance (version 11).
Milford, OH: DNV GL-Healthcare USA, Inc. (Level VII)
16 The Joint Commission. (2019). Standard NPSG.01.01.01. Comprehensive
accreditation manual for hospitals. Oakbrook Terrace, IL: The Joint
Commission. (Level VII)
17 Accreditation Association for Hospitals and Health Systems. (2017). Standard
15.01.16. Healthcare Facilities Accreditation Program: Accreditation
requirements for acute care hospitals. Chicago, IL: Accreditation Association
for Hospitals and Health Systems. (Level VII)
18 Centers for Medicare and Medicaid Services, Department of Health and
Human Services. (2015). Condition of participation: Patient’s rights. 42 C.F.R.
§ 482.13(c)(1).
19 The Joint Commission. (2019). Standard RI.01.01.01. Comprehensive
accreditation manual for hospitals. Oakbrook Terrace, IL: The Joint
Commission. (Level VII)
20 DNV GL-Healthcare USA, Inc. (2016). PR.1.SR.5 . NIAHO® accreditation
requirements: Interpretive guidelines & surveyor guidance (version 11).
Milford, OH: DNV GL-Healthcare USA, Inc. (Level VII)
21 The Joint Commission. (2019). Standard PC.01.02.07. Comprehensive
accreditation manual for hospitals. Oakbrook Terrace, IL: The Joint
Commission. (Level VII)
22 The Joint Commission. (2019). Standard MM.06.01.01. Comprehensive
accreditation manual for hospitals. Oakbrook Terrace, IL: The Joint
Commission. (Level VII)
23 Accreditation Association for Hospitals and Health Systems. (2017). Standard
16.01.03. Healthcare Facilities Accreditation Program: Accreditation
requirements for acute care hospitals. Chicago, IL: Accreditation Association
for Hospitals and Health Systems. (Level VII)
24 Centers for Medicare and Medicaid Services, Department of Health and
Human Services. (2015). Condition of participation: Nursing services. 42
C.F.R. § 482.23(c).
25 DNV GL-Healthcare USA, Inc. (2016). MM.1 .SR.2. NIAHO® accreditation
requirements: Interpretive guidelines & surveyor guidance (version 11).
Milford, OH: DNV GL-Healthcare USA, Inc. (Level VII)
26 Waters, T. R., et al. (2009). “Safe patient handling training for schools of
nursing” [Online]. Accessed via the Web at
https://www.cdc.gov/niosh/docs/2009-127/pdfs/2009-127.pdf (Level VII)
27 Siegel, J. D ., et al. (2007, revised 2017). “2007 guideline for isolation
precautions: Preventing transmission of infectious agents in healthcare
settings” [Online]. Accessed via the Web at
https://www.cdc.gov/infectioncontrol/pdf/guidelines/isolation-guidelines.pdf
(Level II)
28 Accreditation Association for Hospitals and Health Systems. (2017). Standard
07.01.10. Healthcare Facilities Accreditation Program: Accreditation
requirements for acute care hospitals. Chicago, IL: Accreditation Association
for Hospitals and Health Systems. (Level VII)
29 Occupational Safety and Health Administration. (n.d .). “Bloodborne
pathogens, standard number 1910.1030” [Online]. Accessed via the Web at
http://www.osha.gov/pls/oshaweb/owadisp.show_document?
p_table=STANDARDS&p_id=10051 (Level VII)
30 Moss, L. S . (2010). Treatment of the burn patient in primary care. Advances in
Skin & Wound Care, 23(11), 517–524.
31 Ganz, D. A., et al. (2013). Preventing falls in hospitals: A toolkit for improving
quality of care (AHRQ Publication No. 13-0015-EF). Rockville, MD: Agency for
Healthcare Research and Quality. Accessed via the Web at
https://www.ahrq.gov/sites/default/files/publications/files/fallpxtoolkit_0 .pdf
(Level VII)
32 The Joint Commission. (2019). Standard RC.01.03 .01. Comprehensive
accreditation manual for hospitals. Oakbrook Terrace, IL: The Joint
Commission. (Level VII)
33 Centers for Medicare & Medicaid Services, Department of Health and Human
Services. (2015). Condition of participation: Medical record services. 42 C.F.R.
§ 482.24(b).
34 Accreditation Association for Hospitals and Health Systems. (2017). Standard
10.00 .03. Healthcare Facilities Accreditation Program: Accreditation
requirements for acute care hospitals. Chicago, IL: Accreditation Association
for Hospitals and Health Systems. (Level VII)
35 DNV GL-Healthcare USA, Inc. (2016). MR.2 .SR.1 . NIAHO® accreditation
requirements: Interpretive guidelines & surveyor guidance (version 11).
Milford, OH: DNV GL-Healthcare USA, Inc. (Level VII)
BURN DRESSING APPLICATION, BIOLOGICAL
AND SYNTHETIC
Biological dressings provide a temporary protective covering
for burn wounds and for clean granulation tissue. They also
temporarily secure fresh skin grafts and protect graft donor
sites. Three organic materials (pigskin, cadaver skin, and
amniotic membrane) and one synthetic material (Biobrane)
have commonly been used. (See Comparing biological and
synthetic dressings, page 102.) However, amniotic
membrane is rarely used anymore because of decreased
availability, cost, and risk of disease transmission.1 Besides
stimulating rapid wound closure, these dressings control
pain, improve wound healing, and improve function and
cosmetic outcomes.
Amniotic membrane or fresh cadaver skin is usually
applied to the patient in the operating room (OR), although
it may be applied at the bedside. Pigskin and Biobrane may
be applied in either the OR or a treatment room. Before
applying a biological or synthetic dressing, the wound must
be cleaned and debrided. The frequency of dressing
changes depends on the type of wound and the dressing’s
specific function.
The use of sterile or clean technique for wound care
depends on the patient’s immune status, the wound status
(chronic or acute), the type of wound, its location and depth,
and the wound healing environment.4,5 For acute burn
wounds, use sterile technique and wear a gown, a cap, and
a mask whenever the burn wound is exposed.5,6 Wear a
clean gown when applying dressings.5 Wear clean gloves to
remove a soiled dressing and to clean the wound. Wear
sterile gloves to apply topical agents and inner dressings,2,5
and when performing sharp bedside debridement.4
Comparing biological and synthetic
dressings
Equipment
Two pairs of sterile gloves ▪ cap ▪ mask ▪ gown ▪ biological
or synthetic dressing ▪ sterile normal saline solution ▪
sterile basin ▪ Xeroflo gauze (or similar nonadherent
dressing with 3% bismuth tribromophenate in a water-in-oil
emulsion), or Exu-Dry (or similar nonadherent dressing) ▪
roller gauze dressing ▪ sterile scissors ▪ elastic netting or
tape ▪ Optional: prescribed analgesic, sterile forceps, sterile
hemostat, gauze dressing.
Preparation of equipment
If you are using a biologic dressing, pour sterile normal
saline solution into a sterile basin and then place the
biological dressing in the sterile basin. If you’re using a
synthetic dressing, open the dressing package. Using sterile
technique, open the sterile dressing packages. Arrange the
equipment on the dressing cart and keep the cart readily
accessible. Make sure the treatment area has adequate light
to allow accurate wound assessment and dressing
placement.
Implementation
■ Verify the practitioner’s order.
■ Gather and prepare the necessary equipment and
dressings.
■ Perform hand hygiene.7,8,9,10,11,12
■ Confirm the patient’s identity using at least two patient
identifiers.13
■ Provide privacy.14,15,16,17
■ If this is the patient’s first treatment, explain the
procedure to allay fears and promote cooperation.
■ Perform a comprehensive pain assessment using
techniques appropriate for the patient’s age, condition, and
ability to understand.18
■ If ordered, administer an analgesic following safe
medication administration practices to increase the
patient’s comfort and tolerance levels.19,20,21,22 Oral
analgesics should be given at an appropriate time before
the procedure, depending on the medication’s onset and
peak of action. An IV analgesic may be given immediately
before the procedure.
■ Provide a warm environment.23
■ Raise the patient’s bed to waist level while providing
patient care to prevent caregiver back strain.24
■ Perform hand hygiene.7,8,9,10,11,12
■ Put on a cap, a mask, a gown, and sterile gloves.4,5,25,26
■ Assess the burn wound, noting the color, size, odor, and
depth of the wound as well as the presence of drainage,
bleeding, edema, and eschar. Monitor for cellulitis in the
surrounding tissue.23
■ Clean and debride the wound to reduce bacteria.23,27
(See the “Sharp debridement” procedure.)
■ Remove and discard your gloves.
■ Perform hand hygiene.7,8,9,10,11,12 and put on a fresh pair
of sterile gloves.4,5,25,26
■ Place the dressing directly on the wound surface. Apply a
pigskin dressing dermal (shiny) side down; apply Biobrane,
nylon-backed (dull) side down.3 Roll the dressing directly
onto the skin, if applicable. Place the dressing strips so that
the edges touch but don’t overlap. Use sterile forceps, if
necessary.
■ Smooth the dressing. Eliminate folds and wrinkles by
rolling out the dressing with the hemostat handle, the
forceps handle, or your dominant hand to cover the wound
completely and ensure adherence.
■ Use the scissors to trim the dressing around the wound so
that the dressing fits the wound without overlapping
adjacent areas.
■ Place Xeroflo gauze directly over an allograft, pigskin
graft, or amniotic membrane. Place a few layers of sterile
gauze on top to absorb exudate, and wrap with a roller
gauze dressing. Secure the dressing with tape or elastic
netting.
■ Place a nonadhesive dressing (such as Exu-Dry)28 over a
Biobrane dressing to absorb drainage and provide stability.
Wrap the dressing with a roller gauze dressing, and secure it
with tape or elastic netting.
■ Position the patient comfortably, elevating the area if
possible to reduce edema, which may prevent the biological
dressing from adhering.
■ Return the bed to the lowest position to prevent falls and
maintain patient safety.29
■ Reassess the patient’s pain and respond appropriately.18
■ Discard used equipment and supplies in the appropriate
receptacles.30
■ Remove and discard your gloves and personal protective
equipment.25,26
■ Perform hand hygiene.7,8,9,10,11,12
■ Document the procedure.31,32,33,34
Special considerations
■ Handle a biological or synthetic dressing as little as
possible.
■ For the first 24 hours after applying a Biobrane dressing,
keep the outer dressing in place and don’t get it wet. After
24 hours, the dressing will be removed down to the
Biobrane during daily dressing changes, and you’ll inspect
the site for signs of infection. After the Biobrane adheres
(usually in 2 to 3 days), it doesn’t need to be covered with a
dressing.3
Patient teaching
Instruct the patient or caregiver to assess the site daily for
signs of complications, such as infection, swelling, blisters,
drainage, and separation. Make sure the patient knows who
to contact if these complications develop.
Complications
Infection can develop under a biological or synthetic
dressing. Observe the wound carefully during dressing
changes for signs of infection. If wound drainage appears
purulent, remove the dressing, clean the area with normal
saline solution or another prescribed cleaning solution as
ordered, and apply a fresh biological or synthetic dressing.
Documentation
Record the time and date of dressing changes. Note areas of
application, the quality of adherence, and purulent drainage
or other signs of infection. Document preprocedure pain
assessment, pain management administered, and the
effectiveness of your pain management interventions. Also
describe the patient’s tolerance of the procedure.
REFERENCES
1 Bezuhly, M., & Fish, J. S. (2012). Acute burn care. Plastic and Reconstructive
Surgery, 130(2), 349e–358e.
2 Kagan, R. J ., et al. (2013). Surgical management of the burn wound and use of
skin substitutes: An expert panel white paper. Journal of Burn Care &
Research, 34(2), e60–e79.
3 Smith & Nephew. (n.d .). “Biobrane: Instructions for use” [Online]. Accessed
via the Web at http://www.smith-nephew.com/belgique/produits-
old/biobrane-/biobrane--instructions-for-use/
4 Wound, Ostomy and Continence Nurses Society Wound Committee and the
Association for Professionals in Infection Control and Epidemiology 2000
Guidelines Committee. (2000, updated 2011). Clean vs. sterile dressing
techniques for management of chronic wounds: A fact sheet. Journal of
Wound, Ostomy, and Continence Nursing, 39(Suppl. 2), S30–S34. (Level VII)
5 Knighton, J. (n.d .). “Wound management: Wound care for the adult burn
patient” [Online]. Accessed via the Web at
http://burnresource.com/pdfs/wound_management.pdf
6 Weber, J., et al. (2004). Infection control in burn patients. Burns, 30(8), A16–
A24.
7 The Joint Commission. (2019). Standard NPSG.07.01.01. Comprehensive
accreditation manual for hospitals. Oakbrook Terrace, IL: The Joint
Commission. (Level VII)
8 Centers for Disease Control and Prevention. (2002). Guideline for hand
hygiene in health-care settings: Recommendations of the Healthcare Infection
Control Practices Advisory Committee and the HICPAC/SHEA/APIC/IDSA Hand
Hygiene Task Force. MMWR Recommendations and Reports, 51(RR-16), 1–45.
Accessed via the Web at https://www.cdc.gov/mmwr/pdf/rr/rr5116.pdf (Level
II)
9 World Health Organization. (2009). “WHO guidelines on hand hygiene in
health care: First global patient safety challenge, clean care is safer care”
[Online]. Accessed via the Web at
http://apps.who.int/iris/bitstream/10665/44102/1/9789241597906_eng.pdf
(Level IV)
10 Centers for Medicare and Medicaid Services, Department of Health and
Human Services. (2015). Condition of participation: Infection control. 42 C.F.R.
§ 482.42.
11 Accreditation Association for Hospitals and Health Systems. (2017). Standard
07.01.21. Healthcare Facilities Accreditation Program: Accreditation
requirements for acute care hospitals. Chicago, IL: Accreditation Association
for Hospitals and Health Systems. (Level VII)
12 DNV GL-Healthcare USA, Inc. (2016). IC.1 .SR.1 . NIAHO® accreditation
requirements: Interpretive guidelines & surveyor guidance (version 11).
Milford, OH: DNV GL-Healthcare USA, Inc. (Level VII)
13 The Joint Commission. (2019). Standard NPSG.01.01.01. Comprehensive
accreditation manual for hospitals. Oakbrook Terrace, IL: The Joint
Commission. (Level VII)
14 The Joint Commission. (2019). Standard RI.01.01.01. Comprehensive
accreditation manual for hospitals. Oakbrook Terrace, IL: The Joint
Commission. (Level VII)
15 DNV GL-Healthcare USA, Inc. (2016). PR.1.SR.5 . NIAHO® accreditation
requirements: Interpretive guidelines & surveyor guidance (version 11).
Milford, OH: DNV GL-Healthcare USA, Inc. (Level VII)
16 Centers for Medicare and Medicaid Services, Department of Health and
Human Services. (2015). Condition of participation: Patient’s rights. 42 C.F.R.
§ 482.13(c)(1).
17 Accreditation Association for Hospitals and Health Systems. (2017). Standard
15.01.16. Healthcare Facilities Accreditation Program: Accreditation
requirements for acute care hospitals. Chicago, IL: Accreditation Association
for Hospitals and Health Systems. (Level VII)
18 The Joint Commission. (2019). Standard PC.01.02.07. Comprehensive
accreditation manual for hospitals. Oakbrook Terrace, IL: The Joint
Commission. (Level VII)
19 The Joint Commission. (2017). Standard MM.06.01.01. Comprehensive
accreditation manual for hospitals. Oakbrook Terrace, IL: The Joint
Commission. (Level VII)
20 Centers for Medicare and Medicaid Services, Department of Health and
Human Services. (2015). Condition of participation: Nursing services. 42
C.F.R. § 482.23(c).
21 Accreditation Association for Hospitals and Health Systems. (2017). Standard
16.01.03. Healthcare Facilities Accreditation Program: Accreditation
requirements for acute care hospitals. Chicago, IL: Accreditation Association
for Hospitals and Health Systems. (Level VII)
22 DNV GL-Healthcare USA, Inc. (2016). MM.1 .SR.2. NIAHO® accreditation
requirements: Interpretive guidelines & surveyor guidance (version 11).
Milford, OH: DNV GL-Healthcare USA, Inc. (Level VII)
23 Wiegand, D. L. (2017). AACN procedure manual for high acuity, progressive,
and critical care (7th ed.). St: Louis, MO: Elsevier.
24 Waters, T. R., et al. (2009). “Safe patient handling training for schools of
nursing” [Online]. Accessed via the Web at
https://www.cdc.gov/niosh/docs/2009-127/pdfs/2009-127.pdf (Level VII)
25 Accreditation Association for Hospitals and Health Systems. (2017). Standard
07.01.10. Healthcare Facilities Accreditation Program: Accreditation
requirements for acute care hospitals. Chicago, IL: Accreditation Association
for Hospitals and Health Systems. (Level VII)
26 Siegel, J. D ., et al. (2007, revised 2017). “2007 guideline for isolation
precautions: Preventing transmission of infectious agents in healthcare
settings” [Online]. Accessed via the Web at
https://www.cdc.gov/infectioncontrol/pdf/guidelines/isolation-guidelines.pdf
(Level II)
27 Verger, J. T., & Lebet, R. M. (Eds.). (2008). AACN procedure manual for
pediatric acute and critical care. St. Louis, MO: Saunders.
28 Smith & Nephew. (n.d.) . “Wound management: EXU-DRY” [Online]. Accessed
via the Web at http://www.smith-
nephew.com/professional/products/advanced-wound-management/exu-dry-
wound-dressing/
29 Ganz, D. A., et al. (2013). Preventing falls in hospitals: A toolkit for improving
quality of care (AHRQ Publication No. 13-0015-EF). Rockville, MD: Agency for
Healthcare Research and Quality. Accessed via the Web at
https://www.ahrq.gov/sites/default/files/publications/files/fallpxtoolkit_0 .pdf
(Level VII)
30 Occupational Safety and Health Administration. (n.d .). “Bloodborne
pathogens, standard number 1910.1030” [Online]. Accessed via the Web at
http://www.osha.gov/pls/oshaweb/owadisp.show_document?
p_table=STANDARDS&p_id=10051 (Level VII)
31 The Joint Commission. (2019). Standard RC.01.03 .01. Comprehensive
accreditation manual for hospitals. Oakbrook Terrace, IL: The Joint
Commission. (Level VII)
32 Centers for Medicare and Medicaid Services, Department of Health and
Human Services. (2015). Condition of participation: Medical record services.
42 C.F.R. § 482.24(b).
33 Accreditation Association for Hospitals and Health Systems. (2017). Standard
10.00 .03. Healthcare Facilities Accreditation Program: Accreditation
requirements for acute care hospitals. Chicago, IL: Accreditation Association
for Hospitals and Health Systems. (Level VII)
34 DNV GL-Healthcare USA, Inc. (2016). MR.2 .SR.1 . NIAHO® accreditation
requirements: Interpretive guidelines & surveyor guidance (version 11).
Milford, OH: DNV GL-Healthcare USA, Inc. (Level VII)
C
CANES
Indicated for the patient with one-sided weakness or injury,
occasional loss of balance, or increased joint pressure, a
cane provides balance and support for walking and reduces
fatigue and strain on weight-bearing joints. Available in
various sizes, the cane should extend from the greater
trochanter to the floor and have a rubber tip to prevent
slipping. Canes are contraindicated for the patient with
bilateral weakness; such a patient should use crutches or a
walker.
Equipment
Rubber-tipped cane ▪ nonskid slippers or shoes with rubber
soles ▪ Optional: gait belt, standardized fall risk assessment
tool.
Although wooden canes are available, three types of
aluminum canes are used most frequently. The standard
aluminum cane (used by the patient who needs only slight
assistance with walking) provides the least support. The T-
handle cane (used by the patient with hand weakness) has
a straight-shaped handle with grips and a bent shaft. It
provides greater stability than the standard cane. Three- or
four-pronged (quad) canes are used by the patient with poor
balance or one-sided weakness and an inability to hold onto
a walker with both hands. The base of these types of canes
splits into three or four short, splayed legs and provides
greater stability than a standard cane but considerably less
than a walker.
Preparation of equipment
Ask the patient to hold the cane on the uninvolved side 6′′
(15.2 cm) from the base of the little toe. If the cane is made
of aluminum, its height can be adjusted by pushing in the
metal button on the shaft and raising or lowering the shaft;
if it’s made of wood, the rubber tip can be removed and
excess length sawed off. The handle of the cane should be
level with the greater trochanter to allow approximately 30-
degree flexion at the elbow. If the cane is too short, the
patient will have to drop the shoulder to lean on it; if it’s too
long, the patient will have to raise the shoulder and will
have difficulty supporting weight.
Implementation
■ Perform hand hygiene.1,2,3,4,5,6
■ Confirm the patient’s identity using at least two patient
identifiers.7
■ Provide privacy.8,9,10,11
■ Explain the procedure to the patient.
■ Perform a fall risk assessment using a standardized fall
risk assessment tool, as needed.12,13 A fall risk assessment
is generally performed on admission, on transfer within the
hospital, after a significant change in the patient’s
condition, and after a fall.13
■ Institute fall precautions: make sure that the patient is
wearing nonskid slippers or shoes with rubber soles; keep
the walking area uncluttered and well lit; make sure the
floor is clean and dry; and keep the hospital bed and
wheelchair locked.13
HOSPITAL-ACQUIRED CONDITION ALERT Keep in mind that an injury
from a fall is considered a hospital-acquired condition because it can
reasonably prevented using best practices. Follow fall prevention
practices (such as performing a fall risk assessment and instituting
fall precautions) to reduce the risk of injury from patient
falls.13,14,15,16
■ Tell the patient to hold the cane close to his or her body
to prevent leaning and on the uninvolved side17 to promote
a reciprocal gait pattern and to distribute weight away from
the involved side.
■ Instruct the patient to move the cane forward and the
uninvolved leg forward 4′′ to 8′′ (10 to 20 cm)
simultaneously, followed by the uninvolved leg.17
■ Encourage the patient to keep the stride length of each
leg and the timing of each step (cadence) equal.
■ Demonstrate the technique for the patient.
■ Have the patient return the demonstration, and provide
additional teaching as needed.
Negotiating stairs
■ Instruct the patient to always use a railing, if present,
when going up or down stairs. Tell the patient to hold the
cane with the other hand (as shown below). To ascend
stairs, tell the patient to lead with the uninvolved leg and
follow with the involved leg; to descend, tell the patient to
lead with the involved leg and follow with the uninvolved
one. Suggest that the patient use this mnemonic device:
“Up with the good; down with the bad.”
■ To negotiate stairs without a railing, tell the patient to use
the walking technique to ascend and descend the stairs.
Thus, to ascend stairs, tell the patient to hold the cane on
the uninvolved side, step with the uninvolved leg, advance
the cane, and then move the involved leg. To descend, have
the patient hold the cane on the uninvolved side, lead with
the cane, advance the involved leg, and then, finally,
advance the uninvolved leg.
■ Remind the patient always to move the cane just before
moving the involved leg in all stair use regardless of
direction.
Using a chair
■ To teach the patient to sit down, stand by the affected
side and tell the patient to place the backs of the legs
against the edge of the chair seat. Then tell the patient to
move the cane out from the side and to reach back with
both hands to grasp the chair’s armrests. Supporting the
weight on the armrests, the patient can then lower down
onto the seat. While seated, have the patient keep the cane
hooked on the armrest or the chair back.
■ To teach the patient to get up, stand by the affected side
and tell the patient to unhook the cane from the chair and
hold it in the stronger hand as the patient grasps the
armrests. Then tell the patient to move the uninvolved foot
slightly forward, to lean slightly forward, and to push against
the armrests to raise upright (as shown below).
■ Instruct the patient not to lean on the cane when sitting
or rising from the chair to prevent falls.
■ Supervise the patient each time the patient gets into or
out of a chair until you’re both certain the patient can do it
alone.
■ Perform hand hygiene.1,2,3,4,5,6
■ Document the procedure.18,19,20,21
Special considerations
■ To prevent falls during the learning period, guard the
patient carefully by standing slightly behind the patient’s
stronger side and putting one foot between the patient’s
feet and your other foot to the outside of the uninvolved leg.
If necessary, use a gait belt.
■ Coordinate practice sessions in the physical therapy
department, if necessary.
Patient teaching
Instruct the patient and family to assess the patient’s home
environment for safety concerns. Tell them to secure or
remove loose rugs, electrical cords, and clutter from the
floor. Instruct the patient to use safety bars and a raised
toilet seat in the bathroom and a nonskid mat in the
bathtub. Recommend that the patient use a fanny pack or
backpack to carry items around the house and keep
personal items close by.17 Also recommend that the patient
wear nonskid slippers or shoes with rubber soles and
replace the tip of the cane when it’s worn out.
Complications
A poorly fitted cane or unclear instructions can cause the
patient to lose balance and fall.
Documentation
Record the type of cane used, the amount of guarding
required, the distance walked, and the patient’s
understanding and tolerance of cane walking.
REFERENCES
1 The Joint Commission. (2019). Standard NPSG.07.01.01. Comprehensive
accreditation manual for hospitals. Oakbrook Terrace, IL: The Joint
Commission. (Level VII)
2 Centers for Disease Control and Prevention. (2002). Guideline for hand
hygiene in health-care settings: Recommendations of the Healthcare Infection
Control Practices Advisory Committee and the HICPAC/SHEA/APIC/IDSA Hand
Hygiene Task Force. MMWR Recommendations and Reports, 51(RR-16), 1–45.
Accessed via the Web at https://www.cdc.gov/mmwr/pdf/rr/rr5116.pdf (Level
II)
3 World Health Organization. (2009). “WHO guidelines on hand hygiene in
health care: First global patient safety challenge, clean care is safer care”
[Online]. Accessed via the Web at
http://apps.who.int/iris/bitstream/10665/44102/1/9789241597906_eng.pdf
(Level IV)
4 Centers for Medicare and Medicaid Services, Department of Health and
Human Services. (2015). Condition of participation: Infection control. 42 C.F.R.
§ 482.42.
5 Accreditation Association for Hospitals and Health Systems. (2017). Standard
07.01.21. Healthcare Facilities Accreditation Program: Accreditation
requirements for acute care hospitals. Chicago, IL: Accreditation Association
for Hospitals and Health Systems. (Level VII)
6 DNV GL-Healthcare USA, Inc. (2016). IC.1.SR.1 . NIAHO® accreditation
requirements: Interpretive guidelines & surveyor guidance (version 11).
Milford, OH: DNV GL-Healthcare USA, Inc. (Level VII)
7 The Joint Commission. (2019). Standard NPSG.01.01.01. Comprehensive
accreditation manual for hospitals. Oakbrook Terrace, IL: The Joint
Commission. (Level VII)
8 DNV GL-Healthcare USA, Inc. (2016). PR.1 .SR.5 . NIAHO® accreditation
requirements: Interpretive guidelines & surveyor guidance (version 11).
Milford, OH: DNV GL-Healthcare USA, Inc. (Level VII)
9 The Joint Commission. (2019). Standard RI.01.01.01. Comprehensive
accreditation manual for hospitals. Oakbrook Terrace, IL: The Joint
Commission. (Level VII)
10 Centers for Medicare and Medicaid Services, Department of Health and
Human Services. (2015). Condition of participation: Patient’s rights. 42 C.F.R.
§ 482.13(c)(1).
11 Accreditation Association for Hospitals and Health Systems. (2017). Standard
15.01.16. Healthcare Facilities Accreditation Program: Accreditation
requirements for acute care hospitals. Chicago, IL: Accreditation Association
for Hospitals and Health Systems. (Level VII)
12 The Joint Commission. (2015). “Sentinel event alert: Preventing falls and fall-
related injuries in health-care facilities” [Online]. Accessed via the Web at
http://www.jointcommission.org/assets/1/18/SEA_55 .pdf (Level VII)
13 Ganz, D. A., et al. (2013). Preventing falls in hospitals: A toolkit for improving
quality of care (AHRQ Publication No. 13-0015-EF). Rockville, MD: Agency for
Healthcare Research and Quality. Accessed via the Web at
https://www.ahrq.gov/sites/default/files/publications/files/fallpxtoolkit_0 .pdf
(Level VII)
14 Jarrett, N., & Callaham, M. (2016). “Evidence-based guidelines for selected
hospital-acquired conditions: Final report” [Online]. Accessed via the Web at
https://www.cms.gov/Medicare/Medicare-Fee-for-Service-
Payment/HospitalAcqCond/Downloads/2016-HAC-Report.pdf
15 Accreditation Association for Hospitals and Health Systems. (2017). Standard
16.02.02. Healthcare Facilities Accreditation Program: Accreditation
requirements for acute care hospitals. Chicago, IL: Accreditation Association
for Hospitals and Health Systems. (Level VII)
16 The Joint Commission. (2019). Standard PC.01.02.08 . Comprehensive
accreditation manual for hospitals. Oakbrook Terrace, IL: The Joint
Commission. (Level VII)
17 American Academy of Orthopaedic Surgeons. (2015). “How to use crutches,
canes, and walkers” [Online]. Accessed via the Web at
http://orthoinfo.aaos.org/topic.cfm?topic=a00181
18 The Joint Commission. (2019). Standard RC.01.03 .01. Comprehensive
accreditation manual for hospitals. Oakbrook Terrace, IL: The Joint
Commission. (Level VII)
19 Accreditation Association for Hospitals and Health Systems. (2017). Standard
10.00 .03. Healthcare Facilities Accreditation Program: Accreditation
requirements for acute care hospitals. Chicago, IL: Accreditation Association
for Hospitals and Health Systems. (Level VII)
20 Centers for Medicare and Medicaid Services, Department of Health and
Human Services. (2015). Condition of participation: Medical record services.
42 C.F.R. § 482.24(b).
21 DNV GL-Healthcare USA, Inc. (2016). MR.2 .SR.1 . NIAHO® accreditation
requirements: Interpretive guidelines & surveyor guidance (version 11).
Milford, OH: DNV GL-Healthcare USA, Inc. (Level VII)
CAPILLARY BLOOD GAS SAMPLING
An alternative to arterial blood gas (ABG) sampling, capillary
blood gas sampling is used to help monitor a patient’s
respiratory status. ABG analysis evaluates ventilation by
measuring blood pH and the partial pressures of arterial
oxygen (Pao2) and carbon dioxide (PaCO2). Blood pH
measurement reveals the blood’s acid–base balance. Pao2
indicates the amount of oxygen that the lungs deliver to the
blood, and PaCO2 indicates the lungs’ capacity to eliminate
carbon dioxide. ABG samples can also be analyzed for
oxygen content and saturation and for bicarbonate values.
The procedure can be performed in the presence of
hypothermia and hypoperfusion (provided that hypertension
isn’t present) and can be easier to perform than ABG
sampling in these situations. It involves a simple fingerstick,
and is less painful than an arterial puncture.
Capillary blood must be collected in special balanced-
heparin capillary blood gas collection tubes. The laboratory
should analyze samples within 15 minutes of collection.1
Equipment
Single use, auto-disabling sterile lancet (1.5 mm in depth) ▪
alcohol pad ▪ 2′′ × 2′′ (5-cm × 5-cm) sterile gauze pads ▪
gloves ▪ preheparinized glass capillary tube ▪ warming
supplies (such as a chemical warmer or a warm cloth that’s
less than 109°F [42.8°C]) ▪ sealing clay, wax sealer, or cap
▪ sample collection label ▪ laboratory biohazard transport
bag ▪ Optional: topical anesthetic cream, small adhesive
bandage, crushed ice, plastic bag.
Preparation of equipment
Fill a plastic bag with enough crushed ice to contain the
sample if you expect a delay in analysis.2
Implementation
■ Verify the practitioner’s order.
■ Gather and prepare the necessary supplies.
■ Perform hand hygiene.3,4,5,6,7,8
■ Confirm the patient’s identity using at least two patient
identifiers.9
■ Provide privacy.10,11,12,13
■ Explain the procedure to the patient, allowing the patient
to ask questions and express anxiety as needed.
■ Select the capillary puncture site, avoiding the earlobe,
which isn’t an appropriate site for this procedure. The finger
is the preferred site in adults.14 Select a site on the second
or third finger, using the side of the finger, parallel to the
side edges of the nail.14 Avoid the finger’s tip or pad to
prevent additional discomfort.
NURSING ALERT Avoid punctures at the site of a previous puncture;
through inflamed, swollen, edematous or poorly perfused tissues; at a
localized area of infection; or at peripheral arteries.1
■ Apply a topical anesthetic if indicated and time allows.
NURSING ALERT Don’t use lidocaine or prilocaine if the patient is
receiving methemoglobin-inducing agents, such as sulfonamides and
acetaminophen, because a risk of methemoglobinemia exists.
■ Apply a warming device to the puncture site for 5 to 10
minutes to increase blood flow and reduce hemolysis and
bruising. Don’t use products warmed in a microwave
because uneven heating by the microwave presents a burn
risk.
■ Perform hand hygiene.3,4,5,6,7,8 and put on gloves.15,16
■ Remove the warming device from the puncture site.
■ If topical anesthetic cream was used, remove it before
cleaning the puncture site.
■ Clean the puncture site with an alcohol pad and allow it to
dry completely because alcohol may interfere with test
results if not permitted to dry completely.14
■ Place the extremity in a dependent position and grasp it
firmly.
■ To perform the puncture, use a single-use, auto-disabling
lancet to prevent transmission of bloodborne pathogens.17
Puncture the skin with a quick, continuous, and deliberate
stroke to achieve good flow of blood and to prevent the
need to repeat the puncture.14
■ If required by your facility, wipe the first drop of blood
away with a sterile gauze pad, because residual alcohol or
tissue fluids may contaminate the blood gas sample.2,14
■ Hold the capillary tube horizontally to fill it by capillary
action and to prevent air entrapment. Avoid squeezing the
finger too tightly, because doing so may dilute the specimen
with plasma and increases the possibility of hemolysis.14
■ Fill the entire tube with blood and seal it.
■ Apply firm pressure to the puncture site with a sterile
gauze pad to stop the bleeding.14
NURSING ALERT If the patient has a hematologic disorder or is
receiving certain medications, such as warfarin, heparin, or aspirin,
the patient may have a prolonged clotting time.
■ Label the sample in the presence of the patient to
prevent mislabeling.9 If the patient is on oxygen therapy,
note the mode of oxygen therapy and flow rate on the
sample label.2
■ Properly dispose of contaminated equipment. Place the
lancet in a sharps container and place blood-soaked gauze
in a biohazard bag.2,18
■ Remove and discard your gloves, and perform hand
hygiene.3,4,5,6,7,8
■ If you expect a delay in analysis, place the sample on ice
to prevent gas tension alterations due to cellular
metabolism that continues after drawing the sample.2
■ Place the sample in a laboratory biohazard transport bag
and send it to the laboratory immediately.
■ Evaluate the puncture site for evidence of continued
bleeding. Apply a small adhesive bandage, if necessary.
■ Keep the wound clean and dry.
■ Perform hand hygiene.3,4,5,6,7,8
■ Document the procedure.19,20,21,22
Special considerations
■ Never scoop up blood from the patient’s skin, because it
may be partially coagulated, which can cause hemolysis.
■ Make sure there are no air bubbles in the collected
sample, because they may alter the test results.
■ If the patient has a fever, the test results may indicate
false-high Pao2 and PaCO2 levels
Complications
Infection, scarring, calcified nodules, burns, hematoma,
nerve damage, pain, bleeding, and bruising can occur at the
puncture site.1 Inspect the site daily.
Documentation
Note the date and time of the procedure, the site of the
puncture, the number of samples obtained, the amount of
blood loss, and the patient’s response to the procedure.
REFERENCES
1 American Association for Respiratory Care. (2001). AARC clinical practice
guideline: Capillary blood gas sampling for neonatal and pediatric patients.
Respiratory Care, 46(5), 506–513. Accessed via the Web at
http://www.rcjournal.com/cpgs/cbgscpg.html (Level VII)
2 Fischbach, F., & Dunning, M. B. (2017). A manual of laboratory and diagnostic
tests (10th ed.) . Philadelphia, PA: Wolters Kluwer.
3 Centers for Disease Control and Prevention. (2002). Guideline for hand
hygiene in health-care settings: Recommendations of the Healthcare Infection
Control Practices Advisory Committee and the HICPAC/SHEA/APIC/IDSA Hand
Hygiene Task Force. MMWR Recommendations and Reports, 51(RR-16), 1–45.
Accessed via the Web at https://www.cdc.gov/mmwr/pdf/rr/rr5116.pdf (Level
II)
4 The Joint Commission. (2019). Standard NPSG.07.01.01. Comprehensive
accreditation manual for hospitals. Oakbrook Terrace, IL: The Joint
Commission. (Level VII)
5 World Health Organization. (2009). “WHO guidelines on hand hygiene in
health care: First global patient safety challenge, clean care is safer care”
[Online]. Accessed via the Web at
http://apps.who.int/iris/bitstream/10665/44102/1/9789241597906_eng.pdf
(Level IV)
6 Centers for Medicare and Medicaid Services, Department of Health and
Human Services. (2015). Condition of participation: Infection control. 42 C.F.R.
§ 482.42.
7 Accreditation Association for Hospitals and Health Systems. (2017). Standard
07.01.21. Healthcare Facilities Accreditation Program: Accreditation
requirements for acute care hospitals. Chicago, IL: American Accreditation
Association for Hospitals and Health Systems. (Level VII)
8 DNV GL-Healthcare USA, Inc. (2014). IC.1.SR.1 . NIAHO® accreditation
requirements: Interpretive guidelines and surveyor guidance (version 11).
Milford, OH: DNV GL-Healthcare USA, Inc. (Level VII)
9 The Joint Commission. (2019). Standard NPSG.01.01.01. Comprehensive
accreditation manual for hospitals. Oakbrook Terrace, IL: The Joint
Commission. (Level VII)
10 Accreditation Association for Hospitals and Health Systems. (2017). Standard
15.01.16. Healthcare Facilities Accreditation Program: Accreditation
requirements for acute care hospitals. Chicago, IL: American Accreditation
Association for Hospitals and Health Systems. (Level VII)
11 Centers for Medicare and Medicaid Services, Department of Health and
Human Services. (2015). Condition of participation: Patient’s rights. 42 C.F.R.
§ 482.13(c)(1).
12 The Joint Commission. (2019). Standard RI.01.01.01. Comprehensive
accreditation manual for hospitals. Oakbrook Terrace, IL: The Joint
Commission. (Level VII)
13 DNV GL-Healthcare USA, Inc. (2016). PR.1.SR.5 . NIAHO® accreditation
requirements: Interpretive guidelines & surveyor guidance (version 11).
Milford, OH: DNV GL-Healthcare USA, Inc. (Level VII)
14 World Health Organization (WHO). (2010). “WHO guidelines on drawing
blood: Best practices in phlebotomy” [Online]. Accessed via the Web at
http://apps.who.int/iris/bitstream/10665/44294/1/9789241599221_eng.pdf
(Level IV)
15 Siegel, J. D ., et al. (2007, revised 2017). “2007 guideline for isolation
precautions: Preventing transmission of infectious agents in healthcare
settings” [Online]. Accessed via the Web at
https://www.cdc.gov/infectioncontrol/pdf/guidelines/isolation-guidelines.pdf
(Level II)
16 Accreditation Association for Hospitals and Health Systems. (2017). Standard
07.01.10. Healthcare Facilities Accreditation Program: Accreditation
requirements for acute care hospitals. Chicago, IL: American Accreditation
Association for Hospitals and Health Systems. (Level VII)
17 Centers for Disease Control and Prevention. (2011). “CDC clinical reminder:
Use of fingerstick devices on more than one person poses risk for
transmitting bloodborne pathogens” [Online]. Accessed via the Web at
https://www.cdc.gov/injectionsafety/Fingerstick-DevicesBGM.html
18 Occupational Safety and Health Administration. (n.d .). “Bloodborne
pathogens, standard number 1910.1030” [Online]. Accessed via the Web at
http://www.osha.gov/pls/oshaweb/owadisp.show_document?
p_table=STANDARDS&p_id=10051 (Level VII)
19 The Joint Commission. (2019). Standard RC.01.03 .01. Comprehensive
accreditation manual for hospitals. Oakbrook Terrace, IL: The Joint
Commission. (Level VII)
20 Centers for Medicare and Medicaid Services, Department of Health and
Human Services. (2015). Condition of participation: Medical record services.
42 C.F.R. § 482.24(b).
21 Accreditation Association for Hospitals and Health Systems. (2017). Standard
10.00 .03. Healthcare Facilities Accreditation Program: Accreditation
requirements for acute care hospitals. Chicago, IL: American Accreditation
Association for Hospitals and Health Systems. (Level VII)
22 DNV GL-Healthcare USA, Inc. (2016). MR.2 .SR.1 . NIAHO® accreditation
requirements: Interpretive guidelines & surveyor guidance (version 11).
Milford, OH: DNV GL-Healthcare USA, Inc. (Level VII)
CARBON MONOXIDE OXIMETRY
Intermittent or continuous carbon monoxide oximetry can
be performed noninvasively with a lightweight, portable
display unit that’s connected to a sensor probe placed on
the adult patient’s fingertip or an infant’s foot. The sensor
probe collects data about the patient’s carboxyhemoglobin
saturation and sends that information to the oximeter,
which then displays the calculated data in the form of a
percentage. A carboxyhemoglobin saturation level greater
than 3% for nonsmokers and 10% to 15% for smokers
indicates exposure to exogenous carbon monoxide.1
Carbon monoxide levels can be increased as a result of
chronic exposure to cigarette smoke or from acute episodes,
such as from exposure to a combustion heater; inhaling
spray paint or methylene chloride vapors found in paint
removers, degreasers, and solvents; and inadequate
ventilation of natural gas, fire, or vehicle exhaust.2 It may
also increase with exposure to the pesticide aluminum
phosphide (ALP).3 However, carbon monoxide poisoning is
commonly misdiagnosed because the initial signs and
symptoms—fatigue, shortness of breath, mild headache,
and nausea—are similar to those of a viral-related illness.
Severe signs and symptoms include dizziness, increasingly
acute headaches, weakness, drowsiness, and nausea
accompanied by vomiting. Carbon monoxide poisoning can
result in long-term neurologic damage, psychiatric and
cardiovascular disorders, and death.
Carbon monoxide poisoning is typically diagnosed using
the patient’s history, physical examination findings, and
laboratory test results that reveal an elevated carbon
monoxide level. Recent studies show that carbon monoxide
oximetry can also be useful for first-line screening4,5 and to
monitor carbon monoxide trends.5,6 However, further study
is needed to confirm the accuracy of these findings.1
Equipment
Noninvasive pulse carbon monoxide oximeter ▪ appropriate
sensor (according to the patient’s age, weight, digit size,
and the anticipated duration of monitoring)7 ▪ disinfectant
pads ▪ Optional: nail clippers, nail polish remover, batteries,
connecting cable.
Preparation of equipment
Plug the carbon monoxide oximeter into an electrical
source, and then turn on the unit. Plug the cable into the
oximeter unit. Select a sensor that’s compatible with the
particular device and appropriate for the patient, and
connect it to the cable.7 If using a portable, handheld
carbon monoxide oximeter, ensure that the unit is charged;
replace the batteries as needed according to the
manufacturer’s instructions. Attach an appropriate patient
sensor to the carbon monoxide oximeter.7 Calibrate the
carbon monoxide oximeter, if required, following the
manufacturer’s instructions.
Implementation
■ Verify the practitioner’s order for pulse carbon monoxide
oximetry.
■ Gather and prepare the appropriate equipment.
■ Review the patient’s medical record for past medical
history and history of present illness.
■ Perform hand hygiene.8,9,10,11,12,13
■ Confirm the patient’s identity using at least two patient
identifiers.14
■ Provide privacy.15,16,17,18
■ Explain the procedure to the patient and family (if
appropriate) according to their individual communication
and learning needs to increase their understanding, allay
their fears, and enhance cooperation.19 Answer any
questions.
■ Select a finger for the test. Although the index finger is
commonly used, you may use a smaller finger if the
patient’s fingers are too large for the equipment. Select one
that appears to be adequately perfused. If possible, don’t
choose a finger in the hand of an arm being used for blood
pressure monitoring.20
PEDIATRIC ALERT If you’re testing a neonate or small infant, wrap
the probe around the foot with the light beams and detectors aligned
opposite each other. For a large infant, use a probe that fits on the
great toe and secure it to the foot.
■ To enhance the accuracy of the measurement, make sure
the patient isn’t wearing false fingernails or nail polish.
Remove nail polish and other substances that might
interfere with the transmission of light between the sensor’s
light source and the detector.7,20
■ Clean the patient’s finger and fingernail with a
disinfectant pad, and allow it to dry.20
■ Place the sensor probe on the patient’s finger, making
sure the light source and the detector are aligned opposite
each other.7 If the patient has long fingernails, position the
probe perpendicular to the finger, if possible, or clip the
fingernail.
■ Position the patient’s hand at heart level to eliminate
venous pulsations and to promote accurate readings.
■ Look at the display panel on the carbon monoxide
oximeter; the perfusion indicator should begin registering a
pulse. Adjust the sensor and sensitivity, as needed, to
achieve an adequate pulse display, because without a
pulse, signal readings are erroneous.20
■ During oximetry, determine whether blood flow to the site
is adequate by assessing the patient’s pulse rate and
capillary refill time. If it isn’t, loosen restraints, remove tight-
fitting clothes, take off a blood pressure cuff, or check
arterial and IV lines, as appropriate. If none of these
interventions works, you may need to use an alternate site.7
■ Wait the time recommended by the manufacturer before
obtaining the reading.
■ Monitor the patient’s carbon monoxide level and pulse
rate on the display screen, and then obtain readings for
both.
■ Press the SPCO key to obtain a carbon monoxide reading.
Confirm the value as needed by placing the sensor on
another finger and obtain a reading.
■ For continuous monitoring, set the alarm limits
appropriately for the patient’s current condition and make
sure the alarms are turned on, functioning properly, and
audible to staff.21,22,23,24 Reposition reusable sensors at
least every 4 hours; if using adhesive sensors, inspect the
application site at least every 8 hours unless otherwise
directed, and reapply sensors to different sites as needed.7
Keep the monitoring site clean and dry, and make sure that
the skin doesn’t become irritated from the sensor.
■ Report critical test results to the practitioner within the
time frame established by your facility to prevent life-
threatening treatment delays.25
■ Record all measurements in the patient’s medical record.
■ Perform hand hygiene.8,9,10,11,12,13
■ When monitoring is complete, clean and disinfect the
oximeter, cable, and sensor (if not disposable) and the cable
(as applicable) according to the manufacturer’s
instructions.26,27
■ Perform hand hygiene.8,9,10,11,12,13
■ Document the procedure.28,29,30,31
Special considerations
■ Low carbon monoxide levels don’t rule out exposure,
especially if the patient has already received 100% oxygen
or if significant time has elapsed since exposure. In addition
to carbon monoxide oximetry, monitor the patient’s clinical
status and other laboratory parameters, such as arterial or
venous blood gas values.2
■ Individuals who chronically smoke may have mildly
elevated carbon monoxide levels as high as 10%.
Persistence of fetal hemoglobin may also falsely elevate
levels.1,2
■ The Joint Commission issued a sentinel event alert
concerning medical device alarm safety because alarm-
related events have been associated with permanent loss of
function and death. Among the major contributing factors
were improper alarm settings, inappropriately turned off
alarms, and alarm signals that were not audible to staff.
Make sure that alarm limits are appropriately set and that
alarms are turned on, functioning properly, and audible to
staff. Follow facility guidelines for preventing alarm
fatigue.24
Documentation
Document the date and time that you attached the oximeter
unit to the patient. Record the initial percentage of
carboxyhemoglobin registered as well as pulse rate and
oxygen saturation level. Record the date, time, and name of
the practitioner notified of abnormal results, if applicable;
the prescribed interventions; and the patient’s response to
those interventions. Also document patient teaching
provided, questions asked by the patient, and your
responses.
REFERENCES
1 Clardy, P. F., et al. Carbon monoxide poisoning. (2017). In: UpToDate, Traub, S.
J., & Burns, M. M . (Eds.) . Accessed via the Web at http://www.uptodate.com
2 Shochat, G. N. (2017). “Carbon monoxide toxicity” [Online]. Accessed via the
Web at http://emedicine.medscape.com/article/819987-overview (Level VII)
3 Mashayekhian, M., et al. (2016). Elevated carboxyhaemoglobin
concentrations by pulse COoximetry is associated with severe aluminium
phosphide poisoning. Basic & Clinical Pharmacology & Toxicology, 119(3),
322–329. Accessed via the Web at
http://onlinelibrary.wiley.com/doi/10.1111/bcpt.12571/abstract (Level IV)
4 Sebbane, M., et al. (2013). Emergency department management of suspected
carbon monoxide poisoning: Role of pulse co-oximetry. Respiratory Care,
58(10), 1614–1620. Accessed via the Web at
http://rc.rcjournal.com/content/early/2013/03/19/respcare.02313.full.pdf+htm
l (Level IV)
5 Brown, M. D., et al. (2017). Clinical policy: Critical issues in the evaluation and
management of adult patients presenting to the emergency department with
acute carbon monoxide poisoning. Annals of Emergency Medicine, 69(1), 98–
107. (Level I)
6 Park, Y. H., et al. (2012). The accuracy of noninvasive hemoglobin monitoring
using the Radical-7 Pulse CO-Oximeter in children undergoing neurosurgery.
Anesthesia and Analgesia, 115(6), 1302–1307. (Level VI)
7 Masimo Corporation. (2008). “Rad-87 Pulse CO Oximeter operator’s manual”
[Online]. Accessed via the Web at
http://www.infiniti.no/upload/Bruksanvisningar/Masimo/UM_EN_Rad-
87%20Operators%20Manual.pdf
8 The Joint Commission. (2019). Standard NPSG.07.01.01. Comprehensive
accreditation manual for hospitals. Oakbrook Terrace, IL: The Joint
Commission. (Level VII)
9 Centers for Disease Control and Prevention. (2002). Guideline for hand
hygiene in health-care settings: Recommendations of the Healthcare Infection
Control Practices Advisory Committee and the HICPAC/SHEA/APIC/IDSA Hand
Hygiene Task Force. MMWR Recommendations and Reports, 51(RR-16), 1–45.
Accessed via the Web at https://www.cdc.gov/mmwr/pdf/rr/rr5116.pdf (Level
II)
10 World Health Organization. (2009). “WHO guidelines on hand hygiene in
health care: First global patient safety challenge, clean care is safer care”
[Online]. Accessed via the Web at
http://apps.who.int/iris/bitstream/10665/44102/1/9789241597906_eng.pdf
(Level IV)
11 Accreditation Association for Hospitals and Health Systems. (2017). Standard
07.01.21. Healthcare Facilities Accreditation Program: Accreditation
requirements for acute care hospitals. Chicago, IL: Accreditation Association
for Hospitals and Health Systems. (Level VII)
12 Centers for Medicare and Medicaid Services, Department of Health and
Human Services. (2015). Condition of participation: Infection control. 42 C.F.R.
§ 482.42.
13 DNV GL-Healthcare USA, Inc. (2016). IC.1 .SR.1 . NIAHO® accreditation
requirements: Interpretive guidelines & surveyor guidance (version 11).
Milford, OH: DNV GL-Healthcare USA, Inc. (Level VII)
14 The Joint Commission. (2019). Standard NPSG.01.01.01. Comprehensive
accreditation manual for hospitals. Oakbrook Terrace, IL: The Joint
Commission. (Level VII)
15 Accreditation Association for Hospitals and Health Systems. (2017). Standard
15.01.16. Healthcare Facilities Accreditation Program: Accreditation
requirements for acute care hospitals. Chicago, IL: Accreditation Association
for Hospitals and Health Systems. (Level VII)
16 Centers for Medicare and Medicaid Services, Department of Health and
Human Services. (2015). Condition of participation: Patient’s rights. 42 C.F.R.
§ 482.13(c)(1).
17 DNV GL-Healthcare USA, Inc. (2016). PR.1.SR.5 . NIAHO® accreditation
requirements: Interpretive guidelines & surveyor guidance (version 11).
Milford, OH: DNV GL-Healthcare USA, Inc. (Level VII)
18 The Joint Commission. (2019). Standard RI.01.01.01. Comprehensive
accreditation manual for hospitals. Oakbrook Terrace, IL: The Joint
Commission. (Level VII)
19 The Joint Commission. (2019). Standard PC.02.01.21. Comprehensive
accreditation manual for hospitals. Oakbrook Terrace, IL: The Joint
Commission. (Level VII)
20 World Health Organization. (2011). “Pulse oximetry training manual” [Online].
Accessed via the Web at
http://www.who.int/patientsafety/safesurgery/pulse_oximetry/who_ps_pulse_o
xymetry_training_manual_en.pdf?ua=1 (Level VII)
21 The Joint Commission. (2019). Standard NPSG.06 .01.01. Comprehensive
accreditation manual for hospitals. Oakbrook Terrace, IL: The Joint
Commission. (Level VII)
22 Graham, K. C., & Cvach, M. (2010). Monitor alarm fatigue: Standardizing use
of physiological monitors and decreasing nuisance alarms. American Journal
of Critical Care, 19(1), 28–37. Accessed via the Web at
http://ajcc.aacnjournals.org/content/19/1/28.full.pdf
23 American Association of Critical-Care Nurses. (2013). “A ACN practice alert:
Alarm management” [Online]. Accessed via the Web at
https://www.aacn.org/aacn-website/shared/content/practice-
alerts/2015/11/25/alarm-management (Level VII)
24 The Joint Commission. (2013). “Sentinel event alert: Medical device alarm
safety in hospitals” [Online]. Accessed via the Web at
https://www.jointcommission.org/assets/1/6/SEA_50_alarms_4 _26_16.pdf
(Level VII)
25 The Joint Commission. (2019). Standard NPSG.02.03 .01. Comprehensive
accreditation manual for hospitals. Oakbrook Terrace, IL: The Joint
Commission. (Level VII)
26 Accreditation Association for Hospitals and Health Systems. (2017). Standard
07.02.03. Healthcare Facilities Accreditation Program: Accreditation
requirements for acute care hospitals. Chicago, IL: Accreditation Association
for Hospitals and Health Systems. (Level VII)
27 Rutala, W. A., et al. (2008, Revised 2017). “Guideline for disinfection and
sterilization in healthcare facilities, 2008” [Online]. Accessed via the Web at
https://www.cdc.gov/infectioncontrol/pdf/guidelines/disinfection-
guidelines.pdf (Level I)
28 The Joint Commission. (2019). Standard RC.01.03 .01. Comprehensive
accreditation manual for hospitals. Oakbrook Terrace, IL: The Joint
Commission. (Level VII)
29 Accreditation Association for Hospitals and Health Systems. (2017). Standard
10.00 .03. Healthcare Facilities Accreditation Program: Accreditation
requirements for acute care hospitals. Chicago, IL: Accreditation Association
for Hospitals and Health Systems. (Level VII)
30 Centers for Medicare and Medicaid Services, Department of Health and
Human Services. (2015). Condition of participation: Medical record services.
42 C.F.R. § 482.24(b).
31 DNV GL-Healthcare USA, Inc. (2016). MR.2 .SR.1 . NIAHO® accreditation
requirements: Interpretive guidelines & surveyor guidance (version 11).
Milford, OH: DNV GL-Healthcare USA, Inc. (Level VII)
CARDIAC MONITORING
Because it allows continuous observation of the heart’s
electrical activity, cardiac monitoring is used in patients with
conduction disturbances or in those at risk for life-
threatening arrhythmias. To reduce the number of false
alarms that can contribute to alarm fatigue, only those
patients with clinical indications for monitoring should
receive cardiac monitoring.1,2
Like other forms of electrocardiography, cardiac
monitoring uses electrodes placed on the patient’s chest to
transmit electrical signals that are converted into a tracing
of cardiac rhythm on an oscilloscope.
Two types of monitoring may be performed: hardwire or
telemetry. In hardwire monitoring, the patient is connected
to a monitor at the bedside. The rhythm display appears at
the bedside, but it may also be transmitted to a console at a
remote location. Telemetry uses a small transmitter
connected to the patient to send electrical signals to
another location, where they’re displayed on a monitor
screen. Battery powered and portable, telemetry frees the
patient from cumbersome wires and cables, allowing the
patient to be comfortably mobile. Telemetry is especially
useful for monitoring arrhythmias that occur during sleep,
rest, exercise, or stressful situations.
Regardless of the type, cardiac monitors can display the
patient’s heart rate and rhythm, produce a printed record of
cardiac rhythm, and sound an alarm if the patient’s heart
rate rises above or falls below specified limits. Monitors also
recognize and count abnormal heartbeats as well as
changes. For example, ST-segment monitoring helps detect
myocardial ischemia, electrolyte imbalance, coronary artery
spasm, and hypoxic events. The ST segment represents
early ventricular repolarization, and any changes in this
waveform component reflect alterations in myocardial
oxygenation.3 Any monitoring lead that views an ischemic
heart region will reveal ST-segment changes. The monitor’s
software establishes a template of the patient’s normal
QRST pattern from the selected leads; then the monitor
displays ST-segment changes. Some monitors display such
changes continuously; others, only on command. (See Lead
selection.)
Lead selection
Select the best monitoring leads for arrhythmia identification; display two
leads when possible.4
One application of bedside cardiac monitoring is a
reduced-lead continuous 12-lead electrocardiogram (ECG)
system (EASI system). This system uses an advanced
algorithm and only five electrodes placed on the torso to
derive a 12-lead ECG. The system allows all 12 leads to be
simultaneously displayed and recorded. (See Understanding
the EASI system.)
Equipment
Cardiac monitor ▪ lead wires ▪ patient cable ▪ disposable
pre-gelled electrodes (the number varies from three to six,
depending on the monitoring system) ▪ washcloth ▪ soap,
and water ▪ 4′′ × 4′′ (10-cm × 10-cm) gauze pads ▪
Optional: clippers, gloves, indelible marking pen.
For telemetry
Transmitter ▪ transmitter pouch ▪ telemetry battery pack,
leads, and electrodes.
Preparation of equipment
Plug the cardiac monitor into an electrical outlet and turn it
on to warm up the unit while you prepare the equipment
and the patient. Gather the appropriate equipment. Insert
the cable into the appropriate socket in the monitor.
Connect the lead wires to the cable. In some systems, the
lead wires are permanently secured to the cable. Each lead
wire should indicate the location for attachment to the
patient: right arm (RA), left arm (LA), right leg (RL), left leg
(LL), and chest (C). (This designation should appear on the
lead wire, if it’s permanently connected, or at the
connection of the lead wires and cable to the patient.) Then
connect an electrode to each of the lead wires, carefully
checking that each lead wire is in its correct outlet.
For telemetry monitoring, insert a new battery into the
transmitter.5 Match the poles on the battery with the polar
markings on the transmitter case. Test the battery’s charge,
and test the unit by pressing the button at the top of the
unit to ensure that the battery is operational. If the lead
wires aren’t permanently affixed to the telemetry unit,
attach them securely. If they must be attached individually,
connect each one to the correct outlet.
EQUIPMENT
Understanding the EASI system
The five-lead EASI (reduced-lead continuous 12-lead electrocardiogram
[ECG]) configuration gives a three-dimensional view of the electrical activity
of the heart from the frontal, horizontal, and sagittal planes to provide 12
leads of information. A mathematical calculation in the electronics of the
monitoring system is applied to the information, creating a derived 12-lead
ECG. Electrode placement for the EASI system is as follows:
Implementation
■ Assess whether the patient has a medical history of or is
at risk for a cardiac arrhythmia to help guide the
preparation of the best monitoring leads for arrhythmia
detection.4,5
■ Gather and prepare the appropriate equipment.
■ Perform hand hygiene.6,7,8,9,10,11
■ Confirm the patient’s identity using at least two patient
identifiers.12
■ Provide privacy.13,14,15,16
■ Explain the procedure to the patient and family (if
appropriate) according to their communication and learning
needs to increase their understanding, allay their fears, and
enhance cooperation.17
■ Put on gloves if necessary to comply with standard
precautions.18,19,20
■ Raise the patient’s bed to waist level when providing care
to prevent caregiver back strain.21
■ Assist the patient to the supine position and expose the
chest.5
■ Determine electrode positions on the patient’s chest
based on the system and lead you’re using. (See Positioning
monitoring leads, page 110.)
■ If necessary, clip the hair in an area around each
electrode site to ensure good skin contact with the
electrodes.3,5
■ Clean the electrode area with soap and water and dry it
completely with a towel to enable adequate transmission of
electrical impulses.1 Don’t use alcohol to prepare the sites
because it can dry out the patient’s skin.1
Positioning monitoring leads
The illustrations below show the electrode placement for five-, six-, and
three-lead systems. Make sure you place electrodes properly so that
arrhythmias are correctly identified. Before placing chest electrodes, palpate
the patient’s chest to locate the intercostal spaces.4 The angle of Louis, or
sternal angle, is a clinical landmark formed by the junction of the manubrium
and the sternum.
Five-lead system
In the five-lead system, the electrode positions generally remain constant. To
select the leads you want to monitor, simply use the lead selection button at
the central station or on the bedside monitor. Position the electrodes as
follows (shown at right):
■ Place the right arm (RA) electrode near the right shoulder, close to the
junction of the right arm and torso.
■ Place the left arm (LA) electrode near the left shoulder, close to the
junction of the left arm and torso.
■ Place the right leg (RL) electrode below the level of the lowest rib on the
right abdominal area.
■ Place the left leg (LL) electrode below the level of the lowest rib on the left
abdominal area.
■ Place the chest (C) electrode in the fourth intercostal space to the right of
the sternum for V1 or in the fifth intercostal space in the left midaxillary line
for V6.5
Note: The chest electrode can be placed in any of the standard V1 to V6
locations, but V1 and then V6 are generally selected because of their value in
arrhythmia monitoring.
Six-lead system
The electrode positions typically remain constant in the
six-lead system as well. Two chest leads monitor for
arrhythmias as well as the ST segment in the anterior
heart wall.22 To select the leads you want to monitor, use
the lead-selection button at the central station or on the
bedside monitor. Position the electrodes as follows (shown
above):
■ Place the RA electrode near the right shoulder, close to the junction of the
right arm and torso.
■ Place the LA electrode near the left shoulder, close to the junction of the
left arm and torso.
■ Place the RL electrode below the level of the lowest rib on the right
abdominal area.
■ Place the LL electrode below the level of the lowest rib on the left
abdominal area.
■ Place one C electrode in the fourth intercostal space to the right of the
sternum for V1 to monitor arrhythmias; place another C electrode in the fifth
intercostal space halfway between the substernal notch and the left
midclavicular line for V3 to enhance monitoring of the anterior heart wall.
Three-lead system
In the three-lead system, you may need to change the positon of the
electrodes. The first choice of leads to be monitored is modified chest lead 1
(MCL1), followed by modified chest lead 6 (MCL6), and then lead II. For MCL1
or MCL6, in the three-lead system (shown below on left):
■ Place the RA electrode near the left shoulder, close to the junction of the
left arm and torso.5
■ Place the LA electrode in the fourth intercostal space to the right of the
sternum.5
■ Place the LL electrode in the fifth intercostal space in the left midaxillary
line.5
■ Select lead I on the monitor to obtain MCL1 and lead II to obtain MCL6.5
For lead II in the three-lead system, position the electrodes as follows
(shown below on right):
■ Place the RA electrode near the right shoulder, close to the junction of the
right arm and torso.
■ Place the LA electrode near the left shoulder, close to the junction of the
left arm and torso.
■ Place the RL electrode below the level of the lowest rib on the right
abdominal area.
■ Select lead II on the monitor.
■ Roughen the skin at the intended electrode sites with a
washcloth, a gauze pad, or the sandpaper on the electrode
to remove part of the stratum corneum or outer layer of the
dermis to facilitate transmission of the electrical signals.1
■ If possible, use an indelible marker to mark the electrode
locations to make sure the electrode sites remain consistent
if replacement is necessary.5
■ Remove the backing from the pre-gelled electrode. Check
the gel for moistness. If the gel is dry, discard it and replace
it with a fresh electrode.5
■ Apply the electrode to the appropriate site by pressing
your fingers in a circular motion around the electrode to fix
the gel and stabilize the electrode. Avoid pressing directly
on the gel pad to prevent spreading of the gel and loss of
adhesion and transmission.5 Repeat this procedure for each
electrode.
TROUBLESHOOTING
Identifying cardiac monitor problems
For hardwire monitoring
■ When all the electrodes are in place, attach the lead wires
and check for a tracing on the cardiac monitor. Assess the
quality of the ECG. (See Identifying cardiac monitor
problems.)
■ To verify that each beat is being detected by the monitor,
compare the digital heart rate display with your count of the
patient’s heart rate.
■ If necessary, adjust the size and position of the rhythm
tracing on the recording paper following the manufacturer’s
instructions.
■ Select the best monitoring leads for arrhythmia
identification; display two leads when possible. Use lead II to
evaluate atrial activity and measure heart rate, and use V1,
if available, to assess for a wide QRS complex. A five-lead
monitoring system is necessary for monitoring V leads; use
modified chest lead I if a five-lead monitoring system isn’t
available.4
For telemetry monitoring
■ Attach an electrode to the end of each lead wire.
■ Place the transmitter in the pouch. Tie the pouch strings
around the patient’s neck and waist, making sure that the
pouch fits snugly without causing discomfort. If no pouch is
available, place the transmitter in the patient’s bathrobe
pocket. Some patient gowns have a built-in pocket to hold
the transmitter and make movement easier.5
■ Check the patient’s waveform for clarity, position, and
size. Adjust the gain and baseline, as needed. (If necessary,
ask the patient to remain resting or sitting in the room while
you locate the patient’s ECG pattern at the central station.)
■ Select the best monitoring leads for arrhythmia
identification; display two leads when possible.
Completing the procedure
■ Set the upper and lower limits of the heart rate alarm,
taking into consideration the patient’s current heart rate
and clinical condition.23 Turn on alarms and make sure
they’re functioning properly and audible to staff
members.1,24,25,26 If your system has an arrhythmia and
pacemaker recognition system, follow the manufacturer’s
directions to set individual parameters and to activate the
alarm.
■ To obtain a rhythm strip, press the RECORD key at the
central station. Label or make sure that the strip is labeled
with the patient’s name, identification number, date, time,
and lead(s) recorded. Also measure and record the PR
interval, QRS duration, and QT interval.
■ Identify and document the rhythm. Place the rhythm strip
in the appropriate location in the patient’s medical record.27
■ Return the bed to the lowest position to prevent falls and
maintain patient safety.23
■ Discard the used supplies in the appropriate receptacle.18
■ Remove and discard your gloves if worn.
■ Perform hand hygiene.6,7,8,9,10,11
■ Document the procedure.27,28,29,30
Special considerations
■ The Joint Commission has issued a sentinel event alert
concerning medical device alarm safety, because alarm-
related events have been associated with permanent loss of
function or death. Among the major contributing factors
were
improper
alarm
settings,
alarm
settings
inappropriately turned off, and alarm signals not audible to
staff. Make sure that alarm limits are set appropriately and
that alarms are turned on, functioning properly, and audible
to staff. Follow facility guidelines for preventing alarm
fatigue.24
■ Monitor the ECG pattern continually for arrhythmias,
along with the patient’s response to any rhythm or heart
rate change, and intervene appropriately. Obtain a rhythm
strip when any rhythm change occurs.5
■ In patients at high risk for torsades de points, measure
the QT interval and calculate the QT interval corrected for
heart rate (QTC) using a consistent lead. A QTC greater than
0.5 second is dangerously prolonged and associated with
torsades de points. Patients at risk include those who are
taking antiarrhythmics, antibiotics, antipsychotics, and other
medications that prolong QTC and those with severe
bradycardia, hypokalemia, hypomagnesemia, or drug
overdose.4
■ Ensure proper electrode placement every shift to ensure
accurate interpretation of cardiac rhythm.31
■ Make sure that all electrical equipment and outlets are
grounded to avoid electric shock and interference (artifacts).
Also ensure that the patient is clean and dry to prevent
electric shock.31
■ Don’t open the electrode packages until just before using
to prevent the gel from drying out.
■ Don’t place the electrodes on bony prominences, hairy
areas, areas where defibrillator pads will be placed, or areas
for chest compression.31
■ Assess the electrode sites for signs of irritation or
sensitivity reaction. Change and reposition the electrodes
daily or more often if needed.1,4,32
■ If the patient is being monitored by telemetry, show the
patient how the transmitter works. If applicable, show the
button that will produce a recording of the ECG at the
central station. Teach the patient how to push the button
whenever symptoms are present so that the central console
will print a rhythm strip. Tell the patient to remove the
transmitter if taking a shower or bath. However, stress the
importance of letting you know before the unit is removed.
Complications
Complications include skin irritation or sensitivity to the
electrode adhesive or gel.
Documentation
Record in your notes the date and time that monitoring
begins and the monitoring lead used. Note any patient and
family teaching and patient and family understanding of
your teaching. Document a rhythm strip at least every shift
and with any changes in the patient’s condition (or as
directed by your facility). Make sure the strip is labeled with
the patient’s name and identification number as well as the
date, time, lead(s) recorded, appropriate measurements,
and rhythm interpretation.
REFERENCES
1 American Association of Critical-Care Nurses. (2013). “AACN practice alert:
Alarm management” [Online]. Accessed via the Web at
https://www.aacn.org/aacn-website/shared/content/practice-
alerts/2015/11/25/alarm-management (Level VII)
2 Funk, M., et al. (2010). Unnecessary arrhythmia monitoring and
underutilization of ischemia and QT interval monitoring in current clinical
practice: Baseline results of the practical use of the latest standards for
electrocardiography trial. Journal of Electrocardiology, 43(6), 542–547. (Level
II)
3 American Heart Association. (2004). AHA scientific statement: Practice
standards for electrocardiographic monitoring in hospital settings. Circulation,
110, 2721–2746. Accessed via the Web at
http://circ.ahajournals.org/content/110/17/2721.full.pdf+html (Level VII)
4 American Association of Critical-Care Nurses. (2016). “AACN practice alert:
Accurate dysrhythmia monitoring in adults” [Online]. Accessed via the Web at
http://www.aacn.org/wd/practice/docs/practicealerts/dysrhythmia-
monitoring.pdf?menu=aboutus
5 Wiegand, D. L. (2017). AACN procedure manual for high acuity, progressive,
and critical care (7th ed.). Philadelphia, PA: Saunders.
6 Centers for Disease Control and Prevention. (2002). Guideline for hand
hygiene in health-care settings: Recommendations of the Healthcare Infection
Control Practices Advisory Committee and the HICPAC/SHEA/APIC/IDSA Hand
Hygiene Task Force. MMWR Recommendations and Reports, 51(RR-16), 1–45.
Accessed via the Web at https://www.cdc.gov/mmwr/pdf/rr/rr5116.pdf (Level
II)
7 The Joint Commission. (2019). Standard NPSG.07.01.01. Comprehensive
accreditation manual for hospitals. Oakbrook Terrace, IL: The Joint
Commission. (Level VII)
8 World Health Organization. (2009). “WHO guidelines on hand hygiene in
health care: First global patient safety challenge, clean care is safer care”
[Online]. Accessed via the Web at
http://apps.who.int/iris/bitstream/10665/44102/1/9789241597906_eng.pdf
(Level IV)
9 Centers for Medicare and Medicaid Services, Department of Health and
Human Services. (2015). Condition of participation: Infection control. 42 C.F.R.
§ 482.42.
10 Accreditation Association for Hospitals and Health Systems. (2017). Standard
07.01.21. Healthcare Facilities Accreditation Program: Accreditation
requirements for acute care hospitals. Chicago, IL: Accreditation Association
for Hospitals and Health Systems. (Level VII)
11 DNV GL-Healthcare USA, Inc. (2016). IC.1 .SR.1 . NIAHO® accreditation
requirements: Interpretive guidelines & surveyor guidance (version 11).
Milford, OH: DNV GL-Healthcare USA, Inc. (Level VII)
12 The Joint Commission. (2019). Standard NPSG.01.01.01. Comprehensive
accreditation manual for hospitals. Oakbrook Terrace, IL: The Joint
Commission. (Level VII)
13 Centers for Medicare and Medicaid Services, Department of Health and
Human Services. (2015). Condition of participation: Patient’s rights. 42 C.F.R.
§ 482.13(c)(1).
14 Accreditation Association for Hospitals and Health Systems. (2017). Standard
15.01.16. Healthcare Facilities Accreditation Program: Accreditation
requirements for acute care hospitals. Chicago, IL: Accreditation Association
for Hospitals and Health Systems. (Level VII)
15 The Joint Commission. (2019). Standard RI.01.01.01. Comprehensive
accreditation manual for hospitals. Oakbrook Terrace, IL: The Joint
Commission. (Level VII)
16 DNV GL-Healthcare USA, Inc. (2016). PR.1.SR.5 . NIAHO® accreditation
requirements: Interpretive guidelines & surveyor guidance (version 11).
Milford, OH: DNV GL-Healthcare USA, Inc. (Level VII)
17 The Joint Commission. (2019). Standard PC.02.01.21. Comprehensive
accreditation manual for hospitals. Oakbrook Terrace, IL: The Joint
Commission. (Level VII)
18 Siegel, J. D ., et al. (2007, Revised 2017). “2007 guideline for isolation
precautions: Preventing transmission of infectious agents in healthcare
settings” [Online]. Accessed via the Web at
https://www.cdc.gov/infectioncontrol/pdf/guidelines/isolation-guidelines.pdf
(Level II)
19 Accreditation Association for Hospitals and Health Systems. (2017). Standard
07.01.10. Healthcare Facilities Accreditation Program: Accreditation
requirements for acute care hospitals. Chicago, IL: Accreditation Association
for Hospitals and Health Systems. (Level VII)
20 DNV GL-Healthcare USA, Inc. (2016). IC.1 .SR.2 . NIAHO® accreditation
requirements: Interpretive guidelines & surveyor guidance (version 11).
Milford, OH: DNV GL-Healthcare USA, Inc. (Level VII)
21 Waters, T. R., et al. (2009). “Safe patient handling training for schools of
nursing” [Online]. Accessed via the Web at
https://www.cdc.gov/niosh/docs/2009-127/pdfs/2009-127.pdf (Level VII)
22 Nihon Kohden America. (2010). “Bedside ECG monitoring for nurses: BSM
6000 series” [Online]. Accessed via the Web at
http://edutracker.com/trktrnr/presentation/jh_newcastle_pa/n9ecgmonitor.pdf
23 Bell, L., & Cox, B. (2008). Monitoring clinical alarms. American Journal of
Critical Care, 17(1), 44. Accessed via the Web at
http://ajcc.aacnjournals.org/content/17/1/44.full.pdf+html
24 The Joint Commission. (2013). “Sentinel event alert: Medical device alarm
safety in hospitals” [Online]. Accessed via the Web at
https://www.jointcommission.org/assets/1/6/SEA_50_alarms_4 _26_16.pdf
(Level VII)
25 The Joint Commission. (2019). Standard NPSG.06 .01.01. Comprehensive
accreditation manual for hospitals. Oakbrook Terrace, IL: The Joint
Commission. (Level VII)
26 Graham, K. C., & Cvach, M. (2010). Monitor alarm fatigue: Standardizing use
of physiological monitors and decreasing nuisance alarms. American Journal
of Critical Care, 19(1), 28–37. Accessed via the Web at
http://ajcc.aacnjournals.org/content/19/1/28.full.pdf
27 The Joint Commission. (2019). Standard RC.01.03 .01. Comprehensive
accreditation manual for hospitals. Oakbrook Terrace, IL: The Joint
Commission. (Level VII)
28 Centers for Medicare and Medicaid Services, Department of Health and
Human Services. (2015). Condition of participation: Medical record services.
42 C.F.R. § 482.24(b).
29 Accreditation Association for Hospitals and Health Systems. (2017). Standard
10.00 .03. Healthcare Facilities Accreditation Program: Accreditation
requirements for acute care hospitals. Chicago, IL: Accreditation Association
for Hospitals and Health Systems. (Level VII)
30 DNV GL-Healthcare USA, Inc. (2016). MR.2 .SR.1 . NIAHO® accreditation
requirements: Interpretive guidelines & surveyor guidance (version 11).
Milford, OH: DNV GL-Healthcare USA, Inc. (Level VII)
31 Melendez, L. A., & Pino, R. M . (2012). Electrocardiogram interference: A thing
of the past? Biomedical Instrumentation & Technology, 46(6), 470–477. (Level
VI)
32 Cvach, M. M., et al. (2013). Daily electrode change and effect on cardiac
monitor alarms: An evidence-based practice approach. Journal of Nursing
Care Quality, 28(3), 265–271. (Level VI)
CARDIAC OUTPUT MEASUREMENT
Measurement of cardiac output (CO)—the amount of blood
ejected by the heart in 1 minute—helps evaluate cardiac
function. The most widely used method of calculating this
measurement is the bolus thermodilution technique. This
technique evaluates the cardiac status of critically ill
patients and those suspected of having cardiac disease.
To measure CO using the bolus thermodilution technique,
a quantity of solution colder than the patient’s blood is
injected into the right atrium through the proximal port on a
pulmonary artery (PA) catheter. This indicator solution mixes
with the blood as it travels through the right ventricle into
the PA (as shown below). A thermistor on the catheter
registers the change in temperature of the flowing blood. A
computer then plots the temperature change over time as a
curve and calculates flow based on the area under the
curve.
Depending on the patient’s status and your facility’s
preference, iced or room-temperature injectant may be
used. Although iced injectant may provide a stronger signal
because it’s colder, room-temperature injectant is more
convenient and generally provides equally accurate
measurements. However, iced injectant may be more
accurate in hypothermic patients or when smaller volumes
of injectant must be used (3 to 5 mL), as in patients with
volume restrictions.
Cardiac output setup
The photo below shows you how a cardiac output setup should look when it’s
put together correctly and completely.
The normal range for CO is 4 to 8 L/minute.1 However, the
adequacy of a patient’s CO is better assessed by calculating
cardiac index (CI), which is adjusted for the patient’s body
size. To calculate CI, divide the patient’s cardiac output by
body surface area (BSA), which is a function of height and
weight. For example, a cardiac output of 4 L/minute might
be adequate for a 65′′,
120-lb (165-cm, 54-kg) patient
(normally a BSA of 1.59 and a CI of 2.5) but would be
inadequate for a 74′′,
230-lb (188-cm, 104-kg) patient
(normally a BSA of 2.26 and a CI of 1.8). The normal CI for
adults ranges from 2.5 to 4.2 L/minute/m2; for pregnant
women, 3.5 to 6.5 L/minute/m2; and for elderly adults, 2 to
2.5 L/minute/m2.
Equipment
Thermodilution PA catheter in position ▪ CO computer and
cables (or a module for the bedside cardiac monitor) ▪
closed injectant delivery system ▪ 10-mL syringe ▪ 500-mL
bag of dextrose 5% in water or normal saline solution ▪ vital
signs monitoring equipment ▪ crushed ice and water (for
iced-injectant measurement) ▪ Optional: Normal saline
solution.
Some bedside cardiac monitors measure CO continuously,
using either an invasive or a noninvasive method. If your
bedside monitor doesn’t have this capability, you’ll need a
free-standing CO computer.
Preparation of equipment
Perform hand hygiene.3,4,5,6,7,8 Assemble the equipment at
the patient’s bedside. Maintain sterile technique throughout
equipment preparation.1 Insert the closed injectant system
tubing into the 500-mL bag of IV solution. Connect the 10-
mL syringe to the system tubing, and prime the tubing with
IV solution until it’s free of air. Then clamp the tubing. (See
Cardiac output setup.)
After clamping the tubing, connect the primed system to
the stopcock of the proximal injectant lumen of the PA
catheter. Trace the tubing from the patient to its point of
origin to make sure that you’re connecting the tubing to the
correct port.9,10 If using iced injectant, place the coiled
segment into a clean container and add crushed ice and
water to cover the entire coil. Let the solution cool for 15 to
20 minutes. If using room-temperature injectant, connect
the primed system to the stopcock of the proximal injectant
lumen of the PA catheter. Next, connect the temperature
probe from the cardiac output computer to the closed
injectant system’s flow-through housing device. Connect the
CO computer cable to the thermistor connector on the PA
catheter and verify the blood temperature reading. Lastly,
turn on the CO computer and enter the correct computation
constant, as provided by the catheter’s manufacturer; the
computation constant varies by the type and the size of the
catheter, injectate volume, and injectate temperature.1,2
Implementation
■ Gather and prepare the necessary equipment.
■ Perform hand hygiene.3,4,5,6,7,8
■ Confirm the patient’s identity using at least two patient
identifiers.11
■ Provide privacy.
■ Explain the procedure to the patient according to
individual communication and learning needs to increase
understanding, allay fears, and enhance cooperation.12
■ Raise the patient’s bed to waist level when providing care
to prevent caregiver back strain.13
■ Obtain the patient’s vital signs, and hemodynamic
readings and assess the patient’s respiratory and
cardiovascular status, including cardiac rhythm. Monitor for
signs and symptoms of inadequate perfusion, including
restlessness, fatigue, changes in level of consciousness,
decreased capillary refill time, diminished peripheral pulses,
oliguria, and pale, cool skin.1
■ Make sure the patient is in a comfortable, supine position
with the head of the bed elevated no more than 20 degrees.
If the patient’s condition prevents this position, use
consistent positioning to ensure
consistent CO
measurement.1 Tell the patient not to move during the
procedure because movement can cause an error in
measurement.14
■ If you’re using the proximal port for an infusion, flush the
port with normal saline solution at an appropriate rate to
clear the line of infusing medication without administering a
bolus of medication to the patient. If you can, restrict
infusions delivered through the introducer or other central
lines because measurements obtained during administration
of other infusions may be elevated by as much as 40%.1
■ Note the temperature of the injectant on the computer or
monitor screen. The acceptable temperature range for iced
injectate is 32° to 53.6°F (0° to 12°C).1
■ Verify the presence of a PA waveform to ensure that the
distal thermistor is located in the pulmonary artery.1
Observe the patient’s heart rate and cardiac rhythm on the
cardiac monitor; a rapid heart rate or an arrhythmia may
decrease CO and lead to varying CO measurements.1
■ Turn the stopcock, unclamp the injectant IV tubing, and
withdraw exactly 10 mL of solution into the syringe.
Reclamp the tubing (as shown below).1
■ Turn the stopcock at the catheter injectant lumen to open
a fluid path between the injectant lumen of the PA catheter
and syringe.
■ Press the START button on the CO computer, or wait for the
INJECT message to flash.
■ Observe for a steady baseline temperature before
injecting the solution, because an abnormal baseline may
increase variability in CO measurement.1
■ Inject the solution smoothly within 4 seconds at end
expiration to decrease variation in cardiac output
measurements caused by the respiratory cycle (as shown
below).1 Make sure fluid doesn’t leak at the connectors.1
■ If available, analyze the contour of the thermodilution
curve on a strip chart recorder for a rapid upstroke and a
gradual, smooth return to baseline. (See Analyzing
thermodilution curves.)
■ Repeat these steps up to five times, waiting 1 minute
between injections to ensure consistency and accuracy.1
Compute the average of three measurements that are
within 10% of the median value, and record the patient’s
CO.1
■ Return the stopcock to its original position and make sure
the injectant delivery system tubing is clamped (as shown
below).1
■ Restart medication infusions, as necessary.1
■ Verify the presence of a PA waveform on the cardiac
monitor.1
■ Make sure the clamp on the injectant bag is secured to
prevent inadvertent delivery of the injectant to the patient.1
■ Assess the patient’s vital signs and respiratory and
cardiovascular status, including cardiac rhythm after the
procedure, and compare your findings with baseline findings
to evaluate the patient’s hemodynamic status.1
■ Position the patient for comfort.
■ Return the bed to the lowest position to prevent falls and
maintain patient safety.15
■ Discard used supplies in the appropriate receptacle.16,17
■ Perform hand hygiene.3,4,5,6,7,8
■ Record the fluid volume injected for CO measurements in
the patient’s intake and output record.
■ Document the procedure.18,19,20,21
Analyzing thermodilution curves
The thermodilution curve provides valuable information about cardiac output
(CO), injection technique, and equipment problems. When studying the
curve, keep in mind that the area under the curve is inversely proportionate
to the CO: The smaller the area under the curve, the higher the CO; the
larger the area under the curve, the lower the CO.
In addition to providing a record of CO, the curve may indicate problems
related to technique, such as erratic or slow injectant instillations, or other
problems, such as respiratory variations or electrical interference. The curves
below correspond to those typically seen in clinical practice.
Normal thermodilution curve
With an accurate monitoring system and a patient who has adequate CO, the
thermodilution curve begins with a smooth, rapid upstroke and is followed by
a smooth, gradual downslope. The curve shown at left indicates that the
injectant instillation time was within the recommended 4 seconds and that
the temperature curve returned to baseline.
Low CO curve
A thermodilution curve representing low CO shows a rapid, smooth upstroke
(from proper injection technique). However, because the heart is ejecting
blood less efficiently from the ventricles, the injectant warms slowly and
takes longer to be ejected. Consequently, the curve takes longer to return to
baseline. This slow return produces a larger area under the curve,
corresponding to low CO.
High CO curve
As with a low CO curve, the thermodilution curve representing high CO has a
rapid, smooth upstroke from proper injection technique. However, because
the ventricles are ejecting blood too forcefully, the injectant moves through
the heart quickly and the curve returns to baseline more rapidly. The smaller
area under the curve suggests higher CO.
Curve reflecting poor technique
A curve reflecting poor technique results from an uneven and too-slow
(taking more than 4 seconds) administration of injectant. The uneven and
slower-than-normal upstroke and the larger area under the curve erroneously
indicate low CO. A kinked catheter, unsteady hands during the injection, or
improper placement of the injectant lumen in the introducer sheath may also
cause this type of curve.
Special considerations
■ Certain factors can affect the accuracy and reproducibility
of bolus thermodilution cardiac output values, including
variations in injectant temperatures or volumes, rapid
volume infusions during bolus injections, respiratory cycle
influences, an inaccurate computation constant, and
thermal instability after cardiopulmonary bypass.2
■ Handle the injectant solution as little as possible to avoid
thermal indicator variations, which may alter CO values.1
■ Change disposable or reusable transducer systems,
including continuous flush device and flush solution used for
invasive hemodynamic monitoring every 96 hours,
immediately upon suspected contamination, or when
integrity of the system has been compromised. Limit the
number of manipulations or entries to the system.22
■ The Joint Commission issued a sentinel event alert related
to managing risk during transition to new International
Organization for Standardization tubing standards designed
to prevent dangerous tubing misconnections, which can
lead to serious patient injury and death. During the
transition, be sure to trace the tubing and catheter from the
patient to the point of origin before connecting or
reconnecting any device or infusion, at any care transition
(such as a new setting or service), and as part of the hand-
off process. Route tubes and catheters with different
purposes in different standardized directions. Label the
tubing at the distal and proximal ends (when there are
different access sites or several bags hanging). Use tubing
and equipment only as intended. Store medications for
different delivery routes in separate locations.10
Complications
Complications from CO measurement are rare but may
include bradycardia and other hemodynamic changes.
Documentation
Document the patient’s CO, CI, and other hemodynamic
values as well as vital signs at the time of measurement.
Note the patient’s position during measurement and any
other complications, such as bradycardia or hemodynamic
changes. Record the date, time, and name of the
practitioner notified of any abnormal results; prescribed
interventions; and the patient’s response to those
interventions. Document any patient teaching provided and
the patient’s understanding of the teaching.
REFERENCES
1 Wiegand, D.L. (2017). AACN procedure manual for high acuity, progressive,
and critical care (7th ed.). St. Louis, MO: Saunders.
2 McGee, W. T., et al. (Eds.) (2014). Edward’s critical care education: Quick
guide to cardiopulmonary care (3rd ed.) . Irvine, CA: Edwards Lifesciences.
Accessed via the Web at
http://ht.edwards.com/scin/edwards/sitecollectionimages/products/pressurem
onitoring/ar11206-quickguide3rded.pdf
3 World Health Organization. (2009). “WHO guidelines on hand hygiene in
health care: First global patient safety challenge, clean care is safer care”
[Online]. Accessed via the Web at
http://apps.who.int/iris/bitstream/10665/44102/1/9789241597906_eng.pdf
(Level IV)
4 The Joint Commission. (2019). Standard NPSG.07.01.01. Comprehensive
accreditation manual for hospitals. Oakbrook Terrace, IL: The Joint
Commission. (Level VII)
5 Centers for Disease Control and Prevention. (2002). Guideline for hand
hygiene in health-care settings: Recommendations of the Healthcare Infection
Control Practices Advisory Committee and the HICPAC/SHEA/APIC/IDSA Hand
Hygiene Task Force MMWR Recommendations and Reports, 51(RR-16), 1–45.
Accessed via the Web at https://www.cdc.gov/mmwr/pdf/rr/rr5116.pdf (Level
II)
6 Centers for Medicare and Medicaid Services, Department of Health and
Human Services. (2015). Condition of participation: Infection control. 42 C.F.R.
§ 482.42.
7 Accreditation Association for Hospitals and Health Systems. (2017). Standard
07.01.21. Healthcare Facilities Accreditation Program: Accreditation
requirements for acute care hospitals. Chicago, IL: Accreditation Association
for Hospitals and Health Systems. (Level VII)
8 DNV GL-Healthcare USA, Inc. (2016). IC.1.SR.1 . NIAHO® accreditation
requirements: Interpretive guidelines & surveyor guidance (version 11).
Milford, OH: DNV GL-Healthcare USA, Inc. (Level VII)
9 U.S. Food and Drug Administration. (n.d .). “Look. Check. Connect. Safe
medical device connections save lives” [Online]. Accessed via the Web at
http://www.fda.gov/downloads/MedicalDevices/Safety/AlertsandNotices/UCM1
34873.pdf
10 The Joint Commission. (2014). “Sentinel event alert: Managing risk during
transition to new ISO tubing connector standards” [Online]. Accessed via the
Web at
http://www.jointcommission.org/assets/1/6/SEA_53_Connectors_8 _19_14 _final.
pdf (Level VII)
11 The Joint Commission. (2019). Standard NPSG.01.01.01. Comprehensive
accreditation manual for hospitals. Oakbrook Terrace, IL: The Joint
Commission. (Level VII)
12 The Joint Commission. (2019). Standard PC.02.01.21. Comprehensive
accreditation manual for hospitals. Oakbrook Terrace, IL: The Joint
Commission (Level VII)
13 Waters, T. R., et al. (2009). “Safe patient handling training for schools of
nursing” [Online]. Accessed via the Web at
https://www.cdc.gov/niosh/docs/2009-127/pdfs/2009-127.pdf (Level VII)
14 Giuliano, K. K ., et al. (2003). Backrest angle and cardiac output measurement
in critically ill patients. Nursing Research, 52(4), 242–248. (Level VI)
15 Ganz, D. A., et al. (2009). Preventing falls in hospitals: A toolkit for improving
quality of care (AHRQ Publication No. 13-0015-EF). Rockville, MD: Agency for
Healthcare Research and Quality. Accessed via the Web at
https://www.ahrq.gov/sites/default/files/publications/files/fallpxtoolkit_0 .pdf
(Level VII)
16 Occupational Safety and Health Administration. (n.d .). “Bloodborne
pathogens, standard number 1910.1030” [Online]. Accessed via the Web at
https://www.osha.gov/pls/oshaweb/owadisp.show_document?
p_id=10051&p_table=STANDARDS (Level VII)
17 Siegel, J. D ., et al. (2007, Revised 2017). “2007 guideline for isolation
precautions: Preventing transmission of infectious agents in healthcare
settings” [Online]. Accessed via the Web at
https://www.cdc.gov/infectioncontrol/pdf/guidelines/isolation-guidelines.pdf
(Level II)
18 The Joint Commission. (2019). Standard RC.01.03 .01. Comprehensive
accreditation manual for hospitals. Oakbrook Terrace, IL: The Joint
Commission. (Level VII)
19 Centers for Medicare and Medicaid Services, Department of Health and
Human Services. (2015). Condition of participation: Medical record services.
42 C.F.R. § 482.24(b).
20 Accreditation Association for Hospitals and Health Systems. (2017). Standard
10.00 .03. Healthcare Facilities Accreditation Program: Accreditation
requirements for acute care hospitals. Chicago, IL: Accreditation Association
for Hospitals and Health Systems. (Level VII)
21 DNV GL-Healthcare USA, Inc. (2016). MR.2 .SR.1 . NIAHO® accreditation
requirements: Interpretive guidelines & surveyor guidance (version 11).
Milford, OH: DNV GL-Healthcare USA, Inc. (Level VII)
22 Standard 42. Administration set change. Infusion therapy standards of
practice. (2016). Journal of Infusion Nursing, 39, S84–S85. (Level VII)
CARDIOPULMONARY RESUSCITATION, ADULT
Cardiopulmonary resuscitation (CPR) seeks to restore and
maintain the patient’s respirations and circulation after the
heartbeat and breathing have stopped. The ultimate goal of
the resuscitation process is to return a patient to his
previous quality of life and functional state. CPR is a basic
life support (BLS) procedure performed on victims of cardiac
arrest. It should be performed according to the 2015
American Heart Association (AHA) guidelines.1
Studies show that early CPR can improve a patient’s
likelihood of survival. Chest compressions are particularly
important, because perfusion during CPR depends on them.
To prevent a delay in chest compressions, the AHA changed
the sequence of CPR in the 2010 guidelines from “A-B -C ”
(airway, breathing, and compressions) to “C-A-B”
(compressions, airway, and breathing), which gives the
highest priority to chest compressions when resuscitating a
patient in cardiac arrest.1,2
High-quality CPR is important not only at the onset of
resuscitation but throughout the resuscitation process. Key
components of high-quality CPR are minimizing chest
compression interruptions, providing compressions of
adequate rate and depth, avoiding leaning between
compressions, and avoiding excessive ventilation.1,3
Integrating defibrillation and other advanced cardiac life
support (ACLS) measures into the resuscitation process
minimizes interruptions in CPR.1,2
Equipment
Backboard or other firm surface ▪ automated external
defibrillator (AED) ▪ Optional: barrier mask with one-way
valve, gloves, other personal protective equipment.
Implementation
Guidelines for performing CPR vary depending on whether
CPR is being performed by one or two rescuers.
One-person CPR
The following illustrated instructions provide a step-by-step
guide for CPR as currently recommended by the AHA. (See
The AHA BLS algorithm.)
■ Put on gloves and other personal protective equipment,
as needed and available, to comply with standard
precautions.4,5
■ Verify that the environment is safe by quickly scanning
the patient’s location and surroundings for imminent
physical threats, such as toxic and electrical hazards.1
■ Assess the patient to determine whether he or she is
unresponsive (as shown below). Tap the patient on the
shoulder and shout, “Are you all right?” This helps ensure
that you don’t begin CPR on a conscious person. If the
patient is unresponsive, shout for help and activate the
emergency response system via mobile device (if
appropriate).1
■ Check to see whether the patient is apneic or only
gasping (as opposed to breathing regularly) and, if you’re
able, simultaneously check for a pulse to minimize delay in
detecting cardiac arrest and initiating CPR.1,2 To check for a
pulse, palpate the carotid artery that’s closest to you by
placing your index and middle fingers in the groove
between the trachea and the sternocleidomastoid muscle,
as shown on page 118, top left. Palpate for no longer than
10 seconds.1,2
The AHA BLS algorithm
The following algorithm shows the steps to follow when cardiac arrest is
suspected in an adult patient.
Reprinted with permission from American Heart Association. (2015). 2015
American Heart Association guidelines update for cardiopulmonary
resuscitation and emergency cardiovascular care. Circulation, 132, S414–
S435.
■ If the patient is breathing normally and has a pulse,
monitor the patient closely until the emergency response
team arrives.1
■ If breathing is absent or the patient is only gasping and
you feel a pulse within 10 seconds, follow these steps:
NURSING ALERT For patients in cardiac arrest, naloxone
administration is ineffective without concomitant chest compressions
to deliver the drug to the tissues. If opiate overdose is highly
suspected, consider naloxone administration after initiation of CPR.1
■ Open the patient’s airway; use the head tilt–chin lift
technique unless you suspect a cervical spine injury, in
which case, use the jaw-thrust maneuver without head
extension.1,2
■ Provide rescue breathing by giving the patient 10 to 12
breaths/minute (1 breath every 5 to 6 seconds). Use a
barrier mask with a one-way valve if available. Give each
breath over 1 second regardless of whether an advanced
airway is in place; each breath should cause a minimal chest
rise.1,2,3 Avoid excessive ventilation by giving breaths at a
rate of less than 12 breaths/minute; doing so minimizes the
impact of positive-pressure ventilation on blood flow.1,2,3
■ If you know of or suspect opioid overdose, administer
intramuscular or intranasal naloxone, if available, according
to protocol.1
■ If breathing is absent or the patient is only gasping and
you don’t feel a pulse within 10 seconds, have a coworker
retrieve an AED or other defibrillator. If you’re alone,
retrieve an AED or other defibrillator and the emergency
equipment.1,2 Place the patient supine on a firm surface,
such as on a backboard or on the floor; if the patient is on
an air-filled mattress, deflate the mattress to maximize the
effectiveness of chest compressions. When turning the
patient, roll the head and torso as a unit (as shown below);
avoid twisting or pulling the patient’s neck, shoulders, or
hips. Don’t delay the initiation of CPR by waiting to obtain
and position a backboard.1,2
■ Make sure that your knees or feet are apart to provide a
wide base of support.
■ Place the heel of one hand on the center of the patient’s
chest (over the lower half of the sternum) and the heel of
the second hand on top of the first so that your hands are
overlapped and parallel (as shown below).1,2 Immediately
begin chest compressions until an AED or other defibrillator
is ready for use.1
■ With your elbows locked, arms straight, and shoulders
directly over your hands (as shown below), administer chest
compressions. Using the weight of your upper body,
compress the patient’s chest at least 2′′ (5 cm) but no more
than 2.4′′ (6 cm),1 keeping chest compression and chest
recoil duration equal. Allow the patient’s chest to completely
recoil after each chest compression to create a relative
negative intrathoracic pressure that promotes venous return
and cardiopulmonary blood flow.1 Avoid leaning over the
patient’s chest, which could prevent it from recoiling
completely.1,3
■ Administer 30 compressions at a rate of 100 to 120
compressions per minute, pushing hard and fast.1,3 After
administering 30 compressions, open the patient’s airway
and give 2 ventilations. If the patient doesn’t appear to have
a cervical spine injury, use the head tilt–chin lift maneuver
to open the patient’s airway.1,2 To accomplish this, first
place your hand that’s closer to the patient’s head on the
patient’s forehead. Then apply enough pressure to tilt the
patient’s head back. Next, place the fingertips of your other
hand under the bony part of the patient’s lower jaw near the
chin; avoid placing your fingertips on the soft tissue under
the patient’s chin because you may inadvertently obstruct
the airway you’re trying to open. At the same time, keep the
patient’s mouth partially open (as shown below).
■ If you suspect a cervical spine injury, use the jaw-thrust
maneuver.1,2 To perform this maneuver, kneel at the
patient’s head with your elbows on the ground. Rest your
thumbs on the patient’s lower jaw near the corners of the
mouth, pointing your thumbs toward the patient’s feet. Then
place your fingertips around the lower jaw. To open the
airway, lift the lower jaw with your fingertips (as shown
below).
■ To begin ventilations using a mask with a one-way valve,
position the narrow portion of the mask over the patient’s
nose and the wide portion above the patient’s chin.
Covering the nose and mouth with the mask, create a tight
seal. Take a regular breath and place your mouth on the
mouthpiece (as shown on top right).
■ Alternatively, to begin ventilations using mouth-to-mouth
rescue breathing, pinch the patient’s nostrils shut with the
thumb and index finger of the hand you’ve had on the
patient’s forehead. Keep in mind that a handheld
resuscitation bag and mask is recommended by the
guidelines only when a second rescuer arrives; it isn’t
recommended for use by a lone rescuer.1,2
■ Give two breaths, each over 1 second, to promote
oxygenation and to prevent overinflation of the patient’s
lungs. Each ventilation should have enough volume to
produce visible chest rise to ensure adequate
ventilation.1,2,3
■ If the first ventilation isn’t successful, reposition the
patient’s head and try again, because the most common
cause of ventilation difficulty is an improperly opened
airway.1,2 If you’re still unsuccessful, the patient may have a
foreign body airway obstruction.
■ Give 30 chest compressions at a rate of approximately
100 to 120 per minute.1,3 Push hard and fast. Open the
airway and give two ventilations. Then find the proper hand
position again and deliver 30 more compressions. Continue
chest compressions until the emergency medical service
(EMS) team arrives or another rescuer arrives with an AED.
Health care providers should interrupt chest compressions
as infrequently as possible. Interruptions should last no
longer than 10 seconds except for special interventions,
such as using the AED or inserting an airway.1
■ Consider switching compressors during any intervention
associated with appropriate interruptions in chest
compressions. Switch compressors every 2 minutes (or after
about five cycles of compressions and ventilations at a ratio
of 30:2) to prevent decreases in the quality of compressions.
Try to accomplish the switch in fewer than 5 seconds.
ELDER ALERT Avoid interruptions in chest compressions for
interventions such as pulse checks to maximize chest compression
time and improve tissue oxygenation.1,3
■ Remove and discard your gloves and any other personal
protective equipment worn4 and perform hand hygiene
when resuscitation has ended.6,7,8,9,10,11
■ Document the procedure.12,13,14,15
Two-person CPR
■ Put on gloves and other personal protective equipment as
needed and available to comply with standard
precautions.4,5
■ Verify that the environment is safe by quickly scanning
the patient’s location and surroundings for imminent
physical threats, such as toxic and electrical hazards.1
■ Assess the patient to determine whether he or she is
unresponsive. Tap the patient on the shoulder and shout,
“Are you all right?” This helps ensure that you don’t begin
CPR on a conscious person. If the patient is unresponsive,
shout for help and activate the emergency response system
via mobile device (if appropriate).1
■ Check to see whether the patient is apneic or only
gasping (as opposed to breathing regularly) and, if you’re
able, simultaneously check for a pulse to minimize delay in
detecting cardiac arrest and initiating CPR.1,2 To check for a
pulse, palpate the carotid artery that’s closest to you by
placing your index and middle fingers in the groove
between the trachea and the sternocleidomastoid muscle.
Palpate for no longer than 10 seconds.1,2
■ If the patient is breathing normally and has a pulse,
monitor the patient closely until the emergency response
team arrives.1
■ If breathing is absent or the patient is only gasping and
you feel a pulse within 10 seconds, open the patient’s
airway; use the head tilt–chin lift technique unless you
suspect a cervical spine injury, in which case, use the jaw-
thrust maneuver without head extension.1,2 Provide rescue
breathing by giving the patient 10 to 12 breaths/minute
(one breath every 5 to 6 seconds). Use a barrier mask with a
one-way valve if available. Give each breath over 1 second
regardless of whether an advanced airway is in place; each
breath should cause a minimal chest rise.1,2,3 Avoid
excessive ventilation by giving breaths at a rate of less than
12 breaths/minute; doing so minimizes the impact of
positive-pressure ventilation on blood flow.1,2,3 If you know
of or suspect opioid overdose, administer intramuscular or
intranasal naloxone, if available, according to protocol.1
■ If breathing is absent or the patient is only gasping and
you don’t feel a pulse within 10 seconds, have a coworker
retrieve an AED or other defibrillator. If you’re alone,
retrieve an AED or other defibrillator and the emergency
equipment.1,2 Place the patient supine on a firm surface,
such as on a backboard or on the floor; if the patient is on
an air-filled mattress, deflate the mattress to maximize the
effectiveness of chest compressions. When turning the
patient, roll the head and torso as a unit; avoid twisting or
pulling the patient’s neck, shoulders, or hips. Don’t delay
the initiation of CPR by waiting to obtain and position a
backboard.1,2
■ Make sure that your knees or feet are apart to provide a
wide base of support.
■ Place the heel of one hand on the center of the patient’s
chest (over the lower half of the sternum) and the heel of
the second hand on top of the first so that your hands are
overlapped and parallel.1,2
■ Immediately begin chest compressions until an AED or
other defibrillator is ready for use.1
■ With your elbows locked, arms straight, and shoulders
directly over your hands, administer chest compressions.
Using the weight of your upper body, compress the patient’s
chest at least 2′′ (5 cm) but no more than 2.4′′ (6 cm),1
keeping chest compression and chest recoil duration equal.
Allow the patient’s chest to completely recoil after each
chest compression to create a relative negative
intrathoracic pressure that promotes venous return and
cardiopulmonary blood flow.1 Avoid leaning over the
patient’s chest, which could prevent it from recoiling
completely.1,3
■ Administer 30 compressions at a rate of 100 to 120
compressions per minute, pushing hard and fast.1,3 After
administering 30 compressions, open the patient’s airway
and give two ventilations. If the patient doesn’t appear to
have a cervical spine injury, use the head tilt–chin lift
maneuver to open the airway.1,2 To accomplish this, first
place your hand that’s closer to the patient’s head on the
patient’s forehead. Then apply enough pressure to tilt the
patient’s head back. Next, place the fingertips of your other
hand under the bony part of the lower jaw near the chin;
avoid placing your fingertips on the soft tissue under the
patient’s chin because you may inadvertently obstruct the
airway you’re trying to open. At the same time, keep the
mouth partially open.
■ If you suspect a cervical spine injury, use the jaw-thrust
maneuver.1,2 To perform this maneuver, kneel at the
patient’s head with your elbows on the ground. Rest your
thumbs on the lower jaw near the corners of the mouth,
pointing your thumbs toward the patient’s feet. Then place
your fingertips under the lower jaw. To open the airway, lift
the lower jaw with your fingertips.
■ To begin ventilations using a barrier mask with a one-way
valve, position the narrow portion of the mask over the
patient’s nose and the wide portion above the patient’s
chin. Covering the nose and mouth with the mask, create a
tight seal. Take a regular breath and then place your mouth
on the mouthpiece and perform two ventilations.
Alternatively, to begin ventilations using mouth-to-mouth
rescue breathing, pinch the patient’s nostrils shut with the
thumb and index finger of the hand you’ve had on the
patient’s forehead. Take a regular breath and place your
mouth over the patient’s mouth, creating a tight seal.1,2
Give two regular breaths, each over 1 second, to promote
oxygenation and to prevent over inflation of the patient’s
lungs. Each ventilation should have enough volume to
produce a minimal chest rise to ensure adequate
ventilation.
■ Continue chest compressions until the EMS team arrives
or another rescuer arrives with an AED or other defibrillator.
Use the AED or other defibrillator to evaluate the patient’s
rhythm as soon as it’s ready. If the patient has a shockable
rhythm, give one shock and then resume CPR.2
■ If the second rescuer is another health care professional,
the two of you can perform two-person CPR. The second
rescuer should start assisting after you’ve finished a cycle of
30 compressions and two ventilations.1 The switch should
occur in less than 5 seconds, during which the second
rescuer moves into place opposite you and gets ready to
begin compressions (as shown below).1
■ The second rescuer should begin delivering compressions
(as shown below). The compressor (at this point, the second
rescuer) should count out loud so the ventilator can
anticipate when to give ventilations. The rescuers should
deliver 30 cycles of compressions (100 to 120 compressions
per minute)1,2 and two ventilations; the first rescuer should
deliver ventilations during pauses in compressions and
deliver each breath over 1 second.1,2 Avoid excessive
ventilation by giving breaths at a rate of less than 12 per
minute to minimize the impact of positive-pressure
ventilation on blood flow.1,2
■ Switch the compressor role after five cycles of
compressions and ventilations to prevent rescuer fatigue
and a subsequent decrease in compression quality; the
switch should occur in less than 5 seconds.1,2 Chest
compressions shouldn’t be interrupted for longer than 10
seconds unless such specific interventions such as
defibrillation or advanced airway placement are necessary,
to maximize compression time and improve tissue
oxygenation.1,2,3
■ Both rescuers should continue administering CPR until the
EMS team arrives or until normal breathing and effective
circulation return.1,2
Potential hazards of CPR
Cardiopulmonary resuscitation (CPR) can cause various complications,
including injury to bones and vital organs. This chart describes the causes of
CPR hazards and lists preventive steps.
Completing the procedure
■ Remove and discard your gloves and any other personal
protective equipment
worn4
and perform hand
hygiene.6,7,8,9,10,11
■ Document the procedure.12,13,14,15
Special considerations
■ Evidence for an optimum compression rate suggests a
target of 100 to 120 compressions per minute. Rates above
or below this target range appear to reduce survival to
discharge.1,3
■ If hemodynamic monitoring, such as arterial or central
venous catheter monitoring or capnography, are in place,
they should be used to monitor the patient’s response to
CPR and the effectiveness of resuscitation efforts.3
■ Some health care professionals are hesitant to give
mouth-to-mouth rescue breaths. For this reason, the AHA
recommends that all health care professionals learn how to
use disposable airway equipment.1 When using a barrier
device, the rescuer should not delay chest compressions
while setting up the device.1,2
■ Lay rescuers who can perform compressions and
ventilations should use the head tilt–chin lift maneuver to
open the airway.1,2
■ If no complications exist, give the patient’s family the
option of remaining at the bedside during resuscitation,
because doing so helps meet the psychosocial needs of the
patient and family in a time of crisis.16,17
Complications
CPR can cause certain complications—especially if the
compressor doesn’t place his or her hands properly on the
sternum. These complications include fractured ribs, a
lacerated liver, and punctured lungs. Gastric distention, a
common complication, results from giving too much air
during ventilation. (See Potential hazards of CPR.)
Documentation
Document all the events of resuscitation and the names of
the individuals present. Record the reason CPR was
initiated, whether the victim suffered from cardiac or
respiratory arrest, where the arrest occurred, the time CPR
began, and the duration of CPR. Note the patient’s
response, any complications, and interventions to correct
complications.
If the patient also received ACLS measures, document
which interventions were performed, who performed them,
when they were performed, and what equipment was used.
REFERENCES
1 American Heart Association. (2015). 2015 American Heart Association
guidelines update for cardiopulmonary resuscitation and emergency
cardiovascular care. Circulation, 132, S414–S435. (Level II)
2 American Heart Association. (2010). 2010 American Heart Association
guidelines for cardiopulmonary resuscitation and emergency cardiovascular
care. Circulation, 122, S685–S705. (Level II)
3 American Heart Association. (2013). AHA consensus statement:
Cardiopulmonary resuscitation quality—improving cardiac resuscitation
outcomes both inside and outside the hospital. Circulation, 128, 417–435.
Accessed via the Web at http://circ.ahajournals.org/content/128/4/417.full
(Level VII)
4 Siegel, J. D., et al. (2007, revised 2017). “2007 guideline for isolation
precautions: Preventing transmission of infectious agents in healthcare
settings” [Online]. Accessed via the Web at
https://www.cdc.gov/infectioncontrol/pdf/guidelines/isolation-guidelines.pdf
(Level II)
5 Accreditation Association for Hospitals and Health Systems. (2017). Standard
07.01.10. Healthcare Facilities Accreditation Program: Accreditation
requirements for acute care hospitals. Chicago, IL: Accreditation Association
for Hospitals and Health Systems. (Level VII)
6 World Health Organization. (2009). “WHO guidelines on hand hygiene in
health care: First global patient safety challenge, clean care is safer care”
[Online]. Accessed via the Web at
http://apps.who.int/iris/bitstream/10665/44102/1/9789241597906_eng.pdf
(Level IV)
7 The Joint Commission. (2019). Standard NPSG.07.01.01. Comprehensive
accreditation manual for hospitals. Oakbrook Terrace, IL: The Joint
Commission. (Level VII)
8 Centers for Disease Control and Prevention. (2002). Guideline for hand
hygiene in health-care settings: Recommendations of the Healthcare Infection
Control Practices Advisory Committee and the HICPAC/SHEA/APIC/IDSA Hand
Hygiene Task Force. MMWR Recommendations and Reports, 51(RR-16), 1–45.
Accessed via the Web at https://www.cdc.gov/mmwr/pdf/rr/rr5116.pdf (Level
II)
9 Centers for Medicare and Medicaid Services, Department of Health and
Human Services. (2015). Condition of participation: Infection control. 42 C.F.R.
§ 482.42.
10 Accreditation Association for Hospitals and Health Systems. (2017). Standard
07.01.21. Healthcare Facilities Accreditation Program: Accreditation
requirements for acute care hospitals. Chicago, IL: Accreditation Association
for Hospitals and Health Systems. (Level VII)
11 DNV GL-Healthcare USA, Inc. (2016). IC.1 .SR.1 . NIAHO® accreditation
requirements: Interpretive guidelines & surveyor guidance (version 11).
Milford, OH: DNV GL-Healthcare USA, Inc. (Level VII)
12 The Joint Commission. (2019). Standard RC.01.03 .01. Comprehensive
accreditation manual for hospitals. Oakbrook Terrace, IL: The Joint
Commission. (Level VII)
13 Centers for Medicare and Medicaid Services, Department of Health and
Human Services. (2015). Condition of participation: Medical record services.
42 C.F.R. § 482.24(b).
14 Accreditation Association for Hospitals and Health Systems. (2017). Standard
10.00 .03. Healthcare Facilities Accreditation Program: Accreditation
requirements for acute care hospitals. Chicago, IL: Accreditation Association
for Hospitals and Health Systems. (Level VII)
15 DNV GL-Healthcare USA, Inc. (2016). MR.2 .SR.1 . NIAHO® accreditation
requirements: Interpretive guidelines & surveyor guidance (version 11).
Milford, OH: DNV GL-Healthcare USA, Inc. (Level VII)
16 American Association of Critical-Care Nurses. (2016). “A ACN practice alert:
Family presence during resuscitation and invasive procedures” [Online].
Accessed via the Web at https://www.aacn.org/clinical-resources/practice-
alerts/family-presence-during-resuscitation-and-invasive-procedures (Level
VII)
17 Emergency Nurses Association. (2010, revised 2012). “Family presence
during invasive procedures and resuscitation in the emergency department”
[Online]. Accessed via the Web at https://www.ena.org/docs/default-
source/resource-library/practice-
resources/cpg/familypresencecpg3eaabb7cf0414584ac2291feba3be481.pdf?
sfvrsn=9c167fc6_8 (Level VII)
CARDIOPULMONARY RESUSCITATION, CHILD
An adult who needs cardiopulmonary resuscitation (CPR)
typically suffers from a primary cardiac disorder or an
arrhythmia that has stopped the heart. A child who needs
CPR typically suffers from hypoxia caused by respiratory
difficulty or respiratory arrest.
Most pediatric crises requiring CPR are preventable. They
include motor vehicle accidents, drowning, burns, smoke
inhalation, falls, poisoning, suffocation, and choking
(typically from inhaling a balloon, small object, and certain
foods, such as hot dogs, rounded candies, nuts, and
grapes).1 Other causes of cardiopulmonary arrest in children
include laryngospasm and edema from upper respiratory
infections and sudden infant death syndrome.
The goal of CPR is the return of spontaneous circulation.1
However, CPR techniques differ depending on whether the
patient is an adult, a child, or an infant. For CPR purposes,
the American Heart Association (AHA) defines a patient by
age. An infant is younger than age 1; a child is age 1 to
puberty.2
Survival chances improve the sooner CPR begins and the
faster advanced life-support systems are implemented.
However, before beginning CPR on a child, you must first
determine whether the child’s respiratory distress results
from a mechanical obstruction or an infection, such as
epiglottiditis or croup. These latter conditions require
immediate medical attention, not CPR. CPR is appropriate
only when the child isn’t breathing or is only gasping (as
opposed to breathing regularly).1,2
Chest compressions are particularly important because
perfusion of vital organs during CPR depends on them. To
prevent a delay in chest compressions, the AHA changed
the sequence of CPR in the 2010 guidelines from “A-B -C ”
(airway, breathing, and compressions) to “C-A-B”
(compressions, airway, and breathing), which gives the
highest priority to chest compressions when resuscitating a
child in cardiac arrest.1,2
High-quality CPR is important not only at the outset of
resuscitation, but throughout the entire resuscitation
process. Key components of high-quality CPR are minimizing
chest compression interruptions, providing compressions of
adequate rate and depth, allowing complete recoil of the
chest after each compression, avoiding leaning between
compressions, and avoiding excessive ventilation.2,3
Equipment
Backboard or other firm surface ▪ automated external
defibrillator (AED) (preferably with pediatric attenuator for
children younger than age 8) or defibrillator ▪ Optional:
barrier mask with one-way valve, gloves, other personal
protective equipment.
Implementation
■ Review the accompanying illustrated instructions, which
provide a step-by-step guide for CPR as recommended by
the AHA. (See AHA BLS pediatric cardiac arrest algorithm for
the single rescuer.)
■ Put on gloves and other personal protective equipment as
needed and available to comply with standard precautions
and to prevent exposure to potentially infectious blood and
body fluids.4,5,6
■ Verify that the environment is safe by quickly scanning
the location and surroundings for imminent physical threats,
such as toxic and electrical hazards.2
■ To assess responsiveness, gently tap the child on the
shoulder and shout, “Are you all right?” Call the child’s
name if you know it to elicit a response. If the child is
unresponsive, shout for nearby help and activate the
emergency response system via mobile device (if
appropriate).1,2
■ Check to see whether the child is apneic or only gasping
(as opposed to breathing regularly) and, if able,
simultaneously check for a pulse to minimize any delay in
detecting cardiac arrest and initiating CPR. To check for a
pulse, palpate the carotid artery that’s closest to you by
placing your index and middle fingers in the groove formed
by the trachea and the sternocleidomastoid muscle (as
shown below). Alternatively, check for a femoral pulse by
placing your fingers in the center of the child’s groin, just
below the inguinal ligament. Palpate for no longer than 10
seconds.1,2
AHA BLS pediatric cardiac arrest
algorithm for the single rescuer
The algorithm below illustrates the steps for basic life support for a child
recommended by the American Heart Association.
Reprinted with permission from American Heart Association. (2015)
American Heart Association guidelines update for cardiopulmonary
resuscitation and emergency cardiovascular care. Circulation, 132, S519–
S525.
■ If the child is breathing normally and has a pulse, monitor
the child closely until the emergency response team
arrives.2
■ If breathing is absent or the child is only gasping and you
feel a pulse within 10 seconds, open the child’s airway. Use
the head tilt–chin lift maneuver, unless you suspect a
cervical spine injury, in which case you should use the jaw-
thrust maneuver without head extension.1,2 Provide rescue
breathing by giving the child 12 to 20 breaths/minute (1
breath every 3 to 5 seconds).1,2 Use a barrier mask, if
available. Give each breath over 1 second regardless of
whether the child has an advanced airway in place; ensure
that each breath causes minimal chest rise. If using bag-
mask ventilation, use only the force and tidal volume
necessary to just make the chest rise.1,2
■ If breathing is absent or the child is only gasping and you
don’t feel a pulse within 10 seconds, or the pulse is less
than 60 beats/minute and the child has signs of poor
perfusion (such as pallor, cyanosis, and mottling), have a
coworker retrieve the defibrillator or AED. Alternatively, if
you’re alone and you witnessed the child suddenly collapse,
retrieve the defibrillator or AED.1,2 Position the child on a
firm, flat surface (backboard or other hard surface, such as
the ground).1,2 When turning the child, roll the child’s head
and torso as a unit (as shown below); avoid twisting or
pulling the child’s neck, shoulders, or hips. Don’t delay the
initiation of CPR to obtain and position a backboard.
■ Kneel next to the child’s chest or stand beside the bed at
the child’s chest, making sure that your knees or feet are
apart to provide a wide base of support. Place the heel of
one or two hands in the center of the child’s chest, directly
between the child’s nipples (as shown below).1,2 The
decision to use one or two hands depends on the size of the
child and the compressor’s effectiveness.
■ Immediately begin chest compressions until the
defibrillator or AED is ready for use.2
■ With your elbows locked, arms straight, and shoulders
directly over your hand(s), administer compressions. Using
the weight of your upper body, compress the child’s chest
downward at least one-third the anterior-posterior
dimensions of the chest,2,3 which is about 2′′ (5 cm) in most
children. Allow the chest to completely recoil after each
compression; incomplete chest wall recoil during CPR is
associated with higher intrathoracic pressures and
significantly decreased venous return, blood flow, and
cerebral perfusion.1,2
■ Administer 30 compressions at a rate of 100 to 120
compressions per minute.2 After administering 30
compressions, open the child’s airway and prepare to give
two ventilations. If the child doesn’t appear to have a
cervical spine injury, use the head tilt–chin lift maneuver to
open the child’s airway. To perform this maneuver, place
your hand that’s closer to the child’s head on the child’s
forehead. Then apply enough pressure to tilt the child’s
head back. Next, place the fingertips of your other hand
under the bony part of the child’s lower jaw near the chin;
avoid placing your fingertips on the soft tissue under the
child’s chin, because you may inadvertently obstruct the
airway you’re trying to open. At the same time, keep the
child’s mouth partially open (as shown below).
■ If you suspect a cervical spine injury, use the jaw-thrust
maneuver.1,2 To perform this maneuver, rest your thumbs on
the child’s lower jaw near the corners of the mouth, pointing
your thumbs toward the child’s feet. Then place your
fingertips around the lower jaw. To open the airway, lift the
lower jaw with your fingertips.
■ While maintaining an open airway, evaluate breathing
status by placing your ear near the child’s mouth and
nose.1,2 Look for chest movement and scan the child for
breathing.
■ To begin ventilations using a barrier mask with a one-way
valve, position the narrow portion of the mask over the
child’s nose and the wide portion above the child’s chin.
Covering the nose and mouth with the mask, create a tight
seal. Take a regular breath and place your mouth on the
mouthpiece (as shown on next page, top left). Alternatively,
to begin ventilations using mouth-to-mouth rescue
breathing, pinch the child’s nostrils shut with the thumb and
index finger of the hand you’ve had on the child’s forehead.
Take a regular breath and place your mouth over the child’s
mouth, creating a tight seal. Keep in mind that a handheld
resuscitation bag and mask is recommended only when a
second rescuer arrives; it isn’t recommended for use by a
lone rescuer.1,2
■ Give two slow breaths, each over 1 second, to promote
oxygenation and to prevent overinflation of the child’s
lungs. Use only the force and tidal volume necessary to just
make the child’s chest rise.1,2
■ If your first ventilation isn’t successful, reposition the
child’s head to open the airway and try again, because the
most common cause of ventilation difficulty is an improperly
opened airway. If you’re still unsuccessful, consider that the
child may have a foreign body obstruction.
■ If you detect a pulse, and the pulse is greater than 60
beats/minute, continue rescue breathing with one breath
every 3 to 5 seconds (12 to 20 breaths/minute). If you don’t
detect a pulse, continue cycles of 30 compressions to 2
ventilations until the emergency response team or another
rescuer arrives with a defibrillator or AED. Use the
defibrillator or AED as soon as it is available. If after about 2
minutes you’re still alone, activate the emergency response
system and retrieve the defibrillator or AED, if not already
done.2
■ When a second rescuer arrives, continue with two-person
CPR. (See Two-person CPR.)
■ Remove and discard your gloves and other personal
protective equipment, if worn.4
■ Perform hand hygiene.7,8,9,10,11,12
■ Document the procedure.13,14,15,16
Special considerations
■ Some health care professionals hesitate to give mouth-to-
mouth rescue breaths. For this reason, the AHA
recommends that all health care professionals learn how to
use disposable airway equipment.1,2 When using a barrier
device, the rescuer shouldn’t delay chest compressions
while setting up the device.1,2
■ Compression-only CPR can be effective in children with a
primary cardiac arrest. The AHA recommends compression-
only CPR for children in cardiac arrest when rescuers are
unwilling or unable to deliver breaths.2
■ Because effective bag-and-mask ventilation requires
complex steps, it isn’t recommended for a lone rescuer
during CPR. Instead, mouth-to-barrier device techniques can
be used. Bag-and-mask ventilation can be provided
effectively during two-person CPR.1
■ A child’s tongue can easily block his or her small airway. If
this occurs, simply opening the airway may eliminate the
obstruction.
■ When performing chest compressions, take care to ensure
smooth motions. Keep your fingers off—and the heel of your
hand on—the child’s chest at all times. Also, time your
motions so that the compression and relaxation phases are
equal to promote effective compressions.
■ If a child is having difficulty breathing and a parent or
guardian is present, find out whether the child recently had
a fever or an upper respiratory tract infection. If so, suspect
epiglottitis. In this instance, don’t attempt to manipulate the
airway because laryngospasm can occur and completely
obstruct the airway. Allow the child to assume a comfortable
position, and monitor breathing until assistance arrives.
Two-person CPR
During two-person cardiopulmonary resuscitation (CPR), one rescuer
performs chest compressions while the other maintains a patent airway and
administers ventilations.1,2 The ratio of compressions to ventilations for two-
person CPR is 15:2. If available, a child-size, self-inflating bag-mask device
with a volume of at least 450 mL can be used to deliver ventilations in infants
and young children. For older children and adolescents, an adult-size self-
inflating bag with a volume of 1,000 mL may be needed to produce adequate
chest rise.
After insertion of an advanced airway, the compressor should continuously
deliver 100 to 120 compressions/minute without pausing for ventilations.3
The rescuer delivering ventilations should deliver a breath every 6 to 8
seconds (or 8 to 10 per minute).1,2
■ Give the child’s parents or guardian the option of
remaining at the bedside during resuscitation because doing
so helps meet the psychosocial needs of the child and
family.17,18
Complications
CPR can cause complications, including fractured ribs, a
lacerated liver, and pneumothorax, if the compressor
doesn’t place hands on the child’s sternum properly. Gastric
distention, a common complication, results from giving too
much air during ventilation.
Documentation
Document all of the events of resuscitation and the names
of the individuals who were present. Record whether the
child suffered cardiac or respiratory arrest. Note the location
where the arrest occurred, the time CPR began, the duration
of the procedure, and the outcome. Document any
complications—for example, a fractured rib, a bruised
mouth, or gastric distention—as well as actions taken to
correct them.
If the child received pediatric advanced life support,
document which interventions were performed, who
performed them, when they were performed, what
equipment was used, and the child’s response.
REFERENCES
1 American Heart Association. (2010). 2010 American Heart Association
guidelines for cardiopulmonary resuscitation and emergency cardiovascular
care. Circulation, 122, S862–S875. (Level II)
2 American Heart Association. (2015). 2015 American Heart Association
guidelines update for cardiopulmonary resuscitation and emergency
cardiovascular care. Circulation, 132, S519–S525. (Level II)
3 American Heart Association (AHA). (2013). AHA consensus statement:
Cardiopulmonary resuscitation quality: Improving cardiac resuscitation
outcomes both inside and outside the hospital. Circulation, 128, 417–435.
Accessed via the Web at http://circ.ahajournals.org/content/128/4/417.full
(Level VII)
4 Siegel, J. D., et al. (2007, revised 2017). “2007 guideline for isolation
precautions: Preventing transmission of infectious agents in healthcare
settings” [Online]. Accessed via the Web at
https://www.cdc.gov/infectioncontrol/pdf/guidelines/isolation-guidelines.pdf
(Level II)
5 Accreditation Association for Hospitals and Health Systems. (2017). Standard
07.01.10. Healthcare Facilities Accreditation Program: Accreditation
requirements for acute care hospitals. Chicago, IL: Accreditation Association
for Hospitals and Health Systems. (Level VII)
6 DNV GL-Healthcare USA, Inc. (2016). IC.1.SR.2 . NIAHO® accreditation
requirements: Interpretive guidelines & surveyor guidance (version 11).
Milford, OH: DNV GL-Healthcare USA, Inc. (Level VII)
7 World Health Organization. (2009). “WHO guidelines on hand hygiene in
health care: First global patient safety challenge, clean care is safer care”
[Online]. Accessed via the Web at
http://apps.who.int/iris/bitstream/10665/44102/1/9789241597906_eng.pdf
(Level IV)
8 The Joint Commission. (2019). Standard NPSG.07.01.01. Comprehensive
accreditation manual for hospitals. Oakbrook Terrace, IL: The Joint
Commission. (Level VII)
9 Centers for Disease Control and Prevention. (2002). Guideline for hand
hygiene in health-care settings: Recommendations of the Healthcare Infection
Control Practices Advisory Committee and the HICPAC/SHEA/APIC/IDSA Hand
Hygiene Task Force. MMWR Recommendations and Reports, 51(RR-16), 1–45.
Accessed via the Web at https://www.cdc.gov/mmwr/pdf/rr/rr5116.pdf (Level
II)
10 Centers for Medicare and Medicaid Services, Department of Health and
Human Services. (2015). Condition of participation: Infection control. 42 C.F.R.
§ 482.42.
11 Accreditation Association for Hospitals and Health Systems. (2017). Standard
07.01.21. Healthcare Facilities Accreditation Program: Accreditation
requirements for acute care hospitals. Chicago, IL: Accreditation Association
for Hospitals and Health Systems. (Level VII)
12 DNV GL-Healthcare USA, Inc. (2016). IC.1 .SR.1 . NIAHO® accreditation
requirements: Interpretive guidelines & surveyor guidance (version 11).
Milford, OH: DNV GL-Healthcare USA, Inc. (Level VII)
13 The Joint Commission. (2019). Standard RC.02.01.01. Comprehensive
accreditation manual for hospitals. Oakbrook Terrace, IL: The Joint
Commission. (Level VII)
14 Centers for Medicare and Medicaid Services, Department of Health and
Human Services. (2015). Condition of participation: Medical record services.
42 C.F.R. § 482.24(b).
15 Accreditation Association for Hospitals and Health Systems. (2017). Standard
10.00 .03. Healthcare Facilities Accreditation Program: Accreditation
requirements for acute care hospitals. Chicago, IL: Accreditation Association
for Hospitals and Health Systems. (Level VII)
16 DNV GL-Healthcare USA, Inc. (2016). MR.2 .SR.1 . NIAHO® accreditation
requirements: Interpretive guidelines & surveyor guidance (version 11).
Milford, OH: DNV GL-Healthcare USA, Inc. (Level VII)
17 American Association of Critical-Care Nurses (AACN). (2016). “A ACN practice
alert: Family presence during resuscitation and invasive procedures” [Online].
Accessed via the Web at https://www.aacn.org/clinical-resources/practice-
alerts/family-presence-during-resuscitation-and-invasive-procedures (Level
VII)
18 Emergency Nurses Association. (2010, revised 2012). “Family presence
during invasive procedures and resuscitation in the emergency department”
[Online]. Accessed via the Web at https://www.aacn.org/clinical-
resources/practice-alerts/family-presence-during-resuscitation-and-invasive-
procedures (Level VII)
CARDIOPULMONARY RESUSCITATION, INFANT
An adult who needs cardiopulmonary resuscitation (CPR)
typically suffers from a primary cardiac disorder or an
arrhythmia that has stopped the heart. An infant who needs
CPR typically suffers from hypoxia caused by respiratory
difficulty or respiratory arrest.
In infants, the leading causes of cardiopulmonary arrest
are congenital malformations, complications of prematurity,
and sudden infant death syndrome.1 Other causes of
cardiopulmonary arrest in infants include laryngospasm and
edema from upper respiratory infections and choking.
Liquids are the most common cause of choking in infants.1
The goal of CPR is the return of spontaneous circulation.
However, CPR techniques differ depending on whether the
patient is an adult, a child, or an infant. For CPR purposes,
the American Heart Association (AHA) defines a patient by
age. An infant is younger than age 1; a child is age 1 to
puberty.2
Survival chances improve the sooner CPR begins and the
faster advanced life-support systems are implemented. CPR
is appropriate only when the infant isn’t breathing or is only
gasping (as opposed to breathing regularly).1,2 Chest
compressions are particularly important because perfusion
to vital organs during CPR depends on them. To prevent a
delay in chest compressions, the AHA changed the
sequence of CPR in the 2010 guidelines from “A-B-C ”
(airway, breathing, and compressions) to “C-A-B”
(compressions, airway, and breathing), which gives the
highest priority to chest compressions when resuscitating a
patient in cardiac arrest.1,2
High-quality CPR is important not only at the onset of
resuscitation, but throughout the entire resuscitation
process. Key components of high-quality CPR are minimizing
chest compression interruptions, providing compressions of
adequate rate and depth, allowing complete recoil of the
chest after each compression, avoiding leaning between
compressions, and avoiding excessive ventilation.2,3
Equipment
Backboard or other firm surface ▪ automated external
defibrillator (AED) or defibrillator ▪ Optional: gloves, other
personal protective equipment, barrier mask with one-way
valve.
A manual device is preferred in infants with a shockable
rhythm. If a manual device isn’t available, a device with a
pediatric attenuator is preferred; if neither is available, an
AED without a dose attenuator may be used.
Implementation
■ Review the illustrated instructions, which provide a step-
by-step guide for CPR as recommended by the AHA. (See
AHA pediatric cardiac arrest algorithm for the single rescuer,
page 123.)
■ Put on gloves and other personal protective equipment,
as needed and available, to comply with standard
precautions.3,4,5
■ Verify that the environment is safe by quickly scanning
the infant’s location and surroundings for imminent physical
threats, such as toxic and electrical hazards.2
■ Assess the infant to determine whether he or she is
responsive. Gently tap the infant’s foot and ask loudly, “Are
you okay?” Call out the infant’s name if you know it. If the
infant is unresponsive, shout for nearby help and activate
the emergency response system via mobile device (if
appropriate).2
■ Check to see whether the infant is apneic or only gasping
(as opposed to breathing regularly) and, if able,
simultaneously check for a pulse to minimize delay in
detecting cardiac arrest and initiating CPR. To check for a
pulse, palpate the brachial artery, located inside the infant’s
upper arm between the elbow and the shoulder (as shown
below). Palpate for no longer than 10 seconds.1,2
■ If the infant is breathing normally and has a pulse,
monitor the infant closely until the emergency response
team arrives.1,2
■ If breathing is absent or the infant is only gasping, and
you feel a pulse within 10 seconds and it’s 60 beats/minute
or higher, open the airway using the head tilt–chin lift
maneuver, unless contraindicated by trauma. If spinal injury
is suspected, use the jaw-thrust maneuver. Don’t
hyperextend the infant’s neck. Provide rescue breathing by
giving the infant 12 to 20 breaths/minute (1 breath every 3
to 5 seconds). To begin ventilations using a barrier mask
with a one-way valve, position the narrow portion of the
mask over the infant’s nose and the wide portion above the
infant’s chin. Covering the nose and mouth with the mask,
create a tight seal. Take a regular breath and place your
mouth on the mouthpiece. Alternatively, take a breath and
tightly seal your mouth over the infant’s nose and mouth.1,2
■ If breathing is absent or the infant is only gasping and
you don’t feel a pulse within 10 seconds or the pulse rate is
less than 60 beats/minute and the infant has signs of poor
perfusion, such as pallor, cyanosis, or mottling, follow these
steps:2 Activate the emergency response system (if not
already done). Retrieve the defibrillator or AED, if you
witnessed the arrest. If you didn’t witness the arrest, place
the infant supine on a hard surface to begin chest
compressions.6 Place two fingers on the neonate’s sternum
just below the nipple line (as shown below). Use these two
fingers to depress the sternum at least one-third the
anterior-posterior chest. dimension,2,6 usually 11⁄2′′ (4 cm), at
a rate of 100 to 120 compressions/minute.2
■ When performing chest compressions, take care to ensure
smooth motions, and allow the chest to recoil after each
compression; incomplete chest wall recoil during CPR is
associated with higher intrathoracic pressures and
significantly decreased venous return, coronary perfusion,
blood flow, and cerebral perfusion.1,2 Keep your fingers on
the infant’s chest at all times. Time your motions so that the
compression and relaxation phases are equal to promote
effective compressions.
■ After 30 compressions, open the airway and deliver two
breaths. If the infant’s chest rises and falls, then the amount
of air is probably adequate. If the chest doesn’t rise,
reposition the infant’s head, make a better seal, and try
again.1,2 Avoid excessive ventilation.2,6
■ If you’re still alone after about 2 minutes of CPR, activate
the emergency response system and retrieve the
defibrillator or AED (if not already done).
■ Check the infant’s cardiac rhythm with the defibrillator or
AED. If a shockable rhythm is present, deliver a shock, as
indicated.1,2
■ Resume CPR with cycles of 30 compressions to 2
ventilations until the emergency response team arrives and
takes over, or the infant begins breathing spontaneously.2
NURSING ALERT To maximize chest compression time and improve
tissue oxygenation, avoid interruptions to chest compressions, such as
pulse checks.6
■ Continue to monitor the infant if pulse and respirations
return.
■ Remove and discard your gloves and any other personal
protective equipment worn.3
■ Perform hand hygiene.7,8,9,10,11,12
■ Document the procedure.13,14,15,16
Special considerations
■ The AHA recommends that all health care professionals
learn how to use disposable airway equipment.1,2 When
using a barrier device, the rescuer shouldn’t delay chest
compressions while setting up the device.1,2
■ Compression-only CPR can be effective in children with
primary cardiac arrest. If rescuers are unwilling or unable to
deliver breaths, the AHA recommends that rescuers perform
compression-only CPR for child in cardiac arrest.2
■ Because effective bag-and-mask ventilation requires
complex steps, it isn’t recommended for a lone rescuer
performing CPR. During CPR, the lone rescuer should use
mouth-to-barrier device techniques for ventilation. Bag-and-
mask ventilation can be provided effectively during two-
person CPR.1
■ If two rescuers are available, the two thumb–encircling
hands technique is preferred for chest compressions. Place
your hands around the infant’s chest with your fingers
around the thorax and your thumbs together on the lower
half of the sternum.1,2 Compress the sternum with your
thumbs and squeeze your fingers for counterpressure. Use a
compression-to-ventilation ratio of 15 to 2.1,2
■ An infant’s tongue can easily block his or her small
airway. If this occurs, simply opening the airway may
eliminate the obstruction.
■ If the infant has breathing difficulty and a parent or
guardian is present, find out whether the infant recently had
a fever or an upper respiratory tract infection. If so, suspect
epiglottiditis. In this instance, don’t attempt to manipulate
the airway because laryngospasm may occur and
completely obstruct the airway. Allow the infant to assume
a comfortable position, and monitor breathing until
additional assistance arrives.
■ Give the infant’s parents or guardian the option of
remaining at the bedside during resuscitation because doing
so helps meet the psychosocial needs of the infant and
family in a time of crisis.17,18
Complications
CPR can cause complications, including fractured ribs, a
lacerated liver, and pneumothorax, if the compressor
doesn’t place the fingers on the sternum properly. Gastric
distention, a common complication, results from giving too
much air during ventilation.
Documentation
Document all of the events of resuscitation and the names
of the individuals who were present. Record whether the
infant suffered cardiac or respiratory arrest. Note the
location where the arrest occurred, the time CPR began,
how long the procedure continued, and the outcome.
Document any complications—for example, a fractured rib,
a bruised mouth, or gastric distention—as well as actions
taken to correct them.
If the infant received pediatric advanced life support,
document which interventions were performed, who
performed them, when they were performed, what
equipment was used, and what the result was.
REFERENCES
1 American Heart Association. (2010). 2010 American Heart Association
guidelines for cardiopulmonary resuscitation and emergency cardiovascular
care. Circulation, 122, S862–S875. (Level II)
2 American Heart Association. (2015). 2015 American Heart Association
guidelines update for cardiopulmonary resuscitation and emergency
cardiovascular care. Circulation, 132, S519–S525. (Level II)
3 Siegel, J. D., et al. (2007, revised 2017). “2007 guideline for isolation
precautions: Preventing transmission of infectious agents in healthcare
settings” [Online]. Accessed via the Web at
https://www.cdc.gov/infectioncontrol/pdf/guidelines/isolation-guidelines.pdf
(Level II)
4 Accreditation Association for Hospitals and Health Systems. (2017). Standard
07.01.10. Healthcare Facilities Accreditation Program: Accreditation
requirements for acute care hospitals. Chicago, IL: Accreditation Association
for Hospitals and Health Systems. (Level VII)
5 DNV GL-Healthcare USA, Inc. (2016). IC.1.SR.2 . NIAHO® accreditation
requirements: Interpretive guidelines & surveyor guidance (version 11).
Milford, OH: DNV GL-Healthcare USA, Inc. (Level VII)
6 American Heart Association (AHA). (2013). AHA consensus statement:
Cardiopulmonary resuscitation quality: Improving cardiac resuscitation
outcomes both inside and outside the hospital. Circulation, 128, 417–435.
Accessed via the Web at http://circ.ahajournals.org/content/128/4/417.full
(Level VII)
7 The Joint Commission. (2019). Standard NPSG.07.01.01. Comprehensive
accreditation manual for hospitals. Oakbrook Terrace, IL: The Joint
Commission. (Level VII)
8 World Health Organization. (2009). “WHO guidelines on hand hygiene in
health care: First global patient safety challenge, clean care is safer care”
[Online]. Accessed via the Web at
http://apps.who.int/iris/bitstream/10665/44102/1/9789241597906_eng.pdf
(Level IV)
9 Centers for Disease Control and Prevention. (2002). Guideline for hand
hygiene in health-care settings: Recommendations of the Healthcare Infection
Control Practices Advisory Committee and the HICPAC/SHEA/APIC/IDSA Hand
Hygiene Task Force. MMWR Recommendations and Reports, 51(RR-16), 1–45.
Accessed via the Web at https://www.cdc.gov/mmwr/pdf/rr/rr5116.pdf (Level
II)
10 Centers for Medicare and Medicaid Services, Department of Health and
Human Services. (2015). Condition of participation: Infection control. 42 C.F.R.
§ 482.42.
11 Accreditation Association for Hospitals and Health Systems. (2017). Standard
07.01.21. Healthcare Facilities Accreditation Program: Accreditation
requirements for acute care hospitals. Chicago, IL: Accreditation Association
for Hospitals and Health Systems. (Level VII)
12 DNV GL-Healthcare USA, Inc. (2016). IC.1 .SR.1 . NIAHO® accreditation
requirements: Interpretive guidelines & surveyor guidance (version 11).
Milford, OH: DNV GL-Healthcare USA, Inc. (Level VII)
13 The Joint Commission. (2019). Standard RC.02.01.01. Comprehensive
accreditation manual for hospitals. Oakbrook Terrace, IL: The Joint
Commission. (Level VII)
14 Centers for Medicare and Medicaid Services, Department of Health and
Human Services. (2015). Condition of participation: Medical record services.
42 C.F.R. § 482.24(b).
15 Accreditation Association for Hospitals and Health Systems. (2017). Standard
10.00 .03. Healthcare Facilities Accreditation Program: Accreditation
requirements for acute care hospitals. Chicago, IL: Accreditation Association
for Hospitals and Health Systems. (Level VII)
16 DNV GL-Healthcare USA, Inc. (2016). MR.2 .SR.1 . NIAHO® accreditation
requirements: Interpretive guidelines & surveyor guidance (version 11).
Milford, OH: DNV GL-Healthcare USA, Inc. (Level VII)
17 American Association of Critical-Care Nurses (AACN). (2016). AACN practice
alert: Family presence during resuscitation and invasive procedures.
Accessed via the Web at https://www.aacn.org/clinical-resources/practice-
alerts/family-presence-during-resuscitation-and-invasive-procedures (Level
VII)
18 Emergency Nurses Association. (2010). “Family presence during invasive
procedures and resuscitation in the emergency department” [Online].
Accessed via the Web at https://www.ena.org/docs/default-source/resource-
library/practice-
resources/cpg/familypresencecpg3eaabb7cf0414584ac2291feba3be481.pdf?
sfvrsn=9c167fc6_8 (Level VII)
CARDIOVERSION, SYNCHRONIZED
Synchronized cardioversion delivers an electrical charge to
the myocardium that’s timed with the QRS complex. This
charge causes immediate depolarization, interrupting
reentry circuits and allowing the sinoatrial node to resume
control. Synchronizing the electrical charge with the QRS
complex prevents delivery during the relative refractory
period of the cardiac cycle, when a shock could lead to
ventricular fibrillation.1
Synchronized cardioversion is the treatment of choice for
arrhythmias, such as unstable supraventricular tachycardia
due to reentry, unstable atrial flutter, unstable atrial
fibrillation, or unstable monomorphic ventricular tachycardia
with a pulse that doesn’t respond to vagal maneuvers
(Valsalva maneuver or carotid sinus massage) or drug
therapy. The procedure can be elective or urgent depending
on the patient’s tolerance of the arrhythmia.1 For example,
if the patient is hemodynamically stable, the procedure is
commonly elective, allowing for time to assess the patient’s
cardiac and metabolic status to determine whether there’s a
reversible cause that can be treated. If the patient is
unstable (altered mental status, shock or hypotension, and
chest pain), immediate cardioversion is necessary.2
Contraindications to synchronized cardioversion include
tachycardia related to digoxin toxicity, sinus tachycardia,
and multifocal atrial tachycardia. Because atrial fibrillation
increases the risk of stroke, cardioversion is contraindicated
in patients with atrial fibrillation who aren’t receiving
anticoagulation, unless transesophageal imaging is
performed to
rule
out
thrombus formation.3,4
Anticoagulation therapy is recommended for at least 3
weeks before cardioversion and for 4 weeks after
cardioversion to normal sinus rhythm in patients with atrial
fibrillation for 48 hours or longer or when the duration of
atrial fibrillation is unknown.5
Practitioners using synchronized cardioversion should
adhere to the American Heart Association guidelines.1
Equipment
Cardioverter-defibrillator ▪
self-adhesive cardioversion-
defibrillation pads or anterior, posterior, or transverse
paddles and conductive gel pads ▪ cardiac monitor with
recording system ▪ 12-lead electrocardiogram (ECG)
machine ▪ oxygen administration equipment ▪ suction
equipment ▪ artificial airway and intubation supplies ▪
handheld resuscitation bag and mask ▪ emergency cardiac
medications ▪ emergency pacing equipment ▪ automatic
blood pressure device ▪ pulse oximeter and probe ▪
stethoscope ▪ disinfectant pad ▪ hospital-grade disinfectant
▪ Optional: sedation or analgesia, IV catheter insertion
equipment, disposable-head clippers, gloves, gown, mask
with face shield, mask, goggles.
Preparation of equipment
Make sure that the cardioverter-defibrillator pads or paddles
are connected to the cardioverter-defibrillator, and that the
cardioverter-defibrillator battery is adequately charged or
that it’s plugged into a wall outlet. Have emergency
equipment, including a code cart and suction and intubation
equipment, readily available at the patient’s bedside and
make sure that it’s functioning properly. Check any item that
has an expiration date to ensure that it has not expired. If a
product is expired or its integrity is compromised, or if you
find it defective, remove it from patient use, label it as
expired or defective, and report the expiration or defect as
directed by your facility.
Implementation
■ Verify the practitioner’s orders. Check to see whether
cardiac medications have been prescribed for administration
before the procedure.
■ Check the patient’s medical record for recent serum
potassium and magnesium levels and arterial blood gas
results. Also check the most recent digoxin level as ordered.
Electrolyte imbalances, acid-base disturbances, and digoxin
toxicity increase the risk of arrhythmias.6 Notify the
practitioner of critical test results within your facility’s
established time frame so that the patient can be treated
promptly.7
■ Confirm that written informed consent (if possible) is
obtained by the practitioner and that the consent is in the
patient’s medical record.6,8,9,10,11
■ Gather and prepare the appropriate equipment.
■ Conduct a preprocedure verification to make sure that all
relevant documentation, related information, and equipment
are available and correctly identified to the patient’s
identifiers.12
■ Perform hand hygiene.13,14,15,16,17,18
■ Confirm the patient’s identity using at least two patient
identifiers.19
■ Provide privacy20,21,22,23 and explain the procedure to the
patient and family (if appropriate) to increase their
understanding, allay their fears, and enhance cooperation.24
■ If the patient’s condition allows, have him or her maintain
nothing-by-mouth status before the procedure; minimum
fasting recommendations are 2 hours for clear liquids, 6
hours or more for a light meal, and 8 hours or more for fried
or fatty foods or meat.25
■ Raise the patient’s bed to waist level when providing care
to prevent caregiver back strain.26
■ Ensure that the patient is attached to a cardiac monitor,
pulse oximeter, and automatic blood pressure device. Make
sure that the alarm limits on each medical device are set
appropriately for the patient’s current condition, and that
the alarms are turned on, functioning properly, and audible
to staff.27,28,29,30
■ Obtain the patient’s vital signs and oxygen saturation
level using pulse oximetry, and assess neurologic,
cardiovascular, and respiratory status to determine whether
immediate cardioversion is necessary.2,6
■ If the patient has inadequate oxygenation or shows signs
of labored breathing, notify the practitioner and administer
supplemental oxygen, as prescribed.2
■ Perform hand hygiene.13,14,15,16,17,18
■ Put on gloves and other personal protective equipment,
as needed, to comply with standard precautions.31,32,33
■ Make sure that the patient has patent IV access; if not,
insert an IV catheter. (See the “IV catheter insertion and
removal” procedure, page 443.)
■ Obtain a 12-lead ECG to better define the patient’s heart
rhythm and to serve as a baseline for comparison. If the
patient is unstable, don’t delay immediate cardioversion to
obtain the ECG.2,6
■ Administer cardiac medications, if prescribed, following
safe medication administration practices.34,35,36,37
■ Remove all metal objects from the patient, because metal
conducts electricity and could cause burns during
cardioversion.6
■ If the patient has dentures, a partial plate, or another oral
prosthesis, determine whether the device supports airway
patency or has the potential to obstruct it. Remove the
device if it increases the risk of airway obstruction.6
■ Make sure that the patient is in a dry environment and
that his or her chest is dry, because if the rescuer or patient
comes in contact with water, a conductor of electricity, the
rescuer can receive a shock and the patient can receive skin
burns.6
■ Place the patient in the supine position to provide access
to the patient’s chest during the procedure.6
■ If necessary, clip hair from the patient’s chest to make
sure that the electrodes adhere properly.6
■ Remove transdermal medication patches from the
patient’s chest, if present, or make sure that the
cardioversion-defibrillation pads or paddles don’t touch the
patches during the procedure to prevent a chest burn during
cardioversion.6
■ If the patient isn’t already receiving supplemental
oxygen, consider preoxygenation before cardioversion to
promote myocardial oxygenation and to reduce the risk of
cerebral and cardiac complications.6
■ A specially trained health care provider will administer
moderate sedation or anesthesia if time allows and the
patient’s condition permits.
■ Monitor the patient’s heart rate, blood pressure, and
respiratory rate to promptly detect changes in the patient’s
condition and prevent treatment delays.
■ Conduct a time-out before starting the procedure, if the
patient’s condition allows, to perform a final assessment
ensuring that the correct patient, site, positioning, and
procedure are identified and, as applicable, that all relevant
information and necessary equipment are available.38
■ Turn on the cardioverter-defibrillator.6
■ Apply the electrodes to the appropriate locations on the
patient’s chest (if not already present) and attach the
monitoring lead wires on the cardioverter-defibrillator,
because the device must be able to sense the R wave to
provide synchronized cardioversion.6 Ensure that there is an
adequate cardiac rhythm tracing.
■ Apply the self-adhesive cardioversion-defibrillation pads
according to the manufacturer’s directions; if you’re using
anterolateral placement, place one pad at the heart’s apex
just left of the nipple at the midaxillary line and the other
pad just below the right clavicle to the right of the sternum.
Alternatively, remove the paddles from the machine. Place
the paddles and the conductive gel pads using anterolateral
placement.6
Alternative
pad positions,
including
anteroposterior, anterior–left infrascapular, and anterior–
right infrascapular, can also be used depending on the
patient’s individual characteristics.
■ To decrease transthoracic resistance, avoid placing the
self-adhesive cardioversion-defibrillation pads or paddles
over a female patient’s breast.6
■ Turn on the ECG recording device to obtain a continuous
printout to document the patient’s response to
cardioversion.6
■ Push the SYNC button to synchronize the machine with the
patient’s QRS complex. Assess the cardioverter-defibrillator
waveform and make sure that the SYNC button flashes with
each of the patient’s QRS complexes; listen for audible
beeps. Synchronization with the patient’s QRS complex
prevents the random discharge of electrical charges, which
may cause ventricular fibrillation.6
■ Set the energy level to the prescribed dose. Advanced
cardiac life support protocols call for an initial shock of 50 to
100 joules for a patient with unstable supraventricular
tachycardia, 120 to 200 joules for a patient with atrial
fibrillation, 50 to 100 joules for a patient with atrial flutter,
and 100 joules for a patient with monomorphic ventricular
tachycardia with a pulse.
■ Make sure that everyone stands clear of contact with the
patient and the bed to prevent conduction of electrical
current to health care workers.6
■ Charge the cardioverter-defibrillator.
■ Disconnect the oxygen source before cardioversion to
decrease the risk of combustion in the presence of electrical
current.6
■ Confirm that all personnel are clear of the patient and the
bed. If you’re using cardioversion-defibrillation pads, push
the DISCHARGE button. Alternatively, if you’re using paddles,
apply firm pressure (approximately 25 to 30 lb [11.3 to 13.6
kg])39 to each paddle against the patient’s chest wall, push
the DISCHARGE button, and wait for the energy to be
discharged. Keep in mind that the machine has to
synchronize the discharge with the QRS complex.
NURSING ALERT Don’t touch the bed, the patient, or any equipment
attached to the patient while cardioversion is being administered to
prevent transfer of the electrical current to caregivers.
■ Assess the patient’s cardiac rhythm on the monitor.
■ If the arrhythmia fails to convert after the initial shock,
repeat the procedure, increasing the energy dose in a
stepwise fashion or as instructed by the practitioner. Check
that the synchronization mode is active after each
cardioversion attempt, because many defibrillators
automatically default to the unsynchronized mode.
■ When the patient’s rhythm converts, monitor vital signs,
oxygen saturation level, and cardiovascular, neurologic, and
respiratory status to evaluate patient response to the
procedure.6 Make sure you reconnect the patient to the
oxygen source if appropriate.
■ Turn off the continuous ECG recording device.
■ Obtain a follow-up 12-lead ECG, as ordered.
■ Inspect the patient’s chest for electrical burns; treat burns
as needed and prescribed.6
■ Perform a comprehensive pain assessment using
techniques appropriate for the patient’s age, condition, and
ability to understand.40 Administer analgesia as ordered and
indicated
using
safe
medication
administration
practices.34,35,36,37
■ Return the bed to the lowest position to prevent falls and
maintain patient safety.41
■ Discard used supplies in the appropriate receptacles.31
■ Remove and discard your gloves or other personal
protective equipment if worn.31
■ Perform hand hygiene.13,14,15,16,17,18
■ Clean and disinfect your stethoscope using a disinfectant
pad.42,43
■ Clean and disinfect the cardioverter-defibrillator and
make sure that it’s ready for reuse.6,42,43
■ Perform hand hygiene.13,14,15,16,17,18
■ Document the procedure.44,45,46,47
Special considerations
■ Synchronization to the R wave prevents the discharge of
electrical energy randomly on the T wave, which may lead
to ventricular tachycardia or ventricular fibrillation. If
ventricular fibrillation does occur, turn off the
synchronization and defibrillate according to the
defibrillation procedure.6
■ If the patient has a permanent pacemaker or an
implantable cardioverter-defibrillator, don’t place the pads
or paddles over the device, because doing so can impair
current flow to the patient’s heart and damage the device.6
■ The Joint Commission has issued a sentinel event alert
concerning medical device alarm safety, because alarm-
related events have been associated with permanent loss of
function or death. Among the contributing factors are
improper alarm settings, alarm settings inappropriately
turned off, and alarm signals not audible to staff. Make sure
that alarm limits are set appropriately and that alarms are
turned on, functioning properly, and audible to staff. Follow
facility guidelines for preventing alarm fatigue.27
Complications
Common
complications
following
synchronized
cardioversion are skin burns, pulmonary edema,
hypotension,
embolism,
and transient harmless
arrhythmias, such as atrial, ventricular, and junctional
premature beats. Serious ventricular arrhythmias such as
ventricular fibrillation can also occur; however, this type of
arrhythmia is more likely to result from high amounts of
electrical energy, digoxin toxicity, severe heart disease,
electrolyte imbalances, or improper synchronization with the
R wave.
Documentation
Document the procedure, including the voltage delivered
with each attempt, rhythm strips before and after the
procedure, medications administered, and the patient’s
tolerance of the procedure. Note any emergency
interventions required and the patient’s response to these
interventions. Record the patient’s vital signs and your
assessment findings. Document patient and family teaching
provided, patient and family understanding of that teaching,
and whether follow-up teaching is required.
REFERENCES
1 American Heart Association. (2015). 2015 American Heart Association
guidelines update for cardiopulmonary resuscitation and emergency
cardiovascular care. Circulation, 132, S444–S464. (Level II)
2 American Heart Association. (2010). 2010 American Heart Association
guidelines for cardiopulmonary resuscitation and emergency cardiovascular
care. Circulation, 122, S729–S776. (Level II)
3 Beinart, S. C . (2016). “Synchronized electrical cardioversion” [Online].
Accessed via the Web at http://emedicine.medscape.com/article/1834044-
overview
4 Marchiondo, K. (2007). Transesophageal imaging and interventions: Nursing
implications. Critical Care Nurse, 27(2), 25–36 . Accessed July 2017 via the
Web at http://ccn.aacnjournals.org/content/27/2/25.full.pdf+html (Level V)
5 Anderson, J. L., et al. (2013). ACCF/AHA practice guideline: Management of
patients with atrial fibrillation (compilation of 2006 ACCF/AHA/ESC and 2011
ACCF/AHA/HRS recommendations). Circulation, 127, 1916–1926. Accessed via
the Web at http://circ.ahajournals.org/content/127/18/1916.full (Level VII)
6 Wiegand, D. (Ed.). (2017). AACN procedure manual for high acuity,
progressive, and critical care (7th ed.) . St. Louis, MO: Saunders.
7 The Joint Commission. (2019). Standard NPSG.02.03 .01. Comprehensive
accreditation manual for hospitals. Oakbrook Terrace, IL: The Joint
Commission. (Level VII)
8 The Joint Commission. (2019). Standard RI.01.03 .01. Comprehensive
accreditation manual for hospitals. Oakbrook Terrace, IL: The Joint
Commission. (Level VII)
9 Centers for Medicare and Medicaid Services, Department of Health and
Human Services. (2014). Condition of participation: Patient’s rights. 42 C.F.R.
§ 482.13(b)(2).
10 Accreditation Association for Hospitals and Health Systems. (2017). Standard
30.01.11. Healthcare Facilities Accreditation Program: Accreditation
requirements for acute care hospitals. Chicago, IL: Accreditation Association
for Hospitals and Health Systems. (Level VII)
11 DNV GL-Healthcare USA, Inc. (2016). PR.1.SR.3 . NIAHO® accreditation
requirements: Interpretive guidelines & surveyor guidance (version 11).
Milford, OH: DNV GL-Healthcare USA, Inc. (Level VII)
12 The Joint Commission. (2019). Standard UP.01.01.01. Comprehensive
accreditation manual for hospitals. Oakbrook Terrace, IL: The Joint
Commission. (Level VII)
13 The Joint Commission. (2019). Standard NPSG.07.01.01. Comprehensive
accreditation manual for hospitals. Oakbrook Terrace, IL: The Joint
Commission. (Level VII)
14 Centers for Disease Control and Prevention. (2002). Guideline for hand
hygiene in health-care settings: Recommendations of the Healthcare Infection
Control Practices Advisory Committee and the HICPAC/SHEA/APIC/IDSA Hand
Hygiene Task Force. MMWR Recommendations and Reports, 51(RR-16), 1–45.
Accessed via the Web at https://www.cdc.gov/mmwr/pdf/rr/rr5116.pdf (Level
II)
15 World Health Organization. (2009). “WHO guidelines on hand hygiene in
health care: First global patient safety challenge, clean care is safer care”
[Online]. Accessed via the Web at
http://apps.who.int/iris/bitstream/10665/44102/1/9789241597906_eng.pdf
(Level IV)
16 Centers for Medicare and Medicaid Services, Department of Health and
Human Services. (2015). Condition of participation: Infection control. 42 C.F.R.
§ 482.42.
17 Accreditation Association for Hospitals and Health Systems. (2017). Standard
07.01.21. Healthcare Facilities Accreditation Program: Accreditation
requirements for acute care hospitals. Chicago, IL: Accreditation Association
for Hospitals and Health Systems. (Level VII)
18 DNV GL-Healthcare USA, Inc. (2016). IC.1 .SR.1 . NIAHO® accreditation
requirements: Interpretive guidelines & surveyor guidance (version 11).
Milford, OH: DNV GL-Healthcare USA, Inc. (Level VII)
19 The Joint Commission. (2019). Standard NPSG.01.01.01. Comprehensive
accreditation manual for hospitals. Oakbrook Terrace, IL: The Joint
Commission. (Level VII)
20 Centers for Medicare and Medicaid Services, Department of Health and
Human Services. (2015). Condition of participation: Patient’s rights. 42 C.F.R.
§ 482.13(c)(1).
21 Accreditation Association for Hospitals and Health Systems. (2017). Standard
15.01.16. Healthcare Facilities Accreditation program: Accreditation
requirements for acute care hospitals. Chicago, IL: Accreditation Association
for Hospitals and Health Systems. (Level VII)
22 The Joint Commission. (2019). Standard RI.01.01.01. Comprehensive
accreditation manual for hospitals. Oakbrook Terrace, IL: The Joint
Commission. (Level VII)
23 DNV GL-Healthcare USA, Inc. (2016). PR.1.SR.5 . NIAHO® accreditation
requirements: Interpretive guidelines & surveyor guidance (version 11).
Milford, OH: DNV GL-Healthcare USA, Inc. (Level VII)
24 The Joint Commission. (2019). Standard PC.02.01.21. Comprehensive
accreditation manual for hospitals. Oakbrook Terrace, IL: The Joint
Commission. (Level VII)
25 American Society of Anesthesiologists. (2017). Practice guidelines for
preoperative fasting and the use of pharmacologic agents to reduce the risk
of pulmonary aspiration: Application to healthy patients undergoing elective
procedures. Anesthesiology, 126(3), 376–393 . (Level V)
26 Waters, T. R., et al. (2009). “Safe patient handling training for schools of
nursing” [Online]. Accessed via the Web at
http://www.cdc.gov/niosh/docs/2009-127/pdfs/2009-127.pdf (Level VII)
27 The Joint Commission. (2013). “Sentinel event alert: Medical device alarm
safety in hospitals” [Online]. Accessed via the Web at
http://www.jointcommission.org/assets/1/18/SEA_50_alarms_4 _5 _13_FINAL1 .P
DF (Level VII)
28 The Joint Commission. (2019). Standard NPSG.06 .01.01. Comprehensive
accreditation manual for hospitals. Oakbrook Terrace, IL: The Joint
Commission. (Level VII)
29 Graham, K. C., & Cvach, M. (2010). Monitor alarm fatigue: Standardizing use
of physiological monitors and decreasing nuisance alarms. American Journal
of Critical Care, 19(1), 28–37. Accessed via the Web at
http://ajcc.aacnjournals.org/content/19/1/28.full.pdf
30 American Association of Critical-Care Nurses. (2013). “A ACN practice alert:
Alarm management” [Online]. Accessed via the Web at
https://www.aacn.org/aacn-website/shared/content/practice-
alerts/2015/11/25/alarm-management (Level VII)
31 Siegel, J. D ., et al. (2007, Revised 2017). “2007 guideline for isolation
precautions: Preventing transmission of infectious agents in healthcare
settings” [Online]. Accessed via the Web at
https://www.cdc.gov/infectioncontrol/pdf/guidelines/isolation-guidelines.pdf
(Level II)
32 Accreditation Association for Hospitals and Health Systems. (2017). Standard
07.01.10. Healthcare Facilities Accreditation Program: Accreditation
requirements for acute care hospitals. Chicago, IL: Accreditation Association
for Hospitals and Health Systems. (Level VII)
33 DNV GL-Healthcare USA, Inc. (2016). IC.1 .SR.2 . NIAHO® accreditation
requirements: Interpretive guidelines & surveyor guidance (version 11).
Milford, OH: DNV GL-Healthcare USA. Inc. (Level VII)
34 Centers for Medicare and Medicaid Services, Department of Health and
Human Services. (2015). Condition of participation: Nursing services. 42
C.F.R. § 482.23(c).
35 Accreditation Association for Hospitals and Health Systems. (2017). Standard
16.01.03. Healthcare Facilities Accreditation Program: Accreditation
requirements for acute care hospitals. Chicago, IL: Accreditation Association
for Hospitals and Health Systems. (Level VII)
36 The Joint Commission. (2019). Standard MM.06.01.01. Comprehensive
accreditation manual for hospitals. Oakbrook Terrace, IL: The Joint
Commission. (Level VII)
37 DNV GL-Healthcare USA, Inc. (2016). MM.1 .SR.2. NIAHO® accreditation
requirements: Interpretive guidelines & surveyor guidance (version 11).
Milford, OH: DNV GL-Healthcare USA, Inc. (Level VII)
38 The Joint Commission. (2019). Standard UP.01.03.01. Comprehensive
accreditation manual for hospitals. Oakbrook Terrace, IL: The Joint
Commission. (Level VII)
39 McKean, S. C ., et al. (2016). Principles and practice of hospital medicine (2nd
ed.). New York, NY: McGraw Hill.
40 The Joint Commission. (2019). Standard PC.01.02.07. Comprehensive
accreditation manual for hospitals. Oakbrook Terrace, IL: The Joint
Commission. (Level VII)
41 Ganz, D. A., et al. (2013). Preventing falls in hospitals: A toolkit for improving
quality of care (AHRQ Publication No. 13-0015-EF). Rockville, MD: Agency for
Healthcare Research and Quality. Accessed via the Web at
http://www.ahrq.gov/sites/default/files/publications/files/fallpxtoolkit.pdf
(Level VII)
42 Rutala, W. A., et al. (2008, revised 2017). “Guideline for disinfection and
sterilization in healthcare facilities, 2008” [Online]. Accessed via the Web at
https://www.cdc.gov/infectioncontrol/pdf/guidelines/disinfection-
guidelines.pdf (Level I)
43 Accreditation Association for Hospitals and Health Systems. (2017). Standard
07.02.03. Healthcare Facilities Accreditation Program: Accreditation
requirements for acute care hospitals. Chicago, IL: Accreditation Association
for Hospitals and Health Systems. (Level VII)
44 The Joint Commission. (2019). Standard RC.01.03 .01. Comprehensive
accreditation manual for hospitals. Oakbrook Terrace, IL: The Joint
Commission. (Level VII)
45 Centers for Medicare and Medicaid Services, Department of Health and
Human Services. (2015). Condition of participation: Medical record services.
42 C.F.R. § 482.24(b).
46 Accreditation Association for Hospitals and Health Systems. (2017). Standard
10.00 .03. Healthcare Facilities Accreditation Program: Accreditation
requirements for acute care hospitals. Chicago, IL: Accreditation Association
for Hospitals and Health Systems. (Level VII)
47 DNV GL-Healthcare USA, Inc. (2016). MR.2 .SR.1 . NIAHO® accreditation
requirements: Interpretive guidelines & surveyor guidance (version 11).
Milford, OH: DNV GL-Healthcare USA, Inc. (Level VII)
CARE PLAN PREPARATION
A care plan directs the patient’s nursing care from
admission to discharge. This written action plan is based on
nursing diagnoses that have been formulated after
reviewing assessment findings, and it embodies the
components of the nursing process: assessment, diagnosis,
planning, implementation, and evaluation. (See Elements of
a nursing diagnosis.) The care plan consists of three parts:
goals or expected outcomes, which describe behaviors or
results to be achieved within a specified time; appropriate
nursing actions or interventions needed to achieve these
goals; and evaluations of the established goals.
A nursing care plan should be written for each patient,
preferably within 24 hours of admission.3 It’s usually started
by the patient’s primary nurse or the nurse who admits the
patient. If the care plan contains more than one nursing
diagnosis, assign priority to each diagnosis and implement
those with the highest priority first. Update and revise the
plan throughout the patient’s stay, based on the patient’s
response.4,5,6,7 The document becomes part of the
permanent patient record.8
Some health care facilities use standardized care plans
that can be modified to serve many patients. Others use
computer programs to facilitate development of nursing
care plans.
A nursing care plan serves as a database for planning
assignments, giving change-of-shift reports, conferring with
the practitioner or other members of the health care team,
planning patient discharge, and documenting patient care.
In addition, the care plan can be used as a management
tool to determine staffing needs and assignments.
Elements of a nursing diagnosis
You may identify a nursing diagnosis from an actual problem that the patient
experiences, an identified risk, or a desire by the patient to improve current
health status.1
Problem-focused diagnosis
A problem-focused nursing diagnosis contains three components: a problem,
related factors, and the defining characteristics.
■ Human response or problem—After analyzing the patient’s condition,
choose a diagnostic label from a facility-sanctioned list or create a label
specific to the patient. An example of a diagnostic label is Fluid volume
excess.
■ Related factors—The second part of the nursing diagnosis lists etiologic
factors that seem to influence the patient in a way that pertains to the
diagnostic label. Connect these factors to the diagnostic label with the
phrase related to. For example, you might add related factors to the previous
example to read: Fluid volume excess related to excess sodium intake as
evidenced by edema, weight gain over a short time, dyspnea on exertion,
and S3 heart sounds.1,2
■ Defining characteristics—To complete the nursing diagnosis, list defining
characteristics, which are signs and symptoms uncovered during assessment
that help define the diagnostic label. You may list them beneath the
diagnosis and related factors, or add them to the diagnostic statement and
connect them with the phrase as evidenced by. For example, you might add
related factors to the previous example to read: Excess fluid volume related
to excess sodium intake as evidenced by edema, weight gain over a short
time, dyspnea on exertion, and S3 heart sounds.1,2
Risk diagnosis
A risk-related nursing diagnosis contains two components: the identified risk
and the risk factors.
■ Identified risk—After assessing the patient’s condition, choose a diagnostic
label from a facility-approved list, or create a specific label for the patient
that describes the condition for which the patient is at risk. For example, your
assessment may have identified that a patient with arthritis experiences joint
stiffness, so an appropriate nursing diagnosis is Risk for physical mobility
impairment.1
■ Risk factors—For a risk diagnosis there are no etiological factors. You’re
identifying a patient’s vulnerability for a potential problem, so the problem
isn’t yet present. List the risk factors that predispose the patient to the
identified risk. For example, using the previous identified risk, you would add
risk factors to identify Risk for physical mobility impairment related to
arthritic joint pain and stiffness.1
Health promotion diagnosis
A health promotion diagnosis contains two components: the health promotion
diagnosis, which addresses the area of health the patient desires to improve,
and the defining characteristics.
■ Health promotion diagnosis—The health promotion diagnosis is the area of
health the patient desires to improve. An example of a diagnostic label is
Self-care readiness.
■ Defining characteristic(s)—The defining characteristics in a health
promotion diagnosis are evidence of the desire on the patient’s part to
improve his or her current health state. For example, a health promotion
diagnosis may include Self-care readiness as evidenced by an expressed
desire to enhance self-care.1
Equipment
Nursing care plan form or care plan in electronic format ▪
patient’s medical record.
Implementation
■ Gather the appropriate equipment.
■ Review the patient’s medical record, especially the
nursing assessment completed on admission. Review
diagnostic test results, the medical plan, and other
information that may affect patient care. If the patient has
just been admitted, complete a nursing history and physical
assessment and add it to the patient’s record.
■ Perform hand hygiene.9,10,11,12,13,14
■ Confirm the patient’s identity by using at least two
patient identifiers.15
■ Provide privacy.16,17,18,19
■ Obtain from the patient any additional subjective or
objective information needed to complete your assessment.
■ Based on an analysis of the data, determine which
nursing diagnoses will guide your patient care.4 Address all
of the patient’s significant needs when determining nursing
diagnoses.
■ Work with the patient to identify individualized short-term
and long-term goals (expected outcomes) for each nursing
diagnosis. Short-term goals can be achieved quickly; long-
term goals take more time to achieve and usually involve
prevention, patient teaching, and rehabilitation. A correctly
written outcome expresses the desired patient behavior, the
criteria for measurement, and the appropriate time and
conditions under which the behavior will occur. For example,
an outcome containing all these elements might read: “By
Monday, using crutches, Mary Ballin will be able to walk to
the end of the hall and back.” Expected outcomes serve as
the basis for evaluating the effectiveness of nursing
interventions.
■ Select interventions that will help the patient achieve the
stated outcome for each nursing diagnosis. Include specific
information, such as the frequency or particular intervention
technique. Outcomes establish criteria against which you’ll
judge further nursing actions. (See Tips for writing an
effective patient care plan, page 132.)
■ Evaluate the patient’s progress and revise the care plan
as appropriate.4,5,6,7
■ Perform hand hygiene.9,10,11,12,13,14
■ Complete documentation of the care plan.8,20,21,22,23
Special considerations
■ If your facility doesn’t use an electronic medical record,
fill out the nursing care plan in ink, because the document is
part of the permanent medical record. If you must revise
your plan as the patient’s condition changes, fill out a new
care plan and add it to the medical record.
■ Sign and date the care plan whenever you make new
entries to keep the plan current and to maintain
accountability for planning the patient’s care.
■ Customize a standardized care plan to avoid
“standardizing” the patient’s care and to allow you to
address the patient’s individual concerns.
■ Be aware that long-term goals may not be met during
hospitalization, so your planning should address
postdischarge and home care needs. Interventions may
include coordinating home care services.
■ Note that the nursing care plan may be a part of a
multidisciplinary plan of care, such as a critical pathway.
Critical pathways address standardized desired outcomes of
care for a specific treatment or diagnosis.
Documentation
Documentation of the patient’s progress (or lack of it) is
required by The Joint Commission and other regulatory
agencies that monitor health care quality.4,5,6,7 Document all
pertinent nursing diagnoses, expected outcomes, nursing
interventions, and evaluations of expected outcomes. Write
the care plan clearly and concisely so that other members of
the health care team can understand it.
REFERENCES
1 NANDA International. (n.d.) . “How do I write a diagnostic statement for risk,
problem-focused and health promotion diagnoses?” [Online]. Accessed via
the Web at http://nanda.host4kb.com/article/AA-
00492/36/English-/Frequently-Asked-Questions/Nursing-Diagnosis/Nursing-
Diagnosis%3A-Learning-Using/How-do-I-write-a -diagnostic-statement-for-risk-
problem-focused-and-health-promotion-diagnoses.html
2 Herdman, H. T., & Kamitsuru, S. (Eds.). (2018). NANDA International, Nursing
diagnoses: Definitions and classification, 2018–2020 (11th ed.) . New York, NY:
Thieme Publishers.
3 DNV GL-Healthcare USA, Inc. (2016). NS.3 .SR.2 . NIAHO® accreditation
requirements: Interpretive guidelines & surveyor guidance (version 11).
Milford, OH: DNV GL-Healthcare USA, Inc. (Level VII)
Tips for writing an effective patient
care plan
How do you write a care plan that’s realistic, accurate, and helpful? Here are
some guidelines.
Be systematic
Avoid setting an initial outcome that’s impossible to achieve. For example,
suppose the outcome for a newly admitted patient with a stroke were
“Patient will ambulate without assistance.” Although this outcome is certainly
appropriate in the long term, several short-term outcomes, such as “Patient
maintains joint range-of-motion,” need to be achieved first.
Be realistic
The nursing intervention should match staff resources and capabilities. For
example, “Passive range-of-motion exercises to all extremities every 2 hours”
may not be reasonable given the unit’s staffing pattern and care
requirements. The goals you set to correct a patient’s problem should reflect
what is reasonably possible in your setting—for example, “Passive range-of-
motion exercises with a.m. care, p.m . care, and once at night.”
Be clear
Remember, you’ll use goals to evaluate the effectiveness of the care plan, so
it’s important to express them clearly.
Be specific
Include specific details in the patient’s goals. For example, “Give plenty of
fluids” is nonspecific because it doesn’t indicate indicate a specific amount.
In contrast, an intervention that says “Encourage fluids—1,000 mL/day shift,
1,000 mL/evening shift, 500 mL/night shift” allows another nurse to carry out
the intervention with some assurance of having done what you ordered.
Be brief
An intervention that says “Follow turning schedule posted at bedside” is
more readable and useful than having the entire schedule written on the
nursing plan.
4 The Joint Commission. (2019). Standard PC.01.03 .01. Comprehensive
accreditation manual for hospitals. Oakbrook Terrace, IL: The Joint
Commission. (Level VII)
5 Centers for Medicare and Medicaid Services, Department of Health and
Human Services. (2015). Condition of participation: Nursing services. 42
C.F.R. § 482.23(b)(4).
6 DNV GL-Healthcare USA, Inc. (2016). NS.3 .SR.1 . NIAHO® accreditation
requirements: Interpretive guidelines & surveyor guidance (version 11).
Milford, OH: DNV GL-Healthcare USA, Inc. (Level VII)
7 Accreditation Association for Hospitals and Health Systems. (2017). Standard
16.00 .10. Healthcare Facilities Accreditation Program: Accreditation
requirements for acute care hospitals. Chicago, IL: Accreditation Association
for Hospitals and Health Systems. (Level VII)
8 The Joint Commission. (2019). Standard RC.02.01.01. Comprehensive
accreditation manual for hospitals. Oakbrook Terrace, IL: The Joint
Commission. (Level VII)
9 The Joint Commission. (2019). Standard NPSG.07.01.01. Comprehensive
accreditation manual for hospitals. Oakbrook Terrace, IL: The Joint
Commission. (Level VII)
10 World Health Organization. (2009). “WHO guidelines on hand hygiene in
health care: First global patient safety challenge, clean care is safer care”
[Online]. Accessed via the Web at
http://apps.who.int/iris/bitstream/10665/44102/1/9789241597906_eng.pdf
(Level IV)
11 Centers for Disease Control and Prevention. (2002). Guideline for hand
hygiene in health-care settings: Recommendations of the Healthcare Infection
Control Practices Advisory Committee and the HICPAC/SHEA/APIC/IDSA Hand
Hygiene Task Force. MMWR Recommendations and Reports, 51(RR-16), 1–45.
Accessed via the Web at https://www.cdc.gov/mmwr/pdf/rr/rr5116.pdf (Level
II)
12 Centers for Medicare and Medicaid Services, Department of Health and
Human Services. (2015). Condition of participation: Infection control. 42 C.F.R.
§ 482.42.
13 Accreditation Association for Hospitals and Health Systems. (2017). Standard
07.01.21. Healthcare Facilities Accreditation Program: Accreditation
requirements for acute care hospitals. Chicago, IL: Accreditation Association
for Hospitals and Health Systems. (Level VII)
14 DNV GL-Healthcare USA, Inc. (2016). IC.1 .SR.1 . NIAHO® accreditation
requirements: Interpretive guidelines & surveyor guidance (version 11).
Milford, OH: DNV GL-Healthcare USA, Inc. (Level VII)
15 The Joint Commission. (2019). Standard NPSG.01.01.01. Comprehensive
accreditation manual for hospitals. Oakbrook Terrace, IL: The Joint
Commission. (Level VII)
16 The Joint Commission. (2019). Standard RI.01.01.01. Comprehensive
accreditation manual for hospitals. Oakbrook Terrace, IL: The Joint
Commission. (Level VII)
17 Centers for Medicare and Medicaid Services, Department of Health and
Human Services. (2015). Condition of participation: Patient’s rights. 42 C.F.R.
§ 482.13(c)(1).
18 Accreditation Association for Hospitals and Health Systems. (2017). Standard
15.01.16. Healthcare Facilities Accreditation Program: Accreditation
requirements for acute care hospitals. Chicago, IL: Accreditation Association
for Hospitals and Health Systems. (Level VII)
19 DNV GL-Healthcare USA, Inc. (2016). PR.1.SR.5 . NIAHO® accreditation
requirements: Interpretive guidelines & surveyor guidance (version 11).
Milford, OH: DNV GL-Healthcare USA, Inc. (Level VII)
20 The Joint Commission. (2019). Standard RC.01.03 .01. Comprehensive
accreditation manual for hospitals. Oakbrook Terrace, IL: The Joint
Commission. (Level VII)
21 Centers for Medicare and Medicaid Services, Department of Health and
Human Services. (2015). Condition of participation: Medical record services.
42 C.F.R. § 482.24(b).
22 Accreditation Association for Hospitals and Health Systems. (2017). Standard
10.00 .03. Healthcare Facilities Accreditation Program: Accreditation
requirements for acute care hospitals. Chicago, IL: Accreditation Association
for Hospitals and Health Systems. (Level VII)
23 DNV GL-Healthcare USA, Inc. (2016). MR.2 .SR.1 . NIAHO® accreditation
requirements: Interpretive guidelines & surveyor guidance (version 11).
Milford, OH: DNV GL-Healthcare USA, Inc. (Level VII)
CAST APPLICATION
A cast is a hard mold that encases a body part, usually an
extremity, to provide immobilization of bones and
surrounding tissue. It can be used to treat injuries (including
fractures), correct orthopedic conditions (such as
deformities), or promote healing after general or plastic
surgery, amputation, or nerve and vascular repair. (See
Types of cylindrical casts.)
Casts may be constructed of cotton-polyester, plaster,
fiberglass, or other synthetic materials. Plaster, a commonly
used material, is inexpensive, nontoxic, nonflammable, and
easy to mold, and rarely causes allergic reactions or skin
irritation. However, fiberglass is lighter, stronger, and more
resilient than plaster.2 Fiberglass dries rapidly and is more
difficult to mold, but it can bear body weight immediately if
necessary. Typically, a practitioner applies a cast, and a
nurse prepares the patient and the equipment and assists
during the procedure. With special preparation, a nurse or
other health care practitioner may apply or change a
standard cast, but an orthopedist must reduce and set the
fracture.
Possible contraindications for casting may include the
presence of skin disease, peripheral vascular disease,
diabetes mellitus, an open or draining wounds, extreme
edema, and susceptibility to skin breakdown. These aren’t
strict contraindications; the practitioner must weigh the
potential risks and benefits for each patient.
Equipment
Tubular stockinette ▪ casting material ▪ bucket of water ▪
sink equipped with a plaster trap ▪ fluid-impermeable pads
▪ cotton under-cast padding ▪ rubber gloves ▪ prescribed
pain medication ▪ stethoscope ▪ disinfectant pad ▪
adhesive tape or moleskin ▪ pillows or blankets ▪ Optional:
gloves, plaster splints, sponge or felt padding, local
anesthetic, suture material, wound dressings, cast stand,
fan.
EQUIPMENT
Types of cylindrical casts
Made of cotton-polyester, fiberglass, plaster, or other synthetic material,
casts may be applied almost anywhere on the body—to support a single
finger or the entire body. Common casts are shown below.
Long arm cast
A long arm cast is applied from the upper arm to the hand. It’s used for
upper, elbow, or forearm fractures and to hold the arm or elbow muscles and
tendons in place after surgery.
Shoulder spica cast
A shoulder spica cast is applied around the trunk of the body to the shoulder,
arm, and hand. It’s used for shoulder dislocations or soft tissue injury and to
hold the shoulder muscles and tendons in place after surgery.1
Short arm cast
A short arm cast is applied below the elbow to the hand. It’s used for forearm
or wrist fractures and to hold the forearm or wrist muscles and tendons in
place after surgery.
Long leg cast
A long leg cast is applied to the area from the thigh to the foot. It’s used for
knee or lower leg fractures, knee dislocations, or ankle fractures and to hold
the knee area or leg or foot muscles and tendons in place after surgery.
Short leg cast
A short leg cast is applied to the area below the knee to the foot. It’s used for
lower leg fractures, severe ankle sprains or strains, or ankle fractures, and to
hold the leg or foot muscles or tendons in place after surgery.
Unilateral hip spica cast
A unilateral hip spica cast is applied from the waist or the nipple line on the
chest1 to the foot on one leg. It’s used for femur fractures and to hold the hip
or thigh muscles in place after surgery.
One-and-one-half hip spica cast
A one-and-one-half hip spica cast is applied from the waist or the nipple line
of the chest1 to the foot on one leg and to the knee on the other leg. A bar is
placed between the legs to keep the hips and legs immobilized. It’s used for
femur fractures and to hold the hip or thigh muscles and tendons in place
after surgery.
Preparation of equipment
Gather the tubular stockinette and cast material. Tubular
stockinettes range from 2′′ to 12′′ (5 cm × 30.5 cm) wide;
plaster rolls range from 2′′ to 6′′ (5-cm to 15-cm) wide; and
plaster splints range from 3′′ to 6′′ (7.6 -cm to 15-cm) wide.
Put on rubber gloves.
For a cotton-polyester or fiberglass cast
Gently squeeze the packaged casting material to make sure
the envelopes don’t have any air leaks. Humid air
penetrating the packaging can cause the casting material to
fail. To prepare the casting material, follow the
manufacturer’s directions for the appropriate water
temperature to use. Place the equipment so that it’s easily
accessible during the procedure. Remove and discard your
gloves and perform hand hygiene.
For a plaster cast
Gently squeeze the packaged casting material to make sure
envelopes don’t have any air leaks. Humid air leaking into
the envelope can cause the plaster to become stale, which
could make it set too quickly, form lumps, fail to bond with
lower layers, or set as a soft, friable mass.
Follow the manufacturer’s instructions for dipping-water
temperature when preparing plaster.3 The use of a cooler
dipping water is advised to prevent thermal injury.3,4 The
dipping water should be clean and fresh. The temperature of
the water should be tepid or slightly warm for plaster.5
Using water that’s room temperature or slightly warmer is
advised because it allows the cast to set in about 7 minutes
without excessive exothermia. (Cold water retards the rate
at which setting occurs and may be used to facilitate
molding of difficult casts. Warm water speeds the rate of
cast setting and raises the temperature of the skin under
the cast.) Place equipment so that it’s easily accessible.
Remove and discard your gloves and perform hand
hygiene.1,3,4
Implementation
■ Verify the practitioner’s order.
■ Gather and prepare the appropriate equipment.
■ Confirm that a written informed consent has been
obtained and is in the patient’s medical record.3,4,5,6
■ Conduct a preprocedure verification to make sure that all
relevant documentation, related information, and equipment
are available and correctly identified to the patient
identifiers.7,8
■ Verify that the laboratory and imaging studies have been
completed as ordered and that the results are in the
patient’s medical record. Notify the practitioner of any
unexpected results.7
■ Perform hand hygiene.9,10,11,12,13,14
■ Put on gloves as needed to comply with standard
precautions.15,16
■ Confirm the patient’s identity using at least two patient
identifiers.17
■ Provide privacy.18,19,20,21
■ Explain the procedure to allay the patient’s fears.
■ Make sure that the extremity is clean and dry.2
■ Make sure the procedure site is appropriately marked by
the person performing the procedure to ensure that the
right site is being casted, if indicated.8,22
■ Cover the appropriate parts of the patient’s bedding with
a fluid-impermeable pad.
■ Remove jewelry from the limb to be casted. Jewelry may
interfere with circulation to the limb.
■ Assess the condition of the skin of the affected limb and
note any areas of abnormal color, ecchymosis, open
wounds, rashes, or irritation. This will make it easier to
evaluate any patient complaints after the cast is applied.
■ Assess the patient’s baseline neurovascular status.
Palpate the pulses and assess temperature, color, capillary
refill, motion, sensation, and pain in the affected and
unaffected limbs.
■ Assess the patient’s vital signs for baseline comparison.
■ Determine when the patient was last medicated for pain.
■ Perform a comprehensive pain assessment using
techniques appropriate for the patient’s age, condition, and
ability to understand. Provide medication as ordered
following safe medication administration practices.23,24,25,26
Perform a follow-up pain assessment and notify the
practitioner if pain isn’t adequately controlled.27
■ If the patient has an open wound, assist the practitioner
with administering a local anesthetic, closing the wound,
and applying dressings, as needed.
■ Remove and discard your gloves if worn.15,16
■ Perform hand hygiene9,10,11,12,13,14 and put on rubber
gloves.
■ Raise the bed to waist level while providing care to
prevent caregiver back strain.28
■ Help the practitioner position the limb, as ordered. (The
limb may be cast in a position of comfort, flexion, or
extension.)2
■ Conduct a time-out before beginning the procedure to
perform a final assessment that the correct patient, site,
positioning, and procedure are identified and, as applicable,
that all relevant information and necessary equipment are
available.8,29
■ Support the limb in the prescribed position while the
practitioner applies the tubular stockinette and cotton
under-cast padding. The stockinette should extend beyond
the ends of the cast to pad the edges.2 (If the patient has an
open wound or a severe contusion, the practitioner may not
use a stockinette.) Next, the practitioner applies four layers
of cotton under-cast padding to the limb to reduce the risk
of cast saw burns during cast removal. The padding should
be an appropriate width for the size of the patient, and the
practitioner should wrap it from distal to proximal. The
practitioner should place extra padding over bony
prominences to prevent skin breakdown.2
Applying a cotton-polyester cast
■ Open the casting materials one roll at a time. Cotton and
polyester casting must be applied within 3 minutes because
humidity in the air hardens the tape.
■ Immerse the roll in cold water, and squeeze it four times
to ensure uniform saturation.
■ Remove the material from the bucket dripping wet and
hand it to the practitioner.
■ Tell the patient that it will be applied immediately and will
feel warm, giving off heat as it sets.
■ Prepare the necessary number of rolls in similar fashion.
Applying a fiberglass cast
■ If water-activated fiberglass cast material is being used,
use a minimal amount of water to initiate the chemical
reaction that causes the cast to harden. Using too much
water makes the cast difficult to apply. Open one roll at a
time.
■ If light-cured fiberglass cast material is being used, you
can unroll the material more slowly. This material remains
soft and malleable until it’s exposed to ultraviolet light,
which sets it.
Applying a plaster cast
■ Place a roll of plaster casting on its end in the bucket of
water. Immerse it completely. When air bubbles stop rising
from the roll, remove it, gently squeeze out the excess
water, and hand it to the practitioner, who will begin
applying it to the extremity.
■ As the first roll is applied, prepare a second roll in the
same manner. Try to stay one roll ahead during the
procedure.
■ As each roll is applied, the practitioner will smooth it to
remove wrinkles and to spread the plaster into the cloth
webbing, emptying air pockets. If plaster splints are used,
they will be applied to the middle layers of the cast. Before
wrapping the last roll, the ends of the tubular stockinette
are pulled over the cast edges to create a padded end. This
prevents cast crumbling and reduces skin irritation. The final
roll is wrapped to keep the ends of the stockinette in place.
Completing the cast
■ “Petal” the edges of the cast to reduce roughness and
cushion pressure points, as needed. (See How to petal a
cast.)
■ Use a cast stand or your palm to support the cast in the
therapeutic position until it becomes firm to touch (usually
within minutes) to prevent indentation in the cast. Place the
cast on a firm, smooth surface to continue drying.2
■ Promote drying by leaving the cast uncovered and
exposed to air; if permitted by your facility, fans can be
used to increase airflow, which speeds the drying process.2
■ Check the neurovascular status of the casted limb and
compare the findings bilaterally. Palpate the patient’s pulses
and assess the color, temperature, capillary refill, motion,
and sensation of the limbs bilaterally.
■ To facilitate venous return and reduce edema, elevate the
limb above the level of the heart using pillows or bath
blankets. Make sure that the cast has matured and
hardened before placing the limb on a pillow or blanket.
When a cast is allowed to mature on a pillow or blanket,
temperatures beneath the cast can rise to dangerous levels,
placing the patient at risk for thermal injury.30
■ Arrange for an X-ray of the limb to ensure proper
positioning, if ordered.
■ Return the bed to the lowest position to prevent falls and
maintain patient safety.31
■ Remove and discard your gloves and perform hand
hygiene.9,10,11,12,13,14
■ Clean and disinfect your stethoscope with a disinfectant
pad.32,33
■ Perform hand hygiene.9,10,11,12,13,14
■ Document the procedure.34,35,36,37
Special considerations
■ A cotton-polyester cast dries soon after application.
During this drying period, the cast must be properly
positioned to prevent a surface depression that could cause
pressure areas or dependent edema. Assess the patient’s
neurovascular status, monitor drainage, and check the
condition of the cast periodically.
■ After the cast dries completely (it will look shiny and will
no longer feel damp or soft), monitor any drainage and
perform interventions to prevent skin breakdown near the
cast and to prevent complications due to immobility.
■ Begin patient teaching immediately after the cast is
applied and continue until the patient or caregiver can
effectively care for the cast.
■ Never use the bed or table to support the cast as it sets,
because molding can occur and cause pressure necrosis in
the underlying tissue.
■ If a cast is applied after surgery or traumatic injury,
remember that the most accurate way to assess for
excessive bleeding is to monitor vital signs. You can’t use
the amount of blood that you see on the cast as a way of
telling if the patient is bleeding. A visible spot of blood on
the cast can be misleading: one drop of blood can produce a
circle 3′′ (7.6 cm) in diameter.
■ Casts may need to be opened to assess underlying skin
or pulses or to relieve pressure in a specific area. In a
windowed cast, a specific area is cut out to allow inspection
of the underlying skin or to relieve pressure. A bivalved cast
is split medially and laterally, creating anterior and posterior
sections. One of the sections may be removed to prevent
pressure while the remaining section maintains the
immobilization.
■ The practitioner usually removes the cast with the
assistance of a nurse. (See the “Cast removal” procedure,
page 137.) Tell the patient that when the cast is removed,
the casted limb will appear thinner with less muscle tone
than the contralateral limb. The skin will also appear yellow
or gray in color from the accumulated dead skin and oils
from glands near the skin surface. Reassure the patient
that, with good care and exercise, the limb will return to
normal.
■ Institute fall precautions as needed, because a cast
impairs mobility, increasing the risk of falls. (See the “Fall
prevention” procedure, page 307.)38,39
HOSPITAL-ACQUIRED CONDITION ALERT Keep in mind that an injury
from a fall is considered a hospital-acquired condition because it can
be reasonably prevented using best practices. Follow fall prevention
practices (such as instituting fall precautions; keeping the bed in the
lowest, locked position; and providing nonslip footwear) to reduce the
risk of injury from falls.38,39,40
Patient teaching
Sometime before discharge, teach the patient how to care
for the cast. Tell the patient to keep the casted limb
elevated above the level of the heart for the first 24 to 72
hours to minimize swelling.41 If the leg is casted, the patient
can keep it elevated by lying supine with the leg on top of
pillows. If the arm is casted, the hand and elbow should be
kept higher than the shoulder. Also tell the patient to place
ice in a dry plastic bag and wrap it loosely around the cast
at the injury site.41
Instruct the patient to call the practitioner if the patient
can’t move his or her fingers or toes; if there is numbness or
tingling in the casted limb; or if the patient develops signs
or symptoms of infection (such as fever, unusual pain, or a
foul odor from the cast). Advise the patient to maintain
muscle strength by continuing any recommended exercises.
Tell the patient to keep the cast dry, because moisture can
weaken or destroy it. If the practitioner approves, the
patient may cover the cast with a plastic bag or waterproof
cast cover for showering or bathing.2
Urge the patient not to insert anything (such as an object
or powder) into the cast to relieve itching, because foreign
matter can damage the skin and cause infection. Tell the
patient to tap a pen on the outside of the cast instead, or
use a hair dryer on a cool setting to blow cool air into the
cast to relieve itching.2 Warn the patient not to damage any
area of the cast or bear weight on it unless the practitioner
approves.
If the patient must use crutches, instruct the patient to
remove throw rugs and other obstacles from the
environment to reduce the risk of falling. If the patient’s cast
is on the dominant arm, the patient may need help
performing activities of daily living.
Complications
The complications associated with improper cast application
include compartment syndrome, palsy, paresthesia,
ischemia, ischemic myositis, pressure necrosis, deep vein
thrombosis, and misalignment or nonunion of the fracture.
(See Recognizing compartment syndrome, page 136.)
How to petal a cast
Rough cast edges can be cushioned by petaling them with adhesive tape or
moleskin. To do so, first cut several 4′′ × 2′′ (10-cm × 5-cm) strips. Round off
one end of each strip to keep it from curling. Then, making sure the rounded
end of the strip is on the outside of the cast, tuck the straight end just inside
the cast edge.
Smooth the moleskin with your finger until you’re sure it’s secured inside
and out. Repeat the procedure, overlapping the moleskin pieces until you’ve
gone all the way around the cast edge.
Documentation
Record the date and time of the cast application and
assessment of the limb, both before and after the cast was
applied. Note any open wounds or abnormal skin. Record
neurovascular assessments before and after cast
application, and compare them with assessments of the
unaffected limb. Note the location of any special devices,
such as felt pads or plaster splints. Document any teaching
performed as well as the patient’s understanding of that
teaching.
REFERENCES
1 Schoenly, L. (Ed.). (2013). Core curriculum for orthopaedic nursing (7th ed.).
Chicago, IL: National Association of Orthopaedic Nurses.
2 Satryb, S. A., et al. (2011). Casting: All wrapped up. Orthopaedic Nursing,
30(1), 37–41 .
3 The Joint Commission. (2019). Standard RI.01.03 .01. Comprehensive
accreditation manual for hospitals. Oakbrook Terrace, IL: The Joint
Commission. (Level VII)
Recognizing compartment
syndrome
Compartment syndrome is a rare but serious complication that can occur if a
cast is too tight. As the affected limb swells, the cast acts as a closed
compartment, tightly compressing the nerves and blood vessels. The
resulting decreased circulation and decreased tissue oxygenation can lead to
permanent nerve damage and loss of the affected limb. Compartment
syndrome is most common in the lower leg and forearm, but it can also occur
in the hand, foot, thigh, and upper arm. Because necrosis and nerve injury
can occur after 6 hours of ischemia,42 perform frequent neurovascular
assessments and be alert for complaints of increased pain or decreased
effectiveness of analgesics.
Neurologic assessment of the hand is used to evaluate upper extremity
injury. Assess the ulnar nerve by flexing the patient’s ring and little finger and
by having the patient cross his or her index and middle finger and abduct the
fingers. Assess the median nerve by having the patient oppose the thumb to
the ring finger or little finger. The radial nerve can be assessed by wrist
extension, simultaneous extension of all four metacarpophalangeal joints,
and thumb abduction and extension.
Assess the lower extremity by observing for loss of dorsiflexion (footdrop),
loss of plantar flexion, and loss of toe dorsiflexion, and by testing for
diminished sensitivity to stimulation in the space between the first and
second toes.
4 Centers for Medicare and Medicaid Services, Department of Health and
Human Services. (2015). Condition of participation: Patient’s rights. 42 C.F.R.
§ 482.13(b)(2).
5 Accreditation Association for Hospitals and Health Systems. (2017). Standard
15.01.11. Healthcare Facilities Accreditation Program: Accreditation
requirements for acute care hospitals. Chicago, IL: Accreditation Association
for Hospitals and Health Systems. (Level VII)
6 DNV GL-Healthcare USA, Inc. (2016). PR.1 .SR.3 . NIAHO® accreditation
requirements: Interpretive guidelines & surveyor guidance (version 11).
Milford, OH: DNV GL-Healthcare USA, Inc. (Level VII)
7 The Joint Commission. (2019). Standard UP.01.01.01. Comprehensive
accreditation manual for hospitals. Oakbrook Terrace, IL: The Joint
Commission. (Level VII)
8 Accreditation Association for Hospitals and Health Systems. (2017). Standard
30.00 .14. Healthcare Facilities Accreditation Program: Accreditation
requirements for acute care hospitals. Chicago, IL: Accreditation Association
for Hospitals and Health Systems. (Level VII)
9 The Joint Commission. (2019). Standard NPSG.07.01.01. Comprehensive
accreditation manual for hospitals. Oakbrook Terrace, IL: The Joint
Commission. (Level VII)
10 Centers for Disease Control and Prevention. (2002). Guideline for hand
hygiene in health-care settings: Recommendations of the Healthcare Infection
Control Practices Advisory Committee and the HICPAC/SHEA/APIC/IDSA Hand
Hygiene Task Force. MMWR Recommendations and Reports, 51(RR-16), 1–45.
Accessed via the Web at https://www.cdc.gov/mmwr/pdf/rr/rr5116.pdf (Level
II)
11 World Health Organization. (2009). “WHO guidelines on hand hygiene in
health care: First global patient safety challenge, clean care is safer care”
[Online]. Accessed via the Web at
http://apps.who.int/iris/bitstream/10665/44102/1/9789241597906_eng.pdf
(Level IV)
12 Accreditation Association for Hospitals and Health Systems. (2017). Standard
07.01.21. Healthcare Facilities Accreditation Program: Accreditation
requirements for acute care hospitals. Chicago, IL: Accreditation Association
for Hospitals and Health Systems. (Level VII)
13 Centers for Medicare and Medicaid Services, Department of Health and
Human Services. (2015). Condition of participation: Infection control. 42 C.F.R.
§ 482.42.
14 DNV GL-Healthcare USA, Inc. (2016). IC.1 .SR.1 . NIAHO® accreditation
requirements: Interpretive guidelines & surveyor guidance (version 11).
Milford, OH: DNV GL-Healthcare USA, Inc. (Level VII)
15 Siegel, J. D ., et al. (2007, revised 2017). “2007 guideline for isolation
precautions: Preventing transmission of infectious agents in healthcare
settings” [Online]. Accessed via the Web at
https://www.cdc.gov/infectioncontrol/pdf/guidelines/isolation-guidelines.pdf
(Level II)
16 Accreditation Association for Hospitals and Health Systems. (2017). Standard
07.01.10. Healthcare Facilities Accreditation Program: Accreditation
requirements for acute care hospitals. Chicago, IL: Accreditation Association
for Hospitals and Health Systems. (Level VII)
17 The Joint Commission. (2019). Standard NPSG.01.01.01. Comprehensive
accreditation manual for hospitals. Oakbrook Terrace, IL: The Joint
Commission. (Level VII)
18 The Joint Commission. (2019). Standard RI.01.01.01. Comprehensive
accreditation manual for hospitals. Oakbrook Terrace, IL: The Joint
Commission. (Level VII)
19 DNV GL-Healthcare USA, Inc. (2016). PR.1.SR.5 . NIAHO® accreditation
requirements: Interpretive guidelines & surveyor guidance (version 11).
Milford, OH: DNV GL-Healthcare USA, Inc. (Level VII)
20 Accreditation Association for Hospitals and Health Systems. (2017). Standard
15.01.16. Healthcare Facilities Accreditation Program: Accreditation
requirements for acute care hospitals. Chicago, IL: Accreditation Association
for Hospitals and Health Systems. (Level VII)
21 Centers for Medicare and Medicaid Services, Department of Health and
Human Services. (2015). Condition of participation: Patient’s rights. 42 C.F.R.
§ 482.13(c)(1).
22 The Joint Commission. (2019). Standard UP.01.02.01. Comprehensive
accreditation manual for hospitals. Oakbrook Terrace, IL: The Joint
Commission. (Level VII)
23 Centers for Medicare and Medicaid Services, Department of Health and
Human Services. (2015). Condition of participation: Nursing services. 42
C.F.R. § 482.23(c).
24 Accreditation Association for Hospitals and Health Systems. (2017). Standard
16.01.03. Healthcare Facilities Accreditation Program: Accreditation
requirements for acute care hospitals. Chicago, IL: Accreditation Association
for Hospitals and Health Systems. (Level VII)
25 The Joint Commission. (2017). Standard MM.06.01.01. Comprehensive
accreditation manual for hospitals. Oakbrook Terrace, IL: The Joint
Commission. (Level VII)
26 DNV GL-Healthcare USA, Inc. (2016). MM.1 .SR.2. NIAHO® accreditation
requirements: Interpretive guidelines & surveyor guidance (version 11).
Milford, OH: DNV GL-Healthcare USA, Inc. (Level VII)
27 The Joint Commission. (2017). Standard PC.01.02.07. Comprehensive
accreditation manual for hospitals. Oakbrook Terrace, IL: The Joint
Commission. (Level VII)
28 Waters, T. R., et al. (2009). “Safe patient handling training for schools of
nursing” [Online]. Accessed via the Web at
https://www.cdc.gov/niosh/docs/2009-127/pdfs/2009-127.pdf (Level VII)
29 The Joint Commission. (2019). Standard UP.01.03.01. Comprehensive
accreditation manual for hospitals. Oakbrook Terrace, IL: The Joint
Commission. (Level VII)
30 Shuler, F. D., & Bates, C. M . (2013). Skin temperatures generated following
plaster splint application. Orthopedics, 36(5), 364–367. Accessed via the Web
at http://www.healio.com/orthopedics/journals/ortho/2013-5 -36-
5/%7B7c7534a6-1284-4bd7-924e-80146fe58c43%7D/skin-temperatures-
generated-following-plaster-splint-application (Level VI)
31 Ganz, D. A., et al. (2013). Preventing falls in hospitals: A toolkit for improving
quality of care (AHRQ Publication No. 13-0015-EF). Rockville, MD: Agency for
Healthcare Research and Quality. Accessed via the Web at
https://www.ahrq.gov/sites/default/files/publications/files/fallpxtoolkit_0 .pdf
(Level VII)
32 Rutala, W. A., et al. (2008, revised 2017). “Guideline for disinfection and
sterilization in healthcare facilities, 2008” [Online]. Accessed via the Web at
http://www.cdc.gov/hicpac/pdf/guidelines/Disinfection_Nov_2008.pdf (Level I)
33 Accreditation Association for Hospitals and Health Systems. (2017). Standard
07.02.03. Healthcare Facilities Accreditation Program: Accreditation
requirements for acute care hospitals. Chicago, IL: Accreditation Association
for Hospitals and Health Systems. (Level VII)
34 The Joint Commission. (2019). Standard RC.01.03 .01. Comprehensive
accreditation manual for hospitals. Oakbrook Terrace, IL: The Joint
Commission. (Level VII)
35 Centers for Medicare and Medicaid Services, Department of Health and
Human Services. (2014). Condition of participation: Medical record services.
42 C.F.R. § 482.24(b).
36 Accreditation Association for Hospitals and Health Systems. (2017). Standard
10.00 .03. Healthcare Facilities Accreditation Program: Accreditation
requirements for acute care hospitals. Chicago, IL: Accreditation Association
for Hospitals and Health Systems. (Level VII)
37 DNV GL-Healthcare USA, Inc. (2016). MR.2 .SR.1 . NIAHO® accreditation
requirements: Interpretive guidelines & surveyor guidance (version 11).
Milford, OH: DNV GL-Healthcare USA, Inc. (Level VII)
38 The Joint Commission. (2017). Standard PC.01.02.08 . Comprehensive
accreditation manual for hospitals. Oakbrook Terrace, IL: The Joint
Commission. (Level VII)
39 Accreditation Association for Hospitals and Health Systems. (2017). Standard
16.02.02. Healthcare Facilities Accreditation Program: Accreditation
requirements for acute care hospitals. Chicago, IL: Accreditation Association
for Hospitals and Health Systems. (Level VII)
40 Jarrett, N., & LaBresh, K. A. (2015). “Evidence-based guidelines for selected,
candidate, and previously considered hospital-acquired conditions: Final
report” [Online]. Accessed via the Web at
https://www.cms.gov/Medicare/Medicare-Fee-for-Service-
Payment/HospitalAcqCond/Downloads/Evidence-Based-Guidelines.zip
41 American Academy of Orthopaedic Surgeons. (2015). “Care of casts and
splints” [Online]. Accessed via the Web at http://orthoinfo.aaos.org/topic.cfm?
topic=A00095
42 Rasul, A. T., Jr. (2017). “Acute compartment syndrome” [Online]. Accessed via
the Web at http://emedicine.medscape.com/article/307668-
overview#aw2aab6b2b6
CAST REMOVAL
Typically, a cast is removed when a fracture heals or
requires further manipulation. Less common indications
include cast damage, a pressure ulcer under the cast,
excessive drainage or bleeding, and a constrictive cast.
Equipment
Cast spreader ▪ cast saw with vacuum attachment ▪ cast
scissors ▪ washcloth ▪ towel ▪ soap and water ▪ Optional:
hearing protection, gloves, goggles, masks.
Preparation of equipment
The cast saw may be loud enough to require the use of
hearing protection for the patient and staff members
present during the cast removal, according to Occupational
Safety and Health Administration (OSHA) standards.1 Follow
the manufacturer’s directions for use.
Implementation
■ Verify the practitioner’s order.
■ Gather the equipment.
■ Perform hand hygiene.2,3,4,5,6,7
■ Confirm the patient’s identity using at least two patient
identifiers.8
■ Provide privacy.9,10,11,12
■ Explain the procedure to the patient. Explain that the cast
saw uses an oscillating blade that won’t cut the skin.13 Tell
the patient that some heat and vibration may be felt when
the cast is split with the cast saw14 and instruct the patient
to report any discomfort or excessive heat during the
procedure. Emphasize that the patient must remain still.
■ Have the staff and the patient put on hearing-protective
equipment and goggles, masks, and gloves, if needed.1,15,16
■ Assist the practitioner as needed when the cast is
removed. First, one side of the cast is cut and then the other
(as shown below). The cast is then opened with a spreader.
Cast scissors are used to cut through the cast padding.
■ Monitor that patient’s anxiety level as the cast is
removed.
■ Support the extremity and examine the skin.13
Gently wash and dry the skin that was under the cast to
remove the accumulated dead skin.
■ Remove and discard your personal protective equipment,
if worn15, and perform hand hygiene.2,3,4,5,6,7
■ Document the procedure.17,18,19,20
Special considerations
■ If the cast saw doesn’t have a vacuum attachment to
dispose of the cast dust during removal, the staff and
patient should wear masks and eye protection during the
procedure to prevent inhalation of particulate cast material.
Patient teaching
Tell the patient to control swelling by elevating the
extremity (no higher than heart level).13 Tell the patient to
avoid rubbing or scratching the skin, because doing so can
damage the newly exposed skin.13 Instruct the patient how
to perform skin care after the cast is removed. Tell the
patient to follow the practitioner’s instructions regarding
how much and what type of activity to engage in after cast
removal.
Complications
The practitioner may accidentally injure the patient’s skin
with the cast saw, scissors, or spreader. Thermal injury may
also occur due to the heat generated by the cast saw.21
Documentation
Assess the neurovascular integrity of the limb before cast
removal. Document the date and time of removal and the
patient’s tolerance of the procedure. Note the neurovascular
assessment and condition of the patient’s skin after the cast
is removed. Note any complications from the procedure and
nursing actions taken.
REFERENCES
1 Occupational Safety and Health Administration. (2008). “Occupational noise
exposure, standard 1910.95” [Online]. Accessed via the Web at
https://www.osha.gov/pls/oshaweb/owadisp.show_document?
p_table=standards&p_id=9735
2 The Joint Commission. (2019). Standard NPSG.07.01.01. Comprehensive
accreditation manual for hospitals. Oakbrook Terrace, IL: The Joint
Commission. (Level VII)
3 Centers for Disease Control and Prevention. (2002). Guideline for hand
hygiene in health-care settings: Recommendations of the Healthcare Infection
Control Practices Advisory Committee and the HICPAC/SHEA/APIC/IDSA Hand
Hygiene Task Force. MMWR Recommendations and Reports, 51(RR-16), 1–45.
Accessed via the Web at https://www.cdc.gov/mmwr/pdf/rr/rr5116.pdf (Level
II)
4 World Health Organization. (2009). “WHO guidelines on hand hygiene in
health care: First global patient safety challenge, clean care is safer care”
[Online]. Accessed via the Web at
http://apps.who.int/iris/bitstream/10665/44102/1/9789241597906_eng.pdf
(Level IV)
5 Centers for Medicare and Medicaid Services, Department of Health and
Human Services. (2015). Condition of participation: Infection control. 42 C.F.R.
§ 482.42.
6 Accreditation Association for Hospitals and Health Systems. (2017). Standard
07.01.21. Healthcare Facilities Accreditation Program: Accreditation
requirements for acute care hospitals. Chicago, IL: Accreditation Association
for Hospitals and Health Systems. (Level VII)
7 DNV GL-Healthcare USA, Inc. (2016). IC.1.SR.1 . NIAHO® accreditation
requirements: Interpretive guidelines & surveyor guidance (version 11).
Milford, OH: DNV GL-Healthcare USA, Inc. (Level VII)
8 The Joint Commission. (2019). Standard NPSG.01.01.01. Comprehensive
accreditation manual for hospitals. Oakbrook Terrace, IL: The Joint
Commission. (Level VII)
9 The Joint Commission. (2019). Standard RI.01.01.01. Comprehensive
accreditation manual for hospitals. Oakbrook Terrace, IL: The Joint
Commission. (Level VII)
10 DNV GL-Healthcare USA, Inc. (2016). PR.1.SR.5 . NIAHO® accreditation
requirements: Interpretive guidelines & surveyor guidance (version 11).
Milford, OH: DNV GL-Healthcare USA, Inc. (Level VII)
11 Accreditation Association for Hospitals and Health Systems. (2016). Standard
15.01.16. Healthcare Facilities Accreditation Program: Accreditation
requirements for acute care hospitals. Chicago, IL: Accreditation Association
for Hospitals and Health Systems. (Level VII)
12 Centers for Medicare and Medicaid Services, Department of Health and
Human Services. (2015). Condition of participation: Patient’s rights. 42 C.F.R.
§ 482.13(c)(1).
13 Satryb, S. A., et al. (2011). Orthopaedic essentials: Casting, all wrapped up.
Orthopaedic Nursing, 30(1), 37–41 .
14 American Academy of Orthopaedic Surgeons. (2015). “Care of casts and
splints” [Online]. Accessed December 2016 via the Web at
http://orthoinfo.aaos.org/topic.cfm?topic=A00095
15 Siegel, J. D ., et al. (2007, revised 2017). “2007 guideline for isolation
precautions: Preventing transmission of infectious agents in healthcare
settings” [Online]. Accessed via the Web at
https://www.cdc.gov/infectioncontrol/pdf/guidelines/isolation-guidelines.pdf
(Level II)
16 Accreditation Association for Hospitals and Health Systems. (2017). Standard
07.01.10. Healthcare Facilities Accreditation Program: Accreditation
requirements for acute care hospitals. Chicago, IL: Accreditation Association
for Hospitals and Health Systems. (Level VII)
17 The Joint Commission. (2019). Standard RC.01.03 .01. Comprehensive
accreditation manual for hospitals. Oakbrook Terrace, IL: The Joint
Commission. (Level VII)
18 Centers for Medicare and Medicaid Services, Department of Health and
Human Services. (2015). Condition of participation: Medical record services.
42 C.F.R. § 482.24(b).
19 Accreditation Association for Hospitals and Health Systems. (2017). Standard
10.00 .03. Healthcare Facilities Accreditation Program: Accreditation
requirements for acute care hospitals. Chicago, IL: Accreditation Association
for Hospitals and Health Systems. (Level VII)
20 DNV GL-Healthcare USA, Inc. (2016). MR.2 .SR.1 . NIAHO® accreditation
requirements: Interpretive guidelines & surveyor guidance (version 11).
Milford, OH: DNV GL-Healthcare USA, Inc. (Level VII)
21 Puddy, A. C ., et al. (2014). “Cast saw burns: Evaluation of simple techniques
for reducing the risk of thermal injury” [Online]. Journal of Pediatric
Orthopaedics, 34(8), e63–e66. Accessed via the Web at
http://journals.lww.com/pedorthopaedics/Abstract/publishahead/Cast_Saw_Bu
rns___Evaluation_of_Simple_Techniques.99738.aspx (Level VI)
CENTRAL VENOUS ACCESS CATHETER
A central venous access catheter, or central venous
catheter (CVC) is a sterile catheter that’s inserted through a
large vein, such as the subclavian or internal jugular vein, to
provide access to the central veins. The catheter is made of
polyurethane or silicone rubber. A practitioner inserts a
central venous catheter through a large vein, such as the
subclavian or jugular vein, and places the tip of the catheter
in the superior vena cava. (See Central venous access
catheter pathways.)
Catheters impregnated with antiseptics (such as
chlorhexidine) and antimicrobials (such as silver, carbon,
platinum, minocycline, and rifampin) are recommended for
patients in hospital units or patient populations with
vascular catheter-associated infection rates that are higher
than facility goals even after other vascular catheter-
associated infection practices have been implemented; and
for patients with limited venous access or a history of
vascular catheter-associated infection, such as patients with
implanted IV devices.1 The interprofessional team
collaborates to determine whether to use an anti-infective
catheter. Anti-infective catheters should not be used in
patients with allergies to the anti-infective substances.2
Power injectable catheters are also available to enable
power injection of contrast media in patients who require
computed tomography and other testing.
By providing access to the central veins, a central venous
catheter offers several benefits. It allows monitoring of
central venous pressure, which indicates blood volume or
pump efficiency, and permits aspiration of blood samples for
diagnostic tests. It also allows for the administration of IV
fluids (in large amounts if necessary) in emergencies; when
decreased peripheral circulation makes peripheral vein
access difficult; when prolonged IV therapy reduces the
number of accessible peripheral veins; when solutions must
be diluted (for large fluid volumes or irritating or hypertonic
fluids such as total parenteral nutrition solutions); and when
a patient requires long-term venous access. Because
multiple blood samples can be drawn through it without
repeated venipuncture, a central venous access catheter
decreases the patient’s anxiety and preserves peripheral
veins.
Central venous therapy increases the risk of
complications, such as pneumothorax, vascular catheter–
associated infection, sepsis, thrombus formation, and vessel
and adjacent organ perforation—all life-threatening
conditions. Because of age-related changes in the immune
system, older adults are more susceptible to infection than
are younger adults. Remote infections may also increase the
risk of vascular catheter–associated bloodstream infection in
older adults.3
HOSPITAL-ACQUIRED CONDITION ALERT A vascular catheter–
associated infection is considered a hospital-acquired condition
because it can be reasonably prevented using best practices. Make
sure that infection prevention techniques (such as properly preparing
the intended insertion site, using an all-inclusive insertion kit, using
an insertion checklist, and instituting maximal barrier precautions)
are followed during insertion to reduce the risk of vascular catheter–
associated infection; stop the procedure for any breach in sterile
technique that occurs.1,4,5,6,7
Blood sampling
The use of strict sterile no-touch technique is necessary to
reduce the risk of vascular catheter–associated bloodstream
infection. In addition, CVC blood sampling should not be
performed using the same catheter lumen that is used for
drug infusions.65 Only the minimal amount of discard blood
should be obtained to help prevent nosocomial anemia.65
Whenever possible, multiple blood draws should be grouped
together to reduce the number of times the system is
accessed and thereby minimize the risk of infection.65
Failure to adequately flush a CVC after blood withdrawal can
lead to thrombotic catheter occlusion.
Flushing and locking
Aspirating for a blood return and flushing a CVC is a routine
step to assess catheter patency before each infusion,
prevent mixing incompatible medications and solutions after
infusion, and prevent catheter occlusion after blood
sampling. Locking is performed after the final flush to
maintain patency and prevent occlusion in a device that’s
used intermittently. If the system is used intermittently, the
flushing and locking procedure will vary by facility
preference, the medication administration schedule, and the
type and size of the catheter.
All lumens of a multilumen catheter must be regularly
flushed. To maintain patency in catheters used
intermittently, facilities may use a heparin flush solution
available in prefilled syringes of 10 units of heparin per
milliliter or preservative-free normal saline to lock the
catheter. (There is insufficient evidence to recommend one
solution for locking the catheter over another.)68
The recommended frequency for flushing and locking
central venous access catheters varies. When no therapy is
being infused, follow these guidelines:
■ Flush nontunneled, nonvalved catheters at least every 24
hours. If required by your facility, you may also heparin lock
with 5 mL of 10 units/mL heparin.35
■ Flush nontunneled, valved catheters at least weekly. If
required by your facility, you may also heparin lock with 5
mL of 10 units/mL heparin.35
■ Flush tunneled, nonvalved catheters at least weekly. If
required by your facility, you may also heparin lock with 5
mL of 10 units/mL heparin.35
■ Flush tunneled, valved catheters at least weekly. If
required by your facility, you may also heparin lock with 5
mL of 10 units/mL heparin.35
Changing the dressing
Despite the various designs and applications of central
venous access devices, certain aspects of dressing changes
apply to all device types. The sterility and integrity of the
device must be maintained at all times to reduce the risk of
vascular catheter–associated infection.
Transparent semipermeable dressings should be changed
every 5 to 7 days, and gauze dressings should be changed
every 2 days.60,35,1 If signs and symptoms of infection are
present, or if the dressing becomes visibly soiled, loosened,
or dislodged, change the dressing immediately to closely
assess, clean, and disinfect the site.60,1,8
Removing a central venous access catheter
Removal of a central venous access catheter requires sterile
technique and is usually performed by a practitioner or
nurse, either at the end of therapy or at the onset of
complications, or when deemed it is no longer necessary for
the care plan.80 Check with your facility and your state’s
nurse practice act to determine whether removing a
catheter is within your scope of practice.
If the central venous access catheter was inserted in an
emergency situation, remove it as soon as possible, but not
longer than 48 hours after insertion.80 Assess catheter
necessity daily during multidisciplinary rounds, and remove
the catheter as soon as it’s no longer needed; this reduces
the risk of vascular catheter-associated infection.1,46,80
Consider the patient’s condition and therapy, catheter
position, and catheter function when deciding whether to
remove the catheter. If you suspect or confirm a vascular
catheter–associated infection, base the decision to remove
or salvage the catheter on blood culture results, the
patient’s condition, available vascular access sites, the
effectiveness of antimicrobial therapy, and the practitioner’s
direction.80
Equipment
For insertion of a central venous access
catheter
Facility-approved disinfectant ▪ insertion checklist ▪ sterile
gloves ▪ sterile gowns ▪ caps ▪ masks ▪ blanket ▪ fluid-
impermeable pad ▪ large sterile drape ▪ antiseptic solution
(chlorhexidine-based preferred; tincture of iodine, povidone-
iodine, or alcohol if chlorhexidine is contraindicated) ▪
alcohol pads ▪
10-mL prefilled syringes containing
preservative-free normal saline solution ▪ ultrasound device
with sterile probe cover ▪ sterile ultrasound gel ▪ 3-mL
syringe with 25G 1′′ (2.5-cm) needle ▪ 1% or 2% injectable
lidocaine ▪ engineered stabilization device ▪ two central
venous access catheters (antimicrobial impregnated, if
indicated) ▪ sterile needleless connectors (for each catheter
lumen) ▪ IV solution with administration set ▪ electronic
infusion device (preferably a smart pump with dose-error
reduction software) ▪ sterile marker ▪ sterile labels ▪
transparent semipermeable dressing ▪ sign ▪ pulse
oximeter and probe ▪ cardiac monitoring equipment ▪
Optional: skin preparation kit, disposable-head surgical
clippers or single-patient-use scissors, sterile towel,
antiseptic soap, water, prescribed sedative or analgesic,
suture material, suture kit (sterile scissors, hemostat, and
needle holder), disinfectant-containing end caps.
The type of catheter selected depends on the type of
therapy to be used.2 (See Guide to central venous access
catheters, page 140.)
Use an all-inclusive insertion kit or cart that contains all of
the necessary components for maintaining sterile technique
during catheter insertion to reduce the risk of catheter-
related bloodstream infection.1,2
For blood sampling from a central venous
access catheter
Gloves ▪ 10-mL prefilled syringes of preservative-free
normal saline solution ▪ antiseptic pads (alcohol, tincture of
iodine, or chlorhexidine-based) ▪ appropriate-size syringes
or needleless blood collection tube holder ▪ blood collection
tubes ▪ labels ▪ laboratory request forms ▪ laboratory
biohazard transport bag ▪ Optional: prefilled syringe
containing locking solution, mask with face shield or mask
and goggles, blood transfer unit, needleless connector.
For flushing and locking a central venous
access catheter
Gloves ▪ prefilled 10-mL syringe(s) containing preservative-
free normal saline solution (or a smaller syringe that’s
designed to generate lower injection pressure) ▪ antiseptic
pads (alcohol, tincture of iodine, or chlorhexidine-based) ▪
Optional: prefilled syringe with heparin lock solution,
disinfectant-containing cap, dextrose 5% in water (D5W).
For changing the dressing on a central venous
access catheter
Antiseptic solution (chlorhexidine preferred;59 tincture of
iodine, povidone-iodine, or alcohol if the patient is sensitive
to chlorhexidine) ▪ sterile transparent semipermeable
dressing or sterile 4′′ × 4′′ (10-cm × 10-cm) gauze pad ▪
sterile drape ▪ skin barrier solution ▪ sterile gloves ▪ gloves
▪ mask ▪ label ▪ sterile disposable tape measure ▪
Optional: chlorhexidine-impregnated sponge dressing, non-
acetone adhesive remover, sterile adhesive strips.
Central venous access catheter
pathways
The illustrations below show two common pathways for central venous
access catheter insertion. Typically, a central venous access catheter is
inserted in the subclavian vein or the internal jugular vein and terminates in
the superior vena cava. The subclavian site is preferred over the internal
jugular site in adults to reduce the risk of infection;8,9,10 however, in
patients with advanced kidney disease and in those receiving hemodialysis,
the subclavian site should be avoided to prevent subclavian vein
stenosis.8,10
Patients who have a pacemaker in place should be assessed carefully to
determine the most appropriate catheter and insertion site. Pacemakers
commonly are inserted on the left side of the chest or abdomen, so the
contralateral side is preferred for central venous access catheter placement.
If the ipsilateral side is preferred, a peripherally inserted central catheter may
be the safest option.11
Insertion: Subclavian vein
Termination: Superior vena cava
Insertion: Internal jugular vein
Termination: Superior vena cava
Commercially prepared central venous access device
dressing change kits that include most of the equipment
needed are available and are recommended.3,35
For changing a needleless connector on a
central venous access catheter
Antiseptic pads (alcohol, povidone iodine, chlorhexidine-
based) ▪ sterile needleless connector ▪ gloves ▪ prefilled
syringe containing preservative-free normal saline solution
(10-mL syringe or a syringe specifically designed to
generate lower injection pressure) ▪ Optional: disinfectant-
containing end cap.
EQUIPMENT
Guide to central venous access catheters
For removing a central venous access catheter
Gloves ▪ fluid-impermeable pads ▪ sterile 2′′ × 2′′ (5-cm × 5-
cm) gauze pads ▪ sterile transparent semipermeable
dressing ▪ petroleum-based ointment ▪ Optional: protective
eyewear; adhesive remover; sterile scissors and forceps;
sterile suture removal set; handheld resuscitation bag.
Preparation of equipment
Gather all necessary equipment. Before insertion of a
central venous access catheter, confirm catheter type and
size with the practitioner; usually, a 14G or 16G catheter is
selected. Set up equipment for insertion, dressing change,
and line removal, using strict sterile technique. Also confirm
whether the practitioner intends to use ultrasound to guide
insertion; if so, obtain the equipment and make sure it’s
functioning properly.
Inspect all IV equipment and supplies; if a product is
expired, its integrity is compromised, or it’s found defective,
remove it from patient use, label it as expired or defective,
and report the expiration or defect as directed by your
facility.12
Perform hand hygiene to prevent the spread of
microorganisms.8,13,14,15,16,17,18,19,20 Set up the IV solution
and prime the administration set using strict sterile
technique.11 Attach the tubing to the infusion pump, and
recheck all connections to make sure they’re tight.11 Attach
a primed IV administration set to the electronic infusion
device.
Recheck all connections to make sure they’re tight to
prevent dangerous disconnections.21
Label the discard blood collection tube or the discard
syringe to prevent confusing it with the actual specimen.
Implementation
For all procedures
■ Gather and prepare the necessary equipment.
■ Explain the procedure to the patient.
■ Check the patient’s history for hypersensitivity to latex or
to the local anesthetic.
Assisting with inserting a central venous access
catheter
■ Verify the practitioner’s order.
■ Confirm that written informed consent has been obtained,
if necessary, and that the consent form is in the patient’s
medical record.22,23,24,25,26
■ Reinforce the practitioner’s explanation of the procedure,
and answer the patient’s questions. Check the patient’s
history for hypersensitivity to latex or the local anesthetic.
■ Perform hand hygiene.8,13,14,15,16,17,18,19,20
■ Confirm the patient’s identity using at least two patient
identifiers.27
■ Provide privacy.28,29,30,31
■ Provide the patient with information that addresses the
rationale for device insertion, the insertion process,
expected dwell time, care and maintenance of the device,
and signs and symptoms of complications that should be
reported.32
■ Conduct a preprocedure verification to make sure that all
relevant documentation, related information, and equipment
are available and correctly identified to the patient’s
identifiers.33,34
■ Close the door to the room and place a sign on the door
that reads “Sterile Procedure in Progress—Do Not Enter.”3,35
■ Raise the bed to waist level when providing care to
prevent caregiver back strain.36
■ Attach the patient to a cardiac monitor and pulse
oximeter.37 Make sure that the alarm limits are set
appropriately for the patient’s current condition and that the
alarms are turned on, functioning properly, and audible to
staff.38,39,40,41
■ If ultrasound is available, assist the practitioner to
evaluate the patient’s vasculature to determine the
insertion site.35
■ Administer a sedative or an analgesic, if ordered,
following
safe
medication
administration
practices.37,42,43,44,45
■ Put on a cap and mask.3,35
■ Perform hand hygiene.8,13,14,15,16,17,18,19,20
■ Disinfect the work area (such as an overbed table) with a
facility-approved disinfectant and allow it to dry
completely.3,35
■ Place the patient in the Trendelenburg position to dilate
the veins and to reduce the risk of air embolism.
■ For subclavian vein insertion, place a rolled blanket
lengthwise between the patient’s shoulders to increase
venous distention. For jugular vein insertion, place a rolled
blanket under the opposite shoulder to extend the patient’s
neck, making anatomic landmarks more visible. Place a
fluid-impermeable pad under the patient to prevent the bed
from being soiled.
■ Use an insertion checklist to help comply with infection
prevention and safety practices during insertion.1,5,8,11,46
Stop the procedure immediately if you observe breaks in
sterile technique.
■ Turn the patient’s head away from the site to prevent
possible contamination from airborne pathogens and to
make the site more accessible.37
■ To prepare the insertion site, remove excess hair by using
a single-patient-use scissors or disposable-head surgical
clippers to facilitate dressing application.11 If the intended
site is visibly soiled, clean the area with antiseptic soap and
water.3,11,35
■ Perform hand hygiene.8,13,14,15,16,17,18,19,20
■ Establish a sterile field on a table using a sterile towel or
the wrapping from the instrument tray, and assemble
supplies on the sterile field.3,35
■ Label all medications, medication containers, and other
solutions on and off the sterile field.47,48,49
■ Perform hand hygiene.8,13,14,15,16,17,18,19,20
■ Put on a sterile gown and sterile gloves to comply with
maximal barrier precautions.1,8,11,50,51
■ Before beginning the procedure, the practitioner will put
on a mask, a cap, and a sterile gown and gloves to comply
with maximal barrier precautions.1,8,11,50,51
■ Assist the practitioner as needed to prepare the insertion
site. The practitioner will clean the site with a chlorhexidine
sponge8,9,11,5 using a vigorous side-to-side motion for 30
seconds; allow the area to air-dry.8,19,35 If povidone-iodine
solution is used, the practitioner will apply it using swabs,
beginning at the intended insertion site and moving outward
in concentric circles. Allow the solution to remain on the skin
for at least 2 minutes, until it dries completely.3,11,35
■ Remove and discard your gloves; the practitioner also
removes and discards gloves.50,51,52 Perform hand hygiene;
the
practitioner
also
performs
hand
hygiene.8,13,14,15,16,17,18,19,20 Put on a new pair of sterile
gloves; the practitioner also puts on sterile gloves.50,51,53
■ The practitioner drapes the patient with a large, full-body
sterile drape to create a sterile field and to comply with
maximal barrier precautions.1,8,11,5
■ Conduct a time-out before beginning the procedure to
perform a final assessment that the correct patient, site,
positioning, and procedure are identified and, as applicable,
all relevant information and necessary equipment are
available.54
■ Open the packaging of the 3-mL syringe and 25G needle
and hand it to the practitioner using sterile technique.
■ Disinfect the top of the lidocaine vial with an alcohol pad
and allow it to dry. Invert the vial and turn the vial toward
the practitioner so the fluid is visible. The practitioner then
fills the 3-mL syringe and injects the anesthetic into the site.
■ Using sterile technique, hand the practitioner the
ultrasound device with the sterile probe cover. Apply sterile
ultrasound gel. The practitioner locates the vessel using the
device to reduce the risk of insertion-related
complications.8,11,35,55
■ Open the catheter package and inspect the device to
make sure that its integrity is intact. Follow the
manufacturer’s instructions for preparing the catheter for
insertion. Flush the catheter with preservative-free normal
saline solution.3,35
■ Hand the catheter to the practitioner using sterile
technique. The practitioner then inserts the catheter.3,35 The
practitioner may use electrocardiographic (ECG) guided
technology to detect the desired tip location.56
■ Monitor the patient’s respiratory rate, heart rate, and
oxygen saturation level during the procedure. Observe the
cardiac monitor for arrhythmias while the guidewire and
catheter are advanced.37
■ After the catheter is inserted and advanced to the desired
tip location, the practitioner aspirates each lumen for blood
return.3,35
■ Flush the catheter with preservative-free normal saline
solution, observing for complications.3,35 Clamp the
catheter.
■ Using sterile technique, flush the needleless connector
with preservative-free normal saline solution. Attach the
primed needless connectors to the catheter lumens.3,35
■ The practitioner secures the catheter with an engineered
stabilization device, if available,58 to reduce vascular access
device motion. Device motion increases the risk of
unintentional catheter dislodgment and complications
requiring premature catheter removal.58 Whenever possible,
sutures should be avoided because they’re associated with
an increased risk of needlestick injury and support the
growth of biofilm, which increases the risk of catheter-
related bloodstream infection.57
ELDER ALERT Keep in mind that adhesive-backed tape and
securement devices can cause tearing of an older adult’s skin if
removed improperly. An older adult can also develop sensitivities to
adhesives, resulting in redness, itching, and rash, which can cause
catheter dislodgment if the patient rubs, scratches, or pulls at the
adhesive device.3 Use nontraumatic tape, and ensure proper adhesive
removal as needed to prevent skin stripping and tearing.58
■ Use antiseptic solution to remove dried blood, because it
could harbor microorganisms.
■ Apply a chlorhexidine-impregnated sponge dressing if
required by your facility to reduce the risk of central line–
related bloodstream infection.1,8,59
■ Apply a sterile transparent semipermeable dressing (as
shown on next page, top left).8,9 Expect some
serosanguineous drainage during the first 24 hours.59
■ Label the dressing with the date of the procedure or the
date when dressing change is required as directed by your
facility.59
■ Place the patient in a comfortable position and reassess
status.
■ If insertion wasn’t guided by ECG, make sure correct
catheter tip location was confirmed by chest X-ray before
administering medications or administering IV therapy, if
ordered. The catheter tip should be located in the lower one
third of the superior vena cava or cavoatrial junction.11
■ Trace the tubing from the patient to its point of origin to
make sure that it’s connected to the proper port.21,60,61
■ Attach the primed IV administration set. Alternately, lock
the device if ordered. (See sections entitled “Flushing a
central venous access catheter” and “Locking a central
venous access catheter ” page 143.)
■ Route the tubing in a standardized direction if the patient
has other tubing and catheters that have different
purposes.60 Label the tubing at the distal end (near the
patient connection) and proximal end (near the source
container) to reduce the risk of misconnection if multiple IV
lines will be used.60,61
■ Verify the electronic infusion device settings. Unclamp the
catheter and administer the IV solution as ordered. Make
sure that the electronic infusion device alarm limits are set
according to the patient’s current condition, and that the
alarms are turned on, functioning properly, and audible to
staff.38,39,40
■ Place a disinfectant-containing end cap, if available at
your facility, on the remaining needleless connectors to
reduce the risk of vascular catheter–associated infection.1,62
Blood sampling using a central venous access
catheter
■ Verify the practitioner’s order.
■ Perform hand hygiene.8,13,14,15,16,17,18,19,20
■ Confirm the patient’s identity using at least two patient
identifiers.27
■ Provide privacy.28,29,30,31
■ Explain the procedure to the patient and family (if
appropriate) according to their individual communication
and learning needs to increase their understanding, allay
their fears, and enhance cooperation.62
■ Put on gloves; also put on goggles and a mask or face
shield if splashing is likely to comply with standard
precautions.1,8,11,50,51
■ Raise the bed to waist level when providing care to
prevent caregiver back strain.36
■ Trace the tubing from the patient to its point of origin to
make sure you’re accessing the proper port.21,61
■ Stop any infusing IV fluids, including those running
through another lumen of the catheter. Research hasn’t
established the length of time for stopping fluid flow before
obtaining the sample; one study suggests a 10-minute wait
time.63,64 Clamp the lumen, if appropriate. If necessary,
detach the administration set from the needleless connector
and place a sterile cap over the end of the administration
set to prevent contamination.
■ Select the largest lumen for blood sampling if the patient
has a multilumen catheter. For catheters with staggered
lumen exit sites, draw the sample from the lumen exiting at
the point farthest away from the heart (proximal port), or
use the lumen recommended by the manufacturer.63
■ If no IV fluids are infusing and a disinfectant-containing
end cap is covering the end of the needleless connector,
remove and discard the end cap.
■ Perform a vigorous mechanical scrub of the needleless
connector for at least 5 seconds using an antiseptic pad;
then allow it to dry completely.1,65
■ While maintaining the sterility of the syringe tip, attach
the prefilled syringe containing preservative-free normal
saline solution to the needleless connector. (Use a 10-mL
syringe or a syringe specifically designed to generate low
injection pressure.) Unclamp the catheter and slowly
aspirate for blood return that’s the color and consistency of
whole blood. If no blood return occurs, take steps to locate
an external cause of obstruction.66 Notify the practitioner if
troubleshooting is ineffective.
■ If blood return occurs, slowly inject preservative-free
normal saline solution into the catheter.63 Use a minimum
volume of twice the internal volume of the catheter
system.66 Don’t forcibly flush the device; further evaluate
the device if you meet resistance.
■ Use the discard or push–pull method to obtain the blood
sample.63 (If you’re obtaining a blood sample for blood
cultures, see the “Blood culture sample collection”
procedure.)
Discard method
■ Obtain a discard sample to clear the catheter’s dead
space volume and to remove any blood diluted with flush
solution.
■ If you’re using a needleless blood collection tube holder,
clamp the catheter lumen, and then remove and discard the
syringe in a puncture-resistant sharps disposal container.3,50
Perform a vigorous mechanical scrub of the needleless
connector for at least 5 seconds using an antiseptic pad;
then allow it to dry completely.1,65 Attach the needleless
blood collection tube holder to the needleless connector,
release the clamp, engage the labeled discard blood
collection tube, and aspirate 4 to 5 mL of blood.3,50
■ If you’re using a syringe, use the attached syringe you
used for flushing to aspirate 4 to 5 mL of blood.3,50
■ Clamp the catheter, and then remove the labeled discard
blood collection tube from the needleless blood collection
tube holder, or remove the labeled discard syringe and
discard it in a puncture-resistant sharps disposal
container.50,52
■ Obtain blood samples as ordered; repeat the steps as
necessary until all blood samples are obtained. If you’re
using a needleless blood collection tube holder, insert
another blood collection tube into the needleless blood
collection tube holder using the correct order of draw.67,68 If
you’re using a syringe, perform a vigorous mechanical scrub
of the needleless connector for at least 5 seconds using an
antiseptic pad and allow it to dry completely.1,67 Connect an
empty syringe to the needleless connector, release the
clamp, and withdraw the blood sample.67,3,35
■ Clamp the catheter and remove the needleless blood
collection tube holder or syringe.
Push–pull method
■ Using the same syringe, aspirate 4 to 6 mL of
blood.69,70,71 Keeping the syringe attached to the catheter,
push to reinfuse the blood into the catheter. Repeat the
aspiration and reinfusion sequence three to five times (five
cycles is most common).63,69,70,71
■ Clamp the catheter lumen, and then remove and discard
the syringe in a puncture-resistant sharps disposal
container.50,52
■ Perform a vigorous mechanical scrub of the needleless
connector for at least 5 seconds using an antiseptic pad;
then allow it to dry completely.1,67
■ Obtain blood samples as ordered; repeat the steps as
necessary until all blood samples are obtained. If you’re
using a needleless blood collection tube holder, attach the
needleless blood collection tube holder to the needleless
connector, release the clamp, and engage the blood
collection tube into the needleless blood collection tube
holder using the correct order of draw.65,68 If you’re using a
syringe, connect an empty syringe to the needleless
connector, release the clamp, and withdraw the blood
sample.
■ Clamp the catheter and remove the needleless blood
collection tube holder or syringe.
Completing a blood specimen collection by
either method
■ Change the needleless connector according to the
manufacturer’s instructions. Also change the connector
when the device’s integrity is known or suspected to be
compromised and when the connector contains blood or
debris.65,3,35
■ Perform a vigorous mechanical scrub of the needleless
connector for at least 5 seconds using an antiseptic pad.
Then allow it to dry completely.1,65
■ While maintaining the sterility of the syringe tip, attach a
prefilled syringe containing preservative-free normal saline
solution to the needleless connector.65,3,35
■ Unclamp the catheter, slowly inject the preservative-free
normal saline solution, and then reclamp the catheter.65,3,35
■ Remove and discard the syringe.50,52
■ If the patient has a continuous IV infusion prescribed,
unclamp the catheter and continue the prescribed
continuous IV infusion. If the administration set was
detached, first perform a vigorous mechanical scrub of the
needleless connector for at least 5 seconds using an
antiseptic pad and allow it to dry completely.1,65 Then
remove the cap from the end of the administration set,
reconnect to the catheter, and start the infusion.
■ If the patient doesn’t have a continuous infusion
prescribed, proceed with locking the device if required by
your facility. 3,35 Perform a vigorous mechanical scrub of the
needleless connector for at least 5 seconds using an
antiseptic pad. Then allow it to dry completely.3,35 While
maintaining sterility of the syringe tip, attach the syringe of
locking solution to the needleless connector and then
unclamp the device.3,35 Slowly inject the locking solution
into the catheter.3,35
■ Clamp the device following the sequence required for the
specific type of needleless connector used.72 For a positive-
pressure needleless connector, clamp the catheter after
disconnecting the syringe. For a negative-pressure
needleless connector, clamp the catheter while maintaining
pressure on the syringe plunger, and then disconnect the
syringe. For a neutral needleless connector, clamp the
catheter before or after disconnecting the syringe.3,35
■ Discard the syringe in a puncture-resistant sharps
disposal container.50,53
■ Place a new disinfectant-containing end cap, if available
at your facility, on the needleless connector to reduce the
risk of vascular catheter–associated infection.1
■ If you obtained blood using a syringe, use the blood
transfer unit to transfer the blood into appropriate blood
collection tubes.
■ Label the sample collection tubes in the presence of the
patient to prevent mislabeling.63,27
■ Place all collection tubes in a laboratory biohazard
transport bag50 and send them to the laboratory with a
completed laboratory request form.
Flushing a central venous access catheter
■ Perform a vigorous mechanical scrub of the needleless
connector for at least 5 seconds using an antiseptic pad;
then allow it to dry completely.1,65
■ While maintaining sterility of the syringe tip, attach a
prefilled syringe containing preservative-free normal saline
solution to the needleless connector (use a 10-mL syringe or
a smaller syringe that’s designed to generate lower injection
pressure). Unclamp the catheter, and slowly aspirate for a
blood return that’s the color and consistency whole blood to
confirm the patency of the access device.3,35 If you don’t
obtain a blood return, take steps to locate an external cause
of the obstruction.73 Notify the practitioner if
troubleshooting is ineffective.
■ If you obtain a blood return, slowly inject preservative-
free normal saline solution into the central venous access
catheter.3,35 Use minimum volume of twice the internal
volume of the catheter system. Don’t forcible flush the
device; further evaluate the device if you meet
resistance.3,35
■ Remove and discard the syringe in a puncture-resistance
sharps disposable container.3,35,52
■ Administer the prescribed IV fluid or proceed with locking
the device, if indicated.3,35
Locking a central venous access catheter
■ Perform a vigorous mechanical scrub of the needleless
connector for at least 5 seconds using an antiseptic pad;
then allow it to dry completely.1,67
■ While maintaining sterility of the syringe tip, attach the
syringe containing the locking solution to the needleless
connector.3,35
■ Slowly inject the locking solution into the central venous
access catheter.3,35
■ After locking the catheter, follow a clamping sequence to
reduce blood reflux based on the type of needleless
connector. Follow the manufacturer’s instructions for
use.65,72 For a positive-pressure needleless connector,
clamp the catheter after disconnecting the syringe.3,35 For a
negative-pressure needleless connector, maintain pressure
on the syringe while clamping the catheter.3,35 For a neutral
needleless connector, clamp the catheter before or after
disconnecting the syringe.3,35
Changing a needleless connector on a central
venous access catheter
■ Verify the practitioner’s order.
■ Perform hand hygiene.8,13,14,15,16,17,18,19,20
■ Open the needleless connector package using sterile
technique, and inspect the integrity of the device. If the
integrity is compromised, obtain a new one.12,74,75
■ While maintaining the sterility of the syringe tip, attach
the prefilled syringe containing preservative-free normal
saline solution to the new needleless connector using sterile
technique. Prime the needleless connector with
preservative-free normal saline solution to purge the
needleless connector of air.3,35,74,75 Tap the needleless
connector while priming to purge all of the air.77 Leave the
syringe in place.
■ Trace the tubing from the patient to its point of origin to
make sure you’re assessing the proper port.61,21
■ Close the clamp between the connector and the catheter
to prevent air from entering the catheter, which could cause
air embolism.
■ Remove the existing needleless connector.3,35
■ Perform a vigorous mechanical scrub of the needleless
connector for at least 5 seconds using an antiseptic pad;
then allow it to dry completely.1,65
■ Remove the protective cover from the new needleless
connector.74
■ Attach the new primed needleless connector to the
catheter hub. Rotate the device to tighten it, taking care not
to overtighten.74
■ Unclamp the catheter, and slowly aspirate for a blood
return that’s the color and consistency whole blood to
confirm the patency of the access device.3,35 If you don’t
obtain a blood return, take steps to locate an external cause
of the obstruction.76 Notify the patient’s practitioner if
troubleshooting is ineffective.
■ Lock the catheter, if appropriate.
■ Clamp the catheter and remove the syringe in the
sequence appropriate for the device, according to the
manufacturer’s instructions.72 For a positive-pressure
needleless connector,
clamp the catheter after
disconnecting the syringe.3,35 For a negative-pressure
needleless connector, maintain pressure on the syringe
while clamping the catheter.3,35 For a neutral needleless
connector, clamp the catheter before or after disconnecting
the syringe.3,35
■ Place a new disinfectant-containing end cap (if available
at your facility) on the needleless connector to reduce the
risk of vascular catheter–associated infection.65,1
Changing the dressing on a central venous
access catheter
■ Determine the date of the last dressing change.
■ Put on a mask.3,35
■ Perform hand hygiene.8,13,14,15,16,17,18,19,20
■ Assemble the supplies on a sterile field.3,35
■
Put on gloves to comply with standard
precautions.1,8,11,50,51
■ Remove the existing dressing by lifting the edge of the
dressing at the catheter hub and gently pulling the dressing
perpendicular to the skin toward the insertion site to
prevent catheter dislodgment and tearing or stripping of
fragile skin.3,35 If necessary, use a non-acetone adhesive
remover to remove adhesive from the patient’s skin,
because a product containing acetone can harm the
catheter. Discard the dressing in an appropriate receptacle.
■ If a chlorhexidine-impregnated sponge dressing was used
to provide sustained antimicrobial action at the insertion
site, remove and discard it in an appropriate receptacle.
■ Remove the engineered stabilization device and discard it
in the appropriate receptacle.50,52
■ Assess the catheter–skin junction and surrounding skin for
bleeding, redness, swelling, tenderness, induration, and
drainage.3,35
■ Inspect the catheter for cracks, leakage, kinking or
pinching, and mechanical problems.
■ Remove and discard your gloves.51,50,52
■ Perform hand hygiene.8,13,14,15,16,17,18,19,20
■ Put on sterile gloves.35,51
■ Measure the external catheter length using a sterile tape
measure to make sure that the catheter hasn’t
migrated.60,3,35
■ Clean the catheter insertion site with chlorhexidine using
a back-and-forth motion to provide skin antisepsis; if the
patient is sensitive to chlorhexidine, use tincture of iodine,
povidone-iodine, or alcohol swabs. Allow the area to air-dry
completely.59,1,8,46,11,9 If povidone-iodine solution is used,
apply it using swabs. Begin at the catheter insertion site and
move outward in concentric circles. Allow the solution to
remain on the skin until it dries completely (for at least 2
minutes).3,35
■ Apply a skin barrier solution according to the
manufacturer’s instructions to reduce the risk of medical
adhesive–related skin injury. Don’t use compound tincture of
benzoin, because it may increase the bonding of adhesives
to the skin, causing skin injury when the adhesive-based
engineered stabilization device is removed.59
■ Stabilize and secure the catheter, using an engineered
stabilization device, if available; an engineered stabilization
device is recommended because it reduces the risk of
unintentional catheter dislodgment and complications
requiring premature catheter removal.3,35,58
■ If applicable, place a chlorhexidine-impregnated sponge
dressing at the catheter base.59,1,8,46 To facilitate future
removal, position the chlorhexidine-impregnated sponge
dressing with the catheter resting on or near the radial slit
of the dressing. The edges of the slit must touch to
maximize antimicrobial action.
NURSING ALERT Use chlorhexidine-impregnated dressings with
caution in premature neonates and in patients with fragile skin or
complicated skin pathologies, because contact dermatitis and
pressure necrosis can occur.1
■ Apply a sterile transparent semipermeable dressing over
the insertion site. Alternatively, apply a sterile 4′′ × 4′′ (10-
cm × 10-cm) gauze dressing.60,1,8,46 If the patient has
fragile skin, use dressings and tape specially formulated for
fragile skin to prevent skin stripping and tearing during
removal.59
■ Dispose of all used supplies in appropriate
receptacles.50,52
■ Remove and discard your mask and gloves.51,50,52
■ Perform hand hygiene.13,15,16,18,19,20
■ Label the dressing with the date the dressing was
changed or the date it’s next due to be changed, as directed
by your facility.59,3,35
Removing a central venous access catheter
■ Verify the practitioner’s order.
■ Perform hand hygiene.8,13,14,15,16,17,18,19,20
■ Put on gloves and, if needed, protective eyewear to
comply with standard precautions.1,8,11,50,51
■ Place a fluid-impermeable pad under the patient’s
shoulder and another close to the catheter exit site.
■ Trace the tubing from the patients to its point of origin to
make sure that you’re removing the proper catheter.21,61
■ Discontinue IV fluid administration and clamp the IV
tubing.35
■ Position the patient so that the insertion site is at or
below the level of the heart to prevent an air
embolism.76,35,77
■ Carefully remove the old dressing to prevent skin
stripping or tearing.35,3,58
■ Discard the dressing in the appropriate receptacle.53
ELDER ALERT Remove tape and other adhesive materials carefully to
avoid skin injury, including tearing and bruising in the older adult.58
Use an adhesive remover if necessary to help the removal process.3
■ Teach the patient how to perform the Valsalva maneuver;
if the Valsalva maneuver is contraindicated, tell the patient
to exhale during the procedure to prevent air embolism.2,10
■ Remove the engineered stabilization device or sutures if
present.35,3
■ Inspect the site for signs of infection, such as redness,
swelling, or drainage.2
■ Apply a sterile gauze pad to the insertion site. With your
dominant hand, slowly remove the catheter using gentle,
even pressure.35 If you meet resistance, don’t forcibly
remove the catheter, because forcible removal can result in
catheter fracture and embolization. Consult with the
practitioner if you meet resistance to discuss interventions
for successful removal.76
■ Have the patient perform the Valsalva maneuver (unless
contraindicated) or exhale as you withdraw the last catheter
segment from the vein to prevent an air embolism. If
Valsalva maneuver is contraindicated, use a Trendelenburg
or left lateral decubitus position, or have the patient hold
the breath, as applicable.35,77 If the patient is receiving
positive-pressure ventilation, remove the catheter during
the inspiratory phase or when a breath is delivered using a
handheld resuscitation bag.37
■ Apply immediate pressure to the exit site with the sterile
gauze pad until hemostasis is achieved (a minimum of 30
seconds).81,35
■ Place the catheter on the fluid-impermeable pad; inspect
the catheter tip and measure the length of the catheter to
ensure that the catheter has been completely removed.78 If
you suspect that the catheter hasn’t been completely
removed, notify the practitioner immediately and monitor
the patient for signs of distress.
■ Apply petroleum-based ointment to the exit site; then
cover it with a sterile dressing for at least 24 hours to seal
the skin-to-vein tract and to decrease the risk of air
embolism.35,3,77
■ Label the dressing with the date performed or the date to
be changed, as directed by your facility.59
■ Change the dressing every 24 hours until healing has
occurred.35
■ Dispose of the IV tubing and used equipment
properly.50,21
■ Encourage the patient to remain in a flat or reclining
position for at least 30 minutes after device removal to
reduce the risk of air embolism.3,37
After the procedure
■ After all procedures, dispose of all used supplies in the
appropriate receptacles.50,52
■ Remove and discard your gloves, goggles, and mask or
face shield, if worn.51,50,52
■ Perform hand hygiene.8,13,14,15,16,17,18,19,20
■ Document the procedure.79,80,81,82,83
Special considerations
■ Bathe the patient daily using a chlorhexidine wash to
reduce the risk of central line–associated bloodstream
infection.1,8
■ The Joint Commission issued a sentinel event alert
concerning medical device alarm safety, because alarm-
related events have been associated with permanent loss of
function and death. Among the major contributing factors
were improper alarm settings, inappropriately turned off
alarms, and alarm signals that were not audible to staff.
Make sure that alarm limits are appropriately set and that
alarms are turned on, functioning properly, and audible to
staff. Follow facility guidelines for preventing alarm
fatigue.41
■ After insertion, watch for signs and symptoms of
pneumothorax, such as shortness of breath, uneven chest
movement, tachycardia, and chest pain. Notify the
practitioner immediately if such signs and symptoms
appear.37
■ Change the solution every 24 hours or at an interval
determined by your facility while the central venous access
catheter is in place.
■ Use sterile technique when performing dressing, tubing,
and solution changes for a central venous access catheter.
(See “Changing the dressing on a central venous access
catheter,” page 143.)
■ Assess the site for signs and symptoms of infection, such
as discharge, inflammation, and tenderness.
■ To prevent an air embolism, close the catheter clamp, or
have the patient perform the Valsalva maneuver or exhale
each time the catheter hub is open to air.
■ Teach the patient and his family about measures to
prevent central line–related bloodstream infection, including
the importance of hand hygiene. Encourage them to remind
staff members who fail to comply.5,32
■ Routinely evaluate catheter necessity and discontinue
catheter use as soon as it’s no longer needed to reduce the
risk of vascular catheter-associated infection.1
■ Routinely flush the access device after blood sampling,
before and after medication administration, with
discontinuation of an infusion, and when the catheter isn’t in
use.
■ Visually inspect or palpate the catheter–site junction
through the intact dressing daily to assess for signs of
infection.59
■ Immediately notify the IV therapy team, if available, or
the patient’s practitioner if you identify problems with the
central venous access device.
■ Use the minimal amount of discard blood to help prevent
nosocomial anemia.50
■ Group multiple blood draws together whenever possible
to reduce the number of times the system is entered and to
minimize the risk of infection.50
■ Be aware of the type of solution infusing through the
catheter and any effects it may have on laboratory test
results. Temporarily stop infusions if drawing blood through
a multilumen central venous access catheter, or flush the
line with preservative-free normal saline solution before
drawing a discard sample.63,37
Complications
Complications can occur at any time during infusion therapy.
Traumatic complications such as pneumothorax typically
occur on catheter insertion but might not be noticed until
after the procedure is completed. Systemic complications
such as sepsis typically occur later during infusion therapy.
Other complications include phlebitis (especially in
peripheral central venous therapy), thrombus formation,
and air embolism. (See Risks of central venous therapy,
page 146.)
Documentation
Document the specific site preparation; infection prevention
and safety measures followed; type, length, and gauge of
the catheter; date and time of insertion; number and
location of insertion attempts; functionality of the device;
local anesthetic used; condition of the site; type of
securement device; and type of dressing applied. Also note
patient teaching performed and the patient’s understanding
of that teaching.80 Document the catheter tip location by
including a copy of the ECG tracing, chest X-ray report, or
other appropriate report in the medical record.56,80
Document the date and time, the amount and type of
flush solution used, the patency of the catheter, and any
complications that occur.
REFERENCES
1 Marschall, J., et al. (2014). SHEA/IDSA practice recommendations: Strategies
to prevent central line-associated bloodstream infections in acute care
hospitals. Infection Control and Hospital Epidemiology, 35(7), 753–771 .
Accessed via the Web at http://www.jstor.org/stable/10.1086/676533 (Level I)
2 Standard 26. Vascular access device (VAD) planning. Infusion therapy
standards of practice. (2016). Journal of Infusion Nursing, 39, S51–S54. (Level
VII)
3 Infusion Nurses Society. (2017). Policies and procedures for infusion therapy
of the older adult (3rd ed.). Boston, MA: Infusion Nurses Society.
4 Jarrett, N. M., & Callaham, M. (2016). “Evidence-based guidelines for selected
hospital-acquired conditions: Final report” [Online]. Accessed via the Web at
https://www.cms.gov/Medicare/Medicare-Fee-for-Service-
Payment/HospitalAcqCond/Downloads/2016-HAC-Report.pdf
5 The Joint Commission. (2019). Standard NPSG.07.04.01. Comprehensive
accreditation manual for hospitals. Oakbrook Terrace, IL: The Joint
Commission. (Level VII)
6 Accreditation Association for Hospitals and Health Systems. (2017). Standard
07.01.02. Healthcare Facilities Accreditation Program: Accreditation
requirements for acute care hospitals. Chicago, IL: Accreditation Association
for Hospitals and Health Systems. (Level VII)
7 Accreditation Association for Hospitals and Health Systems. (2017). Standard
07.01.19. Healthcare Facilities Accreditation Program: Accreditation
requirements for acute care hospitals. Chicago, IL: Accreditation Association
for Hospitals and Health Systems. (Level VII)
8 Centers for Disease Control and Prevention. (2011, revised 2017). “Guidelines
for the prevention of intravascular catheter-related infections” [Online].
Accessed via the Web at https://www.cdc.gov/hicpac/pdf/guidelines/bsi-
guidelines.pdf (Level I)
9 Rupp, S. M ., et al. (2012). Practice guidelines for central venous access: A
report by the American Society of Anesthesiologists Task Force on Central
Venous Access. Anesthesiology, 116(3), 539–573. Accessed via the Web at
http://anesthesiology.pubs.asahq.org/article.aspx?articleid=2443415 (Level
VII)
10 Standard 27. Site selection. Infusion therapy standards of practice. (2016).
Journal of Infusion Nursing, 39, S54–S58. (Level VII)
11 Standard 33. Vascular access site preparation and device placement. Infusion
therapy standards of practice. (2016). Journal of Infusion Nursing, 39, S64–
S67. (Level VII)
12 Standard 12. Product evaluation, integrity, and defect reporting. Infusion
therapy standards of practice. (2016). Journal of Infusion Nursing, 39, S32–
S34.
13 The Joint Commission. (2019). Standard NPSG.07.01.01. Comprehensive
accreditation manual for hospitals. Oakbrook Terrace, IL: The Joint
Commission. (Level VII)
14 Standard 16. Hand hygiene. Infusion therapy standards of practice. (2016).
Journal of Infusion Nursing, 39, S38–S39 . (Level VII)
15 Centers for Disease Control and Prevention. (2002). Guideline for hand
hygiene in health-care settings: Recommendations of the Healthcare Infection
Control Practices Advisory Committee and the HICPAC/SHEA/APIC/IDSA Hand
Hygiene Task Force. MMWR Recommendations and Reports, 51(RR-16), 1–45.
Accessed via the Web at https://www.cdc.gov/mmwr/pdf/rr/rr5116.pdf (Level
II)
16 World Health Organization. (2009). “WHO guidelines on hand hygiene in
health care: First global patient safety challenge, clean care is safer care”
[Online]. Accessed via the Web at
http://apps.who.int/iris/bitstream/10665/44102/1/9789241597906_eng.pdf
(Level IV)
17 Standard 19. Standard precautions. Infusion therapy standards of practice.
(2016). Journal of Infusion Nursing, 39, S41–S42. (Level IV)
18 Centers for Medicare and Medicaid Services, Department of Health and
Human Services. (2015). Condition of participation: Infection control. 42 C.F.R.
§ 482.42.
19 Accreditation Association for Hospitals and Health Systems. (2017). Standard
07.01.21. Healthcare Facilities Accreditation Program: Accreditation
requirements for acute care hospitals. Chicago, IL: Accreditation Association
for Hospitals and Health Systems. (Level VII)
20 DNV GL-Healthcare USA, Inc. (2016). IC.1 .SR.1 . NIAHO® accreditation
requirements: Interpretive guidelines & surveyor guidance (version 11).
Milford, OH: DNV GL-Healthcare USA, Inc. (Level VII)
21 U.S . Food and Drug Administration. (n.d .). “Look. Check. Connect. Safe
medical device connections save lives” [Online]. Accessed via the Web at
http://www.fda.gov/downloads/MedicalDevices/Safety/AlertsandNotices/UCM1
34873.pdf
22 The Joint Commission. (2019). Standard RI.01.03 .01. Comprehensive
accreditation manual for hospitals. Oakbrook Terrace, IL: The Joint
Commission. (Level VII)
23 Centers for Medicare and Medicaid Services, Department of Health and
Human Services. (2015). Condition of participation: Patient’s rights. 42 C.F.R.
§ 482.13(b)(2).
24 Accreditation Association for Hospitals and Health Systems. (2017). Standard
15.01.11. Healthcare Facilities Accreditation Program: Accreditation
requirements for acute care hospitals. Chicago, IL: Accreditation Association
for Hospitals and Health Systems. (Level VII)
25 Standard 9. Informed consent. Infusion therapy standards of practice. (2016).
Journal of Infusion Nursing, 39, S26–S28. (Level VII)
26 DNV GL-Healthcare USA, Inc. (2016). PR.1.SR.3 . NIAHO® accreditation
requirements: Interpretive guidelines & surveyor guidance (version 11).
Milford, OH: DNV GL-Healthcare USA, Inc. (Level VII)
27 The Joint Commission. (2019). Standard NPSG.01.01.01. Comprehensive
accreditation manual for hospitals. Oakbrook Terrace, IL: The Joint
Commission. (Level VII)
28 The Joint Commission. (2019). Standard RI.01.01.01. Comprehensive
accreditation manual for hospitals. Oakbrook Terrace, IL: The Joint
Commission. (Level VII)
29 Centers for Medicare and Medicaid Services, Department of Health and
Human Services. (2015). Condition of participation: Patient’s rights. 42 C.F.R.
§ 482.13(c)(1).
30 Accreditation Association for Hospitals and Health Systems. (2017). Standard
15.01.16. Healthcare Facilities Accreditation Program: Accreditation
requirements for acute care hospitals. Chicago, IL: Accreditation Association
for Hospitals and Health Systems. (Level VII)
31 DNV GL-Healthcare USA, Inc. (2016). PR.1.SR.5 . NIAHO® accreditation
requirements: Interpretive guidelines & surveyor guidance (version 11).
Milford, OH: DNV GL-Healthcare USA, Inc. (Level VII)
32 Standard 8. Patient education. Infusion therapy standards of practice. (2016).
Journal of Infusion Nursing, 39, S25–S26. (Level VII)
Risks of central venous therapy
33 The Joint Commission. (2019). Standard UP.01.01.01. Comprehensive
accreditation manual for hospitals. Oakbrook Terrace, IL: The Joint
Commission. (Level VII)
34 Accreditation Association for Hospitals and Health Systems. (2017). Standard
30.00 .14. Healthcare Facilities Accreditation Program: Accreditation
requirements for acute care hospitals. Chicago, IL: Accreditation Association
for Hospitals and Health Systems. (Level VII)
35 Infusion Nurses Society. (2016). Policies and procedures for infusion therapy
(5th ed.). Boston, MA: Infusion Nurses Society.
36 Waters, T. R., et al. (2009). “Safe patient handling training for schools of
nursing” [Online]. Accessed via the Web at
https://www.cdc.gov/niosh/docs/2009-127/pdfs/2009-127.pdf (Level VII)
37 Wiegand, D. L. (2017). AACN procedure manual for high acuity, progressive,
and critical care (7th ed.). St. Louis, MO: Saunders.
38 Graham, K. C., & Cvach, M. (2010). Monitor alarm fatigue: Standardizing use
of physiological monitors and decreasing nuisance alarms. American Journal
of Critical Care, 19(1), 28–37. Accessed via the Web at
http://ajcc.aacnjournals.org/content/19/1/28.full.pdf
39 American Association of Critical-Care Nurses. (2013). “A ACN practice alert:
Alarm management” [Online]. Accessed via the Web at
https://www.aacn.org/aacn-website/shared/content/practice-
alerts/2015/11/25/alarm-management (Level VII)
40 The Joint Commission. (2019). Standard NPSG.06 .01.01. Comprehensive
accreditation manual for hospitals. Oakbrook Terrace, IL: The Joint
Commission. (Level VII)
41 The Joint Commission. (2013). “Sentinel event alert: Medical device alarm
safety in hospitals” [Online]. Accessed via the Web at
http://www.jointcommission.org/assets/1/6/SEA_50_alarms_4 _26_16.PDF
(Level VII)
42 Accreditation Association for Hospitals and Health Systems. (2017). Standard
16.01.03. Healthcare Facilities Accreditation Program: Accreditation
requirements for acute care hospitals. Chicago, IL: Accreditation Association
for Hospitals and Health Systems. (Level VII)
43 Centers for Medicare and Medicaid Services, Department of Health and
Human Services. (2015). Condition of participation: Nursing services. 42
C.F.R. § 482.23(c).
44 The Joint Commission. (2019). Standard MM.06.01.01. Comprehensive
accreditation manual for hospitals. Oakbrook Terrace, IL: The Joint
Commission. (Level VII)
45 DNV GL-Healthcare USA, Inc. (2016). MM.1 .SR.2. NIAHO® accreditation
requirements: Interpretive guidelines & surveyor guidance (version 11).
Milford, OH: DNV GL-Healthcare USA, Inc. (Level VII)
46 Association of Professionals in Infection Control and Epidemiology (APIC).
(2015). “Guide to preventing central line-associated bloodstream infections”
[Online]. Accessed via the Web at
http://apic.org/Resource_/TinyMceFileManager/2015/APIC_CLABSI_WEB .pdf
47 The Joint Commission. (2019). Standard NPSG.03 .04.01. Comprehensive
accreditation manual for hospitals. Oakbrook Terrace, IL: The Joint
Commission. (Level VII)
48 Accreditation Association for Hospitals and Health Systems. (2017). Standard
25.01.27. Healthcare Facilities Accreditation Program: Accreditation
requirements for acute care hospitals. Chicago, IL: Accreditation Association
for Hospitals and Health Systems. (Level VII)
49 Standard 13. Medication verification. Infusion therapy standards of practice.
(2016). Journal of Infusion Nursing, 39, S34–S35. (Level VII)
50 Occupational Safety and Health Administration. (n.d .). “Bloodborne
pathogens, standard number 1910.1030” [Online]. Accessed via the Web at
https://www.osha.gov/pls/oshaweb/owadisp.show_document?
p_id=10051&p_table=STANDARDS (Level VII)
51 Siegel, J. D ., et al. (2007, revised 2017). “2007 guideline for isolation
precautions: Preventing transmission of infectious agents in healthcare
settings” [Online]. Accessed via the Web at
https://www.cdc.gov/infectioncontrol/pdf/guidelines/isolation-guidelines.pdf
(Level II)
52 Standard 18. Medical waste and sharps safety. Infusion therapy standards of
practice. (2016). Journal of Infusion Nursing, 39, S40–S41. (Level VII)
53 Accreditation Association for Hospitals and Health Systems. (2017). Standard
07.01.10. Healthcare Facilities Accreditation Program: Accreditation
requirements for acute care hospitals. Chicago, IL: Accreditation Association
for Hospitals and Health Systems. (Level VII)
54 The Joint Commission. (2019). Standard UP.01.03.01. Comprehensive
accreditation manual for hospitals. Oakbrook Terrace, IL: The Joint
Commission. (Level VII)
55 Standard 22. Vascular visualization. Infusion therapy standards of practice.
(2016). Journal of Infusion Nursing, 39, S44–S46. (Level VII)
56 Standard 23. Central venous access device (CVAD) tip location. Infusion
therapy standards of practice. (2016). Journal of Infusion Nursing, 39, S46–
S48. (Level VII)
57 Standard 37. Vascular access device (VAD) stabilization. Infusion therapy
standards of practice. (2016). Journal of Infusion Nursing, 39, S72–S74. (Level
VII)
58 LeBlanc, K., et al. (2013). International Skin Tear Advisory Panel: A tool kit to
aid in the prevention, assessment, and treatment of skin tears using a
simplified classification system. Advances in Skin & Wound Care, 26, 459–
476. (Level IV)
59 Standard 41. Vascular access device (VAD) assessment, care and dressing
changes. Infusion therapy standards of practice. (2016). Journal of Infusion
Nursing, 39, S81–S84. (Level VII)
60 Standard 57. Parenteral medication and solution administration. Infusion
therapy standards of practice. (2016). Journal of Infusion Nursing, 39, S125–
S127. (Level VII)
61 The Joint Commission. (2014). “Sentinel event alert: Managing risk during
transition to new ISO tubing connector standards” [Online]. Accessed via the
Web at
http://www.jointcommission.org/assets/1/6/SEA_53_Connectors_8 _19_14 _final.
pdf (Level VII)
62 The Joint Commission. (2019). Standard PC.02.01.21. Comprehensive
accreditation manual for hospitals. Oakbrook Terrace, IL: The Joint
Commission. (Level VII)
http://www.fda.gov/downloads/MedicalDevices/Safety/AlertsandNotices/UCM1
34873.pdf
63 Standard 43. Phlebotomy. Infusion therapy standards of practice. (2016).
Journal of Infusion Nursing, 39, S85–S91. (Level VII)
64 Fairholm, L., et al. (2011). Monitoring parenteral nutrition in hospitalized
patients: Issues related to spurious bloodwork. Nutrition in Clinical Practice,
26(6), 700–707. Accessed via the Web at
http://journals.sagepub.com/doi/pdf/10.1177/0884533611427041 (Level IV)
65 Standard 34. Needleless connectors. Infusion therapy standards of practice.
(2016). Journal of Infusion Nursing, 39, S68–S70. (Level VII)
66 Standard 40. Flushing and locking. Infusion therapy standards of practice.
(2016). Journal of Infusion Nursing, 39, S77–S81. (Level VII)
67 Johnson, L. (2017). “Phlebotomy order of draw: Who, what, when, where,
why, & how” [Online]. Accessed via the Web at
http://www.ncctinc.com/documents/Phlebotomy%20Order%20of%20Draw.pdf
68 Becton, Dickinson and Company. (2010). “BD Vacutainer® order of draw for
multiple tube collections” [Online]. Accessed via the Web at
http://www.bd.com/en-us/offerings/capabilities/specimen-collection/specimen-
collection-resource-library
69 Frey, A. M. (2003). Drawing blood samples from vascular access devices:
Evidence-based practice. Journal of Infusion Nursing, 26(5), 285–293. (Level
VII)
70 Adlard, K. (2008). Examining the push-pull method of blood sampling from
central venous access devices. Journal of Pediatric Oncology Nursing, 25(4),
200–207. Accessed via the Web at
http://journals.sagepub.com/doi/pdf/10.1177/1043454208320975 (Level VI)
71 Chen, J., et al. (2011). A reliable and safe method of collecting blood samples
from implantable central venous catheters for determination of plasma
gentamicin concentrations. Pharmacotherapy, 31(8), 776–784. (Level VI)
72 Hadaway, L. (2012). Needleless connectors for IV catheters. American Journal
of Nursing, 112(11), 32–44 .
73 Standard 48. Central vascular access device (CVAD) occlusion. Infusion
therapy standards of practice. (2016). Journal of Infusion Nursing, 39, S104–
S106. (Level VII)
74 CareFusion. (2010). “SmartSite needle-free valve user’s guide” [Online].
Accessed via the Web at http://www.carefusion.com/Documents/guides/user-
guides/IF_SmartSite-Needle-Free-Valve_UG_EN.pdf
75 CareFusion. (2012). “MaxPlus clear needleless connector: Quick reference
guide” [Online]. Accessed via the Web at
http://www.carefusion.com/documents/guides/quick-guides/IF_MaxPlus-Clear-
Needleless-Connector_QG_EN.pdf
76 Standard 44. Vascular access device (VAD) removal. Infusion therapy
standards of practice. (2016). Journal of Infusion Nursing, 39, S91–S94. (Level
VII)
77 Standard 50. Air embolism. Infusion therapy standards of practice. (2016).
Journal of Infusion Nursing, 39, S108–S109. (Level VII)
78 Standard 51. Catheter damage (embolism, repair, exchange). Infusion
therapy standards of practice. (2016). Journal of Infusion Nursing, 39, S109–
S112. (Level VII)
79 The Joint Commission. (2019). Standard RC.01.03 .01. Comprehensive
accreditation manual for hospitals. Oakbrook Terrace, IL: The Joint
Commission. (Level VII)
80 Standard 10. Documentation in the medical record. Infusion therapy
standards of practice. (2016). Journal of Infusion Nursing, 39, S28–S30 . (Level
VII)
81 Centers for Medicare and Medicaid Services, Department of Health and
Human Services. (2015). Condition of participation: Medical record services.
42 C.F.R. § 482.24(b).
82 Accreditation Association for Hospitals and Health Systems. (2017). Standard
10.00 .03. Healthcare Facilities Accreditation Program: Accreditation
requirements for acute care hospitals. Chicago, IL: Accreditation Association
for Hospitals and Health Systems. (Level VII)
83 DNV GL-Healthcare USA, Inc. (2016). MR.2 .SR.1 . NIAHO® accreditation
requirements: Interpretive guidelines & surveyor guidance (version 11).
Milford, OH: DNV GL-Healthcare USA, Inc. (Level VII)
84 Standard 42. Administration set change. Infusion therapy standards of
practice. (2016). Journal of Infusion Nursing, 39, S84–S85. (Level VII)
85 Standard 36. Add-on devices. Infusion therapy standards of practice. (2016).
Journal of Infusion Nursing, 39, S71–S72. (Level VII)
86 Standard 52. Central venous access device (CAVD)–associated venous
thrombosis. Infusion therapy standards of practice. (2016). Journal of Infusion
Nursing, 39, S112–S114. (Level VII)
CENTRAL VENOUS PRESSURE MONITORING
With central venous pressure (CVP) monitoring, the
practitioner inserts a catheter through a vein
percutaneously or by cutdown method, and advances it until
its tip lies in the lower segment of the superior vena cava at
or near the cavoatrial junction, because this catheter tip
location is safest.1 Because no major valves lie at the
junction of the vena cava and right atrium, pressure at end
diastole reflects back to the catheter. When connected to a
monometer, the catheter measures CVP—an index of right
ventricular function.
CVP monitoring helps to assess cardiac function, evaluate
venous return to the heart, and indirectly gauge how well
the heart is pumping. The central venous (CV) line also
provides access to a large vessel for rapid, high-volume fluid
administration, and allows frequent blood withdrawal for
laboratory samples. (See Blood sampling using a central
venous access catheter in the “Central venous access
catheter ” procedure, page 142.)
CVP monitoring can be done intermittently or
continuously. Typically, a single-lumen CVP line is used for
intermittent pressure readings. To measure a patient’s
volume status, a disposable plastic water manometer or
transducer is attached between the IV line and the central
venous catheter with a three- or four-way stopcock. CVP is
recorded in centimeters of water (cm H2O) or millimeters of
mercury (mm Hg), read from manometer markings.
NormalCVPrangesfrom3to8cmH2Oor2to6mmHg.2
Changes in preload status are reflected in CVP readings. Any
condition that alters venous return, circulating blood
volume, or cardiac performance may affect CVP. Increased
CVP may indicate vasoconstriction, increased blood volume,
right ventricular failure, tricuspid insufficiency, pericardial
tamponade, pulmonary embolism, obstructive pulmonary
disease, or positive-pressure breathing. Decreased CVP may
indicate hypovolemia, vasodilation (as with sepsis or
vasodilating medications), or increased myocardial
contractility.
HOSPITAL-ACQUIRED CONDITION ALERT Keep in mind that a vascular
catheter–associated infection is considered a hospital-acquired
condition, because a variety of best practices can reasonably prevent
it. Make sure to follow infection prevention techniques (such as using
sterile technique when accessing the device, minimizing catheter
manipulations, and removing the catheter as soon as it’s no longer
necessary) to reduce the risk of vascular catheter–associated
infections.3,4,5
Equipment
Cardiac monitor ▪ leveling device ▪ IV pole ▪ IV solution ▪ IV
administration set ▪ gloves and other personal protective
equipment ▪ Optional: dressing materials.
For CVP measurement with a water manometer
Disposable CVP manometer set ▪ additional stopcock (to
attach the CVP manometer to the catheter) ▪ IV drip
chamber and tubing ▪ tape ▪ dressing materials ▪ Optional:
extension tubing.
For CVP measurement with a transducer
Disposable pressure tubing with flush device and disposable
pressure transducer ▪ pressure monitor and cable ▪
pressure bag ▪ IV pole with transducer mount ▪ marker ▪
nonvented sterile caps.
Preparation of equipment
Inspect all IV all IV equipment and supplies; if a product is
expired or if its integrity is compromised, or if it’s found
defective, remove it from patient use, label it as expired or
defective, and report the expiration or defect as directed by
your facility.6
Label the IV tubing and solution with the date, time, and
your initials.
Implementation
■ Gather the necessary equipment.
■ Perform hand hygiene.7,8,9,10,11,12,13,14
■ Put on gloves to comply with standard precautions.15,16
■ Confirm the patient’s identity using at least two patient
identifiers.17
■ Provide privacy.18,19,20,21
■ Explain the procedure to the patient and family (if
appropriate) according to their individual communication
and learning needs to increase their understanding, allay
their fears, and enhance cooperation.
Measuring CVP with a water manometer
■ Connect the IV solution to the IV tubing and the
manometer. Prime the IV tubing and manometer setup.
Make sure all air bubbles are removed from the tubing.
Attach the water manometer to an IV pole or place it next to
the patient’s chest.
■ Raise the patients bed to waist level when providing care
to prevent caregiver back strain.22
■ If necessary, assist the practitioner with insertion of the
CV catheter. (See the section entitled “Assisting with
inserting a central venous access catheter ” in the “Central
venous access catheter ” procedure, page 138.)
■ Connect the IV tubing to the CV catheter. Trace the tubing
from the patient to its point of origin to make sure that it’s
attached to the correct port.23,24 Route the tubing in a
standardized direction if the patient has other tubing and
catheters that have different purposes.25 Label the tubing at
the distal end (near the patient connection) and at the
proximal end (near the source container) to reduce the risk
of misconnection if multiple IV lines will be in use.26
■ With the CV catheter in place, position the patient with
the head of the bed between 0 and 60 degrees with the bed
in its lowest position. If the patient can’t tolerate this
positioning, use a prone or a 20-, 30- or 90-degree lateral
position, as appropriate. Allow the patient to stabilize for 5
to 15 minutes following a position change.2,27
■ Using the leveling device, locate the phlebostatic axis (at
the level of the right atrium, because CVP reflects right
atrial pressure), which is at the fourth intercostal space at
the midaxillary line. Mark the appropriate place on the
patient’s chest so that all subsequent recordings will be
made using the same location.
■ Align the base of the manometer with the phlebostatic
axis.
■ When the head of the bed is elevated, the phlebostatic
axis remains constant, but the midaxillary line changes. Use
the same degree of elevation for all subsequent
measurements. (See Measuring CVP with a water
manometer.)
■ Typically, markings on the manometer range from –2 to
38 cm H2O (–1 .5 to 28 mm Hg). However, because
manufacturer’s markings may differ, read the directions
before setting up the manometer and obtaining readings.
■ Turn the stopcock off to the patient and slowly fill the
manometer with IV solution until the fluid level is 10 to 20
cm H2O higher than the patient’s expected CVP value. Don’t
overfill the tube, because fluid that spills over the top can
become a source of contamination.
Intermittent CVP readings using a water
manometer
■ Turn the stopcock off to the IV solution and open to the
patient. The fluid level in the manometer will drop. When
the fluid level comes to rest, it will fluctuate slightly with
respirations. Expect it to drop during inspiration and to rise
during expiration.
■ Record CVP at the end of expiration, when intrathoracic
pressure has a negligible effect and the fluctuation is at its
highest point.2 Depending on the type of water manometer
used, note the value either at the bottom of the meniscus or
at the midline of the small floating ball.
■ After you’ve obtained the CVP value, turn the stopcock to
resume the IV infusion. Adjust the IV drip rate, as required.
■ Place the patient in a comfortable position.
EQUIPMENT
Measuring CVP with a water manometer
To ensure accurate central venous pressure (CVP) readings, make sure that
the manometer base is aligned with the patient’s right atrium (the
phlebostatic axis), which is the zero reference point. The manometer set
usually contains a leveling rod to allow you to determine this alignment
quickly.
After adjusting the manometer’s position, examine the three-way stopcock.
By turning it to any position shown below, you can control the direction of
fluid flow. Four-way stopcocks are also available.
■ Return the bed to the lowest position to prevent falls and
maintain patient safety.28
■ Remove and discard your gloves and other personal
protective equipment, if worn.15
■ Perform hand hygiene.7,8,9,10,11,12,13,14
■ Document the procedure.29,30,31,32
Continuous CVP readings using a water
manometer
■ Make sure the stopcock is turned so that the IV solution
port, CVP column port, and patient port are open. Be aware
that with this stopcock position, infusion of the IV solution
increases CVP. Therefore, expect higher readings than those
taken with the stopcock turned off to the IV solution.
■ If the IV solution infuses at a constant rate, CVP will
change as the patient’s condition changes, although the
initial reading will be higher. Assess the patient closely for
changes.
■ Record CVP values at appropriate intervals.
■ Return the bed to the lowest position to prevent falls and
maintain patient safety.28
■ Remove and discard your gloves and other personal
protective equipment, if worn.15
■ Perform hand hygiene.7,8,9,10,11,12,13,14
■ Document the procedure.29,30,31,32
Measuring CVP with a transducer
■ Set up a pressure transducer system. (See the
“Transducer system setup” procedure.)
■ Assist the practitioner with catheter insertion as needed.
■ Make sure that the patient is attached to a cardiac
monitor with pressure monitoring capability. Make sure that
the alarm limits are set appropriately for the patient’s
current condition and that the alarms are turned on,
functioning properly, and audible to staff.33,34,35,36
■ Make sure the CV catheter or the proximal lumen of a
pulmonary artery catheter is attached to the system. (If the
patient has a CV catheter with multiple lumens, the distal
port is dedicated to continuous CVP monitoring, and the
other lumens are used for fluid administration.)
■ Trace the tubing from the patient to its point of origin to
make sure that it’s connected to the proper port.23,24 Route
the tubing in a standardized direction if the patient has
other tubing and catheters that have different purposes.25
Label the tubing at the distal end (near the patient
connection) and at the proximal end (near the source
container) to reduce the risk of misconnection if multiple IV
lines will be in use.26
■ Position the patient supine with the head of the bed
elevated between 0 and 60 degrees. If the patient can’t
tolerate this positioning, use a prone or a 20-, 30- or 90-
degree lateral position, as appropriate. Allow the patient to
stabilize for 5 to 15 minutes following a position change.2,27
■ Using the leveling device, position the air-reference
stopcock or the air–fluid interface of the transducer level
with the phlebostatic axis (midway between the posterior
chest and the sternum at the fourth intercostal space,
midaxillary line) if the patient is supine or prone.2,37 If the
patient is in the lateral position, reference the stopcock or
the air–fluid interface of the transducer at the lateral angel-
specific reference.37 Mark the appropriate place on the
patient’s chest so that all subsequent measurements use
the same location.
■ Turn the stopcock next to the transducer off to the patient
and open to air. Remove the cap to the stopcock port.2,37
■ Zero the transducer following the manufacturer’s
instructions for zeroing.2
■ Turn the stopcock so that it’s in a monitoring position with
the stopcock closed to air and open to the side of the tubing
that will go to the patient. Place a new sterile, nonvented
cap on the stopcock to maintain sterility.2
■ Perform a square waveform test (dynamic response test)
to verify the accuracy of the pressure monitoring system.5,37
Interpreting CVP measurements
A pressure transducer set produces an intermittent or continuous waveform
and readout that’s displayed on the patient’s bedside monitor, along with the
patient’s electrocardiogram (ECG) and other tracings. This method allows you
to continually monitor for acute or gradual changes.
When using a pressure transducer set, make sure the central venous
catheter or the proximal lumen of a pulmonary artery catheter is attached to
the system, and that the patient is still when the reading is taken to prevent
artifact.
There are three waves to be aware of when interpreting a central venous
pressure (CVP) waveform: the a, c, and v waves. Understanding how these
waves relate to cardiac function is necessary to accurately interpret the CVP
waveform.
■ a wave (atrial contraction)—The most prominent wave is the a wave,
which results from atrial contraction at end-diastole. As the right atria
contracts, it forces blood into the right ventricle, causing a rise in pressure.
This rise in pressure travels through the central line to the transducer and is
represented by a positive inflection on the CVP waveform. When compared
with the ECG waveform produced at the same time, the a wave on the CVP
occurs after the P wave. To measure CVP, or right atrial pressure, measure
the mean of the a wave at end-expiration.2
■ c wave (closure of the tricuspid valve)—Isovolumic right ventricular
contraction, which closes the tricuspid valve and causes it to bow back
toward the right atrium in early systole, produces a transient increase in
atrial pressure. This increase in pressure is represented by the c wave on the
waveform. The c wave, also a positive inflection on the CVP waveform,
follows the onset of the QRS complex on the ECG.
■ v wave (ventricular contraction)—The last atrial pressure peak is the v
wave, caused by a combination of atrial filling and ventricular contraction
during late systole while the tricuspid valve remains closed. The v wave
peaks just after the T wave on the ECG.
In addition to the three waves of the CVP waveform, there are two
descents: the x descent, which represents atrial diastole, and the v descent,
which represents atrial emptying.38
■ Read the CVP value by measuring the mean of the a wave
at end-expiration.2 (See Interpreting CVP measurements.)
The monitor will also provide a value on the digital display.
Make sure the patient is still when the reading is taken to
prevent artifact. (See Identifying hemodynamic pressure-
monitoring problems.)
■ Return the bed to the lowest position to prevent falls and
maintain patient safety.28
■ Remove and discard your gloves and other personal
protective equipment if worn.15
■ Perform hand hygiene.7,8,9,10,11,12,13,14
■ Document the procedure.29,30,31,32
Special considerations
■ As ordered, obtain chest X-rays following insertion and
daily, if needed and ordered, to check catheter placement.1
■ To care for the insertion site, change a gauze dressing
every 48 hours and a transparent semipermeable dressing
at least every 5 to 7 days. Change either dressing
immediately if it becomes soiled, damp, or loosened.37,38,39
■ Perform hand hygiene before performing dressing
changes, and use sterile technique and sterile gloves when
re-dressing the site.7,8,9,10,11,12,13,14 When removing the old
dressing and engineered stabilization device, observe the
catheter–skin junction and surrounding skin for signs of
infection, such as redness, and note any patient complaints
of tenderness. Clean the insertion site with an antiseptic
solution and replace stabilization device. Then apply a
chlorhexidine-impregnated sponge dressing, if indicated by
your facility, and cover the site with a sterile gauze dressing
or a transparent semipermeable dressing.38,39
■ Assess catheter necessity daily during multidisciplinary
rounds; you should remove the catheter as soon as it’s no
longer needed to reduce the risk of central line–related
bloodstream infections.4,5,11,39
■ After the initial CVP reading, reevaluate readings
frequently to establish a baseline for the patient. Experts
recommend obtaining readings at 15-, 30-, and 60-minute
intervals to establish a baseline. If the patient’s CVP
fluctuates by more than 2 cm H2O (1.5 mm Hg), suspect a
change in clinical status and report this finding to the
practitioner.
■ Replace the IV administration set, pressure tubing,
transducer, dome, and other components of the system
every 96 hours, or immediately if you suspect
contamination or a compromise of the integrity of the
product or system. Label the IV solution, tubing, and
dressing with the date, the time, and your initials.24,37
■ Perform a square wave test (dynamic response test) at
the start of each shift, when the system is opened to air,
and when the waveform appears changed.2,27
■ Zero the system during initial setup or before catheter
insertion if disconnection occurs between the monitoring
cable and monitor, and when the values obtained don’t
correlate with the patient’s clinical condition.2
■ The Joint Commission issued a sentinel event alert related
to managing risk during transition to new International
Organization for Standardization tubing standards that were
designed to prevent dangerous tubing misconnections,
which can lead to serious patient injury and death. During
the transition, make sure to trace the tubing and catheter
from the patient to the point of origin before connecting or
reconnecting any device or infusion, at any care transition
(such as a new setting or service), and as part of the hand-
off process; route tubes and catheters having different
purposes in different standardized directions; label the
tubing at the distal and proximal ends when there are
different access sites or several bags hanging; use tubing
and equipment only as intended; and store medications for
different delivery routes in separate locations.26
■ The Joint Commission issued a sentinel event alert
concerning medical device alarm safety, because alarm-
related events have been associated with permanent loss of
function and death. Among the major contributing factors
were improper alarm settings, inappropriately turned off
alarms, and alarm signals not audible to staff. Make sure
that the alarm limits are set appropriately and that the
alarms are turned on, functioning properly, and audible to
staff. Follow facility guidelines for preventing alarm
fatigue.35
Complications
Complications of CVP monitoring include pneumothorax
(which typically occurs upon catheter insertion), sepsis,
thrombus, vessel or adjacent organ puncture, and air
embolism.
Documentation
Document all dressing, tubing, and solution changes; the
condition of the site; and site care given. Document the
patient’s CVP readings, the practitioner notified, prescribed
interventions, and the patient’s response. Document the
patient’s tolerance of the procedure, the date and time of
catheter removal, and the type of dressing applied. Note the
condition of the catheter insertion site and whether a
culture specimen was collected. Note any complications and
actions taken. Document any patient teaching provided and
the patient’s understanding of your teaching.40
REFERENCES
1 Standard 23. Central vascular access device (CVAD) tip location. Infusion
therapy standards of practice. (2016). Journal of Infusion Nursing, 39, S46–
S48. (Level VII)
TROUBLESHOOTING
Identifying hemodynamic pressure-
monitoring problems
The table below lists various possible problems you might encounter when
monitoring hemodynamic pressure, along with possible causes and nursing
interventions to help solve the problem.
2 Wiegand, D. L. (2017). AACN procedure manual for high acuity, progressive,
and critical care (7th ed.). St. Louis, MO: Saunders.
3 Jarrett, N., & Callaham, M. (2016). “Evidence-based guidelines for selected
hospital-acquired conditions: Final report” [Online]. Accessed via the Web
https://www.cms.gov/Medicare/Medicare-Fee-for-Service-
Payment/HospitalAcqCond/Downloads/2016-HAC-Report.pdf
4 Association of Professionals in Infection Control and Epidemiology (APIC).
(2015). “Guide to preventing central line-associated bloodstream infections”
[Online]. Accessed via the Web at
http://apic.org/Resource_/TinyMceFileManager/2015/APIC_CLABSI_WEB .pdf
(Level IV)
5 Institute for Healthcare Improvement. (2012). How-to guide: Prevent central
line–associated bloodstream infections. Cambridge, MA: Institute for
Healthcare Improvement. (Level VII)
6 Standard 12. Product evaluation, integrity, and defect reporting. Infusion
therapy standards of practice. (2016). Journal of Infusion Nursing, 39, S32–
S34. (Level VII)
7 The Joint Commission. (2019). Standard NPSG.07.01.01. Comprehensive
accreditation manual for hospitals. Oakbrook Terrace, IL: The Joint
Commission. (Level VII)
8 Centers for Disease Control and Prevention. (2002). Guideline for hand
hygiene in health-care settings: Recommendations of the Healthcare Infection
Control Practices Advisory Committee and the HICPAC/SHEA/APIC/IDSA Hand
Hygiene Task Force. MMWR Recommendations and Reports, 51(RR-16), 1–45.
Accessed via the Web at https://www.cdc.gov/mmwr/pdf/rr/rr5116.pdf (Level
II)
9 World Health Organization. (2009). “WHO guidelines on hand hygiene in
health care: First global patient safety challenge, clean care is safer care”
[Online]. Accessed via the Web at
http://apps.who.int/iris/bitstream/10665/44102/1/9789241597906_eng.pdf
(Level IV)
10 Centers for Medicare and Medicaid Services, Department of Health and
Human Services. (2015). Condition of participation: Infection control. 42 C.F.R.
§ 482.42.
11 The Joint Commission. (2010). Standard NPSG.07.04.01. Comprehensive
accreditation manual for hospitals. Oakbrook Terrace, IL: The Joint
Commission. (Level VII)
12 Accreditation Association for Hospitals and Health Systems. (2017). Standard
07.01.21. Healthcare Facilities Accreditation Program: Accreditation
requirements for acute care hospitals. Chicago, IL: Accreditation Association
for Hospitals and Health Systems. (Level VII)
13 DNV GL-Healthcare USA, Inc. (2016). IC.1 .SR.1 . NIAHO® accreditation
requirements: Interpretive guidelines & surveyor guidance (version 11).
Milford, OH: DNV GL-Healthcare USA, Inc. (Level VII)
14 Standard 16. Hand hygiene. Infusion therapy standards of practice. (2016).
Journal of Infusion Nursing, 39, S38–S39 . (Level VII)
15 Siegel, J. D ., et al. (2007, revised 2017). “2007 guideline for isolation
precautions: Preventing transmission of infectious agents in healthcare
settings” [Online]. Accessed via the Web at
https://www.cdc.gov/infectioncontrol/pdf/guidelines/isolation-guidelines.pdf
(Level II)
16 Accreditation Association for Hospitals and Health Systems. (2017). Standard
07.01.10. Healthcare Facilities Accreditation Program: Accreditation
requirements for acute care hospitals. Chicago, IL: Accreditation Association
for hospitals and Health Systems. (Level VII)
17 The Joint Commission. (2019). Standard NPSG.01.01.01. Comprehensive
accreditation manual for hospitals. Oakbrook Terrace, IL: The Joint
Commission. (Level VII)
18 DNV GL-Healthcare USA, Inc. (2016). PR.1.SR.5 . NIAHO® accreditation
requirements: Interpretive guidelines & surveyor guidance (version 11).
Milford, OH: DNV GL-Healthcare USA, Inc. (Level VII)
19 Accreditation Association for Hospitals and Health Systems. (2017). Standard
15.01.16. Healthcare Facilities Accreditation Program: Accreditation
requirements for acute care hospitals. Chicago, IL: Accreditation Association
for Hospitals and Health Systems. (Level VII)
20 Centers for Medicare and Medicaid Services, Department of Health and
Human Services. (2015). Condition of participation: Patient’s rights. 42 C.F.R.
§ 482.13(c)(1).
21 The Joint Commission. (2019). Standard RI.01.01.01. Comprehensive
accreditation manual for hospitals. Oakbrook Terrace, IL: The Joint
Commission. (Level VII)
22 Waters, T. R., et al. (2009). “Safe patient handling training for schools of
nursing” [Online]. Accessed via the Web at
https://www.cdc.gov/niosh/docs/2009-127/pdfs/2009-127.pdf (Level VII)
23 U.S . Food and Drug Administration. (n.d .). “Look. Check. Connect. Safe
medical device connections save lives” [Online]. Accessed via the Web at
http://www.fda.gov/downloads/MedicalDevices/Safety/AlertsandNotices/UCM1
34873.pdf
24 Standard 42. Administration set change. Infusion therapy standards of
practice. (2016). Journal of Infusion Nursing, 39, S84–S85. (Level VII)
25 Standard 57. Parenteral medication and solution administration. Infusion
therapy standards of practice. (2016). Journal of Infusion Nursing, 39, S125–
S127. (Level VII)
26 The Joint Commission. (2014). “Sentinel event alert: Managing risk during
transition to new ISO tubing connector standards” [Online]. Accessed via the
Web at
http://www.jointcommission.org/assets/1/6/SEA_53_Connectors_8 _19_14 _final.
pdf (Level VII)
27 American Association of Critical-Care Nurses. (2016). “A ACN practice alert:
PA/CVP monitoring in adults” [Online]. Accessed via the Web at
https://www.aacn.org/clinical-resources/practice-alerts/pulmonary-artery-
pressure-measurement
28 Ganz, D. A., et al. (2013). Preventing falls in hospitals: A toolkit for improving
quality of care (AHRQ Publication No. 13-0015-EF). Rockville, MD: Agency for
Healthcare Research and Quality. Accessed via the Web at
https://www.ahrq.gov/sites/default/files/publications/files/fallpxtoolkit_0 .pdf
(Level VII)
29 The Joint Commission. (2019). Standard RC.01.03 .01. Comprehensive
accreditation manual for hospitals. Oakbrook Terrace, IL: The Joint
Commission. (Level VII)
30 Centers for Medicare and Medicaid Services, Department of Health and
Human Services. (2015). Condition of participation: Medical record services.
42 C.F.R. § 482.24(b).
31 Accreditation Association for Hospitals and Health Systems. (2017). Standard
10.00 .03. Healthcare Facilities Accreditation Program: Accreditation
requirements for acute care hospitals. Chicago, IL: Accreditation Association
for Hospitals and Health Systems. (Level VII)
32 DNV GL-Healthcare USA, Inc. (2016). MR.2 .SR.1 . NIAHO® accreditation
requirements: Interpretive guidelines & surveyor guidance (version 11).
Milford, OH: DNV GL-Healthcare USA, Inc. (Level VII)
33 Graham, K. C., & Cvach, M. (2010). Monitor alarm fatigue: Standardizing use
of physiological monitors and decreasing nuisance alarms. American Journal
of Critical Care, 19(1), 28–37. Accessed via the Web at
http://ajcc.aacnjournals.org/content/19/1/28.full.pdf
34 The Joint Commission. (2019). Standard NPSG.06 .01.01. Comprehensive
accreditation manual for hospitals. Oakbrook Terrace, IL: The Joint
Commission. (Level VII)
35 The Joint Commission. (2013). “Sentinel event alert: Medical device alarm
safety in hospitals” [Online]. Accessed via the Web at
http://www.jointcommission.org/assets/1/6/SEA_50_alarms_4 _26_16.PDF
(Level VII)
36 American Association of Critical-Care Nurses. (2013). “A ACN practice alert:
Alarm management” [Online]. Accessed April 2017 via the Web at
https://www.aacn.org/aacn-website/shared/content/practice-
alerts/2015/11/25/alarm-management (Level VII)
37 American Association of Critical-Care Nurses. (2016). “A ACN practice alert:
PA/CVP monitoring in adults” [Online]. Accessed via the Web at
https://www.aacn.org/clinical-resources/practice-alerts/pulmonary-artery-
pressure-measurement
38 McGee, W. T., et al. (2014). Quick guide to cardiopulmonary care (3rd ed.)
Irvine, CA: Edwards Lifesciences. Accessed via the Web at
http://edwardsprod.blob.core.windows.net/media/Default/devices/monitoring/
hemodynamic%20monitoring/ar11206_cardioquickguide_composed_1hr.pdf
39 Centers for Disease Control and Prevention. (2011). “Guidelines for the
prevention of intravascular catheter–related infections” [Online]. Accessed
via the Web at https://www.cdc.gov/hicpac/pdf/guidelines/bsi-guidelines-
2011.pdf (Level I)
40 Standard 41. Vascular access device (VAD) assessment, care, and dressing
changes. Infusion therapy standards of practice. (2016). Journal of Infusion
Nursing, 39, S81–S84. (Level VII)
41 Marschall, J., et al. (2014). SHEA/IDSA practice recommendation: Strategies
to prevent central line–associated bloodstream infections in acute care
hospitals. Infection Control and Hospital Epidemiology, 35(7), 753–771 .
Accessed via the Web at http://www.jstor.org/stable/10.1086/676533 (Level I)
42 Standard 10. Documentation in the medical record. Infusion therapy
standards of practice. (2016). Journal of Infusion Nursing, 39, S28–S30 . (Level
VII)
CEREBROSPINAL FLUID DRAINAGE
MANAGEMENT
Cerebrospinal fluid (CSF) drainage aims to reduce CSF
pressure to the desired level and then to maintain it at that
level. CSF drainage techniques fall into two categories:
internal and external. Internal drainage devices, or shunts,
are surgically implanted devices that divert CSF to the
abdomen or heart when proper CSF absorption is impaired
or obstructed, such as with hydrocephalus. External
drainage is indicated when a temporary diversion of the CSF
is needed; it’s commonly used to manage increased
intracranial pressure (ICP) and to promote spinal cord or
cerebral dura mater healing after traumatic injury or
surgery. In this case, and depending on the indication and
the desired outcome, CSF can be externally drained through
a catheter and a closed drainage collection system from
either the lateral ventricle (ventriculostomy) or the lumbar
subarachnoid space.
Therapeutic uses for external CSF drainage include ICP
monitoring via the ventriculostomy; direct instillation of
medications, contrast media, or air for diagnostic radiology;
and aspiration of CSF for laboratory analysis. (See CSF
drainage.)
Equipment
External ventricular drainage set (includes drainage tubing
and sterile drainage bag) ▪ sterile 4′′ × 4′′ (10-cm × 10-cm)
dressings ▪ paper tape ▪ IV pole ▪ vital signs monitoring
equipment ▪ Optional: gloves, other personal protective
equipment, sterile connector device, facility-approved
antiseptic, sterile specimen container, laboratory transport
bag, prescribed analgesics.
Preparation of equipment
After the practitioner inserts the catheter (see the
“Ventricular drain insertion, assisting” procedure, page 823),
connect the ICP monitoring system and external drainage
system to the distal tip of the catheter. Trace the tubing
from the patient to its point of origin to ensure that the
tubing is connected to the correct port. Secure the
connection points with paper tape or a sterile connector
device.1,2,3 Place the collection system, including the drip
chamber and drainage bag, on an IV pole. Level the system
at the level ordered by the practitioner.4 A computed
tomography scan may be performed to confirm catheter
placement.2
Implementation
■ Verify the practitioner’s orders.
■ Perform hand hygiene.5,6,7,8,9,10
■ Confirm the patient’s identity using at least two patient
identifiers.11
■ Provide privacy.12,13,14,15
■ Explain the procedure to the patient and family (if
appropriate) according to their individual communication
and learning needs to increase their understanding, allay
their fears, and enhance cooperation.
■ Check the patient’s positioning to ensure that the drip
chamber of the ICP monitoring system is located at the
ordered reference level.2,4
■ Perform hand hygiene.6,7,8,9,10
■ Put on gloves and other personal protective equipment as
needed to comply with standard precautions.16,17,18
■ Trace the drainage tubing from the patient to its point of
origin to ensure you’re accessing the correct tubing. Ensure
that the drainage tubing is labeled clearly to alert staff
members so that it isn’t mistaken for IV tubing.1,2,3
■ Assess frequently that the ventricular drain is leveled
appropriately if the patient is active or moving around in
bed to prevent overdrainage or underdrainage. The flow
rate of CSF drainage is regulated by raising the pressure
level on the drip chamber above the foramen of Monro,
which is the zero reference level.2,4
■ Ensure that the CSF drainage system is clamped or open
appropriately, according to the practitioner’s order.
Depending on the patient’s condition, the practitioner may
keep the ventricular drain stopcock set as “off” to the drain
and “open” to the transducer for continuous ICP monitoring.
When ICP reaches a predetermined pressure, the
practitioner may order the stopcock “open” to drain CSF for
a short period. Alternately, the practitioner may order
continuous drainage with intermittent stopcock closings for
ICP readings.2
■ Check the CSF drainage system for patency, as needed,
by lowering the entire system briefly to assess the drip rate
into the drip chamber.2
■ Perform a neurologic assessment and obtain the patient’s
vital signs hourly, or more frequently if the patient’s
condition warrants. Assess for signs and symptoms of
increased ICP, including decreased level of consciousness,
nausea, vomiting, headache, lethargy, and agitation.2,4
■ Obtain mean hourly ICP, and notify the practitioner
immediately if ICP exceeds the established parameter; if no
parameter has been established, notify the practitioner if
ICP rises above 20 mm Hg. Assess ICP in relation to the
patient’s mean arterial pressure to provide an indicator of
the patient’s cerebral perfusion pressure.2
EQUIPMENT
CSF drainage
Cerebrospinal fluid (CSF) drainage aims to control intracranial pressure (ICP)
during treatment for traumatic injury or other conditions that cause a rise in
ICP. A ventricular drain using a closed drainage system is detailed below.
Ventricular drain
To insert a ventricular drain, the practitioner makes a burr hole in the
patient’s skull and inserts the catheter into the ventricle. The distal end of
the catheter is connected to a closed drainage system.
NURSING ALERT To obtain accurate ICP and waveform readings, set
the stopcock as “off” to the drain and “open” to the transducer. The
ventricular drainage system can drain CSF or monitor ICP; it can’t
perform both functions at the same time.2
■ Assess the CSF drainage volume, color, and clarity, and
notify the practitioner if the appearance or volume
changes.2,4
■ Assess the CSF drainage system at least every 4 hours, or
more frequently if the patient’s condition warrants; begin
the inspection at the insertion site and continue along the
entire drainage system. Check for cracks in the system or
fluid leaking from the insertion site, and assess the
condition of the dressing to prevent the risk of infection and
overdrainage.19,20
■ Remove and discard any other personal protective
equipment worn.16,17,18
■ Perform hand hygiene.5,6,7,8,9,10
■ Document the procedure.21,22,23,24
Special considerations
■ Change the drainage bag when it becomes nearly (about
three-quarters) full. Use sterile technique and wear sterile
gloves and a mask when changing the bag to reduce the
risk of infection.2,16,17,18
■ If the catheter is open to drainage, maintain a continual
hourly output of CSF to prevent overdrainage or
underdrainage. Overdrainage may occur if the drip chamber
is placed too far below the catheter insertion site.
Underdrainage may reflect kinked tubing, catheter
displacement, clot formation, or a drip chamber placed
higher than the catheter insertion site.2
■ If a CSF specimen is needed for laboratory analysis, use
strict sterile technique when accessing the external
drainage system. Perform hand hygiene, put on a mask and
sterile gloves, and set up a sterile field. Clean the access
port with a facility-approved antiseptic and allow it to dry.4
Obtain the CSF specimen, label the specimen container in
the presence of the patient, place it in a laboratory
transport bag, and send it to the laboratory.16,17,18
■ Monitor ICP waveforms to detect changes in the
waveform and troubleshoot when necessary. (See the
“Intracranial pressure monitoring” procedure, page 423.)2
■ A patient may experience a chronic headache during
continuous CSF drainage. Reassure the patient that this isn’t
unusual; administer analgesics, as ordered and needed,
following safe medication administration practices.
■ Transferring a patient away from the patient floor to
perform tests and procedures is discouraged to prevent
catheter dislodgment. Check for the option of performing
such tests and procedures at the patient’s bedside. If a
patient must be transported, keep the drainage system
upright and aligned with the patient.20
■ Follow strict sterile technique when connecting tubing,
flushing the system, obtaining specimens from the drainage
system, and changing the dressing.2,4
■ The Joint Commission issued a sentinel event alert related
to managing risk during transition to new International
Organization for Standardization tubing standards that were
designed to prevent dangerous tubing misconnections,
which can lead to serious patient injury and death. During
the transition, make sure to trace the tubing and catheter
from the patient to the point of origin before connecting or
reconnecting any device or infusion, at any care transition
(such as a new setting or service), and as part of the
handoff process; route tubes and catheters having different
purposes in different standardized directions; label the
tubing at the distal and proximal ends (when there are
different access sites or several bags hanging); use tubing
and equipment only as intended; and store medications for
different delivery routes in separate locations.3
Patient teaching
Teach the patient and family members about the reason for
the drain. Explain that the patient’s activity level must be
restricted during CSF drainage. The patient may not sit up,
stand, or walk when the drain is open and must ask for
assistance with movement. The CSF drainage system must
be turned off when the patient is repositioned or
transferred. Instruct the patient to avoid straining, coughing,
and sneezing during CSF drainage.
Complications
Signs of overdrainage of CSF include headache, tachycardia,
diaphoresis, and nausea. Acute CSF overdrainage may result
in collapsed ventricles, tentorial herniation, and medullary
compression.20
NURSING ALERT If CSF drainage accumulates too rapidly, clamp the
system, notify the practitioner immediately, and perform a complete
neurologic assessment, because this complication constitutes a
potential neurosurgical emergency.20
Cessation of drainage may indicate clot formation. If you
can’t quickly identify the cause of the obstruction, notify the
practitioner. If CSF drainage is blocked, the patient may
develop signs and symptoms of increased ICP.
Infection may cause meningitis. Maintain a sterile closed
system and a dry, sterile dressing over the site.
Documentation
Record routine vital signs, ICP, and neurologic assessment
findings at least every 4 hours, or more frequently if the
patient’s condition warrants it.
Document the color, clarity, and amount of CSF at least
every 8 hours, or as determined by your facility or the
patient’s condition. Record hourly and 24-hour CSF output,
and describe the condition of the dressing.
REFERENCES
1 U.S. Food and Drug Administration. (n.d .). “Look. Check. Connect. Safe
medical device connections save lives” [Online]. Accessed via the Web at
http://www.fda.gov/downloads/MedicalDevices/Safety/AlertsandNotices/UCM1
34873.pdf
2 American Association of Neuroscience Nurses (AANN). (2012). Care of the
patient undergoing intracranial pressure monitoring/external ventricular
drainage or lumbar drainage: AANN clinical practice guideline series.
Glenview, IL: AANN.
3 The Joint Commission. (2014). “Sentinel event alert: Managing risk during
transition to new ISO tubing connector standards” [Online]. Accessed via the
Web at
http://www.jointcommission.org/assets/1/6/SEA_53_Connectors_8 _19_14 _final.
pdf (Level VII)
4 Wiegand, D.L. (2017). AACN procedure manual for high acuity, progressive,
and critical care (7th ed.). St. Louis, MO: Saunders.
5 The Joint Commission. (2019). Standard NPSG.07.01.01. Comprehensive
accreditation manual for hospitals. Oakbrook Terrace, IL: The Joint
Commission. (Level VII)
6 Centers for Disease Control and Prevention. (2002). Guideline for hand
hygiene in health-care settings: Recommendations of the Healthcare Infection
Control Practices Advisory Committee and the HICPAC/SHEA/APIC/IDSA Hand
Hygiene Task Force. MMWR Recommendations and Reports, 51(RR-16), 1–45.
Accessed via the Web at https://www.cdc.gov/mmwr/pdf/rr/rr5116.pdf (Level
II)
7 World Health Organization. (2009). “WHO guidelines on hand hygiene in
health care: First global patient safety challenge, clean care is safer care”
[Online]. Accessed via the Web at
http://apps.who.int/iris/bitstream/10665/44102/1/9789241597906_eng.pdf
(Level IV)
8 Accreditation Association of Hospitals and Health Systems. (2017). Standard
07.01.21. Healthcare Facilities Accreditation Program: Accreditation
requirements for acute care hospitals. Chicago, IL: Accreditation Association
of Hospitals and Health Systems. (Level VII)
9 Centers for Medicare and Medicaid Services, Department of Health and
Human Services. (2015). Condition of participation: Infection control. 42 C.F.R.
§ 482.42.
10 DNV GL-Healthcare USA, Inc. (2016). IC.1 .SR.1 . NIAHO® accreditation
requirements: Interpretive guidelines & surveyor guidance (version 11).
Milford, OH: DNV GL-Healthcare USA, Inc. (Level VII)
11 The Joint Commission. (2019). Standard NPSG.01.01.01. Comprehensive
accreditation manual for hospitals. Oakbrook Terrace, IL: The Joint
Commission. (Level VII)
12 Accreditation Association for Hospitals and Health Systems. (2017). Standard
15.01.16. Healthcare Facilities Accreditation Program: Accreditation
requirements for acute care hospitals. Chicago, IL: Accreditation Association
for Hospitals and Health Systems. (Level VII)
13 Centers for Medicare and Medicaid Services, Department of Health and
Human Services. (2015). Condition of participation: Patient’s rights. 42 C.F.R.
§ 482.13(c)(1).
14 DNV GL-Healthcare USA, Inc. (2016). PR.1.SR.5 . NIAHO® accreditation
requirements: Interpretive guidelines & surveyor guidance (version 11).
Milford, OH: DNV GL-Healthcare USA, Inc. (Level VII)
15 The Joint Commission. (2019). Standard RI.01.01.01. Comprehensive
accreditation manual for hospitals. Oakbrook Terrace, IL: The Joint
Commission. (Level VII)
16 Siegel, J. D ., et al. (2007, revised 2017). “2007 guideline for isolation
precautions: Preventing transmission of infectious agents in healthcare
settings” [Online]. Accessed via the Web at
https://www.cdc.gov/infectioncontrol/pdf/guidelines/isolation-guidelines.pdf
(Level II)
17 Accreditation Association of Hospitals and Health Systems. (2017). Standard
07.01.10. Healthcare Facilities Accreditation Program: Accreditation
requirements for acute care hospitals. Chicago, IL: Accreditation Association
of Hospitals and Health Systems. (Level VII)
18 The Joint Commission. (2019). Standard IC.02.01.01. Comprehensive
accreditation manual for hospitals. Oakbrook Terrace, IL: The Joint
Commission. (Level VII)
19 Bader, M. K., & Littlejohns, L. R. (Eds.). (2016). AANN core curriculum for
neuroscience nursing (6th ed.). Glenview, IL: American Association of
Neuroscience Nurses.
20 Medtronic, Inc. (2016). “Duet external drainage and monitoring system”
[Online]. Accessed via the Web at
http://manuals.medtronic.com/wcm/groups/mdtcom_sg/@emanuals/@era/@st
/documents/documents/contrib_088173.pdf (Level VII)
21 The Joint Commission. (2019). Standard RC.01.03 .01. Comprehensive
accreditation manual for hospitals. Oakbrook Terrace, IL: The Joint
Commission. (Level VII)
22 Accreditation Association of Hospitals and Health Systems. (2017). Standard
10.00 .03. Healthcare Facilities Accreditation Program: Accreditation
requirements for acute care hospitals. Chicago, IL: Accreditation Association
of Hospitals and Health Systems. (Level VII)
23 Centers for Medicare and Medicaid Services, Department of Health and
Human Services. (2015). Condition of participation: Medical record services.
42 C.F.R. § 482.24(b).
24 DNV GL-Healthcare USA, Inc. (2016). MR.2 .SR.1 . NIAHO® accreditation
requirements: Interpretive guidelines & surveyor guidance (version 11).
Milford, OH: DNV GL-Healthcare USA, Inc. (Level VII)
CERVICAL COLLAR APPLICATION
A cervical collar may be used for an nonacute injury (such
as strained cervical muscles) or a chronic condition (such as
arthritis or cervical metastasis). A cervical collar may also
be used to prevent cervical spine fracture or spinal cord
damage after an acute injury. The routine use of a cervical
collar for spinal immobilization in the prehospital trauma
patient is controversial because the risks may outweigh the
benefits of its use.1,2
Designed to hold the neck centrally aligned with the chin
slightly elevated, the collar immobilizes the cervical spine,
decreases muscle spasms, and reduces pain; it also
prevents further injury and promotes healing. Cervical collar
size is usually based on the patient’s height, weight, and
physical stature. Great care must be taken when applying
and removing the cervical collar in patients with acute
injury; motion should be limited in order to protect the
spinal cord from mechanical damage (the goal is to have no
motion).3 For this reason, only specially trained health care
practitioners should apply and remove a cervical collar used
for acute injury. At least two health care practitioners must
apply the initial cervical collar—one should institute and
maintain cervical spine precautions by maintaining the
patient’s head, neck, and airway in proper alignment and
the second should apply the collar.4,5
As symptoms of an acute injury subside, the patient may
gradually discontinue wearing the collar, alternating periods
of wear with increasing periods of removal, until the patient
no longer needs the collar.
Equipment
Cervical collar in the appropriate size ▪ stethoscope ▪ vital
signs monitoring equipment ▪ disinfectant pad ▪ Optional:
gloves, gown, face shield, goggles, mask, bolster,
prescribed pain medication.
Implementation
■ Verify the practitioner’s order.
■ Gather and prepare the necessary equipment.
■ Elicit the assistance of a coworker to help immobilize the
patient’s cervical spine. Use cervical spine precautions
(such as maintaining the patient’s head, neck, and airway in
proper alignment).
■ Perform hand hygiene.6,7,8,9,10,11
■ Put on gloves and other personal protective equipment,
as needed, to comply with standard precautions.12,13
■ Confirm the patient’s identity using at least two patient
identifiers.14
■ Provide privacy.15,16,17,18
■ Explain the application procedure to the patient and the
patient’s family (if appropriate) to allay their fears and
anxiety and enhance cooperation. Explain to the patient the
importance of remaining still during the procedure to
prevent neurologic injury.
■ Obtain the patient’s vital signs and assess skin integrity
and neurologic and respiratory status to serve as baselines
for comparison after the procedure.19
■ Remove an appropriate-sized collar from its packaging.
Identify the anterior and posterior positions of the collar. If
required, assemble the collar and make sure that the
padding is secure.
■ Position the patient with arms at his or her sides,
shoulders down, and head aligned centrally; don’t place a
pillow under the patient’s head.4
■ With the help of a coworker, use cervical spine
precautions and gently slide the posterior portion of the
collar behind the patient’s neck (as shown on top right) and
center it;4,5 alternatively, logroll the patient to apply the
posterior portion of the collar. If the patient has long hair,
place the hair outside of the collar.
■ Logroll the patient back into a supine position if the
patient was logrolled to apply the posterior portion of the
collar (as shown on top right).
■ Flare the sides of the anterior portion of the collar
outward (as shown below). Apply the anterior portion of the
collar by sliding it up the patient’s chest and scooping it
under his or her chin.4,5 Make sure that the sides of the
anterior portion of the collar are oriented upward, off the
trapezius muscle, and toward the patient’s ears.
■ While holding the anterior portion of the collar securely,
curl the ends snugly against the patient’s neck.4
■ Apply the Velcro straps one side at a time (as shown
below). Place the front of the collar inside the back (as
directed by the manufacturer) and alternately tighten the
straps, one at a time, until they’re an equal length on both
sides.4,5 Always follow the manufacturer’s instructions;
some collars must be applied so that the anterior portion
overlaps the posterior portion of the collar.20
■ Assess the patient to make sure the collar fits properly; it
must fit snugly and be secure to maintain alignment and
immobilization. If the patient can slip his or her chin inside
the collar, the collar isn’t sufficiently snug.4,5 Replace the
collar with a better-fitting collar if you can’t get the existing
collar to fit snugly.
■ Obtain the patient’s vital signs and reassess neurologic
and respiratory status; compare your results to baseline
data to detect complications associated with collar
application. A semi-rigid cervical collar can compress the
jugular veins and thus increase intracranial pressure, and
possibly restrict the airway.21
■ Make a final assessment to ensure that you’ve properly
applied the collar. Make sure that the collar extends from
the patient’s jaw to just below the sternal notch, the
patient’s chin is centered comfortably in the chin piece, the
straps are both the same length, the sides of the posterior
portion of the collar overlap the sides of the anterior portion
(if appropriate), the front of the collar is angled upward
toward the patient’s ears, the lower edges of the collar
aren’t resting on the patient’s clavicles or digging into the
shoulders, and the pads extend beyond the plastic edges.4
■ Perform a comprehensive pain assessment using
techniques appropriate for the patient’s age, condition, and
ability to understand.22
■ Respond to the patient’s pain using nonpharmacologic
and pharmacologic pain management strategies, as needed
and prescribed.22
■ Remove and discard your gloves and other personal
protective equipment if worn.
■ Perform hand hygiene.6,7,8,9,10,11
■ Clean and disinfect your stethoscope with a disinfectant
pad.
■ Perform hand hygiene.6,7,8,9,10,11
■ Arrange for a cervical spine X-ray, if ordered, to assess
and document cervical spine alignment after the procedure.
■ Document the procedure.23,24,25,26
Special considerations
■ Inspect the patient’s skin under and around the cervical
collar at least twice daily for signs of pressure-related injury.
Conduct more frequent assessments in patients vulnerable
to fluid shifts or in those who are exhibiting signs of
localized or generalized edema.27
Patient teaching
If the patient will be going home with a cervical collar, teach
the patient how to remove the collar, provide skin care,
replace moist or soiled padding, and reapply the collar.
Make sure that a successful return demonstration of the
procedure is performed before discharge.
Complications
Complications associated with cervical collar application
include airway compromise, skin breakdown, increased risk
for aspiration, increased intracranial pressure, increased
agitation, and neurologic injury.28,29
Documentation
Note the type and size of the cervical collar and the time
and date of application. Record the results of neurovascular
checks. Document patient comfort, the collar’s snugness,
and all patient instructions provided.
REFERENCES
1 Sundstrom, T., et al. (2014). Prehospital use of cervical collars in trauma
patients: A critical review. Journal of Neurotrauma, 31(6), 531–540. Accessed
via the Web at http://www.ncbi.nlm.nih.gov/pmc/articles/PMC3949434/
2 Holla, M. (2012). Value of a rigid collar in addition to head blocks: A proof of
principle study. Emergency Medicine Journal, 29(2), 104–107. (Level VI)
3 Prasarn, M. L., et al. (2012). Motion generated in the unstable cervical spine
during the application and removal of cervical immobilization collars. Journal
of Trauma and Acute Care Surgery, 72(6), 1609–1613.
4 Össur. (2010). “Miami J®: Sizing and application instructions” [Online].
Accessed via the Web at https://assets.ossur.com/library/17805/Miami%20J
5 Össur. (2012). “NecLoc® and NecLoc® Kids: Instructions for use” [Online].
Accessed via the Web at
https://assets.ossur.com/library/7073/NecLoc%20Kids%20Collar%20Instructio
ns%20for%20use.pdf
6 The Joint Commission. (2019). Standard NPSG.07.01.01. Comprehensive
accreditation manual for hospitals. Oakbrook Terrace, IL: The Joint
Commission. (Level VII)
7 Centers for Disease Control and Prevention. (2002). Guideline for hand
hygiene in health-care settings: Recommendations of the Healthcare Infection
Control Practices Advisory Committee and the HICPAC/SHEA/APIC/IDSA Hand
Hygiene Task Force. MMWR Recommendations and Reports, 51(RR-16), 1–45.
Accessed via the Web at https://www.cdc.gov/mmwr/pdf/rr/rr5116.pdf (Level
II)
8 World Health Organization. (2009). “WHO guidelines on hand hygiene in
health care: First global patient safety challenge, clean care is safer care”
[Online]. Accessed via the Web at
http://whqlibdoc.who.int/publications/2009/9789241597906_eng.pdf (Level
IV)
9 Centers for Medicare and Medicaid Services, Department of Health and
Human Services. (2015). Condition of participation: Infection control. 42 C.F.R.
§ 482.42.
10 Accreditation Association for Hospitals and Health Systems. (2017). Standard
07.01.21. Healthcare Facilities Accreditation Program: Accreditation
requirements for acute care hospitals. Chicago, IL: Accreditation Association
for Hospitals and Health Systems. (Level VII)
11 DNV GL-Healthcare USA, Inc. (2016). IC.1 .SR.1 . NIAHO® accreditation
requirements: Interpretive guidelines & surveyor guidance (version 11).
Milford, OH: DNV GL-Healthcare USA, Inc. (Level VII)
12 Siegel, J. D ., et al. (2007, revised 2017). “2007 guideline for isolation
precautions: Preventing transmission of infectious agents in healthcare
settings” [Online]. Accessed via the Web at
https://www.cdc.gov/infectioncontrol/pdf/guidelines/isolation-guidelines.pdf
(Level II)
13 Accreditation Association for Hospitals and Health Systems. (2017). Standard
07.01.10. Healthcare Facilities Accreditation Program: Accreditation
requirements for acute care hospitals. Chicago, IL: Accreditation Association
for Hospitals and Health Systems. (Level VII)
14 The Joint Commission. (2019). Standard NPSG.01.01.01. Comprehensive
accreditation manual for hospitals. Oakbrook Terrace, IL: The Joint
Commission. (Level VII)
15 Accreditation Association for Hospitals and Health Systems. (2017). Standard
15.01.16. Healthcare Facilities Accreditation Program: Accreditation
requirements for acute care hospitals. Chicago, IL: Accreditation Association
for Hospitals and Health Systems. (Level VII)
16 Centers for Medicare and Medicaid Services, Department of Health and
Human Services. (2015). Condition of participation: Patient’s rights. 42 C.F.R.
§ 482.13(c)(1).
17 The Joint Commission. (2019). Standard RI.01.01.01. Comprehensive
accreditation manual for hospitals. Oakbrook Terrace, IL: The Joint
Commission. (Level VII)
18 DNV GL-Healthcare USA, Inc. (2016). PR.1.SR.5 . NIAHO® accreditation
requirements: Interpretive guidelines & surveyor guidance (version 11).
Milford, OH: DNV GL-Healthcare USA, Inc. (Level VII)
19 The Joint Commission. (2019). Standard PC.01.02.01. Comprehensive
accreditation manual for hospitals: The official handbook. Oakbrook Terrace,
IL: The Joint Commission. (Level VII)
20 Össur. (2015). “Philadelphia tracheotomy collar: Instructions for use”
[Online]. Accessed via the Web at
http://assets.ossur.com/library/15723/Philadelphia%20Tracheotomy%20Collar.
pdf
21 Sparke, A., et al. (2013). The measurement of tissue interface pressures and
changes in jugular venous parameters associated with cervical
immobilisation devices: A systematic review. Scandinavian Journal of Trauma,
Resuscitation and Emergency Medicine, 21, 81. (Level I)
22 The Joint Commission. (2019). Standard PC.01.02.07. Comprehensive
accreditation manual for hospitals. Oakbrook Terrace, IL: The Joint
Commission. (Level VII)
23 The Joint Commission. (2019). Standard RC.01.03 .01. Comprehensive
accreditation manual for hospitals. Oakbrook Terrace, IL: The Joint
Commission. (Level VII)
24 Centers for Medicare & Medicaid Services, Department of Health and Human
Services. (2015). Condition of participation: Medical record services. 42 C.F.R.
§ 482.24(b).
25 Accreditation Association for Hospitals and Health Systems. (2017). Standard
10.00 .03. Healthcare Facilities Accreditation Program: Accreditation
requirements for acute care hospitals. Chicago, IL: Accreditation Association
for Hospitals and Health Systems. (Level VII)
26 DNV GL-Healthcare USA, Inc. (2016). MR.2 .SR.1 . NIAHO® accreditation
requirements: Interpretive guidelines & surveyor guidance (version 11).
Milford, OH: DNV GL-Healthcare USA, Inc. (Level VII)
27 National Pressure Ulcer Advisory Panel, et al. (2014). “Prevention and
treatment of pressure ulcers: Quick reference guide” [Online]. Accessed via
the Web at http://www.npuap.org/wp-content/uploads/2014/08/Updated-10-
16-14 -Quick-Reference-Guide-DIGITAL-NPUAP-EPUAP-PPPIA-16Oct2014.pdf
(Level VII)
28 Muzin, S., et al. (2008). When should a cervical collar be used to treat neck
pain? Current Reviews in Musculoskeletal Medicine, 1(2), 114–119. Accessed
via the Web at http://www.ncbi.nlm.nih.gov/pmc/articles/PMC2684205/
29 Ham, H. W., et al. (2014). Cervical collar-related pressure ulcers in trauma
patients in intensive care unit. Journal of Trauma Nursing, 21(3), 94–102.
CHEMOTHERAPEUTIC DRUG ADMINISTRATION
Administration of chemotherapeutic drugs requires
advanced skills in addition to those used when giving other
drugs.1 For example, some drugs require specialized
equipment or must be given through an unusual route.
Other drugs become unstable over time, and some must be
protected from light. Chemotherapeutic drug dosages must
also be exact to avoid possibly fatal complications. For these
reasons, only a practitioner or registered nurse who has
completed competency training in administration and safe
handling of chemotherapeutic drugs may administer
them.1,2,3
NURSING ALERT Administer vinca alkaloids in a minibag of
compatible IV solution; don’t administer them using a syringe to make
sure that vinca alkaloids are administered by the IV route only.
Administration of vinca alkaloids by the intrathecal route can cause
severe neurologic toxicity, including coma and death.4
The administration route depends on the drug’s
pharmacodynamics and the tumor’s characteristics. For
example, if a malignant tumor is confined to one area, the
drug may be administered through a localized, or regional,
method. Regional administration allows delivery of a high
drug dose directly to the tumor—a significant advantage,
because many solid tumors don’t respond to drug levels
that are safe for systemic administration.
Chemotherapy may be administered to a patient whose
cancer is believed to have been eradicated through surgery
or radiation therapy. This treatment, called adjuvant
chemotherapy, helps to ensure that no undetectable
metastasis exists. A patient may also receive chemotherapy
before surgery or radiation therapy, called induction
chemotherapy (or
neoadjuvant
or
synchronous
chemotherapy.) Induction chemotherapy helps improve
survival rates by shrinking a tumor before surgical excision
or radiation therapy.
Chemotherapeutic drugs dosages are usually based on
the patient’s total body surface area, previous response to
chemotherapy or radiation therapy, and the functioning of
the major body systems.5 Chemotherapeutic agents
generally prove more effective when given in higher doses,
but their adverse effects often limit the dosage. An
exception to this rule is methotrexate, which is particularly
effective against rapidly growing tumors but also toxic to
normal tissues that rapidly grow and divide. Practitioners
have discovered that they can give a large dose of
methotrexate to destroy cancer cells and then, before the
drug has had a chance to permanently damage vital organs,
give a dose of folinic acid antidote. This antidote stops the
effects of methotrexate, preserving normal tissue.
If the patient is pregnant, the practitioner and other
members of the health care team should collaborate with
the patient’s obstetric team before starting chemotherapy.
Chemotherapy is contraindicated during the first trimester
and isn’t recommended after 35 weeks’ gestation to avoid
delivery during a period of bone marrow suppression.6
Make sure to use sterile no-touch technique when
administering IV chemotherapy to reduce the risk of
vascular catheter–associated infection.7
HOSPITAL-ACQUIRED CONDITION ALERT Keep in mind that a vascular
catheter–associated infection is considered a hospital-acquired
condition, because a variety of best practices can reasonably prevent
it. Be sure to follow infection prevention techniques, such as
performing hand hygiene, using sterile no-touch technique, and
performing a vigorous mechanical scrub of the needleless connector,
to reduce the risk of vascular catheter–associated infection.7,8,9
Equipment
Safety data sheet (SDS) for each prescribed chemotherapy
drug ▪ prescribed chemotherapy drug ▪ antiseptic pads
(chlorhexidine-based, povidone iodine, or alcohol) ▪
administration set ▪ prescribed IV solution ▪ needleless
Luer-lock connectors ▪ 10-mL prefilled syringe(s) containing
preservative-free normal saline flush solution (or a smaller
syringe that’s designed to generate lower injection
pressure) ▪ electronic infusion device (preferably a smart
pump with dose-error reduction software) ▪ low-pressure,
flow-control infusion device (for vesicant administration) ▪
powder-free chemotherapy gloves ▪
nonlinting,
nonabsorbent disposable gown made of polyethylene-
coated polypropylene10 ▪ face shield ▪ goggles ▪
chemotherapy sharps container ▪
hazardous-waste
container approved for cytotoxic waste ▪ labels ▪ scale ▪
stethoscope ▪ thermometer ▪ automated blood pressure
device or sphygmomanometer ▪ hazardous drug spill kit ▪
extravasation equipment ▪ emergency equipment (code
cart with cardiac medications, defibrillator, handheld
resuscitation bag with mask, suction equipment, oxygen,
intubation equipment) ▪ fluid-impermeable pad ▪ Optional:
aluminum foil or brown paper bag, noncoring needle, IV
insertion equipment, other prescribed medications, National
Institute for Occupational Safety and Health (NIOSH)–
approved respirator mask (if aerosolization is likely),
transport bag, stadiometer.
Preparation of equipment
Make sure that a hazardous drug spill kit,11 extravasation
equipment, and emergency equipment are readily available.
Make sure that the emergency equipment is functioning
properly.
Inspect all IV equipment and supplies; if a product is
expired, its integrity is compromised, or it’s found to be
defective, remove it from patient use, label it as expired or
defective, and report the expiration or defect as directed by
your facility.12
The pharmacy may prepare the medication for you. If you
must prepare the medication, wash your hands with soap
and water and put on personal protective equipment (a
nonlinting, nonabsorbent disposable gown made of
polyethylene-coated polypropylene, two pairs of gloves, a
face shield and goggles if splashing is likely, and a NIOSH-
approved respirator mask if aerosolization is possible). Use a
closed-system device and prepare the medication in a
biological safety cabinet following appropriate safety
standards.1 Cap the end of the primed administration tubing
or the Luer-lock end of the syringe. Label the medication
with the patient’s full name and second identifier, complete
generic medication name, route of administration, total
dose to be given, total volume required to administer the
dosage, date and time of preparation, date and time of
administration, and date and time of expiration (when a
syringe is not for immediate use).2 Place a warning on the
medication to indicate that it’s a cytotoxic medication. Wipe
the outside of the solution container or syringe with moist
gauze and then place it in a sealable bag for transport,
making sure not to contaminate the outside of the transport
bag. Label the outside of the bag to indicate that its
contents are hazardous. Discard material that has come in
contact with the cytotoxic medication in a waste container
designed for cytotoxic waste. Use detergent and water to
wash surfaces that have come in contact with the
medication. Remove and discard your gown and outer
gloves. Remove and discard your inner gloves. Wash your
hands with soap and water.2,3,6,10
Implementation
■ Avoid distractions and interruptions when preparing and
administering the medication to prevent medication
administration errors.13,14
■ Review the patient’s medical record for initial cancer
diagnosis and staging or current cancer status; recent
treatments, including surgery, radiation therapy, hormone
therapy, chemotherapy, and complementary therapy;
medical, psychiatric, and surgical history; allergic or
hypersensitivity reactions; patient comprehension regarding
chemotherapy treatment; pregnancy and reproductive
status, including last menstrual period, if applicable; and
physical examination results, including assessment of organ
function appropriate for the planned treatment regimen.2,3,6
■ Review an accurate list of all the patient’s medications
and supplements. Check for drugs that might interact with
chemotherapy. You shouldn’t mix chemotherapeutic drugs
with other medications. If you have questions or concerns
about giving the chemotherapeutic drug, consult with the
practitioner or pharmacist before you administer
it.1,3,6,15,16,17,18,19,20
■ Determine whether the patient has received
chemotherapy before and, if so, note the severity of any
adverse effects.6
■ Confirm that the practitioner has obtained written
informed consent and that the consent form is in the
patient’s medical record.1,2,3,6,21,22,23,24
■ Read the practitioner’s order and make sure that it
includes the patient’s full name and a second patient
identifier; the date; the diagnosis; any allergies; the regimen
name, cycle number, and day when applicable;2 full generic
name of the medications ordered;2 the dose; the patient’s
height, weight (in kilograms),4 and any other variables used
to calculate the dose;1 the method for dose calculation; the
route of administration; the frequency or dates of
administration; rate of administration; supportive care
measures, such as premedications for hypersensitivity and
nausea (if necessary); treatment criteria; the sequence of
medication administration (if applicable); and the protocol
name or number.2,4,6
Classifying chemotherapeutic drugs
To administer chemotherapy safely, you need to know each drug’s potential
for damaging tissue. In this regard, chemotherapeutic drugs are classified as
vesicants, nonvesicants, or irritants.
Vesicants
■ cisplatin (greater than 20 mL or 0.5 mg/mL)
■ dactinomycin
■ daunorubicin
■ docetaxel
■ doxorubicin
■ epirubicin
■ idarubicin
■ mechlorethamine
■ melphalan
■ mitomycin
■ mitoxantrone
■ oxaliplatin
■ paclitaxel
■ vinblastine
■ vincristine sulfate PFS
■ vindesine
■ vinorelbine
Nonvesicants
■ asparaginase
■ cyclophosphamide
■ cytarabine
■ floxuridine
■ fluorouracil
Irritants
■ bleomycin
■ carboplatin
■ carmustine
■ dacarbazine
■ etoposide
■ gemcitabine
■ ifosfamide
■ irinotecan
■ streptozocin
■ topotecan
■ In collaboration with the patient’s multidisciplinary team,
review the patient’s laboratory test results, specifically
complete blood count, blood urea nitrogen level, platelet
count, urine creatinine level, and liver function study
results.1,3
■ Review the patient’s height, weight (in kilograms),4 and
body surface area.1,3
■ Verify that the prescribed medication dose is appropriate
for the patient, diagnosis, and treatment plan. If you have
concerns, consult with the prescribing practitioner or the
pharmacist.17,18,19,20
■ Have a second qualified health care worker independently
verify the chemotherapy order before medication
preparation, confirming the two patient identifiers,
medication name, dose, medication volume, route of
administration, calculation for dosing, and treatment cycle
and day of cycle.1,2,3,6
■ Familiarize yourself with the information contained within
the SDS specific to the prescribed drug.1
■ Gather and prepare the appropriate equipment.
■ Prepare the medication or obtain it from the pharmacy.
■ When you receive the drug from the pharmacy, compare
the medication label with the order in the patient’s medical
record.17,18,19,20 Make sure that it’s properly labeled with the
patient’s full name and a second identifier, full generic drug
name, drug administration route, total dose to be given,
total volume required to administer the dose, date of
administration, and date and time of preparation and
expiration. The container should also contain a label that
clearly identifies the drug as hazardous. Inspect the syringe
or bag and compare the volume to the label; return the drug
to the pharmacy if a discrepancy exists.2
■ If you must prepare the drug yourself, make sure you
properly label it. (See the “Chemotherapeutic drug
preparation and handling” procedure, page 162.)
■ Check the expiration date on the medication. If the
medication is expired, return it to the pharmacy and obtain
new medication.17,18,19,20
■ Visually inspect the solution for particles, discoloration,
and other signs of loss of integrity; don’t administer the
medication if its integrity is compromised.17,18,19,20
■ Perform hand hygiene.25,26,27,28,29,30
■ Confirm the patient’s identity using at least two patient
identifiers.31
■ Explain the procedure to the patient and family (if
appropriate) according to their individual communication
and learning needs to increase their understanding, allay
their fears, and enhance cooperation.32
■ Confirm that the patient received written educational
material at an appropriate reading level and that the
material includes information about the diagnosis,
chemotherapy plan, possible long- and short-term adverse
effects, risks associated with the regimen, reportable signs
and symptoms, monitoring, sexual relations, contraception,
special precautions, and follow-up care.2,3,6 Answer any
questions before administering chemotherapy.
■ Review current medications with the patient, including
over-the-counter medications and complementary and
alternative therapies; notify the practitioner of any
changes.2,15,16
■ Verify allergies, previous reactions, and treatment-related
toxicities with the patient.2,3,6
■ Administer any prescribed premedications following safe
medication administration practices.17,18,19,20
■ Ask the patient about any psychosocial concerns or
cultural or spiritual issues that may affect treatment, and
take action as indicated.2
■ Raise the patient’s bed to waist level when providing care
to prevent caregiver back strain.33
■ Assess the patient’s clinical and performance status.2,3
■ Obtain the patient’s vital signs and current weight (in
kilograms).3,6,4
■ Recalculate the dose, as ordered, using the patient’s body
surface area, and check your calculations against the
written order.1
■ Determine the best site to administer the drug. When
selecting the site, consider drug compatibilities, frequency
of administration, and the vesicant and irritant potential of
the drug; continuous vesicant infusions shouldn’t be
administered through a peripheral IV catheter because of
the
risk
of
extravasation.1,6
(See Classifying
chemotherapeutic drugs.) Use a central venous access
catheter or implanted access device to administer a
vesicant drug that will be infusing for longer than 30
minutes.3,6
■ If a central venous access catheter or implanted port isn’t
available and the drug must be given through a peripheral
IV catheter, avoid using a site that’s more than 24 hours
old,1,6 and assess the site for signs of inflammation or
infiltration; if the integrity of the IV site is uncertain, insert a
new IV catheter at another site.1,6
■ To identify an administration site, examine the patient’s
veins, starting with the hand and proceeding to the forearm.
Veins of choice are pliable and smooth; large veins of the
forearm are preferred.6 Select the smallest gauge and
shortest catheter needed to accommodate the prescribed
therapy, and avoid using of steel needles.6 (See the “IV
catheter insertion and removal” procedure, page 443.)
NURSING ALERT If you’re using a topical anesthetic before
peripheral IV insertion, use one with a short duration of action,
because longer-acting topical anesthetics such as eutectic mixture of
local anesthetics (EMLA) cream (lidocaine 2.5% and prilocaine 2.5%)
can mask changes in sensation at the IV site that signal possible
vesicant extravasation.34
■ Wash your hands with soap and water.3,20,25,26,27,28,29
■ Put on necessary protective equipment (two pairs of
gloves; a nonlinting, nonabsorbent disposable gown made
of polyethylene-coated polypropylene; a face shield and
goggles if splashing is likely; and a respirator, if necessary).
Make sure your inner glove cuff is worn under the gown cuff
and the outer glove cuff extends over the gown cuff to fully
protect your skin. Inspect your gloves to make sure they’re
physically intact.3,10 Wear personal protective equipment
through all stages of handling and administering the drug.
(See Safe handling of chemotherapeutic agents.) Change
your gloves every 30 minutes. If a drug spill occurs or your
gloves become punctured or torn, remove and discard them
immediately, wash your hands with soap and water, and
then put on new gloves.6
■ Establish blood return and patency regardless of the
access type to prevent extravasation injury.1,3,6,36
NURSING ALERT Don’t test vein patency with a chemotherapeutic
drug. If the vein isn’t patent, severe tissue damage can result. Use
preservative-free normal saline solution (or, less commonly, a dextrose
5% solution if the medication is incompatible with normal saline
solution) to assess patency and flush the IV device.36
■ If your facility uses a bar code scanning system, scan
your identification badge, the patient’s identification
bracelet, and the medication’s bar code, as indicated by
your facility’s system.
Safe handling of chemotherapeutic
agents
When preparing and administering chemotherapeutic agents, safe handling
and personal protection must be strictly enforced to prevent accidental
exposure to cytotoxic drugs. The National Institute for Occupational Safety
and Health (NIOSH) recommends reducing exposure risk by using the
following personal protective equipment.10,35
Gowns
■ Use a nonlinting, nonabsorbent, disposable gown made of polyethylene-
coated polyethylene;10 it should have long sleeves with tight-fitting cuffs.
The gown shouldn’t have seams or closures that could permit drugs to pass
through it.
■ Dispose of your gown after each use; reusing a gown increases the risk of
exposure to hazardous drugs.
■ Wear a gown whenever splashing or spilling is possible, such as when
compounding drugs and administering them.
■ Don’t wear your gown outside the compounding or administration area to
avoid contaminating other areas with the hazardous drug.
■ If gown permeation information isn’t available, change your gown every 2
to 3 hours, or immediately if a spill or splash occurs.6,10,35
Gloves
■ Use powder-free chemotherapy gloves.
■ Wash your hands thoroughly with soap and water before putting on and
after taking off gloves.3
■ Inspect gloves for defects before use.
■ Remove and discard your gloves every 30 minutes; remove and discard
them immediately if they become damaged and when contact with the drug
is known or suspected.
■ Wear two pairs of gloves when compounding, administering, and disposing
of hazardous drugs. Wear the inner glove under the gown cuff and the outer
glove over the cuff. Place gloves with long cuffs over the cuff of the gown to
protect the wrist and forearm.
■ Turn gloves inside-out when removing them so that contaminated surfaces
don’t touch uncontaminated surfaces.
■ Wear sterile chemotherapy gloves when compounding sterile
preparations.6,10,37
Face shield and goggles
■ Wear a face shield and goggles whenever splashing is likely; face shields
alone don’t provide adequate eye and face protection.
■ Wear a face shield and goggles when compounding a drug outside of the
biological safety cabinet (BSC) or isolator (for example, in the operating
room), working at or above eye level, cleaning a BSC or isolator, or cleaning a
spill.
Respirators
■ Use a NIOSH-approved, full-face-piece chemical cartridge-type respirator
for large spills, such as when an IV bag breaks, a line disconnects and leaks,
or known or suspected airborne exposure to vapors or gases occurs.6,10,35
Other precautions
■ Consider all personal protective equipment worn when handling hazardous
drugs as contaminated with hazardous drugs; contain and dispose of used
personal protective equipment in a hazardous-waste container.11
■ According to NIOSH, cytotoxic drugs, including oral drugs that must be
compounded or crushed, should be prepared in a primary engineering control
(PEC) area, such as a BSC or a compounding sterile containment isolator. The
PEC area should provide vertical laminar airflow, eliminate exhaust with a
high-efficiency particulate air (HEPA) filter (ideally, it should be vented
outside), and have a continuously running blower. The room in which a BSC is
located should be in a buffer area with negative pressure and be restricted to
authorized personnel. Use of a PEC area doesn’t eliminate the need for
personal protective equipment to prevent inhalation, direct skin contact, and
direct eye contact.6
■ Use tubing and syringes with Luer-lock connectors. Spike IV bags and
prime tubing with a compatible IV solution before adding the cytotoxic drug.
Apply a label that reads CYTOTOXIC AGENT or a similar distinct warning, and wipe
the outside of the container with moist gauze before placing it in a sealable
bag for transport. Select a transport bag that can contain spillage if dropped.
Label the outermost part of the bag to indicate that the contents are
hazardous. Make sure that whoever transports the drug has access to a spill
kit and knows how to use it.6
■ Storage and labeling of chemotherapeutic agents should follow the
facility’s pharmacy guidelines. To prevent accidental ingestion of cytotoxic
agents, never eat, drink, smoke, chew gum, apply cosmetics, or store food in
areas where chemotherapy is prepared or administered. In addition, all
personnel handling chemotherapeutic agents should have specific
instructions related to hazardous waste and spill precautions.
■ Perform a vigorous mechanical scrub of the needleless
Luer-lock connector for at least 5 seconds using an
antiseptic pad; allow it to dry completely before connecting
the administration set.8,37
■ If you’re administering the drug by piggyback or short-
term infusion, trace the tubing from the patient to its point
of origin and then attach the tubing to the appropriate
injection port using a needleless Luer-lock connector. If
you’re administering by continuous infusion, trace the
tubing from the patient to its point of origin and attach the
tubing directly to the IV catheter or into a compatible line of
maintenance IV solution. Trace the tubing to make sure that
you’re connecting the tubing to the correct port before
beginning the infusion.38 Secure all connections with Luer-
lock devices. Route the tubing in a standardized direction if
the patient has other tubing and catheters that have
different purposes. If multiple IV lines will be used, label the
tubing at the distal end (near the patient connection) and
proximal end (near the source container) to reduce the risk
of misconnection. If you’re administering the drug by IV
injection, refer to the practitioner’s orders and pharmacy
guidelines for recommended IV injection rates, diluents, and
other drug-specific details.6
■ Use an electronic infusion device for specific types of
antineoplastic drugs and for all continuous infusions. When
administering a vesicant, use a low-pressure, flow-control
infusion device to minimize pressure on the vein.1,6
NURSING ALERT Chemotherapy drugs are considered “high-alert”
medications because they can cause significant patient harm when
used in error. Perform an independent double check with another
individual who’s qualified to prepare or administer chemotherapy
before chemotherapy administration.39,40
■ Have another individual who’s qualified to prepare or
administer chemotherapy perform an independent double-
check to verify the patient’s identity using two patient
identifiers. Make sure that the correct drug is prepared in
the prescribed concentration and volume, the drug hasn’t
expired, the drug’s indication corresponds with the patient’s
diagnosis, the dosage calculations are correct and the
dosing formula used to derive the final dose is correct, the
route of administration is safe and proper for the patient,
the drug’s integrity is intact, the infusion pump settings are
correct, and the infusion line is attached to the correct port
(if applicable) to reduce the risk of medication errors. Both
you and the other qualified individual involved in the
independent double-check should sign your names in the
patient’s medical record to indicate that the verification
took place.1,2,3,6,39,41
■ Compare the results of the independent double-check. If
discrepancies exist, rectify them before administering the
drug.41
■ Begin administration as prescribed. Make sure that the
administration tubing is clearly labeled to alert staff
members that a hazardous drug is being administered
through the designated line.40
■ During IV administration, closely monitor the patient for
signs and symptoms of a hypersensitivity reaction
(agitation, chest tightness, shortness of breath,
hypotension, rash, itching, facial edema, light-headedness,
dizziness, and abdominal cramping) or extravasation
(swelling, redness, stinging, burning or pain at the access
site, loss of blood return from the device, and IV flow rate
slowing or stoppage).6
■ When administering a vesicant drug by short-term
infusion using a peripheral vein, stay with the patient during
the infusion. Monitor the site for extravasation and verify
blood return every 5 to 10 minutes. When administering a
vesicant by IV injection, verify blood return every 2 to 5 mL.
When administering a vesicant through a central venous
access device or implanted port, check for blood return
periodically.1,6
Managing extravasation
Extravasation—the infiltration of a vesicant drug into the surrounding tissue
— can result from a punctured vein or leakage around a venipuncture site. If
vesicant drugs or fluids extravasate, blistering, peeling and sloughing of the
skin, tissue necrosis, damage to tendons, nerves and joints, functional and
sensory impairment of the affected area, and disfigurement can occur.6,52
Extravasation of vesicant drugs requires emergency treatment.55 Essential
steps include the following:
■ Immediately stop administering the vesicant and other IV fluids infusing
through the access device.6,52
■ Disconnect the IV tubing from the access device, but don’t remove the
device or noncoring needle.6,52
■ Attempt to aspirate residual vesicant from the access device or noncoring
needle using a small (3 mL) syringe.6,52
■ Notify the practitioner.6,52
■ Remove the peripheral IV catheter or noncoring needle after the treatment
plan has been determined.6,52
■ Use a standardized scale to assess and document the extent of the
extravasation.52
■ Estimate the amount of solution that has escaped into the tissue based on
the rate of injection or infusion and the length of time since your last
assessment.52
■ Treat the site as prescribed; treatment may include elevating the
extremity, cold or heat application, and antidote administration.6,52
■ Surgical intervention may be necessary in some cases.
■ After administration, place a fluid-impermeable pad
underneath the connection site between the access device
and administration tubing to absorb drug droplets that may
spill. Disconnect the tubing from the access site, and then
remove the IV container with the tubing attached; don’t
remove the spike from the IV container or reuse the tubing.6
■ Dispose of the IV container, tubing, and fluid-
impermeable pad in a cytotoxic hazardous-waste
receptacle. Dispose of syringes in a chemotherapy sharps
container.6,10,11
■ Perform a vigorous mechanical scrub of the needleless
Luer-lock connector for at least 5 seconds using an
antiseptic pad; allow it to dry completely.8,37
■ While maintaining sterility of the syringe tip, attach a
prefilled syringe containing preservative-free normal saline
solution to the needleless connector. (Use a 10-mL syringe
or a syringe specifically designed to generate lower injection
pressure.) Unclamp the catheter and inject preservative-free
normal saline solution into the catheter at the same rate of
injection as the prescribed medication. Use the amount of
flush solution needed to adequately clear the medication
from the administration set lumen and the catheter. Don’t
forcibly flush the device; further evaluate the device if
resistance is met. Consider using a pulsatile flushing
technique, because short boluses of the flush solution
interrupted by short pauses may be more effective at
removing deposits (such as fibrin, drug precipitate,
intraluminal bacteria) than a continuous low-flow technique.
Alternatively, if the medication is incompatible with normal
saline solution, use dextrose 5% in water, followed by
preservative-free normal saline solution. Don’t allow
dextrose 5% in water to remain in the catheter lumen,
because it provides nutrients for biofilm growth.36
■ Remove and discard the syringe.
■ Proceed with locking the device, if necessary.
■ Return the bed to the lowest position to prevent falls and
maintain patient safety.42
■ Clean and decontaminate surfaces that might have come
in contact with the drug.6,10
■ Remove and discard your personal protective equipment
in a hazardous-waste receptacle.11 Remove and discard
your gown and outer gloves first. Then remove and discard
your inner gloves.6,10
■ Wash your hands with soap and water.6,10,25,26,27,28,29,30
■ Clean and disinfect your stethoscope using a disinfectant
pad.43,44
■ Perform hand hygiene.25,26,27,28,29,30
■ Document the procedure.45,46,47,48,49
Special considerations
■ Be aware that verbal orders aren’t permitted for
chemotherapy agents, except to hold or stop chemotherapy
administration.1,2,6
■ Monitor the patient’s cumulative chemotherapy dose to
make sure that the drug is discontinued if the maximum
lifetime dose is achieved.1
■ Be aware that each chemotherapy agent has unique
adverse effects. Assess and monitor the patient for
anticipated adverse effects for the agent administered.
Treatment-related toxicities should be evaluated, graded,
and documented using standard definitions and criteria.2
■ The Joint Commission issued a sentinel event alert related
to managing risk during transition to the new International
Organization for Standardization tubing standards that were
designed to prevent dangerous tubing misconnections,
which can lead to serious patient injury and death. During
the transition, make sure to trace all tubing and catheters
from the patient to the point of origin before connecting or
reconnecting any device or infusion, at any care transition
(such as a new setting or service), and as part of the hand-
off process; route tubes and catheters having different
purposes in different standardized directions; label the
tubing at both the distal and proximal ends (when there are
different access sites or several bags hanging); use tubing
and equipment only as intended; and store medications for
different delivery routes in separate locations.50
■ If the administration set tubing becomes disconnected,
put on gloves and clamp the patient’s IV catheter close to
the IV access site. Put on personal protective equipment.
Ensure the patency of the IV catheter and take measures to
maintain patency until chemotherapy administration can be
resumed.6
■ If some of the chemotherapy drug comes in contact with
your skin, thoroughly wash the involved area with soap (not
a germicidal agent) and water. If eye contact occurs, flood
the eye with water or saline solution for at least 15 minutes
while holding the eyelid open. Obtain a medical evaluation
as soon as possible after accidental exposure.6
■ Be aware that patient excreta (feces and urine)
contaminated with cytotoxic drugs or their metabolic
byproducts must be handles as cytotoxic waste materials
for at least 48 hours following the last dose of
chemotherapy.2
■ If a chemotherapy spill occurs, use a chemotherapy spill
kit to clean the area. Post a sign to warn others. Wear all
personal protective equipment (double gloves, a gown, face
shield or goggles, booties, and a chemical cartridge-type
respirator with full face piece, if aerosolization is possible)
when cleaning the spill. Report and document the spill
appropriately.
■ During infusion, some drugs need protection from direct
sunlight to avoid possible drug breakdown. In this case,
cover the container with a brown paper bag or aluminum
foil.
■ Note that any health care worker who is pregnant, trying
to conceive, or breast-feeding shouldn’t be exposed to
chemotherapeutic drugs.1,6,11,52
■ If you suspect extravasation, stop the infusion
immediately,52 leave the IV catheter in place, and notify the
practitioner. (See Managing extravasation.)
■ If the patient is enrolled in a clinical trial, review that the
trial’s protocol for the correct dosage and administration
schedule. Confirm that informed consent has been obtained
for participation in the clinical trial.
Patient teaching
Before a patient begins a chemotherapy regimen, provide
written or electronic information about the patient’s
diagnosis, the goals of therapy, the planned schedule and
duration of chemotherapy, the possible short- and long-term
adverse effects, and regimen- or drug-specific signs and
symptoms that require medical attention. The information
should include emergency contact information for the
practice or organization, signs and symptoms that should
trigger a call, and the person who should be called. Also
provide a plan for monitoring and follow-up care. Make sure
that the materials provided are appropriate for the patient
or caregiver’s reading and comprehension level.2
Tell the patient that for the first 48 hours after receiving a
dose of chemotherapy, he or she should close the lid and
flush the toilet at least two times after voiding. Teach the
patient and family how to handle contaminated bed linens
and clothing. Suggest that, while wearing gloves, they place
contaminated items in a pillowcase and then machine wash
them twice in hot water with regular detergent separately
from other household items. Have them dispose of used
gloves in an appropriately labeled hazardous-waste
container.6
Complications
Common adverse effects of chemotherapy are nausea and
vomiting, ranging from mild to debilitating. Bone marrow
suppression, another major complication, can lead to
neutropenia and thrombocytopenia. Other adverse effects
include intestinal irritation, stomatitis, pulmonary fibrosis,
cardiotoxicity, nephrotoxicity, neurotoxicity, hearing loss,
anemia, alopecia, urticaria, radiation recall (if drugs are
given with, or soon after, radiation therapy), anorexia,
esophagitis, diarrhea, and constipation.
IV administration of chemotherapeutic drugs can also lead
to phlebitis; cellulitis; thrombosis; extravasation causing
blistering, peeling, and sloughing of the skin; tissue
necrosis; damage to tendons, nerves, and joints; functional
and sensory impairment of the affected area; and
disfigurement.
Documentation
Facilities commonly require nursing documentation on a
chemotherapy flow sheet. Document according to your
facility’s documentation system. Record any premedication
administered before the procedure. Document the location
and description of the access site and verification of blood
return. Also record the drugs, dosages, route of
administration, sequence of drug administration, needle
type and size used, amount and type of flushing solution,
and the site’s condition after treatment. Document any
adverse reactions, the patient’s tolerance of any
interventions provided, teaching provided to the patient and
family (if applicable), and their understanding of that
teaching. Record
any treatment
required
after
chemotherapy administration.
REFERENCES
1 Standard 58. Antineoplastic therapy. Infusion therapy standards of practice.
(2016). Journal of Infusion Nursing, 39, S127–S129. (Level VII)
2 Neuss, M. N., et al. (2016). 2016 Updated American Society of Clinical
Oncology/Oncology Nursing Society chemotherapy administration safety
standards including standards for pediatric oncology. Journal of Oncology
Practice, 12(12), 1262–1271. Accessed via the web at
http://ascopubs.org/doi/pdfdirect/10.1200/JOP.2016.017905 (Level VII)
3 Esparza, D. M . (2014). Oncology policies and procedures. Pittsburgh, PA:
Oncology Nursing Society.
4 Institute for Safe Medication Practices. (2016). “2016-2017 targeted
medication safety best practices for hospitals” [Online]. Accessed via the
Web at http://www.ismp.org/tools/bestpractices/TMSBP-for-Hospitals.pdf
5 Hinkle, J. L., & Cheever, K. H. (2018). Brunner & Suddarth’s textbook of
medical-surgical nursing (14th ed.). Philadelphia, PA: Wolters Kluwer.
6 Polovich, M., et al. (Eds.) . (2014). Chemotherapy and biotherapy guidelines
and recommendations for practice (4th ed.). Pittsburgh, PA: Oncology Nursing
Society.
7 Jarrett, N., & Callaham, M. (2016). “Evidence-based guidelines for selected
hospital-acquired conditions: Final report” [Online]. Accessed via the Web at
https://www.cms.gov/Medicare/Medicare-Fee-for-Service-
Payment/HospitalAcqCond/Downloads/2016-HAC-Report.pdf
8 Marschall, J., et al. (2014). SHEA/IDSA practice recommendation: Strategies to
prevent central line-associated bloodstream infections in acute care
hospitals. Infection Control and Hospital Epidemiology, 35(7), 753–771 .
Accessed via the Web at http://www.jstor.org/stable/10.1086/676533 (Level I)
9 Centers for Disease Control and Prevention. (2011, revised 2017). “Guidelines
for the prevention of intravascular catheter-related infections” [Online].
Accessed via the Web at http://www.cdc.gov/hicpac/pdf/guidelines/bsi-
guidelines-2011.pdf (Level I)
10 National Institute for Occupational Safety and Health (NIOSH). (2004).
“NIOSH alert: Preventing occupational exposures to antineoplastic and other
hazardous drugs in health care settings” [Online]. Accessed via the Web at
http://www.cdc.gov/niosh/docs/2004-165/pdfs/2004-165.pdf (Level VII)
11 Standard 15. Hazardous drugs and waste. Infusion therapy standards of
practice. (2016). Journal of Infusion Nursing, 39, S36–S37. (Level VII)
12 Standard 12. Product evaluation, integrity, and defect reporting. Infusion
therapy standards of practice. (2016). Journal of Infusion Nursing, 39, S32–
S34. (Level VII)
13 Westbrook, J., et al. (2010). Association of interruptions with an increased risk
and severity of medication administration errors. Archives of Internal
Medicine, 170(8), 683–690 . (Level IV)
14 Institute for Safe Medication Practices. (2012). Side tracks on the safety
express: Interruptions lead to errors and unfinished . . . Wait, what was I
doing? Nurse Advise-ERR, 11(2), 1–4 . Accessed via the Web at
https://www.ismp.org/Newsletters/acutecare/showarticle.aspx?id=37
15 The Joint Commission. (2019). Standard NPSG.03 .06 .01. Comprehensive
accreditation manual for hospitals. Oakbrook Terrace, IL: The Joint
Commission. (Level VII)
16 Accreditation Association for Hospitals and Health Systems. (2017). Standard
25.02.03. Healthcare Facilities Accreditation Program: Accreditation
requirements for acute care hospitals. Chicago, IL: Accreditation Association
for Hospitals and Health Systems. (Level VII)
17 The Joint Commission. (2019). Standard MM.06.01.01. Comprehensive
accreditation manual for hospitals. Oakbrook Terrace, IL: The Joint
Commission. (Level VII)
18 Centers for Medicare and Medicaid Services, Department of Health and
Human Services. (2015). Condition of participation: Nursing services. 42
C.F.R. § 482.23(c).
19 Accreditation Association for Hospitals and Health Systems. (2017). Standard
16.01.03. Healthcare Facilities Accreditation Program: Accreditation
requirements for acute care hospitals. Chicago, IL: Accreditation Association
for Hospitals and Health Systems. (Level VII)
20 DNV GL-Healthcare USA, Inc. (2016). MM.1 .SR.2. NIAHO® accreditation
requirements: Interpretive guidelines & surveyor guidance (version 11).
Milford, OH: DNV GL-Healthcare USA, Inc. (Level VII)
21 DNV GL-Healthcare USA, Inc. (2016). PR.1.SR.3 . NIAHO® accreditation
requirements: Interpretive guidelines & surveyor guidance (version 11).
Milford, OH: DNV GL-Healthcare USA, Inc. (Level VII)
22 Accreditation Association for Hospitals and Health Systems. (2017). Standard
15.01.11. Healthcare Facilities Accreditation Program: Accreditation
requirements for acute care hospitals. Chicago, IL: Accreditation Association
for Hospitals and Health Systems. (Level VII)
23 The Joint Commission. (2019). Standard RI.01.03 .01. Comprehensive
accreditation manual for hospitals. Oakbrook Terrace, IL: The Joint
Commission. (Level VII)
24 Centers for Medicare and Medicaid Services, Department of Health and
Human Services. (2015). Condition of participation: Patient’s rights. 42 C.F.R.
§ 482.13(b)(2).
25 The Joint Commission. (2019). Standard NPSG.07.01.01. Comprehensive
accreditation manual for hospitals. Oakbrook Terrace, IL: The Joint
Commission. (Level VII)
26 Centers for Disease Control and Prevention. (2002). Guideline for hand
hygiene in health-care settings: Recommendations of the Healthcare Infection
Control Practices Advisory Committee and the HICPAC/SHEA/APIC/IDSA Hand
Hygiene Task Force Hand Hygiene Task Force. MMWR Recommendations and
Reports, 51(RR-16), 1–45. Accessed via the Web at
https://www.cdc.gov/mmwr/pdf/rr/rr5116.pdf (Level II)
27 World Health Organization. (2009). “WHO guidelines on hand hygiene in
health care: First global patient safety challenge, clean care is safer care”
[Online]. Accessed via the Web at
http://apps.who.int/iris/bitstream/10665/44102/1/9789241597906_eng.pdf
(Level IV)
28 Centers for Medicare and Medicaid Services, Department of Health and
Human Services. (2015). Condition of participation: Infection control. 42 C.F.R.
§ 482.42.
29 Accreditation Association for Hospitals and Health Systems. (2017). Standard
07.01.21. Healthcare Facilities Accreditation Program: Accreditation
requirements for acute care hospitals. Chicago, IL: Accreditation Association
for Hospitals and Health Systems. (Level VII)
30 DNV GL-Healthcare USA, Inc. (2016). IC.1 .SR.1 . NIAHO® accreditation
requirements: Interpretive guidelines & surveyor guidance (version 11).
Milford, OH: DNV GL-Healthcare USA, Inc. (Level VII)
31 The Joint Commission. (2019). Standard NPSG.01.01.01. Comprehensive
accreditation manual for hospitals. Oakbrook Terrace, IL: The Joint
Commission. (Level VII)
32 The Joint Commission. (2019). Standard PC.02.01.21. Comprehensive
accreditation manual for hospitals. Oakbrook Terrace, IL: The Joint
Commission. (Level VII)
33 Waters, T. R., et al. (2009). “Safe patient handling training for schools of
nursing” [Online]. Accessed via the Web at
https://www.cdc.gov/niosh/docs/2009-127/pdfs/2009-127.pdf (Level VII)
34 Schulmeister, L. (2010). Preventing and managing vesicant chemotherapy
extravasations. Journal of Supportive Oncology, 8(5), 212–215.
35 National Institute for Occupational Safety and Health. (2008). “Workplace
solutions: Personal protective equipment for health care workers who work
with hazardous drugs” [Online]. Accessed via the Web at
http://www.cdc.gov/niosh/docs/wp-solutions/2009-106/pdfs/2009-106.pdf
(Level VII)
36 Standard 40. Flushing and locking. Infusion therapy standards of practice.
(2016). Journal of Infusion Nursing, 39, S77–S81. (Level VII)
37 Standard 34. Needleless connectors. Infusion therapy standards of practice.
(2016). Journal of Infusion Nursing, 39, S68–S70. (Level VII)
38 U.S . Food and Drug Administration. (n.d .). “Look. Check. Connect. Safe
medical device connections save lives” [Online]. Accessed via the Web at
http://www.fda.gov/downloads/MedicalDevices/Safety/AlertsandNotices/UCM1
34873.pdf
39 Standard 13. Medication verification. Infusion therapy standards of practice.
(2016). Journal of Infusion Nursing, 39, S34–S35. (Level VII)
40 Institute for Safe Medication Practices. (2014). “ISMP list of high-alert
medications in acute care settings” [Online]. Accessed via the Web at
http://www.ismp.org/Tools/highalertmedications.pdf (Level VII)
41 Institute for Safe Medication Practices. (2014). Independent double-checks:
Undervalued and misused. ISMP Medication Safety Alert! Nurse Advise-ERR,
12(3), 1. Accessed via the Web at
http://www.ismp.org/newsletters/nursing/issues/NurseAdviseERR201403.pdf
(Level VII)
42 Ganz, D. A., et al. (2013). Preventing falls in hospitals: A toolkit for improving
quality of care (AHRQ Publication No. 13-0015-EF). Rockville, MD: Agency for
Healthcare Research and Quality. Accessed via the Web at
http://www.ahrq.gov/sites/default/files/publications/files/fallpxtoolkit.pdf
(Level VII)
43 Rutala, W. A., et al. (2008, revised 2017). “Guideline for disinfection and
sterilization in healthcare facilities, 2008” [Online]. Accessed via the Web at
https://www.cdc.gov/infectioncontrol/pdf/guidelines/disinfection-
guidelines.pdf (Level I)
44 Accreditation Association for Hospitals and Health Systems. (2017). Standard
07.02.03. Healthcare Facilities Accreditation Program: Accreditation
requirements for acute care hospitals. Chicago, IL: Accreditation Association
for Hospitals and Health Systems. (Level VII)
45 The Joint Commission. (2019). Standard RC.01.03 .01. Comprehensive
accreditation manual for hospitals. Oakbrook Terrace, IL: The Joint
Commission. (Level VII)
46 Centers for Medicare and Medicaid Services, Department of Health and
Human Services. (2015). Condition of participation: Medical record services.
42 C.F.R. § 482.24(b).
47 Accreditation Association for Hospitals and Health Systems. (2017). Standard
10.00 .03. Healthcare Facilities Accreditation Program: Accreditation
requirements for acute care hospitals. Chicago, IL: Accreditation Association
for Hospitals and Health Systems. (Level VII)
48 DNV GL-Healthcare USA, Inc. (2016). MR.2 .SR.1 . NIAHO® accreditation
requirements: Interpretive guidelines & surveyor guidance (version 11).
Milford, OH: DNV GL-Healthcare USA, Inc. (Level VII)
49 Standard 10. Documentation in the medical record. Infusion therapy
standards of practice. (2016). Journal of Infusion Nursing, 39, S28–S30 . (Level
VII)
50 The Joint Commission. (2014). “Sentinel event alert: Managing risk during
transition to new ISO tubing connector standards” [Online]. Accessed via the
Web at
http://www.jointcommission.org/assets/1/6/SEA_53_Connectors_8 _19_14 _final.
pdf (Level VII)
51 Lawson, C. C ., et al. (2012). Occupational exposures among nurses and risk
of spontaneous abortion. American Journal of Obstetrics and Gynecology,
206(4), 327.e1–327.e8. (Level IV)
52 Standard 46. Infiltration and extravasation. Infusion therapy standards of
practice. (2016). Journal of Infusion Nursing, 39, S98–S102. (Level VII)
CHEMOTHERAPEUTIC DRUG PREPARATION AND
HANDLING
Nurses should take extra care when preparing
chemotherapeutic drugs, both for the patient’s safety and
for their own. Patients who receive chemotherapeutic drugs
risk teratogenic, mutagenic, and carcinogenic effects,1 but
the people who prepare and handle the drugs are at risk as
well. According to the Occupational Safety and Health
Administration (OSHA), no acceptable levels of exposure
have been determined for these drugs, and some drugs
exhibit toxicity at low doses;1 because of this, the goal is to
prevent or minimize workplace exposure.
OSHA, the National Institute for Occupational Safety and
Health (NIOSH), the American Society of Health System
Pharmacists, and the Oncology Nursing Society have
established guidelines for handling and administering
chemotherapeutic drugs. These guidelines are strongly
recommended; adhering to them will reduce the risk of
contamination to both yourself and your environment.
The use of proper personal protective equipment is
essential.2,3 Personal protective equipment must include
chemotherapy-resistant gowns and gloves, which should be
worn when handling, preparing, and priming administration
sets; administering or disposing of chemotherapeutic
agents; cleaning up spills; and handling excreta.4 Gowns
should be lint-free and nonabsorbent, have a full front and
back closure, and have elastic or knit cuffs. They should be
worn once and discarded appropriately; they should never
be worn for multiple patients or worn multiple times for the
same patient. Hanging up a used gown is prohibited.
Double-gloving is recommended, and gloves need to be
replaced every 30 minutes, when visibly contaminated, and
after each individual patient contact. A face mask and
goggles should also be worn when splashing is likely.5
All health care workers who handle chemotherapeutic
drugs must be properly educated and trained.2,3,6 A
requirement of such training involves learning how to
reduce exposure when handling the drugs. A second
requirement states that the drugs should be prepared in a
class II biological safety cabinet.
OSHA
guidelines
further
recommend
that
chemotherapeutic drugs be mixed in a properly enclosed
and ventilated work area, and that respiratory and skin
protection be worn. Smoking, drinking, applying cosmetics,
and eating where these drugs are prepared, stored, or used
should be strictly prohibited, and sterile technique should be
used while mixing these drugs.
Gloves, gowns, syringes or vials, and other materials that
have been used in chemotherapeutic preparation and
administration present a possible source of exposure or
injury to the facility’s staff members, patients, and visitors;
using properly labeled, sealed, and covered containers,
handled only by trained and protected personnel, should be
routine practice. Spills also present a hazard, and all
employees should be familiar with appropriate spill
procedures for their own protection. A face mask and a
NIOSH-approved respirator should be worn when cleaning
up chemotherapy spills. Surgical masks shouldn’t be used,
because they aren’t effective against aerosolization of
chemotherapeutic drugs.
Equipment
Safety data sheet (SDS) for each prescribed chemotherapy
drug ▪ prescribed drug or drugs ▪ patient’s medication
record ▪ nonlinting, nonabsorbent disposable gown made of
polyethylene-coated polypropylene5 ▪
powder-free
chemotherapy gloves ▪ face shield ▪ goggles ▪ plastic
absorbent pad ▪ 70% alcohol ▪ sterile gauze pads ▪
hazardous-waste container ▪ IV solution ▪ compatibility
reference source ▪ medication labels ▪ class II biological
safety cabinet ▪ disposable towel ▪ syringes and needles of
various sizes with Luer-lock connectors ▪ IV tubing with
Luer-lock fittings ▪ hazardous drug spill kit ▪ Optional:
closed system transfer devices, NIOSH-approved respirator
mask (if aerosolization is likely).
Preparation of equipment
Make sure that a hazardous drug spill kit is readily available.
Inspect all IV equipment and supplies; if a product is
expired or its integrity compromised, or if it’s found to be
defective, remove it from patient use, label it as expired or
defective, and report the expiration or defect as directed by
your facility.7
Implementation
■ Avoid distractions and interruptions when preparing and
administering each medication to prevent medication
errors.8,9
■ Become familiar with the information contained within the
SDS for each prescribed chemotherapy drug.2
■ Gather and prepare the appropriate equipment.
■ Verify the practitioner’s written order,2 and have a second
practitioner who’s qualified to prepare or administer
chemotherapy verify the order independently.3,6 Keep in
mind that verbal orders aren’t permitted for
chemotherapeutic agents, except to hold or stop
administration.2,4,6
■ Confirm that the practitioner has obtained written
informed consent from the patient and that the consent is in
the patient’s medical record.2,3,4,6,10,11,12,13
■ Wash your hands with soap and water.3,4,14,15,16,17,18,19
■ Put on personal protective equipment (two pairs of
gloves, a nonlinting, nonabsorbent disposable gown made of
polyethylene-coated polypropylene, a face shield [when
splashing is possible], and a respirator, [when aerosolization
is possible]).3,5 Make sure your inner glove cuff is worn
under the gown cuff and the outer glove cuff extends over
the gown cuff to fully protect your skin. Inspect your gloves
to make sure they’re physically intact.3,4,5
■ When working with chemotherapeutic drugs, change your
gloves every 30 minutes. If you spill a drug solution on your
gloves or puncture or tear a glove, remove your gloves
immediately. Wash your hands with soap and water before
putting on new gloves and any time you remove your
gloves.3,4,14,15,16,17,18,19
■ Maintain sterile technique when compounding these
hazardous drugs.20,21,22,23
■ Wear personal protective equipment and take care when
unpacking chemotherapy vials to reduce exposure. The
exteriors of chemotherapy vials have been found to be
contaminated upon arrival from the manufacturers.3,4,5
■ Prepare the drugs in a class II biological safety
cabinet.2,3,5 Leave the hood blower turned on 24 hours per
day, 7 days per week.3,4
■ Before you prepare the drug (and after you finish), clean
the internal surfaces of the cabinet with 70% alcohol and a
disposable towel and allow it to dry.3 Discard the towel in a
hazardous-waste container approved for cytotoxic waste.7
■ Cover the work surface with a clean plastic absorbent pad
to minimize contamination by droplets or spills. Change the
pad at the end of the shift or whenever a spill occurs.
■ Always work below eye level to prevent accidental
exposure to the eyes.4
■ Prepare each drug according to current product
instructions, paying attention to compatibility, stability, and
reconstitution technique.
■ Label the prepared drug with the patient’s name and a
second identifier; the drug’s full generic name; drug
administration route; total dose to be administered; total
volume required to administer the dosage; date of
administration; date and time of drug expiration; and
special handling instructions as appropriate.3,6 Also label all
chemotherapeutic drugs with a hazardous-drug label, such
as one that states CYTOTOXIC DRUG.3,4
■ Wipe the exterior of the IV bag or syringe with sterile
gauze before placing it in a sealed bag for transport.4
■ Clean and decontaminate all work surfaces that may
have come in contact with the hazardous drug.3
■ Place all chemotherapeutic waste products in a
hazardous-waste container approved for cytotoxic waste.5,4
■ Remove and discard your personal protective equipment
in a hazardous-waste container approved for cytotoxic
waste before leaving the work area.5,24
■ Wash your hands with soap and water.4,14,15,16,17,18,19
■ Transport syringes containing the drug in a sealed
container with the Luer-lock end of the syringe capped;
transport IV bags and the primed administration set in a
sealed container that can contain spillage if dropped. Label
the outermost container with a hazardous-drug label to alert
staff that the contents are hazardous,4
■ Wash your hands with soap and water.4,14,15,16,17,18,19
■ Document the procedure.25,26,27,28
Special considerations
■ Use resources to evaluate the hazard potential of the
prescribed drug,1 including the drug’s SDS; product labeling
approved by the U.S . Food and Drug Administration (FDA);
special health warnings from drug manufacturers, the FDA,
and other professional organizations; reports and case
studies published in medical and other professional health
care journals; and evidence-based recommendations from
other institutions that meet the criteria defining hazardous
drugs.
■ Take precautions to reduce your exposure to
chemotherapeutic drugs. Systemic absorption can occur
through ingestion of contaminated materials, contact with
the skin, or inhalation. You can inhale a drug without
realizing it, such as while opening a vial, clipping a needle,
expelling air from a syringe, or discarding excess drug. You
can also absorb a drug from handling contaminated stool or
body fluids.29
■ Use only syringes and IV sets that have Luer-lock fittings.
■ Note that gloves, gowns, syringes or vials, and other
materials that have been used in chemotherapeutic
preparation and administration present a source of
contamination to the facility’s staff members, patients,
visitors, and environment; using properly labeled, sealed,
and enclosed containers for discarded equipment handled
only by trained and protected personnel should be routine
practice.5
■ If some of the drug comes in contact with your skin, wash
the involved area thoroughly with soap (not a germicidal
agent) and water. If eye contact occurs, flood the eye with
water or saline solution for at least 15 minutes while holding
the eyelid open. Obtain a medical evaluation as soon as
possible after accidental exposure.4
■ If a spill occurs, follow you facility’s guidelines for
hazardous spills. Report and document the spill as directed
by your facility.
■ Don’t place any food or drinks in the same refrigerator as
chemotherapeutic drugs.5 For accidental ingestion, don’t
induce vomiting unless indicated by the SDS. Seek
emergency treatment.4
■ Note that women who are pregnant, trying to conceive, or
breast-feeding shouldn’t be exposed to chemotherapeutic
drugs.2,4,30
Patient teaching
Before a patient starts chemotherapy, provide the patient
with written information about the diagnosis, the goal of
therapy, the duration of chemotherapy (including drugs and
schedule), possible short- and long-term adverse effects,
drug-specific risks that require the practitioner to be
notified, and follow-up.6 When teaching a patient about
handling chemotherapeutic drugs, discuss appropriate
safety measures. If the patient will be receiving
chemotherapy at home, teach the patient how to dispose of
contaminated equipment. Tell the patient and his family to
wear gloves whenever handling chemotherapy equipment
or contaminated linens or gowns and pajamas. Instruct
them to place soiled linens in a separate, washable
pillowcase and to launder the pillowcase twice, with the
soiled linens inside, separately from other linens.
All materials used for treatment should be placed in a
leak-proof container and taken to a designated disposal
area. The patient or family should make arrangements with
either a health care facility or private company for pickup
and proper disposal of contaminated waste.
Complications
Long-term or chronic effects of chemotherapeutic drug
exposure that have been identified include damage to the
liver, kidneys, bone marrow, lungs, and heart; infertility
(temporary and permanent); effects on reproduction and the
developing fetus in pregnant women; hearing impairment;
and cancer.5 Direct exposure to these drugs may burn and
damage the skin.
Documentation
Document drug preparation and each incidence of exposure
as directed by your facility.
REFERENCES
1 National Institute for Occupational Safety and Health (NIOSH). (2016). “NIOSH
list of antineoplastic and other hazardous drugs in healthcare settings, 2016
[NIOSH Publication Number 2014−138]” [Online]. Accessed via the Web at
https://www.cdc.gov/niosh/topics/antineoplastic/pdf/hazardous-drugs-
list_2016-161.pdf
2 Standard 58. Antineoplastic therapy. Infusion therapy standards of practice.
(2016). Journal of Infusion Nursing, 39, S127–S129. (Level VII)
3 Esparza, D. M . (Ed.). (2014). Oncology policies and procedures. Pittsburgh, PA:
Oncology Nursing Society.
4 Polovich, M., et al. (Eds.) . (2014). Chemotherapy and biotherapy guidelines
and recommendations for practice (4th ed.). Pittsburgh, PA: Oncology Nursing
Society.
5 National Institute for Occupational Safety and Health (NIOSH). (2004). “NIOSH
alert: Preventing occupational exposure to antineoplastic and other
hazardous drugs in health care settings” [Online]. Accessed via the Web at
http://www.cdc.gov/niosh/docs/2004-165/pdfs/2004-165.pdf (Level VII)
6 Neuss, M. N., et al. (2013). 2013 updated American Society of Clinical
Oncology/Oncology Nursing Society chemotherapy administration safety
standards including standards for the safe administration and management
of oral chemotherapy. Journal of Oncology Practice, 9(Suppl. 2), 5S–13S.
Accessed via the Web at
https://www.ons.org/sites/default/files/2013chemostandards.pdf (Level VII)
7 Standard 12. Product evaluation, integrity, and defect reporting. Infusion
therapy standards of practice. (2016). Journal of Infusion Nursing, 39, S32–
S34. (Level IV)
8 Westbrook, J., et al. (2010). Association of interruptions with an increased risk
and severity of medication administration errors. Archives of Internal
Medicine, 170(8), 683–690 . (Level IV)
9 Institute for Safe Medication Practices. (2012). Side tracks on the safety
express: Interruptions lead to errors and unfinished...Wait, what was I doing?
Nurse Advise-ERR, 11(2), 1–4 . Accessed via the Web at
http://www.ismp.org/Newsletters/acutecare/showarticle.aspx?id=37
10 The Joint Commission. (2019). Standard RI.01.03 .01. Comprehensive
accreditation manual for hospitals. Oakbrook Terrace, IL: The Joint
Commission. (Level VII)
11 Centers for Medicare and Medicaid Services, Department of Health and
Human Services. (2015). Condition of participation: Patient’s rights. 42 C.F.R.
§ 482.13(b)(2).
12 Accreditation Association for Hospitals and Health Systems. (2017). Standard
15.01.11. Healthcare Facilities Accreditation Program: Accreditation
requirements for acute care hospitals. Chicago, IL: Accreditation Association
for Hospitals and Health Systems. (Level VII)
13 DNV GL-Healthcare USA, Inc. (2016). PR.1.SR.3 . NIAHO® accreditation
requirements: Interpretive guidelines & surveyor guidance (version 11).
Milford, OH: DNV GL-Healthcare USA, Inc. (Level VII)
14 Centers for Disease Control and Prevention. (2002). Guideline for hand
hygiene in health-care settings: Recommendations of the Healthcare Infection
Control Practices Advisory Committee and the HICPAC/SHEA/APIC/IDSA Hand
Hygiene Task Force. MMWR Recommendations and Reports, 51(RR-16), 1–45.
Accessed via the Web at https://www.cdc.gov/mmwr/pdf/rr/rr5116.pdf (Level
II)
15 The Joint Commission. (2019). Standard NPSG.07.01.01. Comprehensive
accreditation manual for hospitals. Oakbrook Terrace, IL: The Joint
Commission. (Level VII)
16 World Health Organization. (2009). “WHO guidelines on hand hygiene in
health care: First global patient safety challenge, clean care is safer care”
[Online]. Accessed via the Web at
http://apps.who.int/iris/bitstream/10665/44102/1/9789241597906_eng.pdf
(Level IV)
17 Centers for Medicare and Medicaid Services, Department of Health and
Human Services. (2015). Condition of participation: Infection control. 42 C.F.R.
§ 482.42.
18 Accreditation Association for Hospitals and Health Systems. (2017). Standard
07.01.21. Healthcare Facilities Accreditation Program: Accreditation
requirements for acute care hospitals. Chicago, IL: Accreditation Association
for Hospitals and Health Systems. (Level VII)
19 DNV GL-Healthcare USA, Inc. (2016). IC.1 .SR.1 . NIAHO® accreditation
requirements: Interpretive guidelines & surveyor guidance (version 11).
Milford, OH: DNV GL-Healthcare USA, Inc. (Level VII)
20 The Joint Commission. (2019). Standard MM.05.01.07. Comprehensive
accreditation manual for hospitals. Oakbrook Terrace, IL: The Joint
Commission. (Level VII)
21 Centers for Medicare and Medicaid Services, Department of Health and
Human Services. (2015). Condition of participation: Nursing services. 42
C.F.R. § 482.23(c).
22 Accreditation Association for Hospitals and Health Systems. (2017). Standard
16.01.03. Healthcare Facilities Accreditation Program: Accreditation
requirements for acute care hospitals. Chicago, IL: Accreditation Association
for Hospitals and Health Systems. (Level VII)
23 DNV GL-Healthcare USA, Inc. (2016). MM.1 .SR.2. NIAHO® accreditation
requirements: Interpretive guidelines & surveyor guidance (version 11).
Milford, OH: DNV GL-Healthcare USA, Inc. (Level VII)
24 Siegel, J. D ., et al. (2007, revised 2017). “2007 guideline for isolation
precautions: Preventing transmission of infectious agents in healthcare
settings” [Online]. Accessed via the Web at
https://www.cdc.gov/infectioncontrol/pdf/guidelines/isolation-guidelines.pdf
(Level II)
25 The Joint Commission. (2019). Standard RC.01.03 .01. Comprehensive
accreditation manual for hospitals. Oakbrook Terrace, IL: The Joint
Commission. (Level VII)
26 Centers for Medicare and Medicaid Services, Department of Health and
Human Services. (2015). Condition of participation: Medical record services.
42 C.F.R. § 482.24(b).
27 Accreditation Association for Hospitals and Health Systems. (2017). Standard
10.00 .03. Healthcare Facilities Accreditation Program: Accreditation
requirements for acute care hospitals. Chicago, IL: Accreditation Association
for Hospitals and Health Systems. (Level VII)
28 DNV GL-Healthcare USA, Inc. (2016). MR.2 .SR.1 . NIAHO® accreditation
requirements: Interpretive guidelines & surveyor guidance (version 11).
Milford, OH: DNV GL-Healthcare USA, Inc. (Level VII)
29 Elshamy, K., et al. (2010). Health hazards among oncology nurses exposed to
chemotherapy drugs. African Journal of Haematology/Oncology, 1(3), 70–78.
Accessed via the Web at
http://www.afjho.com/index.php/AJOHAO/article/viewFile/20/32 (Level VI)
30 Lawson, C. C ., et al. (2012). Occupational exposures among nurses and risk
of spontaneous abortion. American Journal of Obstetrics and Gynecology,
206(4), 327.e1–327.e8. (Level IV)
CHEST PHYSIOTHERAPY
Chest physiotherapy includes postural drainage, chest
percussion and vibration, and coughing and deep-breathing
exercises. Together, these techniques mobilize secretions,
help to reexpand alveoli, and promote efficient use of
respiratory muscles.
Postural drainage performed in conjunction with
percussion and vibration encourages peripheral pulmonary
secretions to mobilize into the major bronchi or trachea, and
is accomplished by sequential repositioning of the patient.
Secretions usually drain best with the patient positioned so
that the bronchi are perpendicular to the floor, such as with
the semi- or high-Fowler position. Lower and middle lobe
bronchi usually empty best with the patient in the head-
down position; upper lobe bronchi, in the head-up position.
(See Positioning patients for postural drainage.)
Percussing the chest with cupped hands mechanically
dislodges thick, tenacious secretions from the bronchial
walls. Vibration can be used with percussion to enhance
secretion mobility, or as an alternative to it in a patient who
is frail, in pain, or recovering from thoracic surgery or
trauma. Percussion and vibration can also be performed
using a mechanical device.
Candidates for chest physiotherapy include patients who
produce large amounts of sputum, such as those with
bronchiectasis and cystic fibrosis.1 The procedure hasn’t
proved effective in treating patients with status
asthmaticus, pneumonia,2 or acute exacerbations of chronic
bronchitis when the patient has scant secretions and is
being mechanically ventilated. Chest physiotherapy has
little value for treating patients with stable, chronic
bronchitis and, although some evidence suggests benefits,
chest physiotherapy isn’t recommended for routine
postoperative care.1
Contraindications to chest physiotherapy include active
pulmonary bleeding with hemoptysis, a posthemorrhage
stage, hemodynamic instability, fractured ribs or an
unstable chest wall, increased intracranial pressure (ICP),
lung contusions, pulmonary tuberculosis, untreated
pneumothorax, acute asthma or bronchospasm, lung
abscess or tumor, bony metastasis, head injury, and recent
myocardial infarction.
Chest physiotherapy isn’t
recommended for patients with chronic obstructive
pulmonary
disease
because
it
can
cause
bronchoconstriction.3
Equipment
Stethoscope ▪ pillows or folded towels ▪ adjustable hospital
bed ▪ gloves ▪ facial tissues ▪ suction equipment ▪ oral
care supplies ▪ facility-approved disinfectant ▪ no-touch
receptacle4 ▪ Optional: sterile specimen container, labels,
gown, mask, face shield or protective eyewear, prescribed
medications, supplemental oxygen, laboratory transport
bag.
Preparation of equipment
Gather the equipment at the patient’s bedside. Set up
suction equipment and test its function.
Implementation
■ Verify the practitioner’s order.
■ Perform hand hygiene.5,6,7,8,9,10
■ Confirm the patient’s identity using at least two patient
identifiers.11
■ Provide privacy.12,13,14,15
■ Explain the procedure to the patient and family members
(if appropriate) according to their individual communication
and learning needs to increase their understanding, allay
their fears, and enhance cooperation.16
■ Raise the patient’s bed to waist level while providing care
to prevent caregiver back strain.17
■ Perform hand hygiene.5,6,7,8,9,10
■ Put on gloves and other personal protective equipment as
needed to comply with standard precautions.18,19
■ Auscultate the patient’s breath sounds using a
stethoscope to determine baseline respiratory status.
■ Perform a comprehensive pain assessment using
techniques appropriate for the patient’s age, condition, and
ability to understand.20 If needed, administer pain
medication before the procedure, as ordered, following safe
medication practices.21,22,23,24
Positioning patients for postural
drainage
The following illustrations show the various postural drainage positions and
the areas of the lungs affected by each. Before beginning, assess whether
the patient can tolerate the recommended positioning; once the patient is
positioned, perform ongoing assessments to determine continued tolerance.
Lower lobes: Posterior basal segments
Elevate the foot of the bed 30 degrees. Have the patient lie prone with head
lowered. Position pillows under the chest and abdomen. Percuss the lower
ribs on both sides of the spine.
Lower lobes: Lateral basal segments
Elevate the foot of the bed 30 degrees. Instruct the patient to lie on the
abdomen with head lowered and upper leg flexed over a pillow for support.
Then have the patient rotate a quarter turn upward. Percuss the lower ribs on
the uppermost portion of the lateral chest wall.
Lower lobes: Anterior basal segments
Elevate the foot of the bed 30 degrees. Instruct the patient to lie on his or her
side with head lowered. Then place pillows under the patient’s head and
between the knees. Percuss with a slightly cupped hand over the lower ribs
just beneath the axilla. If an acutely ill patient has trouble breathing in this
position, adjust the bed to an angle the patient can tolerate. Then begin
percussion.
Lower lobes: Superior segments
With the bed flat, have the patient lie on his or her abdomen. Place two
pillows under the hips. Percuss on both sides of the spine at the lower tip of
the scapulae.
Right middle lobe: Medial and lateral segments
Elevate the foot of the bed 15 degrees. Have the patient lie on the left side
with head down and knees flexed. Then have the patient rotate a quarter
turn backward. Place a pillow beneath the patient. Percuss with your hand
moderately cupped under the right nipple. For a female patient, cup your
hand so that its heel is under the armpit and your fingers extend forward
beneath the breast.
Left upper lobe: Superior and inferior segments,
lingular portion
Elevate the foot of the bed 15 degrees. Have the patient lie on his or her
right side with head down and knees flexed. Then have the patient rotate a
quarter turn backward. Place a pillow behind the patient, from shoulders to
hips. Percuss with your hand moderately cupped over the left nipple. For a
female patient, cup your hand so that its heel is beneath the armpit and your
fingers extend forward beneath the breast.
Upper lobes: Anterior segments
Make sure the bed is flat. Have the patient lie on his or her back with a pillow
folded under the knees. Then have the patient rotate slightly away from the
side being drained. Percuss between clavicle and nipple.
Upper lobes: Apical segments
Keep the bed flat. Have the patient lean back at a 30-degree angle against
you and a pillow. Percuss with a cupped hand between the clavicles and the
top of each scapula.
Upper lobes: Posterior segments
Keep the bed flat. Have the patient lean over a pillow at a 30-degree angle.
Percuss and clap the upper back on each side.
■ Position the patient as ordered. In generalized disease,
drainage usually begins with the lower lobes, continues with
the middle lobes, and ends with the upper lobes. In localized
disease, drainage begins with the affected lobes and then
proceeds to the other lobes to avoid spreading the disease
to uninvolved areas.
NURSING ALERT Take the necessary precautions to prevent patient
falls throughout positioning.25,26
■ Instruct the patient to remain in each position for 3 to 15
minutes. During this time, perform percussion and vibration
as ordered. (See Performing percussion and vibration.)
■ After postural drainage, percussion, or vibration, instruct
the patient to deep-breathe and cough to remove loosened
secretions. Hand the patient a facial tissue and tell the
patient to inhale deeply through the nose and then exhale in
three short huffs. Tell the patient to inhale deeply again,
cover the mouth and nose with the tissue, and cough and
expectorate through a slightly open mouth into the tissue;
three consecutive coughs are highly effective. Alternatively,
if a sputum specimen is necessary, have the patient
expectorate into a sterile specimen container. Label the
specimen in the presence of the patient to prevent
mislabeling.11 Send the specimen to the laboratory in a
laboratory transport bag.
■ Have the patient perform coughing exercises for about 1
minute and then rest for 2 minutes. Gradually progress to a
10-minute exercise period four times daily. Try to schedule
the last session just before bedtime to help maximize the
patient’s oxygenation while sleeping.
■ If the patient’s cough is ineffective, suction the patient.
■ Monitor the patient’s response to the treatment. Be alert
for significant color changes, particularly if the patient
becomes dusky, which may indicate poor oxygenation.
■ Provide a no-touch receptacle for the patient to dispose of
the used facial tissues.4
■ Have the patient perform hand hygiene.18,19
■ Reassess and respond to the patient’s pain, as
necessary.20,27
■ Provide oral care, because secretions may have a foul
taste or a stale odor. (See the “Oral care” procedure, page
552.)
■ Auscultate the patient’s breath sounds and compare your
findings with the baseline findings to evaluate the
effectiveness of therapy.
■ Return the patient’s bed to the lowest position to prevent
falls and maintain safety.25
■ Remove and discard gloves and any other personal
protective equipment, if worn.19
■ Perform hand hygiene.6,7,8,9
■ Disinfect your stethoscope using a facility-approved
disinfectant pad.28,29
■ Perform hand hygiene.5,6,7,8,9,10
■ Document the procedure.30,31,32,33
Special considerations
■ For optimal effectiveness and safety, modify chest
physiotherapy according to the patient’s condition. For
example, initiate or increase the flow of supplemental
oxygen, if indicated. If the patient tires quickly during
therapy, shorten the sessions, because fatigue leads to
shallow respirations and increased hypoxia.
■ Maintain adequate hydration in the patient receiving
chest physiotherapy to prevent mucus dehydration and
promote easier mobilization of secretions. Avoid performing
postural drainage immediately before or within 11⁄2 hours
after meals to avoid nausea, vomiting, and aspiration of
food or vomitus.
■ Because chest percussion can induce bronchospasm, any
adjunct treatment (for example, intermittent positive-
pressure breathing or aerosol or nebulizer therapy) should
precede chest physiotherapy.
■ Refrain from percussing over the spine, liver, kidneys, and
spleen to avoid injury to the spine or internal organs. Also
avoid performing percussion on bare skin or the female
patient’s breasts.
■ Percuss over soft clothing (but not over buttons, snaps, or
zippers), or place a thin towel over the area. Remove
jewelry that might scratch or bruise the patient.
Complications
During postural drainage in head-down positions, pressure
on the diaphragm by abdominal contents can impair
respiratory excursion and lead to hypoxia. The head-down
position can also lead to increased ICP, precluding the use of
chest physiotherapy in a patient with head injury, elevated
ICP, or acute neurologic impairment. Vigorous percussion or
vibration can cause rib fracture, especially in a patient with
osteoporosis. In an emphysematous patient with blebs,
coughing could lead to pneumothorax.
Documentation
Record the date and time of chest physiotherapy. Document
baseline respiratory assessment and reassessment findings.
Note the positions used for secretion drainage and the
length of time each was maintained. Note which lung
segments were percussed or vibrated. Record the color,
amount, odor, and viscosity of any secretions produced and
the presence of any blood. Record any complications,
nursing actions taken, and the patient’s response to those
actions. Also document whether the patient received pain
medication and the effectiveness of the medication, as well
as the patient’s tolerance of the procedure.
REFERENCES
1 Strickland, S. L., et al. (2013). AARC clinical practice guideline: Effectiveness
of nonpharmacologic airway clearance therapies in hospitalized patients.
Respiratory Care, 58(12), 2187–2193. Accessed October 2017 via the Web at
http://rc.rcjournal.com/content/58/12/2187.full (Level VII)
2 Yang, M., et al. (2013). Chest physiotherapy for pneumonia in adults.
Cochrane Database of Systematic Reviews, 2013(2), CD006338. (Level I)
3 Stoller, J. K . Management of exacerbations of chronic obstructive pulmonary
disease. (2017). In: UpToDate, Barnes, P. J ., & Hollingsworth, H. (Eds.).
Accessed via the Web at http://www.uptodate.com
4 Centers for Disease Control and Prevention. (2012). “Respiratory
hygiene/cough etiquette in healthcare settings” [Online]. Accessed via the
Web at http://www.cdc.gov/flu/professionals/infectioncontrol/resphygiene.htm
(Level VII)
5 The Joint Commission. (2019). Standard NPSG.07.01.01. Comprehensive
accreditation manual for hospitals. Oakbrook Terrace, IL: The Joint
Commission. (Level VII)
6 Centers for Disease Control and Prevention. (2002). Guideline for hand
hygiene in health-care settings: Recommendations of the Healthcare Infection
Control Practices Advisory Committee and the HICPAC/SHEA/APIC/IDSA Hand
Hygiene Task Force. MMWR Recommendations and Reports, 51(RR-16), 1–45.
Accessed via the Web at https://www.cdc.gov/mmwr/pdf/rr/rr5116.pdf (Level
II)
7 World Health Organization. (2009). “WHO guidelines on hand hygiene in
health care: First global patient safety challenge, clean care is safer care”
[Online]. Accessed via the Web at
http://apps.who.int/iris/bitstream/10665/44102/1/9789241597906_eng.pdf
(Level IV)
8 Centers for Medicare and Medicaid Services, Department of Health and
Human Services. (2015). Condition of participation: Infection control. 42 C.F.R.
§ 482.42.
9 Accreditation Association for Hospitals and Health Systems. (2017). Standard
07.01.21. Healthcare Facilities Accreditation Program: Accreditation
requirements for acute care hospitals. Chicago, IL: Accreditation Association
for Hospitals and Health Systems. (Level VII)
10 DNV GL-Healthcare USA, Inc. (2016). IC.1 .SR.1 . NIAHO® accreditation
requirements: Interpretive guidelines & surveyor guidance (version 11).
Milford, OH: DNV GL-Healthcare USA, Inc.& (Level VII)
11 The Joint Commission. (2019). Standard NPSG.01.01.01. Comprehensive
accreditation manual for hospitals. Oakbrook Terrace, IL: The Joint
Commission. (Level VII)
12 Accreditation Association for Hospitals and Health Systems. (2017). Standard
15.01.16. Healthcare Facilities Accreditation Program: Accreditation
requirements for acute care hospitals. Chicago, IL: Accreditation Association
for Hospitals and Health Systems. (Level VII)
13 The Joint Commission. (2019). Standard RI.01.01.01. Comprehensive
accreditation manual for hospitals. Oakbrook Terrace, IL: The Joint
Commission. (Level VII)
14 Centers for Medicare and Medicaid Services, Department of Health and
Human Services. (2015). Condition of participation: Patient’s rights. 42 C.F.R.
§ 482.13(c)(1).
15 DNV GL-Healthcare USA, Inc. (2016). PR.1.SR.5 . NIAHO® accreditation
requirements: Interpretive guidelines & surveyor guidance (version 11).
Milford, OH: DNV GL-Healthcare USA, Inc. (Level VII)
Performing percussion and vibration
To perform percussion, instruct the patient to breathe slowly and deeply,
using the diaphragm, to promote relaxation. Hold your hands in a cupped
shape, with fingers flexed and thumbs pressed tightly against your index
fingers. Percuss each segment for 1 to 2 minutes by alternating your hands
against the patient in a rhythmic manner. Listen for a hollow sound on
percussion to verify correct performance of the technique.
To perform vibration, ask the patient to inhale deeply and then exhale
slowly through pursed lips. During exhalation, firmly press your fingers and
the palms of your hands against the chest wall. Tense the muscles of your
arms and shoulders in an isometric contraction to send fine vibrations
through the chest wall. Vibrate during five exhalations over each chest
segment.
16 The Joint Commission. (2019). Standard PC.02.01.21. Comprehensive
accreditation manual for hospitals. Oakbrook Terrace, IL: The Joint
Commission. (Level VII)
17 Waters, T. R., et al. (2009). “Safe patient handling training for schools of
nursing” [Online]. Accessed via the Web at
http://www.cdc.gov/niosh/docs/2009-127/pdfs/2009-127.pdf (Level VII)
18 Accreditation Association for Hospitals and Health Systems. (2017). Standard
07.01.10. Healthcare Facilities Accreditation Program: Accreditation
requirements for acute care hospitals. Chicago, IL: Accreditation Association
for Hospitals and Health Systems. (Level VII)
19 Siegel, J. D ., et al. (2007, revised 2017). “2007 guideline for isolation
precautions: Preventing transmission of infectious agents in healthcare
settings” [Online]. Accessed via the Web at
https://www.cdc.gov/infectioncontrol/pdf/guidelines/isolation-guidelines.pdf
(Level II)
20 The Joint Commission. (2019). Standard PC.01.02.07. Comprehensive
accreditation manual for hospitals. Oakbrook Terrace, IL: The Joint
Commission. (Level VII)
21 The Joint Commission. (2019). Standard MM.06.01.01. Comprehensive
accreditation manual for hospitals. Oakbrook Terrace, IL: The Joint
Commission. (Level VII)
22 Centers for Medicare and Medicaid Services, Department of Health and
Human Services. (2015). Condition of participation: Nursing services. 42
C.F.R. § 482.23(c).
23 Accreditation Association for Hospitals and Health Systems. (2017). Standard
16.01.03. Healthcare Facilities Accreditation Program: Accreditation
requirements for acute care hospitals. Chicago, IL: Accreditation Association
for Hospitals and Health Systems. (Level VII)
24 DNV GL-Healthcare USA, Inc. (2016). MM.1 .SR.2. NIAHO® accreditation
requirements: Interpretive guidelines & surveyor guidance (version 11).
Milford, OH: DNV GL-Healthcare USA, Inc. (Level VII)
25 Ganz, D. A., et al. (2013). Preventing falls in hospitals: A toolkit for improving
quality of care (AHRQ Publication No. 13-0015-EF). Rockville, MD: Agency for
Healthcare Research and Quality. Accessed via the Web at
http://www.ahrq.gov/sites/default/files/publications/files/fallpxtoolkit.pdf
(Level VII)
26 The Joint Commission. (2019). Standard PC.01.02.08 . Comprehensive
accreditation manual for hospitals. Oakbrook Terrace, IL: The Joint
Commission. (Level VII)
27 Accreditation Association for Hospitals and Health Systems. (2017). Standard
16.02.05. Healthcare Facilities Accreditation Program: Accreditation
requirements for acute care hospitals. Chicago, IL: Accreditation Association
for Hospitals and Health Systems. (Level VII)
28 Rutala, W. A., et al. (2008, revised 2017). “Guideline for disinfection and
sterilization in healthcare facilities, 2008” [Online]. Accessed via the Web at
https://www.cdc.gov/infectioncontrol/pdf/guidelines/disinfection-
guidelines.pdf (Level I)
29 Accreditation Association for Hospitals and Health Systems. (2017). Standard
07.02.03. Healthcare Facilities Accreditation Program: Accreditation
requirements for acute care hospitals. Chicago, IL: Accreditation Association
for Hospitals and Health Systems. (Level VII)
30 The Joint Commission. (2019). Standard RC.01.03 .01. Comprehensive
accreditation manual for hospitals. Oakbrook Terrace, IL: The Joint
Commission. (Level VII)
31 Centers for Medicare and Medicaid Services, Department of Health and
Human Services. (2015). Condition of participation: Medical record services.
42 C.F.R. § 482.24(b).
32 Accreditation Association for Hospitals and Health Systems. (2017). Standard
10.00 .03. Healthcare Facilities Accreditation Program: Accreditation
requirements for acute care hospitals. Chicago, IL: Accreditation Association
for Hospitals and Health Systems. (Level VII)
33 DNV GL-Healthcare USA, Inc. (2016). MR.2 .SR.1 . NIAHO® accreditation
requirements: Interpretive guidelines & surveyor guidance (version 11).
Milford, OH: DNV GL-Healthcare USA, Inc. (Level VII)
CHEST TUBE DRAINAGE SYSTEM MONITORING
AND CARE
Maintaining and troubleshooting a patient’s chest tube
keeps the chest tube functioning properly and prevents
infection. As part of this process, the nurse is responsible for
making respiratory and thoracic assessments, obtaining
vital signs that reflect effectiveness of therapy or impending
complications, and knowing the appropriate interventions to
perform in response to changes in the patient’s therapy.
Equipment
Vital signs monitoring equipment ▪ stethoscope ▪ pulse
oximeter and probe ▪ two rubber-tipped clamps for each
chest tube inserted ▪ disinfectant pad ▪ Optional: sterile
transparent dressing; 20G needle and syringe; gown; mask;
goggles; mask with face shield; gloves; sterile gloves;
single-use, disposable, sterile chest tube drainage collection
unit; sterile water; suction source; suction connection
tubing; two sterile 4′′ × 4′′ (10-cm × 10-cm) drain dressings;
sterile 4′′ × 4′′ (10-cm × 10-cm) gauze pad; wide paper tape;
1′′ (2.5-cm) adhesive tape for connections; transparent
dressing; engineered stabilization device.
Implementation
■ Review the practitioner’s orders regarding chest tube
care.
■ Gather the necessary supplies.
■ Perform hand hygiene.1,2,3,4,5,6
■ Confirm the patient’s identity using at least two patient
identifiers.7
■ Provide privacy.8,9,10,11
■ Explain the procedure to the patient and family (if
appropriate) according to their individual communication
and learning needs to enhance their understanding, allay
their fears, and enhance cooperation.12
■ Perform a comprehensive pain assessment using
techniques appropriate for the patient’s age, condition, and
ability to understand. Administer ordered pain medication,
as needed, following safe medication administration
practices.13,14,15,16,17 Relieving the patient’s pain promotes
comfort, which facilitates deep breathing, coughing, and
range-of-motion (ROM) exercises.
■ Maintain sterile no-touch technique whenever you make
changes in the system or alter any of the connections to
avoid introducing pathogens
into the pleural
space.18,19,20,21,22
Providing routine care for all drainage systems
■ Repeatedly note the character, consistency, and amount
of drainage in the drainage collection chamber. Notify the
practitioner immediately of a sudden decrease in drainage
or the presence of frank bloody drainage.23
■ Mark the drainage level by writing the time and date at
the drainage level on the drainage collection chamber at an
interval determined by your facility or the patient’s
condition.18
■ Observe the integrity of the drainage tubing and chest
tube every 2 to 4 hours as well as with a change in the
patient’s condition to ensure that the system is intact, with
no air leaks, and to help prevent kinks or clots from
forming.18
■ Periodically check that the air vent in the system is
working properly (if applicable). Occlusion of the air vent
results in a buildup of pressure in the system that could
cause the patient to develop a tension pneumothorax.
■ Coil the system’s tubing and secure it to the edge of the
bed. Make sure the tubing remains at the level of the
patient. Avoid creating dependent loops, kinks, or pressure
on the tubing, because fluid-filled dependent loops can
rapidly change pleural pressures, resulting in dramatically
decreased drainage.18,24 Avoid lifting the drainage system
above the patient’s chest because fluid may flow back into
the pleural space.18,23
■ Keep two rubber-tipped clamps at the bedside to locate
an air leak in the system or to briefly clamp the chest tube if
a commercially prepared system cracks and needs
replacing.
NURSING ALERT Never clamp the tube to get the patient out of bed
or during transportation of the patient. Whenever the chest tube is
clamped, air or fluid can’t escape from the pleural space, which puts
the patient at risk for a tension pneumothorax.18
■ As ordered, encourage the patient to ambulate and
frequently change position and perform coughing and deep
breathing exercises to help drain the pleural space and
expand the lungs.18,24
■ Monitor vital signs and assess the rate and quality of the
patient’s respirations. Auscultate the patients lung fields
periodically to assess air exchange in the affected lung.18
Diminished or absent breath sounds may indicate that the
lung hasn’t reexpanded.
■ Instruct the patient to immediately report any breathing
difficulty. Notify the practitioner immediately if the patient
develops cyanosis, decreased oxygen saturation, rapid or
shallow breathing, subcutaneous emphysema, chest pain, or
excessive bleeding.
■ Assess the chest tube dressing. Palpate the area
surrounding the dressing for crepitus) a crackling feeling
under the skin); crepitus indicates the presence of
subcutaneous emphysema, the leaking of air into the
subcutaneous tissue surrounding the insertion site. Change
the dressing when soiled or as ordered by the practitioner,
or at an interval determined by your facility.18 (See
Changing a chest tube dressing.)
■ Replace the chest tube drainage system as ordered or as
needed. (See Replacing the chest tube drainage system,
page 170.) Notify the practitioner if you must change the
device because of a leak.
■ Encourage active (or assist with passive) range-of-motion
exercises for the patient’s arm or the affected side. Usually,
the thoracotomy patient will splint his or her arm to
decrease discomfort.18
■ Remind the ambulatory patient to keep the drainage
system below the level of the chest tube to facilitate gravity
drainage,35 and to be careful not to disconnect the tubing to
maintain the water seal.
■ Troubleshoot the system as needed when problems arise.
(See Troubleshooting chest tubes, page 171.) Early and
prompt attention to system difficulties will minimize the
patient’s complications.
Additional steps for a water-seal–wet suction
system
■ Check the water-seal level every shift and maintain the
proper level to ensure proper use of the system and to
maintain the patient’s safety.
Changing a chest tube dressing
Follow these steps when changing a chest tube dressing:
■ Perform hand hygiene.1,2,3,4,5,6
■ Confirm the patient’s identity using at least two patient identifiers.7
■ Provide privacy.7,8,9,10
■ Explain the procedure to the patient and family (if appropriate) according
to their individual communication and learning needs to enhance their
understanding, allay their fears, and enhance cooperation.12
■ Raise the bed to waist height while providing patient care to prevent
caregiver back strain.25
■ Perform hand hygiene.1,2,3,4,5,6
■ Put on gloves and other personal protective equipment if needed.9,22
■ Remove the existing dressings around the chest tube insertion site and
dispose of it in an appropriate receptacle.26 Examine the site for signs of
infection or subcutaneous emphysema.
■ Remove and discard your gloves9,22 and perform hand
hygiene.1,2,3,4,5,6
■ Open the packages containing the 4′′ × 4′′ (10-cm × 10-cm) drain
dressings, and gauze pads or the sterile transparent dressing. (Note that
there hasn’t been any published research on chest tube site dressings to
directly support the use of one type of dressing over another for application
over a chest tube insertion site. However, expert opinion, based on evidence
from related studies, suggests that the application of petroleum gauze isn’t
necessary.)18,24
■ Put on sterile gloves.19,22
■ Place the two 4′′ × 4′′ (10-cm × 10-cm) drain dressings around the
insertion site, one from the top and the other from the bottom (as shown
right), to seal the insertion site from any air entry and escape.18 Then place
a 4′′ × 4′′ (10-cm × 10-cm) gauze pad on top of the drain dressings and cover
the dressing with wide paper tape.24
■ Alternatively, apply a transparent dressing over the chest tube insertion
site to allow inspection of the wound.18,24
■ Mark the dressing with the date, the time, and your initials.
■ Return the bed to the lowest position to prevent falls and maintain patient
safety.27
■ Dispose of used supplies in the appropriate receptacle.
■ Remove and discard your gloves and any other personal protective
equipment, if worn.19,22
■ Perform hand hygiene.1,2,3,4,5,6
■ Document the procedure.28,29,30,31
■ Check for fluctuations in the water-seal chamber as the
patient breathes. Normal fluctuations of 2′′ to 4′′ (about 5 to
10 cm) reflect pressure changes in the pleural space during
respiration. To check for fluctuation when a suction system
is being used, momentarily disconnect the suction system
so that the air vent is opened and observe for fluctuation.
■ Check for intermittent bubbling in the water-seal
chamber. This bubbling occurs normally when the system is
removing air from the pleural cavity. If bubbling isn’t readily
apparent during quiet breathing, have the patient take a
deep breath or cough. Absence of bubbling indicates that
the pleural space has sealed.18
■ Check the water level in the suction-control chamber.
Detach the chamber or bottle from the suction source; when
bubbling ceases, observe the water level. If necessary, add
sterile water to bring the level to the prescribed level
(typically 20 cm H2O).
■ Check for gentle bubbling in the suction-control chamber,
which indicates the proper suction level.
Additional steps for a water-seal–dry suction
system
■ Check the water-seal level every shift and maintain the
proper level to ensure that the system is being used
properly and to maintain the patient’s safety.
■ Check for fluctuation in the water-seal chamber as the
patient breathes. Normal fluctuations of 2′′ to 4′′ (about 5 to
10 cm) reflect pressure changes in the pleural space during
respiration. To check for fluctuation when a suction system
is being used, momentarily disconnect the suction system
so that the air vent is opened and observe for fluctuation.
■ Check for intermittent bubbling in the water-seal
chamber. This bubbling occurs normally when the system is
removing air from the pleural cavity. If bubbling isn’t readily
apparent during quiet breathing, have the patient take a
deep breath or cough. Absence of bubbling indicates that
the pleural space has sealed.
■ Check that the rotary dry suction control dial is turned to
the ordered suction mark, usually –20 cm H2O, and verify
that the appropriate indicator is present, indicating that the
system has applied the desired amount of suction. In some
models, an orange float appears in an indicator window.
Other models indicate delivery of the correct amount of
suction when the bellows reach the calibrated triangular
mark in the suction monitor bellows window. Always refer to
the manufacturer’s instructions.
Additional steps for a dry seal–dry suction
system
■ Check the air-leak monitor for right-to-left bubbling and
fluctuation every shift (or more often as symptoms warrant).
Fluctuation of water in the air-leak monitor chamber is a
normal reflection of pressure changes in the pleural cavity
during respirations. Bubbling indicates that air is leaving the
system and is normal for the patient with a pneumothorax,
but it could indicate an air leak.
■ Check that the rotary dry suction control dial is turned to
the ordered suction mark, usually –20 cm H2O, and verify
that the appropriate indicator is present, indicating the
system has applied the desired amount of suction. In some
models, an orange float appears in an indicator window.
Other models indicate delivery of the correct amount of
suction when the bellows reach the calibrated triangular
mark in the suction monitor bellows window. Always refer to
the manufacturer’s instructions.
Completing the procedure
■ Perform hand hygiene.1,2,3,4,5,6
■ Clean and disinfect your stethoscope using a disinfectant
pad.36,37
■ Perform hand hygiene.1,2,3,4,5,6
■ Document the procedure.28,29,30,31
Special considerations
■ Instruct staff members and visitors to avoid touching the
equipment to prevent complications from separated
connections.
■ No clear evidence exists regarding optimal suction
pressure. Research has shown that, in routine cases, limited
or no suction results in reduced chest tube dwell time and
shorter stays in the health care facility.24
Replacing the chest tube drainage
system
In certain circumstances, you may need to replace the chest tube drainage
system. Follow these steps for replacement:
■ Gather the necessary supplies.
■ Perform hand hygiene.1,2,3,4,5,6
■ Confirm the patient’s identity using at least two patient identifiers.7
■ Provide privacy.7,8,9,10
■ Explain the procedure to the patient and family (if appropriate) according
to their individual communication and learning needs to enhance their
understanding, allay their fears, and enhance cooperation.12
■ Open a new, single-use, sterile chest drainage unit.
■ If you’re using a chest drainage system that has a water seal, fill the
water-seal chamber with sterile water to the specified level, according to the
manufacturer’s instructions.
■ If you’re using a dry-seal chest drainage system, fill the air-leak monitor
with sterile water to the specified level, according to the manufacturer’s
instructions.
■ If you’re using a wet suction chest drainage system, fill the suction-control
chamber with sterile water to the prescribed level (typically 20 cm H2O). The
addition of suction (usually 20 cm H2O) increases the negative intrapleural
pressure and helps overcome air leakage by improving the rate of airflow out
of the patient and improving fluid removal. If you’re using a dry suction chest
drainage system, turn the rotary dry suction control dial to the ordered
suction mark, usually –20 cm H2O.
■ Maintain a sterile patient connection tube with the cap in place to enable
later connection of the chest tube catheter to the chest tube drainage
system collection device after removal of the existing device.
■ Place the chest tube drainage system at the bedside in the upright
position, at least 1′ (30 cm) below the patient’s chest. To avoid accidentally
knocking over the device, hang it on the bed frame with the hangers
provided, or secure it according to the manufacturer’s instructions.32 Ensure
that the device is ready when you remove the existing device.
■ Raise the bed to waist level to prevent caregiver back strain.25
■ Perform hand hygiene.1,2,3,4,5,6
■ Put on gloves and, as needed, other personal protective equipment.19,22
■ If using suction, turn off the suction to the current drainage system.
■ Trace the tubing from the patient to its point of origin to make sure you’re
assessing the correct tube.33,34
■ Undo the tape on the connections from the existing chest tube drainage
system to the chest tube catheter to allow access to the chest tube catheter
for drainage device replacement.
■ Briefly cross-clamp the chest tube catheter with two padded clamps (to
avoid ripping or tearing the catheter) about 11⁄2′′ to 21⁄2′′ (4 cm to 6.5 cm) from
the insertion site to minimize dead space and stop air from entering or
exiting the catheter.
■ Instruct the patient to perform the Valsalva maneuver to force air out of
the pleural space and keep air from entering while you switch the tubing. If
the patient can’t perform the maneuver, make the system switch at the end
of exhalation if the patient is breathing spontaneously or the end of
inspiration of a machine-generated breath.35
■ Using sterile no-touch technique, disconnect the old drainage system and
connect the new one.
■ Remove the clamp or clamps and instruct the patient to breathe normally
to allow fluid and air removal to begin again.
■ Secure the chest tube and drainage tube so that there’s no tension pulling
on the insertion site, to help prevent accidental tube dislodgment. Use an
engineered stabilization device, if available, to reduce the risk of
unintentional chest tube dislodgement.18
■ Securely tape the junction of the chest tube and the drainage tube (as
shown right) to prevent dangerous disconnections.
■ Dispose of equipment and waste in the appropriate receptacle.26
■ Remove and discard your gloves and any other personal protective
equipment, if worn.19,22
■ Perform hand hygiene.1,2,3,4,5,6
■ Ensure that all clamps are open and that the drainage tubing has a
straight flow to the chest tube drainage collection device, and has no
dependent loops or kinks.
■ Ensure that the chest tube drainage system is correctly connected to the
patient’s chest tube; then, if appropriate, connect the suction tubing to the
drainage system and the suction regulator.
■ If you’re using a wet suction chest drainage system, adjust the suction
until gentle bubbling appears in the suction control chamber. If you’re using a
dry suction chest drainage system, adjust the suction regulator and verify
that the appropriate indicator is present, indicating that the system has
applied the desired amount of suction. Verify suction operation according to
the manufacturer’s instructions.
■ Check the status of the drainage tubing.
■ Reassess the patient after the procedure. Obtain vital signs and assess
skin color, perfusion, level of consciousness, oxygen requirements,
hemodynamic stability, comfort and pain levels, and respiratory rate,
pattern, and effort to identify the patient’s response to and tolerance of the
procedure.
■ Return the bed to the lowest position to prevent falls and maintain patient
safety.27
■ Perform hand hygiene.1,2,3,4,5,6
■ Clean and disinfect your stethoscope using a disinfectant pad.36,37
■ Perform hand hygiene.1,2,3,4,5,6
■ Document the procedure.28,29,30,31
■ The Joint Commission issued a sentinel event alert related
to managing risk during transition to new International
Organization for Standardization tubing standards that were
designed to prevent dangerous tubing misconnections,
which can lead to serious patient injury and death. During
the transition, make sure to trace each tubing and catheter
from the patient to its point of origin before connecting or
reconnecting any device or infusion, at any care transition
(such as to a new setting or service), and as part of the
hand-off process. In addition, route tubes and catheters with
different purposes in different, standardized directions; label
tubing at both the distal and proximal ends when the
patient has different access sites or several bags hanging;
use tubing and equipment only as intended; and store
medications for different delivery routes in separate
locations.33
■ If the system cracks, clamp the chest tube momentarily
with the two rubber-tipped clamps at the bedside (placed
there at the time of tube insertion). Place the clamps close
to each other near the insertion site; they should face in
opposite directions to provide a more complete seal.
Observe the patient for altered respirations while the tube is
clamped. Then replace the damaged equipment. (Prepare
the new unit before clamping the tube.)
■ For the patient on a ventilator with positive end-
expiratory pressure (PEEP), continuous bubbling typically
occurs because PEEP maintains positive pressure in the
alveoli, resulting in air continually flowing through the lungs.
However, lack of continuous bubbling for patients on PEEP is
normal.
TROUBLESHOOTING
Troubleshooting chest tubes
Use this table to determine possible causes of and interventions for common
chest tube problems.
NURSING ALERT Don’t “strip” a chest drain (occlude the chest tube
with one hand while quickly squeezing and moving the other hand
down the tube to move fluid down the tube into the drainage
chamber), because stripping can cause intraluminal pressures to rise
to a dangerously high level, which may convert a simple pneumothorax
to life-threatening pneumothorax and cause tissue trauma and
unnecessary discomfort.24 Don’t milk, fanfold, or tap the chest drain,
because it hasn’t been demonstrated that such manipulations improve
fluid drainage from the chest.24
■ Remember that routine clamping of the chest tube isn’t
recommended because of the risk of tension pneumothorax.
■ During patient transport, don’t clamp the catheter tubing;
disconnect the suction tubing from the suction source. The
system continues to collect fluid (by gravity) or air (by water
seal). Keep the collection system below the level of the
chest tube at all times to facilitate drainage.35
■ If you hear air leaking from the site, tape the dressing on
three sides to allow air to escape and to prevent a tension
pneumothorax. Closely monitor the patient and prepare for
insertion of a new chest tube.
■ If specimen collection is ordered, remove fluid with the
needle and syringe from the self-sealing portion of the
drainage tubing, or with a needleless syringe from the
needleless site of the drainage tubing after disconnecting
the tubing fluid collection site.
Complications
Complications of chest tube drainage system monitoring
and care include accidental tube dislodgment, infection,
pain, air leak from the insertion site, tubing disconnection,
and chest tube occlusion with subsequent tension
pneumothorax.
Documentation
Routine care
Record the date and time thoracic drainage began, the type
of system used, the amount of suction applied to the pleural
cavity, presence or absence of bubbling or fluctuation in the
water-seal or air-leak monitor chamber (if applicable), initial
amount and type of drainage, and the patient’s respiratory
status.
At the end of each shift, record the frequency of system
inspection; amount, color, and consistency of drainage;
presence or absence of bubbling or fluctuation in the water-
seal or air-leak monitor chamber (if applicable); the patient’s
respiratory status; condition of the chest dressings; if pain
medication was administered; any complications and
nursing actions taken; and any patient teaching provided.
Dressing change
Record the date, time, and reasons for changing the
dressing. Document your assessment findings before and
after the procedure and the patient’s response to the
procedure. Record the condition of the insertion site, the
patient’s respiratory status and vital signs, and any teaching
provided.
Drainage system collection device change
Record the date, time, and reasons for changing the chest
tube drainage system. Document your assessment findings
before and after the procedure and the patient’s response to
the procedure. Note the type of drainage system used, the
amount of suction applied to the pleural cavity (if
applicable), the presence or absence of bubbling or
fluctuation in the water-seal or air-leak monitor chamber (if
applicable), the patient’s respiratory status, and the
amount, color, and consistency of drainage. Record the
patient’s respiratory status and vital signs, the amount of
drainage and its color and consistency, and any teaching
provided.
REFERENCES
1 Centers for Disease Control and Prevention. (2002). Guideline for hand
hygiene in health-care settings: Recommendations of the Healthcare Infection
Control Practices Advisory Committee and the HICPAC/SHEA/APIC/IDSA Hand
Hygiene Task Force. MMWR Recommendations and Reports, 51(RR-16), 1–45.
Accessed via the Web at https://www.cdc.gov/mmwr/pdf/rr/rr5116.pdf (Level
II)
2 The Joint Commission. (2019). Standard NPSG.07.01.01. Comprehensive
accreditation manual for hospitals. Oakbrook Terrace, IL: The Joint
Commission. (Level VII)
3 World Health Organization. (2009). “WHO guidelines on hand hygiene in
health care: First global patient safety challenge, clean care is safer care”
[Online]. Accessed via the Web at
http://apps.who.int/iris/bitstream/10665/44102/1/9789241597906_eng.pdf
(Level IV)
4 Accreditation Association for Hospitals and Health Systems. (2017). Standard
07.01.21. Healthcare Facilities Accreditation Program: Accreditation
requirements for acute care hospitals. Chicago, IL: Accreditation Association
for Hospitals and Health Systems. (Level VII)
5 Centers for Medicare and Medicaid Services, Department of Health and
Human Services. (2015). Condition of participation: Infection control. 42 C.F.R.
§ 482.42.
6 DNV GL-Healthcare USA, Inc. (2016). IC.1.SR.1 . NIAHO® accreditation
requirements: Interpretive guidelines & surveyor guidance (version 11).
Milford, OH: DNV GL-Healthcare USA, Inc. (Level VII)
7 The Joint Commission. (2019). Standard NPSG.01.01.01. Comprehensive
accreditation manual for hospitals. Oakbrook Terrace, IL: The Joint
Commission. (Level VII)
8 The Joint Commission. (2019). Standard RI.01.01.01. Comprehensive
accreditation manual for hospitals. Oakbrook Terrace, IL: The Joint
Commission. (Level VII)
9 Centers for Medicare and Medicaid Services, Department of Health and
Human Services. (2015). Condition of participation: Patient’s rights. 42 C.F.R.
§ 482.13(c)(1).
10 Accreditation Association for Hospitals and Health Systems. (2017). Standard
15.01.16. Healthcare Facilities Accreditation Program: Accreditation
requirements for acute care hospitals. Chicago, IL: Accreditation Association
for Hospitals and Health Systems. (Level VII)
11 DNV GL-Healthcare USA, Inc. (2016). PR.1.SR.5 . NIAHO® accreditation
requirements: Interpretive guidelines & surveyor guidance (version 11).
Milford, OH: DNV GL-Healthcare USA, Inc. (Level VII)
12 The Joint Commission. (2019). Standard PC.02.01.21. Comprehensive
accreditation manual for hospitals. Oakbrook Terrace, IL: The Joint
Commission (Level VII)
13 The Joint Commission. (2019). Standard PC.01.02.07. Comprehensive
accreditation manual for hospitals. Oakbrook Terrace, IL: The Joint
Commission. (Level VII)
14 Accreditation Association for Hospitals and Health Systems. (2017). Standard
16.01.03. Healthcare Facilities Accreditation Program: Accreditation
requirements for acute care hospitals. Chicago, IL: Accreditation Association
for Hospitals and Health Systems. (Level VII)
15 The Joint Commission. (2019). Standard MM.06.01.01. Comprehensive
accreditation manual for hospitals. Oakbrook Terrace, IL: The Joint
Commission. (Level VII)
16 Centers for Medicare and Medicaid Services, Department of Health and
Human Services. (2015). Condition of participation: Nursing services. 42
C.F.R. § 482.23(c).
17 DNV GL-Healthcare USA, Inc. (2016). MM.1 .SR.2. NIAHO® accreditation
requirements: Interpretive guidelines & surveyor guidance (version 11).
Milford, OH: DNV GL-Healthcare USA, Inc. (Level VII)
18 Wiegand, D. L. (2017). AACN procedure manual for high acuity, progressive,
and critical care (7th ed.). St. Louis, MO: Elsevier.
19 Siegel, J. D ., et al. (2007, revised 2017). “2007 guideline for isolation
precautions: Preventing transmission of infectious agents in healthcare
settings” [Online]. Accessed via the Web at
https://www.cdc.gov/infectioncontrol/pdf/guidelines/isolation-guidelines.pdf
(Level II)
20 Centers for Disease Control and Prevention. (2004). Guidelines for preventing
health-care-associated pneumonia, 2003: Recommendations of CDC and the
Healthcare Infection Control Practices Advisory Committee. MMWR
Recommendations and Reports, 53(RR-3), 1–32. Accessed via the Web at
http://www.cdc.gov/mmwr/pdf/rr/rr5303.pdf (Level II)
21 Centers for Medicare and Medicaid Services & The Joint Commission. (2017).
“The specifications manual for national hospital inpatient quality measures
(version 5.2a)” [Online]. Accessed via the Web at
https://www.jointcommission.org/specifications_manual_for_national_hospital_
inpatient_quality_measures.aspx
22 Accreditation Association for Hospitals and Health Systems. (2017). Standard
07.01.10. Healthcare Facilities Accreditation Program: Accreditation
requirements for acute care hospitals. Chicago, IL: Accreditation Association
for Hospitals and Health Systems. (Level VII)
23 Chotai, P., et al. (2016). “Tube thoracostomy management” [Online].
Accessed via the Web at http://emedicine.medscape.com/article/1503275-
overview (Level VII)
24 American Association of Critical-Care Nurses. (2016). “Evidence-based care of
patients with chest tubes” [Online]. Accessed via the Web at
http://www.atriummed.com/EN/chest_drainage/Documents/NTI%202016.pdf
(Level VII)
25 Waters, T. R., et al. (2009). “Safe patient handling training for schools of
nursing” [Online]. Accessed via the Web at
http://www.cdc.gov/niosh/docs/2009-127/pdfs/2009-127.pdf (Level VII)
26 Occupational Safety and Health Administration. (n.d .). “Bloodborne
pathogens, standard number 1910.1030” [Online]. Accessed via the Web at
https://www.osha.gov/pls/oshaweb/owadisp.show_document?
p_id=10051&p_table=STANDARDS (Level VII)
27 Ganz, D. A., et al. (2013). Preventing falls in hospitals: A toolkit for improving
quality of care (AHRQ Publication No. 13-0015-EF). Rockville, MD: Agency for
Healthcare Research and Quality. Accessed via the Web at
http://www.ahrq.gov/sites/default/files/publications/files/fallpxtoolkit.pdf
(Level VII)
28 The Joint Commission. (2019). Standard RC.01.03 .01. Comprehensive
accreditation manual for hospitals. Oakbrook Terrace, IL: The Joint
Commission. (Level VII)
29 Accreditation Association for Hospitals and Health Systems. (2017). Standard
10.00 .03. Healthcare Facilities Accreditation Program: Accreditation
requirements for acute care hospitals. Chicago, IL: Accreditation Association
for Hospitals and Health Systems. (Level VII)
30 Centers for Medicare and Medicaid Services, Department of Health and
Human Services. (2015). Condition of participation: Medical record services.
42 C.F.R. § 482.24(b).
31 DNV GL-Healthcare USA, Inc. (2016). MR.2 .SR.1 . NIAHO® accreditation
requirements: Interpretive guidelines & surveyor guidance (version 11).
Milford, OH: DNV GL-Healthcare USA, Inc. (Level VII)
32 Maquet Getinge Group. (2015). “A personal guide to managing chest
drainage: Water seal chest drainage” [Online]. Accessed via the Web at
http://www.atriummed.com/EN/Chest_Drainage/Documents/Ocean-
BlueHandbook-010140.pdf (Level VII)
33 The Joint Commission. (2014). “Sentinel event alert: Managing risk during
transition to new ISO tubing connector standards” [Online]. Accessed via the
Web at
http://www.jointcommission.org/assets/1/6/SEA_53_Connectors_8 _19_14 _final.
pdf (Level VII)
34 U.S . Food and Drug Administration. (n.d .). “Look. Check. Connect. Safe
medical device connections save lives” [Online]. Accessed via the Web at
http://www.fda.gov/downloads/MedicalDevices/Safety/AlertsandNotices/UCM1
34873.pdf
35 Carroll, P. (2011). “Managing chest drainage: A self-paced learning activity”
[Online]. Accessed via the Web at
http://www.atriummed.com/EN/Chest_Drainage/Documents/continuing%20ed
ucation%202010%20Online.pdf
36 Rutala, W. A., et al. (2008, revised 2017). “Guideline for disinfection and
sterilization in healthcare facilities, 2008” [Online]. Accessed via the Web at
https://www.cdc.gov/infectioncontrol/pdf/guidelines/disinfection-
guidelines.pdf (Level I)
37 Accreditation Association for Hospitals and Health Systems. (2017). Standard
07.02.03. Healthcare Facilities Accreditation Program: Accreditation
requirements for acute care hospitals. Chicago, IL: Accreditation Association
for Hospitals and Health Systems. (Level VII)
38 Perrault, L. P., et al. (2012). The PleuraFlow Active Chest Tube Clearance
System: Initial clinical experience in adult cardiac surgery. Innovations, 7(5),
354–358. (Level VI)
39 Durai, R., et al. (2010). Managing a chest tube and drainage system. AORN
Journal, 91(2), 275–280. (Level VII)
CHEST TUBE DRAINAGE SYSTEM SETUP
Chest tube drainage uses gravity and, sometimes, suction
to restore negative pressure and remove material that
collects in the pleural cavity. The disposable drainage
system combines drainage collection, a wet or dry seal, and
suction control. The seal in the drainage system allows air
and fluid to escape from the pleural cavity but doesn’t allow
air to reenter. Patient safety features on the device include a
pressure relief valve and an air-leak indicator. There are
three types of chest tube drainage systems: a water-seal–
wet suction system, a water-seal–dry suction system, and a
dry-seal–dry-suction system.
A practitioner may order chest tube drainage to remove
accumulated air, fluids (blood, pus, chyle, and serous fluids),
or solids (blood clots) from the pleural cavity; to restore
negative pressure in the pleural cavity; or to reexpand a
partially or totally collapsed lung.
Equipment
Single-use, disposable, sterile chest drainage collection unit
(water-seal–wet-suction system,
water-seal–dry-suction
system, or dry-seal–dry-suction system) ▪ sterile water ▪
gloves ▪ suction source ▪ suction-control device ▪ suction
connection tubing ▪ tape ▪ sterile dressing
Implementation
■ Verify the practitioner’s order to determine the type of
drainage system to be used and other procedural details.
■ Gather the necessary supplies.
■ Perform hand hygiene.1,2,3,4,5,6
■ Confirm the patient’s identity using at least two patient
identifiers.7
■ Provide privacy.8,9,10,11
■ Explain the procedure to the patient and family (if
appropriate) according to their individual communication
and learning needs to increase their understanding, allay
their fears, and enhance cooperation.12
■ Perform hand hygiene.1,2,3,4,5,6
■ Put on gloves to comply with standard precautions.13,14
■ Maintain sterile no-touch technique throughout the entire
procedure and whenever you make changes in the system
or alter connections to avoid introducing pathogens into the
pleural space.
■ Open the single-use, disposable sterile chest drainage
collection unit. Use the floor stand to set the unit on the
floor, or use the hangers to hang it level on the bed below
the level of the patient’s chest tube.15,16
Water-seal–wet-suction system
■ Use sterile water to fill the water-seal chamber to the
specified level according to the manufacturer’s instructions.
The water-seal chamber acts as a one-way valve to allow air
to pass out of the lung, move down through a narrow
channel, and bubble out through the bottom of the water
seal (as shown below).
■ Fill the suction-control chamber with sterile water or
normal saline solution to the prescribed level (usually 10 to
20 cm H2O).
■ After the practitioner inserts the chest tube, trace the
chest tube from the point of origin17 and connect the
patient’s chest tube to the chest tube drainage system. (See
the “Chest tube insertion, assisting” procedure, page 175.)
■ Secure the connection with tape to ensure that the
system remains airtight.18
■ Connect the suction tubing to the drainage system and
the suction regulator.
■ Adjust the suction until gentle bubbling appears in the
suction-control chamber. The addition of suction increases
the negative intrapleural pressure and helps overcome air
leakage by improving the rate of airflow out of the patient
and improving fluid removal.
Water-seal–dry-suction system
■ Use sterile water to fill the water-seal chamber to the
specified level according to the manufacturer’s instructions
(as shown below). The water-seal chamber acts as a one-
way valve to allow air to pass out of the lung, move down
through a narrow channel, and bubble out through the
bottom of the water seal.
■ If the practitioner orders suction, turn the rotary dry
suction control dial to the ordered suction mark, usually –20
cm H2O.
■ After the practitioner inserts the chest tube, trace the
chest tube from the point of origin,17 connect the patient’s
chest tube to the chest tube drainage system,18 and secure
the connection with tape to ensure the system remains
airtight.
■ Connect the suction tubing to the drainage system and
adjust the suction regulator. Verify suction operation
according to the manufacturer’s instructions. An indicator
appears when the desired negative pressure is achieved. In
some models, an orange float appears in an indicator
window. Other models indicate delivery of the correct
amount of suction when the bellows reach the calibrated
triangular mark in the suction monitor bellows window. The
addition of suction increases the negative intrapleural
pressure and helps overcome air leakage by improving the
rate of airflow out of the patient and improving fluid
removal.
Dry-seal–dry-suction system
■ Use sterile water to fill the air-leak monitor chamber to
the specified level according to the manufacturer’s
instructions.
■ If the practitioner orders suction, turn the rotary dry
suction control dial to the ordered suction mark, usually –20
cm H2O.
■ After the practitioner inserts the chest tube, trace the
chest tube from the point of origin,17 connect the patient’s
chest tube to the chest tube drainage system, and secure
the connection with tape to ensure the system remains
airtight. (See the “Chest tube insertion, assisting”
procedure, page 175.)18
■ Connect the suction tubing to the drainage system and
adjust the suction regulator. Verify suction operation
according to the manufacturer’s instructions. An indicator
appears when the desired negative pressure is achieved. In
some models, an orange float appears in an indicator
window. Other models indicate delivery of the correct
amount of suction when the bellows reach the calibrated
triangular mark in the suction monitor bellows window. The
addition of suction increases the negative intrapleural
pressure and helps overcome air leakage by improving the
rate of airflow out of the patient and improving fluid
removal.
For all drainage systems
■ Place the drainage system at the bedside below the
patient’s chest tube in the upright position.15,16 Placement
of the device below the chest enables gravity—in addition to
negative pressure—to drain the tube for optimal results. To
avoid accidentally knocking over the device, hang it on the
bed frame with the hangers provided or secure it according
to the manufacturer’s instructions.15,19
■ Coil the systems tubing and secure it to the edge of the
bed. Make sure that the tubing remains at the level of the
patient. Avoid creating depending loops, kinks, or pressure
in the tubing, because fluid-filled dependent loops can
rapidly change pleural pressures, resulting in dramatically
decreased drainage.18,20 Avoid lifting the drainage system
above the patient’s chest because fluid may flow back into
the pleural space.16,18
■ Remove and discard your gloves.13,14
■ Perform hand hygiene.1,2,3,4,5,6
■ Document the procedure.21,22,23,24
Special considerations
■ Don’t overfill the water-seal chamber. A fluid level greater
than 2 cm makes breathing more difficult. If you
accidentally overfill the chamber, aspirate the excess water
with a needle and syringe. Many models have a grommet to
access the water-seal chamber.19
■ Some systems have a stopcock that can be gradually
closed to limit the suction flow into the drainage system. If
the patient’s chest tube is to allow for gravity drainage,
leave the stopcock in the ON or OPEN position.19
■ No clear evidence exists regarding the optimal amount of
suction pressure. Research has shown that, in routine cases,
limited or no suction results in reduced chest tube dwell
time and shorter stays in the hospital.20
■ Never block the pressure relief valve, which is usually
located on the top of the unit.19
■ Keep rubber-tipped clamps, sterile dressing, and tape at
the bedside in case of accidental dislodgement.
■ If excessive continuous bubbling is present in the water-
seal chamber, especially if you’re using suction, rule out a
leak in the drainage system. Try to locate the leak by cross-
clamping the tube momentarily at various points along its
length. (The bubbling will stop when a clamp is placed
between the air leak and the water seal.) Begin clamping at
the tube’s proximal end and work down toward the drainage
system, paying special attention to the seal around the
connections. If a connection is loose, push it back together
and tape it securely. If you clamp along the tube’s entire
length and the bubbling doesn’t stop, the drainage system
may be cracked and need replacement.
■ If the chest tube and drainage system become
disconnected, you can create a temporary water seal by
immersing the end of the chest tube into a bottle of sterile
water to prevent pneumothorax.9
■ If the chest tube accidentally pulls out and the patient
had an air leak from the chest tube, immediately cover the
site with a sterile dressing and tape it on three sides,
allowing air to escape on the fourth side to reduce the risk
of tension pneumothorax.15 Alternately, cover the site with
a sterile occlusive dressing with a one-way valve, if
available.25 If your previous assessment didn’t detect an air
leak, place a sterile occlusive dressing over the site and
monitor the patient closely for signs of respiratory
distress.15 Stay with the patient and have a colleague call
the practitioner immediately. Assess the patient for signs
and symptoms of tension pneumothorax, including
hypotension; distended jugular veins; absent or decreased
breath sounds; tracheal shift; hypoxemia; weak, rapid pulse;
dyspnea; tachypnea; diaphoresis; and chest pain. Then have
your colleague gather the equipment needed to reinsert the
chest tube.
■ Instruct staff members and visitors to avoid touching the
equipment to prevent complications from separated
connections.
■ To attach a new drainage system when the existing one is
full, briefly cross-clamp the chest tube with two padded
clamps close to the insertion site and, using sterile
technique, disconnect the old drainage system.18 Then
connect the new drainage system and remove the clamps.
■ Note that The Joint Commission issued a sentinel event
alert related to managing risk during transition to new
International Organization for Standardization tubing
standards that were designed to prevent dangerous tubing
misconnections, which can lead to serious patient injury and
death. During the transition, make sure to trace each tubing
and catheter from the patient to its point of origin before
connecting or reconnecting any device or infusion, at any
care transition (such as to a new setting or service), and as
part of the hand-off process. In addition, route tubes and
catheters with different purposes in different, standardized
directions; label tubing at both the distal and proximal ends
when the patient has different access sites or several bags
hanging; use tubing and equipment only as intended; and
store medications for different delivery routes in separate
locations.26
Complications
Complications associated with chest tube drainage setup
include infection, accidental chest tube dislodgement, pain,
air leak from the insertion site, and tubing disconnection.
Documentation
Record the date and time that chest tube drainage began,
the type of drainage system used, the amount of suction
applied to the pleural cavity (if applicable), the presence or
absence of bubbling or fluctuation in the water-seal
chamber (if applicable), the patient’s respiratory status, and
the initial amount, color, and consistency of drainage. Also
document any teaching provided and the patient’s
understanding of the teaching.
REFERENCES
1 Centers for Disease Control and Prevention. (2002). Guideline for hand
hygiene in health-care settings: Recommendations of the Healthcare Infection
Control Practices Advisory Committee and the HICPAC/SHEA/APIC/IDSA Hand
Hygiene Task Force. MMWR Recommendations and Reports, 51(RR-16), 1–45.
Accessed via the Web at https://www.cdc.gov/mmwr/pdf/rr/rr5116.pdf (Level
II)
2 The Joint Commission. (2019). Standard NPSG.07.01.01. Comprehensive
accreditation manual for hospitals. Oakbrook Terrace, IL: The Joint
Commission. (Level VII)
3 World Health Organization. (2009). “WHO guidelines on hand hygiene in
health care: First global patient safety challenge, clean care is safer care”
[Online]. Accessed via the Web at
http://apps.who.int/iris/bitstream/10665/44102/1/9789241597906_eng.pdf
(Level IV)
4 Accreditation Association for Hospitals and Health Systems. (2017). Standard
07.01.21. Healthcare Facilities Accreditation Program: Accreditation
requirements for acute care hospitals. Chicago, IL: Accreditation Association
for Hospitals and Health Systems. (Level VII)
5 Centers for Medicare and Medicaid Services, Department of Health and
Human Services. (2015). Condition of participation: Infection control. 42 C.F.R.
§ 482.42.
6 DNV GL-Healthcare USA, Inc. (2016). IC.1.SR.1 . NIAHO® accreditation
requirements: Interpretive guidelines & surveyor guidance (version 11).
Milford, OH: DNV GL-Healthcare USA, Inc. (Level VII)
7 The Joint Commission. (2019). Standard NPSG.01.01.01. Comprehensive
accreditation manual for hospitals. Oakbrook Terrace, IL: The Joint
Commission. (Level VII)
8 The Joint Commission. (2019). Standard RI.01.01.01. Comprehensive
accreditation manual for hospitals. Oakbrook Terrace, IL: The Joint
Commission. (Level VII)
9 DNV GL-Healthcare USA, Inc. (2016). PR.1 .SR.5 . NIAHO® accreditation
requirements: Interpretive guidelines & surveyor guidance (version 11).
Milford, OH: DNV GL-Healthcare USA, Inc. (Level VII)
10 Centers for Medicare and Medicaid Services, Department of Health and
Human Services. (2015). Condition of participation: Patient’s rights. 42 C.F.R.
§ 482.13(c)(1).
11 Accreditation Association for Hospitals and Health Systems. (2017). Standard
15.01.16. Healthcare Facilities Accreditation Program: Accreditation
requirements for acute care hospitals. Chicago, IL: Accreditation Association
for Hospitals and Health Systems. (Level VII)
12 The Joint Commission. (2019). Standard PC.02.01.21. Comprehensive
accreditation manual for hospitals. Oakbrook Terrace, IL: The Joint
Commission. (Level VII)
13 Siegel, J. D ., et al. (2007, revised 2017). “2007 guideline for isolation
precautions: Preventing transmission of infectious agents in healthcare
settings” [Online]. Accessed via the Web at
https://www.cdc.gov/infectioncontrol/pdf/guidelines/isolation-guidelines.pdf
(Level II)
14 Accreditation Association for Hospitals and Health Systems. (2017). Standard
07.01.10. Healthcare Facilities Accreditation Program: Accreditation
requirements for acute care hospitals. Chicago, IL: Accreditation Association
for Hospitals and Health Systems. (Level VII)
15 Carroll, P. (2011). “Managing chest drainage: A self-paced learning activity”
[Online]. Accessed via the Web at
http://www.atriummed.com/EN/Chest_Drainage/Documents/continuing%20ed
ucation%202010%20Online.pdf (Level VII)
16 Chotai, P., et al. (2016). “Tube thoracostomy management” [Online].
Accessed via the Web at http://emedicine.medscape.com/article/1503275-
overview (Level VII)
17 U.S . Food and Drug Administration. (n.d .). “Look. Check. Connect. Safe
medical device connections save lives” [Online]. Accessed via the Web at
http://www.fda.gov/downloads/MedicalDevices/Safety/AlertsandNotices/UCM1
34873.pdf
18 Wiegand, D. L. (2017). AACN procedure manual for high acuity, progressive,
and critical care (7th ed.). Philadelphia, PA: Saunders.
19 Maquet Getinge Group. (2015). “A personal guide to managing chest
drainage: Water seal chest drainage” [Online]. Accessed via the Web at
http://www.atriummed.com/en/Chest_Drainage/Documents/Ocean-
BlueHandbook-010140.pdf (Level VII)
20 American Association of Critical-Care Nurses. (2016). “Evidence-based care of
patients with chest tubes” [Online]. Accessed via the Web at
http://www.atriummed.com/EN/chest_drainage/Documents/NTI%202016.pdf
(Level VII)
21 The Joint Commission. (2019). Standard RC.01.03 .01. Comprehensive
accreditation manual for hospitals. Oakbrook Terrace, IL: The Joint
Commission. (Level VII)
22 Accreditation Association for Hospitals and Health Systems. (2017). Standard
10.00 .03. Healthcare Facilities Accreditation Program: Accreditation
requirements for acute care hospitals. Chicago, IL: Accreditation Association
for Hospitals and Health Systems. (Level VII)
23 Centers for Medicare and Medicaid Services, Department of Health and
Human Services. (2015). Condition of participation: Medical record services.
42 C.F.R. § 482.24(b).
24 DNV GL-Healthcare USA, Inc. (2016). MR.2 .SR.1 . NIAHO® accreditation
requirements: Interpretive guidelines & surveyor guidance (version 11).
Milford, OH: DNV GL-Healthcare USA, Inc. (Level VII)
25 Durai, R., et al. (2010). Managing a chest tube and drainage system. AORN
Journal, 91(2), 275–280. Accessed via the Web at
http://www.aornjournal.org/article/S0001-2092(09)00928-4/abstract
26 The Joint Commission. (2014). “Sentinel event alert: Managing risk during
transition to new ISO tubing connector standards” [Online] Accessed October
2017 via the Web at
http://www.jointcommission.org/assets/1/6/SEA_53_Connectors_8 _19_14 _final.
pdf (Level VII)
CHEST TUBE INSERTION, ASSISTING
Chest tube insertion (thoracostomy) allows drainage of air
or fluid from the pleural space, which normalizes the
pressure and allows the lung to expand. It is usually
performed by a practitioner such as a physician or an
advanced practice nurse. During chest tube insertion, two
people should be present: the practitioner performing the
thoracostomy and an assistant competent in thoracostomy
care. The size of the chest tube and the insertion site vary
depending on the patient’s size and condition. A smaller-
bore tube is used to remove air, while a larger-bore tube is
used to remove fluid. In general, the smallest tube that will
be effective should be used, because larger tubes cause
more patient discomfort. To remove air, the chest tube is
inserted near the apex of the lung, through the second to
third intercostal space at the midclavicular line, because air
rises to the top of the intrapleural space. To remove fluid,
the chest tube is inserted near the base of the lung, through
the fourth to sixth intercostal spaces between the anterior
axillary and midaxillary lines (as shown below), because
fluid settles to the lower levels of the intrapleural space.
After insertion, the practitioner connects one or more
chest tubes to a thoracic drainage system that removes air,
fluid, or both from the pleural space and prevents backflow
into that space, promoting lung reexpansion.
Equipment
Vital signs monitoring equipment ▪ lidocaine local
anesthetic (0.5% or 1%) ▪ sterile gowns ▪ sterile gloves ▪
masks ▪ caps ▪ eye goggles or face mask with eye shield ▪
antiseptic wipes ▪ rolled towels or blanket ▪ sterile drapes
and sterile towels ▪ chlorhexidine-based antiseptic swabs ▪
sterile syringes (assortment of sizes: 3 mL, 5 mL, and
tuberculin) ▪ 22G and 25G needles ▪ sterile chest tube tray,
which includes hemostats, forceps, trocar, scalpel, Kelly
clamps, scissors, skin expanders, and sponges ▪ sterile
chest tube catheter (#16 to #20 French catheter for air or
serous fluid; #28 to #40 French catheter for blood, pus, or
thick fluid) ▪ suture material (usually #2-0 to #3-0 silk with
cutting needle) ▪ two sterile 4′′ × 4′′ (10-cm × 10-cm) drain
dressings ▪ sterile 4′′ × 4′′ (10-cm × 10-cm) or 2′′ × 2′′ (5-cm
× 5-cm) gauze pads ▪ 3′′ to 4′′ (7.6 - to 10-cm) adhesive tape
▪ 1′′ (2.5 -cm) adhesive tape for connections ▪ two rubber-
tipped clamps for each chest tube ▪ sterile chest tube
drainage system with tubing and connector ▪ sterile marker
▪ sterile labels ▪ prescribed sedation ▪ prescribed pain
medication ▪ stethoscope ▪ disinfectant pad ▪ Optional:
sterile petroleum gauze, suction source, suction-control
device, suction connection tubing, sterile transparent
dressing, sterile water, Y connector, commercial securement
device.
Prepackaged sterile chest tube trays are commercially
available and contain most of the equipment listed.
Preparation of equipment
Check the expiration date on the sterile packages, and
inspect for tears; obtain new packages as needed. Set up
the drainage system according to the manufacturer’s
instructions. (See the “Chest tube drainage system setup”
procedure, page 173.) Place the system next to the
patient’s bed below chest level to facilitate drainage. Label
all medications, medication containers, and other solutions
on and off the sterile field.1,2
Implementation
■ Verify the order for chest tube insertion and the number
and sizes of chest tubes needed.3
■ Gather and prepare the necessary supplies.
■ Make sure that the practitioner has obtained written
informed consent and that a signed consent form is in the
patient’s medical record unless the procedure is an
emergency.4,5,6,7
■ Conduct a preprocedure verification to make sure that all
relevant documentation, related information, and equipment
are available and correctly identified to the patient’s
identifiers.3,8,9
■ Review the patient’s medical record for abnormal chest X-
ray or blood gas results. Notify the practitioner of any
unexpected results.9
■ Review the patient’s medical record for a history of
chronic lung disease, spontaneous pneumothorax, and
pulmonary disease, or procedures that may have included
the need for chest tube placement.9
■ Perform hand hygiene.10,11,12,13,14,15
■ Confirm the patient’s identity using at least two patient
identifiers.5,16
■ Provide privacy.17,18,19,20
■ Explain the procedure to the patient according to
individual communication and learning needs to increase
understanding, allay fears, and enhance cooperation.21
■ Before the procedure, verify that the practitioner has
marked the insertion site with his or her initials or with
another unambiguous mark designated by your facility.22
■ Confirm that the correct procedure has been identified for
the correct patient at the correct site.3,8
■ Assess the patient for signs and symptoms of respiratory
distress, including tachypnea, decreased or absent breath
sounds, dyspnea, cyanosis, asymmetrical chest expansion,
anxiety, restlessness, shortness of breath, tachycardia,
hypotension, arrhythmias, and sudden sharp chest pain.
■ Obtain the patient’s baseline data, including vital signs,
skin color, perfusion, level of consciousness, oxygen
requirements, hemodynamic stability, and respiratory rate,
pattern, and effort to help identify and document acute
changes that may occur during and after the procedure.9
■ Administer sedation and pain medication as ordered,
following
safe
medication
practices.23,24,25,26
The
practitioner may request sedation (benzodiazepines) and
opioid analgesia to reduce pain and to help the patient
remain calm.
■ Raise the patient’s bed to waist level while providing
patient care to prevent caregiver back strain.27
■ Perform hand hygiene.10,11,12,13,14,15
■ Place the patient in the lateral position (for air drainage)
or supine position with the head of the bed elevated 30
degrees (for fluid drainage).9 (Typically, the practitioner
places the chest tube in the midaxillary to anterior axillary
line.) It’s easiest to lay the patient in the supine position,
using rolled towels or a blanket to slightly rotate the upper
body in a side-lying position, with the arm of the affected
side raised above the head.
■ Perform hand hygiene.10,11,12,13,14,15
■ Put on a cap, a mask and goggles or a mask with face
shield, sterile gloves, and a sterile gown to maintain
standard precautions and infection-prevention practices for
a sterile surgical procedure.28,29
■ Conduct a time-out immediately before starting the
procedure to perform a final assessment that the correct
patient, site, positioning, and procedure are identified and
that, as applicable, all relevant information and necessary
equipment are available during and after the procedure.9,30
■ If the patient can cooperate, ask the patient to take a
deep breath just before tube insertion. A deep breath
displaces the diaphragm downward, minimizing the risk of
injury.
■ Assist the practitioner, as needed, with the procedure,
while continually assessing the patient for vital sign
changes. (See Chest tube insertion procedure.)
■ Assist the practitioner in attaching the disposable sterile
chest tube drainage system to the chest tube, using a Y-
connector if placing more than one chest tube.9 Trace the
tubing from the patient to its point of origin to make sure it’s
connected to the proper port.31,32
■ The practitioner sutures the chest tube securely into
place, and may wrap sterile petroleum gauze around the
chest tube where it enters the chest.
■ Remove and discard your gloves.28,29
■ Perform hand hygiene.10,11,12,13,14,15
■ Open the packages of 4′′ × 4′′ (10-cm × 10-cm) drain
dressings, and gauze pads.
■ Put on new sterile gloves.28,29
■ Place the two 4′′ × 4′′ (10-cm × 10-cm) drain dressings
around the insertion site, one from the top and the other
from the bottom (as shown below), to seal the insertion site
from any air entry or escape;9,33 place a 4′′ × 4′′ (10-cm ×
10-cm) gauze pad on top of the drain dressings; and cover
the dressing with wide adhesive tape.33
■ Alternatively, apply a sterile transparent dressing over
the chest tube insertion site to enable direct inspection of
the wound.33
■ Tape the dressings, covering them completely to form an
occlusive dressing.
■ Write the date, the time, and your initials on the dressing.
■ Secure the chest tube and drainage tube with a
commercial securement device or tape so that there’s no
tension pulling on the insertion site to help prevent
accidental tube dislodgment.9
■ Securely tape the junction of the chest tube and the
drainage tube (as shown below) to prevent their
separation.9,33
Chest tube insertion procedure
Chest tube insertion involves these steps:
■ The practitioner puts on a cap, a mask, eye protection, a sterile gown, and
sterile gloves and prepares a sterile field using sterile drapes.
■ The practitioner prepares the insertion site using chlorhexidine-based
antiseptic swabs.
■ After the antiseptic dries completely, the practitioner drapes the patient,
leaving the insertion site exposed.
■ The nurse disinfects the rubber stopper of the lidocaine vial with an
antiseptic pad. The nurse then inverts the bottle and holds it for the
practitioner to withdraw the anesthetic.
■ The practitioner injects a local anesthetic at the site to reduce the pain of
the procedure and waits for the anesthetic to take effect.
■ The practitioner makes a skin incision about 1′′ (2.5 cm) long and then
inserts a hemostat through the opening to enter the pleural space. Typically,
when the pleural space is entered, you’ll see a return of pleural contents,
confirming penetration.
■ The practitioner spreads the hemostat open slightly to enlarge the opening
enough to accommodate the chest tube.
■ Using a finger, the practitioner creates a track for the chest tube and then
clamps the chest tube with the hemostat and inserts them through the
incision, guiding the hemostat and tube along the inserted finger.
■ The practitioner removes the hemostat and immediately connects the
chest tube to the drainage system.
■ Secure the chest tube drainage system according to the
manufacturer’s instructions to keep the drainage system
from tipping over.34
■ Return the bed to the lowest position to prevent falls and
maintain patient safety.35
■ Dispose of equipment and waste in the appropriate
biohazard receptacles.36
■ Remove and discard your gloves and other personal
protective
equipment28,29
and
perform
hand
hygiene.10,11,12,13,14,15
■ Ensure that all clamps are open and that the drainage
tubing has a straight flow to the chest tube drainage
collection system and has no dependent loops or kinks,
because fluid-filled dependent loops can rapidly change
pleural pressure, resulting in dramatically decreased
drainage.9,23
■ Ensure that the chest tube drainage system is correctly
connected to the patient’s chest tube; then, if ordered,
connect the suction tubing to the drainage system and the
suction regulator.
■ Adjust the suction until gentle bubbling appears in the
suction-control chamber of a wet-suction system, or until
the appropriate indicator appears when the dry-suction
system achieves the desired negative pressure.
■ Check the status of the drainage tubing.
NURSING ALERT Drain large effusions slowly, because rapid removal
(removal of more than 1 L of pleural fluid during the first 30 minutes
after chest tube insertion) can cause pulmonary edema.37
■ Reassess the patient after the procedure.38 Obtain vital
signs and assess skin color, perfusion, level of
consciousness, oxygen requirements, hemodynamic
stability, comfort level, pain level, and respiratory rate,
pattern, and effort to identify the patient’s tolerance of the
procedure and response to chest tube placement.
■ Arrange for a portable chest X-ray, as ordered, to check
tube position, air or fluid evacuation, and lung reexpansion.9
■ Monitor the patient’s vital signs at an interval determined
by your facility or as indicated by the patient’s condition.
Auscultate breath sounds at least every 4 hours to assess
air exchange in the affected lung. Diminished or absent
breath sounds indicate that the lung hasn’t reexpanded.
■ Record the type, color, and amount of drainage in the
drainage collection chamber. Notify the practitioner
immediately of a sudden decrease in drainage or the
presence of frank bloody drainage.39
■ Mark the drainage level on the disposable chest drainage
collection device at an interval determined by your facility
or as indicated by the patient’s condition.
■ Perform hand hygiene.10,11,12,13,14,15
■ Clean and disinfect your stethoscope using a disinfectant
pad.40,41
■ Perform hand hygiene.10,11,12,13,14,15
■ Document the procedure.42,43,44,45
Special considerations
NURSING ALERT Don’t “strip” a chest drain (occlude the chest tube
with one hand while quickly squeezing and moving the other hand
down the tube to move fluid down the tube into the drainage chamber)
because intraluminal pressures can rise dangerously high, which may
convert a simple pneumothorax to life-threatening pneumothorax and
cause tissue trauma and unnecessary discomfort. Don’t milk, fanfold,
or tap the chest drain, because these actions don’t improve fluid
drainage from the chest.33
■ If specimen collection is ordered, remove fluid with a
needle and syringe from the self-sealing portion of the
drainage tubing or with a needleless syringe from the
needleless site of the drainage tubing after disinfecting the
tubing collection site.
■ Avoid routine clamping of the chest tube because of the
risk of tension pneumothorax.
■ During patient transport, keep the chest tube drainage
system below chest level.39 Don’t clamp the chest tube
during transport; instead disconnect the suction tubing from
the suction source. The system continues to collect fluid (by
gravity) or air (by water seal).
■ Note that The Joint Commission issued a sentinel event
alert related to managing risk during transition to new
International Organization for Standardization tubing
standards that were designed to prevent dangerous tubing
misconnections, which can lead to serious patient injury and
death. During the transition, make sure to trace each tubing
and catheter from the patient to its point of origin before
connecting or reconnecting any device or infusion, at any
care transition (such as to a new setting or service), and as
part of the hand-off process. In addition, route tubes and
catheters with different purposes in different, standardized
directions; label tubing at both the distal and proximal ends
when the patient has different access sites or several bags
hanging; use tubing and equipment only as intended; and
store medications for different delivery routes in separate
locations.39
■ Keep a rubber-tipped clamp, sterile dressing, and tape at
the bedside in case of accidental dislodgement.39
■ If you hear air leaking from the site, tape the dressing on
three sides to allow air to escape and to prevent a tension
pneumothorax. Immediately notify the practitioner. Closely
monitor the patient and prepare for insertion of a new chest
tube.
Complications
Complications of chest tube insertion include bleeding if a
vessel is inadvertently nicked during the insertion process,
subcutaneous emphysema from air leaking into the pleural
space, and infection.
Documentation
Record the date and time of chest tube insertion, who
inserted the tube, the insertion site, the size of the chest
tube used, medications given, the chest tube drainage
system used, the presence of drainage and bubbling,
associated complications and nursing actions taken, and
patient teaching provided. Document your assessment
findings before and after the procedure and the patient’s
response to the procedure. Record the patient’s respiratory
status and vital signs as well as amount of drainage and its
color and consistency every 2 to 4 hours. Document patient
teaching and understanding of teaching.
REFERENCES
1 The Joint Commission. (2019). Standard NPSG.03 .04.01. Comprehensive
accreditation manual for hospitals. Oakbrook Terrace, IL: The Joint
Commission. (Level VII)
2 Accreditation Association for Hospitals and Health Systems. (2017). Standard
25.01.27. Healthcare Facilities Accreditation Program: Accreditation
requirements for acute care hospitals. Chicago, IL: Accreditation Association
for Hospitals and Health Systems. (Level VII)
3 The Joint Commission. (2019). Standard UP.01.01.01. Comprehensive
accreditation manual for hospitals. Oakbrook Terrace, IL: The Joint
Commission. (Level VII)
4 The Joint Commission. (2019). Standard RI.01.03 .01. Comprehensive
accreditation manual for hospitals. Oakbrook Terrace, IL: The Joint
Commission. (Level VII)
5 Accreditation Association for Hospitals and Health Systems. (2017). Standard
15.01.11. Healthcare Facilities Accreditation Program: Accreditation
requirements for acute care hospitals. Chicago, IL: Accreditation Association
for Hospitals and Health Systems. (Level VII)
6 Centers for Medicare and Medicaid Services, Department of Health and
Human Services. (2015). Condition of participation: Patient’s rights. 42 C.F.R.
§ 482.13(b)(2).
7 DNV GL-Healthcare USA, Inc. (2016). PR.1 .SR.3 . NIAHO® accreditation
requirements: Interpretive guidelines & surveyor guidance (version 11).
Milford, OH: DNV GL-Healthcare USA, Inc. (Level VII)
8 Accreditation Association for Hospitals and Health Systems. (2017). Standard
30.00 .14. Healthcare Facilities Accreditation Program: Accreditation
requirements for acute care hospitals. Chicago, IL: Accreditation Association
for Hospitals and Health Systems. (Level VII)
9 Wiegand, D. L. (2017). AACN procedure manual for high acuity, progressive,
and critical care (7th ed.). St. Louis, MO: Saunders.
10 Centers for Disease Control and Prevention. (2002). Guideline for hand
hygiene in health-care settings: Recommendations of the Healthcare Infection
Control Practices Advisory Committee and the HICPAC/SHEA/APIC/IDSA Hand
Hygiene Task Force. MMWR Recommendations and Reports, 51(RR-16), 1–45.
Accessed via the Web at https://www.cdc.gov/mmwr/pdf/rr/rr5116.pdf (Level
II)
11 The Joint Commission. (2019). Standard NPSG.07.01.01. Comprehensive
accreditation manual for hospitals. Oakbrook Terrace, IL: The Joint
Commission. (Level VII)
12 World Health Organization. (2009). “WHO guidelines on hand hygiene in
health care: First global patient safety challenge, clean care is safer care”
[Online]. Accessed via the Web at
http://apps.who.int/iris/bitstream/10665/44102/1/9789241597906_eng.pdf
(Level IV)
13 Accreditation Association for Hospitals and Health Systems. (2017). Standard
07.01.21. Healthcare Facilities Accreditation Program: Accreditation
requirements for acute care hospitals. Chicago, IL: Accreditation Association
for Hospitals and Health Systems. (Level VII)
14 Centers for Medicare and Medicaid Services, Department of Health and
Human Services. (2015). Condition of participation: Infection control. 42 C.F.R.
§ 482.42.
15 DNV GL-Healthcare USA, Inc. (2016). IC.1 .SR.1 . NIAHO® accreditation
requirements: Interpretive guidelines & surveyor guidance (version 11).
Milford, OH: DNV GL-Healthcare USA, Inc. (Level VII)
16 The Joint Commission. (2019). Standard NPSG.01.01.01. Comprehensive
accreditation manual for hospitals. Oakbrook Terrace, IL: The Joint
Commission. (Level VII)
17 Accreditation Association for Hospitals and Health Systems. (2017). Standard
15.01.16. Healthcare Facilities Accreditation Program: Accreditation
requirements for acute care hospitals. Chicago, IL: Accreditation Association
for Hospitals and Health Systems. (Level VII)
18 Centers for Medicare and Medicaid Services, Department of Health and
Human Services. (2015). Condition of participation: Patient’s rights. 42 C.F.R.
§ 482.13(c)(1).
19 The Joint Commission. (2019). Standard RI.01.01.01. Comprehensive
accreditation manual for hospitals. Oakbrook Terrace, IL: The Joint
Commission. (Level VII)
20 DNV GL-Healthcare USA, Inc. (2016). PR.1.SR.5 . NIAHO® accreditation
requirements: Interpretive guidelines and surveyor guidance (version 11).
Milford, OH: DNV GL-Healthcare USA, Inc. (Level VII)
21 The Joint Commission. (2019). Standard PC.02.01.21. Comprehensive
accreditation manual for hospitals. Oakbrook Terrace, IL: The Joint
Commission (Level VII)
22 The Joint Commission. (2019). Standard UP.01.02.01. Comprehensive
accreditation manual for hospitals. Oakbrook Terrace, IL: The Joint
Commission. (Level VII)
23 Accreditation Association for Hospitals and Health Systems. (2017). Standard
16.01.03. Healthcare Facilities Accreditation Program: Accreditation
requirements for acute care hospitals. Chicago, IL: Accreditation Association
for Hospitals and Health Systems. (Level VII)
24 Centers for Medicare and Medicaid Services, Department of Health and
Human Services. (2015). Condition of participation: Nursing services. 42
C.F.R. § 482.23(c).
25 The Joint Commission. (2019). Standard MM.06.01.01. Comprehensive
accreditation manual for hospitals. Oakbrook Terrace, IL: The Joint
Commission. (Level VII)
26 DNV GL-Healthcare USA, Inc. (2016). MM.1 .SR.2. NIAHO® accreditation
requirements: Interpretive guidelines and surveyor guidance (version 11).
Milford, OH: DNV GL-Healthcare USA, Inc. (Level VII)
27 Waters, T. R., et al. (2009). “Safe patient handling training for schools of
nursing” [Online]. Accessed via the Web at
http://www.cdc.gov/niosh/docs/2009-127/pdfs/2009-127.pdf (Level VII)
28 Siegel J. D., et al. (2007, revised 2017). “2007 guideline for isolation
precautions: Preventing transmission of infectious agents in healthcare
settings” [Online]. Accessed via the Web at
https://www.cdc.gov/infectioncontrol/pdf/guidelines/isolation-guidelines.pdf
(Level II)
29 Accreditation Association for Hospitals and Health Systems. (2017). Standard
07.01.10. Healthcare Facilities Accreditation Program: Accreditation
requirements for acute care hospitals. Chicago, IL: Accreditation Association
for Hospitals and Health Systems. (Level VII)
30 The Joint Commission. (2019). Standard UP.01.03.01. Comprehensive
accreditation manual for hospitals. Oakbrook Terrace, IL: The Joint
Commission. (Level VII)
31 The Joint Commission. (2014). “Sentinel event alert: Managing risk during
transition to new ISO tubing connector standards” [Online]. Accessed via the
Web at
http://www.jointcommission.org/assets/1/6/SEA_53_Connectors_8 _19_14 _final.
pdf (Level VII)
32 U.S . Food and Drug Administration. (n.d .). “Look. Check. Connect. Safe
medical device connections save lives” [Online]. Accessed via the Web at
http://www.fda.gov/downloads/MedicalDevices/Safety/AlertsandNotices/UCM1
34873.pdf
33 American Association of Critical-Care Nurses. (2016). “Evidence-based care of
patients with chest tubes” [Online]. Accessed via the Web at
http://www.atriummed.com/EN/chest_drainage/Documents/NTI%202016.pdf
(Level VII)
34 Maquet Getinge Group. (2015). “A personal guide to managing chest
drainage: Water seal chest drainage” [Online]. Accessed via the Web at
http://www.atriummed.com/EN/Chest_Drainage/Documents/Ocean-
BlueHandbook-010140.pdf (Level VII)
35 Ganz, D. A., et al. (2013). Preventing falls in hospitals: A toolkit for improving
quality of care (AHRQ Publication No. 13-0015-EF). Rockville, MD: Agency for
Healthcare Research and Quality. Accessed via the Web at
http://www.ahrq.gov/sites/default/files/publications/files/fallpxtoolkit.pdf
(Level VII)
36 Occupational Safety and Health Administration. (n.d .). “Bloodborne
pathogens, standard number 1910.1030” [Online]. Accessed via the Web at
https://www.osha.gov/pls/oshaweb/owadisp.show_document?
p_id=10051&p_table=STANDARDS (Level VII)
37 Huggins, J. T., & Chopra, A. Large volume thoracentesis. (2016). In: UpToDate,
Broaddus, V. C., & Finlay, G. (Eds.) . Accessed via the Web at
http://www.uptodate.com
38 The Joint Commission. (2019). Standard PC.01.02.05. Comprehensive
accreditation manual for hospitals. Oakbrook Terrace, IL: The Joint
Commission. (Level VII)
39 Chotai, P., et al. (2016). “Tube thoracostomy management” [Online].
Accessed via the Web at http://emedicine.medscape.com/article/1503275-
overview (Level VII)
40 Rutala, W. A., et al. (2008, revised 2017). “Guideline for disinfection and
sterilization in healthcare facilities, 2008” [Online]. Accessed via the Web at
https://www.cdc.gov/infectioncontrol/pdf/guidelines/disinfection-
guidelines.pdf (Level I)
41 Accreditation Association for Hospitals and Health Systems. (2017). Standard
07.02.03. Healthcare Facilities Accreditation Program: Accreditation
requirements for acute care hospitals. Chicago, IL: Accreditation Association
for Hospitals and Health Systems. (Level VII)
42 The Joint Commission. (2019). Standard RC.01.03 .01. Comprehensive
accreditation manual for hospitals. Oakbrook Terrace, IL: The Joint
Commission. (Level VII)
43 Accreditation Association for Hospitals and Health Systems. (2017). Standard
10.00 .03. Healthcare Facilities Accreditation Program: Accreditation
requirements for acute care hospitals. Chicago, IL: Accreditation Association
for Hospitals and Health Systems. (Level VII)
44 Centers for Medicare and Medicaid Services, Department of Health and
Human Services. (2015). Condition of participation: Medical record services.
42 C.F.R. § 482.24(b).
45 DNV GL-Healthcare USA, Inc. (2016). MR.2 .SR.1 . NIAHO® accreditation
requirements: Interpretive guidelines & surveyor guidance (version 11).
Milford, OH: DNV GL-Healthcare USA, Inc. (Level VII)
CHEST TUBE REMOVAL, ASSISTING
A chest tube allows drainage of the air or fluid from the
pleural space, and enables lung reexpansion and the
restoration of negative pressure to the pleural space.
After the patient’s lung has reexpanded and any drainage
has been controlled, the practitioner may order you to
clamp a chest tube or discontinue suction, with the tube left
to water-seal drainage for several hours before removal to
assess patient tolerance. This waiting period allows time to
observe the patient for signs and symptoms of respiratory
distress, an indication that air or fluid remains trapped in
the pleural space. The practitioner may also order a chest X-
ray before removal to ensure lung expansion.
Chest tube removal usually happens as soon as it’s no
longer clinically indicated, to prevent infection along the
tube tract.1 Chest tube removal is the responsibility of a
physician, nurse practitioner, advance practice nurse, or
physician’s assistant, according to scope of practice. A
nurse assists with removal as needed.
Equipment
Gloves ▪ sterile gloves ▪ goggles and masks or masks with
face shield ▪ gowns ▪ two rubber-tipped chest tube clamps
(two per chest tube) ▪ prescribed medication ▪ suture
removal kit ▪ fluid-impermeable pad ▪ 4′′ × 4′′ (10-cm × 10-
cm) sterile gauze dressings ▪ tape ▪ antiseptic swabs ▪ vital
signs monitoring equipment ▪ stethoscope ▪ disinfectant
pad ▪ Optional: prescribed pain medication, sterile
petroleum gauze.
Implementation
■ Verify the practitioner’s order for chest tube removal.
■ Gather the appropriate equipment.
■ Perform hand hygiene.2,3,4,5,6,7
■ Confirm the patient’s identity using at least two patient
identifiers.8
■ Provide privacy.9,10,11,12
■ Explain the procedure to the patient and family (if
appropriate) according to their individual communication
and learning needs to increase their understanding, allay
their fears, and enhance cooperation.13
■ Premedicate the patient, as ordered, following safe
medication administration practices to reduce the patient’s
discomfort.14,15,16,17
■ Obtain vital signs and perform a respiratory assessment
to determine readiness for chest tube removal.18.
■ Raise the bed to waist level while performing patient care
to prevent caregiver back strain.19
■ Perform hand hygiene 2,3,4,5,6,7 and put on a mask and
goggles or mask with face shield, a gown, and gloves.20
■ Place the patient in the semi-Fowler position or on the
unaffected side to enhance access to the insertion site.18
■ Place a fluid-impermeable pad under the affected side to
protect the linens from drainage and to provide a place to
put the chest tube after removal.
■ Prepare the suture removal kit and a sterile occlusive
dressing with a 4′′ × 4′′ (10-cm × 10-cm) sterile gauze
dressings and tape so that the practitioner can cover the
insertion site with it immediately after removing the chest
tube.18,19 Note that some practitioners use petroleum gauze
in addition to the sterile gauze, based on patient
assessment.21
■ The practitioner performs hand hygiene and puts on
goggles and a mask or a mask with a face shield, a gown,
and sterile gloves.22
■ If instructed by the practitioner, remove the existing
chest tube dressings and discard them appropriately.23 Be
careful not to dislodge the chest tube prematurely.
■ Assist the practitioner as needed with cleaning the area
around the tubes with an antiseptic swab and removing the
sutures.18
■ Trace the chest tube from the point of origin to the
patient to make sure that you’re removing the proper
tube.24 Clamp the chest tube catheter (if not already done)
with two clamps to minimize dead space and stop air from
entering or exiting the catheter.18
■ Assist the practitioner as necessary. The practitioner will
instruct the patient to perform the Valsalva maneuver by
exhaling and bearing down to increase intrathoracic
pressure and prevent air from entering the pleural space as
the practitioner removes the chest tube and covers the
insertion site with the airtight dressing.18
■ Help secure the dressing with tape. Make it as airtight as
possible to seal the insertion site from air entry.18
■ Instruct the patient to breathe normally.
■ Mark the dressing with the date, the time, and your
initials.
■ Return the bed to the lowest position to prevent falls and
maintain patient safety.25
■ Dispose of equipment and waste in an appropriate
receptacle.23
■ Remove and discard your gloves and other personal
protective
equipment20,21
and
perform
hand
hygiene.2,3,4,5,6,7
PATIENT TEACHING
Instructions for coughing and deep
breathing
Coughing and “huffing” (or hug coughing) helps break up secretions in the
lungs for suctioning or expectorating mucus. Deep-breathing exercises help
to expand the lungs and force better distribution of the air into all areas. The
patient may initially need to lie down to do these exercises, but eventually
the patient can do them while sitting upright, and then while walking.
Coughing and huffing
Help the patient to a sitting position. For a controlled cough, the patient
purses the lips and takes a deep breath. The patient should hold the breath
for several seconds and then briefly and gently cough twice. For huffing, the
patient purses the lips and takes a deep breath. After holding the breath for
several seconds, the patient exhales, using the stomach muscles to push out
the air. The vocal chords remain open so that the cough has almost a
whispery sound. Coughing and huffing are repeated several times per day, as
needed.
Deep-breathing exercises
The patient starts by taking a deep breath through the nose, and then purses
his lips as if to whistle. He then exhales the air slowly through pursed lips.
The exhalation should take twice as long as the inhalation. For example, the
patient may start by inhaling for 2 seconds and then exhaling for 4 seconds.
After taking several deep breaths, he should breathe at a normal rhythm and
then begin another cycle of deep breathing.
Usually, the patient will perform coughing and deep-breathing exercises
together. Instruct the patient to breathe in deeply through the nose and then
exhale in three short huffs. Then have the patient inhale deeply again and
cough through a slightly open mouth. Three consecutive coughs are highly
effective. An effective cough sounds deep, low, and hollow; an ineffective
cough is high-pitched. If possible, have the patient perform this exercise for
about 1 minute and then rest for 2 minutes.
■ Closely monitor the patient after the procedure to
determine the patient’s response to and tolerance of the
procedure.18
■ Obtain vital signs, including respiratory rate, pattern, and
effort. Monitor the patient’s color, perfusion, level of
consciousness, oxygen requirements, and hemodynamic
stability. Assess the patient carefully for signs and
symptoms of pneumothorax, subcutaneous emphysema, or
infection.
■ Obtain a chest X-ray, as ordered, to ensure lung
expansion.18
NURSING ALERT Notify the practitioner immediately if the patient
develops acute respiratory distress, because such distress may
indicate the need for a new chest tube.
■ Position the patient for comfort.
■ Encourage coughing and deep breathing exercises to help
prevent pneumonia and promote lung expansion. (See
Instructions for coughing and deep breathing, above.)
■ Regularly assess the chest tube site and dressing for
drainage and re-dress as needed or ordered.
■ Perform a comprehensive pain assessment using
techniques appropriate for the patient’s age, condition, and
ability to understand.26
■ Administer pain medication, as needed and prescribed,
following safe medication administration practices.14,15,16,17
■ Perform hand hygiene.2,3,4,5,6,7
■ Clean and disinfect your stethoscope using a disinfectant
pad.27,28
■ Perform hand hygiene.2,3,4,5,6,7
■ Document the procedure.29,30,31,32
Special considerations
■ The practitioner may elect to physiologically simulate
tube removal by clamping the chest tube for 4 to 6 hours21
or for 6 to 24 hours18 before removing the tube to evaluate
the patient’s tolerance and to confirm that pneumothorax
hasn’t recurred.
Complications
Complications of chest tube removal include infection at the
site, tension pneumothorax, and redevelopment of the
pneumothorax, hemothorax, or chylothorax.
Documentation
Record the date and time of chest tube removal, your
preparation procedures, the patient’s vital signs and
respiratory status, medications given, including the
strength, dose, route of administration, date and time of
administration33 and their effectiveness, and the patient’s
tolerance of the procedure. Document the condition of the
insertion site, complications and nursing actions taken, and
any teaching provided.
REFERENCES
1 American Association of Critical-Care Nurses. (2016). “Evidence-based care of
patients with chest tubes” [Online]. Accessed via the Web at
http://www.atriummed.com/EN/chest_drainage/Documents/NTI%202016.pdf
(Level VII)
2 Centers for Disease Control and Prevention. (2002). Guideline for hand
hygiene in health-care settings: Recommendations of the Healthcare Infection
Control Practices Advisory Committee and the HICPAC/SHEA/APIC/IDSA Hand
Hygiene Task Force. MMWR Recommendations and Reports, 51(RR-16), 1–45.
Accessed via the Web at https://www.cdc.gov/mmwr/pdf/rr/rr5116.pdf (Level
II)
3 The Joint Commission. (2019). Standard NPSG.07.01.01. Comprehensive
accreditation manual for hospitals. Oakbrook Terrace, IL: The Joint
Commission. (Level VII)
4 World Health Organization. (2009). “WHO guidelines on hand hygiene in
health care: First global patient safety challenge, clean care is safer care”
[Online]. Accessed via the Web at
http://apps.who.int/iris/bitstream/10665/44102/1/9789241597906_eng.pdf
(Level IV)
5 Centers for Medicare and Medicaid Services, Department of Health and
Human Services. (2015). Condition of participation: Infection control. 42 C.F.R.
§ 482.42.
6 Accreditation Association for Hospitals and Health Systems. (2017). Standard
07.01.21. Healthcare Facilities Accreditation Program: Accreditation
requirements for acute care hospitals. Chicago, IL: Accreditation Association
for Hospitals and Health Systems. (Level VII)
7 DNV GL-Healthcare USA, Inc. (2016). IC.1.SR.1 . NIAHO® accreditation
requirements: Interpretive guidelines & surveyor guidance (version 11).
Milford, OH: DNV GL-Healthcare USA, Inc. (Level VII)
8 The Joint Commission. (2019). Standard NPSG.01.01.01. Comprehensive
accreditation manual for hospitals. Oakbrook Terrace, IL: The Joint
Commission. (Level VII)
9 Centers for Medicare and Medicaid Services, Department of Health and
Human Services. (2015). Condition of participation: Patient’s rights. 42 C.F.R.
§ 482.13(c)(1).
10 The Joint Commission. (2019). Standard RI.01.01.01. Comprehensive
accreditation manual for hospitals. Oakbrook Terrace, IL: The Joint
Commission. (Level VII)
11 Accreditation Association for Hospitals and Health Systems. (2017). Standard
15.01.16. Healthcare Facilities Accreditation Program: Accreditation
requirements for acute care hospitals. Chicago, IL: Accreditation Association
for Hospitals and Health Systems. (Level VII)
12 DNV GL-Healthcare USA, Inc. (2016). PR.1.SR.5 . NIAHO® accreditation
requirements: Interpretive guidelines & surveyor guidance (version 11).
Milford, OH: DNV GL-Healthcare USA, Inc. (Level VII)
13 The Joint Commission. (2019). Standard PC.02.01.21. Comprehensive
accreditation manual for hospitals. Oakbrook Terrace, IL: The Joint
Commission. (Level VII)
14 Centers for Medicare and Medicaid Services, Department of Health and
Human Services. (2015). Condition of participation: Nursing services. 42
C.F.R. § 482.23(c).
15 The Joint Commission. (2019). Standard MM.06.01.01. Comprehensive
accreditation manual for hospitals. Oakbrook Terrace, IL: The Joint
Commission. (Level VII)
16 Accreditation Association for Hospitals and Health Systems. (2017). Standard
16.01.03. Healthcare Facilities Accreditation Program: Accreditation
requirements for acute care hospitals. Chicago, IL: Accreditation Association
for Hospitals and Health Systems. (Level VII)
17 DNV GL-Healthcare USA, Inc. (2016). MM.1 .SR.2. NIAHO® accreditation
requirements: Interpretive guidelines and surveyor guidance (version 11).
Milford, OH: DNV GL-Healthcare USA, Inc. (Level VII)
18 Wiegand, D. L. (2017). AACN procedure manual for high acuity, progressive,
and critical care (7th ed.). St Louis, MO: Elsevier.
19 Waters, T. R., et al. (2009). “Safe patient handling training for schools of
nursing” [Online]. Accessed via the Web at
https://www.cdc.gov/niosh/docs/2009-127/pdfs/2009-127.pdf (Level VII)
20 Accreditation Association for Hospitals and Health Systems. (2017). Standard
07.01.10. Healthcare Facilities Accreditation Program: Accreditation
requirements for acute care hospitals. Chicago, IL: Accreditation Association
for Hospitals and Health Systems. (Level VII)
21 Huggins, J. T., & Carr, S. Placement and management of thoracostomy tubes.
(2016). In UpToDate, Wolfson, A. B ., et al. (Eds.). Accessed via the Web at
http://www.uptodate.com
22 Siegel, J. D ., et al. (2007, revised 2017). “2007 guideline for isolation
precautions: Preventing transmission of infectious agents in healthcare
settings” [Online]. Accessed via the Web at
https://www.cdc.gov/infectioncontrol/pdf/guidelines/isolation-guidelines.pdf
(Level II)
23 Occupational Safety and Health Administration. (n.d .). “Bloodborne
pathogens, standard number 1910.1030” [Online]. Accessed via the Web at
https://www.osha.gov/pls/oshaweb/owadisp.show_document?
p_id=10051&p_table=STANDARDS (Level VII)
24 U.S . Food and Drug Administration. (n.d .). “Look. Check. Connect. Safe
medical device connections save lives” [Online]. Accessed via the Web at
http://www.fda.gov/downloads/MedicalDevices/Safety/AlertsandNotices/UCM1
34873.pdf
25 Ganz, D. A., et al. (2013). Preventing falls in hospitals: A toolkit for improving
quality of care (AHRQ Publication No. 13-0015-EF). Rockville, MD: Agency for
Healthcare Research and Quality. Accessed via the Web at
https://www.ahrq.gov/sites/default/files/publications/files/fallpxtoolkit_0 .pdf
(Level VII)
26 The Joint Commission. (2019). Standard PC.01.02.07. Comprehensive
accreditation manual for hospitals. Oakbrook Terrace, IL: The Joint
Commission. (Level VII)
27 Rutala, W. A., et al. (2008, revised 2017). “Guideline for disinfection and
sterilization in healthcare facilities, 2008” [Online]. Accessed via the Web at
https://www.cdc.gov/infectioncontrol/pdf/guidelines/disinfection-
guidelines.pdf (Level I)
28 Accreditation Association for Hospitals and Health Systems. (2017). Standard
07.02.03. Healthcare Facilities Accreditation Program: Accreditation
requirements for acute care hospitals. Chicago, IL: Accreditation Association
for Hospitals and Health Systems. (Level VII)
29 The Joint Commission. (2019). Standard RC.01.03 .01. Comprehensive
accreditation manual for hospitals. Oakbrook Terrace, IL: The Joint
Commission. (Level VII)
30 Centers for Medicare and Medicaid Services, Department of Health and
Human Services. (2015). Condition of participation: Medical record services.
42 C.F.R. § 482.24(b).
31 Accreditation Association for Hospitals and Health Systems. (2017). Standard
10.00 .03. Healthcare Facilities Accreditation Program: Accreditation
requirements for acute care hospitals. Chicago, IL: Accreditation Association
for Hospitals and Health Systems. (Level VII)
32 DNV GL-Healthcare USA, Inc. (2016). MR.2 .SR.1 . NIAHO® accreditation
requirements: Interpretive guidelines & surveyor guidance (version 11).
Milford, OH: DNV GL-Healthcare USA, Inc. (Level VII)
33 The Joint Commission. (2019). Standard RC.02.01.01. Comprehensive
accreditation manual for hospitals. Oakbrook Terrace, IL: The Joint
Commission. (Level VII)
CLAVICLE STRAP APPLICATION
Also called a figure-eight strap, a clavicle strap reduces and
immobilizes fractures of the clavicle. It does this by
elevating, extending, and supporting the shoulders in
position for healing, known as the position of attention. A
commercially available figure-eight strap or a 4′′ (10 cm)
elastic bandage may serve as a clavicle strap. (See Types of
clavicle straps.) This strap is contraindicated for an
uncooperative patient. Clavicle straps are typically worn for
4 to 8 weeks.
Equipment
Figure-eight clavicle strap or 4′′ (10-cm) elastic bandage ▪
tape ▪ cotton batting or padding ▪ marking pen ▪ Optional:
scissors, safety pins, analgesics.
EQUIPMENT
Types of clavicle straps
Clavicle straps provide support to the shoulder to help heal a fractured
clavicle. These straps are available ready-made. They can also be made from
a bandage.
Commercially made clavicle straps have a short back panel and long straps
that extend around the patient’s shoulders and axillae. They have Velcro
pads or buckles on the ends for easy fastening.
When making a clavicle strap with a wide elastic bandage, start in the
middle of the patient’s back. After wrapping the bandage around the
shoulders, fasten the ends with safety pins.
Implementation
■ Verify the practitioner’s order.
■ Gather the equipment.
■ Perform hand hygiene.1,2,3,4,5,6
■ Confirm the patient’s identity using at least two patient
identifiers.7
■ Provide privacy8,9,10,11 and explain the procedure to the
patient and family according to their individual
communication and learning needs to increase their
understanding, allay their fears, and enhance cooperation.
■ Assist in removing the patient’s shirt, or cut off the shirt if
movement is too painful.
■ Assess the arm’s neurovascular integrity by palpating the
hand and fingers, noting the color and temperature of the
skin; palpating the radial, ulnar, and brachial pulses
bilaterally; and then comparing the affected with the
unaffected side. Ask the patient about any numbness and
tingling distal to the injury, and assess motor function.
■ Perform a comprehensive pain assessment using
techniques appropriate for the patient’s age, condition, and
ability to understand.12
■ Administer analgesics as ordered following safe
medication administration practices.13,14,15,16 Perform a
follow-up pain assessment and notify the practitioner if the
pain isn’t adequately controlled.12
■ Demonstrate how to assume the position of attention.
Instruct the patient to sit upright and assume this position
gradually to minimize pain.
■ Gently apply powder or cornstarch, as appropriate, to the
axillae and shoulder area to reduce friction from the clavicle
strap. You can use cornstarch if the patient is allergic to
powder.
Applying a commercially made figure-eight
strap
■ Place the apex of the triangle between the scapulae and
drape the straps over the shoulders. Bring the strap with the
Velcro or buckle end under one axilla and through the loop;
then pull the other strap under the other axilla and through
the loop.
■ Gently adjust the straps so that they support the
shoulders in the position of attention.
■ Bring the straps back under the axillae toward the
anterior chest, making sure they maintain the position of
attention.
Applying a 4′′ (10 cm) elastic bandage strap
■ Roll both ends of the elastic bandage toward the middle,
leaving 12′′ to 18′′ (30.5 to 45.7 cm) unrolled.
■ Place the unrolled portion diagonally across the patient’s
back, from right shoulder to left axilla.
■ Bring the lower end of the bandage under the left axilla
and back over the left shoulder; loop the upper end over the
right shoulder and under the axilla.
■ Pull the two ends together at the center of the back so
that the bandage supports the position of attention.
Completing a commercially made figure-eight
strap or an elastic bandage application
■ Secure the ends using safety pins, Velcro pads, or a
buckle, depending on the equipment. Make sure a buckle or
any sharp edges face away from the skin. Tape the secured
ends to the underlying strap or bandage.
■ Place cotton batting or padding under the straps, as well
as under the buckle or pins, to prevent skin irritation.
■Useapentomarkthestrapatthesiteoftheloopofthe
figure-eight strap, or the site where the elastic bandage
crosses on the patient’s back. If the strap loosens, this mark
helps you tighten it to the original position.
■ Assess neurovascular integrity, which may be impaired by
a strap that’s too tight. If neurovascular integrity is
compromised when the strap is correctly applied, notify the
practitioner, who may want to change the treatment.
■ Perform hand hygiene.1,2,3,4,5,6
■ Document the procedure.17,18,19,20
Special considerations
■ If possible, perform the procedure with the patient
standing. However, this may not be feasible, because the
pain from the fracture can cause syncope. If the patient
can’t stand, have him or her sit upright.
■ An adult with a clavicle strap made from an elastic
bandage may require a triangular sling to help support the
weight of the arm, enhance immobilization, and reduce
pain. Inadequate immobilization can cause improper
healing.
■ For a hospitalized patient, monitor the position of the
strap by checking the pen markings every shift.
Patient teaching
Instruct the patient not to remove the clavicle strap until the
practitioner orders. Explain that, with help, the patient can
maintain proper hygiene by lifting segments of the strap to
remove the cotton and by washing the skin daily. Explain
that fresh cotton should be applied after cleaning.
Teach the outpatient how to assess neurovascular
integrity and to recognize signs and symptoms to report
promptly to the practitioner.
Documentation
In the appropriate section of the emergency department
medical record, record the date and time of strap
application, type of clavicle strap, type of padding used,
bilateral neurovascular integrity before and after the
procedure, analgesics administered, and instructions to the
patient.
REFERENCES
1 World Health Organization. (2009). “WHO guidelines on hand hygiene in
health care: First global patient safety challenge, clean care is safer care”
[Online]. Accessed via the Web at
http://whqlibdoc.who.int/publications/2009/9789241597906_eng.pdf (Level
IV)
2 Centers for Disease Control and Prevention. (2002). Guideline for hand
hygiene in health-care settings: Recommendations of the Healthcare Infection
Control Practices Advisory Committee and the HICPAC/SHEA/APIC/IDSA Hand
Hygiene Task Force. MMWR Recommendations and Reports, 51(RR-16), 1–45.
Accessed via the Web at https://www.cdc.gov/mmwr/pdf/rr/rr5116.pdf (Level
II)
3 The Joint Commission. (2019). Standard NPSG.07.01.01. Comprehensive
accreditation manual for hospitals. Oakbrook Terrace, IL: The Joint
Commission. (Level VII)
4 Centers for Medicare and Medicaid Services, Department of Health and
Human Services. (2015). Condition of participation: Infection control. 42 C.F.R.
§ 482.42.
5 Accreditation Association for Hospitals and Health Systems. (2017). Standard
07.01.21. Healthcare Facilities Accreditation Program: Accreditation
requirements for acute care hospitals. Chicago, IL: Accreditation Association
for Hospitals and Health Systems. (Level VII)
6 DNV GL-Healthcare USA, Inc. (2016). IC.1.SR.1 . NIAHO® accreditation
requirements: Interpretive guidelines & surveyor guidance (version 11).
Milford, OH: DNV GL-Healthcare USA, Inc. (Level VII)
7 The Joint Commission. (2019). Standard NPSG.01.01.01. Comprehensive
accreditation manual for hospitals. Oakbrook Terrace, IL: The Joint
Commission. (Level VII)
8 Centers for Medicare and Medicaid Services, Department of Health and
Human Services. (2015). Condition of participation: Patient’s rights. 42 C.F.R.
§ 482.13(c)(1).
9 Accreditation Association for Hospitals and Health Systems. (2017). Standard
15.01.16. Healthcare Facilities Accreditation Program: Accreditation
requirements for acute care hospitals. Chicago, IL: Accreditation Association
for Hospitals and Health Systems. (Level VII)
10 The Joint Commission. (2019). Standard RI.01.01.01. Comprehensive
accreditation manual for hospitals. Oakbrook Terrace, IL: The Joint
Commission. (Level VII)
11 DNV GL-Healthcare USA, Inc. (2016). PR.1.SR.5 . NIAHO® accreditation
requirements: Interpretive guidelines & surveyor guidance (version 11).
Milford, OH: DNV GL-Healthcare USA, Inc. (Level VII)
12 The Joint Commission. (2019). Standard PC.01.02.07. Comprehensive
accreditation manual for hospitals. Oakbrook Terrace, IL: The Joint
Commission. (Level VII)
13 The Joint Commission. (2019). Standard MM.06.01.01. Comprehensive
accreditation manual for hospitals. Oakbrook Terrace, IL: The Joint
Commission. (Level VII)
14 Accreditation Association for Hospitals and Health Systems. (2017). Standard
16.01.03. Healthcare Facilities Accreditation Program: Accreditation
requirements for acute care hospitals. Chicago, IL: Accreditation Association
for Hospitals and Health Systems. (Level VII)
15 Centers for Medicare and Medicaid Services, Department of Health and
Human Services. (2015). Condition of participation: Nursing services. 42
C.F.R. § 482.23(c).
16 DNV GL-Healthcare USA, Inc. (2014). MM.1 .SR.2. NIAHO® accreditation
requirements: Interpretive guidelines & surveyor guidance (version 11).
Milford, OH: DNV GL-Healthcare USA, Inc. (Level VII)
17 The Joint Commission. (2019). Standard RC.01.03 .01. Comprehensive
accreditation manual for hospitals. Oakbrook Terrace, IL: The Joint
Commission. (Level VII)
18 Centers for Medicare and Medicaid Services, Department of Health and
Human Services. (2015). Condition of participation: Medical record services.
42 C.F.R. § 482.24(b).
19 Accreditation Association for Hospitals and Health Systems. (2017). Standard
10.00 .03. Healthcare Facilities Accreditation Program: Accreditation
requirements for acute care hospitals. Chicago, IL: Accreditation Association
for Hospitals and Health Systems. (Level VII)
20 DNV GL-Healthcare USA, Inc. (2016). MR.2 .SR.1 . NIAHO® accreditation
requirements: Interpretive guidelines & surveyor guidance (version 11).
Milford, OH: DNV GL-Healthcare USA, Inc. (Level VII)
CLOSED-WOUND DRAIN MANAGEMENT
Closed-wound drains are typically inserted during surgery in
anticipation of substantial postoperative drainage. Studies
fail to show improved patient outcomes when they’re
inserted during clean surgical cases.1,2 A closed-wound
drain, commonly used after joint replacements and thyroid,
breast, axillary, and abdominal procedures, prevents
exudate from accumulating.3
Jackson-Pratt and Hemovac closed drainage systems are
used most commonly. (See Types of closed drainage
systems.) These drains are considered vacuum drains that
use low negative pressure. The collection chamber expands
as it collects the draining fluid by exchanging negative
pressure for fluid.3
A closed-wound drain consists of perforated tubing
connected to a portable vacuum unit. The distal end of the
tubing lies within the wound and usually leaves the body
from a site other than the primary suture line to preserve
the integrity of the surgical wound. The tubing exit site is
treated as an additional surgical wound; the drain is usually
sutured to the skin.
Empty the drain and measure its contents every 4 to 8
hours or more often according to the patient’s condition, the
amount of drainage, and the practitioner’s orders. Removing
excess drainage maintains maximum suction and avoids
straining the drain’s suture line.
Equipment
Graduated cylinder ▪ antiseptic pad ▪ gloves ▪ fluid-
impermeable pad ▪ Optional: gown, mask with face shield,
mask, goggles, sterile specimen collection container,
specimen container label, antiseptic cleaning agent or
antimicrobial swabs, sterile gauze pads, laboratory
biohazard transport bag, tubing labels.
Implementation
■ Verify the practitioner’s order.
■ Gather the appropriate equipment.
■ Perform hand hygiene.4,5,6,7,8,9
■ Confirm the patient’s identity using at least two patient
identifiers.10
■ Provide privacy11,12,13,14 and explain the procedure to the
patient and family according to their individual
communication and learning needs to increase their
understanding, allay their fears, and enhance cooperation.
■ Put on gloves and other personal protective equipment,
as needed, to comply with standard precautions.15,16,17
■ Raise the bed to waist level while providing patient care
to prevent caregiver back strains.18
■ Assess the patient’s condition.
■ If the patient has more than one closed wound drain,
number the drains so that you can record drainage from
each site. Label each drain at the distal end (near the
patient connection) and the proximal end (near the course
container) to distinguish the different drains and prevent
misconnections.19
■ Protect the patient’s linens by placing a fluid-
impermeable pad under the drain.
■ Unclip the vacuum unit from the patient’s gown.
■ Trace the tubing from the patient to its point of origin to
make sure you’re emptying the correct drain.19,20
■ Release the vacuum by removing the spout plug on the
collection chamber. The container expands completely as it
draws in air.
■ Empty the unit’s contents into a graduated cylinder and
note the amount and appearance of the drainage.
■ If diagnostic tests will be performed on the fluid
specimen, pour the drainage directly into a sterile
laboratory container, note the amount and appearance, and
label the specimen in the presence of the patient to avoid
mislabeling.10 Include the patient’s name, date and time of
collection, type of specimen and from where on the body it
was obtained, and your initials. Place the specimen into a
laboratory biohazard transport bag17 and send it to the
laboratory.
■ Use an antiseptic pad to clean the unit’s spout and plug.
EQUIPMENT
Types of closed drainage systems
There are two common types of closed drainage systems. The Jackson-Pratt
drain, which is typically used with breast and abdominal surgery, collects
exudate in a bulblike device.
The Hemovac drain is used when blood drainage is expected after surgery,
such as in abdominal and orthopedic surgeries.
■ To reestablish the vacuum that creates the drain’s suction
power, fully compress the vacuum unit. With one hand
holding the compressed unit to maintain the vacuum,
replace the spout plug with your other hand (as shown
below).
■ Check the patency of the equipment. Make sure the
tubing is free of twists, kinks, and leaks, because the
drainage system must be airtight to work properly. The
vacuum unit should remain compressed when you release
manual pressure; rapid reinflation indicates an air leak. If
reinflation occurs, recompress the unit and make sure the
spout plug is secure.
■ Secure the vacuum unit to the patient’s gown. Fasten it
below wound level to promote drainage. Don’t apply tension
on drainage tubing when fastening the unit to prevent
possible dislodgment.
■ Remove and discard your gloves.15,16,17
■ Perform hand hygiene.4,5,6,7,8,9
■ Put on a new pair of gloves.15,16,17
■ Observe the sutures that secure the drain to the patient’s
skin; look for signs of pulling or tearing and for swelling or
infection of surrounding skin. Gently clean the sutures with
sterile gauze pads soaked in an antiseptic cleaning agent or
with an antimicrobial swab, if ordered.
■ Properly dispose of drainage and solutions, and clean or
dispose of soiled equipment and supplies.17
■ Return the bed to the lowest position to prevent falls and
maintain patient safety.21
■ Remove and discard your gloves and any other personal
protective equipment, if worn.15,16,17
■ Perform hand hygiene.4,5,6,7,8,9
■ Document the procedure.22,23,24,25
Special considerations
■ Check the drain frequently to make sure suction is
maintained.
■ Empty the drain and measure its contents before the
patient ambulates to prevent the weight of drainage from
pulling on the drain as the patient ambulates.
■ The Joint Commission has issued a sentinel event alert
related to managing risk during transition to new
International Organization for Standardization tubing
standards designed to prevent dangerous tubing
misconnections, which can lead to serious patient injury and
death. During the transition, be sure to trace the tubing and
catheter from the patient to the point of origin before
connecting or reconnecting any device or infusion, at any
care transition (such as a new setting or service), and as
part of the handoff process; route tubes and catheters with
different purposes in different standardized directions; label
the tubing at both the distal and proximal ends when there
are different access sites or several bags hanging; use
tubing and equipment only as intended; and store
medications for different delivery routes in separate
locations.19
Patient teaching
If the patient will be discharged to home with a closed
wound drain, teach the patient and family, if appropriate,
how to empty the collection chamber, reestablish the
vacuum, clean the drain exit site, and record the amount of
the drainage. In addition, teach the patient about signs and
symptoms to report to the practitioner, such as drain site
redness, pain, swelling, drainage, or obstruction in the
tubing.26
Complications
Occlusion of the tubing by fibrin, clots, or other particles can
reduce or obstruct drainage. Infection may develop at the
tubing exit site. Other complications include breakage of the
drain, difficulty in removal, inadvertent removal, pain, a
puckering scar, and visceral perforation.3
Documentation
Record the date and time each time you empty the drain,
the appearance of the drain site and the presence of
swelling or other signs of infection, equipment malfunction
and consequent nursing actions, and the patient’s tolerance
of the treatment. On the intake and output sheet, record
drainage color, consistency, type, and amount. If the patient
has more than one closed-wound drain, number the drains
and record the information above separately for each
drainage site. Note teaching provided and the patient’s
understanding of the teaching.
REFERENCES
1 Corion, L. U ., et al. (2009). Draining after breast reduction: A randomised
controlled inter-patient study. Journal of Plastic, Reconstructive and Aesthetic
Surgery, 62(7), 865–868 . (Level II)
2 Reiffel, A. J . (2013). A multi-disciplinary review of the potential association
between closed-suction drains and surgical site infection. Surgical Infections,
14(3), 244–269. (Level V)
3 Durai, R., & Ng, P. C . (2010). Surgical vacuum drains: Types, uses, and
complications. AORN Journal, 91(2), 266–271. Accessed December 2016 via
the Web at http://onlinelibrary.wiley.com/doi/10.1016/j.aorn.2009.09 .024/epdf
4 The Joint Commission. (2019). Standard NPSG.07.01.01. Comprehensive
accreditation manual for hospitals. Oakbrook Terrace, IL: The Joint
Commission. (Level VII)
5 World Health Organization. (2009). “WHO guidelines on hand hygiene in
health care: First global patient safety challenge, clean care is safer care”
[Online]. Accessed via the Web at
http://apps.who.int/iris/bitstream/10665/44102/1/9789241597906_eng.pdf
(Level IV)
6 Centers for Disease Control and Prevention. (2002). Guideline for hand
hygiene in health-care settings: Recommendations of the Healthcare Infection
Control Practices Advisory Committee and the HICPAC/SHEA/APIC/IDSA Hand
Hygiene Task Force. MMWR Recommendations and Reports, 51(RR-16), 1–45.
Assessed via the Web at https://www.cdc.gov/mmwr/pdf/rr/rr5116.pdf (Level
II)
7 Centers for Medicare and Medicaid Services, Department of Health and
Human Services. (2015). Condition of participation: Infection control. 42 C.F.R.
§ 482.42.
8 Accreditation Association for Hospitals and Health Systems. (2017). Standard
07.01.21. Healthcare Facilities Accreditation Program: Accreditation
requirements for acute care hospitals. Chicago, IL: Accreditation Association
for Hospitals and Health Systems. (Level VII)
9 DNV GL-Healthcare USA, Inc. (2016). IC.1.SR.1 . NIAHO® accreditation
requirements: Interpretive guidelines & surveyor guidance (version 11).
Milford, OH: DNV GL-Healthcare USA, Inc. (Level VII)
10 The Joint Commission. (2019). Standard NPSG.01.01.01. Comprehensive
accreditation manual for hospitals. Oakbrook Terrace, IL: The Joint
Commission. (Level VII)
11 Centers for Medicare and Medicaid Services, Department of Health and
Human Services. (2015). Condition of participation: Patient’s rights. 42 C.F.R.
§ 482.13(c)(1).
12 Accreditation Association for Hospitals and Health Systems. (2017). Standard
15.01.16. Healthcare Facilities Accreditation Program: Accreditation
requirements for acute care hospitals. Chicago, IL: Accreditation Association
for Hospitals and Health Systems. (Level VII)
13 The Joint Commission. (2019). Standard RI.01.01.01. Comprehensive
accreditation manual for hospitals. Oakbrook Terrace, IL: The Joint
Commission. (Level VII)
14 DNV GL-Healthcare USA, Inc. (2016). PR.1.SR.5 . NIAHO® accreditation
requirements: Interpretive guidelines & surveyor guidance (version 11).
Milford, OH: DNV GL-Healthcare USA, Inc. (Level VII)
15 Siegel, J. D ., et al. (2007, revised 2017). “2007 guideline for isolation
precautions: Preventing transmission of infectious agents in healthcare
settings” [Online]. Accessed via the Web at
https://www.cdc.gov/infectioncontrol/pdf/guidelines/isolation-guidelines.pdf
(Level II)
16 Accreditation Association for Hospitals and Health Systems. (2017). Standard
07.01.10. Healthcare Facilities Accreditation Program: Accreditation
requirements for acute care hospitals. Chicago, IL: Accreditation Association
for Hosptials and Health Systems. (Level VII)
17 Occupational Safety and Health Administration. (n.d .). “Bloodborne
pathogens, standard number 1910.1030” [Online]. Accessed via the Web at
https://www.osha.gov/pls/oshaweb/owadisp.show_document?
p_id=10051&p_table=STANDARDS (Level VII)
18 Waters, T. R., et al. (2009). “Safe patient handling training for schools of
nursing” [Online]. Accessed via the Web at
https://www.cdc.gov/niosh/docs/2009-127/pdfs/2009-127.pdf (Level VII)
19 The Joint Commission. (2014). “Sentinel event alert: Managing risk during
transition to new ISO tubing connector standards” [Online]. Accessed via the
Web at
http://www.jointcommission.org/assets/1/6/SEA_53_Connectors_8 _19_14 _final.
pdf (Level VII)
20 U.S . Food and Drug Administration. (n.d .). “Look. Check. Connect. Safe
medical device connections save lives” [Online]. Accessed via the Web at
http://www.fda.gov/downloads/MedicalDevices/Safety/AlertsandNotices/UCM1
34873.pdf
21 Ganz, D. A., et al. (2013). Preventing falls in hospitals: A toolkit for improving
quality of care (AHRQ Publication No. 13-0015-EF). Rockville, MD: Agency for
Healthcare Research and Quality. Accessed via the Web at
https://www.ahrq.gov/sites/default/files/publications/files/fallpxtoolkit_0 .pdf
(Level VII)
22 The Joint Commission. (2019). Standard RC.01.03 .01. Comprehensive
accreditation manual for hospitals. Oakbrook Terrace, IL: The Joint
Commission. (Level VII)
23 Centers for Medicare and Medicaid Services, Department of Health and
Human Services. (2015). Condition of participation: Medical record services.
42 C.F.R. § 482.24(b).
24 Accreditation Association for Hospitals and Health Systems. (2017). Standard
10.00 .03. Healthcare Facilities Accreditation Program: Accreditation
requirements for acute care hospitals. Chicago, IL: Accreditation Association
for Hospitals and Health Systems. (Level VII)
25 DNV GL-Healthcare USA, Inc. (2016). MR.2 .SR.1 . NIAHO® accreditation
requirements: Interpretive guidelines & surveyor guidance (version 11).
Milford, OH: DNV GL-Healthcare USA, Inc. (Level VII)
26 National Institute of Health Clinical Center. (2008). “Patient education: How to
care for the Jackson-Pratt drain” [Online]. Accessed via the Web at
http://www.cc.nih.gov/ccc/patient_education/pepubs/jp.pdf
CODE MANAGEMENT
A code may be called for patients with an absent pulse,
apnea or inadequate breathing, ventricular fibrillation,
pulseless ventricular tachycardia, pulseless electrical
activity, or asystole. The goals of any code are to restore the
patient’s spontaneous heartbeat and respirations and to
prevent hypoxic damage to the brain and other vital organs.
Fulfilling these goals requires quick identification of a
problem and rapid emergency response, optimally using a
team approach to providing treatment. Ideally, the code
team should consist of health care workers trained in
advanced cardiac life support (ACLS), although health care
workers trained in basic life support (BLS) as well as
ancillary health care workers, such as laboratory and
electrocardiogram technicians, may also be a part of the
team. Sponsored by the American Heart Association (AHA),
the ACLS course incorporates BLS skills with advanced
resuscitation techniques. BLS and ACLS should be
performed according to the 2015 AHA guidelines.
According to the 2015 AHA Guidelines for CPR and
Emergency Cardiovascular Care, ACLS interventions build on
the foundation of BLS, which includes immediate recognition
and activation of the emergency response system, early
high-quality cardiopulmonary resuscitation (CPR), and rapid
defibrillation to increase the patient’s chance of survival.
The recommended priority of the AHA guidelines is
performing high-quality CPR chest compressions of
adequate rate and depth that allow complete chest recoil
after each compression with minimal interruptions as well as
avoiding excessive ventilation.1
Always be aware of a patient’s code status as defined by
the practitioner’s orders, the patient’s advance directives,
and the family’s wishes. Ensure that the practitioner who
has ordered a “no code” or “do not resuscitate” status for
the patient has written and signed the order. If these orders
are established on a specific form, have the patient or
responsible family member cosign it, of possible.2
Equipment
Oral, nasal, and endotracheal (ET) airways ▪ one-way valve
masks ▪ oxygen source ▪ oxygen flowmeter ▪ intubation
supplies ▪ tape or commercial tube holder ▪ handheld
resuscitation bag with mask ▪ suction supplies ▪ gloves ▪
cardiac arrest board ▪ peripheral IV supplies (14G, 18G, and
20G peripheral IV catheters) ▪ IV administration sets
(macrodrip and microdrip) ▪ IV fluids (dextrose 5% in water
[D5W], normal saline solution, and lactated Ringer solution)
▪ electrocardiogram (ECG) monitor, electrodes, and leads ▪
cardioverter-defibrillator ▪ self-adhesive defibrillator pads
and connector cable or prepackaged gelled conduction pads
▪
emergency medications (adenosine, amiodarone,
atropine, calcium, diltiazem, dobutamine, dopamine,
epinephrine, lidocaine, magnesium sulfate, naloxone,
norepinephrine, procainamide, sodium bicarbonate, sotalol,
and verapamil) ▪ Optional: transcutaneous pacemaker (if
not included as a function of the cardioverter-defibrillator),
transvenous pacemaker supplies, mask and goggles or
mask with face shield, gown, end-tidal carbon dioxide
detector, continuous quantitative waveform capnography,
esophageal detector, intraosseous (IO) infusion supplies,
automated external defibrillator, central venous access
catheter insertion supplies.
Preparation of equipment
Ensure that the defibrillator is charged and functioning. If
the battery isn’t charged, ensure that an outlet is available
in which to plug it in. Check any item that has an expiration
date to ensure that it has not expired. If a product is
expired, its integrity is compromised, or you find it
defective, remove it from patient use, label it as expired or
defective, and report the expiration or defect as directed by
your facility. Because effective emergency care depends on
reliable and accessible equipment, the equipment as well as
the personnel must be ready for a code at any time. You
also should be familiar with the cardiac drugs you may have
to administer during a code. (See Common emergency
cardiac drugs, page 186.)
Implementation
■ Perform hand hygiene.6,7,8,9,10,11
■ Put on gloves and other personal protective equipment as
needed to follow standard precautions.12,13,14,15
■ If you’re the first to arrive at the scene of a code, verify
that the environment is safe by quickly scanning the
patient’s location and surroundings for imminent physical
threats such as toxic and electrical hazards.16
■ Assess responsiveness by tapping the patient on the
shoulder and shouting, “Are you all right?” If the patient is
unresponsive, shout for nearby help and immediately
activate the emergency response system via mobile device
(if appropriate).1,16
■ Check to see if the patient is apneic or is only gasping (as
opposed to breathing regularly), and, if able, simultaneously
check for a pulse to minimize delay in detecting cardiac
arrest and initiating cardiopulmonary resuscitation.1,16
■ If you don’t feel a pulse within 10 seconds, begin chest
compressions. Depress the adult sternum at least 2′′ (5 cm)
but no more than 2.4′′ (6 cm), allowing the chest to
completely recoil after each compression so that the heart
can adequately fill with blood.17 Avoid leaning over the
patient’s chest, which could prevent the chest from recoiling
completely.16,18 Perform 30 compressions at a rate of 100 to
120 compressions/minute, followed by 2 breaths.16,18 Each
breath should have enough volume to produce a minimal
chest rise to ensure adequate ventilation.16,17,18
■ After a second person arrives with a defibrillator and
other emergency equipment, have that person place the
cardiac arrest board under the patient (or, if the patient is
on an air-filled mattress, make sure that it’s deflated) and
then assist with CPR.3,16
■ Apply the self-adhesive defibrillation pads, following
manufacturer’s instructions, and connect them to the
defibrillator monitor to obtain a quick look at the patient’s
cardiac rhythm. Alternatively, apply prepackaged gelled
conduction pads and then apply the paddles to the patient’s
chest to quickly look at the patient’s cardiac rhythm.
■ For ventricular fibrillation or pulseless ventricular
tachycardia, follow the ACLS protocol for defibrillation as
soon as possible with 360 joules (monophasic) or 120 to 200
joules (biphasic) according to the manufacturer’s
recommendations. Then resume CPR immediately. Don’t
check the patient’s rhythm at this time. Instead, check the
rhythm after five cycles of CPR; perform a pulse check if you
observe an organized rhythm on the monitor.
■ The second person should get into position on the other
side of the patient and be ready to begin chest
compressions after you complete five cycles of
compressions and ventilations at a ratio of 30:2. The switch
should take less than 5 seconds, because interruptions in
chest compressions can compromise vital organ perfusion.
The compressor should be relieved every 2 minutes to
prevent rescuer fatigue that could lead to inadequate
compression rate or depth.3,16
■ Have the nurse assigned to the patient relate the
patient’s medical history and describe the events leading to
cardiac arrest.
■ A third person—either a nurse certified in BLS or a
respiratory therapist—will then attach the handheld
resuscitation bag to the oxygen source.
■ Ideally, a fourth person will be available to open the
patient’s airway and seal the mask to the patient’s face.
After the mask is in place, the other person will squeeze the
resuscitation bag to deliver two ventilations (each over 1
second) during a brief pause after 30 compressions. Both
people will watch for the chest to rise. If a fourth person
isn’t available, the third person will open the patient’s
airway, seal the mask to the patient’s face using one hand,
and then, with the other hand, squeeze the resuscitation
bag to deliver two ventilations during a brief pause after 30
compressions.3,16
■ An ACLS-trained nurse will act as code leader until the
practitioner arrives.3
■ If not already in place, apply ECG electrodes and attach
the patient to the defibrillator’s cardiac monitor. Avoid
placing electrodes on bony prominences or hairy areas. Also
avoid the areas where the defibrillator pads will be placed
and where chest compressions will be given. If you’re using
hands-free defibrillator pads, you’ll need to apply ECG
electrodes or attach them to the defibrillator (unless the
patient
requires
synchronized
cardioversion
or
transcutaneous pacing).
Common emergency cardiac drugs
You may be called on to administer several cardiac drugs during a code. This
chart lists the most common emergency cardiac drugs, along with their
actions, indications, and dosages.
■ After five cycles of CPR, check the patient’s rhythm and, if
necessary, give another shock at the same energy dose (if
using a biphasic defibrillator) or at the same rate if using a
monophasic defibrillator.1,3
■ As CPR and defibrillation continue, if IV access isn’t
already present, insert two peripheral venous access
devices using large-bore IV catheters; alternatively, IO
access may be established if peripheral access isn’t readily
available.1,3 Avoid interrupting chest compressions for IV or
IO insertion. When inserting a peripheral IV catheter, use
only a large vein, such as the antecubital vein, to allow for
rapid fluid administration and to prevent drug extravasation.
■ As soon as the IV catheter is in place, begin an infusion of
normal saline solution or lactated Ringer solution to help
prevent circulatory collapse; D5W is still acceptable, but the
latest ACLS guidelines encourage the use of normal saline
solution or lactated Ringer solution, because D5W can
produce hyperglycemic effects during cardiac arrest.3
■ While one nurse obtains access for parenteral
medications, another team member will set up portable or
wall-suction equipment and suction the patient’s oral
secretions, as necessary, to maintain an open airway.
■ The ACLS-trained nurse will then prepare and administer
emergency cardiac drugs as needed, following safe
medication administration practices.19,20,21,22 (See AHA
adult cardiac arrest algorithm, page 188.) Administer
medications according to the AHA algorithm immediately
after a rhythm check. The AHA algorithm shows the timing
of drug administration and shock administration.1 Keep in
mind that all drugs administered IV should be followed by a
20-mL bolus of IV fluid to facilitate the flow of the drug to
central circulation.1,3
■ If IV or IO access can’t be established, you may
administer medications such as epinephrine, lidocaine, and
naloxone through an ET tube during cardiac arrest once the
patient is intubated. The optimal dose of most drugs given
by this route is unknown, but typically the dose is 2 to 21⁄2
times the recommended IV dose. To do so, dilute the drugs
in 5 to 10 mL of normal saline solution or sterile water and
then instill them into the patient’s ET tube. Studies have
shown that dilution with sterile water, in place of normal
saline solution, may improve absorption of epinephrine and
lidocaine. Afterward, ventilate the patient manually to
improve absorption by distributing the drug throughout the
bronchial tree.1,3
■ The ACLS-trained nurse will also prepare for and assist
with ET intubation or other advanced airway placement.
Compression interruption should be minimized during
advanced airway placement.1
■ Suction the patient as needed. After the patient has been
intubated, the health care provider should use clinical
assessment and a confirmation device such as an end-tidal
carbon dioxide detector, continuous quantitative waveform
capnography, or an esophageal detector to confirm ET tube
placement. However, continuous quantitative waveform
capnography is recommended to confirm ET tube
placement.1 Assessment includes visualization of chest
expansion and auscultation for equal breath sounds, and
auscultation for absent breath sounds over the epigastrium.
When the tube is correctly positioned, tape it securely with
tape or a commercial tube holder. To serve as a reference,
mark the point on the tube that’s level with the patient’s
lips. Document the tube location on the code record.1,3
AHA adult cardiac arrest algorithm
Reprinted with permission from American Heart Association. (2015). 2015
American Heart Association guidelines update for cardiopulmonary
resuscitation and emergency cardiovascular care. Circulation, 132, S444–
S464.
■ After the ET tube is inserted, the provider performing
chest compressions should deliver 100 to 120
compressions/minute continuously without pauses for
ventilations;1,18 the provider delivering ventilations should
administer 1 breath every 6 seconds (10 breaths/minute) to
avoid excessive ventilations and subsequently minimize the
impact of positive-pressure ventilation on blood flow.1,18
■ Meanwhile, another team member of the code team
should document events and treatment. Other duties of the
code team include prompting participants about when to
perform certain activities (such as when to check a pulse or
take vital signs), overseeing the effectiveness of CPR,
keeping track of the time between therapies, and supporting
family. Each team member should know what the other
participant’s role is to prevent duplicating effort. Lastly,
someone from the team should make sure that the primary
nurse’s other patients are reassigned to another nurse.
■ Remove and discard your gloves and any other personal
protective equipment worn.12,13
■ Perform hand hygiene.6,7,8,9,10,11
■ Document the procedure.23,24,25,26
Special considerations
■ Evidence for an optimum compression rate suggests a
target of 100 to 120 compressions/minute. Rates above or
below this target range appear to reduce survival to
discharge.1,18
■ If hemodynamic monitoring, such as arterial or central
venous catheters or capnography, are in place, they should
be used to monitor the patient’s response to CPR and the
effectiveness of resuscitation efforts.18
■ If defibrillator gel pads aren’t available, a conductive gel
must be placed on defibrillator paddles before use. Place the
gel on one paddle, and rub the two paddles together to
spread the gel evenly between them. Ensure that the
surface of the paddle is completely covered.
■ The routine use of magnesium sulfate for cardiac arrest
isn’t recommended unless torsades de pointe is present.1
■ High-dose epinephrine isn’t recommended for routine use
in patients in cardiac arrest.1
■ Vasopressin is no longer recommended as a substitute for
epinephrine.1
■ In in-hospital cardiac arrest, the combination of intra-
arrest epinephrine and methylprednisolone and post-arrest
hydrocortisone may be considered.1
■ Extracorporeal CPR may be considered among selected
cardiac arrest patients who have not responded to initial
convention CPR in settings in which can be rapidly
implemented.1
■ If family members are at the facility during the code,
have someone, such as a clergy member or social worker,
remain with them. Keep family members informed of the
patient’s status.
■ Family members may be present during a code if your
facility supports it. The Emergency Nurses Association and
the American Association of Critical-Care Nurses support the
option of family presence during invasive procedures and
CPR.27,28,29
■ If the family isn’t at the facility, contact them as soon as
possible. Encourage them not to drive to the facility, but
offer to call someone who can give them a ride.
■ When the patient’s condition has stabilized, assess level
of consciousness, breath sounds, heart sounds, peripheral
perfusion, bowel sounds, and urine output. Also take vital
signs every 15 minutes and monitor cardiac rhythm
continuously.1,3
■ Because targeted temperature management (TTM) has
demonstrated improved neurologic recovery, it should be
considered for any patient who is comatose (lacking
meaningful response to verbal commands) after return of
spontaneous circulation following a cardiac arrest. Use a
target temperature for TTM that’s between 89.6° and 96.8°F
(32° to 36°C) and then maintain temperature constantly for
at least 24 hours. Take measures to actively prevent fever in
comatose patients who have received TTM.30
■ Make sure that the patient receives an adequate supply
of oxygen, whether through a mask or a ventilator.1,3 Titrate
inspired oxygen to the lowest level required to achieve an
arterial oxygen saturation of 94% or higher to avoid
potential oxygen toxicity.1,3
■ Check the infusion rates of all IV fluids, and use electronic
infusion devices (preferably smart pumps with dose-error
reduction software) to deliver vasoactive drugs. Make sure
that infusion pump alarm limits are set appropriately for the
patient’s current condition, and that alarms are turned on,
functioning properly, and audible to staff.31,32,33
■ To evaluate the effectiveness of fluid therapy, insert an
indwelling catheter (if ordered) if the patient doesn’t already
have one, or use a bladder scanner to measure the volume
of urine in the bladder. Also insert a nasogastric tube to
relieve or prevent gastric distention.
■ If appropriate, reassure the patient and explain what’s
happening. Allow the patient’s family to visit as soon as
possible.
■ In intubated patients, failure to achieve end-tidal carbon
dioxide (ETCO2) of greater than 10 mm Hg by waveform
capnography after 20 minutes of CPR may be considered in
combination with other factors to help determine when to
terminate resuscitation.1 In nonintubated patients, a specific
ETCO2 cutoff valve shouldn’t be used as an indication to end
resuscitation efforts at any time during CPR.1
■ If the patient dies, notify family members and allow them
to see the patient as soon as possible.
■ To make sure that the code team performs optimally,
schedule a time to review the code.
Complications
Even when performed correctly, CPR can cause fractured
ribs, liver laceration, lung puncture, and gastric distention.
Defibrillation can cause burns and electric shock.
Emergency intubation can result in esophageal or tracheal
laceration, subcutaneous emphysema, or accidental right
mainstem bronchus intubation (characterized by decreased
or absent breath sounds on the left side of the chest and
normal breath sounds on the right).
Documentation
During the code, the recorder documents on the code form
the events in as much detail as possible. Note whether the
arrest was witnessed or unwitnessed, the time of the arrest,
the time CPR was begun, the time the code team arrived
and their names, and the total resuscitation time. Also
document the number of defibrillations, the times they were
performed, the energy dose, the patient’s cardiac rhythm
before and after defibrillation, and the presence or absence
of a pulse.
Document on the code form all drug therapy, including
dosages, routes of administration, and patient response.
Record all procedures, such as peripheral and central line
insertion, pacemaker use or insertion, and ET tube insertion,
noting the time performed and the patient’s tolerance of the
procedure, and all arterial blood gas and laboratory results.
Record whether the patient is transferred to another unit
or facility, along with the patient’s condition at the time of
transfer and whether the family was notified. Document any
complications and the measures taken to correct them. If
the patient dies, document the time of death
pronouncement. When documentation on the code form is
complete, the practitioner and the recorder should sign the
document. Document any patient and family teaching
provided, their understanding of your teaching, and whether
follow-up teaching is required.
REFERENCES
1 American Heart Association. (2015). 2015 American Heart Association
guidelines update for cardiopulmonary resuscitation and emergency
cardiovascular care. Circulation, 132, S444–S464. (Level II)
2 The Joint Commission. (2019). Standard RI.01.02.01. Comprehensive
accreditation manual for hospitals. Oakbrook Terrace, IL: The Joint
Commission. (Level VII)
3 American Heart Association. (2010). 2010 American Heart Association
guidelines for cardiopulmonary resuscitation and emergency cardiovascular
care. Part 8: Adult advanced cardiovascular life support. Circulation, 122,
S729–S767. (Level II)
4 Field, J. M., et al. (Eds.). (2009). The textbook of emergency cardiovascular
care and CPR. Philadelphia, PA: Lippincott Williams & Wilkins.
5 Dave, J. (2017). “Torsades de pointe.” [Online]. Accessed via the Web at
http://emedicine.medscape.com/article/1950863-overview#a9
6 The Joint Commission. (2019). Standard NPSG.07.01.01. Comprehensive
accreditation manual for hospitals. Oakbrook Terrace, IL: The Joint
Commission. (Level VII)
7 Centers for Disease Control and Prevention. (2002). Guideline for hand
hygiene in health-care settings: Recommendations of the Healthcare Infection
Control Practices Advisory Committee and the HICPAC/SHEA/APIC/IDSA Hand
Hygiene Task Force. MMWR Recommendations and Reports, 51(RR-16), 1–45.
Accessed via the Web at https://www.cdc.gov/mmwr/pdf/rr/rr5116.pdf (Level
II)
8 World Health Organization. (2009). “WHO guidelines on hand hygiene in
health care: First global patient safety challenge, clean care is safer care”
[Online]. Accessed via the Web at
http://apps.who.int/iris/bitstream/10665/44102/1/9789241597906_eng.pdf
(Level IV)
9 Centers for Medicare and Medicaid Services, Department of Health and
Human Services. (2015). Condition of participation: Infection control. 42 C.F.R.
§ 482.42.
10 Accreditation Association for Hospitals and Health Systems. (2017). Standard
07.01.21. Healthcare Facilities Accreditation Program: Accreditation
requirements for acute care hospitals. Chicago, IL: Accreditation Association
for Hospitals and Health Systems. (Level VII)
11 DNV GL-Healthcare USA, Inc. (2016). IC.1 .SR.1 . NIAHO® accreditation
requirements: Interpretive guidelines & surveyor guidance (version 11).
Milford, OH: DNV GL-Healthcare USA, Inc. (Level VII)
12 Siegel, J. D ., et al. (2007, revised 2017). “2007 guideline for isolation
precautions: Preventing transmission of infectious agents in healthcare
settings” [Online]. Accessed via the Web at
https://www.cdc.gov/infectioncontrol/pdf/guidelines/isolation-guidelines.pdf
(Level II)
13 Occupational Safety and Health Administration. (n.d .). “Bloodborne
pathogens, standard number 1910.1030” [Online]. Accessed via the Web at
https://www.osha.gov/pls/oshaweb/owadisp.show_document?
p_table=STANDARDS&p_id=10051 (Level VII)
14 Accreditation Association for Hospitals and Health Systems. (2017). Standard
07.01.10. Healthcare Facilities Accreditation Program: Accreditation
requirements for acute care hospitals. Chicago, IL: Accreditation Association
for Hospitals and Health Systems. (Level VII)
15 DNV GL-Healthcare USA, Inc. (2016). IC.1 .SR.2 . NIAHO® accreditation
requirements: Interpretive guidelines & surveyor guidance (version 11).
Milford, OH: DNV GL-Healthcare USA, Inc. (Level VII)
16 American Heart Association. (2015). 2015 American Heart Association
guidelines update for cardiopulmonary resuscitation and emergency
cardiovascular care. Circulation, 132, S414–S435. (Level II)
17 American Heart Association. (2010). 2010 American Heart Association
guidelines for cardiopulmonary resuscitation and emergency cardiovascular
care. Part 4: CPR overview. Circulation, 122, S676–S684. (Level II)
18 Meaney, P. A., et al. (2013). AHA consensus statement: Cardiopulmonary
resuscitation quality: Improving cardiac resuscitation outcomes both inside
and outside the hospital. Circulation, 128, 417–435. Accessed via the Web at
http://circ.ahajournals.org/content/128/4/417.full (Level VII)
19 Centers for Medicare and Medicaid Services, Department of Health and
Human Services. (2015). Condition of participation: Nursing services. 42
C.F.R. § 482.23(c).
20 Accreditation Association for Hospitals and Health Systems. (2017). Standard
16.01.03. Healthcare Facilities Accreditation Program: Accreditation
requirements for acute care hospitals. Chicago, IL: Accreditation Association
for Hospitals and Health Systems. (Level VII)
21 The Joint Commission. (2019). Standard MM.06.01.01. Comprehensive
accreditation manual for hospitals. Oakbrook Terrace, IL: The Joint
Commission. (Level VII)
22 DNV GL-Healthcare USA, Inc. (2016). MM.1 .SR.2. NIAHO® accreditation
requirements: Interpretive guidelines & surveyor guidance (version 11).
Milford, OH: DNV GL-Healthcare USA, Inc. (Level VII)
23 The Joint Commission. (2019). Standard RC.01.03 .01. Comprehensive
accreditation manual for hospitals. Oakbrook Terrace, IL: The Joint
Commission. (Level VII)
24 Centers for Medicare and Medicaid Services, Department of Health and
Human Services. (2015). Condition of participation: Medical record services.
42 C.F.R. § 482.24(b).
25 Accreditation Association for Hospitals and Health Systems. (2017). Standard
10.00 .03. Healthcare Facilities Accreditation Program: Accreditation
requirements for acute care hospitals. Chicago, IL: Accreditation Association
for Hospitals and Health Systems. (Level VII)
26 DNV GL-Healthcare USA, Inc. (2016). MR.1 .SR.1 . NIAHO® accreditation
requirements: Interpretive guidelines & surveyor guidance (version 11).
Milford, OH: DNV GL-Healthcare USA, Inc. (Level VII)
27 Emergency Nurses Association. (2010). “Position statement: Family presence
during invasive procedures and resuscitation in the emergency department”
[Online]. Accessed via the Web at
https://emscimprovement.center/media/pediatric-readiness/pdfs/peds-ready-
toolkit/Family_Presence_During_Invasive_Procedures_and_Resuscitation_in_th
e_ED2125.pdf?la=en (Level VII)
28 American Association of Critical-Care Nurses (AACN). (2016). AACN practice
alert: Family presence during resuscitation and invasive procedures. Critical
Care Nurse, 36(1), e11–e15. Accessed via the Web at
http://ccn.aacnjournals.org/content/36/1/e11.full.pdf (Level VII)
29 Jabre, P., et al. (2014). Offering the opportunity for family to be present
during cardiopulmonary resuscitation: 1-year assessment. Intensive Care
Medicine, 40(7), 981–987. (Level II)
30 American Heart Association. (2015). 2015 American Heart Association
guidelines update for cardiopulmonary resuscitation and emergency
cardiovascular care. Circulation, 132, S465–S482. (Level II)
31 The Joint Commission. (2019). Standard NPSG.06 .01.01. Comprehensive
accreditation manual for hospitals. Oakbrook Terrace, IL: The Joint
Commission. (Level VII)
32 Graham, K. C., & Cvach, M. (2010). Monitor alarm fatigue: Standardizing use
of physiological monitors and decreasing nuisance alarms. American Journal
of Critical Care, 19(1), 28–37. Accessed via the Web at
http://ajcc.aacnjournals.org/content/19/1/28.full.pdf
33 American Association of Critical-Care Nurses (AACN). (2013). “A ACN practice
alert: Alarm management” [Online]. Accessed via the Web at
https://www.aacn.org/aacn-website/shared/content/practice-
alerts/2015/11/25/alarm-management (Level VII)
COLD APPLICATION
The application of cold constricts blood vessels; inhibits
local circulation, suppuration, and tissue metabolism;
relieves vascular congestion; slows bacterial activity in
infections; reduces body temperature; and may act as a
temporary anesthetic during brief, painful procedures. (See
Reducing pain with ice massage.) Cold helps decrease
edema by decreasing capillary permeability and causing
vasoconstriction. Because treatment with cold also relieves
inflammation, reduces edema, and slows bleeding, it may
provide effective initial treatment after eye injuries, strains,
sprains, bruises, muscle spasms, and burns. Studies show
that local application of cold may significantly reduce labor
pain during the first and second phases.1,2 Also referred to
as cryotherapy, cold therapy is typically used to relieve pain
following certain surgical procedures, including arthroscopy
or total joint replacement.3,4
Cold can be applied in dry or moist forms, but ice
shouldn’t be placed directly on a patient’s skin because it
may further damage tissue. Moist application is more
penetrating than dry application, because moisture
facilitates conduction. Devices for applying cold include ice
bags or collar, a cold therapy system, chemical cold packs,
and ice packs. Devices for applying moist cold include cold
compresses for small body areas and cold packs for large
areas.
Cold treatments should be used cautiously on patients
with impaired circulation, on children, and on elderly or
arthritic patients because of the risk of ischemic tissue
damage.
Equipment
Patient thermometer ▪ towel ▪ Optional: glove, dressings.
For an ice bag or collar
Ice bag or collar ▪ tap water ▪ ice chips ▪ absorbent,
protective cloth covering.
For a cold therapy system
Cooler control unit with tubing (differs by manufacturer) ▪
water ▪ cubed or chopped ice ▪ appropriate cooling pad ▪
power supply cord ▪ insulation barrier.
For a chemical cold pack
Single-use pack for applying dry cold ▪ cloth covering.
(These lightweight plastic packs contain a chemical that
turns cold when activated. Reusable cold packs filled with
alcohol-based solution are also available. You can store
these packs frozen until use and, after exterior disinfection,
you can refreeze then and use them again. You can activate
other chemical packs by striking, squeezing, or kneading
them.)
For a cold compress or pack
Basin of ice chips ▪ container of tap water ▪ bath
thermometer ▪ compress material (4′′ × 4′′ [10 cm × 10 cm]
gauze pads or washcloths) or pack material (towels or
flannel) ▪ fluid-impermeable pad ▪ waterproof covering ▪
tape or roller gauze.
Preparation of equipment
Ice bag or collar
Select a device of the correct size, fill it with cold tap water,
and check for leaks. Then empty the device and fill it about
halfway with crushed ice. Using small pieces of ice helps the
device mold to the patient’s body. Squeeze the device to
expel air that might reduce conduction. Fasten the cap and
wipe any moisture from the outside of the device. Wrap the
bag or collar in a cloth covering, and secure the cover with
tape or roller gauze. The protective cover prevents tissue
trauma and absorbs condensation.
Cold therapy system
Remove the cooler control unit lid and fill with water to the
indicated fill line. Then add cubed or chopped ice to the
indicated line. Replace and lock the lid. Connect the power
supply cord to the device and then to the electrical outlet.
Attach the cooling pad to the cooler control unit. Apply the
insulation barrier over the patient’s skin in the treatment
area, then apply the appropriate cooling pad over the
insulation barrier. Always follow the manufacturer’s
directions for use.
Chemical cold pack
Select a pack of the appropriate size and follow the
manufacturer’s directions (striking, squeezing, or kneading)
to activate the cold-producing chemicals. Make certain that
the container hasn’t been broken during activation. Wrap
the pack in a cloth covering and secure the cover with tape
or roller gauze.
Cold compress or pack
Cool a container of tap water by placing it in a basin of ice
or by adding ice to the water. Using a bath thermometer for
guidance, adjust the water temperature to 59°F (15°C) or as
ordered. Immerse the compress material or pack material in
the water.
Implementation
■ Select and prepare the appropriate cold device.
■ Perform hand hygiene.5,6,7,8,9,10
■ Confirm the patient’s identity using at least two patient
identifiers.11
■ Provide privacy.12,13,14,15
■ Explain the procedure to the patient and family (if
appropriate) according to their individual communication
and learning needs to increase their understanding, allay
their fears, and enhance cooperation.16
■ Make sure the room is warm and free from drafts.
■ Raise the patient’s bed to waist level when providing care
to prevent caregiver back strain.17
■ Record the patient’s temperature, pulse, and respirations
to serve as a baseline for comparison.
■ Perform hand hygiene.5,6,7,8,9,10
■ Put on gloves, as needed, to comply with standard
precautions.18,19,20
■ Expose only the treatment site to avoid chilling the
patient.
Applying an ice bag or collar, cold therapy
system, or a chemical cold pack
■ Place the covered cold device on the treatment site and
begin timing the application.
■ Observe the site frequently for signs of tissue intolerance,
such as blanching, mottling, cyanosis, maceration, and
blisters. Also, be alert for shivering and complaints of
burning or numbness. If these signs or symptoms develop,
discontinue treatment and notify the practitioner.
■ Refill or replace the cold device as necessary to maintain
the correct temperature. Change the protective cover if it
becomes wet.
■ Remove the device after the prescribed treatment period;
usually 10 minutes relieves pain and swelling in patients
with soft tissue injuries.21,22
Applying a cold compress or pack
■ Place a fluid-impermeable pad under the site.
■ Remove the compress or pack from the water and wring it
out to prevent dripping.
■ Apply the compress or pack to the treatment site and
begin timing the application.
Reducing pain with ice massage
Normally, ice shouldn’t be applied directly to a patient’s skin because it risks
damaging the skin surface and underlying tissues. However, when carefully
performed, a technique called ice massage may help patients tolerate brief,
painful procedures such as bone marrow aspiration, catheterization, chest
tube removal, injection into joints, lumbar puncture, and suture removal.
Prepare for ice massage by gathering the ice, a porous covering to hold it
in (if desired), and a cloth for wiping water from the patient as the ice melts.
One option for the ice is to freeze water in a paper cup ahead of time and
then remove the paper from half the cup, exposing the ice you’ll use for the
procedure.
Just before the procedure begins, rub the ice over the appropriate area to
numb it. Assess the site frequently; stop rubbing immediately if you detect
signs of tissue intolerance. As you begin the procedure, rub the ice over a
point near but not at the site. This action distracts the patient from the
procedure itself and gives the patient another stimulus to concentrate on. If
the procedure lasts longer than 10 minutes, or if you think tissue damage
may occur, move the ice to a different site and continue the massage.
If you know in advance that the procedure probably will last longer than 10
minutes, massage the site intermittently—2 minutes of massage alternating
with a rest period until the skin regains its normal color. Alternatively, you
can divide the area into several sites and apply ice to each one for several
minutes at a time.
■ Cover the compress or pack with a waterproof covering to
provide insulation and to keep the surrounding area dry.
Secure the covering with tape or roller gauze to prevent it
from slipping.
■ Observe the treatment site frequently for signs of tissue
intolerance, such as blanching, mottling, cyanosis,
maceration, and blisters. Note complaints of burning or
numbness. If these issues develop, discontinue treatment
and notify the practitioner.
■ Change the compress or pack as needed to maintain the
correct temperature.
■ Remove it after the prescribed treatment period; usually
10 minutes relieves pain and swelling in patients with soft
tissue injuries.21,22
Concluding all cold applications
■ Dry the patient’s skin and re-dress the treatment site
according to the practitioner’s orders.
■ Position the patient comfortably
■ Assess the patient’s temperature, pulse, and respirations
and compare them with baselines to determine the patient’s
tolerance of the procedure.
■ Return the bed to the lowest position to prevent falls and
maintain patient safety.23
■ Properly dispose of liquids and soiled materials.
■ If treatment will be repeated, clean and store the
equipment in the patient’s room, out of the patient’s reach;
otherwise, return it to storage.
■ Remove and discard your gloves if worn
■ Perform hand hygiene.5,6,7,8,9,10
■ Document the procedure.24,25,26,27
Special considerations
■ Apply cold immediately after an injury to minimize
edema. Although colder temperatures can be tolerated for a
longer time when the treatment site is small, don’t continue
any application for longer than 1 hour to avoid reflex
vasodilation. The application of temperatures below 59°F
(15°C) also causes local reflex vasodilation.
■ Use sterile technique when applying cold to an open
wound or to a lesion that may open during treatment to
prevent wound contamination. Also, maintain sterile
technique during eye treatment, with separate sterile
equipment for each eye to prevent cross-contamination.
■ Avoid securing cooling devices with pins, because an
accidental puncture could allow extremely cold fluids to leak
out and burn the patient’s skin.
■ If the patient is unconscious, anesthetized, neurologically
or cognitively impaired, or otherwise insensitive to cold,
stay in the room throughout the treatment and check the
treatment site frequently for complications.
PATIENT TEACHING
Using cold for a muscle sprain
For each application, instruct the patient to obtain enough crushed ice to
cover the painful area, place it in a plastic bag, and place the bag inside a
pillowcase or large piece of cloth, as shown below.
For later applications, the patient may want to fill a paper cup with water,
stand a tongue blade in the cup, and place it in the freezer. After the water
freezes, the patient can peel the paper off the ice and hold it with the
protruding handle. If using this method, tell the patient to first cover the area
with a cloth, because applying ice directly to the skin can cause frostbite or
cold shock.
Instruct the patient to rub the ice over the painful area for the specified
treatment time or at least for more than 20 minutes. Warn the patient that
although ice eases pain in a joint that has begun to stiffen, the patient
shouldn’t let the analgesic effect encourage overuse of the joint.
After 24 to 72 hours, when heat and swelling have subsided or when cold
no longer helps, the patient should switch to heat application, as directed.
(See the “Heat application” procedure, page 340.)
Patient teaching
■ Teach the patient how to apply cold for a muscle sprain so
the patient can properly do so after returning home, if
appropriate. (See Using cold for a muscle sprain.) Instruct
the patient and family on the use of the cold therapy
system, if ordered, after an orthopedic procedure.
Complications
Hemoconcentration may cause thrombi. Intense cold may
cause pain, burning, or numbness.
Documentation
Record the time, date, and duration of cold application; the
type of device used (ice bag or collar, cold therapy system,
or chemical cold pack); the application site; the temperature
or temperature setting (if available); the patient’s
temperature, pulse, and respirations before and after
application; skin appearance before, during, and after
application; signs of complications; and the patient’s
tolerance of treatment. Document any patient teaching
provided and the patient’s understanding of that teaching.
REFERENCES
1 Shirvani, M. A., & Ganji, Z. (2014). The influence of cold pack on labour pain
relief and birth outcomes: A randomized controlled trial. Journal of Clinical
Nursing, 23(17–18), 2473–2480.
2 Pour, H. A., & Yavuz, M. (2014). Effects of peripheral cold application on core
body temperature and haemodynamic parameters in febrile patients.
International Journal of Nursing Practice, 20(2), 156–163.
3 Fang, L., et al. (2012). The effects of cryotherapy in relieving postarthroscopy
pain. Journal of Clinical Nursing, 21(5–6), 636–643. (Level VI)
4 Meyer-Marcotty, M., et al. (2011). Standardized combined cryotherapy and
compression using Cryo/Cuff after wrist arthroscopy. Knee Surgery, Sports
Traumatology, Arthroscopy, 19(2), 314–319. (Level VI)
5 The Joint Commission. (2019). Standard NPSG.07.01.01. Comprehensive
accreditation manual for hospitals. Oakbrook Terrace, IL: The Joint
Commission. (Level VII)
6 Centers for Disease Control and Prevention. (2002). Guideline for hand
hygiene in health-care settings: Recommendations of the Healthcare Infection
Control Practices Advisory Committee and the HICPAC/SHEA/APIC/IDSA Hand
Hygiene Task Force. MMWR Recommendations and Reports, 51(RR-16), 1–45.
Accessed via the Web at https://www.cdc.gov/mmwr/pdf/rr/rr5116.pdf (Level
II)
7 World Health Organization. (2009). “WHO guidelines on hand hygiene in
health care: First global patient safety challenge, clean care is safer care”
[Online]. Accessed via the Web at
http://apps.who.int/iris/bitstream/10665/44102/1/9789241597906_eng.pdf
(Level IV)
8 Accreditation Association for Hospitals and Health Systems. (2017). Standard
07.01.21. Healthcare Facilities Accreditation Program: Accreditation
requirements for acute care hospitals. Chicago, IL: Accreditation Association
for Hospitals and Health Systems. (Level VII)
9 Centers for Medicare and Medicaid Services, Department of Health and
Human Services. (2015). Condition of participation: Infection control. 42 C.F.R.
§ 482.42.
10 DNV GL-Healthcare USA, Inc. (2016). IC.1 .SR.1 . NIAHO® accreditation
requirements: Interpretive guidelines & surveyor guidance (version 11).
Milford, OH: DNV GL-Healthcare USA, Inc. (Level VII)
11 The Joint Commission. (2019). Standard NPSG.01.01.01. Comprehensive
accreditation manual for hospitals. Oakbrook Terrace, IL: The Joint
Commission. (Level VII)
12 Centers for Medicare and Medicaid Services, Department of Health and
Human Services. (2015). Condition of participation: Patient’s rights. 42 C.F.R.
§ 482.13(c)(1).
13 Accreditation Association for Hospitals and Health Systems. (2017). Standard
15.01.16. Healthcare Facilities Accreditation Program: Accreditation
requirements for acute care hospitals. Chicago, IL: Accreditation Association
for Hospitals and Health Systems. (Level VII)
14 DNV GL-Healthcare USA, Inc. (2016). PR.1.SR.5 . NIAHO® accreditation
requirements: Interpretive guidelines & surveyor guidance (version 11).
Milford, OH: DNV GL-Healthcare USA, Inc. (Level VII)
15 The Joint Commission. (2019). Standard RI.01.01.01. Comprehensive
accreditation manual for hospitals. Oakbrook Terrace, IL: The Joint
Commission. (Level VII)
16 The Joint Commission. (2019). Standard PC.02.01.21. Comprehensive
accreditation manual for hospitals. Oakbrook Terrace, IL: The Joint
Commission. (Level VII)
17 Waters, T. R., et al. (2009). “Safe patient handling training for schools of
nursing” [Online]. Accessed via the Web at
http://www.cdc.gov/niosh/docs/2009-127/pdfs/2009-127.pdf (Level VII)
18 Accreditation Association for Hospitals and Health Systems. (2017). Standard
07.01.10. Healthcare Facilities Accreditation Program: Accreditation
requirements for acute care hospitals. Chicago, IL: Accreditation Association
for Hospitals and Health Systems. (Level VII)
19 Siegel, J. D ., et al. (2007, revised 2017). “2007 guideline for isolation
precautions: Preventing transmission of infectious agents in healthcare
settings” [Online]. Accessed via the Web at
https://www.cdc.gov/infectioncontrol/pdf/guidelines/isolation-guidelines.pdf
(Level II)
20 DNV GL-Healthcare USA, Inc. (2016). IC.1 .SR.2 . NIAHO® accreditation
requirements: Interpretive guidelines and & surveyor guidance (version 11).
Milford, OH: DNV GL-Healthcare USA, Inc. (Level VII)
21 Eustice, C. (2017). “R.I .C .E. treatment for acute musculoskeletal injury: Self-
care to reduce pain and swelling with soft tissue injuries” [Online]. Accessed
via the Web at https://www.verywell.com/what-is-rice-190446
22 Kuo, C. C ., et al. (2013). Comparing the antiswelling and analgesic effects of
three different ice pack therapy durations: A randomized controlled trial on
cases with soft tissue injuries. Journal of Nursing Research, 21(3), 186–194.
(Level II)
23 Ganz, D. A., et al. (2013). Preventing falls in hospitals: A toolkit for improving
quality of care (AHRQ Publication No. 13-0015-EF). Rockville, MD: Agency for
Healthcare Research and Quality. Accessed via the Web at
http://www.ahrq.gov/sites/default/files/publications/files/fallpxtoolkit.pdf
(Level VII)
24 The Joint Commission. (2019). Standard RC.01.03 .01. Comprehensive
accreditation manual for hospitals. Oakbrook Terrace, IL: The Joint
Commission. (Level VII)
25 Accreditation Association for Hospitals and Health Systems. (2017). Standard
10.00 .03. Healthcare Facilities Accreditation Program: Accreditation
requirements for acute care hospitals. Chicago, IL: Accreditation Association
for Hospitals and Health Systems. (Level VII)
26 Centers for Medicare and Medicaid Services, Department of Health and
Human Services. (2015). Condition of participation: Medical record services.
42 C.F.R. § 482.24(b).
27 DNV GL-Healthcare USA, Inc. (2016). MR.2 .SR.1 . NIAHO® accreditation
requirements: Interpretive guidelines & surveyor guidance (version 11).
Milford, OH: DNV GL-Healthcare USA, Inc. (Level VII)
COLOSTOMY AND ILEOSTOMY CARE
A patient with an ascending, transverse, or descending
colostomy or an ileostomy must wear an external pouch to
collect emerging fecal matter, which may be watery, pasty,
or formed, depending on location of the stoma. Besides
collecting waste matter, the pouch helps to control odor and
protect the stoma and peristomal skin. Most disposable
pouching systems can be used for 3 to 7 days;1 however,
single-use, closed-end pouches should be changed more
frequently.
All pouching systems need to be changed immediately if a
leak develops, and every pouch needs emptying when it’s
one-third to one-half full. The patient with an ileostomy may
need to empty the pouch four or five times daily.
The best time to change the pouching system is when the
bowel is least active, usually in the morning before
breakfast. After a few months, most patients can predict the
best changing time.
The selection of a pouching system should take into
consideration which system provides the best adhesive seal
and skin protection for the individual patient. The type of
pouch selected also depends on the stoma’s location and
structure, abdominal contours, availability of supplies, wear
time, consistency of output, personal preference, patient or
caregiver ability to manage the stoma, and cost.2
Equipment
Pouching system ▪ water ▪ soft cloths or gauze ▪ gloves ▪
facility-approved ostomy skin assessment tool2,3,4 ▪
Optional: scissors, stoma measuring guide, stoma paste or
moldable barrier ring, closure clamp, paper tape, clippers,
liquid skin sealant, pouch deodorant.
Pouching systems may be disposable or reusable,
drainable or closed-ended, and one-piece or two-piece. (See
Comparing ostomy pouching systems, page 194.)
Implementation
■ Gather the appropriate equipment.
■ Perform hand hygiene.5,6,7,8,9,10
■ Confirm the patient’s identity using at least two patient
identifiers.11
■ Provide privacy.12,13,14,15
■ Explain the procedure to the patient and family (if
appropriate) according to their individual communication
and learning needs to increase their understanding, allay
their fears, and enhance cooperation.16 As you perform
each step, explain what you are doing and why, because the
patient will eventually need to perform the procedure
independently. Provide emotional support, as needed.
■ Raise the bed to waist level while providing patient care
to prevent caregiver back strain.17
■ Perform hand hygiene.6,7,8,9,10
■ Put on gloves to comply with standard precautions.18,19
Fitting the skin barrier and pouch
■ For a pouch with an attached skin barrier (one-piece
pouch), measure the stoma with the measuring guide.
Select the opening size that matches the stoma.
■ For an adhesive-backed pouch with a separate skin
barrier (two-piece pouch), measure the stoma with the
measuring guide and select the opening that matches the
stoma. Trace the selected size opening onto the paper back
of the skin barrier’s adhesive side. Cut out the opening. If
the pouch has precut openings, which can be handy for a
round stoma, select an opening that’s 1⁄8′′ (0.3 cm) larger
than the stoma. If the pouch comes without an opening, cut
the hole 1⁄8′′ (0.3 cm) wider than the measured tracing
(although many pouching systems can now be fit up to the
stoma edge without risk of trauma to the stoma). The cut-
to-fit system works best for an irregularly shaped stoma.
(See Applying a skin barrier and pouch, page 195.)
Applying or changing the pouch
■ Empty, remove, and discard the old pouch, if applicable
(as shown on top right).
■ Wipe the stoma and peristomal skin gently with a soft
cloth or gauze (as shown below).
■ Carefully wash the peristomal skin with water and dry by
patting gently. Allow the skin to dry thoroughly. Inspect the
peristomal skin and stoma (as shown below). If necessary,
clip surrounding hair (in a direction away from the stoma) to
promote a better seal and avoid skin irritation from hair
pulling against the adhesive.
■ You may want to apply a ring of stoma paste or a molded
barrier ring around the opening on the back of the skin
barrier (depending on the type of stoma, abdominal
contours, and effluent) to provide extra skin protection and
a better seal to prevent leakage.
■ If applying a two-piece appliance with a separate skin
barrier, peel off the paper backing of the prepared skin
barrier, center the barrier over the stoma, and press gently
to ensure adhesion.
■ For a pouching system with flanges, align the lip of the
pouch flange with the bottom edge of the skin barrier
flange. Gently press around the circumference of the pouch
flange, beginning at the bottom, until the pouch securely
adheres to the barrier flange. (The pouch will click into its
secured position.) Holding the barrier against the skin,
gently pull on the pouch to confirm the seal between
flanges. When using a two-piece adhesive coupling device,
line up the adhesive portion of the pouch to the “landing
zone” of the wafer. Press together for adhesion. You can
attach the pouches used in a two-piece system to the wafer
before application if the patient is still experiencing
incisional discomfort.
Comparing ostomy pouching
systems
Manufactured in many shapes and sizes, ostomy pouches are fashioned for
comfort, safety, and easy application. For example, a disposable, closed-end
pouch may meet the needs of a patient who irrigates the ostomy, who wants
added security, or who wants to discard the pouch after each bowel
movement. Another patient may prefer a reusable, drainable pouch. Some
commonly available pouches are described below.
Disposable pouches
The patient who must empty the pouch often (because of diarrhea or a new
colostomy or ileostomy) may prefer a one-piece, drainable, disposable pouch
with a closure clamp attached to a skin barrier (as shown below). These
transparent or opaque, odor-proof plastic pouches come with attached
adhesive backing. Some pouches have microporous adhesive or belt tabs.
The bottom opening allows for easy draining. This pouch may be used
permanently or temporarily, until stoma size stabilizes.
Also disposable and also made of transparent or opaque odor-proof plastic,
a one-piece, disposable, closed-end pouch may come with a filter. A patient
with a regular bowel elimination pattern may choose this style for additional
security and confidence.
A two-piece, drainable, disposable pouch with separate skin barrier (as
shown below) permits more frequent pouch changes. Also made of
transparent or opaque odor-proof plastic, this style comes with belt tabs and
usually snaps to the skin barrier with a flange mechanism. Newer, two-piece
pouches have an adhesive coupling. The pouch sticks to the wafer, allowing
greater flexibility and comfort.
Reusable pouches
Typically manufactured from sturdy, opaque, hypoallergenic plastic, the
reusable pouch comes with a separate custom-made faceplate and O-ring.
The device has a 1- to 3-month life span, depending on how frequently the
patient empties the pouch. Reusable equipment may benefit a patient who
needs a firm faceplate or who wishes to minimize cost.
■ Encourage the patient to stay quietly in position for about
5 minutes to improve adherence. The patient’s body warmth
helps to improve adherence and soften a rigid skin barrier.
■ Leave a bit of air in the pouch to allow drainage to fall to
the bottom.
■ Apply the closure clamp, if necessary.
■ Return the bed to the lowest positon to prevent falls and
maintain patient safety.20
■ Dispose of all used supplies in appropriate receptacles.21
■ Remove and discard your gloves.18,19
■ Perform hand hygiene.6,7,8,9,10
■ Document the procedure.22,23,24,25
Special considerations
■ When caring for a stoma during the immediate
postoperative period, select an appliance with a larger
opening, adjust the size of the appliance skin barrier by
cutting a larger opening, or cut radial slits in the skin barrier
to allow for flexibility, because a newly created stoma may
become edematous over the first 24 to 48 hours. Use a
sealant to protect skin integrity around the opening. Adjust
the size of the opening as stomal swelling subsides. Avoid
cutting the opening too big after the initial postoperative
period to prevent peristomal skin complications.2
■ Between 6 and 8 weeks after surgery, the stoma will
shrink to its permanent size. At that point, pattern-making
preparations will be unnecessary unless the patient gains
weight, has additional surgery, or injures the stoma.
■ Use commercial pouch deodorants, if desired, although,
most pouches are odor-free; odor should only be evident
when you empty the pouch or if it leaks. Before discharge,
suggest that, if desired, the patient avoid odor-causing
foods, such as fish, eggs, onions, and garlic.
■ If the patient wears a reusable pouching system, suggest
obtaining two or more systems so the patient can wear one
while the other dries after cleaning with soap and water or a
commercially prepared cleaning solution.
■ Most ostomy product manufacturers will provide a patch
test, if requested, to determine whether the patient has an
allergy to a specific ostomy appliance care product.3
Patient teaching
After performing and explaining the procedure to the patient
and caregiver, encourage the patient’s increasing
involvement in self-care. Before discharge, make sure that
the patient and family can care for the ostomy. Provide
written instructions and information about obtaining
replacement equipment. Offer the patient and caregiver a
pamphlet or video instructions related to ostomy care. Make
sure that the patient or caregiver feels comfortable calling
the practitioner, nurse, or wound-ostomy-continence nurse
(WOCN) to ask questions or discuss problems. Refer the
patient to a local ostomy group. Provide counseling on
nutrition, clothing, medications, body image, psychosocial
issues,
interpersonal
relationships,
and
possible
complications.1,3
Complications
Failure to fit the pouch properly over the stoma can injure
the stoma and may cause leakage, which can induce
peristomal skin irritation. Be alert for a possible allergic
reaction to adhesives and other ostomy products.
Documentation
Record the date and time of the pouching system change or
emptying; note the character of drainage, including color,
amount, type, and consistency. Also describe the
appearance of the stoma and the peristomal skin using a
facility-approved assessment tool if possible.2,3,4 Document
any patient teaching provided. Record the patient’s
response to self-care, and evaluate the learning progress.
EQUIPMENT
Applying a skin barrier and pouch
Fitting a skin barrier and ostomy pouch properly can be done in a few steps.
Shown below is a one-piece pouching system with flanges.
1. Measure the stoma using a measuring guide.
2. Trace the appropriate circle carefully on the back of the skin barrier.
3. Cut the circular opening in the skin barrier (or cut the opening to reflect
the configuration of the stoma if it’s not circular). Smooth any rough edges
with your finger.
4. Remove the backing from the skin barrier and apply barrier paste or
moldable barrier ring, as needed, along the edge of the circular opening.
5. Center a one-piece system over the stoma, adhesive side down, and
gently press it to the skin. When using a two-piece system, apply the wafer
and then gently press the pouch opening onto the ring until it snaps into
place. When using a two-piece adhesive coupling device, line up the
adhesive portion of the pouch to the “landing zone” of the wafer. Press
together for adhesion. The pouches used in a two-piece system can be
attached to the wafer before application and applied like a one-piece system
if the patient is still experiencing incisional discomfort. Other two-piece
systems have a floating flange that allows the user to insert the fingers
underneath so that snapping the flange to the pouch doesn’t exert pressure.
6. Close the bottom of the pouch by folding the end upward and using the
clip that comes with the product, or close the integrated closure system.
REFERENCES
1 Wound, Ostomy, and Continence Nurses Society. (2010). Management of the
patient with a fecal ostomy: Best practice guideline for clinicians. Journal of
Wound, Ostomy and Continence Nursing, 37(6), 596–598. (Level VII)
2 Australian Association of Stomal Therapy Nurses, Inc. (2013). “Clinical
guidelines for stomal therapy nursing practice” [Online]. Accessed via the
Web at
http://www.stomaltherapy.com/documents/AASTN_Guidelines_book_2013.pdf
(Level VII)
3 Jordan, R., & Christian, M. (2013). Understanding peristomal skin
complications. Wound Care Advisor, 2(3), 36–41. Accessed via the Web at
https://woundcareadvisor.com/understanding-periostomal-skin-
complications_vol2_no3/ (Level VII)
4 Haugen, V., & Ratliff, C. R. (2013). Tools for assessing peristomal skin
complications. Journal of Wound, Ostomy, and Continence Nursing, 40(2),
131–134.
5 Centers for Disease Control and Prevention. (2002). Guideline for hand
hygiene in health-care settings: Recommendations of the Healthcare Infection
Control Practices Advisory Committee and the HICPAC/SHEA/APIC/IDSA Hand
Hygiene Task Force. MMWR Recommendations and Reports, 51(RR-16), 1–45.
Accessed via the Web at https://www.cdc.gov/mmwr/pdf/rr/rr5116.pdf (Level
II)
6 The Joint Commission. (2019). Standard NPSG.07.01.01. Comprehensive
accreditation manual for hospitals. Oakbrook Terrace, IL: The Joint
Commission. (Level VII)
7 World Health Organization. (2009). “WHO guidelines on hand hygiene in
health care: First global patient safety challenge, clean care is safer care”
[Online]. Accessed via the Web at
http://apps.who.int/iris/bitstream/10665/44102/1/9789241597906_eng.pdf
(Level IV)
8 Accreditation Association for Hospitals and Health Systems. (2017). Standard
07.01.21. Healthcare Facilities Accreditation Program: Accreditation
requirements for acute care hospitals. Chicago, IL: Accreditation Association
for Hospitals and Health Systems. (Level VII)
9 Centers for Medicare and Medicaid Services, Department of Health and
Human Services. (2015). Condition of participation: Infection control. 42 C.F.R.
§ 482.42.
10 DNV GL-Healthcare USA, Inc. (2016). IC.1 .SR.1 . NIAHO® accreditation
requirements: Interpretive guidelines & surveyor guidance (version 11).
Milford, OH: DNV GL-Healthcare USA, Inc. (Level VII)
11 The Joint Commission. (2019). Standard NPSG.01.01.01. Comprehensive
accreditation manual for hospitals. Oakbrook Terrace, IL: The Joint
Commission. (Level VII)
12 Accreditation Association for Hospitals and Health Systems. (2017). Standard
15.01.16. Healthcare Facilities Accreditation Program: Accreditation
requirements for acute care hospitals. Chicago, IL: Accreditation Association
for Hospitals and Health Systems. (Level VII)
13 Centers for Medicare and Medicaid Services, Department of Health and
Human Services. (2015). Condition of participation: Patient’s rights. 42 C.F.R.
§ 482.13(c)(1).
14 The Joint Commission. (2019). Standard RI.01.01.01. Comprehensive
accreditation manual for hospitals. Oakbrook Terrace, IL: The Joint
Commission. (Level VII)
15 DNV GL-Healthcare USA, Inc. (2016). PR.1.SR.5 . NIAHO® accreditation
requirements: Interpretive guidelines & surveyor guidance (version 11).
Milford, OH: DNV GL-Healthcare USA, Inc. (Level VII)
16 The Joint Commission. (2019). Standard PC.02.01.21. Comprehensive
accreditation manual for hospitals. Oakbrook Terrace, IL: The Joint
Commission. (Level VII)
17 Waters, T. R., et al. (2009). “Safe patient handling training for schools of
nursing” [Online]. Accessed via the Web at
https://www.cdc.gov/niosh/docs/2009-127/pdfs/2009-127.pdf (Level VII)
18 Siegel, J. D ., et al. (2007, revised 2017). “2007 guideline for isolation
precautions: Preventing transmission of infectious agents in healthcare
settings” [Online]. Accessed via the Web at
https://www.cdc.gov/infectioncontrol/pdf/guidelines/isolation-guidelines.pdf
(Level II)
19 Accreditation Association for Hospitals and Health Systems. (2017). Standard
07.01.10. Healthcare Facilities Accreditation Program: Accreditation
requirements for acute care hospitals. Chicago, IL: Accreditation Association
for Hospitals and Health Systems. (Level VII)
20 Ganz, D. A., et al. (2013). Preventing falls in hospitals: A toolkit for improving
quality of care (AHRQ Publication No. 13-0015-EF). Accessed via the Web at
https://www.ahrq.gov/sites/default/files/publications/files/fallpxtoolkit_0 .pdf
(Level VII) (Level VII)
21 Occupational Safety and Health Administration. (n.d .). “Bloodborne
pathogens, standard number 1910.1030” [Online]. Accessed via the Web at
https://www.osha.gov/pls/oshaweb/owadisp.show_document?
p_id=10051&p_table=STANDARDS (Level VII)
22 The Joint Commission. (2019). Standard RC.01.03 .01. Comprehensive
accreditation manual for hospitals. Oakbrook Terrace, IL: The Joint
Commission. (Level VII)
23 Accreditation Association for Hospitals and Health Systems. (2017). Standard
10.00 .03. Healthcare Facilities Accreditation Program: Accreditation
requirements for acute care hospitals. Chicago, IL: Accreditation Association
for Hospitals and Health Systems. (Level VII)
24 Centers for Medicare and Medicaid Services, Department of Health and
Human Services. (2015). Condition of participation: Medical record services.
42 C.F.R. § 482.24(b).
25 DNV GL-Healthcare USA, Inc. (2016). MR.2 .SR.1 . NIAHO® accreditation
requirements: Interpretive guidelines & surveyor guidance (version 11).
Milford, OH: DNV GL-Healthcare USA, Inc. (Level VII)
COLOSTOMY IRRIGATION
Colostomy irrigation involves instilling warm water (irrigant)
into the colon via a descending or sigmoid colostomy stoma.
The warm water helps to stimulate bowel peristalsis and
trains the bowel to empty at this specific time. The goal of
irrigation is to prevent the passage of feces or flatus
between irrigations, which may allow the patient to use only
a cap, mini-pouch, or patch to protect the stoma, making
the colostomy less visible through clothing. This goal can be
achieved when irrigation is performed daily or every 2 to 3
days in select patients.1 Colostomy irrigation may also be
used to empty the large bowel before diagnostic testing
(such as colonoscopy) or colon surgery.2 The surgeon
typically determines whether a patient is a candidate for
colostomy irrigation.2
Although colostomy irrigation may begin as soon as bowel
function resumes, most practitioners recommend waiting
until bowel movements are more predictable. After
colostomy irrigation is initiated, it may take 4 to 6 weeks
before bowel emptying becomes regulated. Colostomy
irrigation is most effective when performed 1 hour after a
meal and at the same time each day.2
Colostomy irrigation is contraindicated in patients with
bowel disease, irritable bowel syndrome, hernia, severe
heart or kidney disease, an ascending or transverse
colostomy, or an ileostomy.2
Equipment
Colostomy irrigation set (irrigation drain or sleeve, ostomy
belt, water-soluble lubricant, drainage pouch clamp,
irrigation bag with clamp and tubing, cone tip, clip) ▪ 1 L (1
qt) tap water ▪ IV pole or wall hook ▪ washcloth ▪ towel ▪
water ▪ ostomy appliance ▪ gloves ▪ facility-approved
ostomy skin assessment tool3,4,5 ▪
Optional: fluid-
impermeable pad, bedpan, chair, graduated measuring
container, small dressing or bandage, stoma cap.
Preparation of equipment
Depending on the patient’s condition, colostomy irrigation
may be performed using a bedpan or in the bathroom using
a chair and the toilet.
Set up the irrigation bag, tubing, and cone tip. If irrigation
will take place with the patient in bed, place the bedpan
beside the bed and elevate the head of the bed between 45
and 90 degrees, if allowed. If irrigation will take place in the
bathroom, have the patient sit on the toilet or on a chair
facing the toilet, whichever the patient finds more
comfortable.
Fill the irrigation bag with warmed tap water. Hang the
bag on the IV pole or wall hook. The bottom of the bag
should be at the patient’s shoulder level to prevent the fluid
from entering the bowel too quickly. Most irrigation sets also
have a clamp that regulates the flow rate.
Prime the tubing with irrigant to prevent air from entering
the colon and possibly causing cramps and gas pains.
Implementation
■ Perform hand hygiene.6,7,8,9,10,11
■ Confirm the patient’s identity using at least two patient
identifiers.12
■ Provide privacy.13,14,15,16
■ Explain the procedure to the patient and family (if
appropriate) according to their individual communication
and learning needs to increase their understanding, allay
their fears, and enhance cooperation.17 Explain every step
of the procedure to the patient, because eventually the
patient will be irrigating the colostomy independently.
■ If the patient is in bed, raise the bed to waist level to
prevent caregiver back strain.18
■ Perform hand hygiene.6,7,8,9,10,11
■ Put on gloves to comply with standard precautions.19,20
■ If the patient is in bed or in a chair, place a fluid-
impermeable pad under the patient to protect the sheets or
chair surface from soiling.
■ Remove the ostomy appliance if the patient uses one.
■ Place the irrigation sleeve over the stoma. If the sleeve
doesn’t have an adhesive backing, secure the sleeve with
an ostomy belt. If the patient has a two-piece pouching
system with flanges, snap off the pouch and save it. Snap
on the irrigation sleeve.
■ Place the open-ended bottom of the irrigation sleeve in
the bedpan, toilet, or appropriate measuring container to
promote drainage by gravity.
■ Lubricate your gloved small finger with water-soluble
lubricant and insert the finger into the stoma. If you’re
teaching the patient, have the patient do this step to
determine the bowel angle at which to insert the cone
safely. Expect the stoma to tighten when the finger enters
the bowel and then to relax in a few seconds.
■ Lubricate the cone with water-soluble lubricant to prevent
it from irritating the mucosa.
■ Insert the cone into the top opening of the irrigation
sleeve and then into the stoma. Angle the cone to match
the bowel angle. Insert it gently but snugly; never force it in
place.
■ Instruct the patient to take slow, deep breaths to relax
the abdominal muscles.21
■ Unclamp the irrigation tubing and allow the water to flow
slowly. If you don’t have a clamp to control the irrigant’s
flow rate, pinch the tubing to control the flow. The water
should enter the colon over 5 to 10 minutes.
■ Explain that the patient may experience a sensation of
fullness or bloating during the instillation.21 If the patient
reports cramping, slow or stop the flow, keep the cone in
place, and have the patient take a few deep breaths until
the cramping stops. Cramping during irrigation may result
from a bowel that’s ready to empty, water that’s too cold, a
rapid flow rate, or air in the tubing.
■ After 15 minutes, close the bottom of the irrigation sleeve
with the clip provided in the irrigation kit. The initial return
of water and stool occurs within 15 minutes after
irrigation.21 Have the patient remain stationary for 15 or 20
minutes to allow the initial effluent to drain.
■ Encourage an ambulatory patient to perform activities of
daily living during the next 30 to 45 minutes to stimulate
peristalsis and evacuation of stool.2 Instruct the
nonambulatory patient to massage the abdomen or lean
forward to stimulate peristalsis and evacuation of stool.2,21
■ After 45 minutes, empty the contents of the irrigation
sleeve into the bedpan, toilet, or appropriate measuring
container.
■ Measure output, as ordered; subtract the amount of
irrigant used from the total amount of effluent to determine
the amount of effluent.
■ Remove the irrigation sleeve.
■ Using a washcloth and water, gently clean the area
around the stoma. Rinse it, and then dry the area
thoroughly with a clean towel.
■ Inspect the peristomal skin and stoma. Use a facility-
approved assessment tool if available to objectively identify
and track changes in peristomal skin. Use the tool to assess
for discoloration, erosion, and tissue overgrowth.3,4,5
Observe for signs of mechanical, chemical, allergic,
infectious, or disease-related complications (which may be
linked to preexisting skin conditions, such as psoriasis,
eczema, or seborrheic dermatitis). Notify the practitioner or
a wound-ostomy-continence nurse of changes, as needed.
■ Apply a clean ostomy appliance. (See the “Colostomy and
ileostomy care” procedure, page 193.) The patient who has
a regular bowel elimination pattern may prefer a small
dressing, bandage, or commercial stoma cap.
■ Discard a disposable irrigation sleeve in the appropriate
receptacle.19,20 Rinse a reusable irrigation sleeve with mild
soap and water and hang it to dry along with the irrigation
bag, tubing, and cone.21,22
■ If the patient’s bed was raised for patient care, return it to
the lowest position to prevent falls and maintain patient
safety.23
■ Remove and discard your gloves.19,20
■ Perform hand hygiene.6,7,8,9,10,11
■ Document the procedure.24,25,26,27
Special considerations
■ Irrigating a colostomy to establish a regular bowel
elimination pattern doesn’t work for all patients. If the bowel
continues to move between irrigations, try decreasing the
volume of irrigant. Increasing the irrigant won’t help
because it serves only to stimulate peristalsis. Keep a record
of results. Also consider irrigating every other day.
■ Irrigation may help to regulate bowel function in patients
with a descending or sigmoid colostomy because this is the
bowel’s stool storage area. However, a patient with an
ascending or transverse colostomy won’t benefit from
irrigation. Also, a patient with a descending or sigmoid
colostomy who’s missing part of the ascending or
transverse colon may not be able to irrigate successfully
because the ostomy may function like an ascending or
transverse colostomy.
■ If diarrhea develops, discontinue irrigations until stools
form again. Keep in mind that irrigation alone won’t achieve
regularity; the patient must also observe a complementary
diet and exercise regimen.
■ If the patient has a strictured stoma that prohibits cone
insertion, remove the cone from the irrigation tubing and
replace it with a soft silicone catheter. Angle the catheter
gently 2′′ to 4′′ (5 to 10 cm) into the bowel to instill the
irrigant. Don’t force the catheter into the stoma, and don’t
insert it further than the recommended length because you
may perforate the bowel.
Patient teaching
After explaining the procedure to, and performing the
procedure on, the patient, encourage the patient’s
increasing involvement in self-care. Discuss the patient’s
bathroom setup, how to hang the irrigation bag, and how to
manage all of the equipment to avoid spills. Also discuss
how to avoid excessive tiredness during the procedure.
Teach the patient who will use reusable irrigation bags to
discard the bags after 1 month (or sooner if an odor is
detected). Teach the patient to monitor food intake to
determine whether certain foods are interfering with the
irrigation outcomes. Offer written instructions and
information on obtaining replacement equipment.
Complications
Bowel perforation may result if a catheter is incorrectly
inserted into the stoma. Fluid and electrolyte imbalances
may result from using too much irrigant.
Documentation
Record the date and time of irrigation and the type and
amount of irrigant. Note the stoma’s color and the character
of drainage, including the color, consistency, and amount.
Record any patient teaching. Describe teaching content and
the patient’s response to self-care instruction. Evaluate the
patient’s learning progress.
REFERENCES
1 Grant, M., et al. (2012). Irrigation practices in long-term survivors of
colorectal cancer with colostomies. Clinical Journal of Oncology Nursing,
16(5), 514–519. Accessed via the Web at
http://www.ncbi.nlm.nih.gov/pmc/articles/PMC3951489/ (Level VI)
2 Wound, Ostomy and Continence Nurses Society. (2010). Management of the
patient with a fecal ostomy: Best practice guideline for clinicians. Journal of
Wound, Ostomy and Continence Nursing, 37(6), 596–598. (Level VII)
3 Haugen, H., & Ratliff, C. R. (2013). Tools for assessing peristomal skin
complications. Journal of Wound, Ostomy, and Continence Nursing, 40(2),
131–134. (Level VII)
4 Jordan, R., & Christian, M. (2013). Understanding peristomal skin
complications. Wound Care Advisory, 2(2), 36–41 . Accessed via the Web at
https://woundcareadvisor.com/understanding-periostomal-skin-
complications_vol2_no3/ (Level VII)
5 Australian Association of Stomal Therapy Nurses, Inc. (AASTN). (2013).
“Clinical guidelines for stomal therapy nursing practice” [Online]. Accessed
via the Web at
http://www.stomaltherapy.com/documents/AASTN_Guidelines_book_2013.pdf
(Level VII)
6 The Joint Commission. (2019). Standard NPSG.07.01.01. Comprehensive
accreditation manual for hospitals. Oakbrook Terrace, IL: The Joint
Commission. (Level VII)
7 Centers for Disease Control and Prevention. (2002). Guideline for hand
hygiene in health-care settings: Recommendations of the Healthcare Infection
Control Practices Advisory Committee and the HICPAC/SHEA/APIC/IDSA Hand
Hygiene Task Force. MMWR Recommendations and Reports, 51(RR-16), 1–45.
Accessed via the Web at https://www.cdc.gov/mmwr/pdf/rr/rr5116.pdf (Level
II)
8 World Health Organization. (2009). “WHO guidelines on hand hygiene in
health care: First global patient safety challenge, clean care is safer care”
[Online]. Accessed via the Web at
http://apps.who.int/iris/bitstream/10665/44102/1/9789241597906_eng.pdf
(Level IV)
9 Accreditation Association for Hospitals and Health Systems. (2017). Standard
07.01.21. Healthcare Facilities Accreditation Program: Accreditation
requirements for acute care hospitals. Chicago, IL: Accreditation Association
for Hospitals and Health Systems. (Level VII)
10 Centers for Medicare & Medicaid Services, Department of Health and Human
Services. (2015). Condition of participation: Infection control. 42 C.F.R. §
482.42.
11 DNV GL-Healthcare USA, Inc. (2016). IC.1 .SR.1 . NIAHO® accreditation
requirements: Interpretive guidelines & surveyor guidance (version 11).
Milford, OH: DNV GL-Healthcare USA, Inc. (Level VII)
12 The Joint Commission. (2019). Standard NPSG.01.01.01. Comprehensive
accreditation manual for hospitals. Oakbrook Terrace, IL: The Joint
Commission. (Level VII)
13 Accreditation Association for Hospitals and Health Systems. (2017). Standard
15.01.16. Healthcare Facilities Accreditation Program: Accreditation
requirements for acute care hospitals. Chicago, IL: Accreditation Association
for Hospitals and Health Systems. (Level VII)
14 The Joint Commission. (2019). Standard RI.01.01.01. Comprehensive
accreditation manual for hospitals: The official handbook. Oakbrook Terrace,
IL: The Joint Commission. (Level VII)
15 Centers for Medicare & Medicaid Services, Department of Health and Human
Services. (2015). Condition of participation: Patient’s rights. 42 C.F.R. §
482.13(c)(1).
16 DNV GL-Healthcare USA, Inc. (2016). PR.1.SR.5 . NIAHO® accreditation
requirements: Interpretive guidelines & surveyor guidance (version 11).
Milford, OH: DNV GL-Healthcare USA, Inc. (Level VII)
17 The Joint Commission. (2019). Standard PC.02.01.21. Comprehensive
accreditation manual for hospitals. Oakbrook Terrace, IL: The Joint
Commission (Level VII)
18 Waters, T. R., et al. (2009). “Safe patient handling training for schools of
nursing” [Online]. Accessed via the Web at
https://www.cdc.gov/niosh/docs/2009-127/pdfs/2009-127.pdf
19 Siegel, J. D ., et al. (2007, revised 2017). “2007 guideline for isolation
precautions: Preventing transmission of infectious agents in healthcare
settings” [Online]. Accessed via the Web at
https://www.cdc.gov/infectioncontrol/pdf/guidelines/isolation-guidelines.pdf
(Level II)
20 Accreditation Association for Hospitals and Health Systems. (2017). Standard
07.01.10. Healthcare Facilities Accreditation Program: Accreditation
requirements for acute care hospitals. Chicago, IL: Accreditation Association
for Hospitals and Health Systems. (Level VII)
21 Memorial Sloan Kettering Cancer Center. (2016). “Patient and caregiver
education: Irrigating your sigmoid or descending colostomy” [Online].
Accessed via the Web at https://www.mskcc.org/cancer-care/patient-
education/colostomy-irrigation-instructions-sigmoid-descending-colostomy
(Level VII)
22 Accreditation Association for Hospitals and Health Systems. (2017). Standard
07.02.03. Healthcare Facilities Accreditation Program: Accreditation
requirements for acute care hospitals. Chicago, IL: Accreditation Association
for Hospitals and Health Systems. (Level VII)
23 Ganz, D. A., et al. (2013). Preventing falls in hospitals: A toolkit for improving
quality of care (AHRQ Publication No. 13-0015-EF). Rockville, MD: Agency for
Healthcare Research and Quality. Accessed via the Web at
https://www.ahrq.gov/sites/default/files/publications/files/fallpxtoolkit_0 .pdf
(Level VII)
24 The Joint Commission. (2019). Standard RC.01.03 .01. Comprehensive
accreditation manual for hospitals: The official handbook. Oakbrook Terrace,
IL: The Joint Commission. (Level VII)
25 Accreditation Association for Hospitals and Health Systems. (2017). Standard
10.00 .03. Healthcare Facilities Accreditation Program: Accreditation
requirements for acute care hospitals. Chicago, IL: Accreditation Association
for Hospitals and Health Systems. (Level VII)
26 Centers for Medicare & Medicaid Services, Department of Health and Human
Services. (2015). Condition of participation: Medical record services. 42 C.F.R.
§ 482.24(b).
27 DNV GL-Healthcare USA, Inc. (2016). MR.2 .SR.1 . NIAHO® accreditation
requirements: Interpretive guidelines & surveyor guidance (version 11).
Milford, OH: DNV GL-Healthcare USA, Inc. (Level VII)
CONTACT LENS CARE
Illness or emergency treatment may require that you insert
or remove and store a patient’s contact lenses. Proper
handling and lens care techniques help prevent eye injury
and infection as well as lens loss or damage. Appropriate
lens-handling techniques depend in large part on what type
of lenses the patient wears. Although most patients can
remove their own contact lenses, you should be able to
remove the lenses if the patient can’t. Patients may present
to the emergency department because of difficulty
removing their own lenses or with acute ophthalmologic
complications associated with contact lens use. Assess a
patient with an altered mental status to determine whether
the patient is wearing contact lenses, and then remove
them if present.
All contact lenses float on the corneal tear layer. Soft
lenses typically have diameters larger than the cornea; rigid
lenses typically have diameters smaller than the cornea.
Because they’re larger and more pliable, soft lenses tend to
mold themselves more closely to the eye for a more stable
fit than rigid lenses.
Modes of lens wear vary widely. Although most patients
remove and clean their lenses daily, some wear lenses
overnight or for several days (sometimes up to a month)
without removing them for cleaning. Still other patients
wear disposable lenses, which means that they replace old
lenses with new ones at regular intervals (a few days to a
few months), possibly without removing them for cleaning
between replacements.
Keep in mind that handling contact lenses improperly can
provide a direct source of contamination or injury to the
eye.
Equipment
Powder-free gloves ▪ towel ▪ lens storage case or two small
medicine cups (labeled left and right) ▪ sterile normal saline
solution or soaking solution if available ▪ Optional: patient’s
own equipment for contact lens care (surfactant solution
and enzyme agent), flashlight, rigid contact lens remover,
adhesive tape.
Preparation of equipment
If a commercial lens storage case isn’t available, place
enough sterile normal saline solution into two small
medicine cups to submerge a lens in each one. To avoid
confusing the left and right lenses, which may have different
prescriptions, mark one cup “L” and the other cup “R” and
place the corresponding lens in each cup.
Implementation
■ Gather the appropriate equipment.
■ Perform hand hygiene.1,2,3,4,5,6
■ Confirm the patient’s identity using at least two patient
identifiers.7
■ Provide privacy.8,9,10,11
■ Determine whether the patient wears soft or rigid contact
lenses. Rigid lenses are smaller in diameter than the cornea,
and smaller than soft contact lenses.
■ Explain the procedure to the patient to enhance
cooperation.
■ Raise the patient bed to waist level when providing care
to prevent caregiver back strain.12
■ Put on gloves to comply with standard precautions and
help prevent ocular infection.13,14,15
Inserting soft lenses
■ Place a towel on the patient’s chest.
■ To see if the lens is inside out, bend it between your
thumb and index finger or fill it with saline or soaking
solution. If the lens tends to roll inward or the edge points
slightly inward, it’s oriented correctly. If the edge points
outward or the lens tends to collapse over your fingertip, it’s
probably inside out and should be reversed.
■ Wet the lens with fresh normal saline solution and rub it
gently between your thumb and index finger, or place it on
your palm and rub it with your opposite index finger. Rinse
well.
■ Place the lens, convex side down, on the tip of the index
finger of your dominant hand.
■ Instruct the patient to gaze upward slightly.
■ Confirm that you have the correct lens for the correct
eye. Separate the eyelids with your other thumb and index
finger, and place the lens on the sclera, just below the
cornea. Then, slide the lens gently upward with your finger
until it centers on the cornea.
■ Using the same procedure, insert the opposite lens.
Inserting rigid lenses
■ Wet one lens with solution and gently rub it between your
thumb and index finger, or place it on your palm and rub it
with your opposite index finger. Rinse well with the solution,
leaving a small amount in the lens.
■ Place the lens, convex side down, on the tip of the index
finger of your dominant hand.
■ Instruct the patient to gaze upward slightly.
■ After confirming you have the correct lens for the correct
eye, separate the eyelids with your other thumb and index
finger and gently place the lens directly on the cornea. You
don’t need to press it to the eye because the tear film will
attract it naturally at the first touch.
■ Using the same procedure, insert the opposite lens.
Removing soft lenses
■ Place the patient in the supine position to prevent the
lens from popping out onto the floor, risking loss or damage.
■ Examine the eye and cornea with a flashlight if needed,
and ensure that the correct lens is present and centered on
the cornea before attempting to remove it. Attempting to
remove a contact lens that isn’t there may result in a
corneal abrasion.16
■ If the patient is wearing soft contact lenses, add a few
drops of normal saline solution to each eye 5 to 10 minutes
before removal to hydrate the soft lenses, making removal
easier.16
■ Using your nondominant hand, raise the patient’s upper
eyelid and hold it against the orbital rim.
■ Lightly place the forefinger of your other hand on the lens
and move it down onto the sclera below the cornea.
■ Pinch the lens between your forefinger and thumb; it
should pop off.
■ After removal, place the lens in the proper well of the
storage case (marked “L” or “R”) with enough of the
appropriate storage solution to cover it.17 Alternatively,
place the lens in a labeled medicine cup with solution, and
secure adhesive tape over the top of the cup to prevent loss
of the lens.
■ Remove and care for the other lens using the same
technique.
Removing rigid lenses
■ Before removing a lens, place the patient in the supine
position to prevent the lens from popping out onto the floor,
risking loss or damage.
■ Examine the patient’s eye and cornea with a flashlight if
needed, and ensure that the contact lens is present and
centered on the cornea before attempting to remove it.
Attempting to remove a contact lens that isn’t there may
result in a corneal abrasion.16
■ Place one thumb against the patient’s upper eyelid and
the other thumb against the lower eyelid.
■ Move the eyelids toward each other while gently pressing
inward against the eye to trap the lens edge and break the
suction. Extract the lens from the patient’s eyelashes.
■ Depending on the lens type and thickness, it may pop out
when the suction breaks. You may want to try to break the
suction with one hand while cupping the other hand below
the patient’s eye to catch the lens as it falls.
■ Sometimes the lens will pop out on its own if you ask the
patient to blink after stretching the corner of the eyelids
toward the temporal bone, thus tightening the lid edges
against the globe of the eye.
■ If the lens doesn’t pop out on its own, use a rigid contact
lens remover to carefully remove the lens. Moisten the
remover’s suction cup with normal saline solution, and then
gently touch it to the center of the contact lens. Make sure
to apply it directly to the lens, not the eye. After the suction
cup attaches to the lens, gently twist the lens off the eye.
Then carefully slide the lens off of the suction cup, because
pulling the lens directly off of the suction cup may cause the
lens to warp.
■ After removal, place the lens in the proper well of the
storage case (marked “L” or “R”) with enough of the
appropriate storage solution to cover it.17 Alternatively,
place the lens in a labeled medicine cup with solution, and
secure adhesive tape over the top of the cup to prevent loss
of the lens.
■ Remove and care for the opposite lens using the same
technique.
Cleaning and disinfecting lenses
■ Because lens-cleaning steps vary with lens type and with
each manufacturer’s and practitioner’s instructions, ask the
patient to guide you step-by-step through the patient’s
normal cleaning routine.
■ If the patient can’t tell you how to clean the lenses
properly, remember that all lens types require two steps:
cleaning and disinfection.
■ Clean the lens by rubbing it with a surfactant solution to
remove most surface deposits. For most patients, especially
those who wear soft lenses, the cleaning step may also
include use of an enzyme agent to remove protein deposits
against which surfactant cleaners are typically ineffective.
Enzyme cleaning involves soaking lenses overnight in a
solution in which you’ve dissolved special enzyme tablets.
■ Disinfect the lens by using heat or the appropriate
solution. This step aims to rid the lens of infectious
organisms.
Completing the procedure
■ Return the bed to the lowest position to prevent falls and
maintain patient safety.18
■ Remove and discard your gloves.13
■ Perform hand hygiene.1,2,3,4,5,6
■ Document the procedure.19,20,21,22
Special considerations
■ If you must clean a patient’s lenses, use only the
patient’s own brand of solutions. This minimizes the risk of
allergic reactions to substances included in other solution
brands. Never touch the nozzle of a solution bottle to the
lens, your fingers, or anything else to avoid contaminating
the solution in the bottle.
■ If the patient’s eyes appear dry or you have trouble
moving the lens on the eye, instill several drops of sterile
normal saline solution and wait a few minutes before trying
again to remove the lens to prevent corneal damage. If you
still can’t remove the lens easily, notify the practitioner.
■ Don’t instill eye medication while the patient is wearing
lenses. The lenses could trap the medication, possibly
causing eye irritation or lens damage.
■ Don’t allow soft lenses, which are 40% to 60% water, to
dry out. If they do, soak them in sterile normal saline
solution and they may return to their natural shape.
■ If an unconscious patient is admitted to the emergency
department, check for contact lenses by opening each
eyelid and searching with a small flashlight. If you detect
lenses, remove them immediately, because tears can’t
circulate freely beneath the lenses with eyelids closed,
possibly leading to corneal oxygen depletion or infection.
■ If the patient has had a serious eye injury while wearing a
contact lens and globe perforation is suspected, don’t
attempt to remove the lens; instead, refer the patient to an
ophthalmologist. Place an eye shield (not a pad) over the
eye to minimize or prevent pressure on the globe.16
■ If the patient can’t provide adequate care for the lenses
during hospitalization, encourage the patient to send them
home with a family member. If you aren’t sure how to care
for the lenses in the interim, store them in sterile normal
saline solution until a family member can take them home.
Patient teaching
Advise contact lens wearers to carry appropriate
identification to speed lens removal and ensure proper care
in an emergency.
Complications
The main risk of contact lens removal is corneal abrasion.
You can minimize the risk of corneal abrasion by ensuring
that the contact lens is centered on the cornea and by
following the methods described above. More significant
complications are likely to result from contact lenses left in
the eyes for prolonged periods and can be especially serious
in patients with a reduced level of consciousness.
Complications of contact lens wear include lens deposits,
allergic conjunctivitis, giant papillary conjunctivitis,
peripheral corneal infiltrates, microbial keratitis, and corneal
neovascularization. All types of contact lenses reduce the
amount of oxygen that reaches the cornea. Oxygenation is
reduced further if the patient wears contact lenses when the
eyes are closed.16
Documentation
Record eye condition before and after removal of lenses; the
time of lens insertion, removal, and cleaning; the location of
stored lenses; and, if applicable, the removal of lenses from
the facility by a family member. Document the patient’s
tolerance of the procedure. Note any patient teaching
provided and the patient’s understanding of the teaching.
REFERENCES
1 The Joint Commission. (2019). Standard NPSG.07.01.01. Comprehensive
accreditation manual for hospitals. Oakbrook Terrace, IL: The Joint
Commission. (Level VII)
2 Centers for Disease Control and Prevention. (2002). Guideline for hand
hygiene in health-care settings: Recommendations of the Healthcare Infection
Control Practices Advisory Committee and the HICPAC/SHEA/APIC/IDSA Hand
Hygiene Task Force. MMWR Recommendations and Reports, 51(RR-16), 1–45.
Accessed via the Web at https://www.cdc.gov/mmwr/pdf/rr/rr5116.pdf (Level
II)
3 World Health Organization. (2009). “WHO guidelines on hand hygiene in
health care: First global patient safety challenge, clean care is safer care”
[Online]. Accessed via the Web at
http://apps.who.int/iris/bitstream/10665/44102/1/9789241597906_eng.pdf
(Level IV)
4 Centers for Medicare and Medicaid Services, Department of Health and
Human Services. (2015). Condition of participation: Infection control. 42 C.F.R.
§ 482.42.
5 Accreditation Association for Hospitals and Health Systems. (2017). Standard
07.01.21. Healthcare Facilities Accreditation Program: Accreditation
requirements for acute care hospitals. Chicago, IL: Accreditation Association
for Hospitals and Health Systems. (Level VII)
6 DNV GL-Healthcare USA, Inc. (2016). IC.1.SR.1 . NIAHO® accreditation
requirements: Interpretive guidelines & surveyor guidance (version 11).
Milford, OH: DNV GL-Healthcare USA, Inc. (Level VII)
7 The Joint Commission. (2019). Standard NPSG.01.01.01. Comprehensive
accreditation manual for hospitals. Oakbrook Terrace, IL: The Joint
Commission. (Level VII)
8 The Joint Commission. (2019). Standard RI.01.01.01. Comprehensive
accreditation manual for hospitals. Oakbrook Terrace, IL: The Joint
Commission. (Level VII)
9 Centers for Medicare and Medicaid Services, Department of Health and
Human Services. (2015). Condition of participation: Patient’s rights. 42 C.F.R.
§ 482.13(c)(1).
10 Accreditation Association for Hospitals and Health Systems. (2017). Standard
15.01.16. Healthcare Facilities Accreditation Program: Accreditation
requirements for acute care hospitals. Chicago, IL: Accreditation Association
for Hospitals and Health Systems. (Level VII)
11 DNV GL-Healthcare USA, Inc. (2016). PR.1.SR.5 . NIAHO® accreditation
requirements: Interpretive guidelines & surveyor guidance (version 11).
Milford, OH: DNV GL-Healthcare USA, Inc. (Level VII)
12 Waters, T. R., et al. (2009). “Safe patient handling training for schools of
nursing” [Online]. Accessed via the Web at
http://www.cdc.gov/niosh/docs/2009-127/pdfs/2009-127.pdf (Level VII)
13 Siegel, J. D ., et al. (2007, revised 2017). “2007 guideline for isolation
precautions: Preventing transmission of infectious agents in healthcare
settings” [Online]. Accessed via the Web at
https://www.cdc.gov/infectioncontrol/pdf/guidelines/isolation-guidelines.pdf
(Level II)
14 Accreditation Association for Hospitals and Health Systems. (2017). Standard
07.01.10. Healthcare Facilities Accreditation Program: Accreditation
requirements for acute care hospitals. Chicago, IL: Accreditation Association
for Hospitals and Health Systems. (Level VII)
15 DNV GL-Healthcare USA, Inc. (2016). IC.1 .SR.2 . NIAHO® accreditation
requirements: Interpretive guidelines & surveyor guidance (version 11).
Milford, OH: DNV GL-Healthcare USA, Inc. (Level VII)
16 Tatham, A. J, & Redmill, B. (2016). “Contact lens removal” [Online]. Accessed
via the Web at http://emedicine.medscape.com/article/1413506-overview
17 American Optometric Association. (2006). Optometric clinical practice
guideline: Care of the contact lens patient (2nd ed.). Accessed via the Web at
http://www.aoa .org/documents/optometrists/CPG-19.pdf (Level VII)
18 Ganz, D. A., et al. (2013). Preventing falls in hospitals: A toolkit for improving
quality of care (AHRQ Publication No. 13-0015-EF). Rockville, MD: Agency for
Healthcare Research and Quality. Accessed via the Web at
http://www.ahrq.gov/sites/default/files/publications/files/fallpxtoolkit.pdf
(Level VII)
19 The Joint Commission. (2019). Standard RC.01.03 .01. Comprehensive
accreditation manual for hospitals. Oakbrook Terrace, IL: The Joint
Commission. (Level VII)
20 Centers for Medicare and Medicaid Services, Department of Health and
Human Services. (2015). Condition of participation: Medical record services.
42 C.F.R. § 482.24(b).
21 Accreditation Association for Hospitals and Health Systems. (2017). Standard
10.00 .03. Healthcare Facilities Accreditation Program: Accreditation
requirements for acute care hospitals. Chicago, IL: Accreditation Association
for Hospitals and Health Systems. (Level VII)
22 DNV GL-Healthcare USA, Inc. (2016). MR.2 .SR.1 . NIAHO® accreditation
requirements: Interpretive guidelines & surveyor guidance (version 11).
Milford, OH: DNV GL-Healthcare USA, Inc. (Level VII)
CONTACT PRECAUTIONS
Contact precautions are used to prevent the spread of
microorganisms by direct or indirect contact with the patient
or the patient’s environment. (See Conditions requiring
contact precautions.) Effective contact precautions require a
single room, if possible, and the use of gloves and gowns by
anyone having contact with the patient, the patient’s
support equipment, or items that have come in contact with
the patient or the patient’s environment.1 Proper hand
hygiene and handling and disposal of articles that have
come in contact with the patient and the patient’s
environment are essential.1
NURSING ALERT Please refer to the latest recommendations from the
Centers for Disease Control and Prevention (CDC), located at
https://www.cdc.gov/vhf/ebola/healthcare-us/index.html, when caring
for a patient with known or suspected Ebola virus infection.
Equipment
Gowns ▪ gloves ▪ plastic bags ▪ additional supplies needed
for patient care, such as a thermometer, stethoscope, blood
pressure cuff, and clean dressings ▪ Optional: contact
precautions sign
Preparation of equipment
Keep all contact precaution supplies outside the patient’s
room in a wall- or door-mounted cabinet, a cart, or an
anteroom.
Implementation
■ Gather the necessary equipment.
■ Place a CONTACT PRECAUTIONS sign outside the patient’s door,
as required by your facility, to notify anyone entering the
room of the situation.1,11,12,13,14
■ Perform hand hygiene.12,15,16,17,18,19
■ Put on a gown and gloves before entering the patient’s
room to comply with contact precautions. Instruct any
visitors to do the same as required by your facility. (See the
“Personal protective equipment” procedure, page
618.)1,13,14,20
■ Confirm the patient’s identity using at least two patient
identifiers.21
■ Situate the patient in a single room with private toilet
facilities and an anteroom, if possible. If necessary, two
patients with the same infection may share a room;
however, consult with your facility’s infection preventionist
before placing two patients together.1
■ Explain contact precautions to the patient and family to
ease their anxiety and promote cooperation.22,23
■ Always change gloves after contact with a contaminated
body site or contact with body fluids, excretions, mucous
membranes, nonintact skin, and wound dressings.1 Perform
hand hygiene after removing used gloves and before putting
on new gloves.12,15,16,17,18,19
■ Handle all items that have come in contact with the
patient as you would for a patient on standard precautions.1
■ Limit the patient’s movement from the room. If the
patient must be moved, cover any infected areas with clean
dressings.1 Notify the receiving department or area of the
patient’s contact precautions (and any other transmission-
based precautions, if applicable) so that the precautions will
be maintained by the staff and the patient can be returned
to the room promptly.
■ Teach the patient and family about the importance of
hand hygiene in preventing the spread of infection, and
about other measures to prevent the spread of multidrug-
resistant organisms.4,24
■ Remove and discard your gown and gloves before leaving
the room.1
■ Perform hand hygiene before leaving the patient’s
room.12,15,16,17,18,19
■ Document the procedure.25,26,27,28
Special considerations
■ Clean and disinfect equipment that must be used for
different patients in between each patient use according to
your facility’s policy to prevent cross-contamination. If
Clostridium difficile is confirmed or suspected, after
cleaning, consider using an EPA–registered disinfectant that
has a sporicidal claim or a sodium hypochlorite solution for
disinfection. Notify environmental services after the patient
is discharged and have them clean and disinfect the
room.1,2,12,29,30,31
■ Try to dedicate certain reusable equipment (thermometer,
stethoscope, blood pressure cuff) for the patient in contact
precautions to reduce the risk of transmitting infection to
other patients.1
■ Note that research concerning the benefits of a single-
patient room to prevent transmission of C. difficile are
inconclusive. Some studies have shown that being in the
same room with a colonized or infected adult patient isn’t
necessarily a risk factor for transmission. Patient factors are
important determinants of infection transmission risk. The
need for a single-patient room, private bathroom, or both for
any patient should be determined on a case-by-case
basis.1,2
Conditions requiring contact
precautions
The Centers for Disease Control and Prevention recommends contact
precautions for patients who are infected or colonized (positive for the
microorganism without clinical signs or symptoms of infection) with
epidemiologically important organisms that can be transmitted by direct or
indirect contact. The table below lists common conditions that require
contact precautions, along with details regarding the precautionary period
and applicable special considerations.1
Complications
Social isolation is a complication of contact precautions.
Documentation
Record the need for contact precautions on the nursing care
plan and as otherwise indicated by your facility. Document
initiation and maintenance of the precautions, the patient’s
tolerance of the procedure, and any patient or family
teaching provided and their understanding of your teaching.
Also document the date contact precautions were
discontinued.
REFERENCES
1 Siegel, J. D., et al. (2007, revised 2017). “2007 guideline for isolation
precautions: Preventing transmission of infectious agents in healthcare
settings” [Online]. Accessed via the Web at
https://www.cdc.gov/hicpac/pdf/isolation/Isolation2007.pdf (Level II)
2 Centers for Disease Control and Prevention. (2012). “Frequently asked
questions about Clostridium difficile for healthcare providers” [Online].
Accessed via the Web at
https://www.cdc.gov/HAI/organisms/cdiff/cdiff_faqs_HCP.html
3 Dubberke, E. R., et al. (2014). SHEA/IDSA practice recommendation:
Strategies to prevent Clostridium difficile infections in acute care hospitals:
2014 update. Infection Control and Hospital Epidemiology, 35(8), 628–645.
(Level VII)
4 The Joint Commission. (2019). Standard NPSG.07.03 .01. Comprehensive
accreditation manual for hospitals. Oakbrook Terrace, IL: The Joint
Commission. (Level VII)
5 Dubberke, E. R., & Gerding, D. N. (2011). “Rationale for hand hygiene
recommendations after caring for a patient with Clostridium difficile infection”
[Online]. Accessed via the Web at https://www.shea-
online.org/images/patients/CDI-hand-hygiene-Update.pdf (Level VII)
6 Centers for Disease Control and Prevention. (2017). “Shingles (herpes zoster):
Clinical overview” [Online]. Accessed via the Web at
https://www.cdc.gov/shingles/hcp/clinical-overview.html
7 Centers for Disease Control and Prevention. (2017). “Shingles (herpes zoster):
Preventing varicella-zoster virus (VZV) transmission from zoster in healthcare
settings: Management of patients with herpes zoster” [Online]. Accessed via
the Web at https://www.cdc.gov/shingles/hcp/hc-settings.html (Level VII)
8 Centers for Disease Control and Prevention. (2013). “2012 CRE toolkit:
Guidance for control of carbapenem-resistant Enterobacteriaceae (CRE)”
[Online]. Accessed via the Web at
http://www.safecarecampaign.org/assets/cre-toolkit_final_6_18_2012.pdf
(Level VII)
9 Centers for Disease Control and Prevention. (2005). Guidelines for preventing
the transmission of Mycobacterium tuberculosis in health-care settings, 2005.
MMWR Recommendations and Reports, 54(RR-17), 1–140. Accessed via the
Web at https://www.cdc.gov/mmwr/PDF/rr/rr5417.pdf (Level VII)
10 Hall, A. J., et al. (2011). Updated norovirus outbreak management and
disease prevention guidelines. MMWR Recommendations and Reports, 60(RR-
03), 1–15. Accessed via the Web at
https://www.cdc.gov/mmwr/preview/mmwrhtml/rr6003a1.htm?
s_cid=rr6003a1_w (Level VII)
11 The Joint Commission. (2019). Standard IC.02.01.01. Comprehensive
accreditation manual for hospitals. Oakbrook Terrace, IL: The Joint
Commission. (Level VII)
12 Centers for Medicare and Medicaid Services, Department of Health and
Human Services. (2015). Condition of participation: Infection control. 42 C.F.R.
§ 482.42.
13 Accreditation Association for Hospitals and Health Systems. (2017). Standard
07.01.10. Healthcare Facilities Accreditation Program: Accreditation
requirements for acute care hospitals. Chicago, IL: Accreditation Association
for Hospitals and Health Systems. (Level VII)
14 DNV GL-Healthcare USA, Inc. (2016). IC.1 .SR.2 . NIAHO® accreditation
requirements: Interpretive guidelines & surveyor guidance (version 11).
Milford, OH: DNV GL-Healthcare USA, Inc. (Level VII)
15 The Joint Commission. (2019). Standard NPSG.07.01.01. Comprehensive
accreditation manual for hospitals. Oakbrook Terrace, IL: The Joint
Commission. (Level VII)
16 World Health Organization. (2009). “WHO guidelines on hand hygiene in
health care: First global patient safety challenge, clean care is safer care”
[Online]. Accessed via the Web at
http://apps.who.int/iris/bitstream/10665/44102/1/9789241597906_eng.pdf
(Level IV)
17 Centers for Disease Control and Prevention. (2002). Guideline for hand
hygiene in health-care settings: Recommendations of the Healthcare Infection
Control Practices Advisory Committee and the HICPAC/SHEA/APIC/IDSA Hand
Hygiene Task Force. MMWR Recommendations and Reports, 51(RR-16), 1–45.
Accessed via the Web at https://www.cdc.gov/mmwr/pdf/rr/rr5116.pdf (Level
II)
18 Accreditation Association for Hospitals and Health Systems. (2017). Standard
07.01.21. Healthcare Facilities Accreditation Program: Accreditation
requirements for acute care hospital. Chicago, IL: Accreditation Association
for Hospitals and Health Systems. (Level VII)
19 DNV GL-Healthcare USA, Inc. (2016). IC.1 .SR.1 . NIAHO® accreditation
requirements: Interpretive guidelines & surveyor guidance (version 11).
Milford, OH: DNV GL-Healthcare USA, Inc. (Level VII)
20 Siegel, J. D ., et al. (2006). “Management of multidrug-resistant organisms in
healthcare settings, 2006” [Online]. Accessed via the Web at
https://www.cdc.gov/hicpac/pdf/MDRO/MDROGuideline2006.pdf (Level VII)
21 The Joint Commission. (2019). Standard NPSG.01.01.01. Comprehensive
accreditation manual for hospitals. Oakbrook Terrace, IL: The Joint
Commission. (Level VII)
22 The Joint Commission. (2019). Standard RI.01.03 .01. Comprehensive
accreditation manual for hospitals. Oakbrook Terrace, IL: The Joint
Commission. (Level VII)
23 Centers for Medicare and Medicaid Services, Department of Health and
Human Services. (2015). Condition of participation: Patient’s rights. 42 C.F.R.
§ 482.13(b)(2).
24 Accreditation Association for Hospitals and Health Systems. (2017). Standard
07.01.02. Healthcare Facilities Accreditation Program: Accreditation
requirements for acute care hospitals. Chicago, IL: Accreditation Association
for Hospitals and Health Systems. (Level VII)
25 The Joint Commission. (2019). Standard RC.01.03 .01. Comprehensive
accreditation manual for hospitals. Oakbrook Terrace, IL: The Joint
Commission. (Level VII)
26 Centers for Medicare and Medicaid Services, Department of Health and
Human Services. (2015). Condition of participation: Medical record services.
42 C.F.R. § 482.24(b).
27 Accreditation Association for Hospitals and Health Systems. (2017). Standard
10.00 .03. Healthcare Facilities Accreditation Program: Accreditation
requirements for acute care hospitals. Chicago, IL: Accreditation Association
for Hospitals and Health Systems. (Level VII)
28 DNV GL-Healthcare USA, Inc. (2016). MR.2 .SR.1 . NIAHO® accreditation
requirements: Interpretive guidelines & surveyor guidance (version 11).
Milford, OH: DNV GL-Healthcare USA, Inc. (Level VII)
29 Rutala, W. A., et al. (2008, revised 2017). “Guideline for disinfection and
sterilization in healthcare facilities, 2008” [Online]. Accessed via the Web at
https://www.cdc.gov/infectioncontrol/pdf/guidelines/disinfection-
guidelines.pdf (Level I)
30 The Joint Commission. (2019). Standard IC.02.02.02. Comprehensive
accreditation manual for hospitals. Oakbrook Terrace, IL: The Joint
Commission. (Level VII)
31 Accreditation Association for Hospitals and Health Systems. (2017). Standard
07.02.03. Healthcare Facilities Accreditation Program: Accreditation
requirements for acute care hospitals. Chicago, IL: Accreditation Association
for Hospitals and Health Systems. (Level VII)
CONTINENT ILEOSTOMY CARE
An alternative to conventional ileostomy, a continent, or
pouch, ileostomy (also called a Koch ileostomy or an ileal
pouch) features an internal reservoir fashioned from the
terminal ileum. A continent ileostomy may be used for a
patient who requires proctocolectomy for chronic ulcerative
colitis or multiple polyposis.1 Other patients may have a
traditional ileostomy converted to a continent ileostomy. A
continent ileostomy is contraindicated in Crohn disease or
gross obesity. Patients who need emergency surgery and
those who can’t care for the pouch are also unlikely to have
this type of ileostomy.
The length of preoperative hospitalization varies with the
patient’s condition. Nursing responsibilities include
providing bowel preparation, antibiotic therapy, and
emotional support. After surgery, nursing responsibilities
include ensuring patency of the drainage catheter,
assessing GI function, caring for the stoma and peristomal
skin, managing pain resulting from surgery, and, if
necessary, providing perineal skin care.
Patient teaching on pouch intubation and drainage usually
begins soon after surgery. Continuous drainage is
maintained for about 2 to 6 weeks to allow the suture lines
to heal. During this period, a drainage catheter is attached
to low intermittent suction. After the suture line heals, the
patient learns how to drain the pouch independently.
Equipment
Leg drainage bag ▪ bedside drainage bag ▪ normal saline
solution or water ▪ 50-mL catheter-tip syringe ▪ continent
ileostomy catheter ▪ 4′′ × 4′′ × 1′′ (10-cm × 10-cm × 2.5-
cm) foam dressing and Montgomery straps ▪ precut drain
dressing ▪ gloves ▪ water-soluble lubricant ▪ graduated
container ▪ skin sealant ▪ preoperative checklist ▪ vital
signs monitoring equipment ▪ stethoscope ▪ disinfectant
pad ▪ blood glucose monitoring equipment ▪ pulse oximeter
and probe ▪ Optional: IV insertion equipment, prescribed
antibiotics, prescribed bowel preparation, disposable
clippers, chlorhexidine, other prescribed medications,
pneumatic compression system, end-tidal carbon dioxide
monitor, facility-approved sedation scale, supplemental
oxygen administration supplies.
Implementation
Preoperative care
■ Verify the practitioner’s orders regarding preoperative
care.
■ Review the patient’s medical record for the medical and
surgical history, a reconciled list of current medications, any
allergies, and risk factors that increase the patient’s risk of
adverse reactions to medications, including age, altered
liver and kidney function, a history of sleep apnea, weight
(obese patients may be at increased risk of apnea;
underweight patients may be more sensitive to dose levels
of medication), asthma, a history of smoking, drug–drug
interactions, and first-time medication use.2
■ Gather the appropriate supplies.
■ Confirm that the practitioner has obtained written
informed consent and that the consent is in the patient’s
medical record.3,4,5,6
■ Perform a preprocedure verification to make sure that all
relevant documentation, related information, or equipment
are available and correctly identified with the patient’s
identifiers.7,8
■ Verify that all laboratory and imaging studies are
complete, as ordered, and that the results are in the
patient’s medical record. Notify the practitioner of any
unexpected results.7,8
■ Perform hand hygiene.9,10,11,12,13,14
■ Confirm the patient’s identity using at least two patient
identifiers.15
■ Provide privacy.16,17,18,19
■ Obtain a health history, including previous surgery, skin
condition, history of multiple drug–resistant organisms,
external or implanted medical devices, sensory limitations,
allergies and sensitivities (including to latex and metal), and
home use of noninvasive positive-pressure ventilation or
apnea monitors.20
■ Obtain a pain and analgesic history; ask about measures
that have been effective in relieving or controlling pain in
the past. Also ask about expectations for controlling pain
after surgery. By obtaining a thorough pain history
preoperatively, the health care team may be able to better
control pain postoperatively.20
■ Perform educational, socioeconomic, cultural, and
spiritual assessments to determine the patient’s level of
understanding about the surgical procedure and any special
needs while in the facility.20,21
■ Assess for mobility limitations and disabilities, including
mental and physical impairments, which may require the
use of additional equipment or supplies.20,21,22 Assess and
address the patient’s safety needs, including the risk of
falling, and implement fall-prevention interventions as
needed.20,21,22
■ Assess the patient’s risk of postoperative nausea and
vomiting (PONV) so that the practitioner can consider PONV
prophylaxis to decrease postoperative discomfort. Consider
the patient’s history of PONV, the duration of surgery, and
the type of surgery being performed in your assessment.21
■
Assess the patient’s cognitive, mental, and
cardiopulmonary status; skin condition; functional and
sensory limitations; and use of any hearing or visual aids
and assistive or prosthetic devices.21
■ Obtain other assessment data pertinent to the surgical
procedure. (See the “Preoperative care” procedure, page
626.)13
■ Reinforce and, if necessary, supplement the practitioner’s
explanation of a continent ileostomy and its implications for
the patient.
■ If a wound ostomy continence nurse (WOCN) is available
at your facility, reinforce the WOCN’s preoperative teaching,
which should include anatomy and physiology of the GI
tract, the details of the procedure, demonstration of ostomy
appliances, expected lifestyle changes, and measures to
prepare psychologically for the procedure.23 (See
Understanding pouch construction.)
■ Assess patient and family attitudes related to the
operation and to the forthcoming changes in the patient’s
body image.21
■ Provide encouragement and support.
■ Make sure the stoma site is marked preoperatively to
reduce the incidence of complications and improve self-
care.23,24
■ Teach the patient how to rate pain according to your
facility-approved assessment tool. Advise the patient to
report pain, and discuss such analgesic tools and methods
as patient-controlled analgesia.25
■ Administer the prescribed bowel preparation, as ordered.
■ Monitor and control the patient’s blood glucose level, as
ordered, to reduce the risk of surgical site infection.26
■ Don’t remove hair unless it will interfere with the surgical
procedure. If hair removal is necessary, remove it before the
patient enters the operating room by clipping; don’t use a
razor.26
■ Instruct the patient (assisting, as needed) to perform two
preoperative baths or showers with chlorhexidine, as
ordered, to reduce the number of microorganisms on the
skin, which reduces the risk of subsequent contamination of
the surgical wound.27
■ If the patient was receiving a beta-adrenergic blocker
before surgery, collaborate with the patient’s practitioner to
make sure the patient receives it during the perioperative
period, as appropriate.
Understanding pouch construction
Depending on the patient and related factors during intestinal surgery, the
practitioner may construct a pouch to collect fecal matter internally. To make
such a pouch, the practitioner loops about 12′′ (30.5 cm) of ileum and sutures
the inner sides together.
He opens the loop with a U-shaped cut and seams the inside to create a
smooth lining. Then he fashions a nipple or valve between what is becoming
the pouch and what will be the stoma. He folds the open ileum over, sews
the pouch closed, and fixes the pouch to the abdominal wall.
Because the pouch holds fecal matter in reserve, the patient benefits from
not having to change and empty ostomy equipment. Instead, the patient
empties and irrigates the pouch as needed by inserting a catheter though the
stoma and into the pouch.
Initially after surgery, the nurse performs this procedure until the patient is
able to do it.
■ Administer venous thromboembolism (VTE) prophylaxis,
as ordered.22,28,29 Intermittent pneumatic compression is
recommended for patients at low risk for VTE; for patients at
moderate risk for VTE who aren’t at risk for major bleeding
complications, unfractionated heparin, low-molecular-weight
heparin, or intermittent pneumatic compression is
recommended; for patients at high risk for VTE who aren’t at
high risk for major bleeding complications, unfractionated
heparin, low-molecular-weight heparin, and mechanical
prophylaxis with elastic stockings or intermittent pneumatic
compression is recommended.
■ Complete a surgical safety checklist to ensure compliance
with best practices to improve surgical patient safety.26
■ Make sure the patient has patent IV access; insert a new
IV catheter, as ordered, if necessary. (See “IV catheter
insertion and removal,” page 443.)
■ Administer antibiotics, as ordered, following safe
medication administration practices.30 The patient should
receive prophylactic antibiotics 1 hour before surgical
incision (2 hours before incision is acceptable for the
administration of vancomycin and fluoroquinolones) to
reduce the risk of surgical site infection.2,29,31
■ Maintain nothing-by-mouth status, as ordered. Minimum
fasting recommendations include 2 hours for clear liquids, 6
or more hours for a light meal or nonhuman milk, and 8
hours or more for fried or fatty foods or meat.32
■ Maintain normothermia (95.9°F [35.5°C] or higher) during
the perioperative period, because preoperative and
intraoperative warming reduces the risk of surgical site
infection and intraoperative blood loss.26
■ Provide hand-off communication to the person who’ll be
assuming care of the patient during the procedure; allow
time for questions.33 As part of the hand-off process, allow
time for the receiving staff member to trace each tubing
and catheter from the patient to its point of origin; a
standardized line reconciliation process should be used.34
■ Perform hand hygiene.9,10,11,12,13,14
■ Document the procedure.35,36,37,38
Postoperative care
■ Receive hand-off communication from the person who
was responsible for the patient’s care; ask questions as
necessary to prevent patient care errors during transitions
in care.33 As part of the hand-off process, allow time for the
receiving staff member to trace each tubing and catheter
from the patient to its point of origin; a standardized line
reconciliation process should be used.34
■ Verify the practitioner’s orders regarding postoperative
care.
■ Gather the appropriate equipment.
■ Perform hand hygiene.9,10,11,12,13,14
■ Put on gloves.39,40
■ Confirm the patient’s identity using at least two patient
identifiers.15
■ Provide privacy.16,17,18,19
■ Explain the procedure to the patient according to
individual communication and learning needs to increase
understanding, allay fears, and enhance cooperation.41
■ Perform a comprehensive postoperative assessment. (See
the “Postoperative care” procedure, page 622.)
■ Administer supplemental oxygen, as needed and
prescribed. Supplemental oxygen administration is
recommended during and following surgical procedures
involving mechanical ventilation to optimize tissue
oxygenation and subsequently reduce the risk of surgical
site infection.26
■ Administer pain medication, as needed and ordered,
following safe medication administration practices. If the
medication is administered using an infusion device, verify
proper programming of the device before administration.
Advise the patient and family to notify a staff member
promptly of any changes that might be a reaction to the
medication.2 Reassess the patient’s pain level after
administration to evaluate the effectiveness of therapy;
respond as necessary.2,30,31
NURSING ALERT If the patient is receiving opioids to treat pain, keep
in mind that these medications can cause oversedation and respiratory
compromise. Failure to recognize and respond to progressive signs of
respiratory compromise (somnolence, a decreased respiratory rate and
oxygen saturation level) can lead to respiratory depression and
death.2
■ Monitor the patient’s vital signs, oxygen saturation level
by pulse oximetry, end-tidal carbon dioxide (if needed and
available), respiratory status, and sedation level (using a
facility-approved sedation scale) at a frequency determined
by your facility and the patient’s condition. Monitor the
patient closely to determine whether administered
medications are achieving their therapeutically intended
benefit and to promptly identify and respond to adverse
effects of the medication.
■ Notify the practitioner of changes in the patient’s
condition.4
■ Attach the drainage catheter emerging from the
ileostomy to continuous gravity drainage or low intermittent
suction, as ordered.
■ Trace all tubes from the patient to the point of origin to
make sure they’re attached to the proper ports to prevent
dangerous misconnections.2,42 Route the tubing in a
standardized direction if the patient has other tubing and
catheters that have different purposes. Label the tubing at
both the distal end (near the patient connection) and the
proximal end (near the source container) to reduce the risk
of misconnection if multiple IV lines will be used.34
■ Encourage early ambulation to prevent VTE. A leg
drainage bag may be attached to the patient’s thigh during
ambulation. Continue other prescribed methods of VTE
prophylaxis.
■ Ensure discontinuation of prophylactic antibiotics within
24 hours of the end of surgery.26,28,29
■ Irrigate the ileostomy catheter with 30 mL of normal
saline solution, as ordered and needed, to prevent catheter
obstruction and allow fluid return by gravity. During the
early postoperative period, keep the pouch empty; drainage
will be serosanguineous.
■ Monitor the patient’s intake and output and electrolyte
levels (as ordered) to assess for fluid and electrolyte
imbalances.2
■ If the patient required an indwelling urinary catheter for
surgery and it wasn’t removed in the postanesthesia care
unit, remove it as soon as it’s no longer needed to reduce
the risk of catheter-associated urinary tract infection. Unless
required by the patient’s condition, you should remove the
catheter by postoperative day 1 or 2. (The day of surgery is
considered day 0.)29
■ Check the ileostomy catheter frequently after the patient
begins eating solid food to ensure that neither mucus nor
undigested food particles block the catheter.
■ If the patient complains of abdominal cramps, distention,
and nausea—signs and symptoms of bowel obstruction—the
ileostomy catheter may be clogged. Gently irrigate with 20
to 30 mL of water or normal saline solution until the
ileostomy catheter drains freely. Then move the ileostomy
catheter slightly or rotate it gently to help clear the
obstruction. Finally, try milking the catheter. If these
measures fail, notify the practitioner.
■ Provide stoma and peristomal skin care.
■ Remove the dressing, gently clean the peristomal area
with water, and pat dry.
■ Inspect the peristomal skin and stoma. Use a facility-
approved assessment tool if available. Inspect the stoma
frequently for color, edema, and bleeding. Normally pink to
red, a stoma that turns dark red or blue-red may have a
compromised blood supply. Observe for signs of
mechanical, chemical, allergic, infectious, or disease-related
complications to objectively identify and track changes in
peristomal skin. Notify the practitioner or your facility’s
WOCN with problems, as needed.43,44,45
■ Use a skin sealant around the stoma to prevent skin
irritation.
■ Apply a new stoma dressing. One technique involves
slipping a precut drain dressing around the catheter to
cover the stoma. Cut a hole slightly larger than the lumen of
the catheter in the center of a 4′′ × 4′′ × 1′′ (10-cm × 10-cm
× 2.5 -cm) piece of foam. Disconnect the catheter from the
drainage bag and insert the distal end of the catheter
through the hole in the foam. Slide the foam pad onto the
dressing. Secure the foam in place with Montgomery straps.
Secure the catheter by wrapping the strap ties around it or
by using a commercial catheter securement device. Then
reconnect the catheter to the drainage bag. (The drainage
catheter will be removed by the surgeon when he
determines that the suture line has healed.)
■ To reduce discomfort from gas pain, encourage
ambulation. Also tell the patient to chew food well, limit
conversation while eating, and avoid drinking from a straw
to decrease the possibility of swallowing air, which can
cause gas pain.
■ Remove and discard your gloves.39,40
■ Perform hand hygiene.9,10,11,12,13,14
■ Clean and disinfect your stethoscope using a disinfectant
pad.46,47
■ Perform hand hygiene.9,10,11,12,13,14
■ If available, consult with a WOCN to provide ongoing
postoperative education.23
■ Document the procedure.35,36,37,38
Draining the pouch
■ Verify the practitioner’s order.
■ Gather the appropriate equipment.
■ Perform hand hygiene9,10,11,12,13,14 and put on gloves.39
■ Confirm the patient’s identity using at least two patient
identifiers.15
■ Provide privacy.16,17,18,19
■ Explain the procedure to the patient according to
individual communication and learning needs to increase
understanding, allay fears, and enhance cooperation.41
■ Have the patient with a pouch conversion sit on the toilet
to help the patient feel more at ease during the procedure.
■ Remove the stoma dressing.
■ Encourage the patient to relax the abdominal muscles to
allow the catheter to slide easily into the pouch.
■ Lubricate the drainage catheter tip with the water-soluble
lubricant and insert it with a steady, gentle pressure and a
slight twisting motion into the stoma. Gently push the
catheter downward. (The direction of insertion may vary
depending on the patient.)
■ When the drainage catheter reaches the nipple valve of
the internal pouch or reservoir (after about 2′′ to 21⁄2′′ [5 cm
to 6.5 cm]), you’ll feel resistance. Instruct the patient to
take a deep breath as you exert gentle pressure on the
catheter to insert it through the valve. If this fails, have the
patient lie in the supine position and rest for a few minutes.
Then, with the patient still supine, try to insert the catheter
again. You can also try using a smaller catheter.
■ Gently advance the catheter to the suture marking made
by the surgeon.
■ Let the pouch drain completely, which usually takes 5 to
10 minutes. With thick drainage or a clogged catheter, the
process may take 30 minutes.
■ If the tube clogs, irrigate with 30 mL of water or normal
saline using the 50-mL catheter-tip syringe. You can also
rotate and milk the tube. If these steps fail, remove, rinse,
and reinsert the catheter.
■ Remove the catheter after completing drainage.
■ Measure the output, subtracting the amount of irrigant
used.
■ Rinse the catheter thoroughly with warm water.
■ Clean the peristomal area and apply a fresh stoma
dressing.
■ Remove and discard your gloves.39
■ Perform hand hygiene.9,10,11,12,13,14
■ Document the procedure.35,36,37,38
Special considerations
■ Encourage the patient to refrain from smoking for 30 days
before the procedure to reduce the risk of surgical site
infection and reduced blood supply, which can result in
necrosis.26,48,49
■ Never aspirate fluid from the catheter, because the
resulting negative pressure may damage inflamed tissue.
■ The first few times you intubate the pouch, the patient
may be tense, making insertion difficult. Encourage
relaxation. To shorten drainage time, have the patient
cough, press gently on the abdomen over the pouch, or
suddenly tighten the abdominal muscles and then relax
them.
■ The Joint Commission has issued a sentinel event alert
related to managing risk during transition to new
International Organization for Standardization tubing
standards that were designed to prevent dangerous tubing
misconnections, which can lead to serious patient injury and
death. During the transition, make sure to trace the tubing
and catheter from the patient to the point of origin before
connecting or reconnecting any device or infusion, at any
care transition (such as a new setting or service), and as
part of the handoff process; route tubes and catheters
having different purposes in different standardized
directions; label the tubing at both the distal and proximal
ends (when there are different access sites or several bags
hanging); use tubing and equipment only as intended; and
store medications for different delivery routes in separate
locations.34
Patient teaching
Make sure the patient can properly intubate and drain the
pouch. Provide the patient with the appropriate equipment.
If the postoperative drainage catheter is still in place, teach
the patient how to care for it properly. Make sure the patient
has a pouch-draining schedule, and give the patient
appropriate pamphlets or video instructions on pouch care.
Make sure the patient feels comfortable calling the
practitioner, nurse, or WOCN to ask questions or discuss
problems. Tell the patient where to obtain supplies. Refer
the patient to a local ostomy group. Provide counseling on
nutrition, clothing, medications, body image, psychological
and social issues, interpersonal relationships, and possible
complications.23
Complications
Common postoperative complications include obstruction,
fistula, pouch perforation, nipple valve dysfunction,
abscesses, diarrhea, skin irritation, stenosis of the stoma,
and bacterial overgrowth in the pouch.
Documentation
Record the date, the time, and all aspects of preoperative
and postoperative care. Document drainage from the pouch,
noting irrigant, intubations, drainage amount and
appearance, and patient tolerance. Include the condition of
the stoma and peristomal skin, diet, medications,
intubations, patient teaching, and discharge planning.
REFERENCES
1 Jani, K., & Shah, A. (2015). Laparoscopic total proctocolectomy with ileal
pouch–anal anastomosis for ulcerative colitis. Journal of Minimal Access
Surgery, 11(3), 177–183. Accessed via the Web at
http://www.ncbi.nlm.nih.gov/pmc/articles/PMC4499922/ (Level VI)
2 Centers for Medicare and Medicaid Services, Department of Health and
Human Services. (2015). Condition of participation: Nursing services. 42
C.F.R. § 482.23(c).
3 The Joint Commission. (2019). Standard RI.01.03 .01. Comprehensive
accreditation manual for hospitals. Oakbrook Terrace, IL: The Joint
Commission. (Level VII)
4 Centers for Medicare and Medicaid Services, Department of Health and
Human Services. (2015). Condition of participation: Patient’s rights. 42 C.F.R.
§ 482.13(b)(2).
5 Accreditation Association for Hospitals and Health Systems. (2017). Standard
30.01.11. Healthcare Facilities Accreditation Program: Accreditation
requirements for acute care hospitals. Chicago, IL: Accreditation Association
for Hospitals and Health Systems. (Level VII)
6 DNV GL-Healthcare USA, Inc. (2016). PR.1 .SR.3 . NIAHO® accreditation
requirements: Interpretive guidelines & surveyor guidance (version 11).
Milford, OH: DNV GL-Healthcare USA, Inc. (Level VII)
7 The Joint Commission. (2019). Standard UP.01.01.01. Comprehensive
accreditation manual for hospitals. Oakbrook Terrace, IL: The Joint
Commission. (Level VII)
8 Accreditation Association for Hospitals and Health Systems. (2017). Standard
30.00 .14. Healthcare Facilities Accreditation Program: Accreditation
requirements for acute care hospitals. Chicago, IL: Accreditation Association
for Hospitals and Health Systems. (Level VII)
9 The Joint Commission. (2019). Standard NPSG.07.01.01. Comprehensive
accreditation manual for hospitals. Oakbrook Terrace, IL: The Joint
Commission. (Level VII)
10 Centers for Disease Control and Prevention. (2002). Guideline for hand
hygiene in health-care settings: Recommendations of the Healthcare Infection
Control Practices Advisory Committee and the HICPAC/SHEA/APIC/IDSA Hand
Hygiene Task Force. MMWR Recommendations and Reports, 51(RR-16), 1–45.
Accessed via the Web at https://www.cdc.gov/mmwr/pdf/rr/rr5116.pdf (Level
II)
11 World Health Organization. (2009). “WHO guidelines on hand hygiene in
health care: First global patient safety challenge, clean care is safer care”
[Online]. Accessed via the Web at
http://apps.who.int/iris/bitstream/10665/44102/1/9789241597906_eng.pdf
(Level IV)
12 Centers for Medicare and Medicaid Services, Department of Health and
Human Services. (2015). Condition of participation: Infection control. 42 C.F.R.
§ 482.42.
13 Accreditation Association for Hospitals and Health Systems. (2017). Standard
07.01.21. Healthcare Facilities Accreditation Program: Accreditation
requirements for acute care hospitals. Chicago, IL: Accreditation Association
for Hospitals and Health Systems. (Level VII)
14 DNV GL-Healthcare USA, Inc. (2016). IC.1 .SR.1 . NIAHO® accreditation
requirements: Interpretive guidelines & surveyor guidance (version 11).
Milford, OH: DNV GL-Healthcare USA, Inc. (Level VII)
15 The Joint Commission. (2019). Standard NPSG.01.01.01. Comprehensive
accreditation manual for hospitals. Oakbrook Terrace, IL: The Joint
Commission. (Level VII)
16 Centers for Medicare and Medicaid Services, Department of Health and
Human Services. (2015). Condition of participation: Patient’s rights. 42 C.F.R.
§ 482.13(c)(1).
17 The Joint Commission. (2019). Standard RI.01.01.01. Comprehensive
accreditation manual for hospitals. Oakbrook Terrace, IL: The Joint
Commission. (Level VII)
18 Accreditation Association for Hospitals and Health Systems. (2017). Standard
15.01.16. Healthcare Facilities Accreditation Program: Accreditation
requirements for acute care hospitals. Chicago, IL: Accreditation Association
for Hospitals and Health Systems. (Level VII)
19 DNV GL-Healthcare USA, Inc. (2016). PR.1.SR.5 . NIAHO® accreditation
requirements: Interpretive guidelines & surveyor guidance (version 11).
Milford, OH: DNV GL-Healthcare USA, Inc. (Level VII)
20 American Society of PeriAnesthesia Nurses. (2018). 2017–2018
Perianesthesia nursing standards, practice recommendations and interpretive
statements. Cherry Hill, NJ: American Society of PeriAnesthesia Nurses. (Level
VII)
21 The Joint Commission. (2010). Advancing effective communication, cultural
competence and patient- and family-centered care: A roadmap for hospitals.
Oakbrook Terrace, IL: The Joint Commission. Accessed via the Web at
http://www.jointcommission.org/assets/1/6/ARoadmapforHospitalsfinalversion
727.pdf (Level VII)
22 Accreditation Association for Hospitals and Health Systems. (2017). Standard
16.02.02. Healthcare Facilities Accreditation Program: Accreditation
requirements for acute care hospitals. Chicago, IL: Accreditation Association
for Hospitals and Health Systems. (Level VII)
23 Wound, Ostomy, and Continence Nurses Society. (2010). Management of the
patient with a fecal ostomy: Best practice guideline for clinicians. Journal of
Wound, Ostomy and Continence Nursing, 37(6), 596–598. (Level VII)
24 The Joint Commission. (2019). Standard UP.01.02.01. Comprehensive
accreditation manual for hospitals. Oakbrook Terrace, IL: The Joint
Commission. (Level VII)
25 American Society of Anesthesiologists, Committee on Standards and Practice
Parameters. (2012). Practice guidelines for acute pain management in the
perioperative setting: An updated report by the American Society of
Anesthesiologists Task Force on Acute Pain Management. Anesthesiology,
116, 248–273. Accessed via the Web at
http://anesthesiology.pubs.asahq.org/article.aspx?articleid=1933589 (Level
VII)
26 Anderson, D. J ., et al. (2014). SHEA/IDSA practice recommendation:
Strategies to prevent surgical site infections in acute care hospitals: 2014
update. Infection Control and Hospital Epidemiology, 35(6), 605–627.
Accessed via the Web at http://www.jstor.org/stable/10.1086/676022 (Level I)
27 Van Wicklin, S. A., & Conner, R. (2017). Guideline for patient skin antisepsis.
In R. Conner (Ed.), Guidelines for perioperative practice, 2017 edition.
Denver, CO: AORN, Inc. (Level VII)
28 Institute for Healthcare Improvement. (2012). How-to guide: Prevent surgical
site infections. Cambridge, MA: Institute for Healthcare Improvement. (Level
VII)
29 Centers for Medicare and Medicaid Services and The Joint Commission.
(2017). “The specifications manual for national hospital inpatient quality
measures (version 5.2a)” [Online]. Accessed via the Web at
https://www.jointcommission.org/specifications_manual_for_national_hospital_
inpatient_quality_measures.aspx
30 DNV GL-Healthcare USA, Inc. (2016). MM.1 .SR.2. NIAHO® accreditation
requirements: Interpretive guidelines & surveyor guidance (version 11).
Milford, OH: DNV GL-Healthcare USA, Inc. (Level VII)
31 Accreditation Association for Hospitals and Health Systems. (2017). Standard
16.01.03. Healthcare Facilities Accreditation Program: Accreditation
requirements for acute care hospitals. Chicago, IL: Accreditation Association
for Hospitals and Health Systems. (Level VII)
32 American Society of Anesthesiologists. (2011). Practice guidelines for
preoperative fasting and the use of pharmacologic agents to reduce the risk
of pulmonary aspiration: Application to healthy patients undergoing elective
procedures. Anesthesiology, 114, 495–511. Accessed via the Web at
http://anesthesiology.pubs.asahq.org/Article.aspx?articleid=1933410 (Level
V)
33 The Joint Commission. (2017). Standard PC.02.02.01. Comprehensive
accreditation manual for hospitals. Oakbrook Terrace, IL: The Joint
Commission. (Level VII)
34 The Joint Commission. (2014). “Sentinel event alert: Managing risk during
transition to new ISO tubing connector standards” [Online]. Accessed via the
Web at
http://www.jointcommission.org/assets/1/6/SEA_53_Connectors_8 _19_14 _final.
pdf (Level VII)
35 The Joint Commission. (2019). Standard RC.01.03 .01. Comprehensive
accreditation manual for hospitals. Oakbrook Terrace, IL: The Joint
Commission. (Level VII)
36 Centers for Medicare and Medicaid Services, Department of Health and
Human Services. (2015). Condition of participation: Medical record services.
42 C.F.R. § 482.24(b).
37 Accreditation Association for Hospitals and Health Systems. (2017). Standard
10.00 .03. Healthcare Facilities Accreditation Program: Accreditation
requirements for acute care hospitals. Chicago, IL: Accreditation Association
for Hospitals and Health Systems. (Level VII)
38 DNV GL-Healthcare USA, Inc. (2016). MR.2 .SR.1 . NIAHO® accreditation
requirements: Interpretive guidelines & surveyor guidance (version 11).
Milford, OH: DNV GL-Healthcare USA, Inc. (Level VII)
39 Siegel, J. D ., et al. (2007, revised 2017). “2007 guideline for isolation
precautions: Preventing transmission of infectious agents in healthcare
settings” [Online]. Accessed via the Web at
https://www.cdc.gov/infectioncontrol/pdf/guidelines/isolation-guidelines.pdf
(Level II)
40 Accreditation Association for Hospitals and Health Systems. (2017). Standard
07.01.10. Healthcare Facilities Accreditation Program: Accreditation
requirements for acute care hospitals. Chicago, IL: Accreditation Association
for Hospitals and Health Systems. (Level VII)
41 The Joint Commission. (2019). Standard PC.02.01.21. Comprehensive
accreditation manual for hospitals. Oakbrook Terrace, IL: The Joint
Commission. (Level VII)
42 U.S . Food and Drug Administration. (n.d .). “Look. Check. Connect. Safe
medical device connections save lives” [Online]. Accessed via the Web at
http://www.fda.gov/downloads/MedicalDevices/Safety/AlertsandNotices/UCM1
34873.pdf
43 Haugen, H., & Ratliff, C. R. (2013). Tools for assessing peristomal skin
complications. Journal of Wound, Ostomy, and Continence Nursing, 40(2),
131–134. (Level VII)
44 Jordan, R., & Christian, M. (2013). Understanding peristomal skin
complications. Wound Care Advisory, 2(2), 36–41 . Accessed via the Web at
https://woundcareadvisor.com/understanding-periostomal-skin-
complications_vol2_no3/ (Level VII)
45 Australian Association of Stomal Therapy Nurses, Inc. (2013). “Clinical
guidelines for stomal therapy nursing practice” [Online]. Accessed via the
Web at
http://www.stomaltherapy.com/documents/AASTN_Guidelines_book_2013.pdf
(Level VII)
46 Accreditation Association for Hospitals and Health Systems. (2017). Standard
07.02.03. Healthcare Facilities Accreditation Program: Accreditation
requirements for acute care hospitals. Chicago, IL: Accreditation Association
for Hospitals and Health Systems. (Level VII)
47 Rutala, W. A., et al. (2008, revised 2017). “Guideline for disinfection and
sterilization in healthcare facilities, 2008” [Online]. Accessed via the Web at
https://www.cdc.gov/infectioncontrol/pdf/guidelines/disinfection-
guidelines.pdf (Level I)
48 Sharma, A., et al. (2013). Tobacco smoking and postoperative outcomes after
colorectal surgery. Annals of Surgery, 258(2), 296–300 . (Level VII)
49 Mangram, A. J ., et al. (1999). Hospital Infection Control Practices Advisory
Committee: Guideline for prevention of surgical site infection. Infection
Control and Hospital Epidemiology, 20(4), 250–278. (Level V)
CONTINUOUS AMBULATORY PERITONEAL
DIALYSIS
Continuous ambulatory peritoneal dialysis (CAPD) requires
insertion of a permanent peritoneal catheter (such as a
Tenckhoff catheter) to circulate dialysate continuously in the
peritoneal cavity. Inserted under a local anesthetic, the
catheter is sutured in place and its distal portion is tunneled
subcutaneously to the skin surface. There it serves as a port
for the dialysate solution, which flows in and out of the
peritoneal cavity by gravity. (See How peritoneal dialysis
works.)
CAPD is used most commonly for patients with stage 5
(end-stage) kidney disease who are looking for an
alternative to hemodialysis. It can also be used in patients
with vascular access issues, chronic heart failure, and
ischemic heart disease.1 This procedure can be a welcome
alternative to hemodialysis because it gives the patient
more independence, requires less travel for treatments, and
results in more stable fluid and electrolyte levels than
conventional hemodialysis. Because the patient can resume
normal daily activities between solution changes, CAPD
helps promote independence and a return to a near-normal
lifestyle. It also costs less than hemodialysis.
Conditions that may prohibit CAPD include recent
abdominal surgery, abdominal adhesions, an infected
abdominal wall, diaphragm tears, ileus, and respiratory
insufficiency.
There are two methods of administering CAPD: the
manual exchange method and the continuous-cycle method.
This procedure covers the manual exchange method.
Manual exchanges typically take about 30 minutes each and
are required about four times a day. The continuous-cycle
method is an automated system available for home use.
(See Continuous-cycle peritoneal dialysis, page 210.)
Patients or family members can learn to perform either
method of CAPD administration with appropriate training.
Equipment
Scale ▪ vital sign monitoring equipment ▪ stethoscope ▪
disinfectant pad.
For dialysate infusing and draining
Prescribed dialysate solution double-bag set (preattached
dialysate solution bag, drainage collection bag, and CAPD
administration set [Y-set]) ▪ heating pad or commercial
warmer ▪ three masks ▪ IV pole ▪ sterile 4′′ × 4′′ (10-cm ×
10-cm) gauze pads ▪ sterile basin ▪ antiseptic solution ▪
gloves ▪ sterile gloves ▪ sterile drapes ▪ fluid-impermeable
pad ▪ Optional: transfer set change kit with patient
connector, sterile caps or commercially prepared sterile
caps with prefilled antiseptic, sterile swabs, specimen
container or sterile culture tube with transport medium,
specimen label, prescribed medication, sterile syringes,
antiseptic pads, graduated cylinder.
For catheter dressing change
Sterile drapes ▪ sterile 4′′ × 4′′ (10-cm × 10-cm) gauze pads
▪ dressing ▪ two masks ▪ sterile basin ▪ hypoallergenic
tape or catheter securement device ▪ antiseptic solution ▪
sterile gloves ▪ sterile cap ▪ Optional: commercially
prepared sterile cap with prefilled antiseptic, prescribed
antibiotic ointment.
All equipment used for CAPD must be kept sterile.
Commercially prepared sterile CAPD kits are available.
NURSING ALERT The most common serious complication associated
with CAPD is peritonitis. To prevent peritonitis, the use of a double-
bag exchange system is recommended. Also avoid manual spiking; if
spiking is required, use a connect assist device.3,4
Preparation of equipment
Warm the dialysate solution before instillation using a
heating pad or manufacturer-supplied commercial warming
device. The dialysate solution should feel warm to the touch
on the inner wrist. To measure the temperature of the
solution, fold the solution bag over an electronic
thermometer probe. The temperature should measure no
higher than 98.6°F (37°C). Avoid overheating. Invert the bag
several times for even heat distribution.5
Implementation
■ Review the patient’s medical record for primary kidney
disease and other comorbid conditions, response to
previous peritoneal dialysis treatments, medication history,
and pertinent laboratory test results.6
■ Avoid distractions and interruptions when preparing and
administering medication, including dialysate solution, to
prevent administration errors.7,8
■ Verify the practitioner’s order for the prescribed dialysate
solution, dwell times, and exchange frequency.9,10,11,12
■ Compare the dialysate solution label with the order in the
patient’s medical record.9,10,11,12
■ Check the patient’s medical record for an allergy or
contraindication to the prescribed dialysate solution or its
additives. If an allergy or contraindication exists, don’t
administer the dialysate solution; instead, notify the
practitioner.9,10,11,12
■ Check the expiration date on the dialysate solution. If the
dialysate solution has expired, return it to the pharmacy and
obtain a new dialysate solution.9,10,11,12
■ Inspect the dialysate solution visually for particles,
discoloration, or other signs of loss of integrity; don’t
administer the dialysate solution if its integrity has been
compromised.9,10,11,12
■ Discuss any unresolved concerns about the dialysate
solution with the patient’s practitioner.
■ Gather the appropriate equipment.
■ Perform hand hygiene.13,14,15,16,17,18
■ Confirm the patient’s identity using at least two patient
identifiers.9,10,11,19
■ Provide privacy.20,21,22,23
■ Explain the procedure to the patient.
■ Obtain the patient’s baseline vital signs.
■ Weigh the patient in kilograms to establish a baseline
weight.24 Weigh the patient at the same time each day to
help monitor fluid balance.
■ Instruct the patient to void, if able.25
Draining the dialysate
■ Perform hand hygiene.13,14,15,16,17,18
■ Confirm the patient’s identity using at least two patient
identifiers.19
■ Raise the patient’s bed to waist level when providing
direct patient care to prevent caregiver back strain.26
■ Place the patient with a newly implanted catheter in the
supine position.6
■ Prepare the sterile field by placing a sterile drape on a dry
surface near the patient. Take care to maintain the drape’s
sterility.
■ Place a sterile basin on the sterile field. Place four sterile
gauze pads in the sterile basin and saturate them with the
antiseptic solution. Place the remaining gauze pads on the
sterile field.27
■ Put on gloves and a mask, and provide a mask for the
patient.27,28
■ Hang the dialysate solution bag on an IV pole, and place
the drainage collection bag on a fluid-impermeable pad on
the floor.29
■ Verify that a transfer set is attached to the catheter. If
not, apply a transfer set using sterile technique, and verify
that the clamp is closed. A transfer set acts as an extension
of the peritoneal catheter, preventing contamination and
facilitating sterile connections and disconnections.
■ Carefully remove the dressing covering the peritoneal
catheter and discard it.27 Don’t touch the catheter or the
skin. Check the skin integrity at the catheter exit site, and
assess for signs of infection, such as purulent drainage,
redness, or edema. If drainage is present, obtain a specimen
using a sterile swab, put it in a specimen container or a
sterile culture tube with transport medium, label the
specimen in the presence of the patient to prevent
mislabeling,19 and notify the practitioner.
How peritoneal dialysis works
Peritoneal dialysis works through a combination of diffusion and osmosis.
Diffusion
In diffusion, particles move through a liquid or gas from an area of high-
solute concentration to an area of low-solute concentration until the particles
are evenly dispersed. If a semipermeable membrane is present, the particles
also move through the membrane, depending on the pore size of the
membrane.
In peritoneal dialysis, the water-based dialysate being infused contains
glucose, sodium chloride, calcium, magnesium, acetate or lactate; these
particles are diffused throughout the peritoneum. At the same time, the
waste products and excess electrolytes in the blood cross through the
semipermeable peritoneal membrane into the dialysate solution. Removing
the waste-filled dialysate and replacing it with fresh solution keeps the waste
concentration low and encourages further diffusion.
Osmosis
In osmosis, fluids move through a semipermeable membrane from an area of
low-solute concentration to an area of high-solute concentration. In
peritoneal dialysis, dextrose is added to the dialysate to give it a higher
solute concentration than the blood, creating a high osmotic gradient. Water
migrates from the blood through the peritoneal membrane at the beginning
of each infusion, when the osmotic gradient is highest.
■ Palpate the catheter exit site and subcutaneous tunnel
route for tenderness or pain. If these symptoms occur, notify
the practitioner.
NURSING ALERT If the patient has drainage, tenderness, or pain,
don’t proceed with the infusion without specific orders.
■ Remove and discard your gloves.27,28
■ Perform hand hygiene.13,14,15,16,17,18
■ Put on sterile gloves.30
■ Using one of the antiseptic-soaked gauze pads, scrub the
transfer set–cap connection for 1 mi-nute.30 Discard the
used gauze pad.
EQUIPMENT
Continuous-cycle peritoneal dialysis
Continuous-cycle peritoneal dialysis (CCPD), an automated system, makes
continuous ambulatory peritoneal dialysis easier for the patient. CCPD can be
performed while the patient is awake or asleep. The system runs the dialysis
treatment automatically until all the dialysate solution is infused. The system
controls the cycles: draining the solution, refilling the solution, and
monitoring the dwell time. In the morning, clean dialysate solution is left in
the peritoneal cavity after the patient disconnects from the machine.2
Because the system remains closed throughout the treatment, the risk of
contamination is decreased. The system’s alarms warn about general
system, dialysate solution, and patient problems.
The cycler can be set to an intermittent or continuous dialysate schedule at
home or in a health care facility. The patient typically initiates CCPD at
bedtime and undergoes three to seven exchanges, depending on patient’s
treatment regimen.
The continuous cycler follows the same aseptic care and maintenance
procedures as the manual exchange method.
■ Wrap another antiseptic-soaked gauze pad around the
distal end of the transfer set–cap connection, and leave it in
place for 3 to 5 minutes to reduce the transmission of
microorganisms.30
■ Remove and discard the used gauze pad.30
■ Using a new antiseptic-soaked gauze pad, remove the
cap and then clean the end of the transfer set hub.30
Alternatively, if a commercially prepared antiseptic cap is in
place, remove it from the end of the transfer set.
■ Trace the tubing from the double-bag Y-set to the transfer
set to make sure that you’re connecting the tubing to the
correct port.31 Attach the double-bag Y-set connector to the
transfer set.29,30 Secure the Luer-lock connector tightly.
■ Confirm that the clamp on the drain line of the double-
bag Y-set is open and that the clamp on the fill line of the
double-bag Y-set is closed.
■ Open the transfer set clamp to drain effluent.29
■ Remove and discard the patient’s mask.
■ Return the bed to the lowest position to prevent falls and
maintain patient safety.32
■ Observe the outflow of the previous peritoneal dialysis
cycle to ensure that the fluid has drained completely before
beginning another dialysate solution infusion. Note the
clarity, color, and odor of the outflow. Cloudy effluent may
indicate peritonitis.29,33
■ Monitor the patient’s vital signs during outflow of the
dialysate solution to assess for signs of hypovolemia
(hypotension and tachycardia); notify the practitioner if such
signs occur.30
■ After draining has been completed, clamp the drain line
of the double-bag Y-set and close the transfer set clamp.29
■ Weigh or measure the effluent as required.
■ Discard used supplies in the appropriate receptacles.27,28
■ Remove and discard your gloves and mask.27,28
■ Perform hand hygiene.13,14,15,16,17,18
Flushing and infusing the dialysate
■ After draining has been completed, perform hand
hygiene.13,14,15,16,17,18
■ Confirm the patient’s identity using at least two patient
identifiers.19
■ Put on gloves.27,28
■ Break the seal or frangible pin on the dialysate solution
bag.29
■ Open the clamp on the double-bag Y-set fill line, open the
clamp on the Y-set drain line for 5 seconds to flush fresh
dialysate solution into the drainage collection bag, and close
the clamp on the drain line immediately after flushing to
avoid draining too much dialysate solution.29
■ Open the transfer set clamp to allow dialysate solution to
enter the peritoneal cavity.29 After the dialysate solution has
filled the peritoneal cavity, clamp the fill line on the double-
bag Y-set and close the clamp on the transfer set.29
■ Monitor the patient’s vital signs for evidence of fluid
overload. Also assess the patient for decreased breath
sounds, increased dyspnea, peripheral edema, and ascites.
Notify the practitioner if these signs are present.
Changing the catheter dressing
■ Perform hand hygiene.13,14,15,16,17,18
■ Put on a mask, and provide one for the patient.27,28
■ Set up a sterile field next to the patient by covering a
clean, dry surface with a sterile drape. Maintain the drape’s
sterility. Place all equipment on the sterile field. Place 4′′ ×
4′′ (10-cm × 10-cm) gauze pads in the basin and saturate
them with antiseptic solution.30 Open the 4′′ × 4′′ (10-cm ×
10-cm) gauze pads to be used as the dressing, and place
them onto the sterile field.30
■ Put on sterile gloves.30
■ Disconnect the double-bag Y-set connector from the
transfer set.29
■ Use a sterile gauze pad to hold the transfer set off the
patient’s skin to prevent contamination.
■ If required by your facility, disinfect the end of the
transfer set. Some facilities don’t require disinfection of the
catheter if a new sterile cap is attached to the transfer
set.30
■ Pick up the new sterile cap and attach it to the transfer
set using sterile technique.29,30
■ Using the antiseptic-soaked gauze pads, clean the
catheter and exit site junction (following the antiseptic
manufacturer’s instructions) and then allow them to air-
dry.30
■ Apply an antibiotic ointment to the catheter exit site, if
ordered.25,34
■ Apply a new dressing to the catheter site.
■ Secure the catheter and transfer set to the patient’s
abdomen using hypoallergenic tape or other securement
device to prevent accidental dislodgment.30,35
■ Instruct the patient that activities may be resumed during
the prescribed dialysate solution dwell time (usually 4 to 6
hours).
■ Remove and discard the patient’s mask.27,28
■ Return the bed to the lowest position to prevent falls and
maintain patient safety.32
■ Discard used supplies in the appropriate receptacles.27,28
■ Remove and discard your gloves and mask.27,28
■ Perform hand hygiene.13,14,15,16,17,18
■ Clean and disinfect your stethoscope using a disinfectant
pad.36,37
■ Perform hand hygiene.13,14,15,16,17,18
■ Document the procedure.38,39,40,41
Special considerations
■ Medications, such as insulin or antibiotics, may be added
to the dialysate solution. Follow the practitioner’s order and
safe medication administration practices when adding
medication to the dialysate solution, if unable to have it
prepared by the pharmacy.9,10,11,12 To ensure effective
treatment, confirm that the prescribed drug is compatible
with the dialysate solution and its container.42
■ If inflow and outflow are slow or absent, check the tubing
for kinks. Raising the dialysate solution or repositioning the
patient may increase the inflow rate. Applying manual
pressure to the lateral aspects of the patient’s abdomen
may also help increase drainage.
■ Repeat the procedure for the prescribed number of
exchanges.
■ Once-weekly sterile dressing changes are recommended
until the patient’s catheter exit site is healed (which may
take up to 6 weeks). More frequent dressing changes may
be needed if the dressing becomes soiled or if the patient
experiences excessive sweating.35
■ As clinically indicated and ordered, obtain a residual urine
or effluent sample for analysis to measure urea and
creatinine clearance levels for monitoring the efficacy of
dialysis.25,43
■ Some patient transfer sets are equipped with an adapter
that allows the user to choose DRAIN or FILL when performing
an exchange. Always follow the manufacturer’s instructions
for use.29
■ The Joint Commission issued a sentinel event alert related
to managing risk during transition to new International
Organization for Standardization tubing standards that were
designed to prevent dangerous tubing misconnections,
which can lead to serious patient injury and death. During
the transition, make sure to trace the tubing and catheter
from the patient to the point of origin before connecting or
reconnecting any device or infusion, at any care transition
(such as a new setting or service), and as part of the hand-
off process; route tubes and catheters having different
purposes in different standardized directions; label the
tubing at both the distal and proximal ends (when there are
different access sites or several bags hanging); use tubing
and equipment only as intended; and store medications for
different delivery routes in separate locations.44
Patient teaching
Teach the patient and family how to use sterile technique
throughout the procedure, especially for cleaning and
dressing changes, to prevent complications such as
peritonitis. Stress the importance of good hand-washing
technique to reduce the risk of infection. Provide additional
training to the patient and family, as needed, because doing
so helps reduce the risk of peritonitis.3
Teach the patient and family the signs and symptoms of
peritonitis—cloudy drainage, fever, and abdominal pain and
tenderness—and stress the importance of notifying the
practitioner immediately if such signs or symptoms occur.
Review with the patient and family catheter insertion site
care, including cleaning, dressing changes, and application
of antibiotic ointment as ordered.25,34 Also tell them to call
the practitioner if redness and drainage occur at the
catheter insertion site, because these are signs of infection.
Instruct the patient to record weight and blood pressure
daily and to check regularly for swelling of the extremities.
Teach the patient to keep an accurate record of intake and
output.
Complications
Peritonitis is the most frequent complication of CAPD.
Although treatable, it can permanently scar the peritoneal
membrane, decreasing its permeability and reducing the
efficiency of dialysis. Untreated peritonitis can cause
septicemia and death.
Excessive fluid loss may result from a concentrated
(4.25%) dialysate solution, improper or inaccurate
monitoring of inflow and outflow, or inadequate oral fluid
intake. Excessive fluid retention may result from improper or
inaccurate monitoring of inflow and outflow as well as from
excessive salt or oral fluid intake.
Leaks, obstructions, and hernias may result from
placement and location of the peritoneal catheter.34
Documentation
Record the type and amount of dialysate instilled and
returned for each exchange, the time and duration of the
exchange, and any medication added. Note the color,
clarity, and odor of the returned exchange dialysate, and
check it for mucus, pus, and blood. Document any
discrepancy between fluid intake and output, as well as any
signs of fluid imbalance, such as weight changes, decreased
breath sounds, increased dyspnea, peripheral edema,
ascites, and changes in skin turgor. Record the patient’s
weight, blood pressure, and pulse rate after the last fluid
exchange for the day.
REFERENCES
1 National Kidney Foundation. (2006). “Clinical practice guidelines for
peritoneal dialysis adequacy, 2006 update” [Online]. Accessed via the Web at
http://www2.kidney.org/professionals/KDOQI/guideline_upHD_PD_VA (Level I)
2 American Association of Kidney Patients. (n. d .). “The facts about peritoneal
dialysis” [Online]. Accessed via the Web at https://aakp.org/dialysis/the-facts-
of-peritoneal-dialysis/
3 Piraino, B., et al. (2011). ISPD position statement on reducing the risks of
peritoneal dialysis-related infections. Peritoneal Dialysis International, 31(6),
614–630 . (Level V)
4 Chaudhary, K., et al. (2010). Peritoneal dialysis first: Rationale. Clinical Journal
of the American Society of Nephrology, 6(2), 447–456. Accessed via the Web
at http://cjasn.asnjournals.org/content/6/2/447.full
5 BC Renal. (2013). “Warming peritoneal dialysis solutions” [Online]. Accessed
via the Web at http://www.bcrenalagency.ca/resource-
gallery/Documents/Warming%20Peritoneal%20Dialysis%20Solutions.pdf
6 Gomez, N. J . (Ed.) . (2011). Nephrology nursing scope and standards of
practice (7th ed.). Pitman, NJ: American Nephrology Nurses’ Association.
(Level VII)
7 Westbrook, J., et al. (2010). Association of interruptions with an increased risk
and severity of medication administration errors. Archives of Internal
Medicine, 170(8), 683–690 .
8 Institute for Safe Medication Practices. (2012). Side tracks on the safety
express: Interruptions lead to errors and unfinished...Wait, what was I doing?
Nurse Advise-ERR, 11(2), 1–4 . Accessed via the Web at
https://www.ismp.org/Newsletters/acutecare/showarticle.aspx?id=37
9 Accreditation Association for Hospitals and Health Systems. (2017). Standard
16.01.03. Healthcare Facilities Accreditation Program: Accreditation
requirements for acute care hospitals. Chicago, IL: Accreditation Association
for Hospitals and Health Systems. (Level VII)
10 Centers for Medicare and Medicaid Services, Department of Health and
Human Services. (2015). Condition of participation: Nursing services. 42
C.F.R. § 482.23(c).
11 The Joint Commission. (2019). Standard MM.06.01.01. Comprehensive
accreditation manual for hospitals. Oakbrook Terrace, IL: The Joint
Commission. (Level VII)
12 DNV GL-Healthcare USA, Inc. (2016). MM.1 .SR.2. NIAHO® accreditation
requirements: Interpretive guidelines & surveyor guidance (version 11).
Milford, OH: DNV GL-Healthcare USA, Inc. (Level VII)
13 The Joint Commission. (2019). Standard NPSG.07.01.01. Comprehensive
accreditation manual for hospitals. Oakbrook Terrace, IL: The Joint
Commission. (Level VII)
14 Centers for Disease Control and Prevention. (2002). Guideline for hand
hygiene in health-care settings: Recommendations of the Healthcare Infection
Control Practices Advisory Committee and the HICPAC/SHEA/APIC/IDSA Hand
Hygiene Task Force. MMWR Recommendations and Reports, 51(RR-16), 1–45.
Accessed via the Web at https://www.cdc.gov/mmwr/pdf/rr/rr5116.pdf (Level
II)
15 World Health Organization. (2009). “WHO guidelines on hand hygiene in
health care: First global patient safety challenge, clean care is safer care”
[Online]. Accessed via the Web at
http://whqlibdoc.who.int/publications/2009/9789241597906_eng.pdf (Level
IV)
16 Accreditation Association for Hospitals and Health Systems. (2017). Standard
07.01.21. Healthcare Facilities Accreditation Program: Accreditation standards
for acute care hospitals. Chicago, IL: Accreditation Association for Hospitals
and Health Systems. (Level VII)
17 Centers for Medicare and Medicaid Services, Department of Health and
Human Services. (2015). Condition of participation: Infection control. 42 C.F.R.
§ 482.42.
18 DNV GL-Healthcare USA, Inc. (2016). IC.1 .SR.1 . NIAHO® accreditation
requirements: Interpretive guidelines & surveyor guidance (version 11).
Milford, OH: DNV GL-Healthcare USA, Inc. (Level VII)
19 The Joint Commission. (2019). Standard NPSG.01.01.01. Comprehensive
accreditation manual for hospitals. Oakbrook Terrace, IL: The Joint
Commission. (Level VII)
20 The Joint Commission. (2019). Standard RI.01.01.01. Comprehensive
accreditation manual for hospitals. Oakbrook Terrace, IL: The Joint
Commission. (Level VII)
21 Accreditation Association for Hospitals and Health Systems. (2017). Standard
15.01.16. Healthcare Facilities Accreditation Program: Accreditation
requirements for acute care hospitals. Chicago, IL: Accreditation Association
for Hospitals and Health Systems. (Level VII)
22 Centers for Medicare and Medicaid Services, Department of Health and
Human Services. (2015). Condition of participation: Patient’s rights. 42 C.F.R.
§ 482.13(c)(1).
23 DNV GL-Healthcare USA, Inc. (2016). PR.1.SR.5 . NIAHO® accreditation
requirements: Interpretive guidelines & surveyor guidance (version 11).
Milford, OH: DNV GL-Healthcare USA, Inc. (Level VII)
24 Institute for Safe Medication Practices. (2016). “2016–2017 targeted
medication safety best practices for hospitals” [Online]. Accessed via the
Web at http://www.ismp.org/tools/bestpractices/TMSBP-for-Hospitals.pdf
25 Woodrow, G., & Davies, S. (2011). Renal Association clinical practice
guideline on peritoneal dialysis. Nephron Clinical Practice, 118(Suppl. 1),
c287–c310. Accessed via the Web at
https://www.karger.com/Article/Pdf/328073 (Level VII)
26 Waters, T. R., et al. (2009). “Safe patient handling training for schools of
nursing” [Online]. Accessed via the Web at
https://www.cdc.gov/niosh/docs/2009-127/pdfs/2009-127.pdf (Level VII)
27 Siegel, J. D ., et al. (2007, revised 2017). “2007 guideline for isolation
precautions: Preventing transmission of infectious agents in healthcare
settings” [Online]. Accessed via the Web at
https://www.cdc.gov/infectioncontrol/pdf/guidelines/isolation-guidelines.pdf
(Level II)
28 Accreditation Association for Hospitals and Health Systems. (2017). Standard
07.01.10. Healthcare Facilities Accreditation Program: Accreditation
requirements for acute care hospitals. Chicago, IL: Accreditation Association
for Hospitals and Health Systems. (Level VII)
29 Baxter International, Inc. (2007). “Ultrabag aseptic exchange procedure”
[Online]. Accessed via the Web at
http://www.capd.org.tw/4_2/UltraBagusa.pdf
30 Wiegand, D. L. (2017). AACN procedure manual for high acuity, progressive,
and critical care (7th ed.). St. Louis, MO: Elsevier.
31 U.S . Food and Drug Administration. (n.d .). “Look. Check. Connect. Safe
medical device connections save lives” [Online]. Accessed via the Web at
http://www.fda.gov/downloads/MedicalDevices/Safety/AlertsandNotices/UCM1
34873.pdf
32 Ganz, D. A., et al. (2013). Preventing falls in hospitals: A toolkit for improving
quality of care (AHRQ Publication No. 13-0015-EF). Rockville, MD: Agency for
Healthcare Research and Quality. Accessed via the Web at
https://www.ahrq.gov/sites/default/files/publications/files/fallpxtoolkit_0 .pdf
(Level VII)
33 Lemone, P., et al. (2014). Medical-surgical nursing: Critical thinking in client
care. Upper Saddle River, NJ: Pearson.
34 Burkart, J. M . Patient information: Peritoneal dialysis (beyond the basics).
(2015). In: UpToDate, Golper, T. A., & Sheridan, A. M . (Eds.). Accessed via the
Web at http://www.uptodate.com
35 Warady, B., et al. (2012). Consensus guidelines for the prevention and
treatment of catheter-related infections and peritonitis in pediatric patients
receiving peritoneal dialysis: 2012 update. Peritoneal Dialysis International,
32(Suppl. 2), 32–86 . Accessed via the Web at
http://www.ncbi.nlm.nih.gov/pmc/articles/PMC3524923/
36 Rutala, W. A., et al. (2008, revised 2017). “Guideline for disinfection and
sterilization in healthcare facilities, 2008” [Online]. Accessed via the Web at
https://www.cdc.gov/infectioncontrol/pdf/guidelines/disinfection-
guidelines.pdf (Level I)
37 Accreditation Association for Hospitals and Health Systems. (2017). Standard
07.02.03. Healthcare Facilities Accreditation Program: Accreditation
requirements for acute care hospitals. Chicago, IL: Accreditation Association
for Hospitals and Health Systems. (Level VII)
38 The Joint Commission. (2019). Standard RC.01.03 .01. Comprehensive
accreditation manual for hospitals. Oakbrook Terrace, IL: The Joint
Commission. (Level VII)
39 Accreditation Association for Hospitals and Health Systems. (2017). Standard
10.00 .03. Healthcare Facilities Accreditation Program: Accreditation
requirements for acute care hospitals. Chicago, IL: Accreditation Association
for Hospitals and Health Systems. (Level VII)
40 Centers for Medicare and Medicaid Services, Department of Health and
Human Services. (2015). Condition of participation: Medical record services.
42 C.F.R. § 482.24(b).
41 DNV GL-Healthcare USA, Inc. (2016). MR.2 .SR.1 . NIAHO® accreditation
requirements: Interpretive guidelines & surveyor guidance (version 11).
Milford, OH: DNV GL-Healthcare USA, Inc. (Level VII)
42 de Vin, F., et al. (2009). Intraperitoneal administration of drugs in peritoneal
dialysis patients: A review of compatibility and guidance for clinical use.
Peritoneal Dialysis International, 29(1), 5–15. Accessed via the Web at
http://www.pdiconnect.com/content/29/1/5.full
43 Burkart, J. M ., & Henrich, W. L. Prescribing and assessing adequate of
peritoneal dialysis. (2015). In: UpToDate, Golper, T. A., & Sheridan, A. M .
(Eds.). Accessed via the web at http://www.uptodate.com
44 The Joint Commission. (2014). “Sentinel event alert: Managing risk during
transition to new ISO tubing connector standards” [Online]. Accessed via the
Web at
http://www.jointcommission.org/assets/1/6/SEA_53_Connectors_8 _19_14 _final.
pdf (Level VII)
CONTINUOUS BLADDER IRRIGATION
Continuous bladder irrigation can help prevent urinary tract
obstruction after prostate or bladder surgery by flushing out
small blood clots.1 It may also be used to treat an irritated,
inflamed, or infected bladder lining.
Continuous bladder irrigation requires the placement of a
triple-lumen indwelling urinary catheter. One lumen controls
balloon inflation, a second lumen allows irrigant inflow, and
a third allows irrigant outflow. The continuous flow of
irrigation solution through the bladder creates a mild
tamponade that may help prevent venous hemorrhage. (See
Setup for continuous bladder irrigation.) Although the
catheter is inserted while the patient is in the operating
room after prostate or bladder surgery, it may be inserted at
the bedside if the patient’s isn’t undergoing surgery.
Unless specified otherwise by the practitioner, the patient
should remain on bed rest throughout continuous bladder
irrigation to avoid kinking, dislodging, or pulling on the
catheter, which increase the risk of catheter-associated
urinary tract infection (CAUTI). The urinary catheter should
be removed as soon as it’s no longer needed to reduce the
risk of CAUTI.1,2,3
HOSPITAL-ACQUIRED CONDITION ALERT The Centers for Medicare &
Medicaid Services has identified CAUTI as a hospital-acquired
condition because it can be prevented reasonably using a variety of
best practices. Follow CAUTI prevention practices (including
performing hand hygiene before and after urinary catheter
manipulation; maintaining a sterile, continuously closed drainage
system; maintaining an unobstructed urine flow; emptying the
collection bag regularly; replacing the urinary catheter and collection
system using sterile technique when disconnection, leakage, or breaks
in sterile technique occur; and discontinuing the urinary catheter as
soon as it’s no longer clinically indicated) when caring for the patient
with an indwelling urinary catheter to reduce the risk of
CAUTI.2,4,5,6,7,8
Equipment
Prescribed sterile irrigation solution ▪ sterile irrigation
solution administration set tubing ▪ drainage bag and
tubing ▪ gloves ▪ antiseptic pad ▪ IV pole ▪ vital signs
monitoring equipment ▪ graduated collection container ▪
stethoscope ▪ disinfectant pad ▪ catheter securement
device ▪ Optional: gown, goggles.9
Normal saline solution is usually prescribed for continuous
bladder irrigation after prostate or bladder surgery. Large
volumes of irrigating solution are usually required during the
first 24 to 48 hours after prostate or bladder surgery to
prevent hemorrhage and blockage. The irrigation solution
may also contain an antibiotic.
Preparation of equipment
Ensure that the irrigation solution is at room temperature to
prevent bladder spasm.
Implementation
■ Avoid distractions and interruptions when preparing and
administering the irrigation solution to prevent
administration errors.10,11
■ Verify the practitioner’s order in the patient’s medical
record.12,13,14,15
■ Check the patient’s medical record for allergies or
contraindications to the prescribed irrigation solution. If an
allergy or a contraindication exists, don’t administer the
solution; instead, notify the practitioner.12,13,14,15
■ Gather the prescribed irrigation solution and supplies.
■ Compare the label on the irrigation solution with the order
in the patient’s medical record.
■ Check the expiration date on the irrigation solution. If the
solution has expired, obtain a new supply of the irrigation
solution.12,13,14,15
■ Inspect the irrigation solution visually for particles,
discoloration, or other loss of integrity; don’t administer the
solution if its integrity has been compromised.12,13,14,15
■ Perform hand hygiene.16,17,18,19,20,21
■ Confirm the patient’s identity using at least two patient
identifiers.22
■ Assemble all equipment at the patient’s bedside.
■ Provide privacy.23,24,25,26
■ Explain the procedure to the patient and family (if
appropriate) according to their individual communication
and learning needs to increase their understanding, allay
their fears, and enhance cooperation.27
■ If the patient is receiving the irrigation solution for the
first time, teach about potential adverse reactions and
address any other concerns related to the solution.12,13,14,15
■ Insert the spike of the tubing into the container of
irrigating solution bag.
■ Squeeze the drip chamber on the spike of the tubing.
■ Open the flow clamp and prime the tubing to remove air,
which could cause bladder distention. Then close the clamp.
■ Hang the bag of irrigation solution on the IV pole.
■ Perform hand hygiene.16,17,18,19,20,21
■ Put on gloves and, if needed, a gown and goggles to
comply with standard precautions.1,9,28,29
■ Clean the opening to the inflow lumen of the urinary
catheter with the antiseptic pad and allow it to dry.2,4,9
■ Insert the distal end of the tubing securely into the inflow
lumen of the urinary catheter. Trace the tubing from the
patient to its point of origin to make sure you’ve attached it
to the proper port.30,31
■ Secure the urinary catheter properly to prevent
movement and urethral tension, which increase the risk of
CAUTI.1,2,3,4
■ Ensure that the urinary catheter’s outflow lumen is
attached securely to the drainage bag tubing to maintain a
closed system, preventing disconnections that increase the
risk of CAUTI.
■ Open the flow clamp under the bag of irrigation solution
and set the drip rate as ordered.
EQUIPMENT
Setup for continuous bladder irrigation
In continuous bladder irrigation, a triple-lumen indwelling urinary catheter is
inserted through the patient’s urethra and advanced to the bladder. The
urinary catheter allows irrigation solution to flow into the bladder through
one lumen and flow out through a second lumen, as shown in the inset. The
third lumen is used to inflate the balloon that holds the urinary catheter in
place in the patient’s bladder.
■ To prevent air from entering the system, don’t allow the
irrigation solution bag to empty completely before replacing
it.
■ Keep the drainage bag below the level of the bladder at
all times to prevent backflow of urine into the bladder,
which increases the risk of CAUTI.1,2,4,32 Don’t place the
drainage bag on the floor.1,2,3,32
■ Maintain the urinary catheter and drainage bag tubing
free from kinking.2,3
■ Empty the drainage bag regularly, using a separate
collection container for each patient.1,2,3,32 Use sterile
technique, avoid splashing, and prevent contact of the
drainage spigot with the nonsterile collecting container to
avoid the risk of contamination.1,2,3,4,32
■ Measure the outflow volume accurately. It should equal
or, allowing for urine production, exceed the inflow volume
slightly. If the inflow volume exceeds the outflow volume
postoperatively, suspect bladder rupture at the suture lines
or renal damage, and notify the practitioner immediately.
■ Assess the outflow drainage for changes in appearance
and for blood clots, especially if continuous bladder
irrigation is being performed postoperatively to control
bleeding. If the drainage is bright red, the irrigation solution
usually should be infused rapidly (with the flow clamp wide
open) until the drainage clears. Notify the practitioner
immediately if you suspect hemorrhage. If the drainage is
clear, the solution is usually given at a rate of 40 to 60
drops/minute. The practitioner typically specifies the rate for
irrigation solutions containing an antibiotic.
■ Monitor vital signs as often as required by the patient’s
condition, increasing the frequency if the patient becomes
unstable.
■ Monitor urine output, assess the patient for abdominal
pain, and palpate for bladder distention as indicated. Notify
the practitioner of abnormal findings.
■ Check the inflow and outflow tubing periodically for kinks
to make sure the solution is running freely, without
obstruction, which reduces the risk of CAUTI.1,2,4
■ Remove and discard your gloves and any other personal
protective equipment worn.28,29
■ Perform hand hygiene.16,17,18,19,20,21
■ Clean and disinfect your stethoscope using a disinfectant
pad.33,34
■ Perform hand hygiene.16,17,18,19,20,21
■ Document the procedure.35,36,37,38
Special considerations
■ Don’t clean the periurethral area with an antiseptic pad;
instead, clean the meatal surface during routine hygiene to
reduce the risk of CAUTI.1,2,3
■ Encourage oral fluid intake of 2 to 3 L/day unless
contraindicated by another medical condition.
■ The Joint Commission has issued a sentinel event alert
related to managing risk during transition to new
International Organization for Standardization tubing
standards that were designed to prevent dangerous tubing
misconnections, which can lead to serious patient injury and
death. During the transition, trace the tubing and catheter
from the patient to the point of origin before connecting or
reconnecting any device or infusion, at any care transition
(such as a new setting or service), and as part of the hand-
off process; route tubes and catheters having different
purposes in different standardized directions; label the
tubing at both the distal and proximal ends (when there are
different access sites or several bags hanging); use tubing
and equipment only as intended; and store medications for
different delivery routes in separate locations.31
Complications
Interruptions in a continuous bladder irrigation system can
predispose the patient to infection. Obstruction in the
urinary catheter’s outflow lumen can cause bladder
distention or spasm.
Documentation
Each time a container of irrigation solution is emptied,
record the date, time, and amount of fluid given on the
intake and output record. Record the time and amount of
fluid each time you empty the drainage bag. Note the
appearance of the drainage and any complaints expressed
by the patient. Note the patient’s tolerance of the
procedure.
REFERENCES
1 Healthcare Infection Control Practices Advisory Committee. (2010, revised
2017). “Guideline for the prevention of catheter-associated urinary tract
infections 2009” [Online]. Accessed via the Web at
https://www.cdc.gov/infectioncontrol/pdf/guidelines/cauti-guidelines.pdf
(Level I)
2 Lo, E., et al. (2014). SHEA/IDSA practice recommendation: Strategies to
prevent catheter-associated urinary tract infections in acute care hospitals:
2014 update. Infection Control and Hospital Epidemiology, 35(5), 464–479.
Accessed via the Web at http://www.jstor.org/stable/10.1086/675718 (Level I)
3 Association of Professionals in Infection Control and Epidemiology (APIC).
(2014). “APIC implementation guide: Guide to preventing catheter-associated
urinary tract infections” [Online]. Accessed via the Web at
http://apic.org/Resource_/EliminationGuideForm/6473ab9b-e75c-457a-8d0f-
d57d32bc242b/File/APIC_CAUTI_web_0603 .pdf (Level IV)
4 The Joint Commission. (2019). Standard NPSG.07.06 .01. Comprehensive
accreditation manual for hospitals. Oakbrook Terrace, IL: The Joint
Commission. (Level VII)
5 Society of Urologic Nurses and Associates. (2010, reviewed 2016). “Clinical
practice guidelines: Prevention and control of catheter-associated urinary
tract infection (CAUTI)” [Online]. Accessed via the Web at
http://www.suna.org/sites/default/files/download/cautiGuideline.pdf (Level VII)
6 Centers for Medicare and Medicaid Services, Department of Health and
Human Services. (2017). “Appendix 1: Hospital-acquired conditions (HACS)
list” [Online]. Accessed October 2017 via the Web at
https://www.cms.gov/ICD10Manual/version33-fullcode-
cms/fullcode_cms/P0386.html
7 Jarrett, N. & Callaham, M. (2016). “Evidence-based guidelines for selected
hospital-acquired conditions: Final report” [Online]. Accessed via the Web at
https://www.cms.gov/Medicare/Medicare-Fee-for-Service-
Payment/HospitalAcqCond/Downloads/2016-HAC-Report.pdf
8 Accreditation Association for Hospital and Health Systems. (2017). Standard
07.01.17. Healthcare Facilities Accreditation Program: Accreditation
requirements for acute care hospitals. Chicago, IL: Accreditation Association
for Hospital and Health Systems. (Level VII)
9 Urology Working Nursing Group. (2014). Clinical guideline: Bladder irrigation
—Management of haematuria. Chatswood, NSW: Agency for clinical
innovation. Accessed via the Web at
http://www.aci.health.nsw.gov.au/__data/assets/pdf_file/0018/191061/ACI_Bla
dder_Irrigation.pdf (Level VII)
10 Westbrook, J., et al. (2010). Association of interruptions with an increased risk
and severity of medication administration errors. Archives of Internal
Medicine, 170(8), 683–690 . (Level IV)
11 Institute for Safe Medication Practices. (2012). Side tracks on the safety
express: Interruptions lead to errors and unfinished...Wait what was I doing?
Nurse Advise-ERR, 11(2), 1–4 . Accessed via the Web at
https://www.ismp.org/Newsletters/acutecare/showarticle.aspx?id=37
12 The Joint Commission. (2019). Standard MM.06.01.01. Comprehensive
accreditation manual for hospitals. Oakbrook Terrace, IL: The Joint
Commission. (Level VII)
13 Centers for Medicare and Medicaid Services, Department of Health and
Human Services. (2015). Condition of participation: Nursing services. 42
C.F.R. § 482.23(c).
14 Accreditation Association for Hospitals and Health Systems. (2017). Standard
16.01.03. Healthcare Facilities Accreditation Program: Accreditation
requirements for acute care hospitals. Chicago, IL: Accreditation Association
for Hospitals and Health Systems. (Level VII)
15 DNV GL-Healthcare USA, Inc. (2016). MM.1 .SR.2. NIAHO® accreditation
requirements: Interpretive guidelines & surveyor guidance (version 11).
Milford, OH: DNV GL-Healthcare USA, Inc. (Level VII)
16 The Joint Commission. (2019). Standard NPSG.07.01.01. Comprehensive
accreditation manual for hospitals. Oakbrook Terrace, IL: The Joint
Commission. (Level VII)
17 Centers for Disease Control and Prevention. (2002). Guidelines for hand
hygiene in health-care settings: Recommendations of the Healthcare Infection
Control Practices Advisory Committee and the HICPAC/SHEA/APIC/IDSA Hand
Hygiene Task Force. MMWR Recommendations and Reports, 51(RR-16), 1–45.
Accessed via the Web at https://www.cdc.gov/mmwr/pdf/rr/rr5116.pdf (Level
II)
18 World Health Organization. (2009). “WHO guidelines on hand hygiene in
health care: First global patient safety challenge, clean care is safer care”
[Online]. Accessed via the Web at
http://apps.who.int/iris/bitstream/10665/44102/1/9789241597906_eng.pdf
(Level IV)
19 Centers for Medicare and Medicaid Services, Department of Health and
Human Services. (2015). Condition of participation: Infection control. 42 C.F.R.
§ 482.42.
20 Accreditation Association for Hospitals and Health Systems. (2017). Standard
07.01.21. Healthcare Facilities Accreditation Program: Accreditation
requirements for acute care hospitals. Chicago, IL: Accreditation Association
for Hospitals and Health Systems (Level VII)
21 DNV GL-Healthcare USA, Inc. (2016). IC.1 .SR.1 . NIAHO® accreditation
requirements: Interpretive guidelines & surveyor guidance (version 11).
Milford, OH: DNV GL-Healthcare USA, Inc. (Level VII)
22 The Joint Commission. (2019). Standard NPSG.01.01.01. Comprehensive
accreditation manual for hospitals. Oakbrook Terrace, IL: The Joint
Commission. (Level VII)
23 Centers for Medicare and Medicaid Services, Department of Health and
Human Services. (2015). Condition of participation: Patient’s rights. 42 C.F.R.
§ 482.13(c)(1).
24 The Joint Commission. (2019). Standard RI.01.01.01. Comprehensive
accreditation manual for hospitals. Oakbrook Terrace, IL: The Joint
Commission. (Level VII)
25 Accreditation Association for Hospitals and Health Systems. (2017). Standard
15.01.16. Healthcare Facilities Accreditation Program: Accreditation
requirements for acute care hospitals. Chicago, IL: Accreditation Association
for Hospitals and Health Systems. (Level VII)
26 DNV GL-Healthcare USA, Inc. (2016). PR.1.SR.5 . NIAHO® accreditation
requirements: Interpretive guidelines & surveyor guidance (version 11).
Milford, OH: DNV GL-Healthcare USA, Inc. (Level VII)
27 The Joint Commission. (2019). Standard PC.02.01.21. Comprehensive
accreditation manual for hospitals. Oakbrook Terrace, IL: The Joint
Commission (Level VII)
28 Siegel, J. D ., et al. (2007, revised 2017). “2007 guideline for isolation
precautions: Preventing transmission of infectious agents in healthcare
settings” [Online]. Accessed via the Web at
https://www.cdc.gov/infectioncontrol/pdf/guidelines/isolation-guidelines.pdf
(Level II)
29 Accreditation Association for Hospitals and Health Systems. (2017). Standard
07.01.10. Healthcare Facilities Accreditation Program: Accreditation
requirements for acute care hospitals. Chicago, IL: Accreditation Association
for Hospitals and Health Systems. (Level VII)
30 U.S . Food and Drug Administration. (n.d .). “Look. Check. Connect. Safe
medical device connections save lives” [Online]. Accessed via the Web at
http://www.fda.gov/downloads/MedicalDevices/Safety/AlertsandNotices/UCM1
34873.pdf
31 The Joint Commission. (2014). “Sentinel event alert: Managing risk during
transition to new ISO tubing connector standards” [Online] Accessed via the
Web at
http://www.jointcommission.org/assets/1/6/SEA_53_Connectors_8 _19_14 _final.
pdf (Level VII)
32 Le, L. K. D. (2016). Urinary drainage bags: Emptying, changing and securing.
South Australia, Adelaide: The Joanna Briggs Institute. (Level I)
33 Accreditation Association for Hospitals and Health Systems. (2017). Standard
07.02.03. Healthcare Facilities Accreditation Program: Accreditation
requirements for acute care hospitals. Chicago, IL: Accreditation Association
for Hospitals and Health Systems. (Level VII)
34 Rutala, W. A., et al. (2008, revised 2017). “Guideline for disinfection and
sterilization in healthcare facilities, 2008” [Online]. Accessed via the Web at
https://www.cdc.gov/infectioncontrol/pdf/guidelines/disinfection-
guidelines.pdf (Level I)
35 The Joint Commission. (2019). Standard RC.01.03 .01. Comprehensive
accreditation manual for hospitals. Oakbrook Terrace, IL: The Joint
Commission. (Level VII)
36 Centers for Medicare and Medicaid Services, Department of Health and
Human Services. (2015). Condition of participation: Medical record services.
42 C.F.R. § 482.24(b).
37 Accreditation Association for Hospitals and Health Systems. (2017). Standard
10.00 .03. Healthcare Facilities Accreditation Program: Accreditation
requirements for acute care hospitals. Chicago, IL: Accreditation Association
for Hospitals and Health Systems. (Level VII)
38 DNV GL-Healthcare USA, Inc. (2016). MR.2 .SR.1 . NIAHO® accreditation
requirements: Interpretive guidelines & surveyor guidance (version 11).
Milford, OH: DNV GL-Healthcare USA, Inc. (Level VII)
CONTINUOUS PASSIVE MOTION DEVICE USE
A continuous passive motion (CPM) device is commonly
used after joint surgery, particularly after total knee
arthroplasty. The device increases range of motion in the
joint as the flexion and extension settings are adjusted
during therapy. It minimizes the negative effects of
immobility because of increased circulation from the passive
movement of the limb. The device also stimulates healing
within the articular cartilage and reduces adhesions and
swelling. However, studies involving patients with total knee
arthroplasty or with arthritis or who have had a total knee
replacement suggest that CPM doesn’t improve active knee
flexion, pain, function, or quality of life.1,2,3
The practitioner determines the amount of flexion and
extension of the joint and the cycle rate (the number of
revolutions per minute) as well as the length of time it
should be used.
Although the CPM device is usually used on the knee, as
discussed in this procedure, it may be appropriate for other
joints as well.
Equipment
CPM device ▪ single-patient-use soft-goods kit ▪ tape
measure ▪ goniometer ▪ Optional: gloves, prescribed
analgesic.
Preparation of the equipment
Review the manufacturer’s instructions for the CPM device
before use.
Implementation
■ Verify the practitioner’s order.
■ Gather and prepare the appropriate equipment.
■ Apply the soft-goods padding to the CPM device.
■ Perform hand hygiene.4,5,6,7,8,9
■ Confirm the patient’s identity using at least two patient
identifiers.10
■ Provide privacy.11,12,13,14
■ Explain the procedure to the patient to reduce anxiety
and encourage compliance.
■ Perform a comprehensive pain assessment using
techniques appropriate for the patient’s age, condition, and
ability to understand.15
■ Administer an analgesic, as needed and ordered,
following safe medication administration practices.16,17,18,19
Allow time for the full effect of the analgesic to occur before
starting the machine. Perform a follow-up pain assessment
and notify the practitioner if pain isn’t adequately
controlled.15
■ Put on gloves, if needed, to comply with standard
precautions.20,21
■ Raise the bed to waist level when providing patient care
to prevent caregiver back strain.22
■ Determine the distance between the patient’s gluteal
crease and the popliteal space using the measuring tape.
■ Measure the length of the patient’s lower leg from the
knee to 1⁄4′′ (0.63 cm) beyond the bottom of the foot.
■ Adjust the thigh length and footplate position on the CPM
machine based on your measurements.
■ Position the patient in the middle of the bed.
■ Support the affected extremity, elevating it to allow
placement of the padded CPM device on the bed. Gently
lower the leg onto the device (as shown below).
■ Make sure the patient’s knee is resting at the hinged joint
of the CPM machine and that the leg is slightly abducted.
■ Adjust the footplate to maintain a neutral position for the
patient’s foot (as shown below). Assess the patient’s
position to make sure the leg isn’t internally or externally
rotated to prevent injury.
■ Secure the restraining straps under the CPM device and
around the patient’s leg to hold the leg in position. Check
that two fingers fit between the strap and the patient’s leg
(as shown below) to prevent injury from excessive pressure
from the strap.
■ Turn the unit on at the main power switch and set the
controls to the level prescribed by the practitioner.
■ Teach the patient how to use the STOP/GO button.
■ Set the device to ON and start the therapy by pressing the
GO button. Monitor the patient and the device through the
first few cycles. Verify the angle of flexion when the device
reaches its greatest height by measuring with a goniometer
(as shown below) to ensure the device is set to the
prescribed parameters.
■ Make sure the call light and other necessary items are
within easy reach of the patient.
■ Check the patient’s level of comfort frequently and
perform skin, incision, and neurovascular assessments at a
frequency determined by the patient’s condition.
■ Return the bed to the lowest position to prevent falls and
maintain patient safety.23
■ Remove and discard your gloves, if worn, and perform
hand hygiene.4,5,6,7,8,9
■ Document the procedure.24,25,26,27
Special considerations
■ The use of the CPM device is in addition to physical
therapy during the rehabilitation process.
Patient teaching
Instruct the patient how to use the device and the controls
as prescribed to promote healing and joint function. Make
the patient aware of setting changes and the goals of CPM
therapy. Teach the patient to report signs and symptoms of
neurovascular impairment, such as numbness or tingling,
sudden pain, or coolness of the affected limb.
Documentation
Record the date and the time the CPM device was initiated,
the device settings, and the patient’s tolerance of the CPM
device. Note the patient’s skin, incision, and neurovascular
assessment. Document pain assessment and interventions
and the patient’s response to interventions. Also record any
patient teaching provided and the patient’s understanding
of the teaching.
REFERENCES
1 Harvey, L. A., et al. (2014). Continuous passive motion following total knee
arthroplasty in people with arthritis. Cochrane Database of Systematic
Reviews, 2014(2), CD004260. (Level I)
2 Tabor, D. (2013). An empirical study using range of motion and pain score as
determinants for continuous passive motion: Outcomes following total knee
replacement surgery in an adult population. Orthopedic Nursing, 32(5), 261–
265. (Level VI)
3 Chen, L. H., et al. (2013). Aggressive continuous passive motion exercise
does not improve knee range of motion after total knee arthroplasty. Journal
of Clinical Nursing, 22(3-4), 389–394. (Level VI)
4 The Joint Commission. (2019). Standard NPSG.07.01.01. Comprehensive
accreditation manual for hospitals. Oakbrook Terrace, IL: The Joint
Commission. (Level VII)
5 Centers for Disease Control and Prevention. (2002). Guideline for hand
hygiene in health-care settings: Recommendations of the Healthcare Infection
Control Practices Advisory Committee and the HICPAC/SHEA/APIC/IDSA Hand
Hygiene Task Force. MMWR Recommendations and Reports, 51(RR-16), 1–45.
Accessed via the Web at https://www.cdc.gov/mmwr/pdf/rr/rr5116.pdf (Level
II)
6 Centers for Medicare and Medicaid Services, Department of Health and
Human Services. (2015). Condition of participation: Infection control. 42 C.F.R.
§ 482.42.
7 World Health Organization. (2009). “WHO guidelines on hand hygiene in
health care: First global patient safety challenge, clean care is safer care”
[Online]. Accessed via the Web at
http://apps.who.int/iris/bitstream/10665/44102/1/9789241597906_eng.pdf
(Level IV)
8 Accreditation Association for Hospitals and Health Systems. (2017). Standard
07.01.21. Healthcare Facilities Accreditation Program: Accreditation
requirements for acute care hospitals. Chicago, IL: Accreditation Association
for Hospitals and Health Systems. (Level VII)
9 DNV GL-Healthcare USA, Inc. (2016). IC.1.SR.1 . NIAHO® accreditation
requirements: Interpretive guidelines & surveyor guidance (version 11).
Milford, OH: DNV GL-Healthcare USA, Inc. (Level VII)
10 The Joint Commission. (2019). Standard NPSG.01.01.01. Comprehensive
accreditation manual for hospitals. Oakbrook Terrace, IL: The Joint
Commission. (Level VII)
11 Accreditation Association for Hospitals and Health Systems. (2017). Standard
15.01.16. Healthcare Facilities Accreditation Program: Accreditation
requirements for acute care hospitals. Chicago, IL: Accreditation Association
for Hospitals and Health Systems. (Level VII)
12 Centers for Medicare and Medicaid Services, Department of Health and
Human Services. (2015). Condition of participation: Patient’s rights. 42 C.F.R.
§ 482.13(c)(1).
13 DNV GL-Healthcare USA, Inc. (2016). PR.1.SR.5 . NIAHO® accreditation
requirements: Interpretive guidelines & surveyor guidance (version 11).
Milford, OH: DNV GL-Healthcare USA, Inc. (Level VII)
14 The Joint Commission. (2019). Standard RI.01.01.01. Comprehensive
accreditation manual for hospitals. Oakbrook Terrace, IL: The Joint
Commission. (Level VII)
15 The Joint Commission. (2019). Standard PC.01.02.07. Comprehensive
accreditation manual for hospitals. Oakbrook Terrace, IL: The Joint
Commission. (Level VII)
16 Accreditation Association for Hospitals and Health Systems. (2017). Standard
16.01.03. Healthcare Facilities Accreditation Program: Accreditation
requirements for acute care hospitals. Chicago, IL: Accreditation Association
for Hospitals and Health Systems. (Level VII)
17 Centers for Medicare and Medicaid Services, Department of Health and
Human Services. (2015). Condition of participation: Nursing services. 42
C.F.R. § 482.23(c).
18 The Joint Commission. (2019). Standard MM.06.01.01. Comprehensive
accreditation manual for hospitals. Oakbrook Terrace, IL: The Joint
Commission. (Level VII)
19 DNV GL-Healthcare USA, Inc. (2016). MM.1 .SR.2. NIAHO® accreditation
requirements: Interpretive guidelines & surveyor guidance (version 11).
Milford, OH: DNV GL-Healthcare USA, Inc. (Level VII)
20 Accreditation Association for Hospitals and Health Systems. (2017). Standard
07.01.10. Healthcare Facilities Accreditation Program: Accreditation
requirements for acute care hospitals. Chicago, IL: Accreditation Association
for Hospitals and Health Systems. (Level VII)
21 Siegel, J. D ., et al. (2007, revised 2017). “2007 guideline for isolation
precautions: Preventing transmission of infectious agents in healthcare
settings” [Online]. Accessed via the Web at
https://www.cdc.gov/infectioncontrol/pdf/guidelines/isolation-guidelines.pdf
(Level II)
22 Waters, T. R., et al. (2009). “Safe patient handling training for schools of
nursing” [Online]. Accessed via the Web at
https://www.cdc.gov/niosh/docs/2009-127/pdfs/2009-127.pdf (Level VII)
23 Ganz, D. A., et al. (2013). Preventing falls in hospitals: A toolkit for improving
quality of care (AHRQ Publication No. 13-0015-EF). Rockville, MD: Agency for
Healthcare Research and Quality. Accessed via the Web at
https://www.ahrq.gov/sites/default/files/publications/files/fallpxtoolkit_0 .pdf
(Level VII)
24 The Joint Commission. (2019). Standard RC.01.03 .01. Comprehensive
accreditation manual for hospitals. Oakbrook Terrace, IL: The Joint
Commission. (Level VII)
25 Centers for Medicare and Medicaid Services, Department of Health and
Human Services. (2015). Condition of participation: Medical record services.
42 C.F.R. § 482.24(b).
26 Accreditation Association for Hospitals and Health Systems. (2017). Standard
10.00 .03. Healthcare Facilities Accreditation Program: Accreditation
requirements for acute care hospitals. Chicago, IL: Accreditation Association
for Hospitals and Health Systems. (Level VII)
27 DNV GL-Healthcare USA, Inc. (2016). MR.2 .SR.1 . NIAHO® accreditation
requirements: Interpretive guidelines & surveyor guidance (version 11).
Milford, OH: DNV GL-Healthcare USA, Inc. (Level VII)
CONTINUOUS POSITIVE AIRWAY PRESSURE USE
Continuous positive airway pressure (CPAP) provides
constant pressure into the airways to help hold the airway
open, mobilize secretions, treat atelectasis, and generally
ease the work of breathing. It’s also used to treat chronic
obstructive sleep apnea. CPAP keeps the entire airway open,
from the nares to the alveoli, increasing functional residual
capacity and improving gas exchange.
Although intubated patients may also receive CPAP
through a ventilator, this procedure focuses on
nonintubated patients who receive CPAP through a high-flow
generating system, which can be used in the health care
facility or at home and can reduce or eliminate the need for
intubation. Many patients are started on CPAP in the health
care facility and then continue therapy at home.
Although CPAP has traditionally been administered
through a face mask, other, more comfortable methods
include nasal pillows and the nasal mask.
Because of increased thoracic pressure, CPAP is
contraindicated in patients with increased intracranial
pressure, hemodynamic instability, or recent facial, oral, or
skull trauma. CPAP is also contraindicated in patients with
untreated pneumothorax.1
Equipment
Nasal mask, nasal pillows, or face mask (properly sized) ▪
permanent marker ▪ CPAP machine ▪ washcloth ▪ water ▪
facility-approved disinfectant ▪ oral care supplies ▪
stethoscope ▪ disinfectant pad ▪ Optional: oxygen delivery
tubing, oxygen source, pulse oximeter, gloves, mask,
goggles, gown, mask with face shield, skin barrier.2
Preparation of equipment
In most facilities, a respiratory therapist assumes the
responsibility for setting up and administering CPAP. If a
respiratory therapist isn’t available and you must set up a
CPAP machine, follow the manufacturer’s instructions.
Position the CPAP machine so that the tubing easily reaches
the patient, and plug in the machine. Don’t plug the CPAP
machine into an outlet with another plug in it, and don’t use
an extension cord to reach the outlet. Connect the oxygen
delivery tubing to the air outlet valve on the CPAP unit, if
ordered.
Implementation
■ Verify the practitioner’s order.
■ Notify the respiratory therapist (if available in your
facility) of the CPAP order.
■ Gather and prepare the appropriate equipment.
■ Perform hand hygiene.3,4,5,6,7,8
■ Confirm the patient’s identity using at least two patient
identifiers.9
■ Provide privacy.10,11,12,13
■ Explain the procedure to the patient and family (if
appropriate) according to their individual communication
and learning needs to increase their understanding, allay
their fears, and enhance cooperation.14
■ Instruct the patient to wash the face with a washcloth and
water to remove facial oils and help achieve a better fit.
■ Perform hand hygiene.3,4,5,6,7,8
■ Put on personal protective equipment, if needed to
comply with standard precautions.15,16
■ Check the nasal mask, nasal pillows, or face mask to
make sure that the cushioning isn’t hard or broken. If it is,
replace it.
Applying a nasal mask
■ Place the nasal mask so that the longer straps are located
at the top of the mask (as shown on top right).
■ Make sure that the Velcro is facing away from you, and
thread the four tabs through the slots on the sides and top
of the mask (as shown below).
■ Pull the straps through the slots and fasten them using
the Velcro.
■ Place the mask over the patient’s nose and position the
headgear over the patient’s head.
■ Gradually tighten all the straps on the mask until a seal is
obtained (as shown below). The mask doesn’t have to be
very tight to fit correctly—it just has to have a seal.
■ Use the permanent marker to mark the straps with the
final position to eliminate having to fit the mask each time
the patient wears it.
Applying a nasal pillows
■ Insert the nasal pillows into the shell (as shown below),
making sure they fit correctly and that there’s no air leaking
around them.
■ Place the headgear around the patient’s head and use
the Velcro straps to achieve the proper fit. After the straps
are in the correct place, remove the headgear without
undoing the straps.
■ Attach the nasal pillows to the headgear by wrapping the
Velcro around the tubing, leaving room for rotation (as
shown below).
■ Place the completely assembled headgear back on the
patient and position the nasal pillows comfortably.
■ Attach the shell strap across the shell and adjust the
tension of the strap (as shown on top right) until there’s a
seal in both nostrils.
■ Be careful not to block the exhalation port on the back
side of the shell.
Applying a face mask
■ Hold the mask against the patient’s face and position the
headgear over the head.
■ Using the Velcro straps, adjust the straps as with the
nasal mask (and as shown below) until there are no leaks
present.
■ Connect the flexible tubing to the mask.
Administering CPAP
■ After the administration device is correctly fitted on the
patient, turn on the pressure generator.
■ Turn on the CPAP unit before turning on the oxygen flow
to the ordered level. Make sure the alarm limits are set
appropriately for the patient’s current condition and that the
alarms are turned on, functioning properly, and audible to
staff.17,18,19
■ If ordered, monitor the patient’s oxygen saturation level
using pulse oximetry during treatment.
■ As ordered and tolerated, provide a CPAP mask break
every 4 hours. Check strap tension and skin integrity
beneath and around the mask regularly to prevent device-
related skin breakdown.2
■ Provide frequent oral care. (See the “Oral care”
procedure, page 552.) CPAP may cause dry mouth; the
oropharynx may become colonized with organisms that can
be aspirated into the lungs, causing hospital-associated
pneumonia.
■ Reassess the patient’s respiratory status to ensure that
the patient is tolerating CPAP therapy.
■ When the treatment is over—in the morning or on
discontinuation of the order—turn off the pressure generator
and remove the headgear and appliance from the patient.
■ Clean and disinfect the equipment and store it
properly.20,21
■ Remove and discard your personal protective equipment,
if worn.15,16
■ Perform hand hygiene.3,4,5,6,7,8
■ Clean and disinfect your stethoscope with a disinfectant
pad.20,21
■ Perform hand hygiene.3,4,5,6,7,8
■ Document the procedure.22,23,24,25
Special considerations
■ The Joint Commission has issued a sentinel event alert
concerning medical device alarm safety, because alarm-
related events have been associated with permanent loss of
function or death. Among the major contributing factors
were
improper
alarm
settings,
alarm
settings
inappropriately turned off, and alarm signals not audible to
staff. Make sure that alarm limits are set appropriately and
that alarms are turned on and audible. Follow facility
guidelines for preventing alarm fatigue.17
■ When applying the mask for the first time, allow the
patient to hold the mask in place so that the patient can
remove the mask quickly if the patient needs to
communicate or feels claustrophobic.1
■ If the patient isn’t familiar with CPAP, start with the lowest
pressure settings and adjust them in small increments over
1 to 2 minutes to help the patient adjust to CPAP.1
■ The patient who complains of a runny nose or dryness or
burning in the nose and throat may need to use a humidifier
with the CPAP unit. Discuss this option with the practitioner
and obtain an order for humidification.
■ Always make sure there’s air coming out of the unit when
the power is turned on.
■ Because CPAP administered via a mask can cause nausea
and vomiting, it shouldn’t be used in a patient who’s
unresponsive or at risk for aspiration.
■ Such adverse effects of CPAP as dryness of the eyes,
nasal stuffiness, and a leaking mask, as well as the
inconvenience and noise associated with CPAP use, can lead
to noncompliance.26 For patients with obstructive sleep
apnea, compliance is important for the treatment to be
successful. Discuss these issues with the patient, intervene
as appropriate, and encourage the patient to report
persistent adverse effects.
■ If the mask isn’t properly fitted, the patient may complain
of dry or sore eyes. If this is the case, remove the mask and
headgear and readjust them to minimize leaks.
Patient teaching
Teach the patient how to use the machine at home,
including fitting the mask and taking care of the equipment.
Make sure the patient has the name and phone number of
the company that will be supplying the machine for home
use. Provide a contact number for the respiratory therapist,
and encourage the patient to call if he or she has questions.
Complications
Most complications, such as dry eyes, runny or dry nose, or
burning in the throat or nose, result from ill-fitting masks.
Some patients may be allergic to the mask or develop skin
irritation from the mask contacting the face. If this
complication happens, apply a barrier between the mask
and the skin.
CPAP also potentially causes decreased cardiac output
due to increased intrathoracic pressure. Other complications
include nosebleeds, abdominal bloating, headaches, and
nightmares.
Documentation
Document the CPAP settings, the length of time the patient
was on CPAP, how the patient tolerated CPAP, and if there
were any complications. Also record any patient teaching
provided.
REFERENCES
1 Kacmarek, R. M., et al. (2017). Egan’s fundamentals of respiratory care (11th
ed.). St. Louis, MO: Mosby.
2 Walden, C., et al. (2013). “Getting in step: Partnering with respiratory therapy
to reduce device related pressure ulcers” [Online]. Accessed via the Web at
http://www.serwocn.org/2013Conference/images/posters/2013%20Poster%20
15%20-%20SE%20Regional%20WOCN%208-30 -13.pdf (Level VI)
3 The Joint Commission. (2019). Standard NPSG.07.01.01. Comprehensive
accreditation manual for hospitals. Oakbrook Terrace, IL: The Joint
Commission. (Level VII)
4 Centers for Disease Control and Prevention. (2002). Guideline for hand
hygiene in health-care settings: Recommendations of the Healthcare Infection
Control Practices Advisory Committee and the HICPAC/SHEA/APIC/IDSA Hand
Hygiene Task Force. MMWR Recommendations and Reports, 51(RR-16), 1–45.
Accessed via the Web at https://www.cdc.gov/mmwr/pdf/rr/rr5116.pdf (Level
II)
5 World Health Organization. (2009). “WHO guidelines on hand hygiene in
health care: First global patient safety challenge, clean care is safer care”
[Online]. Accessed via the Web at
http://apps.who.int/iris/bitstream/10665/44102/1/9789241597906_eng.pdf
(Level IV)
6 Centers for Medicare and Medicaid Services, Department of Health and
Human Services. (2015). Condition of participation: Infection control. 42 C.F.R.
§ 482.42.
7 Accreditation Association of Hospitals and Health Systems. (2017). Standard
07.01.21. Healthcare Facilities Accreditation Program: Accreditation
requirements for acute care hospitals. Chicago, IL: Accreditation Association
of Hospitals and Health Systems. (Level VII)
8 DNV GL-Healthcare USA, Inc. (2016). IC.1.SR.1 . NIAHO® accreditation
requirements: Interpretive guidelines & surveyor guidance (version 11).
Milford, OH: DNV GL-Healthcare USA, Inc. (Level VII)
9 The Joint Commission. (2019). Standard NPSG.01.01.01. Comprehensive
accreditation manual for hospitals. Oakbrook Terrace, IL: The Joint
Commission. (Level VII)
10 Centers for Medicare and Medicaid Services, Department of Health and
Human Services. (2015). Condition of participation: Patient’s rights. 42 C.F.R.
§ 482.13(c)(1).
11 The Joint Commission. (2019). Standard RI.01.01.01. Comprehensive
accreditation manual for hospitals. Oakbrook Terrace, IL: The Joint
Commission. (Level VII)
12 Accreditation Association of Hospitals and Health Systems. (2017). Standard
15.01.16. Healthcare Facilities Accreditation Program: Accreditation
requirements for acute care hospitals. Chicago, IL: Accreditation Association
of Hospitals and Health Systems. (Level VII)
13 DNV GL-Healthcare USA, Inc. (2016). PR.1.SR.5 . NIAHO® accreditation
requirements: Interpretive guidelines and surveyor guidance (version 11).
Milford, OH: DNV GL-Healthcare USA, Inc. (Level VII)
14 The Joint Commission. (2019). Standard PC.02.01.21. Comprehensive
accreditation manual for hospitals. Oakbrook Terrace, IL: The Joint
Commission. (Level VII)
15 Siegel, J. D ., et al. (2007, revised 2017). “2007 guideline for isolation
precautions: Preventing transmission of infectious agents in healthcare
settings” [Online]. Accessed via the Web at
https://www.cdc.gov/infectioncontrol/pdf/guidelines/isolation-guidelines.pdf
(Level II)
16 Accreditation Association or Hospitals and Health Systems. (2017). Standard
07.01.10. Healthcare Facilities Accreditation Program: Accreditation
requirements for acute care hospitals. Chicago, IL: Accreditation Association
or Hospitals and Health Systems. (Level VII)
17 The Joint Commission. (2013). “Sentinel event alert: Medical device alarm
safety in hospitals” [Online]. Accessed via the Web at
https://www.jointcommission.org/assets/1/6/SEA_50_alarms_4 _26_16.pdf
(Level VII)
18 The Joint Commission. (2019). Standard NPSG.06 .01.01. Comprehensive
accreditation manual for hospitals. Oakbrook Terrace, IL: The Joint
Commission. (Level VII)
19 American Association of Critical-Care Nurses. (2013). “A ACN practice alert:
Alarm management” [Online]. Accessed via the Web at
http://www.aacn.org/wd/practice/docs/practicealerts/alarm-management-
practice-alert.pdf (Level VII)
20 Rutala, W. A., et al. (2008, Rrevised 2017). “Guideline for disinfection and
sterilization in healthcare facilities, 2008” [Online]. Accessed via the Web at
https://www.cdc.gov/infectioncontrol/pdf/guidelines/disinfection-
guidelines.pdf (Level I)
21 Accreditation Association of Hospitals and Health Systems. (2017). Standard
07.02.03. Healthcare Facilities Accreditation Program: Accreditation
requirements for acute care hospitals. Chicago, IL: Accreditation Association
of Hospitals and Health Systems. (Level VII)
22 The Joint Commission. (2019). Standard RC.01.03 .01. Comprehensive
accreditation manual for hospitals. Oakbrook Terrace, IL: The Joint
Commission. (Level VII)
23 Centers for Medicare and Medicaid Services, Department of Health and
Human Services. (2015). Condition of participation: Medical record services.
42 C.F.R. § 482.24(b).
24 Accreditation Association or Hospitals and Health Systems. (2017). Standard
10.00 .03. Healthcare Facilities Accreditation Program: Accreditation
requirements for acute care hospitals. Chicago, IL: Accreditation Association
of Hospitals and Health Systems. (Level VII)
25 DNV GL-Healthcare USA, Inc. (2016). MR.2 .SR.1 . NIAHO® accreditation
requirements: Interpretive guidelines & surveyor guidance (version 11).
Milford, OH: DNV GL-Healthcare USA, Inc. (Level VII)
26 Weaver, T. Adherence with continuous positive airway pressure (CPAP).
(2017). In: UpToDate, Collop, N. (Ed.). Accessed via the Web at
http://www.uptodate.com
CONTINUOUS RENAL REPLACEMENT THERAPY
Continuous renal replacement therapy (CRRT) is an
extracorporeal purification therapy used to treat patients
with acute kidney injury. Unlike the more traditional
hemodialysis, CRRT is administered around the clock,
providing patients with continuous therapy and sparing
them the destabilizing hemodynamic and electrolytic
changes characteristic of traditional hemodialysis. For
patients who can’t tolerate traditional hemodialysis—such
as those who have hypotension—CRRT is often the only
choice of treatment.
The techniques used vary in complexity. Slow continuous
ultrafiltration (SCUF) uses arteriovenous access and the
patient’s blood pressure to circulate blood through a
hemofilter. Because the goal of this therapy is the removal
of fluids to help prevent or treat fluid overload, the patient
doesn’t receive replacement fluids.1 Continuous venovenous
hemofiltration (CVVH) uses a double-lumen catheter to
provide access to a vein, and a pump moves blood through
the hemofilter. This process removes solutes and fluids
primarily by convection. Replacement fluids help maintain
electrolyte and acid–base balance. Continuous venovenous
hemodialysis (CVVHD) uses a double-lumen catheter to
provide access to a vein while a pump moves dialysate
solution concurrently with blood flow. This process
continuously removes fluid and solutes primarily by
diffusion.
Continuous
venovenous
hemodiafiltration
(CVVHDF) combines the equipment and the fluid and solute
removal processes of CVVH and CVVHD to continuously
remove fluids and solutes by both convection and diffusion.
Slow extended daily dialysis (SLEDD) is a modification of
traditional intermittent hemodialysis. SLEDD usually occurs
in 6- to 12-hour1 treatments, administered 5 to 7 days each
week. The blood flow rates range from 100 to 250
mL/minute, resulting in an extended dialysis time,
decreased solute rate, and ultrafiltration.
CVVH, CVVHD, CVVHDF, or SLEDD is used instead of
continuous arteriovenous hemofiltration (CAVH) to treat
critically ill patients. CVVH in particular has several
advantages over CAVH: it doesn’t require arterial access, it’s
appropriate for patients with low mean arterial pressures,
and it has a better solute clearance.
Before the procedure, the practitioner inserts a double-
lumen vascular access catheter; the internal jugular vein is
the preferred insertion site.1 The practitioner should avoid
the subclavian site in patients with advanced kidney disease
to prevent subclavian stenosis, and the femoral insertion
site because of its association with an increased risk of
infection.2,3
HOSPITAL-ACQUIRED CONDITION ALERT Keep in mind that a vascular
catheter–associated infection is considered a hospital-acquired
condition, because the use of various prevention techniques (such as
performing hand hygiene, properly preparing the access site, and
maintaining sterile technique) when accessing the patient’s double-
lumen catheter can reasonably prevent it.2,3,4,5,6,7
Equipment
CRRT equipment (pump or other CRRT device, tubing with
hemofilter) ▪ heparin flush solution other flush solution ▪
prescribed dialysate solution ▪ sterile and gloves ▪ mask
with face shield or mask and goggles ▪ gown ▪ antiseptic
solution ▪ sterile gauze pads ▪ preservative-free normal
saline flush syringes (10 mL) ▪ sterile drape ▪ sterile
container ▪ tape ▪ infusion pump ▪ cardiac monitor ▪ blood
pressure monitoring device ▪ pulse oximeter and probe ▪
scale ▪ Optional: prescribed replacement solution, occlusive
dressing for catheter insertion sites, supplies for blood
sampling, prescribed medications, prescribed IV fluids,
anticoagulant infusion, infusion pump (preferably a smart
pump with dose-range alerts), anticoagulant antagonist,
hemodynamic monitoring equipment, extra blankets or
warming blanket.
Preparation of equipment
Check the sterility of the hemofilter and blood tubing. Prime
the CRRT circuit and set up the CRRT device or pump
following the manufacturer’s instructions. Make sure that
the CRRT device is plugged into an outlet that has an
emergency power source. Ensure that the equipment,
including the blood pumps, pressure monitors, and air alert
detector and pressure and safety alarms, is functioning
properly. (See Setup for CVVH.)
Implementation
■ Review and verify the practitioner’s CRRT treatment
orders, including modality, vascular access site and type,
type of CRRT device or pump, type of hemofilter, blood
pump speed, anticoagulant therapy (drug dose, infusion
rate, associated laboratory tests, and anticoagulant
monitoring parameters), replacement fluid (if necessary),
hourly ultrafiltration rate, hourly net fluid goals, dialysate
solution rate (if necessary), vital signs and hemodynamic
parameter frequency, and laboratory results (including
parameters for electrolyte repletion and critical values that
require nephrologist notification).8
■ Review the patient’s medical records for a completed
medical history of the patient’s health, current diseases,
current therapy and medications, diagnostic tests, family
and social history, and allergies.8
■ Confirm that the practitioner has obtained written
informed consent and that the consent is in the patient’s
medical record.9,10,11,12
■ Verify that laboratory studies (electrolyte levels,
coagulation studies, complete blood count, blood urea
nitrogen, and creatinine studies) are complete, as ordered,
and that the results are in the patient’s medical record.
Notify the practitioner of any unexpected results.8
■ Confirm that the practitioner verified vascular access
catheter tip placement before use if not inserted using
fluoroscopy.8
■ Gather and prepare the necessary equipment.
■ If prescribed, compare the replacement fluid with the
practitioner’s order and make sure that the solution is
sterile.8
■ Verify the dialysate solution with the practitioner’s order.
Make sure that the solutions are clearly labeled with the
date and time of expiration.8 If the solutions are expired,
return them to the pharmacy and obtain new
solutions.13,14,15,16
■ Visually inspect the solutions for particles, discoloration,
or other loss of integrity; don’t administer the solutions if
their integrity is compromised.13,14,15,16
■ Perform hand hygiene.17,18,19,20,21,22
■ Confirm the patient’s identity using at least two patient
identifiers.23
■ Provide privacy.24,25,26,27
■ Explain the procedure to the patient and family (if
appropriate) according to their individual communication
and learning needs to increase their understanding, allay
their fears, and enhance cooperation.28
■ Make sure that the patient is attached to a cardiac
monitor, blood pressure monitoring device, and pulse
oximeter to closely monitor for changes in condition. Make
sure that the alarm limits are set appropriately for the
patient’s current condition and that the alarms are turned
on, functioning properly, and audible to staff.29,30,31
■ Obtain vital signs, including hemodynamic parameters, to
serve as a baseline for comparison.1,8
■ Assess the patient’s cardiac, pulmonary, neuromuscular,
GI, renal, hematologic, integumentary, immunologic, and
psychosocial status.8
■ Assess the integrity of the vascular access catheter.
Assess the insertion site for redness, swelling, discoloration,
bruising, drainage, bleeding, and evidence of catheter
migration.1,8
■ Obtain the patient’s weight in kilograms to prevent dose-
related medication errors and to serve as a baseline for
evaluating the effectiveness of therapy.1,8,32
■ Notify the practitioner of any assessment findings that
require an alteration in the patient’s treatment plan.8
■ Position the patient for comfort.8
■ Perform hand hygiene.17,18,19,20,21,22
■ Put on gloves, a gown, and a mask and goggles or a face
shield.33,34 Have the patient put on a mask if possible.8
EQUIPMENT
Setup for CVVH
You’ll typically perform continuous renal replacement therapy using
continuous venovenous hemofiltration (CVVH). For this technique, the
practitioner inserts a special catheter into a large vein, such as the internal
jugular vein. He then attaches tubing with a hemofilter to the catheter and
uses an external pump to move blood through the system. The patient’s
venous blood moves through the arterial lumen to the pump, which then
pushes the blood through the catheter to the hemofilter. The hemofilter
removes fluid and toxic solutes (ultrafiltrate) from the patient’s blood and
drains them into a collection device. It doesn’t remove blood cells because
they are too large to pass through the filter. As the blood exits the hemofilter,
the pump then pushes it through the venous lumen back to the patient.
Several components of the pump provide safety mechanisms. Pressure
monitors on the pump maintain the blood flow through the circuit at a
constant rate. An air detector traps air bubbles before the blood returns to
the patient. A venous filter collects any blood clots that may be in the blood.
A blood-leak detector signals when blood is present in the dialysate. A
venous clamp operates if it detects air in the circuit or if there is any
disconnection in the blood line.
■ Make sure that the CRRT device is set up and functioning
properly, and that the pressure monitors, air alert detector,
and pressure safety alarms are set, turned on, functioning
properly, and audible to staff.8,29,31
■ Prepare a sterile field. Place a sterile drape under the
venous access catheter.
■ Perform a vigorous mechanical scrub of the catheter hub
for at least 5 seconds using a facility-approved antiseptic
pad (chlorhexidine or povidone-iodine) and allow it to dry
completely. (Povidone-iodine must be dry for 2
minutes.)2,3,8,35
■ Remove your gloves and discard them in an appropriate
container.33,34
■ Perform hand hygiene.17,18,19,20,21,22
■ Apply sterile gloves.1,33,34
■ Attach a sterile 10-mL syringe to the arterial port and
open the clamp. Withdraw the locking solution while
minimizing the amount of blood withdrawn.8 Close the
clamp. Discard the waste syringe in the appropriate
receptacle. Repeat this process for the venous port.36
■ Attach a 10-mL syringe containing preservative-free
normal saline flush solution to the arterial port. Open the
clamp and flush with 10 mL of normal saline flush solution
to assess catheter patency and integrity.8 Close the clamp
and repeat this process for the venous port of the access
catheter.
Reacting in an emergency
If a situation arises that requires emergency intervention, such as a circuit
leak, hemofilter rupture, clotting, circuit disconnection, or dialyzer or
hemofilter reaction, or if the patient’s condition suddenly deteriorates, follow
these steps:8
■ Stop the continuous renal replacement therapy (CRRT) machine’s blood
pump as well as the other pumps and CRRT infusions.
■ Clamp and disconnect the blood lines; avoid returning the blood to the
patient.
■ Perform a vigorous mechanical scrub of the catheter hub using a
disinfectant (2% chlorhexidine or povidone-iodine) for at least 5 seconds and
allow it to dry.
■ Flush each lumen of the vascular access catheter with 10 mL of
preservative-free normal saline solution to clear the lumens of blood.
■ Lock each lumen with a facility-approved flush solution and then cap them
using a sterile cap.
■ Continue to monitor the patient’s status and laboratory test results.
■ Discard the CRRT system in the appropriate contaminated-waste container.
■ If directed by your facility, complete an adverse occurrence report,
documenting the hemofilter and blood tubing circuit lot numbers.
■ If catheter patency is compromised, assess for
mechanical or thrombotic obstruction. If you suspect
thrombotic obstruction, institute thrombolytic therapy as
ordered or according to your facility’s protocol.8
■ Using sterile technique, disconnect the cap from the
arterial side of the primed tubing. Trace the tubing from the
patient to the point of origin and then, using sterile
technique, connect the arterial line to the hemofilter
circuit.37 Repeat this process for the venous side and secure
both connections.8 Route the tubing in a standardized
direction if the patient has other tubing and catheters that
have different purposes. Label the tubing at the distal end
(near the patient connection) and at the proximal end (near
the source container) to reduce the risk of misconnection if
multiple IV lines will be used.38
■ Keep the vascular access device and connections visible
at all times to promptly detect misconnections.8
■ If your facility uses a bar code technology, scan your
identification badge, the patient’s identification bracelet,
and the dialysate fluid’s bar code, as indicated by your
facility’s bar code system.
NURSING ALERT Dialysate is considered a high-alert medication
because it can cause significant harm when used in error.39
■ If required by your facility, have another nurse perform an
independent double-check of the dialysate to verify the
patient’s identity and to make sure that the correct
dialysate is hanging in the prescribed concentration, the
medication’s indication corresponds with the patient’s
diagnosis, the dosage calculations are correct, the dosing
formula used to derive the final dose is correct, the route of
administration is safe and proper for the patient, the pump
settings are correct, and the infusion lines are attached to
the correct ports.40 Rectify any inconsistencies before
beginning treatment.
■ Open the clamps on the arterial and venous tubing. Turn
on the hemofilter and monitor the blood flow rate through
the circuit.1 Start the flow rate at half the prescribed rate (or
as directed by your facility), assess the patient’s response,
and then increase it to the prescribed rate.8
■ Remove the patient’s mask if worn.
■ Administer an anticoagulant, as indicated and prescribed,
following safe medication administration practices. Have
another nurse perform an independent double-check if
required by your facility. Tailor administration to the
patient’s
response
and the practitioner-ordered
parameters.8,13,14,15,16,41
■ Begin administering the dialysate at the prescribed rate,
and start the ultrafiltration process, as indicated by the type
of machine used.8
■ Secure the hemofilter and all line connections using
appropriate securement devices; keep the connections
visible to detect dangerous disconnections promptly.8
■ Closely monitor the patient’s response to the initiation of
therapy; changes in heart rate and rhythm, blood pressure,
and physical condition, such as dizziness or increased
anxiety, may occur.8 Watch for signs and symptoms of
dialyzer or hemofilter reaction (hypotension, pruritus, back
pain, angioedema, arrhythmia, and anaphylaxis).8
■ Monitor and record the blood flow rate and ultrafiltration
flow rate at least hourly. Record changes that occur as a
result of the practitioner’s order or the patient’s response to
treatment.8
■ Monitor the patient’s temperature, blood pressure, heart
rate, cardiac rhythm, respiratory status, oxygen saturation
level, intravascular and extravascular fluid status, and level
of consciousness.
■ Assess central venous pressure and other hemodynamic
parameters (pulmonary artery pressure, pulmonary artery
wedge pressure, and cardiac output and index) if available.8
■ If the patient exhibits signs and symptoms of decreased
body temperature, such as hemodynamic instability,
shivering, piloerection, skin pallor, coolness, or cyanosis,
assess for factors that might be contributing to a decrease
in core temperature. Adjust the CRRT machine’s operational
temperature as ordered and according to the
manufacturer’s instructions. Provide the patient with extra
blankets or use a warming blanket if indicated.8
■ Obtain blood samples for laboratory testing, as ordered or
according to protocol, to monitor blood glucose, blood urea
nitrogen, and creatinine levels; coagulation and hematologic
status; and acid–base and electrolyte balance. Report
critical test results to the practitioner within the time frame
established by your facility to prevent treatment delays.41,42
■ Adjust prescribed IV fluids, if used, to correct electrolyte
imbalances. Administer intermittent electrolyte infusions, as
ordered, for repletion.8
■ If the patient’s blood glucose levels are elevated,
collaborate with the patient’s practitioner to adjust the
glucose concentration in the dialysate solution, modify the
replacement fluid composition if possible and appropriate,
or administer insulin, as prescribed, following safe
medication administration practices.8,13,14,15,16
■ Monitor the patient for signs and symptoms of dialysis
disequilibrium syndrome (although rare with CRRT), such as
headache, nausea, vomiting, hypertension, decreased
sensorium, seizures, and coma.8
■ Inspect the ultrafiltrate during the procedure. It should
remain clear yellow with no gross blood. Pink-tinged or
bloody ultrafiltrate may signal a membrane leak in the
hemofilter, which permits bacterial contamination and
possible exsanguination. If you observe this sign, stop the
treatment. (See Reacting in an emergency.)8 Prepare a new
system to restart therapy, as indicated.
■ Calculate the volume of required replacement fluid every
hour, as ordered. Infuse the prescribed amount and type of
replacement fluid through the infusion pump into the
arterial side of the circuit to achieve the planned fluid
balance.
NURSING ALERT The practitioner prescribes the targeted net fluid
loss. To calculate the volume of replacement fluid to administer, first
determine the patient’s total fluid loss in the previous hour. Add the
total fluid amount in the collection device in the past hour to any
other fluid losses (such as blood loss, emesis, or nasogastric
drainage); the sum is the total fluid loss. From the total fluid loss,
subtract the patient’s fluid intake from the past hour; then subtract
the net fluid loss prescribed by the practitioner. This calculation will
give you the volume of replacement fluid to infuse.
■ Flush the CRRT circuit with the prescribed volume of
normal saline solution at the prescribed interval and as
needed to maintain patency. Be sure to include the flush
solution in the patient’s hourly fluid intake.8
■ Assess the CRRT circuit and hemofilter for signs of altered
patency, such as arterial and venous pressure changes,
dark fibers in the hemofilter, changes in transmembrane
pressure, separation of formed cells and serum in the
tubing, or a decrease in hemofilter temperature. If you note
such signs, prepare for a system change, as necessary.8
■ If the hemofilter or blood tubing clots, clamp the blood
lines, disconnect the CRRT system from the vascular access
device, and discard the circuit. Maintain the vascular access
device to maintain patency until you can reinitiate therapy.
■ Monitor vascular access device function at least every 30
minutes during treatment.8
■ Perform site care and dressing changes using sterile
technique if the dressing is soiled or no longer intact2 and at
intervals determined by your facility.2,4,5,6,7,8
■ Remove and discard your personal protective
equipment.33,34
■ Perform hand hygiene.17,18,19,20,21,22
■ Document the procedure.43,44,45,46
Special considerations
■ The Joint Commission issued a sentinel event alert
concerning medical device alarm safety, because alarm-
related events have been associated with permanent loss of
function or death. Among the major contributing factors
were
improper
alarm
settings,
alarm
settings
inappropriately turned off, and alarm signals not audible to
staff. Make sure that alarm limits are set appropriately, and
that alarms are turned on and audible to staff. Follow facility
guidelines for preventing alarm fatigue.29
■ The Joint Commission has issued a sentinel event alert
related to managing risk during transition to new
International Organization for Standardization tubing
standards designed to prevent dangerous tubing
misconnections, which can lead to serious patient injury and
death. During the transition, be sure to trace the tubing and
catheter from the patient to the point of origin before
connecting or reconnecting any device or infusion, at any
care transition (such as a new setting or service), and as
part of the hand-off process. Route tubes and catheters with
different purposes in different standardized directions. Label
the tubing at the distal and proximal ends (when there are
different access sites or several bags hanging). Use tubing
and equipment only as intended. Store medications for
different delivery routes in separate locations.38
Complications
Possible complications of CRRT include bleeding from
catheter sites, hemorrhage, hemofilter occlusion, infection,
hypothermia, unstable hemodynamics, vascular access limb
ischemia, thrombosis, dialysis disequilibrium (decreased
neurologic status, seizure activity, hypertension, and nausea
and vomiting), dialyzer reaction (hypotension, anaphylaxis,
pruritus, angioedema, and back pain), hypoxemia, and air
embolism.
Documentation
Record the time the treatment began and ended; fluid
balance
information;
neurologic,
respiratory,
and
hemodynamic assessment findings; vital signs; times of
dressing changes; medications given; the patient’s
tolerance of the procedure; any complications noted; and
nursing actions taken and the patient’s response to those
actions.
REFERENCES
1 Wiegand, D. L. (2017). AACN procedure manual for high acuity, progressive,
and critical care (7th ed.). St. Louis, MO: Elsevier.
2 Centers for Disease Control and Prevention. (2011, revised 2017). “Guidelines
for the prevention of intravascular catheter-related infections” [Online].
Accessed via the Web at
https://www.cdc.gov/infectioncontrol/pdf/guidelines/bsi-guidelines.pdf (Level
I)
3 Marschall, J., et al. (2014). SHEA/IDSA practice recommendation: Strategies to
prevent central line-associated bloodstream infections in acute care
hospitals. Infection Control and Hospital Epidemiology, 35(7), 753–771 .
Accessed via the Web at http://www.jstor.org/stable/10.1086/676533 (Level I)
4 Accreditation Association for Hospitals and Health Systems. (2017). Standard
07.01.19. Healthcare Facilities Accreditation Program: Accreditation
requirements for acute care hospitals. Chicago, IL: Accreditation Association
for Hospitals and Health Systems. (Level VII)
5 Accreditation Association for Hospitals and Health Systems. (2017). Standard
07.01.02. Healthcare Facilities Accreditation Program: Accreditation
requirements for acute care hospitals. Chicago, IL: Accreditation Association
for Hospitals and Health Systems. (Level VII)
6 Jarrett, N. & Callaham, M. (2016). “Evidence-based guidelines for selected
hospital-acquired conditions: Final report” [Online]. Accessed via the Web at
https://www.cms.gov/Medicare/Medicare-Fee-for-Service-
Payment/HospitalAcqCond/Downloads/2016-HAC-Report.pdf
7 The Joint Commission. (2019). Standard NPSG.07.04.01. Comprehensive
accreditation manual for hospitals. Oakbrook Terrace, IL: The Joint
Commission. (Level VII)
8 Gomez, N. (Ed.). (2017). Nephrology nursing scope and standards of practice
(8th ed.). Pitman, NJ: American Nephrology Nurses’ Association.
9 The Joint Commission. (2019). Standard RI.01.03 .01. Comprehensive
accreditation manual for hospitals. Oakbrook Terrace, IL: The Joint
Commission. (Level VII)
10 Centers for Medicare and Medicaid Services, Department of Health and
Human Services. (2015). Condition of participation: Patient’s rights. 42 C.F.R.
§ 482.13(b)(2).
11 Accreditation Association for Hospitals and Health Systems. (2017). Standard
15.01.11. Healthcare Facilities Accreditation Program: Accreditation
requirements for acute care hospitals. Chicago, IL: Accreditation Association
for Hospitals and Health Systems. (Level VII)
12 DNV GL-Healthcare USA, Inc. (2016). PR.1.SR.3 . NIAHO® accreditation
requirements: Interpretive guidelines & surveyor guidance (version 11).
Milford, OH: DNV GL-Healthcare USA, Inc. (Level VII)
13 The Joint Commission. (2019). Standard MM.06.01.01. Comprehensive
accreditation manual for hospitals. Oakbrook Terrace, IL: The Joint
Commission. (Level VII)
14 Accreditation Association for Hospitals and Health Systems. (2017). Standard
16.01.03. Healthcare Facilities Accreditation Program: Accreditation
requirements for acute care hospitals. Chicago, IL: Accreditation Association
for Hospitals and Health Systems. (Level VII)
15 Centers for Medicare and Medicaid Services, Department of Health and
Human Services. (2015). Condition of participation: Nursing services. 42
C.F.R. § 482.23(c).
16 DNV GL-Healthcare USA, Inc. (2016). MM.1 .SR.2. NIAHO® accreditation
requirements: Interpretive guidelines & surveyor guidance (version 11).
Milford, OH: DNV GL-Healthcare USA, Inc. (Level VII)
17 The Joint Commission. (2019). Standard NPSG.07.01.01. Comprehensive
accreditation manual for hospitals: The official handbook. Oakbrook Terrace,
IL: The Joint Commission. (Level VII)
18 Centers for Disease Control and Prevention. (2002). Guideline for hand
hygiene in health-care settings: Recommendations of the Healthcare Infection
Control Practices Advisory Committee and the HICPAC/SHEA/APIC/IDSA Hand
Hygiene Task Force. MMWR Recommendations and Reports, 51(RR-16), 1–45.
Accessed via the Web at https://www.cdc.gov/mmwr/pdf/rr/rr5116.pdf (Level
II)
19 World Health Organization. (2009). “WHO guidelines on hand hygiene in
health care: First global patient safety challenge, clean care is safer care”
[Online]. Accessed via the Web at
http://apps.who.int/iris/bitstream/10665/44102/1/9789241597906_eng.pdf
(Level IV)
20 Centers for Medicare and Medicaid Services, Department of Health and
Human Services. (2015). Condition of participation: Infection control. 42 C.F.R.
§ 482.42.
21 Accreditation Association for Hospitals and Health Systems. (2017). Standard
07.01.21. Healthcare Facilities Accreditation Program: Accreditation
requirements for acute care hospitals. Chicago, IL: Accreditation Association
for Hospitals and Health Systems. (Level VII)
22 DNV GL-Healthcare USA, Inc. (2016). IC.1 .SR.1 . NIAHO® accreditation
requirements: Interpretive guidelines & surveyor guidance (version 11).
Milford, OH: DNV GL-Healthcare USA, Inc. (Level VII)
23 The Joint Commission. (2019). Standard NPSG.01.01.01. Comprehensive
accreditation manual for hospitals. Oakbrook Terrace, IL: The Joint
Commission. (Level VII)
24 Centers for Medicare and Medicaid Services, Department of Health and
Human Services. (2015). Condition of participation: Patient’s rights. 42 C.F.R.
§ 482.13(c)(1).
25 Accreditation Association for Hospitals and Health Systems. (2017). Standard
15.01.16. Healthcare Facilities Accreditation Program: Accreditation
requirements for acute care hospitals. Chicago, IL: Accreditation Association
for Hospitals and Health Systems. (Level VII)
26 DNV GL-Healthcare USA, Inc. (2016). PR.1.SR.5 . NIAHO® accreditation
requirements: Interpretive guidelines & surveyor guidance (version 11).
Milford, OH: DNV GL-Healthcare USA, Inc. (Level VII)
27 The Joint Commission. (2019). Standard RI.01.01.01. Comprehensive
accreditation manual for hospitals. Oakbrook Terrace, IL: The Joint
Commission. (Level VII)
28 The Joint Commission. (2019). Standard PC.02.01.21. Comprehensive
accreditation manual for hospitals. Oakbrook Terrace, IL: The Joint
Commission. (Level VII)
29 The Joint Commission. (2013). “Sentinel event alert: Medical device alarm
safety in hospitals” [Online]. Accessed via the Web at
https://www.jointcommission.org/assets/1/6/SEA_50_alarms_4 _26_16.pdf
(Level VII)
30 American Association of Critical-Care Nurses (AACN). (2013). “A ACN practice
alert: Alarm management” [Online]. Accessed via the Web at
http://www.aacn.org/wd/practice/docs/practicealerts/alarm-management-
practice-alert.pdf (Level VII)
31 Graham, K. C., & Cvach, M. (2010). Monitor alarm fatigue: Standardizing use
of physiological monitors and decreasing nuisance alarms. American Journal
of Critical Care, 19(1), 28–37. Accessed via the Web at
http://ajcc.aacnjournals.org/content/19/1/28.full.pdf
32 Institute for Safe Medication Practices. (2016). “2016–2017 targeted
medication safety best practices for hospitals” [Online]. Accessed via the
Web at http://www.ismp.org/tools/bestpractices/TMSBP-for-Hospitals.pdf
33 Siegel, J. D ., et al. (2007, revised 2017). “2007 guideline for isolation
precautions: Preventing transmission of infectious agents in healthcare
settings” [Online]. Accessed via the Web at
https://www.cdc.gov/infectioncontrol/pdf/guidelines/isolation-guidelines.pdf
(Level II)
34 Accreditation Association for Hospitals and Health Systems. (2017). Standard
07.01.10. Healthcare Facilities Accreditation Program: Accreditation
requirements for acute care hospitals. Chicago, IL: Accreditation Association
for Hospitals and Health Systems. (Level VII)
35 Standard 34. Needleless connectors. Infusion therapy standards of practice.
(2016). Journal of Infusion Nursing, 39, S68–S70. (Level VII)
36 Occupational Safety and Health Administration. (n.d .). “Bloodborne
pathogens, standard number 1910.1030” [Online]. Accessed via the Web at
https://www.osha.gov/pls/oshaweb/owadisp.show_document?
p_id=10051&p_table=STANDARDS (Level VII)
37 U.S . Food and Drug Administration. (n.d .). “Look. Check. Connect. Safe
medical device connections save lives” [Online]. Accessed via the Web at
http://www.fda.gov/downloads/MedicalDevices/Safety/AlertsandNotices/UCM1
34873.pdf
38 The Joint Commission. (2014). “Sentinel event alert: Managing risk during
transition to new ISO tubing connector standards” [Online]. Accessed via the
Web at
http://www.jointcommission.org/assets/1/6/SEA_53_Connectors_8 _19_14 _final.
pdf (Level VII)
39 Institute for Safe Medication Practices. (2014). “ISMP list of high-alert
medications in acute care settings” [Online]. Accessed via the Web at
http://www.ismp.org/Tools/highalertmedications.pdf (Level VII)
40 Institute for Safe Medication Practices. (2014). Independent double-checks:
Undervalued and misused. ISMP Medication Safety Alert! Nurse Advise-ERR,
12(3), 1. Accessed October 2017 via the Web at
http://www.ismp.org/newsletters/nursing/issues/NurseAdviseERR201403.pdf
(Level VII)
41 The Joint Commission. (2019). Standard NPSG.03 .05.01. Comprehensive
accreditation manual for hospitals. Oakbrook Terrace, IL: The Joint
Commission. (Level VII)
42 The Joint Commission. (2019). Standard NPSG.02.03 .01. Comprehensive
accreditation manual for hospitals. Oakbrook Terrace, IL: The Joint
Commission. (Level VII)
43 The Joint Commission. (2019). Standard RC.01.03 .01. Comprehensive
accreditation manual for hospitals. Oakbrook Terrace, IL: The Joint
Commission. (Level VII)
44 Accreditation Association for Hospitals and Health Systems. (2017). Standard
10.00 .03. Healthcare Facilities Accreditation Program: Accreditation
requirements for acute care hospitals. Chicago, IL: Accreditation Association
for Hospitals and Health Systems. (Level VII)
45 Centers for Medicare and Medicaid Services, Department of Health and
Human Services. (2015). Condition of participation: Medical record services.
42 C.F.R. § 482.24(b).
46 DNV GL-Healthcare USA, Inc. (2016). MR.2 .SR.1 . NIAHO® accreditation
requirements: Interpretive guidelines & surveyor guidance (version 11).
Milford, OH: DNV GL-Healthcare USA, Inc. (Level VII)
CREDé MANEUVER
When lower motor neuron damage impairs the voiding
reflex, the bladder may become flaccid or areflexic. Because
the bladder fails to contract properly, urine collects inside it,
causing distention and increasing the risk of infection. The
Credé maneuver—application of manual pressure over the
lower abdomen—promotes complete emptying of the
bladder. After appropriate instruction, the patient can
perform the maneuver independently, unless the patient
can’t reach the lower abdomen or lacks sufficient strength
and dexterity.
Bladder expression using the Credé maneuver was
historically used in an attempt to promote continence and
ensure adequate bladder evacuation. This maneuver is no
longer recommended for patients with a spinal cord injury
because it raises pressure against a closed bladder outlet,
increasing the risk of reflux, hernia, rectogenital prolapse,
and hemorrhoids.1 Performing the Credé maneuver may
require a practitioner’s order.
NURSING ALERT Because of the high pressures that may be created
by performing this procedure, it’s considered potentially hazardous
for patients with neurogenic lower urinary tract dysfunction and
should be used with caution.2,3
Equipment
Bedpan, urinal, or bedside commode ▪ Optional: gloves,
bladder ultrasonography unit with probe.
Implementation
■ Gather the appropriate equipment.
■ Perform hand hygiene.4,5,6,7,8,9
■ Confirm the patient’s identity using at least two patient
identifiers.10
■ Provide privacy.11,12,13,14
■ Explain the procedure to the patient and family (if
appropriate) according to their individual communication
and learning needs to increase their understanding, allay
their fears, and enhance cooperation.15,16
■ Put on gloves as needed to comply with standard
precautions.17,18,19
■ If the patient is on bedrest, raise the patient’s bed to
waist level when providing patient care to prevent caregiver
back strain. 20
■ Position the patient. If permitted, place the patient in the
Fowler position with a bedpan or urinal appropriately
positioned. Alternatively, if the patient’s condition permits,
assist the patient onto the bedside commode. A male
patient may benefit from standing, if possible.
■ Place your hands flat on the patient’s abdomen just below
the umbilicus. Ask the female patient to bend forward from
the hips. Then firmly stroke downward toward the bladder
about six times to stimulate the voiding reflex.
■ Place one of your hands on top of the other above the
pubic arch. Press firmly inward and downward to compress
the bladder and expel residual urine (as shown below).
■ Assist the patient who used a bedside commode back into
bed if necessary. For the patient on bed rest, remove the
bedpan or urinal.
■ Return the bed to the lowest position to prevent falls and
maintain patient safety.21
■ If ordered, measure the urine output; then empty the
contents of the bedpan, urinal, or commode into a toilet or
designated waste area.
■ Remove and discard your gloves, if worn,17 and perform
hand hygiene.4,5,6,7,8,9
■ Document the procedure.22,23,24,25
Special considerations
■ This procedure shouldn’t be performed on patients with
normal bladder tone or bladder spasms.
■ A bladder ultrasonography unit, if available, may be used
to document urine volume before and after the procedure.
Patient teaching
Explain to the patient that the Credé maneuver is a simple
exercise that may be performed at home. Tell the patient
that performing this maneuver will help start a stream of
urine from the bladder. Tell the male patient to void directly
into the toilet from a standing position if possible. The
female patient should sit on the toilet as she normally
would; show her how to lean forward, bending at the hips, to
increase pressure on the bladder. Have the patient place
one hand on top of the other in a return demonstration.
Explain that the stroking movement compresses the bladder
and expels urine.
Complications
Increasing pressures may raise the risk of reflux and
associated complications, as well as hernia, rectogenital
prolapse, and hemorrhoids. In one study of spinal cord–
injured patients who had been practicing the Credé
maneuver to expel urine for more than 20 years, 93.2% had
a residual urine of more than 100 mL, 31.3% developed
urinary lithiasis, 35.1% developed hydronephrosis, and
16.2% had renal damage.26
Documentation
Record the date and time of the procedure, the amount and
characteristics of urine expelled, and the patient’s tolerance
of the procedure. Document any patient teaching performed
and the patient’s understanding of the teaching.
REFERENCES
1 Fonte, N. (2008). Urological care of the spinal cord–injured patient. Journal of
Wound, Ostomy and Continence Nursing, 35(3), 323–331. (Level V)
2 Stöhrer, M., et al. (2009). “Guidelines on neurogenic lower urinary tract
dysfunction” [Online]. Accessed via the Web at http://www.uroweb.org/wp-
content/uploads/18_Neurogenic_LUTD.pdf (Level VII)
3 Francis, K. (2007). Physiology and management of bladder and bowel
continence following spinal cord injury. Ostomy/Wound Management, 53(12),
18–27. Accessed via the Web at http://www.o -wm .com/content/physiology-
and-management-bladder-and-bowel-continence-following-spinal-cord-injury
(Level V)
4 The Joint Commission. (2019). Standard NPSG.07.01.01. Comprehensive
accreditation manual for hospitals. Oakbrook Terrace, IL: The Joint
Commission. (Level VII)
5 Centers for Disease Control and Prevention. (2002). Guideline for hand
hygiene in health-care settings: Recommendations of the Healthcare Infection
Control Practices Advisory Committee and the HICPAC/SHEA/APIC/IDSA Hand
Hygiene Task Force. MMWR Recommendations and Reports, 51(RR-16), 1–45.
Accessed via the Web at https://www.cdc.gov/mmwr/pdf/rr/rr5116.pdf (Level
II)
6 World Health Organization. (2009). “WHO guidelines on hand hygiene in
health care: First global patient safety challenge, clean care is safer care”
[Online]. Accessed via the Web at
http://apps.who.int/iris/bitstream/10665/44102/1/9789241597906_eng.pdf
(Level IV)
7 Centers for Medicare and Medicaid Services, Department of Health and
Human Services. (2015). Condition of participation: Infection control. 42 C.F.R.
§ 482.42.
8 Accreditation Association for Hospitals and Health Systems. (2017). Standard
07.01.21. Healthcare Facilities Accreditation Program: Accreditation
requirements for acute care hospitals. Chicago, IL: Accreditation Association
for Hospitals and Health Systems. (Level VII)
9 DNV GL-Healthcare USA, Inc. (2016). IC.1.SR.1 . NIAHO® accreditation
requirements: Interpretive guidelines & surveyor guidance (version 11).
Milford, OH: DNV GL-Healthcare USA, Inc. (Level VII)
10 The Joint Commission. (2019). Standard NPSG.01.01.01. Comprehensive
accreditation manual for hospitals. Oakbrook Terrace, IL: The Joint
Commission. (Level VII)
11 Accreditation Association for Hospitals and Health Systems. (2017). Standard
15.01.16. Healthcare Facilities Accreditation Program: Accreditation
requirements for acute care hospitals. Chicago, IL: Accreditation Association
for Hospitals and Health Systems. (Level VII)
12 Centers for Medicare and Medicaid Services, Department of Health and
Human Services. (2015). Condition of participation: Patient’s rights. 42 C.F.R.
§ 482.13(c)(1).
13 The Joint Commission. (2019). Standard RI.01.01.01. Comprehensive
accreditation manual for hospitals. Oakbrook Terrace, IL: The Joint
Commission. (Level VII)
14 DNV GL-Healthcare USA, Inc. (2016). PR.1.SR.5 . NIAHO® accreditation
requirements: Interpretive guidelines & surveyor guidance (version 11).
Milford, OH: DNV GL-Healthcare USA, Inc. (Level VII)
15 The Joint Commission. (2019). Standard RI.01.03 .01. Comprehensive
accreditation manual for hospitals. Oakbrook Terrace, IL: The Joint
Commission. (Level VII)
16 Centers for Medicare and Medicaid Services, Department of Health and
Human Services. (2015). Condition of participation: Patient’s rights. 42 C.F.R.
§ 482.13(b)(2).
17 Siegel, J. D ., et al. (2007, revised 2017). “2007 guideline for isolation
precautions: Preventing transmission of infectious agents in healthcare
settings” [Online]. Accessed via the Web at
https://www.cdc.gov/infectioncontrol/pdf/guidelines/isolation-guidelines.pdf
(Level II)
18 Accreditation Association for Hospitals and Health Systems. (2017). Standard
07.01.10. Healthcare Facilities Accreditation Program: Accreditation
requirements for acute care hospitals. Chicago, IL: Accreditation Association
for Hospitals and Health Systems. (Level VII)
19 DNV GL-Healthcare USA, Inc. (2016). IC.1 .SR.2 . NIAHO® accreditation
requirements: Interpretive guidelines & surveyor guidance (version 11).
Milford, OH: DNV GL-Healthcare USA, Inc. (Level VII)
20 Waters, T. R., et al. (2009). “Safe patient handling training for schools of
nursing” [Online]. Accessed via the Web at
https://www.cdc.gov/niosh/docs/2009-127/pdfs/2009-127.pdf (Level VII)
21 Ganz, D. A., et al. (2013). Preventing falls in hospitals: A toolkit for improving
quality of care (AHRQ Publication No. 13-0015-EF). Rockville, MD: Agency for
Healthcare Research and Quality. Accessed via the Web at
https://www.ahrq.gov/sites/default/files/publications/files/fallpxtoolkit_0 .pdf
(Level VII)
22 The Joint Commission. (2019). Standard RC.01.03 .01. Comprehensive
accreditation manual for hospitals. Oakbrook Terrace, IL: The Joint
Commission. (Level VII)
23 Centers for Medicare and Medicaid Services, Department of Health and
Human Services. (2015). Condition of participation: Medical record services.
42 C.F.R. § 482.24(b).
24 Accreditation Association for Hospitals and Health Systems. (2017). Standard
10.00 .03. Healthcare Facilities Accreditation Program: Accreditation
requirements for acute care hospitals. Chicago, IL: Accreditation Association
for Hospitals and Health Systems. (Level VII)
25 DNV GL-Healthcare USA, Inc. (2016). MR.2 .SR.1 . NIAHO® accreditation
requirements: Interpretive guidelines & surveyor guidance (version 11).
Milford, OH: DNV GL-Healthcare USA, Inc. (Level VII)
26 Chang, S. M., et al. (2000). Urologic status of 74 spinal cord injury patients
from the 1976 Tangshan earthquake, and managed for over 20 years using
the Credé maneuver. Spinal Cord, 38, 552–554. Accessed via the Web at
http://www.nature.com/sc/journal/v38/n9/pdf/3101060a.pdf (Level VI)
CRICOTHYROTOMY, ASSISTING
When endotracheal intubation or a tracheotomy can’t be
performed quickly and other nonsurgical methods have
failed to establish an airway, an emergency cricothyrotomy
may be necessary.1 This rarely performed procedure
involves puncturing the trachea through the cricothyroid
membrane.
Usually, your role will be to assist the physician or other
specially trained practitioner responsible for airway
management.2 Ideally, cricothyrotomy is performed using
sterile technique; however, sterile technique may not be
possible in an emergency.
Equipment
For all types of cricothyrotomy
Gloves ▪ personal protective equipment (face mask, eye
protection, gown) ▪ antiseptic solution ▪ sterile 4′′ × 4′′ (10-
cm × 10-cm) gauze pads ▪ sterile drape ▪ sterile towels ▪
tape ▪ oxygen source ▪ oxygen delivery equipment3 ▪ blood
pressure cuff and manometer ▪ pulse oximeter ▪ end-tidal
carbon dioxide (ETCO2) detector ▪ stethoscope ▪ disinfectant
pad ▪ Optional: ultrasound equipment, 1% lidocaine,
syringe, needle.1
For scalpel cricothyrotomy
Scalpel ▪ #6 or smaller tracheostomy tube (if available) ▪
Trousseau dilator1 ▪ tracheal hook1 ▪ handheld resuscitation
bag or T tube and wide-bore oxygen tubing.
For needle cricothyrotomy
14G (or larger) through-the-needle or over-the-needle
catheter ▪ 10-mL syringe ▪ tape ▪ IV extension tubing ▪
hand-operated release valve or pressure-regulating
adjustment valve.
Commercially prepared cricothyrotomy kits are available
and may be used if available at your facility.4
Preparation of equipment
Have one person stay with the patient while another collects
the necessary equipment. Prepare a sterile field with the
sterile drape. Pour antiseptic solution onto gauze pads.
Open sterile packages and prepare the practitioner’s
supplies, as needed.
Implementation
■ If possible, confirm that written informed consent is
obtained and that the consent is in the patient’s medical
record.5,6,7,8
■ Perform hand hygiene.9,10,11,12,13,14
■ Put on gloves and, as needed. other personal protective
equipment to comply with standard precautions.2,15,16
■ Confirm the patient’s identity using at least two patient
identifiers.17
■ Explain the procedure to the patient and family (if
appropriate) according to their individual communication
and learning needs to increase their understanding, allay
their fears, and enhance cooperation,18 as time permits.4
■ Raise the patient’s bed to waist level during the
procedure to prevent caregiver back strain.19
■ Assess the patient’s rate and depth of respirations,
accessory muscle use, chest wall motion, and breath sounds
to identify inadequate respiratory effort.4
■ Apply a pulse oximeter and ETCO2 detector. Monitor
oxygen saturation and ETCO2 level to identify respiratory
effort.4
■ Place the patient in the supine position with the neck in a
neutral position to keep the cervical spine stabilized.1,2,4
■ Administer supplemental oxygen before and throughout
the procedure using the most effective delivery route (blow-
by, nasal cannula, facemask, hand-held resuscitation bag, or
T-tube).3
■ The practitioner cleans the patient’s neck with antiseptic
cleaning solution, following the manufacturer’s instructions,
and allows it to dry. Assist as needed.
■ Assist with draping the patient’s neck with sterile towels.
■ The practitioner locates the precise insertion site by
sliding his or her thumb and fingers down to the thyroid
gland. The practitioner locates the outer borders by noting
the location where the space between his or her fingers and
thumb widens.
■ The practitioner assesses for hematomas, which may
displace the trachea to the unaffected side.
■ The practitioner then moves his or her fingers across the
center of the gland, over the anterior edge of the cricoid
ring (as shown below).
■ Assist the practitioner in anesthetizing the area with 1%
lidocaine, as directed and as time allows.1
Using a scalpel
■ Hand the practitioner a scalpel so that he or she can
make a horizontal incision, less than 1⁄2′′ (1.3 cm) long, in the
cricothyroid membrane just above the cricoid ring.
■ The practitioner inserts a dilator to prevent tissue from
closing around the incision. If a dilator isn’t available, the
practitioner inserts the handle of the scalpel and rotates it
90 degrees (as shown on top right).
■ The practitioner inserts a tracheal hook into the opening,
allowing for passage of an appropriately sized cuffed
tracheostomy tube.1 If a small tracheostomy tube (#6 or
smaller) is available, the practitioner inserts it into the
opening and secures it to help maintain a patent airway. If a
tracheostomy tube isn’t available, the practitioner may tape
the dilator or scalpel handle in place until a tracheostomy
tube is available.
■ If the patient can breathe spontaneously, attach a
humidified oxygen source to the tracheostomy tube with a T
tube; if the patient can’t breathe, attach a handheld
resuscitation bag. Trace the tubing from the patient to its
point of origin to make sure you’re attaching it to the proper
port.20,21 You’ll need to inflate the cuff of the tracheostomy
tube with a syringe to provide positive-pressure ventilation.
■ Auscultate bilaterally for breath sounds and check the
patient’s ETCO2 level to confirm tube placement.4
■ Obtain the patient’s vital signs.
■ Anticipate a chest X-ray to evaluate tube placement.
■ Discard used supplies in appropriate containers.15,16
■ Dispose of your gloves and other personal protective
equipment in appropriate receptacles.15,16
■ Perform hand hygiene.9,10,11,12,13,14
Using a needle
■ Attach a 10-mL syringe to a 14G (or larger) through-the-
needle or over-the-needle catheter.
■ Hand the catheter to the practitioner, who inserts it into
the cricothyroid membrane just above the cricoid ring.
■ The practitioner directs the catheter downward at a 45-
degree angle to the trachea (as shown below) to avoid
damaging the vocal cords. The practitioner maintains
negative pressure by pulling back the syringe plunger while
advancing the catheter. The practitioner will know the
catheter has entered the trachea when air enters the
syringe.
■ When the catheter reaches the trachea, the practitioner
advances it and removes the needle and syringe.
■ Tape the catheter in place. Attach the catheter hub to one
end of the IV extension tubing. At the other end, attach a
hand-operated release valve or a pressure-regulating
adjustment valve. Connect the entire assembly to an
oxygen source.
■ Trace the tubing from the patient to its point of origin to
make sure that you’re connecting it to the proper port.20,21
■ Press the release valve to introduce oxygen into the
trachea and inflate the lungs. When you can see that
they’re inflated, release the valve to allow passive
exhalation. Adjust the pressure-regulating valve to the
minimum pressure needed for adequate lung inflation.
■ Auscultate bilaterally for breath sounds and check the
patient’s ETCO2 level to confirm tube placement.4
■ Obtain the patient’s vital signs.
■ Anticipate a chest X-ray to evaluate tube placement.
■ Discard used supplies in appropriate containers.15,16
■ Dispose of your gloves and other personal protective
equipment in appropriate receptacles.15,16
■ Perform hand hygiene.9,10,11,12,13,14
Completing the procedure
■ Monitor the patient’s heart rate, blood pressure,
respiratory rate, and oxygen saturation throughout the
procedure.2
■ Check for bleeding at the insertion site; subcutaneous
emphysema or inadequate ventilation, which might indicate
tube displacement or an air leak; and tracheal or vocal cord
damage.
■ Return the patient’s bed to the lowest position to prevent
falls and maintain patient safety.22
■ Perform hand hygiene.9,10,11,12,13,14
■ Clean and disinfect your stethoscope using a disinfectant
pad.23,24
■ Perform hand hygiene.9,10,11,12,13,14
■ Document the procedure.25,26,27,28
Special considerations
PEDIATRIC ALERT Scalpel cricothyrotomy isn’t recommended for
children younger than age 12 because it could damage the cricoid
cartilage—the only circumferential support to the upper trachea.
■ Whenever possible, use ultrasound equipment to
visualize the patient’s anatomy before starting the
procedure.
■ If time allows, and if your facility indicates that
cricothyrotomy falls within universal protocol guidelines,
follow the necessary steps, including conducting a time-out
immediately before starting the procedure, to ensure that
the correct patient, site, positioning, and procedure are
identified, and that (as applicable) all relevant information
and necessary equipment are available.29,30,31
■ The Joint Commission issued a sentinel event alert related
to managing risk during transition to new International
Organization for Standardization tubing standards that were
designed to prevent dangerous tubing misconnections,
which can lead to serious patient injury and death. During
the transition, make sure to trace each tubing and catheter
from the patient to its point of origin before connecting or
reconnecting any device or infusion, at any care transition
(such as to a new setting or service), and as part of the
hand-off process. In addition, route tubes and catheters with
different purposes in different, standardized directions; label
tubing at both the distal and proximal ends when the
patient has different access sites or several bags hanging;
use tubing and equipment only as intended; and store
medications for different delivery routes in separate
locations.21
Complications
Hemorrhage, perforation of the thyroid or esophagus, and
subcutaneous or mediastinal emphysema may occur from
this procedure. Infection may occur several days after the
procedure.
Documentation
Document the date and time of the procedure,
circumstances necessitating the procedure, assessment
findings, and the patient’s vital signs before, during, and
after the procedure. Document the size and type of tube
inserted and the centimeter mark at the skin opening.
Document confirmation of proper tube placement (X-ray
findings), ETCO2 level, and auscultation findings. Note
whether spontaneous respirations occurred after the
procedure. Record how much and by what method oxygen
was delivered. Note any procedures performed (such as
endotracheal intubation) after the airway was established.
Document any difficulties that occurred during the
procedure, treatment administered, and the patient’s
response. Also document any medications administered and
the patient’s response.4
REFERENCES
1 Markowitz, J. E. (2015). “Surgical airway techniques” [Online]. Accessed via
the Web at http://emedicine.medscape.com/article/80241-overview#a1
(Level VII)
2 Bair, A. E . Emergency cricothyrotomy (cricothyroidotomy). (2016). In:
UpToDate, Wolfson, A. B. (Ed.). Accessed via the Web at
http://www.uptodate.com
3 Apfelbaum, J. L. et al. (2013). Practice guidelines for management of the
difficult airway: An updated report by the American Society of
Anesthesiologists Task Force on Management of a Difficult Airway.
Anesthesiology, 118(2), 251–270. (Level VII)
4 Wiegand, D. L. (2017). AACN procedure manual for high acuity, progressive,
and critical care (7th ed.). St. Louis, MO: Elsevier.
5 The Joint Commission. (2019). Standard RI.01.03 .01. Comprehensive
accreditation manual for hospitals. Oakbrook Terrace, IL: The Joint
Commission. (Level VII)
6 Centers for Medicare and Medicaid Services, Department of Health and
Human Services. (2015). Condition of participation: Patient’s rights. 42 C.F.R.
§ 482.13(b)(2).
7 Accreditation Association for Hospitals and Health Systems. (2017). Standard
15.01.11. Healthcare Facilities Accreditation Program: Accreditation
requirements for acute care hospitals. Chicago, IL: Accreditation Association
for Hospitals and Health Systems. (Level VII)
8 DNV GL-Healthcare USA, Inc. (2016). PR.1 .SR.3 . NIAHO® accreditation
requirements: Interpretive guidelines & surveyor guidance (version 11).
Milford, OH: DNV GL-Healthcare USA, Inc. (Level VII)
9 The Joint Commission. (2019). Standard NPSG.07.01.01. Comprehensive
accreditation manual for hospitals. Oakbrook Terrace, IL: The Joint
Commission. (Level VII)
10 Centers for Disease Control and Prevention. (2002). Guideline for hand
hygiene in health-care settings: Recommendations of the Healthcare Infection
Control Practices Advisory Committee and the HICPAC/SHEA/APIC/IDSA Hand
Hygiene Task Force. MMWR Recommendations and Reports, 51(RR-16), 1–45.
Accessed via the Web at https://www.cdc.gov/mmwr/pdf/rr/rr5116.pdf (Level
II)
11 World Health Organization. (2009). “WHO guidelines on hand hygiene in
health care: First global patient safety challenge, clean care is safer care”
[Online]. Accessed via the Web at
http://apps.who.int/iris/bitstream/10665/44102/1/9789241597906_eng.pdf
(Level IV)
12 Centers for Medicare and Medicaid Services, Department of Health and
Human Services. (2015). Condition of participation: Infection control. 42 C.F.R.
§ 482.42.
13 Accreditation Association for Hospitals and Health Systems. (2017). Standard
07.01.21. Healthcare Facilities Accreditation Program: Accreditation
requirements for acute care hospitals. Chicago, IL: Accreditation Association
for Hospitals and Health Systems. (Level VII)
14 DNV GL-Healthcare USA, Inc. (2016). IC.1 .SR.1 . NIAHO® accreditation
requirements: Interpretive guidelines & surveyor guidance (version 11).
Milford, OH: DNV GL-Healthcare USA, Inc. (Level VII)
15 Siegel, J. D ., et al. (2007, revised 2017). “2007 guideline for isolation
precautions: Preventing transmission of infectious agents in healthcare
settings” [Online]. Accessed via the Web at
https://www.cdc.gov/infectioncontrol/pdf/guidelines/isolation-guidelines.pdf
(Level II)
16 Accreditation Association for Hospitals and Health Systems. (2017). Standard
07.01.10. Healthcare Facilities Accreditation Program: Accreditation
requirements for acute care hospitals. Chicago, IL: Accreditation Association
for Hospitals and Health Systems. (Level VII)
17 The Joint Commission. (2019). Standard NPSG.01.01.01. Comprehensive
accreditation manual for hospitals. Oakbrook Terrace, IL: The Joint
Commission. (Level VII)
18 The Joint Commission. (2017). Standard PC.02.01.21. Comprehensive
accreditation manual for hospitals. Oakbrook Terrace, IL: The Joint
Commission (Level VII)
19 Waters, T. R., et al. (2009). “Safe patient handling training for schools of
nursing” [Online]. Accessed via the Web at
https://www.cdc.gov/niosh/docs/2009-127/pdfs/2009-127.pdf (Level VII)
20 U.S . Food and Drug Administration. (n.d .). “Look. Check. Connect. Safe
medical device connections save lives” [Online]. Accessed via the Web at
http://www.fda.gov/downloads/MedicalDevices/Safety/AlertsandNotices/UCM1
34873.pdf
21 The Joint Commission. (2014). “Sentinel event alert: Managing risk during
transition to new ISO tubing connector standards” [Online]. Accessed via the
Web at
http://www.jointcommission.org/assets/1/6/SEA_53_Connectors_8 _19_14 _final.
pdf (Level VII)
22 Ganz, D. A., et al. (2013). Preventing falls in hospitals: A toolkit for improving
quality of care (AHRQ Publication No. 13-0015-EF). Rockville, MD: Agency for
Healthcare Research and Quality. Accessed via the Web at
https://www.ahrq.gov/sites/default/files/publications/files/fallpxtoolkit_0 .pdf
(Level VII)
23 Rutala, W. A., et al. (2008, revised 2017). “Guideline for disinfection and
sterilization in healthcare facilities, 2008” [Online]. Accessed via the Web at
https://www.cdc.gov/infectioncontrol/pdf/guidelines/disinfection-
guidelines.pdf (Level I)
24 Accreditation Association for Hospitals and Health Systems. (2017). Standard
07.02.03. Healthcare Facilities Accreditation Program: Accreditation
requirements for acute care hospitals. Chicago, IL: Accreditation Association
for Hospitals and Health Systems. (Level VII)
25 The Joint Commission. (2019). Standard RC.01.03 .01. Comprehensive
accreditation manual for hospitals. Oakbrook Terrace, IL: The Joint
Commission. (Level VII)
26 Centers for Medicare and Medicaid Services, Department of Health and
Human Services. (2015). Condition of participation: Medical record services.
42 C.F.R. § 482.24(b).
27 Accreditation Association for Hospitals and Health Systems. (2017). Standard
10.00 .03. Healthcare Facilities Accreditation Program: Accreditation
requirements for acute care hospitals. Chicago, IL: Accreditation Association
for Hospitals and Health Systems. (Level VII)
28 DNV GL-Healthcare USA, Inc. (2016). MR.2 .SR.1 . NIAHO® accreditation
requirements: Interpretive guidelines & surveyor guidance (version 11).
Milford, OH: DNV GL-Healthcare USA, Inc. (Level VII)
29 The Joint Commission. (2019). Standard UP.01.01.01. Comprehensive
accreditation manual for hospitals. Oakbrook Terrace, IL: The Joint
Commission. (Level VII)
30 The Joint Commission. (2019). Standard UP.01.03.01. Comprehensive
accreditation manual for hospitals. Oakbrook Terrace, IL: The Joint
Commission. (Level VII)
31 Accreditation Association for Hospitals and Health Systems. (2017). Standard
30.00 .14. Healthcare Facilities Accreditation Program: Accreditation
requirements for acute care hospitals. Chicago, IL: Accreditation Association
for Hospitals and Health Systems. (Level VII)
CRUTCH USE
Crutches remove weight from one or both legs, enabling the
patient to support himself or herself with hands and arms.
Typically prescribed for the patient with lower-extremity
injury or weakness, or one who has had a surgical procedure
on the lower limbs, crutches require balance, stamina, and
upper-body strength for successful use.1 Crutch selection
and walking gait depend on the patient’s condition. The
patient who can’t use crutches may be able to use a walker.
Two types of crutches are currently in use: axillary and
nonaxillary. Patients with a sprain, strain, or cast should use
axillary crutches, which are made of standard aluminum or
wood. The primary advantage of axillary crutches is that
they allow the transfer of 80% of a person’s body weight.
Axillary crutches provide better trunk support than forearm
crutches, but they require stamina and upper-body strength.
Nonaxillary crutches, such as aluminum or platform
forearm crutches, allow the transfer of 40% to 50% of the
patient’s body weight, providing stability and moderate
support. Forearm crutches are indicated for patients with
generalized weakness in the lower extremities, such as
those with paraplegia or cerebral palsy. An aluminum
forearm crutch has a collar that fits around the patient’s
forearm and a horizontal handgrip that provides support. A
wooden forearm crutch resembles a wooden axillary crutch
that ends proximally, with a closed leather band that can be
situated around the proximal portion of the patient’s
forearm. A platform forearm crutch is indicated for patients
with painful wrist and hand conditions (such as arthritis),
weak handgrip because of pain and deformities of the hands
and wrists, and elbow contractures. A platform is placed on
the top level of the crutch, a vertical handgrip is placed at
the distal end of the platform, and Velcro straps are applied
around the patient’s forearm.
Equipment
Crutches with axillary or forearm pads, handgrips, and
rubber suction tips ▪ Optional: gait belt, full-length mirror.
Preparation of equipment
After choosing the appropriate crutches, adjust their height
with the patient standing or, if necessary, recumbent. (See
Fitting a patient for crutches.)
Implementation
■ Consult with the patient’s practitioner and physical
therapist to coordinate rehabilitation orders and teaching.
■ Determine the patient’s weight-bearing status to help
determine which gait to teach the patient.
■ Perform hand hygiene.2,3,4,5,6,7
■ Confirm the patient’s identity using at least two patient
identifiers.8
■ Provide privacy.9,10,11,12
■ Explain the procedure to the patient and family (if
appropriate) according to their individual communication
and learning needs to increase their understanding, allay
their fears, and enhance cooperation.13
■ Place a gait belt around the patient’s waist, if necessary,
to help prevent falls. Tell the patient to position the crutches
and to shift his or her weight from side to side.
■ Place the patient in front of a full-length mirror, if
available, to facilitate learning and coordination.
■ Teach the four-point gait to the patient who can bear
weight on both legs. Although this is the safest gait,
because three points are always in contact with the floor, it
requires greater coordination than other gaits because it
requires constant shifting of weight. Use this sequence: right
crutch, left foot, left crutch, right foot. Suggest counting to
help develop rhythm, and make sure each short step is of
equal length. If the patient gains proficiency at this gait,
teach the faster two-point gait. (See Crutch gaits, page
230.)
■ Teach the three-point gait to the patient who can bear
only partial or no weight on one leg. Instruct the patient to
advance both crutches 6′′ to 8′′ (15 to 20 cm) along with the
involved leg. Then tell the patient to bring the unaffected
leg forward and to bear the bulk of his or her weight on the
crutches, but some of it on the affected leg, if possible.
Stress the importance of taking steps of equal length and
duration, with no pauses.
■ Teach the two-point gait to the patient with weak legs but
good coordination and arm strength. This is the most
natural crutch-walking gait because it mimics walking, with
alternating swings of the arms and legs. Instruct the patient
to advance the right crutch and left foot simultaneously,
followed by the left crutch and right foot.
■ Teach the swing-to or swing-through gaits—the fastest
ones—to the patient with complete paralysis of the hips and
legs. Instruct the patient to advance both crutches
simultaneously and to swing the legs parallel to (swing-to)
or beyond the crutches (swing-through).
■ To teach the patient to get up from a chair, tell him or her
to hold both crutches in one hand, with the tips resting
firmly on the floor. The patient should then push up from the
chair with the free hand, supporting himself or herself with
the crutches.
■ To sit down, the patient reverses the process: Tell the
patient to support himself or herself with the crutches in one
hand and to lower himself or herself with the other.
■ To teach the patient to ascend stairs using the three-point
gait, tell the patient to lead with the unaffected (good) leg
and to follow with both the crutches and the affected (bad)
leg. To descend stairs, the patient should lead with the
crutches and the affected (bad) leg and follow with the
unaffected (good) leg. The patient may find it helpful to
remember the phrase, “up with the good; down with the
bad.”
■ Have the patient provide return demonstrations using the
appropriate gait, using a chair, and negotiating stairs.
■ Perform hand hygiene.2,3,4,5,6,7
■ Document the procedure.14,15,16,17
Special considerations
■ Consult with the physical therapy department, because at
a minimum, gait training should include aerobic conditioning
exercises, coordination and balancing exercises, and range-
of-motion and muscle strengthening of both the upper and
lower limbs.1 Also, teach the patient two gaits if possible—
one fast and one slow—so that the patient can alternate
between them to prevent excessive muscle fatigue, and so
he or she can adjust more easily to various walking
conditions.
■ Encourage the patient to remove rugs and clutter from
the floor to decrease the risk of falls.
EQUIPMENT
Fitting a patient for crutches
To measure for axillary crutches, position each crutch so that it extends from
apoint4′′to6′′(10to15cm)tothesideofthefootand1′′to11⁄2′′(2.5to3.8
cm, or about the width of two fingers) below the axillary fold.
Adjust the handgrip so that the patient’s elbow is flexed at a 30-degree
angle1 and the wrist is at a 15-degree angle when the patient is standing
with the crutches in the resting position. The handgrip should be even with
the top of the hip line. Check that the vinyl padding on the arm cuff, the
rubber handgrip, and the rubber tip at the end of the crutches are secure.
To fit forearm crutches, have the patient flex the elbow so the crease in the
wrist is at the hip. Then measure the forearm from 3′′ (7.5 cm) below the
elbow (A) and add the distance between the wrist and the floor (B). This is
the total length (C).
■ Have the patient wear a tennis shoe or other flat rubber-
soled shoe on the foot to prevent slipping.
■ Instruct the patient not to move too fast or to swing the
leg too far forward, because this could cause a loss of
balance.
■ Check the wing nuts or locking mechanisms on the
crutches daily to make sure they’re tightened securely.
Patient teaching
Instruct the patient to contact the practitioner if the
crutches don’t fit, if they break or are lost, or if the patient
has questions about how to use the crutches. Tell the
patient to notify the practitioner if the patient develops
blisters, rashes, painful calluses, or skin breakdown of the
hands, forearms, or underarms. Instruct the patient to avoid
habitually leaning on the crutches; the patient’s weight
should rest on the hands, not the underarm supports.18 The
patient who experiences sudden numbness of hands or
arms should seek care immediately.
Complications
When used with chronic conditions, the swing-to and swing-
through gaits can lead to atrophy of the hips and legs if
appropriate therapeutic exercises aren’t performed
routinely. Instruct the patient to avoid habitually leaning on
the crutches, because prolonged pressure on the axillae can
damage the brachial nerves, causing brachial nerve palsy.
Documentation
Record the type of gait the patient used, the amount of
assistance required, the distance walked, and the patient’s
tolerance of the crutches and gait. Document any patient
teaching and the patient’s understanding of the teaching.
REFERENCES
1 Bradley, S. M ., & Hernandez, C. R. (2011). Geriatric assistive devices.
American Family Physician, 84(4), 405–411 . Accessed via the Web at
http://www.aafp.org/afp/2011/0815/p405.html (Level VII)
2 The Joint Commission. (2019). Standard NPSG.07.01.01. Comprehensive
accreditation manual for hospitals. Oakbrook Terrace, IL: The Joint
Commission. (Level VII)
3 Centers for Disease Control and Prevention. (2002). Guideline for hand
hygiene in health-care settings: Recommendations of the Healthcare Infection
Control Practices Advisory Committee and the HICPAC/SHEA/APIC/IDSA Hand
Hygiene Task Force. MMWR Recommendations and Reports, 51(RR-16), 1–45.
Accessed via the Web at https://www.cdc.gov/mmwr/pdf/rr/rr5116.pdf (Level
II)
4 World Health Organization. (2009). “WHO guidelines on hand hygiene in
health care: First global patient safety challenge, clean care is safer care”
[Online]. Accessed via the Web at
http://apps.who.int/iris/bitstream/10665/44102/1/9789241597906_eng.pdf
(Level IV)
5 Centers for Medicare and Medicaid Services, Department of Health and
Human Services. (2015). Condition of participation: Infection control. 42 C.F.R.
§ 482.42.
6 Accreditation Association for Hospitals and Health Systems. (2017). Standard
07.01.21. Healthcare Facilities Accreditation Program: Accreditation
requirements for acute care hospitals. Chicago, IL: Accreditation Association
for Hospitals and Health Systems. (Level VII)
7 DNV GL-Healthcare USA, Inc. (2016). IC.1.SR.1 . NIAHO® accreditation
requirements: Interpretive guidelines & surveyor guidance (version 11).
Milford, OH: DNV GL-Healthcare USA, Inc. (Level VII)
Crutch gaits
This is a guide for using the four-point, three-point, and two-point swing-to or
swing-through gaits. Start at the bottom and move upward. Note: Shaded
areas indicate weight bearing.
8 The Joint Commission. (2019). Standard NPSG.01.01.01. Comprehensive
accreditation manual for hospitals. Oakbrook Terrace, IL: The Joint
Commission. (Level VII)
9 The Joint Commission. (2019). Standard RI.01.01.01. Comprehensive
accreditation manual for hospitals. Oakbrook Terrace, IL: The Joint
Commission. (Level VII)
10 Centers for Medicare and Medicaid Services, Department of Health and
Human Services. (2015). Condition of participation: Patient’s rights. 42 C.F.R.
§ 482.13(c)(1).
11 Accreditation Association for Hospitals and Health Systems. (2017). Standard
15.01.16. Healthcare Facilities Accreditation Program: Accreditation
requirements for acute care hospitals. Chicago, IL: Accreditation Association
for Hospitals and Health Systems. (Level VII)
12 DNV GL-Healthcare USA, Inc. (2016). PR.1.SR.5 . NIAHO® accreditation
requirements: Interpretive guidelines and surveyor guidance (version 11).
Milford, OH: DNV GL-Healthcare USA, Inc. (Level VII)
13 The Joint Commission. (2019). Standard PC.02.01.21. Comprehensive
accreditation manual for hospitals. Oakbrook Terrace, IL: The Joint
Commission (Level VII)
14 The Joint Commission. (2019). Standard RC.01.03 .01. Comprehensive
accreditation manual for hospitals. Oakbrook Terrace, IL: The Joint
Commission. (Level VII)
15 Centers for Medicare and Medicaid Services, Department of Health and
Human Services. (2015). Condition of participation: Medical record services.
42 C.F.R. § 482.24(b).
16 Accreditation Association for Hospitals and Health Systems. (2017). Standard
10.00 .03. Healthcare Facilities Accreditation Program: Accreditation
requirements for acute care hospitals. Chicago, IL: Accreditation Association
for Hospitals and Health Systems. (Level VII)
17 DNV GL-Healthcare USA, Inc. (2016). MR.2 .SR.1 . NIAHO® accreditation
requirements: Interpretive guidelines and surveyor guidance (version 11).
Milford, OH: DNV GL-Healthcare USA, Inc. (Level VII)
18 American Academy of Orthopaedic Surgeons. (2015). “How to use crutches,
canes, and walkers” [Online]. Accessed via the Web at
http://orthoinfo.aaos.org/topic.cfm?topic=A00181
D
DEFIBRILLATION
The standard treatment for ventricular fibrillation (VF) and
pulseless ventricular tachycardia, defibrillation involves
using external pads or paddles to direct an electrical current
through the patient’s heart. The current causes the
myocardium to depolarize, which, in turn, encourages the
sinoatrial node to resume control of the heart’s electrical
activity. This current can be delivered by a monophasic or
biphasic defibrillator.
Defibrillators with monophasic waveforms deliver current
in one direction. Few monophasic defibrillators are being
manufactured, but some are still in use. For monophasic
defibrillation to be effective, a high amount of electrical
current is required.
In biphasic defibrillation, the electrical current discharged
from the pads or paddles travels in a positive direction for a
specified duration and then reverses and flows in a negative
direction for the remaining time of the electrical discharge
(as shown below). It delivers two currents of electricity and
lowers the defibrillation threshold of the heart muscle,
making it possible to successfully defibrillate VF with smaller
amounts of energy. The biphasic defibrillator can adjust for
differences in impedance or the resistance of the current
through the chest. This helps reduce the number of shocks
needed to terminate VF. Biphasic technology uses lower
energy levels and fewer shocks, which reduces the damage
to the myocardial muscle. Based on their success in
arrhythmia termination, defibrillators using biphasic
waveforms are preferred to monophasic defibrillators for
treatment of both atrial and ventricular arrhythmias.1
The external pads or paddles delivering the current may
be placed on the patient’s chest or, during cardiac surgery
when the patient’s chest is open, sterile defibrillation
paddles may be placed directly on the myocardium. (See
Using a defibrillator.)
EQUIPMENT
Using a defibrillator
Because ventricular fibrillation (VF) leads to death if not corrected, the
success of defibrillation depends on early recognition and quick treatment of
this arrhythmia.2 In addition to treating ventricular fibrillation, defibrillation
may also be used to treat ventricular tachycardia that doesn’t produce a
pulse.1 To help treat the patient as quickly as possible, familiarize yourself
with the defibrillator available at your facility. You can further familiarize
yourself by viewing the defibrillators in the photographs below.
Defibrillator with self-adhesive defibrillation pads
Defibrillator with paddles
A defibrillator with self-adhesive defibrillation pads has
been shown to be as effective as one with paddles. The
defibrillator with self-adhesive pads has the advantage of
delivering energy faster and safer than the defibrillator with
paddles, because energy is delivered hands-free. The pads
can also be used for monitoring and are recommended for
routine use, if available.3
Patients with a history of VF may be candidates for an
implantable cardioverter-defibrillator (ICD), a sophisticated
device that automatically discharges an electrical current
when it senses a ventricular tachyarrhythmia. (See
Understanding the ICD, page 232.)
Equipment
Gloves ▪ defibrillator with electrocardiogram (ECG) monitor
and recorder ▪ self-adhesive defibrillation pads and
connector cable, or defibrillation paddles with prepackaged
gelled defibrillation pads ▪ emergency equipment (code cart
with cardiac medications, handheld resuscitation bag with
mask, suction and intubation equipment) ▪ oxygen delivery
equipment ▪
Optional: blood pressure monitoring
equipment, pulse oximeter, stethoscope, disinfectant wipes,
additional prescribed medications, IV infusion equipment,
supplies for obtaining an arterial sample for arterial blood
gas (ABG) analysis, supplemental oxygen supplies, 12-lead
ECG machine, IV catheter insertion supplies.
EQUIPMENT
Understanding the ICD
The implantable cardioverter-defibrillator (ICD) has a programmable pulse
generator and lead system that monitors the heart’s activity, detects
ventricular bradyarrhythmias and tachyarrhythmias, and responds to each
with different interventions. These interventions include antitachycardia
pacing, cardioversion, defibrillation, and bradycardia pacing. Some ICDs can
be programmed to pace both the atrium and ventricle or both ventricles
(cardiac resynchronization therapy). Some models can also detect and
correct atrial arrhythmias.
Implantation is similar to implantation of a permanent pacemaker. The
cardiologist positions the lead or leads in the endocardium of the right
ventricle (and the right atrium if both chambers require pacing) and then
connects the other end to the generator (about the size of a wallet), which is
implanted in the right or left upper chest near the collarbone. New, smaller
devices can be installed through the blood vessels. These newer devices can
also store information related to the arrhythmic event and perform
electrophysiology testing.
Preparation of equipment
Make sure the defibrillation pads or paddles are connected
to the defibrillator and that the defibrillator battery is
adequately charged or the defibrillator electrical cord is
plugged into the wall. Keep the defibrillation pads in their
packages before use to prevent the conductive gel from
drying out. Ensure that resuscitation equipment and
medications are immediately available. Check any item that
has an expiration date to ensure that it has not expired. If a
product is expired, its integrity is compromised, or you find
it defective, remove it from patient use, label it as expired
or defective, and report the expiration or defect as directed
by your facility.
Implementation
■ Gather and prepare the appropriate equipment.
■ Perform hand hygiene.4,5,6,7,8
■ Confirm the patient’s identity using at least two patient
identifiers.9
■ Provide privacy.10,11,12,13
■ If time allows, make sure the patient and family
understand the procedure.
■ Put on gloves to comply with standard precautions.14,15
■ Assess the patient for response by tapping on the
patient’s shoulder and shouting, “Are you alright?” If the
patient is unresponsive, shout for nearby help and
immediately activate the emergency response system via
mobile device (if appropriate).
■ Check for a pulse while simultaneously looking to see
whether the patient is apneic or is only gasping (as opposed
to breathing regularly) to minimize delay in detecting
cardiac arrest and initiating cardiopulmonary resuscitation
(CPR).16,17
■ If you don’t feel a pulse within 10 seconds, begin chest
compressions. After 30 compressions at a rate of 100 to 120
compressions per minute,16 open the patient’s airway using
a head-tilt chin-lift maneuver and give two breaths. If there
is evidence of trauma that suggests spinal injury, use a jaw-
thrust maneuver to open the airway. Continue CPR until the
defibrillator and emergency equipment arrive.16,17
■ Make sure that the patient is in a dry environment and
that the chest is dry, because contact with water may cause
personnel to receive a shock and the patient to receive skin
burns.3
■ Remove metallic objects that the patient may be wearing,
because metal conducts electricity and could cause burns
during defibrillation.3
■ Remove transdermal medication patches from the
patient’s chest (and back if using anterior–posterior
placement), because the medication may interfere with
current medications and produce burns.3,17
NURSING ALERT When performing defibrillation, don’t place the self-
adhesive pads or paddles directly over an ICD or implanted
pacemaker. This placement may damage the device.3
Defibrillation using self-adhesive defibrillation
pads
■ Expose the patient’s chest and apply the self-adhesive
defibrillation pads. For anterolateral placement, position one
pad to the right of the upper sternum, just below the right
clavicle, and the other over the fifth or sixth intercostal
space at the left anterior axillary line (as shown below).
■ For anteroposterior placement, position the anterior pad
directly over the heart at the precordium, to the left of the
lower sternal border (as shown below).
■ Place the posterior pad under the patient’s body beneath
the heart and immediately below the scapula (but not on
the vertebral column) (as shown below).
■ Defibrillation occurs when an electrical current passes
through the cardiac muscle to restore a single source of
impulse production. Appropriate pad positioning maximizes
the flow of electrical current through the heart.3
■ Turn on the defibrillator and, if performing external
defibrillation using a biphasic defibrillator, use clinically
appropriate energy levels (usually 120 to 200 joules)
following the manufacturer’s recommended dose.1 If you’re
using a monophasic defibrillator, set the energy level for
360 joules for an adult patient.
■ Turn on the ECG recorder to provide a documented
recording of the patient’s ECG as well as the response to
interventions.3
■ Charge the self-adhesive defibrillator pads by pressing
the appropriate button on the defibrillator.
■ Reassess the patient’s cardiac rhythm.
■ Disconnect the oxygen source during actual defibrillation
to decrease the chance of combustion caused by arcing of
the electrical current in the presence of oxygen.3
■ If the patient remains in VF or pulseless ventricular
tachycardia, say “all clear” or use similar wording three
times and visually verify that all staff members are clear of
the patient and the bed before discharging the electrical
current. Electrical current can be conducted from the patient
to anyone in contact with the patient.
Defibrillation using defibrillator paddles
■ If the defibrillator can monitor the patient’s rhythm using
the paddles, turn on the defibrillator, expose the patient’s
chest, and apply the defibrillation gelled pads. For
anterolateral placement, position one gelled defibrillation
pad to the right of the upper sternum, just below the right
clavicle, and the other over the fifth or sixth intercostal
space at the left anterior axillary line. For anteroposterior
placement, position the anterior gelled defibrillation pad
directly over the heart at the precordium to the left of the
lower sternal border. Place the posterior gelled defibrillation
pad under the patient’s body beneath the heart and
immediately below the scapula (but not on the vertebral
column). Defibrillation occurs when an electrical current
passes through the cardiac muscle to restore a single source
of impulse production. Appropriate positioning of the pads
maximizes the flow of electrical current through the heart.3
■ Press the paddles firmly against the patient’s chest on top
of the gelled defibrillation pads (as shown below) using
about 25 lb (11 kg) of pressure to quickly view the cardiac
rhythm.18
■ Connect the monitoring leads of the defibrillator to the
patient and assess the cardiac rhythm.
■ Turn on the ECG recorder to provide a documented
recording of the patient’s ECG as well as the response to
interventions.
■ If a shockable rhythm is present, set the appropriate
energy level and charge the paddles by pressing the charge
buttons, located either on the defibrillator or on the paddles
themselves.
■ Reassess the patient’s cardiac rhythm.
■ Disconnect the oxygen source during actual defibrillation
to decreases the risk of combustion caused by arcing of the
electrical current in the presence of oxygen.3
■ If the patient remains in VF or pulseless ventricular
tachycardia, instruct all staff members to stand clear of the
patient and the bed. Visually verify all staff members are
clear of the patient and the bed before discharging the
current. Electrical current can be conducted from the patient
to anyone in contact with the patient.
■ Discharge the current by pressing both paddle charge
buttons simultaneously, maintaining 25 lb/in2 of pressure on
both paddles.18 Using this pressure decreases transthoracic
resistance. Hold until the defibrillator delivers the electrical
current.3
Completing the procedure
■ Resume CPR immediately after defibrillation, beginning
with chest compressions. Defibrillation is more likely to be
effective if followed immediately with a cycle of chest
compressions and with minimal interruption in chest
compressions.1,16
■ Reassess the patient’s cardiac rhythm after 2 minutes (or
five cycles) of CPR.
■ If the patient remains in VF or pulseless ventricular
tachycardia, prepare to defibrillate a second time. Charge
the defibrillator (monophasic at 360 joules or biphasic at
200 joules) and continue CPR while the defibrillator is
charging. Announce that you’re preparing to defibrillate, and
follow the procedure described above.1
■ Resume CPR immediately, starting with chest
compressions, and complete five cycles.1
■ Reassess the patient. If the patient remains in VF or
pulseless ventricular tachycardia and defibrillation is again
necessary, follow the same procedure as before.1
■ If defibrillation restores a normal rhythm, check the
patient’s central and peripheral pulses and obtain a blood
pressure reading and heart rate. Assess the patient’s
respiratory status, level of consciousness, cardiac rhythm,
breath sounds, skin color, and urine output. Obtain baseline
ABG levels and a 12-lead ECG. Provide supplemental oxygen
and ventilation, and insert an IV catheter (if not already in
place) and administer medications, as needed and ordered,
following safe medication administration practices.19,20,21,22
Check the patient’s chest for electrical burns and treat
them, as ordered. Also prepare the defibrillator for
immediate reuse.
■ Discard all supplies, remove and discard your gloves, and
perform hand hygiene.4,5,6,7,8
■ Provide support and information to the patient’s family,
as needed. After resuscitation, inform the patient about
what happened, if appropriate.
■ Clean and disinfect your stethoscope, if used, using a
disinfectant wipe.15,23
■ Perform hand hygiene.4,5,6,7,8
■ Document the procedure.24,25,26,27
Special considerations
■ Additional defibrillation should be done 30 seconds to 1
minute after administering medications.
■ Check defibrillator operation regularly (usually once per
shift), as determined by your facility.
■ If gelled defibrillation pads aren’t available, defibrillator
paddles require that a conductive gel be placed on the
paddles before use. Place the gel on one paddle, and rub
the two paddles together to spread the gel evenly between
them. Ensure that the surface of the paddle is completely
covered.
■ Defibrillation can be affected by several factors, including
paddle size and placement, condition of the patient’s
myocardium, duration of the arrhythmia, chest resistance,
and the number of countershocks delivered.2
■ Don’t place the pad or paddle over a female patient’s
breast. Instead, place the apex of the pad or paddle at the
fifth to sixth intercostal space, with the middle of the pad or
paddle at the midaxillary line.
■ Family members of the patient undergoing resuscitation
should be given the option to remain at the bedside during
resuscitation, if possible, because it helps meet the
psychosocial needs of the patient and his family in a time of
crisis.28
■ If the patient has a hairy chest, remove the hair from
necessary locations for pad or paddle placement. Chest hair
can increase transthoracic impedance.
Complications
Defibrillation can cause accidental electrical shock to those
providing care. Using dry self-adhesive defibrillation pads or
applying an insufficient amount of conductive medium can
lead to skin burns.
Documentation
Document the procedure, including the patient’s ECG
rhythm both before and after defibrillation; the number of
times defibrillation was performed; the energy used with
each attempt; whether a pulse returned; the dosage, route,
and time of drug administration; whether CPR was
performed; how the airway was maintained; and the
patient’s outcome. Record the patient’s vital signs and your
assessment findings. Document any patient or family
teaching and their comprehension of your teaching, and
whether the patient and family required any follow-up
teaching.
REFERENCES
1 American Heart Association. (2015). 2015 American Heart Association
guidelines update for cardiopulmonary resuscitation and emergency
cardiovascular care. Circulation, 132, S444–S464. (Level II)
2 Chan, P. S ., et al. (2008). Delayed time to defibrillation after in-hospital
cardiac arrest. New England Journal of Medicine, 358(1), 9–17 . (Level VI)
3 Wiegand, D. (2017). AACN procedure manual for high acuity, progressive, and
critical care (7th ed.). St. Louis, MO: Elsevier.
4 The Joint Commission. (2019). Standard NPSG.07.01.01. Comprehensive
accreditation manual for hospitals. Oakbrook Terrace, IL: The Joint
Commission. (Level VII)
5 World Health Organization. (2009). “WHO guidelines on hand hygiene in
health care: First global patient safety challenge, clean care is safer care”
[Online]. Accessed via the Web at
http://apps.who.int/iris/bitstream/10665/44102/1/9789241597906_eng.pdf
(Level IV)
6 Centers for Disease Control and Prevention. (2002). Guideline for hand
hygiene in health-care settings: Recommendations of the Healthcare Infection
Control Practices Advisory Committee and the HICPAC/SHEA/APIC/IDSA Hand
Hygiene Task Force. MMWR Recommendations and Reports, 51(RR-16), 1–45.
Accessed via the Web at https://www.cdc.gov/mmwr/pdf/rr/rr5116.pdf (Level
II)
7 Centers for Medicare and Medicaid Services, Department of Health and
Human Services. (2015). Condition of participation: Infection Control. 42
C.F.R. § 482.42.
8 Accreditation Association for Hospitals and Health Systems. (2017). Standard
07.01.21. Healthcare Facilities Accreditation Program: Accreditation
requirements for acute care hospitals. Chicago, IL: Accreditation Association
for Hospitals and Health Systems. (Level VII)
9 The Joint Commission. (2019). Standard NPSG.01.01.01. Comprehensive
accreditation manual for hospitals. Oakbrook Terrace, IL: The Joint
Commission. (Level VII)
10 Accreditation Association for Hospitals and Health Systems. (2017). Standard
15.01.16. Healthcare Facilities Accreditation Program: Accreditation
requirements for acute care hospitals. Chicago, IL: Accreditation Association
for Hospitals and Health Systems. (Level VII)
11 Centers for Medicare & Medicaid Services, Department of Health and Human
Services. (2015). Condition of participation: Patient’s rights. 42 C.F.R. §
482.13(c)(1).
12 The Joint Commission. (2019). Standard RI.01.01.01. Comprehensive
accreditation manual for hospitals. Oakbrook Terrace, IL: The Joint
Commission. (Level VII)
13 DNV GL-Healthcare USA, Inc. (2016). PR.1.SR.5 . NIAHO® accreditation
requirements: Interpretive guidelines & surveyor guidance (version 11).
Milford, OH: DNV GL-Healthcare USA, Inc. (Level VII)
14 Siegel, J. D ., et al. (2007, revised 2017). “2007 guideline for isolation
precautions: Preventing transmission of infectious agents in healthcare
settings” [Online]. Accessed via the Web at
http://www.cdc.gov/hicpac/pdf/isolation/Isolation2007.pdf (Level II)
15 Accreditation Association for Hospitals and Health Systems. (2017). Standard
07.01.10. Healthcare Facilities Accreditation Program: Accreditation
requirements for acute care hospitals. Chicago, IL: Accreditation Association
for Hospitals and Health Systems. (Level VII)
16 American Heart Association. (2015). 2015 American Heart Association
guidelines update for cardiopulmonary resuscitation and emergency
cardiovascular care. Circulation, 132, S414–S435. (Level II)
17 American Heart Association. (2010). 2010 American Heart Association
guidelines for cardiopulmonary resuscitation and emergency cardiovascular
care. Circulation, 122, S685–S719. (Level II)
18 Woods, S. L., et al. (2010). Cardiac nursing (6th ed.). Philadelphia, PA:
Lippincott Williams & Wilkins.
19 Accreditation Association for Hospitals and Health Systems. (2017). Standard
16.01.03. Healthcare Facilities Accreditation Program: Accreditation
requirements for acute care hospitals. Chicago, IL: Accreditation Association
for Hospitals and Health Systems. (Level VII)
20 Centers for Medicare and Medicaid Services, Department of Health and
Human Services. (2015). Condition of participation: Nursing services. 42
C.F.R. § 482.23(c).
21 The Joint Commission. (2019). Standard MM.06.01.01. Comprehensive
accreditation manual for hospitals. Oakbrook Terrace, IL: The Joint
Commission. (Level VII)
22 DNV GL-Healthcare USA, Inc. (2016). MM.1 .SR.2. NIAHO® accreditation
requirements: Interpretive guidelines & surveyor guidance (version 11).
Milford, OH: DNV GL-Healthcare USA, Inc. (Level VII)
23 Rutala, W. A., et al. (2008, revised 2017). “Guideline for disinfection and
sterilization in healthcare facilities, 2008” [Online]. Accessed via the Web at
https://www.cdc.gov/infectioncontrol/pdf/guidelines/disinfection-
guidelines.pdf (Level I)
24 The Joint Commission. (2019). Standard RC.01.03 .01. Comprehensive
accreditation manual for hospitals. Oakbrook Terrace, IL: The Joint
Commission. (Level VII)
25 Accreditation Association for Hospitals and Health Systems. (2017). Standard
10.00 .03. Healthcare Facilities Accreditation Program: Accreditation
requirements for acute care hospitals. Chicago, IL: Accreditation Association
for Hospitals and Health Systems. (Level VII)
26 Centers for Medicare and Medicaid Services, Department of Health and
Human Services. (2015). Condition of participation: Medical record services.
42 C.F.R. § 482.24(b).
27 DNV GL-Healthcare USA, Inc. (2016). MR.2 .SR.1 . NIAHO® accreditation
requirements: Interpretive guidelines & surveyor guidance (version 11).
Milford, OH: DNV GL-Healthcare USA, Inc. (Level VII)
28 American Association of Critical-Care Nurses (AACN). (2016). AACN practice
alert: Family presence during resuscitation and invasive procedures. Critical
Care Nurse, 36(1), e11–e15. Accessed via the Web at
http://ccn.aacnjournals.org/content/36/1/e11.full.pdf (Level VII)
DISCHARGE
Although discharge from a health care facility is usually
considered routine, effective discharge requires careful
planning and continuing assessment of the patient’s needs
during the hospitalization. Ideally, discharge planning
begins shortly after admission.1,2,3,4,5,6,7,8,9 Discharge
planning aims to teach the patient and family about the
patient’s illness and its effect on lifestyle, to provide
instructions for home care, to communicate dietary or
activity instructions, and to explain the purpose, adverse
effects, and scheduling of drug treatment.10,11,12,13 It can
also include arranging for transportation, follow-up care if
necessary, and coordination of outpatient or home health
care services.
Upon discharge, the nurse should provide the patient with
individualized written instructions for home care. All
instructions should be at the patient’s reading level and in
the patient’s preferred language and format.10,11,12,13 If the
patient doesn’t speak English, a medical interpreter should
help to convey the necessary information.14 The nurse
should place a copy of these instructions in the patient’s
medical record.15
Equipment
Patient’s medical record ▪ patient instruction sheet ▪
discharge summary sheet ▪ plastic bag or patient’s suitcase
for personal belongings ▪ equipment for vital signs
measurement ▪ hospital-grade disinfectant ▪ Optional:
wheelchair.
Implementation
■ Gather the necessary equipment.
■ Perform hand hygiene.16,17,18,19,20,21
■ Confirm the patient’s identity using at least two patient
identifiers.22
■ Inform the patient’s family of the time and date of
discharge as soon as it’s known. If the patient’s family can’t
arrange transportation, notify the social services
department. (Always confirm arranged transportation on the
day of discharge.)10,11,12,13
■ Obtain a written discharge order from the practitioner. If
the patient discharges himself or herself against medical
advice, obtain the appropriate form. (See Dealing with a
discharge against medical advice.)
■ If the patient requires home medical care, confirm
arrangements with the appropriate facility department or
community agency.10,11,12,13
■ Review the patient’s discharge care plan, initiated on
admission and modified during his hospitalization, with the
patient and family.10,11,12,13 List prescribed drugs on the
patient instruction sheet along with the dosage, prescribed
time schedule, and adverse reactions to report to the
practitioner.24,25 Ensure that the drug schedule is consistent
with the patient’s lifestyle to prevent improper
administration and to promote patient compliance. Remind
the patient to discard old medication lists when the patient
returns home.
■ Review procedures the patient or his family will perform
at home. If necessary, demonstrate these procedures,
provide written instructions, and check performance with a
return demonstration.10,11,12,13,26
■ List dietary and activity instructions on the patient
instruction sheet, if applicable, and review the reasons for
them. If the practitioner orders bed rest, make sure the
patient’s family can provide daily care and will obtain
necessary equipment.10,11,12,13
■ Check with the practitioner about the patient’s next office
appointment; if the practitioner hasn’t yet done so, inform
the patient of the date, time, and location. If scheduling is
your responsibility, make an appointment with the
practitioner, outpatient clinic, physical therapy, X-ray
department, or other health services, as needed. If the
patient can’t arrange transportation to these appointments,
notify the social services department.10,11,12,13
■ Retrieve the patient’s valuables from the facility’s safe
and review each item with the patient. Then obtain the
patient’s signature to document the patient’s receipt of the
valuables.
■ Instruct the patient to give a list of medications to the
practitioner; to update the information when medications
are discontinued, dosages are changed, or new medications
(including over-the-counter products) are added; and to
carry a medication list that contains all of this information at
all times in the event of an emergency.24,25
■ Obtain from the pharmacy any drugs the patient brought
to the hospital. Return these to the patient if drug therapy is
unchanged. If giving a new prescription, provide an
explanation of the indications, dosage, schedule, and
adverse effects.24
■ Provide the patient (and family as needed) with written
information on the medications the patient should be taking
upon discharge.24,26
■ If the patient is being discharged to another facility, such
as an assisted-living or long-term care facility, or if the
patient will be followed up at home by a home care agency,
provide hand-off communication to the person who will
assume responsibility for the patient’s care. Allow time for
questions, as necessary, to avoid miscommunication that
can cause patient care errors during transitions of care.27
Make sure that the reconciled list of the patient’s
medications is communicated to the next practitioner who
will be caring for the patient, and that the communication is
documented in the patient’s medical record, to reduce the
risk of transition-related adverse medication events. If the
next practitioner is unknown, make sure that the list is given
to the patient or, if appropriate, the patient’s
family.28,29,30,31
■ Ask the patient, responsible family member, or caregiver
to verbalize their understanding of the discharge
instructions.
■ Ask the patient, responsible family member, or caregiver
to sign the discharge instruction sheet attesting to receipt of
the information.
■ Sign and date the discharge instruction sheet, as required
by your facility, and give the original to the patient,
responsible family member, or caregiver.
■ If appropriate, perform hand hygiene,16,17,18,19,20,21
obtain the patient’s vital signs, and record them on the
discharge summary form. Notify the practitioner if any signs
are abnormal, such as an elevated temperature. If
necessary, the practitioner may alter the patient’s discharge
plan.
■ Before the patient is discharged, perform a physical
assessment. If you detect abnormal signs, or if the patient
develops new symptoms, notify the practitioner and delay
discharge until the practitioner has seen the patient.
Dealing with a discharge against
medical advice
Occasionally, the patient or family may demand discharge against medical
advice (AMA). If this situation occurs, notify the practitioner immediately. If
the practitioner fails to convince the patient to remain in the facility, the
practitioner will ask the patient to sign an AMA form releasing the facility
from legal responsibility for any medical problems the patient may
experience after discharge.23
If the practitioner isn’t available, discuss the discharge form with the
patient and obtain the patient’s signature. If the patient refuses to sign the
AMA form, don’t detain the patient. Detaining the patient violates the
patient’s legal rights. After the patient leaves, document the incident
thoroughly in your notes and notify the practitioner.
■ Ensure that all devices, such as IV catheters, indwelling
urinary catheters, and drains that have been discontinued
by the ordering practitioner, have been properly removed
before discharge to avoid potential complications.
■ Help the patient get dressed if necessary.
■ Collect the patient’s personal belongings from the room,
compare them with the admission inventory of belongings,
and help place them in a suitcase or a plastic bag.
■ After checking the room for misplaced belongings, help
the patient into the wheelchair and escort the patient to the
exit; if the patient is leaving by ambulance, help the patient
onto the stretcher.
■ After the patient has left the area, remove the bed linens
and notify the housekeeping staff that the room is ready for
terminal cleaning.32
■ Clean and disinfect reusable equipment using a hospital-
grade disinfectant.33,34
■ Perform hand hygiene.16,17,18,19,20,21
■ Document the procedure.35,36,37,38
Special considerations
■ Whenever possible, involve the patient’s family in
discharge planning so they can better understand and
perform patient care procedures.10,11,12,13
Patient teaching
Patient teaching provides patients and their caregivers with
the knowledge and skills that they need to manage their
health care need when they are discharged. (See Discharge
teaching goals, page 236.)
Documentation
Although your facility determines the extent and form of
discharge documentation, you’ll usually record the time and
date of discharge; vital signs and physical assessment
results, if applicable; any devices that remain in the patient
and that have been removed, and the patient’s tolerance of
the removal; family members or caregivers present for
teaching; details of instructions given to the patient,
including medications, activity, diet, treatments, and the
use of medical equipment; signs and symptoms to report to
the practitioner; and the date, time, and locations of follow-
up appointments.15,36
REFERENCES
1 The Joint Commission. (2019). Standard PC.04.01.01. Comprehensive
accreditation manual for hospitals. Oakbrook Terrace, IL: The Joint
Commission. (Level VII)
2 Centers for Medicare & Medicaid Services, Department of Health and Human
Services. (2015). Condition of participation: Discharge planning. 42 C.F.R. §
482.43.
3 Accreditation Association for Hospitals and Health Systems. (2017). Standard
15.06 .00. Healthcare Facilities Accreditation Program: Accreditation
requirements for acute care hospitals. Chicago, IL: Accreditation Association
for Hospitals and Health Systems. (Level VII)
4 DNV GL-Healthcare USA, Inc. (2016). DC.1 .SR.1 . NIAHO® accreditation
requirements: Interpretive guidelines & surveyor guidance (version 11).
Milford, OH: DNV GL-Healthcare USA, Inc. (Level VII)
PATIENT TEACHING
Instructions for coughing and deep
breathing
Your discharge teaching should aim to ensure that the patient:
■ understands the illness
■ understands and can manage medication modifications, schedules, and
information
■ carefully follows the diet
■ manages the activity level
■ understands the treatments
■ recognizes the need for rest
■ knows about possible complications
■ knows when and where to seek follow-up care
■ is aware of available community resources as needed.
Remember that your discharge teaching must include the patient’s family or
other caregivers to ensure that the patient receives proper home
care.5,6,7,8,10,11,12,13
5 The Joint Commission. (2019). Standard PC.04.01.03 . Comprehensive
accreditation manual for hospitals. Oakbrook Terrace, IL: The Joint
Commission. (Level VII)
6 Centers for Medicare and Medicaid Services, Department of Health and
Human Services. (2015). Condition of participation: Discharge planning. 42
C.F.R. § 482.43(b)(5).
7 Accreditation Association for Hospitals and Health Systems. (2017). Standard
15.06 .06. Healthcare Facilities Accreditation Program: Accreditation
requirements for acute care hospitals. Chicago, IL: Accreditation Association
for Hospitals and Health Systems. (Level VII)
8 DNV GL-Healthcare USA, Inc. (2016). DC.2 .SR.3 . NIAHO® accreditation
requirements: Interpretive guidelines and surveyor guidance (version 11).
Milford, OH: DNV GL-Healthcare USA, Inc. (Level VII)
9 Cesta, T. (2014). Case management insider: Home health care—A key
component of discharge planning. Hospital Case Management, 22(11), 151–
154. Accessed via the Web at https://www.ahcmedia.com/articles/21678-
home-health-care-x -a -key-component-of-discharge-planning
10 The Joint Commission. (2019). Standard PC.04.01.05. Comprehensive
accreditation manual for hospitals. Oakbrook Terrace, IL: The Joint
Commission. (Level VII)
11 Centers for Medicare & Medicaid Services, Department of Health and Human
Services. (2015). Condition of participation: Discharge planning. 42 C.F.R. §
482.43(c).
12 Accreditation Association for Hospitals and Health Systems. (2017). Standard
15.06 .13. Healthcare Facilities Accreditation Program: Accreditation
requirements for acute care hospitals. Chicago, IL: Accreditation Association
for Hospitals and Health Systems. (Level VII)
13 DNV GL-Healthcare USA, Inc. (2016). DC.2 .SR.4 . NIAHO® accreditation
requirements: Interpretive guidelines and surveyor guidance (version 11).
Milford, OH: DNV GL-Healthcare USA, Inc. (Level VII)
14 The Joint Commission. (2010). Advancing effective communication, cultural
competence, and patient- and family-centered care: A roadmap for hospitals.
Oakbrook Terrace, IL: The Joint Commission. Accessed via the Web at
http://www.jointcommission.org/assets/1/6/ARoadmapforHospitalsfinalversion
727.pdf (Level VII)
15 The Joint Commission. (2019). Standard RC.02.04.01. Comprehensive
accreditation manual for hospitals. Oakbrook Terrace, IL: The Joint
Commission. (Level VII)
16 The Joint Commission. (2019). Standard NPSG.07.01.01. Comprehensive
accreditation manual for hospitals. Oakbrook Terrace, IL: The Joint
Commission. (Level VII)
17 Centers for Disease Control and Prevention. (2002). Guideline for hand
hygiene in health-care settings: Recommendations of the Healthcare Infection
Control Practices Advisory Committee and the HICPAC/SHEA/APIC/IDSA Hand
Hygiene Task Force. MMWR Recommendations and Reports, 51(RR-16), 1–45.
Accessed via the Web at https://www.cdc.gov/mmwr/pdf/rr/rr5116.pdf (Level
II)
18 World Health Organization. (2009). “WHO guidelines on hand hygiene in
health care: First global patient safety challenge, clean care is safer care”
[Online]. Accessed April 2017 via the Web at
http://apps.who.int/iris/bitstream/10665/44102/1/9789241597906_eng.pdf
(Level IV)
19 Centers for Medicare and Medicaid Services, Department of Health and
Human Services. (2015). Condition of participation: Infection control. 42 C.F.R.
§ 482.42.
20 Accreditation Association for Hospitals and Health Systems. (2017). Standard
07.01.21. Healthcare Facilities Accreditation Program: Accreditation
requirements for acute care hospitals. Chicago, IL: Accreditation Association
for Hospitals and Health Systems. (Level VII)
21 DNV GL-Healthcare USA, Inc. (2016). IC.1 .SR.1 . NIAHO® accreditation
requirements: Interpretive guidelines & surveyor guidance (version 11).
Milford, OH: DNV GL-Healthcare USA, Inc. (Level VII)
22 The Joint Commission. (2019). Standard NPSG.01.01.01. Comprehensive
accreditation manual for hospitals. Oakbrook Terrace, IL: The Joint
Commission. (Level VII)
23 Videbeck, S. L. (2017). Psychiatric-mental health nursing (7th ed.).
Philadelphia, PA: Wolters Kluwer.
24 The Joint Commission. (2019). Standard NPSG.03 .06 .01. Comprehensive
accreditation manual for hospitals. Oakbrook Terrace, IL: The Joint
Commission. (Level VII)
25 Accreditation Association for Hospitals and Health Systems. (2017). Standard
25.02.13. Healthcare Facilities Accreditation Program: Accreditation
requirements for acute care hospitals. Chicago, IL: Accreditation Association
for Hospitals and Health Systems. (Level VII)
26 Accreditation Association for Hospitals and Health Systems. (2017). Standard
15.06 .26. Healthcare Facilities Accreditation Program: Accreditation
requirements for acute care hospitals. Chicago, IL: Accreditation Association
for Hospitals and Health Systems. (Level VII)
27 The Joint Commission. (2019). Standard PC.02.02.01. Comprehensive
accreditation manual for hospitals. Oakbrook Terrace, IL: The Joint
Commission. (Level VII)
28 The Joint Commission. (2019). Standard PC.04.02.01. Comprehensive
accreditation manual for hospitals. Oakbrook Terrace, IL: The Joint
Commission. (Level VII)
29 Centers for Medicare & Medicaid Services, Department of Health and Human
Services. (2015). Condition of participation: Discharge planning. 42 C.F.R. §
482.43(d).
30 Accreditation Association for Hospitals and Health Systems. (2017). Standard
15.06 .23. Healthcare Facilities Accreditation Program: Accreditation
requirements for acute care hospitals. Chicago, IL: Accreditation Association
for Hospitals and Health Systems. (Level VII)
31 DNV GL-Healthcare USA, Inc. (2016). DC.3 .SR.4 . NIAHO® accreditation
requirements: Interpretive guidelines and surveyor guidance (version 11).
Milford, OH: DNV GL-Healthcare USA, Inc. (Level VII)
32 Occupational Safety and Health Administration. (n.d .). “Bloodborne
pathogens, standard number 1910.1030” [Online]. Accessed via the Web at
https://www.osha.gov/pls/oshaweb/owadisp.show_document?
p_id=10051&p_table=STANDARDS (Level VII)
33 Rutala, W. A., et al. (2008, revised 2017). “Guideline for disinfection and
sterilization in healthcare facilities, 2008” [Online]. Accessed via the Web at
http://www.cdc.gov/hicpac/pdf/guidelines/Disinfection_Nov_2008.pdf (Level I)
34 Accreditation Association for Hospitals and Health Systems. (2017). Standard
07.02.03. Healthcare Facilities Accreditation Program: Accreditation
requirements for acute care hospitals. Chicago, IL: Accreditation Association
for Hospitals and Health Systems. (Level VII)
35 The Joint Commission. (2019). Standard RC.01.03 .01. Comprehensive
accreditation manual for hospitals. Oakbrook Terrace, IL: The Joint
Commission. (Level VII)
36 Centers for Medicare & Medicaid Services, Department of Health and Human
Services. (2015). Condition of participation: Medical record services. 42 C.F.R.
§ 482.24(b).
37 Accreditation Association for Hospitals and Health Systems. (2017). Standard
10.00 .03. Healthcare Facilities Accreditation Program: Accreditation
requirements for acute care hospitals. Chicago, IL: Accreditation Association
for Hospitals and Health Systems. (Level VII)
38 DNV GL-Healthcare USA, Inc. (2016). MR.2 .SR.1 . NIAHO® accreditation
requirements: Interpretive guidelines & surveyor guidance (version 11).
Milford, OH: DNV GL-Healthcare USA, Inc. (Level VII)
DOCUMENTATION
Documentation is the process of preparing a complete
record of a patient’s care and is a vital tool for
communication among health care team members.1
Accurate, detailed documentation shows the extent and
quality of the care that nurses provide, the outcomes of that
care, and treatment and education that the patient still
needs. Thorough, accurate documentation decreases the
potential for miscommunication and errors.
Comparing charting systems
Documentation is a valuable method for demonstrating
that the nurse has applied nursing knowledge, skills, and
judgment according to professional nursing standards. In a
court of law, the patient’s health record serves as the legal
record of the care provided to that patient. Accrediting
agencies and risk managers use the medical record to
evaluate the quality of care a patient receives. Insurance
companies use documentation systems to verify the care
received. Nursing documentation in the medical record may
also be used for research and education as well as for
quality improvement programs.
Equipment
Medical record (electronic or written) ▪ pen with black or
blue ink, if using a written medical record.
Preparation of equipment
Various systems are available for documentation. Because
each documentation system follows specific policies and
procedures for charting, you should familiarize yourself with
the requirements of each system. (See Comparing charting
systems.)
Implementation
■ Understand your state’s nurse practice act and make sure
your documentation reflects the state’s laws governing the
scope of nursing practice.2
Paper-based documentation
■ Write legibly, because illegible entries can result in
misinterpretation of information and possible patient harm.
■ Use ink, because the medical record is a permanent
document and ink can’t be erased.
■ Sign all entries using your first and last name and title to
clearly identify who wrote the entry.3,4,5,6
■ When signing your initials on a form, use your full
signature in the appropriate place on the form to identify
yourself as the care provider.3,4,5,6
■ Make sure each sheet of the medical record is correctly
labeled with the patient’s identifying information to avoid
documenting on the wrong patient or mistaking the patient
for another.
■ If you make an error, draw a single line through the
mistake and make a notation, such as “documentation
error,” and initial it along with the date and time, as
required by your facility. Then, record the correct entry.
Don’t use correction fluid, erasures, or entries between
lines.
■ Don’t leave blank lines within and between entries. Draw
a line through the blank line to ensure that no further
entries may be made.
■ Document chronologically, using the correct time and
date. Avoid block documentation, which is vague, implies
inattention to the patient, and makes it hard to determine
when specific events occurred.4,5,6,7
Abbreviations to avoid
To reduce the risk of medical errors, The Joint Commission has created a “Do
Not Use” list of abbreviations. The list applies to all orders and medication-
related documentation that’s handwritten, part of a free-text computer entry,
or on preprinted forms.9,10
■ When documentation continues from one page to the
next, sign the bottom of the first page. At the top of the next
page, write the date, the time, and “continued from
previous page.”
■ Document the time as required by your facility using 24-
hour military time or including “a.m.” or “p.m .”
■ If you need to add a late entry, such as an event that you
forgot to document earlier or when the medical record
wasn’t available, add the entry on the next available line
and label it as a “late entry” to show it’s out of sequence.
Then record the date and time of the entry as well as the
date and time when the entry should have been made.
Computer-based documentation
■ Specifically state in the body of your note the time that
events occurred and action was taken, because most
computer systems record the date and time that entries are
made, which may not reflect when the care was actually
provided.4,5,7,8
■ Document time as required by your facility, using either
24-hour military time or including “a.m .” or “p.m .”
■ Make sure that no one else can read the screen, and log
off when you are finished documenting. Never share your
password with anyone else.4,5,7,8
■ Know that most software programs establish an electronic
signature based on your personal user password.3,4,5,6
■ Follow your facility’s guidelines for correcting errors, such
as documenting on the wrong chart.
Completing the procedure
■ Document information as soon as possible to ensure the
accuracy of the information and to reflect ongoing care.
Delayed documentation increases the potential for
omissions, error, and inaccuracy due to memory lapse.4,5,7,8
■ Document only care, treatments, and medications that
have actually been provided or administered; never chart in
advance.4,5,7,8
■ Describe observations and behaviors of the patient rather
than labeling the patient. Don’t offer opinions or use
subjective statements or judgments.
■ Use correct spelling and grammar in your entries,
because misspelled words and poor grammar look
unprofessional and can lead to errors.
■ Use only approved abbreviations.9 (See Abbreviations to
avoid.)
Special considerations
■ Maintain the confidentiality of the medical record at all
times.11,12,13,14 Keep the medical record closed when not in
use and store it in a secure place.
■ Never tamper with documentation or any part of the
clinical record; tampering includes adding to a clinical note
at a later date without indicating that it’s a late entry,
inserting inaccurate information in the record, purposely
omitting information,
rewriting
or
altering the
documentation, destroying clinical record notes or other
documentation, or adding to someone else’s notes without
indicating your identity and the date.
■ If information listed on a form doesn’t apply to your
patient, write “N/A” (not applicable) rather than leaving the
space blank. This notation shows that you read the question
and that it doesn’t apply, rather than that you forgot to
gather the data. It also prevents someone else from adding
the information later.
Documentation
Document the patient’s vital signs, your assessment
findings, the patient’s care plan, your interventions, the
patient’s response to your interventions, and patient and
family teaching, according to your facility’s documentation
system.
REFERENCES
1 Wang, N., et al. (2011). Quality of nursing documentation and approaches to
its evaluation: A mixed-method systematic review. Journal of Advanced
Nursing, 67(9), 1858–1875. (Level V)
2 Anders, J., & Daly, T. (2009). “The crucial role of the nurse in EHR
implementation” [Online]. Accessed via the Web at
http://docplayer.net/763715-The-crucial-role-of-the-nurse-in-ehr-
implementation.html
3 The Joint Commission. (2019). Standard RC.01.02.01. Comprehensive
accreditation manual for hospitals. Oakbrook Terrace, IL: The Joint
Commission. (Level VII)
4 Centers for Medicare & Medicaid Services, Department of Health and Human
Services. (2015). Condition of participation: Medical record services. 42 C.F.R.
§ 482.24(b).
5 Accreditation Association for Hospitals and Health Systems. (2017). Standard
10.00 .03. Healthcare Facilities Accreditation Program: Accreditation
requirements for acute care hospitals. Chicago, IL: Accreditation Association
for Hospitals and Health Systems. (Level VII)
6 DNV GL-Healthcare USA, Inc. (2016). MR.2 .SR.1. NIAHO® accreditation
requirements: Interpretive guidelines & surveyor guidance (version 11).
Milford, OH: DNV GL-Healthcare USA, Inc. (Level VII)
7 The Joint Commission. (2019). Standard RC.01.01.01. Comprehensive
accreditation manual for hospitals. Oakbrook Terrace, IL: The Joint
Commission. (Level VII)
8 The Joint Commission. (2019). Standard RC.01.03 .01. Comprehensive
accreditation manual for hospitals. Oakbrook Terrace, IL: The Joint
Commission. (Level VII)
9 The Joint Commission. (2019). Standard IM.02.02.01. Comprehensive
accreditation manual for hospitals. Oakbrook Terrace, IL: The Joint
Commission. (Level VII)
10 The Joint Commission. (2016). “Facts about the official ‘do not use’ list of
abbreviations” [Online]. Accessed via the Web at
https://www.jointcommission.org/facts_about_do_not_use _list/
11 The Joint Commission. (2019). Standard RI.01.01.01. Comprehensive
accreditation manual for hospitals. Oakbrook Terrace, IL: The Joint
Commission. (Level VII)
12 Centers for Medicare & Medicaid Services, Department of Health and Human
Services. (2015). Condition of participation: Patient’s rights. 42 C.F.R. §
482.13(c)(1).
13 Accreditation Association for Hospitals and Health Systems. (2017). Standard
15.01.16. Healthcare Facilities Accreditation Program: Accreditation
requirements for acute care hospitals. Chicago, IL: Accreditation Association
for Hospitals and Health Systems. (Level VII)
14 DNV GL-Healthcare USA, Inc. (2016). PR.1.SR.5 . NIAHO® accreditation
requirements: Interpretive guidelines & surveyor guidance (version 11).
Milford, OH: DNV GL-Healthcare USA, Inc. (Level VII)
DOPPLER USE
A Doppler ultrasound device uses high-frequency sound
waves to detect and measure blood flow through vessels. A
thin layer of coupling (or transmission) placed on the
patient’s skin or the top of the probe (or transducer) top
helps transmit ultrasound waves from the device’s
transducer through the gel into the patient’s body. The
probe then collects sound waves that are reflected back
from the red blood cells as they flow through the blood
vessel. A Doppler ultrasound device possesses greater
sensitivity than palpation for detecting a weak or faint pulse
and helps determine the patient’s heart rate. It may also be
used to evaluate lower extremity peripheral perfusion, and
to asses fetal heart sounds after the first trimester of
pregnancy.1,2,3,4
Equipment
Doppler ultrasound device with probe (transducer) ▪
coupling or transmission gel ▪ soft cloth ▪ disinfectant spray
or wipe ▪ Optional: isopropyl alcohol, earphones.
Preparation of equipment
Inspect the ultrasound device and probe for signs of cracks
or breaks in the mechanical housing. Inspect cables and
connectors for signs of wear or failure. Discontinue use of
the device with any sign of loss of integrity.5
Implementation
■ Gather the necessary equipment.
■ Perform hand hygiene.6,7,8,9,10,11
■ Confirm the patient’s identity using at least two patient
identifiers.12
■ Provide privacy.13,14,15,16
■ Explain the procedure to the patient and family (if
appropriate) according to their individual communication
and learning needs to increase their understanding, allay
their fears, and enhance cooperation.17
■ Raise the patient’s bed to waist level when providing
patient care to prevent caregiver back strain.18
■ Perform hand hygiene.6,7,8,9,10,11
■ Expose the area intended for pulse assessment. Avoid
rolling up sleeves or pant cuffs in such a manner that
obstructs blood flow.5
■ Apply a small amount of coupling or transmission gel (not
water-soluble lubricant) to the top of the probe or the
patient’s skin directly over the selected artery.5
■ Turn on the Doppler ultrasound devices following the
manufacturer’s instructions for use.5
■ If the device has a speaker, adjust the audio level as
needed. If your model doesn’t have a speaker, plug in the
earphones.
■ To obtain the best signal, tilt the probe 45 degrees from
skin surface over the general location of the vessel, making
sure to put gel between the skin and the probe.5 Slowly
move the probe side to side, and vary the angle of the
probe until you hear vascular sounds—a pulsatile hissing
noise heard with each heartbeat as blood flows through the
artery.5 Reapply more gel if it begins to dry out or is spread
too thinly, creating an air gap between the probe and the
skin. Avoid applying too much gel, because doing so makes
the probe difficult to clean and doesn’t improve probe
performance.5
■ Count the number of pulsations produced in 60 seconds
to determine the pulse rate.
■ Turn off the device following the manufacturer’s
instructions.
■ Wipe the gel from the patient.
■ Return the bed to the lowest position to prevent falls and
maintain patient safety.19
■ Clean the probe and main unit of the ultrasound device
following the manufacturer’s instructions. A cloth dampened
with warm water or pre-saturated isopropyl alcohol wipes
may be used to clean certain devices.5
■ Disinfect the probe and main ultrasound deice with a
disinfectant spray or wipe following manufacturer’s
instructions.5,20,21 Don’t immerse the probe or main
ultrasound device.5 Don’t drop or mishandle the probe or
main ultrasound device, because damage to sensitive
components is likely to occur.5
■ Perform hand hygiene.6,7,8,9,10,11
■ Store the ultrasound device and probe in a clean area
free from dust and debris.5
■ Perform hand hygiene.6,7,8,9,10,11
■ Document the procedure.22,23,24,25
Special considerations
■ A complete Doppler ultrasound assessment requires
listening to and interpreting various signals transmitted
from the Doppler probe. An experienced Doppler user can
recognize the characteristic sounds of open and obstructed
arteries. Doppler sounds vary in pitch (frequency) with the
velocity of blood flow.26
Documentation
Document the location and quality of the pulse as well as
the pulse rate and time of measurement. Document patient
and family teaching, comprehension of that teaching, and
whether the patient and family require follow-up teaching.
REFERENCES
1 Hotoleanu, C., et al. (2010). Correlations between clinical probability and
Doppler ultrasound results in the assessment of deep venous thrombosis.
Medical Ultrasonography, 12(1), 17–21. Accessed via the Web at
http://www.medultrason.ro/assets/Magazines/Medultrason-2010-vol12-
no1/04Hotoleanu.pdf (Level VI)
2 Chesbro, S. B., et al. (2011). Reliability of Doppler and stethoscope methods
of determining systolic blood pressures: Considerations for calculating an
ankle-brachial index. Journal of the National Medical Association, 103(9–10),
863–869 . (Level VI)
3 Calabia, J., et al. (2011). Doppler ultrasound in the measurement of pulse
wave velocity: Agreement with the Complior method. Cardiovascular
Ultrasound, 9, 13–18. Accessed via the Web at
http://www.cardiovascularultrasound.com/content/pdf/1476-7120-9 -13.pdf
(Level VI)
4 Abdulhay, E.W., et al. (2014). Review article: Non-invasive fetal heart rate
monitoring techniques. Biomedical Science and Engineering, 2(3), 53–67.
5 Wallach Surgical Devices. (2013). “User Manual for the LifeDop® ABI
Handheld Vascular System” [Online]. Accessed via the Web at
http://www.wallachsurgical.com/site/assets/files/2849/man0007-dfu_reva.pdf
6 The Joint Commission. (2019). Standard NPSG.07.01.01. Comprehensive
accreditation manual for hospitals. Oakbrook Terrace, IL: The Joint
Commission. (Level VII)
7 Centers for Disease Control and Prevention. (2002). Guideline for hand
hygiene in health-care settings: Recommendations of the Healthcare Infection
Control Practices Advisory Committee and the HICPAC/SHEA/APIC/IDSA Hand
Hygiene Task Force. MMWR Recommendations and Reports, 51(RR-16), 1–45.
Accessed via the Web at https://www.cdc.gov/mmwr/pdf/rr/rr5116.pdf (Level
II)
8 World Health Organization. (2009). “WHO guidelines on hand hygiene in
health care: First global patient safety challenge, clean care is safer care”
[Online]. Accessed via the Web at
http://apps.who.int/iris/bitstream/10665/44102/1/9789241597906_eng.pdf
(Level IV)
9 Accreditation Association for Hospitals and Health Systems. (2017). Standard
07.01.21. Healthcare Facilities Accreditation Program: Accreditation
requirements for acute care hospitals. Chicago, IL: Accreditation Association
for Hospitals and Health Systems. (Level VII)
10 Centers for Medicare Medicaid Services, Department of Health and Human
Services. (2015). Condition of participation: Infection control. 42 C.F.R. §
482.42.
11 DNV GL-Healthcare USA, Inc. (2016). IC.1 .SR.1 . NIAHO® accreditation
requirements: Interpretive guidelines and surveyor guidance (version 11).
Milford, OH: DNV GL-Healthcare USA, Inc. (Level VII)
12 The Joint Commission. (2019). Standard NPSG.01.01.01. Comprehensive
accreditation manual for hospitals. Oakbrook Terrace, IL: The Joint
Commission. (Level VII)
13 The Joint Commission. (2019). Standard RI.01.01.01. Comprehensive
accreditation manual for hospitals. Oakbrook Terrace, IL: The Joint
Commission. (Level VII)
14 Centers for Medicare Medicaid Services, Department of Health and Human
Services. (2015). Condition of participation: Patient’s rights. 42 C.F.R. §
482.13(c)(1).
15 Accreditation Association for Hospitals and Health Systems. (2017). Standard
15.01.16. Healthcare Facilities Accreditation Program: Accreditation
requirements for acute care hospitals. Chicago, IL: Accreditation Association
for Hospitals and Health Systems. (Level VII)
16 DNV GL-Healthcare USA, Inc. (2014). PR.1.SR.5 . NIAHO® accreditation
requirements: Interpretive guidelines & surveyor guidance (version 11).
Milford, OH: DNV GL-Healthcare USA, Inc. (Level VII)
17 The Joint Commission. (2019). Standard PC.02.01.21. Comprehensive
accreditation manual for hospitals. Oakbrook Terrace, IL: The Joint
Commission. (Level VII)
18 Waters, T. R., et al. (2009). “Safe patient handling training for schools of
nursing” [Online]. Accessed via the Web at
http://www.cdc.gov/niosh/docs/2009-127/pdfs/2009-127.pdf (Level VII)
19 Ganz, D. A., et al. (2013). Preventing falls in hospitals: A toolkit for improving
quality of care (AHRQ Publication No. 13-0015-EF). Rockville, MD: Agency for
Healthcare Research and Quality. Accesses via the Web at
http://www.ahrq.gov/sites/default/files/publications/files/fallpxtoolkit.pdf
(Level VII)
20 Rutala, W. A., et al. (2008, Revised 2017). “Guideline for disinfection and
sterilization in healthcare facilities, 2008” [Online]. Accessed via the Web at
http://www.cdc.gov/hicpac/pdf/guidelines/Disinfection_Nov_2008.pdf (Level I)
21 Accreditation Association for Hospitals and Health Systems. (2017). Standard
07.02.03. Healthcare Facilities Accreditation Program: Accreditation
requirements for acute care hospitals. Chicago, IL: Accreditation Association
for Hospitals and Health Systems. (Level VII)
22 The Joint Commission. (2019). Standard RC.01.03 .01. Comprehensive
accreditation manual for hospitals. Oakbrook Terrace, IL: The Joint
Commission. (Level VII)
23 Accreditation Association for Hospitals and Health Systems. (2017). Standard
10.00 .03. Healthcare Facilities Accreditation Program: Accreditation
requirements for acute care hospitals. Chicago, IL: Accreditation Association
for Hospitals and Health Systems. (Level VII)
24 Centers for Medicare Medicaid Services, Department of Health and Human
Services. (2015). Condition of participation: Medical record services. 42 C.F.R.
§ 482.24(b).
25 DNV GL-Healthcare USA, Inc. (2016). MR.2 .SR.1 . NIAHO® accreditation
requirements: Interpretive guidelines & surveyor guidance (version 11).
Milford, OH: DNV GL-Healthcare USA, Inc. (Level VII)
26 Beldon, P. (2010). Performing a Doppler assessment: The procedure. Wound
Essentials, 5, 87–90. Accessed via the Web at http://www.wounds-
uk.com/wound-essentials/wound-essentials-5 -performing-a -doppler-
assessment-the-procedure
DROPLET PRECAUTIONS
Droplet precautions prevent infectious pathogens from
traveling from the respiratory tract of an infectious person
to the mucous membranes of a susceptible host.1 These
pathogens, which are carried by respiratory droplets, spread
when an infected individual coughs, sneezes, or talks during
such procedures as suctioning or endotracheal intubation.
(See Conditions requiring droplet precautions.)
Ideally, a patient requiring droplet precautions should be
placed in a single-patient room.1 People having direct
contact with the patient and those who will be within 3′ (1
M) of the patient should wear a surgical mask covering their
nose and mouth. When exposure to a highly virulent
pathogen is likely, it may be prudent to wear a mask when
within 6′ to 10′ (2 to 3 M) of the patient or upon entering the
patient’s room.1
NURSING ALERT Refer to the latest recommendations from the
Centers for Disease Control and Prevention,
located at
https://www.cdc.gov/vhf/ebola/healthcare-us/index.html, when caring
for the patient with known or suspected Ebola virus disease.
As a general precaution, instruct anyone who enters your
health care facility with signs of a respiratory infection (such
as cough, congestion, rhinorrhea, or increased respiratory
secretions) to cover mouth and nose with a tissue when
coughing and to dispose of soiled tissues promptly.2 Have
the person wear a surgical mask, if tolerated, and instruct
the person to perform hand hygiene after contact with
respiratory secretions.1 If possible, separate the person by
at least 3′ (0.9 M) from other people in common waiting
areas to prevent the spread of infection.1 These actions can
help prevent the spread of infectious pathogens until
appropriate isolation precautions are established.
PEDIATRIC ALERT When handling infants or young children who
require droplet precautions, you may also need to institute contact
precautions and wear gloves and a gown to prevent soiling of clothing
from nasal and oral secretions.
Equipment
Mask ▪ tissues ▪ droplet precautions sign ▪ hospital-grade
disinfectant ▪ Optional: gowns, gloves, no-touch tissue
disposal receptacle.
Gather additional supplies needed for routine patient care,
such as a thermometer, stethoscope, and blood pressure
cuff.
Preparation of equipment
Keep all droplet precaution supplies outside the patient’s
room in a cart or anteroom.
Implementation
■ Gather the necessary equipment.
■ Put a droplet precautions sign at the patient’s door to
notify anyone entering the room of the situation.4,5,6,7
■ Perform hand hygiene.5,8,9,10,11,12
■ Put on a gown, if necessary, to comply with standard
precautions.1,6,7
■ Just before entering the patient’s room, put on a mask
and secure the ties or elastic band at the middle of the back
of your head and neck. Fit the flexible metal nose strip to
your nose bridge so it fits firmly but comfortably. Make sure
the mask fits snugly to your face and below your chin.1
■ Put on gloves, if necessary, to comply with standard
precautions.1,6
■ Confirm the patient’s identity using at least two patient
identifiers.13
■ Situate the patient in a single room with private toilet
facilities and an anteroom if possible. If necessary, two
patients with the same infection may share a room if
approved by your facility’s infection preventionist.1
■ Explain isolation procedures to the patient and his family
to ease patient anxiety and promote cooperation.14,15
■ If the patient is wearing a mask during transport to the
room, remove the mask once the patient reaches the room
and discard it in the appropriate receptacle.1
■ Instruct the patient to cover the nose and mouth with a
facial tissue while coughing or sneezing, dispose of the
tissue immediately,2 and then perform hand hygiene to
prevent the spread of infectious droplets.5,8,9,10,11,12
■ Provide the patient with a no-touch receptacle for tissue
disposal if available.1,2
■ Remove your gloves and gown (if worn), and mask in the
anteroom or, if an anteroom isn’t available, at the patient’s
doorway just before leaving the room. To remove your mask,
untie the strings or remove the elastic bands and dispose of
the mask, handling it by the strings or elastic bands only,
because the front of the mask is considered contaminated.1
■ Perform hand hygiene.5,8,9,10,11,12
■ Clean and disinfect equipment that isn’t dedicated for
single-patient use with a hospital-grade disinfectant after
use to prevent the spread of infection to other
patients.5,16,17,18
■ Perform hand hygiene.5,8,9,10,11,12
■ Document the procedure.19,20,21
Special considerations
■ Make sure all visitors wear masks when in close proximity
to the patient (within 3′ [0.9 M]) and, if necessary, gowns
and gloves.1
■ If the patient must leave the room for essential
procedures, make sure the patient wears a surgical mask
over the nose and mouth, and instruct the patient to use
respiratory hygiene and proper cough etiquette.1 Notify the
receiving department or area of the patient’s isolation
precautions so that the precautions will be maintained and
the patient can be returned to the room promptly.
■ It isn’t necessary for health care workers to wear masks
when transporting a patient on droplet precautions because
the patient is wearing one.1
■ Because pathogens in respiratory droplets don’t remain
infectious over long distances (they generally drop to the
ground within 3′[1 M]), special air handling and ventilation
systems and an airborne infection isolation room with
negative airflow aren’t necessary.1
Conditions requiring droplet
precautions
An infected patient may transmit certain conditions via respiratory droplets.
Such conditions require droplet precautions.1 The table below lists conditions
that require droplet precautions, along with the precautionary period and any
special considerations.
■ Perform hand hygiene, as indicated, during patient
care.5,8,9,10,11,12
■ Single-patient rooms are preferred for patients who
require droplet precautions. However, when transmission
continues after implementing routine infection control
measures, consider creating patient and staff member
cohorts. Consult with your infection preventionist before
cohorting patients or staff members.1
Complications
Social isolation is a complication of droplet precautions.
Documentation
Record the need for droplet precautions on the nursing care
plan and as otherwise indicated by your facility. Document
initiation and maintenance of the precautions, the patient’s
compliance with droplet precautions, any patient or family
teaching performed, and the patient’s and family’s
understanding of the teaching. Also document the date and
time droplet precautions were discontinued.
REFERENCES
1 Siegel, J. D., et al. (2007, revised 2017). “2007 guideline for isolation
precautions: Preventing transmission of infectious agents in healthcare
settings” [Online]. Accessed via the Web at
https://www.cdc.gov/hicpac/pdf/isolation/Isolation2007.pdf (Level II)
2 Centers for Disease Control and Prevention. (2012). “Respiratory
hygiene/cough etiquette in healthcare settings” [Online]. Accessed via the
Web at
https://www.cdc.gov/flu/professionals/infectioncontrol/resphygiene.htm (Level
VII)
3 Centers for Disease Control and Prevention. (2008). Updated
recommendations for isolation of persons with mumps. Morbidity and
Mortality Weekly Report, 57(40), 1103–1105. Accessed via the Web at
https://www.cdc.gov/mmwr/preview/mmwrhtml/mm5740a3.htm (Level VII)
4 The Joint Commission. (2019). Standard IC.02.01.01. Comprehensive
accreditation manual for hospitals. Oakbrook Terrace, IL: The Joint
Commission. (Level VII)
5 Centers for Medicare and Medicaid Services, Department of Health and
Human Services. (2015). Condition of participation: Infection control. 42 C.F.R.
§ 482.42.
6 Accreditation Association for Hospitals and Health Systems. (2017). Standard
07.01.10. Healthcare Facilities Accreditation Program: Accreditation
requirements for acute care hospitals. Chicago, IL: Accreditation Association
for Hospitals and Health Systems. (Level VII)
7 DNV GL-Healthcare USA, Inc. (2016). IC.1.SR.2 . NIAHO® accreditation
requirements: Interpretive guidelines & surveyor guidance (version 11).
Milford, OH: DNV GL-Healthcare USA, Inc. (Level VII)
8 The Joint Commission. (2019). Standard NPSG.07.01.01. Comprehensive
accreditation manual for hospitals. Oakbrook Terrace, IL: The Joint
Commission. (Level VII)
9 Centers for Disease Control and Prevention. (2002). Guideline for hand
hygiene in health-care settings: Recommendations of the Healthcare Infection
Control Practices Advisory Committee and the HICPAC/SHEA/APIC/IDSA Hand
Hygiene Task Force. MMWR Recommendations and Reports, 51(RR-16), 1–45.
Accessed via the Web at https://www.cdc.gov/mmwr/pdf/rr/rr5116.pdf (Level
II)
10 World Health Organization. (2009). “WHO guidelines on hand hygiene in
health care: First global patient safety challenge, clean care is safer care”
[Online]. Accessed via the Web at
http://apps.who.int/iris/bitstream/10665/44102/1/9789241597906_eng.pdf
(Level IV)
11 Accreditation Association for Hospitals and Health Systems. (2017). Standard
07.01.21. Healthcare Facilities Accreditation Program: Accreditation
requirements for acute care hospitals. Chicago, IL: Accreditation Association
for Hospitals and Health Systems. (Level VII)
12 DNV GL-Healthcare USA, Inc. (2016). IC.1 .SR.1 . NIAHO® accreditation
requirements: Interpretive guidelines & surveyor guidance (version 11).
Milford, OH: DNV GL-Healthcare USA, Inc. (Level VII)
13 The Joint Commission. (2019). Standard NPSG.01.01.01. Comprehensive
accreditation manual for hospitals. Oakbrook Terrace, IL: The Joint
Commission. (Level VII)
14 The Joint Commission. (2019). Standard RI.01.03 .01. Comprehensive
accreditation manual for hospitals. Oakbrook Terrace, IL: The Joint
Commission. (Level VII)
15 Centers for Medicare and Medicaid Services, Department of Health and
Human Services. (2015). Condition of participation: Patient’s rights. 42 C.F.R.
§ 482.13(b)(2).
16 Rutala, W. A., et al. (2008, revised 2017). “Guideline for disinfection and
sterilization in healthcare facilities, 2008” [Online]. Accessed via the Web at
https://www.cdc.gov/hicpac/pdf/guidelines/Disinfection_Nov_2008.pdf (Level I)
17 The Joint Commission. (2019). Standard IC.02.02.01. Comprehensive
accreditation manual for hospitals. Oakbrook Terrace, IL: The Joint
Commission. (Level VII)
18 Accreditation Association for Hospitals and Health Systems. (2017). Standard
07.02.03. Healthcare Facilities Accreditation Program: Accreditation
requirements for acute care hospitals. Chicago, IL: Accreditation Association
for Hospitals and Health Systems. (Level VII)
19 The Joint Commission. (2019). Standard RC.01.03 .01. Comprehensive
accreditation manual for hospitals. Oakbrook Terrace, IL: The Joint
Commission. (Level VII)
20 Centers for Medicare and Medicaid Services, Department of Health and
Human Services. (2015). Condition of participation: Medical record services.
42 C.F.R. § 482.24(b).
21 Accreditation Association for Hospitals and Health Systems. (2017). Standard
10.00 .03. Healthcare Facilities Accreditation Program: Accreditation
requirements for acute care hospitals. Chicago, IL: Accreditation Association
for Hospitals and Health Systems. (Level VII)
DRUG AND ALCOHOL SPECIMEN COLLECTION
Drug and alcohol specimen collection is performed to
identify a patient’s drug or alcohol use for several reasons,
including obtaining evidence for a possible criminal charges
after an accident, helping to determine a cause of death,
and screening for employment suitability or adherence to an
ongoing drug addiction rehabilitation program. It’s also used
to establish a differential diagnosis for a patient who’s
experiencing an altered mental state or has such signs and
symptoms as slurred speech, dizziness, confusion, blurred
vision, anxiety, hallucinations, memory impairment, lack of
muscle coordination, or hyperthermia. The collection
method and source of the specimens vary, based on the
reason for testing. Because of the variability in local and
state laws, nurses must strictly follow all facility guidelines.
Drug testing that’s performed to determine employment
suitability and rehabilitation program adherence usually
involves a urine sample collected under highly controlled
conditions. Although collection requirements may vary
slightly, depending on the employer and type of
employment or rehabilitation program, most include a
designated collection site, security for the collection site,
use of authorized personnel, privacy during collection,
integrity and identity of the specimen, and chain-of-custody
documentation. Some rehabilitation programs and
employment circumstances may require the specimen
collection to be observed. Testing is usually limited to five
drug types: marijuana, cocaine, opiates, amphetamines, and
phencyclidine (PCP). In the case of employment screening, if
the results of the initial test are positive, a confirmatory test
is performed using gas chromatography–mass spectrometry.
Depending on the reason for collection and your state
laws, you should ensure that informed consent has been
obtained from the patient or a family member before
obtaining the sample. Consent may not be required if it’s an
emergency, if results will be used only for a differential
diagnosis in an acute crisis, or if the patient is not in a
condition to grant permission. In a criminal case, a law
enforcement officer can’t order blood to be drawn and
doesn’t have the legal right to grant permission if the
patient refuses consent.
Blood samples, when needed, are collected in 10-mL gray-
top blood collection tubes that contain a preservative (100
mg of sodium fluoride) to help prevent deterioration of the
specimen, including changes in alcohol concentration and
the breakdown of cocaine, and an anticoagulant (20 mg of
potassium oxalate) to prevent the sample from clotting. The
integrity and identity of the specimen must be maintained
and, if indicated, chain-of-custody documentation
preserved.
In general, prescription and over-the-counter drugs can be
detected in blood within 4 to 24 hours and in urine for 2 to 4
days. Detection times for alcohol and other drugs vary. (See
Drug detection times.)
This procedure focuses on drug and alcohol specimen
collection for medicolegal reasons. When specimens are
collected for a patient who’s experiencing an altered mental
state or other signs and symptoms, be sure to use the
appropriate collection tubes. (See the “Venipuncture”
procedure, page 816.)
Drug detection times
Equipment
Gloves ▪ chain of custody labels ▪ chain of custody form
with multiple copies ▪ evidence labels ▪ Optional: shipping
containers (if specimens are to be sent to an outside
laboratory),
sphygmomanometer,
stethoscope,
thermometer, pulse oximeter and probe.
Urine specimen collection
Urine collection cup with temperature measurement device
attached in sealed covering ▪ 90-mL plastic, screw-top
specimen container in sealed covering ▪ adhesive label ▪
plastic sealable shipping bag ▪ absorbent material ▪ bluing
agent for toilet water ▪ Optional: digital thermometer.
Blood sample collection
Two 10-mL gray-top Vacutainer blood tubes containing
sodium fluoride and potassium oxalate with adhesive labels
▪ venipuncture supplies ▪ nonalcohol swab (povidone-
iodine) ▪ evidence seals ▪ padded transport box ▪
biohazard transport bag ▪ Optional: 2′′ × 2′′ (5-cm × 5-cm)
gauze pads, soap and water solution.
Note: Prepackaged blood and urine collection kits are
commercially available and contain everything necessary to
collect and preserve the chain of custody for the specimens.
Preparation of equipment
Make sure that access to collection materials and specimens
is adequately restricted. Make sure that LIMITED ACCESS signs
are posted in the specimen collection area to ensure patient
privacy during the specimen collection process.
Implementation
■ Verify the order for drug and alcohol specimen collection.
■ If required, confirm that the patient has provided written
informed consent and that it is included in the patient’s
medical record.1,2,3,4
■ Perform hand hygiene.5,6,7,8,9,10
■ Confirm the patient’s identity using at least two patient
identifiers.11
■ Provide privacy.12,13,14,15
■ Explain the appropriate procedure to the patient, allowing
the patient to ask questions as needed to promote
cooperation.
■ Assess the patient’s level of consciousness and behavior.
■ If applicable, obtain the patient’s vital signs, including
heart rate, respiratory rate, blood pressure, temperature,
and oxygen saturation using pulse oximetry.
■ Obtain a thorough current and past medication history
that includes prescription and nonprescription drugs and
herbal supplements.
Urine sample collection
■ Prepare the collection site by turning off the water supply
or securing water sources.16
■ Add bluing agent to the toilet and water tank to prevent
undetected specimen dilution by the donor.16
■ Remove the waste container, soap dispenser, and any
unnecessary items from the bathroom.16
■ Perform hand hygiene.5,6,7,8,9,10
■ Put on gloves to comply with standard precautions.17,18,19
■ Gather the necessary supplies or prepackaged urine
collection kit.
■ Instruct the patient to remove any unnecessary outer
clothing, such as a coat, hat, or extra shirt. If the patient
refuses to remove a head covering based on religious
practices, the patient may be exempt unless the collector
has a visual indicator that the patient may be concealing
something under the covering. Keep personal items such as
a briefcase or purse with the patient’s outer clothing.
■ Instruct the patient to empty pockets into a lockable
cabinet or box, and have the patient turn pockets inside out
to ensure that they’re emptied and that the patient doesn’t
have anything that could be used to adulterate the
specimen. If the patient brought medications, lock them in
the cabinet or box.
■ Have the patient wash and dry hands.
■ Provide the patient with the sealed collection kit or
container, and have the patient unwrap or break the seal on
the kit or collection container.
■ If direct observation isn’t mandated for specimen
collection, have the patient enter the bathroom and instruct
the patient to provide a urine specimen of at least 30 mL
into the collection cup, to not flush the toilet, to not wash
hands until told to do so after delivering the specimen to
you and watching the specimen being sealed with the
labels, and to immediately leave the bathroom with the
specimen and hand it to you when the patient’s finished
urinating.
■ If direct observation is mandated, observe the patient
during the collection procedure.
■ If the patient has a medical condition that requires an
indwelling urinary catheter or an external urine collection
bag, collect a fresh specimen. Instruct the patient to empty
the urine collection bag in the bathroom and then show you
the empty bag, drink sufficient fluid to provide a specimen,
and pour the urine from the bag into the collection container
in the privacy of the bathroom when at least 30 mL of urine
has been collected.16
■ Check the specimen’s temperature by reading the
temperature strip, and note it on the chain-of-custody form.
■ Check the specimen volume to ensure that the specimen
contains the required amount of urine.
■ Open the sealed screw-top specimen container and
transfer the urine into the container.
■ Label the specimen container with the patient’s name
and identification number and the date and time in the
presence of the patient to prevent mislabeling.11
■ Complete the required information on the chain-of-
custody seal, initial the seal, have the patient initial the
seal, and place it over the top of the specimen container.16
■ Turn the water on and allow the patient to wash hands.
■ Complete the chain-of-custody form and have the patient
sign the form.16
■ Give the patient a copy of the chain-of-custody form.
■ Place the specimen, absorbent material, and completed
chain-of-custody form in the plastic sealable shipping bag.
■ Seal the bag in the presence of the patient.
■ Remove and discard your gloves.17
■ Perform hand hygiene.5,6,7,8,9,10
■ Place the specimen in a secure refrigerator if it won’t be
immediately transported to the laboratory.
■ Make sure the person who removes the specimen for
transport signs the chain-of-custody form. Retain a copy and
place it in the patient’s medical record.
■ Document the procedure.20,21,22,23
Blood sample collection
■ Perform hand hygiene.5,6,7,8,9,10
■
Put on gloves to comply with standard
precautions.17,18,19,24
■ Gather the necessary supplies or prepackaged blood
collection kit.
■ If applicable, ensure that the collection is observed by the
law enforcement officer as required by your facility and
state law.
■ Choose a venipuncture site. The most common sites are
the veins in the antecubital space of the arms; however, if
the patient has scarring in this area from self-injected drugs,
you may need to find an alternate venipuncture site.
■ Clean the skin at the venipuncture site with a nonalcohol
swab such as povidone-iodine. If a nonalcohol swab isn’t
available, use a gauze pad with a solution of soap and
water, making sure that the soap doesn’t contain any
alcohol.
■ Use proper venipuncture technique to collect the blood
sample. (See the “Venipuncture” procedure, page 816.)
■ Fill the collection tubes completely to minimize the air
space above the specimen, which can change the testing
results.
■ Slowly invert the tubes completely at least five times to
ensure proper mixing of the additives. Don’t shake them
vigorously.
■ Label the specimen tubes with the patient’s name and
identification number and the date and time in the presence
of the patient to prevent mislabeling.11 Obtain the law
enforcement officer’s initials on the tubes, if applicable.
■ Complete the required information on the evidence seals,
initial the seals, and have the patient initial the seals.
■ Place a completed evidence seal across the top of each
tube.
■ Complete the chain-of-custody labels and form, and have
the patient sign the form.
■ Place the tubes into a padded transport box and then into
a biohazard laboratory transport bag.24
■ Seal the bag with the chain-of-custody and evidence
labels.
■ Remove and discard your gloves.17,24
■ Perform hand hygiene.5,6,7,8,9,10
■ Attach the chain-of-custody form.
NURSING ALERT Complete all of the above steps in full view of the
patient and, if applicable, the appropriate law enforcement officer.
■ Place the specimen in a secure refrigerator if it won’t be
immediately transported to the laboratory.
■ Perform hand hygiene.5,6,7,8,9,10
■ Make sure the person who removes the specimen for
transport signs the chain-of-custody form. Retain a copy and
place it in the patient’s medical record.
■ Document the procedure.20,21,22,23
Special considerations
■ Consent must be obtained if your state law doesn’t cover
the specimen collection.
■ If the specimen is being collected for a law enforcement
agency, make sure that an officer has notified the patient of
his or her rights, and explained the procedure before you
obtain the sample.
■ If the patient is a minor, permission must be obtained
from the parent or legal guardian, unless state laws
supersede it.
■ Temperature strips attached to urine collection containers
allow temperature certification between 90°F and 100°F
(32.2°C and 37.8°C), which are acceptable under most
standards. However, some testing standards require that
the urine’s temperature be taken with a digital thermometer
and be between 96°F and 99°F (35.6°C and 37.2°C).
■ If the specimen volume is inadequate, discard any
specimen collected and the specimen collection container
used for that attempt, have the patient sit in a waiting area
where you can continuously observe the patient, and
provide the patient with up to 40 ounces of water to drink
(which should be evenly spread out over a 3-hour period or
until the patient can provide an adequate specimen).
Instruct the patient to tell you when the patient feels able to
provide the specimen. If, after 3 hours, the patient can’t
provide a specimen, the collection should be terminated and
you should notify the person who requested the test.
Complications
If specimen collection is performed with no subsequent
medical follow-up, serious medical conditions may be
overlooked, causing the patient to experience adverse
effects. Mishandling of the specimen or improper
documentation of the chain of custody may lead to the
evidence being inaccurate or inadmissible in court.
There are many ways for patients to circumvent testing:
adding adulterants to urine at the time of testing, diluting
urine through excessive water ingestion, consuming
substances that interfere with testing, and substituting a
clean urine sample. Appropriate collection techniques and
tests of specimen integrity can reduce the risk of
tampering.25
Documentation
Record the date and time, what test is being performed, the
reason for the test, and the type of specimen that was
obtained. Note whether a law enforcement officer was
present for the specimen collection, including the agency
the officer represented and the officer’s badge number.
Document that the chain of custody was preserved.
REFERENCES
1 The Joint Commission. (2019). Standard RI.01.03 .01. Comprehensive
accreditation manual for hospitals. Oakbrook Terrace, IL: The Joint
Commission. (Level VII)
2 Centers for Medicare and Medicaid Services, Department of Health and
Human Services. (2015). Condition of participation: Patient’s rights. 42 C.F.R.
§ 482.13(b)(2).
3 Accreditation Association for Hospitals and Health Systems. (2017). Standard
15.01.11. Healthcare Facilities Accreditation Program: Accreditation
requirements for acute care hospitals. Chicago, IL: Accreditation Association
for Hospitals and Health Systems. (Level VII)
4 DNV GL-Healthcare USA, Inc. (2016). PR.1 .SR.3 . NIAHO® accreditation
requirements: Interpretive guidelines & surveyor guidance (version 11).
Milford, OH: DNV GL-Healthcare USA, Inc. (Level VII)
5 Centers for Disease Control and Prevention. (2002). Guideline for hand
hygiene in health care settings: Recommendations of the Healthcare Infection
Control Practices Advisory Committee and the HICPAC/SHEA/APIC/IDSA Hand
Hygiene Task Force. MMWR Recommendations and Reports, 51(RR-16), 1–45.
Accessed via the Web at https://www.cdc.gov/mmwr/pdf/rr/rr5116.pdf (Level
II)
6 The Joint Commission. (2019). Standard NPSG.07.01.01. Comprehensive
accreditation manual for hospitals. Oakbrook Terrace, IL: The Joint
Commission. (Level VII)
7 World Health Organization. (2009). “WHO guidelines on hand hygiene in
health care: First global patient safety challenge, clean care is safer care”
[Online]. Accessed via the Web at
http://apps.who.int/iris/bitstream/10665/44102/1/9789241597906_eng.pdf
(Level IV)
8 Centers for Medicare and Medicaid Services, Department of Health and
Human Services. (2015). Condition of participation: Infection control. 42 C.F.R.
§ 482.42.
9 Accreditation Association for Hospitals and Health Systems. (2017). Standard
07.01.21. Healthcare Facilities Accreditation Program: Accreditation
requirements for acute care hospitals. Chicago, IL: Accreditation Association
for Hospitals and Health Systems. (Level VII)
10 DNV GL-Healthcare USA, Inc. (2016). IC.1 .SR.1 . NIAHO® accreditation
requirements: Interpretive guidelines & surveyor guidance (version 11).
Milford, OH: DNV GL-Healthcare USA, Inc. (Level VII)
11 The Joint Commission. (2019). Standard NPSG.01.01.01. Comprehensive
accreditation manual for hospitals. Oakbrook Terrace, IL: The Joint
Commission. (Level VII)
12 Centers for Medicare and Medicaid Services, Department of Health and
Human Services. (2015). Condition of participation: Patient’s rights. 42 C.F.R.
§ 482.13(c)(1).
13 Accreditation Association for Hospitals and Health Systems. (2017). Standard
15.01.16. Healthcare Facilities Accreditation Program: Accreditation
requirements for acute care hospitals. Chicago, IL: Accreditation Association
for Hospitals and Health Systems. (Level VII)
14 The Joint Commission. (2017). Standard RI.01.01.01. Comprehensive
accreditation manual for hospitals. Oakbrook Terrace, IL: The Joint
Commission. (Level VII)
15 DNV GL-Healthcare USA, Inc. (2016). PR.1.SR.5 . NIAHO® accreditation
requirements: Interpretive guidelines & surveyor guidance (version 11).
Milford, OH: DNV GL-Healthcare USA, Inc. (Level VII)
16 U.S . Department of Transportation Office of Drug and Alcohol Policy and
Compliance. (2014). “Urine specimen collection guidelines” [Online].
Accessed via the Web at
https://www.transportation.gov/sites/dot.gov/files/docs/Urine_Specimen_Colle
ction_Guidelines_July3_2014_A.pdf (Level VII)
17 Siegel, J. D ., et al. (2007, revised 2017). “2007 guideline for isolation
precautions: Preventing transmission of infectious agents in healthcare
settings” [Online]. Accessed via the Web at
http://www.cdc.gov/hicpac/pdf/isolation/Isolation2007.pdf (Level II)
18 Accreditation Association for Hospitals and Health Systems. (2017). Standard
07.01.10. Healthcare Facilities Accreditation Program: Accreditation
requirements for acute care hospitals. Chicago, IL: Accreditation Association
for Hospitals and Health Systems. (Level VII)
19 DNV GL-Healthcare USA, Inc. (2016). IC.1 .SR.2 . NIAHO® accreditation
requirements: Interpretive guidelines & surveyor guidance (version 11).
Milford, OH: DNV GL-Healthcare USA, Inc. (Level VII)
20 The Joint Commission. (2019). Standard RC.01.03 .01. Comprehensive
accreditation manual for hospitals. Oakbrook Terrace, IL: The Joint
Commission. (Level VII)
21 Centers for Medicare and Medicaid Services, Department of Health and
Human Services. (2015). Condition of participation: Medical record services.
42 C.F.R. § 482.24(b).
22 Accreditation Association for Hospitals and Health Systems. (2017). Standard
10.00 .03. Healthcare Facilities Accreditation Program: Accreditation
requirements for acute care hospitals. Chicago, IL: Accreditation Association
for Hospitals and Health Systems. (Level VII)
23 DNV GL-Healthcare USA, Inc. (2016). MR.2 .SR.1 . NIAHO® accreditation
requirements: Interpretive guidelines & surveyor guidance (version 11).
Milford, OH: DNV GL-Healthcare USA, Inc. (Level VII)
24 Occupational Safety and Health Administration. (n.d .). “Bloodborne
pathogens, standard number 1910.1030” [Online]. Accessed via the Web at
https://www.osha.gov/pls/oshaweb/owadisp.show_document?
p_id=10051&p_table=STANDARDS (Level VII)
25 Standridge, J. B., et al. (2010). Urine drug screening: A valuable office
procedure. American Family Physician, 81(5), 635–640. Accessed via the Web
at http://www.aafp.org/afp/2010/0301/p635.html (Level VII)
DYING PATIENT CARE
Death is defined as either irreversible cessation of
circulatory and respiratory functions or irreversible
cessation of all functions of the entire brain, including the
brain stem.1 Signs and symptoms of impending death vary
and may include confusion; decreased level of
consciousness; irregular or decreased respirations that may
be accompanied by rattling and gurgling sounds; weak or
erratic pulse; decreased blood pressure; decreased
socialization or social withdrawal; pale, mottled, cyanotic,
diaphoretic, or cool skin; bowel and bladder incontinence;
involuntary movements; and loss of reflexes in the
extremities.
The patient who is approaching death needs intensive
physical support and emotional comfort. Emotional support
for the dying patient and family most commonly entails
reassurance; your physical presence helps ease fear and
loneliness. More intense emotional support is important at
much earlier stages, especially for patients with long-term
progressive illnesses who can work through the stages of
dying. (See Five stages of dying.)
Respect the patient’s wishes about extraordinary means
of supporting life. The patient may have a current, signed
advance directive. This document, legally binding in most
states, declares the patient’s wishes for end-of-life care
should the patient be unable to make decisions for himself
or herself. (See the “Advance directives” procedure, page 9.)
Five stages of dying
According to Elisabeth Kübler-Ross, author of On Death and Dying, the dying
patient may progress through five psychological stages in preparation for
death. Although each patient experiences these stages differently, and not
necessarily in this order, understanding them will help you meet your
patient’s needs.
Denial
When the patient first learns of the terminal illness, the patient may refuse to
accept the diagnosis. The patient may experience physical signs and
symptoms similar to a stress reaction—shock, fainting, pallor, sweating,
tachycardia, nausea, and GI disorders. During this stage, be honest with the
patient but not blunt or callous. Maintain communication so the patient can
discuss feelings when the patient accepts the reality of death. Don’t force the
patient to confront this reality.
Anger
After the patient stops denying the impending death, the patient may show
deep resentment toward those who will live on after the patient dies—to you,
to the facility staff, and to the patient’s own family. Although you may
instinctively draw back from the patient or even resent this behavior,
remember that the patient is dying and has a right to be angry. After you
accept this anger, you can help the patient find different ways to express it,
and you can help the patient’s family to understand it.
Bargaining
Although the patient acknowledges the impending death, the patient may
attempt to bargain, with God or fate, for more time. The patient will probably
strike this bargain secretly. If the patient does confide in you, listen.
Depression
In this stage, the patient may first experience regrets about the past and
then grieve about the current condition. The patient may withdraw from
friends, family, the practitioner, and you. The patient may suffer from
anorexia, increased fatigue, or self-neglect. You may find the patient sitting
alone, in tears. Accept the patient’s sorrow, and listen. Provide comfort by
touch, as appropriate. Resist the temptation to make optimistic remarks or
cheerful small talk.
Acceptance
The patient who reaches this last stage accepts the inevitability and
imminence of death—without emotion. The patient may simply desire the
quiet company of a family member or friend. If, for some reason, a family
member or friend can’t be present, stay with the patient to satisfy this final
need. Remember, however, that many patients die before reaching this
stage.
Equipment
Clean bed linens ▪ clean gowns ▪ gloves ▪ water-filled basin
▪ soap ▪ washcloth ▪ towels ▪ lotion ▪ lift sheets ▪ artificial
tears or ophthalmic solution ▪ fluid-impermeable pads ▪ oral
care supplies ▪ petroleum jelly ▪ protective barrier cream ▪
sponge-tipped swab ▪ Optional: indwelling urinary catheter,
prescribed medications, suction equipment, vital signs
measurement equipment, oral fluids.
Implementation
■ Verify the presence of a current, signed advance directive
in the patient’s medical record. Obtain one from the
patient’s family members if indicated; offer information on
advance directives as requested and required by your
facility.2,3,4,5
■ Clarify and communicate goals of treatment and the
patient’s values with the patient’s family and
multidisciplinary team.
■ Gather equipment at the patient’s bedside, as needed.
Meeting physical needs
■ Perform hand hygiene.6,7,8,9,10,11
■ Confirm the patient’s identity using at least two patient
identifiers.12
Understanding organ and tissue
donation
A federal regulation enacted in 1998 and revised in 2004 requires facilities to
report any person whose death is imminent or who has died in the health
care facility to a regional organ procurement organization in a timely
manner.30,31,32 This regulation attempts to ensure that no potential donor
goes undetected. The regulation ensures that the family of every potential
donor will understand the option to donate. According to the American
Medical Association, about 25 kinds of organs and tissues are transplanted.
Although donor organ requirements vary, the typical donor must be between
the ages of newborn and 60 years and free from transmissible disease.
Tissue donations are less restrictive, and some tissue banks will accept skin
from donors up to age 75.
Collection of most organs, such as the heart, liver, kidney, or pancreas,
requires that the patient be pronounced brain dead and kept physically alive
until the organs are harvested. Tissue, such as eyes, skin, bone, and heart
valves, may be harvested after death. Contact your regional organ
procurement organization for specific organ donation criteria or to identify a
potential donor. If you don’t know the regional organ procurement
organization in your area, call the United Network for Organ Sharing at 804-
782-4800.
For more on how to register for organ donation, go to http://donatelife.net/.
■ Raise the patient’s bed to waist level when providing care
to prevent caregiver back strain.13
■ Put on gloves to comply with standard precautions.14,15,16
■ Whenever moving from a contaminated to a clean area
during patient care, remove and discard gloves,14 perform
hand hygiene,6,7,8,9,10,11 and put on new gloves.14
■ Obtain vital signs and perform assessments, as indicated.
■ Perform a comprehensive pain assessment using
techniques appropriate for the patient’s age, condition, and
ability to understand.17,18 Administer pain and other
medications for end-of-life signs and symptoms (such as
dyspnea, cough, anxiety, and delirium), as needed and
prescribed, following safe medication administration
practices.19,20,21,22
■ Use nonpharmacologic pain management strategies, such
as guided imagery, massage, and progressive relaxation, as
adjuvant therapy.
■ When the patient’s vision and hearing start to fail, turn
the patient’s head toward the light and speak to the patient
from near the head of the bed. Because hearing may be
acute despite loss of consciousness, avoid whispering or
speaking inappropriately about the patient in the patient’s
presence.
■ Monitor skin integrity carefully and reposition the patient
in bed at least every 2 hours, because sensation, reflexes,
and mobility diminish first in the legs and gradually in the
arms. Avoid shearing forces, and use lift sheets for
repositioning. Make sure the bed sheets cover the patient
loosely to reduce discomfort caused by pressure on arms
and legs.
■ Change the bed linens and the patient’s gown as needed.
Provide skin care during gown changes.
■ Adjust the room temperature for patient comfort, if
necessary.
■ Observe for incontinence or anuria, the result of
diminished neuromuscular control, decreased renal function,
constipation, or diarrhea. If necessary, obtain an order to
catheterize the patient, or place fluid-impermeable pads
beneath the patient’s buttocks. Provide perineal care using
soap, a water-filled basin, a washcloth, and towels to
prevent irritation. Apply a protective barrier cream as
indicated.
■ Elevate the head of the bed to decrease respiratory
resistance. Provide gentle suction of the patient’s
oropharynx as indicated to remove thick, copious
secretions. As the patient’s condition deteriorates, the
patient may breathe mostly through the mouth.
■ Offer fluids, frequently and respectfully; don’t force the
patient to take fluids.
■ Provide oral care frequently, taking care to lubricate the
patient’s lips and mouth with petroleum jelly and a sponge-
tipped swab to counteract dryness.
■ Provide eye care using artificial tears or ophthalmic saline
solution, if ordered, to prevent corneal ulceration, which can
cause blindness and prevent the use of these tissues for
transplantation after the patient dies.
■ Reassess the patient’s pain and other signs and
symptoms, and respond appropriately.17
■ Return the bed to the lowest position to prevent falls and
maintain patient safety.23
■ Discard used supplies in the appropriate receptacles.
■ Remove and discard your gloves.14
■ Perform hand hygiene.6,7,8,9,10,11
Meeting emotional needs
■ Fully explain all care and treatments to the family and
patient even if the patient is unconscious, because hearing
may be intact. Answer any questions as candidly as possible
while remaining sensitive and respectful.
■ Allow the patient and family to express their feelings,
which may range from anger to loneliness. Take time to talk
with the patient and the family. Sit near the head of the bed,
and avoid looking rushed or unconcerned.
■ Assure the family that care will continue before, during,
and after the withdrawal of life-sustaining measures as
indicated, regardless of the outcome.
■ Encourage appropriate affection among the patient and
family members, and provide for privacy and confidentiality.
■ Appreciate cultural, spiritual, and religious traditions
related to the dying process.
■ Notify family members, if they’re absent, when the
patient wishes to see them. Let the patient and family
discuss death at their own pace.
■ Offer to contact a member of the clergy, palliative care
team, hospice, or social services department if appropriate.
■ Document the procedure.24,25,26,27
Special considerations
■ If family members remain with the patient, show them
the location of bathrooms, lounges, and cafeterias. Explain
the patient’s needs, treatments, and care plan to them. If
appropriate, offer to teach them specific skills so that they
can take part in nursing care. Emphasize that their efforts
are important and effective. As the patient’s death
approaches, give them emotional support.
■ Teach the family about signs and symptoms of impending
death.
■ Collaborate with the multidisciplinary team to determine
whether procedures and unnecessary medications can be
discontinued;
necessary
medications
should be
administered by an alternative route when the by-mouth
route becomes difficult.28
■ Family dynamics and cultural, religious, and spiritual
beliefs may all affect the grieving experience. Matters
commonly expressed and discussed include questions about
an afterlife, unresolved social or emotional issues, and
financial concerns.
■ Respect the patient’s and family’s wishes regarding
complementary and alternative medicine; refer to the
National Institutes of Health’s National Center for
Complementary and Alternative Medicine as requested.
■ At an appropriate time, contact the Organ Procurement
Organization (OPO) if the patient is being evaluated for
brain death or if support is being withdrawn in anticipation
of imminent death so that an OPO coordinator can discuss
possible organ donation with family members; such
discussion require special knowledge, training, and
experience to deliver the appropriate message to family
members.29 Explain the process and obtain consents as
indicated. Check the patient’s records to determine whether
the patient has completed an organ donor card. (See
Understanding organ and tissue donation.)
Documentation
Record changes in the patient’s vital signs and general
status. Note the patient’s pain and sign and symptom
assessment, pharmacologic and nonpharmacologic pain and
symptom management, and the patient’s response.
Document end-of-life care discussions and choices and
advance directives. Obtain all necessary signatures,
consents, and required copies. Note the times of cardiac
arrest and the end of respiration, and notify the practitioner
when these occur.
REFERENCES
1 The President’s Commission for the Study of Ethical Problems in Medicine and
Biomedical and Behavioral Research. (1981). “Defining death: Medical, legal,
and ethical issues in the determination of death” [Online]. Accessed via the
Web at
https://repository.library.georgetown.edu/bitstream/handle/10822/559345/defi
ning_death.pdf (Level VII)
2 The Joint Commission. (2019). Standard RI.01.05.01. Comprehensive
accreditation manual for hospitals. Oakbrook Terrace, IL: The Joint
Commission. (Level VII)
3 Centers for Medicare and Medicaid Services, Department of Health and
Human Services. (2015). Condition of participation: Patient’s rights. 42 C.F.R.
§ 482.13(b)(3).
4 Accreditation Association for Hospitals and Health Systems. (2017). Standard
15.01.12. Healthcare Facilities Accreditation Program: Accreditation
requirements for acute care hospitals. Chicago, IL: Accreditation Association
for Hospitals and Health Systems. (Level VII)
5 DNV GL-Healthcare USA, Inc. (2016). PR.2 .SR.1a. NIAHO® accreditation
requirements: Interpretive guidelines & surveyor guidance (version 11).
Milford, OH: DNV GL-Healthcare USA, Inc. (Level VII)
6 The Joint Commission. (2019). Standard NPSG.07.01.01. Comprehensive
accreditation manual for hospitals. Oakbrook Terrace, IL: The Joint
Commission. (Level VII)
7 Centers for Disease Control and Prevention. (2002). Guideline for hand
hygiene in health-care settings: Recommendations of the Healthcare Infection
Control Practices Advisory Committee and the HICPAC/SHEA/APIC/IDSA Hand
Hygiene Task Force. MMWR Recommendations and Reports, 51(RR-16), 1–45.
Accessed via the Web at https://www.cdc.gov/mmwr/pdf/rr/rr5116.pdf (Level
II)
8 World Health Organization. (2009). “WHO guidelines on hand hygiene in
health care: First global patient safety challenge, clean care is safer care”
[Online]. Accessed via the Web at
http://apps.who.int/iris/bitstream/10665/44102/1/9789241597906_eng.pdf
(Level IV)
9 Centers for Medicare and Medicaid Services, Department of Health and
Human Services. (2015). Condition of participation: Infection control. 42 C.F.R.
§ 482.42.
10 Accreditation Association for Hospitals and Health Systems. (2017). Standard
07.01.21. Healthcare Facilities Accreditation Program: Accreditation
requirements for acute care hospitals. Chicago, IL: Accreditation Association
for Hospitals and Health Systems. (Level VII)
11 DNV GL-Healthcare USA, Inc. (2016). IC.1 .SR.1 . NIAHO® accreditation
requirements: Interpretive guidelines & surveyor guidance (version 11).
Milford, OH: DNV GL-Healthcare USA, Inc. (Level VII)
12 The Joint Commission. (2017). Standard NPSG.01.01.01. Comprehensive
accreditation manual for hospitals. Oakbrook Terrace, IL: The Joint
Commission. (Level VII)
13 Waters, T. R., et al. (2009). “Safe patient handling training for schools of
nursing” [Online]. Accessed via the Web at
http://www.cdc.gov/niosh/docs/2009-127/pdfs/2009-127.pdf (Level VII)
14 Siegel, J. D ., et al. (2007, revised 2017). “2007 guideline for isolation
precautions: Preventing transmission of infectious agents in healthcare
settings” [Online]. Accessed via the Web at
http://www.cdc.gov/hicpac/pdf/isolation/Isolation2007.pdf (Level II)
15 Accreditation Association for Hospitals and Health Systems. (2017). Standard
07.01.10. Healthcare Facilities Accreditation Program: Accreditation
requirements for acute care hospitals. Chicago, IL: Accreditation Association
for Hospitals and Health Systems. (Level VII)
16 DNV GL-Healthcare USA, Inc. (2016). IC.1 .SR.2 . NIAHO® accreditation
requirements: Interpretive guidelines & surveyor guidance (version 11).
Milford, OH: DNV GL-Healthcare USA, Inc. (Level VII)
17 The Joint Commission. (2019). Standard PC.01.02.07. Comprehensive
accreditation manual for hospitals. Oakbrook Terrace, IL: The Joint
Commission. (Level VII)
18 Blinderman, C. D., & Billings, J. A. (2015). Comfort care for patients dying in
the hospital. New England Journal of Medicine, 373, 2549–2561.
19 The Joint Commission. (2019). Standard MM.06.01.01. Comprehensive
accreditation manual for hospitals. Oakbrook Terrace, IL: The Joint
Commission. (Level VII)
20 Centers for Medicare and Medicaid Services, Department of Health and
Human Services. (2015). Condition of participation: Nursing services. 42
C.F.R. § 482.23(c).
21 Accreditation Association for Hospitals and Health Systems. (2017). Standard
16.01.03. Healthcare Facilities Accreditation Program: Accreditation
requirements for acute care hospitals. Chicago, IL: Accreditation Association
for Hospitals and Health Systems. (Level VII)
22 DNV GL-Healthcare USA, Inc. (2016). MM.1 .SR.2. NIAHO® accreditation
requirements: Interpretive guidelines & surveyor guidance (version 11).
Milford, OH: DNV GL-Healthcare USA, Inc. (Level VII)
23 Ganz, D. A., et al. (2013). Preventing falls in hospitals: A tool kit for improving
quality of care (AHRQ Publication No. 13-0015-EF). Rockville, MD: Agency for
Healthcare Research and Quality. Accessed via the Web at
http://www.ahrq.gov/sites/default/files/publications/files/fallpxtoolkit.pdf
(Level VII)
24 The Joint Commission. (2019). Standard RC.01.03 .01. Comprehensive
accreditation manual for hospitals. Oakbrook Terrace, IL: The Joint
Commission. (Level VII)
25 Centers for Medicare and Medicaid Services, Department of Health and
Human Services. (2015). Condition of participation: Medical record services.
42 C.F.R. § 482.24(b).
26 Accreditation Association for Hospitals and Health Systems. (2017). Standard
10.00 .03. Healthcare Facilities Accreditation Program: Accreditation
requirements for acute care hospitals. Chicago, IL: Accreditation Association
for Hospitals and Health Systems. (Level VII)
27 DNV GL-Healthcare USA, Inc. (2016). MR.2 .SR.1 . NIAHO® accreditation
requirements: Interpretive guidelines & surveyor guidance (version 11).
Milford, OH: DNV GL-Healthcare USA, Inc. (Level VII)
28 Leung, J. G., et al. (2014). Pharmacotherapy during the end of life: Caring for
the actively dying patient. AACN Advanced Critical Care, 25(2), 79–88 .
29 National Institute for Health and Care Excellence. (2011, updated 2016).
Organ donation for transplantation: Improving donor identification and
consent rates for deceased organ donation: Approach to the those close to
the patient. London: National Institute for Health and Care Excellence.
Accessed via the Web at
https://www.nice.org.uk/guidance/cg135/evidence/full-guideline-184994893
(Level I)
30 Centers for Medicare and Medicaid Services, Department of Health and
Human Services. (2015). Condition of participation: Organ, tissue, and eye
procurement. 42 C.F.R. § 482.45.
31 Accreditation Association for Hospitals and Health Systems. (2017). Standard
14.00 .01. Healthcare Facilities Accreditation Program: Accreditation
requirements for acute care hospitals. Chicago, IL: Accreditation Association
for Hospitals and Health Systems. (Level VII)
32 DNV GL-Healthcare USA, Inc. (2016). TO.1 .SR.1 . NIAHO® accreditation
requirements: Interpretive guidelines & surveyor guidance (version 11).
Milford, OH: DNV GL-Healthcare USA, Inc. (Level VII)
E
EARDROP INSTILLATION
Eardrops treat infection and inflammation, soften cerumen
for later removal, produce local anesthesia, or facilitate
removal of an insect or other foreign body trapped in the
ear.
Instillation of eardrops is usually contraindicated if the
patient has a perforated eardrum, but it may be permitted
with certain medications and adherence to sterile
technique. Other conditions may also prohibit instillation of
certain medications into the ear. For example, instillation of
drops containing hydrocortisone is contraindicated if the
patient has herpes, another viral infection, or a fungal
infection.1
Equipment
Prescribed eardrops ▪ light source ▪ facial tissues ▪
Optional: gloves, cotton-tipped applicator.
Preparation of equipment
Before administration, allow the medication to reach room
temperature, or warm the solution by gently rotating the
container in your hands. Instilling cold eardrops can cause
dizziness and nausea.
Implementation
■ Avoid distractions and interruptions when preparing and
administering the medication to prevent medication
errors.2,3
■ Verify the practitioner’s order.4,5,6,7
■ Reconcile the patient’s medications when a new
medication is ordered to reduce the risk of medication
errors, including omissions, duplications, dosing errors, and
drug interactions.
■ Gather and prepare the medication and the equipment.
Positioning the patient for eardrop
instillation
Before instilling eardrops, have the patient lie on his or her side. Then
straighten the patient’s ear canal to help the medication reach the eardrum.
For an adult, gently pull the auricle up and back; for an infant or young child,
gently pull down and back (as shown below).
Adult
Child
■ Compare the medication label with the order in the
patient’s medical record.4,5,6,7
■ Check the patient’s medical record for an allergy or a
contraindication to the prescribed medication.4,5,6,7 If an
allergy or other contraindication exists, don’t administer the
medication; instead, notify the practitioner.
■ Check the expiration date on the medication.4,5,6,7 If the
medication is expired, return it to the pharmacy and obtain
new medication.
■ Visually inspect the medication for particles,
discoloration, or other signs of loss of integrity; don’t
administer
the
medication
if its integrity is
compromised.4,5,6,7
■ Discuss any unresolved concerns about the medication
with the patient’s practitioner.4,5,6,7
■ Perform hand hygiene.8,9,10,11,12,13
■ Confirm the patient’s identity using at least two patient
identifiers.14
■ Provide privacy.15,16,17,18
■ Explain the procedure to the patient and family (if
appropriate) according to their individual communication
and learning needs to increase their understanding, allay
their fears, and enhance cooperation.19
■ If the patient is receiving the medication for the first time,
teach about potential adverse effects and discuss any other
concerns related to the medications.4,5,6,7
■ Verify the medication is being administered at the proper
time, in the prescribed dose, and by the correct route to
reduce the risk of medication errors.4,5,6,7
■ Confirm in which ear you must administer the
medication.4,5,6,7
■ If your facility uses a bar code scanning system, scan
your identification badge, the patient’s identification
bracelet, and the medication bar code.
■ Raise the bed to waist level when providing patient care
to prevent caregiver back strain.20
■ Perform hand hygiene.8,9,10,11,12,13
■ Put on gloves as needed to comply with standard
precautions.21,22
■ Have the patient sit or lie with the head turned to the
unaffected side.
■ Straighten the patient’s ear canal. Pull the auricle (pinna)
of the ear up and back. (See Positioning he patient for
eardrop instillation.)
■ Using a light source, examine the ear canal for drainage.
If you find any, clean the canal with a tissue or cotton-tipped
applicator, because drainage can reduce the medication’s
effectiveness.
■ To avoid damaging the ear canal with the dropper, gently
support the hand holding the dropper against the patient’s
head. Straighten the patient’s ear canal once again and
instill the ordered number of drops. To avoid patient
discomfort, position the dropper so that the drops fall
against the sides of the ear canal, not on the eardrum. Hold
the ear canal in position until you see the medication
disappear down the canal. Then release the ear.
■ Massage the tragus (the fleshy part in front of the ear
canal) with your finger. Doing so facilitates entry of the
medication into the ear canal.
■ Instruct the patient to remain with head to the side for 3
to 5 minutes to allow the medication to run down into the
ear canal.23
■ Place a cotton ball in the ear to prevent the medication
from leaking out.
■ Clean and dry the outer ear with a tissue.
■ If ordered, repeat the procedure in the other ear after 3 to
5 minutes.
■ Assist the patient into a comfortable position.
■ Return the bed to the lowest position to prevent falls and
maintain patient safety.24
■ Remove and discard your gloves, if worn.21,22
■ Perform hand hygiene.8,9,10,11,12,13
■ Document the procedure.25,26,27,28
Special considerations
■ Remember that some conditions make a normally tender
ear canal even more sensitive, so be especially gentle when
performing this procedure.
■ To prevent injury to the eardrum, never insert a cotton-
tipped applicator into the ear canal past the point where you
can see the tip.
■ After instilling eardrops to soften cerumen, irrigate the
ear as ordered to facilitate cerumen removal.
■ If the patient has vertigo, keep the side rails of the bed up
and assist the patient during the procedure, as necessary.
Also, move slowly to avoid exacerbating the vertigo.
■ Teach the patient or caregiver how to instill the eardrops
correctly so that treatment can continue at home if needed.
Review the procedure and let the patient demonstrate while
you observe.
■ When the ear canal is obstructed, delivery of topical
preparations may be enhanced by use of aural toilet,
placement of an ear wick, or both.23
Patient teaching
If the practitioner prescribes continued eardrop use at
home, review the medication dosage, scheduled times,
expected results, and possible adverse effects. Teach the
patient and family (if appropriate) how to properly
administer the medication.
Complications
Complications may include local reactions, such as redness
and swelling of the ear canal, or systemic reactions. The
patient may complain of dizziness, nausea, or discomfort if
the medication is given while it’s cold.
Documentation
Record the medication, the ear treated or whether you
treated both ears, and the date, time, and number of
eardrops instilled. Also note any adverse reactions that arise
during the procedure, such as drainage, redness, vertigo,
nausea, and pain. Document any patient teaching and the
patient’s comprehension of the teaching, and whether
further teaching was required.
REFERENCES
1 GlaxoSmithKline (Ireland) Ltd. (2013). “Otosporin ear drops suspension”
[Online]. Accessed via the Web at
http://www.medicines.ie/printfriendlydocument.aspx?
documentid=6566&companyid=400
2 Westbrook, J., et al. (2010). Association of interruptions with an increased risk
and severity of medication administration errors. Archives of Internal
Medicine, 170(8), 683–690 . (Level IV)
3 Institute for Safe Medication Practices. (2013). Side tracks on the safety
express: Interruptions lead to errors and unfinished . . . Wait what was I
doing? Nurse Advise-ERR, 11(2), 1–4 . Accessed via the Web at
https://www.ismp.org/Newsletters/acutecare/showarticle.aspx?id=37
4 The Joint Commission. (2019). Standard MM.06 .01.01. Comprehensive
accreditation manual for hospitals. Oakbrook Terrace, IL: The Joint
Commission. (Level VII)
5 Centers for Medicare & Medicaid Services, Department of Health and Human
Services. (2015). Condition of participation: Nursing services. 42 C.F.R. §
482.23(c).
6 Accreditation Association for Hospitals and Health Systems. (2017). Standard
16.01.03. Healthcare Facilities Accreditation Program: Accreditation
requirements for acute care hospitals. Chicago, IL: Accreditation Association
for Hospitals and Health Systems. (Level VII)
7 DNV GL-Healthcare USA, Inc. (2016). MM .1 .SR.2 . NIAHO® accreditation
requirements: Interpretive guidelines & surveyor guidance (version 11).
Milford, OH: DNV GL-Healthcare USA, Inc. (Level VII)
8 The Joint Commission. (2019). Standard NPSG.07.01.01. Comprehensive
accreditation manual for hospitals. Oakbrook Terrace, IL: The Joint
Commission. (Level VII)
9 Centers for Disease Control and Prevention. (2002). Guideline for hand
hygiene in health-care settings: Recommendations of the Healthcare Infection
Control Practices Advisory Committee and the HICPAC/SHEA/APIC/IDSA Hand
Hygiene Task Force. MMWR Recommendations and Reports, 51(RR-16), 1–45.
Accessed via the Web at https://www.cdc.gov/mmwr/pdf/rr/rr5116.pdf (Level
II)
10 World Health Organization. (2009). “WHO guidelines on hand hygiene in
health care: First global patient safety challenge, clean care is safer care”
[Online]. Accessed via the Web at
http://apps.who.int/iris/bitstream/10665/44102/1/9789241597906_eng.pdf
(Level IV)
11 Centers for Medicare & Medicaid Services, Department of Health and Human
Services. (2015). Condition of participation: Infection control. 42 C.F.R. §
482.42.
12 Accreditation Association for Hospitals and Health Systems. (2017). Standard
07.01.21. Healthcare Facilities Accreditation Program: Accreditation
requirements for acute care hospitals. Chicago, IL: Accreditation Association
for Hospitals and Health Systems. (Level VII)
13 DNV GL-Healthcare USA, Inc. (2016). IC.1 .SR.1 . NIAHO® accreditation
requirements: Interpretive guidelines & surveyor guidance (version 11).
Milford, OH: DNV GL-Healthcare USA, Inc. (Level VII)
14 The Joint Commission. (2019). Standard NPSG.01.01.01. Comprehensive
accreditation manual for hospitals. Oakbrook Terrace, IL: The Joint
Commission. (Level VII)
15 Accreditation Association for Hospitals and Health Systems. (2017). Standard
15.01.16. Healthcare Facilities Accreditation Program: Accreditation
requirements for acute care hospitals. Chicago, IL: Accreditation Association
for Hospitals and Health Systems. (Level VII)
16 Centers for Medicare and Medicaid Services, Department of Health and
Human Services. (2015). Condition of participation: Patient’s rights. 42 C.F.R.
§ 482.13(c)(1).
17 DNV GL-Healthcare USA, Inc. (2016). PR.1.SR.5 . NIAHO® accreditation
requirements: Interpretive guidelines & surveyor guidance (version 11).
Milford, OH: DNV GL-Healthcare USA, Inc. (Level VII)
18 The Joint Commission. (2019). Standard RI.01.01.01. Comprehensive
accreditation manual for hospitals. Oakbrook Terrace, IL: The Joint
Commission. (Level VII)
19 The Joint Commission. (2019). Standard PC.02.01.21. Comprehensive
accreditation manual for hospitals. Oakbrook Terrace, IL: The Joint
Commission. (Level VII)
20 Waters, T. R., et al. (2009). “Safe patient handling training for schools of
nursing” [Online]. Accessed via the Web at
http://www.cdc.gov/niosh/docs/2009-127/pdfs/2009-127.pdf (Level VII)
21 Siegel, J. D ., et al. (2007, revised 2017). “2007 guideline for isolation
precautions: Preventing transmission of infectious agents in healthcare
settings” [Online]. Accessed via the Web at
http://www.cdc.gov/hicpac/pdf/isolation/Isolation2007.pdf (Level II)
22 Accreditation Association for Hospitals and Health Systems. (2017). Standard
07.01.10. Healthcare Facilities Accreditation Program: Accreditation
requirements for acute care hospitals. Chicago, IL: Accreditation Association
for Hospitals and Health Systems. (Level VII)
23 Rosenfeld, R. M., et al. (2014). Clinical practice guideline: Acute otitis
externa. Otolaryngology, Head and Neck Surgery, 150(Suppl. 1), S1–S24.
Accessed via the Web at http://oto.sagepub.com/content/150/1_suppl/S1.full
(Level VII)
24 Ganz, D. A., et al. (2013). Preventing falls in hospitals: A toolkit for improving
quality of care (AHRQ Publication No. 13-0015-EF). Rockville, MD: Agency for
Healthcare Research and Quality. Accessed via the Web at
http://www.ahrq.gov/sites/default/files/publications/files/fallpxtoolkit.pdf
(Level VII)
25 The Joint Commission. (2019). Standard RC.01.03 .01. Comprehensive
accreditation manual for hospitals. Oakbrook Terrace, IL: The Joint
Commission. (Level VII)
26 Accreditation Association for Hospitals and Health Systems. (2017). Standard
10.00 .03. Healthcare Facilities Accreditation Program: Accreditation
requirements for acute care hospitals. Chicago, IL: Accreditation Association
for Hospitals and Health Systems. (Level VII)
27 Centers for Medicare & Medicaid Services, Department of Health and Human
Services. (2015). Condition of participation: Medical record services. 42 C.F.R.
§ 482.24(b).
28 DNV GL-Healthcare USA, Inc. (2016). MR.2 .SR.1 . NIAHO® accreditation
requirements: Interpretive guidelines & surveyor guidance (version 11).
Milford, OH: DNV GL-Healthcare USA, Inc. (Level VII)
EAR IRRIGATION
Irrigating the ear involves washing the external auditory
canal with a stream of solution to clean the canal of
discharge, soften and remove impacted cerumen, or
dislodge a foreign body. Sometimes, irrigation aims to
relieve localized inflammation and discomfort. The
procedure must be performed carefully so that it doesn’t
cause the patient discomfort or vertigo and to avoid
increasing the risk of otitis externa. Because irrigation may
contaminate the middle ear if the tympanic membrane is
ruptured, an otoscopic examination always precedes ear
irrigation.1
NURSING ALERT This procedure is contraindicated when a vegetable
(such as a pea) obstructs the auditory canal. This type of foreign body
attracts and absorbs moisture. In contact with an irrigant or other
solution, it swells, causing intense pain and complicating removal of
the object by irrigation.2,3 Ear irrigation is also contraindicated if the
patient has a cold, a fever, an ear infection, an injured or ruptured
tympanic membrane, a history of ear surgery, or a cleft palate with or
without surgical repair.3 The presence of a battery (or a battery part)
in the ear contraindicates irrigation because battery acid could leak,
and irrigation would spread caustic material throughout the canal.2,3
Procedural modifications may be indicated for patients with structural
abnormalities, diabetes, or an immunocompromised state or those
taking anticoagulant therapy.3
Equipment
Irrigation device (bulb syringe, syringe with irrigating tip, or
commercial ear irrigation device) ▪ otoscope with ear
speculum ▪ prescribed irrigating solution (normal saline or
other irrigating solution) ▪ basin filled with hot water ▪ light
source ▪ emesis basin ▪ gloves ▪ fluid-impermeable pad ▪
bath towel ▪ washcloth ▪ 4′′ × 4′′ (10-cm × 10-cm) gauze
pad ▪ Optional: goggles or face shield.
Preparation of equipment
Select the appropriate syringe and obtain the prescribed
irrigating solution. Put the container of irrigating solution
into the large basin filled with hot water to warm the
solution to body temperature: 98.6°F (37°C). Avoid extreme
temperature changes because they can affect inner ear
fluids, causing nausea and dizziness. Test the temperature
of the solution by sprinkling a few drops on your inner wrist.
Inspect equipment for breaks or cracks and replace as
necessary.
Implementation
■ Verify the practitioner’s order for irrigation, including the
prescribed irrigation solution.
■ Gather the necessary equipment.
■ Perform hand hygiene.4,5,6,7,8,9
■ Confirm the patient’s identity using at least two patient
identifiers.10
■ Provide privacy.11,12,13,14
■ Review the history of the patient’s conditions, including
signs and symptoms, diseases involving the ear, and the
condition of the tympanic membrane.1
■ Explain the procedure to the patient to enhance
cooperation and ease fears.
■ Make sure you have adequate lighting.
■ Raise the patient’s bed to waist level when providing
patient care to prevent caregiver back strain.15
■ Put on gloves to comply with standard precautions.16,17,18
■ To avoid getting foreign matter into the ear canal, clean
the auricle and the meatus of the auditory canal with a
washcloth moistened with normal saline solution or other
prescribed irrigating solution.
■ If you haven’t already done so, use the otoscope with ear
speculum to inspect the auditory canal to be irrigated.1
NURSING ALERT The ear canal is very sensitive, and instrumentation
can be painful. Use caution when examining the ear. The patient must
remain still while you examine the ear and insert any instruments into
the ear to avoid ear canal damage.
■ Help the patient to a sitting position. To prevent the
solution from running down the neck, tilt the head slightly
forward and toward the affected side. If the patient can’t sit,
have the patient lie on the back and tilt the head slightly
forward and toward the affected ear.
■ If the patient is sitting, place the fluid-impermeable pad
(covered with the bath towel) on the patient’s shoulder and
upper arm, under the affected ear. If the patient is lying
down, cover the pillow and the area under the affected ear.
■ Put on goggles or a face shield before irrigation, if
necessary.16
■ Draw the irrigating solution into the syringe and expel
any air.
■ Gently pull the pinna up and back to straighten the ear
canal.19 Have the patient hold an emesis basin beneath the
ear to catch returning irritant.
■ Position the tip of the irrigating syringe at the meatus of
the auditory canal (as shown below). Don’t block the
meatus, because doing so will impede backflow and raise
pressure in the canal.
■ With the patient’s head tilted toward the affected ear,
point the syringe tip upward and toward the posterior ear
canal. This angle prevents damage to the tympanic
membrane and guards against pushing debris farther into
the ear canal. Direct a steady stream of irrigant against the
upper wall of the ear canal (as shown below).
■ Throughout the irrigation, check the return flow and
monitor the patient’s tolerance of the procedure.
NURSING ALERT During irrigation, observe the patient for signs of
pain or dizziness. If the patient reports either, stop the procedure,
recheck the temperature of the irrigating solution, inspect the
patient’s ear with the otoscope, and resume irrigation, as indicated.
■ Remove the syringe when it’s empty and inspect the
return flow for cloudiness, cerumen, blood, or foreign
matter. Then, refill the syringe, and continue the irrigation
until the return flow is clear. Never use more than 500 mL of
irrigant during this procedure.
■ Remove the syringe, and inspect the ear canal for
cleanliness with the otoscope.
■ Dry the patient’s auricle and neck.
■ Remove the bath towel and fluid-impermeable pad. Have
the patient lie on the affected side with the 4′′ × 4′′ (10-cm
× 10-cm) gauze pad under the ear to promote drainage of
residual debris and solution.
■ Return the bed to the lowest position to prevent falls and
maintain patient safety.20
■ Discard used supplies in the appropriate receptacles.
■ Remove and discard your gloves and goggles or face
shield, if worn.16
■ Perform hand hygiene.4,5,6,7,8,9
■ Document the procedure.21,22,23,24
Special considerations
■ Avoid dropping or squirting irrigating solution on the
tympanic membrane, which may startle the patient and
cause discomfort.
■ If the practitioner directs you to place a cotton pledget in
the ear canal to retain some of the solution, pack the cotton
loosely. Instruct the patient not to remove it.
■ If irrigation doesn’t dislodge impacted cerumen, the
practitioner may order you to instill several drops of
glycerin, docusate, 2% acetic acid, 10% sodium
bicarbonate, carbamide peroxide, or a similar preparation
two to three times daily for 2 to 3 days, and then to irrigate
the ear again.1
■ If you’re performing the procedure on a patient with a
hearing aid, remove the hearing aid and then inspect the
ear canal with a handheld otoscope. If the patient has
bilateral hearing aids, examine the second ear after
replacing the first hearing aid to facilitate communication.
Keep in mind that cerumen impaction may change hearing
aid performance.1
NURSING ALERT The American Academy of Otolaryngology–Head and
Neck Foundation recommends against ear candling for treating or
preventing cerumen impaction.1
Complications
Possible complications include pain, vertigo, nausea, otitis
externa, and otitis media (if the patient has a perforated or
ruptured tympanic membrane).1 Forceful instillation of
irrigating solution can rupture the tympanic membrane.
Instilling cerumenolytic agents can also result in transient
hearing loss and local irritation.
Documentation
Record the date and time of irrigation. Note which ear you
irrigated or whether you treated both ears. Also note the
volume and the solution used, the appearance of the canal
before and after irrigation, the appearance of the return
flow, the patient’s tolerance of the procedure, and any
comments the patient made about the condition, especially
related to hearing acuity. Also document any patient
teaching performed and the patient’s understanding of that
teaching.
REFERENCES
1 Schwartz, S. R., et al. (2017). Clinical practice guideline (update): Earwax
(cerumen impaction). Otolaryngology—Head and Neck Surgery, 156(1S), S1–
S29. Accessed via the Web at
http://journals.sagepub.com/doi/pdf/10.1177/0194599816671491 (Level VII)
2 Kwong, A. O. (2017). “Ear foreign body removal procedures” [Online].
Accessed via the Web at http://emedicine.medscape.com/article/80507-
overview
3 Hayter, K. L. (2016). Listen up for safe ear irrigation. Nursing, 46(6), 62–65.
Accessed via the Web at
http://journals.lww.com/nursing/Pages/articleviewer.aspx?
year=2016&issue=06000&article=00016&type=Fulltext
4 The Joint Commission. (2019). Standard NPSG.07.01.01. Comprehensive
accreditation manual for hospitals. Oakbrook Terrace, IL: The Joint
Commission. (Level VII)
5 Centers for Disease Control and Prevention. (2002). Guideline for hand
hygiene in health-care settings: Recommendations of the Healthcare Infection
Control Practices Advisory Committee and the HICPAC/SHEA/APIC/IDSA Hand
Hygiene Task Force. MMWR Recommendations and Reports, 51(RR-16), 1–45.
Accessed via the Web at https://www.cdc.gov/mmwr/pdf/rr/rr5116.pdf (Level
II)
6 World Health Organization. (2009). “WHO guidelines on hand hygiene in
health care: First global patient safety challenge. Clean care is safer care”
[Online]. Accessed via the Web at
http://apps.who.int/iris/bitstream/10665/44102/1/9789241597906_eng.pdf
(Level IV)
7 Centers for Medicare and Medicaid Services, Department of Health and
Human Services. (2015). Condition of participation: Infection control. 42 C.F.R.
§ 482.42.
8 Accreditation Association for Hospitals and Health Systems. (2017). Standard
07.01.21. Healthcare Facilities Accreditation Program: Accreditation
requirements for acute care hospitals. Chicago, IL: Accreditation Association
for Hospitals and Health Systems. (Level VII)
9 DNV GL-Healthcare USA, Inc. (2016). IC.1.SR.1 . NIAHO® accreditation
requirements: Interpretive guidelines & surveyor guidance (version 11).
Milford, OH: DNV GL-Healthcare USA, Inc. (Level VII)
10 The Joint Commission. (2017). Standard NPSG.01.01.01. Comprehensive
accreditation manual for hospitals. Oakbrook Terrace, IL: The Joint
Commission. (Level VII)
11 Centers for Medicare and Medicaid Services, Department of Health and
Human Services. (2015). Condition of participation: Patient’s rights. 42 C.F.R.
§ 482.13(c)(1).
12 Accreditation Association for Hospitals and Health Systems. (2017). Standard
15.01.16. Healthcare Facilities Accreditation Program: Accreditation
requirements for acute care hospitals. Chicago, IL: Accreditation Association
for Hospitals and Health Systems. (Level VII)
13 The Joint Commission. (2019). Standard RI.01.01.01. Comprehensive
accreditation manual for hospitals. Oakbrook Terrace, IL: The Joint
Commission. (Level VII)
14 DNV GL-Healthcare USA, Inc. (2016). PR.1.SR.5 . NIAHO® accreditation
requirements: Interpretive guidelines & surveyor guidance (version 11).
Milford, OH: DNV GL-Healthcare USA, Inc. (Level VII)
15 Waters, T. R., et al. (2009). “Safe patient handling training for schools of
nursing” [Online]. Accessed via the Web at
http://www.cdc.gov/niosh/docs/2009-127/pdfs/2009-127.pdf (Level VII)
16 Siegel, J. D ., et al. (2007, revised 2017). “2007 guideline for isolation
precautions: Preventing transmission of infectious agents in healthcare
settings” [Online]. Accessed via the Web at
http://www.cdc.gov/hicpac/pdf/isolation/Isolation2007.pdf (Level II)
17 Accreditation Association for Hospitals and Health Systems. (2017). Standard
07.01.10. Healthcare Facilities Accreditation Program: Accreditation
requirements for acute care hospitals. Chicago, IL: Accreditation Association
for Hospitals and Health Systems. (Level VII)
18 DNV GL-Healthcare USA, Inc. (2016). IC.1 .SR.2 . NIAHO® accreditation
requirements: Interpretive guidelines & surveyor guidance (version 11).
Milford, OH: DNV GL-Healthcare USA, Inc. (Level VII)
19 Emergency Nurses Association. (2013). Sheehy’s manual of emergency care
(7th ed.). St. Louis, MO: Mosby.
20 Ganz, D. A., et al. (2013). Preventing falls in hospitals: A toolkit for improving
quality of care (AHRQ Publication No. 13-0015-EF). Rockville, MD: Agency for
Healthcare Research and Quality. Accessed via the Web at
http://www.ahrq.gov/sites/default/files/publications/files/fallpxtoolkit.pdf
(Level VII)
21 The Joint Commission. (2019). Standard RC.01.03 .01. Comprehensive
accreditation manual for hospitals. Oakbrook Terrace, IL: The Joint
Commission. (Level VII)
22 Centers for Medicare and Medicaid Services, Department of Health and
Human Services. (2015). Condition of participation: Medical record services.
42 C.F.R. § 482.24(b).
23 Accreditation Association for Hospitals and Health Systems. (2017). Standard
10.00 .03. Healthcare Facilities Accreditation Program: Accreditation
requirements for acute care hospitals. Chicago, IL: Accreditation Association
for Hospitals and Health Systems. (Level VII)
24 DNV GL-Healthcare USA, Inc. (2016). MR.2 .SR.1 . NIAHO® accreditation
requirements: Interpretive guidelines & surveyor guidance (version 11).
Milford, OH: DNV GL-Healthcare USA, Inc. (Level VII)
ELASTIC BANDAGE APPLICATION
Elastic bandages exert gentle, even pressure on a body
part. They can be used to minimize joint swelling and
provide support after trauma to the musculoskeletal system
and, when used with a splint, they can immobilize a fracture
during healing. They also provide hemostatic pressure and
anchor dressings over a fresh wound or after surgical
procedures, such as vein stripping.
Less commonly, elastic compression bandages are used to
help promote venous return. They can prevent pooling of
blood in the legs, and are sometimes used in place of
antiembolism
stockings
to
prevent
venous
thromboembolism, such as deep vein thrombosis and
pulmonary embolism, in postoperative or bedridden patients
who can’t stimulate venous return through muscle activity.
Elastic bandages may also be used as compression wraps in
patients with lower extremity edema and venous
insufficiency and to promote healing in patients with venous
ulcers.1,2
Equipment
Elastic bandage of appropriate width and length ▪ tape or
self-closures ▪ cleaning solution (skin cleaner or mild soap
or normal saline solution)3 ▪ towel ▪ Optional: gloves, skin
barrier cream,3 gauze pads or absorbent cotton.
Elastic bandages usually come in 2′′ to 6′′ (5- to 15.2 -cm)
widths and 4′ and 6′ (1.2 - and 1.8 -M) lengths. The 3′′ (7.6 -
cm) width is adaptable to most applications. An elastic
bandage with self-closures is also available.
Preparation of equipment
Select an elastic bandage that wraps the affected body part
completely but isn’t excessively long. Generally, use a
narrower bandage for wrapping the foot, lower leg, hand, or
arm and a wider bandage for the thigh or trunk. The
bandage should be clean and rolled before application.
Implementation
■ Verify the practitioner’s order.
■ Review the patient’s medical record for contraindications
to elastic compression bandage application.
■ Gather the appropriate equipment.
■ Perform hand hygiene.4,5,6,7,8,9
■ Confirm the patient’s identity using at least two patient
identifiers.10
■ Provide privacy.11,12,13,14
■ Explain the procedure to the patient and family (if
appropriate) according to their individual communication
and learning needs to increase their understanding, allay
their fears, and enhance cooperation.15
■ Raise the patient’s bed to waist level when providing
patient care to prevent caregiver back strain.16
■ Position the patient comfortably, with the body part to be
bandaged in normal functioning position to promote
circulation and prevent deformity and discomfort.
■ Perform hand hygiene.4,5,6,7,8,9
■ Put on gloves as needed to comply with standard
precautions.17,18,19
■ Inspect the area to be wrapped for the presence of
lesions and skin breakdown.3 If either condition is present,
consult the practitioner before applying the elastic bandage.
■ Clean and dry the skin surface of the area to be wrapped;
apply a skin barrier cream, as indicated.3
■ If the patient requires a compression wrap because of
significant lower extremity edema, the risk of impaired
circulation is increased; consult with a wound care nurse or
another practitioner competent in the application of
compression wraps to ensure proper application, as
needed.3
■ Before applying a bandage to an extremity with
significant dependent edema, elevate the extremity for 15
to 30 minutes to facilitate venous return.3
■ Avoid allowing two adjacent skin surfaces to touch when
applying an elastic bandage. Place gauze pads or absorbent
cotton as needed between skin surfaces, such as between
toes and fingers and under breasts and arms, to prevent
skin irritation.
■ Hold the bandage with the roll facing upward in one hand
and the free end of the bandage in the other hand. Hold the
bandage roll close to the part being bandaged to ensure
even tension and pressure.
■ When wrapping an extremity, begin wrapping at the most
distal part and work proximally to promote venous return.
Bandaging techniques
Circular
Each turn encircles the previous one, covering it
completely. Use this technique to anchor a bandage.
Spiral
Each turn partially overlaps the previous one. Use this
technique to wrap a long, straight body part or one of
increasing circumference.
Spiral-reverse
Anchor the bandage and then reverse direction halfway
through each spiral turn. Use this technique to
accommodate the increasing circumference of a body
part.
Figure eight
Anchor below the joint, and then use alternating
ascending and descending turns to form a figure eight.
Use this technique around joints.
Recurrent
This technique includes a combination of recurrent and
circular turns. Hold the bandage as you make each
recurrent turn and then use the circular turns as a final
anchor. Use this technique for a residual limb, a hand, or
the scalp.
■ Anchor the elastic compression bandage initially by
circling the body part twice. To prevent the bandage from
slipping out of place on a foot, wrap it in a figure eight
around the foot, the ankle, and then the foot again before
continuing. The same technique works on any joint such as
the knee. Include the heel when wrapping the foot, but
don’t wrap the toes unless absolutely necessary, because
the distal extremities are assessed to detect impaired
circulation.
■ Unroll the elastic bandage as you wrap the body part.
Never unroll the entire bandage before wrapping, because
doing so could produce uneven pressure, which interferes
with blood circulation and cell nourishment.
■ Overlap each layer of the elastic bandage by one-half to
two-thirds the width of the strip. (See Bandaging
techniques.)
■ Wrap firmly, but not too tightly. As you wrap, ask the
patient to tell you if the bandage feels comfortable. If the
patient complains of tingling, itching, numbness, or pain,
loosen the bandage.
■ When you’re finished wrapping, secure the end of the
bandage with tape or self-closures. Be careful not to scratch
or pinch the patient. Avoid using metal clips, because they
typically come loose when the patient moves, and can get
lost in the bed linens and injure the patient.
■ Assess distal circulation after the bandage is in place,
because the elastic may tighten as you wrap, and every 4
hours thereafter, because an elastic bandage that’s too
tight can result in neurovascular damage. Lift the distal end
of the bandage and assess the skin underneath for color,
temperature, and integrity.
■ If the wrapped body part is an extremity, elevate it for 15
to 30 minutes after wrapping to facilitate venous return.
■ Return the bed to the lowest position to prevent falls and
maintain patient safety.20
■ Remove the elastic bandage every 8 hours or whenever
it’s loose, soiled, or wrinkled. Roll it up as you unwrap to
ready it for reuse. Observe the area and provide skin care
before rewrapping the bandage.
■ Replace the elastic bandage at least once daily. Bathe the
skin with cleaning solution, dry it thoroughly, and observe
for irritation and breakdown before applying a fresh
bandage.
■ Remove and discard gloves if worn.17
■ Perform hand hygiene.4,5,6,7,8,9
■ Document the procedure.21,22,23,24
Special considerations
■ If a patient has weeping lower-extremity edema, change
elastic bandages frequently. Ensure that the bandage
doesn’t shift or crease, which could cause constriction,
particularly around the heel and ankle.3
■ Avoid leaving gaps in bandage layers, resulting in
exposed skin surfaces between layers, because doing so
may result in uneven pressure on the body part.
■ Observe the patient for an allergic reaction, because
some patients can’t tolerate the sizing in a new bandage.
Laundering a new bandage before use reduces this risk. Use
latex-free elastic bandages for patients with latex allergy.
■ Launder the bandage daily or whenever it becomes limp
to restore the bandage’s elasticity. Always keep two
bandages handy so one can be applied while the other
bandage is being laundered.
■ When using an elastic bandage after a surgical procedure
on an extremity (such as vein stripping) or with a splint to
immobilize a fracture, remove it only as ordered rather than
every 8 hours.
Complications
Arterial obstruction—characterized by a decreased or
absent distal pulse, blanching or bluish discoloration of the
skin, dusky nail beds, numbness and tingling or pain and
cramping, and cold skin—can result from elastic bandage
application. Edema can occur from obstruction of venous
return. Less serious complications include allergic reaction
and skin irritation.
Documentation
Record the date and time of elastic bandage application and
removal, the application site, the bandage size, skin
condition before application, skin care provided after
removal, any complications, the patient’s tolerance of the
treatment, any patient teaching and the patient’s
comprehension of the teaching, and whether follow-up
teaching is required.
REFERENCES
1 O’Meara, S., et al. (2012). Compression for venous leg ulcers. Cochrane
Database of Systematic Reviews, 2012(11), CD000265. (Level I)
2 Mauck, K. F., et al. (2014). Comparative systematic review and meta-analysis
of compression modalities for the promotion of venous ulcer healing and
reducing ulcer recurrence. Journal of Vascular Surgery, 60(Suppl. 2), 71S–90S .
(Level I)
3 Cooper, K. L. (2011). Care of the lower extremities in patients with acute
decompensated heart failure. Critical Care Nurse, 31(4), 21–29. Accessed via
the Web at http://ccn.aacnjournals.org/content/31/4/21.full.pdf
4 The Joint Commission. (2019). Standard NPSG.07.01.01. Comprehensive
accreditation manual for hospitals. Oakbrook Terrace, IL: The Joint
Commission. (Level VII)
5 Centers for Disease Control and Prevention. (2002). Guideline for hand
hygiene in health-care settings: Recommendations of the Healthcare Infection
Control Practices Advisory Committee and the HICPAC/SHEA/APIC/IDSA Hand
Hygiene Task Force. MMWR Recommendations and Reports, 51(RR-16), 1–45.
Accessed via the Web at https://www.cdc.gov/mmwr/pdf/rr/rr5116.pdf (Level
II)
6 World Health Organization. (2009). “WHO guidelines on hand hygiene in
health care: First global patient safety challenge, clean care is safer care”
[Online]. Accessed via the Web at
http://apps.who.int/iris/bitstream/10665/44102/1/9789241597906_eng.pdf
(Level IV)
7 Centers for Medicare and Medicaid Services, Department of Health and
Human Services. (2015). Condition of participation: Infection control. 42 C.F.R.
§ 482.42.
8 Accreditation Association for Hospitals and Health Systems. (2017). Standard
07.01.21. Healthcare Facilities Accreditation Program: Accreditation
requirements for acute care hospitals. Chicago, IL: Accreditation Association
for Hospitals and Health Systems. (Level VII)
9 DNV GL-Healthcare USA, Inc. (2016). IC.1.SR.1 . NIAHO® accreditation
requirements: Interpretive guidelines & surveyor guidance (version 11).
Milford, OH: DNV GL-Healthcare USA, Inc. (Level VII)
10 The Joint Commission. (2019). Standard NPSG.01.01.01. Comprehensive
accreditation manual for hospitals. Oakbrook Terrace, IL: The Joint
Commission. (Level VII)
11 Accreditation Association for Hospitals and Health Systems. (2017). Standard
15.01.16. Healthcare Facilities Accreditation Program: Accreditation
requirements for acute care hospitals. Chicago, IL: Accreditation Association
for Hospitals and Health Systems. (Level VII)
12 The Joint Commission. (2019). Standard RI.01.01.01. Comprehensive
accreditation manual for hospitals. Oakbrook Terrace, IL: The Joint
Commission. (Level VII)
13 DNV GL-Healthcare USA, Inc. (2016). PR.1.SR.5 . NIAHO® accreditation
requirements: Interpretive guidelines & surveyor guidance (version 11).
Milford, OH: DNV GL-Healthcare USA, Inc. (Level VII)
14 Centers for Medicare and Medicaid Services, Department of Health and
Human Services. (2015). Condition of participation: Patient’s rights. 42 C.F.R.
§ 482.13(c)(1).
15 The Joint Commission. (2019). Standard PC.02.01.21. Comprehensive
accreditation manual for hospitals. Oakbrook Terrace, IL: The Joint
Commission. (Level VII)
16 Waters, T. R., et al. (2009). “Safe patient handling training for schools of
nursing” [Online]. Accessed via the Web at
http://www.cdc.gov/niosh/docs/2009-127/pdfs/2009-127.pdf (Level VII)
17 Occupational Safety and Health Administration. (n.d .). “Bloodborne
pathogens, standard number 1910.1030” [Online]. Accessed via the Web at
http://www.osha.gov/pls/oshaweb/owadisp.show_document?
p_table=STANDARDS&p_id=10051 (Level VII)
18 Siegel, J. D ., et al. (2007, revised 2017). “2007 guideline for isolation
precautions: Preventing transmission of infectious agents in healthcare
settings” [Online]. Accessed via the Web at
https://www.cdc.gov/hicpac/pdf/isolation/Isolation2007.pdf (Level II)
19 Accreditation Association for Hospitals and Health Systems. (2017). Standard
07.01.10. Healthcare Facilities Accreditation Program: Accreditation
requirements for acute care hospitals. Chicago, IL: Accreditation Association
for Hospitals and Health Systems. (Level VII)
20 Ganz, D. A., et al. (2013). Preventing falls in hospitals: A toolkit for improving
quality of care (AHRQ Publication No. 13-0015-EF). Rockville, MD: Agency for
Healthcare Research and Quality. Accessed via the Web at
http://www.ahrq.gov/sites/default/files/publications/files/fallpxtoolkit.pdf
(Level VII)
21 The Joint Commission. (2019). Standard RC.01.03 .01. Comprehensive
accreditation manual for hospitals. Oakbrook Terrace, IL: The Joint
Commission. (Level VII)
22 Centers for Medicare and Medicaid Services, Department of Health and
Human Services. (2015). Condition of participation: Medical record services.
42 C.F.R. § 482.24(b).
23 Accreditation Association for Hospitals and Health Systems. (2017). Standard
10.00 .03. Healthcare Facilities Accreditation Program: Accreditation
requirements for acute care hospitals. Chicago, IL: Accreditation Association
for Hospitals and Health Systems. (Level VII)
24 DNV GL-Healthcare USA, Inc. (2016). MR.2 .SR.1 . NIAHO® accreditation
requirements: Interpretive guidelines & surveyor guidance (version 11).
Milford, OH: DNV GL-Healthcare USA, Inc. (Level VII)
ELECTRICAL BONE GROWTH STIMULATION
Approximately 10% of patients in the United States who
suffer bone fractures develop delayed bone healing.1 By
imitating the body’s natural electrical forces, electrical bone
growth stimulation initiates or accelerates the healing
process in a fractured bone that fails to heal. This procedure
is also used to help bones grow together after such
procedures as spinal fusion.
Fully implantable (invasive) direct current stimulation
devices and noninvasive electromagnetic coil or ultrasound
stimulation devices are available. (See Electrical bone
growth stimulation devices, page 254.) The choice of device
depends on the fracture type and location, the practitioner’s
preference, and the patient’s ability and willingness to
comply with instructions. With an invasive direct-current
stimulation device, implantation is performed under general
anesthesia. After the bone fragments join together, the
generator and lead wire are removed under local
anesthesia. The device requires no patient involvement.
With noninvasive devices, the patient must manage the
treatment schedule and maintain the equipment. This
procedure discusses the use of noninvasive devices.
EQUIPMENT
Electrical bone growth stimulation
devices
Electrical bone growth stimulation may be invasive or noninvasive.
Invasive system
An invasive system involves placing a spiral cathode
inside the bone at the fracture site. A wire leads from the
cathode to a battery-powered generator, also implanted
in local tissues. The patient’s body completes the circuit.
Noninvasive system
A noninvasive system may include a cuff-like transducer
or fitted ring that wraps around the patient’s limb at the
level of the injury. Electrical current penetrates the limb.
Equipment
Ordered stimulation set ▪ Optional: clippers, mineral oil,
glycerin, soft cloth.
For ultrasound stimulation
The stimulation set consists of an ultrasound device with a
rechargeable battery that’s attached to a transducer by a
cord, a strap that holds the transducer in place, a device
charger, and ultrasound gel.2
For electromagnetic stimulation
The stimulation set consists of a generator that plugs into a
standard 110-volt outlet and two strong electromagnetic
coils placed on either side of the injured area. The coils can
be incorporated into a cast, a cuff, or an orthotic device.
Preparation of equipment
All equipment comes in sets with instructions provided by
the manufacturer. Follow the instructions carefully and make
sure that the equipment is operational before use.
Implementation
■ Verify the practitioner’s order.
■ Ask whether the patient is sensitive to nickel or
chromium, because both are present in the electrical bone
stimulation system. If the patient is sensitive, notify the
practitioner.
■ Gather and prepare the equipment.
■ Perform hand hygiene.3,4,5,6,7,8
■ Confirm the patient’s identity using at least two patient
identifiers.9
■ Provide privacy.10,11,12,13
■ Explain the procedure to the patient and family (if
appropriate) according to their individual communication
and learning needs to increase their understanding, allay
their fears, and enhance cooperation.14
Performing ultrasound stimulation
■ Remove excessive body hair from the injured site using
clippers, if necessary.
■ Apply gel to the transducer.2
■ Apply the strap and transducer according to the
manufacturer’s instructions.
■ Follow the manufacturer’s instructions to program the
device for the ordered length of time for treatment.
■ Tell the patient to report local skin irritation; if it occurs,
consider using mineral oil or glycerin.2
■ After each treatment is complete, remove the strap and
transducer and wipe the patient’s skin, the transducer, and
the strap with a soft cloth.2
■ Teach the patient how to care for the ultrasound device
according to the manufacturer’s instructions.
Performing electromagnetic stimulation
■ Show the patient where to place the coils.
■ Tell the patient to apply the coils for 3 to 10 hours each
day, as ordered by the practitioner. Explain that many
patients find it most convenient to perform the procedure at
night.
■ Urge the patient not to interrupt the treatments for more
than 10 minutes at a time.
■ Teach the patient how to use and care for the generator.
Completing the procedure
■ Relay the practitioner’s instructions for weight bearing.
Usually, the practitioner will advise against bearing weight
until evidence of bone healing appears on X-rays.
■ Perform hand hygiene.3,4,5,6,7,8
■ Document the procedure.15,16,17,18
Special considerations
■ A patient undergoing direct-current electrical bone
stimulation
shouldn’t
undergo
electrocauterization,
diathermy, or magnetic resonance imaging (MRI).
Electrocautery may short-circuit the system; diathermy may
potentiate the electrical current, possibly causing tissue
damage; and MRI will interfere with or stop the current.
■
Check the manufacturer’s instructions for
contraindications and precautions while using an ultrasound
device. Note that pacemakers and other implantable
devices may be affected while using the device.2
■ Electromagnetic coils are contraindicated in patients who
are pregnant, have a tumor, or have an arm fracture and a
pacemaker.
Patient teaching
Teach the patient how to care for the cast or external
fixation devices. Also tell the patient how to care for the
electrical generator or ultrasound device. Urge the patient
to follow treatment instructions faithfully. If applicable,
encourage the patient to stop smoking, provide smoking-
cessation materials, and refer the patient to outpatient
smoking-cessation counseling, because smoking delays
bone healing.19,20
Complications
Complications associated with any surgical procedure,
including infection, can occur during insertion of direct-
current electrical bone growth stimulation equipment. Local
irritation or skin ulceration can occur around the strap or
transducer. No complications are associated with use of
electromagnetic coils.
Documentation
Record the type of electrical bone stimulation equipment
provided, including the date, time, and location, as
appropriate. Note the patient’s skin condition and tolerance
of the procedure.21 Also record instructions given to the
patient and family, as well as their ability to understand and
act on those instructions, and whether they require follow-
up teaching.
REFERENCES
1 Galkowski, V., et al. (2009). Bone stimulation for fracture healing: What’s all
the fuss? Indian Journal of Orthopaedics, 43(2), 117–120.
2 Bioventus. (2014). Exogen® User Guide. Accessed via the Web at
http://www.exogen.com/wp-content/uploads/81087030-US-2014-User-Guide-
2.pdf
3 Centers for Disease Control and Prevention. (2002). Guideline for hand
hygiene in health-care settings: Recommendations of the Healthcare Infection
Control Practices Advisory Committee and the HICPAC/SHEA/APIC/IDSA Hand
Hygiene Task Force. MMWR Recommendations and Reports, 51(RR-16), 1–45.
Accessed via the Web at https://www.cdc.gov/mmwr/pdf/rr/rr5116.pdf (Level
II)
4 World Health Organization. (2009). “WHO guidelines on hand hygiene in
health care: First global patient safety challenge, clean care is safer care”
[Online]. Accessed via the Web at
http://apps.who.int/iris/bitstream/10665/44102/1/9789241597906_eng.pdf
(Level IV)
5 The Joint Commission. (2019). Standard NPSG.07.01.01. Comprehensive
accreditation manual for hospitals. Oakbrook Terrace, IL: The Joint
Commission. (Level VII)
6 Centers for Medicare and Medicaid Services, Department of Health and
Human Services. (2015). Condition of participation: Infection control. 42 C.F.R.
§ 482.42.
7 Accreditation Association for Hospitals and Health Systems. (2017). Standard
07.01.21. Healthcare Facilities Accreditation Program: Accreditation
requirements for acute care hospitals. Chicago, IL: Accreditation Association
for Hospitals and Health Systems. (Level VII)
8 DNV GL-Healthcare USA, Inc. (2016). IC.1.SR.1 . NIAHO® accreditation
requirements: Interpretive guidelines & surveyor guidance (version 11).
Milford, OH: DNV GL-Healthcare USA, Inc. (Level VII)
9 The Joint Commission. (2019). Standard NPSG.01.01.01. Comprehensive
accreditation manual for hospitals. Oakbrook Terrace, IL: The Joint
Commission. (Level VII)
10 The Joint Commission. (2019). Standard RI.01.01.01. Comprehensive
accreditation manual for hospitals. Oakbrook Terrace, IL: The Joint
Commission. (Level VII)
11 DNV GL-Healthcare USA, Inc. (2016). PR.1.SR.5 . NIAHO® accreditation
requirements: Interpretive guidelines & surveyor guidance (version 11).
Milford, OH: DNV GL-Healthcare USA, Inc. (Level VII)
12 Centers for Medicare and Medicaid Services, Department of Health and
Human Services. (2015). Condition of participation: Patient’s rights. 42 C.F.R.
§ 482.13(c)(1).
13 Accreditation Association for Hospitals and Health Systems. (2017). Standard
15.01.16. Healthcare Facilities Accreditation Program: Accreditation
requirements for acute care hospitals. Chicago, IL: Accreditation Association
for Hospitals and Health Systems. (Level VII)
14 The Joint Commission. (2019). Standard PC.02.01.21. Comprehensive
accreditation manual for hospitals. Oakbrook Terrace, IL: The Joint
Commission.
15 The Joint Commission. (2019). Standard RC.01.03 .01. Comprehensive
accreditation manual for hospitals. Oakbrook Terrace, IL: The Joint
Commission. (Level VII)
16 Centers for Medicare and Medicaid Services, Department of Health and
Human Services. (2015). Condition of participation: Medical record services.
42 C.F.R. § 482.24(b).
17 Accreditation Association for Hospitals and Health Systems. (2017). Standard
10.00 .03. Healthcare Facilities Accreditation Program: Accreditation
requirements for acute care hospitals. Chicago, IL: Accreditation Association
for Hospitals and Health Systems. (Level VII)
18 DNV GL-Healthcare USA, Inc. (2016). MR.2 .SR.1 . NIAHO® accreditation
requirements: Interpretive guidelines & surveyor guidance (version 11).
Milford, OH: DNV GL-Healthcare USA, Inc. (Level VII)
19 National Association of Orthopaedic Nurses. (2013). Core curriculum for
orthopaedic nursing (7th ed.). Boston, MA: Pearson Custom Publishing.
20 Centers for Medicare and Medicaid Services & The Joint Commission. (2017).
“The specifications manual for national hospital inpatient quality measures
(version 5.2a)” [Online]. Accessed via the Web at
https://www.jointcommission.org/specifications_manual_for_national_hospital_
inpatient_quality_measures.aspx
21 The Joint Commission. (2019). Standard RC.02.01.01. Comprehensive
accreditation manual for hospitals. Oakbrook Terrace, IL: The Joint
Commission. (Level VII)
ELECTROCARDIOGRAM, 12-LEAD
Coronary heart disease remains a leading cause of mortality
worldwide. Promptly recognizing and treating acute
coronary syndromes, such as ST-segment elevation
myocardial infarction (STEMI) and non-STEMI acute coronary
syndrome, can reduce and prevent cardiac arrest.1
One of the most valuable and frequently used diagnostic
tools, an electrocardiogram (ECG) can display the heart’s
electrical activity as waveforms. Impulses moving through
the heart’s conduction system create electrical currents that
can be monitored on the body’s surface. Electrodes
attached to the skin can detect these electrical currents and
transmit them to an instrument that produces a record of
cardiac activity—the ECG. An ECG can be used to identify
myocardial ischemia and infarction, rhythm and conduction
disturbances, chamber enlargement, electrolyte imbalances,
and drug toxicity.2,3
A standard 12-lead ECG uses a series of electrodes placed
on the extremities and the chest wall to assess the heart
from 12 different views (leads). The 12 leads consist of 3
standard bipolar limb leads (designated I, II, III), 3 unipolar
augmented leads (aVR, aVL, aVF), and 6 unipolar precordial
leads (V1 to V6), which show the heart from the horizontal
plane.
The ECG device measures and averages the differences
between the electrical potential of the electrode sites for
each lead and graphs them over time. This creates the
standard ECG complex, made up of P-QRS-T . The P wave
represents atrial depolarization; the QRS complex,
ventricular depolarization; and the T wave, ventricular
repolarization. (See Reviewing ECG waveforms and
components, page 256.)
Variations of the standard ECG include the exercise ECG
(stress ECG) and ambulatory ECG (Holter monitoring). The
exercise ECG monitors heart rate, blood pressure, and ECG
waveforms as the patient walks on a treadmill or pedals a
stationary bicycle. For the ambulatory ECG, the patient
wears a portable Holter monitor to record heart activity
continually over 24 hours.
The ECG is accomplished using a multichannel method. All
electrodes are attached to the patient at once, and the
machine prints a simultaneous view of all leads.
Equipment
ECG machine with recording paper ▪ disposable pre-gelled
electrodes ▪ 4′′ × 4′′ (10-cm × 10-cm) gauze pads ▪
washcloth ▪ soap and water ▪ bath blanket or sheet ▪
Optional: disposable head clippers, single-patient-use
scissors, indelible marking pen, gloves, alcohol pad.
Reviewing ECG waveforms and
components
An electrocardiogram (ECG) waveform has three basic components: the P
wave, QRS complex, and T wave. These elements can be further divided into
the PR interval, J point, ST segment, U wave, and QT interval.
P wave and PR interval
The P wave represents atrial depolarization. The PR interval represents the
time it takes an impulse to travel from the atria through the AV nodes and
bundle of His. The PR interval measures from the beginning of the P wave to
the beginning of the QRS complex.
QRS complex
The QRS complex represents ventricular depolarization (the time it takes for
the impulse to travel through the bundle branches to the Purkinje fibers).
The Q wave, when present, appears as the first negative deflection in the
QRS complex; the R wave, as the first positive deflection. The S wave
appears as the second negative deflection or the first negative deflection
after the R wave.
J point and ST segment
Marking the end of the QRS complex, the J point also indicates the beginning
of the ST segment. The ST segment represents part of ventricular
repolarization.
T wave and U wave
Usually following the same deflection pattern as the P wave, the T wave
represents ventricular repolarization. The U wave follows the T wave, but
isn’t always seen.
QT interval
The QT interval represents ventricular depolarization and repolarization. It
extends from the beginning of the QRS complex to the end of the T wave.
Preparation of equipment
Place the ECG machine close to the patient’s bed; check the
cable and wires for fraying or breakage, and replace them or
obtain another machine if necessary. Plug the cord into the
wall outlet, or ensure proper functioning if the machine is
battery operated. Turn on the machine and input the
required patient information. If the patient is already
connected to a cardiac monitor, move the electrodes to
accommodate the precordial leads and minimize electrical
interference on the ECG tracing. Keep the patient away from
electrical fixtures and power cords. Make sure the centers of
the pre-gelled electrodes are moist to promote impulse
transmission.4
Implementation
■ Verify the practitioner’s order.
■ Gather and prepare the appropriate equipment.
■ Perform hand hygiene.5,6,7,8,9,10
■ Put on gloves, as needed to comply with standard
precautions.11,12
■ Confirm the patient’s identity using at least two patient
identifiers.13
■ Provide privacy.14,15,16,17
■ Explain the procedure to the patient. Tell the patient that
the test records the heart’s electrical activity, and that it
may be repeated at certain intervals. Emphasize that no
electrical current will enter the body. Also, tell the patient
that the test typically takes just a few minutes.
■ Raise the bed to waist level when providing patient care
to prevent caregiver back strain.18
■ Have the patient lie in the supine position in the center of
the bed with arms at the sides.2,3,19 Raise the head of the
bed, if the patient desires, to promote comfort. Ensure the
patient’s arms and legs remain relaxed to minimize muscle
trembling, which can cause electrical interference.3
■ Expose the patient’s arms, legs, and chest, and then
cover the patient appropriately with a bath blanket or sheet.
■ Select the electrode sites. Select flat, fleshy areas to
place the limb lead electrodes. Avoid muscular and bony
areas. If the patient has an amputated limb, choose a site
on the residual limb.
■ If an area is excessively hairy, clip the hair.4,20,21
■ Wash the electrode site with soap and water and a
washcloth and wipe them with a dry washcloth or gauze pad
to roughen the skin, which helps remove the outer layer to
facilitate electrical signal transmission.4,21,22 If necessary,
clean any oily skin with an alcohol pad and allow it to
dry.20,23
■ Mark the sites with an indelible marker if serial ECGs are
likely.4
■ Apply disposable pre-gelled electrodes to the patient’s
wrists and to the medial aspects of the ankles. Apply the
pre-gelled electrodes directly to the prepared sites as
recommended by the manufacturer’s instructions. To
guarantee the best connection to the lead wire, position
electrodes on the patient’s legs with the lead connections
pointing superiorly.
■ Apply a pre-gelled electrode at each electrode position on
the patient’s chest. If the patient is female, be sure to place
the chest electrodes below the breast tissue. (See
Positioning chest electrodes.)
■ Connect the lead wires to the electrodes. Note that the tip
of each lead wire is lettered and color-coded for easy
identification. The white or RA lead wire goes to the right
arm; the green or RL lead wire, to the right leg; the red or LL
lead wire, to the left leg; the black or LA lead wire, to the
left arm; and the brown or V1 to V6 lead wires, to the chest
electrodes.
■ Ensure that the paper speed selector is set to the
standard 25 mm/second and that the machine is set to full
voltage. The machine will record a normal standardization
mark—a square that’s the height of 2 large squares or 10
small squares on the recording paper.
■ If any part of the waveform height extends beyond the
paper when you record the ECG, adjust the normal
standardization to half-standardization. Note this adjustment
on the ECG strip, because this will need to be considered in
interpreting the results.3
■ Ask the patient to relax and breathe normally. Tell the
patient to lie still and not to talk when you record the ECG,
to minimize artifact.24
■ Press the AUTO or START button. Observe the tracing quality.
The machine will record all 12 leads automatically, recording
3 consecutive leads simultaneously. Some machines have a
display screen so you can preview waveforms before the
machine records them on paper.
■ When the machine finishes recording the 12-lead ECG,
turn off the machine, remove the electrodes, and clean the
patient’s skin. After disconnecting the lead wires from the
electrodes, dispose of the electrodes, as indicated.
■ Return the bed to the lowest position to prevent falls and
maintain patient safety.25
■ Remove and discard your gloves, if worn.
■ Clean, disinfect, and prepare the equipment for future
use.4
■ Perform hand hygiene.5,6,7,8,9,10
■ Document the procedure.26,27,28,29
Special considerations
■ During the procedure, ask the patient to breathe
normally. If respirations distort the recording, ask the patient
to hold the breath briefly to reduce baseline wander in the
tracing.
■ If the patient has a pacemaker, you can perform an ECG
with or without a magnet, according to the practitioner’s
orders. Be sure to note the presence of a pacemaker and
the use of the magnet on the ECG strip.
■ Record the ECG with the patient in the same position
each time, because different positions may cause
differences in the tracings. If another position is required
because of the patient’s condition, document the position
used on the tracing and in the patient’s medical record.4,19
Documentation
Document the date and time the ECG was obtained and
significant responses by the patient in the patient’s medical
record. Verify the date, time, patient’s name, and assigned
identification number on the ECG itself. Note any
appropriate clinical information on the ECG and place it in
the patient’s medical record.
REFERENCES
1 American Heart Association. (2015). Part 5: Acute coronary syndromes. 2015
international consensus on cardiopulmonary resuscitation and emergency
cardiovascular care science with treatment recommendations. Circulation,
132(S1), S146–S176. (Level II)
2 Kligfield, P., et al. (2007). Recommendations for the standardization and
interpretation of the electrocardiogram: Part I: The electrocardiogram and its
technology: A scientific statement from the American Heart Association
Electrocardiography and Arrhythmias Committee, Council on Clinical
Cardiology; the American College of Cardiology Foundation; and the Heart
Rhythm Society: Endorsed by the International Society for Computerized
Electrocardiology. Circulation, 115, 1306–1324. Accessed via the Web at
http://circ.ahajournals.org/content/115/10/1306.full.pdf (Level I)
3 Kadish, A. H., et al. (2001). “ACC/AHA clinical competence statement on
electrocardiography and ambulatory electrocardiography: A report of the
ACC/AHA/ACP-ASIM Task Force on Clinical Competence (ACC/AHA Committee
to Develop a Clinical Competence Statement on Electrocardiography and
Ambulatory Electrocardiography).” Endorsed by the International Society for
Holter and Noninvasive Electrocardiology. Circulation, 104, 3169–3178.
Accessed via the Web at
http://circ.ahajournals.org/content/104/25/3169.full.pdf (Level I)
4 Wiegand, D. L. (Ed.). (2017). AACN procedure manual for high acuity,
progressive, and critical care (7th ed.) . St. Louis, MO: Elsevier.
5 The Joint Commission. (2019). Standard NPSG.07.01.01. Comprehensive
accreditation manual for hospitals. Oakbrook Terrace, IL: The Joint
Commission. (Level VII)
6 Centers for Disease Control and Prevention. (2002). Guideline for hand
hygiene in health-care settings: Recommendations of the Healthcare Infection
Control Practices Advisory Committee and the HICPAC/SHEA/APIC/IDSA Hand
Hygiene Task Force. MMWR Recommendations and Reports, 51(RR-16), 1–45.
Accessed via the Web at https://www.cdc.gov/mmwr/pdf/rr/rr5116.pdf (Level
II)
7 World Health Organization. (2009). “WHO guidelines on hand hygiene in
health care: First global patient safety challenge, clean care is safer care”
[Online]. Accessed via the Web at
http://apps.who.int/iris/bitstream/10665/44102/1/9789241597906_eng.pdf
(Level IV)
8 Centers for Medicare and Medicaid Services, Department of Health and
Human Services. (2015). “Condition of participation: Infection control.” 42
C.F.R. § 482.42.
9 Accreditation Association for Hospitals and Health Systems. (2017). Standard
07.01.21. Healthcare Facilities Accreditation Program: Accreditation
requirements for acute care hospitals. Chicago, IL: Accreditation Association
for Hospitals and Health Systems. (Level VII)
10 DNV GL-Healthcare USA, Inc. (2014). IC.1 .SR.1 . NIAHO® accreditation
requirements: Interpretive guidelines & surveyor guidance (version 11).
Milford, OH: DNV GL-Healthcare USA, Inc. (Level VII)
11 Siegel, J. D ., et al. (2007, revised 2017). “2007 guideline for isolation
precautions: Preventing transmission of infectious agents in healthcare
settings” [Online]. Accessed via the Web at
http://www.cdc.gov/hicpac/pdf/isolation/Isolation2007.pdf (Level II)
12 Accreditation Association for Hospitals and Health Systems. (2017). Standard
07.01.10. Healthcare Facilities Accreditation Program: Accreditation
requirements for acute care hospitals. Chicago, IL: Accreditation Association
for Hospitals and Health Systems. (Level VII)
Positioning chest electrodes
To ensure accurate test results, position chest electrodes as follows:
V1: Fourth intercostal space at right border of sternum
V2: Fourth intercostal space at left border of sternum
V3: Halfway between V2 and V4
V4: Fifth intercostal space at midclavicular line
V5: Fifth intercostal space at anterior axillary line (halfway between V4 and
V6)
V6: Fifth intercostal space at midaxillary line, level with V4
13 The Joint Commission. (2019). Standard NPSG.01.01.01. Comprehensive
accreditation manual for hospitals. Oakbrook Terrace, IL: The Joint
Commission. (Level VII)
14 Accreditation Association for Hospitals and Health Systems. (2017). Standard
15.01.16. Healthcare Facilities Accreditation Program: Accreditation
requirements for acute care hospitals. Chicago, IL: Accreditation Association
for Hospitals and Health Systems. (Level VII)
15 Centers for Medicare and Medicaid Services, Department of Health and
Human Services. (2015). Condition of participation: Patient’s rights. 42 C.F.R.
§ 482.13(c)(1).
16 The Joint Commission. (2019). Standard RI.01.01.01. Comprehensive
accreditation manual for hospitals. Oakbrook Terrace, IL: The Joint
Commission. (Level VII)
17 DNV GL-Healthcare USA, Inc. (2016). PR.1.SR.5 . NIAHO® accreditation
requirements: Interpretive guidelines & surveyor guidance (version 11).
Milford, OH: DNV GL-Healthcare USA, Inc. (Level VII)
18 Waters, T. R., et al. (2009). “Safe patient handling training for schools of
nursing” [Online]. Accessed via the Web at
http://www.cdc.gov/niosh/docs/2009-127/pdfs/2009-127.pdf (Level VII)
19 Garcia, T. (2015). Acquiring the 12 lead electrocardiogram: Doing it right
every time. Journal of Emergency Nursing, 41(6), 474–478.
20 American Association of Critical-Care Nurses. (2016). AACN practice alert:
Accurate dysrhythmia monitoring in adults. Critical Care Nurse, 36(6), e26–
e34. Accessed via the Web at https://www.aacn.org//clinical-
resources/practice-alerts/dysrhythmia-monitoring (Level VII)
21 Walsh-Irwin, C., & Jurgens, C.Y. (2015). Proper skin preparation and electrode
placement decreases alarms on a telemetry unit. Dimensions of Critical Care
Nursing, 34(3), 134–139.
22 American Association of Critical-Care Nurses. (2013). “A ACN practice alert:
Alarm management” [Online]. Accessed via the Web at
https://www.aacn.org/aacn-website/shared/content/practice-
alerts/2015/11/25/alarm-management (Level VII)
23 American Association of Critical-Care Nurses. (2016). AACN practice alert:
Ensuring accurate ST-segment monitoring. Critical Care Nurse, 36(6), e18–
e25. Accessed via the Web at
http://ccn.aacnjournals.org/content/36/6/e18.extract
24 Physio-Control, Inc. (2015). “Minimizing ECG artifact” [Online]. Accessed via
the Web at https://www.physio-control.com/WorkArea/DownloadAsset.aspx?
id=2147489452
25 Ganz, D. A., et al. (2013). Preventing falls in hospitals: A toolkit for improving
quality of care (AHRQ Publication No. 13-0015-EF). Rockville, MD: Agency for
Healthcare Research and Quality. Accessed via the Web at
http://www.ahrq.gov/sites/default/files/publications/files/fallpxtoolkit.pdf
(Level VII)
26 The Joint Commission. (2019). Standard RC.01.03 .01. Comprehensive
accreditation manual for hospitals. Oakbrook Terrace, IL: The Joint
Commission. (Level VII)
27 Centers for Medicare & Medicaid Services, Department of Health and Human
Services. (2015). Condition of participation: Medical record services. 42 C.F.R.
§ 482.24(b).
28 Accreditation Association for Hospitals and Health Systems. (2017). Standard
10.00 .03. Healthcare Facilities Accreditation Program: Accreditation
requirements for acute care hospitals. Chicago, IL: Accreditation Association
for Hospitals and Health Systems. (Level VII)
29 DNV GL-Healthcare USA, Inc. (2016). MR.2 .SR.1 . NIAHO® accreditation
requirements: Interpretive guidelines & surveyor guidance (version 11).
Milford, OH: DNV GL-Healthcare USA, Inc. (Level VII)
ELECTROCARDIOGRAM, RIGHT CHEST LEAD
An electrocardiogram (ECG) measures the electrical activity
of the heart. Unlike a standard 12-lead ECG, used primarily
to evaluate left ventricular function, a right chest lead ECG
reflects right ventricular function and provides clues to
damage or dysfunction in this chamber. You might need to
perform a right chest lead ECG for a patient with an inferior
wall myocardial infarction (MI) and suspected right
ventricular involvement.1 Between 25% and 50% of patients
with this type of MI have right ventricular involvement.1,2
Early identification of a right ventricular MI is essential
because its treatment differs from treatment for other MIs.
For instance, in left ventricular MI, treatment involves
administering IV fluids judiciously to prevent heart failure.
Conversely, in right ventricular MI, treatment typically
requires administration of IV fluids to maintain adequate
filling pressures on the right side of the heart. This helps the
right ventricle eject an adequate volume of blood at an
adequate pressure.
Equipment
Multichannel ECG machine with attached patient cable, lead
wires, and recording paper ▪ soap and water ▪ washcloth ▪
towel ▪ disposable pre-gelled electrodes ▪ dry washcloth or
4′′ × 4′′ (10-cm × 10-cm) gauze pads ▪ gauze pad or moist
cloth ▪ Optional: disposable head clippers, single-patient-
use scissors, indelible marking pen, gloves, alcohol pads.
Preparation of equipment
Place the ECG machine close to the patient’s bed. Ensure
that the cable and lead wires aren’t broken or fraying;
replace them if needed. Plug the machine’s cord into the
wall outlet, or ensure the machine functions if it’s battery
operated. Turn the machine on and input the required
patient information. Keep the patient away from electrical
fixtures and power cords. Depending on the type of pre-
gelled electrode used, make sure that they are moist or
sticky to promote impulse transmission.
Implementation
■ Verify the practitioner’s order.
■ Gather and prepare the necessary equipment.
■ Perform hand hygiene.3,4,5,6,7,8
■ Confirm the patient’s identity using at least two patient
identifiers.9
■ Provide privacy.10,11,12,13
■ Explain the procedure to the patient to promote
cooperation. Inform the patient that the practitioner has
ordered a right chest lead ECG, a procedure that involves
placing electrodes on the arms, legs, and chest. Reassure
the patient that the test is painless and takes only a few
minutes, during which the patient will need to lie quietly on
the back.
■ Put on gloves, if needed, to comply with standard
precautions.14,15,16
■ Raise the patient’s bed to waist level when providing care
to prevent caregiver back strain.17
■ Place the patient in a supine position or, if the patient has
difficulty lying flat, in the semi-Fowler position.18
■ Expose the patient’s arms, chest, and legs. Drape the
patient appropriately with the patient’s bath blanket or
sheet. (Drape a female patient’s chest until you apply the
chest electrodes.)
■ Select electrode sites. Select flat, fleshy areas to place
the limb lead electrodes. Avoid muscular and bony areas. If
the patient has an amputated limb, choose a site on the
residual limb.
■ Examine the patient’s chest to locate the correct sites for
chest lead placement (as shown below). If the patient is
female, you’ll place the electrodes under the breast
tissue.19
■ If an area is excessively hairy, clip the hair using a
disposable-head clippers.19,20,21
■ To enhance limb lead electrode contact and trace quality,
prepare the application sites by washing them with soap
and water and drying them thoroughly; moist skin may
prevent the electrodes from adhering.19 Rub the electrode
sites briskly with a dry washcloth or gauze pad to remove
dead skin cells and promote impulse transmission.19,20,21,22
If necessary, clean oily skin with an alcohol pad and allow it
to dry.23,24
■ Mark all the electrode sites with an indelible marker if
serial ECGs are likely, to permit accurate comparison with
future tracings.19
■ Apply disposable pre-gelled electrodes to the prepared
sites on the patient’s arms and legs, distal to the shoulders
and hips, according to the manufacturer’s instructions.20
Position them in approximately the same location on each
limb. To guarantee the best connection to the lead wire,
position disposable pre-gelled electrodes on the legs with
the lead connection pointing superiorly.
■ Connect the lead wires to the electrodes. The lead wires
are color-coded and lettered. Place the white or right arm
(RA) wire on the right arm, the black or left arm (LA) wire on
the left arm, the green or right leg (RL) wire on the right leg,
and the red or left leg (LL) wire on the left leg.
■ Apply a pre-gelled electrode at each electrode position on
the patient’s chest.
■ Use your fingers to feel between the patient’s ribs (the
intercostal spaces). Start at the second intercostal space on
the left (the notch felt at the top of the sternum, where the
manubrium joins the body of the sternum). Count down two
spaces to the fourth intercostal space at the left sternal
border. Then apply a disposable pre-gelled electrode to the
site and attach lead wire V1R to that electrode.
■ Move your fingers across the sternum to the fourth
intercostal space at the right sternal border. Apply a
disposable pre-gelled electrode to that site and attach lead
V2R.
■ Move your finger down to the fifth intercostal space and
over to the midclavicular line. Place a disposable pre-gelled
electrode here and attach lead V4R. Apply a disposable pre-
gelled electrode midway on this line from V2R and attach
lead V3R.
■ Move your finger horizontally from V4R to the right
midaxillary line. Apply an electrode to this site and attach
lead V6R.
■ Move your fingers along the same horizontal line to the
midpoint between V4R and V6R. This is the right anterior
midaxillary line. Apply a disposable pre-gelled electrode to
this site and attach lead V5R.
■ Ask the patient to breathe normally and to refrain from
talking during the recording so that muscle movement won’t
distort the tracing.
■ Make sure that the paper speed is set at 25 mm/second
and the amplitude at 1 mV/10 mm.10,11
■ Press the AUTO or START key. The ECG machine will record
all 12 leads automatically. Check your facility’s policy for the
number of readings to obtain. (Some facilities require at
least two ECGs so that one copy can be sent out for
interpretation while the other remains at the bedside.)
■ Observe the tracing quality. If any part of the waveform
height extends beyond the paper when you record the ECG,
adjust the normal standardization to half-standardization.
Note this adjustment on the ECG strip, because this will
need to be considered in interpreting the results.25
■ When you’re finished recording the ECG, turn off the
machine. Make sure that the ECG is clearly labeled with the
patient’s name, identification number, date, and time. Also
label the tracing as “RIGHT CHEST ECG” to distinguish it from a
standard 12-lead ECG.1 Make sure that the tracings are
correctly labeled V1R through V6R.
■ Remove the electrodes and discard them in the
appropriate receptacle.
■ Clean the patient’s skin with a gauze pad or moist cloth.
■ Return the bed to the lowest position to prevent falls and
maintain patients safety.26
■ Remove and discard your gloves, if worn.14
■ Perform hand hygiene.3,4,5,6,7,8
■ Clean, disinfect, and prepare the equipment for future
use.19
■ Perform hand hygiene.3,4,5,6,7,8
■ Place the tracing in the patient’s medical record.
■ Document the procedure.27,28,29,30
Special considerations
■ For best results, place the electrodes symmetrically on
the limbs. If the patient’s wrist or ankle is covered by a
dressing, or if the patient is an amputee, choose an area
that’s available on both sides.
■ If your facility has the capability of transmitting the
patient’s ECG from the ECG machine to the patient’s
medical record, verify that the ECG transmission was
completed successful.
Complications
Prolonged application of the adhesive on the electrodes may
cause skin irritation or tissue breakdown. Failure to identify
the tracing as a right chest ECG could lead to misdiagnosis.
Documentation
Document the date and time of the procedure, the reason
for the test, and the patient’s tolerance of it. Record any
patient teaching you provided and the patient’s
understanding of the teaching.
REFERENCES
1 Provinse, J. F., et al. (2013). “ENA’s transition into practice: Right-sided and
posterior electrocardiograms (ECGs)” [Online]. Accessed via the Web at
https://www.ena.org/docs/default-source/resource-library/practice-
resources/tips/right-side-ecg.pdf?sfvrsn=836f00e6_8 (Level VII)
2 Dima, C., et al. (2017). “Right ventricular infarction” [Online]. Accessed via
the Web at http://emedicine.medscape.com/article/157961-overview
3 The Joint Commission. (2019). Standard NPSG.07.01.01. Comprehensive
accreditation manual for hospitals. Oakbrook Terrace, IL: The Joint
Commission. (Level VII)
4 Centers for Disease Control and Prevention. (2002). Guideline for hand
hygiene in health care settings: Recommendations of the Healthcare Infection
Control Practices Advisory Committee and the HICPAC/SHEA/APIC/IDSA Hand
Hygiene Task Force. MMWR Recommendations and Reports, 51(RR-16), 1–45.
Accessed via the Web at https://www.cdc.gov/mmwr/pdf/rr/rr5116.pdf (Level
II)
5 World Health Organization. (2009). “WHO guidelines on hand hygiene in
health care: First global patient safety challenge, clean care is safer care”
[Online]. Accessed via the Web at
http://apps.who.int/iris/bitstream/10665/44102/1/9789241597906_eng.pdf
(Level IV)
6 Centers for Medicare and Medicaid Services, Department of Health and
Human Services. (2015). Condition of participation: Infection control. 42 C.F.R.
§ 482.42.
7 Accreditation Association for Hospitals and Health Systems. (2017). Standard
07.01.21. Healthcare Facilities Accreditation Program: Accreditation
requirements for acute care hospitals. Chicago, IL: Accreditation Association
for Hospitals and Health Systems. (Level VII)
8 DNV GL-Healthcare USA, Inc. (2016). IC.1.SR.1 . NIAHO® accreditation
requirements: Interpretive guidelines & surveyor guidance (version 11).
Milford, OH: DNV GL-Healthcare USA, Inc. (Level VII)
9 The Joint Commission. (2019). Standard NPSG.01.01.01. Comprehensive
accreditation manual for hospitals. Oakbrook Terrace, IL: The Joint
Commission. (Level VII)
10 Centers for Medicare and Medicaid Services, Department of Health and
Human Services. (2015). Condition of participation: Patient’s rights. 42 C.F.R.
§ 482.13(c)(1).
11 Accreditation Association for Hospitals and Health Systems. (2017). Standard
15.01.16. Healthcare Facilities Accreditation Program: Accreditation
requirements for acute care hospitals. Chicago, IL: Accreditation Association
for Hospitals and Health Systems. (Level VII)
12 The Joint Commission. (2019). Standard RI.01.01.01. Comprehensive
accreditation manual for hospitals. Oakbrook Terrace, IL: The Joint
Commission. (Level VII)
13 DNV GL-Healthcare USA, Inc. (2016). PR.1.SR.5 . NIAHO® accreditation
requirements: Interpretive guidelines & surveyor guidance (version 11).
Milford, OH: DNV GL-Healthcare USA, Inc. (Level VII)
14 Siegel, J. D ., et al. (2007, revised 2017). “2007 guideline for isolation
precautions: Preventing transmission of infectious agents in healthcare
settings” [Online]. Accessed via the Web at
http://www.cdc.gov/hicpac/pdf/isolation/Isolation2007.pdf (Level II)
15 Accreditation Association for Hospitals and Health Systems. (2017). Standard
07.01.10. Healthcare Facilities Accreditation Program: Accreditation
requirements for acute care hospitals. Chicago, IL: Accreditation Association
for Hospitals and Health Systems. (Level VII)
16 DNV GL-Healthcare USA, Inc. (2016). IC.1 .SR.2 . NIAHO® accreditation
requirements: Interpretive guidelines & surveyor guidance (version 11).
Milford, OH: DNV GL-Healthcare USA, Inc. (Level VII)
17 Waters, T. R., et al. (2009). “Safe patient handling training for schools of
nursing” [Online]. Accessed via the Web at
http://www.cdc.gov/niosh/docs/2009-127/pdfs/2009-127.pdf (Level VII)
18 Feldman, T., et al. (1985). Relation of electrocardiographic R-wave amplitude
to changes in left ventricular chamber size and position in normal subjects.
American Journal of Cardiology, 55(9), 1168–1174 . (Level VI)
19 Wiegand, D. L. (Ed.). (2017). AACN procedure manual for high acuity,
progressive, and critical care (7th ed.) . St. Louis, MO: Elsevier.
20 Kligfield, P., et al. (2007). Recommendations for the standardization and
interpretation of the electrocardiogram: Part I: The electrocardiogram and its
technology: a scientific statement from the American Heart Association
Electrocardiography and Arrhythmias Committee, Council on Clinical
Cardiology; the American College of Cardiology Foundation; and the Heart
Rhythm Society. Circulation, 115, 1306–1324. Accessed via the Web at
http://circ.ahajournals.org/content/115/10/1306.full (Level VII)
21 Oster, C. D. (2005). “Proper skin prep helps ensure ECG trace quality”
[Online]. Accessed via the Web at
http://multimedia.3m.com/mws/media/358372O/proper-skin-prep-ecg-trace-
quality-white-paper.pdf
22 American Association of Critical-Care Nurses. (2013). “A ACN practice alert:
Alarm management” [Online]. Accessed via the Web at
https://www.aacn.org/aacn-website/shared/content/practice-
alerts/2015/11/25/alarm-management (Level VII)
23 American Association of Critical-Care Nurses. (2016). AACN practice alert:
Accurate dysrhythmia monitoring in adults. Critical Care Nurse, 36(6), e26–
e34. Accessed via the Web at https://www.aacn.org//clinical-
resources/practice-alerts/dysrhythmia-monitoring
24 American Association of Critical-Care Nurses. (2016). AACN practice alert:
Ensuring accurate ST-segment monitoring. Critical Care Nurse, 36(6), e18–
e25. Accessed via the Web at
http://ccn.aacnjournals.org/content/36/6/e18.extract
25 Kadish, A. H., et al. (2001). ACC/AHA clinical competence statement on
electrocardiography and ambulatory electrocardiography. Circulation, 104,
3169–3178. Accessed via the Web at
http://circ.ahajournals.org/content/104/25/3169.full (Level VII)
26 Ganz, D. A., et al. (2013). Preventing falls in hospitals: A toolkit for improving
quality of care (AHRQ Publication No. 13-0015-EF). Rockville, MD: Agency for
Healthcare Research and Quality. Accessed via the Web at
http://www.ahrq.gov/sites/default/files/publications/files/fallpxtoolkit.pdf
(Level VII)
27 The Joint Commission. (2019). Standard RC.01.03 .01. Comprehensive
accreditation manual for hospitals. Oakbrook Terrace, IL: The Joint
Commission. (Level VII)
28 Centers for Medicare and Medicaid Services, Department of Health and
Human Services. (2015). Condition of participation: Medical record services.
42 C.F.R. § 482.24(b).
29 Accreditation Association for Hospitals and Health Systems. (2017). Standard
10.00 .03. Healthcare Facilities Accreditation Program: Accreditation
requirements for acute care hospitals. Chicago, IL: Accreditation Association
for Hospitals and Health Systems. (Level VII)
30 DNV GL-Healthcare USA, Inc. (2016). MR.2 .SR.1 . NIAHO® accreditation
requirements: Interpretive guidelines & surveyor guidance (version 11).
Milford, OH: DNV GL-Healthcare USA, Inc. (Level VII)
ELECTROCARDIOGRAM, POSTERIOR CHEST
LEAD
An electrocardiogram (ECG) is a recording of the electrical
activity of the heart. The 12-lead ECG is an essential
diagnostic tool in the management and treatment of
ischemic heart disease, but because of the location of the
heart’s posterior surface, changes associated with
myocardial damage may not be apparent on a standard 12-
lead ECG. To help identify posterior involvement, some
practitioners recommend using posterior chest leads in
addition to the limb leads of the 12-lead ECG. Despite lung
and muscle barriers, posterior leads may provide clues to
posterior wall infarction.1,2 Because patients with coexisting
posterior infarction are at greater risk for complications,
acute therapy, including thrombolysis and angioplasty,
shouldn’t be delayed.3
Equipment
Multichannel ECG machine with attached patient cables,
lead wires, and recording paper ▪ disposable pre-gelled
electrodes ▪ soap and water ▪ washcloth ▪ towel ▪ dry
washcloth or 4′′ × 4′′ (10-cm × 10-cm) gauze pads ▪ gauze
pad or moist cloth ▪ Optional: gloves, disposable-head
clippers, single-patient-use scissors, alcohol pad, indelible
marking pen.
Preparation of equipment
Place the ECG machine close to the patient’s bed. Verify
that cables and lead wires aren’t frayed or broken; replace
them if necessary. Plug the cord into the wall outlet, or
ensure that the machine functions if it’s battery operated.
Turn the machine on and input the required patient
information. Keep the patient away from electrical fixtures
and power cords. Depending on the type of pre-gelled
electrodes used, make sure that they’re moist or sticky to
promote impulse transmission.
Implementation
■ Verify the practitioner’s order.
■ Gather and prepare the necessary equipment.
■ Perform hand hygiene.4,5,6,7,8,9
■ Confirm the patient’s identity using at least two patient
identifiers.10
■ Provide privacy.11,12,13,14
■ As you set up the machine to record a posterior chest
ECG, explain the procedure to the patient to promote
cooperation. Tell the patient that the test records the heart’s
electrical activity, and that it may be repeated at certain
intervals. Emphasize that no electrical current will enter the
patient’s body. Also, tell the patient that the test typically
takes about 5 minutes.
■ Put on gloves, if needed, to comply with standard
precautions.15,16,17
■ Raise the bed to waist level when providing patient care
to prevent caregiver back strain.18
■ Have the patient lie in the supine position in the center of
the bed with arms at sides.19 You may raise the head of the
bed to promote comfort.
■ Expose the patient’s arms and legs, and drape the patient
appropriately. The patient’s arms and legs should be relaxed
to minimize muscle trembling, which can cause electrical
interference.20
■ Identify the limb lead locations.
■ Select flat, fleshy areas to place the limb lead electrodes.
Avoid muscular and bony areas. If the patient has an
amputated limb, choose a site on the residual limb. If an
area is extremely hairy, clip the hair with a disposable-head
clippers.21,22,23
■ To enhance limb lead electrode contact, prepare the
application sites by washing them with soap and water and
drying them thoroughly; moist skin may prevent the
electrodes from adhering.21
■ Rub the electrode sites briskly with a dry washcloth or
gauze pad to remove dead skin cells and promote impulse
transmission.11,12
■ For the limb leads, apply disposable pre-gelled electrodes
to the patient’s arms and legs, distal to the shoulders and
hips. Position them in approximately the same location on
each limb. Apply each electrode directly to the prepared
site, as recommended by the manufacturer’s instructions. To
guarantee the best connection to the lead wire, position
disposable pre-gelled electrodes on the legs with the lead
connection pointing superiorly.
■ Help the patient turn onto the right side and expose the
left side of the patient’s back. Identify the electrode
locations. Use disposable-head clippers to clip hair in
excessively hairy areas.21,22,23,24
■ Prepare the posterior electrode application sites as
described for the limb leads.
■ If necessary, clean oily skin with an alcohol pad and allow
it to dry.25,26 Mark all the electrode sites with an indelible
marker if serial ECGs are likely, to permit accurate
comparison with future tracings.21
■ Attach a disposable pre-gelled electrode to the V7 position
on the left posterior axillary line, fifth intercostal space, at
the same level as V6. Then attach the V4 lead wire to the V7
electrode.
■ Attach a disposable pre-gelled electrode to the patient’s
back at the V9 position, just left of his spinal column at the
left paraspinal line, at the same level as V6 and V7. Then,
attach the V6 lead wire to the V9 electrode.
■ Attach a disposable pre-gelled electrode to the patient’s
back at the V8 position, halfway between leads V7 and V9, at
the same level as V6 and V7, and attach the V5 lead wire to
this electrode. (See Placing electrodes for posterior ECG.)
■ Ask the patient to breathe normally and to refrain from
talking during the recording so that muscle movement won’t
distort the tracing.
■ Make sure that the paper speed is set for 25 mm/second.
If necessary, standardize the machine. Press AUTO or START to
start recording.
■ Observe the tracing quality. If any part of the waveform
height extends beyond the paper when you record the ECG,
adjust the normal standardization to half-standardization.
Note this adjustment on the ECG strip, because this
adjustment will need to be considered in interpreting the
results.
■ When using a multichannel ECG machine, the unattached
leads will print out as straight lines. Relabel the leads
labeled V4, V5, and V6 to leads V7, V8, and V9, respectively.
■ When the ECG is complete, turn off the machine.
■ Label the tracing with the patient’s name and
identification number and the date and time. Note whether
the tracing is a right- or left-posterior chest lead ECG. Make
sure the leads are correctly labeled V7 through V9.2
■ Remove the electrodes and discard them in the
appropriate receptacle.
■ Clean the patient’s skin with a gauze pad or a moist cloth.
■ Return the bed to the lowest position to prevent falls and
maintain patient safety.27
■ Remove and discard your gloves, if worn.15
■ Perform hand hygiene.4,5,6,7,8,9
■ Place the ECG in the patient’s medical record.
■ Document the procedure.28,29,30,31
Special considerations
For best results, place the electrodes symmetrically on the
limbs. If the patient’s wrist or ankle is covered by a
dressing, or if the patient is an amputee, choose an area
that’s available on both sides. If your facility has the
capability of transmitting the patient’s ECG from the ECG
machine to the patient’s electronic medical record, verify
that the ECG transmission was completed successfully.
Complications
Prolonged application of the adhesive on the electrodes may
cause skin irritation or tissue breakdown. Failure to correctly
label the ECG leads could lead to misdiagnosis.
Documentation
Document in your notes the test’s date and time and the
patient’s tolerance of the procedure. Note any appropriate
clinical information on the ECG and place it in the patient’s
medical record. Record any patient teaching and the
patient’s understanding of the teaching.
REFERENCES
1 Aqel, R. A., et al. (2009). Usefulness of three posterior chest leads for the
detection of posterior wall acute myocardial infarction. American Journal of
Cardiology, 103(2), 159–164. Accessed via the Web at
http://www.ajconline.org/article/S0002-9149(08)01513-0/fulltext (Level VI)
2 Provinse, J. F., et al. (2013). “ENA’s translation into practice: Right-sided and
posterior electrocardiograms (ECGs)” [Online]. Accessed via the Web at
https://www.ena.org/docs/default-source/resource-library/practice-
resources/tips/right-side-ecg.pdf?sfvrsn=836f00e6_8 (Level VII)
3 Van Gorselen, E. O. F., et al. (2007). Posterior myocardial infarction: The dark
side of the moon. Netherlands Heart Journal, 15(1), 16–21. Accessed via the
Web at https://www.ncbi.nlm.nih.gov/pmc/articles/PMC1847720/ (Level V)
4 The Joint Commission. (2019). Standard NPSG.07.01.01. Comprehensive
accreditation manual for hospitals. Oakbrook Terrace, IL: The Joint
Commission. (Level VII)
5 Centers for Disease Control and Prevention. (2002). Guideline for hand
hygiene in health-care settings: Recommendations of the Healthcare Infection
Control Practices Advisory Committee and the HICPAC/SHEA/APIC/IDSA Hand
Hygiene Task Force. MMWR Recommendations and Reports, 51(RR-16), 1–45.
Accessed via the Web at https://www.cdc.gov/mmwr/pdf/rr/rr5116.pdf (Level
II)
6 World Health Organization. (2009). “WHO guidelines on hand hygiene in
health care: First global patient safety challenge, clean care is safer care”
[Online]. Accessed via the Web at
http://apps.who.int/iris/bitstream10665/44102/1/9789241597906_eng.pdf
(Level IV)
7 Centers for Medicare and Medicaid Services, Department of Health and
Human Services. (2015). Condition of participation: Infection control. 42 C.F.R.
§ 482.42.
8 Accreditation Association for Hospitals and Health Systems. (2017). Standard
07.01.21. Healthcare Facilities Accreditation Program: Accreditation
requirements for acute care hospitals. Chicago, IL: Accreditation Association
for Hospitals and Health Systems. (Level VII)
9 DNV GL-Healthcare USA, Inc. (2016). IC.1.SR.1 . NIAHO® accreditation
requirements: Interpretive guidelines & surveyor guidance (version 11).
Milford, OH: DNV GL-Healthcare USA, Inc. (Level VII)
10 The Joint Commission. (2019). Standard NPSG.01.01.01. Comprehensive
accreditation manual for hospitals. Oakbrook Terrace, IL: The Joint
Commission. (Level VII)
11 Centers for Medicare and Medicaid Services, Department of Health and
Human Services. (2015). Condition of participation: Patient’s rights. 42 C.F.R.
§ 482.13(c)(1).
12 Accreditation Association for Hospitals and Health Systems. (2017). Standard
15.01.16. Healthcare Facilities Accreditation Program: Accreditation
requirements for acute care hospitals. Chicago, IL: Accreditation Association
for Hospitals and Health Systems. (Level VII)
13 The Joint Commission. (2019). Standard RI.01.01.01. Comprehensive
accreditation manual for hospitals. Oakbrook Terrace, IL: The Joint
Commission. (Level VII)
14 DNV GL-Healthcare USA, Inc. (2016). PR.1.SR.5 . NIAHO® accreditation
requirements: Interpretive guidelines & surveyor guidance (version 11).
Milford, OH: DNV GL-Healthcare USA, Inc. (Level VII)
15 Siegel, J. D ., et al. (2007, revised 2017). “2007 guideline for isolation
precautions: Preventing transmission of infectious agents in healthcare
settings” [Online]. Accessed via the Web at
http://www.cdc.gov/hicpac/pdf/isolation/Isolation2007.pdf (Level II)
16 Accreditation Association for Hospitals and Health Systems. (2017). Standard
07.01.10. Healthcare Facilities Accreditation Program: Accreditation
requirements for acute care hospitals. Chicago, IL: Accreditation Association
for Hospitals and Health Systems. (Level VII)
17 DNV GL-Healthcare USA, Inc. (2016). IC.1 .SR.2 . NIAHO® accreditation
requirements: Interpretive guidelines & surveyor guidance (version 11).
Milford, OH: DNV GL-Healthcare USA, Inc.
18 Waters, T. R., et al. (2009). “Safe patient handling training for schools of
nursing” [Online]. Accessed via the Web at
http://www.cdc.gov/niosh/docs/2009-127/pdfs/2009-127.pdf (Level VII)
19 Feldman, T., et al. (1985). Relation of electrocardiographic R-wave amplitude
to changes in left ventricular chamber size and position in normal subjects.
American Journal of Cardiology, 55(9), 1168–1174 . (Level VI)
20 American College of Cardiology/American Heart Association (ACC/AHA).
(2001). ACC/AHA clinical competence statement on electrocardiography and
ambulatory electrocardiography. Circulation, 104(25), 3169–3178. Accessed
via the Web at http://circ.ahajournals.org/content/104/25/3169.full (Level VII)
21 Wiegand, D. L. (Ed.). (2017). AACN procedure manual for high acuity,
progressive, and critical care (7th ed.) . St. Louis, MO: Elsevier.
22 Kligfield, P., et al. (2007). Recommendations for the standardization and
interpretation of the electrocardiogram: Part I: The electrocardiogram and its
technology: A scientific statement from the American Heart Association
Electrocardiography and Arrhythmias Committee, Council on Clinical
Cardiology; the American College of Cardiology Foundation; and the Heart
Rhythm Society. Circulation, 115, 1306–1324. Accessed via the Web at
http://circ.ahajournals.org/content/115/10/1306.full (Level VII)
Placing electrodes for posterior ECG
To ensure an accurate electrocardiogram (ECG) reading, make sure that the
posterior leads V7, V8, and V9 are placed at the same level horizontally as
the V6 lead at the fifth intercostal space.2 Place V6 at the midaxillary line.
Place lead V7 at the posterior axillary line, lead V9 at the left paraspinal line,
and lead V8 halfway between leads V7 and V9.
23 Oster, C. D. (2005). “Proper skin prep helps ensure ECG trace quality”
[Online]. Accessed via the Web at
http://multimedia.3m.com/mws/media/358372O/proper-skin-prep-ecg-trace-
quality-white-paper.pdf
24 American Association of Critical-Care Nurses. (2013). “A ACN practice alert:
Alarm management” [Online]. Accessed via the Web at
https://www.aacn.org/aacn-website/shared/content/practice-
alerts/2015/11/25/alarm-management (Level VII)
25 American Association of Critical-Care Nurses. (2016). AACN practice alert:
Accurate dysrhythmia monitoring in adults. Critical Care Nurse, 36(6), e26–
e34. Accessed via the Web at https://www.aacn.org//clinical-
resources/practice-alerts/dysrhythmia-monitoring
26 American Association of Critical-Care Nurses. (2016). AACN practice alert:
Ensuring accurate ST-segment monitoring. Critical Care Nurse, 36(6), e18–
e25. Accessed via the Web at
http://ccn.aacnjournals.org/content/36/6/e18.extract
27 Ganz, D. A., et al. (2013). Preventing falls in hospitals: A toolkit for improving
quality of care (AHRQ Publication No. 13-0015-EF). Rockville, MD: Agency for
Healthcare Research and Quality. Accessed via the Web at
http://www.ahrq.gov/sites/default/files/publications/files/fallpxtoolkit.pdf
(Level VII)
28 The Joint Commission. (2019). Standard RC.01.03 .01. Comprehensive
accreditation manual for hospitals. Oakbrook Terrace, IL: The Joint
Commission. (Level VII)
29 Centers for Medicare and Medicaid Services, Department of Health and
Human Services. (2015). Condition of participation: Medical record services.
42 C.F.R. § 482.24(b).
30 Accreditation Association for Hospitals and Health Systems. (2017). Standard
10.00 .03. Healthcare Facilities Accreditation Program: Accreditation
requirements for acute care hospitals. Chicago, IL: Accreditation Association
for Hospitals and Health Systems. (Level VII)
31 DNV GL-Healthcare USA, Inc. (2016). MR.2 .SR.1 . NIAHO® accreditation
requirements: Interpretive guidelines & surveyor guidance (version 11).
Milford, OH: DNV GL-Healthcare USA, Inc. (Level VII)
Placing electrodes for signal-
averaged ECG
To prepare your patient for a signal-averaged electrocardiogram (ECG), place
the electrodes in the X, Y, and Z orthogonal positions, as shown below. These
positions bisect one another to provide a three-dimensional, composite view
of ventricular activation.
Anterior chest
Posterior chest
KEY
ELECTROCARDIOGRAM, SIGNAL-AVERAGED
An electrocardiogram (ECG) measures the electrical activity
of the heart. A signal-averaged ECG is a more detailed type
of ECG that helps identify patients at risk for sustained
ventricular tachycardia. Because this cardiac arrhythmia can
be a precursor of sudden death after a myocardial infarction
(MI), the results of a signal-averaged ECG can allow
appropriate preventive measures.1,2
Using a computer-based ECG, signal averaging detects
low-amplitude signals or late electrical potentials, which
reflect slow conduction or disorganized ventricular activity
through abnormal or infarcted regions of the ventricles. The
signal-averaged ECG is developed by recording the noise-
free surface ECG in three specialized leads for several
hundred beats. The ECG machine gathers input from these
leads and amplifies, filters, and samples the signals. The
computer collects and stores data for analysis. The crucial
values are those showing QRS complex duration, duration of
the portion of the QRS complex with an amplitude under 40
mV, and the root mean square voltage of the last 40 msec.
(See Placing electrodes for signal-averaged ECG.) Signal
averaging enhances signals that would otherwise be missed
because of increased amplitude and sensitivity to
ventricular activity. For instance, on the standard 12-lead
ECG, “noise” created by muscle tissue, electronic artifacts,
and electrodes masks late potentials, which have a low
amplitude. This procedure identifies the risk of sustained
ventricular tachycardia in patients with malignant
ventricular tachycardia, a history of MI, unexplained
syncope, nonischemic congestive cardiomyopathy, or
nonsustained ventricular tachycardia.
Equipment
Signal-averaged ECG machine with attached patient cable,
lead wires, and recording paper ▪ signal-averaged computer
▪ record of patient’s surface ECG for 200 to 300 QRS
complexes ▪ soap ▪ washcloth ▪ towel ▪ three bipolar
disposable pre-gelled electrodes ▪ dry washcloth or 4′′ × 4′′
(10-cm × 10-cm) gauze pads ▪ gauze pad or moist cloth ▪
Optional: disposable-head clippers, single-patient-use
scissors, alcohol pads, gloves.
Preparation of equipment
Place the ECG machine close to the patient’s bed. Ensure
that the cable and lead wires aren’t broken or fraying;
replace them if needed. Plug the machine’s cord into the
wall outlet, or ensure the machine functions if it’s battery
operated. Turn on the machine and input the required
patient information. Keep the patient away from the
electrical fixtures and power cords. Depending on the type
of pre-gelled electrodes used, make sure that they’re moist
or sticky to promote impulse transmission.
Implementation
■ Verify the practitioner’s order.
■ Gather and prepare the necessary equipment.
■ Perform hand hygiene.3,4,5,6,7,8
■ Confirm the patient’s identity using at least two patient
identifiers.9
■ Provide privacy.10,11,12,13
■ Explain the procedure to the patient to promote
cooperation. Inform the patient that this procedure will take
10 to 30 minutes and will help the practitioner determine
the patient’s risk for a certain type of arrhythmia. If
appropriate, mention that it may be done along with other
tests, such as echocardiography, Holter monitoring, and a
stress test.
■ Put on gloves if necessary to comply with standard
precautions.14,15,16
■ Raise the patient’s bed to waist level when providing
patient care to prevent caregiver back strain.17
■ Have the patient lie in the supine position, and tell the
patient to remain as still as possible.18
■ Expose the patient’s chest. Drape the patient
appropriately with the patient’s bath blanket or sheet.
■ Select the electrode sites. If an area is excessively hairy,
clip the hair using a disposable-head clippers.1,19
■ Wash the skin with soap and water, drying it thoroughly
to enhance electrode contact and trace quality; moist skin
may prevent the electrodes from adhering.20,21 Rub the
electrode sites briskly with a dry washcloth or gauze pad to
remove dead skin cells and promote impulse
transmission.1,19,20 If necessary, clean oily skin with an
alcohol pad and allow it to dry.22,23
■ Apply disposable pre-gelled electrodes (following the
manufacturer’s instructions) to the prepared electrode sites.
■ Connect the lead wires to the electrodes.
■ Place the leads in the X, Y, and Z positions.
■ Ask the patient to breathe normally and refrain from
talking during the recording so that muscle movement won’t
distort the tracing.
■ Press the AUTO or START key.
■ After the ECG machine is finished recording the
information, turn it off.
■ Remove and discard the electrodes in an appropriate
receptacle.
■ Clean the patient’s skin with a gauze pad or a moist cloth.
■ Return the bed to the lowest positions to prevent falls and
maintain patient safety.24
■ Remove and discard your gloves, if worn.14
■ Perform hand hygiene.3,4,5,6,7,8
■ Clean, disinfect, and prepare the ECG equipment for
future use.20
■ Perform hand hygiene.3,4,5,6,7,8
■ Place the ECG tracing in the patient’s medical record for
the practitioner to interpret.
■ Document the procedure.25,26,27,28
Special considerations
■ Because muscle movements may cause a false-positive
result, patients who are restless or in respiratory distress are
poor candidates for signal-averaged ECG. Proper electrode
placement and skin preparation are essential to this
procedure.
■ Results indicating low-amplitude signals include a QRS
complex duration greater than 110 msec, a duration of more
than 40 msec for the amplitude portion under 40 V, and a
root mean square voltage of less than 25 V during the last
40 msec of the QRS complex. However, all three factors
don’t need to be present to consider the result positive or
negative. The final interpretation hinges on individualized
patient factors.
■ Results of signal-averaged ECG help the practitioner
determine whether the patient is a candidate for invasive
procedures, such as electrophysiologic testing or
angiography.
■ Keep in mind that the significance of signal-averaged ECG
results in patients with bundle-branch heart block is
unknown, because myocardial activation doesn’t follow the
usual sequence in these patients.
■ If your facility has the capability of transmitting the
patient’s ECG from the ECG machine to the patient’s
medical record, verify that the ECG transmission was
completed successfully.
Complications
Prolonged application of adhesive on the electrode may
cause skin irritation or tissue breakdown at the application
site.
Documentation
Document the time of the procedure, why the procedure
was done, and how the patient tolerated it. Record any
patient teaching and the patient’s comprehension of your
teaching.
REFERENCES
1 Kadish, A. H., et al. (2001). ACC/AHA clinical competence statement on
electrocardiography and ambulatory electrocardiography: A report of the
ACC/AHA/ACP-ASIM Task Force on Clinical Competence (ACC/AHA Committee
to Develop a Clinical Competence Statement on Electrocardiography and
Ambulatory Electrocardiography). Circulation, 104, 3169–3178. Accessed via
the Web at http://circ.ahajournals.org/content/104/25/3169.full (Level VII)
2 Narayan, S. M., & Cain, M. E. Clinical applications of the signal-averaged
electrocardiogram: Overview. (2016). In: UpToDate, Goldberger, A. L., &
Downey, B. C . (Eds.) . Accessed via the Web at http://www.uptodate.com
3 The Joint Commission. (2019). Standard NPSG.07.01.01. Comprehensive
accreditation manual for hospitals. Oakbrook Terrace, IL: The Joint
Commission. (Level VII)
4 Centers for Disease Control and Prevention. (2002). Guidelines for hand
hygiene in health care settings: Recommendations of the Healthcare Infection
Control Practices Advisory Committee and the HICPAC/SHEA/APIC/IDSA Hand
Hygiene Task Force. MMWR Recommendations and Reports, 51(RR-16), 1–45.
Accessed via the Web at https://www.cdc.gov/mmwr/pdf/rr/rr5116.pdf (Level
II)
5 World Health Organization. (2009). “WHO guidelines on hand hygiene in
health care: First global patient safety challenge, clean care is safer care”
[Online]. Accessed via the Web at
http://apps.who.int/iris/bitstream/10665/44102/1/9789241597906_eng.pdf
(Level IV)
6 Centers for Medicare and Medicaid Services, Department of Health and
Human Services. (2015). Condition of participation: Infection control. 42 C.F.R.
§ 482.42.
7 Accreditation Association for Hospitals and Health Systems. (2017). Standard
07.01.21. Healthcare Facilities Accreditation Program: Accreditation
requirements for acute care hospitals. Chicago, IL: Accreditation Association
for Hospitals and Health Systems. (Level VII)
8 DNV GL-Healthcare USA, Inc. (2016). IC.1.SR.1 . NIAHO® accreditation
requirements: Interpretive guidelines & surveyor guidance (version 11).
Milford, OH: DNV GL-Healthcare USA, Inc. (Level VII)
9 The Joint Commission. (2019). Standard NPSG.01.01.01. Comprehensive
accreditation manual for hospitals. Oakbrook Terrace, IL: The Joint
Commission. (Level VII)
10 Accreditation Association for Hospitals and Health Systems. (2017). Standard
15.01.16. Healthcare Facilities Accreditation Program: Accreditation
requirements for acute care hospitals. Chicago, IL: Accreditation Association
for Hospitals and Health Systems. (Level VII)
11 Centers for Medicare and Medicaid Services, Department of Health and
Human Services. (2015). Condition of participation: Patient’s rights. 42 C.F.R.
§ 482.13(c)(1).
12 The Joint Commission. (2019). Standard RI.01.01.01. Comprehensive
accreditation manual for hospitals. Oakbrook Terrace, IL: The Joint
Commission. (Level VII)
13 DNV GL-Healthcare USA, Inc. (2014). PR.1.SR.5 . NIAHO® accreditation
requirements: Interpretive guidelines & surveyor guidance (version 11).
Milford, OH: DNV GL-Healthcare USA, Inc. (Level VII)
14 Siegel, J. D ., et al. (2007, revised 2017). “2007 guideline for isolation
precautions: Preparing transmission of infectious agents in healthcare
settings” [Online]. Accessed via the Web at
http://www.cdc.gov/hicpac/pdf/isolation/Isolation2007.pdf (Level II)
15 Accreditation Association for Hospitals and Health Systems. (2017). Standard
07.01.10. Healthcare Facilities Accreditation Program: Accreditation
requirements for acute care hospitals. Chicago, IL: Accreditation Association
for Hospitals and Health Systems. (Level VII)
16 DNV GL-Healthcare USA, Inc. (2016). IC.1 .SR.2 . NIAHO® accreditation
requirements: Interpretive guidelines & surveyor guidance (version 11).
Milford, OH: DNV GL-Healthcare USA, Inc. (Level VII)
17 Waters, T. R., et al. (2009). “Safe patient handling training for schools of
nursing” [Online]. Accessed via the Web at
http://www.cdc.gov/niosh/docs/2009-127/pdfs/2009-127.pdf (Level VII)
18 Feldman, T., et al. (1985). Relation of electrocardiographic R-wave amplitude
to changes in left ventricular chamber size and position in normal subjects.
American College of Cardiology, 55(9), 1168–1174 . (Level VI)
19 Oster, C. D. (2005). “Proper skin prep helps ensure ECG trace quality”
[Online]. Accessed via the Web at
http://multimedia.3m.com/mws/media/358372O/proper-skin-prep-ecg-trace-
quality-white-paper.pdf (Level VI)
20 Wiegand, D. L. (Ed.). (2017). AACN procedure manual for high acuity,
progressive, and critical care (7th ed.) . St. Louis, MO: Elsevier.
21 American Association of Critical-Care Nurses. (2013). “A ACN practice alert:
Alarm management” [Online]. Accessed via the Web at
https://www.aacn.org/aacn-website/shared/content/practice-
alerts/2015/11/25/alarm-management (Level VII)
22 American Association of Critical-Care Nurses. (2016). AACN practice alert:
Accurate dysrhythmia monitoring in adults. Critical Care Nurse, 36(6), e26–
e34. Accessed via the Web at https://www.aacn.org//clinical-
resources/practice-alerts/dysrhythmia-monitoring
23 American Association of Critical-Care Nurses. (2016). AACN practice alert:
Ensuring accurate ST-segment monitoring. Critical Care Nurse, 36(6), e18–
e25. Accessed via the Web at
http://ccn.aacnjournals.org/content/36/6/e18.extract
24 Ganz, D. A., et al. (2013). Preventing falls in hospitals: A toolkit for improving
quality of care (AHRQ Publication No. 13-0015-EF). Rockville, MD: Agency for
Healthcare Research and Quality. Accessed via the Web at
http://www.ahrq.gov/sites/default/files/publications/files/fallpxtoolkit.pdf
(Level VII)
25 The Joint Commission. (2019). Standard RC.01.03 .01. Comprehensive
accreditation manual for hospitals. Oakbrook Terrace, IL: The Joint
Commission. (Level VII)
26 Centers for Medicare and Medicaid Services, Department of Health and
Human Services. (2015). Condition of participation: Medical record services.
42 C.F.R. § 482.24(b).
27 Accreditation Association for Hospitals and Health Systems. (2017). Standard
10.00 .03. Healthcare Facilities Accreditation Program: Accreditation
requirements for acute care hospitals. Chicago, IL: Accreditation Association
for Hospitals and Health Systems. (Level VII)
28 DNV GL-Healthcare USA, Inc. (2016). MR.2 .SR.1 . NIAHO® accreditation
requirements: Interpretive guidelines & surveyor guidance (version 11).
Milford, OH: DNV GL-Healthcare USA, Inc. (Level VII)
ENDOSCOPIC THERAPY, ASSISTING
Endoscopy of the upper gastrointestinal tract, also called
esophagogastroduodenoscopy or EGD, is indicated for a
range of diagnostic and therapeutic procedures.1 This
procedure focuses on endoscopic therapy to visualize the
upper GI tract to help diagnose, control, or prevent bleeding
and evacuate blood and clots.
During this procedure, the practitioner advances a
fiberoptic endoscope through the patient’s esophagus and
into the stomach and duodenum to help look for a bleeding
site. After locating the bleeding site, the practitioner may
inject a sclerosing agent through an injector needle, which is
inserted through a port in the endoscope. The practitioner
injects the sclerosing agent into the bleeding vessel or
tissue surrounding the vessel, and may also use laser or
thermal therapy or apply a band to stop bleeding. A nurse
assists with the procedure.
Equipment
Prescribed medications (anesthetics, sedatives, analgesics,
sclerosing agent) ▪ oral airway or bite block ▪ water-soluble
lubricant ▪ oxygen administration equipment ▪ suction
apparatus ▪ sterile normal saline solution or sterile water for
irrigation ▪ endoscope (rigid or flexible) ▪ endoscopic
injector needle (23G to 26G, 2- to 5-mm needle) ▪ three 10-
mL syringes filled with prescribed sclerosing agent ▪ tonsil-
tip suction device ▪ gloves, gowns, and masks and goggles,
or masks with face shields ▪ two 30- to 60-mL syringes ▪
cardiac monitor ▪ pulse oximeter and probe ▪ capnometer ▪
automatic blood pressure cuff ▪ prescribed IV fluid ▪
enzymatic detergent ▪ lint-free cloth or sponge ▪ facility-
approved sedation scoring system ▪ Optional: endoscopic
laser or thermal equipment, esophageal clips, esophageal
bands, specimen containers, laboratory biohazard transport
bag, laboratory request form, nasogastric tube, IV catheter
insertion equipment, emergency equipment (including
intubation equipment, cardiac medications, and a
defibrillator).
Preparation of equipment
Set up the suction apparatus and make sure it’s functioning
properly.2 Gather the emergency equipment and ensure
proper function.
Label all medications, medication containers, and other
solutions on and off the sterile field; on the label, include
the medication name, dosage, strength, quantity, diluent
and volume (if appropriate), and expiration date and time.3,4
Implementation
■ Verify the practitioner’s orders.
■ Confirm that written informed consent was obtained by
the practitioner and that the consent is in the patient’s
medical record.5,6,7,8
■ Check the patient’s medical record for allergies and other
contraindications to the prescribed medications. If any exist,
don’t administer the medications; instead, notify the
practitioner.
■ Check the patient’s history for hypersensitivity to latex.
■ Conduct a preprocedure verification to make sure that all
relevant documentation, related information, and equipment
are available and correctly identified to the patient’s
identifiers.9,10
■ Verify that the laboratory and imaging studies have been
completed as ordered and that the results are in the
patient’s medical record. Notify the practitioner of any
unexpected results. If applicable, check the patient’s
medical record for pregnancy test results.11
■ Verify all medication or solution labels verbally and
visually. Verification is done by two individuals qualified to
participate in the procedure whenever the person preparing
the medication or solution isn’t the person who’ll be
administering it.3,4
■ Review baseline coagulation studies, because abnormal
results increase the potential for bleeding.2 Review baseline
hematocrit and hemoglobin levels.
■ Perform hand hygiene.12,13,14,15,16,17
■ Put on personal protective equipment, as needed, to
comply with standard precautions.18,19,20,21
■ Confirm the patient’s identity using at least two patient
identifiers.22
■ Provide privacy.6,23,24,25
■ Reinforce the practitioner’s explanation of the procedure,
and answer the patient’s questions to ease anxiety and
promote cooperation.
■ Confirm the patient’s nothing-by-mouth status before the
procedure; minimum fasting recommendations include 2
hours for clear liquids, 6 or more hours for a light meal, and
8 hours or more for fried or fatty foods or meat.2,26
■ Assess the patient for conditions that may make
ventilation difficult, such as significant obesity, a history of
snoring or sleep apnea, facial hair, missing teeth, or the
presence of stridor.11
■ Remove the patient’s dentures, if appropriate, because
they can interfere with safe passage of the endoscope.
■ Verify that the patient has an adequate-sized, patent IV
catheter (an 18G catheter is preferred) to administer
sedation and any emergency medications or IV fluid, if
necessary. If an adequate catheter isn’t in place, insert one.
(See the “IV catheter insertion and removal” procedure,
page 443.) Begin an IV infusion, as prescribed.
■ Provide goggles or a waterproof covering for the patient’s
eyes to protect the patient against accidental exposure to
blood or the sclerosing agent.18,19,20,21
■ Raise the patient’s bed to waist level when providing care
to prevent caregiver back strain.27
■ Attach the patient to the cardiac monitor, pulse oximeter,
and automatic blood pressure cuff for continuous monitoring
during the procedure.2 Set the alarm limits appropriately for
the patient’s current condition and make sure that the
alarms are turned on, functioning, and audible to
staff.28,29,30,31
■ Attach the patient to a capnometer to continuously
monitor exhaled carbon dioxide during the procedure. Make
sure the alarm limits are set properly for the patient’s
current condition and alarms are turned on, functioning
properly, and audible to staff.28,29,30,31,32
■ Obtain baseline vital signs and assess the patient’s
neurologic, cardiac, and respiratory status to serve as a
baseline for comparison during and after the
procedure.2,33,34,35
■ Determine the patient’s sedation score based on vital
signs, level of consciousness (LOC), and respiratory status
using a facility-approved scoring system.33,34
■ Position the patient in the left lateral position. This
position is the position of choice to prevent aspiration and
allow predictable views of the stomach as the scope is
advanced; it allows secretions to collect in the dependent
areas of the mouth for ease of suctioning.2
■ Conduct a time-out immediately before starting the
procedure to perform a final assessment that the correct
patient, site, positioning, and procedure are identified and,
as applicable, that all relevant information and necessary
equipment are available.10,36
■ Administer analgesia, sedation, or both as ordered,
following safe medication administration practices, before
endoscope insertion
to facilitate the insertion
process.2,37,38,39,40
NURSING ALERT Moderate sedation agents are considered high-alert
medications because they can cause significant patient harm when
used in error. If required by your facility, before beginning the
medication, have another nurse perform an independent double-check
to ensure safe medication administration.41,42 (See Double-checking
high-alert medications.)
■ After comparing results of the independent double-check
with the other nurse (if required), administer the medication
if there are no discrepancies. If discrepancies exist, rectify
them before administering the medication.
■ Administer each medication separately in incremental
doses, and titrate it to the desired effect to decrease the
risk of overdose and respiratory and circulatory
depression.11
■ Continuously monitor the patient’s heart rate and
function (using a cardiac monitor), oxygen saturation level
(using pulse oximetry), and respiratory rate and adequacy
of ventilation (using continual observation of clinical status
and capnography).32,43,44,45
■ Determine and evaluate the patient’s blood pressure and
heart rate at least every 5 minutes.32,44,45
■ Monitor the patient’s LOC (by checking response to verbal
commands when practical), comfort level, and skin
condition at regular intervals.11
■ Administer supplemental oxygen if hypoxia occurs.44
Determine the method and rate of flow by the patient’s
optimal oxygen saturation level according to pulse
oximetry.11
■ Assist the practitioner as indicated during the procedure.
If you’re monitoring the patient, you can assist with minor,
interruptible tasks when the patient’s condition is stable.
However, another trained staff member should assist with
more complicated procedures.43,46
■ The practitioner will anesthetize the posterior pharynx
with a topical anesthetic agent and insert an oral airway to
prevent the patient from biting down on the endoscope.2
■ The practitioner will lubricate the distal end of the
endoscope with a water-soluble lubricant to facilitate
passage of the endoscope.2 Instruct the patient to swallow
while the endoscope is being advanced to help facilitate
passage into the esophagus.2
■ Suction the oropharynx, as needed, using a tonsil-tip
suction catheter to prevent aspiration of secretions.2
■ Prepare the equipment for thermal or laser coagulation
therapy, as needed, which will be used to control bleeding.2
■ Assist with irrigation using sterile normal saline solution
or sterile water through the endoscope to improve
visualization.2
■ If the site requires sclerosing, assist with the sclerosing
needle and inject the sclerosing agent, as requested.2
■ Provide the practitioner with endoscopic bands or clips as
requested if endoscopic variceal ligation (the treatment of
choice for controlling variceal hemorrhage) is necessary.47
■ If the practitioner obtains a specimen for testing, place it
in the proper specimen container, label the container in the
presence of the patient to prevent mislabeling,22 and place
the container in a laboratory transport bag.20
■ The practitioner will then carefully remove the
endoscope.
■ Insert a nasogastric tube, if ordered, to assess for
recurrent bleeding. (See the “Nasogastric tube insertion and
removal” procedure, page 524.)2
■ Assess the patient for gag, swallow, and cough reflexes.
Maintain the patient in the left lateral position until the gag,
swallow, and cough reflexes return. After these reflexes
return, reposition the patient to promote comfort.2
■ Return the bed to the lowest position to prevent falls and
maintain patient safety.48
■ Remove your personal protective equipment and place it
in the appropriate receptacle.18,20
■ Perform hand hygiene.12,13,14,15,16,17
■ After the procedure, continue to monitor the patient using
the same monitoring parameters used during the procedure;
monitor until discharge criteria are met. The patient should
remain awake for at least 20 minutes without stimulation
before being considered ready for discharge. The duration
and frequency of monitoring should be individualized
depending on the level of sedation achieved, the patient’s
overall condition, and the nature of the procedure for which
sedation was administered. If a reversal agent was given,
monitor the patient for a sufficient time (for example, 2
hours) after the last administration of an antagonist to make
sure that the patient doesn’t become re-sedated after the
reversal effects have worn off.11,44,49,50
■ Immediately after use, preclean the endoscope before
sending it for reprocessing: Wipe the insertion end of the
endoscope with a wet sponge or lint-free cloth soaked in
freshly prepared enzymatic detergent solution. Insert the
distal portion of the endoscope into the solution container
and use the suction device to suction the solution through
the air, water, and biopsy channels. Alternate between
suctioning the solution and air until the return solution is
visibly clean. Flush or blow air through the channels
according to the endoscope manufacturer’s instructions.
Detach the endoscope from the light source and suction
setup. If you’re using a video endoscope, attach the
protective video cap to the device. Place the endoscope in a
container for transport to the reprocessing area.51,52,53,54
■ Send specimens to the laboratory in the laboratory
transport bag,20 along with a completed laboratory request
form.
■ Perform hand hygiene.12,13,14,15,16,17
■ Document the procedure.55,56,57,58
Special considerations
■ Endoscope insertion and advancement may stimulate a
vagal response in the patient, causing bradycardia. Closely
monitor the patient.2
■ Keep in mind that sedatives and topical anesthetics
interfere with the patient’s gag reflex, placing the patient at
risk for aspiration. Moderate sedation may also put the
patient at risk for respiratory depression.2
■ The Joint Commission issued a sentinel event alert
concerning medical device alarm safety, because alarm-
related events have been associated with permanent loss of
function or death. Among the major contributing factors
were
improper
alarm
settings,
alarm
settings
inappropriately turned off, and alarm signals not audible to
staff. Make sure alarm limits are set appropriately, and that
alarms are turned on, functioning properly, and audible to
staff. Follow facility guidelines for preventing alarm
fatigue.29
Double-checking high-alert
medications
When administering high-alert medications such as moderate sedation
agents, if required by your facility, another nurse must perform an
independent double-check of your preparation of the drug to ensure safe
administration.42 The second nurse should do the following:
■ Verify the patient’s identity.
■ Make sure that the correct medication is being given and in the prescribed
concentration.
■ Make sure that the medication’s indication corresponds with the patient’s
diagnosis.
■ Verify that the dosage calculations are correct and the dosing formula used
to derive the final dose is correct.
■ Verify that the route of administration is safe and appropriate for the
patient.
■ Ensure that pump settings are correct and that the infusion line is attached
to the correct port, if appropriate.
Complications
Complications include respiratory depression, hypotension,
bradycardia, anaphylactic reaction to the sclerosing agent
and premedications, aspiration, bleeding, temporary
dysphagia, esophageal perforation, and decreased LOC.
Documentation
Record the patient’s vital signs, oxygen saturation levels,
and other assessment findings before, during, and after the
procedure. Document the date and time of the procedure;
sclerosing agent administered, if applicable; any other
therapies used during the procedure; and the patient’s
tolerance of the procedure. If any unexpected complications
occurred, document the necessary interventions and the
patient’s response to such interventions. Also document any
patient and family teaching and understanding of the
teaching.
REFERENCES
1 Cohen, J., & Greenwald, D. A. Overview of upper gastrointestinal endoscopy
(esophagogastroduodenoscopy). (2015). In: UpToDate, Howell, D. A., &
Grover, S. (Eds.). Accessed via the Web at http://www.uptodate.com
2 Wiegand, D. L. (2017). AACN procedure manual for high acuity, progressive,
and critical care (7th ed.). St. Louis, MO: Elsevier.
3 The Joint Commission. (2019). Standard NPSG.03 .04.01. Comprehensive
accreditation manual for hospitals. Oakbrook Terrace, IL: The Joint
Commission. (Level VII)
4 Accreditation Association for Hospitals and Health Systems. (2017). Standard
25.01.27. Healthcare Facilities Accreditation Program: Accreditation
requirements for acute care hospitals. Chicago, IL: Accreditation Association
for Hospitals and Health Systems. (Level VII)
5 The Joint Commission. (2019). Standard RI.01.03 .01. Comprehensive
accreditation manual for hospitals. Oakbrook Terrace, IL: The Joint
Commission. (Level VII)
6 Centers for Medicare and Medicaid Services, Department of Health and
Human Services. (2015). Condition of participation: Patient’s rights. 42 C.F.R.
§ 482.13(c)(1).
7 Accreditation Association for Hospitals and Health Systems. (2017). Standard
30.01.11. Healthcare Facilities Accreditation Program: Accreditation
requirements for acute care hospitals. Chicago, IL: Accreditation Association
for Hospitals and Health Systems. (Level VII)
8 DNV GL-Healthcare USA, Inc. (2016). PR.1 .SR.3 . NIAHO® accreditation
requirements: Interpretive guidelines & surveyor guidance (version 11).
Milford, OH: DNV GL-Healthcare USA, Inc. (Level VII)
9 The Joint Commission. (2019). Standard UP.01.01.01. Comprehensive
accreditation manual for hospitals. Oakbrook Terrace, IL: The Joint
Commission. (Level VII)
10 Accreditation Association for Hospitals and Health Systems. (2017). Standard
30.00 .14. Healthcare Facilities Accreditation Program: Accreditation
requirements for acute care hospitals. Chicago, IL: Accreditation Association
for Hospitals and Health Systems. (Level VII)
11 Van Wicklin, S. A., & Conner, R. (2017). Guideline for care of the patient
receiving moderate sedation/analgesia. In R. Conner (Ed.), Guidelines for
perioperative practice, 2017 edition. Denver, CO: AORN, Inc. (Level VII)
12 Centers for Disease Control and Prevention. (2002). Guideline for hand
hygiene in health care settings: Recommendations of the Healthcare Infection
Control Practices Advisory Committee and the HICPAC/SHEA/APIC/IDSA Hand
Hygiene Task Force. MMWR Recommendations and Reports, 51(RR-16), 1–45.
Accessed via the Web at https://www.cdc.gov/mmwr/pdf/rr/rr5116.pdf (Level
II)
13 The Joint Commission. (2019). Standard NPSG.07.01.01. Comprehensive
accreditation manual for hospitals. Oakbrook Terrace, IL: The Joint
Commission. (Level VII)
14 World Health Organization. (2009). “WHO guidelines on hand hygiene in
health care: First global patient safety challenge, clean care is safer care”
[Online]. Accessed via the Web at
http://apps.who.int/iris/bitstream/10665/44102/1/9789241597906_eng.pdf
(Level IV)
15 Accreditation Association for Hospitals and Health Systems. (2017). Standard
07.01.21. Healthcare Facilities Accreditation Program: Accreditation
requirements for acute care hospitals. Chicago, IL: Accreditation Association
for Hospitals and Health Systems. (Level VII)
16 Centers for Medicare and Medicaid Services, Department of Health and
Human Services. (2015). Condition of participation: Infection control. 42 C.F.R.
§ 482.42.
17 DNV GL-Healthcare USA, Inc. (2016). IC.1 .SR.1 . NIAHO® accreditation
requirements: Interpretive guidelines & surveyor guidance (version 11).
Milford, OH: DNV GL-Healthcare USA, Inc. (Level VII)
18 Siegel, J. D ., et al. (2007, revised 2017). “2007 guideline for isolation
precautions: Preventing transmission of infectious agents in healthcare
settings” [Online]. Accessed via the Web at
http://www.cdc.gov/hicpac/pdf/isolation/Isolation2007.pdf (Level II)
19 Accreditation Association for Hospitals and Health Systems. (2017). Standard
07.01.10. Healthcare Facilities Accreditation Program: Accreditation
requirements for acute care hospitals. Chicago, IL: Accreditation Association
for Hospitals and Health Systems. (Level VII)
20 Occupational Safety and Health Administration. (n.d .). “Bloodborne
pathogens, standard number 1910.1030” [Online]. Accessed via the Web at
https://www.osha.gov/pls/oshaweb/owadisp.show_document?
p_id=10051&p_table=STANDARDS (Level VII)
21 DNV GL-Healthcare USA, Inc. (2016). IC.1 .SR.2 . NIAHO® accreditation
requirements: Interpretive guidelines & surveyor guidance (version 11).
Milford, OH: DNV GL-Healthcare USA, Inc. (Level VII)
22 The Joint Commission. (2019). Standard NPSG.01.01.01. Comprehensive
accreditation manual for hospitals. Oakbrook Terrace, IL: The Joint
Commission. (Level VII)
23 The Joint Commission. (2019). Standard RI.01.01.01. Comprehensive
accreditation manual for hospitals. Oakbrook Terrace, IL: The Joint
Commission. (Level VII)
24 Accreditation Association for Hospitals and Health Systems. (2017). Standard
15.01.16. Healthcare Facilities Accreditation Program: Accreditation
requirements for acute care hospitals. Chicago, IL: Accreditation Association
for Hospitals and Health Systems. (Level VII)
25 DNV GL-Healthcare USA, Inc. (2016). PR.1.SR.5 . NIAHO® accreditation
requirements: Interpretive guidelines & surveyor guidance (version 11).
Milford, OH: DNV GL-Healthcare USA, Inc. (Level VII)
26 American Society of Anesthesiologists. (2011). “Practice guidelines for
preoperative fasting and the use of pharmacologic agents to reduce the risk
of pulmonary aspiration: Application to healthy patients undergoing elective
procedures” [Online]. Accessed via the Web at
http://anesthesiology.pubs.asahq.org/Article.aspx?articleid=1933410 (Level
V)
27 Waters, T. R., et al. (2009). “Safe patient handling training for schools of
nursing” [Online]. Accessed via the Web at
http://www.cdc.gov/niosh/docs/2009-127/pdfs/2009-127.pdf (Level VII)
28 The Joint Commission. (2019). Standard NPSG.06 .01.01. Comprehensive
accreditation manual for hospitals. Oakbrook Terrace, IL: The Joint
Commission. (Level VII)
29 The Joint Commission. (2013). “Sentinel event alert: Medical device alarm
safety in hospitals” [Online]. Accessed via the Web at
https://www.jointcommission.org/assets/1/6/SEA_50_alarms_4 _26_16.pdf
(Level VII)
30 Graham, K. C., & Cvach, M. (2010). Monitor alarm fatigue: Standardizing use
of physiological monitors and decreasing nuisance alarms. American Journal
of Critical Care, 19(1), 28–37. Accessed via the Web at
http://ajcc.aacnjournals.org/content/19/1/28.full.pdf
31 American Association of Critical-Care Nurses. (2013). “A ACN practice alert:
Alarm management” [Online]. Accessed via the Web at
https://www.aacn.org/aacn-website/shared/content/practice-
alerts/2015/11/25/alarm-management (Level VII)
32 American Society of Anesthesiologists. (2010, reaffirmed 2015). “Standards
for basic anesthetic monitoring” [Online]. Accessed via the Web at
https://www.asahq.org/quality-and-practice-management/standards-
guidelines-and-related-resources-search (Level VII)
33 The Joint Commission. (2019). Standard PC.03 .01.03 . Comprehensive
accreditation manual for hospitals. Oakbrook Terrace, IL: The Joint
Commission. (Level VII)
34 Centers for Medicare and Medicaid Services, Department of Health and
Human Services. (2015). Condition of participation: Surgical services. 42
C.F.R. § 482.51.
35 Accreditation Association for Hospitals and Health Systems. (2017). Standard
30.01.04. Healthcare Facilities Accreditation Program: Accreditation
requirements for acute care hospitals. Chicago, IL: Accreditation Association
for Hospitals and Health Systems. (Level VII)
36 The Joint Commission. (2019). Standard UP.01.03.01. Comprehensive
accreditation manual for hospitals. Oakbrook Terrace, IL: The Joint
Commission. (Level VII)
37 The Joint Commission. (2017). Standard MM.06.01.01. Comprehensive
accreditation manual for hospitals. Oakbrook Terrace, IL: The Joint
Commission. (Level VII)
38 Centers for Medicare and Medicaid Services, Department of Health and
Human Services. (2015). Condition of participation: Nursing services. 42
C.F.R. § 482.23(c).
39 Accreditation Association for Hospitals and Health Systems. (2017). Standard
16.01.03. Healthcare Facilities Accreditation Program: Accreditation
requirements for acute care hospitals. Chicago, IL: Accreditation Association
for Hospitals and Health Systems. (Level VII)
40 DNV GL-Healthcare USA, Inc. (2016). MM.1 .SR.2. NIAHO® accreditation
requirements: Interpretive guidelines & surveyor guidance (version 11).
Milford, OH: DNV GL-Healthcare USA, Inc. (Level VII)
41 Institute for Safe Medication Practices. (2014). “ISMP list of high-alert
medications in acute care settings” [Online]. Accessed via the Web at
http://www.ismp.org/Tools/highalertmedications.pdf (Level VII)
42 Institute for Safe Medication Practices. (2008). Conducting an independent
double-check. ISMP Medication Safety Alert! Nurse Advise-ERR, 6(12), 1.
Accessed via the Web at
http://www.ismp.org/newsletters/nursing/Issues/NurseAdviseERR200812.pdf
(Level VII)
43 Society of Gastroenterology Nurses and Associates, Inc. (1991, revised 2013).
“Position statement: Statement on the use of sedation and analgesia in the
gastrointestinal endoscopy setting” [Online]. Accessed via the Web at
https://www.sgna.org/Portals/0/Education/PDF/Position-
Statements/Sedation_2013-FINAL.pdf (Level VII)
44 American Society of Anesthesiologists. (2002). Practice guidelines for
sedation and analgesia by non-anesthesiologists. Anesthesiology, 96(4),
1004–1017. Accessed via the Web at
http://anesthesiology.pubs/asahq.org/article.aspx?articleid=1944958 (Level
VII)
45 The Joint Commission. (2019). Standard PC.03 .01.05. Comprehensive
accreditation manual for hospitals. Oakbrook Terrace, IL: The Joint
Commission. (Level VII)
46 Society of Gastroenterological Nurses and Associates, Inc. (1991, revised
2012). “Position statement: Manipulation of endoscopes during endoscopic
procedures” [Online]. Accessed via the Web at
https://www.sgna.org/Portals/0/Education/PDF/Position-
Statements/SGNAManipulationofEndoscopesduringEndoscopicProcedures201
2.pdf (Level VII)
47 American Society for Gastrointestinal Endoscopy. (2014). Guideline: The role
of endoscopy in the management of variceal hemorrhage. Gastrointestinal
Endoscopy, 80(2), 221–227. Accessed via the Web at
https://www.asge.org/docs/default-source/education/practice_guidelines/doc-
2014_the-role-of-endoscopy-in-the-management-of-variceal-hemorrhage.pdf
(Level VII)
48 Ganz, D. A., et al. (2013). Preventing falls in hospitals: A toolkit for improving
quality of care (AHRQ Publication No. 13-0015-EF). Rockville, MD: Agency for
Healthcare Research and Quality. Accessed via the Web at
http://www.ahrq.gov/sites/default/files/publications/files/fallpxtoolkit.pdf
(Level VII)
49 Meyers, J. L., & Chaudhuri, S. (2011). Procedural sedation and analgesia: A
practical review for non-anesthesiologists. Journal of Surgical Radiology, 2(4),
344–356.
50 The Joint Commission. (2019). Standard PC.03 .01.07. Comprehensive
accreditation manual for hospitals. Oakbrook Terrace, IL: The Joint
Commission. (Level VII)
51 Rutala, W. A., et al. (2008, revised 2017). “Guideline for disinfection and
sterilization in healthcare facilities, 2008” [Online]. Accessed via the Web at
http://www.cdc.gov/hicpac/pdf/guidelines/Disinfection_Nov_2008.pdf (Level I)
52 Society of Gastroenterology Nurses and Associates, Inc. (2002, revised 2014).
“Position statement: Reprocessing of endoscopic accessories and valves”
[Online]. Accessed via the Web at
https://www.sgna.org/Portals/0/Education/PDF/Position-
Statements/Reprocessingvalvesdocument_FINAL.pdf (Level VII)
53 American Society for Gastrointestinal Endoscopy. (2011). Multisociety
guideline on reprocessing flexible gastrointestinal endoscopes: 2011.
Gastrointestinal Endoscopy, 73(6), 1075–1084. Accessed via the Web at
https://www.researchgate.net/publication/51179843_Multisociety_guideline_o
n_reprocessing_flexible_gastrointestinal_endoscopes_2011 (Level VII)
54 Accreditation Association for Hospitals and Health Systems. (2017). Standard
07.02.03. Healthcare Facilities Accreditation Program: Accreditation
requirements for acute care hospitals. Chicago, IL: Accreditation Association
for Hospitals and Health Systems. (Level VII)
55 The Joint Commission. (2019). Standard RC.01.03 .01. Comprehensive
accreditation manual for hospitals. Oakbrook Terrace, IL: The Joint
Commission. (Level VII)
56 Centers for Medicare and Medicaid Services, Department of Health and
Human Services. (2015). Condition of participation: Medical record services.
42 C.F.R. § 482.24(b).
57 Accreditation Association for Hospitals and Health Systems. (2017). Standard
10.00 .03. Healthcare Facilities Accreditation Program: Accreditation
requirements for acute care hospitals. Chicago, IL: Accreditation Association
for Hospitals and Health Systems. (Level VII)
58 DNV GL-Healthcare USA, Inc. (2016). MR.2 .SR.1 . NIAHO® accreditation
requirements: Interpretive guidelines & surveyor guidance (version 11).
Milford, OH: DNV GL-Healthcare USA, Inc. (Level VII)
ENDOTRACHEAL DRUG ADMINISTRATION
When IV or intraosseous (IO) access isn’t readily available,
certain drugs can be administered into the respiratory
system through an endotracheal (ET) tube. This route allows
uninterrupted resuscitation efforts and avoids such
complications as coronary artery laceration, cardiac
tamponade, and pneumothorax, which can occur when
emergency drugs are administered through an intrathoracic
route.
Drugs given through an ET tube usually produce lower
blood levels of the drug than the same dose given IV.
According to the 2010 American Heart Association
guidelines for cardiopulmonary resuscitation (CPR) and
emergency cardiovascular care, studies show that these
lower blood levels may actually be detrimental to the
patient. For example, when epinephrine is administered
through an ET tube, it can produce transient beta-
adrenergic effects, causing vasodilation and subsequent
hypotension and reducing the chance of patient survival.
Because of this, although it’s possible to administer some
resuscitation drugs through an ET tube, IV or IO
administration is preferred because these routes provide
more predictable drug delivery and pharmacologic effect.1,2
When IV or IO access can’t be established, epinephrine,
vasopressin, and lidocaine may be administered through an
ET tube during cardiac arrest. Typically, the dose given by
the ET route is 2 to 21⁄2 times the recommended IV dose.
The drug should be diluted in 5 to 10 mL of sterile water or
normal saline solution and then injected directly into the ET
tube; better absorption may occur when epinephrine and
lidocaine are diluted in sterile water rather than normal
saline solution. Naloxone and atropine also can be
administered through an ET tube.1,2
Drugs given endotracheally are typically administered in
an emergency situation by a practitioner, an emergency
medical technician, or a critical care nurse. Although
guidelines may vary depending on state regulations, the
basic administration method is the same.
Drugs may be given endotracheally using the syringe
method or the adapter method. A swivel adapter can be
placed on the end of the ET tube and, while ventilation
continues through a bag-valve device, the drug can be
delivered through the closed stopcock. (See Administering
endotracheal drugs, page 268.)
Equipment
ET tube ▪ gloves ▪ end-tidal carbon dioxide (CO2) detector,
esophageal detection device, or continuous waveform
capnography device ▪ handheld resuscitation bag ▪
prescribed medication ▪ syringe ▪ needle or needleless
transfer device ▪ sterile water or normal saline solution ▪
stethoscope ▪ disinfectant pad ▪ medication label ▪
Optional: swivel adapter, other personal protective
equipment.
Implementation
■ Avoid distractions and interruptions when preparing and
administering the medication to prevent medication
errors.3,4
■ Verify the order on the patient’s medication
administration record by checking it against the
practitioner’s order, if able; use a closed-loop
communication system in a code situation.1,5,6,7,8,9
■ Gather the prescribed medication and equipment.
■ Compare the medication label with the order in the
patient’s medical record, if appropriate.6,7,8,9
■ Check the patient’s medical record for an allergy or a
contraindication to the prescribed medication. If an allergy
or a contraindication exists, don’t administer the
medication; instead, notify the practitioner.6,7,8,9
■ Check the expiration date on the medication. If the
medication is expired, return it to the pharmacy and obtain
new medication.6,7,8,9
■ Visually inspect the medication for particles,
discoloration, and other signs of loss of integrity; don’t
administer
the
medication
if its integrity is
compromised.6,7,8,9
■ Discuss any unresolved concerns about the medication
with the patient’s practitioner.6,7,8,9
■ Perform hand hygiene.10,11,12,13,14,15
■ Put on gloves and other personal protective equipment,
as needed, to comply with standard precautions.16,17
■ Confirm the patient’s weight in kilograms if giving
lidocaine to ensure accurate dosing of medication.18,19
■ Calculate the drug dose. Keep in mind that adult
advanced cardiac life support guidelines recommend that
drugs given endotracheally be administered at 2 to 21⁄2
times the recommended IV dose.1,2
■ Draw up the correct amount of medication into the
syringe. Dilute it in 5 to 10 mL of sterile water or normal
saline solution. Dilution increases drug volume and contact
with the lung tissue.
■ Label the syringe with the name and the dose of the
medication.20
■ Confirm the patient’s identity using at least two patient
identifiers.21
■ Provide privacy.22,23,24,25
■ Explain the procedure and allow family members to
remain with the patient if desired.26
■ Check ET tube placement by assessing chest expansion
bilaterally and listening over the epigastrium (you shouldn’t
hear breath sounds) and by assessing the lung fields
bilaterally (breath sounds should be equal and adequate).
Also check placement by using a continuous waveform
capnography device, if available. If continuous waveform
capnography isn’t available, use a nonwaveform carbon
dioxide detector, esophageal detector device, or ultrasound
device if an experienced ultrasound operator is available.2
NURSING ALERT Be aware that continuous waveform capnography
combined with clinical assessment is recommended as the most
reliable method of confirming correct ET tube placement.2
■ If CPR is in progress, interrupt chest compressions briefly
(less than 10 seconds) to administer the medication.2,27
■ Discontinue manual ventilation momentarily, remove the
needle from the syringe, insert the tip of the syringe directly
into the ET tube or into the swivel adapter, and inject the
drug into the tube.
■ After injecting the drug, reattach the resuscitation bag
and ventilate the patient briskly to clear the ET tube of the
drug and to disperse the drug into the airways.
■ Discard the syringe and needle in a puncture-resistant
sharps container.16
■ Remove and discard your gloves and any other personal
protective equipment worn.16
■ Perform hand hygiene.10,11,12,13,14,15
■ Clean and disinfect your stethoscope with a disinfectant
pad.28,29
■ Perform hand hygiene.10,11,12,13,14,15
■ Document the procedure.30,31,32,33
Special considerations
■ Keep in mind that, during cardiac arrest, drug
administration should only briefly interrupt chest
compressions.1
Complications
Potential complications of ET drug administration are related
to the metabolism of the drug in the respiratory tract, which
results in slow, erratic absorption and an unpredictable,
reduced systemic effect.
Administering endotracheal drugs
In an emergency, some drugs can be given through an endotracheal (ET)
tube if IV or intraosseous access isn’t available. They may be given using the
syringe method or the adapter method. Before injecting any drug, check for
proper placement of the ET tube using an end-tidal carbon dioxide detector,
an esophageal detection device, or continuous waveform capnography.
Auscultate breath sounds and check for equal chest expansion during manual
ventilation. Make sure the patient is in the supine position with the head level
with or slightly higher than the body.
Syringe method
Remove the needle before injecting medication into the ET tube. Insert the
tip of the syringe into the ET tube, and inject the drug deep into the tube (as
shown below).
Adapter method
An adapter device for ET drug administration provides a more closed system
of drug delivery than the syringe method. A special adapter placed on the
end of the ET tube (as shown below) allows drug delivery through the closed
stopcock.
Documentation
Document that ET tube placement was verified, and record
the methods used for verification. Record the date and time
of medication administration, the medication administered,
the type and volume of diluent used, and the patient’s
response to the medication. Document any adverse effects,
the practitioner notified, any prescribed interventions, and
the patient’s response to those interventions. Document any
patient and family teaching, their understanding of the
teaching, and whether follow-up teaching is needed.
REFERENCES
1 American Heart Association. (2010). Part 8: Adult advanced cardiovascular
life support. 2010 American Heart Association guidelines for cardiopulmonary
resuscitation and emergency cardiovascular care. Circulation, 122, S729–
S767. (Level II)
2 American Heart Association. (2015). Part 7: Adult advanced cardiovascular
life support. 2015 American Heart Association guidelines update for
cardiopulmonary resuscitation and emergency cardiovascular care.
Circulation, 132, S444–S464. (Level II)
3 Institute for Safe Medication Practices. (2012). Side tracks on the safety
express: Interruptions lead to errors and unfinished...Wait, what was I doing?
Nurse Advise-ERR, 11(2), 1–4 . Accessed via the Web at
https://www.ismp.org/Newsletters/acutecare/showarticle.aspx?id=37 (Level
VII)
4 Westbrook, J., et al. (2010). Association of interruptions with an increased risk
and severity of medication administration errors. Archives of Internal
Medicine, 170(8), 683–690 . (Level IV)
5 The Joint Commission. (2019). Standard MM.04.01.01. Comprehensive
accreditation manual for hospitals. Oakbrook Terrace, IL: The Joint
Commission. (Level VII)
6 The Joint Commission. (2019). Standard MM.06 .01.01. Comprehensive
accreditation manual for hospitals. Oakbrook Terrace, IL: The Joint
Commission. (Level VII)
7 Accreditation Association for Hospitals and Health Systems. (2017). Standard
16.01.03. Healthcare Facilities Accreditation Program: Accreditation
requirements for acute care hospitals. Chicago, IL: Accreditation Association
for Hospitals and Health Systems. (Level VII)
8 Centers for Medicare and Medicaid Services, Department of Health and
Human Services. (2015). Condition of participation: Nursing services. 42
C.F.R. § 482.23(c).
9 DNV GL-Healthcare USA, Inc. (2016). MM .1 .SR.2 . NIAHO® accreditation
requirements: Interpretive guidelines & surveyor guidance (version 11).
Milford, OH: DNV GL-Healthcare USA, Inc. (Level VII)
10 The Joint Commission. (2019). Standard NPSG.07.01.01. Comprehensive
accreditation manual for hospitals. Oakbrook Terrace, IL: The Joint
Commission. (Level VII)
11 World Health Organization. (2009). “WHO guidelines on hand hygiene in
health care: First global patient safety challenge, clean care is safer care”
[Online]. Accessed via the Web at
http://apps.who.int/iris/bitstream/10665/44102/1/9789241597906_eng.pdf
(Level IV)
12 Centers for Disease Control and Prevention. (2002). Guideline for hand
hygiene in health-care settings: Recommendations of the Healthcare Infection
Control Practices Advisory Committee and the HICPAC/SHEA/APIC/IDSA Hand
Hygiene Task Force. MMWR Recommendations and Reports, 51(RR-16), 1–45.
Accessed via the Web at https://www.cdc.gov/mmwr/pdf/rr/rr5116.pdf (Level
II)
13 Accreditation Association for Hospitals and Health Systems. (2017). Standard
07.01.21. Healthcare Facilities Accreditation Program: Accreditation
requirements for acute care hospitals. Chicago, IL: Accreditation Association
for Hospitals and Health Systems. (Level VII)
14 Centers for Medicare and Medicaid Services, Department of Health and
Human Services. (2015). Condition of participation: Infection control. 42 C.F.R.
§ 482.42.
15 DNV GL-Healthcare USA, Inc. (2016). IC.1 .SR.1 . NIAHO® accreditation
requirements: Interpretive guidelines & surveyor guidance (version 11).
Milford, OH: DNV GL-Healthcare USA, Inc. (Level VII)
16 Siegel, J. D ., et al. (2007, revised 2017). “2007 guideline for isolation
precautions: Preventing transmission of infectious agents in healthcare
settings” [Online]. Accessed via the Web at
http://www.cdc.gov/hicpac/pdf/isolation/Isolation2007.pdf (Level II)
17 Accreditation Association for Hospitals and Health Systems. (2017). Standard
07.01.10. Healthcare Facilities Accreditation Program: Accreditation
requirements for acute care hospitals. Chicago, IL: Accreditation Association
for Hospitals and Health Systems. (Level VII)
18 Emergency Nurses Association. (2016). “Weighing patients in kilograms”
[Online]. Accessed via the Web at https://www.ena.org/docs/default-
source/resource-library/practice-resources/position-
statements/weighingallpatientsinkilograms.pdf?sfvrsn=9c0709e_6 (Level VII)
19 Institute for Safe Medication Practices. (2018). “2018–2019 targeted
medication safety best practices for hospitals” [Online]. Accessed via the
Web at http://www.ismp.org/tools/bestpractices/TMSBP-for-Hospitals.pdf
(Level VII)
20 Accreditation Association for Hospitals and Health Systems. (2017). Standard
25.01.18. Healthcare Facilities Accreditation Program: Accreditation
requirements for acute care hospitals. Chicago, IL: Accreditation Association
for Hospitals and Health Systems. (Level VII)
21 The Joint Commission. (2019). Standard NPSG.01.01.01. Comprehensive
accreditation manual for hospitals. Oakbrook Terrace, IL: The Joint
Commission. (Level VII)
22 Accreditation Association for Hospitals and Health Systems. (2017). Standard
15.01.16. Healthcare Facilities Accreditation Program: Accreditation
requirements for acute care hospitals. Chicago, IL: Accreditation Association
for Hospitals and Health Systems. (Level VII)
23 Centers for Medicare and Medicaid Services, Department of Health and
Human Services. (2015). Condition of participation: Patient’s rights. 42 C.F.R.
§ 482.13(c)(1).
24 The Joint Commission. (2019). Standard RI.01.01.01. Comprehensive
accreditation manual for hospitals. Oakbrook Terrace, IL: The Joint
Commission. (Level VII)
25 DNV GL-Healthcare USA, Inc. (2016). PR.1.SR.5 . NIAHO® accreditation
requirements: Interpretive guidelines & surveyor guidance (version 11).
Milford, OH: DNV GL-Healthcare USA, Inc. (Level VII)
26 Emergency Nurses Association. (2012). “Clinical practice guideline: Family
presence during invasive procedures and resuscitation” [Online]. Accessed
via the Web at https://www.ena.org/docs/default-source/resource-
library/practice-
resources/cpg/familypresencesynopsis3bdad0aaaeeb4370856e849f26e553a3
. pdf?sfvrsn=21ca66b_8 (Level VII)
27 Meaney, P. A., et al. (2013). Cardiopulmonary resuscitation quality: Improving
cardiac resuscitation outcomes both inside and outside the hospital: A
consensus statement from the American Heart Association. Circulation, 128,
417–435. (Level VII)
28 Accreditation Association for Hospitals and Health Systems. (2017). Standard
07.02.03. Healthcare Facilities Accreditation Program: Accreditation
requirements for acute care hospitals. Chicago, IL: Accreditation Association
for Hospitals and Health Systems. (Level VII)
29 Rutala, W. A., et al. (2008). “Guideline for disinfection and sterilization in
healthcare facilities, 2008” [Online]. Accessed via the Web at
http://www.cdc.gov/hicpac/pdf/guidelines/Disinfection_Nov_2008.pdf (Level I)
30 The Joint Commission. (2019). Standard RC.01.03 .01. Comprehensive
accreditation manual for hospitals. Oakbrook Terrace, IL: The Joint
Commission. (Level VII)
31 Centers for Medicare and Medicaid Services, Department of Health and
Human Services. (2015). Condition of participation: Medical record services.
42 C.F.R. § 482.24(b).
32 Accreditation Association for Hospitals and Health Systems. (2017). Standard
10.00 .03. Healthcare Facilities Accreditation Program: Accreditation
requirements for acute care hospitals. Chicago, IL: Accreditation Association
for Hospitals and Health Systems. (Level VII)
33 DNV GL-Healthcare USA, Inc. (2016). MR.2 .SR.1 . NIAHO® accreditation
requirements: Interpretive guidelines & surveyor guidance (version 11).
Milford, OH: DNV GL-Healthcare USA, Inc. (Level VII)
ENDOTRACHEAL INTUBATION
Endotracheal (ET) intubation involves the oral or nasal
insertion of a flexible tube through the larynx into the
trachea for the purposes of controlling the airway and
mechanically ventilating the patient. Performed by a
practitioner, anesthetist, respiratory therapist, or nurse
educated in the procedure, ET intubation typically occurs in
emergencies such as cardiopulmonary arrest or in diseases
such as epiglottitis. In most circumstances, clinicians use
rapid sequence intubation to secure the patient’s airway;
it’s the standard of care in emergency airway management
when difficult intubation isn’t anticipated. With rapid
sequence intubation, the patient receives a rapidly acting
sedative and a neuromuscular blocking agent, which cause
the patient to become immediately unconscious and flaccid
to facilitate emergent endotracheal intubation and minimize
the risk of aspiration of stomach contents.1,2,3,4
Advantages of the procedure are that it establishes and
maintains a patent airway, protects against aspiration by
sealing off the trachea from the digestive tract, permits
removal of tracheobronchial secretions in patients who can’t
cough effectively, and provides a route for mechanical
ventilation. Disadvantages are that it bypasses normal
respiratory defenses against infection, reduces cough
effectiveness, and prevents verbal communication.
ET intubation by the nasotracheal route (blind
nasotracheal intubation) is more comfortable than oral
intubation, but it’s also more difficult to perform. Because
the tube passes blindly through the nasal cavity, the
procedure causes greater tissue trauma, increases the risk
of infection by nasal bacteria introduced into the trachea,
and risks pressure necrosis of the nasal mucosa. However,
exact tube placement is easier, and the risk of dislodgment
is lower. The cuff on the ET tube maintains a closed system
that permits positive pressure ventilation and protects the
airway from aspiration of secretions and gastric contents.
Oral ET intubation (direct visualization intubation) is
preferred over the nasotracheal route because intubation by
the nasotracheal route increases the risk of sinusitis, which
may increase the risk of ventilator-associated pneumonia.5
Nasotracheal intubation is contraindicated in patients with
facial fractures or suspected basilar skull fractures and after
cranial surgery such as transsphenoidal hypophysectomy.6
Equipment
Two ET tubes (one spare) of the appropriate size (normal
femalesizeis7to8mm;normalmalesizeis8to9mm)
with in-line or subglottic suctioning if available ▪ 10-mL
syringe ▪ stethoscope ▪ prescribed sedative ▪ local
anesthetic spray ▪ overbed or other table ▪ water-soluble
lubricant ▪ adhesive or other strong tape or commercial ET
tube holder ▪ skin preparation product ▪ gloves ▪ goggles
and mask or face shield and other personal protective
equipment ▪ cardiac monitoring equipment ▪ blood
pressure monitoring equipment ▪ pulse oximeter and probe
▪ suction equipment ▪ handheld resuscitation bag with
sterile swivel adapter ▪ humidified oxygen source ▪ carbon
dioxide detector or quantitative waveform capnography
equipment ▪ oral care supplies ▪ cuff pressure manometer
▪ disinfectant pad ▪ batteries ▪ Optional: chlorhexidine-
based mouth care solution, stylet, IV catheter insertion
equipment, soft physical wrist restraints, ventilator.
Prepackaged intubation trays that contain most of the
necessary supplies may be available.
Preparation of equipment
Before direct visualization intubation, you may use a stylet
to stiffen the tube. The entire stylet may be lubricated.
Insert the stylet into the tube so that its distal tip lies about
1⁄2′′ (1.3 cm) inside the distal end of the tube. Make sure the
stylet doesn’t protrude from the tube to avoid vocal cord
trauma. Also, check the light in the laryngoscope by
snapping the appropriate-sized blade into place; if the bulb
doesn’t light, replace the batteries or the laryngoscope
(whichever will be quicker).
Prepare the humidified oxygen source and the suction
equipment for immediate use. If the patient is in bed,
remove the headboard to provide easier access.
Implementation
■ Verify the practitioner’s order for intubation, if not an
emergency situation.
■ Review the patient’s medical record for a history of
medical, surgical, and anesthetic factors that may increase
the risk of difficult intubation.7
■ Conduct a preprocedure verification to make sure all
relevant documentation, related information, and equipment
are available and correctly identified to the patient’s
identifiers.8,9
■ Assess the patient’s immediate history for suspected
spinal cord injury or cranial surgery to make sure that the
proper intubation method is chosen.6
■ Gather and prepare the necessary supplies.
■ Perform hand hygiene10,11,12,13,14,15 and then put on
gloves to comply with standard precautions.16,17
■ Confirm the patient’s identity using at least two patient
identifiers, if possible.18
■ Provide privacy.19,20,21,22
■ If the patient is in bed, remove the headboard to provide
easier access.
■ Raise the patient’s bed to waist level when providing care
to prevent caregiver back strain.23
■ Using sterile technique, open the package containing the
ET tube and, if desired, open the other supplies on an
overbed table.
■ Attach the syringe to the port on the tube’s exterior pilot
cuff. Slowly inflate the cuff, observing for uniform inflation.
Then use the syringe to deflate the cuff.
■ If a stylet is needed to stiffen the tube, lubricate the
stylet and insert it into the tube so that its distal tip lies
about 1⁄2′′ (1.3 cm) inside the distal end of the tube. Make
sure that the stylet doesn’t protrude from the tube to avoid
vocal cord and tracheal trauma.6
■ Lubricate the first 1′′ (2.5 cm) of the distal end of the ET
tube with water-soluble lubricant using sterile technique.
Use only water-soluble lubricant because it can be absorbed
by the mucous membranes.
■ If possible, assign a staff person to provide information to
the patient and family and support them throughout the
procedure, according to their individual communication and
learning needs;24 offer family members the option of staying
at the bedside to allay the patient’s and family’s fears and
to decrease anxiety.25
■ Assess the patient’s oral cavity for dentures or loose
teeth; remove them if possible, because they might obstruct
the airway.6 Inspect the patient’s oral cavity, airway, head,
and neck for factors that might increase the risk of difficult
intubation.7
■ Determine when the patient last had something to eat,
because recent food consumption increases the risk of
aspiration; handheld resuscitation bag use may also
increase abdominal distention, further increasing the risk of
aspiration.6,26,27
■ Assess the patient’s level of consciousness, level of
anxiety, and respiratory status to determine whether the
patient needs sedation, a paralytic agent, or both.6
■ Attach the patient to cardiac monitoring equipment, blood
pressure monitoring equipment, and a pulse oximeter to
monitor the patient’s heart rhythm, blood pressure, and
oxygen saturation for changes before, during, and after the
procedure.6 Make sure alarm limits are set appropriately for
the patient’s current condition, and that alarms are turned
on, properly functioning, and audible to staff.28
■ Insert an IV catheter if the patient doesn’t already have a
functioning catheter in place to administer sedation and
other emergency medications, if needed.6 (See the “IV
catheter insertion and removal” procedure, page 443.)
■ Administer a sedative, or a sedative and paralytic agent,
as ordered, to decrease respiratory secretions, induce
amnesia or analgesia, and help calm and relax a conscious
patient.29,30,31,32
NURSING ALERT Sedatives and paralytic medications are considered
high-alert medications because they can cause significant harm when
used in error. If required in your facility, before administering these
medications, have another nurse perform an independent double-
check to verify the patient’s identity and make sure that the correct
medication is being administered in the prescribed concentration, the
medication’s indication corresponds with the patient’s diagnosis, the
dosage calculations are correct and the dosing formula used to derive
the final dose is correct, the route of administration is safe and proper
for the patient, and, if the medication is administered through an
infusion pump, the pump settings are correct and the infusion line is
attached to the correct port.33,34
■ After comparing the results of the independent double-
check with another nurse (if required) and, if no
discrepancies exist, administer the medication. If
discrepancies exist, rectify them before administering the
medication.34
■ Conduct a time-out immediately before starting the
procedure to perform a final assessment that the correct
patient, site, position, and procedure are identified and, as
applicable, that all relevant information and necessary
equipment are available.15,35
■ Remove and discard your gloves.16
■ Perform hand hygiene.10,11,12,13,14,15
■ Put on goggles and a mask (or a mask with face shield), a
gown, and gloves, because secretions may splash during
intubation.16,17
■ Preoxygenate the patient with 100% oxygen using a
handheld resuscitation bag for at least 3 minutes; continue
until the tube is inserted to prevent hypoxia.6
For direct visualization intubation
■ Place the patient in the supine, “sniffing” position so that
the mouth, pharynx, and trachea are extended. If cervical
spine injury is suspected, have an assistant maintain the
patient’s head in a neutral position with the spine
immobilized.6
■ Spray a local anesthetic (such as lidocaine) deep into the
posterior pharynx, if indicated, to diminish the gag reflex
and reduce patient discomfort.
■ If necessary, suction the patient’s pharynx just before
tube insertion to improve visualization of the patient’s
pharynx and vocal cords and to prevent aspiration of
secretions.
■ Be prepared to time each intubation attempt, limiting
each attempt to less than 30 seconds to prevent hypoxia.36
Ideally, each attempt should be limited to 10 seconds during
cardiopulmonary resuscitation (CPR).26,27 Hyperoxygenate
the patient between attempts, if necessary.6,36
■ Stand at the head of the patient’s bed. Use the fingers of
your right hand to open the patient’s mouth to provide
access to the oral cavity.6
■ Grasp the laryngoscope handle in your left hand, and
gently slide the blade into the right side of the patient’s
mouth using the blade to push the tongue to the left to
visualize the glottis opening.6
■ Advance the blade to expose the epiglottis. When using a
straight blade, insert the tip under the epiglottis; when
using a curved blade, insert the tip between the base of the
tongue and the epiglottis.
■ Lift the laryngoscope handle upward and away from your
body at a 45-degree angle to reveal the vocal cords. Avoid
pivoting the laryngoscope against the patient’s teeth to
avoid damaging them.
■ Insert the ET tube into the right side of the patient’s
mouth.
■ Guide the tube into the vertical openings of the larynx
between the vocal cords, being careful not to mistake the
horizontal opening of the esophagus for the larynx. If the
vocal cords are closed because of a spasm, wait a few
seconds for them to relax; then gently guide the tube past
them to avoid traumatic injury.
■ Advance the tube until the cuff disappears beyond the
vocal cords. Avoid advancing the tube farther to avoid
occluding a major bronchus and precipitating lung collapse.6
■ When the ET tube is placed properly, continue to hold it
securely in place at the patient’s lips while withdrawing the
laryngoscope blade and then the stylet, if present.6
For blind nasotracheal intubation
■ Place the patient with the head and neck in a neutral
position.
■ Spray a local anesthetic and a mucosal vasoconstrictor
into the nasal passages to anesthetize the nasal turbinates
and reduce the chance of bleeding.6
■ Be prepared to time each intubation attempt, limiting
each attempt to less than 30 seconds to prevent hypoxia.26
Ideally, each attempt should be limited to 10 seconds during
CPR.26 Hyperoxygenate the patient between attempts if
necessary.26
■ Insert the lubricated ET tube along the floor of the nasal
cavity, listening and feeling for air movement through the
tube as it’s advanced to ensure that the tube is properly
placed in the airway.
■ Advance the tube between the vocal cords when the
patient inhales, because the vocal cords separate on
inhalation.
■ Listen for the breath sounds to become louder when the
tube is past the vocal cords. If breath sounds disappear at
any time during tube advancement, withdraw the tube until
they reappear.
■ When you place the ET properly, continue to hold it
securely in place and withdraw the stylet if present.6
After intubation
■ Inflate the tube’s cuff with 5 to 10 mL of air according to
the manufacturer’s instructions. When the patient is
mechanically ventilated, you’ll use the minimal-leak
technique or the minimal occlusive volume technique to
establish correct inflation of the cuff. (For instructions, see
the “Tracheal cuff-pressure measurement” procedure.)
Guidelines recommend a cuff pressure between 20 and 30
cm H2O to ensure ventilation, prevent aspiration, and
maintain tracheal perfusion.37,38,39,40,41,42
■ Confirm ET tube placement using physical and
nonphysical examination techniques. Physical examination
techniques include auscultating for bilateral breath sounds,
observing for bilateral chest expansion, and listening over
the epigastrium (where breath sounds shouldn’t be heard).
The preferred nonphysical examination technique to confirm
and monitor placement is continuous quantitative waveform
capnography.7,26,27 If continuous waveform capnography is
not available, a nonwaveform carbon dioxide detector,
esophageal detector device, or ultrasound used by an
experienced operator is a reasonable alternative.27
NURSING ALERT If ET tube insertion is occurring during emergency
care, avoid interrupting chest compressions when confirming tube
placement.
NURSING ALERT Intubation performed during cardiac arrest
shouldn’t delay initial CPR and defibrillation for ventricular
fibrillation.
■ If any signs of esophageal intubation are present
(stomach distention, belching, or a gurgling sound),
immediately deflate the cuff and remove the tube. After
reoxygenating the patient to prevent hypoxia, repeat
insertion using a sterile tube to prevent contamination of
the trachea.
■ Auscultate bilaterally to exclude the possibility of
endobronchial intubation. If you fail to hear breath sounds
on both sides of the chest, you may have inserted the tube
into one of the mainstem bronchi (usually the right one
because of its wider angle at the bifurcation); such insertion
occludes the other bronchus and lung and results in
atelectasis on the obstructed side. It’s also possible that the
tube is resting on the carina, resulting in dry secretions that
obstruct both bronchi. (The patient’s coughing and fighting
the ventilator will alert you to the problem.) To correct these
situations, deflate the cuff, withdraw the tube 1 to 2 cm,
auscultate for bilateral breath sounds, and then reinflate the
cuff.
■ Once you have confirmed correct ET tube placement,
administer oxygen or initiate mechanical ventilation and
suction, if indicated. During CPR, deliver ventilations using a
handheld resuscitation bag at a rate of one breath every 6
to 8 seconds.27
■ Measure the distance from the edge of the lip to the end
of the tube and document the distance on the flow sheet or
emergency sheet. If the tube has measurement markings on
it, record the measurement where the tube exits at the lips.
By periodically monitoring this mark, you can detect tube
displacement.26
■ Apply a skin preparation product, such as benzoin, to
each cheek and let it dry. Secure the tube using a strong
adhesive tape or a commercial ET tube holder or tape to
prevent inadvertent extubation.26,27 (See Methods to secure
an ET tube, pages 272, 273.)
■ Obtain a chest X-ray to verify tube position.26
■ If ordered, obtain an arterial blood sample for arterial
blood gas analysis to evaluate gas exchange. Notify the
practitioner of critical test results within your facility’s
established time-frame so the patient can receive prompt
treatment.43
■ Monitor pulse saturation by pulse oximetry, as ordered.6
■ Place a swivel adapter between the tube and the
humidified oxygen source to allow for intermittent
suctioning and to reduce tube tension.
■ Position the patient with the head elevated 30 to 45
degrees to reduce the risk of ventilator-associated
pneumonia (VAP).5,44,45
■ Provide frequent nasal and oral care and reposition the ET
tube daily to prevent formation of pressure injuries, drying
of oral mucous membranes, and VAP. Perform oral care daily
with a chlorhexidine-based mouth care solution daily, as
prescribed.46,47,48
■ Suction secretions through the ET tube as the patient’s
condition indicates to clear secretions and prevent mucus
plugs from obstructing the tube.
■ Return the bed to the lowest position to prevent falls and
maintain patient safety.49
■ Remove and discard your gloves and other personal
protective equipment.16
■ Perform hand hygiene.10,11,12,13,14,15
■ Clean and disinfect your stethoscope using a disinfectant
pad.50,51
■ Perform hand hygiene.10,11,12,13,14,15
■ Document the procedure.52,53,54,55
Special considerations
■ The Joint Commission issued a sentinel event alert
concerning medical device alarm safety because alarm-
related events have been associated with permanent loss of
function or death. Among the major contributing factors
were improper alarm settings, alarm settings turned off
inappropriately, and alarm signals not audible to staff. Make
sure alarm limits are set appropriately, and that alarms are
turned on, functioning properly, and audible to staff. Follow
facility guidelines for preventing alarm fatigue.56
■ Intubation performed during cardiac arrest shouldn’t
delay initial CPR and defibrillation for ventricular
fibrillation.26
■ Orotracheal intubation is preferred in emergencies
because insertion is easier and faster than it is with
nasotracheal intubation. However, maintaining exact tube
placement is more difficult, and the tube must be well
secured to avoid kinking and to prevent bronchial
obstruction or accidental extubation.
■ The routine use of cricoid pressure is no longer
recommended except to help visualize the vocal cords in
tracheal intubation.26
■ Although low-pressure cuffs have significantly reduced
the incidence of tracheal erosion and necrosis caused by
cuff pressure on the tracheal wall, overinflation of a low-
pressure cuff can negate the benefit. Use the minimal-leak
technique to avoid these complications. Inflating the cuff a
bit more to make a complete seal with the least amount of
air is the next most desirable method. A gradual increase in
cuff volume indicates tracheal dilatation or erosion. A
sudden increase in volume indicates rupture of the cuff and
requires immediate reintubation if the patient is being
ventilated or if the patient requires continuous cuff inflation
to maintain a high concentration of delivered oxygen. A
minimal pressure of 20 cm H2O is recommended to prevent
aspiration and VAP.57
■ Always record the volume of air needed to inflate the cuff.
Cuff pressure should be monitored at least every 8 hours to
avoid overinflation and underinflation.57
■ If the patient requires mechanical ventilation, using a
multidisciplinary approach, interrupt the patient’s sedation
daily and assess the patient’s readiness to wean. Doing so
reduces the amount of time the patient spends on a
ventilator and reduces the risk of VAP.47
■ Make sure the patient who requires mechanical
ventilation receives deep venous thromboembolism
prophylaxis (unless contraindicated), as prescribed, as well
as peptic ulcer disease prophylaxis. When combined with
head-of-bed elevation, oral care, daily sedation interruption,
and assessment of the readiness to wean, these measures
reduce the incidence of VAP.47
■ Other techniques for managing a difficult airway include
fiberoptic intubation, use of an intubating stylet or a tube
changer, insertion of a supraglottic airway as an intubating
conduit, use of laryngoscope blades of varying design and
size, and use of a light wand or videolaryngoscope.7
Patient teaching
Teach the patient and his family about measures to prevent
VAP, including performing hand hygiene regularly and
keeping the head of bed elevated 30 to 45 degrees.
Complications
ET intubation can result in apnea caused by reflex breath
holding or interruption of oxygen delivery; bronchospasm;
aspiration of blood, secretions, or gastric contents; tooth
damage or loss; and injury to the lips, mouth, pharynx, or
vocal cords. It can also result in laryngeal edema and
erosion and in tracheal stenosis, erosion, and necrosis.
Nasotracheal intubation can result in nasal bleeding,
laceration, sinusitis, otitis media, and VAP. Incorrect
placement of an ET tube can result in hypoxia,
pneumothorax, vocal cord paralysis, and even death.
Documentation
Record the date and time of intubation, its indication, and
success or failure. Document the type and size of ET tube,
external length measurement from the patient’s lip, the
volume of air needed to adequately inflate the cuff, inflation
technique used, and medications administered. Record
when supplemental oxygen or mechanical ventilation was
initiated, your assessment findings, techniques used to
confirm tube placement, complications, interventions taken
in response to those complications, and the patient’s
response to your interventions.
REFERENCES
1 Bair, A. E . Rapid sequence intubation for adults outside the operating room.
(2017). In: UpToDate, Walls, R. M., & Grayzel, J. (Eds.) . Accessed via the Web
at http://www.uptodate.com
2 Sagarin, M. J ., et al. (2005). Airway management by US and Canadian
emergency medicine residents: A multicenter analysis of more than 6,000
endotracheal intubation attempts. Annals of Emergency Medicine, 46(4),
328–336 . (Level VI)
3 Brown, C. A., et al. (2015). Techniques, success, and adverse events in the
emergency department adult intubations. Annals of Emergency Medicine,
65(4), 363–370. (Level VI)
Methods to secure an ET tube
An endotracheal (ET) tube should be secured with a commercial ET tube
holder as recommended by The American Heart Association and American
Pediatric Association. Alternatively, the tube may be taped in place to
prevent dislodgment.
To secure the tube, use one of the following methods.
Method 1
Made of hard plastic or of softer materials, commercial ET tube holders are a
convenient way to secure an ET tube in place. They’re available in adult and
pediatric sizes, and some models come with bite blocks attached. The strap
is placed around the patient’s neck and secured around the tube with Velcro
fasteners. Because each model is different, check with the manufacturer’s
guidelines for correct placement and care.
Method 2
Cut two 2′′ (5-cm) strips and two 15′′ (38-cm) strips of 1′′ (2.5 -cm) cloth
adhesive tape. Then cut a 13′′ (33-cm) slit in one end of each 15′′ (38-cm)
strip (as shown below). (Some facilities require the tape to encircle the
patient’s head.)
Apply compound benzoin tincture or other skin preparation product to the
patient’s cheeks. Place the 2′′ (5-cm) strips on the patient’s cheeks, creating
a new surface on which to anchor the tape securing the tube. When frequent
retaping is necessary, this step helps preserve the patient’s skin integrity. If
the patient’s skin is excoriated or at risk, you can use a transparent
semipermeable dressing to protect the skin.
Apply a skin preparation product to the part of the tube where you’ll be
applying the tape. On the side of the mouth where the tube will be anchored,
place the unslit end of the long tape on top of the tape on the patient’s
cheek.
Wrap the top half of the tape around the tube twice, pulling the tape tightly
around the tube. Then, directing the tape over the patient’s upper lip, place
the end of the tape on the patient’s other cheek. Cut off any excess tape. Use
the lower half of the tape to secure an oral airway, if necessary (as shown
below).
Alternatively, twist the lower half of the tape around the tube twice and
attach it to the original cheek. Taping in opposite directions places equal
traction on the tube.
If an oral airway is taped in the mouth or you’re concerned about the
tube’s stability, apply the other 15′′ (38-cm) strip of tape in the same manner,
starting on the other side of the patient’s face (as shown below). If the tape
around the tube is too bulky, use only the upper part of the tape and cut off
the lower part. If the patient has copious oral secretions, seal the tape by
cutting a 1′′ (2.5 -cm) piece of paper tape, coating it with a skin preparation
product, and placing the paper tape over the adhesive tape.
Method 3
Cut one piece of 1′′ (2.5 -cm) cloth adhesive tape long enough to wrap around
the patient’s head and overlap in front. Then cut an 8′′ (20.3-cm) piece of
tape and center it on the longer piece, sticky sides together. Next, cut a 5′′
(12.7-cm) slit in each end of the longer tape (as shown below).
Apply a skin preparation product to the patient’s cheeks, under the nose,
and under the lower lip. If you’re using benzoin, don’t spray it directly on the
patient’s face, because vapors can be irritating if inhaled and can also harm
the eyes.
Place the top half of one end of the tape under the patient’s nose and wrap
the lower half around the ET tube. Place the lower half of the other end of the
tape along the patient’s lower lip and wrap the top half around the tube (as
shown below).
Method 4
Cut a tracheostomy tie in two pieces, one a few inches longer than the other,
and cut two 6′′ (15.2 -cm) pieces of 1′′ (2.5 -cm) cloth adhesive tape. Then cut
a 2′′ (5-cm) slit in one end of both pieces of tape. Fold back the other end of
the tape 1⁄2′′ (1.3 cm) so that the sticky sides are together, and cut a small
hole in it (as shown below).
Apply a skin preparation product to the part of the ET tube that will be
taped. Wrap the split ends of each piece of tape around the tube, one piece
on each side. Overlap the tape to secure it.
Apply the free ends of the tape to both sides of the patient’s face. Then
insert tracheostomy ties through the holes in the tape and knot the ties (as
shown below).
Bring the longer tie behind the patient’s neck. Knotting the ties on the side
prevents the patient from lying on the knot and developing a pressure injury.
4 Goto, T., et al. (2015). Multiple failed intubation attempts are associated with
decreased success rates on the first rescue intubation in the emergency
department: A retrospective analysis of multicentre observational data.
Scandinavian Journal of Trauma, Resuscitation and Emergency Medicine, 23,
5. Accessed via the Web at http://link.springer.com/article/10.1186/s13049-
014-0085-8/fulltext.html (Level IV)
5 Klompas, M., et al. (2014). Strategies to prevent ventilator-associated
pneumonia in acute care hospitals: 2014 update. Infection Control and
Hospital Epidemiology, 35(8), 915–936. Accessed via the Web at
http://www.jstor.org/stable/10.1086/677144 (Level I)
6 Wiegand, D. L. (Ed.). (2017). AACN procedure manual for high acuity,
progressive and critical care (7th ed.) . St. Louis, MO: Elsevier.
7 American Society of Anesthesiologists. (2013). Practice guidelines for
management of the difficult airway: An updated report by the American
Society of Anesthesiologists Task Force on Management of the Difficult
Airway. Anesthesiology, 118, 251–270. Accessed via the Web at
http://anesthesiology.pubs.asahq.org/Article.aspx?articleid=1918684 (Level
VII)
8 The Joint Commission. (2019). Standard UP.01.01.01. Comprehensive
accreditation manual for hospitals. Oakbrook Terrace, IL: The Joint
Commission. (Level VII)
9 Accreditation Association for Hospitals and Health Systems. (2017). Standard
30.00 .14. Healthcare Facilities Accreditation Program: Accreditation
requirements for acute care hospitals. Chicago, IL: Accreditation Association
for Hospitals and Health Systems. (Level VII)
10 The Joint Commission. (2019). Standard NPSG.07.01.01. Comprehensive
accreditation manual for hospitals. Oakbrook Terrace, IL: The Joint
Commission. (Level VII)
11 Centers for Disease Control and Prevention. (2002). Guideline for hand
hygiene in health-care settings: Recommendations of the Healthcare Infection
Control Practices Advisory Committee and the HICPAC/SHEA/APIC/IDSA Hand
Hygiene Task Force. MMWR Recommendations and Reports, 51(RR-16), 1–45.
Accessed via the Web at https://www.cdc.gov/mmwr/pdf/rr/rr5116.pdf (Level
II)
12 Centers for Medicare and Medicaid Services, Department of Health and
Human Services. (2015). Condition of participation: Infection control. 42 C.F.R.
§ 482.42.
13 DNV GL-Healthcare USA, Inc. (2016). IC.1 .SR.1 . NIAHO® accreditation
requirements: Interpretive guidelines & surveyor guidance (version 11).
Milford, OH: DNV GL-Healthcare USA, Inc. (Level VII)
14 World Health Organization. (2009). “WHO guidelines on hand hygiene in
health care: First global patient safety challenge, clean care is safer care”
[Online]. Accessed via the Web at
http://apps.who.int/iris/bitstream/10665/44102/1/9789241597906_eng.pdf
(Level IV)
15 Accreditation Association for Hospitals and Health Systems. (2017). Standard
07.01.21. Healthcare Facilities Accreditation Program: Accreditation
requirements for acute care hospitals. Chicago, IL: Accreditation Association
for Hospitals and Health Systems. (Level VII)
16 Siegel, J. D ., et al. (2007, revised 2017). “2007 guideline for isolation
precautions: Preventing transmission of infectious agents in healthcare
settings” [Online]. Accessed via the Web at
http://www.cdc.gov/hicpac/pdf/isolation/Isolation2007.pdf (Level II)
17 Accreditation Association for Hospitals and Health Systems. (2017). Standard
07.01.10. Healthcare Facilities Accreditation Program: Accreditation
requirements for acute care hospitals. Chicago, IL: Accreditation Association
for Hospitals and Health Systems. (Level VII)
18 The Joint Commission. (2019). Standard NPSG.01.01.01. Comprehensive
accreditation manual for hospitals. Oakbrook Terrace, IL: The Joint
Commission. (Level VII)
19 The Joint Commission. (2019). Standard RI.01.01.01. Comprehensive
accreditation manual for hospitals. Oakbrook Terrace, IL: The Joint
Commission. (Level VII)
20 DNV GL-Healthcare USA, Inc. (2016). PR.1.SR.5 . NIAHO® accreditation
requirements: Interpretive guidelines & surveyor guidance (version 11).
Milford, OH: DNV GL-Healthcare USA, Inc. (Level VII)
21 Centers for Medicare and Medicaid Services, Department of Health and
Human Services. (2015). Condition of participation: Patient’s rights. 42 C.F.R.
§ 482.13(c)(1).
22 Accreditation Association for Hospitals and Health Systems. (2017). Standard
15.01.16. Healthcare Facilities Accreditation Program: Accreditation
requirements for acute care hospitals. Chicago, IL: Accreditation Association
for Hospitals and Health Systems. (Level VII)
23 Waters, T. R., et al. (2009). “Safe patient handling training for schools of
nursing” [Online]. Accessed via the Web at
http://www.cdc.gov/niosh/docs/2009-127/pdfs/2009-127.pdf (Level VII)
24 The Joint Commission. (2019). Standard PC.02.01.21. Comprehensive
accreditation manual for hospitals. Oakbrook Terrace, IL: The Joint
Commission. (Level VII)
25 American Association of Critical-Care Nurses (AACN). (2016). “A ACN practice
alert: Family presence during resuscitation and invasive procedures” [Online].
Accessed via the Web at https://www.aacn.org/clinical-resources/practice-
alerts/family-presence-during-resuscitation-and-invasive-procedures (Level
VII)
26 American Heart Association. (2010). Part 8: Adult advanced cardiovascular
life support. 2010 American Heart Association guidelines for cardiopulmonary
resuscitation and emergency cardiovascular care. Circulation, 122, S729–
S767. (Level II)
27 American Heart Association. (2015). 2015 American Heart Association
guidelines update for cardiopulmonary resuscitation and emergency
cardiovascular care. Circulation, 132, S444–S464. (Level II)
28 Graham, K. C., & Cvach, M. (2010). Monitor alarm fatigue: Standardizing use
of physiological monitors and decreasing nuisance alarms. American Journal
of Critical Care, 19(1), 28–37. Accessed via the Web at
http://ajcc.aacnjournals.org/content/19/1/28.full.pdf
29 Accreditation Association for Hospitals and Health Systems. (2017). Standard
16.01.03. Healthcare Facilities Accreditation Program: Accreditation
requirements for acute care hospitals. Chicago, IL: Accreditation Association
for Hospitals and Health Systems. (Level VII)
30 Centers for Medicare and Medicaid Services, Department of Health and
Human Services. (2015). Condition of participation: Nursing services. 42
C.F.R. § 482.23(c).
31 The Joint Commission. (2019). Standard MM.06.01.01. Comprehensive
accreditation manual for hospitals. Oakbrook Terrace, IL: The Joint
Commission. (Level VII)
32 DNV GL-Healthcare USA, Inc. (2016). MM.1 .SR.2. NIAHO® accreditation
requirements: Interpretive guidelines & surveyor guidance (version 11).
Milford, OH: DNV GL-Healthcare USA, Inc. (Level VII)
33 Institute for Safe Medication Practices. (2014). Independent double-checks:
Undervalued and misused. ISMP Medication Safety Alert! Nurse Advise-ERR,
12(3), 1. Accessed via the Web at
http://www.ismp.org/newsletters/nursing/issues/NurseAdviseERR201403.pdf
(Level VII)
34 Institute for Safe Medication Practices. (2014). “ISMP list of high-alert
medications in acute care settings” [Online]. Accessed via the Web at
http://www.ismp.org/Tools/highalertmedications.pdf (Level VII)
35 The Joint Commission. (2019). Standard UP.01.03.01. Comprehensive
accreditation manual for hospitals. Oakbrook Terrace, IL: The Joint
Commission. (Level VII)
36 Kacmarek, R. M ., et al. (2017). Egan’s fundamentals of respiratory care (11th
ed.). St. Louis, MO: Mosby.
37 Sole, M. L., et al. (2011). Evaluation of an intervention to maintain
endotracheal tube cuff pressure within therapeutic range. American Journal of
Critical Care, 20(2), 109–117 . Accessed via the Web at
https://www.ncbi.nlm.nih.gov/pmc/articles/PMC3506174/ (Level II)
38 Sultan, P., et al. (2011). Endotracheal tube cuff pressure monitoring: A review
of the evidence. Journal of Perioperative Practice, 21(11), 379–386 . (Level II)
39 Asai, S., et al. (2014). Decrease in cuff pressure during the measurement
procedure: A experimental study. Journal of Intensive Care, 2(1), 34. Accessed
via the Web at http://www.jintensivecare.com/content/2/1/34 (Level VI)
40 Sengupta, P., et al. (2004). Endotracheal tube cuff pressure in three hospitals,
and the volume required to produce an appropriate cuff pressure. BMC
Anesthesiology, 4(1), 8. Accessed via the Web at
http://www.biomedcentral.com/1471-2253/4/8 (Level VI)
41 Nseir, S., et al. (2009). Variations in endotracheal cuff pressure in intubated
critically ill patients: Prevalence and risk factors. European Journal of
Anaesthesiology, 26(3), 229–234. (Level IV)
42 Howard, W. R. (2011). Bench study of a new device to display and maintain
stable artificial airway cuff pressure. Respiratory Care, 56(10), 1506–1513.
Accessed via the Web at
http://rc.rcjournal.com/content/56/10/1506.full.pdf+html (Level VI)
43 The Joint Commission. (2019). Standard NPSG.02.03 .01. Comprehensive
accreditation manual for hospitals. Oakbrook Terrace, IL: The Joint
Commission. (Level VII)
44 Institute for Healthcare Improvement. (2012). How-to guide: Prevent
ventilator-associated pneumonia. Cambridge, MA: Institute for Healthcare
Improvement. (Level VII)
45 American Association of Critical-Care Nurses (AACN). (2017). “A ACN practice
alert: Prevention of ventilator-associated pneumonia in adults” [Online].
Accessed via the Web at https://www.aacn.org/clinical-resources/practice-
alerts/ventilator-associated-pneumonia-vap (Level VII)
46 Klompas, M., et al. (2014). Strategies to prevent ventilator-associated
pneumonia in acute care hospitals: 2014 update. Infection Control and
Hospital Epidemiology, 35(8), 915–936. Accessed via the Web at
http://www.jstor.org/stable/10.1086/677144 (Level I)
47 Institute for Clinical Systems Improvement. (2011). “Health care protocol:
Prevention of ventilator-associated pneumonia (5th ed.)” [Online]. Accessed
via the Web at https://www.icsi.org/_asset/y24ruh/VAP-Interactive1111.pdf
(Level VII)
48 American Association of Critical-Care Nurses. (2017). “A ACN practice alert:
Oral care for acutely and critically ill patients” [Online]. Accessed via the Web
at https://www.aacn.org/clinical-resources/practice-alerts/oral-care-for-
acutely-and-critically-ill-patients (Level VII)
49 Ganz, D. A., et al. (2013). Preventing falls in hospitals: A toolkit for improving
quality of care (AHRQ Publication No. 13-0015-EF). Rockville, MD: Agency for
Healthcare Research and Quality. Accessed via the Web at
http://www.ahrq.gov/sites/default/files/publications/files/fallpxtoolkit.pdf
(Level VII)
50 Rutala, W. A., et al. (2008). “Guideline for disinfection and sterilization in
healthcare facilities, 2008” [Online]. Accessed via the Web at
https://www.cdc.gov/infectioncontrol/pdf/guidelines/disinfection-
guidelines.pdf (Level I)
51 Accreditation Association for Hospitals and Health Systems. (2017). Standard
07.02.03. Healthcare Facilities Accreditation Program: Accreditation
requirements for acute care hospitals. Chicago, IL: Accreditation Association
for Hospitals and Health Systems. (Level VII)
52 The Joint Commission. (2019). Standard RC.01.03 .01. Comprehensive
accreditation manual for hospitals. Oakbrook Terrace, IL: The Joint
Commission. (Level VII)
53 Accreditation Association for Hospitals and Health Systems. (2017). Standard
10.00 .03. Healthcare Facilities Accreditation Program: Accreditation
requirements for acute care hospitals. Chicago, IL: Accreditation Association
for Hospitals and Health Systems. (Level VII)
54 Centers for Medicare and Medicaid Services, Department of Health and
Human Services. (2015). Condition of participation: Medical record services.
42 C.F.R. § 482.24(b).
55 DNV GL-Healthcare USA, Inc. (2016). MR.2 .SR.1 . NIAHO® accreditation
requirements: Interpretive guidelines & surveyor guidance (version 11).
Milford, OH: DNV GL-Healthcare USA, Inc. (Level VII)
56 The Joint Commission. (2013). “Sentinel event alert: Medical device alarm
safety in hospitals” [Online]. Accessed via the Web at
https://www.jointcommission.org/assets/1/6/SEA_50_alarms_4 _26_16.pdf
(Level VII)
57 Sole, M. L., et al. (2011). Evaluation of an intervention to maintain
endotracheal tube cuff pressure within therapeutic range. American Journal of
Critical Care, 20(2), 109–117 . Accessed via the Web at
http://ajcc.aacnjournals.org/content/20/2/109.full.pdf (Level II)
ENDOTRACHEAL TUBE CARE
An intubated patient requires meticulous care to ensure
airway patency and prevent complications until the patient
can maintain spontaneous ventilation. Care sometimes
includes repositioning the endotracheal (ET) tube if it
becomes partially dislodged or a chest X-ray shows
improper placement.
Some facilities require a practitioner or a respiratory
therapist to reposition the ET tube.
Equipment
10-mL syringe ▪ suction equipment ▪ gloves ▪ handheld
resuscitation bag with mask ▪ hospital-grade disinfectant ▪
Optional: gown, mask, goggles, mask with face shield.
For repositioning an ET tube
Skin adhesive preparation product ▪ stethoscope ▪ adhesive
or hypoallergenic tape or commercial tube holder ▪ oxygen
source ▪ ET tube cuff pressure manometer ▪ continuous
waveform capnography equipment or end-tidal carbon
dioxide monitoring equipment.
For removing an ET tube
Supplemental oxygen equipment ▪ pulse oximeter ▪
equipment for reintubation ▪ equipment for obtaining vital
signs.
Preparation of equipment
Gather all equipment at the patient’s bedside. Set up the
suction equipment. If appropriate, set up supplemental
oxygen equipment. Have a handheld resuscitation bag with
a mask available.
Implementation
■ Perform hand hygiene.1,2,3,4,5,6
■ Confirm the patient’s identify using at least two patient
identifiers.7
■ Provide privacy.8,9,10,11
■ Explain the procedure to the patient and family (if
appropriate) according to their individual communication
and learning needs to increase their understanding, allay
their fears, and enhance cooperation.12
■ Raise the bed to waist level when providing care to
prevent caregiver back strain.13
■ Perform hand hygiene.1,2,3,4,5,6
■ Put on gloves and personal protective equipment as
needed to comply with standard precautions.14,15
Repositioning an ET tube
■ Obtain assistance from a respiratory therapist or another
nurse to prevent accidental extubation during the procedure
if the patient coughs.
■ Elevate the head of the bed at least 30 degrees (unless
contraindicated), if not already done, to reduce the risk of
aspiration
and
subsequent
ventilator-associated
pneumonia.16
■ Hyperoxygenate the patient for 30 to 60 seconds to
prevent suction-related hypoxemia.17
■ Suction the patient’s trachea through the ET tube to
remove any secretions, which can cause the patient to
cough during the procedure. Coughing increases the risk of
trauma and tube dislodgment. Then suction the patient’s
pharynx to remove any secretions that may have
accumulated above the ET tube cuff, which helps to prevent
aspiration of secretions during cuff deflation.16,18,19,20,21
Aspiration increases the risk of ventilator-associated
pneumonia.22,23
■ To prevent traumatic manipulation of the tube, instruct
the assisting nurse or respiratory therapist to hold the tube
as you carefully untape the tube or unfasten the commercial
tube holder (as shown below). When freeing the tube, locate
the centimeter marking on the tube or measure the length
from the patient’s mouth to the top of the tube so that you
have a reference point when moving the tube.19
■ Next, deflate the cuff by attaching a 10-mL syringe to the
pilot balloon port and aspirating air until you meet
resistance and the pilot balloon deflates. Deflate the cuff
before moving the tube (as shown on top right) because the
cuff forms a seal within the trachea, and movement of an
inflated cuff can damage the tracheal wall and vocal cords.
■ Reposition the tube, as necessary, noting new centimeter
marking or measuring the length. Also consider shifting the
ET tube from one side of the mouth to the other to prevent
pressure injury.24
■ Reinflate the cuff immediately. To do this, instruct the
patient to inhale, if able, and inflate the cuff slowly using the
10-mL syringe attached to the tube’s pilot balloon port. As
you do this, use your stethoscope to auscultate the patient’s
neck to determine the presence of an air leak. When air
leakage ceases, stop cuff inflation and, while still
auscultating the patient’s neck, aspirate a small amount of
air until you detect a slight leak (as shown below). This
maneuver creates a minimal air leak, which indicates that
the cuff is inflated at the lowest pressure possible to create
an adequate seal. If the patient is being ventilated
mechanically, aspirate to create a minimal air leak during
the inspiratory phase of respiration, because the positive
pressure of the ventilator during inspiration will create a
larger leak around the cuff.19 Note the number of cubic
centimeters of air required to achieve a minimal air leak.
■ Attach a cuff manometer to the pilot balloon to measure
the ET cuff pressure, and compare the reading with previous
pressure readings to prevent overinflation. Cuff pressure
should be maintained between 20 and 30 cm H2O to ensure
proper ventilation, prevent aspiration, and maintain tracheal
perfusion.21,25,26,27,28
■ Confirm proper ET tube position by auscultating for
bilateral breath sounds, looking for symmetrical chest wall
movement, and using continuous waveform capnography. If
continuous waveform capnography equipment isn’t
available, use clinical assessment and end-tidal carbon
dioxide monitoring equipment.29,30
■ Secure the ET tube in place by applying a skin adhesive
preparation product and adhesive or hypoallergenic tape, or
by refastening the commercial tube holder to prevent
inadvertent dislodgement.18
Removing an ET tube
■ Verify the practitioner’s order or follow your facility’s
protocol for weaning and extubation.
■ Obtain baseline vital signs and assess the patient’s
respiratory status, including oxygen saturation level, to
identify that intubation is no longer necessary.18
■ When you’re authorized to remove the ET tube, obtain
assistance from a respiratory therapist or another nurse to
prevent traumatic manipulation of the tube when it’s
untaped or unfastened.
■ Position the patient in the semi-Fowler position (as shown
below), because respiratory muscles are more effective in
an upright position than in a prone position; this position
also facilitates coughing and prevents aspiration.18
■ Hyperoxygenate the patient for 30 to 60 seconds to
prevent suctioning-related hypoxemia.17,18
■ Suction the ET tube and the patient’s oropharynx to
remove any accumulated secretions and to help prevent
aspiration of secretions when the cuff is deflated.16,18,19,31
■ Hyperoxygenate the patient for at least 1 minute after
suctioning to allow oxygen saturation levels to recover after
suctioning.17,18
■ Untape or unfasten the ET tube while the assistant
stabilizes the tube.
■ Attach a 10-mL syringe to the pilot balloon port, and
aspirate air until you meet resistance and the pilot balloon
deflates. If you fail to detect an air leak around the deflated
cuff, notify the practitioner immediately and don’t proceed
with extubation. Absence of an air leak may indicate marked
tracheal edema, which can result in total airway obstruction
if the ET tube is removed.19
■ Instruct the patient to be calm and take a deep breath. At
the peak of inspiration, because vocal cords are maximally
abducted, remove the ET tube following the natural curve of
the patient’s mouth (as shown below).18
■ Administer supplemental humidified oxygen to promote
oxygenation and help decrease airway irritation, patient
discomfort, and laryngeal edema.
■ Suction the oropharynx, if needed, and encourage the
patient to cough and deep-breathe. Remind the patient that
a sore throat and hoarseness are to be expected and will
gradually subside.
■ Closely monitor the patient’s vital signs, oxygen
saturation level, neurologic status, and respiratory status,
including airway patency,18,19 to evaluate the patient’s
tolerance of extubation and to watch for signs of respiratory
distress. Be alert for stridor or other evidence of upper
airway obstruction. Obtain an arterial sample for blood gas
analysis, if ordered.19
Completing the procedure
■ Return the bed to the lowest position to prevent falls and
maintain patient safety.32
■ Dispose of used supplies in the appropriate receptacles.
■ Remove and discard your gloves and any other personal
protective equipment worn.14,15
■ Perform hand hygiene.1,2,3,4,5,6
■ Clean and disinfect reusable equipment with a facility-
approved disinfectant, or discard disposable equipment.33,34
■ Perform hand hygiene.1,2,3,4,5,6
■ Document the procedure.35,36,37,38
Special considerations
■ When repositioning an ET tube, be especially careful in
patients with highly sensitive airways. Sedation may be
indicated in such patients.
■ If you inadvertently cut the pilot balloon on the cuff,
immediately call the person in your facility who’s
responsible for intubation so that the damaged tube can be
replaced with one that’s intact. Don’t remove the tube,
because a tube with an air leak is better than no airway.
■ Never remove an ET tube from a patient without the
ready availability of someone skilled and authorized in
insertion of advanced airway devices.19
Complications
Traumatic injury to the larynx or trachea may result from
tube manipulation, accidental extubation, or tube slippage
into the right bronchus. Respiratory failure and airway
obstruction due to laryngospasm or marked tracheal edema
are the gravest possible complications of ET tube removal.
Documentation
After ET tube repositioning, record the date and time of the
procedure, reason for repositioning (for example,
malpositioning shown by chest X-ray), new tube position,
total amount of air in the cuff after the procedure,
complications and nursing actions taken, and the patient’s
tolerance of the procedure. Document any patient teaching
and the patient’s understanding of your teaching.
Record the date and time of ET tube removal, vital signs,
oxygen saturation level, and assessment findings, including
the presence or absence of stridor or other signs of upper
airway edema. Document the type of supplemental oxygen
administered, complications and required subsequent
therapy, and the patient’s tolerance of the procedure. Also
document any patient teaching and the patient’s
understanding of your teaching.
REFERENCES
1 The Joint Commission. (2019). Standard NPSG.07.01.01. Comprehensive
accreditation manual for hospitals. Oakbrook, IL: The Joint Commission. (Level
VII)
2 Centers for Disease Control and Prevention. (2002). Guideline for hand
hygiene in health-care settings: Recommendations of the Healthcare Infection
Control Practices Advisory Committee and the HICPAC/SHEA/APIC/IDSA
Hygiene Task Force. MMWR Recommendations and Reports, 51(RR-16), 1–45.
Accessed via the Web at https://www.cdc.gov/mmwr/pdf/rr/rr5116.pdf (Level
II)
3 World Health Organization. (2009). “WHO guidelines on hand hygiene in
health care: First global patient safety challenge, clean care is safer care”
[Online]. Accessed via the Web at
http://apps.who.int/iris/bitstream/10665/44102/1/9789241597906_eng.pdf
(Level IV)
4 Accreditation Association for Hospitals and Health Systems. (2017). Standard
07.01.21. Healthcare Facilities Accreditation Program: Accreditation
requirements for acute care hospitals. Chicago, IL: Accreditation Association
for Hospitals and Health Systems. (Level VII)
5 Centers for Medicare and Medicaid Services, Department of Health and
Human Services. (2015). Condition of participation: Infection control. 42 C.F.R.
§ 482.42.
6 DNV GL-Healthcare USA, Inc. (2016). IC.1.SR.1 . NIAHO® accreditation
requirements: Interpretive guidelines & surveyor guidance (version 11).
Milford, OH: DNV GL-Healthcare USA, Inc. (Level VII)
7 The Joint Commission. (2019). Standard NPSG.01.01.01. Comprehensive
accreditation manual for hospitals. Oakbrook, IL: The Joint Commission. (Level
VII)
8 Accreditation Association for Hospitals and Health Systems. (2017). Standard
15.01.16. Healthcare Facilities Accreditation Program: Accreditation
requirements for acute care hospitals. Chicago, IL: Accreditation Association
for Hospitals and Health Systems. (Level VII)
9 Centers for Medicare and Medicaid Services, Department of Health and
Human Services. (2015). Condition of participation: Patient’s rights. 42 C.F.R.
§ 482.13(c)(1).
10 The Joint Commission. (2019). Standard RI.01.01.01. Comprehensive
accreditation manual for hospitals. Oakbrook, IL: The Joint Commission. (Level
VII)
11 DNV GL-Healthcare USA, Inc. (2016). PR.1.SR.5 . NIAHO® accreditation
requirements: Interpretive guidelines & surveyor guidance (version 11).
Milford, OH: DNV GL-Healthcare USA, Inc. (Level VII)
12 The Joint Commission. (2017). Standard PC.02.01.21. Comprehensive
accreditation manual for hospitals. Oakbrook Terrace, IL: The Joint
Commission. (Level VII)
13 Waters, T. R., et al. (2009). “Safe patient handling training for schools of
nursing” [Online]. Accessed via the Web at
http://www.cdc.gov/niosh/docs/2009-127/pdfs/2009-127.pdf (Level VII)
14 Siegel, J. D ., et al. (2007, revised 2017). “2007 guideline for isolation
precautions: Preventing transmission of infectious agents in healthcare
settings” [Online]. Accessed via the Web at
https://www.cdc.gov/infectioncontrol/pdf/guidelines/isolation-guidelines.pdf
(Level II)
15 Accreditation Association for Hospitals and Health Systems. (2017). Standard
07.01.10. Healthcare Facilities Accreditation Program: Accreditation
requirements for acute care hospitals. Chicago, IL: Accreditation Association
for Hospitals and Health Systems. (Level VII)
16 American Association of Critical-Care Nurses. (2008). “A ACN practice alert:
Ventilator associated pneumonia” [Online]. Accessed via the Web at
http://www.aacn.org/wd/practice/docs/practicealerts/vap.pdf (Level VII)
17 American Association for Respiratory Care (AARC). (2010). AARC practice
guidelines: Endotracheal suctioning of mechanically ventilated patients with
artificial airways 2010. Respiratory Care, 55(6), 758–764. Accessed via the
Web at http://www.rcjournal.com/cpgs/pdf/06.10.0758.pdf (Level I)
18 Wiegand, D. (2017). AACN procedure manual for high acuity, progressive,
and critical care (7th ed.). St. Louis, MO: Elsevier.
19 American Association for Respiratory Care (AARC). (2007). AARC practice
guideline: Removal of the endotracheal tube—2007 revision & update.
Respiratory Care, 52(1), 81–93 . Accessed via the Web at
http://www.rcjournal.com/cpgs/pdf/removal_of_endotracheal_tube.pdf (Level
VII)
20 Centers for Disease Control and Prevention. (2004). Guidelines for preventing
health-care-associated pneumonia, 2003: Recommendations of CDC and the
Healthcare Infection Control Practices Advisory Committee. MMWR
Recommendations and Reports, 53(RR-3), 1–32. Accessed via the Web at
http://www.cdc.gov/mmwr/pdf/rr/rr5303.pdf (Level II)
21 Sole, M. L., et al. (2011). Evaluation of an intervention to maintain
endotracheal tube cuff pressure within therapeutic range. American Journal of
Critical Care, 20(2), 109–117 . Accessed via the Web at
http://ajcc.aacnjournals.org/content/20/2/109.long (Level IV)
22 Association of Professionals in Infection Control and Epidemiology (APIC).
(2009). “An APIC 2009: Guide to the elimination of ventilator-associated
pneumonia” [Online]. Accessed via the Web at
http://www.apic.org/Resource_/EliminationGuideForm/18e326ad-b484-471c-
9c35-6822a53ee4a2/File/VAP_09 .pdf (Level IV)
23 Klompas, M., et al. (2014). Strategies to prevent ventilator-associated
pneumonia in acute care hospitals: 2014 update. Infection Control and
Hospital Epidemiology, 35(8), 915–936. Accessed via the Web at
http://www.jstor.org/stable/10.1086/677144 (Level I)
24 Hyzy, R. Z. Complications of the endotracheal tube following initial
placement: Prevention and management in adult intensive care unit patients.
(2017). In UpToDate, Manaker, S. (Ed.). Accessed via the Web at
http://www.uptodate.com
25 Asai, S., et al. (2014). Decrease in cuff pressure during the measurement
procedure: A experimental study. Journal of Intensive Care, 2, 34. Accessed
via the Web at http://www.jintensivecare.com/content/2/1/34 (Level VI)
26 Sengupta, P., et al. (2004). Endotracheal tube cuff pressure in three hospitals,
and the volume required to produce an appropriate cuff pressure. BMC
Anesthesiology, 4(1), 8. Accessed via the Web at
http://www.biomedcentral.com/1471-2253/4/8 (Level VI)
27 Nseir, S., et al. (2009). Variations in endotracheal cuff pressure in intubated
critically ill patients: Prevalence and risk factors. European Journal of
Anesthesiology, 26(3), 229–234. (Level IV)
28 Howard, W. R. (2011). Bench study of a new device to display and maintain
stable artificial airway cuff pressure. Respiratory Care, 56(10), 1506–1513.
Accessed via the Web at http://rc.rcjournal.com/content/56/10/1506.full.pdf
(Level VI)
29 Walsh, B. K ., et al. (2011). AARC practice guideline: Capnography/capnometry
during mechanical ventilation: 2011. Respiratory Care, 56(4), 503–509.
Accessed via the Web at http://www.rcjournal.com/cpgs/pdf/04.11 .0503.pdf
(Level VII)
30 American Heart Association. (2015). Part 7: Adult advanced cardiovascular
life support. 2015 American Heart Association guidelines update for
cardiopulmonary resuscitation and emergency cardiovascular care.
Circulation, 132, S444–S464. (Level II)
31 Magill, S. S ., et al. (2013). Developing a new national approach to
surveillance for ventilator-associated events. American Journal of Critical
Care, 22(6), 469–473. Accessed via the Web at
http://ajcc.aacnjournals.org/content/22/6/469.full.pdf+html (Level VII)
32 Ganz, D. A., et al. (2013). Preventing falls in hospitals: A toolkit for improving
quality of care (AHRQ No. 13-0015-EF). Rockville, MD: Agency for Healthcare
Research and Quality. Accessed via the Web at
https://www.ahrq.gov/professionals/systems/hospital/fallpxtoolkit/index.html
(Level VII)
33 Rutala, W. A., et al. (2008, revised 2017). “Guideline for disinfection and
sterilization in healthcare facilities, 2008” [Online]. Accessed via the Web at
https://www.cdc.gov/infectioncontrol/pdf/guidelines/disinfection-
guidelines.pdf (Level I)
34 Accreditation Association for Hospitals and Health Systems. (2017). Standard
07.02.03. Healthcare Facilities Accreditation Program: Accreditation
requirements for acute care hospitals. Chicago, IL: Accreditation Association
for Hospitals and Health Systems. (Level VII)
35 The Joint Commission. (2019). Standard RC.01.03 .01. Comprehensive
accreditation manual for hospitals. Oakbrook, IL: The Joint Commission. (Level
VII)
36 Accreditation Association for Hospitals and Health Systems. (2017). Standard
10.00 .03. Healthcare Facilities Accreditation Program: Accreditation
requirements for acute care hospitals. Chicago, IL: Accreditation Association
for Hospitals and Health Systems. (Level VII)
37 Centers for Medicare and Medicaid Services, Department of Health and
Human Services. (2015). Condition of participation: Medical record services.
42 C.F.R. § 482.24(b).
38 DNV GL-Healthcare USA, Inc. (2016). MR.2 .SR.1 . NIAHO® accreditation
requirements: Interpretive guidelines & surveyor guidance (version 11).
Milford, OH: DNV GL-Healthcare USA, Inc. (Level VII)
END-TIDAL CARBON DIOXIDE MONITORING
End-tidal carbon dioxide (ETCO2) monitoring determines the
carbon dioxide (CO2) concentration in exhaled gas to
provide information about a patient’s pulmonary, cardiac,
and metabolic status. A sudden or gradual change in ETCO2
can provide valuable information about the patient’s
condition. An increase in ETCO2 can signal fever associated
with sepsis, malignant hyperthermia, decreased ventilation,
venous pulmonary embolism, increased carbon monoxide,
return of circulation after cardiopulmonary resuscitation,
chronic obstructive pulmonary disease, partial airway
obstruction, neuromuscular blockade, use of respiratory
depressants, or conditions causing metabolic acidosis.1 A
decrease in ETCO2 can indicate respiratory depression,
pulmonary embolism, excess ventilation, hypometabolic
state, hypotension, low cardiac output, esophageal
intubation, complete airway obstruction, metabolic acidosis,
or a disconnected ventilator.1,2,3
ETCO2 can be measured noninvasively using a quick,
disposable method or continuously with capnography. The
disposable method uses a colorimetric CO2 detector that
relies on a color change to indicate CO2 levels during
exhalation; this method provides only a snapshot of the
patient’s ETCO2. (See Detecting end-tidal CO2 using a
colorimetric CO2 detector, page 278.) The disposable
method can be useful, but the litmus paper that’s
responsible for the color change might not function if it
becomes moistened by the patient’s secretions.
Capnography is the graphic display of the measurement
of CO2 in the respiratory gases.2 Capnography uses various
technologies to detect CO2, including infrared spectroscopy,
molecular correlation spectroscopy, Raman spectroscopy,
mass spectroscopy, and photoacoustic spectroscopy. Each
type detects CO2 and then provides a continuous waveform
and a digital readout of ETCO2. Infrared spectroscopy is the
most commonly used method because it’s cost effective and
is found in most portable ETCO2 monitoring devices. (See
How continuous ETCO2 monitoring using infrared
spectroscopy works, page 279.)2
There are two methods for measuring continuous ETCO2:
using a mainstream detector or a sidestream detector. A
mainstream detector is placed at the airway; it almost
immediately generates a capnogram that reflects in real
time the partial pressure of CO2 within the airway. A
sidestream detector attaches near the patient’s mouth or
nares. The device aspirates a sample of gas for analysis
from the breathing circuit through a long, small-bore tube at
a flow rate ranging from 50 to 250 mL/minute. Delays in
sidestream analysis vary with long sampling tubes, the rate
of air aspiration into the capnometer, and the efficiency of
the device itself.2
EQUIPMENT
Detecting end-tidal CO2 using a colorimetric
CO2 detector
A colorimetric carbon dioxide (CO2) detector, such as the Easy Cap shown
below, can be used during intubation to verify proper endotracheal tube (ET)
placement, and for up to 2 hours after intubation if needed for patient
transport. The device attaches directly to the ET tube and responds quickly to
exhaled CO2 with a color change from purple to yellow. Depending on which
end-tidal carbon dioxide (ETCO2) detector you use, the meaning of color
changes within the detector dome may differ from the analysis for the Easy
Cap detector described below. Follow the manufacturer’s instructions for the
specific detector you’re using.
■ The rim of the Easy Cap is divided into four segments (clockwise from the
top): CHECK, A, B, and C. The CHECK segment is solid purple, signifying the
absence of carbon dioxide (CO2).
■ The numbers in the other sections range from 0.03 to 5 and indicate the
percentage of exhaled CO2. The color should fluctuate during ventilation
from purple (in section A) during inspiration to yellow (in section C) at the end
of expiration. This indicates that the ETCO2 levels are adequate, above 2%.
■ An end-expiratory color change from the C range to the B range may be
the first sign of hemodynamic instability.
■ During cardiopulmonary resuscitation (CPR), an end-expiratory color
change from the A or B range to the C range may mean the return of
spontaneous ventilation.
■ During prolonged cardiac arrest, inadequate pulmonary perfusion leads to
inadequate gas exchange. The patient exhales little or no CO2, so the color
stays in the purple range even with proper intubation. Ineffective CPR also
leads to inadequate pulmonary perfusion.
■ Devices are available in adult and pediatric sizes.
Color indications on end-expiration
The 2015 American Heart Association Guidelines for
Cardiopulmonary
Resuscitation
and
Emergency
Cardiovascular Care recommend ETCO2 monitoring in
combination with clinical assessment to confirm initial ET
tube placement in a patient in cardiac arrest when
continuous quantitative waveform capnography isn’t
available.3,4
Continuous
quantitative
waveform
capnography can
help monitor
cardiopulmonary
resuscitation (CPR) quality in an intubated patient and
detect fatigue in a rescuer performing chest compressions.
ETCO2 monitoring is recommended to guide ventilator
management.3 In addition, its use has become standard
during administration of anesthesia, such as moderate or
deep sedation, and it is recommended during administration
of epidural or patient-controlled analgesia for pain control,
because ETCO2 measurements can provide an indication that
a
patient is experiencing hypoventilation
from
oversedation.2,5,6,7
Equipment
Gloves ▪ mainstream or sidestream CO2 detector ▪ airway
adapter ▪ ETCO2 monitoring system ▪ Optional: gown, mask,
goggles, mask with face shield.
Preparation of equipment
If the monitor you’re using isn’t self-calibrating, calibrate it
as the manufacturer directs, because failure to calibrate the
device can lead to false readings.1 If you’re using a
sidestream CO2 monitor, be sure to replace the water trap
between patients, if directed. The trap allows humidity from
exhaled gases to be condensed into an attached container.
Newer sidestream models don’t require water traps.
Implementation
■ Verify the practitioner’s order or follow your facility
protocol.
■ Gather and prepare the necessary equipment.
■ Perform hand hygiene.8,9,10,11,12,13
■ Confirm the patient’s identity using at least two patient
identifiers.14
■ Provide privacy.15,16,17,18
■ Explain the procedure to the patient and family (if
appropriate) according to their individual communication
and learning needs to decrease fear, ease anxiety, and
increase cooperation.19 Include information about the
monitor, its use, and attachments.
■ Raise the patient’s bed to waist level when providing care
to prevent caregiver back strain.20
■ Perform hand hygiene.8,9,10,11,12,13
■ Put on gloves and, as needed, other personal protective
equipment to comply with standard precautions.21,22
■ Assess the patient’s cardiac and respiratory status to
serve as a baselines for comparison.
■ Plug the ETCO2 monitor into a grounded outlet and then
attach the cable to the display monitor. Using a grounded
outlet reduces the rate of electrical interference.
■ Assemble the airway adapter and sensor and attach them
to the patient’s ET tube, tracheostomy, or nasal cannula,
following the manufacturer’s instructions.1 Attach the
airway adapter and sensor as close to the patient’s
ventilation connection or airway as possible to decrease
improper gas sampling.1
■ Observe the capnogram waveforms for quality to make
sure the readings are accurate.1
■ Make sure the alarm limits according to the patient’s
current condition, and that the alarms are turned on,
functioning properly, and audible to staff.23,24,25,26
■ Closely monitor the patient’s cardiac and respiratory
status, capnogram waveforms, and digital display for
changes; promptly report changes in the patient’s condition
to the practitioner to prevent treatment delays.
■ Return the bed to the lowest position to prevent falls and
maintain patient safety.27
■ Remove and discard your gloves and any other personal
protective equipment worn.21,22
■ Perform hand hygiene.8,9,10,11,12,13
■ Document the procedure.28,29,30,31
Special considerations
■ The Joint Commission issued a sentinel event alert
concerning medical device alarm safety, because alarm-
related events have been associated with permanent loss of
function and death. Among the major contributing factors
were improper alarm settings, inappropriately turned off
alarms, and alarm signals that were not audible to staff.
Make sure that alarm limits are appropriately set and that
alarms are turned on and audible to staff. Follow facility
guidelines for preventing alarm fatigue.25
■ Assess for ET tube kinking, mucus plugging, and
bronchospasm in a patient receiving mechanical ventilation
who develops sustained decreases in ETCO2.1
■ Note that the respiratory therapist typically changes the
airway adapter with every breathing circuit and ET tube
change.
How continuous ETCO2 monitoring
using infrared spectroscopy works
With infrared spectroscopy, the optical portion of an end-tidal carbon dioxide
(ETCO2) monitor contains an infrared light source, a sample chamber, a
special carbon dioxide (CO2) filter, and a photodetector. The infrared light
passes through the sample chamber and is absorbed in varying amounts,
depending on the amount of CO2 the patient has just exhaled. The
photodetector measures CO2 content and relays this information to the
microprocessor in the monitor, which displays the continuous waveform and
a digital readout of the CO2 value.
Normal capnogram
Time-based capnography, the most commonly used display of ETCO2, depicts
the respiratory phases. A normal time-based capnogram (shown below)
consists of several segments, which reflect the various stages of exhalation
and inhalation. Normally, any gas eliminated from the airway during early
exhalation is dead-space gas, which hasn’t undergone exchange at the
alveolocapillary membrane. Measurements taken during this period contain
no CO2. As exhalation continues, CO2 concentration rises sharply and rapidly.
The sensor now detects gas that has undergone exchange, producing
measurable quantities of CO2. The final stages of alveolar emptying occur
during late exhalation. During the alveolar plateau phase, CO2 concentration
rises more gradually because alveolar emptying is more constant. The point
at which the ETCO2 value is derived is the end of exhalation, when CO2
concentration peaks. Unless an alveolar plateau is present, this value doesn’t
accurately estimate alveolar CO2. During inhalation, the CO2 concentration
declines sharply to zero.
Volumetric capnography, which is used less commonly than time-based
capnography, measures and displays the volume of expired CO2 over time.
Volumetric capnography provides information about physiologic dead space
and the effects of positive end-expiratory pressure on the expiratory phase.
■ Place the adapter on the ET tube to avoid contaminating
exhaled gases with fresh gas flow from the ventilator. If
you’re using a heat and moisture exchanger, you may be
able to position the airway adapter between the exchanger
and breathing circuit.
■ If the patient’s ETCO2 values differ from the partial
pressure of arterial carbon dioxide, assess for factors that
can influence ETCO2—especially when the differential
between arterial and ETCO2 values (the arterial absolute
difference of carbon dioxide [a-ADCO2]) is above normal.
■ Remember that ETCO2 monitoring doesn’t replace arterial
blood gas (ABG) measurements because it doesn’t assess
oxygenation or blood pH. Supplementing ETCO2 monitoring
with pulse oximetry may provide more complete
information.
■ In a nonintubated patient, use ETCO2 values to establish
trends. Be aware that in such a patient, exhaled gas is more
likely to mix with ambient air, and exhaled CO2 may be
diluted by fresh gas flow from the nasal cannula.
■ Be aware that a practitioner commonly discontinues
ETCO2 monitoring when the patient has been weaned
effectively from mechanical ventilation or when the patient
is no longer at risk for respiratory compromise. Carefully
assess the patient’s tolerance for weaning. After extubation,
continuous ETCO2 monitoring may detect the need for
reintubation.
Complications
Inaccurate measurements, such as from poor sampling
technique, calibration drift, contamination of optics with
moisture or secretions, or equipment malfunction, can lead
to misdiagnosis and improper treatment.
The effects of manual resuscitation or ingestion of alcohol
or carbonated beverages can alter the detector’s findings.
Color changes detected after fewer than six ventilations can
be misleading.4
Documentation
Document the initial ETCO2 value and all ventilator settings.
Describe the waveform if one appears on the monitor. If the
monitor has a printer, you may want to print out a sample
waveform and include it in the patient’s medical record.
Document ETCO2 values at least as often as vital signs,
whenever significant changes in waveform or patient status
occur, and before and after weaning, respiratory
procedures, and other interventions. Note the findings from
the patient’s cardiac and respiratory assessments. Record
ABG analysis, as ordered, and document the corresponding
ETCO2 values. Document teaching provided to the patient
and family, their understanding of the teaching, and the
need for any follow-up teaching.
REFERENCES
1 Wiegand, D. L. (2017). AACN procedure manual for high acuity, progressive,
and critical care (7th ed.). St. Louis, MO: Elsevier.
2 Spiegel, J. (2013). End-tidal carbon dioxide: The most vital of vital signs.
Anesthesiology News, 2013, 21–27. Accessed via the Web at
http://www.anesthesiologynews.com/download/Capnography_ANSE13_WM .pd
f
3 Walsh, B. K ., et al. (2011). AARC clinical practice guideline:
Capnography/capnometry during mechanical ventilation: 2011. Respiratory
Care, 56(4), 503–509. Accessed via the Web at
http://rc.rcjournal.com/content/56/4/503.full.pdf (Level VII)
4 American Heart Association. (2015). Part 7: Adult advanced cardiovascular
life support. 2015 American Heart Association guidelines update for
cardiopulmonary resuscitation and emergency cardiovascular care.
Circulation, 132, S444–S464. (Level II)
5 Krauss, B., & Falk, J. L. Carbon dioxide monitoring (capnography). (2016). In:
UpToDate, Walls, R. M., & Torrey, S. B . (Eds.) . Retrieved from
http://www.uptodate.com
6 Press, C. D., et al. (2015). “End-tidal capnography” [Online]. Accessed via the
Web at http://emedicine.medscape.com/article/2116444-overview
7 Deitch, K., et al. (2010). Does end tidal CO2 monitoring during emergency
department procedural sedation and analgesia with propofol decrease the
incidence of hypoxic events? A randomized, controlled trial. Annals of
Emergency Medicine, 55(3), 258–264. (Level II)
8 The Joint Commission. (2019). Standard NPSG.07.01.01. Comprehensive
accreditation manual for hospitals. Oakbrook Terrace, IL: The Joint
Commission. (Level VII)
9 Centers for Disease Control and Prevention. (2002). Guideline for hand
hygiene in health-care settings: Recommendations of the Healthcare Infection
Control Practices Advisory Committee and the HICPAC/SHEA/APIC/IDSA Hand
Hygiene Task Force. MMWR Recommendations and Reports, 51(RR-16), 1–45.
Accessed via the Web at https://www.cdc.gov/mmwr/pdf/rr/rr5116.pdf (Level
II)
10 World Health Organization. (2009). “WHO guidelines on hand hygiene in
health care: First global patient safety challenge, clean care is safer care”
[Online]. Accessed via the Web at
http://apps.who.int/iris/bitstream/10665/44102/1/9789241597906_eng.pdf
(Level IV)
11 Accreditation Association for Hospitals and Health Systems. (2017). Standard
07.01.21. Healthcare Facilities Accreditation Program: Accreditation
requirements for acute care hospitals. Chicago, IL: Accreditation Association
for Hospitals and Health Systems. (Level VII)
12 Centers for Medicare and Medicaid Services, Department of Health and
Human Services. (2015). Condition of participation: Infection control. 42 C.F.R.
§ 482.42.
13 DNV GL-Healthcare USA, Inc. (2016). IC.1 .SR.1 . NIAHO® accreditation
requirements: Interpretive guidelines & surveyor guidance (version 11).
Milford, OH: DNV GL-Healthcare USA, Inc. (Level VII)
14 The Joint Commission. (2019). Standard NPSG.01.01.01. Comprehensive
accreditation manual for hospitals. Oakbrook Terrace, IL: The Joint
Commission. (Level VII)
15 The Joint Commission. (2019). Standard RI.01.01.01. Comprehensive
accreditation manual for hospitals. Oakbrook Terrace, IL: The Joint
Commission. (Level VII)
16 Centers for Medicare and Medicaid Services, Department of Health and
Human Services. (2015). Condition of participation: Patient’s rights. 42 C.F.R.
§ 482.13(c)(1).
17 Accreditation Association for Hospitals and Health Systems. (2017). Standard
15.01.16. Healthcare Facilities Accreditation Program: Accreditation
requirements for acute care hospitals. Chicago, IL: Accreditation Association
for Hospitals and Health Systems. (Level VII)
18 DNV GL-Healthcare USA, Inc. (2016). PR.1.SR.5 . NIAHO® accreditation
requirements: Interpretive guidelines & surveyor guidance (version 11).
Milford, OH: DNV GL-Healthcare USA, Inc. (Level VII)
19 The Joint Commission. (2019). Standard PC.02.01.21. Comprehensive
accreditation manual for hospitals. Oakbrook Terrace, IL: The Joint
Commission. (Level VII)
20 Waters, T. R., et al. (2009). “Safe patient handling training for schools of
nursing” [Online]. Accessed via the Web at
http://www.cdc.gov/niosh/docs/2009-127/pdfs/2009-127.pdf (Level VII)
21 Siegel, J. D ., et al. (2007, revised 2017). “2007 guideline for isolation
precautions: Preventing transmission of infectious agents in healthcare
settings” [Online]. Accessed via the Web at
http://www.cdc.gov/hicpac/pdf/isolation/Isolation2007.pdf (Level II)
22 Accreditation Association for Hospitals and Health Systems. (2017). Standard
07.01.10. Healthcare Facilities Accreditation Program: Accreditation
requirements for acute care hospitals. Chicago, IL: Accreditation Association
for Hospitals and Health Systems. (Level VII)
23 American Association of Critical-Care Nurses. (2013). “A ACN practice alert:
Alarm management” [Online]. Accessed via the Web at
http://www.aacn.org/wd/practice/docs/practicealerts/alarm-management-
practice-alert.pdf (Level VII)
24 Graham, K. C., & Cvach, M. (2010). Monitor alarm fatigue: Standardizing use
of physiological monitors and decreasing nuisance alarms. American Journal
of Critical Care, 19, 28–37. Accessed via the Web at
http://ajcc.aacnjournals.org/content/19/1/28.full.pdf
25 The Joint Commission. (2013). “Sentinel event alert: Medical device alarm
safety in hospitals” [Online]. Accessed via the Web at
http://www.jointcommission.org/assets/1/18/SEA_50_alarms_4 _5 _13_FINAL1 .P
DF (Level VII)
26 The Joint Commission. (2019). Standard NPSG.06 .01.01. Comprehensive
accreditation manual for hospitals. Oakbrook Terrace, IL: The Joint
Commission. (Level VII)
27 Ganz, D. A., et al. (2013). Preventing falls in hospitals: A toolkit for improving
quality of care (AHRQ Publication No. 13-0015-EF). Rockville, MD: Agency for
Healthcare Quality and Research. Accessed via the Web at
http://www.ahrq.gov/sites/default/files/publications/files/fallpxtoolkit.pdf
(Level VII)
28 The Joint Commission. (2019). Standard RC.01.03 .01. Comprehensive
accreditation manual for hospitals. Oakbrook Terrace, IL: The Joint
Commission. (Level VII)
29 Accreditation Association for Hospitals and Health Systems. (2017). Standard
10.00 .03. Healthcare Facilities Accreditation Program: Accreditation
requirements for acute care hospitals. Chicago, IL: Accreditation Association
for Hospitals and Health Systems. (Level VII)
30 Centers for Medicare and Medicaid Services, Department of Health and
Human Services. (2015). Condition of participation: Medical record services.
42 C.F.R. § 482.24(b).
31 DNV GL-Healthcare USA, Inc. (2016). MR.2 .SR.1 . NIAHO® accreditation
requirements: Interpretive guidelines & surveyor guidance (version 11).
Milford, OH: DNV GL-Healthcare USA, Inc. (Level VII)
ENEMA ADMINISTRATION
Enema administration involves instilling a solution into the
rectum and colon. In a retention enema, the patient holds
the solution within the rectum or colon for 30 minutes to 1
hour. With a cleansing enema, the patient expels the
solution almost completely within 15 minutes. Both types of
enema stimulate peristalsis by mechanically distending the
colon and stimulating rectal wall nerves.
Enemas are used to clean the lower bowel in preparation
for diagnostic or surgical procedures, relieve distention and
promote expulsion of flatus, lubricate the rectum and colon,
and soften hardened stool for removal. Return-flow enemas
are occasionally prescribed to expel flatus. In addition, a
retention enema may be used to administer medications
such as sodium polystyrene sulfonate for treatment of
hyperkalemia, lactulose for treatment of hepatic
encephalopathy, and vancomycin for the treatment of
severe, complicated Clostridium difficile infection.1,2
Enemas are contraindicated in patients after recent colon
or rectal surgery or myocardial infarction and in patients
with acute abdominal conditions of unknown origin such as
suspected appendicitis. They should be administered
cautiously to patients with arrhythmia.
ELDER ALERT Enemas should be administered with caution to older
adults because people in this age-group are at greater risk for
hyperphosphatemia, perforation, and sepsis.3
Equipment
Prescribed solution and enema administration set or
prescribed enema solution in a squeeze bottle ▪ fluid-
impermeable pads ▪ bath blanket ▪ bedpan or bedside
commode ▪ toilet paper or moist wipes ▪ stethoscope ▪
disinfectant pad ▪ Optional: IV pole, additional personal
protective equipment, water-soluble lubricant, rectal balloon
catheter or large urinary catheter with 30-mL balloon,
prefilled syringe with 30 mL of saline solution, clamp or
catheter plug.
Prepackaged disposable enema kits are available, as are
small-volume enema solutions in irrigating and retention
types and in pediatric sizes.
Preparation of equipment
If you’re using a concentrated enema solution, dilute the
solution according to the manufacturer’s instructions.4
Because some ingredients may be mucosal irritants, make
sure the proportions are correct and the agents are mixed
thoroughly to avoid local irritation. Warm the solution until
it’s lukewarm to reduce patient discomfort. Clamp the
tubing and fill the enema bag with the prescribed solution.
Unclamp the tubing, flush the solution through the tubing,
and then reclamp it. Flushing detects leaks and removes air
that could cause discomfort if introduced into the colon.
Hang the solution container on the IV pole and take all
supplies to the patient’s room.
If you’re using an enema contained within a disposable
squeeze bottle, no preparation is needed.
Check any item that has an expiration date to ensure that
it has not expired. If a product is expired, if its integrity is
compromised, or if it’s defective, remove it from patient
use, label it as expired or defective, and report the
expiration or defect as directed by your facility.
Implementation
■ Avoid distractions and interruptions when preparing and
administering an enema or an enema with medication to
prevent medication errors.5,6
■ Verify the order on the patient’s medication record by
checking it against the practitioner’s order, if
appropriate.7,8,9,10
■ Perform hand hygiene.11,12,13,14,15,16
■ Gather and prepare the necessary equipment.
■ Compare the solution or medication label with the order
in the patient’s medical record.7,8,9,10
■ Check the patient’s medical record for an allergy or a
contraindication to the prescribed solution. If an allergy or a
contraindication exists, don’t administer the solution;
instead, notify the practitioner.7,8,9,10
■ Check the expiration date on the medication. If the
medication is expired, return it to the pharmacy and obtain
new medication.7,8,9,10
■ Visually inspect the solution for particles or discoloration
or other loss of integrity; don’t administer the solution if its
integrity is compromised.7,8,9,10
■ Discuss any unresolved concerns about the medication
with the patient’s practitioner.7,8,9,10
■ Prepare the enema, as needed.
■ Perform hand hygiene.11,12,13,14,15,16
■ Confirm the patient’s identity using at least two patient
identifiers.17
■ Provide privacy.18,19,20,21
■ Explain the procedure to the patient and family (if
appropriate) according to their individual communication
and learning needs to increase their understanding, allay
their fears, and enhance cooperation.
■ If the patient is receiving an enema with medication,
explain that the medication must be retained in the colon
for a prescribed amount of time (varies by medication) and
that the rectal balloon catheter or urinary catheter with
balloon will remain in place for that prescribed amount of
time to assist with retention.
■ Ask the patient about previous enemas and the patient’s
difficulty retaining them to determine your equipment
needs.
■ If the patient is receiving the medication for the first time,
discuss potential adverse reactions and any other patient
concerns related to the medication.7,8,9,10
■ Verify that the medication is being administered at the
proper time, in the prescribed dose, and by the correct route
to reduce the risk of medication errors.8,9,10
■ Encourage the patient to empty the bladder, because
fluid entering the rectum may cause discomfort if the
patient has a full bladder.22
■ Place a bedpan or commode nearby for the patient to
use. If the patient can use the bathroom, make sure that it
will be available when the patient needs it. Have toilet
paper or moist wipes within the patient’s reach.
■ If your facility uses a bar code scanning system, scan
your identification badge, the patient’s identification
bracelet, and the medication’s bar code.
■ Perform hand hygiene.11,12,13,14,15,16
■ Put on gloves and other personal protective equipment,
as needed, to comply with standard precautions.23,24
■ Raise the bed to waist level when performing patient care
to prevent caregiver back strain.25
■ Remove any clothing below the patient’s waist and cover
the patient with a blanket.22
■ Assess the patient’s GI status for bowel sounds and
abdominal distention to serve as a baseline for comparison.
■ Position the patient on the left side with the knees bent or
in the knee-to-chest position to expose the anus and ease
insertion of the enema.4,22
■ Place fluid-impermeable pads under the patient’s
buttocks to prevent soiling the linens.
For administration using an enema
administration set
■ Remove the cap from the enema administration set and
lubricate the distal tip of the administration tubing with
water-soluble lubricant to facilitate rectal insertion and
reduce irritation.4 Alternatively, if you’re using an
administration set with a prelubricated tip or an enema
contained in a disposable squeeze bottle, remove the
protective covering to expose the prelubricated tip.
■ Gently insert the lubricated tip into the rectum,
advancing it 2′′ to 3′′ (5 to 7.6 cm) with the tip pointing
toward the umbilicus (as shown below). Don’t force the tip
into the rectum, because doing so can cause injury. During
insertion, instruct the patient to bear down as if having a
bowel movement if able; this helps relax the muscles
around the anus, easing insertion.26
■ Unclamp the enema administration set and allow the
solution to flow into the rectum slowly. Advise the patient to
inform you of any discomfort, in which case you should slow
the flow rate, because the flow is probably too fast.4
■ After infusing all the liquid, slowly withdraw the tip of the
enema administration set tubing or squeeze bottle to
prevent a reflex emptying of the bowel.
■ Instruct the patient to retain the enema, as prescribed.
Explain that it’s often easier to retain the enema while lying
down.22
■ Return the bed to the lowest position to prevent falls and
maintain patient safety.27
■ Make sure the patient has access to a call light and a
bedpan, commode, or bathroom.22
■ If additional enemas are scheduled, clean and disinfect
the reusable equipment28,29 and store it appropriately. If no
additional enemas are scheduled, properly dispose of the
enema equipment.
For administration using a squeeze bottle
■ Remove the protective covering from the disposable
squeeze bottle to expose the prelubricated tip.
■ Expel excess air from the squeeze bottle, because air in
the colon can cause discomfort.26
■ Gently insert the lubricated tip into the rectum,
advancing it 2′′ to 3′′ (5 cm to 7.6 cm) with the tip pointing
toward the umbilicus. Don’t force the tip into the rectum,
because doing so can cause injury. During insertion, instruct
the patient to bear down as if having a bowel movement, if
able, to help relax the muscles around the anus, easing
insertion.26
■ Squeeze the bottle (as shown below) until nearly all of the
solution is gone.
For administration using a rectal balloon
catheter (retention enema)
■ Lubricate the distal tip of a rectal balloon catheter.
Alternatively, use a large urinary catheter with 30-mL
balloon.
■ Gently insert the lubricated tip into the rectum,
advancing it 6′′ to 8′′ (15 cm to 20 cm) into the sigmoid
colon. Don’t force the tip into the rectum, because doing so
can cause injury. During insertion, instruct the patient to
bear down as if having a bowel movement, if able, to help
relax the muscles around the anus, easing insertion.26
■ Connect the enema administration set to the rectal
balloon catheter or large urinary catheter with balloon.
■ Inflate the balloon with 20 to 30 mL of saline solution,
following the manufacturer’s instructions, until it’s snug.
■ Unclamp the enema administration set and allow the
solution to flow into the rectum at the prescribed rate.
■ Advise the patient to verbalize discomfort, in which case
you should slow the flow rate because it’s probably too
fast.4
■ Disconnect the administration set.
■ Clamp or plug the catheter for the ordered amount of
time (dwell time varies by medication).
■ If leakage occurs, elevate the patient’s hips on pillows or
place the patient in a temporary knee-chest position.30
■ Properly dispose of the enema equipment.
■ Return the bed to the lowest position to prevent falls and
maintain patient safety.
■ Make sure the patient has access to a call light.
■ After the dwell time is completed, deflate the balloon and
remove and properly discard the rectal balloon catheter or
large urinary catheter with 30-mL balloon.
Completing the procedure
■ Remove and discard your gloves and any other personal
protective equipment if worn.
■ Perform hand hygiene.11,12,13,14,15,16
■ Clean and disinfect your stethoscope with a disinfectant
pad.28,29
■ Perform hand hygiene.11,12,13,14,15,16
■ Document the procedure.31,32,33,34
Special considerations
■ Because patients with salt-retention disorders, such as
heart failure, may absorb sodium from the saline enema
solution, administer the solution to such patients cautiously
and monitor electrolyte status. A change in electrolyte
status can cause cardiac arrhythmias.
Complications
Enemas may produce dizziness or faintness; excessive
irritation of the colonic mucosa resulting from repeated
administration or from sensitivity to the enema ingredients;
hyponatremia or hypokalemia from repeated administration
of hypotonic solutions; and cardiac arrhythmias resulting
from vasovagal reflex stimulation after insertion of the
rectal catheter. Colonic water absorption may result from
prolonged retention of hypotonic solutions, which may, in
turn, cause hypervolemia or water intoxication.
Documentation
Record the date and time of enema administration; special
equipment used; the type and amount of solution; retention
time; the approximate amount returned; the color,
consistency, and amount of the return; abnormalities within
the return; any complications that occurred; and the
patient’s tolerance of the treatment. Document any
complications that occurred, the name of the practitioner
notified of those complications, the date and time of
notification, prescribed interventions, and the patient’s
response to those interventions. Document patient and
family teaching provided, their understanding of the
teaching, and any necessary follow-up teaching.
REFERENCES
1 Lee, W. M., et al. (2011). “AASLD position paper: The management of acute
liver failure: Update 2011” [Online]. Accessed via the Web at
http://www.aasld.org/practiceguidelines/Documents/AcuteLiverFailureUpdate2
011.pdf (Level VII)
2 Cohen, S. H., et al. (2010). Clinical practice guidelines for Clostridium difficile
infection in adults: 2010 update by the Society for Healthcare Epidemiology
of America (SHEA) and the Infectious Diseases Society of America (IDSA).
Infection Control and Hospital Epidemiology, 31(5), 431–455. (Level V)
3 Long Khanh Dao Le, B. (2015). Enema: Administration (older person). South
Australia: The Joanna Briggs Institute. (Level V)
4 Institute for Safe Medication Practices. (2015). “Administration of rectal
suppositories and enemas” [Online]. Accessed via the Web at
http://www.consumermedsafety.org/component/k2/item/462-administration-
of-rectal-suppositories-or-enemas
5 Westbrook, J., et al. (2010). Association of interruptions with an increased risk
and severity of medication administration errors. Archives of Internal
Medicine, 170(8), 683–690 . (Level IV)
6 Institute for Safe Medication Practices. (2012). Side tracks on the safety
express: Interruptions lead to errors and unfinished . . . Wait, what was I
doing? Nurse Advise-ERR, 11(2), 1–4 . Accessed via the Web at
https://www.ismp.org/Newsletters/acutecare/showarticle.aspx?id=37
7 DNV GL-Healthcare USA, Inc. (2016). MM .1 .SR.2 . NIAHO® accreditation
requirements: Interpretive guidelines & surveyor guidance (version 11).
Milford, OH: DNV GL-Healthcare USA, Inc. (Level VII)
8 The Joint Commission. (2019). Standard MM.06 .01.01. Comprehensive
accreditation manual for hospitals. Oakbrook Terrace, IL: The Joint
Commission. (Level VII)
9 Accreditation Association for Hospitals and Health Systems. (2017). Standard
16.01.03. Healthcare Facilities Accreditation Program: Accreditation
requirements for acute care hospitals. Chicago, IL: Accreditation Association
for Hospitals and Health Systems. (Level VII)
10 Centers for Medicare and Medicaid Services, Department of Health and
Human Services. (2015). Condition of participation: Nursing services. 42
C.F.R. § 482.23(c).
11 DNV GL-Healthcare USA, Inc. (2016). IC.1 .SR.1 . NIAHO® accreditation
requirements: Interpretive guidelines & surveyor guidance (version 11).
Milford, OH: DNV GL-Healthcare USA, Inc. (Level VII)
12 Centers for Medicare and Medicaid Services, Department of Health and
Human Services. (2015). Condition of participation: Infection control. 42 C.F.R.
§ 482.42.
13 Accreditation Association for Hospitals and Health Systems. (2017). Standard
07.01.21. Healthcare Facilities Accreditation Program: Accreditation
requirements for acute care hospitals. Chicago, IL: Accreditation Association
for Hospitals and Health Systems. (Level VII)
14 The Joint Commission. (2019). Standard NPSG.07.01.01. Comprehensive
accreditation manual for hospitals. Oakbrook Terrace, IL: The Joint
Commission. (Level VII)
15 World Health Organization. (2009). “WHO guidelines on hand hygiene in
health care: First global patient safety challenge, clean care is safer care”
[Online]. Accessed via the Web at
http://apps.who.int/iris/bitstream/10665/44102/1/9789241597906_eng.pdf
(Level IV)
16 Centers for Disease Control and Prevention. (2002). Guideline for hand
hygiene in health-care settings: Recommendations of the Healthcare Infection
Control Practices Advisory Committee and the HICPAC/SHEA/APIC/IDSA Hand
Hygiene Task Force. MMWR Recommendations and Reports, 51(RR-16), 1–45.
Accessed via the Web at https://www.cdc.gov/mmwr/pdf/rr/rr5116.pdf (Level
II)
17 The Joint Commission. (2019). Standard NPSG.01.01.01. Comprehensive
accreditation manual for hospitals. Oakbrook Terrace, IL: The Joint
Commission. (Level VII)
18 The Joint Commission. (2019). Standard RI.01.01.01. Comprehensive
accreditation manual for hospitals. Oakbrook Terrace, IL: The Joint
Commission. (Level VII)
19 DNV GL-Healthcare USA, Inc. (2016). PR.1.SR.5 . NIAHO® accreditation
requirements: Interpretive guidelines & surveyor guidance (version 11).
Milford, OH: DNV GL-Healthcare USA, Inc. (Level VII)
20 Centers for Medicare and Medicaid Services, Department of Health and
Human Services. (2015). Condition of participation: Patient’s rights. 42 C.F.R.
§ 482.13(c)(1).
21 Accreditation Association for Hospitals and Health Systems. (2017). Standard
15.01.16. Healthcare Facilities Accreditation Program: Accreditation
requirements for acute care hospitals. Chicago, IL: Accreditation Association
for Hospitals and Health Systems. (Level VII)
22 Kyle, G. (2007). Bowel care: Part 4—Administering an enema. Nursing Times,
103(45), 26–27.
23 Accreditation Association for Hospitals and Health Systems. (2017). Standard
07.01.10. Healthcare Facilities Accreditation Program: Accreditation
requirements for acute care hospitals. Chicago, IL: Accreditation Association
for Hospitals and Health Systems. (Level VII)
24 Siegel, J. D ., et al. (2007, revised 2017). “2007 guideline for isolation
precautions: Preventing transmission of infectious agents in healthcare
settings” [Online]. Accessed via the Web at
http://www.cdc.gov/hicpac/pdf/isolation/Isolation2007.pdf (Level II)
25 Waters, T. R., et al. (2009). “Safe patient handling training for schools of
nursing” [Online]. Accessed via the Web at
http://www.cdc.gov/niosh/docs/2009-127/pdfs/2009-127.pdf (Level VII)
26 Fleet Laboratories. (n.d .). “Fleet saline enema: relief in just 1-5 minutes”
[Online]. http://www.fleetlabs.com/constipation-relief-products/enemas/fleet-
saline-enema/
27 Ganz, D. A., et al. (2013). Preventing falls in hospitals: A toolkit for improving
quality of care (AHRQ Publication No. 13-0015-EF). Rockville, MD: Agency for
Healthcare Research and Quality. Accessed via the Web at
http://www.ahrq.gov/sites/default/files/publications/files/fallpxtoolkit.pdf
(Level VII)
28 Accreditation Association for Hospitals and Health Systems. (2017). Standard
07.02.03. Healthcare Facilities Accreditation Program: Accreditation
requirements for acute care hospitals. Chicago, IL: Accreditation Association
for Hospitals and Health Systems. (Level VII)
29 Rutala, W. A., et al. (2008). “Guideline for disinfection and sterilization in
healthcare facilities, 2008” [Online]. Accessed via the Web at
http://www.cdc.gov/hicpac/pdf/guidelines/Disinfection_Nov_2008.pdf (Level I)
30 Sanofi-Aventis. (2014). “Prescribing information: Kayexalate (Sodium
Polystyrene Sulfonate)” [Online]. Accessed via the Web at
http://products.sanofi.ca/en/kayexalate.pdf
31 DNV GL-Healthcare USA, Inc. (2016). MR.2 .SR.1 . NIAHO® accreditation
requirements: Interpretive guidelines & surveyor guidance (version 11).
Milford, OH: DNV GL-Healthcare USA, Inc. (Level VII)
32 Accreditation Association for Hospitals and Health Systems. (2017). Standard
10.00 .03. Healthcare Facilities Accreditation Program: Accreditation
requirements for acute care hospitals. Chicago, IL: Accreditation Association
for Hospitals and Health Systems. (Level VII)
33 Centers for Medicare and Medicaid Services, Department of Health and
Human Services. (2015). Condition of participation: Medical record services.
42 C.F.R. § 482.24(b).
34 The Joint Commission. (2019). Standard RC.01.03 .01. Comprehensive
accreditation manual for hospitals. Oakbrook Terrace, IL: The Joint
Commission. (Level VII)
EPICARDIAL PACING AND CARE
Epicardial pacing wires are commonly positioned on the
epicardial (outer) surface of the heart after cardiac surgery1
to manage surgery-related arrhythmias. Depending on the
patient’s need, the surgeon may place positive and negative
electrodes on the right atrium, right ventricle, or both,
loosely suturing the electrodes to the epicardial surface and
bringing them out through the chest wall through small
incisions.
If the patient requires pacing, you or the practitioner will
connect epicardial pacing wires to the pulse generator of a
temporary pacemaker. When the patient becomes
hemodynamically stable and no longer requires pacing, the
surgeon or a specially trained nurse removes the wires.
Equipment
For insertion and care
Pacemaker generator with new battery ▪ extra batteries ▪
connecting cable ▪ atrial epicardial wires ▪ ventricular
epicardial wires ▪ sterile rubber finger cot, glove, or plastic
cap ▪ sterile occlusive dressing ▪ label ▪ gloves ▪ cardiac
monitoring equipment (see the “Cardiac monitoring”
procedure, page 108) ▪ vital signs monitoring equipment ▪
stethoscope ▪ disinfectant pad ▪ 12-lead electrocardiogram
(ECG) machine and supplies ▪ Optional: protective plastic
cover.
For removal
Gloves ▪ personal protective equipment (gown, goggles and
mask or face shield with a mask) ▪ prescribed analgesic ▪
sterile gauze ▪ antiseptic solution (chlorhexidine-based) ▪
tape ▪ suture removal kit ▪ cardiac monitoring equipment ▪
vital signs monitoring equipment ▪
stethoscope ▪
disinfectant pad ▪ emergency equipment (code cart with
cardiac medications, defibrillator, handheld resuscitation
bag with mask, intubation equipment) ▪ temporary
transcutaneous or transvenous pacing equipment ▪
Optional: IV catheter insertion equipment.
Preparation of equipment
For insertion
Insert a new battery into the pulse generator and make sure
it’s functioning properly. Make sure extra batteries are
available.
For removal
Check that the emergency equipment and temporary
transcutaneous or transvenous pacing equipment are
readily available.
Implementation
For insertion and care
■ Verify the practitioner’s order.
■ Gather and prepare the appropriate equipment.
■ Confirm that a written informed consent has been
obtained and is in the patient’s medical record.2,3,4,5
■ Perform a preprocedure verification to make sure that all
relevant documentation, related information, and equipment
are available and correctly identified to the patient’s
identifiers.6,7
■ Verify that the laboratory and imaging studies have been
completed as ordered and that the results are in the
patient’s medical record. Notify the practitioner of any
unexpected results.
■ Perform hand hygiene.8,9,10,11,12,13
■ Confirm the patient’s identity using at least two patient
identifiers.14
■ Provide privacy.15,16,17,18
■ Raise the patient’s bed to waist level when providing care
to prevent caregiver back strain.19
■ Reinforce the practitioner’s explanation of the procedure
to the patient and family to decrease anxiety.
■ The surgical team will conduct a time-out immediately
before starting the procedure to perform a final assessment
that the correct patient, site, positioning, and procedure are
identified and all relevant information and necessary
equipment are available.20
■ The surgeon will hook epicardial wires into the epicardium
just before the end of surgery. Depending on the patient’s
condition, the surgeon may insert atrial wires, ventricular
wires, or both.
■ Perform hand hygiene.8,9,10,11,12,13
■ Put on gloves to prevent microshock.21
■ After insertion, attach the patient to the bedside cardiac
monitor to monitor the patient’s heart rhythm and evaluate
pacemaker function.21,22,23,24
■ Ensure that the pulse generator is turned off.25
■ Attach the connecting cable to the pulse generator by
connecting the positive pole on the cable to the positive
pole on the pulse generator and the negative pole on the
cable to the negative pole on the pulse generator.21
■ Expose the epicardial pacing wires and identify the atrial
and ventricular wires if both are present. Epicardial wires
that exit the chest to the right of the sternum originate in
the atrium; wires that exit to the left of the sternum
originate in the ventricle.21
Sensitivity and stimulation
threshold testing
Sensitivity and stimulation threshold testing help determine the appropriate
pacemaker rate and the amount of electrical current needed to initiate
depolarization of the myocardium. Testing should occur on both chambers, as
appropriate. Sensitivity threshold testing isn’t necessary if the patient has no
intrinsic rhythm. In some facilities, critical care nurses are permitted to
perform sensitivity and stimulation threshold testing; in other facilities, the
practitioner must perform the testing. Frequency of testing also varies by
facility. Commonly, testing occurs at least every 24 hours to make sure that
the pacemaker is functioning properly and that it isn’t delivering high levels
of energy to the myocardium.
Performing sensitivity threshold testing21
■ Slowly turn the sensitivity dial counterclockwise to a higher setting until
the sensing indicator light stops flashing, which will occur when the device no
longer senses the patient’s intrinsic rhythm.
■ Gradually turn the sensitivity dial clockwise to a lower setting until the
sensing light begins flashing with each complex and the pacing light stops
flashing; this setting is the sensing threshold.
■ Set the sensitivity dial to the setting that’s one-half the value of the
sensing threshold.
Performing stimulation threshold testing21
■ Set the pacing rate about 10 beats/minute above the patient’s intrinsic
rate.
■ Beginning at 20 milliamperes, slowly decrease the output until capture is
lost.
■ Gradually increase the milliamperes until you see a 1:1 capture and the
pacing light flashes; this is the stimulation threshold.
■ Set the milliamperes at least two times higher than the stimulation
threshold.
■ Using the connecting cable, connect the epicardial wires
to the pulse generator. Connect the positive electrode to the
positive terminal on the pulse generator through the
connecting cable; connect the negative electrode to the
negative terminal.21 Make sure that the connecting cable is
tightly secured to the generator, because improper
connection can cause pacing malfunction, potentially
leading to asystole.1
■ Set the pacing mode, rate, and energy level (output or
milliamperes) according to the practitioner’s order, or as
determined by sensitivity (the level at which intrinsic
cardiac activity is sensed by electrodes) and stimulation
threshold testing (the minimum amount of voltage
necessary to initiate depolarization).21 (See Sensitivity and
stimulation threshold testing.)
■ After adjusting the pacemaker settings, place the
protective plastic cover over the pacemaker controls or lock
the controls.21
■ Apply a sterile occlusive dressing over the insertion site21
to prevent infection at the insertion site and label it with the
date, the time, and your initials.
■ Secure the pulse generator to prevent it from falling or
becoming inadvertently detached.21
■ Insulate exposed wires using a plastic cap, glove, or
finger cot to prevent microshock.21
■ Assess the patient’s vital signs, skin color, level of
consciousness, and peripheral pulses to determine the
effectiveness of the paced rhythm. Perform a 12-lead
electrocardiogram (ECG) to serve as a baseline, and then
perform additional ECGs daily or with clinical changes. Also,
if possible, obtain a rhythm strip before, during, and after
pacemaker placement; after any adjustment in pacemaker
settings; and whenever the patient receives treatment
because of a pacemaker complication.
■ Perform a comprehensive pain assessment using
techniques appropriate for the patient’s age, condition, and
ability to understand. Respond to the patient’s pain
appropriately.26
For removal
■ Verify the practitioner’s order in the patient’s medical
record for epicardial wire removal.
■ Review laboratory data for coagulation and electrolyte
results to make sure they’re within normal limits, to reduce
the risk of bleeding and cardiac arrhythmias. Notify the
practitioner of abnormal values.21
■ Check the medication record to ensure that the patient
isn’t receiving anticoagulants, to reduce the risk of
hemorrhage following the procedure.21 If the patient is
receiving anticoagulants, notify the practitioner to confirm
wire removal, because epicardial pacing wires aren’t
typically removed while the patient is receiving
anticoagulant therapy owing to the risk for bleeding.21
■ Gather and prepare the equipment and bring it to the
patient’s bedside.
■ Perform hand hygiene.8,9,10,11,12,13
■ Confirm the patient’s identity using two patient
identifiers.14
■ Reinforce the practitioner’s explanation of the procedure
to the patient and family to decrease anxiety.
■ Explain the procedure to the patient and family (if
appropriate) according to their individual communication
and learning needs to increase their understanding, allay
their fears, and enhance cooperation.22 Tell the patient that
a mild to moderate pulling sensation may be felt during wire
removal.23,24
■ Make sure the patient is attached to a cardiac monitor.
Make sure the alarm limits are set appropriately for the
patient’s current condition and that the alarms are turned
on, functioning properly, and audible to staff.25,26,27
■ Raise the patient’s bed to waist level when providing
patient care to prevent caregiver back strain.19
■ Obtain vital signs and an ECG rhythm strip and assess
cardiovascular status to ensure that the patient is stable
before removal of pacing wires and to provide a baseline for
comparison.21
■ Perform a comprehensive pain assessment using
techniques appropriate for the patient’s age, condition, and
ability to understand.28
■ Administer an analgesic following safe medication
administration practices 20 to 30 minutes before the
procedure to promote patient comfort.21,29,30,31
■ Confirm that the patient has patent IV access in case
emergency fluids or medications are required.21 Insert an IV
catheter if patent access isn’t available. (See the “IV
catheter insertion and removal” procedure, page 443.)
■ Perform hand hygiene8,9,10,11,12,13 and put on personal
protective equipment.32,33
■ Place the patient in the supine position so that the wires
are readily accessible and the patient is properly positioned
if emergency measures become necessary.21
■ Using sterile no-touch technique, open the suture
removal kit and gauze packages and place them within
reach.
■ Carefully remove and discard the dressing covering the
exit site.
■ Remove and discard your gloves,32,33 perform hand
hygiene,8,9,10,11,12,13 and put on a new pair of gloves.32,33
■ Clean the exit sites with antiseptic solution; clean at least
a 3′′ (7.6 -cm) area around the exit sites.21
■ Cut the sutures at the appropriate place and remove
them. (See the “Suture removal” procedure, page 730.)21
■ Grasp a wire and slowly and gently pull to uncoil it from
the epicardium.21 If you feel resistance, stop and notify the
practitioner.
■ While pulling each wire, observe the cardiac monitor for
arrhythmias, because arrhythmias are common during
epicardial pacing wire removal.
■ Inspect the pacing wire for a small piece of tissue at the
tip, which indicates that you’ve removed the entire wire
intact.21
■ If you note bleeding at the exit site, apply pressure until
hemostasis is achieved.21
■ Observe the site, noting drainage, redness, or skin
breakdown.
■ Apply a sterile occlusive dressing over the exit sites.
■ Dispose of soiled supplies appropriately to reduce the risk
of transmission of microorganism.32,34
■ Return the bed to the lowest position to prevent falls and
maintain patient safety.35
■ Monitor vital signs every 15 minutes for the first hour,
every 30 minutes for the next 2 hours, and then hourly for 2
hours at an interval determined by your facility and the
patient’s condition to assess hemodynamic stability.
Continue arrhythmia monitoring for at least 24 hours after
the wires are removed.21
■ Closely monitor the patient for cardiac arrhythmias and
signs and symptoms of cardiac tamponade, such as the
Beck triad (hypotension, muffled heart tones, and jugular
vein distention), tachycardia, decreased peripheral pulses,
and dyspnea. Cardiac tamponade may not be immediately
evident if bleeding is slow; therefore, you may need to
monitor the patient closely for up to 2 hours.
■ Reassess the patient for pain and respond appropriately if
the patient continues to have pain despite receiving the
prescribed medication.28
■ Maintain the patient on bedrest for at least 1 hour after
the epicardial pacing wires are removed.21,36
Completing the procedure
■ Discard supplies, remove and discard your gloves,23 and
perform hand hygiene.8,9,10,11,12,13
■ Clean and disinfect your stethoscope using a disinfectant
pad.33,34
■ Perform hand hygiene.8,9,10,11,12,13
■ Document the procedure.37,38,39,40
Special considerations
■ Take care to prevent microshock, including warning the
patient not to use any electrical equipment that isn’t
grounded, such as telephones, electric shavers, televisions,
and lamps.
■ If the patient is disoriented or uncooperative, use
restraints if less restrictive measures aren’t effective to
prevent accidental removal of the pacemaker wires.
■ If the patient needs emergency defibrillation, make sure
the pacemaker can withstand the procedure. If you’re
unsure, disconnect the pulse generator to avoid damage.
■ Continuously monitor the ECG reading, noting capture,
sensing, rate, intrinsic beats, and competition of paced and
intrinsic rhythms. If the pacemaker is sensing correctly, the
sense indicator on the pulse generator should flash with
each beat. (See Handling pacemaker malfunction, page
286.)
■ Change the dressing at a frequency determined by your
facility and the type of dressing used.21 Clean the insertion
site with an antiseptic solution, change the dressing, and
label it with the date, the time, and your initials. Inspect the
site for signs of infection and notify the practitioner of
erythema or drainage at the site, which may necessitate
pacing wire removal.1
■ Assess and document sensitivity and stimulation
thresholds (commonly every 24 hours), as required by your
facility, to make sure that the pacemaker is functioning
properly.21
■ Monitor the pulse generator’s battery light indicator and
change the battery when necessary; battery life varies
according to the pacing energy needed.21
■ If the pulse generator is no longer needed, disconnect it
from the pacing wires and insulate the wires using a plastic
cap, glove, or finger cot to prevent microshocks.
■ Change the dressing at a frequency determined by your
facility and the type of dressing used.21 Clean the insertion
site with an antiseptic solution, change the dressing, and
label it with the date, the time, and your initials. Inspect the
site for signs of infection and notify the practitioner of
erythema or drainage at the site, which may necessitate
pacing wire removal.1
■ Assess and document sensitivity and stimulation
thresholds (commonly every 24 hours) as required by your
facility to make sure the pacemaker is functioning
properly.21
■ Monitor the pulse generator’s battery light indicator and
change the battery when necessary; battery life varies
according to the pacing energy needed.21
■ If the pulse generator is no longer needed, disconnect it
from the pacing wires and insulate the wires using a plastic
cap, glove, or finger cot to prevent microshocks.
Complications
Complications associated with pacemaker therapy include
microshock, equipment failure, competitive or fatal
arrhythmias, lead dislodgement, myocardial perforation, and
pulmonary embolism.1 Epicardial pacemakers carry a risk of
infection, cardiac arrest, and diaphragmatic stimulation.
Complications following epicardial pacing wire removal
occur more commonly in patients with a history of heart
failure, repeat heart surgery, or anticoagulant therapy.
Complications include cardiac tamponade, infection,
hemorrhage, hematoma, arrhythmias, hemodynamic
instability, myocardial ischemia, and graft site trauma.
Documentation
Record the reason for pacing, the time it started, the
locations of the electrodes, and the pacemaker settings.
Note the patient’s response to the procedure, along with
any complications and interventions taken. If possible,
obtain rhythm strips before, during, and after pacemaker
placement and whenever pacemaker settings are changed
or when the patient receives treatment for a complication
caused by the pacemaker. As you monitor the patient,
record the patient’s response to temporary pacing and note
any changes in the patient’s condition. Document patient
teaching and the patient’s understanding of your teaching.
Record the date, time, and name of the person removing
the wires. If an analgesic was administered, record the
name, dose, route, and time it was given and the patient’s
rating of the pain level.
Describe the condition of the exit site, the ease with which
you removed the wires, and whether you noted tissue at the
end of the wires. Include vital signs, ECG strip, and patient
assessment before, during, and after the procedure. Record
how you dressed the site. Note the patient’s tolerance of the
procedure.
If any adverse effects occurred, note the time, name of
the practitioner notified, orders given, nursing interventions,
and the patient’s response. Document frequent
assessments on a frequent vital sign assessment sheet or in
the electronic medical record. Include patient and family
teaching provided and their understanding of your teaching.
REFERENCES
1 Hayes, D. L. Temporary cardiac pacing. (2017). In: UpToDate, Ganz, L. I ., &
Downey, B. C . (Eds.) . Retrieved from www.uptodate.com
2 Accreditation Association for Hospitals and Health Systems. (2017). Standard
30.01.11. Healthcare Facilities Accreditation Program: Accreditation
requirements for acute care hospitals. Chicago, IL: Accreditation Association
for Hospitals and Health Systems. (Level VII)
3 Centers for Medicare and Medicaid Services, Department of Health and
Human Services. (2015). Condition of participation: Patient’s rights. 42 C.F.R.
§ 482.13(b)(2).
4 Centers for Medicare and Medicaid Services, Department of Health and
Human Services. (2015). Condition of participation: Surgical services. 42
C.F.R. § 482.51.
5 DNV GL-Healthcare USA, Inc. (2016). PR.1 .SR.3 . NIAHO® accreditation
requirements: Interpretive guidelines & surveyor guidance (version 11).
Milford, OH: DNV GL-Healthcare USA, Inc. (Level VII)
6 The Joint Commission. (2019). Standard UP.01.01.01. Comprehensive
accreditation manual for hospitals. Oakbrook Terrace, IL: The Joint
Commission. (Level VII)
7 Accreditation Association for Hospitals and Health Systems. (2017). Standard
30.00 .14. Healthcare Facilities Accreditation Program: Accreditation
requirements for acute care hospitals. Chicago, IL: Accreditation Association
for Hospitals and Health Systems. (Level VII)
8 The Joint Commission. (2019). Standard NPSG.07.01.01. Comprehensive
accreditation manual for hospitals. Oakbrook Terrace, IL: The Joint
Commission. (Level VII)
9 World Health Organization. (2009). “WHO guidelines on hand hygiene in
health care: First global patient safety challenge, clean care is safer care”
[Online]. Accessed via the Web at
http://apps.who.int/iris/bitstream/10665/44102/1/9789241597906_eng.pdf
(Level IV)
10 Centers for Disease Control and Prevention. (2002). Guideline for hand
hygiene in health-care settings: Recommendations of the Healthcare Infection
Control Practices Advisory Committee and the HICPAC/SHEA/APIC/IDSA Hand
Hygiene Task Force Hand Hygiene Task Force. MMWR Recommendations and
Reports, 51(RR-16), 1–45. Accessed via the Web at
https://www.cdc.gov/mmwr/pdf/rr/rr5116.pdf (Level II)
11 Centers for Medicare and Medicaid Services, Department of Health and
Human Services. (2015). Condition of participation: Infection control. 42 C.F.R.
§ 482.42.
12 Accreditation Association for Hospitals and Health Systems. (2017). Standard
07.01.21. Healthcare Facilities Accreditation Program: Accreditation
requirements for acute care hospitals. Chicago, IL: Accreditation Association
for Hospitals and Health Systems. (Level VII)
13 DNV GL-Healthcare USA, Inc. (2016). IC.1 .SR.1 . NIAHO® accreditation
requirements: Interpretive guidelines & surveyor guidance (version 11).
Milford, OH: DNV GL-Healthcare USA, Inc. (Level VII)
14 The Joint Commission. (2019). Standard NPSG.01.01.01. Comprehensive
accreditation manual for hospitals. Oakbrook Terrace, IL: The Joint
Commission. (Level VII)
TROUBLESHOOTING
Handling pacemaker malfunction
Occasionally, a temporary pacemaker may fail to function
appropriately. When this occurs, you need to take
immediate action to correct the problem. Follow these
steps when your patient’s pacemaker fails to pace,
capture, or sense intrinsic beats.
Failure to pace
Failure to pace occurs when the pacemaker either doesn’t fire or fires too
often. The pulse generator may not be working properly, or it may not be
conducting the impulse to the patient.
Nursing interventions
■ If the pacing or sensing indicator flashes, check the patient, all
connections, and the battery. Check the position of the pacing electrode in
the patient by X-ray if ordered.
■ If the pulse generator is turned on but the indicators still aren’t flashing,
change the battery. If that doesn’t help, use a different pulse generator.
■ Check the settings if the pacemaker is firing too rapidly. If the rate is
correct or if increasing the sensitivity (according to the practitioner’s order)
doesn’t help, change the pulse generator.
■ Have a transcutaneous pacemaker on standby in case the pacemaker
continues to malfunction and the patient becomes symptomatic. Notify the
practitioner.
Failure to capture
In failure to capture, you can see the pacemaker spikes but the heart isn’t
responding. This malfunction may be caused by changes in the pacing
threshold from ischemia, swelling at the insertion site, an electrolyte
imbalance (high or low potassium or magnesium levels), acidosis, an adverse
reaction to a medication, a perforated ventricle, fibrosis, or the electrode
position.
Nursing interventions
■ Verify that the settings are correct, according to the practitioner’s order.
■ If the heart isn’t responding, carefully check all connections, increase the
milliamperes slowly as determined by your facility, and then notify the
practitioner of the failure to capture.
■ Have a transcutaneous pacemaker on standby in case the pacemaker
continues to malfunction and the patient becomes symptomatic. Notify the
practitioner.
Failure to sense intrinsic beats
Failure to sense intrinsic beats could cause ventricular tachycardia or
ventricular fibrillation if the pacemaker fires on the vulnerable T wave.
Possible causes include the pacemaker sensing an external stimulus as a QRS
complex, which could lead to asystole, or the pacemaker not being sensitive
enough, which means it could fire anywhere within the cardiac cycle.
Nursing interventions
■ If the pacing is undersensing, increase the sensitivity by turning down the
voltage, usually to 2 to 5 millivolts (mV). If it’s oversensing, decrease the
sensitivity by turning up the voltage to 5 mV or higher.
■ Change the battery and then the pulse generator.
■ Remove items in the room causing electromechanical interference (such
as razors, radios, and cautery devices). Check the ground wires on the bed
and other equipment for obvious damage. Unplug each piece and see if the
interference stops. When you locate the cause, notify the staff engineer to
check it.
■ If the pacemaker is still firing on the T wave and all else has failed to
correct it, attach the patient to a transcutaneous pacemaker, turn off the
epicardial pacemaker, and notify the practitioner.
15 The Joint Commission. (2019). Standard RI.01.01.01. Comprehensive
accreditation manual for hospitals. Oakbrook Terrace, IL: The Joint
Commission. (Level VII)
16 DNV GL-Healthcare USA, Inc. (2016). PR.1.SR.5 . NIAHO® accreditation
requirements: Interpretive guidelines & surveyor guidance (version 11).
Milford, OH: DNV GL-Healthcare USA, Inc. (Level VII)
17 Centers for Medicare and Medicaid Services, Department of Health and
Human Services. (2015). Condition of participation: Patient’s rights. 42 C.F.R.
§ 482.13(c)(1).
18 Accreditation Association for Hospitals and Health Systems. (2017). Standard
15.01.16. Healthcare Facilities Accreditation Program: Accreditation
requirements for acute care hospitals. Chicago, IL: Accreditation Association
for Hospitals and Health Systems. (Level VII)
19 Waters, T. R., et al. (2009). “Safe patient handling training for schools of
nursing” [Online]. Accessed via the Web at
http://www.cdc.gov/niosh/docs/2009-127/pdfs/2009-127.pdf (Level VII)
20 The Joint Commission. (2019). Standard UP.01.03.01. Comprehensive
accreditation manual for hospitals. Oakbrook Terrace, IL: The Joint
Commission. (Level VII)
21 Wiegand, D. (2017). AACN procedure manual for high acuity, progressive,
and critical care (7th ed.). St. Louis, MO: Elsevier.
22 The Joint Commission. (2019). Standard PC.02.01.21. Comprehensive
accreditation manual for hospitals. Oakbrook Terrace, IL: The Joint
Commission. (Level VII)
23 Roschkov, S., & Jensen, L. (2004). Coronary artery bypass graft patients’ pain
perception during epicardial pacing wire removal. Canadian Journal of
Cardiovascular Nursing, 14(3), 32–38 . (Level VI)
24 Mullin, M. H., et al. (2009). Sensations during removal of epicardial pacing
wires after coronary artery bypass graft surgery. Heart & Lung, 38(5), 377–
381. (Level VI)
25 Graham, K. C., & Cvach, M. (2010). Monitor alarm fatigue: Standardizing use
of physiological monitors and decreasing nuisance alarms. American Journal
of Critical Care, 19(1), 28–37. Accessed via the Web at
http://ajcc.aacnjournals.org/content/19/1/28.full.pdf
26 American Association of Critical-Care Nurses (AACN). (2013). “A ACN practice
alert: Alarm management” [Online]. Accessed via the Web at
http://www.aacn.org/wd/practice/docs/practicealerts/alarm-management-
practice-alert.pdf (Level VII)
27 The Joint Commission. (2019). Standard NPSG.06 .01.01. Comprehensive
accreditation manual for hospitals. Oakbrook Terrace, IL: The Joint
Commission. (Level VII)
28 The Joint Commission. (2019). Standard PC.01.02.07. Comprehensive
accreditation manual for hospitals. Oakbrook Terrace, IL: The Joint
Commission. (Level VII)
29 Centers for Medicare and Medicaid Services, Department of Health and
Human Services. (2015). Condition of participation: Nursing services. 42
C.F.R. § 482.23(c).
30 Accreditation Association for Hospitals and Health Systems. (2017). Standard
16.01.03. Healthcare Facilities Accreditation Program: Accreditation
requirements for acute care hospitals. Chicago, IL: Accreditation Association
for Hospitals and Health Systems. (Level VII)
31 DNV GL-Healthcare USA, Inc. (2016). MM.1 .SR.2. NIAHO® accreditation
requirements: Interpretive guidelines & surveyor guidance (version 11).
Milford, OH: DNV GL-Healthcare USA, Inc. (Level VII)
32 Siegel, J. D ., et al. (2007, revised 2017). “2007 guideline for isolation
precautions: Preventing transmission of infectious agents in healthcare
settings” [Online]. Accessed via the Web at
http://www.cdc.gov/hicpac/pdf/isolation/Isolation2007.pdf (Level II)
33 Accreditation Association for Hospitals and Health Systems. (2017). Standard
07.01.10. Healthcare Facilities Accreditation Program: Accreditation
requirements for acute care hospitals. Chicago, IL: Accreditation Association
for Hospitals and Health Systems. (Level VII)
34 Occupational Safety and Health Administration. (n.d .). “Bloodborne
pathogens, standard number 1910.1030” [Online]. Accessed via the Web at
http://www.osha.gov/pls/oshaweb/owadisp.show_document?
p_table=STANDARDS&p_id=10051 (Level VII)
35 Ganz, D. A., et al. (2013). Preventing falls in hospitals: A toolkit for improving
quality of care (AHRQ Publication No. 13-0015-EF). Rockville, MD: Agency for
Healthcare Research and Quality. Accessed via the Web at
http://www.ahrq.gov/sites/default/files/publications/files/fallpxtoolkit.pdf
(Level VII)
36 Pennsylvania Patient Safety Authority. (2006). Minimizing complications from
epicardial pacing wires after cardiac surgery. PA-PSRS Patient Safety Advisory,
3, 1–6.
37 The Joint Commission. (2019). Standard RC.01.03 .01. Comprehensive
accreditation manual for hospitals. Oakbrook Terrace, IL: The Joint
Commission. (Level VII)
38 Accreditation Association for Hospitals and Health Systems. (2017). Standard
10.00 .03. Healthcare Facilities Accreditation Program: Accreditation
requirements for acute care hospitals. Chicago, IL: Accreditation Association
for Hospitals and Health Systems. (Level VII)
39 Centers for Medicare and Medicaid Services, Department of Health and
Human Services. (2015). Condition of participation: Medical record services.
42 C.F.R. § 482.24(b).
40 DNV GL-Healthcare USA, Inc. (2016). MR.2 .SR.1 . NIAHO® accreditation
requirements: Interpretive guidelines & surveyor guidance (version 11).
Milford, OH: DNV GL-Healthcare USA, Inc. (Level VII)
EPIDURAL ANALGESIC ADMINISTRATION
In epidural analgesic administration, an anesthesia
practitioner such as an anesthesiologist or a nurse
anesthetist may place an epidural catheter into the epidural
space around the spinal cord to provide a route for
administration of pain medication. It can be used short-term
for acute pain associated with surgery, procedures, trauma,
or labor pain, or long-term for chronic pain, including
cancer-related pain.
The primary advantage of
administering pain medication through an epidural catheter
is that pain can be managed with smaller doses of
analgesia, therefore reducing the risks associated with
larger doses of systemic analgesia.1,2,3 Pain medication may
be administered through an epidural catheter intermittently,
continuously, or with a patient-controlled epidural analgesia
pump. Epidural use for chronic pain may also incorporate an
implanted pump. The epidural catheter is typically located
in the thoracic or lumbar region of the spine. (See Location
of an epidural catheter, page 288.)
Medications typically administered via an epidural
catheter include dilute local anesthetics (such as
bupivacaine or ropivacaine) and opioid analgesics (such as
fentanyl, sufentanil, morphine, or hydromorphone), either
alone or in combination. Adjuncts, such as clonidine, may be
added to the solution. All medications administered by the
epidural route must be preservative free, because
preservatives are toxic to the central nervous system.1,4,5
After the anesthesia practitioner inserts the epidural
catheter, administers the initial test dose, and sets the
dosage parameters, the specially trained nurse may initiate
the infusion, administer bolus doses, adjust infusion rates,
replace empty drug containers, troubleshoot the infusion
device, change the tubing and dressing, discontinue
therapy, and, in some cases, remove the catheter. Nurses
are also responsible for assessing the patient, monitoring for
adverse effects, and teaching the patient and family. Nurses
should check with the guidelines of their facility as well as
with the nurse practice act for the state in which they work
to determine which interventions are within their scope of
care.6,7
Equipment
Programmable epidural infusion device with anti–free-flow
protection4 ▪ epidural infusion tubing (yellow-lined epidural
administration set with injection ports)1 containing a 0.2 -
micron, surfactant-free, particulate-retentive filter4 ▪
prescribed preservative-free epidural medications4 ▪ EPIDURAL
ONLY labels ▪ blood pressure monitoring equipment ▪
stethoscope ▪ thermometer ▪ pulse oximeter and probe ▪
gloves ▪ mask ▪ tape measure ▪ antiseptic pads (povidone-
iodine or chlorhexidine) ▪ 10-mL empty syringe ▪ 10-mL
syringe containing preservative-free normal saline solution ▪
disinfectant pad ▪ emergency equipment (code cart with
cardiac medications, handheld resuscitation bag and mask,
defibrillator, intubation and suction equipment, and
naloxone4,8) ▪
Optional: capnography monitoring
equipment.
Preparation of equipment
Make sure that emergency equipment is readily available
and functioning properly. Make sure the pharmacy has been
notified ahead of time about the medication order, because
epidural solutions require special preparation. Inspect all
infusion equipment and supplies; if a product is expired, if
its integrity is compromised, or if it’s found defective,
remove it from patient use, label it as expired or defective,
and report the expiration or defect as directed by your
facility.9
Implementation
■ Avoid distractions and interruptions when preparing and
administering the medication to prevent medication
errors.10,11
■ Review the practitioner’s order to make sure that the
prescribed medication, dose, rate, and route of
administration are appropriate for the patient’s age,
condition, and access device. Address concerns about the
order with the practitioner, pharmacist, or your supervisor,
and, if needed, risk management or as directed by your
facility.12,13,14,15
■ Reconcile the patient’s medications when a new
medication is ordered to reduce the risk of medication
errors, including omissions, duplications, dosing errors, and
drug interactions.16
■ Gather and prepare the appropriate equipment.
■ Obtain the medication from the pharmacy.1
Location of an epidural catheter
An epidural catheter is introduced via a needle through the skin,
subcutaneous tissue, and ligaments between two vertebrae into the epidural
space. The specific interspace between two vertebrae chosen for epidural
insertion depends on the level where the medication’s effect is needed, but is
commonly performed in the thoracic or lumbar regions of the spine.
■ Compare the medication label with the order in the
patient’s medical record.12,13,14,15
■ Review the patient’s medical record for an allergy or a
contraindication to the prescribed medication. If an allergy
or a contraindication exists, don’t administer the
medication; instead, notify the practitioner.12,13,14,15
■ Check the expiration date on the medication. If the
medication is expired, return it to the pharmacy and obtain
new medication.12,13,14,15
■ Visually inspect the solution for particulates,
discoloration, and other signs of loss of integrity; don’t
administer
the
medication
if its integrity is
compromised.12,13,14,15
■ Discuss any unresolved concerns about the medication
with the patient’s practitioner.12,13,14,15
■ Perform hand hygiene.17,18,19,20,21,22
■ Confirm the patient’s identity using at least two patient
identifiers.23
■ Provide privacy.24,25,26,27
■ Explain the procedure to the patient and family (if
appropriate) according to their individual communication
and learning needs to increase their understanding, allay
their fears, and enhance cooperation.28
■ If the patient is receiving the medication for the first time,
provide teaching about potential adverse reactions and
discuss any
other
concerns
related to the
medication.12,13,14,15
■ Raise the patient’s bed to waist level when providing
patient care to prevent caregiver back strain.29
■ Perform hand hygiene.17,18,19,20,21,22
■ Obtain the patient’s vital signs and oxygen saturation
level and assess neurologic status and sedation level to
serve as a baseline for comparison.1,30
■ Perform a comprehensive pain assessment using
techniques appropriate for the patient’s age, condition, and
ability to understand.31 Review with the patient how to use
an appropriate pain scale, as appropriate.1,4
■ Make sure that the patient has adequate, patent IV
access to provide a route for IV fluids or emergency
medications if needed; insert a new IV catheter, if
necessary. (See the “IV catheter insertion and removal”
procedure.)14
■ Perform hand hygiene.17,18,19,20,21,22
■ Put on gloves and a mask.1,4,30,32,33
■ Assess the insertion site for signs of infection
(tenderness, erythema, swelling, drainage) and the insertion
site dressing for dressing intactness, moisture, or leakage.
Notify the practitioner of any unexpected findings.
■ Assess the catheter for intactness. Measure the external
catheter length with a tape measure and compare that
measurement to the measurement taken during insertion to
assess for catheter migration.30 Notify the practitioner of
catheter damage or migration.
■ Verify that the medication is being administered at the
proper time, in the prescribed dose, and by the correct route
to reduce the risk of medication errors.
■ If your facility uses bar-code technology, scan your
identification badge, the patient’s identification bracelet,
and the medication’s bar code.
■ For a continuous infusion or patient-controlled epidural
anesthesia:1,2,4,30 Connect the prescribed, preservative-free
medication to the epidural infusion tubing and prime the
tubing. Label the tubing at both the distal (near the patient
connection) and proximal (near the source container) ends
with a label that reads EPIDURAL ONLY to reduce the risk of
misconnection.34 Insert the epidural infusion tubing into the
programmable electronic infusion device according to the
manufacturer’s
instructions.
Program
the dosage
parameters according the practitioner’s orders. Label the
device with a label that reads EPIDURAL ONLY.
■ Perform a vigorous mechanical scrub of the epidural
catheter hub with an antiseptic pad for at least 5 seconds,
and then allow it to dry completely.1,4,30
NURSING ALERT Don’t use antiseptic containing alcohol or acetone
to disinfect the catheter hub; these agents can cause neurotoxic
effects. Instead, use povidone-iodine or chlorhexidine.1,4,30
■ Attach an empty 10-mL syringe to the epidural catheter
hub and gently aspirate for blood or cerebral spinal fluid to
confirm proper epidural catheter placement. If more than
0.5 mL of blood or serous fluid is aspirated, don’t reinject
the aspirate or administer the medication. Instead, notify
the practitioner, because the catheter has most likely
migrated into a vein or the intrathecal space.1,4,30
■ For a continuous infusion or patient-controlled epidural
anesthesia: Connect the epidural infusion tubing to the
epidural catheter. Trace the tubing from the patient to its
point of origin to make sure that it’s connected correctly.35
Route the tubing in a standardized direction if the patient
has other tubing and catheters that have different
purposes.34
■ If required by your facility, before beginning an epidural
infusion, have another nurse perform an independent
double-check to reduce the risk of medication errors.
Compare the results of the independent double-check. If no
discrepancies exist, move forward with medication
administration. If discrepancies exist, rectify them before
administering the medication.36
NURSING ALERT Epidural medications are considered “high-alert”
medications because they can cause significant patient harm when
used in error.37 If required by your facility, before administering
epidural analgesia, have another nurse perform an independent
double-check to verify the patient’s identity and to make sure that the
correct medication is present in the prescribed concentration, the
medication’s indication corresponds with the patient’s diagnosis, the
dosage calculations and the dosing formula used to derive the final
dose are correct, the route of administration is safe and proper for the
patient, and, for an infusion, the pump settings are correct and the
epidural infusion tubing is attached correctly to help prevent
medication errors.36
■ If you’re administering a bolus dose of epidural
analgesic:1,30 While maintaining sterility of the syringe tip,
attach the syringe containing the prescribed, preservative-
free medication to the epidural catheter hub and slowly
administer the medication. If you meet excessive resistance,
assess the catheter for kinks or reposition the patient. If
resistance continues to impede administration, notify the
practitioner. After administering the bolus, remove the
syringe from the catheter hub. While maintaining sterility of
the syringe tip, attach the syringe containing preservative-
free normal saline solution to the catheter hub. Flush the
epidural catheter with 1 to 2 mL of preservative-free normal
saline solution to ensure the medication reaches the
epidural space.
■ For a continuous infusion or patient-controlled epidural
anesthesia: Make sure that the infusion device alarm limits
are set appropriately for the patient’s current condition and
that the alarms are turned on, functioning properly, and
audible to staff.38,39,40,41 Begin the infusion or set the device
to allow the patient to self-administer doses, as appropriate.
Lock the keypad on the infusion device to prevent
inadvertent infusion rate changes.1
■ Monitor the patient’s vital signs, oxygen saturation, end-
tidal carbon dioxide (if capnography monitoring is ordered),
level of sedation, and sensory and motor function at
established intervals determined by your facility, the
practitioner’s orders, and the patient’s condition.1,2,4
NURSING ALERT Patients at higher risk for adverse effects of
epidural analgesia include the elderly, patients with comorbidities
(such as sleep apnea or psychiatric conditions), and those taking
concurrent medications (such as other analgesics or sedatives).
Increased vigilance while monitoring these patients is essential for
promptly recognizing and treating adverse events.4,42
■ Reassess the patient’s pain using an appropriate pain
scale at established intervals determined by your facility,
the practitioner’s orders, and the patient’s condition. If the
patient reports moderate to severe pain, the infusion rate
may need to be increased. Notify the practitioner for an
unacceptable pain level despite intervention.1,4,31
■ Monitor the patient at established intervals determined
by your facility, the practitioner’s orders, and the patient’s
condition for:1,2,4 adverse effects of the medication, such as
pruritus, nausea and vomiting, urinary retention, orthostatic
hypotension, respiratory depression, oversedation, and
motor block; signs and symptoms of local anesthetic
systemic toxicity, including visual disturbances, ringing in
the ears, tingling or numbness around the mouth, metallic
taste in the mouth, and anxiety; signs and symptoms of
catheter insertion site infection or epidural abscess, such as
back pain, tenderness, erythema, swelling, drainage, fever,
malaise, neck stiffness, progressive numbness, and motor
block; dressing intactness, moisture, or leakage; and
catheter length and intactness.
■ Notify the practitioner of any adverse events or
unexpected outcomes and intervene as appropriate and as
ordered.
■ For a continuous infusion or patient-controlled epidural
anesthesia, monitor the electron infusion device for history
of analgesic use and correct administration parameters at
established intervals determined by your facility, the
practitioner’s orders, and the patient’s condition.
■ Return the bed to the lowest position to prevent falls and
maintain patient safety.43
■ Discard all used supplies in appropriate receptacles.43
■ Remove and discard your mask and gloves.44
■ Perform hand hygiene.17,18,19,20,21,22
■ Clean and disinfect your stethoscope with a disinfectant
pad. Clean and disinfect other equipment used according to
the manufacturer’s instructed and as directed by your
facility to prevent the spread of infection.45
■ Perform hand hygiene.17,18,19,20,21,22
■ Document the procedure.46,47,48,49
Special considerations
■ IV access should be maintained for at least 24 hours after
epidural catheter insertion to facilitate administration of IV
fluids and vasopressors for hypotension, naloxone for
respiratory depression or pruritus, and antiemetics for
nausea and vomiting.1,4
■ The dressing on a short-term epidural catheter should be
changed only if it’s loose, wet, or soiled because of the risk
of infection and dislodgment. The dressing on a long-term
epidural catheter should be changed every 7 days while
performing site antisepsis.2,30
■ Drugs given epidurally diffuse slowly and may cause
adverse effects, including excessive sedation, for up to 12
hours after epidural infusion has been discontinued.
■ The Joint Commission has issued a sentinel event alert
concerning medical device alarm safety, because alarm-
related events have been associated with permanent loss of
function and death. Among the major contributing factors
are improper alarm settings, inappropriately turned off
alarms, and alarm signals that were not audible to staff.
Make sure alarm limits are appropriately set and that alarms
are turned on, functioning properly, and audible to staff.
Follow facility guidelines for preventing alarm fatigue.41
■ The Joint Commission has issued a sentinel event alert
related to managing risk during transition to new
International Organization for Standardization tubing
standards that were designed to prevent dangerous tubing
misconnections, which can lead to serious patient injury and
death. During the transition, be sure to trace the tubing and
catheter from the patient to the point of origin before
connecting or reconnecting any device or infusion, at any
care transition (such as a new setting or service), and as
part of the handoff process; route tubes and catheters
having different purposes in different standardized
directions; label the tubing at both the distal and proximal
ends when there are different access sites or several bags
hanging; use tubing and equipment only as intended; and
store medications for different delivery routes in separate
locations.34
Patient teaching
Review with the patient and family, as appropriate, signs
and symptoms to report, including worsening pain or an
unacceptable pain level; adverse effects of opioids (itching,
nausea and vomiting, oversedation, and respiratory
depression);1,2,4 symptoms of local anesthetic systemic
toxicity (visual disturbances, ringing in the ears, tingling or
numbness around the mouth, metallic taste in the mouth,
and anxiety;1,43 and signs and symptoms of catheter
migration or epidural hematoma or abscess, including
changes in pain perception, new or worsening back pain,
numbness of the extremities, loss of motor control of the
lower extremities, and loss of bowel or bladder function.1,2,4
Complications
Potential complications of epidural analgesic administration
include adverse reactions to opioids and local anesthetics
and catheter-related problems, such as infection, epidural
hematoma, and catheter migration.
Documentation
Document your assessments before, during, and after
epidural analgesic administration, including vital signs,
oxygen saturation, pain level, and sedation level. Record the
infusion device type and gauge, external catheter length,
and site and dressing condition. Document any unexpected
outcomes, your interventions, and the patient’s response to
those interventions. Record the medications administered,
including the medication strength, dose, route of
administration, and date and time of administration.50
Document the patient’s response to those medications. Also
document teaching provided to the patient and family and
their comprehension of that teaching.
REFERENCES
1 Wiegand, D. (2017). AACN procedure manual for high acuity, progressive and
critical care (7th ed.). St. Louis, MO: Elsevier.
2 Sawhney, M. (2012). Epidural analgesia: What nurses need to know. Nursing,
42(8), 36–41 . Accessed via the Web at http://www.nursingcenter.com/lnc/pdf?
AID=1403661&an=00152193-201208000-
00015&Journal_ID=54016&Issue_ID=1403510
3 Chou, R., et al. (2016). Management of postoperative pain: A clinical practice
guideline from the American Pain Society, the American Society of Regional
Anesthesia and Pain Medicine, and the American Society of Anesthesiologists’
Committee on Regional Anesthesia, Executive Committee, and Administrative
Council. The Journal of Pain, 17(2), 131–157. (Level VII)
4 Standard 54. Intraspinal access devices. Infusion therapy standards of
practice. (2016). Journal of Infusion Nursing, 39, S118–S120. (Level VII)
5 Ituk, U. & Wong, C. A. Epidural and combined spinal-epidural anesthesia:
Techniques. (2017). In: UpToDate, Maniker, R. & Crowley, M. (Eds.). Retrieved
from: www.uptodate.com
6 Pasero, C., et al. (2007). Registered nurse management and monitoring of
analgesia by catheter techniques: Position statement. Pain Management
Nursing, 8(2), 48–54. Accessed via the Web at
http://www.aspmn.org/documents/RegisteredNurseManagementandMonitorin
gofAnalgesiaByCatheterTechniquesPMNversion.pdf (Level VII)
7 American Association of Nurse Anesthetists. (2017). “Care of patients
receiving analgesia by catheter techniques: Position statement and policy
considerations” [Online]. Accessed via the Web at
https://www.aana.com/docs/default-source/practice-aana-com-web-
documents-(all)/care-of-patients-receiving-analgesia-by-catheter-
techniques.pdf?sfvrsn=d30049b1_2 (Level VII)
8 Institute for Safe Medication Practices. (2018). “2018–2019 targeted
medication safety best practices for hospitals” [Online]. Accessed via the
Web at https://www.ismp.org/tools/bestpractices/TMSBP-for-Hospitals.pdf
9 Standard 12. Product evaluation, integrity, and defect reporting. Infusion
therapy standards of practice. (2016). Journal of Infusion Nursing, 39, S32–
S34. (Level VII)
10 Westbrook, J., et al. (2010). Association of interruptions with an increased risk
and severity of medication administration errors. Archives of Internal
Medicine, 170(8), 683–690 . (Level IV)
11 Institute for Safe Medication Practices. (2013). Side tracks on the safety
express: Interruptions lead to errors and unfinished...Wait, what was I doing?
Nurse Advise-ERR, 11(2), 1–4 . Accessed via the Web at
https://www.ismp.org/Newsletters/acutecare/showarticle.aspx?id=37
12 The Joint Commission. (2019). Standard MM.06.01.01. Comprehensive
accreditation manual for hospitals. Oakbrook Terrace, IL: The Joint
Commission. (Level VII)
13 Centers for Medicare & Medicaid Services, Department of Health and Human
Services. (2015). Condition of participation: Nursing services. 42 C.F.R. §
482.23(c).
14 Accreditation Association for Hospitals and Health Systems. (2017). Standard
16.01.03. Healthcare Facilities Accreditation Program: Accreditation
requirements for acute care hospitals. Chicago, IL: Accreditation Association
for Hospitals and Health Systems. (Level VII)
15 DNV GL-Healthcare USA, Inc. (2016). MM.1 .SR.2. NIAHO® accreditation
requirements: Interpretive guidelines & surveyor guidance (version 11).
Milford, OH: DNV GL-Healthcare USA, Inc. (Level VII)
16 Standard 13. Medication verification. Infusion therapy standards of practice.
(2016). Journal of Infusion Nursing, 39, S34–S35. (Level VII)
17 The Joint Commission. (2019). Standard NPSG.07.01.01. Comprehensive
accreditation manual for hospitals. Oakbrook Terrace, IL: The Joint
Commission. (Level VII)
18 Centers for Disease Control and Prevention. (2002). Guideline for hand
hygiene in health-care settings: Recommendations of the Healthcare Infection
Control Practices Advisory Committee and the HICPAC/SHEA/APIC/IDSA Hand
Hygiene Task Force. MMWR Recommendations and Reports, 51(RR-16), 1–45.
Accessed via the Web at https://www.cdc.gov/mmwr/pdf/rr/rr5116.pdf (Level
II)
19 World Health Organization. (2009). “WHO guidelines on hand hygiene in
health care: First global patient safety challenge, clean care is safer care”
[Online]. Accessed via the Web at
http://apps.who.int/iris/bitstream/10665/44102/1/9789241597906_eng.pdf
(Level IV)
20 Accreditation Association for Hospitals and Health Systems. (2017). Standard
07.01.21. Healthcare Facilities Accreditation Program: Accreditation
requirements for acute care hospitals. Chicago, IL: Accreditation Association
for Hospitals and Health Systems. (Level VII)
21 Centers for Medicare and Medicaid Services, Department of Health and
Human Services. (2015). Condition of participation: Infection control. 42 C.F.R.
§ 482.42.
22 DNV GL-Healthcare USA, Inc. (2016). IC.1 .SR.1 . NIAHO® accreditation
requirements: Interpretive guidelines & surveyor guidance (version 11).
Milford, OH: DNV GL-Healthcare USA, Inc. (Level VII)
23 The Joint Commission. (2019). Standard NPSG.01.01.01. Comprehensive
accreditation manual for hospitals. Oakbrook Terrace, IL: The Joint
Commission. (Level VII)
24 The Joint Commission. (2019). Standard RI.01.01.01. Comprehensive
accreditation manual for hospitals. Oakbrook Terrace, IL: The Joint
Commission. (Level VII)
25 DNV GL-Healthcare USA, Inc. (2016). PR.1.SR.5 . NIAHO® accreditation
requirements: Interpretive guidelines & surveyor guidance (version 11).
Milford, OH: DNV GL-Healthcare USA, Inc. (Level VII)
26 Centers for Medicare and Medicaid Services, Department of Health and
Human Services. (2015). Condition of participation: Patient’s rights. 42 C.F.R.
§ 482.13(c)(1).
27 Accreditation Association for Hospitals and Health Systems. (2017). Standard
15.01.16. Healthcare Facilities Accreditation Program: Accreditation
requirements for acute care hospitals. Chicago, IL: Accreditation Association
for Hospitals and Health Systems. (Level VII)
28 The Joint Commission. (2019). Standard PC.02.01.21. Comprehensive
accreditation manual for hospitals. Oakbrook Terrace, IL: The Joint
Commission. (Level VII)
29 Waters, T. R., et al. (2009). “Safe patient handling training for schools of
nursing” [Online]. Accessed via the Web at
http://www.cdc.gov/niosh/docs/2009-127/pdfs/2009-127.pdf (Level VII)
30 Infusion Nurses Society. (2016). Policies and procedures for infusion therapy
(5th ed.). Boston, MA: Infusion Nurses Society.
31 The Joint Commission. (2019). Standard PC.01.02.07. Comprehensive
accreditation manual for hospitals. Oakbrook Terrace, IL: The Joint
Commission. (Level VII)
32 Siegel, J. D ., et al. (2007, revised 2017). “2007 guideline for isolation
precautions: Preventing transmission of infectious agents in healthcare
settings” [Online]. Accessed via the Web at
https://www.cdc.gov/infectioncontrol/pdf/guidelines/isolation-guidelines.pdf
(Level II)
33 Accreditation Association for Hospitals and Health Systems. (2017). Standard
07.01.10. Healthcare Facilities Accreditation Program: Accreditation
requirements for acute care hospitals. Chicago, IL: Accreditation Association
for Hospitals and Health Systems. (Level VII)
34 The Joint Commission. (2014). “Sentinel event alert: Managing risk during
transition to new ISO tubing connector standards” [Online]. Accessed via the
Web at
http://www.jointcommission.org/assets/1/6/SEA_53_Connectors_8 _19_14 _final.
pdf (Level VII)
35 U.S . Food and Drug Administration. (n.d .). “Look. Check. Connect. Safe
medical device connections save lives” [Online]. Accessed via the Web at
http://www.fda.gov/downloads/MedicalDevices/Safety/AlertsandNotices/UCM1
34873.pdf
36 Institute for Safe Medication Practices. (2014). Independent double-checks:
Undervalued and misused. ISMP Medication Safety Alert! Nurse Advise-ERR,
12(3), 1. Accessed via the Web at
http://www.ismp.org/newsletters/nursing/issues/NurseAdviseERR201403.pdf
(Level VII)
37 Institute for Safe Medication Practices. (2014). “ISMP list of high-alert
medications in acute care settings” [Online]. Accessed via the Web at
http://www.ismp.org/tools/highalertmedications.pdf (Level VII)
38 Graham, K. C., & Cvach, M. (2010). Monitor alarm fatigue: Standardizing use
of physiological monitors and decreasing nuisance alarms. American Journal
of Critical Care, 19(1), 28–37. Accessed via the Web at
http://ajcc.aacnjournals.org/content/19/1/28.full.pdf
39 American Association of Critical-Care Nurses. (2013). “A ACN practice alert:
Alarm management” [Online]. Accessed via the Web at
http://www.aacn.org/wd/practice/docs/practicealerts/alarm-management-
practice-alert.pdf (Level VII)
40 The Joint Commission. (2019). Standard NPSG.06 .01.01. Comprehensive
accreditation manual for hospitals. Oakbrook Terrace, IL: The Joint
Commission. (Level VII)
41 The Joint Commission. (2013). “Sentinel event alert: Medical device alarm
safety in hospitals” [Online]. Accessed via the Web at
http://www.jointcommission.org/assets/1/18/SEA_50_alarms_4 _5 _13_FINAL1 .P
DF (Level VII)
42 Standard 2. Special patient populations. Infusion therapy standards of
practice. (2016). Journal of Infusion Nursing, 39, S11–S13. (Level VII)
43 Ganz, D. A., et al. (2013). Preventing falls in hospitals: A toolkit for improving
quality of care (AHRQ Publication No. 13-0015-EF). Rockville, MD: Agency for
Healthcare Research and Quality. Accessed via the Web at
https://www.ahrq.gov/sites/default/files/publications/files/fallpxtoolkit_0 .pdf
(Level VII)
44 Occupational Safety and Health Administration. (n.d .). “Bloodborne
pathogens, standard number 1910.1030” [Online]. Accessed via the Web at
http://www.osha.gov/pls/oshaweb/owadisp.show_document?
p_table=STANDARDS&p_id=10051 (Level VII)
45 Accreditation Association for Hospitals and Health Systems. (2017). Standard
07.02.03. Healthcare Facilities Accreditation Program: Accreditation
requirements for acute care hospitals. Chicago, IL: Accreditation Association
for Hospitals and Health Systems. (Level VII)
46 The Joint Commission. (2019). Standard RC.01.03 .01. Comprehensive
accreditation manual for hospitals. Oakbrook Terrace, IL: The Joint
Commission. (Level VII)
47 Centers for Medicare & Medicaid Services, Department of Health and Human
Services. (2015). Condition of participation: Medical record services. 42 C.F.R.
§ 482.24(b).
48 Accreditation Association for Hospitals and Health Systems. (2017). Standard
10.00 .03. Healthcare Facilities Accreditation Program: Accreditation
requirements for acute care hospitals. Chicago, IL: Accreditation Association
for Hospitals and Health Systems. (Level VII)
49 DNV GL-Healthcare USA, Inc. (2016). MR.2 .SR.1 . NIAHO® accreditation
requirements: Interpretive guidelines & surveyor guidance (version 11).
Milford, OH: DNV GL-Healthcare USA, Inc. (Level VII)
50 The Joint Commission. (2019). Standard RC.02.01.01. Comprehensive
accreditation manual for hospitals. Oakbrook Terrace, IL: The Joint
Commission. (Level VII)
ESOPHAGOGASTRIC TAMPONADE TUBE CARE
Used to control hemorrhage from esophageal or gastric
varices, an esophagogastric tamponade tube is inserted
nasally or orally and advanced into the esophagus or
stomach. (See Types of esophagogastric tamponade tubes.)
Although the practitioner inserts an esophagogastric
tamponade tube, the nurse cares for the patient during and
after intubation and, in an emergency, may remove the
tube. Typically, the patient with an esophagogastric
tamponade tube is on the intensive care unit for close
observation and constant care. The patient may receive
sedatives, but the dose should be individualized, especially
for the patient with probable liver injury.1
After the tube is in place, a gastric balloon secured at the
end of the tube can be inflated and drawn tightly against
the cardia of the stomach. The inflated balloon secures the
tube and exerts pressure on the cardia. The pressure, in
turn, controls variceal bleeding. Most tubes also contain an
esophageal balloon to control esophageal bleeding (if
gastric tamponade alone is insufficient).
EQUIPMENT
Types of esophagogastric tamponade
tubes
When working with a patient who has an esophagogastric tamponade tube,
remember the advantages of the most common types.
Blakemore-Sengstaken tube
A Blakemore-Sengstaken tube is a triple-lumen, double-balloon tube that has
a gastric aspiration port, which allows you to obtain drainage from below the
gastric balloon and also to instill medication.
Linton tube
A Linton tube is a triple-lumen, single-balloon tube that
has a port for gastric aspiration and one for esophageal
aspiration. The Linton tube reduces the risk of esophageal
necrosis because it doesn’t have an esophageal balloon.
Minnesota esophagogastric tamponade tube
A Minnesota esophagogastric tamponade tube is an
esophageal tube that has four lumens and two balloons.
The device provides pressure-monitoring ports for both
balloons without the need for Y-connectors. One port is
used for gastric suction, the other for esophageal suction.
Balloon tamponade should be used as a temporary
measure (for no more than 24 hours) in patients with
uncontrollable bleeding who have a more definitive
treatment plan.2 If the balloon remains inflated longer than
24 hours, pressure necrosis may develop, causing further
hemorrhage or perforation.
With the increasing use of endoscopic procedures to help
control bleeding, the use of esophagogastric tamponade
tubes is decreasing. Endoscopic variceal ligation is currently
the treatment of choice for acute variceal hemorrhage.
Other treatments include gastric lavage, drug therapy with
octreotide or vasopressin, sclerotherapy, variceal banding,
and transjugular intrahepatic portosystemic shunting.
Balloon tamponade may be used in conjunction with these
therapies, but it generally isn’t used unless initial
endoscopic and pharmacologic treatments fail.3
Equipment
Blood pressure monitoring equipment ▪ stethoscope ▪
disinfectant pad ▪ manometer ▪ normal saline solution ▪
irrigation set ▪ large volume syringe ▪ washcloth ▪ water-
soluble lubricant ▪ cotton-tipped applicators ▪ sponge
swabs or toothbrush and toothpaste ▪ petroleum jelly ▪
suction equipment ▪ intake-and-output record ▪ gloves ▪
traction rope, 1-lb (0.45 kg) traction weight, football helmet,
catcher’s mask, or tape ▪ scissors ▪ Optional: prescribed
sedative, prescribed pain medication, personal protective
equipment (gown and mask with goggles or mask with face
shield).
Preparation of equipment
Make sure scissors and suction equipment are present at
the patient’s bedside; ensure that the suction equipment is
functioning properly.
Check any item that has an expiration date to ensure that
it hasn’t expired. If a product is expired or defective or if its
integrity is compromised, remove it from patient use, label it
as expired or defective, and report the expiration or defect
as directed by your facility.
Implementation
■ Verify the practitioner’s order.
■ Gather and prepare the necessary equipment.
■ Perform hand hygiene.4,5,6,7,8,9
■ Confirm the patient’s identity using at least two patient
identifiers.10
■ Provide privacy.11,12,13,14
■ Explain the procedure to the patient and family (if
appropriate) according to their communication and learning
needs to increase understanding, allay fears, and enhance
cooperation.15
■ Raise the patient’s bed to waist level when performing
patient care to prevent caregiver back strain.16
■ Perform hand hygiene.4,5,6,7,8,9 Put on gloves and, as
needed, other personal protective equipment to comply with
standard precautions.17,18
■ Monitor the patient’s vital signs at an interval determined
by the patient’s condition, as ordered. A change in vital
signs may signal complications or recurrent bleeding.
■ If the patient has a Blakemore-Sengstaken or Minnesota
tube, check the pressure gauge on the manometer every
hour. Maintain esophageal balloon pressures at 25 to 45 mm
Hg (3.3 to 6.0 kPa).1
■ Assist the practitioner with reducing esophageal balloon
pressure by 5 mm Hg (0.7 kPa) every 3 hours or, if
permitted, perform this step as ordered until pressure is 25
mm Hg (3.3 kPa) and the patient shows no signs of
bleeding. Using the lowest possible pressure helps prevent
esophageal necrosis.1
■ Assist the practitioner with completely deflating the
esophageal balloon for 30 minutes every 8 hours, as
ordered, to prevent esophageal necrosis.1
■ Maintain drainage and suction on gastric and esophageal
aspiration ports, as ordered. Fluid accumulating in the
stomach may cause the patient to regurgitate the tube, and
fluid accumulating in the esophagus may lead to vomiting
and aspiration.
■ Trace the tube from the patient to the point of origin to
make sure you’re assessing the correct port,19,20 and then
irrigate the gastric aspiration port, as ordered, using the
irrigation set and normal saline solution. Frequent irrigation
keeps the tube from clogging. Obstruction in the tube can
lead to regurgitation of the tube and vomiting.
■ To prevent pressure injury, clean the patient’s nares and
apply water-soluble lubricant frequently. Use a washcloth
and warm water to loosen crusted nasal secretions before
applying the lubricant with cotton-tipped applicators.
■ Provide oral care frequently using sponge swabs to clean
the patient’s teeth, gums, and tongue, or assist the patient
with brushing them with a toothbrush or toothpaste at least
twice daily to increase patient comfort and promote a
healthy oral cavity. Encourage the patient to participate in
oral care if possible.
■ Lubricate the lips with either sponge swabs or petroleum
jelly applied with a cotton-tipped applicator.
■ If necessary, suction the patient’s oral cavity frequently,
because an esophageal balloon may prevent swallowing of
secretions and saliva.1
■ Offer emotional support. Keep the patient as quiet as
possible.
■ Perform a comprehensive pain assessment using
techniques appropriate for the patient’s age, condition, and
ability to understand.21
■ Administer pain medication, a sedative, or both as
needed and prescribed following safe medication
administration practices.22,23,24,25
■ Make sure the tube is secured. A football helmet with a
face mask, a catcher’s mask,3 or gentle traction using a
traction rope, a 1-lb (0.5-kg) weight, or tape may be used. If
a weight is used, make sure that the weight hangs from the
foot of the bed at all times. Never rest it on the bed. Instruct
housekeepers and other coworkers not to move the weight,
because reduced traction may change the position of the
tube. If using tape, tape the tube to the patient’s face,
which provides traction.
■ Keep the patient on complete bed rest, because exertion,
such as coughing or straining, increases intra-abdominal
pressure, which may trigger further bleeding.
■ Keep the head of the patient’s bed elevated 30 to 45
degrees to minimize aspiration and to prevent ventilator-
associated pneumonia if the patient is intubated and
mechanically ventilated.1,26
■ Observe the patient carefully for esophageal rupture,
indicated by signs and symptoms of shock, increased
respiratory difficulties, and increased bleeding.
■ Monitor intake and output, as ordered.
■ Assess the patient’s sedation level, reassess the patient
for pain, and intervene as appropriate.21
■ Return the bed to the lowest position to prevent falls and
maintain patient safety.27
■ Remove and discard your gloves and other personal
protective equipment.17,18
■ Perform hand hygiene.4,5,6,7,8,9
■ Clean and disinfect your stethoscope with a disinfectant
pad.28,29
■ Perform hand hygiene.4,5,6,7,8,9
■ Document the procedure.30,31,32,33
Special considerations
■ Keep scissors at the bedside so you can cut the tube
quickly to deflate the balloons if asphyxia develops. When
performing this emergency intervention, hold the tube
firmly close to the nostril before cutting.1
■ If you’re using traction, be sure to release the tension
before deflating any balloons. If a weight is being used,
remove the weight. If a football helmet, catcher’s mask, or
tape supplies traction, untape the esophagogastric
tamponade tube from the face guard or face before
deflating the balloons. Deflating the balloon under tension
triggers a rapid release of the entire tube from the nose,
which may injure mucous membranes, initiate recurrent
bleeding, and obstruct the airway.
■ If the practitioner orders an X-ray study to check the
tube’s position or to view the chest, lift the patient in the
direction of the pulley, and then place the X-ray film behind
the patient’s back. Never roll the patient from side to side,
because pressure exerted on the tube in this way may shift
the tube’s position. Similarly, lift the patient to make the
bed or to assist with the bedpan.
■ To reduce the risk of necrosis and ulceration, the
maximum recommended duration for tamponade therapy is
24 hours.
■ The Joint Commission issued a sentinel event alert related
to managing risk during transition to new International
Organization for Standardization tubing standards that were
designed to prevent dangerous tubing misconnections,
which can lead to serious patient injury and death. During
the transition, trace the tubing and catheter from the
patient to the point of origin before connecting or
reconnecting any device or infusion, at any care transition
(such as a new setting or service), and as part of the hand-
off process; route tubes and catheters having different
purposes in different standardized directions; when there
are different access sites present or several bag hanging,
label the tubing at the distal and proximal ends; use tubing
and equipment only as intended; and store medications for
different delivery routes in separate locations.20
Complications
Esophageal rupture, the most life-threatening complication
associated with esophagogastric tamponade tube use, can
occur at any time, but it’s most likely to occur during
intubation or inflation of the esophageal balloon.
Esophageal necrosis may occur if the esophageal balloon is
inflated for more than 24 hours or if the balloon is
overinflated.34 Asphyxia may result if the balloon moves up
the esophagus and blocks the airway. Aspiration of pooled
esophageal secretions may also complicate this procedure.
Documentation
Document vital signs, esophageal pressure, your GI
assessment findings, the condition of the patient’s nostrils,
oral care provided, and any medications administered,
including the medication strength, dose, route of
administration, and date and time administered.35 Note
when the balloons are deflated, by whom, and low long they
were deflated. Record the patient’s tolerance of the
procedure. Also note the color, consistency, and amount of
gastric returns. Read the manometer hourly, and record the
esophageal pressures. Record any signs and symptoms of
complications,
the practitioner
notified,
nursing
interventions taken, and the patient’s response to those
interventions. Document gastric aspiration and lumen
irrigations. Document and patient teaching provided to the
patient and family or caregivers, their understanding of the
teaching, and whether they require follow-up teaching.
REFERENCES
1 Wiegand, D. (2017). AACN procedure manual for high acuity, progressive, and
critical care (7th ed.). St. Louis, MO: Elsevier.
2 Garcia-Tsao, G., et al. (2007). AASLD practice guidelines: Prevention and
management of gastroesophageal varices and variceal hemorrhage in
cirrhosis. Hepatology, 46(3), 922–938 . Accessed via the Web at
https://www.aasld.org/sites/default/files/guideline_documents/GastroVaricesa
nd2009Hemorrhage.pdf (Level VII)
3 American Society for Gastrointestinal Endoscopy. (2014). Guideline: The role
of endoscopy in the management of variceal hemorrhage. Gastrointestinal
Endoscopy, 80(2), 221–227. Accessed via the Web at
https://www.asge.org/docs/default-source/education/practice_guidelines/doc-
2014_the-role-of-endoscopy-in-the-management-of-variceal-hemorrhage.pdf
(Level VII)
4 The Joint Commission. (2019). Standard NPSG.07.01.01. Comprehensive
accreditation manual for hospitals. Oakbrook Terrace, IL: The Joint
Commission. (Level VII)
5 Centers for Disease Control and Prevention. (2002). Guideline for hand
hygiene in health-care settings: Recommendations of the Healthcare Infection
Control Practices Advisory Committee and the HICPAC/SHEA/APIC/IDSA Hand
Hygiene Task Force. MMWR Recommendations and Reports, 51(RR-16), 1–45.
Accessed via the Web at https://www.cdc.gov/mmwr/pdf/rr/rr5116.pdf (Level
II)
6 World Health Organization. (2009). “WHO guidelines on hand hygiene in
health care: First global patient safety challenge, clean care is safer care”
[Online]. Accessed via the Web at
http://apps.who.int/iris/bitsream/10665/44102/1/9789241597906_eng.pdf
(Level IV)
7 Accreditation Association for Hospitals and Health Systems. (2017). Standard
07.01.21. Healthcare Facilities Accreditation Program: Accreditation
requirements for acute care hospitals. Chicago, IL: Accreditation Association
for Hospitals and Health Systems. (Level VII)
8 Centers for Medicare and Medicaid Services, Department of Health and
Human Services. (2015). Condition of participation: Infection control. 42 C.F.R.
§ 482.42.
9 DNV GL-Healthcare USA, Inc. (2016). IC.1.SR.1 . NIAHO® accreditation
requirements: Interpretive guidelines & surveyor guidance (version 11).
Milford, OH: DNV GL-Healthcare USA, Inc. (Level VII)
10 The Joint Commission. (2019). Standard NPSG.01.01.01. Comprehensive
accreditation manual for hospitals. Oakbrook Terrace, IL: The Joint
Commission. (Level VII)
11 Accreditation Association for Hospitals and Health Systems. (2017). Standard
15.01.16. Healthcare Facilities Accreditation Program: Accreditation
requirements for acute care hospitals. Chicago, IL: Accreditation Association
for Hospitals and Health Systems. (Level VII)
12 Centers for Medicare and Medicaid Services, Department of Health and
Human Services. (2015). Condition of participation: Patient’s rights. 42 C.F.R.
§ 482.13(c)(1).
13 The Joint Commission. (2019). Standard RI.01.01.01. Comprehensive
accreditation manual for hospitals. Oakbrook Terrace, IL: The Joint
Commission. (Level VII)
14 DNV GL-Healthcare USA, Inc. (2016). PR.1.SR.5 . NIAHO® accreditation
requirements: Interpretive guidelines & surveyor guidance (version 11).
Milford, OH: DNV GL-Healthcare USA, Inc. (Level VII)
15 The Joint Commission. (2019). Standard PC.02.01.21. Comprehensive
accreditation manual for hospitals. Oakbrook Terrace, IL: The Joint
Commission. (Level VII)
16 Waters, T. R., et al. (2009). “Safe patient handling training for schools of
nursing” [Online]. Accessed via the Web at
https://www.cdc.gov/niosh/docs/2009-127/pdfs/2009-127.pdf (Level VII)
17 Siegel, J. D ., et al. (2007, revised 2017). “2007 guideline for isolation
precautions: Preventing transmission of infectious agents in healthcare
settings” [Online]. Accessed via the Web at
https://www.cdc.gov/infectioncontrol/pdf/guidelines/isolation-guidelines.pdf
(Level II)
18 Accreditation Association for Hospitals and Health Systems. (2017). Standard
07.01.10. Healthcare Facilities Accreditation Program: Accreditation
requirements for acute care hospitals. Chicago, IL: Accreditation Association
for Hospitals and Health Systems. (Level VII)
19 U.S . Food and Drug Administration. (n.d .). “Look. Check. Connect. Safe
medical device connections save lives” [Online]. Accessed via the Web at
http://www.fda.gov/downloads/MedicalDevices/Safety/AlertsandNotices/UCM1
34873.pdf
20 The Joint Commission. (2014). “Sentinel event alert: Managing risk during
transition to new ISO tubing connector standards” [Online]. Accessed via the
Web at
http://www.jointcommission.org/assets/1/6/SEA_53_Connectors_8 _19_14 _final.
pdf (Level VII)
21 The Joint Commission. (2019). Standard PC.01.02.07. Comprehensive
accreditation manual for hospitals. Oakbrook Terrace, IL: The Joint
Commission.(Level VII)
22 The Joint Commission. (2019). Standard MM.06.01.01. Comprehensive
accreditation manual for hospitals. Oakbrook Terrace, IL: The Joint
Commission.(Level VII)
23 Centers for Medicare and Medicaid Services, Department of Health and
Human Services. (2015). Condition of participation: Nursing services. 42
C.F.R. § 482.23(c).
24 Accreditation Association for Hospitals and Health Systems. (2017). Standard
16.01.03. Healthcare Facilities Accreditation Program: Accreditation
requirements for acute care hospitals. Chicago, IL: Accreditation Association
for Hospitals and Health Systems. (Level VII)
25 DNV GL-Healthcare USA, Inc. (2016). MM.1 .SR.2. NIAHO® accreditation
requirements: Interpretive guidelines & surveyor guidance. Milford, OH: DNV
GL-Healthcare USA, Inc. (Level VII)
26 American Association of Critical-Care Nurses (AACN). (2008). “A ACN practice
alert: Ventilator associated pneumonia” [Online]. Accessed via the Web at
http://www.aacn.org/wd/practice/docs/practicealerts/vap.pdf (Level VII)
27 Ganz, D. A., et al. (2013). Preventing falls in hospitals: A toolkit for improving
quality of care (AHRQ Publication No. 13-0015-EF). Rockville, MD: Agency for
Healthcare Research and Quality. Accessed via the Web at
http://www.ahrq.gov/sites/default/files/publications/files/fallpxtoolkit.pdf
(Level VII)
28 Rutala, W. A., et al. (2008). “Guideline for disinfection and sterilization in
healthcare facilities, 2008” [Online]. Accessed via the Web at
https://www.cdc.gov/infectioncontrol/pdf/guidelines/disinfection-
guidelines.pdf (Level I)
29 Accreditation Association for Hospitals and Health Systems. (2017). Standard
07.02.03. Healthcare Facilities Accreditation Program: Accreditation
requirements for acute care hospitals. Chicago, IL: Accreditation Association
for Hospitals and Health Systems. (Level VII)
30 The Joint Commission. (2019). Standard RC.01.03 .01. Comprehensive
accreditation manual for hospitals. Oakbrook Terrace, IL: The Joint
Commission. (Level VII)
31 Accreditation Association for Hospitals and Health Systems. (2017). Standard
10.00 .03. Healthcare Facilities Accreditation Program: Accreditation
requirements for acute care hospitals. Chicago, IL: Accreditation Association
for Hospitals and Health Systems. (Level VII)
32 Centers for Medicare and Medicaid Services, Department of Health and
Human Services. (2015). Condition of participation: Medical record services.
42 C.F.R. § 482.24(b).
33 DNV GL-Healthcare USA, Inc. (2016). MR.2 .SR.1 . NIAHO® accreditation
requirements: Interpretive guidelines & surveyor guidance (version 11).
Milford, OH: DNV GL-Healthcare USA, Inc. (Level VII)
34 Bajaj, J. S ., & Sanyal, A. J . Methods to achieve hemostasis in patients with
acute variceal hemorrhage. (2017). In: UpToDate. Saltzman, J. R., & Travis, A.
C. (Eds.). Retrieved from: www.uptodate.com
35 The Joint Commission. (2019). Standard RC.02.01.01. Comprehensive
accreditation manual for hospitals. Oakbrook Terrace, IL: The Joint
Commission. (Level VII)
ESOPHAGOGASTRIC TAMPONADE TUBE
INSERTION AND REMOVAL
Used for the temporary control of hemorrhage from
esophageal or gastric varices, an esophagogastric
tamponade tube is inserted nasally or orally and advanced
into the esophagus and stomach. Ordinarily, a practitioner
inserts and removes the tube. However, in an emergency
situation, a nurse may remove it.
After the tube is inserted, a gastric balloon secured at the
end of the tube can be inflated and drawn tightly against
the cardia of the stomach. The inflated balloon secures the
tube and exerts pressure on the cardia. The pressure, in
turn, controls variceal bleeding.
Most tubes also contain an esophageal balloon to control
esophageal bleeding. Balloon tamponade is recommended
for no longer than 24 hours, because pressure necrosis may
develop and cause further hemorrhage or perforation.1
With the increase in endoscopy, the use of
esophagogastric tamponade tubes is decreasing. In fact,
endoscopic variceal ligation is currently the treatment of
choice for acute variceal hemorrhage. Other treatments
include gastric lavage, drug therapy with octreotide or
vasopressin,
sclerotherapy,
variceal banding, and
transjugular intrahepatic portosystemic shunting. Balloon
tamponade may be used in conjunction with these therapies
but generally isn’t used unless initial endoscopic and
pharmacologic treatments fail.1
Equipment
For insertion
Esophagogastric tamponade tube ▪ suction equipment (two
suction sources and canisters, connecting tubing, rigid
suction catheter) ▪ irrigation set ▪ normal saline solution ▪
two 60-mL catheter-tipped syringes ▪
water-soluble
lubricant ▪ 1⁄2′′ or 1′′ (1.3 - or 2.5-cm) adhesive tape ▪
stethoscope ▪ foam nose guard ▪ four rubber-shod clamps
(two clamps and two plastic plugs for a Minnesota tube) ▪
traction equipment (football helmet, catcher’s mask, or a
basic frame with traction rope, pulleys, and a 1-lb [453.6 g]
weight) ▪ manometer ▪ basin of water ▪ scissors ▪ gloves ▪
gown ▪ goggles ▪ waterproof marking pen ▪ cardiac
monitoring equipment ▪ disinfectant pad ▪ Optional: Y-
connector tube, nasogastric (NG) tube, labels.
For removal
60-mL oral or enteral syringe ▪ gloves ▪ gown ▪ goggles ▪
manometer ▪ oral care supplies. Preparation of equipment.
For insertion
Keep the traction helmet or mask at the bedside or attach
traction equipment to the bed so that traction is readily
available after tube insertion. Place the suction machines
nearby and plug them in. Open the irrigation set and fill the
container with normal saline solution. Place all equipment
within reach. Place scissors at the bedside.
Test the balloons on the esophagogastric tamponade tube
for air leaks by inflating them and submerging them in the
basin of water. If no bubbles appear in the water, the
balloons are intact. Remove them from the water and
deflate them. Clamp the tube lumens so that the balloons
stay deflated during insertion.
To prepare the Minnesota tube, connect the manometer to
the gastric pressure monitoring port. Note the pressure
when the balloon fills with 100, 200, 300, 400, and 500 mL
of air.
Check the aspiration lumens for patency, and make sure
they’re labeled according to their purpose. If they aren’t
identified, label them carefully with the waterproof marking
pen.
Check any equipment or supplies that have an expiration
date to ensure that they have not expired. If a product is
expired, if its integrity is compromised, or if you find it’s
defective, remove it from patient use, label it as expired or
defective, and report the expiration or defect as directed by
your facility.
Implementation
■ Verify the practitioner’s order.
■ Gather and prepare the necessary equipment.
■ Perform hand hygiene.2,3,4,5,6,7
■ Confirm the patient’s identity using at least two patient
identifiers.8
■ Provide privacy.9,10,11,12
■ Explain the procedure and its purpose to the patient and
family or caregiver according to their individual
communication and learning needs to increase their
understanding, decrease their anxiety, and enhance
cooperation.13
■ Raise the bed to waist level when performing patient care
to prevent caregiver back strain.14
■ Attach the patient to a cardiac monitor (if not already
attached) and assess the patient’s cardiac rhythm.15 (See
the “Cardiac monitoring” procedure, page 108.) Set the
upper and lower heart rate alarm limits according to the
patient’s current condition and make sure that alarms are
turned on, functioning properly, and audible to
staff.16,17,18,19 Esophageal tube insertion can cause vagal
stimulation, bradycardia, and ST-segment elevation.15
■ Assess the patient’s baseline respiratory status for
baseline comparison.15
■ Perform hand hygiene.2,3,4,5,6,7
■ Put on gloves, a gown, and goggles to comply with
standard precautions.20,21
■ Assist the patient into the semi-Fowler position. Place the
patient who isn’t alert in the left lateral position. These
positions facilitate tube passage into the stomach and help
prevent aspiration.15
For insertion
■ Explain that the practitioner will inspect the patient’s
nostrils for patency.
■ To determine the length of tubing needed, hold the
balloon at the patient’s xiphoid process and then extend the
tube to the patient’s ear and forward to the nose. Using a
waterproof pen, mark this point on the tubing.15
■ Inform the patient that the practitioner will spray the
throat (posterior pharynx) and nostril with an anesthetic to
minimize discomfort and gagging during intubation.
■ After lubricating the tip of the tube with water-soluble
lubricant to reduce friction and facilitate insertion, the
practitioner will pass the tube through the more patent
nostril. As the practitioner does this, the practitioner will
direct the patient to tilt the chin toward the chest and to
swallow when the patient senses the tip of the tube in the
back of the throat. Swallowing helps to advance the tube
into the esophagus and prevents intubation of the trachea.
(If the practitioner introduces the tube orally, the
practitioner will direct the patient to swallow immediately.)
As the patient swallows, the practitioner quickly advances
the tube at least 1⁄2′′ (1.3 cm) beyond the previously marked
point on the tube.
■ To confirm tube placement, the practitioner will aspirate
stomach contents through the gastric port. After partially
inflating the gastric balloon with 50 to 100 mL of air, the
practitioner will order an X-ray of the abdomen to confirm
correct placement of the balloon.15 Before fully inflating the
balloon, the practitioner will use the 60-mL syringe to
irrigate the stomach with normal saline solution and empty
the stomach as completely as possible. This irrigation helps
the patient avoid regurgitating gastric contents when the
balloon inflates.
■ After confirming tube placement, the practitioner will fully
inflate the gastric balloon (250 to 500 mL of air for a
Blakemore-Sengstaken tube, and 700 to 800 mL of air for a
Linton tube) and clamp the tube. If using a Minnesota tube,
the practitioner will connect the pressure-monitoring port for
the gastric balloon lumen to the manometer and then inflate
the balloon in 100-mL increments until it fills with up to 500
mL of air. While introducing the air, the practitioner will
monitor the intragastric balloon pressure to make sure the
balloon stays inflated. Then the practitioner will clamp the
ports. For the Blakemore-Sengstaken or Minnesota tube, the
practitioner will gently pull on the tube until feeling
resistance, which indicates that the gastric balloon is
inflated and exerting pressure on the cardia of the stomach.
When sensing that the balloon is engaged, the practitioner
will place the foam nose guard around the area where the
tube emerges from the nostril.
■ Be ready to tape the nose guard in place around the tube
to help minimize pressure on the nostril from the traction
and decrease the risk of necrosis.15
■ With the nose guard secured, apply traction to the tube
using the method preferred by the practitioner. Use a
traction rope and a 1-lb weight, or pull the tube gently and
tape it tightly to the face guard of a football helmet or
catcher’s mask. (See Securing an esophagogastric
tamponade tube with a football helmet.) Alternatively, some
facilities tape the tube to the side of the patient’s face as a
method of providing traction, which helps eliminate any
issues that may occur with weights or a helmet.
■ Lavage the stomach through the gastric aspiration lumen
with normal saline solution (tepid or room-temperature)
until the return fluid is clear.15 The vasoconstriction from the
lavage stops the hemorrhage; the lavage empties the
stomach. Any blood detected later in the gastric aspirate
indicates that bleeding remains uncontrolled.22
■ Trace the tubing from the patient to its point of origin to
make sure that you’re connecting the tubing to the correct
port23,24 and attach one of the suction sources to the gastric
aspiration lumen to empty the stomach, help prevent
nausea and possible vomiting, and allow continuous
observation of the gastric contents for blood.
■ If using a Blakemore-Sengstaken or a Minnesota tube, the
practitioner will inflate the esophageal balloon as well as the
gastric balloon to compress the esophageal varices and
control bleeding.
■ With a Blakemore-Sengstaken tube, the Y-connector tube
is attached to the esophageal lumen. Then a
sphygmomanometer inflation bulb is attached to one end of
the Y-connector and the manometer to the other end. The
esophageal balloon is inflated until the pressure gauge
ranges from 25 and 45 mm Hg (3.3 and 6 kPa) and the tube
is clamped.15
■ With a Minnesota tube, the manometer is attached
directly to the esophageal pressure-monitoring outlet. Then,
using the 60-mL syringe and pushing the air slowly into the
esophageal balloon port, the balloon is inflated until the
pressure gauge ranges from 35 to 45 mm Hg (4.6 to 6 kPa).
■ Set up esophageal suction to prevent accumulation of
secretions that may cause vomiting and pulmonary
aspiration. This is important because swallowed secretions
can’t pass into the stomach if the patient has an inflated
esophageal balloon in place. If the patient has a Linton or a
Minnesota tube, attach the suction source to the esophageal
aspiration port. If the patient has a Blakemore-Sengstaken
tube, advance an NG tube through the other nostril into the
esophagus to the point where the esophageal balloon
begins, and attach the suction source, as ordered. Trace
each tubing from the patient to its point of origin to make
sure that you’re connecting to the proper port. Route the
tubing in a standardized direction if the patient has other
tubing and catheters with different purposes. Label the
tubing at both the distal (near the patient connection) and
proximal (near the source container) ends to reduce the risk
of misconnection if multiple lines will be used.23,24
■ Assess the patient’s respiratory status; observe for signs
of airway obstruction.
■ Assess the patient’s cardiac status.
For removal
■ The practitioner will deflate the esophageal balloon by
aspirating the air with a syringe. (The practitioner may order
the esophageal balloon to be deflated at 5-mm Hg [0.7 -kPa]
increments every 30 minutes for several hours.) Then, if
bleeding doesn’t recur, the practitioner will remove the
traction from the gastric tube and deflate the gastric balloon
(also by aspiration). The gastric balloon is always deflated
just before removing the tube to prevent the balloon from
riding up into the esophagus or pharynx and obstructing the
airway or possibly causing asphyxia or rupture.15
■ After disconnecting all suction tubes, the practitioner will
gently remove the esophagogastric tamponade tube. If
there is resistance, the practitioner will aspirate the balloons
again. (To remove a Minnesota tube, the practitioner will
grasp it near the patient’s nostril and cut across all four
lumens approximately 3′′ [7.5 cm] below that point to
ensure deflation of all balloons.)
■ After the tube has been removed, assist the patient with
oral care to promote comfort and reduce bacterial
colonization in the oropharynx.
■ Discard equipment in the appropriate receptacles.
Completing the procedure
■ Return the bed to the lowest position to prevent falls and
maintain patient safety.25
■ Remove and discard your gloves and personal protective
equipment.20,21
■ Perform hand hygiene.2,3,4,5,6,7
■ Clean and disinfect your stethoscope using a disinfectant
pad.26,27
■ Perform hand hygiene.2,3,4,5,6,7
■ Document the procedure.28,29,30,31
Special considerations
■ The Joint Commission issued a sentinel event alert
concerning medical device alarm safety, because alarm-
related events have been associated with permanent loss of
function or death. Among the major contributing factors
were
improper
alarm
settings,
alarm
settings
inappropriately turned off, and alarm signals not audible to
staff. Make sure that alarm limits are set appropriately and
that alarms are turned on and audible. Follow facility
guidelines for preventing alarm fatigue.16
■ If the patient appears cyanotic or if other signs of airway
obstruction develop during tube placement, remove the
tube immediately, because it may have entered the trachea
instead of the esophagus.
■ Many practitioners will intubate a patient before inserting
an esophageal tube to help eliminate the possibility of
aspiration pneumonia during tube insertion and while the
tube is in place.
■ After intubation, keep scissors at the bedside. If
respiratory distress occurs, cut across all lumens while
holding the tube at the nares, and remove the tube quickly.
■ Unless contraindicated, the patient can sip water through
a straw during intubation to facilitate tube advancement.
■ Keep in mind that the intraesophageal balloon pressure
varies with respirations and esophageal contractions.
Baseline pressure is the important pressure to use when
monitoring for complications.
Securing an esophagogastric
tamponade tube with a football
helmet
If a basic traction frame isn’t available, you can secure an esophagogastric
tamponade tube to a football helmet or a catcher’s mask to reduce the risk of
the gastric balloon’s slipping down or away from the cardia of the stomach.
Tape the tube to the face guard, as shown below, and fasten the chin strap.
■ The balloon should stay inflated no longer than 24 hours,
because necrosis of the cardia may result.15 Usually, the
practitioner removes the tube only after a trial period
(lasting at least 12 hours) with the esophageal balloon
deflated or with the gastric balloon tension released from
the cardia to check for rebleeding. In some facilities, the
practitioner may deflate the esophageal balloon for 30
minutes every 8 hours to prevent the risk of esophageal
tissue necrosis.15 Follow the manufacturer’s instructions for
use for tube deflation.
■ The Joint Commission has issued a sentinel event alert
related to managing risk during transition to new
International Organization for Standardization tubing
standards designed to prevent dangerous tubing
misconnections, which can lead to serious patient injury and
death. During the transition, be sure to trace the tubing and
catheter from the patient to the point of origin before
connecting or reconnecting any device or infusion, at any
care transition (such as a new setting or service), and as
part of the handoff process; route tubes and catheters with
different purposes in different standardized directions; label
the tubing at the distal and proximal ends when there are
different access sites present or several bags hanging; use
tubing and equipment only as intended; and store
medications for different delivery routes in separate
locations.24
Complications
Aspiration is the most common complication of
esophagogastric tamponade tube insertion. Erosion and
perforation of the esophagus and gastric mucosa may result
from the tension placed on these areas by the balloons
during traction. Esophageal rupture may result if the gastric
balloon accidentally inflates in the esophagus. Acute airway
occlusion may result if the balloon dislodges and moves
upward into the trachea. Other erosions, nasal tissue
necrosis, and aspiration of oral secretions may complicate
the patient’s condition.
Documentation
Record the date and time of insertion and removal, the type
of tube used, and the name of the practitioner who
performed the procedure.
Also document
the
intraesophageal balloon pressure (for the Blakemore-
Sengstaken and Minnesota tubes), intragastric balloon
pressure (for the Minnesota tube), or amount of air injected
(for the Blakemore-Sengstaken and Linton tubes). Record
the amount of fluid used for gastric irrigation and the color,
consistency, and amount of gastric returns, both before and
after lavage.
Record the date and time of removal and the name of the
practitioner who performed the procedure. Document the
patient’s tolerance of the procedure, any complications,
and, if complications occurred, the prescribed interventions
and the patient’s response to those interventions.
Document patient and family teaching and comprehension
of your teaching.
REFERENCES
1 American Society for Gastrointestinal Endoscopy. (2014). Guideline: The role
of endoscopy in the management of variceal hemorrhage. Gastrointestinal
Endoscopy, 80(2), 221–227. Accessed via the Web at
https://www.asge.org/docs/default-source/education/practice_guidelines/doc-
2014_the-role-of-endoscopy-in-the-management-of-variceal-hemorrhage.pdf
(Level VII)
2 The Joint Commission. (2019). Standard NPSG.07.01.01. Comprehensive
accreditation manual for hospitals. Oakbrook Terrace, IL: The Joint
Commission. (Level VII)
3 Centers for Disease Control and Prevention. (2002). Guideline for hand
hygiene in health-care settings: Recommendations of the Healthcare Infection
Control Practices Advisory Committee and the HICPAC/SHEA/APIC/IDSA Hand
Hygiene Task Force. MMWR Recommendations and Reports, 51(RR-16), 1–45.
Accessed via the Web at https://www.cdc.gov/mmwr/pdf/rr/rr5116.pdf (Level
II)
4 World Health Organization. (2009). “WHO guidelines on hand hygiene in
health care: First global patient safety challenge, clean care is safer care”
[Online]. Accessed via the Web at
http://apps.who.int/iris/bitstream/10665/44102/1/9789241597906_eng.pdf
(Level IV)
5 Accreditation Association for Hospitals and Health Systems. (2017). Standard
07.01.21. Healthcare Facilities Accreditation Program: Accreditation
requirements for acute care hospitals. Chicago, IL: Accreditation Association
for Hospitals and Health Systems. (Level VII)
6 Centers for Medicare and Medicaid Services, Department of Health and
Human Services. (2015). Condition of participation: Infection control. 42 C.F.R.
§ 482.42.
7 DNV GL-Healthcare USA, Inc. (2016). IC.1.SR.1 . NIAHO® accreditation
requirements: Interpretive guidelines & surveyor guidance (version 11).
Milford, OH: DNV GL-Healthcare USA, Inc. (Level VII)
8 The Joint Commission. (2019). Standard NPSG.01.01.01. Comprehensive
accreditation manual for hospitals. Oakbrook Terrace, IL: The Joint
Commission. (Level VII)
9 Accreditation Association for Hospitals and Health Systems. (2017). Standard
15.01.16. Healthcare Facilities Accreditation Program: Accreditation
requirements for acute care hospitals. Chicago, IL: Accreditation Association
for Hospitals and Health Systems. (Level VII)
10 Centers for Medicare and Medicaid Services, Department of Health and
Human Services. (2015). Condition of participation: Patient’s rights. 42 C.F.R.
§ 482.13(c)(1).
11 The Joint Commission. (2017). Standard RI.01.01.01. Comprehensive
accreditation manual for hospitals. Oakbrook Terrace, IL: The Joint
Commission. (Level VII)
12 DNV GL-Healthcare USA, Inc. (2016). PR.1.SR.5 . NIAHO® accreditation
requirements: Interpretive guidelines & surveyor guidance (version 11).
Milford, OH: DNV GL-Healthcare USA, Inc. (Level VII)
13 The Joint Commission. (2019). Standard PC.02.01.21. Comprehensive
accreditation manual for hospitals. Oakbrook Terrace, IL: The Joint
Commission. (Level VII)
14 Waters, T. R., et al. (2009). “Safe patient handling training for schools of
nursing” [Online]. Accessed via the Web at
https://www.cdc.gov/niosh/docs/2009-127/pdfs/2009-127.pdf (Level VII)
15 Wiegand, D. (2017). AACN procedure manual for high acuity, progressive and
critical care (7th ed.). St. Louis, MO: Elsevier.
16 The Joint Commission. (2013). “Sentinel event alert: Medical device alarm
safety in hospitals” [Online]. Accessed the Web at
http://www.jointcommission.org/assets/1/18/SEA_50_alarms_4 _5 _13_FINAL1 .P
DF (Level VII)
17 American Association of Critical-Care Nurses (AACN). (2013). “A ACN practice
alert: Alarm management” [Online]. Accessed via the Web at
https://www.aacn.org/aacn-website/shared/content/practice-
alerts/2015/11/25/alarm-management (Level VII)
18 Graham, K. C., & Cvach, M. (2010). Monitor alarm fatigue: Standardizing use
of physiological monitors and decreasing nuisance alarms. American Journal
of Critical Care, 19(1), 28–37. Accessed via the Web at
http://ajcc.aacnjournals.org/content/19/1/28.full.pdf
19 The Joint Commission. (2019). Standard NPSG.06 .01.01. Comprehensive
accreditation manual for hospitals. Oakbrook Terrace, IL: The Joint
Commission.(Level VII)
20 Siegel, J. D ., et al. (2007, revised 2017). “2007 guideline for isolation
precautions: Preventing transmission of infectious agents in healthcare
settings” [Online]. Accessed via the Web at
https://www.cdc.gov/infectioncontrol/pdf/guidelines/isolation-guidelines.pdf
(Level II)
21 Accreditation Association for Hospitals and Health Systems. (2017). Standard
07.01.10. Healthcare Facilities Accreditation Program: Accreditation
requirements for acute care hospitals. Chicago, IL: Accreditation Association
for Hospitals and Health Systems. (Level VII)
22 Saltzman, J. R. Approach to acute upper gastrointestinal bleeding in adults.
(2017). In: UpToDate, Feldman, M., & Travis, A. C . (Eds.). Retrieved from:
www.uptodate.com
23 U.S . Food and Drug Administration. (n.d .). “Look. Check. Connect. Safe
medical device connections save lives” [Online]. Accessed via the Web at
http://www.fda.gov/downloads/MedicalDevices/Safety/AlertsandNotices/UCM1
34873.pdf
24 The Joint Commission. (2014). “Sentinel event alert: Managing risk during
transition to new ISO tubing connector standards” [Online]. Accessed via the
Web at
http://www.jointcommission.org/assets/1/6/SEA_53_Connectors_8 _19_14 _final.
pdf (Level VII)
25 Ganz, D. A., et al. (2013). Preventing falls in hospitals: A toolkit for improving
quality of care (AHRQ Publication No. 13-0015-EF). Rockville, MD: Agency for
Healthcare Research and Quality. Accessed via the Web at
https://www.ahrq.gov/sites/default/files/publications/files/fallpxtoolkit_0 .pdf
(Level VII)
26 Rutala, W. A., et al. (2008, revised 2017). “Guideline for disinfection and
sterilization in healthcare facilities, 2008” [Online]. Accessed via the Web at
https://www.cdc.gov/infectioncontrol/pdf/guidelines/disinfection-
guidelines.pdf (Level I)
27 Accreditation Association for Hospitals and Health Systems. (2017). Standard
07.02.03. Healthcare Facilities Accreditation Program: Accreditation
requirements for acute care hospitals. Chicago, IL: Accreditation Association
for Hospitals and Health Systems. (Level VII)
28 The Joint Commission. (2019). Standard RC.01.03 .01. Comprehensive
accreditation manual for hospitals. Oakbrook Terrace, IL: The Joint
Commission. (Level VII)
29 Accreditation Association for Hospitals and Health Systems. (2017). Standard
10.00 .03. Healthcare Facilities Accreditation Program: Accreditation
requirements for acute care hospitals. Chicago, IL: Accreditation Association
for Hospitals and Health Systems. (Level VII)
30 Centers for Medicare and Medicaid Services, Department of Health and
Human Services. (2016). Condition of participation: Patient’s rights. 42 C.F.R.
§ 482.24(b).
31 DNV GL-Healthcare USA, Inc. (2016). MR.2 .SR.1 . NIAHO® accreditation
requirements: Interpretive guidelines & surveyor guidance (version 11).
Milford, OH: DNV GL-Healthcare USA, Inc. (Level VII)
EXTERNAL FIXATION MANAGEMENT
In external fixation, a practitioner inserts metal pins and
wires through skin and muscle layers into the broken bones
and affixes them to an adjustable external frame that
maintains their proper alignment during healing. (See Types
of external fixation devices.) This procedure is used most
commonly to treat open, unstable fractures with extensive
soft-tissue damage, comminuted closed fractures, and
septic, nonunion fractures, and to facilitate surgical
immobilization of a joint. Specialized types of external
fixators may be used to lengthen leg bones1 or immobilize
the cervical spine.
One advantage of external fixation over other
immobilization techniques is that it stabilizes the fracture
while allowing full visualization and access to open wounds.
It also facilitates early ambulation, which reduces the risk of
complications from immobilization.
Equipment
External fixation set ▪ sterile gloves ▪ sterile container ▪
sterile cotton-tipped applicators ▪ prescribed antiseptic
cleaning solution ▪ ice pack ▪ prescribed pain medication ▪
Optional: pillow, sterile dressing.
Equipment varies with the type of fixator and the type and
location of the fracture. Typically, sets of pins, stabilizing
rods, and clips are available from manufacturers.
Preparation of equipment
Make sure that the external fixation set includes all the
equipment it’s supposed to include and that the equipment
has been sterilized.
Implementation
■ Verify the practitioner’s order.
■ Gather and prepare the necessary equipment.
■ Perform hand hygiene.3,4,5,6,7,8
■ Confirm the patient’s identity using at least two patient
identifiers.9
■ Provide privacy.10,11,12,13
■ Explain the procedure to the patient to reduce the
patient’s anxiety and enhance cooperation. Emphasize that
the patient will feel little pain after the fixation device is in
place. Assure the patient that feelings of anxiety are normal
and that the patient will be able to adjust to the apparatus.
EQUIPMENT
Types of external fixation devices
The practitioner’s selection of an external fixation device depends on the
severity of the patient’s fracture and on the type of bone alignment needed.
Here are some examples of external fixation devices.
Universal day frame
The universal day frame is used to manage tibial fractures. This device allows
the practitioner to readjust the position of bony fragments by angulation and
rotation. The compression-distraction device allows compression and
distraction of bony fragments.
Portsmouth external fixation bar
The Portsmouth external fixation bar is a device used to
manage complicated tibial fractures. The locking nut
adjustment on the mobile carriage only allows bone
compression, so the practitioner must accurately reduce
bony fragments before applying the device.
Ilizarov fixator
The Ilizarov fixator is a special type of external fixation device. This device is
a combination of rings and tensioned transosseous wires used primarily in
limb lengthening, bone transport, and limb salvage. Highly complex, it
provides gradual distraction that results in good-quality bone formation with
a minimum of complications. It also provides enough stability to allow early
unrestricted weight bearing.2
■ Tell the patient that moving about is permitted with the
apparatus in place; this may help the patient resume normal
activities more quickly.
■ Raise the patient’s bed to waist level when performing
patient care to prevent caregiver back strain.14
■ Provide a comprehensive pain assessment using
techniques appropriate for the patient’s age, condition, and
ability to understand.15 Administer pain medication, as
ordered, following safe medication administration
practices.16,17,18,19 Perform a follow-up pain assessment and
notify the practitioner if pain isn’t adequately controlled.15
■ After the fixation device is in place, assess neurovascular
status at an interval determined by your facility and the
patient’s condition to assess for possible neurologic
damage. Assess color, warmth, motion, sensation, digital
movement, edema, capillary refill, and pulses of the
affected extremity. Compare with the unaffected side.
■ Apply an ice pack to the surgical site, as ordered, to
reduce swelling, relieve pain, and lessen bleeding.
■ Perform a comprehensive pain assessment and
administer pain medication, as ordered, 30 minutes to 1
hour before exercising or mobilizing the affected extremity
using techniques that are appropriate for the patient’s age,
condition, and ability to understand.15 Administer pain
medication, as ordered and indicated, following safe
medication
administration
practices to promote
comfort.16,17,18,19
■ Monitor the patient for pain not relieved by analgesics
and for burning, tingling, or numbness, which may indicate
nerve damage or circulatory impairment.
■ Elevate the affected extremity, if appropriate, to minimize
edema.
■ To prevent infection, perform pin site care, as ordered,
following these guidelines: open sterile packages and sterile
container. Pour the prescribed antiseptic solution into the
sterile container. Perform hand hygiene.3,4,5,6,7,8 Put on
sterile gloves to comply with standard precautions.20,21,22
Using sterile technique, clean the pin site with a sterile
cotton-tipped applicator dipped in the prescribed antiseptic
solution.23 If ordered, apply a loose sterile dressing.23,24
Remove and discard your gloves20 and perform hand
hygiene.3,4,5,6,7,8
■ Perform pin site care, daily or weekly, after the first 48 to
72 hours, depending on the amount of drainage.23 The most
effective frequency for pin site care hasn’t been
determined.24,25
■ Check for redness, tenting of the skin, prolonged or
purulent drainage from the pin site, swelling, elevated body
or pin site temperature, and any bowing or bending of pins,
which may stress the skin.
■ Return the bed to the lowest position to prevent falls and
maintain patient safety.26
■ Perform hand hygiene.3,4,5,6,7,8
■ Document the procedure.27,28,29,30
Special considerations
■ The National Association of Orthopaedic Nurses
recommends using 2% chlorhexidine solution for pin site
care.23 Although studies have shown that chlorhexidine may
be the most effective cleaning solution, continued research
is needed to fully establish the most effective way to
prevent infection.31
■ Because external fixation is commonly used in
adolescents, pay special attention to the patient’s
psychosocial needs. Assess for depression, social issues,
body image concerns, and sleep deprivation. Design a care
plan with the patient and family to address these issues.
■ As appropriate, encourage the patient to stop smoking
and provide smoking-cessation materials, because smoking
delays bone healing.32
For the patient with an Ilizarov fixator
■ When the device has been placed and preliminary
calluses have begun to form at the insertion sites (in 5 to 10
days), gentle distraction is initiated by turning the
appropriate screws one-quarter turn every 4 to 6 hours, as
ordered.
■ Note that nonsteroidal anti-inflammatory drugs are
usually contraindicated because they may decrease the
necessary inflammation caused by the distraction, resulting
in delayed bone formation.
Patient teaching
Before discharge, teach the patient and family members
how to provide pin site care.23 Although pin site care is a
sterile procedure in the health care facility, the patient can
use clean technique at home. Teach the patient to recognize
signs and symptoms of pin site infection.23 Tell the patient
to keep the affected limb elevated when sitting or lying
down.
For the patient with an Ilizarov fixator
Teach the patient to be consistent in turning the screws
every 4 to 6 hours around the clock, or as ordered by the
practitioner. Because the treatment period may be
prolonged (4 to 10 months), discuss with the patient and
family members the psychological effects of long-term care.
Complications
Complications of external fixation include loosening of pins
and loss of fracture stabilization, infection of the pin tract or
wound, skin breakdown, nerve damage, and muscle
impingement.
Ilizarov fixator pin sites are more prone to infection
because of the extended treatment period and because of
the pins’ movement to accomplish distraction. The pins are
also more likely to break because of their small diameter.
Also, the large number of pins used increases the patient’s
risk of neurovascular compromise.
Documentation
Record the patient’s response to the apparatus. Document
neurovascular status, the condition of the pin sites and
surround skin, pin site care, and pain assessment.
Document patient and family teaching performed and the
understanding of that teaching. Also document the
administration of any pain medication and its effectiveness.
REFERENCES
1 Ilizarov International Deformity & Lengthening Institute. (n.d .). “Limb
lengthening” [Online]. Accessed via the Web at http://www.ilizarov.org/ll.pdf
2 Ramos, T., et al. (2013). Treatment of distal tibial fractures with the Ilizarov
external fixator—A prospective observational study in 39 consecutive
patients. BMC Musculoskeletal Disorders, 14, 30. Accessed via the Web at
https://www.ncbi.nlm.nih.gov/pmc/articles/PMC3626620/ (Level VI)
3 The Joint Commission. (2019). Standard NPSG.07.01.01. Comprehensive
accreditation manual for hospitals. Oakbrook Terrace, IL: The Joint
Commission. (Level VII)
4 Centers for Disease Control and Prevention. (2002). Guideline for hand
hygiene in health-care settings: Recommendations of the Healthcare Infection
Control Practices Advisory Committee and the HICPAC/SHEA/APIC/IDSA Hand
Hygiene Task Force Hand Hygiene Task Force. MMWR Recommendations and
Reports, 51(RR-16), 1–45. Accessed via the Web at
https://www.cdc.gov/mmwr/pdf/rr/rr5116.pdf (Level II)
5 World Health Organization. (2009). “WHO guidelines on hand hygiene in
health care: First global patient safety challenge, clean care is safer care”
[Online]. Accessed via the Web at
http://apps.who.int/iris/bitstream/10665/44102/1/9789241597906_eng.pdf
(Level IV)
6 Accreditation Association for Hospitals and Health Systems. (2017). Standard
07.01.21. Healthcare Facilities Accreditation Program: Accreditation
requirements for acute care hospitals. Chicago, IL: Accreditation Association
for Hospitals and Health Systems. (Level VII)
7 Centers for Medicare and Medicaid Services, Department of Health and
Human Services. (2015). Condition of participation: Infection control. 42 C.F.R.
§ 482.42.
8 DNV GL-Healthcare USA, Inc. (2016). IC.1.SR.1 . NIAHO® accreditation
requirements: Interpretive guidelines & surveyor guidance (version 11).
Milford, OH: DNV GL-Healthcare USA, Inc. (Level VII)
9 The Joint Commission. (2019). Standard NPSG.01.01.01. Comprehensive
accreditation manual for hospitals. Oakbrook Terrace, IL: The Joint
Commission. (Level VII)
10 Centers for Medicare and Medicaid Services, Department of Health and
Human Services. (2015). Condition of participation: Patient’s rights. 42 C.F.R.
§ 482.13(c)(1).
11 Accreditation Association for Hospitals and Health Systems. (2017). Standard
15.01.16. Healthcare Facilities Accreditation Program: Accreditation
requirements for acute care hospitals. Chicago, IL: Accreditation Association
for Hospitals and Health Systems. (Level VII)
12 The Joint Commission. (2019). Standard RI.01.01.01. Comprehensive
accreditation manual for hospitals. Oakbrook Terrace, IL: The Joint
Commission. (Level VII)
13 DNV GL-Healthcare USA, Inc. (2016). PR.1.SR.5 . NIAHO® accreditation
requirements: Interpretive guidelines & surveyor guidance (version 11).
Milford, OH: DNV GL-Healthcare USA, Inc. (Level VII)
14 Waters, T. R., et al. (2009). “Safe patient handling training for schools of
nursing” [Online]. Accessed via the Web at
http://www.cdc.gov/niosh/docs/2009-127/pdfs/2009-127.pdf (Level VII)
15 The Joint Commission. (2019). Standard PC.01.02.07. Comprehensive
accreditation manual for hospitals. Oakbrook Terrace, IL: The Joint
Commission. (Level VII)
16 The Joint Commission. (2019). Standard MM.06.01.01. Comprehensive
accreditation manual for hospitals. Oakbrook Terrace, IL: The Joint
Commission. (Level VII)
17 Centers for Medicare and Medicaid Services, Department of Health and
Human Services. (2015). Condition of participation: Nursing services. 42
C.F.R. § 482.23(c).
18 Accreditation Association for Hospitals and Health Systems. (2017). Standard
16.01.03. Healthcare Facilities Accreditation Program: Accreditation
requirements for acute care hospitals. Chicago, IL: Accreditation Association
for Hospitals and Health Systems. (Level VII)
19 DNV GL-Healthcare USA, Inc. (2016). MM.1 .SR.2. NIAHO® accreditation
requirements: Interpretive guidelines & surveyor guidance (version 11).
Milford, OH: DNV GL-Healthcare USA, Inc. (Level VII)
20 Siegel, J. D ., et al. (2007, revised 2017). “2007 guideline for isolation
precautions: Preventing transmission of infectious agents in healthcare
settings” [Online]. Accessed via the Web at
http://www.cdc.gov/hicpac/pdf/isolation/Isolation2007.pdf (Level II)
21 Accreditation Association for Hospitals and Health Systems. (2017). Standard
07.01.10. Healthcare Facilities Accreditation Program: Accreditation
requirements for acute care hospitals. Chicago, IL: Accreditation Association
for Hospitals and Health Systems. (Level VII)
22 DNV GL-Healthcare USA, Inc. (2016). IC.1 .SR.2 . NIAHO® accreditation
requirements: Interpretive guidelines & surveyor guidance (version 11).
Milford, OH: DNV GL-Healthcare USA, Inc. (Level VII)
23 Holmes, S. B., & Brown, S. J . (2005). Skeletal pin site care: National
Association of Orthopaedic Nurses guidelines for orthopaedic nursing.
Orthopaedic Nursing, 24(2), 99–107. (Level VII)
24 Ferreira, N., & Marais, L. C . (2012). Prevention and management of external
fixator pin track sepsis. Strategies in Trauma and Limb Reconstruction, 7(2),
67–72. Accessed via the Web at
https://www.ncbi.nlm.nih.gov/pmc/articles/PMC3535127/ (Level V)
25 Timms, A., et al. (2011). Guidance on pin site care: Report and
recommendations from the 2010 Consensus Project on Pin Site Care. London,
UK: Royal College of Nursing. Accessed via the Web at
http://www.rcn.org.uk/__data/assets/pdf_file/0009/413982/004137.pdf (Level
VII)
26 Ganz, D. A., et al. (2013). Preventing falls in hospitals: A toolkit for improving
quality of care (AHRQ Publication No. 13-0015-EF). Rockville, MD: Agency for
Healthcare Research and Quality. Accessed via the Web at
http://www.ahrq.gov/sites/default/files/publications/files/fallpxtoolkit.pdf
(Level VII)
27 The Joint Commission. (2019). Standard RC.01.03 .01. Comprehensive
accreditation manual for hospitals. Oakbrook Terrace, IL: The Joint
Commission. (Level VII)
28 Centers for Medicare and Medicaid Services, Department of Health and
Human Services. (2015). Condition of participation: Medical record services.
42 C.F.R. § 482.24(b).
29 Accreditation Association for Hospitals and Health Systems. (2017). Standard
10.00 .03. Healthcare Facilities Accreditation Program: Accreditation
requirements for acute care hospitals. Chicago, IL: Accreditation Association
for Hospitals and Health Systems. (Level VII)
30 DNV GL-Healthcare USA, Inc. (2016). MR.2 .SR.1 . NIAHO® accreditation
requirements: Interpretive guidelines & surveyor guidance (version 11).
Milford, OH: DNV GL-Healthcare USA, Inc. (Level VII)
31 Lethaby, A., et al. (2013). Pin site care for preventing infections associated
with external bone fixators and pins. Cochrane Database of Systematic
Reviews, 2013(12), CD004551. Accessed via the Web at
http://onlinelibrary.wiley.com/doi/10.1002/14651858.CD004551.pub3/full
(Level I)
32 National Association of Orthopaedic Nurses. (2013). Core curriculum for
orthopaedic nursing (7th ed.). Chicago, IL: National Association of
Orthopaedic Nurses.
EYE CARE
Eye care is the practice of assessing, cleaning, or irrigating
the eye or the instillation of prescribed ocular preparations.
Eye care may be necessary to relieve pain and discomfort,
prevent or treat infection or injury to the eye, detect disease
at an early stage, detect drug-induced toxicity, prevent
damage to the cornea in sedated or unconscious patients,
maintain contact lenses, and care for false eye prostheses.
Equipment
Towel ▪ sterile drape ▪ sterile basin ▪ powder-free gloves ▪
sterile gauze pads ▪ sterile normal saline solution ▪ light
source ▪ Optional: prescribed artificial tears or eye
ointment, eye patch or shield, hydrogel dressing, paper
tape, eye irrigation supplies.
Implementation
■ Gather the necessary equipment and make sure the
lighting is adequate.
■ Perform hand hygiene.1,2,3,4,5,6
■ Confirm the patient’s identity using at least two patient
identifiers.7
■ Provide privacy.8,9,10,11
■ Explain the procedure to the patient, even if the patient is
comatose or appears unresponsive.
■ Raise the patient’s bed to waist level when providing care
to prevent caregiver back strain.12
■ Place the head of the patient’s bed to 30 degrees, unless
contraindicated by the patient’s condition.
■ Ensure the patient is in a comfortable position.
■ Place a towel around the patient’s neck.
■ Create a sterile field using a sterile drape.
■ Place the sterile basin and sterile gauze pads on the
sterile field.
■ Pour sterile normal saline solution into the sterile basin
using sterile technique.
■ Put on power-free gloves to comply with standard
precautions.13,14,15
■ Assess the patient’s eyes and periorbital area for redness,
drainage, bruising, presence of a foreign object, pupil size
and reactivity, and subjective reports of pain, vision loss,
itching, sensitivity to light, or sensation of something in the
eye.
■ Irrigate the eyes as needed and prescribed. (See the “Eye
irrigation” procedure, page 301.)
■ To remove secretions or crusts adhering to the eyelids
and eyelashes, first soak a sterile gauze pad in sterile
normal saline solution. Instruct the patient to close the eyes;
then, without applying pressure, gently wipe the patient’s
eye with the moistened gauze pad, working from the inner
canthus to the outer canthus to prevent debris and fluid
from entering the tear duct.
NURSING ALERT Don’t use cotton swabs, tweezers, or any other
materials on the eye itself.
■ To help prevent cross-contamination, use a new sterile
gauze pad for each wipe until the eye is clean. Repeat the
procedure for the other eye. Use a new sterile gauze pad for
each wipe until all the discharge has been removed.
■ To help keep the eyes moist after cleaning them, instill
artificial tears or apply eye ointment, as ordered, following
safe medication administration practices. (See the “Eye
medication administration” procedure, page 305.)16,17,18,19
■ Close the patient’s eyelids gently using the back of your
fingertip. Use an eye patch or shield or hydrogel dressing,20
as indicated, to promote eye closure in the patient with
partial or incomplete eyelid closure. Use paper tape to
secure the eye patch or shield.21
■ Return the bed to the lowest position to prevent falls and
maintain patient safety.22
■ Dispose of the used supplies in the appropriate
receptacle.
■ Remove and discard your gloves.13
■ Perform hand hygiene.1,2,3,4,5,6
■ Document the procedure.23,24,25,26
Special considerations
■ Unconscious patients lose the protective corneal reflex of
blinking, increasing the risk of corneal drying, abrasions,
and eye injury. In this patient population, it is important to
keep the patient’s eyes closed to maintain eye moisture and
prevent injury.27
■ To prevent irritation, avoid using soap for cleaning the
eyes.
Documentation
Record the time and type of eye care in your notes.
Document your assessment of the eyes and periorbital
areas, noting redness, drainage, or bruising; the presence of
any foreign object; pupil size and reactivity; and subjective
reports of pain, vision loss, itching, sensitivity to light, or the
sensation of something in the eye. If applicable, document
any irrigation procedure performed or administration of
eyedrops or ointment in the patient’s medication record.
Document any patient teaching you offered regarding
methods to minimize and prevent eye contamination or
injury and the patient’s understanding of the teaching.
REFERENCES
1 The Joint Commission. (2019). Standard NPSG.07.01.01. Comprehensive
accreditation manual for hospitals. Oakbrook Terrace, IL: The Joint
Commission. (Level VII)
2 Centers for Disease Control and Prevention. (2002). Guideline for hand
hygiene in health care settings: Recommendations of the Healthcare Infection
Control Practices Advisory Committee and the HICPAC/SHEA/APIC/IDSA Hand
Hygiene Task Force. MMWR Recommendations and Reports, 51(RR-16), 1–45.
Accessed via the Web at https://www.cdc.gov/mmwr/pdf/rr/rr5116.pdf (Level
II)
3 World Health Organization. (2009). “WHO guidelines on hand hygiene in
health care: First global patient safety challenge, clean care is safer care”
[Online]. Accessed via the Web at
http://apps.who.int/iris/bitstream/10665/44102/1/9789241597906_eng.pdf
(Level IV)
4 Centers for Medicare and Medicaid Services, Department of Health and
Human Services. (2015). Condition of participation: Infection control. 42 C.F.R.
§ 482.42.
5 Accreditation Association for Hospitals and Health Systems. (2017). Standard
07.01.21. Healthcare Facilities Accreditation Program: Accreditation
requirements for acute care hospitals. Chicago, IL: Accreditation Association
for Hospitals and Health Systems. (Level VII)
6 DNV GL-Healthcare USA, Inc. (2016). IC.1.SR.1 . NIAHO® accreditation
requirements: Interpretive guidelines & surveyor guidance (version 11).
Milford, OH: DNV GL-Healthcare USA, Inc. (Level VII)
7 The Joint Commission. (2019). Standard NPSG.01.01.01. Comprehensive
accreditation manual for hospitals. Oakbrook Terrace, IL: The Joint
Commission. (Level VII)
8 Centers for Medicare and Medicaid Services, Department of Health and
Human Services. (2015). Condition of participation: Patient’s rights. 42 C.F.R.
§ 482.13(c)(1).
9 Accreditation Association for Hospitals and Health Systems. (2017). Standard
15.01.16. Healthcare Facilities Accreditation Program: Accreditation
requirements for acute care hospitals. Chicago, IL: Accreditation Association
for Hospitals and Health Systems. (Level VII)
10 The Joint Commission. (2019). Standard RI.01.01.01. Comprehensive
accreditation manual for hospitals. Oakbrook Terrace, IL: The Joint
Commission. (Level VII)
11 DNV GL-Healthcare USA, Inc. (2016). PR.1.SR.5 . NIAHO® accreditation
requirements: Interpretive guidelines & surveyor guidance (version 11).
Milford, OH: DNV GL-Healthcare USA, Inc. (Level VII)
12 Waters, T. R., et al. (2009). “Safe patient handling training for schools of
nursing” [Online]. Accessed via the Web at
http://www.cdc.gov/niosh/docs/2009-127/pdfs/2009-127.pdf (Level VII)
13 Siegel, J. D ., et al. (2007, revised 2017). “2007 guideline for isolation
precautions: Preventing transmission of infectious agents in healthcare
settings” [Online]. Accessed via the Web at
http://www.cdc.gov/hicpac/pdf/isolation/Isolation2007.pdf (Level II)
14 Accreditation Association for Hospitals and Health Systems. (2017). Standard
07.01.10. Healthcare Facilities Accreditation Program: Accreditation
requirements for acute care hospitals. Chicago, IL: Accreditation Association
for Hospitals and Health Systems. (Level VII)
15 DNV GL-Healthcare USA, Inc. (2016). IC.1 .SR.2 . NIAHO® accreditation
requirements: Interpretive guidelines & surveyor guidance (version 11).
Milford, OH: DNV GL-Healthcare USA, Inc. (Level VII)
16 Centers for Medicare and Medicaid Services, Department of Health and
Human Services. (2015). Condition of participation: Nursing services. 42
C.F.R. § 482.23(c).
17 Accreditation Association for Hospitals and Health Systems. (2017). Standard
16.01.03. Healthcare Facilities Accreditation Program: Accreditation
requirements for acute care hospitals. Chicago, IL: American Osteopathic
Association. (Level VII)
18 The Joint Commission. (2019). Standard MM.06.01.01. Comprehensive
accreditation manual for hospitals. Oakbrook Terrace, IL: The Joint
Commission. (Level VII)
19 DNV GL-Healthcare USA, Inc. (2016). MM.1 .SR.2. NIAHO® accreditation
requirements: Interpretive guidelines & surveyor guidance (version 11).
Milford, OH: DNV GL-Healthcare USA, Inc. (Level VII)
20 Douglas, L., & Berry, S. (2011). Developing clinical guidelines in eye care for
intensive care units. Nursing Children and Young People, 23(5), 14–20. (Level
VII)
21 Perry, A., et al. (2018). Clinical nursing skills and techniques (8th ed.). St.
Louis, MO: Elsevier.
22 Ganz, D. A., et al. (2013). Preventing falls in hospitals: A toolkit for improving
quality of care (Publication No. 13-0015-EF). Rockville, MD: Agency for
Healthcare Research and Quality. Accessed via the Web at
http://www.ahrq.gov/sites/default/files/publications/files/fallpxtoolkit.pdf
(Level VII)
23 The Joint Commission. (2019). Standard RC.01.03 .01. Comprehensive
accreditation manual for hospitals. Oakbrook Terrace, IL: The Joint
Commission. (Level VII)
24 Centers for Medicare and Medicaid Services, Department of Health and
Human Services. (2015). Condition of participation: Medical record services.
42 C.F.R. § 482.24(b).
25 Accreditation Association for Hospitals and Health Systems. (2017). Standard
10.00 .03. Healthcare Facilities Accreditation Program: Accreditation
requirements for acute care hospitals. Chicago, IL: Accreditation Association
for Hospitals and Health Systems. (Level VII)
26 DNV GL-Healthcare USA, Inc. (2016). MR.2 .SR.1 . NIAHO® accreditation
requirements: Interpretive guidelines & surveyor guidance (version 11).
Milford, OH: DNV GL-Healthcare USA, Inc. (Level VII)
27 Taylor, C., et al. (2015). Fundamentals of nursing: The art and science of
nursing care (8th ed.). Philadelphia, PA: Wolters Kluwer.
EYE COMPRESS APPLICATION
Whether applied warm or cold, eye compresses are soothing
and therapeutic. Because cold numbs sensory fibers, cold
compresses can reduce swelling and bleeding and relieve
itching, such as with allergic conjunctivitis.1 Cold
compresses may also be ordered to ease periorbital
discomfort between prescribed doses of pain medication.
Because heat increases circulation, which enhances
absorption and decreases inflammation, warm compresses
may relieve discomfort and promote drainage of superficial
infections. Warm eye compresses may be ordered for
patients diagnosed with viral or bacterial conjunctivitis or
blepharitis.1,2
The presence of ocular infection requires the use of sterile
technique for this procedure.
Equipment
Prescribed solution (usually sterile water, normal saline
solution, or prescribe ophthalmic irrigant) ▪ sterile basin ▪
sterile 4′′ × 4′′ (10-cm × 10-cm) gauze pads ▪ towel ▪ pillow
▪ Optional: gloves or sterile gloves, prescribed ophthalmic
ointment or eyedrops, eye patch.
Additional equipment for a warm compress
Basin of warm water or access to hot tap water.
Additional equipment for a cold compress
Small plastic bag, ice pack, or latex-free glove ▪ ice chips ▪
1⁄2′′ (1.3 -cm) hypoallergenic tape.
Preparation of equipment
If you’re performing a sterile procedure, label all
medications, medication containers, and solutions on and
off the sterile field.3,4
For a warm compress
Place a capped bottle of sterile water or normal saline
solution in a basin of hot water or under a stream of hot tap
water. Allow the solution to become warm (no warmer than
113°F [45°C]).5 Pour the warm water or saline solution into
a sterile basin, filling the basin about halfway. Place some of
the sterile gauze pads in the basin.
For a cold compress
Place ice chips in a plastic bag, ice pack, or latex-free glove,
if necessary. Keep the ice pack small to avoid excessive
pressure on the eye. Remove excess air from the bag, pack,
or glove, and then knot or close the open end. Cut a piece of
hypoallergenic tape to secure the ice pack. Place all
equipment on the bedside stand near the patient.
Implementation
■ Verify the practitioner’s order for solution, frequency, and
duration of treatment.
■ Gather and prepare the appropriate equipment.
■ Perform hand hygiene and, as needed, put on gloves or
sterile gloves.6,7,8,9,10,11
■ Confirm the patient’s identity using at least two patient
identifiers.12
■ Provide privacy.13,14,15,16 Explain the procedure to the
patient and family (if appropriate) according to their
individual communication and learning needs to increase
their understanding, allay their fears, and enhance
cooperation.17
■ Raise the patient’s bed to waist level when providing care
to prevent caregiver back strain.18
■ Perform hand hygiene.6,7,8,9,10,11
■ Help the patient into the supine position; support the
patient’s head with a pillow and turn it slightly to the
unaffected side. This position will help hold the compress in
place.
■ If the patient has an eye patch, remove and discard it.
■ Inspect the eye and surrounding skin to serve as a
baseline.
■ Remove and discard your gloves (if worn), perform hand
hygiene,6,7,8,9,10,11 and put on new gloves.19
■ Drape a towel around the patient’s shoulders to catch any
spills.
For a warm compress
■ Remove two sterile gauze pads from the basin, and
squeeze out the excess solution.
■ Instruct the patient to close the eyes.
■ Gently apply the pads—one on top of the other—to the
affected eye. (If the patient complains that the compress
feels too hot, remove it immediately.)
■ Change the compress every few minutes during the
prescribed length of time. After removing each compress,
inspect the patient’s skin for signs that the compress
solution is too hot.
For a cold compress
■ Moisten the middle of one of the sterile 4′′ × 4′′ (10-cm ×
10-cm) gauze pads with the prescribed solution (sterile
water, normal saline solution, or ophthalmic irrigating
solution) to help conduct the cold from the ice pack. Keep
the edges dry so that they can absorb excess moisture.
■ Tell the patient to close the eyes.
■ Place the moist gauze pad over the affected eye, place
the ice pack on top of the gauze pad, and tape it in place.
■ If the patient complains of pain, remove the ice pack.
Some patients may have an adverse reaction to cold.
■ Remove and discard your gloves, if worn.19
■ Perform hand hygiene.6,7,8,9,10,11
■ After 15 to 20 minutes, or as ordered, perform hand
hygiene,6,7,8,9,10,11 and put on gloves, as needed.19
■ Remove the tape, ice pack, and gauze pad and discard
them.
For all compresses
■ Use the remaining dry sterile gauze pads to clean and dry
the patient’s face.
■ If ordered, apply ophthalmic ointment, instill drops using
safe medication practices,20,21,22,23 or apply an eye patch.
(See the “Eye medication administration” procedure, page
305.)
■ Return the patient’s bed to the lowest position to prevent
falls and maintain the patient’s safety.24
■ Discard used supplies.
■ Remove and discard your gloves, if worn.19
■ Perform hand hygiene.6,7,8,9,10,11
■ Document the procedure.25,26,27,28
Special considerations
■ When applying warm compresses, change the compress
as frequently as necessary to maintain a constant
temperature—typically every 5 minutes—to increase
vasodilation and promote discharge.2,5
■ Don’t use a microwave to warm the solution because of
the risk of overheating the solution.
■ Cold compresses are contraindicated in treating eye
inflammation, such as keratitis and iritis, because the
capillary constriction inhibits delivery of nutrients to the
cornea.
Documentation
Record the time and duration of the procedure. Describe the
eye’s appearance before and after treatment, any drainage,
and the patient’s comfort level. Note any ointments,
eyedrops, or dressings applied to the eye. Record the
patient’s tolerance of the procedure. Document any patient
teaching provided and the patient’s understanding of the
teaching.
REFERENCES
1 American Optometric Association. (n. d .). “Conjunctivitis” [Online]. Accessed
via the Web at https://www.aoa .org/patients-and-public/eye-and-vision-
problems/glossary-of-eye-and-vision-conditions/conjunctivitis
2 American Optometric Association. (n. d .). “Blepharitis” [Online]. Accessed via
the Web at https://www.aoa.org/patients-and-public/eye-and-vision-
problems/glossary-of-eye-and-vision-conditions/blepharitis?sso=y
3 The Joint Commission. (2019). Standard NPSG.03 .04.01. Comprehensive
accreditation manual for hospitals. Oakbrook Terrace, IL: The Joint
Commission. (Level VII)
4 Accreditation Association for Hospitals and Health Systems. (2017). Standard
25.01.27. Healthcare Facilities Accreditation Program: Accreditation
requirements for acute care hospitals. Chicago, IL: Accreditation Association
for Hospitals and Health Systems. (Level VII)
5 Blackie, C. A., et al. (2008). Inner eyelid surface temperature as a function of
warm compress methodology. Optometry and Vision Science, 85(8), 675–683.
(Level II)
6 The Joint Commission. (2019). Standard NPSG.07.01.01. Comprehensive
accreditation manual for hospitals. Oakbrook Terrace, IL: The Joint
Commission. (Level VII)
7 World Health Organization. (2009). “WHO guidelines on hand hygiene in
health care: First global patient safety challenge, clean care is safer care”
[Online]. Accessed via the Web at
http://apps.who.int/iris/bitstream/10665/44102/1/9789241597906_eng.pdf
(Level IV)
8 Centers for Disease Control and Prevention. (2002). Guideline for hand
hygiene in health-care settings: Recommendations of the Healthcare Infection
Control Practices Advisory Committee and the HICPAC/SHEA/APIC/IDSA Hand
Hygiene Task Force. MMWR Recommendations and Reports, 51(RR-16), 1–45.
Accessed via the Web at https://www.cdc.gov/mmwr/pdf/rr/rr5116.pdf (Level
II)
9 Centers for Medicare and Medicaid Services, Department of Health and
Human Services. (2015). Condition of participation: Infection control. 42 C.F.R.
§ 482.42.
10 Accreditation Association for Hospitals and Health Systems. (2017). Standard
07.01.21. Healthcare Facilities Accreditation Program: Accreditation
requirements for acute care hospitals. Chicago, IL: Accreditation Association
for Hospitals and Health Systems. (Level VII)
11 DNV GL-Healthcare USA, Inc. (2016). IC.1 .SR.1 . NIAHO® accreditation
requirements: Interpretive guidelines & surveyor guidance (version 11).
Milford, OH: DNV GL-Healthcare USA, Inc. (Level VII)
12 The Joint Commission. (2019). Standard NPSG.01.01.01. Comprehensive
accreditation manual for hospitals. Oakbrook Terrace, IL: The Joint
Commission. (Level VII)
13 Centers for Medicare and Medicaid Services, Department of Health and
Human Services. (2015). Condition of participation: Patient’s rights. 42 C.F.R.
§ 482.13(c)(1).
14 Accreditation Association for Hospitals and Health Systems. (2017). Standard
15.01.16. Healthcare Facilities Accreditation Program: Accreditation
requirements for acute care hospitals. Chicago, IL: Accreditation Association
for Hospitals and Health Systems. (Level VII)
15 The Joint Commission. (2019). Standard RI.01.01.01. Comprehensive
accreditation manual for hospitals. Oakbrook Terrace, IL: The Joint
Commission. (Level VII)
16 DNV GL-Healthcare USA, Inc. (2016). PR.1.SR.5 . NIAHO® accreditation
requirements: Interpretive guidelines & surveyor guidance (version 11).
Milford, OH: DNV GL-Healthcare USA, Inc. (Level VII)
17 The Joint Commission. (2019). Standard PC.02.01.21. Comprehensive
accreditation manual for hospitals. Oakbrook Terrace, IL: The Joint
Commission. (Level VII)
18 Waters, T. R., et al. (2009). “Safe patient handling training for schools of
nursing” [Online]. Accessed via the Web at
https://www.cdc.gov/niosh/docs/2009-127/pdfs/2009-127.pdf (Level VII)
19 Siegel, J. D ., et al. (2007, revised 2017). “2007 guideline for isolation
precautions: Preventing transmission of infectious agents in healthcare
settings” [Online]. Accessed via the Web at
https://www.cdc.gov/infectioncontrol/pdf/guidelines/isolation-guidelines.pdf
(Level II)
20 The Joint Commission. (2018). Standard MM.06.01.01. Comprehensive
accreditation manual for hospitals. Oakbrook Terrace, IL: The Joint
Commission. (Level VII)
21 Centers for Medicare and Medicaid Services, Department of Health and
Human Services. (2015). Condition of participation: Nursing services. 42
C.F.R. § 482.23(c).
22 Accreditation Association for Hospitals and Health Systems. (2017). Standard
16.01.03. Healthcare Facilities Accreditation Program: Accreditation
requirements for acute care hospitals. Chicago, IL: Accreditation Association
for Hospitals and Health Systems. (Level VII)
23 DNV GL-Healthcare USA, Inc. (2016). MM.1 .SR.2. NIAHO® accreditation
requirements: Interpretive guidelines & surveyor guidance (version 11).
Milford, OH: DNV GL-Healthcare USA, Inc. (Level VII)
24 Ganz, D. A., et al. (2013). Preventing falls in hospitals: A toolkit for improving
quality of care (AHRQ Publication No. 13-0015-EF). Rockville, MD: Agency for
Healthcare Research Quality. Accessed via the Web at
https://www.ahrq.gov/sites/default/files/publications/files/fallpxtoolkit_0 .pdf
(Level VII)
25 The Joint Commission. (2019). Standard RC.01.03 .01. Comprehensive
accreditation manual for hospitals. Oakbrook Terrace, IL: The Joint
Commission. (Level VII)
26 Centers for Medicare and Medicaid Services, Department of Health and
Human Services. (2015). Condition of participation: Medical record services.
42 C.F.R. § 482.24(b).
27 Accreditation Association for Hospitals and Health Systems. (2017). Standard
10.00 .03. Healthcare Facilities Accreditation Program: Accreditation
requirements for acute care hospitals. Chicago, IL: Accreditation Association
for Hospitals and Health Systems. (Level VII)
28 DNV GL-Healthcare USA, Inc. (2016). MR.2 .SR.1 . NIAHO® accreditation
requirements: Interpretive guidelines & surveyor guidance (version 11).
Milford, OH: DNV GL-Healthcare USA, Inc. (Level VII)
EYE IRRIGATION
Used mainly to flush secretions, chemicals, and foreign
bodies from the eye, eye irrigation also provides a way to
administer medications for corneal and conjunctival
disorders. In an emergency, tap water may serve as an
irrigant.
The amount of solution needed to irrigate an eye depends
on the contaminant. Secretions require a moderate volume;
major chemical burns require a copious amount. Usually, an
IV bottle or bag of normal saline solution (with IV tubing
attached) supplies enough solution for continuous irrigation
of a chemical burn. (See Three devices for eye irrigation,
page 302.)
Equipment
Gloves ▪ fluid-impermeable pads ▪ emesis basin ▪ towel ▪
sterile gauze pads ▪ Optional: goggles, eyelid retractor,
ophthalmic anesthetic drops, Morgan lens.
For moderate-volume irrigation
Prescribed sterile ophthalmic irrigant ▪ Optional: 60-mL
sterile syringe, sterile squeeze bottle, sterile basin or
irrigation bottle.
For copious irrigation
One or more 1,000-mL bottles or bags of normal saline
solution or lactated Ringer solution ▪ standard IV infusion
set ▪ IV pole.
Commercially prepared bottles of sterile ophthalmic
irrigant are available.
EQUIPMENT
Three devices for eye irrigation
Depending on the type and extent of injury, you may need a specific device
to irrigate the patient’s eye, such as a syringe or squeeze bottle, IV tubing, or
a Morgan lens.
Syringe or squeeze bottle
For moderate-volume irrigation—to remove eye secretions, for example—
apply sterile ophthalmic irrigant to the eye directly from a 60-mL syringe or
squeeze bottle (as shown at right) filled with ophthalmic irrigant. Direct the
stream at the inner canthus, and position the patient so the stream washes
across the cornea and exits at the outer canthus.
IV tubing
For copious irrigation—to treat chemical burns, for
example—set up an IV bag and tubing. Direct a constant
flow or normal saline or lactated Ringer solution at the
inner canthus so that the solution flows across the cornea
to the outer canthus. Flush the eye (as shown at right) for
at least 15 minutes. Alkali burns may require irrigation for
several hours.
Morgan lens
Attached to IV tubing that’s connected to a bag of IV fluid,
a Morgan lens permits continuous lavage and also
delivers medication to the eye. Begin the irrigation at the
prescribed flow rate. To insert the device, ask the patient
to look down as you insert the lens under the upper eyelid
(as shown at right). Then have him look up as you retract
and release the lower eyelid over the lens.
Preparation of equipment
Read the label on the irrigant and compare it with the
practitioner’s order. Double-check its sterility, strength, and
expiration date. All solutions should be warmed to 90°F to
100°F (32.2°C to 37.8°C), if possible, to promote patient
comfort.1
For moderate-volume irrigation
Pour the sterile irrigant into the sterile basin. Fill the syringe
or squeeze bottle with 30 to 60 mL of irrigant. If you’re
using a commercially prepared bottle of sterile irrigant,
remove the cap from the irrigant container and place the
container within easy reach. Be sure to keep the tip of the
container sterile.
For copious irrigation
Use aseptic technique to set up the IV infusion set and the
bag of normal saline or lactated Ringer solution. Hang the
container on an IV pole, fill the IV tubing with the solution,
and adjust the drip regulator valve to ensure an adequate
but not forceful flow.
Place all other equipment within easy reach.
Implementation
■ Verify the practitioner’s order.
■ Gather and prepare the appropriate equipment.
■ Perform hand hygiene.2,3,4,5,6,7
■ Confirm the patient’s identity using at least two patient
identifiers.8
■ Provide privacy.9,10,11,12
■ Explain the procedure to the patient and family (if
appropriate) according to their individual communication
and learning needs to increase their understanding, allay
their fears, and enhance cooperation.13 If the patient has a
chemical burn, ease anxiety by explaining that irrigation
prevents further damage.
■ Raise the patient’s bed to waist level when providing care
to prevent caregiver back strain.14
■ Perform hand hygiene.2,3,4,5,6,7
■ Help the patient into the supine position with the head of
the bed elevated.
■ Perform hand hygiene.2,3,4,5,6,7
■ Put on gloves and, if splashing is likely, goggles to comply
with standard precautions.15,16
■ If the patient is wearing contact lenses, remove and
discard them immediately to prevent further damage and to
facilitate irrigation.
NURSING ALERT If the patient has a history of acid or alkali
exposure, irrigate the eye immediately and then perform a complete
eye examination. The extent of the injury depends on the amount of
exposure. Irrigating immediately reduces damage.17
■ Gently remove visible external discharge or debris from
the eye with sterile gauze pads. Wipe from the inner
canthus to the outer canthus to prevent debris from being
washed back into the eye. Use a new sterile gauze pad with
each wipe to prevent cross-contamination.
■ Turn the patient’s head slightly toward the affected side
to prevent cross-contamination from the solution flowing
over the patient’s nose and into the other eye.
■ Place a fluid-impermeable pad under the patient’s head,
and hold the emesis basin against the affected side (as
shown below) to catch excess solution.
■ Using the thumb and index finger of your nondominant
hand, separate the patient’s eyelids (as shown below).
■ If ordered, instill ophthalmic anesthetic eyedrops
following safe medication practices as a comfort
measure.18,19,20,21 Use them only once, because repeated
use retards healing.
■ To irrigate the conjunctival cul-de-sac, continue holding
the eyelids apart with your thumb and index finger.
■ To irrigate the upper eyelid (the superior fornix), use an
eyelid retractor. Steady the hand holding the retractor by
resting it on the patient’s forehead. The retractor prevents
the eyelid from closing involuntarily when solution touches
the cornea and conjunctiva.
Administering moderate-volume irrigation
■ Holding the syringe or squeeze bottle of sterile
ophthalmic irrigant about 1′′ (2.5 cm) from the eye, direct a
constant, gentle stream at the inner canthus (as shown
below) so that the solution flows across the cornea to the
outer canthus. Use only enough force to gently remove
secretions from the conjunctiva.
■ Make sure that you don’t touch or press on the eyeball
with the syringe or tip of the squeeze bottle while irrigating,
to avoid causing discomfort and possible further injury to
the patient.
■ Evert the lower eyelid and then the upper eyelid to
inspect for retained foreign particles.
Administering copious irrigation
■ Hold the control valve on the IV tubing about 1′′ (2.5 cm)
above the patient’s eye, and direct a constant, gentle
stream of normal saline or lactated Ringer solution at the
inner canthus so that the solution flows across the cornea to
the outer canthus.
■ Ask the patient to rotate the eye periodically while you
continue the irrigation. This action may dislodge foreign
particles and ensures irrigation of the entire eye.
■ Evert the lower eyelid and then the upper eyelid to
inspect for retained foreign particles. (This inspection is
especially important when the patient has caustic lime in
the eye.)
Completing the procedure
■ Remove any foreign particles by gently touching the
conjunctiva with a sterile gauze pad moistened with irrigant.
Don’t touch the cornea.
■ Resume irrigating the eye until all visible foreign particles
have been removed.
■ Gently dry the patient’s eyelids with a sterile gauze pad,
wiping from the inner to the outer canthus. Use a new
sterile gauze pad for each wipe. This reduces the patient’s
need to rub the eye.
■ Offer the patient a towel for drying the face and neck.
■ Return the bed to the lowest position to prevent falls and
maintain patient safety.22
■ Discard waste and used supplies in the appropriate
receptacle
■ Remove and discard your gloves, and remove your
goggles, if worn.15
■ Perform hand hygiene.2,3,4,5,6,7
■ Document the procedure.23,24,25,26
Special considerations
■ Arrange for follow-up care, when necessary.
■ When irrigating both eyes, have the patient tilt his or her
head toward the side being irrigated to avoid cross-
contamination.
■ For chemical burns, irrigate each eye for 15 to 30 minutes
with normal saline or lactated Ringer solution to dilute and
wash out the harsh chemical.27 After irrigation, close the
patient’s eye for about 5 minutes and then test the pH of
the eye by touching the pH test strip to the area between
the eyelid and globe. Continue irrigation until a neutral pH
(7) is achieved and maintained for at least 30 minutes.17
■ After irrigating any chemical, note the time, date, and
chemical for your own reference in case you develop
contact dermatitis.17
■ Studies have shown that the most comfortable method of
irrigation for patients is the use of the Morgan lens in
combination with a lidocaine-saline solution.28
■ If you’re using a Morgan lens, follow the manufacturer’s
guidelines. Flow of solution must start before instillation and
continue while you’re removing the lens.29
Documentation
Note the duration of irrigation, the type and amount of
solution used, and characteristics of the drainage. Record
your assessment of the patient’s eye before and after
irrigation. Also note the patient’s response to the procedure.
Document the presence and removal of contact lenses, as
appropriate. Note the chemical to which the patient was
exposed, as applicable. Record the pH of the eye before
irrigation and any subsequent pH values, as appropriate.
Document any patient and family teaching provided,
understanding of the teaching, and whether follow-up
teaching was required.
REFERENCES
1 Ernst, A., et al. (1998). Warmed versus room temperature saline solution for
ocular irrigation: A randomized clinical trial. Annals of Emergency Medicine,
32(6), 676–679. (Level II)
2 The Joint Commission. (2019). Standard NPSG.07.01.01. Comprehensive
accreditation manual for hospitals. Oakbrook Terrace, IL: The Joint
Commission. (Level VII)
3 World Health Organization. (2009). “WHO guidelines on hand hygiene in
health care: First global patient safety challenge, clean care is safer care”
[Online]. Accessed via the Web at
http://apps.who.int/iris/bitstream/10665/44102/1/9789241597906_eng.pdf
(Level IV)
4 Centers for Disease Control and Prevention. (2002). Guideline for hand
hygiene in health-care settings: Recommendations of the Healthcare Infection
Control Practices Advisory Committee and the HICPAC/SHEA/APIC/IDSA Hand
Hygiene Task Force. MMWR Recommendations and Reports, 51(RR-16), 1–45.
Accessed via the Web at https://www.cdc.gov/mmwr/pdf/rr/rr5116.pdf (Level
II)
5 Centers for Medicare and Medicaid Services, Department of Health and
Human Services. (2015). Condition of participation: Infection control. 42 C.F.R.
§ 482.42.
6 Accreditation Association for Hospitals and Health Systems. (2017). Standard
07.01.21. Healthcare Facilities Accreditation Program: Accreditation
requirements for acute care hospitals. Chicago, IL: Accreditation Association
for Hospitals and Health Systems. (Level VII)
7 DNV GL-Healthcare USA, Inc. (2016). IC.1.SR.1 . NIAHO® accreditation
requirements: Interpretive guidelines & surveyor guidance (version 11).
Milford, OH: DNV GL-Healthcare USA, Inc. (Level VII)
8 The Joint Commission. (2019). Standard NPSG.01.01.01. Comprehensive
accreditation manual for hospitals. Oakbrook Terrace, IL: The Joint
Commission. (Level VII)
9 Centers for Medicare and Medicaid Services, Department of Health and
Human Services. (2015). Condition of participation: Patient’s rights. 42 C.F.R.
§ 482.13(c)(1).
10 Accreditation Association for Hospitals and Health Systems. (2017). Standard
15.01.16. Healthcare Facilities Accreditation Program: Accreditation
requirements for acute care hospitals. Chicago, IL: Accreditation Association
for Hospitals and Health Systems. (Level VII)
11 The Joint Commission. (2019). Standard RI.01.01.01. Comprehensive
accreditation manual for hospitals. Oakbrook Terrace, IL: The Joint
Commission. (Level VII)
12 DNV GL-Healthcare USA, Inc. (2016). PR.1.SR.5 . NIAHO® accreditation
requirements: Interpretive guidelines & surveyor guidance (version 11).
Milford, OH: DNV GL-Healthcare USA, Inc. (Level VII)
13 The Joint Commission. (2019). Standard PC.02.01.21. Comprehensive
accreditation manual for hospitals. Oakbrook Terrace, IL: The Joint
Commission. (Level VII)
14 Waters, T. R., et al. (2009). “Safe patient handling training for schools of
nursing” [Online]. Accessed via the Web at
https://www.cdc.gov/niosh/docs/2009-127/pdfs/2009-127.pdf (Level VII)
15 Siegel, J. D ., et al. (2007, revised 2017). “2007 guideline for isolation
precautions: Preventing transmission of infectious agents in healthcare
settings” [Online]. Accessed via the Web at
https://www.cdc.gov/infectioncontrol/pdf/guidelines/isolation-guidelines.pdf
(Level II)
16 Accreditation Association for Hospitals and Health Systems. (2017). Standard
07.01.10. Healthcare Facilities Accreditation Program: Accreditation
requirements for acute care hospitals. Chicago, IL: Accreditation Association
for Hospitals and Health Systems. (Level VII)
17 Pokhrel, P. K., & Loftus, S. A. (2007). Ocular emergencies. American Family
Physician, 76(6), 829–836 . Accessed via the Web at
http://www.aafp.org/afp/2007/0915/p829.pdf
18 The Joint Commission. (2019). Standard MM.06.01.01. Comprehensive
accreditation manual for hospitals. Oakbrook Terrace, IL: The Joint
Commission. (Level VII)
19 Centers for Medicare and Medicaid Services, Department of Health and
Human Services. (2015). Condition of participation: Nursing services. 42
C.F.R. § 482.23(c).
20 Accreditation Association for Hospitals and Health Systems. (2017). Standard
16.01.03. Healthcare Facilities Accreditation Program: Accreditation
requirements for acute care hospitals. Chicago, IL: Accreditation Association
for Hospitals and Health Systems. (Level VII)
21 DNV GL-Healthcare USA, Inc. (2016). MM.1 .SR.2. NIAHO® accreditation
requirements: Interpretive guidelines & surveyor guidance (version 11).
Milford, OH: DNV GL-Healthcare USA, Inc. (Level VII)
22 Ganz, D. A., et al. (2013). Preventing falls in hospitals: A toolkit for improving
quality of care (AHRQ Publication No. 13-0015-EF). Accessed via the Web at
https://www.ahrq.gov/sites/default/files/publications/files/fallpxtoolkit_0 .pdf
(Level VII)
23 The Joint Commission. (2018). Standard RC.01.03 .01. Comprehensive
accreditation manual for hospitals. Oakbrook Terrace, IL: The Joint
Commission. (Level VII)
24 Centers for Medicare and Medicaid Services, Department of Health and
Human Services. (2015). Condition of participation: Medical record services.
42 C.F.R. § 482.24(b).
25 Accreditation Association for Hospitals and Health Systems. (2017). Standard
10.00 .03. Healthcare Facilities Accreditation Program: Accreditation
requirements for acute care hospitals. Chicago, IL: Accreditation Association
for Hospitals and Health Systems. (Level VII)
26 DNV GL-Healthcare USA, Inc. (2016). MR.2 .SR.1 . NIAHO® accreditation
requirements: Interpretive guidelines & surveyor guidance (version 11).
Milford, OH: DNV GL-Healthcare USA, Inc. (Level VII)
27 Rodrigues, Z. (2009). Irrigation of the eye after alkaline and acidic burns.
Emergency Nurse, 17(8), 26–29.
28 O’Malley, G. F., et al. (2008). Eye irrigation is more comfortable with a
lidocaine-containing irrigation solution compared with normal saline. The
Journal of Trauma: Injury, Infection, and Critical Care, 64(5), 1360–1362.
(Level II)
29 MorTan, Inc. (2015). “Morgan lens instructional chart” [Online]. Accessed via
the Web at http://morganlens.com/wp-
content/uploads/2015/06/Mortan_Instructions-2015-r3.pdf
EYE MEDICATION ADMINISTRATION
During an eye examination, a practitioner can use eyedrops
to anesthetize the eye, dilate the pupil to facilitate
examination, and stain the cornea to identify corneal
abrasions, scars, and other anomalies. Eye medications can
also be used to lubricate the eye, treat certain eye
conditions (such as glaucoma and infections), and lubricate
the eye socket for insertion of a prosthetic eye.
Understanding the ocular effects of medications is
important, because certain drugs may cause eye disorders
or have serious ocular effects. For example, anticholinergics,
which are commonly used during eye examinations, can
precipitate acute glaucoma in patients with a predisposition
to the disorder.1
Equipment
Prescribed eye medication ▪ gloves ▪ warm water or normal
saline solution ▪ sterile gauze pads ▪ facial tissues ▪
Optional: ocular dressing.
Preparation of equipment
Make sure the medication is labeled for ophthalmic use.
Remember to date the medication container the first time
you open it, because manufacturers specify the time period
for which medication can be used after opening to prevent
contamination.2,3 Follow your facility’s guideline or the
manufacturer’s recommendations on when to discard an
opened eye medication. If the tip of an eye ointment tube
has crusted, turn the tip on a sterile gauze pad to remove
the crust.
Implementation
■ Avoid distractions and interruptions when preparing and
administering the medication to prevent medication
administration errors.4,5
■ Verify the order on the patient’s medication record by
checking it against the practitioner’s order.6,7,8,9
■ Reconcile the patient’s medications when a new
medication is ordered to reduce the risk of medication
errors, including omissions, duplications, dosing errors, and
drug interactions.10,11,12
■ Gather and prepare the appropriate medication and
equipment.
■ Compare the medication label with the practitioner’s
order to verify the correct medication, indication, dose,
route, and time of administration.6,7,8,9 Confirm which eye
requires treatment.
NURSING ALERT Make sure you know which eye to treat, because the
practitioner may order different medications and doses for each eye.
■ Check the patient’s medical record for an allergy or other
contraindication to the prescribed medication. If an allergy
or other contraindication is present, don’t administer the
medication; instead, notify the practitioner.6,7,8,9
■ Visually inspect the medication for discoloration or any
other loss of integrity. Don’t give the medication if its
integrity is compromised.6,7,8,9
■ Discuss any unresolved concerns about the medication
with the patient’s practitioner.6,7,8,9
■ Warm the medication to room temperature, if needed.
■ Perform hand hygiene.13,14,15,16,17,18
■ Confirm the patient’s identify using at least two patient
identifiers.8,19
■ Provide privacy.20,21,22,23
■ If the patient is receiving the medication for the first time,
inform the patient or family about possible significant
adverse reactions and discuss any other concerns related to
the medication.6,7,8,9
■ Verify that you’re administering the medication at the
proper time, in the prescribed dosage, and by the correct
route to reduce the risk of medication errors.6,7,8,9
■ If your facility uses a bar code scanning system, scan
your identification badge, the patient’s identification
bracelet, and the medication’s bar code.
■ Explain the procedure to the patient and family (if
appropriate) according to their individual communication
and learning needs to increase their understanding, allay
their fears, and enhance cooperation.24
■ Raise the patient’s bed to waist level when providing care
to prevent caregiver back strain.25
■ Perform hand hygiene13,14,15,16,17,18 and then put on
gloves.26,27
■ If the patient is wearing an eye dressing, remove it by
gently pulling it down and away from the patient’s forehead
to prevent skin shearing or tearing.28 Take care not to
contaminate your hands.
■ Remove any discharge by cleaning around the eye with
sterile gauze pads moistened with warm water or normal
saline solution. With the patient’s eye closed, clean from the
inner to the outer canthus, using a fresh sterile gauze pad
for each stroke.
Instilling eyedrops
To instill eyedrops, pull the lower lid down to expose the conjunctival sac.
Have the patient look up and away, and then squeeze the prescribed number
of drops into the sac. Then, release the patient’s eyelid.
■ To remove crusted secretions around the eye, moisten a
gauze pad with warm water or normal saline solution. Ask
the patient to close the eye, and then place the gauze pad
over it for 1 or 2 minutes. Remove the pad, and then repeat
with new moist sterile gauze pads, as necessary, until the
secretions are soft enough to be removed without
traumatizing the mucosa.
■ Remove and discard your gloves.
■ Perform hand hygiene.13,14,15,16,17,18
■ Put on new gloves.26,27
■ Instruct the patient to tilt the head back and toward the
side of the affected eye so that excess medication can flow
away from the tear duct, minimizing systemic absorption
through the nasal mucosa.
For eyedrops
■ Remove the bottle top from the medication container and
place it on a clean, dry surface. Be careful to avoid
contaminating the dropper tip or bottle top.
■ Before instilling the eyedrops, instruct the patient to look
up and away. This position moves the cornea away from the
lower lid and minimizes the risk of touching the cornea with
the dropper if the patient blinks.
■ If necessary, steady the hand holding the dropper by
resting it against the patient’s forehead. With your other
hand, gently pull down the lower lid of the affected eye and
instill the drops in the conjunctival sac. Try to avoid placing
the drops directly on the eyeball to prevent the patient from
experiencing discomfort. (See Instilling eyedrops.)
■ After instilling the eyedrops, instruct the patient to close
both eyes gently, without squeezing the lids shut.
■ To prevent systemic absorption of medication, gently
press your thumb on the inner canthus for 2 to 3 minutes
while the patient closes both eyes. Doing so helps prevent
medication from flowing into the tear ducts.29,30
■ Use a clean tissue to remove any excess solution leaking
from the eye. Remember to use a fresh tissue for each eye
to prevent cross-contamination.
For eye ointment
■ Squeeze a small ribbon of medication on the edge of the
conjunctival sac from the inner to the outer canthus. If
necessary, steady the hand holding the medication tube by
bracing it against the patient’s forehead or cheek, taking
care not to touch the tip of the tube to the eye or other
surface. Cut off the ribbon by turning the tube.
For all eye medication
■ Instruct the patient to close the eyes gently without
squeezing the lids shut and to roll the eyes behind the
closed lids to help distribute the medication over the surface
of the eyeball.
■ Use a clean tissue to remove any excess solution or
ointment leaking from the eye. Remember to use a fresh
tissue for each eye to prevent cross-contamination.
■ Replace the medication cap.
■ Apply a new ocular dressing, if necessary.
■ Return the bed to the lowest position to prevent falls and
maintain patient safety.31
■ Return the medication to the storage area. Make sure to
store it according to the label’s instructions.
■ Remove and discard your gloves.
■ Perform hand hygiene.13,14,15,16,17,18
■ Document the procedure.32,33,34,35
Special considerations
■ To maintain the drug container’s sterility, never touch the
tip of the bottle or dropper or the tip of the tube to the
patient’s eyeball, lids, or lashes. If the dropper tip becomes
contaminated, discard the medication and obtain another
sterile medication bottle.
■ To prevent cross-contamination, never use a container of
eye medication for more than one patient.
■ If you’re instilling more than one medication, wait at least
5 minutes between instillations.30 If the practitioner has
ordered an eye ointment and eyedrops, administer the
drops first to enable the eyedrop medication to penetrate
the eye without interference from the layer of ointment.
■ Treat only the affected eye, unless otherwise ordered.
Complications
Instillation of some eye medications may cause transient
burning, itching, and redness. Rarely, systemic effects may
occur.
Documentation
Record the medication administered, eye or eyes treated,
and date, time, and dose according to your facility’s
documentation format. Note the patient’s response to the
procedure and any adverse effects that occur. Document
any patient teaching provided and the patient’s
understanding of that teaching, any necessary follow-up
teaching, and your evaluation of any observed return
demonstration.
REFERENCES
1 Pharmacist’s Letter/Prescriber’s Letter. (2011). “Drugs that cause or
exacerbate glaucoma” [Online]. Accessed via the Web at
http://rw.therapeuticresearch.com/pl/ArticlePDF.aspx?
cs=&s=PRL&DocumentFileID=0&DetailID=271124&SegmentID=0
2 The Joint Commission. (2019). Standard MM.05.01.09 . Comprehensive
accreditation manual for hospitals. Oakbrook Terrace, IL: The Joint
Commission. (Level VII)
3 Accreditation Association for Hospitals and Health Systems. (2017). Standard
25.01.18. Healthcare Facilities Accreditation Program: Accreditation
requirements for acute care hospitals. Chicago, IL: Accreditation Association
for Hospitals and Health Systems. (Level VII)
4 Westbrook, J., et al. (2010). Association of interruptions with an increased risk
and severity of medication administration errors. Archives of Internal
Medicine, 170(8), 683–690 . (Level IV)
5 Institute for Safe Medication Practices. (2013). Side tracks on the safety
express: Interruptions lead to errors and unfinished...Wait, what was I doing?
Nurse Advise-ERR, 11(2), 1–4 . Accessed via the Web at
https://www.ismp.org/Newsletters/acutecare/showarticle.aspx?id=37
6 The Joint Commission. (2019). Standard MM.06 .01.01. Comprehensive
accreditation manual for hospitals. Oakbrook Terrace, IL: The Joint
Commission. (Level VII)
7 Centers for Medicare and Medicaid Services, Department of Health and
Human Services. (2015). Condition of participation: Nursing services. 42
C.F.R. § 482.23(c).
8 Accreditation Association for Hospitals and Health Systems. (2017). Standard
16.01.03. Healthcare Facilities Accreditation Program: Accreditation
requirements for acute care hospitals. Chicago, IL: Accreditation Association
for Hospitals and Health Systems. (Level VII)
9 DNV GL-Healthcare USA, Inc. (2016). MM .1 .SR.2 . NIAHO® accreditation
requirements: Interpretive guidelines & surveyor guidance (version 11).
Milford, OH: DNV GL-Healthcare USA, Inc. (Level VII)
10 Institute for Healthcare Improvement. (2011). How-to guide: Prevent adverse
drug events (medication reconciliation). Cambridge, MA: Institute for
Healthcare Improvement. (Level VII)
11 Accreditation Association for Hospitals and Health Systems. (2017). Standard
25.02.13. Healthcare Facilities Accreditation Program: Accreditation
requirements for acute care hospitals. Chicago, IL: Accreditation Association
for Hospitals and Health Systems. (Level VII)
12 The Joint Commission. (2019). Standard NPSG.03 .06 .01. Comprehensive
accreditation manual for hospitals. Oakbrook Terrace, IL: The Joint
Commission. (Level VII)
13 The Joint Commission. (2019). Standard NPSG.07.01.01. Comprehensive
accreditation manual for hospitals. Oakbrook Terrace, IL: The Joint
Commission. (Level VII)
14 Centers for Disease Control and Prevention. (2002). Guideline for hand
hygiene in health-care settings: Recommendations of the Healthcare Infection
Control Practices Advisory Committee and the HICPAC/SHEA/APIC/IDSA Hand
Hygiene Task Force. MMWR Recommendations and Reports, 51(RR-16), 1–45.
Accessed via the Web at https://www.cdc.gov/mmwr/pdf/rr/rr5116.pdf (Level
II)
15 World Health Organization. (2009). “WHO guidelines on hand hygiene in
health care: First global patient safety challenge, clean care is safer care”
[Online]. Accessed via the Web at
http://apps.who.int/iris/bitstream/10665/44102/1/9789241597906_eng.pdf
(Level IV)
16 Accreditation Association for Hospitals and Health Systems. (2017). Standard
07.01.21. Healthcare Facilities Accreditation Program: Accreditation
requirements for acute care hospitals. Chicago, IL: Accreditation Association
for Hospitals and Health Systems. (Level VII)
17 Centers for Medicare and Medicaid Services, Department of Health and
Human Services. (2015). Condition of participation: Infection control. 42 C.F.R.
§ 482.42.
18 DNV GL-Healthcare USA, Inc. (2016). IC.1 .SR.1 . NIAHO® accreditation
requirements: Interpretive guidelines & surveyor guidance (version 11).
Milford, OH: DNV GL-Healthcare USA, Inc. (Level VII)
19 The Joint Commission. (2019). Standard NPSG.01.01.01. Comprehensive
accreditation manual for hospitals. Oakbrook Terrace, IL: The Joint
Commission. (Level VII)
20 The Joint Commission. (2019). Standard RI.01.01.01. Comprehensive
accreditation manual for hospitals. Oakbrook Terrace, IL: The Joint
Commission. (Level VII)
21 DNV GL-Healthcare USA, Inc. (2016). PR.1.SR.5 . NIAHO® accreditation
requirements: Interpretive guidelines & surveyor guidance (version 11).
Milford, OH: DNV GL-Healthcare USA, Inc. (Level VII)
22 Centers for Medicare and Medicaid Services, Department of Health and
Human Services. (2015). Condition of participation: Patient’s rights. 42 C.F.R.
§ 482.13(c)(1).
23 Accreditation Association for Hospitals and Health Systems. (2017). Standard
15.01.16. Healthcare Facilities Accreditation Program: Accreditation
requirements for acute care hospitals. Chicago, IL: Accreditation Association
for Hospitals and Health Systems. (Level VII)
24 The Joint Commission. (2019). Standard PC.02.01.21. Comprehensive
accreditation manual for hospitals. Oakbrook Terrace, IL: The Joint
Commission. (Level VII)
25 Waters, T. R., et al. (2009). “Safe patient handling training for schools of
nursing” [Online]. Accessed via the Web at
http://www.cdc.gov/niosh/docs/2009-127/pdfs/2009-127.pdf (Level VII)
26 Siegel, J. D ., et al. (2007, revised 2017). “2007 guideline for isolation
precautions: Preventing transmission of infectious agents in healthcare
settings” [Online]. Accessed via the Web at
http://www.cdc.gov/hicpac/pdf/isolation/Isolation2007.pdf (Level II)
27 Accreditation Association for Hospitals and Health Systems. (2017). Standard
07.01.10. Healthcare Facilities Accreditation Program: Accreditation
requirements for acute care hospitals. Chicago, IL: Accreditation Association
for Hospitals and Health Systems. (Level VII)
28 LeBlanc, K., et al. (2013). International skin tear advisory panel: A tool kit to
aid in the prevention, assessment, and treatment of skin tears using a
simplified classification system. Advances in Skin & Wound Care, 26(10), 459–
476. (Level IV)
29 Taylor, C., et al. (2015). Fundamentals of nursing: The art and science of
nursing care (8th ed.). Philadelphia, PA: Wolters Kluwer.
30 Glaucoma Research Foundation. (2017). “Eye drop tips” [Online]. Accessed
via the Web at http://glaucoma.org/treatment/eyedrop-tips.php
31 Ganz, D. A., et al. (2013). Preventing falls in hospitals: A toolkit for improving
quality of care (AHRQ Publication No. 13-0015-EF). Rockville, MD: Agency for
Healthcare Research and Quality. Accessed via the Web at
http://www.ahrq.gov/sites/default/files/publications/files/fallpxtoolkit.pdf
(Level VII)
32 The Joint Commission. (2019). Standard RC.01.03 .01. Comprehensive
accreditation manual for hospitals. Oakbrook Terrace, IL: The Joint
Commission. (Level VII)
33 Centers for Medicare and Medicaid Services, Department of Health and
Human Services. (2015). Condition of participation: Medical record services.
42 C.F.R. § 482.24(b).
34 Accreditation Association for Hospitals and Health Systems. (2017). Standard
10.00 .03. Healthcare Facilities Accreditation Program: Accreditation
requirements for acute care hospitals. Chicago, IL: Accreditation Association
for Hospitals and Health Systems. (Level VII)
35 DNV GL-Healthcare USA, Inc. (2016). MR.2 .SR.1 . NIAHO® accreditation
requirements: Interpretive guidelines & surveyor guidance (version 11).
Milford, OH: DNV GL-Healthcare USA, Inc. (Level VII)
F
FALL PREVENTION AND MANAGEMENT
Falls are a major cause of injury and death among older
adults. Each year, one in three adults older than age 65
falls.1 For hospitalized patients, falls are the most common
safety incident, with rates of 1.7 to 25 falls per 1,000
patient stays, and 30% to 51% of falls in hospitals result in
injury.2 One-third of these falls can be prevented.2
Factors that contribute to falls among older adult patients
include lengthy convalescent periods, incomplete recovery,
medication use, increasing physical disability, and impaired
vision, hearing, or mental status. For example, if an older
adult’s equilibrium becomes impaired, it’s likely to take
longer to return to normal than it would for a younger adult
— and, during that extended period of disequilibrium, the
older adult is at an increased risk for falling. Falls not only
cause physical injuries, but also trigger such psychological
issues as a loss of self-confidence, which hastens
dependence and a move to a long-term care facility.
Extrinsic or environmental factors that increase the risk of
falling include poor lighting, use of throw rugs, highly waxed
floors, unfamiliar surroundings, or misuse of assistive
devices. Intrinsic or physiologic factors include age over 80
years, lower extremity weakness, vertigo, orthostatic
hypotension, depression, failing eyesight, gait or balance
disorders, functional or cognitive impairment, and being
female.3
You should perform a risk assessment for falls for all
admitted patients3,4,5 using a standardized, facility-
approved assessment tool, such as the Hendrich II Tool,
Morse Fall Scale, Johns Hopkins Tool, or STRATIFY tool.2,3
In a health care facility, an accidental fall can change a
short stay for a minor problem into a prolonged stay for
serious—and possibly life-threatening—problems. The risk of
falling is highest during the first week of a stay in a health
care or long-term care facility. (See Who’s at risk for a fall?)
Equipment
Vital signs monitoring equipment ▪
stethoscope ▪
disinfectant pad ▪ standardized fall risk assessment tool ▪
supplies for fall precautions ▪ pillows ▪ blankets ▪ Optional:
emergency equipment (crash cart with cardiac medications,
defibrillator, hand-held resuscitation bag with mask,
intubation equipment), electrocardiography (ECG) monitor,
dressings, prescribed analgesics, cold and warm
compresses, naloxone, gait belt, chair alarm, bed alarm,
assistive device.
Preparation of equipment
If you’re helping a fallen patient, send an assistant to collect
the assessment and emergency equipment you need.
Implementation
■ Perform hand hygiene.6,7,8,9,10,11
■ Confirm the patient’s identity using at least two patient
identifiers.12
For fall prevention
■ When the patient first enters the room, institute universal
fall precautions to make sure the environment is safe and
the patient is comfortable.2 Orient the patient to the room
and the call light to help prevent falls related to an
unfamiliar environment. Have the patient perform a return
demonstration on call light use.
Who’s at risk for a fall?
Preventing falls begins with identifying the patients at greatest risk. Consider
a patient with one or more of the following characteristics to be at risk.
■ Age 80 or older
■ Lower extremity weakness
■ Female gender
■ A history of a recent fall
■ Functional or cognitive impairment
■ Dizziness
■ Gait or balance impairment
■ Depression
■ Low body mass index
■ Urinary incontinence
■ Sensory deficits, particularly vision defects
■ Orthostatic hypotension
■ Use of more than four prescription medications
■ Use of psychotropic medications
■ Living in an environment that contains fall hazards3
■ Ask a patient who’s age 65 or older or a patient who
demonstrates unsteadiness or difficulty walking if he or she
has fallen in the past 12 months. If the patient has fallen,
ask about the frequency and circumstances of the fall, and
evaluate the patient for gait and balance deficits.3 Assess
for proper use of assistive devices.
■ Assess the patient’s risk of falling, using either a
standardized risk assessment form or one developed by
your facility.2,4,5 Assess such factors as the patient’s history
of falling, mobility, what medications the patient takes, and
the patient’s mental status. Note whether the patient’s
incontinent, has sensory deficits such as impaired vision,
lives in an environment that contains fall hazards, or
experiences orthostatic hypotension.2 Perform a fall risk
assessment after a change in the patient’s condition,
transfer from another unit, or a fall, or at a frequency
determined by your facility. The optimal frequency for fall
risk assessment hasn’t yet been determined.2
HOSPITAL-ACQUIRED CONDITION ALERT Keep in mind that the
Centers for Medicare and Medicaid Services considers an injury from
a fall a hospital-acquired condition, because various best practices can
reasonably prevent it. Be sure to use fall prevention techniques (such
as performing a fall risk assessment and instituting fall precautions)
to reduce the risk of injury from fall.2,4,5,13
■ Make sure the patient is checked for potential dangers
hourly during the daytime and evening and every 2 hours
overnight to comply with universal fall precautions.2 Correct
potential dangers in the patient’s room.
■ Keep the call light positioned so it’s within the patient’s
reach it at all times.2
■ Provide adequate nighttime lighting.2
■ Place the patient’s personal belongings (such as a purse
or wallet, books, and tissues) and assistive devices (such as
a urinal or commode, cane, or walker) within easy reach.2
■ Keep the bed in its lowest position so the patient can
easily reach the floor when getting out of bed. This position
also reduces the distance to the floor in case the patient
falls. Lock the bed’s wheels.2
■ Keep the patient’s area uncluttered.2
■ Keep floor surfaces clean and dry. Make sure spills are
cleaned up immediately.2
■ Instruct the patient to rise slowly from a supine position
to avoid possible dizziness and loss of balance.2
■ Advise the patient to wear well-fitting, nonskid footwear.2
■ Respond promptly to the patient’s call light to help limit
the number of times the patient gets out of bed without
help.
■ Alert other caregivers to the patient’s risk of falling and to
the interventions you’ve implemented.4
■ Assess the need for one-on-one patient monitoring, and
arrange for it as needed.8
■ Have a gait belt readily available at the patient’s bedside,
if needed, for use during ambulation or transfer.2
■ Use a chair or bed alarm, if needed, to alert staff
members that the patient is attempting to get up without
assistance.2
Medications associated with falls
This chart highlights some classes of drugs and the possible adverse effects
of each that may increase a patient’s risk of falling.
■ Encourage the patient to perform active range-of-motion
(ROM) exercises to improve flexibility and coordination.
■ Assist the patient with early and regular ambulation if the
patient’s condition allows, because exercise reduces the risk
of falling in older people. Encourage the patient to use an
assistive device for ambulation, such as a walker or cane or
other equipment recommended by physical or occupational
therapy.2
■ If needed, regularly schedule assistance with toileting.2
■ Review medications that may contribute to a fall.2
■ Perform hand hygiene.6,7,8,9,10,11
■ Document the procedure.14,15,16,17
For fall management
■ If you’re with a patient as the patient falls, maintain your
grip on the gait belt (if present) and place your elbow
against the patient’s waist or thigh to prevent the patient
from going down or to lessen the force of the fall.18 If you’re
with a bariatric patient, move any objects out of the way
that could cause injury, and try to protect the patient’s head
from striking any objects or the floor, because there’s very
little you can do to prevent the fall.18 Alternatively, if you
weren’t with the patient when the patient fell, verify that the
environment is safe by quickly scanning the patient’s
location and surroundings to make sure that there are no
imminent physical threats, such as toxic or electrical
hazards.19
■ Remain calm and stay with the patient to prevent any
further injury.
■ Assess the patient for response. If the patient is
unresponsive, shout for nearby help and activate the
emergency response system via mobile device (if
appropriate).19 Check for absent breathing or only gasping
and, if able, simultaneously check for a pulse to minimize
delay in detecting cardiac arrest and initiating
cardiopulmonary resuscitation.19
■ If the patient is breathing normally and has a pulse,
monitor the patient closely until the emergency response
team arrives.19 If breathing is absent or the patient is only
gasping and you feel a pulse within 10 seconds, open the
patient’s airway; use the head tilt-chin lift technique unless
you suspect a cervical spine injury, then use the jaw thrust
without head extension.19,20 Provide rescue breathing, 1
breath every 5 to 6 seconds or about 10 to 12
breaths/minute.19 Check the patient’s pulse about every 2
minutes. If you don’t detect a pulse, begin chest
compressions.19 If you suspect an opioid overdose,
administer naloxone intranasally or intramuscularly, if
available, according to protocol.19
■ If breathing is absent or the patient is only gasping and
you don’t feel a pulse within 10 seconds, have a coworker
retrieve the defibrillator or automated external defibrillator
(AED) and other emergency equipment. Alternatively, if
you’re alone, retrieve the defibrillator or AED and
emergency equipment.19 Immediately begin chest
compressions until the defibrillator or AED is ready for use.19
Compress an adult’s chest at a rate of 100 to 120
compressions per minute, with a compression depth of at
least 2′′ (5 cm) for an average adult, while avoiding
excessive chest compression depths (greater than 2.4′′ [6
cm]). Avoid leaning on the chest between compressions to
allow full chest wall recoil.19 After starting compressions,
open the patient’s airway and deliver rescue breaths (each
over approximately 1 second); use a ratio of 30
compressions to 2 breaths. When the defibrillator is ready
for use, check the patient’s rhythm and defibrillate if the
patient has a shockable rhythm; otherwise, continue
cardiopulmonary resuscitation.20
NURSING ALERT Don’t move the patient until you fully evaluate the
patient’s status to prevent further injury if an injury has occurred as a
result of the fall.2
■ To determine the extent of the patient’s injuries, look for
lacerations, abrasions, and obvious deformities. Note any
deviations from the patient’s baseline condition and notify
the practitioner of them. Determine whether the patient
experienced a head trauma, because this requires further
diagnostic evaluation to rule out subdural hematoma.
NURSING ALERT Patients taking anticoagulants or on aspirin therapy
who experience head trauma are at increased risk for subdural
hematoma.
■ Take steps to control bleeding (if indicated), and obtain an
X-ray if you suspect a fracture. Provide first aid for minor
injuries, as needed.
■ If you weren’t present during the fall, confirm the
patient’s identity using at least two patient identifiers.12 Ask
the patient or a witness what happened. Ask whether the
patient experienced pain or a change in level of
consciousness.
■ Provide reassurance, as needed, and observe for such
signs and symptoms as confusion, tremor, weakness, pain,
and dizziness.
■ Assess the patient’s limb strength and motion. Don’t
perform ROM exercises if you suspect a fracture or if the
patient complains of any odd sensations or limited
movement. If you suspect an injury, don’t move the patient
until a practitioner examines him or her.
■ While the patient lies on the floor until the practitioner
arrives, offer pillows and blankets for comfort. However, if
you suspect a spinal cord injury, don’t place a pillow under
the patient’s head.
■ If you don’t detect any problems, return the patient to the
bed with the help of another staff member. Never try to lift a
patient alone because you may injure yourself or the
patient.
■ Even if the patient shows no signs of distress or has
sustained only minor injuries, monitor vital signs and assess
neurologic status frequently until the patient’s condition
stabilizes. Notify the practitioner if you note any change
from the baseline.
■ Perform a comprehensive pain assessment using
techniques appropriate for the patient’s age, condition, and
ability to understand.21
■ Perform necessary measures to relieve the patient’s pain.
Administer analgesics, as ordered, following safe medication
administration practices.22,23,24,25 Apply cold compresses for
the first 24 hours and warm compresses, as needed.
■ Perform a postfall assessment to determine the root
cause of the fall.2,4,5 Gather assessment data from the
patient, staff members, and any witnesses to the fall.
Review the events that preceded the fall and any
contributing factors. Discuss why it occurred and how it
could have been prevented. Assess the patient’s
environment, looking for possible causes of the fall. Review
medications, such as sedative and opioids, that may have
contributed to the fall. (See Medications associated with
falls.) Assess for gait disturbances or improper use of a
cane, crutches, or a walker.3
■ Monitor the patient’s status for the next 48 hours or for a
period determined by your facility and the patient’s
condition.26
■ Perform hand hygiene.6,7,8,9,10,11
■ Update the patient’s risk profile.2,4,5
■ Document the procedure.14,15,16,17
Special considerations
■ If you don’t already have a fall prevention program or
interdisciplinary fall team in place in your facility, consider
starting such a program.2
NURSING ALERT Perform a risk assessment for falls on all admitted
patients.3,8
Documentation
Document any measures taken to help prevent a fall,
including patient and family teaching.
After a fall, complete a detailed incident report to help
track frequent patient falls so that prevention measures can
be used with high-risk patients. Used primarily for your
facility’s insurance carrier, this report isn’t considered part
of the patient’s record. However, a copy will go to the
facility’s administrator, who will evaluate care given on the
unit and propose new safety policies, as appropriate. It may
also go to other patient care teams, such as fall prevention
teams.
Make sure the incident report notes where and when the
fall occurred, how the patient was found, and in what
position. Include the events preceding the fall, the names of
witnesses, the patient’s reaction to the fall, and a detailed
description of the patient’s condition based on assessment
findings. Also include the patient’s statement of the event.
Note any interventions taken and the names of other staff
members who helped care for the patient after the fall.
Record the practitioner’s name and the date and time the
practitioner was notified, as well as the patient’s health care
power of attorney and the date and time he or she was
notified. Include a copy of the practitioner’s report. Also
note whether the patient was sent for diagnostic tests or
transferred to another unit.
Include all of the information about the fall in the patient’s
record. Also document the patient’s vital signs and whether
you’re monitoring the patient for a severe complication.
REFERENCES
1 Centers for Disease Control and Prevention, National Center for Injury
Prevention and Control. (2017). “Older adult falls: Get the facts” [Online].
Accessed via the Web at
http://www.cdc.gov/HomeandRecreationalSafety/Falls/adultfalls.html
2 Ganz, D. A., et al. (2013). Preventing falls in hospitals: A toolkit for improving
quality of care (AHRQ Publication No. 13-0015-EF). Rockville, MD: Agency for
Healthcare Research and Quality. Accessed via the Web at
http://www.ahrq.gov/sites/default/files/publications/files/fallpxtoolkit.pdf
(Level VII)
3 American Geriatrics Society & British Geriatrics Society. (2010). “Prevention of
falls in older persons: AGS/BGS clinical practice guideline” [Online]. Accessed
via the Web at http://www.medcats.com/FALLS/frameset.htm (Level VII)
4 The Joint Commission. (2019). Standard PC.01.02.08 . Comprehensive
accreditation manual for hospitals. Oakbrook Terrace, IL: The Joint
Commission. (Level VII)
5 Accreditation Association for Hospitals and Health Systems. (2016). Standard
16.02.02. Healthcare Facilities Accreditation Program: Accreditation
requirements for acute care hospitals. Chicago, IL: Accreditation Association
for Hospitals and Health Systems. (Level VII)
6 Centers for Disease Control and Prevention. (2002). Guideline for hand
hygiene in health-care settings: Recommendations of the Healthcare Infection
Control Practices Advisory Committee and the HICPAC/SHEA/APIC/IDSA Hand
Hygiene Task Force. MMWR Recommendations and Reports, 51(RR-16), 1–45.
Accessed via the Web at https://www.cdc.gov/mmwr/pdf/rr/rr5116.pdf (Level
II)
7 World Health Organization. (2009). “WHO guidelines on hand hygiene in
health care: First global patient safety challenge, clean care is safer care”
[Online]. Accessed via the Web at
http://apps.who.int/iris/bitstream/10665/44102/1/9789241597906_eng.pdf
(Level IV)
8 The Joint Commission. (2019). Standard NPSG.07.01.01. Comprehensive
accreditation manual for hospitals. Oakbrook Terrace, IL: The Joint
Commission. (Level VII)
9 Accreditation Association for Hospitals and Health Systems. (2016). Standard
07.01.21. Healthcare Facilities Accreditation Program: Accreditation
requirements for acute care hospitals. Chicago, IL: American Osteopathic
Association. (Level VII)
10 Centers for Medicare and Medicaid Services, Department of Health and
Human Services. (2015). Condition of participation: Infection control. 42 C.F.R.
§ 482.42.
11 DNV GL-Healthcare USA, Inc. (2016). IC.1 .SR.1 . NIAHO® accreditation
requirements: Interpretive guidelines & surveyor guidance (version 11).
Milford, OH: DNV GL-Healthcare USA, Inc. (Level VII)
12 The Joint Commission. (2019). Standard NPSG.01.01.01. Comprehensive
accreditation manual for hospitals. Oakbrook Terrace, IL: The Joint
Commission. (Level VII)
13 Jarrett, N., & Callaham, M. (2016). “Evidence-based guidelines for selected
hospital-acquired conditions: Final report” [Online]. Accessed via the Web at
https://www.cms.gov/Medicare/Medicare-Fee-for-Service-
Payment/HospitalAcqCond/Downloads/2016-HAC-Report.pdf
14 The Joint Commission. (2019). Standard RC.01.03 .01. Comprehensive
accreditation manual for hospitals. Oakbrook Terrace, IL: The Joint
Commission. (Level VII)
15 Centers for Medicare and Medicaid Services, Department of Health and
Human Services. (2015). Condition of participation: Medical record services.
42 C.F.R. § 482.24(b).
16 Accreditation Association for Hospitals and Health Systems. (2017). Standard
10.00 .03. Healthcare Facilities Accreditation Program: Accreditation
requirements for acute care hospitals. Chicago, IL: American Osteopathic
Association. (Level VII)
17 DNV GL-Healthcare USA, Inc. (2016). MR.2 .SR.1 . NIAHO® accreditation
requirements: Interpretive guidelines & surveyor guidance (version 11).
Milford, OH: DNV GL-Healthcare USA, Inc. (Level VII)
18 Waters, T. R., et al. (2009). “Safe patient handling training for schools of
nursing” [Online]. Accessed via the Web at
http://www.cdc.gov/niosh/docs/2009-127/pdfs/2009-127.pdf (Level VII)
19 American Heart Association. (2015). 2015 American Heart Association
guidelines update for cardiopulmonary resuscitation and emergency
cardiovascular care. Circulation, 132, S414–S435. (Level II)
20 American Heart Association. (2010). 2010 American Heart Association
guidelines for cardiopulmonary resuscitation and emergency cardiovascular
care. Circulation, 122, S676–S684. (Level II)
21 The Joint Commission. (2019). Standard PC.01.02.07. Comprehensive
accreditation manual for hospitals. Oakbrook Terrace, IL: The Joint
Commission. (Level VII)
22 Accreditation Association for Hospitals and Health Systems. (2016). Standard
16.01.03. Healthcare Facilities Accreditation Program: Accreditation
requirements for acute care hospitals. Chicago, IL: Accreditation Association
for Hospitals and Health Systems. (Level VII)
23 Centers for Medicare and Medicaid Services, Department of Health and
Human Services. (2015). Condition of participation: Nursing services. 42
C.F.R. § 482.23(c).
24 The Joint Commission. (2019). Standard MM.06.01.01. Comprehensive
accreditation manual for hospitals. Oakbrook Terrace, IL: The Joint
Commission. (Level VII)
25 DNV GL-Healthcare USA, Inc. (2016). MM.1 .SR.2. NIAHO® accreditation
requirements: Interpretive guidelines & surveyor guidance (version 11).
Milford, OH: DNV GL-Healthcare USA, Inc. (Level VII)
26 Gray-Micelli, D., & Quigley, P. A. (2012). “Nursing standards of practice: Fall
prevention” [Online]. Accessed via the Web at http://consultgeri.org/geriatric-
topics/falls (Level VII)
FECAL IMPACTION REMOVAL, DIGITAL
Fecal impaction—a large, hard, dry mass of stool in the folds
of the rectum and, at times, in the sigmoid colon—results
from prolonged retention and accumulation of stool.
Common causes include poor bowel habits, inactivity,
dehydration, improper diet (especially inadequate fluid
intake), constipation-inducing drugs, and incomplete bowel
cleaning after a barium enema or barium swallow.
With newer bowel care techniques, such as transanal
irrigation and digital rectal stimulation, digital removal of a
fecal impaction isn’t often needed.1 However, for a small
group of patients—such as those who have sustained a
spinal cord injury or have a neurological condition such as
multiple sclerosis or spina bifida—it may be an essential
part of their bowel-care routine. Digital fecal impaction
removal may also be used as an acute intervention for
patients who have impacted stool that can’t be resolved
with medication.1,2 Symptoms of impaction may include
absent or reduced evacuation of stool, abdominal bloating
or distension, nausea, and pain. It may be accompanied by
overflow diarrhea, in which loose stool leaks around the
fecal mass.1 Digital removal of a fecal impaction typically
requires a practitioner’s order to perform.
If the patient requires digital removal of fecal impaction as
part of routine bowel care, the routine shouldn’t be
interrupted, regardless of the setting in which care is
provided. This is especially important for patients with
spinal cord injury who are at risk for autonomic dysreflexia,
a medical emergency that can result if the bowel becomes
distended owing to impaction or constipation. Autonomic
dysreflexia can lead to cerebral hemorrhage, seizures, and
cardiac arrest.1,3
This procedure is contraindicated during pregnancy; after
rectal, genitourinary, abdominal, perineal, or gynecologic
reconstructive surgery; in patients with myocardial
infarction, coronary insufficiency, pulmonary embolus, heart
failure, heart block, and Stokes-Adams syndrome (without
pacemaker treatment); and in patients with GI or vaginal
bleeding, hemorrhoids, rectal polyps, or blood dyscrasias.
Equipment
Equipment for measuring vital signs ▪ gloves ▪ fluid-
impermeable pad ▪ bedpan or bedside commode ▪ toilet
paper ▪ disposal plastic bag ▪ pH-balanced cleaner4 or soap
and water ▪ disposable cloth4 or washcloth ▪ water-soluble
lubricant ▪ washcloth ▪ bath blanket ▪ Optional: lift sheet,
lift equipment,4 gown, mask with face shield, mask, goggles,
lidocaine gel.
Implementation
■ Verify the practitioner’s order.
■ Gather the appropriate equipment.
■ Perform hand hygiene.5,6,7,8,9,10
■ Confirm the patient’s identity using at least two patient
identifiers.11
■ Provide privacy.12,13,14,15
■ Explain the procedure to the patient, including adverse
effects, expected outcomes, and complications, to enhance
cooperation and to allow the patient to provide a valid and
informed consent to the procedure.1,2 Take the patient’s
religious and cultural beliefs into consideration.1,14
■ Inform the patient that a chaperone may be present
during the procedure if the patient wishes.16
■ Offer the patient the opportunity to empty the bladder
before the procedure to promote comfort.16
■ Raise the patient’s bed to waist level when providing care
to prevent caregiver back strain.17
■ Obtain vital signs for baseline comparison, because anal
stimulation may cause a vagal response, and in patients
with spinal cord injury, autonomic dysreflexia may occur. If
digital fecal impaction removal is routine and well-tolerated
by the patient, obtaining vital signs may not be necessary.1
■ Perform a complete GI assessment.
■ Put on gloves and, as needed, other protective equipment
to comply with standard precautions.18,19,20
■ Assist the patient to a Sims’ position (side-lying with the
upper leg flexed over the lower leg).16 Alternatively, position
the patient in a Sims’ position using a lift-sheet, lift
equipment, or other patient positioning aid to prevent
friction and shear injuries of the patient’s skin and caregiver
injury.4
■ Place a fluid-impermeable pad under the patient’s
buttocks to prevent soiling the bed linens.16
■ Cover the patient with a blanket, exposing only the rectal
area, to provide privacy and warmth, and to maintain the
patient’s dignity.2
■ Inspect the perineal and perianal area for rectal prolapse,
hemorrhoids, anal skin tags, wounds, discharge, anal
lesions, infestations, and skin conditions. Report
abnormalities to the patient’s practitioner.16
■ Moisten an gloved index finger with water-soluble
lubricant to reduce friction during insertion, avoiding injury
to sensitive tissue.16
■ Inform the patient you are about to perform the
procedure.16 Instruct the patient to breathe deeply to
promote relaxation.
■ Gently insert your lubricated index finger beyond the anal
sphincter into the rectum. Assess the fecal material by
feeling for stool type (hard individual pieces, a large mass,
or soft stool).16 Rotate your finger gently around the stool
and work the stool downward close to the anus for removal.
If the patient experiences discomfort, stop the procedure if
necessary, and administer lidocaine gel, as ordered,
following safe medication administration practices. Wait for
the lidocaine to become effective before continuing with the
procedure.16
■ Remove feces slowly with the gloved finger in a hooked or
semi-hooked position to reduce trauma to the rectal
mucosa.16 Remove a solid mass one lump at a time; for a
semi-solid mass of feces, push your gloved finger in the
middle of the mass and divide it, then remove small
amounts of feces in sections.16
■ Monitor the patient closely throughout the procedure.
NURSING ALERT If the patient experiences pain, nausea, rectal
bleeding, change in pulse rate or skin color, diaphoresis, or syncope,
stop the procedure immediately and notify the practitioner.
■ Observe the characteristics of the feces and dispose of it
in the toilet. If the toilet isn’t available or convenient,
discard it in an appropriate receptacle.16
■ Remove and discard your gloves.18
■ Perform hand hygiene.5,6,7,8,9,10
■ Put on gloves to comply with standard precautions.18,19,20
■ Wipe residual water-soluble lubricant from the anal
area.16
■ If necessary, clean the perianal area with a pH-balanced
cleanser and disposable cloth (if available), because
traditional soap and water and washcloths increase the risk
of tissue injury.4 Alternatively, use soap and water and a
washcloth to clean the perianal area. Gently dry the area to
prevent moisture-associated skin damage.4
■ Assist the patient with repositioning, as needed.
Alternatively, reposition the patient, as needed using an
appropriate positioning aid.
■ Remove and discard your gloves.
■ Perform hand hygiene.5,6,7,8,9,10
■ Obtain the patient’s vital signs, as needed, and compare
them to baseline to evaluate the patient’s tolerance of the
procedure. Notify the practitioner or rapid response team if
signs of autonomic dysreflexia occur.16
■ Perform hand hygiene.5,6,7,8,9,10
■ Put on gloves.18,19
■ Offer the patient an opportunity for toileting, if necessary
and appropriate, because digital removal of a fecal
impaction may
stimulate peristalsis, encouraging
defecation.16 If necessary, position the bedpan under the
patient and assist the patient with use as needed, and then
lower the bed to the lowest position to prevent falls and
maintain patient safety.21 If the patient is able to use a
commode, return the bed to the lowest position, and then
assist the patient to the commode, as necessary. For an
ambulatory patient, return the bed to the lowest position,
and then assist the patient to the toilet.
■ Discard used supplies in appropriate receptacles.
■ Clean, disinfect, and store the bedpan or commode, if
used.22,23
■ Remove and discard your gloves, and other personal
protective equipment, if worn.18
■ Perform hand hygiene.5,6,7,8,9,10
■ Report any abnormalities, adverse effects, or other
concerns related to the procedure to the wound, ostomy,
and continence nurse or the patient’s practitioner, as
appropriate.16
■ Document the procedure.24,25,26,27
Special considerations
■ The most important aspect of care is preventing
recurrence of elimination problems.
Complications
Digital removal of fecal impaction can stimulate the vagus
nerve and may decrease heart rate and cause syncope.
Autonomic dysreflexia may occur in the patient with spinal
cord injury. Potential damage to the mucous membrane
lining of the bowel, which increases the risk of bleeding,
inflammation, and infection, may also occur.
Documentation
Record the time and date of the procedure, the patient’s
response, and stool color, consistency, and any
abnormalities. Note any complications, the interventions
taken, and the patient’s response to those interventions.
Document any patient teaching performed and the patient’s
understanding of the teaching.
REFERENCES
1 Ness, W. (2013). Digital removal of faeces. Nursing Times, 109 (17/18), 18–
20.
2 Jayasekara, R. (2015). Feces: Digital removal. South Australia: Joanna Briggs
Institute.
3 Royal College of Nursing. (2012). Management of lower bowel dysfunction,
including DRE and DRF: A guidance for nurses. London: Royal College of
Nursing.
4 Wound Ostomy and Continence Nurses Society (WOCN). (2016). Guideline for
prevention and management of pressure ulcers (injuries): WOCN clinical
practice guideline series 2. Mount Laurel, NJ; Wound Ostomy and Continence
Nurses Society.
5 The Joint Commission. (2019). Standard NPSG.07.01.01. Comprehensive
accreditation manual for hospitals. Oakbrook Terrace, IL: The Joint
Commission. (Level VII)
6 Centers for Disease Control and Prevention. (2002). Guideline for hand
hygiene in health-care settings: Recommendations of the Healthcare Infection
Control Practices Advisory Committee and the HICPAC/SHEA/APIC/IDSA Hand
Hygiene Task Force. MMWR Recommendations and Reports, 51(RR-16), 1–45.
Accessed via the Web at https://www.cdc.gov/mmwr/pdf/rr/rr5116.pdf (Level
II)
7 World Health Organization. (2009). “WHO guidelines on hand hygiene in
health care: First global patient safety challenge, clean care is safer care”
[Online]. Accessed via the Web at
http://apps.who.int/iris/bitstream/10665/44102/1/9789241597906_eng.pdf
(Level IV)
8 Centers for Medicare and Medicaid Services, Department of Health and
Human Services. (2015). Condition of participation: Infection control. 42 C.F.R.
§ 482.42.
9 Accreditation Association for Hospitals and Health Systems. (2017). Standard
07.01.21. Healthcare Facilities Accreditation Program: Accreditation
requirements for acute care hospitals. Chicago, IL: Accreditation Association
for Hospitals and Health Systems. (Level VII)
10 DNV GL-Healthcare USA, Inc. (2016). IC.1 .SR.1 . NIAHO® accreditation
requirements: Interpretive guidelines & surveyor guidance (version 11).
Milford, OH: DNV GL-Healthcare USA, Inc. (Level VII)
11 The Joint Commission. (2019). Standard NPSG.01.01.01. Comprehensive
accreditation manual for hospitals. Oakbrook Terrace, IL: The Joint
Commission. (Level VII)
12 Accreditation Association for Hospitals and Health Systems. (2017). Standard
15.01.16. Healthcare Facilities Accreditation Program: Accreditation
requirements for acute care hospitals. Chicago, IL: Accreditation Association
for Hospitals and Health Systems. (Level VII)
13 Centers for Medicare and Medicaid Services, Department of Health and
Human Services. (2015). Condition of participation: Patient’s rights. 42 C.F.R.
§ 482.13(c)(1).
14 The Joint Commission. (2019). Standard RI.01.01.01. Comprehensive
accreditation manual for hospitals. Oakbrook Terrace, IL: The Joint
Commission. (Level VII)
15 DNV GL-Healthcare USA, Inc. (2016). PR.1.SR.5 . NIAHO® accreditation
requirements: Interpretive guidelines & surveyor guidance (version 11).
Milford, OH: DNV GL-Healthcare USA, Inc. (Level VII)
16 Trowbridge, K., & Roe, C. (2014). Digital removal of feces (neurogenic bowel
or spinal cord injury): Community setting. South Australia: Joanna Briggs
Institute.
17 Waters, T. R., et al. (2009). “Safe patient handling training for schools of
nursing” [Online]. Accessed via the Web at
http://www.cdc.gov/niosh/docs/2009-127/pdfs/2009-127.pdf (Level VII)
18 Siegel, J. D ., et al. (2007, revised 2017). “2007 guideline for isolation
precautions: Preventing transmission of infectious agents in healthcare
settings” [Online]. Accessed via the Web at
http://www.cdc.gov/hicpac/pdf/isolation/Isolation2007.pdf (Level II)
19 Accreditation Association for Hospitals and Health Systems. (2017). Standard
07.01.10. Healthcare Facilities Accreditation Program: Accreditation
requirements for acute care hospitals. Chicago, IL: Accreditation Association
for Hospitals and Health Systems. (Level VII)
20 DNV GL-Healthcare USA, Inc. (2016). IC.1 .SR.2 . NIAHO® accreditation
requirements: Interpretive guidelines & surveyor guidance (version 11).
Milford, OH: DNV GL-Healthcare USA, Inc. (Level VII)
21 Ganz, D. A., et al. (2013). Preventing falls in hospitals: A toolkit for improving
quality of care (AHRQ Publication No. 13-0015-EF). Rockville, MD: Agency for
Healthcare Research and Quality. Accessed via the Web at
http://www.ahrq.gov/sites/default/files/publications/files/fallpxtoolkit.pdf
(Level VII)
22 Rutala, W. A., et al. (2008, revised 2017). “Guideline for disinfection and
sterilization in healthcare facilities, 2008” [Online]. Accessed via the Web at
http://www.cdc.gov/hicpac/pdf/guidelines/Disinfection_Nov_2008.pdf (Level I)
23 Accreditation Association for Hospitals and Health Systems. (2017). Standard
07.02.03. Healthcare Facilities Accreditation Program: Accreditation
requirements for acute care hospitals. Chicago, IL: Accreditation Association
for Hospitals and Health Systems. (Level VII)
24 The Joint Commission. (2019). Standard RC.01.03 .01. Comprehensive
accreditation manual for hospitals. Oakbrook Terrace, IL: The Joint
Commission. (Level VII)
25 Centers for Medicare and Medicaid Services, Department of Health and
Human Services. (2015). Condition of participation: Medical record services.
42 C.F.R. § 482.24(b).
26 Accreditation Association for Hospitals and Health Systems. (2017). Standard
10.00 .03. Healthcare Facilities Accreditation Program: Accreditation
requirements for acute care hospitals. Chicago, IL: Accreditation Association
for Hospitals and Health Systems. (Level VII)
27 DNV GL-Healthcare USA, Inc. (2016). MR.2 .SR.1 . NIAHO® accreditation
requirements: Interpretive guidelines & surveyor guidance (version 11).
Milford, OH: DNV GL-Healthcare USA, Inc. (Level VII)
FECAL OCCULT BLOOD TESTS
Fecal occult blood tests are valuable for determining the
presence of GI bleeding and for distinguishing between true
melena and melena-like stools. (Certain medications, such
as iron supplements and bismuth compounds, can darken
stools so that they resemble melena.)
These tests are particularly important for early detection
of colorectal cancer because 80% of patients with this
disorder test positive. However, a single positive test result
doesn’t confirm GI bleeding or indicate colorectal cancer. To
confirm a positive result, the test must be repeated at least
three times while the patient follows a special diet,
according to the manufacturer’s recommendations for the
particular occult blood test. Even then, a confirmed positive
test doesn’t necessarily indicate colorectal cancer; GI
bleeding can also result from many causes other than
cancer, such as ulcers, colon polyps, and diverticula.
However, a positive result does indicate the need for further
diagnostic studies.
Fecal occult blood tests are easily performed on collected
specimens or smears from a digital rectal examination. The
guaiac-based Hemoccult® tests, which include Hemoccult
SENSA® and Hemoccult II®, are commonly used; of the
two, Hemoccult SENSA® has greater sensitivity for cancer
and advanced adenomas. Both tests produce a blue reaction
in a fecal smear if occult blood loss exceeds 2 mL in 24
hours.
A newer test, the fecal immunochemical test (FIT), which
includes InSure FIT, detects human globin, a protein that,
along with heme, constitutes human hemoglobin;1 this
makes the FIT more specific for human blood than such
guaiac-based tests as the Hemoccult SENSA. The FIT is also
more specific for lower GI bleeding, which makes it more
specific for detecting colorectal cancer. Some FITs also
require fewer samples and less direct handling of stool.
Equipment
Gloves.
For a guaiac-based slide test
Guaiac test slide with quality-control monitors ▪ guaiac
developing solution ▪ specimen applicator sticks.
For a FIT
FIT kit with long-handled brushes and test card ▪ label ▪
laboratory transport bag.
Preparation of equipment
Always check the condition and expiration dates of the
slides and developing solution before use. Discard any
damaged, discolored, or expired products. Hemoccult
SENSA test slides contain guaiac paper; keep the cover flap
of the slide sealed until ready to use.
Implementation
■ Verify the practitioner’s order.
■ Gather and prepare the appropriate equipment.
■ Perform hand hygiene.2,3,4,5,6,7
■ Confirm the patient’s identity using at least two patient
identifiers.8
■ Provide privacy.9,10,11,12
■ Explain the procedure to the patient.
■ Check the patient’s history for medications and
conditions that may interfere with the test.
PATIENT TEACHING
Home tests for fecal occult blood
Although most fecal occult blood tests require the patient to collect a
specimen of stool and to smear it on a slide, the ColoCARE test doesn’t,
making the procedure safer and simpler.22
If the patient will be performing the ColoCARE test at home, tell the patient
to avoid red meat and vitamin C supplements for 2 days beforehand. The
patient should check with the practitioner about discontinuing any
medications before the test. Drugs that may interfere with test results
include aspirin, indomethacin, corticosteroids, reserpine, dietary
supplements, anticancer drugs, and anticoagulants. The patient should also
talk to the practitioner about medical conditions to determine the timing of
the test. For example, the patient who has bleeding hemorrhoids, peptic
ulcers, or gastritis shouldn’t take the test. In addition, women who are at or
near the time of menstruation shouldn’t take the test.
To perform the test, tell the patient to follow these steps:
■ Flush the toilet twice just before performing the test to remove any toilet-
cleaning chemicals from the tank.
■ Defecate into the toilet, but don’t throw toilet paper into the bowl.
■ Within 5 minutes, remove the test pad from its pouch and float it printed
side up on the water.
■ Watch the pad for 15 to 30 seconds for any evidence of blue or green color
changes
■ Record the result on the reply pad.22
■ Emphasize that the patient should perform this test with three consecutive
bowel movements and then send the completed card to the practitioner.
However, inform the patient that the practitioner should be called
immediately if the patient notes a positive color change in the first test.
■ Put on gloves to comply with standard precautions.13,14,15
■ Collect a stool specimen. (See the “Stool specimen
collection” procedure, page 717.) If collecting a specimen
for FIT testing from the toilet, flush the toilet before the
patient defecates and instruct the patient to avoid placing
used toilet paper in the toilet bowl to ensure accurate test
results.1
To perform a guaiac-based slide test
■ Open the flap on the slide packet.16
■ Use a specimen applicator stick to apply a thin smear of
the stool specimen to the guaiac-impregnated filter paper
exposed in box A. Alternatively, after performing a digital
rectal examination, wipe the finger you used for the
examination on a square of the filter paper.16
■ Apply a second smear from another part of the specimen
to the filter paper exposed in box B, because some parts of
the specimen may not contain blood.16
■ Allow the specimen to dry for 3 to 5 minutes.16
■ Open the flap on the reverse side of the slide package.16
■ Place two drops of guaiac developing solution on the
paper over each smear.16
■ Wait for a reaction; a blue reaction will appear in 30 to 60
seconds if the test is positive. Any trace of blue on or at the
edge of the smear is positive for occult blood and can be
recorded before the end of 60 seconds. Absence of blue at
the end of 60 seconds is negative for occult blood. (Wait the
full 60 seconds before recording a negative result.)16
■ Interpret the results.
NURSING ALERT This test is visually read and requires color
differentiation. You shouldn’t interpret it if you have a blue color
deficiency (color blindness).16
■ Perform a quality-control test by applying 1 drop of
developer between the positive and negative quality-control
areas. Read the quality-control test results within 10
seconds. If the slide and developer are functioning properly,
blue will appear in the positive area and no blue will appear
in the negative area. If the quality-control test fails to react
as expected after application of the developer, the patient’s
test results are invalid and shouldn’t be documented.
Repeat the procedure using new equipment.16
■ Record the results.
■ Discard the slide package in an appropriate receptacle.17
To perform a FIT
■ Open the flap of the test card.1
■ Remove one of the long-handled brushes from the kit.
■ Gently brush the surface of the stool with the brush and
then rinse the brush in the toilet water surrounding the
stool.1
■ Dab the brush onto the test card and then close the flap.1
■ Label the specimen in the presence of the patient to
prevent mislabeling.8
■ Place the test card in the laboratory biohazard transport
bag and send it to the laboratory.17
Completing the procedure
■ Remove and discard your gloves.13,17
■ Perform hand hygiene.2,3,4,5,6,7
■ Document the procedure.18,19,20,21
Special considerations
■ Test stool specimens as soon as possible after collection,
and make sure they aren’t contaminated with urine, soap
solution, iodine, or toilet tissue.
■ Test samples from several different portions of the same
specimen, because occult blood from the upper GI tract isn’t
always evenly dispersed throughout the formed stool;
likewise, blood from colorectal bleeding may occur mostly
on the outer stool surface.
■ Don’t exchange developers with different manufacturers
or brands.
■ Don’t collect specimens during or until 3 days after a
female patient’s menstrual period to avoid a false-positive
test resulting from contamination of the specimen.1
■ Be aware that ingestion of 2 to 5 mL of blood (such as
from bleeding gums), active bleeding from hemorrhoids, or
hematuria can produce false-positive results.1
■ If repeated testing is necessary after a positive screening
test, explain the test to the patient. Instruct the patient to
maintain a high-fiber diet and to refrain from eating red
meat, poultry, fish, turnips, and horseradish for 48 to 72
hours before the test as well as throughout the collection
period, because these substances can alter test results.16
■ As ordered, have the patient discontinue the use of iron
preparations, bromides, iodides, rauwolfia derivatives,
indomethacin, colchicine, salicylates, potassium, bismuth
compounds, steroids, and ascorbic acid for 48 to 72 hours
before the test as well as during it to ensure accurate test
results and to avoid the possible bleeding that some of
these compounds can cause.16
■ Guaiac slides and developer are ready for use as
packaged but must be stored and used appropriately
according to the manufacturer’s instructions. Store products
at a controlled room temperature of 59° to 86°F (15° to
30°C).16 Don’t use them past the expiration date stamped
on each slide and developer bottle. Protect them from heat,
light, volatile chemicals, and refrigeration temperatures.16
Watch for signs of deterioration, including discoloration of
the normally off-white guaiac paper and failure of the
control system to react as expected (subsequent test results
should be regarded as invalid).
■ Note that the developer is an irritant; avoid contact with
the skin and eyes. If contact should occur, rinse promptly
with water and consult a practitioner.16
Patient teaching
If the patient will be using the Hemoccult slide packet or the
FIT at home, advise the patient to complete the label on the
slide packet before specimen collection. If the patient will be
using a ColoCARE test packet, inform the patient that this
test is a preliminary screen for occult blood in the stool. The
patient will not have to obtain a stool specimen to perform
the test but that the instructions should be followed
carefully. (See Home tests for fecal occult blood.)
Documentation
Record the time and date of the test, the name and title of
the person interpreting the test, the test result, and any
unusual characteristics of the stool tested. Report positive
results to the practitioner. Document any patient teaching
provided.
REFERENCES
1 Enterix, Inc. (n.d .) . “Using the InSure® FITTM patient collection kit and test
card” [Online]. Accessed via the Web at
http://www.insuretest.com/patient/how-to-use .php
2 The Joint Commission. (2019). Standard NPSG.07.01.01. Comprehensive
accreditation manual for hospitals. Oakbrook Terrace, IL: The Joint
Commission. (Level VII)
3 Centers for Disease Control and Prevention. (2002). Guideline for hand
hygiene in health-care settings: Recommendations of the Healthcare Infection
Control Practices Advisory Committee and the HICPAC/SHEA/APIC/IDSA Hand
Hygiene Task Force. MMWR Recommendations and Reports, 51(RR-16), 1–45.
Accessed via the Web at https://www.cdc.gov/mmwr/pdf/rr/rr5116.pdf (Level
II)
4 World Health Organization. (2009). “WHO guidelines on hand hygiene in
health care: First global patient safety challenge, clean care is safer care”
[Online]. Accessed via the Web at
http://apps.who.int/iris/bitstream/10665/44102/1/9789241597906_eng.pdf
(Level IV)
5 Centers for Medicare and Medicaid Services, Department of Health and
Human Services. (2015). Condition of participation: Infection control. 42 C.F.R.
§ 482.42.
6 Accreditation Association for Hospitals and Health Systems. (2017). Standard
07.01.21. Healthcare Facilities Accreditation Program: Accreditation
requirements for acute care hospitals. Chicago, IL: Accreditation Association
for Hospitals and Health Systems. (Level VII)
7 DNV GL-Healthcare USA, Inc. (2016). IC.1.SR.1 . NIAHO® accreditation
requirements: Interpretive guidelines & surveyor guidance (version 11).
Milford, OH: DNV GL-Healthcare USA, Inc. (Level VII)
8 The Joint Commission. (2019). Standard NPSG.01.01.01. Comprehensive
accreditation manual for hospitals. Oakbrook Terrace, IL: The Joint
Commission. (Level VII)
9 Accreditation Association for Hospitals and Health Systems. (2017). Standard
15.01.16. Healthcare Facilities Accreditation Program: Accreditation
requirements for acute care hospitals. Chicago, IL: Accreditation Association
for Hospitals and Health Systems. (Level VII)
10 Centers for Medicare and Medicaid Services, Department of Health and
Human Services. (2015). Condition of participation: Patient’s rights. 42 C.F.R.
§ 482.13(c)(1).
11 The Joint Commission. (2019). Standard RI.01.01.01. Comprehensive
accreditation manual for hospitals. Oakbrook Terrace, IL: The Joint
Commission. (Level VII)
12 DNV GL-Healthcare USA, Inc. (2016). PR.1.SR.5 . NIAHO® accreditation
requirements: Interpretive guidelines & surveyor guidance (version 11).
Milford, OH: DNV GL-Healthcare USA, Inc. (Level VII)
13 Siegel, J. D ., et al. (2007, revised 2017). “2007 guideline for isolation
precautions: Preventing transmission of infectious agents in healthcare
settings” [Online]. Accessed via the Web at
http://www.cdc.gov/hicpac/pdf/isolation/Isolation2007.pdf (Level II)
14 Accreditation Association for Hospitals and Health Systems. (2017). Standard
07.01.10. Healthcare Facilities Accreditation Program: Accreditation
requirements for acute care hospitals. Chicago, IL: Accreditation Association
for Hospitals and Health Systems. (Level VII)
15 DNV GL-Healthcare USA, Inc. (2016). IC.1 .SR.2 . NIAHO® accreditation
requirements: Interpretive guidelines & surveyor guidance (version 11).
Milford, OH: DNV GL-Healthcare USA, Inc. (Level VII)
16 Beckman Coulter, Inc. (2015). “Hemoccult Sensa: Product instructions”
[Online]. Accessed via the Web at
https://www.beckmancoulter.com/wsrportal/page/techdocSearch?
sortColumn=title&sortOrder=asc&startIndex=1&searchByURL=no&searchTyp
e=searchByProduct&marketSegmentId=1000356&productLineId=1000211&
productSeriesId=1002228&productId=1000619&documentCategoryId=4&lan
guageCode=en&pageSize=10&downloadTechDocFileFormat=exe&activeCate
goriesFlag=false
17 Occupational Safety and Health Administration. (n.d .). “Bloodborne
pathogens, standard number 1910.1030” [Online]. Accessed via the Web at
https://www.osha.gov/pls/oshaweb/owadisp.show_document?
p_id=10051&p_table=STANDARDS (Level VII)
18 The Joint Commission. (2019). Standard RC.01.03 .01. Comprehensive
accreditation manual for hospitals. Oakbrook Terrace, IL: The Joint
Commission. (Level VII)
19 Centers for Medicare and Medicaid Services, Department of Health and
Human Services. (2015). Condition of participation: Medical record services.
42 C.F.R. § 482.24(b).
20 Accreditation Association for Hospitals and Health Systems. (2017). Standard
10.00 .03. Healthcare Facilities Accreditation Program: Accreditation
requirements for acute care hospitals. Chicago, IL: Accreditation Association
for Hospitals and Health Systems. (Level VII)
21 DNV GL-Healthcare USA, Inc. (2016). MR.2 .SR.1 . NIAHO® accreditation
requirements: Interpretive guidelines & surveyor guidance (version 11).
Milford, OH: DNV GL-Healthcare USA, Inc. (Level VII)
22 Helena Laboratories. (n.d.) . “Your guide to occult blood testing with
ColoCARE®” [Online]. Accessed via the Web at
http://www.helena.com/Literature/520Rev9.pdf
FEEDING
Various disabilities and conditions may prevent a patient
from
self-feeding, including
cognitive
deficits,
neuromuscular disease, cancer, obstructive lung disease,
and traumatic injury. A patient who can’t self-feed is
susceptible to malnutrition. Also, a patient’s condition or its
associated treatment may result in pain, nausea,
depression, and anorexia, interfering with the patient’s
desire to eat. Meeting such a patient’s nutritional needs
requires determining food preferences in a friendly,
unhurried manner; encouraging self-feeding to promote
independence and dignity; and documenting intake and
output.
Equipment
Meal tray ▪ overbed table ▪ fluid-impermeable pad or
towels ▪ flexible straws ▪ basin of water ▪ soap ▪ washcloth
▪ hand towel ▪ hospital-approved disinfectant ▪ spoon or
feeding syringe ▪ oral care supplies ▪ Optional: assistive
feeding devices, prescribed pain medication, clean linens,
graduated containers, chair.
Implementation
■ Verify the practitioner’s order for diet
■ Collaborate with a speech pathologist, as indicated, to
assess the patient’s swallowing and subsequent risk of
aspiration. Follow recommendations prescribed by the
speech pathologist to reduce the patient’s risk of aspiration.
■ Review the patient’s medical record for conditions that
may affect the patient’s ability to self-feed. Note any
feeding problems and techniques that were recommended
by the speech pathologist to remedy those problems.
Review the patient’s medications for adverse effects that
might interfere with appetite.1
■ Gather the appropriate equipment.
■ Perform hand hygiene.2,3,4,5,6,7
■ Confirm the patient’s identity using at least two patient
identifiers.8
■ Provide privacy.9,10,11,12
■ Assess the patient’s neurologic status, dentition, and
functional status to determine whether oral feeding is
appropriate.
■ Collaborate with the patient and family to determine food
preferences (including ethnic foods). Ask about the normal
consistency of foods as well as the timing and frequency of
the meal pattern.1
■ Perform a comprehensive pain assessment using
techniques appropriate for the patient’s age, condition, and
ability to understand.13
■ Administer pain medication, as needed and prescribed,
following safe medication administration practices.14,15,16,17
■ Explain the procedure to the patient to enhance
cooperation.
■ Because many adults consider being fed demeaning,
allow the patient some control over mealtime, such as
letting the patient set the pace of the meal or deciding the
order in which the patient eats various foods.
■ Position the patient with the head of the bed elevated 30
to 45 degrees, unless contraindicated, to ease swallowing
and reduce the risk of aspiration.18
■ If the patient has a tracheostomy, follow the practitioner’s
order and your facility’s guidelines for oral feeding,
including suctioning the patient’s tracheostomy tube prior to
eating (if necessary), maintaining cuff pressure, applying a
one-way valve, positioning the patient, and applying
aspiration precautions.19
NURSING ALERT In patients with prolonged critical illness or
anticipated impaired swallowing, a fiber-optic evaluation of
swallowing function is recommended before an oral feeding trial.20
EQUIPMENT
Using assistive feeding devices
Various feeding devices can help the patient who has limited arm mobility,
grasp, range of motion (ROM), or coordination. Before introducing the patient
to an assistive feeding device, assess the patient’s ability to master it. Don’t
introduce a device the patient can’t manage. If the patient’s condition is
progressively disabling, encourage the use of the device only until mastery of
it falters.
Introduce the assistive device before mealtime, with the patient seated in a
natural position. Explain its purpose, show the patient how to use it, and
encourage practice. After meals, wash the device thoroughly and store it in
the patient’s bedside stand. Document the patient’s progress and share it
with staff and family members to help reinforce the patient’s independence.
Plate guard
This device blocks food from spilling off the plate. Attach the guard to the
side of the plate opposite the hand the patient uses to self-feed. Guiding the
patient’s hand, show the patient how to push food against the guard to
secure it on the utensil. Then have the patient try again with food of a
different consistency. When the patient tires, feed the patient the rest of the
meal. At subsequent meals, encourage the patient to self-feed for
progressively longer periods until the patient can self-feed an entire meal.
Swivel spoon
This utensil helps the patient with limited ROM in the forearm and will fit in
universal cuffs.
Universal cuffs
Universal cuffs are flexible bands that help the patient with flail hands or
diminished grasp. Each cuff contains a slot that holds a fork or spoon. Attach
the cuff to the hand the patient uses to self-feed. Then place the fork or
spoon in the cuff slot. Bend the utensil to facilitate feeding.
Long-handled utensils
These utensils have jointed stems to help the patient with limited ROM in the
elbow and shoulder.
Utensils with built-up handles
Utensils with built up handles can help the patient with diminished grasp.
They can be purchased or can be improvised by wrapping tape around the
utensil handles.
Spouted cups
Spouted cups have a spout that can be used to prevent spills and burns for
patients experiencing tremors or who have unsteady arms and hands.
Slotted cups
Slotted (or nosey) cups have a cutout for the nose to allow the patient to
drink without bending the neck or tilting the head. Some have handles on
both sides to ensure a firm grasp.
■ Before the meal tray arrives, give the patient soap, a
basin of water or a wet washcloth, and a hand towel to
clean the hands. If necessary, wash the patient’s hands.
■ Clean the overbed table by wiping it with a hospital-
approved disinfectant.21,22
■ Confirm that the correct tray has been delivered to the
correct patient.
■ Check the tray to make sure it contains foods and fluids
appropriate for the patient’s condition.
■ Encourage the patient to self-feed herself if able. If the
patient is restricted to the prone or the supine position but
can use arms and hands, encourage the patient to try foods
that can be picked up, such as sandwiches. If the patient
can assume the Fowler or semi-Fowler position but has
limited use of arms or hands, teach the patient how to use
assistive feeding devices. (See Using assistive feeding
devices.)
■ If necessary, tuck a napkin or towel under the chin to
protect the gown from spills. Use a fluid-impermeable pad or
towel to protect bed linens.
■ Position a chair next to the patient’s bed so you can sit
comfortably if you need to feed the patient.
■ Face the patient during feeding, make eye contact, and
use a gentle tone of voice.
■ Set up the patient’s tray, remove the plate from the tray
warmer, and discard all plastic wrappings. Then cut the food
into bite-sized pieces (as shown on next page, top left).
Season food according to the patient’s request, as
appropriate.
■ To help a blind or visually impaired patient feed, describe
the placement of various foods on the plate in relation to
the hours on a clock face. Maintain consistent placement for
subsequent meals.
■ Ask the patient which food the patient prefers to eat first
to promote a sense of control over the meal. Some patients
prefer to eat one food at a time; others prefer to alternate
foods.
■ Provide verbal encouragement to participate in eating by
talking about the food’s taste and smell and providing
verbal prompts to chew and swallow.
■ Ask the patient to indicate when ready for another
mouthful. Pause between courses and whenever the patient
wants to rest. During the meal, wipe the patient’s mouth
and chin, as needed.
■ If the patient is at risk for aspiration, monitor closely.
■ When the patient finishes eating, remove the tray. If
necessary, clean up spills and change the bed linens.
■ Provide oral care. (See the “Oral care” procedure, page
552.)
■ Perform hand hygiene.2,3,4,5,6,7
■ Document oral intake, as ordered. (See Recording fluid
intake and output.)
■ Document the procedure.23,24,25,26
Special considerations
■ A swallow evaluation is recommended before starting oral
feeding in patients who require prolonged endotracheal
intubation.18
■ If the patient is restricted to the supine position, provide
foods that can be chewed easily; feed liquids carefully, and
only after the patient has swallowed any food in the mouth,
to reduce the risk of aspiration.
■ Establish a pattern for feeding the patient, and share this
information with the other staff members so the patient
doesn’t need to repeatedly instruct staff members about
preferred feeding techniques.
■ If the patient and family are willing, suggest that family
members assist with feeding. Such assistance will make the
patient feel more comfortable at mealtimes and may ease
discharge planning.
Complications
Obstruction of the airway may lead to asphyxia, and
aspiration of food can potentially cause hospital-acquired
pneumonia. Undernutrition may occur in the patient with
feeding dependence or if the patient denies feeding
difficulties.
Documentation
Describe the feeding technique used in the nursing care
plan to ensure continuity of care. Record the amount of food
and fluid consumed; also note the fluids consumed on the
intake and output record, if required. Note which foods the
patient consistently fails to eat; then try to find the reason.
Record the patient’s level of independence. For a blind
patient, record the pattern of feeding in the nursing care
plan.
Recording fluid intake and output
Accurate intake and output records help evaluate a patient’s fluid and
electrolyte balance, suggest various diagnoses, and influence the choice of
fluid therapy. These records are mandatory for patients with burns, renal
failure, electrolyte imbalance, recent surgical procedures, heart failure, or
severe vomiting and diarrhea, and for patients receiving diuretics or
corticosteroids. Intake and output records are also significant in monitoring
patients with nasogastric (NG) tubes or drainage collection devices and for
those receiving IV therapy.
Fluid intake comprises all fluid entering the patient’s body, including
beverages, fluids contained in solid foods taken by mouth, and foods that
aren’t liquid at room temperature, such as flavored gelatin, custard, ice
cream, and some beverages. Additional intake includes GI instillations,
bladder irrigations, fluids ingested with medications, and IV fluids.
Fluid output consists of all fluid that leaves the patient’s body, including
urine, loose stools, vomitus, aspirated fluid loss, and drainage from surgical
drains, NG tubes, and chest tubes.
When recording fluid intake and output, enlist the patient’s help, if
possible. Record the amount in milliliters (mL). Measure; don’t estimate.
Monitor intake and output during each shift, and notify the practitioner if
amounts differ significantly over a 24-hour period. Document your findings in
the appropriate location; describe any fluid restrictions and the patient’s
compliance.
REFERENCES
1 Vitale, C. A., et al. (2009). Strategies for improving care for patients with
advanced dementia and eating problems: Optimizing care through physician
and speech pathologist collaboration. Annals of Long-Term Care, 17 (5), 32–39
Accessed via the Web at
http://www.managedhealthcareconnect.com/content/strategies-improving-
care-patients-with-advanced-dementia-and-eating-problems-full-title-bel
2 The Joint Commission. (2019). Standard NPSG.07.01.01. Comprehensive
accreditation manual for hospitals. Oakbrook Terrace, IL: The Joint
Commission. (Level VII)
3 Centers for Disease Control and Prevention. (2002). Guideline for hand
hygiene in health-care settings: Recommendations of the Healthcare Infection
Control Practices Advisory Committee and the HICPAC/SHEA/APIC/IDSA Hand
Hygiene Task Force. MMWR Recommendations and Reports, 51(RR-16), 1–45.
Accessed via the Web at https://www.cdc.gov/mmwr/pdf/rr/rr5116.pdf (Level
II)
4 World Health Organization. (2009). “WHO guidelines on hand hygiene in
health care: First global patient safety challenge, clean care is safer care”
[Online]. Accessed via the Web at
http://apps.who.int/iris/bitstream/10665/44102/1/9789241597906_eng.pdf
(Level IV)
5 Centers for Medicare and Medicaid Services, Department of Health and
Human Services. (2015). Condition of participation: Infection control. 42 C.F.R.
§ 482.42.
6 Accreditation Association for Hospitals and Health Systems. (2017). Standard
07.01.21. Healthcare Facilities Accreditation Program: Accreditation
requirements for acute care hospitals. Chicago, IL: Accreditation Association
for Hospitals and Health Systems. (Level VII)
7 DNV GL-Healthcare USA, Inc. (2016). IC.1.SR.1 . NIAHO® accreditation
requirements: Interpretive guidelines & surveyor guidance (version 11).
Milford, OH: DNV GL-Healthcare USA, Inc. (Level VII)
8 The Joint Commission. (2019). Standard NPSG.01.01.01. Comprehensive
accreditation manual for hospitals. Oakbrook Terrace, IL: The Joint
Commission. (Level VII)
9 The Joint Commission. (2019). Standard RI.01.01.01. Comprehensive
accreditation manual for hospitals. Oakbrook Terrace, IL: The Joint
Commission. (Level VII)
10 Centers for Medicare and Medicaid Services, Department of Health and
Human Services. (2015). Condition of participation: Patient’s rights. 42 C.F.R.
§ 482.13(c)(1).
11 Accreditation Association for Hospitals and Health Systems. (2017). Standard
15.01.16. Healthcare Facilities Accreditation Program: Accreditation
requirements for acute care hospitals. Chicago, IL: Accreditation Association
for Hospitals and Health Systems. (Level VII)
12 DNV GL-Healthcare USA, Inc. (2016). PR.1.SR.5 . NIAHO® accreditation
requirements: Interpretive guidelines & surveyor guidance (version 11).
Milford, OH: DNV GL-Healthcare USA, Inc. (Level VII)
13 The Joint Commission. (2017). Standard PC.01.02.07. Comprehensive
accreditation manual for hospitals. Oakbrook Terrace, IL: The Joint
Commission. (Level VII)
14 Centers for Medicare and Medicaid Services, Department of Health and
Human Services. (2015). Condition of participation: Nursing services. 42
C.F.R. § 482.23(c).
15 Accreditation Association for Hospitals and Health Systems. (2017). Standard
16.01.03. Healthcare Facilities Accreditation Program: Accreditation
requirements for acute care hospitals. Chicago, IL: Accreditation Association
for Hospitals and Health Systems. (Level VII)
16 The Joint Commission. (2019). Standard MM.06.01.01. Comprehensive
accreditation manual for hospitals. Oakbrook Terrace, IL: The Joint
Commission. (Level VII)
17 DNV GL-Healthcare USA, Inc. (2016). MM.1 .SR.2. NIAHO® accreditation
requirements: Interpretive guidelines & surveyor guidance (version 11).
Milford, OH: DNV GL-Healthcare USA, Inc. (Level VII)
18 American Association of Critical-Care Nurses (AACN). (2016). “A ACN practice
alert: Prevention of aspiration in adults” [Online]. Accessed via the Web at
https://www.aacn.org/clinical-resources/practice-alerts/prevention-of-
aspiration (Level VII)
19 John Hopkins Medicine. (n.d.) . “Living with a tracheostomy: Eating with a
tracheostomy” [Online]. Accessed via the Web at
http://www.hopkinsmedicine.org/tracheostomy/living/eating.html
20 Hyzy, R. C. Complications of the endotracheal tube following initial
placement: Prevention and management in adult intensive care unit patients.
(2017). In: UpToDate, Manaker, S., & Finlay, G. (Eds.) . Retrieved from:
http://www.uptodate.com
21 Rutala, W. A., et al. (2008). “Guideline for disinfection and sterilization in
healthcare facilities, 2008” [Online]. Accessed via the Web at
http://www.cdc.gov/hicpac/pdf/guidelines/Disinfection_Nov_2008.pdf (Level I)
22 Accreditation Association for Hospitals and Health Systems. (2017). Standard
07.02.03. Healthcare Facilities Accreditation Program: Accreditation
requirements for acute care hospitals. Chicago, IL: Accreditation Association
for Hospitals and Health Systems. (Level VII)
23 The Joint Commission. (2019). Standard RC.01.03 .01. Comprehensive
accreditation manual for hospitals. Oakbrook Terrace, IL: The Joint
Commission. (Level VII)
24 Centers for Medicare and Medicaid Services, Department of Health and
Human Services. (2015). Condition of participation: Medical record services.
42 C.F.R. § 482.24(b).
25 Accreditation Association for Hospitals and Health Systems. (2017). Standard
10.00 .03. Healthcare Facilities Accreditation Program: Accreditation
requirements for acute care hospitals. Chicago, IL: Accreditation Association
for Hospitals and Health Systems. (Level VII)
26 DNV GL-Healthcare USA, Inc. (2016). MR.2 .SR.1 . NIAHO® accreditation
requirements: Interpretive guidelines & surveyor guidance (version 11).
Milford, OH: DNV GL-Healthcare USA, Inc. (Level VII)
FEEDING TUBE INSERTION AND REMOVAL
Inserting an enteral feeding tube nasally or orally into the
stomach or duodenum allows a patient to receive
nourishment if the patient is unable to do so orally. The
enteral feeding tube also permits supplemental feedings in
a patient who has very high nutritional requirements, such
as one with extensive burns. The preferred feeding tube
insertion route is nasal, but the oral route may be used for
patients with such conditions as a head injury, deviated
septum, or other nose injury. The tubes are intended for
short-term use in patients who are expected to require
enteral nutrition for up to 6 weeks.1
Duodenal feeding tubes are most appropriate for patients
with gastric outlet obstruction, severe gastroparesis, or a
known history of reflux and aspiration of stomach contents.1
Contraindications to enteral feeding tube insertion include
mechanical obstruction of the GI tract, uncorrectable
coagulopathy, and bowel ischemia.1 Traumatic injuries to
the head, neck, and face and recent transsphenoidal
surgery
may prevent
nasal insertion.1
Relative
contraindications to enteral feeding tube insertion include
recent GI bleeding, hemodynamic instability, ascites,
respiratory compromise, and certain anatomic anomalies.1
Enteral feeding tubes differ somewhat from standard
nasogastric tubes. Made of silicone or polyurethane, feeding
tubes have small diameters and great flexibility. These
features reduce oropharyngeal irritation, necrosis from
pressure on the tracheoesophageal wall, distal esophageal
irritation, and discomfort when swallowing. To facilitate
passage, some feeding tubes are weighted with tungsten,
and some need a guide wire to keep them from curling in
the back of the throat. These small-bore tubes usually have
radiopaque markings so that their position can be verified
by X-ray.
Equipment
For feeding tube insertion
Enteral feeding tube (#5 to #8 French, with or without a
guide wire) ▪ fluid-impermeable pad or towel ▪ gloves ▪
water-soluble lubricant ▪ securement device, tape, or
transparent semipermeable dressing ▪ enteral syringe ▪
indelible marker ▪ Optional: penlight cup of water, straw, pH
testing equipment, alcohol pad, tape, gown, mask with face
shield, mask, goggles, capnography equipment, enteral
feeding pump, prokinetic agent.
For feeding tube removal
Oral care supplies ▪ enteral syringe ▪ stethoscope ▪
disinfectant pad ▪ fluid-impermeable pad or towel ▪ gloves
▪ Optional: adhesive remover, gown, mask with face shield,
mask, goggles.
Preparation of equipment
For feeding tube insertion
Typically, the practitioner orders the smallest-bore tube that
will allow free passage of the liquid feeding formula. Read
the instructions on the tubing package carefully, because
tube characteristics vary according to the manufacturer.
(For example, some tubes have marks at the appropriate
lengths for gastric, duodenal, and jejunal insertion.)
Examine the tube to make sure it’s free from defects, such
as cracks or rough or sharp edges. Run water through the
tube to check for patency, activate the coating, and
facilitate removal of the guide wire.
Implementation
■ Verify the practitioner’s order.
■ Review the patient’s medical record for history of recent
facial injury or surgery, basilar skull fracture, or
transsphenoidal pituitary resection; prior nasal or upper GI
surgery; esophageal stent placement; or anatomic
conditions (such as deviated nasal septum or hiatal hernia)
that may contraindicate nasal insertion.2
■ If required in your facility, confirm that the practitioner
has obtained written informed consent and that the consent
form is in the patient’s medical record.2,3,4,5,6
■ Gather and prepare the necessary equipment.
■ Perform hand hygiene.7,8,9,10,11,12
■ Confirm the patient’s identity using at least two patient
identifiers.13
■ Provide privacy.14,15,16,17
■ Explain the procedure to the patient and family (if
appropriate) according to their individual communication
and learning needs to increase their understanding, allay
their fears, and enhance cooperation.18 Ask whether the
patient has a history of epistaxis or sinusitis. If so, ask
whether one naris is more susceptible.2
■ Agree on a signal that can be used if the patient wants
you to stop briefly during the procedure.
■ Raise the patient’s bed to waist level when providing care
to prevent caregiver back strain.19
■ Assess the patient’s GI status for baseline comparison.
Assess the patient’s risk of aspiration.1,20
■ Position the patient with the head of the bed elevated at
least 30 degrees to facilitate enteral feeding tube
advancement into the esophagus; if contraindicated,
consider the reverse Trendelenburg position.1
■ To enhance gastric motility and subsequently facilitate
passage of the tube distal to the pylorus, administer a
prokinetic agent, if prescribed, following safe medication
administration practices.2
■ Perform hand hygiene7,8,9,10,11,12 and put on gloves and,
as needed, other personal protective equipment to comply
with standard precautions.21,22
■ Assess the patient’s nares, if applicable, to determine the
best choice for insertion. Use a penlight to ease
visualization, as needed.
Inserting a feeding tube
■ Determine the insertion length of the tube to help ensure
gastric placement. Place the tube’s distal end at the tip of
the patient’s nose (or mouth for oral insertion) and then
extend the tube to the earlobe, down to the xiphoid process,
and then midway to the umbilicus.1 Note the corresponding
incremental marking on the tube, or if the tube doesn’t
contain incremental markings, mark the tube or note an
identifier at the intended exit point.2
■ Drape a fluid-impermeable pad across on the patient’s
chest to protect the gown and bed linens from soiling.2
Inserting the tube nasally
■ Lubricate the curved tip of the tube and the feeding tube
guide wire, if appropriate, with a small amount of water-
soluble lubricant to ease insertion and prevent tissue
injury.2
■ Instruct the patient, if able, to hold an emesis basin and
facial tissues in case they are needed.
■ To advance the enteral feeding tube, insert the curved,
lubricated tip into the more patent nostril and direct it along
the nasal passage.
■ Guide the tube at an angle parallel to the floor of the
nasal canal, advancing it gently downward through the
nasal passage toward the distal pharynx.2 Instruct the
patient to assume a chin-tuck position (unless
contraindicated).2 When the enteral feeding tube reaches
the oropharynx you’ll feel some resistance.
■ Unless contraindicated, instruct the patient to lower chin
to chest to close the trachea. Then give the patient a small
cup of water with a straw or ice chips. Direct the patient to
sip the water or suck on the ice and swallow frequently to
ease the tube’s passage. Advance the tube as the patient
swallows.
Inserting the tube orally
■ Lubricate the curved distal tip of the enteral feeding tube
and the tube guidewire, if appropriate, with a small amount
of water-soluble lubricant to ease insertion and prevent
tissue injury.2
■ Grasp the tube with the distal end pointing downward,
and carefully insert it into the patient’s oral cavity.
■ Guide the tube downward toward the patient’s
esophagus. Instruct the patient to assume a chin-tuck
position (unless contraindicated) to close the trachea and
open the esophagus.2
Positioning the tube
■ If you meet resistance, rotate the tube to guide it toward
the esophagus. If you continue to meet resistance, don’t
force the tube. Instead, stop the procedure and assess for
barriers to tube advancement.
■ As you advance the tube, monitor the patient for cues
(such as coughing and discomfort) that might indicate that
the tube entered the respiratory tract or kinked or coiled in
the oral cavity.2 Immediately stop the procedure and
remove the tube if you suspect respiratory intubation. Allow
the patient time to rest, and then resume the insertion
procedure, as indicated.
■ Continue advancing the enteral feeding tube until you
reach the predetermined length at the patient’s nostril or
lips.2
■ Use at least two bedside methods to determine enteral
feeding tube location during insertion.1,23 Watch for signs of
respiratory distress (such as coughing and dyspnea).1,23 Use
capnography equipment, if available, to detect carbon
dioxide in the tube, which indicates inadvertent tracheal
insertion.1,23 Measure the pH of tube aspirate if this is
performed in your facility. Fasting gastric pH is usually 5 or
less, even in patients receiving gastric acid inhibitors;
however, this method may not be reliable because gastric
pH has a high pH occasionally.1,23 Fluid aspirated from a
tube that has perforated the pleural space typically has a
pH of 7 or higher.1 Inspect the tube aspirate; fasting gastric
secretions commonly appear grassy green or brown or clear
and colorless.1,23 Aspirate from the pleural space typically
has a pale yellow, serous appearance.1
■ To advance the enteral feeding tube—especially a
tungsten-weighted tube—to the duodenum, position the
patient on the right side to use gravity to assist tube
passage through the pylorus. Move the tube forward 2′′ to 3′′
(5 cm to 7.6 cm) hourly. Observe for a change in aspirate
appearance as the tube progresses from the stomach to the
duodenum; use these findings to determine the appropriate
time to obtain an order for an X-ray to confirm placement.
Tube placement must be confirmed by X-ray before feeding
begins, because duodenal feeding can cause nausea and
vomiting if accidentally delivered to the stomach.1,23
■ Ensure that enteral feeding tube placement is confirmed
by X-ray and documented before initial use; a properly
obtained and interpreted X-ray is recommended to confirm
correct placement of any blindly inserted enteral tube
before its initial use for feedings or medication.1,23,24
■ After X-ray confirmation of tube placement, remove the
guidewire (if present) with one hand while holding the tube
in place at the nostrils or mouth.2
■ Secure the tube with a securement device, tape, or
semipermeable transparent dressing to prevent
dislodgment. Clean the patient’s skin where you intend to
secure the tube.2,25 For excessively oily skin, wipe the skin
with an alcohol pad and allow it to dry before applying the
securement device.26 Apply a skin preparation product to
the skin, if needed.2 Apply the securement device and
secure the tube according to the manufacturer’s
instructions. Alternatively, apply the tape and secure the
tube, or for a small, soft tube, use a transparent
semipermeable dressing, if desired.2 Use protective padding
under the tube, if necessary, to protect the skin from friction
and pressure.25 Keep the skin under the tube clean and dry
to prevent skin breakdown.
■ Mark the tube at the patient’s naris or lip with indelible
marker. Measure the external tube length or note the
incremental marking on the tube where it exits the patient’s
nose or mouth; document the external length in the
patient’s medical record to obtain a baseline for comparison
to assess for tube migration.1
■ Route the tubing toward the patient’s feet and place the
enteral feeding pump, if used, toward the foot of the bed,
because a standardized approach of keeping IV lines routed
toward the head and enteric lines routed toward the feet
prevents dangerous misconnections.27
■ Remove and discard the fluid-impermeable pad or towel.
■ Maintain the head of the bed elevated to at least 30
degrees (unless contraindicated) to prevent aspiration. If
contraindicated, consider the reverse Trendelenburg
position.1
■ Return the bed to the lowest position to prevent falls and
maintain the patient’s safety.28
Removing a feeding tube
■ Trace the enteral feeding tube from the patient to its
point of origin to make sure that you’re accessing the proper
port.29,30
■ Verify tube placement, and then use an enteral syringe to
flush the enteral feeding tube with air; then clamp or pinch
the tube to prevent fluid aspiration during tube withdrawal.2
■ Gently remove the securement device, tape, or
semipermeable transparent dressing securing the enteral
feeding tube to prevent skin stripping or tearing. Use
adhesive remover, if needed.
■ With a slow, smooth, steady movement, remove the tube
to prevent potential aspiration of residual formula and GI
secretions during removal.2 If you encounter resistance
while removing the enteral tube, rotate the tube and try to
remove it again. If resistance continues, stop the procedure
and notify the practitioner; the location of the tube may
need to be verified by X-ray.
■ Inspect the tube to make sure that it’s intact.2 Notify the
practitioner if the tube isn’t intact.
■ Discard the tube in the appropriate receptacle.
■ Assist the patient with performing oral care (or perform
oral care) to promote comfort and prevent oral colonization
of microorganisms. (See the “Oral care” procedure, page
552.)
■ Perform nasal care if the enteral feeding tube was
inserted through the naris.
Completing the procedure
■ Remove and discard your gloves and (if worn) other
personal protective equipment.21,22
■ Perform hand hygiene.7,8,9,10,11,12
■ Document the procedure.31,32,33,34
Special considerations
■ Monitor external tube length before use and at least
every 4 hours1,35 to determine whether the length of the
external portion of the tube has changed, indicating that the
tube has moved. If you observe a significant increase in the
external length, use other bedside tests to determine
whether the tube has become dislodged; if in doubt, obtain
an X-ray, as ordered, to determine tube location.1
■ The Joint Commission has issued a sentinel event alert
related to managing risk during transition to new
International Organization for Standardization tubing
standards designed to prevent dangerous tubing
misconnections, which can lead to serious patient injury and
death. During the transition, trace the tubing and catheter
from the patient to the point of origin before connecting or
reconnecting any device or infusion, at any care transition
(such as a new setting or service), and as part of the
handoff process; route tubes and catheters with different
purposes in different standardized directions; label the
tubing at the distal and proximal ends (when there are
different access sites or several bags hanging); use tubing
and equipment only as intended; and store medications for
different delivery routes in separate locations.36
Complications
Complications of insertion of an enteral feeding tube may
include misplacement into the bronchial tree, which can
result in pneumonia, pneumonitis, and pneumothorax if not
recognized.37 Prolonged enteral feeding tube intubation
may lead to sinusitis, esophagitis, esophagotracheal fistula,
gastric ulceration, skin erosion at the nostril, and pulmonary
and oral infection.
Documentation
For enteral feeding tube insertion, record the date and time,
tube type and size, the insertion site, the area of placement,
and confirmation of proper placement. Document the
patient’s tolerance of the procedure, any patient teaching
provided, and the patient’s understanding of your teaching.
For enteral feeding tube removal, record the date and
time of removal and the patient’s tolerance of the
procedure. Document any patient teaching provided and the
patient’s understanding of your teaching.
REFERENCES
1 Boullata, J. I ., et al. (2016). ASPEN safe practices for enteral nutrition therapy.
Journal of Parenteral and Enteral Nutrition, 41(1), 15–103. Accessed via the
Web at http://journals.sagepub.com/doi/10.1177/0148607116673053 (Level
VII)
2 Wiegand, D. L. (2017). AACN procedure manual for high acuity, progressive,
and critical care (7th ed.). St. Louis, MO: Elsevier.
3 Accreditation Association for Hospitals and Health Systems. (2017). Standard
15.01.11. Healthcare Facilities Accreditation Program: Accreditation
requirements for acute care hospitals. Chicago, IL: Accreditation Association
for Hospitals and Health Systems. (Level VII)
4 Centers for Medicare and Medicaid Services, Department of Health and
Human Services. (2015). Condition of participation: Patient’s rights. 42 C.F.R.
§ 482.13(b)(2).
5 DNV GL-Healthcare USA, Inc. (2016). PR.1 .SR.3 . NIAHO® accreditation
requirements: Interpretive guidelines & surveyor guidance (version 11).
Milford, OH: DNV GL-Healthcare USA, Inc. (Level VII)
6 The Joint Commission. (2019). Standard RI.01.03 .01. Comprehensive
accreditation manual for hospitals. Oakbrook Terrace, IL: The Joint
Commission. (Level VII)
7 The Joint Commission. (2019). Standard NPSG.07.01.01. Comprehensive
accreditation manual for hospitals. Oakbrook Terrace, IL: The Joint
Commission. (Level VII)
8 Centers for Disease Control and Prevention. (2002). Guideline for hand
hygiene in health-care settings: Recommendations of the Healthcare Infection
Control Practices Advisory Committee and the HICPAC/SHEA/APIC/IDSA Hand
Hygiene Task Force. MMWR Recommendations and Reports, 51(RR-16), 1–45.
Accessed via the Web at https://www.cdc.gov/mmwr/pdf/rr/rr5116.pdf (Level
II)
9 World Health Organization. (2009). “WHO guidelines on hand hygiene in
health care: First global patient safety challenge, clean care is safer care”
[Online]. Accessed via the Web at
http://apps.who.int/iris/bitstream/10665/44102/1/9789241597906_eng.pdf
(Level IV)
10 Accreditation Association for Hospitals and Health Systems. (2017). Standard
07.01.21. Healthcare Facilities Accreditation Program: Accreditation
requirements for acute care hospitals. Chicago, IL: Accreditation Association
for Hospitals and Health Systems. (Level VII)
11 Centers for Medicare and Medicaid Services, Department of Health and
Human Services. (2015). Condition of participation: Infection control. 42 C.F.R.
§ 482.42.
12 DNV GL-Healthcare USA, Inc. (2016). IC.1 .SR.1 . NIAHO® accreditation
requirements: Interpretive guidelines & surveyor guidance (version 11).
Milford, OH: DNV GL-Healthcare USA, Inc. (Level VII)
13 The Joint Commission. (2019). Standard NPSG.01.01.01. Comprehensive
accreditation manual for hospitals. Oakbrook Terrace, IL: The Joint
Commission. (Level VII)
14 Centers for Medicare and Medicaid Services, Department of Health and
Human Services. (2015). Condition of participation: Patient’s rights. 42 C.F.R.
§ 482.13(c)(1).
15 Accreditation Association for Hospitals and Health Systems. (2017). Standard
15.01.16. Healthcare Facilities Accreditation Program: Accreditation
requirements for acute care hospitals. Chicago, IL: Accreditation Association
for Hospitals and Health Systems. (Level VII)
16 DNV GL-Healthcare USA, Inc. (2016). PR.1.SR.5 . NIAHO® accreditation
requirements: Interpretive guidelines & surveyor guidance (version 11).
Milford, OH: DNV GL-Healthcare USA, Inc. (Level VII)
17 The Joint Commission. (2019). Standard RI.01.01.01. Comprehensive
accreditation manual for hospitals. Oakbrook Terrace, IL: The Joint
Commission. (Level VII)
18 The Joint Commission. (2019). Standard PC.02.01.21. Comprehensive
accreditation manual for hospitals. Oakbrook Terrace, IL: The Joint
Commission. (Level VII)
19 Waters, T. R., et al. (2009). “Safe patient handling training for schools of
nursing” [Online]. Accessed via the Web at
http://www.cdc.gov/niosh/docs/2009-127/pdfs/2009-127.pdf (Level VII)
20 McClave, S. A., et al. (2016). Guidelines for the provision and assessment of
nutrition support therapy in the adult critically ill patient: Society of Critical
Care Medicine (SCCM) and American Society for Parenteral and Enteral
Nutrition (A.S .P.E.N.). Journal of Parenteral and Enteral Nutrition, 40(2), 159–
211. (Level VII)
21 Siegel, J. D ., et al. (2007, revised 2017). “2007 guideline for isolation
precautions: Preventing transmission of infectious agents in healthcare
settings” [Online]. Accessed via the Web at
http://www.cdc.gov/hicpac/pdf/isolation.Isolation2007.pdf (Level II)
22 Accreditation Association for Hospitals and Health Systems. (2017). Standard
07.01.10. Healthcare Facilities Accreditation Program: Accreditation
requirements for acute care hospitals. Chicago, IL: Accreditation Association
for Hospitals and Health Systems. (Level VII)
23 American Association of Critical-Care Nurses (AACN). (2016). “A ACN practice
alert: Initial and ongoing verification of feeding tube placement in adults”
[Online]. Accessed via the Web at https://www.aacn.org/clinical-
resources/practice-alerts/initial-and-ongoing-verification-of-feeding-tube-
placement-in-adults (Level VII)
24 Ukelja, A., et al. (2010). Standards for nutrition support: Adult hospitalized
patients. Nutrition in Clinical Practice, 25(4), 403–414 . Accessed via the Web
at http://ncp.sagepub.com/content/25/4/403.full.pdf+html (Level VII)
25 Holden-Mount, S., & Sieggreen, M. (2015). “Medical device-related ulcers:
Pediatrics & adults” [Online]. Accessed via the Web at
http://www.npuap.org/wp-content/uploads/2015/02/5.- Medical-Devices-S -
Holden-Mount-and-M-Sieggreen1.pdf
26 C. R. Bard, Inc. (2010) “StatLock NG stabilization device” [Online]. Accessed
via the Web at
http://www.bardmedical.com/media/3240/StatLock%20NG%20Poster%20M10
33.pdf
27 U.S . Food and Drug Administration. (n.d .). “Look. Check. Connect. Safe
medical device connections save lives” [Online]. Accessed via the Web at
http://www.fda.gov/downloads/MedicalDevices/Safety/AlertsandNotices/UCM1
34873.pdf
28 Ganz, D. A., et al. (2013). Preventing falls in hospitals: A toolkit for improving
quality of care (AHRQ Publication No. 13-0015-EF). Rockville, MD: Agency for
Healthcare Research and Quality. Accessed via the Web at
http://www.ahrq.gov/sites/default/files/publications/files/fallpxtoolkit.pdf
(Level VII)
29 The Joint Commission. (2014). “Sentinel event alert: Managing risk during
transition to new ISO tubing connector standards” [Online]. Accessed via the
Web at
http://www.jointcommission.org/assets/1/6/SEA_53_Connectors_8 _19_14 _final.
pdf (Level VII)
30 U.S . Food and Drug Administration. (n.d .). “Look. Check. Connect. Safe
medical device connections save lives” [Online]. Accessed via the Web at
http://www.fda.gov/downloads/MedicalDevices/Safety/AlertsandNotices/UCM1
34873.pdf
31 The Joint Commission. (2019). Standard RC.01.03 .01. Comprehensive
accreditation manual for hospitals. Oakbrook Terrace, IL: The Joint
Commission. (Level VII)
32 DNV GL-Healthcare USA, Inc. (2016). MR.2 .SR.1 . NIAHO® accreditation
requirements: Interpretive guidelines & surveyor guidance (version 11).
Milford, OH: DNV GL-Healthcare USA, Inc. (Level VII)
33 Accreditation Association for Hospitals and Health Systems. (2017). Standard
10.00 .03. Healthcare Facilities Accreditation Program: Accreditation
requirements for acute care hospitals. Chicago, IL: Accreditation Association
for Hospitals and Health Systems. (Level VII)
34 Centers for Medicare and Medicaid Services, Department of Health and
Human Services. (2015). Condition of participation: Medical record services.
42 C.F.R. § 482.24(b).
35 Urden, L. D., et al. (2018). Critical care nursing: Diagnosis and management
(8th ed.). Maryland Heights, MO: Elsevier.
36 The Joint Commission. (2014). “Sentinel event alert: Managing risk during
transition to new ISO tubing connector standards” [Online]. Accessed via the
Web at
http://www.jointcommission.org/assets/1/6/SEA_53_Connectors_8 _19_14 _final.
pdf (Level VII)
37 Stayner, J. L., et al. (2012). Feeding tube placement: Errors and
complications. Nutrition in Clinical Practice, 27(6), 738–748. Accessed via the
Web at http://ncp.sagepub.com/content/27/6/738.full.pdf+html (Level V)
FEMORAL COMPRESSION
After a procedure involving a femoral arterial access site
(such as cardiac catheterization or angiography), femoral
compression maintains hemostasis at the puncture site. A
femoral compression device applies direct pressure to the
arterial access site. Application involves placing a wide strap
under the patient’s buttocks and attaching it to the device
with an inflatable plastic dome. After the dome is positioned
over the puncture site, it’s inflated to the set pressure. A
practitioner or specially trained nurses may apply a femoral
compression device.
Equipment
Femoral compression device strap ▪ compression arch with
dome and three-way stopcock ▪ pressure inflation device ▪
sterile transparent dressing ▪ gloves ▪ mask and goggles or
mask with face shield ▪ indelible marker ▪ cardiac
monitoring equipment ▪ vital signs monitoring equipment ▪
stethoscope ▪ disinfectant pad ▪ emergency equipment
(crash cart with cardiac medications, defibrillator, handheld
resuscitation bag with mask, intubation equipment) ▪
Optional: prescribed pain medication, Doppler ultrasound
device, gown.
Preparation of equipment
Make sure the emergency equipment is readily available
and functioning properly before the procedure.1
Implementation
Before the procedure
■ Confirm the practitioner’s order regarding the femoral
compression device, including the length of time the device
should remain in place.
■ Gather and prepare the appropriate equipment.
■ Perform hand hygiene.2,3,4,5,6,7
■ Confirm the patient’s identity using at least two patient
identifiers.8
■ Provide privacy.9,10,11,12
■ Explain the procedure to the patient and family (if
appropriate) according to their individual communication
and learning needs to increase their understanding, allay
their fears, and enhance cooperation.13
■ Make sure the patient is positioned on the stretcher or
bed with the affected leg straight and the head of the bed
flat.1
■ Obtain the patient’s vital signs and monitor cardiac
rhythm to detect bradyarrhythmias that can occur with a
vasovagal reaction.1 Make sure that cardiac monitor alarm
limits are set appropriately for the patient’s current
condition and that alarms are turned on, functioning
properly, and audible to staff members.14,15,16,17
■ Perform a comprehensive pain assessment using
techniques appropriate for the patient’s age, condition, and
ability to understand. Administer pain medication, as
needed and prescribed, following safe medication
administration practices.1,18,19,20,21,22
Applying the femoral compression device
■ Put on gloves, a mask and goggles or a mask with face
shield, and a gown, as needed.1,23,24
■ Assess the condition of the puncture site and the
neurovascular status of the affected extremity. Mark the
distal pulses with an indelible marker to facilitate locating
pulses during and after the procedure.1
■ Place the device strap under the patient’s hips before
sheath removal (in cases that warrant the use of a sheath).
■ With the assistance of another nurse, position the
compression arch over the arterial puncture site, not the
skin puncture site. The arterial puncture site is 1⁄2′′ to 3⁄4′′ (1.3
cm to 1.9 cm) above the skin puncture site, because the
practitioner inserts the arterial sheath at a 45-degree angle
to the artery.1
■ Apply manual pressure over the dome area while the
straps are secured to the arch.
■ After the dome is properly positioned over the arterial
puncture site, connect the pressure inflation device to the
stopcock that’s attached to the device.
■ Before inflation, verify the amplitude and location of the
pedal pulse.
■ Begin to inflate the dome; the practitioner withdraws the
arterial sheath when the dome is inflated between 60 and
80 mm Hg.
■ Immediately after removal of the arterial sheath, inflate
the device to the ordered pressure (typically 10 to 20 mm
Hg above the patient’s systolic blood pressure) to control
bleeding. (See the “Arterial and venous sheath removal”
procedure, page 25.)
■ After 2 to 3 minutes, reduce the pressure following the
manufacturer’s recommendations and the practitioner’s
specific orders for pressure changes.
■ Assess the site for proper placement of the device and for
signs of bleeding or hematoma.
■ Assess the distal pulses of the affected extremity, and
perform a neurovascular assessment. Use a Doppler
ultrasound device, if necessary.
Maintaining the device
■ Reassess the patient’s vital signs, device placement, the
puncture site, and peripheral vascular and neurovascular
status of the affected extremity every 15 minutes for an
hour, then every 30 minutes over the next hour, and then
hourly for the following 4 hours.1 Afterward, continue to
monitor at an interval determined by your facility and the
patient’s condition.
■ If the dome isn’t in the proper position, perform hand
hygiene and put on gloves, protective eyewear, and a gown,
as needed,2,3,4,5,6,7,23,24 and then reposition the
compression arch and dome, as necessary. Using the
pressure inflation device, reinflate the device to the ordered
pressure.
■ Recheck the applied pressure against the pressure stated
in the practitioner’s order.
■ Continue to monitor the patient’s cardiac rhythm to
detect bradyarrhythmias that might occur with a vasovagal
reaction.1
■ Confirm distal pulses after any adjustments of the device.
Removing the device
■ Put on gloves, a mask and goggles or a mask with face
shield, and a gown, as needed.23,24
■ Remove the air from the dome.
■ Leave the dome in place at 0 mm Hg pressure for at least
10 minutes; then loosen the straps and remove the device
by rolling it off.
■ Assess the puncture site for bleeding and hematoma after
hemostasis is achieved by palpating around the site.1
■ Apply a sterile transparent dressing over the puncture
site.
■ Frequently assess the puncture site and neurovascular
status of the extremity. Watch for signs of bleeding,
hematoma, and infection.
■ Dispose of the device in an appropriate receptacle.
■ Raise the head of the bed up 30 degrees after hemostasis
is achieved, as desired by the patient, to minimize back
discomfort.1
Completing the procedure
■ Instruct the patient to keep the affected leg straight, to
maintain the head of the bed in its prescribed position, and
to splint the groin if needed to cough or sneeze. Tell the
patient to call for assistance with elimination when
necessary.
■ Ensure that the patient’s call light and personal
belongings are within reach.
■ Remove and discard your gloves, mask and goggles or
mask and face shield, and gown, if worn.
■ Perform hand hygiene.2,3,4,5,6,7
■ Clean and disinfect your stethoscope using a disinfectant
pad.25,26
■ Perform hand hygiene.2,3,4,5,6,7
■ Document the procedure.27,28,29,30
Special considerations
■ The Joint Commission has issued a sentinel event alert
concerning medical device alarm safety, because alarm-
related events have been associated with permanent loss of
function or death. Among the major contributing factors
were
improper
alarm
settings,
alarm
settings
inappropriately turned off, and alarm signals not audible to
staff. Make sure that alarm limits are set appropriately, and
that alarms are turned on, functioning properly, and audible
to staff. Follow facility guidelines for preventing alarm
fatigue.17
■ Maintain the patient on bed rest for 1 to 6 hours after
arterial sheath removal and for a maximum of 4 hours after
venous sheath removal.1
■ If you note external bleeding or signs of internal bleeding,
remove the device, apply manual pressure, and notify the
practitioner.
■ Change the sterile transparent dressing at the puncture
site every 24 to 48 hours. (The sterile transparent dressing
permits inspection of the site for bleeding, drainage, or
hematoma.)
■ If the patient received antiplatelet and antithrombotic
regimens in conjunction with percutaneous coronary
intervention, exercise caution, because the patient is at
increased risk for bleeding.
■ The length of time it takes to achieve hemostasis varies
with the patient’s condition. Tissue damage may occur with
pressure maintained for longer than 2 hours.1
Complications
Complications associated with femoral compression include
bleeding, hematoma, retroperitoneal bleeding, and
pseudoaneurysm. Other potential complications may
include infection, arteriovenous fistula formation, ischemia
of the extremity, thrombosis, and embolization. Tissue
damage can also occur if prolonged pressure is maintained.
Documentation
Document the initial application of the device, sheath
removal, and the patient’s tolerance of the procedure.
Record vital signs, puncture site assessments, distal pulses,
neurovascular assessments, periodic deflation, repositioning
of the device, the length of time the device was in place,
and removal of the device. Document patient and family
teaching, complications, and interventions.
REFERENCES
1 Wiegand, D. L. (2017). AACN procedure manual for high acuity, progressive
and critical care (7th ed.). St. Louis, MO: Elsevier.
2 The Joint Commission. (2019). Standard NPSG.07.01.01. Comprehensive
accreditation manual for hospitals. Oakbrook Terrace, IL: The Joint
Commission. (Level VII)
3 Centers for Disease Control and Prevention. (2002). Guideline for hand
hygiene in health-care settings: Recommendations of Healthcare Infection
Control Practices Advisory Committee and the HICPAC/SHEA/APIC/IDSA Hand
Hygiene Task Force. MMWR Recommendations and Reports, 51(RR-16), 1–45.
Accessed via the Web at https://www.cdc.gov/mmwr/pdf/rr/rr5116.pdf (Level
II)
4 World Health Organization. (2009). “WHO guidelines on hand hygiene in
health care: First global patient safety challenge, clean care is safer care”
[Online]. Accessed via the Web at
http://apps.who.int/iris/bitstream/10665/44102/1/9789241597906_eng.pdf
(Level IV)
5 Accreditation Association for Hospitals and Health Systems. (2017). Standard
07.01.21. Healthcare Facilities Accreditation Program: Accreditation
requirements for acute care hospitals. Chicago, IL: Accreditation Association
for Hospitals and Health Systems. (Level VII)
6 Centers for Medicare and Medicaid Services, Department of Health and
Human Services. (2015). Condition of participation: Infection control. 42 C.F.R.
§ 482.42.
7 DNV GL-Healthcare USA, Inc. (2016). IC.1.SR.1 . NIAHO® accreditation
requirements: Interpretive guidelines & surveyor guidance (version 11).
Milford, OH: DNV GL-Healthcare USA, Inc. (Level VII)
8 The Joint Commission. (2019). Standard NPSG.01.01.01. Comprehensive
accreditation manual for hospitals. Oakbrook Terrace, IL: The Joint
Commission. (Level VII)
9 The Joint Commission. (2019). Standard RI.01.01.01. Comprehensive
accreditation manual for hospitals. Oakbrook Terrace, IL: The Joint
Commission. (Level VII)
10 DNV GL-Healthcare USA, Inc. (2016). PR.1.SR.5 . NIAHO® accreditation
requirements: Interpretive guidelines & surveyor guidance (version 11).
Milford, OH: DNV GL-Healthcare USA, Inc. (Level VII)
11 Centers for Medicare and Medicaid Services, Department of Health and
Human Services. (2015). Condition of participation: Patient’s rights. 42 C.F.R.
§ 482.13(c)(1).
12 Accreditation Association for Hospitals and Health Systems. (2017). Standard
15.01.16. Healthcare Facilities Accreditation Program: Accreditation
requirements for acute care hospitals. Chicago, IL: Accreditation Association
for Hospitals and Health Systems. (Level VII)
13 The Joint Commission. (2019). Standard PC.02.01.21. Comprehensive
accreditation manual for hospitals. Oakbrook Terrace, IL: The Joint
Commission. (Level VII)
14 The Joint Commission. (2019). Standard NPSG.06 .01.01. Comprehensive
accreditation manual for hospitals. Oakbrook Terrace, IL: The Joint
Commission.(Level VII)
15 American Association of Critical-Care Nurses. (2013). “A ACN practice alert:
Alarm management” [Online]. Accessed via the Web at
http://www.aacn.org/wd/practice/docs/practicealerts/alarm-management-
practice-alert.pdf
16 Graham, K. C., & Cvach, M. (2010). Monitor alarm fatigue: Standardizing use
of physiological monitors and decreasing nuisance alarms. American Journal
of Critical Care, 19(1), 28–37. Accessed via the Web at
http://ajcc.aacnjournals.org/content/19/1/28.full.pdf
17 The Joint Commission. (2013). “Sentinel event alert: Medical device alarm
safety in hospitals” [Online]. Accessed via the Web at
http://www.jointcommission.org/assets/1/18/SEA_50_alarms_4 _5 _13_FINAL1 .P
DF
18 The Joint Commission. (2019). Standard PC.01.02.07. Comprehensive
accreditation manual for hospitals. Oakbrook Terrace, IL: The Joint
Commission. (Level VII)
19 Accreditation Association for Hospitals and Health Systems. (2017). Standard
16.01.03. Healthcare Facilities Accreditation Program: Accreditation
requirements for acute care hospitals. Chicago, IL: Accreditation Association
for Hospitals and Health Systems. (Level VII)
20 The Joint Commission. (2019). Standard MM.06.01.01. Comprehensive
accreditation manual for hospitals. Oakbrook Terrace, IL: The Joint
Commission. (Level VII)
21 Centers for Medicare and Medicaid Services, Department of Health and
Human Services. (2015). Condition of participation: Nursing services. 42
C.F.R. § 482.23(c).
22 DNV GL-Healthcare USA, Inc. (2016). MM.1 .SR.2. NIAHO® accreditation
requirements: Interpretive guidelines & surveyor guidance (version 11).
Milford, OH: DNV GL-Healthcare USA, Inc. (Level VII)
23 Siegel, J. D ., et al. (2007, revised 2017). “2007 guideline for isolation
precautions: Preventing transmission of infectious agents in healthcare
settings” [Online]. Accessed via the Web at
http://www.cdc.gov/hicpac/pdf/isolation/Isolation2007.pdf (Level II)
24 Accreditation Association for Hospitals and Health Systems. (2017). Standard
07.01.10. Healthcare Facilities Accreditation Program: Accreditation
requirements for acute care hospitals. Chicago, IL: Accreditation Association
for Hospitals and Health Systems. (Level VII)
25 Rutala, W. A., et al. (2008, revised 2017). “Guideline for disinfection and
sterilization in healthcare facilities, 2008” [Online]. Accessed via the Web at
http://www.cdc.gov/hicpac/pdf/guidelines/Disinfection_Nov_2008.pdf (Level I)
26 Accreditation Association for Hospitals and Health Systems. (2017). Standard
07.02.03. Healthcare Facilities Accreditation Program: Accreditation
requirements for acute care hospitals. Chicago, IL: Accreditation Association
for Hospitals and Health Systems. (Level VII)
27 The Joint Commission. (2019). Standard RC.01.03 .01. Comprehensive
accreditation manual for hospitals. Oakbrook Terrace, IL: The Joint
Commission. (Level VII)
28 Accreditation Association for Hospitals and Health Systems. (2017). Standard
10.00 .03. Healthcare Facilities Accreditation Program: Accreditation
requirements for acute care hospitals. Chicago, IL: Accreditation Association
for Hospitals and Health Systems. (Level VII)
29 Centers for Medicare and Medicaid Services, Department of Health and
Human Services. (2015). Condition of participation: Medical record services.
42 C.F.R. § 482.24(b).
30 DNV GL-Healthcare USA, Inc. (2016). MR.2 .SR.1 . NIAHO® accreditation
requirements: Interpretive guidelines & surveyor guidance (version 11).
Milford, OH: DNV GL-Healthcare USA, Inc. (Level VII)
FOOT CARE
Daily bathing of feet and regular trimming of toenails
promotes cleanliness, prevents infection, stimulates
peripheral circulation, and controls odor by removing debris
from between toes and under toenails. It’s particularly
important for bedridden patients and those especially
vulnerable to foot infection. Increased susceptibility may be
caused by peripheral vascular disease, diabetes mellitus,
poor nutritional status, arthritis, or any condition that
impairs peripheral circulation. Patients with diabetes should
have yearly foot examination to identify factors that
increase the risk of ulcers or amputation.1 In at-risk
patients, proper foot care should include meticulous
cleanliness and regular observation for signs of skin
breakdown.
When you perform a foot examination, inspect the
patient’s foot, assess foot pulses, and test for loss of
protective sensation. Ask the patient about any history of
previous foot ulceration or amputation, neuropathic or
peripheral vascular signs and symptoms, impaired vision,
tobacco use, and foot care practices.1 (See Foot care for
patients with diabetes.) Teach the at-risk patient proper foot
care on at least a yearly basis.1
Toenail trimming is contraindicated in patients with toe
infections, diabetes mellitus, neurologic disorders, renal
failure, or peripheral vascular disease, unless performed by
a practitioner. Some facilities prohibit nurses from trimming
toenails. Check to see whether you’re permitted by your
facility before trimming the patient’s toenails.
Equipment
Bath blanket ▪ large basin ▪ soap ▪ water ▪ towel ▪ fluid-
impermeable pad ▪ pillow ▪ washcloth ▪ disposable, single-
use toenail clippers ▪ emery board ▪ cotton-tipped
applicators ▪ cotton ▪ lotion ▪ water-absorbent powder ▪
bath thermometer ▪ hospital-grade disinfectant ▪ puncture-
proof sharps container ▪ Optional: gloves, heel protectors,
protective boots, 2′′ × 2′′ (5-cm × 5-cm) gauze pads.
Preparation of equipment
Fill the basin halfway with warm water. Test water
temperature with a bath thermometer, because patients
with diminished peripheral sensation could burn their feet in
excessively hot water (over 105°F [40.6°C]) without feeling
any warning pain.
Implementation
■ Gather the equipment at the patient’s bedside.
■ Perform hand hygiene.2,3,4,5,6,7
■ Put on gloves if needed to comply with standard
precautions.8,9,10
■ Confirm the patient’s identity using at least two patient
identifiers.11
■ Provide privacy.12,13,14,15
■ Explain to the patient that you’re going to wash the
patient’s feet and provide foot and toenail care.
■ Raise the patient’s bed to waist level when providing care
to prevent caregiver back strain.16
■ Cover the patient with a bath blanket. Fanfold the top
linen to the foot of the bed.
■ Place a fluid-impermeable pad and a towel under the
patient’s feet to keep the bottom linen dry. Then position
the basin on the pad.
■ Insert a pillow beneath the patient’s knee to provide
support, and cushion the rim of the basin with the edge of
the towel to prevent pressure on the patient’s leg.
■ Immerse one foot in the basin. Allow it to soak for about
10 minutes and then wash it thoroughly with soap and
water. Soaking softens the skin and toenails, loosens debris
under toenails, and comforts and refreshes the patient.
■ After washing the foot, rinse it with a washcloth, remove
it from the basin, and place it on the towel.
■ Gently and thoroughly dry the patient’s foot; don’t rub,
especially between the toes, because doing so can cause
skin breakdown.
■ Empty the basin, and refill it with warm water at the
appropriate temperature
■ Soak the other foot.
■ While the second foot is soaking, give the first one a
pedicure. Using a cotton-tipped applicator, carefully clean
the patient’s toenails. Use an emery board to smooth the
nails as indicated to prevent self-inflicted skin tears.17
■ Consult a podiatrist (if required by your facility) if the
patient’s nails need trimming.
■ Clean and rinse the foot that has been soaking, dry it
thoroughly, and give it a pedicure.
■ Apply lotion to moisten dry skin, or lightly dust water-
absorbent powder between the toes to absorb moisture.
Don’t apply lotion between the toes, because lotion can
cause skin maceration.18
■ Remove the bath blanket and cover the patient with the
top linens.
■ Return the bed to the lowest position to prevent falls and
maintain patient safety.19
■ Empty the basin and clean and disinfect reusable
equipment, as appropriate.20,21
■ Discard used supplies in appropriate receptacles.
■ Remove and discard your gloves, if worn.8
■ Perform hand hygiene.2,3,4,5,6,7
■ Document the procedure.22,23,24
Special considerations
■ While providing foot care, observe the color, shape, and
texture of the toenails. If you see redness, drying, cracking,
blisters, discoloration, or other signs of traumatic injury,
especially in a patient with impaired peripheral circulation,
notify the practitioner. Because such a patient is vulnerable
to infection and gangrene, the patient needs prompt
treatment.1
■ If a patient’s toenail grows inward at the corners, tuck a
wisp of cotton under it to relieve pressure on the toe.
Foot care for patients with diabetes
Because diabetes mellitus can reduce blood supply to the feet, normally
minor foot injuries can lead to dangerous infection. When caring for a patient
with diabetes, keep these foot care guidelines in mind:
■ Advise the patient to exercise the feet daily to help improve circulation.
Teach the patient to sit on the edge of the bed and point the toes upward,
then downward, 10 times. The patient should then make a circle with each
foot 10 times.
■ Explain that shoes must fit properly. Instruct the patient to break in new
shoes gradually by increasing wearing time by 30 minutes each day. Also tell
the patient to check old shoes frequently for rough spots in the lining.
■ Advise high-risk patients with diabetes, including those with severe
neuropathy, foot deformities, or history of amputation, that the use of
specialized therapeutic footwear is recommended.1
■ Tell the patient to wear clean socks daily and to avoid socks with holes,
darned spots, or rough, irritating seams.
■ Advise the patient to see a practitioner if the patient has corns or
calluses.1
■ Tell the patient to wear warm socks or slippers and to use extra blankets to
avoid cold feet.
■ Advise the patient to avoid heating pads or hot-water bottles, because
these items may cause burns.
■ Teach the patient to regularly inspect the skin on the feet for cuts, cracks,
blisters, or red, swollen areas, and to use a mirror to check the soles as
needed. Inform the patient that even slight cuts on the feet should receive a
practitioner’s attention. As a first-aid measure, tell the patient to wash the
cut thoroughly and apply a mild antiseptic. Urge the patient to avoid harsh
antiseptics, such as iodine, because they can damage tissue.
■ Advise the patient to avoid tight-fitting garments and activities that can
decrease circulation, especially wearing elastic garters, sitting with the knees
crossed, picking at sores or rough spots on the feet, walking barefoot, or
applying adhesive tape to the skin on the feet.
■ When providing foot care for a bedridden patient, perform
range-of-motion exercises, unless contraindicated, to
stimulate circulation and prevent foot contractures and
muscle atrophy. Tuck folded 2′′ × 2′′ (5-cm × 5-cm) gauze
pads between overlapping toes to protect the skin from the
toenails. Apply heel protectors or protective boots to
prevent skin breakdown.
Patient teaching
Instruct the patient to notify the practitioner right away if
the patient observes discoloration (any part of the leg or
foot turns blue or black); notes reduced sensation to pain or
temperature; develops an injury that doesn’t heal or
becomes infected; experiences unusual numbness, tingling,
cold, cramping, or pain in the feet; or develops pain while
walking that’s relieved by rest.
If a patient can’t perform proper foot care and inspection
because of visual difficulties, physical constraints that
prevent movement, or cognitive problems that impair the
patient’s ability to assess the condition of the foot and to
institute appropriate responses, teach family members or
another caregiver to assist in care.1
Complications
Injury to the subungual skin may occur.
Documentation
Record the date and time of foot care in your notes. Record
and report any abnormal findings and any nursing actions
you take. If toenail trimming was necessary, specify the
name of the person who performed the trimming. Document
patient teaching provided and the patient’s understanding
of that teaching.
REFERENCES
1 American Diabetes Association. (2017). Standards of medical care in diabetes
—2017: Foot care. Diabetes Care, 40(Suppl. 1), S88–S98 . Accessed via the
Web at
http://professional.diabetes.org/sites/professional.diabetes.org/files/media/dc_
40_s1_final.pdf (Level VII)
2 Centers for Disease Control and Prevention. (2002). Guideline for hand
hygiene in health-care settings: Recommendations of the Healthcare Infection
Control Practices Advisory Committee and the HICPAC/SHEA/APIC/IDSA Hand
Hygiene Task Force. MMWR Recommendations and Reports, 51(RR-16), 1–45.
Accessed via the Web at https://www.cdc.gov/mmwr/pdf/rr/rr5116.pdf (Level
II)
3 World Health Organization. (2009). “WHO guidelines on hand hygiene in
health care: First global patient safety challenge, clean care is safer care”
[Online]. Accessed via the Web at
http://apps.who.int/iris/bitstream/10665/44102/1/9789241597906_eng.pdf
(Level IV)
4 The Joint Commission. (2019). Standard NPSG.07.01.01. Comprehensive
accreditation manual for hospitals. Oakbrook Terrace, IL: The Joint
Commission. (Level VII)
5 Centers for Medicare and Medicaid Services, Department of Health and
Human Services. (2015). Condition of participation: Infection control. 42 C.F.R.
§ 482.42.
6 Accreditation Association for Hospitals and Health Systems. (2017). Standard
07.01.21. Healthcare Facilities Accreditation Program: Accreditation
requirements for acute care hospitals. Chicago, IL: Accreditation Association
for Hospitals and Health Systems. (Level VII)
7 DNV GL-Healthcare USA, Inc. (2016). IC.1.SR.1 . NIAHO® accreditation
requirements: Interpretive guidelines & surveyor guidance (version 11).
Milford, OH: DNV GL-Healthcare USA, Inc. (Level VII)
8 Siegel, J. D., et al. (2007, revised 2017). “2007 guideline for isolation
precautions: Preventing transmission of infectious agents in healthcare
settings” [Online]. Accessed via the Web at
http://www.cdc.gov/hicpac/pdf/isolation/Isolation2007.pdf (Level II)
9 Accreditation Association for Hospitals and Health Systems. (2017). Standard
07.01.10. Healthcare Facilities Accreditation Program: Accreditation
requirements for acute care hospitals. Chicago, IL: Accreditation Association
for Hospitals and Health Systems. (Level VII)
10 DNV GL-Healthcare USA, Inc. (2016). IC.1 .SR.2 . NIAHO® accreditation
requirements: Interpretive guidelines & surveyor guidance (version 11).
Milford, OH: DNV GL-Healthcare USA, Inc. (Level VII)
11 The Joint Commission. (2019). Standard NPSG.01.01.01. Comprehensive
accreditation manual for hospitals. Oakbrook Terrace, IL: The Joint
Commission. (Level VII)
12 Centers for Medicare and Medicaid Services, Department of Health and
Human Services. (2015). Condition of participation: Patient’s rights. 42 C.F.R.
§ 482.13(c)(1).
13 Accreditation Association for Hospitals and Health Systems. (2017). Standard
15.01.16. Healthcare Facilities Accreditation Program: Accreditation
requirements for acute care hospitals. Chicago, IL: Accreditation Association
for Hospitals and Health Systems. (Level VII)
14 The Joint Commission. (2019). Standard RI.01.01.01. Comprehensive
accreditation manual for hospitals. Oakbrook Terrace, IL: The Joint
Commission. (Level VII)
15 DNV GL-Healthcare USA, Inc. (2016). PR.1.SR.5 . NIAHO® accreditation
requirements: Interpretive guidelines & surveyor guidance (version 11).
Milford, OH: DNV GL-Healthcare USA, Inc. (Level VII)
16 Waters, T. R., et al. (2009). “Safe patient handling training for schools of
nursing” [Online]. Accessed via the Web at
http://www.cdc.gov/niosh/docs/2009-127/pdfs/2009-127.pdf (Level VII)
17 LeBlanc, K., et al. (2013). International skin tear advisory panel: A tool kit to
aid in the prevention, assessment, and treatment of skin tears using a
simplified classification system. Advances in Skin and Wound Care, 26(10),
459–476. (Level IV)
18 Heitzman, J. (2010). Foot care for patients with diabetes. Topics in Geriatric
Rehabilitation, 26(3), 250–263.
19 Ganz, D. A., et al. (2013). Preventing falls in hospitals: A toolkit for improving
quality of care (AHRQ Publication No. 13-0015-EF). Rockville, MD: Agency for
Healthcare Research and Quality. Accessed via the Web at
http://www.ahrq.gov/sites/default/files/publications/files/fallpxtoolkit.pdf
(Level VII)
20 Rutala, W. A., et al. (2008, revised 2017). “Guideline for disinfection and
sterilization in healthcare facilities, 2008” [Online]. Accessed via the Web at
http://www.cdc.gov/hicpac/pdf/guidelines/Disinfection_Nov_2008.pdf (Level I)
21 Accreditation Association for Hospitals and Health Systems. (2017). Standard
07.02.03. Healthcare Facilities Accreditation Program: Accreditation
requirements for acute care hospitals. Chicago, IL: Accreditation Association
for Hospitals and Health Systems. (Level VII)
22 The Joint Commission. (2019). Standard RC.01.03 .01. Comprehensive
accreditation manual for hospitals. Oakbrook Terrace, IL: The Joint
Commission. (Level VII)
23 Centers for Medicare and Medicaid Services, Department of Health and
Human Services. (2015). Condition of participation: Medical record services.
42 C.F.R. § 482.24(b).
24 Accreditation Association for Hospitals and Health Systems. (2017). Standard
10.00 .03. Healthcare Facilities Accreditation Program: Accreditation
requirements for acute care hospitals. Chicago, IL: Accreditation Association
for Hospitals and Health Systems. (Level VII)
FOREIGN-BODY AIRWAY OBSTRUCTION AND
MANAGEMENT
Most cases of foreign-body airway obstruction in adults
occur while they’re eating. Foreign bodies can cause mild or
severe airway obstruction. In a child, foreign-body airway
obstruction occurs most often when they’re eating or
playing and typically involves such items as balloons and
small objects, or such foods as hot dogs, rounded candies,
nuts, or grapes. In infants, airway obstruction typically
results from a liquid.
Foreign bodies can cause mild or severe airway
obstruction. If the obstruction is mild and the patient is
coughing forcefully, there’s no reason to intervene;
spontaneous coughing and breathing typically relieve the
obstruction.1,2
If severe obstruction develops, you must intervene quickly
to relieve the obstruction;1,2 anoxia resulting from the
obstruction may cause brain damage and death in 4 to 6
minutes. Intervene by administering abdominal thrusts, also
called the Heimlich maneuver,
which uses a
subdiaphragmatic abdominal thrust to create diaphragmatic
pressure in the static lung below the foreign body sufficient
to expel the obstruction. Abdominal thrusts are used in
conscious adult patients who can’t speak, cough, or
breathe.
If abdominal thrusts are ineffective, you may consider
administering chest thrusts; this maneuver forces air out of
the lungs, creating an artificial cough. Also use chest thrusts
for an obese patient, if you’re unable to encircle the
patient’s abdomen, and for a patient who’s in the late
stages of pregnancy.1,2
For infants, deliver repeated cycles of five back blows
followed by five chest compressions until the foreign body is
expelled or the infant becomes unresponsive. Abdominal
thrusts aren’t recommended for infants because they may
damage the infant’s liver.
If a patient is unconscious or becomes unconscious
despite your efforts, start cardiopulmonary resuscitation
(CPR) immediately.
Equipment
No special equipment is required.
Implementation
■ Determine whether the patient is choking by asking, “Are
you choking?” If the patient indicates “yes” by nodding the
head without speaking, there is a severe airway
obstruction.1,2
■ Activate the emergency response system quickly if the
patient is having difficulty breathing. If another person is
present, have him or her activate the system.1,2
■ To calm the patient, talk to the patient and explain what
you’re doing. Tell the patient that you’ll try to dislodge the
foreign body.
For a conscious adult or child
■ Standing behind the patient, wrap your arms around the
patient’s waist. Make a fist with one hand, and place the
thumb side against the abdomen, slightly above the
umbilicus and well below the xiphoid process. Then grasp
your fist with the other hand (as shown below).
■ Squeeze the patient’s abdomen using quick inward and
upward thrusts. Each thrust should be a separate and
distinct movement; each should be forceful enough to
create an artificial cough that will dislodge an obstruction.
Continue the abdominal thrust in rapid sequence until the
obstruction is relieved or the patient becomes unresponsive.
■ Make sure you have a firm grasp on the patient, because
the patient may lose consciousness and need to be lowered
to the floor.1 Support the head and neck to prevent injury. If
the patient becomes unconscious, start CPR and follow the
steps for an unconscious adult or child.
■ Examine the patient for injuries, such as ruptured or
lacerated abdominal or thoracic viscera, resulting from the
procedure.
For an obese or pregnant adult
■ If the patient is conscious, stand behind and place your
arms under the patient’s armpits and around the chest.
■ Place the thumb side of your clenched fist against the
middle of the sternum, avoiding the margins of the ribs and
the xiphoid process (as shown below).
■ Grasp your fist with your other hand and perform a chest
thrust with enough force to expel the foreign body. Continue
until the patient expels the obstruction or loses
consciousness. If the patient loses consciousness, carefully
lower the patient to the floor and follow the steps outlined
below for an unconscious adult or child.
■ Examine the patient for injuries, such as ruptured or
lacerated abdominal or thoracic viscera, resulting from the
procedure.
■ Notify the practitioner of the patient’s status, especially
with loss of consciousness.
For an unconscious adult or child
■ For a patient who has become unresponsive while you are
trying to remove a foreign object, carefully lower the patient
to the ground and call for help, or activate the emergency
response system.1,2
■ If you come upon an unconscious patient, establish
unresponsiveness by tapping the patient and shouting, “Are
you alright?” Check to see if the patient is apneic or only
gasping. If the patient is unresponsive and apneic or only
gasping, call for help or activate the emergency response
system.1,2
■ Begin CPR immediately, starting with chest compressions;
use a ratio of 30 chest compression to two ventilations.1,2
(See the “Cardiopulmonary resuscitation, adult” and
“Cardiopulmonary resuscitation, child” procedures, pages
116 and 122.)
■ Each time the airway is opened using a head-tilt, chin-lift
maneuver, look for an object in the patient’s mouth.1,2
Remove the object, if seen.1,2
NURSING ALERT Never perform a blind finger-sweep to retrieve an
object from a patient’s airway. Remove visible objects.1
■ Attempt to ventilate the patient and follow with 30 chest
compressions; continue CPR until the object is expelled.1
■ Examine the patient for injuries, such as ruptured or
lacerated abdominal or thoracic viscera, resulting from the
procedure.
For an infant
■ Determine whether the infant has a severe foreign body
object obstruction. If it’s severe, the infant won’t be able to
cough or make a sound.1
■ If severe obstruction exists, place the infant face down so
that he or she is straddling your arm with head lower than
trunk.1
■ Rest your forearm on your thigh and deliver five back
blows with the heel of your hand between the infant’s
shoulder blades (as shown below).1
■ If the back blows don’t remove the obstruction, place
your free hand on the infant’s back.
■ Supporting the neck, jaw, and chest with your other hand,
turn the infant over onto your thigh, keeping the infant’s
head lower than the trunk.
■ Imagine a line between the infant’s nipples and place the
index finger of your free hand on the sternum, just below
this imaginary line. Then place your middle and ring fingers
next to your index finger and lift the index finger off the
infant’s chest (as shown below).1
■ Deliver five chest thrusts as you would for chest
compression, but at a slower rate.1
■ Repeat the above steps until you’ve relieved the
obstruction or the infant becomes unconscious.
■ If the infant becomes unconscious, call for help and start
to perform CPR beginning with chest compressions.1 (See
the “Cardiopulmonary resuscitation, infant” procedure, page
126.)
■ After 30 chest compressions, open the airway.1
■ Before performing rescue breaths, look in the infant’s
mouth for the foreign body. If you see the object, remove it.
Never perform a blind finger-sweep on an infant, because it
may push the foreign body further back into the pharynx
and damage the oropharynx.1
■ Attempt ventilation and follow with chest compressions at
a rate of 30 chest compressions to two ventilations until the
object is removed.1
■ Activate the emergency response system after 2 minutes
if no one else has done so.1 Continue with CPR until the
emergency response or code team arrives.
Completing the procedure
■ Perform hand hygiene.3,4,5,6,7,8
■ Document the procedure.9,10,11,12
Special considerations
■ If the patient vomits during abdominal thrusts, quickly
wipe out the patient’s mouth with your fingers and resume
the maneuver, as necessary.
■ Even if your efforts to clear the airway don’t seem to be
effective, keep trying. As oxygen deprivation increases,
smooth and skeletal muscles relax, making your maneuvers
more likely to succeed.
■ Never perform a blind finger-sweep to retrieve an object
from a patient’s airway. You could end up pushing the object
further into the airway rather than removing the object.
Complications
Nausea, regurgitation, bruising, and achiness may develop
after the patient can breathe independently. The patient
may also be injured, possibly from incorrect placement of
the rescuer’s hands, or because of osteoporosis or
metastatic lesions that increase the risk of fracture.
Documentation
Record the date and time of the procedure, the patient’s
actions before the obstruction, the approximate length of
time it took to clear the airway, and the type and size of the
object removed. Also, note the patient’s vital signs after the
procedure, any complications that occurred and nursing
actions taken, and the patient’s tolerance of the procedure.
REFERENCES
1 American Heart Association. (2015). 2015 American Heart Association
guidelines update for cardiopulmonary resuscitation and emergency
cardiovascular care. Circulation, 132(18 Suppl. 2), S315–S367. (Level II)
2 American Heart Association. (2010). Adult basic life support: 2010 American
Heart Association guidelines for cardiopulmonary resuscitation and
emergency cardiovascular care. Circulation, 122(18 Suppl. 3), S685–S705.
(Level II)
3 The Joint Commission. (2019). Standard NPSG.07.01.01. Comprehensive
accreditation manual for hospitals. Oakbrook Terrace, IL: The Joint
Commission. (Level VII)
4 Centers for Disease Control and Prevention. (2002). Guideline for hand
hygiene in health-care settings: Recommendations of the Healthcare Infection
Control Practices Advisory Committee and the HICPAC/SHEA/APIC/IDSA Hand
Hygiene Task Force. MMWR Recommendations and Reports, 51(RR-16), 1–45.
Accessed via the Web at https://www.cdc.gov/mmwr/pdf/rr/rr5116.pdf (Level
II)
5 World Health Organization. (2009). “WHO guidelines on hand hygiene in
health care: First global patient safety challenge, clean care is safer care”
[Online]. Accessed via the Web at
http://apps.who.int/iris/bitstream/10665/44102/1/9789241597906_eng.pdf
(Level IV)
6 Centers for Medicare and Medicaid Services, Department of Health and
Human Services. (2015). Condition of participation: Infection control. 42 C.F.R.
§ 482.42.
7 Accreditation Association for Hospitals and Health Systems. (2017). Standard
07.01.21. Healthcare Facilities Accreditation Program: Accreditation
requirements for acute care hospitals. Chicago, IL: Accreditation Association
for Hospitals and Health Systems. (Level VII)
8 DNV GL-Healthcare USA, Inc. (2016). IC.1.SR.1 . NIAHO® accreditation
requirements: Interpretive guidelines & surveyor guidance (version 11).
Milford, OH: DNV GL-Healthcare USA, Inc. (Level VII)
9 The Joint Commission. (2019). Standard RC.01.03 .01. Comprehensive
accreditation manual for hospitals. Oakbrook Terrace, IL: The Joint
Commission. (Level VII)
10 Centers for Medicare and Medicaid Services, Department of Health and
Human Services. (2015). Condition of participation: Medical record services.
42 C.F.R. § 482.24(b).
11 Accreditation Association for Hospitals and Health Systems. (2017). Standard
10.00 .03. Healthcare Facilities Accreditation Program: Accreditation
requirements for acute care hospitals. Chicago, IL: Accreditation Association
for Hospitals and Health Systems. (Level VII)
12 DNV GL-Healthcare USA, Inc. (2016). MR.2 .SR.1 . NIAHO® accreditation
requirements: Interpretive guidelines & surveyor guidance (version 11).
Milford, OH: DNV GL-Healthcare USA, Inc. (Level VII)
FUNCTIONAL ASSESSMENT
A functional assessment is used to evaluate the older
adult’s overall well-being and self-care abilities. It helps
identify individual needs and care deficits, provides a basis
for developing a care plan that enhances the abilities of the
older adult with coexisting disease and chronic illness, and
provides feedback about treatment and rehabilitation. The
goal of a functional assessment is to help an older adult
maintain independence by matching needs with such
services as housekeeping, home health care, and day care.
Several tools are available to help perform a methodical
functional assessment. Become familiar with the functional
assessment tool used in your facility.
The Katz Index of Independence in Activities of Daily
Living is a widely used tool for evaluating a person’s ability
to perform six daily personal care activities: bathing,
dressing, toileting, transferring, continence, and feeding. It
describes functional level at a specific point in time and
objectively assigns a total score based on points accrued for
dependence or independence in each of the six functional
areas. (See Katz Index of Independence in Activities of Daily
Living.)
Another widely used tool, the Lawton Instrumental
Activities of Daily Living Scale, evaluates a person’s ability
to perform more complex personal care activities. It
addresses the activities needed to support independent
living, such as the ability to use a telephone, shop, prepare
food, perform housekeeping tasks, do laundry, use
transportation, handle medications, and manage finances.
Each of the activities is rated on a three-point scale, ranging
from independence to complete disability. When using the
Lawton scale, make sure you evaluate the patient in terms
of safety. For example, a person may be able to cook a small
meal but may leave the stove burner on after cooking.
The Barthel Index is commonly used in rehabilitation
settings to assess the person’s need for assistance with
activities of daily living and to document improvement in
the patient’s abilities. The Barthel Index ranks functional
status of the following 10 self-care functions: feeding,
moving from wheelchair to bed and returning, performing
personal toileting, getting on and off the toilet, bathing,
walking on a level surface or propelling a wheelchair,
ascending and descending stairs, dressing and undressing,
maintaining bowel continence, and controlling the bladder.
The Barthel Index ranks functional status as either
independent or dependent, and each item is scored
according to the degree of assistance needed; over time,
results reveal improvement or decline.2 A similar scale,
called the Barthel Self-Care Rating Scale, is a more detailed
evaluation of function. Both tools provide information to
help you determine the type of assistance needed.
A standardized assessment tool called the Minimum Data
Set (MDS) was developed by the Centers for Medicare and
Medicaid Services Nursing Quality Initiative to make patient
assessments more consistent and reliable throughout the
country. The MDS includes assessment information that can
be used to identify potential nutritional problems, risk
factors, and potential for improved function. The use of this
tool is required in all extended-care facilities that receive
federal funding. MDS 3.0, the latest version of the MDS,
replaced MDS 2.0 in 2012. It has improved the tool’s
reliability and accuracy and includes the patient in the
assessment process.3
The Outcome and Assessment Information Set-C, now
known as OASIS-C, is a standardized form required by the
Health Care Financing Administration for Medicare-certified
agencies. This form is a comprehensive assessment of home
care patients. The OASIS-C was developed specifically to
measure outcomes for adults who receive home care. This
instrument allows the collection of data to measure changes
in a patient’s health status over time. Typically, OASIS-C
data is collected when a patient starts home care, at the 60-
day recertification point, and when the patient is discharged
or transferred to another health care facility, such as a
hospital or subacute care facility.4
Katz Index of Independence in
Activities of Daily Living
Evaluation form
Name:
Date:
For each area of functioning listed below, assign a score of 1 point if the
patient is independent (requires no supervision, direction, or personal
assistance) and 0 points if the patient is dependent (requires supervision,
direction, personal assistance, or total care).1
Equipment
Facility-approved functional assessment tool.
Implementation
■ Perform hand hygiene.5,6,7,8,9,10
■ Confirm the patient’s identity using at least two patient
identifiers.11
■ Provide privacy.12,13,14,15
■ Explain the procedure to the patient and family (if
appropriate), including the location where it will take place
(such as in a hospital room or a treatment room), according
to their individual communication and learning needs to
increase their understanding, allay their fears, and enhance
cooperation.16
■ Review the patient’s health history to obtain subjective
data about the patient and insight into problem areas and
subtle physical changes.
■ Obtain biographical data, including the patient’s name,
age, and birth date, if not already provided.
■ Using a facility-approved functional assessment tool, ask
the patient to answer the questions. If the patient is unable
to answer, ask a caregiver to do so.
■ Perform hand hygiene.5,6,7,8,9,10
■ Document the procedure.17,18,19,20
Special considerations
■ In a long-term care facility, the physical assessment and
care plan should be completed by a licensed nurse within 24
hours of a patient’s admission. Functional assessment
should be completed after a 7- to 14-day assessment
period. A comprehensive care plan should be developed
within 21 days.
Documentation
Document all assessment findings according to your
facility’s assessment scale.
REFERENCES
1 Katz, S., et al. (1970). Progress in the development of the index of ADL. The
Gerontologist, 10(1), 20–30 .
2 Mahoney, F. I ., & Barthel, D. W. (1965). Functional evaluation: The Barthel
Index. Maryland State Medical Journal, 14, 56–61. Accessed via the Web at
http://www.strokecenter.org/wp-content/uploads/2011/08/barthel_reprint.pdf
3 Centers for Medicare and Medicaid Services, Department of Health and
Human Services. (2015). “MDS 3.0 for nursing homes and swing bed
providers” [Online]. Accessed via the Web at
https://www.cms.gov/Medicare/Quality-Initiatives-Patient-Assessment-
Instruments/NursingHomeQualityInits/NHQIMDS30.html
4 Centers for Medicare and Medicaid Services, Department of Health and
Human Services. (2017). “OASIS user manuals” [Online]. Accessed via the
Web at https://www.cms.gov/Medicare/Quality-Initiatives-Patient-Assessment-
Instruments/HomeHealthQualityInits/HHQIOASISUserManual.html
5 The Joint Commission. (2019). Standard NPSG.07.01.01. Comprehensive
accreditation manual for hospitals. Oakbrook Terrace, IL: The Joint
Commission. (Level VII)
6 World Health Organization. (2009). “WHO guidelines on hand hygiene in
health care: First global patient safety challenge, clean care is safer care”
[Online]. Accessed via the Web at
http://apps.who.int/iris/bitstream/10665/44102/1/9789241597906_eng.pdf
(Level IV)
7 Centers for Disease Control and Prevention. (2002). Guideline for hand
hygiene in health-care settings: Recommendations of the Healthcare Infection
Control Practices Advisory Committee and the HICPAC/SHEA/APIC/IDSA Hand
Hygiene Task Force. MMWR Recommendations and Reports, 51(RR-16), 1–45.
Accessed via the Web at https://www.cdc.gov/mmwr/pdf/rr/rr5116.pdf (Level
II)
8 Centers for Medicare and Medicaid Services, Department of Health and
Human Services. (2015). Condition of participation: Infection control. 42 C.F.R.
§ 482.42.
9 Accreditation Association for Hospitals and Health Systems. (2017). Standard
07.01.21. Healthcare Facilities Accreditation Program: Accreditation
requirements for acute care hospitals. Chicago, IL: Accreditation Association
for Hospitals and Health Systems. (Level VII)
10 DNV GL-Healthcare USA, Inc. (2016). IC.1 .SR.1 . NIAHO® accreditation
requirements: Interpretive guidelines & surveyor guidance (version 11).
Milford, OH: DNV GL-Healthcare USA, Inc. (Level VII)
11 The Joint Commission. (2019). Standard NPSG.01.01.01. Comprehensive
accreditation manual for hospitals. Oakbrook Terrace, IL: The Joint
Commission. (Level VII)
12 The Joint Commission. (2019). Standard RI.01.01.01. Comprehensive
accreditation manual for hospitals. Oakbrook Terrace, IL: The Joint
Commission. (Level VII)
13 Centers for Medicare and Medicaid Services, Department of Health and
Human Services. (2015). Condition of participation: Patient’s rights. 42 C.F.R.
482.13(c)(1).
14 Accreditation Association for Hospitals and Health Systems. (2017). Standard
15.01.16. Healthcare Facilities Accreditation Program: Accreditation
requirements for acute care hospitals. Chicago, IL: Accreditation Association
for Hospitals and Health Systems. (Level VII)
15 DNV GL-Healthcare USA, Inc. (2016). PR.1.SR.5 . NIAHO® accreditation
requirements: Interpretive guidelines & surveyor guidance (version 11).
Milford, OH: DNV GL-Healthcare USA, Inc. (Level VII)
16 The Joint Commission. (2019). Standard PC.02.01.21. Comprehensive
accreditation manual for hospitals. Oakbrook Terrace, IL: The Joint
Commission. (Level VII)
17 The Joint Commission. (2019). Standard RC.01.03 .01. Comprehensive
accreditation manual for hospitals. Oakbrook Terrace, IL: The Joint
Commission. (Level VII)
18 Centers for Medicare and Medicaid Services, Department of Health and
Human Services. (2015). Condition of participation: Medical record services.
42 C.F.R. § 482.24(b).
19 Accreditation Association for Hospitals and Health Systems. (2017). Standard
10.00 .03. Healthcare Facilities Accreditation Program: Accreditation
requirements for acute care hospitals. Chicago, IL: Accreditation Association
for Hospitals and Health Systems. (Level VII)
20 DNV GL-Healthcare USA, Inc. (2016). MR.2 .SR.1 . NIAHO® accreditation
requirements: Interpretive guidelines & surveyor guidance (version 11).
Milford, OH: DNV GL-Healthcare USA, Inc. (Level VII)
G
GAIT BELT USE
A gait belt is a safety device made of cloth or plastic that
buckles securely around a patient’s waist. The device
provides a secure grasping surface to aid with patient
transfer and ambulation.1 Commonly used for patients who
are at risk for falling, a gait belt can help safely lower a
patient to the ground if the patient begins to fall or loses
balance during transfer or ambulation. When combined with
proper body mechanics, a gait belt also improves caregiver
safety by preventing back injury.
Before gait belt use, assess the patient for
contraindications, including recent abdominal, back, or
chest surgery; hernia; severe cardiac or respiratory
conditions; abdominal aneurysm; or the presence of a
gastrostomy tube or other equipment that might be
compromised by gait belt use.
Equipment
Shoes or slippers with nonskid soles ▪ robe ▪ gait belt ▪
vital signs monitoring equipment ▪
stethoscope ▪
disinfectant pad ▪ Optional: assistive devices (walker, cane,
crutches), prescribed pain medication.
Preparation of equipment
Inspect the gait belt before use. Check the belt for broken
stitches and torn or frayed material. Don’t use the device if
the buckle is cracked or broken or it doesn’t fasten
securely.2 Check for proper buckle closure and test the
buckle to make sure that it doesn’t slip when you pull on it.
Make sure that the bed and wheelchair, if used, are in a
locked position.3
Implementation
■ Perform hand hygiene.4,5,6,7,8,9
■ Confirm the patient’s identity using at least two patient
identifiers.10
■ Provide privacy.11,12,13,14
■ Explain the reason for gait belt use to the patient and
family (if appropriate) according to their communication and
learning needs to increase their understanding, allay their
fears, and enhance cooperation.15
■ Assess the patient’s risk of falling and tolerance of recent
activities. Check for any conditions that would
contraindicate gait belt use.16,17
■ Obtain vital signs to serve as a baseline for comparison.
■ Perform a comprehensive pain assessment using
techniques appropriate for the patient’s age, condition, and
ability to understand.18 Administer pain medication, as
needed and prescribed, following safe medication
administration practices.19,20,21,22
■ Assist the patient to a comfortable sitting position; then
allow for a brief rest to help the patient adjust to postural
changes.
■ Help the patient put on a robe and appropriate footwear,
such as nonskid socks or slippers, to maintain dignity and
reduce the risk of falling.3
■ Wrap the belt around the patient’s waist and over any
clothing, with the buckle facing front.
■ Adjust the belt so that it fits snugly around the patient’s
waist (as shown below). Slide your open hand between the
belt and the patient to make sure that the device fits snugly
but isn’t too tight.2
HOSPITAL-ACQUIRED CONDITION ALERT An injury from a fall is
considered a hospital-acquired condition by the Centers for Medicare
and Medicaid Services because it can be reasonably prevented using
various best practices. Follow fall prevention techniques (such as
assessing the patient’s risk of falling, providing nonskid footwear,
instructing the patient to rise slowly to adjust to postural changes,
and using a gait belt) to reduce the risk of injury from patient
falls.3,16,17,23
■ Keep clothing as wrinkle-free as possible under the gait
belt to prevent skin breakdown.
Transferring the patient
■ If the patient has one-sided weakness, position the
destination surface (wheelchair, commode, or chair) on the
patient’s unaffected side. If the destination surface has
wheels, make sure the wheels are locked.
■ Position yourself close to the patient so that you’re facing
each other.
■ Grasp both sides of the gait belt using an underhand grip.
■ While firmly gripping the gait belt, keep your back
straight, bend your knees slightly, position your feet in a
wide stance to maintain proper body mechanics (as shown
below), and begin rocking back and forth to overcome
forces resisting transfer. Instruct the patient, on a count of
three, to push off of the surface he’s sitting on to encourage
independence.
■ Allow the patient to stand for a moment to ensure
balance.
■ Instruct the patient to pivot and to bear as much weight
as possible on the unaffected side. Support the affected
side, because the patient will tend to lean to this side.
■ Pivot on your back foot, guiding the patient to the
destination surface. Maintain contact between the
destination surface and the patient’s legs, because doing so
helps ensure proper positioning before the patient sits.
■ Keeping a firm grip on the gait belt, gently lower the
patient onto the surface. Tell the patient to reach and grasp
the armrests (as shown below), using them to bear some
weight if possible. Flex your knees and hips while assisting
the patient onto the destination surface. Using good body
mechanics prevents back injury by supporting weight with
large muscle groups.
Ambulating the patient
■ Position yourself close to the patient so that you’re facing
each other.
■ Grasp both sides of the gait belt using an underhand grip.
■ While firmly gripping the gait belt, keep your back
straight, bend your knees slightly, position your feet in a
wide stance to maintain proper body mechanics, and begin
rocking back and forth to overcome forces resisting transfer.
Instruct the patient to push off of the mattress on a count of
three to encourage independence.
■ Allow the patient to stand for a moment to ensure
balance.
■ Place one hand under the gait belt in back of the patient.
If the patient is weaker on one side, make sure to walk on
that side when ambulating (as shown below), because the
patient will tend to lean to this side. Encourage the patient
to use a handrail if available.
■ Walk closely behind and slightly to the side of the patient,
keeping the same pattern and pace as the patient.
■ Allow for rest periods as needed.
Completing the procedure
■ Remove the gait belt after use to prevent patient harm.
■ Store the gait belt at the patient’s bedside for immediate
use.
■ Perform hand hygiene.4,5,6,7,8,9
■ Clean and disinfect your stethoscope using a disinfectant
pad.24,25
■ Perform hand hygiene.4,5,6,7,8,9
■ Document the procedure.26,27,28,29
Special considerations
■ Don’t leave a gait belt applied to a patient who’s
unattended in a chair or bed. The gait belt could become
displaced and result in strangulation or other patient injury.
■ If the patient is morbidly obese or can’t bear weight,
consider using lift equipment to transfer the patient instead
of a gait belt to ensure patient safety and prevent caregiver
injury.
■ If the patient loses weight-bearing ability during
ambulation or transfer, maintain your grip on the gait belt,
pull the patient as close to your body as possible, and gently
slide the patient to the floor using the large muscles in your
upper leg. Call for assistance, and have the assistant help
you place the patient back into the chair or bed or in
another sitting position.
■ Before ambulation, decide with the patient the distance
the patient can walk and your destination. Planning helps
ensure safety.
Documentation
Document the patient’s tolerance of the procedure; the
distance that the patient ambulated, if applicable; and any
associated complications. If complications occurred, record
the date, time, and name of the practitioner notified; the
prescribed interventions; and the patient’s response to
those interventions. Document teaching provided to the
patient and family and their comprehension of that
teaching.
REFERENCES
1 U.S. Department of Labor, Occupational Safety & Health Administration.
(2009). “Guidelines for nursing homes: Ergonomics for the prevention of
musculoskeletal disorders” [Online]. Accessed via the Web at
http://www.osha.gov/ergonomics/guidelines/nursinghome/final_nh_guidelines.
html (Level I)
2 Posey Company. (2014). “Posey® EZ clean gait belts” [Online]. Accessed via
the Web at http://www.posey.com/sites/default/files/product-docs/M6022-
Posey%C2%AE-EZ-Clean- Gait-Belts.pdf
3 Ganz, D. A., et al. (2013). Preventing falls in hospitals: A toolkit for improving
quality of care (AHRQ Publication No. 13-0015-EF). Rockville, MD: Agency for
Healthcare Research and Quality. Accessed via the Web at
http://www.ahrq.gov/sites/default/files/publications/files/fallpxtoolkit.pdf
(Level VII)
4 Centers for Disease Control and Prevention. (2002). Guideline for hand
hygiene in health-care settings: Recommendations of the Healthcare Infection
Control Practices Advisory Committee and the HICPAC/SHEA/APIC/IDSA Hand
Hygiene Task Force. MMWR Recommendations and Reports, 51(RR-16), 1–45.
Accessed via the Web at https://www.cdc.gov/mmwr/pdf/rr/rr5116.pdf (Level
II)
5 World Health Organization. (2009). “WHO guidelines on hand hygiene in
health care: First global patient safety challenge, clean care is safer care”
[Online]. Accessed via the Web at
http://apps.who.int/iris/bitstream/10665/44102/1/9789241597906_eng.pdf
(Level IV)
6 The Joint Commission. (2019). Standard NPSG.07.01.01. Comprehensive
accreditation manual for hospitals. Oakbrook Terrace, IL: The Joint
Commission. (Level VII)
7 Centers for Medicare and Medicaid Services, Department of Health and
Human Services. (2015). Condition of participation: Infection control. 42 C.F.R.
§ 482.42.
8 Accreditation Association for Hospitals and Health Systems. (2017). Standard
07.01.21. Healthcare Facilities Accreditation Program: Accreditation
requirements for acute care hospitals. Chicago, IL: Accreditation Association
for Hospitals and Health Systems. (Level VII)
9 DNV GL-Healthcare USA, Inc. (2016). IC.1.SR.1 . NIAHO accreditation
requirements: Interpretive guidelines & surveyor guidance (version 11).
Milford, OH: DNV GL-Healthcare USA, Inc. (Level VII)
10 The Joint Commission. (2019). Standard NPSG.01.01.01. Comprehensive
accreditation manual for hospitals. Oakbrook Terrace, IL: The Joint
Commission. (Level VII)
11 Accreditation Association for Hospitals and Health Systems. (2017). Standard
15.01.16. Healthcare Facilities Accreditation Program: Accreditation
requirements for acute care hospitals. Chicago, IL: Accreditation Association
for Hospitals and Health Systems. (Level VII)
12 Centers for Medicare and Medicaid Services, Department of Health and
Human Services. (2015). Condition of participation: Patient’s rights. 42 C.F.R.
§ 482.13(c)(1).
13 DNV GL-Healthcare USA, Inc. (2016). PR.1.SR.5 . NIAHO® accreditation
requirements: Interpretive guidelines & surveyor guidance (version 11).
Milford, OH: DNV GL-Healthcare USA, Inc. (Level VII)
14 The Joint Commission. (2019). Standard RI.01.01.01. Comprehensive
accreditation manual for hospitals. Oakbrook Terrace, IL: The Joint
Commission. (Level VII)
15 The Joint Commission. (2019). Standard PC.02.01.21. Comprehensive
accreditation manual for hospitals. Oakbrook Terrace, IL: The Joint
Commission. (Level VII)
16 The Joint Commission. (2019). Standard PC.01.02.08 . Comprehensive
accreditation manual for hospitals. Oakbrook Terrace, IL: The Joint
Commission. (Level VII)
17 Accreditation Association for Hospitals and Health Systems. (2017). Standard
16.02.02. Healthcare Facilities Accreditation Program: Accreditation
requirements for acute care hospitals. Chicago, IL: Accreditation Association
for Hospitals and Health Systems. (Level VII)
18 The Joint Commission. (2019). Standard PC.01.02.07. Comprehensive
accreditation manual for hospitals. Oakbrook Terrace, IL: The Joint
Commission. (Level VII)
19 The Joint Commission. (2019). Standard MM.06.01.01. Comprehensive
accreditation manual for hospitals. Oakbrook Terrace, IL: The Joint
Commission. (Level VII)
20 Accreditation Association for Hospitals and Health Systems. (2017). Standard
16.01.03. Healthcare Facilities Accreditation Program: Accreditation
requirements for acute care hospitals. Chicago, IL: Accreditation Association
for Hospitals and Health Systems. (Level VII)
21 Centers for Medicare and Medicaid Services, Department of Health and
Human Services. (2015). Condition of participation: Nursing services. 42
C.F.R. § 482.23(c).
22 DNV GL-Healthcare USA, Inc. (2016). MM.1 .SR.2. NIAHO® accreditation
requirements: Interpretive guidelines & surveyor guidance (version 11).
Milford, OH: DNV GL-Healthcare USA, Inc. (Level VII)
23 Jarrett, N., & Callaham, M. (2016). “Evidence-based guidelines for selected
hospital-acquired conditions: Final report” [Online]. Accessed via the Web at
https://www.cms.gov/Medicare/Medicare-Fee-for-Service-
Payment/HospitalAcqCond/Downloads/2016-HAC-Report.pdf
24 Rutala, W. A., et al. (2008). “Guideline for disinfection and sterilization in
healthcare facilities, 2008” [Online]. Accessed via the Web at
http://www.cdc.gov/hicpac/pdf/guidelines/Disinfection_Nov_2008.pdf (Level I)
25 Accreditation Association for Hospitals and Health Systems. (2017). Standard
07.02.03. Healthcare Facilities Accreditation Program: Accreditation
requirements for acute care hospitals. Chicago, IL: Accreditation Association
for Hospitals and Health Systems. (Level VII)
26 The Joint Commission. (2019). Standard RC.01.03 .01. Comprehensive
accreditation manual for hospitals. Oakbrook Terrace, IL: The Joint
Commission. (Level VII)
27 Accreditation Association for Hospitals and Health Systems. (2017). Standard
10.00 .03. Healthcare Facilities Accreditation Program: Accreditation
requirements for acute care hospitals. Chicago, IL: Accreditation Association
for Hospitals and Health Systems. (Level VII)
28 Centers for Medicare and Medicaid Services, Department of Health and
Human Services. (2015). Condition of participation: Medical record services.
42 C.F.R. § 482.24(b).
29 DNV GL-Healthcare USA, Inc. (2016). MR.2 .SR.1 . NIAHO® accreditation
requirements: Interpretive guidelines & surveyor guidance (version 11).
Milford, OH: DNV GL-Healthcare USA, Inc. (Level VII)
GASTRIC LAVAGE
Gastric lavage flushes the stomach and removes ingested
substances through a gastric lavage tube. The procedure
may be used to empty the stomach in preparation for
endoscopic examination or after poisoning or a drug
overdose, especially in patients who have central nervous
system depression or an inadequate gag reflex. However,
the American Academy of Clinical Toxicology doesn’t
recommend routinely using gastric lavage to manage
instances of poisoning because its benefits don’t outweigh
the risks; it may delay treatment with activated charcoal
and other therapies, and it may cause serious
complications.1,2
Gastric lavage should be performed in the emergency
department or on the intensive care unit by a practitioner,
gastroenterologist, or nurse who has received proper
training.1,3 A large-bore lavage tube may be inserted by a
gastroenterologist.
This procedure is contraindicated after ingestion of a
corrosive substance (such as lye, petroleum distillates,
ammonia, alkalis, or mineral acids) because the lavage tube
may perforate the already compromised esophagus.1 It’s
also contraindicated for patients with an unprotected airway
or craniofacial abnormalities or injuries, when lavage
increases the risk and severity of aspiration, for a patient at
risk for hemorrhage or GI perforation because of pathology
or recent surgery, and for a patient who resists or refuses to
cooperate.1 Gastric lavage used to manage upper GI
hemorrhage is controversial.4 Studies show that it allows
endoscopy to be performed more quickly, but it doesn’t
affect clinical outcomes.5
Correct lavage tube placement is essential for patient
safety because accidental misplacement (in the lungs, for
example) followed by lavage can be fatal.
Equipment
2 to 3 L of normal saline solution, tap water, or appropriate
antidote, as ordered ▪ graduated container ▪ Ewald tube or
any large-lumen gastric tube, typically #34 to #40 French
(see Using wide-bore gastric tubes) ▪ connection tubing ▪
intermittent suction setup ▪ water-soluble lubricant or
anesthetic ointment ▪ emesis basin ▪ 1⁄2′′ (1.3 -cm)
hypoallergenic tape ▪ 60-mL bulb or catheter-tip syringe or
prepackaged syringe irrigation kit ▪ gloves ▪ mask and
goggles or mask with face shield ▪ gown ▪ fluid-
impermeable pad or towel ▪ Yankauer (tonsil-tip) suction
device attached to suction ▪ cardiac monitor ▪ pulse
oximeter and probe ▪ automated blood pressure cuff ▪
stethoscope ▪ disinfectant pad ▪ emergency equipment
(code cart with cardiac medications, defibrillator, handheld
resuscitation bag with mask, oxygen source, intubation
equipment) ▪ Optional: charcoal tablets or solution.
Preparation of equipment
Make sure emergency equipment is readily available and
functioning properly. Set up the lavage and suction
equipment. Lubricate the end of the lavage tube with the
water-soluble lubricant or anesthetic ointment. Set up the
Yankauer (tonsil-tip) catheter for oropharyngeal suctioning.
Check any item that has an expiration date to ensure that
it hasn’t expired. If a product has expired, its integrity has
been compromised, or you find it defective, remove it from
patient use, label it as expired or defective, and report the
expiration or defect as directed by your facility.
Implementation
■ Verify the practitioner’s order.
■ Gather and prepare the appropriate equipment.
■ Perform hand hygiene.6,7,8,9,10,11
■ Confirm the patient’s identity using at least two patient
identifiers.12
■ Provide privacy.13,14,15,16
■ Explain the procedure to the patient and family members
(if appropriate) according to their individual communication
and learning needs to increase their understanding, allay
their fears, and enhance cooperation.17
■ Raise the patient’s bed to waist level when providing
patient care to avoid caregiver back strain.18
■ Attach the patient to a cardiac monitor, automated blood
pressure cuff, and pulse oximeter for monitoring during the
procedure.19 Ensure the upper and lower alarm limits are
set according to the patient’s current condition, and that the
alarms are turned on, functioning properly, and audible to
staff.20,21,22
■ Obtain the patient’s vital signs, and the oxygen saturation
level using pulse oximetry, and assess the patient’s level of
consciousness to serve as a baseline for comparison.
■ Assess the patient’s cardiac status (including the cardiac
rhythm) and respiratory status to serve as a baseline.19
■ Perform hand hygiene.6,7,8,9,10,11
■ Put on a gown, gloves, and a mask and goggles or mask
with face shield to comply with standard precautions.23,24
EQUIPMENT
Using wide-bore gastric tubes
If you need to deliver a large volume of fluid rapidly through a gastric tube
(for example, when irrigating the stomach of a patient with profuse gastric
bleeding or poisoning), a wide-bore gastric tube usually serves best. Typically
inserted orally, these tubes remain in place only long enough to complete the
lavage and evacuate stomach contents.
Ewald tube
In an emergency, using an Ewald tube (a single-lumen tube with several
openings at the distal end) allows you to aspirate large amounts of gastric
contents quickly.
Levacuator tube
The Levacuator tube has two lumens. Use the larger lumen for evacuating
gastric contents; use the smaller one for instilling an irrigant.
Edlich tube
The single-lumen Edlich tube has four openings near the closed distal tip. A
funnel or syringe can be connected at the proximal end. Like the Ewald tube,
the Edlich tube lets you withdraw large quantities of gastric contents quickly.
■ Drape a towel or fluid-impermeable pad over the patient’s
chest to protect from soiling.19
■ Place the bed in the semi-Fowler position, ensuring the
head of the bed is elevated 10 to 20 degrees, creating a
slight reverse-Trendelenburg position. 19
■ Place the patient in the left lateral decubitus position to
increase access to the stomach, decrease pyloric emptying,
and prevent aspiration should the patient vomit.19
■ The practitioner or nurse inserts the lavage tube nasally
or orally and advances it slowly and gently, because forceful
insertion may injure tissues.
■ Because the patient may vomit when the lavage tube
reaches the posterior pharynx during insertion, be prepared
to suction the airway immediately with a Yankauer (tonsil-
tip) suction device.1
■ The tube’s placement is checked by aspirating stomach
contents with a 60-mL syringe and obtaining X-ray
confirmation.19
■ After placement is confirmed, secure the lavage tube
nasally or orally with hypoallergenic tape.
■ Trace the connection tubing from the patient to its point
of origin to ensure that it’s attached to the proper port to
prevent dangerous misconnections.25,26
■ Aspirate stomach contents using a 60-mL syringe.
■ Begin gastric lavage by slowly instilling 200 to 300 mL of
fluid (for adults) using the 60-mL syringe.19
■ Aspirate the irrigant with the syringe and empty it into a
graduated container or connect the lavage tube to the
intermittent suction.19
■ Measure the outflow amount to make sure it equals at
least the amount of irrigant you instilled to prevent
accidental stomach distention and vomiting. If the drainage
amount falls significantly short of the instilled amount,
reposition the tube until sufficient solution flows out.
■ Repeat the procedure as indicated.
■ If the procedure is being performed for hemorrhage,
repeat lavage intermittently until returned fluids appear
clear, signaling that bleeding has stopped.
■ If the procedure is being performed for an overdose,
repeat lavage intermittently until the aspirated fluid is clear
of toxic substances.
■ Assess the patient’s vital signs, cardiac rhythm, oxygen
saturation level, and level of consciousness (LOC) during
and after the procedure.19 Gastric lavage has been shown to
cause changes in oxygen saturation and may lead to
hypoxia.19 Notify the practitioner of any changes.
■ If ordered, remove the lavage tube by clamping the tube
and then pulling it out slowly and steadily.
■ Return the patient’s bed to the lowest position to prevent
falls and maintain patient safety.27
■ Dispose of used supplies in the appropriate receptacles.23
■ Remove and discard your gloves and personal protective
equipment.23,24
■ Perform hand hygiene.6,7,8,9,10,11
■ Clean and disinfect your stethoscope using a disinfectant
pad.28,29
■ Perform hand hygiene.6,7,8,9,10,11
■ Document the procedure.30,31,32,33
Special considerations
■ Watch closely for airway obstruction caused by vomiting
or excess oral secretions. As needed, suction the oral cavity
frequently throughout gastric lavage to ensure an open
airway and prevent aspiration. Be aware that, for the same
reasons, and if the patient doesn’t exhibit an adequate gag
reflex or is comatose, the patient may require an
endotracheal tube before the procedure.1
■ If ordered, after lavage to remove poisons or drugs, mix
charcoal tablets or solution with the irrigant (water or
normal saline solution) and administer the mixture through
the gastric tube. The charcoal will absorb any remaining
toxic substances. Note that the tube may be clamped
temporarily, allowed to drain via gravity, attached to
intermittent suction, or removed.
■ When performing gastric lavage to stop bleeding, keep
precise intake and output records to determine the amount
of bleeding.
■ Be aware that you may need to measure serum
electrolyte and arterial blood gas levels during or after
lavage when large volumes of fluid are instilled and
withdrawn.
■ Note that The Joint Commission issued a sentinel event
alert concerning medical device alarm safety, because
alarm-related events have been associated with permanent
loss of function and death. Among the major contributing
factors were improper alarm settings, inappropriately turned
off alarms, and alarm signals that were not audible to staff.
Make sure that alarm limits are appropriately set and that
alarms are turned on, functioning properly, and audible to
staff. Follow facility guidelines for preventing alarm
fatigue.22
■ The Joint Commission has issued a sentinel event alert
related to managing risk during transition to new
International Organization for Standardization tubing
standards that were designed to prevent dangerous tubing
misconnections, which can lead to serious patient injury and
death. During the transition, make sure to trace the
connection tubing and catheter from the patient to the point
of origin before connecting or reconnecting any device or
infusion, at any care transition (such as a new setting or
service), and as part of the handoff process; route any tubes
and catheters having different purposes in different
standardized directions; label the connection tubing at the
distal and proximal ends when different access sites are
present or several bags are hanging; use connection tubing
and equipment only as intended; and store medications for
different delivery routes in separate locations.26
Complications
Aspiration
pneumonia,
laryngospasm,
arrhythmias,
esophageal and stomach perforation, fluid and electrolyte
imbalances, respiratory distress, and small conjunctival
hemorrhages are complications of gastric lavage.1
Documentation
Record the date and time of gastric lavage performance,
size and type of gastric tube used, and confirmation of tube
placement. Document the volume and type of irrigant, the
amount of drained gastric contents, and your observations,
including color and consistency of drainage. Note the
patient’s vital signs, cardiac rhythm, oxygen saturation
level, and LOC and cardiac and respiratory status before,
during, and after the procedure. Document any drugs
instilled through the gastric tube; the time the tube was
removed; and the patient’s tolerance of the procedure.
Document patient and family teaching performed, patient
and family understanding of that teaching, and whether
follow-up teaching was required.
REFERENCES
1 Benson, B. E., et al. (2013). Position paper update: Gastric lavage for
gastrointestinal decontamination. Clinical Toxicology, 51(3), 140–146. (Level
VII)
2 Miyauchi, M., et al. (2013). Gastric lavage guided by ultrathin transnasal
esophagogastroduodenoscopy in a life-threatening case of tobacco extract
poisoning: A case report. Journal of Nippon Medical School, 80(4), 307–311.
Accessed via the Web at
https://www.jstage.jst.go.jp/article/jnms/80/4/80_307/_pdf
3 Mostafazadeh, B., & Farzaneh, E. (2012). A novel protocol for gastric lavage in
patients with aluminum phosphide poisoning: A double-blind study. Acta
Medica Iranica, 50(8), 530–534.
4 Saltzman, J. R. Approach to acute upper gastrointestinal bleeding in adults.
(2017). In: UpToDate, Feldman, M., & Travis, A. C . (Eds.). Retrieved from: the
Web at http://www.uptodate.com
5 Huang, E. S ., et al. (2011). Impact of nasogastric lavage on outcomes in acute
GI bleeding. Gastrointestinal Endoscopy, 74(5), 971–980 . (Level VI)
6 Centers for Disease Control and Prevention. (2002). Guideline for hand
hygiene in health-care settings: Recommendations of the Healthcare Infection
Control Practices Advisory Committee and the HICPAC/SHEA/APIC/IDSA Hand
Hygiene Task Force. MMWR Recommendations and Reports, 51(RR-16), 1–45.
Accessed via the Web at https://www.cdc.gov/mmwr/pdf/rr/rr5116.pdf (Level
II)
7 World Health Organization. (2009). “WHO guidelines on hand hygiene in
health care: First global patient safety challenge, clean care is safer care”
[Online]. Accessed via the Web at
http://apps.who.int/iris/bitstream/10665/44102/1/9789241597906_eng.pdf
(Level IV)
8 The Joint Commission. (2019). Standard NPSG.07.01.01. Comprehensive
accreditation manual for hospitals. Oakbrook Terrace, IL: The Joint
Commission. (Level VII)
9 Accreditation Association for Hospitals and Health Systems. (2017). Standard
07.01.21. Healthcare Facilities Accreditation Program: Accreditation
requirements for acute care hospitals. Chicago, IL: Accreditation Association
for Hospitals and Health Systems. (Level VII)
10 Centers for Medicare and Medicaid Services, Department of Health and
Human Services. (2015). Condition of participation: Infection control. 42 C.F.R.
§ 482.42.
11 DNV GL-Healthcare USA, Inc. (2016). IC.1 .SR.1 . NIAHO® accreditation
requirements: Interpretive guidelines & surveyor guidance (version 11).
Milford, OH: DNV GL-Healthcare USA, Inc. (Level VII)
12 The Joint Commission. (2019). Standard NPSG.01.01.01. Comprehensive
accreditation manual for hospitals. Oakbrook Terrace, IL: The Joint
Commission. (Level VII)
13 Accreditation Association for Hospitals and Health Systems. (2017). Standard
15.01.16. Healthcare Facilities Accreditation Program: Accreditation
requirements for acute care hospitals. Chicago, IL: Accreditation Association
for Hospitals and Health Systems. (Level VII)
14 Centers for Medicare and Medicaid Services, Department of Health and
Human Services. (2015). Condition of participation: Patient’s rights. 42 C.F.R.
§ 482.13(c)(1).
15 The Joint Commission. (2019). Standard RI.01.01.01. Comprehensive
accreditation manual for hospitals. Oakbrook Terrace, IL: The Joint
Commission. (Level VII)
16 DNV GL-Healthcare USA, Inc. (2016). PR.1.SR.5 . NIAHO® accreditation
requirements: Interpretive guidelines & surveyor guidance (version 11).
Milford, OH: DNV GL-Healthcare USA, Inc. (Level VII)
17 The Joint Commission. (2019). Standard PC.02.01.21. Comprehensive
accreditation manual for hospitals. Oakbrook Terrace, IL: The Joint
Commission. (Level VII)
18 Waters, T. R., et al. (2009). “Safe patient handling training for schools of
nursing” [Online]. Accessed via the Web at
http://www.cdc.gov/niosh/docs/2009-127/pdfs/2009-127.pdf (Level VII)
19 Wiegand, D. L. (2017). AACN procedure manual for high acuity, progressive,
and critical care (7th ed.). St. Louis, MO: Elsevier.
20 American Association of Critical-Care Nurses. (2013). “A ACN practice alert:
Alarm management” [Online]. Accessed via the Web at
https://www.aacn.org/aacn-website/shared/content/practice-
alerts/2015/11/25/alarm-management (Level VII)
21 Graham, K. C., & Cvach, M. (2010). Monitor alarm fatigue: Standardizing use
of physiological monitors and decreasing nuisance alarms. American Journal
of Critical Care, 19(1), 28–37. Accessed via the Web at
http://ajcc.aacnjournals.org/content/19/1/28.full.pdf
22 The Joint Commission. (2013). “Sentinel event alert: Medical device alarm
safety in hospitals” [Online]. Accessed via the Web at
http://www.jointcommission.org/assets/1/18/SEA_50_alarms_4 _5 _13_FINAL1 .P
DF (Level VII)
23 Siegel, J. D ., et al. (2007, revised 2017). “2007 guideline for isolation
precautions: Preventing transmission of infectious agents in healthcare
settings” [Online]. Accessed via the Web at
http://www.cdc.gov/hicpac/pdf/isolation/Isolation2007.pdf (Level II)
24 Accreditation Association for Hospitals and Health Systems. (2017). Standard
07.01.10. Healthcare Facilities Accreditation Program: Accreditation
requirements for acute care hospitals. Chicago, IL: Accreditation Association
for Hospitals and Health Systems. (Level VII)
25 U.S . Food and Drug Administration. (n.d .). “Look. Check. Connect. Safe
medical device connections save lives” [Online]. Accessed via the Web at
http://www.fda.gov/downloads/MedicalDevices/Safety/AlertsandNotices/UCM1
34873.pdf
26 The Joint Commission. (2014). “Sentinel event alert: Managing risk during
transition to new ISO tubing connector standards” [Online]. Accessed via the
Web at
http://www.jointcommission.org/assets/1/6/SEA_53_Connectors_8 _19_14 _final.
pdf (Level VII)
27 Ganz, D. A., et al. (2013). Preventing falls in hospitals: A toolkit for improving
quality of care (AHRQ Publication No. 13-0015-EF). Rockville, MD: Agency for
Healthcare Research and Quality. Accessed via the Web at
http://www.ahrq.gov/sites/default/files/publictions/files/fallpxtoolkit.pdf (Level
VII)
28 Rutala, W. A., et al. (2008, revised 2017). “Guideline for disinfection and
sterilization in healthcare facilities, 2008” [Online]. Accessed via the Web at
https://www.cdc.gov/infectioncontrol/pdf/guidelines/disinfection-
guidelines.pdf (Level I)
29 Accreditation Association for Hospitals and Health Systems. (2017). Standard
07.02.03. Healthcare Facilities Accreditation Program: Accreditation
requirements for acute care hospitals. Chicago, IL: Accreditation Association
for Hospitals and Health Systems. (Level VII)
30 The Joint Commission. (2019). Standard RC.01.03 .01. Comprehensive
accreditation manual for hospitals. Oakbrook Terrace, IL: The Joint
Commission. (Level VII)
31 Accreditation Association for Hospitals and Health Systems. (2017). Standard
10.00 .03. Healthcare Facilities Accreditation Program: Accreditation
requirements for acute care hospitals. Chicago, IL: Accreditation Association
for Hospitals and Health Systems. (Level VII)
32 Centers for Medicare and Medicaid Services, Department of Health and
Human Services. (2015). Condition of participation: Medical record services.
42 C.F.R. § 482.24(b).
33 DNV GL-Healthcare USA, Inc. (2016). MR.2 .SR.1 . NIAHO® accreditation
requirements: Interpretive guidelines & surveyor guidance (version 11).
Milford, OH: DNV GL-Healthcare USA, Inc. (Level VII)
GASTROSTOMY FEEDING BUTTON REINSERTION
A gastrostomy feeding button serves as an alternative to a
standard gastrostomy tube. The low-profile feeding device is
generally used for an ambulatory patient or a pediatric
patient who’s receiving long-term enteral feedings.
Low-profile feeding devices are kept in place by either a
balloon or retention dome.1 Here we describe reinsertion of
the button that has a mushroom retention dome at one end
and two wing tabs and a flexible safety plug at the other.
When inserted into an established stoma, the button lies
almost flush with the skin, with only the tabs and the top of
the safety plug visible.
A one-way, antireflux valve mounted just inside the
mushroom dome prevents accidental leakage of gastric
contents. Follow the manufacturer’s instructions for
frequency of button replacement.2
The gastrostomy feeding button is contraindicated in
patients who don’t have a well-established stoma tract or
whose stomach has not been approximated to the stomach
wall, and in patients with a stoma tract longer than 1.7′′ (4.4
cm).3,4
Equipment
Gastrostomy feeding button of the correct size (or all three
sizes, if the correct one isn’t known) ▪ stoma measuring
device ▪ obturator ▪ washcloth ▪ soap and water ▪ water-
soluble lubricant ▪ gloves.
Implementation
■ Verify the practitioner’s order.
■ Gather the appropriate equipment.
NURSING ALERT To prevent the risk of infection, don’t reuse a
feeding button that has popped out.3
■ Perform hand hygiene.4,5,6,7,8,9
■ Confirm the patient’s identify using at least two patient
identifiers.10
■ Provide privacy.11,12,13,14
■ Explain the procedure to the patient and family (if
appropriate) according to their individual communication
and learning needs to increase their understanding, allay
their fears, and enhance cooperation.15
■ Raise the bed to waist level while providing care to
prevent caregiver back strain.16
■ Position the patient to allow easy access to the stoma.
■ Perform hand hygiene.4,5,6,7,8,9
■ Put on gloves.17,18
■ Inspect the stoma site for signs of infection, such as
drainage, pus, inflammation, and tenderness. If any are
present, don’t proceed with the procedure and notify the
practitioner.3,19
■ Check the depth of the patient’s stoma using a stoma
measuring device to make sure you have a feeding button
of the correct size.3,19 If the stoma length falls between two
markings, use the one that is external to the stoma tract.3,19
NURSING ALERT Periodic sizing is required, especially in growing
children, to prevent compression injuries of the gastric mucosa or
epidermis.2
■ Clean around the stoma with mild soap and water.
■ Lubricate the obturator with a water-soluble lubricant,
and distend the button several times to ensure patency and
function of the antireflux valve within the button.
■ Lubricate the mushroom dome and the stoma.
■ Gently push the button through the stoma into the
stomach (as shown on top right). Don’t exert too much
pressure; excess pressure during insertion may cause the
button to be pushed into the stomach.3,19
■ Remove the obturator by gently rotating it as you
withdraw it to keep the antireflux valve from adhering to it.
■ After removing the obturator, confirm placement by
rotating the button and gently pushing it into the stoma. If
you feel no resistance, the device is properly placed.3
■ Close the flexible safety plug (as shown below), which
should be relatively flush with the skin surface. The button
is now ready for administration of enteral feedings.
■ Lower the patient’s bed to the lowest level to prevent
falls and maintain patient safety.20
■ Discard used disposable equipment in the appropriate
receptacle.
■ Remove and discard your gloves and perform hand
hygiene.4,5,6,7,8,9
■ Document the procedure.21,22,23,24
Special considerations
■ If the button pops out during feeding, estimate the
formula already delivered, reinsert a new button, and
resume feeding.
■ Once daily, clean the peristomal skin with mild soap and
water and let the skin air-dry for 20 minutes to avoid skin
irritation. Also clean the site whenever spillage from the
feeding bag occurs.
Patient teaching
Before discharge, make sure the patient can insert and care
for the gastrostomy feeding button. If possible, teach the
patient or a family member how to reinsert the button by
first practicing on a model. Offer written instructions and
answer questions on obtaining replacement supplies.
Complications
Complications from gastrostomy button reinsertion are rare;
they include irritation of the surrounding skin from leakage
of gastric contents and placing or slippage of the device into
the peritoneal cavity, which could cause peritonitis or
sepsis.3,19 Improper placement or excessive traction on the
gastrostomy button may cause misalignment of the internal
dome, dislodgement, or tissue necrosis, and too much
pressure on the entire device may cause it to become
dislodged or be pushed into the stomach.3,19
Documentation
Record the reason for reinsertion, the size of the button
used, and the patient’s tolerance of the procedure.
Document any complications and nursing actions taken.
Note the appearance of the stoma and surrounding skin.
Also document any patient teaching provided, as well as the
patient’s and family’s understanding of the teaching.
REFERENCES
1 Blumenstein, I., et al. (2014). Gastroenteric tube feeding: Techniques,
problems and solutions. World Journal of Gastroenterology, 20(26), 8505–
8524. Accessed via the Web at
https://www.ncbi.nlm.nih.gov/pmc/articles/PMC4093701/
2 Boullata, J. I ., et al. (2016). ASPEN safe practices for enteral nutrition therapy.
Journal of Parenteral and Enteral Nutrition, 41(1), 15–103. Accessed via the
Web at http://journals.sagepub.com/doi/full/10.1177/0148607116673053
(Level VII)
3 Bard Access Systems, Inc. (2009). “BARD button replacement gastrostomy
device: Information for use” [Online]. Accessed via the Web at
http://www.bardpv.com/wp-
content/uploads/2013/07/0723876_CE_Button_Replacement_Gastrostomy_De
vice_IFU_web.pdf
4 The Joint Commission. (2019). Standard NPSG.07.01.01. Comprehensive
accreditation manual for hospitals. Oakbrook Terrace, IL: The Joint
Commission. (Level VII)
5 Centers for Disease Control and Prevention. (2002). Guideline for hand
hygiene in health-care settings: Recommendations of the Healthcare Infection
Control Practices Advisory Committee and the HICPAC/SHEA/APIC/IDSA Hand
Hygiene Task Force. MMWR Recommendations and Reports, 51(RR-16), 1–45.
Accessed via the Web at https://www.cdc.gov/mmwr/pdf/rr/rr5116.pdf (Level
II)
6 World Health Organization. (2009). “WHO guidelines on hand hygiene in
health care: First global patient safety challenge, clean care is safer care”
[Online]. Accessed via the Web at
http://apps.who.int/iris/bitstream/10665/44102/1/9789241597906_eng.pdf
(Level IV)
7 Accreditation Association for Hospitals and Health Systems. (2017). Standard
07.01.21. Healthcare Facilities Accreditation Program: Accreditation
requirements for acute care hospitals. Chicago, IL: Accreditation Association
for Hospitals and Health Systems. (Level VII)
8 Centers for Medicare and Medicaid Services, Department of Health and
Human Services. (2015). Condition of participation: Infection control. 42 C.F.R.
§ 482.42.
9 DNV GL-Healthcare USA, Inc. (2016). IC.1.SR.1 . NIAHO® accreditation
requirements: Interpretive guidelines & surveyor guidance (version 11).
Milford, OH: DNV GL-Healthcare USA, Inc. (Level VII)
10 The Joint Commission. (2019). Standard NPSG.01.01.01. Comprehensive
accreditation manual for hospitals. Oakbrook Terrace, IL: The Joint
Commission. (Level VII)
11 Accreditation Association for Hospitals and Health Systems. (2017). Standard
15.01.16. Healthcare Facilities Accreditation Program: Accreditation
requirements for acute care hospitals. Chicago, IL: Accreditation Association
for Hospitals and Health Systems. (Level VII)
12 Centers for Medicare and Medicaid Services, Department of Health and
Human Services. (2015). Condition of participation: Patient’s rights. 42 C.F.R.
§ 482.13(c)(1).
13 DNV GL-Healthcare USA, Inc. (2016). PR.1.SR.5 . NIAHO® accreditation
requirements: Interpretive guidelines & surveyor guidance (version 11).
Milford, OH: DNV GL-Healthcare USA, Inc. (Level VII)
14 The Joint Commission. (2019). Standard RI.01.01.01. Comprehensive
accreditation manual for hospitals. Oakbrook Terrace, IL: The Joint
Commission. (Level VII)
15 The Joint Commission. (2019). Standard PC.02.01.21. Comprehensive
accreditation manual for hospitals. Oakbrook Terrace, IL: The Joint
Commission. (Level VII)
16 Waters, T. R., et al. (2009). “Safe patient handling training for schools of
nursing” [Online]. Accessed via the Web at
http://www.cdc.gov/niosh/docs/2009-127/pdfs/2009-127.pdf (Level VII)
17 Siegel, J. D ., et al. (2007, revised 2017). “2007 guideline for isolation
precautions: Preventing transmission of infectious agents in healthcare
settings” [Online]. Accessed via the Web at
http://www.cdc.gov/hicpac/pdf/isolation/Isolation2007.pdf (Level II)
18 Accreditation Association for Hospitals and Health Systems. (2017). Standard
07.01.10. Healthcare Facilities Accreditation Program: Accreditation
requirements for acute care hospitals. Chicago, IL: Accreditation Association
for Hospitals and Health Systems. (Level VII)
19 Bard Peripheral Vascular. (2014). “Enteral feeding tube” [Online]. Accessed
via the Web at http://www.bardpv.com/wp-
content/uploads/2014/05/EnteralFeedingS120382_r0.pdf
20 Ganz, D. A., et al. (2013). Preventing falls in hospitals: A toolkit for improving
quality of care (AHRQ Publication No. 13-0015-EF). Rockville, MD: Agency for
Healthcare Research and Quality. Accessed via the Web at
http://www.ahrq.gov/sites/default/files/publications/files/fallpxtoolkit.pdf
(Level VII)
21 The Joint Commission. (2019). Standard RC.01.03 .01. Comprehensive
accreditation manual for hospitals. Oakbrook Terrace, IL: The Joint
Commission. (Level VII)
22 Centers for Medicare and Medicaid Services, Department of Health and
Human Services. (2015). Condition of participation: Medical record services.
42 C.F.R. § 482.24(b).
23 Accreditation Association for Hospitals and Health Systems. (2017). Standard
10.00 .03. Healthcare Facilities Accreditation Program: Accreditation
requirements for acute care hospitals. Chicago, IL: Accreditation Association
for Hospitals and Health Systems. (Level VII)
24 DNV GL-Healthcare USA, Inc. (2016). MR.2 .SR.1 . NIAHO® accreditation
requirements: Interpretive guidelines & surveyor guidance (version 11).
Milford, OH: DNV GL-Healthcare USA, Inc. (Level VII)
H
HAIR CARE
Combing and brushing a patient’s hair stimulates scalp
circulation, removes dead cells and debris, and distributes
hair oils to produce a healthy sheen. The frequency of hair
care depends on the length and texture of the patient’s hair,
the duration of hospitalization, and the patient’s condition.
Usually, hair should be combed and brushed daily.
Equipment
Comb ▪ brush ▪ bath towel ▪ Optional: gloves, wide-tooth
comb, pick, lubricating conditioner, hot soapy water, hair
ties, hair pins.
Preparation of equipment
The comb and brush should be clean. If necessary, wash
them in hot, soapy water. The comb should have dull, even
teeth to prevent scratching the scalp. The brush should
have stiff bristles to enhance vigorous brushing and
stimulation of circulation.
Implementation
■ Gather the equipment on the patient’s bedside stand.
■ Perform hand hygiene.1,2,3,4,5,6
■ Confirm the patient’s identity using at least two patient
identifiers.7
■ Provide privacy.8,9,10,11
■ Tell the patient you’re going to comb and brush the hair
to promote circulation. If possible, encourage the patient to
do this, assisting as necessary.
■ Raise the patient’s bed to waist level when providing care
to prevent caregiver back strain.12 If the patient’s condition
allows, help the patient to a sitting position by raising the
head of the bed.
■ Drape a bath towel over the patient’s pillow and
shoulders to catch loose hair and dirt.
■ Put on gloves if the patient has open scalp lesions to
comply with standard precautions.13,14,15
■ For short hair, comb and brush one side at a time. For
long or curly hair, turn the patient’s head away from you,
and then part the hair down the middle from front to back.
Comb and brush the hair on the side facing you. Then turn
the patient’s head and comb and brush the opposite side.
Part hair into small sections for easier handling. Comb one
section at a time, working from the ends toward the scalp to
remove tangles. Anchor each section of hair above the area
being combed to avoid hurting the patient.
■ For tightly curled hair, use a comb with wide-spaced teeth
or a pick; comb through the hair working from the neckline
toward the forehead.16
■ If the hair is tangled, rub a small amount of lubricating
conditioner on the hair strands to loosen them.17 Then,
comb and brush the hair, making sure to get all the tangles
out.
■ Style the hair as the patient prefers. Braiding long or curly
hair helps prevent snarling. To braid, part hair down the
middle of the scalp and begin braiding near the face. Don’t
braid too tightly to avoid patient discomfort. Fasten the ends
of the braids with hair ties. Pin the braids across the top of
the patient’s head or let them hang, as the patient desires,
so the finished braids don’t press against the patient’s
scalp.
■ After styling the hair, carefully remove the towel by
folding it inward. This technique prevents loose hairs and
debris from falling onto the pillow or into the patient’s bed.
■ Return the bed to the lowest position to prevent falls and
maintain patient safety.18
■ Remove and discard your gloves, if worn.13
■ Perform hand hygiene.1,2,3,4,5,6
■ Document the procedure.19,20,21,22
Special considerations
■ When providing hair care, check the patient’s scalp
carefully for signs of scalp disorders or skin breakdown,
particularly if the patient is bedridden.
■ Make sure each patient has his or her own comb and
brush to avoid cross-contamination.
Documentation
Describe any scalp abnormalities in your notes.
REFERENCES
1 The Joint Commission. (2019). Standard NPSG.07.01.01. Comprehensive
accreditation manual for hospitals. Oakbrook Terrace, IL: The Joint
Commission. (Level VII)
2 Centers for Disease Control and Prevention. (2002). Guideline for hand
hygiene in health-care settings: Recommendations of the Healthcare Infection
Control Practices Advisory Committee and the HICPAC/SHEA/APIC/IDSA Hand
Hygiene Task Force. MMWR Recommendations and Reports, 51(RR-16), 1–45.
Accessed via the Web at https://www.cdc.gov/mmwr/pdf/rr/rr5116.pdf (Level
II)
3 World Health Organization. (2009). “WHO guidelines on hand hygiene in
health care: First global patient safety challenge, clean care is safer care”
[Online]. Accessed via the Web at
http://apps.who.int/iris/bitstream/10665/44102/1/9789241597906_eng.pdf
(Level IV)
4 Centers for Medicare and Medicaid Services, Department of Health and
Human Services. (2015). Condition of participation: Infection control. 42 C.F.R.
§ 482.42.
5 Accreditation Association for Hospitals and Health Systems. (2017). Standard
07.01.21. Healthcare Facilities Accreditation Program: Accreditation
requirements for acute care hospitals. Chicago, IL: Accreditation Association
for Hospitals and Health Systems. (Level VII)
6 DNV GL-Healthcare USA, Inc. (2016). IC.1.SR.1 . NIAHO® accreditation
requirements: Interpretive guidelines & surveyor guidance (version 11).
Milford, OH: DNV GL-Healthcare USA, Inc. (Level VII)
7 The Joint Commission. (2019). Standard NPSG.01.01.01. Comprehensive
accreditation manual for hospitals. Oakbrook Terrace, IL: The Joint
Commission. (Level VII)
8 Centers for Medicare and Medicaid Services, Department of Health and
Human Services. (2015). Condition of participation: Patient’s rights. 42 C.F.R.
§ 482.13(c)(1).
9 Accreditation Association for Hospitals and Health Systems. (2017). Standard
15.01.16. Healthcare Facilities Accreditation Program: Accreditation
requirements for acute care hospitals. Chicago, IL: Accreditation Association
for Hospitals and Health Systems. (Level VII)
10 The Joint Commission. (2019). Standard RI.01.01.01. Comprehensive
accreditation manual for hospitals. Oakbrook Terrace, IL: The Joint
Commission. (Level VII)
11 DNV GL-Healthcare USA, Inc. (2016). PR.1.SR.5 . NIAHO® accreditation
requirements: Interpretive guidelines & surveyor guidance (version 11).
Milford, OH: DNV GL-Healthcare USA, Inc. (Level VII)
12 Waters, T. R., et al. (2009). “Safe patient handling training for schools of
nursing” [Online]. Accessed via the Web at
http://www.cdc.gov/niosh/docs/2009-127/pdfs/2009-127.pdf (Level VII)
13 Siegel, J. D ., et al. (2007, revised 2017). “2007 guideline for isolation
precautions: Preventing transmission of infectious agents in healthcare
settings” [Online]. Accessed via the Web at
http://www.cdc.gov/hicpac/pdf/isolation/Isolation2007.pdf (Level II)
14 Accreditation Association for Hospitals and Health Systems. (2017). Standard
07.01.10. Healthcare Facilities Accreditation Program: Accreditation
requirements for acute care hospitals. Chicago, IL: Accreditation Association
for Hospitals and Health Systems. (Level VII)
15 DNV GL-Healthcare USA, Inc. (2016). IC.1 .SR.2 . NIAHO® accreditation
requirements: Interpretive guidelines & surveyor guidance (version 11).
Milford, OH: DNV GL-Healthcare USA, Inc. (Level VII)
16 Taylor, C., et al. (2015). Fundamentals of nursing: The art and science of
nursing care (8th ed.). Philadelphia, PA: Wolters Kluwer.
17 Craven, R. F., et al. (2017). Fundamentals of nursing: Human health and
function (8th ed.). Philadelphia, PA: Lippincott Williams & Wilkins.
18 Ganz, D. A., et al. (2013). Preventing falls in hospitals: A toolkit for improving
quality of care (AHRQ Publication No. 13-0015-EF). Rockville, MD: Agency for
Healthcare Research and Quality. Accessed via the Web at
http://www.ahrq.gov/sites/default/publications/files/fallpxtoolkit.pdf (Level VII)
19 The Joint Commission. (2019). Standard RC.01.03 .01. Comprehensive
accreditation manual for hospitals. Oakbrook Terrace, IL: The Joint
Commission. (Level VII)
20 Centers for Medicare and Medicaid Services, Department of Health and
Human Services. (2015). Condition of participation: Medical record services.
42 C.F.R. § 482.24(b).
21 Accreditation Association for Hospitals and Health Systems. (2017). Standard
10.00 .03. Healthcare Facilities Accreditation Program: Accreditation
requirements for acute care hospitals. Chicago, IL: Accreditation Association
for Hospitals and Health Systems. (Level VII)
22 DNV GL-Healthcare USA, Inc. (2016). MR.2 .SR.1 . NIAHO® accreditation
requirements: Interpretive guidelines & surveyor guidance (version 11).
Milford, OH: DNV GL-Healthcare USA, Inc. (Level VII)
HALO-VEST TRACTION MANAGEMENT
Halo-vest traction is a nonsurgical treatment used to
immobilize the head and neck and protect the cervical spine
after traumatic cervical vertebrae injury as well as to
prevent further injury to the spinal cord. When surgical
intervention is indicated, halo-vest traction may be used
preoperatively to reduce spinal misalignment and
postoperatively to allow bone healing.1 An orthopedic
surgeon or a neurosurgeon applies halo-vest traction, with
nursing assistance, in an emergency department, in a
specially equipped room, on the intensive care unit, or in
the operating room after surgical reduction of vertebral
injuries.
Components of a halo-vest traction device include a metal
ring that fits over the patient’s skull pins, anterior and
posterior portions of a vest, a vest lining, four upright bars,
and two transverse bars that distribute the weight of the
entire apparatus around the chest.
The halo-vest unit is a single-use item. Application of halo-
vest traction requires sterile technique and signed informed
consent. Duration of treatment varies, but traction is
commonly needed for up to 12 weeks.1
Halo-vest traction offers several advantages: it
immobilizes cervical spine fractures while allowing patient
mobility, facilitates surgery of the cervical spine, permits
flexion and extension, and allows airway intubation without
losing skeletal traction. Adjustments at the junction of the
threaded support rods and horizontal frame also allows for
necessary alignment. Halo-vest traction can’t be used for a
patient with an unstable skull fracture or an open chest
wound.
Equipment
Vital signs monitoring equipment ▪ stethoscope ▪ Halo-vest
kit (vest, liner, head ring, positioning pins, skull pins,
suprastructure, wrenches, and lock nuts) ▪ cap ▪ gown ▪
mask ▪ light source ▪ positioning device ▪ tape measure ▪
clippers ▪ 4′′ × 4′′ (10-cm × 10-cm) sterile gauze pads ▪
antiseptic solution or antiseptic swabs ▪ sterile gloves ▪
sterile drapes ▪ wrench ▪ anesthetic agent ▪ alcohol pads ▪
syringe ▪ 25G needles ▪ torque screwdrivers ▪ disinfectant
pad ▪ Optional: prescribed analgesic, prescribed sedative,
cervical collar, gown, mask with face shield or mask and
goggles.
Preparation of equipment
The practitioner measures the patient’s head at the greatest
circumference of the skull (about 1 cm above the ears);
depending on the device type, the practitioner may also
measure the mediolateral and anterior-posterior diameter of
the head to determine proper ring size. To determine the
proper vest size, the practitioner measures the patient’s
chest circumference at the xiphoid process. If the patient
has a pendulous abdomen, the practitioner measures the
widest portion of the costal margin. To determine anterior
vest size, the practitioner measures the patient’s sternal
length.2
Check the expiration date of the prepackaged kit, and
check the outside covering for damage to ensure the
sterility of the contents.
Implementation
■ Verify the practitioner’s order.
■ Gather the necessary equipment.
■ Confirm that the practitioner has obtained written
informed consent and that the consent form is in the
patient’s medical record.3,4,5,6
■ Conduct a preprocedure verification to make sure that all
relevant documentation, related information, and equipment
are available and correctly identified to the patient’s
identifiers.7,8
■ Verify that the laboratory and imaging studies have been
completed as ordered and that the results are in the
patient’s medical record. Notify the practitioner of any
unexpected results.
■ Perform hand hygiene.9,10,11,12,13,14
■ Confirm the patient’s identity using at least two patient
identifiers.15
■ Provide privacy.16,17,18,19
■ Reinforce the practitioner’s explanation of the procedure
to the patient and family (if appropriate) according to their
individual communication and learning needs to increase
their understanding, allay their fears, and enhance
cooperation, and answer their questions.20
■ Check the patient’s history for hypersensitivity to latex or
the anesthetic agent.
■ Make sure that lighting is adequate.
■ Raise the patient’s bed to waist level when providing care
to prevent caregiver back strain.21
■ Perform hand hygiene.9,10,11,12,13,14
■ Obtain baseline vital signs and assess the patient’s
neurologic and respiratory status.
■ Perform a comprehensive pain assessment using
techniques appropriate for the patient’s age, condition, and
ability to understand.22
■ Administer an analgesic, as needed and ordered,
following safe medication administration practices to assist
with pain management.1,23,24,25,26,27
■ Administer a sedative, as ordered, following safe
medication administration practices to help the patient relax
during the procedure.2,23,24,25,26,27
Assisting with halo application
■ Have a coworker assist with the procedure to maintain
proper cervical spine precautions and prevent patient injury.
■ Remove the headboard from the bed.
■ Maintain the patient in the supine position.2,27
■ Maintain cervical spine alignment by supporting the
patient’s head using the positioning device.28
■ The practitioner selects four pin sites: 1⁄2′′ (1.3 cm) above
the lateral one-third of each eyebrow and 1⁄2′′ (1.3 cm) above
the top of each ear in the occipital area. The practitioner
also takes into account the degree and type of correction
needed to provide proper cervical alignment.
■ Trim the hair at the intended pin sites with clippers to
facilitate subsequent care and to help prevent infection.2,27
■ Perform hand hygiene.9,10,11,12,13,14
■ Put on gloves and other personal protective equipment as
needed to comply with standard precautions.2,3,28,29,30
■ Use an antiseptic swab or 4′′ × 4′′ (10-cm × 10-cm) sterile
gauze pads soaked in antiseptic solution to prepare the pin
site areas for pin application. Allow the solution to dry
following the manufacturer’s instructions.2,27
■ Open the halo-vest unit using sterile technique to avoid
contamination. (See the “Sterile technique, basic”
procedure, page 714.)
■ The practitioner puts on a cap, a gown, a mask, and
sterile gloves and then removes the halo and Allen wrench.
■ Conduct a time-out immediately before starting the
procedure to perform a final assessment that the correct
patient, site, positioning, and procedure are identified and,
as applicable, that all relevant information and necessary
equipment are available.8,31
■ The practitioner positions the ring on the patient’s head
using the positioning pins to hold the halo ring in place
temporarily, which should accommodate access to the
selected skull pin sites.
■ Assist the practitioner with preparing the anesthetic
agent, if necessary.
■ Clean and disinfect the injection port of the anesthetic
with an alcohol pad, and allow it to dry.
■ Invert the vial so that the practitioner can insert a 25G
needle attached to a syringe and withdraw the anesthetic.
■ The practitioner injects the anesthetic at each of the four
pin sites;2,28 note that an anesthetic without epinephrine is
preferred to prevent necrosis around the injection site.28
Change the needle on the syringe after each injection.
■ Using sterile technique, the practitioner threads each
skull pin through its halo ring hole until it touches the skin.
The practitioner then tightens the pins by hand using one of
two methods, according to the manufacturer’s instructions.
For an opposing pair, the pins opposite each other are
tightened simultaneously; for a posterior–anterior pair, the
two posterior pins are tightened first and then the two
anterior pins.2,28
■ The practitioner visually checks the pins’ positioning and
then tightens them in incremental steps using the torque
screwdrivers and following the manufacturer’s instructions;
the pins are commonly tightened 6 to 8 inch-pounds (0.68
to 0.90 newton meters).2,28
■ The practitioner removes the positioning pins and then
applies and tightens the lock nuts to the pins by hand to
secure the pins in place.2,28 The practitioner applies plastic
caps over the free ends of the pins to prevent them from
snagging on linens and clothing.2
Applying the vest
■ Separate the anterior and posterior portions of the vest, if
necessary.2
■ If not already in place, position the liners inside the
anterior and posterior portions of the vest to make it more
comfortable to wear and to help prevent pressure injuries.
■ With assistance from a coworker, raise the patient from
the waist, maintaining proper cervical spine precautions;
properly position the posterior portion of the vest according
to the manufacturer’s instructions.1,2
■ Carefully return the patient to the supine position, and
then check the position of the posterior portion of the
vest.1,2
■ The practitioner then positions the anterior portion of the
vest on the patient’s chest and secures it in place with the
posterior portion, using the waist stabilizers and straps and
shoulder straps.1,2
■ As you continue to maintain cervical spine precautions,
the practitioner aligns and attaches the superstructure to
the halo ring and tightens the screws or bolts.1,2
■ After application is complete, help the practitioner bring
the patient to a sitting position so that the practitioner can
check that the head is in alignment with the body and that
the halo superstructure is symmetrical.2
■ When halo-vest traction is in place, arrange for an X-ray,
as ordered, to make sure that the desired alignment has
been achieved.2
NURSING ALERT If the patient complains of having difficulty
swallowing or feeling pressure on top of the head, the vest may be
applied too tightly, too high, or too low. Adjustments to approve
patient comfort and alignment may be necessary and will be based on
the results of the cervical spine X-rays.1
Caring for the patient
■ Gather the necessary equipment at the patient’s bedside.
■ Perform hand hygiene.9,10,11,12,13,14
■ Confirm the patient’s identity using at least two patient
identifiers.15
■ Explain the procedure to the patient and family (if
appropriate) according to their individual communication
and learning needs to increase their understanding, allay
their fears, and enhance cooperation, and answer their
questions.20
■ Raise the patient’s bed to waist level when providing care
to prevent caregiver back strain.21
■ Assess the patient’s vital signs and neurologic status
closely for deterioration from baseline neurologic function.
NURSING ALERT Notify the practitioner immediately if you observe
any loss of motor function or any decreased sensation from baseline
because these changes could indicate spinal cord trauma.
■ Because the vest limits chest expansion, routinely assess
the patient’s pulmonary status, especially in a patient with
pulmonary disease.
ELDER ALERT Respiratory complications from halo fixation are more
common in older patients.24
■ Perform hand hygiene9,10,11,12,13,14 and put on gloves to
comply with standard precautions.29,30
■ Using cotton-tipped applicators, gently clean the pin sites
with chlorhexidine or another facility-approved antiseptic
solution every 8 hours or as indicated. Povidone-iodine
shouldn’t be used because it interferes with tissue
healing.30
■ Use a clean cotton-tipped applicator for each individual
site, and rinse each site afterward with normal saline
solution to remove any excess cleaning solution.32
Meticulous pin site care prevents infection and removes
debris that might block drainage and lead to abscess
formation.
■ If crusting is present, wrap the pin site with gauze soaked
in normal saline solution for 15 to 20 minutes and then
remove the gauze. Using a gentle rolling motion, remove
the crust with a cotton-tipped applicator that has been
soaked in normal saline solution.1
■ Observe for loose pins and signs and symptoms of
infection, including swelling, redness, purulent drainage,
tracking (an open area where skin has pulled away from the
pin), and pain at the site. Notify the practitioner if any signs
and symptoms of infection develop.1
■ The practitioner retightens the skull pins with the torque
screwdriver 24 and 48 hours after the halo is applied.28
■ If the patient complains of a headache after the pins are
tightened, administer prescribed pain medication, as
ordered, following safe medication administration
practices.23,24,25,26,27 If pain occurs with jaw movement or if
any movement of the head or neck occurs, notify the
practitioner immediately, because this symptom may
indicate that pins have slipped.
■ Examine the halo-vest unit every shift to make sure that
the unit is secure and that the patient’s head is centered
within the halo. If the vest fits correctly, you should be able
to insert one or two fingers under the jacket at the shoulder
and chest when the patient is in the supine position.
■ Wash the patient’s chest and back daily; be careful not to
put any stress on the apparatus, which could knock it out of
alignment and lead to subluxation of the cervical spine.
Place the patient on his or her back. Loosen the bottom
Velcro straps so you can get to the chest and back. Turn the
patient on his or her side (less than 45 degrees) to wash the
back. Reaching under the vest, wash and dry the skin.
Check for tender, reddened areas, or pressure spots that
may develop into ulcers. If itching occurs, check to see
whether the patient is allergic to sheepskin and whether any
drug the patient is taking might cause a skin rash. Change
the vest lining, as needed. Close the vest.
NURSING ALERT Don’t use lotions or powders underneath the vest.2
A cotton pillowcase or undershirt can be worn or placed under the vest
for comfort and perspiration absorption; change this item regularly.1
■ Shampoo the patient’s hair regularly. Place the patient in
the supine position in bed with a towel or large plastic bag
along the back and shoulders of the halo vest to protect the
lining from getting wet. The halo crown, pins, and bars can
all safely get wet.1
■ Verify that a torque wrench and a crescent wrench are
available for use in an emergency if the patient’s vest must
be removed.
Completing the procedure
■ Discard used supplies in the appropriate receptacles.33
■ Remove and discard your gloves and any other personal
protective equipment worn.28,29
■ Return the bed to the lowest position to prevent falls and
maintain the patient’s safety.34
■ Perform hand hygiene.9,10,11,12,13,14
■ Clean and disinfect your stethoscope using a disinfectant
pad.35,36
■ Perform hand hygiene.9,10,11,12,13,14
■ Document the procedure.37,38,39,40
Special considerations
NURSING ALERT Keep a torque wrench and a crescent wrench
available at all times. These wrenches should accompany the patient
when while away from the unit for testing. In the event of cardiac
arrest, know the type of vest that the patient is wearing. Some vests
have a hinged front to raise the breastplate for cardiopulmonary
resuscitation (CPR). If the patient doesn’t have one of these vests, you
will need to use a wrench to remove the distal anterior bolts. Pull the
two upright bars outward, unfasten the Velcro straps, and remove the
front of the vest. Use the sturdy back of the vest as a board for CPR. To
prevent subluxating the cervical injury, perform a jaw thrust to open
the airway, which avoids hyperextension of the neck. Pull the patient’s
mandible forward while maintaining proper head and neck alignment.
This positioning pulls the tongue forward to open the airway.
■ Be aware that there are many different types of halo and
vest components. Make sure that you’re familiar with the
equipment used by your facility. Confirm that the device is
compatible with magnetic resonance imaging, as indicated.
■ Ensure that the practitioner examines the patient about
24 hours after halo-vest application to assess pin tightness
and to check for complications.2
■ Note that some devices require the skull pins to be
removed at least once every 14 days to be cleaned and
retorqued; follow the manufacturer’s instructions.
■ If countertraction will be applied, position the patient with
the head of the bed flat and on shock blocks or in the
reverse Trendelenburg position.33
■ Never lift up a patient by the vertical bars of a halo-vest
traction device. Doing so could strain or tear the skin at the
pin sites or misalign the traction.
■ To prevent falls in an ambulatory patient, walk with the
patient. Remember that the patient will have trouble seeing
objects at or near his or her feet, and that the weight of the
halo-vest unit (about 10 lb [4.5 kg]) may throw the patient
off balance. If the patient is in a wheelchair, lower the leg
rests to prevent the chair from tipping backward.
■ Because the vest limits chest expansion, routinely assess
pulmonary function, especially in a patient with pulmonary
disease.
Patient teaching
If the patient is to be discharged home with halo-vest
traction, teach the patient and family how to care for the
halo-vest apparatus and the pins, stress the importance of
vigilant skin care, and explain how to perform such activities
of daily living as bathing, dressing, sleeping, and
ambulating. Stress the importance of avoiding bending,
heavy lifting, and driving, and explain that the patient may
need to alter clothing as necessary while in the halo vest.
Have the patient and a family member teach back the
information to confirm their understanding. A physical
therapist may teach the patient how to use assistive
devices. Instruct the patient and family not to adjust the
pins.
Provide information about follow-up appointments. Tell the
patient to notify the practitioner if there are any signs and
symptoms of infection, loosening or dislodgment at the pin
site, skin breakdown, swallowing problems, headache,
malaise, or visual changes, or if the patient experiences a
fall or other trauma.1
Complications
Manipulating the patient’s neck during application of halo-
vest traction can cause subluxation of the spinal cord or
could push a bone fragment into the spinal cord, possibly
compressing the cord and causing paralysis below the
break.
Inaccurate positioning of the skull pins can lead to a
puncture of the dura mater, causing a loss of cerebrospinal
fluid and a serious central nervous system infection.
Multiple retorquing of the pins increases the potential for a
dural puncture. Nonsterile technique during application of
the halo or inadequate pin-site care can lead to infection at
the pin sites and other complications, including pin-site
loosening or dislodgement, swallowing problems, and ring
migration. Pressure injuries can develop if the vest fits
poorly or chafes the skin.
Documentation
Record the date and time that the halo-vest traction was
applied. Also note the length of the procedure and the
patient’s response. Record the patient’s vital signs and
neurologic, pain, and pulmonary assessment findings.
Document that a preprocedure verification and time-out
were performed. Document the appearance of pin insertion
sites, analgesics provided, and patient education performed.
When providing care to the patient with halo-vest traction,
record routine vital signs as well as pain, pulmonary, and
neurologic assessments. Document pin-site care. Note any
signs or symptoms of infection or loose pins. Document
patient teaching and the patient’s comprehension of that
teaching.
REFERENCES
1 Sarro, A., et al. (2010). Developing a standard of care for halo vest and pin
site care including patient and family education: A collaborative approach
among three greater Toronto area teaching hospitals. Journal of Neuroscience
Nursing, 42(3), 169–173.
2 Ossur. (2016). “Technical manual: Resolve halo vest” [Online]. Accessed via
the Web at
https://assets.ossur.com/library/36606/ReSolve%20Halo%20Technical%20ma
nual%20-%20ReSolve%20Halo%20Vest.pdf
3 The Joint Commission. (2019). Standard RI.01.03 .01. Comprehensive
accreditation manual for hospitals. Oakbrook Terrace, IL: The Joint
Commission. (Level VII)
4 Centers for Medicare and Medicaid Services, Department of Health and
Human Services. (2015). Condition of participation: Patient’s rights. 42 C.F.R.
§ 482.13(b)(2).
5 Accreditation Association for Hospitals and Health Systems. (2017). Standard
30.01.11. Healthcare Facilities Accreditation Program: Accreditation
requirements for acute care hospitals. Chicago, IL: Accreditation Association
for Hospitals and Health Systems. (Level VII)
6 DNV GL-Healthcare USA, Inc. (2016). PR.1 .SR.3 . NIAHO® accreditation
requirements: Interpretive guidelines & surveyor guidance (version 11).
Milford, OH: DNV GL-Healthcare USA, Inc. (Level VII)
7 The Joint Commission. (2019). Standard UP.01.01.01. Comprehensive
accreditation manual for hospitals. Oakbrook Terrace, IL: The Joint
Commission. (Level VII)
8 Accreditation Association for Hospitals and Health Systems. (2017). Standard
30.00 .14. Healthcare Facilities Accreditation Program: Accreditation
requirements for acute care hospitals. Chicago, IL: Accreditation Association
for Hospitals and Health Systems. (Level VII)
9 The Joint Commission. (2019). Standard NPSG.07.01.01. Comprehensive
accreditation manual for hospitals. Oakbrook Terrace, IL: The Joint
Commission. (Level VII)
10 Centers for Disease Control and Prevention. (2002). Guideline for hand
hygiene in health-care settings: Recommendations of the Healthcare Infection
Control Practices Advisory Committee and the HICPAC/SHEA/APIC/IDSA Hand
Hygiene Task Force. MMWR Recommendations and Reports, 51(RR-16), 1–45.
Accessed via the Web at https://www.cdc.gov/mmwr/pdf/rr/rr5116.pdf (Level
II)
11 World Health Organization. (2009). “WHO guidelines on hand hygiene in
health care: First global patient safety challenge, clean care is safer care”
[Online]. Accessed via the Web at
http://apps.who.int/iris/bitstream/10665/44102/1/9789241597906_eng.pdf
(Level IV)
12 Accreditation Association for Hospitals and Health Systems. (2017). Standard
07.01.21. Healthcare Facilities Accreditation Program: Accreditation
requirements for acute care hospitals. Chicago, IL: Accreditation Association
for Hospitals and Health Systems. (Level VII)
13 Centers for Medicare and Medicaid Services, Department of Health and
Human Services. (2015). Condition of participation: Infection control. 42 C.F.R.
§ 482.42.
14 DNV GL-Healthcare USA, Inc. (2016). IC.1 .SR.1 . NIAHO® accreditation
requirements: Interpretive guidelines & surveyor guidance (version 11).
Milford, OH: DNV GL-Healthcare USA, Inc. (Level VII)
15 The Joint Commission. (2019). Standard NPSG.01.01.01. Comprehensive
accreditation manual for hospitals. Oakbrook Terrace, IL: The Joint
Commission. (Level VII)
16 Accreditation Association for Hospitals and Health Systems. (2017). Standard
15.01.16. Healthcare Facilities Accreditation Program: Accreditation
requirements for acute care hospitals. Chicago, IL: Accreditation Association
for Hospitals and Health Systems. (Level VII)
17 Centers for Medicare and Medicaid Services, Department of Health and
Human Services. (2015). Condition of participation: Patient’s rights. 42 C.F.R.
§ 482.13(c)(1).
18 DNV GL-Healthcare USA, Inc. (2016). PR.1.SR.5 . NIAHO® accreditation
requirements: Interpretive guidelines & surveyor guidance (version 11).
Milford, OH: DNV GL-Healthcare USA, Inc. (Level VII)
19 The Joint Commission. (2019). Standard RI.01.01.01. Comprehensive
accreditation manual for hospitals. Oakbrook Terrace, IL: The Joint
Commission. (Level VII)
20 The Joint Commission. (2019). Standard PC.02.01.21. Comprehensive
accreditation manual for hospitals. Oakbrook Terrace, IL: The Joint
Commission. (Level VII)
21 Waters, T. R., et al. (2009). “Safe patient handling training for schools of
nursing” [Online]. Accessed via the Web at
http://www.cdc.gov/niosh/docs/2009-127/pdfs/2009-127.pdf (Level VII)
22 The Joint Commission. (2019). Standard PC.01.02.07. Comprehensive
accreditation manual for hospitals. Oakbrook Terrace, IL: The Joint
Commission. (Level VII)
23 Accreditation Association for Hospitals and Health Systems. (2017). Standard
16.01.03. Healthcare Facilities Accreditation Program: Accreditation
requirements for acute care hospitals. Chicago, IL: Accreditation Association
for Hospitals and Health Systems. (Level VII)
24 Centers for Medicare and Medicaid Services, Department of Health and
Human Services. (2015). Condition of participation: Nursing services. 42
C.F.R. § 482.23(c).
25 DNV GL-Healthcare USA, Inc. (2016). MM.1 .SR.2. NIAHO® accreditation
requirements: Interpretive guidelines & surveyor guidance (version 11).
Milford, OH: DNV GL-Healthcare USA, Inc. (Level VII)
26 Institute for Safe Medication Practices. (2012). Side tracks on the safety
express: Interruptions lead to errors and unfinished...Wait, what was I doing?
Nurse Advise-ERR, 11(2), 1–4 . Accessed via the Web at
https://www.ismp.org/Newsletters/acutecare/showarticle.aspx?id=37
27 The Joint Commission. (2019). Standard MM.06.01.01. Comprehensive
accreditation manual for hospitals. Oakbrook Terrace, IL: The Joint
Commission. (Level VII)
28 Accreditation Association for Hospitals and Health Systems. (2017). Standard
07.01.10. Healthcare Facilities Accreditation Program: Accreditation
requirements for acute care hospitals. Chicago, IL: Accreditation Association
for Hospitals and Health Systems. (Level VII)
29 Siegel, J. D ., et al. (2007, revised 2017). “2007 guideline for isolation
precautions: Preventing transmission of infectious agents in healthcare
settings” [Online]. Accessed via the Web at
http://www.cdc.gov/hicpac/pdf/isolation/Isolation2007.pdf (Level II)
30 Lagerquist, D., et al. (2012). Care of external fixator pin sites. American
Journal of Critical Care, 21(1), 288–295. Accessed via the Web at
http://ajcc.aacnjournals.org/content/21/4/288.full (Level V)
31 The Joint Commission. (2019). Standard UP.01.03.01. Comprehensive
accreditation manual for hospitals. Oakbrook Terrace, IL: The Joint
Commission. (Level VII)
32 The Joint Commission. (2019). Standard NPSG.07.05.01. Comprehensive
accreditation manual for hospitals. Oakbrook Terrace, IL: The Joint
Commission. (Level VII)
33 Wiegand, D. L. (2017). AACN procedure manual for high acuity, progressive
and critical care (7th ed.). St. Louis, MO: Elsevier.
34 Ganz, D. A., et al. (2013). Preventing falls in hospitals: A toolkit for improving
quality of care (AHRQ Publication No. 13-0015-EF). Rockville, MD: Agency for
Healthcare Research and Quality. Accessed via the Web at
http://www.ahrq.gov/sites/default/files/publications/files/fallpxtoolkit.pdf
(Level VII)
35 Rutala, W. A., et al. (2008, revised 2017). “Guideline for disinfection and
sterilization in healthcare facilities, 2008” [Online]. Accessed via the Web at
https://www.cdc.gov/infectioncontrol/pdf/guidelines/disinfection-
guidelines.pdf (Level I)
36 Accreditation Association for Hospitals and Health Systems. (2017). Standard
07.02.03. Healthcare Facilities Accreditation Program: Accreditation
requirements for acute care hospitals. Chicago, IL: Accreditation Association
for Hospitals and Health Systems. (Level VII)
37 Accreditation Association for Hospitals and Health Systems. (2017). Standard
10.00 .03. Healthcare Facilities Accreditation Program: Accreditation
requirements for acute care hospitals. Chicago, IL: Accreditation Association
for Hospitals and Health Systems. (Level VII)
38 Centers for Medicare and Medicaid Services, Department of Health and
Human Services. (2015). Condition of participation: Medical record services.
42 C.F.R. § 482.24(b).
39 The Joint Commission. (2019). Standard RC.01.03 .01. Comprehensive
accreditation manual for hospitals. Oakbrook Terrace, IL: The Joint
Commission. (Level VII)
40 DNV GL-Healthcare USA, Inc. (2016). MR.2 .SR.1 . NIAHO® accreditation
requirements: Interpretive guidelines & surveyor guidance (version 11).
Milford, OH: DNV GL-Healthcare USA, Inc. (Level VII)
HAND HYGIENE
“Hand hygiene” is a general term used by the Centers for
Disease Control and Prevention (CDC) and the World Health
Organization (WHO) to refer to hand washing, antiseptic
hand washing, antiseptic hand rubbing, or surgical hand
asepsis.1,2,3,4,5,6
The hands are the conduits for almost every transfer of
potential pathogens from one patient to another, from a
contaminated object to the patient, or from a staff member
to the patient. Because of this, hand hygiene is the single
most important procedure in preventing infection.1 To
protect patients from health care–associated infections,
hand hygiene must be performed routinely and
thoroughly.4,7 In effect, clean and healthy hands with intact
skin, short fingernails, and no rings minimizes the risk of
contamination. Artificial nails may serve as a reservoir for
microorganisms,8,9 as may rough or chapped hands.1
Washing with soap and water is appropriate when hands
are visibly soiled or contaminated with blood or other body
fluids, when exposure to potential spore-forming pathogens
(such as Clostridium difficile or Bacillus anthracis) is strongly
suspected or proven, and after using the restroom. Using an
alcohol-based hand
sanitizer is appropriate for
decontaminating the hands before direct patient contact;
before putting on gloves; before inserting an invasive
device; after contact with the patient; when moving from a
contaminated body site to a clean body site during patient
care; after contact with body fluids, excretions, mucous
membranes, nonintact skin, or wound dressings (if hands
aren’t visibly soiled); after removing gloves; and after
contact with inanimate objects in the patient’s
environment.1,2,7,10 (See Your five moments for hand
hygiene.)
Your five moments for hand hygiene
According to the World Health Organization (WHO), there are five key
moments during patient care when health care workers should perform hand
hygiene.
© World Health Organization, 2009. “My 5 Moments for Hand Hygiene”
[Online]. Accessed via the Web at
http://www.who.int/gpsc/5may/background/5moments/en/index.html. All
rights reserved.
The CDC recommends performing hand hygiene with soap
and water before eating;1 the WHO recommends using
either an alcohol-based hand rub or washing with soap and
water before preparing food or handling medication.2
Equipment
Hand washing
Soap ▪ warm running water ▪ paper towels ▪ Optional:
emollient hand cream.
Hand sanitizing
Alcohol-based hand rub.
Implementation
Hand washing
■ Remove rings according to your facility’s policy, because
they harbor dirt and skin microorganisms. Remove your
watch and bracelets, or wear them well above the wrist. If
you wear nail polish, it must be kept in good repair to
minimize its potential to harbor microorganisms; refer to
your facility’s guidelines regarding nail polish. Natural nails
should be short (less than 1⁄4′′ [0.6 cm]).1,8,11
■ With your arms angled downward toward the faucet,
adjust the water temperature until it’s comfortably warm
(not hot).
■ Wet your hands and wrists with warm water1,2 and apply
soap from a dispenser.1 Don’t use bar soap, because it
allows cross-contamination.1 Hold your hands below elbow
level to prevent water from running up your arms and back
down, contaminating clean areas.
■ Work up a generous lather by rubbing your hands
together vigorously for about 20 seconds.1 Soap and warm
water reduce surface tension, which, aided by friction,
loosens surface microorganisms, which wash away in the
lather (as shown below).
■ Pay special attention to the area under your fingernails
and around your cuticles, and to your thumbs, knuckles, and
the sides of your fingers and hands, because
microorganisms thrive in these protected or overlooked
areas. If you don’t remove your rings, move them up and
down your finger to clean beneath them.1
■ Avoid splashing water on yourself or the floor, because
microorganisms spread more easily on wet surfaces, and
because slippery floors are dangerous. Avoid touching the
sink or faucets, because they’re considered contaminated.
■ Rinse your hands and wrists well, because running water
flushes away suds, soil, and microorganisms.
■ Pat your hands and wrists dry with a paper towel. Avoid
rubbing, which can cause abrasion and chapping.
■ If the sink isn’t equipped with knee or foot controls, turn
off the faucets by gripping them with a dry paper towel to
avoid recontaminating your hands (as shown below).
Hand sanitizing
■ Apply alcohol-based hand rub to the palm of one hand
and then rub your hands together to cover all surfaces of
the hands.1,2
■ Continue rubbing your hands together until all of the
product has dried (usually about 30 seconds).1,2
Special considerations
■ Bundling supplies and clustering tasks reduces the
number of times health care workers need to be in patients’
rooms, resulting in fewer instances in which workers need to
perform hand hygiene, which likely increases compliance.12
Getting to the root of hand hygiene
failure
The Joint Commission’s Hand Hygiene Project,12 in observing health care
workers at eight participating hospitals, has identified the following 10 root
causes of hand hygiene failure:
■ ineffective placement of dispensers or sinks
■ failure to accurately or frequently collect or report hand hygiene
compliance data
■ lack of accountability and just-in-time coaching
■ a safety culture that doesn’t stress hand hygiene at all levels
■ ineffective or insufficient education
■ full hands that leave health care workers unable to wash
■ glove wearing, which interferes with the process
■ the perception that hand hygiene isn’t needed if gloves are worn
■ forgetfulness
■ distractions.
■ Before participating in any sterile procedure or whenever
your hands are grossly contaminated, also wash your
forearms, and clean under your fingernails and in and
around your cuticles. Don’t use brushes, metal files, or other
hard objects, because they can injure your skin and, if
reused, may be a source of contamination.
■ The CDC hand hygiene guideline recommends that
artificial nails or extenders not be worn by health care
workers who have direct contact with patients at high risk
for acquiring infections, such as patients on intensive care
or transplant units.1 Similarly, the WHO recommends in its
publication “WHO guidelines on hand hygiene in health
care” that artificial nails or extenders not be worn by health
care workers who have direct contact with patients.2
■ If your hands aren’t visibly soiled, you can use an alcohol-
based hand rub for routine decontamination.1
■ If you’re providing care in the patient’s home, bring your
own supply of soap and disposable paper towels. If running
water isn’t available, disinfect your hands with an alcohol-
based hand rub.
■ Avoid the use of triclosan-containing soaps because of the
risk of antimicrobial resistance; there’s no evidence to
support their superiority.7
■ Keep in mind that glove use doesn’t eliminate the need
for hand hygiene. (See Getting to the root of hand hygiene
failure.)
■ Teach patients and their families about the importance of
hand hygiene in preventing the spread of infection, and
encourage them to remind health care workers to perform
hand hygiene when necessary.1,3
■ To prevent your hands from becoming dry or chapped,
apply an emollient hand cream after performing hand
hygiene, or switch to a different cleaning agent.7 Make sure
that the hand cream or lotion you use won’t cause the
material in your gloves to deteriorate. If you develop
dermatitis, you may need to be evaluated by your employee
health care provider to determine whether you should
continue to work until the condition resolves. Hands with
dermatitis are more susceptible to becoming colonized with
transient bacteria.
Complications
Because frequent hand washing strips the skin of natural
oils, it can result in dryness, cracking, and irritation.
However, these effects are probably more common after
repeated use of antiseptic cleaning agents, especially in
people with sensitive skin.
REFERENCES
1 Centers for Disease Control and Prevention. (2002). Guideline for hand
hygiene in health-care settings: Recommendations of the Healthcare Infection
Control Practices Advisory Committee and the HICPAC/SHEA/APIC/IDSA Hand
Hygiene Task Force. MMWR Recommendations and Reports, 51(RR-16), 1–45.
Accessed via the Web at https://www.cdc.gov/mmwr/pdf/rr/rr5116.pdf (Level
II)
2 World Health Organization. (2009). “WHO guidelines on hand hygiene in
health care: First global patient safety challenge, clean care is safer care”
[Online]. Accessed via the Web at
http://apps.who.int/iris/bitstream/10665/44102/1/9789241597906_eng.pdf
(Level IV)
3 The Joint Commission. (2019). Standard NPSG.07.01.01. Comprehensive
accreditation manual for hospitals: The official handbook. Oakbrook Terrace,
IL: The Joint Commission. (Level VII)
4 Centers for Medicare and Medicaid Services, Department of Health and
Human Services. (2015). Condition of participation: Infection control. 42 C.F.R.
§ 482.42.
5 Accreditation Association for Hospitals and Health Systems. (2017). Standard
07.01.21. Healthcare Facilities Accreditation Program: Accreditation
requirements for acute care hospitals. Chicago, IL: Accreditation Association
for Hospitals and Health Systems. (Level VII)
6 DNV GL-Healthcare USA, Inc. (2016). IC.1.SR.1 . NIAHO® accreditation
requirements: Interpretive guidelines & surveyor guidance (version 11).
Milford, OH: DNV GL-Healthcare USA, Inc. (Level VII)
7 Ellingson, K., et al. (2014). Strategies to prevent healthcare-associated
infections through hand hygiene. Infection Control and Hospital Epidemiology,
35(8), 937–960 . Accessed via the Web at
http://www.jstor.org/stable/10.1086/677145 (Level VII)
8 Parry, M. F., et al. (2001). Candida osteomyelitis and diskitis after spinal
surgery: An outbreak that implicates artificial nail use. Clinical Infectious
Diseases, 32(3), 352–357. Accessed via the Web at
http://cid.oxfordjournals.org/content/32/3/352.full (Level IV)
9 Gordin, F. M ., et al. (2007). A cluster of hemodialysis-related bacteremia
linked to artificial fingernails. Infection Control and Hospital Epidemiology,
28(6), 743–744 .
10 The Joint Commission. (2009). “Measuring hand hygiene adherence:
Overcoming the challenges” [Online]. Accessed via the Web at
http://www.jointcommission.org/assets/1/18/hh_monograph.pdf (Level VII)
11 Salisbury, D. M., et al. (1997). The effect of rings on microbial load of health
care workers’ hands. American Journal of Infection Control, 25(1), 24–27.
(Level VI)
12 Health Research & Educational Trust. (2010). Hand hygiene project: Best
practices from hospitals participating in The Joint Commission Center for
Transforming Healthcare Project. Chicago, IL: Health Research & Educational
Trust. Accessed via the Web at http://www.hpoe.org/Reports-
HPOE/hand_hygiene_project.pdf (Level VII)
HEARING AID CARE
Causes of hearing loss include chronic ear infections,
trauma (pressure changes), age changes (presbycusis),
long-term exposure to loud noises, and neuromas on the
acoustic nerve. Additionally, certain drugs can contribute to
hearing loss or degradation, including aspirin, naproxen, and
ketorolac. Accumulation of cerumen can also affect hearing
ability, leading to conductive hearing loss.
Hearing aids can help some patients regain some of their
lost hearing. Several types of hearing aids are available in
digital and analog form. Analog hearing aids simply amplify
speech and sound; digital hearing aids provide amplification
that can be individualized for the patient’s type of hearing
loss. All hearing aids have a microphone, a speaker, and an
amplifier. Several types of hearing aids are available:1
■ An open-behind-the-ear aid is a slim tube inserted into
the external ear canal. This aid leaves the ear canal open,
so it’s best for mild to moderate high-frequency hearing loss
in which low-frequency hearing is still normal or near
normal.
■ A behind-the-ear aid amplifies the sound from a
customized ear mold that’s placed in the external ear canal.
This type of aid is appropriate for almost all types of hearing
loss.
■ A full-shell aid is custom-made and fills most of the bowl-
shaped area of the outer ear. It’s used for mild to severe
hearing loss.
■ A half-shell aid is custom-made and fills the lower portion
of the bowl-shaped area of the outer ear. It provides
optimum performance and maximum comfort. It’s used for
mild to severe hearing loss.
■ A canal aid fits partially inside the external ear canal and
is used for mild to moderately severe hearing loss.
■ A mini-canal aid fits almost completely inside the external
ear canal and is appropriate for mild to moderately severe
hearing loss.
■ A completely-in-the-canal aid fits deeply within the
external ear canal. This type decreases wind noise, has less
feedback, and provides a more natural sound. Those with
mild to moderately severe hearing loss can benefit from this
type of aid.
Patients generally wear hearing aids only during the day.
At night and at times of rest, most patients remove their
hearing aids. Because of the fragile nature of the hearing
aid, the device must be cleaned properly and carefully to
avoid damage.
Equipment
Hearing aid ▪ facial tissue ▪ towel ▪ cleaning tools as
recommended by the manufacturer ▪ storage case ▪
washcloth ▪ water ▪ soap ▪ Optional: spare battery, dryer
for hearing aids, gloves, battery tester.
Implementation
■ Gather the appropriate equipment.
■ Perform hand hygiene.2,3,4,5,6,7
■ Confirm the patient’s identity using at least two patient
identifiers.8
■ Provide privacy.9,10,11,12
■ Raise the patient’s bed to waist level when providing care
to prevent caregiver back strain.13
Removing and cleaning the hearing aid
■ Inspect the patient’s ear. If drainage is present, put on
gloves to comply with standard precautions.14,15,16
■ Gently turn the hearing aid off to prevent feedback, in the
form of whistling or squealing, during removal.
■ Grasp the hearing aid and remove it, following the
contour of the patient’s ear.
■ Wipe the outside of the hearing aid with a facial tissue or
dry cloth.17
■ Carefully inspect the hearing aid and look for
accumulated cerumen (earwax). Cerumen can block sound
and the pressure equalizer channel and create a feeling of
ear pressure.
■ Clean the hearing air following the manufacturer’s
instructions.
■ Inspect the hearing aid for any rough areas that may
irritate the ear canal.
■ Open the battery compartment of the hearing aid to
conserve battery life and allow internal components to air-
dry.17
■ Place the hearing aid and battery in a storage case
labeled with the patient’s name, room number, and
identification number.
■ Assess the patient’s ear for drainage, redness, and
irritation.
■ Place a towel under the patient’s ear and gently clean the
ear and ear canal using a washcloth, soap, and warm water.
NURSING ALERT Don’t use alcohol or other solvents on the hearing
aid, because they may cause breakdown of the material.
Inserting the hearing aid
■ Gently remove the hearing aid from the storage case.
■ Close the battery compartment door.
■ Cupping your hand over the hearing aid, test the battery
by slowing turning the volume to high. You should hear
feedback; when you do, decrease the volume.
■ Insert the hearing aid into the appropriate ear by holding
it with the thumb and index finger of your dominant hand
and placing it in the ear, following the contour of the
patient’s ear. Note that some hearing aids are color-coded
red for right and blue for left.
■ Turn the volume up slowly until it reaches a comfortable
level for the patient.
■ If you or the patient hears feedback after insertion,
decrease the volume, reposition the device, and check the
ear canal for blockage from earwax.17
Completing the procedure
■ Return the bed to the lowest position to prevent falls and
maintain patient safety.18
■ Remove and discard your gloves, if worn.14
■ Perform hand hygiene.2,3,4,5,6,7
■ Document the procedure.19,20,21,22
Special considerations
■ Many individuals with severe hearing loss have learned to
read lips. Although this skill improves reception of the
words, it doesn’t improve the ability to hear. Face the
patient when you speak, and speak slowly.
■ Keep background noise to a minimum if possible. White
noise can cause distractions, especially at higher
frequencies.
■ Keep in mind that higher voices may be more difficult to
hear, especially if the hearing loss is in the higher
frequency, as occurs in elderly patients. Patients with
hearing loss may also have difficulty hearing such
consonants and sounds as “p,” “k,” “f,” “th,” and “s.”
■ Avoid placing the hearing aid in direct sunlight or direct
heat. Store batteries in a cool, dry place. Don’t store them in
the refrigerator.17
■ Hearing aid batteries should last 1 to 2 weeks. If
available, use a battery tester to check battery strength.17
Patient teaching
Teach the patient how to properly remove, clean, and insert
the hearing aid.
ELDER ALERT Some older adult patients may have difficulty
manipulating hearing aids, making it difficult to correctly insert and
clean them. In such a case, refer the patient to an audiologist, who
can recommend a hearing aid that will better fit the patient’s lifestyle.
Tell the patient to keep the hearing aid in the storage case
when not in use to avoid damage. Also, tell the patient to
keep the hearing aid out of reach of children and animals.
Dogs are attracted to the smell of hearing aids and may
damage them if they can reach them. Tell the patient to
keep the hearing aid dry and to remove it before showering,
swimming, or participating in an activity with water. The
patient should also avoid getting hairspray or cologne on
the hearing aid.
Refer the patient for counseling and rehabilitative training,
as needed, to help the patient cope with hearing
impairment and to learn ways to modify the environment to
accommodate hearing loss.23
Complications
Dropping the hearing aid may damage it. If moisture enters
the hearing aid, either during wear or during cleaning, the
device might stop transmitting sound.
Documentation
Document the proper functioning, insertion, removal, and
cleaning of each hearing aid. Also document skin integrity
and the presence of redness, drainage, or excessive
cerumen. Note the locations where the hearing aid was
stored. If you conducted patient teaching, record the
teaching performed and the patient’s response to the
teaching.
REFERENCES
1 The Mayo Clinic. (2015). “Hearing aids: How to choose the right one” [Online].
Accessed via the Web at http://www.mayoclinic.org/diseases-
conditions/hearing-loss/in-depth/hearing-aids/ART-20044116
2 The Joint Commission. (2019). Standard NPSG.07.01.01. Comprehensive
accreditation manual for hospitals. Oakbrook Terrace, IL: The Joint
Commission. (Level VII)
3 Centers for Disease Control and Prevention. (2002). Guideline for hand
hygiene in health-care settings: Recommendations of the Healthcare Infection
Control Practices Advisory Committee and the HICPAC/SHEA/APIC/IDSA Hand
Hygiene Task Force. MMWR Recommendations and Reports, 51(RR-16), 1–45.
Accessed via the Web at https://www.cdc.gov/mmwr/pdf/rr/rr5116.pdf (Level
II)
4 World Health Organization. (2009). “WHO guidelines on hand hygiene in
health care: First global patient safety challenge, clean care is safer care”
[Online]. Accessed via the Web at
http://apps.who.int/iris/bitstream/10665/44102/1/9789241597906_eng.pdf
(Level IV)
5 Accreditation Association for Hospitals and Health Systems. (2017). Standard
07.01.21. Healthcare Facilities Accreditation Program: Accreditation
requirements for acute care hospitals. Chicago, IL: Accreditation Association
for Hospitals and Health Systems. (Level VII)
6 Centers for Medicare and Medicaid Services, Department of Health and
Human Services. (2015). Condition of participation: Infection control. 42 C.F.R.
§ 482.42.
7 DNV GL-Healthcare USA, Inc. (2016). IC.1.SR.1 . NIAHO® accreditation
requirements: Interpretive guidelines & surveyor guidance (version 11).
Milford, OH: DNV GL-Healthcare USA, Inc. (Level VII)
8 The Joint Commission. (2019). Standard NPSG.01.01.01. Comprehensive
accreditation manual for hospitals. Oakbrook Terrace, IL: The Joint
Commission. (Level VII)
9 The Joint Commission. (2019). Standard RI.01.01.01. Comprehensive
accreditation manual for hospitals. Oakbrook Terrace, IL: The Joint
Commission. (Level VII)
10 Centers for Medicare and Medicaid Services, Department of Health and
Human Services. (2015). Condition of participation: Patient’s rights. 42 C.F.R.
§ 482.13(c)(1).
11 Accreditation Association for Hospitals and Health Systems. (2017). Standard
15.01.16. Healthcare Facilities Accreditation Program: Accreditation
requirements for acute care hospitals. Chicago, IL: Accreditation Association
for Hospitals and Health Systems. (Level VII)
12 DNV GL-Healthcare USA, Inc. (2016). PR.1.SR.5 . NIAHO® accreditation
requirements: Interpretive guidelines & surveyor guidance (version 11).
Milford, OH: DNV GL-Healthcare USA, Inc. (Level VII)
13 Waters, T. R., et al. (2009). “Safe patient handling training for schools of
nursing” [Online]. Accessed via the Web at
http://www.cdc.gov/niosh/docs/2009-127/pdfs/2009-127.pdf (Level VII)
14 Siegel, J. D ., et al. (2007, revised 2017). “2007 guideline for isolation
precautions: Preventing transmission of infectious agents in healthcare
settings” [Online]. Accessed via the Web at
http://www.cdc.gov/hicpac/pdf/isolation/Isolation2007.pdf (Level II)
15 Accreditation Association for Hospitals and Health Systems. (2017). Standard
07.01.10. Healthcare Facilities Accreditation Program: Accreditation
requirements for acute care hospitals. Chicago, IL: Accreditation Association
for Hospitals and Health Systems. (Level VII)
16 DNV GL-Healthcare USA, Inc. (2016). IC.1 .SR.2 . NIAHO® accreditation
requirements: Interpretive guidelines & surveyor guidance (version 11).
Milford, OH: DNV GL-Healthcare USA, Inc. (Level VII)
17 American Speech-Language-Hearing Association. (2015). “Audiology
information series: Daily care and troubleshooting tips for hearing aids”
[Online]. Accessed via the Web at http://www.asha.org/uploadedFiles/AIS-
Hearing-Aids-Troubleshooting.pdf#search=%22audiology%22
18 Ganz, D. A., et al. (2013). Preventing falls in hospitals: A toolkit for improving
quality of care (AHRQ Publication No. 13-0015-EF). Accessed via the Web at
http://www.ahrq.gov/sites/default/files/publications/files/fallpxtoolkit.pdf
(Level VII)
19 The Joint Commission. (2019). Standard RC.01.03 .01. Comprehensive
accreditation manual for hospitals. Oakbrook Terrace, IL: The Joint
Commission. (Level VII)
20 Accreditation Association for Hospitals and Health Systems. (2017). Standard
10.00 .03. Healthcare Facilities Accreditation Program: Accreditation
requirements for acute care hospitals. Chicago, IL: Accreditation Association
for Hospitals and Health Systems. (Level VII)
21 Centers for Medicare and Medicaid Services, Department of Health and
Human Services. (2015). Condition of participation: Medical record services.
42 C.F.R. § 482.24(b).
22 DNV GL-Healthcare USA, Inc. (2016). MR.2 .SR.1 . NIAHO® accreditation
requirements: Interpretive guidelines & surveyor guidance (version 11).
Milford, OH: DNV GL-Healthcare USA, Inc. (Level VII)
23 Lin, F. R. (2012). Hearing loss in older adults: Who’s listening? JAMA, 307(11),
1147–1148.
HEAT APPLICATION
Heat applied directly to the patient’s body raises tissue
temperature and enhances the inflammatory process by
causing vasodilation and increasing local circulation, which
promotes leukocytosis, suppuration, drainage, and healing.
Heat also increases tissue metabolism; reduces pain caused
by muscle spasm, muscle strains, or minor aches and
stiffness; and decreases congestion in deep visceral organs.
Direct heat may be dry or moist. Dry heat can be
delivered at a higher temperature and for a longer time than
moist heat. Devices for applying dry heat include the hot-
water bottle, electric heating pad with or without circulating
water, and chemical hot pack.
Moist heat softens crusts and exudates, penetrates
deeper than dry heat, is less drying to the skin, produces
less perspiration, and is usually more comfortable for the
patient. Devices for applying moist heat include warm
compresses for small body areas and warm packs for large
areas.
Direct heat treatment can’t be used on a patient at risk for
hemorrhage. It also is contraindicated if the patient has a
sprained limb in the acute stage (because vasodilation
would increase pain and swelling) or a condition associated
with acute inflammation, such as appendicitis. Direct heat
should be applied cautiously to pediatric and elderly
patients and to patients with impaired kidney, cardiac, or
respiratory function; arteriosclerosis or atherosclerosis;
impaired sensation; diabetes; or spinal cord injury. It should
be applied with extreme caution to heat-sensitive areas,
such as scar tissue and stomas. Don’t apply heat to an open
wound after trauma, to inflamed or edematous areas, to a
localized malignant tumor, to the testes, to the abdomen of
a pregnant woman, or over metallic implants.1
NURSING ALERT Don’t apply heat over a fentanyl transdermal system
or its surrounding area, because an increase in temperature increases
fentanyl release from the system, which may result in overdose and
death.2
Equipment
Thermometer ▪ Optional: gloves, towel, sterile towel,
dressings, adhesive tape or roller gauze.
For a hot-water bottle
Hot-water bottle ▪ hot tap water ▪ pitcher ▪ bath (utility)
thermometer ▪ absorbent, protective cloth covering.
For an electric heating pad
Electric heating pad ▪ absorbent, protective cloth covering.
For a chemical hot pack (disposable)
Chemical hot pack.
For a warm compress or pack (sterile or
nonsterile)
Warm compress or pack ▪ basin of hot tap water ▪ container
of sterile water, normal saline solution, or other prescribed
solution ▪ sterile bowl or basin ▪ fluid-impermeable pad ▪
sterile or nonsterile bath (utility) thermometer ▪ clean or
sterile waterproof covering ▪ waterproof trash bag ▪ hot-
water bottle or chemical hot pack ▪ Optional: sterile forceps,
clean container.
Preparation of equipment
Hot-water bottle
Fill the bottle with hot tap water to detect leaks and warm
the bottle; then empty it. Run hot tap water into a pitcher
and measure the water temperature with the bath
thermometer. Adjust the temperature as ordered, usually to
115° to 125°F (46.1° to 51.7°C) for adults.
PEDIATRIC ALERT Adjust water temperature to between 105° and
115°F (40.6° and 46.1°C) for children younger than age 2.
ELDER ALERT Adjust water temperature to between 105° and 115°F
(40.6° and 46.1°C) for older adult patients.
Next, pour hot water into the bottle, filling it one-half to
two-thirds full. Partially filling the bottle keeps it lightweight
and flexible to mold to the treatment area. Squeeze the
bottle until the water reaches the neck to expel any air that
would make the bottle inflexible and reduce heat
conduction. Fasten the top and check the bag for leaks.
Place the bag in an absorbent cloth covering, and secure
the cover with tape or roller gauze.
Electric heating pad
Check the cord for frayed or damaged insulation. Then plug
in the pad and adjust the control switch to the desired
setting. Wrap the pad in a protective cloth covering, and
secure the cover with tape or roller gauze. If the pad comes
with its own cover, inspect the cover and fasteners to
ensure that all are intact. Follow the manufacturer’s
instructions for use for an electric heating pad that
circulates water.
Chemical hot pack
Select a pack of the correct size. Then follow the
manufacturer’s directions (strike, squeeze, or knead) to
activate the heat-producing chemicals. Place the pack in a
protective cloth covering and secure the cover with tape or
roller gauze.
Sterile warm compress or pack
Warm the container of sterile water or solution by setting it
in a sink or basin of hot water. Measure its temperature with
a sterile bath thermometer. If a sterile thermometer is
unavailable, pour some heated sterile solution into a clean
container, check the temperature with a regular bath
thermometer, and then discard the tested solution. Adjust
the temperature by adding hot or cold water to the sink or
basin until the solution reaches 120°F (48.9°C) for adults.3
PEDIATRIC ALERT Adjust the water temperature to 100°F (37.8°C) for
children.3
ELDER ALERT Adjust the water temperature to 100°F (37.8°C) for
older adult patients.3
NURSING ALERT Adjust the water temperature to 100°F (37.8°C) for
an eye compress.3
Pour the heated solution into a sterile bowl or basin. Then,
using the sterile forceps and sterile technique, soak the
compress or pack in the heated solution and wring out
excess solution while maintaining sterility. If necessary,
prepare a hot-water bottle or chemical hot pack to keep the
compress or pack warm.
Nonsterile warm compress or pack
Fill a bowl or basin with hot tap water or other solution and
measure the temperature of the fluid with a bath
thermometer. Adjust the temperature as ordered, usually to
120°F (48.9°C) for adults.3
PEDIATRIC ALERT Adjust the water temperature to 100°F (37.8°C) for
children.3
ELDER ALERT Adjust the water temperature to 100°F (37.8°C) for
older adult patients.3
NURSING ALERT Adjust the water temperature to 100°F (37.8°C) for
an eye compress.3
Soak the compress or pack in the hot liquid and wring out
excess liquid. If necessary, prepare a hot-water bottle, K
pad, or chemical hot pack to keep the compress or pack
warm.
Implementation
■ Verify the practitioner’s order if needed.
■ Gather and prepare the equipment.
■ Perform hand hygiene.4,5,6,7,8,9
■ Provide privacy.11,12,13,14
■ Confirm the patient’s identity using at least two patient
identifiers.10
■ Explain the procedure to the patient and family (if
appropriate) according to their individual communication
and learning needs to increase their understanding, allay
their fears, and enhance cooperation.15 Tell the patient not
to lean or lie directly on the heating device, because direct
contact reduces air space and increases the risk of burns.
Warn the patient against adjusting the temperature of the
heating device or adding hot water to a hot-water bottle.
Advise the patient to report pain immediately and to remove
the device if necessary.
■ Make sure the room is warm and free of drafts.
■ Obtain the patient’s temperature, pulse, and respirations
to serve as a baseline. If heat treatment is being applied to
raise the patient’s body temperature, monitor the patient’s
temperature, pulse, and respirations throughout the
application.
■ Perform hand hygiene.4,5,6,7,8,9
■ Put on gloves or sterile gloves as needed to comply with
standard precautions.16,17
■ Expose only the treatment area, because vasodilation will
make the patient feel chilly.
■ Assess the treatment area for open lesions, edema,
bleeding, and evidence of altered circulation, because the
risk of damage to tissue is increased if the area is already
traumatized.1
Applying a hot-water bottle, an electric heating
pad, or a chemical hot pack
■ Before applying the heating device, press it against your
inner forearm to test its temperature and heat distribution.
If it heats unevenly, obtain a new device.
■ Apply the device to the treatment area and, if necessary,
secure it with tape or roller gauze. Begin timing the
application.
■ Assess the patient’s skin condition frequently; remove the
device if you observe increased swelling or excessive
redness, blistering, maceration, or pallor, or if the patient
reports discomfort. Refill the hot-water bottle as necessary
to maintain the correct temperature.
■ Remove the device after 20 to 30 minutes, or as ordered.
Applying a warm compress or pack
■ Place a fluid-impermeable pad under the site.
■ Remove the warm compress or pack from the bowl or
basin. (Use sterile forceps throughout the procedure if
needed.)
■ Wring excess solution from the compress or pack. Excess
moisture increases the risk of burns.
PATIENT TEACHING
Using moist heat to relieve muscle spasm
Tell patients to choose moist heat rather than dry heat when attempting to
ease muscle tension or spasm. Moist heat is less drying to the skin, less apt
to cause burns, less likely to cause excessive fluid and salt loss through
sweating, and more likely to penetrate deeper tissues. Instruct the patient to
apply heat for 20 to 30 minutes, as follows:
■ Place a moist towel over the painful area.
■ Cover the towel with a hot-water bottle properly filled and at the correct
temperature.
■ Remove the hot-water bottle and towel after 20 to 30 minutes. Don’t
continue the application for longer than 30 minutes, because therapeutic
value decreases after that time.
■ Apply the compress or pack gently to the affected site.
After a few seconds, lift the device and check the skin for
excessive redness, maceration, or blistering. When you’re
sure the compress or pack isn’t causing a burn, mold it
firmly to the skin to keep air out, because air reduces the
temperature and effectiveness of the compress or pack.
Work quickly so the compress or pack retains its heat.
■ Apply a waterproof covering (sterile, if necessary) to the
device. Secure it with tape or roller gauze to prevent it from
slipping.
■ Place a hot-water bottle or chemical hot pack and
waterproof covering over the compress or pack to maintain
the correct temperature. Begin timing the application.
■ Assess the patient’s skin at regular intervals. Remove the
device if the skin shows excessive redness, maceration, or
blistering, or if the patient experiences pain or discomfort.
Change the compress or pack as needed to maintain the
correct temperature.
■ After 15 or 20 minutes, or as ordered, remove the device.
Discard it into a waterproof trash bag.
Completing the procedure
■ Dry the patient’s skin with a towel (sterile, if necessary),
as needed. Note the condition of the skin and redress the
area, if necessary. Obtain the patient’s temperature, pulse,
and respirations to compare with the baseline. Then make
sure the patient is comfortable.
■ Remove and discard your gloves, if worn, and perform
hand hygiene.4,5,6,7,8,9
■ If the treatment is to be repeated, store the equipment in
the patient’s room, out of reach; otherwise, return it for
proper cleaning and disinfection.
■ Document the procedure.18,19,20,21
Special considerations
■ Make sure that closure devices aren’t in direct contact
with the skin, because closure devices can cause burns.
■ If the patient is unconscious, anesthetized, cognitively or
neurologically impaired, or insensitive to heat, stay with the
patient throughout the treatment.
■ When direct heat is ordered to decrease congestion
within internal organs, the application must cover a large
enough area to increase blood volume at the skin’s surface.
For relief of pelvic organ congestion, for example, apply
heat over the patient’s lower abdomen, hips, and thighs. To
achieve local relief, you may concentrate heat only over the
specified area. (See Using moist heat to relieve muscle
spasm.)
■ As an alternative method to apply a sterile moist
compress, use a bedside sterilizer to sterilize the compress.
Saturate the compress with tap water or another solution
and wring it dry. Then place it in the bedside sterilizer at
275°F (135°C) for 15 minutes. Remove the compress with
sterile forceps or sterile gloves, and wring out the excess
solution. Then place the compress in a sterile bowl, measure
its temperature with a sterile thermometer, and allow it to
cool to 120°F (48.9°C).3
■ Follow the manufacturer’s instructions for heating
compresses, and avoid overheating.
Patient teaching
Teach the patient who is to continue heat application at
home how to use the equipment and how to make sure the
equipment is safe. Also teach the patient to check the skin
at regular intervals for signs and symptoms of excessive
exposure to heat.
Complications
Heat application can cause burns. Electrical shock may
occur from improper use of a heating pad.
Documentation
Record the time and date of heat application; the type,
temperature or heat setting, duration, and site of
application; the patient’s temperature, pulse, respirations,
and skin condition before, during, and after treatment; signs
of complications; and the patient’s tolerance of the
treatment. Document any patient teaching and the patient’s
understanding of your teaching.
REFERENCES
1 Taylor, C., et al. (2015). Fundamentals of nursing: The art and science of
nursing care (8th ed.). Philadelphia, PA: Wolters Kluwer.
2 Janssen Pharmaceuticals, Inc. (2016). “Duragesic (fentanyl transdermal
system): Full US prescribing information” [Online]. Accessed via the Web at
http://www.duragesic.com/prescribing-information.html
3 Burn Foundation. (n.d.) . “Safety facts on scald burns” [Online]. Accessed via
the Web at http://www.burnfoundation.org/programs/resource.cfm?c=1&a=3
4 Accreditation Association for Hospitals and Health Systems. (2017). Standard
07.01.21. Healthcare Facilities Accreditation Program: Accreditation
requirements for acute care hospitals. Chicago, IL: Accreditation Association
for Hospitals and Health Systems. (Level VII)
5 Centers for Medicare & Medicaid Services, Department of Health and Human
Services. (2015). Condition of participation: Infection control. 42 C.F.R. §
482.42.
6 The Joint Commission. (2019). Standard NPSG 07.01.01. Comprehensive
accreditation manual for hospitals. Oakbrook Terrace, IL: The Joint
Commission. (Level VII)
7 Centers for Disease Control and Prevention. (2002). Guideline for hand
hygiene in health-care settings: Recommendations of the Healthcare Infection
Control Practices Advisory Committee and the HICPAC/SHEA/APIC/IDSA Hand
Hygiene Task Force. MMWR Recommendations and Reports, 51(RR-16), 1–45.
Accessed via the Web at https://www.cdc.gov/mmwr/pdf/rr/rr5116.pdf (Level
II)
8 World Health Organization. (2009). “WHO guidelines on hand hygiene in
health care: First global patient safety challenge, clean care is safer care”
[Online]. Accessed via the Web at
http://apps.who.int/iris/bitstream/10665/44102/1/9789241597906_eng.pdf
(Level IV)
9 DNV GL-Healthcare USA, Inc. (2016). IC.1.SR.1 . NIAHO® accreditation
requirements: Interpretive guidelines & surveyor guidance (version 11).
Milford, OH: DNV GL-Healthcare USA, Inc. (Level VII)
10 The Joint Commission. (2019). Standard NPSG.01.01.01. Comprehensive
accreditation manual for hospitals. Oakbrook Terrace, IL: The Joint
Commission. (Level VII)
11 Accreditation Association for Hospitals and Health Systems. (2017). Standard
15.01.16. Healthcare Facilities Accreditation Program: Accreditation
requirements for acute care hospitals. Chicago, IL: Accreditation Association
for Hospitals and Health Systems. (Level VII)
12 Centers for Medicare and Medicaid Services, Department of Health and
Human Services. (2015). Condition of participation: Patient’s rights. 42 C.F.R.
§ 482.13(c)(1).
13 DNV GL-Healthcare USA, Inc. (2016). PR.1.SR.5 . NIAHO® accreditation
requirements: Interpretive guidelines & surveyor guidance (version 11).
Milford, OH: DNV GL-Healthcare USA, Inc. (Level VII)
14 The Joint Commission. (2019). Standard RI.01.01.01. Comprehensive
accreditation manual for hospitals. Oakbrook Terrace, IL: The Joint
Commission. (Level VII)
15 The Joint Commission. (2019). Standard PC.02.01.21. Comprehensive
accreditation manual for hospitals. Oakbrook Terrace, IL: The Joint
Commission. (Level VII)
16 Accreditation Association for Hospitals and Health Systems. (2017). Standard
07.01.10. Healthcare Facilities Accreditation Program: Accreditation
requirements for acute care hospitals. Chicago, IL: Accreditation Association
for Hospitals and Health Systems. (Level VII)
17 Siegel, J. D ., et al. (2007, revised 2017). “2007 guideline for isolation
precautions: Preventing transmission of infectious agents in healthcare
settings” [Online]. Accessed via the Web at
http://www.cdc.gov/hicpac/pdf/isolation/Isolation2007.pdf (Level II)
18 The Joint Commission. (2019). Standard RC 01.03 .01. Comprehensive
accreditation manual for hospitals. Oakbrook Terrace, IL: The Joint
Commission. (Level VII)
19 Centers for Medicare and Medicaid Services, Department of Health and
Human Services. (2015). Condition of participation: Medical record services.
42 C.F.R. § 482.24(b).
20 Accreditation Association for Hospitals and Health Systems. (2017). Standard
10.00 .03. Healthcare Facilities Accreditation Program: Accreditation
requirements for acute care hospitals. Chicago, IL: Accreditation Association
for Hospitals and Health Systems. (Level VII)
21 DNV GL-Healthcare USA, Inc. (2016). MR.2 .SR.1 . NIAHO® accreditation
requirements: Interpretive guidelines & surveyor guidance (version 11).
Milford, OH: DNV GL-Healthcare USA, Inc. (Level VII)
HEIGHT AND WEIGHT MEASUREMENT
Height and weight are routinely measured during admission
to a health care facility. An accurate record of the patient’s
height and weight is essential for calculating dosages of
drugs, anesthetics, and contrast agents; assessing
nutritional status and bone health; and determining the
height-weight ratio, body surface area, and body mass index
(BMI).1 And because body weight provides the best overall
picture of fluid status, monitoring weight daily proves
important for patients receiving sodium-retaining or diuretic
medications. Rapid weight gain may signal fluid retention;
rapid weight loss, diuresis.
Accurate weight measurement, rather than estimation, is
important, because errors in estimation have been reported
to be as high as 42%; errors occur even when patients
estimate their own weight.2,3,4 Weight can be measured
with a standing scale, chair scale, portable bed scale, or
built-in bed scale. (See Types of scales, page 344.)
The Institute for Safe Medication Practices recommends
that weight be measured in metric units only (kilograms for
adults, adolescents, children, and infants, and grams for
neonates), because official product labeling for medications
provides weight-based dosing using only the metric system.
Significant medication errors have occurred when a
patient’s weight was documented in nonmetric units of
measure and confused with kilograms or grams. Numerous
errors have been reported when health care workers convert
weights from one measurement system to another, or weigh
a patient in pounds but accidently record the value as
kilograms in the patient’s medical record, resulting in a
greater than twofold dosing error.5
Equipment
Standing scale with measurement bar or chair scale or bed
scale ▪ drawsheet (for bed scale) ▪ facility-approved
disinfectant ▪ Optional: gloves, tape measure and ruler (if
scale doesn’t have measuring bar), wheelchair, pillow,
sheets, transfer device.
Preparation of equipment
Select the appropriate scale, usually a standing scale for an
ambulatory patient or a chair or bed scale for an acutely ill
or debilitated patient. Then check to make sure the scale is
balanced. Standing scales and, to a lesser extent, bed
scales may become unbalanced when transported.
Whichever type of scale you choose, use the same scale
each time if the patient’s condition allows. If the department
has more than one of a scale type (for example, several
standing scales), make sure that each scale is marked so
that you can use of the same scale each time whenever
possible.
Implementation
■ Gather and prepare the appropriate equipment.
■ Perform hand hygiene.6,7,8,9,10
■ Confirm the patient’s identity using at least two patient
identifiers.11
■ Explain the procedure to the patient.
■ Provide privacy.12,13,14,15
Using a standing scale
■ Check that the scale reads zero to ensure accurate
measurement. If you’re using a digital scale, make sure it’s
set to display the patient’s weight in kilograms. If the scale
has wheels, lock them before the patient steps on to
prevent it from accidently moving.
■ Tell the patient to remove robe and slippers or shoes.
■ Assist the patient onto the scale and remain close to the
patient to prevent falls.
■ If you’re using an upright balance (gravity) scale, slide
the lower rider to the groove representing the largest
increment below the patient’s estimated weight. Then slide
the small upper rider until the beam balances. Add the
upper and lower rider figures to determine the patient’s
weight. Return the weight holder to its proper place.
■ If the scale is digital, read the display with the patient
standing as still as possible.
■ While the patient is still on the scale, tell the patient to
stand erect. Then raise the measuring bar beyond the top of
the patient’s head, extend the horizontal bar, and lower the
bar until it touches the top of the patient’s head. Read the
patient’s height.
■ Help the patient off the scale
■ Return the patient’s robe and slippers or shoes.
Using a chair scale
■ Transport the patient to the weighing area or the scale to
the patient’s bedside.
■ Lock the scale in place to prevent it from moving
accidentally.
■ If you’re using a scale with a swing-away chair arm,
unlock the arm. When unlocked, the arm swings back 180
degrees to permit easy access.
■ Position the scale beside the patient’s bed or wheelchair
with the chair arm open.
■ If the chair scale is digital, make sure the display reads
zero before use to ensure accurate measurement, and that
the scale is set to display the patient’s weight in kilograms.
■ Transfer the patient onto the scale.
■ Swing the chair arm to the front of the scale and lock the
arm in place.
■ Press the button and record the patient’s weight. If using
a balance scale, follow the same process used with a
standing scale to determine the weight.
■ Transfer the patient from the chair scale to the bed or
wheelchair.
■ Lock the main beam to avoid damaging the scale during
transport and unlock the wheels; remove the scale from the
patient’s room, if applicable.
Using a portable digital bed scale
■ Before using a bed scale, cover its stretcher with a
drawsheet.
■ Zero the scale with the drawsheet in place to ensure
accurate weighing, and make sure the scale is set to display
the patient’s weight in kilograms.
■ Release the stretcher to the horizontal position; then lock
it in place to prevent it from accidently moving.
■ Raise the patient’s bed to waist level when providing
patient care to prevent caregiver back strain.16
■ Turn the patient on the side, facing away from the scale.
■ Roll the base of the scale under the patient’s bed. Adjust
the lever to widen the base of the scale, providing stability.
Then lock the scale’s wheels.
■ Center the stretcher above the bed, lower it onto the
mattress, and roll the patient onto the stretcher.
■ Position the circular weighing arms of the scale over the
patient and attach them securely to the stretcher bars.
■ Pump the handle with long, slow strokes to raise the
patient a few inches off the bed. Ensure that the patient
doesn’t lean on or touch the headboard, side rails, or other
bed equipment, because this will affect weight
measurement.
■ Press the OPERATE button.
■ Read the patient’s weight on the digital display panel.
■ Press on the scale’s handle to lower the patient.
■ Detach the circular weighing arms from the stretcher
bars, roll the patient off the stretcher, and remove the
stretcher.
■ Position the patient comfortably in bed.
■ Release the wheel lock and withdraw the scale from
under the bed. Return the stretcher to its vertical position.
■ Return the bed to the lowest position to prevent falls and
maintain patient safety.17
Using a built-in bed scale
■ Before placing the patient in a bed with a built-in scale,
prepare the bed. If required by the manufacturer, place the
bed in the weighing position, typically with the head of bed
elevated less than 40 degrees. Make sure the bed isn’t
touching anything, such as the wall or medical devices, to
prevent an inaccurate reading. Prepare the sleep surface
with pillows, sheets, and any other items that don’t vary in
weight that the patient will be using. Place a list of these
items by the patient’s bedside, if needed, to make sure the
patient is weighed with these items consistently; some
facilities have a protocol that designates the specific items
that should be on the bed consistently. Zero the bed scale
with the items in place, making sure that no one is touching
the bed during this time.
EQUIPMENT
Types of scales
Various scales, including standing scales, chair scales, and bed scales, are
available to weigh patients.
■ With the assistance of coworkers and a transfer device,
place the patient on the bed, making sure the patient is
centered in the bed and lying still.
■ If the scale doesn’t function automatically, begin
obtaining the patient’s weight following the manufacturer’s
instructions.
Completing the procedure
■ Perform hand hygiene.6,7,8,9,10
■ Calculate the patient’s BMI if necessary to determine
whether the patient is at a healthy weight. (See Calculating
and interpreting BMI.)
■ Put on gloves18,19 and clean and disinfect the scale using
a hospital-grade disinfectant.20,21
■ Remove and discard your gloves and perform hand
hygiene.6,7,8,9,10
■ Document the procedure.23,24,25,26
Measuring height without a scale
■ Perform hand hygiene.6,7,8,9,10
■ Confirm the patient’s identity using at least two patient
identifiers.11
■ Provide privacy.13,14,15
■ Explain the procedure to the patient.
■ Have the patient remove shoes and stand against a wall
with back and heels touching the wall. Place a straight, level
object (such as a ruler) on top of the patient’ head parallel
to the floor. Mark the location of the ruler on the wall. Using
a tape measure, measure the distance between the mark
and the floor.
■ If the patient is unable to stand, place the patient supine
in bed with the head of the bed flat.27,28 Using a tape
measure, measure from the top of the patient’s head to the
heels.
■ Note the measurement in centimeters or inches, as
directed by your facility.1
■ Perform hand hygiene.6,7,8,9,10
■ Document the procedure.23,24,25,26
Special considerations
■ Reassure and steady patients who are at risk for losing
their balance on a scale.
■ If possible, weigh the patient at the same time each day
(usually before breakfast), in similar clothing, and using the
same scale. Have the patient void before being weighed if
applicable. If the patient uses crutches, weigh the patient
with the crutches, then weigh the crutches and any heavy
clothing and subtract their weight from the total to
determine the patient’s weight.
■ When rolling the patient onto the stretcher, be careful not
to dislodge IV catheters, indwelling catheters, and other
supportive equipment.
■ Report any change in weight of more than 1 kg (2.2 lb)
per day, unless it’s expected, such as after dialysis or
diuretic therapy.
■ Measuring height can be difficult for bedbound patients,
patients with structural anomalies, and patients with
contractures. Alternative methods for estimating height in
such patients include measuring recumbent length, knee
height, forearm length, and demispan.27,29 Use of a sliding
caliper should be the method of choice, however, because
it’s the closest in accuracy to standing height.30
Complications
Inaccurate measurement can lead to errors in medication
administration and other treatments.
Documentation
Record the patient’s height in inches and centimeters on the
nursing assessment form and in other medical records, as
required by your facility.
Record the patient’s weight using metric measurements.5
Record the date and time of measurement and the type of
scale used, and the scale’s identification number if more
than one scale of the same type is available.31 If the patient
was weighed using a bed scale, note the items that were in
place when the scale was reset to zero before use.31
REFERENCES
1 Tipton, P. H., et al. (2012). Patient safety: Consider the accuracy of height and
weight measurements. Nursing, 42(5), 50–52 . (Level V)
2 Breuer, L., et al. (2010). Weight approximation in stroke before thrombolysis:
The WAIST-Study: A prospective observational “dose-finding” study. Stroke,
41(12), 2867–2871. (Level VI)
3 Maskin, L. P., et al. (2010). Accuracy of weight and height estimation in an
intensive care unit. Anaesthesia Intensive Care, 38(5), 930–934.
4 Darnis, S., et al. (2012). Estimation of body weight in hospitalized patients.
QJM, 105(8), 769–774 .
5 Institute for Safe Medication Practices. (2018). “2018–2019 targeted
medication safety best practices for hospitals” [Online]. Accessed via the
Web at http://www.ismp.org/tools/bestpractices/TMSBP-for-Hospitals.pdf
6 The Joint Commission. (2019). Standard NPSG.07.01.01. Comprehensive
accreditation manual for hospitals. Oakbrook Terrace, IL: The Joint
Commission. (Level VII)
7 Centers for Disease Control and Prevention. (2002). Guideline for hand
hygiene in health-care settings: Recommendations of the Healthcare Infection
Control Practices Advisory Committee and the HICPAC/SHEA/APIC/IDSA Hand
Hygiene Task Force. MMWR Recommendations and Reports, 51(RR-16), 1–45.
Accessed via the Web at https://www.cdc.gov/mmwr/pdf/rr/rr5116.pdf (Level
II)
8 World Health Organization. (2009). “WHO guidelines on hand hygiene in
health care: First global patient safety challenge, clean care is safer care”
[Online]. Accessed via the Web at
http://apps.who.int/iris/bitstream/10665/44102/1/9789241597906_eng.pdf
(Level IV)
9 Accreditation Association for Hospitals and Health Systems. (2017). Standard
07.01.21. Healthcare Facilities Accreditation Program: Accreditation
requirements for acute care hospitals. Chicago, IL: Accreditation Association
for Hospitals and Health Systems. (Level VII)
10 Centers for Medicare and Medicaid Services, Department of Health and
Human Services. (2015). Condition of participation: Infection control. 42 C.F.R.
§ 482.42.
11 DNV GL-Healthcare USA, Inc. (2016). IC.1 .SR.1 . NIAHO® accreditation
requirements: Interpretive guidelines & surveyor guidance (version 11).
Milford, OH: DNV GL-Healthcare USA, Inc. (Level VII)
12 The Joint Commission. (2019). Standard NPSG.01.01.01. Comprehensive
accreditation manual for hospitals. Oakbrook Terrace, IL: The Joint
Commission. (Level VII)
13 Accreditation Association for Hospitals and Health Systems. (2017). Standard
15.01.16. Healthcare Facilities Accreditation Program: Accreditation
requirements for acute care hospitals. Chicago, IL: Accreditation Association
for Hospitals and Health Systems. (Level VII)
14 Centers for Medicare and Medicaid Services, Department of Health and
Human Services. (2015). Condition of participation: Patient’s rights. 42 C.F.R.
§ 482.13(c)(1).
15 The Joint Commission. (2019). Standard RI.01.01.01. Comprehensive
accreditation manual for hospitals. Oakbrook Terrace, IL: The Joint
Commission. (Level VII)
16 Waters, T. R., et al. (2009). “Safe patient handling training for schools of
nursing” [Online]. Accessed via the Web at
http://www.cdc.gov/niosh/docs/2009-127/pdfs/2009-127.pdf (Level VII)
17 Ganz, D. A., et al. (2013). Preventing falls in hospitals: A toolkit for improving
quality of care (AHRQ Publication No. 13-0015-EF). Rockville, MD: Agency for
Healthcare Research and Quality. Accessed via the Web at
http://www.ahrq.gov/sites/default/files/publications/files/fallpxtoolkit.pdf
(Level VII)
18 Siegel, J. D ., et al. (2007, revised 2017). “2007 guideline for isolation
precautions: Preventing transmission of infectious agents in healthcare
settings” [Online]. Accessed via the Web at
http://www.cdc.gov/hicpac/pdf/isolation/Isolation2007.pdf (Level II)
19 Accreditation Association for Hospitals and Health Systems. (2017). Standard
07.01.10. Healthcare Facilities Accreditation Program: Accreditation
requirements for acute care hospitals. Chicago, IL: Accreditation Association
for Hospitals and Health Systems. (Level VII)
20 Rutala, W. A., et al. (2008, revised 2017). “Guideline for disinfection and
sterilization in healthcare facilities, 2008” [Online]. Accessed via the Web at
http://www.cdc.gov/hicpac/pdf/guidelines/Disinfection_Nov_2008.pdf (Level I)
21 Accreditation Association for Hospitals and Health Systems. (2017). Standard
07.02.03. Healthcare Facilities Accreditation Program: Accreditation
requirements for acute care hospitals. Chicago, IL: Accreditation Association
for Hospitals and Health Systems. (Level VII)
22 Centers for Disease Control and Prevention. (2015). “About adult BMI”
[Online]. Accessed via the Web at
http://www.cdc.gov/healthyweight/assessing/bmi/adult_bmi/index.html
23 The Joint Commission. (2019). Standard RC.01.03 .01. Comprehensive
accreditation manual for hospitals. Oakbrook Terrace, IL: The Joint
Commission. (Level VII)
24 Accreditation Association for Hospitals and Health Systems. (2017). Standard
10.00 .03. Healthcare Facilities Accreditation Program: Accreditation
requirements for acute care hospitals. Chicago, IL: Accreditation Association
for Hospitals and Health Systems. (Level VII)
25 Centers for Medicare and Medicaid Services, Department of Health and
Human Services. (2015). Condition of participation: Medical record services.
42 C.F.R. § 482.24(b).
26 DNV GL-Healthcare USA, Inc. (2016). MR.2 .SR.1 . NIAHO® accreditation
requirements: Interpretive guidelines & surveyor guidance (version 11).
Milford, OH: DNV GL-Healthcare USA, Inc. (Level VII)
27 Venkataramen, R., et al. (2015). Height measurement in the critically ill
patient: A tall order in the critical care unit. Indian Journal of Critical Care
Medicine, 19(11), 665–668 .
28 Freitag, E., et al. (2010). Determination of body weight and height
measurement for critically ill patients admitted to the intensive care unit: A
quality improvement project. Australian Critical Care, 23(4), 197–207.
29 Froehlich-Grobe, K., et al. (2011). Measuring height without a stadiometer:
Empirical investigation of four height estimates among wheelchair users.
American Journal of Physical Medicine and Rehabilitation, 90(8), 658–666 .
Accessed via the Web at
http://www.ncbi.nlm.nih.gov/pmc/articles/PMC3148840/
30 Frid, H., et al. (2013). Agreement between different methods of measuring
height in elderly patients. Journal of Human Nutrition and Dietetics, 26(5),
504–511.
31 Byrd, J., et al. (2011). Scale consistency study: How accurate are inpatient
hospital scales? Nursing, 41(11), 21–24.
Calculating and interpreting BMI
Body mass index (BMI) is a number calculated from a person’s weight and
height to determine if the patient is overweight or obese. BMI allows you to
compare the patient’s weight status with the general population. To calculate
the patient’s BMI, use the following formula:
BMI = weight (kg) ÷ [height (M)]2.
For example, for a patient weighing 68 kg and measuring 1.65 m, the
calculation is as follows:
68kg÷(1.65M)2=BMIof2522
For adults age 20 or older, BMI is interpreted using standard weight status
categories that are the same for all ages and for both men and women. For
children and teenagers, BMI interpretation is both age- and gender-specific.
Use the table below to interpret BMI in adults.
HEMODIALYSIS
Hemodialysis is a potentially lifesaving procedure that
removes blood from the body, circulates it through an
artificial kidney known as a dialyzer, and then returns it to
the body. Various access sites can be used for this
procedure. (See Hemodialysis access, page 346.) The
access can be temporary or long-term, depending on the
patient’s condition and needs. Catheters are used for short-
term access; arteriovenous (AV) fistulas and AV grafts
provide more long-term access for hemodialysis.
AV fistulas are preferred for long-term access because
research shows they result in the longest survival, fewer
access-related procedures, fewer hospitalizations because
of infection, and lower overall costs of care. The Centers for
Medicare and Medicaid Services and the Institute for
Healthcare Improvement developed the Fistula First
Breakthrough Initiative, a national campaign to increase the
use of AV fistulas over catheters in patients who require
hemodialysis.1,2 One challenge to using an AV fistula first is
that planning is required so that the fistula can be created
and can mature before a patient with stage 4 chronic kidney
disease transitions to stage 5 chronic kidney failure.3
Hemodialysis access
Hemodialysis requires vascular access. The site and type of access may vary,
depending on the expected duration of dialysis, the practitioner’s preference,
and the patient’s condition.
Subclavian vein catheterization
Typically, double-lumen catheters are placed in the internal jugular vein.4 If
the internal jugular vein can’t be used, then the subclavian or femoral vein is
used. The use of the subclavian vein for catheter placement isn’t
recommended for patients who require permanent arteriovenous (AV) fistulas
because the risk of thrombosis can compromise AV fistula creation.5,6
Using the Seldinger technique, the practitioner inserts an introducer needle
into the subclavian vein, then inserts a guide wire through the introducer
needle and removes the needle. Using the guide wire, the practitioner then
threads a 5′′ to 12′′ (13-cm to 30-cm) plastic or Teflon catheter (with a Y hub)
into the patient’s vein.
Several types of double-lumen catheters can be used for dialysis access,
depending on the patient’s condition, the practitioner’s preference, and the
anticipated length of time that the catheter will be needed. The internal
diameter of each lumen is approximately 12G to allow for high flow rates.
The catheters have two ports: one red and one blue. The red port is used for
withdrawing the patient’s blood and sending it to the dialyzer, and the blue
port is used for returning dialyzed blood to the patient.
Most double-lumen catheters are considered temporary dialysis accesses.
However, a double-lumen tunneled catheter with a Dacron cuff may be used
for months.7 This catheter is tunneled from the skin insertion site to the
selected vein, and the Dacron cuff on the catheter under the skin acts as a
barrier to infection.
Femoral vein catheterization
Using the Seldinger technique, the practitioner inserts an introducer needle
into the left or right femoral vein, then inserts a guide wire through the
introducer needle and removes the needle.
Using the guide wire, the practitioner then threads a 5′′ to 12′′ (13-cm to 30-
cm) plastic or Teflon catheter with a Y hub or two catheters, one for inflow
and another placed about 1⁄2′′ (1 cm) distal to the first for outflow. This site
should be used only when no other access site is available, because it’s
associated with an increased risk of infection and deep vein thrombosis.8
AV fistula
To create an AV fistula, a surgeon makes an incision into the patient’s wrist or
lower forearm and then makes two additional small incisions, one in the side
of an artery and another in the side of a vein. The practitioner sutures the
edges of the incisions together to make a common opening 0.12′′ to 0.3 ′′ (3
mm to 7 mm) long. Because an AV fistula requires a 4- to 6-week maturing
time before it can be used as a dialysis access site, creation of a fistula is
recommended before hemodialysis is needed so that the fistula is matured
and ready for use when needed.
AV graft
To create an AV graft, the practitioner makes an incision in the patient’s
forearm, upper arm, or thigh. The practitioner then tunnels a natural or
synthetic graft under the skin and sutures the distal end to an artery and the
proximal end to a vein.
The underlying mechanism in hemodialysis is differential
diffusion across a semipermeable membrane, which
extracts the by-products of protein metabolism (urea) as
well as creatinine and excess water. The membrane doesn’t
permit diffusion of large molecules such as blood cells and
plasma proteins. This process restores or maintains the
balance of the body’s buffer system and electrolytes.
Hemodialysis promotes a rapid return to normal serum
values and helps prevent complications associated with
uremia. (See How hemodialysis works.)
Hemodialysis provides temporary support for patients with
acute kidney injury. It’s also used for the regular long-term
treatment of patients with stage 5 chronic kidney disease.
Hemodialysis may also be needed to remove toxic
substances from the blood in patients suffering from various
acute poisoning or barbiturate or analgesia overdose. The
patient’s condition, along with such variables as the rate of
creatinine accumulation and weight gain, determines the
number and duration of hemodialysis treatments. To
determine ultrafiltration requirements, the patient’s present
weight is compared with the weight after the last dialysis
treatment and the target weight. Blood pressure and
hemodynamic status are also considered.
EQUIPMENT
How hemodialysis works
In hemodialysis, blood flows from the patient to an external dialyzer (or
artificial kidney) through an access site. Inside the dialyzer, blood and
dialysate flow countercurrently, divided by a semipermeable membrane. The
composition of the dialysate resembles normal extracellular fluid. The blood
contains an excess of specific solutes (metabolic waste products and some
electrolytes), and the dialysate contains electrolytes that may be at abnormal
levels in the patient’s bloodstream. The dialysate’s electrolyte composition
can be modified to raise or lower electrolyte levels, depending on need.
Excretory function and electrolyte homeostasis are achieved by diffusion,
the movement of a molecule across the dialyzer’s semipermeable membrane
from an area of higher solute concentration to an area of lower
concentration. Water (solvent) crosses the membrane from the blood into the
dialysate by ultrafiltration. This process removes excess water, waste
products, and other metabolites through osmotic pressure and hydrostatic
pressure. Osmotic pressure is the movement of water across the
semipermeable membrane from an area of lesser solute concentration to one
of greater solute concentration. Hydrostatic pressure forces water from the
blood compartment into the dialysate compartment. Cleaned of impurities
and excess water, the blood returns to the body through a venous site.
Dialyzer
The hollow-fiber dialyzer contains fine capillaries, with a semipermeable
membrane enclosed in a plastic cylinder. Blood flows through these
capillaries as the system pumps dialysate in the opposite direction on the
outside of the capillaries.
Dialysate delivery systems
Three system types can be used to deliver dialysate. The batch system uses
a reservoir for recirculating dialysate. The regenerative system uses sorbents
to purify and regenerate recirculating dialysate. The proportioning system
(the most common) mixes concentrate with water to form dialysate, which
then circulates through the dialyzer and goes down a drain after a single
pass, followed by fresh dialysate.
Hemodialysis is typically performed on a hemodialysis unit
by specially trained personnel. However, if the patient is
acutely ill and unstable, it can be performed at the bedside
on an intensive care unit.
Equipment
For initiating hemodialysis with AV access
Scale ▪ hemodialysis machine with appropriate dialyzer and
dialysate ▪ stethoscope ▪ vital signs monitoring equipment
▪ gloves, gown, mask with face shield or mask and goggles
▪ two 15G or 17G winged fistula needles ▪ two 10-mL
syringes ▪ prescribed flush solution ▪ fluid-impermeable
pads ▪ antiseptic pads (chlorhexidine, povidone-iodine, or
70% alcohol)9 ▪ antiseptic solution or antibacterial soap or
scrub and water ▪ sterile 4′′ × 4′′ (10-cm × 10-cm) gauze
pads ▪ adhesive tape ▪ prescribed medications ▪ supplies
for blood sampling, as indicated ▪ tourniquet ▪ Optional:
prescribed topical anesthetic,10 prescribed anticoagulant.
For initiating hemodialysis with a double-lumen
catheter
Scale ▪ hemodialysis machine with appropriate dialyzer and
dialysate ▪ gloves ▪ gown ▪ mask with face shield or mask
and goggles ▪ antiseptic pads (chlorhexidine, povidone-
iodine, or 70% alcohol)9 ▪ stethoscope ▪ vital signs
monitoring equipment ▪ 10-mL syringes with preservative-
free normal saline solution ▪ syringes ▪ prescribed
medications ▪ supplies for blood sampling ▪ Optional:
prescribed anticoagulant.
For discontinuing hemodialysis with AV access
Gloves ▪ gown ▪ mask with face shield or mask and goggles
▪ stethoscope ▪ vital signs monitoring equipment ▪ sterile
4′′ × 4′′ (10-cm × 10-cm) gauze pads ▪ antimicrobial
ointment or chlorhexidine-impregnated sponge dressing ▪
adhesive tape ▪ scale ▪ disinfectant pad ▪ facility-approved
disinfectant.
For discontinuing hemodialysis with a double-
lumen catheter
Mask with face shield or mask and goggles ▪ gloves ▪ two
10-mL syringes with preservative-free normal saline solution
▪ syringes ▪ two sterile Luer-lock caps ▪ stethoscope ▪ vital
signs monitoring equipment ▪
antiseptic pads
(chlorhexidine, alcohol or povidone-iodine) ▪ scale ▪
disinfectant pad ▪ Optional: sterile specimen container;
povidone-iodine ointment, polymyxin B, bacitracin zinc, or
gramicidin ointment; sterile transparent semipermeable
dressing or sterile 4′′ × 4′′ (10-cm × 10-cm) gauze pads and
tape.
Preparation of equipment
NURSING ALERT To avoid a pyrogenic reaction and bacteremia with
septicemia resulting from contamination, use strict sterile technique
during preparation of the machine. Discard equipment that has been
disconnected and exposed to the air.5
Prepare and test the hemodialysis equipment following
the manufacturer’s instructions. To maintain catheter
patency, carefully follow the manufacturer’s instructions for
specific catheter care and flushing procedures. Maintain
sterile technique to prevent introducing pathogens into the
patient’s bloodstream during dialysis. Test the dialyzer and
dialysis machine for residual disinfectant after rinsing; this
may require a double-check by a second nurse or
technician.9 Make sure the dialysis machine alarms limits
are set appropriately and that the alarms are turned on,
functioning properly, and audible to staff.11,12,13
Implementation
Initiating hemodialysis
■ Review the patient’s medical record for advance directive
and resuscitation status, isolation precautions (including the
reason for isolation, date and source of culture, organisms
cultured and their sensitivity, and type of isolation required),
reason for admission, current problem list (including current
medical diagnosis, recent surgical interventions, and recent
diagnostic procedures), and medications.14
■ Avoid distractions and interruptions when preparing and
administering the dialysate to prevent administration
errors.15,16
■ Verify the practitioner’s order. The hemodialysis order
should include treatment time, dialyzer type, blood flow
rate, dialysate flow rate, dialysate composition,
anticoagulation (if needed), and the fluid removal plan.14
■ Perform hand hygiene.17,18,19,20,21,22,23
■ Confirm the patient’s identity using at least two patient
identifiers.24
■ Provide privacy.25,26,27,28
■ Explain the procedure to the patient and family (if
appropriate) according to their individual communication
and learning needs to increase their understanding, allay
their fears, and enhance cooperation.29
■ Raise the patient’s bed to waist level (if applicable) when
providing patient care to prevent caregiver back strain.30
■ Perform hand hygiene.17,18,19,20,21,22,23
■ Put on gloves and, as needed, other personal protective
equipment to comply with standard precautions. Institute
transmission-based precautions, as needed.14
Performing prehemodialysis patient assessment
■ Assess the patient for changes in energy and overall well-
being.14
■ Obtain the patient’s blood pressure. Obtain both sitting
and standing blood pressures, as the patient’s condition
permits, to detect orthostatic changes. For an immobile
patient, obtain blood pressure with the head of bed down
flat and then with the head of bed elevated 80 to 90
degrees, unless contraindicated. Keep the head of bed
elevated at least 30 degrees for a patient with increased
intracranial pressure.14 If the patient receives an
antihypertensive medication, determine whether the
pretreatment dose was held or administration times were
changed, if ordered.14
■ Obtain the patient’s temperature. Keep in mind that
uremic patients often have a body temperature of less than
98.6°F (37°C), and setting the dialysis solution temperature
higher than the patient’s temperature can cause
vasodilation and subsequent hypotension.14 Elevated
temperature may indicate infection and increases insensible
fluid loss.14
■ Assess the patient’s heart rate and rhythm. Attach the
patient to a cardiac monitor if the heart rate is less than 50
beats/minute or greater than 120 beats/minute, or as
ordered.14 Make sure that the alarm limits are set
appropriately for the patient’s current condition, and that
the alarms are turned on, functioning properly, and audible
to staff. Notify the practitioner of new-onset bradycardia or
tachycardia.14 Bradycardia may indicate digoxin toxicity or
hyperkalemia, requiring an adjustment in dialysate to
prevent arrhythmias and a review of medications to check
for other medications that can cause bradycardia.14
Auscultate heart sounds. Report new findings to the
practitioner.14
■ Assess the patient’s fluid balance, including intake (IV
infusions, oral intake, and enteral feedings) and output
(urine, removed ultrafiltrate, stool, drainage [for example,
from chest tubes, a nasogastric tube, and wound drains],
and insensible fluid losses caused by burns, wounds,
ventilation, and temperature elevation).14
■ Weigh the patient (in kilograms) at the same time daily. If
using a bed scale, use standardized linens on the bed and
bed positioning. Compare the daily weight to the prescribed
“dry” weight obtained from outpatient records, if available,
or to the hospital admission weight, to additionally assess
volume status.14
■ Assess for edema. If present, grade the severity using a
scale, such as 0 = no pitting; 1+ = trace; 2+ = mild; 3+
moderate; and +4 = severe.14 Inspect dependent areas for
edema (sacral area for a patient positioned supine; legs,
feet, and scrotum for a sitting or ambulatory patient; and
facial and periorbital area for a patient who is reclined or
positioned prone), and assess for facial and upper extremity
edema, which may indicate occlusion of the subclavian and
jugular veins. Assess for brawny edema (dark-colored skin
that appears distended and becomes so tight with fluid that
the fluid can’t be displaced by applied pressure) and
anasarca (generalized edema).14
■ Assess for ascites and neck vein distention.14
■ Assess the patient’s mucous membranes and skin turgor
and integrity. Dry mucous membranes and skin tenting
indicate volume depletion.14
■ Monitor hemodynamic status using bioimpedance,
impedance cardiography, pulmonary artery pressure, or
central venous pressure, if ordered.14
■ Assess pulmonary status by assessing respiratory rate,
rhythm, and pattern; auscultating breath sounds; assessing
for cyanosis; obtaining oxygen saturation level by pulse
oximetry; assessing fraction of inspired oxygen (if
applicable); and reviewing current arterial blood gas values
and trends and chest X-ray results.14
■ Assess the patient’s GI status, including the presence of
bowel sounds and stool output. Hold anticoagulation and
notify the practitioner if you suspect GI bleeding.14
■ Assess the patient’s genitourinary status, including the
primary cause of acute kidney injury or chronic kidney
disease.14
■ Assess the patient’s endocrine status by reviewing blood
glucose level stability and evaluating hemoglobin A1c value,
if ordered. Monitor the use of systemic insulin for a patient
who requires intensive care.14
■ Assess the patient’s neurologic status, including level of
consciousness; risk factors associated with hemodialysis,
such as disequilibrium syndrome, use of anticoagulation,
and intracranial bleed; and the presence of brain injury for
which the patient requires intracranial pressure
monitoring.14
■ Assess the patient’s current laboratory test results
(sodium, potassium, glucose, calcium, phosphorus, calcium
phosphorus product, magnesium, carbon dioxide, blood urea
nitrogen, creatinine, albumin, cholesterol, triglyceride,
transaminase, ferritin, and iron levels; total iron-binding
capacity; transferrin saturation; complete blood count;
prothrombin time; D-dimer; heparin-induced thromboplastin
antibody; and digoxin level), as needed and ordered.14
■ Assess the AV access site. Inspect the access extremity
and compare it to the other extremity, noting any obvious
differences. Assess the access extremity for swelling,
collateral vein formation, change in color or temperature,
tortuosity of the fistula, decreased sensation, movement
limitation, and delayed capillary refill.
■ Assess the fistula for redness, warmth, drainage from
prior needle sites, ecchymosis, hematoma, rash, skin
breakdown, aneurysm, and stenosis.
■ Auscultate for the presence of a bruit, which indicates
turbulent blood flow at the anastomosis. When the fistula
functions properly, no separation should exist between the
systolic and diastolic components of the sound; it should
sound like a continuous “whooshing” sound. A high-pitched
sound may indicate underlying stenosis. Notify the
practitioner of changes in the sound or character of the
blood flow through the fistula.14
■ Palpate the fistula for a continuous vibration sensation
known as a thrill. If the vibration becomes pulsatile or you
can no longer feel a vibration, stenosis may be present.14
■ Determine whether the patient had any problems with
the last dialysis treatment, if applicable. Inquire about
posttreatment recovery time, if applicable.14
■ Compare your assessment findings to previous treatment
records (if applicable) to recognize changes in the patient’s
status that may require further evaluation and reporting.14
■ Remove and discard your gloves and other personal
protective equipment, if worn.
■ Perform hand hygiene.17,18,19,20,21,22,23
Initiating hemodialysis with AV access
■ Collaborate with the practitioner to form the patient’s
treatment plan based on laboratory test results and
predialysis assessment findings.14
■ Perform hand hygiene.17,18,19,20,21,22,23
■ Gather and prepare the necessary equipment.
■ Assist the patient into a comfortable position (supine or
sitting in a recliner with the feet elevated).
■ Apply a topical anesthetic to the AV puncture site, as
ordered, approximately 45 to 60 minutes before
cannulation, following safe medication administration
practices.10,31,32,33,34 If using ethyl chloride, whose
anesthetic effect lasts 1 to 2 minutes, apply it immediately
before cannulation.35
■ Perform hand hygiene.17,18,19,20,21,22,23
■ Wash the site with antibacterial soap or scrub and
water.14
■ Perform hand hygiene.17,18,19,20,21,22,23
■ Put on gloves, a gown, and a mask with face shield or a
mask
and
goggles to
comply with standard
precautions.18,36,37,38
■ Place the patient’s AV access limb on a fluid-impermeable
pad.6
■ Clean the skin over the AV access with the antiseptic
used in your facility, following the manufacturer’s
instructions.9,14 Apply a chlorhexidine-based solution using
a back-and-forth friction scrub for 30 seconds, and then
allow it to dry.6 Apply alcohol using a circular friction motion
for 1 minute, and then allow it to dry.6 Apply povidone-
iodine solution for 2 to 3 minutes, and then allow it to
dry.6,39
■ Remove and discard your gloves.36,39
■ Perform hand hygiene.17,18,19,20,21,22,23
■ Put on new gloves.18,36,37,38
■ Choose an appropriate-sized needle to cannulate the
fistula (usually a 17G needle for the first cannulation; 15G
for a mature fistula).14
■ Draw up normal saline solution into each 10-mL syringe.5
■ Apply a tourniquet to the upper portion of the arm
containing the fistula to increase venous pressure, enlarge
and stabilize the vein, and ease cannulation.14,39
■ Lightly place the thumb and forefinger of your hand that
isn’t holding the needle on either side of the vessel to
prevent the vessel from moving.
■ Pull the skin taut in the direction opposite of needle
insertion; stabilize the vessel but avoid placing excess
pressure.5
■ Grasp the butterfly needle by the wings, prime the needle
with normal saline solution until all of the air is purged, and
then clamp the needle.14
■ Remove the protective cap and immediately cannulate
the fistula. The arterial needle can be inserted in the
direction of blood flow in the fistula (antegrade) or against
the direction of blood flow (retrograde). Insert the needle at
a 25-degree angle with the bevel up.14 As you advance the
needle, watch for blood flashback.14
■ Open the clamp and remove the tourniquet.14
■ Aspirate 1 mL to 5 mL of blood with a 10-mL syringe,
flush the needle with normal saline solution, and then clamp
it. Observe for signs and symptoms of infiltration.14
■ Secure the needle with tape. Tape the needle at the same
angle of insertion to prevent moving the tip of the needle
from the desired location within the vessel lumen.14
■ Cannulate the fistula with the venous needle a few inches
beyond the arterial needle (farther from the AV
anastomosis), inserting the needle in the same direction as
the blood flow.14 Follow the steps used for the arterial
needle.
■ Remove the syringe from the end of the arterial needle
tubing, uncap the arterial dialyzer tubing, and connect the
two lines. Tape the connection securely to prevent
accidental separation of the tubing.
■ Remove the syringe from the end of the venous needle
tubing, uncap the venous dialyzer tubing, and connect the
two lines. Tape the connection securely to prevent
accidental separation of the tubing.
NURSING ALERT Dialysate is considered a high-alert medication
because it can cause the patient significant harm when used in
error.40,41
■ If required by your facility, before beginning hemodialysis,
have another nurse perform an independent double-check
to verify the patient’ identity and to make sure that the
correct dialysate is hanging in the prescribed concentration,
the dosage calculations are correct, the dialysis machine
settings are correct, and the infusion line is attached to the
correct port.42
■ Compare the results of the independent double-check
with the other nurse (if required) and, if no discrepancies
exist, unclamp the tubing and begin the hemodialysis
treatment. Keep the access and connections visible at all
times.14 If discrepancies exist, rectify them before beginning
hemodialysis.
■ Monitor the hemodialysis equipment parameters: every
30 minutes (more frequently if the patient is restless or
confused), verify that all lines are open and connections are
intact and secure.14
■ Observe the color of blood in the dialyzer (dark color can
precede filter clotting; cherry red may indicate hemolysis).
■ Check pressure readings, including venous pressure,
arterial pressure, and transmembrane pressure. Venous
pressure shouldn’t exceed 250 mm Hg. High venous
pressure may indicate clotting in the venous chamber, blood
line, or venous needle; low venous pressure may indicate
disconnection. Arterial pressure shouldn’t exceed –250 mm
Hg. Low arterial pressure indicates hypotension, excess
suction on the access wall, or a clotted arterial needle or
access port; a sudden drop in arterial pressure may indicate
needle migration or infiltration. High arterial pressure may
indicate dialyzer or system clotting. Transmembrane
pressure (venous pressure minus the dialysate pressure in
millimeters of mercury) should rise slowly throughout
hemodialysis in response to ultrafiltration, with subsequent
increased blood viscosity.14
■ Observe the anticoagulant pump to make sure the
anticoagulant is administered as prescribed. Monitor the
system and the patient’s response to the anticoagulant
through direct observation and blood specimen testing, as
indicated.14
■ Check the blood and dialysate flow rates to ensure
delivery of prescribed rates to achieve the desired patient
solute clearance.14
■ Monitor and adjust the ultrafiltration rate according to the
patient’s response to treatment.14
■ Monitor dialysate conductivity to ensure delivery of
dialysis solution with an electrolyte concentration that won’t
cause hemolysis or crenation of red blood cells.14
■ Closely monitor the patient’s vital signs, oxygen
saturation level, pain level, intake and output, anticoagulant
administration, and laboratory test results, as well as any
complaints or changes in the patient’s behavior throughout
the treatment session to promptly recognize changes in the
patient’s condition or vascular access. Intervene quickly to
resolve any treatment complications.14
■ Watch for signs and symptoms of dialysis disequilibrium
syndrome (such as headache, nausea, vomiting, blurred
vision, muscle cramps, restlessness, hypertension,
increased pulse pressure, decreased sensorium, seizures,
and coma). If any of these signs or symptoms develops,
notify the practitioner and intervene as ordered. The
hemodialysis treatment may need to be discontinued or the
efficiency of diffusion reduced.14
■ Administer prescribed medications, as ordered, following
safe medication administration practices.31,32,33,34
■ Obtain blood samples for coagulation studies, as
ordered.6
■ Return the bed to the lowest position to prevent falls and
maintain patient safety.43
■ Discard used equipment in appropriate receptacles.36
Initiating hemodialysis with a double-lumen catheter
■ Have the patient put on a mask.44
■ Prepare the preservative-free normal saline flush solution
in the 10-mL syringes, as indicated.
■ Assess the catheter exit site for signs and symptoms of
dysfunction, infection, and other complications.14,45
■ Identify the red (arterial) and blue (venous) ports.
■ Clamp the catheter to prevent air from entering either
lumen of the catheter.44
■ Remove the caps and then disinfect the catheter hubs
using a new antiseptic pad for each hub. Scrub the sides
(threads) and end of each hub thoroughly using friction,
making sure to remove any residue. Continue disinfecting
the catheter limbs using friction, moving from each hub to
at least several centimeters toward the patient’s body. Hold
the catheter limbs while the antiseptic dries.44 Discard the
antiseptic pads.
■ Don’t allow the catheter hubs to touch unsterile
surfaces.44
■ While maintaining sterility of the syringe tip, attach a
syringe to the red port catheter hub, unclamp the catheter,
withdraw the locking solution, clamp the catheter, and
remove the syringe.46
■ Perform a vigorous mechanical scrub of the red port
catheter hub for at least 5 seconds using an antiseptic pad.
Then allow it to dry completely.47,48
■ While maintaining sterility of the syringe tip, attach a 10-
mL prefilled syringe containing preservative-free normal
saline solution to the red port, unclamp the port, gently
instill the solution, and then reclamp the red port.44,49
■ While maintaining sterility of the syringe tip, attach
another syringe to the blue port catheter hub, unclamp the
catheter, withdraw the locking solution, clamp the catheter,
and remove the syringe.46
■ Perform a vigorous mechanical scrub of the blue port
catheter hub for at least 5 seconds using an antiseptic pad.
Then allow it to dry completely.47,48
■ While maintaining sterility of the syringe tip, attach
another 10-mL prefilled syringe containing preservative-free
normal saline solution to the blue port, unclamp the port,
gently instill the solution, and then reclamp the blue
port.44,49
■ If catheter patency is in question, assess for mechanical
or thrombotic dysfunction; institute thrombolytic therapy, as
ordered, if thrombotic dysfunction is present.
■ Remove the syringe from the red port and then,
maintaining sterile technique, attach the red port to the line
leading to the arterial port of the dialyzer.44
■ Trace the tubing from the patient to its point of origin to
make sure you’ve connected it to the proper port.50,51
■ Remove the syringe from the blue port and then,
maintaining sterile technique, attach the blue port to the
line leading to the venous port of the dialyzer.44
■ Trace the tubing from the patient to its point of origin to
make sure you’ve connected it to the proper port.50,51
■ Secure the tubing to the patient to reduce tension on the
connections and to prevent trauma to the catheter insertion
site.
■ Open the clamps to the arterial and venous dialyzer
tubing.
■ Remove the patient’s mask.
■ Begin the hemodialysis treatment. Keep the access and
connections visible at all times.14
Discontinuing hemodialysis with AV access
■ Perform hand hygiene.17,18,19,20,21,22,23
■ Have the patient put on a mask.
■ Raise the patient’s bed to waist level (if applicable) when
providing patient care to prevent caregiver back strain.30
■ Remove the tape from the connection site of the arterial
lines.
■ Clamp the needle tubing, and then disconnect the lines.
Note that the blood in the arterial line will continue to flow
toward the dialyzer, followed by normal saline solution.
Clamp the blood line just before the blood reaches the point
where the saline solution enters the line.
■ Unclamp the saline solution and allow a small amount of
saline solution to flow through the line.
■ Unclamp the dialyzer line and allow all of the blood to
flow into the dialyzer, where it passes through the filter and
back to the patient through the venous line.
■ After the blood is retransfused, clamp the venous needle
tubing and the dialyzer’s venous line and turn off the blood
pump.
■ Remove the tape from the connection site of the venous
lines, and disconnect the lines.
■ Apply a folded 4′′ × 4′′ (10-cm × 10-cm) sterile gauze pad
over the needle site, but don’t apply pressure.
■ Carefully remove the needles (one at a time to prevent
unnecessary loss of blood due to the force of pressure in the
access)6 at approximately the same angle as needle
insertion to prevent dragging the needle across the
patient’s skin and to avoid puncturing the vein wall.39
■ Apply pressure to the site with the folded 4′′ × 4′′ (10-cm
× 10-cm) sterile gauze pad using two fingers until the
bleeding stops. Note that application of inadequate pressure
can result in hematoma formation; excessive pressure can
result in thrombosis. You should be able to continue to feel a
thrill both above and below the compression site while
holding pressure. Bleeding usually stops within 10 minutes.
■ Cover the site with a dry sterile dressing.7,9 Avoid
circumferential taping of the dressing.
■ When dialysis is complete, weigh the patient in
kilograms,40 obtain vital signs (including blood pressure
sitting and standing, if possible), and assess neurologic
status. Compare these findings with the predialysis
assessment data.
■ Return the bed to the lowest position to prevent falls and
maintain patient safety.43
Discontinuing hemodialysis with a double-
lumen catheter
■ Perform hand hygiene.17,18,19,20,21,22,23
■ Put on gloves, a gown, and a mask with face shield or a
mask and goggles to comply with standard precautions.37
■ Turn the blood pump on the hemodialysis machine to 50
to 100 mL/minute.
■ Raise the patient’s bed to waist level (if applicable) when
providing patient care to prevent caregiver back strain.30
■ Clamp the catheter lumens to prevent air from entering
either lumen of the catheter.44
■ Disinfect the connections between the catheter hubs and
the lines leading to the dialyzer, using a separate antiseptic
pad for each connection; then allow them to dry
completely.8,44
■ Disconnect the dialysis line from the red port of the
catheter.
■ Perform a vigorous mechanical scrub of the hub for at
least 5 seconds using an antiseptic pad. Scrub the sides
(threads) and the end of the hub thoroughly using friction,
making sure to remove any residue. Then allow it to dry
completely.8,44
■ While maintaining sterility of the syringe tip, attach a 10-
mL prefilled syringe containing preservative-free normal
saline solution to the red catheter port, unclamp the
catheter lumen, and then slowly flush the lumen. Then
clamp the catheter lumen and remove and discard the
syringe.42
■ Perform a vigorous mechanical scrub of the catheter hub
for at least 5 seconds using an antiseptic pad. Then allow it
to dry completely.8,47
■ While maintaining sterility of the syringe tip, attach a
syringe containing the prescribed locking solution, unclamp
the catheter lumen, and lock the port following unit
protocol. Then clamp the catheter lumen and remove and
discard the syringe.48
■ Perform a vigorous mechanical scrub of the red port for at
least 5 seconds using an antiseptic pad and then allow it to
dry completely.8,47 Cap the port with a new sterile Luer-lock
cap.44
■ Disconnect the dialysis line from the blue catheter port
and perform a vigorous mechanical scrub of the hub for at
least 5 seconds using an antiseptic pad. Scrub the sides
(threads) and the end of the hub thoroughly using friction,
making sure to remove any residue. Allow it to dry
completely.8,44
■ While maintaining sterility of the syringe tip, attach a 10-
mL syringe containing preservative-free normal saline
solution to the blue catheter port, unclamp the catheter
lumen, and slowly flush the lumen. Then clamp the catheter
lumen and remove and discard the syringe.
■ Perform a vigorous mechanical scrub of the catheter hub
for at least 5 seconds using an antiseptic pad. Then allow it
to dry completely.8,47
■ While maintaining sterility of the syringe tip, attach a
syringe containing the prescribed locking solution and lock
the port following unit protocol. Then clamp the catheter
lumen and remove and discard the syringe.
■ Perform a vigorous mechanical scrub of the blue port for
at least 5 seconds using an antiseptic pad and then allow it
to dry completely.8,47 Cap the port with a new sterile Luer-
lock cap.44
■ Place the patient in the supine position, with the head
facing away from the catheter.
■ If necessary, perform catheter exit site care and apply a
sterile transparent semipermeable (or sterile gauze and
tape) dressing to the catheter exit site.6 If compatible with
the hemodialysis catheter material, apply povidone-iodine,
polymyxin B, bacitracin zinc, or gramicidin ointment (as
prescribed) to the catheter exit site to reduce the risk of
vascular catheter–associated infection.8
■ Remove the patient’s mask.
■ Assess the patient’s postdialysis weight (in kilograms)52,
vital signs, and neurologic, respiratory, and cardiac status;
compare your findings to predialysis baseline findings.
■ Remove and discard your gloves.38
■ Return the bed to the lowest position (if applicable) to
prevent falls and maintain patient safety.
■ Perform hand hygiene.17,18,19,20,21,22,23
■ Put on new gloves.38
■ Rinse and disinfect the dialysis delivery system.40,52
Completing the procedure
■ Remove and discard your gloves and other personal
protective equipment, if worn.36,38
■ Perform hand hygiene.17,18,19,20,21,22,23
■ Document the procedure.53,54,55,56
Special considerations
■ The Joint Commission issued a sentinel event alert
concerning medical device alarm safety, because alarm-
related events have been associated with permanent loss of
function and death. Among the major contributing factors
were improper alarm settings, inappropriately turned off
alarms, and alarm signals not audible to staff. Make sure
that alarm limits are appropriately set, and that alarms are
turned on and audible to staff. Follow facility guidelines for
preventing alarm fatigue.11
■ Immediately report any suspected machine malfunction
or equipment defect.
NURSING ALERT Make sure you complete each step in the
hemodialysis procedure correctly. Overlooking a single step or
performing it incorrectly can cause unnecessary blood loss or
inefficient treatment from poor clearances or inadequate fluid
removal. For example, when preparing the equipment, never allow a
normal saline solution bag to run dry while priming and soaking the
dialyzer, because that could cause air to enter the patient portion of
the dialysate system. Failure to perform accurate hemodialysis therapy
can lead to patient injury or death.
■ Continue necessary drug administration during the
hemodialysis treatment unless the drug would be removed
in the dialysate; if so, administer the medication after
dialysis.
■ If you meet resistance while instilling the anticoagulant
flush solution into either port of a dual-lumen catheter, stop
flushing immediately. Clamp the port, replace the sterile
Luer-lock cap, and notify the practitioner. Place a DO NOT USE
message on the port until its patency is verified.
Patient teaching
Postoperative period
In the postoperative period, teach the patient to care for the
AV access site. Teach the patient to keep the incision clean
and dry to prevent infection, and to clean it daily until it
heals completely and the sutures are removed (usually 10
to 14 days after surgery). Teach the patient how to use a
stethoscope to auscultate for the access bruit and how to
palpate a thrill. The patient should check the access several
times a day. He should notify the practitioner of pain,
swelling, redness, drainage, and any decrease in the access
thrill or bruit.
Explain that after the access site heals, the patient may
use the arm freely. Exercise is beneficial because it
stimulates vein enlargement. The patient may start by
squeezing a small rubber ball or other soft object for 15
minutes as advised by the practitioner.
Teach the patient to avoid putting excessive pressure on
the arm. The patient shouldn’t sleep on it, wear constricting
clothing, or lift heavy objects with it. Also the patient
shouldn’t allow anyone to take his or her blood pressure or
draw blood from the access arm.
If the patient will be performing hemodialysis at home,
thoroughly review all aspects of the procedure with the
patient and family. Give them the phone number of the
dialysis center. Emphasize that training for home
hemodialysis is a complex process requiring 2 to 3 months
to ensure that the patient or family member performs it
safely and competently. Keep in mind that this procedure is
stressful.
After hemodialysis
Teach the patient to keep the dressings on the access site
for several hours after the treatment. Teach the patient not
to loosen the scabs on the needle insertion sites because
they may bleed or become infected. If bleeding should
occur, teach the patient to apply pressure to the needle
sites with a clean towel or gauze for 10 to 15 minutes
without lifting the pressure. Prematurely releasing the
pressure may disturb the clot formation. Tell the patient to
use enough pressure to stop the bleeding but not enough to
occlude the pulse in the access. Instruct the patient to tape
the dressing in place when the bleeding stops, but never to
wrap the tape all the way around the arm. Tell the patient to
go to the emergency department if the bleeding can’t be
stopped.
Complications
Bacterial endotoxins in the dialysate may cause fever.
Improper access care and needle site asepsis can introduce
bacteria into the bloodstream and cause sepsis. Rapid fluid
removal and electrolyte changes during dialysis can cause
early dialysis disequilibrium syndrome. Signs and symptoms
include headache, nausea, vomiting, restlessness,
hypertension, muscle cramps, backache, and seizures.
Excessive removal of fluid during ultrafiltration can cause
hypovolemia and hypotension. Diffusion of the sugar and
sodium content of the dialysate solution into the blood can
cause hyperglycemia and hypernatremia, and subsequent
hyperosmolarity.
Cardiac arrhythmias can occur as the result of electrolyte
and pH changes in the blood. They can also develop if the
patient is taking antiarrhythmics, because the drugs may be
removed during the treatment. Angina can develop in
patients with anemia and in those with preexisting
arteriosclerotic disease. Patients with reduced oxygen levels
resulting from extracorporeal blood flow or membrane
sensitivity may require oxygen administration during
hemodialysis.
Some complications of hemodialysis can be fatal. An air
embolus can result from tubing disconnection, if the dialyzer
contains air, or from an empty saline solution container.
Signs and symptoms include dyspnea, chest pain, coughing,
and cyanosis.
Hemolysis of the blood cells can result from obstructed
flow of the dialysate concentrate or from incorrect setting of
the conductivity alarm limits. Signs and symptoms include
cherry red blood, chest pain, dyspnea, arrhythmias,
hyperkalemia, and an abrupt decrease in hematocrit.
Hyperthermia, which can result from overheating of the
dialysate, is potentially fatal.
Exsanguination can result if the connections on the blood
lines become separated or ruptured or the dialyzer
membrane ruptures.
Improper access site cannulation or needle site care can
cause hematoma, pseudoaneurysm formation, and even
rupture of the graft, which is accompanied by excessive
bleeding.
Documentation
Record the time the treatment began, along with the
patient’s predialysis assessment data and vital signs. Note
any complications and nursing actions taken. Note any
blood samples sent and the laboratory results obtained.
Record the time the treatment was completed and the
patient’s response to it. Record the condition of the AV
access site or catheter insertion site with the date and time
of the dressing change, the time hemostasis was obtained,
and any culture specimens obtained.
REFERENCES
1 End Stage Renal Disease National Coordinating Center. (2017). “Fistula first
catheter last” [Online]. Accessed via the Web at
http://www.esrdncc.org/en/fistula-first-catheter-last
2 National Kidney Foundation (NKF). (2017). “NKF and the Fistula First
Breakthrough Initiative” [Online]. Accessed via the Web at
https://www.kidney.org/patients/pfc/DialysisEducation
3 Vassalotti, J. A., et al. (2012). Fistula first breakthrough initiative: Targeting
catheter last in fistula first. Seminars in Dialysis, 25(3), 303–310. (Level VII)
4 Aydin, Z., et al. (2012). Placement of hemodialysis catheters with a technical,
functional, and anatomical viewpoint. International Journal of Nephrology,
2012, 302826. Accessed via the Web at
http://www.hindawi.com/journals/ijn/2012/302826/ (Level VI)
5 National Kidney Foundation. (2015). “KDOQI clinical practice guideline for
hemodialysis adequacy: 2015 update” [Online]. Accessed via the Web at
http://www.ajkd.org/article/S0272-6386(15)01019-7/pdf (Level VII)
6 Wiegand, D. L. (2017). AACN procedure manual for high acuity, progressive
and critical care (7th ed.). St. Louis, MO: Elsevier.
7 Centers for Disease Control and Prevention. (2011, revised 2017). “Guidelines
for the prevention of intravascular catheter-related infections” [Online].
Accessed via the Web at
https://www.cdc.gov/infectioncontrol/guidelines/bsi/recommendations.html
(Level I)
8 Marschall, J., et al. (2014). SHEA/IDSA practice recommendation: Strategies to
prevent central line-associated bloodstream infections in acute care
hospitals. Infection Control and Hospital Epidemiology, 35(7), 753–771 .
Accessed via the Web at http://www.jstor.org/stable/10.1086/676533 (Level I)
9 Centers for Disease Control and Prevention. (2016). “Dialysis safety: Dialysis
BSI prevention collaborative” [Online]. Accessed via the Web at
http://www.cdc.gov/dialysis/coalition/prevention-collaborative.html
10 Çelik, G., et al. (2011). Vapocoolant spray vs lidocaine/prilocaine cream for
reducing the pain of venipuncture in hemodialysis patients: A randomized,
placebo-controlled, crossover study. International Journal of Medical Sciences,
8(7), 623–627. Accessed via the Web at http://www.medsci.org/v08p0623.pdf
(Level II)
11 The Joint Commission. (2013). “Sentinel event alert: Medical device alarm
safety in hospitals” [Online]. Accessed via the Web at
http://www.jointcommission.org/assets/1/18/SEA_50_alarms_4 _5 _13_FINAL1 .P
DF (Level VII)
12 The Joint Commission. (2019). Standard NPSG.06 .01.01. Comprehensive
accreditation manual for hospitals. Oakbrook Terrace, IL: The Joint
Commission. (Level VII)
13 Graham, K. C., & Cvach, M. (2010). Monitor alarm fatigue: Standardizing use
of physiological monitors and decreasing nuisance alarms. American Journal
of Critical Care, 19(1), 28–37. Accessed via the Web at
http://ajcc.aacnjournals.org/content/19/1/28.full.pdf
14 American Nephrology Nurses’ Association (ANNA). (2015). Core curriculum
for nephrology nursing (6th ed.). Pitman, NJ: ANNA.
15 Westbrook, J., et al. (2010). Association of interruptions with an increased risk
and severity of medication administration errors. Archives of Internal
Medicine, 170(8), 683–690 .
16 Institute for Safe Medication Practices. (2012). Side tracks on the safety
express: Interruptions lead to errors and unfinished...Wait, what was I doing?
Nurse Advise-ERR, 11(2), 1–4 . Accessed via the Web at
https://www.ismp.org/Newsletters/acutecare/showarticle.aspx?id=37
17 The Joint Commission. (2019). Standard NPSG.07.01.01. Comprehensive
accreditation manual for hospitals. Oakbrook Terrace, IL: The Joint
Commission. (Level VII)
18 Centers for Disease Control and Prevention. (2001). Recommendations for
preventing transmission of infections among chronic hemodialysis patients.
MMWR Recommendations and Reports, 50(RR-5), 1–43. Accessed via the Web
at http://www.cdc.gov/mmwr/PDF/rr/rr5005.pdf (Level II)
19 Centers for Disease Control and Prevention. (2002). Guideline for hand
hygiene in health-care settings: Recommendations of the Healthcare Infection
Control Practices Advisory Committee and the HICPAC/SHEA/APIC/IDSA Hand
Hygiene Task Force. MMWR Recommendations and Reports, 51(RR-16), 1–45.
Accessed via the Web at https://www.cdc.gov/mmwr/pdf/rr/rr5116.pdf (Level
II)
20 World Health Organization. (2009). “WHO guidelines on hand hygiene in
health care: First global patient safety challenge, clean care is safer care”
[Online]. Accessed via the Web at
http://apps.who.int/iris/bitstream/10665/44102/1/9789241597906_eng.pdf
(Level IV)
21 Accreditation Association for Hospitals and Health Systems. (2017). Standard
07.01.21. Healthcare Facilities Accreditation Program: Accreditation
requirements for acute care hospitals. Chicago, IL: Accreditation Association
for Hospitals and Health Systems. (Level VII)
22 Centers for Medicare and Medicaid Services, Department of Health and
Human Services. (2015). Condition of participation: Infection control. 42 C.F.R.
§ 482.42.
23 DNV GL-Healthcare USA, Inc. (2016). IC.1 .SR.1 . NIAHO® accreditation
requirements: Interpretive guidelines & surveyor guidance (version 11).
Milford, OH: DNV GL-Healthcare USA, Inc. (Level VII)
24 The Joint Commission. (2019). Standard NPSG.01.01.01. Comprehensive
accreditation manual for hospitals. Oakbrook Terrace, IL: The Joint
Commission. (Level VII)
25 The Joint Commission. (2019). Standard RI.01.01.01. Comprehensive
accreditation manual for hospitals. Oakbrook Terrace, IL: The Joint
Commission.(Level VII)
26 Centers for Medicare and Medicaid Services, Department of Health and
Human Services. (2015). Condition of participation: Patient’s rights. 42 C.F.R.
§ 482.13(c)(1).
27 Accreditation Association for Hospitals and Health Systems. (2017). Standard
15.01.16. Healthcare Facilities Accreditation Program: Accreditation
requirements for acute care hospitals. Chicago, IL: Accreditation Association
for Hospitals and Health Systems. (Level VII)
28 DNV GL-Healthcare USA, Inc. (2016). PR.1.SR.5 . NIAHO® accreditation
requirements: Interpretive guidelines & surveyor guidance (version 11).
Milford, OH: DNV GL-Healthcare USA, Inc. (Level VII)
29 The Joint Commission. (2019). Standard PC.02.01.21. Comprehensive
accreditation manual for hospitals. Oakbrook Terrace, IL: The Joint
Commission. (Level VII)
30 Waters, T. R., et al. (2009). “Safe patient handling training for schools of
nursing” [Online]. Accessed via the Web at
http://www.cdc.gov/niosh/docs/2009-127/pdfs/2009-127.pdf (Level VII)
31 The Joint Commission. (2017). Standard MM.06.01.01. Comprehensive
accreditation manual for hospitals. Oakbrook Terrace, IL: The Joint
Commission. (Level VII)
32 Accreditation Association for Hospitals and Health Systems. (2017). Standard
16.01.03. Healthcare Facilities Accreditation Program: Accreditation
requirements for acute care hospitals. Chicago, IL: Accreditation Association
for Hospitals and Health Systems. (Level VII)
33 Centers for Medicare and Medicaid Services, Department of Health and
Human Services. (2015). Condition of participation: Nursing services. 42
C.F.R. § 482.23(c).
34 DNV GL-Healthcare USA, Inc. (2016). MM.1 .SR.2. NIAHO® accreditation
requirements: Interpretive guidelines & surveyor guidance (version 11).
Milford, OH: DNV GL-Healthcare USA, Inc. (Level VII)
35 Gebauer Company. (n.d .) “Gebauer’s ethyl chloride” [Online]. Accessed via
the Web at
http://cdn2.hubspot.net/hubfs/150313/docs/Ethyl_Chloride/Application/EC_En
glish_IFU.pdf
36 Occupational Safety and Health Administration. (n.d .). “Bloodborne
pathogens, standard number 1910.1030” [Online]. Accessed via the Web at
https://www.osha.gov/pls/oshaweb/owadisp.show_document?
p_id=10051&p_table=STANDARDS (Level VII)
37 Accreditation Association for Hospitals and Health Systems. (2017). Standard
07.01.10. Healthcare Facilities Accreditation Program: Accreditation
requirements for acute care hospitals. Chicago, IL: Accreditation Association
for Hospitals and Health Systems. (Level VII)
38 Siegel, J. D ., et al. (2007, revised 2017). “2007 guideline for isolation
precautions: Preventing transmission of infectious agents in healthcare
settings” [Online]. Accessed via the Web at
http://www.cdc.gov/hicpac/pdf/isolation/Isolation2007.pdf (Level II)
39 National Kidney Foundation. (2006). “2006 updates: Clinical practice
guidelines and clinical practice recommendations: Vascular access” [Online].
Accessed via the Web at http://www.kidney.org/sites/default/files/docs/12-50-
0210_jag_dcp_guidelines-va_oct06_sectionc_ofc.pdf (Level VII)
40 Institute for Safe Medication Practices. (2016). “2016–2017 targeted
medication safety best practices for hospitals” [Online]. Accessed via the
Web at http://www.ismp.org/tools/bestpractices/TMSBP-for-Hospitals.pdf
41 Institute for Safe Medication Practices. (2014). “ISMP’s list of high-alert
medications in acute care settings” [Online]. Accessed via the Web at
http://www.ismp.org/Tools/highalertmedications.pdf
42 Institute for Safe Medication Practices. (2008). Conducting an independent
double-check. ISMP Medication Safety Alert! Nurse Advise-ERR, 6(12), 1.
Accessed via the Web at
http://www.ismp.org/newsletters/nursing/Issues/NurseAdviseERR200812.pdf
(Level VII)
43 Ganz, D. A., et al. (2013). Preventing falls in hospitals: A toolkit for improving
quality of care (AHRQ Publication No. 13-0015-EF). Rockville, MD: Agency for
Healthcare Research and Quality. Accessed via the Web at
http://www.ahrq.gov/sites/default/files/publications/files/fallpxtoolkit.pdf
(Level VII)
44 Centers for Disease Control and Prevention. (n.d .). “Hemodialysis central
venous catheter scrub-the-hub protocol” [Online]. Accessed via the Web at
http://www.cdc.gov/dialysis/PDFs/collaborative/Hemodialysis-Central-Venous-
Catheter-STH-Protocol.pdf
45 Standard 41. Vascular access device (VAD) assessment, care and dressing
changes. Infusion therapy standards of practice. (2016). Journal of Infusion
Nursing, 39, S81–S84. (Level VII)
46 Standard 29. Hemodialysis vascular access devices (VADs). Infusion therapy
standards of practice. (2016). Journal of Infusion Nursing, 39, S59–S60 . (Level
VII)
47 Standard 34. Needleless connectors. Infusion therapy standards of practice.
(2016). Journal of Infusion Nursing, 39, S68–S70. (Level VII)
48 Standard 40. Flushing and locking. Infusion therapy standards of practice.
(2016). Journal of Infusion Nursing, 39, S77–S81. (Level VII)
49 U.S . Food and Drug Administration. (n.d .). “Look. Check. Connect. Safe
medical device connections save lives” [Online]. Accessed via the Web at
http://www.fda.gov/downloads/MedicalDevices/Safety/AlertsandNotices/UCM1
34873.pdf
50 The Joint Commission. (2014). “Sentinel event alert: Managing risk during
transition to new ISO tubing connector standards” [Online]. Accessed via the
Web at
http://www.jointcommission.org/assets/1/6/SEA_53_Connectors_8 _19_14 _final.
pdf (Level VII)
51 Accreditation Association for Hospitals and Health Systems. (2017). Standard
07.02.03. Healthcare Facilities Accreditation Program: Accreditation
requirements for acute care hospitals. Chicago, IL: Accreditation Association
for Hospitals and Health Systems. (Level VII)
52 Rutala, W. A., et al. (2008, revised 2017). “Guideline for disinfection and
sterilization in healthcare facilities, 2008” [Online]. Accessed via the Web at
http://www.cdc.gov/hicpac/pdf/guidelines/Disinfection_Nov_2008.pdf (Level I)
53 The Joint Commission. (2019). Standard RC.01.03 .01. Comprehensive
accreditation manual for hospital. Oakbrook Terrace, IL: The Joint
Commission. (Level VII)
54 Accreditation Association for Hospitals and Health Systems. (2017). Standard
10.00 .03. Healthcare Facilities Accreditation Program: Accreditation
requirements for acute care hospitals. Chicago, IL: Accreditation Association
for Hospitals and Health Systems. (Level VII)
55 Centers for Medicare and Medicaid Services, Department of Health and
Human Services. (2015). Condition of participation: Medical record services.
42 C.F.R. § 482.24(b).
56 DNV GL-Healthcare USA, Inc. (2016). MR.2 .SR.1 . NIAHO® accreditation
requirements: Interpretive guidelines & surveyor guidance (version 11).
Milford, OH: DNV GL-Healthcare USA, Inc. (Level VII)
HEMOGLOBIN TESTING, BEDSIDE
Hemoglobin level can be measured at the patient’s bedside
using a portable photometer device. This method involves
obtaining a fingerstick specimen and placing it in the
device, which immediately determines the hemoglobin level
and allows for prompt intervention, if necessary. In contrast,
the traditional method involves obtaining a blood specimen
using venipuncture (or a vascular access device) and then
sending the sample to the laboratory for interpretation.
Several portable testing systems are available for bedside
hemoglobin monitoring. These systems are also convenient
for the patient’s home use. At home or at the bedside, using
single-use, autodisabling fingerstick devices prevents the
spread of bloodborne pathogens.1
Normal hemoglobin values for adults range from 12.5 to
15 mg/dL (125 to 150 mmol/L). Normal hemoglobin ranges
vary by age in children. A below-normal hemoglobin value
may indicate anemia, recent hemorrhage, or fluid retention,
all of which result in hemodilution. An elevated hemoglobin
value suggests hemoconcentration from polycythemia or
dehydration.
Equipment
Portable photometer ▪ single-use, auto-disabling lancet1 ▪
microcuvette ▪ two pairs of gloves ▪ alcohol pads ▪ gauze
pads ▪ disinfectant pads ▪ Optional: warm, moist
compresses.
Preparation of equipment
Note the expiration date on the microcuvette vial. If opening
the vial for the first time, label the vial with the date and
time it was opened. Microcuvettes can be stored for up to 2
years; however, after the vial is opened, the shelf life of the
microcuvettes is 90 days. Turn on the photometer. If the
photometer hasn’t been used recently, insert the control
microcuvette to make sure that the photometer is working
properly.
Implementation
■ Verify the practitioner’s order.
■ Gather and prepare the appropriate equipment.
■ Perform hand hygiene2,3,4,5,6,7 and put on gloves to
comply with standard precautions.8,9
■ Confirm the patient’s identity using at least two patient
identifiers.10
■ Provide privacy.11,12,13,14
■ Explain the procedure to the patient or to the parents or
guardian, if applicable.
■ Tell the patient that a pinprick will be felt in the finger
during blood sampling.
■ Select an appropriate puncture site. In most cases, use
the fingertip for an adult or child, and the heel or the great
toe for an infant.15 For an adult, the middle and fourth
fingers are the best choices, because the second finger is
usually the most sensitive, and the thumb may have
thickened skin or calluses. Blood should circulate freely in
the finger from which you’re drawing blood, so avoid using a
ring-bearing finger. To ensure an adequate blood sample,
don’t use a cold, cyanotic, or swollen area as the puncture
site.
■ If necessary, dilate the capillaries by applying warm,
moist compresses to the area for about 10 minutes.
■ Clean the intended puncture site with an alcohol pad and
allow it to dry completely, because any remaining alcohol
may interfere with the test results.15
■ To collect the sample from the fingertip, use a single-use,
auto-disabling lancet. Position the lancet on the side of the
patient’s fingertip, perpendicular to the lines of the
fingerprints.9 Puncture the skin with a quick, continuous,
and deliberate stroke to achieve a good flow of blood and to
prevent the need to repeat the puncture.15
■ If required by your facility, wipe away the first drop of
blood using a gauze pad, because it may be contaminated
with tissue, fluid, or debris.15
■ Apply the microcuvette, which automatically collects a
precise amount of blood (approximately 5 mL). Don’t
squeeze the patient’s finger too tightly, because doing so
may dilute the specimen with plasma.15
■ Insert the microcuvette into the photometer. Hemoglobin
test results appear on the photometer screen in 60 seconds.
■ Place a gauze pad over the puncture site and apply firm
pressure to stop bleeding.
■ Dispose of the lancet and microcuvette in appropriate
containers.16
■ Remove and discard your gloves16 and perform hand
hygiene.2,3,4,5,6,7
■ Put on a pair of new gloves8,9 and clean and disinfect the
photometer using a disinfectant pad so that it’s ready to use
for another patient.17,18
■ Remove and discard your gloves16 and perform hand
hygiene.2,3,4,5,6,7
■ Notify the practitioner if the test result is outside the
expected parameters.19
■ Document the procedure.20,21,22,23
Special considerations
■ Bedside hemoglobin testing is considered a waived test,
meaning the test system was approved for waiver under the
Clinical Laboratory Improvement Amendments of 1988 by
the U.S . Food and Drug Administration. To qualify for waived
test status, the test must be simple to perform and have low
risk for erroneous test results. However, keep in mind that
errors can occur anywhere in the testing process; make sure
you follow the manufacturer’s instructions for use to prevent
testing errors that could result in treatment errors.24
Documentation
Document the values obtained from the photometer as well
as the date and time of the test. Record the date and time
the practitioner was notified of abnormal results, any
interventions performed, and the patient’s response to
these interventions.
REFERENCES
1 U.S. Food and Drug Administration. (2010). “Use of fingerstick devices on
more than one person poses risk for transmitting bloodborne pathogens:
Initial communication: Update 11/29/2010” [Online]. Accessed via the Web at
http://www.premiersafetyinstitute.org/wp-content/uploads/FDA-Fingerstick-
device-update-manufact112910.pdf
2 The Joint Commission. (2019). Standard NPSG.07.01.01. Comprehensive
accreditation manual for hospitals. Oakbrook Terrace, IL: The Joint
Commission. (Level VII)
3 Centers for Disease Control and Prevention. (2002). Guideline for hand
hygiene in health-care settings: Recommendations of the Healthcare Infection
Control Practices Advisory Committee and the HICPAC/SHEA/APIC/IDSA Hand
Hygiene Task Force. MMWR Recommendations and Reports, 51(RR-16), 1–45.
Accessed via the Web at https://www.cdc.gov/mmwr/pdf/rr/rr5116.pdf (Level
II)
4 World Health Organization. (2009). “WHO guidelines on hand hygiene in
health care: First global patient safety challenge, clean care is safer care”
[Online]. Accessed via the Web at
http://apps.who.int/iris/bitstream/10665/44102/1/9789241597906_eng.pdf
(Level IV)
5 Centers for Medicare and Medicaid Services, Department of Health and
Human Services. (2015). Condition of participation: Infection control. 42 C.F.R.
§ 482.42.
6 Accreditation Association for Hospitals and Health Systems. (2017). Standard
07.01.21. Healthcare Facilities Accreditation Program: Accreditation
requirements for acute care hospitals. Chicago, IL: Accreditation Association
for Hospitals and Health Systems. (Level VII)
7 DNV GL-Healthcare USA, Inc. (2016). IC.1.SR.1 . NIAHO® accreditation
requirements: Interpretive guidelines & surveyor guidance (version 11).
Milford, OH: DNV GL-Healthcare USA, Inc. (Level VII)
8 Siegel, J. D., et al. (2007, revised 2017). “2007 guideline for isolation
precautions: Preventing transmission of infectious agents in healthcare
settings” [Online]. Accessed via the Web at
http://www.cdc.gov/hicpac/pdf/isolation/Isolation2007.pdf (Level II)
9 Accreditation Association for Hospitals and Health Systems. (2017). Standard
07.01.10. Healthcare Facilities Accreditation Program: Accreditation
requirements for acute care hospitals. Chicago, IL: Accreditation Association
for Hospitals and Health Systems. (Level VII)
10 The Joint Commission. (2019). Standard NPSG.01.01.01. Comprehensive
accreditation manual for hospitals. Oakbrook Terrace, IL: The Joint
Commission. (Level VII)
11 Accreditation Association for Hospitals and Health Systems. (2017). Standard
15.01.16. Healthcare Facilities Accreditation Program: Accreditation
requirements for acute care hospitals. Chicago, IL: Accreditation Association
for Hospitals and Health Systems. (Level VII)
12 Centers for Medicare and Medicaid Services, Department of Health and
Human Services. (2015). Condition of participation: Patient’s rights. 42 C.F.R.
§ 482.13(c)(1).
13 The Joint Commission. (2019). Standard RI.01.01.01. Comprehensive
accreditation manual for hospitals. Oakbrook Terrace, IL: The Joint
Commission. (Level VII)
14 DNV GL-Healthcare USA, Inc. (2016). PR.1.SR.5 . NIAHO® accreditation
requirements: Interpretive guidelines & surveyor guidance (version 11).
Milford, OH: DNV GL-Healthcare USA, Inc. (Level VII)
15 World Health Organization. (2010). “WHO guidelines on drawing blood: Best
practices in phlebotomy” [Online]. Accessed via the Web at
http://apps.who.int/iris/bitstream/10665/44294/1/9789241599221_eng.pdf
16 Occupational Safety and Health Administration. (n.d .). “Bloodborne
pathogens, standard number 1910.1030” [Online]. Accessed via the Web at
http://www.osha.gov/pls/oshaweb/owadisp.show_document?
p_table=STANDARDS&p_id=10051 (Level VII)
17 Rutala, W. A., et al. (2008, revised 2017). “Guideline for disinfection and
sterilization in healthcare facilities, 2008” [Online]. Accessed via the Web at
http://www.cdc.gov/hicpac/pdf/guidelines/Disinfection_Nov_2008.pdf (Level I)
18 Accreditation Association for Hospitals and Health Systems. (2017). Standard
07.02.03. Healthcare Facilities Accreditation Program: Accreditation
requirements for acute care hospitals. Chicago, IL: Accreditation Association
for Hospitals and Health Systems. (Level VII)
19 The Joint Commission. (2019). Standard NPSG.02.03 .01. Comprehensive
accreditation manual for hospitals. Oakbrook Terrace, IL: The Joint
Commission. (Level VII)
20 The Joint Commission. (2019). Standard RC.01.03 .01. Comprehensive
accreditation manual for hospitals. Oakbrook Terrace, IL: The Joint
Commission. (Level VII)
21 Centers for Medicare and Medicaid Services, Department of Health and
Human Services. (2015). Condition of participation: Medical record services.
42 C.F.R. § 482.24.
22 Accreditation Association for Hospitals and Health Systems. (2017). Standard
10.00 .03. Healthcare Facilities Accreditation Program: Accreditation
requirements for acute care hospitals. Chicago, IL: Accreditation Association
for Hospitals and Health Systems. (Level VII)
23 DNV GL-Healthcare USA, Inc. (2016). MR.2 .SR.1 . NIAHO® accreditation
requirements: Interpretive guidelines & surveyor guidance (version 11).
Milford, OH: DNV GL-Healthcare USA, Inc. (Level VII)
24 Centers for Disease Control and Prevention. (2017). “Clinical laboratory
improvement amendments (CLIA): Waived tests” [Online]. Accessed via the
Web at http://www.cdc.gov/CLIA/Resources/WaivedTests/default.aspx
HIP ARTHROPLASTY CARE
Hip arthroplasty involves surgical replacement of the hip
joint. It may be total (replacing the femoral head and
acetabulum) or partial (replacing only one joint component).
(See Total hip replacement.)
Hip arthroplasty is performed to decrease or eliminate
pain and improve functional status. It’s most commonly
used to treat osteoarthritis. Other indications include
rheumatoid arthritis, avascular necrosis, traumatic arthritis,
hip fractures, benign and malignant bone tumors,
ankylosing spondylitis, and juvenile rheumatoid arthritis.
Arthroplasty postprocedure care includes providing routine
postoperative care, maintaining alignment of the affected
joint, and assisting with exercises. Nursing responsibility
includes teaching, safe mobility, home care, and exercises
that may continue for several years.
HOSPITAL-ACQUIRED CONDITION ALERT Keep in mind that venous
thromboembolism (VTE) in patients who underwent hip replacement
is considered a hospital-acquired condition because it can be
reasonably prevented using best practices. Make sure to follow VTE
prevention practices—such as using mechanical compression devices
(for example, antiembolism stockings, sequential pneumatic
compression device, arterial-venous impulse foot compression device),
promoting early ambulation, and providing pharmacologic prophylaxis
—to reduce the risk of VTE.1,2,3
Equipment
Antiembolism stocking, sequential compression device,
arterial-venous impulse foot compression device ▪
hypoallergenic moisturizer4 ▪ warm water ▪ crutches or
walker ▪ closed-wound drainage system ▪ abduction splint ▪
marker ▪
over-the-bed trapeze bar ▪
prescribed
anticoagulants ▪ prescribed pain medications ▪ blood
pressure monitoring device ▪ stethoscope ▪ disinfectant pad
▪ Optional: gloves, electronic infusion device (preferably a
smart pump with dose-error reduction software), sterile
dressings, hypoallergenic tape, prescribed beta-adrenergic
agent, pulse oximeter, capnography device, sedation scale.
Implementation
■ Receive handoff communication from the person who was
responsible for the patient’s care. Ask questions, as
necessary, to avoid miscommunications that can cause
patient care errors during transitions of care.5 As part of the
handoff process, trace each tubing and catheter from the
patient to its point of origin, using a standardized line
reconciliation process with high-reliability practices.6
■ Verify the practitioner’s orders.
■ Perform hand hygiene.7,8,9,10,11,12
■ Confirm the patient’s identity using at least two patient
identifiers.13
■ Provide privacy.14,15,16,17
■ Explain all postprocedure care to the patient to allay fears
and enhance cooperation.18
■ Raise the patient’s bed to waist level when providing
patient care to prevent caregiver back strain.18
■ Perform hand hygiene.7,8,9,10,11,12
■ Put on gloves, as needed, to comply with standard
precautions.20,21,22
■ Monitor vital signs at an interval determined by your
facility and the patient’s condition; no evidence-based
research is available to dictate the best practice for the
frequency of vital signs monitoring.23 Promptly report
changes in vital signs, because these changes may indicate
the presence of infection, hemorrhage, and other
postoperative complications.
■ Screen and assess the patient’s pain using facility-defined
criteria that are consistent for the patient’s age, condition,
and ability to understand.24
■ Treat the patient’s pain as needed and ordered using
nonpharmacologic or pharmacologic measures, or a
combination of approaches. Base the treatment plan on
evidence-based practices and the patient’s clinical
condition, past medical history, and pain management
goals.24 If administering pain medications, follow safe
medication administration practices.25,26,27,28
■ If the patient is receiving IV opioid medication, frequently
monitor vital signs, respiratory status (including oxygen
saturation level using pulse oximetry, and end-tidal carbon
dioxide level using a capnography device, if available), and
sedation level, to promptly recognize and treat oversedation
and respiratory depression related to IV opioid use.
■ Explain the monitoring process to the patient and family,
and inform them that it might be necessary to awaken the
patient to assess the effects of the medication. Advise the
patient and family to alert staff immediately if the patient
develops breathing problems or other changes that might
indicate a reaction to the medication.25,29
■ Assess the patient for postoperative nausea and
vomiting, and intervene as needed.23
■ Assess and address the patient’s safety needs to reduce
the risk of patient harm.23
■ Direct the patient to perform deep-breathing and
coughing exercises to prevent postprocedure pneumonia.
■ Apply an antiembolism stocking or sequential
compression device, as ordered, to promote venous return
and prevent VTE.30,31 (See the “Sequential compression
therapy” and “Antiembolism stocking application”
procedures, pages 687 and 18.)
■ Make sure baseline coagulation studies have been
obtained and are documented in the patient’s medical
record.
■ Administer thromboembolic pharmacoprophylaxis, as
ordered, following safe medication administration practices,
to minimize the risk of VTE.25,26,30,31 Monitor International
Normalized Ratio (INR) if the patient is receiving warfarin. If
a continuous infusion of heparin is prescribed, administer it
using an electronic infusion device (preferably a smart
pump with dose-reduction software) to provide consistent
and accurate dosing.30,32 Monitor laboratory results, such as
complete blood count, prothrombin time, partial
thromboplastin time, and INR.30 Notify the practitioner of
critical test results within your facility’s established time
frame to ensure that the patient receives prompt
treatment.33
■ Observe the patient for bleeding and signs and symptoms
of phlebitis, such as warmth, swelling, tenderness, and
redness.30
■ Inspect the dressings for excessive bleeding. Circle any
drainage on the dressing and mark it with your initials, the
date, and the time.
■ As needed, apply more sterile dressings using
hypoallergenic tape. Report excessive bleeding to the
patient’s practitioner.
■ Observe the closed-wound drainage system for discharge
color. (See the “Closed-wound drain management”
procedure, page 183.) Proper drainage prevents hematoma.
Purulent discharge and fever may indicate infection. Empty
and measure drainage, as ordered, using clean technique to
prevent infection.
■ Monitor fluid intake and output daily (including wound
drainage in the output measurement) and electrolyte levels,
as ordered, to promptly detect and treat fluid and
electrolyte imbalances. Notify the practitioner of critical test
results within your facility’s established time frame to
ensure that the patient receives prompt treatment.33
■ If an indwelling urinary catheter was inserted for surgery,
remove the catheter on postoperative day 1 or 2 (with the
day of surgery considered day 0), or as soon as it’s no
longer needed, to reduce the risk of catheter-associated
urinary tract infection.30,34,35 (See the “Indwelling urinary
catheter care and removal” procedure, page 386.)
■ Make sure prophylactic antibiotics are discontinued within
24 hours after surgery.30,36,37
■ Apply an ice bag, as ordered, to the affected site for the
first 48 hours to reduce swelling, relieve pain, and control
bleeding.
■ Help the patient use the trapeze bar for repositioning
every 2 hours.36 Position changes enhance comfort, prevent
pressure
injuries,
and help prevent
respiratory
complications.
■ Hydrate the patient’s skin, after bathing with warm water,
by applying a hypoallergenic moisturizer while the skin is
still damp, as indicated, to prevent skin breakdown.4
■ Position the patient according to the surgical approach
used and the surgeon’s preference. Depending on the
surgical approach, an abduction splint may be necessary to
keep the hip in a neutral position.
■ Encourage the patient to begin plantar flexion and
dorsiflexion exercises of the ankles and feet to prevent VTE.
■ Collaborate with physical therapy professionals, as
appropriate, to formulate an individualized exercise plan for
the patient.
■ Before ambulation, assess the patient’s pain and
administer pain medication, as ordered and indicated,
following safe medication administration practices,25,26,27,28
because movement is very painful. Encourage the patient
during exercise.
■ Help the patient with progressive ambulation, using
assistive devices such as crutches or a walker when needed.
■ If the patient was receiving a beta-adrenergic blocker
before surgery, collaborate with the patient’s practitioner to
make sure the patient receives it during the perioperative
period, as appropriate.30
■ Reassess the patient’s pain by evaluating the response to
treatment and progress toward pain management goals.
Assess for adverse reactions and risk factors for adverse
events that may result from treatment.24
■ Educate the patient and family about measures to
prevent surgical site infection.37,38,39,40
■ Return the patient’s bed to the lowest position to prevent
falls and maintain patient safety.41
■ Remove and discard your gloves, if worn.20
■ Perform hand hygiene.7,8,9,10,11,12
■ Disinfect your stethoscope using a disinfectant pad.42,43
■ Perform hand hygiene.7,8,9,10,11,12
■ Document the procedure.44,45,46,47
Special considerations
■ Progressive ambulation protocols vary. Most patients are
permitted to begin transfer and progressive ambulation with
assistive devices on the first day. Collaborate with physical
therapy professionals, as appropriate. Early ambulation
decreases the risk of postoperative, complications such as
VTEs, constipation, respiratory compromise and pressure
injuries.48
■ The Joint Commission issued a sentinel event alert
concerning inadequate hand-off communication, because of
the potential for patient harm that can result when a
receiver receives inaccurate, incomplete, untimely,
misinterpreted, or otherwise inadequate information. To
improve hand-off communication, standardize the critical
information communicated by the sender. At a minimum,
include the sender contact information; illness assessment;
patient summary, including events leading up to the illness
or admission, hospital course, ongoing assessment, and
plan of care; to-do action list; contingency plans; allergy list;
code status; medication list; and dated laboratory test
results and vital signs. Provide face-to-face communication
whenever possible in an interruption-free location, using
facility-approved, standardized tools and methods (for
example, forms, templates, checklists, protocols, and
mnemonics). Provide ample time and opportunity for
questions, and include the multidisciplinary team members
and the patient and family, when appropriate.49
■ The Joint Commission issued a sentinel event alert related
to managing risk during transition to new International
Organization for Standardization tubing standards that were
designed to prevent dangerous tubing misconnections,
which can lead to serious patient injury and death. During
the transition, make sure to trace each tubing and catheter
from the patient to its point of origin before connecting or
reconnecting any device or infusion, at any care transition
(such as to a new setting or service), and as part of the
hand-off process. In addition, route tubes and catheters
having different purposes in different, standardized
directions; label the tubing at both the distal and proximal
ends when the patient has different access sites or several
bags hanging; use tubing and equipment only as intended;
and store medications for different delivery routes in
separate locations.6
Patient teaching
During discharge teaching, instruct the patient to:
■ take prescribed medications as ordered
■ adhere to the ordered schedule for follow-up blood testing
(usually twice weekly) until discontinued by the practitioner
■ keep follow-up appointments with the surgeon
Total hip replacement
To form a totally artificial hip, the surgeon cements a femoral head prosthesis
in place to articulate with a cup, which is then cemented into the deepened
acetabulum. The surgeon may avoid using cement by implanting a prosthesis
with a porous coating that promotes bony ingrowth.
■ immediately report signs or symptoms of deep vein
thrombosis, such as increasing calf pain, tenderness, or
swelling above or below the knee and increased swelling in
the calf, ankle, or foot
■ immediately report warning signs of a blood clot that has
traveled to a lung, including a sudden increase in shortness
of breath, sudden chest pain, and localized chest pain with
coughing
■ promptly report signs and symptoms of possible infection,
such as fever (temperature above 101°F [38.3°C]), shaking
chills, excessive incisional drainage, unusual warmth or
swelling around the incision, and increasing hip pain.
Teach the patient and family about pain management
strategies during discharge planning. Include information
about the patient’s pain management plan and adverse
effects of pain management treatment. Discuss activities of
daily living and items in the home environment that might
exacerbate pain or reduce the effectiveness of the pain
management plan, and include strategies to address these
issues. Teach the patient and family about safe use, storage,
and disposal of opioids if prescribed.24
Stress the importance of continuing with rehabilitation,
not only to maintain physical function but also to prevent
complications. Caution the patient about the risk of falling,
and teach the patient to avoid stairs until able to keep a
strong and mobile balance. Urge the patient to wear strong,
sturdy shoes, and emphasize that assistive devices are an
important part of rehabilitation. Explain that the patient may
need periodic X-rays to evaluate for loosening or wearing
out of prosthesis components, as indicated.31
Complications
Immobility after arthroplasty may result in such
complications as shock, pulmonary embolism, pneumonia,
phlebitis, paralytic ileus, urine retention, and bowel
impaction. A deep wound or infection at the prosthesis site
is a serious complication that may force removal of the
prosthesis. Although these are the most common
complications, their incidence has been significantly
reduced because of the use of prophylactic antibiotics and
anticoagulants and early mobilization. Dislocation of a total
hip prosthesis may occur after violent hip flexion or
adduction or during internal rotation. Signs of dislocation
include inability to rotate the hip or bear weight, shortening
of the leg, and increased pain.
Fat embolism, a potentially fatal complication resulting
from release of fat molecules in response to increased
intramedullary canal pressure from the prosthesis, may
develop within 72 hours after surgery. Watch for such signs
and symptoms as apprehension, diaphoresis, fever,
dyspnea, hypoxia, pulmonary effusion, tachycardia,
cyanosis, seizures, decreased level of consciousness, and a
petechial rash on the chest and shoulders; hypoxia is an
early sign that may occur hours before the onset of
respiratory complaints.50,51
Documentation
Record the patient’s postoperative assessment findings,
including vital signs, respiratory status, sedation level (if
applicable), and nausea and vomiting assessment.
Document signs and symptoms of infection. Record the
patient’s neurovascular status and the use of VTE
prevention practices. Document the patient’s pain and
response to pain medication. Describe the patient’s position
(especially the position of the affected leg), skin care and
condition, and postprocedure pneumonia prevention
practices. Document all exercises performed and their
effect; also record ambulatory efforts, the type of support
used, and the amount of traction weight. Record any patient
teaching provided and the patient’s understanding of the
teaching.
On the appropriate flowchart, record vital signs and fluid
intake and output. Note the turning and skin care schedule
and the current exercise and ambulation program. Record
discharge instructions provided, as well as the patient’s
understanding of them.
REFERENCES
1 Jarrett, N., & Callaham M. (2016). “Evidence-based guidelines for selected,
candidate, and previously considered hospital-acquired conditions: Final
report” [Online]. Accessed via the Web at
https://www.cms.gov/Medicare/Medicare-Fee-for-Service-
Payment/HospitalAcqCond/Downloads/2016-HAC-Report.pdf
2 Falck-Ytter, Y., et al. (2012). Prevention of VTE in orthopedic surgery patients:
Antithrombotic therapy and prevention of thrombosis, 9th ed: American
College of Chest Physicians evidence-based clinical practice guidelines.
Chest, 141(2 Suppl), e278S–e325S.
3 Balk, E. M., et al. (2017). Venous thromboembolism prophylaxis in major
orthopedic surgery: Systematic review update (AHRQ Publication No. 17 -
EHC021-EF). Rockville, MD: Agency for Healthcare Research and Quality.
Accessed via the Web at
https://effectivehealthcare.ahrq.gov/sites/default/files/pdf/thromboembolism-
update_research-2017.pdf
4 LeBlanc, K., et al. (2013). International Skin Tear Advisory Panel: A tool kit to
aid in the prevention, assessment, and treatment of skin tears using a
simplified classification system. Advances in Skin and Wound Care, 26(10),
459–476. (Level IV)
5 The Joint Commission. (2019). Standard PC.02.02.01. Comprehensive
accreditation manual for hospitals. Oakbrook Terrace, IL: The Joint
Commission. (Level VII)
6 The Joint Commission. (2014). “Sentinel event alert: Managing risk during
transition to new ISO tubing connector standards” [Online]. Accessed via the
Web at
http://www.jointcommission.org/assets/1/6/SEA_53_Connectors_8 _19_14 _final.
pdf (Level VII)
7 The Joint Commission. (2019). Standard NPSG.07.01.01. Comprehensive
accreditation manual for hospitals. Oakbrook Terrace, IL: The Joint
Commission. (Level VII)
8 World Health Organization. (2009). “WHO guidelines on hand hygiene in
health care: First global patient safety challenge, clean care is safer care”
[Online]. Accessed via the Web at
http://apps.who.int/iris/bitstream/10665/44102/1/9789241597906_eng.pdf
(Level IV)
9 Centers for Disease Control and Prevention. (2002). Guideline for hand
hygiene in health-care settings: Recommendations of the Healthcare Infection
Control Practices Advisory Committee and the HICPAC/SHEA/APIC/IDSA Hand
Hygiene Task Force. MMWR Recommendations and Reports, 51(RR-16), 1–45.
Accessed via the Web at https://www.cdc.gov/mmwr/pdf/rr/rr5116.pdf (Level
II)
10 Centers for Medicare and Medicaid Services, Department of Health and
Human Services. (2015). Condition of participation: Infection control. 42 C.F.R.
§ 482.42.
11 Accreditation Association for Hospitals and Health Systems. (2017). Standard
07.01.21. Healthcare Facilities Accreditation Program: Accreditation
requirements for acute care hospitals. Chicago, IL: Accreditation Association
for Hospitals and Health Systems. (Level VII)
12 DNV GL-Healthcare USA, Inc. (2016). IC.1 .SR.1 . NIAHO® accreditation
requirements: Interpretive guidelines and surveyor guidance (version 11).
Milford, OH: DNV GL-Healthcare USA, Inc. (Level VII)
13 The Joint Commission. (2019). Standard NPSG.01.01.01. Comprehensive
accreditation manual for hospitals. Oakbrook Terrace, IL: The Joint
Commission. (Level VII)
14 Accreditation Association for Hospitals and Health Systems. (2017). Standard
15.01.16. Healthcare Facilities Accreditation Program: Accreditation
requirements for acute care hospitals. Chicago, IL: Accreditation Association
for Hospitals and Health Systems. (Level VII)
15 Centers for Medicare and Medicaid Services, Department of Health and
Human Services. (2015). Condition of participation: Patient’s rights. 42 C.F.R.
§ 482.13(c)(1).
16 The Joint Commission. (2019). Standard RI.01.01.01. Comprehensive
accreditation manual for hospitals. Oakbrook Terrace, IL: The Joint
Commission. (Level VII)
17 DNV GL-Healthcare USA, Inc. (2016). PR.1.SR.5 . NIAHO® accreditation
requirements: Interpretive guidelines and surveyor guidance (version 11).
Milford, OH: DNV GL-Healthcare USA, Inc. (Level VII)
18 The Joint Commission. (2019). Standard PC.02.01.21. Comprehensive
accreditation manual for hospitals. Oakbrook Terrace, IL: The Joint
Commission.(Level VII)
19 Waters, T. R., et al. (2009). “Safe patient handling training for schools of
nursing” [Online]. Accessed via the Web at
https://www.cdc.gov/niosh/docs/2009-127/pdfs/2009-127.pdf (Level VII)
20 Siegel, J. D ., et al. (2007, revised 2017). “2007 guideline for isolation
precautions: Preventing transmission of infectious agents in healthcare
settings” [Online]. Accessed via the Web at
https://www.cdc.gov/infectioncontrol/pdf/guidelines/isolation-guidelines.pdf
(Level II)
21 Accreditation Association for Hospitals and Health Systems. (2017). Standard
07.01.10. Healthcare Facilities Accreditation Program: Accreditation
requirements for acute care hospitals. Chicago, IL: Accreditation Association
for Hospitals and Health Systems. (Level VII)
22 DNV GL-Healthcare USA, Inc. (2016). IC.1 .SR.2 . NIAHO® accreditation
requirements: Interpretive guidelines and surveyor guidance (version 11).
Milford, OH: DNV GL-Healthcare USA, Inc. (Level VII)
23 American Society of PeriAnesthesia Nurses. (2018). 2017-2018
Perianesthesia nursing standards, practice recommendations and interpretive
statements. Cherry Hill, NJ: American Society of PeriAnesthesia Nurses. (Level
VII)
24 The Joint Commission. (2019). Standard PC.01.02.07. Comprehensive
accreditation manual for hospitals. Oakbrook Terrace, IL: The Joint
Commission. (Level VII)
25 Centers for Medicare and Medicaid Services, Department of Health and
Human Services. (2015). Condition of participation: Nursing services. 42
C.F.R. § 482.23(c).
26 Accreditation Association for Hospitals and Health Systems. (2017). Standard
16.01.03. Healthcare Facilities Accreditation Program: Accreditation
requirements for acute care hospitals. Chicago, IL: Accreditation Association
for Hospitals and Health Systems. (Level VII)
27 The Joint Commission. (2019). Standard MM.06.01.01. Comprehensive
accreditation manual for hospitals. Oakbrook Terrace, IL: The Joint
Commission. (Level VII)
28 DNV GL-Healthcare USA, Inc. (2016). MM.1 .SR.2. NIAHO® accreditation
requirements: Interpretive guidelines and surveyor guidance (version 11).
Milford, OH: DNV GL-Healthcare USA, Inc. (Level VII)
29 Centers for Medicare and Medicaid Services, Department of Health and
Human Services. (2014). “Requirements for hospital medication
administration, particularly intravenous medications and post-operative care
of patients receiving IV opioids” [Online]. Accessed via the Web at
http://www.cms.gov/Medicare/Provider-Enrollment-and-
Certification/SurveyCertificationGenInfo/Downloads/Survey-and-Cert-Letter-
14-15.pdf
30 Centers for Medicare and Medicaid Services & The Joint Commission. (2016).
“The specifications manual for national hospital inpatient quality measures
(version 5.2a)” [Online]. Accessed via the Web at
https://www.jointcommission.org/specifications_manual_for_national_hospital_
inpatient_quality_measures.aspx
31 American Academy of Orthopaedic Surgeons. (2011). “Preventing venous
thromboembolic disease in patients undergoing elective hip and knee
arthroplasty: Evidence-based guideline and evidence report” [Online].
Accessed via the Web at
http://www.aaos.org/research/guidelines/VTE/VTE_full_guideline.pdf (Level VII)
32 The Joint Commission. (2019). Standard NPSG.03 .05.01. Comprehensive
accreditation manual for hospitals. Oakbrook Terrace, IL: The Joint
Commission. (Level VII)
33 The Joint Commission. (2019). Standard NPSG.02.03 .01. Comprehensive
accreditation manual for hospitals. Oakbrook Terrace, IL: The Joint
Commission. (Level VII)
34 Healthcare Infection Control Practices Advisory Committee. (2010, revised
2017). “Guideline for prevention of catheter-associated urinary tract infection
2009” [Online]. Accessed via the Web at
https://www.cdc.gov/infectioncontrol/pdf/guidelines/cauti-guidelines.pdf
(Level I)
35 Association of Professionals in Infection Control and Epidemiology. (2014).
“APIC implementation guide: Guide to preventing catheter-associated urinary
tract infections” [Online]. Accessed via the Web at
http://apic.org/Resource_/EliminationGuideForm/6473ab9b-e75c-457a-8d0f-
d57d32bc242b/File/APIC_CAUTI_web_0603 .pdf (Level IV)
36 World Health Organization. (2016). “Global guidelines for the prevention of
surgical site infection” [Online]. Accessed via the Web at
http://www.who.int/gpsc/global-guidelines-web.pdf
37 Anderson, D. J ., et al. (2014). SHEA/IDSA practice recommendation:
Strategies to prevent surgical site infections in acute care hospitals: 2014
update. Infection Control and Hospital Epidemiology, 35, 605–627. Accessed
via the Web at http://www.jstor.org/stable/10.1086/676022 (Level I)
38 The Joint Commission. (2019). Standard NPSG.07.05.01. Comprehensive
accreditation manual for hospitals. Oakbrook Terrace, IL: The Joint
Commission. (Level VII)
39 Association of Professionals in Infection Control and Epidemiology (APIC).
(2010). “Guide to the elimination of orthopedic surgical site infections”
[Online]. Accessed via the Web at
http://www.apic.org/Resource_/EliminationGuideForm/34e03612-d1e6-4214-
a76b-e532c6fc3898/File/APIC-Ortho-Guide.pdf (Level IV)
40 Institute for Healthcare Improvement. (2012). How-to-guide: Prevent surgical
site infection for hip and knee arthroplasty. Cambridge, MA: Institute for
Healthcare Improvement. (Level VII)
41 Ganz, D. A., et al. (2013). Preventing falls in hospitals: A toolkit for improving
quality of care (AHRQ Publication No. 13-0015-EF). Accessed via the Web at
https://www.ahrq.gov/sites/default/files/publications/files/fallpxtoolkit_0 .pdf
(Level VII)
42 Rutala, W. A., et al. (2008, revised 2017). “Guideline for disinfection and
sterilization in healthcare facilities, 2008” [Online]. Accessed via the Web at
https://www.cdc.gov/infectioncontrol/pdf/guidelines/disinfection-
guidelines.pdf (Level I)
43 Accreditation Association for Hospitals and Health Systems. (2017). Standard
07.02.03. Healthcare Facilities Accreditation Program: Accreditation
requirements for acute care hospitals. Chicago, IL: Accreditation Association
for Hospitals and Health Systems. (Level VII)
44 The Joint Commission. (2019). Standard RC.01.03 .01. Comprehensive
accreditation manual for hospitals. Oakbrook Terrace, IL: The Joint
Commission. (Level VII)
45 Centers for Medicare and Medicaid Services, Department of Health and
Human Services. (2015). Condition of participation: Medical record services.
42 C.F.R. § 482.24(b).
46 Accreditation Association for Hospitals and Health Systems. (2017). Standard
10.00 .03. Healthcare Facilities Accreditation Program: Accreditation
requirements for acute care hospitals. Chicago, IL: Accreditation Association
for Hospitals and Health Systems. (Level VII)
47 DNV GL-Healthcare USA, Inc. (2016). MR.2 .SR.1 . NIAHO® accreditation
requirements: Interpretive guidelines and surveyor guidance (version 11).
Milford, OH: DNV GL-Healthcare USA, Inc. (Level VII)
48 Craven, H. (Ed.) . (2016). Core curriculum for medical-surgical nursing (5th
ed.). Pitman, NJ: Academy of Medical-Surgical Nurses.
49 The Joint Commission. (2017). “Sentinel event alert, Issue 58: Inadequate
hand-off communication” [Online]. Accessed via the Web at
https://www.jointcommission.org/assets/1/18/SEA_58_Hand_off_Comms_9_6 _1
7_FINAL_(1).pdf (Level VII)
50 Weinhouse, G. L. Fat embolism syndrome. (2017). In: UpToDate, Parsons, P.
E., & Finlay, G. (Eds.). Retrieved from: www.uptodate.com
51 Shaikh, N. (2009). Emergency management of fat embolism syndrome.
Journal of Emergencies, Trauma, and Shock, 2(1), 29–33 . Accessed via the
Web at http://www.onlinejets.org/article.asp?issn=0974-
2700%3Byear=2009%3Bvolume=2%3Bissue=1%3Bspage=29%3Bepage=33
%3Baulast=Shaikh (Level V)
HOUR-OF-SLEEP CARE
Hour-of-sleep care meets the patient’s physical and
psychological needs in preparation for sleep. It includes
providing for the patient’s hygiene, making the bed clean
and comfortable, and ensuring safety. For example, raising
the bed’s side rails can prevent the drowsy or sedated
patient from falling out. This type of care also provides an
opportunity to answer the patient’s questions about the
next day’s tests and procedures and to discuss worries and
concerns.
Effective hour-of-sleep care prepares the patient for a
good night’s sleep. Ineffective care may contribute to
sleeplessness, which can intensify patient anxiety and
interfere with treatment and recuperation. Promoting the
patient’s sleep in the challenging environment of a nursing
unit dictates not only that you be sensitive to the patient’s
needs and attuned to the environment, but also that you
have the tools and resources necessary to implement
effective strategies.
Equipment
Bedpan, urinal or commode ▪ basin (single use or
disposable)1,2 ▪ skin cleaner ▪ towel ▪ washcloth or
disposable bath wipes ▪ toothbrush and toothpaste ▪ lotion
▪ water container ▪ blankets ▪ facial tissues ▪ Optional:
gloves, bedpan or urinal, earplugs, eye mask, clean linens,
patient gown, denture cup, commercial denture cleaner,
dressing materials, prescribed medications.
Preparation of equipment
Gather the equipment at the patient’s bedside. For an
ambulatory patient who’s capable of self-care, gather skin
cleaner, a washcloth, a towel, and oral hygiene items at the
sink.
Implementation
■ Perform hand hygiene3,4,5,6,7,8 and put on gloves, if
needed, to comply with standard precautions.9,10
■ Confirm the patient’s identity using at least two patient
identifiers.11
■ Provide privacy12,13,14,15 and tell the patient you will help
the patient prepare for sleep.
■ Raise the patient’s bed to waist level when providing care
to prevent caregiver back strain.16
■ Offer a bedpan or urinal to a patient on bed rest.
Alternatively, assist the ambulatory patient to the bathroom
or commode.
■ Fill the basin with warm water and bring it to the patient’s
bedside, or use prewarmed disposable bath wipes, if
available. Offer the skin cleaner and encourage the patient
to wash if the patient is able to do so, to promote
independence. Otherwise, wash the patient’s face and
hands and dry them thoroughly.
■ Provide a toothbrush and toothpaste or a properly labeled
denture cup and commercial denture cleaner. Assist the
patient with oral hygiene, as necessary. (See the “Oral care”
procedure, page 552.) If the patient prefers to wear
dentures until bedtime, leave denture care items within
easy reach.
■ After providing oral care, turn the patient onto the side or
stomach. Wash, rinse, and dry the patient’s back and
buttocks. Massage the back with lotion to help the patient
relax. (See the “Back care” procedure, page 43.)
■ While providing back care, observe the skin for redness,
cracking, or other signs of breakdown. If the patient’s gown
is soiled or damp, provide a clean one and help put it on, if
necessary.
■ Check dressings, binders, antiembolism stockings, or
other aids, changing or readjusting them as needed.
■ Refill the water container, and place it and a box of facial
tissues within the patient’s easy reach to prevent falls if the
patient needs to reach for these items.
■ Straighten or change bed linens, as necessary, and fluff
the patient’s pillow. Clean linens are only needed if the linen
is soiled. Cover the patient with a blanket or place one
within easy reach to prevent chills during the night. Then
position the patient comfortably.
■ Offer the patient ear plugs, if appropriate, to help block
noise from the unit.17
■ If the patient appears distressed, restless, or in pain,
administer medications as needed and ordered following
safe medication administration practices.18,19,20
■ After making the patient comfortable, evaluate the
patient’s mental and physical condition.
■ Place the bed in a low position and, if appropriate, raise
the side rails to promote safety.21
■ Place the call light within the patient’s easy reach, and
instruct the patient to use it whenever necessary.
■ Move all breakables from the overbed table out of the
patient’s reach, and remove any equipment and supplies
that could cause a fall if the patient gets up during the
night.
■ Turn off the lights.22
■ Decrease the volume of monitor and equipment alarms as
medically appropriate.
NURSING ALERT Monitor alarms should be on, set appropriately, and
audible to staff; volumes should never be decreased if contraindicated
by the patient’s clinical status.23,24
■ Remove and discard your gloves, if worn.9
■ Perform hand hygiene.3,4,5,6,7,8
■ Close the patient’s door if not contraindicated.
■ Document the procedure.25,26,27,28
Special considerations
■ Ask the patient about the patient’s sleep routine at home
and, whenever possible, let the patient follow it while taking
into consideration the patient’s social and cultural
background, because sleep, while biological, can also be
shaped by societal and cultural values and beliefs.
■ Try to observe certain rituals, such as a bedtime snack,
which can aid sleep. A back massage, a tub bath, or a
shower can also help relax the patient and promote a restful
night. If the patient normally bathes or showers before
bedtime, let the patient do so if the patient’s condition and
practitioner’s orders permit it.
■ For the patient in the intensive care unit, periods of quiet
time that coincide with circadian rhythms should be
provided. In the intensive care unit setting, efforts to reduce
controllable noise and light at particular times throughout
the day have been shown to contribute to patient sleep,
even during day-shift hours.
Documentation
Record the time and type of hour-of-sleep care in your
notes. Include use of any special procedures, such as
relaxation techniques.
REFERENCES
1 Johnson, D., et al. (2009). Patients’ bath basins as potential sources of
infection: A multicenter sampling study. American Journal of Critical Care,
18(1), 31–40. Accessed via the Web at
http://ajcc.aacnjournals.org/content/18/1/31.full.pdf+html (Level IV)
2 Powers, J., et al. (2012). Chlorhexidine bathing and microbial contamination in
patients’ bath basins. American Journal of Critical Care, 21(5), 338–342.
Accessed via the Web at http://ajcc.aacnjournals.org/content/21/5/338.full
(Level IV)
3 The Joint Commission. (2019). Standard NPSG.07.01.01. Comprehensive
accreditation manual for hospitals. Oakbrook Terrace, IL: The Joint
Commission. (Level VII)
4 Centers for Disease Control and Prevention. (2002). Guideline for hand
hygiene in health-care settings: Recommendations of the Healthcare Infection
Control Practices Advisory Committee and the HICPAC/SHEA/APIC/IDSA Hand
Hygiene Task Force. MMWR Recommendations and Reports, 51(RR-16), 1–45.
Accessed via the Web at https://www.cdc.gov/mmwr/pdf/rr/rr5116.pdf (Level
II)
5 World Health Organization. (2009). “WHO guidelines on hand hygiene in
health care: First global patient safety challenge, clean care is safer care”
[Online]. Accessed via the Web at
http://apps.who.int/iris/bitstream/10665/44102/1/9789241597906_eng.pdf
(Level IV)
6 Accreditation Association for Hospitals and Health Systems. (2017). Standard
07.01.21. Healthcare Facilities Accreditation Program: Accreditation
requirements for acute care hospitals. Chicago, IL: Accreditation Association
for Hospitals and Health Systems. (Level VII)
7 Centers for Medicare & Medicaid Services, Department of Health and Human
Services. (2015). Condition of participation: Infection control. 42 C.F.R. §
482.42.
8 DNV GL-Healthcare USA, Inc. (2016). IC.1.SR.1 . NIAHO® accreditation
requirements: Interpretive guidelines & surveyor guidance (version 11).
Milford, OH: DNV GL-Healthcare USA, Inc. (Level VII)
9 Siegel, J. D., et al. (2007, revised 2017). “2007 guideline for isolation
precautions: Preventing transmission of infectious agents in healthcare
settings” [Online]. Accessed via the Web at
http://www.cdc.gov/hicpac/pdf/isolation/Isolation2007.pdf (Level II)
10 Accreditation Association for Hospitals and Health Systems. (2017). Standard
07.01.10. Healthcare Facilities Accreditation Program: Accreditation
requirements for acute care hospitals. Chicago, IL: Accreditation Association
for Hospitals and Health Systems. (Level VII)
11 The Joint Commission. (2019). Standard NPSG.01.01.01. Comprehensive
accreditation manual for hospitals. Oakbrook Terrace, IL: The Joint
Commission. (Level VII)
12 Centers for Medicare and Medicaid Services, Department of Health and
Human Services. (2015). Condition of participation: Patient’s rights. 42 C.F.R.
§ 482.13(c)(1).
13 Accreditation Association for Hospitals and Health Systems. (2017). Standard
15.01.16. Healthcare Facilities Accreditation Program: Accreditation
requirements for acute care hospitals. Chicago, IL: Accreditation Association
for Hospitals and Health Systems. (Level VII)
14 The Joint Commission. (2019). Standard RI.01.01.01. Comprehensive
accreditation manual for hospitals. Oakbrook Terrace, IL: The Joint
Commission. (Level VII)
15 DNV GL-Healthcare USA, Inc. (2016). PR.1.SR.5 . NIAHO® accreditation
requirements: Interpretive guidelines & surveyor guidance (version 11).
Milford, OH: DNV GL-Healthcare USA, Inc. (Level VII)
16 Waters, T. R., et al. (2009). “Safe patient handling training for schools of
nursing” [Online]. Accessed via the Web at
http://www.cdc.gov/niosh/docs/2009-127/pdfs/2009-127.pdf (Level VII)
17 Jones, C., & Dawson, D. (2012). Eye masks and earplugs improve patient’s
perception of sleep. Nursing in Critical Care, 17(5), 247–254. (Level II)
18 Accreditation Association for Hospitals and Health Systems. (2017). Standard
16.01.03. Healthcare Facilities Accreditation Program: Accreditation
requirements for acute care hospitals. Chicago, IL: Accreditation Association
for Hospitals and Health Systems. (Level VII)
19 Centers for Medicare and Medicaid Services, Department of Health and
Human Services. (2015). Condition of participation: Nursing services. 42
C.F.R. § 482.23(c).
20 The Joint Commission. (2019). Standard MM.06.01.01. Comprehensive
accreditation manual for hospitals. Oakbrook Terrace, IL: The Joint
Commission. (Level VII)
21 Ganz, D. A., et al. (2013). Preventing falls in hospitals: A toolkit for improving
quality of care (AHRQ Publication No. 13-0015-EF). Rockville, MD: Agency for
Healthcare Research and Quality. Accessed via the Web at
http://www.ahrq.gov/sites/default/files/publications/files/fallpxtoolkit.pdf
(Level VII)
22 Thomas, K. P., et al. (2012). Sleep rounds: A multidisciplinary approach to
optimize sleep quality and satisfaction in hospitalized patients. Journal of
Hospital Medicine, 7(6), 508–512. (Level IV)
23 The Joint Commission. (2019). Standard NPSG 06.01.01. Comprehensive
accreditation manual for hospitals. Oakbrook Terrace, IL: The Joint
Commission. (Level VII)
24 American Association of Critical-Care Nurses. (2013). “A ACN practice alert:
Alarm management” [Online]. Accessed via the Web at
https://www.aacn.org/aacn-website/shared/content/practice-
alerts/2015/11/25/alarm-management (Level VII)
25 The Joint Commission. (2019). Standard RC.01.03 .01. Comprehensive
accreditation manual for hospitals. Oakbrook Terrace, IL: The Joint
Commission. (Level VII)
26 Accreditation Association for Hospitals and Health Systems. (2017). Standard
10.00 .03. Healthcare Facilities Accreditation Program: Accreditation
requirements for acute care hospitals. Chicago, IL: Accreditation Association
for Hospitals and Health Systems. (Level VII)
27 Centers for Medicare and Medicaid Services, Department of Health and
Human Services. (2015). Condition of participation: Medical record services.
42 C.F.R. § 482.24(b).
28 DNV GL-Healthcare USA, Inc. (2016). MR.2 .SR.1 . NIAHO® accreditation
requirements: Interpretive guidelines & surveyor guidance (version 11).
Milford, OH: DNV GL-Healthcare USA, Inc. (Level VII)
HUMIDIFIER THERAPY
Humidifiers, which deliver a maximum amount of water
vapor without producing particulate water, are used to
prevent drying and irritation of the upper airway. They’re
used in the treatment of such conditions as croup, in which
the upper airway is inflamed, and when secretions are
particularly thick and tenacious.
Several types of humidifiers are available. (See Types of
humidifiers, page 360.) Diffusion head humidifiers (also
known as in-line humidifiers) humidify only the air being
delivered to the patient by an oxygen delivery system. One
type of diffusion head humidifier—the cascade bubble
diffusion humidifier—heats water vapor, which raises the
moisture-carrying capacity of gas and increases the amount
of humidity delivered to the patient. A diffusion head
humidifier can be added to a low-flow oxygen delivery
system to humidify the air being delivered to the patient,
but it doesn’t heat the water vapor. Bedside humidifiers and
heated vaporizers sit at the patient’s bedside and are
plugged into an electrical outlet. A heated vaporizer heats
water vapor to raise the moisture-carrying capacity of gas,
adding humidity to an entire room.
Equipment
Appropriate humidifier ▪ sterile, distilled water (for all types)
or tap water (if the unit has a demineralizing capability) ▪
container for waste water.
Bedside humidifier and heated vaporizer
Facility-approved disinfectant.
Diffusion head humidifier (including cascade
bubble diffusion humidifier)
Flowmeter ▪ oxygen source ▪ oxygen delivery device ▪
Optional: drainage bag, commercially prepared disposable
unit, gloves.
Preparation of equipment
For a bedside humidifier
Open the reservoir and add sterile, distilled water to the fill
line; then close the reservoir. Keep all room windows and
doors closed tightly to maintain adequate humidification.
For a cascade bubble diffusion humidifier
Install the cascade bubble diffuser into the ventilator circuit
according to the manufacturer’s instructions. Unscrew the
cascade reservoir and add sterile, distilled water to the fill
line. Then screw the top back onto the reservoir. For routine
use on an intubated patient, plug in the heater unit and set
the temperature to between 93.2°F (34°C) and 105.8°F
(41°C) at the circuit Y-connector.1 Use an audible
temperature alarm, as recommended and applicable; set
the high-temperature alarm no higher than 105.8°F (41°C),
with a 109.4°F (43°C) over-temperature limit, and the low-
temperature alarm no lower than 3.6°F (2°C) below the
desired temperature at the circuit Y-connector. Test the
device and alarm periodically for proper functioning.1 Make
sure that the alarm limits are set appropriately for the
patient’s current condition, and that the alarms are turned
on, functioning properly, and audible to staff.2,3,4
For a diffusion head humidifier
Unscrew the humidifier reservoir and add sterile, distilled
water to the appropriate level. (If you’re using a disposable
unit, screw the cap with the extension onto the top of the
unit.) Then screw the reservoir back onto the humidifier, and
attach the flowmeter to the oxygen source.
Screw the humidifier onto the flowmeter until the seal is
tight. Then set the flowmeter at a rate of 2 L/minute and
check for gentle bubbling, which indicates that the
flowmeter is working properly. Next, check the positive-
pressure release valve by occluding the end valve on the
humidifier. The pressure should back up into the humidifier,
signaled by a high-pitched whistle. If this whistle doesn’t
occur, tighten all connections and try again. Make sure the
device is set up and functioning properly.
For a heated vaporizer
Remove the top of the vaporizer and fill the reservoir to the
fill line with sterile, distilled water (or tap water if
permitted). Replace the top securely. Make sure the
vaporizer has been properly prepared.
Implementation
■ Verify the practitioner’s order.
■ Gather and prepare the necessary equipment.
■ Perform hand hygiene.5,6,7,8,9,10
■ Confirm the patient’s identity using at least two patient
identifiers.11
■ Provide privacy.12,13,14,15
■ Explain the procedure to the patient and family (if
appropriate) according to their individual communication
and learning needs to increase their understanding, allay
their fears, and enhance cooperation.16
■ Put on gloves, if needed, to comply with standard
precautions.17,18
Bedside humidifier
■ Plug the unit into an electrical outlet and then turn on the
unit. Make sure the device is functioning properly.
NURSING ALERT Position the cord out of the way to prevent it from
becoming a fall hazard.
■ Check for a fine mist emission from the nozzle, which
indicates proper operation.
■ Direct the humidifier unit’s nozzle toward the patient but
away from the patient’s face for effective treatment.
■ Check the unit every 4 hours for proper operation and
water level.
■ Clean and refill the unit as needed to reduce the risk of
bacterial growth. Unplug the unit. Discard the old water.
Clean and disinfect the unit with a facility-approved
disinfectant
according
to
the
manufacturer’s
instructions.19,20,21 Rinse the reservoir container. Refill the
container with water.
Cascade bubble diffusion humidifier
■ Assess the temperature of the inspired gas near the
patient’s airway, every 2 hours or as determined by your
facility. If the cascade becomes too hot, check the heater
unit and reset, or replace the unit as necessary, because
overheated water vapor can cause respiratory tract burns.
■ Check the reservoir’s water level every 2 to 4 hours, and
fill it as necessary. If the water level falls below the
minimum water level mark, humidity will decrease to that of
room air.
■ Frequently check for condensation buildup in the tubing,
which can result from the high humidification produced by
the cascade.
■ Empty the condensate as necessary so it can’t drain into
the patient’s respiratory tract, encourage growth of
microorganisms, or obstruct dependent sections of tubing.
Follow the manufacturer’s recommendations for removing
condensation from the patient circuit. Condensate is
infectious waste and shouldn’t be drained back into the
humidifier.1
■ Assess the quantity and consistency of the patient’s
secretions to evaluate the effectiveness of treatment.1
Diffusion head humidifier
■ Attach the oxygen delivery device to the humidifier and
then to the patient. Adjust the flowmeter to the appropriate
oxygen flow rate and look for a gentle bubbling.
■ If appropriate, add a drainage bag to the low point of the
tubing to prevent condensate from accumulating in the
tubing.
■ Check the reservoir every 4 hours. If the water level drops
too low, empty the remaining water, rinse the jar, and refill
it with sterile, distilled water. Alternately, replace a
commercially prepared disposable unit at its low water
mark. As the reservoir water level decreases, the
evaporation of water in the gas decreases, reducing
humidification of the delivered gas.
■ Assess the patient’s sputum periodically; sputum that’s
too thick can hinder mobilization and expectoration. If thick
sputum occurs, the patient requires a device that can
provide higher humidity.
Heated vaporizer
■ Place the vaporizer about 4′ (1.2 m) from the patient so
that the steam will be directed toward, but not directly onto,
the patient. Place the unit in a spot where it can’t be
overturned by the patient or visitors to avoid hot-water
burns. This step is especially important if children will be in
the room.
■ Plug the unit into an electrical outlet. Steam should soon
rise from the unit into the air. Close all windows and doors to
maintain adequate humidification.
NURSING ALERT Position the cord out of the way to prevent a fall
hazard.
EQUIPMENT
Types of humidifiers
■ Every 4 hours, check the water level and check the unit
for proper functioning. Clean and refill the unit as needed to
reduce the risk of bacterial growth. Unplug the unit. Discard
the old water. Clean and disinfect the unit with a facility-
approved disinfectant according to the manufacturer’s
instructions.19,20,21 Rinse the reservoir container. Refill the
container with water. If the steam production seems
insufficient, consider refilling with half sterile, distilled water
and half tap water.
Completing the procedure
■ Remove and discard your gloves, if worn.
■ Perform hand hygiene.5,6,7,8,9,10
■ Document the procedure.22,23,24,25
Special considerations
■ Replace a bedside humidifier unit every 7 days or as
determined by your facility, and send used units for proper
decontamination.
■ Assess the patient regularly to determine the
effectiveness of therapy, because a bedside humidifier or
vaporizer doesn’t deliver a precise amount of
humidification. Ask whether the patient has noticed any
improvement, and evaluate the patient’s sputum.
■ The Joint Commission has issued a sentinel event alert
concerning medical device alarm safety, because alarm-
related events have been associated with permanent loss of
function or death. Among the major contributing factors
were
improper
alarm
settings,
alarm
settings
inappropriately turned off, and alarm signals not audible to
staff members. Make sure that alarm limits are set
appropriately, and that alarms are turned on and audible.
Follow facility guidelines for preventing alarm fatigue.2
■ Change the ventilator circuit when it’s not functioning
properly or is visibly soiled, unless otherwise specified by
the manufacturer.1
■ Change the cascade at an interval specified by your
facility.
■ Because the diffusion head humidifier creates a level of
humidity comparable to that of ambient air, it is use only for
oxygen flow rates greater than 4 L/minute.
■ For patients receiving oxygen by tracheostomy or a
transtracheal device in which the device bypasses the upper
airway, humidification of inspired gas is necessary even at
low flow rates.26
■ Change the humidification system regularly to prevent
bacterial growth and invasion. Stagnant water within a
humidifier may place the patient at risk for Legionella
infection injuries.21
■ Don’t use heated humidification with infants and children
because of the risk of scald and burn injuries.1
Patient teaching
Make sure the patient and family understand the reason for
using a humidifier and know how to use the equipment.
Give them specific written guidelines concerning all aspects
of home care.
Instruct a patient using a bedside humidifier at home to
fill it with plain tap water, but to periodically use sterile,
distilled water to prevent mineral buildup, or to follow the
manufacturer’s instructions for use. Tell the patient and
family to rinse the heated vaporizer unit with bleach and
water regularly and according to the manufacturer’s
instructions.21 Also tell the patient to run white vinegar
through the unit to help clean it, prevent bacterial buildup,
and dissolve deposits.
Complications
If contaminated, humidifiers can cause infection. Stagnant
water within the vaporizer may place a patient at risk for
Legionella infection.21 Improper cleaning can lead to mold
growth, which may exacerbate certain respiratory problems,
especially fort people allergic to molds.27
Cascade bubble diffusion humidifiers can cause aspiration
of tubal condensation, pulmonary burns if the air is heated,
and infection if contaminated. Improper humidifier
temperature settings may also lead to hyperthermia.1
Documentation
Record the date and time when humidification began and
was discontinued, the type of humidifier used, the patient’s
response to humidification, and any patient teaching
provided.
REFERENCES
1 Restrepo, R. D., & Walsh, B. K . (2012). AARC clinical practice guideline:
Humidification during mechanical ventilation: 2012. Respiratory Care, 57(5),
782–788. Accessed via the Web at
http://rc.rcjournal.com/content/57/5/782.full.pdf (Level VII)
2 The Joint Commission. (2013). “Sentinel event alert: Medical device alarm
safety in hospitals” [Online]. Accessed via the Web at
https://www.jointcommission.org/assets/1/6/SEA_50_alarms_4 _26_16.pdf
(Level VII)
3 The Joint Commission. (2019). Standard NPSG.06 .01.01. Comprehensive
accreditation manual for hospitals. Oakbrook Terrace, IL: The Joint
Commission. (Level VII)
4 Graham, K. C ., & Cvach, M. (2010). Monitor alarm fatigue: Standardizing use
of physiological monitors and decreasing nuisance alarms. American Journal
of Critical Care, 19(1), 28–37. Accessed via the Web at
http://ajcc.aacnjournals.org/content/19/1/28.full.pdf
5 The Joint Commission. (2019). Standard NPSG.07.01.01. Comprehensive
accreditation manual for hospitals. Oakbrook Terrace, IL: The Joint
Commission. (Level VII)
6 Centers for Disease Control and Prevention. (2002). Guideline for hand
hygiene in health-care settings: Recommendations of the Healthcare Infection
Control Practices Advisory Committee and the HICPAC/SHEA/APIC/IDSA Hand
Hygiene Task Force. MMWR Recommendations and Reports, 51(RR-16), 1–45.
Accessed via the Web at https://www.cdc.gov/mmwr/pdf/rr/rr5116.pdf (Level
II)
7 World Health Organization. (2009). “WHO guidelines on hand hygiene in
health care: First global patient safety challenge, clean care is safer care”
[Online]. Accessed via the Web at
http://apps.who.int/iris/bitstream/10665/44102/1/9789241597906_eng.pdf
(Level IV)
8 Accreditation Association for Hospitals and Health Systems. (2017). Standard
07.01.21. Healthcare Facilities Accreditation Program: Accreditation
requirements for acute care hospitals. Chicago, IL: Accreditation Association
for Hospitals and Health Systems. (Level VII)
9 Centers for Medicare and Medicaid Services, Department of Health and
Human Services. (2015). Condition of participation: Infection control. 42 C.F.R.
§ 482.42.
10 DNV GL-Healthcare USA, Inc. (2016). IC.1 .SR.1 . NIAHO® accreditation
requirements: Interpretive guidelines & surveyor guidance (version 11).
Milford, OH: DNV GL-Healthcare USA, Inc. (Level VII)
11 The Joint Commission. (2019). Standard NPSG.01.01.01. Comprehensive
accreditation manual for hospitals. Oakbrook Terrace, IL: The Joint
Commission. (Level VII)
12 The Joint Commission. (2019). Standard RI.01.01.01. Comprehensive
accreditation manual for hospitals. Oakbrook Terrace, IL: The Joint
Commission. (Level VII)
13 Centers for Medicare and Medicaid Services, Department of Health and
Human Services. (2015). Condition of participation: Patient’s rights. 42 C.F.R.
§ 482.13(c)(1).
14 Accreditation Association for Hospitals and Health Systems. (2017). Standard
15.01.16. Healthcare Facilities Accreditation Program: Accreditation
requirements for acute care hospitals. Chicago, IL: Accreditation Association
for Hospitals and Health Systems. (Level VII)
15 DNV GL-Healthcare USA, Inc. (2016). PR.1.SR.5 . NIAHO® accreditation
requirements: Interpretive guidelines & surveyor guidance (version 11).
Milford, OH: DNV GL-Healthcare USA, Inc. (Level VII)
16 The Joint Commission. (2019). Standard PC.02.01.21. Comprehensive
accreditation manual for hospitals. Oakbrook Terrace, IL: The Joint
Commission. (Level VII)
17 Siegel, J. D ., et al. (2007, revised 2017). “2007 guideline for isolation
precautions: Preventing transmission of infectious agents in healthcare
settings” [Online]. Accessed via the Web at
http://www.cdc.gov/hicpac/pdf/isolation/Isolation2007.pdf (Level II)
18 Accreditation Association for Hospitals and Health Systems. (2017). Standard
07.01.10. Healthcare Facilities Accreditation Program: Accreditation
requirements for acute care hospitals. Chicago, IL: Accreditation Association
for Hospitals and Health Systems. (Level VII)
19 Rutala, W. A., et al. (2008, revised 2017). “Guideline for disinfection and
sterilization in healthcare facilities, 2008” [Online]. Accessed via the Web at
https://www.cdc.gov/infectioncontrol/pdf/guidelines/disinfection-
guidelines.pdf (Level I)
20 Accreditation Association for Hospitals and Health Systems. (2017). Standard
07.02.03. Healthcare Facilities Accreditation Program: Accreditation
requirements for acute care hospitals. Chicago, IL: Accreditation Association
for Hospitals and Health Systems. (Level VII)
21 Public Health Agency of Canada. (2015). “Legionella” [Online]. Accessed via
the Web at http://phac-aspc.gc.ca/id-mi/legionella-eng.php
22 The Joint Commission. (2019). Standard RC.01.03 .01. Comprehensive
accreditation manual for hospitals. Oakbrook Terrace, IL: The Joint
Commission. (Level VII)
23 Accreditation Association for Hospitals and Health Systems. (2017). Standard
10.00 .03. Healthcare Facilities Accreditation Program: Accreditation
requirements for acute care hospitals. Chicago, IL: Accreditation Association
for Hospitals and Health Systems. (Level VII)
24 Centers for Medicare and Medicaid Services, Department of Health and
Human Services. (2015). Condition of participation: Medical record services.
42 C.F.R. § 482.24(b).
25 DNV GL-Healthcare USA, Inc. (2016). MR.2 .SR.1 . NIAHO® accreditation
requirements: Interpretive guidelines & surveyor guidance (version 11).
Milford, OH: DNV GL-Healthcare USA, Inc. (Level VII)
26 Duck, A. (2009). Does oxygen need humidification? Nursing Times, 105(49–
50), 28.
27 Miller, R. Patient information: Trigger avoidance in asthma (beyond the
basics). (2016). In: UpToDate, Bochner, B. S ., & Feldweg, A. M. (Eds.).
Retrieved from: http://www.uptodate.com
HYPERTHERMIA-HYPOTHERMIA BLANKET USE
A hyperthermia-hypothermia blanket raises, lowers, or
maintains body temperature through conductive heat or
cold transfer between the blanket and the patient. It can be
operated manually or automatically.
In manual operation, a nurse or the practitioner sets the
temperature on the unit. The blanket reaches and maintains
this temperature regardless of the patient’s temperature.
The temperature setting must be adjusted manually to
reach a different setting. The patient’s body temperature is
monitored with a conventional thermometer, or with a
bladder thermometer if the patient has an indwelling urinary
catheter with a temperature transducer.
In automatic operation, the unit directly and continually
monitors the patient’s temperature by means of a
thermistor probe (rectal, esophageal, or nasopharyngeal),
and alternates heating and cooling cycles as necessary to
achieve and maintain the desired body temperature.1,2 The
thermistor probe also may be used in conjunction with
manual operation but isn’t essential. The unit is equipped
with an alarm to warn of abnormal temperature fluctuations
and a circuit breaker that protects against current overload.
The blanket is used most commonly to reduce high fever
when more conservative measures, such as baths, ice
packs, and antipyretics, have been unsuccessful. Its other
uses include maintaining normal temperature during
surgery or shock; inducing hypothermia during surgery to
decrease metabolic activity, which reduces oxygen
requirements; reducing intracranial pressure; controlling
bleeding and intractable pain in patients with amputations,
burns, or cancer; and providing warmth in cases of mild to
moderate hypothermia.3
Equipment
Hyperthermia-hypothermia control unit ▪ distilled water ▪
thermistor
probe (rectal,
skin,
esophageal,
or
nasopharyngeal) ▪ water-soluble lubricant ▪ one or two
hyperthermia-hypothermia blankets ▪ one or two disposable
blanket covers (or one or two sheets or bath blankets) ▪
adhesive tape ▪ vital signs monitoring equipment ▪
stethoscope ▪ disinfectant pads ▪ pillow ▪ Optional: gloves,
hospital gown with cloth ties, cardiac monitoring equipment,
protective wraps for the patient’s hands and feet, prescribed
sedation, prescribed analgesia.
Disposable hyperthermia-hypothermia blankets are
available for single-patient use.
Preparation of equipment
First, read the operation manual. Inspect the control unit
and each blanket for leaks, and inspect the plugs and
connecting wires for broken prongs, kinks, and fraying. If
you detect or suspect malfunction, don’t use the equipment.
Connect the blanket to the control unit, and set the
controls for manual or automatic operation and for the
desired blanket or body temperature. Make sure the
machine is properly grounded before plugging it in. Turn on
the machine and add the distilled water to the unit
reservoir, if necessary, to fill the blanket. Allow the blanket
to preheat or precool so that the patient receives immediate
thermal benefit.
Implementation
■ Verify the practitioner’s order.
■ Gather and prepare the equipment.
■ If required by your facility, make sure that the patient or a
responsible family member has signed a consent form.1,4,5,6
■ Perform hand hygiene.7,8,9,10,11,12
■ Confirm the patient’s identity using at least two patient
identifiers.13
■ Provide privacy.14,15,16,17
■ Make sure the room is warm and free from drafts if using
the blanket to warm the patient, to prevent heat loss
through convection.
■ If the patient will be receiving therapy with a water-based
system and isn’t already wearing a hospital gown, ask the
patient to put one on. Use a gown with cloth ties rather than
metal snaps or pins to prevent heat or cold injury.
EQUIPMENT
Types of hyperthermia–hypothermia
systems
There are two main types of hyperthermia-hypothermia systems: water-
based and air-based.
Water-based system
A water-based hyperthermia-hypothermia system pumps warmed or cooled
water through circulating coils in the blanket to modify the patient’s
temperature through conduction. While the blanket is in use, you must
monitor the patient’s temperature. The blanket’s temperature can be
adjusted to help keep the patient’s temperature in the ordered range.
Air-based system
Like a large hair dryer, the warming unit draws air through a filter, warms the
air to the desired temperature, and circulates it through a hose to a blanket
placed over the patient. When using an air-based system, be sure to place
the blanket directly over the patient with the paper side facing down and the
clear tubular side facing up. The patient shouldn’t be wearing a gown. Make
sure the connection hose is at the foot of the bed.
■ Explain the procedure to the patient and family (if
appropriate) according to their individual communication
and learning needs to increase their understanding, allay
their fears, and enhance cooperation.18
■ Raise the bed to waist level while providing care to
prevent caregiver back strain.19
■ Perform hand hygiene.7,8,9,10,11,12
■ Put on gloves, as needed, to comply with standard
precautions.20,21
■ If ordered, attach the patient to a cardiac monitor for
continuous monitoring to observe for cardiac arrhythmias.1
Make sure that alarm limits are set appropriately for the
patient’s current condition, and that alarms are turned on,
functioning properly, and audible to staff.22,23,24 (See the
“Cardiac monitoring” procedure.)
■ Obtain the patient’s vital signs and assess cardiac
rhythm, respiratory status, level of consciousness,
neurologic function, and skin condition to serve as a
baseline.1
■ Administer sedation, analgesia, or both, as ordered,
following safe medication administration practices.25,26,27,28
■ Keeping the bottom sheet in place and the patient
recumbent, roll the patient to one side and slide the blanket
halfway underneath so that its top edge aligns with the
patient’s neck. Then roll the patient back, and pull and
flatten the blanket across the bed. Place a pillow under the
patient’s head. Use a disposable cover, sheet, or bath
blanket as insulation between the patient and the blanket if
using a water-based system to absorb perspiration and
condensation, which can cause tissue breakdown if left on
the skin. (See Types of hyperthermia–hypothermia systems.)
■ If you’re using an automatic operation, insert the
thermistor probe in the patient’s rectum using a water-
soluble lubricant to ease insertion and tape it in place to
prevent accidental dislodgment. If rectal insertion is
contraindicated, an alternate site of temperature monitoring
may be needed, such as the esophagus or nasopharynx.
Verify the thermistor probe temperature measurement by
comparing it to the patient’s temperature obtained through
another method to ensure accuracy.1
■ Remove and discard your gloves, if worn,29 perform hand
hygiene,7,8,9,10,11,12 and plug the other end of the probe into
the correct jack on the unit’s control panel.
■ Place a sheet or, if ordered, the second hyperthermia-
hypothermia blanket over the patient to increase the
thermal benefit by trapping cooled or heated air.
■ Wrap the patient’s hands and feet, if the patient wishes,
to minimize chilling and promote comfort.
■ Monitor the patient’s vital signs, cardiac rhythm,
respiratory status, neurologic status, and skin integrity at
regular intervals, as indicated by the patient’s condition, the
device manufacturer’s instructions, and the practitioner’s
order.1
■ To prevent pressure injuries, reposition the patient at an
interval determined by the patient’s tissue tolerance, level
of activity and mobility, skin condition, overall medical
condition, treatment goals, support surface in use (if
applicable), and comfort.30 Keep the patient’s skin,
bedclothes, and blanket cover free of perspiration and
condensation.31
HOSPITAL-ACQUIRED CONDITION ALERT A stage 3 or 4 pressure
injury is considered a hospital-acquired condition by the Centers for
Medicare and Medicaid Services because a variety of best practices
can reasonably prevent it. Be sure to follow pressure injury prevention
practices (such as managing moisture, repositioning the patient, and
performing a skin assessment) when caring for a patient at risk for
pressure injury.31,32,33,34
Discontinuing hyperthermia-hypothermia
blanket use
■ When target temperature has been maintained for the
prescribed period and the patient’s condition warrants it,
discontinue the hyperthermia-hypothermia blanket, as
ordered. If the blanket was ordered to cool the patient,
rewarm the patient slowly (maximum rate of 0.2° to 0.5°C
per hour).2
■ After turning off the machine, follow the manufacturer’s
directions. Some units must remain plugged in for at least
30 minutes to allow the condenser fan to remove water
vapor from the mechanism. Continue to monitor the
patient’s temperature until it stabilizes, because body
temperature can drift up or down after discontinuation.
■ Remove all equipment from the bed. Discard used
supplies in the appropriate receptacles.29
■ Dry off and make the patient comfortable. Supply a fresh
hospital gown, if necessary. Cover the patient as appropriate
for the involved condition.
■ Return the bed to the lowest position to prevent falls and
maintain patient safety.35
■ Continue to monitor the patient’s vital signs and condition
regularly, as indicated by the patient’s condition.
Completing the procedure
■ Clean nondisposable items and send them for
reprocessing as directed by your facility.29
■ Perform hand hygiene.7,8,9,10,11,12
■ Clean and disinfect your stethoscope with a disinfectant
pad.36,37
■ Perform hand hygiene.7,8,9,10,11,12
■ Document the procedure.38,39,40,41
Special considerations
■ If the patient shivers excessively during hypothermia
treatment, notify the practitioner immediately, because
sedation and neuromuscular blockade may be necessary to
control shivering.2,42 Shivering elevates body temperature,
increases metabolism, increases oxygen consumption, and
negates the effects of therapeutic hypothermia.
■ With hyperthermia or hypothermia therapy, the patient
may
experience
a
secondary defense
reaction
(vasoconstriction or vasodilation, respectively) that causes
body temperature to rebound, defeating the treatment’s
purpose.
■ Don’t use pins to secure catheters, tubes, or blanket
covers, because an accidental puncture can result in fluid
leakage and burns.
■ After use, if the patient requires transmission-based
isolation precautions, place the blanket, blanket cover, and
probe in a plastic bag clearly marked with the type of
isolation precautions so that the central supply department
can give it special handling. If the blanket is disposable,
discard it, using appropriate precautions.
■ The Joint Commission has issued a sentinel event alert
concerning medical device alarm safety, because alarm-
related events have been associated with permanent loss of
function and death. Among the major contributing factors
are improper alarm settings, inappropriately turned off
alarms, and alarm signals not audible to staff. Make sure
that alarm limits are set appropriately, and that alarms are
turned on, functioning properly, and audible to staff. Follow
facility guidelines for preventing alarm fatigue.43
Complications
Use of a hyperthermia-hypothermia blanket can cause
marked changes in vital signs, increased intracranial
pressure, respiratory distress or arrest, and cardiac arrest.
Hyperglycemia, hypokalemia, arrhythmias, hypotension,
impaired coagulation, and infection have been reported as
common adverse events associated with cooling after
cardiac arrest.2,44
Documentation
Document the type of hyperthermia-hypothermia unit used,
control settings (manual or automatic and temperature
settings), and the method of temperature monitoring.
Record the date, time, and duration of treatment. Document
the patient’s temperature and the site of temperature
assessment,1,45 cardiac rhythm, respiratory status, level of
consciousness, neurologic function, skin assessment, and
pain assessment. Document the patient’s tolerance of
treatment. Document any unexpected outcomes, your
interventions, and the patient’s response to them. Record
any patient teaching and the patient’s understanding of
your teaching.
REFERENCES
1 Wiegand, D. L. (2017). AACN procedure manual for high acuity, progressive,
and critical care (7th ed.). St. Louis, MO: Elsevier.
2 Polderman, K. H., et al. (2009). Therapeutic hypothermia and controlled
normothermia in the intensive care unit: Practical considerations, side effects,
and cooling methods. Critical Care Medicine, 37(3), 1101–1119.
3 Mathiesen, C., et al. (2015). Caring for patients treated with therapeutic
hypothermia. Critical Care Nurse, 35(5), e1–e12. (Level VI)
4 The Joint Commission. (2017). Standard RI.01.03 .01. Comprehensive
accreditation manual for hospitals. Oakbrook Terrace, IL: The Joint
Commission. (Level VII)
5 Accreditation Association for Hospitals and Health Systems. (2017). Standard
15.01.11. Healthcare Facilities Accreditation Program: Accreditation
requirements for acute care hospitals. Chicago, IL: Accreditation Association
for Hospitals and Health Systems. (Level VII)
6 DNV GL-Healthcare USA, Inc. (2016). PR.1 .SR.3 . NIAHO® accreditation
requirements: Interpretive guidelines & surveyor guidance (version 11).
Milford, OH: DNV GL-Healthcare USA, Inc. (Level VII)
7 The Joint Commission. (2019). Standard NPSG.07.01.01. Comprehensive
accreditation manual for hospitals. Oakbrook Terrace, IL: The Joint
Commission. (Level VII)
8 Centers for Disease Control and Prevention. (2002). Guideline for hand
hygiene in health-care settings: Recommendations of the Healthcare Infection
Control Practices Advisory Committee and the HICPAC/SHEA/APIC/IDSA Hand
Hygiene Task Force. MMWR Recommendations and Reports, 51(RR-16), 1–45.
Accessed via the Web at https://www.cdc.gov/mmwr/pdf/rr/rr5116.pdf (Level
II)
9 World Health Organization. (2009). “WHO guidelines on hand hygiene in
health care: First global patient safety challenge, clean care is safer care”
[Online]. Accessed via the Web at
http://apps.who.int/iris/bitstream/10665/44102/1/9789241597906_eng.pdf
(Level IV)
10 Accreditation Association for Hospitals and Health Systems. (2017). Standard
07.01.21. Healthcare Facilities Accreditation Program: Accreditation
requirements for acute care hospitals. Chicago, IL: Accreditation Association
for Hospitals and Health Systems. (Level VII)
11 Centers for Medicare and Medicaid Services, Department of Health and
Human Services. (2015). Condition of participation: Infection control. 42 C.F.R.
§ 482.42.
12 DNV GL-Healthcare USA, Inc. (2016). IC.1 .SR.1 . NIAHO® accreditation
requirements: Interpretive guidelines & surveyor guidance (version 11).
Milford, OH: DNV GL-Healthcare USA, Inc. (Level VII)
13 The Joint Commission. (2019). Standard NPSG.01.01.01. Comprehensive
accreditation manual for hospitals. Oakbrook Terrace, IL: The Joint
Commission. (Level VII)
14 The Joint Commission. (2019). Standard RI.01.01.01. Comprehensive
accreditation manual for hospitals. Oakbrook Terrace, IL: The Joint
Commission. (Level VII)
15 DNV GL-Healthcare USA, Inc. (2016). PR.1.SR.5 . NIAHO® accreditation
requirements: Interpretive guidelines & surveyor guidance (version 11).
Milford, OH: DNV GL-Healthcare USA, Inc. (Level VII)
16 Centers for Medicare and Medicaid Services, Department of Health and
Human Services. (2015). Condition of participation: Patient’s rights. 42 C.F.R.
§ 482.13(c)(1).
17 Accreditation Association for Hospitals and Health Systems. (2017). Standard
15.01.16. Healthcare Facilities Accreditation Program: Accreditation
requirements for acute care hospitals. Chicago, IL: Accreditation Association
for Hospitals and Health Systems. (Level VII)
18 The Joint Commission. (2019). Standard PC.02.01.21. Comprehensive
accreditation manual for hospitals. Oakbrook Terrace, IL: The Joint
Commission. (Level VII)
19 Waters, T. R., et al. (2009). “Safe patient handling training for schools of
nursing” [Online]. Accessed via the Web at
http://www.cdc.gov/niosh/docs/2009-127/pdfs/2009-127.pdf (Level VII)
20 Siegel, J. D ., et al. (2007, revised 2017). “2007 guideline for isolation
precautions: Preventing transmission of infectious agents in healthcare
settings” [Online]. Accessed via the Web at
http://www.cdc.gov/hicpac/pdf/isolation/Isolation2007.pdf (Level II)
21 Accreditation Association for Hospitals and Health Systems. (2017). Standard
07.01.10. Healthcare Facilities Accreditation Program: Accreditation
requirements for acute care hospitals. Chicago, IL: Accreditation Association
for Hospitals and Health Systems. (Level VII)
22 Graham, K. C., & Cvach, M. (2010). Monitor alarm fatigue: Standardizing use
of physiological monitors and decreasing nuisance alarms. American Journal
of Critical Care, 19(1), 28–37. Accessed via the Web at
http://ajcc.aacnjournals.org/content/19/1/28.full.pdf
23 The Joint Commission. (2019). Standard NPSG.06 .01.01. Comprehensive
accreditation manual for hospitals. Oakbrook Terrace, IL: The Joint
Commission. (Level VII)
24 American Association of Critical-Care Nurses. (2013). “A ACN practice alert:
Alarm management” [Online]. Accessed via the Web at
https://www.aacn.org/clinical-resources/practice-alerts/alarm-management
(Level VII)
25 Accreditation Association for Hospitals and Health Systems. (2017). Standard
16.01.03. Healthcare Facilities Accreditation Program: Accreditation
requirements for acute care hospitals. Chicago, IL: Accreditation Association
for Hospitals and Health Systems. (Level VII)
26 Centers for Medicare and Medicaid Services, Department of Health and
Human Services. (2015). Condition of participation: Nursing services. 42
C.F.R. § 482.23©.
27 DNV GL-Healthcare USA, Inc. (2016). MM.1 .SR.2. NIAHO® accreditation
requirements: Interpretive guidelines & surveyor guidance (version 11).
Milford, OH: DNV GL-Healthcare USA, Inc. (Level VII)
28 The Joint Commission. (2019). Standard MM.06.01.01. Comprehensive
accreditation manual for hospitals. Oakbrook Terrace, IL: The Joint
Commission. (Level VII)
29 Occupational Safety and Health Administration. (n.d .). “Bloodborne
pathogens, standard number 1910.1030” [Online]. Accessed via the Web at
https://www.osha.gov/pls/oshaweb/owadisp.show_document?
p_id=10051&p_table=STANDARDS (Level VII)
30 Wound Ostomy and Continence Nurses Society (WOCN). (2016). Guideline for
prevention and management of pressure ulcers (injuries): WOCN clinical
practice guideline series 2. Mount Laurel, NJ: WOCN Society.
31 National Pressure Ulcer Advisory Panel, et al. (2014). “Prevention and
treatment of pressure ulcers: Quick reference guide” [Online]. Accessed via
the Web at http://www.npuap.org/wp-content/uploads/2014/08/Quick-
Reference-Guide-DIGITAL-NPUAP-EPUAP-PPPIA.pdf (Level VII)
32 Jarrett, N., & Callaham, M. (2016). “Evidence-based guidelines for selected
hospital-acquired conditions: Final report” [Online]. Accessed via the Web at
https://www.cms.gov/Medicare/Medicare-Fee-for-Service-
Payment/HospitalAcqCond/Downloads/2016-HAC-Report.pdf
33 Accreditation Association for Hospitals and Health Systems. (2017). Standard
16.02.02. Healthcare Facilities Accreditation Program: Accreditation
requirements for acute care hospitals. Chicago, IL: Accreditation Association
for Hospitals and Health Systems. (Level VII)
34 National Pressure Ulcer Advisory Panel. (2016). “National Pressure Ulcer
Advisory Panel (NPUAP) announces a change in terminology from pressure
ulcer to pressure injury and updates the stages of pressure injury” [Online].
Accessed via the Web at http://www.npuap.org/national-pressure-ulcer-
advisory-panel-npuap-announces-a -change-in-terminology-from-pressure-
ulcer-to-pressure-injury-and-updates-the-stages-of-pressure-injury/
35 Ganz, D. A., et al. (2013). Preventing falls in hospitals: A toolkit for improving
quality of care (AHRQ Publication No. 13-0015-EF). Rockville, MD: Agency for
Healthcare Research and Quality. Accessed via the Web at
http://www.ahrq.gov/sites/default/files/publications/files/fallpxtoolkit.pdf
(Level VII)
36 Rutala, W. A., et al. (2008, revised 2017). “Guideline for disinfection and
sterilization in healthcare facilities, 2008” [Online]. Accessed via the Web at
http://www.cdc.gov/hicpac/pdf/guidelines/Disinfection_Nov_2008.pdf (Level I)
37 Accreditation Association for Hospitals and Health Systems. (2017). Standard
07.02.03. Healthcare Facilities Accreditation Program: Accreditation
requirements for acute care hospitals. Chicago, IL: Accreditation Association
for Hospitals and Health Systems. (Level VII)
38 The Joint Commission. (2019). Standard RC 01.03 .01. Comprehensive
accreditation manual for hospitals. Oakbrook Terrace, IL: The Joint
Commission. (Level VII)
39 Centers for Medicare and Medicaid Services, Department of Health and
Human Services. (2015). Condition of participation: Medical record services.
42 C.F.R. § 482.24(b).
40 Accreditation Association for Hospitals and Health Systems. (2017). Standard
10.00 .03. Healthcare Facilities Accreditation Program: Accreditation
requirements for acute care hospitals. Chicago, IL: Accreditation Association
for Hospitals and Health Systems. (Level VII)
41 DNV GL-Healthcare USA, Inc. (2016). MR.2 .SR.1 . NIAHO® accreditation
requirements: Interpretive guidelines & surveyor guidance (version 11).
Milford, OH: DNV GL-Healthcare USA, Inc. (Level VII)
42 Rittenberger, J. C ., et al. Post-cardiac arrest management in adults. (2016).
In: UpToDate, Walls, R. M . (Ed.). Retrieved from: http://www.uptodate.com/
43 The Joint Commission. (2013). “Sentinel event alert: Medical device alarm
safety in hospitals” [Online]. Accessed via the Web at
http://www.jointcommission.org/assets/1/6/SEA_50_alarms_4 _26_16.PDF
(Level VII)
44 Kim, Y. M., et al. (2015). Adverse events associated with poor neurological
outcome during targeted temperature management and advanced critical
care after out-of-hospital cardiac arrest. Critical Care, 19, 283. (Level VI)
45 Van Wicklin, S. A., & Conner, R. (2018). Guideline for the prevention of
unplanned patient hypothermia. In R. Conner (Ed.), Guidelines for
perioperative practice 2018 edition. Denver, CO: AORN, Inc. (Level VII)
I
IM INJECTION
Intramuscular (IM) injections deposit medication deep into
muscle tissue. This route of administration provides rapid
systemic action and absorption of relatively large doses (up
to 5 mL in appropriate sites).1 IM injections are
recommended for patients who can’t take medication orally,
when IV administration is inappropriate or inaccessible, and
for drugs that are altered by digestive juices. Because
muscle tissue has few sensory nerves, IM injections allow
less painful administration of irritating drugs.
The site for an IM injection must be chosen carefully,
taking into account the patient’s general physical status and
the purpose of the injection. IM injections shouldn’t be
administered at inflamed, edematous, or irritated sites or at
sites that contain moles, birthmarks, scar tissue, or other
lesions. IM injections may also be contraindicated in
patients with impaired coagulation mechanisms, occlusive
peripheral vascular disease, edema, and shock, as well as
after thrombolytic therapy and during an acute myocardial
infarction (MI), because these conditions impair peripheral
absorption. IM injections require sterile technique to
maintain the integrity of muscle tissue.
The Z-track method is preferred for administering IM
injections. By leaving a zigzag path that seals the needle
track, this technique prevents drug leakage into the
subcutaneous tissue, helps seal the drug in the muscle, and
minimizes irritation.1
Equipment
Patient’s medication administration record ▪ prescribed
medication ▪ single-use sterile syringe and needle of
appropriate size and gauge (a self-sheathing needle is
recommended)2 ▪ alcohol pads ▪ gauze pads ▪ Optional:
gloves, 1′′ (2.5 -cm) tape, ice, filter needle.
The prescribed medication must be sterile. The needle
may be packaged separately or already attached to the
syringe. (See Selecting the appropriate syringe and needle.)
Implementation
■ Avoid distractions and interruptions when preparing and
administering medications to prevent medication errors.6,7
■ Verify the order in the patient’s medication record by
checking it against the practitioner’s order.8,9,10,11
■ Reconcile the patient’s medications when a new
medication is ordered to reduce the risk of medication
errors, including omissions, duplications, dosing errors, and
drug interactions.12,13,14
■ Perform hand hygiene.15
■ Gather the equipment and the prescribed medication.
Choose equipment appropriate to the prescribed medication
and the injection site and make sure it works properly. The
needle should be straight, smooth, and free from burrs.
■ Compare the medication label with the order in the
patient’s medical record.8,9,10,11
■ Check the patient’s medical record for an allergy or a
contraindication to the prescribed medication. If an allergy
or contraindications exist, don’t administer the medication;
instead, notify the practitioner.8,9,10,11
■ Check the expiration date on the medication. If the
medication is expired, return it to the pharmacy and obtain
new medication.8,9,10,11
■ Visually inspect the solution for particles, discoloration, or
other loss of integrity; don’t administer the medication if its
integrity is compromised.8,9,10,11 If in doubt, check with the
pharmacist and the manufacturer’s instructions. Remember
that for some drugs (such as suspensions), the presence of
drug particles is normal.
■ Discuss any unresolved concerns about the medication
with the patient’s practitioner.8,9,10,11
■ Perform hand hygiene.16,17,18,19,20,21
■ Carefully calculate the dose. If it’s a high-alert medication
that can cause significant patient harm when used in error,
perform an independent double-check with another nurse if
required by your facility.22,23
■ Read the medication label again as you draw up the
medication for injection if needed. (See Drawing up
medication for injection.)
■ Perform hand hygiene.16,17,18,19,20,21
■ Confirm the patient’s identity using at least two patient
identifiers.26
■ Provide privacy.27,28,29,30
■ If the patient is receiving the medication for the first time,
discuss potential adverse reactions and any other concerns
related to the medication.8,9,10,11
■ Explain the procedure to the patient and family (if
appropriate) according to their individual communication
and learning needs to increase their understanding, allay
their fears, and enhance cooperation.31
■ Verify that the medication is being administered at the
proper time, in the prescribed dose, and by the correct route
to reduce the risk of medication errors.8,9,10,11
■ If your facility uses a bar code scanning system, scan
your identification badge, the patient’s identification
bracelet, and the medication’s bar code.
■ Raise the patient’s bed to waist level when providing
patient care to prevent caregiver back strain.32
■ Perform hand hygiene.16,17,18,19,20,21
■ Put on gloves if contact with blood or body fluids is likely,
or if your skin or the patient’s skin isn’t intact; gloves aren’t
required for routine IM injection because they don’t protect
against needle-stick injury.2,24
■ Select an appropriate injection site. The ventrogluteal site
is used most commonly for healthy adults, although the
deltoid muscle may be used for a small-volume injection (2
mL or less). (See Locating IM injection sites, page 366.)
Remember to always rotate injection sites for patients who
require repeated injections.
NURSING ALERT If using the ventrogluteal site, take care to correctly
identify anatomic landmarks before administration. Use of the
dorsogluteal site isn’t recommended because of the potential for nerve
damage.1,33,34
■ Position and drape the patient appropriately using the
bed linens, making sure the site is well exposed and lighting
is adequate (as shown below).
■ After selecting the injection site, clean the skin with an
alcohol pad.24 Move the pad outward in a circular motion to
a circumference of about 2′′ (5 cm) from the injection site
and allow the skin to dry completely (as shown below).24
■ Remove the needle sheath. With the thumb and index
finger of your nondominant hand, gently displace the skin
and subcutaneous tissue of the injection site by pulling the
skin laterally for the Z-track technique.1 (See the “Z-track
injection” procedure.)
■ Position the syringe at a 90-degree angle to the skin
surface, with the needle a couple of inches (about 5 cm)
from the skin. Tell the patient that a prick will be felt as you
insert the needle. Then quickly and smoothly insert the
needle through the skin and subcutaneous tissue, deep into
the muscle at a 90-degree angle.
■ Support the syringe with your nondominant hand if
desired. Pull back slightly on the plunger with your dominant
hand to aspirate for blood if appropriate. Aspiration of blood
isn’t recommended for administration of immunizations and
vaccines.4,35 If no blood appears, slowly inject the
medication into the muscle. A slow, steady injection rate
allows the muscle to distend gradually and accept the
medication under minimal pressure. You should feel little or
no resistance against the force of the injection.
Selecting the appropriate syringe
and needle
For an IM injection, the size of the syringe and the gauge and length of the
needle are determined by several factors, including the amount and viscosity
of the medication, the injection site chosen, and the patient’s weight and
amount of adipose tissue. Needles used for IM injections are longer than
subcutaneous needles because they must reach deep into the muscle.
The volume of medication administered IM is usually 1 to 4 mL, so a 3- or
5-mL syringe is usually appropriate. The appropriate gauge of the needle is
determined by the medication being administered. Biological agents and
medications in aqueous solutions should be administered with a 20G to 25G
needle. Medications in oil-based solutions should be administered with an
18G to 25G needle.
Needle length depends on the injection site, the patient’s size, and the
amount of subcutaneous fat covering the muscle. Patients who are obese
may require a longer needle (11⁄2′′ [3.8 cm] or longer),3 and thin or emaciated
patients may require a shorter needle (1⁄2′′ to 1′′ [1.25 cm to 2.5 cm]). When
choosing the needle size and injection site, take into consideration muscle
size, thickness of adipose tissue at the injection site, volume of the material
to be administered, injection technique, and depth below the muscle surface
into which you’ll inject the medication:4,5
■ Vastus lateralis: 1⁄2′′ to 1′′ (1.3 cm to 2.5 cm)
■ Deltoid: 1⁄2′′ to 11⁄2′′ (1.3 cm to 3.8 cm)
■ Ventrogluteal: 1⁄2′′ to 11⁄2′′ (1.3 cm to 3.8 cm)
Drawing up medication for injection
Your technique for drawing up the medication will vary according to the type
of container in which the medication is manufactured. Prepare the
medication in a clean, dry work space that is free of clutter and
contamination.15 Follow aseptic technique during preparation to prevent the
transfer of microorganisms to the patient.15
For single-dose ampules: Disinfect the neck of the ampule with an
alcohol pad before breaking it.15 Wrap an alcohol pad around the ampule’s
neck and snap off the top, directing the force away from your body. Attach a
filter needle to the syringe and withdraw the medication, keeping the
needle’s bevel tip below the level of the solution. Tap the syringe to clear air
from it. Cover the needle with the needle sheath.
Before discarding the ampule, check the medication label against the
patient’s medication record.8,9,10,11 Discard the filter needle and the
ampule in a puncture-resistant sharps disposal container.24 Attach the
appropriate needle to the syringe.
For single-dose or multidose vials: Whenever possible, use a single-
dose vial instead of a multidose vial, especially when medications will be
administered to multiple patients.25 Reconstitute powdered drugs according
to instructions. Make sure all crystals have dissolved in the solution. Warm
the vial by rolling it between your palms to help the drug dissolve faster.
Wipe the stopper of the medication vial with an alcohol pad and allow it to
dry completely.15 Draw up the prescribed amount of medication. Read the
medication label as you select the medication, as you draw it up, and after
you have drawn it up to verify the correct dosage.
Don’t use an air bubble in the syringe. Modern, disposable syringes are
calibrated to give the correct dose without an air bubble. Change the needle
if it has become damaged or contaminated; cover the needle with the needle
sheath.2 Store all multidose vials according to the manufacturer’s guidelines.
NURSING ALERT If blood appears in the syringe on aspiration, the
needle is in a blood vessel. If this occurs, stop the injection, withdraw
the needle, prepare another injection with new equipment, and inject
another site. Don’t inject the bloody solution.
■ After the injection, wait 10 seconds to allow the
medication to begin to diffuse into the surrounding muscle
tissue; then withdraw the needle slowly at a 90-degree
angle.1,36,37 If present, activate the needle’s safety
mechanism to prevent accidental needle-stick injury.2,38
Locating IM injection sites
Deltoid
Have the patient sit or stand. Find the lower edge of the acromial process and
the point on the lateral arm in line with the axilla. Insert the needle 1′′ to 2′′
(2.5 to 5 cm) below the acromial process, usually two or three
fingerbreadths, at a 90-degree angle or angled slightly toward the process.
Typical injection: 0.5 mL (range: 0.5 to 2.0 mL).1
Ventrogluteal
Have the patient sit, stand, lie laterally, or lie supine. Locate the greater
trochanter of the femur with the heel of your hand. Then spread your index
and middle fingers from the anterior superior iliac spine to as far along the
iliac crest as you can reach. Insert the needle between the two fingers at a
90-degree angle to the muscle. (Remove your fingers before inserting the
needle.) Typical injection: 2.5 to 5 mL (range: 1 to 5 mL).1
Vastus lateralis
Have the patient sit or lie supine. The patient’s knee may be slightly flexed
and the foot may be externally rotated to help relax the muscle. Use the
lateral muscle of the quadriceps group, from a handbreadth below the
greater trochanter to a handbreadth above the knee. Insert the needle into
the middle third of the muscle parallel to the surface on which the patient is
lying. Typical injection: 5 mL (range: 1 to 5 mL).1
■ Release the displaced skin and subcutaneous tissue to
seal the needle track.
■ Cover the injection site immediately with a gauze pad (as
shown below), and apply gentle pressure.
■ Remove the gauze pad and inspect the injection site for
signs of active bleeding or bruising. If bleeding continues,
apply pressure to the site; if bruising occurs, you may apply
ice.
■ Return the bed to the lowest position to prevent falls and
maintain patient safety.39
■ Monitor for adverse reactions at the site for 10 to 30
minutes after the injection.40
ELDER ALERT An elderly patient may bleed or ooze from the site
after the injection because of decreased tissue elasticity. Applying a
small pressure bandage may be helpful.
■ Discard all equipment appropriately. Don’t recap needles;
dispose of them in an appropriate sharps container to avoid
needle-stick injuries.2,24
■ Remove and discard your gloves, if worn, and perform
hand hygiene.16,17,18,19,20,21
■ Document the procedure.41,42,43,44
Special considerations
■ To slow their absorption, some drugs for IM administration
are dissolved in oil or other special solutions. Mix these
preparations well before drawing them into the syringe.
■ Never inject into sensitive muscles, especially those that
twitch or tremble when you assess site landmarks and
tissue depth. Injections into these trigger areas may cause
sharp or referred pain, such as the pain caused by nerve
trauma.
■ Keep a rotation record that lists all available injection
sites, divided into various body areas, for patients who
require repeated injections. Rotate from a site in the first
area to a site in each of the other areas. Then return to a
site in the first area that’s at least 1′′ (2.5 cm) away from the
previous injection site in that area.
■ If the patient has experienced pain or emotional trauma
from repeated injections, consider numbing the area before
cleaning it by holding ice on it for several seconds. If you
must inject more than 4 mL of solution, divide the solution
and inject it at two separate sites.
■ Always encourage the patient to relax the muscle you’ll
be injecting, because injections into tense muscles are
typically more painful and may bleed more readily.
■ IM injections can damage local muscle cells, causing
elevations in serum enzyme levels (creatine kinase [CK])
that can be confused with elevations resulting from damage
to cardiac muscle, as in MI. To distinguish between skeletal
and cardiac muscle damage, diagnostic tests for suspected
MI must identify the isoenzyme of CK specific to cardiac
muscle (CK-MB) and include tests to determine lactate
dehydrogenase and aspartate aminotransferase levels. If it’s
important to measure these enzyme levels, suggest that the
practitioner switch to IV administration and adjust dosages
accordingly.
■ Prepare the injectable medication as close as possible to
the time of administration—at least within 1 hour of
administration.15
■ If the medication isn’t going to be administered
immediately, clearly label the medication syringe to prevent
a medication error. An immediately administered
medication is one that’s prepared, taken directly to the
patient, and administered without any break in the
process.45,46,47
■ Vaccine doses shouldn’t be drawn into a syringe until
immediately before administration.4
■ Dosage adjustments are usually necessary when
changing from the IM route to the oral route.
Complications
Accidental injection of concentrated or irritating medications
into subcutaneous tissue or other areas where they can’t be
fully absorbed can cause sterile abscesses to develop. Such
abscesses result from the body’s natural immune response,
in which phagocytes attempt to remove the foreign matter.
Failure to rotate sites in patients who require repeated
injections can lead to deposits of unabsorbed medications.
Such deposits can reduce the desired pharmacologic effect
and may lead to abscess formation or tissue fibrosis.
Improper technique can also result in injury to bone, blood
vessels, and peripheral nerves.1
ELDER ALERT Because elderly patients typically have decreased
muscle mass, IM medications can be absorbed more quickly than
expected.
Documentation
Document the drug administered, dose, date, time, route of
administration, and injection site according to your facility’s
documentation format. Also, note the patient’s tolerance of
the injection and the injection’s effects, including any
adverse effects. If you’re documenting immunization
administration, include the lot number and expiration date.
(See Documenting administration of controlled substances.)
Documenting administration of
controlled substances
Some facilities use a computerized system that confirms the opioid count for
each drug as it’s used or removed from the system via a secure identification
code. This system eliminates the need for opioid counts during the day.
Before administering a controlled substance, regardless of the system
being used, always verify the amount of drug in the container and sign out
the medication as required by your facility. A second nurse should document
your activity and observe you if part of a controlled substance dose must be
wasted.
What to report
If you discover a discrepancy in the controlled substance count, report it as
required by your facility. You’ll need to file an occurrence report as well. An
investigation will follow.
REFERENCES
1 Hopkins, U., & Arias, C. Y. (2013). Large-volume IM injections: A review of best
practices. Oncology Nurse Advisor, 2013, 32–37. Accessed via the Web at
http://media.oncologynurseadvisor.com/documents/44/ona_feature0213_injec
tions_10767.pdf
2 Occupational Safety and Health Administration. (n.d .). “Bloodborne
pathogens, standard number 1910.1030” [Online]. Accessed via the Web at
https://www.osha.gov/pls/oshaweb/owadisp.show_document?
p_id=10051&p_table=STANDARDS (Level VII)
3 Tanioka, T., et al. (2013). Optimal needle insertion length for intramuscular
injection of risperidone long-acting injectable (RLAI). Health, 5(12), 1939–
1945. Accessed via the Web at
http://www.scirp.org/journal/PaperInformation.aspx?paperID=40471
4 Centers for Disease Control and Prevention. (2011). General
recommendations on immunization: Recommendations of the Advisory
Committee on Immunization Practices. MMWR Recommendations and
Reports, 60(RR-02), 1–60 . Accessed via the Web at
http://www.cdc.gov/mmwr/pdf/rr/rr6002.pdf (Level II)
5 Zaybak, A., et al. (2015). Examination of subcutaneous tissue thickness in the
thigh site for intramuscular injection in obese individuals. Journal of
Ultrasound in Medicine, 34(9), 1657–1662. Accessed via the Web at
http://www.ncbi.nlm.nih.gov/pubmed/26269301
6 Westbrook, J., et al. (2010). Association of interruptions with an increased risk
and severity of medication administration errors. Archives of Internal
Medicine, 170(8), 683–690 . (Level IV)
7 Institute for Safe Medication Practices. (2012). Side tracks on the safety
express: Interruptions lead to errors and unfinished...Wait, what was I doing?
Nurse Advise-ERR, 11(2), 1–4 . Accessed via the Web at
https://www.ismp.org/Newsletters/acutecare/showarticle.aspx?id=37 (Level
VII)
8 The Joint Commission. (2019). Standard MM.06 .01.01. Comprehensive
accreditation manual for hospitals. Oakbrook Terrace, IL: The Joint
Commission. (Level VII)
9 Accreditation Association for Hospitals and Health Systems. (2017). Standard
16.01.03. Healthcare Facilities Accreditation Program: Accreditation
requirements for acute care hospitals. Chicago, IL: Accreditation Association
for Hospitals and Health Systems. (Level VII)
10 Centers for Medicare and Medicaid Services, Department of Health and
Human Services. (2015). Condition of participation: Preparation and
administration of drugs. 42 C.F.R. § 482.23(c).
11 DNV GL-Healthcare USA, Inc. (2016). MM.1 .SR.2. NIAHO® accreditation
requirements: Interpretive guidelines and surveyor guidance (version 11).
Milford, OH: DNV GL-Healthcare USA, Inc. (Level VII)
12 Institute for Healthcare Improvement. (2011). How-to guide: Prevent adverse
drug events (medication reconciliation). Cambridge, MA: Institute for
Healthcare Improvement. (Level VII)
13 The Joint Commission. (2019). Standard NPSG.03 .06 .01. Comprehensive
accreditation manual for hospitals. Oakbrook Terrace, IL: The Joint
Commission. (Level VII)
14 Accreditation Association for Hospitals and Health Systems. (2017). Standard
25.02.13. Healthcare Facilities Accreditation Program: Accreditation
requirements for acute care hospitals. Chicago, IL: Accreditation Association
for Hospitals and Health Systems. (Level VII)
15 Association of Professionals in Infection Control and Epidemiology (APIC).
(2016). APIC position paper: Safe injection, infusion and medication vial
practice in health care (2016). Washington, DC: APIC. (Level VII)
16 The Joint Commission. (2019). Standard NPSG.07.01.01. Comprehensive
accreditation manual for hospitals. Oakbrook Terrace, IL: The Joint
Commission. (Level VII)
17 Centers for Disease Control and Prevention. (2002). Guideline for hand
hygiene in health-care settings: Recommendations of the Healthcare Infection
Control Practices Advisory Committee and the HICPAC/SHEA/APIC/IDSA Hand
Hygiene Task Force. MMWR Recommendations and Reports, 51(RR-16), 1–45.
Accessed via the Web at https://www.cdc.gov/mmwr/pdf/rr/rr5116.pdf (Level
II)
18 World Health Organization. (2009). “WHO guidelines on hand hygiene in
health care: First global patient safety challenge, clean care is safer care”
[Online]. Accessed via the Web at
http://apps.who.int/iris/bitstream/10665/44102/1/9789241597906_eng.pdf
(Level IV)
19 Accreditation Association for Hospitals and Health Systems. (2017). Standard
07.01.10. Healthcare Facilities Accreditation Program: Accreditation
requirements for acute care hospitals. Chicago, IL: Accreditation Association
for Hospitals and Health Systems. (Level VII)
20 Centers for Medicare and Medicaid Services, Department of Health and
Human Services. (2015). Condition of participation: Infection control. 42 C.F.R.
§ 482.42.
21 DNV GL-Healthcare USA, Inc. (2016). IC.1 .SR.1 . NIAHO® accreditation
requirements: Interpretive guidelines and surveyor guidance (version 11).
Milford, OH: DNV GL-Healthcare USA, Inc. (Level VII)
22 Institute for Safe Medication Practices. (2014). “ISMP list of high-alert
medications in acute care settings” [Online]. Accessed via the Web at
http://www.ismp.org/Tools/highalertmedications.pdf (Level VII)
23 Institute for Safe Medication Practices. (2008). Conducting an independent
double-check ISMP Medication Safety Alert! Nurse Advise-ERR, 6(12), 1.
Accessed via the Web at
http://www.ismp.org/newsletters/nursing/Issues/NurseAdviseERR200812.pdf
(Level VII)
24 World Health Organization. (2010). “WHO best practices for injections and
related procedures toolkit” [Online]. Accessed via the Web at
http://whqlibdoc.who.int/publications/2010/9789241599252_eng.pdf (Level
IV)
25 Centers for Disease Control and Prevention. (2011). “Safe injection practices
to prevent transmission of infections to patients” [Online]. Accessed via the
Web at http://www.cdc.gov/injectionsafety/IP07_standardPrecaution.html
(Level II)
26 The Joint Commission. (2019). Standard NPSG.01.01.01. Comprehensive
accreditation manual for hospitals. Oakbrook Terrace, IL: The Joint
Commission. (Level VII)
27 Accreditation Association for Hospitals and Health Systems. (2017). Standard
15.01.16. Healthcare Facilities Accreditation Program: Accreditation
requirements for acute care hospitals. Chicago, IL: Accreditation Association
for Hospitals and Health Systems. (Level VII)
28 Centers for Medicare and Medicaid Services, Department of Health and
Human Services. (2015). Condition of participation: Patient’s rights. 42 C.F.R.
§ 482.13(c)(1).
29 DNV GL-Healthcare USA, Inc. (2016). PR.1.SR.5 . NIAHO® accreditation
requirements: Interpretive guidelines and surveyor guidance (version 11).
Milford, OH: DNV GL-Healthcare USA, Inc. (Level VII)
30 The Joint Commission. (2019). Standard RI.01.01.01. Comprehensive
accreditation manual for hospitals. Oakbrook Terrace, IL: The Joint
Commission. (Level VII)
31 The Joint Commission. (2019). Standard PC.02.01.21. Comprehensive
accreditation manual for hospitals. Oakbrook Terrace, IL: The Joint
Commission.
32 Waters, T. R., et al. (2009). “Safe patient handling training for schools of
nursing” [Online]. Accessed via the Web at
http://www.cdc.gov/niosh/docs/2009-127/pdfs/2009-127.pdf
33 Mishra, P., & Stringer, M. D. (2010). Sciatic nerve injury from intramuscular
injection: A persistent and global problem. International Journal of Clinical
Practice, 64(11), 1573–1579. (Level V)
34 Cocoman, A., & Murray, J. (2010). Recognizing the evidence and changing
practice on injection sites. British Journal of Nursing, 19(18), 1170–1174 .
(Level V)
35 Sisson, H. (2015). Aspiration during the intramuscular injection procedure: A
systematic literature review. Journal of Clinical Nursing, 24(17–18), 2368–
2375. Accessed via the Web at
http://www.ncbi.nlm.nih.gov/pubmed/25871949 (Level I)
36 Nicoll, L. H., & Hesby, A. (2002). Intramuscular injection: An integrative
research review and guideline for evidence-based practice. Applied Nursing
Research, 15(3), 149–162. (Level V)
37 Taylor, C., et al. (2015). Fundamentals of nursing: The art and science of
nursing care (8th ed.). Philadelphia, PA: Wolters Kluwer.
38 Occupational Safety and Health Administration. (n.d .). “Safety and health
topics: Bloodborne pathogens and needlestick prevention” [Online]. Accessed
via the Web at http://www.osha.gov/SLTC/bloodbornepathogens (Level VII)
39 Ganz, D. A., et al. (2013). Preventing falls in hospitals: A toolkit for improving
quality of care (AHRQ Publication No. 13-0015-EF). Rockville, MD: Agency for
Healthcare Research and Quality. Accessed via the Web at
http://www.ahrq.gov/sites/default/files/publications/files/fallpxtoolkit.pdf
40 The Joint Commission. (2019). Standard MM.07.01.03 . Comprehensive
accreditation manual for hospitals. Oakbrook Terrace, IL: The Joint
Commission. (Level VII)
41 The Joint Commission. (2019). Standard RC.01.03 .01. Comprehensive
accreditation manual for hospitals. Oakbrook Terrace, IL: The Joint
Commission. (Level VII)
42 Accreditation Association for Hospitals and Health Systems. (2017). Standard
10.00 .03. Healthcare Facilities Accreditation Program: Accreditation
requirements for acute care hospitals. Chicago, IL: Accreditation Association
for Hospitals and Health Systems. (Level VII)
43 Centers for Medicare and Medicaid Services, Department of Health and
Human Services. (2015). Condition of participation: Medical record services.
42 C.F.R. § 482.24(b).
44 DNV GL-Healthcare USA, Inc. (2016). MR.2 .SR.1 . NIAHO® accreditation
requirements: Interpretive guidelines and surveyor guidance (version 11).
Milford, OH: DNV GL-Healthcare USA, Inc. (Level VII)
45 The Joint Commission. (2019). Standard MM.05.01.09 . Comprehensive
accreditation manual for hospitals. Oakbrook Terrace, IL: The Joint
Commission. (Level VII)
46 Accreditation Association for Hospitals and Health Systems. (2017). Standard
25.01.18. Healthcare Facilities Accreditation Program: Accreditation
requirements for acute care hospitals. Chicago, IL: Accreditation Association
for Hospitals and Health Systems. (Level VII)
47 The Joint Commission. (2019). Standard NPSG.03 .04.01. Comprehensive
accreditation manual for hospitals. Oakbrook Terrace, IL: The Joint
Commission. (Level VII)
IMPAIRED SWALLOWING AND ASPIRATION
PRECAUTIONS
Patients may experience impaired swallowing as a result of
several specific problems. The first of these—oropharyngeal
dysphagia—is impaired swallowing associated with deficits
in oral and pharyngeal structure or function. Patients with
oropharyngeal dysphagia are at especially high risk for
aspiration, and many of them have silent aspiration
(aspiration without visible signs of swallowing difficulty such
as coughing or gagging before, during, or after swallowing).1
Patients at risk for oropharyngeal dysphagia include those
with nervous system damage, such as stroke, head injury,
or spinal cord injury; those with neuromuscular diseases,
such as muscular dystrophy or cerebral palsy; those with
progressive neurologic diseases, such as Parkinson’s
disease, multiple sclerosis, amyotrophic lateral sclerosis,
and dementia; those with facial, oral, or neck surgery or
trauma; those with head and neck cancer; and those who
have been intubated for longer than 3 days.2
The second impaired swallowing problem is associated
with esophageal dysphagia and aspiration due to
gastroesophageal reflux disease, esophageal dysmotility or
structural abnormality, delayed gastric emptying, and the
presence of a nasogastric tube, which may lead to reflux,
regurgitation, and subsequent aspiration.
Lastly, impaired swallowing can be associated with
tracheostomies or ventilation support that results in
decreased sensation of the oral and pharyngeal cavities,
decreased sensation of food or fluids penetrating the
laryngeal vestibule and aspirating (dropping below the level
of the vocal cords), decreased ability to cough aspirated
material off the vocal cords, and decreased laryngeal
elevation and airway closure.
Additionally, patients receiving sedation are at risk for
aspiration because sedation reduces cough and gag
reflexes, and can interfere with the patient’s ability to
handle oropharyngeal secretions and refluxed gastric
contents. Sedation may slow gastric emptying, increasing
the risk for aspiration.
Equipment
Meal tray ▪ call light ▪ wall suction or portable suction
apparatus ▪ suction kit ▪ gloves ▪ oral care supplies ▪
swallowing precautions and feeding information sheet ▪
stethoscope ▪ pulse oximeter ▪ scale ▪ Optional: protective
eyewear (mask with face shield or goggles), adaptive
feeding devices, mortar and pestle or other appropriate
medication crushing supplies, appropriate vehicle for
crushed pills (applesauce, pudding, and so forth), irrigation
tray with 60-mL piston syringe, pH strips, glucose test
stripes, water.
Implementation
■ Gather the appropriate equipment.
■ Perform hand hygiene.3,4,5,6,7,8
■ Confirm the patient’s identity using at least two patient
identifiers.9
■ Provide privacy.10,11,12,13
■ Explain the procedure to the patient and family.
■ Put on gloves and protective eyewear, if indicated, before
suctioning the patient or providing oral care.14,15
■ Request a referral for and assist with a bedside swallow
evaluation (usually conducted by a speech-language
pathologist), as indicated.2,16 A swallowing evaluation can
determine if the patient is at risk for aspiration.
Managing impaired swallowing due to
oropharyngeal dysphagia
■ After the swallowing evaluation is completed, develop a
multidisciplinary management plan that includes common
swallowing strategies and takes into consideration the
patient’s nutritional status and required supervision.16,17
Using common swallowing strategies
■ Have suction equipment available at the bedside.
■ Verify the patient’s diet modifications, as ordered.17
■ Position the patient at a 90-degree angle during meals to
decrease the risk of aspiration.18 Otherwise, maintain the
head of the patient’s bed at 30 to 45 degrees unless
contraindicated by the patient’s condition.2 Alternatively,
consider reverse Trendelenburg position to elevate the head
of the bed (unless contraindicated) if the patient can’t
tolerate backrest elevation.2
■ Implement additional strategies of body positioning and
posture, as recommended, to alter the speed and flow
direction of a food or liquid bolus, commonly with the intent
of protecting the airway to facilitate a safe swallow.16,17,18,19
■ Have the patient to sit up for 30 minutes, as
recommended, after meals.19
■ Assist with or perform oral care using appropriate oral
care supplies before and after meals, and check for food
residue.18
■ If applicable, ensure that dentures are in place, free from
debris, and fit well.
■ Ensure the patient uses any recommended adaptive
devices, and provide assistance as needed.17
■ Obtain an order for the liquid form of oral medications, if
needed and available. If a liquid form isn’t available, open
the capsule or crush the medication with a mortar and
pestle or other medication-crushing equipment, if
appropriate, and mix them in an appropriate vehicle, such
as applesauce, as required. Alternatively, consult with the
pharmacist, who may be able to compound medication to
create a medication form, such as powder, inhaler, liquid,
lozenge, or suppository, that’s tailored to the patient’s
specialized needs.20
ELDER ALERT While it may be necessary to open a capsule or crush
oral medications for patients at risk for aspiration, it is equally
necessary to ensure that only appropriate medications are opened or
crushed. Consult the practitioner and your facility’s pharmacist if
unsure.21,22
■ Avoid mixed consistencies of food.
■ If applicable, ensure that the temperature, consistency,
and amount of foods and liquids are appropriate. Chill
water; avoid tepid liquids or food.
■ Minimize distractions when the patient is eating and
drinking.18
■ Encourage small sips with liquids and slow intake with
adequate chewing.
■ If one side of the patient’s face is paralyzed, place food
on the unaffected side. Check the affected side of the mouth
for food that may lodge in the cheek during and after meals.
If appropriate, teach the patient to perform a finger-sweep.
■ Employ swallowing maneuvers, as recommended, to
improve the safety or efficiency of swallow function.17,19
■ If fatigue impairs swallowing, provide rest periods before
and during meals as needed.18
■ Assess swallowing between bites by feeling the rise and
fall of the larynx (Adam’s apple).
■ Be alert for patient feedback during meals, and modify
the presentation and pace of feeding as needed.17,18
■ Avoid medications that dry up secretions, which may
make swallowing more difficult for the patient.18
■ Post swallowing precautions and feeding instructions in
the patient’s room.
Monitoring nutritional status
■ Ask the dietitian to conduct a nutrition evaluation.
■ Monitor the patient’s hydration and nutrition. Poor
compliance with modified diets may lead to reduced food
and fluid intake and an increased risk of malnutrition and
dehydration.17
■ Implement calorie counts as ordered.
■ Weigh the patient daily or as ordered.
■ Consult with the patient and family regarding food and
fluid preferences.
■ Provide small, frequent meals and supplements.
■ Praise the patient for achieving nutritional goals.
Using one-on-one supervision
■ Ensure that someone remains with the patient throughout
every meal.
■ Provide feeding assistance or cueing for feeding and
swallowing strategies during the entire meal, or ensure that
a family member does so.17
■ Encourage the patient to take 30 to 45 minutes to eat.
Patients with dysphagia typically need to eat slowly.
■ Monitor the patient for signs of aspiration, such as
coughing or gagging.
Using close supervision
■ Check on the patient frequently during the meal; spend 3
to 5 minutes each time by re-cueing and reminding the
patient to use swallowing strategies.
■ Monitor the patient for signs of aspiration.
■ Encourage the patient to increase intake, if needed, and
provide other options to maximize safety and nutritional
intake.
■ Keep the call light within reach.
Using distant supervision
■ Provide initial cueing to initiate swallowing strategies.
■ Check on the patient by walking past the room frequently.
■ Monitor the patient for signs of aspiration.
■ Assess the patient’s progress at least two to three times
during meals.
■ Keep the call light within reach.
Completing the procedure
■ Perform hand hygiene.3,4,5,6,7,8
■ Document the procedure.23,24,25,26
Managing impaired swallowing due to
esophageal dysphagia
■ Monitor for reflux and aspiration risks related to
esophageal dysphagia.
■ Consult with a speech-language pathologist and
registered dietitian to determine the need for alternative
nutrition.
■ Monitor respiratory rate and depth; monitor breath
sounds for crackles or wheezes, which may indicate
aspiration and airway obstruction. Monitor for dyspnea and
cyanosis.
■ Monitor the patient’s GI status for factors that may
increase the risk of reflux and subsequent aspiration, such
as abdominal distention or firmness, large gastric residual
volume, feeling of fullness, or nausea. Note that gastric
residual volume shouldn’t be used routinely for
monitoring.27,28
■ Monitor the patient’s intake and output and daily weight.
Weight loss may indicate an esophageal problem.
■ Implement strategies for oral intake.
■ Position the patient sitting upright at a 90-degree angle
during oral feeding and maintain the position for 2 hours
after the meal to decrease the risk of reflux, regurgitation,
and aspiration.19 Otherwise, maintain the head of the
patient’s bed at 30 to 45 degrees unless contraindicated by
the patient’s condition.2 Alternatively, consider reverse
Trendelenburg position to elevate the head of the bed
(unless contraindicated) if the patient can’t tolerate
backrest elevation.2
■ Offer thickened liquids and pureed and moist foods that
may be easier to swallow if esophageal dysmotility exists.
■ Feed the patient slowly; allow adequate time for
esophageal emptying.
■ If the patient feels full quickly, offer small, frequent meals
of high-calorie foods.
■ Alternate liquids and solids during feedings to improve
esophageal emptying of solids.
■ Avoid spicy and acidic foods, and decrease caffeine intake
to decrease reflux.
■ Tell the patient to avoid eating before bed.
■ Perform hand hygiene.3,4,5,6,7,8
■ Document the procedure.23,24,25,26
Managing a patient with a feeding tube
■ Initiate a dietary consult.
■ Provide oral care for the patient who is on nothing-by-
mouth status to decrease colonization of bacteria in the
mouth, because the patient is at risk for secretion
aspiration.
■ After feeding tube insertion, confirm tube placement by
X-ray. X-ray confirmation of placement, especially of small-
bore feeding tubes, is the gold standard for safe placement.
■ Trace the tubing from the patient to its point of origin
before administering the feeding through the feeding tube
to make sure the feeding is administered through the proper
port.29,30 Route the tubing in a standardized direction if the
patient has other tubing and catheters that have different
purposes. If you’ll be using multiple lines, label the tubing at
the distal end (near the patient connection) and at the
proximal end (near the source container) to reduce the risk
of misconnection.8,30
■ Assess placement of the feeding tube before feeding and
every 4 hours for a patient with a continuous feeding using
the following methods, as appropriate: Measure the external
portion of the catheter to detect a change in the external
length, indicating tube migration. Aspirate contents from
the tube with a 60-mL piston syringe and irrigation set, and
observe for changes in volume, appearance, and color. If
performed in your facility, test the pH of the aspirate with
pH strips. Fasting gastric pH is usually 5 or less. Review
routine chest and abdominal X-rays for placement. If tube
placement is in doubt, obtain an X-ray to confirm
placement, as ordered.2,31
■ If the assessment indicates the possibility of feeding
solution in mucus coughed or suctioned from the trachea,
test the mucus for glucose with glucose test strips. A
positive result may indicate tube displacement and
aspiration of feeding solution.
■ Monitor the patient receiving feedings through a gastric
tube for tolerance of enteral feedings by noting abdominal
distention and complaints of abdominal pain, nausea, and
vomiting; observing for passage of flatus and stool; and
monitoring gastric residual volumes.2,18 If vomiting is
present, stop the feeding and notify the practitioner.
■ Check gastric residuals every 4 hours during the first 48
hours of gastric feedings; after the enteral feeding goal rate
is achieved, monitor residual volume every 6 to 8 hours in
patients who aren’t critically ill. For critically ill patients,
monitor gastric residual volume every 4 hours.2 Return
residual volume to the stomach. Flush the feeding tube with
30 mL of water after measuring residual volume.
■ If residual volume is 250 mL or more after a second
residual check, a medication to improve gastric motility may
be needed.18 Hold the feedings for a residual volume
greater than 500 mL (or as required by your facility) and
assesses GI status.28
■ Maintain the patient with the head of the bed elevated 30
to 45 degrees during feedings, unless contraindicated by
the patient’s condition, to facilitate movement of feeding
solution through the stomach and into the small intestine,
thus decreasing the risk of regurgitation and aspiration.
Alternatively, consider the reverse Trendelenburg position to
elevate the head of bed (unless contraindicated) if the
patient can’t tolerate backrest elevation.2,18
■ Perform hand hygiene.3,4,5,6,7,8
■ Document the procedure.23,24,25,26
Managing impaired swallowing due to
tracheostomies or endotracheal tubes
■ Maintain the head of the bed at an angle of 30 to 45
degrees, unless contraindicated by the patient’s
condition.2,18
■ Use sedatives as sparingly as feasible, because sedation
causes reduced cough and gag reflexes, may interfere with
the patient’s ability to handle secretions and refluxed
gastric contents, and may slow gastric emptying.2,18
■ Maintain tracheal cuff pressures, as indicated. Suction
secretions from above the cuff before deflating the cuff to
prevent aspiration of secretions and subsequent health
care–associated pneumonia.2
■ Suction the patient as needed to maintain a patent
airway.
■ Obtain a practitioner’s order for speaking valve trials, as
appropriate.
■ Discard used supplies in the appropriate receptacles.14,15
■ Remove and discard gloves and protective eyewear if
used.10
■ Perform hand hygiene.3,4,5,6,7,8
■ Document the procedure.23,24,25,26
Managing impaired swallowing due to speaking valve
trials
■ Maintain the head of the bed at an angle of 30 to 45
degrees, unless contraindicated by the patient’s condition.2
■ Have the speech-language pathologist assess the
patient’s tolerance for the speaking valve. The speaking
valve permits hands-free speech and can return
oropharyngeal sensation and taste.
■ Deflate the cuff before placing the valve. Monitor oxygen
saturation at baseline, with the valve in place, and with
valve removal.
■ Follow speaking valve recommendations for cleaning and
wearing schedules.
■ Ensure the speaking valve is in place during meals
(according to the speech-language pathologist’s
recommendations), because it’s usually safer to eat with the
valve in place. The patient’s ability to cough material off the
vocal cords is increased.
Completing the procedure
■ Perform hand hygiene.3,4,5,6,7,8
■ Document the procedure.23,24,25,26
Special considerations
■ Patients with ischemic or hemorrhagic stroke should
undergo dysphagia screening with an evidence-based,
facility-approved bedside testing protocol before being
given food, fluids, or medication by mouth.32
■ Monitor the patient for signs and symptoms of swallowing
problems and aspiration. These include coughing before,
during, or after eating; wet or “gurgling” voice; increased
chest congestion after eating; multiple swallows on one
mouthful or washing down food with liquids; complaints of
food getting “stuck” or painful swallowing; unexplained
changes in the amount or rate of eating; drooling or spitting
food out of the mouth; difficulty breathing during meals;
weight loss and poor oral intake; recurrent pneumonias; low-
grade temperatures shortly after meals; increased white
blood cell counts; and leakage from the tracheostomy site.
Currently,
videofluoroscopic and
videoendoscopic
evaluations are the most accurate methods for diagnosing
aspiration.16,19
■ Small-bowel feedings are recommended when patients
are intolerant of gastric feedings or have documented
aspiration.2
■ Angiotensin-converting enzyme inhibitors may improve
the swallowing reflex in older patients with aspiration
pneumonia.
Patient teaching
A patient with dysphagia may require instructions on
exercises to improve oral control or the overall strength,
coordination, and initiation of oropharyngeal swallowing;
how to use adaptive feeding devices; and overall strategies
to reduce the risk of aspiration.
Train and supervise the family to feed the patient
according to the speech therapy and the practitioner’s
recommendations. Teach family members how to perform
abdominal thrusts and how to use suction equipment, as
needed.
Complications
Patients with impaired swallowing are more prone to airway
obstruction and aspiration during meals. Aspiration may
result in pneumonitis or pneumonia. Difficulty swallowing
may result in decreased oral intake and eventually lead to
dehydration and malnutrition.
Documentation
Record the amount of intake, daily weight measurements,
the patient’s food preferences, progress with meals, and any
techniques effective in helping the swallowing process.
Document patient tolerance to tube feedings, volume of
gastric residual volume, and pH values, as indicated.
Document the effectiveness of patient and family teaching,
complications that arose, and interventions taken to remedy
the problem. Document any aspiration precautions taken.
REFERENCES
1 Eisenstadt, E. S . (2010). Dysphagia and aspiration pneumonia in older adults.
Journal of the American Academy of Nurse Practitioners, 22(1), 17–22 . (Level
V)
2 American Association of Critical-Care Nurses. (2016). “AACN practice alert:
Prevention of aspiration in adults” [Online]. Critical Care Nurse, 36(1), e20–e -
24. Accessed via the Web at https://www.aacn.org/~/media/aacn-
website/clincial-resources/practice-
alerts/preventionaspirationpracticealert.pdf (Level VII)
3 The Joint Commission. (2019). Standard NPSG.07.01.01. Comprehensive
accreditation manual for hospitals. Oakbrook Terrace, IL: The Joint
Commission. (Level VII)
4 Centers for Disease Control and Prevention. (2002). Guideline for hand
hygiene in health-care settings: Recommendations of the Healthcare Infection
Control Practices Advisory Committee and the HICPAC/SHEA/APIC/IDSA Hand
Hygiene Task Force. MMWR Recommendations and Reports, 51(RR-16), 1–45.
Accessed via the Web at https://www.cdc.gov/mmwr/pdf/rr/rr5116.pdf (Level
II)
5 World Health Organization. (2009). “WHO guidelines on hand hygiene in
health care: First global patient safety challenge, clean care is safer care”
[Online]. Accessed via the Web at
http://apps.who.int/iris/bitstream/10665/44102/1/9789241597906_eng.pdf
(Level IV)
6 Accreditation Association for Hospitals and Health Systems. (2017). Standard
07.01.21. Healthcare Facilities Accreditation Program: Accreditation
requirements for acute care hospitals. Chicago, IL: Accreditation Association
for Hospitals and Health Systems. (Level VII)
7 Centers for Medicare and Medicaid Services, Department of Health and
Human Services. (2015). Condition of participation: Infection control. 42 C.F.R.
§ 482.42.
8 DNV GL-Healthcare USA, Inc. (2016). IC.1.SR.1 . NIAHO® accreditation
requirements: Interpretive guidelines and surveyor guidance (version 11).
Milford, OH: DNV GL-Healthcare USA, Inc. (Level VII)
9 The Joint Commission. (2019). Standard NPSG.01.01.01. Comprehensive
accreditation manual for hospitals. Oakbrook Terrace, IL: The Joint
Commission. (Level VII)
10 Accreditation Association for Hospitals and Health Systems. (2017). Standard
15.01.16. Healthcare Facilities Accreditation Program: Accreditation
requirements for acute care hospitals. Chicago, IL: Accreditation Association
for Hospitals and Health Systems. (Level VII)
11 Centers for Medicare and Medicaid Services, Department of Health and
Human Services. (2015). Condition of participation: Patient’s rights. 42 C.F.R.
§ 482.13(c)(1).
12 DNV GL-Healthcare USA, Inc. (2016). PR.1.SR.5 . NIAHO® accreditation
requirements: Interpretive guidelines and surveyor guidance (version 11).
Milford, OH: DNV GL-Healthcare USA, Inc. (Level VII)
13 The Joint Commission. (2019). Standard RI.01.01.01. Comprehensive
accreditation manual for hospitals. Oakbrook Terrace, IL: The Joint
Commission. (Level VII)
14 Siegel, J. D ., et al. (2007, revised 2017). “2007 guideline for isolation and
precautions: Preventing transmission of infectious agents in healthcare
settings” [Online]. Accessed via the Web at
http://www.cdc.gov/hicpac/pdf/isolation/Isolation2007.pdf (Level II)
15 Accreditation Association for Hospitals and Health Systems. (2017). Standard
07.01.10. Healthcare Facilities Accreditation Program: Accreditation
requirements for acute care hospitals. Chicago, IL: Accreditation Association
for Hospitals and Health Systems. (Level VII)
16 Accreditation Association for Hospitals and Health Systems. (2017). Standard
16.02.02. Healthcare Facilities Accreditation Program: Accreditation
requirements for acute care hospitals. Chicago, IL: Accreditation Association
for Hospitals and Health Systems. (Level VII)
17 Sura, L., et al. (2012). Dysphagia in the elderly: Management and nutritional
considerations. Clinical Interventions in Aging, 7, 287–298. Accessed via the
Web at http://www.ncbi.nlm.nih.gov/pmc/articles/PMC3426263/ (Level V)
18 Metheny, N. A. (2012). “Preventing aspiration in older adults with dysphagia”
[Online]. Accessed via the Web at https://consultgeri.org/try-this/general-
assessment/issue-20 (Level VII)
19 Hitoshi, K., et al. (2011). Body positions and functional training to reduce
aspiration in patients with dysphagia. Japan Medical Association Journal,
54(1), 35–38 . Accessed via the Web at
http://www.med.or.jp/english/journal/pdf/2011_01/035_038 .pdf (Level VII)
20 Goldsmith, T., & Kurash Cohen, A. Swallowing disorders and aspiration in
palliative care: Assessment and strategies for management. (2016). In:
UpToDate, Savarese, D. M. (Ed.). Retrieved from: www.uptodate.com
21 Institute for Safe Medication Practices. (2015). “Oral dosage forms that
should not be crushed” [Online]. Accessed via the Web at
http://www.ismp.org/tools/donotcrush.pdf (Level VII)
22 Institute for Safe Medication Practices. (2014). “ISMP medication safety alert:
Ensure it is safe to crush medications” [Online]. Accessed via the Web at
https://www.ismp.org/Newsletters/ambulatory/archives/2011104_1 .asp (Level
VII)
23 The Joint Commission. (2019). Standard RC.01.03 .01. Comprehensive
accreditation manual for hospitals. Oakbrook Terrace, IL: The Joint
Commission. (Level VII)
24 Centers for Medicare and Medicaid Services, Department of Health and
Human Services. (2015). Condition of participation: Medical record services.
42 C.F.R. § 482.24(b).
25 Accreditation Association for Hospitals and Health Systems. (2017). Standard
10.00 .03. Healthcare Facilities Accreditation Program: Accreditation
requirements for acute care hospitals. Chicago, IL: Accreditation Association
for Hospitals and Health Systems. (Level VII)
26 DNV GL-Healthcare USA, Inc. (2016). MR.2 .SR.1 . NIAHO® accreditation
requirements: Interpretive guidelines and surveyor guidance (version 11).
Milford, OH: DNV GL-Healthcare USA, Inc. (Level VII)
27 McClave, S. A., et al. (2016). ACG clinical guideline: Nutrition therapy in the
adult hospitalized patient. The American Journal of Gastroenterology, 111(3),
315–334.
28 Boullata, J. I., et al. (2016). ASPEN safe practices for enteral nutrition therapy.
Journal of Parenteral and Enteral Nutrition, 41(1), 15–103. Accessed via the
Web at http://journals.sagepub.com/doi/full/10.1177/0148607116673053
(Level VII)
29 U.S . Food and Drug Administration. (n.d .). “Look. Check. Connect. Safe
medical device connections save lives” [Online]. Accessed via the Web at
http://www.fda.gov/downloads/MedicalDevices/Safety/AlertsandNotices/UCM1
34873.pdf
30 The Joint Commission. (2014). “Sentinel event alert: Managing risk during
transition to new ISO tubing connector standards” [Online]. Accessed via the
Web at
http://www.jointcommission.org/assets/1/6/SEA_53_Connectors_8 _19_14 _final.
pdf (Level VII)
31 Simons, S. R., et al. (2012). Bedside assessment of enteral tube placement:
Aligning practice with evidence. American Journal of Nursing, 112(2), 40–46.
(Level V)
32 The Joint Commission. (2016). “Disease-specific care certification program:
Stroke performance measurement implementation guide (version 2016)”
[Online]. Accessed via the Web at
https://www.jointcommission.org/assets/1/6/CSTKManual2016October.pdf
IMPLANTED PORT USE
Surgically implanted by a surgeon or interventional
radiologist using local anesthesia, an implanted port, also
known as a vascular access device or a vascular access
port, is a type of central venous access device. It consists of
a Silastic or polyurethane catheter attached to a reservoir,
which is covered with a self-sealing silicone septum. The
practitioner places the catheter in the central venous
system and typically implants the reservoir in a
subcutaneous pocket in the upper arm, abdomen, side, or
back.
EQUIPMENT
Understanding implanted ports
Typically, an implanted port is used to deliver intermittent infusions of
medication, parenteral nutrition, chemotherapy, and blood products.7 The
patient’s skin covers the device completely, reducing the risk of extrinsic
contamination. Patients may prefer this type of central line because it
doesn’t alter body image, requires less routine catheter care, only minimally
restricts patient activity, and carries a decreased risk of infection compared
with other central venous access devices. The implanted port consists of a
catheter connected to a small reservoir. A septum designed to withstand
multiple punctures seals the reservoir. To access the port, a special noncoring
needle is inserted perpendicular to the reservoir.
Use of an implanted port is most common when some
type of long-term IV therapy is required and an external
central venous device isn’t appropriate or desirable.
Depending on patient needs, the type of port selected may
have one or two lumens. A port can be used immediately
after placement, although some edema and tenderness may
persist for about 72 hours, making the device initially
difficult to palpate and slightly uncomfortable for the
patient. (See Understanding implanted ports.)
For a patient who requires repeated computerized axial
tomography scans with contrast, the practitioner may
implant a port specially developed to withstand the high
pressures of power injectors. Use of a power injector
requires a specialized access needle and tubing approved
for power injection to ensure that the tubing and
connections won’t rupture or separate.1
Central venous therapy increases the risk of
complications, such as pneumothorax, vascular catheter–
associated infection, sepsis, thrombus formation, and vessel
and adjacent organ perforation (all life-threatening
conditions). Because of age-related changes in the immune
system, older adults are more susceptible to infection than
younger adults. Remote infections can also increase the risk
of vascular catheter–associated bloodstream infections in
older adults.2
HOSPITAL-ACQUIRED CONDITION ALERT Keep in mind that a vascular
catheter–associated infection is considered a hospital-acquired
condition because various best practices can reasonably prevent it. Be
sure to follow infection prevention techniques (such as properly
preparing the intended insertion site and instituting maximal barrier
precautions) during implanted port insertion to decrease the risk of
vascular catheter–associated infection. Stop the procedure if any
breach in sterile technique occurs.3,4,5,6
Equipment
Assisting with insertion
Insertion checklist ▪ sterile gloves ▪ sterile gown ▪ masks ▪
caps ▪ gowns ▪ chlorhexidine sponges ▪ noncoring needles
of appropriate type and gauge ▪ extension tubing set ▪
implanted port and guidewire ▪ local anesthetic (lidocaine
without epinephrine) ▪ prefilled syringes of heparin flush
solution ▪ prefilled syringes of preservative-free normal
saline flush solution ▪ sterile occlusive dressings (gauze or
transparent semipermeable membrane) ▪
needleless
connector(s) ▪ skin closure devices: suture material,
surgical glue, or adhesive skin closures ▪ X-ray equipment ▪
Optional: prescribed prophylactic antibiotics, general
anesthetic agent, other surgical equipment, ultrasound
device with sterile probe cover, sterile ultrasound gel,
disinfectant-containing end cap, chlorhexidine-impregnated
sponge dressing.
Accessing a top-entry port
Gloves ▪ mask(s) ▪ sterile gloves ▪ sterile drape ▪
noncoring needle with attached extension set tubing2,8 ▪
antiseptic swabs (chlorhexidine-based, povidone-iodine;
tincture of iodine, or alcohol if chlorhexidine is
contraindicated) ▪ sterile 10-mL syringes prefilled with
preservative-free normal saline solution ▪
sterile
transparent semipermeable dressing ▪ sterile needleless
connector ▪ engineered stabilization device ▪ labels ▪
Optional: prescribed local anesthetic, prescribed locking
solution such as prefilled heparinized saline flush solution
syringe (10 units/mL),2,8 ordered IV fluid, IV administration
set, sterile 2′′ × 2′′ (5-cm × 5-cm) gauze dressing, sterile
tape,
chlorhexidine-impregnated
sponge dressing,
disinfectant-containing end cap.
Some facilities use an implantable port access kit.
Obtaining a blood sample
Gloves ▪ antiseptic pads (alcohol, tincture of iodine, or
chlorhexidine-based) ▪
appropriate-size syringes or
needleless blood collection tube holder ▪ 10-mL syringes
prefilled with preservative-free normal saline solution9 ▪
blood collection tubes ▪ laboratory request forms and labels
▪ laboratory biohazard transport bag ▪ Optional: protective
eyewear or mask with face shield, sterile IV end cap, 10-mL
syringe prefilled containing prescribed locking solution (such
as heparin lock solution), blood transfer unit, sterile
needless connector, disinfectant-containing end cap.
Administering a bolus injection
Prescribed medication in a syringe ▪ gloves ▪ 10-mL
syringes prefilled with preservative-free normal saline
solution ▪ antiseptic pads (chlorhexidine-based, povidone
iodine, or alcohol) ▪ Optional: bar code technology, 10-mL
syringe prefilled with prescribed locking solution such as
heparin lock solution (10 units/mL),10 sterile needleless
connector, 5-micron filter needle, appropriate diluent as
indicated, 10-mL syringe prefilled with locking solution (such
as heparin lock, 100 unit/mL).
Administering a continuous infusion
Prescribed IV solution ▪ IV administration set ▪ IV pole ▪
gloves ▪ antiseptic pads (chlorhexidine-based, povidone
iodine, or alcohol) ▪ 10-mL syringe prefilled with
preservative-free normal saline solution labels ▪ electronic
infusion device ▪ Optional: barcode technology.
Preparation of equipment
Inspect all IV equipment and supplies; if a product is
expired, if its integrity is compromised, or if it’s defective,
remove it from patient use, label it as expired or defective,
and report the expiration or defect as directed by your
facility.
Assisting with insertion
Confirm with the practitioner the size and type of the device
and the insertion site. Attach the tubing to the solution
container and prime the tubing with the prescribed solution.
Prime the noncoring needle with the extension set. Use
strict sterile technique for all priming, and ensure all tubing
is free of air.7 After you’ve primed the tubing, recheck all
connections for tightness. Make sure that sealed caps cover
all open end.
Administering a bolus injection
If needed, access the port using the appropriate noncoring
needle. Review the medication monograph so that you know
the actions, adverse effects, and administration rate of the
medication you’ll be injecting.2,8
If needed, draw up the prescribed medication in the
syringe and dilute it, if necessary. Whenever possible,
administer pharmacy-prepared or commercially available
products.11,12 Many medications come in unit-dose syringes.
Administering a continuous infusion
Review the patient’s medical record to determine the
location of the implanted port and whether it’s currently
accessed with a noncoring needle. If needed, access the
port using the appropriate noncoring needle.
Implementation
Assisting with insertion
■ Conduct a preprocedure verification to make sure that all
relevant documentation, related information, and equipment
are available and correctly identified to the patient’s
identifiers.13
■ Check the patient’s history for hypersensitivity to local
anesthetics or chlorhexidine.
■ Make sure the practitioner has obtained informed consent
and that the consent is in the patient’s medical
record.14,15,16,17,18
■ Use an insertion checklist to adhere to infection
prevention and safety practices during insertion.7,19,20,21,22
Stop the procedure immediately if you observe any breaks
in sterile technique.19
■
Perform hand hygiene to prevent spreading
microorganisms.7,20,23,24,25,26,27,28,29
■ Confirm the patient’s identity using at least two patient
identifiers.30
■ Reinforce to the patient the practitioner’s explanation of
the procedure, its benefit and risks, and what’s expected of
the patient during and after implantation.31
■ Answer questions about movement restrictions, cosmetic
concerns, and management regimens to allay the patient’s
fears.
■ Administer an antibiotic, if prescribed, following safe
medication administration practices.12,32,33,34
■ Put on the mask, cap, sterile gloves, and sterile
gown.7,19,22,35,36
■ The practitioner who surgically implants the port will most
likely use a local anesthetic. Occasionally, however, a
general anesthetic will be used.
■ Prepare the insertion site using chlorhexidine-based
antiseptic sponges and allow it to dry.7,19,20 Before
beginning the procedure, the practitioner will drape the
patient from head to toe to comply with maximal barrier
precautions.7,19,20 When the practitioner begins the
procedure, you may be responsible for handing equipment
and supplies to the practitioner.
■ Conduct a time-out immediately before starting the
procedure to determine that the correct patient, site,
positioning, and procedure are identified, and to confirm, as
applicable, that relevant information and necessary
equipment are available.13
■ If requested by the practitioner, using sterile technique,
hand the practitioner the ultrasound device with the sterile
probe cover and apply sterile ultrasound gel. The
practitioner locates the vessel using the device to reduce
the risk of insertion-related complications.37
■ Assist as needed while the practitioner inserts the
device.13,38 The practitioner makes a small incision and
introduces the guidewire and catheter, typically advancing it
into the subclavian vein, terminating in the superior vena
cava. After X-ray or fluoroscopy confirms correct placement
of the catheter tip, the practitioner creates a subcutaneous
pocket over a bony prominence in the chest wall. The
practitioner then tunnels the catheter to the pocket. Next,
the practitioner connects the catheter to the reservoir,
places the reservoir in the pocket, and flushes it with
heparin flush solution. Lastly, the practitioner sutures the
reservoir to the underlying fascia and closes the incision
with the preferred skin closure device.
■ Access the implanted port with a noncoring needle and
attach the primed extension set and needleless injection
cap, as ordered. (See the section below entitled “Accessing
a top-entry port.”) If available, also apply a disinfectant-
containing end cap to the needleless connector.6,39
■ Apply a chlorhexidine-impregnated sponge dressing, if
required by your facility, to reduce the risk of central line-
associated blood stream infection.6,7
■ Apply a sterile occlusive dressing over the site.1,40
■ Dispose of used equipment and discard of waste in the
appropriate receptacle.35,41,42
■ Remove and discard your personal protective
equipment35 and perform hand hygiene.7,20,23,24,25,26,27,28,29
■ Document the procedure.43,44,45,46,47
Accessing a top-entry port
■ Review the patient’s medical record to determine the
type (such as a power-injectable device) and location of the
implanted port, whether it has been previously accessed,
and the patient’s response to the procedure. If a power
injection will be performed using the implanted port, the
non-coring Huber needle used to access the port must be
identified as power-injection compatible.8
TROUBLESHOOTING
Managing implanted port problems
This chart outlines common problems with implanted ports along with
possible causes and nursing interventions.
■ Ensure that placement of the catheter tip has been
confirmed.
■ Verify the practitioner’s order, if required by your facility.
■ Determine whether the patient has a history of allergies
or contraindications to the antiseptic, anesthetic, or
prescribed solution.8
■ Gather the necessary supplies.
■ Perform hand hygiene.7,20,23,24,25,26,27,28,29
■ Confirm the patient’s identity using at least two patient
identifiers.30
■ Explain the procedure to the patient and answer any
questions to decrease anxiety and promote cooperation.7
■ Assess the patient’s pain tolerance and discuss the
patient’s preferences for using a local anesthetic before
accessing the port.1,2,8
■ Administer a topical anesthetic, as needed and
prescribed.2,8
■ Perform hand hygiene.7,20,23,24,25,26,27,28,29
■ Put on gloves.1,27,35
■ Position the patient for comfort with head turned away
from the implanted port.8 Alternatively, put a mask on the
patient.
■ Assess the skin overlying the port and the tissue
surrounding the port. Observe for signs of infection or
thrombosis. Don’t insert the noncoring needle if erythema,
inflammation, exudate, supraclavicular swelling, or venous
distention is present. Instead, notify the patient’s
practitioner.
■ Palpate and locate the septum; assess for device
rotation.2,8
■ Remove and discard your gloves.36
■ Perform hand hygiene.7,20,23,24,25,26,27,28,29
■ Put on a mask.2,8
■ Open the supplies and prepare a sterile field using a
sterile drape. Using sterile technique, place the supplies on
the sterile field.2,8
■ Put on sterile gloves.2,8
■ Clean the implanted port access site with antiseptic
swabs following the manufacturer’s instructions: For
chlorhexidine (preferred), apply with an applicator using a
vigorous side-to-side motion for 30 seconds, and allow to
dry completely.2,8,22 For povidone-iodine solution, apply
using a swab. Begin at the intended insertion site, moving
outward in concentric circles. Allow the solution to dry
completely, typically at least 2 minutes.2,8,22
■ Attach a needleless connector to the extension set, which
is connected to the noncoring needle.2,8
■ Maintaining sterility of the syringe tip, attach a syringe
containing preservative-free normal saline solution to the
needleless connector and prime the extension set and
noncoring needle with preservative-free normal saline
solution.2,8
■ With your nondominant hand, palpate and stabilize the
implanted port.2,8
■ Grasp the noncoring needle with your dominant hand,
and insert the noncoring needle perpendicular to the skin
through the septum of the port until the needle tip comes in
contact with the back of the port.2,8 Consider orienting the
bevel of the noncoring needle in the opposite direction from
the outflow channel where the catheter is attached to the
port body to remove a greater amount of protein when
flushing with this bevel orientation.1,48
■ Unclamp the extension tubing. Aspirate for blood return
that’s the color and consistency of whole blood to confirm
device patency. If you don’t obtain any blood return, take
steps to locate an external cause of obstruction.10
■ If you obtain blood return, slowly inject preservative-free
normal saline solution into the port. Use a minimum volume
of twice the internal volume of the catheter system. Don’t
forcibly flush the device; further evaluate the device if you
meet resistance.2,8,10 Troubleshoot the system and notify
the patient’s practitioner if you can’t confirm patency.
NURSING ALERT If you can’t aspirate blood return to confirm needle
placement, have the patient change positions, raise the arms, cough,
or perform the Valsalva maneuver to increase thoracic pressure and
increase yield for blood return. If you still can’t obtain blood return or
confirm needle placement, clamp the tubing and notify the
practitioner before proceeding.8 (See Managing implanted port
problems.)
■ Secure the noncoring needle with sterile tape with an
engineered stabilization device, if available. An engineered
stabilization device is recommended to reduce vascular
access device motion, which increases the risk for
unintentional catheter dislodgement and complications
requiring premature catheter removal.49 Support the wings
of the noncoring needle (if present) with sterile gauze; make
sure the gauze doesn’t prevent visualization of the needle
insertion site.2,8
■ If applicable, place a chlorhexidine-impregnated sponge
dressing beneath the needle. The edges of the radial slit of
the sponge dressing must touch to maximize antimicrobial
action. Always follow the manufacturer’s directions.7
■ Apply a sterile transparent semipermeable dressing over
the insertion site, noncoring needle, and upper portion of
the extension tubing to maintain sterility of the system and
enable visualization of the needle and insertion site.2,8
■ Perform a vigorous mechanical scrub of the needleless
connector device for at least 5 seconds6 with an antiseptic
pad and allow it to dry completely.2,6,8,39
■ Attach the primed IV administration set to the needleless
connector. (See the section entitled “Administering a
continuous infusion,” page 375.) Trace the tubing from the
patient to its point of origin to make sure that you are
attaching the tubing to the correct port before beginning the
infusion.34,48 Route the tubing in a standardized direction if
the patient has other tubing and catheters that have
different purposes. Label the tubing at both the distal (near
the patient connection) and proximal (near the source
container) ends to reduce the risk of misconnection if
multiple IV lines will be used.34 Begin infusion therapy, as
ordered. Alternatively, lock the device with prescribed
locking solution1,10 and apply a disinfectant-containing end
cap, if available.6
■ Label the dressing with the current date or the date the
dressing is due to be changed, as directly by your facility.8
■ Dispose of equipment and waste in the appropriate
receptacle.35,41,42
■ Remove and discard your gloves and mask36 and perform
hand hygiene.7,20,23,24,25,26,27,28,29
■ Document the procedure.43,44,45,46,47
Obtaining a blood sample
■ Verify the practitioner’s order for blood sampling.
■ Perform hand hygiene.7,20,23,24,25,26,27,28,29
■ Confirm the patient’s identity using at least two patient
identifiers.30
■ Explain the procedure to the patient and answer any
questions to decrease anxiety and promote cooperation.7
■ If fasting is required before testing, verify that the patient
has fasted. If any other preparations (such as administering
or holding medication) are required before testing, make
sure that they were completed.
■ Unless contraindicated, place the patient in the supine
position with head slightly elevated to allow for optimal
access.
■ If they aren’t already marked clearly, label the
preservative-free normal saline flush syringes.
■ If you’re using a needleless blood collection tube holder
with the discard method, label the discard blood collection
tube to prevent confusing it with the actual specimen. If
you’re using a syringe with the discard method, label one of
the preservative-free normal saline flush syringes as a flush-
and-discard syringe and use it to both flush the port and
obtain the discard sample to avoid re-accessing the
needleless connector.
■ Perform hand hygiene.7,20,23,24,25,26,27,28,29
■ Put on gloves; also put on protective eyewear or a mask
with face shield if splashing is likely.35,43
■ Locate the noncoring needle extension tubing.1
■ Stop infusions that are infusing through the port before
drawing the blood sample to prevent inaccurate blood test
results. (Research hasn’t established the appropriate length
of time for stopping fluid flow; one study suggests a 10-
minute wait time before drawing the sample.) Trace the
tubing from the patient to its point of origin to make sure
you’ve stopped the proper infusion.49 Close the clamp on
the extension tubing, and clamp and disconnect the IV
tubing, maintaining sterility. Cover the IV tubing end with a
sterile cap.
■ Assess the skin overlying the port, the tissue surrounding
the port, and the site of needle entry. Observe for signs of
infection, thrombosis, device rotation, and skin erosion. Hold
the procedure and call the practitioner if you observe any
complications.
■ Close the clamp on the extension tubing.
■ If a disinfectant-containing end cap is covering the end of
the needleless connector, remove and discard it.6,39
■ Perform a vigorous mechanical scrub of the needleless
connector for at least 5 seconds6 using an antiseptic pad
and then allow it to dry completely.2,6,8,39
■ Maintaining the sterility of the syringe tip, attach a
prefilled syringe containing preservative-free normal saline
solution to the needleless connector. (Use a 10-mL syringe
or a syringe specifically designed to generate lower injection
pressure.) Unclamp the extension tubing and slowly aspirate
for a blood return that is the color and consistency of whole
blood. If you don’t obtain a blood return, take steps to locate
an external cause of the obstruction.2,8,10
■ If you obtain a blood return, slowly inject preservative-
free normal saline solution into the port. Use a minimum
volume of twice the internal volume of the catheter system.
Don’t forcibly flush the device; further evaluate the device if
you meet resistance.2,8,10
■ Use the discard or push-pull method to obtain the blood
sample. If you’re obtaining a sample for blood cultures, see
the “Blood culture sample collection” procedure.
Discard method
■ Obtain a discard sample to clear the catheter’s dead
space volume and remove any blood diluted with flush
solution.
■ If you’re using a needleless blood collection tube holder:
Reclamp the tubing, and then remove and discard the
syringe in a puncture-resistant sharps disposal container.42
Perform a vigorous mechanical scrub of the needleless
connector for at least 5 seconds6 using an antiseptic pad;
then allow it to dry completely.6,40 Attach the blood
collection tube holder to the needleless connector, release
the clamp, and engage the labeled discard blood collection
tube. Limit the discard amount to 11⁄2 to 2 times the fill
volume of the catheter system8,9 to ensure that a minimal
amount of blood is taken from the patient as waste. If you’re
using a syringe: Use the attached syringe you used for
flushing and aspirate the discard volume. Limit the discard
volume to 11⁄2 to 2 times the full volume of the catheter
system to ensure that a minimal amount of blood is taken
from the patient as waste.8,9
■ Clamp the extension tubing, and then remove the labeled
discard blood collection tube from the needleless blood
collection tube holder, or remove the labeled discard
syringe and discard it in a puncture-resistant sharps
disposal container.41,42
■ Obtain blood samples, as ordered: If you’re using a
needleless blood collection tube holder, insert another blood
collection tube into the needleless blood collection tube
holder, unclamp the tubing, and follow the correct order of
draw. If you’re using a syringe, perform a vigorous
mechanical scrub of the needleless connector for at least 5
seconds6 using an antiseptic pad and allow it to dry,6,39
connect an empty syringe to the needleless connector,
release the clamp, and withdraw the blood sample. Repeat
the steps until you obtain all of the necessary blood
samples.
■ Clamp the extension tubing and remove the needleless
blood collection tube holder or the syringe.
Push-pull method
■ Using the attached syringe that you used for flushing,
aspirate 4 to 6 mL of blood.50,51
■ Keeping the syringe attached to the tubing, push to
reinfuse the blood into the port.
■ Repeat the aspiration and reinfusion sequence three to
five times (five cycles is most common).50,51
■ Clamp the extension tubing, and then remove and discard
the syringe in a puncture-resistant sharps disposal
container.41,42
■ Perform a vigorous mechanical scrub of the needleless
connector for at least 5 seconds6 using an antiseptic pad;
then allow it to dry completely.6,39
■ Obtain blood samples, as ordered: If you’re using a
needleless blood collection tube holder, attach the
needleless blood collection tube holder to the needleless
connector, release the clamp, and engage the blood
collection tube into the needleless blood collection tube
holder using the correct order of draw. If you’re using a
syringe, connect an empty syringe to the needleless
connector, release the clamp, and withdraw the blood
sample. Repeat the steps until you obtain all necessary
blood samples.
■ Clamp the catheter and remove the needleless blood
collection tube holder or the syringe.
Completing the procedure
■ Label the samples with the patient’s name, identification
number, name of the test, and date and time of collection in
the presence of the patient to prevent mislabeling.
■ Place all blood collection tubes in a laboratory biohazard
transport bag and send them to the laboratory with a
completed laboratory request form.42
■ Dispose of equipment and waste in the appropriate
receptacle.35,41,42
■ Remove and discard your gloves and mask35 and perform
hand hygiene.7,20,23,24,25,26,27,28,29
■ Document the procedure.43,44,45,46,47
Administering a bolus injection
■ Review the patient’s medical record to determine the
location of the implanted port, whether it’s currently
accessed with a noncoring needle, and the patient’s
response to previous procedures.
■ Ensure that the placement of the catheter tip has been
confirmed.
■ Compare the medication label with the order in the
patient’s medical record.2,8,34
■ Check the patient’s medical record for an allergy or
contraindication to the prescribed medication. If an allergy
or contraindication exists, don’t administer the medication;
instead, notify the practitioner.2,8,33
■ Check the expiration date on the medication. If the
medication is expired, return it to the pharmacy and obtain
new medication.2,8,34
■ Visually inspect the solution for particles, discoloration, or
other loss of integrity; don’t administer the medication if its
integrity is compromised.2,8,33
■ Discuss any unresolved concerns about the medication
with the patient’s practitioner.34
■ Verify that the medication is being administered at the
proper time, in the prescribed dose, and by the correct route
to reduce the risk of medication errors.33
■ Review the patient’s baseline vital signs and observe for
changes that may indicate a local or systemic infection.
■ Perform hand hygiene.7,20,23,24,25,26,27,28,29
■ Confirm the patient’s identity using at least two patient
identifiers.30
■ Explain the procedure to the patient. If the patient is
receiving the medication for the first time, discuss potential
adverse reactions and any other concerns related to the
medication.7
■ If your facility uses a bar code technology, scan your
identification badge, the patient’s identification bracelet,
and the medication’s bar code.
■ Perform hand hygiene.7,20,23,24,25,26,27,28,29
■ Put on gloves.35,43
■ If a disinfectant-containing end cap is in place at the end
of the needleless connector, remove and discard it.6
■ Perform a vigorous mechanical scrub of the needleless
connector for at least 5 seconds6 using an antiseptic pad;
then allow it to dry completely.6,39
■ Maintaining the sterility of the syringe tip, attach a
prefilled syringe containing preservative-free normal saline
solution to the needleless connector. (Use a 10-mL syringe
or a syringe specifically designed to generate lower injection
pressure.) Unclamp the extension tubing and slowly aspirate
for a blood return that is the color and consistency of whole
blood. If you don’t obtain a blood return, take steps to locate
an external cause of the obstruction.2,8,10
■ If you obtain a blood return, slowly inject preservative-
free normal saline solution into the port. Use a minimum
volume of twice the internal volume of the catheter system.
Don’t forcibly flush the device; further evaluate the device if
you meet resistance.2,8,10
■ Examine the skin surrounding the needle for signs of
infiltration, such as swelling and tenderness. If you note
these signs, stop the injection and intervene appropriately.
■ Remove and discard the saline syringe.
■ Perform a vigorous mechanical scrub of the needleless
connector for at least 5 seconds6 using an antiseptic pad;
then allow it to dry completely.6,39
■ Maintaining the sterility of the syringe tip, connect the
syringe with the medication for the IV bolus injection into
the injection port of the needleless connector.
■ Inject the medication at the rate indicated on the label;
consult with the pharmacist before injection if a rate isn’t
present.2,8
■ Remove the syringe from the needleless connector.
■ Thoroughly disinfect the needleless connector of the
access tubing with an antiseptic pad.
■ Perform a vigorous mechanical scrub of the needleless
connector for at least 5 seconds6 using an antiseptic pad;
then allow it to dry completely.6,39
■ While maintaining sterility of the syringe tip, attach a
prefilled syringe containing preservative-free normal saline
solution to the needleless connector. (Use a 10-mL syringe
or a syringe specifically designed to generate lower injection
pressure.) Inject preservative-free normal saline solution
into the catheter at the same rate of injection as the
prescribed medication. Use the amount of flush solution
needed to adequately clear the medication from the
administration set lumen and the catheter. Don’t forcibly
flush the device; further evaluate the device if you meet
resistance. Consider using a pulsatile flushing technique,
because short boluses of the flush solution interrupted by
short pauses may be more effective at removing deposits
(such as fibrin, drug precipitate, and intraluminal bacteria)
than a continuous low-flow technique. Alternatively, if the
medication is incompatible with normal saline solution, use
dextrose 5% in water (D5W) followed by preservative-free
normal saline solution. Don’t allow D5W to remain in the
catheter lumen, because it provides nutrients for biofilm
growth. Remove and discard the syringe.10
■ Proceed with locking the device if necessary. Perform a
vigorous mechanical scrub of the needleless connector for
at least 5 seconds6 using an antiseptic pad; then allow it to
dry completely.6,39
■ Slowly inject the locking solution.10
■ Close the clamp on the access tubing according to the
type of needleless connector used to reduce blood reflux.
■ For a positive-pressure needleless connector, clamp the
catheter after disconnecting the syringe.2,8 For a negative-
pressure needleless connector, maintain pressure on the
syringe while clamping the catheter.2,8 For a neutral
needleless connector, clamp the catheter before or after
disconnecting the syringe.2,8
■ Apply a new disinfectant-containing end cap, if available,
or de-access the implanted port, if indicated.
■ Dispose of equipment and waste in the appropriate
receptacle.35,41,42
■ Remove and discard your gloves and mask36 and perform
hand hygiene.7,20,23,24,25,26,27,28,29
■ Document the procedure.43,44,45,46,47
Administering a continuous infusion
■ Make sure that confirmation of the placement of the
catheter tip has been obtained.
■ Verify the practitioner’s order for the type of infusion to
be administered.
■ Review the patient’s baseline vital signs and observe for
changes that may indicate a local or systemic infection.
■ Gather the necessary equipment.
■ Compare the IV solution label with the order in the
patient’s medical record.2,8,33
■ Visually inspect the IV solution for particulates,
discoloration, or other loss of integrity, and check the
expiration date. Replace the solution if the integrity is
compromised or if it’s expired.
■ Determine whether the patient has a history of
allergies.19
■ Perform hand hygiene.7,20,23,24,25,26,27,28,29
■ Confirm the patient’s identity using at least two patient
identifiers.30
■ Explain the procedure to the patient.7
■ Locate the noncoring needle extension tubing under the
patient’s gown.
■ Assess the skin overlying the port, the tissue surrounding
the port, and the site of needle entry. Observe for signs of
infection, thrombosis, device rotation, and skin erosion. Hold
the procedure and notify the practitioner if you observe any
complications.
■ If your facility uses a bar code technology, scan your
identification badge, the patient’s identification bracelet,
and the solution’s bar code.
■ Put on gloves.35,43
■ Close the clamp on the IV administration set tubing,
remove the protective cover from the administration set’s
spike and the IV infusion container, insert the spike into the
solution container, and hang the container on an IV pole.2,8
■ Prime the administration set tubing of the IV
administration set to purge the tubing of air. (See the “IV
therapy preparation” procedure, page 458.) Set the
electronic infusion pump parameters according to the
practitioner’s orders and the manufacturer’s instructions.2,8
(See the “IV pump use” procedure, page 452.)
■ If a disinfectant-containing end cap is in place, remove it
from the end of the needleless connector and discard it.6
■ Perform a vigorous mechanical scrub of the needleless
connector for at least 5 seconds6 using an antiseptic pad;
then allow it to dry completely.6,39
■ Maintaining the sterility of the syringe tip, attach a
prefilled syringe containing preservative-free normal saline
solution to the needleless connector. (Use a 10-mL syringe
or a syringe specifically designed to generate lower injection
pressure.)
■ Unclamp the tubing and slowly aspirate for a blood return
that is the color and consistency of whole blood. If you don’t
obtain a blood return, take steps to locate an external cause
of the obstruction.2,8,10 Have the patient change positions,
raise the arms over the head, take a deep breath and hold
it, or cough to increase intrathoracic pressure and increase
yield for blood return.8 If you still can’t obtain a blood return
or confirm noncoring needle placement, notify the
practitioner.
■ If you obtain a blood return, slowly inject preservative-
free normal saline solution into the port. Use a minimum
volume of twice the internal volume of the catheter system.
Don’t forcibly flush the device; further evaluate the device if
you meet resistance.2,8,10
■ Remove the syringe.2,8
■ Perform a vigorous mechanical scrub of the needleless
connector for at least 5 seconds6 using an antiseptic pad;
then allow it to dry completely.6,39
■ Connect and secure the IV administration set tubing of
the prescribed IV solution to the needleless connector of the
extension tubing.
■ Trace the tubing from the patient to its point of origin to
make sure it’s connected to the proper port before
beginning the infusion.2,8,34,49 Route the tubing in a
standardized direction if the patient has other tubing and
catheters that have different purposes. Label the tubing at
both the distal (near the patient connection) and proximal
(near the source container) ends to reduce the risk of
misconnection if multiple IV lines will be used.35,50
■ Start the electronic infusion device.2,8
■ Monitor the electronic infusion device for 1 to 2 minutes
to ensure the proper administration rate.2,8
■ Examine the skin surrounding the needle for signs of
extravasation or infiltration, such as swelling and
tenderness. If you note these signs, or if the patient
complains of stinging, burning, or pain at the site, stop the
infusion and intervene appropriately.
■ Label the IV tubing with the date of initiation or the date
it’s due to be changed, as directed by your facility.34
■ Dispose of equipment and waste in the appropriate
receptacle.35,41,42
■ Remove and discard your gloves and mask36 and perform
hand hygiene.7,20,23,24,25,26,27,28,29
■ Document the procedure.43,44,45,46,47
Special considerations
■ Assess the implantation site for infection by visually
monitoring and palpating the site through an intact
dressing. If the patient has a fever without an obvious
source, tenderness at the insertion site, or other signs or
symptoms suggesting local or bloodstream infection,
remove the dressing and inspect the site thoroughly.7
■ Always use the smallest noncoring size needle necessary
to accommodate the infusion to prolong the life of the port
and lessen the amount of pain experienced by the patient.1
Use a noncoring needle of a length that allows the needle to
sit flush to the skin and securely within the port to reduce
the risk of needle dislodgment during access.1
■ Change the transparent semipermeable dressing and the
needle every 5 to 7 days. Gauze dressings should be
changed every 48 hours. However, any dressing should be
changed immediately if its integrity is compromised. If
gauze is used to support the wings of an access needle and
it doesn’t obscure the insertion site under the transparent
semipermeable dressing, it can be changed every 5 to 7
days.52
■ Alternative pain management strategies, such as
distraction or relaxation techniques, may be helpful.
■ Assess for catheter function before each use, observing
for such clinical signs and symptoms as lack of blood return,
difficulty or inability to flush, edema, the patient’s reports of
hearing gurgling, flow stream sounds with flushing,
paresthesia, and neurologic effects. Also assess the
implantation site for signs of infection, device rotation, and
skin erosion.52
■ Assess the implantation site for infection by visually
monitoring and palpating the site through an intact
dressing. If the patient has a fever without an obvious
source, tenderness at the insertion site, or other signs or
symptoms suggestive of local or bloodstream infection,
remove the dressing and inspect the site thoroughly.7,19
■ Assess for and identify signs of central venous access
device occlusion, including sluggish flow and the inability to
withdraw blood, flush, or infuse through the device. If
clotting threatens to occlude the implanted port, the
practitioner may order a fibrinolytic agent to clear the
catheter. Because such agents increase the risk of bleeding,
this intervention may be contraindicated in patients who
have had surgery within the past 10 days, who have active
internal bleeding such as GI bleeding, or who have
experienced central nervous system damage, such as
infarction, hemorrhage, traumatic injury, surgery, or primary
or metastatic disease within the past 2 months.
■ If total parenteral nutrition is infusing in the lumen from
which blood is to be drawn, flush the line with 20 mL of
normal saline solution before drawing blood.9 Avoid
obtaining blood samples from ports with parenteral nutrition
infusing to reduce the risk of central line–associated
bloodstream infections.
■ Blood drawn from an implanted port isn’t recommended
for blood cultures, unless the port is suspected to be the
source of infection. If blood cultures are drawn from the
port, replace the needleless connector with a new one
before obtaining the blood cultures, or draw the blood
cultures directly from the port.9 (See the “Blood culture
sample collection” procedure.)
■ When drawing blood for therapeutic drug levels, draw
blood from a lumen other than the lumen being used for the
drug infusion when possible. Use caution in interpreting
results when therapeutic drug levels are drawn from the
same lumen being used to administer the medication.9
■ Always follow the manufacturer’s guidelines for flush
technique and when to clamp.
■ If you’re having difficulty aspirating blood, have the
patient change position, cough, move the arms above the
head, or take a deep breath and hold it.8
■ If using a heparin flush, be aware of any effects it may
have on specimens, and flush the catheter before drawing a
discard sample, if necessary.
■ Change primary or secondary continuous infusion
administration sets no more frequently than every 96 hours,
but at least every 7 days, and immediately upon suspected
contamination or when the integrity of the product or
system has been compromised.6,7
■ The Joint Commission issued a sentinel event alert related
to managing risk during transition to new International
Organization for Standardization tubing standards designed
to prevent dangerous tubing misconnections, which can
lead to serious patient injury and death. During the
transition, make sure to trace the tubing and catheter from
the patient to the point of origin before connecting or
reconnecting any device or infusion, at any care transition
(such as a new setting or service), and as part of the hand-
off process; route tubes and catheters having different
purposes in different standardized directions; label the
tubing at both the distal and proximal ends (when there are
different access sites or several bags hanging); use tubing
and equipment only as intended; and store medications for
different delivery routes in separate locations.49
Patient teaching
If the patient is going home, thorough teaching about
procedures as well as follow-up visits from a home care
nurse will need to be performed to ensure safety and
successful treatment. Tell the patient what type of port is in
place, and explain the importance of carrying a port
identification card.
If the patient will be accessing the port, explain that the
most uncomfortable part of the procedure is the actual
insertion of the needle into the skin. Once the needle has
penetrated the skin, the patient will feel mostly pressure.
Eventually, the skin over the port will become desensitized
from frequent needle punctures. Until then, the patient may
want to use a topical anesthetic.
Stress the importance of pushing the needle into the port
until the patient feels the needle bevel touch the back of the
port. Many patients tend to stop short of the back of the
port, leaving the needle bevel in the rubber septum. Also
stress the importance of monthly flushes when no more
infusions are scheduled.
If possible, instruct a family member in all aspects of
care.2 If the patient is receiving an infusion at home, teach
the patient and family member about checking the dressing
daily. Also teach the patient how to dress and undress to
avoid pulling at the needle site; how to protect the site
during bathing; to immediately report pain, burning,
stinging, or soreness at the site; and to stop the infusion
and report wetness, leaking, or swelling at the site.1
Complications
Complications associated with an implanted port include
port migration, catheter occlusion, infection, infiltration,
extravasation, and air embolism. The patient may also
experience an adverse reaction to the medication
administered.
Be alert for signs and symptoms of air embolism, such as
sudden onset of dyspnea, breathlessness, weak pulse,
increased central venous pressure, loss of consciousness,
chest pain, jugular vein distention, wheezing, altered mental
status, altered speech, numbness, paralysis, coughing, and
tachyarrhythmias. If any of these signs or symptoms occurs,
place the patient on the left side in the Trendelenburg
position or in a left lateral decubitus position and notify the
practitioner. Also be alert for signs and symptoms of sepsis
and catheter-related infection (redness, drainage, edema, or
tenderness at the exit site).
Documentation
Document your assessment findings, including location and
appearance of the implanted port site.
When accessing an implanted port, record the needle
gauge and length used to access the site, the appearance of
blood return, the number of attempts, and any unexpected
outcomes and your interventions. If an infusion is initiated,
include the type, amount, and rate of the infusion.
Document the date, the time, the amount and type of flush
solution used, the patency of the catheter, presence of a
blood return, lack of resistance when flushing, and absence
of signs and symptoms of complications. If any
complications occurred, document your interventions.
Record the patient’s tolerance of and response to the
procedure, as well as patient-teaching topics covered and
the patient’s understanding. Also keep a record of all needle
and dressing changes for continuous infusions and blood
samples obtained, including the type and amount.44
When obtaining a blood sample, document the date and
time the sample was drawn and the volume of blood
withdrawn. Include the tests for which the sample was
drawn and the time the sample was sent to the laboratory.
Document the patency of the catheter, absence of signs and
symptoms of complications, presence of a blood return upon
aspiration, lack of resistance when flushing, and the amount
and types of flushes used. Also note the patient’s tolerance
of the procedure and any teaching provided to the patient
and family.44
When administering a bolus injection, document the drug,
route, dose, time, and rate of administration and the
patient’s response to the medication. Record the type and
amount of flush solution used. Document the presence of
blood return, the condition of the site, and teaching
provided to the patient and family and their understanding
of the teaching.44
REFERENCES
1 Standard 28. Implanted vascular access ports. Infusion therapy standards of
practice. (2016). Journal of Infusion Nursing, 39, S58–S59. (Level VII)
2 Infusion Nurses Society. (2017). Policies and procedures for infusion therapy
of the older adult (2nd ed.) . Boston, MA: Infusion Nurses Society.
3 Accreditation Association for Hospitals and Health Systems. (2017). Standard
07.01.19. Healthcare Facilities Accreditation Program: Accreditation
requirements for acute care hospitals. Chicago, IL: Accreditation Association
for Hospitals and Health Systems. (Level VII)
4 Accreditation Association for Hospitals and Health Systems. (2017). Standard
07.01.02. Healthcare Facilities Accreditation Program: Accreditation
requirements for acute care hospitals. Chicago, IL: Accreditation Association
for Hospitals and Health Systems. (Level VII)
5 Jarrett, N., & Callaham, M. (2016). “Evidence-based guidelines for selected
hospital-acquired conditions: Final report” [Online]. Accessed via the Web at
https://www.cms.gov/Medicare/Medicare-Fee-for-Service-
Payment/HospitalAcqCond/Downloads/2016-HAC-Report.pdf
6 Marschall, J., et al. (2014). SHEA/IDSA practice recommendation: Strategies to
prevent central line–associated bloodstream infections in acute care
hospitals. Infection Control and Hospital Epidemiology, 35(7), 753–771 .
Accessed via the Web at http://www.jstor.org/stable/10.1086/676533
7 Centers for Disease Control and Prevention. (2011, revised 2017). “Guidelines
for the prevention of intravascular catheter-related infections” [Online].
Accessed via the Web at
https://www.cdc.gov/infectioncontrol/pdf/guidelines/bsi-guidelines.pdf (Level
I)
8 Infusion Nurses Society. (2016). Policies and procedures for infusion therapy
(5th ed.). Boston, MA: Infusion Nurses Society.
9 The Nebraska Medical Center. (2012). Standardizing central venous catheter
care: Hospital to home (2nd ed.). Omaha, NE: The Nebraska Medical Center.
Accessed via the Web at
https://www.nebraskamed.com/sites/default/files/documents/scorch-
guidelines.pdf
10 Standard 40. Flushing and locking. Infusion therapy standards of practice.
(2016). Journal of Infusion Nursing, 39, S77–S81. (Level VII)
11 Standard 17. Compounding of parenteral solutions and medications. Infusion
therapy standards of practice. (2016). Journal of Infusion Nursing, 39, S39–
S40. (Level VII)
12 Centers for Medicare and Medicaid Services, Department of Health and
Human Services. (2015). Condition of participation: Nursing services. 42
C.F.R. § 482.23(c).
13 The Joint Commission. (2019). Standard UP.01.01.01. Comprehensive
accreditation manual for hospitals. Oakbrook Terrace, IL: The Joint
Commission. (Level VII)
14 Standard 9. Informed consent. Infusion therapy standards of practice. (2016).
Journal of Infusion Nursing, 39, S26–S28. (Level VII)
15 The Joint Commission. (2019). Standard RI.01.03 .01. Comprehensive
accreditation manual for hospitals. Oakbrook Terrace, IL: The Joint
Commission. (Level VII)
16 Centers for Medicare and Medicaid Services, Department of Health and
Human Services. (2015). Condition of participation: Patient’s rights. 42 C.F.R.
§ 482.13(b).
17 Accreditation Association for Hospitals and Health Systems. (2017). Standard
15.01.11. Healthcare Facilities Accreditation Program: Accreditation
requirements for acute care hospitals. Chicago, IL: Accreditation Association
for Hospitals and Health Systems. (Level VII)
18 DNV GL-Healthcare USA, Inc. (2016). PR.1.SR.3 . NIAHO® accreditation
requirements: Interpretive guidelines and surveyor guidance (version 11).
Milford, OH: DNV GL-Healthcare USA, Inc. (Level VII)
19 The Joint Commission. (2012). Preventing central line–associated
bloodstream infections: A global challenge, a global perspective. Oakbrook
Terrace, IL: Joint Commission Resources. Accessed via the Web at
http://www.jointcommission.org/assets/1/18/CLABSI_Monograph.pdf (Level
VII)
20 The Joint Commission. (2019). Standard NPSG.07.04.01. Comprehensive
accreditation manual for hospitals. Oakbrook Terrace, IL: The Joint
Commission. (Level VII)
21 Centers for Medicare and Medicaid Services & The Joint Commission. (2017).
“The specifications manual for national hospital inpatient quality measures
(version 5.2a)” [Online]. Accessed via the Web at
https://www.jointcommission.org/specifications_manual_for_national_hospital_
inpatient_quality_measures.aspx
22 Standard 33. Vascular access site preparation and device placement. Infusion
therapy standards of practice. (2016). Journal of Infusion Nursing, 39, S64–
S67. (Level VII)
23 Centers for Disease Control and Prevention. (2002). “Guideline for hand
hygiene in health-care settings: Recommendations of the Healthcare Infection
Control Practices Advisory Committee and the HICPAC/SHEA/APIC/IDSA Hand
Hygiene Task Force” [Online]. MMWR Recommendations and Reports, 51(RR-
16), 1–45. Accessed via the Web at
https://www.cdc.gov/mmwr/pdf/rr/rr5116.pdf (Level II)
24 The Joint Commission. (2019). Standard NPSG.07.01.01. Comprehensive
accreditation manual for hospitals. Oakbrook Terrace, IL: The Joint
Commission. (Level VII)
25 Standard 16. Hand hygiene. Infusion therapy standards of practice. (2016).
Journal of Infusion Nursing, 39, S38–S39 . (Level VII)
26 World Health Organization. (2009). “WHO guidelines on hand hygiene in
health care: First global patient safety challenge, clean care is safer care”
[Online]. Accessed via the Web at
http://apps.who.int/iris/bitstream/10665/44102/1/9789241597906_eng.pdf
(Level IV)
27 Centers for Medicare and Medicaid Services, Department of Health and
Human Services. (2015). Condition of participation: Infection control. 42 C.F.R.
§ 482.42.
28 Accreditation Association for Hospitals and Health Systems. (2017). Standard
07.01.21. Healthcare Facilities Accreditation Program: Accreditation
requirements for acute care hospitals. Chicago, IL: Accreditation Association
for Hospitals and Health Systems. (Level VII)
29 DNV GL-Healthcare USA, Inc. (2016). IC.1 .SR.1 . NIAHO® accreditation
requirements: Interpretive guidelines and surveyor guidance (version 11).
Milford, OH: DNV GL-Healthcare USA, Inc. (Level VII)
30 The Joint Commission. (2019). Standard NPSG.01.03 .01. Comprehensive
accreditation manual for hospitals. Oakbrook Terrace, IL: The Joint
Commission. (Level VII)
31 Standard 8. Patient education. Infusion therapy standards of practice. (2016).
Journal of Infusion Nursing, 39, S25–S26. (Level VII)
32 DNV GL-Healthcare USA, Inc. (2016). MM.1 .SR.2. NIAHO® accreditation
requirements: Interpretive guidelines and surveyor guidance (version 11).
Milford, OH: DNV GL-Healthcare USA, Inc. (Level VII)
33 The Joint Commission. (2017). Standard MM.06.01.01. Comprehensive
accreditation manual for hospitals. Oakbrook Terrace, IL: The Joint
Commission. (Level VII)
34 Standard 57. Parenteral medication and solution administration. Infusion
therapy standards of practice. (2016). Journal of Infusion Nursing, 39, S125–
S127. (Level VII)
35 Siegel, J. D ., et al. (2007, revised 2017). “2007 guideline for isolation
precautions: Preventing transmission of infectious agents in healthcare
settings” [Online]. Accessed via the Web at
http://www.cdc.gov/hicpac/pdf/isolation/Isolation2007.pdf (Level II)
36 Accreditation Association for Hospitals and Health Systems. (2017). Standard
07.01.10. Healthcare Facilities Accreditation Program: Accreditation
requirements for acute care hospitals. Chicago, IL: Accreditation Association
for Hospitals and Health Systems. (Level VII)
37 Granziera, E., et al. (2014). Totally implantable venous access devices:
Retrospective analysis of different insertion techniques and predictors of
complications in 796 devices implanted in a single institution. BMC Surgery,
14, 27. (Level IV)
38 Standard 22. Vascular visualization. Infusion therapy standards of practice.
(2016). Journal of Infusion Nursing, 39, S44–S46. (Level VII)
39 Standard 34. Needleless connectors. Infusion therapy standards of practice.
(2016). Journal of Infusion Nursing, 39, S68–S70. (Level VII)
40 American Society of Anesthesiologists. (2012). Practice guidelines for central
venous access. Anesthesiology, 116(3), 539–573. (Level I)
41 Standard 18. Medical waste and sharps safety. Infusion therapy standards of
practice. (2016). Journal of Infusion Nursing, 39, S40–S41. (Level VII)
42 Occupational Safety and Health Administration. (n.d .). “Bloodborne
pathogens, standard number 1910.1030” [Online]. Accessed via the Web at
https://www.osha.gov/pls/oshaweb/owadisp.show_document?
p_id=10051&p_table=STANDARDS (Level VII)
43 The Joint Commission. (2019). Standard RC.01.03 .01. Comprehensive
accreditation manual for hospitals. Oakbrook Terrace, IL: The Joint
Commission. (Level VII)
44 Standard 10. Documentation in the medical record. Infusion therapy
standards of practice. (2016). Journal of Infusion Nursing, 39, S28–S30 . (Level
VII)
45 Centers for Medicare and Medicaid Services, Department of Health and
Human Services. (2015). Condition of participation: Medical record services.
42 C.F.R. § 482.24(b).
46 Accreditation Association for Hospitals and Health Systems. (2017). Standard
10.00 .03. Healthcare Facilities Accreditation Program: Accreditation
requirements for acute care hospitals. Chicago, IL: Accreditation Association
for Hospitals and Health Systems. (Level VII)
47 DNV GL-Healthcare USA, Inc. (2016). MR.2 .SR.1 . NIAHO® accreditation
requirements: Interpretive guidelines and surveyor guidance (version 11).
Milford, OH: DNV GL-Healthcare USA, Inc. (Level VII)
48 Guiffant, G., et al. (2012). Flushing ports of totally implantable venous access
devices, and impact of the Huber point needle bevel orientation:
Experimental tests and numerical computation. Medical Devices: Evidence
and Research, 2(5), 31–37. (Level VI)
49 The Joint Commission. (2014). “Sentinel event alert: Managing risk during
transition to new ISO tubing connector standards” [Online]. Accessed via the
Web at
http://www.jointcommission.org/assets/1/6/SEA_53_Connectors_8 _19_14 _final.
pdf
50 Adlard, K. (2008). Examining the push-pull method of blood sampling from
central venous access devices. Journal of Pediatric Oncology Nursing, 25(4),
200–207. Accessed via the Web at
http://www.choc.org/userfiles/file/jpedoncolnursing25-2 .pdf (Level II)
51 Frey, A. M. (2003). Drawing blood samples from vascular access devices:
Evidence-based practice. Journal of Infusion Nursing, 26(5), 285–293. (Level
VII)
52 Gorski, L., et al. (2010). Central venous access devices: Care, maintenance,
and potential complications. In: Alexander, M., et al. (Eds.), Infusion nursing:
An evidence-based approach (3rd ed.). St Louis, MO: Saunders Elsevier.
INCENTIVE SPIROMETRY
Incentive spirometry involves using a device to help the
patient achieve maximal ventilation by providing feedback
on respiratory effort. The device measures respiratory flow
or respiratory volume, and induces the patient to take a
deep breath and hold it for several seconds. This deep
breath increases lung volume, boosts alveolar inflation, and
promotes venous return. Incentive spirometry is designed to
replicate the natural mechanisms of sighing or yawning,
preventing and reversing the alveolar collapse that causes
atelectasis and pneumonitis.
Devices used for incentive spirometry provide an
immediate visual incentive to breathe deeply. Some are
activated when the patient inhales a certain volume of air;
the device then estimates the amount of air inhaled. Others
contain plastic floats that rise according to the amount of air
the patient pulls through the device during inhalation. Any
device used for incentive spirometry should be volume-
oriented.1
Incentive spirometry is indicated for patients with
atelectasis, conditions that predispose patients to
atelectasis (upper abdominal surgery, thoracic surgery,
surgery in patients with chronic obstructive pulmonary
disease [COPD]), and patients with a restrictive lung defect
associated with quadriplegia or a dysfunctional diaphragm.2
It can be used to complement deep breathing, directed
coughing, early mobilization, and optimal analgesia to
prevent postoperative complications.1 However, current
evidence has found that its use doesn’t prevent
postoperative
pulmonary
complications.3,4
It’s
contraindicated in patients who are unable to cooperate,
who can’t receive instruction on or supervision of the proper
use of the device, and who can’t generate adequate
inspiration because of pain, diaphragmatic dysfunction, or
opiate analgesic use.1
Direct supervision of incentive spirometry use isn’t
necessary after the patient is able to demonstrate proper
technique. However, periodic reassessment is necessary to
make sure the patient complies with proper technique.1,5
Equipment
Flow or volume incentive spirometer, as indicated, with
disposable tube and mouthpiece ▪ stethoscope ▪ plastic
storage bag ▪ gloves ▪ watch ▪ disinfectant pad ▪ label ▪
Optional: pillow, prescription pain medication.
Preparation of equipment
Read the manufacturer’s instructions for spirometer setup
and operation. Remove the flow tube and mouthpiece from
the package and attach them to the device according to the
manufacturer’s instructions. Set the flow rate or volume
goal as determined by the practitioner or respiratory
therapist and based on the patient’s preoperative
performance; inaccurate flow rate or volume goal may
cause pulmonary hyperventilation.
Implementation
■ Verify the practitioner’s order.
■ Gather and prepare the appropriate equipment.
■ Perform hand hygiene.1,6,7,8,9,10
■ Confirm the patient’s identity using at least two patient
identifiers.11
■ Provide privacy.12,13,14,15
■ Explain the procedure to the patient and family (if
appropriate) according to their individual communication
and learning needs to increase their understanding, allay
their fears, and enhance cooperation.16 Make sure that the
patient understands the importance of performing this
exercise regularly to maintain alveolar inflation. Advise the
patient to avoid incentive spirometry exercises at mealtime
to prevent nausea.
■ Assess the patient’s condition.
■ Perform a comprehensive pain assessment using
techniques appropriate for the patient’s age, condition, and
ability to understand.17 Administer pain medication as
needed and prescribed following safe medication
administration practices.18,19,20,21
■ Raise the patient’s bed to waist level when providing care
to prevent caregiver back strain.22
■ Help the patient sit comfortably or assume the semi-
Fowler position to promote optimal lung expansion. The
patient using a flow incentive spirometer who can’t assume
or maintain the sitting or semi-Fowler position can perform
the procedure in any position as long as the device remains
upright. Tilting a flow incentive spirometer decreases the
required patient effort and reduces the exercise’s
effectiveness.
■ Auscultate the patient’s breath sounds to provide a
baseline for comparison with posttreatment auscultation
findings.
■ Have the patient who has an incision splint the incision
with a pillow.
■ Instruct the patient to exhale normally, insert the
mouthpiece, and close the lips tightly around the
mouthpiece (as shown on next page, top left), because a
weak seal can alter flow and volume readings. Instruct the
patient to then inhale as slowly and as deeply as possible. If
the patient has difficulty with this step, tell the patient to
suck as through a straw but more slowly. Ask the patient to
retain the entire volume of air inhaled for at least 5 seconds
or, if you’re using a device with a light indicator, until the
light turns off. This deep breath creates sustained
transpulmonary pressure near the end of inspiration and is
sometimes called a sustained maximal inspiration.1
■ Tell the patient to remove the mouthpiece and exhale
normally. Allow the patient to relax and take several normal
breaths before attempting another breath with the
spirometer. Note the volumes.
■ After proper instruction and return demonstration,
encourage the patient to use the incentive spirometer
independently.1 Because of a lack of evidence for specific
frequency of use, the patient may take 10 breaths every 1
to 2 hours while awake; 10 breaths five times per day; or 15
breaths every 4 hours.1
■ Evaluate the patient’s ability to cough effectively, and
encourage coughing during and after each exercise session,
because deep lung inflation can loosen secretions,
facilitating their removal.
■ Inspect any expectorated secretions.
■ Auscultate the patient’s breath sounds. Compare the
findings with baseline auscultation findings.
■ Return the bed to the lowest position to prevent falls and
maintain patient safety.23
■ Put on gloves to comply with standard precautions.24,25
■ Wash the mouthpiece in warm water and dry it.26,27 Avoid
immersing the spirometer itself in water, because water
enhances bacterial growth and impairs the internal filter’s
effectiveness in preventing inhalation of extraneous
material.
■ Place the mouthpiece in a plastic storage bag between
exercises, and label it and the spirometer, if applicable, with
the patient’s name to avoid inadvertent use by another
patient.1 Keep the incentive spirometer within the patient’s
reach.
■ Remove and discard your gloves.
■ Perform hand hygiene.6,7,8,9,10
■ Clean and disinfect your stethoscope using a disinfectant
pad.26,27
■ Perform hand hygiene.6,7,8,9,10
■ Document the procedure.28,29,30,31
Special considerations
■ If the patient is scheduled for surgery, make a
preoperative assessment of the patient’s respiratory pattern
and capability to ensure the development of appropriate
postoperative goals. Teach the patient how to use the
spirometer before surgery so that the patient can
concentrate on your instructions and practice the exercise.
■ Provide paper and a pencil so the patient can note
exercise times.
■ Note that some spirometers can be adapted for use by
patients who have a tracheal stoma.
■ If applicable, remove the patient’s dentures to create a
better seal.
Patient teaching
If the patient is learning the skill preoperatively and taking
the instrument home, provide oral and written instructions
for use, including cleaning and storage, frequency of
sessions, and volumes desired. Demonstrate the procedure
and observe return demonstrations.
Instruct the patient to contact the practitioner if shortness
of breath, dizziness, extreme exacerbation of coughing, or
extreme fatigue or pain associated with use of the incentive
spirometer occur.
Documenting flow and volume
levels
Documentation for flow and volume levels in incentive spirometry depends
on the type of spirometer the patient is using.
If the patient is using a flow incentive spirometer, compute the volume by
multiplying the setting by the duration that the patient kept the ball (or balls)
suspended. For example, if the patient suspended the ball for 3 seconds at a
setting of 500 mL during each of 10 breaths, multiply 500 mL by 3 seconds
and then record this total (1,500 mL) and the number of breaths as 1,500 mL
× 10 breaths.
If the patient is using a volume incentive spirometer, take the volume
reading directly from the spirometer. For example, record 1,000 mL × 5
breaths.
Complications
Complications
of
incentive
spirometry
include
hyperventilation, which could lead to respiratory alkalosis;
hypoxemia secondary to interruption of prescribed oxygen;
fatigue; and pain. Incentive spirometry can be ineffective if
not performed as instructed.1
Documentation
Record any teaching you provided and the patient’s ability
to perform a return demonstration. Document the flow or
volume levels, date and time of the procedure, type of
spirometer, and number of breaths taken. Also record the
patient’s condition before and after the procedure, tolerance
of the procedure, and the results of preprocedure and
postprocedure auscultation. (See Documenting flow and
volume levels.)
REFERENCES
1 Restrepo, R. D., et al. (2011). AARC clinical practice guideline: Incentive
spirometry: 2011. Respiratory Care, 56(10), 1600–1604. Accessed via the
Web at http://rc.rcjournal.com/content/56/10/1600.full.pdf (Level I)
2 Kacmarek, R. M., et al. (2017). Egan’s fundamentals of respiratory care (11th
ed.). St Louis, MO: Elsevier.
3 Moola, S. (2016). Postoperative pulmonary complications: Postoperative
strategies. Adelaide, SA: The Joanna Briggs Institute. (Level II)
4 Pantel, H., et al. (2017). Effect of incentive spirometry on postoperative
hypoxemia and pulmonary complications after bariatric surgery: A
randomized clinical trial. JAMA Surgery, 152(5), 422–428. (Level I)
5 Hassanzadeh, H., et al. (2012). Postoperative incentive spirometry use.
Orthopedics, 35(6), e927–e931. Accessed via the Web at
http://www.healio.com/orthopedics/journals/ortho/%7Bea909f29-0520-4b14-
b047-223489e3ee6b%7D/postoperative-incentive-spirometry-use (Level VI)
6 The Joint Commission. (2019). Standard NPSG.07.01.01. Comprehensive
accreditation manual for hospitals. Oakbrook Terrace, IL: The Joint
Commission. (Level VII)
7 Centers for Disease Control and Prevention. (2002). Guideline for hand
hygiene in health-care settings: Recommendations of the Healthcare Infection
Control Practices Advisory Committee and the HICPAC/SHEA/APIC/IDSA Hand
Hygiene Task Force. MMWR Recommendations and Reports, 51(RR-16), 1–45.
Accessed October 2017 via the Web at
https://www.cdc.gov/mmwr/pdf/rr/rr5116.pdf (Level II)
8 World Health Organization. (2009). “WHO guidelines on hand hygiene in
health care: First global patient safety challenge, clean care is safer care”
[Online]. Accessed via the Web at
http://apps.who.int/iris/bitstream/10665/44102/1/9789241597906_eng.pdf
(Level IV)
9 DNV GL-Healthcare USA, Inc. (2016). IC.1.SR.1 . NIAHO® accreditation
requirements: Interpretive guidelines and surveyor guidance (version 11).
Milford, OH: DNV GL-Healthcare USA, Inc. (Level VII)
10 Centers for Medicare and Medicaid Services, Department of Health and
Human Services. (2015). Condition of participation: Infection control. 42 C.F.R.
§ 482.42.
11 The Joint Commission. (2019). Standard NPSG.01.01.01. Comprehensive
accreditation manual for hospitals. Oakbrook Terrace, IL: The Joint
Commission. (Level VII)
12 The Joint Commission. (2019). Standard RI.01.01.01. Comprehensive
accreditation manual for hospitals. Oakbrook Terrace, IL: The Joint
Commission. (Level VII)
13 Centers for Medicare and Medicaid Services, Department of Health and
Human Services. (2015). Condition of participation: Patient’s rights. 42 C.F.R.
§ 482.13(c)(1).
14 Accreditation Association for Hospitals and Health Systems. (2017). Standard
15.01.16. Healthcare Facilities Accreditation Program: Accreditation
requirements for acute care hospitals. Chicago, IL: Accreditation Association
for Hospitals and Health Systems. (Level VII)
15 DNV GL-Healthcare USA, Inc. (2016). PR.1.SR.5 . NIAHO® accreditation
requirements: Interpretive guidelines and surveyor guidance (version 11).
Milford, OH: DNV GL-Healthcare USA, Inc. (Level VII)
16 The Joint Commission. (2019). Standard PC.02.01.21. Comprehensive
accreditation manual for hospitals. Oakbrook Terrace, IL: The Joint
Commission. (Level VII)
17 The Joint Commission. (2019). Standard PC.01.02.07. Comprehensive
accreditation manual for hospitals. Oakbrook Terrace, IL: The Joint
Commission. (Level VII)
18 Accreditation Association for Hospitals and Health Systems. (2017). Standard
16.01.03. Healthcare Facilities Accreditation Program: Accreditation
requirements for acute care hospitals. Chicago, IL: Accreditation Association
for Hospitals and Health Systems. (Level VII)
19 DNV GL-Healthcare USA, Inc. (2016). MM.1 .SR.2. NIAHO® accreditation
requirements: Interpretive guidelines and surveyor guidance (version 11).
Milford, OH: DNV GL-Healthcare USA, Inc. (Level VII)
20 The Joint Commission. (2019). Standard MM.06.01.01. Comprehensive
accreditation manual for hospitals. Oakbrook Terrace, IL: The Joint
Commission. (Level VII)
21 Centers for Medicare and Medicaid Services, Department of Health and
Human Services. (2015). Condition of participation: Nursing services. 42
C.F.R. § 482.23(c).
22 Waters, T. R., et al. (2009). “Safe patient handling training for schools of
nursing” [Online]. Accessed via the Web at
http://www.cdc.gov/niosh/docs/2009-127/pdfs/2009-127.pdf (Level VII)
23 Ganz, D. A., et al. (2013). Preventing falls in hospitals: A toolkit for improving
quality of care (AHRQ Publication No. 13-0015-EF). Rockville, MD: Agency for
Healthcare Research and Quality. Accessed via the Web at
http://www.ahrq.gov/sites/default/files/publications/files/fallpxtoolkit.pdf
(Level VII)
24 Siegel, J. D ., et al. (2007). “2007 guideline for isolation precautions:
Preventing transmission of infectious agents in healthcare settings” [Online].
Accessed via the Web at
http://www.cdc.gov/hicpac/pdf/isolation/Isolation2007.pdf (Level II)
25 Accreditation Association for Hospitals and Health Systems. (2017). Standard
07.01.10. Healthcare Facilities Accreditation Program: Accreditation
requirements for acute care hospitals. Chicago, IL: Accreditation Association
for Hospitals and Health Systems. (Level VII)
26 Rutala, W. A., et al. (2008). “Guideline for disinfection and sterilization in
healthcare facilities, 2008” [Online]. Accessed via the Web at
https://www.cdc.gov/infectioncontrol/pdf/guidelines/disinfection-
guidelines.pdf (Level I)
27 Accreditation Association for Hospitals and Health Systems. (2017). Standard
07.02.03. Healthcare Facilities Accreditation Program: Accreditation
requirements for acute care hospitals. Chicago, IL: Accreditation Association
for Hospitals and Health Systems. (Level VII)
28 The Joint Commission. (2019). Standard RC.01.03 .01. Comprehensive
accreditation manual for hospitals. Oakbrook Terrace, IL: The Joint
Commission. (Level VII)
29 Accreditation Association for Hospitals and Health Systems. (2017). Standard
10.00 .03. Healthcare Facilities Accreditation Program: Accreditation
requirements for acute care hospitals. Chicago, IL: Accreditation Association
for Hospitals and Health Systems. (Level VII)
30 DNV GL-Healthcare USA, Inc. (2016). MR.2 .SR.1 . NIAHO® accreditation
requirements: Interpretive guidelines and surveyor guidance (version 11).
Milford, OH: DNV GL-Healthcare USA, Inc. (Level VII)
31 Centers for Medicare and Medicaid Services, Department of Health and
Human Services. (2015). Condition of participation: Medical record services.
42 C.F.R. § 482.24(b).
INCONTINENCE DEVICE APPLICATION, MALE
Many patients don’t require an indwelling urinary catheter
to manage their incontinence. External catheters serve as
an alternative to indwelling urinary catheters in cooperative
male patients who don’t have signs of urinary retention or
bladder outlet obstruction. A male incontinence device, also
known as a condom catheter or penile sheath, can help
prevent unnecessary indwelling catheterization, which
increases the risk of catheter-associated urinary tract
infection (CAUTI).1,2,3,4 This device reduces the risk of CAUTI
from catheterization, promotes bladder retraining when
possible, helps prevent skin breakdown, and improves the
patient’s self-image. The device consists of a condom
catheter secured to the shaft of the penis and connected to
a leg bag or drainage bag.4
HOSPITAL-ACQUIRED CONDITION ALERT CAUTIs are the most
common health care–associated infections. Researchers estimate that
as many as 70% of these infections are preventable by following a
variety of evidence-based practices.5 The Centers for Medicare and
Medicaid Services lists CAUTIs among the hospital-acquired
conditions that have payment implications because these infections
can be reasonably prevented. Appropriate use of a male condom
catheter as part of a comprehensive approach may help reduce the
incidence of CAUTI.1,2,3,6,7,8
Contraindications to placement include latex or adhesive
allergy, skin irritation or open lesions on the glans penis or
penile shaft, phimosis or paraphimosis, catheter-induced
hypospadias, and, if the patient is highly agitated or
confused, a high risk of trauma related to improper catheter
removal.9
Equipment
Condom catheter of appropriate size and type9 ▪ drainage
bag ▪ extension tubing ▪ gloves ▪ basin ▪ soap ▪ water ▪
washcloth ▪ towel ▪ Optional: disposable-head clippers,
commercial adhesive strip, skin protectant, scissors.
Preparation of equipment
Fill the basin with lukewarm water. Then bring the basin and
the remaining equipment to the patient’s bedside.
Follow the manufacturer’s instructions for condom sizing.9
Implementation
Applying the device
■ Review the patient’s medical record for an allergy to latex
or adhesive.9
■ Perform hand hygiene.1,10,11,12,13,14,15
■ Confirm the patient’s identity using at least two patient
identifiers.16
■ Provide privacy17,18,19,20 and explain the procedure to the
patient.
■ Put on gloves to comply with standard precautions.21,22
■ If the patient is circumcised, wash the penis with soap
and water, rinse well, and pat dry with a towel. If the patient
is uncircumcised, gently retract the foreskin and clean
beneath it. Rinse well but don’t dry, because moisture
provides lubrication and prevents friction during foreskin
replacement. Replace the foreskin to avoid penile
constriction. Then, if necessary, clip hair from the base and
shaft of the penis to prevent the adhesive strip or skin-bond
cement from pulling pubic hair.
■ Apply a skin protectant, as indicated, and allow it to dry
completely.9
■ If you’re using a precut commercial adhesive strip for a
nonadhesive-coated condom catheter, insert the glans penis
through its opening and position the strip 1′′ (2.5 cm) from
the scrotal area. If you’re using uncut adhesive for a
nonadhesive-coated condom catheter, cut a strip to fit
around the shaft of the penis. Remove the protective
covering from one side of the adhesive strip and press this
side firmly to the penis to enhance adhesion. Then remove
the covering from the other side of the strip.
■ If you’re using an adhesive-coated condom catheter,
there’s no need for additional adhesive strips or securing
devices.
■ Position the rolled condom catheter at the tip of the
penis, leaving 1⁄2′′ (1.3 cm) between the condom end and the
tip of the penis, with the drainage opening at the urinary
meatus.
■ Unroll the catheter upward, past the adhesive strip (if
using a nonadhesive-coated condom catheter) on the shaft
of the penis. Then gently press the sheath against the strip
until it adheres. (See How to apply a condom catheter.)
■ Using extension tubing, connect the condom catheter to
the leg bag or drainage bag.
■ Regularly inspect the catheter and extension tubing for
kinks or twists, which could obstruct urine flow and cause
the catheter to balloon, eventually dislodging it.
■ Regularly assess the penile skin for signs of irritation or
breakdown.9
■ Remove and discard your gloves.21,22
■ Perform hand hygiene.1,10,11,12,13,14,15
■ Document the procedure.23,24,25
Removing the device
■ Perform hand hygiene.1,10,11,12,13,14,15
■ Confirm the patient’s identity using at least two patient
identifiers.16
■ Provide privacy and explain the procedure to the
patient.17,18,19
■ Put on gloves.21,22
■ To facilitate removal, soak the penis with warm water and
a washcloth for 30 seconds.10
■ Simultaneously roll the condom catheter and adhesive
strip off the penis and discard them.
■ Clean the penis with lukewarm water, rinse thoroughly,
and dry. Check for swelling or signs of skin breakdown.
■ Remove the drainage bag by closing the drain clamp,
unlatching the leg straps, and disconnecting the extension
tubing at the top of the bag.
■ Remove and discard your gloves.21,22
■ Perform hand hygiene.1,10,11,12,13,14,15
■ Document the procedure.23,24,25,26
Special considerations
■ When fitting an uncircumcised male, allow adequate
space within the catheter to prevent the foreskin from being
drawn into the outlet during voiding.9
■ If the penis retracts with position changes, a shorter
catheter or different type of product may be necessary.9
■ When using an external catheter to collect a clean-catch
urinary specimen, collect the urine in an unused and newly
applied catheter and drainage bag.9
Patient teaching
If being discharged with a catheter, instruct the patient and
caregiver in routine catheter care; signs and symptoms of
occlusion, skin irritation, and infection; and when to report
problems to a practitioner.9
Complications
Complications are commonly due to equipment malfunction
or trauma from improper application and removal, and can
include penile irritation, skin breakdown, and edema;
ischemic tissue injury; infection; and, rarely, urethral
diverticulum.9,27 A sensitivity reaction to the device
materials may also occur.
Documentation
Record the date and time of application and removal of the
incontinence device. Also note skin condition and the
patient’s response to the device, including voiding pattern,
to assist with bladder retraining.
How to apply a condom catheter
Apply an adhesive strip to the shaft of the penis about 1′′ (2.5 cm) from the
scrotal area.
Then roll the condom catheter onto the penis past the adhesive strip. Leave
about 1⁄2′′ (1.3 cm) clearance at the end.
Press the sheath gently against the strip until it adheres.
REFERENCES
1 Healthcare Infection Control Practices Advisory Committee. (2010, revised
2017). “Guideline for prevention of catheter-associated urinary tract
infections 2009” [Online]. Accessed via the Web at
https://www.cdc.gov/infectioncontrol/pdf/guidelines/cauti-guidelines.pdf
(Level I)
2 Meddings, J., et al. (2014). Reducing unnecessary urinary catheter use and
other strategies to prevent catheter-associated urinary tract infection: An
integrative review. BMJ Quality and Safety, 23(4), 277–289. Accessed via the
Web at http://qualitysafety.bmj.com/content/23/4/277.full.pdf+html (Level I)
3 Association of Professionals in Infection Control and Epidemiology. (2014).
“APIC implementation guide: Guide to preventing catheter-associated urinary
tract infections” [Online]. Accessed via the Web at
http://apic.org/Resource_/EliminationGuideForm/6473ab9b-e75c-457a-8d0f-
d57d32bc242b/File/APIC_CAUTI_web_0603 .pdf (Level IV)
4 Nettina, S.M. (2014). Lippincott manual of nursing practice (10th ed.).
Philadelphia, PA: Wolters Kluwer.
5 Seckel, M. A. (2013). Maintaining urinary catheters: What does the evidence
say? Nursing2013, 43(2), 63–65. (Level VII)
6 The Joint Commission. (2019). Standard NPSG.07.06 .01. Comprehensive
accreditation manual for hospitals. Oakbrook Terrace, IL: The Joint
Commission. (Level VII)
7 Accreditation Association for Hospitals and Health Systems. (2017). Standard
07.01.17. Healthcare Facilities Accreditation Program: Accreditation
requirements for acute care hospitals. Chicago, IL: Accreditation Association
for Hospitals and Health Systems. (Level VII)
8 Lo, E., et al. (2014). SHEA/IDSA practice recommendation: Strategies to
prevent catheter-associated urinary tract infections in acute care hospitals:
2014 update. Infection Control and Hospital Epidemiology, 35(5), 464–479.
Accessed via the Web at http://www.jstor.org/stable/10.1086/675718 (Level I)
9 Wound, Ostomy and Continence Nurses Society. (2008). “External catheter
fact sheet” [Online]. Accessed via the Web at
http://citeseerx.ist.psu.edu/viewdoc/download?
doi=10.1 .1.173.3785&rep=rep1&type=pdf (Level VII)
10 The Joint Commission. (2019). Standard NPSG.07.01.01. Comprehensive
accreditation manual for hospitals. Oakbrook Terrace, IL: The Joint
Commission. (Level VII)
11 Centers for Disease Control and Prevention. (2002). Guideline for hand
hygiene in health-care settings: Recommendations of the Healthcare Infection
Control Practices Advisory Committee and the HICPAC/SHEA/APIC/IDSA Hand
Hygiene Task Force. MMWR Recommendations and Reports, 51(RR-16), 1–45.
Accessed via the Web at https://www.cdc.gov/mmwr/pdf/rr/rr5116.pdf (Level
II)
12 World Health Organization. (2009). “WHO guidelines on hand hygiene in
health care: First global patient safety challenge, clean care is safer care”
[Online]. Accessed via the Web at
http://apps.who.int/iris/bitstream/10665/44102/1/9789241597906_eng.pdf
(Level IV)
13 Centers for Medicare and Medicaid Services, Department of Health and
Human Services. (2015). Condition of participation: Infection control. 42 C.F.R.
§ 482.42.
14 Accreditation Association for Hospitals and Health Systems. (2017). Standard
07.01.21. Healthcare Facilities Accreditation Program: Accreditation
requirements for acute care hospitals. Chicago, IL: Accreditation Association
for Hospitals and Health Systems. (Level VII)
15 DNV GL-Healthcare USA, Inc. (2016). IC.1 .SR.1 . NIAHO® accreditation
requirements: Interpretive guidelines and surveyor guidance (version 11).
Milford, OH: DNV GL-Healthcare USA, Inc. (Level VII)
16 The Joint Commission. (2019). Standard NPSG.01.01.01. Comprehensive
accreditation manual for hospitals. Oakbrook Terrace, IL: The Joint
Commission. (Level VII)
17 Accreditation Association for Hospitals and Health Systems. (2017). Standard
15.01.16. Healthcare Facilities Accreditation Program: Accreditation
requirements for acute care hospitals. Chicago, IL: Accreditation Association
for Hospitals and Health Systems. (Level VII)
18 Centers for Medicare and Medicaid Services, Department of Health and
Human Services. (2015). Condition of participation: Patient’s rights. 42 C.F.R.
§ 482.13(c)(1).
19 The Joint Commission. (2019). RI .01.01.01. Comprehensive accreditation
manual for hospitals. Oakbrook Terrace, IL: The Joint Commission. (Level VII)
20 DNV GL-Healthcare USA, Inc. (2016). PR.1.SR.5 . NIAHO® accreditation
requirements: Interpretive guidelines and surveyor guidance (version 11).
Milford, OH: DNV GL-Healthcare USA, Inc. (Level VII)
21 Accreditation Association for Hospitals and Health Systems. (2017). Standard
07.01.10. Healthcare Facilities Accreditation Program: Accreditation
requirements for acute care hospitals. Chicago, IL: Accreditation Association
for Hospitals and Health Systems. (Level VII)
22 Siegel, J. D ., et al. (2007, revised). “2007 guideline for isolation precautions:
Preventing transmission of infectious agents in healthcare settings” [Online].
Accessed via the Web at
http://www.cdc.gov/hicpac/pdf/isolation/Isolation2007.pdf (Level II)
23 The Joint Commission. (2019). Standard RC.01.03 .01. Comprehensive
accreditation manual for hospitals. Oakbrook Terrace, IL: The Joint
Commission. (Level VII)
24 Centers for Medicare and Medicaid Services, Department of Health and
Human Services. (2015). Condition of participation: Medical record services.
42 C.F.R. § 482.24(b).
25 Accreditation Association for Hospitals and Health Systems. (2017). Standard
10.00 .03. Healthcare Facilities Accreditation Program: Accreditation
requirements for acute care hospitals. Chicago, IL: Accreditation Association
for Hospitals and Health Systems. (Level VII)
26 DNV GL-Healthcare USA, Inc. (2016). MR.2 .SR.1 . NIAHO® accreditation
requirements: Interpretive guidelines and surveyor guidance (version 11).
Milford, OH: DNV GL-Healthcare USA, Inc. (Level VII)
27 Dwivedi, A. K ., et al. (2014). Massive urethral diverticulum: A complication of
condom catheter use. British Journal of Nursing, 21(9), S20–S22. (Level VII)
INCONTINENCE MANAGEMENT, FECAL
Fecal incontinence is the involuntary passage of feces,
which may occur gradually (as in dementia) or suddenly (as
in spinal cord injury). Urge incontinence occurs when the
patient is aware of the need to defecate but is incontinent
despite effort to retain the stool. Passive incontinence
occurs when the patient lacks awareness of the need to
defecate before being incontinent.1 Risk factors for fecal
incontinence include advanced age, diarrhea, fecal urgency,
urinary incontinence, diabetes mellitus, and hormone
therapy in postmenopausal women.1
In elderly patients, fecal incontinence may be transient or
permanent, and affects up to 14% of patients in assisted
living and extended care facilities.1 Not usually a sign of
serious illness, fecal incontinence can seriously impair an
elderly patient’s physical and psychological well-being.
Patients with fecal or urinary incontinence are at risk for
incontinence-associated dermatitis, which can result in the
development of pressure injuries and secondary skin
infection.1
Successful management of these patients depends on
identifying and treating the underlying cause or causes.1,2,3
Most cases can be treated; some can even be cured.
Treatment aims to control the condition through bowel
retraining or other behavioral management techniques, diet
modification, drug therapy, pessaries, and possibly
surgery.3,4 Despite appropriate management, some patients
may remain incontinent because of dementia, immobility, or
comorbid issues. In such cases, management aims to
prevent associated complications.5
Equipment
Gloves ▪ stethoscope ▪ skin barrier or skin protectant ▪
appropriate skin cleaner ▪ incontinence pads ▪ bedside
commode or bedpan ▪ disinfectant pad ▪ Optional: skin
moisturizer, fecal incontinence collector or fecal
management system, absorbent adult briefs, specimen
container, label, laboratory transport bag, laboratory
request form.
Implementation
■ Gather the necessary equipment.
■ Perform hand hygiene.6,7,8,9,10,11
■ Confirm the patient’s identity using at least two patient
identifiers.12
■ Provide privacy.13,14,15,16
■ Obtain an incontinence history. Ask the patient to identify
the onset, duration, and severity of the fecal incontinence
as well as any identified patterns (such as whether it occurs
at night or with diarrhea). Focus the history on GI,
neurologic, and psychological disorders. Asses for chronic
constipation or laxative abuse.17
■ Assess the patient’s medication regimen. Check for drugs
that affect bowel activity, such as antibiotics, aspirin, some
anticholinergic antiparkinsonian
agents,
aluminum
hydroxide, calcium carbonate antacids, diuretics, iron
preparations, opiates, sedatives, tricyclic antidepressants,
and phenothiazines.
■ Review the patient’s diet.4 Note whether the patient
receives enteral nutrition and, if so, be sure to include the
type, volume, and frequency of administration, because
osmotic diarrhea-induced incontinence
should be
considered.5
■ Note the frequency, consistency, and volume of stools
passed in the past 24 hours.
■ Raise the patient’s bed to waist level when providing
patient care to prevent caregiver back strain.18
■ Perform hand hygiene.6,7,8,9,10,11
■ Put on gloves to comply with standard precautions.19,20,21
■ Protect the patient’s bed with an incontinence pad.
Ensure that the pads aren’t layered and are without wrinkles
to reduce pressure risk and subsequent skin damage.
NURSING ALERT Guidelines recommend use of an incontinence pad
when the patient is in bed and a superabsorbent adult disposable brief
when the patient’s out of bed, as needed.22 A superabsorbent adult
disposable brief is designed to absorb and wick moisture from
incontinence away from the skin when the patient is ambulating.
However, note that this type of brief can become heavy when full; it
can make ambulation difficult in a mobility-impaired patient and may
increase the risk of falls. Change the brief after each incontinence
episode.2
■ Inspect the abdomen for distention, and auscultate for
bowel sounds. If not contraindicated, check for fecal
impaction (a factor in overflow incontinence), as ordered.
■ Obtain a stool specimen, if ordered. Label the specimen
in the presence of the patient to prevent mislabeling.12
Send the specimen to the laboratory in a laboratory
transport bag with a completed laboratory request form (if
used in your facility). (See the “Stool specimen collection”
procedure.)
■ Provide ongoing assessment of the perineal skin,
including risk factors for skin breakdown and general
condition such as visible areas of skin redness and
erosion.22,23
■ Maintain effective hygienic care to increase the patient’s
comfort and prevent skin breakdown and infection.4,23,24
Clean the perineal area frequently with an appropriate skin
cleaner; if possible, use a no-rinse skin cleaner with a pH
range similar to that of normal skin, instead of soap and
water, to help prevent incontinence-associated dermatitis.2
If a moisturizer isn’t already incorporated into the skin
cleaner, apply a moisturizer daily, as needed. Apply a skin
barrier or protectant after every incontinence episode to
protect the skin from constant moisture.2 Use measures to
control odor.
NURSING ALERT Clean the skin gently, using care to avoid rigorous
scrubbing or friction to minimize the risk of compromising the skin
barrier function. If dried or difficult-to-remove feces are present,
gently apply a moistened cloth on the area and softly pat it around as
needed to remove the feces.22
■ Provide bowel retraining for a neurologically capable
patient with chronic incontinence. Offer the patient the
commode or bedpan every 1 to 2 hours as appropriate.
■ If the patient has intact perineal skin, apply a fecal
incontinence collector or fecal management system, as
indicated and ordered.
■ Check the patient’s incontinence pad (if applicable) at
least every 2 hours to ensure that it’s dry. Because the skin
lying on an underpad is commonly moist, expose this area
to air when turning the patient to allow moisture to
evaporate and the skin surface to dry.2 Regularly and
promptly remove soil and irritants from the skin to help
prevent or minimize exposure of the skin to damaging
irritants.22
■ Replace soiled linens promptly.
■ Return the patient’s bed to the lowest position to prevent
falls and maintain patient safety.25
■ Remove and discard your gloves.9
■ Perform hand hygiene.6,7,8,9,10,11
■ Clean and disinfect your stethoscope using a disinfectant
pad.26,27
■ Perform hand hygiene.6,7,8,9,10,11
■ Document the procedure.28,29,30,31
Special considerations
■ Schedule extra time to provide encouragement and
support for the patient, because the patient may feel
shame, embarrassment, and powerlessness from loss of
control.
■ Minimize the use of incontinence pads and adult briefs
when possible, because they can trap heat and moisture
and progress skin damage.23
■ Antifungal products, steroidal-based topical anti-
inflammatory products, and topical antibiotics to treat
incontinence-associated dermatitis are recommended only
in specific situations.23,24
■ Be aware that patients with fecal incontinence might be
unable to reposition themselves. Reposition the patient as
needed to reduce pressure-related injury risk.2
Complications
Skin breakdown and infection may result from incontinence.
Psychological problems resulting from incontinence include
social isolation, loss of independence, lowered self-esteem,
and depression.
Documentation
Document your assessment findings. Record all bladder and
bowel retraining efforts, noting scheduled bathroom times,
food and fluid intake, and elimination amounts, as
appropriate. Document the duration of continent periods.
Note any complications, including emotional problems and
signs of skin breakdown and infection as well as the
treatments given for them.
REFERENCES
1 Robson, K. M ., & Lembo, A. J . Fecal incontinence in adults: Etiology and
evaluation. (2017). In: UpToDate, Talley, N. J ., & Grover, S. (Eds.) . Retrieved
from: www.uptodate.com
2 Zulkowski, K. (2012). Diagnosing and treating moisture-associated skin
damage. Advances in Skin and Wound Care, 25(5), 231–236. Accessed via the
Web at
http://journals.lww.com/aswcjournal/Fulltext/2012/05000/Diagnosing_and_Tre
ating_Moisture_Associated_Skin.9 .aspx
3 Wald, A. (2016). Update on the management of fecal incontinence for the
gastroenterologist. Gastroenterology & Hepatology, 12(3), 155–164. Accessed
via the Web at https://www.ncbi.nlm.nih.gov/pmc/articles/PMC4872843/
4 Robson, K. M ., & Lembo, A. J . Fecal incontinence in adults: Management.
(2016). In: UpToDate, Talley, N. J., & Grover, S. (Eds.). Retrieved from:
www.uptodate.com
5 Leung, F. W., & Rao, S. S . (2011). Approach to fecal incontinence and
constipation in older hospitalized patients. Hospital Practice, 39(1), 97–104.
(Level V)
6 Centers for Disease Control and Prevention. (2002). Guideline for hand
hygiene in health-care settings: Recommendations of the Healthcare Infection
Control Practices Advisory Committee and the HICPAC/SHEA/APIC/IDSA Hand
Hygiene Task Force. MMWR Recommendations and Reports, 51(RR-16), 1–45.
Accessed via the Web at https://www.cdc.gov/mmwr/pdf/rr/rr5116.pdf (Level
II)
7 World Health Organization. (2009). “WHO guidelines on hand hygiene in
health care: First global patient safety challenge, clean care is safer care”
[Online]. Accessed via the Web at
http://apps.who.int/iris/bitstream/10665/44102/1/9789241597906_eng.pdf
(Level IV)
8 The Joint Commission. (2019). Standard NPSG.07.01.01. Comprehensive
accreditation manual for hospitals. Oakbrook Terrace, IL: The Joint
Commission. (Level VII)
9 Centers for Medicare and Medicaid Services, Department of Health and
Human Services. (2015). Condition of participation: Infection control. 42 C.F.R.
§ 482.42.
10 Accreditation Association for Hospitals and Health Systems. (2017). Standard
07.01.21. Healthcare Facilities Accreditation Program: Accreditation
requirements for acute care hospitals. Chicago, IL: Accreditation Association
for Hospitals and Health Systems. (Level VII)
11 DNV GL-Healthcare USA, Inc. (2016). IC.1 .SR.1 . NIAHO® accreditation
requirements: Interpretive guidelines and surveyor guidance (version 11).
Milford, OH: DNV GL-Healthcare USA, Inc. (Level VII)
12 The Joint Commission. (2019). Standard NPSG.01.01.01. Comprehensive
accreditation manual for hospitals. Oakbrook Terrace, IL: The Joint
Commission. (Level VII)
13 The Joint Commission. (2019). Standard RI.01.01.01. Comprehensive
accreditation manual for hospitals. Oakbrook Terrace, IL: The Joint
Commission. (Level VII)
14 Centers for Medicare and Medicaid Services, Department of Health and
Human Services. (2015). Condition of participation: Patient’s rights. 42 C.F.R.
§ 482.13(c)(1).
15 Accreditation Association for Hospitals and Health Systems. (2017). Standard
15.01.16. Healthcare Facilities Accreditation Program: Accreditation
requirements for acute care hospitals. Chicago, IL: Accreditation Association
for Hospitals and Health Systems. (Level VII)
16 DNV GL-Healthcare USA, Inc. (2016). PR.1.SR.5 . NIAHO® accreditation
requirements: Interpretive guidelines and surveyor guidance (version 11).
Milford, OH: DNV GL-Healthcare USA, Inc. (Level VII)
17 Whitehead, W. E., et al. (2009). Fecal incontinence in US adults: Epidemiology
and risk factors. Gastroenterology, 137(2), 512–517. Accessed via the Web at
http://www.gastrojournal.org/article/S0016-5085(09)00721-5/pdf (Level VI)
18 Waters, T. R., et al. (2009). “Safe patient handling training for schools of
nursing” [Online]. Accessed via the Web at
http://www.cdc.gov/niosh/docs/2009-127/pdfs/2009-127.pdf (Level VII)
19 Siegel, J. D ., et al. (2007, revised 2017). “2007 guideline for isolation
precautions: Preventing transmission of infectious agents in healthcare
settings” [Online]. Accessed via the Web at
https://www.cdc.gov/infectioncontrol/pdf/guidelines/isolation-guidelines.pdf
(Level II)
20 Accreditation Association for Hospitals and Health Systems. (2017). Standard
07.01.10. Healthcare Facilities Accreditation Program: Accreditation
requirements for acute care hospitals. Chicago, IL: Accreditation Association
for Hospitals and Health Systems. (Level VII)
21 DNV GL-Healthcare USA, Inc. (2016). IC.1 .SR.2 . NIAHO® accreditation
requirements: Interpretive guidelines and surveyor guidance (version 11).
Milford, OH: DNV GL-Healthcare USA, Inc. (Level VII)
22 Beeckman, D., et al. (2015). Incontinence-associated dermatitis: Moving
prevention forward: Proceedings from the Global IAD Expert Panel. London,
UK: Wounds International. Accessed via the Web at
http://www.woundsinternational.com/media/other-
resources/_/1154/files/iad_web.pdf (Level VII)
23 Chatham, N., & Carls, C. (2012). How to manage incontinence associated
dermatitis. Wound Care Advisor, 1(1), 7–10. Accessed via the Web at
https://woundcareadvisor.com/how-to-manage-incontinence-associated-
dermatitis/
24 Gray, M., et al. (2012). Incontinence-associated dermatitis: A comprehensive
review and update. Journal of Wound, Ostomy, and Continence Nursing,
39(1), 61–74 . Accessed via the Web at
http://www.nursingcenter.com/cearticle?an=00152192-201201000-00010
(Level V)
25 Ganz, D. A., et al. (2013). Preventing falls in hospitals: A toolkit for improving
quality of care (AHRQ Publication No. 13-0015-EF). Rockville, MD: Agency for
Healthcare Research and Quality. Accessed via the Web at
https://www.ahrq.gov/sites/default/files/publications/files/fallpxtoolkit_0 .pdf
(Level VII)
26 Rutala, W. A., et al. (2008, revised 2017). “Guideline for disinfection and
sterilization in healthcare facilities, 2008” [Online]. Accessed via the Web at
https://www.cdc.gov/infectioncontrol/pdf/guidelines/disinfection-
guidelines.pdf (Level I)
27 Accreditation Association for Hospitals and Health Systems. (2017). Standard
07.02.03. Healthcare Facilities Accreditation Program: Accreditation
requirements for acute care hospitals. Chicago, IL: Accreditation Association
for Hospitals and Health Systems. (Level VII)
28 The Joint Commission. (2019). Standard RC.01.03 .01. Comprehensive
accreditation manual for hospitals. Oakbrook Terrace, IL: The Joint
Commission. (Level VII)
29 Centers for Medicare and Medicaid Services, Department of Health and
Human Services. (2015). Condition of participation: Medical record services.
42 C.F.R. § 482.24(b).
30 Accreditation Association for Hospitals and Health Systems. (2017). Standard
10.00 .03. Healthcare Facilities Accreditation Program: Accreditation
requirements for acute care hospitals. Chicago, IL: Accreditation Association
for Hospitals and Health Systems. (Level VII)
31 DNV GL-Healthcare USA, Inc. (2016). MR.2 .SR.1 . NIAHO® accreditation
requirements: Interpretive guidelines and surveyor guidance (version 11).
Milford, OH: DNV GL-Healthcare USA, Inc. (Level VII)
EQUIPMENT
Artificial urinary sphincter implant
An artificial urinary sphincter implant can help restore continence to a patient
with a neurogenic bladder. Criteria for inserting an implant include:
■ incontinence associated with a weak urinary sphincter
■ incoordination between the detrusor muscle and the urinary sphincter (if
drug therapy fails)
■ inadequate bladder storage (if intermittent catheterization and drug
therapy are unsuccessful).
Configuration and placement
An implant consists of a control pump, an occlusive cuff, and a pressure-
regulating balloon. The cuff is placed around the bladder neck, and the
balloon is placed under the rectus muscle in the abdomen. The balloon holds
fluid that inflates the cuff. In males, the surgeon places the control pump in
the scrotum (as shown below); in females, the practitioner places the pump
in the labium.
Using the implant
To void, the patient squeezes the bulb to deflate the cuff, which opens the
urethra by returning fluid to the balloon. After voiding, the cuff reinflates
automatically, sealing the urethra until the patient needs to void again.
Potential complications and care
If complications develop, the implant may need to be repaired or removed.
Possible complications include cuff leakage (uncommon), trapped blood or
other fluid contaminants (which can cause control pump problems), skin
erosion around the bulb or erosion in the bladder neck or the urethra,
infection, inadequate occlusion pressures, and kinked tubing. If the bladder
holds residual urine, intermittent self-catheterization may be needed.
Care includes avoiding strenuous activity for about 6 months after surgery
and having regular checkups.
INCONTINENCE MANAGEMENT, URINARY
Urinary incontinence, the involuntary loss of urine, affects
both male and female patients.1 In elderly patients, urinary
incontinence commonly follows any loss or impairment of
urinary sphincter control. It may be transient or permanent.
About 13 million adults experience some form of urinary
incontinence, including half of homebound adults.2
Contrary to popular opinion, urinary incontinence is
neither a disease nor a part of normal aging. It isn’t
inevitable and can be avoided or reversed with support and
interventions. Incontinence may be caused by childbirth,
confusion, dehydration, fecal impaction, or restricted
mobility. It’s also a sign of various disorders, such as
prostatic hyperplasia, bladder calculus, bladder cancer,
urinary tract infection (UTI), stroke, diabetic neuropathy,
Guillain-Barré syndrome, multiple sclerosis, prostatic cancer,
prostatitis, spinal cord injury, and urethral stricture. It may
also result from urethral sphincter damage after
prostatectomy. In addition, certain drugs, including diuretics,
hypnotics, sedatives, anticholinergics, antihypertensives,
and alpha antagonists, may trigger urinary incontinence.
Urinary incontinence is classified as acute or chronic.
Acute urinary incontinence results from disorders that are
potentially reversible, such as delirium, dehydration, urine
retention, restricted mobility, fecal impaction, infection or
inflammation, drug reactions, and polyuria.
Chronic urinary incontinence occurs in several types and
includes stress, overflow, urge, mixed, reflex, and functional
(total) incontinence. In stress incontinence, leakage results
from a sudden physical strain, such as a sneeze, cough, or
quick movement. In overflow incontinence, urine retention
causes dribbling because the distended bladder can’t
contract strongly enough to force a urine stream. In urge
incontinence, the patient can’t control the impulse to
urinate; this type may also be referred to a “overactive
bladder.”3 In functional incontinence, urine leaks despite a
normally functioning bladder and urethra; it is usually
related to cognitive or mobility factors. In addition, the
patient may have symptoms of both stress incontinence and
urge incontinence, known as mixed incontinence or
overactive bladder syndrome with incontinence.4,5
Patients with urinary incontinence should be carefully
assessed for underlying disorders. Most can be treated;
some can even be cured. Treatment aims to control the
condition through bladder retraining or other behavioral
management techniques, diet modification, drug therapy,
pessaries and, possibly, surgery. Corrective surgery for
urinary incontinence includes transurethral resection of the
prostate in males, urethral collagen injections for males or
females, repair of the anterior vaginal wall or retropelvic
suspension of the bladder in females, artificial urinary
sphincter implant, a urethral sling, and bladder
augmentation. (See Artificial urinary sphincter implant.)
Equipment
Bladder retraining record ▪ gloves ▪ appropriate skin
cleanser ▪ skin protectant or skin barrier product ▪
incontinence pads or briefs6 ▪ bedside commode, bedpan,
or urinal ▪ Optional: skin moisturizer, male external
catheter, specimen container and label, laboratory request
form, laboratory transport bag.
Implementation
■ Gather the necessary equipment.
■ Perform hand hygiene.7,8,9,10,11,12
■ Confirm the patient’s identity using at least two patient
identifiers.13
■ Provide privacy.14,15,16,17
■ Obtain an incontinence history as needed. Ask when the
patient first noticed urine leakage and whether it began
suddenly or gradually. Have the patient describe the typical
urinary pattern: Does the patient usually experience
incontinence during the day or at night? Does the patient
get the urge to go again immediately after emptying the
bladder? Does the patient get strong urges to go? Ask the
patient to rate the urinary control: Does the patient have
moderate control, or is the patient completely incontinent?
If the patient sometimes urinates with control, ask the
patient to identify when and how much the patient usually
urinates. Ask the patient to describe any previous treatment
received for incontinence or measures the patient has
performed.
■ Assess for related problems, such as urinary hesitancy,
frequency, urgency, nocturia, and decreased force or
interruption of the urine stream. Ask about medication
regimens, including nonprescription drugs.
■ Assess the patient’s environment. Is a toilet or commode
readily available? How long does the patient take to reach
it? Assess the patient’s manual dexterity in the bathroom—
for example, how easily does the patient manipulate
clothing?
■ Evaluate the patient’s mental status and cognitive
function.
■ Quantify the patient’s normal daily fluid intake.
■ Review the patient’s medication and diet history for drugs
and foods that affect digestion and elimination.
■ Review or obtain the patient’s medical history, noting
especially any incidence of UTI, diabetes, spinal injury or
tumor, stroke, and bladder or pelvic surgery. For a female
patient, also note the number and route of births and
whether she’s had a hysterectomy; for a male, note any
prostate surgery. Assess for such disorders as delirium,
dehydration, urine retention, restricted mobility, fecal
impaction, infection, inflammation, and polyuria.3
■ Raise the patient’s bed to waist level when providing
patient care to prevent caregiver back strain.18
■ Perform hand hygiene7,8,9,10,11,12 and put on gloves to
comply with standard precautions.19,20,21
■ Select an incontinence pad or brief that is absorbent
enough to wick incontinence moisture away from the
patient’s skin and prevent maceration.6
■ Inspect the urethral meatus for obvious inflammation or
anatomic defects. Have a female patient bear down while
you note any urine leakage.
■ Gently palpate the abdomen for bladder distention, which
signals urine retention.
■ Assess for costovertebral angle tenderness. If possible,
have the patient examined by a urologist.
■ Obtain specimens for appropriate laboratory tests, as
ordered. (See the “Urine specimen collection” procedure.)
■ Have the patient complete a 3-day voiding diary to help
develop an individualized bladder management program for
the patient.22
■ Begin incontinence management by implementing an
appropriate bladder retraining program, as appropriate.6
(See Correcting urinary incontinence with bladder
management.)
■ To manage functional incontinence, frequently assess the
patient’s mental and functional status. Regularly remind the
patient to void. Respond to calls promptly, and help the
patient get to the bathroom quickly.
■ Assess the patient’s perineal area for signs of breakdown,
including risk factors for skin breakdown and general
condition, such as visible areas of skin redness and
erosion.24,25
■ Check the patient’s incontinence pad or brief at least
every 2 hours to ensure that it’s dry. When turning the
patient, expose the area that comes in contact with the
incontinence pad to air to promote drying of the skin
surface.24,26
■ Maintain effective hygienic care to increase the patient’s
comfort and prevent skin breakdown and infection.25,27
Clean the perineal area frequently with an appropriate skin
cleaner—preferably a no-rinse skin cleaner with a pH range
similar to that of normal skin instead of soap and water—to
help prevent incontinence-associated dermatitis.26 If a
moisturizer isn’t already incorporated into the skin cleaner,
apply a moisturizer daily, as needed. Apply a skin barrier or
skin protectant product after every incontinence episode to
protect the skin from constant moisture.26 Use measures to
control odors.
NURSING ALERT Clean the skin gently, using care to avoid rigorous
scrubbing or friction to minimize the risk of compromising the skin
barrier function.24
■ Return the patient’s bed to the lowest position to prevent
falls and maintain patient safety.28
■ Remove and discard your gloves19,25 and perform hand
hygiene.7,8,9,10,11,12
■ Document the procedure.29,30,31,32
Special considerations
■ External male catheters may be indicated to prevent
wetness that results from temporary or chronic urinary
incontinence in males who have little or no postvoid
residual.25 External catheters may be preferred over
indwelling catheters, because external devices are less
invasive and carry less risk of urinary complications
associated with instrumentation of the urethra. External
catheters can be used in conjunction with clean intermittent
catheterization.5
■ Minimize the use of incontinent pads and adult briefs
when possible because they can trap heat and moisture and
progress skin damage.25
■ Note that the use of antifungal products, steroidal-based
topical anti-inflammatory products, and topical antibiotics to
treat incontinence-associated dermatitis is recommended
only in specific situations.25,27
■ To ensure healthful hydration and to prevent UTI,
encourage the patient to maintain an adequate daily intake
of fluids (six to eight 8-oz [0.24 -L] glasses). Restrict oral
fluid intake after 6 p.m ., as appropriate.
■ Schedule extra time to provide encouragement and
support for the patient, because the patient may feel
shame, embarrassment, and powerlessness from loss of
control.
Patient teaching
Teach the patient and family member or other caregiver
about normal lower urinary tract function, the patient’s
particular type of incontinence, the benefits versus the risks
of the available treatment alternatives, and the fact that
symptom control may require trials of multiple therapeutic
options.33
PATIENT TEACHING
Correcting urinary incontinence with
bladder management
An incontinent patient typically feels frustrated, embarrassed, and hopeless.
Fortunately, the problem can usually be corrected with a bladder
management program—a program that aims to establish a regular voiding
pattern. Follow these guidelines.
Assess elimination patterns
First, assess the patient’s intake and voiding patterns and reason for each
accidental voiding (such as a coughing spell). Use an incontinence
monitoring record.
Establish a voiding schedule
Encourage the patient to void regularly, for example, every 2 hours. When
the patient can stay dry for 2 hours, increase the interval by 30 minutes
every day until the patient achieves a 3- to 4-hour voiding schedule. Teach
the patient to practice relaxation techniques such as deep breathing, which
help decrease the sense of urgency.
Record results and remain positive
Keep a record of continence and incontinence to help reinforce the patient’s
efforts to remain continent. Remember, both your own and your patient’s
positive attitudes are crucial to this successful bladder management.
Take steps for success
Here are some additional tips to boost the patient’s success:
■ Be sure to locate the patient’s bed near a bathroom or portable toilet.
Leave a light on at night. If the patient needs assistance getting out of bed or
a chair, promptly answer the call for help.
■ Teach the patient measures to prevent urinary tract infections, such as
adequate fluid intake (at least 2,000 mL/day unless contraindicated), drinking
cranberry juice to help acidify urine, wearing cotton underpants, and bathing
with nonirritating soaps. If the patient has urge incontinence, cranberry juice
is contraindicated.
■ Encourage the patient to empty the bladder completely before and after
meals and at bedtime.
■ Advise the patient to urinate whenever the urge arises and never to ignore
it.
■ Instruct the patient to take prescribed diuretics upon rising in the morning.
■ Advise the patient to limit the use of sleeping aids, sedatives, and alcohol;
they decrease the urge to urinate and can increase incontinence, especially
at night.
■ If the patient is overweight, encourage weight loss.
■ Suggest exercises to strengthen pelvic muscles.
■ Instruct the patient to increase dietary fiber to decrease constipation and
incontinence.
■ Monitor the patient for signs of anxiety and depression.
■ Reassure the patient that periodic incontinent episodes don’t mean that
the program has failed. Encourage persistence, tolerance, and a positive
attitude.
■ To manage stress incontinence, begin an exercise program to help
strengthen the pelvic floor muscles.23 (See Strengthening pelvic floor
muscles, page 386.)
Complications
Skin breakdown and infection may result from incontinence.
Psychological problems resulting from incontinence include
social isolation, loss of independence, lowered self-esteem,
and depression.
Documentation
Document your assessment findings. Record all bladder
retraining efforts, noting scheduled bathroom times, food
and fluid intake, and elimination amounts, as appropriate.
Document the duration of continent periods. Note any
complications, including emotional problems and signs of
skin breakdown and infection as well as the treatments
given for them. Record any patient and family teaching
provided, their understanding of the teaching, and whether
they require follow-up teaching.
PATIENT TEACHING
Strengthening pelvic floor muscles
Stress incontinence, the most common kind of urinary incontinence in
females, usually results from weakening of the urethral sphincter. In males, it
may sometimes occur after a radical prostatectomy. You can help male and
female patients prevent or minimize stress incontinence by teaching pelvic
floor muscle training (PFMT) or Kegel exercises to strengthen the
pubococcygeal muscles.23
Learning PFMT exercises
First, explain how to locate the muscles of the pelvic floor. To identify this
area initially, teach the patient to tighten the muscles of the pelvic floor to
stop the flow of urine while urinating and then to release the muscles to
restart the flow. Then explain to the patient that PFMT exercises are a series
of contractions and relaxations of the pelvic floor muscles that are essential
to muscle retraining. Once learned, these exercises can be done anywhere.
Although these exercises shouldn’t be done while urinating, they can be done
at any other time.
Establishing a regimen
Suggest that the patient start out by contracting the pelvic floor muscles for
5 seconds, relaxing for 5 seconds, and then repeating the procedure as often
as needed. Typically, the patient starts with 10 contractions in the morning
and 10 at night, gradually increasing the relaxation and contraction time.
Advise the patient not to use stomach, leg, or buttock muscles. Also
discourage leg crossing or breath holding during these exercises.
REFERENCES
1 Nazarko, L. (2017). Beyond the bladder: Holistic care when urinary
incontinence develops. British Journal of Community Nursing, 22(1), 662–666 .
2 Craven, H. (Ed.). (2016). Core curriculum for medical-surgical nursing (5th
ed.). Pitman, NJ: Academy of Medical-Surgical Nurses.
3 Lukacz, E. S . Evaluation of women with urinary incontinence. (2017). In:
UpToDate, Brubaker, L, et al. (Eds.) . Retrieved from: www.uptodate.com
4 Wakamatsu, M. M ., et al. (2014). Better bladder and bowel control. Boston,
MA: Harvard Health Publications.
5 Clemens, J. Q . Urinary incontinence in men. (2017). In: UpToDate, O’Leary, M.
P., & Libman, H. (Eds). Retrieved from: www.uptodate.com
6 Wound Ostomy and Continence Nurses Society (WOCN). (2016). Guideline for
prevention and management of pressure ulcers (injuries): WOCN clinical
practice guideline series 2. Mount Laurel, NJ: WOCN Society.
7 Centers for Disease Control and Prevention. (2002). Guideline for hand
hygiene in health-care settings: Recommendations of the Healthcare Infection
Control Practices Advisory Committee and the HICPAC/SHEA/APIC/IDSA Hand
Hygiene Task Force. MMWR Recommendations and Reports, 51(RR-16), 1–45.
Accessed via the Web at https://www.cdc.gov/mmwr/pdf/rr/rr5116.pdf (Level
II)
8 World Health Organization. (2009). “WHO guidelines on hand hygiene in
health care: First global patient safety challenge, clean care is safer care”
[Online]. Accessed via the Web at
http://apps.who.int/iris/bitstream/10665/44102/1/9789241597906_eng.pdf
(Level IV)
9 The Joint Commission. (2019). Standard NPSG.07.01.01. Comprehensive
accreditation manual for hospitals. Oakbrook Terrace, IL: The Joint
Commission. (Level VII)
10 Centers for Medicare and Medicaid Services, Department of Health and
Human Services. (2015). Condition of participation: Infection control. 42 C.F.R.
§ 482.42.
11 Accreditation Association for Hospitals and Health Systems. (2017). Standard
07.01.21. Healthcare Facilities Accreditation Program: Accreditation
requirements for acute care hospitals. Chicago, IL: Accreditation Association
for Hospitals and Health Systems. (Level VII)
12 DNV GL-Healthcare USA, Inc. (2016). IC.1 .SR.1 . NIAHO® accreditation
requirements: Interpretive guidelines and surveyor guidance (version 11).
Milford, OH: DNV GL-Healthcare USA, Inc. (Level VII)
13 The Joint Commission. (2019). Standard NPSG.01.01.01. Comprehensive
accreditation manual for hospitals. Oakbrook Terrace, IL: The Joint
Commission. (Level VII)
14 The Joint Commission. (2019). Standard RI.01.01.01. Comprehensive
accreditation manual for hospitals. Oakbrook Terrace, IL: The Joint
Commission. (Level VII)
15 Centers for Medicare and Medicaid Services, Department of Health and
Human Services. (2015). Condition of participation: Patient’s rights. 42 C.F.R.
§ 482.13(c)(1).
16 Accreditation Association for Hospitals and Health Systems. (2017). Standard
15.01.16. Healthcare Facilities Accreditation Program: Accreditation
requirements for acute care hospitals. Chicago, IL: Accreditation Association
for Hospitals and Health Systems. (Level VII)
17 DNV GL-Healthcare USA, Inc. (2016). PR.1.SR.5 . NIAHO® accreditation
requirements: Interpretive guidelines and surveyor guidance (version 11).
Milford, OH: DNV GL-Healthcare USA, Inc. (Level VII)
18 Waters, T. R., et al. (2009). “Safe patient handling training for schools of
nursing” [Online]. Accessed via the Web at
https://www.cdc.gov/niosh/docs/2009-127/pdfs/2009-127.pdf (Level VII)
19 Siegel, J. D ., et al. (2007, revised 2017). “2007 guideline for isolation
precautions: Preventing transmission of infectious agents in healthcare
settings” [Online]. Accessed via the Web at
https://www.cdc.gov/infectioncontrol/pdf/guidelines/isolation-guidelines.pdf
(Level II)
20 Accreditation Association for Hospitals and Health Systems. (2017). Standard
07.01.10. Healthcare Facilities Accreditation Program: Accreditation
requirements for acute care hospitals. Chicago, IL: Accreditation Association
for Hospitals and Health Systems. (Level VII)
21 DNV GL-Healthcare USA, Inc. (2016). IC.1 .SR.2 . NIAHO® accreditation
requirements: Interpretive guidelines and surveyor guidance (version 11).
Milford, OH: DNV GL-Healthcare USA, Inc. (Level VII)
22 Elmer, C., et al. (2017). Twenty-four–hour voiding diaries versus 3-day voiding
diaries: A clinical comparison. Female Pelvic Medicine & Reconstructive
Surgery, 23(6), 429–432.
23 Qaseem, A., et al. (2014). Nonsurgical management of urinary incontinence
in women: A clinical practice guideline from the American College of
Physicians. Annals of Internal Medicine, 161(6), 429–440. Accessed via the
Web at http://annals.org/aim/article/1905131/nonsurgical-management-
urinary-incontinence-women-clinical-practice-guideline-from-american (Level
VII)
24 Langemo, D., et al. (2011). Incontinence and incontinence-associated
dermatitis. Advances in Skin and Wound Care, 24(3), 126–140. Accessed via
the Web at http://www.nursingcenter.com/journalarticle?
Article_ID=1126332&Journal_ID=54015&Issue_ID=1126316&expiredce=1
25 Chatham, N., & Carls, C. (2012). How to manage incontinence associated
dermatitis. Wound Care Advisor, 1(1), 7–10. Accessed via the Web at
http://woundcareadvisor.com/wp-content/uploads/2012/05/WCA_M -J-
2012_Dermatitis.pdf
26 Zulkowski, K. (2012). Diagnosing and treating moisture-associated skin
damage. Advances in Skin and Wound Care, 25(5), 231–236. Accessed via the
Web at
http://journals.lww.com/aswcjournal/Fulltext/2012/05000/Diagnosing_and_Tre
ating_Moisture_Associated_Skin.9 .aspx
27 Gray, M., et al. (2012). Incontinence-associated dermatitis: A comprehensive
review and update. Journal of Wound, Ostomy, and Continence Nursing,
39(1), 61–74 . (Level V)
28 Ganz, D. A., et al. (2013). Preventing falls in hospitals: A toolkit for improving
quality of care (AHRQ Publication No. 13-0015-EF). Rockville, MD: Agency for
Healthcare Research and Quality. Accessed via the Web at
https://www.ahrq.gov/sites/default/files/publications/files/fallpxtoolkit_0 .pdf
(Level VII)
29 The Joint Commission. (2019). Standard RC.01.03 .01. Comprehensive
accreditation manual for hospitals. Oakbrook Terrace, IL: The Joint
Commission. (Level VII)
30 Centers for Medicare and Medicaid Services, Department of Health and
Human Services. (2015). Condition of participation: Medical record services.
42 C.F.R. § 482.24(b).
31 Accreditation Association for Hospitals and Health Systems. (2017). Standard
10.00 .03. Healthcare Facilities Accreditation Program: Accreditation
requirements for acute care hospitals. Chicago, IL: Accreditation Association
for Hospitals and Health Systems. (Level VII)
32 DNV GL-Healthcare USA, Inc. (2016). MR.2 .SR.1 . NIAHO® accreditation
requirements: Interpretive guidelines and surveyor guidance (version 11).
Milford, OH: DNV GL-Healthcare USA, Inc. (Level VII)
33 Gormley, E. A., et al. (2012, amended 2014). “Diagnosis and treatment of
non-neurogenic overactive bladder (OAB) in adults: AUA/SUFU guideline”
[Online]. Accessed via the Web at
http://www.auanet.org/guidelines/overactive-bladder-(oab)-(aua/sufu-
guideline-2012-amended-2014) (Level VII)
INDWELLING URINARY CATHETER CARE AND
REMOVAL
The Centers for Disease Control and Prevention estimates
that 15% to 25% of hospitalized patients have an indwelling
urinary catheter inserted at some time during their
hospitalization.1 Catheters are often inserted for
inappropriate indications.2,3 Consider alternatives to
indwelling urinary catheterization when appropriate, such as
external catheter application, bladder ultrasonography,
intermittent catheterization, use of optimal incontinence
products, prompted toileting, urinal and bedside commode
use, and daily weights as alternative methods to collect and
measure urine and monitor fluid balance.4 Appropriate
indications for catheter use include perioperative use for
selected surgical procedures, such as urologic surgery or
surgery on contiguous structures of the genitourinary tract,
prolonged surgery, large-volume infusions or diuretic use
during surgery, or when intraoperative urine output
monitoring is needed; hourly urine output measurement in
critically ill patients; acute urinary retention or urinary
obstruction; open pressure injuries or skin grafts for
selected patients with urinary incontinence; and at the
patient’s request to improve comfort during end-of-life
care.5
Inappropriate or unnecessary use of an indwelling urinary
catheter can result in catheter-associated urinary tract
infection (CAUTI). CAUTI is the most common type of health
care–associated infection in adult patients.3,6 Researchers
estimate that as much as 70% of these infections are
preventable by following a variety of evidence-based
practices.3,6,7
HOSPITAL-ACQUIRED CONDITION ALERT The Centers for Medicare
and Medicaid Services has identified CAUTI as a hospital-acquired
condition that has payment implications, because CAUTI can be
reasonably prevented using a variety of best practices. When caring
for a patient with an indwelling urinary catheter, follow CAUTI
prevention practices, such as performing hand hygiene before and
after catheter manipulation; maintaining a sterile, continuously closed
drainage system; properly securing the catheter; keeping the
collection bag below the level of the bladder; maintaining
unobstructed urine flow; emptying the collection bag regularly;
replacing the urinary catheter and collection system using sterile
technique when breaks in sterile technique, disconnection, or leakage
occur; and discontinuing the catheter as soon as it’s no longer
clinically indicated when caring for a patient with an indwelling
urinary catheter to reduce the risk of CAUTI.5,6,8,9,10,11,12,13
Equipment
Gloves ▪ washcloth ▪ soap and water or plain disposable
wipe ▪ catheter securement device ▪ urine collection
container ▪ Optional: light source, tape, gown, goggles,
mask, mask with face shield, perineal cleaner.
For catheter removal
Fluid-impermeable pad ▪ gloves ▪ 10-mL Luer lock syringe ▪
perineal care supplies ▪ Optional: gown, mask and goggles
or mask with face shield, adhesive remover, gauze pads,
cotton-tipped applicator.
Implementation
Catheter care
■ Gather the necessary equipment.
■ Perform hand hygiene.11,14,15,16,17,18,19
■ Confirm the patient’s identity using at least two patient
identifiers.20
■ Provide privacy.21,22,23,24
■ Explain the procedure to the patient and family (if
appropriate) according to their individual communication
and learning needs to increase their understanding, allay
their fears, and enhance cooperation.25 Discuss the risks
associated with indwelling urinary catheter use and the
measures necessary to reduce the risk of CAUTI.3,6,13 Advise
the patient to remind staff to perform hand hygiene before
and after handling the catheter if they fail to do so.3,6,13
■ Make sure the lighting is adequate so that you can clearly
see the perineum and catheter tubing.
■ Review the necessity of continued catheter use; remove
the catheter (as ordered or according to protocol) as soon as
it’s no longer clinically indicated to reduce the risk of
CAUTI.5,9,10,11,12,13,26
■ Raise the patient’s bed to waist level when performing
patient care to prevent caregiver back strain.27
■ Perform hand hygiene.11,14,15,16,17,18,19
■ Put on gloves and other personal protective equipment,
as needed, to comply with standard precautions.28,29
■ Inspect the catheter system for disconnections and
leakage, because a sterile, continuously closed system is
required to reduce the risk of CAUTI. Replace the catheter
and drainage system using sterile technique when a break
in
sterile technique,
disconnection,
or
leakage
occurs.5,9,10,11,12,13,30
■ Provide routine hygiene for meatal care; note that
cleaning the meatal area with antiseptic solutions isn’t
necessary.5,9,10,11,12,13,30 To avoid contaminating the urinary
tract, always clean by wiping away from—never toward—the
urinary meatus. Use a washcloth and soap and water (or a
perineal cleaner, if used in your facility) or a plain
disposable wipe to clean the periurethral area.26,31 Clean
after each bowel movement; avoid frequent and vigorous
cleaning of the area.31 Gently retract the foreskin of an
uncircumcised male and clean the area, and then return the
foreskin to its normal position.31
NURSING ALERT When cleaning the periurethral area, clean the area
carefully to prevent catheter movement and urethral traction, which
increase the risk of CAUTI.31
■ Inspect the periurethral area for signs of inflammation
and infection.
■ Make sure the catheter is properly secured.5,32 Assess the
securement device daily and change it when clinically
indicated and as recommended by the manufacturer.33 If a
new securement device is needed, connect it to the
catheter before applying the device to the skin.32 If a
securement device isn’t available, use a piece of adhesive
tape to secure the catheter.34 If using tape, retape the
catheter on the side opposite from where it was previously
to prevent skin hypersensitivity and irritation.
NURSING ALERT Provide enough slack before securing the catheter
to prevent tension on the tubing, which could injure the urethral
lumen and bladder wall.11
■ Monitor intake and output, as ordered. Monitor for
changes in urine output, including volume and color.35
Notify the practitioner of abnormal changes.
■ Empty the drainage bag regularly when it becomes one-
half to two-thirds full to prevent undue traction on the
urethra from the weight of urine in the bag. Use a separate
collecting container to empty the drainage for each patient.
During emptying, avoid splashing, and don’t allow the
drainage spigot to come in contact with the nonsterile
collecting container.5,9,10,11,31,36
■ Keep the catheter and drainage tubing free from kinks to
allow the free flow of urine,13,26 and keep the drainage bag
below the level of the patient’s bladder to prevent backflow
of urine into the bladder, which increases the risk of
CAUTI.3,5,10,11,26,36
■ Don’t place the drainage bag on the floor, to reduce the
risk of contamination and subsequent CAUTI.9,10,37
■ Return the bed to the lowest position to prevent falls and
maintain patient safety.11
■ Dispose of all used supplies in appropriate waste
receptacles.
■ Remove and discard your gloves and any other personal
protective equipment worn.29
■ Perform hand hygiene.14,15,16,17,18,19
■ Document the procedure.38,39,40,41
Catheter removal
■ Verify the practitioner’s order, if necessary, or follow your
facility’s protocol for indwelling urinary catheter removal.
■ Gather the equipment and supplies at the patient’s
bedside.
■ Perform hand hygiene.14,15,16,17,18,19
■ Confirm the patient’s identity using at least two patient
identifiers.20
■ Explain the procedure to the patient and family (if
appropriate) according to their individual communication
and learning needs to increase their understanding, allay
their fears, and enhance cooperation.25 Tell the patient to
expect slight discomfort.
■ Provide privacy.21,22,23,24
■ Raise the patient’s bed to waist level when performing
patient care to prevent caregiver back strain.27
■ Perform hand hygiene.11,14,15,16,17,18,19
■ Put on gloves and other personal protective equipment, if
necessary, to comply with standard precautions.28,29
■ Place the patient on a fluid-impermeable pad to protect
the bed linens.
■ Position the patient for easy access to the urinary
catheter, and drape the patient for privacy.
■ Remove the urinary catheter securement device gently
according to the manufacturer’s directions, or remove the
tape that secures the catheter and catheter tubing. Apply
adhesive remover with a cotton-tipped applicator or gauze
pad, if needed, to assist with removal and to prevent skin
tearing or shearing.
■ Assess the patient’s perineum and meatus for redness,
irritation, or discharge.
PATIENT TEACHING
Teaching about leg bags
A urine drainage bag attached to the leg provides the catheterized patient
with greater mobility. Because the bag is hidden under clothing, it may also
help the patient feel more comfortable about catheterization. Leg bags are
usually worn during the day and are replaced at night with a standard
drainage bag.
If the patient will be discharged with an indwelling urinary catheter, teach
the patient how to attach and remove a leg bag. To demonstrate, you’ll need
a bag with a short drainage tube, two straps, an alcohol pad, adhesive tape,
and a screw clamp or hemostat.
Attaching the leg bag
■ Provide privacy and explain the procedure. Describe the advantages of a
leg bag, but caution the patient that a leg bag is smaller than a standard
drainage bag and may have to be emptied more frequently.
■ Remove the protective covering from the tip of the drainage tube. Then
show the patient how to clean the tip with an alcohol pad, wiping away from
the opening to avoid contaminating the tube.
■ Show the patient how to attach the tube to the catheter.
■ Place the drainage bag on the patient’s calf or thigh. Have the patient
fasten the straps securely (as shown at right), and then show the patient how
to tape the catheter to the leg. Emphasize that the patient must leave slack
in the catheter to minimize pressure on the bladder, urethra, and related
structures. Excessive pressure or tension can lead to tissue breakdown.
Avoiding complications
■ Although most leg bags have a valve in the drainage tube that prevents
urine reflux into the bladder, urge the patient to keep the drainage bag lower
than the bladder at all times, because urine in the bag is a perfect growth
medium for bacteria. Caution the patient also not to go to bed or take long
naps while wearing the leg bag.
■ To prevent a full leg bag from damaging the bladder wall and urethra,
encourage the patient to empty the bag when it’s half full or every 3 to 6
hours.34 The patient should also inspect the catheter and drainage tube
periodically for compression or kinking, which could obstruct urine flow and
result in bladder distention.
■ Instruct the patient to avoid fastening the straps too tightly, because doing
so may impede circulation.
■ Tell the patient to wash the leg bag with soap and water or a bacteriostatic
solution before each use to prevent infection.
■ Attach a 10-mL Luer-lock syringe to the Luer-lock
mechanism on the urinary catheter.
■ Allow the pressure within the urinary catheter’s balloon to
force the plunger back and to fill the syringe with all of the
sterile water in the balloon to deflate the balloon. The
amount of sterile water injected usually is indicated on the
tip of the catheter’s balloon lumen and in the patient’s
medical record. Don’t use vigorous aspiration, because this
may cause the balloon inflation lumen to collapse; use only
gentle aspiration, if needed, to encourage deflation. Allow
adequate time (about 30 seconds) for the pressure within
the balloon to fill the syringe. If the balloon doesn’t deflate
or if deflation is slow, remove and reapply the syringe to the
Luer-lock mechanism. If the balloon still doesn’t deflate,
consider severing the balloon valve arm, if permitted by
your facility. If necessary, contact the practitioner or other
specially trained professional for assistance as indicated by
your facility.42
■ Ask the patient to take a deep breath in and then out to
help relax the pelvic floor muscles; as the patient exhales,
gently remove the catheter by withdrawing it slowly and
evenly. If you meet resistance while withdrawing the
catheter, stop and notify the practitioner. Warn a male
patients that he may feel discomfort as the deflated balloon
passes through the prostatic urethra.43
■ If the patient is able to perform perineal self-care, provide
the necessary supplies. If not, provide perineal care.43
■ Remove and discard the fluid-impermeable pad, and
position the patient for comfort.
■ Measure and record the amount of urine in the collection
bag before discarding it.
■ Encourage the patient whose condition allows it to
maintain an oral intake of 30 mL/kg/day to flush the bladder
of microorganisms that might be associated with indwelling
urinary catheter use.43
■ Return the bed to the lowest position to prevent falls and
maintain patient safety.11
■ Dispose of used equipment in the appropriate
receptacles.
■ Remove and discard your gloves and any other personal
protective equipment worn.29
■ Perform hand hygiene.14,15,16,17,18,19
■ Monitor the patient for first voiding after indwelling
urinary catheter removal. Assess the volume and
characteristics of the voided urine.
■ Perform hand hygiene.14,15,16,17,18,19
■ Document the procedure.38,39,40,41
Special considerations
■ Unless obstruction is anticipated (for example, from
bleeding after prostate or bladder surgery), bladder
irrigation isn’t recommended. If obstruction is anticipated,
continuous irrigation is suggested to prevent obstruction.31
■ If you need to collect a small urine specimen or culture,
thoroughly disinfect the needleless sampling port with a
disinfectant pad and then allow it to dry. Collect the sample
by aspirating urine from the needleless sampling port with a
sterile syringe or sterile urine collection tube system and a
cannula adapter.5,11,31 (See the “Urine specimen collection”
procedure.)
■ If a large volume of urine is needed for special analysis,
obtain the sample from the drainage bag using sterile
technique.5,31
■ When possible, attach a leg bag to allow the patient
greater mobility.
■ Encourage a patient with unrestricted fluid intake to
increase intake to at least 30 mL/kg/day to help flush the
urinary system and reduce sediment formation.34,44
■ Unless otherwise clinically indicated, consider using the
smallest bore catheter possible, consistent with good
drainage, to minimize bladder neck and urethral
trauma.5,26,31
■ After catheter removal, assess the patient for
incontinence (or dribbling), urgency, persistent dysuria or
bladder spasms, fever, chills, or palpable bladder distention.
Report these conditions to the practitioner.
Patient teaching
If the patient will be discharged with an indwelling catheter,
teach the patient how to use a leg bag. (See Teaching about
leg bags.) Instruct the patient to wash the urinary meatus
and perineal area with soap and water twice daily and the
anal area after each bowel movement. Provide the patient
and family with information regarding additional methods of
infection control as well as the signs and symptoms of
urinary tract infection and obstruction.44 Also review with
the patient reasons to notify the practitioner.
Complications
Complications associated with indwelling urinary catheter
use include CAUTI, genitourinary trauma, epididymitis (in
men), retained balloon fragments, bladder fistula (with
prolonged
use), bladder
stone
formation,
and
incontinence.45,46
Documentation
Document the reason for continued catheter use,13,26
maintenance care provided,5 your assessment findings,
patient and family teaching performed, and patient and
family understanding of the teaching. Record any specimens
collected, including the collection method.
Document the date and time the indwelling urinary
catheter was removed, the amount of sterile water removed
from the urinary catheter balloon, perineal assessment
findings, and the patient’s tolerance of the procedure.
Record the time and amount of the patient’s first void after
catheter removal, any signs and symptoms associated with
catheter removal, your interventions, and the patient’s
response to those interventions. Document patient teaching
and the patient’s comprehension of your teaching.
REFERENCES
1 Centers for Disease Control and Prevention. (2015, updated 2017). “Catheter-
associated urinary tract infections (CAUTI)” [Online]. Accessed via the Web at
https://www.cdc.gov/hai/ca_uti/uti.html
2 Gould, C. (n.d .). “Catheter-associated urinary tract infection (CAUTI) toolkit”
[Online]. Accessed via the Web at
http://www.cdc.gov/HAI/pdfs/toolkits/CAUTItoolkit_3 _10.pdf
3 Carter, N. M ., et al. (2014). An evidence-based approach to the prevention of
catheter-associated urinary tract infections. Urologic Nursing, 34(5), 238–245.
4 American Hospital Association/Health Research & Educational Trust. (2017).
“Catheter associated urinary tract infection (CAUTI) top ten checklist: Date of
last CAUTI event” [Online]. Accessed via the Web at http://www.hret-
hiin.org/resources/display/catheterassociated-urinary-tract-infections-cauti-
top-ten-checklist-date-of-last-cauti-event
5 Lo, E., et al. (2014). SHEA/IDSA practice recommendation: Strategies to
prevent catheter-associated urinary tract infections in acute care hospitals:
2014 update. Infection Control and Hospital Epidemiology, 35(5), 464–479.
Accessed via the Web at http://www.jstor.org/stable/10.1086/675718 (Level I)
6 Halm, M. A., & O’Connor, N. (2014). Do system-based interventions affect
catheter-associated urinary tract infection? American Journal of Critical Care,
23(6), 505–509. Accessed via the Web at
http://ajcc.aacnjournals.org/content/23/6/505.full.pdf+html (Level V)
7 Seckel, M. A. (2013). Maintaining urinary catheters: What does the evidence
say? Nursing2013, 43(2), 63–65. Accessed via the Web at
http://journals.lww.com/nursing/Pages/articleviewer.aspx?
year=2013&issue=02000&article=00018&type=Fulltext
8 Jarrett, N., & Callaham, M. (2016). “Evidence-based guidelines for selected
hospital-acquired conditions: Final report” [Online]. Accessed via the Web at
https://www.cms.gov/Medicare/Medicare-Fee-for-Service-
Payment/HospitalAcqCond/Downloads/2016-HAC-Report.pdf
9 Accreditation Association for Hospitals and Health Systems. (2017). Standard
07.01.17. Healthcare Facilities Accreditation Program: Accreditation
requirements for acute care hospitals. Chicago, IL: Accreditation Association
for Hospitals and Health Systems. (Level VII)
10 The Joint Commission. (2019). Standard NPSG.07.06 .01. Comprehensive
accreditation manual for hospitals. Oakbrook Terrace, IL: The Joint
Commission. (Level VII)
11 Healthcare Infection Control Practices Advisory Committee. (2010, revised
2017). “Guideline for prevention of catheter-associated urinary tract
infections 2009” [Online]. Accessed via the Web at
https://www.cdc.gov/infectioncontrol/pdf/guidelines/cauti-guidelines.pdf
(Level I)
12 Institute for Healthcare Improvement. (2012). How-to guide: Prevent
catheter-associated urinary tract infection. Cambridge, MA: Institute for
Healthcare Improvement. (Level VII)
13 Association of Professionals in Infection Control and Epidemiology (APIC).
(2014). “APIC implementation guide: Guide to preventing catheter-associated
urinary tract infections” [Online]. Accessed via the Web at
http://apic.org/Resource_/EliminationGuideForm/6473ab9b-e75c-457a-8d0f-
d57d32bc242b/File/APIC_CAUTI_web_0603 .pdf (Level IV)
14 Centers for Disease Control and Prevention. (2002). Guideline for hand
hygiene in health-care settings: Recommendations of the Healthcare Infection
Control Practices Advisory Committee and the HICPAC/SHEA/APIC/IDSA Hand
Hygiene Task Force. MMWR Recommendations and Reports, 51(RR-16), 1–45.
Accessed via the Web at https://www.cdc.gov/mmwr/pdf/rr/rr5116.pdf (Level
II)
15 The Joint Commission. (2019). Standard NPSG.07.01.01. Comprehensive
accreditation manual for hospitals. Oakbrook Terrace, IL: The Joint
Commission. (Level VII)
16 World Health Organization. (2009). “WHO guidelines on hand hygiene in
health care: First global patient safety challenge, clean care is safer care”
[Online]. Accessed via the Web at
http://apps.who.int/iris/bitstream/10665/44102/1/9789241597906_eng.pdf
(Level IV)
17 Accreditation Association for Hospitals and Health Systems. (2017). Standard
07.01.21. Healthcare Facilities Accreditation Program: Accreditation
requirements for acute care hospitals. Chicago, IL: Accreditation Association
for Hospitals and Health Systems. (Level VII)
18 Centers for Medicare and Medicaid Services, Department of Health and
Human Services. (2015). Condition of participation: Infection control. 42 C.F.R.
§ 482.42.
19 DNV GL-Healthcare USA, Inc. (2016). IC.1 .SR.1 . NIAHO® accreditation
requirements: Interpretive guidelines and surveyor guidance (version 11).
Milford, OH: DNV GL-Healthcare USA, Inc. (Level VII)
20 The Joint Commission. (2019). Standard NPSG.01.01.01. Comprehensive
accreditation manual for hospitals. Oakbrook Terrace, IL: The Joint
Commission. (Level VII)
21 Accreditation Association for Hospitals and Health Systems. (2017). Standard
15.01.16. Healthcare Facilities Accreditation Program: Accreditation
requirements for acute care hospitals. Chicago, IL: Accreditation Association
for Hospitals and Health Systems. (Level VII)
22 Centers for Medicare and Medicaid Services, Department of Health and
Human Services. (2015). Condition of participation: Patient’s rights. 42 C.F.R.
§ 482.13(c)(1).
23 DNV GL-Healthcare USA, Inc. (2016). PR.1.SR.5 . NIAHO® accreditation
requirements: Interpretive guidelines and surveyor guidance (version 11).
Milford, OH: DNV GL-Healthcare USA, Inc. (Level VII)
24 The Joint Commission. (2019). Standard RI.01.01.01. Comprehensive
accreditation manual for hospitals. Oakbrook Terrace, IL: The Joint
Commission. (Level VII)
25 The Joint Commission. (2019). Standard PC.02.01.21. Comprehensive
accreditation manual for hospitals. Oakbrook Terrace, IL: The Joint
Commission. (Level VII)
26 American Association of Critical-Care Nurses (AACN). (2017). “A ACN practice
alert: Prevention of CAUTI in adults” [Online]. Accessed via the Web at
https://www.aacn.org/~/media/aacn-website/clincial-resources/practice-
alerts/adultcauti2017practicealert.pdf
27 Waters, T. R., et al. (2009). “Safe patient handling training for schools of
nursing” [Online]. Accessed via the Web at
http://www.cdc.gov/niosh/docs/2009-127/pdfs/2009-127.pdf (Level VII)
28 Siegel, J. D ., et al. (2007, revised 2017). “2007 guideline for isolation
precautions: Preventing transmission of infectious agents in healthcare
settings” [Online]. Accessed via the Web at
http://www.cdc.gov/hicpac/pdf/isolation/Isolation2007.pdf (Level II)
29 Accreditation Association for Hospitals and Health Systems. (2017). Standard
07.01.10. Healthcare Facilities Accreditation Program: Accreditation
requirements for acute care hospitals. Chicago, IL: Accreditation Association
for Hospitals and Health Systems. (Level VII)
30 Long Khanh Dao Le, B. (2015). Urethral catheter (indwelling short term):
Urinary tract infection prevention. Adelaide: Joanna Briggs Institute. (Level V)
31 Society of Urologic Nurses and Associates. (2016). Clinical practice
guidelines: Prevention & control of catheter-associated urinary tract infection
(CAUTI). Pittman, NJ: Society of Urologic Nurses and Associates. Accessed via
the Web at
http://www.suna.org/sites/default/files/download/cautiGuideline.pdf (Level VII)
32 Payne, D. (2014). Safe and secure: Catheter fixation. Nursing and Residential
Care, 16(1), 608–610.
33 C. R. Bard. (2014). “StatLock Foley stabilization device” [Online]. Accessed
via the Web at
http://www.bardmedical.com/media/18169/ud_statlockfoleyposter.pdf
34 Society of Urologic Nurses and Associates. (2015). Clinical practice
guidelines: Care of the patient with an indwelling catheter. Pittman, NJ:
Society of Urologic Nurses and Associates. Accessed via the Web at
https://www.suna.org/sites/default/files/download/indwellingCatheter.pdf
(Level VII)
35 Craven, H. (Ed.) . (2016). Core curriculum for medical-surgical nursing (5th
ed.). Pitman, NJ: Academy of Medical-Surgical Nurses.
36 Long Khanh Dao Le, B. (2016). Urinary drainage bags: Emptying, changing,
and securing. Adelaide: Joanna Briggs Institute. (Level V)
37 Smith, J. M. (2003). Indwelling catheter management: From habit-based to
evidence-based practice. Ostomy/Wound Management, 49(12), 34–45.
Accessed via the Web at http://www.o -wm .com/content/indwelling-catheter-
management-from-habit-based-evidence-based-practice
38 The Joint Commission. (2019). Standard RC.01.03 .01. Comprehensive
accreditation manual for hospitals. Oakbrook Terrace, IL: The Joint
Commission. (Level VII)
39 Accreditation Association for Hospitals and Health Systems. (2017). Standard
10.00 .03. Healthcare Facilities Accreditation Program: Accreditation
requirements for acute care hospitals. Chicago, IL: Accreditation Association
for Hospitals and Health Systems. (Level VII)
40 Centers for Medicare and Medicaid Services, Department of Health and
Human Services. (2015). Condition of participation: Medical record services.
42 C.F.R. § 482.24(b).
41 DNV GL-Healthcare USA, Inc. (2016). MR.2 .SR.1 . NIAHO® accreditation
requirements: Interpretive guidelines and surveyor guidance (version 11).
Milford, OH: DNV GL-Healthcare USA, Inc. (Level VII)
42 C. R. Bard, Inc. (n.d .). “SureStepTM Foley tray system: Insertion and removal
skills training checklist” [Online]. Accessed via the Web at
http://www.bardmedical.com/media/675882/ud_surestep_insertionremovalche
cklist.pdf
43 European Association of Urology Nurses. (2012). “Evidence-based guidelines
for best practice in urological healthcare: Catheterisation: Indwelling
catheters in adults” [Online]. Accessed via the Web at
http://www.nursing.nl/PageFiles/11870/001_1391694991387.pdf (Level VII)
44 Herter, R., & Kazer, M. W. (2010). Best practices in urinary catheter care.
Home Healthcare Nurse, 28(6), 342–349. Accessed via the Web at
http://journals.lww.com/homehealthcarenurseonline/pages/articleviewer.aspx
?year=2010&issue=06000&article=00005&type=Fulltext
45 Leuck, A. M ., et al. (2012). Complications of Foley catheters—Is infection the
greatest risk? Journal of Urology, 187(5), 1662–1666. Accessed via the Web at
http://www.jurology.com/article/S0022-5347(11)06062-9/fulltext (Level VI)
46 Schaeffer, A. J . Complications of urinary bladder catheters and preventive
strategies. (2017). In: UpToDate, Richie, J. P., & Chen, W. (Eds.). Retrieved
from; www.uptodate.com
INDWELLING URINARY CATHETER INSERTION
An indwelling urinary (Foley) catheter remains in the
bladder to provide continuous urine drainage. A balloon
inflated at the catheter’s distal end prevents it from slipping
out of the bladder after insertion.
An indwelling urinary catheter should be inserted only
when absolutely necessary because its use is associated
with an increased risk of developing a urinary tract
infection, with the risk increasing with each day of use.1,2
Catheter-associated urinary tract infection (CAUTI) is the
most common type of health care–associated infection in
the United States, accounting for 35% of all such infections.3
HOSPITAL-ACQUIRED CONDITION ALERT Keep in mind that the
Centers for Medicare and Medicaid Services considers CAUTI a
hospital-acquired condition because it can be reasonably prevented
using a variety of best practices. When caring for a patient with an
indwelling urinary catheter, be sure to follow CAUTI prevention
practices to reduce the risk of CAUTI, such as performing hand
hygiene before and after any catheter manipulation; maintaining a
sterile,
continuously closed drainage
system;
maintaining
unobstructed urine flow; emptying the collection bag regularly;
replacing the catheter and collection system using sterile technique
when a break in sterile technique, disconnection, or leakage occurs;
and discontinuing the catheter as soon as it’s no longer clinically
indicated.4,5,6,7,8,9
To reduce the risk of CAUTI, consider alternatives to
indwelling urinary catheterization when appropriate, such as
external catheter application, bladder ultrasonography,
intermittent catheterization, use of optimal incontinent
products, prompted toileting, urinal and bedside commode
use, and daily weight as alternative methods for collecting
and measuring urine and monitoring fluid balance.10 Insert
an indwelling urinary catheter only for appropriate
indications, such as acute urinary retention or bladder outlet
obstruction; the need for accurate urine output
measurements in a critically ill patient; perioperative use for
a patient undergoing urologic surgery or another procedure
on structures of the genitourinary tract; prolonged surgery
(with removal of catheters inserted for this purpose in the
postanesthesia care unit); large-volume infusions or diuretic
administration anticipated during surgery; intraoperative
monitoring of urinary output; assistance in the healing of
open sacral or perineal wounds or skin grafts in certain
incontinent patients;5 prolonged immobilization (such as
potentially unstable thoracic or lumbar spine and multiple
traumatic injuries, including pelvic fractures); and improved
comfort for end-of-life care, if needed.2
Indwelling urinary catheter insertion is contraindicated in
a patient who has a urethral injury, which is typically
associated with pelvic trauma. Relative contraindications
include urethral stricture, recent urinary tract surgery (for
example urethra, bladder), and the presence of an artificial
sphincter. For these issues, a practitioner should be
consulted to perform the procedure.11,12
Use sterile technique when inserting, manipulating, and
maintaining the catheter. Maintain a sterile, continuously
closed drainage system;13 don’t disconnect the catheter
from the drainage bag unless absolutely necessary. Avoid
irrigation unless necessary.1,14 When the patient has an
indwelling urinary catheter inserted for surgery, ensure its
discontinuation within 24 hours of surgery unless another
indication exists. Review the need for the indwelling urinary
catheter daily and remove it as soon as it’s no longer
necessary.1,2,3,4,5,6,7,9
Equipment
Sterile indwelling urinary catheter (smallest-bore catheter
possible that will support adequate urine drainage) ▪
syringe filled with 10 mL of sterile water ▪ fluid-
impermeable pads ▪ gloves ▪ sterile gloves ▪ sterile drape
▪ sterile fenestrated drape ▪ sterile presaturated antiseptic
swabs or antiseptic solution, sterile water, or saline and
sterile swabs or sterile cotton balls and plastic forceps2,5 ▪
single-use packets of soap-containing wipes, or soap and
water and a washcloth ▪ single-use packet of sterile water-
soluble lubricant ▪ sterile drainage collection device ▪
intake and output record ▪ securement device or tape ▪
Optional: insertion checklist, examination light or flashlight,
bladder ultrasonography device, gown, mask with face
shield or mask and goggles.
Prepackaged sterile disposable kits that usually contain all
the necessary equipment are available.
Implementation
■ Verify the practitioner’s order.
■ Assess the patient to make sure that an indwelling
urinary catheter is indicated; assess for alternatives to
indwelling urinary catheter use.15 If necessary, use bladder
ultrasonography to measure the volume of urine in the
patient’s bladder to avoid unnecessary catheterization.2
(See the “Bladder ultrasonography” procedure.)
■ Check the patient’s medical record for allergies, including
to latex and iodine.16
■ Gather the appropriate equipment. Use the smallest bore
catheter possible that will support adequate urine drainage
(unless otherwise clinically indicated) to minimize bladder
neck and urethral trauma.5,14,17
■ Obtain the assistance of a coworker to help with patient
positioning and to ensure that sterile technique is
maintained during insertion.
■ Ensure adequate lighting.
■ Use an insertion checklist if available in your facility to
guide the insertion process.18
■ Perform hand hygiene.2,19,20,21,22,23,24,25
■ Confirm the patient’s identity using at least two patient
identifiers.26
■ Provide privacy.27,28,29,30
■ Explain the procedure to the patient and family (if
appropriate) according to their individual communication
and learning needs to increase their understanding, allay
their fears, and enhance cooperation.31 Inform them of the
reason for catheterization and what to expect in the way of
discomfort.19 Discuss the risks associated with indwelling
urinary catheter use and the necessary measures to reduce
the risk of CAUTI.3,9 Advise the patient and family to remind
staff to perform hand hygiene before and after handling the
catheter if not done.18
■ Raise the patient’s bed to waist level when providing care
to prevent caregiver back strain.32
■ Perform hand hygiene.2,19,20,21,22,23,24,25
■ Put on gloves and personal protective equipment, as
needed, to comply with standard precautions.33,34
For a female patient
■ Place the patient in the supine or lithotomy position with
her knees bent and legs abducted to allow visualization of
the urinary meatus.19 Alternatively, position the patient on
her side in a knee-chest position if she’s unable to tolerate
supine or lithotomy positioning.
■ Place a fluid-impermeable pad on the bed between the
patient’s legs and under her hips to avoid soiling the linens.
■ Open the outer packaging of the prepackaged insertion
kit and place it between the patient’s legs.
■ Wash the patient’s periurethral area with warm water and
soap. Rinse and dry thoroughly.1,8,10
■ Remove and discard your gloves.33
■ Perform hand hygiene.2,19,20,21,22,23,24,25
■ Using sterile no-touch technique, open the insertion kit
wrap.35
■ Put on sterile gloves.1,2,5,8,10
■ Place a sterile underpad beneath the patient; shield your
gloves by cuffing the drape material under your gloved
hands to prevent contamination.35
■ Place a sterile fenestrated drape over the perineal area to
create a sterile field (as shown below).19 Take care not to
contaminate your gloves.
■ Tear open the packet of presaturated antiseptic swabs, or
saturate sterile swabs of cotton balls with antiseptic
solution, sterile water, or sterile saline as directed by your
facility.2,5 Be careful not to spill the solution on the
equipment.
■ Open the packet of water-soluble lubricant and deposit
the lubricant into the insertion kit tray.
■ Open the catheter and place it on the tray with the
lubricant.
■ If the drainage bag is not preconnected, attach it to the
other end of the catheter.
■ Attach the syringe filled with sterile water to the balloon
inflation port. Don’t inflate the balloon before insertion
unless directed by the manufacturer, because doing so can
cause microtears, which increase the risk of infection.
■ Separate the labia majora and labia minora as widely as
possible with the thumb, middle, and index fingers of your
nondominant hand so you have a full view of the urinary
meatus. Keep the labia well separated throughout the
procedure so they don’t obscure the urinary meatus or
contaminate the area when it’s cleaned.
■ With your dominant hand, use an antiseptic swab or,
using plastic forceps, pick up a cotton ball soaked with
sterile antiseptic, sterile water, or sterile saline to clean the
labium minus furthest from you using a downward stroke;
then discard the swab or cotton ball. Repeat for the labium
closest to you. Use another antiseptic swab or solution-
soaked cotton ball to clean the area between the labia
minora.19
■ Maintaining sterile technique, pick up the catheter with
your dominant hand and lubricate the catheter tip with the
water-soluble lubricant.19
■ Hold the catheter 2′′ to 3′′ (5 to 7.6 cm) from the tip, and
slowly insert the lubricated catheter tip into the urinary
meatus (as shown below); expect to be able to advance the
catheter without meeting resistance.19
■ Continue to hold the labia apart until urine begins to flow,
and advance the catheter about 2′′ to 3′′ (5 to 7.6 cm)
further to make sure the balloon is in the bladder and not in
the urethra.19 If urine doesn’t begin to flow, ask your
coworker to apply gentle pressure to the suprapubic region,
which may initiate urine flow.36 If the catheter is
inadvertently inserted into the vagina, leave it there as a
landmark, then begin the procedure over again using new
supplies.
■ Inflate the balloon using the water-filled syringe (as
shown below), instilling the recommended amount of sterile
water specified on the catheter to secure the catheter inside
the bladder.19 Gently pull the catheter until the inflated
balloon is snug against the bladder neck.
■ Secure the catheter to the patient’s thigh using a
securement device (or tape if a securement device isn’t
available) to prevent possible tension on the urogenital
trigone.2,19
■ Keep the catheter and drainage tube free from kinking to
prevent obstruction of urinary flow.1,2,5,7
■ Position the drainage bag below the level of the patient’s
bladder to facilitate drainage and prevent stasis of urine,
which increases the risk of CAUTI.1,2 Don’t place the
drainage bag on the floor, to reduce the risk of
contamination and subsequent CAUTI.2
■ Return the bed to the lowest position to prevent falls and
maintain patient safety.37
■ Dispose of all used supplies in the appropriate
receptacles.
■ Remove and discard your gloves and any other personal
protective equipment worn.33,34,38
■ Perform hand hygiene.2,19,20,21,22,23,24,25
■ Document the procedure.39,40,41,42
For a male patient
■ Position the patient in the supine position with his legs
extended and flat on the bed. Ask the patient to hold the
position to give you a clear view of the urinary meatus and
to prevent contamination of the sterile field.
■ Place a fluid-impermeable pad on the bed between the
patient’s legs and under his hips to avoid soiling the linens.
■ Open the outer packaging of the prepackaged insertion
kit and place it between the patient’s legs.
■ Wash the patient’s periurethral area using soap-
containing wipes. Alternatively, you may clean the area with
warm water and soap using a washcloth. Rinse and dry the
area thoroughly.33
■ Remove and discard your gloves.1,8,10
■ Perform hand hygiene.2,19,20,21,22,23,24,25
■ Using sterile no-touch technique, open the insertion kit
wrap.35
■ Put on sterile gloves.1,2,5,8,10
■ Place a sterile underpad beneath the patient; shield your
gloves by cuffing the drape material under your gloved
hands to prevent contamination.35
■ Place a sterile fenestrated drape over the patient’s lower
abdomen and upper thighs so that only the genital area
remains exposed (as shown below).19 Take care not to
contaminate your gloves.
■ Tear open the packet of presaturated antiseptic swabs, or
saturate the sterile swabs or cotton balls with antiseptic
solution, sterile water, or sterile saline solution as directed
by your facility.2,5 Be careful not to spill the solution on the
equipment.
■ Open the container of water-soluble lubricant and deposit
the lubricant into the insertion kit tray.
■ If the drainage bag is not preconnected, attach it to the
other end of the catheter.
■ Attach the syringe filled with sterile water to the balloon
inflation port. Don’t inflate the balloon before insertion
unless directed by the manufacturer, because doing so can
cause microtears, which increase the risk of infection.
■ Hold the penis with your nondominant hand. If the patient
is uncircumcised, retract the foreskin. Then gently lift and
stretch the penis to a 60- to 90-degree angle.43 Hold the
penis this way throughout the procedure to straighten the
urethra and maintain a sterile field.
■ Use your dominant hand to clean the glans with a sterile,
antiseptic swab or solution-soaked sterile cotton ball held in
the forceps. Clean in a circular motion, starting at the
urinary meatus and working outward (as shown on top
right).43
■ Repeat the procedure, using another antiseptic swab or
solution-soaked cotton ball, taking care not to contaminate
your sterile glove.
■ Maintaining sterile technique, pick up the catheter with
your dominant hand and lubricate the catheter tip with the
water-soluble lubricant.43 Additionally, if ordered, instill 5 to
10 mL of sterile water soluble lubricant into the urethra to
prevent trauma to the urethral lining and to facilitate
insertion.43
■ Hold the catheter 2′′ to 3′′ (5 to 7.6 cm) from the tip, and
prepare to insert the lubricated tip into the urinary meatus
(as shown below). To facilitate insertion by relaxing the
sphincter, ask the patient to cough as you insert the
catheter. Tell him to breathe deeply and slowly to further
relax the sphincter and help prevent spasms.43
■ Continue to advance the catheter to the catheter
bifurcation and check for urine flow.43 If urine fails to flow,
ask a coworker to apply gently pressure to the suprapubic
area. If the foreskin was retracted, replace it to prevent
compromised circulation and painful swelling.
■ Once urine starts to flow, inflate the balloon using the
water-filled syringe attached to the inflation port, instilling
the recommended amount of sterile water specified on the
catheter. Gently pull the catheter until the inflated balloon is
snug against the bladder neck.43
NURSING ALERT Never inflate a balloon without first establishing
urine flow, which confirms that the catheter is in the bladder.
■ Secure the catheter using a catheter securement
device.2,19 If a securement device isn’t available, tape the
catheter to the patient’s abdomen or thigh to prevent
pressure on the urethra at the penoscrotal junction, which
can lead to formation of urethrocutaneous fistulas. Taping
this way also prevents traction on the bladder and alteration
in the normal direction of urine flow in males.
■ Keep the catheter and drainage tube free from kinking
and avoid dependent loops to prevent obstruction of urine
flow.1,2,5,7
■ Hang the collection bag below the level of the patient’s
bladder to prevent urine reflux into the bladder, which can
cause CAUTI, and to facilitate gravity drainage of the
bladder.1,2 Don’t place the drainage bag on the floor.2
■ Return the bed to the lowest position to prevent falls and
maintain patient safety.37
■ Dispose of all used supplies in appropriate receptacles.
■ Remove and discard your gloves and any other personal
protective equipment worn.33,34,38
■ Perform hand hygiene.2,19,20,21,22,23,24,25
■ Document the procedure.39,40,41,42
Special considerations
■ Patients at high risk for latex hypersensitivity include
those with spina bifida, spinal cord injury, atopy, certain
food allergies, and occupational exposure. Provide these
patients with a latex-free environment by avoiding all
products containing latex proteins, including gloves,
catheters, condoms, drains, and injection ports.16
■ In addition to hypersensitivity reactions, latex urethral
catheters have been associated with an increased risk of
cytotoxicity, urethritis, stricture, urinary tract infection, and
encrustation. Selection of an alternative material, such as
100% silicone, reduces these risks, particularly when you
anticipate long-term catheterization.16
■ Empty the drainage bag at least once per shift using a
separate, clean collecting container for each patient; avoid
splashing, and prevent contact of the drainage spigot with
the collecting container.1,2,9
■ If you need a small urine sample for laboratory
examination (for culture or urinalysis), thoroughly disinfect
the needleless sampling port with a disinfectant pad and
allow it to dry, and aspirate urine from the sampling port
using a sterile adapter or syringe. If you need a large
volume for special analysis (not culture), obtain the sample
from the drainage bag using sterile technique.3,14
■ Monitor and record the patient’s intake and output.1,3
■ After the first unsuccessful insertion attempt, a urologist
(or a nurse in some facilities) may use an #18 French Coude
catheter.44
■ Explain the basic principles of gravity drainage so that
the patient realizes the importance of keeping the drainage
tubing and collection bag lower than the bladder at all
times.2,5
Patient teaching
If the patient will be discharged with a long-term indwelling
catheter, teach the patient or family all aspects of daily
catheter maintenance, including care of the skin and urinary
meatus, signs and symptoms of urinary tract infection or
obstruction, how to irrigate the catheter (if appropriate), and
the importance of adequate fluid intake to maintain
patency.9
Complications
Complications associated with indwelling urinary catheter
use include CAUTI, genitourinary trauma, retained balloon
fragments, bladder fistula (with prolonged use), bladder
stone formation, and incontinence.3,44,45
Documentation
Document your assessment findings and the indication for
catheter use. Record the date and time of insertion and the
size and type of catheter used, and the amount of sterile
water used to inflate the balloon. Note the characteristics of
the urine obtained. Record the patient’s intake and output.
Document any complications, the date and time the
practitioner was notified, the prescribed interventions, and
the patient’s response to those interventions. Record patient
teaching and the patient’s comprehension of your teaching.
REFERENCES
1 Agency for Healthcare Research and Quality. (2015). “Toolkit for reducing
catheter-associated urinary tract infections in hospital units: Implementation
guide” [Online]. Accessed via the Web at
https://www.ahrq.gov/professionals/quality-patient-safety/hais/cauti-
tools/impl-guide/index.html (Level VII)
2 Healthcare Infection Control Practices Advisory Committee. (2010). “Guideline
for prevention of catheter-associated urinary tract infections 2009” [Online].
Accessed via the Web at
http://www.cdc.gov/hicpac/pdf/CAUTI/CAUTIguideline2009final.pdf (Level I)
3 Carter, N. M ., et al. (2014). An evidence-based approach to the prevention of
catheter-associated urinary tract infections. Urologic Nursing, 34(5), 238–245.
4 Jarrett, N., & Callaham, M. (2016). “Evidence-based guidelines for selected
hospital-acquired conditions: Final report” [Online]. Accessed via the Web at
https://www.cms.gov/Medicare/Medicare-Fee-for-Service-
Payment/HospitalAcqCond/Downloads/2016-HAC-Report.pdf
5 Lo, E., et al. (2014). SHEA/IDSA practice recommendation: Strategies to
prevent catheter-associated urinary tract infections in acute care hospitals.
Infection Control and Hospital Epidemiology, 35(5), 464–479. Accessed via
the Web at http://www.jstor.org/stable/10.1086/675718 (Level I)
6 Conway, L. J ., & Larson, E. L. (2012). Guidelines to prevent catheter-
associated urinary tract infection: 1980 to 2010. Heart Lung, 41(3), 271–283.
Accessed via the Web at
http://www.ncbi.nlm.nih.gov/pmc/articles/PMC3362394/
7 The Joint Commission. (2019). Standard NPSG.07.06 .01. Comprehensive
accreditation manual for hospitals. Oakbrook Terrace, IL: The Joint
Commission. (Level VII)
8 Association of Professionals in Infection Control and Epidemiology. (2014).
“APIC implementation guide: Guide to preventing catheter-associated urinary
tract infections” [Online]. Accessed via the Web at
http://apic.org/Resource_/EliminationGuideForm/6473ab9b-e75c-457a-8d0f-
d57d32bc242b/File/APIC_CAUTI_web_0603 .pdf (Level IV)
9 Halm, M. A., & O’Connor, N. (2014). Do system-based interventions affect
catheter-associated urinary tract infection? American Journal of Critical Care,
23(6), 505–509. Accessed via the Web at
http://ajcc.aacnjournals.org/content/23/6/505.full.pdf+html (Level V)
10 American Hospital Association/Health Research & Educational Trust. (2017).
“Catheter associated urinary tract infection (CAUTI) top ten checklist: Date of
last CAUTI event” [Online]. Accessed via the Web at http://www.hret-
hiin.org/resources/display/catheterassociated-urinary-tract-infections-cauti-
top-ten-checklist-date-of-last-cauti-event
11 Wound, Ostomy and Continence Nurses Society (WOCN). (2016). Care and
Management of patients with urinary catheters: A clinical resource guide.
Mount Laurel, NJ: WOCN.
12 Schaeffer, A.J . Placement and management of urinary bladder catheters in
adults. (2017). In: UpToDate, Richie, J. P. (Ed.) . Retrieved from:
www.uptodate.com
13 Long Khanh Dao Le, B. (2015). Urethral catheter (indwelling short term):
Urinary tract infection prevention. Adelaide, Australia: Joanna Briggs Institute.
(Level V)
14 Society of Urologic Nurses and Associates. (2016). Clinical practice
guidelines: Prevention and control of catheter-associated urinary tract
infection (CAUTI). Pittman, NJ: Society of Urologic Nurses and Associates.
Accessed via the Web at
http://www.suna.org/sites/default/files/download/cautiGuideline.pdf
15 American Association of Critical-Care Nurses (AACN). (2017). “A ACN practice
alert: Prevention of CAUTI in adults” [Online]. Accessed via the Web at
https://www.aacn.org/clinical-resources/practice-alerts/prevention-of-cauti-in-
adults (Level VII)
16 Achmetov, T., & Gray, M. (2008). Adverse reactions to latex in the clinical
setting: A urologic perspective. Infection Control Resource, 2(2), 1–7.
Accessed via the Web at
http://www.grovemedical.com/customer/grmein/pdf/latex_reactions.pdf
17 Herter, R., & Kazer, M. W. (2010). Best practices in urinary catheter care.
Home Healthcare Nurse, 28(6), 342–349. Accessed via the Web at
http://journals.lww.com/homehealthcarenurseonline/pages/articleviewer.aspx
?year=2010&issue=06000&article=00005&type=Fulltext
18 Institute for Healthcare Improvement. (2012). How-to guide: Prevent
catheter-associated urinary tract infection. Cambridge, MA: Institute for
Healthcare Improvement. (Level VII)
19 Society of Urologic Nurses and Associates. (2015). “Clinical practice
guidelines: Adult female urethral catheterization” [Online]. Accessed via the
Web at
http://www.suna.org/sites/default/files/download/femaleCatheterization.pdf
(Level V)
20 The Joint Commission. (2019). Standard NPSG.07.01.01. Comprehensive
accreditation manual for hospitals. Oakbrook Terrace, IL: The Joint
Commission. (Level VII)
21 Centers for Disease Control and Prevention. (2002). Guideline for hand
hygiene in health-care settings: Recommendations of the Healthcare Infection
Control Practices Advisory Committee and the HICPAC/SHEA/APIC/IDSA Hand
Hygiene Task Force. MMWR Recommendations and Reports, 51(RR-16), 1–45.
Accessed via the Web at https://www.cdc.gov/mmwr/pdf/rr/rr5116.pdf (Level
II)
22 World Health Organization. (2009). “WHO guidelines on hand hygiene in
health care: First global patient safety challenge, clean care is safer care”
[Online]. Accessed at
http://apps.who.int/iris/bitstream/10665/44102/1/9789241597906_eng.pdf
(Level IV)
23 Accreditation Association for Hospitals and Health Systems. (2017). Standard
07.01.21. Healthcare Facilities Accreditation Program: Accreditation
requirements for acute care hospitals. Chicago, IL: Accreditation Association
for Hospitals and Health Systems. (Level VII)
24 Centers for Medicare and Medicaid Services, Department of Health and
Human Services. (2015). Condition of participation: Infection control. 42 C.F.R.
§ 482.42.
25 DNV GL-Healthcare USA, Inc. (2016). IC.1 .SR.1 . NIAHO® accreditation
requirements: Interpretive guidelines and surveyor guidance (version 11).
Milford, OH: DNV GL-Healthcare USA, Inc. (Level VII)
26 The Joint Commission. (2019). Standard NPSG.01.01.01. Comprehensive
accreditation manual for hospitals. Oakbrook Terrace, IL: The Joint
Commission. (Level VII)
27 Accreditation Association for Hospitals and Health Systems. (2017). Standard
15.01.16. Healthcare Facilities Accreditation Program: Accreditation
requirements for acute care hospitals. Chicago, IL: Accreditation Association
for Hospitals and Health Systems. (Level VII)
28 Centers for Medicare and Medicaid Services, Department of Health and
Human Services. (2015). Condition of participation: Patient’s rights. 42 C.F.R.
§ 482.13(c)(1).
29 The Joint Commission. (2019). Standard RI.01.01.01. Comprehensive
accreditation manual for hospitals. Oakbrook Terrace, IL: The Joint
Commission. (Level VII)
30 DNV GL-Healthcare USA, Inc. (2016). PR.1.SR.5 . NIAHO® accreditation
requirements: Interpretive guidelines and surveyor guidance (version 11).
Milford, OH: DNV GL-Healthcare USA, Inc. (Level VII)
31 The Joint Commission. (2019). Standard PC.02.01.21. Comprehensive
accreditation manual for hospitals. Oakbrook Terrace, IL: The Joint
Commission. (Level VII)
32 Waters, T. R., et al. (2009). “Safe patient handling training for schools of
nursing” [Online]. Accessed via the Web at
http://www.cdc.gov/niosh/docs/2009-127/pdfs/2009-127.pdf (Level VII)
33 Siegel, J. D ., et al. (2007, revised 2017). “2007 guideline for isolation
precautions: Preventing transmission of infectious agents in healthcare
settings” [Online]. Accessed via the Web at
http://www.cdc.gov/hicpac/pdf/isolation/Isolation2007.pdf (Level II)
34 Accreditation Association for Hospitals and Health Systems. (2017). Standard
07.01.10. Healthcare Facilities Accreditation Program: Accreditation
requirements for acute care hospitals. Chicago, IL: Accreditation Association
for Hospitals and Health Systems. (Level VII)
35 Van Wicklin, S. A., & Conner, R. (2017). Guideline for sterile technique. In R.
Conner (Ed.). Guidelines for perioperative practice 2017 edition. Denver, CO:
AORN, Inc. (Level VII)
36 Schaeffer, A. J . Placement and management of urinary bladder catheters in
adults. (2016). In: UpToDate, Richie, J. P., & Chen, W. (Eds.). Retrieved from:
www.uptodate.com
37 Ganz, D. A., et al. (2013). Preventing falls in hospitals: A toolkit for improving
quality of care (AHRQ Publication No. 13-0015-EF). Rockville, MD: Agency for
Healthcare Research and Quality. Accessed via the Web at
http://www.ahrq.gov/sites/default/files/publications/files/fallpxtoolkit.pdf
(Level VII)
38 Occupational Safety and Health Administration. (n.d .). “Bloodborne
pathogens, standard number 1910.1030” [Online]. Accessed via the Web at
https://www.osha.gov/pls/oshaweb/owadisp.show_document?
p_id=10051&p_table=STANDARDS (Level VII)
39 The Joint Commission. (2019). Standard RC.01.03 .01. Comprehensive
accreditation manual for hospitals. Oakbrook Terrace, IL: The Joint
Commission. (Level VII)
40 Accreditation Association for Hospitals and Health Systems. (2017). Standard
10.00 .03. Healthcare Facilities Accreditation Program: Accreditation
requirements for acute care hospitals. Chicago, IL: Accreditation Association
for Hospitals and Health Systems. (Level VII)
41 Centers for Medicare and Medicaid Services, Department of Health and
Human Services. (2015). Condition of participation: Medical record services.
42 C.F.R. § 482.24(b).
42 DNV GL-Healthcare USA, Inc. (2016). MR.2 .SR.1 . NIAHO® accreditation
requirements: Interpretive guidelines and surveyor guidance (version 11).
Milford, OH: DNV GL-Healthcare USA, Inc. (Level VII)
43 Society of Urologic Nurses and Associates. (2015). Clinical practice
guidelines: Adult male urethral catheterization. Pittman, NJ: Society of
Urologic Nurses and Associates. Accessed via the Web at
https://www.suna.org/download/maleCatheterization (Level VII)
44 Leuck, A. M ., et al. (2012). Complications of Foley catheters: Is infection the
greatest risk? Journal of Urology, 187, 1662–1666. Accessed via the Web at
http://www.jurology.com/article/S0022-5347(11)06062-9/pdf (Level IV)
45 Schaeffer, A. J . Complications of urinary bladder catheters and preventive
strategies. (2017). In: UpToDate, Richie, J. P., & Chen, W. (Eds.). Retrieved
from: www.uptodate.com
INDWELLING URINARY CATHETER IRRIGATION
Indwelling urinary (Foley) catheter irrigation shouldn’t be
performed routinely. However, obstructions sometimes
occur and require irrigation. To relieve an obstruction
resulting from clots, mucus, or other causes, an intermittent
method of irrigation may be used.1 Whenever possible, the
catheter should be irrigated through a closed system to
decrease the risk of infection.2 If an obstruction is
anticipated, closed continuous irrigation may be used to
prevent it.3 (See the “Continuous bladder irrigation”
procedure, page 212.)
Signs and symptoms that a catheter might be obstructed
include absence of urine flow from the catheter, urine flow
bypassing the catheter, and suprapubic pain that becomes
more pronounced as the bladder fills. If the obstruction
remains unrelieved, vasovagal signs such as sweating,
tachycardia, and hypotension can also occur.4
Before initiating catheter irrigation, a bladder scanner
may be used to confirm whether a decrease in urine output
results from a blockage or reduced urine in the bladder,
decreasing the number of unnecessary irrigations and
minimizing breaks in the closed drainage system.5
If an obstruction occurs and it’s likely that the catheter
material is contributing to obstruction, change the catheter.2
To prevent catheter-associated urinary tract infection
(CAUTI), review the need for the catheter daily, and remove
the catheter as soon as it’s no longer needed.1,2,5,6,7
HOSPITAL-ACQUIRED CONDITION ALERT The Centers for Medicare
and Medicaid Services has identified CAUTI as a hospital-acquired
condition with payment implications because it can be reasonably
prevented using a variety of best practices, such as performing hand
hygiene before and after any catheter manipulation; maintaining a
sterile,
continuously closed drainage
system;
maintaining
unobstructed urine flow; emptying the collection bag regularly;
replacing the catheter and collection system using sterile technique
when a break in sterile technique, disconnection, or leakage occurs;
and discontinuing the catheter as soon as it’s no longer clinically
indicated to reduce the risk of CAUTI.1,2,5,6,8
Equipment
Prescribed irrigating solution (such as normal saline
solution) ▪ sterile basin ▪ 30- to 60-mL syringes ▪ antiseptic
pads ▪ gloves ▪ fluid-impermeable pad ▪ intake and output
record ▪ clamp ▪ graduated receptacle ▪ Optional: gown,
mask, goggles or mask with face shield, 18G blunt-end
needle, commercially packaged irrigation kit.
Commercially packaged kits containing sterile irrigating
solution, a graduated receptacle, and a 50-mL catheter tip
syringe may be available in some facilities.
Preparation of equipment
Check the expiration date on the irrigating solution. To
prevent vesical spasms during instillation of solution, warm
it to room temperature. Never heat the solution on a burner
or in a microwave oven; hot irrigating solution can injure the
patient’s bladder.
Implementation
■ Verify the practitioner’s order.
■ Gather and prepare the appropriate equipment.
■ Perform hand hygiene.9,10,11,12,13,14
■ Confirm the patient’s identity using at least two patient
identifiers.15
■ Provide privacy.16,17,18,19
■ Explain the procedure to the patient and family (if
appropriate) according to their individual communication
and learning needs to increase their understanding, allay
their fears, and enhance cooperation.20
■ Raise the patient’s bed to waist level when providing care
to prevent caregiver back strain.
■ Perform hand hygiene.9,10,11,12,13,14
■ Put on gloves and other protective equipment as needed
to comply with standard precautions.21,22
■ Empty the catheter drainage bag into a graduated
receptacle. During emptying, avoid splashing, and don’t
allow the drain spigot to come in contact with the nonsterile
collecting container.1,2,3,23 Measure the amount of urine,
noting the color and characteristics before irrigation.
■ Remove and discard your gloves.21,22
■ Perform hand hygiene.9,10,11,12,13,14
■ Put on a new set of gloves to comply with standard
precautions.21,22
■ Expose the catheter’s aspiration port and place a fluid-
impermeable pad under it to protect the bed linens.
■ Clamp the catheter tubing below the aspiration port (as
shown below).
■ Create a sterile field at the patient’s bedside.
■ Using a sterile no-touch technique, pour the prescribed
amount of sterile irrigating solution into a sterile basin.
■ Place the tip of the syringe into the solution and fill the
syringe with the appropriate amount (as shown below).
■ Thoroughly disinfect the aspiration port with an antiseptic
pad (as shown below) and then allow it to dry to remove as
many bacterial contaminants as possible.
■ Maintaining the sterility of the syringe tip, attach the
syringe to the aspiration port, or insert the blunt-tip needle
into the port if a needleless system isn’t in place.
■ Trace the tubing to its point of origin to make sure you’re
accessing the correct port before beginning irrigation.24,25
■ Instill the irrigating solution into the catheter slowly to
prevent bladder spasms. If necessary, repeat the procedure
until you’ve instilled the prescribed amount of irrigating
solution.
■ Remove the syringe and blunt-tip needle (if used).
■ Unclamp the drainage tube to allow the irrigating solution
and urine to flow into the drainage bag.
■ Make sure the catheter tubing is secured to the patient’s
leg, and that the catheter and drainage tube are free from
kinking and dependent loops to allow free flow of urine.
Keep the drainage bag below the level of the bladder to
prevent backflow of urine into the bladder, which increases
the risk of CAUTI.2,3,6
■ Return the bed to the lowest level to prevent falls and
maintain patient safety.26
■ Dispose of all used supplies in appropriate receptacles.
■ Remove your gloves and any other personal protective
equipment, if worn.21,22
■ Perform hand hygiene.9,10,11,12,13,14
■ Document the procedure.27,28,29,30
Special considerations
■ If you encounter any resistance during instillation of the
irrigating solution, don’t try to force the solution into the
bladder. Instead, stop the procedure and notify the
practitioner. If an indwelling catheter becomes totally
obstructed, obtain an order to remove it and replace it with
a new one to prevent bladder distention, acute renal failure,
urinary stasis, and subsequent infection.
■ Use caution if the patient has had open bladder surgery
or renal transplantation, because increased pressure on the
suture lines can result in suture line disruption and
extravasation of urine.4
■ Encourage a catheterized patient who isn’t on restricted
fluid intake to increase intake to 30 mL/kg/day to help flush
the urinary system and reduce sediment formation.
■ The Joint Commission has issued a sentinel event alert
related to managing risk during transition to the new
International Organization for Standardization tubing
standards designed to prevent dangerous tubing
misconnections, which can lead to serious patient injury and
death. During the transition, be sure to trace each tubing
and catheter from the patient to its point of origin before
connecting or reconnecting any device or infusion, at any
care transition (such as a new setting or service), and as
part of the handoff process; route tubes and catheters with
different purposes in different standardized directions; label
the tubing at both the distal and proximal ends when there
are different access sites or several bags hanging; use
tubing and equipment only as intended; and store
medications for different delivery routes in separate
locations.25
Complications
CAUTI is a complication associated with indwelling urinary
catheter irrigation.
Documentation
Document the date and time the irrigation was performed,
as well as the type and volume of irrigating solution
instilled. Note the amount, color, and consistency of return
urine flow, and document the patient’s tolerance of the
procedure. Also note any resistance during instillation of the
solution. If the return flow volume is less than the amount of
solution instilled, note this on the intake and output record
and in your notes.
REFERENCES
1 Lo, E., et al. (2014). SHEA/IDSA practice recommendation: Strategies to
prevent catheter-associated urinary tract infections in acute care hospitals:
2014 update. Infection Control and Hospital Epidemiology, 35(5), 464–479.
Accessed via the Web at http://www.jstor.org/stable/10.1086/675718 (Level I)
2 Healthcare Infection Control Practices Advisory Committee. (2010). “Guideline
for prevention of catheter-associated urinary tract infections 2009” [Online].
Accessed via the Web at
http://www.cdc.gov/hicpac/pdf/CAUTI/CAUTIguideline2009final.pdf (Level I)
3 Society of Urologic Nurses and Associates. (2016). Clinical practice
guidelines: Prevention & control of catheter-associated urinary tract infection
(CAUTI). Pittman, NJ: Society of Urologic Nurses and Associates. Accessed via
the Web at
https://www.suna.org/sites/default/files/download/cautiGuideline.pdf (Level
VII)
4 McLeod, P., et al. (2008, revised 2012). “Bladder irrigation: Guidelines”
[Online]. Accessed via the Web at
http://www.aci.health.nsw.gov.au/_data/assets/pdf_file/0007/165589/Bladder-
Irrigation-Toolkit.pdf (Level VII)
5 Association of Professionals in Infection Control and Epidemiology (APIC).
(2014). “APIC implementation guide: Guide to preventing catheter-associated
urinary tract infections” [Online]. Accessed via the Web at
http://apic.org/Resource_/EliminationGuideForm/6473ab9b-e75c-457a-8d0f-
d57d32bc242b/File/APIC_CAUTI_web_0603 .pdf (Level IV)
6 The Joint Commission. (2019). Standard NPSG.07.06 .01. Comprehensive
accreditation manual for hospitals. Oakbrook Terrace, IL: The Joint
Commission. (Level VII)
7 Herter, R., & Kazer, M. W. (2010). Best practices in urinary catheter care.
Home Healthcare Nurse, 28(6), 342–349.
8 Jarrett, N. M., & Callahan, M. (2016). “Evidence-based guidelines for selected
hospital-acquired conditions: Final report” [Online]. Accessed via the Web at
https://www.cms.gov/Medicare/Medicare-Fee-for-Service-
Payment/HospitalAcqCond/Downloads/2016-HAC-Report.pdf
9 The Joint Commission. (2019). Standard NPSG.07.01.01. Comprehensive
accreditation manual for hospitals. Oakbrook Terrace, IL: The Joint
Commission. (Level VII)
10 Centers for Disease Control and Prevention. (2002). Guideline for hand
hygiene in health-care settings: Recommendations of the Healthcare Infection
Control Practices Advisory Committee and the HICPAC/SHEA/APIC/IDSA Hand
Hygiene Task Force. MMWR Recommendations and Reports, 51(RR-16), 1–45.
Accessed via the Web at https://www.cdc.gov/mmwr/pdf/rr/rr5116.pdf (Level
II)
11 World Health Organization. (2009). “WHO guidelines on hand hygiene in
health care: First global patient safety challenge, clean care is safer care”
[Online]. Accessed via the Web at
http://apps.who.int/iris/bitstream/10665/44102/1/9789241597906_eng.pdf
(Level IV)
12 Accreditation Association for Hospitals and Health Systems. (2017). Standard
07.01.21. Healthcare Facilities Accreditation Program: Accreditation
requirements for acute care hospitals. Chicago, IL: Accreditation Association
for Hospitals and Health Systems. (Level VII)
13 Centers for Medicare and Medicaid Services, Department of Health and
Human Services. (2015). Condition of participation: Infection control. 42 C.F.R.
§ 482.42.
14 DNV GL-Healthcare USA, Inc. (2016). IC.1 .SR.1 . NIAHO® accreditation
requirements: Interpretive guidelines and surveyor guidance (version 11).
Milford, OH: DNV GL-Healthcare USA, Inc. (Level VII)
15 The Joint Commission. (2019). Standard NPSG.01.01.01. Comprehensive
accreditation manual for hospitals. Oakbrook Terrace, IL: The Joint
Commission. (Level VII)
16 Accreditation Association for Hospitals and Health Systems. (2017). Standard
15.01.16. Healthcare Facilities Accreditation Program: Accreditation
requirements for acute care hospitals. Chicago, IL: Accreditation Association
for Hospitals and Health Systems. (Level VII)
17 Centers for Medicare and Medicaid Services, Department of Health and
Human Services. (2015). Condition of participation: Patient’s rights. 42 C.F.R.
§ 482.13(c)(1).
18 The Joint Commission. (2019). Standard RI.01.01.01. Comprehensive
accreditation manual for hospitals. Oakbrook Terrace, IL: The Joint
Commission. (Level VII)
19 DNV GL-Healthcare USA, Inc. (2016). PR.1.SR.5 . NIAHO® accreditation
requirements: Interpretive guidelines and surveyor guidance (version 11).
Milford, OH: DNV GL-Healthcare USA, Inc. (Level VII)
20 The Joint Commission. (2019). Standard PC.02.01.21. Comprehensive
accreditation manual for hospitals. Oakbrook Terrace, IL: The Joint
Commission. (Level VII)
21 Accreditation Association for Hospitals and Health Systems. (2017). Standard
07.01.10. Healthcare Facilities Accreditation Program: Accreditation
requirements for acute care hospitals. Chicago, IL: Accreditation Association
for Hospitals and Health Systems. (Level VII)
22 Siegel, J. D ., et al. (2007, revised 2017). “2007 guideline for isolation
precautions: Preventing transmission of infectious agents in healthcare
settings” [Online]. Accessed via the Web at
http://www.cdc.gov/hicpac/pdf/isolation/Isolation2007.pdf (Level II)
23 Long Khanh Dao Le, B. (2016). Urinary drainage bags: Emptying, changing,
and securing. Adelaide: Joanna Briggs Institute. (Level V)
24 U.S . Food and Drug Administration. (n.d .). “Look. Check. Connect. Safe
medical device connections save lives” [Online]. Accessed via the Web at
http://www.fda.gov/downloads/MedicalDevices/Safety/AlertsandNotices/UCM1
34873.pdf
25 The Joint Commission. (2014). “Sentinel event alert: Managing risk during
transition to new ISO tubing connector standards” [Online]. Accessed via the
Web at
http://www.jointcommission.org/assets/1/6/SEA_53_Connectors_8 _19_14 _final.
pdf (Level VII)
26 Ganz, D. A., et al. (2013). Preventing falls in hospitals: A toolkit for improving
quality of care (AHRQ Publication No. 13-0015-EF). Rockville, MD: Agency for
Healthcare Research and Quality. Accessed via the Web at
http://www.ahrq.gov/sites/default/files/publications/files/fallpxtoolkit.pdf
(Level VII)
27 The Joint Commission. (2019). Standard RC.01.03 .01. Comprehensive
accreditation manual for hospitals. Oakbrook Terrace, IL: The Joint
Commission. (Level VII)
28 Accreditation Association for Hospitals and Health Systems. (2017). Standard
10.00 .03. Healthcare Facilities Accreditation Program: Accreditation
requirements for acute care hospitals. Chicago, IL: Accreditation Association
for Hospitals and Health Systems. (Level VII)
29 Centers for Medicare and Medicaid Services, Department of Health and
Human Services. (2015). Condition of participation: Medical record services.
42 C.F.R. § 482.24(b).
30 DNV GL-Healthcare USA, Inc. (2016). MR.2 .SR.1 . NIAHO® accreditation
requirements: Interpretive guidelines and surveyor guidance (version 11).
Milford, OH: DNV GL-Healthcare USA, Inc. (Level VII)
INTERMITTENT INFUSION DEVICE DRUG
ADMINISTRATION
An intermittent infusion device, or saline lock, eliminates the
need for multiple venipunctures or maintaining venous
access with a continuous IV infusion. This device allows
intermittent administration by infusion or by the IV bolus
injection method.
When administering IV fluids to older adults, keep in mind
that these patients commonly have compromised cardiac,
hepatic, or renal systems, which puts them at high risk of
heart failure, shock, or cardiac arrest if IV fluids are
administered too rapidly or in too great a volume.
Furthermore, older patients in particular may be unable to
articulate symptoms because of such underlying conditions
as stroke, intubation, tracheostomy, dementia, or delirium;
monitor these patients closely during all IV infusions. Speed
shock may also result from rapid administration of a bolus
medication or an infusion. Symptoms of speed shock, such
as dizziness and headache, occur rapidly, which may make
it difficult for the older patient to articulate them. These
early symptoms may progress to chest tightness,
hypotension, irregular pulse, and anaphylactic shock. Close
observation and careful control of medication or solutions
administered parentally to older adults is crucial.1
Sterile technique should always be used when
administering a drug through an intermittent infusion device
to reduce the risk of vascular catheter– associated infection.
HOSPITAL-ACQUIRED CONDITION ALERT Keep in mind that a vascular
catheter–associated infection is considered a hospital-acquired
condition because it can be reasonably prevented using best practices.
Follow infection prevention techniques (such as performing hand
hygiene, using sterile technique, performing a vigorous mechanical
scrub of needleless connectors, and discontinuing the device as soon
as it’s no longer needed) when administering a drug through an
intermittent infusion device to reduce the risk of vascular catheter–
associated infection.2
Equipment
Gloves ▪ antiseptic pads (alcohol, povidone iodine, or
chlorhexidine-based) ▪ 10-mL syringe(s) prefilled with
preservative-free normal saline solution ▪ prescribed
medication in an IV container (for IV infusion) or in a syringe
(for IV bolus injection) ▪ administration set ▪ needleless
connector(s) ▪ sterile male Luer covering device ▪ Optional:
electronic infusion device, pulse oximeter, capnography
equipment, standardized sedation scale, disinfectant-
containing end cap.
Preparation of equipment
Inspect all IV equipment and supplies; if a product is
expired, if its integrity is compromised, or if it’s defective,
remove it from patient use, label it as expired or defective,
and report the expiration or defect as directed by your
facility.3
Implementation
■ Avoid distractions and interruptions when preparing and
administering medications to prevent medication errors.4,5
■ Verify the order in the patient’s medication record by
checking it against the practitioner’s order.1,6,7,8,9,10,11
■ Compare the medication label with the order in the
patient’s medical record.7,8,10,11
■ Check the patient’s medication record for an allergy or
other contraindication to the prescribed medication. If an
allergy or other contraindication exists, don’t administer the
medication; instead, notify the practitioner.1,6,9,12
■ Check the expiration date on the medication. If it has
expired, return the medication to the pharmacy and obtain a
new medication.7,9,12
■ Visually inspect the medication for particles,
discoloration, or any other loss of integrity; don’t administer
the medication if its integrity is compromised.1,6,7,9,12
■ Discuss any unresolved concerns about the medication
with the patient’s practitioner.
■ Verify that you’re administering the medication at the
proper time, in the prescribed dose, and by the correct route
to reduce the risk of medication errors.7,10,12
■ Perform hand hygiene.13,14,15,16,17,18,19,20
■ Confirm the patient’s identity using at least two patient
identifiers.21
■ Provide privacy.22,23,24,25
■ Explain the procedure to the patient. If the patient is
receiving the medication for the first time, teach the patient
about potential adverse reactions and discuss any other
concerns related to the medication.26
■ Raise the patient’s bed to waist level when providing
patient care to prevent caregiver back strain.27
■ Perform hand hygiene.13,14,15,16,17,18,19,20
■ Put on gloves.28,29,30
■ Prepare the medication and administration set: For an IV
infusion, remove the protective cover of the administration
set’s spike and the infusion container, insert the spike into
the infusion container, attach a needleless connector to the
opposite end of the administration set tubing, and then
prime the tubing and needleless connector.1,6,7 For an IV
bolus injection, attach a needleless connector to the syringe
containing the prescribed medication and prime the
needleless connector.1,6,31
■ Assess the IV site to ensure that it’s free from signs of
infection (tenderness, erythema, and induration within 2 cm
of the insertion site, and purulent drainage at the exit site),
phlebitis (tenderness at the site, erythema, warmth,
swelling, induration, purulent drainage, and palpable venous
cord), and infiltration (blanching, bruising, or redness
around the insertion site); edema in any direction from the
insertion site; skin temperature changes; pain, burning, or
stinging with injection or infusion; blisters; impaired
mobility; numbness or tingling; slowed capillary refill time;
and fluid leaking from the insertion site.1,6,31
■ If your facility uses a bar code technology, scan your
identification badge, the patient’s identification bracelet,
and the medication’s bar code.
■ If a disinfectant-containing end cap is in place, remove it
from the end of the needleless connector and discard it.
■ Perform a vigorous mechanical scrub of the needleless
connector for at least 5 seconds using an antiseptic pad.
Allow it to dry.1,6,32,33
■ Maintaining sterility of the syringe tip, attach a prefilled
syringe containing preservative-free normal saline solution
to the needleless connector. (Use a 10-mL syringe or a
syringe specifically designed to generate lower injection
pressure.) Unclamp the device clamp, if present, and slowly
aspirate for blood return that is the color and consistency of
whole blood. If no blood return is obtained, take steps to
locate an external cause of the obstruction.1,6,7,34,35
■ If a blood return is obtained, slowly inject preservative-
free normal saline solution into the intermittent infusion
device. Use a minimum volume of twice the internal volume
of the catheter system. Don’t forcibly flush the device;
further evaluate the device if resistance is met.34 Insert a
new intermittent infusion device at another location if
needed. (See the “Intermittent infusion device insertion”
procedure.)1,6
■ Remove and discard the syringe.1,6,36
■ Perform a vigorous scrub of the needleless connector for
at least 5 seconds using an antiseptic pad. Allow it to dry
completely.1,6,32,33
Administering an IV bolus injection
■ Attach the syringe containing the prescribed medication
to the needleless connector of the intermittent infusion
device.1,6
■ Administer the medication at the rate indicated on the
medication label; consult with the pharmacist if the rate
isn’t specified.1,6
■ Remove and discard the syringe.1,6,36
Administering an IV drug infusion
■ Remove the protective cover from the distal end of the
administration set tubing.1,6
■ Connect the administration set tubing to the intermittent
infusion device’s needleless connector.1,6
■ Trace the tubing from the patient to its point of origin to
make sure that you’re connecting it to the proper
port.7,37,38,39 Route the tubing in a standardized direction if
the patient has other tubing and catheters that have
different purposes. Label the tubing at the distal end (near
the patient connection) and proximal end (near the source
container) to reduce the risk of misconnection if multiple IV
lines will be used.7,37
■ Slowly open the clamp of the administration set tubing,
and adjust the flow rate to begin the infusion. Alternatively,
turn on the electronic infusion device and begin the infusion
at the prescribed flow rate.1,6
■ If using a gravity-flow administration set, monitor the
drops per minute by counting the drops and using a clock
with a second hand; if using an electronic infusion pump,
watch the device display for 1 to 2 minutes to ensure the
proper administration rate.1,6
■ When the infusion is complete, clamp the administration
set tubing and disconnect the tubing from the intermittent
infusion device. If you’re reusing the administration set
tubing, close the clamp on the tubing, aseptically attach a
new, sterile, compatible covering device to the male Luer
end of the administration set. Don’t attach the exposed end
of the administration set to a port on the same set.40 If you
won’t reuse the tubing, discard it appropriately with the IV
container.28,29,36
Completing the procedure
■ Perform a vigorous mechanical scrub of the needleless
connector for at least 5 seconds using an antiseptic pad.
Allow it to dry completely.1,6,32,33,35,41
■ Maintaining sterility of the syringe tip, attach a prefilled
syringe containing preservative-free normal saline solution
to the intermittent infusion device’s needleless connector.
(Use a 10-mL syringe or a syringe specifically designed to
generate lower injection pressure.)
■ Unclamp the catheter and inject preservative-free normal
saline solution into the catheter at the same rate of injection
as the prescribed medication. Use the amount of flush
solution needed to adequately clear the medication from the
administration set lumen and the catheter. Don’t forcibly
flush the device; further evaluate the device if resistance is
met.
■ Consider using a pulsatile flushing technique, because
short boluses of the flush solution interrupted by short
pauses may be more effective at removing deposits (e.g .,
fibrin, drug precipitate, intraluminal bacteria) than a
continuous low-flow technique. Alternatively, if the
medication is incompatible with normal saline solution, use
dextrose 5% in water followed by preservative-free normal
saline solution. Don’t allow dextrose 5% in water to remain
in the catheter lumen because it provides nutrients for
biofilm growth.1,6,34,42
■ Follow a clamping sequence to reduce blood reflux based
on the type of needleless connector. For a positive-pressure
needleless connector,
clamp the catheter after
disconnecting the syringe;1,6 for a negative-pressure
needleless connector, maintain pressure on the syringe
while clamping the catheter;1,6 and for a neutral needleless
connector, clamp the catheter before or after disconnecting
the syringe.1,6
■ If used in your facility, place a new disinfectant-
containing end cap on the end of the needleless
connector.32,43
■ Return the bed to the lowest position to prevent falls and
maintain patient safety.44
■ Dispose of used equipment in the appropriate
receptacles.28,29,36
■ Remove and discard your gloves.28,29,36
■ Perform hand hygiene.13,14,15,16,17,18,19,20
■ Monitor the patient closely for adverse reactions to the
prescribed medication.7,43
■ If the patient is receiving an IV opioid medication,
frequently monitor the patient’s respiratory rate, oxygen
saturation level by pulse oximetry, end-tidal carbon dioxide
level by capnography (if available), and sedation level using
a standardized sedation scale to decrease the risk of
adverse events associated with IV opioid use.43
■ If the patient is receiving an IV opioid medication, explain
the assessment and monitoring processes to the patient and
family members and tell them to alert staff if breathing
problems or sedation occurs.26,43
■ Perform hand hygiene.13,14,15,16,17,18,19,20
■ Document the procedure.45,46,47,48,49
Special considerations
■ Before administering an injectable drug, make sure you
know the prescribed infusion rate and infusion time period.7
■ The Joint Commission issued a sentinel event alert related
to managing risk during transition to new International
Organization for Standardization tubing standards that were
designed to prevent dangerous tubing misconnections,
which can lead to serious patient injury and death. During
the transition, make sure to trace the tubing and catheter
from the patient to the point of origin before connecting or
reconnecting any device or infusion, at any care transition
(such as a new setting or service), and as part of the
handoff process; route tubes and catheters having different
purposes in different standardized directions; label the
tubing at both the distal and proximal ends when there are
different access sites or several bags hanging; use tubing
and equipment only as intended; and store medications for
different delivery routes in separate locations.37
Complications
Infiltration, infection, phlebitis, and reactions specific to the
infused medication are the most common complications.
Documentation
Document the type, concentration, dosage, and volume of
drug administered and the times of administration.
Document the date, the time, the amount and type of flush
solution used, the patency of the catheter, presence of a
blood return, lack of resistance when flushing, and absence
of signs and symptoms of complications. If any
complications occurred, document your interventions. Also
document patient teaching provided and the patient’s
understanding of that teaching. On the intake record, record
the type and volume of all IV solutions used to dilute the
medication and to flush the line.46
REFERENCES
1 Infusion Nurses Society. (2017). Policies and procedures for infusion therapy
of the older adult (3rd ed.). Boston, MA: Infusion Nurses Society.
2 Jarrett, N. & Callaham, M. (2016). “Evidence-based guidelines for selected
hospital-acquired conditions: Final report” [Online]. Accessed via the Web at
https://www.cms.gov/Medicare/Medicare-Fee-for-Service-
Payment/HospitalAcqCond/Downloads/2016-HAC-Report.pdf
3 Standard 12. Product evaluation, integrity, and defect reporting. Infusion
therapy standards of practice. (2016). Journal of Infusion Nursing, 39, S32–
S34. (Level VII)
4 Westbrook, J., et al. (2010). Association of interruptions with an increased risk
and severity of medication administration errors. Archives of Internal
Medicine, 170(8), 683–690 . (Level IV)
5 Institute for Safe Medication Practices. (2013). Side tracks on the safety
express: Interruptions lead to errors and unfinished . . . Wait what was I
doing? Nurse Advise-ERR, 11(2), 1–4 . Accessed via the Web at
https://www.ismp.org/Newsletters/acutecare/showarticle.aspx?id=37
6 Infusion Nurses Society. (2016). Policies and procedures for infusion therapy
(5th ed.). Boston, MA: Infusion Nurses Society.
7 Standard 57. Parenteral medication and solution administration. Infusion
therapy standards of practice. (2016). Journal of Infusion Nursing, 39, S125–
S127. (Level VII)
8 Centers for Medicare and Medicaid Services, Department of Health and
Human Services. (2015). Condition of participation: Pharmaceutical services.
42 C.F.R. § 482.25 .
9 Accreditation Association for Hospitals and Health Systems. (2017). Standard
16.01.03. Healthcare Facilities Accreditation Program: Accreditation
requirements for acute care hospitals. Chicago, IL: Accreditation Association
for Hospitals and Health Systems. (Level VII)
10 DNV GL-Healthcare USA, Inc. (2016). MM.1 .SR.2. NIAHO® accreditation
requirements: Interpretive guidelines and surveyor guidance (version 11).
Milford, OH: DNV GL-Healthcare USA, Inc. (Level VII)
11 Standard 13. Medication verification. Infusion therapy standards of practice.
(2016). Journal of Infusion Nursing, 39, S34–S35. (Level VII)
12 Centers for Medicare and Medicaid Services, Department of Health and
Human Services. (2015). Condition of participation: Nursing services. 42
C.F.R. § 482.23(c).
13 Centers for Disease Control and Prevention. (2002). Guideline for hand
hygiene in health-care settings: Recommendations of the Healthcare Infection
Control Practices Advisory Committee and the HICPAC/SHEA/APIC/IDSA Hand
Hygiene Task Force. MMWR Recommendations and Reports, 51(RR-16), 1–45.
Accessed via the Web at https://www.cdc.gov/mmwr/pdf/rr/rr5116.pdf (Level
II)
14 The Joint Commission. (2019). Standard NPSG.07.01.01. Comprehensive
accreditation manual for hospitals. Oakbrook Terrace, IL: The Joint
Commission. (Level VII)
15 Standard 16. Hand hygiene. Infusion therapy standards of practice. (2016).
Journal of Infusion Nursing, 39, S38–S39 . (Level VII)
16 World Health Organization. (2009). “WHO guidelines on hand hygiene in
health care: First global patient safety challenge, clean care is safer care”
[Online]. Accessed via the Web at
http://apps.who.int/iris/bitstream/10665/44102/1/9789241597906_eng.pdf
(Level IV)
17 Centers for Disease Control and Prevention. (2011, revised 2017). “Guidelines
for the prevention of intravascular catheter-related infections” [Online].
Accessed via the Web at http://www.cdc.gov/hicpac/pdf/guidelines/bsi-
guidelines-2011.pdf (Level I)
18 Accreditation Association for Hospitals and Health Systems. (2017). Standard
07.01.21. Healthcare Facilities Accreditation Program: Accreditation
requirements for acute care hospitals. Chicago, IL: Accreditation Association
for Hospitals and Health Systems. (Level VII)
19 Centers for Medicare and Medicaid Services, Department of Health and
Human Services. (2015). Condition of participation: Infection control. 42 C.F.R.
§ 482.42.
20 DNV GL-Healthcare USA, Inc. (2016). IC.1 .SR.1 . NIAHO® accreditation
requirements: Interpretive guidelines and surveyor guidance (version 11).
Milford, OH: DNV GL-Healthcare USA, Inc. (Level VII)
21 The Joint Commission. (2019). Standard NPSG.01.01.01. Comprehensive
accreditation manual for hospitals. Oakbrook Terrace, IL: The Joint
Commission. (Level VII)
22 The Joint Commission. (2019). Standard RI.01.01.01. Comprehensive
accreditation manual for hospitals. Oakbrook Terrace, IL: The Joint
Commission. (Level VII)
23 DNV GL-Healthcare USA, Inc. (2016). PR.1.SR.5 . NIAHO® accreditation
requirements: Interpretive guidelines and surveyor guidance (version 11).
Milford, OH: DNV GL-Healthcare USA, Inc. (Level VII)
24 Centers for Medicare and Medicaid Services, Department of Health and
Human Services. (2015). Condition of participation: Patient’s rights. 42 C.F.R.
§ 482.13(c)(1).
25 Accreditation Association for Hospitals and Health Systems. (2017). Standard
15.01.16. Healthcare Facilities Accreditation Program: Accreditation
requirements for acute care hospitals. Chicago, IL: Accreditation Association
for Hospitals and Health Systems. (Level VII)
26 Standard 8. Patient education. Infusion therapy standards of practice. (2016).
Journal of Infusion Nursing, 39, S25–S26. (Level VII)
27 Waters, T. R., et al. (2009). “Safe patient handling training for schools of
nursing” [Online]. Accessed via the Web at
http://www.cdc.gov/niosh/docs/2009-127/pdfs/2009-127.pdf (Level VII)
28 Occupational Safety and Health Administration. (n.d .). “Bloodborne
pathogens, standard number 1910.1030” [Online]. Accessed via the Web at
http://www.osha.gov/pls/oshaweb/owadisp.show_document?
p_id=10051&p_table=STANDARDS (Level VII)
29 Siegel, J. D ., et al. (2007, revised 2017). “2007 guideline for isolation
precautions: Preventing transmission of infectious agents in healthcare
settings” [Online]. Accessed via the Web at
http://www.cdc.gov/hicpac/pdf/isolation/Isolation2007.pdf (Level II)
30 Accreditation Association for Hospitals and Health Systems. (2017). Standard
07.01.10. Healthcare Facilities Accreditation Program: Accreditation
requirements for acute care hospitals. Chicago, IL: Accreditation Association
for Hospitals and Health Systems. (Level VII)
31 Standard 46. Infiltration and extravasation. Infusion therapy standards of
practice. (2016). Journal of Infusion Nursing, 39, S98–S102. (Level VII)
32 Standard 34. Needleless connectors. Infusion therapy standards of practice.
(2016). Journal of Infusion Nursing, 39, S68–S70. (Level VII)
33 Marschall, J., et al. (2014). SHEA/IDSA practice recommendation: Strategies
to prevent central line-associated bloodstream infections in acute care
hospitals. Infection Control and Hospital Epidemiology, 35, 753–771 .
Accessed via the Web at http://www.jstor.org/stable/10.1086/676533 (Level I)
34 Standard 40. Flushing and locking. Infusion therapy standards of practice.
(2016). Journal of Infusion Nursing, 39, S77–S81. (Level VII)
35 The Joint Commission. (2015). “CLABSI Toolkit: Preventing Central Line–
Associated Bloodstream Infections: Useful Tools, An International Perspective”
[Online]. Accessed via the Web at
http://www.jointcommission.org/CLABSIToolkit (Level VII)
36 Standard 18. Medical waste and sharps safety. Infusion therapy standards of
practice. (2016). Journal of Infusion Nursing, 39, S40–S41. (Level VII)
37 The Joint Commission. (2014). “Sentinel event alert: Managing risk during
transition to new ISO tubing connector standards” [Online]. Accessed via the
Web at
http://www.jointcommission.org/assets/1/6/SEA_53_Connectors_8 _19_14 _final.
pdf (Level VII)
38 U.S . Food and Drug Administration. (n.d .). “Look. Check. Connect. Safe
medical device connections save lives” [Online]. Accessed via the Web at
http://www.fda.gov/downloads/MedicalDevices/Safety/AlertsandNotices/UCM1
34873.pdf
39 Health Technology Safety Research Team in Collaboration with ISMP Canada.
(2012). Mitigating the risks associated with multiple IV infusions:
Recommendations based on a field study of twelve Ontario hospitals.
Accessed via the Web at http://s3.amazonaws.com/rdcms-
aami/files/production/public/FileDownloads/Foundation/Infusion/062012_Multi
pleIVInfusions_Phase1bSummary_Recommendations_Rationale.pdf (Level VII)
40 Standard 42. Administration set change. Infusion therapy standards of
practice. (2016). Journal of Infusion Nursing, 39, S84–S85. (Level VII)
41 Infusion Nurses Society. (2010). Infusion nursing: An evidence-based
approach (3rd ed.). St. Louis, MO: Saunders.
42 Hadaway, L. (2012). Needleless connectors for IV catheters. AJN American
Journal of Nursing, 112(11), 32–44 . Accessed via the Web at
http://journals.lww.com/ajnonline/Abstract/2012/11000/Needleless_Connector
s_for_IV_Catheters.23.aspx (Level VII)
43 Centers for Medicare and Medicaid Services. (2014). “Requirements for
hospital medication administration, particularly intravenous (IV) medications
and post-operative care of patients receiving IV opioids” [Online]. Accessed
via the Web at http://www.cms.gov/Medicare/Provider-Enrollment-and-
Certification/SurveyCertificationGenInfo/Downloads/Survey-and-Cert-Letter-
14-15.pdf
44 Ganz, D. A., et al. (2013). Preventing falls in hospitals: A toolkit for improving
quality of care (AHRQ Publication No. 13-0015-EF). Rockville, MD: Agency for
Healthcare Research and Quality. Accessed via the Web at
http://www.ahrq.gov/sites/default/files/publications/files/fallpxtoolkit.pdf
(Level VII)
45 The Joint Commission. (2019). Standard RC.01.03 .01. Comprehensive
accreditation manual for hospitals. Oakbrook Terrace, IL: The Joint
Commission. (Level VII)
46 Standard 10. Documentation in the medical record. Infusion therapy
standards of practice. (2016). Journal of Infusion Nursing, 39, S28–S30 . (Level
VII)
47 Centers for Medicare and Medicaid Services, Department of Health and
Human Services. (2015). Condition of participation: Medical record services.
42 C.F.R. § 482.24(b).
48 Accreditation Association for Hospitals and Health Systems. (2017). Standard
10.00 .03. Healthcare Facilities Accreditation Program: Accreditation
requirements for acute care hospitals. Chicago, IL: Accreditation Association
for Hospitals and Health Systems. (Level VII)
49 DNV GL-Healthcare USA, Inc. (2016). MR.2 .SR.1 . NIAHO® accreditation
requirements: Interpretive guidelines and surveyor guidance (version 11).
Milford, OH: DNV GL-Healthcare USA, Inc. (Level VII)
INTERMITTENT INFUSION DEVICE FLUSHING
AND LOCKING
An intermittent infusion device consists of an IV cannula
with an injection cap attached. This device is used to
maintain venous access in patients receiving IV medications
intermittently as well as in those who might need
medications if an emergency situation arises.
An intermittent infusion device should be flushed before
each infusion, after each infusion (to prevent the mixing of
incompatible medications and solutions), and after blood
sampling.1,2 The volume of flush solution required for
flushing depends on the type and size of the catheter and
the type of infusion therapy prescribed. A volume equal to
twice the internal volume of the catheter is recommended,
but a larger volume may be required after blood sampling or
transfusion.1,2,3 Never forcibly flush an intermittent infusion
device. To prevent catheter damage, use a 10-mL syringe to
assess patency, unless a smaller syringe designed to
generate lower amounts of pressure is available.1,2,3 Use
sterile technique when flushing an intermittent infusion
device to reduce the risk of vascular catheter–associated
infection. Lock an intermittent infusion device immediately
after each use with preservative-free normal saline
solution.3
HOSPITAL-ACQUIRED CONDITION ALERT Keep in mind that a vascular
catheter–associated infection is considered a hospital-acquired
condition, because best practices can reasonably prevent it. Be sure to
follow infection prevention techniques, such as performing hand
hygiene, using sterile technique, and performing a vigorous
mechanical scrub of needleless connectors when flushing an
intermittent infusion device, to reduce the risk of vascular catheter–
associated infections.4,5
Needleless systems such as the intermittent infusion
device also offer benefits to health care workers. By
protecting workers from needle stick and other sharps-
related injuries that can expose them to bloodborne
pathogens, they help meet the Occupational Safety and
Health Administration’s recommendation for the use of safer
medical devices.6
Equipment
Antiseptic pads (alcohol, povidone iodine, or chlorhexidine-
based) ▪ 10-mL syringe with preservative-free normal saline
solution ▪ gloves ▪ Optional: disinfectant-containing end
cap.
Implementation
■ Verify the practitioner’s order and the patient’s
medication administration record for time intervals for
flushing the IV cannula. Flushing the IV cannula at
appropriate intervals improves the duration of catheter
patency.
■ Gather the necessary equipment.
■ Perform hand hygiene.7,8,9,10,11,12,13,14
■ Confirm the patient’s identity using at least two patient
identifiers.15
■ Provide privacy.16,17,18,19
■ Explain the procedure to the patient and family (if
appropriate) according to their individual communication
and learning needs to increase their understanding, allay
their fears, and enhance communication.20
■ Raise the patient’s bed to waist level when providing care
to prevent caregiver back strain.21
■ Perform hand hygiene.7,8,9,10,11,12,13,14
■
Put on gloves to comply with standard
precautions.1,2,6,22,23
■ Assess the IV site to ensure that it’s free from signs of
infection, infiltration, and phlebitis.5,24,25 (See Complications
of IV therapy, page 400.)
■ If a disinfectant-containing end cap is covering the
injection cap, remove and discard it.
■ Perform a vigorous mechanical scrub of the needleless
connector for at least 5 seconds using an antiseptic pad.
Allow it to dry completely.26,27
■ While maintaining the sterility of the syringe tip, attach a
prefilled syringe containing preservative-free normal saline
solution to the needleless connector. (Use a 10-mL syringe
or a syringe specifically designed to generate lower injection
pressure.) Unclamp the catheter and slowly aspirate for a
blood return that is the color and consistency of whole
blood. If you don’t obtain a blood return, take steps to locate
an external cause of the obstruction.3
■ If you obtain a blood return, slowly inject the
preservative-free normal saline solution into the catheter.
Use a minimum volume of twice the internal volume of the
catheter system. Don’t forcibly flush the catheter; further
evaluate the device if you meet resistance.3
■ Close the clamp and remove the syringe according to the
type of needleless injection cap used: For a positive-
pressure needleless cap, clamp after the syringe is
disconnected; for a negative-pressure needleless cap,
maintain pressure on the syringe plunger while closing the
clamp; and for a neutral needleless cap, clamp before or
after syringe disconnection.1,2
■ Attach a new disinfectant-containing end cap, if used in
your facility, to reduce the risk of infection.27
■ Assess the IV site after any manipulation of the catheter
to check for infiltration at the cannula insertion site.5,25
■ Return the bed to the lowest position to prevent falls and
maintain patient safety.28
■
Dispose of the syringe in an appropriate
receptacle.6,22,23,29
■ Remove and discard your gloves.6,22,23,29
■ Perform hand hygiene.7,8,9,10,11,12,13,14
■ Document the procedure.30,31,32,33,34
Complications of IV therapy
This chart details common complications of IV therapy and associated
interventions.
Special considerations
■ If the patient reports a burning sensation during injection
of the flush solution, stop the injection and check cannula
placement.25 If the cannula is in the vein, inject the flush at
a slower rate to minimize irritation.
■ Change needleless connectors no more frequently than
every 96 hours, but at least every 7 days, because changing
the device more frequently increases the risk of vascular
catheter–associated infection. Additionally, change the
needleless connector if it’s removed for any reason, if
there’s blood or debris within the connector, before drawing
a blood culture through a vascular access device, or if the
needleless connector becomes contaminated. In addition,
change it routinely, as directed by your facility.8
■ You’ll typically flush an intermittent infusion device with
preservative-free normal saline solution. However, when the
medication to be infused is incompatible with preservative-
free normal saline solution, flush the device with 5%
dextrose in water (D5W) instead; after medication
administration, flush with D5W and then follow by flushing
with preservative-free normal saline solution.3
Patient teaching
If the patient will be discharged with an intermittent infusion
device and orders for intermittent IV infusions or
medications, begin discharge planning with a home health
nurse as early as possible. Communicate with the home
health nurse about the type of catheter being used,
including manufacturer and catheter size, if known; the date
of insertion; dressing change and flush protocols taught at
the facility; and any complications after placement.
Teach the patient and family about hand hygiene
techniques, dressing changes, device flushing, medication
administration and syringe pump use (as applicable),
disposal techniques for syringes, and any other relevant
information about managing the intermittent infusion
device.
Before discharge, demonstrate the procedure for the
patient and family, and have them perform a return
demonstration. In addition, to ensure that the patient and
family understand the information, have them repeat what
they have learned about the most common complications of
IV therapy (for example, sepsis and accidental removal),
what signs to look for, and what to do if complications
occur.5,35
Instruct the patient to contact the practitioner if the IV
becomes dislodged, a fever develops, or the IV insertion site
becomes red or swollen or oozes fluid or blood.
Complications
Complications associated with intermittent infusion device
flushing and locking include mechanical issues, infiltration,
extravasation, and infection.
Documentation
Record the date and time; concentration and amount of
flush solution used; presence or absence of blood return and
any resistance to flushing; appearance of the site (including
the presence or absence of redness, swelling, drainage,
tenderness, or streaking); and interventions for any
complications that occurred. Also note the patient’s
tolerance of the procedure, any patient teaching, and
patient’s understanding of the teaching.
REFERENCES
1 Infusion Nurses Society. (2017). Policies and procedures for infusion nursing
of the older adult (3rd ed.). Boston, MA: Infusion Nurses Society.
2 Infusion Nurses Society. (2016). Policies and procedures for infusion therapy
(5th ed.). Boston, MA: Infusion Nurses Society.
3 Standard 40. Flushing and locking. Infusion therapy standards of practice.
(2016). Journal of Infusion Nursing, 39, S77–S81. (Level VII)
4 Jarrett, N., & Callaham, M. (2016). “Evidence-based guidelines for selected
hospital-acquired conditions: Final report” [Online]. Accessed via the Web at
https://www.cms.gov/Medicare/Medicare-Fee-for-Service-
Payment/HospitalAcqCond/Downloads/2016-HAC-Report.pdf
5 Infusion Nurses Society. (2013). INS position paper: Recommendations for
improving safety practices with short peripheral catheters. Norwood, MA:
Infusion Nurses Society. (Level VII)
6 Occupational Safety and Health Administration. (n.d .). “Bloodborne
pathogens, standard number 1910.1030” [Online]. Accessed via the Web at
https://www.osha.gov/pls/oshaweb/owadisp.show_document?
p_id=10051&p_table=STANDARDS (Level VII)
7 The Joint Commission. (2019). Standard NPSG.07.01.01. Comprehensive
accreditation manual for hospitals. Oakbrook Terrace, IL: The Joint
Commission. (Level VII)
8 Centers for Disease Control and Prevention. (2011, revised 2017). “Guidelines
for the prevention of intravascular catheter–related infections” [Online].
Accessed via the Web at
https://www.cdc.gov/infectioncontrol/pdf/guidelines/bsi-guidelines.pdf (Level
I)
9 Centers for Disease Control and Prevention. (2002). Guideline for hand
hygiene in health-care settings: Recommendations of the Healthcare Infection
Control Practices Advisory Committee and the HICPAC/SHEA/APIC/IDSA Hand
Hygiene Task Force. MMWR Recommendations and Reports, 51(RR-16), 1–45.
Accessed via the Web at https://www.cdc.gov/mmwr/pdf/rr/rr5116.pdf (Level
II)
10 World Health Organization. (2009). “WHO guidelines on hand hygiene in
health care: First global patient safety challenge, clean care is safer care”
[Online]. Accessed via the Web at
http://apps.who.int/iris/bitstream/10665/44102/1/9789241597906_eng.pdf
(Level IV)
11 Standard 16. Hand hygiene. Infusion therapy standards of practice. (2016).
Journal of Infusion Nursing, 39, S38–S39 . (Level VII)
12 Accreditation Association for Hospitals and Health Systems. (2017). Standard
07.01.21. Healthcare Facilities Accreditation Program: Accreditation
requirements for acute care hospitals. Chicago, IL: Accreditation Association
for Hospitals and Health Systems. (Level VII)
13 Centers for Medicare and Medicaid Services, Department of Health and
Human Services. (2015). Condition of participation: Infection control. 42 C.F.R.
§ 482.42.
14 DNV GL-Healthcare USA, Inc. (2016). IC.1 .SR.1 . NIAHO® accreditation
requirements: Interpretive guidelines and surveyor guidance (version 11).
Milford, OH: DNV GL-Healthcare USA, Inc. (Level VII)
15 The Joint Commission. (2019). Standard NPSG.01.01.01. Comprehensive
accreditation manual for hospitals. Oakbrook Terrace, IL: The Joint
Commission. (Level VII)
16 The Joint Commission. (2019). Standard RI.01.01.01. Comprehensive
accreditation manual for hospitals. Oakbrook Terrace, IL: The Joint
Commission. (Level VII)
17 Centers for Medicare and Medicaid Services, Department of Health and
Human Services. (2015). Condition of participation: Patient’s rights. 42 C.F.R.
§ 482.13(c)(1).
18 Accreditation Association for Hospitals and Health Systems. (2017). Standard
15.01.16. Healthcare Facilities Accreditation Program: Accreditation
requirements for acute care hospitals. Chicago, IL: Accreditation Association
for Hospitals and Health Systems. (Level VII)
19 DNV GL-Healthcare USA, Inc. (2016). PR.1.SR.5 . NIAHO® accreditation
requirements: Interpretive guidelines and surveyor guidance (version 11).
Milford, OH: DNV GL-Healthcare USA, Inc. (Level VII)
20 The Joint Commission. (2019). Standard PC.02.01.21. Comprehensive
accreditation manual for hospitals. Oakbrook Terrace, IL: The Joint
Commission. (Level VII)
21 Waters, T. R., et al. (2009). “Safe patient handling training for schools of
nursing” [Online]. Accessed via the Web at
http://www.cdc.gov/niosh/docs/2009-127/pdfs/2009-127.pdf (Level VII)
22 Siegel, J. D ., et al. (2007, revised 2017). “2007 guideline for isolation
precautions: Preventing transmission of infectious agents in healthcare
settings” [Online]. Accessed via the Web at
https://www.cdc.gov/infectioncontrol/pdf/guidelines/isolation-guidelines.pdf
(Level II)
23 Accreditation Association for Hospitals and Health Systems. (2017). Standard
07.01.10. Healthcare Facilities Accreditation Program: Accreditation
requirements for acute care hospitals. Chicago, IL: Accreditation Association
for Hospitals and Health Systems. (Level VII)
24 Standard 41. Vascular access device (VAD) assessment, care and dressing
changes. Infusion therapy standards of practice. (2016). Journal of Infusion
Nursing, 39, S81–S84. (Level VII)
25 Standard 46. Infiltration and extravasation. Infusion therapy standards of
practice. (2016). Journal of Infusion Nursing, 39, S98–S102. (Level VII)
26 Marschall, J., et al. (2014). SHEA/IDSA practice recommendation: Strategies
to prevent central line-associated bloodstream infections in acute care
hospitals. Infection Control and Hospital Epidemiology, 35(7), 753–771 .
Accessed via the Web at http://www.jstor.org/stable/10.1086/676533 (Level I)
27 Standard 34. Needleless connectors. Infusion therapy standards of practice.
(2016). Journal of Infusion Nursing, 39, S68–S70. (Level VII)
28 Ganz, D. A., et al. (2013). Preventing falls in hospitals: A toolkit for improving
quality of care (AHRQ Publication No. 13-0015-EF). Rockville, MD: Agency for
Healthcare Research and Quality. Accessed via the Web at
http://www.ahrq.gov/sites/default/files/publications/files/fallpxtoolkit.pdf
(Level VII)
29 Standard 18. Medical waste and sharps safety. Infusion therapy standards of
practice. (2016). Journal of Infusion Nursing, 39, S40–S41. (Level VII)
30 The Joint Commission. (2019). Standard RC.01.03 .01. Comprehensive
accreditation manual for hospitals. Oakbrook Terrace, IL: The Joint
Commission. (Level VII)
31 Standard 10. Documentation in the medical record. Infusion therapy
standards of practice. (2016). Journal of Infusion Nursing, 39, S28–S30 . (Level
VII)
32 Accreditation Association for Hospitals and Health Systems. (2017). Standard
10.00 .03. Healthcare Facilities Accreditation Program: Accreditation
requirements for acute care hospitals. Chicago, IL: Accreditation Association
for Hospitals and Health Systems. (Level VII)
33 Centers for Medicare and Medicaid Services, Department of Health and
Human Services. (2015). Condition of participation: Medical record services.
42 C.F.R. § 482.24(b).
34 DNV GL-Healthcare USA, Inc. (2016). MR.2 .SR.1 . NIAHO® accreditation
requirements: Interpretive guidelines and surveyor guidance (version 11).
Milford, OH: DNV GL-Healthcare USA, Inc. (Level VII)
35 Standard 8. Patient education. Infusion therapy standards of practice. (2016).
Journal of Infusion Nursing, 39, S25–S26. (Level VII)
INTERMITTENT INFUSION DEVICE INSERTION
Also called a saline lock, an intermittent infusion device
consists of a catheter with a needleless connector attached.
Filled with preservative-free normal saline solution to
prevent blood clot formation, the device maintains venous
access in patients who receive IV medication regularly or
intermittently but who don’t require continuous infusion.
An intermittent infusion device has several advantages
over an IV catheter that’s maintained at a moderately slow
infusion rate. It minimizes the risk of fluid overload and
electrolyte imbalance, cuts costs, reduces the risk of
contamination by eliminating IV solution containers and
administration sets, increases patient comfort and mobility,
reduces patient anxiety, and, if inserted in a large vein,
allows collection of multiple blood samples without repeated
venipuncture.
If you anticipate long-term therapy, start with a vein at
the most distal site so that you can move proximally as
needed for subsequent IV insertion sites.1 For infusion of an
irritating medication, choose a large vein distal to any
nearby joint. Cannulation of hemodialysis catheters, fistulas,
and grafts for IV infusion therapy requires an order from a
nephrologist or practitioner unless an emergency situation
exists.1
Use veins on the dorsal and ventral surfaces of the upper
extremities, including the metacarpal, cephalic, basilic, and
median veins. If possible, choose a vein in the nondominant
arm or hand.1 Avoid using veins in an upper extremity on
the side of breast surgery with axillary node dissection or
with an arteriovenous fistula or graft, radiation therapy, or
lymphedema, or an extremity affected by stroke.1 If the
patient has stage 4 or 5 chronic kidney disease, avoid using
the upper arm or forearm veins that could be the site of
dialysis access.1 Avoid using lower extremity veins because
of the increased risk of tissue damage, thrombophlebitis,
and ulceration.
Avoid areas of flexion; areas where pain occurs on
palpation; veins compromised by bruising, infiltration,
phlebitis, sclerosis, or cord formation; and areas where
procedures are planned. Avoid the lateral surface of the
wrist for about 4′′ to 5′′ (10.2 cm to 12.7 cm) because of the
risk of nerve damage; avoid the ventral surface of the wrist
because of the associated pain on insertion and the risk of
nerve damage. Take care to insert catheters away from
open wounds. Make each successive cannulation proximal
to the previous cannulation site. Collaborate with the patient
and practitioner to discuss the risks and benefits of using a
vein in an affected extremity if no other options exist.
For an older adult, choose an area with more
subcutaneous tissue and skeletal support for better device
stabilization, keeping in mind the need to conserve access
for future therapy.2 If the patient uses an ambulatory aid to
maintain independence, determine on which side the
patient uses the device; avoid inserting the device in the
hands and in areas of flexion.2,3 Allow an older adult to have
input regarding the site of catheter insertion, because many
older adults have previous experience with infusion therapy
and can indicate what has been successful or unsuccessful.2
If the patient isn’t very mobile, consider using an extremity
that most easily allows access to the bathroom or
commode.1
Follow sterile technique when inserting an IV catheter to
reduce the risk of vascular catheter–associated
infection.2,4,5
HOSPITAL-ACQUIRED CONDITION ALERT Keep in mind that a vascular
catheter–associated infection is considered a hospital-acquired
condition because various best practices can reasonably prevent it.
Follow infection prevention techniques (such as performing hand
hygiene, preparing the site with an antiseptic, adhering to sterile
technique during insertion and maintenance, and discontinuing the
device when it’s no longer needed) to reduce the risk of vascular
catheter–associated infection.3,6,7,8
Equipment
Closed IV catheter system with stabilization system and
safety shield9 ▪ needleless connector ▪ sterile 10-mL
prefilled syringe of preservative-free normal saline solution
▪ single-use tourniquet (preferably latex-free) ▪ antiseptic
pads (chlorhexidine-based, alcohol, or povidone iodine) ▪
chlorhexidine-based solution (tincture of iodine, povidone
iodine, or alcohol may be used if chlorhexidine is
contraindicated) ▪ transparent semipermeable dressing ▪
engineered stabilization device or sterile tape ▪ dressing
label or marker ▪ gloves ▪ Optional: soap and water, sterile
gloves, single-patient-use scissors or disposable-head
clippers, prescribed local anesthetic, warm packs,
ultrasound device with sterile probe cover, ultrasound gel.
Preparation of equipment
Inspect all IV equipment and supplies; if a product is
expired, if its integrity is compromised, or if it’s defective,
remove it from patient use, label it as expired or defective,
and report the expiration or defect as directed by your
facility.10
Implementation
■ Verify the practitioner’s order.
■ Review the patient’s medical record for allergies to
antiseptic solutions or latex. Also review it for factors that
may affect peripheral vasculature—including conditions that
result in structural vessel changes (such as diabetes and
hypertension), a history of frequent venipuncture or lengthy
infusion therapy, skin variations, skin alterations (such as
scars and tattoos), patient age, obesity, fluid volume deficit,
and history of IV drug abuse—to determine the need for
vascular visualization technology.11
■ Gather and prepare the appropriate equipment.
■ Perform hand hygiene.4,12,13,14,15,16,17,18
■ Confirm the patient’s identity using at least two patient
identifiers.19
■ Provide privacy.20,21,22,23
■ Explain the procedure to the patient to enhance
cooperation, and describe the purpose of the intermittent
infusion device. Provide the patient with information about
the insertion process, expected duration of therapy, care
and maintenance of the device, and signs and symptoms of
complications and when to report them.6,24,25
■ Raise the patient’s bed to waist level when providing care
to prevent caregiver back strain.26
■ Place the patient in a comfortable reclining position,
leaving the arm in a dependent position to increase venous
fill of the lower arms and hands. If the patient’s skin is cold,
consider using warm packs or dry warmth to promote
vascular dilation.6
Applying the tourniquet and dilating the vein
■ Apply a tourniquet at an appropriate location above the
intended puncture site to dilate the vein.2,5 Loosely apply
the tourniquet, or avoid its use in patients who bruise easily,
are at risk for bleeding, or have compromised circulation or
fragile skin.6
■ Assess the patient’s veins in the upper extremity and
identify potential sites that are easily seen or palpated. If no
access sites are visible or easily palpated, use visualization
technology to help identify an appropriate insertion site.
Choose an insertion site based on your assessment
findings.5
■ Check for a pulse distal to the tourniquet location.2,25 If
you don’t detect it, release the tourniquet and reapply it
with less tension to prevent arterial occlusion.
■ Lightly palpate the vein with the index and middle fingers
of your nondominant hand to assess vein condition. Stretch
the skin to anchor the vein. If the vein feels hard or ropelike,
select another.
■ If the vein is easily palpable but not sufficiently dilated,
place the extremity in a dependent position for several
seconds, or lightly stroke the vessel downward. If you have
selected a vein in the arm or hand, tell the patient to open
and close the fist several times.2,5,6
■ Release the tourniquet for site preparation.2,5
Preparing the site
■ If the intended insertion site is visibly soiled, clean it with
soap and water before applying the antiseptic solution.2,5,6
■ Remove excess hair from the intended insertion site, if
needed, using a single-patient-use scissors or disposable-
head clippers if needed to facilitate dressing
application.2,4,5,6
■ Administer a local anesthetic, as indicated and
prescribed,
using
safe
medication
administration
practices.2,5,27,28 (See Easing the pain of intermittent
infusion device insertion.)
■ Perform hand hygiene4,12,13,15,16,17,18 and put on
gloves.6,29,31
■ Prepare the site using a skin antiseptic agent. For
chlorhexidine (preferred), apply with an applicator using a
vigorous side-to-side motion for 30 seconds and allow the
area to dry completely.2,4,5,6 For povidone-iodine, apply
using a swab. Begin at the intended insertion site, moving
outward in concentric circles. Allow the solution dry
completely (typically, at least 2 minutes).2,5
■ If you must palpate the intended insertion site after
cleaning, remove and discard your gloves, perform hand
hygiene, and put on sterile gloves to avoid contaminating
the insertion site.5
ELDER ALERT Be aware that although you should apply antiseptic
agents with friction, this application can cause irritated skin to
become damaged, causing discomfort in an older adult. Antiseptics
can also cause stinging and irritation. Excessive amounts of alcohol
may dry already-compromised skin.2
■ Reapply the tourniquet.
■ Use visualization technology such as near-infrared
technology or ultrasound to locate the vein, if necessary and
available.2,5,6,11
■ Using the thumb of your nondominant hand, stretch the
skin taut below the puncture site to stabilize the vein.
■ Grasp the access cannula with your dominant hand,
remove the cover, and examine the cannula tip.6 If the edge
isn’t smooth, discard and replace the device.
Inserting the device
■ Tell the patient that you’re about to insert the device.
■ Hold the needle bevel up and enter the skin directly over
the vein at a 0- to 15-degree angle.5
■ Puncture the skin and anterior vein wall, watching the
flashback chamber or extension tubing behind the hub for
blood return, which signifies that you’ve properly accessed
the vein. (You might not see a blood return in a small vein.)
■ Level the insertion device slightly by lifting the tip of the
device up to prevent puncturing the back wall of the vein
with the access device.
■ As you continue to hold the skin taut, use the devices’
push-off tab to separate the device from the needle stylet.
■ Advance the catheter into the vein. To avoid
contaminating the catheter hub, don’t advance the catheter
by pushing from the catheter hub.5
■ Release the tourniquet.
■ Activate the device’s safety mechanism following the
manufacturer’s instructions for use.5
■ Clamp the extension tubing, then attach a needleless
connector and any other appropriate add-on devices primed
with preservative-free normal saline solution.2,5
Easing the pain of intermittent
infusion device insertion
You can ease the pain of intermittent infusion device insertion by
administering an anesthetic agent before insertion.2,5 Be sure to follow
these steps when administering an anesthetic agent:
■ Obtain and review the practitioner’s order.
■ Review the patient’s medical record for any history of an allergy to the
prescribed anesthetic.
■ Perform hand hygiene.4,12,13,15,16,17,18
■ Confirm the patient’s identity using at least two patient identifiers.19
■ Provide the patient with information about the selected local anesthetic
agent, including the benefits, potential complications, and management.24
■ Put on gloves, as needed.29,30
For anesthetic cream
■ Apply the recommended amount of anesthetic cream to the intended
insertion site.
■ Cover the area with a transparent semipermeable dressing.
■ Note the time of application on the dressing with a marking pen.
■ Leave the cream on the skin for the recommended application time.
■ After the recommended application time, remove the dressing, wipe off the
cream, evaluate the effectiveness of the anesthetic, and assess for any
adverse reactions to the anesthetic.
■ Disinfect the site with an antiseptic solution.
■ Insert the device as usual.
For an anesthetic dermal patch
■ Apply the dermal patch to the intended access site.
■ Leave the patch on the skin for the recommended application time.
■ Remove the patch, evaluate the effectiveness of the anesthetic, and
assess the site for any adverse reactions to the anesthetic patch.
■ Disinfect the site with an antiseptic solution.
■ Insert the device as usual.
For an intradermal anesthetic
■ Disinfect the skin of the intended access site with antiseptic pad and allow
it to dry.
■ Withdraw 0.3 mL of injectable anesthetic into a 1-mL syringe.
■ With the needle bevel up, gently insert the needle intradermally above the
intended access site.
■ Aspirate to make sure that you didn’t inadvertently insert the needle into a
vessel.
■ Inject 0.1 to 0.3 mL of the anesthetic, forming a wheal at the intended
access site.
■ Remove the needle and discard the syringe in a puncture-resistant sharps
container.
■ Evaluate the effectiveness of the anesthetic, and assess for any adverse
reactions.
■ Disinfect the site with an antiseptic solution.
■ Insert the device as usual.
For topical vapocoolant spray
■ Disinfect the skin of the intended access site with antiseptic solution and
then allow it to dry.
■ Spray the single-patient vapocoolant mist from the recommended distance
at the intended insertion site immediately before cannulation for the
recommended number of seconds or until the skin turns white, whichever
occurs sooner.
■ Allow the liquid to evaporate from the skin.
■ Insert the device as usual.
For iontophoresis
■ Refer to the iontophoresis device manufacturer’s instructions for use.5
■ Evaluate the effectiveness of iontophoresis and assess for adverse
reactions.5
■ Disinfect the site with an antiseptic solution and insert the catheter as
usual.
■ Perform a vigorous mechanical scrub of the needleless
connector for at least 5 seconds using an antiseptic pad.
Allow it to dry completely.32,33
■ While maintaining sterility of the syringe tip, attach a
prefilled syringe containing preservative-free normal saline
solution to the extension set hub. (Use a 10-mL syringe or a
syringe specifically designed to generate lower injection
pressure.) Slowly aspirate to remove air from the extension
set and to assess for a blood return that is the color and
consistency of whole blood. If you don’t obtain a blood
return, take steps to locate an external cause of
obstruction.5,34
■ If you do obtain a blood return, slowly inject preservative-
free normal saline solution into the catheter. Use a minimum
volume of twice the internal volume of the catheter system.
Don’t forcibly flush the device; further evaluate the device if
you meet resistance.5,34
■ Clamp the catheter to reduce blood reflux; the clamping
sequence depends on the type of needleless connector
used.2,5 For a positive-pressure needleless port, clamp the
catheter after removing the syringe; for a negative-pressure
needleless port, maintain pressure on the syringe plunger
while clamping the catheter; and for a neutral needleless
port, clamp the device before or after disconnecting the
syringe.
■ Attach a disinfectant-containing end cap to the needless
connector, if available in your facility.
■ Secure the catheter using an engineered stabilization
device, if available. An engineered stabilization device
reduces vascular access device motion, which increases the
risk for unintentional catheter dislodgement and
complications requiring premature catheter removal.35 If an
engineered stabilization device is unavailable, secure the
catheter with sterile tape.5
■ Apply a transparent semipermeable dressing.4,36 If the
patient has fragile skin, use a specially designed dressing to
prevent skin tearing or stripping.37
■ Secure the catheter extension tubing using sterile tape.
■ Label the dressing with the current date or the date the
dressing is due to be changed, as directed by your facility.36
■ If the catheter insertion site is near a movable joint,
stabilize the joint using a padded joint stabilization device
that supports the area of flexion and maintains the joint in a
functional position. Secure the joint stabilization device
following the manufacturer’s instructions. Make sure that
the device enables visualization and assessment of the
insertion site and vascular pathway. Ensure that it doesn’t
exert pressure that constricts circulation or cause pressure
injuries, skin impairment, or nerve damage. Periodically
remove the device to assess circulation, range of motion,
function, and skin integrity.38
■ Return the bed to the lowest position to prevent falls and
maintain patient safety.39
■
Discard used supplies in the appropriate
receptacle.29,31,40,41
■ Remove and discard your gloves.29,31,40
■ Perform hand hygiene.4,12,13,14,15,16,17,18
■ Document the procedure.42,43,44,45,46
Special considerations
■ No more than two attempts at insertion should be made
by one nurse, and total attempts should be limited to no
more than four, because multiple unsuccessful attempts
cause the patient unnecessary pain, delay treatment, limit
future vascular access, increase cost, and increase the risk
of complications.6
■ If the patient reports symptoms of paresthesia, such as
radiating electrical pain, tingling, burning, a prickly feeling,
or numbness, immediately stop the insertion procedure and
carefully remove the catheter. Also stop the procedure upon
the patient’s request or when the patient’s actions indicate
severe pain. Notify the practitioner of the patient’s report of
symptoms, because early recognition of nerve damage
produces a better prognosis. Document the details of the
patient’s report of symptoms in the medical record.47
■ If the patient reports a burning sensation during the
injection of the preservative-free normal saline solution,
stop the injection and check catheter placement. If the
catheter is in the vein, inject the preservative-free normal
saline solution at a slower rate to minimize irritation. If the
catheter isn’t in the vein, remove and discard it; then select
a new venipuncture site and, using fresh equipment, restart
the procedure.48
■ If the practitioner orders discontinuing an IV infusion and
orders an intermittent infusion device in its place, convert
the existing line by disconnecting the IV tubing and attach a
needleless connector. (See Converting an IV line to an
intermittent infusion device.)
EQUIPMENT
Converting an IV line to an intermittent
infusion device
To convert an existing IV line into an intermittent infusion
device, follow these steps:
■ Prime the needleless connector with preservative-free normal saline
solution.
■ Clamp the IV catheter.
■ Clamp the IV tubing, and then remove the administration set from the
cannula hub.
■ Perform a vigorous mechanical scrub of the needleless connector for at
least 5 seconds using an antiseptic pad. Allow it to dry completely.32,33
■ Remove the protective cap from the needleless connector.
■ Attach the needleless connector to the catheter hub. Rotate the device to
tighten it.
■ Perform a vigorous mechanical scrub of the needleless connector for at
least 5 seconds using an antiseptic pad. Allow it to dry completely.32,33
■ While maintaining the sterility of the syringe tip, attach a prefilled syringe
containing preservative-free normal saline solution to the needleless
connector. (Use a 10-mL syringe or a syringe specifically designed to
generate lower injection pressure.) Unclamp the catheter and slowly aspirate
for blood return that is the color and consistency of whole blood. If no blood
return occurs, take steps to locate an external cause of obstruction.5,34
■ If blood return occurs, slowly inject preservative-free normal saline solution
into the catheter. Use a minimum volume of twice the internal volume of the
catheter system. Don’t forcibly flush the device; further evaluate the device if
you meet resistance.5,34
■ Clamp the catheter to reduce blood reflux; the clamping sequence
depends on the type of needleless connector used.2,5 For a positive-pressure
needleless connector (shown below at left), clamp the catheter after
removing the syringe. For a negative-pressure needleless connector (shown
below in the middle), maintain pressure on the syringe plunger while
clamping the catheter. For a neutral needleless connector (shown below at
right), clamp the device before or after disconnecting the syringe.
Complications
Complications associated with intermittent infusion device
insertion include intravascular catheter–related bloodstream
infection, insertion site infection, phlebitis, infiltration,
hematoma formation, and vasospasm.
Documentation
Record the insertion site location; specific site preparation;
local anesthetic (if used); infection prevention and safety
precautions taken; type, length, and gauge of the catheter
inserted; date and time of insertion; insertion method,
including use of visualization and guidance technology;
number of insertion attempts; type and amount of flush
solution used; device functionality; method of catheter
stabilization; and patient’s tolerance of the procedure. Note
any complications that occurred and subsequent
interventions. Document patient and family teaching and
their understanding of that teaching.43
REFERENCES
1 Standard 27. Site selection. Infusion therapy standards of practice. (2016).
Journal of Infusion Nursing, 39, S54–S58. (Level VII)
2 Infusion Nurses Society. (2017). Policies and procedures for infusion therapy
of the older adult (3rd ed.). Boston, MA: Infusion Nurses Society.
3 Vizcarra, C., et al. (2014). Recommendations for improving safety practices
with short peripheral catheters. Journal of Infusion Nursing, 37(2), 121–124.
(Level VII)
4 Centers for Disease Control and Prevention. (2011, revised 2017). “Guidelines
for the prevention of intravascular catheter–related infections” [Online].
Accessed via the Web at http://www.cdc.gov/hicpac/pdf/guidelines/bsi-
guidelines-2011.pdf (Level I)
5 Infusion Nurses Society. (2016). Policies and procedures for infusion therapy
(5th ed.). Boston, MA: Infusion Nurses Society.
6 Standard 33. Vascular access site preparation and device placement. Infusion
therapy standards of practice. (2016). Journal of Infusion Nursing, 39, S64–
S65. (Level VII)
7 Standard 19. Standard precautions. Infusion therapy standards of practice.
(2016). Journal of Infusion Nursing, 39, S41–S42. (Level VII)
8 Jarrett, N., & Callaham, M. (2016). “Evidence-based guidelines for selected
hospital-acquired conditions: Final report” [Online]. Accessed via the Web at
https://www.cms.gov/Medicare/Medicare-Fee-for-Service-
Payment/HospitalAcqCond/Downloads/2016-HAC-Report.pdf
9 Standard 26. Vascular access device (VAD) planning. Infusion therapy
standards of practice. (2016). Journal of Infusion Nursing, 39, S51–S54. (Level
VII)
10 Standard 12. Product evaluation, integrity, and defect reporting. Infusion
therapy standards of practice. (2016). Journal of Infusion Nursing, 39, S32–
S34. (Level VII)
11 Standard 22. Vascular visualization. Infusion therapy standards of practice.
(2016). Journal of Infusion Nursing, 39, S44–S46. (Level VII)
12 The Joint Commission. (2019). Standard NPSG.07.01.01. Comprehensive
accreditation manual for hospitals. Oakbrook Terrace, IL: The Joint
Commission. (Level VII)
13 Standard 16. Hand hygiene. Infusion therapy standards of practice. (2016).
Journal of Infusion Nursing, 39, S38–S39 . (Level VII)
14 Centers for Disease Control and Prevention. (2002). Guideline for hand
hygiene in health-care settings: Recommendations of the Healthcare Infection
Control Practices Advisory Committee and the HICPAC/SHEA/APIC/IDSA Hand
Hygiene Task Force. MMWR Recommendations and Reports, 51(RR-16), 1–45.
Accessed via the Web at https://www.cdc.gov/mmwr/pdf/rr/rr5116.pdf (Level
II)
15 World Health Organization. (2009). “WHO guidelines on hand hygiene in
health care: First global patient safety challenge, clean care is safer care”
[Online]. Accessed via the Web at
http://apps.who.int/iris/bitstream/10665/44102/1/9789241597906_eng.pdf
(Level IV)
16 Accreditation Association for Hospitals and Health Systems. (2017). Standard
07.01.21. Healthcare Facilities Accreditation Program: Accreditation
requirements for acute care hospitals. Chicago, IL: Accreditation Association
for Hospitals and Health Systems. (Level VII)
17 Centers for Medicare and Medicaid Services, Department of Health and
Human Services. (2015). Condition of participation: Infection control. 42 C.F.R.
§ 482.42.
18 DNV GL-Healthcare USA, Inc. (2016). IC.1 .SR.1 . NIAHO® accreditation
requirements: Interpretive guidelines and surveyor guidance (version 11).
Milford, OH: DNV GL-Healthcare USA, Inc. (Level VII)
19 The Joint Commission. (2019). Standard NPSG.01.01.01. Comprehensive
accreditation manual for hospitals. Oakbrook Terrace, IL: The Joint
Commission. (Level VII)
20 Accreditation Association for Hospitals and Health Systems. (2017). Standard
15.01.16. Healthcare Facilities Accreditation Program: Accreditation
requirements for acute care hospitals. Chicago, IL: Accreditation Association
for Hospitals and Health Systems. (Level VII)
21 DNV GL-Healthcare USA, Inc. (2016). PR.1.SR.5 . NIAHO® accreditation
requirements: Interpretive guidelines and surveyor guidance (version 11).
Milford, OH: DNV GL-Healthcare USA, Inc. (Level VII)
22 Centers for Medicare and Medicaid Services, Department of Health and
Human Services. (2015). Condition of participation: Patient’s rights. 42 C.F.R.
§ 482.13(c)(1).
23 The Joint Commission. (2019). Standard RI.01.01.01. Comprehensive
accreditation manual for hospitals. Oakbrook Terrace, IL: The Joint
Commission. (Level VII)
24 Standard 8. Patient education. Infusion therapy standards of practice. (2016).
Journal of Infusion Nursing, 39, S25–S26. (Level VII)
25 The Joint Commission. (2019). Standard RR.01.01.03 . Comprehensive
accreditation manual for hospitals. Oakbrook Terrace, IL: The Joint
Commission. (Level VII)
26 Waters, T. R., et al. (2009). “Safe patient handling training for schools of
nursing” [Online]. Accessed via the Web at
http://www.cdc.gov/niosh/docs/2009-127/pdfs/2009-127.pdf (Level VII)
27 DNV GL-Healthcare USA, Inc. (2016). MM.1 .SR.2. NIAHO® accreditation
requirements: Interpretive guidelines and surveyor guidance (version 11).
Milford, OH: DNV GL-Healthcare USA, Inc. (Level VII)
28 Standard 32. Local anesthesia for vascular access (VAD) placement and
access. Infusion therapy standards of practice. (2016). Journal of Infusion
Nursing, 39, S63–S64. (Level VII)
29 Siegel, J. D ., et al. (2007, revised 2017). “2007 guideline for isolation
precautions: Preventing transmission of infectious agents in healthcare
settings” [Online]. Accessed via the Web at
http://www.cdc.gov/hicpac/pdf/isolation/Isolation2007.pdf (Level II)
30 Accreditation Association for Hospitals and Health Systems. (2017). Standard
07.01.10. Healthcare Facilities Accreditation Program: Accreditation
requirements for acute care hospitals. Chicago, IL: Accreditation Association
for Hospitals and Health Systems. (Level VII)
31 Occupational Safety and Health Administration. (n.d .). “Bloodborne
pathogens, standard number 1910.1030” [Online]. Accessed via the Web at
http://www.osha.gov/pls/oshaweb/owadisp.show_document?
p_id=10051&p_table=STANDARDS (Level VII)
32 Marschall, J., et al. (2014). SHEA/IDSA practice recommendation: Strategies
to prevent central line-associated bloodstream infections in acute care
hospitals. Infection Control and Hospital Epidemiology, 35(7), 753–771 .
Accessed via the Web at http://www.jstor.org/stable/10.1086/676533 (Level I)
33 Standard 34. Needleless connectors. Infusion therapy standards of practice.
(2016). Journal of Infusion Nursing, 39, S68–S70. (Level VII)
34 Standard 40. Flushing and locking. Infusion therapy standards of practice.
(2016). Journal of Infusion Nursing, 39, S77–S81. (Level VII)
35 Standard 37. Vascular access device (VAD) stabilization. Infusion therapy
standards of practice. (2016). Journal of Infusion Nursing, 39, S72–74 . (Level
VII)
36 Standard 41. Vascular access device (VAD) assessment, care and dressing
changes. Infusion therapy standards of practice. (2016). Journal of Infusion
Nursing, 39, S81–S84. (Level VII)
37 LeBlanc, K., et al. (2013). International skin tear advisory panel: A tool kit to
aid in the prevention, assessment, and treatment of skin tears using a
simplified classification system. Advances in Skin and Wound Care, 26(10),
459–476. (Level VII)
38 Standard 38. Joint stabilization. Infusion therapy standards of practice.
(2016). Journal of Infusion Nursing, 39, S74–S75. (Level VII)
39 Ganz, D. A., et al. (2013). Preventing falls in hospitals: A toolkit for improving
quality of care (AHRQ Publication No. 13-0015-EF). Rockville, MD: Agency for
Healthcare Research and Quality. Accessed via the Web at
http://www.ahrq.gov/sites/default/files/publications/files/fallpxtoolkit.pdf
(Level VII)
40 Standard 18. Medical waste and sharps safety. Infusion therapy standards of
practice. (2016). Journal of Infusion Nursing, 39, S40–S41. (Level VII)
41 Accreditation Association for Hospitals and Health Systems. (2017). Standard
07.03 .07. Healthcare Facilities Accreditation Program: Accreditation
requirements for acute care hospitals. Chicago, IL: Accreditation Association
for Hospitals and Health Systems. (Level VII)
42 The Joint Commission. (2019). Standard RC.01.03 .01. Comprehensive
accreditation manual for hospitals. Oakbrook Terrace, IL: The Joint
Commission. (Level VII)
43 Standard 10. Documentation in the medical record. Infusion therapy
standards of practice. (2016). Journal of Infusion Nursing, 39, S28–S30 . (Level
VII)
44 Accreditation Association for Hospitals and Health Systems. (2017). Standard
10.00 .03. Healthcare Facilities Accreditation Program: Accreditation
requirements for acute care hospitals. Chicago, IL: Accreditation Association
for Hospitals and Health Systems. (Level VII)
45 Centers for Medicare and Medicaid Services, Department of Health and
Human Services. (2015). Condition of participation: Medical record services.
42 C.F.R. § 482.24(b).
46 DNV GL-Healthcare USA, Inc. (2016). MR.2 .SR.1 . NIAHO® accreditation
requirements: Interpretive guidelines and surveyor guidance (version 11).
Milford, OH: DNV GL-Healthcare USA, Inc. (Level VII)
47 Standard 47. Nerve injuries. Infusion therapy standards of practice. (2016).
Journal of Infusion Nursing, 39, S102–S104. (Level VII)
48 Standard 46. Infiltration and extravasation. Infusion therapy standards of
practice. (2016). Journal of Infusion Nursing, 39, S98–S102. (Level VII)
INTERMITTENT POSITIVE-PRESSURE BREATHING
Intermittent positive-pressure breathing (IPPB) delivers room
air or oxygen into the lungs at a pressure higher than
atmospheric pressure. This delivery ceases when pressure in
the mouth or in the breathing circuit tube increases to a
predetermined airway pressure.
IPPB was formerly the mainstay of pulmonary therapy,
with its proponents claiming that the device delivered
aerosolized medications deeper into the lungs, decreased
the work of breathing, and assisted in the mobilization of
secretions. Studies now show that IPPB has no clinical
benefit over handheld nebulizers. However, it continues to
be used selectively to treat atelectasis and to promote
airway clearance when patients aren’t responsive to other
procedures, such as incentive spirometry and chest
physiotherapy.1,2 It may also be used to augment tidal
volume and reduce the work of breathing in patients who
become easily fatigued and find airway clearance difficult.2
Equipment
IPPB machine with all necessary circuit tubing ▪ mouthpiece
or mask ▪ source of pressurized gas at 50 psi ▪ prescribed
medication or normal saline solution ▪ 3-mL syringe ▪ blood
pressure monitoring equipment ▪ stethoscope ▪ disinfectant
pad ▪ facial tissues and waste bag or specimen cup ▪ warm,
soapy water ▪ sterile water ▪ plastic bag ▪ Optional: gloves.
Preparation of equipment
Follow the manufacturer’s instructions to set up the
equipment properly. Label all medications, medication
containers, and other solutions.3,4
Implementation
■ Verify the practitioner’s orders.
■ Gather and prepare the necessary equipment and the
medication, if ordered. If administering medication, follow
these steps: Avoid distractions and interruptions when
preparing and administering medication to prevent
medication errors.5,6,7,8,9 Compare the medication label to
the order in the patient’s medical record.6,7,8,9 Check the
patient’s medical record for an allergy or a contraindication
to the prescribed medication. If an allergy or
contraindications exist, don’t administer the medication and
notify the practitioner.6,7,8,9 Check the expiration date on
the medication. If the medication is expired, return it to the
pharmacy and obtain new medication. Visually inspect the
solution for particles or discoloration or other loss of
integrity; don’t administer the medication if its integrity is
compromised.6,7,8,9 Discuss any unresolved concerns about
the medication with the patient’s practitioner. If the patient
is receiving the medication for the first time, teach about
potential adverse reactions or other concerns related to the
medication. Verify that the medication is being administered
at the proper time, in the prescribed dose, and by the
correct route to reduce the risk of medication errors.6,7,8,9 If
your facility uses bar-code technology, scan your
identification badge, the patient’s identification bracelet,
and the medication’s bar code.
■ Perform hand hygiene.10,11,12,13,14,15
■ Confirm the patient’s identity using at least two patient
identifiers.16
■ Provide privacy.17,18,19,20
■ Explain the procedure to the patient and family (if
appropriate) according to their individual communication
and learning needs to increase their understanding, allay
their fears, and enhance cooperation.21
■ Raise the patient’s bed to waist level while providing care
to prevent caregiver back strain.22
■ Instruct the patient to sit erect in a chair, if indicated, to
allow for optimal lung expansion. If the patient can’t sit,
position the patient in the semi-Fowler or supine
position.2,23
■ Perform hand hygiene10,11,12,13,14,15 and put on gloves, as
needed, to comply with standard precautions.24,25
■ Obtain baseline blood pressure and heart rate
measurements, especially if a bronchodilator will be
administered, and auscultate breath sounds for
posttreatment comparisons.
■ Instill the ordered medication or normal saline solution
into the nebulizer cup.
■ Turn on the IPPB machine at the appropriate settings as
determined by the practitioner or respiratory therapist.
■ Instruct the patient to insert the mouthpiece and to make
a tight seal with the lips.
■ Instruct the patient to breathe deeply and slowly through
the mouth as if sucking on a straw. Encourage the patient to
let the machine do the work.
■ During treatment, instruct the patient to hold the breath
for a few seconds after full inspiration to allow for greater
distribution of gas and medication, if administered, and then
to exhale normally.
■ During treatment, obtain the patient’s blood pressure and
heart rate. IPPB treatment increases intrathoracic pressure
and may temporarily decrease cardiac output and venous
return, resulting in tachycardia, hypotension, and headache.
Monitoring also detects reactions to the bronchodilator, if
administered. If you note a sudden change in blood pressure
or increase in heart rate of 20 or more beats/minute, stop
the treatment and notify the practitioner.
■ If the patient is tolerating the treatment, continue until
the medication or normal saline solution in the nebulizer is
exhausted, usually about 10 minutes.
■ After treatment and as needed, have the patient either
expectorate into tissues and discard them in a waste bag or
expectorate in a specimen cup; alternatively, you can
suction the patient as necessary.
■ Auscultate the patient’s breath sounds, and compare the
findings with the pretreatment assessment findings to
evaluate the effectiveness of therapy.
■ Return the bed to the lowest position to prevent falls and
maintain patient safety.26
■ Shake excess moisture from the nebulizer and the
mouthpiece or mask.
■ After 24 hours of use, discard the equipment or clean it
with warm, soapy water; rinse it with sterile water; and then
air-dry it. When it’s dry, store it in a clean plastic bag.27
■ Remove and discard your gloves, if worn.24
■ Perform hand hygiene.10,11,12,13,14,15
■ Clean and disinfect your stethoscope with a disinfectant
pad.27,28
■ Perform hand hygiene.10,11,12,13,14,15
■ Document the procedure.29,30,31,32
Special considerations
■ If possible, avoid administering IPPB treatment
immediately before or after a meal, because the treatment
may induce nausea, and because a full stomach reduces
lung expansion.
■ Never give IPPB treatment without medication or sterile
saline in the nebulizer; doing so could dry the patient’s
airway, making secretions more difficult to mobilize.
■ If the purpose of treatment is to mobilize secretions,
ensure the patient expectorates into a specimen cup to
measure the secretions obtained.
■ If the patient wears dentures, leave them in place to
ensure a proper seal, but remove them if they slide out of
position.
■ If the patient has an artificial airway, use a special
adapter, such as mechanical ventilation tubing, to give IPPB
treatments.
■ When using a mask to administer treatments, allow the
patient frequent rest periods and observe for gastric
distention, because this complication is more likely to occur
with a mask.
■ If the patient’s blood pressure is stable during the initial
treatment, you may not need to check it during subsequent
treatments unless the patient has a history of
cardiovascular disease, hypotension, or sensitivity to any
drug delivered in the treatment.
Patient teaching
If the patient will be using IPPB at home, provide
appropriate patient teaching. Have the patient demonstrate
the proper setup, use, and cleaning of the equipment before
discharge. Tell the patient not to change the pressure
settings without checking with the practitioner. Suggest the
patient avoid using IPPB immediately before or after a meal
because of possible nausea and reduced lung expansion.
Instruct the patient to discontinue treatment and call the
practitioner if dizziness occurs.
Complications
Gastric insufflation may result from swallowed air; it occurs
more commonly with a mask than with a mouthpiece.
Dizziness can result from hyperventilation. The work of
breathing can be increased, especially if the patient is
uncomfortable with or frightened by the machine.
Decreased blood pressure can result from decreased venous
return, especially in a patient with hypovolemia or
cardiovascular disease. Increased intracranial pressure can
result from impeded venous return from the brain.
Spontaneous pneumothorax may result from increased
intrathoracic pressure; this complication is rare but is most
likely to occur in patients with emphysematous blebs.1
Documentation
Record the date, time, and duration of treatment;
medication administered, if applicable; pressure used; vital
signs; breath sounds before and after treatment; amount of
sputum produced; any complications and nursing actions
taken; the patient’s tolerance of the procedure; and any
patient teaching provided and the patient’s understanding
of the teaching.
REFERENCES
1 American Association for Respiratory Care (AARC). (1993, revised 2003).
AARC clinical practice guideline: Intermittent positive pressure breathing—
2003 revision & update. Respiratory Care, 48(5), 540–546. Accessed via the
Web at http://rc.rcjournal.com/content/48/5/540.full.pdf (Level VII)
2 Bott, J., et al. (2009). Guidelines for the physiotherapy management of the
adult, medical, spontaneously breathing patient. Thorax, 64(Suppl 1), i1–i51.
Accessed via the Web at
http://thorax.bmj.com/content/64/Suppl_1/i1.full.pdf+html (Level VII)
3 The Joint Commission. (2019). Standard MM.05.01.09 . Comprehensive
accreditation manual for hospitals. Oakbrook Terrace, IL: The Joint
Commission. (Level VII)
4 Accreditation Association for Hospitals and Health Systems. (2017). Standard
25.01.18. Healthcare Facilities Accreditation Program: Accreditation
requirements for acute care hospitals. Chicago, IL: Accreditation Association
for Hospitals and Health Systems. (Level VII)
5 Institute for Safe Medication Practices. (2012). Side tracks on the safety
express: Interruptions lead to errors and unfinished...Wait, what was I doing?
Nurse Advise-ERR, 11(2), 1–4 . Accessed via the Web at
https://www.ismp.org/Newsletters/acutecare/showarticle.aspx?id=37
6 Accreditation Association for Hospitals and Health Systems. (2017). Standard
16.01.03. Healthcare Facilities Accreditation Program: Accreditation
requirements for acute care hospitals. Chicago, IL: Accreditation Association
for Hospitals and Health Systems. (Level VII)
7 Centers for Medicare and Medicaid Services, Department of Health and
Human Services. (2015). Condition of participation: Nursing services. 42
C.F.R. § 482.23(c).
8 The Joint Commission. (2019). Standard MM.06 .01.01. Comprehensive
accreditation manual for hospitals. Oakbrook Terrace, IL: The Joint
Commission. (Level VII)
9 DNV GL-Healthcare USA, Inc. (2016). MM .1 .SR.2 . NIAHO® accreditation
requirements: Interpretive guidelines and surveyor guidance (version 11).
Milford, OH: DNV GL-Healthcare USA, Inc. (Level VII)
10 The Joint Commission. (2019). Standard NPSG.07.01.01. Comprehensive
accreditation manual for hospitals. Oakbrook Terrace, IL: The Joint
Commission. (Level VII)
11 Centers for Disease Control and Prevention. (2002). Guideline for hand
hygiene in health-care settings: Recommendations of the Healthcare Infection
Control Practices Advisory Committee and the HICPAC/SHEA/APIC/IDSA Hand
Hygiene Task Force. MMWR Recommendations and Reports, 51(RR-16), 1–45.
Accessed via the Web at https://www.cdc.gov/mmwr/pdf/rr/rr5116.pdf (Level
II)
12 World Health Organization. (2009). “WHO guidelines on hand hygiene in
health care: First global patient safety challenge, clean care is safer care”
[Online]. Accessed via the Web at
http://apps.who.int/iris/bitstream/10665/44102/1/9789241597906_eng.pdf
(Level IV)
13 Accreditation Association for Hospitals and Health Systems. (2017). Standard
07.01.21. Healthcare Facilities Accreditation Program: Accreditation
requirements for acute care hospitals. Chicago, IL: Accreditation Association
for Hospitals and Health Systems. (Level VII)
14 Centers for Medicare and Medicaid Services, Department of Health and
Human Services. (2015). Condition of participation: Infection control. 42 C.F.R.
§ 482.42.
15 DNV GL-Healthcare USA, Inc. (2016). IC.1 .SR.1 . NIAHO® accreditation
requirements: Interpretive guidelines and surveyor guidance (version 11).
Milford, OH: DNV GL-Healthcare USA, Inc. (Level VII)
16 The Joint Commission. (2019). Standard NPSG.01.01.01. Comprehensive
accreditation manual for hospitals. Oakbrook Terrace, IL: The Joint
Commission. (Level VII)
17 The Joint Commission. (2019). Standard RI.01.01.01. Comprehensive
accreditation manual for hospitals. Oakbrook Terrace, IL: The Joint
Commission. (Level VII)
18 Centers for Medicare and Medicaid Services, Department of Health and
Human Services. (2015). Condition of participation: Patient’s rights. 42 C.F.R.
§ 482.13(c)(1).
19 Accreditation Association for Hospitals and Health Systems. (2017). Standard
15.01.16. Healthcare Facilities Accreditation Program: Accreditation
requirements for acute care hospitals. Chicago, IL: Accreditation Association
for Hospitals and Health Systems. (Level VII)
20 DNV GL-Healthcare USA, Inc. (2016). PR.1.SR.5 . NIAHO® accreditation
requirements: Interpretive guidelines and surveyor guidance (version 11).
Milford, OH: DNV GL-Healthcare USA, Inc. (Level VII)
21 The Joint Commission. (2019). Standard PC.02.01.21. Comprehensive
accreditation manual for hospitals. Oakbrook Terrace, IL: The Joint
Commission. (Level VII)
22 Waters, T. R., et al. (2009). “Safe patient handling training for schools of
nursing” [Online]. Accessed via the Web at
http://www.cdc.gov/niosh/docs/2009-127/pdfs/2009-127.pdf (Level VII)
23 Guérin, C., et al. (2010). The short-term effects of intermittent positive
pressure breathing treatments on ventilation in patients with neuromuscular
disease. Respiratory Care, 55(7), 866–872. Accessed via the Web at
http://rc.rcjournal.com/content/55/7/866.full.pdf (Level VI)
24 Siegel, J. D ., et al. (2007, revised 2017). “2007 guideline for isolation
precautions: Preventing transmission of infectious agents in healthcare
settings” [Online]. Accessed via the Web at
https://www.cdc.gov/infectioncontrol/pdf/guidelines/isolation-guidelines.pdf
(Level II)
25 Accreditation Association for Hospitals and Health Systems. (2017). Standard
07.01.10. Healthcare Facilities Accreditation Program: Accreditation
requirements for acute care hospitals. Chicago, IL: Accreditation Association
for Hospitals and Health Systems. (Level VII)
26 Ganz, D. A., et al. (2013). Preventing falls in hospitals: A toolkit for improving
quality of care (AHRQ Publication No. 13-0015-EF). Rockville, MD: Agency for
Healthcare Research and Quality. Accessed via the Web at
http://www.ahrq.gov/sites/default/files/publications/files/fallpxtoolkit.pdf
(Level VII)
27 Accreditation Association for Hospitals and Health Systems. (2017). Standard
07.02.03. Healthcare Facilities Accreditation Program: Accreditation
requirements for acute care hospitals. Chicago, IL: Accreditation Association
for Hospitals and Health Systems. (Level VII)
28 Rutala, W. A., et al. (2008, revised 2017). “Guideline for disinfection and
sterilization in healthcare facilities, 2008” [Online]. Accessed via the Web at
https://www.cdc.gov/infectioncontrol/pdf/guidelines/disinfection-
guidelines.pdf (Level I)
29 The Joint Commission. (2019). Standard RC.01.03 .01. Comprehensive
accreditation manual for hospitals. Oakbrook Terrace, IL: The Joint
Commission. (Level VII)
30 Accreditation Association for Hospitals and Health Systems. (2017). Standard
10.00 .03. Healthcare Facilities Accreditation Program: Accreditation
requirements for acute care hospitals. Chicago, IL: Accreditation Association
for Hospitals and Health Systems. (Level VII)
31 Centers for Medicare and Medicaid Services, Department of Health and
Human Services. (2015). Condition of participation: Medical record services.
42 C.F.R. § 482.24(b).
32 DNV GL-Healthcare USA, Inc. (2016). MR.2 .SR.1 . NIAHO® accreditation
requirements: Interpretive guidelines and surveyor guidance (version 11).
Milford, OH: DNV GL-Healthcare USA, Inc. (Level VII)
INTERMITTENT URINARY CATHETERIZATION
Intermittent (straight) urinary catheter insertion involves
inserting a temporary catheter into the bladder to drain
urine. In contrast with an indwelling urinary catheter, an
intermittent catheter is removed as soon as the urine is
drained. It’s a preferred alternative to indwelling urinary
catheter insertion for managing patients with neurogenic
bladder and urinary retention because it’s associated with
lower
infection
rates than
indwelling
urinary
catheterization.1,2,3,4,5
Intermittent urinary catheterization has been used in
patients with spinal cord injury, spinal tumors, diabetic
neuropathy, multiple sclerosis, spina bifida, myelodysplasia,
bladder outlet obstruction, and continent urinary diversion.
It’s also been used to manage incontinence and
postoperative urinary retention as well as to collect urine
samples for culture and sensitivity.
Intermittent urinary catheterization is used long-term or
short-term, depending on the patient’s condition. When
used routinely, it should be performed at regular intervals
throughout the day according to the patient’s fluid intake to
prevent bladder overdistention.2
In the health care facility, use sterile or clean technique
for insertion, as required by your facility. At home, the
patient may use clean technique without increasing the risk
for a urinary tract infection (UTI). This procedure focuses on
using sterile technique.
Equipment
Sterile urethral catheter (#10 to #22 French) ▪ single-use
packets of soap-containing wipes, or soap, water, washcloth,
and towel ▪ gloves ▪ fluid-impermeable pads ▪ sterile
gloves ▪ sterile drape ▪ sterile fenestrated drape ▪ sterile,
presaturated antiseptic swabs; antiseptic solution and
sterile swabs; or antiseptic solution, sterile cotton balls, and
plastic forceps ▪ urine drainage receptacle ▪ single-use
packets of sterile water-soluble lubricant ▪ Optional: towel,
light source, gown, mask and goggles, or mask with face
shield, bladder ultrasonography unit with probe, catheter
storage container.
Prepackaged sterile disposable kits that usually contain all
the necessary equipment are available.
Implementation
■ Verify the practitioner’s order.
■ Check the patient’s medical record for a history of
hypersensitivity to iodine or latex.6
■ Gather the appropriate equipment. Use the smallest
catheter possible to minimize urethral damage.3,4
NURSING ALERT Large catheters (#18 French or larger) can increase
erosion of the bladder neck and urethral mucosa, cause stricture
formation, and impede drainage of periurethral gland secretions.7
■ Obtain the assistance of a coworker if necessary to help
position the patient.
■ Ensure adequate lighting.
■ Perform hand hygiene.8,9,10,11,12,13
■ Confirm the patient’s identity using at least two patient
identifiers.14
■ Provide privacy.15,16,17,18
■ Explain the procedure to the patient and family as
appropriate according to their communication and learning
needs to increase understanding, allay fears, and enhance
cooperation.19
■ Check the patient’s intake and output record to see the
time and amount of the last recent void; confirm the time
with the patient.
■ Raise the patient’s bed to waist level when providing care
to prevent caregiver back strain.20
■ Percuss and palpate the patient’s bladder to establish
baseline data. Ask if the patient feels the urge to void. If
possible, measure the volume of urine in the bladder using
bladder ultrasonography; ultrasonography helps prevent
unnecessary catheterization.2,5
■ Perform hand hygiene.8,9,10,11,12,13
■ Put on gloves, as needed, to comply with standard
precautions.21,22
For a female patient
■ Place the patient in the supine position with her knees
flexed and separated and her feet flat on the bed, about 2′
(60 cm) apart. If she finds this position uncomfortable, have
her flex one knee and keep the other leg flat on the bed. Or
have the patient lie on her side with her knees drawn up to
her chest during the catheterization procedure (as shown
below). This position may be especially helpful for elderly or
disabled patients, such as those with severe contractures.
■ Ask the patient to hold her position to give you a clear
view of the urinary meatus and to prevent contamination of
the sterile field.
■ Place fluid-impermeable pads on the bed between the
patient’s legs and under her hips to prevent inadvertent
soiling of the patient’s bed linens.
■ Use the soap-containing wipes to clean the patient’s
periurethral area thoroughly. Alternatively, clean the area
with warm, soapy water using a washcloth, rinse, and then
dry the area with a towel.2
■ Remove and discard your gloves.21,22
■ Perform hand hygiene.8,9,10,11,12,13
■ To create the sterile field, open the prepackaged kit or
equipment tray and place it at an area near the patient or
between the patient’s legs. If the sterile gloves are the first
item on the top of the tray, put them on. Place the sterile
drape under the patient’s hips. Then drape the patient’s
lower abdomen with the sterile fenestrated drape so that
only the genital area remains exposed (as shown below).
Make sure you don’t contaminate your gloves if you have
them on already.3,9,23,24
■ Open the rest of the kit or tray. Put on the sterile gloves if
you haven’t already done so.21
■ Tear open the packet of presaturated antiseptic wipes, or
use antiseptic cleaning solution to saturate the sterile
cotton balls or sterile swabs. Be careful not to spill the
solution on the equipment.
■ Open the packet of water-soluble lubricant and apply it to
the catheter tip.
■ Separate the labia majora and labia minora as widely as
possible with the thumb, middle, and index fingers of your
nondominant hand so you have a full view of the urinary
meatus. Keep the labia well separated throughout the
procedure so they don’t obscure the urinary meatus or
contaminate the area when it’s cleaned.
■ With your dominant hand, use an antiseptic swab, or pick
up a sterile antiseptic-soaked cotton ball with the plastic
forceps, and wipe one side of the urinary meatus with a
downward motion (as shown below).
■ Wipe the other side with another antiseptic swab or
antiseptic-soaked cotton ball using the same technique.
Then wipe directly over the meatus with a third antiseptic
swab or antiseptic-soaked cotton ball. Take care not to
contaminate your sterile glove.
■ Pick up the straight catheter with your dominant hand,
holding it about 2′′ to 3′′ (5 to 7.5 cm) from the tip, and
prepare to insert the lubricated tip into the urinary meatus.
To facilitate insertion, ask the patient to cough as you insert
the catheter, because coughing relaxes the sphincter. Tell
her to breathe deeply and slowly to further relax the
sphincter and reduce spasms.24
NURSING ALERT Never force a catheter during insertion. Maneuver it
gently as the patient bears down or coughs. If you still meet
resistance, stop and notify the practitioner. Sphincter spasms,
strictures, or misplacement in the vagina may cause resistance.
■ Slowly and gently advance the catheter 2′′ to 4′′ (5 to 10
cm) while continuing to hold the labia apart until urine
begins to flow. If the catheter is inadvertently inserted into
the vagina, leave it there as a landmark. Then begin the
procedure over again using new supplies.
■ Drain the urine into the urine receptacle.
■ Hold the catheter in place until the urine flow stops and
the bladder is empty.
■ When flow has stopped, slowly remove the catheter,
allowing urine to drain from the lower half of the bladder.
Completely remove the catheter when there’s no further
urine flow.
■ Return the bed to the lowest position to prevent falls and
maintain patient safety.25
■ If the catheter is disposable, discard it in the appropriate
receptacle. If it’s reusable, clean the catheter with mild soap
and water and store it in a clean, dry container.26,27
■ Discard all the used supplies in the appropriate
receptacles.
■ Remove and discard your gloves and any other personal
protective equipment worn.21,22
■ Perform hand hygiene.8,9,10,11,12,13
■ Document the procedure.28,29,30,31
For a male patient
■ Place the patient in the supine position with his legs
extended and flat on the bed. Ask the patient to remain in
that position to give you a clear view of the urinary meatus
and to prevent contamination of the sterile field.
■ Place a fluid-impermeable pad on the bed between the
patient’s legs and under his hips to prevent inadvertent
soiling of bed linens.
■ Use the soap-containing wipes to wash the periurethral
area. Alternatively, clean the area with warm, soapy water
and a washcloth and dry the area with the towel.
■ Place a new fluid-impermeable pad under the patient if
the existing one is wet or soiled.
■ Remove and discard your gloves.21,22
■ Perform hand hygiene.8,9,10,11,12,13
■ To create the sterile field, open the prepackaged kit or
equipment tray and place it next to the patient’s hip. If the
sterile gloves are the first item on the top of the tray, put
them on. Place the sterile drape under the patient’s hips.
Then drape the patient’s lower abdomen with the sterile
fenestrated drape so that only the genital area remains
exposed. Make sure you don’t contaminate your gloves if
you have them on already.3,9,23,24
■ Open the rest of the kit or tray. Put on the sterile gloves if
you haven’t already done so.21
■ Tear open the packet of presaturated antiseptic swabs, or
use an antiseptic cleaning agent to saturate sterile cotton
balls or swabs. Be careful not to spill the solution on the
equipment.
■ Open the packet of water-soluble lubricant and apply it to
the catheter tip.
■ Hold the penis with your nondominant hand. If the patient
is uncircumcised, retract the foreskin. Then gently lift and
stretch the penis to a 60- to 90-degree angle. Hold the penis
this way throughout the procedure to straighten the urethra
and maintain a sterile field.
■ Use your dominant hand to clean the glans with an
antiseptic swab or an antiseptic-soaked sterile cotton ball
you picked up with the forceps. Clean in a circular motion,
starting at the urinary meatus and working outward (as
shown on next page, top left).
■ Repeat the procedure, using another antiseptic swab or
antiseptic-soaked sterile cotton ball. Make sure that you
don’t contaminate your sterile glove.
■ Pick up the catheter with your dominant hand, holding it
about 2′′ to 3′′ (5 to 7.5 cm) from the tip, and prepare to
insert the lubricated tip into the urinary meatus. To facilitate
insertion, ask the patient to cough as you insert the
catheter, because coughing will relax the sphincter. Tell him
to breathe deeply and slowly to further relax the sphincter
and reduce spasms.
■ Gently insert the catheter into the meatus, approximately
6′′ to 8′′ (15 to 20 cm) or until the urine begins to flow.
■ As you reach the level of the prostate, you’ll meet some
resistance. Tell the patient to breathe deeply and slowly as
you continue to advance the catheter.
NURSING ALERT Never force a catheter during insertion. Maneuver it
gently as the patient bears down or coughs. If you still meet
resistance, stop and notify the practitioner. Sphincter spasms,
strictures, or an enlarged prostate may cause resistance.
■ If the foreskin was retracted, replace it to prevent
compromised circulation and painful swelling.
■ Drain the urine into the urine receptacle.
■ Hold the catheter in place until the urine flow stops and
the bladder is empty.
■ When urine flow has stopped, slowly remove the catheter,
allowing urine to drain from the lower half of the bladder.
Completely remove the catheter when there’s no further
urine flow.
■ Return the bed to the lowest position to prevent falls and
maintain patient safety.25
■ If the catheter is disposable, discard it in the appropriate
receptacle. If it is reusable, clean the catheter with mild
soap and water and store it in a clean, dry container.26,27
■ Discard all the used supplies in the appropriate
receptacle.
■ Remove and discard your gloves and any other personal
protective equipment worn.21,22
■ Perform hand hygiene.8,9,10,11,12,13
■ Document the procedure.28,29,30,31
Special considerations
■ Patients with spina bifida, spinal cord injury, atopy,
certain food allergies, and occupational latex exposure are
at increased risk for latex allergy. Provide these patients
with a latex-free environment by avoiding all products
containing latex proteins, including gloves, catheters,
condoms, drains, and injection ports.6
■ If ordered, a topical anesthetic may be instilled directly
into the urethra before catheter insertion to prevent pain
and trauma to the urethral lining.32
■ Some practitioners use a syringe prefilled with water-
soluble lubricant and instill the lubricant directly into the
male urethra instead of on the catheter tip. A topical
anesthetic gel may also be instilled into the urethra before
catheter insertion. These methods help prevent pain and
trauma to the urethral lining as well as possible urinary tract
infection.33
■ If the practitioner orders a urine specimen for laboratory
analysis, obtain it from the urine receptacle with a specimen
collection container at the time of catheterization, label it in
the presence of the patient to prevent mislabeling,14 and
send it to the laboratory in a biohazard transport bag34 with
the appropriate laboratory request form (if required by your
facility).
Patient teaching
Before discharge, teach the patient and caregiver about
self-catheterization as required for discharge. Review proper
hand washing, catheterization technique, and daily care of
the urinary meatus, as well as maintenance of catheter
supplies. Instruct the patient to report signs and symptoms
of UTI or an obstruction. Advise the patient to stay well
hydrated so that the urine is a light straw color.35
Complications
Complications include urethral false passages, urethral
strictures, bladder perforation, and deterioration of the
upper urinary tract. UTI can result from the introduction of
bacteria into the bladder. Improper insertion can cause
traumatic injury to the urethral and bladder mucosa.
Bladder atony or spasms can result from rapid
decompression of a severely distended bladder.
Documentation
Record the date, time, and size and type of catheter used.
Also describe the amount, color, and other characteristics of
urine emptied from the bladder. Your facility may require
only the intake and output record for fluid-balance data.
Describe the patient’s tolerance of the procedure. Note
whether a urine specimen was sent for laboratory analysis.
Document any patient teaching and the patient’s
understanding of the teaching.
REFERENCES
1 Association of Professionals in Infection Control and Epidemiology. (2014).
“APIC implementation guide: Guide to preventing catheter-associated urinary
tract infections” [Online]. Accessed via the Web at
http://apic.org/Resource_/EliminationGuideForm/6473ab9b-e75c-457a-8d0f-
d57d32bc242b/File/APIC_CAUTI_web_0603 .pdf (Level IV)
2 Healthcare Infection Control Practices Advisory Committee. (2010). “Guideline
for prevention of catheter-associated urinary tract infections 2009” [Online].
Accessed via the Web at
http://www.cdc.gov/hicpac/pdf/CAUTI/CAUTI_GuidelineAppendices2009final.p
df (Level I)
3 Lo, E., et al. (2014). SHEA/IDSA practice recommendation: Strategies to
prevent catheter-associated urinary tract infections in acute care hospitals:
2014 update. Infection Control and Hospital Epidemiology, 35(5), 464–479.
Accessed via the Web at http://www.jstor.org/stable/10.1086/675718 (Level I)
4 Society of Urologic Nurses and Associates. (2016). “Clinical practice
guidelines: Prevention & control of catheter-associated urinary tract infection
(CAUTI)” [Online]. Accessed via the Web at
https://www.suna.org/sites/default/files/download/cautiGuideline.pdf (Level
VII)
5 American Hospital Association/Health Research & Educational Trust. (2017).
“Catheter-associated urinary tract infection (CAUTI) top ten checklist: Date of
last CAUTI event” [Online]. Accessed via the Web at http://www.hret-
hiin.org/resources/display/catheterassociated-urinary-tract-infections-cauti-
top-ten-checklist-date-of-last-cauti-event
6 Achmetov, T., & Gray, M. (2008). Adverse reactions to latex in the clinical
setting: A urologic perspective. Infection Control Resource, 2(2), 1, 4–6 .
Accessed via the Web at http://www.covidien.com/imageServer.aspx?
contentID=20455&contenttype=application/pdf
7 Herter, R., & Kazer, M. W. (2010). Best practices in urinary catheter care.
Home Healthcare Nurse, 28(6), 342–349.
8 Centers for Disease Control and Prevention. (2002). Guideline for hand
hygiene in health-care settings: Recommendations of the Healthcare Infection
Control Practices Advisory Committee and the HICPAC/SHEA/APIC/IDSA Hand
Hygiene Task Force. MMWR Recommendations and Reports, 51(RR-16), 1–45.
Accessed via the Web at https://www.cdc.gov/mmwr/pdf/rr/rr5116.pdf (Level
II)
9 The Joint Commission. (2019). Standard NPSG.07.01.01. Comprehensive
accreditation manual for hospitals. Oakbrook Terrace, IL: The Joint
Commission. (Level VII)
10 World Health Organization. (2009). “WHO guidelines on hand hygiene in
health care: First global patient safety challenge, clean care is safer care”
[Online]. Accessed via the Web at
http://apps.who.int/iris/bitstream/10665/44102/1/9789241597906_eng.pdf
(Level IV)
11 Accreditation Association for Hospitals and Health Systems. (2017). Standard
07.01.21. Healthcare Facilities Accreditation Program: Accreditation
requirements for acute care hospitals. Chicago, IL: Accreditation Association
for Hospitals and Health Systems. (Level VII)
12 Centers for Medicare and Medicaid Services, Department of Health and
Human Services. (2015). Condition of participation: Infection control. 42 C.F.R.
§ 482.42.
13 DNV GL-Healthcare USA, Inc. (2016). IC.1 .SR.1 . NIAHO® accreditation
requirements: Interpretive guidelines and surveyor guidance (version 11).
Milford, OH: DNV GL-Healthcare USA, Inc. (Level VII)
14 The Joint Commission. (2019). Standard NPSG.01.01.01. Comprehensive
accreditation manual for hospitals. Oakbrook Terrace, IL: The Joint
Commission. (Level VII)
15 Accreditation Association for Hospitals and Health Systems. (2017). Standard
15.01.16. Healthcare Facilities Accreditation Program: Accreditation
requirements for acute care hospitals. Chicago, IL: Accreditation Association
for Hospitals and Health Systems. (Level VII)
16 Centers for Medicare and Medicaid Services, Department of Health and
Human Services. (2015). Condition of participation: Patient’s rights. 42 C.F.R.
§ 482.13(c)(1).
17 DNV GL-Healthcare USA, Inc. (2016). PR.1.SR.5 . NIAHO® accreditation
requirements: Interpretive guidelines and surveyor guidance (version 11).
Milford, OH: DNV GL-Healthcare USA, Inc. (Level VII)
18 The Joint Commission. (2019). Standard RI.01.01.01. Comprehensive
accreditation manual for hospitals. Oakbrook Terrace, IL: The Joint
Commission. (Level VII)
19 The Joint Commission. (2019). Standard PC.02.01.21. Comprehensive
accreditation manual for hospitals. Oakbrook Terrace, IL: The Joint
Commission. (Level VII)
20 Waters, T. R., et al. (2009). “Safe patient handling training for schools of
nursing” [Online]. Accessed via the Web at
http://www.cdc.gov/niosh/docs/2009-127/pdfs/2009-127.pdf (Level VII)
21 Siegel, J. D ., et al. (2007, revised 2017). “2007 guideline for isolation
precautions: Preventing transmission of infectious agents in healthcare
settings” [Online]. Accessed via the Web at
http://www.cdc.gov/hicpac/pdf/isolation/Isolation2007.pdf (Level II)
22 Accreditation Association for Hospitals and Health Systems. (2017). Standard
07.01.10. Healthcare Facilities Accreditation Program: Accreditation
requirements for acute care hospitals. Chicago, IL: Accreditation Association
for Hospitals and Health Systems. (Level VII)
23 The Joint Commission. (2019). Standard NPSG.07.06 .01. Comprehensive
accreditation manual for hospitals. Oakbrook Terrace, IL: The Joint
Commission. (Level VII)
24 Society of Urologic Nurses and Associates. (2015). “Clinical practice
guidelines: Adult female urethral catheterization” [Online]. Accessed via the
Web at http://www.suna.org/resources/femaleCatheterization.pdf (Level VII)
25 Ganz, D. A., et al. (2013). Preventing falls in hospitals: A toolkit for improving
quality of care (AHRQ Publication No. 13-0015-EF). Rockville, MD: Agency for
Healthcare Research and Quality. Accessed via the Web at
http://www.ahrq.gov/sites/default/files/publications/files/fallpxtoolkit.pdf
(Level VII)
26 Rutala, W. A., et al. (2008, revised 2017). “Guideline for disinfection and
sterilization in healthcare facilities, 2008” [Online]. Accessed via the Web at
https://www.cdc.gov/infectioncontrol/pdf/guidelines/disinfection-
guidelines.pdf (Level I)
27 Accreditation Association for Hospitals and Health Systems. (2017). Standard
07.02.03. Healthcare Facilities Accreditation Program: Accreditation
requirements for acute care hospitals. Chicago, IL: Accreditation Association
for Hospitals and Health Systems. (Level VII)
28 The Joint Commission. (2019). Standard RC.01.03 .01. Comprehensive
accreditation manual for hospitals. Oakbrook Terrace, IL: The Joint
Commission. (Level VII)
29 Accreditation Association for Hospitals and Health Systems. (2017). Standard
10.00 .03. Healthcare Facilities Accreditation Program: Accreditation
requirements for acute care hospitals. Chicago, IL: Accreditation Association
for Hospitals and Health Systems. (Level VII)
30 Centers for Medicare and Medicaid Services, Department of Health and
Human Services. (2015). Condition of participation: Medical record services.
42 C.F.R. § 482.24(b).
31 DNV GL-Healthcare USA, Inc. (2016). MR.2 .SR.1 . NIAHO® accreditation
requirements: Interpretive guidelines and surveyor guidance (version 11).
Milford, OH: DNV GL-Healthcare USA, Inc. (Level VII)
32 Shlamovitz, G. Z. (2016). “Urethral catheterization in women periprocedural
care” [Online]. Accessed via the Web at
http://emedicine.medscape.com/article/80735-periprocedure
33 Villanueva, C., & Hemstreet, G. P., III. (2008). Difficult male urethral
catheterization: A review of different approaches. International Brazilian
Journal of Urology, 34(4), 401–412. Accessed via the Web at
http://www.brazjurol.com.br/july_august_2008/Villanueva_ing_401_412.pdf
(Level V)
34 Occupational Safety and Health Administration. (n.d .). “Bloodborne
pathogens, standard number 1910.1030” [Online]. Accessed via the Web at
https://www.osha.gov/pls/oshaweb/owadisp.show_document?
p_id=10051&p_table=STANDARDS (Level VII)
35 Newman, D. K ., and Wilson, M. M. (2011). Review of intermittent
catheterization and current best practices. Urologic Nursing, 31(1), 12–18.
INTERNAL FIXATION MANAGEMENT
In internal fixation, also known as surgical reduction or open
reduction–internal fixation, the practitioner implants fixation
devices to stabilize the fracture. Internal fixation devices
include nails, screws, pins, wires, and rods, all of which may
be used in combination with metal plates. These devices
remain in the body indefinitely unless the patient
experiences adverse reactions after the healing process is
complete. (See Reviewing internal fixation devices.)
Typically, internal fixation is used to treat fractures of the
face and jaw, spine, and arms and legs as well as fractures
involving a joint (most commonly, the hip). Internal fixation
permits earlier mobilization and can shorten hospitalization,
particularly in elderly patients with hip fractures.
Nursing management for a patient who undergoes internal
fixation involves monitoring neurovascular status,
administering medications, managing the patient’s pain,
preventing infection, and assisting with ambulation and
exercises.
Equipment
Stethoscope ▪ thermometer ▪ blood pressure monitor ▪
pulse oximeter and probe ▪ ice bag ▪ prescribed pain
medication ▪ compression sleeves or foot covers ▪
sequential compression device or arterial-venous impulse
foot compression controller ▪ prescribed IV fluids ▪
preoperative checklist ▪ disinfectant pad ▪ plain or
antimicrobial soap, or other skin preparation product ▪
Optional: IV catheter insertion kit, disposable-head clippers,
prescribed medications, labels, patient-controlled analgesia
(PCA) pump, sedation scale, overhead frame with trapeze,
pillow, capnography equipment.
For a patient with a leg fracture, you may also need a
pressure-relief mattress, crutches, or a walker. A patient
with a hip fracture may require abductor pillows and a
padded splint.1
Implementation
Preoperative care
■ Review the patient’s medical record for relevant
information, such past medical and surgical history
(including postoperative nausea and vomiting), allergies,
sensitivities, medication use, disabilities, substance use or
abuse, physical and mental impairments, mobility
limitations, external or implanted medical devices, home
use of noninvasive positive-pressure ventilation, sensory
limitations, and risk factors for developing postoperative
delirium (for older adult patients).2,3
■ Verify that laboratory and imaging studies have been
completed, as ordered, and that the results are in the
patient’s medical record. Notify the practitioner of
unexpected results.4,5
■ Confirm that the practitioner has obtained written
informed consent and that the consent form is in the
patient’s medical record.6,7,8,9
■ Conduct a preprocedure verification to make sure that all
relevant documentation and related information or
equipment are available and correctly identified to the
patient’s identifiers.4,10
■ Verify the practitioner’s orders.
■ Perform hand hygiene.11,12,13,14,15,16
■ Confirm the patient’s identity using at least two patient
identifiers.17
■ Provide privacy.18,19,20
■ Obtain the patient’s vital signs and oxygen saturation
level to serve as a baseline for comparison.
■ Assess the patient’s cardiac, neurologic, and respiratory
status to serve as baselines for comparison.
■ Assess the neurovascular status of the affected extremity,
if appropriate, and compare your results with findings in the
unaffected extremity to promptly detect signs of
neurovascular compromise.21
■ Immobilize and elevate the affected extremity, if
appropriate, to reduce associated discomfort, promote
venous return, and reduce swelling. Support the extremity
adequately when moving or elevating it.21
■ Apply ice to the affected site, if needed and prescribed, to
promote comfort and to reduce swelling.21
■ Assess and address the patient’s safety, emotional, and
psychological needs.2
■ Begin a preoperative checklist such as the World Health
Organization’s Surgical Safety Checklist.
■ Reinforce the practitioner’s explanation of the procedure
and answer the patient’s questions. Check the patient
history for hypersensitivity to latex.
EQUIPMENT
Reviewing internal fixation devices
In trochanteric or subtrochanteric fractures, the surgeon may use a hip pin or
nail, with or without a screw plate. A pin or plate with extra nails stabilizes
the fracture by impacting the bone ends at the fracture site.
In an uncomplicated fracture of the femoral shaft, the surgeon may use an
intramedullary rod. This device permits early ambulation with partial weight
bearing.
Another choice for fixation of a long-bone fracture is a screw plate, shown
here on the tibia. The surgeon will typically use a screw plate on the lower
extremities to provide extra bone stability.
In an arm fracture, the surgeon may fix the involved bones with a plate, rod,
or nail. Most radial and ulnar fractures may be fixed with plates, whereas
humeral fractures are commonly fixed with rods.
■ Screen and assess the patient’s pain using facility-defined
criteria that are consistent with the patient’s age, condition,
and ability to understand.2,22
■ Administer pain medication, as ordered and indicated,
following safe medication administration practices.23,24,25,26
Perform a follow-up pain assessment, and notify the
practitioner if pain isn’t adequately controlled.22
■ Tell the patient what to expect during postoperative
assessment, monitoring, and care.
■ Teach the patient how to cough and deep breathe to
reduce the risk of postprocedure pneumonia.27
■ Prepare the patient for proposed exercise and progressive
ambulation regimens if necessary.
■ Encourage the patient to perform active range-of-motion
(ROM) exercises of the uninvolved joints, unless
contraindicated.21
■ Confirm the patient’s nothing by mouth status before the
procedure
(unless
emergent);
minimum
fasting
recommendations include 2 hours for clear liquids, 6 or
more hours for a light meal or nonhuman milk, and 8 hours
or more for fried or fatty foods or meat.28
■ Confirm that the patient has patent IV access to
administer
prophylactic
antibiotics5,29
(commonly
administered 1 hour before the incision, or 2 hours before if
vancomycin or fluoroquinolones are prescribed),30 IV fluids,
and blood products, as prescribed. Insert an IV catheter if
necessary. (See the “IV catheter insertion and removal”
procedure, page 443.)31
■ Verify the surgical procedure and site with the patient and
family, if present.10,21
■ Remove hair at the surgical site only if absolutely
necessary. If hair removal is necessary, use disposable-head
clippers for hair removal. Don’t shave the site, to reduce the
risk of surgical site infection.32
■ Assist the patient with bathing with plain or antimicrobial
soap and water or another skin preparation product as
ordered to reduce the risk of surgical site infection.29,32
■ Provide hand-off communication for the person who’ll be
assuming responsibility for the patient’s care. Allow time for
questions, as necessary, to avoid miscommunications that
can cause patient care errors during transitions of care.33 As
part of the handoff process, allow time for the receiving
person to trace each tube and catheter from the patient to
its point of origin; use a standardized line reconciliation
process using high-reliability practices.34,35
■ Perform hand hygiene.11,12,13,14,15,16
■ Clean and disinfect your stethoscope using a disinfectant
pad.36,37
■ Perform hand hygiene.11,12,13,14,15,16
■ Document the procedure.38,39,40,41
Postoperative care
■ Receive hand-off communication from the person who
was responsible for the patient’s care. Ask questions as
necessary to avoid miscommunications that can cause
patient care errors during transitions of care.33,42 As part of
the handoff process, trace each tube and catheter from the
patient to its point of origin; use a standardized line
recognition process using high-reliability practices.34,35
■ Verify the practitioner’s orders.
■ Reconcile the patient’s medications at each care
transition and when the practitioner prescribes a new
medication to reduce the risk of medication errors, including
omissions, duplications, dosing errors, and drug
interactions.
■ Perform hand hygiene.11,12,13,14,15,16
■ Confirm the patient’s identity using at least two patient
identifiers.17
■ Provide privacy.18,19,20
■ Assess the patient’s vital signs, oxygen saturation level,
and cardiac, neurologic, and respiratory status and compare
with baseline findings.2
■ Monitor the patient’s vital signs at an interval determined
by your facility and the patient’s condition, because there’s
no evidence-based research to indicate the best practice for
frequency of vital sign checks.2
■ Assess the patency of the patient’s IV catheter; insert a
new one if necessary and administer IV fluids as prescribed.
■ If the patient has different IV access sites or several bags
of IV fluid hanging, label the distal end (near the patient
connection) and proximal end (near the source container) of
the tubing.34
■ Monitor fluid intake and output and electrolyte levels as
ordered to promptly detect fluid and electrolyte imbalances.
Notify the practitioner promptly if imbalances occur.23,43
■ Assess the patient’s neurovascular status.2 Assess color,
motion, sensation, digital movement, edema, capillary refill,
and pulses of the affected area. Compare your findings with
the unaffected side, if appropriate. Ask about the presence
of burning, tingling, and numbness in the affected area,
which may indicate impaired circulation.
■ Apply an ice bag to the operative site, as ordered, to
reduce swelling, relieve pain, and lessen bleeding.
■ Assess the patient’s comfort level, including positioning,
temperature, and postoperative nausea and vomiting.2
■ Screen and assess the patient’s pain using facility-defined
criteria that are consistent with the patient’s age, condition,
and ability to understand.2,22
■ Treat the patient’s pain as needed and ordered using
nonpharmacologic, pharmacologic, or a combination of
approaches. Base the treatment on evidence-based
practices and the patient’s clinical condition, past medical
history, and pain management goals.22 If administering pain
medication, following safe administration practices to
promote comfort.23,24,25,26 If the patient is using PCA,
instruct the patient to administer a dose before exercising or
moving.
■ For a patient receiving IV opioid medication, frequently
monitor the patient’s respiratory rate, oxygen saturation
level by pulse oximetry, end-tidal carbon dioxide level by
capnography (if available), and sedation level using a
standardized sedation scale to decrease the risk of adverse
events associated with IV opioid use.43 Monitor the patient
closely if identified at high risk for adverse outcomes related
to opioid treatment.22 Explain the assessment and
monitoring process to the patient and family (including that
it may be necessary to awaken the patient to assess the
effects of the medication). Advise the patient and family to
alert a staff member immediately if breathing problems or
other changes that might be a reaction to the medication
occur.23,43
■ Assess the patient’s safety needs, including the risk of
falling. Implement the appropriate measures to ensure
patient safety.2,44,45
■ Reassess and respond to the patient’s pain by evaluating
the response to treatment and progress toward pain
management goals. Assess for adverse reactions and risk
factors for adverse events that may result from
treatment.2,22
■ Elevate the affected limb on a pillow, if appropriate, to
minimize edema.21
■ Assess the condition and color of the patient’s skin.2
■ Monitor the patient’s surgical dressings for signs of
excessive drainage or bleeding.2
■ Assist with and encourage the patient to perform ROM
and other muscle-strengthening exercises, as ordered, to
promote circulation, improve muscle tone, and maintain
joint function.
■ To prevent postprocedure pneumonia, have the patient
cough and deep breathe.27,13 Tell the patient that early
ambulation and optimal pain management also reduce the
risk of postoperative pulmonary complications.32
■ If not already in place, apply compression sleeves or a
sequential compression device or foot covers and an
arterial-venous impulse foot compression controller, as
ordered, to prevent venous thromboembolism (VTE).46 (See
the “Sequential compression therapy” procedure.)
■ If necessary, with the assistance of coworkers, position
the patient on a pressure-relief mattress to prevent skin
breakdown.
■ Teach the patient to perform early progressive
ambulation27 and mobilization using an overhead frame
with a trapeze, crutches, or a walker and splint, as
appropriate. (See the “Crutch use” procedure, page 228.)
■ Continue thromboembolic pharmacologic prophylaxis as
ordered by the practitioner to prevent VTE. Make sure
baseline coagulation studies have been obtained and are
documented in the patient’s medical record. For the patient
receiving warfarin, monitor the International Normalized
Ratio.46
■ Make sure prophylactic antibiotics are discontinued within
24 hours after surgery.46
■ Encourage the patient to consume fluids, as the patient’s
condition allows, and administer a stool softener as ordered
following safe medication administration practices, because
immobility and opioid use can slow colonic activity, causing
constipation.1,23,24,25,26
■ If the patient had an indwelling urinary catheter that was
inserted for surgery, remove the catheter on postoperative
day 1 or 2 (with the day of surgery considered day 0),
according to your facility’s protocol or the practitioner’s
order, to reduce the risk of catheter-associated urinary tract
infection.46,47 (See the “Indwelling urinary catheter care and
removal” procedure, page 386.)
■ If the patient was receiving a beta-adrenergic blocker
before surgery, collaborate with the practitioner to ensure
that the patient receives it during the perioperative
period.3,46
■ Perform hand hygiene.11,12,13,14,15,16
■ Clean and disinfect your stethoscope using a disinfectant
pad.36,37
■ Perform hand hygiene.11,12,13,14,15,16
■ Document the procedure.38,39,40,41
Special considerations
■ After removal of the initial postoperative dressing, begin
assessing the incision site for signs and symptoms of
infection, such as erythema, drainage, edema, and unusual
pain.
■ Administer mupirocin nasal ointment, in combination with
or without chlorhexidine body wash, as ordered, to prevent
Staphylococcus aureus infection in nasal carriers.32
■ The Joint Commission issued a sentinel event alert related
to managing risk during transition to the new International
Organization for Standardization tubing standards designed
to prevent dangerous tubing misconnections, which can
lead to serious patient injury and death. During the
transition, trace the tubing and catheter from the patient to
the point of origin before connecting or reconnecting any
device or infusion, at any care transition (such as a new
setting or service), and as part of the hand-off process;
route tubes and catheters having different purposes in
different standardized directions; when there are different
access sites or several bags hanging, label the tubing at
both the distal and proximal ends; use tubing and
equipment only as intended; and store medications for
different delivery routes in separate locations.34
Patient teaching
Before discharge, instruct the patient and family how to care
for the incisional site, including the importance of proper
hand hygiene and how to recognize signs and symptoms of
surgical site infection. Also, teach the patient and family
about practicing an exercise regimen (if any) and using
assistive ambulation devices (such as crutches or a walker),
if appropriate. Teach the patient measures to prevent
postoperative pneumonia. Teach the signs and symptoms of
VTE and when and how to seek treatment. Also teach the
patient about the prescribed anticoagulation regimen.30
During discharge planning, teach the patient and family
about pain management strategies; include information
about the patient’s pain management plan and adverse
effects of pain management treatment. Discuss activities of
daily living, and items in the home environment that might
exacerbate pain or reduce the effectiveness of the pain
management plan, and include strategies to address these
issues. Teach the patient and family about safe use, storage,
and disposal of opioids if prescribed.22
Complications
Surgical site infection and, more critically, infection
involving metal fixation devices may require reopening the
incision, draining the suture line, and possibly removing the
fixation device. Any such infection would require wound
dressings and antibiotic therapy. Other complications may
include malunion, nonunion, fat or pulmonary embolism,
neurovascular impairment, compartment syndrome,1 and
chronic pain.
Documentation
Document vital signs, oxygen saturation and sedation
levels, and perioperative cardiovascular, respiratory, and
neurologic assessment findings. Document neurovascular
assessment findings and the use of VTE prevention
practices. Note all exercises performed and their effect, and
any ambulatory effort and assistive ambulation device you
used. Document postprocedure pneumonia prevention
practices you used and the patient’s response. Record pain
assessment findings, pain medications you administered,
date and time of administration, and the patient’s response.
Describe wound appearance and alignment of the affected
bone. Document teaching provided to the patient and family
(if applicable), their understanding of that teaching, and
whether they require follow-up teaching.
REFERENCES
1 Horn, P. L., et al. (2011). Orthopaedic trauma: Pilon fractures. Orthopaedic
Nursing, 30(5), 299–300 .
2 American Society of PeriAnesthesia Nurses. (2018). 2017–2018
Perianesthesia nursing standards, practice recommendations and interpretive
statements. Cherry Hill, NJ: American Society of PeriAnesthesia Nurses. (Level
VII)
3 American College of Surgeons. (2012). “ACS NSQIP/AGS best practice
guidelines: Optimal preoperative assessment of the geriatric surgical patient”
[Online]. Accessed via the Web at
https://www.facs.org/~/media/files/quality%20programs/nsqip/acsnsqipagsge
riatric2012guidelines.ashx (Level VII)
4 The Joint Commission. (2019). Standard UP.01.01.01. Comprehensive
accreditation manual for hospitals. Oakbrook Terrace, IL: The Joint
Commission. (Level VII)
5 World Health Organization (WHO). (2009). “WHO guidelines for safe surgery
2009: Safe surgery saves lives” [Online]. Accessed via the Web at
http://apps.who.int/iris/bitstream/10665/44185/1/9789241598552_eng.pdf
(Level VI)
6 The Joint Commission. (2019). Standard RI.01.03 .01. Comprehensive
accreditation manual for hospitals. Oakbrook Terrace, IL: The Joint
Commission. (Level VII)
7 Centers for Medicare and Medicaid Services, Department of Health and
Human Services. (2015). Condition of participation: Patient’s rights. 42 C.F.R.
§ 482.13(b)(2).
8 Accreditation Association for Hospitals and Health Systems. (2017). Standard
30.01.11. Healthcare Facilities Accreditation Program: Accreditation
requirements for acute care hospitals. Chicago, IL: Accreditation Association
for Hospitals and Health Systems. (Level VII)
9 DNV GL-Healthcare USA, Inc. (2016). PR.1 .SR.5 . NIAHO® accreditation
requirements: Interpretive guidelines and surveyor guidance (version 11).
Milford, OH: DNV GL-Healthcare USA, Inc. (Level VII)
10 Accreditation Association for Hospitals and Health Systems. (2017). Standard
30.00 .14. Healthcare Facilities Accreditation Program: Accreditation
requirements for acute care hospitals. Chicago, IL: Accreditation Association
for Hospitals and Health Systems. (Level VII)
11 Centers for Disease Control and Prevention. (2002). Guideline for hand
hygiene in health-care settings: Recommendations of the Healthcare Infection
Control Practices Advisory Committee and the HICPAC/SHEA/APIC/IDSA Hand
Hygiene Task Force. MMWR Recommendations and Reports, 51(RR-16), 1–45.
Accessed via the Web at https://www.cdc.gov/mmwr/pdf/rr/rr5116.pdf (Level
II)
12 World Health Organization. (2009). “WHO guidelines on hand hygiene in
health care: First global patient safety challenge, clean care is safer care”
[Online]. Accessed via the Web at
http://apps.who.int/iris/bitstream/10665/44102/1/9789241597906_eng.pdf
(Level IV)
13 The Joint Commission. (2019). Standard NPSG.07.01.01. Comprehensive
accreditation manual for hospitals. Oakbrook Terrace, IL: The Joint
Commission. (Level VII)
14 Centers for Medicare and Medicaid Services, Department of Health and
Human Services. (2015). Condition of participation: Infection control. 42 C.F.R.
§ 482.42.
15 Accreditation Association for Hospitals and Health Systems. (2017). Standard
07.01.21. Healthcare Facilities Accreditation Program: Accreditation
requirements for acute care hospitals. Chicago, IL: Accreditation Association
for Hospitals and Health Systems. (Level VII)
16 DNV GL-Healthcare USA, Inc. (2016). IC.1 .SR.1 . NIAHO® accreditation
requirements: Interpretive guidelines and surveyor guidance (version 11).
Milford, OH: DNV GL-Healthcare USA, Inc. (Level VII)
17 The Joint Commission. (2019). Standard NPSG.01.01.01. Comprehensive
accreditation manual for hospitals. Oakbrook Terrace, IL: The Joint
Commission. (Level VII)
18 The Joint Commission. (2019). Standard RI.01.01.01. Comprehensive
accreditation manual for hospitals. Oakbrook Terrace, IL: The Joint
Commission. (Level VII)
19 Centers for Medicare and Medicaid Services, Department of Health and
Human Services. (2015). Condition of participation: Patient’s rights. 42.C.F.R.
§ 482.13(c)(1).
20 Accreditation Association for Hospitals and Health Systems. (2017). Standard
15.01.16. Healthcare Facilities Accreditation Program: Accreditation
requirements for acute care hospitals. Chicago, IL: Accreditation Association
for Hospitals and Health Systems. (Level VII)
21 Hinkle, J. L., & Cheever, K. H. (2018). Brunner and Suddarth’s textbook of
medical-surgical nursing (14th ed.). Philadelphia, PA: Wolters Kluwer.
22 The Joint Commission. (2019). Standard PC.01.02.07. Comprehensive
accreditation manual for hospitals. Oakbrook Terrace, IL: The Joint
Commission. (Level VII)
23 Centers for Medicare and Medicaid Services, Department of Health and
Human Services. (2015). Condition of participation: Nursing services. 42
C.F.R. § 482.23(c).
24 Accreditation Association for Hospitals and Health Systems. (2017). Standard
16.01.03. Healthcare Facilities Accreditation Program: Accreditation
requirements for acute care hospitals. Chicago, IL: Accreditation Association
for Hospitals and Health Systems. (Level VII)
25 The Joint Commission. (2019). Standard MM.06.01.01. Comprehensive
accreditation manual for hospitals. Oakbrook Terrace, IL: The Joint
Commission. (Level VII)
26 DNV GL-Healthcare USA, Inc. (2016). MM.1 .SR.2. NIAHO® accreditation
requirements: Interpretive guidelines and surveyor guidance (version 11).
Milford, OH: DNV GL-Healthcare USA, Inc. (Level VII)
27 Centers for Disease Control and Prevention. (2004). Guidelines for preventing
health-care-associated pneumonia, 2003: Recommendations of CDC and the
Healthcare Infection Control Practices Advisory Committee. MMWR
Recommendations and Reports, 53(RR-3), 1–32. Accessed via the Web at
http://www.cdc.gov/mmwr/pdf/rr/rr5303.pdf (Level II)
28 American Society of Anesthesiologists. (2017). Practice guidelines for
preoperative fasting and the use of pharmacologic agents to reduce the risk
of pulmonary aspiration: Application to healthy patients undergoing elective
procedures. Anesthesiology, 126(3), 376–393 . (Level V)
29 Berríos-Torres, S. I ., et al. (2017). Centers for Disease Control and Prevention
guideline for the prevention of surgical site infection, 2017. JAMA Surgery,
152(8), 784–791. Accessed via the Web at
http://jamanetwork.com/journals/jamasurgery/fullarticle/2623725 (Level VII)
30 Anderson, D. J ., et al. (2014). SHEA/IDSA practice recommendation:
Strategies to prevent surgical site infections in acute care hospitals: 2014
update. Infection Control and Hospital Epidemiology, 35(6), 605–627.
Accessed via the Web at http://www.jstor.org/stable/10.1086/676022 (Level I)
31 The Joint Commission. (2019). Standard NPSG.07.05.01. Comprehensive
accreditation manual for hospitals. Oakbrook Terrace, IL: The Joint
Commission. (Level VII)
32 World Health Organization. (2016). “Global guidelines for the prevention of
surgical site infection” [Online]. Accessed via the Web at
http://www.who.int/gpsc/global-guidelines-web.pdf
33 The Joint Commission. (2019). Standard PC.02.02.01. Comprehensive
accreditation manual for hospitals. Oakbrook Terrace, IL: The Joint
Commission. (Level VII)
34 The Joint Commission. (2014). “Sentinel event alert: Managing risk during
transition to new ISO tubing connector standards” [Online]. Accessed via the
Web at
http://www.jointcommission.org/assets/1/6/SEA_53_Connectors_8 _19_14 _final.
pdf (Level VII)
35 U.S . Food and Drug Administration. (n.d .). “Look. Check. Connect. Safe
medical device connections save lives” [Online]. Accessed via the Web at
http://www.fda.gov/downloads/MedicalDevices/Safety/AlertsandNotices/UCM1
34873.pdf
36 Rutala, W. A., et al. (2008, revised 2017). “Guideline for disinfection and
sterilization in healthcare facilities, 2008” [Online]. Accessed via the Web at
https://www.cdc.gov/infectioncontrol/pdf/guidelines/disinfection-
guidelines.pdf (Level I)
37 Accreditation Association for Hospitals and Health Systems. (2017). Standard
07.02.03. Healthcare Facilities Accreditation Program: Accreditation
requirements for acute care hospitals. Chicago, IL: Accreditation Association
for Hospitals and Health Systems. (Level VII)
38 The Joint Commission. (2019). Standard RC.01.03 .01. Comprehensive
accreditation manual for hospitals. Oakbrook Terrace, IL: The Joint
Commission. (Level VII)
39 Centers for Medicare and Medicaid Services, Department of Health and
Human Services. (2015). Condition of participation: Medical record services.
42 C.F.R. § 482.24(b).
40 Accreditation Association for Hospitals and Health Systems. (2017). Standard
10.00 .03. Healthcare Facilities Accreditation Program: Accreditation
requirements for acute care hospitals. Chicago, IL: Accreditation Association
for Hospitals and Health Systems. (Level VII)
41 DNV GL-Healthcare USA, Inc. (2016). MR.2 .SR.1 . NIAHO® accreditation
requirements: Interpretive guidelines and surveyor guidance (version 11).
Milford, OH: DNV GL-Healthcare USA, Inc. (Level VII)
42 Van Wicklin, S. A., & Conner, R. (2018). Guideline for transfer of patient care
information. In R. Conner (Ed.), Guidelines for perioperative practice, 2018
edition. Denver, CO: AORN, Inc. (Level VII)
43 Centers for Medicare and Medicaid Services. (2014). “Requirements for
hospital medication administration, particularly intravenous (IV) medications
and post-operative care of patients receiving IV opioids” [Online]. Accessed
via the Web at http://www.cms.gov/Medicare/Provider-Enrollment-and-
Certification/SurveyCertificationGenInfo/Downloads/Survey-and-Cert-Letter-
14-15.pdf
44 The Joint Commission. (2019). Standard PC.01.02.08 . Comprehensive
accreditation manual for hospitals. Oakbrook Terrace, IL: The Joint
Commission. (Level VII)
45 Accreditation Association for Hospitals and Health Systems. (2017). Standard
16.02.02. Healthcare Facilities Accreditation Program: Accreditation
requirements for acute care hospitals. Chicago, IL: Accreditation Association
for Hospitals and Health Systems. (Level VII)
46 Centers for Medicare and Medicaid Services & The Joint Commission. (2017).
“The specifications manual for national hospital inpatient quality measures
(version 5.2a)” [Online]. Accessed via the Web at
https://www.jointcommission.org/specifications_manual_for_national_hospital_
inpatient_quality_measures.aspx
47 Association of Professionals in Infection Control and Epidemiology. (2014).
“APIC implementation guide: Guide to preventing catheter-associated urinary
tract infections” [Online]. Accessed via the Web at
http://apic.org/Resource_/EliminationGuideForm/6473ab9b-e75c-457a-8d0f-
d57d32bc242b/File/APIC_CAUTI_web_0603 .pdf (Level IV)
INTRA-ABDOMINAL PRESSURE MONITORING
Intra-abdominal pressure (IAP) monitoring measures the
pressure in the abdominal compartment. It can be assessed
directly with an intraperitoneal catheter or indirectly with a
gastric balloon or an indwelling urinary catheter Because of
such potential complications as bowel perforation and
peritoneal contamination with direct methods, indirect
assessment using urinary bladder pressure measurement is
considered the gold standard for IAP measurement.1
If pressure in the abdominal cavity becomes greater than
the pressure in the capillaries that perfuse the abdominal
organs, ischemia and infarction may result. Increased IAP
can also lead to reduced cardiac output, increased systemic
vascular resistance, increased peripheral vascular
resistance, reduced venous return, and increased
intrathoracic pressure, which limits expansion of the
diaphragm, resulting in hypoventilation and hypoxia.2 By
measuring IAP, the nurse can detect a rise in pressure and
initiate lifesaving measures.3
The urinary catheter should be removed as soon as it’s no
longer needed to prevent catheter-associated urinary tract
infection (CAUTI).4,5
HOSPITAL-ACQUIRED CONDITION ALERT The Centers for Medicare
and Medicaid Services has identified CAUTI as a hospital-acquired
condition because it can be reasonably prevented using a variety of
best practices. When caring for the patient with an indwelling urinary
catheter, follow CAUTI prevention practices, such as performing hand
hygiene before and after catheter manipulation; maintaining a sterile,
continuously closed drainage system; maintaining unobstructed urine
flow; emptying the collection bag regularly; replacing the catheter and
collection system using sterile technique, disconnection, or leakage
occur; and discontinuing the catheter as soon as it’s no longer
clinically indicated to reduce the risk of CAUTI.4,5,6
Equipment
Indwelling urinary catheter with drainage collection bag ▪
gloves ▪ monitoring system and equipment (module,
bedside monitor, and cable) ▪ 500- to 1,000-mL IV bag of
normal saline solution ▪ commercially prepared IAP
monitoring kit, with or without transducer ▪ IV pole ▪
transducer holder ▪ tape ▪ antiseptic pad ▪ leveling device
▪ Optional: preassembled disposable pressure tubing with
transducer and flush device, gown, mask and goggles or
mask with face shield, sterile tape.
Preparation of equipment
Check any item that has an expiration date to ensure that it
hasn’t expired. If a product has expired, if its integrity has
been compromised, or if you find it defective, remove it
from patient use, label it as expired or defective, and report
the expiration or defect as directed by your facility.
Implementation
■ Verify the practitioner’s order.
■ Gather the necessary equipment.
■ Perform hand hygiene.7,8,9,10,11,12
■ Confirm the patient’s identity using at least two patient
identifiers.13
■ Provide privacy.14,15,16,17
■ Explain the procedure to the patient and family (if
appropriate) according to their communication and learning
needs to increase understanding, allay fears, and enhance
cooperation.18 Include the purpose of IAP monitoring and
the anticipated duration of catheter placement.
■ Raise the bed to waist level when providing care to
prevent caregiver back strain.19
■ Using sterile technique, insert an indwelling urinary
catheter, if the patient doesn’t already have one in place.
(See the “Indwelling urinary catheter insertion” procedure,
page 390.) If the patient has one in place, check catheter
patency.
■ Perform hand hygiene.7,8,9,10,11,12
■ Put on gloves, if needed, and other personal protective
equipment to comply with standard precautions.20,21
■ Hang the bag of normal saline solution on the IV pole next
to the patient. Spike the saline bag with commercially
prepared IAP monitoring system tubing with integrated
transducer. Alternatively, attach the preassembled
disposable pressure tubing with transducer and flush device
to the IAP monitoring system tubing and spike the saline
bag.
For a standard system
■ Mount the urinary drainage tubing on the clamp.22
■ Remove the cap from the distal end of the transducer and
open the transducer stopcock.22
■ Flush the tubing, transducer, and stopcock with normal
saline solution to prime the transducer line and remove all
air bubbles.22
■ Close the transducer stopcock, and attach the transducer
to the patient or the IV pole at the level of the iliac crest at
the midaxillary line.2,3,23
■ Attach the cable from the transducer to the monitor, turn
on the monitor, and select a 30-mm Hg scale for monitoring
pressure.2
■ Remove the cap from the valve port, and flush the tubing
with normal saline solution to prime the valve port and
remove all air bubbles.22
■ Trace the tubing from the patient to its point of origin to
make sure you’re accessing the correct port.24
■ Thoroughly disinfect the indwelling urinary catheter
sampling port with an antiseptic pad, using friction, and
allow it to dry, to reduce the risk of infection.5
■ Using sterile, no-touch technique, attach the end of the
valve port to the catheter sampling port.22
■ With the patient in the supine position and the head of
the bed flat, turn the clamp handle to IAP22 and zero the
transducer to atmosphere at the level of the iliac crest at
the midaxillary line to cancel out the effect of atmospheric
pressure.2,3,23
■ If possible, keep the patient in the supine position with
the head of the bed flat when obtaining pressure
measurements to prevent the abdominal organs from
exerting pressure on the bladder. If the patient is at risk for
ventilator-associated pneumonia, you may need to elevate
the head of the bed at least 30 degrees. Because pressure
measurements may differ with varying positions, use
consistent positioning for each measurement to ensure
accuracy.2,23,25,26
■ After zeroing the transducer, make sure that the stopcock
to the transducer is open.22
■ Turn the clamp handle to DRAIN and allow the bladder to
drain.22
■ Turn the clamp handle to IAP.22
■ Fill the syringe with 25 mL of normal saline solution,
according to the manufacturer’s instructions, and instill the
normal saline solution into the bladder. This volume won’t
overdistend the bladder and produce a false-high reading.2
■ Allow the system to equilibrate after instilling the saline
solution, and then obtain the IAP reading at the end of the
patient’s expiration2,22 with the graphic scale on the
monitor display and numeric display of the mean pressure
when the effect of respiratory pressures is minimized.2 (See
Evaluating intra-abdominal pressure.)
■ After obtaining the reading, turn the clamp to DRAIN and
allow the bladder to drain.22
For an automated valved system
■ Prime the system by flushing normal saline through the
tubing, transducer, stopcock, and automatic valve following
the manufacturer’s instructions.27
■ Place a sterile drape under the patient’s urinary drainage
bag connection.27
■ Trace the tubing from the patient to its point of origin to
make sure you’re accessing the correct port.24
■ Thoroughly disinfect the indwelling urinary catheter
connection with an antiseptic pad, using friction, and allow it
to dry, to reduce the risk of infection.
■ Using sterile, no-touch technique, disconnect the urinary
catheter from the urinary drainage bag, holding each tube
upright to prevent urine from leaking onto the bed.28
■ Remove the protective covering on the valve, and attach
the urinary catheter and drainage bag to appropriate
locations on the automatic valve.28
■ Attach the transducer to the patient or the IV pole at the
level of the iliac crest at the midaxillary line.27,28
■ Attach the cable from the transducer to the monitor, turn
on the monitor, and select a 30-mm Hg scale for monitoring
pressure.2
■ Turn the stopcock off to the patient and zero the
transducer at the iliac crest at the midaxillary line.27
■ After zeroing the transducer, turn the stopcock back to its
original position facing the dead-end cap and open to the
patient.27
■ Fill the syringe with 20 mL of normal saline solution,
according to the manufacturer’s instructions. Instill the
saline solution into the bladder within 10 seconds, causing
the valve to inflate, then close the connection between the
urinary catheter and urinary drainage tubing.27
■ Allow the system to equilibrate after instilling the saline
solution,2,28 and then obtain the IAP reading at the end of
the patient’s expiration with the graphic scale on the
monitor display and numeric display of the mean pressure
when the effect of respiratory pressures is minimized. After
2 minutes, the valve will automatically open, allowing the
bladder to drain normally.27
Completing the procedure
■ Measure urine output, making sure to subtract the
volume of instilled normal saline solution to maintain
accurate intake and output.2
■ Tape the connections securely.
■ Dispose of used supplies in appropriate receptacles.
■ Remove and discard your gloves and any other personal
protective equipment worn.21
■ Return the bed to the lowest positions to prevent falls and
maintain patient safety.29
■ Perform hand hygiene.7,8,9,10,11,12
■ Document the procedure.30,31,32,33
Special considerations
■ The Joint Commission issued a sentinel event alert related
to managing risk during transition to new International
Organization for Standardization tubing standards that were
designed to prevent dangerous tubing misconnections,
which can lead to serious patient injury and death. During
the transition, trace the tubing and catheter from the
patient to the point of origin before connecting or
reconnecting any device or infusion, at any care transition
(such as a new setting or service), and as part of the hand-
off process; route tubes and catheters having different
purposes in different standardized directions; when there
are different access sites or several bags hanging, label the
tubing at both the distal and proximal ends; use tubing and
equipment only as intended; and store medications for
different delivery routes in separate locations.34
■ Monitor IAP at least every 4 hours or as clinically
indicated.2 Report an increasing IAP to the practitioner. An
IAP of 12 mm Hg or greater signals intra-abdominal
hypertension; an IAP above 20 mm Hg indicates abdominal
compartment syndrome, which may require decompression
surgery.2
■ IAP typically displayed on the cardiac monitor is a mean
pressure that reflects the pressure during both inspiration
and expiration. If noticeable differences exist in the IAP
reading during inspiration and expiration, consider obtaining
a more precise end-expiration IAP reading by using a printed
waveform strip or the graphic scale on the cardiac monitor.2
■ Assess patients at risk for intra-abdominal hypertension
for signs and symptoms of reduced organ perfusion,
including decreased or absent urine output; hypotension;
reduced cardiac output; increased serum creatinine levels,
central venous and pulmonary artery pressures, intracranial
pressure, serum lactate levels, and peak airway pressure;
decreased tidal volume; hypoxemia; hypercapnia; and
impaired peripheral circulation.
■ IAP readings may not be accurate in a patient with
intraperitoneal adhesions, pelvic hematomas, pelvic
fractures, abdominal packs, or a neurogenic bladder,
because accurate IAP measurement requires free movement
of the bladder wall. Chronically increased IAP due to morbid
obesity, pregnancy, or ascites can also complicate accurate
measurement.26,35
■ Mechanical ventilation increases intrathoracic pressure,
causing a direct influence on IAP as the increased pressure
is transmitted across the patient’s abdomen. Closely
monitor IAP in critically ill patients on ventilator support,
even if such patients have no other apparent risk factors for
increased IAP.36
Complications
An IAP that exceeds 20 mm Hg is usually associated with
irreversible organ damage, leading to abdominal
compartment syndrome and multiple organ dysfunction
syndrome. With increased pressure readings and signs of
reduced organ perfusion, surgical intervention may be
required to preserve organ function and decrease morbidity
and mortality associated with intra-abdominal hypertension
and abdominal compartment syndrome. Maintaining an
indwelling urinary catheter and assessing the closed system
for pressure monitoring increases the risk of CAUTI.
Evaluating intra-abdominal pressure
A sustained or repeated intra-abdominal pressure (IAP) reading of 12 mm Hg
or higher is considered intra-abdominal hypertension. The severity of intra-
abdominal hypertension is graded according to the parameters below.2
Documentation
Record the date and time and the result of the IAP reading.
(Frequent IAP readings may be recorded on a frequent
parameter assessment sheet.) Document whether the
system was leveled and zeroed and the patient’s position
during the reading. Record the amount of normal saline
solution instilled. Document the practitioner who was
notified of an abnormal reading, any orders given,
interventions performed, and the patient’s response to
interventions.
Record any vital signs and assessments performed at the
time of the IAP reading. Record urinary output, making sure
to subtract the instilled normal saline solution. Document
any urinary catheter care performed. If a printed waveform
strip is available, label it INTRA-ABDOMINAL PRESSURE; write the
date, time, and patient’s name on the strip; and place it in
the patient’s medical record.
Note the patient’s tolerance of the procedure. Document
any patient teaching provided and the patient’s
understanding of the teaching.
REFERENCES
1 Lee, R. K . (2012). Intra-abdominal hypertension and abdominal compartment
syndrome: A comprehensive overview. Critical Care Nurse, 32(1), 19–31.
Accessed via the Web at
http://ccn.aacnjournals.org/content/32/1/19.full.pdf+html
2 Wiegand, D. L. (2017). AACN procedure manual for high acuity, progressive,
and critical care (7th ed.). St. Louis, MO: Elsevier.
3 Malbrain, M. L., et al. (2006). Results from the International Conference of
Experts on Intra-abdominal Hypertension and Abdominal Compartment
Syndrome. I . Definitions. Intensive Care Medicine, 32(11), 1722–1732. (Level
VII)
4 The Joint Commission. (2019). Standard NPSG.07.06 .01. Comprehensive
accreditation manual for hospitals. Oakbrook Terrace, IL: The Joint
Commission. (Level VII)
5 Lo, E., et al. (2014). SHEA/IDSA practice recommendation: Strategies to
prevent catheter-associated urinary tract infections in acute care hospitals:
2014 update. Infection Control and Hospital Epidemiology, 35(5), 464–479.
Accessed via the Web at http://www.jstor.org/stable/10.1086/675718 (Level I)
6 Jarrett, N., & Callaham, M. (2016). “Evidence-based guidelines for selected
hospital-acquired conditions: Final report” [Online]. Accessed via the Web at
https://www.cms.gov/Medicare/Medicare-Fee-for-Service-
Payment/HospitalAcqCond/Downloads/2016-HAC-Report.pdf
7 The Joint Commission. (2019). Standard NPSG.07.01.01. Comprehensive
accreditation manual for hospitals. Oakbrook Terrace, IL: The Joint
Commission. (Level VII)
8 World Health Organization. (2009). “WHO guidelines on hand hygiene in
health care: First global patient safety challenge, clean care is safer care”
[Online]. Accessed via the Web at
http://apps.who.int/iris/bitstream/10665/44102/1/9789241597906_eng.pdf
(Level IV)
9 Accreditation Association for Hospitals and Health Systems. (2017). Standard
07.01.21. Healthcare Facilities Accreditation Program: Accreditation
requirements for acute care hospitals. Chicago, IL: Accreditation Association
for Hospitals and Health Systems. (Level VII)
10 Centers for Medicare and Medicaid Services, Department of Health and
Human Services. (2015). Condition of participation: Infection control. 42 C.F.R.
§ 482.42.
11 Centers for Disease Control and Prevention. (2002). Guideline for hand
hygiene in health-care settings: Recommendations of the Healthcare Infection
Control Practices Advisory Committee and the HICPAC/SHEA/APIC/IDSA Hand
Hygiene Task Force. MMWR Recommendations and Reports, 51(RR-16), 1–45.
Accessed via the Web at https://www.cdc.gov/mmwr/pdf/rr/rr5116.pdf (Level
II)
12 DNV GL-Healthcare USA, Inc. (2016). IC.1 .SR.1 . NIAHO® accreditation
requirements: Interpretive guidelines and surveyor guidance (version 11).
Milford, OH: DNV GL-Healthcare USA, Inc. (Level VII)
13 The Joint Commission. (2019). Standard NPSG.01.01.01. Comprehensive
accreditation manual for hospitals. Oakbrook Terrace, IL: The Joint
Commission. (Level VII)
14 The Joint Commission. (2019). Standard RI.01.01.01. Comprehensive
accreditation manual for hospitals. Oakbrook Terrace, IL: The Joint
Commission. (Level VII)
15 Centers for Medicare and Medicaid Services, Department of Health and
Human Services. (2016). Condition of participation: Patient’s rights. 42 C.F.R.
§ 482.13(c)(1).
16 Accreditation Association for Hospitals and Health Systems. (2017). Standard
15.01.16. Healthcare Facilities Accreditation Program: Accreditation
requirements for acute care hospitals. Chicago, IL: Accreditation Association
for Hospitals and Health Systems. (Level VII)
17 DNV GL-Healthcare USA, Inc. (2016). PR.1.SR.5 . NIAHO® accreditation
requirements: Interpretive guidelines and surveyor guidance (version 11).
Milford, OH: DNV GL-Healthcare USA, Inc. (Level VII)
18 The Joint Commission. (2019). Standard PC.02.01.21. Comprehensive
accreditation manual for hospitals. Oakbrook Terrace, IL: The Joint
Commission. (Level VII)
19 Waters, T. R., et al. (2009). “Safe patient handling training for schools of
nursing” [Online]. Accessed via the Web at
https://www.cdc.gov/niosh/docs/2009-127/pdfs/2009-127.pdf (Level VII)
20 Siegel, J. D ., et al. (2007, revised 2017). “2007 guideline for isolation
precautions: Preventing transmission of infectious agents in healthcare
settings” [Online]. Accessed via the Web at
https://www.cdc.gov/infectioncontrol/pdf/guidelines/isolation-guidelines.pdf
(Level II)
21 Accreditation Association for Hospitals and Health Systems. (2017). Standard
07.01.10. Healthcare Facilities Accreditation Program: Accreditation
requirements for acute care hospitals. Chicago, IL: Accreditation Association
for Hospitals and Health Systems. (Level VII)
22 C. R. Bard, Inc. (2016). “Intra-abdominal pressure monitoring device”
[Online]. Accessed via the Web at
http://www.bardmedical.com/media/18373/pt-mon-iap-reference-card.pdf
23 Soler Morejon, C., et al. (2012). Effects of zero reference position on bladder
pressure measurements: An observational study. Annals of Intensive Care,
2(Suppl. 1), S13. Accessed via the Web at
http://www.ncbi.nlm.nih.gov/pmc/articles/PMC3390299/ (Level VI)
24 U.S . Food and Drug Administration. (n.d .). “Look. Check. Connect. Safe
medical device connections save lives” [Online]. Accessed via the Web at
http://www.fda.gov/downloads/MedicalDevices/Safety/AlertsandNotices/UCM1
34873.pdf
25 Yi, M., et al. (2012). The evaluation of the effect of body positioning on intra-
abdominal pressure measurement and the effect of intra-abdominal pressure
at different body positioning on organ function and prognosis in critically ill
patients. Journal of Critical Care, 27(2), 222.e1–222 .e6. (Level VI)
26 Gestring, M. Abdominal compartment syndrome in adults. (2017). In:
UpToDate, Sanfey, H., et al. (Eds.). Retrieved from: www.uptodate.com
27 Wolfe Tory Medical, Inc. (2010). “AbViser® AutoValve® instructions” [Online].
Accessed via the Web at http://abviser.com/wp-
content/uploads/2011/04/AbViser-Instructions-Chart-Transducer-Included.pdf
28 ConvaTec. (2012). “How to use the AbViserTM IAP monitoring device” [Online].
Accessed via the Web at http://abviser.com/products/abviser-iap-monitoring-
device/how-to-use -the-abviser-iap-monitoring-device/
29 Ganz, D. A., et al. (2013). Preventing falls in hospitals: A toolkit for improving
quality of care (AHRQ Publication No. 13-0015-EF). Rockville, MD: Agency for
Healthcare Research and Quality. Accessed via the Web at
https://www.ahrq.gov/sites/default/files/publications/files/fallpxtoolkit_0 .pdf
(Level VII)
30 The Joint Commission. (2019). Standard RC.01.03 .01. Comprehensive
accreditation manual for hospitals. Oakbrook Terrace, IL: The Joint
Commission. (Level VII)
31 Accreditation Association for Hospitals and Health Systems. (2017). Standard
10.00 .03. Healthcare Facilities Accreditation Program: Accreditation
requirements for acute care hospitals. Chicago, IL: Accreditation Association
for Hospitals and Health Systems. (Level VII)
32 Centers for Medicare and Medicaid Services, Department of Health and
Human Services. (2015). Condition of participation: Medical record services.
42 C.F.R. § 482.24(b).
33 DNV GL-Healthcare USA, Inc. (2016). MR.2 .SR.1 . NIAHO® accreditation
requirements: Interpretive guidelines and surveyor guidance (version 11).
Milford, OH: DNV GL-Healthcare USA, Inc. (Level VII)
34 The Joint Commission. (2014). “Sentinel event alert: Managing risk during
transition to new ISO tubing connector standards” [Online]. Accessed via the
Web at
http://www.jointcommission.org/assets/1/6/SEA_53_Connectors_8 _19_14 _final.
pdf (Level VII)
35 Papavramidis, T. S . (2011). Abdominal compartment syndrome—Intra-
abdominal hypertension: Defining, diagnosing, and managing. Journal of
Emergencies, Trauma, and Shock, 4(2), 279–291. Accessed via the Web at
https://www.ncbi.nlm.nih.gov/pmc/articles/PMC3132369
36 Soler Morejon, C., & Barbeito, T. O. T. (2012). Effect of mechanical ventilation
on intra-abdominal pressure in critically ill patients without other risk factors
for abdominal hypertension: An observational multicenter epidemiological
study. Annals of Intensive Care, 2(Suppl. 1), S22–S34. Accessed via the Web
at http://www.annalsofintensivecare.com/content/pdf/2110-5820-2 -S1-
S22.pdf (Level VI)
INTRA-AORTIC BALLOON COUNTERPULSATION
Providing temporary support for the heart’s left ventricle,
intra-aortic balloon counterpulsation (IABC) mechanically
displaces blood within the aorta by means of an intra-aortic
balloon attached to an external pump console, referred to as
an intra-aortic balloon pump (IABP). The balloon is usually
inserted through the common femoral artery and positioned
with its tip just distal to the left subclavian artery. It’s made
of polyethylene and is inflated with gas driven by the pump.
Helium is commonly used because its low density facilitates
rapid transfer of gas from the IABP to the balloon. It’s also
easily absorbed into the bloodstream if the balloon
ruptures.1
When used correctly, IABC improves two key aspects of
myocardial physiology: It increases the supply of oxygen-
rich blood to the myocardium, and it decreases myocardial
oxygen demand and consumption. Several physiologic and
nonphysiologic factors can affect IABC efficacy, including
the patient’s cardiac function, hemodynamic conditions, the
position and size of the balloon catheter used, and signal
quality.2
IABC is indicated for patients with a wide range of low-
cardiac-output disorders or cardiac instability. (See
Indications and contraindications for IABC). Perioperatively,
the technique is used to support and stabilize patients with
a suspected high-grade lesion who are undergoing such
procedures as angioplasty, thrombolytic therapy, cardiac
surgery, and cardiac catheterization. Available evidence no
longer supports routine use in patients with acute
myocardial infarction complicated by cardiogenic shock who
are receiving early revascularization.3,4
Equipment
For assisting with insertion
IAB console, cables, and appropriate-sized balloon catheters
▪ IAB insertion kit ▪ 30-mL Luer-lock syringe ▪ 10-mL sterile
syringes of prefilled flush solution ▪ helium gas source ▪
electrocardiogram (ECG) monitor and electrodes ▪ pulse
oximeter ▪ automated blood pressure cuff ▪ temperature
probe ▪ clippers ▪ prescribed sedative or analgesic ▪
transducer system ▪ prepared bag of ordered flush solution
▪ antiseptic solution (chlorhexidine-based preferred)6 ▪
sterile drape ▪ sterile gloves ▪ sterile occlusive dressing ▪
sterile gown ▪ cap ▪ mask with face shield or mask and
goggles ▪ sutures or other stabilization device ▪ suction
equipment ▪
oxygen administration equipment ▪
emergency equipment (code cart with cardiac medications,
defibrillator, hand-held resuscitation bag with mask,
intubation equipment) ▪ temporary pacemaker equipment ▪
insertion checklist6 ▪ Optional: single-patient-use scissors or
disposable-head surgical clippers, fluoroscope, backup
helium supply, central line insertion kit, arterial catheter
insertion equipment, pulmonary artery (PA) catheter
insertion equipment, IV insertion and administration
equipment, indwelling urinary catheter insertion equipment,
arterial blood gas kit, blood sampling equipment, heparin,
Dacron graft (for a surgically inserted balloon), 18G
angiography needle, lubrication, tubing labels.
For maintaining IABC
IABC console and balloon catheters ▪ ECG monitor and
electrodes ▪ transducer system setup ▪ IV flush solution ▪
vital signs monitoring equipment ▪ pulse oximeter ▪
disinfectant pad ▪ stethoscope ▪ oxygen administration
equipment ▪ emergency equipment (code cart with cardiac
medications, defibrillator, handheld resuscitation bag with
mask, intubation equipment) ▪ arterial blood gas (ABG) kits
▪ suction equipment ▪ equipment for obtaining laboratory
samples (blood collection tubes, labels, laboratory request
forms, laboratory biohazard transport bag, antiseptic pads)
▪ temporary pacemaker equipment ▪ gloves ▪ prescribed
vasoactive medications ▪
Optional: prescribed pain
medications, mechanical ventilatory support equipment,
central venous catheter dressing change kit.
For assisting with removal
Dressing materials ▪ gloves ▪ suture removal kit ▪ vital
signs monitoring equipment ▪ stethoscope ▪ disinfectant
pad ▪ Optional: protamine sulfate (as prescribed),
mechanical compression device.
Preparation of equipment
As determined by your facility, you or a perfusionist must
zero and balance the pressure transducer in the IABP and
calibrate the oscilloscope monitor to ensure accuracy. Refer
to the manufacturer’s instructions.
Plug the balloon pump console into a nearby power outlet
and turn it on. Open the helium tank and verify that an
adequate helium supply is available. Set up the IABP
according to the manufacturer’s instructions.
Make sure that the emergency equipment, suction setup,
and temporary pacemaker setup are readily available in
case the patient develops complication (such as an
arrhythmia) during insertion.
Implementation
■ Verify the practitioner’s order.
■ Gather and prepare the appropriate equipment.
■ Confirm that written informed consent has been obtained
by the practitioner and that the signed consent form is in
the patient’s medical record.7,8,9,10
■ Conduct a preprocedure verification to make sure that all
relevant documentation, related information, and equipment
are available and correctly identified to the patient’s
identifiers.11,12
■ Verify that a complete blood count, coagulation studies,
and other ordered studies have been completed as ordered
to check for conditions that may increase the risk of
bleeding. Ensure that the results are in the patient’s medical
record.13 Notify the practitioner of unexpected results.14
■ Perform hand hygiene.15,16,17,18,19,20
■ Confirm the patient’s identity using at least two patient
identifiers.12,21
For assisting with insertion
■ Reinforce the practitioner’s explanation of the procedure
for the patient and family (if appropriate) according to their
individual communication and learning needs to increase
their understanding, allay their fears, and enhance
cooperation. Explain that the practitioner will insert a
special balloon catheter into the aorta, which increases
oxygen supply to the heart, decreases the heart’s workload,
and increases cardiac output and perfusion of vital organs.
Briefly explain the insertion procedure, and mention that the
catheter will be connected to a console next to the bed.
Explain that the affected extremity will be immobilized and
that the head of the bed will be no higher than 45 degrees
while the catheter is in place.13 Tell the patient that the
balloon will be removed after the heart can resume an
adequate workload. (See How the intra-aortic balloon pump
works, page 418.)
■ Provide privacy.22,23,24,25
■ Raise the bed to waist level when providing patient care
to prevent caregiver back strain.26
■ Make sure the patient has adequate IV access via a
peripheral IV catheter or central venous access device, as
prescribed, for administering prescribed fluids and
medications, as needed.
■ If indicated, ordered, and not already in place, assist with
insertion of hemodynamic monitoring devices, such as an
arterial catheter or PA catheter.
■ Insert an indwelling urinary catheter, if ordered, to assess
fluid balance and renal function.
Indications and contraindications
for IABC
Various indications and contraindications exist for intra-aortic balloon
counterpulsation (IABC).2 Indications include:
■ acute myocardial infarction
■ refractory left ventricular failure
■ cardiogenic shock
■ refractory ventricular arrhythmias
■ acute mitral regurgitation and ventricular septal defect
■ cardiomyopathies
■ sepsis
■ refractory unstable angina
■ complex cardiac anomalies (in infants and children)
■ cardiac surgery
■ cardiac catheterization and angioplasty
■ weaning from cardiopulmonary bypass.1
Contraindications are categorized as absolute or relative. Absolute
contraindications include:
■ aortic regurgitation
■ aortic dissection
■ uncontrolled sepsis
■ uncontrolled bleeding disorder
■ severe peripheral artery disease
■ abdominal aortic aneurysm.5
■ Connect all monitoring equipment, including the cardiac
monitor, pulse oximeter, automated blood pressure cuff,
temperature probe, and hemodynamic monitoring devices,
as needed. Set alarm limits appropriately for the patient’s
current condition, and make sure alarms are turned on,
functioning properly, and audible to staff.27,28,29,30
■ Apply chest electrodes based on desired trigger mode. A
trigger is the signal the IABP uses to identify the beginning
of the next cardiac cycle; the R wave of the ECG is the
preferred trigger source for identifying the cardiac cycle.13
Select the desired ECG source from the waveform selector
in the IABP controls. Obtain a baseline ECG.
■ Attach another set of ECG electrodes to the patient,
unless the ECG pattern is being transmitted from the
patient’s bedside monitor to the IAPB through another
cable, known as a slaving cable.
■ Obtain the patient’s baseline vital signs and oxygen
saturation by pulse oximetry for baseline comparison.
■ Administer supplemental oxygen as ordered and as
necessary.
■ Remove excess hair from the intended insertion site, if
needed, using a single-patient-use scissors or disposable-
head surgical clippers, to facilitate dressing application.31
■ Assess and record the patient’s peripheral leg pulses and
document sensation, movement, color, and temperature of
the legs to help determine peripheral circulation status and
the best insertion site.
■ Administer a sedative or an analgesic, as ordered,
following safe medication administration practices.32,33,34,35
■ Position the patient supine with access to the insertion
site.
■ Perform hand hygiene.15,16,17,18,19,20
■ Prepare the sterile field.6,36,37
■ Place the catheter, insertion kit, and other supplies on the
sterile field as indicated.36
■ Make sure that all medications on and off the sterile field
are labeled, to prevent medication administration
errors.38,39
■Putonacap,amaskwithafaceshieldoramaskand
goggles, a sterile gown, and sterile gloves to comply with
maximal barrier precautions.6,13,36,37,40,41
■ The practitioner puts on a cap, a mask with a face shield
or a mask and goggles, a sterile gown, and sterile gloves.
The practitioner then cleans the site with chlorhexidine-
based antiseptic solution and drapes the patient using a
sterile drape
and
observing
maximal barrier
precautions.6,36,37,40,41
■ Conduct a time-out immediately before starting the
procedure to determine that the correct patient, site,
positioning, and procedure are identified, and confirm, as
applicable, that relevant information and necessary
equipment are available.12,42
■ To reduce the risk of thromboemboli related to catheter
insertion, administer a heparin bolus, if prescribed, following
safe medication administration practices.13,32,33,34
EQUIPMENT
How the intra-aortic balloon pump works
Made of polyurethane, the intra-aortic balloon is attached to an external
pump console (called the intra-aortic balloon pump) by means of a large-
lumen catheter. These illustrations show the direction of blood flow when the
pump inflates and deflates the balloon.
Balloon inflation
The balloon inflates as the aortic valve closes and diastole begins. The
balloon inflation displaces blood superiorly, which in turn augments coronary
artery blood flow.
Balloon deflation
The balloon deflates before ventricular ejection, when the aortic valve opens.
This deflation permits ejection of blood from the left ventricle against a
lowered resistance. As a result, aortic end-diastolic pressure and afterload
decrease and cardiac output rises.
NURSING ALERT Heparin is a “high-alert” medication because it can
cause significant patient harm when used in error.43
■ If required by your facility, before administering heparin,
have another nurse perform an independent double-check
to verify the patient’s identity and to make sure that the
correct medication is hanging in the prescribed
concentration, the medication’s indication corresponds with
the patient’s diagnosis, the dosage calculations are correct
and the dosing formula used to derive the final dose is
correct, the route of administration is safe and proper for
the patient, the pump settings are correct, and the infusion
line is attached to the correct port.44
■ During the procedure, make sure the health care team
follows infection prevention practices; use an insertion
checklist to guide the insertion process to reduce the risk of
infection.6,36,40,41
■ Attach the 30-mL syringe with one-way valve to the distal
end of the balloon lumen.
■ Pull back on the syringe until all air is aspirated, and then
disconnect the syringe while keeping the valve in place,
creating a vacuum.13
■ Lubricate the IAB catheter according to the
manufacturer’s instructions.
■ Flush the inner lumen of the IAB catheter before insertion
according to the manufacturer’s instructions.
■ Assist the practitioner with insertion of the IAB, as
appropriate.
Inserting the intra-aortic balloon percutaneously
■ The practitioner may insert the balloon percutaneously
into the femoral artery using Seldinger technique.12
■ First, the practitioner accesses the vessel with an 18G
angiography needle and removes the inner stylet.
■ Next, the practitioner passes the guidewire through the
needle and removes the needle.
■ After advancing a vessel dilator over the guidewire into
the vessel, the practitioner removes the vessel dilator,
leaving the guidewire in place.
■ Next, the practitioner passes an introducer (dilator and
sheath assembly) over the guidewire into the vessel until
about 1′′ (2.5 cm) remains above the insertion site. The
practitioner then removes the inner dilator, leaving the
introducer sheath and guidewire in place.
■ After passing the balloon over the guidewire into the
introducer sheath, the practitioner advances the catheter
into position, 3⁄8′′ to 3⁄4′′ (1 to 2 cm) distal to the left
subclavian artery, under fluoroscopic guidance.
■ The practitioner secures the IABC to the patient’s leg
using sutures or another stabilization device, as indicated.
■ Apply a sterile occlusive dressing over the insertion site.
Inserting the intra-aortic balloon surgically
■ If unable to insert the catheter percutaneously, the
practitioner may insert it surgically using a femoral artery or
subclavian artery approach. (See Surgical insertion sites for
the intra-aortic balloon.)
Connecting the catheter to the IABP
■ The practitioner removes the one-way valve from the IAB
catheter and connects the IAB catheter to a catheter
extender. The practitioner or nurse then connects the
catheter extender to the pneumatic module of the IABP.
■ Assist the practitioner or connect the previously prepared
and zeroed transducer system to the aortic arterial line
lumen (inner lumen) of the IAB catheter. Verify blood return,
gently flush the lumen using the flush device, and then level
the transducer with the patient’s midaxillary line and zero it
to ensure accuracy.
■ Trace all connections from the patient to their point of
origin to make sure that they’re connected to the proper
ports, and to make sure that all connections are tight and
secure to prevent disconnections.46
■ Route tubing using a standardized approach if the patient
has other tubing and catheters that have different purposes.
Label the tubing at the distal end (near the patient
connection) and proximal end (near the source container) to
reduce the risk of misconnection if you’re using multiple IV
lines.47
■ Obtain a portable chest X-ray, as ordered, to confirm IAB
catheter placement. Place the IABP on standby, as
indicated, for clearer visualization.13
■ Initiate counterpulsation therapy, as ordered, following
the manufacturer’s instructions.
■ Monitor the patient’s vital signs, hemodynamic
parameters, and clinical status at a frequency determined
by your facility and the patient’s condition.48
Completing the procedure
■ Return the bed to the lowest position to prevent falls and
maintain patient safety.49
■ Discard used supplies appropriately.50
■ Remove and discard your personal protective equipment.
■ Perform hand hygiene.15,16,17,18,19,20
■ Document the procedure.51,52,53,54
For maintaining IABC
■ Perform hand hygiene.15,16,17,18,19,20
■ Put on gloves, as needed, throughout the procedure to
follow standard precautions.15,55
■ Verify that the pump settings coincide with the
practitioner’s order.
■ Ensure that alarm limits are set appropriately for the
patient’s current condition, and that alarms are turned on,
functioning properly, and audible to staff.27,28,29,30
■ Interpret waveforms and monitor balloon function. (See
Interpreting intra-aortic balloon waveforms, page 420.)
■ Maintain accurate IABP timing according to waveform
interpretation; proper IABP inflation and deflation balance
oxygen supply and demand, reducing the risk of further
ischemia and compromised contractility.2
■ Monitor the IABP to make sure that it’s functioning
properly.
NURSING ALERT If the pump console malfunctions or becomes
inoperable, don’t allow the balloon catheter to remain dormant for
more than 30 minutes, or for the length of time determined by the
manufacturer.13 Obtain another pump console and attach it to the
balloon, then resume pumping. In the meantime, inflate the balloon
manually, using a 60-mL syringe and room air, a minimum of once
every 5 minutes to prevent thrombus formation in the catheter. The
volume of inflation is equal to 10 mL less than the balloon size marked
on the catheter. Never manually inflate the balloon if rupture is
suspected.
■ Raise the bed to waist level when providing care to
prevent caregiver back strain.26
■ Assess the patient’s cardiovascular status, hemodynamic
status, and peripheral pulses every 15 to 60 minutes
according to the patient’s condition. Notify the practitioner
immediately if you note changes.13
■ Monitor the patient’s vital signs and level of
consciousness at an interval determined by the patient’s
condition.
■ Monitor oxygen saturation, and provide supplemental
oxygen and noninvasive or invasive ventilatory support as
required and ordered.56
■ Auscultate heart and breath sounds at an interval
determined by the patient’s condition. If the patient’s
condition permits, put the IABC on standby during
auscultation so that IABC noises don’t interfere with your
assessment.13
■ Measure cardiac output (CO), cardiac index (CI), positive
airway pressure (PAP), and pulmonary artery occlusion
pressure, as ordered, to detect changes in the patient’s
condition.
■ Note pulses, color, capillary refill, sensation, motor
function, edema, and temperature in the affected limb.
Notify the practitioner immediately if you detect circulatory
changes, because the balloon may need to be removed.49
■ Assess the insertion site for hematoma, bleeding, and
infection every 2 hours or at an interval determined by the
patient’s condition.13,37
■ Observe and record the patient’s baseline arm pulses,
arm sensation and movement, and arm color and
temperature immediately after balloon insertion and then
every other hour while the balloon is in place.
■ Assess GI status regularly as warranted by the patient’s
condition. Check for abdominal distention and tenderness,
and assess for changes in elimination patterns.
■ Monitor the patient’s urine output every 15 to 60
minutes, according to the patient’s condition.13
■ Perform a comprehensive pain assessment using
techniques appropriate for the patient’s age, condition, and
ability to understand.57,58 Administer pain medications as
ordered using safe medication practices.32,33,34,35
■ Maintain the head of the bed at less than 45 degrees to
prevent kinking and migration of the catheter.13
■ Assess skin integrity regularly. Reposition the patient
frequently while maintaining catheter position and function.
Consider the use of pressure-relief surfaces and
devices.59,60
HOSPITAL-ACQUIRED CONDITION ALERT Keep in mind that the
Centers for Medicare and Medicaid Services consider a stage 3 or 4
pressure injury a hospital-acquired condition, because various best
practices can reasonably prevent it. Make sure to follow pressure
injury prevention practices, such as performing skin assessments,
using support surfaces, and frequently repositioning the patient, to
reduce the risk of pressure injuries.59,60,61,62
■ Perform range-of-motion exercises to prevent venous
stasis and muscle atrophy.
■ As appropriate, encourage coughing and deep breathing.
Provide chest physiotherapy, as tolerated and ordered.48
■ Monitor the patient’s hematologic status. Observe for
bleeding gums, blood in the urine or stools, petechiae, and
bleeding or hematoma at the insertion site. Monitor platelet
count, hemoglobin level, and hematocrit daily. Expect to
administer blood products to maintain hematocrit at 30%. If
platelet count drops, expect to administer platelets.
■ If heparin is used for arterial lumen patency, monitor
partial thromboplastin time (PTT) every 6 hours while the
heparin dose is adjusted to maintain PTT at 11⁄2 to 2 times
the normal value, and then every 12 to 24 hours while the
balloon remains in place.
NURSING ALERT Heparin is a high-alert medication because it can
cause significant patient harm when used un error. Have another
nurse perform an independent double-check to ensure safe medication
administration.44
■ Obtain samples for ABG analysis, as ordered.
Surgical insertion sites for the intra-
aortic balloon
If an intra-aortic balloon can’t be inserted percutaneously, the practitioner
will insert it surgically, using a femoral or transthoracic approach.
Femoral artery approach
Insertion through the femoral artery requires a cutdown and an arteriotomy.
The practitioner passes the balloon through a Dacron graft that has been
sewn to the artery.
Subclavian artery approach
Although traditionally inserted in the femoral artery, the balloon can be
inserted through the. subclavian artery, giving the patient more mobility than
the femoral site.45 For this approach, the practitioner inserts the balloon in
an antegrade direction through the subclavian artery and then positions it in
the descending thoracic aorta.
■ Monitor serum electrolyte levels, especially sodium and
potassium, as ordered, to assess the patient’s fluid and
electrolyte balance and help prevent arrhythmias.
NURSING ALERT Avoid sampling from the central lumen of the
balloon to avoid thrombus formation.48
■ Obtain an ECG, as ordered.
■ Obtain a chest X-ray, as ordered.
■ Watch for signs and symptoms of a dissecting aortic
aneurysm, including a blood pressure differential between
the left and right arms, elevated blood pressure, syncope,
pallor, diaphoresis, dyspnea, a throbbing abdominal mass, a
reduced red blood cell count with an elevated white blood
cell count, and pain in the chest, abdomen, or back. Notify
the practitioner immediately if you detect any of these
complications.
■ Administer vasoactive medications, as prescribed,
following safe medication administration practices.32,33,34,35
■ Identify parameters that demonstrate clinical readiness to
wean from IABC therapy.13 Such criteria may include
resolution of signs and symptoms associated with
hypoperfusion caused by low CO, including angina; CI of 2
L/minute/m2 or higher that doesn’t decrease by more 20%;
pulmonary artery occlusion pressure that doesn’t increase
more than 20% above preweaning level; urine output
greater than 0.5 mL/kg/hour; heart rate less than 100
beats/minute; and minimal need for positive ionotropic
agents.48
Interpreting intra-aortic balloon
waveforms
To function properly, the inflation–deflation cycle of an intra-aortic balloon
pump (IABP) must be synchronized to appropriate events in the patient’s
cardiac cycle. During intra-aortic balloon counterpulsation (IABC), you can
use electrocardiogram (ECG) and arterial pressure waveforms to determine
whether the IABP is functioning properly. The central lumen of the double-
lumen intra-aortic balloon catheter allows monitoring of the pressure in the
descending aorta during the cardiac cycle. Timing of the IABP is always
performed using the arterial waveform as a guide.13,48
Many IABP models automatically adjust timing setting to accommodate
changes in the patient’s heart rate. Knowing the individuals patient’s goals of
therapy and the available trigger options for a particular system help
optimize therapy.2
Normal inflation–deflation timing
Balloon inflation occurs after aortic valve closure; deflation, during
isovolumetric contraction, just before the aortic valve opens. In a properly
timed waveform, such as the one shown at right, the inflation point lies at or
slightly above the dicrotic notch. Both inflation and deflation cause a sharp V
shape. Peak diastolic pressure exceeds peak systolic pressure; peak systolic
pressure exceeds assisted peak systolic pressure.
Early inflation
With early inflation, the inflation point lies before the dicrotic notch (shown at
right). Early inflation dangerously increases myocardial stress and decreases
cardiac output.
Early deflation
Early deflation results in a U shape on the arterial waveform (shown at right).
Peak systolic pressure is less than or equal to assisted peak systolic pressure.
Early deflation won’t decrease afterload or myocardial oxygen consumption.
Late inflation
With late inflation, the dicrotic notch precedes the inflation point, and the
notch and the inflation point create a W shape (shown at right). Late inflation
can lead to a reduction in peak diastolic pressure, coronary and systemic
perfusion augmentation time, and augmented coronary perfusion pressure.
Late deflation
With late deflation, peak systolic pressure exceeds assisted peak systolic
pressure (shown at right). This event threatens the patient by increasing
afterload, myocardial oxygen consumption, cardiac workload, and preload. It
occurs when the balloon has been inflated for too long or fails to receive the
input signal from the ECG, indicating the start of systole (QRS complex).
■ Return the bed to the lowest position to prevent falls and
maintain patient safety.49
■ Discard used supplies appropriately.50
■ Remove and discard your gloves.
■ Perform hand hygiene.15,16,17,18,19,20
■ Clean and disinfect your stethoscope using a disinfectant
pad.63,64
■ Perform hand hygiene.15,16,17,18,19,20
■ Document the procedure.51,52,53
Weaning a patient from IABC
■ Verify the practitioner’s order.
■ Perform hand hygiene.15,16,17,18,19,20
■ Confirm the patient’s identity using at least two patient
identifiers.12,21
■ To begin weaning, gradually decrease the frequency of
balloon augmentation to 1:2, as ordered. Although each
facility has its own weaning protocol, be aware that you’ll
usually maintain assist frequency for an hour or longer. If
the patient’s hemodynamic indices remain stable during this
time, continue weaning by decreasing the frequency of
balloon augmentation to 1:3, and so on.
■ Avoid leaving the patient on a low augmentation volume
for more than 2 hours to prevent embolus formation.
■ If you’ve reduced the augmentation volume for weaning,
return the pump to full augmentation volume at a ratio of
1:1 for 5 minutes each hour to decrease the risk of platelet
aggregation.
■ Assess the patient’s tolerance of weaning by monitoring
vital signs, ECG, mental status, urine output, distal
perfusion, CO, and CI.48 Signs and symptoms of poor
tolerance include hypotension, confusion, disorientation,
urine output below 30 mL/hour, cold and clammy skin, chest
pain, arrhythmias, ischemic ECG changes, reduced CO and
CI, and elevated PAP. If the patient develops any of these
problems, notify the practitioner immediately.
■ Perform hand hygiene.15,16,17,18,19,20
■ Clean and disinfect your stethoscope using a disinfectant
pad.63,64
■ Perform hand hygiene.15,16,17,18,19,20
For assisting with removal
■ Discontinue the heparin infusion at least 4 hours before
removal, or reverse the effects with protamine sulfate, as
ordered.13
■ Verify that coagulation studies are within normal limits
before balloon removal to prevent hemorrhage from the
insertion site.48
■ Perform hand hygiene.15,16,17,18,19,20
■ Put on gloves.15,56
■ Confirm the patient’s identity using at least two patient
identifiers.12,21
■ Provide privacy.22,23,24,25
■ Assess hemodynamic stability before removal.13
■ Turn off the control system and disconnect the connection
tubing from the catheter to ensure balloon deflation.
■ Raise the bed to waist level to prevent caregiver back
strain.26
■ Assist the practitioner with removal, as needed. The
practitioner removes the sutures securing the balloon, and
then withdraws the balloon until the proximal end of the
catheter contacts the distal end of the introducer sheath.
■ While applying pressure below the puncture site, the
practitioner removes the balloon and introducer sheath as a
unit, allowing a few seconds of free bleeding to prevent
thrombus formation.
■ Assess the integrity of the balloon after removal.
■ Apply direct pressure to the site for 30 to 45 minutes or
until bleeding stops.13 (Note: In some facilities, applying
pressure is the practitioner’s responsibility.)
■ Apply a mechanical compression device, as ordered.48
■ If the balloon was inserted surgically, assist the surgeon
with closure of the Dacron graft and suturing of the insertion
site. A cardiologist usually removes the percutaneous
catheter.
■ Assess the site for bleeding or hematoma. Apply a sterile
pressure dressing and keep it in place for 2 to 4 hours.13
■ Assess the patient’s pedal and posterior tibial pulses, and
the color, temperature, and sensation of the affected limb
immediately after removal and every 1 hour for 2 hours,
then every 2 hours or according to the practitioner’s
orders.13
■ Assess the patient’s vital signs and hemodynamic
parameters every 15 minutes for 1 hour, every 30 minutes
for the next hour, and then hourly as the patient’s condition
warrants. Notify the practitioner of any abnormalities.13
■ Maintain the patient on bed rest, with the head of the bed
elevated 30 degrees or less, and keep the affected
extremity straight for 8 hours or according to the
practitioner’s order.13
■ Return the bed to the lowest position to prevent falls and
maintain patient safety.49
■ Discard used supplies appropriately.50
■ Remove and discard your gloves.
■ Perform hand hygiene.15,16,17,18,19,20
■ Clean and disinfect your stethoscope using a disinfectant
pad.63,64
■ Perform hand hygiene.15,16,17,18,19,20
■ Document the procedure.51,52,53,54
Special considerations
■ The practitioner must time inflation and deflation to the
patient’s cardiac cycle to achieve optimal counterpulsation.
Assess timing of the IABC with the arterial waveform. The
practitioner should determine the goal of IABC therapy
before choosing the best timing method, because
inappropriate timing can be detrimental to left ventricular
performance.2
■ Some IABP manufacturers produce autotiming devices
that sense the R wave on the ECG tracing and use this as
the trigger source.2,13,65
■ The Joint Commission issued a sentinel event alert related
to managing risk during transition to new International
Organization for Standardization tubing standards designed
to prevent dangerous tubing misconnections, which can
lead to serious patient injury and death. During the
transition, be sure to trace the tubing and catheter from the
patient to the point of origin before connecting or
reconnecting any device or infusion, at any care transition
(such as a new setting or service), and as part of the
handoff process. Route tubes and catheters with different
purposes in different standardized directions. When there
are different access sites or several bags hanging, label the
tubing at the distal and proximal ends. Use tubing and
equipment only as intended, and store medications for
different delivery routes in separate locations.47
■ The Joint Commission issued a sentinel event alert
concerning medical device alarm safety, because alarm-
related events have been associated with permanent loss of
function or death. Among the major contributing factors
were
improper
alarm
settings,
alarm
settings
inappropriately turned off, and alarm signals not audible to
staff. Make sure that alarm limits are set appropriately, and
that alarms are turned on, functioning properly, and audible
to staff. Follow facility guidelines for preventing alarm
fatigue.29
■ To prevent vascular catheter-associated infection, be
aware that site care and frequency depend on the type of
dressing used. Change a transparent semipermeable
dressing at least every 7 days, and a gauze dressing every 2
days.6,36,37 Change the dressing sooner if drainage, site
tenderness, signs of infection, or compromised dressing
integrity occur.6,36,37 Perform catheter site care with an
antiseptic pad (chlorhexidine-based is preferred), allow it to
dry, replace the securement device (if used), and then apply
a sterile occlusive dressing.6,36,37
■ Watch for pump interruptions, which may result from
loose ECG electrodes or lead wires, static or 60-cycle
interference, catheter kinking, or improper body alignment.
■ Keep in mind that anticoagulant use or the presence of
thrombocytopenia, which can be caused by the balloon
itself, increases the risk of bleeding.
Complications
IABC may cause numerous complications. Potential
complications include arterial embolism stemming from clot
formation on the balloon surface, extension or rupture of an
aortic aneurysm, femoral or iliac artery perforation, femoral
artery occlusion, balloon rupture, stroke, balloon migration,
sepsis, and limb ischemia. Bleeding at the insertion site may
become aggravated by pump-induced thrombocytopenia
caused by platelet aggregation around the balloon.
Removal of and IAB can cause bleeding and hematoma
formation at the insertion site.
Documentation
Document the size of the catheter, balloon volume, and
IABP frequency.13 Document all aspects of patient
preparation and assessment, including any patient and
family teaching provided and the patient’s and family’s
understanding of the teaching. Also document the
procedure, interventions, complications, and the patient’s
response.
Document all aspects of patient assessment and
management, including the patient’s response to therapy
and weaning. If you’re responsible for the IABC device,
document all routine checks, problems, and troubleshooting
measures. If a technician is responsible for the IABC device,
record only when and why you notified the technician, as
well as the result of the technician’s actions on the patient,
if applicable. Also document any teaching you provided and
the patient’s understanding of that teaching.
REFERENCES
1 Krishna, M., & Zacharowski, K. (2009). Principles of intra-aortic balloon pump
counterpulsation. Continuing Education in Anaesthesia, Critical Care and Pain,
9(1), 24–28. Accessed via the Web at
http://ceaccp.oxfordjournals.org/content/9/1/24.full
2 Hanlon-Pena, P. M., & Quaal, S. J . (2011). Intra-aortic balloon pump timing:
Review of evidence supporting current practice. American Journal of Critical
Care, 20(4), 323–334. Accessed via the Web at
http://ajcc.aacnjournals.org/content/20/4/323.full
3 Thiele, H., et al. (2012). Intraaortic balloon support for myocardial infarction
with cardiogenic shock. New England Journal of Medicine, 367, 1287. (Level II)
4 Hochman, J. S ., & Reyentovich, A. Prognosis and treatment of cardiogenic
shock complicating acute myocardial infarction. (2015). In: UpToDate, Gersh,
B. J., et al. (Eds.). Retrieved from: www.uptodate.com.
5 Laham, R. J ., & Aroesty, J. M. Intraaortic balloon pump counterpulsation.
(2016). In: UpToDate, Gersh, B. J ., et al. (Eds.) . Retrieved from:
www.uptodate.com
6 Marschall, J., et al. (2014). SHEA/IDSA practice recommendation: Strategies to
prevent central line–associated bloodstream infections in acute care
hospitals. Infection Control and Hospital Epidemiology, 35(7), 753–771 .
Accessed via the Web at http://www.jstor.org/stable/10.1086/676533 (Level I)
7 The Joint Commission. (2019). Standard RI.01.03 .01. Comprehensive
accreditation manual for hospitals. Oakbrook Terrace, IL: The Joint
Commission. (Level VII)
8 Centers for Medicare and Medicaid Services, Department of Health and
Human Services. (2015). Condition of participation: Patient’s rights. 42 C.F.R.
§ 482.13(b)(2).
9 DNV GL-Healthcare USA, Inc. (2016). PR.1 .SR.3 . NIAHO® accreditation
requirements: Interpretive guidelines and surveyor guidance (version 11).
Milford, OH: DNV GL-Healthcare USA, Inc. (Level VII)
10 Accreditation Association for Hospitals and Health Systems. (2017). Standard
30.00 .11. Healthcare Facilities Accreditation Program: Accreditation
requirements for acute care hospitals. Chicago, IL: Accreditation Association
for Hospitals and Health Systems. (Level VII)
11 The Joint Commission. (2019). Standard UP.01.01.01. Comprehensive
accreditation manual for hospitals. Oakbrook Terrace, IL: The Joint
Commission. (Level VII)
12 Accreditation Association for Hospitals and Health Systems. (2017). Standard
30.00 .14. Healthcare Facilities Accreditation Program: Accreditation
requirements for acute care hospitals. Chicago, IL: Accreditation Association
for Hospitals and Health Systems. (Level VII)
13 Wiegand, D. L. (2017). AACN procedure manual for high acuity, progressive,
and critical care (7th ed.). St. Louis, MO: Elsevier.
14 The Joint Commission. (2019). Standard NPSG.02.03 .01. Comprehensive
accreditation manual for hospitals. Oakbrook Terrace, IL: The Joint
Commission. (Level VII)
15 The Joint Commission. (2019). Standard NPSG.07.01.01. Comprehensive
accreditation manual for hospitals. Oakbrook Terrace, IL: The Joint
Commission. (Level VII)
16 Centers for Disease Control and Prevention. (2002). Guideline for hand
hygiene in health-care settings: Recommendations of the Healthcare Infection
Control Practices Advisory Committee and the HICPAC/SHEA/APIC/IDSA Hand
Hygiene Task Force. MMWR Recommendations and Reports, 51(RR-16), 1–45.
Accessed via the Web at https://www.cdc.gov/mmwr/pdf/rr/rr5116.pdf (Level
II)
17 World Health Organization. (2009). “WHO guidelines on hand hygiene in
health care: First global patient safety challenge, clean care is safer care”
[Online]. Accessed via the Web at
http://apps.who.int/iris/bitstream/10665/44102/1/9789241597906_eng.pdf
(Level IV)
18 Centers for Medicare and Medicaid Services, Department of Health and
Human Services. (2015). Condition of participation: Infection control. 42 C.F.R.
§ 482.42.
19 Accreditation Association for Hospitals and Health Systems. (2017). Standard
07.01.10. Healthcare Facilities Accreditation Program: Accreditation
requirements for acute care hospitals. Chicago, IL: Accreditation Association
for Hospitals and Health Systems. (Level VII)
20 DNV GL-Healthcare USA, Inc. (2016). IC.1 .SR.1 . NIAHO® accreditation
requirements: Interpretive guidelines and surveyor guidance (version 11).
Milford, OH: DNV GL-Healthcare USA, Inc. (Level VII)
21 The Joint Commission. (2019). Standard NPSG.01.01.01. Comprehensive
accreditation manual for hospitals. Oakbrook Terrace, IL: The Joint
Commission. (Level VII)
22 The Joint Commission. (2019). Standard RI.01.01.01. Comprehensive
accreditation manual for hospitals. Oakbrook Terrace, IL: The Joint
Commission. (Level VII)
23 DNV GL-Healthcare USA, Inc. (2016). PR.1.SR.5 . NIAHO® accreditation
requirements: Interpretive guidelines and surveyor guidance (version 11).
Milford, OH: DNV GL-Healthcare USA, Inc. (Level VII)
24 Centers for Medicare and Medicaid Services, Department of Health and
Human Services. (2015). Condition of participation: Patient’s rights. 42C.F.R. §
482.13(c)(1).
25 Accreditation Association for Hospitals and Health Systems. (2017). Standard
15.01.16. Healthcare Facilities Accreditation Program: Accreditation
requirements for acute care hospitals. Chicago, IL: Accreditation Association
for Hospitals and Health Systems. (Level VII)
26 Waters, T. R., et al. (2009). “Safe patient handling training for schools of
nursing” [Online]. Accessed via the Web at
http://www.cdc.gov/niosh/docs/2009-127/pdfs/2009-127.pdf (Level VII)
27 The Joint Commission. (2019). Standard NPSG 06.01.01. Comprehensive
accreditation manual for hospitals. Oakbrook Terrace, IL: The Joint
Commission. (Level VII)
28 The Joint Commission. (2013). “Sentinel event alert: Medical device alarm
safety in hospitals” [Online]. Accessed via the Web at
https://www.jointcommission.org/assets/1/6/SEA_50_alarms_4 _26_16.pdf
(Level VII)
29 American Association of Critical-Care Nurses. (2013). “A ACN practice alert:
Alarm management” [Online]. Accessed via the Web at
https://www.aacn.org/aacn-website/shared/content/practice-
alerts/2015/11/25/alarm-management (Level VII)
30 Graham, K. C., & Cvach, M. (2010). Monitor alarm fatigue: Standardizing use
of physiological monitors and decreasing nuisance alarms. American Journal
of Critical Care, 19(1), 28–37. Accessed via the Web at
http://ajcc.aacnjournals.org/content/19/1/28.full.pdf
31 Standard 33. Vascular access site preparation and device placement. Infusion
therapy standards of practice. (2016). Journal of Infusion Nursing, 39, S64–
S67. (Level VII)
32 Centers for Medicare and Medicaid Services, Department of Health and
Human Services. (2015). Condition of participation: Nursing services. 42
C.F.R. § 482.23(c).
33 Accreditation Association for Hospitals and Health Systems. (2017). Standard
16.01.03. Healthcare Facilities Accreditation Program: Accreditation
requirements for acute care hospitals. Chicago, IL: Accreditation Association
for Hospitals and Health Systems. (Level VII)
34 The Joint Commission. (2019). Standard MM.06.01.01. Comprehensive
accreditation manual for hospitals. Oakbrook Terrace, IL: The Joint
Commission. (Level VII)
35 DNV GL-Healthcare USA, Inc. (2016). MM.1 .SR.2. NIAHO® accreditation
requirements: Interpretive guidelines and surveyor guidance (version 11).
Milford, OH: DNV GL-Healthcare USA, Inc. (Level VII)
36 The Joint Commission. (2019). Standard NPSG.07.04.01. Comprehensive
accreditation manual for hospitals. Oakbrook Terrace, IL: The Joint
Commission. (Level VII)
37 Centers for Disease Control and Prevention. (2011, revised 2017). “Guidelines
for the prevention of intravascular catheter–related infections” [Online].
Accessed via the Web at http://www.cdc.gov/hicpac/pdf/guidelines/bsi-
guidelines-2011.pdf (Level I)
38 The Joint Commission. (2019). Standard NPSG.03 .04.01. Comprehensive
accreditation manual for hospitals. Oakbrook Terrace, IL: The Joint
Commission. (Level VII)
39 Accreditation Association for Hospitals and Health Systems. (2017). Standard
25.01.27. Healthcare Facilities Accreditation Program: Accreditation
requirements for acute care hospitals. Chicago, IL: Accreditation Association
for Hospitals and Health Systems. (Level VII)
40 Accreditation Association for Hospitals and Health Systems. (2017). Standard
07.01.09. Healthcare Facilities Accreditation Program: Accreditation
requirements for acute care hospitals. Chicago, IL: Accreditation Association
for Hospitals and Health Systems. (Level VII)
41 Accreditation Association for Hospitals and Health Systems. (2017). Standard
07.01.19. Healthcare Facilities Accreditation Program: Accreditation
requirements for acute care hospitals. Chicago, IL: Accreditation Association
for Hospitals and Health Systems. (Level VII)
42 The Joint Commission. (2019). Standard UP.01.03.01. Comprehensive
accreditation manual for hospitals. Oakbrook Terrace, IL: The Joint
Commission. (Level VII)
43 Institute for Safe Medication Practices. (2014). “ISMP list of high-alert
medications in acute care settings” [Online]. Accessed via the Web at
http://www.ismp.org/tools/highalertmedications.pdf (Level VII)
44 Institute for Safe Medication Practices. (2008). Conducting an independent
double-check. ISMP Medication Safety Alert! Nurse Advise-ERR, 6(12), 1.
Accessed via the Web at
http://www.ismp.org/newsletters/nursing/Issues/NurseAdviseERR200812.pdf
(Level VII)
45 Raman, J., et al. (2010). Subclavian artery access for ambulatory balloon
pump insertion. Annals of Thoracic Surgery, 90(3), 1032–1034.
46 U.S . Food and Drug Administration. (n.d .). “Look. Check. Connect. Safe
medical device connections save lives” [Online]. Accessed via the Web at
http://www.fda.gov/downloads/MedicalDevices/Safety/AlertsandNotices/UCM1
34873.pdf
47 The Joint Commission. (2014). “Sentinel event alert: Managing risk during
transition to new ISO tubing connector standards” [Online]. Accessed via the
Web at
http://www.jointcommission.org/assets/1/6/SEA_53_Connectors_8 _19_14 _final.
pdf (Level VII)
48 Goldich, G. (2011). Getting in sync with intra-aortic balloon pump therapy.
Nursing2011 Critical Care, 6(3), 10–13. Accessed via the Web at
http://www.nursingcenter.com/lnc/pdfjournal?AID=1254563&an=00152193-
201110001-00003&Journal_ID=&Issue_ID=
49 Ganz, D. A., et al. (2013). Preventing falls in hospitals: A toolkit for improving
quality of care (AHRQ Publication No. 13-0015-EF). Rockville, MD: Agency for
Healthcare Research and Quality. Accessed via the Web at
http://www.ahrq.gov/sites/default/files/publications/files/fallpxtoolkit.pdf
(Level VII)
50 Occupational Safety and Health Administration. (n.d .). “Bloodborne
pathogens, standard number 1910.1030” [Online]. Accessed via the Web at
https://www.osha.gov/pls/oshaweb/owadisp.show_document?
p_id=10051&p_table=STANDARDS (Level VII)
51 The Joint Commission. (2019). Standard RC.02.01.01. Comprehensive
accreditation manual for hospitals. Oakbrook Terrace, IL: The Joint
Commission. (Level VII)
52 Centers for Medicare and Medicaid Services, Department of Health and
Human Services. (2015). Condition of participation: Medical record services.
42 C.F.R. § 482.24(b).
53 Accreditation Association for Hospitals and Health Systems. (2017). Standard
10.00 .03. Healthcare Facilities Accreditation Program: Accreditation
requirements for acute care hospitals. Chicago, IL: Accreditation Association
for Hospitals and Health Systems. (Level VII)
54 DNV GL-Healthcare USA, Inc. (2016). MR.2 .SR.1 . NIAHO® accreditation
requirements: Interpretive guidelines and surveyor guidance (version 11).
Milford, OH: DNV GL-Healthcare USA, Inc. (Level VII)
55 Siegel, J. D ., et al. (2007, revised 2017). “2007 guideline for isolation
precautions: Preventing transmission of infectious agents in healthcare
settings” [Online]. Accessed via the Web at
http://www.cdc.gov/hicpac/pdf/isolation/Isolation2007.pdf (Level II)
56 McMurray, J. V., et al. (2012). ESC guidelines for the diagnosis and treatment
of acute and chronic heart failure 2012. European Heart Journal, 33(14),
1787–1847. (Level VII)
57 The Joint Commission. (2019). Standard PC.01.02.07. Comprehensive
accreditation manual for hospitals. Oakbrook Terrace, IL: The Joint
Commission. (Level VII)
58 Accreditation Association for Hospitals and Health Systems. (2017). Standard
16.02.01. Healthcare Facilities Accreditation Program: Accreditation
requirements for acute care hospitals. Chicago, IL: Accreditation Association
for Hospitals and Health Systems. (Level VII)
59 Accreditation Association for Hospitals and Health Systems. (2017). Standard
16.02.02. Healthcare Facilities Accreditation Program: Accreditation
requirements for acute care hospitals. Chicago, IL: Accreditation Association
for Hospitals and Health Systems. (Level VII)
60 National Pressure Ulcer Advisory Panel, et al. (2014). “Prevention and
treatment of pressure ulcers: Quick reference guide” [Online]. Accessed via
the Web at http://www.npuap.org/wp-content/uploads/2014/08/Quick-
Reference-Guide-DIGITAL-NPUAP-EPUAP-PPPIA.pdf
61 Jarrett, N., & Callaham, M. (2016). “Evidence-based guidelines for selected
hospital-acquired conditions: Final report” [Online]. Accessed via the Web at
https://www.cms.gov/Medicare/Medicare-Fee-for-Service-
Payment/HospitalAcqCond/Downloads/2016-HAC-Report.pdf
62 National Pressure Ulcer Advisory Panel. (2016). “NPUAP pressure injury
stages” [Online]. Accessed via the Web at
http://www.npuap.org/resources/educational-and-clinical-resources/npuap-
pressure-injury-stages/ (Level VII)
63 Rutala, W. A., et al. (2008, revised 2017). “Guideline for disinfection and
sterilization in healthcare facilities, 2008” [Online]. Accessed via the Web at
https://www.cdc.gov/infectioncontrol/pdf/guidelines/disinfection-
guidelines.pdf (Level I)
64 Accreditation Association for Hospitals and Health Systems. (2017). Standard
07.02.03. Healthcare Facilities Accreditation Program: Accreditation
requirements for acute care hospitals. Chicago, IL: Accreditation Association
for Hospitals and Health Systems. (Level VII)
65 Yarham, G., et al. (2013). Fiber-optic intra-aortic balloon therapy and its role
within cardiac surgery. Perfusion, 28(2), 97–102.
INTRACRANIAL PRESSURE MONITORING
Intracranial pressure (ICP) monitoring measures pressure
exerted by the brain, blood, and cerebrospinal fluid (CSF)
against the inside of the skull. Indications for monitoring ICP
include head trauma with bleeding or edema,
overproduction or insufficient absorption of CSF, cerebral
hemorrhage, and space-occupying brain lesions. ICP
monitoring can detect elevated ICP early, before clinical
danger signs develop.1 Prompt intervention can then help
avert or diminish neurologic damage caused by cerebral
hypoxia and shifts of brain mass.
The four basic ICP monitoring systems are intraventricular
catheter, subarachnoid bolt, epidural or subdural sensor,
and intraparenchymal pressure monitoring. Intraventricular
catheters are considered the gold standard for measuring
ICP because they’re inserted directly into the ventricle
through a burr hole, which permits ICP monitoring and
therapeutic CSF drainage to control ICP.1 (See
Understanding ICP monitoring, page 424.) Regardless of
which system is used, the procedure is typically performed
by a neurosurgeon in the operating room or emergency
department or on the intensive care unit. Insertion of an ICP
monitoring device requires sterile technique to reduce the
risk of central nervous system (CNS) infection. Setting up
equipment for the monitoring systems also requires strict
sterile technique.1
Equipment
Intracranial access kit ▪ catheter ▪ flushless transducer ▪
pressure cable and module ▪ cardiac monitor ▪ pulse
oximeter and probe ▪ sterile 4′′ × 4′′ (10-cm × 10-cm) gauze
pads ▪ fluid-impermeable pads ▪ single-patient-use scissors
or disposable-head clippers ▪ sterile drapes ▪ sterile towels
▪ antiseptic solution or sterile prep kit ▪ sterile gowns ▪
sterile gloves ▪ masks ▪ caps ▪ sterile marker ▪ sterile
labels ▪ preservative-free normal saline solution for injection
▪ 30-mL or 40-mL syringe1 ▪ lidocaine local anesthetic ▪
sterile dressing supplies ▪ leveling device ▪ vital signs
monitoring equipment ▪ Optional: tape, prescribed sedation,
pain medication, osmotic diuretic, prescribed IV fluid, IV
pole, external ventricular drainage system, arterial catheter
insertion equipment.
You may need to gather other equipment as instructed by
the practitioner, such as the drill and bits, a scalp retractor,
and a scalp staple.
Preparation of equipment
Various types of preassembled ICP monitoring units are
available, each with its own setup protocols. These units are
designed to reduce the risk of infection by eliminating the
need for multiple stopcocks, manometers, and transducer
dome assemblies. When preparing the equipment, label all
medications, medication containers, and other solutions on
and off the sterile field.2 Prepare and set up the monitoring
system according to the manufacturer’s instructions. (See
Setting up an ICP monitoring system, page 425.)
Implementation
Catheter insertion
■ Verify the practitioner’s order.
■ Gather and prepare the equipment, personnel, and
supplies needed for device insertion.
■ Confirm that written informed consent has been obtained
and that the consent form is in the patient’s medical
record.11,12,13,14
■ Conduct a preprocedure verification to make sure that all
relevant documentation, related information, and equipment
are available and correctly identified to the patient’s
identifiers.15,16
EQUIPMENT
Understanding ICP monitoring
Intracranial pressure (ICP) can be monitored using one of four types of
systems.
Intraventricular catheter monitoring
For intraventricular catheter monitoring, which provides direct monitoring of
ICP, the practitioner inserts a small catheter into the lateral ventricle through
a burr hole. Although this method provides the most accurate measure of
ICP, and is the only type of ICP monitoring that allows evaluation of brain
compliance and drainage of significant amounts of cerebrospinal fluid (CSF),
it carries the greatest risk of infection. Contraindications usually include
stenotic cerebral ventricles, cerebral aneurysms in the path of catheter
placement, and suspected vascular lesions.
Subarachnoid bolt monitoring
Subarachnoid bolt monitoring involves insertion of a special bolt into the
subarachnoid space through a twist-drill burr hole that’s positioned in the
front of the skull behind the hairline. Placing the bolt is easier than placing an
intraventricular catheter, especially if a computed tomography scan reveals
that the cerebrum has shifted or the ventricles have collapsed. This type of
ICP monitoring also carries less risk of infection and parenchymal damage,
because the bolt doesn’t penetrate the cerebrum.
Epidural or subdural sensor monitoring
ICP can also be monitored from the epidural or subdural space. For epidural
monitoring, the practitioner inserts a fiberoptic sensor into the epidural space
through a burr hole. This system’s main drawback is its questionable
accuracy, because it doesn’t measure ICP directly from a CSF-filled space.
For subdural monitoring, the practitioner tunnels a fiberoptic transducer-
tipped catheter through a burr hole, placing its tip on brain tissue under the
dura mater. The main drawback to this method is its inability to drain CSF.
Intraparenchymal pressure monitoring
For intraparenchymal monitoring, the practitioner inserts a catheter through
a small subarachnoid bolt and, after puncturing the dura mater, advances
the catheter a few centimeters into the brain’s white matter. One advantage
of this method is that the equipment doesn’t need to be balanced or
calibrated after insertion. Although this method doesn’t provide direct access
to CSF, measurements are accurate because brain tissue pressures correlate
well with ventricular pressures.
■ Verify that ordered laboratory and imaging studies have
been completed and that the results are in the patient’s
medical record. Notify the practitioner of any unexpected
results.
■ Check the patient’s history for an allergy or a
hypersensitivity to iodine, latex, or the ordered local
anesthetic.
■ Perform hand hygiene.3,4,5,6,7,8
■ Confirm the patient’s identity using at least two patient
identifiers.17
■ Provide privacy.11,12,13,18
■ Reinforce the practitioner’s explanation of the procedure
to the patient and family (if appropriate), according to their
individual communication and learning needs, to increase
their understanding, allay their fears, and enhance
cooperation.19 Answer any questions.
■ Make sure the patient is attached to a cardiac monitor
and pulse oximeter to monitor heart rate and rhythm and
oxygen saturation level during the procedure.1 Make sure
the alarm limits are set appropriately for the patient’s
current condition, and that the alarms are turned on,
functioning properly and audible to staff.20,21,22,23
■ Assist with arterial catheter insertion, if ordered, because
vigilant monitoring of mean arterial blood pressure is
necessary to avoid decreased cerebral perfusion pressure
(CPP).1 Make sure the alarm limits are set appropriately for
the patient’s current condition, and that the alarms are
turned on, functioning properly, and audible to
staff.20,21,22,23
■ If the monitoring device is to be inserted outside the
operating room (OR), make sure that conditions model the
OR; use maximum barrier precautions and close the doors
to the room where the procedure is being performed. Make
sure anyone in the room wears a mask and cap.1
■ Obtain baseline routine and neurologic vital signs to aid in
prompt detection of decompensation during the
procedure.1,24
■ Assess the patient’s sedation and pain management
needs in collaboration with the practitioner.25 Administer
medications, as indicated and prescribed, following safe
medication practices, to ensure the patient’s comfort during
the procedure.1,26,27,28,29,30
■ Raise the patient’s bed to waist level while providing care
to prevent caregiver back strain.31
■ Perform hand hygiene.3,4,5,6,7,8
■ Put on gloves, a cap, and a mask to comply with standard
precautions.1,9,10,24
■ Place the patient in the supine position with the head in a
neutral position and the head of the bed elevated to 30
degrees (or as ordered).1
■ Place fluid-impermeable pads under the patient’s head.
■ Verify that the insertion site has been identified before
preparing the site to minimize the risk of preparing the
wrong area.32
■ Braid or clip hair at the insertion site. If the hair is clipped,
use tape or some similar sticky product to remove residual
hair clippings.1
■ Immobilize the patient’s head to prevent patient
movement and facilitate catheter insertion.1
■ Clean the incision site with an antiseptic solution using a
circular motion.
NURSING ALERT Note that 2% chlorhexidine preparation isn’t
recommended when contact with the meninges is possible.1,33
■ Drape the areas surrounding the insertion site with sterile
drapes using maximal barrier precautions.1
■ The practitioner puts on a cap, a mask, a sterile gown,
and sterile gloves.1,10,24
■ Conduct a time-out immediately before the practitioner
begins the procedure to identify the correct patient, site,
positioning, and procedure, and to ensure that all relevant
information and necessary equipment are available.16,34
■ The practitioner opens the interior wrap of the sterile
supply tray, infiltrates the scalp with an anesthetic agent,1
and proceeds with insertion of the ICP monitoring device.
Assist with the procedure, as needed.
■ During insertion, continually monitor the patient’s heart
rate and rhythm, respiratory rate, and oxygen saturation
level. Frequently monitor the patient’s blood pressure.
Assess neurologic status every 15 minutes, because serial
assessments are necessary to immediately identify
neurologic changes and ensure prompt treatment.1
■ After insertion, assist the practitioner with connecting the
catheter to the monitoring equipment while maintaining
sterility and preventing contamination of the site, catheter,
and sterile field.1 Trace the tubing from the patient to the
point of origin to make sure that it’s connected to the proper
port.35,36
■ Clean around the insertion site with antiseptic solution,
allow it to dry, and then apply a sterile occlusive dressing to
the site.1
■ Clearly label the access port of an external ventricular
drain to indicate that it’s an external ventricular drain,
preventing accidental mix-up of the port with an IV line.1
■ Maintain the patient in an upright position with the head
of the bed elevated 30 degrees or as ordered to promote
venous return. Make sure that the head is at the top of the
bed in a midline position to the rest of the body, because
flexion or rotation of the head or neck can obstruct venous
return and thereby increase ICP.1
■ Maintain the ICP transducer at the foramen of Monro.
Anatomically, the reference point is equivalent to the level
of the ear or the outer canthus of the eye. Transducer
placement at a point above or below the anatomically
correct position will result in false readings.
EQUIPMENT
Setting up an ICP monitoring system
To set up an intracranial pressure (ICP) monitoring system, use strict sterile
technique. Use the two-person method when priming the tubing with normal
saline solution so that the second person can monitor the sterile technique
and assist as needed.1 Follow these steps:
■ Perform hand hygiene.3,4,5,6,7,8
■ Open a sterile towel on a bedside table to create a sterile field.
■ On the sterile field, place a 30-mL syringe1 filled with preservative-free
sterile normal saline solution and a disposable transducer.
■ Put on sterile gloves, a cap, a mask, and a sterile gown.9,10
■ Attach the flushless transducer to the panel mount stopcock.1
■ Using sterile technique, attach the syringe containing sterile preservative-
free normal saline solution to the stopcock at the distal end of the tubing
(patient line stopcock).1
■ Turn the stopcock off toward the drainage device.1
■ Slowly inject the preservative-free sterile normal saline solution toward the
distal end (patient end) of the tubing (as shown below). As the fluid reaches
the distal end of the tubing, allow several drops of the solution to exit the
end of the tubing to make sure air is cleared from the tubing.1
■ Turn the stopcock off to the distal end of the tubing, keeping the syringe in
place. Make sure that the panel mount stopcock is open to the flushless
transducer. Prime through the vented caps in the flushless transducer.
Replace the vented caps with dead-end caps.1
■ With the syringe remaining in place, turn the stopcock off to the
transducer, and prime fluid into the drip chamber.1
■ After priming the system, keep the stopcock on the distal end (patient end)
of the tubing off to make sure that no normal saline solution leaks from the
system before connection.1
■ Connect the transducer to the bedside monitor with a pressure cable that’s
plugged into the designated pressure module.1
■ Align the zero point with the center line of the patient’s head, level with
the middle of the ear.
■ The key to accurate ICP measurement is to use the same landmark each
time you check the zero reference level.1
■ Lower the flow chamber to zero, and turn the stopcock off to the dead-end
cap.
■ With a clean hand, balance the system according to the manufacturer’s
guidelines.
■ Remove and discard your gloves.
■ Perform hand hygiene.3,4,5,6,7,8
■ Zero and calibrate the device after insertion, if required
by the type of device used. If the device requires
recalibration after it’s in use, rezero at least every 12
hours.1
■ If the patient has an external ventricular drain, maintain
the drip chamber at the prescribed zero reference and
pressure levels.1
■ Make sure that the monitor’s alarm limits are set
appropriately for the patient’s current condition, and that
the alarms are turned on, functioning properly, and audible
to staff.21,22,23
Interpreting ICP waveforms
You must be familiar with intracranial pressure (ICP) waveforms so you can
quickly identify and respond to changes that may indicate decreased
intracranial compliance.
Normal waveform
A normal ICP waveform typically has three peaks: P1, P2, and P3. P1, the
pressure wave, originates from choroid plexus pulsations. P2, the tidal wave,
is more variable in shape and amplitude, and ends on the dicrotic notch. P3,
the dicrotic wave, falls after the dicrotic notch and commonly tapers
downward. P3 is caused by closure of the aortic valve. Some individuals may
have additional peaks, but they aren’t as clinically significant as the three
main peaks. This waveform occurs continuously and indicates an ICP in the
normal range, between 0 and 15 mm Hg.
Abnormal waveforms
A waves
As mean ICP rises, P2 progressively elevates, causing the pulse wave to
appear more rounded. The most clinically significant ICP waveforms are A
waves, which may reach elevations of 50 to 100 mm Hg, persist for 5 to 20
minutes, and then drop sharply, signaling exhaustion of the brain’s
compliance mechanisms. A waves may come and go, spiking from temporary
rises in thoracic pressure or from any condition that increases ICP beyond the
brain’s compliance limits. Certain activities, such as sustained coughing or
straining during defecation, can cause temporary elevations in thoracic
pressure. Because A waves are an ominous sign, they require emergency
treatment.
B waves
B waves, which appear sharp and rhythmic with a sawtooth pattern, occur
every 11⁄2 to 2 minutes and may reach elevations of 50 mm Hg. The clinical
significance of B waves isn’t clear, but the waves correlate with respiratory
changes and may occur more frequently with decreasing compensation.
Because B waves sometimes precede A waves, notify the practitioner if B
waves occur frequently.
C waves
C waves are rapid and rhythmic, but not sharp, and last 1 to 2 minutes with
an ICP of 20 to 50 mm Hg. Clinically insignificant, they may fluctuate with
respirations or systemic blood pressure changes.
Waveform showing equipment problem
A waveform such as the one shown below signals a problem with the
transducer or monitor. Check for line obstruction, and determine if the
transducer needs rebalancing. If the patient has a low ICP reading, this
waveform may be normal.
■ Begin ICP monitoring; obtain an ICP tracing and assess
the waveform. Use this tracing as a baseline for comparison.
(See Interpreting ICP waveforms.) If the patient has an
external ventricular drain, turn the stopcock off to the drain
and open to the transducer to obtain an accurate ICP
numeric value and waveform.1
■ Observe ICP in relation to other hemodynamic
parameters, such as mean arterial pressure.1
■ Dispose of insertion instruments and equipment
appropriately to prevent exposure to potentially infectious
materials.1
■ Remove and discard your personal protective
equipment.9,10
■ Return the bed to the lowest position to prevent falls and
maintain patient safety.37
■ Perform hand hygiene.3,4,5,6,7,8
■ Arrange for a computed tomography scan, if ordered, to
confirm catheter placement.1
ICP monitoring and care
■ Assess the patient’s neurologic status hourly, or more
frequently if the patient’s condition warrants. Notify the
practitioner immediately if the patient’s ICP exceeds
established parameters. If no parameters exist, notify the
practitioner if ICP exceeds 20 mm Hg. Watch for signs and
symptoms of increased ICP, such as decreased level of
consciousness, nausea, vomiting, headache, lethargy, and
agitation.1 (See Managing ICP.)
■ If the bedside monitor doesn’t calculate CPP, calculate
CPP hourly by subtracting the patient’s ICP from the mean
arterial pressure (MAP) (CPP = MAP – ICP). If CPP isn’t within
the specified parameters, notify the practitioner.1
Managing ICP
By performing nursing care gently, slowly, and cautiously, you can best help
manage—or even significantly reduce—increased intracranial pressure (ICP).
If possible, urge the patient to participate in care. Here are some steps you
can take to manage increased ICP.
■ Plan your care to include rest periods between activities, and minimize
external stimulation to allow the patient’s ICP to return to baseline, thus
avoiding lengthy and cumulative pressure elevations.
■ Speak to the patient before attempting any procedures, even if the patient
appears comatose. Touch the patient on an arm or leg first before touching in
a more personal area, such as the face or chest. This is especially important
if the patient doesn’t know you, or if the patient is confused or sedated.
■ Suction the patient only when it’s necessary to remove secretions and
maintain airway patency.
■ Hyperventilate the patient with 100% oxygen as ordered. Hyperventilation
with oxygen from a handheld resuscitation bag or ventilator helps rid the
patient of excess carbon dioxide, thereby constricting cerebral vessels and
reducing cerebral blood volume and ICP. However, only normal brain tissues
respond, because blood vessels in damaged areas have reduced
vasoconstrictive ability. Hyperventilation should only be used in an acute
situation to decrease ICP until other measures can be instituted, because it
can cause ischemia.1
■ To promote venous drainage, keep the patient’s head in the midline
position, even when the patient is positioned on his or her side.1 Avoid
flexing the neck or hip more than 90 degrees, and keep the head of the bed
elevated 30 to 45 degrees. Keep endotracheal tube ties and rigid cervical
collars secure, but loose enough to prevent compression of the jugular veins.
■ Avoid placing the patient in the prone position.
■ To avoid increasing intrathoracic pressure, which raises ICP, discourage the
Valsalva maneuver and isometric muscle contractions. To avoid isometric
contractions, distract the patient when giving painful injections by asking the
patient to wiggle the toes and by massaging the area before injection to
relax the muscle, and have the patient concentrate on breathing through
difficult procedures such as bed-to-stretcher transfers. To keep the patient
from holding the breath when moving around in bed, tell the patient to relax
as much as possible during position changes. If necessary, administer a stool
softener to help prevent constipation and unnecessary straining during
defecation.
■ If the patient is heavily sedated, monitor respiratory rate and blood gas
levels. Depressed respirations will compromise ventilations and oxygen
exchange. Maintaining adequate respiratory rate and volume helps reduce
ICP.
■ Assess CSF drainage hourly for color and clarity.1
■ Assess external ventricular drain patency as needed by
lowering the entire system briefly to assess drip rate into
the graduated burette.1
■ Check the patient’s position hourly to ensure that the
transducer is at the ordered reference level to prevent
overdrainage or underdrainage if an external ventricular
drain is in place and to ensure accurate ICP readings.1
■ Assess the catheter system at least every 4 hours to
ensure the system is intact and has no leaks, kinks, or clots
to decrease the risk of increased ICP related to catheter flow
and drainage, and to ensure accurate pressure readings and
waveforms consistent with neurologic assessment.1
■ Record an ICP tracing each shift and as waveform
changes occur; compare these tracings with previous
tracings.1
■ If the patient has an external ventricular drain, inform the
patient and family that the bed position should only be
changed with assistance, because raising the level of the
bed with the external ventricular drain at fixed zero and
reference levels can result in a large increase in CSF
drainage.1
■ Clamp an external ventricular drain any time there is a
patient response (coughing, vomiting, or response to care)
or procedure (suctioning, repositioning, and transport) that
may cause CSF overdrainage.1
■ If an ICP waveform doesn’t appear, troubleshoot the
system. If the patient has an external ventricular drain, then
air bubbles, clots, or debris within the drainage tubing or
across the transducer may be the cause. Systematically
assess the system for air and debris. Make sure the drain is
leveled at the appropriate landmark and the system
rezeroed. If a waveform still fails to appear, replace the
pressure cable, module, or transducer; change only one at a
time.1
■ Don’t routinely change the drainage tubing; leave it in
place for the duration of external ventricular drainage. If the
drainage tubing becomes accidently disconnected, maintain
the sterility of the ventricular catheter, and obtain and
connect a new sterile drainage system.1
■ When accessing an external ventricular drainage system,
perform hand hygiene, put on a mask, set up a sterile field,
and put on sterile gloves. Scrub the access port for 3
minutes using povidone-iodine or use another facility-
approved antiseptic and follow the manufacturer’s
instructions for use.1
■ Maintain the drainage bag in an upright position. If it
must be laid down, drain the CSF to the lower collection bag
to decrease the transfer of bacteria in the collection
chamber to the drainage bag. Change the drainage bag
when it’s nearly full, wearing sterile gloves and a mask.1
■ Change the dressing every 48 hours, when soiled, or as
directed by your facility.1 When changing the dressing, put
on sterile gloves and a mask, and remove and discard the
dressing. Then clip any hair that has grown back at the site,
and inspect the site for CSF leakage and signs of infection.
Remove and discard your gloves, perform hand hygiene, put
on a new pair of sterile gloves, and place a new sterile
occlusive dressing over the site. Then remove and discard
your gloves.1
■ Perform hand hygiene.3,4,5,6,7,8
■ Document the procedure.38,39,40,41
Special considerations
■ The Joint Commission issued a sentinel event alert
concerning medical device alarm safety, because alarm-
related events have been associated with permanent loss of
function and death. Among the major contributing factors
were improper alarm settings, alarms turned off
inappropriately, and alarm signals that were not audible to
staff. Make sure that alarm limits are set appropriately, and
that alarms are turned on, functioning properly, and audible
to staff. Follow facility guidelines for preventing alarm
fatigue.23
■ The Joint Commission issued a sentinel event alert related
to managing risk during transition to new International
Organization for Standardization tubing standards that were
designed to prevent dangerous tubing misconnections,
which can lead to serious patient injury and death. During
the transition, make sure to trace each tubing and catheter
from the patient to its point of origin before connecting or
reconnecting any device or infusion, at any care transition
(such as to a new setting or service), and as part of the
hand-off process. In addition, route tubes and catheters with
different purposes in different, standardized directions; label
tubing at both the distal and proximal ends when the
patient has different access sites or several bags hanging;
use tubing and equipment only as intended; and store
medications for different delivery routes in separate
locations.36
■ If the patient develops increased ICP, open the external
ventricular drain to drain CSF, as ordered; administer
hyperosmolar therapy with hypertonic saline solution or
mannitol, if prescribed.42
■ Be aware that induced hypothermia may reduce ICP
initially but can cause cerebral edema during rewarming,
and isn’t recommended for treatment of increased ICP.42
Complications
CNS infection, the most common hazard of ICP monitoring,
can result from contamination of the equipment setup or of
the insertion site.
NURSING ALERT Excessive loss of CSF can result from faulty
stopcock placement or a drip chamber that’s positioned too low. Such
loss can rapidly decompress the cranial contents and damage bridging
cortical veins, leading to hematoma formation. Decompression can
also lead to rupture of existing hematomas or aneurysms, causing
hemorrhage.
Watch for signs of impending or overt decompensation:
pupillary dilation (unilateral or bilateral); decreased pupillary
response to light; decreasing level of consciousness; rising
systolic blood pressure and widening pulse pressure;
bradycardia; slowed, irregular respirations; and, in late
decompensation, decerebrate posturing.
Documentation
Record the time and date of the insertion procedure and the
patient’s response. Note the insertion site and the type of
monitoring system used. Record the zero reference level,
ICP digital readings and waveforms, and CPP hourly in your
notes or a flowchart, or directly on readout strips, depending
on your facility’s documentation format. Document any
factors that may affect ICP (for example, drug therapy,
stressful procedures, and sleep).
Record routine and neurologic vital signs hourly, and
describe the patient’s clinical status. Note the amount,
character, and frequency of any CSF drainage (for example,
“between 6 p.m . and 7 p.m ., 15 mL of blood-tinged CSF”).
Also record the ICP reading in response to drainage. Record
any patient and family teaching provided and their
understanding of the teaching.
REFERENCES
1 American Association of Neuroscience Nurses (AANN). (2012). Care of the
patient undergoing intracranial pressure monitoring/external ventricular
drainage or lumbar drainage: AANN clinical practice guideline series.
Glenview, IL: AANN.
2 Accreditation Association for Hospitals and Health Systems. (2017). Standard
25.01.27. Healthcare Facilities Accreditation Program: Accreditation
requirements for acute care hospitals. Chicago, IL: Accreditation Association
for Hospitals and Health Systems. (Level VII)
3 The Joint Commission. (2019). Standard NPSG.07.01.01. Comprehensive
accreditation manual for hospitals. Oakbrook Terrace, IL: The Joint
Commission. (Level VII)
4 Centers for Disease Control and Prevention. (2002). Guideline for hand
hygiene in health-care settings: Recommendations of the Healthcare Infection
Control Practices Advisory Committee and the HICPAC/SHEA/APIC/IDSA Hand
Hygiene Task Force. MMWR Recommendations and Reports, 51(RR-16), 1–45.
Accessed via the Web at https://www.cdc.gov/mmwr/pdf/rr/rr5116.pdf (Level
II)
5 World Health Organization. (2009). “WHO guidelines on hand hygiene in
health care: First global patient safety challenge, clean care is safer care”
[Online]. Accessed via the Web at
http://apps.who.int/iris/bitstream/10665/44102/1/9789241597906_eng.pdf
(Level IV)
6 Accreditation Association for Hospitals and Health Systems. (2017). Standard
07.01.21. Healthcare Facilities Accreditation Program: Accreditation
requirements for acute care hospitals. Chicago, IL: Accreditation Association
for Hospitals and Health Systems. (Level VII)
7 Centers for Medicare and Medicaid Services, Department of Health and
Human Services. (2015). Condition of participation: Infection control. 42 C.F.R.
§ 482.42.
8 DNV GL-Healthcare USA, Inc. (2016). IC.1.SR.1 . NIAHO® accreditation
requirements: Interpretive guidelines and surveyor guidance (version 11).
Milford, OH: DNV GL-Healthcare USA, Inc. (Level VII)
9 Siegel, J. D., et al. (2007, revised 2017). “2007 guideline for isolation
precautions: Preventing transmission of infectious agents in healthcare
settings” [Online]. Accessed via the Web at
https://www.cdc.gov/infectioncontrol/pdf/guidelines/isolation-guidelines.pdf
(Level II)
10 Accreditation Association for Hospitals and Health Systems. (2017). Standard
07.01.10. Healthcare Facilities Accreditation Program: Accreditation
requirements for acute care hospitals. Chicago, IL: Accreditation Association
for Hospitals and Health Systems. (Level VII)
11 The Joint Commission. (2019). Standard RI.01.03 .01. Comprehensive
accreditation manual for hospitals. Oakbrook Terrace, IL: The Joint
Commission. (Level VII)
12 Centers for Medicare and Medicaid Services, Department of Health and
Human Services. (2015). Condition of participation: Patient’s rights. 42 C.F.R.
§ 482.13(b)(2).
13 Accreditation Association for Hospitals and Health Systems. (2017). Standard
30.01.11. Healthcare Facilities Accreditation Program: Accreditation
requirements for acute care hospitals. Chicago, IL: Accreditation Association
for Hospitals and Health Systems. (Level VII)
14 DNV GL-Healthcare USA, Inc. (2016). PR.1.SR.3 . NIAHO® accreditation
requirements: Interpretive guidelines and surveyor guidance (version 11).
Milford, OH: DNV GL-Healthcare USA, Inc. (Level VII)
15 The Joint Commission. (2019). Standard UP.01.01.01. Comprehensive
accreditation manual for hospitals. Oakbrook Terrace, IL: The Joint
Commission. (Level VII)
16 Accreditation Association for Hospitals and Health Systems. (2017). Standard
30.00 .14. Healthcare Facilities Accreditation Program: Accreditation
requirements for acute care hospitals. Chicago, IL: Accreditation Association
for Hospitals and Health Systems. (Level VII)
17 The Joint Commission. (2019). Standard NPSG.01.01.01. Comprehensive
accreditation manual for hospitals. Oakbrook Terrace, IL: The Joint
Commission. (Level VII)
18 Accreditation Association for Hospitals and Health Systems. (2017). Standard
15.01.16. Healthcare Facilities Accreditation Program: Accreditation
requirements for acute care hospitals. Chicago, IL: Accreditation Association
for Hospitals and Health Systems. (Level VII)
19 The Joint Commission. (2019). Standard PC.02.01.21. Comprehensive
accreditation manual for hospitals. Oakbrook Terrace, IL: The Joint
Commission. (Level VII)
20 American Association of Critical-Care Nurses (AACN). (2013). “A ACN practice
alert: Alarm management” [Online]. Accessed via the Web at
https://www.aacn.org/aacn-website/shared/content/practice-
alerts/2015/11/25/alarm-management (Level VII)
21 Graham, K. C., & Cvach, M. (2010). Monitor alarm fatigue: Standardizing use
of physiological monitors and decreasing nuisance alarms. American Journal
of Critical Care, 19(1), 28–37. Accessed via the Web at
http://ajcc.aacnjournals.org/content/19/1/28.full.pdf
22 The Joint Commission. (2019). Standard NPSG.06 .01.01. Comprehensive
accreditation manual for hospitals. Oakbrook Terrace, IL: The Joint
Commission. (Level VII)
23 The Joint Commission. (2013). “Sentinel event alert: Medical device alarm
safety in hospitals” [Online]. Accessed via the Web at
http://www.jointcommission.org/assets/1/18/SEA_50_alarms_4 _5 _13_FINAL1 .P
DF (Level VII)
24 Wiegand, D. L. (2017). AACN procedure manual for high acuity, progressive,
and critical care (7th ed.). St. Louis, MO: Elsevier.
25 The Joint Commission. (2019). Standard PC.01.02.07. Comprehensive
accreditation manual for hospitals. Oakbrook Terrace, IL: The Joint
Commission. (Level VII)
26 Accreditation Association for Hospitals and Health Systems. (2017). Standard
16.01.03. Healthcare Facilities Accreditation Program: Accreditation
requirements for acute care hospitals. Chicago, IL: Accreditation Association
for Hospitals and Health Systems. (Level VII)
27 Centers for Medicare and Medicaid Services, Department of Health and
Human Services. (2015). Condition of participation: Nursing services. 42
C.F.R. § 482.23(c).
28 DNV GL-Healthcare USA, Inc. (2016). MM.1 .SR.2. NIAHO® accreditation
requirements: Interpretive guidelines and surveyor guidance (version 11).
Milford, OH: DNV GL-Healthcare USA, Inc. (Level VII)
29 The Joint Commission. (2019). Standard MM.06.01.01. Comprehensive
accreditation manual for hospitals. Oakbrook Terrace, IL: The Joint
Commission. (Level VII)
30 Westbrook, J., et al. (2010). Association of interruptions with an increased risk
and severity of medication administration errors. Archives of Internal
Medicine, 170(8), 683–690 . (Level IV)
31 Waters, T. R., et al. (2009). “Safe patient handling training for schools of
nursing” [Online]. Accessed via the Web at
https://www.cdc.gov/niosh/docs/2009-127/pdfs/2009-127.pdf (Level VII)
32 The Joint Commission. (2019). Standard UP.01.02.01. Comprehensive
accreditation manual for hospitals. Oakbrook Terrace, IL: The Joint
Commission. (Level VII)
33 Becton, Dickinson, and Company. (n.d.) . “Skin preparation” [Online].
Accessed via the Web at http://www.bd .com/en-
us/offerings/capabilities/infection-prevention/skin-preparation
34 The Joint Commission. (2019). Standard UP.01.03.01. Comprehensive
accreditation manual for hospitals. Oakbrook Terrace, IL: The Joint
Commission. (Level VII)
35 U.S . Food and Drug Administration. (n.d .). “Look. Check. Connect. Safe
medical device connections save lives” [Online]. Accessed via the Web at
http://www.fda.gov/downloads/MedicalDevices/Safety/AlertsandNotices/UCM1
34873.pdf
36 The Joint Commission. (2014). “Sentinel event alert: Managing risk during
transition to new ISO tubing connector standards” [Online]. Accessed via the
Web at
http://www.jointcommission.org/assets/1/6/SEA_53_Connectors_8 _19_14 _final.
pdf (Level VII)
37 Ganz, D. A., et al. (2013). Preventing falls in hospitals: A toolkit for improving
quality of care (AHRQ Publication No. 13-0015-EF). Rockville, MD: Agency for
Healthcare Research and Quality. Accessed via the Web at
https://www.ahrq.gov/sites/default/files/publications/files/fallpxtoolkit_0 .pdf
(Level VII)
38 The Joint Commission. (2019). Standard RC.01.03 .01. Comprehensive
accreditation manual for hospitals. Oakbrook Terrace, IL: The Joint
Commission. (Level VII)
39 Accreditation Association for Hospitals and Health Systems. (2017). Standard
10.00 .03. Healthcare Facilities Accreditation Program: Accreditation
requirements for acute care hospitals. Chicago, IL: Accreditation Association
for Hospitals and Health Systems. (Level VII)
40 Centers for Medicare and Medicaid Services, Department of Health and
Human Services. (2015). Condition of participation: Medical record services.
42 C.F.R. § 482.24(b).
41 DNV GL-Healthcare USA, Inc. (2016). MR.2 .SR.1 . NIAHO® accreditation
requirements: Interpretive guidelines and surveyor guidance (version 11).
Milford, OH: DNV GL-Healthcare USA, Inc. (Level VII)
42 Ropper, A. H. (2012). Hyperosmolar therapy for raised intracranial pressure.
New England Journal of Medicine, 367(8), 746–752.
INTRADERMAL INJECTION
Because little systemic absorption of intradermally injected
agents takes place, intradermal injections are used primarily
to produce a local effect, as in allergy or tuberculin testing.
Intradermal injections are administered in small volumes—
usually 0.01 to 0.1 mL—into the outer layers of the skin.
The ventral forearm is the most commonly used site for
intradermal injection because of its easy accessibility and
lack of hair. In extensive allergy testing, the outer aspect of
the upper arms may be used. (See Intradermal injection
sites.)
Equipment
Patient’s medication administration record and medical
record ▪ single-use tuberculin or 1-mL syringe with a 26G or
27G 1⁄4 ′′ to 1⁄2′′ (0.64-cm to 1.25-cm) needle ▪ prescribed
medication or antigen ▪ alcohol pads ▪ Optional: gloves,
pen, emergency resuscitation equipment, epinephrine.
Preparation of equipment
Make sure emergency equipment is readily available and
functioning properly.
Use single-dose vials for parenteral medications whenever
possible. Don’t administer medications from single-dose
vials or ampules to multiple patients or combine leftover
contents for later use. If multidose vials must be used, both
the needle or cannula and syringe used to access the
multidose vial must be sterile.1
Implementation
■ Avoid distractions and interruptions when preparing and
administering the medication to prevent medication errors.2
■ Verify the order in the patient’s medical record by
checking it against the practitioner’s order.3,4,5,6
■ Reconcile the patient’s medications when a new
medication is ordered to reduce the risk of medication
errors, including omissions, duplications, dosing errors, and
drug interactions.7,8,9
■ Perform hand hygiene.10
■ Gather the equipment and the medication and select the
appropriate-sized needle.
■ Compare the medication label with the order in the
patient’s medical record.3,4,5,6,11
■ Review the patient’s medical record for drug allergies or
contraindications to the prescribed medication. If an allergy
or a contraindication exists, don’t administer the
medication; instead, notify the practitioner.3,4,5,6
■ Check the expiration date on the medication. If the
medication is expired, return it to the pharmacy and obtain
new medication.3,4,5,6
■ Visually inspect the prescribed medication for particles,
discoloration, or other loss of integrity; don’t administer the
medication if its integrity is compromised.3,4,5,6
NURSING ALERT Never use medication that’s cloudy or discolored or
that contains a precipitate unless the manufacturer ’s instructions
allow it. Remember that for some drugs (such as suspensions), the
presence of drug particles is normal. When in doubt, check with the
pharmacist.
■ Discuss any unresolved concerns about the medication
with the patient’s practitioner.3,4,5,6
■ Perform hand hygiene.10,12,13,14,15,16,17,18
■ Carefully calculate the dose and draw up the medication
in a clean, dry work space that is free of clutter and
contamination.10
Follow
aseptic technique during
preparation of medication to prevent the transfer of
microorganisms to the patient.10 Make sure to disinfect the
rubber stopper of the medication vial with alcohol before
inserting the needle.10
■ Perform hand hygiene.12,13,14,15,16,17,18
■ Confirm the patient’s identity using at least two patient
identifiers.19
■ If the patient is receiving the medication for the first time,
teach about potential adverse reactions and discuss any
other concerns related to the medication.3,4,5
Intradermal injection sites
The most common intradermal injection site is the ventral forearm. Other
sites (indicated by dotted areas) include the upper chest, upper arms, and
shoulder blades. Skin in these areas is usually lightly pigmented, thinly
keratinized, and relatively hairless, facilitating detection of adverse reactions.
■ Verify that the medication is being administered at the
proper time, in the prescribed dose, and by the correct route
to reduce the risk of medication errors.3,4,5,6
■ If your facility uses a bar-code technology, scan your
identification badge, the patient’s identification band, and
the medication’s bar code.
■ Explain the procedure to the patient and family (if
appropriate) according to their individual communication
and learning needs to increase their understanding, allay
their fears, and enhance cooperation.20 Tell the patient
where you’ll be giving the injection.
■ Provide privacy.21,22,23
■ Perform hand hygiene.12,13,14,15,16,17,18
■ Put on gloves if contact with blood or other body fluids is
likely, or if your skin or the patient’s skin isn’t intact; gloves
aren’t recommended for routine intradermal injection
because they don’t protect against needlestick injury.12
■ Instruct the patient to sit up and to extend her arm, and
support it on a flat surface with the ventral forearm exposed
(as shown below).
■ Select the site of injection on the ventral forearm about
two or three fingerbreadths distal to the antecubital space.
Be sure the test site is free of hair or blemishes.
■ With an alcohol pad, wipe the area from the center of the
injection site working outward.12 Allow the skin to dry
completely before administering the injection (as shown
below).12
■ While holding the patient’s forearm in your hand, stretch
the skin taut with your thumb (as shown below).
With your free hand, hold the needle at a 5- to 15-degree
angle to the patient’s arm, with its bevel up (as shown
below).24
■ Insert the needle about 1⁄8′′ (0.3 cm) below the epidermis.
Stop when the needle’s bevel tip is under the skin, and
inject the antigen slowly. You should feel some resistance as
you do this, and a wheal should form (as shown on top
right). If no wheal forms, you have injected the antigen too
deeply; withdraw the needle, and administer another test
dose at least 2′′ (5 cm) from the first site.
■ Withdraw the needle at the same angle you used to insert
it. Don’t rub the site. Rubbing could irritate the underlying
tissue, which may affect test results.
■ If you’re administering multiple antigens, inject them at
sites at least 2′′ (5 cm) apart. Circle each test site with a
marking pen, and label each site according to the recall
antigen given. Instruct the patient to refrain from washing
off the circles until the test is completed.
■ Don’t recap the needle. Dispose of needles and syringes
in a leak-proof, puncture-resistance container.12,25
■ Remove and discard your gloves, if worn, and perform
hand hygiene.12,13,14,15,16,17,18
■ Assess the patient’s reaction; for tuberculin skin testing,
assess the reaction in 48 to 72 hours.26
■ Document the procedure.27,28,29,30
Special considerations
■ In patients who are hypersensitive to the test antigens, a
severe anaphylactic response can result. This reaction
requires immediate epinephrine injection and other
emergency resuscitation procedures. Be especially alert
after giving a test dose of penicillin or tetanus antitoxin.
Patient teaching
Instruct the patient to return for follow-up testing or results
interpretation as indicated.
Complications
An allergic reaction or pain may occur as a result of the
medication injected.
Documentation
According to your facility’s charting format, document the
type and dosage of medication or antigen given, the lot
number or expiration date as indicated, the time you gave
it, and the injection site. Note skin reactions and other
adverse reactions and any patient teaching provided.
REFERENCES
1 Siegel, J. D., et al. (2007, revised 2017). “2007 guideline for isolation
precautions: Preventing transmission of infectious agents in healthcare
settings” [Online]. Accessed via the Web at
http://www.cdc.gov/hicpac/pdf/isolation/Isolation2007.pdf (Level II)
2 Westbrook, J., et al. (2010). Association of interruptions with an increased risk
and severity of medication administration errors. Archives of Internal
Medicine, 170(8), 683–690 . (Level IV)
3 The Joint Commission. (2019). Standard MM.06 .01.01. Comprehensive
accreditation manual for hospitals. Oakbrook Terrace, IL: The Joint
Commission. (Level VII)
4 Accreditation Association for Hospitals and Health Systems. (2017). Standard
16.01.03. Healthcare Facilities Accreditation Program: Accreditation
requirements for acute care hospitals. Chicago, IL: Accreditation Association
for Hospitals and Health Systems. (Level VII)
5 Centers for Medicare & Medicaid Services, Department of Health and Human
Services. (2015). Condition of participation: Nursing services. 42 C.F.R. §
482.23(c).
6 DNV GL-Healthcare USA, Inc. (2016). MM .1 .SR.2 . NIAHO® accreditation
requirements: Interpretive guidelines and surveyor guidance (version 11).
Milford, OH: DNV GL-Healthcare USA, Inc. (Level VII)
7 Institute for Healthcare Improvement. (2011). How-to guide: Prevent adverse
drug events (medication reconciliation). Cambridge, MA: Institute for
Healthcare Improvement. (Level VII)
8 Accreditation Association for Hospitals and Health Systems. (2017). Standard
25.02.13. Healthcare Facilities Accreditation Program: Accreditation
requirements for acute care hospitals. Chicago, IL: Accreditation Association
for Hospitals and Health Systems. (Level VII)
9 The Joint Commission. (2019). Standard NPSG.03 .06 .01. Comprehensive
accreditation manual for hospitals. Oakbrook Terrace, IL: The Joint
Commission. (Level VII)
10 Association of Professionals in Infection Control and Epidemiology (APIC).
(2016). APIC position paper: Safe injection, infusion and medication vial
practice in health care (2016). Washington, DC: APIC. (Level VII)
11 The Joint Commission. (2019). Standard MM.04.01.01. Comprehensive
accreditation manual for hospitals. Oakbrook Terrace, IL: The Joint
Commission. (Level VII)
12 World Health Organization. (2010). “WHO best practices for injections and
related procedures toolkit” [Online]. Accessed via the Web at
http://apps.who.int/iris/bitstream/10665/44298/1/9789241599252_eng.pdf
(Level IV)
13 Accreditation Association for Hospitals and Health Systems. (2017). Standard
07.01.10. Healthcare Facilities Accreditation Program: Accreditation
requirements for acute care hospitals. Chicago, IL: Accreditation Association
for Hospitals and Health Systems. (Level VII)
14 Centers for Medicare & Medicaid Services, Department of Health and Human
Services. (2015). Condition of participation: Infection control. 42 C.F.R. §
482.42.
15 The Joint Commission. (2019). Standard NPSG.07.01.01. Comprehensive
accreditation manual for hospitals. Oakbrook Terrace, IL: The Joint
Commission. (Level VII)
16 World Health Organization. (2009). “WHO guidelines on hand hygiene in
health care: First global patient safety challenge, clean care is safer care”
[Online]. Accessed via the Web at
http://apps.who.int/iris/bitstream/10665/44102/1/9789241597906_eng.pdf
(Level IV)
17 Centers for Disease Control and Prevention. (2002). Guideline for hand
hygiene in health-care settings: Recommendations of the Healthcare Infection
Control Practices Advisory Committee and the HICPAC/SHEA/APIC/IDSA Hand
Hygiene Task Force. MMWR Recommendations and Reports, 51(RR-16), 1–45.
Accessed via the Web at https://www.cdc.gov/mmwr/pdf/rr/rr5116.pdf (Level
II)
18 DNV GL-Healthcare USA, Inc. (2016). IC.1 .SR.1 . NIAHO® accreditation
requirements: Interpretive guidelines and surveyor guidance (version 11).
Milford, OH: DNV GL-Healthcare USA, Inc. (Level VII)
19 The Joint Commission. (2019). Standard NPSG.01.01.01. Comprehensive
accreditation manual for hospitals. Oakbrook Terrace, IL: The Joint
Commission. (Level VII)
20 The Joint Commission. (2019). Standard PC.02.01.21. Comprehensive
accreditation manual for hospitals. Oakbrook Terrace, IL: The Joint
Commission. (Level VII)
21 Accreditation Association for Hospitals and Health Systems. (2017). Standard
15.01.16. Healthcare Facilities Accreditation Program: Accreditation
requirements for acute care hospitals. Chicago, IL: Accreditation Association
for Hospitals and Health Systems. (Level VII)
22 Centers for Medicare & Medicaid Services, Department of Health and Human
Services. (2015). Condition of participation: Patient’s rights. 42 C.F.R. §
482.13(c)(1).
23 DNV GL-Healthcare USA, Inc. (2016). PR.1.SR.5 . NIAHO® accreditation
requirements: Interpretive guidelines and surveyor guidance (version 11).
Milford, OH: DNV GL-Healthcare USA, Inc. (Level VII)
24 Tarnow, K., & King, N. (2004). Intradermal injections: Traditional bevel up
versus bevel down. Applied Nursing Research, 17(4), 275–282. (Level VI)
25 Occupational Safety and Health Administration. (n.d .). “Bloodborne
pathogens, standard number 1910.1030” [Online]. Accessed via the Web at
https://www.osha.gov/pls/oshaweb/owadisp.show_document?
p_id=10051&p_table=STANDARDS (Level VII)
26 Centers for Disease Control and Prevention. (2016). “Fact sheet: Testing for
tuberculosis” [Online]. Accessed via the Web at
http://www.cdc.gov/tb/publications/factsheets/testing/tb_testing.htm
27 The Joint Commission. (2019). Standard RC.01.03 .01. Comprehensive
accreditation manual for hospitals. Oakbrook Terrace, IL: The Joint
Commission. (Level VII)
28 Accreditation Association for Hospitals and Health Systems. (2017). Standard
10.00 .03. Healthcare Facilities Accreditation Program: Accreditation
requirements for acute care hospitals. Chicago, IL: Accreditation Association
for Hospitals and Health Systems. (Level VII)
29 Centers for Medicare & Medicaid Services, Department of Health and Human
Services. (2015). Condition of participation: Medical record services. 42 C.F.R.
§ 482.24(b).
30 DNV GL-Healthcare USA, Inc. (2016). MR.2 .SR.1 . NIAHO® accreditation
requirements: Interpretive guidelines and surveyor guidance (version 11).
Milford, OH: DNV GL-Healthcare USA, Inc. (Level VII)
INTRAOSSEOUS INFUSION
When rapid venous access is difficult or impossible,
intraosseous (IO) access allows short-term delivery of fluids,
medications, or blood into the bone marrow. (See
Understanding IO infusion, page 432.) IO access may be
appropriate in emergencies or urgent situations where
reliable venous access can’t be achieved quickly (such as in
patients with shock, sepsis, status epilepticus, extensive
burns, or multiple trauma) or in patients for whom IV access
is medically necessary and can’t be achieved by other
means despite multiple attempts.1,2,3 The American Heart
Association recommends inserting an IO device to
administer emergency medications when you can’t quickly
insert another access device.4,5 Advanced Trauma Life
Support, Advanced Cardiovascular Life Support, and
Pediatric Advanced Life Support guidelines currently
recommend IO access as the immediate alternative route
when peripheral IV access is unobtainable.6 The onset of
drug action and drug levels administered by this route are
comparable to those of IV administration.4,5
An IO device can be placed manually or by using either an
impact-driven or drill-powered device.7,8,9 When used in
adults, the preferred IO access site is the proximal humerus,
because studies show it to be superior for flow rates, drug
delivery,
and
management
of
infusion
pain;10,11,12,13,14,15,16,17,18,19 however, the proximal tibia,
distal tibia, and sternum may also be used.2,3,8 Numerous
studies show that an IO catheter can be placed more rapidly
than a central venous catheter; however, unlike with other
venous access devices, an IO device can only be left in
place until conventional vascular access is obtained, and for
no longer than 24 hours.2,20
Don’t insert an IO access device in a site of previous IO
access or attempted access, in a fracture at or above the
site that required surgical repair of the bone, or in an area of
known or suspected infection or local vascular compromise.
IO access device insertion may be contraindicated in
patients with osteogenesis imperfecta, osteopetrosis, or
severe osteoporosis.2 Only personnel trained in this
procedure should perform it. Usually, a nurse assists a
practitioner with insertion; however, a qualified registered
nurse may insert, maintain, and remove IO access
devices.21
Equipment
Appropriate-sized IO infusion needle set ▪ antiseptic agent
and applicator (chlorhexidine-based, povidone-iodine, or
alcohol) ▪ sterile gauze pads ▪ gloves ▪ 10-mL syringes with
preservative-free normal saline flush solution ▪ prescribed
fluids or medications ▪ extension set or three-way stopcock
▪ administration set and needleless connector ▪ 2%
lidocaine (preservative- and epinephrine-free) ▪ 3- to 5-mL
syringe (for lidocaine injection) ▪ 5-mL syringe ▪ tape ▪
sterile occlusive dressing ▪ sterile marker ▪ labels ▪ IO alert
armband ▪ Optional: other personal protective equipment
(such as a gown and a mask with a face shield or a mask
and goggles), soap and water, disposable-head clippers or
single-patient-use scissors, additional stabilization or
protective device, vital signs monitoring equipment,
electronic infusion device (preferably a smart pump with
dose-error reduction software), pressure bag.
Preparation of equipment
Inspect all IV equipment and supplies; if a product is
expired, if its integrity is compromised, or if it’s found
defective, remove it from patient use, label it as expired or
defective, and report the expiration or defect as directed by
your facility.22 Prepare any prescribed IV fluids or
medications, and prime the administration set and
extension set or three-way stopcock. Using a sterile marker,
label all medications, medication containers, and other
solutions on and off the sterile field.23,24
Implementation
■ Verify the practitioner’s order.
■ Perform hand hygiene.25
■ Gather and prepare the appropriate equipment.
Understanding IO infusion
During intraosseous (IO) infusion, the bone marrow serves as a
noncollapsible vein; allowing fluid infused into the marrow cavity to rapidly
enter the circulation by way of an extensive network of venous sinusoids.
Here, the needle is shown positioned in the patient’s proximal humerus.
■ If time permits, confirm that written informed consent has
been obtained by the practitioner and is in the patient’s
medical record.26,27,28,29
■ Check the patient’s history for hypersensitivity to the
local anesthetic or contraindications to the procedure.
■ If time permits, perform a preprocedure verification to
make sure that all relevant documentation, related
information, and equipment are available and correctly
identified to the patient’s identifiers.30,31
■ Perform hand hygiene.32,33,34,35,36,37
■ Confirm the patient’s identity using at least two patient
identifiers.38
■ Explain the procedure to the patient (if conscious) and
family (if appropriate) according to their individual
communication and learning needs to increase their
understanding, allay fears, and enhance cooperation.39 Tell
the patient which bone site will receive the infusion. Inform
the patient that a local anesthetic will be administered but
that feeling pressure during needle insertion is to be
expected.
■ Raise the bed to waist level when providing patient care
to prevent caregiver back strain.40
■ Perform hand hygiene.32,33,34,35,36
■ Position the patient appropriately for the selected
puncture site.
■ If the intended insertion site is visibly soiled, put on
gloves and then clean the site with soap and water.3
Remove and discard your gloves and perform hand
hygiene.32,33,34,35,36
■ Remove excess hair from the site with clippers or single-
use scissors if necessary.3,41
■ Perform hand hygiene.32,33,34,35,36
■ Put on gloves and, as needed, other personal protective
equipment to comply with standard precautions.42
■ If time allows, conduct a time-out immediately before
starting the procedure to perform a final assessment that
the correct patient, site, positioning, and procedure are
identified and that all relevant information and necessary
equipment are available.43
■ Prepare the insertion site using a skin antiseptic agent.2
For chlorhexidine (preferred), apply with an applicator using
a vigorous sided-to-side motion for 30 seconds, and then
allow the area to dry completely. For povidone-iodine
solution, apply using a swab, beginning at the intended
insertion site and moving outward in concentric circles.
Allow the solution to dry completely (typically, at least 2
minutes).
■ Hand the practitioner the 3- or 5-mL syringe with 2%
lidocaine (preservative- and epinephrine-free), as indicated,
so that the practitioner can anesthetize the insertion
site.2,9,44
■ Stabilize the patient’s extremity.3
■ Assist the practitioner with the insertion, as needed.
■ The practitioner inserts the IO device through the skin
and into the bone. Alternatively, the practitioner may use an
IO drill needle and handheld drill to place the needle.45
■ The practitioner advances the device with a forward and
backward rotary motion through the periosteum until the
needle penetrates the marrow cavity. The device should
“give” suddenly as it enters the marrow and should stand
erect when released.
■ The practitioner removes the stylet from the IO infusion
device or the obturator from the needle and attaches a 5-
mL syringe.
■ The practitioner aspirates some bone marrow to confirm
needle placement.19,46 The practitioner may not be able to
aspirate bone marrow in some patients (for example, those
who are dehydrated); inability to aspirate bone marrow
doesn’t necessarily indicate improper placement.3
■ The practitioner replaces the first syringe with a syringe
containing preservative-free normal saline flush solution and
then flushes the cannula with 5 to 10 mL to confirm needle
placement and to clear the cannula of clots and bone
particles.46
■ The practitioner may slowly inject lidocaine into the IO
space after establishing access and before infusion to
prevent infusion-related pain.2,3,41
■ Connect the primed extension set or three-way stopcock
to the IO hub according to the IO access device
manufacturer’s instructions to facilitate infusion of
medications and IV fluids.
■ Secure the device with tape and then cover the site with
a sterile occlusive dressing and other protective or
stabilization device, as required, to prevent accidental
dislodgement during patient transport and emergency
procedures. Certain IO device manufacturers provide a
protective or stabilization device to cover and secure the IO
access needle.2,9
■ Label the dressing with the date and time and your
initials, and the name of the practitioner who inserted the
device.47
■ Trace the IV tubing from the patient to the point of origin
to make sure that the tubing is connected to the correct
port. Then, attach the needleless connector from the IV
administration set to the IO catheter extension set or three-
way stopcock. Route the tubing in a standardized direction if
the patient has other tubing and catheters that have
different purposes.48,49
■ Administer fluids and medications, as ordered, following
safe medication administration practices.50,51,52,53 Needle
size and flow through the bone marrow determine IO flow
rates. Fluids should flow freely through a properly placed
needle; however, guidelines recommend using an electronic
infusion device or pressure bag to regulate flow.9,54 If using
an electronic infusion device, consider the use of a smart
pump with dose-error reduction software to reduce the risk
of infusion-related medication errors.55
■ Place an IO alert armband on the patient to notify staff
members of IO device placement.
■ Monitor the patient’s vital signs as warranted by the
patient’s condition.
■ Check the infusion site for complications, such as
bleeding, infiltration, extravasation and compartment
syndrome.2 Stop the infusion and notify the practitioner if
complications occur.
■ Assess perfusion in the extremity distal to the insertion
site.
■ Return the bed to the lowest position to prevent falls and
maintain patient safety.56
■ Discard used equipment in appropriate receptacles.57
■ Remove and discard your gloves and other personal
protective equipment, if worn.57
■ Perform hand hygiene.32,33,34,35,36,37
■ Document the procedure.58,59,60,61
Special considerations
■ If you need IO access during cardiac arrest, don’t
interrupt cardiopulmonary resuscitation for IO device
insertion.
■ Some IO device manufacturers supply a target patch that
you can affix to the patient’s skin in the desired access
location, such as the sternum, before IO needle insertion to
aid in placement in the appropriate location.8,9,62
■ The practitioner should discontinue IO infusion as soon as
conventional vascular access is possible. An IO infusion
should remain in place for no longer than 24 hours, because
prolonged infusion significantly increases the risk of
infection.2,20
■ After needle removal, apply gentle pressure to the site
with a gauze pad as needed for 5 minutes, then place
antiseptic ointment and a sterile occlusive dressing over the
injection site.
■ If you’re administering blood and blood products through
the IO device, see the “Transfusion of blood and blood
products” procedure.
■ The Joint Commission has issued a sentinel event alert
related to managing risk during transition to the new
International Organization for Standardization tubing
standards designed to prevent dangerous tubing
misconnections, which can lead to serious patient injury and
death. During the transition, be sure to trace all tubing and
catheters from the patient to their points of origin before
connecting or reconnecting any device or infusion, at any
care transition (such as a new setting or service), and as
part of the handoff process. In addition, route tubes and
catheters having different purposes in different,
standardized directions; label the tubing at both the distal
and proximal ends when there are different access sites or
several bags hanging; use tubing and equipment only as
intended; and store medications for different delivery routes
in separate locations.49
■ After removal, monitor the insertion site for bleeding and
for such signs of infection as pain, tenderness, erythema,
edema, and drainage around the site; also monitor the
patient for fever and elevated white blood cell count.3
Inspect the site and change the dressing as needed until
drainage ceases and epithelization occurs.46
Complications
Common complications include infiltration or extravasation
of fluid into subcutaneous tissue, resulting from incorrect
needle placement; subperiosteal effusion, resulting from
failure of fluid to enter the marrow space; and clotting in the
needle from delayed infusion or failure to flush the needle
after placement. Other complications include subcutaneous
abscess, osteomyelitis, compartment syndrome, embolism
of fat or bone fragment, necrosis, and epiphyseal
injury.3,46,63
Documentation
Record the indications for insertion of the IO device; date
and time of insertion; size, type, and location of the device;
specific site preparation; local anesthetic; infection
prevention and safety precautions taken; the type, length,
size, and lot number of the device inserted; device
functionality; insertion method; patient’s tolerance of the
procedure; and name of the person who placed the
device.64 Also document assessment of the insertion site,
including perfusion distal to the site. Record verification of
IO catheter placement, the presence of bone marrow
aspirate, patency, and ease of flushing. Also document
patient and family teaching performed, as well as patient
and family understanding of the teaching. Document the
type and volume of fluid infused and any medications given
in the patient’s medical record.
REFERENCES
1 Bailey, P. Intraosseous infusion. (2016). In: UpToDate, Stack, A. & Wolfson, A.
(Eds.). Retrieved from: www.uptodate.com
2 Standard 55. Intraosseous (IO) access devices. Infusion therapy standards of
practice. (2016). Journal of Infusion Nursing, 39, S120–S122. (Level VII)
3 Infusion Nurses Society. (2016). Policies and procedures for infusion therapy
(5th ed.). Boston, MA: Infusion Nurses Society.
4 American Heart Association. (2015). 2015 American Heart Association
guidelines update for cardiopulmonary resuscitation and emergency
cardiovascular care. Circulation, 132, S444–S464. (Level II)
5 American Heart Association. (2010). 2010 American Heart Association
guidelines update for cardiopulmonary resuscitation and emergency
cardiovascular care. Circulation, 122, S729–S767. (Level II)
6 Lewis, G. C ., et al. (2013). Critical skills and procedures in emergency
medicine: Vascular access skills and procedures. Emergency Medicine Clinics
of North America, 31(1), 59–86.
7 Consortium on Intraosseous Vascular Access in Healthcare Practice. (2010).
Recommendations for the use of intraosseous vascular access for emergent
and nonemergent situations in various health care settings: A consensus
paper. Critical Care Nurse, 30(6), e1–e7. Accessed via the Web at
http://ccn.aacnjournals.org/content/30/6/e1.full.pdf+html (Level VII)
8 Day, M. W. (2011). Intraosseous devices for intravascular access in adult
trauma patients. Critical Care Nurse, 31(2), 76–89 . Accessed via the Web at
http://ccn.aacnjournals.org/content/31/2/76.full.pdf
9 Luck, R. P., et al. (2010). Intraosseous access. Journal of Emergency Medicine,
39(4), 468–475.
10 Kovar, J., & Gillum, L. (2010). Alternate route: The humerus bone—A viable
option for IO access. JEMS: A Journal of Emergency Medical Services, 35(8),
52–59.
11 Wampler, D., et al. (2012). Paramedics successfully perform humeral EZ-IO
intraosseous access in adult out-of-hospital cardiac arrest patients. American
Journal of Emergency Medicine, 30(7), 1095–1099.
12 Miller, L., et al. (2010). A two-phase study of fluid administration
measurement during intraosseous infusion. Annals of Emergency Medicine,
56(3), S151. (Level II)
13 Ong, M. E ., et al. (2009). An observational, prospective study comparing tibial
and humeral intraosseous access using the EZ-IO. American Journal of
Emergency Medicine, 27(1), 8–15.
14 Philbeck, T. E ., et al. (2010). Hurts so good: Easing IO pain and pressure.
JEMS: A Journal of Emergency Medical Services, 35(9), 58–69 .
15 Paxton, J. H., et al. (2009). Proximal humerus intraosseous infusion: A
preferred emergency venous access. Journal of Trauma, 67(3), 606–611.
16 Hoskins, S. L., et al. (2007). Abstract 49: Comparison of intraosseous
proximal humerus and sternal routes for drug delivery during CPR.
Circulation, 116(Suppl. 16), II–933 .
17 Hoskins, S. L., et al. (2006). Abstract 79: Efficacy of epinephrine delivery via
the intraosseous humeral head during CPR. Circulation, 114(Suppl. 18), II–
1204.
18 Warren, D. W., et al. (1993). Comparison of fluid infusion rates among
peripheral intravenous and humerus, femur, malleolus, and tibial
intraosseous sites in normovolemic and hypovolemic piglets. Annals of
Emergency Medicine, 22(2), 183–186.
19 Teleflex. (2017). “The science and fundamentals of intraosseous vascular
access (3rd ed.)” [Online]. Accessed via the Web at
https://www.teleflex.com/global/clinical-resources/ez-io/EZ-
IO_Science_Fundamentals_MC-003266-Rev1-1 .pdf
20 Day, M. W. (2009). Boning up on intraosseous devices. Nursing Critical Care,
4(3), 22–26. via the Web at
http://www.nursingcenter.com/library/JournalArticle.asp?Article_ID=860674
21 Infusion Nurses Society (INS). (2009). The role of the registered nurse in the
insertion of intraosseous access devices. Journal of Infusion Nursing, 32(4),
187–188. (Level VII)
22 Standard 12. Product evaluation, integrity, and defect reporting. Infusion
therapy standards of practice. (2016). Journal of Infusion Nursing, 39, S32–
S34. (Level VII)
23 The Joint Commission. (2019). Standard NPSG.03 .04.01. Comprehensive
accreditation manual for hospitals. Oakbrook Terrace, IL: The Joint
Commission. (Level VII)
24 Accreditation Association for Hospitals and Health Systems. (2017). Standard
25.01.27. Healthcare Facilities Accreditation Program: Accreditation
requirements for acute care hospitals. Chicago, IL: Accreditation Association
for Hospitals and Health Systems. (Level VII)
25 Association of Professionals in Infection Control and Epidemiology (APIC).
(2016). APIC position paper: Safe injection, infusion, and medication vial
practices in health care. (2016). Washington, DC: APIC. (Level VII)
26 The Joint Commission. (2019). Standard RI.01.03 .01. Comprehensive
accreditation manual for hospitals. Oakbrook Terrace, IL: The Joint
Commission. (Level VII)
27 Centers for Medicare and Medicaid Services, Department of Health and
Human Services. (2015). Condition of participation: Patient’s rights. 42 C.F.R.
§ 482.13(b)(2).
28 Accreditation Association for Hospitals and Health Systems. (2017). Standard
15.01.11. Healthcare Facilities Accreditation Program: Accreditation
requirements for acute care hospitals. Chicago, IL: Accreditation Association
for Hospitals and Health Systems. (Level VII)
29 DNV GL-Healthcare USA, Inc. (2016). PR.1.SR.3 . NIAHO® accreditation
requirements: Interpretive guidelines and surveyor guidance (version 11).
Milford, OH: DNV GL-Healthcare USA, Inc. (Level VII)
30 The Joint Commission. (2019). Standard UP.01.01.01. Comprehensive
accreditation manual for hospitals. Oakbrook Terrace, IL: The Joint
Commission. (Level VII)
31 Accreditation Association for Hospitals and Health Systems. (2017). Standard
30.00 .14. Healthcare Facilities Accreditation Program: Accreditation
requirements for acute care hospitals. Chicago, IL: Accreditation Association
for Hospitals and Health Systems. (Level VII)
32 Centers for Disease Control and Prevention. (2002). Guideline for hand
hygiene in health-care settings: Recommendations of the Healthcare Infection
Control Practices Advisory Committee and the HICPAC/SHEA/APIC/IDSA Hand
Hygiene Task Force. MMWR Recommendations and Reports, 51(RR-16), 1–45.
Accessed via the Web at https://www.cdc.gov/mmwr/pdf/rr/rr5116.pdf (Level
II)
33 The Joint Commission. (2019). Standard NPSG.07.01.01. Comprehensive
accreditation manual for hospitals. Oakbrook Terrace, IL: The Joint
Commission. (Level VII)
34 World Health Organization. (2009). “WHO guidelines on hand hygiene in
health care: First global patient safety challenge, clean care is safer care”
[Online]. Accessed via the Web at
http://apps.who.int/iris/bitstream/10665/44102/1/9789241597906_eng.pdf
(Level IV)
35 Centers for Medicare and Medicaid Services, Department of Health and
Human Services. (2015). Condition of participation: Infection control. 42 C.F.R.
§ 482.42.
36 Accreditation Association for Hospitals and Health Systems. (2017). Standard
07.01.21. Healthcare Facilities Accreditation Program: Accreditation
requirements for acute care hospitals. Chicago, IL: Accreditation Association
for Hospitals and Health Systems. (Level VII)
37 DNV GL-Healthcare USA, Inc. (2016). IC.1 .SR.1 . NIAHO® accreditation
requirements: Interpretive guidelines and surveyor guidance (version 11).
Milford, OH: DNV GL-Healthcare USA, Inc. (Level VII)
38 The Joint Commission. (2019). Standard NPSG.01.01.01. Comprehensive
accreditation manual for hospitals. Oakbrook Terrace, IL: The Joint
Commission. (Level VII)
39 The Joint Commission. (2019). Standard PC.02.01.21. Comprehensive
accreditation manual for hospitals. Oakbrook Terrace, IL: The Joint
Commission. (Level VII)
40 Waters, T. R., et al. (2009). “Safe patient handling training for schools of
nursing” [Online]. Accessed via the Web at
http://www.cdc.gov/niosh/docs/2009-127/pdfs/2009-127.pdf (Level VII)
41 Infusion Nurses Society. (2017). Policies and procedures for infusion nursing
of the older adult (3rd ed.). Boston, MA: Infusion Nurses Society.
42 Siegel, J. D ., et al. (2007, revised 2017). “2007 guideline for isolation
precautions: Preventing transmission of infectious agents in healthcare
settings” [Online]. Accessed via the Web at
http://www.cdc.gov/hicpac/pdf/isolation/Isolation2007.pdf (Level II)
43 The Joint Commission. (2019). Standard UP.01.03.01. Comprehensive
accreditation manual for hospitals. Oakbrook Terrace, IL: The Joint
Commission. (Level VII)
44 Tobias, J. D., & Ross, A. K. (2010). Intraosseous infusions: A review for the
anesthesiologist with a focus on pediatric use. Anesthesia and Analgesia,
110(2), 391–401. Accessed via the Web at http://www.anesthesia-
analgesia.org/content/110/2/391.full.pdf
45 Vidacare, LLC (2014). “EZ-IO® intraosseous vascular access needles
instructions for use” [Online]. Accessed via the Web at
http://www.teleflex.com/en/usa/ezioeducation/documents/8082_Rev_A _US_FD
A_Intraosseous_Infusion_System_IFU.PDF
46 Wiegand, D. L. (Ed.). (2017). AACN procedure manual for high acuity,
progressive, and critical care (7th ed.) . St. Louis, MO: Elsevier.
47 Standard 41. Vascular access device (VAD) assessment, care, and dressing
changes. Infusion therapy standards of practice. (2016). Journal of Infusion
Nursing, 39, S81–S84. (Level VII)
48 U.S . Food and Drug Administration. (n.d .). “Look. Check. Connect. Safe
medical device connections save lives” [Online]. Accessed via the Web at
http://www.fda.gov/downloads/MedicalDevices/Safety/AlertsandNotices/UCM1
34873.pdf
49 The Joint Commission. (2014). “Sentinel event alert: Managing risk during
transition to new ISO tubing connector standards” [Online]. Accessed via the
Web at
http://www.jointcommission.org/assets/1/6/SEA_53_Connectors_8 _19_14 _final.
pdf (Level VII)
50 The Joint Commission. (2019). Standard MM.06.01.01. Comprehensive
accreditation manual for hospitals. Oakbrook Terrace, IL: The Joint
Commission. (Level VII)
51 Accreditation Association for Hospitals and Health Systems. (2017). Standard
16.01.03. Healthcare Facilities Accreditation Program: Accreditation
requirements for acute care hospitals. Chicago, IL: Accreditation Association
for Hospitals and Health Systems. (Level VII)
52 Centers for Medicare and Medicaid Services, Department of Health and
Human Services. (2015). Condition of participation: Nursing services. 42
C.F.R. § 482.23(c).
53 DNV GL-Healthcare USA, Inc. (2016). MM.1 .SR.2. NIAHO® accreditation
requirements: Interpretive guidelines and surveyor guidance (version 11).
Milford, OH: DNV GL-Healthcare USA, Inc. (Level VII)
54 Emergency Nurses Association. (2015). “Clinical practice guideline synopsis:
Difficult intravenous access” [Online]. Accessed via the Web at
https://www.ena.org/docs/default-source/resource-library/practice-
resources/cpg/difficultivaccesssynopsis.pdf?sfvrsn=978ac6ae_8
55 Standard 24. Flow-control devices. Infusion therapy standards of practice.
(2016). Journal of Infusion Nursing, 39, S48–S50. (Level VII)
56 Ganz, D. A., et al. (2013). Preventing falls in hospitals: A toolkit for improving
quality of care (AHRQ Publication No. 13-0015-EF). Rockville, MD: Agency for
Healthcare Research and Quality. Accessed via the Web at
http://www.ahrq.gov/sites/default/files/publications/files/fallpxtoolkit.pdf
(Level VII)
57 Occupational Safety and Health Administration. (n.d .). “Bloodborne
pathogens, standard number 1910.1030” [Online]. Accessed via the Web at
http://www.osha.gov/pls/oshaweb/owadisp.show_document?
p_table=STANDARDS&p_id=10051 (Level VII)
58 The Joint Commission. (2019). Standard RC.02.01.01. Comprehensive
accreditation manual for hospitals. Oakbrook Terrace, IL: The Joint
Commission. (Level VII)
59 Centers for Medicare and Medicaid Services, Department of Health and
Human Services. (2015). Condition of participation: Medical record services.
42 C.F.R. § 482.24(b).
60 Accreditation Association for Hospitals and Health Systems. (2017). Standard
10.00 .03. Healthcare Facilities Accreditation Program: Accreditation
requirements for acute care hospitals. Chicago, IL: Accreditation Association
for Hospitals and Health Systems. (Level VII)
61 DNV GL-Healthcare USA, Inc. (2016). MR.2 .SR.1 . NIAHO® accreditation
requirements: Interpretive guidelines and surveyor guidance (version 11).
Milford, OH: DNV GL-Healthcare USA, Inc. (Level VII)
62 Pyng Medical Corporation. (2011). “Fast1 intraosseous infusion system:
Training device instructions” [Online]. Accessed via the Web at
http://www.pyng.com/wp/wp-content/uploads/2011/03/PM-
097a%20FAST1%20Training%20Device%20Instructions.pdf
63 Tay, E. T. (2017). “Intraosseous access” [Online]. Accessed via the Web at
http://reference.medscape.com/article/80431-overview
64 Standard 10. Documentation in the medical record. Infusion therapy
standards of practice. (2016). Journal of Infusion Nursing, 39, S28–S30 . (Level
VII)
INTRAPLEURAL DRUG ADMINISTRATION
An intrapleural drug is injected through the chest wall into
the pleural space or instilled through a chest tube placed
intrapleurally for drainage. (For more information on chest
tube insertion, see the “Chest tube insertion, assisting”
procedure, page 175.) During intrapleural injection of a
drug, the needle passes through the intercostal muscles and
parietal pleura on its way to the pleural space. (See
Inserting
an
intrapleural
catheter.) Intrapleurally
administered drugs diffuse across the parietal pleura and
innermost intercostal muscles to affect the intercostal
nerves.
Practitioners use intrapleural administration to promote
analgesia, treat spontaneous pneumothorax, resolve pleural
effusion, and administer chemotherapy. Drugs commonly
given by intrapleural injection include tetracycline, tissue
plasminogen
activator
and
deoxyribonuclease,3
streptokinase, anesthetics, sterile talc, biotherapy agents,
and chemotherapeutic agents (to treat malignant pleural
effusion or lung adenocarcinoma).4
Contraindications for drug administration by this route
include pleural fibrosis or adhesions, which interfere with
diffusion of the drug to the intended site; pleural
inflammation; sepsis; and infection at the puncture site.
Patients with bullous emphysema and those receiving
respiratory therapy using positive end-expiratory pressure
shouldn’t receive intrapleural injections because they may
exacerbate an already compromised pulmonary condition.
Equipment
An intrapleural drug is typically given through a 16G to 18G
blunt-tipped intrapleural (epidural) needle and catheter.
Accessory equipment depends on the type of access device
the practitioner uses. All equipment must be sterile.
For drug administration
Gloves ▪ sterile gauze pads ▪ antiseptic solution ▪
prescribed medication ▪ appropriate-sized needles and
syringes ▪ dressings ▪ tape ▪ Optional: 1% lidocaine,
electronic infusion pump (preferably a smart pump with
dose-error reduction software).
For chemotherapy administration
Safety data sheet for the prescribed chemotherapy drug5 ▪
nonlinting, nonabsorbent disposable gown made of
polyethylene-coated polypropylene6 ▪
powder-free
chemotherapy gloves ▪
face shield ▪ prescribed
chemotherapeutic
medication
with the attached
administration set ▪ fluid-impermeable pad ▪ sterile gauze
pads ▪ antiseptic solution ▪ syringe with a Luer-lock
connector ▪ rubber-tipped clamps ▪ tape ▪ hazardous drug
spill kit ▪ hazardous waste receptacle ▪ scale ▪ dressings ▪
vital signs monitoring equipment ▪
stethoscope ▪
disinfectant pad ▪ emergency equipment (code cart with
cardiac medications, defibrillator, handheld resuscitation
bag with mask, intubation equipment) ▪ Optional: ▪
National Institute for Occupational Safety and Health–
approved respirator mask (if aerosolization is likely),
electronic infusion pump (preferably a smart pump with
dose-error reduction software).
Preparation of equipment
Label all medications and solutions on and off the sterile
filed to prevent medication administration errors.7 When
administering chemotherapy, make sure a spill kit is readily
available to clean up spills immediately should they occur.
Make sure that emergency equipment is readily available
and is functioning properly.
Implementation
Administering medication
■ Assist the practitioner with medication preparation and
administration, as required.
■ Avoid distractions and interruptions when preparing and
administering
medications
to prevent
medication
administration errors.8,9
■ Verify the order in the patient’s medication record by
checking it against the practitioner’s order.10,11,12,13,14
■ Perform hand hygiene.15,16,17,18,19,20
■ Put on gloves.19,21
■ Compare the medication label with the order in the
patient’s medical record.10,12,13,14
■ Check the expiration date on the medication. If the
medication is expired, return it to the pharmacy and obtain
a new medication.10,12,13,14
■ Check the patient’s medical record for an allergy or other
contraindication to the prescribed medication. If an allergy
or
other
contraindication
exists,
notify
the
practitioner.10,12,13,14
■ Visually inspect the medication for discoloration or other
indication of loss of integrity. Don’t prepare or administer
the medication if its integrity is compromised.10,12,13,14
■ Confirm the patient’s identity using at least two patient
identifiers.22
■ Discuss any unresolved concerns about the medication
with the patient’s practitioner.10,12,13,14
■ If the patient is receiving the medication for the first time,
discuss potential adverse effects and any other concerns
related to the medication.10,12,13,14
■ Verify with the practitioner, as required, that the
medication is administered at the proper time, in the
prescribed dose, and by the correct route to reduce the risk
of medication errors.10,12,13,14,23
NURSING ALERT Before administering a high-alert medication, if
required by your facility, you and the practitioner may need to perform
an independent double-check to verify the patient’s identity; ensure
that the right medication is on hand; verify that the medication’s
indication corresponds with the patient’s diagnosis; check that dosage
calculations are correct; verify that the route of administration is safe
and proper for the patient; and, if giving an infusion, ensure that the
pump settings are correct and that the infusion line is attached to the
correct port.23
■ Explain the procedure to the patient and family (if
appropriate) according to their individual communication
and learning needs to increase their understanding, allay
their fears, and enhance cooperation.24
■ Raise the bed to waist level while providing care to
prevent caregiver back strain.25
■ Position the patient with the affected side up to gain
access to the injection port.
■ Assist the doctor with removing the dressing from the
intrapleural catheter or chest tube and clamp the drainage
tube, if present.
■ Discard the dressing in the appropriate receptacle.26
■ Remove and discard your gloves.
■ Perform hand hygiene.15,16,17,18,19,20
Inserting an intrapleural catheter
In intrapleural administration, the practitioner inserts a needle into the fourth
to eighth intercostal space, 3′′ to 4′′ (7.5 to 10 cm) from the posterior midline,
and then advances the needle medially over the superior edge of the
patient’s rib through the intercostal muscles until it tangentially penetrates
the parietal pleura. The practitioner advances the catheter into the pleural
space through the needle, and then removes the needle. The nurse should
assist the practitioner with insertion as necessary. After inserting the
catheter, the practitioner coils it to prevent kinking and then sutures it
securely to the patient’s skin.
The practitioner confirms placement by aspirating the catheter. Resistance
indicates correct placement in the pleural space; aspirated blood means that
the catheter probably is misplaced in a blood vessel, and aspirated air means
that it’s probably in a lung. The practitioner then orders a chest X-ray to
verify placement and to detect such complications as pneumothorax.
After insertion, apply a sterile occlusive dressing over the insertion site to
prevent catheter dislodgment. Monitor the patient’s vital signs after the
procedure at an interval determined by your facility or by the patient’s
condition; no evidence-based research is available to indicate best practice
for frequency of vital signs monitoring.1 Perform a comprehensive pain
assessment using techniques appropriate for the patient’s age, condition,
and ability to understand. Respond appropriately to the assessment
findings.2
■ Put on a new pair of gloves.19
■ Assist the practitioner with tracing the tubing from the
patient to its point of origin to make sure that the
medication is being administered into the correct port.27
■ The practitioner disinfects the access port of the catheter
or chest tube with an antiseptic-soaked gauze pad and
allows it to dry.
■ Prepare the appropriate medication dose, as needed, and
hand it to the practitioner.
■ The practitioner injects the medication. If it’s an
anesthetic, the practitioner gives a bolus or loading dose
initially and then a continuous infusion. For other
medication, the practitioner may also administer an
anesthetic such as lidocaine to alleviate pain during
injection.
■ Apply new dressings as needed.
■ Monitor the patient closely during and after drug
administration to gauge the effectiveness of drug therapy
and to check for complications and adverse effects.
■ Return the bed to the lowest position to prevent falls and
maintain patient safety.28
■ Discard used supplies.26
■ Remove and discard your gloves.
■ Perform hand hygiene.15,16,17,18,19,20
■ Document the procedure.19,20,29,30,31,32
Administering chemotherapy
■ Review the patient’s medical record for verification of
initial cancer diagnosis and staging or current cancer status;
recent treatments, including surgery, radiation therapy,
hormone therapy, cytotoxic therapy, and complementary
therapy; medical, psychiatric, and surgical history; presence
of allergic or hypersensitivity reactions; pregnancy and
reproductive status, including the last menstrual period if
applicable; and physical examination that includes
assessment of height, weight, body surface area, and organ
function appropriate for the planned treatment regimen.4,33
■ Verify the practitioner’s order for the chemotherapeutic
agent. Ensure that the order contains the patient’s complete
name and a second identifier, the date, the patient’s
diagnosis, any applicable allergies, the regimen name and
number (if applicable), treatment criteria, the dosage
calculation method, the patient’s height and weight, and
any other variables used to calculate the dose, dosage,
route and rate of administration, administration schedule,
duration of therapy, cumulative lifetime dose (if applicable),
and sequence of drug administration (if applicable) as well
as any supportive care treatments that are appropriate for
the regimen.10,12,13,14,33,34
■ Verify that the patient has received written educational
materials appropriate for the patient’s reading level and
understanding, and that the materials include information
about the diagnosis, the chemotherapy plan, possible long-
and short-term adverse effects, risks associated with the
regimen, signs and symptoms to report, monitoring, and
follow-up care.33
■ Confirm that the practitioner has obtained written
informed consent, and that the consent form is in the
patient’s medical record.33,34
■ Verify that the prescribed medication dose is appropriate
for the patient, diagnosis, and treatment plan. If you have
concerns, consult with the prescribing practitioner or the
pharmacist.4,10,12,13,14,33
■ Independently verify the chemotherapy order before
medication preparation, confirming the two patient
identifiers; medication name, dose, and volume; route of
administration; calculation for dosing; and treatment cycle
and where the patient is at in that cycle.4,11,12,13,14,23,33
■ Become familiar with the information in the safety data
sheet specific to the prescribed drug.35,36
■ Obtain the medication from the pharmacy.
■ Gather the appropriate equipment.
■ Perform hand hygiene.15,16,17,18,19,20
■ Confirm the patient’s identity using at least two patient
identifiers.22
■ Review current medications with the patient, including
over-the-counter medications and complementary and
alternative therapies; notify the practitioner of any
changes.33
■ Assess the patient’s clinical and performance status.33
■ Obtain the patient’s vital signs and weight in kilograms to
enable accurate calculation of dosages related to
weight.33,37
■ Verify allergies, previous reactions, and treatment-related
toxicities with the patient.10,12,13,14,33
■ Ask the patient about any psychosocial concerns or
cultural or spiritual issues that may affect treatment, and
take action as indicated.33
■ If premedication is prescribed before chemotherapy
administration to prevent adverse effects of the medication,
administer the medication before the procedure as ordered
following safe medication administration practices.10,12,13,14
■ Raise the bed to waist level when providing care to
prevent caregiver back strain.25
■ Wash your hands with soap and water.4,15,16,17,18,19,20
■ Put on personal protective equipment (two pairs of
gloves, a gown, a face shield, and a respirator if necessary).
Make sure that your inner glove cuff is worn under the gown
cuff, and that the outer glove cuff extends over the gown
cuff to fully protect your skin. Inspect your gloves to make
sure that they’re physically intact.4,38
■ Position the patient in a sitting position and leaning
forward on a sturdy surface to gain access to the injection
port.4
■ Assist the practitioner with removing the dressing from
the intrapleural catheter or chest tube.
■ Discard the dressing in the appropriate receptacle.26 If
pleural effusion is present, it must be completely drained
from the pleural cavity before the medication is instilled.4
Clamp the drainage tube, if present.
■ Remove and discard your gloves.
■ Wash your hands with soap and water.4,15,16,17,18,19,20
■ Confirm the treatment plan, drug route, and symptom
management plan with the patient.24
■ Verify the accuracy of the medication name, dose, and
volume; route of administration; expiration date and time;
and appearance and physical integrity of the medication.
Document the verification process.23,33
■ With the practitioner who is administering the
chemotherapy, confirm the patient’s identity using at least
two patient identifiers.15,23,33
NURSING ALERT Chemotherapy drugs are considered high-alert
medications because they can cause significant patient harm when
used in error. Perform an independent double-check with another
practitioner who’s qualified to prepare or administer chemotherapy
before chemotherapy administration.33,39
■ Put on two new pairs of gloves.4,38
■ Place a fluid-impermeable pad underneath the work area
to absorb droplets of the medication that may spill.34,36
■ Assist the practitioner with preparing the access port. The
practitioner thoroughly disinfects the access port of the
catheter or chest tube with an antiseptic-soaked gauze pad
and then allows it to dry.
■ The practitioner injects the medication or begins an
infusion. Before the infusion begins, trace the tubing from
the patient to its point of origin to make sure the tubing is
connected to the proper port. Label the tubing distal end
(near the patient connection) and proximal end (near the
source container) to reduce the risk of misconnection.27,40
■ Apply new dressings, as needed. Label the dressings with
the date, the time, and your initials.
■ Discard the fluid-impermeable pad and other used
equipment in the proper receptacles.36
■ After instillation, clamp the tubing so that all the
chemotherapy agent remains in the intrapleural space for
the prescribed dwell time.4
■ Monitor the patient closely for signs of respiratory
distress, an allergic reaction, or other adverse reactions to
the medication.
■ If the medication was administered by infusion, remove
the medication container with the tubing attached and
dispose of it in the proper receptacle; don’t remove the
spike from the container (the spike prevents exposure to the
hazardous medication).4 If the medication container will be
used to collect drainage after the prescribed dwell time,
leave it hanging on an IV pole at the patient’s bedside. After
the prescribed dwell time, lower the bag to a dependent
position, unclamp the tubing, and allow fluid to drain by
gravity. After the prescribed volume drains, disconnect the
tubing from the injection port and discard it, the fluid, and
the container in the appropriate receptacle.
■ Return the bed to the lowest position to prevent falls and
maintain patient safety.28
■ Remove your gloves and personal protective equipment
and discard them in an appropriate receptacle.
■ Wash your hands with soap and water.4,15,16,17,18,19,20
■ Clean and disinfect your stethoscope with an antiseptic
pad.41,42
■ Perform hand hygiene.15,16,17,18,19,20
■ Document the procedure.29,30,31,32
Special considerations
■ If the patient is receiving a continuous infusion, label the
solution bag clearly. Cover all injection ports so that other
drugs aren’t injected into the pleural space accidentally.
■ If the chest tube dislodges, cover the site at once with a
sterile gauze pad and tape it in place. Stay with the patient,
monitor vital signs, and observe carefully for signs and
symptoms of tension pneumothorax: hypotension,
distended jugular veins, absent breath sounds, tracheal
shift, hypoxemia, dyspnea, tachypnea, diaphoresis, chest
pain, and a weak, rapid pulse. Have another nurse call the
practitioner and gather the equipment for reinsertion.
■ For a patient with a chest tube, keep rubber-tipped
clamps at the bedside. If a commercial chest tube system
cracks or a tube disconnects, use the clamps to clamp the
chest tube close to the insertion site temporarily. Be sure to
observe the patient closely for signs of tension
pneumothorax, because no air can escape from the pleural
space while the tube is clamped.
■ Each chemotherapy agent has unique adverse effects.
Assess and monitor the patient for anticipated adverse
effects for the agent administered. Evaluate, grade, and
document treatment-related toxicities using standard
definitions or criteria, as indicated.33
■ When handling chemotherapy agents, change your
gloves regularly (every 30 to 60 minutes), whenever your
gloves become damaged, and when contact with the drug is
known or suspected.38
■ If some of the chemotherapy drug comes in contact with
your skin, wash the involved area thoroughly with soap and
water (not a germicidal agent). If eye contact occurs, flood
the eye with water or normal saline solution for at least 15
minutes while holding the eyelid open. Obtain a medical
evaluation as soon as possible after accidental exposure.4
■ If a chemotherapy spill occurs, use a chemotherapy spill
kit to clean the area. Wear all personal protective equipment
(double gloves, a gown, a face shield or goggles, booties,
and a respirator if aerosolization is possible). Post a sign to
warn others. Clean up the hazardous spill, as indicated.
Report and document the spill appropriately.4
■ The Joint Commission issued a sentinel event alert related
to managing risk during transition to the new International
Organization for Standardization tubing standards that were
designed to prevent dangerous tubing misconnections,
which can lead to serious patient injury and death. During
the transition, trace all tubing and catheters from the
patient to their points of origin before connecting or
reconnecting any device or infusion, at any care transition
(such as to a new setting or service), and as part of the
handoff process. Additional protective measures include
routing tubes and catheters having different purposes in
different, standardized directions; labeling the tubing at
both the distal and proximal ends when there are different
access sites or several bags hanging; using tubing and
equipment only as intended; and storing medications for
different delivery routes in separate locations.40
Patient teaching
Before a patient begins a chemotherapy regimen, the
patient should receive written or electronic information
regarding the diagnosis, the goals of therapy, the planned
schedule and duration of chemotherapy, the possible short-
and long-term adverse effects, and regimen- or drug-
specific symptoms that require medical attention. Include
emergency contact information for the practice or
organization, signs and symptoms that should trigger a call,
and who should be contacted. The patient should also
receive a plan for monitoring and follow-up care. Ensure that
the materials provided are appropriate for the patient’s or
caregiver’s reading level and understanding.33
Complications
Pneumothorax or tension pneumothorax may occur if the
practitioner accidentally injects air into the pleural cavity.
These complications are more likely to occur in a patient
who is on mechanical ventilation.
Accidental catheter placement in the lung can lead to
respiratory distress; catheter placement within a vessel can
increase the medication’s effects; and laceration of
intercostal vessels may cause bleeding. If the catheter
fractures, lung puncture may occur.
Local anesthetic toxicity can lead to tinnitus, metallic
taste, light-headedness, somnolence, visual and auditory
disturbances, restlessness, delirium, slurred speech,
nystagmus, muscle tremor, seizures, arrhythmias, and
cardiovascular collapse. A local anesthetic containing
epinephrine can cause tachycardia and hypertension.
Intrapleural chemotherapeutic drugs can irritate the
pleura chemically and cause such systemic effects as
neutropenia
and thrombocytopenia.
Administering
intrapleural tetracycline without an anesthetic can cause
pain.
The insertion site can become infected. However,
meticulous skin preparation, strict sterile technique, and
sterile dressings usually prevent infection.
Documentation
Document the date and time of catheter insertion, the
practitioner’s name, the site of the catheter, and the
patient’s tolerance of the procedure. For drug
administration, record the date, time, drug administered,
drug dosage, patient’s response to the treatment, and
condition of the catheter insertion site. Document all
preverification, including who was involved in the
verification process. Also note any adverse reactions to the
medication, the practitioner notified, the prescribed
interventions, and the patient’s response to the
interventions.
REFERENCES
1 American Society of PeriAnesthesia Nurses. (2015). 2015–2017
Perianesthesia nursing standards, practice recommendations and interpretive
statements. Cherry Hill, NJ: American Society of PeriAnesthesia Nurses. (Level
VII)
2 The Joint Commission. (2019). Standard PC.01.02.07. Comprehensive
accreditation manual for hospitals. Oakbrook Terrace, IL: The Joint
Commission. (Level VII)
3 Ahmed, A. H., & Yacoub, T. E . (2010). Intrapleural therapy in management of
complicated parapneumonic effusions and empyema. Clinical Pharmacology,
2, 213–221. Accessed via the Web at
http://www.ncbi.nlm.nih.gov/pmc/articles/PMC3262383/
4 Polovich, M., et al. (Eds.) . (2014). Chemotherapy and biotherapy guidelines
and recommendations for practice (4th ed.). Pittsburgh, PA: Oncology Nursing
Society.
5 Occupational Safety and Health Administration. (n.d .). “Hazard
communication safety data sheets” [Online]. Accessed via the Web at
https://www.osha.gov/Publications/HazComm_QuickCard_SafetyData.html
6 National Institute for Occupational Safety and Health (NIOSH). (2004). “NIOSH
alert: Preventing occupational exposures to antineoplastic and other
hazardous drugs in health care settings” [Online]. Accessed via the Web at
http://www.cdc.gov/niosh/docs/2004-165/pdfs/2004-165.pdf
7 The Joint Commission. (2019). Standard NPSG.03 .04.01. Comprehensive
accreditation manual for hospitals. Oakbrook Terrace, IL: The Joint
Commission. (Level VII)
8 Westbrook, J., et al. (2010). Association of interruptions with an increased risk
and severity of medication administration errors. Archives of Internal
Medicine, 170(8), 683–690 . (Level IV)
9 Institute for Safe Medication Practices. (2012). Side tracks on the safety
express: Interruptions lead to errors and unfinished...Wait, what was I doing?
Nurse Advise-ERR, 11(2), 1–4 . Accessed via the Web at
https://www.ismp.org/Newsletters/acutecare/showarticle.aspx?id=37
10 The Joint Commission. (2019). Standard MM.06.01.01. Comprehensive
accreditation manual for hospitals. Oakbrook Terrace, IL: The Joint
Commission. (Level VII)
11 The Joint Commission. (2017). Standard MM.04.01.01. Comprehensive
accreditation manual for hospitals. Oakbrook Terrace, IL: The Joint
Commission. (Level VII)
12 Centers for Medicare and Medicaid Services, Department of Health and
Human Services. (2015). Condition of participation: Nursing services. 42
C.F.R. § 482.23(c).
13 Accreditation Association for Hospitals and Health Systems. (2017). Standard
16.01.03. Healthcare Facilities Accreditation Program: Accreditation
requirements for acute care hospitals. Chicago, IL: Accreditation Association
for Hospitals and Health Systems. (Level VII)
14 DNV GL-Healthcare USA, Inc. (2016). MM.1 .SR.2. NIAHO® accreditation
requirements: Interpretive guidelines and surveyor guidance (version 11).
Milford, OH: DNV GL-Healthcare USA, Inc. (Level VII)
15 The Joint Commission. (2019). Standard NPSG.07.01.01. Comprehensive
accreditation manual for hospitals. Oakbrook Terrace, IL: The Joint
Commission. (Level VII)
16 World Health Organization. (2009). “WHO guidelines on hand hygiene in
health care: First global patient safety challenge, clean care is safer care”
[Online]. Accessed via the Web at
http://apps.who.int/iris/bitstream/10665/44102/1/9789241597906_eng.pdf
(Level IV)
17 Centers for Disease Control and Prevention. (2002). Guideline for hand
hygiene in health-care settings: Recommendations of the Healthcare Infection
Control Practices Advisory Committee and the HICPAC/SHEA/APIC/IDSA Hand
Hygiene Task Force. MMWR Recommendations and Reports, 51(RR-16), 1–45.
Accessed via the Web at https://www.cdc.gov/mmwr/pdf/rr/rr5116.pdf (Level
II)
18 Centers for Medicare and Medicaid Services, Department of Health and
Human Services. (2015). Condition of participation: Infection control. 42 C.F.R.
§ 482.42.
19 Accreditation Association for Hospitals and Health Systems. (2017). Standard
07.01.10. Healthcare Facilities Accreditation Program: Accreditation
requirements for acute care hospitals. Chicago, IL: Accreditation Association
for Hospitals and Health Systems. (Level VII)
20 DNV GL-Healthcare USA, Inc. (2016). IC.1 .SR.1 . NIAHO® accreditation
requirements: Interpretive guidelines and surveyor guidance (version 11).
Milford, OH: DNV GL-Healthcare USA, Inc. (Level VII)
21 Siegel, J. D ., et al. (2007, revised 2017). “2007 guideline for isolation
precautions: Preventing transmission of infectious agents in healthcare
settings” [Online]. Accessed via the Web at
http://www.cdc.gov/hicpac/pdf/isolation/Isolation2007.pdf (Level II)
22 The Joint Commission. (2019). Standard NPSG.01.01.01. Comprehensive
accreditation manual for hospitals. Oakbrook Terrace, IL: The Joint
Commission. (Level VII)
23 Institute for Safe Medication Practices. (2014). Independent double checks:
undervalued and misused. ISMP Medication Safety Alert! Nurse Advise-ERR,
12(3), 1–5 . Accessed via the Web at
http://www.ismp.org/newsletters/nursing/issues/NurseAdviseERR201403.pdf
(Level VII)
24 The Joint Commission. (2019). Standard PC.02.01.21. Comprehensive
accreditation manual for hospitals. Oakbrook Terrace, IL: The Joint
Commission. (Level VII)
25 Waters, T. R., et al. (2009). “Safe patient handling training for schools of
nursing” [Online]. Accessed via the Web at
http://www.cdc.gov/niosh/docs/2009-127/pdfs/2009-127.pdf (Level VII)
26 Occupational Safety and Health Administration. (n.d .). “Bloodborne
pathogens, standard number 1910.1030” [Online]. Accessed via the Web at
http://www.osha.gov/pls/oshaweb/owadisp.show_document?
p_id=10051&p_table=STANDARDS (Level VII)
27 U.S . Food and Drug Administration. (n.d .). “Look. Check. Connect. Safe
medical device connections save lives” [Online]. Accessed via the Web at
https://www.fda.gov/downloads/MedicalDevices/Safety/AlertsandNotices/UCM
134873.pdf
28 Ganz, D. A., et al. (2013). Preventing falls in hospitals: A toolkit for improving
quality of care (AHRQ Publication No. 13-0015-EF). Rockville, MD: Agency for
Healthcare Research and Quality. Accessed via the Web at
http://www.ahrq.gov/sites/default/files/publications/files/fallpxtoolkit.pdf
(Level VII)
29 The Joint Commission. (2019). Standard RC.02.01.01. Comprehensive
accreditation manual for hospitals. Oakbrook Terrace, IL: The Joint
Commission. (Level VII)
30 Centers for Medicare and Medicaid Services, Department of Health and
Human Services. (2015). Condition of participation: Medical record services.
42 C.F.R. § 482.24(b).
31 Accreditation Association for Hospitals and Health Systems. (2017). Standard
10.00 .03. Healthcare Facilities Accreditation Program: Accreditation
requirements for acute care hospitals. Chicago, IL: Accreditation Association
for Hospitals and Health Systems. (Level VII)
32 DNV GL-Healthcare USA, Inc. (2016). MR.2 .SR.1 . NIAHO® accreditation
requirements: Interpretive guidelines and surveyor guidance (version 11).
Milford, OH: DNV GL-Healthcare USA, Inc. (Level VII)
33 Neuss, M. N., et al. (2013). 2013 updated American Society of Clinical
Oncology/Oncology Nursing Society chemotherapy administration safety
standards including standards for the safe administration and management
of oral chemotherapy. Journal of Oncology Practice, 9(Suppl. 2), 5s–13s.
Accessed via the Web at
http://www.instituteforquality.org/sites/instituteforquality.org/files/asco_ons_sa
fety_standards_2013_0 .pdf (Level VII)
34 Centers for Medicare and Medicaid Services, Department of Health and
Human Services. (2015). Condition of participation: Patient’s rights. 42 C.F.R.
§ 482.13(b)(2).
35 Department of Health and Human Services, Centers for Disease Control and
Prevention, and the National Institute for Occupational Safety and Health
(NIOSH). (2012). NIOSH list of antineoplastic and other hazardous drugs in
healthcare settings 2012 (NIOSH publication number 2012-150). Accessed via
the Web at http://www.cdc.gov/niosh/docs/2012-150/pdfs/2012-150.pdf (Level
I)
36 Occupational Safety and Health Administration. (n.d .). “Toxic and hazardous
substances, standard number 1910.1450, App A” [Online]. Accessed via the
Web at http://www.osha.gov/pls/oshaweb/owadisp.show_document?
p_table=STANDARDS&p_id=10107
37 Institute for Safe Medication Practices. (2016). “2016–2017 targeted
medication safety best practices for hospitals” [Online]. Accessed via the
Web at http://www.ismp.org/tools/bestpractices/TMSBP-for-Hospitals.pdf
38 National Institute for Occupational Safety and Health. (2008). “Personal
protective equipment for health care workers who work with hazardous
drugs” [Online]. Accessed via the Web at http://www.cdc.gov/niosh/docs/wp-
solutions/2009-106/pdfs/2009-106.pdf
39 Institute for Safe Medication Practices. (2014). “ISMP list of high-alert
medications in acute care settings” [Online]. Accessed via the Web at
http://www.ismp.org/tools/highalertmedications.pdf (Level VII)
40 The Joint Commission. (2015). “Sentinel event alert: Managing risk during
transition to new ISO tubing connector standards” [Online]. Accessed via the
Web at
http://www.jointcommission.org/assets/1/6/SEA_53_Connectors_8 _19_14 _final.
pdf (Level VII)
41 Rutala, W. A., et al. (2008, revised 2017). “Guideline for disinfection and
sterilization in healthcare facilities, 2008” [Online]. Accessed via the Web at
https://www.cdc.gov/hicpac/pdf/guidelines/Disinfection_Nov_2008.pdf (Level I)
42 Accreditation Association for Hospitals and Health Systems. (2017). Standard
07.02.03. Healthcare Facilities Accreditation Program: Accreditation
requirements for acute care hospitals. Chicago, IL: Accreditation Association
for Hospitals and Health Systems. (Level VII)
IONTOPHORESIS
Iontophoresis is a technique for delivering an ionic
medication quickly with minimal discomfort. It’s used as an
alternative to parenteral injection for the administration of
ionic medication solutions, such as local anesthetics. The
Dupel iontophoresis device is an example of a device used
for iontophoresis. This handheld dual-channel device, which
is powered by a 9-volt battery, is capable of delivering
medications with different ionic charges into the skin. A
treatment electrode attached to lead wires is connected to
the iontophoresis device. Current that flows through the
device forces the ionic medication solution into the skin
away from the like-charged electrode. If a positively charged
medication solution is to be administered, the treatment
electrode is attached to the positive lead wire. If a
negatively charged solution is to be administered, the lead
wire is attached to the negative lead wire. With the dual-
channel device, one channel can deliver a negatively charge
medication while the other delivers a positively charged
medication simultaneously. Alternatively, like-charged
medications can be used in the treatment electrodes for
both channels. The dose of ionic medication solution
delivered depends on the current applied to the treatment
electrode and the length of time that the current is applied.
Local anesthetic agents, such as those administered
through iontophoresis, may be considered before vascular
access device insertion.1 Lidocaine iontophoresis has been
found to be 80% to 100% effective in providing anesthetic
action before such procedures as injections, abrasion
treatment, and laser surgery and cautery.2 Because
iontophoresis act quickly, often within 10 minutes, it’s an
excellent choice for numbing IV insertion sites, especially in
children.
Equipment
Dose-control device with battery and lead wires ▪ drug-
delivery electrode kit ▪ lidocaine 2% with epinephrine
1:100,000 solution ▪ mild soap and water ▪ washcloths ▪
syringe with needle ▪ gloves ▪ tongue blade ▪ Optional:
disposable-head clippers, alcohol pads, disposable scissors.
Read the manufacturer’s instructions before using the
device.
Implementation
■ Verify the practitioner’s order.
■ Perform hand hygiene.3,4,5,6,7,8
■ Confirm the patient’s identity using at least two patient
identifiers.9
■ Ask the patient (or, if the patient is a child, ask the
parents or guardian) about any allergies or sensitivity to
medications or contraindications to treatment.
NURSING ALERT Avoid iontophoresis in patients with cardiac
pacemakers or other electrically sensitive implanted devices.10
■ Explain the procedure to the patient and family (or the
child and the child’s parents or guardians) according to their
individual communication and learning needs to increase
their understanding, allay their fears, and enhance
cooperation.11 Tell the patient that tingling or warmth under
the electrode pads might be felt while they’re on the skin.
■ Perform hand hygiene.3,4,5,6,7,8
■ Put on gloves.7,12
■ Assess the patient for appropriate electrode placement.
The medication-delivery electrode will be placed over the
intended procedure site; the second electrode, which drives
drug ions into the skin, must be applied over a muscle 4′′ to
6′′ (10 to 15 cm) from the first.
■ Examine the patient’s skin and select intact electrode
placement sites, avoiding areas with pimples, unhealed
wounds, or ingrown hairs.
■ Prepare the skin by cleaning with soap and water and
drying it thoroughly; don’t use alcohol to prepare the skin
unless it’s excessively oily.10
■ If necessary, trim excess body hair at the application
sites.
■ Remove the paper flap from the back of the drug-delivery
electrode.
■ Draw up the lidocaine with epinephrine in a syringe as
ordered, following safe medication administration
practices.13,14,15,16
■ Remove the needle from the syringe and saturate the
medication pad with the amount of lidocaine and
epinephrine solution indicated on the pad (as shown below).
The amount of lidocaine and epinephrine solution required
to saturate the pad varies with pad size. For a standard-
sized pad, use about 1 mL; for a large pad, use about 2.5
mL.
■ Remove the remaining backing from the drug-delivery
pad.
■ Apply the pad to the selected site.
■ Remove the backing from the grounding electrode, and
then apply it to the second prepared site.
■ Connect the lead clips to the electrodes according to the
manufacturer’s instructions.
■ Make sure the device is turned off and then connect the
lead wires to the device.
■ Turn on the device.
■ Set the desired treatment dosage. The device is
calibrated to deliver a dose of 40 milliamps (mA). Adjust the
dosage by pressing the dosage arrow keys up or down until
the correct dosage is displayed.
■ Set the desired level of current using the current knobs
on the device. If you don’t know the desired level, initiate
treatment at a level lower than 2 mA and adjust in 0.1-mA
increments; current is commonly set between 0.5 and 4
mA.10
■ Initiate treatment by setting the treatment mode switch.
Current will ramp up to the set intensity level in 30 seconds.
■ Pause the treatment as needed to assess for patient
tolerance and comfort.
■ At the end of treatment, turn off the device.
■ Disconnect the lead wires, and remove the electrodes.
■ Assess the skin at the drug-delivery site for numbness by
touching it with a blunt object, such as a tongue blade.
■ Promptly prepare the site and perform the venipuncture
or other procedure, because the numbness may last only a
few minutes.
■ Remove and discard your gloves.
■ Perform hand hygiene.3,4,5,6,7,8
■ Document the procedure.17,18,19,20
Special considerations
■ To avoid interfering with energy emission, don’t tape or
compress the electrode sites, and don’t apply heat or cold
to the electrode sites during treatment.
■ If the device doesn’t function, make sure that the battery
is fresh and properly installed (check polarity markings) and
that the battery contacts are clean. If a battery must be
replaced during the treatment, record how much of the
treatment was completed, because this information will be
lost when the battery is replaced.
Complications
Iontophoresis can cause transient erythema, inflammation,
blanching, itching, burning, and a tingling sensation at the
site, which usually disappears within 12 hours after
treatment.10 An allergic reaction may occur in patients
sensitive to lidocaine or epinephrine.
Documentation
Document the treatment, sites used, and effectiveness in
achieving analgesia. Also document any adverse reactions.
Record any patient teaching and the patient’s (and, if
applicable, the parents’ or guardian’s) understanding of the
teaching.
REFERENCES
1 Infusion Nurse Society. (2016). Policies and procedures for infusion therapy
(5th ed.). Boston, MA: Infusion Nurses Society.
2 Tadicherla, S., & Berman, B. (2006). Percutaneous dermal drug delivery for
local pain control. Therapeutics and Clinical Risk Management, 2(1), 99–113.
Accessed via the Web at
http://www.ncbi.nlm.nih.gov/pmc/articles/PMC1661648
3 Centers for Disease Control and Prevention. (2002). Guideline for hand
hygiene in health-care settings: Recommendations of the Healthcare Infection
Control Practices Advisory Committee and the HICPAC/SHEA/APIC/IDSA Hand
Hygiene Task Force. MMWR Recommendations and Reports, 51(RR-16), 1–45.
Accessed via the Web at https://www.cdc.gov/mmwr/pdf/rr/rr5116.pdf (Level
II)
4 World Health Organization. (2009). “WHO guidelines on hand hygiene in
health care: First global patient safety challenge, clean care is safer care”
[Online]. Accessed via the Web at
http://apps.who.int/iris/bitstream/10665/44102/1/9789241597906_eng.pdf
(Level IV)
5 The Joint Commission. (2019). Standard NPSG.07.01.01. Comprehensive
accreditation manual for hospitals. Oakbrook Terrace, IL: The Joint
Commission. (Level VII)
6 Centers for Medicare & Medicaid Services, Department of Health and Human
Services. (2015). Condition of participation: Infection control. 42 C.F.R. §
482.42.
7 Accreditation Association for Hospitals and Health Systems. (2017). Standard
07.01.10. Healthcare Facilities Accreditation Program: Accreditation
requirements for acute care hospitals. Chicago, IL: Accreditation Association
for Hospitals and Health Systems. (Level VII)
8 DNV GL-Healthcare USA, Inc. (2016). IC.1.SR.1 . NIAHO® accreditation
requirements: Interpretive guidelines and surveyor guidance (version 11).
Milford, OH: DNV GL-Healthcare USA, Inc. (Level VII)
9 The Joint Commission. (2019). Standard NPSG.01.01.01. Comprehensive
accreditation manual for hospitals. Oakbrook Terrace, IL: The Joint
Commission. (Level VII)
10 Empi. (2010). “DUPEL dual channel iontophoresis system: Instruction for use
manual” [Online]. Accessed via the Web at
https://www.djoglobal.com/sites/default/files/360379.pdf
11 The Joint Commission. (2019). Standard PC.02.01.21. Comprehensive
accreditation manual for hospitals. Oakbrook Terrace, IL: The Joint
Commission. (Level VII)
12 Siegel, J. D ., et al. (2007). “2007 guideline for isolation precautions:
Preventing transmission of infectious agents in healthcare settings” [Online].
Accessed via the Web at
http://www.cdc.gov/hicpac/pdf/isolation/Isolation2007.pdf (Level II)
13 The Joint Commission. (2019). Standard MM.06.01.01. Comprehensive
accreditation manual for hospitals. Oakbrook Terrace, IL: The Joint
Commission. (Level VII)
14 Centers for Medicare & Medicaid Services, Department of Health and Human
Services. (2015). Condition of participation: Nursing services. 42 C.F.R. §
482.23(c).
15 Accreditation Association for Hospitals and Health Systems. (2017). Standard
16.01.03. Healthcare Facilities Accreditation Program: Accreditation
requirements for acute care hospitals. Chicago, IL: Accreditation Association
for Hospitals and Health Systems. (Level VII)
16 DNV GL-Healthcare USA, Inc. (2016). MM.1 .SR.2. NIAHO® accreditation
requirements: Interpretive guidelines and surveyor guidance (version 11).
Milford, OH: DNV GL-Healthcare USA, Inc. (Level VII)
17 The Joint Commission. (2019). Standard RC.01.03 .01. Comprehensive
accreditation manual for hospitals. Oakbrook Terrace, IL: The Joint
Commission. (Level VII)
18 Centers for Medicare & Medicaid Services, Department of Health and Human
Services. (2015). Condition of participation: Medical record services. 42 C.F.R.
§ 482.24(b).
19 Accreditation Association for Hospitals and Health Systems. (2017). Standard
10.00 .03. Healthcare Facilities Accreditation Program: Accreditation
requirements for acute care hospitals. Chicago, IL: Accreditation Association
for Hospitals and Health Systems. (Level VII)
20 DNV GL-Healthcare USA, Inc. (2016). MR.2 .SR.1 . NIAHO® accreditation
requirements: Interpretive guidelines and surveyor guidance (version 11).
Milford, OH: DNV GL-Healthcare USA, Inc. (Level VII)
IV BOLUS INJECTION
The IV bolus injection method allows rapid drug
administration. It can be used in an emergency to provide
an immediate drug effect. It can also be used to administer
drugs that can’t be given IM, to achieve peak drug levels in
the bloodstream, and to deliver drugs that can’t be diluted.
Bolus doses of medication can be injected directly through
a venous access device with a continuous infusion or
through a vascular access device intended for intermittent
use. Each medication has its own safe rate of injection,
which is specified by the drug manufacturer. The medication
usually takes effect rapidly, so the patient must be
monitored for adverse reactions, such as cardiac
arrhythmias and anaphylaxis. IV bolus injections are
contraindicated when rapid drug administration could cause
life-threatening complications.
NURSING ALERT Speed shock can result from rapid bolus
administration of an IV medication. Carefully administer the
medication at the proper rate and closely monitor the patient during
administration. Symptoms of speed shock include dizziness, headache,
and other symptoms caused by the rapidity of the medication’s onset.
Signs and symptoms can progress to chest tightness, hypotension,
irregular pulse, and anaphylactic shock. Keep in mind that an older
adult patient might not be able to articulate these symptoms because
of preexisting conditions, such as stroke, tracheotomy, endotracheal
intubation, dementia, or delirium.1
Sterile no-touch technique is required during
administration to reduce the risk of vascular catheter–
associated infection.
EQUIPMENT
Using a ready injectable
A commercially premeasured medication packaged with a syringe and
needle, the ready injectable enables rapid drug administration in an
emergency. Preparing a ready injectable usually takes only 15 to 20 seconds.
Other advantages include the reduced risk of breaking sterile technique
during administration and the easy identification of medication and dose.
When using a ready injectable, be sure to give the precise dose prescribed.
For example, if a 50-mg/mL cartridge is supplied but the patient’s prescribed
dose is 25 mg, you must administer only 0.5 mL, half of the volume
contained in the cartridge. Be alert for potential medication errors whenever
dispensing medications in premeasured dosage forms.
HOSPITAL-ACQUIRED CONDITION ALERT Keep in mind that a vascular
catheter–associated infection is considered a hospital-acquired
condition because various best practices can reasonably prevent it. Be
sure to follow infection prevention techniques (such as performing
hand hygiene, performing a vigorous mechanical scrub of the
needleless connector, following sterile no-touch technique when
accessing the device, and limiting catheter manipulations) when
administering IV bolus injections through the catheter to reduce the
risk of infection.2,3,4,5,6,7
Equipment
Patient’s medication administration record ▪ gloves ▪
syringe ▪ antiseptic pads (alcohol, tincture of iodine, or
chlorhexidine-based) ▪ prescribed medication ▪ prefilled-
syringe (10-mL, or a smaller volume syringe designed to
generate lower amounts of pressure)8 containing
preservative-free normal saline solution (or other
compatible flush solution if medication is incompatible with
normal saline solution)9 ▪ Optional: appropriate diluent,
second syringe filled with preservative-free normal saline
solution, prefilled syringe with locking solution, disinfectant-
containing caned cap, sedation scale, pulse oximeter,
capnography equipment.
A useful dosage form is the ready injectable. (See Using a
ready injectable.)
Preparation of equipment
Inspect all IV equipment and supplies; if a product is
expired, if its integrity is compromised, or if it’s defective,
remove it from patient use, label it as expired or defective,
and report the expiration or defect as directed by your
facility.10
Implementation
■ Avoid distractions and interruptions when preparing and
administering
medications
to prevent
medication
administration errors.11,12
■ Verify the practitioner’s order.1,13,14,15,16
■ Review the patient’s medical record for factors that
increase the patient’s risk of adverse reactions and toxicity
to the prescribed medication.13,17
■ Check the patient’s medical record for an allergy or other
contraindication to the prescribed medication. If an allergy
or contraindications exists, don’t administer the medication;
instead, notify the practitioner.14,16
■ Gather and prepare the equipment.
■ Compare the medication label with the order in the
patient’s medical record.14,16,18,19
■ Check the expiration date on the medication. If the
medication is expired, return it to the pharmacy and obtain
a new medication.13,14,16
■ Visually inspect the medication for discoloration or any
other loss of integrity; don’t administer the medication if its
integrity is compromised.1,13,14,15,16
■ Review the drug monograph before administration (if
necessary) to ensure safe medication administration.1,15
■ Check the compatibility of the medication with the IV
solution, other medicated infusions, and the flush solution,
as appropriate.
■ Discuss any unresolved concerns about the medication
with the patient’s practitioner.13,16
■ Perform hand hygiene.1,2,3,15,20,21,22,23,24,25
■ Confirm the patient’s identity using at least two patient
identifiers.15,26,27
■ Provide privacy.28,29,30,31
■ Explain the procedure to the patient and family according
to their individual communication and learning needs to
increase their understanding, allay their fears, and enhance
cooperation.1,15
■ If the patient is receiving the medication for the first time,
teach about potential adverse reactions and discuss any
other concerns related to the medication.13,14,16
■ Raise the bed to waist level when providing care to
prevent caregiver back strain.32
■ Carefully assess the patient’s condition (including vital
signs, body systems appropriate to the prescribed
medication, and the vascular access site) to establish
baselines for comparison.
■ Perform hand hygiene.1,2,3,15,20,21,22,23,24,25,33
■ Put on gloves.34,35,36
■ If the medication isn’t in a prefilled syringe, dilute it (if
required) and draw it up in a syringe using sterile technique.
Check the medication label three times while preparing it to
prevent medication administration errors.
■ If you transferred the medication or solution from the
original packaging to another container, or if it won’t be
administered immediately, label the container with the
medication name, dosage, quantity, diluent and volume,
and expiration date, as indicated.7,37
■ Verify that the medication is being administered at the
proper time, in the prescribed dose, and by the correct route
to reduce the risk of medication errors.13,14,16,19
■ If your facility uses bar-code technology, scan your
identification badge, the patient’s identification bracelet,
and the medication’s bar code.
■ If the medication being administered is a high-alert
medication, have another nurse perform an independent
double-check (if required by your facility) before
administration to reduce the risk of medication
administration errors. Rectify any discrepancies before
administration.
NURSING ALERT A high-alert medication is a medication that can
cause significant patient harm when used in error. If required by your
facility, have another nurse perform an independent double-check to
verify the patient’s identity and to make sure that the correct
medication is being administered in the prescribed concentration, the
medication’s indication corresponds with the patient’s diagnosis, the
dosage calculations are correct and the dosing formula used to derive
the final dose is correct, the route of administration is safe and proper
for the patient, and the medication is being administered through the
correct port.38
For administration through a vascular access
device with continuous infusion
■ Trace the tubing from the patient to its point of origin to
make sure you’re accessing the proper administration set
tubing and to prevent dangerous misconnections.39,40
■ Close the flow clamp of the IV administration tubing and
pause the electronic infusion device, if in use.41
■ Perform a vigorous mechanical scrub of the lowest
needleless injection port of the administration tubing for at
least 5 seconds with an antiseptic pad; then allow it to dry
completely.1,3,15
■ While maintaining the sterility of the syringe tip, attach a
prefilled syringe containing preservative-free normal saline
or another compatible solution to the needleless connector
port closest to the patient in an existing infusion to allow the
medication to reach the circulatory system as soon as
possible. (Use a 10-mL syringe or a syringe specifically
designed to generate lower injection pressure.) Unclamp the
catheter and slowly aspirate for blood return that’s the color
and consistency of whole blood. If you don’t obtain a blood
return, take steps to locate an external cause of
obstruction.1,9,15
■ If you obtain a blood return, slowly inject preservative-
free normal saline solution into the catheter. Use a minimum
volume of twice the internal volume of the catheter system.
Don’t forcibly flush the device; further evaluate the device if
you meet resistance.8 Don’t inject against resistance;
further evaluate the vascular access device if you can’t
flush freely.1,8,15
■ Remove and discard the syringe in a puncture-resistant
sharps disposal container.36
■ Perform a vigorous mechanical scrub of the injection port
for at least 5 seconds using an antiseptic pad; then allow it
to dry completely.1,3,15
■ While maintaining the sterility of the syringe tip, attach
the medication syringe to the injection port.1,15
■ Inject the medication as prescribed and according to the
rate on the medication label; consult with the pharmacist if
a rate isn’t specified.1,15
■ If the bolus medication is compatible with the patient’s
prescribed IV solution, open the clamp on the administration
tubing, adjust the flow rate, or restart the infusion pump, as
indicated.1,9,15
■ If the bolus medication is incompatible with the patient’s
prescribed IV solution, perform a vigorous mechanical scrub
of the injection port for at least 5 seconds with an antiseptic
pad; then allow it to dry completely.1,3,15 While maintaining
the sterility of the syringe tip, attach a prefilled syringe
containing preservative-free normal saline solution to the
needleless connector. Unclamp the catheter and inject
preservative-free normal saline solution into the catheter at
the same rate of injection as the prescribed medication. Use
the amount of flush solution needed to adequately clear the
medication from the administration set lumen and the
catheter. Don’t forcibly flush the device; further evaluate the
device if you meet resistance. Consider using a pulsatile
flushing technique, because short boluses of the flush
solution interrupted by short pauses may be more effective
at removing deposits (such as fibrin, drug precipitate, and
intraluminal bacteria) than a continuous low-flow technique.
Alternatively, if the medication is incompatible with normal
saline solution, use dextrose 5% in water (D5W), followed by
preservative-free normal saline solution. Don’t allow D5W to
remain in the catheter lumen, because it provides nutrients
for biofilm growth.8 Remove and discard the syringe in a
puncture-resistant sharps disposal container.36 Open the
clamp, adjust the flow rate, or restart the electronic infusion
device, as indicated.
For administration through an intermittent
vascular access device
■ Trace the catheter from the patient to its point of origin to
make sure you’re accessing the proper port.39,40
■ If a disinfectant-containing end cap is on the end of the
needleless connector, remove and discard it.
■ Perform a vigorous mechanical scrub of the needleless
connector for at least 5 seconds using an antiseptic pad;
then allow it to dry completely.1,3,15,42
■ While maintaining the sterility of the syringe tip, attach a
prefilled syringe containing preservative-free normal saline
or another compatible solution to the needleless connector
port closest to the patient in an existing infusion to allow the
medication to reach the circulatory system as soon as
possible. (Use a 10-mL syringe or a syringe specifically
designed to generate lower injection pressure.) Unclamp the
catheter and slowly aspirate for blood return that’s the color
and consistency of whole blood. If you don’t obtain a blood
return, take steps to locate an external cause of
obstruction.1,15
■ If you obtain a blood return, slowly inject preservative-
free normal saline solution into the catheter. Use a minimum
volume of twice the internal volume of the catheter system.
Don’t forcibly flush the device; further evaluate the device if
you meet resistance.8 Don’t inject against resistance;
further evaluate the vascular access device if you can’t
flush freely.1,15
■ Remove and discard the syringe in a puncture-resistant
sharps disposal container.35,36,43
■ Perform a vigorous mechanical scrub of the needleless
connector for at least 5 seconds using an antiseptic pad.
Allow it to dry completely.1,3,15
■ While maintaining the sterility of the syringe tip, attach
the medication syringe to the needleless connector of the
venous access device.1,15
■ Inject the medication as prescribed and according to the
rate on the medication label; consult with the pharmacist if
a rate isn’t specified.1,15
■ Remove and discard the syringe in a puncture-resistant
sharps disposal container.36
■ Perform a vigorous mechanical scrub of the needleless
connector for at least 5 seconds using an antiseptic pad;
then allow it to dry completely.1,3,15
■ While maintaining the sterility of the syringe tip, attach a
prefilled syringe containing preservative-free normal saline
solution to the needleless connector. Unclamp the catheter
and inject preservative-free normal saline solution into the
catheter at the same rate of injection as the prescribed
medication. Use the amount of flush solution needed to
adequately clear the medication from the administration set
lumen and the catheter. Don’t forcibly flush the device;
further evaluate the device if you meet resistance. Consider
using a pulsatile flushing technique, because short boluses
of the flush solution interrupted by short pauses may be
more effective at removing deposits (such as fibrin, drug
precipitate, and intraluminal bacteria) than a continuous
low-flow technique. Alternatively, if the medication is
incompatible with normal saline solution, use D5W, followed
by preservative-free normal saline solution. Don’t allow D5W
to remain in the catheter lumen, because it provides
nutrients for biofilm growth.1,8,15
■ If indicated, proceed with locking the catheter.1,15 Perform
a vigorous mechanical scrub of the needleless connector for
at least 5 seconds using an antiseptic pad; then allow it to
dry completely.1,3,15 While maintaining the sterility of the
syringe tip, attach the syringe containing the locking
solution to the needleless connector.1,15 Slowly inject the
locking solution into the venous access device.1,15 After
locking the catheter, follow a clamping sequence to reduce
blood reflux based on the type of needleless connector. If
you’re using a positive-pressure needleless connector,
clamp the catheter after disconnecting the syringe.1,15 If
you’re using a negative-pressure needleless connector,
maintain pressure on the syringe while clamping the
catheter.1,15 If you’re using a neutral needleless connector,
clamp the catheter before or after disconnecting the
syringe.1,15
■ If available in your facility, apply a new disinfectant-
containing end cap to the needleless connector of the
venous access device to reduce the risk of vascular
catheter–associated infection.44
Completing the procedure
■
Discard used supplies in the appropriate
receptacles.35,36,43,45
■ Remove and discard your gloves35,36 and perform hand
hygiene.20,21,22,23,24,33
■ Return the bed to the lowest position to prevent falls and
maintain patient safety.46
■ Monitor the patient closely for adverse reactions to the
prescribed medication. If adverse reactions occur, notify the
patient’s practitioner promptly and intervene as ordered.17
■ If the patient is receiving IV opioid medication, frequently
monitor the patient’s respiratory rate, oxygen saturation
level by pulse oximetry, end-tidal carbon dioxide level by
capnography (if available), and sedation level using a
standardized sedation scale to decrease the risk of adverse
events associated with IV opioid use.13,17 Explain the
assessment and monitoring process to the patient and
family, and tell them to alert staff if the patient experiences
breathing problems or sedation.13,17
■ Perform hand hygiene.20,21,22,23,24,33
■ Document the procedure.47,48,49,50
Special considerations
■ Use single-dose vials for parenteral medications
whenever possible.35,51
■ Never administer medications from the same syringe to
more than one patient.35,51
■ Don’t enter a medication or fluid container with a used
syringe.35,51
■ Never use medications packaged as single-dose or single-
use for more than one patient. This includes ampules, bags,
and bottles of IV solutions.35,51
■ Don’t keep multidose vials in the immediate patient
treatment area. Store them in accordance with the
manufacturer’s recommendations, and discard them if their
sterility is compromised or questionable.35,51
■ Always use sterile technique when preparing and
administering injections.35,51
■ Avoid using infusion pumps to deliver bolus doses to
prevent overinfusion of highly potent medications.41
■ If you’re preparing and administering more than one IV
bolus injection medication to a patient, you should either
completely prepare and administer one medication before
preparing and administering the second, or prepare and
label one medication before preparing and labeling the next
one. To decrease the risk of medication errors, bring only
one labeled syringe with a bolus injection IV medication to
the bedside at a time.7
■ The Joint Commission issued a sentinel event alert related
to managing risk during transition to the new International
Organization for Standardization tubing standards that were
designed to prevent dangerous tubing misconnections,
which can lead to serious patient injury and death. During
the transition, make sure to trace all tubing and catheters
from the patient to their points of origin before connecting
or reconnecting any device or infusion, at any care
transition (such as a new setting or service), and as part of
the hand-off process; route tubes and catheters having
different purposes in different standardized directions; label
the tubing at both the distal and proximal ends (when there
are different access sites or several bags hanging); use
tubing and equipment only as intended; and store
medications for different delivery routes in separate
locations.39
Patient teaching
Teach the patient about the medication and its potential
adverse effects.
Complications
Because drugs administered by IV bolus injections are
delivered directly into the circulatory system and can
produce an immediate effect, an acute allergic reaction or
anaphylaxis can develop rapidly. If signs of anaphylaxis
(dyspnea, cyanosis, seizures, and increasing respiratory
distress) occur, notify the practitioner immediately and
begin emergency procedures, as necessary. Other adverse
effects vary depending on the medication administered.
Monitor for signs of local and systemic infections. Also
watch for signs of extravasation, such as redness and
swelling. If extravasation occurs, stop the injection, estimate
the amount of infiltration, and notify the practitioner.
Documentation
Record the amount and type of drug administered, date and
time of administration, route of administration, vascular
access device used, condition and patency of the vascular
access device before and after administration, and the
patient’s tolerance of the procedure.1,15,27 Also note the
medication’s effect and any adverse reactions. Document
patient teaching and the patient’s understanding of your
teaching.
REFERENCES
1 Infusion Nurses Society. (2017). Policies and procedures for infusion therapy
of the older adult (3rd ed.). Boston, MA: Infusion Nurses Society.
2 Centers for Disease Control and Prevention. (2011, revised 2017). “Guidelines
for the prevention of intravascular catheter-related infections” [Online].
Accessed via the Web at
https://www.cdc.gov/infectioncontrol/pdf/guidelines/bsi-guidelines.pdf (Level
I)
3 Marschall, J., et al. (2014). SHEA/IDSA practice recommendation: Strategies to
prevent central line-associated bloodstream infections in acute care
hospitals. Infection Control and Hospital Epidemiology, 35(7), 753–771 .
Accessed via the Web at http://www.jstor.org/stable/10.1086/676533 (Level I)
4 Jarrett, N., & Callaham, M. (2016). “Evidence-based guidelines for selected,
candidate, and previously considered hospital-acquired conditions: Final
report” [Online]. Accessed via the Web at
https://www.cms.gov/Medicare/Medicare-Fee-for-Service-
Payment/HospitalAcqCond/Downloads/2016-HAC-Report.pdf
5 Accreditation Association for Hospitals and Health Systems. (2017). Standard
07.01.02. Healthcare Facilities Accreditation Program: Accreditation
requirements for acute care hospitals. Chicago, IL: Accreditation Association
for Hospitals and Health Systems. (Level VII)
6 The Joint Commission. (2019). Standard NPSG.07.04.01. Comprehensive
accreditation manual for hospitals. Oakbrook Terrace, IL: The Joint
Commission. (Level VII)
7 Institute for Safe Medication Practices. (2015). “ISMP safe practice guidelines
for adult IV push medications” [Online]. Accessed via the Web at
http://www.ismp.org/Tools/guidelines/ivsummitpush/ivpushmedguidelines.pdf
(Level VII)
8 Standard 40. Flushing and locking. Infusion therapy standards of practice.
(2016). Journal of Infusion Nursing, 39, S77–S81. (Level VII)
9 Loubnan, V., & Nasser, S. C . (2010). A guide on intravenous drug
compatibilities based on their pH. Pharmacie Globale, International Journal of
Comprehensive Pharmacy, 5(1), 1–9 . (Level VII)
10 Standard 12. Product evaluation, integrity, and defect reporting. Infusion
therapy standards of practice. (2016). Journal of Infusion Nursing, 39, S32–
S34.
11 Westbrook, J., et al. (2010). Association of interruptions with an increased risk
and severity of medication administration errors. Archives of Internal
Medicine, 170(8), 683–690 . (Level IV)
12 Institute for Safe Medication Practices. (2012). Side tracks on the safety
express: Interruptions lead to errors and unfinished...Wait what was I doing?
Nurse Advise-ERR, 11(2), 1–4 . Accessed via the Web at
https://www.ismp.org/Newsletters/acutecare/showarticle.aspx?id=37
13 Centers for Medicare and Medicaid Services, Department of Health and
Human Services. (2015). Condition of participation: Nursing services. 42
C.F.R. § 482.23(c).
14 The Joint Commission. (2019). Standard MM.06.01.01. Comprehensive
accreditation manual for hospitals. Oakbrook Terrace, IL: The Joint
Commission. (Level VII)
15 Infusion Nurses Society. (2016). Policies and procedures for infusion therapy
(5th ed.). Boston, MA: Infusion Nurses Society.
16 Accreditation Association for Hospitals and Health Systems. (2017). Standard
16.01.03. Healthcare Facilities Accreditation Program: Accreditation
requirements for acute care hospitals. Chicago, IL: Accreditation Association
for Hospitals and Health Systems. (Level VII)
17 Centers for Medicare and Medicaid Services. (2014). “Requirements for
hospital medication administration, particularly intravenous (IV) medications
and post-operative care of patients receiving IV opioids” [Online]. Accessed
via the Web at http://www.cms.gov/Medicare/Provider-Enrollment-and-
Certification/SurveyCertificationGenInfo/Downloads/Survey-and-Cert-Letter-
14-15.pdf
18 Centers for Medicare and Medicaid Services, Department of Health and
Human Services. (2015). Condition of participation: Pharmaceutical services.
42 C.F.R. § 482.25 .
19 DNV GL-Healthcare USA, Inc. (2016). MM.1 .SR.2. NIAHO® accreditation
requirements: Interpretive guidelines and surveyor guidance (version 11).
Milford, OH: DNV GL-Healthcare USA, Inc. (Level VII)
20 Centers for Disease Control and Prevention. (2002). Guideline for hand
hygiene in health-care settings: Recommendations of the Healthcare Infection
Control Practices Advisory Committee and the HICPAC/SHEA/APIC/IDSA Hand
Hygiene Task Force. MMWR Recommendations and Reports, 51(RR-16), 1–45.
Accessed via the Web at https://www.cdc.gov/mmwr/pdf/rr/rr5116.pdf (Level
II)
21 World Health Organization. (2009). “WHO guidelines on hand hygiene in
health care: First global patient safety challenge, clean care is safer care”
[Online]. Accessed via the Web at
http://apps.who.int/iris/bitstream/10665/44102/1/9789241597906_eng.pdf
(Level IV)
22 The Joint Commission. (2019). Standard NPSG.07.01.01. Comprehensive
accreditation manual for hospitals. Oakbrook Terrace, IL: The Joint
Commission. (Level VII)
23 Accreditation Association for Hospitals and Health Systems. (2017). Standard
07.01.21. Healthcare Facilities Accreditation Program: Accreditation
requirements for acute care hospitals. Chicago, IL: Accreditation Association
for Hospitals and Health Systems. (Level VII)
24 Centers for Medicare and Medicaid Services, Department of Health and
Human Services. (2015). Condition of participation: Infection control. 42 C.F.R.
§ 482.42.
25 DNV GL-Healthcare USA, Inc. (2016). IC.1 .SR.1 . NIAHO® accreditation
requirements: Interpretive guidelines and surveyor guidance (version 11).
Milford, OH: DNV GL-Healthcare USA, Inc. (Level VII)
26 The Joint Commission. (2019). Standard NPSG.01.01.01. Comprehensive
accreditation manual for hospitals. Oakbrook Terrace, IL: The Joint
Commission. (Level VII)
27 Standard 57. Parenteral medication and solution administration. Infusion
therapy standards of practice. (2016). Journal of Infusion Nursing, 39, S125–
S127. (Level VII)
28 Accreditation Association for Hospitals and Health Systems. (2017). Standard
15.01.16. Healthcare Facilities Accreditation Program: Accreditation
requirements for acute care hospitals. Chicago, IL: Accreditation Association
for Hospitals and Health Systems. (Level VII)
29 Centers for Medicare and Medicaid Services, Department of Health and
Human Services. (2015). Condition of participation: Patient’s rights. 42 C.F.R.
§ 482.13 (c)(1).
30 DNV GL-Healthcare USA, Inc. (2016). PR.1.SR.5 . NIAHO® accreditation
requirements: Interpretive guidelines and surveyor guidance (version 11).
Milford, OH: DNV GL-Healthcare USA, Inc. (Level VII)
31 The Joint Commission. (2019). Standard RI.01.01.01. Comprehensive
accreditation manual for hospitals. Oakbrook Terrace, IL: The Joint
Commission. (Level VII)
32 Waters, T. R., et al. (2009). “Safe patient handling training for schools of
nursing” [Online]. Accessed via the Web at
http://www.cdc.gov/niosh/docs/2009-127/pdfs/2009-127.pdf (Level VII)
33 Standard 16. Hand hygiene. Infusion therapy standards of practice. (2016).
Journal of Infusion Nursing, 39, S38–S39 . (Level VII)
34 Infusion Nurses Society. (2013). “INS position paper: Recommendations for
improving safety practices with short peripheral catheters” [Online].
Accessed via the Web at
http://eo2.commpartners.com/users/inskc/downloads/140204_IV_Safety_Positi
on_Paper.pdf (Level VII)
35 Siegel, J. D ., et al. (2007). “2007 guideline for isolation precautions:
Preventing transmission of infectious agents in healthcare settings” [Online].
Accessed via the Web at
http://www.cdc.gov/hicpac/pdf/isolation/Isolation2007.pdf (Level II)
36 Occupational Safety and Administration. (n.d.). “Bloodborne pathogens,
standard number 1910.1030” [Online]. Accessed via the Web at
http://www.osha.gov/pls/oshaweb/owadisp.show_document?
p_id=10051&p_table=STANDARDS (Level VII)
37 The Joint Commission. (2019). Standard NPSG.03 .04.01. Comprehensive
accreditation manual for hospitals. Oakbrook Terrace, IL: The Joint
Commission. (Level VII)
38 Institute for Safe Medication Practices. (2008). Conducting an independent
double-check. ISMP Medication Safety Alert! Nurse Advise-ERR, 6(12), 1.
Accessed via the Web at
http://www.ismp.org/newsletters/nursing/Issues/NurseAdviseERR200812.pdf
(Level VII)
39 The Joint Commission. (2014). “Sentinel event alert: Managing risk during
transition to new ISO tubing connector standards” [Online]. Accessed via the
Web at
http://www.jointcommission.org/assets/1/6/SEA_53_Connectors_8 _19_14 _final.
pdf (Level VII)
40 U.S . Food and Drug Administration. (n.d .). “Look. Check. Connect. Safe
medical device connections save lives” [Online]. Accessed via the Web at
http://www.fda.gov/downloads/MedicalDevices/Safety/AlertsandNotices/UCM1
34873.pdf
41 Health Technology Safety Research Team in Collaboration with ISMP Canada.
(2012). “Mitigating the risks associated with multiple IV infusions:
Recommendations based on a field study of twelve Ontario hospitals”
[Online]. Accessed via the Web at http://s3.amazonaws.com/rdcms-
aami/files/production/public/FileDownloads/Foundation/Infusion/062012_Multi
pleIVInfusions_Phase1bSummary_Recommendations_Rationale.pdf (Level VII)
42 Standard 34. Needleless connectors. Infusion therapy standards of practice.
(2016). Journal of Infusion Nursing, 39, S68–S70. (Level VII)
43 Standard 18. Medical waste and sharps safety. Infusion therapy standards of
practice. (2016). Journal of Infusion Nursing, 39, S40–S41. (Level VII)
44 Moureau, N. L., & Flynn, J. (2015). Disinfection of needleless connector hubs:
Clinical evidence systematic review. Nursing Research and Practice, 2015,
Article ID 796762. Accessed via the Web at
https://www.hindawi.com/journals/nrp/2015/796762/
45 Accreditation Association of Hospitals and Health Systems. (2017). Standard
07.03 .07. Healthcare Facilities Accreditation Program: Accreditation
requirements for acute care hospitals. Chicago, IL: Accreditation Association
for Hospitals and Health Systems. (Level VII)
46 Ganz, D. A., et al. (2013). Preventing falls in hospitals: A toolkit for improving
quality of care (AHRQ Publication No. 13-0015-EF). Rockville, MD: Agency for
Healthcare Research and Quality. Accessed via the Web at
http://www.ahrq.gov/sites/default/files/publications/files/fallpxtoolkit.pdf
(Level VII)
47 The Joint Commission. (2019). Standard RC.01.03 .01. Comprehensive
accreditation manual for hospitals. Oakbrook Terrace, IL: The Joint
Commission. (Level VII)
48 Standard 10. Documentation in the medical record. Infusion therapy
standards of practice. (2016). Journal of Infusion Nursing, 39, S28–S30 . (Level
VII)
49 Centers for Medicare and Medicaid Services, Department of Health and
Human Services. (2015). Condition of participation: Medical record services.
42 C.F.R. § 482.24(b).
50 DNV GL-Healthcare USA, Inc. (2016). MR.2 .SR.1 . NIAHO® accreditation
requirements: Interpretive guidelines and surveyor guidance (version 11).
Milford, OH: DNV GL-Healthcare USA, Inc. (Level VII)
51 Centers for Disease Control and Prevention. (2011). “Safe injection practices
to prevent transmission of infections to patients” [Online]. Accessed via the
Web at http://www.cdc.gov/injectionsafety/IP07_standardPrecaution.html
(Level I)
IV CATHETER INSERTION AND REMOVAL
Short peripheral IV catheter insertion involves selection of a
venipuncture device and an insertion site, application of a
tourniquet, site preparation, venipuncture, catheter
securement, and dressing application. Select a venipuncture
device and site according to the patient’s vascular access
device needs based on the prescribed therapy or treatment
regimen, anticipated duration of therapy, vascular
characteristics, and the patient’s age, comorbidities, history
of infusion therapy, preference for IV catheter location, and
ability and resources available to care for the device.
A short peripheral catheter allows administration of fluids,
medication, blood, and blood components and maintains IV
access to the patient. Peripheral catheters are
recommended for use with infusates with an osmolality of
900 mOsm/L or less, and a therapy regimen of fewer than 6
days.1,2
Select the smallest gauge short peripheral catheter that
will accommodate the prescribed therapy. For example,
consider a 20G to 24G for most infusion therapies, including
blood transfusion, because peripheral catheters larger than
20G are more likely to cause phlebitis. For older adults,
consider a 22G to 24G catheter to minimize insertion-
related trauma. Consider a larger gauge catheter of 14G to
18G for rapid transfusion or 16G to 20G for rapid fluid
replacement, as in a trauma case or when a fenestrated
catheter is needed for a contrast-based radiographic
study.1,2,3
If you anticipate long-term therapy, start with a vein at
the most distal site so that you can move proximally, as
needed, for subsequent IV insertion sites. (See Choosing an
IV insertion site.) Cannulation of hemodialysis catheters,
fistulas, and grafts for IV infusion therapy requires an order
from a nephrologist or practitioner unless an emergency
situation exists.4
Follow sterile technique when inserting an IV catheter to
reduce the risk of vascular catheter–associated
infection.1,3,5
Choosing an IV insertion site
The following guidelines may be useful when choosing an appropriate
peripheral IV insertion site.
■ Use veins on the dorsal and ventral surfaces of the upper extremities,
including the metacarpal, cephalic, basilic, and median veins. If possible,
choose a vein in the nondominant arm or hand.4
■ Avoid using veins in an upper extremity on the side of breast surgery with
axillary node dissection or with an arteriovenous fistula or graft, radiation
therapy, or lymphedema, or an extremity affected by stroke.4
■ If the patient has stage 4 or 5 chronic kidney disease, avoid using the
upper arm or forearm veins that could be the site of dialysis access.4
■ Avoid using lower extremity veins because of the increased risk of tissue
damage, thrombophlebitis, and ulceration.
■ Avoid areas of flexion; areas where pain occurs on palpation; veins
compromised by bruising, infiltration, phlebitis, sclerosis, or cord formation;
and areas where procedures are planned.
■ Avoid the lateral surface of the wrist for about 4′′ to 5′′ (10.2 cm to 12.7
cm) because of the risk of nerve damage; avoid the ventral surface of the
wrist because of the associated pain on insertion and the risk of nerve
damage.
■ Take care to insert catheters away from open wounds.
■ Make each successive cannulation site proximal to the previous
cannulation site.
■ Collaborate with the patient and practitioner to discuss the risks and
benefits of using a vein in an affected extremity if no other options exist.
■ For an older adult, choose an area with more subcutaneous tissue and
skeletal support for better device stabilization, keeping in mind the need to
conserve access for future therapy.5
■ If the patient uses an ambulatory aid to maintain independence, determine
on which side the patient uses the device; avoid inserting the device in the
hands and in areas of flexion.5,6
■ Allow an older adult to have input regarding the site of catheter insertion,
because many older adults have previous experience with infusion therapy
and can indicate what has been successful or unsuccessful.5
■ If the patient isn’t very mobile, consider using an extremity that most
easily allows access to the bathroom or commode.5
HOSPITAL-ACQUIRED CONDITION ALERT Keep in mind that a vascular
catheter–associated infection is considered a hospital-acquired
condition because it can be reasonably prevented using best practices.
Follow infection prevention techniques (such as performing hand
hygiene, preparing the site with an antiseptic, adhering to sterile
technique during insertion and maintenance, and discontinuing the
device when it’s no longer needed) to reduce the risk of vascular
catheter–associated infection.6,7,8
Equipment
For insertion
Chlorhexidine-based solution9 (tincture of iodine, povidone-
iodine, or alcohol may be used if a contraindication to
chlorhexidine exists) ▪ gloves ▪ single-use tourniquet ▪
short peripheral catheters with safety device2 ▪ antiseptic
pad (chlorhexidine-based, povidone-iodine, or alcohol) ▪
prescribed IV solution with attached and primed
administration set ▪ IV pole ▪ transparent semipermeable
dressing ▪ engineered stabilization device ▪ Optional: soap
and water, joint stabilization device, arm packs, single-use
scissors, disposable-head clippers, vein stabilization device,
prescribed local anesthetic, sterile gloves, short extension
set (if not permanently attached to the IV catheter),
electronic infusion device, manual flow-control device,
ultrasound device with sterile probe cover, sterile
ultrasound gel.
Commercial IV insertion kits come with or without an IV
access device. In many facilities, venipuncture equipment is
kept on a tray or cart, allowing more choice of access
devices and easy replacement of contaminated items.10
For removal
Gloves ▪ sterile gauze pads ▪ tape ▪ Optional: culture swab
and tube, adhesive remover, small adhesive dressing.
Preparation of equipment
Inspect all IV equipment and supplies; if a product is
expired, if its integrity is compromised, or if you find it
defective, remove it from patient use, label it as expired or
defective, and report the expiration or defect as directed by
your facility.11
Prime the IV administration set with the prescribed IV
solution or medication. (See the “IV therapy preparation”
procedure.) Use a manual flow-control device for lower risk
infusions, an electronic infusion device for infusion therapies
that require precise flow control, and a smart pump with
dose-error reduction software to reduce the risk of infusion-
related medication errors.12 (See the “IV pump use”
procedure.)
Implementation
■ Verify the practitioner’s order for insertion of a short
peripheral IV catheter. Review the order to make sure that
the prescribed infusion solution or medication, dose, rate,
and route of administration are appropriate for the patient’s
age, condition, and access device. Address concerns about
the order with the practitioner, pharmacist, or your
supervisor and, if needed, the risk management
department, or as directed by your facility.13
■ Review the patient’s medical record for allergies to
antiseptic solutions, latex, and anesthetic agents. Also
review it for factors that may affect peripheral vasculature,
such as conditions that result in structural vessel changes,
including diabetes or hypertension, history of frequent
venipuncture or lengthy infusion therapy, skin variations,
skin alterations (such as scars and tattoos), patient age,
obesity, fluid volume deficit, or history of IV drug abuse, to
determine the need for vascular visualization technology.14
■ Gather and prepare the appropriate equipment.
■ Compare the label on the solution container to the order
in the patient’s medical record. Verify the name, dosage,
concentration, administration route, frequency, and infusion
rate.15,16
■ Inspect the solution for discoloration or particulate matter
and inspect the container for leaks, cracks, or other signs of
integrity loss.3,5,13 Obtain new IV solution if the integrity is
compromised.
■ Perform hand hygiene.1,17,18,19,20,21,22,23
■ Confirm the patient’s identity using at least two patient
identifiers.24
■ Provide privacy.25,26,27,28
■ Explain the procedure to the patient to ensure
cooperation and reduce anxiety. Anxiety can cause a
vasomotor response that results in venous constriction.
Provide the patient with information about the insertion
process, expected duration of therapy, care and
maintenance of the IV catheter, and signs and symptoms of
complications as well as when to report them.9,29
■ Obtain informed consent and place the consent form in
the patient’s medical record if required by your facility.
Alternatively, obtain patient assent to perform the
procedure.3
■ Hang the IV solution with attached primed administration
set on an IV pole positioned close to the patient’s bed.
■ Raise the patient’s bed to waist level when providing care
to prevent caregiver back strain.30
■ Place the patient in a comfortable sitting or reclining
position, leaving the arm in a dependent position to increase
venous fill of the lower arms and hands.9
Applying the tourniquet
■ Apply a tourniquet on an upper extremity to dilate the
veins and assess for an appropriate insertion site. Loosely
apply the tourniquet or avoid its use in patients who bruise
easily, are at risk for bleeding, or have compromised
circulation or fragile skin.9
■ Assess the patient’s veins in the upper extremity and
identify potential sites that are easily seen or palpated. If no
access sites are visible or easily palpated, use visualization
technology to help identify an appropriate insertion site.
Choose an insertion site based on your assessment
findings.3
■ Check for a pulse distal to the tourniquet location.3,5 If a
pulse isn’t present, release the tourniquet and reapply it
with less tension to prevent arterial occlusion.
■ Lightly palpate the vein with the index and middle fingers
of your nondominant hand to assess vein condition.3 Stretch
the skin to anchor the vein. If the vein feels hard or ropelike,
select another vein.
■ If the vein is easily palpable but not sufficiently dilated,
place the extremity in a dependent position for several
seconds or lightly stroke the vessel downward. If you have
selected a vein in the arm or hand, tell the patient to open
and close the fist several times, and lightly stroking the vein
downward. Apply dry heat, if necessary, to increase the
likelihood of successful catheter insertion.3,5,9
■ Release the tourniquet for site preparation.3,5
Preparing the site
■ If the intended insertion site is visibly soiled, clean it with
soap and water before applying the antiseptic solution.3,5,9
■ Clip the hair around the insertion site, if needed, with
single-patient-use-scissors or disposable-head electric
clippers to facilitate dressing application after catheter
insertion.9
■ Administer a local anesthetic, if indicated and prescribed,
following safe medication administration practices.3,31,32
Because there’s less supportive underlying tissue in older
adults, take care not to nick or damage the vein when
administering a local anesthetic; avoid inadvertently
administering the anesthetic intravascularly.
■ Perform hand hygiene.1,17,18,19,20,21,22,23
■ Put on gloves.1,33,34,35
■ Clean the intended site and surrounding skin with
chlorhexidine using a back-and-forth scrubbing motion for at
least 30 seconds to remove flora that would otherwise be
introduced into the vascular system with the venipuncture.
Allow the antiseptic to dry completely.3,9 If you musty
palpate the intended insertion site after cleaning, remove
and discard your gloves, perform hand hygiene, and put on
sterile gloves to avoid contaminating the insertion site.3
ELDER ALERT Be aware that, although antiseptic agents should be
applied with friction, irritated skin may become more damaged,
causing discomfort in older adults. Antiseptics can cause stinging and
irritation. Excessive amounts of alcohol may dry already compromised
skin.5
■ Reapply the tourniquet.3
■ Use visualization technology, such as near-infrared light
technology (as shown below), if needed and available, to
locate a viable peripheral venous access site and decrease
insertion time, or use ultrasound technology, if available, to
locate the vein in a patient with difficult venous
access.9,36,37
■ Using the thumb of your nondominant hand, stretch the
skin taut below the puncture site to stabilize the vein.3 If the
patient is an older adult, anchor the vein distal to the
intended insertion site; the vein may be difficult to stabilize
and penetrate because of the aging process.5
Inserting the device
■ Tell the patient that you are about to insert the device.
■ Place the short peripheral catheter on top of the vein at a
10- to 15-degree angle from the skin.3
■ Puncture the skin and anterior vein wall, watching for a
blood return to appear in the catheter, flashback chamber,
or both.3
■ As you continue to hold the skin taut, use the device’s
push-off tab to separate the catheter from the needle stylet.
Advance the catheter into the vein. Don’t advance the
catheter by pushing from the catheter hub to avoid
contaminating the catheter hub.3
■ Release the tourniquet.3
■ Activate the device’s safety mechanism following the
manufacturer’s instructions for use.3
■ If the catheter doesn’t contain a permanently attached
extension tubing and you need to attach one, compress the
patient’s skin well above the catheter tip to stop blood flow,
attach the extension set to the catheter hub, and tighten
the Luer lock, making sure the Luer lock doesn’t come in
contact with the patient’s skin to prevent contamination of
the Luer-lock device.3
■ Perform a vigorous mechanical scrub of the extension
tubing hub for at least 5 seconds using an antiseptic pad.
Allow it to dry completely.38,39,40
■ While maintaining sterility of the syringe tip, attach a
prefilled syringe containing preservative-free normal saline
solution to the extension set hub. (Use a 10-mL syringe or a
syringe specifically designed to generate lower injection
pressure.) Slowly aspirate to remove air from the extension
set and to assess for a blood return that is the color and
consistency of whole blood. If you don’t obtain a blood
return, take steps to locate an external cause of
obstruction.3,38
■ If you do obtain a blood return, slowly inject preservative-
free normal saline solution into the catheter. Use a minimum
volume of twice the internal volume of the catheter system.
Don’t forcibly flush the device; further evaluate the device if
you meet resistance.3,38
■ Clamp the catheter, and then remove and discard the
syringe in a puncture-resistant sharps disposal container.3
■ Perform a vigorous mechanical scrub of the extension
tubing hub for at least 5 seconds using an antiseptic pad.
Allow it to dry completely.38,39,40
■ Attach the primed IV administration set to the hub. Trace
the tubing from the patient to its point of origin to make
sure that you’re connecting it to the proper port.13,41
■ Unclamp the catheter and begin the infusion, as
prescribed. Monitor the insertion site for swelling; remove
the catheter if swelling occurs or the patient complains of
discomfort or pain.3
Dressing the site
■ Secure the catheter with an engineered stabilization
device, if available. An engineered stabilization device is
recommended because it reduces vascular access device
motion, which increases the risk of unintentional catheter
dislodgment and complications requiring premature
catheter removal.29 If an engineered stabilization device is
unavailable, secure the catheter with sterile tape.3
■ Apply a transparent semipermeable dressing over the
insertion site following the manufacturer’s instructions.29 If
the patient has fragile skin, use a dressing specifically
formulated for fragile skin to prevent skin stripping or
tearing with removal.42
■ Route the tubing in a standardized direction if the patient
has other tubing and catheters that have different purposes.
Label the tubing at the distal end (near the patient
connection) and proximal end (near the source container) to
reduce the risk of misconnection if you’ll be using multiple
IV access sites or IV bags.43
■ Curl the extension set to the side and tape it to the
patient’s arm if needed for extra securement.3
■ Label the dressing with the current date or the date the
dressing is due to be changed, as directed by your facility.3
■ If the IV catheter insertion site is near a movable joint,
stabilize the joint using a padded joint stabilization device
that supports the area of flexion and maintains the joint in a
functional position. Secure the joint stabilization device
following the manufacturer’s instructions. Make sure the
device enables visualization and assessment of the insertion
site and vascular pathway. Ensure that it doesn’t exert
pressure that constricts circulation or cause pressure
injuries, skin impairment, or nerve damage. Periodically
remove the device to assess circulation, range of motion,
function, and skin integrity.44
Removing an IV catheter
■ Verify the order to remove the peripheral IV catheter.3,45
■ Gather the appropriate equipment.
■ Perform hand hygiene.1,17,18,19,20,21,22,23
■ Confirm the patient’s identity using at least two patient
identifiers.24
■ Provide privacy.25,26,27,28
■ Explain the procedure to the patient to increase
understanding, allay fears, and enhance cooperation.3
■ Raise the patient’s bed to waist level when providing care
to prevent caregiver back strain.30
■ Place the patient in a sitting or recumbent position.3
■ Open a sterile gauze pad and place it within reach on a
clean barrier.
■ Perform hand hygiene.1,17,18,19,20,21,22,23
■
Put on gloves to comply with standard
precautions.1,33,34,35
■ Trace the IV administration set tubing from the patient to
its point of origin to make sure you’re accessing the proper
IV administration set.41
■ Clamp the IV administration set tubing, the extension set,
or both to stop the flow of solution.3
■ Remove the joint stabilization device, if present.
■ Remove the transparent dressing by pulling the dressing
edges back toward the IV insertion site to avoid stripping or
tearing the skin.5,42
■ Remove the catheter securement device, if present.3,5
■ Apply the appropriate solution indicated to loosen the
dressing and securement device adhesive, if necessary.3
■ Inspect the catheter–skin junction for signs of infection or
phlebitis.3,5,8 If signs of vascular catheter-associated
infection are present, notify the practitioner and discuss the
need for obtaining specimens for culture (e.g .,
blood,
drainage) before removing the IV catheter.3 Obtain culture
specimens as indicated and ordered.3
■ Hold the gauze pad over the IV insertion site with one
hand, and use your other hand to withdraw the cannula
slowly and smoothly, keeping it parallel to the skin.3
■ Using the gauze pad, apply firm pressure over the
puncture site until bleeding has stopped (for a minimum of
30 seconds).3,5
■ Assess the IV catheter tip after removal for damage and
possible fragmentation. If damage is seen or suspected, a
chest X-ray or further evaluation may be warranted. Assess
the patient carefully for signs and symptoms of catheter
embolism (for example, palpitations, arrhythmias, dyspnea,
cough, thoracic pain that isn’t associated with the patient’s
primary condition or comorbidities).3
■ Return the bed to the lowest level to prevent falls and
maintain patient safety.46
■
Discard used supplies in an appropriate
receptacle.33,34,47,48
■ Remove and discard your gloves.33,34,47
■ Perform hand hygiene.1,17,18,19,20,21,22,23
■ Document the procedure.49,50,51,52,53
Special considerations
■ One nurse should make no more than two attempts at
insertion, and total attempts should be limited to no more
than four, because unsuccessful attempts limit future
attempts and cause the patient unnecessary pain, delay
treatment, limit future vascular access, increase cost, and
increase risk of complications.9
■ If the patient reports symptoms of paresthesia, such as
radiating electrical pain, tingling, burning, prickly feeling, or
numbness, immediately stop the insertion procedure and
carefully remove the catheter. Also stop the procedure upon
the patient’s request or when the patient’s actions indicate
severe pain. Notify the practitioner of the patient’s report of
symptoms, because early recognition of nerve damage
produces a better prognosis. Document the details of the
patient’s report of symptoms in the medical record.54
■ If the patient reports a burning sensation during the
injection of preservative-free normal saline solution, stop
the injection and check catheter placement. If the catheter
is in the vein, inject the preservative-free normal saline
solution at a slower rate to minimize irritation. If the
catheter isn’t in the vein, remove and discard it; then select
a new venipuncture site and, using fresh equipment, restart
the procedure.55
■ The Joint Commission has issued a sentinel event alert
related to managing risk during transition to new
International Organization for Standardization tubing
standards designed to prevent dangerous tubing
misconnections, which can lead to serious patient injury and
death. During the transition, be sure to trace the tubing and
catheter from the patient to its point of origin before
connecting or reconnecting any device or infusion, at any
care transition (such as a new setting or service), and as
part of the handoff process. Route tubes and catheters with
different purposes in different standardized directions. Label
the tubing at the distal and proximal ends when there are
different access sites or several bags hanging. Use tubing
and equipment only as intended. Store medications for
different delivery routes in separate locations.43
■ After removal, change the IV catheter dressing every 24
hours until the exit site heals3,5 and monitor the site for 48
hours to detect postinfusion phlebitis.56
Complications
Improper insertion technique during peripheral IV catheter
insertion may cause vascular catheter–associated infection,
hematoma, and bleeding.
Complications of IV catheter removal include hematoma,
local or systemic infection, phlebitis, and catheter
embolism.
Documentation
Document the date and time of insertion; the type, gauge,
and length of the vascular access device; the anatomic
location of the insertion site; the number and location of
attempts; and the functionality of the device.
Record the local anesthetic, if used, site preparation, and
whether visualization or ultrasound technology was used to
guide insertion. Also document the type and flow rate of the
IV solution, the name and dose of medication in the solution
(if any), any adverse reactions and actions taken to correct
them, patient teaching, and evidence of patient
understanding.50
Record the date and time of catheter removal, the site
from which the catheter was removed, the condition of the
catheter site and catheter, the patient’s tolerance of the
procedure, and any patient teaching provided and the
patient’s response to your teaching.
REFERENCES
1 Centers for Disease Control and Prevention. (2011, revised 2017). “Guidelines
for the prevention of intravascular catheter–related infections” [Online].
Accessed via the Web at http://www.cdc.gov/hicpac/pdf/guidelines/bsi-
guidelines-2011.pdf (Level I)
2 Standard 26. Vascular access device (VAD) planning. Infusion therapy
standards of practice. (2016). Journal of Infusion Nursing, 39, S51–S54. (Level
VII)
3 Infusion Nurses Society. (2016). Policies and procedures for infusion therapy
(5th ed.). Boston, MA: Infusion Nurses Society.
4 Standard 27. Site selection. Infusion therapy standards of practice. (2016).
Journal of Infusion Nursing, 39, S54–S58. (Level VII)
5 Infusion Nurses Society. (2017). Policies and procedures for infusion therapy
of the older adult (3rd ed.). Boston, MA: Infusion Nurses Society.
6 Vizcarra, C., et al. (2014). “Recommendations for improving safety practices
with short peripheral catheters.” Journal of Infusion Nursing, 37(2), 121–124.
(Level VII)
7 Jarrett, N., & Callaham, M. (2016). “Evidence-based guidelines for selected,
candidate, and previously considered hospital-acquired conditions: Final
report” [Online]. Accessed via the Web at
https://www.cms.gov/Medicare/Medicare-Fee-for-Service-
Payment/HospitalAcqCond/Downloads/2016-HAC-Report.pdf
8 Standard 49. Infection. Infusion therapy standards of practice. (2016). Journal
of Infusion Nursing, 39, S106–S108. (Level VII)
9 Standard 33. Vascular access site preparation and device placement. Infusion
therapy standards of practice. (2016). Journal of Infusion Nursing, 39, S64–
S67. (Level VII)
10 Franklin, B. D., et al. (2012). The safe insertion of peripheral intravenous
catheters: A mixed methods descriptive study of the availability of the
equipment needed. Antimicrobial Resistance and Infection Control, 1, 15.
Accessed via the Web at http://www.aricjournal.com/content/1/1/15 (Level VII)
11 Standard 12. Product evaluation, integrity, and defect reporting. Infusion
therapy standards of practice. (2016). Journal of Infusion Nursing, 39, S32–
S34. (Level VII)
12 Standard 24. Flow-control devices. Infusion therapy standards of practice.
(2016). Journal of Infusion Nursing, 39, S48–S49. (Level VII)
13 Standard 57. Parenteral medication and solution administration. Infusion
therapy standards of practice. (2016). Journal of Infusion Nursing, 39, S125–
S127. (Level VII)
14 Standard 22. Vascular visualization. Infusion therapy standards of practice.
(2016). Journal of Infusion Nursing, 39, S44–S46. (Level VII)
15 Centers for Medicare and Medicaid Services, Department of Health and
Human Services. (2015). Condition of participation: Nursing services. 42
C.F.R. § 482.23(c).
16 Accreditation Association for Hospitals and Health Systems. (2017). Standard
16.01.03. Healthcare Facilities Accreditation Program: Accreditation
requirements for acute care hospitals. Chicago, IL: Accreditation Association
for Hospitals and Health Systems. (Level VII)
17 The Joint Commission. (2019). Standard NPSG.07.01.01. Comprehensive
accreditation manual for hospitals. Oakbrook Terrace, IL: The Joint
Commission. (Level VII)
18 Standard 16. Hand hygiene. Infusion therapy standards of practice. (2016).
Journal of Infusion Nursing, 39, S38–S39 . (Level VII)
19 Centers for Disease Control and Prevention. (2002). Guideline for hand
hygiene in health-care settings: Recommendations of the Healthcare Infection
Control Practices Advisory Committee and the HICPAC/SHEA/APIC/IDSA Hand
Hygiene Task Force. MMWR Recommendations and Reports, 51(RR-16), 1–45.
Accessed via the Web at https://www.cdc.gov/mmwr/pdf/rr/rr5116.pdf (Level
II)
20 World Health Organization. (2009). “WHO guidelines on hand hygiene in
health care: First global patient safety challenge, clean care is safer care”
[Online]. Accessed via the Web at
http://apps.who.int/iris/bitstream/10665/44102/1/9789241597906_eng.pdf
(Level IV)
21 Accreditation Association for Hospitals and Health Systems. (2017). Standard
07.01.21. Healthcare Facilities Accreditation Program: Accreditation
requirements for acute care hospitals. Chicago, IL: Accreditation Association
for Hospitals and Health Systems. (Level VII)
22 Centers for Medicare and Medicaid Services, Department of Health and
Human Services. (2015). Condition of participation: Infection control. 42 C.F.R.
§ 482.42.
23 DNV GL-Healthcare USA, Inc. (2016). IC.1 .SR.1 . NIAHO® accreditation
requirements: Interpretive guidelines and surveyor guidance (version 11).
Milford, OH: DNV GL-Healthcare USA, Inc. (Level VII)
24 The Joint Commission. (2019). Standard NPSG.01.01.01. Comprehensive
accreditation manual for hospitals. Oakbrook Terrace, IL: The Joint
Commission. (Level VII)
25 Accreditation Association for Hospitals and Health Systems. (2017). Standard
15.01.16. Healthcare Facilities Accreditation Program: Accreditation
requirements for acute care hospitals. Chicago, IL: Accreditation Association
for Hospitals and Health Systems. (Level VII)
26 Centers for Medicare and Medicaid Services, Department of Health and
Human Services. (2015). Condition of participation: Patient’s rights. 42 C.F.R.
§ 482.13(c)(1).
27 DNV GL-Healthcare USA, Inc. (2016). PR.1.SR.5 . NIAHO® accreditation
requirements: Interpretive guidelines and surveyor guidance (version 11).
Milford, OH: DNV GL-Healthcare USA, Inc. (Level VII)
28 The Joint Commission. (2019). Standard RI.01.01.01. Comprehensive
accreditation manual for hospitals. Oakbrook Terrace, IL: The Joint
Commission. (Level VII)
29 Standard 37. Vascular access device (VAD) stabilization. Infusion therapy
standards of practice. (2016). Journal of Infusion Nursing, 39, S72–S74. (Level
VII)
30 Waters, T. R., et al. (2009). “Safe patient handling training for schools of
nursing” [Online]. Accessed via the Web at
http://www.cdc.gov/niosh/docs/2009-127/pdfs/2009-127.pdf
31 Standard 32. Local anesthesia for vascular access device (VAD) placement
and access. Infusion therapy standards of practice. (2016). Journal of Infusion
Nursing, 39, S63–S64. (Level VII)
32 DNV GL-Healthcare USA, Inc. (2016). MM.1 .SR.2. NIAHO® accreditation
requirements: Interpretive guidelines and surveyor guidance (version 11).
Milford, OH: DNV GL-Healthcare USA, Inc. (Level VII)
33 Occupational Safety and Health Administration. (n.d .). “Bloodborne
pathogens, standard number 1910.1030” [Online]. Accessed via the Web at
https://www.osha.gov/pls/oshaweb/owadisp.show_document?
p_id=10051&p_table=STANDARDS (Level VII)
34 Siegel, J. D ., et al. (2007, revised 2017). “2007 guideline for isolation
precautions: Preventing transmission of infectious agents in healthcare
settings” [Online]. Accessed via the Web at
http://www.cdc.gov/hicpac/pdf/isolation/Isolation2007.pdf (Level II)
35 Accreditation Association for Hospitals and Health Systems. (2017). Standard
07.01.10. Healthcare Facilities Accreditation Program: Accreditation
requirements for acute care hospitals. Chicago, IL: Accreditation Association
for Hospitals and Health Systems. (Level VII)
36 Meer, J. M. (2015). Ultrasonography assisted peripheral line placement.
Medscape. Accessed via the Web at
http://emedicine.medscape.com/article/1433943-overview (Level VII)
37 Arnold, K. (2011). Ultrasound guided peripheral IV insertion. Ivy League
Nurse.com. Accessed via the Web at
http://www.ivyleaguenurse.com/courses/Ultrasound_Guided_PIVs.pdf
38 Standard 40. Flushing and locking. Infusion therapy standards of practice.
(2016). Journal of Infusion Nursing, 39, S77–S81. (Level VII)
39 Marschall, J., et al. (2014). SHEA/IDSA practice recommendation: Strategies
to prevent central line-associated bloodstream infections in acute care
hospitals. Infection Control and Hospital Epidemiology, 35(7), 753–771 .
Accessed via the Web at http://www.jstor.org/stable/10.1086/676533 (Level I)
40 Standard 34. Needleless connectors. Infusion therapy standards of practice.
(2016). Journal of Infusion Nursing, 39, S68–S70. (Level VII)
41 U.S . Food and Drug Administration. (n.d .). “Look. Check. Connect. Safe
medical device connections save lives” [Online]. Accessed via the Web at
http://www.fda.gov/downloads/MedicalDevices/Safety/AlertsandNotices/UCM1
34873.pdf
42 LeBlanc, K., et al. (2013). International skin tear advisory panel: A tool kit to
aid in the prevention, assessment, and treatment of skin tears using a
simplified classification system. Advances in Skin and Wound Care, 26(10),
459–476.
43 The Joint Commission. (2014). “Sentinel event alert: Managing risk during
transition to new ISO tubing connector standards” [Online]. Accessed via the
Web at
http://www.jointcommission.org/assets/1/6/SEA_53_Connectors_8 _19_14 _final.
pdf (Level VII)
44 Standard 38. Joint stabilization. Infusion therapy standards of practice.
(2016). Journal of Infusion Nursing, 39, S74–S75. (Level VII)
45 Standard 44. Vascular access device (VAD) removal. Infusion therapy
standards of practice. (2016). Journal of Infusion Nursing, 39, S91–94. (Level
VII)
46 Ganz, D. A., et al. (2013). Preventing falls in hospitals: A toolkit for improving
quality of care (AHRQ Publication No. 13-0015-EF). Rockville, MD: Agency for
Healthcare Research and Quality. Accessed via the Web at
http://www.ahrq.gov/sites/default/files/publications/files/fallpxtoolkit.pdf
47 Standard 18. Medical waste and sharps safety. Infusion therapy standards of
practice. (2016). Journal of Infusion Nursing, 39, S40–S41. (Level VII)
48 Accreditation Association for Hospitals and Health Systems. (2017). Standard
07.03 .07 Healthcare Facilities Accreditation Program: Accreditation
requirements for acute care hospitals. Chicago, IL: Accreditation Association
for Hospitals and Health Systems. (Level VII)
49 The Joint Commission. (2019). Standard RC.01.03 .01. Comprehensive
accreditation manual for hospitals. Oakbrook Terrace, IL: The Joint
Commission. (Level VII)
50 Standard 10. Documentation in the medical record. Infusion therapy
standards of practice. (2016). Journal of Infusion Nursing, 39, S28–S30 . (Level
VII)
51 Centers for Medicare and Medicaid Services, Department of Health and
Human Services. (2015). Condition of participation: Medical record services.
42 C.F.R. § 482.24(b).
52 Accreditation Association for Hospitals and Health Systems. (2017). Standard
10.00 .03. Healthcare Facilities Accreditation Program: Accreditation
requirements for acute care hospitals. Chicago, IL: Accreditation Association
for Hospitals and Health Systems. (Level VII)
53 DNV GL-Healthcare USA, Inc. (2016). MR.2 .SR.1 . NIAHO® accreditation
requirements: Interpretive guidelines and surveyor guidance (version 11).
Milford, OH: DNV GL-Healthcare USA, Inc. (Level VII)
54 Standard 47. Nerve injuries. Infusion therapy standards of practice. (2016).
Journal of Infusion Nursing, 39, S102–S104. (Level VII)
55 Standard 46. Infiltration and extravasation. Infusion therapy standards of
practice. (2016). Journal of Infusion Nursing, 39, S98–S102. (Level VII)
56 Standard 45. Phlebitis. Infusion therapy standards of practice. (2016). Journal
of Infusion Nursing, 39, S95–S98 . (Level VII)
IV CATHETER MAINTENANCE
Routine maintenance of a short peripheral IV catheter
insertion site includes regular assessment of the site (at
least every 4 hours, or every 1 to 2 hours for a patient who’s
critically ill, sedated, or cognitively impaired). It also
includes periodic dressing changes, which help to prevent
complications, such as thrombophlebitis and infection.1 The
recommended frequency of dressing changes varies based
on such factors as the type of dressing and the patient’s
condition. The Infusion Nurses Society (INS) recommends
that you change a gauze dressing over an IV catheter
insertion site every 2 days, or immediately if the dressing
becomes damp, loosened, or visibly soiled, or if you suspect
infection or inflammation of the site.1,2 The INS recommends
that you change a transparent semipermeable membrane
dressing every 5 to 7 days, or immediately if the dressing
becomes damp, loosened, or visibly soiled, or if you suspect
infection or inflammation of the site.1,2 You should also
change the dressing whenever you replace the IV device,
which should occur as soon as possible (preferably in 24 to
48 hours) after insertion under suboptimal conditions (such
as during an emergency),1 as well as when clinically
indicated based on the patient’s condition, integrity of the
vein and skin, length and type of prescribed therapy,
integrity and patency of the existing catheter, and the
patient’s care location.1,3
HOSPITAL-ACQUIRED CONDITION ALERT Keep in mind that vascular
catheter–associated infection is considered a hospital-acquired
condition because it can be reasonably prevented using best practices.
Use infection-prevention techniques (such as performing hand
hygiene, properly cleaning the insertion site with an antiseptic, and
using sterile technique) when changing an IV dressing to reduce the
risk of vascular catheter–associated infection.4,5
The need for continued use of a short peripheral IV
catheter should be reassessed on a daily basis. Catheter
removal should occur as soon as the catheter is no longer
included in the plan of care or when it hasn’t been used for
at least 24 hours.6
Equipment
For a dressing change
Gloves ▪ antiseptic swab or pad (chlorhexidine-based
solution [preferred]; tincture of iodine, povidone-iodine, or
alcohol may be used if a contraindication to chlorhexidine
exists)1 ▪ sterile transparent semipermeable dressing ▪
engineered stabilization device ▪ label ▪ Optional: sterile 2′′
× 2′′ (5-cm × 5-cm) gauze pads, sterile tape.
For a solution change
IV solution container ▪ labels ▪ Optional: time tape.
For an IV administration tubing change
IV administration set ▪ prescribed IV fluid ▪ IV pole ▪ gloves
▪ antiseptic pads (chlorhexidine-based, alcohol, or tincture
of iodine) ▪ transparent semipermeable dressing ▪ labels ▪
Optional: add-on devices, electronic infusion device,
engineered stabilization device.
For using a time tape
Prescribed IV solution ▪ preprinted IV time tape or 1′′ (2.5 -
cm) piece of tape ▪ pen.
Preparation of equipment
Inspect all IV equipment and supplies; if a product is
expired, if its integrity is compromised, or if it’s defective,
remove it from patient use, label it as expired or defective,
and report the expiration or defect as directed by your
facility.7
Implementation
■ Review the patient’s medical record for allergies,
sensitivities, and contraindications to the antiseptic solution
or dressing materials.8
■ Gather the appropriate equipment.
■ Perform hand hygiene to prevent the spread of
microorganisms.9,10,11,12,13,14,15
■ Confirm the patient’s identity using at least two patient
identifiers.16
■ Provide privacy.17,18,19,20
■ Explain the procedure to the patient to allay fears and
ensure cooperation.
■ Raise the patient’s bed to waist level when providing
patient care to prevent caregiver back strain.21
Changing a dressing
■
Put on gloves to comply with standard
precautions.9,22,23,24
■ Visually inspect the entire infusion system for clarity of
the solution, integrity of the system (such as leakage and
secure Luer connections), accurate flow rate, and expiration
dates of the solution and administration set, as applicable.1
■ Assess the catheter–skin junction and surrounding area
by visual inspection and palpation through an intact
dressing for erythema, tenderness, swelling, and drainage.
Pay attention for patient reports of pain, paresthesia,
numbness, or tingling.1,2,25
■ Gently remove the existing dressing, beginning at the
catheter hub and pulling it perpendicular to the skin toward
the insertion site to avoid catheter dislodgment and skin
tearing and stripping.2,25,26
■ Carefully remove the stabilization device, if indicated,
following the manufacturer’s instructions for use.1,27
■ Assess the skin that was underneath the dressing. If signs
or symptoms of phlebitis (pain, tenderness, erythema,
warmth, swelling, induration, purulence, or palpable venous
cord), infiltration (pain, edema, blanching, or fluid leakage
from the puncture site), or infection (erythema extending at
least 1 cm from the insertion site, induration, exudate, pain
or tenderness, or fever with no other obvious source of
infection) are present, remove and replace the catheter
(preferably in the opposite extremity).1,28,29,30 (See the “IV
catheter insertion and removal” procedure.) Notify the
patient’s practitioner and intervene as indicated and
ordered.
■ Clean the insertion site and surrounding skin with an
antiseptic solution,
following the
manufacturer’s
instructions. Apply chlorhexidine using a back-and-forth
motion for at least 30 seconds and allow it to dry
completely.2 Apply povidone iodine (or another iodophor)
using swab sticks in a concentric circle, beginning at the
catheter insertion site and moving outward. Allow the
antiseptic to dry completely (typically 11⁄2 to 2 minutes).2
■ Secure the catheter with an engineered stabilization
device, if available. An engineered stabilization device is
recommended because this type of device reduces vascular
access device motion, which increases the risk of
unintentional catheter dislodgement and complications that
require premature catheter removal.27
■ Place a sterile, transparent semipermeable dressing over
the insertion site and catheter hub to prevent contamination
of the insertion site. Alternately, apply a sterile 4′′ × 4′′ (10-
cm × 10-cm) gauze dressing secured with sterile tape in
place of the semipermeable dressing.1,2 If the patient has
fragile skin, use a dressing specifically formulated for fragile
skin to prevent skin tearing and stripping.26
■ Label the dressing with the date you changed the
dressing or the date it’s next due to be changed, as directed
by your facility.1
■ Return the bed to the lowest level to prevent falls and
maintain patient safety.31
■ Discard used supplies in appropriate receptacles.22,23,32,33
■ Remove and discard your gloves.22,23,32
■ Perform hand hygiene.10,11,12,13,14,15
■ Document the procedure.34,35,36,37,38
Changing the solution
■ Gather and prepare the necessary equipment.
■ Review the practitioner’s order to make sure that the
prescribed infusion solution, rate, and route of
administration are appropriate for the patient’s age,
condition, and access device. Address concerns about the
order with the practitioner, pharmacist, or your supervisor
and, if needed, risk management, or as directed by your
facility.2,39,40
■ Compare the IV solution label with the order in the
patient’s medical record.2,39,40
■ Perform hand hygiene to prevent the spread of
microorganisms.10,11,12,13,14,15
■ Confirm the patient’s identity using at least two patient
identifiers.16
■ Provide privacy.17,18,19,20
■ Explain the procedure to the patient to allay fears and
enhance cooperation.
■ If your facility uses barcode technology, scan your
identification badge, the patient’s identification bracelet,
and the IV solution’s barcode.
■ Clamp the administration set tubing when inverting it to
prevent air from entering the tubing. Keep the drip chamber
filled to the level determined by the manufacturer. Place the
IV infusion device in standby or pause mode.
■ If you’re replacing an IV solution bag, remove the seal or
tab from the new bag and remove the old bag from the IV
pole. Remove the spike, insert it into the new IV solution
bag, trace the administration set tubing from the patient to
its point of origin to ensure that the tubing is connected to
the proper port,39,41,42 and adjust the infusion flow rate or
restart the IV infusion device.2
■ If you’re replacing an IV solution bottle, remove the cap
and seal from the new bottle, disinfect the bottle’s rubber
port thoroughly with an antiseptic pad, and allow the port to
dry. Clamp the IV line, pause the IV infusion device, remove
the spike from the old bottle, and insert the spike into the
new bottle. Then hang the new bottle, trace the
administration set tubing from the patient to its point of
origin to ensure that the tubing is connected to the proper
port,39,41,42 and adjust the infusion flow rate or restart the IV
infusion device.
ELDER ALERT Because older adults commonly have compromised
cardiac, hepatic, or renal systems, they’re at risk for complications
associated with IV solution administration. An older patient may not
be able to articulate symptoms because of an underlying condition
(such as stroke, intubation, tracheotomy, dementia, or delirium).
Infusion of a large volume of fluid or fluid delivered at a rapid rate
may quickly result in heart failure, shock, or cardiac arrest, so
frequently monitor an older patient during IV infusions. An older
patient is also at risk for speed shock, which results from rapid
administration of a bolus medication or infusion. The patient may not
be able to communicate such early symptoms as dizziness or
headache, which can rapidly progress to chest tightness, hypotension,
irregular pulse, and anaphylactic shock. Control IV administration
rates carefully and monitor older patients closely to reduce the risk of
speed shock.25
■ Route the administration set tubing in a standardized
direction if the patient has other tubing and IV catheters in
place that have different purposes. If multiple IV lines will be
used, label the tubing at the distal end (near the patient
connection) and proximal end (near the source container) to
reduce the risk of misconnection.39,41
■ Label the new IV solution container with the date and
time of change, and place a time tape on the container if
required by your facility.
■
Discard used supplies in the appropriate
receptacles.22,23,32,33
■ Monitor the flow-control device regularly, inspect the IV
insertion site for complications, and evaluate the patient’s
response to therapy.39
■ Perform hand hygiene.10,11,12,13,14,15
■ Document the procedure.34,35,36,37,38
Changing the tubing
■ Hang the solution on an IV pole.
■ To prime the new administration set (including add-on
devices and extension tubing, if used), squeeze the
administration set’s drip chamber, filling it to the level
indicated by the manufacturer.2 Then slowly open the clamp
while holding the distal end of the administration set
upright, allowing the filter to hang upside down.2 Prime the
entire length of the administration set and add-on devices.
Alternatively, use the priming feature on the electronic
infusion device.
■ Clamp the administration set.2
■
Put on gloves to comply with standard
precautions.9,22,23,24
■ Assess the catheter–skin junction and surrounding area
by visual inspection and palpation through an intact
dressing for erythema, tenderness, swelling, and drainage.
Pay attention for patient reports of pain, paresthesia,
numbness, or tingling.1
■ Gently remove the existing dressing, beginning at the
catheter hub and pulling it perpendicular to the skin toward
the insertion site as needed to access the catheter hub.2
■ Carefully remove the stabilization device, if indicated,
following the manufacturer’s instructions for use.1,27
■ Stop or pause the electronic infusion device, if indicated.
■ Trace the existing tubing from the patient to its point of
origin to make sure you’re accessing the proper
tubing.39,41,42,43
■ Clamp the existing administration set.2
■ Clamp the IV catheter to prevent accidental exposure to
blood and to reduce the risk of air embolism.2
■ Gently disconnect the existing tubing from the IV catheter
hub, being careful not to dislodge the catheter.2
■ Perform a vigorous mechanical scrub of the catheter hub
for at least 5 seconds, using an antiseptic pad. Allow it to
dry completely.44
■ Remove the protective cap from the distal end of the new
administration set and attach it to the catheter hub.2
■ Trace the tubing from the patient to its point of origin to
make sure you’ve connected the new administration tubing
to the proper port.39,41,42,43
■ Open the IV catheter clamp.2
■ Place the administration set in the electronic infusion
device and then turn on the device. Alternatively, slowly
open the clamp of the administration set to begin the
infusion.2
■ Confirm that the electronic infusion device displays the
correct information, unclamp the tubing, and begin the
infusion. Watch the electronic infusion device for 1 to 2
minutes to ensure the proper administration rate.2 (See the
“IV pump use” procedure.) Alternatively, if using a manual
flow-control device, monitor the drops per minute manually
to ensure the proper administration rate.
■ Clean the insertion site and surrounding skin.
■ Apply a new stabilization device, if needed.
■ Apply a new transparent semipermeable dressing over
the insertion site, if needed. (See the section above entitled
“Changing a dressing.”)1,27
■ Check that all connections are secure to prevent leakage,
bleeding, contamination, and disconnections.41,42
■ Recheck the IV flow rate.
■
Discard used supplies in an appropriate
receptacle.22,23,32,33
■ Remove and discard your gloves.22,23,32
■ Perform hand hygiene.10,11,12,13,14,15
■ Label the administration set at the proximal and distal
ends to prevent dangerous misconnections. Route the
tubing in a standardized direction if the patient has other
tubing and catheters that have different purposes.39,41
■ Label the administration set and solution container with
the date of initiation or the date when change is necessary,
as directed by your facility.1
■ Monitor the patient’s intake, output, and electrolyte
levels, as ordered, to promptly recognize fluid and
electrolyte imbalances. Promptly report fluid and electrolyte
imbalances to the patient’s practitioner to prevent
treatment delays.45,46
■ Perform hand hygiene.10,11,12,13,14,15
■ Document the procedure.34,35,36,37,38
Using a time tape
■ Calculate the hourly IV infusion rate.
■ Place a preprinted IV time tape (or 1′′ [2.5 -cm] piece of
tape) vertically on the IV solution container alongside the
volume-increment markers.
■ Starting at the IV solution level, identify the number of
milliliters of solution to be infused, and use a pen to mark
the appropriate time and a horizontal line on the IV time
tape at this level. Then continue to mark the tape similarly
at 1-hour intervals until you’ve reached the bottom of the IV
solution container. Don’t use a felt-tip pen to write on a
plastic IV solution bag directly, because the ink may
penetrate the container, contaminating the IV solution.
■ Monitor the flow-control device regularly, inspect the IV
insertion site for complications, and evaluate the patient’s
response to therapy.1
■ Compare the time with the appropriate IV infusion level
on the time tape to ensure safe and accurate delivery of the
prescribed IV infusion rate and volume.
■ Perform hand hygiene.10,11,12,13,14,15
■ Document the procedure.34,35,36,37,38
Patient teaching
Teach the patient about positioning and movement related
to the IV site and tubing, and tell the patient to report any
changes to the catheter site as well as any discomfort.
Special considerations
■ Change the needleless connector no more frequently
than every 96 hours, because changing the device more
frequently increases the risk of intravascular catheter–
associated infection.47 If used within a continuous infusion
system, change the needleless connector when changing
the primary administration set. Additionally, change the
needleless connector if you remove it for any reason; if
there is blood or debris within the connector; before drawing
a blood culture through a vascular access device; if the
needleless connector becomes contaminated; and routinely,
as directed by your facility.47
■ Change primary and secondary continuous administration
sets used to administer solutions other than lipid, blood, or
blood products no more frequently than every 96 hours,48
but at least every 7 days,49 and immediately upon
suspected contamination or when the integrity of the
product or system is compromised.2,48 In addition to routine
changes, change the administration set whenever you
change the peripheral catheter site or when you insert a
new central venous access device.48
■ Change the transfusion administration set and filter after
completion of each unit or every 4 hours; if you can infuse
more than 1 unit in 4 hours, use the transfusion
administration set for a 4-hour period.48
■ The Joint Commission has issued a sentinel event alert
related to managing risk during transition to the new
International Organization for Standardization tubing
standards designed to prevent dangerous tubing
misconnections, which can lead to serious patient injury and
death. During the transition, trace the administration set
tubing and IV catheter from the patient to the point of origin
before connecting or reconnecting any device or infusion, at
any care transition (such as a new setting or service), and
as part of the hand-off process; route tubing and IV
catheters having different purposes in different standardized
directions; label the tubing at the distal and proximal ends
when there are different access sites or several IV solution
bags hanging; use tubing and equipment only as intended;
and store medications for different delivery routes in
separate locations.41
Complications
Potential complications include catheter dislodgment and
infection. Complications of IV solution change include air
embolism, infection, and circulatory overload. An
excessively slow flow rate may cause insufficient intake of
fluids, drugs, and nutrients; an excessively rapid rate of fluid
or drug infusion may cause circulatory overload, possibly
leading to heart failure and pulmonary edema as well as
adverse drug effects.
Documentation
For a dressing change, record the date and time of the
dressing change and the appearance of the site, the
dressing type, the type of stabilization device used, site care
performed, and any patient reports of discomfort or pain.
Document patient and family teaching and understanding of
the teaching.
For a solution change, record the time, date, and rate and
type of solution, and any additives involved. Also record the
appearance of the site.
For a tubing change, record the date and time of the
tubing change, the appearance of the site, the type of
dressing applied, and any patient teaching and the patient’s
understanding of your teaching. Document the patient’s
tolerance of the procedure as well as the type of IV fluid
administered and the rate of infusion.
When using a time tape, record the original flow rate
when beginning the infusion through the peripheral IV
catheter. If you adjust the rate, record the change, the date
and time, and your initials. Document any patient teaching
provided and the patient’s understanding of your teaching.
REFERENCES
1 Standard 41. Vascular access device (VAD) assessment, care and dressing
changes. Infusion therapy standards of practice. (2016). Journal of Infusion
Nursing, 39, S81–S84. (Level VII)
2 Infusion Nurses Society. (2016). Policies and procedures for infusion therapy
(5th ed.). Boston, MA: Infusion Nurses Society.
3 Rickard, C. M ., et al. (2012). Routine versus clinically indicated replacement of
peripheral intravenous catheters: A randomised controlled equivalence trial.
Lancet, 380(9847), 1066–1074. (Level I)
4 Jarrett, N., & Callaham, M. (2016). “Evidence-based guidelines for selected
hospital-acquired conditions: Final report” [Online]. Accessed via the Web at
https://www.cms.gov/Medicare/Medicare-Fee-for-Service-
Payment/HospitalAcqCond/Downloads/2016-HAC-Report.pdf
5 Infusion Nurses Society. (2013). “INS position paper: Recommendations for
improving safety practices with short peripheral catheters” [Online].
Accessed via the Web at
http://eo2.commpartners.com/users/inskc/downloads/140204_IV_Safety_Positi
on_Paper.pdf (Level VII)
6 Standard 44. Vascular access device (VAD) removal. Infusion therapy
standards of practice. (2016). Journal of Infusion Nursing, 39, S91–94. (Level
VII)
7 Standard 12. Product evaluation, integrity, and defect reporting. Infusion
therapy standards of practice. (2016). Journal of Infusion Nursing, 39, S32–
S34. (Level VII)
8 Silvestri, D. L., & McEnery-Stonelake, M. (2013). Chlorhexidine: Uses and
adverse reactions. Dermatitis, 24(3), 112–118. (Level VII)
9 Centers for Disease Control and Prevention. (2011, revised 2017). “Guidelines
for the prevention of intravascular catheter–related infections” [Online].
Accessed via the Web at http://www.cdc.gov/hicpac/pdf/guidelines/bsi-
guidelines-2011.pdf (Level I)
10 The Joint Commission. (2019). Standard NPSG.07.01.01. Comprehensive
accreditation manual for hospitals. Oakbrook Terrace, IL: The Joint
Commission. (Level VII)
11 Centers for Disease Control and Prevention. (2002). Guideline for hand
hygiene in health-care settings: Recommendations of the Healthcare Infection
Control Practices Advisory Committee and the HICPAC/SHEA/APIC/IDSA Hand
Hygiene Task Force. MMWR Recommendations and Reports, 51(RR-16), 1–45.
Accessed via the Web at https://www.cdc.gov/mmwr/pdf/rr/rr5116.pdf (Level
II)
12 World Health Organization. (2009). “WHO guidelines on hand hygiene in
health care: First global patient safety challenge, clean care is safer care”
[Online]. Accessed via the Web at
http://apps.who.int/iris/bitstream/10665/44102/1/9789241597906_eng.pdf
(Level IV)
13 Standard 16. Hand hygiene. Infusion therapy standards of practice. (2016).
Journal of Infusion Nursing, 39, S38–S39 . (Level VII)
14 Accreditation Association for Hospitals and Health Systems. (2017). Standard
07.01.21. Healthcare Facilities Accreditation Program: Accreditation
requirements for acute care hospitals. Chicago, IL: Accreditation Association
for Hospitals and Health Systems. (Level VII)
15 DNV GL-Healthcare USA, Inc. (2016). IC.1 .SR.1 . NIAHO® accreditation
requirements: Interpretive guidelines and surveyor guidance (version 11).
Milford, OH: DNV GL-Healthcare USA, Inc. (Level VII)
16 The Joint Commission. (2019). Standard NPSG.01.01.01. Comprehensive
accreditation manual for hospitals. Oakbrook Terrace, IL: The Joint
Commission. (Level VII)
17 The Joint Commission. (2019). Standard RI.01.01.01. Comprehensive
accreditation manual for hospitals. Oakbrook Terrace, IL: The Joint
Commission. (Level VII)
18 DNV GL-Healthcare USA, Inc. (2016). PR.1.SR.5 . NIAHO® accreditation
requirements: Interpretive guidelines and surveyor guidance (version 11).
Milford, OH: DNV GL-Healthcare USA, Inc. (Level VII)
19 Centers for Medicare and Medicaid Services, Department of Health and
Human Services. (2015). Condition of participation: Patient’s rights. 42 C.F.R.
§ 482.13(c)(1).
20 Accreditation Association for Hospitals and Health Systems. (2017). Standard
15.01.16. Healthcare Facilities Accreditation Program: Accreditation
requirements for acute care hospitals. Chicago, IL: Accreditation Association
for Hospitals and Health Systems. (Level VII)
21 Waters, T. R., et al. (2009). “Safe patient handling training for schools of
nursing” [Online]. Accessed via the Web at
http://www.cdc.gov/niosh/docs/2009-127/pdfs/2009-127.pdf
22 Siegel, J. D ., et al. (2007, revised 2017). “2007 guideline for isolation
precautions: Preventing transmission of infectious agents in healthcare
settings” [Online]. Accessed via the Web at
http://www.cdc.gov/hicpac/pdf/isolation/Isolation2007.pdf (Level II)
23 Occupational Safety and Health Administration. (n.d .). “Bloodborne
pathogens, standard number 1910.1030” [Online]. Accessed via the Web at
http://www.osha.gov/pls/oshaweb/owadisp.show_document?
p_id=10051&p_table=STANDARDS (Level VII)
24 Accreditation Association for Hospitals and Health Systems. (2016). Standard
07.01.10. Healthcare Facilities Accreditation Program: Accreditation
requirements for acute care hospitals. Chicago, IL: Accreditation Association
for Hospitals and Health Systems. (Level VII)
25 Infusion Nurses Society. (2017). Policies and procedures for infusion therapy
of the older adult (3rd ed.). Boston, MA: Infusion Nurses Society.
26 LeBlanc, K., et al. (2013). International skin tear advisory panel: A tool kit to
aid in the prevention, assessment, and treatment of skin tears using a
simplified classification system. Advances in Skin and Wound Care, 26(10),
459–476. (Level IV)
27 Standard 37. Vascular access device (VAD) stabilization. Infusion therapy
standards of practice. (2016). Journal of Infusion Nursing, 39, S72–S74. (Level
VII)
28 Standard 49. Infection. Infusion therapy standards of practice. (2016). Journal
of Infusion Nursing, 39, S106–S108.
29 Standard 45. Phlebitis. Infusion therapy standards of practice. (2016). Journal
of Infusion Nursing, 39, S95–S98 .
30 Standard 46. Infiltration and extravasation. Infusion therapy standards of
practice. (2016). Journal of Infusion Nursing, 39, S98–S102. (Level VII)
31 Ganz, D. A., et al. (2013). “Preventing falls in hospitals: A toolkit for improving
quality of care (AHRQ Publication No. 13-0015-EF)” [Online]. Accessed via the
Web at
http://www.ahrq.gov/sites/default/files/publications/files/fallpxtoolkit.pdf
(Level VII)
32 Standard 18. Medical waste and sharps safety. Infusion therapy standards of
practice. (2016). Journal of Infusion Nursing, 39, S40–S41. (Level VII)
33 Accreditation Association for Hospitals and Health systems. (2017). Standard
07.03 .07. Healthcare Facilities Accreditation Program: Accreditation
requirements for acute care hospitals. Chicago, IL: Accreditation Association
for Hospitals and Health Systems. (Level VII)
34 The Joint Commission. (2019). Standard RC.01.03 .01. Comprehensive
accreditation manual for hospitals. Oakbrook Terrace, IL: The Joint
Commission. (Level VII)
35 Standard 10. Documentation in the medical record. Infusion therapy
standards of practice. (2016). Journal of Infusion Nursing, 39, S28–S30 . (Level
VII)
36 Centers for Medicare and Medicaid Services, Department of Health and
Human Services. (2015). Condition of participation: Medical record services.
42 C.F.R. § 482.24(b).
37 Accreditation Association for Hospitals and Health Systems. (2017). Standard
10.00 .03. Healthcare Facilities Accreditation Program: Accreditation
requirements for acute care hospitals. Chicago, IL: Accreditation Association
for Hospitals and Health Systems. (Level VII)
38 DNV GL-Healthcare USA, Inc. (2016). MR.2 .SR.1 . NIAHO® accreditation
requirements: Interpretive guidelines and surveyor guidance (version 11).
Milford, OH: DNV GL-Healthcare USA, Inc. (Level VII)
39 Standard 57. Parenteral medication and solution administration. Infusion
therapy standards of practice. (2016). Journal of Infusion Nursing, 39, S125–
S127. (Level VII)
40 The Joint Commission. (2019). Standard PC.02.01.03 . Comprehensive
accreditation manual for hospitals. Oakbrook Terrace, IL: The Joint
Commission. (Level VII)
41 The Joint Commission. (2014). “Sentinel event alert: Managing risk during
transition to new ISO tubing connector standards” [Online]. Accessed via the
Web at
http://www.jointcommission.org/assets/1/6/SEA_53_Connectors_8 _19_14 _final.
pdf (Level VII)
42 U.S . Food and Drug Administration. (n.d .). “Look. Check. Connect. Safe
medical device connections save lives” [Online]. Accessed via the Web at
http://www.fda.gov/downloads/MedicalDevices/Safety/AlertsandNotices/UCM1
34873.pdf
43 Standard 42. Administration set change. Infusion therapy standards of
practice. (2016). Journal of Infusion Nursing, 39, S84–S85. (Level VII)
44 Marschall, J., et al. (2014). SHEA/IDSA practice recommendation: Strategies
to prevent central line-associated bloodstream infections in acute care
hospitals. Infection Control and Hospital Epidemiology, 35(7), 753–771 .
Accessed via the Web at http://www.jstor.org/stable/10.1086/676533 (Level I)
45 Centers for Medicare and Medicaid Services. (2014). “Requirements for
hospital medication administration, particularly intravenous (IV) medications
and post-operative care of patients receiving IV opioids” [Online]. Accessed
via the Web at http://www.cms.gov/Medicare/Provider-Enrollment-and-
Certification/SurveyCertificationGenInfo/Downloads/Survey-and-Cert-Letter-
14-15.pdf
46 Centers for Medicare and Medicaid Services, Department of Health and
Human Services. (2015). Condition of participation: Nursing services. 42
C.F.R. § 482.23(c).
47 Standard 34. Needleless connectors. Infusion therapy standards of practice.
(2016). Journal of Infusion Nursing, 39, S68–S70. (Level VII)
48 Standard 42. Administration set change. Infusion therapy standards of
practice. (2016). Journal of Infusion Nursing, 39, S84–S85. (Level VII)
49 Association of Professionals in Infection Control and Epidemiology (APIC).
(2015). Guide to preventing central line-associated bloodstream infections.
Accessed via the Web at
http://apic.org/Resource_/TinyMceFileManager/2015/APIC_CLABSI_WEB .pdf
IV VINFUSION RATES AND MANUAL CONTROL
Calculated from a practitioner’s order, flow rate is usually
expressed as the total volume of IV solution infused over a
prescribed interval, or as the total volume given in milliliters
per hour. Many devices can regulate the flow of IV solution,
including clamps, flow regulators, and infusion pumps. (See
Using IV clamps.)
When regulated by a clamp, flow rate is usually measured
in drops per minute; by an infusion pump, in milliliters per
hour. Flow regulators can be set to deliver the desired
amount of solution, also in milliliters per hour. Less accurate
than infusion pumps, flow regulators are most reliable when
used with inactive adult patients. With any device, flow rate
can easily be monitored by using a time tape, which
indicates the prescribed solution level at hourly intervals.
(See the “IV catheter maintenance” procedure, page 447.)
Equipment
Prescribed IV solution ▪ IV administration set with clamp ▪
watch with second hand ▪ labels ▪ Optional: drip rate chart.
Standard macrodrip sets deliver from 10 to 20 drops/mL,
depending on the manufacturer; microdrip sets, 60
drops/mL; and blood transfusion sets, 10 drops/mL. A
commercially available adapter can convert a macrodrip set
to a microdrip system.
Preparation of equipment
Inspect all IV equipment and supplies. If a product has
expired, if its integrity has been compromised, or if you find
it to be defective, remove it from patient use, label it as
expired or defective, and report the expiration or defect as
directed by your facility.1
Implementation
■ Verify the practitioner’s order for the prescribed IV flow
rate.2
■ Gather the appropriate equipment.
■ Perform hand hygiene.3,4,5,6,7,8,9,10
■ Confirm the patient’s identity using at least two patient
identifiers.11
■ Explain the procedure to the patient and family (if
appropriate) according to their individual communication
and learning needs to increase their understanding, allay
their fears, and enhance cooperation.12
■ Attach the administration set to the IV solution and prime
the administration set tubing to purge the system of air.
(See the “IV therapy preparation” procedure, page 458.)
Label the administration set with the date of initiation or the
date when change is required, as directed by your facility.13
■ Connect the primed IV administration set to the IV
catheter. Trace the tubing administration set from the
patient to its point of origin to make sure you’re connecting
the tubing to the proper port.2,14,15 If the patient is
connected to other tubing and catheters that have different
purposes, route the tubing in a standardized direction. Label
the tubing at the distal end (near the patient connection)
and proximal end (near the source container) to reduce the
risk of misconnections.15
■ Calculate the proper drip rate, or use your unit’s drip rate
chart. (See Calculating infusion rates, page 452.)
■ After calculating the desired IV drip rate, remove your
watch and hold it next to the IV drip chamber so that you
can observe the watch and drops simultaneously.
■ Release the IV clamp and regulate the flow to the
approximate drip rate. Then count drops for 1 minute to
account for flow irregularities and ensure the proper
administration rate.16,17
■ Adjust the IV clamp as necessary, and count drops for 1
minute. Continue to adjust the IV clamp and count drops
until the correct IV flow rate is achieved.
■ Closely monitor the IV flow rate, inspect the IV site for
complications, and assess the patient’s response to therapy.
■ Perform hand hygiene.3,4,5,6,7,8,9,10
■ Document the procedure.18,19,20,21,22
Special considerations
■ Use an electronic infusion device for infusions that require
precise flow control to maintain patient safety. Consider the
use of a smart pump with dose error-reduction software to
reduce the risk of infusion-related medication errors.2,23
■ The Joint Commission has issued a sentinel event alert
related to managing risk during the transition to new
International Organization for Standardization tubing
standards designed to prevent dangerous tubing
misconnections, which can lead to serious patient injury and
death. During the transition, be sure to trace the tubing and
catheter from the patient to the point of origin before
connecting or reconnecting any device or infusion, at any
care transition (such as a new setting or service), and as
part of the hand-off process. Route tubing and catheters
with different purposes in different standardized directions.
When there are different access sites or several bags
hanging, label the tubing at the distal and proximal ends.
Use tubing and equipment only as intended, and store
medications for different delivery routes in separate
locations.15
Complications
An excessively slow IV flow rate may cause insufficient
intake of fluids, drugs, and nutrients; an excessively rapid IV
flow rate of fluid or drug infusion may cause circulatory
overload—possibly leading to heart failure and pulmonary
edema—as well as other adverse drug effects.
Documentation
Record the original IV flow rate when setting up a peripheral
IV line. If you adjust the IV flow rate, record the change, the
date and time, and your initials. Document the patient’s
response to therapy. Document any teaching you provided
to the patient and family members (if applicable) and their
understanding of your teaching.
EQUIPMENT
Using IV clamps
With a roller clamp, you can increase or decrease the flow through the IV line
by turning a wheel.
With a slide clamp, you can open or close the line by moving the clamp
horizontally. However, you can’t make fine adjustments to the flow rate.
REFERENCES
1 Standard 12. Product evaluation, integrity, and defect reporting. Infusion
therapy standards of practice. (2016). Journal of Infusion Nursing, 39, S32–
S34. (Level VII)
2 Standard 57. Parenteral medication and solution administration. Infusion
therapy standards of practice. (2016). Journal of Infusion Nursing, 39, S125–
S126. (Level VII)
3 The Joint Commission. (2019). Standard NPSG.07.01.01. Comprehensive
accreditation manual for hospitals. Oakbrook Terrace, IL: The Joint
Commission. (Level VII)
4 Centers for Disease Control and Prevention. (2002). Guideline for hand
hygiene in health-care settings: Recommendations of the Healthcare Infection
Control Practices Advisory Committee and the HICPAC/SHEA/APIC/IDSA Hand
Hygiene Task Force. MMWR Recommendations and Reports, 51(RR-16), 1–45.
Accessed via the Web at https://www.cdc.gov/mmwr/pdf/rr/rr5116.pdf (Level
II)
5 World Health Organization. (2009). “WHO guidelines on hand hygiene in
health care: First global patient safety challenge, clean care is safer care”
[Online]. Accessed via the Web at
http://apps.who.int/iris/bitstream/10665/44102/1/9789241597906_eng.pdf
(Level IV)
6 Standard 16. Hand hygiene. Infusion therapy standards of practice. (2016).
Journal of Infusion Nursing, 39, S38–S39 . (Level VII)
7 Centers for Disease Control and Prevention. (2011, revised 2017). “Guidelines
for the prevention of intravascular catheter-related infections” [Online].
Accessed via the Web at http://www.cdc.gov/hicpac/pdf/guidelines/bsi-
guidelines-2011.pdf (Level I)
8 Centers for Medicare and Medicaid Services, Department of Health and
Human Services. (2015). Condition of participation: Infection control. 42 C.F.R.
§ 482.42.
9 Accreditation Association for Hospitals and Health Systems. (2017). Standard
07.01.21. Healthcare Facilities Accreditation Program: Accreditation
requirements for acute care hospitals. Chicago, IL: Accreditation Association
for Hospitals and Health Systems. (Level VII)
10 DNV GL-Healthcare USA, Inc. (2016). IC.1 .SR.1 . NIAHO® accreditation
requirements: Interpretive guidelines and surveyor guidance (version 11).
Milford, OH: DNV GL-Healthcare USA, Inc. (Level VII)
11 The Joint Commission. (2019). Standard NPSG.01.01.01. Comprehensive
accreditation manual for hospitals. Oakbrook Terrace, IL: The Joint
Commission. (Level VII)
12 The Joint Commission. (2019). Standard PC.02.01.21. Comprehensive
accreditation manual for hospitals. Oakbrook Terrace, IL: The Joint
Commission. (Level VII)
13 Standard 42. Administration set changes. Infusion therapy standards of
practice. (2016). Journal of Infusion Nursing, 39, S84–S85. (Level VII)
14 U.S . Food and Drug Administration. (n.d .). “Look. Check. Connect. Safe
medical device connections save lives” [Online]. Accessed via the Web at
http://www.fda.gov/downloads/MedicalDevices/Safety/AlertsandNotices/UCM1
34873.pdf
15 The Joint Commission. (2014). “Sentinel event alert: Managing risk during
transition to new ISO tubing connector standards” [Online]. Accessed via the
Web at
http://www.jointcommission.org/assets/1/6/SEA_53_Connectors_8 _19_14 _final.
pdf (Level VII)
16 Infusion Nurses Society. (2016). Policies and procedures for infusion therapy
(5th ed.). Boston, MA: Infusion Nurses Society.
17 Infusion Nurses Society. (2017). Policies and procedures for infusion therapy
of the older adult (3rd ed.). Boston, MA: Infusion Nurses Society.
18 The Joint Commission. (2019). Standard RC.01.03 .01. Comprehensive
accreditation manual for hospitals. Oakbrook Terrace, IL: The Joint
Commission. (Level VII)
19 Standard 10. Documentation in the medical record. Infusion therapy
standards of practice. (2016). Journal of Infusion Nursing, 39, S28–S30 . (Level
VII)
20 Centers for Medicare and Medicaid Services, Department of Health and
Human Services. (2015). Condition of participation: Medical record services.
42 C.F.R. § 482.24(b).
21 Accreditation Association for Hospitals and Health Systems. (2017). Standard
10.00 .03. Healthcare Facilities Accreditation Program: Accreditation
requirements for acute care hospitals. Chicago, IL: Accreditation Association
for Hospitals and Health Systems. (Level VII)
22 DNV GL-Healthcare USA, Inc. (2016). MR.2 .SR.1 . NIAHO® accreditation
requirements: Interpretive guidelines and surveyor guidance (version 11).
Milford, OH: DNV GL-Healthcare USA, Inc. (Level VII)
23 Standard 24. Flow-control devices. Infusion therapy standards of practice.
(2016). Journal of Infusion Nursing, 39, S48–S49. (Level VII)
Calculating infusion rates
When calculating the infusion rate of IV solutions, remember that the number
of drops required to deliver 1 mL varies with the type and manufacturer of
the administration set used. To calculate the infusion rate, you must know
the calibration of the drip rate for each manufacturer’s product. Use this
formula to calculate specific drip rates:
Macrodrip administration setA standard (macrodrip) administration set
delivers from 10 to 20 drops/mL.
Microdrip administration setA pediatric (microdrip) administration set
delivers about 60 drops/mL.
Blood transfusion setA blood transfusion set delivers about 10 drops/mL.
IV PUMP USE
Various types of pumps electronically regulate the flow of IV
solutions or drugs with great accuracy. Volumetric IV pumps,
used for high-pressure infusion of drugs, or for highly
accurate delivery of fluids or drugs, have mechanisms to
propel the solution at the desired rate under pressure.
(Pressure is brought to bear only when gravity flow rates are
insufficient to maintain preset infusion rates.) The peristaltic
IV pump applies pressure to the IV tubing to force the
solution through it. (Not all peristaltic IV pumps are
volumetric; some count drops.) The piston-cylinder IV pump
pushes the solution through special disposable cassettes.
Most of these IV pumps operate at high pressures (up to 45
psi), delivering from 1 to 999 mL/hour with about 98%
accuracy; some pumps operate at 10 to 25 psi. The portable
syringe pump delivers very small amounts of fluid over a
long period of time. It’s used for administering fluids to
infants and for delivering intra-arterial drugs.
Other specialized devices include barcode-automated
programming devices, smart pumps, the controlled-release
infusion system, the secondary syringe converter, and
patient-controlled analgesia. (See Understanding smart
pumps.)
IV Pumps also have various detectors and alarms that
automatically signal or respond to the completion of an
infusion, air in the line, low battery power, and occlusion or
inability to deliver at the set rate.
ELDER ALERT Keep in mind that older adults commonly have
compromised cardiac, hepatic, or renal systems, which place them at
risk during IV fluid administration. If infusions are too rapid or the
volume is too great, the patient may develop heart failure, shock, or
cardiac arrest. An older adult may be unable to articulate symptoms
because of underlying conditions, such as stroke, intubation,
tracheostomy, dementia, or delirium. Monitor older adult patients
closely during all IV infusions. Rapid administration of a bolus
medication or infusion may cause speed shock; symptoms associated
with speed shock, such as dizziness and headache, occur rapidly,
making it difficult for the patient to articulate such symptoms. Early
symptoms of speed shock may progress to chest tightness,
hypotension, irregular pulse, and anaphylactic shock. Carefully
control any parenteral medication or solution and observe older adult
patients closely.2
EQUIPMENT
Understanding smart pumps
Conventional, general-purpose infusion pumps allow nurses to program an
hourly infusion rate and volume. A smart pump has software that enables
nurses to choose infusion parameters from a facility’s customized drug
library, which can help prevent serious infusion errors. Before smart pumps
are used at the bedside, a facility programs the pumps with its own specific
information. These profiles specify the infusion requirements for different
types of patients, such as adults and children, and care areas, such as
pediatric, maternal, oncology, intensive care, and postanesthesia care units.
Each profile includes a drug library that contains facility-defined drug infusion
parameters, such as acceptable concentrations, infusion rates, dosing units,
and maximum and minimum loading and maintenance dose bolus limits. The
maximum rate and pressure at which the infusion will run can also be
programmed into the software. A team that typically consist of pharmacists,
practitioners, and nurses within each facility sets up and manages these
profiles based on the facility’s own best-practice guidelines.
Smart pumps vary by manufacturer, with some pumps even incorporating
barcode technology on each IV medication bag. The barcode automatically
programs the pump according to a current drug order. When you turn on a
typical smart pump, it asks you to designate the specific patient care area
you’re going to use it in. Then it automatically configures itself to provide you
with the infusion parameters for that area. Because a pump may be used in
different types of patient care units and departments throughout the facility,
this feature adds an extra layer of safety.
You then program the pump by choosing the intended drug and
concentration from the smart pump’s list and entering the ordered dose and
infusion rate. The pump checks this information against the drug library. If
the parameters you’ve programmed match those in the pump’s drug library
for that patient care area, the pump allows the infusion to begin. However, if
what you’ve programmed is outside of the specified limits, the pump alerts
you with a visual and audible alarm and lets you know which parameter lies
outside of the recommended range.
A smart pump also logs and tracks all alerts, recording the time, date, drug,
concentration, and infusion rate, as well as your action—including whether
you overrode the alert or reprogrammed the pump with different settings.
This provides your facility with data it can use to shape current practice
guidelines and identify process improvements.
The Institute for Safe Medication Practices recommends that, before
deploying a smart pump, a facility should follow these steps:
■ Standardize concentrations within the health care facility; asking a health
care worker to choose from several concentrations increases the risk of
selection error.
■ Limit the number of standard concentrations to no more than two for each
drug for a specific patient care area.
■ Standardize dosing units for a given drug; for instance, always use either
mcg/minute or mcg/kg/minute for nitroglycerin, but not both.
■ Standardize definitions for terms used in IV drug administration (such as
bolus, intermittent infusion, continuous infusion).
■ Ensure that the concentrations, dose units, and nomenclature used in the
smart pump are consistent with those used in the medication administration
record, pharmacy computer system, and electronic medical record.
■ Meet with all relevant clinicians to agree on the proper upper and lower
hard and soft dose limits.
■ Monitor overrides of alerts to assess whether the alerts have been properly
configured or whether additional quality intervention is required.
■ Ensure the pump’s “smart” feature is used in all parts of the facility; for
instance, if the operating room sets up the IV pump volumetrically without
the “smart” feature, but the intensive care unit uses the “smart” feature, an
error may occur if the IV pump isn’t reprogrammed properly.
■ Ensure that the upper and lower dose limits are set for bolus doses, when
applicable.
■ Have a human factors engineer identify new opportunities for failure when
the pumps are deployed.
■ Establish procedures that allow staff members, when necessary, to
administer drugs in nonstandard concentrations as well as to administer
drugs that aren’t in the drug library.
■ Deploy the smart pump throughout all areas of the hospital; doing so helps
prevent errors that may occur when different types of IV pumps are used on
different units.1
Equipment
IV pump ▪ IV pole ▪ prescribed IV solution ▪ sterile
administration set ▪ antiseptic pads (alcohol, tincture of
iodine, or chlorhexidine-based) ▪ prefilled syringe containing
preservative-free normal saline ▪ gloves ▪ Optional:
needleless connector, IV catheter insertion kit.
Preparation of equipment
Inspect all IV equipment and supplies; if a product is
expired, if its integrity is compromised, or if it’s defective,
remove it from patient use, label it as expired or defective,
and report the expiration or defect as directed by your
facility.3 Attach the IV pump to the IV pole.
Implementation
■ Avoid distractions and interruptions when preparing and
administering medications to prevent medication errors.4,5,6
■ Verify the practitioner’s order; make sure it contains the
type and volume of fluid, medication and dosage (if a
medicated infusion is prescribed), route of administration,
frequency, and duration of administration.2,4,7,8,9 Review the
practitioner’s order to make sure that the prescribed
infusion solution or medication, dose, rate, and route of
administration are appropriate for the patient’s age,
condition, and access device. Address concerns about the
order with the practitioner, the pharmacist, or your
supervisor and, if needed, the risk management
department, or as directed by your facility.
■ Perform a medication reconciliation when the practitioner
orders a new medication to reduce the risk of medication
errors, including omissions, duplications, dosing errors, and
drug interactions.4
■ Check the patient’s medical record for an allergy or
contraindication to the prescribed medication. If an allergy
or contraindication exists, don’t administer the medication;
instead, notify the practitioner.7,8,10
■ Gather and prepare the appropriate equipment.
■ Inspect the IV solution for cracks, leaks, and
contamination. Also verify that it has been labeled properly,
contains the right solution in the right concentration, and
hasn’t expired.2,4,7,8,9
■ Discuss any unresolved concerns about the medication
with the patient’s practitioner.7
■ Verify that you’re administering the medication at the
proper time, in the prescribed dose, and by the correct route
to reduce the risk of medication errors.7,8,10
■ Perform hand hygiene.11,12,13,14,15,16,17
■ Confirm the patient’s identity using at least two patient
identifiers.18
■ Provide privacy.19,20,21,22
■ Explain the procedure to the patient and family (if
appropriate) according to their individual communication
and learning needs to increase their understanding, allay
their fears, and enhance cooperation.
■ Access the port on the IV container and perform a
vigorous mechanical scrub using an antiseptic pad, if
appropriate, and allow it to dry completely. (See the “IV
therapy preparation” procedure, page 458.)
■ Insert the administration set spike, and fill the drip
chamber to the manufacturer’s mark to prevent air bubbles
from entering the tubing.2,9
■ Slowly open the clamp to prime the administration set
tubing while holding the distal end of the administration set
upright, permitting the filter to hang upside down. Prime the
entire length of the administration set tubing, and then
close the clamp.2,9 Place the administration set tubing into
the IV pump following the manufacturer’s instructions.
■ Alternatively, insert the administration set tubing into the
IV pump and use the pump’s priming function to prime the
administration set tubing.
■ If your facility uses a bar code technology, scan your
identification badge, the patient’s identification bracelet,
and the bar code on the medication bag, or follow your
facility’s bar code system procedure.
■ Position the IV pump on the same side of the bed as the
vascular access device or the anticipated IV insertion site to
avoid misconnections.23
■ Plug in the IV pump.
■ Raise the patient bed to waist level when providing care
to prevent caregiver back strain.24
■ Perform hand hygiene.11,12,13,14,15,16,17
■ Put on gloves.12,25,26,27
■ Assess the IV insertion site.4
■ If a disinfectant-containing end cap is in place at the end
of the needless connector, remove and discard it.28
■ Perform a vigorous mechanical scrub of the needleless
connector with an antiseptic and allow it to dry
completely.2,9,29,30
■ Maintaining sterility of the syringe tip, attach a prefilled
syringe containing preservative-free normal saline solution
to the needleless connector. (Use a 10-mL syringe or a
syringe specifically designed to generate low injection
pressure.) Unclamp the catheter and slowly aspirate for
blood return that is the color and consistency of whole
blood. If no blood return occurs, take steps to locate an
external cause of obstruction.31
■ If blood return occurs, slowly inject preservative-free
normal saline solution into the catheter. Use a minimum
volume of twice the internal volume of the catheter system.
Don’t forcibly flush the device; further evaluate the device if
you meet resistance.31
■ Clamp the IV catheter, and remove and discard the
syringe in a puncture-resistant sharps disposal container.26
■ Perform a vigorous mechanical scrub of the IV catheter
hub or needleless connector for at least 5 seconds using an
antiseptic pad; then allow it to dry completely.30
■ Trace the sterile administration set tubing from the
patient to its point of origin to ensure that you’re connecting
the tubing to the correct port.4,23,32
■ Remove the protective cap from the distal end of the
sterile administration set tubing and attach the
administration set tubing to the IV catheter hub using sterile
technique.29 If you’re infusing an IV solution or medication
via a secondary IV line, attach the secondary IV
administration set tubing to the injection port closest to the
IV insertion site of the primary line with a needleless
connector. (See the “IV secondary line drug infusion”
procedure.)
■ Route the tubing in a standardized direction if the patient
has other tubing and catheters that have different purposes.
If multiple IV access sites or IV bags will be used, label the
tubing at both the distal end (near the patient connection)
and proximal end (near the source container) to reduce the
risk of misconnection.32
■ Turn on the IV pump and enter the desired drug infusion
rate and volume settings, following specific operating
instructions.
■ Confirm that the IV pump’s display screen displays the
right information.
■ Open the IV catheter (if appropriate) and sterile
administration set tubing clamps, and then push the RUN or
START button.
■ Ensure that the alarm limits are set appropriately and
that the alarms are turned on, functioning properly, and
audible to staff.33,34,35 Explain the alarm system to the
patient to prevent anxiety when the alarm is activated.
Don’t rely on the IV pump to detect IV infiltration or
extravasation, because these alarms aren’t intended to
detect IV fluid flow disruption.36
■ Check that all connections are secure to prevent leakage,
bleeding, contamination, and disconnections.23,32
■ Recheck the patency of the IV catheter and watch the IV
insertion site for infiltration.4,36
■ Observe the IV pump for 1 to 2 minutes to make sure it’s
delivering the infusion at the proper rate.2,9
■ Remove and discard your gloves.25,26
■ Perform hand hygiene.11,12,13,14,15,16,17
■ Return the bed to the lowest position to prevent falls and
maintain patient safety.37
■ Frequently monitor the IV pump and the patient to ensure
the device’s correct operation and flow rate and to detect
complications, including infiltration, infection, and air
embolism.36
■ Monitor the patient’s intake and output and electrolyte
levels, as ordered, to detect fluid and electrolyte
imbalances. Promptly notify the practitioner of imbalances
to prevent treatment delays.10,38
■ Perform hand hygiene.11,12,13,14,15,16,17
■ Document the procedure.39,40,41,42,43
Special considerations
■ The Joint Commission issued a sentinel event alert
concerning medical device alarm safety, because alarm-
related events have been associated with permanent loss of
function or death. Among the major contributing factors
were
improper
alarm
settings,
alarm
settings
inappropriately turned off, and alarm signals not audible to
staff. Make sure alarm limits are set appropriately, and that
alarms are turned on, functioning properly, and audible to
staff. Follow facility guidelines for preventing alarm
fatigue.35
■ The Joint Commission issued a sentinel event alert related
to managing risk during transition to new International
Organization for Standardization tubing standards that were
designed to prevent dangerous tubing misconnections,
which can lead to serious patient injury and death. During
the transition, make sure to trace each tubing and catheter
from the patient to its point of origin before connecting or
reconnecting any device or infusion, at any care transition
(such as to a new setting or service), and as part of the
hand-off process. In addition, route tubes and catheters with
different purposes in different, standardized directions; label
tubing at both the distal and proximal ends when the
patient has different access sites or several bags hanging;
use tubing and equipment only as intended; and store
medications for different delivery routes in separate
locations.32
Complications
Complications associated with IV solution and medication
infusion via an IV pump can include circulatory overload and
adverse effects from specific medication administration.
General complications associated with IV infusion include
infiltration, extravasation, phlebitis, infection, and air
embolism. Keep in mind that infiltration can develop rapidly
with infusion by a volumetric pump because the increased
subcutaneous pressure won’t slow the infusion rate until
significant edema occurs. Never rely on infusion pump
alarms to detect the presence of infiltration.
Documentation
In addition to routine documentation of the IV infusion,
record the use of a pump. Also document any patient
teaching provided and the patient’s understanding of the
teaching.
REFERENCES
1 Institute for Safe Medication Practices. (2009). “Proceedings from the ISMP
summit on the use of smart infusion pumps: Guidelines for safe
implementation and use” [Online]. Accessed via the Web at
http://www.ismp.org/tools/guidelines/smartpumps/comments/printerVersion.p
df (Level VII)
2 Infusion Nurses Society. (2017). Policies and procedures for infusion nursing
of the older adult (3rd ed.). Boston, MA: Infusion Nurses Society.
3 Standard 12. Product evaluation, integrity, and defect reporting. Infusion
therapy standards of practice. (2016). Journal of Infusion Nursing, 39, S32–
S34. (Level VII)
4 Standard 57. Parenteral medication and solution administration. Infusion
therapy standards of practice. (2016). Journal of Infusion Nursing, 39, S125–
S127. (Level VII)
5 Institute for Safe Medication Practices. (2012). Side tracks on the safety
express: Interruptions lead to errors and unfinished...Wait, what was I doing?
Nurse Advise-ERR, 11(2), 1–4 . Accessed via the Web at
https://www.ismp.org/Newsletters/acutecare/showarticle.aspx?id=37
6 Westbrook, J., et al. (2010). Association of interruptions with an increased risk
and severity of medication administration errors. Archives of Internal
Medicine, 170(8), 683–690 . (Level IV)
7 The Joint Commission. (2019). Standard MM.06 .01.01. Comprehensive
accreditation manual for hospitals. Oakbrook Terrace, IL: The Joint
Commission. (Level VII)
8 Accreditation Association for Hospitals and Health Systems. (2017). Standard
25.01.18. Healthcare Facilities Accreditation Program: Accreditation
requirements for acute care hospitals. Chicago, IL: Accreditation Association
for Hospitals and Health Systems. (Level VII)
9 Infusion Nurses Society. (2016). Policies and procedures for infusion therapy
(5th ed.). Boston, MA: Infusion Nurses Society.
10 Centers for Medicare and Medicaid Services, Department of Health and
Human Services. (2015). Condition of participation: Nursing services. 42
C.F.R. § 482.23(c).
11 Centers for Disease Control and Prevention. (2002). Guideline for hand
hygiene in health-care settings: Recommendations of the Healthcare Infection
Control Practices Advisory Committee and the HICPAC/SHEA/APIC/IDSA Hand
Hygiene Task Force. MMWR Recommendations and Reports, 51(RR-16), 1–45.
Accessed via the Web at https://www.cdc.gov/mmwr/pdf/rr/rr5116.pdf (Level
II)
12 Centers for Disease Control and Prevention. (2011, revised 2017). “Guidelines
for the prevention of intravascular catheter–related infections” [Online].
Accessed via the Web at http://www.cdc.gov/hicpac/pdf/guidelines/bsi-
guidelines-2011.pdf (Level I)
13 Standard 16. Hand hygiene. Infusion therapy standards of practice. (2016).
Journal of Infusion Nursing, 39, S38–S39 . (Level VII)
14 The Joint Commission. (2019). Standard NPSG.07.01.01. Comprehensive
accreditation manual for hospitals. Oakbrook Terrace, IL: The Joint
Commission. (Level VII)
15 World Health Organization. (2009). “WHO guidelines on hand hygiene in
health care: First global patient safety challenge, clean care is safer care”
[Online]. Accessed via the Web at
http://apps.who.int/iris/bitstream/10665/44102/1/9789241597906_eng.pdf
(Level IV)
16 Accreditation Association for Hospitals and Health Systems. (2017). Standard
07.01.21. Healthcare Facilities Accreditation Program: Accreditation
requirements for acute care hospitals. Chicago, IL: Accreditation Association
for Hospitals and Health Systems. (Level VII)
17 DNV GL-Healthcare USA, Inc. (2016). IC.1 .SR.1 . NIAHO® accreditation
requirements: Interpretive guidelines and surveyor guidance (version 11).
Milford, OH: DNV GL-Healthcare USA, Inc. (Level VII)
18 The Joint Commission. (2019). Standard NPSG.01.01.01. Comprehensive
accreditation manual for hospitals. Oakbrook Terrace, IL: The Joint
Commission. (Level VII)
19 The Joint Commission. (2019). Standard RI.01.01.01. Comprehensive
accreditation manual for hospitals. Oakbrook Terrace, IL: The Joint
Commission. (Level VII)
20 Centers for Medicare and Medicaid Services, Department of Health and
Human Services. (2015). Condition of participation: Patient’s rights. 42 C.F.R.
§ 482.13(c)(1).
21 DNV GL-Healthcare USA, Inc. (2016). PR.1.SR.5 . NIAHO® accreditation
requirements: Interpretive guidelines and surveyor guidance (version 11).
Milford, OH: DNV GL-Healthcare USA, Inc. (Level VII)
22 Accreditation Association for Hospitals and Health Systems. (2017). Standard
15.01.16. Healthcare Facilities Accreditation Program: Accreditation
requirements for acute care hospitals. Chicago, IL: Accreditation Association
for Hospitals and Health Systems. (Level VII)
23 U.S . Food and Drug Administration. (n.d .). “Look. Check. Connect. Safe
medical device connections save lives” [Online]. Accessed via the Web at
http://www.fda.gov/downloads/MedicalDevices/Safety/AlertsandNotices/UCM1
34873.pdf
24 Waters, T. R., et al. (2009). “Safe patient handling training for schools of
nursing” [Online]. Accessed via the Web at
http://www.cdc.gov/niosh/docs/2009-127/pdfs/2009-127.pdf (Level VII)
25 Siegel, J. D ., et al. (2007, revised 2017). “2007 guideline for isolation
precautions: Preventing transmission of infectious agents in healthcare
settings” [Online]. Accessed via the Web at
http://www.cdc.gov/hicpac/pdf/isolation/Isolation2007.pdf (Level II)
26 Occupational Safety and Health Administration. (n.d .). “Bloodborne
pathogens, standard number 1910.1030” [Online]. Accessed via the Web at
http://www.osha.gov/pls/oshaweb/owadisp.show_document?
p_id=10051&p_table=STANDARDS (Level VII)
27 Accreditation Association for Hospitals and Health Systems. (2017). Standard
07.01.10. Healthcare Facilities Accreditation Program: Accreditation
requirements for acute care hospitals. Chicago, IL: Accreditation Association
for Hospitals and Health Systems. (Level VII)
28 Moureau, N. L., & Flynn, J. (2015). Disinfection of needleless connector hubs:
Clinical evidence systematic review. Nursing Research and Practice, 2015,
796762. Accessed via the Web at
https://www.hindawi.com/journals/nrp/2015/796762/
29 Marschall, J., et al. (2014). SHEA/IDSA practice recommendation: Strategies
to prevent central line–associated bloodstream infections in acute care
hospitals. Infection Control and Hospital Epidemiology, 35(7), 753–771 .
Accessed via the Web at http://www.jstor.org/stable/10.1086/676533 (Level I)
30 Standard 34. Needleless connectors. Infusion therapy standards of practice.
(2016). Journal of Infusion Nursing, 39, S68–S70. (Level VII)
31 Standard 40. Flushing and locking. Infusion therapy standards of practice.
(2016). Journal of Infusion Nursing, 39, S77–S81.
32 The Joint Commission. (2014). “Sentinel event alert: Managing risk during
transition to new ISO tubing connector standards” [Online]. Accessed via the
Web at
http://www.jointcommission.org/assets/1/6/SEA_53_Connectors_8 _19_14 _final.
pdf (Level VII)
33 The Joint Commission. (2019). Standard NPSG.06 .01.01. Comprehensive
accreditation manual for hospitals. Oakbrook Terrace, IL: The Joint
Commission. (Level VII)
34 Graham, K.C., & Cvach, M. (2010). Monitor alarm fatigue: Standardizing use
of physiological monitors and decreasing nuisance alarms. American Journal
of Critical Care, 19(1), 28–37. Accessed via the Web at
http://ajcc.aacnjournals.org/content/19/1/28.full.pdf
35 The Joint Commission. (2013). “Sentinel event alert: Medical device alarm
safety in hospitals” [Online]. Accessed via the Web at
http://www.jointcommission.org/assets/1/18/SEA_50_alarms_4 _5 _13_FINAL1 .P
DF (Level VII)
36 Standard 24. Flow-control devices. Infusion therapy standards of practice.
(2016). Journal of Infusion Nursing, 39, S48–S50. (Level VII)
37 Ganz, D. A., et al. (2013). Preventing falls in hospitals: A toolkit for improving
quality of care (AHRQ Publication No. 13-0015-EF). Rockville, MD: Agency for
Healthcare Research and Quality. Accessed April 2017 via the Web at
http://www.ahrq.gov/sites/default/files/publications/files/fallpxtoolkit.pdf
(Level VII)
38 Centers for Medicare and Medicaid Services. (2014). “Requirements for
hospital medication administration, particularly intravenous (IV) medications
and post-operative care of patients receiving IV opioids” [Online]. Accessed
via the Web at http://www.cms.gov/Medicare/Provider-Enrollment-and-
Certification/SurveyCertificationGenInfo/Downloads/Survey-and-Cert-Letter-
14-15.pdf (Level VII)
39 The Joint Commission. (2019). Standard RC.01.03 .01. Comprehensive
accreditation manual for hospitals. Oakbrook Terrace, IL: The Joint
Commission. (Level VII)
40 Standard 10. Documentation in the medical record. Infusion therapy
standards of practice. (2016). Journal of Infusion Nursing, 39, S28–S30 . (Level
VII)
41 Centers for Medicare and Medicaid Services, Department of Health and
Human Services. (2015). Condition of participation: Medical record services.
42 C.F.R. § 482.24(b).
42 Accreditation Association for Hospitals and Health Systems. (2017). Standard
10.00 .03. Healthcare Facilities Accreditation Program: Accreditation standards
for acute care hospitals. Chicago, IL: Accreditation Association for Hospitals
and Health Systems. (Level VII)
43 DNV GL-Healthcare USA, Inc. (2016). MR.2 .SR.1 . NIAHO® accreditation
requirements: Interpretive guidelines and surveyor guidance (version 11).
Milford, OH: DNV GL-Healthcare USA, Inc. (Level VII)
IV SECONDARY LINE DRUG INFUSION
A secondary IV line is a complete IV set, container, tubing,
and microdrip or macrodrip system connected to the lower Y
port (secondary port) of a primary line instead of to the IV
catheter. It can be used for continuous or intermittent drug
infusion. When used continuously, a secondary IV line
permits drug infusion and titration while the primary line
maintains a constant total infusion rate.
A secondary IV line used for intermittent infusions is
commonly called a piggyback set. In this case, the primary
line maintains venous access between drug doses. Typically,
a piggyback set includes a small IV container, short tubing,
and a macrodrip system. The volume is typically 25 to 250
mL. This set connects to the primary line’s upper Y port,
also called a piggyback port. Antibiotics are most commonly
administered by intermittent (piggyback) infusion. You
should position the primary IV solution below the secondary
solution to facilitate infusion. (The manufacturer provides an
extension hook for that purpose.)
You should change a secondary administration set used to
continuously administer fluids other than lipids, blood, or
blood products at least every 7 days but no more frequently
than every 96 hours, unless it becomes contaminated or
otherwise compromised.1,2 If the secondary administration
set is detached from the primary administration set, it’s
considered a primary intermittent administration set, and
you should change it every 24 hours.1
HOSPITAL-ACQUIRED CONDITION ALERT A vascular catheter–
associated infection is considered a hospital-acquired condition
because it can be reasonably prevented using best practices. Follow
infection prevention techniques (such as performing hand hygiene,
performing a vigorous mechanical scrub of the needleless connectors,
limiting catheter access, and following sterile, no-touch technique)
during IV secondary line drug infusion to decrease the risk of vascular
catheter–associated infection.3,4,5
Equipment
Gloves ▪ prescribed IV medication ▪ administration set with
secondary injection port (Luer-lock design recommended) or
volume-controlled administration set1 ▪ needleless adapter
▪
antiseptic pads (alcohol, tincture of iodine, or
chlorhexidine-based) ▪ 10-mL prefilled syringe containing
preservative-free normal saline solution ▪ IV pole ▪ labels ▪
Optional: extension hook, electronic infusion device.
For intermittent infusion, the primary line typically has a
piggyback port with a back check valve that stops the flow
from the primary line during drug infusion and returns to the
primary flow after infusion. You can also use a volume-
control set with an intermittent infusion line.
Preparation of equipment
Inspect all IV equipment and supplies; if a product is
expired, if its integrity is compromised, or if it’s found
defective, remove it from patient use, label it as expired or
defective, and report the expiration or defect as directed by
your facility.6 Confirm that the primary administration set
contains a secondary port.
Check drug compatibility with the primary solution. If
necessary, add the drug to the secondary IV solution.
(Whenever possible, administer pharmacy-prepared or
commercially available products.) To do so, remove any
seals from the secondary container, perform a vigorous
mechanical scrub of the main port for at least 5 seconds
with an antiseptic pad, and allow it to dry.5 Inject the
prescribed medication using safe medication administration
practices, and gently agitate the solution to mix the
medication thoroughly. (See the “Safe medication
administration practices, general” procedure.) Properly label
the mixed IV solution as required by your facility. In a
perioperative or procedural setting, the label should contain
the medication name, strength, and quantity; diluent type
and volume; and the expiration date.7
Insert the administration set spike and attach the
needleless system. Open the flow clamp, prime the line, and
then close the flow clamp. Initiate immediate-use
medications within 1 hour of preparation or discard them.8
Implementation
■ Gather and prepare the appropriate medication and
equipment.
■ Avoid distractions and interruptions when preparing and
administering medications to prevent medication errors.9,10
■ Review the practitioner’s order to make sure it contains
the type of fluid and volume, medication and dosage, route
of administration, and frequency and duration of
administration, and that these are appropriate for the
patient’s age, condition, and access device. Address any
concerns about the order with the practitioner,10,11 the
pharmacist, or your supervisor and, if needed, risk
management, or as directed by your facility.11,12,13,14,15,16,17
■ Reconcile the patient’s medications when a new
medication is ordered to reduce the risk of medications
errors, including omissions, duplications, dosing errors, and
drug interactions.12
■ Compare the medication label with the order in the
patient’s medical record.11,12,14,15,18
■ Check the patient’s medical record for an allergy or a
contraindication to the prescribed medication. If an allergy
or contraindication exists, don’t administer the medication;
instead, notify the practitioner.10,11,19
■ Check the expiration date on the medication. If the
medication is expired, return it to the pharmacy, obtain new
medication, and notify the practitioner.10,11,12,19
■ Visually inspect the solution for particles, discoloration, or
other loss of integrity; don’t administer the medication if its
integrity is compromised.10,11,12,19
■ Verify that you’re administering the medication at the
proper time, in the prescribed dose, and by the correct route
to reduce the risk of medication errors.10,11,12,15,19
■ Perform hand hygiene.2,20,21,22,23,24,25
■ Confirm the patient’s identity using at least two patient
identifiers.26
■ Provide privacy.27,28,29,30
■ Explain the procedure to the patient. If the patient is
receiving the medication for the first time, teach about the
potential adverse reactions and discuss any other concerns
related to the medication.11,31
■ If your facility uses a bar code technology, scan your
identification badge, the patient’s identification bracelet,
and the medication’s bar code.12
■ Put on gloves.2,32,33,34
■ If the prescribed drug is incompatible with the primary IV
solution, replace the primary solution with a fluid that’s
compatible with both solutions, as ordered.35
■ Assess the patient’s IV site for pain, redness, or
swelling.12,16,17,36
■ If a disinfectant-containing cap is in place at the end of
the needleless connector, remove and discard it.37,38
■ Perform a vigorous mechanical scrub of the needleless
connector for at least 5 seconds5 with an antiseptic pad and
allow it to dry completely.5,16,17,38,39
■ Maintaining sterility of the syringe tip, attach a prefilled
syringe containing preservative-free normal saline solution
to the needleless connector; use a 10-mL syringe or a
syringe specifically designed to generate lower injection
pressure. If necessary, unclamp the catheter and slowly
aspirate for a blood return that’s the color and consistency
of whole blood. If you don’t obtain a blood return, take steps
to locate an external cause of obstruction.12,16,17,40
■ If you obtain a blood return, slowly inject preservative-
free normal saline solution into the catheter to assess
catheter function. Use a minimum volume of twice the
internal volume of the catheter system. Don’t forcibly flush
the device; further evaluate the device if you meet
resistance.16,17,40
■ If necessary, insert a new IV catheter, or notify the
practitioner if the patient has a central venous access
catheter and you see signs of complications at the insertion
site or if catheter function is compromised. (See the “IV
catheter insertion and removal” procedure, page 443.)12
NURSING ALERT Don’t administer continuous high-alert medications
as a secondary infusion. Don’t piggyback a secondary infusion into a
primary infusion containing a high-alert drug, to avoid adverse drug
events caused by infusion at indeterminate rates or pump
programming errors.10,41,42
■ Hang the secondary set’s container on the IV pole.
■ Perform a vigorous mechanical scrub of the needleless
connector of the primary line that’s closest to the vascular
access catheter for at least 5 seconds, and allow it to dry
completely.5,16,17,38,39
■ Trace the tubing from the patient to its point of origin to
make sure that you’re connecting it to the proper
port.12,41,43,44 Route the tubing in a standardized direction if
the patient has other tubing and catheters that have
different purposes. Label the tubing at the distal end (near
the patient connection) and proximal end (near the source
container) to reduce the risk of misconnection if multiple IV
lines will be used.41,43
■ Insert the needleless adapter from the secondary line into
the needleless connector, verify a proper connection, and
secure it to the primary line, as needed.44
■ To run the secondary set’s container by itself, lower the
primary set’s container with an extension hook. To run both
containers simultaneously, place them at the same height.
(See Assembling a piggyback set.)
■ Open the clamp and adjust the drip rate.
■ For continuous infusion, set the secondary solution to the
desired drip rate; then adjust the primary solution to
achieve the desired total infusion rate.
■ For intermittent infusion, perform a visual inspection of
the drip chambers to verify that the secondary infusion is
active and that the primary infusion is not active.41 Adjust
the primary drip rate, as required, on completion of the
secondary solution. If you’re reusing the secondary solution
tubing, close the clamp on the tubing, remove the
needleless adapter, and replace it with a new, sterile one.1
Don’t attach the exposed end of the administration set to a
port on the same set.1 If you won’t reuse the tubing, discard
it appropriately with the IV container.
■ Use an electronic infusion device for infusions that require
precise flow control to maintain patient safety. Consider the
use of a smart pump with dose-error reduction software to
reduce the risk of infusion-related medication errors. Make
sure alarm limits are set appropriately and that alarms are
turned on, properly functioning, and audible to staff
members.45
■ Discard used supplies in appropriate receptacles.32,33,46
■ Remove and discard your gloves.32,33,46
■ Perform hand hygiene.2,20,21,22,23,24,25
■ Document the procedure.47,48,49,50,51
Special considerations
■ Use an electronic infusion device for medication infusion
to maintain a constant infusion rate. (See the “IV pump use”
procedure, page 452.)
■ Unless you’re piggybacking lipids, don’t piggyback a
secondary IV line to a total parenteral nutrition line because
of the risk of contamination.
■ The Joint Commission issued a sentinel event alert related
to managing risk during transition to the new International
Organization for Standardization tubing standards that were
designed to prevent dangerous tubing misconnections,
which can lead to serious patient injury and death. During
the transition, trace all tubing and catheters from the
patient to the points of origin before connecting or
reconnecting any device or infusion, at any care transition
(such as to a new setting or service), and as part of the
hand-off process; route tubes and catheters having different
purposes in different standardized directions; label the
tubing at both the distal and proximal ends when there are
different access sites or several bags hanging; use tubing
and equipment only as intended; and store medications for
different delivery routes in separate locations.43
Complications
The patient may experience an adverse reaction to the
infused drug. In addition, repeated punctures of the
secondary injection port can damage the seal, possibly
allowing leakage or contamination.
General complications of infusion therapy include
phlebitis, infiltration, extravasation, air embolism, infection,
and circulatory overload.
Documentation
Record the amount and type of drug administered and the
amount of IV solution on the intake and output and
medication records. Also note the date, duration and rate of
infusion, and the patient’s response, including signs and
symptoms, adverse effects, and adverse events, when
applicable. Document patient and family teaching and their
understanding of your teaching.48
EQUIPMENT
Assembling a piggyback set
A piggyback set is useful for intermittent drug infusion. For the set to work
properly, you must position the secondary set’s container higher than the
primary set’s container.
REFERENCES
1 Standard 42. Administration set change. Infusion therapy standards of
practice. (2016). Journal of Infusion Nursing, 39, S84–S85. (Level VII)
2 Centers for Disease Control and Prevention. (2011, revised 2017). “Guidelines
for the prevention of intravascular catheter-related infections” [Online].
Accessed via the Web at http://www.cdc.gov/hicpac/pdf/guidelines/bsi-
guidelines-2011.pdf (Level I)
3 Jarrett, N., & Callaham, M. (2016). “Evidence-based guidelines for selected
hospital-acquired conditions: Final report” [Online]. Accessed via the Web at
https://www.cms.gov/Medicare/Medicare-Fee-for-Service-
Payment/HospitalAcqCond/Downloads/2016-HAC-Report.pdf
4 Infusion Nurses Society. (2013). “INS position paper: Recommendations for
improving safety practices with short peripheral catheters” [Online].
Norwood, MA: Infusion Nurses Society. Accessed via the Web at
http://eo2.commpartners.com/users/inskc/downloads/140204_IV_Safety_Positi
on_Paper.pdf (Level VII)
5 Marschall, J., et al. (2014). SHEA/IDSA practice recommendation: Strategies to
prevent central line–associated bloodstream infections in acute care
hospitals. Infection Control and Hospital Epidemiology, 35(7), 753–771 .
Accessed via the Web at http://www.jstor.org/stable/10.1086/676533 (Level I)
6 Standard 12. Product evaluation, integrity, and defect reporting. Infusion
therapy standards of practice. (2016). Journal of Infusion Nursing, 39, S32–
S34. (Level VII)
7 The Joint Commission. (2019). Standard NPSG.03 .04.01. Comprehensive
accreditation manual for hospitals. Oakbrook Terrace, IL: The Joint
Commission. (Level VII)
8 Standard 17. Compounding and preparation of parenteral solutions and
medications. Infusion therapy standards of practice. (2016). Journal of
Infusion Nursing, 39, S39–40. (Level VII)
9 Westbrook, J., et al. (2010). Association of interruptions with an increased risk
and severity of medication administration errors. Archives of Internal
Medicine, 170(8), 683–690 . (Level IV)
10 Centers for Medicare and Medicaid Services, Department of Health and
Human Services. (2015). Condition of participation: Nursing services. 42
C.F.R. § 482.23(c).
11 The Joint Commission. (2019). Standard MM.06.01.01. Comprehensive
accreditation manual for hospitals. Oakbrook Terrace, IL: The Joint
Commission. (Level VII)
12 Standard 57. Parenteral medication and solution administration. Infusion
therapy standards of practice. (2016). Journal of Infusion Nursing, 39, S125–
S127. (Level VII)
13 The Joint Commission. (2019). Standard MM.04.01.01. Comprehensive
accreditation manual for hospitals. Oakbrook Terrace, IL: The Joint
Commission. (Level VII)
14 Centers for Medicare and Medicaid Services, Department of Health and
Human Services. (2015). Condition of participation: Pharmaceutical services.
42 C.F.R. § 482.25 .
15 DNV GL-Healthcare USA, Inc. (2016). MM.1 .SR.2. NIAHO® accreditation
requirements: Interpretive guidelines and surveyor guidance (version 11).
Milford, OH: DNV GL-Healthcare USA, Inc. (Level VII)
16 Infusion Nurses Society. (2016). Policies and procedures for infusion therapy
(5th ed.). Boston, MA: Infusion Nurses Society.
17 Infusion Nurses Society. (2017). Policies and procedures for infusion nursing
of the older adult (3d ed.). Boston, MA: Infusion Nurses Society.
18 Standard 13. Medication verification. Infusion therapy standards of practice.
(2016). Journal of Infusion Nursing, 39, S34–S35. (Level VII)
19 Accreditation Association for Hospitals and Health Systems. (2017). Standard
25.01.18. Healthcare Facilities Accreditation Program: Accreditation
requirements for acute care hospitals. Chicago, IL: Accreditation Association
for Hospitals and Health Systems. (Level VII)
20 The Joint Commission. (2019). Standard NPSG.07.01.01. Comprehensive
accreditation manual for hospitals. Oakbrook Terrace, IL: The Joint
Commission. (Level VII)
21 Standard 16. Hand hygiene. Infusion therapy standards of practice. (2016).
Journal of Infusion Nursing, 39, S38–S39 . (Level VII)
22 Centers for Disease Control and Prevention. (2002). Guideline for hand
hygiene in health-care settings: Recommendations of the Healthcare Infection
Control Practices Advisory Committee and the HICPAC/SHEA/APIC/IDSA Hand
Hygiene Task Force. MMWR Recommendations and Reports, 51(RR-16), 1–45.
Accessed via the Web at https://www.cdc.gov/mmwr/pdf/rr/rr5116.pdf (Level
II)
23 World Health Organization. (2009). “WHO guidelines on hand hygiene in
health care: First global patient safety challenge, clean care is safer care”
[Online]. Accessed via the Web at
http://apps.who.int/iris/bitstream/10665/44102/1/9789241597906_eng.pdf
(Level IV)
24 Accreditation Association for Hospitals and Health Systems. (2017). Standard
07.01.21. Healthcare Facilities Accreditation Program: Accreditation
requirements for acute care hospitals. Chicago, IL: Accreditation Association
for Hospitals and Health Systems. (Level VII)
25 DNV GL-Healthcare USA, Inc. (2016). IC.1 .SR.1 . NIAHO® accreditation
requirements: Interpretive guidelines and surveyor guidance (version 11).
Milford, OH: DNV GL-Healthcare USA, Inc. (Level VII)
26 The Joint Commission. (2019). Standard NPSG.01.01.01. Comprehensive
accreditation manual for hospitals. Oakbrook Terrace, IL: The Joint
Commission. (Level VII)
27 Accreditation Association for Hospitals and Health Systems. (2017). Standard
15.01.16. Healthcare Facilities Accreditation Program: Accreditation
requirements for acute care hospitals. Chicago, IL: Accreditation Association
for Hospitals and Health Systems. (Level VII)
28 Centers for Medicare and Medicaid Services, Department of Health and
Human Services. (2015). Condition of participation: Patient’s rights. 42 C.F.R.
§ 482.13(c)(1).
29 DNV GL-Healthcare USA, Inc. (2016). PR.1.SR.5 . NIAHO® accreditation
requirements: Interpretive guidelines and surveyor guidance (version 11).
Milford, OH: DNV GL-Healthcare USA, Inc. (Level VII)
30 The Joint Commission. (2019). Standard RI.01.01.01. Comprehensive
accreditation manual for hospitals. Oakbrook Terrace, IL: The Joint
Commission. (Level VII)
31 Standard 8. Patient education. Infusion therapy standards of practice. (2016).
Journal of Infusion Nursing, 39, S25–S26. (Level VII)
32 Occupational Safety and Health Administration. (n.d .). “Bloodborne
pathogens, standard number 1910.1030” [Online]. Accessed via the Web at
http://www.osha.gov/pls/oshaweb/owadisp.show_document?
p_id=10051&p_table=STANDARDS (Level VII)
33 Siegel, J. D ., et al. (2007, revised 2017). “2007 guideline for isolation
precautions: Preventing transmission of infectious agents in healthcare
settings” [Online]. Accessed via the Web at
http://www.cdc.gov/hicpac/pdf/isolation/Isolation2007.pdf (Level II)
34 Accreditation Association for Hospitals and Health Systems. (2017). Standard
07.01.10. Healthcare Facilities Accreditation Program: Accreditation
requirements for acute care hospitals. Chicago, IL: Accreditation Association
for Hospitals and Health Systems. (Level VII)
35 Loubnan, V., & Nasser, S. C ., (2010). A guide on intravenous drug
compatibilities based on their pH. Pharmacie Globale, 5(1), 1–9 . (Level VII)
36 Standard 41. Vascular access device (VAD) assessment, care, and dressing
changes. Infusion therapy standards of practice. (2016). Journal of Infusion
Nursing, 39, S81–S84. (Level VII)
37 Moureau, N. L. & Flynn, J. (2015). Disinfection of needleless connector hubs:
Clinical evidence systematic review. Nursing Research and Practice, 2015,
796762. Accessed via the Web at
http://www.hindawi.com/journals/nrp/2015/796762/
38 Standard 34. Needleless connectors. Infusion therapy standards of practice.
(2016). Journal of Infusion Nursing, 39, S68–S70. (Level VII)
39 The Joint Commission. (2019). “CLABSI toolkit: Preventing central line–
associated bloodstream infections: Useful tools, an international perspective”
[Online]. Accessed via the Web at
http://www.jointcommission.org/topics/clabsi_toolkit.aspx (Level VII)
40 Standard 40. Flushing and locking. Infusion therapy standards of practice.
(2016). Journal of Infusion Nursing, 39, S77–S81. (Level VII)
41 Health Technology Safety Research Team and Institute for Safe Medication
Practices Canada. (2012). “Mitigating the risks associated with multiple IV
infusions: Recommendations based on a field study of twelve Ontario
hospitals” [Online]. Accessed via the Web at
http://s3.amazonaws.com/rdcms-
aami/files/production/public/FileDownloads/Foundation/Infusion/062012_Multi
pleIVInfusions_Phase1bSummary_Recommendations_Rationale.pdf (Level VII)
42 The Joint Commission. (2019). Standard MM.01.01.03 . Comprehensive
accreditation manual for hospitals. Oakbrook Terrace, IL: The Joint
Commission. (Level VII)
43 The Joint Commission. (2014). “Sentinel event alert: Managing risk during
transition to new ISO tubing connector standards” [Online]. Accessed via the
Web at
http://www.jointcommission.org/assets/1/6/SEA_53_Connectors_8 _19_14 _final.
pdf (Level VII)
44 U.S . Food and Drug Administration. (n.d .). “Look. Check. Connect. Safe
medical device connections save lives” [Online]. Accessed via the Web at
http://www.fda.gov/downloads/MedicalDevices/Safety/AlertsandNotices/UCM1
34873.pdf
45 Standard 24. Flow-control devices. Infusion therapy standards of practice.
(2016). Journal of Infusion Nursing, 39, S48–S50. (Level VII)
46 Standard 18. Medical waste and sharps safety. Infusion therapy standards of
practice. (2016). Journal of Infusion Nursing, 39, S40–S41. (Level VII)
47 The Joint Commission. (2019). Standard RC.01.03 .01. Comprehensive
accreditation manual for hospitals. Oakbrook Terrace, IL: The Joint
Commission. (Level VII)
48 Standard 10. Documentation in the medical record. Infusion therapy
standards of practice. (2016). Journal of Infusion Nursing, 39, S28–S30 . (Level
VII)
49 Centers for Medicare and Medicaid Services, Department of Health and
Human Services. (2015). Condition of participation: Medical record services.
42 C.F.R. § 482.24.
50 Accreditation Association for Hospitals and Health Systems. (2017). Standard
10.00 .03. Healthcare Facilities Accreditation Program: Accreditation
requirements for acute care hospitals. Chicago, IL: Accreditation Association
for Hospitals and Health Systems. (Level VII)
51 DNV GL-Healthcare USA, Inc. (2016). MR.2 .SR.1 . ®NIAHO accreditation
requirements: Interpretive guidelines and surveyor guidance (version 11).
Milford, OH: DNV GL-Healthcare USA, Inc. (Level VII)
IV THERAPY PREPARATION
Selection and preparation of appropriate equipment are
essential for accurate delivery of an IV solution. IV bag
preparation is necessary before administering parenteral
medication or solutions. Solutions and medications should
be prepared and dispensed from the pharmacy or as
commercially prepared solutions.1 If a solution is prepared
outside of the pharmacy, initiation of administration should
begin within 1 hour after the start of preparation. IV bag
preparation requires sterile no-touch technique to prevent
contamination and reduce the risk of vascular catheter–
associated infection.2
NURSING ALERT Keep in mind that a vascular catheter–associated
infection is considered a hospital-acquired condition because various
evidence-based practices can reasonably prevent it. Be sure to follow
infection prevention techniques, such as performing hand hygiene and
following sterile no-touch technique when preparing IV solutions and
priming IV administration sets to reduce the risk of vascular catheter–
associated infection.3,4,5,6,7
Because certain IV solutions and medications are unstable
in plastic fluid containers, they’re prepared in bottles. Before
such a solution or medication can be administered,
however, the nonvented IV bottle must be prepared.1 A
vented IV administration set should be used to administer
the solution or medication. The pharmacy should prepare
and dispense these IV solutions and medications, or a
commercially prepared solution should be used.2 If an IV
solution or medication has been prepared outside the
pharmacy, administration should begin within 1 hour of the
start of preparation.1
There’s insufficient evidence to recommend the frequency
of routine replacement of IV solution containers (without
post manufacturer additives), with the exception of
parenteral nutrition solutions, which should be replaced
every 24 hours. Replacing other IV solution containers less
frequently than every 24 hours can be considered in times
of product shortages, but the decision should be weighed
against the risk of infection.2
Equipment
IV solution bag ▪ IV administration set ▪ IV pole ▪ label ▪
Optional: prescribed medication, antiseptic pads, flow-
control device.
Preparation of equipment
Inspect all IV equipment and supplies; if a product is
expired, if its integrity is compromised, or if it’s defective,
remove it from patient use, label it as expired or defective,
and report the expiration or defect as directed by your
facility.8
Implementation
Preparing the bag
■ Slide the flow clamp of the administration set tubing
down to the drip chamber or injection port and close the
clamp.
■ Remove the protective cap or tear the tab from the tubing
insertion port (as shown on next page, top left).
■ Remove the protective cap from the administration set
spike.
■ Hold the port firmly with one hand and insert the spike
with your other hand (as shown below). Be careful not to
contaminate the IV bag insertion port or the IV tubing spike.
■ Hang the bag on the IV pole, if you haven’t already, and
squeeze the drip chamber until it’s half full.
■ Prime the administration tubing. (See the section below
entitled “Priming the tubing.”) Attach a flow-control device,
if necessary, following the manufacturer’s instructions. (See
the “IV pump use” procedure.) Choose a flow-control device
that’s appropriate for the patient’s age, acuity, and mobility;
severity of the illness; type of therapy; dosing
considerations; health care setting; and risk of adverse
effects to therapy.8
■ Label the bag with the patient’s name and identification
number, date and time, the bag number, ordered rate and
duration of infusion, and your initials.
■ Label the tubing as IV ROUTE at both the proximal and
distal ends to avoid misconnections to a different route of
entry into the body.9
■ Maintain the sterility of the male Luer end of the
administration set before and during connection to the
vascular access device.
■ Perform hand hygiene.10,11,12,13,14,15,16
■ Document the procedure.17,18,19,20,21
Preparing a bottle
■ Close the flow or roller clamp on the administration set
tubing.
■ For a nonvented bottle, remove the bottle’s metal cap
and inner disk, if present. For a vented bottle, remove the
bottle’s metal cap and latex diaphragm to release the
vacuum. If the vacuum isn’t intact, discard the bottle and
begin again.
EQUIPMENT
Using in-line filters
In-line filters are used to prevent undesirable substances from entering the
vascular system. The size and type of filter required is determined by the
type of infusate; follow the manufacturer’s instructions for use. The filter may
be an add-on device or part of the IV administration set tubing. Consult the
information below about filter use, or check with a pharmacist and the
manufacturer’s specific recommendations if you’re unsure about the type of
filter to use or whether a filter is required.4,22
■ Apply or replace an in-line filter with each change of the IV administration
set.
■ When administering lipid infusions or 3-in-1 parenteral nutrition solutions,
use a 1.2 -micron filter, which retains particles and eliminates air.
■ When administering nonlipid-containing solutions that require filtration,
use a 0.2 -micron filter, which retains bacteria and particulates and eliminates
air.
■ When using an electronic infusion device, ensure that the pounds per
square inch (psi) rating of the filter exceeds the psi exerted by the electronic
infusion device.
■ Don’t administer small-volume infusions of 5 mL or less over 24 hours
through a 0.2 -micron filter.
■ Don’t administer IV push medications through a 0.2 -micron filter.
■ Place the bottle on a stable surface and disinfect the
rubber stopper with an antiseptic pad using friction, and
allow it to dry.
■ Remove the protective cap from the administration set
spike, and push the spike through the center of the
nonvented bottle’s rubber stopper. Avoid twisting or angling
the spike to prevent pieces of the stopper from breaking off
and falling into the solution. If using a vented bottle, push
the spike through the insertion port next to the air vent tube
opening.
■ Invert the nonvented bottle. If its vacuum is intact, you’ll
hear a hissing sound and see air bubbles rise (this may not
occur if you’ve already added medication). If the vacuum
isn’t intact, discard the bottle and begin again.
■ Hang the bottle on the IV pole.
■ Squeeze the drip chamber until it’s half full.
■ Perform hand hygiene.10,11,12,13,14,15,16
■ Document the procedure.17,8,19,20,21
Priming the tubing
Hang the solution on the IV pole, if you haven’t already, and
squeeze the drip chamber until it’s half full.
Leave the protective cover on the end of the tubing, hold
the tubing above waist level, aim the distal end of the
tubing over a wastebasket or sink, and slowly open the flow
clamp.
If an in-line filter is necessary, purge the tubing before
attaching it to avoid forcing air into the filter and possibly
clogging some filter channels. Attach a filter to the end of
the IV tubing, and follow the manufacturer’s instructions for
filling and priming it. Most filters are positioned with the
distal end of the tubing facing upward so that the solution
will completely wet the filter membrane and all air bubbles
will be eliminated from the line.22 (See Using in-line filters.)
Leave the clamp open until the IV solution flows through
the entire length of tubing to release trapped air bubbles
and force out all the air.
Invert all Y-ports and backcheck valves and tap them, if
necessary, to fill them with solution.
Loop the IV administration set tubing over the IV pole until
you’re prepared to attach the tubing to the venous access
device.
Attach a flow-control device, if necessary, following the
manufacturer’s instructions. (See the “IV pump use”
procedure.) Choose a flow-control device that’s appropriate
for the severity of illness, type of therapy, dosing
considerations, health care setting, risk of therapy adverse
effects, and the patient’s age, acuity, and mobility.23
Label the IV administration set tubing with the date of
initiation or the date when change is required, as directed
by your facility.4,24,25
Label the tubing with the infusing solution or medication
at both the proximal and distal ends to avoid
misconnections to a different route of entry into the body, if
appropriate.21
Perform hand hygiene.10,11,12,13,14,15,16
Document the procedure.17,18,19,20,21
Special considerations
The Joint Commission has issued a sentinel event alert
related to managing risk during the transition to new
International Organization for Standardization tubing
standards designed to prevent dangerous tubing
misconnections, which can lead to serious patient injury and
death. During the transition, be sure to trace the tubing and
catheter from the patient to the point of origin before
connecting or reconnecting any device or infusion, at any
care transition (such as a new setting or service), and as
part of the hand-off process. Route tubing and catheters
with different purposes in different standardized directions.
When there are different access sites or several bags
hanging, label the tubing at the distal and proximal ends.
Use tubing and equipment only as intended, and store
medications for different delivery routes in separate
locations.9
Documentation
Document the type of therapy, drug and dose (if applicable),
rate, time, route, and method of administration.2
REFERENCES
1 Standard 17. Compounding and preparation of parenteral solutions and
medications. Infusion therapy standards of practice. (2016). Journal of
Infusion Nursing, 39, S39–S40. (Level VII)
2 Standard 57. Parenteral medication and solution administration. Infusion
therapy standards of practice. (2016). Journal of Infusion Nursing, 39, S125–
S127. (Level VII)
3 Centers for Disease Control and Prevention. (2011, revised 2017). “Guidelines
for the prevention of intravascular catheter-related infections” [Online].
Accessed via the Web at http://www.cdc.gov/hicpac/pdf/guidelines/bsi-
guidelines-2011.pdf (Level I)
4 Infusion Nurses Society. (2016). Policies and procedures for infusion therapy
(5th ed.). Boston, MA: Infusion Nurses Society.
5 The Joint Commission. (2019). Standard NPSG.07.04.01. Comprehensive
accreditation manual for hospitals. Oakbrook Terrace, IL: The Joint
Commission. (Level VII)
6 Marschall, J., et al. (2014). SHEA/IDSA practice recommendation: Strategies to
prevent central line-associated bloodstream infections in acute care
hospitals. Infection Control and Hospital Epidemiology, 35(7), 753–771 .
Accessed via the Web at http://www.jstor.org/stable/10.1086/676533
7 Jarrett, N., & Callaham, M. (2016). “Evidence-based guidelines for selected,
candidate, and previously considered hospital-acquired conditions: Final
report” [Online]. Accessed via the Web at
https://www.cms.gov/Medicare/Medicare-Fee-for-Service-
Payment/HospitalAcqCond/Downloads/2016-HAC-Report.pdf
8 Standard 24. Flow-control devices. Infusion therapy standards of practice.
(2016). Journal of Infusion Nursing, 39, S48–S49. (Level VII)
9 The Joint Commission. (2014). “Sentinel event alert: Managing risk during
transition to new ISO tubing connector standards” [Online]. Accessed via the
Web at
http://www.jointcommission.org/assets/1/6/SEA_53_Connectors_8 _19_14 _final.
pdf (Level VII)
10 The Joint Commission. (2019). Standard NPSG.07.01.01. Comprehensive
accreditation manual for hospitals. Oakbrook Terrace, IL: The Joint
Commission. (Level VII)
11 Standard 16. Hand hygiene. Infusion therapy standards of practice. (2016).
Journal of Infusion Nursing, 39, S38–S39 . (Level VII)
12 Centers for Disease Control and Prevention. (2002). Guideline for hand
hygiene in health-care settings: Recommendations of the Healthcare Infection
Control Practices Advisory Committee and the HICPAC/SHEA/APIC/IDSA Hand
Hygiene Task Force. MMWR Recommendations and Reports, 51(RR-16), 1–45.
Accessed via the Web at https://www.cdc.gov/mmwr/pdf/rr/rr5116.pdf (Level
II)
13 World Health Organization. (2009). “WHO guidelines on hand hygiene in
health care: First global patient safety challenge, clean care is safer care”
[Online]. Accessed via the Web at
http://apps.who.int/iris/bitstream/10665/44102/1/9789241597906_eng.pdf
(Level IV)
14 Accreditation Association for Hospitals and Health Systems. (2017). Standard
07.01.21. Healthcare Facilities Accreditation Program: Accreditation
requirements for acute care hospitals. Chicago, IL: Accreditation Association
for Hospitals and Health Systems. (Level VII)
15 Centers for Medicare and Medicaid Services, Department of Health and
Human Services. (2015). Condition of participation: Infection control. 42 C.F.R.
§ 482.42.
16 DNV GL-Healthcare USA, Inc. (2016). IC.1 .SR.1 . NIAHO® accreditation
requirements: Interpretive guidelines and surveyor guidance (version 11).
Milford, OH: DNV GL-Healthcare USA, Inc. (Level VII)
17 The Joint Commission. (2019). Standard RC.01.03 .01. Comprehensive
accreditation manual for hospitals. Oakbrook Terrace, IL: The Joint
Commission. (Level VII)
18 Standard 10. Documentation in the medical record. Infusion therapy
standards of practice. (2016). Journal of Infusion Nursing, 39, S28–S30 . (Level
VII)
19 Centers for Medicare and Medicaid Services, Department of Health and
Human Services. (2015). Condition of participation: Medical record services.
42 C.F.R. § 482.24(b).
20 Accreditation Association for Hospitals and Health Systems. (2017). Standard
10.00 .03. Healthcare Facilities Accreditation Program: Accreditation
requirements for acute care hospitals. Chicago, IL: Accreditation Association
for Hospitals and Health Systems. (Level VII)
21 DNV GL-Healthcare USA, Inc. (2016). MR.2 .SR.1 . NIAHO® accreditation
requirements: Interpretive guidelines and surveyor guidance (version 11).
Milford, OH: DNV GL-Healthcare USA, Inc. (Level VII)
22 Standard 35. Filtration. Infusion therapy standards of practice. (2016). Journal
of Infusion Nursing, 39, S70–S71. (Level VII)
23 Standard 25. Flow-control devices. Infusion therapy standards of practice.
(2016). Journal of Infusion Nursing, 39, S48–S50. (Level VII)
24 Infusion Nurses Society. (2019). Infusion nursing: An evidence-based
approach (4th ed.) . St. Louis, MO: Saunders.
25 Standard 42. Administration set change. Infusion therapy standards of
practice. (2016). Journal of Infusion Nursing, 39, S84–S85. (Level VII)
I
JUGULAR VENOUS OXYGEN SATURATION MONITORING
Jugular venous oxygen saturation (SjvO2) monitoring
measures the venous oxygenation saturation of blood as it
leaves the brain, reflecting the oxygen saturation of blood
after cerebral perfusion has taken place.1 Comparing SjvO2
with the arterial venous oxygenation can help to determine
whether blood flow to the brain matches the brain’s
metabolic demand.
The normal range for SjvO2 is 55% to 70%. Values higher
than 70% indicate hyperperfusion; values between 40% and
54% indicate relative hypoperfusion. Values lower than 40%
indicate ischemia.
Monitoring of SjvO2 allows the nurse to maximize the
balance between cerebral perfusion, oxygenation, and
metabolism. Indications for SjvO2 monitoring include any
neurologic injury in which ischemia is a threat,
intraoperative monitoring, subarachnoid hemorrhage, and
postacute head injury with increased intracranial pressure
(ICP).
The normal range for SjVO2 is 55% to 75%. Values higher
than 75% indicate hyperperfusion; values below 54%
indicate relative hypoperfusion, with the brain at risk for
ischemia.2,3
SjVO2 monitoring commonly is used with other types of
cerebral hemodynamic monitoring—such as ICP monitoring
— to provide detailed information regarding pressure and
perfusion states during treatment. Treatment regimens can
be titrated to enhance pressure and perfusion, allowing
maximal balance between cerebral perfusion, oxygenation,
and metabolism.
Data from monitoring can also be used to calculate the
following:
■ cerebral extraction of oxygen (CEO2 = arterial oxygen
saturation [SaO2] − SjvO2)
■ cerebral arterial oxygen content (CaO2 = 1.34 ×
hemoglobin [Hgb] × SaO2 − 0 .0031 × partial pressure of
arterial oxygen [PaO2])
■ global cerebral oxygen extraction ratio (O2ER = SaO2 −
SjvO2/SaO2) and jugular venous oxygen content saturation
(CjvO2 = 1.34 × Hgb × SjvO2 + 0.0031 × jugular venous
oxygen tension [PjvO2])
■ arteriovenous jugular oxygen content (AVjDO2 = CaO2 −
CjvO2).
TROUBLESHOOTING
Common causes of desaturation
During jugular venous oxygen saturation monitoring, you may encounter
periods of desaturation and need to be prepared to take action. Below are
common causes of desaturation and appropriate interventions.
These calculations help determine cerebral oxygen use,
metabolic demand, and adequacy of oxygen delivery.
Equipment
Monitoring equipment with cable for fiberoptic SjvO2
catheter ▪ gloves ▪ Optional: other personal protective
equipment, supplies for venous blood sampling, prescribed
sedation or analgesia.
Implementation
■ Verify the practitioner’s order.
■ Gather the appropriate equipment.
■ Perform hand hygiene.4,5,6,7,8,9
■ Put on gloves and other personal protective equipment,
as needed, to comply with standard precautions.10,11
■ Confirm the patient’s identity using at least two patient
identifiers.12
■ Provide privacy.13,14,15,16
■ Explain the procedure to the patient and family (if
appropriate) according to their individual communication
and learning needs to increase their understanding, allay
their fears, and enhance cooperation.
■ Monitor the patient’s neurologic status, vital signs, ICP,
and pain level to promptly detect changes in the patient’s
condition.
NURSING ALERT Because the catheter in the jugular bulb can inhibit
venous outflow, a sustained ICP of more than 5 mm Hg over
preinsertion baseline may be an indication for catheter removal.
■ Make sure that the monitor alarm limits are set
appropriately for the patient’s current condition, and that
the alarms are turned on, functioning properly, and audible
to staff.17,18,19,20
■ Obtain a jugular venous blood gas sample and perform in
vivo calibration according to the manufacturer’s instructions
and at intervals indicated by the manufacturer.21 In vivo
calibration is necessary to ensure reliability of the data.
■ Obtain blood samples for laboratory testing, as ordered;
hemoglobin and hematocrit values may be necessary to
interpret SjVO2 and to calculate other hemodynamic
parameters.22
■ Monitor catheter, tubing, and pressure bag system
integrity, and monitor the insertion site for signs of
infection, infiltration, and bleeding to detect possible
complications and catheter dislodgment.
■ Record baseline parameters for SjVO2,22 and calculate and
record baseline AVjDO2, cerebral extraction of oxygen
(CEO2), and global cerebral oxygen extraction ratio (O2ER)
values.
■ Continuously monitor SjVO2 and ICP values to promptly
identify changes in the patient’s condition and prevent
treatment delays. Monitor for SjVO2 desaturations (see
Common causes of desaturation) and note the correlation
between the ICP and SjVO2, because increased ICP is a
frequent cause of desaturation in patients with brain
injury.23 Notify the practitioner if desaturations occur.
■ Recalculate and record AVjDO2, CEO2, and O2ER, as
indicated.
■ Administer sedation or analgesia, as indicated and as
ordered, following safe medication administration practices,
to maintain, monitor, and enhance cerebral perfusion
pressure (CPP).24,25,26,27,28,29
■ Discard used supplies in appropriate receptacles.
■ Remove and discard your gloves and other personal
protective equipment, if worn.10,11
■ Perform hand hygiene.4,5,6,7,8,9
■ Document the procedure.30,31,32,33
Special considerations
■ Maintain a safe environment during monitoring to prevent
accidental dislodgment of the catheter.
■ Change the dressing using sterile technique if it becomes
soiled or loosened and at the interval determined by your
facility for central venous access device redressing.
■ Change the IV solution and tubing for the catheter at the
interval determined by your facility.
■ For an SjVO2 catheter with low light intensity, check the
fiberoptics for obstruction, occlusion, and damage. Aspirate
the catheter until blood can be freely sampled and normal
light intensity is displayed. If you can’t aspirate a blood
sample, check whether the catheter needs to be replaced.
■ For an SjVO2 catheter with high light intensity, adjust the
patient’s head to ensure neutral neck position. High light
intensity indicates a vessel wall artifact and is usually
encountered during patient repositioning.
■ To assess for catheter coiling, identify rhythmic
fluctuations in SjVO2 trends. Those unrelated to changes in
ICP, CPP, or systemic blood pressure signify coiling of the
catheter. Obtain a lateral cervical spine or lateral skull X-ray
to assess the position of the catheter in the external jugular
vein (compare to X-ray done on insertion). If coiling is
confirmed, the practitioner may consider replacing the
catheter.
■ Assess line necessity daily, and make sure that the line is
removed when it’s no longer needed to reduce the risk of
intravascular catheter–associated bloodstream infection.34
■ The Joint Commission issued a sentinel event alert
concerning medical device alarm safety, because alarm-
related events have been associated with permanent loss of
function and death. Among the major contributing factors
were improper alarm settings, alarms turned off
inappropriately, and alarm signals that were not audible to
staff. Make sure that alarm limits are appropriately set, and
that alarms are turned on, functioning properly, and audible
to staff. Follow facility guidelines for preventing alarm
fatigue.17
■ The Joint Commission has issued a sentinel event alert
related to managing risk during transition to new
International Organization for Standardization tubing
standards that were designed to prevent dangerous tubing
misconnections, which can lead to serious patient injury and
death. During the transition, be sure to trace each tubing
and catheter from the patient to its point of origin before
connecting or reconnecting any device or infusion, at any
care transition (such as a new setting or service), and as
part of the hand-off process; route tubes and catheters
having different purposes in different standardized
directions; label tubing at both the distal and proximal ends
(when the patient has different access sites or several bags
hanging); use tubing and equipment only as intended; and
store medications for different delivery routes in separate
locations.35
Complications
Complications associated with SjVO2 monitoring are similar
to complications that can occur with any central line, the
most common being intravascular catheter–associated
bloodstream infection. Other risks include pneumothorax,
carotid artery puncture, internal jugular thrombosis, and
excessive bleeding.
In rare instances, the catheter can also cause impaired
cerebral venous drainage and increased ICP.
Documentation
Record the baseline SjVO2 reading and initial CEO2, AVjDO2,
and O2ER calculations. Record SjVO2 and ICP hourly. Record
subsequent CEO2, AVjDO2, and O2ER, when indicated.
Document your assessment findings; the date, time, and
name of the practitioner notified of any abnormalities;
prescribed interventions; and the patient’s response to
those interventions.
Document
any
medications
administered, including the medication strength, dose, route
of administration, and date and time of administration.36
Record teaching provided to the patient and family and their
comprehension of the teaching.
REFERENCES
1 Hemphill, J. C ., III, & Phan, N. Management of acute severe traumatic brain
injury. (2015). In: UpToDate, Aminoff, M. J ., et al. (Eds.). Retrieved from:
www.uptodate.com
2 Bhardwaj, A., et al. (2015). Jugular venous oximetry. Journal of
Neuroanaesthesiology & Critical Care, 2(3), 225–231. Accessed via the Web
at http://www.jnaccjournal.org/article.asp?issn=2348-
0548;year=2015;volume=2;issue=3;spage=225;epage=231;aulast=Bhardw
aj
3 Wiegand, D. L. (Ed.). (2017). AACN procedure manual for critical care (7th
ed.). St. Louis, MO: Elsevier.
4 The Joint Commission. (2019). Standard NPSG.07.01.01. Comprehensive
accreditation manual for hospitals. Oakbrook Terrace, IL: The Joint
Commission. (Level VII)
5 Centers for Disease Control and Prevention. (2002). Guideline for hand
hygiene in health-care settings: Recommendations of the Healthcare Infection
Control Practices Advisory Committee and the HICPAC/SHEA/APIC/IDSA Hand
Hygiene Task Force. MMWR Recommendations and Reports, 51(RR-16), 1–45.
Accessed via the Web at https://www.cdc.gov/mmwr/pdf/rr/rr5116.pdf (Level
II)
6 World Health Organization. (2009). “WHO guidelines on hand hygiene in
health care: First global patient safety challenge, clean care is safer care”
[Online]. Accessed via the Web at
http://apps.who.int/iris/bitstream/10665/44102/1/9789241597906_eng.pdf
(Level IV)
7 Accreditation Association for Hospitals and Health Systems. (2017). Standard
07.01.21. Healthcare Facilities Accreditation Program: Accreditation
requirements for acute care hospitals. Chicago, IL: Accreditation Association
for Hospitals and Health Systems. (Level VII)
8 Centers for Medicare and Medicaid Services, Department of Health and
Human Services. (2015). Condition of participation: Infection control. 42 C.F.R.
§ 482.42.
9 DNV GL-Healthcare USA, Inc. (2016). IC.1.SR.1 . NIAHO® accreditation
requirements: Interpretive guidelines & surveyor guidance (version 11).
Milford, OH: DNV GL-Healthcare USA, Inc. (Level VII)
10 Siegel, J. D ., et al. (2007, revised 2017). “2007 guideline for isolation
precautions: Preventing transmission of infectious agents in healthcare
settings” [Online]. Accessed via the Web at
https://www.cdc.gov/infectioncontrol/pdf/guidelines/isolation-guidelines.pdf
(Level II)
11 Accreditation Association for Hospitals and Health Systems. (2017). Standard
07.01.10. Healthcare Facilities Accreditation Program: Accreditation
requirements for acute care hospitals. Chicago, IL: Accreditation Association
for Hospitals and Health Systems. (Level VII)
12 The Joint Commission. (2019). Standard NPSG.01.01.01. Comprehensive
accreditation manual for hospitals. Oakbrook Terrace, IL: The Joint
Commission. (Level VII)
13 DNV GL-Healthcare USA, Inc. (2016). PR.1.SR.5 . NIAHO® accreditation
requirements: Interpretive guidelines & surveyor guidance (version 11).
Milford, OH: DNV GL-Healthcare USA, Inc. (Level VII)
14 Centers for Medicare and Medicaid Services, Department of Health and
Human Services. (2015). Condition of participation: Patient’s rights. 42 C.F.R.
§ 482.13(c)(1).
15 The Joint Commission. (2019). Standard RI.01.01.01. Comprehensive
accreditation manual for hospitals. Oakbrook Terrace, IL: The Joint
Commission. (Level VII)
16 Accreditation Association for Hospitals and Health Systems. (2017). Standard
15.01.16. Healthcare Facilities Accreditation Program: Accreditation
requirements for acute care hospitals. Chicago, IL: Accreditation Association
for Hospitals and Health Systems. (Level VII)
17 The Joint Commission. (2013). “Sentinel event alert: Medical device alarm
safety in hospitals” [Online]. Accessed via the Web at
http://www.jointcommission.org/assets/1/18/SEA_50_alarms_4 _5 _13_FINAL1 .P
DF (Level VII)
18 Graham, K. C., & Cvach, M. (2010). Monitor alarm fatigue: Standardizing use
of physiological monitors and decreasing nuisance alarms. American Journal
of Critical Care, 19(1), 28–37. Accessed via the Web at
http://ajcc.aacnjournals.org/content/19/1/28.full.pdf
19 American Association of Critical-Care Nurses (AACN). (2013). “A ACN practice
alert: Alarm management” [Online]. Accessed via the Web at
https://www.aacn.org/aacn-website/shared/content/practice-
alerts/2015/11/25/alarm-management (Level VII)
20 The Joint Commission. (2019). Standard NPSG.06 .01.01. Comprehensive
accreditation manual for hospitals. Oakbrook Terrace, IL: The Joint
Commission. (Level VII)
21 Manno, E. M . (Ed.). (2012). Emergency management in neurocritical care.
Hoboken, NJ: Wiley-Blackwell.
22 Cyrous, A., et al. (2012). New approaches to bedside monitoring in stroke.
Expert Review of Neurotherapeutics, 12(8), 915–928. Accessed via the Web
at http://www.tandfonline.com/doi/full/10.1586/ern.12.85?
scroll=top&needAccess=true
23 Chiu, W., et al. (2012). “Application of brain tissue oxygen monitoring in
traumatic brain injury” [Online]. Accessed via the Web at
http://www.internationalbrain.org/articles/application-of-brain-tissue-oxygen-
monitoring-in-traumatic-brain-injury/
24 Westbrook, J., et al. (2010). Association of interruptions with an increased risk
and severity of medication administration errors. Archives of Internal
Medicine, 170(8), 683–690 . (Level IV)
25 The Joint Commission. (2019). Standard MM.06.01.01. Comprehensive
accreditation manual for hospitals. Oakbrook Terrace, IL: The Joint
Commission. (Level VII)
26 Institute for Safe Medication Practices. (2012). Side tracks on the safety
express: Interruptions lead to errors and unfinished . . . Wait, what was I
doing? Nurse Advise-ERR, 11(2), 1–4 . Accessed via the Web at
https://www.ismp.org/Newsletters/acutecare/showarticle.aspx?id=37
27 DNV GL-Healthcare USA, Inc. (2016). MM.1 .SR.2. NIAHO® accreditation
requirements: Interpretive guidelines & surveyor guidance (version 11).
Milford, OH: DNV GL-Healthcare USA, Inc. (Level VII)
28 Centers for Medicare and Medicaid Services, Department of Health and
Human Services. (2015). Condition of participation: Nursing services. 42
C.F.R. § 482.23(c).
29 Accreditation Association for Hospitals and Health Systems. (2017). Standard
16.01.03. Healthcare Facilities Accreditation Program: Accreditation
requirements for acute care hospitals. Chicago, IL: Accreditation Association
for Hospitals and Health Systems. (Level VII)
30 The Joint Commission. (2019). Standard RC.01.03 .01. Comprehensive
accreditation manual for hospitals. Oakbrook Terrace, IL: The Joint
Commission. (Level VII)
31 Accreditation Association for Hospitals and Health Systems. (2017). Standard
10.00 .03. Healthcare Facilities Accreditation Program: Accreditation
requirements for acute care hospitals. Chicago, IL: Accreditation Association
for Hospitals and Health Systems. (Level VII)
32 Centers for Medicare and Medicaid Services, Department of Health and
Human Services. (2015). Condition of participation: Medical record services.
42 C.F.R. § 482.24(b).
33 DNV GL-Healthcare USA, Inc. (2016). MR.2 .SR.1 . NIAHO® accreditation
requirements: Interpretive guidelines & surveyor guidance (version 11).
Milford, OH: DNV GL-Healthcare USA, Inc. (Level VII)
34 Centers for Disease Control and Prevention. (2011, revised 2017). “Guidelines
for the prevention of intravascular catheter-related infections” [Online].
Accessed via the Web at http://www.cdc.gov/hicpac/pdf/guidelines/bsi-
guidelines-2011.pdf (Level I)
35 The Joint Commission. (2014). “Sentinel event alert: Managing risk during
transition to new ISO tubing connector standards” [Online]. Accessed via the
Web at
http://www.jointcommission.org/assets/1/6/SEA_53_Connectors_8 _19_14 _final.
pdf (Level VII)
36 The Joint Commission. (2019). Standard RC.02.01.01. Comprehensive
accreditation manual for hospitals. Oakbrook Terrace, IL: The Joint
Commission. (Level VII)
K
KNEE ARTHROPLASTY POSTPROCEDURE CARE
Knee arthroplasty involves surgical replacement of all or
part of the knee joint. In partial knee replacement, either
the medial or lateral compartment of the knee joint is
replaced. Total knee replacement is commonly used to treat
severe pain, joint contractures, and deterioration of joint
surfaces, conditions that prohibit full extension or flexion.1
Arthroplasty postprocedure care includes maintaining
alignment of the affected joint, assisting with exercises, and
providing
routine
postoperative
care.
Nursing
responsibilities include teaching, safe mobility, home care,
and exercises that may continue for several years.
HOSPITAL-ACQUIRED CONDITION ALERT Keep in mind that venous
thromboembolism (VTE) in patients who have undergone total knee
replacement is considered a hospital-acquired condition because it
can be reasonably prevented using best practices. Make sure to follow
VTE prevention practices (such as using mechanical compression
devices, including antiembolism stockings and an intermittent
pneumatic compression device; early ambulation; and pharmacologic
prophylaxis) to help reduce the risk of VTE.2,3,4
Equipment
Arterial-venous foot compression controller and foot covers,
or sequential compression device and sleeves ■ crutches or
walker ■ prescribed pain medications ■ prescribed
antibiotics ■ prescribed anticoagulants ■ gloves ■
hypoallergenic moisturizer ■ warm water ■ skin cleanser ■
stethoscope ■ thermometer ■ blood pressure device ■
pillow ■ disinfectant pad ■ Optional: ice pack, continuous
passive motion (CPM) machine, closed wound drainage
system, electronic infusion device (preferably a smart pump
with dose-error reduction software), prescribed beta-
adrenergic blocker, pulse oximeter, standardized sedation
scale.
After total knee replacement, a knee immobilizer may be
applied in the operating room, or the leg may be placed in
CPM.
Implementation
■ Receive hand-off communication from the person who
was responsible previously for the patient’s care. Ask
questions as necessary to help avoid miscommunications
that can cause patient care errors during transition of care.5
Trace the tubing and catheter from the patient to its point of
origin as part of the hand-off process; use a standardized
line reconciliation process using high-reliability practices.6,7
■ Verify the practitioner’s orders.
■ Perform hand hygiene.8,9,10,11,12,13
■ Confirm the patient’s identity using at least two patient
identifiers.9
■ Explain all the procedures to the patient and family
members (if appropriate) according to their individual
communication and learning needs to help increase their
understanding, allay their fears, and enhance cooperation.14
■ Perform hand hygiene.8,15,16,17,18,19
■ Put on gloves.
■ Monitor vital signs according to the patient’s condition
and at an interval determined by your facility and the
patient’s condition; no evidence-based research exists to
indicate best practices for the frequency of vital signs
assessment.20 Report changes in vital signs, because they
may indicate infection, hemorrhage, or postoperative
complications.
■ Encourage the patient to perform deep-breathing and
coughing exercises to help prevent postprocedure
pneumonia.
■ Assess the patient’s bilateral neurovascular status
regularly at an interval determined by your facility and the
patient’s condition, to help detect signs of complications.
Check the patient’s affected leg for color, temperature, toe
movement, sensation, edema, capillary filling, and pedal
pulse. Investigate any complaints of pain, burning,
numbness, or tingling.
■ If not already in place, apply a sequential compression
device to the patient’s lower extremities or an arterial-
venous impulse foot compression device to the patient’s
feet as ordered to help prevent VTE.21 (See the “Sequential
compression therapy” procedure.) Remove the sleeves or
foot covers regularly to inspect the patient’s skin for
breakdown, and then reapply the sleeves or foot covers.
■ Screen and assess the patient’s pain using facility-defined
criteria that are consistent with the patient’s age, condition,
and ability to understand.22
■ In collaboration with the multidisciplinary team, involve
the patient in the pain management planning process.
Provide education on pain management, treatment options,
and the safe use of opioid and nonopioid medications when
prescribed. Develop realistic expectations and measurable
goals that the patient understands for the degree, duration,
and reduction of pain. Discuss objectives used to evaluate
treatment progress (for example, relief of pain and improved
physical and psychosocial function).22
■ Treat the patient’s pain as needed and ordered using
nonpharmacologic or pharmacologic methods, or a
combination of approaches. Base the treatment plan on
evidence-based practices and the patient’s clinical
condition, medical history, and pain management goals.22 If
administering prescribed pain medications, follow safe
medication administration practices.23,24,25,26
■ If the patient is receiving IV opioid medication, take these
steps: Frequently monitor the patient’s respiratory status,
oxygen saturation level by pulse oximetry, end-tidal carbon
dioxide level by capnography (if available), and sedation
level using a standardized sedation scale to help promptly
recognize and treat oversedation and respiratory depression
related to IV opioid medication use.24 Explain the monitoring
process to the patient and family members (including that it
may be necessary to awaken the patient to assess the
effects of the medication). Advise the patient and family
members to alert staff immediately if breathing problems,
sedation, or other changes occur that might be a reaction to
the medication.23,24
■ If the patient was receiving a beta-adrenergic blocker
before surgery, collaborate with the practitioner to ensure
that the patient receives it during the perioperative period
as appropriate.21
■ Ensure that prophylactic antibiotics are discontinued
within 24 hours after surgery.21,25
■ Administer thromboembolic pharmacologic prophylaxis,
as ordered,21,26 following safe medication administration
practices, to minimize the risk of VTE.23 If the practitioner
prescribes a continuous infusion of heparin, administer it
using an electronic infusion device (preferably a smart
pump with dose-error-reduction software) to help provide
consistent, accurate dosing.
■ Observe the patient for bleeding and symptoms of
phlebitis, such as warmth, swelling, tenderness, and
redness. Monitor laboratory results, such as complete blood
count, prothrombin time, International Normalized Ratio,
and partial thromboplastin time.27 Notify the practitioner of
critical test results within your facility’s established time
frame so that the patient can be treated promptly.21
■ Perform hand hygiene.8,15,16,17,18,19
■ Put on gloves to comply with standard precautions.28
■ Inspect the patient’s dressings for excessive bleeding;
notify the practitioner of excessive bleeding if present.
NURSING ALERT During inspection, pay special attention to the
incisional area. Monitor for bruising, and report redness, warmth, or
swelling of the surgical site. Record drainage amounts, and report
excess drainage immediately, because this could signal bleeding into
the joint. Be aware that many patients complain of slight numbness or
tingling and mild swelling at the incision site.
■ Observe the closed-wound drainage system for discharge
color. (See the “Closed-wound drain management”
procedure, page 183.) Proper drainage prevents hematoma.
Purulent discharge and fever may indicate infection. Empty
and measure drainage, as ordered, using clean technique to
prevent infection.
■ Remove and discard your gloves.
■ Perform hand hygiene.8,15,16,17,18,19
■ Monitor the patient’s fluid intake (include wound drainage
in the output measurement) and electrolyte levels as
ordered to help detect and treat fluid and electrolyte
imbalances promptly.
■ If the patient has an indwelling urinary catheter that was
inserted for surgery, remove the catheter on postoperative
day 1 or 2 (with the day of surgery considered day 0),
according to your facility’s protocol or the practitioner’s
order, to reduce the risk of catheter-associated urinary tract
infection.21,29 (See the “Indwelling urinary catheter care and
removal” procedure, page 386.)
■ If ordered, apply an ice pack to the patient’s affected
surgical site for the first 48 hours; however, be aware that
the potential benefits of cold therapy on blood loss,
postoperative pain, and range of motion may be too
insignificant to justify its use.30
■ Help the patient use the trapeze to reposition every 2
hours. These position changes enhance comfort, prevent
pressure
injuries,
and help prevent
respiratory
complications.
■ Perform hand hygiene.8,15,16,17,18,19
■ Put on gloves to comply with standard precautions.28
■ Provide skin care for the patient’s back and buttocks,
using warm water and skin cleanser for bathing. While the
patient’s skin is still damp, hydrate the skin with a
hypoallergenic moisturizer as indicated to help prevent skin
tearing.31
■ Instruct the patient to perform muscle-strengthening
exercises for the affected and unaffected extremities, as
ordered, to help maintain muscle strength and range of
motion and to help prevent phlebitis. Collaborate with
physical therapy professionals, as appropriate.
■ Instruct the patient to begin quadriceps exercises and
straight-leg raises when ordered (usually on the second
postoperative day).
■ Encourage the patient to begin flexion-extension
exercises when ordered (usually after the first dressing
change). Collaborate with physical therapy professionals as
appropriate.
■ Elevate the patient’s affected leg, as ordered, to reduce
swelling.
■ If the practitioner orders use of the CPM machine, the
practitioner will adjust the machine daily to increase the
degree of flexion of the patient’s affected leg gradually.
Typically, patients can dangle their feet on the first day after
surgery and begin ambulation with partial weight-bearing
(cemented knee) or toe-touch ambulation only (uncemented
knee), as tolerated, by the second day. The patient may
need to wear a knee immobilizer for support when walking;
otherwise, the patient should be in CPM for most of the day
and night or during waking hours only. (See the “Continuous
passive motion device use” procedure, page 215.) The
degree of flexion, extension, and weight-bearing status
depend on the practitioner’s specific orders, the surgical
approach used, and the surgeon’s preference.
■ Remove and discard your gloves.
■ Perform hand hygiene.8,15,16,17,18,19
■ Before ambulation, ensure adequate pain management,
because movement is very painful. Encourage the patient
during exercise.
■ Help the patient with progressive ambulation, using
adjustable crutches or a walker when needed.
■ Reassess the patient’s pain by evaluating the response to
treatment and the progress toward pain management goals.
Assess the patient for adverse reactions as well as for risk
factors for adverse events that may result from treatment.
■ Teach the patient and family about measures to prevent
surgical site infection.25,32,33,34
■ Perform hand hygiene.8,15,16,17,18,19
■ Clean and disinfect your stethoscope using a disinfectant
pad.32,33
■ Perform hand hygiene.8,15,16,17,18,19
■ Document the procedure.34,35,36,37
Special considerations
Fever within the first 48 hours after surgery is commonly
due to atelectasis. Superficial wound infections commonly
take 4 to 6 days for fever to develop.
Patient teaching
During discharge teaching, instruct the patient to take
prescribed medications, as ordered; have blood tests
performed, as ordered (usually twice weekly), until
discontinued by the practitioner; keep follow-up
appointments with the surgeon; immediately report any
signs or symptoms of deep vein thrombosis, such as
increasing calf pain, tenderness, or swelling above or below
the knee and increased swelling in the calf, ankle, or foot;
immediately report warning signs and symptoms of a blood
clot that has traveled to the lungs, including a sudden
increase in shortness of breath, sudden chest pain, or
localized chest pain with coughing; and promptly report
signs and symptoms of possible infection, such as fever (a
temperature above 101°F [38.3°C]), shaking chills,
excessive incisional drainage, unusual warmth or swelling
around the incision, and increasing knee pain.
Teach the patient and family members about pain
management strategies during discharge planning. Include
information about the patient’s pain management plan and
adverse effects of pain management treatment. Discuss
activities of daily living and items in the home environment
that might exacerbate pain or reduce the effectiveness of
the pain management plan, and include strategies to
address these issues. Teach the patient and family members
about safe use, storage, and disposal of opioid medications
if prescribed.22
Stress the importance of continuing with rehabilitation,
not only to maintain physical function, but also to prevent
complications. Caution the patient about the risk of falling,
and teach the patient to avoid stairs until able to keep a
strong and mobile balance. Urge the patient to wear strong,
sturdy shoes, and emphasize that assistive devices are an
important part of rehabilitation. Explain that the patient may
need periodic X-rays to evaluate for loosening or wearing
out of prosthesis components, as indicated.
Complications
Immobility after arthroplasty may result in such
complications as shock, pulmonary embolism, pneumonia,
phlebitis, paralytic ileus, urine retention, and bowel
impaction. A deep wound or infection at the prosthesis site
is a serious complication that may force removal of the
prosthesis.
Fat embolism, a potentially fatal complication resulting
from release of fat molecules in response to increased
intramedullary canal pressure from the prosthesis, may
develop within 72 hours after surgery. Watch for such signs
and symptoms as apprehension, diaphoresis, fever,
dyspnea, pulmonary effusion, tachycardia, cyanosis,
seizures, decreased level of consciousness, and a petechial
rash on the chest and shoulders.
Other complications include patellofemoral instability,
patellar component loosening or failure, patella fracture,
patellar clunk syndrome, and rupture of the extensor
mechanism. Injury to the peroneal nerve may cause
paresthesia, numbness, and extensor weakness (drop foot).
Other less common complications include periprosthetic
fracture, aseptic failure, instability, persistent pain, stiffness,
and limited range of motion.35
Documentation
Record the patient’s neurovascular status, and maintenance
and settings of the CPM device. Describe the patient’s
position (especially the position of the affected leg), skin
care and condition, respiratory care and condition, and the
use of a sequential compression device. Document all
exercises performed and their effect; also record ambulatory
efforts, the type of support used, and the amount of traction
weight.
On the appropriate flowchart, record vital signs and fluid
intake and output. Note the turning and skin care schedule
and the current exercise and ambulation program. Record
discharge instructions and how well the patient seems to
understand them.
REFERENCES
1 Martin, G. M., & Crowley, M. Total knee arthroplasty. (2017). In: UpToDate,
Furst, D. E ., & Curtis, M. R. (Eds.). Retrieved from: www.uptodate.com
2 Jarrett, N., & Callaham, M. (2016). “Evidence-based guidelines for selected
hospital-acquired conditions: Final report” [Online]. Accessed via the Web at
https://www.cms.gov/Medicare/Medicare-Fee-for-Service-
Payment/HospitalAcqCond/Downloads/2016-HAC-Report.pdf
3 Balk, E. M., et al. (2017). Venous thromboembolism prophylaxis in major
orthopedic surgery: Systematic review update (AHRQ Publication No. 17 -
EHC021-EF). Rockville, MD: Agency for Healthcare Research and Quality.
Accessed via the Web
https://effectivehealthcare.ahrq.gov/topics/thromboembolism-
update/research-2017
4 Falck-Ytter, Y., et al. (2012). Prevention of VTE in orthopedic surgery patients:
antithrombotic therapy and prevention of thrombosis (9th ed.): American
College of Chest Physicians evidence-based clinical practice guidelines.
Chest, 141 (2 Suppl), e278S–e325S.
5 The Joint Commission. (2019). Standard PC.02.02.01. Comprehensive
accreditation manual for hospitals. Oakbrook Terrace, IL: The Joint
Commission. (Level VII)
6 U.S. Food and Drug Administration. (n.d .). “Look. Check. Connect. Safe
medical device connections save lives” [Online]. Accessed via the Web at
http://www.fda.gov/downloads/MedicalDevices/Safety/AlertsandNotices/UCM1
34873.pdf
7 The Joint Commission. (2014). “Sentinel event alert: Managing risk during
transition to new ISO tubing connector standards” [Online]. Accessed via the
Web at
http://www.jointcommission.org/assets/1/6/SEA_53_Connectors_8 _19_14 _final.
pdf (Level VII)
8 DNV GL-Healthcare USA, Inc. (2016). IC.1.SR.1 . NIAHO® accreditation
requirements: Interpretive guidelines & surveyor guidance (version 11).
Milford, OH: DNV GL-Healthcare USA, Inc. (Level VII)
9 The Joint Commission. (2019). Standard NPSG.01.01.01. Comprehensive
accreditation manual for hospitals. Oakbrook Terrace, IL: The Joint
Commission. (Level VII)
10 The Joint Commission. (2019). Standard RI.01.01.01. Comprehensive
accreditation manual for hospitals. Oakbrook Terrace, IL: The Joint
Commission. (Level VII)
11 Centers for Medicare and Medicaid Services, Department of Health and
Human Services. (2015). Condition of participation: Patient’s rights. 42 C.F.R.
§ 482.13(c)(1).
12 Accreditation Association for Hospitals and Health Systems. (2017). Standard
15.01.16. Healthcare Facilities Accreditation Program: Accreditation
requirements for acute care hospitals. Chicago, IL: Accreditation Association
for Hospitals and Health Systems. (Level VII)
13 DNV GL-Healthcare USA, Inc. (2016). PR.1.SR.5 . NIAHO® accreditation
requirements: Interpretive guidelines & surveyor guidance (version 11).
Milford, OH: DNV GL-Healthcare USA, Inc. (Level VII)
14 The Joint Commission. (2019). Standard PC.02.01.21. Comprehensive
accreditation manual for hospitals. Oakbrook Terrace, IL: The Joint
Commission. (Level VII)
15 The Joint Commission. (2019). Standard NPSG.07.01.01. Comprehensive
accreditation manual for hospitals. Oakbrook Terrace, IL: The Joint
Commission. (Level VII)
16 Centers for Disease Control and Prevention. (2002). Guideline for hand
hygiene in health-care settings: Recommendations of the Healthcare Infection
Control Practices Advisory Committee and the HICPAC/SHEA/APIC/IDSA Hand
Hygiene Task Force. MMWR Recommendations and Reports, 51(RR-16), 1–45.
Accessed via the Web at https://www.cdc.gov/mmwr/pdf/rr/rr5116.pdf (Level
II)
17 World Health Organization. (2009). “WHO guidelines on hand hygiene in
health care: First global patient safety challenge, clean care is safer care”
[Online]. Accessed via the Web at
http://apps.who.int/iris/bitstream/10665/44102/1/9789241597906_eng.pdf
(Level IV)
18 Centers for Medicare and Medicaid Services, Department of Health and
Human Services. (2015). Condition of participation: Infection control. 42 C.F.R.
§ 482.42.
19 Accreditation Association for Hospitals and Health Systems. (2017). Standard
07.01.21. Healthcare Facilities Accreditation Program: Accreditation
requirements for acute care hospitals. Chicago, IL: Accreditation Association
for Hospitals and Health Systems. (Level VII)
20 American Society of PeriAnesthesia Nurses. (2018). 2017–2018
Perianesthesia nursing standards, practice recommendations and interpretive
statements. Cherry Hill, NJ: American Society of PeriAnesthesia Nurses. (Level
VII)
21 The Joint Commission. (2019). Standard NPSG.02.03 .01. Comprehensive
accreditation manual for hospitals. Oakbrook Terrace, IL: The Joint
Commission. (Level VII)
22 The Joint Commission. (2019). Standard PC.01.02.07. Comprehensive
accreditation manual for hospitals. Oakbrook Terrace, IL: The Joint
Commission. (Level VII)
23 Centers for Medicare and Medicaid Services, Department of Health and
Human Services. (2015). Condition of participation: Nursing services. 42
C.F.R. § 482.23(c).
24 Centers for Medicare and Medicaid Services. (2014). “Requirements for
hospital medication administration, particularly intravenous (IV) medications
and post-operative care of patients receiving IV opioids” [Online]. Accessed
via the Web at http://www.cms.gov/Medicare/Provider-Enrollment-and-
Certification/SurveyCertificationGenInfo/Downloads/Survey-and-Cert-Letter-
14-15.pdf
25 Anderson, D. J ., et al. (2014). SHEA/IDSA practice recommendation:
Strategies to prevent surgical site infections in acute care hospitals: 2014
update. Infection Control and Hospital Epidemiology, 35, 605–627. Accessed
via the Web at http://www.jstor.org/stable/10.1086/676022 (Level I)
26 American Academy of Orthopaedic Surgeons. (2011). “Preventing venous
thromboembolic disease in patients undergoing elective hip and knee
arthroplasty: Evidence-based guideline and evidence report” [Online].
Accessed via the Web at
http://www.aaos.org/research/guidelines/VTE/VTE_full_guideline.pdf (Level VII)
27 Centers for Medicare and Medicaid Services & The Joint Commission. (2017).
“The specifications manual for national hospital inpatient quality measures
(version 5.2a.)” [Online]. Accessed via the Web at
https://www.jointcommission.org/specifications_manual_for_national_hospital_
inpatient_quality_measures.aspx
28 Siegel, J. D ., et al. (2007, revised 2017). “2007 guideline for isolation
precautions: Preventing transmission of infectious agents in healthcare
settings” [Online]. Accessed via the Web at
https://www.cdc.gov/infectioncontrol/pdf/guidelines/isolation-guidelines.pdf
(Level II)
29 Association of Professionals in Infection Control and Epidemiology (APIC).
(2014). “APIC implementation guide: Guide to preventing catheter-associated
urinary tract infections” [Online]. Accessed via the Web at
http://apic.org/Resource_/EliminationGuideForm/6473ab9b-e75c-457a-8d0f-
d57d32bc242b/File/APIC_CAUTI_web_0603 .pdf (Level IV)
30 Adie, S., et al. (2012). Cryotherapy following total knee replacement.
Cochrane Database of Systematic Reviews, 2012(9), CD007911. (Level I)
31 LeBlanc, K., et al. (2013). International skin tear advisory panel: A tool kit to
aid in the prevention, assessment, and treatment of skin tears using a
simplified classification system. Advances in Skin & Wound Care, 26(10), 459–
476. (Level IV)
32 Rutala, W. A., et al. (2008, revised 2017). “Guideline for disinfection and
sterilization in healthcare facilities, 2008” [Online]. Accessed via the Web at
https://www.cdc.gov/infectioncontrol/pdf/guidelines/disinfection-
guidelines.pdf (Level I)
33 Accreditation Association for Hospitals and Health Systems. (2017). Standard
07.02.03. Healthcare Facilities Accreditation Program: Accreditation
requirements for acute care hospitals. Chicago, IL: Accreditation Association
for Hospitals and Health Systems. (Level VII)
34 The Joint Commission. (2019). Standard RC.01.03 .01. Comprehensive
accreditation manual for hospitals. Oakbrook Terrace, IL: The Joint
Commission. (Level VII)
35 Martin, G. M . Complications of total knee arthroplasty. (2017). In: UpToDate.
Furst, D. E ., & Curtis, M. R. (Eds.). Retrieved from: www.uptodate.com
36 Lewis, C. G., et al. (2014). Evaluation of the first-generation AAOS clinical
guidelines on the prophylaxis of venous thromboembolic events in patients
undergoing total joint arthroplasty: Experience with 3289 patients from a
single institution. Journal of Bone & Joint Surgery, 96(16), 1327–1332. (Level
IV)
37 Selby, R., et al. (2012). Impact of thromboprophylaxis guidelines on clinical
outcomes following total hip and total knee replacement. Thrombosis
Research, 130(2), 166–172. (Level IV)
L
LARYNGEAL MASK AIRWAY INSERTION
The laryngeal mask airway (LMA) establishes and maintains
a patent airway in the unconscious patient. Anesthesia
personnel use it extensively in the operating room. It’s also
appropriate for emergency airway and ventilatory support
when endotracheal (ET) intubation isn’t immediately
possible. Nurses and other health care practitioners with
special training in the use of the LMA may also use it in
place of a face mask during adult, pediatric, and neonatal
resuscitation.1,2,3,4,5,6,7,8
First- and second-generation LMAs exist. Some are
reusable and must be cleaned and sterilized between uses;
others are disposable, made for single-patient use. First-
generation LMAs (such as the LMA UniqueTM) consist of a
semirigid tube attached to an inflatable polyvinylchloride
cuff. Second-generation LMAs (such as the LMA SupremeTM)
consist of an anatomically shaped airway tube with an
inflatable polyvinylchloride cuff, along with a separate
drainage tube for passage of a gastric tube to the stomach
and an incorporated bite block. The cuff is placed into the
patient’s mouth and advanced blindly until it rests above
the larynx. The patient may then breathe spontaneously or
be assisted with moderate positive-pressure ventilation. In
addition, some second-generation LMAs have noninflatable
gel cuffs (such as the I-Gel LMA), and others are designed to
facilitate intubation (such as the Air-Q LMA). The LMA may
not protect the patient from regurgitation and aspiration;
however, when compared with the bag-valve-mask device,
regurgitation is less likely and aspiration uncommon.1,4
Because of the risks of regurgitation and aspiration, LMAs
should be used in patients with full stomachs only in
emergency situations in which intubation isn’t possible, or if
ventilation by face mask is ineffective. LMAs may be
contraindicated for morbidly obese patients, patients more
than 14 weeks pregnant, those with sustained multiple or
massive injuries or acute abdominal or thoracic injuries,
those with any condition that results in delayed gastric
emptying, and those who have recently received opiate
medication. Always follow the manufacturer’s indications
and instructions for use.7,8
EQUIPMENT
LMA specifications: First-generation LMA
(LMA UniqueTM) and second-generation
LMA (LMA SupremeTM)
The following chart will help you choose the right size laryngeal mask airway
(LMA) for your patient.
This procedure only discusses first- and second-generation
disposable LMAs with inflatable cuffs that are inserted as an
emergency airway device.
Equipment
Two appropriately-sized LMA based on patient’s weight (see
LMA specifications: First-generation LMA [LMA UniqueTM] and
second-generation LMA [LMA SupremeTM]) ■ syringe of
appropriate size for deflating and inflating cuff ■ water-
soluble lubricant ■ gloves ■ oxygen equipment ■ tape or
device to secure the tube ■ bag-valve mask device ■
stethoscope ■ pulse oximeter and probe ■ capnometer ■
disinfectant pad ■ folded towel or blanket ■ suction
equipment ■ Optional: other personal protective equipment
(gown, goggles and mask or mask with face shield), bite
block, orogastric tube, intubation equipment.
Preparation of equipment
Assemble suction equipment and check that it’s working
properly in case you can’t adequately ventilate the patient
with the LMA after successful insertion. Make sure supplies
for endotracheal intubation are readily available in case
they’re needed.14
For a first-generation LMA
Perform
hand hygiene
and
then
put
on
gloves.9,10,11,12,13,14,15 Remove the LMA from its package
and visually inspect it for discoloration, cracks, kinks, and
visible foreign particles; also make sure it’s the right size.
Inspect the airway opening and check that the aperture bars
are intact. Manually tighten the connector, if needed, and
gently pull the inflation line to ensure it is securely
attached.7
Flex the airway tube to increase its curvature up to but
not exceeding 180 degrees. If the tube kinks, discard the
device and use a new one.7 Test the integrity of the cuff.7
(See Performing a cuff test: First-generation LMA [LMA
UniqueTM].)
For a second-generation LMA
Perform
hand hygiene
and
then
put
on
gloves.9,10,11,12,13,14,15 Remove the LMA from its package,
and visually inspect the surface of the airway tube and the
drain tube for discoloration, cracks, or kinks; also make sure
it’s the right size. Inspect the interior of the airway tube and
the drain tube for any loose particles or blockages. If
present, remove loose particles. Completely deflate the
cuff.8 (See Cuff deflation technique.)
NURSING ALERT Don’t use a device that fails any of the inspections
or tests. Always have a second device available to use in case of
failure.7,8
Implementation
■ Gather and prepare the necessary equipment.
■ Perform hand hygiene.9,10,11,12,13,14
EQUIPMENT
Performing a cuff test: First-generation
LMA (LMA UniqueTM)
■ Confirm the patient’s identity using at least two patient
identifiers.16
■ Assess the patient’s level of consciousness. The patient
should be unconscious and unresponsive, because the LMA
shouldn’t be inserted into a patient who may resist insertion
owing to stimulation of the gag reflex.17
■ If time allows, explain the procedure to the family
according to their individual communication and learning
needs to increase their understanding, allay their fears, and
enhance cooperation.18
■ Give the family the option to be present at the bedside,
because family presence during resuscitation and invasive
procedures fosters medical decision making, patient care,
and communication with family members.19
■ Put on gloves and, as needed, other personal protective
equipment to comply with standard precautions.12,15
■ While the equipment is being prepared by a coworker,
ventilate and oxygenate the patient with a bag-valve mask
device, if necessary.
■ Lubricate the posterior surface of the LMA, using a water-
soluble lubricant to ease insertion.7,8 Avoid getting the
lubricant on the anterior surface of the cuff, because the
lubricant may be aspirated.
■ Place the patient in the supine position with a folded
towel or blanket under the head to flex the neck and extend
the head (the “sniffing position”) to ease insertion of the
LMA.
■ Stand behind the patient’s head and place your
nondominant hand under the patient’s head, lifting the head
slightly and keeping upward pressure.20
Inserting a first-generation device
■ Hold the LMA in your dominant hand like a pencil, with
your index finger placed at the junction of the mask and the
tube (as shown below).7 The lumen of the LMA should be
facing up, with the lubricated posterior surface facing the
floor.
■ Extend the patient’s head while flexing the neck and
flatten the LMA against the patient’s hard palate.7,20 Use
your middle finger to gently press down on the patient’s jaw.
■ Flex your wrist fully so that the tip of the LMA points
toward the patient’s head and down, and use your index
finger to insert the tip of the LMA into the patient’s mouth
(as shown below).7
■ Press the posterior surface of the LMA against the hard
palate and advance it into the oropharynx (as shown
below).7,20 By applying pressure up against the hard palate,
the LMA will advance to the proper position.
■ Use your middle finger to open the patient’s jaw and
check that the cuff is compressed against the hard palate. If
the cuff isn’t flattened against the hard palate, remove the
LMA and insert it again.
■ While maintaining pressure on the LMA so that it stays
pressed against the hard palate, extend your index finger
fully while continuing to advance the LMA until you meet
resistance at the hypopharynx (as shown on bottom right).
The LMA should now be in the correct position.7,20
EQUIPMENT
Cuff deflation technique
Follow these steps to properly deflate a laryngeal mask airway cuff:8
■ Firmly attach a syringe that is at least 50 mL to the inflation port.
■ Compress the distal end of the device in between the thumb and index
finger (as shown below).
■ Apply slight tension to the inflation line so that it’s slightly stretched.
■ Draw back on the syringe plunger, withdrawing all the air and creating a
palpable vacuum.
■ Disconnect the syringe.
■ Check that the cuff doesn’t spontaneously reinflate. If it does, discard the
device and use a new one.
■ Remove your nondominant hand from under the patient’s
head, and use it to hold the LMA in place while removing
your index finger (as shown below).7,20
■ Without holding the LMA, use the syringe to inflate the
cuff to an intracuff pressure of no more than 60 cm
H2O.7,17,20 Only one-half the maximum inflation volume is
required to make a seal. Inflating the cuff without holding
the tube allows it to settle itself into the correct position
during cuff inflation. Don’t overinflate the cuff.
■ Check the patient’s mouth to make sure the cuff isn’t
visible, and observe for minor outward movement of the
tube and minor neck bulging in the area of the cricothyroid,
indicating proper tube placement and cuff inflation.
■ Insert a bite block to keep the patient from biting on the
tube, which may cause it to become occluded or move out
of proper position.7,20
■ Tape the LMA and bite block securely to the patient’s
face, or use a commercial device to secure the tube.
Inserting a second-generation device
■ Holding the proximal end of the device with the connector
pointing downward to the chest and the distal tip pointing
toward the palate (as shown below), press the distal tip
against the inner aspect of the upper teeth or gums.
■ Begin sliding the device inward against the hard palate
using a slight diagonal approach. (Direct the tip away from
the midline.) While maintaining pressure against the palate,
continue to slide inward, rotating the hand in a circular
motion so that the device follows the curvature of the hard
and soft palates behind the tongue (as shown below).8
■ Continue until you feel resistance, which indicates contact
with the upper esophageal sphincter (as shown below).8
■ While maintaining inward pressure, secure the device
using a 12′′ to 16′′ (30 to 40 cm) piece of adhesive tape.
Press the tape transversely across the fixation tab, taping
cheek to cheek. The device should be gently pressed inward
by the tape (as shown below). Don’t rotate the tape around
the proximal end of the tape.8
■ Inflate the cuff with the minimal amount of air to achieve
an effective seal. (See Maximum cuff inflation volumes and
orogastric tube size for second-generation LMA [LMA
SupremeTM].) The intracuff pressure shouldn’t exceed 60 cm
H2O.8
■ Check the bite block position. The integrated bite block
should lie between the teeth.8
■ Perform a suprasternal notch test to confirm placement.
Place a small drop (1 to 2 mL) of water-soluble lubricant on
the proximal end of the gastric drain tube and watch for a
slight up-and-down meniscus movement of the lubricant
following the application and release of gentle pressure on
the suprasternal notch.8
■ Pass a well-lubricated orogastric tube slowly through the
drain tube into the stomach, as indicated, to facilitate
gastric drainage.8
Completing the procedure
■ Verify correct placement by capnography, by auscultating
for bilateral breath sounds using a stethoscope, and by
monitoring using pulse oximetry.1,21
■ Use a bag-valve mask connected to an oxygen source, if
indicated, to gently deliver ventilations using a peak airway
pressure less than 20 cm H2O and a tidal volume of 8 mL/kg
of body weight or less. Using low pressure ventilations
avoids exceeding cuff pressure and reduces the risk of
forcing air into the stomach.
■ Remove and discard your gloves and other personal
protective equipment, if worn.
■ Perform hand hygiene.9,10,11,14
■ Clean and disinfect your stethoscope using a disinfectant
pad.22,23
■ Perform hand hygiene.9,10,11,12,13,14
■ Document the procedure.24,25,26,27
Special considerations
■ If there’s a risk that the patient may have neck trauma,
insert the LMA with the patient’s neck in a neutral position.
■ Introducers, which are used in place of your index finger,
may be available from the manufacturer to assist with
insertion. The introducer maintains contact between the
posterior aspect of the tube and the patient’s hard palate,
and should be used according to the manufacturer’s
instructions.
■ Never use extreme force when inserting an LMA.
■ If there’s any concern about the final placement of the
LMA, remove and reposition the device.
■ Avoid use of the LMA in patients who need high pressures
for ventilation. The LMA has a low-pressure seal, which may
be ineffective when used with high pressures.
■ Monitor the patient’s respiratory status continually to
ensure proper ventilation, oxygenation, and tube placement
while the LMA is in place.
■ Assess for an air leak, which may indicate that the LMA
isn’t in correct position. If the patient has prolonged
expirations and no oval swelling around the cricoid
membrane, remove the LMA and reinsert it while
maintaining adequate ventilations to the patient.21
■ If the patient vomits, turn the patient to the side to allow
for drainage of contents and suction the airway.
Complications
Aspiration of stomach contents is a risk, because the LMA
doesn’t protect the airway. Use of excessive force during
insertion can result in trauma to the mouth, teeth, or
pharynx, including lacerations, bleeding, edema, and
laryngospasm. Use of excessive air to inflate the cuff can
result in edema or nerve damage. Other complications
include hoarseness, dysphagia, stridor, dysarthria, and
dysphonia.
Documentation
Document why LMA insertion was needed. Record the
method of ventilation and oxygenation used while preparing
for LMA insertion. Note that the cuff was tested for patency
and that the device was visually inspected, with no
irregularities observed. Record the date, time, and name of
the person performing the procedure. Include the size of the
LMA, volume of air used to inflate the cuff, and number of
attempts to achieve proper placement. Record the methods
used to determine proper tube placement. As appropriate,
include placement of the bite block and how the bite block
and tube were secured. If appropriate, document the size of
the orogastric tube inserted. Document whether the patient
was breathing spontaneously or receiving assisted or
controlled ventilations. Include the amount of oxygen being
delivered. Also document any evidence of trauma to the
airway from insertion of the LMA. Record frequent
assessments of tube placement and respiratory status on a
frequent patient assessment record using the appropriate
documentation format. Include any teaching and support
given to the family.
EQUIPMENT
Maximum cuff inflation volumes and
orogastric tube size for second-
generation LMA (LMA SupremeTM)
This chart supplies the maximum cuff inflation volume and orogastric tube
size for a second-generation laryngeal mask airway (LMA) by MLA size.7
REFERENCES
1 American Heart Association. (2015). 2015 American Heart Association
guidelines update for cardiopulmonary resuscitation and emergency
cardiovascular care. Circulation, 132, S444–S464. (Level II)
2 American Heart Association. (2015). 2015 American Heart Association
guidelines update for cardiopulmonary resuscitation and emergency
cardiovascular care. Circulation, 132, S526–S542. (Level II)
3 American Heart Association. (2015). 2015 American Heart Association
guidelines update for cardiopulmonary resuscitation and emergency
cardiovascular care. Circulation, 132, S543–S560. (Level II)
4 American Heart Association. (2010). Advanced cardiovascular life support:
2010 American Heart Association guidelines for cardiopulmonary
resuscitation and emergency cardiovascular care. Circulation, 122, S729–
S767. (Level II)
5 American Heart Association. (2010). Pediatric advanced life support: 2010
American Heart Association guidelines for cardiopulmonary resuscitation and
emergency cardiovascular care. Circulation, 122, S876–S908 . (Level II)
6 American Heart Association. (2010). Neonatal resuscitation: 2010 American
Heart Association guidelines for cardiopulmonary resuscitation and
emergency cardiovascular care. Circulation, 122, S909–S919. (Level II)
7 Teleflex Incorporated. (2015). “Instructions for use—LMA UniqueTM” [Online].
Accessed via the Web at http://www.lmaco-
ifu.com/sites/default/files/node/278/ifu/revision/3509/ifu-lma-unique-
paf2100000buk.pdf
8 Teleflex Incorporated. (2015). “Instructions for use—LMA SupremeTM”
[Online]. Accessed via the Web at http://www.lmaco-
ifu.com/sites/default/files/node/440/ifu/revision/3596/ifu-lma-supreme-
paj2100002buk.pdf
9 The Joint Commission. (2019). Standard NPSG.07.01.01. Comprehensive
accreditation manual for hospitals. Oakbrook Terrace, IL: The Joint
Commission. (Level VII)
10 Centers for Disease Control and Prevention. (2002). Guideline for hand
hygiene in health-care settings: Recommendations of the Healthcare Infection
Control Practices Advisory Committee and the HICPAC/SHEA/APIC/IDSA Hand
Hygiene Task Force. MMWR Recommendations and Reports, 51(RR-16), 1–45.
Accessed via the Web at http://www.cdc.gov/mmwr/pdf/rr/rr5116.pdf (Level II)
11 World Health Organization. (2009). “WHO guidelines on hand hygiene in
health care: First global patient safety challenge, clean care is safer care”
[Online]. Accessed via the Web at
http://apps.who.int/iris/bitstream/10665/44102/1/9789241597906_eng.pdf
(Level IV)
12 Accreditation Association for Hospitals and Health Systems. (2017). Standard
07.01.10. Healthcare Facilities Accreditation Program: Accreditation
requirements for acute care hospitals. Chicago, IL: Accreditation Association
for Hospitals and Health Systems. (Level VII)
13 Centers for Medicare and Medicaid Services, Department of Health and
Human Services. (2015). Condition of participation: Infection control. 42 C.F.R.
§ 482.42.
14 DNV GL-Healthcare USA, Inc. (2016). IC.1 .SR.1 . NIAHO® accreditation
requirements: Interpretive guidelines and surveyor guidance (version 11).
Milford, OH: DNV GL-Healthcare USA, Inc. (Level VII)
15 Siegel, J. D ., et al. (2007, revised 2017). “2007 guideline for isolation
precautions: Preventing transmission of infectious agents in healthcare
settings” [Online]. Accessed via the Web at
http://www.cdc.gov/hicpac/pdf/isolation/Isolation2007.pdf (Level II)
16 The Joint Commission. (2019). Standard NPSG.01.01.01. Comprehensive
accreditation manual for hospitals. Oakbrook Terrace, IL: The Joint
Commission. (Level VII)
17 Kacmarek, R. M ., et al. (2017). Egan’s fundamentals of respiratory care (11th
ed.). St Louis, MO: Mosby.
18 The Joint Commission. (2019). Standard PC.02.01.21. Comprehensive
accreditation manual for hospitals. Oakbrook Terrace, IL: The Joint
Commission. (Level VII)
19 American Association of Critical-Care Nurses. (2016). AACN practice alert:
Family presence during resuscitation and invasive procedures. Critical Care
Nurse, 36(1), e11–e15. Accessed via the Web at https://www.aacn.org/clinical-
resources/practice-alerts/family-presence-during-resuscitation-and-invasive-
procedures (Level VII)
20 Wiegand, D. L. (2017). AACN procedure manual for high acuity, progressive
and critical care (7th ed.). St. Louis, MO: Elsevier.
21 American Society of Anesthesiologists. (2003, revised 2013). Practice
guidelines for management of the difficult airway: An updated report by the
American Society of Anesthesiologists Task Force on Management of the
Difficult Airway. Anesthesiology, 118(2), 251–270. Accessed via the Web at
http://anesthesiology.pubs.asahq.org/article.aspx?articleid=1918684 (Level
IV)
22 Rutala, W. A., et al. (2008, revised 2017). “Guideline for disinfection and
sterilization in healthcare facilities, 2008” [Online]. Accessed via the Web at
http://www.cdc.gov/hicpac/pdf/guidelines/Disinfection_Nov_2008.pdf (Level I)
23 Accreditation Association for Hospitals and Health Systems. (2017). Standard
07.02.03. Healthcare Facilities Accreditation Program: Accreditation
requirements for acute care hospitals. Chicago, IL: Accreditation Association
for Hospitals and Health Systems. (Level VII)
24 The Joint Commission. (2019). Standard RC.01.03 .01. Comprehensive
accreditation manual for hospitals. Oakbrook Terrace, IL: The Joint
Commission. (Level VII)
25 Accreditation Association for Hospitals and Health Systems. (2017). Standard
10.00 .03. Healthcare Facilities Accreditation Program: Accreditation
requirements for acute care hospitals. Chicago, IL: Accreditation Association
for Hospitals and Health Systems. (Level VII)
26 Centers for Medicare and Medicaid Services, Department of Health and
Human Services. (2015). Condition of participation: Medical record services.
42 C.F.R. § 482.24(b).
27 DNV GL-Healthcare USA, Inc. (2016). MR.2 .SR.1 . NIAHO® accreditation
requirements: Interpretive guidelines and surveyor guidance (version 11).
Milford, OH: DNV GL-Healthcare USA, Inc. (Level VII)
LASER THERAPY, ASSISTING
Using the highly focused and intense energy of a laser
beam, the surgeon can treat various skin lesions. Laser
therapy has several advantages. As a surgical instrument,
the laser offers precise control. It spares normal tissue,
speeds healing, and deters infection by sterilizing the
operative site. In addition, by sealing tiny blood vessels as it
vaporizes tissue, the laser beam leaves a nearly bloodless
operative field.
Laser therapy can be performed on an outpatient basis.
The lasers used most commonly to treat skin lesions are
vascular, pigment, and carbon dioxide (CO2) lasers. (See
Understanding types of laser therapy.)
In general, laser surgery is safe, although bleeding and
scarring can result. One pronounced hazard, to the patient
and treatment staff alike, is eye damage or other injury
caused by unintended laser beam reflection. For this reason,
anyone in the surgical suite, including the patient, must
wear special goggles to filter laser light, and the surgeon
must use special nonreflective instruments. Access to the
room must be strictly controlled, and all windows must be
covered.
Equipment
Laser ■ high-filtration face masks ■ appropriate protective
eyewear (approved by the laser safety officer[LSO])1 ■ laser
smoke evacuator ■ extra vacuum filters for evacuator ■
surgical drape ■ prescribed cleaning solution ■ skin
preparation product ■ sterile gauze ■ normal saline
solution ■ nonadherent dressings ■ surgical tape ■ cotton-
tipped applicators ■ nonreflective surgical instruments ■
gowns ■ cap ■ sterile gloves ■ prescribed local anesthetic
■ basin of water ■ towels ■ fire extinguisher ■ door
warning signs.
Preparation of equipment
Perform hand hygiene2,3,4,5,6,7 and gather the equipment.
Inspect protective eyewear for damage and scratches
before use. Do not use damaged eyewear.1 Prepare a
surgical field, which should include a local anesthetic, as
ordered, as well as both dry and wet sterile gauze; normal
saline solution; a basin of water; and wet towels.8 The gauze
is used to control bleeding, protect healthy tissue, and
abrade and remove any eschar that would otherwise inhibit
laser absorption. Prepare nonreflective surgical instruments
as needed.
Cover all the windows in the surgical suite (including
windows in doors as well as in walls) to prevent the laser
beam from escaping through the windows, creating a
potential for exposure.1,9
Make sure all laser equipment is tested according to the
manufacturer’s recommendations by trained personnel
before the patient enters the procedure room. Only lasers
that successfully pass the beam alignment verification
should be used for procedures.9
Make sure that water, normal saline solution, and a fire
extinguisher are readily available for use during the
procedure.1,8 Keep in mind that fire is a significant hazard
during laser use. Never use a laser in an oxygen-rich
environment. Exercise caution when using a laser near
flammable solutions or volatile or combustible chemicals or
liquids.10 Refer to the manufacturer’s instructions for use
and fire safety information.10
Implementation
■ Make sure the practitioner has obtained a written
informed consent and that the signed consent form is in the
patient’s medical record.11,12,13,14
■ Conduct a preprocedure verification to make sure that all
relevant documentation, related information, and equipment
are available and correctly identified to the patient’s
identifiers.15,16
■ Perform hand hygiene.2,3,4,5,6,7
■ Confirm the patient’s identity using at least two patient
identifiers.17
■ Reinforce the surgeon’s explanation of the procedure,
according to the patient’s individual communication and
learning needs to increase understanding, allay fears, and
enhance cooperation.18 Answer the patient’s questions.
Discuss with the patient how the laser works and point out
the equipment to help allay the patient’s concerns.
■ Put on a cap and gown to comply with standard
precautions, a high-filtration face mask, and protective
eyewear.9,19,20,21
■ Ensure that the surgical site is marked, as directed by
your facility.22
■ Position the patient comfortably. Drape the patient and
place sterile gauze saturated with normal saline solution
over exposed tissue around the operative site, if needed. To
avoid thermal injuries and reduce the risk of fire, ensure
that all surgical drapes at the site are moist.1
■ Place protective eyewear on the patient: goggles or
glasses designed for the type of laser, if the patient will
remain awake during the procedure; wet eye pads, laser-
specific eye shields, or as designated by the LSO if the
patient will undergo general anesthesia; or metal corneal
eye shields if the patient will undergo laser surgery on or
around the eyelids.1
■ Confirm that everyone in the room, including the patient,
is wearing protective eyewear to filter the laser light.1,8
■ Keep the door to the surgical suite closed and post
warning signs regarding the type of laser used at all
entrances to the surgical suite to keep unprotected people
from inadvertently entering the room.1
■ Make sure that the skin preparation product and hand
antiseptic agents are completely dry before the laser is
turned on to prevent surgical fires. Use of nonflammable
preparation agents minimizes the risk.1
■ Keep drapes near the surgical site moist to reduce the
risk of fire. Ensure that wet towels and normal saline
solution are available on the sterile field to extinguish a fire
if one occurs.1
NURSING ALERT With high-enough energy and absorption, laser
beams can ignite clothing, hair, or paper products. The risk increases
in the presence of oxygen, methane, and alcohol. Take such
precautions as removing or protecting hair and clothing within the
treatment areas to help reduce this risk. The high voltage required by
lasers can also result in electric shock. Proper wiring during
installation is critical.23
■ Conduct a time-out immediately before the procedure to
perform a final assessment that the correct patient, site,
positioning, and procedure are identified and, as applicable,
all relevant information and necessary equipment are
available.16,24
■ After the surgeon administers the anesthetic and it takes
effect, activate the laser smoke evacuator. The CO2 laser
has a vacuum hose attached to a separate apparatus to
clear the surgical site of laser smoke plume during laser
therapy. The vacuum has a filter that traps and collects
most of the vaporized tissue. Change the filter whenever
suction decreases and follow facility guidelines for filter
disposal.
■ When the surgeon finishes the procedure, perform hand
hygiene,2,3,4,5,6,7 put on sterile gloves,19 and apply direct
pressure with a sterile gauze pad to any bleeding wound
until hemostasis is achieved. If a wound continues to bleed,
notify the practitioner.
■ When the bleeding is controlled, use sterile technique to
clean the area with a cotton-tipped applicator dipped in the
prescribed cleaning solution. Then size and cut a
nonadherent dressing. Secure the dressing with surgical
tape.
■ Remove the patient’s protective eyewear.
■ Discard used equipment and supplies in the appropriate
receptacles.
■ Remove and discard your gloves and other personal
protective equipment19 and perform hand hygiene.2,3,4,5,6,7
■ Document the procedure.25,26,27,28
Special considerations
■ Lasers used to treat vascular and pigment lesions won’t
result in a wound; only superficial skin changes will occur.
■ Make sure you have thorough knowledge of how each
laser operates and of laser safety considerations for both
the patient and health care providers.1,8
■ Evidence shows that surgical smoke contains toxic gases
and vapors as well as bacterial and viral contaminants.1 The
National Institute for Occupational Safety and Health,
Occupational Safety and Health Administration, Laser
Institute of America, Association of periOperative Registered
Nurses, and The Joint Commission recommend that surgical
smoke be filtered and evacuated through the use of room
ventilation, smoke evacuators, and room suction systems.
Staff should wear high-filtration face masks to filter
particulates.8
Patient teaching
Before the procedure, tell the patient that the surgeon uses
the laser beam to excise the lesion like a scalpel. Inform
that the laser causes a burn-like wound that can be deep
and appear charred. Also, explain that some of the eschar
will be removed during the initial postoperative cleaning and
that more will gradually dislodge at home. Warn the patient
to expect a burning odor and smoke during the procedure,
and that a machine called a smoke evacuator, which sounds
like a vacuum cleaner, will clear the smoke away. Tell the
patient to expect to feel heat from the laser, but to inform
the surgeon immediately if pain develops.
Teach the patient how to dress the wound or perform daily
skin care, as ordered by the surgeon. Explain that showering
is permitted but that the patient should avoid immersing the
wound in water to prevent delayed wound healing and
infection. In case the wound bleeds at home, demonstrate
how to apply direct pressure on the site with clean gauze or
a washcloth for 20 minutes. If pressure doesn’t control the
bleeding, tell the patient to call the surgeon.
Urge the patient whose foot or leg was operated on to
keep the extremity elevated and to use it as little as
possible, because pressure can inhibit healing. Warn the
patient to protect the treated area from exposure to the sun
to avoid changes in pigmentation. Tell the patient to call the
surgeon if a temperature of 100°F (37.8°C) or higher occurs
and persists longer than 1 day.
Complications
Pain, bruising, erythema, and blistering can occur after laser
surgery. Scarring, pigment changes, and infection are rare
complications. Delayed wound healing and allergic reaction
are also potential complications of certain types of laser
therapies.23
Understanding types of laser
therapy
Laser therapy is now an essential tool for treating many types of skin lesions.
The number of lasers used in dermatology continues to grow, with different
types used for specific conditions.
The term laser is an acronym for Light Amplification by the Stimulated
Emission of Radiation. When directed toward the skin, most of this light
energy is absorbed by chromophores, substances that absorb specific
wavelengths of light. This is the basis of selective photothermolysis, which
has revolutionized cutaneous laser surgery. Melanin is the target
chromophore in pigmented lesions, and oxyhemoglobin within microvessels
is the target chromophore in vascular lesions.
Make sure you’re familiar with the various types of lasers and the
indications for each.
Lasers for treating vascular lesions
The laser most commonly used for vascular lesions is the pulsed dye laser
(PDL). Other lasers used for vascular lesions include copper vapor, argon,
argon-pumped tunable dye, potassium-titanyl-phosphate (KTP), krypton, and
neodymium:yttrium-aluminum-garnet (Nd:YAG). Vascular lesions appropriate
for laser therapy include port-wine stains, hemangiomas, venous lake,
rosacea, telangiectasia, and Kaposi sarcoma.
Lasers for treating pigmented lesions
Lasers that are effective in treating tattoos and dermal and epidermal
pigmented lesions include Q-switched ruby, Q -switched Nd:YAG, Q -switched
alexandrite, and PDL. Pigmented lesions appropriate for laser treatment
include tattoos, freckles, and birthmarks, including nevi of Ota, melasma,
solar lentigo, café-au-lait spots, Becker nevi, and epidermal nevi.
Lasers for hair removal
Lasers used to eliminate unwanted hair include ruby, alexandrite, and
Nd:YAG. Laser treatment is only effective in removing dark-colored hair; it
doesn’t effectively remove blonde, red, white, or gray hair.
Potential laser safety-related complications include ocular
damage, burns, and electric shock. Depending on the laser
and its indication, laser-tissue interaction may produce a
smoke plume, tissue splatter, or both, potentially
transmitting infectious microorganisms.23
Documentation
Note the patient’s skin condition before and after the
procedure. Document the safety measures taken before and
during the procedure, the type of laser used, and the laser
time and energy level.9 Also document any bleeding, the
type of dressing applied, and any complaints by the patient
of pain and the interventions implemented. Document home
care instructions provided to the patient, the patient’s
understanding of those instructions, and whether any
follow-up teaching was needed.
REFERENCES
1 Van Wicklin, S. A., & Conner, R. (2018). Guideline for safe use of energy-
generating devices. In R. Conner (Ed.), Guidelines for perioperative practice:
2018 edition. Denver, CO: AORN. (Level VII)
2 Centers for Disease Control and Prevention. (2002). Guideline for hand
hygiene in health-care settings: Recommendations of the Healthcare Infection
Control Practices Advisory Committee and the HICPAC/SHEA/APIC/IDSA Hand
Hygiene Task Force. MMWR Recommendations and Reports, 51(RR-16), 1–45.
Accessed via the Web at https://www.cdc.gov/mmwr/pdf/rr/rr5116.pdf (Level
II)
3 World Health Organization. (2009). “WHO guidelines on hand hygiene in
health care: First global patient safety challenge, clean care is safer care”
[Online]. Accessed via the Web at
http://apps.who.int/iris/bitstream/10665/44102/1/9789241597906_eng.pdf
(Level IV)
4 The Joint Commission. (2019). Standard NPSG.07.01.01. Comprehensive
accreditation manual for hospitals. Oakbrook Terrace, IL: The Joint
Commission. (Level VII)
5 Centers for Medicare and Medicaid Services, Department of Health and
Human Services. (2015). Condition of participation: Infection control. 42 C.F.R.
§ 482.42.
6 Accreditation Association for Hospitals and Health Systems. (2017). Standard
07.01.21. Healthcare Facilities Accreditation Program: Accreditation
requirements for acute care hospitals. Chicago, IL: Accreditation Association
for Hospitals and Health Systems. (Level VII)
7 DNV GL-Healthcare USA, Inc. (2016). IC.1.SR.1 . NIAHO® accreditation
requirements: Interpretive guidelines and surveyor guidance (version 11).
Milford, OH: DNV GL-Healthcare USA, Inc. (Level VII)
8 Castelluccio, D. (2012). Implementing AORN recommended practices for laser
safety. AORN Journal, 95(5), 612–627. Accessed via the Web at
http://www.aornjournal.org/article/S0001-2092(12)00257-8/pdf (Level VII)
9 Occupational Safety and Health Administration. (n.d .). “OSHA technical
manual: Section III: Chapter 6: Laser hazards” [Online]. Accessed via the Web
at https://www.osha.gov/dts/osta/otm/otm_iii/otm_iii_6 .html#6 (Level VII)
10 Van Wicklin, S. A., & Conner, R. (2018). Guideline for a safe environment of
care, part 1. In R. Conner (Ed.), Guidelines for perioperative practice: 2018
edition. Denver, CO: AORN, Inc. (Level VII)
11 The Joint Commission. (2019). Standard RI.01.03 .01. Comprehensive
accreditation manual for hospitals. Oakbrook Terrace, IL: The Joint
Commission. (Level VII)
12 Centers for Medicare and Medicaid Services, Department of Health and
Human Services. (2015). Condition of participation: Patient’s rights. 42 C.F.R.
§ 482.13(b)(2).
13 Accreditation Association for Hospitals and Health Systems. (2017). Standard
30.01.11. Healthcare Facilities Accreditation Program: Accreditation
requirements for acute care hospitals. Chicago, IL: Accreditation Association
for Hospitals and Health Systems. (Level VII)
14 DNV GL-Healthcare USA, Inc. (2016). PR.1.SR.3 . NIAHO® accreditation
requirements: Interpretive guidelines and surveyor guidance (version 11).
Milford, OH: DNV GL-Healthcare USA, Inc. (Level VII)
15 The Joint Commission. (2019). Standard UP.01.01.01. Comprehensive
accreditation manual for hospitals. Oakbrook Terrace, IL: The Joint
Commission. (Level VII)
16 Accreditation Association for Hospitals and Health Systems. (2017). Standard
30.00 .14. Healthcare Facilities Accreditation Program: Accreditation
requirements for acute care hospitals. Chicago, IL: Accreditation Association
for Hospitals and Health Systems. (Level VII)
17 The Joint Commission. (2019). Standard NPSG.01.01.01. Comprehensive
accreditation manual for hospitals. Oakbrook Terrace, IL: The Joint
Commission. (Level VII)
18 The Joint Commission. (2019). Standard PC.02.01.21. Comprehensive
accreditation manual for hospitals. Oakbrook Terrace, IL: The Joint
Commission. (Level VII)
19 Siegel, J. D ., et al. (2007, revised 2017). “2007 guideline for isolation
precautions: Preventing transmission of infectious agents in health care
settings” [Online]. Accessed via the Web at
https://www.cdc.gov/infectioncontrol/pdf/guidelines/isolation-guidelines.pdf
(Level II)
20 Accreditation Association for Hospitals and Health Systems. (2017). Standard
07.01.10. Healthcare Facilities Accreditation Program: Accreditation
requirements for acute care hospitals. Chicago, IL: Accreditation Association
for Hospitals and Health Systems. (Level VII)
21 DNV GL-Healthcare USA, Inc. (2016). IC.1 .SR.2 . NIAHO® accreditation
requirements: Interpretive guidelines and surveyor guidance (version 11).
Milford, OH: DNV GL-Healthcare USA, Inc. (Level VII)
22 The Joint Commission. (2019). Standard UP.01.02.01. Comprehensive
accreditation manual for hospitals. Oakbrook Terrace, IL: The Joint
Commission. (Level VII)
23 Brown, C. W., Jr. (2016). “Complications of dermatologic laser surgery”
[Online]. Accessed via the Web at
http://emedicine.medscape.com/article/1120837-overview
24 The Joint Commission. (2019). Standard UP.01.03.01. Comprehensive
accreditation manual for hospitals. Oakbrook Terrace, IL: The Joint
Commission. (Level VII)
25 The Joint Commission. (2019). Standard RC.01.03 .01. Comprehensive
accreditation manual for hospitals. Oakbrook Terrace, IL: The Joint
Commission. (Level VII)
26 Centers for Medicare and Medicaid Services, Department of Health and
Human Services. (2015). Condition of participation: Medical record services.
42 C.F.R. § 482.24(b).
27 Accreditation Association for Hospitals and Health Systems. (2017). Standard
10.00 .03. Healthcare Facilities Accreditation Program: Accreditation
requirements for acute care hospitals. Chicago, IL: Accreditation Association
for Hospitals and Health Systems. (Level VII)
28 DNV GL-Healthcare USA, Inc. (2016). MR.2 .SR.1 . NIAHO® accreditation
requirements: Interpretive guidelines and surveyor guidance (version 11).
Milford, OH: DNV GL-Healthcare USA, Inc. (Level VII)
LATEX ALLERGY PROTOCOL
Latex—a natural product of the rubber tree—is used in many
products in the health care field. With the increased use of
latex in barrier protection and medical equipment, more
nurses and patients are becoming hypersensitive to it.
Certain groups of people are at increased risk for developing
latex allergy. These groups include people who have had or
will undergo multiple surgical procedures (such as those
with a history of spina bifida), health care workers
(especially those who work in emergency departments and
operating rooms), workers who manufacture latex and latex-
containing products, and people with a genetic
predisposition to latex allergy.1 Some studies also suggest
that pregnant patients are at a greater risk for latex allergy.2
People allergic to certain foods, including bananas,
avocados, chestnuts, apples, carrots, celery, papaya,
potatoes, kiwis, melons, and tomatoes, may also be allergic
to latex.3 Exposure to latex elicits an allergic response
similar to the one that occurs with these foods; thus, these
foods are termed cross-reactive.
For people with latex allergy, latex becomes a hazard
when the protein in latex comes in direct contact with
mucous membranes or is inhaled, which happens with the
use of powdered latex surgical gloves. Manipulation of the
powder in the latex surgical gloves can trigger rhinitis and
asthma signs and symptoms.3,4
The diagnosis of latex allergy is based on the patient’s
history and physical examination. The patient should
undergo laboratory testing to confirm or eliminate the
diagnosis. Laboratory tests include skin testing, such as the
skin-prick or patch test; the radioallergosorbent test, which
measures the serum level of latex-specific immunoglobulin
E in the blood; and other serum blood tests, such as
Pharmacia CAP, AlaSTAT, and HYTEC.
Latex allergy can produce a myriad of signs and
symptoms, including generalized itching (such as on the
hands and arms); itchy, watery, or burning eyes; sneezing
and coughing (hay fever–type signs and symptoms); rash;
hives; bronchial asthma, scratchy throat, or difficulty
breathing; edema of the face, hands, or neck; and
anaphylaxis.1
To help identify a patient at risk for latex allergy, ask latex
allergy–specific questions during the health history. (See
Latex allergy screening.) If the patient’s history reveals a
latex sensitivity, the practitioner assigns the patient to one
of three categories based on the extent of sensitization:
■ Group 1 patients have a history of anaphylaxis or a
systemic reaction when exposed to a natural latex product.
■ Group 2 patients have a clear history of an allergic
reaction of a nonsystemic type.
■ Group 3 patients don’t have a previous history of latex
hypersensitivity but are considered high risk because of an
associated medical condition, occupation, or crossover
allergy.
If you determine that the patient has a sensitivity to latex,
ensure that the patient doesn’t come in contact with latex,
because such contact could result in a life-threatening
hypersensitivity reaction. Creating a latex-safe environment
is the only way to safeguard the patient. Many facilities now
designate nonlatex equipment, which is usually kept on a
cart that can be moved into the patient’s room. The
American Latex Allergy Association maintains an electronic
listing of products that contains latex and alternatives that
don’t.
Equipment
Latex-free equipment, including room contents ■
anaphylaxis kit ■ latex allergy sign or other facility-specific
alert ■ appropriate warning labels ■ latex-free supply kit ■
latex-free emergency equipment (crash cart with
defibrillator, handheld resuscitation bag with mask,
intubation equipment ■ Optional: face mask with latex-free
ties, latex-allergy patient identification bracelet, transparent
dressing, gown.
Preparation of equipment
Place all equipment on a supply cart, and make sure the
supply cart is readily available. Make sure latex-free
emergency equipment and an anaphylaxis kit are readily
available so that you can act immediately if the patient has
an allergic reaction to latex. Make sure that the emergency
equipment functions properly.
Implementation
■ Review the patient’s medical record for a latex allergy,
factors that increase the risk of a latex allergy, or a history
of signs and symptoms of contact dermatitis (especially of
the hands), contact urticaria, hay fever, rhinitis, or asthma.5
■ Perform hand hygiene.6,7,8,9,10,11
■ If the patient is suspected of having or confirmed to have
a latex sensitivity or allergy, and you’ve used latex
products, put on a gown before entering the patient’s room
to reduce the risk of potential patient exposure to residual
latex powder.
■ Confirm the patient’s identify using at least two patient
identifiers.12
■ If a latex allergy hasn’t been identified, assess the patient
for factors that increase the risk of latex sensitivity, as well
as for signs and symptoms associated with contact
dermatitis, contact urticaria, hay fever, rhinitis, or asthma.5
■ Gather and prepare the appropriate equipment.
■ Explain latex allergy precautions to the patient and family
(if appropriate) according to their communication and
learning needs to increase understanding, allay fears, and
enhance cooperation.13
■ If a latex allergy has been identified, arrange for the
patient to be admitted to a latex-safe room. Make sure latex
products aren’t used for other patients in the room if the
room isn’t private.14
■ Post a latex allergy sign (or other facility-specific alert) at
the room entrance to prevent personnel from entering the
patient’s room with supplies that contain latex.14
■ If your facility requires that the patient wear a latex
allergy identification wristband or bracelet, place it on the
patient.5
■ Make sure that there’s a visual alert on the front of the
patient’s medical record to alert staff members immediately
to the patient’s latex allergy.5
■ Label the patient’s bed (if directed by your facility) to
alert staff members to the patient’s latex allergy.5,14
■ If the patient requires surgery, document the patient’s
latex sensitivity or allergy and communicate this information
to the perioperative team.5 (See Anesthesia induction and
latex allergy, page 474.)
■ If the health care facility’s electronic medical record
system doesn’t automatically alert other departments (such
as the dietary and central supply departments and the
pharmacy) to the patient’s allergy to latex, notify them of
the patient’s allergy.
■ If you must transport the patient to another area of the
facility, make sure that the latex-free supply cart
accompanies the patient and that all health care workers
who come in contact with the patient wear latex-free gloves.
The patient may need to wear a face mask with latex-free
ties when leaving the room to protect the patient from
inhaling airborne latex particles.
■ Review labels on all medical devices, equipment, and
supplies (such as adhesives, tape, IV equipment,
electrocardiogram electrodes, and dressing supplies) for
latex content.15 Use latex-free products whenever
possible.14 When a latex-safe alternative isn’t available,
cover latex-containing equipment that comes in contact
with the patient.5
■ Puncture medication vials only once when withdrawing
medication, because multiple punctures increase the risk of
introducing latex proteins into the contents.5 Don’t remove
the rubber stopper from a medication vial when withdrawing
medication, because removing the stopper doesn’t reduce
contamination of the contents with latex protein, and the
medication may already contain latex absorbed from the
stopper during transport and storage.5
■ If the patient requires pulse oximetry and the oximeter
probe contains latex, cover the patient’s skin with a
transparent dressing before applying the probe to create a
barrier and prevent latex exposure.16
■ Perform hand hygiene.6,7,8,9,10,11
■ Document the procedure.17,18,19,20
Special considerations
■ If the patient requires surgery or another invasive
procedure that can’t be performed in a latex-safe room,
staff members performing the procedure should remove all
latex-containing products from the room the evening before
the procedure (if possible), except for those that are sealed
or contained;5 schedule an elective procedure as the first
procedure of the day to allow time for the room air to be
completely exchanged after terminal cleaning;5,14 restrict
traffic and equipment in the operating room before and
during the procedure to help reduce the release of latex
particles;5 and cover latex-containing equipment that will
come in direct contact with the patient with stockinettes to
provide a barrier between the equipment and the patient’s
skin.5,14
Latex allergy screening
To determine if the patient has a latex sensitivity or allergy, ask the following
screening questions:
■ What is your occupation?
■ Have you experienced an allergic reaction, local sensitivity, or itching
following exposure to any latex products, such as balloons, dishwashing
gloves, or condoms?
■ Have you experienced shortness of breath or wheezing after blowing up
balloons or after a dental visit?
■ Have you experienced itching in or around your mouth after eating a
banana?
If the patient answers yes to any of these questions, proceed with the
following questions:
■ Do you have a history of allergies, dermatitis, or asthma? If so, what type
of reaction do you have?
■ Do you have any congenital abnormalities? If yes, explain.
■ Do you have any food allergies? If so, what specific allergies do you have?
Describe your reaction.
■ If you experience shortness of breath or wheezing when blowing up latex
balloons, describe your reaction.
■ Have you had any previous surgical procedures? Did you experience
associated complications? If so, describe them.
■ Have you had previous dental procedures? Did you experience associated
complications? If so, describe them.
■ Are you exposed to latex in your occupation, and have you ever had a
reaction to these products? If so, describe your reaction.
■ Remember that signs and symptoms of latex allergy
usually occur within 30 minutes of anesthesia induction.
However, the time of onset can range from 10 minutes to
several hours.
■ Keep in mind that, as a health care worker, you’re
susceptible to developing latex hypersensitivity. If you
suspect that you’re sensitive to latex, contact the employee
health services department concerning facility protocol for
latex-sensitive employees. Use nonlatex products as often
as possible to help reduce your exposure to latex. If you
must wear latex gloves, wear the powder-free variety when
possible, because the natural rubber latex proteins in
powdered gloves attach to the cornstarch powder particles
and become airborne when putting on and removing gloves.
Patient teaching
Teach the patient that the best way to prevent an allergic
reaction is to avoid latex exposure. Encourage the patient to
obtain and wear a medical identification bracelet and to
carry nonlatex gloves.4,21 Teach the patient with a severe
group 1 allergy to latex about the benefits and use of a
prescribed epinephrine self-injection pen.4,21 Instruct the
patient to tell all health care workers, including dentists,
about the latex allergy. Instruct the patient to read labels on
household rubber items for latex content.
Documentation
Document the results of latex allergy screening, the date
and time of screening, and notification of staff members of
the patient’s status. Document placement of signs and
warning labels and any patient teaching provided.
Anesthesia induction and latex
allergy
Latex allergy can cause signs and symptoms in both conscious and
anesthetized patients.
REFERENCES
1 American Association of Nurse Anesthetists. (1993, revised 2014). “Latex
allergy management (guidelines)” [Online]. Accessed via the Web at
https://www.aana.com/docs/default-source/practice-aana-com-web-
documents-(all)/latex-allergy-management.pdf?sfvrsn=9c0049b1_2
2 Draisci, G., et al. (2011). Latex sensitization: A special risk for the obstetric
population? Anesthesiology, 114(3), 565–569. Accessed via the Web at
http://anesthesiology.pubs.asahq.org/article.aspx?articleid=1933469
3 Asthma and Allergy Foundation of America. (2015). “Latex allergy” [Online].
Accessed via the Web at http://www.aafa.org/page/latex-allergy.aspx
4 Hamilton, R. G . Latex allergy: Epidemiology, clinical manifestations, and
diagnosis. (2015). In: UpToDate, Bochner, B. S ., & TePas, E. (Eds.). Retrieved
from: www.uptodate.com
5 Van Wicklin, S. A., & Conner, R. (2018). Guideline for safe environment of
care, part 1. In R. Conner (Eds.), Guidelines for perioperative practices, 2018
edition. Denver, CO: AORN, Inc. (Level VII)
6 The Joint Commission. (2019). Standard NPSG.07.01.01. Comprehensive
accreditation manual for hospitals. Oakbrook Terrace, IL: The Joint
Commission. (Level VII)
7 Centers for Disease Control and Prevention. (2002). Guideline for hand
hygiene in health-care settings: Recommendations of the Healthcare Infection
Control Practices Advisory Committee and the HICPAC/SHEA/APIC/IDSA Hand
Hygiene Task Force. MMWR Recommendations and Reports, 51(RR-16), 1–45.
Accessed via the Web at http://www.cdc.gov/mmwr/pdf/rr/rr5116.pdf (Level II)
8 World Health Organization. (2009). “WHO guidelines on hand hygiene in
health care: First global patient safety challenge, clean care is safer care”
[Online]. Accessed via the Web at
http://apps.who.int/iris/bitstream/10665/44102/1/9789241597906_eng.pdf
(Level IV)
9 Centers for Medicare and Medicaid Services, Department of Health and
Human Services. (2015). Condition of participation: Infection control. 42 C.F.R.
§ 482.42.
10 DNV GL-Healthcare USA, Inc. (2016). IC.1 .SR.1 . NIAHO® accreditation
requirements: Interpretive guidelines and surveyor guidance (version 11).
Milford, OH: DNV GL-Healthcare USA, Inc. (Level VII)
11 Accreditation Association for Hospitals and Health Systems. (2017). Standard
07.01.21. Healthcare Facilities Accreditation Program: Accreditation
requirements for acute care hospitals. Chicago, IL: Accreditation Association
for Hospitals and Health Systems. (Level VII)
12 The Joint Commission. (2019). Standard NPSG.01.01.01. Comprehensive
accreditation manual for hospitals. Oakbrook Terrace, IL: The Joint
Commission. (Level VII)
13 The Joint Commission. (2019). Standard PC.02.01.21. Comprehensive
accreditation manual for hospitals. Oakbrook Terrace, IL: The Joint
Commission. (Level VII)
14 Sussman, G., & Gold, M. (n.d .). “Guidelines for the management of latex
allergies” [Online]. Accessed via the Web at
http://latexallergyresources.org/articles/guidelines-management-latex-
allergies#guidelinesforfacilities
15 Standard 14. Latex sensitivity and allergy. Infusion therapy standards of
practice. (2016). Journal of Infusion Nursing, 39, S35–S36 .
16 American Latex Allergy Association. (n.d .). “Patient assessment equipment”
[Online]. Accessed via the Web at
http://latexallergyresources.org/taxonomy/term/36
17 The Joint Commission. (2019). Standard RC.01.03 .01. Comprehensive
accreditation manual for hospitals. Oakbrook Terrace, IL: The Joint
Commission. (Level VII)
18 Centers for Medicare and Medicaid Services, Department of Health and
Human Services. (2015). Condition of participation: Medical record services.
42 C.F.R. § 482.24(b).
19 DNV GL-Healthcare USA, Inc. (2016). MR.2 .SR.1 . NIAHO® accreditation
requirements: Interpretive guidelines and surveyor guidance (version 11).
Milford, OH: DNV GL-Healthcare USA, Inc. (Level VII)
20 Accreditation Association for Hospitals and Health Systems. (2017). Standard
10.00 .03. Healthcare Facilities Accreditation Program: Accreditation
requirements for acute care hospitals. Chicago, IL: Accreditation Association
for Hospitals and Health Systems. (Level VII)
21 Pollart, S. M., et al. (2009). Latex allergy. American Family Physician, 80(12),
1413–1418. Accessed via the Web at
http://www.aafp.org/afp/2009/1215/p1413.html
LIPID EMULSION ADMINISTRATION
Given as a separate solution in conjunction with parenteral
nutrition or as a component of a total nutrient admixture or
three-in-one solution, lipid emulsions are a source of calories
and essential fatty acids. A deficiency in essential fatty
acids can hinder wound healing, adversely affect production
of red blood cells, and impair prostaglandin synthesis.
Currently, all of the IV lipid emulsions available in the
United States are soybean oil–based; however, other
countries have used alternative oil-based lipid emulsions
containing olives and fish. Studies show that these
alternative lipid emulsions may have fewer proinflammatory
effects, less immune suppression, and more antioxidant
effects than the standard soybean oil products.1,2 Further
research is needed to develop specific guidelines for their
use.2
When given alone, lipid emulsions can be administered
through a peripheral or a central venous line. Central
venous access is preferred when lipid emulsion
administration accompanies hypertonic parenteral nutrition
solution administration.3
Lipid emulsions are contraindicated in patients who have
a condition that disrupts normal fat metabolism, such as
pathologic hyperlipidemia, lipid nephrosis, or acute
pancreatitis. They also can’t be given to patients with
severe egg allergies. They must be used cautiously in
patients who have liver or pulmonary disease, anemia, or
coagulation disorders as well as in those who are at risk for
developing a fat embolism.
Equipment
Prescribed lipid emulsion ■ diethylhexyl phthalate (DEHP)–
free lipid administration set4 ■ filter (1.2 micron) ■ prefilled
syringe containing preservative-free normal saline solution
■ needleless connector ■ tape ■ antiseptic pads
(chlorhexidine-based, povidone iodine, or alcohol) ■
electronic infusion device with anti-free-flow protection5 ■
gloves ■ Optional: mask, time tape.
Preparation of equipment
To prevent aggregation of fat globules, don’t shake the lipid
container excessively. Protect the emulsion from freezing,
and never add anything to it.
Inspect all IV equipment and supplies; if a product is
expired, if its integrity is compromised, or if you find it
defective, remove it from patient use, label it as expired or
defective, and report the expiration or defect, as directed by
your facility.6
Implementation
■ Avoid distractions and interruptions when preparing and
administering lipids to prevent medication errors.7,8
■ Verify the practitioner’s order, and make sure that the
prescribed therapy is appropriate for the patient’s age,
condition, and access device. Confirm the access device
catheter tip location, as appropriate, and confirm that the
dose, rate, and route are appropriate for the patient.
Address concerns about the order with the practitioner,
pharmacist, or your supervisor and, if needed, the risk
management department or as directed by your facility.9,10
■ Gather the appropriate supplies and the lipid infusion.
■ Compare the label on the lipid emulsion with the order in
the patient’s medical record. The label should contain the
appropriate patient identifiers, the administration date and
time, the patient’s current weight, the route of
administration, and the complete name and prescribed
amount of lipid emulsion, including the total volume to be
infused, the infusion rate in milliliters per hour, the duration
of the infusion, and the expiration date.11
■ Check the patient’s medical record for an allergy or
contraindication to the lipid emulsion. If an allergy or
contraindication exists, don’t administer the emulsion;
instead, notify the practitioner.12,13,14,15
■ Inspect the emulsion for opacity and consistency of color
and texture. If the emulsion looks frothy or oily or contains
particles, or if you think its stability or sterility is
questionable, return the bottle to the pharmacy.12,13,14,15
■ Discuss unresolved concerns about lipids with the
patient’s practitioner.12,13,14,15
■ Confirm that the practitioner has obtained written
informed consent (if required) and that the consent is in the
patient’s medical record.16,17,18,19,20
■ Perform hand hygiene.21,22,23,24,25,26
■ Confirm the patient’s identity using at least two patient
identifiers.27
■ Provide privacy.20,28,29,30
■ If the patient is receiving lipids for the first time, teach
about
potential
adverse
reactions
or
other
concerns.12,13,14,15
■ Verify that the lipid emulsion is being administered at the
proper time, in the prescribed dose, and by the correct route
to reduce the risk of medication errors.12,13,14,15
■ If your facility uses a bar code technology, scan your
identification badge, the patient’s identification bracelet,
and the lipid bar code.
■ Explain the procedure to the patient to promote
cooperation. Answer any questions the patient has about
lipid emulsion administration.18,31
■ Raise the patient’s bed to waist level when providing care
to prevent caregiver back strain.32
■ Perform hand hygiene.21,22,23,24,25,26
■ Put on gloves as well as a mask if required by your
facility.33,34
■ Using sterile technique, remove the protective cap from
the lipid emulsion bottle, thoroughly disinfect the rubber
stopper with an antiseptic pad using friction, and allow the
stopper to dry.
■ Hold the bottle upright and, using strict aseptic
technique, insert the vented spike through the inner circle of
the rubber stopper.
■ Invert the bottle, and squeeze the drip chamber until it
fills to the level indicated in the tubing package instructions.
■ Open the flow clamp and prime the tubing and the 1.2
micron filter.11,35,36 An in-line filter should be used to reduce
the potential for harm from particulates, microprecipitates,
microorganisms, and air emboli.11 Gently tap the tubing to
dislodge air bubbles trapped in the Y-ports. If necessary,
attach a time tape to the lipid emulsion container to monitor
fluid intake.
■ Label the administration set tubing, noting the date and
time of initiation or the date when change is required, as
directed by our facility.4
■ Perform a vigorous mechanical scrub of the needleless
connector for at least 5 seconds using an antiseptic pad and
allow it to dry completely.37,38
■ Verify patency of the access device by aspirating for a
blood return and flushing the catheter to reduce the risk of
infiltration and extravasation.10,39 While maintaining sterility
of the syringe tip, attach a prefilled syringe containing
preservative-free normal saline solution to the needleless
connector. (Use a 10-mL syringe or a syringe specifically
designed to generate lower injection pressure.) Unclamp the
catheter and slowly aspirate for a blood return that is the
color and consistency of whole blood. If you don’t obtain a
blood return, take steps to locate an external cause of
obstruction.
■ If you obtain a blood return, slowly inject preservative-
free normal saline solution into the catheter. Use a minimum
volume of twice the internal volume of the catheter system.
Don’t forcibly flush the device; further evaluate the device if
you meet resistance. Flush the catheter with preservative-
free normal saline solution according to the catheter type.
■ Clamp the access device before disconnecting it to
prevent air from entering the catheter. If the catheter is a
central venous (CV) access device and a clamp isn’t
available, ask the patient to perform the Valsalva maneuver
just as you change the tubing, if possible. Or, if the patient
is being mechanically ventilated, change the IV tubing
immediately after the machine delivers a breath at peak
inspiration. Both of these measures increase intrathoracic
pressure and prevent air embolism.40
■ Using sterile technique, attach the primed lipid emulsion
tubing to the needleless connector.
■ Trace the IV tubing from the patient to its point of origin
to make sure that you’re connecting it to the proper port.
Route the tubing in a standardized direction if the patient
has other tubing and catheters that have different purposes.
Label the tubing at the distal end (near the patient
connection) and proximal end (near the source container) to
reduce the risk of misconnection if you’ll be using multiple
IV lines. Then put the lipid emulsion tubing into the infusion
device.41,42
■ Program the infusion pump following the manufacturer’s
instructions. For the patient’s first lipid infusion, set the test
dose at a rate of 1 mL/minute for 30 minutes or as ordered.
NURSING ALERT A lipid infusion is considered a high-alert
medication because it can cause significant patient harm when used in
error. Another nurse must double-check certain procedure steps to
ensure safe medication administration.43
■ Before beginning a lipid infusion, if required by your
facility, have another nurse perform an independent double-
check to verify the patient’s identity and make sure that the
correct medication is hanging in the prescribed
concentration; the medication’s indication corresponds with
the patient’s diagnosis; the dosage calculations are correct
and the dosing formula used to derive the final dose is
correct; the route of administration is safe and proper for
the patient; the pump settings are correct; and the infusion
line is attached to the correct port.11,44
■ After comparing results of the independent double-check
with another nurse (if required), begin infusing the
medication if no discrepancies exist. If discrepancies exist,
rectify them before beginning the infusion.
■ Unclamp the catheter and start the infusion pump.
■ Make sure that the infusion device alarm limits are set
appropriately and that the alarms are turned on, functioning
properly, and audible to staff.5,11,45,46,47
■ Monitor the patient’s vital signs, and watch for signs and
symptoms of adverse reactions, such as fever; flushing,
sweating, or chills; a pressure sensation over the eyes;
nausea; vomiting; headache; chest and back pain;
tachycardia; dyspnea; and cyanosis. An allergic reaction
usually is due to either the source of lipids or to eggs, which
occur in the emulsion as egg phospholipids, an emulsifying
agent.
■ Monitor the patient’s intake and output to promptly
recognize fluid imbalances.
■ If the patient has no adverse reactions to the test dose,
begin the infusion at the prescribed rate after an
independent double-check with another nurse, if required.44
■ Return the bed to the lowest position to prevent falls and
maintain patient safety.48
■ Discard used supplies in appropriate receptacles.33,49,50
■ Remove and discard your gloves and mask, if worn.33,49,50
■ Perform hand hygiene.21,22,23,24,25,26
■ Document the procedure.51,52,53,54
Special considerations
■ The Joint Commission issued a sentinel event alert
concerning medical device alarm safety, because alarm-
related events have been associated with permanent loss of
function or death. Among the major contributing factors
were
improper
alarm
settings,
alarm
settings
inappropriately turned off, and alarm signals not audible to
staff. Make sure alarm limits are set appropriately, and that
alarms are turned on and audible to staff. Follow facility
guidelines for preventing alarm fatigue.46
■ Exercise caution when administering IV lipid emulsions to
patients with severe liver damage, pulmonary disease,
anemia, or blood coagulation disorders, and when a danger
of fat embolism is present.35
■ Be aware that IV lipid emulsions contain aluminum; levels
can become toxic with prolonged use in patients with kidney
impairment.35
■ Always maintain strict aseptic technique while preparing
and handling equipment.4,38
■ If the lipid emulsion will be piggybacked into parenteral
nutrition, connect it between the filter and the patient’s
access device; control flow rates of each infusion with
separate infusion devices.4,38
■ If a multilumen catheter will be used to administer
parenteral nutrition, one port should be designated
exclusively for parenteral nutrition administration.55
■ Observe the patient’s reaction to the lipid emulsion. Most
patients report a feeling of satiety; some complain of an
unpleasant metallic taste.
■ Change the administration sets used for IV fat emulsions
that are infused separately every 12 hours; change the set
with a new fat emulsion container.4 Change the
administration
set immediately
upon
suspected
contamination, or when the integrity of the system has been
compromised.38
■ Make sure a dietitian or clinician with expertise in
nutrition performs a nutrition assessment and formulates a
nutrition care plan that describes intervention and
monitoring and reevaluation parameters.55
■ Monitor for lipid tolerance rate. Cloudy plasma in a
centrifuged sample of citrated blood indicates that the lipids
haven’t been cleared from the patient’s bloodstream.
■ Be aware that a lipid emulsion may clear from the blood
at an accelerated rate in patients with full-thickness burns,
multiple traumatic injuries, or a metabolic imbalance,
because catecholamines,
adrenocortical hormones,
thyroxine, and growth hormone enhance lipolysis and
embolization of fatty acids.
■ Obtain weekly laboratory tests, as ordered. Usual tests
include liver function studies, prothrombin time, platelet
count, and serum triglyceride levels. Whenever possible,
draw blood for triglyceride levels at least 6 hours after the
completion of the lipid emulsion infusion to avoid falsely
elevated results.
■ Never rehang a partially empty bottle of emulsion,
because a lipid emulsion is an excellent medium for
bacterial growth.
■ Complete the infusion of lipid emulsions within 12 to 24
hours, as ordered.4,55
■ The Joint Commission has issued a sentinel event alert
related to managing risk during transition to new
International Organization for Standardization tubing
standards that were designed to prevent dangerous tubing
misconnections, which can lead to serious patient injury and
death. During the transition, be sure to trace the tubing and
catheter from the patient to the point of origin before
connecting or reconnecting any device or infusion, at any
care transition (such as a new setting or service), and as
part of the hand-off process; route tubes and catheters
having different purposes in different standardized
directions; when there are different access sites or several
bags hanging, label the tubing at both the distal and
proximal ends; use tubing and equipment only as intended;
and store medications for different delivery routes in
separate locations.42
Complications
Immediate or early adverse reactions to lipid emulsion
therapy, which occur in less than 1% of patients, include
fever, dyspnea, cyanosis, nausea and vomiting, headache,
flushing, diaphoresis, lethargy, syncope, chest and back
pain, slight pressure over the eyes, irritation at the infusion
site,
hyperlipidemia,
hypercoagulability,
and
thrombocytopenia.
PEDIATRIC ALERT Thrombocytopenia has been reported in infants
receiving a 20% IV lipid emulsion.
Delayed but uncommon complications associated with
prolonged administration of lipid emulsion include
hepatomegaly, splenomegaly, jaundice secondary to central
lobular cholestasis, and blood dyscrasias (such as
thrombocytopenia, leukopenia, and transient increases in
liver function studies). Dry or scaly skin, thinning hair,
abnormal liver function studies, and thrombocytopenia may
indicate a deficiency of essential fatty acids. For unknown
reasons, some patients develop brown pigmentation in the
reticuloendothelial system.
Documentation
Record the times of all dressing changes and solution
changes, the condition of the catheter insertion site, your
assessments of the patient’s condition, and any
complications and resulting interventions. Also document
patient and family teaching and their understanding of the
teaching.56
REFERENCES
1 Barbosa, V. M., et al. (2010). Effects of a fish oil containing lipid emulsion on
plasma phospholipid fatty acids, inflammatory markers, and clinical outcomes
in septic patients: A randomized, controlled clinical trial. Critical Care, 14(1),
R5. Accessed via the Web at
http://www.ncbi.nlm.nih.gov/pmc/articles/PMC2875515/ (Level I)
2 Vanek, V. W., et al. (2012). A.S .P.E.N. position paper: Clinical role for
alternative intravenous fat emulsions. Nutrition in Clinical Practice, 27(2),
150–192.
3 Standard 26. Vascular access device (VAD) planning. Infusion therapy
standards of practice. (2016). Journal of Infusion Nursing, 39, S51–S54. (Level
VII)
4 Standard 42. Administration set change. Infusion therapy standards of
practice. (2016). Journal of Infusion Nursing, 39, S84–S85. (Level VII)
5 Standard 61. Parenteral nutrition. Infusion therapy standards of practice.
(2016). Journal of Infusion Nursing, 39, S133–S135. (Level VII)
6 Standard 12. Product evaluation, integrity, and defect reporting. Infusion
therapy standards of practice. (2016). Journal of Infusion Nursing, 39, S32–
S34. (Level VII)
7 Westbrook, J., et al. (2010). Association of interruptions with an increased risk
and severity of medication administration errors. Archives of Internal
Medicine, 170(8), 683–690 . (Level IV)
8 Institute for Safe Medication Practices. (2013). Side tracks on the safety
express: Interruptions lead to errors and unfinished . . . Wait, what was I
doing? Nurse Advise-ERR, 11(2), 1–4 . Accessed via the Web at
https://www.ismp.org/Newsletters/acutecare/showarticle.aspx?id=37 (Level
VII)
9 The Joint Commission. (2019). Standard MM.04.01.01. Comprehensive
accreditation manual for hospitals. Oakbrook Terrace, IL: The Joint
Commission. (Level VII)
10 Standard 57. Parenteral medication and solution administration. Infusion
therapy standards of practice. (2016). Journal of Infusion Nursing, 39, S125–
S127.
11 Ayers, P., et al. (2014). A.S .P.E .N. parenteral nutrition safety consensus
recommendations. Journal of Parenteral and Enteral Nutrition, 38, 296–333 .
Accessed via the Web at
http://pen.sagepub.com/content/38/3/296.full.pdf+html (Level VII)
12 The Joint Commission. (2019). Standard MM.06.01.01. Comprehensive
accreditation manual for hospitals. Oakbrook Terrace, IL: The Joint
Commission. (Level VII)
13 Accreditation Association for Hospitals and Health Systems. (2017). Standard
16.01.03. Healthcare Facilities Accreditation Program: Accreditation
requirements for acute care hospitals. Chicago, IL: Accreditation Association
for Hospitals and Health Systems. (Level VII)
14 Centers for Medicare and Medicaid Services, Department of Health and
Human Services. (2015). Condition of participation: Nursing services. 42
C.F.R. § 482.23(c).
15 DNV GL-Healthcare USA, Inc. (2016). MM.1 .SR.2. NIAHO® accreditation
requirements: Interpretive guidelines and surveyor guidance (version 11).
Milford, OH: DNV GL-Healthcare USA, Inc. (Level VII)
16 Infusion Nurses Society. (2016). Policies and procedures for infusion nursing
(5th ed.). Boston, MA: Infusion Nurses Society.
17 Accreditation Association for Hospitals and Health Systems. (2017). Standard
15.01.11. Healthcare Facilities Accreditation Program: Accreditation
requirements for acute care hospitals. Chicago, IL: Accreditation Association
for Hospitals and Health Systems. (Level VII)
18 Centers for Medicare and Medicaid Services, Department of Health and
Human Services. (2015). Condition of participation: Patient’s rights. 42 C.F.R.
§ 482.13(b)(2).
19 DNV GL-Healthcare USA, Inc. (2016). PR.1.SR.3 . NIAHO® accreditation
requirements: Interpretive guidelines and surveyor guidance (version 11).
Milford, OH: DNV GL-Healthcare USA, Inc. (Level VII)
20 Accreditation Association for Hospitals and Health Systems. (2017). Standard
15.01.16. Healthcare Facilities Accreditation Program: Accreditation
requirements for acute care hospitals. Chicago, IL: Accreditation Association
for Hospitals and Health Systems. (Level VII)
21 The Joint Commission. (2019). Standard NPSG.07.01.01. Comprehensive
accreditation manual for hospitals. Oakbrook Terrace, IL: The Joint
Commission. (Level VII)
22 Centers for Disease Control and Prevention. (2002). Guideline for hand
hygiene in health-care settings: Recommendations of the Healthcare Infection
Control Practices Advisory Committee and the HICPAC/SHEA/APIC/IDSA Hand
Hygiene Task Force. MMWR Recommendations and Reports, 51(RR-16), 1–45.
Accessed via the Web at http://www.cdc.gov/mmwr/pdf/rr/rr5116.pdf (Level II)
23 World Health Organization. (2009). “WHO guidelines on hand hygiene in
health care: First global patient safety challenge, clean care is safer care”
[Online]. Accessed via the Web at
http://apps.who.int/iris/bitstream/10665/44102/1/9789241597906_eng.pdf
(Level IV)
24 Accreditation Association for Hospitals and Health Systems. (2017). Standard
07.01.21. Healthcare Facilities Accreditation Program: Accreditation
requirements for acute care hospitals. Chicago, IL: Accreditation Association
for Hospitals and Health Systems. (Level VII)
25 Centers for Medicare and Medicaid Services, Department of Health and
Human Services. (2015). Condition of participation: Infection control. 42 C.F.R.
§ 482.42.
26 DNV GL-Healthcare USA, Inc. (2016). IC.1 .SR.1 . NIAHO® accreditation
requirements: Interpretive guidelines and surveyor guidance (version 11).
Milford, OH: DNV GL-Healthcare USA, Inc. (Level VII)
27 The Joint Commission. (2019). Standard NPSG.01.01.01. Comprehensive
accreditation manual for hospitals. Oakbrook Terrace, IL: The Joint
Commission. (Level VII)
28 Centers for Medicare and Medicaid Services, Department of Health and
Human Services. (2015). Condition of participation: Patient’s rights. 42 C.F.R.
§ 482.13(c)(1).
29 DNV GL-Healthcare USA, Inc. (2016). PR.1.SR.5 . NIAHO® accreditation
requirements: Interpretive guidelines and surveyor guidance (version 11).
Milford, OH: DNV GL-Healthcare USA, Inc. (Level VII)
30 The Joint Commission. (2019). Standard RI.01.01.01. Comprehensive
accreditation manual for hospitals. Oakbrook Terrace, IL: The Joint
Commission. (Level VII)
31 The Joint Commission. (2019). Standard RI.01.03 .01. Comprehensive
accreditation manual for hospitals. Oakbrook Terrace, IL: The Joint
Commission.
32 Waters, T. R., et al. (2009). “Safe patient handling training for schools of
nursing” [Online]. Accessed via the Web at
http://www.cdc.gov/niosh/docs/2009-127/pdfs/2009-127.pdf (Level VII)
33 Siegel, J. D ., et al. (2007, revised 2017). “2007 guideline for isolation
precautions: Preventing transmission of infectious agents in healthcare
settings” [Online]. Accessed via the Web at
http://www.cdc.gov/hicpac/pdf/isolation/Isolation2007.pdf (Level II)
34 Accreditation Association for Hospitals and Health Systems. (2017). Standard
07.01.10. Healthcare Facilities Accreditation Program: Accreditation
requirements for acute care hospitals. Chicago, IL: Accreditation Association
for Hospitals and Health Systems. (Level VII)
35 Baxter Healthcare Corp. (2016). “Intralipid® 20% prescribing information”
[Online]. Accessed via the Web at
http://ecatalog.baxter.com/ecatalog/loadResource.blob?bid=20000307
36 Institute for Safe Medication Practices. (2016). IV fat emulsion needs a filter.
ISMP Medication Safety Alert! Acute Care Edition, 21(1):3.
37 Marschall, J., et al. (2014). SHEA/IDSA practice recommendation: Strategies
to prevent central line–associated bloodstream infections in acute care
hospitals. Infection Control and Hospital Epidemiology, 35, 753–771 .
Accessed via the Web at http://www.jstor.org/stable/10.1086/676533 (Level I)
38 Centers for Disease Control and Prevention. (2011). “Guidelines for the
prevention of intravascular catheter–related infections” [Online]. Accessed
via the Web at http://www.cdc.gov/hicpac/pdf/guidelines/bsi-guidelines-
2011.pdf (Level I)
39 Standard 40. Flushing and locking. Infusion therapy standards of practice.
(2016). Journal of Infusion Nursing, 39, S77–S80 . (Level VII)
40 Standard 50. Air embolism. Infusion therapy standards of practice. (2016).
Journal of Infusion Nursing, 39, S108–S109. (Level VII)
41 U.S . Food and Drug Administration. (n.d .). “Look. Check. Connect. Safe
medical device connections save lives” [Online]. Accessed via the Web at
http://www.fda.gov/downloads/MedicalDevices/Safety/AlertsandNotices/UCM1
34873.pdf
42 The Joint Commission. (2014). “Sentinel event alert: Managing risk during
transition to new ISO tubing connector standards” [Online]. Accessed via the
Web at
http://www.jointcommission.org/assets/1/6/SEA_53_Connectors_8 _19_14 _final.
pdf (Level VII)
43 Institute for Safe Medication Practices. (2014). “ISMP list of high-alert
medications in an acute care setting” [Online]. Accessed via the Web at
http://www.ismp.org/tools/highalertmedications.pdf (Level VII)
44 Institute for Safe Medication Practices. (2014). Independent double-checks:
Undervalued and misused. ISMP Medication Safety Alert! Nurse Advise-ERR,
12(3), 1. Accessed via the Web at
http://www.ismp.org/newsletters/nursing/issues/NurseAdviseERR201403.pdf
(Level VII)
45 The Joint Commission. (2019). Standard NPSG.06 .01.01. Comprehensive
accreditation manual for hospitals. Oakbrook Terrace, IL: The Joint
Commission. (Level VII)
46 The Joint Commission. (2013). “Sentinel event alert: Medical device alarm
safety in hospitals” [Online]. Accessed via the Web at
https://www.jointcommission.org/assets/1/6/SEA_50_alarms_4 _26_16.pdf
(Level VII)
47 Graham, K.C., & Cvach, M. (2010). Monitor alarm fatigue: Standardizing use
of physiological monitors and decreasing nuisance alarms. American Journal
of Critical Care, 19(1), 28–37. Accessed via the Web at
http://ajcc.aacnjournals.org/content/19/1/28.full.pdf
48 Ganz, D. A., et al. (2013). Preventing falls in hospitals: A toolkit for improving
quality of care (AHRQ Publication No. 13-0015-EF). Accessed via the Web at
http://www.ahrq.gov/sites/default/files/publications/files/fallpxtoolkit.pdf
(Level VII)
49 Occupational Safety and Health Administration. (n.d .). “Bloodborne
pathogens, standard number 1910.1030” [Online]. Accessed via the Web at
https://www.osha.gov/pls/oshaweb/owadisp.show_document?
p_table=STANDARDS&p_id=10051 (Level VII)
50 Standard 18. Medical waste and sharps safety. Infusion therapy standards of
practice. (2016). Journal of Infusion Nursing, 39, S40–S41.
51 The Joint Commission. (2019). Standard RC.01.03 .01. Comprehensive
accreditation manual for hospitals. Oakbrook Terrace, IL: The Joint
Commission. (Level VII)
52 Accreditation Association for Hospitals and Health Systems. (2017). Standard
10.00 .03. Healthcare Facilities Accreditation Program: Accreditation
requirements for acute care hospitals. Chicago, IL: Accreditation Association
for Hospitals and Health Systems. (Level VII)
53 Centers for Medicare and Medicaid Services, Department of Health and
Human Services. (2015). Condition of participation: Medical record services.
42 C.F.R. § 482.24(b).
54 DNV GL-Healthcare USA, Inc. (2016). MR.2 .SR.1 . NIAHO® accreditation
requirements: Interpretive guidelines and surveyor guidance (version 11).
Milford, OH: DNV GL-Healthcare USA, Inc. (Level VII)
55 Ukleja, A., et al. (2010). Standards for nutrition support: Adult hospitalized
patients. Nutrition in Clinical Practice, 25(4), 403–414 . Accessed via the Web
at http://journals.sagepub.com/doi/abs/10.1177/0884533610374200?
url_ver=Z39.88-2003&rfr_id=ori:rid:crossref.org&rfr_dat=cr_pub%3dpubmed
56 Standard 10. Documentation in the medical record. Infusion therapy
standards of practice. (2016). Journal of Infusion Nursing, 39, S28–S30 . (Level
VII)
LOW-AIR-LOSS THERAPY BED USE
Low-air-loss therapy beds consist of segmented, air-filled
cushions that provide surface area for pressure relief.
Studies have shown that these beds are effective in
preventing pressure injuries in obese patients, although
recent research hasn’t demonstrated that this type of
support surface is superior in preventing and treating skin
breakdown and minimizing pain than other support
surfaces.1 Low-air-loss therapy beds inflate to specific
pressures based on the height and weight of the patient.
They’re indicated for patients with skin grafts and surgical
flaps, pressure injuries, edema, cancer, and malnutrition, as
well as for orthopedic or transplant patients.
The segmented air cushions, covered by a low-friction
fabric, inflate and rest on a bed frame (similar to a standard
bed frame), reducing pressure on skin surfaces and
diminishing shearing forces when repositioning the patient.
A maximum-inflate feature allows the entire surface to
become firm for patient repositioning. The system is also
capable of deflating quickly in emergencies. As with a
standard bed frame, you can adjust the head and foot of the
bed. These beds also assist with microclimate management
by circulating air, which helps to evaporate moisture and
reduce temperature, reducing excess skin moisture and
preventing maceration.2 Some models are equipped with
pulsation or rotational capability. (See Low-air-loss therapy
bed, page 478.) Keep in mind that, although pressure
redistribution devices are helpful for preventing and
managing pressure injuries, they shouldn’t replace
repositioning protocols; instead, they should serve as
adjunct therapy.3
Pulsation promotes circulation, which improves healing;
lateral rotation capability raises one lung over the other,
mobilizing
secretions
and
preventing pulmonary
complications.4 Larger beds are available for bariatric
patients, and some bed models allow pressure zone and
lumbar support adjustment.
Low-air-loss therapy beds are contraindicated for patients
with an unstable cervical, thoracic, or lumbar fracture.
Patients with uncontrolled diarrhea, hemodynamic
instability, severe agitation, or uncontrolled claustrophobia
may not benefit from this bed.
Equipment
Low-air-loss therapy bed ■ turning sheet ■ assistive
transfer device ■ Optional: gloves, other personal
protective equipment.
Preparation of equipment
Usually the manufacturer’s representative or a trained staff
member prepares the bed for use. The unit is plugged in
and turned on to inflate the bed. Make sure the bed inflates
properly and that the equipment is in working order. If the
bed isn’t self-calibrating, follow the manufacturer’s
instructions for proper calibration and alarm activation (for
low-pressure and power-failure alarm settings.5 Adjust
additional settings—such as degree of rotation—as
appropriate. Don’t fully inflate the bed until the patient is
moved onto it.
EQUIPMENT
Low-air-loss therapy bed
A low-air-loss therapy bed reduces pressure on skin surfaces and may be
used for patients with such conditions as immobility, malnutrition,
incontinence, contractures, fractures, or amputations. Some models come
with special features, such as rotational or percussion options.
Implementation
■ Review the patient’s medical record to identify
contraindications to use of the low-air-loss therapy bed.6
■ Verify the practitioner’s order.
■ Gather and prepare the appropriate equipment, such as a
manufacturer-approved turning sheet.
■ Make sure that the bed is plugged in and turned on and
that it inflates properly. Adjust the settings as appropriate.
■ Perform hand hygiene 7,8,9,10,11,12,13 and put on gloves
and other personal protective equipment if needed to
comply with standard precautions.14
■ Confirm the patient’s identity using at least two patient
identifiers.15
■ Provide privacy.16,17,18,19
■ Explain and, if possible, demonstrate the operation of the
low-air-loss therapy bed. Tell the patient the reason for its
use. Explain the bed’s special features, such as lumbar
supports and rotation.
■ With the help of coworkers, transfer the patient to the
bed using an appropriate assistive transfer device to
prevent patient and caregiver injury.20
■ Start with the settings as set by the representative,
monitor the patient for comfort, and ensure proper
functioning of the bed.
■ Adjust the inflation settings on the control panel
according to the patient’s comfort and therapeutic use.
■ Make sure that the side rails are raised, as appropriate,
and then lower the bed and lock its wheels to ensure the
patient’s safety.21 Assess the patient’s body alignment.
■ Place the call light within the patient’s reach.
■ Remove and discard your gloves and other personal
protective equipment if worn.
■ Perform hand hygiene.7,8,9,10,11,12,13
■ Document the procedure.22,23,24,25
Special considerations
■ Encourage coughing and deep breathing every 2 hours.
■ Initiate and maintain an individualized turning schedule
based on risk factors and the patient’s ability and
willingness to reposition.26 When repositioning the patient,
use an approved turning sheet; some beds come with
special foam wedges to use for repositioning.
■ Make sure you don’t place unnecessary equipment
between the patient’s skin and the surface, which would
block the beneficial effects of the mattress.26
■ To turn and reposition the patient, use the maximum-
inflate feature to fully inflate the bed. Use the turning sheet
to position the patient and place the pillows or foam
wedges. Then return the bed to the correct patient settings.
■ If the bed is rotational, verify that invasive lines and tubes
are secured at the correct angle to minimize the risk of
binding, disconnecting, or dislodging.
■ To position a bedpan, deflate the seat portion of the bed,
roll the patient away from you, and place the bedpan on the
turning sheet. Then reposition the patient. To remove the
bedpan, hold it steady, roll the patient away from you, and
remove the bedpan. Then reinflate the seat portion of the
bed.
■ Don’t use pins or clamps to secure sheets or tubing,
because they may puncture the bed and result in air loss.
Take care to avoid puncturing the bed when giving
injections.
■ Assess the patient’s skin every 2 hours. Assess pressure
injury risk on admission to the facility, at regular intervals,
and with any signs of skin or wound deterioration.3,27
■ Engage the emergency or cardiopulmonary resuscitation
button during cardiac arrest to help ensure adequate chest
compressions.
Documentation
Record the duration of therapy and the patient’s response to
it. Document the condition of the patient’s skin, including
the presence of pressure ulcers and other wounds.
Document the patient’s comfort level and tolerance of
rotational angles, as applicable.
REFERENCES
1 Somnath, S., et al. (2013). “Pressure ulcer treatment strategies: Comparative
effectiveness” [Online]. Accessed via the Web at
http://www.ncbi.nlm.nih.gov/books/NBK143657/pdf/TOC.pdf (Level V)
2 Krasner, D. L. (Ed.). (2014). Chronic wound care: The essentials: A clinical
source book for healthcare professionals. Malvern, PA: HMP Communications.
3 Wound, Ostomy and Continence Nurses Society (WOCN). (2016). Guideline for
prevention and management of pressure ulcers (injuries). Mount Laurel, NJ:
WOCN. (Level VII)
4 Bryant, R. A., & Nix, D. P. (2016). Acute & chronic wounds: Current
management concepts (5th ed.) . St. Louis, MO: Elsevier.
5 American National Manufacturing, Inc. (n.d .). “Medical beds” [Online].
Accessed via the Web at http://www.americannationalmfg.com/medical-
beds.html
6 McNichol, L., et al. (2015). Identifying the right surface for the right patient at
the right time: Generation and content validation of an algorithm for support
surface selection. Journal of Wound, Ostomy and Continence Nursing, 42(1),
19–37. (Level VII)
7 The Joint Commission. (2019). Standard NPSG.07.01.01. Comprehensive
accreditation manual for hospitals. Oakbrook Terrace, IL: The Joint
Commission. (Level VII)
8 Centers for Disease Control and Prevention. (2002). Guideline for hand
hygiene in health-care settings: Recommendations of the Healthcare Infection
Control Practices Advisory Committee and the HICPAC/SHEA/APIC/IDSA Hand
Hygiene Task Force. MMWR Recommendations and Reports, 51(RR-16), 1–45.
Accessed via the Web at https://www.cdc.gov/mmwr/pdf/rr/rr5116.pdf (Level
II)
9 World Health Organization. (2009). “WHO guidelines on hand hygiene in
health care: First global patient safety challenge, clean care is safer care”
[Online]. Accessed via the Web at
http://apps.who.int/iris/bitstream/10665/44102/1/9789241597906_eng.pdf
(Level IV)
10 Centers for Medicare and Medicaid Services, Department of Health and
Human Services. (2015). Condition of participation: Infection control. 42 C.F.R.
§ 482.42.
11 Accreditation Association for Hospitals and Health Systems. (2017). Standard
07.01.21. Healthcare Facilities Accreditation Program: Accreditation
requirements for acute care hospitals. Chicago, IL: Accreditation Association
for Hospitals and Health Systems. (Level VII)
12 Siegel, J. D ., et al. (2007, revised 2017). “2007 guideline for isolation
precautions: Preventing transmission of infectious agents in healthcare
settings” [Online]. Accessed via the Web at
https://www.cdc.gov/infectioncontrol/pdf/guidelines/isolation-guidelines.pdf
(Level II)
13 DNV GL-Healthcare USA, Inc. (2016). IC.1 .SR.1 . NIAHO® accreditation
requirements: Interpretive guidelines and surveyor guidance (version 11).
Milford, OH: DNV GL-Healthcare USA, Inc. (Level VII)
14 Accreditation Association for Hospitals and Health Systems. (2017). Standard
07.01.10. Healthcare Facilities Accreditation Program: Accreditation
requirements for acute care hospitals. Chicago, IL: Accreditation Association
for Hospitals and Health Systems. (Level VII)
15 The Joint Commission. (2019). Standard NPSG.01.01.01. Comprehensive
accreditation manual for hospitals. Oakbrook Terrace, IL: The Joint
Commission. (Level VII)
16 Centers for Medicare and Medicaid Services, Department of Health and
Human Services. (2015). Condition of participation: Patient’s rights. 42 C.F.R.
§ 482.13(c)(1).
17 Accreditation Association for Hospitals and Health Systems. (2017). Standard
15.01.16. Healthcare Facilities Accreditation Program: Accreditation
requirements for acute care hospitals. Chicago, IL: Accreditation Association
for Hospitals and Health Systems. (Level VII)
18 DNV GL-Healthcare USA, Inc. (2016). PR.1.SR.5 . NIAHO® accreditation
requirements: Interpretive guidelines and surveyor guidance (version 11).
Milford, OH: DNV GL-Healthcare USA, Inc. (Level VII)
19 The Joint Commission. (2019). Standard RI.01.01.01. Comprehensive
accreditation manual for hospitals. Oakbrook Terrace, IL: The Joint
Commission. (Level VII)
20 U.S . Department of Labor, Occupational Safety and Health Administration.
(2003, revised 2009). “Guidelines for nursing homes: Ergonomics for the
prevention of musculoskeletal disorders” [Online]. Accessed via the Web at
http://www.osha.gov/ergonomics/guidelines/nursinghome/final_nh_guidelines.
html
21 Accreditation Association for Hospitals and Health Systems. (2017). Standard
16.02.02. Healthcare Facilities Accreditation Program: Accreditation
requirements for acute care hospitals. Chicago, IL: Accreditation Association
for Hospitals and Health Systems. (Level VII)
22 The Joint Commission. (2019). Standard RC.01.03 .01. Comprehensive
accreditation manual for hospitals. Oakbrook Terrace, IL: The Joint
Commission. (Level VII)
23 Centers for Medicare and Medicaid Services, Department of Health and
Human Services. (2015). Condition of participation: Patient’s rights. 42 C.F.R.
§ 482.13(b)(2).
24 Accreditation Association for Hospitals and Health Systems. (2017). Standard
10.00 .03. Healthcare Facilities Accreditation Program: Accreditation
requirements for acute care hospitals. Chicago, IL: Accreditation Association
for Hospitals and Health Systems. (Level VII)
25 DNV GL-Healthcare USA, Inc. (2016). MR.2 .SR.1 . NIAHO® accreditation
requirements: Interpretive guidelines and surveyor guidance (version 11).
Milford, OH: DNV GL-Healthcare USA, Inc. (Level VII)
26 Fletcher, J. (2017). Reposition patients effectively to prevent pressure ulcers.
Wounds International, 8(1), 7–10. (Level VII)
27 Berlowitz, D., et al. (2014). Preventing pressure ulcers in hospitals: A toolkit
for improving quality of care. Rockville, MD: Agency for Healthcare Research
and Quality. Accessed via the Web at
http://www.ahrq.gov/professionals/systems/hospital/pressureulcertoolkit/inde
x.html (Level VII)
LUMBAR PUNCTURE, ASSISTING
Lumbar puncture involves the insertion of a sterile needle
into the subarachnoid space of the spinal canal, usually
between the third and fourth lumbar vertebrae. This
procedure is used to determine the presence of blood in
cerebrospinal fluid (CSF), obtain CSF specimens for
laboratory analysis, inject dyes for contrast in radiologic
studies, or administer drugs or anesthesia. The pressure of
CSF, which flows freely between the brain and the spinal
column, can also be measured during the procedure.
Performed by a practitioner with a nurse assisting, lumbar
puncture requires sterile technique and careful patient
positioning. This procedure is contraindicated in patients
with increased intracranial pressure (ICP) with mass effect, a
lumbar deformity, a platelet count of less than 50,000/mm3,
or an International Normalized Ratio greater than 1.5, as
well as in those receiving anticoagulants or who have an
infection at the puncture site.1,2
Equipment
Overbed or procedure table ■ vital signs monitoring
equipment ■ sterile gloves ■ cap ■ mask3 ■ sterile gown
■ antiseptic solution ■ sterile gauze pads ■ antiseptic pads
■ sterile fenestrated drape ■ 3-mL syringe ■ 25G 3⁄4′′
sterile needle ■ local anesthetic (usually 1% lidocaine
without epinephrine) ■ 22G 31⁄2′′ spinal needle with stylet2,4
■ three-way stopcock ■ manometer ■ sterile occlusive
dressing ■ four sterile collection tubes with caps ■ labels ■
light source ■ sterile marker ■ sterile labels ■ laboratory
transport bag ■ small pillow ■ Optional: patient-care
reminder, prescribed analgesia or anxiolytic, prescribed
contrast medium, laboratory request form, antiseptic
sponge, spinal anesthetic.
Disposable lumbar puncture trays contain most of the
needed sterile equipment.
Implementation
■ Verify the practitioner’s order.
■ Gather the equipment and take it to the patient’s
bedside.
■ Confirm that the practitioner has obtained written
informed consent and that the consent is in the patient’s
medical record.5,6,7
■ Perform a preprocedure verification to make sure that all
relevant documentation, related information, and equipment
is available and is correctly identified to the patient’s
identifiers.8,9
■ Verify that the laboratory and imaging studies are
complete, as ordered, and that the results are in the
patient’s medical record. Notify the practitioner of any
unexpected results.
■ Perform hand hygiene.10,11,12,13,14,15
■ Confirm the patient’s identity using at least two patient
identifiers.16
■ Provide privacy.17,18,19,20
■ Explain the procedure to the patient and family (if
appropriate) according to their individual communication
and learning needs to increase their understanding, allay
their fears, and enhance cooperation.5,6,21
■ Inform the patient that a headache may be felt after
lumbar puncture, but reassure the patient that cooperation
during the procedure will minimize such an effect.
■ Check the patient’s history for hypersensitivity to local
anesthetic, antiseptic solution, analgesia, or sedation.
■ Instruct the patient to void before the procedure.
■ If prescribed, give analgesia or anxiolytic medication
using safe medication practices to promote comfort and
decrease anxiety so the patient can maintain the position
during the procedure.2,22,23,24,25,26,27
■ Perform hand hygiene.10,11,12,23,24
■ Open the equipment tray on an overbed or procedure
table, being careful not to contaminate the sterile field when
you open the wrapper.
■ Label all medications, medication containers, and other
solutions on and off the sterile field.28,29
■ Provide adequate lighting at the puncture site.30
■ Raise the patient’s bed to waist level when providing
patient care to prevent caregiver back strain.
■ Position the patient in a side-lying or sitting position
according to the practitioner’s preference. (See Positioning
for lumbar puncture, page 480.)
■ Reemphasize the importance of remaining as still as
possible to minimize discomfort and trauma.
■ Perform hand hygiene.10,11,12,13,14
■ Put on a cap, a mask, a sterile gown, and sterile
gloves.3,31
■ The practitioner cleans the puncture site with antiseptic
solution and allows it to dry to prevent contamination by the
body’s normal skin flora. The practitioner then drapes the
area with the sterile fenestrated drape to provide a sterile
field. (If the practitioner uses antiseptic sponges instead of
sterile gauze pads, he or she may remove the sterile gloves
and put on another pair to avoid introducing antiseptic
solution into the subarachnoid space with the lumbar
puncture needle.)
NURSING ALERT Studies suggest that chlorhexidine is neurotoxic; its
use as an antiseptic agent for skin preparation before lumbar
puncture is controversial.2,32
■ Conduct a time-out before starting the procedure to
determine that the correct patient, site, positioning, and
procedure are identified and confirmed as applicable.9,33
■ If the equipment tray doesn’t include an ampule of
anesthetic, disinfect the injection port of a vial of anesthetic
with an antiseptic pad. Then invert the vial 45 degrees so
that the practitioner can insert a 25G needle and syringe
and withdraw the anesthetic for injection.
NURSING ALERT Dedicate multidose medication vials to one patient
whenever possible to reduce the risk of viral hepatitis transmission
and other infections.34
■ Before the practitioner injects the anesthetic, explain that
the patient will experience a transient burning sensation
and local pain. Ask the patient to report any other persistent
pain or sensations, because they may indicate irritation or
puncture of a nerve root, requiring repositioning of the
needle.
Positioning for lumbar puncture
For a side-lying position. have the patient lie on the side at the edge of the
bed, with the chin tucked to the chest and the knees drawn up to the
abdomen. Make sure the head of the bed is flat and the patient has no more
than a small pillow under the head.2 Make sure the patient’s spine is curved
and the back is at the edge of the bed (as shown below). This position widens
the spaces between the vertebrae, easing insertion of the needle.
Patient positioning
To help the patient maintain this position, place one of your hands behind
the patient’s neck and the other hand behind the knees, and pull gently. Hold
the patient firmly in this position throughout the procedure to prevent
accidental needle displacement. For a sitting position, have the patient sit on
the edge of the bed, leaning over the bed table. Typically, the practitioner
inserts the needle between the third and fourth lumbar vertebrae (as shown
below).
Needle insertion
■ When the practitioner inserts the sterile spinal needle into
the subarachnoid space between the third and fourth
lumbar vertebrae, instruct the patient to remain still and
breathe normally. If necessary, hold the patient firmly in
position to prevent sudden movement that may displace the
needle.
■ Closely monitor the patient for adverse reactions, such as
headache, nausea, vomiting, elevated heart rate, pallor, and
clammy skin. Immediately alert the practitioner to any
significant changes.
■ If the practitioner is performing lumbar puncture to
administer contrast medium for radiologic studies or spinal
anesthetic, the practitioner injects the dye or anesthetic at
this time.
■ When the needle is in place, the practitioner attaches a
manometer with a three-way stopcock to the needle hub to
read CSF pressure. If ordered, help the patient extend the
legs to provide a more accurate pressure reading.
■ The practitioner then detaches the manometer and allows
CSF to drain from the needle hub into the collection tubes.
When the practitioner has collected 2 to 3 mL in each tube,
mark the tubes in sequence and securely cap them. Label
the specimens in the presence of the patient to prevent
mislabeling.16
■ The practitioner removes the spinal needle and then
applies a sterile occlusive dressing to the puncture site.2
■ Assist the patient into a supine or prone position, for a
length of time specified by the practitioner’s order (usually 1
to 4 hours), which acts as pressure to the site.2
■ Discard used supplies in the appropriate receptacle.35
■ Remove and discard your gloves and other personal
protective equipment.31
■ Perform hand hygiene.10,11,12,13,14
■ Return the patient’s bed to the lowest position to prevent
falls and maintain patient safety.36
■ Place the CSF specimens in a laboratory transport bag
and send them to the laboratory immediately, with
completed laboratory request forms if used in your facility.
Don’t refrigerate collected CSF specimens for later
transport, because refrigeration alters results.37
■ Perform hand hygiene.10,11,12,13,14,15
■ Document the procedure.38,39,40,41
Special considerations
■ Monitor CSF test results and report critical results to the
practitioner within the time frame determined by your
facility to prevent treatment delays.42
■ Encourage the patient to drink fluids after the procedure
to restore spinal fluid volume and reduce the risk of
headache.
■ Obtain a serum glucose value from the patient, as
ordered, to compare the serum glucose value and the CSF
glucose concentration. Hyperglycemia increases CSF
glucose concentration, and hypoglycemia decreases CSF
glucose concentration.2
■ After the procedure, monitor the puncture site for
redness, swelling, and drainage.
■ After the procedure, assess the patient’s neurologic
status and vital signs, as ordered and according to the
patient’s condition (commonly every 15 minutes for the first
hour, every 30 minutes for the second hour, every hour for
4 hours, and then at a minimum of every 4 hours for 24
hours).2 Notify the practitioner of changes in neurologic
status.
■ For an obese patient, the practitioner may use an
ultrasound to help determine accurate needle placement.43
Complications
Headache is the most common adverse effect of lumbar
puncture.1 Others adverse effects may include a reaction to
the anesthetic, meningitis, epidural or subdural abscess,
bleeding into the spinal canal, CSF leakage through the
dural defect remaining after needle withdrawal, local pain
caused by nerve root irritation, edema or hematoma at the
puncture site, transient difficulty voiding, and fever. The
most serious complications of lumbar puncture, although
rare, are tonsillar herniation and medullary compression.
Documentation
Record that you took a time-out before the procedure to
verify the correct patient, correct site, and correct
procedure.33 Document the time that the procedure started
and ended; administration of medications (include the
strength, dose, route, rate of administration, date and time
of administration, access site used, administration devices
used, and any adverse effects of the prescribed
medication);44 number of specimen tubes you collected;
color, consistency, and other characteristics of the collected
specimens; and time of specimen transport to the
laboratory. Also record patient positioning after the
procedure and the patient’s response to the procedure.
Document patient teaching you performed, the patient’s
understanding of that teaching, and whether the patient
requires follow-up teaching.
REFERENCES
1 Johnson, K. S ., & Sexton, D. J . Lumbar puncture: Technique, indications,
contraindications, and complications in adults. (2016). In: UpToDate, Aminoff,
M. J ., & Wilterdink, J. L. (Eds.). Retrieved from: www.uptodate.com
2 Wiegand, D. L. (Ed.). (2017). AACN procedure manual for high acuity,
progressive and critical care (7th ed.) . St. Louis, MO: Elsevier.
3 Siegel, J. D., et al. (2007, revised 2017). “2007 guideline for isolation
precautions: Preventing transmission of infectious agents in healthcare
settings” [Online]. Accessed via the Web at
https://www.cdc.gov/infectioncontrol/pdf/guidelines/isolation-guidelines.pdf
(Level II)
4 Armon, C., & Evans, R. W. (2005). Addendum to assessment: Prevention of
post–lumbar puncture headaches: Report of the Therapeutics and Technology
Assessment Subcommittee of the American Academy of Neurology.
Neurology, 65(4), 510–512. Accessed via the Web at
http://www.neurology.org/content/65/4/510.abstract
5 The Joint Commission. (2019). Standard RI.01.03 .01. Comprehensive
accreditation manual for hospitals. Oakbrook Terrace, IL: The Joint
Commission. (Level VII)
6 Centers for Medicare and Medicaid Services, Department of Health and
Human Services. (2015). Condition of participation: Patient’s rights. 42 C.F.R.
§ 482.13(b)(2).
7 Accreditation Association for Hospitals and Health Systems. (2017). Standard
15.01.11. Healthcare Facilities Accreditation Program: Accreditation
requirements for acute care hospitals. Chicago, IL: Accreditation Association
for Hospitals and Health Systems. (Level VII)
8 The Joint Commission. (2019). Standard UP.01.01.01. Comprehensive
accreditation manual for hospitals. Oakbrook Terrace, IL: The Joint
Commission. (Level VII)
9 Accreditation Association for Hospitals and Health Systems. (2017). Standard
30.00 .14. Healthcare Facilities Accreditation Program: Accreditation
requirements for acute care hospitals. Chicago, IL: Accreditation Association
for Hospitals and Health Systems. (Level VII)
10 The Joint Commission. (2019). Standard NPSG.07.01.01. Comprehensive
accreditation manual for hospitals. Oakbrook Terrace, IL: The Joint
Commission. (Level VII)
11 Centers for Disease Control and Prevention. (2002). Guideline for hand
hygiene in health-care settings: Recommendations of the Healthcare Infection
Control Practices Advisory Committee and the HICPAC/SHEA/APIC/IDSA Hand
Hygiene Task Force. MMWR Recommendations and Reports, 51(RR-16), 1–45.
Accessed via the Web at http://www.cdc.gov/mmwr/pdf/rr/rr5116.pdf (Level II)
12 World Health Organization. (2009). “WHO guidelines on hand hygiene in
health care: First global patient safety challenge, clean care is safer care”
[Online]. Accessed via the Web at
http://apps.who.int/iris/bitstream/10665/44102/1/9789241597906_eng.pdf
(Level IV)
13 Accreditation Association for Hospitals and Health Systems. (2017). Standard
07.01.21. Healthcare Facilities Accreditation Program: Accreditation
requirements for acute care hospitals. Chicago, IL: Accreditation Association
for Hospitals and Health Systems. (Level VII)
14 Centers for Medicare and Medicaid Services, Department of Health and
Human Services. (2015). Condition of participation: Infection control. 42 C.F.R.
§ 482.42.
15 DNV GL-Healthcare USA, Inc. (2016). IC.1 .SR.1 . NIAHO® accreditation
requirements: Interpretive guidelines and surveyor guidance (version 11).
Milford, OH: DNV GL-Healthcare USA, Inc. (Level VII)
16 The Joint Commission. (2019). Standard NPSG.01.01.01. Comprehensive
accreditation manual for hospitals. Oakbrook Terrace, IL: The Joint
Commission. (Level VII)
17 Accreditation Association for Hospitals and Health Systems. (2017). Standard
15.01.16. Healthcare Facilities Accreditation Program: Accreditation
requirements for acute care hospitals. Chicago, IL: Accreditation Association
for Hospitals and Health Systems. (Level VII)
18 Centers for Medicare and Medicaid Services, Department of Health and
Human Services. (2015). Condition of participation: Patient’s rights. 42 C.F.R.
§ 482.13(c)(1).
19 DNV GL-Healthcare USA, Inc. (2016). PR.1.SR.5 . NIAHO® accreditation
requirements: Interpretive guidelines and surveyor guidance (version 11).
Milford, OH: DNV GL-Healthcare USA, Inc. (Level VII)
20 The Joint Commission. (2019). Standard RI.01.01.01. Comprehensive
accreditation manual for hospitals. Oakbrook Terrace, IL: The Joint
Commission. (Level VII)
21 The Joint Commission. (2019). Standard PC.02.01.21. Comprehensive
accreditation manual for hospitals. Oakbrook Terrace, IL: The Joint
Commission. (Level VII)
22 The Joint Commission. (2019). Standard MM.06.01.01. Comprehensive
accreditation manual for hospitals. Oakbrook Terrace, IL: The Joint
Commission. (Level VII)
23 Accreditation Association for Hospitals and Health Systems. (2017). Standard
16.01.03. Healthcare Facilities Accreditation Program: Accreditation
requirements for acute care hospitals. Chicago, IL: Accreditation Association
for Hospitals and Health Systems. (Level VII)
24 Centers for Medicare and Medicaid Services, Department of Health and
Human Services. (2015). Condition of participation: Nursing services. 42
C.F.R. § 482.23(c).
25 DNV GL-Healthcare USA, Inc. (2016). MM.1 .SR.2. NIAHO® accreditation
requirements: Interpretive guidelines and surveyor guidance (version 11).
Milford, OH: DNV GL-Healthcare USA, Inc. (Level VII)
26 Institute for Safe Medication Practices. (2016). “2016–2017 targeted
medication safety best practices for hospitals” [Online]. Accessed via the
Web at http://www.ismp.org/tools/bestpractices/TMSBP-for-Hospitals.pdf
27 Institute for Safe Medication Practices. (2012). Side tracks on the safety
express: Interruptions lead to errors and unfinished . . . Wait, what was I
doing? Nurse Advise-ERR, 11(2), 1–4 . Accessed via the Web at
https://www.ismp.org/Newsletters/acutecare/showarticle.aspx?id=37
28 The Joint Commission. (2019). Standard NPSG.03 .04.01. Comprehensive
accreditation manual for hospitals. Oakbrook Terrace, IL: The Joint
Commission. (Level VII)
29 Accreditation Association for Hospitals and Health Systems. (2017). Standard
25.01.27. Healthcare Facilities Accreditation Program: Accreditation
requirements for acute care hospitals. Chicago, IL: Accreditation Association
for Hospitals and Health Systems. (Level VII)
30 Waters, T. R., et al. (2009). “Safe patient handling training for schools of
nursing” [Online]. Accessed via the Web at
http://www.cdc.gov/niosh/docs/2009-127/pdfs/2009-127.pdf (Level VII)
31 Accreditation Association for Hospitals and Health Systems. (2017). Standard
07.01.10. Healthcare Facilities Accreditation Program: Accreditation
requirements for acute care hospitals. Chicago, IL: Accreditation Association
for Hospitals and Health Systems. (Level VII)
32 Van Wicklin, S. A., & Conner, R. (2018). Guideline for preoperative skin
antisepsis. In R. Conner (Ed.), Guidelines for perioperative practice: 2018
edition. Denver, CO: AORN, Inc.
33 The Joint Commission. (2019). Standard UP.01.03.01. Comprehensive
accreditation manual for hospitals. Oakbrook Terrace, IL: The Joint
Commission. (Level VII)
34 Dolan, S. A., et al. (2016). “APIC position paper: Safe injection, infusion, and
medication vial practices in health care (2016)” [Online]. Accessed via the
Web at
http://www.apic.org/Resource_/TinyMceFileManager/Position_Statements/2016
APICSIPPositionPaper.pdf
35 Occupational Safety and Health Administration. (n.d .). “Bloodborne
pathogens, standard number 1910.1030” [Online]. Accessed via the Web at
http://www.osha.gov/pls/oshaweb/owadisp.show_document?
p_table=STANDARDS&p_id=10051 (Level VII)
36 Ganz, D. A., et al. (2013). Preventing falls in hospitals: A toolkit for improving
quality of care (AHRQ Publication No. 13-0015-EF). Accessed via the Web at
http://www.ahrq.gov/sites/default/files/publications/files/fallpxtoolkit.pdf
(Level VII)
37 Fischbach, F., & Dunning, M. B . (2014). A manual of laboratory and diagnostic
tests (8th ed.). Philadelphia, PA: Wolters Kluwer.
38 The Joint Commission. (2019). Standard RC.01.03 .01. Comprehensive
accreditation manual for hospitals. Oakbrook Terrace, IL: The Joint
Commission. (Level VII)
39 Accreditation Association for Hospitals and Health Systems. (2017). Standard
10.00 .03. Healthcare Facilities Accreditation Program: Accreditation
requirements for acute care hospitals. Chicago, IL: Accreditation Association
for Hospitals and Health Systems. (Level VII)
40 Centers for Medicare and Medicaid Services, Department of Health and
Human Services. (2015). Condition of participation: Medical record services.
42 C.F.R. § 482.24(b).
41 DNV GL-Healthcare USA, Inc. (2016). MR.2 .SR.1 . NIAHO® accreditation
requirements: Interpretive guidelines and surveyor guidance (version 11).
Milford, OH: DNV GL-Healthcare USA, Inc. (Level VII)
42 The Joint Commission. (2019). Standard NPSG.02.03 .01. Comprehensive
accreditation manual for hospitals. Oakbrook Terrace, IL: The Joint
Commission. (Level VII)
43 Strony, R. (2010). Ultrasound-assisted lumbar puncture in obese patients.
Critical Care Clinics, 26(4), 661–664.
44 The Joint Commission. (2019). Standard RC.02.01.01. Comprehensive
accreditation manual for hospitals. Oakbrook Terrace, IL: The Joint
Commission. (Level VII)
M
MANUAL VENTILATION
A handheld resuscitation bag is an inflatable device that can
be attached to a face mask or directly to an endotracheal
(ET) or tracheostomy tube, allowing manual delivery of
oxygen or room air to the lungs of a patient who can’t
breathe spontaneously.
During cardiopulmonary resuscitation (CPR), using a
handheld resuscitation bag to administer rescue breaths is
less important than providing high-quality chest
compressions. Lone rescuers should begin chest
compressions first. After 30 compressions, the rescuer
should then administer two breaths. When a second person
arrives, that person can use a handheld resuscitation bag to
administer two breaths after every 30 compressions.1
Equipment
Handheld resuscitation bag with mask ▪ oxygen source ▪
oxygen tubing ▪ nipple adapter attached to oxygen
flowmeter ▪ gloves ▪ suction equipment ▪ emergency
resuscitation equipment (code cart with cardiac
medications, defibrillator, and intubation equipment) ▪
Optional: personal protective equipment, oropharyngeal
airway, nasopharyngeal airway, oxygen accumulator
(oxygen reservoir).
Preparation of equipment
Unless the patient is intubated or has a tracheostomy,
select a mask that fits snugly over the mouth and nose.
Attach the mask to the resuscitation bag.
If oxygen is readily available, connect the handheld
resuscitation bag to the oxygen. Attach one end of the
tubing to the bottom of the bag and the other end to the
nipple adapter on the flowmeter of the oxygen source.
Turn on the oxygen and adjust the flow rate to 15
L/minute.2 The patient who has a low partial pressure of
arterial oxygen will need a higher fraction of inspired oxygen
(Fio2). To increase the concentration of inspired oxygen, you
can add an oxygen accumulator (also called an oxygen
reservoir). This device, which attaches to an adapter on the
bottom of the bag, permits an Fio2 of up to 100%. If time
allows, set up suction equipment. Make sure emergency
resuscitation equipment is readily available.
Implementation
■ Gather and prepare the equipment.
■ Perform hand hygiene.3,4,5,6,7,8
■ Confirm the patient’s identity using at least two patient
identifiers.9
■ Provide privacy.10,11,12,13
■ Explain the procedure to the patient and family, if they’re
present and time allows, according to their individual
communication and learning needs, to increase their
understanding, allay their fears, and enhance cooperation.14
■ Raise the bed to waist level to prevent caregiver back
strain.15
■ Put on gloves and other personal protective equipment,
as needed, to comply with standard precautions.16,17
■ Before using the handheld resuscitation bag, inspect the
patient’s upper airway for foreign objects. If present,
remove them, because doing so may restore spontaneous
respirations in some instances, and because foreign matter
or secretions can obstruct the airway and impede
resuscitation efforts.
■ Suction the patient to remove any secretions that may
obstruct the airway. If necessary, insert an oropharyngeal or
nasopharyngeal airway to maintain airway patency. If the
patient has a tracheostomy or ET tube in place, suction the
tube.
■ If appropriate, remove the bed’s headboard and stand at
the head of the bed to help keep the patient’s neck
extended and to free space at the side of the bed for other
activities, such as CPR.
■ Unless the patient shows evidence of head or neck
trauma, use the head-tilt, chin-lift maneuver to open the
patient’s airway to move the tongue away from the base of
the pharynx and prevent obstruction of the airway.1,18
■ Apply the mask. (See How to apply a handheld
resuscitation bag and mask.)
■ Keeping your nondominant hand on the patient’s mask,
exert downward pressure to seal the mask against the face.
For the adult patient, use your dominant hand to compress
the bag to deliver 600 mL of air over 1 second to produce a
rise in the patient’s chest.1
■ Deliver breaths with the patient’s own inspiratory effort, if
any is present. Don’t attempt to deliver a breath as the
patient exhales. During CPR, deliver cycles of 30
compressions and two breaths; deliver breaths during
pauses in compressions, and deliver each breath over 1
second.1
■ Observe the patient’s chest to ensure that it rises and
falls with each compression.1,18 If ventilation fails to occur,
check the fit of the mask and the patency of the patient’s
airway; if necessary, reposition the patient’s head and
ensure patency with an oral airway.
■ Assist with ET intubation if necessary. (See the
“Endotracheal intubation” procedure, page 269.)
■ Remove and discard your gloves and any other personal
protective equipment worn.
■ Return the bed to the lowest position to prevent falls and
maintain patient safety.
■ Perform hand hygiene.3,4,5,6,7,8
■ Document the procedure.19,20,21,22
Special considerations
■ Avoid neck hyperextension if the patient has a possible
cervical injury; instead, use the jaw-thrust maneuver to
open the airway.1,2,18 If you need both hands to keep the
patient’s mask in place with a good seal and maintain
hyperextension, use the lower part of your arm to compress
the bag against your side until another rescuer is available
to assist.
■ Observe for vomiting through the clear part of the mask.
If vomiting occurs, stop the procedure immediately, lift the
mask, wipe and suction vomitus, and resume resuscitation.
■ An oropharyngeal airway should be inserted only in an
unresponsive patient who has lost the gag reflex.
■ It isn’t possible to deliver an accurate or exact tidal
volume while using a handheld resuscitation bag and
mask.23
■ If a second rescuer relieves you in performing chest
compressions during CPR and you’re using the handheld
resuscitation bag and mask to deliver breaths, make sure
the use of the bag doesn’t interfere with the performance of
chest compressions.18
■ Give the family the option to remain at the bedside
during the procedure, because doing so helps meet the
psychosocial needs of the patient and family in a time of
crisis.24
Complications
Aspiration of vomitus may result in pneumonia, and gastric
distention may result from air forced into the patient’s
stomach. In an emergency, hyperventilation of the patient
may cause increased intrathoracic pressure with a
subsequent decrease in coronary and cerebral perfusion
pressures.
Documentation
In an emergency, record the date and time of the procedure,
the reason for initiating the procedure, any complications
and the nursing action taken, and the patient’s response to
treatment using your facility’s documentation system or
flow sheet for respiratory distress.
If it isn’t an emergency, record the date and time of the
procedure as well as the reason and length of time the
patient was disconnected from mechanical ventilation and
received manual ventilation. Note the patient’s tolerance of
the procedure, along with any complications and nursing
actions taken. Document any patient and family teaching
and their understanding of your teaching.
REFERENCES
1 American Heart Association. (2015). 2015 American Heart Association
guidelines update for cardiopulmonary resuscitation and emergency
cardiovascular care. Circulation, 132, S414–S435. (Level II)
2 Wiegand, D. L. (2017). AACN procedure manual for high acuity, progressive,
and critical care (7th ed.). St. Louis, MO: Elsevier.
3 The Joint Commission. (2019). Standard NPSG.07.01.01. Comprehensive
accreditation manual for hospitals. Oakbrook Terrace, IL: The Joint
Commission. (Level VII)
4 Centers for Disease Control and Prevention. (2002). Guideline for hand
hygiene in health-care settings: Recommendations of the Healthcare Infection
Control Practices Advisory Committee and the HICPAC/SHEA/APIC/IDSA Hand
Hygiene Task Force. MMWR Recommendations and Reports, 51(RR-16), 1–45.
Accessed via the Web at http://www.cdc.gov/mmwr/pdf/rr/rr5116.pdf (Level II)
EQUIPMENT
How to apply a handheld resuscitation
bag and mask
Place the mask over the patient’s face so that the apex of the triangle covers
the bridge of the nose and the base lies between the lower lip and chin to
create a tight seal. Hold the mask in place (as shown below).
Using your nondominant hand, create a C shape with the thumb and index
finger over the top of the mask and apply gentle downward pressure. Hook
the remaining fingers around the mandible and lift it upward toward the
mask, creating an E shape (as shown below). Make sure that the patient’s
mouth remains open underneath the mask. Attach the resuscitation bag to
the mask and the tubing leading to the oxygen source. Alternatively, if the
patient has a tracheostomy or endotracheal tube in place, remove the mask
from the bag and attach the handheld resuscitation bag directly to the tube.
5 World Health Organization. (2009). “WHO guidelines on hand hygiene in
health care: First global patient safety challenge, clean care is safer care”
[Online]. Accessed via the Web at
http://apps.who.int/iris/bitstream/10665/44102/1/9789241597906_eng.pdf
(Level IV)
6 Accreditation Association for Hospitals and Health Systems. (2017). Standard
07.01.21. Healthcare Facilities Accreditation Program: Accreditation
requirements for acute care hospitals. Chicago, IL: Accreditation Association
for Hospitals and Health Systems. (Level VII)
7 Centers for Medicare and Medicaid Services, Department of Health and
Human Services. (2015). Condition of participation: Infection control. 42 C.F.R.
§ 482.42.
8 DNV GL-Healthcare USA, Inc. (2016). IC.1.SR.1 . NIAHO® accreditation
requirements: Interpretive guidelines & surveyor guidance (version 11).
Milford, OH: DNV GL-Healthcare USA, Inc. (Level VII)
9 The Joint Commission. (2019). Standard NPSG.01.01.01. Comprehensive
accreditation manual for hospitals. Oakbrook Terrace, IL: The Joint
Commission. (Level VII)
10 Accreditation Association for Hospitals and Health Systems. (2017). Standard
15.01.16. Healthcare Facilities Accreditation Program: Accreditation
requirements for acute care hospitals. Chicago, IL: Accreditation Association
for Hospitals and Health Systems. (Level VII)
11 Centers for Medicare and Medicaid Services, Department of Health and
Human Services. (2015). Condition of participation: Patient’s rights. 42 C.F.R.
§ 482.13(c)(1).
12 DNV GL-Healthcare USA, Inc. (2016). PR.1.SR.5 . NIAHO® accreditation
requirements: Interpretive guidelines & surveyor guidance (version 11).
Milford, OH: DNV GL-Healthcare USA, Inc. (Level VII)
13 The Joint Commission. (2019). Standard RI.01.01.01. Comprehensive
accreditation manual for hospitals. Oakbrook Terrace, IL: The Joint
Commission. (Level VII)
14 The Joint Commission. (2019). Standard PC.02.01.21. Comprehensive
accreditation manual for hospitals. Oakbrook Terrace, IL: The Joint
Commission. (Level VII)
15 Waters, T. R., et al. (2009). “Safe patient handling training for schools of
nursing” [Online]. Accessed via the Web at
http://www.cdc.gov/niosh/docs/2009-127/pdfs/2009-127.pdf
16 Siegel, J. D ., et al. (2007, revised 2017). “2007 guideline for isolation
precautions: Preventing transmission of infectious agents in healthcare
settings” [Online]. Accessed via
https://www.cdc.gov/infectioncontrol/pdf/guidelines/isolation-guidelines.pdf
(Level II)
17 Accreditation Association for Hospitals and Health Systems. (2017). Standard
07.01.10. Healthcare Facilities Accreditation Program: Accreditation
requirements for acute care hospitals. Chicago, IL: Accreditation Association
for Hospitals and Health Systems. (Level VII)
18 American Heart Association. (2010). 2010 American Heart Association
guidelines for cardiopulmonary resuscitation and emergency cardiovascular
care. Circulation, 122, S729–S767, S876–S908 . (Level II)
19 The Joint Commission. (2019). Standard RC.02.01.01. Comprehensive
accreditation manual for hospitals. Oakbrook Terrace, IL: The Joint
Commission. (Level VII)
20 Centers for Medicare and Medicaid Services, Department of Health and
Human Services. (2015). Condition of participation: Medical record services.
42 C.F.R. § 482.24(b).
21 Accreditation Association for Hospitals and Health Systems. (2017). Standard
10.00 .03. Healthcare Facilities Accreditation Program: Accreditation standards
for acute care hospitals. Chicago, IL: Accreditation Association for Hospitals
and Health Systems. (Level VII)
22 DNV GL-Healthcare USA, Inc. (2016). MR.2 .SR.1 . NIAHO® accreditation
requirements: Interpretive & surveyor guidance (version 11). Milford, OH:
DNV GL-Healthcare USA, Inc. (Level VII)
23 Lee, H. M., et al. (2008). Can you deliver accurate tidal volume by manual
resuscitator? Emergency Medicine Journal, 25(10), 632–634. (Level VI)
24 American Association of Critical-Care Nurses (AACN). (2016). “A ACN practice
alert: Family presence during resuscitation and invasive procedures” [Online].
Accessed via the Web at http://ccn.aacnjournals.org/content/36/1/e11.full.pdf
MASSIVE INFUSION DEVICE USE
A massive infusion device is a mechanical device used in
patients who need rapid fluid replacement with IV fluids or
blood products. It can warm IV fluids or blood products to
room temperature to prevent hypothermia and then
administer the fluid rapidly at rates of up to 45,000
mL/hour.1 The device requires specialized IV tubing that
expands under pressure.2
Examples of a massive infusion device include the Level 1
infuser and the Belmont infuser. The Level 1 infuser warms
fluids through a sealed heat exchanger that contains
recirculating solution. Pressure chambers apply pressure
and deliver the prescribed fluids at a rapid rate. The
administration set tubing contains a gas vent-filter and the
heat exchanger. An air detector clamp monitors for the
presence of air; when it detects air, the clamp closes off the
line and alerts the clinician of the presence of air in the
system.3 The Belmont infuser administers the prescribed
fluids through the administration set tubing using a roller-
type peristaltic fluid pump. Fluid passes through a heat
exchanger that consists of a plastic device housing stainless
steel rings, which transfer heat to the fluid. The infuser also
contains a pressure sensor that monitors the line pressure of
the infusate. If the sensor detects pressure that exceeds the
limit set by the clinician, the pump automatically slows the
infusion. If line pressure suddenly increases, the device
shuts down and an alarm sounds.1
Patients with life-threatening conditions such as severe
trauma, GI or postoperative hemorrhage, and burns may
require the use of a rapid infusion device to receive large
volumes of fluids within a short period.2
HOSPITAL-ACQUIRED CONDITION ALERT Keep in mind that a vascular
catheter–associated infection is considered a hospital-acquired
condition because various best practices can reasonably prevent it. Be
sure to follow infection prevention techniques when administering a
massive infusion (such as performing a vigorous mechanical scrub of
the needleless connector, following sterile no-touch technique when
accessing the patient’s vascular access device, and limiting catheter
manipulations) to reduce the risk of vascular catheter–associated
infection.4,5,6,7,8,9,10
Equipment
Massive infusion device ▪ prescribed IV fluids or blood
products ▪ 10-mL syringe containing preservative-free
normal saline solution ▪ appropriate administration set with
warming device or heat exchanger1,3 ▪ replacement filter or
vent or large-capacity reservoir, as indicated1,3 ▪ IV pole ▪
gloves ▪ antiseptic pads (chlorhexidine-based, povidone
iodine, or alcohol) ▪ labels ▪ monitoring equipment ▪
blankets ▪ Optional: indwelling urinary catheter, supplies for
blood gas sampling, gown, mask with face shield or mask
and goggles.
Preparation of equipment
Male sure that the equipment is safe for massive, rapid, or
pressurized infusion.11
Inspect all IV equipment and supplies; if a product is
expired, if its integrity is compromised, or if it’s defective,
remove it from patient use, label it as expired or defective,
and report the expiration or defect as directed by your
facility.12
Set up and use the massive infusion device, warming
device, or heat exchanger following the manufacturer’s
instructions for use. Make sure that the system is plugged
into an outlet to ensure that the infused fluid is heated
properly.1,3 Make sure that the device alarm limits are set
appropriately, and that the alarms are turned on,
functioning properly, and audible to staff.11,13,14
Troubleshoot
alarms
according to the specific
manufacturer’s instructions for use.1,3
Implementation
■ Verify the practitioner’s orders, including whether you
should warm the fluid or blood.15,16 Review the
practitioner’s order to make sure that the prescribed
solution, rate, and route of administration are appropriate
for the patient’s age, condition, and access device. Address
concerns about the order with the practitioner, the
pharmacist, or your supervisor and, if needed, the risk
management department, or as directed by your facility.17
■ Confirm that the practitioner has obtained written
informed consent and that the consent is in the patient’s
medical record.18,19,20,21,22
■ Verify that baseline coagulation studies and hematocrit,
electrolyte, and hemoglobin levels have been obtained to
serve as a comparison and help guide fluid replacement.2,23
■ Check the patient history for allergies, as indicated.
■ Perform hand hygiene.4,24,25,26,27,28,29
■ Confirm the patient’s identity using at least two patient
identifiers.30
■ Provide privacy.31,32,33,34
■ Reinforce the practitioner’s explanation of the procedure
and answer any questions to evaluate the patient’s
understanding of the information provided and reduce
anxiety.
■ Perform a baseline physical assessment (before obtaining
blood for transfusion, if ordered), including vital signs and
respiratory status. Assess for conditions that can increase
the risk of adverse effects of therapy (such as heart failure,
fever, kidney disease, and risk of fluid volume excess).15
■ If the patient doesn’t already have one in place, insert an
indwelling urinary catheter, as ordered, to help monitor fluid
resuscitation efforts. (See the “Indwelling urinary catheter
insertion” procedure, page 390.)
■ Perform hand hygiene.24,25,26,27,29
■ Put on gloves and other personal protective equipment as
needed.35,36
■ Make sure the patient has two patent, large-bore (14G to
18G) IV catheters.15 If not, insert two IV catheters to
administer IV fluid and medications, as needed, until a
central venous catheter is possible.37 (See the “IV catheter
insertion and removal” procedure, page 443.) If you’re
unable to establish venous access, initiate intraosseous
access, if indicated.38 (See the “Intraosseous infusion”
procedure.)
■ Assist the practitioner with insertion of a central venous
or pulmonary artery catheter to facilitate administration of
large fluid volumes and to help monitor the patient’s fluid
status.2
■ Assist the practitioner with arterial catheter insertion for
continuous blood pressure assessment. (See the “Arterial
pressure monitoring” procedure, page 28.)2
■ Turn on the infusion device according to the
manufacturer’s instructions to allow the system to warm
up.2
■ If you’re infusing blood products, perform a
pretransfusion blood verification with another qualified
health care provider. A pretransfusion verification by two
qualified health care providers is required to prevent life-
threatening blood incompatibility errors.15,30,39 (See the
“Transfusion of blood and blood products” procedure.)
HOSPITAL-ACQUIRED CONDITION ALERT Keep in mind that blood
incompatibility errors are considered hospital-acquired conditions,
because various best practices can reasonably prevent them. Be sure
to follow best practices, such as properly identifying the blood sample
used for compatibility testing before administering blood and blood
products to reduce the risk of blood incompatibility errors.5
■ Remove the appropriate administration set from its
packaging. Inspect the administration sets for loose or
missing Luer and spike caps to ensure sterility.1,3
Using the Level 1 infuser
■ Install the appropriate administration set into the infusion
device according to the manufacturer’s instructions.3
■ Secure the heat exchanger and gas vent filter in their
proper positions and turn them on, following the
manufacturer’s instructions.2,3
■ Close all of the clamps on the Y-administration set.3
■ Invert and spike the fluid or blood product bag. Squeeze
the bag to remove all air and connect the ordered fluid or
blood product to the Y-set. Then hang the bag on the hooks
provided within the rapid infuser pressure chambers.2 Close
the pressure chamber door and secure the latch. Repeat for
each fluid line you’ll use.3
■ Open the clamps above the drip chamber for each IV fluid
bag you’ll use.3
■ Fill the drip chambers on the administration set halfway
by squeezing them to prevent air from entering the tubing.2
Repeat with each fluid line, as indicated.3
■ Open the remaining clamps above the heat exchanger so
that fluid will flow into the gas vent filter assembly.3
■ Gently tap the gas vent filter assembly to dislodge air
bubbles from the filter screen, according to the
manufacturer’s instructions. Inspect the tubing and filter
when finished to make sure there are no air bubbles.2
■ Remove the male Luer cap from the distal end of the
administration set tubing.3
■ Open the pinch clamp below the gas vent filter assembly.
Allow fluid to flow until you no longer observe air in the
tubing and the line is primed with fluid to prevent air
embolism. Then close the roller clamp. Put a new needleless
connector on the end of the tubing.3,40
■ Perform a vigorous mechanical scrub of the needleless
connector on the vascular access device for at least 5
seconds using an antiseptic pad, and allow it to dry
completely.6,40
■ Maintaining sterility of the syringe tip, attach a prefilled
syringe containing preservative-free normal saline solution
to the needleless connector. (Use a 10-mL syringe or a
syringe specifically designed to generate low injection
pressure.) Unclamp the catheter and slowly aspirate for
blood return that is the color and consistency of whole
blood. If no blood return occurs, take steps to locate an
external cause of obstruction.41
■ If blood return occurs, slowly inject preservative-free
normal saline solution into the catheter. Use a minimum
volume of twice the internal volume of the catheter system.
Don’t forcibly flush the device; further evaluate the device if
you meet resistance.41
■ Clamp the catheter and remove and discard the syringe
in a puncture-resistant sharps disposal container.42
■ Carefully remove the needleless connector from the
vascular access device. Perform a vigorous mechanical
scrub of the catheter hub for at least 5 seconds using an
antiseptic pad; then allow it to dry completely.6,10,43,44
■ Trace the tubing from the patient to its point of origin to
make sure that you’re attaching the tubing to the proper
port.45,46
■ Connect the distal end of the tubing to the patient’s
vascular access catheter. If the patient has other tubing and
catheters that have different purposes, route the tubing
using a standardized approach. If you’re using multiple IV
lines, label each tubing at the distal end (near the child
connection) and proximal end (near the source container) to
reduce the risk of misconnection.46
■ Complete functional testing of all audible and visual
alarms according to the manufacturer’s instructions. If any
visual indicator doesn’t illuminate or the audible signal
doesn’t sound, remove the device from service
immediately.3,47,48
■ After confirming proper infusion device operation,
unclamp the tubing and begin the infusion, adjusting the
infusion rate as needed.2
Using the Belmont infuser
■ Install the appropriate administration set into the infusion
device according to the manufacturer’s instructions.1
■ Confirm that the heat exchanger is secured properly.1
■ As needed for infusion of larger volumes of fluid, replace
the reservoir chamber with the larger-capacity reservoir.
Using sterile technique, remove the reservoir chamber from
the administration set by disconnecting the Luer
connectors.1
■ Attach the reservoir holder onto the IV pole and place the
larger reservoir into the holder.1
■ Attach the three fluid supply tails onto the top of the
larger reservoir to be used.1
■ Connect the larger reservoir to the administration set.
Adjust the reservoir holder to make sure that the connection
leads underneath the reservoir aren’t stretched or kinked.1
■ Hang the fluid bag on the IV pole.1
■ Close the bag clamps, remove the bag spike cap, perform
a vigorous mechanical scrub of the port with an antiseptic
pad for at least 5 seconds and allow it to dry completely,
and then spike the fluid bag, piercing it fully to ensure that
fluids flow freely.1
■ Repeat with additional fluid lines that you’ll use.1
■ Open the bag clamps.1
■ Prime the main system by pressing the PRIME button to
recirculate 100 mL of fluid at 500 mL/minute to remove air
and replace the main system with fluid.1
■ Prime the remainder of the administration tubing by
opening the roller clamp and removing the male Luer cap at
the distal end of the tubing. Press the PT. LINE PRIME button
once to prime at 50 mL/minute and press and hold the
button to prime at 200 mL/minute. Press the STOP button
after inspecting the tubing to make sure there are no air
bubbles. Press the PT. LINE PRIME button again to remove any
remaining air.1
■ Put a new needleless connector on the end of the
tubing.27
■ Perform a vigorous mechanical scrub of the needleless
connector of the vascular access device for at least 5
seconds with an antiseptic pad, and allow it to dry
completely.4,6,40,43,44
■ Maintaining sterility of the syringe tip, attach a prefilled
syringe containing preservative-free normal saline solution
to the needleless connector. (Use a 10-mL syringe or a
syringe specifically designed to generate low injection
pressure.) Unclamp the catheter and slowly aspirate for
blood return that is the color and consistency of whole
blood. If no blood return occurs, take steps to locate an
external cause of obstruction.41,43,44
■ If blood return occurs, slowly inject preservative-free
normal saline solution into the catheter. Use a minimum
volume of twice the internal volume of the catheter system.
Don’t forcibly flush the device; further evaluate the device if
you meet resistance.41
■ Clamp the catheter and remove and discard the syringe
in a puncture-resistant sharps disposal container.42
■ Carefully remove the needleless connector from the
vascular access device. Perform a vigorous mechanical
scrub of the catheter hub for at least 5 seconds using an
antiseptic pad; then allow it to dry completely.4,6,10,40,43,44
■ Trace the tubing from the patient to its point of origin to
make sure that you’re attaching the tubing to the proper
port.45,46
■ Connect the distal end of the tubing to the patient’s
vascular access catheter.1 If the patient has other tubing
and catheters that have different purposes, route the tubing
using a standardized approach. If you’re using multiple IV
lines, label each tubing at the distal end (near the child
connection) and proximal end (near the source container) to
reduce the risk of misconnection.46
■ Unclamp the catheter, press INFUSE to start infusing, and
adjust the flow rate, as needed.1
Completing the procedure
■ Monitor the patient’s vital signs every 5 to 15 minutes, as
indicated. As the patient’s condition stabilizes, monitor vital
signs less frequently (every 30 minutes until the patient’s
blood pressure is stable for longer than 2 hours).2
■ Monitor core temperature every 15 to 30 minutes and
maintain a core temperature no lower than 96.8°F (36°C) to
prevent hypothermia-induced coagulopathies.2
■ Assess the patient’s hemodynamic parameters every 15
to 30 minutes and urine output every 30 to 60 minutes, as
ordered, to evaluate the patient’s fluid volume status, which
indicates the effectiveness of fluid resuscitation and can be
used to guide therapy.2
■ Inspect IV sites every 15 minutes, because rapid infusion
increases the risk of infiltration.2
■ If the patient is receiving blood products, monitor closely
for signs of a transfusion reaction, such as fever, chills,
flushing,
nausea,
chest tightness,
restlessness,
apprehension, and back pain.2,15
■ Obtain an arterial blood gas sample, as ordered, to
monitor oxygenation and acid-base balance. (See the
“Arterial puncture for blood gas analysis” procedure, page
31.)
■ When the infusion is complete, change the IV fluid or
blood bag according to the specific manufacturer’s
instructions.
■ Discard the empty infusion bag in the proper
receptacle.35,42 Note that some facilities require that empty
blood transfusion bags be returned to the blood bank.
■ Obtain blood samples for hemoglobin level, hematocrit,
lactic acid level, and electrolyte levels as well as coagulation
studies, and perform thromboelastography, as ordered. (See
the “Venipuncture” procedure.)
■ Report all critical test results to the practitioner within the
time frame established by your facility to prevent life-
threatening treatment delays.49
■
Dispose of used equipment in appropriate
receptacles.35,42,50
■ Provide additional warming measures, such as additional
blankets, to keep the patient warm and prevent
hypothermia.2
■ Remove and discard your gloves and other personal
protective equipment, if worn.35,42,51
■ Perform hand hygiene.24,25,26,27,29,36
■ Document the procedure.52,53,54,55
Special considerations
■ Rapid infusion devices are designed for use during rapid
fluid infusion only; they aren’t appropriate when a specific
drip rate is required.
■ The rate of administration of resuscitation fluids should
be adequate to support tissue perfusion.23 Most devices
increase the flow rate gradually to prevent damage to the
vein. Adjust the infusion rate, as needed and tolerated.
■ Don’t use these devices with a pressure infuser; the
system pump provides adequate pressure to infuse fluid.1
■ Replace gas vent filters and reservoirs according to the
manufacturer’s instructions.1,3 Change the tubing and filter
of a Level 1 transfuser according to the manufacturer’s
recommendations.56 Clean and disinfect the device
according to the manufacturer’s recommendations.
■ If you’re administering blood products, prime the system
with a compatible IV solution; don’t prime with the blood
product.1,3
■ The Joint Commission issued a sentinel event alert related
to managing risk during transition to new International
Organization for Standardization tubing standards designed
to prevent dangerous tubing misconnections, which can
lead to serious patient injury and death. During the
transition, be sure to trace each tubing and catheter from
the patient to its point of origin before connecting or
reconnecting any device or infusion, at any care transition
(such as to a new setting or service), and as part of the
hand-off process. In addition, route tubes and catheters with
different purposes in different, standardized directions; label
tubing at both the distal and proximal ends when the
patient has different access sites or several bags hanging;
use tubing and equipment only as intended; and store
medications for different delivery routes in separate
locations.46
■ The Joint Commission issued a sentinel event alert
concerning medical device alarm safety, because alarm-
related events have been associated with permanent loss of
function and death. Among the major contributing factors
were improper alarm settings, inappropriately turned off
alarms, and alarm signals not audible to staff members.
Make sure that alarm limits are set appropriately, and that
alarms are turned on, functioning properly, and audible to
staff. Follow facility guidelines for preventing alarm
fatigue.48
Complications
Possible complications include electrolyte imbalances, fluid
overload, acid-base imbalance, infiltration or extravasation,
pulmonary edema, heart failure, interstitial edema, acute
respiratory distress syndrome, and hypothermia.
Documentation
Document the transfusion of all blood products in the
patient’s record; include the product type, the date and time
of the infusion, and the unique number or lot number for the
blood products. Record the patient’s core temperature
before the start of a massive infusion and at intervals during
and after the procedure. Include a meticulous account of the
amounts of fluids, the types of fluids, and correlating vital
signs. Incorporate documentation of massive fluid infusion
into the existing required documentation protocol for
resuscitation documentation.52,53
REFERENCES
1 Belmont Instrument Corporation. (n.d .). “The Belmont® Rapid Infuser,
FMS2000: Operator’s manual” [Online]. Accessed via the Web at
http://derriforded.weebly.com/uploads/1/5/2/4/15247360/belmont.pdf
2 Wiegand, D. L. (2017). AACN procedure manual for high acuity, progressive,
and critical care (7th ed.). Philadelphia, PA: Elsevier.
3 Smiths Medical. (2006). “Level 1® H-1200 Fast Flow Fluid Warmer: Operator’s
manual” [Online]. Accessed via the Web at
http://photos.medwrench.com/equipmentManuals/2436-724.pdf
4 Centers for Disease Control and Prevention. (2011, revised 2017). “Guidelines
for the prevention of intravascular catheter–related infections” [Online].
Accessed via the Web at
https://www.cdc.gov/infectioncontrol/pdf/guidelines/bsi-guidelines.pdf
5 Jarrett, N., & Callaham, M. (2016). “Evidence-based guidelines for selected
hospital-acquired conditions: Final report” [Online]. Accessed via the Web at
https://www.cms.gov/Medicare/Medicare-Fee-for-Service-
Payment/HospitalAcqCond/Downloads/2016-HAC-Report.pdf
6 Marschall, J., et al. (2014). SHEA/IDSA practice recommendation: Strategies to
prevent central line–associated bloodstream infections in acute care
hospitals, 2014 update. Infection Control and Hospital Epidemiology, 35, 753–
771. Accessed April 2017 via the Web at
http://www.jstor.org/stable/10.1086/676533 (Level I)
7 The Joint Commission. (2019). Standard NPSG.07.04.01. Comprehensive
accreditation manual for hospitals. Oakbrook Terrace, IL: The Joint
Commission. (Level VII)
8 Accreditation Association for Hospitals and Health Services. (2017). Standard
07.01.02. Healthcare Facilities Accreditation Program: Accreditation
requirements for acute care hospitals. Chicago, IL: Accreditation Association
for Hospitals and Health Systems. (Level VII)
9 Accreditation Association for Hospitals and Health Systems. (2017). Standard
07.01.19. Healthcare Facilities Accreditation Program: Accreditation
requirements for acute care hospitals. Chicago, IL: Accreditation Association
for Hospitals and Health Systems. (Level VII)
10 The Joint Commission. (2019). “CLABSI toolkit and monograph—Preventing
central line–associated bloodstream infections: Useful tools, an international
perspective” [Online]. Accessed via the Web at
http://www.jointcommission.org/topics/clabsi_toolkit.aspx (Level VII)
11 Gandhi, M. N., et al. (Eds.). (2011). A practical approach to anesthesia for
emergency surgery. New Delhi, India: Jaypee Brothers Medical Publishers.
12 Standard 12. Product evaluation, integrity, and defect reporting. Infusion
therapy standards of practice. (2016). Journal of Infusion Nursing, 39, S32–
S34. (Level VII)
13 Zoremba, N., et al. (2011). Air elimination capability in rapid infusion
systems. Anaesthesia, 66(11), 1031–1034. (Level IV)
14 The Joint Commission. (2019). Standard NPSG.06 .01.01. Comprehensive
accreditation manual for hospitals. Oakbrook Terrace, IL: The Joint
Commission. (Level VII)
15 Standard 62. Transfusion therapy. Infusion therapy standards of practice.
(2016). Journal of Infusion Nursing, 39, S135–S137. (Level VII)
16 Standard 25. Blood and fluid warming. Infusion therapy standards of practice.
(2016). Journal of Infusion Nursing, 39, S49–S50. (Level VII)
17 Standard 57. Parenteral medication and solution administration. Infusion
therapy standards of practice. (2016). Journal of Infusion Nursing, 39, S125–
S127.
18 The Joint Commission. (2019). Standard RI.01.03 .01. Comprehensive
accreditation manual for hospitals. Oakbrook Terrace, IL: The Joint
Commission. (Level VII)
19 Standard 9. Informed consent. Infusion therapy standards of practice. (2016).
Journal of Infusion Nursing, 39, S26–S28. (Level VII)
20 Centers for Medicare and Medicaid Services, Department of Health and
Human Services. (2015). Condition of participation: Patient’s rights. 42 C.F.R.
§ 482.13(b)(2).
21 Accreditation Association for Hospitals and Health Systems. (2017). Standard
15.01.11. Healthcare Facilities Accreditation Program: Accreditation
requirements for acute care hospitals. Chicago, IL: Accreditation Association
for Hospitals and Health Systems. (Level VII)
22 DNV GL-Healthcare USA, Inc. (2016). PR.1.SR.3 . NIAHO® accreditation
requirements: Interpretive guidelines & surveyor guidance (version 11).
Milford, OH: DNV GL-Healthcare USA, Inc. (Level VII)
23 Kaur, P., et al. (2011). Transfusion protocol in trauma. Journal of Emergencies,
Trauma, and Shock, 4(1), 103–108. Accessed via the Web at
https://www.ncbi.nlm.nih.gov/pmc/articles/PMC3097557/ (Level V)
24 Centers for Disease Control and Prevention. (2002). Guideline for hand
hygiene in health-care settings: Recommendations of the Healthcare Infection
Control Practices Advisory Committee and the HICPAC/SHEA/APIC/IDSA Hand
Hygiene Task Force. MMWR Recommendations and Reports, 51(RR-16), 1–45.
Accessed via the Web at http://www.cdc.gov/mmwr/pdf/rr/rr5116.pdf (Level II)
25 The Joint Commission. (2019). Standard NPSG.07.01.01. Comprehensive
accreditation manual for hospitals. Oakbrook Terrace, IL: The Joint
Commission. (Level VII)
26 Standard 16. Hand hygiene. Infusion therapy standards of practice. (2016).
Journal of Infusion Nursing, 39, S38–S39 . (Level VII)
27 World Health Organization. (2009). “WHO guidelines on hand hygiene in
health care: First global patient safety challenge, clean care is safer care”
[Online]. Accessed via the Web at
http://apps.who.int/iris/bitstream/10665/44102/1/9789241597906_eng.pdf
(Level IV)
28 Centers for Medicare and Medicaid Services, Department of Health and
Human Services. (2015). Condition of participation: Infection control. 42 C.F.R.
§ 482.42.
29 DNV GL-Healthcare USA, Inc. (2016). IC.1 .SR.1 . NIAHO® accreditation
requirements: Interpretive guidelines & surveyor guidance (version 11).
Milford, OH: DNV GL-Healthcare USA, Inc. (Level VII)
30 The Joint Commission. (2019). Standard NPSG.01.01.01. Comprehensive
accreditation manual for hospitals. Oakbrook Terrace, IL: The Joint
Commission. (Level VII)
31 Accreditation Association for Hospitals and Health Systems. (2017). Standard
15.01.16. Healthcare Facilities Accreditation Program: Accreditation
requirements for acute care hospitals. Chicago, IL: Accreditation Association
for Hospitals and Health Systems. (Level VII)
32 Centers for Medicare and Medicaid Services, Department of Health and
Human Services. (2015). Condition of participation: Patient’s rights. 42 C.F.R.
§ 482.13(c)(1).
33 DNV GL-Healthcare USA, Inc. (2016). PR.1.SR.5 . NIAHO® accreditation
requirements: Interpretive guidelines & surveyor guidance (version 11).
Milford, OH: DNV GL-Healthcare USA, Inc. (Level VII)
34 The Joint Commission. (2019). Standard RI.01.01.01. Comprehensive
accreditation manual for hospitals. Oakbrook Terrace, IL: The Joint
Commission. (Level VII)
35 Occupational Safety and Health Administration. (n.d .). “Bloodborne
pathogens, standard number 1910.1030” [Online]. Accessed via the Web at
http://www.osha.gov/pls/oshaweb/owadisp.show_document?
p_id=10051&p_table=STANDARDS (Level VII)
36 Siegel, J. D ., et al. (2007, revised 2017). “2007 guideline for isolation
precautions: Preventing transmission of infectious agents in healthcare
settings” [Online]. Accessed via the Web at
https://www.cdc.gov/infectioncontrol/pdf/guidelines/isolation-guidelines.pdf
(Level II)
37 American College of Surgeons Committee on Trauma. (2012). Advanced
trauma life support: Student course manual (9th edition). Chicago, IL:
American College of Surgeons.
38 Day, M. W. (2011). Intraosseous devices for intravascular access in adult
trauma patients. Critical Care Nurse, 31(2), 76–90 . (Level VII)
39 The Joint Commission. (2017). Standard NPSG.01.03 .01. Comprehensive
accreditation manual for hospitals. Oakbrook Terrace, IL: The Joint
Commission. (Level VII)
40 Standard 34. Needleless connectors. Infusion therapy standards of practice.
(2016). Journal of Infusion Nursing, 39, S68–S70. (Level VII)
41 Standard 40. Flushing and locking. Infusion therapy standards of practice.
(2016). Journal of Infusion Nursing, 39, S77–S81. (Level VII)
42 Standard 18. Medical waste and sharps safety. Infusion therapy standards of
practice. (2016). Journal of Infusion Nursing, 39, S40–S41. (Level VII)
43 Infusion Nurses Society. (2017). Policies and procedures for infusion therapy
of the older adult (3rd ed.). Boston, MA: Infusion Nurses Society.
44 Infusion Nurses Society. (2016). Policies and procedures for infusion therapy
(5th ed.). Boston, MA: Infusion Nurses Society.
45 U.S . Food and Drug Administration. (n.d .). “Look. Check. Connect. Safe
medical device connections save lives” [Online]. Accessed via the Web at
http://www.fda.gov/downloads/MedicalDevices/Safety/AlertsandNotices/UCM1
34873.pdf
46 The Joint Commission. (2014). “Sentinel event alert: Managing risk during
transition to new ISO tubing connector standards” [Online]. Accessed via the
Web at
http://www.jointcommission.org/assets/1/6/SEA_53_Connectors_8 _19_14 _final.
pdf (Level VII)
47 Graham, K. C., & Cvach, M. (2010). Monitor alarm fatigue: Standardizing use
of physiological monitors and decreasing nuisance alarms. American Journal
of Critical Care, 19(1), 28–37. Accessed via the Web at
http://ajcc.aacnjournals.org/content/19/1/28.full.pdf
48 The Joint Commission. (2013). “Sentinel event alert: Medical device alarm
safety in hospitals” [Online]. Accessed via the Web at
http://www.jointcommission.org/assets/1/18/SEA_50_alarms_4 _5 _13_FINAL1 .P
DF (Level VII)
49 The Joint Commission. (2019). Standard NPSG.02.03 .01. Comprehensive
accreditation manual for hospitals. Oakbrook Terrace, IL: The Joint
Commission. (Level VII)
50 Accreditation Association for Hospitals and Health Systems. (2017). Standard
07.03 .07. Healthcare Facilities Accreditation Program: Accreditation
requirements for acute care hospitals. Chicago, IL: Accreditation Association
for Hospitals and Health Systems. (Level VII)
51 Accreditation Association for Hospitals and Health Systems. (2017). Standard
07.01.10. Healthcare Facilities Accreditation Program: Accreditation
requirements for acute care hospitals. Chicago, IL: Accreditation Association
for Hospitals and Health Systems. (Level VII)
52 The Joint Commission. (2019). Standard RC.01.03 .01. Comprehensive
accreditation manual for hospitals. Oakbrook Terrace, IL: The Joint
Commission. (Level VII)
53 Standard 10. Documentation in the medical record. Infusion therapy
standards of practice. (2016). Journal of Infusion Nursing, 39, S28–S30 . (Level
VII)
54 Centers for Medicare and Medicaid Services, Department of Health and
Human Services. (2015). Condition of participation: Medical record services.
42 C.F.R. § 482.24(b).
55 DNV GL-Healthcare USA, Inc. (2016). MR.2 .SR.1 . NIAHO® accreditation
requirements: Interpretive guidelines & surveyor guidance (version 11).
Milford, OH: DNV GL-Healthcare USA, Inc. (Level VII)
56 Smiths Medical. (2006). “Operator’s and service manual: Level 1® H-1000
Fluid Warmer” [Online]. Accessed via the Web at
http://manualzilla.com/doc/6037519/smiths-h -1000-fluid-warmer-service-
manual
MECHANICAL TRACTION MANAGEMENT
Mechanical traction exerts a pulling force on a part of the
body—usually the spine, pelvis, or long bones of the arms
and legs. It can be used to reduce fractures, treat
dislocations, correct or prevent deformities, improve or
correct contractures, or decrease muscle spasms.
Depending on the injury or condition, an orthopedist may
order either skin or skeletal traction.
Applied directly to the skin and thus indirectly to the bone,
skin traction is ordered when a light, temporary, or
noncontinuous pulling force is required. Contraindications
for skin traction include a severe injury with open wounds,
an allergy to tape or other skin traction equipment,
circulatory disturbances, dermatitis, and varicose veins.
With skeletal traction, an orthopedist inserts a pin or wire
through the bone and attaches the traction equipment to
the pin or wire to exert a direct, constant, longitudinal
pulling force. Indications for skeletal traction include
fractures of the tibia, femur, and humerus. Infections such
as osteomyelitis contraindicate skeletal traction.
The IV-type basic frame is typically used for patients
weighing up to 250 lb (113 kg).1 The IV-type Balkan traction
frame is generally used for special traction setups and for
the increased weight-bearing of patients weighing between
250 lb and 450 lb (113.6 kg and 205 kg).1 The claw-type
basic frame is used on beds without IV sockets; this frame
can hold patients weighing up to 200 lb (91 kg).1
After placing the patient in the specific type of traction the
orthopedist ordered, assess and manage the patient’s pain;
monitor the neurovascular status of the affected extremity;
prevent complications from immobility; routinely inspect the
equipment and the patient’s skin; add traction weights, as
ordered; and, in patients with skeletal traction, monitor the
pin insertion sites for signs of infection.2,3
Equipment
IV-type basic frame
102′′ (259-cm) plain bar ▪ 27′′ (69-cm) double-clamp bar ▪
48′′ (122-cm) swivel-clamp bar ▪ two 36′′ (91-cm) plain bars
▪ four 4′′ (10-cm) IV posts with clamps ▪ cross clamp ▪
trapeze with clamp ▪ wall bumper or roller ▪ Optional: IV
post adapter brackets, 1 curved double-clamp bar.
IV-type Balkan traction frame
Two 102′′ (259-cm) plain bars ▪ two 27′′ (69-cm) double-
clamp bars ▪ two 48′′ (122-cm) swivel-clamp bars ▪ five 36′′
(91-cm) plain bars ▪ four 4′′ (10-cm) IV posts with clamps ▪
eight cross clamps ▪ trapeze with clamp ▪ wall bumper or
roller ▪ Optional: IV post adapter brackets, two curved
double clamp bars.1
Claw-type basic frame
102′′ (259-cm) plain bar ▪ two 66′′ (168-cm) swivel-clamp
bars ▪ two upper-panel clamps ▪ two lower-panel clamps ▪
trapeze with clamp ▪ wall bumper or roller.
Preparation of equipment
Arrange with central supply or the appropriate department
to have the traction equipment transported to the patient’s
room on a traction cart.
Implementation
■ Verify the practitioner’s order. The order should include
type of traction, amount of weight applied to provide
traction, if applicable, and specific pin-site care if applicable.
■ Perform hand hygiene.4,5,6,7,8,9
■ Confirm the patient’s identity using at least two patient
identifiers.10
■ Explain the purpose of traction to the patient. Emphasize
the importance of maintaining proper body alignment after
the traction equipment is set up.
■ Provide privacy.11,12,13,14
■ Explain the purpose of traction to the patient and family
(if appropriate) according to their individual communication
and learning needs to increase their understanding, allay
their fears, and enhance cooperation.15 Emphasize the
importance of maintaining proper body alignment after
traction equipment setup. Explain how to use the trapeze to
assist with repositioning.
■ Adjust the bed to its lowest position.1
IV-type basic frame
■ As necessary, install IV post adapter brackets for the
head and foot of the bed according to the bed model
manufacturer’s instructions.1
■ Attach one 4′′ (10-cm) IV post with clamp to each end of
both 36′′ (91-cm) horizontal plain bars.
■ Secure an IV post in each IV holder at the bed corners.
Using a cross clamp, fasten the 48′′ (122-cm) vertical swivel-
clamp bar to the middle of the horizontal plain bar at the
foot of the bed.
■ Fasten the 27′′ (69-cm) vertical double-clamp bar to the
middle of the horizontal plain bar at the head of the bed.
■ Attach the 102′′ (259-cm) horizontal plain bar to the tops
of the two vertical bars, making sure the clamp knobs point
up.
■ Attach the curved double-clamp bar, as needed, at the
foot of the bed, within the angle of the horizontal and
vertical bars for maximum stability.1
■ Using the appropriate clamp, attach the trapeze to the
horizontal bar about 2′ (61 cm) from the head of the bed.
(See IV-type basic traction frame, page 488.)
IV-type Balkan traction frame
■ As necessary, install IV post adapter brackets for the
head and foot of the bed according to the bed model
manufacturer’s instructions.1
EQUIPMENT
IV-type basic traction frame
With an IV-type basic frame, IV posts, placed in IV holders, support the
horizontal bars across the foot and head of the bed. These horizontal bars
then support the two uprights. You must add an additional curved double-
clamp bar to the frame to support patients weighing 200 lb to 250 lb (91 kg
to 114 kg). Without the use of the curved double-clamp bar, the weight limit
is 199 lb (91 kg).1
■ Attach one 4′′ (10-cm) IV post with clamp to each end of
two 36′′ (91-cm) horizontal plain bars.
■ Secure an IV post in each IV holder at the bed corners.
■ Attach a 48′′ (122-cm) vertical swivel-clamp bar, using a
cross clamp, to each IV post clamp on the horizontal plain
bar at the foot of the bed.
■ Fasten one 36′′ (91-cm) horizontal plain bar across the
midpoints of the two 48′′ (122-cm) swivel-clamp bars, using
two cross clamps.
■ Attach a 27′′ (69-cm) vertical double-clamp bar to each IV
post clamp on the horizontal bar at the head of the bed.
■ Using two cross clamps, fasten a 36′′ (91-cm) horizontal
plain bar across the midpoints of two 27′′ double-clamp bars.
■ Clamp a 102′′ (259-cm) horizontal plain bar onto the
vertical bars on each side of the bed; make sure the clamp
knobs point up.
■ Use two cross clamps to attach a 36′′ (91-cm) horizontal
plain bar across the two overhead bars, about 2′ (61 cm)
from the head of the bed.
■ Attach the trapeze to this 36′′ (91-cm) horizontal bar. (See
IV-type Balkan traction frame.)
Claw-type basic frame
■ Attach one lower-panel and one upper-panel clamp to
each 66′′ (168-cm) swivel-clamp bar.
■ Fasten one bar to the footboard and one to the headboard
by turning the clamp knobs clockwise until they’re tight and
then pulling back on the upper clamp’s rubberized bar until
it’s tight.
■ Secure the 102′′ (259-cm) horizontal plain bar atop the
two vertical bars, making sure that the clamp knobs point
up.
■ Using the appropriate clamp, attach the trapeze to the
horizontal bar about 2′ (61 cm) from the head of the bed.
(See Claw-type basic frame.)
■ Attach a wall bumper or roller to the vertical bar or bars
at the head of the bed to protect the walls from damage
caused by the bed or equipment.
Completing the procedure
■ Attach a wall bumper or roller to the vertical bar or bars
at the head of the bed to protect the walls from damage
caused by the bed or equipment.
■ Ensure that the traction frame and its components will
remain clear of environmental structures or other
equipment during operation of bed controls.1
■ Lock out the necessary bed controls based on the type of
traction applied to maintain proper traction and body
alignment and prevent patient injury. Follow the bed model
manufacturer’s instructions.1
EQUIPMENT
IV-type Balkan traction frame
The IV-type Balkan frame features IV posts and horizontal bars (secured in
the same manner as those for the IV-type basic frame) that support four
uprights. The frame requires the addition of two curved double clamp bars
for support of patients weighing 350 lb to 450 lb (159 kg to 205 kg). Without
the use of the curved double clamp bars, the weight limit is 349 lb (158 kg).1
■ Perform hand hygiene.4,5,6,7,8,8
■ Document the procedure.16,17,18,19
Special considerations
■ Countertraction must always be provided by the patient’s
body weight, pull of weights in the opposite direction, or
elevation of the bed.
■ The line of pull should be maintained at all times.
■ The weights should hang freely at all times.
■ Friction should be prevented on the traction apparatus.
■ When using skin traction, apply ordered weights slowly
and carefully to avoid jerking the affected extremity.
Arrange the weights so that they don’t hang over the
patient to avoid injury in case the ropes break.
■ When applying Buck traction, make sure that the line of
pull is always parallel to the bed and not angled downward
to prevent pressure on the heel. Placing a flat pillow, small
foam pad, or folded blanket under the extremity helps keep
the heel off the bed.1 However, ensure that doing so doesn’t
alter the line of pull.
■ Some practitioners prefer that traction weights hang off
the head of the bed versus the foot of the bed to keep the
weights out of visitors’ reach and prevent inadvertent
bumping by personnel.1
■ Communicate any ordered modifications to the traction
setup to other personnel, as needed. If a camera is
available, take a photo of the setup and place it in the
patient’s medical record or above the patient’s bed to
provide visual verification of how to maintain traction
setup.1
■ Don’t use the traction frame to push, pull, or steer the
bed to avoid weakening or destabilizing the frame.1
■ After each patient use, clean, disinfect, disassemble, and
store all traction equipment according to the manufacturer’s
instructions.1,20,21
Complications
Immobility during traction may result in pressure injuries,
osteoporosis, muscle atrophy, weakness, or contractures.
Immobility can also cause GI disturbances such as
constipation or ileus; urinary problems, including stasis and
calculi; respiratory problems, such as stasis of secretions
and hypostatic pneumonia; and circulatory disturbances,
including stasis and thrombophlebitis.
Prolonged immobility, especially after traumatic injury,
may result in depression or other emotional disturbances.
Skeletal traction may cause osteomyelitis originating at the
pin or wire sites.
EQUIPMENT
Claw-type basic frame
With a claw-type basic frame, claw attachments secure the uprights to the
footboard and headboard.
Documentation
In the patient’s record, document the time and type of
traction setup, and that the traction components are
correctly and tightly assembled.1 Note specific modifications
if ordered by the practitioner, the amount of traction weight
used, and that the weight is hanging freely.1
When caring for the patient in traction, note the patient’s
tolerance of traction, neurovascular integrity, skin condition,
and respiratory status. Note administration of pain
medications and their effectiveness. Document any patient
and family teaching you provided, their understanding of
your teaching, and whether they require follow-up teaching.
REFERENCES
1 Zimmer Orthopaedic Surgical Products, Inc. (2006). “Zimmer traction
handbook: A complete reference guide to the basics of traction” [Online].
Accessed via the Web at http://www.zimmer.com/content/dam/zimmer-
web/documents/en-US/pdf/medical-professionals/surgical-and-operating-
room-solutions/zimmer_traction_handbook.pdf
2 Holmes, S. B., et al. (2005). National Association of Orthopaedic Nurses
guidelines for orthopaedic nursing: Skeletal pin site care. Orthopaedic
Nursing, 24(2), 99–107.
3 Timms, A., & Pugh, H. (2012). Pin site care: guidance and key
recommendations. Nursing Standard, 27(1), 50–55 . (Level VII)
4 Centers for Disease Control and Prevention. (2002). Guideline for hand
hygiene in health-care settings: Recommendations of the Healthcare Infection
Control Practices Advisory Committee and the HICPAC/SHEA/APIC/IDSA Hand
Hygiene Task Force. MMWR Recommendations and Reports, 51(RR-16), 1–45.
Accessed via the Web at https://www.cdc.gov/mmwr/pdf/rr/rr5116.pdf (Level
II)
5 World Health Organization. (2009). “WHO guidelines on hand hygiene in
health care: First global patient safety challenge, clean care is safer care”
[Online]. Accessed via the Web at
http://apps.who.int/iris/bitstream/10665/44102/1/9789241597906_eng.pdf
(Level IV)
6 The Joint Commission. (2019). Standard NPSG.07.01.01. Comprehensive
accreditation manual for hospitals. Oakbrook Terrace, IL: The Joint
Commission. (Level VII)
7 Centers for Medicare and Medicaid Services, Department of Health and
Human Services. (2015). Condition of participation: Infection control. 42 C.F.R.
§ 482.42.
8 Accreditation Association for Hospitals and Health Systems. (2017). Standard
07.01.21. Healthcare Facilities Accreditation Program: Accreditation
requirements for acute care hospitals. Chicago, IL: Accreditation Association
for Hospitals and Health Systems. (Level VII)
9 DNV GL-Healthcare USA, Inc. (2016). IC.1.SR.1 . NIAHO® accreditation
requirements: Interpretive guidelines & surveyor guidance (version 11).
Milford, OH: DNV GL-Healthcare USA, Inc. (Level VII)
10 The Joint Commission. (2019). Standard NPSG.01.01.01. Comprehensive
accreditation manual for hospitals. Oakbrook Terrace, IL: The Joint
Commission. (Level VII)
11 Accreditation Association for Hospitals and Health Systems. (2017). Standard
15.01.16. Healthcare Facilities Accreditation Program: Accreditation
requirements for acute care hospitals. Chicago, IL: Accreditation Association
for Hospitals and Health Systems. (Level VII)
12 The Joint Commission. (2019). Standard RI.01.01.01. Comprehensive
accreditation manual for hospitals. Oakbrook Terrace, IL: The Joint
Commission. (Level VII)
13 Centers for Medicare and Medicaid Services, Department of Health and
Human Services. (2015). Condition of participation: Patient’s rights. 42 C.F.R.
§ 482.13(c)(1).
14 DNV GL-Healthcare USA, Inc. (2016). PR.1.SR.5 . NIAHO® accreditation
requirements: Interpretive guidelines & surveyor guidance (version 11).
Milford, OH: DNV GL-Healthcare USA, Inc. (Level VII)
15 The Joint Commission. (2019). Standard PC.02.01.21. Comprehensive
accreditation manual for hospitals. Oakbrook Terrace, IL: The Joint
Commission. (Level VII)
16 The Joint Commission. (2019). Standard RC.01.03 .01. Comprehensive
accreditation manual for hospitals. Oakbrook Terrace, IL: The Joint
Commission. (Level VII)
17 Centers for Medicare and Medicaid Services, Department of Health and
Human Services. (2014). Condition of participation: Medical record services.
42 C.F.R. § 482.24(b).
18 Accreditation Association for Hospitals and Health Systems. (2017). Standard
10.00 .03. Healthcare Facilities Accreditation Program: Accreditation
requirements for acute care hospitals. Chicago, IL: Accreditation Association
for Hospitals and Health Systems. (Level VII)
19 DNV GL-Healthcare USA, Inc. (2016). MR.2 .SR.1 . NIAHO® accreditation
requirements: Interpretive guidelines & surveyor guidance (version 11).
Milford, OH: DNV GL-Healthcare USA, Inc. (Level VII)
20 Rutala, W. A., et al. (2008, revised 2017). “Guideline for disinfection and
sterilization in healthcare facilities, 2008” [Online]. Accessed via the Web at
https://www.cdc.gov/infectioncontrol/pdf/guidelines/disinfection-
guidelines.pdf (Level I)
21 Accreditation Association for Hospitals and Health Systems. (2017). Standard
07.02.03. Healthcare Facilities Accreditation Program: Accreditation
requirements for acute care hospitals. Chicago, IL: Accreditation Association
for Hospitals and Health Systems. (Level VII)
MECHANICAL VENTILATION, POSITIVE
PRESSURE
The purpose of positive-pressure mechanical ventilation is
to promote gas exchange in the lungs by producing positive
intrathoracic pressure and positive airway pressure. This
positive-pressure mechanical ventilation may be delivered
to the airway through an endotracheal (ET) or tracheostomy
tube. The amount of gas exchange that takes place depends
on the resistance and compliance of the lung itself.
Depending on how they provide ventilation, mechanical
ventilators fall into three categories. They can deliver a
preset tidal volume (VT), deliver a preset peak inspiratory
pressure, or operate at a high frequency (60 to 3,000
oscillations per minute) with low VT.
Positive-pressure ventilation is indicated for the patient
with respiratory or ventilatory failure evidenced by
hypoxemia, metabolic acidosis, respiratory acidosis,
inadequate tissue oxygenation, and respiratory muscle
fatigue. These signs and symptoms may result from acute
or chronic lung injury; neurologic disorders; trauma;
chemical or medical respiratory depressants, such as
sedation, anesthesia, or pain killers; multiple organ
dysfunction syndrome; or disease entities, including
cardiogenic pulmonary edema, pulmonary hemorrhage,
pulmonary thromboembolism, acute severe asthma, sepsis,
or septic shock.1 The goals of positive-pressure ventilation
include maintaining adequate alveolar ventilation,
correcting hypoxemia, and decreasing the work of breathing
while providing adequate respirations and rest for the
patient.
A practitioner orders mechanical ventilation and, in
collaboration with the respiratory therapist, sets ventilatory
parameters to maintain pH, partial pressure of arterial
carbon dioxide, partial pressure of arterial oxygen, and
arterial oxygen saturation. The practitioner, respiratory
therapist, and nurse must collaborate to manage the
moment-to-moment ventilatory needs of the patient. The
nurse must know how to assess, monitor, and care for
patients on mechanical ventilation and understand basic
ventilator mechanisms of action. (See Mechanical
ventilation terminology, page 490.)
Mechanical ventilation terminology
Make sure you’re familiar with the following mechanical ventilation
terminologies:
Assist-control mode: The ventilator delivers a preset tidal volume (VT) at a
preset rate; however, the patient can initiate additional breaths, which
trigger the ventilator to deliver the preset VT at positive pressure.
Continuous positive airway pressure (CPAP): This setting prompts the
ventilator to deliver positive pressure to the airway throughout the
respiratory cycle. It works only on patients who can breathe spontaneously.
Control mode: The ventilator delivers a preset VT at a fixed rate, regardless
of whether the patient is breathing spontaneously.
Fraction of inspired oxygen (FIO2): This is the percentage of oxygen
delivered to the patient by the ventilator. The dial or digital display on the
ventilator that sets this percentage is labeled OXYGEN CONCENTRATION or OXYGEN
PERCENTAGE. You should use the lowest possible FIO2 to meet the patient’s
oxygenation goal.1
Inspiratory-expiratory (I:E) ratio: This ratio compares the duration of
inspiration to the duration of expiration. The I:E ratio of normal, spontaneous
breathing is 1:2, meaning that expiration is twice as long as inspiration.
Inspiratory flow rate (IFR): The IFR denotes the VT delivered within a
certain time. Its value can range from 20 to 120 L/minute.
Minute ventilation or minute volume (VE): This measurement results
from the multiplication of respiratory rate and VT.
Peak inspiratory pressure (PIP): Measured by the pressure manometer
on the ventilator, PIP reflects the amount of pressure required to deliver a
preset VT.
Plateau pressure: Airway pressure measured after a 0.5 second pause at
the end of inspiration, plateau pressure indicates the stiffness of the lungs.
Positive end-expiratory pressure (PEEP): In PEEP mode, the ventilator is
triggered to apply positive pressure at the end of each expiration to increase
the area for oxygen exchange by helping to inflate and keep open collapsed
alveoli. The practitioner typically initiates PEEP at 5 cm H2O but possibly as
high as 20 cm H2O in acute respiratory distress syndrome (ARDS).1
Pressure support: A ventilator adjunct, pressure support delivers positive
pressure, supplementing the spontaneous breath of a patient on the
ventilator. It’s used to reduce the work of breathing associated with the
artificial airway or increase the volume of the patient’s spontaneous breath.
Respiratory rate: The number of breaths per minute delivered by the
ventilator; also called frequency. The rate set is dependent on the patient’s
condition and the ventilator mode, but it’s typically 12 to 16 breaths per
minute.1
Sensitivity setting: A setting that determines the amount of effort the
patient must exert to trigger the inspiratory cycle.
Sigh volume: A ventilator-delivered breath that’s 11⁄4 times as large as the
patient’s VT.
Synchronized intermittent mandatory ventilation (SIMV): The
ventilator delivers a preset number of breaths at a specific VT. The patient
may supplement these mechanical ventilations with his or her own breaths,
in which case the VT and rate are determined by the patient’s own
inspiratory ability.
Tidal volume (VT): This refers to the volume of air delivered to the patient
with each cycle, usually 8 to 10 mL/kg. Low VT ventilation of 6 to 8 mL/kg
predicted body weight has been associated with decreased mortality and
improved outcomes in patients with acute respiratory failure and ARDS.1
Equipment
Oxygen source ▪ air source that can supply 50 psi ▪
mechanical ventilator ▪ humidifier ▪ ventilator circuit
tubing, connectors, and adapters ▪ condensation collection
trap ▪ spirometer, respirometer, or electronic device to
measure flow and volume ▪ in-line thermometer ▪ gloves ▪
handheld resuscitation bag with reservoir ▪ suction
equipment ▪ sterile distilled water ▪ equipment for arterial
blood gas (ABG) analysis ▪ vital signs monitoring equipment
▪ stethoscope ▪ disinfectant pad ▪ pulse oximeter and
probe ▪ capnography device ▪ oral care products ▪
emergency resuscitation equipment (code cart with
emergency medications, defibrillator, intubation equipment
▪ Optional: prescribed sedative, neuromuscular blocking
agent, and other medications; chlorhexidine oral care
product; gown; mask and goggles or mask with face shield;
peripheral nerve stimulation equipment; communication
board; eye lubricant.
Preparation of equipment
In most facilities, respiratory therapists assume
responsibility for setting up a ventilator. If necessary,
however, check the manufacturer’s instructions for setting it
up. In some cases, you’ll need to add sterile distilled water
to the humidifier and connect the ventilator to the
appropriate gas source.
Plug the ventilator into an emergency electrical outlet
(with generator backup) and turn it on. Adjust the settings
on the ventilator, as ordered. Make sure the ventilator’s
alarms are set appropriately for the ventilator settings and
the patient’s current condition, and that the alarms are
turned on, functioning properly, and audible to staff.2,3,4
Make sure that the humidifier is filled with the sterile
distilled water, and that the heated humidifier is set to
deliver an inspired gas temperature of greater than or equal
to 93.2°F (34°C) but less than 105.8°F (41°C) at the circuit
Y-piece and provide a minimum of 33 mg/L of water vapor.5
Attach a capnography device to measure carbon dioxide
levels to confirm placement of the ET tube and detect any
disconnection from the ventilator or other complications.6,7
Implementation
■ Verify the practitioner’s order.
■ If the patient isn’t already intubated, prepare the patient
for intubation. (See the “Endotracheal intubation”
procedure, page 269.)
■ Gather and prepare the necessary equipment.
■ Perform hand hygiene.8,9,10,11,12,13
■ Confirm the patient’s identity using at least two patient
identifiers.14
■ Provide privacy.15,16,17,18
■ When possible, explain the procedure to the patient and
family (if appropriate) according to their individual
communication and learning needs to increase their
understanding, allay their fears, and enhance cooperation.19
Assure them that staff members are nearby to provide care.
■ Make sure the patient is being adequately oxygenated.
■ Raise the patient’s bed to waist level when providing
patient care to prevent caregiver back strain.20
■ Perform hand hygiene.8,9,10,11,12,13
■ Put on gloves and other personal protective equipment as
needed to comply with standard precautions.21,22,23,24
■ As the patient’s condition allows, perform a complete
physical assessment, and obtain blood for ABG analysis to
establish baselines for comparison.
■ Assist with intubation (if necessary) and then connect the
ET tube to the ventilator circuit. Trace the ventilator circuit
from the patient to its point of origin to make sure it’s
connected properly.25,26
■ Observe for chest expansion, and auscultate for bilateral
breath sounds to verify that the patient is being
ventilated.21
■ Monitor the patient’s oxygen saturation level by pulse
oximetry; make sure that the alarm limits are set
appropriately for the patient’s current condition, and that
the alarms are turned on, functioning properly, and audible
to staff.2,3,4,27
■ Use waveform capnography, an exhaled-carbon dioxide
detector, or an esophageal detector device in addition to a
chest X-ray to confirm ET tube placement.28,29
■ Position the patient with the head of the bed elevated 30
to 45 degrees, unless contraindicated by the patient’s
condition, to reduce the risk of aspiration and consequent
ventilator-associated pneumonia (VAP). If the patient can’t
bend at the waist, use a reverse Trendelenburg position.30,31
■ Suction the patient’s airway when necessary to maintain
airway patency by removing accumulated pulmonary
secretions.29 Before performing suctioning, hyperoxygenate
the patient, as needed, with 100% oxygen for 30 to 60
seconds. Suction the patient with a closed-suction catheter,
limiting suctioning to 15 seconds. After suctioning,
hyperoxygenate the patient for at least 1 minute using the
same technique you used before suctioning.29
■ Observe the amount and consistency of the patient’s
secretions.
■ Monitor the patient’s ABG values after the initial
ventilator setup, after changes in ventilator settings, and as
the patient’s condition indicates, if ordered, to determine
whether the patient is being adequately ventilated and to
avoid oxygen toxicity. Be prepared to adjust ventilator
settings based on ABG analysis. Notify the practitioner of
critical test results within your facility’s established time
frame so the patient can receive prompt treatment.32
■ Check the ventilator tubing frequently for condensation,
which can cause resistance to airflow and which the patient
may aspirate. As needed, drain the condensate into a
collection trap. Keep the circuit closed during condensate
drainage to prevent bacterial contamination. Don’t drain the
condensate into the humidifier, because the condensate
may be contaminated with the patient’s secretions. Also
avoid accidental drainage of condensation into the patient’s
airway when moving the tubing or the patient, because
condensate is considered infectious waste.5,21
■ Inspect heat and moisture exchangers, and replace
inserts or filters contaminated by secretions.
■ Check the in-line thermometer to make sure the
temperature of the air delivered to the patient is close to
body temperature.
■ If you’re using a heated humidifier, monitor the inspired
air temperature as close to the patient’s airway as possible.
The heated humidifier should be set to deliver an inspired
gas temperature of 92.3°F (34°C) or above, but less than
105.8°F (41°C) (with a 109.4°F [43°C] over-limit
temperature), and the low temperature alarm should be set
no lower than 3.6°F (2°C) below the desired temperature at
the circuit Y-piece.5
■ Change, clean, or dispose of the ventilator tubing and
equipment when it’s visibly soiled or malfunctioning, or at
an interval determined by your facility, to reduce the risk of
bacterial contamination.5,21
■ Monitor the patient’s vital signs and respiratory status at
an interval determined by the patient’s condition and your
facility. When monitoring the patient’s vital signs, count
spontaneous breaths as well as ventilator-delivered breaths.
■ Provide emotional support to the patient during all phases
of mechanical ventilation to reduce anxiety and promote
successful treatment. Even if the patient is unresponsive,
continue to explain all procedures and treatments.
■ Confirm that the ventilator alarms are set appropriately
for the patient’s current condition. Make sure that the
alarms are turned on, functioning, and audible to
staff.2,3,4,27
■ Unless contraindicated, turn the patient from side to side
every 1 to 2 hours to facilitate lung expansion and removal
of secretions, and perform active or passive range-of-motion
exercises for all extremities to reduce the hazards of
immobility.
■ Assess the patient’s peripheral circulation, and monitor
intake and output to assess for signs of decreased cardiac
output. Watch for signs and symptoms of fluid volume
excess or dehydration.
■ Brush the patient’s teeth, gums, and tongue at least
twice a day using a soft pediatric or adult toothbrush to
prevent VAP.33,34
■ Use a chlorhexidine rinse daily, as prescribed, to reduce
colonization of the oropharynx and prevent subsequent
VAP.30,33,34,35 For a patient undergoing cardiac surgery, use
the rinse twice a day during the perioperative period.33
■ Moisten the patient’s lips and oral mucosa every 2 to 4
hours to reduce oral inflammation and improve oral
health.33,34
■ Institute measures to prevent venous thromboembolism
(VTE) and peptic ulcer disease (PUD), if prescribed.30,34
NURSING ALERT Make sure that you follow infection-prevention
techniques (such as performing hand hygiene, providing oral care,
positioning the patient with head of bed elevated 30 to 45 degrees)
when caring for the patient receiving mechanical ventilation to reduce
the risk of VAP.21
■ Place the call light within the patient’s reach, and
establish a method of communication, such as a
communication board, because intubation and mechanical
ventilation impair the patient’s ability to speak. An artificial
airway may help the patient to speak by allowing air to pass
through the vocal cords.
■ Administer and titrate the patient’s sedative and
neuromuscular blocking agent as ordered following safe
medication administration practices.36,37,38,39 Maintain
target sedation levels to avoid oversedation.40 Remember
that the patient receiving a neuromuscular blocking agent
requires close observation because of the inability to
breathe spontaneously or communicate.
■ Return the bed to the lowest position to prevent falls and
maintain patient safety.41
■ Take steps to ensure the patient’s safety, such as raising
the side rails of the bed while turning the patient, and
covering and lubricating the patient’s eyes.
■ Dispose of used supplies in the appropriate receptacle.
■ Remove and discard your gloves and any other personal
protective equipment.22
■ Perform hand hygiene.8,9,10,11,12,13
■ Clean and disinfect your stethoscope using a disinfectant
pad.42,43
■ Perform hand hygiene.8,9,10,11,12,13
■ Document the procedure.44,45,46,47
Special considerations
■ The Joint Commission issued a sentinel event alert
concerning medical device alarm safety, because alarm-
related events have been associated with permanent loss of
function and death. Among the major contributing factors
were improper alarm settings, alarms inappropriately turned
off, and alarm signals not audible to staff. Make sure that
alarm limits are set appropriately, and that alarms are
turned on, functioning properly, and audible to staff. Follow
facility guidelines for preventing alarm fatigue.2
■ If signs of respiratory distress or hypoxemia develop, or if
an alarm sounds and you can’t easily identify the problem,
disconnect the patient from the ventilator and use a
handheld resuscitation bag to ventilate the patient. (See
Responding to ventilator alarms, page 492.)
■ If the patient is receiving a neuromuscular blocking
agent, make sure that he or she also receives a sedative.
Neuromuscular blocking agents cause paralysis without
altering the patient’s level of consciousness (LOC). A patient
receiving a neuromuscular blocking agent requires close
observation because of the inability to breathe and
communicate. Reassure the patient and family that the
paralysis is temporary. Also make sure emergency
resuscitation equipment is readily available in case the
ventilator malfunctions or the patient is extubated
accidentally.
■ Discuss with the practitioner during multidisciplinary
rounds a sedation vacation strategy to assess for readiness
for weaning.30
■ Interrupt sedation daily, as ordered or according to your
facility’s protocol, and assess the patient’s readiness to
wean.30
■ The Joint Commission has issued a sentinel event alert
related to managing risk during transition to new
International Organization for Standardization tubing
standards designed to prevent dangerous tubing
misconnections, which can lead to serious patient injury and
death. During the transition, trace the tubing and catheter
from the patient to the point of origin before connecting or
reconnecting any device or infusion, at any care transition
(such as a new setting or service), and as part of the hand-
off process. Route tubes and catheters with different
purposes in different standardized directions. Label the
tubing at the distal and proximal ends (when there are
different access sites or several bags hanging). Use tubing
and equipment only as intended. Store medications for
different delivery routes in separate locations.26
■ Assess the patient’s readiness to wean daily during
multidisciplinary rounds. Begin to wean the patient from the
ventilator as soon as the patient is ready and as ordered, to
reduce the risk of ventilator-associated pneumonia and
additional cardiopulmonary complications. (See the
“Weaning a patient from a ventilator” procedure.)30,48
■ In a postoperative patient, perform a comprehensive pain
assessment using techniques appropriate for the patient’s
age, condition, and ability to understand.49 Administer
analgesics, as needed and ordered, following safe
medication administration practices.36,37,38,39
■ If the patient is receiving enteral feedings, avoid gastric
overdistention to reduce the risk of aspiration.
■ Ensure that the patient gets adequate rest and sleep,
because fatigue can delay weaning from the ventilator.
Provide subdued lighting, safely muffle equipment noises,
and restrict staff access to the area to promote quiet during
rest periods.
■ Teach the patient and family about measures to prevent
VAP, including maintaining the head of the bed at 30 to 45
degrees. Encourage them to alert staff members when the
bed doesn’t appear to be positioned correctly.30,31
Patient teaching
If the patient will be discharged on a ventilator, evaluate the
ability and motivation of the family or caregiver to provide
care. Well before discharge, develop a teaching plan that
addresses the patient’s needs. For example, teaching should
include information about ventilator care and settings,
artificial airway care, suctioning, respiratory therapy,
communication, nutrition, therapeutic exercise, signs and
symptoms of infection, and ways to troubleshoot minor
equipment malfunctions.
TROUBLESHOOTING
Responding to ventilator alarms
Also evaluate the patient’s need for adaptive equipment,
such as a hospital bed, wheelchair or walker with a
ventilator tray, patient lift, and bedside commode.
Determine whether the patient needs to travel; if so, select
appropriate portable and backup equipment. Before
discharge, have the patient’s caregiver demonstrate the
ability to use the equipment. At discharge, contact a durable
medical equipment vendor and a home health nurse to
follow up with the patient. Also, refer the patient to
community resources, if available.
Complications
Mechanical ventilation can cause tension pneumothorax,
decreased cardiac output, oxygen toxicity, fluid volume
excess caused by humidification, infection, and such GI
complications as distention or bleeding from stress ulcers.
Documentation
Document the date and time mechanical ventilation was
initiated. Name the type of ventilator used for the patient,
and note its settings. Describe the patient’s response to
mechanical ventilation, including vital signs, breath sounds,
assessment findings, and oxygen saturation. List any
complications and nursing interventions taken. Record all
pertinent laboratory data, including ABG analysis results.
Describe the patient’s LOC, respiratory effort, and skin color.
Note the patient’s need for suctioning and the color and the
amount of secretions. Document interventions, such as
head of bed elevation, oral care, sedation interruption, and
weaning, and the patient’s response to these interventions.
Note any patient and family teaching you provided and their
understanding of the teaching.
If the patient was receiving pressure-support ventilation
(PSV) or using a T-piece or tracheostomy collar, note the
duration of spontaneous breathing and the patient’s ability
to maintain the weaning schedule. If using intermittent
mandatory ventilation, with or without PSV, record the
control breath rate, the time of each breath reduction, and
the rate of spontaneous respirations. Document patient and
family teaching.
REFERENCES
1 Courey, A. J ., & Hyzy, T. C . Overview of mechanical ventilation. (2017). In:
UpToDate, Parsons, P. E., & Finlay, G. (Eds.) . Retrieved from:
www.uptodate.com
2 The Joint Commission. (2013). “Sentinel event alert: Medical device alarm
safety in hospitals” [Online]. Accessed via the Web at
http://www.jointcommission.org/assets/1/6/SEA_50_alarms_4 _26_16.pdf
(Level VII)
3 Graham, K. C ., & Cvach, M. (2010). Monitor alarm fatigue: Standardizing use
of physiological monitors and decreasing nuisance alarms. American Journal
of Critical Care, 19(1), 28–37. Accessed via the Web at
http://ajcc.aacnjournals.org/content/19/1/28.full.pdf
4 The Joint Commission. (2019). Standard NPSG.06 .01.01. Comprehensive
accreditation manual for hospitals. Oakbrook Terrace, IL: The Joint
Commission. (Level VII)
5 Restrepo, R. D., & Walsh, B. K . (2012). AARC clinical practice guideline:
Humidification during invasive and noninvasive mechanical ventilation, 2012.
Respiratory Care, 57(5), 782–788. Accessed via the Web at
http://rc.rcjournal.com/content/57/5/782.full.pdf (Level VII)
6 American Heart Association. (2010). 2010 American Heart Association
guidelines for cardiopulmonary resuscitation and emergency cardiovascular
care. Circulation, 122, S729–S767. (Level II)
7 American Heart Association. (2015). 2015 American Heart Association
guidelines update for cardiopulmonary resuscitation and emergency
cardiovascular care. Circulation, 132, S444–S464. (Level II)
8 The Joint Commission. (2019). Standard NPSG.07.01.01. Comprehensive
accreditation manual for hospitals. Oakbrook Terrace, IL: The Joint
Commission. (Level VII)
9 Centers for Disease Control and Prevention. (2002). Guideline for hand
hygiene in health-care settings: Recommendations of the Healthcare Infection
Control Practices Advisory Committee and the HICPAC/SHEA/APIC/IDSA Hand
Hygiene Task Force. MMWR Recommendations and Reports, 51(RR-16), 1–45.
Accessed via the Web at https://www.cdc.gov/mmwr/pdf/rr/rr5116.pdf (Level
II)
10 World Health Organization. (2009). “WHO guidelines on hand hygiene in
health care: First global patient safety challenge, clean care is safer care”
[Online]. Accessed via the Web at
http://apps.who.int/iris/bitstream/10665/44102/1/9789241597906_eng.pdf
(Level IV)
11 Centers for Medicare and Medicaid Services, Department of Health and
Human Services. (2015). Condition of participation: Infection control. 42 C.F.R.
§ 482.42.
12 Accreditation Association for Hospitals and Health Systems. (2017). Standard
07.01.21. Healthcare Facilities Accreditation Program: Accreditation
requirements for acute care hospitals. Chicago, IL: Accreditation Association
for Hospitals and Health Systems. (Level VII)
13 DNV GL-Healthcare USA, Inc. (2016). IC.1 .SR.1 . NIAHO® accreditation
requirements: Interpretive guidelines & surveyor guidance (version 11).
Milford, OH: DNV GL-Healthcare USA, Inc. (Level VII)
14 The Joint Commission. (2019). Standard NPSG.01.01.01. Comprehensive
accreditation manual for hospitals. Oakbrook Terrace, IL: The Joint
Commission. (Level VII)
15 The Joint Commission. (2019). Standard RI.01.01.01. Comprehensive
accreditation manual for hospitals. Oakbrook Terrace, IL: The Joint
Commission. (Level VII)
16 Centers for Medicare and Medicaid Services, Department of Health and
Human Services. (2015). Condition of participation: Patient’s rights. 42 C.F.R.
§ 482.13(c)(1).
17 Accreditation Association for Hospitals and Health Systems. (2017). Standard
15.01.16. Healthcare Facilities Accreditation Program: Accreditation
requirements for acute care hospitals. Chicago, IL: Accreditation Association
for Hospitals and Health Systems. (Level VII)
18 DNV GL-Healthcare USA, Inc. (2016). PR.1.SR.5 . NIAHO® accreditation
requirements: Interpretive guidelines & surveyor guidance (version 11).
Milford, OH: DNV GL-Healthcare USA, Inc. (Level VII)
19 The Joint Commission. (2019). Standard PC.02.01.21. Comprehensive
accreditation manual for hospitals. Oakbrook Terrace, IL: The Joint
Commission. (Level VII)
20 Waters, T. R., et al. (2009). “Safe patient handling training for schools of
nursing” [Online]. Accessed via the Web at
https://www.cdc.gov/niosh/docs/2009-127/pdfs/2009-127.pdf (Level VII)
21 Centers for Disease Control and Prevention. (2004). Guidelines for preventing
health-care-associated pneumonia, 2003: Recommendations of CDC and the
Healthcare Infection Control Practices Advisory Committee. MMWR
Recommendations and Reports, 53(RR-3), 1–32. Accessed via the Web at
http://www.cdc.gov/mmwr/pdf/rr/rr5303.pdf (Level II)
22 Siegel, J. D ., et al. (2007, revised 2017). “2007 guideline for isolation
precautions: Preventing transmission of infectious agents in healthcare
settings” [Online]. Accessed via
https://www.cdc.gov/infectioncontrol/pdf/guidelines/isolation-guidelines.pdf
(Level II)
23 Accreditation Association for Hospitals and Health Systems. (2017). Standard
07.01.10. Healthcare Facilities Accreditation Program: Accreditation
requirements for acute care hospitals. Chicago, IL: Accreditation Association
for Hospitals and Health Systems. (Level VII)
24 DNV GL-Healthcare USA, Inc. (2016). IC.1 .SR.2 . NIAHO® accreditation
requirements: Interpretive guidelines & surveyor guidance (version 11).
Milford, OH: DNV GL-Healthcare USA, Inc. (Level VII)
25 U.S . Food and Drug Administration. (n.d .). “Look. Check. Connect. Safe
medical device connections save lives” [Online]. Accessed via the Web at
https://www.fda.gov/downloads/MedicalDevices/Safety/AlertsandNotices/UCM
134873.pdf
26 The Joint Commission. (2014). “Sentinel event alert: Managing risk during
transition to new ISO tubing connector standards” [Online]. Accessed via the
Web at
http://www.jointcommision.org/assets/1/6/SEA_53_Connectors_8_19_14 _final.
pdf (Level VII)
27 American Association of Critical-Care Nurses. (2013). “A ACN practice alert:
Alarm management” [Online]. Accessed via the Web at
https://www.aacn.org/aacn-website/shared/content/practice-
alerts/2015/11/25/alarm-management (Level VII)
28 Walsh, B. K ., et al. (2011). AARC clinical practice guideline:
Capnography/capnometry during mechanical ventilation, 2011. Respiratory
Care, 56(4), 503–509. Accessed via the Web at
http://rc.rcjournal.com/content/respcare/56/4/503.full.pdf (Level VII)
29 Restrepo, R. D., et al. (2010). AARC clinical practice guidelines: Endotracheal
suctioning of mechanically ventilated patients with artificial airways, 2010.
Respiratory Care, 55(6), 758–764. Accessed via the Web at
http://rc.rcjournal.com/content/respcare/55/6/758.full.pdf (Level VII)
30 Institute for Healthcare Improvement. (2012). How-to-guide: Prevent
ventilator-associated pneumonia. Cambridge, MA: Institute for Healthcare
Improvement. (Level VII)
31 American Association of Critical-Care Nurses. (2017). “A ACN practice alert:
Ventilator associated pneumonia (VAP)” [Online]. Accessed via the Web at
https://www.aacn.org/clinical-resources/practice-alerts/ventilator-associated-
pneumonia-vap (Level VII)
32 The Joint Commission. (2019). Standard NPSG.02.03 .01. Comprehensive
accreditation manual for hospitals. Oakbrook Terrace, IL: The Joint
Commission. (Level VII)
33 American Association of Critical-Care Nurses. (2017). “A ACN practice alert:
Oral care for acutely and critically ill patients” [Online]. Accessed via the Web
at https://www.aacn.org/clinical-resources/practice-alerts/oral-care-for-
acutely-and-critically-ill-patients (Level VII)
34 Accreditation Association for Hospitals and Health Systems. (2017). Standard
07.01.02. Healthcare Facilities Accreditation Program: Accreditation
requirements for acute care hospitals. Chicago, IL: Accreditation Association
for Hospitals and Health Systems. (Level VII)
35 Hillier, B., et al. (2013). Preventing ventilator-associated pneumonia through
oral care, product selection, and application method. AACN Advanced Critical
Care, 24(1), 38–58. (Level I)
36 Centers for Medicare and Medicaid Services, Department of Health and
Human Services. (2015). Condition of participation: Nursing services. 42
C.F.R. § 482.23(c).
37 Accreditation Association for Hospitals and Health Systems. (2017). Standard
16.01.03. Healthcare Facilities Accreditation Program: Accreditation
requirements for acute care hospitals. Chicago, IL: Accreditation Association
for Hospitals and Health Systems. (Level VII)
38 The Joint Commission. (2019). Standard MM.06.01.01. Comprehensive
accreditation manual for hospitals. Oakbrook Terrace, IL: The Joint
Commission. (Level VII)
39 DNV GL-Healthcare USA, Inc. (2016). MM.1 .SR.2. NIAHO® accreditation
requirements: Interpretive guidelines & surveyor guidance (version 11).
Milford, OH: DNV GL-Healthcare USA, Inc. (Level VII)
40 Grap, M. J ., et al. (2012). Sedation in adults receiving mechanical ventilation:
Physiological and comfort outcomes. American Journal of Critical Care, 21(3),
e53–e64. Accessed via the Web at
http://ajcc.aacnjournals.org/content/21/3/e53.full.pdf (Level VI)
41 Ganz, D. A., et al. (2013). Preventing falls in hospitals: A toolkit for improving
quality of care (AHRQ Publication No. 13-0015-EF). Rockville, MD: Agency for
Healthcare Research and Quality. Accessed via the Web at
https://www.ahrq.gov/sites/default/files/publications/files/fallpxtoolkit.pdf
(Level VII)
42 Rutala, W. A., et al. (2008, revised 2017). “Guideline for disinfection and
sterilization in healthcare facilities, 2008” [Online]. Accessed via the Web at
https://www.cdc.gov/infectioncontrol/pdf/guidelines/disinfection-
guidelines.pdf (Level I)
43 Accreditation Association for Hospitals and Health Systems. (2017). Standard
07.02.03. Healthcare Facilities Accreditation Program: Accreditation
requirements for acute care hospitals. Chicago, IL: Accreditation Association
for Hospitals and Health Systems. (Level VII)
44 The Joint Commission. (2019). Standard RC.01.03 .01. Comprehensive
accreditation manual for hospitals. Oakbrook Terrace, IL: The Joint
Commission. (Level VII)
45 Centers for Medicare and Medicaid Services, Department of Health and
Human Services. (2015). Condition of participation: Medical record services.
42 C.F.R. § 482.24(b).
46 Accreditation Association for Hospitals and Health Systems. (2017). Standard
10.00 .03. Healthcare Facilities Accreditation Program: Accreditation
requirements for acute care hospitals. Chicago, IL: Accreditation Association
for Hospitals and Health Systems. (Level VII)
47 DNV GL-Healthcare USA, Inc. (2016). MR.2 .SR.1 . NIAHO® accreditation
requirements: Interpretive guidelines & surveyor guidance (version 11).
Milford, OH: DNV GL-Healthcare USA, Inc. (Level VII)
48 Klompas, M., et al. (2014). Strategies to prevent ventilator-associated
pneumonia in acute care hospitals: 2014 update. Infection Control and
Hospital Epidemiology, 35(8), 915–936. Accessed via the Web at
http://www.jstor.org/stable/10.1086/677144 (Level I)
49 The Joint Commission. (2019). Standard PC.01.02.07. Comprehensive
accreditation manual for hospitals. Oakbrook Terrace, IL: The Joint
Commission. (Level VII)
METERED-DOSE INHALER USE
A metered-dose inhaler (MDI) delivers topical medications to
the respiratory tract, producing local and systemic effects.
The mucosal lining of the respiratory tract absorbs the
inhalant almost immediately. Examples of common
inhalants include bronchodilators, which improve airway
patency and facilitate drainage of mucus; mucolytics, which
attain a high local concentration to liquefy tenacious
bronchial secretions; and corticosteroids, which decrease
inflammation in the respiratory tract.
The use of MDIs may be contraindicated in patients who
can’t form an airtight seal around the device and in those
who lack the coordination or clear vision to assemble the
device. Some patients use a spacer to assist them with the
airtight seal. Specific inhalants may also be contraindicated.
For example, bronchodilators are contraindicated in patients
with tachycardia or a history of cardiac arrhythmias
associated with tachycardia.
Equipment
Prescribed MDI with mouthpiece ▪
stethoscope ▪
disinfectant pad ▪ Optional: gloves, MDI spacer, water for
gargling, emesis basin.
Implementation
■ Avoid distractions and interruptions when preparing and
administering medication to prevent medication errors.1,2
■ Verify the practitioner’s order.3,4,5,6
■ Reconcile the patient’s medications when the practitioner
prescribes a new medication to help reduce the risk of
medication errors, including omissions, duplications, dosing
errors, and drug interactions.
■ Perform hand hygiene.7,8,9,10,11,12
■ Compare the medication label with the order in the
patient’s medical record.3,4,5,6
■ Check the patient’s medical record for an allergy or other
contraindication to the medication. If an allergy or a
contraindication exists, don’t administer the medication;
notify the practitioner.3,4,5,6
■ Check the expiration date on the medication. If the
medication has expired, return it to the pharmacy and
obtain new medication.3,4,5,6
■ Inspect the prescribed MDI visually for loss of integrity;
don’t administer the medication if the MDI’s integrity has
been compromised.3,4,5,6
■ Discuss any unresolved concerns about the medication
with the practitioner.3,4,5,6
■ Confirm the patient’s identity using at least two patient
identifiers.13
■ Provide privacy.14,15,16,17
■ Explain the procedure to the patient and family members
(if appropriate) according to their individual communication
and learning needs to help increase their understanding,
allay their fears, and enhance cooperation.18
■ If the patient is using the medication for the first time,
teach him about potential adverse reactions and discuss
any other concerns related to the medication.3,4,5,6
■ Verify that the medication is being administered at the
proper time, in the prescribed dose, and by the correct route
to reduce the risk of medication errors.3,4,5,6
■ If your facility uses bar code technology, scan your
identification badge, the patient’s identification bracelet,
and the medication’s bar code, or follow the procedure for
your facility’s barcode system.
■ Raise the patient’s bed to waist level when providing care
to help prevent caregiver back strain.19
■ Perform hand hygiene.7,8,9,10,11,12
■ Put on gloves, if needed, to comply with standard
precautions.20,21,22
■ Assess the patient’s breath sounds to obtain a baseline
for comparison.
■ Insert the metal stem of the prescribed MDI into the small
hole on the flattened portion of the mouthpiece.
■ Shake the prescribed MDI to mix the medication and
aerosol propellant. Prime the MDI, as needed, according to
the manufacturer’s instructions; requirements for priming
(spraying one or more puffs into the air before use) vary
among devices and ensure that the inhaler is ready to use
and will dispense the correct amount of medication.23
■ Remove the mouthpiece cap. Attach the prescribed MDI
to the spacer as indicated, making sure not to touch the
mouthpiece. Note that some MDIs have a spacer built into
the inhaler.
■ Instruct the patient to exhale fully and then to hold the
prescribed MDI 1′′ to 2′′ (2.5 cm to 5 cm) in front of the
mouth, or as instructed by the practitioner, and then place
the prescribed MDI or spacer into the mouth and close the
lips around it (as shown below).23,24
■ Instruct the patient to press down on the prescribed MDI
one time as the patient starts breathing in through the
mouth slowly. (If a spacer is being used, instruct the patient
to press down on the prescribed MDI first and then begin to
breathe in slowly within 5 seconds.)
■ Instruct the patient to continue breathing in slowly, as
deeply as possible.24 This action draws the medication into
the lungs.
■ Remove the mouthpiece from the patient’s mouth, and
instruct the patient to hold the breath and count to 10
slowly, if possible,23,24 to allow the medication to reach the
alveoli.
■ Instruct the patient to exhale slowly through pursed lips
to keep the distal bronchioles open, allowing increased
absorption and diffusion of the drug and better gas
exchange.
■ When inhaled corticosteroids (such as beclomethasone,
budesonide, ciclesonide, flunisolide, fluticasone, and
triamcinolone) are administered, instruct the patient to rinse
and gargle with water and then to expectorate using an
emesis basin, if necessary, after each dose to help prevent
an infection in the mouth.23,25,26
■ When inhaled quick-relief medications (beta2-adrenergic
agonists) are administered, the patient should wait about 15
to 30 seconds between inhalations. There’s no need to wait
between inhalations for other medications.
■ When all the ordered inhalations have been administered,
remove the spacer (if used) from the MDI, and wash the
spacer and mouthpiece according to the manufacturer’s
instructions.
■ Put the cap back on the prescribed MDI after each use.
Store the MDI and spacer, if used, with the patient’s
medication.
■ Assess the patient’s breath sounds after medication
administration to determine the response to the medication.
■ Allow the patient to gargle with water, if desired, to
remove the medication from the mouth and the back of the
throat.
■ Return the bed to the lowest position to prevent falls and
maintain patient safety.27
■ Remove and discard your gloves, if worn.20
■ Perform hand hygiene.7,8,9,10,11,12
■ Clean and disinfect your stethoscope using a disinfectant
pad.28,29
■ Perform hand hygiene.7,8,9,10,11,12
■ Document the procedure.30,31,32,33
Special considerations
■ MDIs with spacers may be recommended to provide
greater therapeutic benefit for children and for patients who
have difficulty with coordination. A spacer attachment is an
extension to the inhaler’s mouthpiece that provides more
dead-air space for mixing the medication. Some MDIs have
built-in spacers.
■ Some spacers have built-in whistles. If a whistling sound
is heard, the patient is breathing too fast or too strongly.23
■ If the patient is also using a corticosteroid, instruct the
patient to use the bronchodilator MDI first and then to wait 5
minutes before using the corticosteroid MDI, because this
process allows the bronchodilator to open the air passages
for maximum effectiveness.
Patient teaching
Teach the patient how to use the MDI so that the patient can
continue treatments after discharge. Explain that
overdosage, which is common, can cause the medication to
lose its effectiveness. Instruct the patient to record the date
and time of each inhalation as well as the response, to
prevent overdosage and to help the practitioner determine
the medication’s effectiveness. If more than one inhalation
is ordered, advise the patient whether waiting is necessary
before repeating the procedure and, if so, how long. During
teaching, instruct the patient to notify the practitioner if MDI
use is needed more frequently and if more than one
cartridge every 3 weeks is required. Inform the patient of
possible adverse reactions to the prescribed MDI. Advise the
patient to rinse the mouth with water after inhalation if the
MDI contains a corticosteroid.
Complications
Complications are related to the medication being
administered by the MDI. Incorrect use of an MDI can cause
overdosing or underdosing of the prescribed medication.
Documentation
Document the medication strength, dose, and route of
administration and the date and time of its administration.
Document respiratory assessment findings before and after
MDI use and the patient’s response to treatment. Document
any adverse reactions that occur, the date and time the
practitioner was notified, any prescribed interventions, and
the patient’s response to those interventions.34 Document
any teaching provided to the patient and family members (if
applicable), their understanding of the teaching, and
whether they require follow-up teaching.
REFERENCES
1 Westbrook, J., et al. (2010). Association of interruptions with an increased risk
and severity of medication administration errors. Archives of Internal
Medicine, 170(8), 683–690 . (Level IV)
2 Institute for Safe Medication Practices. (2012). Side tracks on the safety
express: Interruptions lead to errors and unfinished . . . Wait, what was I
doing? Nurse Advise-ERR, 11(2), 1–4 . Accessed via the Web at
https://www.ismp.org/Newsletters/acutecare/showarticle.aspx?id=37
3 The Joint Commission. (2019). Standard MM.06 .01.01. Comprehensive
accreditation manual for hospitals. Oakbrook Terrace, IL: The Joint
Commission. (Level VII)
4 Centers for Medicare and Medicaid Services, Department of Health and
Human Services. (2015). Condition of participation: Nursing services. 42
C.F.R. § 482.23(c).
5 Accreditation Association for Hospitals and Health Systems. (2017). Standard
16.01.03. Healthcare Facilities Accreditation Program: Accreditation
requirements for acute care hospitals. Chicago, IL: Accreditation Association
for Hospitals and Health Systems. (Level VII)
6 DNV GL-Healthcare USA, Inc. (2016). MM .1 .SR.2 . NIAHO® accreditation
requirements: Interpretive guidelines & surveyor guidance (version 11).
Milford, OH: DNV GL-Healthcare USA, Inc. (Level VII)
7 Centers for Disease Control and Prevention. (2002). Guideline for hand
hygiene in health-care settings: Recommendations of the Healthcare Infection
Control Practices Advisory Committee and the HICPAC/SHEA/APIC/IDSA Hand
Hygiene Task Force. MMWR Recommendations and Reports, 51(RR-16), 1–45.
Accessed via the Web at https://www.cdc.gov/mmwr/pdf/rr/rr5116.pdf (Level
II)
8 World Health Organization. (2009). “WHO guidelines on hand hygiene in
health care: First global patient safety challenge, clean care is safer care”
[Online]. Accessed via the Web at
http://apps.who.int/iris/bitstream/10665/44102/1/9789241597906_eng.pdf
(Level IV)
9 The Joint Commission. (2019). Standard NPSG.07.01.01. Comprehensive
accreditation manual for hospitals. Oakbrook Terrace, IL: The Joint
Commission. (Level VII)
10 Centers for Medicare and Medicaid Services, Department of Health and
Human Services. (2015). Condition of participation: Infection control. 42 C.F.R.
§ 482.42.
11 Accreditation Association for Hospitals and Health Systems. (2017). Standard
07.01.21. Healthcare Facilities Accreditation Program: Accreditation
requirements for acute care hospitals. Chicago, IL: Accreditation Association
for Hospitals and Health Systems. (Level VII)
12 DNV GL-Healthcare USA, Inc. (2016). IC.1 .SR.1 . NIAHO® accreditation
requirements: Interpretive guidelines & surveyor guidance (version 11).
Milford, OH: DNV GL-Healthcare USA, Inc. (Level VII)
13 The Joint Commission. (2019). Standard NPSG.01.01.01. Comprehensive
accreditation manual for hospitals. Oakbrook Terrace, IL: The Joint
Commission. (Level VII)
14 The Joint Commission. (2019). Standard RI.01.01.01. Comprehensive
accreditation manual for hospitals. Oakbrook Terrace, IL: The Joint
Commission. (Level VII)
15 Centers for Medicare and Medicaid Services, Department of Health and
Human Services. (2015). Condition of participation: Patient’s rights. 42 C.F.R.
§ 482.13(c)(1).
16 Accreditation Association for Hospitals and Health Systems. (2017). Standard
15.01.16. Healthcare Facilities Accreditation Program: Accreditation
requirements for acute care hospitals. Chicago, IL: Accreditation Association
for Hospitals and Health Systems. (Level VII)
17 DNV GL-Healthcare USA, Inc. (2016). PR.1.SR.5 . NIAHO® accreditation
requirements: Interpretive guidelines & surveyor guidance (version 11).
Milford, OH: DNV GL-Healthcare USA, Inc. (Level VII)
18 The Joint Commission. (2019). Standard PC.02.01.21. Comprehensive
accreditation manual for hospitals. Oakbrook Terrace, IL: The Joint
Commission. (Level VII)
19 Waters, T. R., et al. (2009). “Safe patient handling training for schools of
nursing” [Online]. Accessed via the Web at
http://www.cdc.gov/niosh/docs/2009-127/pdfs/2009-127.pdf (Level VII)
20 Siegel, J. D ., et al. (2007, revised 2017). “2007 guideline for isolation
precautions: Preventing transmission of infectious agents in healthcare
settings” [Online]. Accessed via the Web at
https://www.cdc.gov/infectioncontrol/pdf/guidelines/isolation-guidelines.pdf
(Level II)
21 Accreditation Association for Hospitals and Health Systems. (2017). Standard
07.01.10. Healthcare Facilities Accreditation Program: Accreditation
requirements for acute care hospitals. Chicago, IL: Accreditation Association
for Hospitals and Health Systems. (Level VII)
22 DNV GL-Healthcare USA, Inc. (2016). IC.1 .SR.2 . NIAHO® accreditation
requirements: Interpretive guidelines & surveyor guidance (version 11).
Milford, OH: DNV GL-Healthcare USA, Inc. (Level VII)
23 American Thoracic Society. (2014). “Using your metered dose inhaler (MDI)”
[Online]. Accessed via the Web at https://www.thoracic.org/patients/patient-
resources/resources/metered-dose-inhaler-mdi.pdf
24 National Heart, Lung, and Blood Institute. National Asthma Education and
Prevention Program. (2007). Expert panel report 3: Guidelines for the
diagnosis and management of asthma (NIH Publication No. 07-4051).
Bethesda, MD: National Institutes of Health. Accessed via the Web at
https://www.nhlbi.nih.gov/guidelines/asthma/asthgdln.pdf (Level VII)
25 American Academy of Allergy, Asthma & Immunology. (n.d .). “Inhaled asthma
medications” [Online]. Accessed via the Web at
http://www.aaaai.org/conditions-and-treatments/library/at-a -glance/inhaled-
asthma-medications.aspx
26 National Asthma Education and Prevention Program. (2013). “How to use a
metered-dose inhaler” [Online]. Accessed via the Web at
https://www.nhlbi.nih.gov/files/docs/public/lung/asthma_tipsheets.pdf
27 Ganz, D. A., et al. (2013). Preventing falls in hospitals: A toolkit for improving
quality of care(AHRQ Publication No. 13-0015-EF). Rockville, MD: Agency for
Healthcare Research and Quality. Accessed via the Web at
https://www.ahrq.gov/sites/default/files/publications/files/fallpxtoolkit_0 .pdf
28 Rutala, W. A., et al. (2008, revised 2018). “Guideline for disinfection and
sterilization in healthcare facilities, 2008” [Online]. Accessed via the Web at
https://www.cdc.gov/infectioncontrol/pdf/guidelines/disinfection-
guidelines.pdf (Level I)
29 Accreditation Association for Hospitals and Health Systems. (2017). Standard
07.02.03. Healthcare Facilities Accreditation Program: Accreditation
requirements for acute care hospitals. Chicago, IL: Accreditation Association
for Hospitals and Health Systems. (Level VII)
30 The Joint Commission. (2019). Standard RC.01.03 .01. Comprehensive
accreditation manual for hospitals. Oakbrook Terrace, IL: The Joint
Commission. (Level VII)
31 Centers for Medicare and Medicaid Services, Department of Health and
Human Services. (2015). Condition of participation: Medical record services.
42 C.F.R. § 482.24(b).
32 Accreditation Association for Hospitals and Health Systems. (2017). Standard
10.00 .03. Healthcare Facilities Accreditation Program: Accreditation
requirements for acute care hospitals. Chicago, IL: Accreditation Association
for Hospitals and Health Systems. (Level VII)
33 DNV GL-Healthcare USA, Inc. (2016). MR.2 .SR.1 . NIAHO® accreditation
requirements: Interpretive guidelines & surveyor guidance (version 11).
Milford, OH: DNV GL-Healthcare USA, Inc. (Level VII)
34 The Joint Commission. (2019). Standard RC.02.01.01. Comprehensive
accreditation manual for hospitals. Oakbrook Terrace, IL: The Joint
Commission. (Level VII)
MIXED VENOUS OXYGEN SATURATION
MONITORING
Mixed venous oxygen saturation (Svo2) monitoring involves
the use of a fiberoptic thermodilution pulmonary artery (PA)
catheter to continuously monitor oxygen delivery to tissues
and oxygen consumption by tissues. Monitoring of Svo2
allows rapid detection of impaired oxygen delivery, such as
from decreased cardiac output, hemoglobin level, or arterial
oxygen saturation. It also helps evaluate a patient’s
response to drug therapy, endotracheal tube suctioning,
ventilator setting changes, positive end-expiratory pressure
(PEEP), and fraction of inspired oxygen. Svo2 usually ranges
from 60% to 80%.1
NURSING ALERT Keep in mind that a vascular catheter–associated
infection is considered a hospital-acquired condition because various
best practices can reasonably prevent it. Be sure to follow infection-
prevention techniques (such as performing hand hygiene, using sterile
technique when accessing the device, and removing the catheter as
soon as it’s no longer necessary) to reduce the risk of vascular
catheter–associated infections.2,3,4,5
Equipment
Fiberoptic PA catheter ▪ co-oximeter (monitor) ▪ optical
module and cable ▪ gloves ▪ mixed venous blood sampling
equipment ▪ laboratory biohazard bag ▪ laboratory request
form ▪ label ▪ Optional: gown, protective eyewear.
Preparation of equipment
Review the manufacturer’s instructions for assembly and
use of the fiberoptic PA catheter. Connect the optical module
and cable to the monitor. Next, peel back the wrapping
covering the catheter just enough to uncover the fiberoptic
connector. Attach the fiberoptic connector to the optical
module while allowing the rest of the catheter to remain in
its sterile wrapping. Calibrate the fiberoptic catheter by
following the manufacturer’s instructions. Enter the
patient’s most recent hemoglobin level during the
calibration process.6
To prepare for the rest of the procedure, follow the
instructions for PA catheter insertion, as described in the
“Pulmonary artery pressure and pulmonary artery occlusion
pressure monitoring” procedure. (See Svo2 monitoring
equipment.)
Implementation
■ Verify the practitioner’s order.
■ Gather and prepare the necessary equipment.
■ Perform hand hygiene.8,9,10,11,12,13
■ Confirm the patient’s identity using at least two patient
identifiers.14
■ Provide privacy.15,16,17,18
■ Explain the procedure to the patient and family (if
appropriate) according to their individual communication
and learning needs to increase their understanding, allay
their fears, and enhance cooperation.19
■ Raise the patient’s bed to waist level when providing
patient care to prevent back strain.20
■ Perform hand hygiene.8,9,10,11,12,13
■ Put on gloves and other personal protective equipment,
including a gown and protective eyewear, if indicated, to
comply with standard precautions.21,22,23,24
■ Assist with the insertion of the fiberoptic catheter just as
you would for a PA catheter insertion.
■ After the catheter is inserted, confirm that the light
intensity tracing on the graphic printout is within normal
range to ensure correct positioning and function of the
catheter.
■ Observe the digital readout and record the Svo2 on the
graph paper. Repeat readings at least once each hour to
monitor and document trends.
■ Make sure the alarms limits are set appropriately for the
patient’s current condition and that the alarms are turned
on, functioning, and audible to staff.25,26,27,28
Recalibrating the monitor
■ Trace the tubing from the patient to the point of origin to
make sure that you’re accessing the correct port.29,30 Draw
a mixed venous blood sample from the distal port of the PA
catheter.
■ Label the mixed venous blood sample in the presence of
the patient to prevent mislabeling.14 Place it in a laboratory
biohazard transport bag23 and send it with the completed
laboratory request form to the laboratory immediately to
compare the laboratory’s Svo2 reading with that of the
fiberoptic catheter.
■ If the catheter values and the laboratory values differ by
more than 4%, follow the manufacturer’s instructions to
enter the Svo2 value obtained by the laboratory into the co-
oximeter.
■ Recalibrate the monitor every 24 hours or whenever the
catheter has been disconnected from the optical module.
Completing the procedure
■ Return the bed to the lowest position to prevent falls and
maintain patient safety.31
■ Remove and discard your gloves and other personal
protective equipment, if worn.21,23
■ Perform hand hygiene.8,9,10,11,12,13
■ Document the procedure.32,33,34,35
Special considerations
■ The Joint Commission issued a sentinel event alert
concerning medical device alarm safety, because alarm-
related events have been associated with permanent loss of
function and death. Among the major contributing factors
were improper alarm settings, alarms inappropriately turned
off, and alarm signals not audible to staff. Make sure that
alarm limits are set appropriately, and that alarms are
turned on, functioning properly, and audible to staff. Follow
facility guidelines for preventing alarm fatigue.26
■ If the patient’s Svo2 drops below 60% or varies by more
than 10% for 3 minutes or longer, reassess the patient. If
the Svo2 doesn’t return to the baseline value after nursing
interventions, notify the practitioner. A decreasing Svo2, or a
value less than 60%, indicates impaired oxygen delivery,
which can occur in hemorrhage, hypoxia, shock, sepsis,36
arrhythmias, or suctioning. Svo2 may also decrease as a
result of increased oxygen demand from hyperthermia,
shivering, or seizures.
■ If the intensity of the tracing is low, ensure that all
connections between the catheter and co-oximeter are
secure and that the catheter is patent and not kinked.
■ If the tracing is damped or erratic, try to aspirate blood
from the catheter to check for patency. If you can’t aspirate
blood, notify the practitioner to replace the catheter. Also
check the PA waveform to determine whether the catheter
has wedged. If the catheter has wedged, turn the patient
from side to side and instruct the patient to cough. If the
catheter remains wedged, notify the practitioner
immediately.
■ The Joint Commission has issued a sentinel event alert
related to managing risk during transition to new
International Organization for Standardization tubing
standards designed to prevent dangerous tubing
misconnections, which can lead to serious patient injury and
death. During the transition, be sure to trace the tubing and
catheter from the patient to the point of origin before
connecting or reconnecting any device or infusion, at any
care transition (such as a new setting or service), and as
part of the hand-off process; route tubes and catheters with
different purposes in different standardized directions; when
there are different access sites or several bags hanging,
label the tubing at the distal and proximal ends; use tubing
and equipment only as intended; and store medications for
different delivery routes in separate locations.30
EQUIPMENT
Svo2 monitoring equipment
A mixed venous oxygen saturation (Svo2) monitoring system consists of a
flow-directed pulmonary artery (PA) catheter with fiberoptic filaments, an
optical module, and a co-oximeter. The co-oximeter displays a continuous
digital Svo2 value; the strip recorder prints a permanent record.
Catheter insertion follows the same technique as with any thermodilution
flow-directed PA catheter. The distal lumen connects to an external PA
pressure monitoring system, the proximal or central venous pressure lumen
connects to another monitoring system or to a continuous flow
administration unit, and the optical module connects to the co-oximeter
unit.7
Complications
Complications may include infection, catheter migration,
and
thromboembolism.
Complications
such
as
pneumothorax, hemothorax, or arrhythmias may occur
during catheter placement.
Documentation
Record the Svo2 value, as ordered, and document a tracing.
Note significant changes in the patient’s status; the date,
time, and name of the practitioner notified; prescribed
interventions; and the patient’s response to those
interventions. For comparison, note the Svo2 as measured
by the fiberoptic catheter whenever a blood sample is
obtained for laboratory analysis of Svo2. Document patient
teaching and the patient’s understanding of the teaching.
REFERENCES
1 Wiegand, D. L. (2017). AACN procedure manual for high acuity, progressive,
and critical care (7th ed.). St. Louis, MO: Elsevier.
2 Jarrett, N., & Callaham, M. (2016). “Evidence-based guidelines for selected
hospital-acquired conditions: Final report” [Online]. Accessed via the Web at
https://www.cms.gov/Medicare/Medicare-Fee-for-Service-
Payment/HospitalAcqCond/2016-HAC-Report.pdf
3 Association of Professionals in Infection Control and Epidemiology. (2015).
“Guide to preventing central line-associated bloodstream infections” [Online].
Accessed via the Web at
http://apic.org/Resource_/TinyMceFileManager/2015/APIC_CLABSI_WEB .pdf
(Level IV)
4 Marschall, J., et al. (2014). SHEA/IDSA practice recommendation: Strategies to
prevent central line-associated bloodstream infections in acute care
hospitals. Infection Control and Hospital Epidemiology, 35(7), 753–771 .
Accessed via the Web at http://www.jstor.org/stable/10.1086/676533 (Level I)
5 Accreditation Association for Hospitals and Health Systems. (2017). Standard
07.01.19. Healthcare Facilities Accreditation Program: Accreditation
requirements for acute care hospitals. Chicago, IL: Accreditation Association
for Hospitals and Health Systems. (Level VII)
6 Edwards Lifesciences. (2002). “Understanding continuous mixed venous
oxygen saturation (Svo2) monitoring with the Swan- Ganz oximetry TD system
(2nd ed.)” [Online]. Accessed via the Web at
http://ht.edwards.com/resourcegallery/products/swanganz/pdfs/svo2edbook.p
df
7 Edwards Lifesciences. (2014). “Quick guide to cardiopulmonary care (3rd
ed.)” [Online]. Accessed via the Web at
http://ht.edwards.com/scin/edwards/sitecollectionimages/products/pressurem
onitoring/ar11206-quickguide3rded.pdf
8 The Joint Commission. (2019). Standard NPSG.07.01.01. Comprehensive
accreditation manual for hospitals. Oakbrook Terrace, IL: The Joint
Commission. (Level VII)
9 Centers for Disease Control and Prevention. (2002). Guideline for hand
hygiene in health-care settings: Recommendations of the Healthcare Infection
Control Practices Advisory Committee and the HICPAC/SHEA/APIC/IDSA Hand
Hygiene Task Force. MMWR Recommendations and Reports, 51(RR-16), 1–45.
Accessed via the Web at https://www.cdc.gov/mmwr/pdf/rr/rr5116.pdf (Level
II)
10 World Health Organization. (2009). “WHO guidelines on hand hygiene in
health care: First global patient safety challenge, clean care is safer care”
[Online]. Accessed via the Web at
http://apps.who.int/iris/bitstream/10665/44102/1/9789241597906_eng.pdf
(Level IV)
11 Centers for Medicare and Medicaid Services, Department of Health and
Human Services. (2015). Condition of participation: Infection control. 42 C.F.R.
§ 482.42.
12 Accreditation Association for Hospitals and Health Systems. (2017). Standard
07.01.21. Healthcare Facilities Accreditation Program: Accreditation
requirements for acute care hospitals. Chicago, IL: Accreditation Association
for Hospitals and Health Systems. (Level VII)
13 DNV GL-Healthcare USA, Inc. (2016). IC.1 .SR.1 . NIAHO® accreditation
requirements: Interpretive guidelines & surveyor guidance (version 11).
Milford, OH: DNV GL-Healthcare USA, Inc. (Level VII)
14 The Joint Commission. (2019). Standard NPSG.01.01.01. Comprehensive
accreditation manual for hospitals. Oakbrook Terrace, IL: The Joint
Commission. (Level VII)
15 The Joint Commission. (2019). Standard RI.01.01.01. Comprehensive
accreditation manual for hospitals. Oakbrook Terrace, IL: The Joint
Commission. (Level VII)
16 Centers for Medicare and Medicaid Services, Department of Health and
Human Services. (2015). Condition of participation: Patient’s rights. 42 C.F.R.
§ 482.13(c)(1).
17 Accreditation Association for Hospitals and Health Systems. (2017). Standard
15.01.16. Healthcare Facilities Accreditation Program: Accreditation
requirements for acute care hospitals. Chicago, IL: Accreditation Association
for Hospitals and Health Systems. (Level VII)
18 DNV GL-Healthcare USA, Inc. (2016). PR.1.SR.5 . NIAHO® accreditation
requirements: Interpretive guidelines & surveyor guidance (version 11).
Milford, OH: DNV GL-Healthcare USA, Inc. (Level VII)
19 The Joint Commission. (2019). Standard PC.02.01.21. Comprehensive
accreditation manual for hospitals. Oakbrook Terrace, IL: The Joint
Commission. (Level VII)
20 Waters, T. R., et al. (2014). “Safe patient handling training for schools of
nursing” [Online]. Accessed via the Web at
https://www.cdc.gov/niosh/docs/2009-127/pdfs/2009-127.pdf (Level VII)
21 Siegel, J. D ., et al. (2007, revised 2017). “2007 guideline for isolation
precautions: Preventing transmission of infectious agents in healthcare
settings” [Online]. Accessed via the Web at
https://www.cdc.gov/infectioncontrol/pdf/guidelines/isolation-guidelines.pdf
(Level II)
22 Accreditation Association for Hospitals and Health Systems. (2017). Standard
07.01.10. Healthcare Facilities Accreditation Program: Accreditation
requirements for acute care hospitals. Chicago, IL: Accreditation Association
for Hospitals and Health Systems. (Level VII)
23 Occupational Safety and Health Administration. (n.d .). “Bloodborne
pathogens, standard number 1910.1030” [Online]. Accessed via the Web at
https://www.osha.gov/pls/oshaweb/owadisp.show_document?
p_id=10051&p_table=STANDARDS (Level VII)
24 DNV GL-Healthcare USA, Inc. (2016). IC.1 .SR.2 . NIAHO® accreditation
requirements: Interpretive guidelines & surveyor guidance (version 11).
Milford, OH: DNV GL-Healthcare USA, Inc. (Level VII)
25 American Association of Critical Care Nurses. (2013). “A ACN practice alert:
Alarm management” [Online]. Accessed via the Web at
https://www.aacn.org/aacn-website/shared/content/practice-
alerts/2015/11/25/alarm-management (Level VII)
26 The Joint Commission. (2013). “Sentinel event alert: Medical device alarm
safety in hospitals” [Online]. Accessed via the Web at
https://www.jointcommission.org/assets/1/6/SEA_50_alarms_4 _26_16.pdf
(Level VII)
27 The Joint Commission. (2019). Standard NPSG.06 .01.01. Comprehensive
accreditation manual for hospitals. Oakbrook Terrace, IL: The Joint
Commission. (Level VII)
28 Graham, K. C., & Cvach, M. (2010). Monitor alarm fatigue: Standardizing use
of physiological monitors and decreasing nuisance alarms. American Journal
of Critical Care, 19(1), 28–37. Accessed via the Web at
http://ajcc.aacnjournals.org/content/19/1/28.full.pdf
29 U.S . Food and Drug Administration. (n.d .). “Look. Check. Connect. Safe
medical device connections save lives” [Online]. Accessed via the Web at
https://www.fda.gov/downloads/MedicalDevices/Safety/AlertsandNotices/UCM
134873.pdf
30 The Joint Commission. (2014). “Sentinel event alert: Managing risk during
transition to new ISO tubing connector standards” [Online]. Accessed via the
Web at
http://www.jointcommission.org/assets/1/6/SEA_53_Connectors_8 _19_14 _final.
pdf (Level VII)
31 Ganz, D. A., et al. (2013). Preventing falls in hospitals: A toolkit for improving
quality of care (AHRQ Publication No. 13-0015-EF). Rockville, MD: Agency for
Healthcare Research and Quality. Accessed via the Web at
https://www.ahrq.gov/sites/default/files/publications/files/fallpxtoolkit.pdf
(Level VII)
32 The Joint Commission. (2019). Standard RC.01.03 .01. Comprehensive
accreditation manual for hospitals. Oakbrook Terrace, IL: The Joint
Commission. (Level VII)
33 Centers for Medicare and Medicaid Services, Department of Health and
Human Services. (2015). Condition of participation: Medical record services.
42 C.F.R. § 482.24(b).
34 Accreditation Association for Hospitals and Health Systems. (2017). Standard
10.00 .03. Healthcare Facilities Accreditation Program: Accreditation
requirements for acute care hospitals. Chicago, IL; Accreditation Association
for Hospitals and Health Systems. (Level VII)
35 DNV GL-Healthcare USA, Inc. (2016). MR.2 .SR.1 . NIAHO® accreditation
requirements: Interpretive guidelines & surveyor guidance (version 11).
Milford, OH: DNV GL-Healthcare USA, Inc. (Level VII)
36 Dellinger, R. P., et al. (2013). Surviving sepsis campaign: International
guidelines for management of severe sepsis and septic shock, 2012. Critical
Care Medicine, 41(2), 580–637. Accessed via the Web at
http://www.sccm.org/Documents/SSC-Guidelines.pdf (Level VII)
MODERATE SEDATION
Previously referred to as conscious sedation, moderate
sedation is a drug-induced depression of consciousness in
which the patient responds purposefully to verbal
commands, either spontaneously or with light tactile
stimulation. With moderate sedation, the patient is able to
maintain a patent airway, protective reflexes (such as the
ability to handle secretions without aspiration), adequate
spontaneous ventilations, and cardiovascular function
without interventions.1,2
Moderate sedation, or procedural sedation and analgesia,
is commonly administered to relieve anxiety, discomfort, or
pain so that patients can tolerate unpleasant procedures; in
children and uncooperative adults, it may be used to
expedite procedures that aren’t particularly uncomfortable
but that require the patient to remain still.1
Because predicting a patient’s response to sedation isn’t
always possible, health care providers must have an
understanding of the different levels of sedation. (See
Levels of sedation.)
In addition to the person administering moderate
sedation, this procedure requires the presence of at least
one other person capable of establishing a patent airway,
administering positive-pressure ventilation to the patient,
and summoning additional assistance if necessary. A person
with advanced life support skills should be immediately
available (within 1 to 5 minutes).1,4
A patient receiving moderate sedation requires sedation
monitoring before the procedure, throughout the procedure,
and during the recovery period. Health care workers
permitted by their scope of practice to administer moderate
sedation should receive special training.1,2,4,5,6 Those
administering the sedation who are responsible for the
patient’s care should understand the pharmacology of the
agents as well as the role of reversal agents. Those
monitoring the patient receiving moderate sedation should
be able to recognize associated complications.1 Health care
workers responsible for monitoring a patient receiving
moderate sedation/analgesia shouldn’t have other
responsibilities that would require leaving the patient
unattended or that would compromise continuous
monitoring during the procedure.2,4
Some patients who require a procedure may not be
appropriate candidates for moderate sedation and may
require anesthesia that’s monitored by an anesthesia care
provider. The American Society of Anesthesiologists (ASA)
devised the ASA physical status classification system to
provide a uniform guideline for evaluating the severity of
systemic diseases, physiologic dysfunction, and anatomic
abnormalities to determine a patient’s risk of developing
complications.7 (See ASA physical status classification
system.) Patients classified as P1, P2, and medically stable
P3 are commonly considered appropriate for registered
nurse–administered moderate sedation.4
Moderate sedation is commonly administered for
procedures that are performed in many settings outside the
operating room, including GI procedure units, interventional
radiology suites, bronchoscopy suites, emergency
departments, interventional cardiology suites, and critical
care units. Regardless of the location, adequately trained
staff and appropriate monitoring equipment must be
available to ensure the patient’s safety.
Equipment
Sedation record ▪ positive-pressure oxygen delivery system
▪ supplemental oxygen administration equipment1 ▪ suction
apparatus ▪ suction catheter ▪ pulse oximeter and probe ▪
blood pressure monitoring equipment ▪ capnometer ▪
stethoscope ▪ cardiac monitoring equipment ▪ thermometer
▪ disinfectant pad ▪ emergency resuscitation equipment
(code cart with emergency medications, defibrillator,
handheld resuscitation bag with mask, and intubation
equipment)1,2 ▪ prescribed medications and reversal agents
▪ Optional: gloves and other personal protective equipment,
IV insertion equipment.
Preparation of equipment
Make sure the room where the patient will be receiving the
sedation has all the necessary equipment, including
emergency care supplies.1,2,6 Test all emergency and
monitoring equipment to ensure that it’s in proper working
order before attaching it to the patient.1
Implementation
■ Avoid distractions and interruptions when preparing and
administering medication to prevent medication errors.9,10
■ Verify the practitioner’s order for the prescribed
medication.11,12,13,14
■ Review the patient’s medical record and verify
documentation of preexisting medical conditions; a history
of tobacco, alcohol, or substance use or abuse; previous
anesthesia and sedation experiences; current medications;
allergies; the last time the patient ate or had oral fluids; a
recent height and weight (in metric units);15 and physical
examination findings, including evaluation of the airway and
a cardiac and respiratory assessment.1,2,4,6,16,17
NURSING ALERT Contact the anesthesia care provider if the patient
has any of the following conditions: a history of respiratory or
hemodynamic instability; one or more significant comorbidities;
pregnancy; sleep apnea; inability to communicate or cooperate;
multiple drug allergies; multiple medications with potential for drug
interactions with sedative analgesia; or current substance abuse.
Extra precautions may need to be taken with these patients, including
additional monitoring and medication management.4
NURSING ALERT Obese patients have special needs during moderate
sedation because they’re at increased risk for complications due to
altered physiology. Consult with the anesthesia care provider.18
■ If applicable, check the patient’s medical record for
pregnancy test results.4
■ Confirm that written informed consent has been obtained
by the practitioner and is in the patient’s medical
record.2,4,6,19,20,21,22
■ Conduct a preprocedure verification to make sure that all
relevant documentation, related information, and equipment
are available and correctly identified to the patient’s
identifiers.23,24
■ Compare the medication label with the order in the
patient’s medical record.11,12,13,14
■ Check the patient’s medical record for allergies and other
contraindications to the prescribed medication. If either
exists, don’t administer the medication; notify the
practitioner.11,12,13,14
■ Check the expiration date on the medication. If the
medication is expired, return it to the pharmacy and obtain
new medication.11,12,13,14
■ Visually inspect the solution for particles or discoloration
or other loss of integrity; don’t administer the medication if
its integrity is compromised.11,12,13,14
■ Discuss any unresolved concerns about the medication
with the patient’s practitioner.11,12,13,14
■ Perform hand hygiene.25,26,27,28,29,30
■ Confirm the patient’s identity using at least two patient
identifiers.31
■ Provide privacy.32,33,34,35
■ Verify the scheduled invasive procedure and the correct
site as stated by the patient, and compare it with the
medical record.23,36
■ Reinforce the practitioner’s explanation of the sedation
administration procedure to the patient and family (if
appropriate) according to their individual communication
and learning needs to increase their understanding, allay
their fears, and enhance cooperation.37 Answer their
questions. Teach the patient and family about potential
adverse reactions or other concerns related to the
medication.11,12,13,14
■ If the patient is to be discharged less than 12 hours after
receiving sedation, verify that arrangements have been
made to transport the patient home and that an adult will
be available in case complications arise.
■ Confirm the patient’s nothing-by-mouth status before the
procedure;6 if not an emergency, minimum fasting
recommendations include 2 hours for clear liquids, 6 or
more hours for a light meal or nonhuman milk, and 8 or
more hours for fried or fatty foods or meat. If the need for
the procedure is an emergency, collaborate with the
practitioner to compare the risks and benefits of the
procedure, considering the amount and type of liquids or
solids ingested.38
■ Assess the patient for conditions that might make
ventilation difficult, such as significant obesity, history of
snoring or sleep apnea, facial hair, missing teeth, and the
presence of stridor.4
■ When the patient is in the room where sedation will be
administered, perform hand hygiene25,26,27,28,29,30 and put
on gloves and other personal protective equipment as
needed to comply with standard precautions.39,40,41
■ Attach the patient to a pulse oximeter and obtain the
patient’s oxygen saturation level. Make sure that the alarm
limits are set appropriately for the patient’s current
condition, and that the alarms are turned on, functioning
properly, and audible to staff.4,42,43,44,45,46
■ Attach the patient to a cardiac monitor to monitor heart
rate and rhythm.4,42 Make sure that the alarm limits are set
appropriately for the patient’s current condition, and that
the alarms are turned on, functioning properly, and audible
to staff.1,43,44,45,46
■ Attach the patient to a capnometer to continuously
monitor exhaled carbon dioxide during the procedure. Make
sure that the alarm limits are set appropriately for the
patient’s current condition, and that alarms are turned on,
functioning properly, and audible to staff.6,42,43,44,45,46
■ Obtain the patient’s vital signs, oxygen saturation level,
level of consciousness (LOC), skin color, and respiratory
status to use as a baseline for comparison during and after
the procedure.16
■ Ensure that the patient has patent IV access. If a patent
IV catheter isn’t present, establish one.1,6 (See the “IV
catheter insertion and removal” procedure, page 443.)
■ Confirm that the procedure site has been marked
appropriately by the practitioner, if indicated. Involve the
patient in the process if possible.7,24,47
■ Confirm the medication dosage calculations based on the
patient’s weight or body surface area.
■ If your facility uses a bar-code technology, scan your
identification badge, the patient’s identification bracelet,
and the medication’s bar code.
■ After the patient is prepped and draped for the procedure,
conduct a time-out immediately before starting the
procedure to perform a final assessment that the correct
patient, site, positioning, and procedure are identified and,
as applicable, all relevant information and necessary
equipment are available.7,36,48
Levels of sedation
Because a patient receiving sedation might not always respond as intended,
make sure you can recognize the different levels of sedation. The American
Society of Anesthesiologists describes levels of sedation as follows:3
■ Minimal sedation (anxiolysis) is a drug-induced state during which a
patient responds normally to verbal commands. Cognitive function and
physical coordination may be impaired, but airway reflexes and ventilatory
and cardiovascular functions aren’t affected.
■ Moderate sedation/analgesia (conscious sedation) is a drug-induced
depression of consciousness during which a patient responds purposefully to
verbal commands, given either alone or accompanied by light tactile
stimulation. (Reflex withdrawal from a painful stimulus isn’t considered a
purposeful response.) The patient doesn’t require intervention to maintain a
patent airway, has adequate spontaneous ventilation, and maintains
cardiovascular function.
■ Deep sedation/analgesia is a drug-induced depression of consciousness
during which a patient can’t be easily aroused but responds purposefully to
repeated or painful stimulation. The patient’s ability to independently
maintain ventilatory function may be impaired. The patient may require
assistance to maintain a patent airway and may not have adequate
spontaneous ventilation, but typically maintains cardiovascular function.
■ General anesthesia is a drug-induced loss of consciousness during which
a patient can’t be aroused, even by painful stimulation. The patient’s ability
to maintain ventilatory function independently is typically impaired. The
patient is likely to require assistance to maintain a patent airway, and may
need positive-pressure ventilation because of depressed spontaneous
ventilation or drug-induced depression of neuromuscular function.
Cardiovascular function may be impaired.
ASA physical status classification
system
The American Society of Anesthesiologists (ASA) physical status classification
system is widely used to estimate a patient’s risk of developing
complications.8
P1: normal, healthy patient
P2: patient with mild systemic disease
P3: patient with severe systemic disease
P4: patient with severe systemic disease that’s a constant threat to life
P5: moribund patient who isn’t expected to survive the procedure
P6: patient declared brain dead whose organs are being removed for
donation
NURSING ALERT Medications used for moderate sedation are
considered high-alert medications because they can cause significant
patient harm when used in error.49
■ Before administering moderate sedation, have another
nurse perform an independent double-check to verify the
patient’s identity and to make sure that the correct
medication is being administered in the prescribed
concentration, the medication’s indication corresponds with
the patient’s diagnosis, the dosage calculations are correct
and the dosing formula used to derive the final dose is
correct, and the route of administration is safe and proper
for the patient.50
■ Compare the results of the independent double-check
with the other nurse and, if no discrepancies exist, begin
administering the medication. If discrepancies exist, rectify
them before administering the medication.50
■ Administer each medication separately in incremental
doses and titrate it to the desired effect following safe
medication administration practices to decrease the risk of
overdose
and
respiratory
and
circulatory
depression.4,11,12,13,14
■ Continuously monitor the patient’s heart rate and
function (using a cardiac monitor), oxygenation (using pulse
oximetry), and respiratory rate and adequacy of ventilation
(using continual observation of clinical status and
capnography).1,4,6,51
TROUBLESHOOTING
Responding to complications of sedation
This table reviews nursing interventions for various complications of
sedation.
■ Determine and evaluate the patient’s blood pressure and
heart rate at least every 5 minutes.1,42,51
■ Monitor the patient’s LOC (by checking response to verbal
commands when practical), comfort level, and skin
condition at regular intervals.4,51
■ Administer supplemental oxygen if hypoxia occurs.1 The
method and rate of flow should be determined by the
patient’s optimal oxygen saturation level according to pulse
oximetry.4 Hypoxemia may cause cardiopulmonary
complications.4
■ Monitor the patient’s temperature when clinically
significant changes in body temperature are intended,
anticipated, or suspected.42,51
■ Monitor the patient for complications and intervene as
indicated.2,51
■ When sedation administration is complete, use the same
monitoring parameters used during the procedure and
monitor the patient until discharge criteria are met. The
patient should remain awake for at least 20 minutes without
stimulation before being considered ready for discharge.
The duration and frequency of monitoring should be
individualized, depending on the level of sedation achieved,
the patient’s overall condition, and the nature of the
procedure for which sedation was administered. If a reversal
agent was given, monitor the patient for a sufficient time
interval (for example, 2 hours) after the last administration
of an antagonist to make sure that the patient doesn’t
become resedated after the reversal effects have worn
off.1,4
■ Remove and discard your gloves and other personal
protective equipment, if worn.39
■ Perform hand hygiene.25,26,27,28,29,30
■ Clean and disinfect your stethoscope using a disinfectant
pad.52,53
■ Perform hand hygiene.25,26,27,28,29,30
■ Document the procedure.54,55,56,57,58
Special considerations
■ The Joint Commission issued a sentinel event alert
concerning medical device alarm safety, because alarm-
related events have been associated with permanent loss of
function and death. Among the major contributing factors
were improper alarm settings, alarms inappropriately turned
off, and alarm signals not audible to staff. Make sure that
alarm limits are set appropriately, and that alarms are
turned on, functioning properly, and audible to staff. Follow
facility guidelines for preventing alarm fatigue.43
■ Use a recovery and discharge criteria scoring system,
such as the Aldrete Post-Anesthesia Recovery Score and the
Post-Anesthesia Discharge Scoring System, to monitor the
patient’s status and to help determine when the patient is
ready for discharge; tailor use of the scoring system to the
patient’s specific needs.59
■ Before discharge, the patient should meet certain criteria,
which may include a return to preprocedural baseline LOC
and stable vital signs; a sufficient time interval (for example,
2 hours) since the last administration of an antagonist; the
use of an objective patient assessment scoring system;
absence of protracted nausea; intact protective reflexes (for
example, gag or cough reflexes); adequate pain control; and
return of sensory and motor control.4
Patient teaching
After completion of the procedure, reinforce patient
education with written instructions for the patient and
family. Teach the patient and family about potential adverse
reactions, and discuss other concerns related to the
administered medications.11 Explain when the patient
should seek immediate emergency care, and provide the
patient’s escort with an emergency phone number.6 Teach
the patient and family about pain management strategies.
Reinforce the importance of having someone available to
assist the patient with care for 24 hours after the procedure.
Complications
The patient can become oversedated during moderate
sedation. Other complications of moderate sedation include
aspiration of gastric contents, respiratory depression or
failure, and adverse reactions to the medication. Observe
the patient for airway obstruction, respiratory depression,
hypotension, and drug-specific complications.
Age and general health, in addition to such preexisting
respiratory conditions as chronic obstructive pulmonary
disease and asthma, and hepatic or renal dysfunction can
increase the patient’s risk of adverse reactions. In general,
older adults, because of decreased renal and hepatic
function and relative loss of muscle, are at greater risk.
Drug interactions may occur; opioids when used in
combination with sedatives may produce a synergistic
effect. (See Responding to complications of sedation.)
Documentation
Document according to your facility’s documentation
system and stated parameters, including preprocedure
assessment findings, procedure and site verification, and
time-out; the name, dose, route, time, and effects of all
medications administered; the patient’s LOC, ventilation,
and oxygenation status; and the procedure start and end
times. Documentation should also include vital signs at
intervals determined by the type and quantity of medication
administered and the patient’s condition.4 Record any
complications, interventions taken, and the patient’s
response to the interventions. Note any teaching provided
and the patient’s understanding of the teaching.
REFERENCES
1 American Society of Anesthesiologists. (2002). Practice guidelines for
sedation and analgesia by non-anesthesiologists. Anesthesiology, 96, 1004–
1017. Accessed via the Web at
http://anesthesiology.pubs.asahq.org/article.aspx?articleid=1944958 (Level
VII)
2 American Society of PeriAnesthesia Nurses. (2018). 2017–2018
Perianesthesia nursing standards, practice recommendations and interpretive
statements. Cherry Hill, NJ: American Society of PeriAnesthesia Nurses. (Level
VII)
3 American Society of Anesthesiologists. (2014). “Continuum of depth of
sedation: Definition of general anesthesia and levels of sedation/analgesia”
[Online]. Accessed via the Web at http://www.asahq.org/quality-and-practice-
management/standards-guidelines-and-related-resources/continuum-of-
depth-of-sedation-definition-of-general-anesthesia-and-levels-of-sedation-
analgesia (Level VII)
4 Van Wicklin, S. A., & Conner, R. (20178). Guideline for managing the patient
receiving moderate sedation/analgesia. In R. Conner (Ed.), Guidelines for
perioperative practice 2018 edition. Denver, CO: AORN, Inc. (Level VII)
5 Accreditation Association for Hospitals and Health Systems. (2017). Standard
30.01.04. Healthcare Facilities Accreditation Program: Accreditation
requirements for acute care hospitals. Chicago, IL: Accreditation Association
for Hospitals and Health Systems. (Level VII)
6 Standard 63. Moderate sedation/analgesia using intravenous infusion.
Infusion therapy standards of practice. (2016). Journal of Infusion Nursing, 39,
S137–S138. (Level VII)
7 Rothrock, J. C . (2015). Alexander’s care of the patient in surgery (15th ed.).
St. Louis, MO: Mosby.
8 American Society of Anesthesiologists. (2014). “ASA physical status
classification system” [Online]. Accessed via the Web at
https://www.asahq.org/resources/clinical-information/asa-physical-status-
classification-system
9 Westbrook, J., et al. (2010). Association of interruptions with an increased risk
and severity of medication administration errors. Archives of Internal
Medicine, 170(8), 683–690 . (Level IV)
10 Institute for Safe Medication Practices. (2012). Side tracks on the safety
express: Interruptions lead to errors and unfinished . . . Wait, what was I
doing? Nurse Advise-ERR, 11(2), 1–4 . Accessed via the Web at
https://www.ismp.org/Newsletters/acutecare/showarticle.aspx?id=37
11 The Joint Commission. (2019). Standard MM.06.01.01. Comprehensive
accreditation manual for hospitals. Oakbrook Terrace, IL: The Joint
Commission. (Level VII)
12 Centers for Medicare and Medicaid Services, Department of Health and
Human Services. (2015). Condition of participation: Nursing services. 42
C.F.R. § 482.23(c).
13 Accreditation Association for Hospitals and Health Systems. (2017). Standard
16.01.03. Healthcare Facilities Accreditation Program: Accreditation
requirements for acute care hospitals. Chicago, IL: Accreditation Association
for Hospitals and Health Systems. (Level VII)
14 DNV GL-Healthcare USA, Inc. (2016). MM.1 .SR.2. NIAHO® accreditation
requirements: Interpretive guidelines & surveyor guidance (version 11).
Milford, OH: DNV GL-Healthcare USA, Inc. (Level VII)
15 Institute for Safe Medication Practices. (2016). “2016–2017 targeted
medication safety best practices for hospitals” [Online]. Accessed via the
Web at http://www.ismp.org/tools/bestpractices/TMSBP-for-Hospitals.pdf
16 The Joint Commission. (2019). Standard PC.03 .01.03 . Comprehensive
accreditation manual for hospitals. Oakbrook Terrace, IL: The Joint
Commission. (Level VII)
17 Accreditation Association for Hospitals and Health Systems. (2017). Standard
30.01.06. Healthcare Facilities Accreditation Program: Accreditation
requirements for acute care hospitals. Chicago, IL: Accreditation Association
for Hospitals and Health Systems. (Level VII)
18 Welliver, M., & Bednarzyk, M. (2009). Sedation considerations for the
nonintubated obese patient in critical care. Critical Care Nursing Clinics of
North America, 21(3), 341–352. (Level VII)
19 DNV GL-Healthcare USA, Inc. (2016). PR.1.SR.3 . NIAHO® accreditation
requirements: Interpretive guidelines & surveyor guidance (version 11).
Milford, OH: DNV GL-Healthcare USA, Inc. (Level VII)
20 The Joint Commission. (2016). Standard RI.01.03 .01. Comprehensive
accreditation manual for hospitals. Oakbrook Terrace, IL: The Joint
Commission. (Level VII)
21 Centers for Medicare and Medicaid Services, Department of Health and
Human Services. (2015). Condition of participation: Patient’s rights. 42 C.F.R.
§ 482.13(b)(2).
22 Accreditation Association for Hospitals and Health Systems. (2017). Standard
15.01.11. Healthcare Facilities Accreditation Program: Accreditation
requirements for acute care hospitals. Chicago, IL: Accreditation Association
for Hospitals and Health Systems. (Level VII)
23 The Joint Commission. (2019). Standard UP.01.01.01. Comprehensive
accreditation manual for hospitals. Oakbrook Terrace, IL: The Joint
Commission. (Level VII)
24 Accreditation Association for Hospitals and Health Systems. (2017). Standard
30.00 .14. Healthcare Facilities Accreditation Program: Accreditation
requirements for acute care hospitals. Chicago, IL: Accreditation Association
for Hospitals and Health Systems. (Level VII)
25 The Joint Commission. (2019). Standard NPSG.07.01.01. Comprehensive
accreditation manual for hospitals. Oakbrook Terrace, IL: The Joint
Commission. (Level VII)
26 Centers for Disease Control and Prevention. (2002). Guideline for hand
hygiene in health-care settings: Recommendations of the Healthcare Infection
Control Practices Advisory Committee and the HICPAC/SHEA/APIC/IDSA Hand
Hygiene Task Force. MMWR Recommendations and Reports, 51(RR-16), 1–45.
Accessed via the Web at https://www.cdc.gov/mmwr/pdf/rr/rr5116.pdf (Level
II)
27 World Health Organization. (2009). “WHO guidelines on hand hygiene in
health care: First global patient safety challenge, clean care is safer care”
[Online]. Accessed via the Web at
http://apps.who.int/iris/bitstream/10665/44102/1/9789241597906_eng.pdf
(Level IV)
28 Centers for Medicare and Medicaid Services, Department of Health and
Human Services. (2015). Condition of participation: Infection control. 42 C.F.R.
§ 482.42.
29 Accreditation Association for Hospitals and Health Systems. (2017). Standard
07.01.21. Healthcare Facilities Accreditation Program: Accreditation
requirements for acute care hospitals. Chicago, IL: Accreditation Association
for Hospitals and Health Systems. (Level VII)
30 DNV GL-Healthcare USA, Inc. (2014). IC.1 .SR.1 . NIAHO® accreditation
requirements: Interpretive guidelines & surveyor guidance (version 11).
Milford, OH: DNV GL-Healthcare USA, Inc. (Level VII)
31 The Joint Commission. (2019). Standard NPSG.01.01.01. Comprehensive
accreditation manual for hospitals. Oakbrook Terrace, IL: The Joint
Commission. (Level VII)
32 Accreditation Association for Hospitals and Health Systems. (2017). Standard
15.01.16. Healthcare Facilities Accreditation Program: Accreditation
requirements for acute care hospitals. Chicago, IL: Accreditation Association
for Hospitals and Health Systems. (Level VII)
33 Centers for Medicare and Medicaid Services, Department of Health and
Human Services. (2015). Condition of participation: Patient’s rights. 42 C.F.R.
§ 482.13(c)(1).
34 DNV GL-Healthcare USA, Inc. (2016). PR.1.SR.5 . NIAHO® accreditation
requirements: Interpretive guidelines & surveyor guidance (version 11).
Milford, OH: DNV GL-Healthcare USA, Inc. (Level VII)
35 The Joint Commission. (2019). Standard RI.01.01.01. Comprehensive
accreditation manual for hospitals. Oakbrook Terrace, IL: The Joint
Commission. (Level VII)
36 Van Wicklin, S. A., & Conner, R. (2018). Policy and procedure template for use
with recommended practices. In R. Conner (Ed.), Guidelines for perioperative
practice 2018 edition. Denver, CO: AORN, Inc. (Level VII)
37 The Joint Commission. (2019). Standard PC.02.01.21. Comprehensive
accreditation manual for hospitals. Oakbrook Terrace, IL: The Joint
Commission. (Level VII)
38 American Society of Anesthesiologists. (2011). Practice guidelines for
preoperative fasting and the use of pharmacologic agents to reduce the risk
of pulmonary aspiration: Application to healthy patients undergoing elective
procedures. Anesthesiology, 114(3), 495–511. Accessed via the Web at
http://anesthesiology.pubs.asahq.org/Article.aspx?articleid=1933410 (Level
V)
39 Siegel, J. D ., et al. (2007, revised 2017). “2007 guideline for isolation
precautions: Preventing transmission of infectious agents in healthcare
settings” [Online]. Accessed via the Web at
https://www.cdc.gov/infectioncontrol/pdf/guidelines/isolation-guidelines.pdf
(Level II)
40 Accreditation Association for Hospitals and Health Systems. (2017). Standard
07.01.10. Healthcare Facilities Accreditation Program: Accreditation
requirements for acute care hospitals. Chicago, IL: Accreditation Association
for Hospitals and Health Systems. (Level VII)
41 DNV GL-Healthcare USA, Inc. (2016). IC.1 .SR.2 . NIAHO® accreditation
requirements: Interpretive guidelines & surveyor guidance (version 11).
Milford, OH: DNV GL-Healthcare USA, Inc. (Level VII)
42 American Society of Anesthesiologists. (2011, reaffirmed 2015). “Standards
for basic anesthetic monitoring” [Online]. Accessed via the Web at
http://www.asahq.org/~/media/Sites/ASAHQ/Files/Public/Resources/standards-
guidelines/standards-for-basic-anesthetic-monitoring.pdf (Level VII)
43 The Joint Commission. (2013). “Sentinel event alert: Medical device alarm
safety in hospitals” [Online]. Accessed via the Web at
https://www.jointcommission.org/assets/1/6/SEA_50_alarms_4 _26_16.pdf
(Level VII)
44 Graham, K. C., & Cvach, M. (2010). Monitor alarm fatigue: Standardizing use
of physiological monitors and decreasing nuisance alarms. American Journal
of Critical Care, 19(1), 28–37. Accessed via the Web at
http://ajcc.aacnjournals.org/content/19/1/28.full.pdf
45 The Joint Commission. (2019). Standard NPSG.06 .01.01. Comprehensive
accreditation manual for hospitals. Oakbrook Terrace, IL: The Joint
Commission. (Level VII)
46 American Association of Critical-Care Nurses. (2013). “A ACN practice alert:
Alarm management” [Online]. Accessed via the Web at
https://www.aacn.org/aacn-website/shared/content/practice-
alerts/2015/11/25/alarm-management (Level VII)
47 The Joint Commission. (2019). Standard UP.01.02.01. Comprehensive
accreditation manual for hospitals. Oakbrook Terrace, IL: The Joint
Commission. (Level VII)
48 The Joint Commission. (2019). Standard UP.01.03.01. Comprehensive
accreditation manual for hospitals. Oakbrook Terrace, IL: The Joint
Commission. (Level VII)
49 Institute for Safe Medication Practices. (2014). “ISMP list of high-alert
medications in acute care settings” [Online]. Accessed via the Web at
http://www.ismp.org/Tools/highalertmedications.pdf (Level VII)
50 Institute for Safe Medication Practices. (2014). Independent double-checks:
Undervalued and misused. Nurse Advise-ERR, 12(3), 1. Accessed via the Web
at
http://www.ismp.org/newsletters/nursing/Issues/NurseAdviseERR201403.pdf
(Level VII)
51 The Joint Commission. (2019). Standard PC.03 .01.05. Comprehensive
accreditation manual for hospitals. Oakbrook Terrace, IL: The Joint
Commission. (Level VII)
52 Rutala, W. A., et al. (2008, revised 2017). “Guideline for disinfection and
sterilization in healthcare facilities, 2008” [Online]. Accessed via the Web at
https://www.cdc.gov/infectioncontrol/pdf/guidelines/disinfection-
guidelines.pdf (Level I)
53 Accreditation Association for Hospitals and Health Systems. (2017). Standard
07.02.03. Healthcare Facilities Accreditation Program: Accreditation
requirements for acute care hospitals. Chicago, IL: Accreditation Association
for Hospitals and Health Systems. (Level VII)
54 The Joint Commission. (2019). Standard RC.01.03 .01. Comprehensive
accreditation manual for hospitals. Oakbrook Terrace, IL: The Joint
Commission. (Level VII)
55 The Joint Commission. (2019). Standard RC.02.01.03 . Comprehensive
accreditation manual for hospitals. Oakbrook Terrace, IL: The Joint
Commission. (Level VII)
56 Centers for Medicare and Medicaid Services, Department of Health and
Human Services. (2015). Condition of participation: Medical record services.
42 C.F.R. § 482.24(b).
57 Accreditation Association for Hospitals and Health Systems. (2017). Standard
10.00 .03. Healthcare Facilities Accreditation Program: Accreditation
requirements for acute care hospitals. Chicago, IL: Accreditation Association
for Hospitals and Health Systems. (Level VII)
58 DNV GL-Healthcare USA, Inc. (2016). MR.2 .SR.1 . NIAHO® accreditation
requirements: Interpretive guidelines & surveyor guidance (version 11).
Milford, OH: DNV GL-Healthcare USA, Inc. (Level VII)
59 Meyers, J. L., & Chaudhuri, S. (2011). Procedural sedation and analgesia: A
practical review for non-anesthesiologists. Journal of Surgical Radiology, 2(4),
344–356.
MUCUS CLEARANCE DEVICE
Patients with chronic respiratory disorders, such as cystic
fibrosis, bronchitis, or bronchiectasis, require therapy to
mobilize and remove mucus secretions from the lungs. A
handheld mucus clearance device can help such patients
cough up secretions more easily. Two such devices on the
market are the Flutter device and the Acapella device, both
of which facilitate mucus removal with oscillatory positive
expiratory pressure. Both devices have similar performance
characteristics; however, Acapella’s performance isn’t
gravity-dependent and may be easier for some patients to
use, particularly at low expiratory flows.1
Both devices consist of a ball valve that vibrates as the
patient exhales vigorously through it. The vibrations
propagate throughout the airways during expiration,
loosening mucus. As the patient repeats this process, the
mucus progressively moves up the airway until the patient
can easily cough it out. A licensed practitioner determines
the frequency and duration of device use.
Use of a mucus clearance device in patients with chronic
obstructive pulmonary disease has been shown to improve
patient response to bronchodilators when a patient uses the
device before bronchodilator therapy.2,3
Mucus clearance devices are contraindicated for use in
patients with known pneumothorax or overt right-sided
heart failure.3 They should be used with caution in patients
with intolerance to the increased work of breathing, as well
as in patients with hemodynamic instability, increased
intracranial pressure, acute sinusitis, recent facial, oral, or
skull surgery or trauma, epistaxis, esophageal surgery,
active hemoptysis, nausea, or known or suspected tympanic
membrane rupture or other middle ear pathology.4
Equipment
Mucus clearance device ▪ emesis basin ▪ tissues ▪ trash
bag ▪ stethoscope ▪ disinfectant pad ▪ oral care supplies
(see the “Oral care” procedure) ▪ Optional: gloves.
Implementation
■ Verify the practitioner’s order.
■ Gather the appropriate equipment.
■ Perform hand hygiene.5,6,7,8,9,10
■ Confirm the patient’s identity using at least two patient
identifiers.11
■ Provide privacy.12,13,14,15
■ Explain the procedure to the patient and family (if
appropriate) according to their individual communication
and learning needs to increase their understanding, allay
their fears, and enhance cooperation.16 Tell the patient that
using the mucus clearance device will help move the mucus
through the airways so that it can eventually be
expectorated.
■ Perform hand hygiene.5,6,7,8,9,10
■ Put on gloves as needed to comply with standard
precautions.17,18,19
■ Auscultate the patient’s breath sounds to obtain a
baseline assessment for comparison.
■ Instruct the patient sit with the back straight and head
tilted backward slightly so that the throat and trachea are
wide open. This position allows exhaled air to flow smoothly
from the lungs and out through the device.
■ If the patient prefers, the patient may place the elbows
on a table at a height that prevents slouching, which would
interfere with smooth breathing.
■ For the Flutter device, tell the patient to hold the device
so that the stem is parallel to the floor. This position places
the interior cone of the device at a 30-degree tilt, which
allows the ball inside the device to bounce and roll freely in
the cone. For the Acapella device, tell the patient to hold the
device parallel with the floor.
■ Instruct the patient draw a deep breath and hold it for 2
to 3 seconds. This inhalation step is important because it
evenly distributes the inspired air throughout the lungs,
especially in the small airways, where infection and airway
damage can occur.
■ After 2 to 3 seconds, instruct the patient to place the
device in the mouth and then exhale at a steady rate for as
long as possible. Breathing out too quickly and forcefully,
may cause the vibrations to be ineffective.
■ Instruct the patient to keep the cheeks as flat and hard as
possible while exhaling to direct the air out through the
device most effectively. Suggest that the patient hold the
cheeks lightly with the other hand to help learn the proper
technique.
■ After the patient has completely exhaled, instruct the
patient to remove the device from the mouth, take in
another full breath, and cough.
■ Instruct the patient to expectorate the mucus into an
emesis basin or tissue.
■ Instruct the patient to repeat the entire procedure several
times or as recommended by the practitioner.
■ Observe the type, amount, color, and odor of
expectorated secretions.
■ Dispose of expectorated mucus appropriately.17
■ Auscultate the patient’s breath sounds to determine the
effectiveness of coughing, and compare your findings with
the baseline assessment.
■ Instruct the patient to perform oral care.
■ Remove and discard your gloves if worn.17
■ Perform hand hygiene.5,6,7,8,9,10
■ Clean and disinfect your stethoscope using a disinfectant
pad.20,21
■ Perform hand hygiene.5,6,7,8,9,10
■ Document the procedure.22,23,24,25
Special considerations
■ As an alternative to removing the device from the mouth
after completely exhaling, the patient can leave the device
in the mouth, draw another big breath through the nose,
hold it for 2 to 3 seconds, and then exhale. The patient may
breathe through the device up to five times before taking
the final breath and coughing.
■ To help the patient achieve the best fluttering effect, you
may need to place one hand on the patient back and the
other on the chest as the patient exhales through the
device. If the patient’s achieving the maximum effect, you’ll
feel the vibrations in the lungs as the patient exhales. If
initial results are unsatisfactory, tell the patient to adjust the
angle of the device until optimal fluttering occurs.
■ Patients routinely perform multiple sets of 10 to 15
exhalations over 12 to 20 minutes. After each series of
exhalations, the patient is instructed to “huff” (take
repeated, controlled, short, rapid exhalations) and cough,
which aids expectoration.26,27
■ Observe the patient over several sets and evaluate the
patient’s ability to self-administer the treatment.
■ For the Flutter device, the oscillation frequency can be
regulated by moving the device slightly up or down from its
horizontal position.26
■ All models of the Acapella device can be used with a
mask or mouthpiece or in line with a nebulizer.26
■ Patients with severe airway obstruction may not be able
to generate sufficient airflow to cause the steel ball within
the Flutter device to vibrate, limiting the device’s
effectiveness in such patients.26
■ The Flutter and Acapella mucus clearance devices are
recommended for single-patient use.
Patient teaching
Instruct the patient to clean the mucus clearance device
after each use by disassembling and rinsing all components
with tap water, wiping the device parts with a clean towel,
reassembling the device, and storing it in a clean, dry
location. Instruct the patient to clean the device thoroughly
every 2 days by washing all parts in a solution of mild soap
or detergent, rinsing with tap water, wiping the parts with a
clean towel, reassembling the device, and storing the device
in a clean, dry place. Advise the patient against using
bleach or other chlorine-containing products.3,4
Complications
The increased work of breathing associated with the use of
the mucus clearance device may lead to hypoventilation
and hypercarbia. Other potential adverse events include
increased cranial pressure, cardiovascular compromise
(myocardial ischemia,
decreased
venous
return),
claustrophobia, and pulmonary barotrauma. Patients may
also swallow excess air, increasing the likelihood of vomiting
and aspiration.4
Documentation
Record the date, the time, and the patient’s tolerance of the
procedure. Record the type, amount, color, and odor of any
secretions that the patient is able to expectorate. Document
the patient’s breath sounds before and after using the
mucus clearance device and coughing. Also record the
number of times that the patient repeated the procedure
and the success of the coughing efforts. Document any
teaching provided to the patient and the patient’s
understanding of the teaching.
REFERENCES
1 Volska, T. A., et al. (2003). Performance comparison of two oscillating positive
expiratory pressure devices: Acapella versus Flutter. Respiratory Care, 48(2),
124–130. Accessed via the Web at
http://www.henleysmed.com/sites/default/files/acapella_vs_flutter.pdf (Level
VI)
2 Wolkove, N., et al. (2004). A randomized trial to evaluate the sustained
efficacy of a mucus clearance device in ambulatory patients with chronic
obstructive pulmonary disease. Canadian Respiratory Journal, 11(8), 567–
572. (Level II)
3 AptalisPharma US, Inc. (2013). “Flutter® mucus clearance device:
Instructions for use” [Online]. Accessed via the Web at
http://www.allergan.com/assets/pdf/flutter_pi
4 Smiths Medical ASD, Inc. (2014). “Acapella® vibratory PEP therapy system:
Reference guide” [Online]. Accessed with the Web at http://www.smiths-
medical.com/~/media/M/Smiths-
medical_com/Files/Import%20Files/RE194317EN-102014_LR.pdf
5 The Joint Commission. (2019). Standard NPSG.07.01.01. Comprehensive
accreditation manual for hospitals. Oakbrook Terrace, IL: The Joint
Commission. (Level VII)
6 Centers for Disease Control and Prevention. (2002). Guideline for hand
hygiene in health-care settings: Recommendations of the Healthcare Infection
Control Practices Advisory Committee and the HICPAC/SHEA/APIC/IDSA Hand
Hygiene Task Force. MMWR Recommendations and Reports, 51(RR-16), 1–45.
Accessed via the Web at https://www.cdc.gov/mmwr/pdf/rr/rr5116.pdf (Level
II)
7 World Health Organization. (2009). “WHO guidelines on hand hygiene in
health care: First global patient safety challenge, clean care is safer care”
[Online]. Accessed via the Web at
http://apps.who.int/iris/bitstream/10665/44102/1/9789241597906_eng.pdf
(Level IV)
8 Centers for Medicare and Medicaid Services, Department of Health and
Human Services. (2015). Condition of participation: Infection control. 42 C.F.R.
§ 482.42.
9 Accreditation Association for Hospitals and Health Systems. (2017). Standard
07.01.21. Healthcare Facilities Accreditation Program: Accreditation
requirements for acute care hospitals. Chicago, IL: Accreditation Association
for Hospitals and Health Systems. (Level VII)
10 DNV GL-Healthcare USA, Inc. (2016). IC.1 .SR.1 . NIAHO® accreditation
requirements: Interpretive guidelines & surveyor guidance (version 11).
Milford, OH: DNV GL-Healthcare USA, Inc. (Level VII)
11 The Joint Commission. (2019). Standard NPSG.01.01.01. Comprehensive
accreditation manual for hospitals. Oakbrook Terrace, IL: The Joint
Commission. (Level VII)
12 Centers for Medicare and Medicaid Services, Department of Health and
Human Services. (2015). Condition of participation: Patient’s rights. 42 C.F.R.
§ 482.13(c)(1).
13 Accreditation Association for Hospitals and Healths Systems. (2017).
Standard 15.01.16. Healthcare Facilities Accreditation Program: Accreditation
requirements for acute care hospitals. Chicago, IL: Accreditation Association
for Hospitals and Health Systems. (Level VII)
14 The Joint Commission. (2019). Standard RI.01.01.01. Comprehensive
accreditation manual for hospitals. Oakbrook Terrace, IL: The Joint
Commission. (Level VII)
15 DNV GL-Healthcare USA, Inc. (2016). PR.1.SR.5 . NIAHO® accreditation
requirements: Interpretive guidelines & surveyor guidance (version 11).
Milford, OH: DNV GL-Healthcare USA, Inc. (Level VII)
16 The Joint Commission. (2019). Standard PC.02.01.21. Comprehensive
accreditation manual for hospitals. Oakbrook Terrace, IL: The Joint
Commission. (Level VII)
17 Siegel, J. D ., et al. (2007, revised 2017). “2007 guideline for isolation
precautions: Preventing transmission of infectious agents in healthcare
settings” [Online]. Accessed via the Web at
https://www.cdc.gov/infectioncontrol/pdf/guidelines/isolation-guidelines.pdf
(Level II)
18 Accreditation Association for Hospitals and Health Systems. (2017). Standard
07.01.10. Healthcare Facilities Accreditation Program: Accreditation
requirements for acute care hospitals. Chicago, IL: Accreditation Association
for Hospitals and Health Systems. (Level VII)
19 DNV GL-Healthcare USA, Inc. (2016). IC.1 .SR.2 . NIAHO® accreditation
requirements: Interpretive guidelines & surveyor guidance (version 11).
Milford, OH: DNV GL-Healthcare USA, Inc. (Level VII)
20 Rutala, W. A., et al. (2008, revised 2017). “Guideline for disinfection and
sterilization in healthcare facilities, 2008” [Online]. Accessed via the Web at
https://www.cdc.gov/hicpac/pdf/guidelines/Disinfection_Nov_2008.pdf (Level I)
21 Accreditation Association for Hospitals and Health Systems. (2017). Standard
07.02.03. Healthcare Facilities Accreditation Program: Accreditation
requirements for acute care hospitals. Chicago, IL: Accreditation Association
for Hospitals and Health Systems. (Level VII)
22 The Joint Commission. (2019). Standard RC.01.03 .01. Comprehensive
accreditation manual for hospitals. Oakbrook Terrace, IL: The Joint
Commission. (Level VII)
23 Centers for Medicare and Medicaid Services, Department of Health and
Human Services. (2015). Condition of participation: Medical record services.
42 C.F.R. § 482.24(b).
24 Accreditation Association for Hospitals and Health Systems. (2017). Standard
10.00 .03. Healthcare Facilities Accreditation Program: Accreditation
requirements for acute care hospitals, Chicago, IL: Accreditation Association
for Hospitals and Health Systems. (Level VII)
25 DNV GL-Healthcare USA, Inc. (2016). MR.2 .SR.1 . NIAHO® accreditation
requirements: Interpretive guidelines & surveyor guidance (version 11).
Milford, OH: DNV GL-Healthcare USA, Inc. (Level VII)
26 Hristara-Papadopoulou, A., et al. (2008). Current devices of respiratory
physiotherapy. Hippokratia, 12(4), 211–220. Accessed via the Web at
https://www.ncbi.nlm.nih.gov/pmc/articles/PMC2580042/ (Level V)
27 Lester, M. K ., & Flume, P. A. (2009). Airway-clearance therapy guidelines and
implementation. Respiratory Care, 54(6), 733–753. Accessed via the Web at
http://rc.rcjournal.com/content/54/6/733.full.pdf (Level VII)
N
NASAL BRIDLE INSERTION AND REMOVAL
A nasal bridle is used to secure a nasally inserted gastric or
enteral feeding tube to prevent the tube’s inadvertent
dislodgment or removal.1 It more effectively secures a
nasogastric or nasoenteral feeding tube than traditional
tape to prevent inadvertent dislodgment. As a result, its use
also reduces the need for repeated X-ray exposure to verify
tube placement after inadvertent dislodgment or removal.2
Additionally, the use of a nasal bridle reduces the risk of
skin breakdown because tape isn’t needed to secure the
tube.1
Nasal bridle use is contraindicated in patients with nasal
airway obstructions or abnormalities as well as in those with
facial or cranial fractures.1 A nasal bridle shouldn’t be used
in a patient who may pull on the bridle hard enough to
cause injury.1 Before a nasal bridal is inserted, the
practitioner should perform a nasal examination to ensure
that the patient has adequate bone in the posterior septum
to support the bridle system.1
A nasal bridle should be inserted only by those who have
been specially trained in the insertion technique and have
demonstrated competency in performing insertion.
Equipment
Gloves ▪ bridle catheter with attached umbilical cloth tape
and stylet ▪ clip ▪ retrieval probe ▪ water-soluble lubricant ▪
scissors ▪ Optional: skin barrier, clip reopening tool, gown,
mask and goggles or mask with face shield.
Implementation
■ Verify the practitioner’s order.
■ If required by your facility, confirm that the practitioner
has obtained written informed consent from the patient and
that the consent form is in the patient’s medical
record.3,4,5,6
■ Perform hand hygiene.7,8,9,10,11,12
■ Confirm the patient’s identity using at least two patient
identifiers.13
■ Provide privacy.14,15,16,17
■ Explain the procedure to the patient and family members
(if appropriate) according to their individual communication
and learning needs to help increase their understanding,
allay their fears, and enhance cooperation.18
■ Raise the patient’s bed to waist level when providing care
to help prevent caregiver back strain.19
■ Place the patient in a supine or sitting position to help
ease insertion.1
■ Perform hand hygiene.7,8,9,10,11,12
■ Put on gloves and other personal protective equipment as
needed to comply with standard precautions.20,21,22
Inserting a nasal bridle
■ Lubricate the nasal bridle retrieval probe, catheter, and
umbilical tape with water-soluble lubricant.1
■ Insert the retrieval probe (blue) into the patient’s nostril;
if the nasogastric or nasoenteral feeding tube is already in
place, insert the probe in the nostril opposite the existing
tube (as shown below) until the second rib is at the base of
the nostril; make adjustments for a smaller patient.1
■ Insert the nasal bridle catheter (white) into the opposite
nostril to allow the magnets to meet (as shown below).1
■ Pull back on the stylet about 1⁄2′′ (1.3 cm) until the
magnets connect; you should hear or feel the click of the
magnets as they connect. Equal lengths of both probes,
minus the orange stylet, should be exposed.1 If necessary,
twist the retrieval probe and nasal bridle catheter gently
from side to side or up and down to encourage contact
between the magnets. If contact still doesn’t occur, advance
the retrieval probe (blue) and bridle catheter (white).1
■ Remove the stylet completely from the nasal bridle
catheter when the magnets connect (as shown below).1
■ Slowly withdraw the retrieval probe (blue) (as shown
below), and allow the nasal bridle catheter (white) to
advance through the nose; continue until the cloth umbilical
tape is in the nose, creating a loop or bridle around the
vomer bone. If the catheter and umbilical tape don’t
advance out of the opposite nostril, remove the catheter,
replace the stylet, and repeat the procedure.1
■ Using scissors, cut the nasal bridle catheter portion from
the umbilical tape. Dispose of the catheter (white) and
retrieval probe (blue).1
■ If the nasogastric or nasoenteral feeding tube hasn’t been
inserted, insert it now.1 (See the “Feeding tube insertion and
removal” procedure, page 316.)
■ Place the clip about 1⁄2′′ (1.3 cm) or one finger’s width
from the nostril (as shown below); make sure that the clip
doesn’t touch the nostril.1
NURSING ALERT Use caution when handling the bridle clip near the
patient’s mouth; consider covering the patient’s mouth to prevent the
clip from falling into the patient’s mouth should you accidentally drop
it.1
■ For a #5 to #12 French clip, ensure that the nasogastric
or nasoenteral feeding tube fits securely in the clip’s
channel, and then place both strands of the umbilical tape
near the hinge of the clip, keeping the tape flat.1 For a #14
to #18 French clip, ensure that the nasogastric or
nasoenteral feeding tube fits securely in the clip’s channel.
Place both strands of umbilical tape between the soft inner
portion of the clip and the outer, more rigid plastic section.1
■ Close the clip by folding over the plastic edge (as shown
below) and firmly snapping it shut. Keep in mind that the
clip is difficult to reopen, so be sure to position the
nasogastric or nasoenteral feeding tube, umbilical tape, and
clip properly before closing the clip. Don’t use another
object to open or close the clip, because the clip may
become damaged, making it less secure. If the clip becomes
damaged, use a new one.1
■ After closing the clip completely, tie the two umbilical
tape strands together (excluding the tube) in a simple knot
(as shown below). Knot the tape ends two to three times,
and then cut the excess umbilical tape.
■ Make sure a thorough nasal examination is performed
after nasal bridle insertion to ensure that the umbilical tape
loop has passed behind the nasal septum, not through a
septal perforation.1
■ Regularly monitor the position of the nasal enteral tube
and clip for signs of enteral feeding tube migration.1,23
■ Monitor the insertion site for redness, swelling, drainage,
and skin irritation. Use a skin barrier as necessary.24
■ Monitor the clip for signs of damage or loose attachment
to the nasogastric or nasoenteral feeding tube; replace the
clip if necessary.1
■ Return the patient’s bed to the lowest position to prevent
falls and maintain patient safety.25
Removing a nasal bridle
To remove a nasal bridle and nasogastric or
nasoenteral tube together
■ Using scissors, cut one strand of the umbilical tape.26
■ Pull the nasal bridle and nasogastric or nasoenteral tube
gently out of the patient’s nose.26
To removal a nasal bridle alone
■ Leaving the nasal clip in place, cut both ends of the
umbilical tape near the clip.23,26
■ Secure the umbilical tape as you gently remove it to
avoid dislodging the nasogastric or nasoenteral feeding tube
during tape removal. Maintaining control of the tape also
protects the patient from aspirating or swallowing pieces of
the tape.26
Completing the procedure
■ Dispose of used supplies in the appropriate receptacle.
■ Remove and discard your gloves and any other personal
protective equipment worn.21
■ Perform hand hygiene.7,8,9,10,11,12
■ Document the procedure.27,28,29,30
Special considerations
■ Use an alternative means of securing the enteral feeding
tube if there’s excessive traction on the nasal bridle,
because excessive traction on the nasal bridle may cause
tube displacement or nasal injury.1
■ Don’t use tools, such as hemostats, to open or close the
clip to help avoid damaging the clip and making it less
secure and effective. If the clip must be relocated because
of tube repositioning, use the manufacturer’s clip reopening
tool.1
■ The nasal bridle can remain in place for up to 30 days of
continuous use before requiring replacement.2
Complications
If the nasal bridle is secured too tightly, damage may occur
to the internal and external tissues. The nasogastric or
nasoenteral feeding tube may become dislodged if the nasal
bridle is secured too loosely.1,23 Complications associated
with nasal bridle removal include aspiration or swallowing of
the umbilical tape.
Documentation
Document that the practitioner assessed the patient’s nose
before the procedure. Record the size of the clip used, the
position of the nasogastric or nasoenteral feeding tube, the
condition of the patient’s nose, and the patient’s tolerance
of the procedure. Document the date and time that you
removed the nasal bridle; the location of the nasogastric or
nasoenteral feeding tube, if left in place; the condition of the
umbilical tape; the condition of the patient’s skin around the
nares and upper lip; and the patient’s tolerance of the
procedure. Document any teaching provided to the patient
and family members (if applicable), their understanding of
that teaching, and whether they require follow-up teaching.
REFERENCES
1 Applied Medical Technology, Inc. (2016). “AMT BridleTM: Pocket guide”
[Online]. Accessed January 2018 via the Web at
http://www.gbukenteral.com/pdf/Bridle-insertion-pocket-guide.pdf
2 Bechtold, M. L., et al. (2014). Nasal bridles for securing nasoenteric tubes: A
meta-analysis. Nutrition in Clinical Practice, 29, 667–671. Accessed via the
Web at https://www.ncbi.nlm.nih.gov/pmc/articles/PMC4304091/ (Level I)
3 The Joint Commission. (2019). Standard RI.01.03 .01. Comprehensive
accreditation manual for hospitals. Oakbrook Terrace, IL: The Joint
Commission. (Level VII)
4 Centers for Medicare and Medicaid Services, Department of Health and
Human Services. (2015). Condition of participation: Patient’s rights. 42 C.F.R.
§ 482.13(b)(2).
5 Accreditation Association for Hospitals and Health Systems. (2017). Standard
15.01.11. Healthcare Facilities Accreditation Program: Accreditation
requirements for acute care hospitals. Chicago, IL: Accreditation Association
for Hospitals and Health Systems. (Level VII)
6 DNV GL-Healthcare USA, Inc. (2016). PR.1 .SR.3 . NIAHO® accreditation
requirements: Interpretive guidelines & surveyor guidance (version 11).
Milford, OH: DNV GL-Healthcare USA, Inc. (Level VII)
7 The Joint Commission. (2019). Standard NPSG.07.01.01. Comprehensive
accreditation manual for hospitals. Oakbrook Terrace, IL: The Joint
Commission. (Level VII)
8 Centers for Disease Control and Prevention. (2002). Guideline for hand
hygiene in health-care settings: Recommendations of the Healthcare Infection
Control Practices Advisory Committee and the HICPAC/SHEA/APIC/IDSA Hand
Hygiene Task Force. MMWR Recommendations and Reports, 51(RR-16), 1–45.
Accessed via the Web at https://www.cdc.gov/mmwr/pdf/rr/rr5116.pdf (Level
II)
9 World Health Organization. (2009). “WHO guidelines on hand hygiene in
health care: First global patient safety challenge, clean care is safer care”
[Online]. Accessed via the Web at
http://apps.who.int/iris/bitstream/10665/44102/1/9789241597906_eng.pdf
(Level IV)
10 Accreditation Association for Hospitals and Health Systems. (2017). Standard
07.01.21. Healthcare Facilities Accreditation Program: Accreditation
requirements for acute care hospitals. Chicago, IL: Accreditation Association
for Hospitals and Health Systems. (Level VII)
11 Centers for Medicare and Medicaid Services, Department of Health and
Human Services. (2015). Condition of participation: Infection control. 42 C.F.R.
§ 482.42.
12 DNV GL-Healthcare USA, Inc. (2016). IC.1 .SR.1 . NIAHO® accreditation
requirements: Interpretive guidelines & surveyor guidance (version 11).
Milford, OH: DNV GL-Healthcare USA, Inc. (Level VII)
13 The Joint Commission. (2019). Standard NPSG.01.01.01. Comprehensive
accreditation manual for hospitals. Oakbrook Terrace, IL: The Joint
Commission. (Level VII)
14 The Joint Commission. (2019). Standard RI.01.01.01. Comprehensive
accreditation manual for hospitals. Oakbrook Terrace, IL: The Joint
Commission. (Level VII)
15 Centers for Medicare and Medicaid Services, Department of Health and
Human Services. (2015). Condition of participation: Patient’s rights. 42 C.F.R.
§ 482.13(c)(1).
16 Accreditation Association for Hospitals and Health Systems. (2017). Standard
15.01.16. Healthcare Facilities Accreditation Program: Accreditation
requirements for acute care hospitals. Chicago, IL: Accreditation Association
for Hospitals and Health Systems. (Level VII)
17 DNV GL-Healthcare USA, Inc. (2016). PR.1.SR.5 . NIAHO® accreditation
requirements: Interpretive guidelines & surveyor guidance (version 11).
Milford, OH: DNV GL-Healthcare USA, Inc. (Level VII)
18 The Joint Commission. (2019). Standard PC.02.01.21. Comprehensive
accreditation manual for hospitals. Oakbrook Terrace, IL: The Joint
Commission. (Level VII)
19 Waters, T. R., et al. (2009). “Safe patient handling training for schools of
nursing” [Online]. Accessed via the Web at
https://www.cdc.gov/niosh/docs/2009-127/pdfs/2009-127.pdf (Level VII)
20 Siegel, J. D ., et al. (2007, revised 2017). “2007 guideline for isolation
precautions: Preventing transmission of infectious agents in healthcare
settings” [Online]. Accessed January 2018 via the Web at
https://www.cdc.gov/infectioncontrol/pdf/guidelines/isolation-guidelines.pdf
(Level II)
21 Accreditation Association for Hospitals and Health Systems. (2017). Standard
07.01.10. Healthcare Facilities Accreditation Program: Accreditation
requirements for acute care hospitals. Chicago, IL: Accreditation Association
for Hospitals and Health Systems. (Level VII)
22 DNV GL-Healthcare USA, Inc. (2016). IC.1 .SR.2 . NIAHO® accreditation
requirements: Interpretive guidelines & surveyor guidance (version 11).
Milford, OH: DNV GL-Healthcare USA, Inc. (Level VII)
23 McGinnis, C. (2011). The feeding tube bridle: One inexpensive, safe, and
effective method to prevent inadvertent feeding tube dislodgement. Nutrition
in Clinical Practice, 26, 70–77.
24 Wiegand, D. L. (2017). AACN procedure manual for high acuity, progressive,
and critical care (7th ed.). St Louis, MO: Elsevier.
25 Ganz, D. A., et al. (2013). Preventing falls in hospitals: A toolkit for improving
quality of care(AHRQ Publication No. 13-0015-EF). Rockville, MD: Agency for
Healthcare Research and Quality. Accessed via the Web at
https://www.ahrq.gov/sites/default/files/publications/files/fallpxtoolkit_0 .pdf
(Level VII)
26 Applied Medical Technology, Inc. (2017). “The AMT BridleTM nasal retaining
system: Frequently asked questions” [Online]. Accessed via the Web at
http://www.appliedmedical.net/gi-products/bridle/
27 The Joint Commission. (2019). Standard RC.01.03 .01. Comprehensive
accreditation manual for hospitals. Oakbrook Terrace, IL: The Joint
Commission. (Level VII)
28 Centers for Medicare and Medicaid Services, Department of Health and
Human Services. (2015). Condition of participation: Medical record services.
42 C.F.R. § 482.24(b).
29 Accreditation Association for Hospitals and Health Systems. (2017). Standard
10.00 .03. Healthcare Facilities Accreditation Program: Accreditation
requirements for acute care hospitals. Chicago, IL: Accreditation Association
for Hospitals and Health Systems. (Level VII)
30 DNV GL-Healthcare USA, Inc. (2016). MR.2 .SR.1 . NIAHO® accreditation
requirements: Interpretive guidelines & surveyor guidance (version 11).
Milford, OH: DNV GL-Healthcare USA, Inc. (Level VII)
NASAL IRRIGATION
Irrigation of the nasal passages soothes irritated mucous
membranes and washes away crusted mucus, secretions,
and foreign matter. Left unattended, these deposits may
impede sinus drainage and nasal airflow and cause
headaches, infections, and unpleasant odors. Irrigation may
be done with a bulb syringe or an electronic irrigating
device.
Nasal irrigation benefits patients with acute or chronic
nasal conditions, including sinusitis, rhinitis, Wegener
granulomatosis, and Sjögren syndrome.1,2 The procedure
may also help people who regularly inhale toxins or
allergens—paint fumes, sawdust, pesticides, or coal dust, for
example.3 Nasal irrigation is routinely recommended after
some nasal surgeries to enhance healing by removing
postoperative eschar and to aid remucosolization of the
sinus cavities and ostia.4
Possible contraindications for nasal irrigation may include
advanced destruction of the sinuses, frequent nosebleeds,
and foreign bodies in the nasal passages (which could be
driven farther into the passages by the irrigant). However,
some patients with these conditions may benefit from
irrigation. Other contraindications to the procedure include
facial trauma and neurologic or musculoskeletal problems
that may increase the risk of aspiration.2
Equipment
Bulb syringe or oral irrigating device ▪ rigid or flexible
disposable nasal irrigation tips (for single-patient use) ▪
normal saline solution ▪ fluid-impermeable pad ▪ towels ▪
facial tissues ▪ bath basin or sink ▪ gloves ▪ soap ▪ water ▪
hospital-grade disinfectant.
Preparation of equipment
Attach the disposable nasal irrigation tip to the delivery
device, as needed.
Warm the saline solution to about 105°F (40.6°C). If you’ll
be irrigating with a bulb syringe, draw some irrigant into the
bulb and then expel it to rinse any residual solution from the
previous irrigation and to warm the bulb.
If you’re using an oral irrigating device, plug the
instrument into an electrical outlet in an area near the
patient. Then run about 1 cup (240 mL) of normal saline
solution through the tubing to rinse residual solution from
the lines and to warm the tubing. Next, fill the reservoir of
the device with warm saline solution.
Implementation
■ Gather and prepare the necessary equipment.
■ Perform hand hygiene.5,6,7,8,9,10
■ Confirm the patient’s identity using at least two patient
identifiers.11
■ Provide privacy.12,13,14,15
■ Explain the procedure to the patient and family members
(if appropriate) according to their individual communication
and learning needs to help increase their understanding,
allay their fears, and enhance cooperation.16
■ Raise the patient’s bed to waist level when providing care
to help prevent caregiver back strain.17
■ Perform hand hygiene.5,6,7,8,9,10
■ Put on gloves to comply with standard precautions.18,19,20
■ Place a towel on the patient’s upper body to protect
clothing from getting wet. Place a fluid-impermeable pad on
the bed if indicated.
■ Have the patient sit comfortably near the equipment in a
position that allows the bulb or catheter tip to enter the
nose and the returning irrigant to flow into the bath basin or
sink. (See Positioning the patient for nasal irrigation.)
■ Instruct the patient to keep the mouth open and to
breathe rhythmically during irrigation. This action causes
the soft palate to seal the throat, allowing the irrigant to
stream out the opposite nostril and carry discharge with it.
■ Instruct the patient not to speak or swallow during the
irrigation to avoid forcing infectious material into the
sinuses or eustachian tubes.
■ To avoid injuring the nasal mucosa, remove the irrigating
tip from the nostril if the patient reports the need to sneeze
or cough.
Using a bulb syringe
■ Fill the bulb syringe with saline solution and insert the tip
about 1⁄2′′ (1.3 cm) into the patient’s nostril.
■ Squeeze the bulb until a gentle stream of warm irrigant
washes through the nose. Avoid forceful squeezing, which
may drive debris from the nasal passages into the sinuses
or eustachian tubes and introduce infection. Alternate the
nostrils until the return irrigant runs clear.
Positioning the patient for nasal
irrigation
Whether you’re helping a patient to perform nasal irrigation with a bulb
syringe or an electronic irrigating device, the irrigation will progress more
easily once the patient learns how to hold the head for optimal safety,
comfort, and effectiveness.
Help the patient to sit upright with the head bent forward over the basin or
sink and well-flexed on the chest. The patient’s nose and ear should be on
the same vertical plane.
Explain that the patient’s less likely to breathe in the irrigant when holding
the head in this position. This position should also keep the irrigant from
entering the eustachian tubes, which will now lie above the level of the
irrigation stream.
Using an electronic irrigating device
■ Insert the irrigation tip into the nostril about 1⁄2′′ to 1′′ (1.3
to 2.5 cm) into the patient’s nostril.
■ Turn on the electronic irrigating device. Begin with a low
pressure setting (increasing the pressure as needed) to
obtain a gentle stream of irrigant. Be careful not to drive
material from the nose into the sinuses or eustachian tubes.
Irrigate both nostrils until the draining irrigant runs clear.
Completing the procedure
■ Inspect the returning irrigant for purulence, which may
indicate infection, bleeding, or foreign bodies. Report
unexpected findings to the practitioner.
■ After irrigation, have the patient wait a few minutes
before blowing excess fluid from both nostrils at once.
Gentle blowing through both nostrils prevents fluid or
pressure buildup in the sinuses. This action also helps to
loosen and expel crusted secretions and mucus.
■ Return the patient’s bed to the lowest position to prevent
falls and maintain patient safety.21
■ Clean the bulb syringe or irrigating device with soap and
water and then disinfect it, as recommended. Rinse and dry
the device. Clean the basin or sink with hospital-grade
disinfectant.22,23
■ Remove and discard your gloves.18
■ Perform hand hygiene.5,6,7,8,9,10
■ Document the procedure.24,25,26,27
Special considerations
■ Expect fluid to drain from the patient’s nose for a brief
time after irrigation and before blowing the nose.
■ Insert the irrigation tip far enough to ensure that the
irrigant cleans the nasal membranes before draining out. A
typical amount of irrigant ranges from 500 to 1,000 mL.
Patient teaching
■ To continue nasal irrigations at home, teach the patient
how to prepare saline solution. Tell the patient to fill a clean
1-L plastic bottle (4 cups + 1 oz = 1 L) with bottled or
distilled water, add 1 tsp of salt, and shake the solution until
the salt dissolves. Stress to the patient that tap water
obtained from the faucet directly isn’t safe for use in nasal
irrigation due to the increased risk of infection and nasal
mucosal irritation associated with tap water use.28 Only
distilled, sterile, or boiled and cooled tap water should be
used for nasal irrigation.28
■ If the patient will use a commercial nasal rinsing device,
teach the necessary steps,28 beginning with washing and
drying the hands; ensuring that the device is clean and
completely dry before use; using the appropriate irrigant as
recommended by the device manufacturer (normal saline
solution, sterile or distilled water, boiled and cooled tap
water, or filtered tap water); following the manufacturer’s
directions for use; cleaning the device with distilled, sterile,
or boiled and cooled tap water; and finally drying the inside
with a paper towel or letting it air-dry between uses.
■ Instruct the patient to notify the practitioner if signs and
symptoms worsen or if headaches, nosebleeds, or fever
develop.28
Complications
Use of nasal irrigation devices can lead to ear fullness, sinus
discomfort, nosebleeds, and headaches. Infection is possible
with improper use of the device.28
Documentation
Document the time and duration of the procedure and the
amount of irrigant used. Describe the appearance of the
drained solution. Record your assessment of the patient’s
comfort level and breathing ease before and after the
procedure. Note the patient’s tolerance of the procedure.
Document any teaching provided to the patient and family
members (if applicable), their understanding of that
teaching, and whether they require follow-up teaching.
REFERENCES
1 Rabago, D., & Zgierska, A. (2009). Saline nasal irrigation for upper respiratory
conditions. American Family Physician, 80(10), 1117–1119. Accessed via the
Web at http://www.aafp.org/afp/2009/1115/p1117.html
2 Rosenfeld, R. M ., et al. (2015). Clinical practice guideline (update): Adult
sinusitis. Otolaryngology—Head and Neck Surgery, 152(2 Suppl.), S1–S39 .
Accessed via the Web at
http://oto.sagepub.com/content/152/2_suppl/S1.full.pdf+html
3 Hermelingmeier, K. E ., et al. (2012). Nasal irrigation as an adjunctive
treatment in allergic rhinitis: A systematic review and meta-analysis.
American Journal of Rhinology & Allergy, 26(5), e119–e125. Accessed via the
Web at http://www.ncbi.nlm.nih.gov/pmc/articles/PMC3904042/ (Level I)
4 Low, T. H., et al. (2014). A double-blind randomized controlled trial of normal
saline, lactated Ringer’s, and hypertonic saline nasal irrigation solution after
endoscopic sinus surgery. American Journal of Rhinology & Allergy, 28(3),
225–231. (Level II)
5 Centers for Disease Control and Prevention. (2002). Guideline for hand
hygiene in health-care settings: Recommendations of the Healthcare Infection
Control Practices Advisory Committee and the HICPAC/SHEA/APIC/IDSA Hand
Hygiene Task Force. MMWR Recommendations and Reports, 51(RR-16), 1–45.
Accessed via the Web at https://www.cdc.gov/mmwr/pdf/rr/rr5116.pdf (Level
II)
6 World Health Organization. (2009). “WHO guidelines on hand hygiene in
health care: First global patient safety challenge, clean care is safer care”
[Online]. Accessed via the Web at
http://apps.who.int/iris/bitstream/10665/44102/1/9789241597906_eng.pdf
(Level IV)
7 The Joint Commission. (2019). Standard NPSG.07.01.01. Comprehensive
accreditation manual for hospitals. Oakbrook Terrace, IL: The Joint
Commission. (Level VII)
8 Centers for Medicare and Medicaid Services, Department of Health and
Human Services. (2015). Condition of participation: Infection control. 42 C.F.R.
§ 482.42.
9 Accreditation Association for Hospitals and Health Systems. (2017). Standard
07.01.21. Healthcare Facilities Accreditation Program: Accreditation
requirements for acute care hospitals. Chicago, IL: Accreditation Association
for Hospitals and Health Systems. (Level VII)
10 DNV GL-Healthcare USA, Inc. (2016). IC.1 .SR.1 . NIAHO® accreditation
requirements: Interpretive guidelines & surveyor guidance (version 11).
Milford, OH: DNV GL-Healthcare USA, Inc. (Level VII)
11 The Joint Commission. (2019). Standard NPSG.01.01.01. Comprehensive
accreditation manual for hospitals. Oakbrook Terrace, IL: The Joint
Commission. (Level VII)
12 Centers for Medicare and Medicaid Services, Department of Health and
Human Services. (2015). Condition of participation: Patient’s rights. 42 C.F.R.
§ 482.13(c)(1).
13 Accreditation Association for Hospitals and Health Systems. (2017). Standard
15.01.16. Healthcare Facilities Accreditation Program: Accreditation
requirements for acute care hospitals. Chicago, IL: Accreditation Association
for Hospitals and Health Systems. (Level VII)
14 The Joint Commission. (2019). Standard RI.01.01.01. Comprehensive
accreditation manual for hospitals. Oakbrook Terrace IL: The Joint
Commission. (Level VII)
15 DNV GL-Healthcare USA, Inc. (2016). PR.1.SR.5 . NIAHO® accreditation
requirements: Interpretive guidelines & surveyor guidance (version 11).
Milford, OH: DNV GL-Healthcare USA, Inc. (Level VII)
16 The Joint Commission. (2019). Standard PC.02.01.21. Comprehensive
accreditation manual for hospitals. Oakbrook Terrace, IL: The Joint
Commission. (Level VII)
17 Waters, T. R., et al. (2009). “Safe patient handling training for schools of
nursing” [Online]. Accessed via the Web at
https://www.cdc.gov/niosh/docs/2009-127/pdfs/2009-127.pdf (Level VII)
18 Siegel, J. D ., et al. (2007, revised 2017). “2007 guideline for isolation
precautions: Preventing transmission of infectious agents in healthcare
settings” [Online]. Accessed via the Web at
https://www.cdc.gov/infectioncontrol/pdf/guidelines/isolation-guidelines.pdf
(Level II)
19 Accreditation Association for Hospitals and Health Systems. (2017). Standard
07.01.10. Healthcare Facilities Accreditation Program: Accreditation
requirements for acute care hospitals. Chicago, IL: Accreditation Association
for Hospitals and Health Systems. (Level VII)
20 DNV GL-Healthcare USA, Inc. (2016). IC.1 .SR.2 . NIAHO® accreditation
requirements: Interpretive guidelines & surveyor guidance (version 11).
Milford, OH: DNV GL-Healthcare USA, Inc. (Level VII)
21 Ganz, D. A., et al. (2013). Preventing falls in hospitals: A toolkit for improving
quality of care (AHRQ Publication No. 13-0015-EF). Rockville, MD: Agency for
Healthcare Research and Quality. Accessed via the Web at
https://www.ahrq.gov/sites/default/files/publications/files/fallpxtoolkit_0 .pdf
(Level VII)
22 Rutala, W. A., et al. (2008, revised 2017). “Guideline for disinfection and
sterilization in healthcare facilities, 2008” [Online]. Accessed via the Web at
https://www.cdc.gov/infectioncontrol/pdf/guidelines/disinfection-
guidelines.pdf (Level I)
23 Accreditation Association for Hospitals and Health Systems. (2017). Standard
07.02.03. Healthcare Facilities Accreditation Program: Accreditation
requirements for acute care hospitals. Chicago, IL: Accreditation Association
for Hospitals and Health Systems. (Level VII)
24 The Joint Commission. (2019). Standard RC.01.03 .01. Comprehensive
accreditation manual for hospitals. Oakbrook Terrace, IL: The Joint
Commission. (Level VII)
25 Centers for Medicare and Medicaid Services, Department of Health and
Human Services. (2015). Condition of participation: Medical record services.
42 C.F.R. § 482.24(b).
26 Accreditation Association for Hospitals and Health Systems. (2017). Standard
10.00 .03. Healthcare Facilities Accreditation Program: Accreditation
requirements for acute care hospitals. Chicago, IL: Accreditation Association
for Hospitals and Health Systems. (Level VII)
27 DNV GL-Healthcare USA, Inc. (2016). MR.2 .SR.1 . NIAHO® accreditation
requirements: Interpretive guidelines & surveyor guidance (version 11).
Milford, OH: DNV GL-Healthcare USA, Inc. (Level VII)
28 U.S . Food and Drug Administration. (2017). “Is rinsing your sinuses with neti
pots safe?” [Online]. Accessed via the Web at
https://www.fda.gov/ForConsumers/ConsumerUpdates/ucm316375.htm
NASAL MEDICATION ADMINISTRATION
Medications can be instilled into the nostril as nose drops,
via a nasal inhaler, or as an aerosol.
Most nasal medications are vasoconstrictors, which relieve
nasal congestion by coating and shrinking swollen mucous
membranes; an example is phenylephrine. Because
vasoconstrictors can be absorbed systemically, they are
usually contraindicated in hypertensive patients. Other
types of nasal medications include serotonin-receptor
agonists,1
antiseptics,
anesthetics,
opioids,
and
corticosteroids. Local anesthetics may be administered to
promote patient comfort during
rhinolaryngologic
examination,
laryngoscopy,
bronchoscopy,
and
endotracheal intubation. Corticosteroids may be prescribed
to reduce inflammation in patients with allergic or
inflammatory conditions and those with nasal polyps.
Nose drops can be directed at a specific area of the nasal
passage. This method is noninvasive, essentially painless,
and avoids gastrointestinal breakdown and adverse effects
as well as hepatic first-pass metabolism of the drug.2,3
Medication can also be administered using a nasal inhaler,
which delivers topical medications to the respiratory tract,
producing local and systemic effects. The mucosal lining of
the respiratory tract absorbs the inhalant almost
immediately. Examples of common inhalants are
bronchodilators, which improve airway patency and
facilitate mucous drainage; mucolytics, which attain a high
local concentration to liquefy tenacious bronchial secretions;
and corticosteroids, which decrease inflammation.
Nasal aerosols, a third method of delivery, diffuse
medication throughout the nasal passages. This method
results in increased local effects with minimal systemic
effects; it is noninvasive, essentially painless, and helpful in
rapid absorption and effect.2,3
Nasal delivery of medications avoids gastrointestinal (GI)
breakdown, adverse GI reactions, and first-pass metabolism
of the drug by the liver.2,3
Equipment
For nose drop instillation
Prescribed medication ▪ patient’s medication record ▪
dropper or appropriate-sized syringe ▪ emesis basin ▪ facial
tissues ▪ Optional: pillow, small piece of plastic tubing,
atomization device, gloves.
For nasal inhaler
Prescribed medication ▪ patient’s medication record ▪ facial
tissues ▪ normal saline solution (or another appropriate
solution) ▪ Optional: gloves, emesis basin.
For nasal aerosol
Prescribed medication ▪ patient’s medication record ▪
Optional: pillow, gloves.
Implementation
■ Avoid distractions and interruptions when preparing and
administering
medications
to prevent
medication
administration errors.4,5
■ Verify the order on the patient’s medication record by
checking it against the practitioner’s order.6,7,8,9
■ Reconcile the patient’s medications when a new
medication is ordered to reduce the risk of medication
errors, including omissions, duplications, dosing errors, and
drug interactions.
■ Gather the prescribed medication and appropriate
equipment.
■ Compare the medication label with the practitioner’s
order to verify the correct medication, indication, dose,
route, and time of administration.6,7,8,9 Verify the correct
concentration of the medication. Phenylephrine, for
example, is available in concentrations from 0.125% to 1%.
■ Check the expiration date on the medication. If the
medication is expired, return it to the pharmacy and obtain
new medication.6,7,8,9
■ Check the patient’s medical record for an allergy or other
contraindication to the prescribed medication. If an allergy
or other contraindication exists, don’t administer the
medication; instead, notify the practitioner.6,7,8,9
■ Visually inspect the medication for discoloration or other
loss of integrity. Don’t give the medication if its integrity is
compromised.6,7,8,9
■ Discuss any unresolved concerns about the medication
with the patient’s practitioner.6,7,8,9
■ Perform hand hygiene.10,11,12,13,14,15
■ Confirm the patient’s identity using at least two patient
identifiers.16
■ Provide privacy.17,18,19,20
■ Explain the procedure to the patient and family (if
appropriate) according to their individual communication
and learning needs to increase their understanding, allay
their fears, and enhance cooperation.21
■ If the patient is receiving the medication for the first time,
inform the patient or family about significant adverse
reactions and discuss any other concerns related to the
medication.6,7,8,9
■ Verify that the medication is being administered at the
proper time, in the prescribed dose, and by the correct route
to reduce the risk of medication errors.6,7,8,9
■ If your facility uses a bar-code technology, scan your
identification badge, the patient’s identification bracelet,
and the medication’s bar code.
■ Put on gloves, if needed, to comply with standard
precautions.22,23
■ Raise the patient’s bed to waist level when providing care
to prevent caregiver back strain.24
For nose drop instillation
■ Provide a facial tissue and ask the patient to blow the
nose before instilling nose drops, as appropriate.25
■ When possible, position the patient so that the drops flow
back into the nostrils, toward the affected area. (See
Positioning the patient for nose drop instillation, page 510.)
■ Draw the medication into the dropper or an appropriate-
sized syringe.
■ Push up the tip of the patient’s nose slightly. Position the
dropper just above the nostril, and direct its tip toward the
midline of the nose so that the drops flow toward the back
of the nasal cavity rather than down the throat.
■ Insert the dropper about 3⁄8′′ (1 cm) into the nostril. Don’t
let the dropper or syringe touch the sides of the nostril,
because this would contaminate the dropper or could cause
the patient to sneeze.
■ Instill the prescribed number of drops or milliliters,
observing the patient carefully for signs of discomfort.
■ To prevent the drops from leaking out of the nostrils, ask
the patient to keep the head tilted back for at least 5
minutes and to breathe through the mouth. This also allows
sufficient time for the medication to constrict mucous
membranes.
■ Keep an emesis basin handy so that the patient can
expectorate any medication that flows into the oropharynx
and mouth. Use a facial tissue to wipe any excess
medication from the patient’s nostrils and face.
■ If used, clean the dropper by separating the plunger and
pipette and flushing them with warm water. Allow them to
air-dry.
For nasal inhaler
■ Agitate the contents of the medication bottle for aqueous
spray inhalers, as directed. Follow the manufacturer’s
instructions for loading and activating dry-powdered
inhalers.26
■ Remove the protective cap from the applicator tip.
■ Have the patient tilt the head slightly forward.
■ Tell the patient to keep the medication container upright
and to place the applicator tip into one nostril, pointing it
slightly away from the nasal septum, while occluding the
other nostril with a finger.
■ For aqueous spray inhalers, instruct the patient to place
the thumb at the bottom of the bottle and the middle and
index fingers on either side of the spray tip, and then to
press down firmly and quickly on the inhaler while inhaling
deeply with the mouth closed.27 For a dry-powder inhaler,
instruct the patient to breathe in quickly and forcefully to
release a premeasured, loaded dose of medication.26
■ Tell the patient to remove the inhaler from the nostril and
to hold the breath for a few seconds.
■ Have the patient exhale through the mouth.
■ Have the patient repeat the procedure in the other nostril,
as directed.
■ Have the patient tilt the head back for a few seconds and
gargle with normal saline solution or water to remove the
medication from the mouth and throat. Offer the patient an
emesis basin, as needed.
■ Instruct the patient to avoid blowing the nose for 15
minutes after medication administration.
For nasal spray instillation
■ Agitate the contents of the medication container
according to the manufacturer’s instructions.
■ Remove the protective cap from the atomizer.
Positioning the patient for nose
drop instillation
To reach the ethmoid and sphenoid sinuses, have the patient lie on the back
with the neck hyperextended and the head tilted back over the edge of the
bed. Support the head with one hand to prevent neck strain.
To reach the maxillary and frontal sinuses, have the patient lie on the back
with the head toward the affected side and hanging slightly over the edge of
the bed. Ask the patient to rotate the head laterally after hyperextension,
and support the head with one hand to prevent neck strain.
To administer drops for relief of ordinary nasal congestion, help the patient
to a reclining or supine position with the head tilted slightly toward the
affected side. Aim the dropper upward, toward the patient’s eye, rather than
downward, toward the ear.
■ To prevent air from entering the nasal cavity and to allow
the medication to flow properly, occlude one of the patient’s
nostrils with your finger. Insert the atomizer tip into the
open nostril.
■ Instruct the patient to inhale with the mouth closed. As
the patient inhales, squeeze the atomizer once, quickly and
firmly. Use just enough force to coat the inside of the
patient’s nose with the medication. Then tell the patient to
exhale through the mouth.
■ If ordered, spray the nostril again. Then repeat the
procedure in the other nostril.
■ Instruct the patient to keep the head tilted back for
several minutes and to breathe slowly through the nose so
that the medication has time to work. Tell the patient to
avoid nose blowing for 15 minutes after nasal spray
instillation.
■ Keep an emesis basin handy so that the patient can
expectorate any medication that flows into the oropharynx
and mouth. Use a facial tissue to wipe any excess
medication from the patient’s nostrils and face.
Completing the procedure
■ Return the bed to the lowest position to prevent falls and
maintain patient safety.28
■ Dispose of equipment in the appropriate receptacles.29
■ Remove and discard your gloves, if worn.22,29
■ Perform hand hygiene.10,11,12,13,14,15
■ Document the procedure.30,31,32,33
Special considerations
■ To administer nasal medications more easily to a child or
uncooperative patient, attach a small piece of tubing or an
atomizer to a prefilled syringe of medication. Always follow
the manufacturer’s instructions for atomization device
use.34
■ If using a metered-dose pump spray system, prime the
delivery system with four sprays (or as directed by the
manufacturer), or until a fine mist appears. Repeat the
process to prime the system, as directed. Newer delivery
system designs may reduce the need for priming and
repriming and provide safety features to enhance dosing
control. Always follow the manufacturer’s instructions for
use.2
■ To prevent the spread of infection, label the medication
bottle so that it will be used only for that patient.35
Patient teaching
Teach the patient how to instill nasal medications correctly
so that the patient can continue treatment after discharge,
if necessary. Caution against using nasal medications longer
than prescribed, because they may cause a rebound effect
that worsens the condition. A rebound effect occurs when
the medication loses its effectiveness and relaxes the
vessels in the nasal turbinates, producing a stuffiness that
can be relieved only by discontinuing the medication. Teach
good oral and nasal hygiene.
Complications
Complications are related to the adverse effects of the
medication being administered. Use of nasal inhalers may
also dry the nasal membranes and epistaxis. Some nasal
medications may cause restlessness, palpitations,
nervousness, and other systemic effects. For example,
excessive use of corticosteroid nose drops may cause
hyperadrenocorticism and adrenal suppression. Some
medications can cause a rebound effect when used for a
longer duration than prescribed.
Documentation
Record the medication instilled and its concentration, the
number of drops or milliliters administered, and whether the
medication was instilled in one or both nostrils. Also note
the time and date of instillation and any resulting adverse
effects. If adverse reactions occurred, document any
interventions and the patient’s response to the
interventions. Document patient teaching and the patient’s
understanding of your teaching.
REFERENCES
1 GlaxoSmithKline. (2017). “Imitrex® (sumatriptan) nasal spray” [Online].
Accessed via the Web at
https://www.gsksource.com/pharma/content/dam/GlaxoSmithKline/US/en/Pres
cribing_Information/Imitrex_Nasal_Spray/pdf/IMITREX-NASAL-SPRAY-PI -PIL.PDF
2 Djupesland, G. (2013). Nasal drug delivery devices: Characteristics and
performance in a clinical perspective—A review. Drug Delivery and
Translational Research, 3(1), 42–62. Accessed via the Web at
http://link.springer.com/article/10.1007/s13346-012-0108-9
3 Bitter, C., et al. (2011). Nasal drug delivery in humans. Current Problems in
Dermatology, 40, 20–35. Accessed via the Web at
https://www.karger.com/Article/Abstract/321044
4 Westbrook, J., et al. (2010). Association of interruptions with an increased risk
and severity of medication administration errors. Archives of Internal
Medicine, 170(8), 683–690 . (Level IV)
5 Institute for Safe Medication Practices. (2012). Side tracks on the safety
express: Interruptions lead to errors and unfinished . . . Wait, what was I
doing? Nurse Advise-ERR, 11(2), 1–4 . Accessed via the Web at
https://www.ismp.org/Newsletters/acutecare/showarticle.aspx?id=37
6 The Joint Commission. (2019). Standard MM.06 .01.01. Comprehensive
accreditation manual for hospitals. Oakbrook Terrace, IL: The Joint
Commission. (Level VII)
7 Accreditation Association for Hospitals and Health Systems. (2017). Standard
16.01.03. Healthcare Facilities Accreditation Program: Accreditation
requirements for acute care hospitals. Chicago, IL: Accreditation Association
for Hospitals and Health Systems. (Level VII)
8 Centers for Medicare and Medicaid Services, Department of Health and
Human Services. (2015). Condition of participation: Nursing services. 42
C.F.R. § 482.23(c).
9 DNV GL-Healthcare USA, Inc. (2016). MM .1 .SR.2 . NIAHO® accreditation
requirements: Interpretive guidelines & surveyor guidance (version 11).
Milford, OH: DNV GL-Healthcare USA, Inc. (Level VII)
10 The Joint Commission. (2019). Standard NPSG.07.01.01. Comprehensive
accreditation manual for hospitals. Oakbrook Terrace, IL: The Joint
Commission. (Level VII)
11 Centers for Disease Control and Prevention. (2002). Guideline for hand
hygiene in health-care settings: Recommendations of the Healthcare Infection
Control Practices Advisory Committee and the HICPAC/SHEA/APIC/IDSA Hand
Hygiene Task Force. MMWR Recommendations and Reports, 51(RR-16), 1–45.
Accessed July 2017 via the Web at
https://www.cdc.gov/mmwr/pdf/rr/rr5116.pdf (Level II)
12 World Health Organization. (2009). “WHO guidelines on hand hygiene in
health care: First global patient safety challenge, clean care is safer care”
[Online]. Accessed via the Web at
http://apps.who.int/iris/bitstream/10665/44102/1/9789241597906_eng.pdf
(Level IV)
13 Accreditation Association for Hospitals and Health Systems. (2017). Standard
07.01.21. Healthcare Facilities Accreditation Program: Accreditation
requirements for acute care hospitals. Chicago, IL: Accreditation Association
for Hospitals and Health Systems. (Level VII)
14 Centers for Medicare and Medicaid Services, Department of Health and
Human Services. (2015). Condition of participation: Infection control. 42 C.F.R.
§ 482.42.
15 DNV GL-Healthcare USA, Inc. (2016). IC.1 .SR.1 . NIAHO® accreditation
requirements: Interpretive guidelines & surveyor guidance (version 11).
Milford, OH: DNV GL-Healthcare USA, Inc. (Level VII)
16 The Joint Commission. (2019). Standard NPSG.01.01.01. Comprehensive
accreditation manual for hospitals. Oakbrook Terrace, IL: The Joint
Commission. (Level VII)
17 Accreditation Association for Hospitals and Health Systems. (2017). Standard
15.01.16. Healthcare Facilities Accreditation Program: Accreditation
requirements for acute care hospitals. Chicago, IL: Accreditation Association
for Hospitals and Health Systems. (Level VII)
18 Centers for Medicare and Medicaid Services, Department of Health and
Human Services. (2015). Condition of participation: Patient’s rights. 42 C.F.R.
§ 482.13(c)(1).
19 DNV GL-Healthcare USA, Inc. (2016). PR.1.SR.5 . NIAHO® accreditation
requirements: Interpretive guidelines & surveyor guidance (version 11).
Milford, OH: DNV GL-Healthcare USA, Inc. (Level VII)
20 The Joint Commission. (2019). Standard RI.01.01.01. Comprehensive
accreditation manual for hospitals. Oakbrook Terrace, IL: The Joint
Commission. (Level VII)
21 The Joint Commission. (2019). Standard PC.02.01.21. Comprehensive
accreditation manual for hospitals. Oakbrook Terrace, IL: The Joint
Commission. (Level VII)
22 Siegel, J. D ., et al. (2007, revised 2017). “2007 guideline for isolation
precautions: Preventing transmission of infectious agents in healthcare
settings” [Online]. Accessed via the Web at
https://www.cdc.gov/infectioncontrol/pdf/guidelines/isolation-guidelines.pdf
(Level II)
23 Accreditation Association for Hospitals and Health Systems. (2017). Standard
07.01.10. Healthcare Facilities Accreditation Program: Accreditation
requirements for acute care hospitals. Chicago, IL: Accreditation Association
for Hospitals and Health Systems. (Level VII)
24 Waters, T. R., et al. (2009). “Safe patient handling training for schools of
nursing” [Online]. Accessed via the Web at
https://www.cdc.gov/niosh/docs/2009-127/pdfs/2009-127.pdf (Level VII)
25 Taylor, C., et al. (2015). Fundamentals of nursing: The art and science of
nursing care (8th ed.). Philadelphia, PA: Wolters Kluwer.
26 AstraZeneca. (2015). “Rhinocort® Turbuhaler®” [Online]. Accessed via the
Web at https://www.astrazeneca.ca/content/dam/az-
ca/downloads/productinformation/RHINOCORT%20TURBUHALER%20-
%20Product-Monograph.pdf
27 Merck and Co., Inc. (2013). “Nasonex®: Patient information” [Online].
Accessed via the Web at
https://www.merck.com/product/usa/pi_circulars/n/nasonex/nasonex_ppi.pdf
28 Ganz, D. A., et al. (2013). Preventing falls in hospitals: A toolkit for improving
quality of care (AHRQ Publication No. 13-0015-EF). Rockville, MD: Agency for
Healthcare Research and Quality. Accessed via the Web at
https://www.ahrq.gov/sites/default/files/publications/files/fallpxtoolkit.pdf
(Level VII)
29 Occupational Safety and Health Administration. (n.d .). “Bloodborne
pathogens, standard number 1910.1030” [Online]. Accessed via the Web at
https://www.osha.gov/pls/oshaweb/owadisp.show_document?
p_id=10051&p_table=STANDARDS (Level VII)
30 The Joint Commission. (2019). Standard RC.01.03 .01. Comprehensive
accreditation manual for hospitals. Oakbrook Terrace, IL: The Joint
Commission. (Level VII)
31 Accreditation Association for Hospitals and Health Systems. (2017). Standard
10.00 .03. Healthcare Facilities Accreditation Program: Accreditation
requirements for acute care hospitals. Chicago, IL: Accreditation Association
for Hospitals and Health Systems. (Level VII)
32 Centers for Medicare and Medicaid Services, Department of Health and
Human Services. (2015). Condition of participation: Medical record services.
42 C.F.R. § 482.24(b).
33 DNV GL-Healthcare USA, Inc. (2016). MR.2 .SR.1 . NIAHO® accreditation
requirements: Interpretive guidelines & surveyor guidance (version 11).
Milford, OH: DNV GL-Healthcare USA, Inc. (Level VII)
34 Teleflex Incorporated. (2013). “Using the LMA® MAD NasalTM Intranasal
Mucosal Atomization Device” [Online]. Accessed via the Web at
http://www.teleflex.com/en/usa/productAreas/ems/documents/AN_ATM _MAD-
Nasal-Usage_Guide_AI _2012-1528.pdf
35 Accreditation Association for Hospitals and Health Systems. (2017). Standard
25.01.18. Healthcare Facilities Accreditation Program: Accreditation
requirements for acute care hospitals. Chicago, IL: Accreditation Association
for Hospitals and Health Systems. (Level VII)
NASAL PACKING, ASSISTING
In the highly vascular nasal mucosa, even seemingly minor
injuries can cause major bleeding and blood loss. Initial
treatment begins with ensuring a secure airway and
hemodynamic stability.
Most nasal bleeding originates at a plexus of arterioles
and venules in the anteroinferior septum. About 90% of
nosebleeds are anterior and can be controlled by pinching
the anterior aspect of the nose.1,2 Initially, direct pressure is
applied for about 20 minutes. When direct pressure alone
doesn’t stop bleeding, topical vasoconstrictive drugs such
as oxymetazoline or chemical cautery with silver nitrate
sticks may be effective. Silver nitrate sticks are rolled over
the area for 5 to 10 seconds until a gray eschar forms; then
antibiotic ointment is applied to the area.1
If these steps are unsuccessful, nasal packing is typically
the next step for persistent bleeding from epistaxis
(nosebleed).1,3 The patient may have to undergo nasal
packing to stop anterior bleeding (which runs out of the
nose) or posterior bleeding (which runs down the throat). If
blood drains into the nasopharyngeal area or lacrimal ducts,
the patient may also appear to bleed from the mouth and
eyes. Only about 1 in 10 nosebleeds occurs in the posterior
nose, which usually bleeds more heavily than the anterior
location.4 Posterior nasal packing is contraindicated in
patients with facial trauma. If the patient can’t protect the
airway because of shock, altered mental status, or another
condition, the airway should be secured before posterior
nasal packing insertion.1
The nurse typically assists a practitioner with anterior or
posterior nasal packing. Commercially available balloons are
relatively easy to insert and quite effective for anterior
bleeding.1 Whichever procedure is used, the patient will
need ongoing encouragement and support to reduce
discomfort and anxiety, as well as ongoing assessment to
determine whether the procedure succeeded and to detect
possible complications.
Equipment
Gowns ▪ mask and goggles or mask with face shield ▪
gloves ▪ drape ▪ emesis basin ▪ nasal speculum ▪ light
source (such as headlamp or fiberoptic nasal endoscope) ▪
suction apparatus ▪ normal saline solution ▪ prescribed
anesthetic agent ▪ cotton balls or gauze pad ▪ nasal balloon
device or nasal tampon ▪ vital signs monitoring equipment
▪ disinfectant pad ▪ oral care supplies ▪ stethoscope ▪ tape
▪ pulse oximeter and probe ▪ sterile nasal aspirator tip ▪
nasal speculum and tongue blades (may be in a
preassembled head and neck kit) ▪ vial of 2% lidocaine ▪
sterile normal saline solution (1-g container and 60-mL
syringe with Luer-lock tip or 5-mL bullets for moistening
nasal tampons) ▪ posterior packing materials4 for gauze
method (silk suture material, 0 gauge; gauze squares, 4′′ ×
4′′ [10-cm × 10-cm]; two #14 or #16 French catheters with
30-mL balloon [Foley or some other type; balloon not to be
inflated]) ▪ posterior packing materials4 for balloon method
(commercially produced double-balloon tampon or Foley
catheter, #10 to #14 French with a 30-mL balloon [balloon
to be inflated], 10-mL syringe) ▪ Kelly clamp or Bayonet
forceps ▪ antibiotic ointment ▪ prescribed medications ▪
Optional: epistaxis tray, 20-mL syringe, prescribed sedative,
supplemental humidified oxygen and face mask, supplies for
blood sampling, sterile water, water-soluble lubricant or
antibiotic ointment, facial tissues, prescribed medications,
flashlight, tongue blade, syringe, hemostat, 10-mL syringe,
topical nasal vasoconstrictor (such as 0.5% phenylephrine).
Inserting posterior nasal packing
Posterior packing consists of a gauze roll shaped and secured by three
sutures (one suture at each end and one in the middle), or a balloon-type
catheter. To insert the packing, the practitioner advances one or two soft
catheters into the patient’s nostrils (as shown below). When the catheter tips
appear in the nasopharynx, the practitioner grasps them with a Kelly clamp
or bayonet forceps and pulls them forward through the mouth. The
practitioner secures the two end sutures to the catheter tip and draws the
catheter back through the nostrils. This step brings the packing into place
with the end sutures hanging from the patient’s nostril. (The middle suture
emerges from the patient’s mouth to free the packing, when needed.)
The practitioner may weigh the nose sutures with a clamp. Then the
practitioner will pull the packing securely into place behind the soft palate
and against the posterior end of the septum (nasal choana).
Secure the strings to the patient’s face with tape to prevent migration or
aspiration of the packing.29
Preparation of equipment
Inspect all equipment and supplies; if a product is expired, if
its integrity is compromised, or if it’s defective, remove it
from patient use, label it as expired or defective, and report
the expiration or defect as directed by your facility.
Make sure that the light source functions properly,
because good lighting is essential.3 Prepare the suction
equipment and make sure that it’s functioning properly.
Have normal saline solution readily available to flush the
suction tubing, as needed.
Implementation
■ Gather and prepare all the necessary equipment at the
patient’s bedside.
■ Perform hand hygiene.5,6,7,8,9,10
■ Confirm the patient’s identity using at least two patient
identifiers.11
■ Provide privacy.12,13,14,15
■ Explain the procedure to the patient and family (if
appropriate) according to their individual communication
and learning needs to increase their understanding, allay
their fears, and enhance cooperation.16
■ Raise the patient’s bed to waist level when providing care
to prevent caregiver back strain.17
■ Perform hand hygiene.5,6,7,8,9,10
■ Obtain the patient’s vital signs, and observe for
hypotension with postural changes. Hypotension and
tachycardia suggest significant blood loss.
■ Obtain the patient’s oxygen saturation level using pulse
oximetry.
■ Monitor airway patency and provide the patient with an
emesis basin, because the patient will be at risk for
aspirating or vomiting swallowed blood.
■ Screen and assess the patient’s pain using facility-defined
criteria that are consistent with the patient’s age, condition,
and ability to understand.18
■ Treat the patient’s pain, as needed and ordered, using
nonpharmacologic or pharmacologic approaches, or a
combination of approaches. Base the treatment plan on
evidence-based practices and the patient’s clinical
condition, past medical history, and pain management
goals.18 Monitor the patient closely if identified at high risk
for adverse outcomes related to opioid treatment, if opioids
are prescribed.18
■ If ordered, administer a mild sedative, following safe
medication administration practices, to reduce the patient’s
anxiety and decrease sympathetic stimulation, which can
exacerbate a nosebleed.1,19,20,21,22
■ Perform hand hygiene.5,6,7,8,9,10
■ Put on gloves, a gown, and a mask and goggles or a mask
with face shield to comply with standard
precautions.23,24,25,26
■ Help the patient sit with the head tilted forward to
minimize blood drainage into the throat and prevent
aspiration.3
■ Drape the patient as necessary.
■ Make sure the suction regulator is turned on, and attach
the connecting tubing so the practitioner can aspirate the
nasal cavity to remove clots before locating the bleeding
source.
■ At the bedside, create a sterile field using no-touch sterile
technique. Open and place all sterile equipment on the
sterile field including the sterile nasal aspirating tip. Label
all medications, medication containers, and solutions on and
off the sterile field.27 Thoroughly lubricate the posterior
packing with antibiotic ointment, as ordered.4 Alternatively,
the practitioner will lubricate the catheters.
■ To inspect the nasal cavity, the practitioner will use a
nasal speculum and an external light source such as a
headlamp or a fiberoptic nasal endoscope. To remove
collected blood and help visualize the bleeding vessel, the
practitioner may ask the patient to blow the nose, or the
practitioner may use suction.1,3 The practitioner may treat
the nose early with a vasoconstrictor, such as
phenylephrine, to slow bleeding and aid visualization.28
■ Instruct the patient to open and breathe normally through
the mouth during catheter insertion to minimize gagging as
the catheters pass through the nostril.
■ Assist with administering an anesthetic agent, if needed.
The practitioner may add 2% lidocaine to a topical nasal
vasoconstrictor and have the patient inhale it.4
■ Prepare to assist the practitioner with insertion of
packing, as directed. (See Inserting posterior nasal packing,
and Inserting anterior nasal packing.)
■ After insertion, help the patient assume a comfortable
position with head elevated 45 to 90 degrees. Assess for
airway obstruction or any respiratory changes.4
■ Monitor the patient’s vital signs to detect changes in
condition.
■ Monitor the patient’s respiratory status to make sure the
airway is patent; monitor oxygen saturation level by pulse
oximetry to detect hypoxemia. Make sure that the alarm
limits are set appropriately for the patient’s current
condition and that the alarms are turned on, functioning
properly, and audible to staff.31,32,33,34
■ Administer supplemental humidified oxygen by face
mask, as needed and ordered.
■ Provide emotional support, because mouth breathing,
which is necessary with the packing in place, may cause
anxiety and hyperventilation.
■ If severe or recurrent bleeding or an underlying medical
condition is present, obtain a blood sample for complete
blood count and blood compatibility testing, as ordered. If
the patient has renal or hepatic dysfunction, or if the patient
was taking an anticoagulant, obtain a specimen for
coagulation studies, as ordered.1 Notify the practitioner of
critical test results within your facility’s established
timeframe so the patient can receive prompt treatment.35
■ Check the posterior oropharynx frequently to see whether
there’s bleeding into the back of the throat or whether the
packing has slipped out of position.
Inserting anterior nasal packing
If bleeding persists despite chemical cautery, assist the practitioner with
insertion of nasal packing to stop the bleeding. You may use a commercially
available inflatable balloon or nasal tampon to pack the area.
Inflatable balloon device
An inflatable balloon device has a balloon that’s coated with a
carboxymethylcellulose hydrocolloid compound that acts as a platelet
aggregator. The substance also creates a lubricant when it comes in contact
with water to ease insertion. After soaking the device in sterile water, the
practitioner inserts the device along the superior aspect of the hard palate
until the fabric ring is well into the naris (as shown below). Then, using a 20-
mL syringe, the practitioner inflates the balloon until the pilot cuff becomes
rounded and feels firm when squeezed.1
Reassess the device 15 to 20 minutes after insertion. If necessary, reinflate
the cuff to ensure proper pressure. Tape the pilot balloon to the patient’s
cheek away from the upper lip. The device can remain in place for up to 72
hours, as needed.30
Nasal tampon
To insert a nasal tampon, after coating the tampon with water-soluble
lubricant or antibiotic ointment, as prescribed, the practitioner grabs the
string end with gloved fingers or forceps. The practitioner inserts the tampon
gently and quickly along the floor of the nasal cavity until the string reaches
the naris (as shown below).3
If the tampon doesn’t expand within 30 seconds of insertion, the
practitioner irrigates it with 10 mL of saline solution or water so that the
tampon expands. Tape the string to the patient’s nose to secure the device in
place and trim the ends of the string, if necessary.
■ Maintain the head of the bed at 30 degrees or higher.3
■ Because a patient with nasal packing must breathe
through the mouth, provide frequent oral care. Artificial
saliva, room humidification, and ample fluid intake also
relieve dryness caused by mouth breathing.
■ As ordered, administer an analgesic, antiemetic,
decongestant, sedative, and prophylactic antibiotic following
safe medication administration practices.1,19,20,21,22,28
■ Reassess and respond to the patient’s pain by evaluating
the response to treatment and progress toward pain
management goals. Assess for adverse reactions and risk
factors for adverse events that may result from treatment.18
■ Return the patient’s bed to the lowest position to prevent
falls and maintain patient safety.36
■ Discard used supplies in the appropriate receptacle.24
■ Remove and discard your gloves and other personal
protective equipment.23,24
■ Perform hand hygiene.5,6,7,8,9,10
■ Clean and disinfect your stethoscope using a disinfectant
pad.37,38
■ Perform hand hygiene.5,6,7,8,9,10
■ Document the procedure.39,40,41,42
Special considerations
■ Assist the practitioner, as required, in the balloon
catheter method of posterior nasal packing insertion. If
using a commercially produced double-balloon tampon,
inflate the balloons according to the manufacturer’s
instructions.30 If using a Foley catheter, inflate the balloon
with up to 10 mL of sterile water. (Don’t inflate the balloon
to its full 30-mL capacity.)3
■ If mucosal oozing persists, apply a moustache dressing by
securing a folded gauze pad over the nasal vestibules with
tape or a commercial nasal dressing holder. Change the pad
when soiled.
■ Keep emergency equipment (flashlight, tongue blade,
syringe, and hemostats) at the patient’s bedside to speed
packing removal if it becomes displaced and occludes the
airway.
■ After the packing is in place, compile assessment data
carefully to help detect the underlying cause of nosebleeds.
Mechanical factors include a deviated septum, injury, and a
foreign body. Environmental factors include drying and
erosion of the nasal mucosa. Other possible causes include
upper respiratory tract infection, anticoagulant or salicylate
therapy, blood dyscrasias, cardiovascular or hepatic
disorders, tumors of the nasal cavity or paranasal sinuses,
chronic nephritis, and familial hemorrhagic telangiectasia.
■ If significant blood loss occurs or if the underlying cause
remains unknown, expect the practitioner to order a
complete blood count and type and crossmatch profile as
soon as possible. A coagulation profile (prothrombin time
and International Normalized Ratio) may also be ordered,
especially in patients who are anticoagulated.2 Blood
transfusion may be necessary.
■ The patient should remain on modified bed rest until
removal of the pack.3 The practitioner will usually remove
nasal packing in 2 to 5 days.
■ The Joint Commission issued a sentinel event alert
concerning medical device alarm safety, because alarm-
related events have been associated with permanent loss of
function or death. Among the major contributing factors
were improper alarm settings, alarms inappropriately turned
off, and alarm signals not audible to staff. Make sure alarm
limits are set appropriately, and that alarms are turned on,
functioning properly, and audible to staff. Follow facility
guidelines for preventing alarm fatigue.31
PATIENT TEACHING
Preventing recurrent nosebleeds
Review these self-care guidelines with your patient to reduce the patient’s
risk of developing recurrent nosebleeds.
■ Because nosebleeds can result from dry mucous membranes, suggest that
the patient use a cool mist vaporizer or humidifier, as needed, especially in
dry environments.
■ Teach the patient how to minimize pressure on nasal passages. Advise, for
instance, to avoid constipation and consequent straining during defecation.
Recommend a fiber-rich diet and adequate fluid intake, and warn the patient
to avoid extreme physical exertion for 24 hours after the nosebleed stops.
Caution the patient to avoid aspirin, nonsteroidal anti-inflammatory drugs,
alcoholic beverages, and tobacco for at least 5 days.
■ If the patient gets a nosebleed despite these precautions, tell the patient
to keep the head higher than the heart and, using the thumb and forefinger,
to press the soft portion of the nostrils together and against the facial bones.
(Recommend against direct pressure if the patient has a facial injury or nasal
fracture.) Tell the patient to maintain pressure for up to 10 minutes and then
to reassess bleeding. If it’s uncontrolled, the patient should reapply pressure
for another 10 minutes with ice between the thumb and forefinger.
■ After a nosebleed or after nasal packing is removed, caution the patient to
avoid rubbing or picking the nose, putting a handkerchief or tissue in the
nose, or blowing the nose forcefully for at least 48 hours. After this time, the
patient may blow the nose gently and use salt-water nasal spray to clear
nasal clots.
Patient teaching
Advise the patient to eat soft foods, because nasal packing
can impair the ability to eat and swallow. Instruct the
patient to drink fluids often or to use artificial saliva to cope
with dry mouth. Teach the patient measures to prevent
nosebleeds, and instruct the patient to seek medical help if
these measures fail to stop bleeding. (See Preventing
recurrent nosebleeds.)
Complications
The pressure of a posterior pack on the soft palate may lead
to hypoxemia. Patients with posterior packing are at special
risk for aspiration of blood. Patients with underlying
pulmonary conditions, such as chronic obstructive
pulmonary disease and asthma, are at special risk for
exacerbation of the condition or for hypoxemia while nasal
packing is in place. Airway obstruction may occur if a
posterior pack slips backward. Other possible complications
include otitis media, hematotympanum (blood in the middle
ear) and pressure necrosis of nasal structures, especially the
septum. Bradyarrhythmias can develop because of
stimulation of the posterior oropharynx related to the
packing.3 Sedation may cause hypotension in a patient with
significant blood loss and may also increase the patient’s
risk of aspiration and hypoxemia.
Documentation
Record the type of pack used to ensure its removal at the
appropriate time. On the intake-and-output record,
document the estimated blood loss and all fluid
administered. Note the patient’s vital signs and oxygen
saturation; the results of any laboratory tests; all drugs
administered, including topical agents; and the patients
response to sedation, analgesics, and position changes.
Record any complications that occur and interventions
taken. Also document patient teaching, discharge
instructions, and the clinical follow-up plan, the patient’s
understanding of this information, and whether the patient
requires follow-up teaching.
REFERENCES
1 ACEP Now. (2009). “Treatment of epistaxis” [Online]. Accessed via the Web at
http://www.acepnow.com/article/treatment-epistaxis
2 Alter, H. Approach to the adult with epistaxis. (2017). In: UpToDate, Wolfson,
A. B., et al. (Eds.). Retrieved from: www.uptodate.com
3 Goralnick, E. (2017). “Anterior nasal packing for epistaxis” [Online]. Accessed
via the Web at http://emedicine.medscape.com/article/80526-overview
4 Goralnick, E. (2016). “Posterior epistaxis nasal pack” [Online]. Accessed via
the Web at http://emedicine.medscape.com/article/80545-overview
5 Centers for Disease Control and Prevention. (2002). Guideline for hand
hygiene in health-care settings: Recommendations of the Healthcare Infection
Control Practices Advisory Committee and the HICPAC/SHEA/APIC/IDSA Hand
Hygiene Task Force. MMWR Recommendations and Reports, 51(RR-16), 1–45.
Accessed via the Web at https://www.cdc.gov/mmwr/pdf/rr/rr5116.pdf (Level
II)
6 World Health Organization. (2009). “WHO guidelines on hand hygiene in
health care: First global patient safety challenge, clean care is safer care”
[Online]. Accessed via the Web at
http://apps.who.int/iris/bitstream/10665/44102/1/9789241597906_eng.pdf
(Level IV)
7 The Joint Commission. (2019). Standard NPSG.07.01.01. Comprehensive
accreditation manual for hospitals. Oakbrook Terrace, IL: The Joint
Commission. (Level VII)
8 Centers for Medicare and Medicaid Services, Department of Health and
Human Services. (2015). Condition of participation: Infection control. 42 C.F.R.
§ 482.42.
9 Accreditation Association for Hospitals and Health Systems. (2017). Standard
07.01.21. Healthcare Facilities Accreditation Program: Accreditation
requirements for acute care hospitals. Chicago, IL: Accreditation Association
for Hospitals and Health Systems. (Level VII)
10 DNV GL-Healthcare USA, Inc. (2016). IC.1 .SR.1 . NIAHO® accreditation
requirements: Interpretive guidelines & surveyor guidance (version 11).
Milford, OH: DNV GL-Healthcare USA, Inc. (Level VII)
11 The Joint Commission. (2019). Standard NPSG.01.01.01. Comprehensive
accreditation manual for hospitals. Oakbrook Terrace, IL: The Joint
Commission. (Level VII)
12 The Joint Commission. (2019). Standard RI.01.01.01. Comprehensive
accreditation manual for hospitals. Oakbrook Terrace, IL: The Joint
Commission. (Level VII)
13 Centers for Medicare and Medicaid Services, Department of Health and
Human Services. (2015). Condition of participation: Patient’s rights. 42 C.F.R.
§ 482.13(c)(1).
14 Accreditation Association for Hospitals and Health Systems. (2017). Standard
15.01.16. Healthcare Facilities Accreditation Program: Accreditation
requirements for acute care hospitals. Chicago, IL: Accreditation Association
for Hospitals and Health Systems. (Level VII)
15 DNV GL-Healthcare USA, Inc. (2016). PR.1.SR.5 . NIAHO® accreditation
requirements: Interpretive guidelines & surveyor guidance (version 11).
Milford, OH: DNV GL-Healthcare USA, Inc. (Level VII)
16 The Joint Commission. (2019). Standard PC.02.01.21. Comprehensive
accreditation manual for hospitals. Oakbrook Terrace, IL: The Joint
Commission. (Level VII)
17 Waters, T. R., et al. (2009). “Safe patient handling training for schools of
nursing” [Online]. Accessed via the Web at
http://www.cdc.gov/niosh/docs/2009-127/pdfs/2009-127.pdf (Level VII)
18 The Joint Commission. (2019). Standard PC.01.02.07. Comprehensive
accreditation manual for hospitals. Oakbrook Terrace, IL: The Joint
Commission. (Level VII)
19 Centers for Medicare and Medicaid Services, Department of Health and
Human Services. (2015). Condition of participation: Nursing services. 42
C.F.R. § 482.23(c).
20 Accreditation Association for Hospitals and Health Systems. (2017). Standard
16.01.03. Healthcare Facilities Accreditation Program: Accreditation
requirements for acute care hospitals. Chicago, IL: Accreditation Association
for Hospitals and Health Systems. (Level VII)
21 The Joint Commission. (2019). Standard MM.06.01.01. Comprehensive
accreditation manual for hospitals. Oakbrook Terrace, IL: The Joint
Commission. (Level VII)
22 DNV GL-Healthcare USA, Inc. (2016). MM.1 .SR.2. NIAHO® accreditation
requirements: Interpretive guidelines & surveyor guidance (version 11).
Milford, OH: DNV GL-Healthcare USA, Inc. (Level VII)
23 Siegel, J. D ., et al. (2007, revised 2017). “2007 guideline for isolation
precautions: Preventing transmission of infectious agents in healthcare
settings” [Online]. Accessed via the Web at
https://www.cdc.gov/infectioncontrol/pdf/guidelines/isolation-guidelines.pdf
(Level II)
24 Occupational Safety and Health Administration. (n.d .). “Bloodborne
pathogens, standard number 1910.1030” [Online]. Accessed via the Web at
https://www.osha.gov/pls/oshaweb/owadisp.show_document?
p_id=10051&p_table=STANDARDS (Level VII)
25 Accreditation Association for Hospitals and Health Systems. (2017). Standard
07.01.10. Healthcare Facilities Accreditation Program: Accreditation
requirements for acute care hospitals. Chicago, IL: Accreditation Association
for Hospitals and Health Systems. (Level VII)
26 DNV GL-Healthcare USA, Inc. (2016). IC.1 .SR.2 . NIAHO® accreditation
requirements: Interpretive guidelines & surveyor guidance (version 11).
Milford, OH: DNV GL-Healthcare USA, Inc. (Level VII)
27 The Joint Commission. (2019). Standard NPSG.03 .04.01. Comprehensive
accreditation manual for hospitals. Oakbrook Terrace, IL: The Joint
Commission. (Level VII)
28 Nguyen, Q. A. (2017). “Epistaxis treatment and management” [Online].
Accessed via the Web at http://emedicine.medscape.com/article/863220-
treatment
29 Killick, N., et al. (2014). Nasal packing for epistaxis: An evidence-based
review. British Journal of Hospital Medicine, 75(3), 143–147 . (Level V)
30 Smith & Nephew, Inc. (2015). “Rapid Rhinoepistaxis products” [Online].
Accessed via the Web at http://www.smith-
nephew.com/global/ent/rr_epistaxis_solutions_brochure_rr117l.pdf
31 The Joint Commission. (2013). “Sentinel event alert: Medical device alarm
safety in hospitals” [Online]. Accessed via the Web at
https://www.jointcommission.org/assets/1/6/SEA_50_alarms_4 _26_16.pdf
(Level VII)
32 The Joint Commission. (2019). Standard NPSG.06 .01.01. Comprehensive
accreditation manual for hospitals. Oakbrook Terrace, IL: The Joint
Commission. (Level VII)
33 Graham, K. C., & Cvach, M. (2010). Monitor alarm fatigue: Standardizing use
of physiological monitors and decreasing nuisance alarms. American Journal
of Critical Care, 19(1), 28–37. Accessed via the Web at
http://ajcc.aacnjournals.org/content/19/1/28.full.pdf
34 American Association of Critical-Care Nurses. (2013). “A ACN practice alert:
Alarm management” [Online]. Accessed via the Web at
https://www.aacn.org/aacn-website/shared/content/practice-
alerts/2015/11/25/alarm-management (Level VII)
35 The Joint Commission. (2019). Standard NSPG.02.03 .01. Comprehensive
accreditation manual for hospitals. Oakbrook Terrace, IL: The Joint
Commission. (Level VII)
36 Ganz, D. A., et al. (2013). Preventing falls in hospitals: A toolkit for improving
quality of care (AHRQ Publication No. 13-0015-EF). Rockville, MD: Agency for
Healthcare Research and Quality. Accessed via the Web at
https://www.ahrq.gov/sites/default/files/publications/files/fallpxtoolkit_0 .pdf
(Level VII)
37 Rutala, W. A., et al. (2008, revised 2017). “Guideline for disinfection and
sterilization in healthcare facilities, 2008” [Online]. Accessed via the Web at
https://www.cdc.gov/infectioncontrol/pdf/guidelines/disinfection-
guidelines.pdf (Level I)
38 Accreditation Association for Hospitals and Health Systems. (2017). Standard
07.02.03. Healthcare Facilities Accreditation Program: Accreditation
requirements for acute care hospitals. Chicago, IL: Accreditation Association
for Hospitals and Health Systems. (Level VII)
39 The Joint Commission. (2019). Standard RC.01.03 .01. Comprehensive
accreditation manual for hospitals. Oakbrook Terrace, IL: The Joint
Commission. (Level VII)
40 Centers for Medicare and Medicaid Services, Department of Health and
Human Services. (2015). Condition of participation: Medical record services.
42 C.F.R. § 482.24(b).
41 Accreditation Association for Hospitals and Health Systems. (2017). Standard
10.00 .03. Healthcare Facilities Accreditation Program: Accreditation
requirements for acute care hospitals. Chicago, IL: Accreditation Association
for Hospitals and Health Systems. (Level VII)
42 DNV GL-Healthcare USA, Inc. (2016). MR.2 .SR.1 . NIAHO® accreditation
requirements: Interpretive guidelines & surveyor guidance (version 11).
Milford, OH: DNV GL-Healthcare USA, Inc. (Level VII)
NASOENTERIC-DECOMPRESSION TUBE CARE
A nasoenteric-decompression tube is used to aspirate
intestinal contents for analysis and to treat intestinal
obstruction or a GI fistula.1 The tube may also help to
prevent nausea, vomiting, and abdominal distention after GI
surgery.
The patient with a nasoenteric-decompression tube needs
special care, including precise intake-and-output records as
well as continuous monitoring to ensure tube patency,
maintain suction and bowel decompression, and detect such
complications as fluid and electrolyte imbalances related to
aspiration of intestinal contents. The patient will also need
frequent mouth and nose care to provide comfort and
prevent skin breakdown, and encouragement and support
during tube insertion and removal and while the tube is in
place.
Equipment
Suction apparatus with intermittent suction capability ▪ oral
care supplies ▪ stethoscope ▪ disinfectant pad ▪
securement device or tape ▪ Optional: protective padding,
gloves, gown, mask and goggles or mask with face shield,
irrigation set, normal saline solution, blood sampling
supplies.
Preparation of equipment
Assemble the suction apparatus and set up the suction unit.
If indicated, test the unit by turning it on and placing the
end of the suction tubing in a container of water. If the
tubing draws in water, the unit works.
Implementation
■ Gather the appropriate equipment.
■ Verify X-ray confirmation of tube placement.2
■ Perform hand hygiene.3,4,5,6,7,8
■ Confirm the patient’s identity using at least two patient
identifiers.9
■ Provide privacy.10,11,12,13
■ Explain the purpose of the procedure to the patient and
family (if appropriate) according to their individual
communication and learning needs to increase their
understanding, allay their fears, and enhance cooperation.14
■ Raise the patient’s bed to waist level when performing
care to prevent caregiver back strain.15
■ Keep the head of the patient’s bed elevated at least 30
degrees; if contraindicated, consider the reverse
Trendelenburg position.16
■ Perform hand hygiene.3,4,5,6,7,8
■ Put on gloves and personal protective equipment as
needed to comply with standard precautions.17,18,19,20
■ Trace the tubing from the patient to its point of origin to
make sure that you’re accessing the correct tube.21,22
■ Assess for tube migration at least every 4 hours by
checking the external tube length or the incremental
marking at the tube’s exit site and comparing it with the
baseline.16
■ Assess the patient’s GI status at least every 4 hours and
as indicated by the patient’s condition to promptly
recognize changes in the patient’s condition.16
■ Inspect the skin under the tube by gently lifting and
repositioning it at the naris at least twice daily (but
preferably more frequently) to assess for pressure injury
formation, redistribute pressure, and decrease shear
force.23
■ Ask the patient whether the tube causes pain or
discomfort at the naris or whether the securement device or
tape feels too tight. For a patient who is unable to
communicate, observe for agitation, pulling, itching, or
grabbing, which may be a sign that the tube causes
discomfort.23
■ Clean the skin and apply fresh tape (at least daily) or a
new securement device (at least weekly according to the
manufacturer’s instructions), as needed. If the patient’s skin
is excessively oily, wipe the skin with an alcohol pad and
allow it to dry completely before applying the securement
device.24
■ Avoid securing the tube toward the top of the patient’s
head.23
■ Use protective padding under the device, if necessary, to
protect the skin from friction and pressure. Keep the skin
under the tube clean and dry.23
NURSING ALERT If the patient has fragile skin and you’re using tape
to secure the tube, use tape specifically formulated for fragile skin to
prevent skin stripping and tearing during removal.25
■ Ensure that the tube is attached to suction, as
prescribed.16 Monitor the suction device for proper
functioning.
■ Monitor the patient’s intake and output at an interval
determined by the patient’s condition and your facility. Note
the characteristics of the nasoenteric decompression tube
drainage.16 If drainage isn’t accumulating in the collection
container, suspect an obstruction in the tube. Notify the
practitioner and then irrigate the tube with the irrigation set,
as ordered, to clear the obstruction. Include the instilled
volume in the patient’s intake. Notify the practitioner if
you’re unable to establish tube patency.
■ Obtain blood samples for laboratory testing, as ordered,
to monitor fluids, electrolytes, and blood loss.26 (See the
“Venipuncture” procedure.) Notify the practitioner of critical
test results within your facility’s established time frame so
the patient can be promptly treated.27
■ Correlate the patient’s output with laboratory test results
to detect a trend toward dehydration, electrolyte imbalance,
or both.16
■ Provide oral care regularly to promote comfort and
prevent oral colonization to decrease the risk for hospital-
associated pneumonia. (See the “Oral care” procedure.)
■ Return the bed to the lowest position to prevent falls and
to maintain patient safety.28
■ Remove and discard your gloves and any other personal
protective equipment, if worn.17,18
■ Perform hand hygiene.3,4,5,6,7,8
■ Clean and disinfect your stethoscope using a disinfectant
pad.29,30
■ Perform hand hygiene.3,4,5,6,7,8
■ Document the procedure.31,32,33,34
Special considerations
■ If the tip of the balloon falls below the ileocecal valve
(confirmed by X-ray), you can’t remove the tube nasally, but
must advance it and remove it through the anus.
■ If the balloon at the end of the tube protrudes from the
anus, notify the practitioner.
■ The Joint Commission issued a sentinel event alert related
to managing risk during transition to new International
Organization for Standardization tubing standards that were
designed to prevent dangerous tubing misconnections,
which can lead to serious patient injury and death. During
the transition, make sure to trace the tubing and catheter
from the patient to the point of origin before connecting or
reconnecting any device or infusion, at any care transition
(such as a new setting or service), and as part of the hand-
off process; route tubes and catheters having different
purposes in different standardized directions; label the
tubing at the distal and proximal ends when there are
different access sites or several bags hanging; use tubing
and equipment only as intended; and store medications for
different delivery routes in separate locations.21
Complications
Complications may be mechanical, such as an obstructed or
clogged tube or tube breakage. Other complications may
include laryngospasm, aspiration, mucosal erosion and
bleeding,35 aorto-esophageal fistula, stricture formation,
throat pain, stridor, dysphagia, vocal cord paralysis, rhinitis,
and sinusitis.36 Dehydration and electrolyte imbalances can
result from the removal of body fluids and electrolytes by
suctioning. Pain, swelling, and salivary dysfunction can
signal parotitis, which occurs in dehydrated, debilitated
patients. In addition, pneumonia and intussusception of the
bowel (from the weight of the balloon) can occur.
Documentation
Document your assessment findings, the external tube
length, the condition of the patient’s naris, the volume and
characteristics of drainage, suction applied, and oral care
provided. Record any complications, the name of the
practitioner notified, and the date and time of the
notification, prescribed interventions, and the patient’s
response to those interventions. Document patient and
family teaching, their understanding of your teaching, and
whether they require follow-up teaching.
REFERENCES
1 Itkin, M., et al. (2011). Multidisciplinary practical guidelines for
gastrointestinal access for enteral nutrition and decompression from the
Society of Interventional Radiology and American Gastroenterological
Association (AGA) Institute, with endorsement by Canadian Interventional
Radiological Association (CIRA) and Cardiovascular and Interventional
Radiological Society of Europe (CIRSE). Journal of Vascular and Interventional
Radiology, 22(8), 1089–1106. Accessed via the Web at
http://www.jvir.org/article/S1051-0443(11)00850-5/pdf (Level VII)
2 American Association of Critical-Care Nurses. (2016). “AACN practice alert:
Initial and ongoing verification of feeding tube placement in adults” [Online].
Accessed via the Web at https://www.aacn.org/clinical-resources/practice-
alerts/initial-and-ongoing-verification-of-feeding-tube-placement-in-adults
(Level VII)
3 The Joint Commission. (2019). Standard NPSG.07.01.01. Comprehensive
accreditation manual for hospitals. Oakbrook Terrace, IL: The Joint
Commission. (Level VII)
4 Centers for Disease Control and Prevention. (2002). Guideline for hand
hygiene in health-care settings: Recommendations of the Healthcare Infection
Control Practices Advisory Committee and the HICPAC/SHEA/APIC/IDSA Hand
Hygiene Task Force. MMWR Recommendations and Reports, 51(RR-16), 1–45.
Accessed via the Web at https://www.cdc.gov/mmwr/pdf/rr/rr5116.pdf (Level
II)
5 World Health Organization. (2009). “WHO guidelines on hand hygiene in
health care: First global patient safety challenge, clean care is safer care”
[Online]. Accessed via the Web at
http://apps.who.int/iris/bitstream/10665/44102/1/9789241597906_eng.pdf
(Level IV)
6 Centers for Medicare and Medicaid Services, Department of Health and
Human Services. (2015). Condition of participation: Infection control. 42 C.F.R.
§ 482.42.
7 Accreditation Association for Hospitals and Health Systems. (2017). Standard
07.01.21. Healthcare Facilities Accreditation Program: Accreditation
requirements for acute care hospitals. Chicago, IL: Accreditation Association
for Hospitals and Health Systems. (Level VII)
8 DNV GL-Healthcare USA, Inc. (2016). IC.1.SR.1 . NIAHO® accreditation
requirements: Interpretive guidelines & surveyor guidance (version 11).
Milford, OH: DNV GL-Healthcare USA, Inc. (Level VII)
9 The Joint Commission. (2019). Standard NPSG.01.01.01. Comprehensive
accreditation manual for hospitals. Oakbrook Terrace, IL: The Joint
Commission. (Level VII)
10 The Joint Commission. (2019). Standard RI.01.01.01. Comprehensive
accreditation manual for hospitals. Oakbrook Terrace, IL: The Joint
Commission. (Level VII)
11 Centers for Medicare and Medicaid Services, Department of Health and
Human Services. (2015). Condition of participation: Patient’s rights. 42 C.F.R.
§ 482.13(c)(1).
12 Accreditation Association for Hospitals and Health Systems. (2017). Standard
15.01.16. Healthcare Facilities Accreditation Program: Accreditation
requirements for acute care hospitals. Chicago, IL: Accreditation Association
for Hospitals and Health Systems. (Level VII)
13 DNV GL-Healthcare USA, Inc. (2016). PR.1.SR.5 . NIAHO® accreditation
requirements: Interpretive guidelines & surveyor guidance (version 11).
Milford, OH: DNV GL-Healthcare USA, Inc. (Level VII)
14 The Joint Commission. (2019). Standard PC.02.01.21. Comprehensive
accreditation manual for hospitals. Oakbrook Terrace, IL: The Joint
Commission. (Level VII)
15 Waters, T. R., et al. (2009). “Safe patient handling training for schools of
nursing” [Online]. Accessed via the Web at
https://www.cdc.gov/niosh/docs/2009-127/pdfs/2009-127.pdf (Level VII)
16 Wiegand, D. L. (2017). AACN procedure manual for high acuity, progressive,
and critical care (7th ed.). St. Louis, MO: Elsevier.
17 Siegel, J. D ., et al. (2007, revised 2017). “2007 guideline for isolation
precautions: Preventing transmission of infectious agents in healthcare
settings” [Online]. Accessed via the Web at
https://www.cdc.gov/infectioncontrol/pdf/guidelines/isolation-guidelines.pdf
(Level II)
18 Occupational Safety and Health Administration. (n.d .). “Bloodborne
pathogens, standard number 1910.1030” [Online]. Accessed via the Web at
https://www.osha.gov/pls/oshaweb/owadisp.show_document?
p_id=10051&p_table=STANDARDS (Level VII)
19 Accreditation Association for Hospitals and Health Systems. (2017). Standard
07.01.10. Healthcare Facilities Accreditation Program: Accreditation
requirements for acute care hospitals. Chicago, IL: Accreditation Association
for Hospitals and Health Systems. (Level VII)
20 DNV GL-Healthcare USA, Inc. (2016). IC.1 .SR.2 . NIAHO® accreditation
requirements: Interpretive guidelines & surveyor guidance (version 11).
Milford, OH: DNV GL-Healthcare USA, Inc. (Level VII)
21 The Joint Commission. (2014). “Sentinel event alert: Managing risk during
transition to new ISO tubing connector standards” [Online] Accessed via the
Web at
http://www.jointcommission.org/assets/1/6/SEA_53_Connectors_8 _19_14 _final.
pdf
22 U.S . Food and Drug Administration. (n.d .). “Look. Check. Connect. Safe
medical device connections save lives” [Online]. Accessed via the Web at
https://www.fda.gov/downloads/MedicalDevices/Safety/AlertsandNotices/UCM
134873.pdf
23 Holden-Mount, S. & Sieggreen, M. (2015). “Medical device-related ulcers:
Pediatrics & adults” [Online]. Accessed via the Web at
http://www.npuap.org/wp-content/uploads/2015/02/5.- Medical-Devices-S -
Holden-Mount-and-M-Sieggreen1.pdf
24 C. R. Bard, Inc. (2010) “StatLock NG stabilization device” [Online]. Accessed
via the Web at
http://www.bardmedical.com/media/3240/StatLock%20NG%20Poster%20M10
33.pdf
25 LeBlanc, K., et al. (2013). International skin tear advisory panel: A toolkit to
aid in the prevention, assessment, and treatment of skin tears using a
simplified classification system. Advances in Skin and Wound Care, 26(10),
459–476.
26 Jackson, P. G., & Raiji, M. (2011). Evaluation and management of intestinal
obstruction. American Family Physician, 83(2), 159–165. Accessed via the
Web at http://www.aafp.org/afp/2011/0115/p159.html
27 The Joint Commission. (2019). Standard NPSG.02.03 .01. Comprehensive
accreditation manual for hospitals. Oakbrook Terrace, IL: The Joint
Commission. (Level VII)
28 Ganz, D. A., et al. (2013). Preventing falls in hospitals: A toolkit for improving
quality of care (AHRQ Publication No. 13-0015-EF). Rockville, MD: Agency for
Healthcare Research and Quality. Accessed via the Web at
https://www.ahrq.gov/sites/default/files/publications/files/fallpxtoolkit.pdf
(Level VII)
29 Rutala, W. A., et al. (2008, revised 2017). “Guideline for disinfection and
sterilization in healthcare facilities, 2008” [Online]. Accessed via the Web at
https://www.cdc.gov/hicpac/pdf/guidelines/Disinfection_Nov_2008.pdf (Level I)
30 Accreditation Association for Hospitals and Health Systems. (2017). Standard
07.02.03. Healthcare Facilities Accreditation Program: Accreditation
requirements for acute care hospitals. Chicago, IL: Accreditation Association
for Hospitals and Health Systems. (Level VII)
31 The Joint Commission. (2019). Standard RC.01.03 .01. Comprehensive
accreditation manual for hospitals. Oakbrook Terrace, IL: The Joint
Commission. (Level VII)
32 Centers for Medicare and Medicaid Services, Department of Health and
Human Services. (2015). Condition of participation: Medical record services.
42 C.F.R. § 482.24(b).
33 Accreditation Association for Hospitals and Health Systems. (2017). Standard
10.00 .03. Healthcare Facilities Accreditation Program: Accreditation
requirements for acute care hospitals. Chicago, IL: Accreditation Association
for Hospitals and Health Systems. (Level VII)
34 DNV GL-Healthcare USA, Inc. (2016). MR.2 .SR.1 . NIAHO® accreditation
requirements: Interpretive guidelines & surveyor guidance (version 11).
Milford, OH: DNV GL-Healthcare USA, Inc. (Level VII)
35 Hodin, R. A., & Bordeianou, L. Nasogastric and nasoenteric tubes. (2015). In:
UpToDate, Sanfey, H., & Collins, K. A. (Eds.) . Retrieved from: uptodate.com
36 Prabhakaran, S. (2012). Nasoenteric tube complications. Scandinavian
Journal of Surgery, 101(3), 147–155. Accessed via the Web at
http://journals.sagepub.com/doi/pdf/10.1177/145749691210100302
NASOENTERIC-DECOMPRESSION TUBE
INSERTION AND REMOVAL
A nasoenteric-decompression tube, inserted nasally and
advanced beyond the stomach into the intestinal tract,
aspirates intestinal contents for analysis and to treat
intestinal obstruction or GI fistula.1 The tube can also help
to prevent nausea, vomiting, and abdominal distention after
GI surgery. A practitioner usually inserts and removes a
nasoenteric-decompression tube; however, a nurse may
remove it in an emergency. An oroenteric-decompression
tube is a good substitute if the patient has facial trauma, a
nasal injury, or abnormal nasal anatomy.1
Some
nasoenteric-decompression tubes have a
preweighted tip and balloon at one end of the tube that
holds air or water to stimulate peristalsis and facilitate the
tube’s passage through the pylorus and into the intestinal
tract. (See Nasoenteric-decompression tubes.)
Equipment
For insertion
Nasoenteric-decompression tube ▪ suction apparatus with
intermittent suction capability ▪ light source ▪ gloves ▪
towel or fluid-impermeable pad ▪ water-soluble lubricant ▪
securement device or tape ▪ bulb syringe or catheter-tip
syringe ▪ oral care supplies ▪ Optional: penlight, anesthetic
agent, gown, mask and goggles or mask with face shield,
specially formulated tape, pen with indelible ink, pH testing
supplies, cup of water, straw.
For removal
Gloves ▪ fluid-impermeable pad or towel ▪ clamp ▪ oral care
supplies ▪ Optional: 10-mL syringe.
Preparation of equipment
Prepare the nasoenteric-decompression tube according to
the manufacturer’s instructions. Set up the suction
apparatus, as ordered, and make sure that it’s functioning
properly.
Implementation
■ Verify the practitioner’s order.
■ Gather and prepare the appropriate equipment.
■ Perform hand hygiene.2,3,4,5,6,7
■ Confirm the patient’s identity using at least two patient
identifiers.8
■ Provide privacy.9,10,11,12
■ Explain the procedure to the patient and family (if
appropriate) according to their individual communication
and learning needs to increase their understanding, allay
their fears, and enhance cooperation.13
EQUIPMENT
Nasoenteric-decompression tubes
The type of nasoenteric-decompression tube chosen for the patient depends
on the size of the patient and the nostrils, the estimated duration of
intubation, and the reason for the procedure. For example, to remove viscous
material from the patient’s intestinal tract, the practitioner may select a tube
with a wide bore and a single lumen. Typically, a #14 or #16 French tube is
appropriate.
Such tubes as the preweighted Andersen Miller-Abbot type intestinal tube
(shown below), have a tungsten-weighted inflatable latex balloon tip
designed for temporary management of mechanical obstruction in the small
or large intestines.
■ Make sure that lighting is adequate.
■ Raise the patient’s bed to waist level when performing
care to prevent caregiver back strain.14
■ Perform hand hygiene.2,3,4,5,6,7
Inserting a nasoenteric-decompression tube
■ Put on gloves and other personal protective equipment as
needed to comply with standard precautions.15,16,17,18
■ Assess the patient’s GI status to serve as a baseline for
comparison.
■ Position the patient as the practitioner specifies, usually
in the semi-Fowler or high Fowler position.19
■ Place a fluid-impermeable pad or towel across the
patient’s chest to protect the patient from soiling during
tube insertion.
■ Agree with the patient on a signal that can be used to
stop the insertion briefly if necessary.
■ The practitioner assesses the patency of the patient’s
nostrils.
■ Administer an anesthetic agent, if prescribed, following
safe medication administration practices.19,20,21,22,23
■ To determine the insertion depth of the tube to ensure it
reaches the stomach, the practitioner places the tube’s
distal end at the tip of the patient’s nose and then extends
the tube to the earlobe and down to the xiphoid process,
and then midway to the umbilicus.19 The practitioner marks
the tube with an indelible pen or holds it at this point.19
■ The practitioner applies water-soluble lubricant to the
distal end of the tube to facilitate insertion.19
■ Assist the practitioner with insertion, as needed.
■ Advise the patient to breathe through the mouth as the
balloon enters the nostril.
■ After the balloon begins its descent, the practitioner
releases the grip on it, allowing the weight of the fluid or the
preweighted tip to pull the tube into the nasopharynx.
■ When the tube reaches the nasopharynx, the practitioner
instructs the patient to lower the chin in a chin-tuck position
(unless contraindicated) and to swallow. In some cases, the
practitioner instructs the patient to sip water through a
straw after the tube is in the oropharynx to facilitate tube
insertion with swallowing.19 If it’s unsafe for the patient to
swallow water, the practitioner may encourage dry
swallowing, if desired.19
■ The practitioner continues to advance the tube slowly to
prevent it from curling or kinking in the stomach.
■ To confirm the tube’s passage into the stomach, assist the
practitioner with using at least two bedside methods to
determiner tube location during insertion,24 including
watching for signs of respiratory distress (coughing and
dyspnea);24 using capnography, if available, to detect
carbon dioxide, which indicates inadvertent tracheal
insertion;24 measuring pH aspirate from the tube if pH strips
are available and pH measurement is performed in your
facility (fasting gastric pH is usually 5 or less, even in
patients receiving gastric acid inhibitors; however, this
method isn’t reliable enough to exclude the need for X-ray
placement verification because gastric content occasionally
has a high pH);24 and inspecting the visual characteristics of
the tube aspirate (fasting gastric secretions commonly
appear grassy-green or clear and colorless).24
■ Position the patient as directed to help advance the tube.
The patient will typically lie on the right side until the tube
clears the pylorus (about 2 hours).
■ After the tube clears the pylorus, the practitioner may
direct you to advance it 2′′ to 3′′ (5 cm to 7.5 cm) every hour
and to reposition the patient until the premeasured mark
reaches the patient’s nostril. Gravity and peristalsis will help
advance the tube. (Notify the practitioner if you can’t
advance the tube.)
NURSING ALERT Don’t secure the tube while it advances to the
premeasured mark unless instructed to do so by the practitioner.
■ Keep the remaining premeasured length of tube well
lubricated to ease passage and prevent irritation.
■ After the tube progresses the necessary distance, the
practitioner will order an X-ray; most tubes are impregnated
with a radiopaque mark so that you can easily confirm
placement by X-ray or other imaging technique.24
■ Secure the tube with a securement device or tape to
prevent displacement: Clean the patient’s skin where you
intend to secure the tube.19,25 If the patient’s skin is
excessively oily, wipe the skin with an alcohol pad and allow
it to dry before applying the securement device.26 Apply a
skin preparation product to the skin, if needed.19 Avoid
securing the tube toward the top of the patient’s head to
avoid putting pressure on the naris.25 Apply the securement
device and secure the tube following the manufacturer’s
instructions. Alternatively, apply the tape and secure the
tube or, for a small soft tube, use transparent
semipermeable dressings to secure the tube, if desired.19
Use protective padding under the tube if necessary to
protect the skin from friction and pressure.25 Keep the skin
under the tube clean and dry.26
■ Measure the external tube length or note the incremental
marking on the tube where it exits the patient’s nose;
document the external tube length in the patient’s medical
record to establish a baseline for comparison to assess for
tube migration.
■ Trace the tubing from the patient to its point of origin to
make sure that you’re accessing the correct tube, and then
attach the tube to intermittent suction, if ordered. Tape the
connection to prevent accidental disconnection of the
tubing. Route the tubing toward the foot of the bed, because
a standardized approach of keeping IV lines routed toward
the head and enteric lines routed toward the feet prevents
dangerous misconnections. If you’re using different access
sites, label each tubing at the distal and proximal ends to
distinguish the different tubing and to prevent
misconnections.27,28
■ Remove and discard the towel or fluid-impermeable pad.
■ Inspect the skin under the tube by gently lifting and
repositioning it at the naris at least twice daily, but
preferably more frequently, to assess for pressure injury
formation, redistribute pressure, and decrease shear
force.25
■ Return the bed to the lowest position to prevent falls and
maintain patient safety.30
Removing a nasoenteric-decompression tube
■
Put on gloves to comply with standard
precautions.15,16,17,18
■ Position the patient as the practitioner specifies, typically
in the semi-Fowler or high Fowler position. You may also
need to help the patient hold the neck in a hyperextended
position.
■ Protect the patient’s chest by placing a fluid-impermeable
pad or towel on top of it.
■ Trace the tubing from the patient to its point of origin to
make sure you’re accessing the correct tube.27
■ Clamp the tube and disconnect it from suction to prevent
the patient from aspirating gastric contents that leak from
the tube during withdrawal.
■ If the patient has a tube with an inflated balloon tip,
attach a 10-mL syringe to the balloon port and withdraw the
air or water. Don’t deflate the balloon until you’re ready to
remove the tube.
■ Slowly withdraw 6′′ to 8′′ (15.2 cm to 20.3 cm) of the tube.
Wait 10 minutes, withdraw another 6′′ to 8′′. Continue this
procedure until the tube reaches the patient’s esophagus
(with 18′′ [45.7 cm] of the tube remaining inside the
patient). At this point, you can gently withdraw the tube
completely.
NURSING ALERT If the tube doesn’t come out easily, don’t force it.
Notify the practitioner.30
■ Inspect the tube to ensure that it’s intact. If the tube isn’t
intact, notify the practitioner.19
Completing the procedure
■ Return the bed to the lowest position to prevent falls and
maintain patient safety.30
■ Discard used equipment appropriately.
■ Remove and discard your gloves.15,16
■ Perform hand hygiene.2,3,4,5,6,7
■ Document the procedure.31,32,33,34
Special considerations
■ For a double- or triple-lumen tube, label which lumen
accommodates balloon inflation and which accommodates
drainage.
■ The Joint Commission has issued a sentinel event alert
related to managing risk during transition to new
International Organization for Standardization tubing
standards that were designed to prevent dangerous tubing
misconnections, which can lead to serious patient injury and
death. During the transition, make sure to trace all tubing
and catheters from the patient to their points of origin
before connecting or reconnecting any device or infusion, at
any care transition (such as to a new setting or service), and
as part of the hand-off process. In addition, route tubes and
catheters having different purposes in different,
standardized directions; label the tubing at the distal and
proximal ends when the patient has different access sites or
several bags hanging; use tubing and equipment only as
intended; and store medications for different delivery routes
in separate locations.28
■ Provide oral care and continue to do so regularly to
promote comfort and to prevent oral colonization with
microorganisms that may contribute to health care–
associated pneumonia. (See the “Oral care” procedure.)
■ Provide oral care after removing the tube to promote
comfort and prevent oral colonization that may contribute to
health care–associated pneumonia.
Complications
Nasoenteric-decompression tubes may cause reflux
esophagitis, nasal or oral inflammation, and nasal,
laryngeal, or esophageal ulceration. Misplacement into the
bronchial tree can result in pneumonitis, pneumonia, and
pneumothorax if not recognized.35,36
Documentation
Document the procedure; the date and time of insertion; the
name of the practitioner who inserted the tube; the length,
size, and type of nasoenteric tube inserted; the nostril used
to place the tube; the amount of suction applied; the type of
securement device used to secure the tube; and a
description of the gastric contents aspirated. Record the
patient’s tolerance of the procedure, method used to
confirm tube placement, external tube length, and GI
assessment findings.
Record the date and time of tube removal, the indication
for removal, and the patient’s tolerance of the procedure.
Record the color, consistency, and amount of drainage.
Document any patient teaching performed and the patient’s
understanding of that teaching.
REFERENCES
1 Itkin, M., et al. (2011). Multidisciplinary practical guidelines for
gastrointestinal access for enteral nutrition and decompression from the
Society of Interventional Radiology and American Gastroenterological
Association (AGA) Institute, with endorsement by Canadian Interventional
Radiological Association (CIRA) and Cardiovascular and Interventional
Radiological Society of Europe (CIRSE). Journal of Vascular and Interventional
Radiology, 22(8), 1089–1106. Accessed via the Web at
http://www.jvir.org/article/S1051-0443(11)00850-5/pdf (Level VII)
2 The Joint Commission. (2019). Standard NPSG.07.01.01. Comprehensive
accreditation manual for hospitals. Oakbrook Terrace, IL: The Joint
Commission. (Level VII)
3 Centers for Disease Control and Prevention. (2002). Guideline for hand
hygiene in health-care settings: Recommendations of the Healthcare Infection
Control Practices Advisory Committee and the HICPAC/SHEA/APIC/IDSA Hand
Hygiene Task Force. MMWR Recommendations and Reports, 51(RR-16), 1–45.
Accessed via the Web at https://www.cdc.gov/mmwr/pdf/rr/rr5116.pdf (Level
II)
4 World Health Organization. (2009). “WHO guidelines on hand hygiene in
health care: First global patient safety challenge, clean care is safer care”
[Online]. Accessed via the Web at
http://apps.who.int/iris/bitstream/10665/44102/1/9789241597906_eng.pdf
(Level IV)
5 Centers for Medicare and Medicaid Services, Department of Health and
Human Services. (2015). Condition of participation: Infection control. 42 C.F.R.
§ 482.42.
6 Accreditation Association for Hospitals and Health Systems. (2017). Standard
07.01.21. Healthcare Facilities Accreditation Program: Accreditation
requirements for acute care hospitals. Chicago, IL: Accreditation Association
for Hospitals and Health Systems. (Level VII)
7 DNV GL-Healthcare USA, Inc. (2016). IC.1.SR.1 . NIAHO® accreditation
requirements: Interpretive guidelines & surveyor guidance (version 11).
Milford, OH: DNV GL-Healthcare USA, Inc. (Level VII)
8 The Joint Commission. (2019). Standard NPSG.01.01.01. Comprehensive
accreditation manual for hospitals. Oakbrook Terrace, IL: The Joint
Commission. (Level VII)
9 Centers for Medicare and Medicaid Services, Department of Health and
Human Services. (2015). Condition of participation: Patient’s rights. 42 C.F.R.
§ 482.13(c)(1).
10 Accreditation Association for Hospitals and Health Systems. (2017). Standard
15.01.16. Healthcare Facilities Accreditation Program: Accreditation
requirements for acute care hospitals. Chicago, IL: Accreditation Association
for Hospitals and Health Systems. (Level VII)
11 The Joint Commission. (2019). Standard RI.01.01.01. Comprehensive
accreditation manual for hospitals. Oakbrook Terrace, IL: The Joint
Commission. (Level VII)
12 DNV GL-Healthcare USA, Inc. (2016). PR.1.SR.5 . NIAHO® accreditation
requirements: Interpretive guidelines & surveyor guidance (version 11).
Milford, OH: DNV GL-Healthcare USA, Inc. (Level VII)
13 The Joint Commission. (2019). Standard PC.02.01.21. Comprehensive
accreditation manual for hospitals. Oakbrook Terrace, IL: The Joint
Commission. (Level VII)
14 Waters, T. R., et al. (2009). “Safe patient handling training for schools of
nursing” [Online]. Accessed via the Web at
https://www.cdc.gov/niosh/docs/2009-127/pdfs/2009-127.pdf (Level VII)
15 Siegel, J. D ., et al. (2007, revised 2017). “2007 guideline for isolation
precautions: Preventing transmission of infectious agents in health care
settings” [Online]. Accessed via the Web at
https://www.cdc.gov/infectioncontrol/pdf/guidelines/isolation-guidelines.pdf
(Level II)
16 Occupational Safety and Health Administration. (n.d .). “Bloodborne
pathogens, standard number 1910.1030” [Online]. Accessed via the Web at
https://www.osha.gov/pls/oshaweb/owadisp.show_document?
p_id=10051&p_table=STANDARDS (Level VII)
17 Accreditation Association for Hospitals and Health Systems. (2017). Standard
07.01.10. Healthcare Facilities Accreditation Program: Accreditation
requirements for acute care hospitals. Chicago, IL: Accreditation Association
for Hospitals and Health Systems. (Level VII)
18 DNV GL-Healthcare USA, Inc. (2016). IC.1 .SR.2 . NIAHO® accreditation
requirements: Interpretive guidelines & surveyor guidance (version 11).
Milford, OH: DNV GL-Healthcare USA, Inc. (Level VII)
19 Wiegand, D. L. (2017). AACN procedure manual for high acuity, progressive,
and critical care (7th ed.). St. Louis, MO: Elsevier.
20 The Joint Commission. (2019). Standard MM.06.01.01. Comprehensive
accreditation manual for hospitals. Oakbrook Terrace, IL: The Joint
Commission. (Level VII)
21 Centers for Medicare and Medicaid Services, Department of Health and
Human Services. (2015). Condition of participation: Nursing services. 42
C.F.R. § 482.23(c).
22 Accreditation Association for Hospitals and Health Systems. (2017). Standard
16.01.03. Healthcare Facilities Accreditation Program: Accreditation
requirements for acute care hospitals. Chicago, IL: Accreditation Association
for Hospitals and Health Systems. (Level VII)
23 DNV GL-Healthcare USA, Inc. (2016). MM.1 .SR.2. NIAHO® accreditation
requirements: Interpretive guidelines & surveyor guidance (version 11).
Milford, OH: DNV GL-Healthcare USA, Inc. (Level VII)
24 American Association of Critical-Care Nurses. (2016). “A ACN practice alert:
Initial and ongoing verification of feeding tube placement in adults” [Online].
Accessed via the Web at https://www.aacn.org/clinical-resources/practice-
alerts/initial-and-ongoing-verification-of-feeding-tube-placement-in-adults
(Level VII)
25 Holden-Mount, S. & Sieggreen, M. (2015). “Medical device-related ulcers:
Pediatrics & adults” [Online]. Accessed via the Web at
http://www.npuap.org/wp-content/uploads/2015/02/5.- Medical-Devices-S -
Holden-Mount-and-M-Sieggreen1.pdf
26 C. R. Bard, Inc. (2010) “StatLock NG stabilization device” [Online]. Accessed
via the Web at
http://www.bardmedical.com/media/3240/StatLock%20NG%20Poster%20M10
33.pdf
27 U.S . Food and Drug Administration. (n.d .). “Look. Check. Connect. Safe
medical device connections save lives” [Online]. Accessed via the Web at
https://www.fda.gov/downloads/MedicalDevices/Safety/AlertsandNotices/UCM
134873.pdf
28 The Joint Commission. (2014). “Sentinel event alert: Managing risk during
transition to new ISO tubing connector standards” [Online]. Accessed via the
Web at
http://www.jointcommission.org/assets/1/6/SEA_53_Connectors_8 _19_14 _final.
pdf (Level VII)
29 Hinkle, J. L., & Cheever, K. H. (2018). Brunner and Suddarth’s textbook of
medical-surgical nursing (134th ed.). Philadelphia, PA: Wolters Kluwer.
30 Ganz, D. A., et al. (2013). Preventing falls in hospitals: A toolkit for improving
quality of care (AHRQ Publication No. 13-0015-EF). Accessed via the Web at
https://www.ahrq.gov/sites/default/files/publications/files/fallpxtoolkit.pdf
(Level VII)
31 The Joint Commission. (2019). Standard RC.01.03 .01. Comprehensive
accreditation manual for hospitals. Oakbrook Terrace, IL: The Joint
Commission. (Level VII)
32 Centers for Medicare and Medicaid Services, Department of Health and
Human Services. (2015). Condition of participation: Medical record services.
42 C.F.R. § 482.24(b).
33 Accreditation Association for Hospitals and Health Systems. (2017). Standard
10.00 .03. Healthcare Facilities Accreditation Program: Accreditation
requirements for acute care hospitals. Chicago, IL: Accreditation Association
for Hospitals and Health Systems. (Level VII)
34 DNV GL-Healthcare USA, Inc. (2016). MR.2 .SR.1 . NIAHO® accreditation
requirements: Interpretive guidelines & surveyor guidance (version 11).
Milford, OH: DNV GL-Healthcare USA, Inc. (Level VII)
35 Stayner, J. L., et al. (2012). Feeding tube placement: Errors and
complications. Nutrition in Clinical Practice, 27(6), 738–748. (Level V)
36 Sparks, D. A., et al. (2011). Pulmonary complications of 9931 narrow-bore
nasoenteric tubes during blind placement: A critical review. Journal of
Parenteral and Enteral Nutrition, 35(5), 625–629. Accessed via the Web at
http://pen.sagepub.com/content/35/5/625.full.pdf+html (Level I)
NASOGASTRIC TUBE CARE
Providing effective nasogastric (NG) tube care requires
meticulous monitoring of the patient and the equipment.
Monitoring the patient involves checking drainage from the
NG tube and assessing GI function. Monitoring the
equipment involves verifying correct tube placement and
function.
Equipment
Gloves ▪ stethoscope ▪ commercial securement device ▪
graduated container ▪ disinfectant pad ▪ Optional: skin
preparation product, irrigation supplies, fluid-impermeable
pad, towel, catheter-tip syringe, alcohol pad.
Preparation of equipment
If the practitioner ordered suction, for a Salem sump tube,
make sure that the larger primary lumen (for drainage and
suction) is connected to the suction equipment and the
appropriate setting has been selected, as ordered (usually
low constant suction). If the practitioner didn’t specify the
setting, follow the manufacturer’s instructions. A Levin tube
usually calls for intermittent low suction.
Check the suction device to make sure it’s functioning
properly. If using a thermotic pump (such as the Gomco
gastric drainage pump), make sure the device is plugged
into a grounded outlet. Make sure the collection chamber is
assembled properly and that the connecting tubing to the
bacteria filter is without moisture. Make sure that the
suction tubing is attached to the collection chamber and
that the selector switch is set to the prescribed suction,
usually 90 to 120 mm Hg.1
If using wall suction, make sure the suction device and
collection chamber are connected to the suction source.
Verify that the suction tubing is attached to the collection
chamber. Ensure that the suction setting is correct
(intermittent or continuous) and that it’s set to the
prescribed suction, usually 30 to 40 mm Hg.2
Implementation
■ Gather the appropriate equipment.
■ Perform hand hygiene.3,4,5,6,7,8
■ Confirm the patient’s identity using at least two patient
identifiers.9
■ Provide privacy.10,11,12,13
■ Explain the procedure to the patient, and family (if
appropriate) according to their individual communication
and learning needs to increase their understanding, allay
their fears, and enhance cooperation.14
■ Raise the patient’s bed to waist level when providing
patient care to prevent caregiver back strain.15
■ Maintain the patient with the head of the bed elevated at
least 30 degrees; if contraindicated, consider the reverse
Trendelenburg position to prevent aspiration.16,17
■ Perform hand hygiene.3,4,5,6,7,8
■
Put on gloves to comply with standard
precautions.18,19,20,21
■ Assess the patient’s GI status at an interval determined
by the patient’s condition and your facility.17
■ Ask the patient whether the NG tube causes pain or
discomfort at the naris or whether the securement device or
tape feels too tight. For a patient who is unable to
communicate, observe for agitation, pulling, itching, or
grabbing, which may be a sign that the NG tube causes
discomfort.22
■ Inspect the skin under the NG tube by gently lifting and
repositioning it at the naris at least daily to prevent medical
device-related pressure injury.23
■ Clean the skin and apply fresh tape (at least daily) or a
new securement device (at least weekly according to the
manufacturer’s instructions), as needed.24 Wipe excessively
oily skin with an alcohol pad and allow it to dry completely
before applying the securement device.24 Avoid securing
the NG tube toward the top of the patient’s head.22 Use
protective padding under the device, if necessary, to
prevent medical device-related pressure injury.22 Keep the
skin under the NG tube clean and dry.22
NURSING ALERT If the patient has fragile skin and you’re using tape
to secure the tube, use tape specifically formulated for fragile skin to
prevent skin stripping and tearing during removal.25
■ Trace the tubing from the patient to its point of origin to
make sure that you’re accessing the correct tube.16,26,27
■ Check the position of the NG tube regularly and before
instilling any type of solution into the tube.28 Use various
techniques to confirm placement: Observe the incremental
marking on the tube at the exit site or measure the external
tube length and compare it to the incremental marking or
external tube length documented in the medical records at
the time of insertion to assess tube migration.16,17,18 Review
chest and abdominal X-ray reports to look for notations
about the tube’s location.16,28 Inspect the visual
characteristics of the tube aspirate; fasting gastric
secretions commonly appear grassy-green or clean and
colorless, whereas fluid withdrawn from the tube that has
perforated into the pleural space typically has a yellow
serous appearance.16 Measure the pH of aspirate from the
tube if pH strips are available and pH measurement is
performed in your facility; fasting gastric pH is usually 5 or
less, even in patients receiving gastric acid inhibitors.16,28,29
Arrange for an X-ray, as ordered, if the tube’s placement is
uncertain.16,28
■ Irrigate the tube, as ordered or necessary, to maintain
tube patency.16,28
■ Monitor the patient’s intake and output at an interval
determined by the patient’s condition and your facility.
Monitor the patient’s fluid and electrolyte status to promptly
recognize fluid and electrolyte imbalances. Keep in mind
that patients with large-volume NG output are at risk for
acid-base imbalances. Report imbalances to the patient’s
practitioner promptly.17
■ Monitor the appearance of gastric drainage; report bloody
or coffee-ground-color drainage, which may indicate
bleeding.
■ Provide oral care regularly to promote comfort and
prevent oral colonization, and to decrease the risk of
hospital-associated pneumonia. (See the “Oral care”
procedure.)
■ Return the bed to the lowest position to prevent falls and
maintain patient safety.30
■ Remove and discard your gloves.18,19
■ Perform hand hygiene.3,4,5,6,7,8
■ Clean and disinfect your stethoscope using a disinfectant
pad.31,32
■ Perform hand hygiene.3,4,5,6,7,8
■ Document the procedure.33,34,35,36
Special considerations
■ NG tubes can become clogged or incorrectly positioned.
Attempt to reposition the patient or rotate and reposition
the tube. However, if the tube was inserted during surgery,
avoid this maneuver to ensure that the movement doesn’t
interfere with gastric or esophageal sutures. Instead, notify
the practitioner.
■ If necessary, irrigate the NG tube and instill 30 mL of air
into the vent tube to maintain patency. Don’t attempt to
stop reflux by clamping the vent tube. Unless
contraindicated, elevate the patient’s torso more than 30
degrees, and keep the vent tube above the patient’s midline
to prevent a siphoning effect.
■ If no drainage appears in the tube, check the suction
equipment for proper function. Then, holding the NG tube
over a fluid-impermeable pad or an emesis basin, separate
the tube and the suction source. Check the suction
equipment by placing the suction tubing in an irrigant
container of water. If the apparatus draws water, check the
NG tube for proper function. Note the amount of water
drawn into the suction container on the intake-and-output
record.
■ Before ambulation, disconnect the patient’s NG tube from
the suction equipment and clamp the tube to prevent
stomach contents from draining out of the tube.
■ The Joint Commission issued a sentinel event alert related
to managing risk during transition to new International
Organization for Standardization tubing standards that were
designed to prevent dangerous tubing misconnections,
which can lead to serious patient injury and death. During
the transition, make sure to trace the tubing and catheter
from the patient to the point of origin before connecting or
reconnecting any device or infusion, at any care transition
(such as a new setting or service), and as part of the hand-
off process; route tubes and catheters having different
purposes in different standardized directions; when there
are different access sites or several bags hanging, label the
tubing at both the distal and proximal ends; use tubing and
equipment only as intended; and store medications for
different delivery routes in separate locations.27
Complications
Epigastric or abdominal pain and vomiting may result from a
clogged or improperly placed tube. Any NG tube—the Levin
tube in particular—can move and aggravate esophagitis,
ulcers, or esophageal varices, causing hemorrhage.
Perforation may result from aggressive insertion technique.
Dehydration and electrolyte imbalances can result from
removing body fluids and electrolytes by suctioning. Pain,
swelling, and salivary dysfunction may signal parotitis,
which occurs in dehydrated, debilitated patients. Intubation
can cause oral or nasal skin breakdown and discomfort and
increased mucous secretions. Aspiration pneumonia may
result from gastric reflux. Vigorous suction can damage the
gastric mucosa and cause significant bleeding, possibly
interfering with endoscopic assessment and diagnosis.
Documentation
Document your GI assessment findings, including the
volume and description of drainage. Record intake and
output. Note the condition of the patient’s naris and skin
under and surrounding the tube and securement device, the
skin care provided, and whether the securement device was
changed. Document the methods used to confirm NG tube
placement. Record oral care provided. Document patient
and family teaching, their understanding of your teaching,
and whether they require follow-up teaching.
REFERENCES
1 Allied Health Care Products, Inc., Gomco Division (n.d .). “Gomco mobile
gastric drainage pump” [Online]. Accessed via the Web at
http://www.alliedhpi.com/images/zs168-199-001.pdf
2 C. R. Bard, Inc. (2015). “BARD® nasogastric sump tubes: Instructions for use”
[Online]. Accessed via the Web at
http://www.bardmedical.com/media/751612/nasogastric-sump-tubes.pdf
3 Centers for Disease Control and Prevention. (2002). Guideline for hand
hygiene in health-care settings: Recommendations of the Healthcare Infection
Control Practices Advisory Committee and the HICPAC/SHEA/APIC/IDSA Hand
Hygiene Task Force. MMWR Recommendations and Reports, 51(RR-16), 1–45.
Accessed via the Web at https://www.cdc.gov/mmwr/pdf/rr/rr5116.pdf (Level
II)
4 World Health Organization. (2009). “WHO guidelines on hand hygiene in
health care: First global patient safety challenge, clean care is safer care”
[Online]. Accessed via the Web at
http://apps.who.int/iris/bitstream/10665/44102/1/9789241597906_eng.pdf
(Level IV)
5 The Joint Commission. (2019). Standard NPSG.07.01.01. Comprehensive
accreditation manual for hospitals. Oakbrook Terrace, IL: The Joint
Commission. (Level VII)
6 Centers for Medicare and Medicaid Services, Department of Health and
Human Services. (2015). Condition of participation: Infection control. 42 C.F.R.
§ 482.42.
7 Accreditation Association for Hospitals and Health Systems. (2017). Standard
07.01.21. Healthcare Facilities Accreditation Program: Accreditation
requirements for acute care hospitals. Chicago, IL: Accreditation Association
for Hospitals and Health Systems. (Level VII)
8 DNV GL-Healthcare USA, Inc. (2016). IC.1.SR.1 . NIAHO® accreditation
requirements: Interpretive guidelines & surveyor guidance (version 11).
Milford, OH: DNV GL-Healthcare USA, Inc. (Level VII)
9 The Joint Commission. (2019). Standard NPSG.01.01.01. Comprehensive
accreditation manual for hospitals. Oakbrook Terrace, IL: The Joint
Commission. (Level VII)
10 Centers for Medicare and Medicaid Services, Department of Health and
Human Services. (2015). Condition of participation: Patient’s rights. 42 C.F.R.
§ 482.13(c)(1).
11 Accreditation Association for Hospitals and Health Systems. (2017). Standard
15.01.16. Healthcare Facilities Accreditation Program: Accreditation
requirements for acute care hospitals. Chicago, IL: Accreditation Association
for Hospitals and Health Systems. (Level VII)
12 The Joint Commission. (2019). Standard RI.01.01.01. Comprehensive
accreditation manual for hospitals. Oakbrook Terrace, IL: The Joint
Commission. (Level VII)
13 DNV GL-Healthcare USA, Inc. (2016). PR.1.SR.5 . NIAHO® accreditation
requirements: Interpretive guidelines & surveyor guidance (version 11).
Milford, OH: DNV GL-Healthcare USA, Inc. (Level VII)
14 The Joint Commission. (2019). Standard PC.02.01.21. Comprehensive
accreditation manual for hospitals. Oakbrook Terrace, IL: The Joint
Commission. (Level VII)
15 Waters, T. R., et al. (2009). “Safe patient handling training for schools of
nursing” [Online]. Accessed via the Web at
http://www.cdc.gov/niosh/docs/2009-127/pdfs/2009-127.pdf (Level VII)
16 Boullata, J. I., et al. (2016). ASPEN safe practices for enteral nutrition therapy.
Journal of Parenteral and Enteral Nutrition, 41(1), 15–103. Accessed via the
Web at http://journals.sagepub.com/doi/full/10.1177/0148607116673053
(Level VII)
17 Wiegand, D. L. (2017). AACN procedure manual for high acuity, progressive,
and critical care (7th ed.). St. Louis, MO: Elsevier.
18 Siegel, J. D ., et al. (2007, revised 2017). “2007 guideline for isolation
precautions: Preventing transmission of infectious agents in healthcare
settings” [Online]. Accessed via the Web at
https://www.cdc.gov/infectioncontrol/pdf/guidelines/isolation-guidelines.pdf
(Level II)
19 Occupational Safety and Health Administration. (n.d .). “Bloodborne
pathogens, standard number 1910.1030” [Online]. Accessed via the Web at
https://www.osha.gov/pls/oshaweb/owadisp.show_document?
p_id=10051&p_table=STANDARDS (Level VII)
20 Accreditation Association for Hospitals and Health Systems. (2017). Standard
07.01.10. Healthcare Facilities Accreditation Program: Accreditation
requirements for acute care hospitals. Chicago, IL: Accreditation Association
for Hospitals and Health Systems. (Level VII)
21 DNV GL-Healthcare USA, Inc. (2016). IC.1 .SR.2 . NIAHO® accreditation
requirements: Interpretive guidelines & surveyor guidance (version 11).
Milford, OH: DNV GL-Healthcare USA, Inc. (Level VII)
22 Holden-Mount, S., & Sieggreen, M. (2015). “Medical device-related ulcers:
Pediatrics & adults” [Online]. Accessed via the Web at
http://www.npuap.org/wp-content/uploads/2015/02/5.- Medical-Devices-S -
Holden-Mount-and-M-Sieggreen1.pdf
23 National Pressure Ulcer Advisory Panel. (2017). “Best practices for prevention
of medical device-related pressure injuries” [Online]. Accessed via the Web at
http://www.npuap.org/wp-content/uploads/2013/04/Updated-MDPI -
Poster2017.pdf
24 C. R. Bard, Inc. (2010). “StatLock NG stabilization device” [Online]. Accessed
via the Web at
http://www.bardmedical.com/media/3240/StatLock%20NG%20Poster%20M10
33.pdf
25 LeBlanc, K., et al. (2013). International skin tear advisory panel: A toolkit to
aid in the prevention, assessment, and treatment of skin tears using a
simplified classification system. Advances in Skin and Wound Care, 26(10),
459–476. (Level IV)
26 U.S . Food and Drug Administration. (n.d .). “Look. Check. Connect. Safe
medical device connections save lives” [Online]. Accessed via the Web at
https://www.fda.gov/downloads/MedicalDevices/Safety/AlertsandNotices/UCM
134873.pdf
27 The Joint Commission. (2014). “Sentinel event alert: Managing risk during
transition to new ISO tubing connector standards” [Online]. Accessed via the
Web at
http://www.jointcommission.org/assets/1/6/SEA_53_Connectors_8 _19_14 _final.
pdf (Level VII)
28 American Association of Critical-Care Nurses. (2016). “A ACN practice alert:
Initial and ongoing verification of feeding tube placement in adults” [Online].
Accessed via the Web at https://www.aacn.org/clinical-resources/practice-
alerts/initial-and-ongoing-verfication-of-feeding-tube-placements-in-adults
(Level VII)
29 Emergency Nurses Association. (2015). “Clinical practice guideline: Synopsis
gastric tube placement verification” [Online]. Accessed via the Web at
https://www.ena.org/docs/default-source/resource-library/practice-
resources/cpg/gastrictubecpg7b5530b71c1e49e8b155b6cca1870adc.pdf?
sfvrsn=a8e9dd7a_8 (Level VII)
30 Ganz, D. A., et al. (2013). Preventing falls in hospitals: A toolkit for improving
quality of care (AHRQ Publication No. 13-0015-EF). Rockville, MD: Agency for
Healthcare Research and Quality. Accessed via the Web at
https://www.ahrq.gov/sites/default/files/publications/files/fallpxtoolkit.pdf
(Level VII)
31 Rutala, W. A., et al. (2008, revised 2017). “Guideline for disinfection and
sterilization in healthcare facilities, 2008” [Online]. Accessed via the Web at
https://www.cdc.gov/hicpac/pdf/guidelines/Disinfection_Nov_2008.pdf (Level I)
32 Accreditation Association for Hospitals and Health Systems. (2017). Standard
07.02.03. Healthcare Facilities Accreditation Program: Accreditation
requirements for acute care hospitals. Chicago, IL: Accreditation Association
for Hospitals and Health Systems. (Level VII)
33 The Joint Commission. (2019). Standard RC.01.03 .01. Comprehensive
accreditation manual for hospitals. Oakbrook Terrace, IL: The Joint
Commission. (Level VII)
34 Centers for Medicare and Medicaid Services, Department of Health and
Human Services. (2016). Condition of participation: Medical record services.
42 C.F.R. § 482.24(b).
35 Accreditation Association for Hospitals and Health Systems. (2017). Standard
10.00 .03. Healthcare Facilities Accreditation Program: Accreditation
requirements for acute care hospitals. Chicago, IL: Accreditation Association
for Hospitals and Health Systems. (Level VII)
36 DNV GL-Healthcare USA, Inc. (2016). MR.2 .SR.1 . NIAHO® accreditation
requirements: Interpretive guidelines & surveyor guidance (version 11).
Milford, OH: DNV GL-Healthcare USA, Inc. (Level VII)
NASOGASTRIC TUBE DRUG INSTILLATION
A nasogastric (NG) tube allows direct instillation of
medication into the GI system of patients who can’t ingest
drugs orally. Before administration, the nurse must check
the patency and positioning of the tube and assess the
patient’s GI status, because the procedure is
contraindicated if the tube is obstructed or improperly
positioned, if the patient is vomiting around the tube, or if
the patient’s bowel sounds are absent because of a
condition such as mesenteric ischemia, small-bowel
obstruction, or paralytic ileus.1,2
Administering medications enterally carries potential risks,
because most medications given via this route weren’t
originally formulated to be administered directly into the GI
tract.3 Medications given enterally must be given in liquid
form to avoid enteral tube obstruction. Drugs shouldn’t be
added directly to an enteral feeding formula;2 they must be
administered separately through an enteral tube because of
the risk of physical and chemical incompatibilities, tube
obstruction, and altered therapeutic response.
Equipment
Prescribed medication ▪ fluid-impermeable pad ▪ clean
enteral syringe (20-mL or larger)2 ▪ purified water (distilled,
ultrafiltered, ultraviolet-light treated, or sterile)2 ▪ medicine
cups ▪ gloves ▪ Optional: mortar and pestle or other pill-
crushing device, pH testing supplies, measuring tape, gown,
mask with face shield, mask, goggles.
Preparation of equipment
Consult with the pharmacist if the patient is receiving a
continuous tube feeding. It may be necessary to withhold
the feeding for at least 30 minutes before administering the
medication if separation is needed to avoid altered drug
bioavailability.2
Implementation
■ Avoid distractions and interruptions when preparing and
administering the medication to prevent medication
errors.4,5
■ Verify the practitioner’s order, including drug, dose,
dosage form, route, and access device.2,6,7,8,9
■ Reconcile the patient’s medications when a new
medication is ordered to reduce the risk of medication
errors, including omissions, duplications, dosing errors, and
drug interactions.
■ Review the patient’s medical record for verification of the
location of the distal tube tip before administering the
medication to ensure adequate administration and
absorption of the drug.2,10,11
■ Gather the prescribed medication and equipment.
■ Compare the medication label with the order in the
patient’s medication record.6,7,8,9
■ Check the patient’s medical record for an allergy to the
prescribed medication. If an allergy or a contraindication
exists, don’t administer the medication; notify the
practitioner.6,7,8,9
■ Check the expiration date on the medication. If the
medication is expired, return it to the pharmacy and obtain
a new medication.6,7,8,9
■ Visually inspect the medication for any loss of integrity;
don’t administer the medication if integrity is
compromised.6,7,8,9
■ Discuss any unresolved concerns about the medication
with the patient’s practitioner.6,7,8,9
■ Consult with a pharmacist to determine the safest dosage
form of the drug before administration, if necessary. Use
medications prepared by the pharmacy under controlled
conditions whenever possible.2 If needed and permitted by
your facility, you may prepare nonhazardous and
nonallergenic medications in a clean area of a medication
room.2
■ Use the available liquid dosage form if it’s appropriate for
enteral administration. Further dilute the drug before
administration, as directed by the pharmacist; the volume of
diluent required to further dilute liquid medication depends
on the desired viscosity, osmolality, or both.2
■ If the liquid form of a medication isn’t appropriate or
available, substitute only immediate-release dosage forms
and prepare the immediate-release dosage forms according
to the pharmacist’s instructions, which may include crushing
simple compressed tablets to a fine powder using a mortar
and pestle or other pill-crushing device and mixing the
powder with purified water;2 or opening hard gelatin
capsules and mixing the powder containing the immediate-
release medication with purified water.2
■ Perform hand hygiene.12,13,14,15,16,17
■ Confirm the patient’s identity using at least two patient
identifiers.18
■ Provide privacy.19,20,21,22
■ If the patient is receiving the medication for the first time,
teach about potentially adverse reactions and discuss any
other concerns related to the medication.6,7,8,9
■ Explain the procedure to the patient and family (if
appropriate) according to their individual communication
and learning needs to increase their understanding, allay
their fears, and enhance cooperation.23
■ Verify that the medication is being administered at the
proper time, in the prescribed dose, and by the correct
route, to reduce the risk of medication errors.
■ If your facility uses a bar code technology, scan your
identification badge, the patient’s identification bracelet,
and the medication’s bar code.
■ Raise the patient’s bed to waist level when providing care
to prevent caregiver back strain.24
■ Place a fluid-impermeable pad or towel across the
patient’s chest to avoid soiling the linens during the
procedure.
■ Elevate the head of the bed at least 30 degrees; if
contraindicated, consider the reverse Trendelenburg
position to reduce the risk for aspiration.2
■ Perform hand hygiene.12,13,14,15,16,17
■ Put on gloves, and other personal protective equipment,
as needed, to comply with standard precautions.25,26,27
■ Trace the tubing from the patient to its point of origin to
make sure you’re accessing the proper tube before
beginning the medication administration.2,28,29
■ Unclamp the enteral tube if not in continuous use, or (if
not already done) stop the continuous enteral feeding,
clamp the enteral administration set, and cap the distal end
of the tubing. Verify proper enteral tube placement using at
least two of the following:2 Observe for a change in external
tube length or incremental marking at the exit site.2,11
Review chest and abdominal X-ray reports.11 Aspirate tube
contents and inspect the visual characteristics of the tube
aspirate; fasting gastric secretions commonly appear
grassy-green or brown, or clear and colorless,2,11 whereas
aspirate from a tube that has perforated the pleural space
typically has a pale yellow serous appearance.2 Measure the
pH of aspirate from the tube if pH measurement is
performed in your facility; fasting gastric pH is usually 5 or
less, even in children receiving gastric acid inhibitors,
whereas fluid aspirated from a tube in the pleural space
typically has a pH of 7 or higher.2
■ Notify the practitioner if placement is in doubt, and
arrange for an X-ray, if ordered.2,11
■ After verifying proper tube placement, flush the tube with
at least 15 mL of purified water.2 Monitor the patient closely
throughout instillation. Stop the procedure immediately and
notify the practitioner if the patient shows signs of distress.
NURSING ALERT Don’t mix together different medications intended
for administration through the enteral tube because of the risks for
physical and chemical incompatibilities, tube obstruction, and altered
therapeutic drug responses.2
■ Administer the medication using a clean enteral syringe
(as shown below).2
■ Flush the enteral tube again with at least 15 mL of
purified water, taking into consideration the patient’s fluid
volume status.2
■ Repeat the procedure with the next medication, if
prescribed.2
■ Flush the enteral tube one final time with at least 15 mL
of purified water.2
■ Clamp the enteral tube and detach the syringe.
■ Replace the cap at the tip of the enteral tube.
Alternatively, attach the enteral administration set tubing to
the end of the enteral tube, unclamp the tube, and restart
the enteral feeding, if ordered, to avoid compromising the
patient’s nutrition status. Hold the feeding for 30 minutes or
more after medication administration only if separation is
indicated to avoid altered drug bioavailability. Consult with a
pharmacist, as necessary.
■ Remove and discard the fluid-impermeable pad or towel.
■ Return the bed to the lowest position to prevent falls and
maintain the patient’s safety.30
■ Clean and dry reusable equipment, including enteral
syringes and containers for flushing and medication
administration.2
■ Discard used supplies in the appropriate receptacle.25
■ Remove and discard your gloves, and other personal
protective equipment if worn.25
■ Perform hand hygiene.12,13,14,15,16,17
■ Store the equipment away from potential sources of
contamination.2
■ Document the procedure.31,32,33,34
Special considerations
■ If the patient’s gastrostomy tube becomes clogged, flush
the tube with water. If flushing with water is unsuccessful,
notify the practitioner; a pancreatic enzyme solution, an
enzymatic declogging kit, or a mechanical declogging
device may be considered before exchanging the tube for a
new one.2
■ The Joint Commission issued a sentinel event alert related
to managing risk during transition to new International
Organization for Standardization tubing standards designed
to prevent dangerous tubing misconnections, which can
lead to serious patient injury and death. During the
transition, be sure to trace the tubing and catheter from the
patient to the point of origin before connecting or
reconnecting any device or infusion, at any care transition
(such as a new setting or service), and as part of the hand-
off process; route tubes and catheters with different
purposes in different standardized directions; label the
tubing at the distal and proximal ends when there are
different access sites or several bags hanging; use tubing
and equipment only as intended; and store medications for
different delivery routes in separate locations.29
Patient teaching
If the patient will require an NG tube after discharge, give
oral and written instructions for instilling medication through
an NG tube to the patient and family, as appropriate. Make
sure you’re present when the patient performs the
procedure for the first few times so that you can provide
assistance and answer any questions. Offer encouragement,
and correct any errors in technique, as necessary.
Complications
Aspiration can occur with improper tube placement.
Administration of large volumes of liquid medications
containing sorbitol (such as liquid acetaminophen) or those
of high osmolality (such as electrolyte solutions) may cause
cramping, abdominal discomfort, and diarrhea.2,35
Documentation
Record the instillation of medication, the dose, medication
strength, date and time of instillation, and the patient’s
tolerance of the procedure.36 On the intake-and-output
sheet, note the amount of fluid instilled. Document any
patient teaching provided and whether the patient gave a
return demonstration.
REFERENCES
1 Makic, M. B. F., et al. (2011). Evidence-based practice habits: Putting sacred
cows out to pasture. Critical Care Nurse, 31(2), 38–62. Accessed via the Web
at http://ccn.aacnjournals.org/content/31/2/38.full.pdf (Level V)
2 Boullata, J. I ., et al. (2016). ASPEN safe practices for enteral nutrition therapy.
Journal of Parenteral and Enteral Nutrition, 41(1), 15–103. Accessed via the
Web at http://journals.sagepub.com/doi/full/10.1177/0148607116673053
(Level IV)
3 White, R., & Bradnam, V. (2015). Handbook of drug administration via enteral
feeding tubes (3rd ed.). London, UK: Pharmaceutical Press.
4 Westbrook, J., et al. (2010). Association of interruptions with an increased risk
and severity of medication administration errors. Archives of Internal
Medicine, 170(8), 683–690 . (Level IV)
5 Institute for Safe Medication Practices. (2012). Side tracks on the safety
express: Interruptions lead to errors and unfinished...Wait, what was I doing?
Nurse Advise-ERR, 11(2), 1–4 . Accessed via the Web at
https://www.ismp.org/Newsletters/acutecare/showarticle.aspx?id=37
6 The Joint Commission. (2019). Standard MM.06 .01.01. Comprehensive
accreditation manual for hospitals. Oakbrook Terrace, IL: The Joint
Commission. (Level VII)
7 Centers for Medicare and Medicaid Services, Department of Health and
Human Services. (2015). Condition of participation: Nursing services. 42
C.F.R. § 482.23(c).
8 Accreditation Association for Hospitals and Health Systems. (2017). Standard
16.01.03. Healthcare Facilities Accreditation Program: Accreditation
requirements for acute care hospitals. Chicago, IL: Accreditation Association
for Hospitals and Health Systems. (Level VII)
9 DNV GL-Healthcare USA, Inc. (2016). MM .1 .SR.2 . NIAHO® accreditation
requirements: Interpretive guidelines & surveyor guidance (version 11).
Milford, OH: DNV GL-Healthcare USA, Inc. (Level VII)
10 Wilson, N., & Best, C. (2011). Administration of medicines via an enteral
feeding tube. Nursing Times, 107(41), 18–20. Accessed via the Web at
http://www.nursingtimes.net/Journals/2011/10/17/l/d/v/Rev-nutrition.pdf
11 American Association of Critical Care Nurses. (2016). “A ACN practice alert:
Initial and ongoing verification of feeding tube placement in adults” [Online].
Accessed via the Web at https://www.aacn.org/clinical-resources/practice-
alerts/initial-and-ongoing-verification-of-feeding-tube-placement-in-adults
(Level VII)
12 The Joint Commission. (2019). Standard NPSG.07.01.01. Comprehensive
accreditation manual for hospitals. Oakbrook Terrace, IL: The Joint
Commission. (Level VII)
13 Centers for Disease Control and Prevention. (2002). Guideline for hand
hygiene in health-care settings: Recommendations of the Healthcare Infection
Control Practices Advisory Committee and the HICPAC/SHEA/APIC/IDSA Hand
Hygiene Task Force. MMWR Recommendations and Reports, 51(RR-16), 1–45.
Accessed via the Web at https://www.cdc.gov/mmwr/pdf/rr/rr5116.pdf (Level
II)
14 World Health Organization. (2009). “WHO guidelines on hand hygiene in
health care: First global patient safety challenge, clean care is safer care”
[Online]. Accessed via the Web at
http://apps.who.int/iris/bitstream/10665/44102/1/9789241597906_eng.pdf
(Level IV)
15 Centers for Medicare and Medicaid Services, Department of Health and
Human Services. (2015). Condition of participation: Infection control. 42
C.F.R.§ 482.42.
16 Accreditation Association for Hospitals and Health Systems. (2017). Standard
07.01.21. Healthcare Facilities Accreditation Program: Accreditation
requirements for acute care hospitals. Chicago, IL: Accreditation Association
for Hospitals and Health Systems. (Level VII)
17 DNV GL-Healthcare USA, Inc. (2016). IC.1 .SR.1 . NIAHO® accreditation
requirements: Interpretive guidelines & surveyor guidance (version 11).
Milford, OH: DNV GL-Healthcare USA, Inc. (Level VII)
18 The Joint Commission. (2019). Standard NPSG.01.01.01. Comprehensive
accreditation manual for hospitals. Oakbrook Terrace, IL: The Joint
Commission. (Level VII)
19 Centers for Medicare and Medicaid Services, Department of Health and
Human Services. (2015). Condition of participation: Patient’s rights. 42 C.F.R.
§ 482.13(c)(1).
20 Accreditation Association for Hospitals and Health Systems. (2017). Standard
15.01.16. Healthcare Facilities Accreditation Program: Accreditation
requirements for acute care hospitals. Chicago, IL: Accreditation Association
for Hospitals and Health Systems. (Level VII)
21 The Joint Commission. (2019). Standard RI.01.01.01. Comprehensive
accreditation manual for hospitals. Oakbrook Terrace, IL: The Joint
Commission. (Level VII)
22 DNV GL-Healthcare USA, Inc. (2016). PR.1.SR.5 . NIAHO® accreditation
requirements: Interpretive guidelines & surveyor guidance (version 11).
Milford, OH: DNV GL-Healthcare USA, Inc. (Level VII)
23 The Joint Commission. (2019). Standard PC.02.01.21. Comprehensive
accreditation manual for hospitals. Oakbrook Terrace, IL: The Joint
Commission. (Level VII)
24 Waters, T. R., et al. (2009). “Safe patient handling training for schools of
nursing” [Online]. Accessed via the Web at
https://www.cdc.gov/niosh/docs/2009-127/pdfs/2009-127.pdf
25 Siegel, J. D ., et al. (2007). “2007 guideline for isolation precautions:
Preventing transmission of infectious agents in healthcare settings” [Online].
Accessed via the Web at
https://www.cdc.gov/infectioncontrol/pdf/guidelines/isolation-guidelines.pdf
(Level II)
26 Accreditation Association for Hospitals and Health Systems. (2017). Standard
07.01.10. Healthcare Facilities Accreditation Program: Accreditation
requirements for acute care hospitals. Chicago, IL: Accreditation Association
for Hospitals and Health Systems. (Level VII)
27 DNV GL-Healthcare USA, Inc. (2016). IC.1 .SR.2 . NIAHO® accreditation
requirements: Interpretive guidelines & surveyor guidance (version 11),
Milford, OH: DNV GL-Healthcare USA, Inc. (Level VII)
28 U.S . Food and Drug Administration. (n.d .). “Look. Check. Connect. Safe
medical device connections save lives” [Online]. Accessed via the Web at
https://www.fda.gov/downloads/MedicalDevices/Safety/AlertsandNotices/UCM
134873.pdf
29 The Joint Commission. (2014). “Sentinel event alert: Managing risk during
transition to new ISO tubing connector standards” [Online]. Accessed via the
Web at
http://www.jointcommission.org/assets/1/6/SEA_53_Connectors_8 _19_14 _final.
pdf
30 Ganz, D. A., et al. (2013). Preventing falls in hospitals: A toolkit for improving
quality of care (AHRQ Publication No. 13-0015-EF). Rockville, MD: Agency for
Healthcare Research and Quality. Accessed via the Web at
https://www.ahrq.gov/sites/default/files/publications/files/fallpxtoolkit.pdf
(Level VII)
31 The Joint Commission. (2019). Standard RC.01.03 .01. Comprehensive
accreditation manual for hospitals. Oakbrook Terrace, IL: The Joint
Commission. (Level VII)
32 Centers for Medicare and Medicaid Services, Department of Health and
Human Services. (2015). Condition of participation: Medical record services.
42 C.F.R. § 482.24(b).
33 Accreditation Association for Hospitals and Health Systems. (2017). Standard
10.00 .03. Healthcare Facilities Accreditation Program: Accreditation
requirements for acute care hospitals. Chicago, IL: Accreditation Association
for Hospitals and Health Systems. (Level VII)
34 DNV GL-Healthcare USA, Inc. (2016). MR.2 .SR.1 . NIAHO® accreditation
requirements: Interpretive guidelines & surveyor guidance (version 11).
Milford, OH: DNV GL-Healthcare USA, Inc. (Level VII)
35 Phillips, N. M., & Nay, R. (2008). A systematic review of nursing
administration of medication via enteral tubes in adults. Journal of Clinical
Nursing, 17(17), 2257–2265. (Level I)
36 The Joint Commission. (2019). Standard RC.02.01.01. Comprehensive
accreditation manual for hospitals. Oakbrook Terrace, IL: The Joint
Commission. (Level VII)
NASOGASTRIC TUBE INSERTION AND REMOVAL
Usually inserted to decompress the stomach, a nasogastric
(NG) tube can prevent vomiting after major surgery. An NG
tube is typically in place for 48 to 72 hours after surgery, by
which time peristalsis usually resumes. It may remain in
place for shorter or longer periods depending on its use.
An NG tube has other diagnostic and therapeutic
applications, especially in assessing and treating upper GI
bleeding, collecting gastric contents for analysis, performing
gastric lavage, aspirating gastric secretions, and
administering medications and nutrients.1
Inserting an NG tube requires close observation of the
patient and verification of proper placement. The NG tube
position and patency must be confirmed before initial use of
the tube for nutrition or medication administration.2
Most NG tubes have a radiopaque marker or strip at the
distal end so that the tube’s position can be verified by X-
ray. If the position can’t be confirmed, the practitioner may
order fluoroscopy to verify placement.
The most common NG tubes are the Levin tube, which has
one lumen, and the Salem sump tube, which has two
lumens—one for suction and drainage and a smaller one for
ventilation. Air flows through the vent lumen continuously,
which protects the delicate gastric mucosa by preventing a
vacuum from forming should the tube adhere to the
stomach lining. (See Types of NG tubes.)
Equipment
For insertion
NG tube (usually #12, #14, #16, or #18 French for an
average adult) ▪ fluid-impermeable pad or towel ▪
securement device, tape, or transparent semipermeable
dressing ▪ gloves ▪ water-soluble lubricant ▪ enteral
catheter-tip syringe or irrigation set with syringe ▪ Optional:
penlight, prescribed anesthetic, cup of water, straw, mask
and goggles or mask with face shield, basin of warm water
or ice water, labels, carbon dioxide detector, pH testing
equipment, suction equipment, indelible marker, alcohol
pad, protective padding.
For removal
Stethoscope ▪ catheter-tip syringe ▪ fluid-impermeable pad
or towel ▪ gloves ▪ washcloth, disposable wipe, or tissue ▪
oral care supplies ▪ disinfectant pad. Optional: gown, mask
and goggles or mask with face shield, adhesive remover.
Preparation of equipment
Inspect the NG tube for defects, such as rough edges or
partially closed lumens. Then check the tube’s patency by
flushing it with water. If you need to increase the tube’s
flexibility to ease insertion, coil it around your gloved fingers
for a few seconds or dip it in warm water. If the tube is too
flaccid, stiffen it by filling the tube with water and then
freezing it3 or dipping the tube in ice water.
If the practitioner orders it, set up suction equipment. If
using a thermotic pump (such as the Gomco gastric
drainage pump), plug the device into a grounded outlet.
Make sure the collection chamber is assembled properly and
that the connecting tubing to the bacteria filter is without
moisture. Attach the suction tubing to the collection
chamber. Set the selector switch to the prescribed suction,
usually 90 to 120 mm Hg.4 Follow the manufacturer’s
directions for use.
If using wall suction, connect the suction device and
collection chamber to the suction source. Attach the suction
tubing to the collection chamber. Choose the prescribed
suction setting (intermittent or continuous) and set to the
prescribed suction, usually 30 to 40 mm Hg.5
Make sure that the suction device functions properly.
Implementation
■ Verify the practitioner’s order.
■ Review the patient’s medical record for history of recent
facial injury or surgery, basilar skull fracture, or
transsphenoidal pituitary resection; prior nasal or upper GI
surgery; esophageal stent placement; or anatomic
conditions (such as a deviated nasal septum or hiatal
hernia) that may contraindicate insertion.6
■ Gather and prepare the necessary equipment.
■ Perform hand hygiene.7,8,9,10,11,12
■ Confirm the patient’s identity using at least two patient
identifiers.13
■ Provide privacy.14,15,16,17
■ Explain the procedure to the patient and family (if
appropriate) according to their individual communication
and learning needs to increase their understanding, allay
their fears, and enhance cooperation.18
Inserting an NG tube
■ Ask the patient whether there is a history of epistaxis or
sinusitis. If so, ask whether one naris is more susceptible.6
■ Agree on a signal that the patient can use to stop the
procedure briefly.
■ Raise the patient’s bed to waist level when providing care
to prevent caregiver back strain.19
■ Assess the patient’s GI status for baseline comparison.6
■ Position the patient with the head of the bed elevated at
least 30 degrees; if contraindicated, consider the reverse
Trendelenburg position.2,6
■ Perform hand hygiene.7,8,9,10,11,12
■ Put on gloves and, as needed, other personal protective
equipment to comply with standard precautions).20,21,22,23
■ Assess the patient’s nares to determine the best choice
for insertion. Use a penlight to ease visualization, as
needed.
■ Determine the insertion length of the tube to help ensure
gastric placement. Place the tube’s distal end at the tip of
the patient’s nose (as shown below) or mouth for oral
insertion, and then extend the tube to the earlobe, down to
the xiphoid process, and then midway to the umbilicus.6
Note the corresponding incremental marking on the tube, or
if the tube doesn’t contain incremental markings, mark the
tube or note an identifier at the intended exit point.6
■ Drape a fluid-impermeable pad or towel over the patient’s
chest to protect the gown and bed linens from soiling.6
EQUIPMENT
Types of NG tubes
The practitioner will choose the type and diameter of nasogastric (NG) tube
that best suits the patient’s needs, such as lavage, aspiration, enteral
therapy, and stomach decompression. Choices may include the Levin and
Salem sump tubes.
Levin tube
The Levin tube is a rubber or plastic tube that has a single lumen, a length of
42′′ to 50′′ (106.7 cm to 127 cm), and holes at the tip and along the side.
Salem sump tube
A Salem sump tube is a double-lumen tube that’s made of clear plastic and
has a blue sump port (pigtail) that allows atmospheric air to enter the
patient’s stomach. This air allows the tube to float freely and not adhere to or
damage gastric mucosa. The larger port of this 48′′ (122-cm) tube serves as
the main suction conduit. The tube has openings at 45, 55, 65, and 75 cm as
well as a radiopaque line to verify placement.
■ Administer an anesthetic agent, if ordered, following safe
medication administration practices.24,25,26,27,28,29
■ Lubricate the distal tip of the tube with water-soluble
lubricant.6 Alternatively, if the tube is impregnated with
water-activated lubricant, activate the lubricant by dipping
the tip in water.
■ Grasp the tube with the distal end pointing downward,
curve it if necessary, and carefully insert it into the more
patent nostril (as shown below).
■ Guide the tube at an angle parallel to the floor of the
nasal canal, and guide it gently downward as the tube
advances through the nasal passage toward the distal
pharynx.6 Instruct the patient to assume a chin-tuck
position (if not contraindicated) to close the trachea and
open the esophagus.6 If you meet resistance, try to gently
rotate the tip of the tube until it advances past the nasal
passage. If you continue to meet resistance, don’t force the
tube. Instead, withdraw the tube and allow the patient to
rest, relubricate the tube, and retry, or insert the tube in the
other naris.6
■ Unless contraindicated, after the tube reaches the
oropharynx, allow the patient to sip water through a straw
(as shown below) as you slowly advance the tube to
facilitate passage of the tube into the esophagus. (If the
patient isn’t able to safely swallow water, ask the patient to
dry swallow.) Although swallowing may be helpful, it isn’t
necessary for successful NG tube insertion. Some patients
may prefer rapid insertion without swallowing.6
■ As you advance the tube, monitor the patient for cues
(such as coughing or discomfort) that might indicate that
the tube entered the respiratory tract or kinked or coiled in
the oral cavity.6
■ Continue to advance the tube to the predetermined
length.6
■ After you insert the tube to the predetermined length,
confirm the tube’s placement in the stomach, using at least
two of these bedside methods:2,30 Watch for signs of
respiratory distress (coughing and dyspnea).2,30 Use
capnography, if available, to detect carbon dioxide, which
indicates inadvertent tracheal insertion.2,30,31 Measure pH of
aspirate from the tube if your facility uses pH
measurement.2,30,32 (Fasting gastric pH is typically 5 or less,
even in patients receiving gastric acid inhibitors; however,
this method isn’t reliable enough to exclude the need for X-
ray placement verification, because gastric aspirate
occasionally has a high pH.30 Fluid aspirated from a tube
that has perforated the pleural space typically has a pH of 7
or higher.)2 Aspirate secretions from the tube with an
enteral syringe (as shown below), and inspect the visual
characteristics of the tube aspirate; fasting gastric
secretions commonly appear grassy-green, brown, or clear
and colorless,2,30 whereas aspirate from the pleural space
typically has a pale yellow serous appearance.2
■ Arrange for an X-ray, if ordered, to verify placement.2,30
Ensure that proper tube placement has been confirmed by
X-ray and documented before initial use for feedings or
medication administration to prevent complications
associated with blind tube insertion.2
NURSING ALERT If the patient has fragile skin and you’re using tape
to secure the tube, use tape specifically formulated for fragile skin to
prevent skin stripping and tearing during removal.33
■ Secure the tube with a securement device, tape (as
shown below), or transparent semipermeable dressing to
prevent displacement: Clean the patient’s skin where you
intend to secure the tube.6,34 Wipe excessively oily skin with
an alcohol pad and allow it to dry before applying the
securement device.35 Apply a skin preparation product to
the skin if needed.6 Avoid securing the tube toward the top
of the patient’s head to avoid putting pressure on the
naris.34 Apply the securement device and secure the tube
following the manufacturer’s instructions. Alternatively,
apply the tape and secure the tube or, for a small soft tube,
use a transparent semipermeable dressing to secure the
tube, if desired.6 Use protective padding under the tube, if
necessary, to protect the skin from friction and pressure.34
■ Mark the tube at the patient’s naris with an indelible
marker. Measure the external tube length or note the
incremental marking on the tube where it exits the patient’s
nose; document the external tube length in the patient’s
medical record to establish a baseline for comparison to
assess for tube migration.6
■ Trace the tubing from the patient to its point of origin to
make sure that you’re connecting the correct tubing, and
then attach it to suction equipment, if ordered, and verify
the designated suction pressure.36,37 Route the tubing
toward the patient’s feet, because a standardized approach
of keeping IV lines routed toward the head and enteric lines
routed toward the feet prevents dangerous misconnections.
If you’re using different access sites, label each tubing at
the distal and proximal ends to distinguish the different
tubing and prevent misconnections.37
■ Provide oral care, and continue to do so regularly to
promote comfort and prevent oral colonization with
microorganisms that may contribute to health care–
associated pneumonia. (See the “Oral care” procedure.)
■ Remove and discard the fluid-impermeable pad or
towel.21
■ Keep the head of the bed elevated at least 30 degrees
(unless contraindicated) to prevent aspiration. If
contraindicated, consider the reverse Trendelenburg
position.26
Removing an NG tube
■ Position the patient with the head of the bed elevated at
least 30 degrees to prevent aspiration. If contraindicated,
consider the reverse Trendelenburg position.2
■ Assess the patient’s GI function by assessing for nausea,
vomiting, abdominal distention, abdominal discomfort, and
ability to pass flatus or stools. Notify the practitioner of
abnormal findings, which may suggest that the patient is
not ready for tube removal.2
■ Drape a fluid-impermeable pad or towel across the
patient’s chest, as shown below, to protect the gown and
bed linens from spills.2,6
■ Discontinue gastric suction, as needed, to prepare for NG
tube removal.6
■ Perform hand hygiene.7,8,9,10,11,12
■ Put on gloves and, if needed, other personal protective
equipment to comply with standard precautions.20,21,22,23
■ Trace the tubing from the patient to its point of origin to
make sure that you’re accessing the correct tube.2,36
■ Verify tube placement, and then use a catheter-tip
syringe to flush the tube with a small bolus of air to clear
the tube of any remaining gastric contents and
subsequently prevent aspiration.6
■ Gently remove the securement device or tape from the
patient’s nose to prevent skin stripping and tearing.33 Use
adhesive remover, if necessary, to assist with removal and
to prevent skin breakdown.
■ Fold over or clamp the proximal end of the tube to
prevent backflow of gastric contents from the tube during
removal.6
■ Ask the patient to hold the breath to close the epiglottis.
Then withdraw the tube gently and steadily. (When the
distal end of the tube reaches the nasopharynx, you can pull
it quickly.) Inspect the tube to be sure it’s intact.6
Completing the procedure
■ Return the bed to the lowest position to prevent falls and
maintain patient safety.38
■ Discard used supplies in the appropriate receptacle.21
■ Remove and discard your gloves and any other personal
protective equipment worn.20,21
■ Perform hand hygiene.7,8,9,10,11,12
■ Document the procedure.39,40,41,42
Special considerations
■ When using a Salem-sump tube with suction, connect the
larger primary lumen (for drainage and suction) to the
suction equipment and select the appropriate setting, as
ordered (usually low suction). If the practitioner doesn’t
specify the setting, follow the manufacturer’s instructions. A
Levin tube usually calls for intermittent suction.
■ The Joint Commission has issued a sentinel event alert
related to managing risk during transition to new
International Organization for Standardization tubing
standards designed to prevent dangerous tubing
misconnections, which can lead to serious patient injury and
death. During the transition, be sure to trace the tubing and
catheter from the patient to the point of origin before
connecting or reconnecting any device or infusion, at any
care transition (such as a new setting or service), and as
part of the hand-off process; route tubes and catheters with
different purposes in different standardized directions; label
the tubing at the distal and proximal ends (when there are
different access sites or several bags hanging); use tubing
and equipment only as intended; and store medications for
different delivery routes in separate locations.37
■ Monitor the patient for signs of GI dysfunction, including
nausea, vomiting, abdominal distention or discomfort, and
food intolerance. GI dysfunction may necessitate reinsertion
of the NG tube.
Patient teaching
A home care nurse, the patient, or a family member may
insert an NG tube at home, deliver the feeding, and remove
the tube. Indications for insertion include gastric
decompression and short-term feeding. (See Using an NG
tube at home.)
Complications
Potential complications of prolonged intubation with an NG
tube include skin erosion at the nostril, sinusitis,
esophagitis, esophagotracheal fistula, gastric ulceration,
and pulmonary and oral infection. Complications that can
result from suctioning include electrolyte imbalances and
dehydration.
Documentation
Record the type and size of the NG tube as well as the date
and time, the route of insertion, and the tube’s external
length measurement or centimeter mark. Include the
method you used to confirm tube placement. Also note the
type and amount of suction, if used, and describe the
drainage, including the amount, color, character,
consistency, and odor. Note the patient’s tolerance of the
procedure. Include in your notes any signs and symptoms
signaling complications, such as nausea, vomiting, and
abdominal distention; the date, time, and person you
notified of any complications; interventions you provided;
and the patient’s response to the interventions. Document
subsequent irrigation procedures and continuing problems
after irrigation.
Document the patient’s GI status before tube removal.
Record the date and time of NG tube removal. Describe the
color, consistency, and amount of gastric drainage. Note
unusual events following NG tube removal, such as nausea,
vomiting, abdominal distention, and food intolerance. Note
the patient’s tolerance of the procedure. Document any
patient teaching you performed and the patient’s
understanding of that teaching.
REFERENCES
1 Hodin, R. A., & Bordeiznou, L. Nasogastric and nasoenteric tubes. (2015). In:
UpToDate, Sanfey, H., & Collins, K. A. (Eds.) . Retrieved from:
www.uptodate.com
2 Boullata, J. I ., et al. (2016). ASPEN safe practices for enteral nutrition therapy.
Journal of Parenteral and Enteral Nutrition, 41(1), 15–103. Accessed via the
Web at http://journals.sagepub.com/doi/pdf/10.1177/0148607116673053
(Level VII)
3 Chun, D. H., et al. (2009). A randomized, clinical trial of frozen versus
standard nasogastric tube placement. World Journal of Surgery, 33(9), 1789–
1792. (Level II)
4 Allied Health Care Products, Inc., Gomco Division (n.d .). “Gomco mobile
gastric drainage pump” [Online]. Accessed via the Web at
http://www.alliedhpi.com/images/zs168-199-001.pdf
PATIENT TEACHING
Using an NG tube at home
If the patient will need to have a nasogastric (NG) tube in place at home and
the patient or a family member will perform the procedure, you’ll need to
provide additional instruction, including hands-on training and return
demonstration. Instruct the patient and family member on how to:
■ obtain equipment needed for home intubation
■ insert, remove, and dispose of the tube
■ verify tube placement by aspirating stomach contents
■ correct tube misplacement
■ secure the tube
■ use the tube for gastric decompression (if appropriate)
■ set up, operate, and troubleshoot suctioning equipment
■ clean and store reusable NG tubes
■ flush and irrigate the NG tube
■ administer medications and enteral feedings via the NG tube, including
formula preparation and storage
■ provide comfort measures for the patient
■ inspect the nares for discharge and irritation and avoid or address these
effects
■ change the skin barrier and securement device
■ provide oral care and other hygienic measures
■ obtain a practitioner’s order for local throat spray or provide the patient
with ice chips (as indicated)
■ recognize signs and symptoms of respiratory distress, including cyanosis,
tachycardia, tachypnea, nasal flaring, retractions, expiratory grunting,
wheezing, prolonged coughing, and choking. (Instruct the patient or family to
stop the tube insertion or feeding if these signs or symptoms occur.)
Instruct the patient or family to contact the practitioner for:
■ signs or symptoms of respiratory distress
■ meeting resistance when trying to insert or remove the NG tube
■ vomiting while the tube is in place
■ skin breakdown due to tube placement and the use of a securement
device, tape, or other dressings.
5 C. R. Bard, Inc. (2015). “BARD® nasogastric sump tubes: Instructions for use”
[Online]. Accessed via the Web at
http://www.bardmedical.com/media/751612/nasogastric-sump-tubes.pdf
6 Wiegand, D. L. (2017). AACN procedure manual for high acuity, progressive,
and critical care (7th ed.). St. Louis: Elsevier.
7 The Joint Commission. (2019). Standard NPSG.07.01.01. Comprehensive
accreditation manual for hospitals. Oakbrook Terrace, IL: The Joint
Commission. (Level VII)
8 Centers for Disease Control and Prevention. (2002). Guideline for hand
hygiene in health-care settings: Recommendations of the Healthcare Infection
Control Practices Advisory Committee and the HICPAC/SHEA/APIC/IDSA Hand
Hygiene Task Force. MMWR Recommendations and Reports, 51(RR-16), 1–45.
Accessed via the Web at https://www.cdc.gov/mmwr/pdf/rr/rr5116.pdf (Level
II)
9 World Health Organization. (2009). “WHO guidelines on hand hygiene in
health care: First global patient safety challenge, clean care is safer care”
[Online]. Accessed via the Web at
http://apps.who.int/iris/bitstream/10665/44102/1/9789241597906_eng.pdf
(Level IV)
10 Centers for Medicare and Medicaid Services, Department of Health and
Human Services. (2015). Condition of participation: Infection control. 42 C.F.R.
§ 482.42.
11 Accreditation Association for Hospitals and Health Systems. (2017). Standard
07.01.21. Healthcare Facilities Accreditation Program: Accreditation
requirements for acute care hospitals. Chicago, IL: Accreditation Association
for Hospitals and Health Systems. (Level VII)
12 DNV GL-Healthcare USA, Inc. (2016). IC.1 .SR.1 . NIAHO® accreditation
requirements: Interpretive guidelines & surveyor guidance (version 11).
Milford, OH: DNV GL-Healthcare USA, Inc. (Level VII)
13 The Joint Commission. (2019). Standard NPSG.01.01.01. Comprehensive
accreditation manual for hospitals. Oakbrook Terrace, IL: The Joint
Commission. (Level VII)
14 Centers for Medicare and Medicaid Services, Department of Health and
Human Services. (2015). Condition of participation: Patient’s rights. 42 C.F.R.
§ 482.13(c)(1).
15 Accreditation Association for Hospitals and Health Systems. (2017). Standard
15.01.16. Healthcare Facilities Accreditation Program: Accreditation
requirements for acute care hospitals. Chicago, IL: Accreditation Association
for Hospitals and Health Systems. (Level VII)
16 The Joint Commission. (2019). Standard RI.01.01.01. Comprehensive
accreditation manual for hospitals. Oakbrook Terrace, IL: The Joint
Commission. (Level VII)
17 DNV GL-Healthcare USA, Inc. (2016). PR.1.SR.5 . NIAHO® accreditation
requirements: Interpretive guidelines & surveyor guidance (version 11).
Milford, OH: DNV GL-Healthcare USA, Inc. (Level VII)
18 The Joint Commission. (2019). Standard PC.02.01.21. Comprehensive
accreditation manual for hospitals. Oakbrook Terrace, IL: The Joint
Commission. (Level VII)
19 Waters, T. R., et al. (2009). “Safe patient handling training for schools of
nursing” [Online]. Accessed via the Web at
https://www.cdc.gov/niosh/docs/2009-127/pdfs/2009-127.pdf (Level VII)
20 Siegel, J. D ., et al. (2007, revised 2017). “2007 guideline for isolation
precautions: Preventing transmission of infectious agents in healthcare
settings” [Online]. Accessed via the Web at
https://www.cdc.gov/infectioncontrol/pdf/guidelines/isolation-guidelines.pdf
(Level II)
21 Occupational Safety and Health Administration. (n.d .). “Bloodborne
pathogens, standard number 1910.1030” [Online]. Accessed via the Web at
https://www.osha.gov/pls/oshaweb/owadisp.show_document?
p_id=10051&p_table=STANDARDS (Level VII)
22 Accreditation Association for Hospitals and Health Systems. (2017). Standard
07.01.10. Healthcare Facilities Accreditation Program: Accreditation
requirements for acute care hospitals. Chicago, IL: Accreditation Association
for Hospitals and Health Systems. (Level VII)
23 DNV GL-Healthcare USA, Inc. (2016). IC.1 .SR.2 . NIAHO® accreditation
requirements: Interpretive guidelines & surveyor guidance (version 11).
Milford, OH: DNV GL-Healthcare USA, Inc. (Level VII)
24 Uri, O., et al. (2011). Lidocaine gel as an anesthetic protocol for nasogastric
tube insertion in the ED. American Journal of Emergency Medicine, 29(4),
386–390 . (Level IV)
25 Kuo, Y. W., et al. (2010). Reducing the pain of nasogastric tube intubation with
nebulized and atomized lidocaine: A systematic review and meta-analysis.
Journal of Pain and Symptom Management, 40(4), 613–620. Accessed via the
Web at http://www.jpsmjournal.com/article/S0885-3924(10)00398-2/fulltext
(Level I)
26 Centers for Medicare and Medicaid Services, Department of Health and
Human Services. (2015). Condition of participation: Nursing services. 42
C.F.R. § 482.23(c).
27 Accreditation Association for Hospitals and Health Systems. (2017). Standard
16.01.03. Healthcare Facilities Accreditation Program: Accreditation
requirements for acute care hospitals. Chicago, IL: Accreditation Association
for Hospitals and Health Systems. (Level VII)
28 The Joint Commission. (2019). Standard MM.06.01.01. Comprehensive
accreditation manual for hospitals. Oakbrook Terrace, IL: The Joint
Commission. (Level VII)
29 DNV GL-Healthcare USA, Inc. (2016). MM.1 .SR.2. NIAHO® accreditation
requirements: Interpretive guidelines & surveyor guidance (version 11).
Milford, OH: DNV GL-Healthcare USA, Inc. (Level VII)
30 American Association of Critical Care Nurses. (2016). “A ACN practice alert:
Initial and ongoing verification of feeding tube placement in an adult”
[Online]. Accessed via the Web at https://www.aacn.org/clinical-
resources/practice-alerts/initial-and-ongoing-verification-of-feeding-tube-
placement-in-adults (Level VII)
31 Galbois, A., et al. (2011). Colorimetric capnography, a new procedure to
ensure correct feeding tube placement in the intensive care unit: An
evaluation of a local protocol. Journal of Critical Care, 26(6), 411–414. (Level
IV)
32 Emergency Nurses Association. (2015). “Clinical practice guideline: Gastric
tube placement verification” [Online]. Accessed via the Web at
https://www.ena.org/docs/default-source/resource-library/practice-
resources/cpg/gastrictubecpg7b5530b71c1e49e8b155b6cca1870adc.pdf?
sfvrsn=a8e9dd7a_8 (Level VII)
33 LeBlanc, K., et al. (2013). International Skin Tear Advisory Panel: A tool kit to
aid in the prevention, assessment, and treatment of skin tears using a
simplified classification system. Advances in Skin and Wound Care, 26(10),
459–476. (Level IV)
34 Holden-Mount, S., & Sieggreen, M. (2015). “Medical device-related ulcers:
Pediatrics and adults” [Online]. Accessed via the Web at
http://www.npuap.org/wp-content/uploads/2015/02/5.- Medical-Devices-S -
Holden-Mount-and-M-Sieggreen1.pdf
35 C. R. Bard, Inc. (2010) “StatLock NG stabilization device” [Online]. Accessed
via the Web at
http://www.bardmedical.com/media/3240/StatLock%20NG%20Poster%20M10
33.pdf
36 U.S . Food and Drug Administration. (n.d .). “Look. Check. Connect. Safe
medical device connections save lives” [Online]. Accessed via the Web at
https://www.fda.gov/downloads/MedicalDevices/Safety/AlertsandNotices/UCM
134873.pdf
37 The Joint Commission. (2014). “Sentinel event alert: Managing risk during
transition to new ISO tubing connector standards” [Online]. Accessed via the
Web at
http://www.jointcommission.org/assets/1/6/SEA_53_Connectors_8 _19_14 _final.
pdf (Level VII)
38 Ganz, D. A., et al. (2013). Preventing falls in hospitals: A toolkit for improving
quality of care (AHRQ Publication No. 13-0015-EF). Rockville, MD: Agency for
Healthcare Research and Quality. Accessed via the Web at
https://www.ahrq.gov/sites/default/files/publications/files/fallpxtoolkit.pdf
(Level VII)
39 The Joint Commission. (2019). Standard RC.01.03 .01. Comprehensive
accreditation manual for hospitals. Oakbrook Terrace, IL: The Joint
Commission. (Level VII)
40 Centers for Medicare and Medicaid Services, Department of Health and
Human Services. (2015). Condition of participation: Medical record services.
42 C.F.R. § 482.24(b).
41 Accreditation Association for Hospitals and Health Systems. (2017). Standard
10.00 .03. Healthcare Facilities Accreditation Program: Accreditation
requirements for acute care hospitals. Chicago, IL: Accreditation Association
for Hospitals and Health Systems. (Level VII)
42 DNV GL-Healthcare USA, Inc. (2016). MR.2 .SR.1 . NIAHO® accreditation
requirements: Interpretive guidelines & surveyor guidance (version 11).
Milford, OH: DNV GL-Healthcare USA, Inc. (Level VII)
NASOPHARYNGEAL AIRWAY INSERTION AND
CARE
Insertion of a nasopharyngeal airway—a soft rubber or latex
uncuffed catheter—establishes or maintains a patent airway
by displacing the tongue or soft palate from the pharyngeal
air passages.1 This airway is the typical choice for patients
with airway obstruction or the risk of developing airway
obstruction when conditions such as a clenched jaw or oral
problems prevent placement of an oral airway.2 It’s also
used to protect the nasal mucosa from injury when the
patient
needs frequent
nasotracheal
suctioning.
Unconscious patients as well as consciously sedated
patients may tolerate a nasopharyngeal airway better than
an oral airway.1
The airway follows the curvature of the nasopharynx,
passing through the nose and extending from the nostril to
the posterior pharynx. The bevel-shaped pharyngeal end of
the airway facilitates insertion, and its funnel-shaped nasal
end helps prevent slippage.
Insertion of a nasopharyngeal airway is preferred when an
oropharyngeal airway is contraindicated or fails to maintain
a patent airway. A nasopharyngeal airway is contraindicated
for patients with pathologic nasopharyngeal deformities. An
oropharyngeal airway is preferred for patients who have or
are suspected of having traumatic brain injury, central facial
fractures, or basal skull fractures, or if severe coagulopathy
is present or suspected, as well as for patients on
anticoagulation therapy.2,3,4,5
Equipment
Nasopharyngeal airway of proper size ▪ tongue blade ▪
water-soluble lubricant ▪ gloves ▪
stethoscope ▪
disinfectant pad ▪ oral care supplies ▪ Optional: suction
equipment; flashlight; resuscitation mask, handheld
resuscitation bag, or oxygen-powered breathing device.
Preparation of equipment
Make sure suction equipment is readily available and
properly functioning.
Implementation
■ Verify the practitioner’s order.
■ Gather the appropriate equipment.
■ Perform hand hygiene.6,7,8,9,10,11
■ Confirm the patient’s identity using at least two patient
identifiers.12
■ Provide privacy.13,14,15,16
■ In nonemergency situations, explain the procedure to the
patient and family (if appropriate) according to their
individual communication and learning needs to increase
their understanding, allay their fears, and enhance
cooperation.17
■ Raise the patient’s bed to waist level when providing
patient care to prevent caregiver back strain.18
■ Measure the diameter of the patient’s nostril and the
distance from the tip of the nose to the earlobe.
■ Select an airway diameter that is slightly smaller than
that of the nostril and a length that is the patient’s
measurement from the nose tip to the earlobe.3 Airway
sizes are labeled according to their internal diameter. The
recommended airway size for a large adult is 8 to 9 mm; for
a medium-sized adult, 7 to 8 mm; for a small adult, 6 to 7
mm.3
■ Lubricate the distal half of the airway’s surface with a
water-soluble lubricant to prevent traumatic injury during
insertion.3
■ Place the patient in the supine or high Fowler position
unless contraindicated to provide easy access to the nares.3
■ Perform hand hygiene.6,7,8,9,10,11
■ Put on gloves to comply with standard precautions.19,20
■ Properly insert the airway. (See Inserting a
nasopharyngeal airway.)
■ Immediately after insertion, auscultate the patient’s
respirations. If they’re absent or inadequate, initiate
artificial positive-pressure ventilation with a resuscitation
mask, a handheld resuscitation bag, or an oxygen-powered
breathing device.
■ Suction the patient’s airway as needed to remove
secretions. (See the “Oronasopharyngeal suction”
procedure.)
■ Reassess the patient’s respiratory status following
suctioning and at an interval determined by the patient’s
condition and your facility.3
■ Assess the patient’s skin surrounding the nasopharyngeal
airway regularly for redness, swelling, drainage, bleeding,
and skin breakdown.3
■ Check the airway regularly to detect dislodgment or
obstruction.
■ Provide oral care, moisturizing the oral mucosa and lips
every 2 to 4 hours and as needed. Brush the patient’s teeth,
gums, and tongue at least twice a day to reduce the risk of
pneumonia.21 (See the “Oral care” procedure.)
■ Return the bed to the lowest position to prevent falls and
maintain patient safety.22
■ Remove and discard your gloves.19
■ Perform hand hygiene.6,7,8,9,10,11
■ Clean and disinfect your stethoscope using a disinfectant
pad.23,24
■ Perform hand hygiene.6,7,8,9,10,11
■ Document the procedure.25,26,27,28
Special considerations
■ If the patient continues to cough or gag, the tube may be
too long. If so, remove the airway and insert a shorter one.
■ Every 8 hours, remove and clean the airway to check for
skin breakdown. Clean the airway according to the
manufacturer’s instructions. Reinsert the clean airway.
Consider rotating to the other nostril to prevent skin
breakdown.3
■ When the patient’s natural airway is patent, remove the
airway in one smooth motion. If the airway sticks, apply
lubricant around the nasal end of the tube and around the
nostril and then gently rotate the airway until it’s free.
Complications
Sinus infection may result from obstruction of sinus
drainage. Insertion of the airway may injure the nasal
mucosa and cause bleeding and, possibly, aspiration of
blood into the trachea. If the tube is too long, it may enter
the esophagus and cause gastric distention and
hypoventilation during artificial ventilation. Although
semiconscious patients usually tolerate this type of airway
better than conscious patients do, they may still experience
laryngospasm and vomiting.
Documentation
Document the date and time of the airway’s insertion, the
size of the airway, removal and cleaning of the airway, shifts
from one nostril to the other, the condition of the mucous
membranes, suctioning, complications and nursing
interventions taken, and the patient’s tolerance of the
procedure. Document patient and family teaching (if
appropriate) and their understanding of that teaching.
REFERENCES
1 Becker, D. E ., et al. (2014). Essentials of airway management, oxygenation,
and ventilation: Part 1: Basic equipment and devices. Anesthesia Progress,
61(2), 78–83 .
2 American Heart Association. (2010). 2010 American Heart Association
guidelines for cardiopulmonary resuscitation and emergency cardiovascular
care. Circulation, 122, S729–S767. (Level II)
Inserting a nasopharyngeal airway
First, hold the airway beside the patient’s face to make sure it’s the proper
size (as shown below). It should be slightly smaller than the patient’s nostril
diameter and slightly longer than the distance from the tip of the nose to the
earlobe.3
To insert the airway, hyperextend the patient’s neck using a chin-lift or jaw-
thrust technique to anteriorly displace the patient’s mandible (unless
contraindicated). Then push up the tip of the nose and pass the airway into
the nostril (as shown below). Avoid pushing against any resistance to prevent
tissue trauma and airway kinking.
To check for correct airway placement, first close the patient’s mouth.
Then, place your finger over the tube’s opening to detect air exchange. Also,
open the patient’s mouth, depress the patient’s tongue with a tongue blade,
and look for the airway tip behind the uvula. Use a flashlight to illuminate the
oral cavity if necessary.3
3 Wiegand, D. L. (2017). AACN procedure manual for critical care (7th ed.). St.
Louis, MO: Elsevier.
4 Bullard, D., et al. (2012). Contraindications to nasopharyngeal airway
insertion. Nursing, 42(10), 66–67. Accessed via the Web at
http://journals.lww.com/nursing/Fulltext/2012/10000/Contraindications_to_nas
opharyngeal_airway.21.aspx (Level V)
5 American Heart Association. (2015). 2015 American Heart Association
guidelines update for cardiopulmonary resuscitation and emergency
cardiovascular care. Circulation, 132, S444–S464. (Level II)
6 The Joint Commission. (2019). Standard NPSG.07.01.01. Comprehensive
accreditation manual for hospitals. Oakbrook Terrace, IL: The Joint
Commission. (Level VII)
7 Centers for Disease Control and Prevention. (2002). Guideline for hand
hygiene in health-care settings: Recommendations of the Healthcare Infection
Control Practices Advisory Committee and the HICPAC/SHEA/APIC/IDSA Hand
Hygiene Task Force. MMWR Recommendations and Reports, 51(RR-16), 1–45.
Accessed via the Web at https://www.cdc.gov/mmwr/pdf/rr/rr5303.pdf (Level
II)
8 World Health Organization. (2009). “WHO guidelines on hand hygiene in
health care: First global patient safety challenge, clean care is safer care”
[Online]. Accessed via the Web at
http://apps.who.int/iris/bitstream/10665/44102/1/9789241597906_eng.pdf
(Level IV)
9 Centers for Medicare and Medicaid Services, Department of Health and
Human Services. (2015). Condition of participation: Infection control. 42 C.F.R.
§ 482.42.
10 Accreditation Association for Hospitals and Health Systems. (2017). Standard
07.01.21. Healthcare Facilities Accreditation Program: Accreditation
requirements for acute care hospitals. Chicago, IL: Accreditation Association
for Hospitals and Health Systems. (Level VII)
11 DNV GL-Healthcare USA, Inc. (2016). IC.1 .SR.1 . NIAHO® accreditation
requirements: Interpretive guidelines & surveyor guidance (version 11).
Milford, OH: DNV GL-Healthcare USA, Inc. (Level VII)
12 The Joint Commission. (2019). Standard NPSG.01.01.01. Comprehensive
accreditation manual for hospitals. Oakbrook Terrace, IL: The Joint
Commission. (Level VII)
13 The Joint Commission. (2019). Standard RI.01.01.01. Comprehensive
accreditation manual for hospitals. Oakbrook Terrace, IL: The Joint
Commission. (Level VII)
14 Centers for Medicare and Medicaid Services, Department of Health and
Human Services. (2015). Condition of participation: Patient’s rights. 42 C.F.R.
§ 482.13(c)(1).
15 Accreditation Association for Hospitals and Health Systems. (2017). Standard
15.01.16. Healthcare Facilities Accreditation Program: Accreditation
requirements for acute care hospitals. Chicago, IL: Accreditation Association
for Hospitals and Health Systems. (Level VII)
16 DNV GL-Healthcare USA, Inc. (2016). PR.1.SR.5 . NIAHO® accreditation
requirements: Interpretive guidelines & surveyor guidance (version 11).
Milford, OH: DNV GL-Healthcare USA, Inc. (Level VII)
17 The Joint Commission. (2019). Standard PC.02.01.21. Comprehensive
accreditation manual for hospitals. Oakbrook Terrace, IL: The Joint
Commission. (Level VII)
18 Waters, T. R., et al. (2009). “Safe patient handling training for schools of
nursing” [Online]. Accessed via the Web at
https://www.cdc.gov/niosh/docs/2009-127/pdfs/2009-127.pdf (Level VII)
19 Siegel, J. D ., et al. (2007, revised 2017). “2007 guideline for isolation
precautions: Preventing transmission of infectious agents in healthcare
settings” [Online]. Accessed via the Web at
https://www.cdc.gov/infectioncontrol/pdf/guidelines/isolation-guidelines.pdf
(Level II)
20 Accreditation Association for Hospitals and Health Systems. (2017). Standard
07.01.10. Healthcare Facilities Accreditation Program: Accreditation
requirements for acute care hospitals. Chicago, IL: Accreditation Association
for Hospitals and Health Systems. (Level VII)
21 American Association of Critical-Care Nurses. (2017). “A ACN practice alert:
Oral care for acutely and critically ill patients” [Online]. Accessed via the Web
at https://www.aacn.org/clinical-resources/practice-alerts/oral-care-for-
acutely-and-critically-ill-patients (Level VII)
22 Ganz, D. A., et al. (2013). Preventing falls in hospitals: A toolkit for improving
quality of care (AHRQ Publication No. 13-0015-EF). Rockville, MD: Agency for
Healthcare Research and Quality. Accessed via the Web at
https://www.ahrq.gov/sites/default/files/publications/files/fallpxtoolkit.pdf
(Level VII)
23 Rutala, W. A., et al. (2008, revised 2017). “Guideline for disinfection and
sterilization in healthcare facilities, 2008” [Online]. Accessed via the Web at
https://www.cdc.gov/infectioncontrol/pdf/guidelines/disinfection-
guidelines.pdf (Level I)
24 Accreditation Association for Hospitals and Health Systems. (2017). Standard
07.02.03. Healthcare Facilities Accreditation Program: Accreditation
requirements for acute care hospitals. Chicago, IL: Accreditation Association
for Hospitals and Health Systems. (Level VII)
25 The Joint Commission. (2019). Standard RC.01.03 .01. Comprehensive
accreditation manual for hospitals. Oakbrook Terrace, IL: The Joint
Commission. (Level VII)
26 Centers for Medicare and Medicaid Services, Department of Health and
Human Services. (2015). Condition of participation: Medical record services.
42 C.F.R. § 482.24(b).
27 Accreditation Association for Hospitals and Health Systems. (2017). Standard
10.00 .03. Healthcare Facilities Accreditation Program: Accreditation
requirements for acute care hospitals. Chicago, IL: Accreditation Association
for Hospitals and Health Systems. (Level VII)
28 DNV GL-Healthcare USA, Inc. (2016). MR.2 .SR.1 . NIAHO® accreditation
requirements: Interpretive guidelines & surveyor guidance (version 11).
Milford, OH: DNV GL-Healthcare USA, Inc. (Level VII)
NEBULIZER THERAPY
An established component of respiratory care, nebulizer
therapy aids bronchial hygiene by restoring and maintaining
mucous blanket continuity; hydrating dried, retained
secretions; promoting expectoration of secretions;
humidifying inspired oxygen; and delivering medications.
Therapy may be administered through nebulizers that have
a large or small volume, are connected to ventilator tubing,
or are ultrasonic.
Large-volume nebulizers, such as the Venturi jet, are used
to provide long-term 100% humidity for an artificial airway
such as a tracheostomy or for certain pulmonary conditions
such as cystic fibrosis. (See Large-volume nebulizer.) Cool
aerosols can be used to treat upper airway disorders, such
as croup, epiglottiditis, and postextubation edema.1 Heated
aerosols are used whenever the upper airway is bypassed,
such as in patients who are intubated or have a
tracheostomy, to prevent the dry gas from causing damage
to the bronchial airways.1 The aerosol mist can be delivered
via mist tent, hood, mouthpiece, mask, T-piece, face tent, or
tracheostomy collar. The amount of aerosol the nebulizer
delivers varies depending on the design, gas flow, air
entrainment port, and temperature.1 Small-volume
nebulizers are also used to deliver medications.
In-line nebulizers are used to deliver medications to
patients who are being mechanically ventilated. In such
cases, the nebulizer is placed in the inspiratory side of the
ventilatory circuit. Standard precautions should be used for
all patients on nebulizer therapy to prevent exposure to
body fluids.
Ultrasonic nebulizers are electrically driven and use high-
frequency vibrations to break up surface water into
particles. The resultant dense mist works to penetrate
smaller airways and is useful for hydrating secretions,
thereby inducing a cough and sputum. The aerosol mist can
be delivered to the patient via mist tent, hood, mouthpiece,
mask, T-piece, face tent, or tracheostomy collar. Some
ultrasonic nebulizers are also capable of aerosolizing
medications, but this application hasn’t been shown to be
superior to a standard jet nebulizer.
Standard precautions for body fluid isolation should be
used for all patients on nebulizer therapy. Airborne
precautions should be implemented for patients with known
or suspected tuberculosis, including enclosing and
containing aerosol administration and filtering aerosols that
bypass or are exhaled by the patient.
Equipment
For large-volume nebulizer therapy
Stethoscope ▪ pressurized gas source ▪ flowmeter ▪ patient
interface device (such as a mask or collar) ▪ large-bore
oxygen tubing ▪ nebulizer ▪ sterile distilled water1 ▪ tissues
and emesis basin or other container (for collection or
disposal of expectorated sputum) ▪ suction source and
supplies ▪ gloves ▪ vital signs monitoring equipment ▪
disinfectant pad ▪ oral care supplies ▪ Optional: oxygen
blender (if a built-in adjustable oxygen controller isn’t
available), heating device, in-line thermometer (if using a
heater), gown, mask and goggles or mask with face shield.
For small-volume nebulizer therapy
Stethoscope ▪ pressurized gas source ▪ flowmeter ▪ oxygen
tubing ▪ vital signs monitoring equipment ▪ nebulizer cup ▪
mouthpiece or mask ▪ sterile normal saline solution1 ▪
prescribed medication ▪ syringe and needle or needleless
device ▪ antiseptic pad ▪ tissues and emesis basin or other
container (for collection or disposal of expectorated sputum)
▪ oral care supplies ▪ gloves ▪ disinfectant pad ▪ Optional:
spirometer or peak flow meter, suction source and supplies,
sterile water, gown, mask and goggles or mask with face
shield.
For in-line nebulizer therapy
Syringe or needleless device ▪ disinfectant pad ▪
pressurized gas source ▪ flowmeter ▪ in-line nebulizer cup ▪
prescribed medication and diluent ▪ gloves ▪ stethoscope ▪
pulse oximeter and probe ▪ vital signs monitoring
equipment ▪ Optional: gown, mask and goggles or mask
with face shield, suction source and supplies.
For ultrasonic nebulizer therapy
Stethoscope ▪ ultrasonic gas-delivery device ▪ large-bore
oxygen tubing ▪ patient interface device, such as a mask,
mouthpiece, or collar2 ▪ nebulizer couplet compartment ▪
tissues and emesis basin or other container (for collection or
disposal of expectorated sputum) ▪ disinfectant pad ▪
prescribed medications for inhalation ▪ oral care supplies ▪
gloves ▪ vital signs monitoring equipment ▪ Optional: sterile
distilled water, spirometer or peak flow meter, sterile normal
saline solution, suction source and supplies, gown, mask
and goggles or mask with face shield.
Preparation of equipment
Assemble the ultrasonic nebulizer according to the
manufacturer’s instructions. To ensure proper operation of
the nebulizer, check the connections with the AC adapter
and electrical output or battery installation. Reconnect or
reinstall, as needed.2
Depending on the manufacturer, fill the reservoir of the
device with sterile distilled water until it reaches exactly the
level marked. This amount of water serves as a conductor
for the ultrasonic waves and medication and will never be
nebulized.3
Implementation
For large-volume nebulizer therapy
■ Verify the practitioner’s order.
■ Gather the appropriate equipment.
■ Perform hand hygiene.4,5,6,7,8,9
■ Confirm the patient’s identity using at least two patient
identifiers.10
■ Provide privacy.11,12,13,14
■ Explain the procedure to the patient and family (if
appropriate) according to their individual communication
and learning needs to increase their understanding, allay
their fears, and enhance cooperation.15
■ Raise the patient’s bed to waist level when providing
patient care to prevent back strain.16
■ Perform hand hygiene.4,5,6,7,8,9
■ Put on gloves and, as needed, other personal protective
equipment to comply with standard precautions.17,18,19
■ Obtain the patient’s vital signs, and perform a respiratory
assessment to establish a baseline.
■ If possible, place the patient in a sitting or high Fowler
position to encourage full lung expansion and promote
aerosol dispersion.
■ Fill the nebulizer chamber to the indicated level with
sterile distilled water.1 To prevent corrosion, avoid using
saline solution.
■ Add a heating device, if ordered, and place an in-line
thermometer between the outlet port and the patient, as
close to the patient as possible, to monitor the actual
temperature of the inhaled gas and to avoid burning the
patient.
■ If the nebulizer will also supply oxygen to the patient, set
the air entrainment port or adjust the external oxygen
blender to the ordered oxygen concentration and analyze
the flow at the patient’s end of the tubing to ensure delivery
of the prescribed oxygen percentage.
■ Attach the delivery device to the patient.
■ Encourage the patient to cough and expectorate sputum,
and suction as needed.
■ Check the water level in the nebulizer at frequent
intervals and refill or replace, as indicated. When refilling a
reusable container, discard the old water to prevent
infection from bacterial or fungal growth, and refill the
container to the indicator line with sterile distilled water.1
■ If the aerosol is heated, tell the patient to report warmth,
discomfort, or hot tubing, because these may indicate a
heater malfunction. Use the in-line thermometer to monitor
the temperature of the gas the patient is inhaling. If you
turn off the flow for more than 5 minutes, unplug the heater
to avoid overheating the water and burning the patient
when the aerosol is resumed.
■ Obtain the patient’s vital signs and assess respiratory
status to evaluate the effectiveness of therapy.
■ Change the nebulizer unit and tubing at an interval
determined by your facility to prevent bacterial
contamination.
■ Assist the patient with oral care, as needed. (See the
“Oral care” procedure.)
■ Return the bed to the lowest position to prevent falls and
maintain patient safety.20
■ Remove and discard your gloves and any other personal
protective equipment worn.17
■ Perform hand hygiene.4,5,6,7,8,9
■ Clean and disinfect your stethoscope using a disinfectant
pad.21,22
■ Perform hand hygiene.4,5,6,7,8,9
■ Document the procedure.23,24,25,26
EQUIPMENT
Large-volume nebulizer
Connected to a flowmeter and pneumatically powered, an air entrainment
port allows oxygen and air to mix to deliver a reliable oxygen concentration
through a jet orifice. When connected to a liquid chamber, liquid is siphoned
into the jet flow and creates an aerosol.1 The amount of aerosol delivered
varies depending on the design, gas flow, air entrapment port, and
temperature.1 The following are advantages and disadvantages to using a
large-volume nebulizer.
Advantages
■ Provides oxygen and aerosol therapy
■ Can be used for long-term therapy
Disadvantages
■ Increases the risk of bacterial growth (in reusable units)
■ Results in condensate collection in large-bore tubing
■ May cause mucosal irritation from breathing hot, dry air (if water level isn’t
maintained correctly in reservoir)
■ Increases the risk of overhydration by mist (in infants)
For small-volume, in-line, or ultrasonic
nebulizer therapy
■ Avoid distractions and interruptions when preparing and
administering medications to prevent medication errors.27,28
■ Verify the practitioner’s order.29,30,31,32
■ Reconcile the patient’s medications when the practitioner
orders a new medication to reduce the risk of medication
errors, including omissions, dosing errors, and drug
interactions.
■ Gather the necessary equipment.
■ Compare the medication label with the order in the
patient’s medical record.29,30,31,32
■ Check the patient’s medical record for an allergy or a
contraindication to the prescribed medication. If an allergy
or a contraindications exists, don’t administer the
medication; notify the practitioner.29,30,31,32
■ Check the expiration date on the medication. If the
medication is expired, return it to the pharmacy and obtain
new medication.29,30,31,32
■ Visually inspect the medication for particles or
discoloration or other signs of loss of integrity; don’t
administer
the
medication
if its integrity is
compromised.29,30,31,32
■ Label all medications, medication containers, and other
solutions and handle them using sterile technique.33,34
■ Discuss any unresolved concerns about the medication
with the patient’s practitioner.29,30,31,32
■ Perform hand hygiene.4,5,6,7,8,9
■ Confirm the patient’s identity using at least two patient
identifiers.10
■ Provide privacy.11,12,13,14
■ Explain the procedure to the patient and family (if
appropriate) according to their individual communication
and learning needs to increase their understanding, allay
their fears, and enhance cooperation.15
■ If the patient is receiving the medication for the first time,
teach about potential adverse effects and discuss any other
concerns related to the medication.29,30,31,32
■ Raise the patient’s bed to waist level when providing
patient care to prevent back strain.16
■ Perform hand hygiene.4,5,6,7,8,9
■ Put on gloves and, as needed, other personal protective
equipment to comply with standard precautions.17,18,19
■ Obtain the patient’s vital signs, perform a respiratory
assessment, and obtain a spirometry or peak flow reading,
as ordered, to establish a baseline.
■ If possible, place the patient in a sitting or high Fowler
position to encourage full lung expansion and promote
aerosol dispersion.
■ Verify that the medication is being administered at the
proper time, in the prescribed dose, and by the correct route
to reduce the risk of medication errors.29,30,31,32
■ If your facility uses a bar code technology, scan your
identification badge, the patient’s identification bracelet,
and the medication’s bar code.
For small-volume therapy
■ Draw up the prescribed medication and inject it into the
nebulizer cup. To prevent contamination, don’t touch the
nebulizer.
■ Add sterile normal saline solution or water to the
prescribed dose volume according to the drug
manufacturer’s prescribing information.1
■ After attaching the flowmeter to the gas source, attach
the nebulizer to the flowmeter and then adjust the flow
according to the manufacturer’s recommendations, usually
6 to 10 L/minute (as shown below).1
■ Add sterile normal saline solution to the prescribed dose
volume according to the drug manufacturer’s prescribing
information.1
■ Check the outflow port to ensure adequate misting.
■ Assist the patient with the mouthpiece or mask, as
needed, depending on the delivery system and patient-
related factors such as age and physical and cognitive
ability.2 Instruct the patient to inhale slowly through the
mouth at a normal tidal volume (as shown below).1
■ Remain with the patient and continue the treatment until
the nebulizer begins to sputter.1,2
■ Monitor heart rate and respiratory status during the
procedure to detect any adverse reactions to the
medication.35,36,37
■ After treatment, obtain the patient’s vital signs, assess
the respiratory status, and obtain a spirometry or peak flow
measurement as indicated to detect any adverse reactions
to the medication.38,39
■ Encourage the patient to cough and expectorate, or
suction the patient’s airway as needed.37
■ Assist the patient with oral care. (See the “Oral care”
procedure.)
■ Return the bed to the lowest position to prevent falls and
maintain patient safety.20
■ Rinse the nebulizer with sterile water and allow it to air-
dry, or discard it after the treatment.1
For in-line nebulizer therapy
■ Draw up the medication and diluent, open the nebulizer
cup, inject the medication, and then replace the lid. Attach
the cup to the gas source with the attached tubing.
■ Insert the nebulizer cup adapter into the inspiratory limb
of the ventilator circuit 6′′ (15.2 cm) from the Y-connection
to create a reservoir of aerosolized medication in the
inspiratory limb of the circuit and to reduce the amount of
drug flushed into the expiratory limb.40
■ Remove the heat-moisture exchanger from the ventilator
if it’s attached.
■ Initiate gas flow by using the nebulizer function on the
ventilator, if available. If this function isn’t available, initiate
gas flow from an external source to create a mist.1
NURSING ALERT Adding an external gas flow to the ventilator can
affect gas flow and volume delivery to the patient, causing alarms to
trigger. Monitor the patient closely during a nebulizer treatment, and
return ventilator settings to pretreatment levels as soon as possible
after treatment.1
■ If the patient is being ventilated using a spontaneous
pressure mode, encourage the patient to take slow, even
breaths during the treatment.
■ Remain with the patient during the treatment, which
typically lasts 15 to 20 minutes, and monitor vital signs,
oxygen saturation level, and ventilator parameters to detect
any adverse reaction to the medication.
■ Discontinue treatment when medication administration is
complete. Remove the nebulizer cup from the ventilatory
circuit.35,36
■ Encourage the patient to cough, and suction excess
secretions as needed.
■ Perform a respiratory assessment to evaluate the
effectiveness of therapy.38,41
■ Return the bed to the lowest position to prevent falls and
maintain patient safety.20
■ Clean and store the nebulizer cup according to the
manufacturer’s instructions.
For ultrasonic nebulizer therapy
■ Fill the couplet compartment on the nebulizer with the
prescribed medication or sterile normal saline solution to
the level indicated.1 If the dose to be inhaled is larger than
the maximum capacity of the compartment, divide it into
several separate inhalations.3
■ Before beginning, administer an inhaled bronchodilator
(metered-dose inhaler or small-volume nebulizer) to prevent
bronchospasm, as ordered, following safe medication
administration practices.29,30,31,32
■ Turn on the nebulizer machine, and check the outflow
port to ensure proper misting.
■ As needed, assist the patient with applying a mouthpiece,
mask, or collar, as necessary, depending on the delivery
system and patient-related factors such as age and physical
and cognitive ability.2
■ Encourage the patient to take slow, even breaths through
the mouth.1
■ Remain with the patient during the procedure until all of
the medication in the nebulizer cup has been aerosolized to
observe for adverse reactions. Watch for labored
respirations, because ultrasonic nebulizer therapy may
hydrate retained secretions and obstruct airways. Observe
for wheezing resulting from irritation of the airways.35,36
■ When medication delivery is complete, turn off the
nebulizer.
■ Clean and store the nebulizer and tubing appropriately to
prevent bacterial contamination.
■ Obtain the patient’s vital signs, assess respiratory status,
and obtain a spirometry or peak flow measurement, as
ordered, to determine the efficacy of treatment.38,41
■ Encourage the patient to cough and expectorate, or
suction the airway as needed.
■ Dispose of sputum properly or send an ordered specimen
to the laboratory immediately. (See the “Sputum collection”
procedure.)
■ Assist the patient with oral care. (See the “Oral care”
procedure.)
■ Return the bed to the lowest position to prevent falls and
maintain patient safety.20
Completing the procedure
■ Dispose of used supplies in the appropriate receptacle.
■ Remove and discard your gloves and any other personal
protective equipment worn.17
■ Perform hand hygiene.4,5,6,7,8,9
■ Clean and disinfect your stethoscope using a disinfectant
pad.21,22
■ Perform hand hygiene.4,5,6,7,8,9
■ Document the procedure.23,24,25,26
Special considerations
■ When using large-volume nebulizer therapy in pediatric
patients or patients with a delicate fluid balance, be alert for
signs of overhydration (exhibited by unexplained weight
gain occurring over several days after the initiation of
therapy), pulmonary edema, crackles, and electrolyte
imbalance.
■ If a nebulizer device is for single-patient use, use it only
for a single patient, label it with the proper patient
identifiers, and discard it at the end of the patient’s stay to
prevent cross-contamination.2
■ If oxygen is being delivered concomitantly, the fraction of
inspired oxygen (FIO2) may be diluted if the flow isn’t
adequate, so if the mist disappears when the patient
inhales, increase the gas flow.
■ A nose clip may be used if the patient has difficulty
remembering to breathe through the mouth.
■ Use only sterile fluids for nebulization to reduce the risk
of infection.1
■ Ventilator modes and settings can affect aerosol
deposition. Lung-model studies suggest that low inspiratory
flow rates, use of decelerating flow instead of square wave–
form flow, tidal volume greater than 500 mL, and longer
inspiratory times are all associated with improved aerosol
deposition. Spontaneous inspiration through the ventilator
circuit provides increased lung deposition compared with
controlled,
assist-controlled,
and
pressure-support
ventilation.
■ Adding gas from the nebulizer to the ventilator circuit
may increase volumes, flows, and peak airway pressures,
altering the intended pattern of ventilation. Reset ventilator
settings at the end of treatment if you made changes to
accommodate the additional gas flow during nebulization.
■ Adding gas from a nebulizer into the ventilator circuit
may make the patient unable to trigger the ventilator during
nebulization, leading to hypoventilation.
■ Don’t leave the in-line nebulizer cup in the ventilator
circuit between treatments, because doing so increases the
risk of a pressure leak in the system.
■ You should typically consider the treatment over with the
onset of nebulizer sputtering. Some nebulizers will sputter
for extended periods after administration of the majority of
the inhaled dose. Evidence suggests that after the onset of
sputter, the patient inhales very little additional drug. A
newer electronic nebulizer may use a microprocessor that
monitors how much dose the nebulizer has administered
and automatically turns off the nebulizer at the end of each
dose.2
■ Humidification in the ventilator circuit decreases aerosol
delivery of medication as particles are deposited in the
circuit. Medications delivered to patients during mechanical
ventilation may require increased dosage to achieve a
therapeutic effect.40
Patient teaching
If the patient needs to continue nebulizer therapy after
discharge, teach the patient and family how to use the
equipment. (See Using a nebulizer at home.)
Complications
Nebulized particulates can irritate the mucosa and cause
bronchospasm and dyspnea.2 Other complications include
airway burns (when a heating element is used), infection
from contaminated equipment (rare), and adverse reactions
to the medication.40
PATIENT TEACHING
Using a nebulizer at home
If the patient will be using a small-volume nebulizer at home, teach the
following steps:2
■ Wash your hands with soap and warm water and dry thoroughly.
■ Assemble the tubing, nebulizer cup, and mouthpiece or mask.
■ Put the prescribed medicine into the nebulizer cup.
■ Sit in an upright position.
■ Connect the nebulizer to a power source.
■ Breathe normally, with occasional deep breaths, until sputtering occurs or
until the end of nebulization.
■ Keep the nebulizer vertical during treatment.
■ Rinse the nebulizer with sterile or distilled water and allow it to air-dry.
■ Disinfect the nebulizer according to the manufacturer’s instructions.
Teach the patient who will be using an ultrasonic nebulizer for home
therapy the following steps:2
■ Wash your hands with soap and warm water and dry them thoroughly.
■ Correctly assemble the nebulizer.
■ Follow the manufacturer’s instructions for performing a functionality test
before the first use of a new nebulizer and after each disinfection to verify
proper operation.
■ Pour the prescribed medication or solution into the medication reservoir.
Don’t exceed the volume recommended by the manufacturer.
■ Sit in an upright position.
■ Turn on the power.
■ Hold the nebulizer in the position recommended by the manufacturer.
■ Breathe normally, with occasional deep breaths.
■ If you must interrupt treatment, turn off the unit to avoid waste.
■ When you’ve completed the treatment, disassemble and clean the
nebulizer, as recommended by the manufacturer.
■ Once or twice a week, disinfect the nebulizer following the manufacturer’s
instructions.
Documentation
Record the date, time, and duration of therapy; the type and
amount of medication; FIO2 or oxygen flow, if administered;
vital signs, respiratory assessment, and peak flow or
spirometry readings before and after treatment; the
patient’s response to treatment; and any patient teaching
provided and the patient’s understanding of the teaching.
REFERENCES
1 Kacmarek, R. M., et al. (2017). Egan’s fundamentals of respiratory care (11th
ed.). St. Louis, MO: Mosby.
2 Gregory, K. L., et al. (2013). “Guide to aerosol delivery devices for physicians,
nurses, pharmacists, and other health care professionals” [Online]. Accessed
via the Web at http://www.aarc.org/wp-
content/uploads/2014/08/aerosol_guide_pro.pdf (Level VII)
3 GF Health Products, Inc. (2008). “Lumiscope portable ultrasonic nebulizer
model 6700: User manual” [Online]. Accessed via the Web at
http://www.grahamfield.com/nosync/productimagesV2/ProductAdditionalInfoIt
emOriginal2220.PDF
4 Centers for Disease Control and Prevention. (2002). Guideline for hand
hygiene in health-care settings: Recommendations of the Healthcare Infection
Control Practices Advisory Committee and the HICPAC/SHEA/APIC/IDSA Hand
Hygiene Task Force. MMWR Recommendations and Reports, 51(RR-16), 1–45.
Accessed via the Web at https://www.cdc.gov/mmwr/pdf/rr/rr5116.pdf (Level
II)
5 World Health Organization. (2009). “WHO guidelines on hand hygiene in
health care: First global patient safety challenge, clean care is safer care”
[Online]. Accessed via the Web at
http://apps.who.int/iris/bitstream/10665/44102/1/9789241597906_eng.pdf
(Level IV)
6 The Joint Commission. (2019). Standard NPSG.07.01.01. Comprehensive
accreditation manual for hospitals. Oakbrook Terrace, IL: The Joint
Commission. (Level VII)
7 Centers for Medicare and Medicaid Services, Department of Health and
Human Services. (2015). Condition of participation: Infection control. 42 C.F.R.
§ 482.42.
8 Accreditation Association for Hospitals and Health Systems. (2017). Standard
07.01.21. Healthcare Facilities Accreditation Program: Accreditation
requirements for acute care hospitals. Chicago, IL: Accreditation Association
for Hospitals and Health Systems. (Level VII)
9 DNV GL-Healthcare USA, Inc. (2016). IC.1.SR.1 . NIAHO® accreditation
requirements: Interpretive guidelines & surveyor guidance (version 11).
Milford, OH: DNV GL-Healthcare USA, Inc. (Level VII)
10 The Joint Commission. (2019). Standard NPSG.01.01.01. Comprehensive
accreditation manual for hospitals. Oakbrook Terrace, IL: The Joint
Commission. (Level VII)
11 The Joint Commission. (2019). Standard RI.01.01.01. Comprehensive
accreditation manual for hospitals. Oakbrook Terrace, IL: The Joint
Commission. (Level VII)
12 Centers for Medicare and Medicaid Services, Department of Health and
Human Services. (2015). Condition of participation: Patient’s rights. 42 C.F.R.
§ 482.13(c)(1).
13 Accreditation Association for Hospitals and Health Systems. (2017). Standard
15.01.16. Healthcare Facilities Accreditation Program: Accreditation
requirements for acute care hospitals. Chicago, IL: Accreditation Association
for Hospitals and Health Systems. (Level VII)
14 DNV GL-Healthcare USA, Inc. (2016). PR.1.SR.5 . NIAHO® accreditation
requirements: Interpretive guidelines & surveyor guidance (version 11).
Milford, OH: DNV GL-Healthcare USA, Inc. (Level VII)
15 The Joint Commission. (2019). Standard PC.02.01.21. Comprehensive
accreditation manual for hospitals. Oakbrook Terrace, IL: The Joint
Commission. (Level VII)
16 Waters, T. R., et al. (2009). “Safe patient handling training for schools of
nursing” [Online]. Accessed via the Web at
https://www.cdc.gov/niosh/docs/2009-127/pdfs/2009-127.pdf
17 Siegel, J. D ., et al. (2007, revised 2017). “2007 guideline for isolation
precautions: Preventing transmission of infectious agents in healthcare
settings” [Online]. Accessed via the Web at
https://www.cdc.gov/infectioncontrol/pdf/guidelines/isolation-guidelines.pdf
(Level II)
18 Accreditation Association for Hospitals and Health Systems. (2017). Standard
07.01.10. Healthcare Facilities Accreditation Program: Accreditation
requirements for acute care hospitals. Chicago, IL: Accreditation Association
for Hospitals and Health Systems. (Level VII)
19 DNV GL-Healthcare USA, Inc. (2016). NC.1 .SR.2 . NIAHO® accreditation
requirements: Interpretive guidelines & surveyor guidance (version 11).
Milford, OH: DNV GL-Healthcare USA, Inc. (Level VII)
20 Ganz, D. A., et al. (2013). Preventing falls in hospitals: A toolkit for improving
quality of care (AHRQ Publication No. 13-0015-EF). Rockville, MD: Agency for
Healthcare Research and Quality. Accessed via the Web at
https://www.ahrq.gov/sites/default/files/publications/files/fallpxtoolkit.pdf
(Level VII)
21 Rutala, W. A., et al. (2008, revised 2017). “Guideline for disinfection and
sterilization in healthcare facilities, 2008” [Online]. Accessed via the Web at
https://www.cdc.gov/hicpac/pdf/guidelines/Disinfection_Nov_2008.pdf (Level I)
22 Accreditation Association for Hospitals and Health Systems. (2017). Standard
07.02.03. Healthcare Facilities Accreditation Program: Accreditation
requirements for acute care hospitals. Chicago, IL: Accreditation Association
for Hospitals and Health Systems. (Level VII)
23 The Joint Commission. (2019). Standard RC.01.03 .01. Comprehensive
accreditation manual for hospitals. Oakbrook Terrace, IL: The Joint
Commission. (Level VII)
24 Centers for Medicare and Medicaid Services, Department of Health and
Human Services. (2015). Condition of participation: Medical record services.
42 C.F.R. § 482.24(b).
25 Accreditation Association for Hospitals and Health Systems. (2017). Standard
10.00 .03. Healthcare Facilities Accreditation Program: Accreditation
requirements for acute care hospitals. Chicago, IL: Accreditation Association
for Hospitals and Health Systems. (Level VII)
26 DNV GL-Healthcare USA, Inc. (2016). MR.2 .SR.1 . NIAHO® accreditation
requirements: Interpretive guidelines & surveyor guidance (version 11).
Milford, OH: DNV GL-Healthcare USA, Inc. (Level VII)
27 Westbrook, J., et al. (2010). Association of interruptions with an increased risk
and severity of medication administration errors. Archives of Internal
Medicine, 170(8), 683–690 . (Level IV)
28 Institute for Safe Medication Practices. (2012). Side tracks on the safety
express: Interruptions lead to errors and unfinished...Wait, what was I doing?
Nurse Advise-ERR, 11(2), 1–4 . Accessed via the Web at
https://www.ismp.org/Newsletters/acutecare/showarticle.aspx?id=37
29 The Joint Commission. (2019). Standard MM.06.01.01. Comprehensive
accreditation manual for hospitals. Oakbrook Terrace, IL: The Joint
Commission. (Level VII)
30 Centers for Medicare and Medicaid Services, Department of Health and
Human Services. (2015). Condition of participation: Nursing services. 42
C.F.R. § 482.23(c).
31 Accreditation Association for Hospitals and Health Systems. (2017). Standard
16.01.03. Healthcare Facilities Accreditation Program: Accreditation
requirements for acute care hospitals. Chicago, IL: Accreditation Association
for Hospitals and Health Systems. (Level VII)
32 DNV GL-Healthcare USA, Inc. (2016). MM.1 .SR.2. NIAHO® accreditation
requirements: Interpretive guidelines & surveyor guidance (version 11).
Milford, OH: DNV GL-Healthcare USA, Inc. (Level VII)
33 The Joint Commission. (2019). Standard MM.05.01.09 . Comprehensive
accreditation manual for hospitals. Oakbrook Terrace, IL: The Joint
Commission. (Level VII)
34 Accreditation Association for Hospitals and Health Systems. (2017). Standard
25.01.18. Healthcare Facilities Accreditation Program: Accreditation
requirements for acute care hospitals. Chicago, IL: Accreditation Association
for Hospitals and Health Systems. (Level VII)
35 Young, R. J., & Murphy, K. R. (2011). “Devices for aerosol delivery in the
treatment of adults with asthma and chronic obstructive pulmonary disease
(COPD) in the United States” [Online]. Accessed via the Web at
http://advanceweb.com/web/astrazeneca/focus_on_copd_issue3_devicesforae
rosol/focus_on_copd_issue3.html
36 Hoisington, E. R., et al. (2009). A comparison of respiratory care workload
with 2 different nebulizers. Respiratory Care, 54(4), 495–499. Accessed via
the Web at http://www.rcjournal.com/contents/04.09/04.09 .0495.pdf (Level
VI)
37 Ari, A., & Restrepo, R. D . (2012). AARC clinical practice guideline: Aerosol
delivery device selection for spontaneously breathing patients: 2012.
Respiratory Care, 57(4), 613–626. Accessed via the Web at
https://www.aarc.org/wp-content/uploads/2014/08/aerosol_delivery_2012.pdf
(Level VII)
38 Fanta, C. H. Management of acute exacerbations of asthma in adults. (2017).
In: UpToDate, Bochner, B. S ., et al. (Eds.). Retrieved from: www.uptodate.com
39 Global Initiative for Chronic Obstructive Lung Disease. (2018). “Global
strategy for the diagnosis, management, and prevention of COPD” [Online].
Accessed via the Web at http://goldcopd.org/gold-reports/ (Level I)
40 Hess, D., & Dhand, R. Delivery of inhaled medication in adults. (2017). In:
UpToDate, Bochner, B. S . & Hollingsworth, H. (Eds.). Retrieved from:
www.uptodate.com
41 Vestbo, J., et al. (2013). Global strategy for the diagnosis, management, and
prevention of chronic obstructive pulmonary disease. American Journal of
Respiratory and Critical Care Medicine, 187(4), 347–365. Accessed via the
Web at http://www.atsjournals.org/doi/abs/10.1164/rccm.201204-0596PP?
src=recsys&#readcube-e .pdf (Level VII)
NEGATIVE-PRESSURE WOUND THERAPY
Negative-pressure wound therapy encourages healing of
acute and chronic wounds by applying continuous or
intermittent subatmospheric pressure to the surface of a
wound using a well-sealed dressing.1,2 Doing so removes
excess wound fluids that can cause maceration and delay
healing, reduces edema and bacterial colonization, and
stimulates the formation of healthy granulation tissue. It
also increases local blood flow and draws wound edges
together. (See Understanding negative-pressure wound
therapy.)
Negative-pressure wound therapy is indicated for acute
and traumatic wounds, pressure injuries, and chronic open
wounds, such as diabetic ulcers, dehisced surgical wounds,
partial-thickness burns, meshed grafts, and skin flaps.2,4 It’s
contraindicated in patients with exposed vital organs,
necrotic tissue
wounds
with eschar,
untreated
coagulopathy, or an allergy to any component of the
procedure. This therapy should be used cautiously in
patients with active bleeding, in those taking anticoagulants
or platelet aggregate inhibitors, and when achieving wound
hemostasis has been difficult.5,6,7
There are negative pressure wound therapy units that
allow for continuous wound irrigation to the wound bed. Also
available are portable, single-patient-use, and disposable
negative pressure wound therapy units. The use of such
devices promotes patient mobility, increases the ease of
performing activities of daily living, and facilitates early
hospital discharge.8
No consensus of expert opinion exists regarding the use of
clean or sterile technique when caring for chronic wounds.9
Equipment
Emesis basin ▪ sterile normal saline irrigating solution ▪
gloves ▪ sterile gloves ▪ fluid-impermeable pad ▪ irrigation
kit with syringe ▪ suction tubing ▪ evacuation canister
tubing ▪ skin protectant wipe ▪ evacuation canister ▪
negative-pressure wound therapy unit ▪ wound assessment
tool and guide ▪ vital signs monitoring equipment ▪ label ▪
Optional: gown, goggles, prescribed pain medication, scale,
prescribed cleansing agent, additional skin barrier product,
prescribed wound irrigation solution, irrigation tubing set.
For foam packing
Sterile scissors ▪ foam packing ▪ transparent dressing
therapy drape ▪ transparent semipermeable dressing.
For gauze packing
Nonadherent gauze ▪
antimicrobial gauze packing
moistened with sterile normal saline solution ▪ drain ▪
ostomy strip paste ▪ transparent dressings.
Preparation of equipment
Assemble the negative-pressure wound therapy unit at the
bedside according to the manufacturer’s instructions. Make
sure the unit functions properly, the dressings and supplies
aren’t expired and are intact, and the tubing and canisters
are appropriate for the unit and the patient’s size, weight,
condition, and wound characteristics. A large canister
shouldn’t be used for an older adult patient, a patient at
high risk of bleeding, or a patient who can’t tolerate large-
volume fluid loss.5,10 Set negative pressure according to the
practitioner’s order and the manufacturer’s instructions (25
to 200 mm Hg). Prepare a place for the supplies that’s
within reach.
Warm the sterile irrigating solution to 90°F to 95°F
(32.2°C to 37.8°C) to reduce discomfort. Studies show that
warm solutions may be more comfortable for patients than
room-temperature solutions.11 Pour irrigating solution into
the container of the irrigation kit.
Implementation
■ Verify the practitioner’s order for the appropriate wound
cleaning agent, frequency of dressing change, type of
negative-pressure unit, type of wound packing, and settings
for the negative-pressure unit.12
■ Review the patient’s medical record for allergies or
contraindications to treatment. Also assess the patient’s
bleeding risk before initiation of therapy.5,12,13
■ Confirm that written informed consent has been obtained
by the practitioner and is in the patient’s medical record, as
required.14,15,16,17
■ Gather and prepare the equipment.
■ Perform hand hygiene.18,19,20,21,22,23
■ Confirm the patient’s identity using at least two patient
identifiers.24
■ Provide privacy.25,26,27,28
■ Explain the procedure to the patient and family (if
appropriate) according to their individual communication
and learning needs to increase their understanding, allay
their fears, and enhance cooperation.29
■ Assess the patient’s condition.
■ Perform a comprehensive pain assessment using
techniques appropriate for the patient’s age, condition, and
ability to understand.30
■ Administer pain medication, as needed and prescribed,
following safe medication administration practices.31,32,33,34
■ Raise the patient’s bed to waist level when providing
patient care to prevent caregiver back strain.35
■ Perform hand hygiene.18,19,20,21,22,23
■ Put on gloves and, if necessary, a gown and goggles to
comply with standard precautions and protect yourself from
wound drainage and contamination.36,37
■ Place a fluid-impermeable pad under the patient to catch
any spills and avoid linen changes.
■ Position the patient to allow maximum wound exposure.
■ Place the emesis basin under the wound to collect any
drainage.
■ Using sterile technique, prepare a sterile field and place
all the supplies on the sterile field.
■ Remove the soiled dressing and weigh it as ordered.
Verify that the number of removed pieces correlates with
the number documented in the patient’s medical record.5
Then discard them in an appropriate receptacle.38
■ Thoroughly inspect the wound to ensure that all pieces of
dressing components have been removed.
■ Remove and discard your gloves36,38 and perform hand
hygiene.18,19,20,21,22,23
■ Replace your gown as needed and put on a new pair of
gloves.36,38
■ Irrigate the wound thoroughly using normal saline
solution and an irrigation syringe. (See the “Wound
irrigation” procedure.)
■ Clean the area around the wound with normal saline
solution or ordered cleansing agent.12
■ Wipe the intact skin with a skin protectant wipe and allow
it to dry to prevent blistering when removing the dressing.
Apply an additional skin barrier product, as indicated.3,5
■ Remove and discard your gloves36,38 and perform hand
hygiene.18,19,20,21,22,23
Understanding negative-pressure
wound therapy
When a wound fails to heal in a timely manner, negative-pressure wound
therapy is an option. It involves placing a special dressing in a wound or over
a graft or flap and using a vacuum-assisted closure device to create negative
pressure within the wound bed, which increases circulation and improves
proliferations of granulation tissue.3
Depending on the type of wound, the selected manufacturer’s equipment,
and the practitioner’s preference, gauze or foam packing will be used.
Gauze packing
Gauze packing, as shown below, is typically used in circumferential and
tunneling wounds and explored enteric fistulas. Gauze fits most wounds and
tends to be more comfortable for the patient during application and removal.
Foam packing
Foam packing, as shown below, is typically used in wounds with a lot of
exudate. It’s available in various sizes to fit a wide range of wound types and
can be cut to accommodate any wound size.
■ Put on sterile gloves.36,38
■ Assess the wound. Note the wound’s precise location, any
tunneling, tissue type and loss, size, color, odor, and the
presence of warmth, edema, or drainage. Also observe for
signs and symptoms of wound infection, including increased
pain, fever, and elevated white blood cell count.3
ELDER ALERT Closely monitor older adult patients, certain small
adults, and those with large exudating wounds in relation to body size
and weight for fluid loss and dehydration. When monitoring fluid
output, consider the volume of fluid in both the tubing and canister
and the weight of the dressing removed.5
■ Measure the wound (length, depth, and width) using your
facility’s assessment tool and guide. Obtain measurements
at the baseline assessment, with the first dressing change,
weekly, and when negative-pressure wound therapy is
discontinued.
■ If your gloves are contaminated, remove and discard
them,36,38 perform hand hygiene, and put on a new pair of
sterile gloves.18,19,20,21,22,23,36,38
Using foam packing
■ Using sterile scissors, cut the foam to the shape and
measurement of the wound to help maintain negative
pressure to the entire wound. More than one piece of foam
may be necessary, depending on the size of the wound.
Don’t cut the foam directly over the wound to prevent foam
fragments from falling into the wound. If a tunnel is present,
cut the foam longer than the tunnel to ensure the foam
makes contact with the wound.
■ Carefully place the foam in the wound, ensuring that the
foam is in contact with the wound bed, margins, and any
tunneled area or areas of undermining. (If there’s a groove
in the foam, apply it with the groove side up.) Don’t pack
the foam tightly into any areas of the wound, because doing
so may cause pressure on granulation tissue, which may
delay healing.
■ Count the number of foam pieces you use and document
the number on the dressing and in the patient’s medical
record.5,13 Confirm the count with another nurse if available.
■ Apply the transparent therapy dressing drape over the
foam, leaving a 1′′ to 2′′ (3-cm to 5-cm) margin of intact skin
covered by the dressing around the wound to ensure that
the wound is covered completely and that the negative-
pressure seal will be intact.5
■ If continuous wound irrigation isn’t prescribed, pinch the
transparent therapy dressing drape and carefully cut a hole
no larger than 1′′ (2.5 cm) in the center of the drape (over
the groove in the foam if present). Do not cut a slit, because
it could seal during therapy.5 The hole in the drape is the
insertion point for the suction tubing. Depending on the
equipment your facility uses, the tubing may be attached to
an adhesive pad that you attach to this site. If you’re not
using a preattached system, place the suction tubing into
the center of the foam. The embedded tubing delivers
negative pressure to the wound. Apply a transparent
semipermeable dressing over the insertion point of the
suction tubing.
■ If a continuous wound irrigation is prescribed, connect the
administration set to the prescribed irrigation solution bag
and hang it on the device’s hanger arm. Select the
instillation pad application site, giving consideration to fluid
flow and tubing positioning to allow for optimal flow and
exudate removal.6,7 Pinch the transparent therapy dressing
drape and carefully cut a hole (based on manufacturer’s
directions) no larger than 1′′ (2.5 cm) in the selected
location. Do not cut a slit, because it could seal during
therapy. The hole must be large enough to allow for the
input of the irrigant.6,7 Peel the backing from the instillation
pad and apply it over the hole in the transparent therapy
dressing drape.
■ Select the vacuum pad application site, giving
consideration to fluid flow and tubing positioning to allow for
optimal flow and exudate removal. Avoid placing over bony
prominences or within tissue creases.6,7 Pinch the
transparent therapy dressing drape and carefully cut
another hole (based on manufacturer’s directions) no larger
than 1′′ (2.5 cm) in the selected location. Do not cut a slit,
because it could seal during therapy. The hole must be large
enough to allow for the removal of fluid and exudate.6,7 Peel
the backing from the vacuum pad and apply it over the hole
in the transparent therapy dressing drape. Connect the
tubing from the irrigation bag to the instillation pad
following the manufacturer’s instructions. Connect the
tubing from the vacuum pad to the device’s collection
canister following the manufacturer’s instructions.
Using gauze packing
■ Using sterile scissors, trim a single layer of nonadherent
gauze.
■ Lay the nonadherent gauze across the wound bed.
■ Apply saline-moistened antimicrobial gauze loosely into
the wound, ensuring that the gauze is in contact with the
nonadherent gauze, margins, and any tunneled area or
areas of undermining. Don’t overpack the wound, because
doing so can delay healing.
■ Count the number of gauze pads or rolls used and
document that number on the dressing and in the patient’s
medical record.13 Confirm the count with another nurse if
available.
■ Position the drain tubing on top of the gauze. If a channel
drain (a small, cylindrical drain) or round drain (a round,
perforated drain) is used, wrap a layer of saline-moistened
gauze around the drain.
■ Apply ostomy strip paste to a small portion of the wound
edge at the location where the drain tubing exits the wound
to secure the tubing’s position. Position the drain tubing on
top of the ostomy strip paste. Apply the ostomy strip paste
over the top of the tubing and pinch it in place to secure the
tubing’s position.
■ Apply one or more transparent semipermeable
dressing(s) over the wound. Reinforce the seal by pinching
the transparent occlusive film and ostomy strip paste
together.
Completing the procedure
■ Connect the free end of the drain tubing to the canister
tubing at the adapter.
■ Position the drain tubing on flat surfaces, away from the
perineal area, bony prominences, or pressure areas to
prevent additional skin breakdown.5
■ Anchor the drain tubing several inches away from the
dressing to prevent tension on the suction tubing.
■ Dispose of soiled supplies appropriately.38
■ Remove and discard your gloves and any other personal
protective equipment worn,36,38 and perform hand
hygiene.18,19,20,21,22,23
■ Turn on the negative-pressure unit. Make sure the
transparent dressing drape shrinks to the foam or gauze
and the skin to ensure a good seal. This seal is apparent by
a raisin-like appearance of the dressing. Failure of the
dressing drape to shrink to the foam or gauze under
negative pressure indicates a break in the seal and will
trigger the device’s alarm. If administering continuous
irrigation, set the instillation rate per the practitioner’s
order.
■ Make sure the device alarm limits are set appropriately,
and that the alarms are turned on, functioning properly, and
audible to staff.39,40,41
■ Reassess the patient’s pain and respond appropriately.30
■ Make sure the patient is comfortable.
■ Return the bed to the lowest position to prevent falls and
maintain patient safety.42
■ Monitor the patient closely; monitor and record the
drainage at an interval determined by your facility and the
patient’s condition.
■ Perform hand hygiene.18,19,20,21,22,23
■ Document the procedure.43,44,45,46
Special considerations
■ The Joint Commission issued a sentinel event alert
concerning medical device alarm safety, because alarm-
related events have been associated with permanent loss of
function or death. Among the major contributing factors
were improper alarm settings, alarms inappropriately turned
off, and alarm signals not audible to staff. Make sure alarm
limits are set appropriately, and that alarms are turned on
and audible to staff. Follow facility guidelines for preventing
alarm fatigue.39
■ Many manufacturers have dressing kits that contain the
necessary equipment. Make sure that you’re using the
correct kit for your patient’s needs.
■ Change the dressing according to the manufacturer’s
directions, usually 48 hours after the beginning of treatment
and then two to three times per week.3 More frequent
dressing changes may be necessary if the wound has heavy
drainage or drainage with sediment, or if the wound is
infected. Try to coordinate the dressing change with the
practitioner’s visit so the practitioner can inspect the
wound.
■ Be aware that audible and visual alarms alert you when
the canister is full, the dressing has an air leak, the battery
is low, or the tubing becomes blocked or dislodged.
■ Change the evacuation canister once per week, when it’s
full, or if it has any signs of damage.
■ Never leave the dressing in place without suction. If the
machine malfunctions, replace the dressing with a wet-to-
damp dressing until the machine is repaired or replaced.
Leaving the dressing in place without suction puts the
patient at high risk for infection.12
■ If the patient requires defibrillation, disconnect the unit
from the wound first. If the dressing interferes with
defibrillation, remove the dressing.
■ Be aware that many negative-pressure units aren’t
compatible with computed tomography or magnetic
resonance imaging. Check the manufacturer’s instructions
before testing.
■ Evaluate the effectiveness of negative-pressure wound
therapy weekly using a comprehensive wound assessment
tool and wound measurements. If the wound shows no
steady improvement within 2 weeks, or if the wound
worsens, reevaluate the use of negative-pressure wound
therapy.5
■ If the wound is infected, notify the practitioner so that
treatment may begin with systemic antibiotics before the
initiation of negative-pressure wound therapy. Necrotic
tissue should be debrided before the initiation of therapy.
■ If the patient experiences pain from the negative-
pressure wound therapy or dressing changes, consider
premedicating the patient, decreasing the pressure settings,
using continuous instead of intermittent suction, changing
the type of filler dressing, applying a contact layer to the
wound surface before inserting the foam, and instilling
normal saline solution before removing the dressing.47
■ For best results, ensure that the patient receives
uninterrupted therapy for at least 22 hours daily.5 If therapy
is interrupted for more than 2 hours, remove the old
dressing and irrigate the wound. Apply a new sterile
dressing and reapply the therapy. Alternatively, if ordered,
apply a sterile wet-to-moist gauze dressing to the wound.5
Patient teaching
If the patient will be using negative-pressure wound therapy
at home, teach the patient and family about the device,
foam or gauze dressing changes using sterile technique,
and possible complications with the machine or the wound.
Tell them to remove the foam dressing and replace it with a
wet-to-damp dressing if the machine malfunctions, and to
contact the practitioner as soon as possible if they observe
signs of infection. Demonstrate dressing changes and
observe return demonstrations. Answer all questions and
provide guidance and encouragement as needed.13
Complications
Local skin irritation may occur. Serious complications include
bleeding13 and excessive fluid loss. Cleaning and care of
wounds may temporarily increase the patient’s pain and
increases the risk of infection.13
Documentation
Document the date and time; wound assessment, including
signs and symptoms of infection; wound measurements;
pain assessment and any intervention; and the patient’s
response. Record the weight of soiled dressings (if
appropriate). Note the type and number of dressings
used5,13 and the settings for the negative pressure wound
therapy unit. Record the verification of components
removed from the wound.5 Document the patient’s
tolerance of the procedure. Record any patient teaching
provided and the patent’s understanding of the teaching.
REFERENCES
1 Anesäter, E., et al. (2011). The influence of different sizes and types of wound
fillers on wound contraction and tissue pressure during negative pressure
wound therapy. International Wound Journal, 8(4), 336–342. (Level VI)
2 Gestring, M. Negative pressure wound therapy. (2016). In: UpToDate, Sanfey,
S., & Collins, K. A. (Eds.) . Retrieved from: www.uptodate.com
3 Baranoski, S., & Ayello, E. A. (2016). Wound care essentials: Practice
principles (4th ed.). Philadelphia, PA: Wolters Kluwer.
4 Sandoz, H. (2015). Negative pressure wound therapy: Clinical utility. Chronic
Wound Care Management and Research, 2, 71–79. Accessed via the Web
https://www.dovepress.com/negative-pressure-wound-therapy-clinical-utility-
peer-reviewed-fulltext-article-CWCMR
5 KCI® Licensing, Inc. (2015). “V.A.C .TM therapy clinical guidelines: A reference
source for clinicians” [Online]. Accessed via the Web at
http://www.acelity.com/healthcare-professionals/instructions-for-use (Level
VII)
6 Cardinal Health. (2015). “SVED clinical user manual” [Online]. Accessed via
the Web at
http://www.cardinalhealth.com/content/dam/corp/web/documents/Manual/CA
RDINAL-HEALTH.SVED-Manual-Clinician.pdf
7 KCI Licensing, Inc. (2013). “V.A.C . Ulta negative pressure wound therapy
system safety information and V.A.C . Veraflo cleanse dressing system
application instructions” [Online]. Accessed via the Web at
http://www.acelity.com/healthcare-professionals/instructions-for-use
8 Brandon, T. (2015). A portable, disposable system for negative-pressure
wound therapy. British Journal of Nursing, 24(2), 98–106.
9 Wound Ostomy and Continence Nurses Society. (2012). Clean vs. sterile
dressing techniques for management of chronic wounds: A fact sheet. Journal
of Wound Ostomy Continence Nursing, 39(25), S30–S34. Accessed via the
Web at http://www.nursingcenter.com/Handlers/articleContent.pdf?
key=pdf_00152192-201203001-00007 (Level VII)
10 Centers for Medicare and Medicaid Services. (2012). “Negative pressure
wound therapy interpretive guidelines” [Online]. Accessed via the Web at
https://www.cms.gov/Medicare/Provider-Enrollment-and-
Certification/MedicareProviderSupEnroll/Downloads/NPWTinterpretguidlines_fi
nalcleared.pdf
11 Emergency Nurses Association. (2015). “Clinical practice guideline: Synopsis
wound preparation” [Online]. Accessed via the Web at
https://www.ena.org/docs/default-source/resource-library/practice-
resources/cpg/woundpreparationsynopsis.pdf?sfvrsn=4da0a990_8 (Level VII)
12 Martindell, D. (2012). Safety monitor: The safe use of negative-pressure
wound therapy. American Journal of Nursing, 112(6), 59–63.
13 U.S . Food and Drug Administration. (2010, updated 2018). “Class II special
controls guidance document: Non-powered suction apparatus device
intended for negative pressure wound therapy (NPWT)—guidance for industry
and FDA staff” [Online]. Accessed via the Web at
https://www.fda.gov/medicaldevices/deviceregulationandguidance/guidanced
ocuments/ucm233275.htm
14 The Joint Commission. (2019). Standard RI.01.03 .01. Comprehensive
accreditation manual for hospitals. Oakbrook Terrace, IL: The Joint
Commission. (Level VII)
15 Centers for Medicare and Medicaid Services, Department of Health and
Human Services. (2015). Condition of participation: Patient’s rights. 42 C.F.R.
§ 482.13(b)(2).
16 Accreditation Association for Hospitals and Health Systems. (2017). Standard
15.01.11. Healthcare Facilities Accreditation Program: Accreditation
requirements for acute care hospitals. Chicago, IL: Accreditation Association
for Hospitals and Health Systems. (Level VII)
17 DNV GL-Healthcare USA, Inc. (2016). PR.1.SR.3 . NIAHO® accreditation
requirements: Interpretive guidelines & surveyor guidance (version 11).
Milford, OH: DNV GL-Healthcare USA, Inc. (Level VII)
18 The Joint Commission. (2019). Standard NPSG.07.01.01. Comprehensive
accreditation manual for hospitals. Oakbrook Terrace, IL: The Joint
Commission. (Level VII)
19 Centers for Disease Control and Prevention. (2002). Guideline for hand
hygiene in health-care settings: Recommendations of the Healthcare Infection
Control Practices Advisory Committee and the HICPAC/SHEA/APIC/IDSA Hand
Hygiene Task Force. MMWR Recommendations and Reports, 51(RR-16), 1–45.
Accessed via the Web at https://www.cdc.gov/mmwr/pdf/rr/rr5116.pdf (Level
II)
20 World Health Organization. (2009). “WHO guidelines on hand hygiene in
health care: First global patient safety challenge, clean care is safer care”
[Online]. Accessed via the Web at
http://apps.who.int/iris/bitstream/10665/44102/1/9789241597906_eng.pdf
(Level IV)
21 Accreditation Association for Hospitals and Health Systems. (2017). Standard
07.01.21. Healthcare Facilities Accreditation Program: Accreditation
requirements for acute care hospitals. Chicago, IL: Accreditation Association
for Hospitals and Health Systems. (Level VII)
22 Centers for Medicare and Medicaid Services, Department of Health and
Human Services. (2015). Condition of participation: Infection control. 42 C.F.R.
§ 482.42.
23 DNV GL-Healthcare USA, Inc. (2016). IC.1 .SR.1 . NIAHO® accreditation
requirements: Interpretive guidelines & surveyor guidance (version 11).
Milford, OH: DNV GL-Healthcare USA, Inc. (Level VII)
24 The Joint Commission. (2019). Standard NPSG.01.01.01. Comprehensive
accreditation manual for hospitals. Oakbrook Terrace, IL: The Joint
Commission. (Level VII)
25 Accreditation Association for Hospitals and Health Systems. (2017). Standard
15.01.16. Healthcare Facilities Accreditation Program: Accreditation
requirements for acute care hospitals. Chicago, IL: Accreditation Association
for Hospitals and Health Systems. (Level VII)
26 Centers for Medicare and Medicaid Services, Department of Health and
Human Services. (2015). Condition of participation: Patient’s rights. 42 C.F.R.
§ 482.13(c)(1).
27 DNV GL-Healthcare USA, Inc. (2016). PR.1.SR.5 . NIAHO® accreditation
requirements: Interpretive guidelines & surveyor guidance (version 11).
Milford, OH: DNV GL-Healthcare USA, Inc. (Level VII)
28 The Joint Commission. (2019). Standard RI.01.01.01. Comprehensive
accreditation manual for hospitals. Oakbrook Terrace, IL: The Joint
Commission. (Level VII)
29 The Joint Commission. (2019). Standard PC.02.01.21. Comprehensive
accreditation manual for hospitals. Oakbrook Terrace, IL: The Joint
Commission. (Level VII)
30 The Joint Commission. (2019). Standard PC.01.02.07. Comprehensive
accreditation manual for hospitals. Oakbrook Terrace, IL: The Joint
Commission. (Level VII)
31 The Joint Commission. (2019). Standard MM.06.01.01. Comprehensive
accreditation manual for hospitals. Oakbrook Terrace, IL: The Joint
Commission. (Level VII)
32 Accreditation Association for Hospitals and Health Systems. (2017). Standard
16.01.03. Healthcare Facilities Accreditation Program: Accreditation
requirements for acute care hospitals. Chicago, IL: Accreditation Association
for Hospitals and Health Systems. (Level VII)
33 Centers for Medicare and Medicaid Services, Department of Health and
Human Services. (2015). Condition of participation: Nursing services. 42
C.F.R. § 482.23(c).
34 DNV GL-Healthcare USA, Inc. (2016). MM.1 .SR.2. NIAHO® accreditation
requirements: Interpretive guidelines & surveyor guidance (version 11).
Milford, OH: DNV GL-Healthcare USA, Inc. (Level VII)
35 Waters, T. R., et al. (2009). “Safe patient handling training for schools of
nursing” [Online]. Accessed via the Web at
https://www.cdc.gov/niosh/docs/2009-127/pdfs/2009-127.pdf (Level VII)
36 Siegel, J. D ., et al. (2007, revised 2017). “2007 guideline for isolation
precautions: Preventing transmission of infectious agents in healthcare
settings” [Online]. Accessed via the Web at
https://www.cdc.gov/infectioncontrol/pdf/guidelines/isolation-guidelines.pdf
(Level II)
37 Accreditation Association for Hospitals and Health Systems. (2017). Standard
07.01.10. Healthcare Facilities Accreditation Program: Accreditation
requirements for acute care hospitals. Chicago, IL: Accreditation Association
for Hospitals and Health Systems. (Level VII)
38 Occupational Safety and Health Administration. (n.d .). “Bloodborne
pathogens, standard number 1910.1030” [Online]. Accessed via the Web at
https://www.osha.gov/pls/oshaweb/owadisp.show_document?
p_id=10051&p_table=STANDARDS (Level VII)
39 The Joint Commission. (2013). “Sentinel event alert: Medical device alarm
safety in hospitals” [Online]. Accessed via the Web at
http://www.jointcommission.org/assets/1/18/SEA_50_alarms_4 _5 _13_FINAL1 .P
DF (Level VII)
40 The Joint Commission. (2019). Standard NPSG.06 .01.01. Comprehensive
accreditation manual for hospitals. Oakbrook Terrace, IL: The Joint
Commission. (Level VII)
41 Graham, K. C., & Cvach, M. (2010). Monitor alarm fatigue: Standardizing use
of physiological monitors and decreasing nuisance alarms. American Journal
of Critical Care, 19(1), 28–37. Accessed via the Web at
http://ajcc.aacnjournals.org/content/19/1/28.full.pdf
42 Ganz, D. A., et al. (2013). Preventing falls in hospitals: A toolkit for improving
quality of care (AHRQ Publication No. 13-0015-EF). Rockville, MD: Agency for
Healthcare Research and Quality. Accessed via the Web at
http://www.ahrq.gov/sites/default/files/publications/files/fallpxtoolkit.pdf
(Level VII)
43 The Joint Commission. (2019). Standard RC.01.03 .01. Comprehensive
accreditation manual for hospitals. Oakbrook Terrace, IL: The Joint
Commission. (Level VII)
44 Accreditation Association for Hospitals and Health Systems. (2017). Standard
10.00 .03. Healthcare Facilities Accreditation Program: Accreditation
requirements for acute care hospitals. Chicago, IL: Accreditation Association
for Hospitals and Health Systems. (Level VII)
45 Centers for Medicare and Medicaid Services, Department of Health and
Human Services. (2015). Condition of participation: Medical record services.
42 C.F.R. § 482.24(b).
46 DNV GL-Healthcare USA, Inc. (2016). MR.2 .SR.1 . NIAHO® accreditation
requirements: Interpretive guidelines & surveyor guidance (version 11).
Milford, OH: DNV GL-Healthcare USA, Inc. (Level VII)
47 Bryant, R. A, & Nix, D. P. (Eds.). (2015). Acute and chronic wounds: Current
management concepts (5th ed.) . St. Louis, MO: Mosby.
NEPHROSTOMY AND CYSTOSTOMY TUBE
DRESSING CHANGES
Two urinary diversion techniques—nephrostomy and
cystostomy—ensure temporary or permanent drainage from
the kidneys or bladder and help prevent urinary tract
infection or kidney failure. (See Urinary diversion
techniques.)
A nephrostomy tube drains urine directly from a kidney
when a disorder inhibits the normal flow of urine.
Practitioners usually place the tube percutaneously,
although they sometimes insert it surgically through the
renal cortex and medulla into the renal pelvis from a lateral
flank incision. The practitioner will usually place the tube
because of obstructive problems, such as ureteral or
ureteropelvic junction calculi or tumors. Diverting urine with
a nephrostomy tube also allows kidney tissue damaged from
obstructive disease to heal.1
A cystostomy tube drains urine from the bladder, diverting
it from the urethra. The practitioner will use this type of
tube after certain gynecologic procedures, bladder surgery,
prostatectomy, severe urethral strictures, or traumatic
injury. The practitioner inserts the tube into the bladder
approximately 2′′ (5 cm) above the pubic symphysis, and
may use it alone or in addition to an indwelling urethral
catheter.
Equipment
Antiseptic swabs ▪ fluid-impermeable pad ▪ gloves ▪ sterile
gloves ▪ sterile precut 4′′ × 4′′ (10-cm × 10-cm) drain
dressings or transparent semipermeable dressing ▪
hypoallergenic adhesive tape or other securement device.
Preparation of equipment
Check the expiration date on each sterile package, and
inspect each package for tears. Replace items as necessary.
Implementation
■ Verify the practitioner’s order.
■ Gather the appropriate equipment.
■ Perform hand hygiene.2,3,4,5,6,7
■ Confirm the patient’s identity using at least two patient
identifiers.8
■ Provide privacy.9,10,11,12
■ Explain the procedure to the patient and family (if
appropriate) according to their individual communication
and learning needs to increase their understanding, allay
their fears, and enhance cooperation.13
■ Open the antiseptic swabs, the sterile precut 4′′ × 4′′ (10-
cm × 10-cm) drain dressings or transparent semipermeable
dressing, and the sterile gloves using sterile technique.
■ Raise the patient’s bed to waist level when providing
patient care to prevent back strain.14
■ Perform hand hygiene.2,3,4,5,6,7
■ Put on gloves to comply with standard precautions.15,16,17
■ Position the patient so you can clearly see the tube exit
site. If the patient has a nephrostomy tube, have the patient
lie on the side opposite the tube. If the patient has a
cystostomy tube, have the patient lie on the back.
■ Place the fluid-impermeable pad under the patient to
absorb excess drainage and keep the patient dry.
■ Carefully remove the tape around the tube, and remove
the wet or soiled dressing.
■ Note the markings on the tube at the insertion site to
check for accidental dislodgment.
■ Assess the tube exit site for redness, swelling, warmth,
tenderness, or drainage to note signs of infection and skin
breakdown and, if any are present, report them to the
practitioner.
■ Discard used supplies in the appropriate receptacle.
■ Remove and discard your gloves15 and perform hand
hygiene.2,3,4,5,6,7
■ Put on sterile gloves.15
■ Use an antiseptic swab to clean the skin, wiping from the
tube site outward.
■ Discard the swab appropriately, being careful not to
contaminate your gloves.15
■ Repeat the skin cleaning procedure, if needed.
■ Place a sterile precut 4′′ × 4′′ (10-cm × 10-cm) drain
dressing and place it around the tube exit site. If necessary,
overlap two drain dressings for maximum absorption.
Alternatively, apply a transparent semipermeable dressing
over the tube exit site to enable observation of the site
without removing the dressing.
■ Secure the dressing with hypoallergenic tape or another
securement device. Tape the tube to the patient’s lateral
abdomen to prevent tension on the tube.
NURSING ALERT If the patient has fragile skin, use dressings and
tape specifically formulated for fragile skin to prevent skin stripping
and tearing during removal.18
■ Remove and discard your gloves.15
■ Perform hand hygiene.2,3,4,5,6,7
■ Help the patient to a comfortable position.
■ Return the bed to the lowest position to prevent falls and
maintain safety.19
■ Perform hand hygiene.2,3,4,5,6,7
■ Document the procedure.20,21,22,23
Special considerations
■ Change the dressings daily as needed.
■ Check a nephrostomy tube frequently for kinks or
obstructions. Kinks are likely to occur if the patient lies on
the insertion site. Suspect an obstruction when the amount
of urine in the drainage bag decreases or the amount of
urine around the insertion site increases. Pressure created
by urine backing up in the tube can damage nephrons.
Gently curve a cystostomy tube to prevent kinks.
■ Typically, cystostomy tubes for postoperative urologic
patients should be checked hourly for 24 hours to ensure
adequate drainage and tube patency. To check tube
patency, note the amount of urine in the drainage bag and
check the patient’s bladder for distention.
■ Keep the drainage bag below the level of the kidney at all
times to prevent urine reflux.24
■ If the tube becomes dislodged, cover the site with a
sterile dressing and notify the practitioner immediately.
■ The practitioner may order the nephrostomy tube to be
clamped to determine the patient’s readiness for removal.
While the tube is clamped, assess the patient for flank pain
and fever, and monitor intake and urine output.
Patient teaching
Teach the patient and family how to care for the tube after
discharge. Instruct them how to clean the tube exit site with
soap and water, check for skin breakdown, change the
dressing daily, and wash hands before and after dressing
and drainage bag changes.24 Also teach them how to
change the drainage bag or leg bag and perform irrigation,
as indicated. Explain that the patient can use a leg bag
during the day and a larger drainage bag at night.
Tell the patient that showering is permitted but that baths
and swimming are not. Stress the importance of reporting to
the practitioner any signs of infection (including red skin and
white, yellow, or green drainage at the insertion site), an
oral temperature above 100.4°F (38°C), tube displacement
(drainage that smells like urine), and severe flank pain.
Encourage patients with unrestricted fluid intake to
increase their daily intake to at least 3 qt (2.8 L) to help
flush the urinary system and reduce sediment formation.
Complications
The patient has an increased risk of infection, because
nephrostomy and cystostomy tubes provide a direct
opening to the kidneys and bladder.
Documentation
Document the date and time of dressing change and the
patient’s tolerance of the procedure. Describe the color and
amount of drainage from the nephrostomy or cystostomy
tube, and record any color changes as they occur. Note the
markings on the tube at the tube exit site and the presence
of any signs of infection or skin breakdown. If the patient
has more than one tube, describe the drainage (color,
amount, and character) from each separate tube. Record
any complications, interventions, and the patient’s response
to the interventions. Note any teaching performed and the
patient’s understanding of the teaching.
REFERENCES
1 Preminger, G. M . Options in the management of renal and ureteral stones in
adults. (2016). In: UpToDate, Goldfarb, S., et al. (Eds.) . Retrieved from:
www.uptodate.com
2 The Joint Commission. (2019). Standard NPSG.07.01.01. Comprehensive
accreditation manual for hospitals. Oakbrook Terrace, IL: The Joint
Commission. (Level VII)
3 Centers for Disease Control and Prevention. (2002). Guideline for hand
hygiene in health-care settings: Recommendations of the Healthcare Infection
Control Practices Advisory Committee and the HICPAC/SHEA/APIC/IDSA Hand
Hygiene Task Force. MMWR Recommendations and Reports, 51(RR-16), 1–45.
Accessed via the Web at https://www.cdc.gov/mmwr/pdf/rr/rr5116.pdf (Level
II)
4 World Health Organization. (2009). “WHO guidelines on hand hygiene in
health care: First global patient safety challenge, clean care is safer care”
[Online]. Accessed via the Web at
http://apps.who.int/iris/bitstream/10665/44102/1/9789241597906_eng.pdf
(Level IV)
5 Centers for Medicare and Medicaid Services, Department of Health and
Human Services. (2015). Condition of participation: Infection control. 42 C.F.R.
§ 482.42.
6 Accreditation Association for Hospitals and Health Systems. (2017). Standard
07.01.21. Healthcare Facilities Accreditation Program: Accreditation
requirements for acute care hospitals. Chicago, IL: Accreditation Association
for Hospitals and Health Systems. (Level VII)
7 DNV GL-Healthcare USA, Inc. (2016). IC.1.SR.1 . NIAHO® accreditation
requirements: Interpretive guidelines & surveyor guidance (version 11).
Milford, OH: DNV GL-Healthcare USA, Inc. (Level VII)
8 The Joint Commission. (2019). Standard NPSG.01.01.01. Comprehensive
accreditation manual for hospitals. Oakbrook Terrace, IL: The Joint
Commission. (Level VII)
9 Centers for Medicare and Medicaid Services, Department of Health and
Human Services. (2015). Condition of participation: Patient’s rights. 42 C.F.R.
§ 482.13(c)(1).
Urinary diversion techniques
A cystostomy or a nephrostomy can be used to create a permanent diversion
to relieve obstruction from an inoperable tumor or provide an outlet for urine
after cystectomy. A temporary diversion can relieve obstruction from a
calculus or ureteral edema.
Cystostomy
In a cystostomy, the practitioner inserts a catheter percutaneously through
the suprapubic area into the bladder, as shown below.
Nephrostomy
In a nephrostomy, the practitioner inserts a catheter percutaneously through
the flank into the renal pelvis, as shown below.
10 Accreditation Association for Hospitals and Health Systems. (2017). Standard
15.01.16. Healthcare Facilities Accreditation Program: Accreditation
requirements for acute care hospitals. Chicago, IL: Accreditation Association
for Hospitals and Health Systems. (Level VII)
11 The Joint Commission. (2019). Standard RI.01.01.01. Comprehensive
accreditation manual for hospitals. Oakbrook Terrace, IL: The Joint
Commission. (Level VII)
12 DNV GL-Healthcare USA, Inc. (2016). PR.1.SR.5 . NIAHO® accreditation
requirements: Interpretive guidelines & surveyor guidance (version 11).
Milford, OH: DNV GL-Healthcare USA, Inc. (Level VII)
13 The Joint Commission. (2019). Standard PC.02.01.21. Comprehensive
accreditation manual for hospitals. Oakbrook Terrace, IL: The Joint
Commission. (Level VII)
14 Waters, T. R., et al. (2009). “Safe patient handling training for schools of
nursing” [Online]. Accessed via the Web at
https://www.cdc.gov/niosh/docs/2009-127/pdfs/2009-127.pdf (Level VII)
15 Siegel, J. D ., et al. (2007, revised 2017). “2007 guideline for isolation
precautions: Preventing transmission of infectious agents in healthcare
settings” [Online]. Accessed via the Web at
https://www.cdc.gov/infectioncontrol/pdf/guidelines/isolation-guidelines.pdf
(Level II)
16 Accreditation Association for Hospitals and Health Systems. (2017). Standard
07.01.10. Healthcare Facilities Accreditation Program: Accreditation
requirements for acute care hospitals. Chicago, IL: Accreditation Association
for Hospitals and Health Systems. (Level VII)
17 DNV GL-Healthcare USA, Inc. (2016). IC.1 .SR.2 . NIAHO® accreditation
requirements: Interpretive guidelines & surveyor guidance (version 11).
Milford, OH: DNV GL-Healthcare USA, Inc. (Level VII)
18 LeBlanc, K., et al. (2013). International skin tear advisory panel: A tool kit to
aid in the prevention, assessment, and treatment of skin tears using a
simplified classification system. Advances in Skin & Wound Care, 26(10), 459–
476. (Level IV)
19 Ganz, D. A., et al. (2013). Preventing falls in hospitals: A toolkit for improving
quality of care (AHRQ Publication No. 13-0015-EF). Rockville, MD: Agency for
Healthcare Research and Quality. Accessed via the Web at
https://www.ahrq.gov/sites/default/files/publications/files/fallpxtoolkit.pdf
(Level VII)
20 The Joint Commission. (2019). Standard RC.01.03 .01. Comprehensive
accreditation manual for hospitals. Oakbrook Terrace, IL: The Joint
Commission. (Level VII)
21 Centers for Medicare and Medicaid Services, Department of Health and
Human Services. (2015). Condition of participation: Medical record services.
42 C.F.R. § 482.24(b).
22 Accreditation Association for Hospitals and Health Systems. (2017). Standard
10.00 .03. Healthcare Facilities Accreditation Program: Accreditation
requirements for acute care hospitals. Chicago, IL: Accreditation Association
for Hospitals and Health Systems. (Level VII)
23 DNV GL-Healthcare USA, Inc. (2016). MR.2 .SR.1 . NIAHO® accreditation
requirements: Interpretive guidelines & surveyor guidance (version 11).
Milford, OH: DNV GL-Healthcare USA, Inc. (Level VII)
24 Agency for Clinical Innovation. (2013). “Management of patients with
nephrostomy tubes: Clinical guideline and patient information” [Online].
Accessed via the Web at
http://www.aci.health.nsw.gov.au/__data/assets/pdf_file/0005/191066/ACI_Nep
hrostomy_Jan13.pdf (Level VII)
NEUROLOGIC ASSESSMENT
Neurologic vital signs supplement the routine measurement
of temperature, pulse rate, blood pressure, and respirations
by evaluating the patient’s level of consciousness (LOC),
pupillary activity, and orientation to time, place, and person.
They provide a simple, indispensable tool for checking the
patient’s neurologic status quickly.
A measure of environmental awareness and self-
awareness, LOC reflects cortical function and usually
provides the first sign of central nervous system
deterioration. Changes in pupillary activity (pupil size,
shape, equality, and response to light) may signal increased
intracranial pressure (ICP) associated with a space-
occupying lesion. Evaluating muscle strength and tone,
reflexes, and posture also may help identify nervous system
damage.
Changes in vital signs alone rarely indicate neurologic
compromise, so any changes should be evaluated in light of
a complete neurologic assessment. Because vital signs are
controlled at the medullary level, changes in neurologic vital
signs may signify ominous neurologic compromise.
Equipment
Low-pitched tuning fork ▪ penlight ▪ thermometer ▪ sterile
cotton ball or cotton-tipped applicator ▪ stethoscope ▪
sphygmomanometer ▪ pupil size chart ▪ pencil or pen ▪
paperclip or key ▪ safety pin ▪ disinfectant pad.
Implementation
■ Perform hand hygiene.1,2,3,4,5,6
■ Confirm the patient’s identity using at least two patient
identifiers.7
■ Provide privacy.8,9,10,11
■ Explain the procedure to the patient (even if
unresponsive) and family (if appropriate) according to their
individual communication and learning needs to increase
their understanding, allay their fears, and enhance
cooperation.12
■ Raise the patient’s bed to waist level when providing care
to prevent caregiver back strain.13
Assessing LOC and orientation
■ Assess the patient’s LOC by evaluating the responses.
Use standard methods such as the Glasgow Coma Scale
(see Using the Glasgow Coma Scale) and the Rancho Los
Amigos Cognitive Scale (see Using the Rancho Los Amigos
Cognitive Scale). Begin by measuring the patient’s response
to verbal, light tactile (touch), or painful (nail bed pressure)
stimuli. First, ask the patient’s full name. If the patient
responds appropriately, assess orientation to time, place,
and person. Ask the patient the place and then what day,
season, and year it is. (Expect disorientation to affect the
sense of date first, then time, place, caregivers, and lastly
self.) Assess the quality of the patient’s replies. For
example, garbled words indicate difficulty with the motor
nerves that govern speech muscles. Rambling responses
indicate difficulty with thought processing and organization.
ELDER ALERT Because of decreased hearing, vision, and tactile
sensation with aging, cues in the environment are an important
feedback mechanism for older adults. When an older adult
experiences a change in environment, such as admission to a hospital
or other health care facility or a transfer from one unit to another,
neurologic functioning may be affected negatively. Orienting the
patient to the environment and planning for other needs, such as
providing adequate lighting without glare, visual and auditory clues,
and appropriate assistive devices, may maximize the patient’s
functioning within the environment.15
■ Assess the patient’s ability to understand and follow one-
step commands that require a motor response. For example,
ask the patient to open and close the eyes or stick out the
tongue (as shown below). Note whether the patient can
maintain LOC. If you must gently shake the patient to keep
the patient focused on your verbal commands, the patient
may be neurologically compromised.
■ If the patient doesn’t respond to commands or touch,
apply a painful stimulus. Painful stimuli are classified as
central (response via the brain) or peripheral (response via
the spine). Apply a central stimulus first and note the
patient’s response. Acceptable central stimuli include
squeezing the trapezius muscle, applying supraorbital or
mandibular pressure, and rubbing the sternum. If the
patient doesn’t respond to central stimuli, apply a peripheral
stimulus to all four extremities to establish a baseline. With
moderate pressure, squeeze the nail beds on fingers and
toes, and note the patient’s response. Check motor
responses bilaterally to rule out monoplegia (paralysis of a
single area) and hemiplegia (paralysis of one side of the
body).
Examining pupils and eye movement
■ Ask the patient to open the eyes. If the patient doesn’t
respond, gently lift the upper eyelids. Inspect each pupil for
size and shape, and compare the two for equality.
■ Test the pupillary response to light. (See Assessing the
pupils, page 542.) Also see if the pupils are positioned in, or
deviated from, the midline.
■ Brighten the room and have the conscious patient open
the eyes. Observe the eyelids for ptosis or drooping. Then
check extraocular movements. Hold up one finger and ask
the patient to follow it with the eyes alone. As you move the
finger up, down, laterally, and obliquely, see if the patient’s
eyes track together to follow your finger (conjugate gaze).
Watch for involuntary jerking or oscillating eye movements
(nystagmus).
■ Bring a pencil or other object in from the side and have
the patient state when the object enters the field of vision.
This tests the peripheral field.
■ Test the corneal reflex by touching a wisp of cotton ball to
the cornea. This test normally causes an immediate blink
reflex. Repeat for the other eye.
NURSING ALERT Excessive testing of the corneal reflex can cause
corneal damage. Perform this assessment carefully.
■ If the patient is unconscious, test the oculocephalic (doll’s
eye) reflex. Hold the patient’s eyelids open, then quickly but
gently turn the patient’s head to one side and then the
other. If the patient’s eyes move in the opposite direction
from the side to which you turn the head, the reflex is intact.
NURSING ALERT Never test the doll’s eye reflex if you know or
suspect that the patient has a cervical spine injury, because
permanent spinal cord damage may result.
Using the Glasgow Coma Scale
Using the Rancho Los Amigos Cognitive Scale
Widely used to classify brain-injured patients according to their behavior, the
Rancho Los Amigos Cognitive Scale describes the phases of recovery—from
coma to independent functioning—on a scale of I (unresponsive) to VIII
(purposeful, appropriate, alert, and oriented). This chart is useful when
assessing patients with posttraumatic amnesia.
Assessing the pupils
To evaluate pupil size more precisely, use a chart showing the various pupil
sizes (in increments of 1 mm, with the normal diameter ranging from 2 to 6
mm). Remember, pupil size varies considerably, and some patients have
normally unequal pupils (anisocoria).
Grading pupil size
To test the pupillary reaction to light, slightly darken the room, ask the
patient to look into the distance, and shine a penlight obliquely into each
pupil in turn (as shown).16 Observe for direct reaction (pupillary constriction
in the same eye) and consensual reaction (pupillary constriction in the
opposite eye).16
Next, test accommodation by placing your finger about 4′′ (10 cm) from the
bridge of the patient’s nose. Ask the patient to look at a fixed object in the
distance and then to look at your finger. The patient’s eyes should converge
and the pupils should constrict.16
Evaluating motor function
■ If the patient is conscious, test grip strength in both
hands at the same time. Extend your hands, ask the patient
to squeeze your fingers as hard as possible, and compare
the strength of each hand. Grip strength is usually slightly
stronger in the dominant hand.
■ Test arm strength by having the patient close the eyes
and hold the arms straight out in front with the palms up (as
shown below). See if either arm drifts downward or
pronates, indicating muscle weakness.
■ Test leg strength by having the patient raise the legs, one
at a time (as shown below), against gentle downward
pressure from your hand. Gently push down on each leg at
the midpoint of the thigh to evaluate muscle strength.
NURSING ALERT If decorticate or decerebrate posturing develops in
response to stimuli, notify the practitioner immediately. (See
Identifying warning postures.)
■ Evaluate muscle tone by having the patient flex and
extend the extremities on both sides.
Identifying warning postures
Decorticate and decerebrate postures are ominous signs of central nervous
system deterioration.
Decorticate (abnormal flexion)
In the decorticate posture, the patient’s arms are adducted and flexed, with
the wrists and fingers flexed on the chest. The legs may be stiffly extended
and internally rotated, with plantar flexion of the feet.
The decorticate posture may indicate a lesion of the frontal lobe, internal
capsule, or cerebral peduncles.
Decerebrate (extension)
In the decerebrate posture, the patient’s arms are adducted and extended
with the wrists pronated and the fingers flexed. One or both legs may be
stiffly extended, with plantar flexion of the feet.
The decerebrate posture may indicate lesions of the upper brain stem.
■ Test the plantar reflex. To do so, stroke the lateral aspect
of the sole of the patient’s foot with your thumbnail or
another moderately sharp object. Normally, this elicits
flexion of all toes (as shown below). Watch for a positive
Babinski sign—dorsiflexion of the great toe with fanning of
the other toes—which indicates an upper motor neuron
lesion.
Evaluating sensory function
■ To test for pain sensation, start by having the patient
close the eyes. Then, using a safety pin, gently touch
various areas of the patient’s body, alternating between the
sharp and dull end of the pin. Ask the patient “Is this sharp
or dull?” as you proceed. Compare corresponding areas on
the two sides of the body. Start with both shoulders and
then proceed with the inner and outer aspects of the
forearms, the thumbs and little fingers, the fronts of the
thighs, the medial and lateral aspects of both calves, the
little toes, and the medial aspect of the buttock to test most
of the dermatomes and major peripheral nerves.16
■ Test the patient’s sense of light touch by touching the
skin lightly with a wisp of cotton while the patient’s eyes
remain closed. Ask the patient to respond whenever a touch
is felt. Compare corresponding areas on the two sides of the
body.16
■ To test vibratory sense, apply a tuning fork over different
bony prominences while the patient keeps the eyes closed.
Tap the tuning fork on the heel of your hand and place it
firmly over a distal interphalangeal joint of the patient’s
finger, and then over the interphalangeal joint of the big
toe. Ask the patient to tell you when the sensation stops;
then touch the fork to stop it.17
■ Assess position sense (proprioception) by grasping the
patient’s big toe, holding it by its sides between your thumb
and index finger, and then pulling it away from the other
toes. Show the patient “up” and “down” as you move the
toe clearly upward and downward. Then, have the patient
close the eyes and ask the patient to tell you whether you’re
moving the toe up or down as you move the large toe in an
arc. Repeat several times on each side.16
■ To test stereognosis, have the patient close the eyes.
Place a familiar object, such as a paperclip or key, in the
patient’s hand and have the patient identify it. If motor
impairment prevents the patient from identifying the object
in this manner, use a blunt end of a pen or pencil to draw a
number in the patient’s palm and have the patient identify
it.16
■ Test point localization by having the patient close the
eyes; then touch one of the patient’s limbs and ask the
patient where you touched.
■ Test two-point discrimination by touching the patient
simultaneously in two contralateral areas with an opened
paperclip. Find the minimal distance at which the patient
can discriminate one from two points.16
Completing the neurologic examination
■ Assess the patient’s temperature, pulse, respiratory rate,
and blood pressure. The patient’s pulse pressure—the
difference between systolic pressure and diastolic pressure
— is especially important, because widening pulse pressure
can indicate increasing ICP.
■ Return the bed to the lowest position to prevent falls and
maintain patient safety.18
■ Perform hand hygiene.1,2,3,4,5,6
■ Disinfect your stethoscope and other equipment as
necessary using a disinfectant pad.19,20
■ Perform hand hygiene.1,2,3,4,5,6
■ Document the procedure.21,22,23,24
Special considerations
NURSING ALERT If a previously stable patient suddenly develops a
change in neurologic or routine vital signs, further assess the
patient’s condition and notify the practitioner immediately. One of the
earliest changes that may occur with increased ICP is a change in
LOC. Changes in pulse and blood pressure do occur, but generally late
in the course of increasing ICP.
■ Be aware that clinical issues commonly affecting older
adults may negatively influence the neurologic assessment,
including fluid and electrolyte imbalances, opioid analgesia
administration, fatigue, environmental changes, pain,
infection, and depression.15
■ In acute care settings, older adults are at risk for delirium,
so the neurologic assessment should include an ongoing
assessment using a standardized delirium assessment tool
to ensure early detection.15
■ If you suspect the patient is having a stroke, use the
National Institutes of Health Stroke Scale to evaluate the
patient.25
■ To save time while keeping complete records, your facility
may allow the use of abbreviations. To avoid
misinterpretation, use only commonly understood and
accepted abbreviations and terms, such as PERRLA (pupils
equal, round, reactive to light and accommodation) and
EOM (extraocular movements).
Documentation
Document detailed baseline data; subsequent notes can be
brief unless the patient’s condition changes. Record the
patient’s LOC and orientation, pupillary activity, motor
function, sensory function, and routine vital signs. Note the
Glasgow Coma Scale or Rancho Los Amigos Cognitive Scale
score if used. Describe the patient’s behavior—for example,
“difficult to arouse by gentle shaking,” “sleepy,” or
“unresponsive to painful stimuli.” Document any patient
teaching provided and the patient’s understanding of the
teaching.
REFERENCES
1 World Health Organization. (2009). “WHO guidelines on hand hygiene in
health care: First global patient safety challenge, clean care is safer care”
[Online]. Accessed via the Web at
http://apps.who.int/iris/bitstream/10665/44102/1/9789241597906_eng.pdf
(Level IV)
2 The Joint Commission. (2019). Standard NPSG.07.01.01. Comprehensive
accreditation manual for hospitals. Oakbrook Terrace, IL: The Joint
Commission. (Level VII)
3 Centers for Disease Control and Prevention. (2002). Guideline for hand
hygiene in health-care settings: Recommendations of the Healthcare Infection
Control Practices Advisory Committee and the HICPAC/SHEA/APIC/IDSA Hand
Hygiene Task Force. MMWR Recommendations and Reports, 51(RR-16), 1–45.
Accessed via the Web at https://www.cdc.gov/mmwr/pdf/rr/rr5116.pdf (Level
II)
4 Centers for Medicare and Medicaid Services, Department of Health and
Human Services. (2015). Condition of participation: Infection control. 42 C.F.R.
§ 482.42.
5 Accreditation Association for Hospitals and Health Systems. (2017). Standard
07.01.21. Healthcare Facilities Accreditation Program: Accreditation
requirements for acute care hospitals. Chicago, IL: Accreditation Association
for Hospitals and Health Systems. (Level VII)
6 DNV GL-Healthcare USA, Inc. (2016). IC.1.SR.1 . NIAHO® accreditation
requirements: Interpretive guidelines & surveyor guidance (version 11).
Milford, OH: DNV GL-Healthcare USA, Inc. (Level VII)
7 The Joint Commission. (2019). Standard NPSG.01.01.01. Comprehensive
accreditation manual for hospitals. Oakbrook Terrace, IL: The Joint
Commission. (Level VII)
8 Centers for Medicare and Medicaid Services, Department of Health and
Human Services. (2015). Condition of participation: Patient’s rights. 42 C.F.R.
§ 482.13(c)(1).
9 Accreditation Association for Hospitals and Health Systems. (2017). Standard
15.01.16. Healthcare Facilities Accreditation Program: Accreditation
requirements for acute care hospitals. Chicago, IL: Accreditation Association
for Hospitals and Health Systems. (Level VII)
10 The Joint Commission. (2019). Standard RI.01.01.01. Comprehensive
accreditation manual for hospitals. Oakbrook Terrace, IL: The Joint
Commission. (Level VII)
11 DNV GL-Healthcare USA, Inc. (2016). PR.1. SR.5 . NIAHO® accreditation
requirements: Interpretive guidelines & surveyor guidance (version 11).
Milford, OH: DNV GL-Healthcare USA, Inc. (Level VII)
12 The Joint Commission. (2019). Standard PC.02.01.21. Comprehensive
accreditation manual for hospitals. Oakbrook Terrace, IL: The Joint
Commission. (Level VII)
13 Waters, T. R., et al. (2009). “Safe patient handling training for schools of
nursing” [Online]. Accessed via the Web at
https://www.cdc.gov/niosh/docs/2009-127/pdfs/2009-127.pdf (Level VII)
14 Teasdale, G., et al. (n.d .). GCS at 40: The Glasgow structured approach to
assessment of the Glasgow Coma Scale [video]. Accessed via the Web at
http://www.glasgowcomascale.org/
15 Thompson, H. J . (2009). “Neurologic assessment of the older adult: A guide
for nurses” [Online]. Accessed via the Web at
http://apps.aann.org/Store/ProductDetails.aspx?productId=192054556 (Level
VII)
16 Bickley, L. (2017). Bates’ guide to physical examination and history taking
(12th ed.). Philadelphia, PA: Wolters Kluwer.
17 Hickey, J. V. (2014). The clinical practice of neurological and neurosurgical
nursing (7th ed.). Philadelphia, PA: Wolters Kluwer.
18 Ganz, D. A., et al. (2013). Preventing falls in hospitals: A toolkit for improving
quality of care (AHRQ Publication No. 13-0015-EF). Rockville, MD: Agency for
Healthcare Research and Quality. Accessed via the Web at
https://www.ahrq.gov/sites/default/files/publications/files/fallpxtoolkit.pdf
(Level VII)
19 Rutala, W. A., et al. (2008, revised 2017). “Guideline for disinfection and
sterilization in healthcare facilities” [Online]. Accessed via the Web at
https://www.cdc.gov/hicpac/pdf/guidelines/Disinfection_Nov_2008.pdf (Level I)
20 Accreditation Association for Hospitals and Health Systems. (2017). Standard
07.02.03. Healthcare Facilities Accreditation Program: Accreditation
requirements for acute care hospitals. Chicago, IL: Accreditation Association
for Hospitals and Health Systems. (Level VII)
21 The Joint Commission. (2019). Standard RC.01.03 .01. Comprehensive
accreditation manual for hospitals. Oakbrook Terrace, IL: The Joint
Commission. (Level VII)
22 Centers for Medicare and Medicaid Services, Department of Health and
Human Services. (2015). Condition of participation: Medical record services.
42 C.F.R. § 482.24(b).
23 Accreditation Association for Hospitals and Health Systems. (2017). Standard
10.00 .03. Healthcare Facilities Accreditation Program: Accreditation
requirements for acute care hospitals. Chicago, IL: Accreditation Association
for Hospitals and Health Systems. (Level VII)
24 DNV GL-Healthcare USA, Inc. (2016). MR.2 .SR.1 . NIAHO® accreditation
requirements: Interpretive guidelines & surveyor guidance (version 11).
Milford, OH: DNV GL-Healthcare USA, Inc. (Level VII)
25 National Institute of Neurological Disorders and Stroke. (2016). “NIH Stroke
scale” [Online]. Accessed via the Web at
https://www.ninds.nih.gov/sites/default/files/NIH_Stroke_Scale_Booklet.pdf
NUTRITIONAL SCREENING
A patient’s nutritional status is evaluated by examining
information from several sources, such as the patient’s
medical history, physical assessment findings, and
laboratory results. If nutritional screening determines the
patient is at risk for a nutritional disorder, a comprehensive
nutritional assessment may then be conducted to set goals
and determine interventions to correct actual or potential
imbalances.1,2
Nutritional screening may reduce the risk of malnutrition.3
Nutritional screening also provides information about the
status of acute and chronic conditions.4 It examines certain
variables to determine the risk of problems in specific
populations—such as pregnant women, older adult people,
or those with certain disorders (such as cardiac disorders,
diabetes)—to detect deficiencies or potential imbalances.
If warranted by the patient’s needs or condition, complete
a nutritional screening within 24 hours of the patient’s
admission to an acute care center.1
Equipment
Scale with stadiometer ▪ nutritional screening tool1 ▪ tape
measure ▪ Optional: chair or bed scale, sliding calipers.5
Preparation of equipment
Select the appropriate scale—usually, a standing scale for
an ambulatory patient or a chair or bed scale for an acutely
ill or debilitated patient. Ensure the scale is balanced,
because standing scales and, to a lesser extent, bed scales
may become unbalanced when transported.
Implementation
■ Perform hand hygiene.6,7,8,9,10,11
■ Confirm the patient’s identity using at least two patient
identifiers.12
■ Explain the purpose of and procedure for nutritional
screening to the patient.5
■ Ask the patient to remove shoes, and obtain the patient’s
weight using a scale. Weight provides a rough estimate of
body composition.
■ Ask about unplanned or unintentional weight loss or gain.
Determine how much weight the patient lost or gained and
over what period of time. A weight loss of more than 5% of
body weight in 30 days or 10% in 180 days, or a weight gain
of 10 lb (4.5 kg) or more in 180 days places the patient at
nutritional risk.
■ Measure the patient’s height while the patient is standing
erect without shoes, using the measuring bar on the scale. If
the patient can’t stand, approximate height by measuring
“wingspan.”
(See Overcoming height measurement
problems.)
■ Calculate or estimate body mass index (BMI) to evaluate
weight in relation to height. (See Calculating BMI.)15
Overcoming height measurement
problems
A patient confined to a wheelchair or one who can’t stand up straight
because of such orthopedic problems as kyphosis or scoliosis poses a
challenge to accurately measuring height. Alternative methods include
measurement of recumbent length, knee height, forearm length, and demi-
span.13 However, sliding calipers is the method of choice because it is
closest in accuracy to measuring standing height.14
Calculating BMI
Use one of the formulas below to calculate your patient’s body mass index
(BMI).
OR
Determining BMI
Body mass index (BMI) measures weight in relation to height. The BMI ranges
shown here are for adults. Although these ranges don’t provide an exact
guide for healthy or unhealthy weight, they show that health risks increase
with increasing weight and obesity. To use the graph below, find the patient’s
weight along the bottom and then go straight up until you come to the line
that matches the patient’s height. The shaded area indicates whether the
patient is healthy, overweight, or obese.
■ A BMI of 18.5 to 24.9 defines healthy weight; a BMI of 25
to 29.9 defines overweight; a BMI of 30 or more defines
obesity.16 (See Determining BMI.)
■ Evaluate the patient’s weight distribution by measuring
waist circumference around the patient’s abdomen at the
level of the iliac crest. Before reading the tape measure,
ensure that the tape is snug but doesn’t compress the skin
and is parallel to the floor. If the measurement is greater
than 35′′ (89 cm) for a woman or 40′′ (102 cm) for a man
(with a normal BMI), the patient is at greater risk for health
problems.1 People with a high distribution of fat around their
waists as opposed to their hips and thighs are at greater risk
for such diseases as type 2 diabetes, dyslipidemia,
hypertension, and cardiovascular disease.15
Risk factors for malnutrition
Risk factors for malnutrition are varied and multifaceted.17,18 Processes
associated with aging can also lead to malnutrition, although aging itself isn’t
an independent risk factor. Risk factors for malnutrition include medical,
lifestyle and social, psychological, and hospitalization-related factors.
■ Question the patient about eating habits, living
environment, and functional status to determine whether
the patient’s at risk for nutritional problems. A problem in
any of these areas places the patient at risk and requires
further nutritional assessment. (See Risk factors for
malnutrition.)
■ Review the medical record and interview the patient to
determine whether the present illness or medical history
places the patient at nutritional risk.
■ Review physical assessment findings for signs of poor
nutrition. (See Evaluating nutritional disorders.)
■ Make a referral to a registered dietitian if a nutritional
screening suggests the patient is at risk for nutritional
problems.1 A registered dietitian will then perform a
comprehensive nutritional assessment.
■ Perform hand hygiene.6,7,8,9,10,11
■ Document the procedure.20,21,22,23
Special considerations
■ The nutritional screening is typically performed during the
initial nursing history and physical assessment, but should
be completed within 24 hours of admission.1,24,25
■ When measuring height, note the growth of children as
well as diminishing height of older adults. Growth of children
may be noted on standardized charts to assess growth
patterns for possible abnormalities. Diminishing height of
older adults may be related to osteoporotic changes and
should be investigated.5
Documentation
Record the date and time of the nutritional screening. Place
the patient’s height and weight on the screening form as
well as the graphic sheet or patient care flow sheet. Note
the type of scale used. Complete the screening tool as
recommended. Calculate and record the patient’s BMI. Use
a progress note to record information that doesn’t have a
space on the screening tool. Record whether the patient has
experienced any weight loss or significant weight gain, the
time over which the loss or gain occurred, and how much
weight was lost or gained.
Make sure laboratory results are documented, including
the name of anyone you notified of abnormal results, and
whether orders were given. Note any nutritional problems
detected during the physical examination and review of the
patient’s medical record. Include any patient teaching
provided. For patients at nutritional risk, record the date and
time, names of the people notified and whether those who
were notified came to see the patient, any orders received,
and your nursing interventions and the patient’s response.
REFERENCES
1 Mueller, C., et al. (2011). A.S .P.E.N. clinical guidelines: Nutrition screening,
assessment, and intervention in adults. Journal of Parenteral and Enteral
Nutrition, 35(1), 16–24. Accessed via the Web at
http://pen.sagepub.com/content/35/1/16.full.pdf (Level I)
2 Kirkland, L., et al. (2013). Nutrition in the hospitalized patient. Journal of
Hospital Medicine, 8(1), 52–58. (Level VII)
3 Omidvari, A. H., et al. (2013). Nutritional screening for improving professional
practice for patient outcomes in hospital and primary care settings. Cochrane
Database of Systematic Reviews, 2013(6), CD005539. (Level I)
4 Lilamand, M., et al. (2015). The mini nutritional assessment-short form and
mortality in nursing home residents: Results from the INCUR study. Journal of
Nutrition, Health and Aging, 19(4), 383–388 . (Level IV)
5 Potter, P., et al. (2016). Fundamentals of nursing (9th ed.) . St. Louis, MO:
Elsevier.
6 The Joint Commission. (2019). Standard NPSG.07.01.01. Comprehensive
accreditation manual for hospitals. Oakbrook Terrace, IL: The Joint
Commission. (Level VII)
7 Centers for Disease Control and Prevention. (2002). Guideline for hand
hygiene in health-care settings: Recommendations of the Healthcare Infection
Control Practices Advisory Committee and the HICPAC/SHEA/APIC/IDSA Hand
Hygiene Task Force. MMWR Recommendations and Reports, 51(RR-16), 1–45.
Accessed via the Web at http://www.cdc.gov/mmwr/pdf/rr/rr5116.pdf (Level II)
8 World Health Organization. (2009). “WHO guidelines on hand hygiene in
health care: First global patient safety challenge, clean care is safer care”
[Online]. Accessed via the Web at
http://apps.who.int/iris/bitstream/10665/44102/1/9789241597906_eng.pdf
(Level IV)
9 Accreditation Association for Hospitals and Health Systems. (2017). Standard
07.01.21. Healthcare Facilities Accreditation Program: Accreditation
requirements for acute care hospitals. Chicago, IL: Accreditation Association
for Hospitals and Health Systems. (Level VII)
10 Centers for Medicare and Medicaid Services, Department of Health and
Human Services. (2015). Condition of participation: Infection control. 42 C.F.R.
§ 482.42.
11 DNV GL-Healthcare USA, Inc. (2016). IC.1 .SR.1 . NIAHO® accreditation
requirements: Interpretive guidelines & surveyor guidance (version 11).
Milford, OH: DNV GL-Healthcare USA, Inc. (Level VII)
12 The Joint Commission. (2019). Standard NPSG.01.01.01. Comprehensive
accreditation manual for hospitals. Oakbrook Terrace, IL: The Joint
Commission. (Level VII)
13 Froehlich-Grobe, K., et al. (2011). Measuring height without a stadiometer.
American Journal of Physical Medicine and Rehabilitation, 90(8), 658–666 .
Accessed via the Web at
http://www.ncbi.nlm.nih.gov/pmc/articles/PMC3148840/ (Level IV)
14 Frid, H., et al. (2013). Agreement between different methods of measuring
height in elderly patients. Journal of Human Nutrition and Dietetics, 26(5),
504–511. (Level IV)
15 U.S . Department of Health and Human Services, National Heart, Lung, and
Blood Institute. (2012). “Integrated guidelines for cardiovascular health and
risk reduction in children and adolescents” [Online]. Accessed via the Web at
https://www.nhlbi.nih.gov/health-pro/guidelines/current/cardiovascular-health-
pediatric-guidelines (Level I)
Evaluating nutritional disorders
This chart can help you interpret your nutritional assessment findings. Body
systems are listed below, with signs or symptoms and the implications for
each.
16 U.S . Department of Health and Human Services & U.S . Department of
Agriculture. (2015). 2015–2020 dietary guidelines for Americans (8th ed.).
Accessed via the Web at
https://health.gov/dietaryguidelines/2015/resources/2015-
2020_Dietary_Guidelines.pdf (Level VII)
17 De Morais, C., et al. (2013). Nutritional risk of European elderly. European
Journal of Clinical Nutrition, 67(11), 1215–1219. (Level IV)
18 Roy, R., et al. (2015). Food environment interventions to improve the dietary
behavior of young adults in tertiary education settings: A systematic
literature review. Journal of the Academy of Nutrition and Dietetics, 115(10),
1647–1681. (Level V)
19 Bassiouny, M. A. (2013). Dental erosion due to abuse of illicit drugs and
acidic carbonated beverages. General Dentistry, 61(2), 38–44 . (Level VI)
20 The Joint Commission. (2019). Standard RC.01.03 .01. Comprehensive
accreditation manual for hospitals. Oakbrook Terrace, IL: The Joint
Commission. (Level VII)
21 Centers for Medicare and Medicaid Services, Department of Health and
Human Services. (2015). Condition of participation: Medical record services.
42 C.F.R. § 482.24(b).
22 Accreditation Association for Hospitals and Health Systems. (2017). Standard
10.00 .03. Healthcare Facilities Accreditation Program: Accreditation
requirements for acute care hospitals. Chicago, IL: Accreditation Association
for Hospitals and Health Systems. (Level VII)
23 DNV GL-Healthcare USA, Inc. (2016). MR.2 .SR.1 . NIAHO® accreditation
requirements: Interpretive guidelines & surveyor guidance (version 11).
Milford, OH: DNV GL-Healthcare USA, Inc. (Level VII)
24 The Joint Commission. (2019). Standard PC.01.02.03 . Comprehensive
accreditation manual for hospitals. Oakbrook Terrace, IL: The Joint
Commission. (Level VII)
25 Accreditation Association for Hospitals and Health Systems. (2017). Standard
10.01.24. Healthcare Facilities Accreditation Program: Accreditation
requirements for acute care hospitals. Chicago, IL: Accreditation Association
for Hospitals and Health Systems. (Level VII)
EQUIPMENT
How the Ommaya reservoir works
To insert an Ommaya reservoir, the practitioner drills a burr hole and inserts
the device’s catheter through the patient’s nondominant frontal lobe into the
lateral ventricle. The reservoir, which has a self-sealing silicone injection
dome, rests over the burr hole under a scalp flap. This creates a slight, soft
bulge on the scalp about the size of a quarter. Usually, drugs are injected into
the dome with a syringe.
O
OMMAYA RESERVOIR DRUG INFUSION
Also known as a subcutaneous cerebrospinal fluid (CSF)
reservoir, the Ommaya reservoir allows delivery of long-
term drug therapy to the CSF by way of the brain’s
ventricles. It’s most commonly used for chemotherapy and
pain management, specifically for treating central nervous
system (CNS) lymphoma, malignant CNS disease, and
meningeal carcinomatosis. The reservoir spares the patient
repeated lumbar punctures to administer chemotherapeutic
drugs, analgesics, antibiotics, and antifungals.1
The reservoir is a mushroom-shaped silicone apparatus
with an attached catheter. It’s surgically implanted beneath
the patient’s scalp, and the catheter is threaded into the
ventricle through a burr hole in the skull. (See How the
Ommaya reservoir works.) Besides providing convenient,
comparatively painless access to CSF, the Ommaya
reservoir permits consistent and predictable drug
distribution throughout the subarachnoid space and CNS. It
also allows for measurement of intracranial pressure (ICP).
Before reservoir insertion, the patient may receive a local
or general anesthetic, depending on the patient’s condition
and the practitioner’s preference. After an X-ray confirms
placement of the reservoir, a pressure dressing is applied
for 24 hours. The sutures may be removed in about 10 days.
However, the reservoir can be used within 48 hours to
deliver drugs, obtain CSF pressure measurements, drain
CSF, and withdraw CSF specimens.
The practitioner usually injects drugs into the Ommaya
reservoir, but a specially trained nurse may perform this
procedure if permitted by the facility and the state’s nurse
practice act. This sterile procedure usually takes 15 to 30
minutes.
Equipment
Equipment varies but may include the following:
Preservative-free prescribed drug ▪ personal protective
equipment (sterile gloves, gown, mask and goggles or mask
with face shield) ▪ antiseptic solution (avoid antiseptics
containing alcohol or acetone) ▪ 10-mL syringe ▪ two 3-mL
syringes ▪ 25G 5/8′′ (1.6 -cm) butterfly needle or Huber
needle ▪ 10-mL prefilled syringe containing preservative-
free normal saline solution ▪ sterile drape ▪ sterile gauze
pads ▪ thermometer ▪ sphygmomanometer ▪ stethoscope ▪
disinfectant pad ▪ Optional: CSF collection tubes, label,
laboratory biohazard transport bag, additional medications
as prescribed.
For chemotherapy
Safety data sheet for prescribed chemotherapy drug ▪
prescribed chemotherapy medication ▪ scale ▪ powder-free
chemotherapy gloves ▪ nonlinting, nonabsorbent disposable
gown ▪ face shield ▪ National Institute for Occupational
Safety and Health–approved respirator mask (if
aerosolization is likely)2 ▪ syringes with Luer-lock connector
▪ chemotherapy sharps container ▪ hazardous-waste
container approved for cytotoxic waste ▪ hazardous-drug
spill kit ▪ supplies for emergency treatment (soap, eyewash,
sterile saline solution for irrigation) ▪ emergency equipment
(crash cart with cardiac medications, defibrillator, handheld
resuscitation bag with mask, intubation equipment).
Preparation of equipment
Make sure that a chemotherapy spill kit and emergency
equipment are readily available if chemotherapy is being
administered. Also ensure that the emergency equipment is
functioning properly.
Ensure that the medication to be administered is brought
to room temperature as needed.
Implementation
■ Perform hand hygiene.3,4,5,6,7,8
■ Gather the prescribe medication and the appropriate
equipment.
■ Avoid distractions and interruptions when preparing and
administering
medications
to prevent
medication
administration errors.9,10
Preparing for medication administration
(nonchemotherapeutic drugs)
■ Verify the practitioner’s order.11,12,13,14
■ Compare the medication label to the order in the
patient’s medical record.11,12,13,14
■ Check the patient’s medical record for allergies or other
contraindication to the prescribed medication. If an allergy
or a contraindication exists, don’t administer the
medication; notify the practitioner.11,12,13,14
■ Review an accurate list of all the patient’s medications
and supplements.15,16,17,18
■ Check the expiration date on the medication. If the
medication is expired, return it to the pharmacy and obtain
new medication.11,12,13,14
■ Visually inspect the solution for particles, discoloration, or
other loss of integrity; don’t administer the medication if its
integrity is compromised.11,12,13,14
■ Discuss any unresolved concerns about the medication
with the patient’s practitioner.11,12,13,14
■ Perform hand hygiene.3,4,5,6,7,8
■ Confirm the patient’s identity using two patient
identifiers.19
■ Provide privacy.20,21,22,23
■ If the patient is receiving the medication for the first time,
teach about the potential adverse reactions and discuss any
other concerns related to the medication.11,12,13,14
■ Assess the patient’s baseline vital signs, pain level, and
neurologic status; if any are altered, stop the procedure and
notify the practitioner.
Preparing for chemotherapy administration
■ Review the patient’s medical record for initial cancer
diagnosis and staging or current cancer status; recent
treatments, including surgery, radiation therapy, hormone
therapy, cytotoxic therapy, and complementary therapy;
medical, psychiatric, and surgical history; presence of
allergic or hypersensitivity reactions; pregnancy and
reproductive status, including the last menstrual period if
applicable; and physical examination that includes
assessment of organ function appropriate for the planned
treatment regimen.15,16,24
■ Review an accurate list of all the patient’s medications
and supplements.15,16,17,18
■ Confirm that the practitioner has obtained written
informed consent and that the signed consent form is in the
patient’s medical record.15,25,26,27,28
■ Check that the order is written and contains the following
information:15,24 patient’s complete name and a second
identifier, the date, the patient’s diagnosis, any allergies,
and the regimen’s name and number (if applicable),
including the individual drug’s generic name, treatment
criteria and dosage calculation method, the patient’s height
and weight in kilograms, and any other variables used to
calculate the dose. The order must also contain the dosage,
the route and rate of administration, the schedule, duration
of therapy, cumulative lifetime dose (if applicable),
sequence of drug administration (if applicable), and any
supportive care treatments appropriate for the regimen,
such as premedications for hypersensitivity, nausea, and
hydration if necessary.
■ Verify that the prescribed medication dose is appropriate
for the patient, diagnosis, and treatment plan. If you have
concerns, consult with the prescribing practitioner or
pharmacist.11,12,13,14,15,16
■ Have a second qualified individual verify the
chemotherapy order before medication preparation, which
should include confirming the two patient identifiers,
medication name, dose, medication volume, route of
administration, calculation for treatment dosing, and
treatment cycle and day of cycle.15,16
■ Become familiar with the information contained in the
material safety data sheet specific to the prescribed
drug.29,30
■ In collaboration with the patient’s multidisciplinary team,
review the patient’s test results, specifically complete blood
count, blood urea nitrogen level, platelet count, and liver
function studies.31
■ Review the patient’s height, weight (in kilograms), and
body surface area.15,16,31
■ Compare the medication label to the order in the
patient’s medical record.11,12,13,14
■ Check the expiration date on the medication. If the
medication is expired, return it to the pharmacy and obtain
new medication.11,12,13,14
■ Visually inspect the solution for particles, discoloration, or
other loss of integrity; don’t administer the medication if its
integrity is compromised.11,12,13,14
■ Perform hand hygiene.3,4,5,6,7,8
■ Confirm the patient’s identity using at least two patient
identifiers.19
■ Provide privacy.20,21,22,23
■ Assess the patient’s clinical and performance status.24
■ Verify with the patient any allergies, previous reactions,
and treatment-related toxicities.24
■ Monitor any cumulative chemotherapy dose to ensure
that the patient hasn’t reached the maximum lifetime
dose.31
■ Ask the patient about any psychosocial concerns or
cultural or spiritual issues that may affect treatment, and
take action as indicated.24
■ Confirm the treatment plan, drug route, and symptom
management plan with the patient.15
■ Confirm that the patient has received written information
regarding the cancer diagnosis and associated
chemotherapy regimen, its associated short- and long-term
adverse effects (including fertility risks, as appropriate),
goals of therapy, and the continuing care plan.24
■ Obtain the patient’s vital signs, including pain level, to
use as a baseline for comparison.15,16,31
■ Recalculate the dose, as ordered, using the patient’s body
surface area and weight, if applicable;31 check your
calculations against the written order.
■ Verify that the drug is properly labeled when you receive
it from the pharmacy, and that this information includes the
patient’s full name and second identifier, full generic drug
name, drug administration route, total dose to be given,
total volume required to administer the dosage, date of
administration, and date and time of preparation and
expiration. Make sure that it also includes any special
handling instructions and a label that clearly identifies the
drug as hazardous and for intrathecal use only.15,24
Administering the medication or
chemotherapeutic agent
■ Ensure that placement of the Ommaya reservoir has been
confirmed before initial use.
■ If required, conduct a preprocedure verification to make
sure that all relevant documentation, related information,
and equipment are available and correctly identified to the
patient’s identifiers.32,33
■ Explain the procedure to the patient and family (if
appropriate) according to their individual communication
and learning needs to increase their understanding, allay
their fears, and enhance cooperation.34
■ Determine whether the practitioner has ordered any
premedications to combat adverse effects of the prescribed
medication or chemotherapeutic agent, and administer
them as prescribed following safe medication administration
practices.11,12,13,14
■ If your facility uses a bar code technology, scan your
identification badge, the patient’s identification bracelet,
and the medication’s bar code.
■ Raise the patient’s bed to waist level when providing
patient care to prevent caregiver back strain.35
■ Position the patient in a sitting or reclining position.
■ Perform hand hygiene.3,4,5,6,7,8
■ Open a sterile tray and prepare a sterile field on a work
surface close to the patient.
■ Place the prescribed medication and necessary supplies
on the sterile field. Make sure that all medications on and off
the sterile field are clearly labeled.36,37
■ Wash your hands using soap and water if the drug is a
chemotherapeutic agent; perform hand hygiene if it
isn’t.3,4,5,6,7,8,15
■ Put on personal protective equipment.38 If you’re
administering a chemotherapeutic agent, wear two pairs of
sterile, powder-free chemotherapy gloves, a gown, a mask,
a face shield if splashing is likely, and a respirator (if
necessary).2,15,30 Make sure that your inner glove cuff is
worn under the gown cuff and that the outer glove cuff
extends over the gown cuff to fully protect your skin.
Inspect your gloves to make sure that they’re physically
intact.
■ Conduct a time-out immediately before starting the
procedure to perform a final assessment in order to ensure
that the correct patient, site, positioning, and procedure are
identified and, as applicable, that all relevant information
and necessary equipment are available.39
■ Examine the area over the reservoir for signs of infection
or trauma. Notify the practitioner if any are present.
■ To confirm placement and to fill the reservoir, gently
palpate the reservoir and pump it three or four times;
expect free flow of CSF from the ventricle into the reservoir.
■ Drape the reservoir site with a sterile drape and prepare
the patient’s scalp with an antiseptic solution, as
determined by your facility, working in a circular motion
from the center outward. Allow the solution to dry
completely to achieve its maximum effect.
NURSING ALERT Chemotherapeutic drugs are considered high-alert
medications because they can cause significant patient harm if used in
error. Never administer a chemotherapeutic drug without performing
an independent double-check with another practitioner who is
qualified to prepare or administer chemotherapy.15,24,40
NURSING ALERT Vinca alkaloids such as vincristine are never given
in an Ommaya reservoir because of potentially lethal neurotoxicity,
including coma and death.15
■ Verify that the prescribed medication is being
administered at the proper time, in the prescribed dose, and
by the correct route to reduce the risk of medication
errors.11,12,13,14
■ If administering a chemotherapeutic agent, have another
practitioner who is qualified to prepare or administer
chemotherapy perform an independent double-check to
verify the patient’s identity and to make sure that the
correct drug is prepared in the prescribed concentration and
volume, the drug hasn’t expired, the drug’s indication
corresponds with the patient’s diagnosis, the dosage
calculations are correct and the dosing formula used to
derive the final dose is correct, the route of administration is
safe and proper for the patient, and the drug’s integrity is
intact.41 Both of you should sign the patient’s medical
record indicating that the verification took place.15,24
■ Compare the results of the independent double-check
with the other practitioner and, if no discrepancies exist,
begin administering the drug. If discrepancies exist, rectify
them before administering the drug.41
■ Using sterile technique, attach a 10-mL syringe to the
butterfly needle. Consider using a stopcock between the
butterfly needle and syringe to ease changing multiple
syringes.42
■ Place the butterfly needle at a 45-degree angle and insert
it into the reservoir. Alternatively, puncture the reservoir
with the Huber needle.
■ Slowly and gently aspirate 3 mL of CSF into the attached
syringe to make sure that it’s clear and doesn’t contain
blood.43 If the aspirate isn’t clear, notify the practitioner
before continuing.
■ If a CSF sample is needed for laboratory testing, clamp
the tubing, discard the CSF, and, using a new syringe,
withdraw the appropriate amount of CSF.
NURSING ALERT Don’t use a Vacutainer to aspirate CSF because
rapidly withdrawing CSF with this device could damage the ventricle’s
choroid plexus.
■ Continue to aspirate as many milliliters of CSF as the
volume of drug to be instilled. (Some facilities use the CSF
instead of a preservative-free diluent to deliver the
medication.)
■ Detach the syringe from the needle hub.
■ Attach the drug syringe.
■ Instill the prescribed medication or chemotherapeutic
agent slowly, monitoring the patient for headache, nausea,
dizziness, or other change in neurologic status.
■ Clamp the tubing and then detach the syringe.
■ Attach the prefilled syringe containing preservative-free
normal saline solution, and slowly flush the reservoir.
■ Withdraw the needle.
■ Cover the site with a sterile gauze pad and apply gentle
pressure for a moment or two until superficial bleeding
stops.
■ Gently pump the reservoir to distribute the medication.
■ Discard the needle and syringe in an appropriate sharps
disposal container;44 use a chemotherapy sharps container
if the medication was a chemotherapeutic agent.16,45
■ If laboratory testing is ordered, place the CSF reserved for
laboratory testing in the collection tubes and label the tubes
in the presence of the patient to prevent mislabeling.19 Then
discard the syringe in an appropriate sharps container.44
■ Return the bed to the lowest position to prevent falls and
maintain patient safety.46
■ Instruct the patient to lie quietly for about 15 to 30
minutes after the procedure to prevent meningeal irritation,
which can lead to nausea and vomiting.
■ Monitor the patient for adverse drug reactions and signs
and symptoms of increased ICP—such as vital sign changes,
nausea, vomiting, pain, and dizziness—every 30 minutes for
2 hours, every hour for 2 hours, every 4 hours for 24 hours,
and then every 8 hours for the duration of care.42
Completing the procedure
■ Remove and discard used supplies in appropriate waste
receptacles.30,44,45,47
■ Remove your personal protective equipment and discard
it in an appropriate receptacle.38 If you administered
chemotherapy, discard your equipment in the hazardous-
waste container for cytotoxic waste.30,45
■ Wash your hands with soap and water if you administered
a chemotherapeutic medication;5,15,24,30 perform hand
hygiene if you didn’t.3,4,5,6,7,8
■ Perform a comprehensive pain assessment using
techniques appropriate for the patient’s age, condition, and
ability to understand.48
■ Administer pain medication as needed and prescribed
following safe medication administration practices.11,12,13,14
■ Place the specimen in a laboratory transport bag47 and
immediately send it to the laboratory.
■ With a disinfectant pad, disinfect equipment that isn’t for
single-patient use.49,50
■ Perform hand hygiene.3,4,5,6,7,8
■ Document the procedure.51,52,53,54
Special considerations
■ Be aware that the practitioner may prescribe an
antiemetic to be administered 30 minutes before the
procedure to control nausea and vomiting.
■ If the patient is scheduled to receive an Ommaya
reservoir, explain the procedure before reservoir insertion.32
Be sure that the patient and family understand the potential
complications, and answer any questions they may have.
Reassure the patient that any hair clipped for the implant
will grow back, and that only a coin-sized patch must remain
clipped for injections. (Hair regrowth will be slower if the
patient is receiving chemotherapy.)
■ After the reservoir is implanted, the site is commonly left
open to air after the first 24 hours.43 Instruct the patient to
resume normal activities but to protect the site from bumps
and traumatic injury while the incision heals. Tell the patient
that unless complications develop, the reservoir should
function for years.
■ Each chemotherapy agent has unique adverse effects.
Assess and monitor the patient for anticipated adverse
effects for the agent administered. Treatment-related
toxicities should be evaluated, graded, and documented
using standard definitions or criteria.24
■ If some of the chemotherapy drug comes in contact with
your skin, wash the involved area thoroughly with soap (not
a germicidal agent) and water. If eye contact occurs, flood
the eye with water or saline solution for at least 15 minutes
while holding the eyelid open. Obtain a medical evaluation
as soon as possible after accidental exposure.15,19,30
■ If a spill occurs, use a chemotherapy spill kit to clean the
area. Wear all personal protective equipment (double
gloves, a gown, a face shield or goggles, booties, and a
respirator if aerosolization is possible) when cleaning the
spill. Post a sign to warn others. Report and document the
spill appropriately.
■ Note that any health care worker who is pregnant, trying
to conceive, or breast-feeding shouldn’t be exposed to
chemotherapeutic drugs.15,29
Patient teaching
Teach the patient and family (if applicable) about measures
to prevent hospital-associated infections, including the
importance of hand hygiene. Encourage them to remind
health care workers who fail to perform hand hygiene before
providing care.16
Instruct the patient and family (if applicable) to notify the
practitioner if any signs of infection (for example, redness,
swelling, tenderness, or drainage) develop at the insertion
site or if the patient develops headache, neck stiffness, or
fever, which may indicate a systemic infection.
Verify that the patient received written educational
materials appropriate for the patient’s reading level and
understanding that include information about the patient’s
diagnosis, chemotherapy plan (if applicable), possible long-
and short-term adverse effects, risks associated with the
regimen, reportable signs and symptoms, monitoring,
sexual relations, contraception, special precautions, and
follow-up care if the patient is receiving chemotherapy.
Complications
Infection may develop but can usually be treated
successfully with antibiotics injected directly into the
reservoir. Persistent infection may require removal of the
reservoir.55
Catheter migration or blockage may cause symptoms of
increased ICP, such as headache and nausea. In this
situation the practitioner may gently push and release the
reservoir several times (a technique called pumping). With a
finger on the patient’s scalp, the practitioner can feel the
reservoir refill. Slow filling suggests catheter migration or
blockage, which must be confirmed by a computed
tomography scan. Surgical correction is required.
Documentation
Document your assessment findings; the type and size of
needle used; patient tolerance; CSF characteristics;
medication, dose, and volume administered; amount of CSF
withdrawn; specimens collected and results; and any
complications. Also record the appearance of the reservoir
insertion site before and after access. Note any adverse
effects of the drug, the practitioner who was notified,
prescribed interventions, and the patient’s response to the
interventions. Document any patient and family teaching
and their understanding of the teaching.
REFERENCES
1 Demopoulos, A., & Brown, P. Treatment of leptomeningeal metastases
(carcinomatous meningitis). (2017). In: UpToDate, DeAngelis, L. M., et al.
(Eds.). Retrieved from: www.uptodate.com
2 Centers for Disease Control and Prevention & National Institute for
Occupational Safety and Health. (2008). “Personal protective equipment for
health care workers who work with hazardous drugs” [Online]. Accessed via
the Web at https://www.cdc.gov/niosh/docs/wp-solutions/2009-106/pdfs/2009-
106.pdf (Level VII)
3 Centers for Disease Control and Prevention. (2002). Guideline for hand
hygiene in health-care settings: Recommendations of the Healthcare Infection
Control Practices Advisory Committee and the HICPAC/SHEA/APIC/IDSA Hand
Hygiene Task Force. MMWR Recommendations and Reports, 51(RR-16), 1–45.
Accessed via the Web at https://www.cdc.gov/mmwr/pdf/rr/rr5116.pdf (Level
II)
4 World Health Organization. (2009). “WHO guidelines on hand hygiene in
health care: First global patient safety challenge, clean care is safer care”
[Online]. Accessed via the Web at
http://apps.who.int/iris/bitstream/10665/44102/1/9789241597906_eng.pdf
(Level IV)
5 The Joint Commission. (2019). Standard NPSG.07.01.01. Comprehensive
accreditation manual for hospitals. Oakbrook Terrace, IL: The Joint
Commission. (Level VII)
6 Accreditation Association for Hospitals and Health Systems. (2017). Standard
07.01.21. Healthcare Facilities Accreditation Program: Accreditation
requirements for acute care hospitals. Chicago, IL: Accreditation Association
for Hospitals and Health Systems. (Level VII)
7 Centers for Medicare and Medicaid Services, Department of Health and
Human Services. (2015). Condition of participation: Infection control. 42 C.F.R.
§ 482.42.
8 DNV GL-Healthcare USA, Inc. (2016). IC.1.SR.1 . NIAHO® accreditation
requirements: Interpretive guidelines & surveyor guidance (version 11).
Milford, OH: DNV GL-Healthcare USA, Inc. (Level VII)
9 Westbrook, J., et al. (2010). Association of interruptions with an increased risk
and severity of medication administration errors. Archives of Internal
Medicine, 170, 683–690. (Level IV)
10 Institute for Safe Medication Practices. (2012). Side tracks on the safety
express: Interruptions lead to errors and unfinished...Wait, what was I doing?
Nurse Advise-ERR, 11(2), 1–4 . Accessed via the Web at
https://www.ismp.org/Newsletters/acutecare/showarticle.aspx?id=37
11 The Joint Commission. (2019). Standard MM.06.01.01. Comprehensive
accreditation manual for hospitals. Oakbrook Terrace, IL: The Joint
Commission. (Level VII)
12 Accreditation Association for Hospitals and Health Systems. (2017). Standard
16.01.03. Healthcare Facilities Accreditation Program: Accreditation
requirements for acute care hospitals. Chicago, IL: Accreditation Association
for Hospitals and Health Systems. (Level VII)
13 Centers for Medicare and Medicaid Services, Department of Health and
Human Services. (2015). Condition of participation: Nursing services. 42
C.F.R. § 482.23(c).
14 DNV GL-Healthcare USA, Inc. (2016). MM.1 .SR.2. NIAHO® accreditation
requirements: Interpretive guidelines & surveyor guidance (version 11).
Milford, OH: DNV GL-Healthcare USA, Inc. (Level VII)
15 Polovich, M., et al. (Eds.). (2014). Chemotherapy and biotherapy guidelines
and recommendations for practice (4th ed.). Pittsburgh, PA: Oncology Nursing
Society.
16 Esparza, D. M. (Ed.) . (2014). Oncology policies and procedures. Pittsburgh,
PA: Oncology Nursing Society.
17 The Joint Commission. (2019). Standard NPSG.03 .06 .01. Comprehensive
accreditation manual for hospitals. Oakbrook Terrace, IL: The Joint
Commission. (Level VII)
18 Accreditation Association for Hospitals and Health Systems. (2017). Standard
25.02.03. Healthcare Facilities Accreditation Program: Accreditation
requirements for acute care hospitals. Chicago, IL: Accreditation Association
for Hospitals and Health Systems. (Level VII)
19 The Joint Commission. (2019). Standard NPSG.01.01.01. Comprehensive
accreditation manual for hospitals. Oakbrook Terrace, IL: The Joint
Commission. (Level VII)
20 The Joint Commission. (2019). Standard RI.01.01.01. Comprehensive
accreditation manual for hospitals. Oakbrook Terrace, IL: The Joint
Commission. (Level VII)
21 Accreditation Association for Hospitals and Health Systems. (2017). Standard
15.01.16. Healthcare Facilities Accreditation Program: Accreditation
requirements for acute care hospitals. Chicago, IL: Accreditation Association
for Hospitals and Health Systems. (Level VII)
22 Centers for Medicare and Medicaid Services, Department of Health and
Human Services. (2015). Condition of participation: Patient’s rights. 42 C.F.R.
§ 482.13(c)(1).
23 DNV GL-Healthcare USA, Inc. (2016). PR.1.SR.5 . NIAHO® accreditation
requirements: Interpretive guidelines & surveyor guidance (version 11).
Milford, OH: DNV GL-Healthcare USA, Inc. (Level VII)
24 Neuss, M. N., et al. (2013). 2013 updated American Society of Clinical
Oncology/Oncology Nursing Society chemotherapy administration safety
standards including standards for the safe administration and management
of oral chemotherapy. Oncology Nursing Forum, 40, 225–233. Accessed via
the Web at https://www.ons.org/sites/default/files/2013chemostandards.pdf
(Level VII)
25 Centers for Medicare and Medicaid Services, Department of Health and
Human Services. (2015). Condition of participation: Patient’s rights. 42 C.F.R.
§ 482.13.
26 DNV GL-Healthcare USA, Inc. (2016). PR.1.SR.3 . NIAHO® accreditation
requirements: Interpretive guidelines & surveyor guidance (version 11).
Milford, OH: DNV GL-Healthcare USA, Inc. (Level VII)
27 The Joint Commission. (2019). Standard RI.01.03 .01. Comprehensive
accreditation manual for hospitals. Oakbrook Terrace, IL: The Joint
Commission. (Level VII)
28 Accreditation Association for Hospitals and Health Systems. (2017). Standard
15.01.11. Healthcare Facilities Accreditation Program: Accreditation
requirements for acute care hospitals. Chicago, IL: Accreditation Association
for Hospitals and Health Systems. (Level VII)
29 Occupational Safety and Health Administration. (n.d .). “Controlling
occupational exposure to hazardous drugs” [Online]. Accessed via the Web at
https://www.osha.gov/SLTC/hazardousdrugs/controlling_occex_hazardousdrug
s.html (Level VII)
30 National Institute for Occupational Safety and Health (NIOSH). (2004).
“NIOSH alert: Preventing occupational exposure to antineoplastic and other
hazardous drugs in health care settings” [Online]. Accessed via the Web at
https://www.cdc.gov/niosh/docs/2004-165/pdfs/2004-165.pdf (Level VII)
31 Standard 58. Antineoplastic therapy. Infusion therapy standards of practice.
(2016). Journal of Infusion Nursing, 39, S127–S129. (Level VII)
32 The Joint Commission. (2019). Standard UP.01.01.01. Comprehensive
accreditation manual for hospitals. Oakbrook Terrace, IL: The Joint
Commission. (Level VII)
33 Accreditation Association for Hospitals and Health Systems. (2017). Standard
30.00 .14. Healthcare Facilities Accreditation Program: Accreditation
requirements for acute care hospitals. Chicago, IL: Accreditation Association
for Hospitals and Health Systems. (Level VII)
34 The Joint Commission. (2019). Standard PC.02.01.21. Comprehensive
accreditation manual for hospitals. Oakbrook Terrace, IL: The Joint
Commission. (Level VII)
35 Waters, T. R., et al. (2009). “Safe patient handling training for schools of
nursing” [Online]. Accessed via the Web at
https://www.cdc.gov/niosh/docs/2009-127/pdfs/2009-127.pdf (Level VII)
36 The Joint Commission. (2019). Standard NPSG.03 .04.01. Comprehensive
accreditation manual for hospitals. Oakbrook Terrace, IL: The Joint
Commission. (Level VII)
37 Accreditation Association for Hospitals and Health Systems. (2017). Standard
25.01.27. Healthcare Facilities Accreditation Program: Accreditation
requirements for acute care hospitals. Chicago, IL: Accreditation Association
for Hospitals and Health Systems. (Level VII)
38 Siegel, J. D ., et al. (2007, revised 2017). “2007 guideline for isolation
precautions: Preventing transmission of infectious agents in healthcare
settings” [Online]. Accessed via the Web at
https://www.cdc.gov/infectioncontrol/pdf/guidelines/isolation-guidelines.pdf
(Level II)
39 The Joint Commission. (2019). Standard UP.01.03.01. Comprehensive
accreditation manual for hospitals. Oakbrook Terrace, IL: The Joint
Commission. (Level VII)
40 Institute for Safe Medication Practices. (2014). “ISMP list of high-alert
medications in acute care settings” [Online]. Accessed via the Web at
http://www.ismp.org/tools/highalertmedications.pdf (Level VII)
41 Institute for Safe Medication Practices. (2014). Independent double-checks:
Undervalued and misused. ISMP Medication Safety Alert! Nurse Advise-ERR,
12(3), 1–4 . Accessed via the Web at
http://www.ismp.org/newsletters/nursing/Issues/NurseAdviseERR201403.pdf
(Level VII)
42 Aiello-Laws, L., & Rutledge, D. N. (2008). Management of adult patients
receiving intraventricular chemotherapy for the treatment of leptomeningeal
metastasis. Clinical Journal of Oncology Nursing, 12(3), 429–435.
43 Standard 54. Intraspinal access devices. Infusion therapy standards of
practice. (2016). Journal of Infusion Nursing, 39, S118–S120. (Level VII)
44 Standard 18. Medical waste and sharps safety. Infusion therapy standards of
practice. (2016). Journal of Infusion Nursing, 39, S40–S41. (Level VII)
45 Standard 15. Hazardous drugs and waste. Infusion therapy standards of
practice. (2016). Journal of Infusion Nursing, 39, S36–S37. (Level VII)
46 Ganz, D. A., et al. (2013). Preventing falls in hospitals: A toolkit for improving
quality of care (AHRQ Publication No. 13-0015-EF). Rockville, MD: Agency for
Healthcare Research and Quality. Accessed via the Web at
https://www.ahrq.gov/sites/default/files/publications/files/fallpxtoolkit.pdf
(Level VII)
47 Occupational Safety and Health Administration. (n.d .). “Bloodborne
pathogens, standard number 1910.1030” [Online]. Accessed via the Web at
https://www.osha.gov/pls/oshaweb/owadisp.show_document?
p_id=10051&p_table=STANDARDS (Level VII)
48 The Joint Commission. (2019). Standard PC.01.02.07. Comprehensive
accreditation manual for hospitals. Oakbrook Terrace, IL: The Joint
Commission. (Level VII)
49 Rutala, W. A., et al. (2008, revised 2017). “Guideline for disinfection and
sterilization in healthcare facilities, 2008” [Online]. Accessed via the Web at
https://www.cdc.gov/hicpac/pdf/guidelines/Disinfection_Nov_2008.pdf (Level I)
50 Accreditation Association for Hospitals and Health Systems. (2017). Standard
07.02.03. Healthcare Facilities Accreditation Program: Accreditation
requirements for acute care hospitals. Chicago, IL: Accreditation Association
for Hospitals and Health Systems. (Level VII)
51 The Joint Commission. (2019). Standard RC.01.03 .01. Comprehensive
accreditation manual for hospitals. Oakbrook Terrace, IL: The Joint
Commission. (Level VII)
52 Accreditation Association for Hospitals and Health Systems. (2017). Standard
10.00 .03. Healthcare Facilities Accreditation Program: Accreditation
requirements for acute care hospitals. Chicago, IL: Accreditation Association
for Hospitals and Health Systems. (Level VII)
53 Centers for Medicare and Medicaid Services, Department of Health and
Human Services. (2015). Condition of participation: Medical record services.
42 C.F.R. § 482.24(b).
54 DNV GL-Healthcare USA, Inc. (2016). MR.2 .SR.1 . NIAHO® accreditation
requirements: Interpretive guidelines & surveyor guidance (version 11).
Milford, OH: DNV GL-Healthcare USA, Inc. (Level VII)
55 Baddour, L. M., et al. Infections of cerebrospinal fluid shunts and other
devices. (2017). In: UpToDate, Calderwood, S. B., et al. (Eds.). Retrieved from:
www.uptodate.com
ORAL CARE
Oral care, which typically involves the nurse or patient
brushing and flossing the patient’s teeth and inspecting the
mouth, is commonly performed in the morning, at bedtime,
and after meals. Oral care removes soft plaque deposits and
calculus from the teeth, cleans and massages the gums,
reduces mouth odor, provides comfort, and reduces the risk
of infection.
Patients who are intubated and receiving mechanical
ventilation require oral care more frequently, because
mechanical ventilation dries the oral mucosa and affects
salivary flow, increasing the risk of infection.1,2,3,4
Colonization of microorganisms in the oropharynx is a factor
in the development of ventilator-associated pneumonia
(VAP). The microorganisms that develop on the tooth
surface because of dental plaque can translocate from the
mouth to the lung, which can result in VAP.1,4 In addition to
routine oral care, the Institute for Healthcare Improvement
has added daily oral care with chlorhexidine to its VAP
prevention bundle because evidence shows that it helps
prevent VAP5 when combined with the other bundle
elements, including elevating the patient’s head 30 to 45
degrees, interrupting sedation daily and assessing readiness
to wean, and providing peptic ulcer disease and deep vein
thrombosis prophylaxis, unless contraindicated.6
Additional factors that can increase the risk of oral
problems include cognitive impairment, swallowing
difficulty, disruptive behavior or resistance to care,
functional impairment, use of certain medications, previous
or current radiation or chemotherapy, tobacco and alcohol
use, previous history of dental problems, and lack of access
to dental care.7
Equipment
Towel or facial tissues ▪ emesis basin ▪ trash bag ▪
mouthwash (preferably alcohol-free)7 ▪ soft, compact head
toothbrush ▪ toothpaste ▪ water or sterile water ▪ drinking
straw ▪ dental floss or interdental cleaner ▪ gloves ▪
Optional: other personal protective equipment, suction
apparatus, oral irrigating device, 4′′ × 4′′ (10-cm × 10-cm)
gauze pads, penlight, small mirror, floss holder.
For a comatose or debilitated patient as needed
Fluid-impermeable pad ▪ bite block or mouth prop7 ▪
appropriate lubricant7 ▪ sponge-tipped swabs.
For an intubated patient
Gloves ▪ suction equipment ▪ fluid-impermeable pad ▪
penlight ▪ gauze pads ▪ water ▪ soft-bristle toothbrush ▪
toothpaste ▪ sterile water ▪ moisturizing gel ▪ Optional:
chlorhexidine mouth rinse, other personal protective
equipment, bite block, oropharyngeal airway, facility-
approved oral assessment tool.
Preparation of equipment
Bring a cup of water and other equipment to the patient’s
bedside. If you’ll be using oral suction equipment, connect
the tubing to the suction canister and suction catheter, turn
on the suction apparatus, and check for correct operation.
If necessary, devise a bite block to protect yourself from
being bitten during the procedure. Wrap a gauze pad over
the end of a tongue blade, fold the edge in, and secure it
with adhesive tape.
Implementation
■ Gather and prepare the necessary equipment.
■ Perform hand hygiene.8,9,10,11,12,13
■ Put on gloves and other personal protective equipment,
as needed.14,15
■ Confirm the patient’s identity using at least two patient
identifiers.16
■ Explain the procedure to the patient to decrease anxiety
and promote cooperation.
■ Provide privacy.17,18,19
■ Raise the patient’s bed to waist level when providing
patient care to prevent caregiver back strain.20
■ Assess the patient’s current oral hygiene regimen and
self-care ability to help determine the level of oral care
necessary.7
■ Assess the oropharyngeal cavity, as needed.21 Inspect
the patient’s lips to see if they’re dry, cracked, or caked; if
so, expect the same condition inside the oral cavity. Palpate
the oropharyngeal cavity with your gloved index finger,
moving along the gingival surfaces. If oral secretions are
present, assess their amount, viscosity, and color. Suction
the oropharyngeal cavity, as needed.
Supervising oral care
■ For a bedridden patient capable of self-care, encourage
the patient to perform his or her own mouth care.
■ If permitted by the patient’s condition, place the patient
in the Fowler position to promote comfort.
■ Place the overbed table in front of the patient and
arrange the equipment on it. Open the table and set up the
built-in mirror, if available, or position a small mirror on the
table.
■ Drape a towel over the patient’s chest to protect the
patient’s gown.
■ Instruct the patient to floss the teeth while looking into
the mirror.
■ Observe to make sure the patient is flossing correctly,
and correct the patient if necessary. Tell the patient who is
using dental floss to wrap the floss around the second or
third fingers of both hands. Starting with the front teeth and
without injuring the gums, the patient should insert the floss
as far as possible into the space between each pair of teeth
(as shown below) and clean the surfaces of adjacent teeth
by pulling the floss up and down against the side of each
tooth. After the patient flosses a pair of teeth, remind the
patient to use a clean 1′′ (2.5-cm) section of floss for the
next pair.
■ While the patient flosses, mix mouthwash and water in a
plastic cup, place a straw in the cup, and position the
emesis basin nearby.
Denture care
Prostheses made of acrylic resins, vinyl composites, or both, dentures replace
some or all of the patient’s natural teeth. Dentures require proper care to
remove soft plaque deposits and calculus and to reduce mouth odor. Such
care involves removing and rinsing dentures after meals, daily brushing and
removal of tenacious deposits, and soaking in a commercial denture cleaner.
Dentures must be removed from the comatose or presurgical patient to
prevent possible airway obstruction.
Equipment and preparation
Start by assembling the following equipment at the
patient’s bedside:
■ Emesis basin
■ Labeled denture cup
■ Soft-bristled toothbrush or denture brush7,22
■ Gloves
■ Mild soap, denture cream, paste, or gel7,22
■ Commercial denture cleaner, if available7,22
■ Paper towel or washcloth
■ Sponge-tipped swab
■ 4′′ × 4′′ (10-cm × 10-cm) gauze pads
■ Mouthwash (preferably alcohol-free)
■ Gauze
■ Optional: white vinegar, adhesive denture liner
Perform hand hygiene 8,9,10,11,12,13 and put on gloves.14,15
Removing dentures
■ To remove a full upper denture, grasp the front and palatal surfaces of the
denture with your thumb and forefinger. Position the index finger of your
opposite hand over the upper border of the denture and press to break the
seal between denture and palate. Grasp the denture with gauze, because
saliva can make it slippery.
■ To remove a full lower denture, grasp the front and lingual surfaces of the
denture with your thumb and index finger and gently lift up.
■ To remove partial dentures, first ask the patient or a caregiver how the
prosthesis is retained and how to remove it. If the partial denture is held in
place with clips or snaps, then exert equal pressure on the border of each
side of the denture. Avoid lifting the clasps, which easily bend or break.
Performing oral and denture care
■ After removing dentures, place them in a properly labeled denture cup.
Add warm water and a commercial denture cleaner, if available, to remove
stains and hardened deposits. Follow package directions. Avoid soaking
dentures in mouthwash containing alcohol because it may damage a soft
liner.
■ If dentures are particularly dirty, you may soak them in a 50:50 solution of
diluted white vinegar and cold water. They may also need chemical cleaning
by a dental professional.7
■ Instruct the patient to rinse with mouthwash to remove food particles and
reduce mouth odor. Then stroke the palate, buccal surfaces, gums, and
tongue with a soft toothbrush or sponge-tipped mouth swab to clean the
mucosa and stimulate circulation. Inspect for irritated areas or sores, which
may indicate a poorly fitting denture.
■ Physically clean the dentures with soap or appropriate denture cream,
paste, or gel and a soft-bristled toothbrush or denture brush in a basin or sink
filled with water and lined with a paper towel or washcloth to prevent denture
breakage if dropped. Don’t use toothpastes intended for natural teeth,
because they’re too abrasive and will scratch the acrylic surface.7,22 Clean
the dentures using only moderate pressure to prevent scratches and warm
water to prevent distortion.
■ Clean the denture cup, and then place the dentures in it.
■ Rinse the brush.
■ Clean and dry the emesis basin.
■ Return all equipment to the patient’s bedside stand.
Inserting dentures
■ If the patient desires, apply adhesive liner to the dentures. Moisten
dentures with water, if necessary, to reduce friction and ease insertion.
■ Encourage the patient to wear the dentures to enhance appearance,
facilitate eating and speaking, and prevent changes in the gum line that may
affect denture fit.
■ Instruct the patient to brush teeth and gums while looking
into the mirror. Encourage frequent rinsing during brushing,
and provide facial tissues for wiping the mouth.
Performing oral care for a comatose or
debilitated patient
■ For a comatose patient or a conscious patient incapable
of self-care, you’ll perform oral care.
■ If the patient is resisting oral care, obtain the assistance
of an additional coworker or caregiver, as necessary. Some
patients may resist oral care through disruptive behaviors or
because of cognitive impairment. Use skillful, strategic
communication with the patient and, if necessary, try oral
care at another time of day when the patient is more
cooperative or in a more suitable environment.7
■ If the patient wears dentures, clean them thoroughly. (See
Denture care.)
■ Some patients may benefit from an oral irrigating device.
(See Using an oral irrigating device, page 554.)
■ Arrange the equipment on the overbed table or bedside
stand, including the oral suction equipment, if necessary.
Ensure suction apparatus is within reach to use throughout
the procedure. If a suction apparatus isn’t available, wipe
the inside of the patient’s mouth frequently with a moist,
sponge-tipped swab.
■ Mix mouthwash and water in a plastic cup and place a
straw in it.
■ Raise the patient’s bed to waist level when providing
patient care to prevent caregiver back strain.20
■ Lower the head of the bed, and position the patient on
the side with the face extended over the edge of the pillow
to facilitate drainage and prevent fluid aspiration.
■ Place a fluid-impermeable pad under the patient’s chin
and an emesis basin near her cheek (as shown on top right)
to absorb or catch drainage. Lubricate the patient’s oral
tissues and lips with petroleum jelly to prevent dryness and
cracking.37 Reapply lubricant as needed during oral care.
■ If necessary, insert the mouth prop to hold the patient’s
mouth open during oral care.7
■ Using a dental floss holder, hold the floss against each
tooth and direct it as close to the gum as possible without
injuring the sensitive tissues around the tooth.
■ Wet the toothbrush with water, sterile water, or normal
saline solution. If necessary, use hot water to soften the
bristles.
■ Apply toothpaste.
■ Brush the patient’s lower teeth from the gum line up; the
upper teeth, from the gum line down (as shown on next
page, top left). Place the brush at a 45-degree angle to the
gum line, and press the bristles gently into the gingival
sulcus. Using short, gentle strokes to prevent gum damage,
brush the facial surfaces (toward the cheek) and the lingual
surfaces (toward the tongue) of the bottom teeth. Use just
the tip of the brush for the lingual surfaces of the front
teeth. Then, using the same technique, brush the facial and
lingual surfaces of the top teeth. Next, brush the biting
surfaces of the bottom and top teeth, using a back and forth
motion. Ask the patient to rinse frequently, if possible,
during brushing by taking the mouthwash solution through
the straw. Hold the emesis basin steady under the patient’s
cheek, and wipe the patient’s mouth and cheeks with facial
tissues as needed.
EQUIPMENT
Using an oral irrigating device
An oral irrigating device, such as the Waterpik, directs a pulsating jet of water
around the teeth to massage gums and remove debris and food particles. It’s
especially useful for cleaning areas missed by brushing, such as around
bridgework, crowns, and dental wires. Because this device enhances oral
hygiene, it benefits patients undergoing head and neck irradiation, which can
damage teeth and cause severe caries. The device also maintains oral
hygiene in a patient with a fractured jaw or with mouth injuries that limit
standard mouth care.
Equipment and preparation
To use the device, first assemble the following equipment:
■ Oral irrigating device
■ Towel
■ Gloves and other personal protective equipment, as needed
■ Emesis basin
■ Pharyngeal suction apparatus
■ Salt solution or mouthwash (alcohol-free) if ordered
■ Soap
■ Water
Perform hand hygiene8,9,10,11,12,13 and put on gloves.14,15
Implementation
■ Insert the oral irrigating device’s plug into a nearby electrical outlet.
■ Remove the device’s cover, turn it upside down, and fill it with lukewarm
water or with a mouthwash or salt solution, as ordered. When using a salt
solution, dissolve the salt beforehand in a separate container and then pour
the solution into the cover. Salt solutions shouldn’t be used in patients who
have problems with dryness and dehydration, because salt solutions
exacerbate these conditions.
■ Secure the cover to the base of the device. Remove the water hose handle
from the base and snap the jet tip into place. If necessary, wet the grooved
end of the tip to ease insertion. Adjust the pressure dial to the setting most
comfortable for the patient. If the patient’s gums are tender and prone to
bleed, choose a low setting.
■ Turn the patient to the side to prevent aspiration of water. Then place a
towel under the patient’s chin and an emesis basin next to the cheek to
absorb or catch drainage.
■ Adjust the knurled knob on the handle to direct the water jet, place the jet
tip in the patient’s mouth, and turn on the device. Instruct the alert patient to
keep the lips partially closed to avoid spraying water.
■ Direct the water at a right angle to the gum line of each tooth and
between teeth (as shown below). Avoid directing water under the patient’s
tongue, because this action may injure sensitive tissue.
■ After irrigating each tooth, pause briefly and instruct the patient to
expectorate the water or solution into the emesis basin. If the patient is
unable to do so, suction the water from the sides of the mouth with the
pharyngeal suction apparatus. After irrigating all teeth, turn off the device
and remove the jet tip from the patient’s mouth.
■ Empty the remaining water or solution from the cover, remove the jet tip
from the handle, and return the handle to the base.
■ Clean the jet tip with soap and water, rinse the cover; dry them both and
return them to storage.
■ After brushing the patient’s teeth, dip a sponge-tipped
mouth swab into the mouthwash solution. Press the swab
against the side of the plastic cup to remove excess
moisture. Gently stroke the gums, buccal surfaces, palate,
and tongue to clean the mucosa and stimulate circulation.
Replace the swab as necessary for thorough cleaning. Avoid
inserting the swab too deeply to prevent gagging and
vomiting.
Performing oral care for an intubated patient
■ Elicit the help of a coworker if needed.
■ Gather the appropriate equipment.
■ Perform hand hygiene.8,9,10,11,12,13
■ Confirm the patient’s identity using at least two patient
identifiers.16
■ Explain the procedure to the patient to decrease anxiety
and promote cooperation with the procedure.
■ Provide privacy.17,18,19
■ Turn on the suction equipment and make sure it’s
functioning properly.
■ Raise the patient’s bed to waist level when providing
patient care to prevent caregiver back strain.20
■ Perform hand hygiene.8,9,10,11,12,13
■ Put on gloves and other personal protective equipment as
needed to comply with standard precautions.14,15
■ Place the patient in the high Fowler position to reduce the
risk of aspiration.
■ Place a fluid-impermeable pad under the patient’s chin to
absorb drainage.
■ Assess the patient’s level of consciousness; an
unconscious or disoriented patient may reflexively bite
down when something is introduced into the mouth. You
may need a bite block or oropharyngeal airway to keep the
mouth open.21
■ Perform deep suctioning: suction the patient’s oropharynx
to prevent aspiration of secretions in the oropharynx, and
suction above the endotracheal (ET) tube cuff, because oral
care stimulates additional secretions.21
■ Assess the patient’s oropharyngeal cavity using a facility-
approved oral assessment tool if necessary. If the patient’s
lips are dried and cracked, lubricate them with moisturizing
petroleum jelly before beginning your assessment.1,4,21
■ To assess the oropharyngeal cavity, first place a gloved
finger in the side of the patient’s mouth between the teeth
and cheek to generate trust and demonstrate to the patient
that the examination and care won’t be painful.21 Have a
penlight available to visualize oral structures if needed.21
Move your gloved finger on the gingival surfaces around the
mouth.21 Moisten a single layer of a soft gauze pad and
wrap it around your index finger; move the finger from the
right upper to left upper gingiva, and then from the left
lower to the right lower gingiva.21,23 Repeat your
assessment in the same direction for the inside of the
mouth (lingual); use the same direction, because a
standardized approach helps you avoid missing areas during
your assessment.21 Examine the gauze for bloody drainage;
if bleeding is present and copious, use a gauze-wrapped
finger to brush the patient’s teeth, not a toothbrush.21
■ Gently brush the patient’s teeth, gums, and tongue at
least twice daily using a soft-bristle toothbrush,
toothpaste,1,4 and a small amount of sterile water21 to
reduce oropharyngeal colonization and dental plaque, which
increase the risk of VAP.16 Brush in one continuous line,
starting at the left upper gingival surface of the teeth,
moving to the right upper surface, then to the right lower
surface, and finally to the left lower surface. Then switch to
the lingual surface of the teeth, starting at the lower left,
and moving through all surfaces in a set pattern.21
■ If the patient is orally intubated, carefully clean the
portion of the ET tube in the patient’s oral cavity as part of
oral care, because plaque and bacterial biofilm can form on
the surface of the tube.21
■ Suction the patient’s oropharynx to remove excess fluid
and debris, which helps prevent aspiration.21,24
■ Move the ET tube to the other side of the mouth at least
daily to reduce pressure on the lips and oral cavity. Suction
the patient’s oropharynx before deflating the ET tube cuff
and moving the tube. (See the “Endotracheal tube care”
procedure.)24
■ Moisturize the oral mucosa and lips every 2 to 4 hours to
reduce oral inflammation and improve oral health.1,4
■ Use a chlorhexidine mouth rinse daily, as prescribed, to
prevent VAP.6 Use a chlorhexidine mouth rinse twice daily
during the perioperative period for adult patients who have
undergone cardiac surgery, as prescribed, to prevent VAP.1,4
■ Reassess the patient’s oropharynx to note the
effectiveness of oral care.
■ If needed to prevent biting in the orally intubated patient,
insert a bite block or oropharyngeal airway by inserting it
along the ET tube.24
■ Reposition the patient for comfort, maintaining the head
of the bed at 30 to 45 degrees, to prevent aspiration and
reduce the risk of VAP.6,25
After oral care
■ Reassess the patient’s mouth for cleanliness and tooth
and tissue condition.
■ Return the patient’s bed to the low position to maintain
patient safety.26
■ Rinse the toothbrush and clean the emesis basin.
■ Remove your gloves and any other personal protective
equipment worn.
■ Perform hand hygiene.8,9,10,11,12,13
■ Place a clean suction catheter on the tubing.
■ Return reusable equipment to the appropriate storage
location.
■ Discard disposable equipment in the appropriate
receptacle.14,15,27
■ Perform hand hygiene.8,9,10,11,12,13
■ Refer the patient to a dental professional, as indicated.7
■ Document the procedure.28,29,30,31
Special considerations
■ Use sponge-tipped mouth swabs to clean the teeth of a
patient with sensitive gums. These swabs produce less
friction than a toothbrush but don’t clean as well.
■ The lubricant is for external use only; use it only on the
lips.7
■ Implement different strategies to facilitate the patient’s
oral hygiene care plan, as needed. For example, break down
dental care tasks for the patient; consult with a practitioner
for review of medications that could affect oral health;
modify the patient’s diet; increase the patient’s fluid intake;
encourage the patient to eliminate sugar-containing gum or
lozenges, smoking, caffeine, and alcohol; and use different
dental products, such as modified toothbrushes, mouth
rinses, saliva substitutes, and spray bottles.7
■ Don’t use chlorhexidine and fluoride together, because
fluoride can interfere with the action of chlorhexidine; allow
1 to 2 hours between their use.7
■ Prescription-strength fluoride is contraindicated for
patients who can’t follow directions or expectorate
adequately, as well as for those who tend to swallow
inadvertently.7
■ Clean the mouth of a toothless comatose patient by
wrapping a gauze pad around your index finger, moistening
it with mouthwash, and gently swabbing the oral tissues.
■ Remember that mucous membranes dry quickly in the
patient breathing through the mouth or receiving oxygen
therapy. Moisten the patient’s mouth and lips regularly with
moistened sponge-tipped swabs or water.1
Patient teaching
Instruct the patient as needed in proper oral hygiene and
the need for regular follow-up with a dental professional.7
Documentation
Record the date and time of oral care in your notes.
Document whether the patient assisted in performing oral
care, the type of oral care administered, and the patient’s
response to the procedure. Document successful strategies
in the patient’s oral hygiene care plan.7 Also document
unusual conditions, such as bleeding, edema, mouth odor,
excessive secretions, or plaque on the tongue. Note the
patient’s tolerance of the procedure.
REFERENCES
1 American Association of Critical-Care Nurses (AACN). (2010). “AACN practice
alert: Oral care for patients at risk for ventilator-associated pneumonia”
[Online]. Accessed via the Web at
https://www.aacn.org/docs/EventPlanning/WB0011/oral-care-patients-at-risk-
vap-r44spvmp.pdf (Level VII)
2 Centers for Disease Control and Prevention. (2004). Guidelines for preventing
health-care-associated pneumonia, 2003: Recommendations of CDC and the
Healthcare Infection Control Practices Advisory Committee. MMWR
Recommendations and Reports, 53(RR-3), 1–32. Accessed via the Web at
http://www.cdc.gov/mmwr/pdf/rr/rr5303.pdf (Level II)
3 Hillier, B., et al. (2013). Preventing ventilator-associated pneumonia through
oral care, product selection, and application method: A literature review.
AACN Advanced Critical Care 24(1), 39–59. (Level V)
4 Kiyoshi-Teo, H., & Blegen, M. (2015). Influences of institutional guidelines on
oral hygiene practices in intensive care units. American Journal of Critical
Care, 24(4), 309–318. (Level IV)
5 Hua, F., et al. (2016). Oral hygiene care for critically ill patients to prevent
ventilator-associated pneumonia. Cochrane Database of Systematic Reviews,
2016(10), CD008367. Accessed via the Web at
http://www.cochrane.org/CD008367/ORAL_oral-hygiene-care-critically-ill-
patients-prevent-ventilator-associated-pneumonia (Level VII)
6 Institute for Healthcare Improvement. (2012). How-to-guide: Prevent
ventilator-associated pneumonia. Cambridge, MA: Institute for Healthcare
Improvement. (Level VII)
7 Johnson, V. B. (2012). Evidence based practice guideline: Oral hygiene care
for functionally dependent and cognitively impaired older adults. Journal of
Gerontological Nursing, 38(11), 11–19. (Level I)
8 The Joint Commission. (2019). Standard NPSG.07.01.01. Comprehensive
accreditation manual for hospitals. Oakbrook Terrace, IL: The Joint
Commission. (Level VII)
9 World Health Organization. (2009). “WHO guidelines on hand hygiene in
health care: First global patient safety challenge, clean care is safer care”
[Online]. Accessed via the Web at
http://apps.who.int/iris/bitstream/10665/44102/1/9789241597906_eng.pdf
(Level IV)
10 Centers for Disease Control and Prevention. (2002). Guideline for hand
hygiene in health-care settings: Recommendations of the Healthcare Infection
Control Practices Advisory Committee and the HICPAC/SHEA/APIC/IDSA Hand
Hygiene Task Force. MMWR Recommendations and Reports, 51(RR-16), 1–45.
Accessed via the Web at https://www.cdc.gov/mmwr/pdf/rr/rr5116.pdf (Level
II)
11 Centers for Medicare and Medicaid Services, Department of Health and
Human Services. (2015). Condition of participation: Infection control. 42 C.F.R.
§ 482.42.
12 Accreditation Association for Hospitals and Health Systems. (2017). Standard
07.01.21. Healthcare Facilities Accreditation Program: Accreditation
requirements for acute care hospitals. Chicago, IL: Accreditation Association
for Hospitals and Health Systems. (Level VII)
13 DNV GL-Healthcare USA, Inc. (2016). IC.1 .SR.1 . NIAHO® accreditation
requirements: Interpretive guidelines & surveyor guidance (version 11).
Milford, OH: DNV GL-Healthcare USA, Inc. (Level VII)
14 Siegel, J. D ., et al. (2007, revised 2017). “2007 guideline for isolation
precautions: Preventing transmission of infectious agents in healthcare
settings” [Online]. Accessed via the Web at
https://www.cdc.gov/infectioncontrol/pdf/guidelines/isolation-guidelines.pdf
(Level II)
15 Accreditation Association for Hospitals and Health Systems. (2017). Standard
07.01.10. Healthcare Facilities Accreditation Program: Accreditation
requirements for acute care hospitals. Chicago, IL: Accreditation Association
for Hospitals and Health Systems. (Level VII)
16 The Joint Commission. (2019). Standard. NPSG.01.01.01. Comprehensive
accreditation manual for hospitals. Oakbrook Terrace, IL: The Joint
Commission. (Level VII)
17 Accreditation Association for Hospitals and Health Systems. (2017). Standard
15.01.16. Healthcare Facilities Accreditation Program: Accreditation
requirements for acute care hospitals. Chicago, IL: Accreditation Association
for Hospitals and Health Systems. (Level VII)
18 Centers for Medicare and Medicaid Services, Department of Health and
Human Services. (2015). Condition of participation: Patient’s rights. 42 C.F.R.
§ 482.13(c)(1).
19 The Joint Commission. (2019). Standard RI.01.01.01. Comprehensive
accreditation manual for hospitals. Oakbrook Terrace, IL: The Joint
Commission. (Level VII)
20 Waters, T. R., et al. (2009). “Safe patient handling training for schools of
nursing” [Online]. Accessed via the Web at
http://www.cdc.gov/niosh/docs/2009-127/pdfs/2009-127.pdf
21 Ames, N. J ., et al. (2011). Effects of systematic oral care in critically ill
patients: A multicenter study. American Journal of Critical Care, 20(5), e103–
e114. Accessed via the Web at
http://ajcc.aacnjournals.org/content/20/5/e103.full.pdf+html (Level III)
22 American Dental Association. (n.d .). “Removable partial dentures” [Online].
Accessed via the Web at http://www.mouthhealthy.org/en/az-
topics/d/dentures-partial (Level VII)
23 Darby, M. L ., & Walsh, M. (Eds.) (2015). Dental hygiene: Theory and practice
(4th ed.). St. Louis, MO: Saunders.
24 Wiegand, D. L. (2017). AACN procedure manual for high acuity, progressive,
and critical care (7th ed.). St. Louis: Elsevier.
25 Klompas, M., et al. (2014). Strategies to prevent ventilator-associated
pneumonia in acute care hospitals: 2014 update. Infection Control and
Hospital Epidemiology, 35(8), 915–936. Accessed via the Web at
http://www.jstor.org/stable/full/10.1086/677144 (Level I)
26 Ganz, D. A., et al. (2013). Preventing falls in hospitals: A toolkit for improving
quality of care (AHRQ Publication No. 13-0015-EF). Rockville, MD: Agency for
Healthcare Research and Quality. Accessed via the Web at
http://www.ahrq.gov/sites/default/files/publications/files/fallpxtoolkit.pdf
(Level VII)
27 Accreditation Association for Hospitals and Health Systems. (2017). Standard
07.03 .07. Healthcare Facilities Accreditation Program: Accreditation
requirements for acute care hospitals. Chicago, IL: Accreditation Association
for Hospitals and Health Systems. (Level VII)
28 The Joint Commission. (2019). Standard RC.01.03 .01. Comprehensive
accreditation manual for hospitals: The official handbook. Oakbrook Terrace,
IL: The Joint Commission. (Level VII)
29 Centers for Medicare and Medicaid Services, Department of Health and
Human Services. (2015). Condition of participation: Medical record services.
42 C.F.R. § 482.24(b).
30 Accreditation Association for Hospitals and Health Systems. (2017). Standard
10.00 .03. Healthcare Facilities Accreditation Program: Accreditation
requirements for acute care hospitals. Chicago, IL: Accreditation Association
for Hospitals and Health Systems. (Level VII)
31 DNV GL-Healthcare USA, Inc. (2016). MR.2 .SR.1 . NIAHO® accreditation
requirements: Interpretive guidelines & surveyor guidance (version 11).
Milford, OH: DNV GL-Healthcare USA, Inc. (Level VII)
ORAL DRUG ADMINISTRATION
Because oral administration is usually the safest, most
convenient, and least expensive method, most drugs are
administered by this route. Drugs for oral administration are
available in many forms: tablets, enteric-coated tablets,
capsules, syrups, elixirs, oils, liquids, suspensions, powders,
and granules. Some require special preparation before
administration, such as mixing with juice to make them
more palatable; oils, powders, and granules most often
require such preparation.1
Sometimes oral drugs are prescribed in higher dosages
than their parenteral equivalents, because after absorption
through the GI system, they are immediately broken down
by the liver before they reach the systemic circulation.
ELDER ALERT Oral dosages normally prescribed for adults may be
dangerous for elderly patients because of decreased hepatic and renal
clearance.2
Oral administration is contraindicated for unconscious
patients; it may also be contraindicated in patients with
nausea and vomiting and in those who can’t swallow.
Make sure you understand the pharmacology behind the
medications administered to prevent potential error and
patient harm.3
Equipment
Patient’s medication record ▪ prescribed medication ▪
medication cup ▪ water ▪ Optional: appropriate vehicle
(such as pudding or applesauce) for crushed pills
(commonly used with elderly patients), preferred beverage,
pill-crushing device.
Implementation
■ Avoid distractions and interruptions when preparing and
administering
medication
to prevent
medication
administration errors.4,5
■ Verify the order on the patient’s medication record by
checking it against the practitioner’s order.6,7,8,9
■ Reconcile the patient’s medications when a new
medication is ordered to reduce the risk of medication
errors, including omissions, duplications, dosing errors, and
drug interactions.
■ Gather the prescribed medication and the appropriate
equipment.
■ Compare the medication label against the order in the
patient’s medical record.6,7,8,9
■ Check the patient’s medical record for an allergy or a
contraindication to the prescribed medication. If an allergy
or a contraindication exists, don’t administer the
medication; notify the practitioner.6,7,8,9
NURSING ALERT Cardiovascular agents, antibiotics, diuretics,
anticoagulants, antidiabetics, steroids, opioids, anticholinergics,
benzodiazepines, and nonsteroidal anti-inflammatory drugs most
commonly cause drug interactions. To avoid drug interactions, review
with the patient all current prescribed and over-the-counter
medications, dietary supplements, and herbal preparations. Notify the
patient’s practitioner and your facility’s pharmacy of any potential
interactions.2,3,10,11,12,13
■ Check the expiration date on the medication (as shown
below). If the medication is expired, return it to the
pharmacy and obtain new medication.6,7,8,9
■ Visually inspect the medication for any loss of integrity;
don’t administer the medication if its integrity is
compromised.6,7,8,9
■ Discuss any unresolved concerns about the medication
with the patient’s practitioner.6,7,8,9
■ Perform hand hygiene.14,15,16,17,18,19
■ Confirm the patient’s identity using at least two patient
identifiers.20
■ Provide privacy.21,22,23,24
■ Explain the procedure to the patient and family (if
appropriate) according to their individual communication
and learning needs to increase their understanding, allay
their fears, and enhance cooperation.25
■ If the patient is receiving the medication for the first time,
teach about significant adverse reactions and discuss any
other concerns related to the medication.6,7,8,9
■ Assess the patient’s condition to determine the need for
the medication and the effectiveness of previous therapy.
■ Carefully observe the patient for a rash, pruritus, cough,
or other signs of an adverse reaction to a previously
administered drug.
■ Verify that the medication is being administered at the
proper time, in the prescribed dose, and by the correct route
to reduce the risk of medication errors.6,7,8,9,26
■ If your facility uses a bar-code technology, scan your
identification badge, the patient’s identification bracelet,
and the medication’s bar code.
■ Give the patient the medication (as shown below) and an
appropriate vehicle or liquid, as needed, to aid swallowing,
minimize adverse effects, or promote absorption. For
example, give cyclophosphamide with adequate amounts of
fluids to force diuresis and subsequently reduce the risk of
urinary tract toxicity;27 give antitussive cough syrup without
a fluid to avoid diluting its soothing effect on the throat. If
appropriate, crush the medication to facilitate swallowing.
■ If the patient can’t swallow a whole tablet or capsule, ask
the pharmacist whether the drug is available in liquid form
or can be administered by another route. If not, request a
crushed tablet (if appropriate) or discuss whether you can
crush the tablet yourself or open the capsule and mix it with
food. Keep in mind that many enteric-coated timed-release
medications and gelatin capsules shouldn’t be crushed to
prevent possible adverse effects. Contact the practitioner
for an order to change the route of administration when
necessary.
■ Stay with the patient until the drug has been swallowed.
If the patient seems confused or disoriented, check the
mouth to make sure that the drug has been swallowed.
Return and reassess the patient’s response within 1 hour
after giving the medication.
■ Perform hand hygiene.14,15,16,17,18,19
■ Document the procedure.28,29,30,31
Special considerations
■ Notify the practitioner about any medication withheld.
■ Assess parameters such as blood pressure and pulse, as
needed, before administering a medication with dose-
holding parameters.
■ Evaluate appropriate current laboratory test results
(including potassium and digoxin levels), as needed and
ordered, before administering medication affected by these
values.
■ Use care when measuring the prescribed dose of liquid
oral medication. (See Measuring liquid medications.)
■ Don’t give medication from a poorly labeled or unlabeled
container. Don’t attempt to label or reinforce drug labels
yourself; this must be done by a pharmacist.32,33
■ Never give a medication prepared by someone else.
■ Never return unwrapped or prepared medications to stock
containers; instead, dispose of them or return them to the
pharmacy. Keep in mind that the disposal of any controlled
substance must be cosigned by another nurse, as mandated
by law.
■ If the patient questions you about the medication or
dosage, check the medication record again. If the
medication is correct, reassure the patient. Explain any
changes in the medication or dosage. Instruct, as
appropriate, about possible adverse effects. Ask the patient
to report any thing perceived as a possible adverse effect.
Measuring liquid medications
To pour liquids, hold the medication cup at eye level. Use your thumb to mark
off the correct level on the cup (as shown below).
Then put the cup down and read the bottom of the meniscus (the curved
surface of the liquid) at eye level to ensure accuracy. If you’ve poured too
much medication into the cup, discard the excess; don’t return it to the
bottle. Here are a few additional tips:
■ Hold the container so that the medication flows from the side opposite the
label so it won’t run down the container and stain or obscure the label.
Remove drips from the lip of the bottle first and then from the sides, using a
clean, damp paper towel.
■ For a liquid measured in drops, use only the dropper supplied with the
medication.
■ To avoid damaging or staining the patient’s teeth,
administer iron preparations through a straw.
■ An unpleasant-tasting liquid can usually be made more
palatable if taken through a straw because the liquid
contacts fewer taste buds, making it more palatable.
■ When tablets must be split, request the pharmacy to split
and repackage them before dispensing the medication to
prevent medication errors.
Patient teaching
Teach the patient about oral medications, including the
indication; dosage; potential interactions with other drugs,
foods, and herbal and dietary supplements; adverse effects;
and special administration guidelines.10 Provide a
completely reconciled list of medications and written
information about those medications at discharge.34,35
Make sure you meet the health literacy needs of the
patient and caregiver when providing discharge
instructions.36 To assist those with functional, cognitive, or
memory deficits, provide detailed medication templates or
pictorial aids; assist the patient and caregiver with memory
aids and dispensing devices, as needed.37
Take special care when teaching older patients, who are at
risk for polypharmacy. (See Reducing medication risks in
older adult patients, page 558.)
Complications
Complications
associated
with oral
medication
administration include aspiration, adverse effects of the
prescribed medication, and medication administration
errors.
Documentation
Note the drug administered, the dose, the date and time,
and any adverse reactions. If adverse reactions occurred,
document your interventions and the patient’s response to
those interventions. If the patient refused a drug, document
the refusal and notify the charge nurse and the patient’s
practitioner, as needed. Also note if a drug was omitted or
withheld for other reasons, such as radiology or laboratory
tests, or if, in your judgment, the drug was contraindicated
at the ordered time. Verify and sign out all controlled-
substances according to your controlled substances
documentation system. Document patient teaching and the
patient’s comprehension of your teaching.
Reducing medication risks in older
adult patients
To help prevent polypharmacy and other medication risks, you can help older
adult patients manage and adhere to their medication regimens by
instructing them (and caregivers, as appropriate) to take the following
actions:
■ Maintain an accurate list of all medications, including over-the-counter and
prescribed drugs, generic and brand-name medications, dietary
supplements, and herbal remedies; note dosages, dosing frequency, and the
reason for taking each drug.12
■ Maintain a complete list of practitioners and their associated contact
information.12
■ Bring all current medications to each practitioner’s appointment.12
■ Post the name and telephone number of the local pharmacy where it can
be easily seen.
■ Adhere to dietary restrictions.12
■ Understand potential medication-related problems that require emergency
care.12
■ Take medications exactly as directed.12
■ Link dosing schedules to routine activities of daily living.12
■ Use only one pharmacy to obtain medications.12
■ Don’t share medications with others.12
■ Store medications in a secure, dry location away from sunlight.12
■ Refrigerate medications, if necessary.12
■ Properly dispose of old medications.12
REFERENCES
1 Emblin, K. (2013). Drug formulations and delivery systems. Nurse Prescribing,
11(2), 83–88 .
2 Davies, E. A., & O’Mahony, M. S. (2015). Adverse drug reactions in special
populations—The elderly. British Journal of Clinical Pharmacology, 80(4), 796–
807. Accessed via the Web at
http://onlinelibrary.wiley.com/doi/10.1111/bcp.12596/epdf (Level V)
3 Ndosi, M. E ., & Newell, R. (2009). Nurses’ knowledge of pharmacology behind
drugs they commonly administer. Journal of Clinical Nursing, 18(4), 570–580.
(Level VI)
4 Westbrook, J., et al. (2010). Association of interruptions with an increased risk
and severity of medication administration errors. Archives of Internal
Medicine, 170(8), 683–690 . (Level IV)
5 Institute for Safe Medication Practices. (2012). Side tracks on the safety
express: Interruptions lead to errors and unfinished...Wait, what was I doing?
Nurse Advise-ERR, 11(2), 1–4 . Accessed via the Web at
https://www.ismp.org/Newsletters/acutecare/showarticle.aspx?id=37
6 The Joint Commission. (2019). Standard MM.06 .01.01. Comprehensive
accreditation manual for hospitals. Oakbrook Terrace, IL: The Joint
Commission. (Level VII)
7 Accreditation Association for Hospitals and Health Systems. (2017). Standard
16.01.03. Healthcare Facilities Accreditation Program: Accreditation
requirements for acute care hospitals. Chicago, IL: Accreditation Association
for Hospitals and Health Systems. (Level VII)
8 Centers for Medicare and Medicaid Services, Department of Health and
Human Services. (2015). Condition of participation: Nursing services. 42
C.F.R. § 482.23(c).
9 DNV GL-Healthcare USA, Inc. (2016). MM .1 .SR.2 . NIAHO® accreditation
requirements: Interpretive guidelines & surveyor guidance (version 11).
Milford, OH: DNV GL-Healthcare USA, Inc. (Level VII)
10 Boparai, M. K ., & Korc-Grodzicki, B. (2011). Prescribing for older adults. Mount
Sinai Journal of Medicine, 78(4), 613–626.
11 Gabe, M. E ., et al. (2011). Adverse drug reactions: Treatment burdens and
nurse-led medication monitoring. Journal of Nursing Management, 19(3), 377–
392. (Level V)
12 Woodruff, K. (2010). Preventing polypharmacy in older adults. American
Nurse Today, 5(10). Accessed via the Web at
https://americannursetoday.com/preventing-polypharmacy-in-older-adults/
13 Runganga, M., et al. (2014). Multiple medication use in older patients in post-
acute transitional care: A prospective cohort study. Clinical Interventions in
Aging, 9, 1453–1462. Accessed via the Web at
https://www.ncbi.nlm.nih.gov/pmc/articles/PMC4158998/ (Level IV)
14 The Joint Commission. (2019). Standard NPSG.07.01.01. Comprehensive
accreditation manual for hospitals. Oakbrook Terrace, IL: The Joint
Commission. (Level VII)
15 Centers for Disease Control and Prevention. (2002). Guideline for hand
hygiene in health-care settings: Recommendations of the Healthcare Infection
Control Practices Advisory Committee and the HICPAC/SHEA/APIC/IDSA Hand
Hygiene Task Force. MMWR Recommendations and Reports, 51(RR-16), 1–45.
Accessed via the Web at https://www.cdc.gov/mmwr/pdf/rr/rr5116.pdf (Level
II)
16 World Health Organization. (2009). “WHO guidelines on hand hygiene in
health care: First global patient safety challenge, clean care is safer care”
[Online]. Accessed via the Web at
http://apps.who.int/iris/bitstream/10665/44102/1/9789241597906_eng.pdf
(Level IV)
17 Accreditation Association for Hospitals and Health Systems. (2017). Standard
07.01.21. Healthcare Facilities Accreditation Program: Accreditation
requirements for acute care hospitals. Chicago, IL: Accreditation Association
for Hospitals and Health Systems. (Level VII)
18 Centers for Medicare and Medicaid Services, Department of Health and
Human Services. (2015). Condition of participation: Infection control. 42 C.F.R.
§ 482.42.
19 DNV GL-Healthcare USA, Inc. (2016). IC.1 .SR.1 . NIAHO® accreditation
requirements: Interpretive guidelines & surveyor guidance (version 11).
Milford, OH: DNV GL-Healthcare USA, Inc. (Level VII)
20 The Joint Commission. (2019). Standard NPSG.01.01.01. Comprehensive
accreditation manual for hospitals. Oakbrook Terrace, IL: The Joint
Commission. (Level VII)
21 Centers for Medicare and Medicaid Services, Department of Health and
Human Services. (2015). Condition of participation: Patient’s rights. 42 C.F.R.
§ 482.13(c)(1).
22 Accreditation Association for Hospitals and Health Systems. (2017). Standard
15.01.16. Healthcare Facilities Accreditation Program: Accreditation
requirements for acute care hospitals. Chicago, IL: Accreditation Association
for Hospitals and Health Systems. (Level VII)
23 DNV GL-Healthcare USA, Inc. (2016). PR.1.SR.5 . NIAHO® accreditation
requirements: Interpretive guidelines & surveyor guidance (version 11).
Milford, OH: DNV GL-Healthcare USA, Inc. (Level VII)
24 The Joint Commission. (2019). Standard RI.01.01.01. Comprehensive
accreditation manual for hospitals. Oakbrook Terrace, IL: The Joint
Commission. (Level VII)
25 The Joint Commission. (2019). Standard PC.02.01.21. Comprehensive
accreditation manual for hospitals. Oakbrook Terrace, IL: The Joint
Commission. (Level VII)
26 Edwards, S., & Axe, S. (2015). The 10 R’s of safe multidisciplinary drug
administration. Nurse Prescribing, 13(8), 398–406.
27 Roxane Laboratories. (2013). “Cyclophosphamide capsules, for oral use”
[Online]. Accessed via the Web at
http://www.accessdata.fda.gov/drugsatfda_docs/label/2013/203856s000lbl.pd
f
28 The Joint Commission. (2019). Standard RC.01.03 .01. Comprehensive
accreditation manual for hospitals. Oakbrook Terrace, IL: The Joint
Commission. (Level VII)
29 Accreditation Association for Hospitals and Health Systems. (2017). Standard
10.00 .03. Healthcare Facilities Accreditation Program: Accreditation
requirements for acute care hospitals. Chicago, IL: Accreditation Association
for Hospitals and Health Systems. (Level VII)
30 Centers for Medicare and Medicaid Services, Department of Health and
Human Services. (2015). Condition of participation: Medical record services.
42 C.F.R. § 482.24(b).
31 DNV GL-Healthcare USA, Inc. (2016). MR.2 .SR.1 . NIAHO® accreditation
requirements: Interpretive guidelines & surveyor guidance (version 11).
Milford, OH: DNV GL-Healthcare USA, Inc. (Level VII)
32 The Joint Commission. (2019). Standard MM.05.01.09 . Comprehensive
accreditation manual for hospitals. Oakbrook Terrace, IL: The Joint
Commission. (Level VII)
33 Accreditation Association for Hospitals and Health Systems. (2017). Standard
25.01.18. Healthcare Facilities Accreditation Program: Accreditation
requirements for acute care hospitals. Chicago, IL: Accreditation Association
for Hospitals and Health Systems. (Level VII)
34 Accreditation Association for Hospitals and Health Systems. (2017). Standard
25.02.13. Healthcare Facilities Accreditation Program: Accreditation
requirements for acute care hospitals. Chicago, IL: Accreditation Association
for Hospitals and Health Systems. (Level VII)
35 The Joint Commission. (2019). Standard NPSG.03 .06 .01. Comprehensive
accreditation manual for hospitals. Oakbrook Terrace, IL: The Joint
Commission. (Level VII)
36 The Joint Commission. (2010). Advancing effective communication, cultural
competence, and patient- and family-centered care: A roadmap for hospitals.
Oakbrook Terrace, IL: The Joint Commission. Accessed via the Web at
http://www.jointcommission.org/assets/1/6/ARoadmapforHospitalsfinalversion
727.pdf (Level VII)
37 Hesselink, G., et al. (2012). Are patients discharged with care? A qualitative
study of perceptions and experiences of patients, family members and care
providers. BMJ Quality and Safety, 21, i39–i49. Accessed via the Web at
http://qualitysafety.bmj.com/content/qhc/21/Suppl_1/i39.full.pdf (Level VI)
ORGAN DONOR, IDENTIFICATION
In 1984, the U.S . Congress passed the National Organ
Transplant Act, which established the Organ Procurement
and Transplant Network, a national registry for organ
matching.1 This act was created to address the critical
shortage of organ donations and to improve the organ
matching and placement process. With passage of this act,
it’s now a federal requirement for U.S. health care facilities
to identify potential organ donors.
In addition to requirements of the National Organ
Transplant Act, the U.S . Department of Health and Human
Services requires U.S . health care facilities to report every
death or imminent death to the Organ Procurement
Organization (OPO) as part of the health care facility’s
condition of participation and eligibility to receive Medicare
funds. The Joint Commission has also addressed organ
donation in its accreditation requirements.2
As part of the process of identifying a potential organ
donor, to help elicit a more positive response from the
family, the practitioner should keep the family members
informed about the patient’s condition and provide them
with information about realistic expectations for the
patient’s outcome.3,4 Separating brain death notification
from the discussion of organ donation results in as much as
an eight-times-greater chance that the family will consent to
donation than when discussed together.4 The hospital and
OPO should agree when a referral to the OPO should be
made. Guidelines vary on what criteria to use, but they
generally stipulate that referral to the OPO should occur
when a patient scores less than a 4 or 5 on the Glasgow
Coma Scale5,6 or in the absence of a patient’s brain stem
reflexes.3,6
As the need for organ donation continues to surge, timely
identification and maintenance of potential organ donors
becomes even more critical to saving lives. Innovative
programs are needed to provide an effective model for
identifying donors, creating decision protocols, and
integrating organ donation into the end-of-life continuum of
care.
Equipment
Organ donation information materials ▪ appropriate consent
forms ▪ monitoring equipment ▪ Optional: personal
protective equipment, laboratory specimen tubes, labels.
Preparation of equipment
Have information regarding organ donation and appropriate
consent forms readily available. Ensure that the information
is provided in a language and at a literacy level that the
family members can understand.7,8,9
Implementation
■ Determine whether the patient has an advance directive
that addresses organ donation or if the patient is listed in a
donor registry (such as on a driver’s license), because these
legal documents, which are supported in most states, may
influence the family’s ultimate decision.2,7,10,11
■ Keep family members informed of the patient’s medical
condition to prepare them for realistic patient outcomes.3,4
■ Arrange for an interdisciplinary meeting with the family in
a quiet, nonthreatening environment, if needed, to further
help the family realize the diagnosis and prognosis.6
■ Assess the family’s spiritual needs, resources, and
preferences. Refer the family to spiritual care services, as
needed.12,13
■ Consult the OPO coordinator in your area when the
patient’s death is imminent and before brain death testing
begins to inform the coordinator that your facility is
evaluating a potential candidate for organ donation, so that
the coordinator can be present to guide staff members
through the preparation process when appropriate.6
■ Collaborate with the OPO staff member to make sure that
the family’s needs are met. Advance planning with the OPO
helps improve donation rates.6,14
■ Perform hand hygiene.15,16,17,18,19,20
■ Confirm the patient’s identity using at least two patient
identifiers.21
■ Put on personal protective equipment, including gloves, a
gown, and eye protection, if indicated.18,22
■ Collect laboratory samples as indicated to provide data
for the assessment of organ function. Tests may include
complete blood count, liver and renal function tests,
electrolyte levels, and human immunodeficiency virus
tests.3,23
■ Monitor vital signs and fluid status, because a patient
with decreased organ perfusion may not be eligible to
donate an organ.3,23
■ Assist with examining the patient for the determination of
brain death.245
■ As applicable, ensure that the patient’s brain death has
been declared and documented. Many states have certain
criteria that must be followed, as well as guidelines on what
type of practitioner can make the declaration, before the
OPO coordinator can officially approach family members and
determine their willingness to discuss organ donation.25
■ Contact the OPO coordinator if brain death is declared so
that a coordinator can discuss possible organ donation with
the family. The OPO coordinator has the special knowledge,
training, and experience to be able to deliver the
appropriate message to families.6
■ If the family agrees to proceed with organ donation, the
OPO coordinator obtains dated and timed witnessed consent
and then coordinates the process with the health care
team.7,9,26
■ Encourage the family to be at the bedside as much as
possible and keep them informed as procedures and
preparations are taking place to help promote family time
and facilitate closure. Assure the family that the primary
focus is on the care and dignity of the patient, whether or
not the donation occurs.6
■ Make sure that the family knows what to expect regarding
end-of-life care, including when drugs are discontinued and
ventilator or other therapies are withdrawn, to help prevent
additional grief or anxiety.6
■ Discard used supplies in the appropriate manner.22,27
■ Remove and discard your gloves and personal protective
equipment22 and perform hand hygiene.15,16,17,18,19,20
■ Document the procedure.28,29,30,31
Special considerations
■ Be aware of cultural, religious, and spiritual preferences
that must also be considered when approaching the family
about organ donation.8
■ If an ethical dilemma arises, consult your facility’s ethics
committee to help clarify the decision-making process or
offer viable alternatives for the family or staff members.
■ Guidelines and practices for the determination of brain
death and legislation regarding consents and procedures for
organ procurement can vary based on national and state
regulations as well as the patient’s age.5,24,25,32,33,34
Complications
If communication with the OPO coordinator isn’t established
early enough, trust may be lost between the professional
caregivers and the family, and successful organ donation
may be denied. Other negative outcomes that may result
include the patient’s wishes not being honored, obtaining
consent for organs that aren’t viable, and identifying a
donor who isn’t medically suitable for organ donation.3,14
Documentation
Document any interactions you have with the family, such
as multidisciplinary conferences and contact with the OPO
coordinator. Document any family teaching provided and
the family members’ understanding of the teaching. After
brain death has been determined, document the date and
time of the determination as well as the name of the
practitioner who made the declaration. Include all methods
used to determine brain death. Document any family
contact, visitation, requests, or further teaching that occurs
after the organ donation process is in place.
REFERENCES
1 U.S. Department of Health & Human Services Organ Procurement and
Transplantation Network. (2017). “Policies” [Online]. Accessed via the Web at
https://optn.transplant.hrsa.gov/governance/policies/ (Level VII)
2 The Joint Commission. (2019). Standard RI.01.05.01. Comprehensive
accreditation manual for hospitals. Oakbrook Terrace, IL: The Joint
Commission. (Level VII)
3 Wiegand, D. L. (2017). AACN procedure manual for high acuity, progressive
and critical care (7th ed.). St. Louis: Elsevier.
4 Robey, T. E., & Marcolini, E. G . (2013). Organ donation after acute brain
death: Addressing limitations of time and resources in the emergency
department. Yale Journal of Biology and Medicine, 86(3), 333–342. Accessed
via the Web at http://www.ncbi.nlm.nih.gov/pmc/articles/PMC3767218/ (Level
VII)
5 Rudge, C., et al. (2012). International practices of organ donation. British
Journal of Anaesthesia, 108(Suppl. 1), i48–i55. Accessed via the Web at
http://bja.oxfordjournals.org/content/108/suppl_1/i48.full (Level V)
6 Alban, R. F., et al. (2016). Improving donor conversion rates at a level one
trauma center: Impact of best practice guidelines. Cureus, 8(11), 891. (Level
VII)
7 Centers for Medicare & Medicaid Services, Department of Health and Human
Services. (2015). Condition of participation: Patient’s rights. 42 C.F.R. §
482.13(b)(2).
8 The Joint Commission. (2010). “Advancing effective communication, cultural
competence, and patient- and family-centered care: A roadmap for hospitals”
[Online]. Oakbrook Terrace, IL: The Joint Commission. Accessed via the Web
at
http://www.jointcommission.org/assets/1/6/aroadmapforhospitalsfinalversion7
27.pdf (Level VII)
9 Accreditation Association for Hospitals and Health Systems. (2017). Standard
30.01.11. Healthcare Facilities Accreditation Program: Accreditation
requirements for acute care hospitals. Chicago, IL: Accreditation Association
for Hospitals and Health Systems. (Level VII)
10 U.S . Department of Health and Human Services. (n.d .). “How organ donation
works” [Online]. Accessed via the Web at
https://organdonor.gov/about/process.html (Level VII)
11 Accreditation Association for Hospitals and Health Systems. (2017). Standard
15.01.12. Healthcare Facilities Accreditation Program: Accreditation
requirements for acute care hospitals. Chicago, IL: Accreditation Association
for Hospitals and Health Systems. (Level VII)
12 Johnson, J. R., et al. (2014). The association of spiritual care providers’
activities with family members’ satisfaction with care after a death in the ICU.
Critical Care Medicine, 42(9), 1991–2000. (Level IV)
13 Prommer, E. (2014). Organ donation and palliative care: Can palliative care
make a difference? Journal of Palliative Medicine, 17(3), 368–371. (Level VII)
14 Ehrle, R. (2006). Timely referral of potential organ donors. Critical Care Nurse,
26(2), 88–93 . Accessed via the Web at
http://ccn.aacnjournals.org/content/26/2/88.full (Level V)
15 Centers for Disease Control and Prevention. (2002). Guideline for hand
hygiene in health-care settings: Recommendations of the Healthcare Infection
Control Practices Advisory Committee and the HICPAC/SHEA/APIC/IDSA Hand
Hygiene Task Force. MMWR Recommendations and Reports, 51(RR-16), 1–45.
Accessed via the Web at https://www.cdc.gov/mmwr/pdf/rr/rr5116.pdf (Level
II)
16 The Joint Commission. (2019). Standard NPSG.07.01.01. Comprehensive
accreditation manual for hospitals. Oakbrook Terrace, IL: The Joint
Commission. (Level VII)
17 World Health Organization. (2009). “WHO guidelines on hand hygiene in
health care: First global patient safety challenge, clean care is safer care”
[Online]. Accessed the Web at
http://apps.who.int/iris/bitstream/10665/44102/1/9789241597906_eng.pdf
(Level IV)
18 Accreditation Association for Hospitals and Health Systems. (2017). Standard
07.01.10. Healthcare Facilities Accreditation Program: Accreditation
requirements for acute care hospitals. Chicago, IL: Accreditation Association
for Hospitals and Health Systems. (Level VII)
19 Centers for Medicare & Medicaid Services, Department of Health and Human
Services. (2015). Condition of participation: Infection control. 42 C.F.R. §
482.42.
20 DNV GL-Healthcare USA, Inc. (2016). IC.1 .SR.1 . NIAHO® accreditation
requirements: Interpretive guidelines & surveyor guidance (version 11).
Milford, OH: DNV GL-Healthcare USA, Inc. (Level VII)
21 The Joint Commission. (2019). Standard NPSG.01.01.01. Comprehensive
accreditation manual for hospitals. Oakbrook Terrace, IL: The Joint
Commission. (Level VII)
22 Siegel, J. D ., et al. (2007, revised 2017). “2007 guideline for isolation
precautions: Preventing transmission of infectious agents in healthcare
settings” [Online]. Accessed via the Web at
https://www.cdc.gov/infectioncontrol/pdf/guidelines/isolation-guidelines.pdf
(Level II)
23 McKeown, D. W., et al. (2012). Management of the heartbeating, brain-dead
organ donor. British Journal of Anaesthesia, 108(Suppl 1), 96–107. Accessed
via the Web at http://bja.oxfordjournals.org/content/108/suppl_1/i96.full
(Level VII)
24 Wijdicks, E. F. M., et al. (2010). Evidence-based guideline update:
Determining brain death in adults: Report of the Quality Standards
Subcommittee of the American Academy of Neurology. Neurology, 74(23),
1911–1918. Accessed via the Web at
http://n.neurology.org/content/74/23/1911.long (Level I)
25 U.S . Department of Health and Human Services. (2011). “State organ
donation legislation” [Online]. Accessed via the Web at
http://www.organdonor.gov/legislation_micro/
26 DNV GL-Healthcare USA, Inc. (2016). PR.1.SR.3 . NIAHO® accreditation
requirements: Interpretive guidelines & surveyor guidance (version 11).
Milford, OH: DNV GL-Healthcare USA, Inc. (Level VII)
27 Accreditation Association for Hospitals and Health Systems. (2017). Standard
07.03 .07. Healthcare Facilities Accreditation Program: Accreditation
requirements for acute care hospitals. Chicago, IL: Accreditation Association
for Hospitals and Health Systems. (Level VII)
28 The Joint Commission. (2019). Standard RC.01.03 .01. Comprehensive
accreditation manual for hospitals. Oakbrook Terrace, IL: The Joint
Commission. (Level VII)
29 Accreditation Association for Hospitals and Health Systems. (2017). Standard
10.00 .03. Healthcare Facilities Accreditation Program: Accreditation
requirements for acute care hospitals. Chicago, IL: Accreditation Association
for Hospitals and Health Systems. (Level VII)
30 Centers for Medicare & Medicaid Services, Department of Health and Human
Services. (2015). Condition of participation: Medical record services. 42 C.F.R.
§ 482.24(b).
31 DNV GL-Healthcare USA, Inc. (2016). MR.2 .SR.1 . NIAHO® accreditation
requirements: Interpretive guidelines & surveyor guidance (version 11).
Milford, OH: DNV GL-Healthcare USA, Inc. (Level VII)
32 Wijdicks, E. F. M. (2012). The transatlantic divide over brain death
determination and the debate. Brain, 135(Pt 4), 1321–1331. (Level V)
33 Nakagawa, T. A., et al. (2011). American Academy of Pediatrics: Guidelines
for the determination of brain death in infants and children: An update of the
1987 task force recommendations. Pediatrics, 128(3), e720–e740. Accessed
via the Web at http://pediatrics.aappublications.org/content/128/3/e720.full
(Level I)
34 Smith, M. (2012). Brain death: Time for an international consensus. British
Journal of Anaesthesia, 108(Suppl. 1), i6–i9 . Accessed via the Web at
http://bjanaesthesia.org/article/S0007-0912(17)32161-X/fulltext (Level V)
ORONASOPHARYNGEAL SUCTION
Oronasopharyngeal suction removes secretions from the
pharynx by a suction catheter inserted through the mouth
or nostril. Used to maintain a patent airway, this procedure
helps the patient who can’t clear the airway effectively with
coughing and expectoration, such as the unconscious or
severely debilitated patient. The procedure should be
performed as often as necessary, depending on the
patient’s condition. Including oral suctioning as part of
standard oral hygiene practice in intubated patients may
reduce the risk of ventilator-associated pneumonia.1,2
Because the catheter may inadvertently slip into the lower
airway or esophagus, oronasopharyngeal suction is a sterile
procedure that requires sterile equipment. However, clean
technique is sufficient for a tonsil-tip suction device. In fact,
an alert patient can use a tonsil-tip suction device
independently to remove secretions.
Equipment
Wall suction or portable suction unit with connecting tubing
▪ water-soluble lubricant ▪ sterile normal saline solution ▪
disposable sterile container ▪ sterile suction catheter (#10
to #16 French) ▪ sterile gloves ▪ overbed table ▪ towel ▪
stethoscope ▪ disinfectant pad ▪ Optional: tongue blade,
tonsil-tip suction device, nasopharyngeal or oropharyngeal
airway (optional for frequent suctioning), gown, mask and
goggles or mask with face shield.
A commercially prepared kit contains a sterile catheter, a
disposable container, and sterile gloves.
Preparation of equipment
Gather and place the suction equipment on the patient’s
overbed table or bedside stand. Position the table or stand
on your preferred side of the bed to facilitate suctioning.
Connect the tubing to the suctioning unit. Date and then
open the bottle of normal saline solution.
Implementation
■ Verify the practitioner’s order for oropharyngeal
suctioning if your facility requires one.
■ Review the patient’s blood gas or oxygen saturation
values and vital signs. Check the history for
contraindications, such as a deviated septum, nasal polyps,
nasal obstruction, traumatic injury, facial trauma, epistaxis,
or mucosal swelling.
■ Gather and prepare the appropriate equipment.
■ Perform hand hygiene.3,4,5,6,7,8
■ Confirm the patient’s identity using at least two patient
identifiers.9
■ Provide privacy.10,11,12,13
■ Explain the procedure to the patient (even if
unresponsive) and family (if appropriate) according to their
individual communication and learning needs to increase
their understanding, allay their fears, and enhance
cooperation.14 Inform the patient that suctioning may
stimulate transient coughing or gagging, but that coughing
helps to mobilize secretions. If the patient has been
suctioned before, summarize the reasons for the procedure.
Provide reassurance throughout the procedure to minimize
anxiety and fear, which can increase oxygen consumption.
■ Raise the patient’s bed to waist level during patient care
to prevent caregiver back strain.15
■ Perform hand hygiene.3,4,5,6,7,8
■ Put on personal protective equipment, as appropriate, to
comply with standard precautions.16,17,18
■ Evaluate the patient’s respiratory status and ability to
cough and deep-breathe to determine the patient’s ability to
move secretions up the tracheobronchial tree.
■ If you are suctioning through the nose, determine which
nostril is more patent.
■ Place the patient in the semi-Fowler or high Fowler
position, if tolerated, to promote lung expansion and
effective coughing. If the patient is unconscious, use the
side-lying position with the patient facing you to help
promote drainage of secretions.
■ Place a towel across the patient’s chest.
■ Turn on the suction from the wall or portable unit and set
the pressure, typically to between 100 and 120 mm Hg;
higher pressures cause excessive trauma without enhancing
secretion removal.19
■ Occlude the end of the connecting tubing to check
suction pressure.
■ Using sterile technique, open the suction catheter kit or
the packages containing the sterile catheter, container, and
gloves.
■ Perform hand hygiene.3,4,5,6,7,8
■ Put on sterile gloves;16 consider your dominant hand
sterile and your nondominant hand nonsterile.
■ Using your nondominant hand, pour the saline solution
into the sterile container.
■ With your nondominant hand, place a small amount of
water-soluble lubricant on the sterile area of the catheter.
The lubricant facilitates passage of the catheter during
nasopharyngeal suctioning.
■ Pick up the catheter with your dominant (sterile) hand
and attach it to the connecting tubing (as shown below).
Use your nondominant hand to control the suction valve
while your dominant hand manipulates the catheter.
PATIENT TEACHING
Tips on airway clearance
Deep breathing and coughing are vital for removing secretions from the
lungs. Other techniques used to help clear the airways include diaphragmatic
breathing and forced expiration. Here’s how to teach these techniques to
your patients.
Diaphragmatic breathing
First, tell the patient to lie in the supine position, with head elevated 15 to 20
degrees on a pillow. Tell the patient to place one hand on the abdomen and
then inhale and feel the abdomen rise. Explain that this is known as
“breathing with the diaphragm.”
Next, instruct the patient to exhale slowly through the nose—or, even
better, through pursed lips—while letting the abdomen collapse. Explain that
this action decreases the respiratory rate and increases tidal volume.
Suggest that the patient perform this exercise for 30 minutes several times
a day. After the patient becomes accustomed to the position and has learned
to breathe using the diaphragm, the patient may apply abdominal weights of
8.8 to 11 lb (4 to 5 kg). The weights enhance the movement of the
diaphragm toward the head during expiration.
To enhance the effectiveness of exercise, the patient may also manually
compress the lower costal margins, perform straight-leg lifts, and coordinate
the breathing technique with a physical activity such as walking.
Forced expiration
Explain to the patient that forced expiration (also known as huff coughing)
helps clear secretions while causing less traumatic injury than does a cough.
To perform the technique, tell the patient to forcefully expire without closing
the glottis, starting with a middle to low lung volume. Tell the patient to
follow this expiration with a period of diaphragmatic breathing and
relaxation.
Explain that if the secretions are in the central airways, the patient may
have to use a more forceful expiration or a cough to clear them.
■ Dip the catheter into the sterile normal saline solution (as
shown below) to moisten the inside of the catheter.
■ Instruct the patient to cough and to breathe slowly and
deeply several times before you begin suctioning. Coughing
helps loosen secretions and may decrease the amount of
suction necessary, while deep breathing helps minimize or
prevent hypoxia. (See Tips on airway clearance.)
For nasal insertion
■ Raise the tip of the patient’s nose with your nondominant
hand to straighten the passageway and facilitate insertion
of the catheter. Without applying suction, gently insert the
suction catheter into the patient’s nostril (as shown on next
page, top left). Roll the catheter between your fingers to
help it advance through the turbinates. Continue to advance
the catheter approximately 5′′ to 6′′ (12.7 to 15.2 cm) until
you reach the pool of secretions or the patient begins to
cough.
For oral insertion
■ Without applying suction, gently insert the catheter into
the patient’s mouth. Advance it 3′′ to 4′′ (7.6 to 10.2 cm)
along the side of the patient’s mouth until you reach the
pool of secretions or the patient begins to cough. Suction
both sides of the patient’s mouth and pharyngeal area.
Completing the procedure
■ Using intermittent suction, withdraw the catheter from
either the mouth or the nose with a continuous rotating
motion to minimize invagination of the mucosa into the
catheter’s tip and side ports. Apply suction for no longer
than 10 seconds at a time to minimize tissue trauma.
■ Between passes, wrap the catheter around your dominant
hand to prevent contamination.
■ If secretions are thick, clear the lumen of the catheter by
dipping it in normal saline solution and applying suction.
■ Repeat the procedure, up to three times, until gurgling or
bubbling sounds stop and respirations are quiet. Allow 30
seconds to 1 minute to allow reoxygenation and
reventilation.
■ After completing suctioning, pull your sterile glove off
over the coiled catheter and discard it.16
■ Flush the connecting tubing with normal saline solution.
Then discard the container of normal saline solution and
remove your other glove.16
■ Return the bed to the lowest position to prevent falls and
maintain patient safety.20
■ Remove and discard other personal protective equipment,
if worn.16
■ Perform hand hygiene.3,4,5,6,7,8
■ Reassess the patient’s respiratory status to evaluate the
patient’s tolerance and the effectiveness of the procedure.
■ Clean and disinfect your stethoscope using a disinfectant
pad.21,22
■ Perform hand hygiene.3,4,5,6,7,8
■ Document the procedure.23,24,25,26
Special considerations
■ If the patient has no history of nasal problems, alternate
suctioning between nostrils to minimize traumatic injury.
■ If the patient requires repeated oronasopharyngeal
suctioning, the use of a nasopharyngeal or oropharyngeal
airway will help with catheter insertion, reduce traumatic
injury, and promote a patent airway. (See the
“Nasopharyngeal airway insertion and care” and
“Oropharyngeal airway insertion and care” procedures,
pages 528 and 563.)
■ If the patient has excessive oral secretions, consider
using a tonsil-tip suction device, which allows the patient to
remove oral secretions independently.
■ Let the patient rest after suctioning while you continue to
observe. The frequency and duration of suctioning depend
on the patient’s tolerance of the procedure and on
complications.
Patient teaching
Oronasopharyngeal suctioning may be performed in the
home using a portable suction machine. Under these
circumstances, suctioning is a clean rather than a sterile
procedure. Properly cleaned catheters can be reused,
putting less financial strain on the patient. Whether the
patient requires disposable or reusable suction equipment,
make sure that the patient and caregivers have received
proper teaching and support.
Complications
Increased dyspnea caused by hypoxia and anxiety may
result from this procedure. Hypoxia can occur because
oxygen from the oronasopharynx is removed with the
secretions. In addition, bloody aspirate can result from
prolonged or traumatic suctioning. Using water-soluble
lubricant can help to minimize traumatic injury.
Documentation
Record the date, time, reason for suctioning, and technique
used; the amount, color, consistency, and odor (if any) of
the secretions; the patient’s respiratory status before and
after the procedure; any complications and the nursing
actions taken; and the patient’s tolerance of the procedure.
Document any patient teaching and the patient’s
understanding of the teaching.
REFERENCES
1 Larrow, V., & Klich-Heartt, E. (2016). Prevention of ventilator-associated
pneumonia in the intensive care unit: Beyond the basics. Journal of
Neuroscience Nursing, 48(3), 160–165.
2 Sole, M. L., et al. (2011). Oropharyngeal secretion volume in intubated
patients: The importance of oral suctioning. American Journal of Critical Care,
20(6), e141–e145. Accessed via the Web at
http://ajcc.aacnjournals.org/content/20/6/e141.full.pdf+html (Level IV)
3 The Joint Commission. (2019). Standard NPSG.07.01.01. Comprehensive
accreditation manual for hospitals. Oakbrook Terrace, IL: The Joint
Commission. (Level VII)
4 Centers for Disease Control and Prevention. (2002). Guideline for hand
hygiene in health-care settings: Recommendations of the Healthcare Infection
Control Practices Advisory Committee and the HICPAC/SHEA/APIC/IDSA Hand
Hygiene Task Force. MMWR Recommendations and Reports, 51(RR-16), 1–45.
Accessed via the Web at https://www.cdc.gov/mmwr/pdf/rr/rr5116.pdf (Level
II)
5 World Health Organization. (2009). “WHO guidelines on hand hygiene in
health care: First global patient safety challenge, clean care is safer care”
[Online]. Accessed via the Web at
http://apps.who.int/iris/bitstream/10665/44102/1/9789241597906_eng.pdf
(Level IV)
6 Centers for Medicare and Medicaid Services, Department of Health and
Human Services. (2015). Condition of participation: Infection control. 42 C.F.R.
482.42.
7 Accreditation Association for Hospitals and Health Systems. (2017). Standard
07.01.21. Healthcare Facilities Accreditation Program: Accreditation
requirements for acute care hospitals. Chicago, IL: Accreditation Association
for Hospitals and Health Systems. (Level VII)
8 DNV GL-Healthcare USA, Inc. (2016). IC.1.SR.1 . NIAHO® accreditation
requirements: Interpretive guidelines & surveyor guidance (version 11).
Milford, OH: DNV GL-Healthcare USA, Inc. (Level VII)
9 The Joint Commission. (2019). Standard NPSG.01.01.01. Comprehensive
accreditation manual for hospitals. Oakbrook Terrace, IL: The Joint
Commission. (Level VII)
10 The Joint Commission. (2019). Standard RI.01.01.01. Comprehensive
accreditation manual for hospitals. Oakbrook Terrace, IL: The Joint
Commission. (Level VII)
11 Centers for Medicare and Medicaid Services, Department of Health and
Human Services. (2015). Condition of participation: Patient’s rights. 42 C.F.R.
§ 482.13(c)(1).
12 Accreditation Association for Hospitals and Health Systems. (2017). Standard
15.01.16. Healthcare Facilities Accreditation Program: Accreditation
requirements for acute care hospitals. Chicago, IL: Accreditation Association
for Hospitals and Health Systems. (Level VII)
13 DNV GL-Healthcare USA, Inc. (2016). PR.1.SR.5 . NIAHO® accreditation
requirements: Interpretive guidelines & surveyor guidance (version 11).
Milford, OH: DNV GL-Healthcare USA, Inc. (Level VII)
14 The Joint Commission. (2019). Standard PC.02.01.21. Comprehensive
accreditation manual for hospitals. Oakbrook Terrace, IL: The Joint
Commission. (Level VII)
15 Waters, T. R., et al. (2009). “Safe patient handling training for schools of
nursing” [Online]. Accessed via the Web at
https://www.cdc.gov/niosh/docs/2009-127/pdfs/2009-127.pdf (Level VII)
16 Siegel, J. D ., et al. (2007, revised 2017). “2007 guideline for isolation
precautions: Preventing transmission of infectious agents in healthcare
settings” [Online]. Accessed via the Web at
https://www.cdc.gov/infectioncontrol/pdf/guidelines/isolation-guidelines.pdf
(Level II)
17 Accreditation Association for Hospitals and Health Systems. (2017). Standard
07.01.10. Healthcare Facilities Accreditation Program: Accreditation
requirements for acute care hospitals. Chicago, IL: Accreditation Association
for Hospitals and Health Systems. (Level VII)
18 DNV GL-Healthcare USA, Inc. (2016). IC.1 .SR.2 . NIAHO® accreditation
requirements: Interpretive guidelines & surveyor guidance (version 11).
Milford, OH: DNV GL-Healthcare USA, Inc. (Level VII)
19 Wiegand, D. L. (2017). AACN procedure manual for high acuity, progressive,
and critical care (7th ed.). St. Louis, MO: Elsevier.
20 Ganz, D. A., et al. (2013). Preventing falls in hospitals: A toolkit for improving
quality of care (AHRQ Publication No. 13-0015-EF). Rockville, MD: Agency for
Healthcare Research and Quality. Accessed via the Web at
https://www.ahrq.gov/sites/default/files/publications/files/fallpxtoolkit.pdf
(Level VII)
21 Rutala, W. A., et al. (2008, revised 2017). “Guideline for disinfection and
sterilization in healthcare facilities, 2008” [Online]. Accessed via the Web at
https://www.cdc.gov/hicpac/pdf/guidelines/Disinfection_Nov_2008.pdf (Level I)
22 Accreditation Association for Hospitals and Health Systems. (2017). Standard
07.02.03. Healthcare Facilities Accreditation Program: Accreditation
requirements for acute care hospitals. Chicago, IL: Accreditation Association
for Hospitals and Health Systems. (Level VII)
23 The Joint Commission. (2019). Standard RC.01.03 .01. Comprehensive
accreditation manual for hospitals. Oakbrook Terrace, IL: The Joint
Commission. (Level VII)
24 Centers for Medicare and Medicaid Services, Department of Health and
Human Services. (2015). Condition of participation: Medical record services.
42 C.F.R. § 482.24(b).
25 Accreditation Association for Hospitals and Health Systems. (2017). Standard
10.00 .03. Healthcare Facilities Accreditation Program: Accreditation
requirements for acute care hospitals. Chicago, IL: Accreditation Association
for Hospitals and Health Systems. (Level VII)
26 DNV GL-Healthcare USA, Inc. (2016). MR.2 .SR.1 . NIAHO® accreditation
requirements: Interpretive guidelines & surveyor guidance (version 11).
Milford, OH: DNV GL-Healthcare USA, Inc. (Level VII)
OROPHARYNGEAL AIRWAY INSERTION AND
CARE
An oropharyngeal airway, a curved plastic device, is
inserted into the mouth to the posterior pharynx to establish
or maintain a patent airway. In an unconscious patient, the
tongue usually obstructs the posterior pharynx. The
oropharyngeal airway conforms to the curvature of the
palate, removing the obstruction and allowing air to pass
around and through the tube. It also facilitates
oropharyngeal suctioning. The oropharyngeal airway is
intended for short-term use and should be used only in an
unresponsive patient who can’t maintain the airway. It may
be left in place longer as an airway adjunct to prevent the
orally intubated patient from biting the endotracheal tube.
The oropharyngeal airway isn’t the airway of choice for
the patient with loose or avulsed teeth or who has
undergone recent oral surgery.
NURSING ALERT Inserting this airway in an conscious or
semiconscious patient may stimulate vomiting and laryngospasm; use
only in unresponsive patients who don’t have a cough or gag reflex.1,2
Equipment
For inserting
Oropharyngeal airway of appropriate size ▪ tongue blade ▪
gloves ▪ tape or other securement device ▪ stethoscope ▪
disinfectant pad ▪ oral care supplies ▪ Optional: suction
equipment, resuscitation mask, handheld resuscitation bag
or oxygen-powered breathing device, mask and goggles or
mask with face shield.
For reflex testing
Cotton-tipped applicator.
Preparation of equipment
Select an appropriate-sized airway for the patient; an
oversized airway can obstruct breathing by depressing the
epiglottis into the laryngeal opening. Typically, you’ll select
a medium size (size 4 or 5) for the average adult and a large
size (size 6) for the large adult. Be sure to confirm the
correct size of the airway by placing the airway flange
beside the patient’s cheek, parallel to the maxillary
incisors.3 If the airway is the right size, the airway curve
should reach to the angle of the jaw.
Implementation
■ Verify the practitioner’s order.
■ Gather and prepare the appropriate equipment.
■ Perform hand hygiene.4,5,6,7,8,9
■ Confirm the patient’s identity using at least two patient
identifiers.10
■ Provide privacy.11,12,13,14
■ Explain the procedure to the patient and family (if
appropriate) according to their individual communication
and learning needs to increase their understanding, allay
their fears, and enhance cooperation.15
■ Raise the patient’s bed to waist level when performing
patient care to prevent caregiver back strain.16
■ Perform hand hygiene.4,5,6,7,8,9
■ Put on gloves as necessary to comply with standard
precautions. Use a mask and goggles or a mask with face
shield if secretions are copious.17,18,19,20
■ If the patient is wearing dentures, remove them so they
don’t cause further airway obstruction.
■ Suction the patient, if necessary to remove secretions.
(See “Oronasopharyngeal suction,” page 560.)
■ Place the patient in the supine position with the neck
hyperextended, if this isn’t contraindicated. Otherwise, use
the jaw-thrust maneuver if a cervical spine injury is
suspected.1,21
■ Insert the oropharyngeal airway using the cross-finger or
the tongue-blade technique. (See Inserting an oral airway,
page 564.)
■ Immediately after insertion, auscultate breath sounds and
assess the patient’s respirations. If respirations are absent
or inadequate, initiate artificial positive-pressure ventilation
with a mouth-to-mask technique, a handheld resuscitation
bag, or an oxygen-powered breathing device to ensure
adequate ventilation. Stridor, gasping respirations, or
snoring may indicate inadequate airway placement.17
■ Secure the airway with tape or other securement device,
if indicated, to prevent expulsion of the airway; leave the
airway unsecured in patients who need to be able to cough
out the airway if gagging should occur.17
■ Position the patient on the side to decrease the risk of
aspiration of vomitus.
■ Frequently check the position of the airway to ensure
correct placement. Make sure that the patient’s lips and
tongue aren’t between the teeth and airway to prevent
traumatic injury.
■ Suction the patient as necessary.
■ Reassess the patient’s respiratory status following
suctioning and at an interval determined by the patient’s
condition and your facility.17
■ Brush the patient’s teeth, gums, and tongue at least
twice per day using a soft toothbrush. Moisturize the oral
mucosa and lips every 2 to 4 hours.22,23 Inspect the mucous
membranes of the patient’s mouth for tissue irritation,
which can result from prolonged airway use. (See the “Oral
care” procedure, page 552.)
■ Return the bed top the lowest position to prevent falls
and maintain patient safety.24
■ Remove and discard your gloves.18
■ Perform hand hygiene.4,5,6,7,8,9
■ Clean and disinfect your stethoscope with a disinfectant
pad.25,26
■ Perform hand hygiene.4,5,6,7,8,9
■ Document the procedure.27,28,29,30
Special considerations
■ Evaluate the patient’s behavior to provide the cue for
airway removal. The patient is likely to gag or cough as the
patient becomes more alert, indicating that the airway is no
longer needed.
■ When the patient regains consciousness and can swallow,
remove the airway by pulling it outward and downward,
following the mouth’s natural curvature.
■ Remove the oropharyngeal airway every 8 hours or as
needed. Clean the airway according to the manufacturer’s
instructions and reinsert the clean airway.17
■ After removing the airway, test the patient’s cough and
gag reflexes to ensure that removal of the airway wasn’t
premature and that the patient can maintain the airway. To
test for the gag reflex, use a cotton-tipped applicator to
touch both sides of the posterior pharynx. To test for the
cough reflex, gently touch the posterior oropharynx with the
cotton-tipped applicator.
EQUIPMENT
Inserting an oral airway
Unless this position is contraindicated, hyperextend the patient’s head (as
shown below) before using either the cross-finger or tongue-blade insertion
method.
To insert an oropharyngeal airway using the cross-finger method, place
your thumb on the patient’s lower teeth and your index finger on the upper
teeth. Gently open the mouth by pushing the teeth apart (as shown below).
Insert the airway upside down to avoid pushing the tongue toward the
pharynx, and slide it over the tongue toward the back of the mouth. Rotate
the airway as it approaches the posterior wall of the pharynx so that it points
downward (as shown below).
To use the tongue blade technique, open the patient’s mouth and depress
the tongue with the blade. Guide the airway over the back of the tongue as
you did for the cross-finger technique.
Complications
Tooth damage or loss, tissue damage, and bleeding may
result from insertion. If the airway is too long, it may press
the epiglottis against the entrance of the larynx, producing
complete airway obstruction. If the airway isn’t inserted
properly, it may push the tongue posteriorly, aggravating
the problem of upper airway obstruction.
Documentation
Record the date and time of the airway’s insertion, size of
the airway, removal and cleaning of the airway, condition of
mucous membranes, any suctioning, adverse reactions and
nursing actions taken, and the patient’s tolerance of the
procedure. Document any patient teaching provided and the
patient’s understanding of that teaching.
REFERENCES
1 American Heart Association. (2010). 2010 American Heart Association
guidelines for cardiopulmonary resuscitation and emergency cardiovascular
care. Circulation, 122, S729–S767. (Level II)
2 American Heart Association. (2015). 2015 American Heart Association
guidelines update for cardiopulmonary resuscitation and emergency
cardiovascular care. Circulation, 132, S444–S464. (Level II)
3 Kim, H. J ., et al. (2016). Determination of the appropriate sizes of
oropharyngeal airways in adults: Correlation with external facial
measurements: A randomized crossover study. European Journal of
Anaesthesiology, 33(12), 936–942. (Level II)
4 The Joint Commission. (2019). Standard NPSG.07.01.01. Comprehensive
accreditation manual for hospitals. Oakbrook Terrace, IL: The Joint
Commission. (Level VII)
5 Centers for Disease Control and Prevention. (2002). Guideline for hand
hygiene in health-care settings: Recommendations of the Healthcare Infection
Control Practices Advisory Committee and the HICPAC/SHEA/APIC/IDSA Hand
Hygiene Task Force. MMWR Recommendations and Reports, 51(RR-16), 1–45.
Accessed via the Web at https://www.cdc.gov/mmwr/pdf/rr/rr5116.pdf (Level
II)
6 World Health Organization. (2009). “WHO guidelines on hand hygiene in
health care: First global patient safety challenge, clean care is safer care”
[Online]. Accessed via the Web at
http://apps.who.int/iris/bitstream/10665/44102/1/9789241597906_eng.pdf
(Level IV)
7 Centers for Medicare and Medicaid Services, Department of Health and
Human Services. (2015). Condition of participation: Infection control. 42 C.F.R.
§ 482.42.
8 Accreditation Association for Hospitals and Health Systems. (2017). Standard
07.01.21. Healthcare Facilities Accreditation Program: Accreditation
requirements for acute care hospitals. Chicago, IL: Accreditation Association
for Hospitals and Health Systems. (Level VII)
9 DNV GL-Healthcare USA, Inc. (2016). IC.1.SR.1 . NIAHO® accreditation
requirements: Interpretive guidelines & surveyor guidance (version 11).
Milford, OH: DNV GL-Healthcare USA, Inc. (Level VII)
10 The Joint Commission. (2019). Standard NPSG.01.01.01. Comprehensive
accreditation manual for hospitals. Oakbrook Terrace, IL: The Joint
Commission. (Level VII)
11 Centers for Medicare and Medicaid Services, Department of Health and
Human Services. (2015). Condition of participation: Patient’s rights. 42 C.F.R.
§ 482.13(c)(1).
12 Accreditation Association for Hospitals and Health Systems. (2017). Standard
15.01.16. Healthcare Facilities Accreditation Program: Accreditation
requirements for acute care hospitals. Chicago, IL: Accreditation Association
for Hospitals and Health Systems. (Level VII)
13 The Joint Commission. (2019). Standard RI.01.01.01. Comprehensive
accreditation manual for hospitals. Oakbrook Terrace, IL: The Joint
Commission. (Level VII)
14 DNV GL-Healthcare USA, Inc. (2016). PR.1.SR.5 . NIAHO® accreditation
requirements: Interpretive guidelines & surveyor guidance (version 11).
Milford, OH: DNV GL-Healthcare USA, Inc. (Level VII)
15 The Joint Commission. (2019). Standard PC.02.01.21. Comprehensive
accreditation manual for hospitals. Oakbrook Terrace, IL: The Joint
Commission. (Level VII)
16 Waters, T. R., et al. (2009). “Safe patient handling training for schools of
nursing” [Online]. Accessed via the Web at
https://www.cdc.gov/niosh/docs/2009-127/pdfs/2009-127.pdf
17 Wiegand, D. L. (2017). AACN procedure manual for high acuity, progressive,
and critical care (7th ed.). St. Louis, MO: Elsevier.
18 Siegel, J. D ., et al. (2007, revised 2017). “2007 guideline for isolation
precautions: Preventing transmission of infectious agents in healthcare
settings” [Online]. Accessed via the Web at
https://www.cdc.gov/infectioncontrol/pdf/guidelines/isolation-guidelines.pdf
(Level II)
19 Accreditation Association for Hospitals and Health Systems. (2017). Standard
07.01.10. Healthcare Facilities Accreditation Program: Accreditation
requirements for acute care hospitals. Chicago, IL: Accreditation Association
for Hospitals and Health Systems. (Level VII)
20 DNV GL-Healthcare USA, Inc. (2016). IC.1 .SR.2 . NIAHO® accreditation
requirements: Interpretive guidelines & surveyor guidance (version 11).
Milford, OH: DNV GL-Healthcare USA, Inc. (Level VII)
21 American Heart Association. (2015). 2015 American Heart Association
guidelines update for cardiopulmonary resuscitation and emergency
cardiovascular care. Circulation, 132, S414–S435. (Level II)
22 Ames, N. J ., et al. (2011). Effects of systematic oral care in critically ill
patients: A multicenter study. American Journal of Critical Care, 20(5), e103–
e114. Accessed October 2017 via the Web at
http://ajcc.aacnjournals.org/content/20/5/e103.full (Level VI)
23 American Association of Critical-Care Nurses. (2017). “A ACN practice alert:
Oral care for acutely and critically ill patients” [Online]. Accessed via the Web
at https://www.aacn.org/clinical-resources/practice-alerts/oral-care-for-
acutely-and-critically-ill-patients (Level VII)
24 Ganz, D. A., et al. (2013). Preventing falls in hospitals: A toolkit for improving
quality of care (AHRQ Publication No. 13-0015-EF). Rockville, MD: Agency for
Healthcare Research and Quality. Accessed via the Web at
https://www.ahrq.gov/sites/default/files/publications/files/fallpxtoolkit.pdf
(Level VII)
25 Rutala, W. A., et al. (2008, revised 2017). “Guideline for disinfection and
sterilization in healthcare facilities, 2008” [Online]. Accessed via the Web at
https://www.cdc.gov/hicpac/pdf/guidelines/Disinfection_Nov_2008.pdf (Level I)
26 Accreditation Association for Hospitals and Health Systems. (2017). Standard
07.02.03. Healthcare Facilities Accreditation Program: Accreditation
requirements for acute care hospitals. Chicago, IL: Accreditation Association
for Hospitals and Health Systems. (Level VII)
27 The Joint Commission. (2019). Standard RC.01.03 .01. Comprehensive
accreditation manual for hospitals. Oakbrook Terrace, IL: The Joint
Commission. (Level VII)
28 Centers for Medicare and Medicaid Services, Department of Health and
Human Services. (2015). Condition of participation: Medical record services.
42 C.F.R. § 482.24(b).
29 Accreditation Association for Hospitals and Health Systems. (2017). Standard
10.00 .03. Healthcare Facilities Accreditation Program: Accreditation
requirements for acute care hospitals. Chicago, IL: Accreditation Association
for Hospitals and Health Systems. (Level VII)
30 DNV GL-Healthcare USA, Inc. (2016). MR.2 .SR.1 . NIAHO® accreditation
requirements: Interpretive guidelines & surveyor guidance (version 11).
Milford, OH: DNV GL-Healthcare USA, Inc. (Level VII)
OXYGEN ADMINISTRATION
Oxygen administration helps relieve hypoxemia and
maintain adequate oxygenation of tissues and vital organs.
In patients with hypoxemia, the cardiopulmonary system
compensates by increasing ventilation and cardiac output.
Oxygen administration increases blood oxygen content so
that the heart doesn’t have to pump as much blood per
minute to meet tissue demands. Reducing cardiac workload
is especially important when disease or injury, such as
myocardial infarction, sepsis, or trauma, is already stressing
the heart. Hypoxemia causes pulmonary vasoconstriction
and subsequent pulmonary hypertension, which increases
workload in the right side of the heart. Oxygen
administration can reverse pulmonary vasoconstriction,
thereby decreasing right ventricular workload.1 Oxygen
administration has only limited benefit for treatment of
hypoxia caused by anemia because of the blood’s limited
oxygen-carrying capacity.
Indications for oxygen administration include:
■ documented hypoxemia (partial pressure of arterial
oxygen [PaO2] less than 60 mm Hg or arterial oxygen
saturation [SaO2] less than 90% on room air, or PaO2 or
SaO2 below desirable range for the particular clinical
situation)
■ acute care situations suggestive of hypoxemia
■ severe trauma
■ acute myocardial infarction
■ short-term therapy or surgical intervention (for example,
postanesthesia recovery).1,2
When indications are present, there are no
contraindications to oxygen administration.2
Various methods of oxygen delivery are available. The
patient’s disease, physical condition, and age help
determine the most appropriate method of administration.
The adequacy of oxygen therapy is determined by arterial
blood gas (ABG) analysis, oxygen saturation monitoring, and
clinical examination.
Equipment
The equipment needed depends on the type of delivery
system ordered. (See Guide to oxygen delivery systems,
pages 566–568.) Equipment includes selections from the
following list: Oxygen source (wall unit, cylinder, liquid tank,
or concentrator) ▪ flowmeter ▪ adapter (if using a wall unit)
or a pressure-reduction gauge (if using a cylinder) ▪ sterile
humidity bottle and adapters ▪ appropriate oxygen delivery
system (nasal cannula, simple mask, or nonrebreather mask
for low-flow and variable oxygen concentrations; Venturi
mask, aerosol mask, T-tube, tracheostomy collar, tent, or
oxygen hood for high-flow and specific oxygen
concentrations) ▪
small-diameter or large-diameter
connection tubing ▪ jet adapter for Venturi mask (if adding
humidity) ▪ stethoscope ▪ disinfectant pad ▪ vital signs
monitoring equipment ▪ pulse oximeter and probe ▪
Optional: gloves, mask and goggles or mask with face
shield,3 gauze pads, tape, oxygen analyzer, ABG kit, jet
adapter for Venturi mask, OXYGEN PRECAUTIONS sign.
Preparation of equipment
Although a respiratory therapist typically is responsible for
setting up, maintaining, and managing the equipment, you’ll
need a working knowledge of the oxygen system being
used.
Check the oxygen outlet port to verify flow. If using a
nasal cannula, pinch the tubing near the prongs to listen for
a higher-pitched sound caused by the release of increased
pressure. All oxygen delivery systems should be checked at
least once each day; some systems require more frequent
checks by a calibrated analyzer.2
Implementation
■ Verify the practitioner’s order for the oxygen therapy,
because oxygen is considered a medication or therapy and
should be prescribed.4
■ Gather and prepare the necessary equipment.
■ Perform hand hygiene.5,6,7,8,9,10
■ Confirm the patient’s identity using at least two patient
identifiers.11
■ Provide privacy.12,13,14,15
■ Explain the procedure to the patient and family (if
appropriate) according to their individual communication
and learning needs to increase their understanding, allay
their fears, and enhance cooperation.16
■ Raise the patient’s bed to waist level when providing
patient care to prevent caregiver back strain.17
■ Elevate the head of the bed 30 to 45 degrees (unless
contraindicated) to prevent health care–associated
pneumonia.18,19
■ Perform hand hygiene.5,6,7,8,9,10
■ Put on gloves and, as needed, other personal protective
equipment to comply with standard precautions.20,21,22
■ Perform a baseline physical assessment, including vital
signs, breath sounds, oxygen saturation, and physical
assessment. In an emergency, verify that the patient has a
patent airway before administering oxygen.
■ Select the most appropriate oxygen delivery device based
on the practitioner’s order and the patient’s status.
■ Check the patient’s room to make sure it’s safe for
oxygen administration. Whenever possible, replace
electrical devices with nonelectrical ones to reduce the risk
of fire.
■ If the patient care area isn’t already clearly labeled and
your facility requires it, place an OXYGEN PRECAUTIONS sign on
the door to the patient’s room.
■ Help place the oxygen delivery device on the patient.
Make sure it fits properly and is stable.
■ Monitor the patient’s oxygen saturation level by pulse
oximetry to assess response to oxygen therapy. Make sure
that the alarm limits are set appropriately for the patient’s
current condition, and that alarms are turned on, functioning
properly, and audible to staff.23,24,25,26
■ If the practitioner has ordered an ABG analysis to
evaluate ventilation, acid-base balance, oxygenation status,
or oxygen-carrying capacity, obtain an arterial sample after
allowing sufficient time for the patient’s oxygenation to
return to a steady state. (See the “Arterial puncture for
blood gas analysis” procedure, page 31.) A patient with
healthy lungs may achieve a steady state within 5 minutes
after a change in therapy; a patient with chronic obstructive
pulmonary disease (COPD) may require 20 to 30 minutes.1
Notify the practitioner of critical test results within your
facility’s established time frame so that the patient can be
promptly treated.27
■ Assess the patient frequently for signs and symptoms of
hypoxia, such as restlessness, decreased level of
consciousness, increased heart rate, arrhythmias,
perspiration, dyspnea, use of accessory muscles, yawning or
flared nostrils, cyanosis, and cool, clammy skin. Obtain vital
signs, as needed.
■ Regularly monitor the patient’s skin integrity around the
oxygen delivery device to prevent medical device–related
skin injury. Wipe moisture or perspiration from the patient’s
face and from the mask, and pad pressure areas if needed.
EQUIPMENT
Guide to oxygen delivery systems
Patients may receive oxygen through one of several administration systems.
Each has its own benefits, drawbacks, and indications for use. The
advantages and disadvantages of each system are described below.
Nasal cannula
Oxygen is delivered through plastic cannulas in the patient’s nostrils.
Advantages: Safe and simple; comfortable, and easily tolerated; nasal
prongs can be shaped to fit any face; effective for low oxygen
concentrations; allows movement, eating, and talking; inexpensive and
disposable.
Disadvantages: Can’t deliver concentrations higher than 40%; can’t be
used in complete nasal obstruction; may cause headaches or dry mucous
membranes if flow rate exceeds 6 L/minute;2 can dislodge easily.
Administration guidelines: Hook the cannula tubing behind the patient’s
ears and under the chin. Slide the adjuster upward under the chin to secure
the tubing. If using an elastic strap to secure the cannula, position it over the
ears and around the back of the head. Don’t apply it too tightly, because
doing so can result in excess pressure on facial structures and cannula
occlusion as well. With a nasal cannula, oral breathers achieve the same
oxygen delivery as nasal breathers. Provide humidification at a flow rate
greater than 4 L/minute.2 Use care when assigning an estimated fraction of
inspired oxygen (Fio2) to patients, because this low-flow system can have
great fluctuations.2
Simple mask
Oxygen flows through an entry port at the bottom of the mask and exits
through large holes on the sides of the mask.
Advantages: Can deliver concentrations of 35% to 50%.2
Disadvantages: Hot and confining; may irritate patient’s skin; tight seal,
which may cause discomfort, is required for higher oxygen concentrations;
interferes with talking and eating; impractical for long-term therapy because
of its imprecision.
Administration guidelines: Select the mask size that offers the best fit.
Place the mask over the patient’s nose, mouth, and chin, and mold the
flexible metal edge to the bridge of the nose. Adjust the elastic band around
the head to hold the mask firmly but comfortably over the cheeks, chin, and
bridge of the nose. For elderly or cachectic patients with sunken cheeks, tape
gauze pads to the mask over the cheek area to try to create an airtight seal.
Without this seal, room air dilutes the oxygen, preventing delivery of the
prescribed concentration. A minimum of 5 L/minute is required in all masks to
flush expired carbon dioxide from the mask so that the patient doesn’t
rebreathe it.2
Nonrebreather mask
On inhalation, the one-way valve opens, directing oxygen from a reservoir
bag into the mask. On exhalation, gas exits the mask through the one-way
expiratory valve and enters the atmosphere. The patient breathes gas only
from the bag.
Advantages: Delivers the highest possible oxygen concentration (60% to
90%) short of intubation and mechanical ventilation; effective for short-term
therapy; can be converted to a partial rebreather mask, if necessary, by
removing the one-way valve.
Disadvantages: Requires a tight seal, which may be difficult to maintain
and may cause discomfort; may irritate the patient’s skin; interferes with
talking and eating; impractical for long-term therapy.
Administration guidelines: Follow procedures listed for the simple mask.
Make sure that the mask fits very snugly and that the one-way valves are
secure and functioning. Provide a minimum flow rate of 10 L/minute.2
Because the mask excludes room air, valve malfunction can cause carbon
dioxide buildup and suffocate an unconscious patient. If the reservoir bag
collapses more than slightly during inspiration, raise the flow rate until you
see only a slight deflation. Marked or complete deflation indicates an
insufficient flow rate. Keep the reservoir bag from twisting or kinking. Ensure
free expansion by making sure the bag lies outside the patient’s gown and
bedcovers.
CPAP mask
This system allows the spontaneously breathing patient to receive continuous
positive airway pressure (CPAP), with or without an artificial airway. A positive
end-expiratory pressure valve may be fitted to the mask on the lower
expiratory port to allow expired gases to be exhaled under a fixed valve
pressure.
Advantages: Noninvasively improves arterial oxygenation by increasing
functional residual capacity; allows the patient to avoid intubation; allows the
patient to talk and cough without interrupting positive pressure.
Disadvantages: Requires a tight fit, which may cause discomfort;
interferes with eating and talking; increases the risk of aspiration if the
patient vomits; increases the risk of pneumothorax, diminished cardiac
output, and gastric distention; must be used cautiously in patients with
chronic obstructive pulmonary disease, bullous lung disease, low cardiac
output, or tension pneumothorax.
Administration guidelines: Place one strap behind the patient’s head
and the other strap over the head to ensure a snug fit. Attach one latex strap
to the connector prong on one side of the mask. Then, use one hand to
position the mask on the patient’s face while using the other hand to connect
the strap to the other side of the mask. After the mask is applied, assess the
patient’s respiratory, circulatory, and GI function every hour. Watch for signs
of pneumothorax, decreased cardiac output, a drop in blood pressure, and
gastric distention.
Transtracheal oxygen
The patient receives oxygen through a catheter inserted into the tracheal
cartilage through a small permanent opening in the base of the neck in a
simple outpatient procedure.
Advantages: Supplies oxygen to the lungs throughout the respiratory
cycle; provides continuous oxygen without hindering mobility; doesn’t
interfere with eating or talking; doesn’t dry mucous membranes; catheter
can easily be concealed by a shirt or scarf.
Disadvantages: Not suitable for use in patients at risk for bleeding or
those with severe bronchospasm, uncompensated respiratory acidosis,
pleural herniation into the base of the neck, or high corticosteroid dosages.
Administration guidelines: After insertion, obtain a chest X-ray to
confirm placement. Monitor the patient for bleeding, respiratory distress,
pneumothorax, pain, coughing, or hoarseness. Don’t use the catheter for
about 1 week after insertion to decrease the risk of subcutaneous
emphysema.
Venturi mask
The mask is connected to a Venturi device, which mixes a specific volume of
air and oxygen.
Advantages: Delivers highly accurate oxygen concentration despite the
patient’s respiratory pattern, because the same amount of air is always
entrained; dilute jets can be changed or the dial turned to change oxygen
concentration; doesn’t dry mucous membranes; humidity or aerosol can be
added.
Disadvantages: Confining, and may irritate skin; oxygen concentration
may be altered if mask fits loosely, tubing kinks, oxygen intake ports become
blocked, flow is insufficient, or patient is hyperpneic; interferes with eating
and talking; condensate may collect and drip on the patient if humidification
is used.
Administration guidelines: Make sure that the oxygen flow rate is set at
the amount specified on each mask and that the Venturi valve is set for the
desired Fio2.
Aerosols
A face mask, hood, tent, or tracheostomy tube or collar is connected to wide-
bore tubing that receives aerosolized oxygen from a jet nebulizer. The jet
nebulizer, which is attached near the oxygen source, adjusts air entrainment
in a manner similar to the Venturi device.
Advantages: Administers high humidity; gas can be heated (when
delivered through an artificial airway) or cooled (when delivered through a
tent).
Disadvantages: Condensate collected in the tracheostomy collar or T
tube may drain into the tracheostomy; the weight of the T tube can put
stress on the tracheostomy tube.
Administration guidelines: Guidelines vary with the type of nebulizer
used—the ultrasonic, large-volume, small-volume, or in-line. When using a
high-output nebulizer, watch for signs of overhydration, pulmonary edema,
crackles, and electrolyte imbalance.
■ Return the bed to the lowest position to prevent falls and
maintain patient safety.28
■ Remove and discard your personal protective equipment,
if worn.20
■ Perform hand hygiene.5,6,7,8,9,10
■ Clean and disinfect your stethoscope using a disinfectant
pad to prevent transmission of microorganisms.29,30
■ Perform hand hygiene.5,6,7,8,9,10
■ Document the procedure.31,32,33,34
Special considerations
■ If the patient will be receiving oxygen at a concentration
above 60% for more than 24 hours, watch carefully for signs
of oxygen toxicity. Prolonged high concentrations of oxygen
can cause lung injury. Surfactant activity may be impaired,
and increased capillary congestion, edema, interstitial space
thickening, and fibrotic changes may occur. The patient may
exhibit signs and symptoms of tracheobronchial irritation,
such as coughing and substernal discomfort. Remind the
patient to cough and deep-breathe frequently to prevent
atelectasis. Also, to prevent the development of serious lung
damage, measure ABG values repeatedly to determine
whether high oxygen concentrations are still necessary.
■ Maintain the patient’s target oxygen saturation level
within the recommended range of 94% to 98%, unless
otherwise specified. If the patient has COPD or other risk
factors for hypercapnic respiratory failure, a saturation of
88% to 92% may be recommended.4
■ Be aware that flowmeters, which connect to an oxygen or
compressed air source, are color-coded so that oxygen
(green) isn’t confused with compressed air (yellow).4
■ Avoid interruptions in oxygen therapy for walking or
transport.2 Regularly check the content of cylinders and
calculate how long they will last. This is especially important
for cylinders on resuscitation carts and when transferring a
patient.4
■ The Joint Commission issued a sentinel event alert
concerning medical device alarm safety, because alarm-
related events have been associated with permanent loss of
function or death. Among the major contributing factors
were improper alarm settings, alarms inappropriately turned
off, and alarm signals not audible to staff. Make sure alarm
limits are set appropriately, and that alarms are turned on,
functioning properly, and audible to staff. Follow facility
guidelines for preventing alarm fatigue.23
Patient teaching
Before discharging a patient who will receive oxygen
therapy at home, make sure you know the types of oxygen
therapy, the kinds of services that are available, and the
service schedules offered by local home suppliers. Together
with the practitioner and the patient, choose the device best
suited to the patient. (See Types of home oxygen therapy,
page 569.)
If the patient will be receiving transtracheal oxygen
therapy, teach the patient how to properly clean and care
for the catheter. Advise the patient to keep the skin
surrounding the insertion site clean and dry to prevent
infection.
No matter which device the patient uses, you’ll need to
evaluate the ability and motivation of the patient and family
members to administer oxygen therapy at home. Make sure
they understand the reason the patient is receiving oxygen
and the safety issues involved in oxygen administration.
Teach them how to properly use and clean the equipment
and supplies.
If the patient will be discharged with oxygen for the first
time, make sure the patient’s health insurance covers home
oxygen. If it doesn’t, find out what criteria the patient must
meet to obtain coverage. Without a third-party payer, the
patient may not be able to afford home oxygen therapy.
Complications
Oxygen use increases the risk of fires. Humidification
systems may become contaminated, increasing the risk of
infection.2 With a fraction of inspired oxygen of greater than
50%, absorption atelectasis, oxygen toxicity, and depression
of ciliary or leukocytic function may occur; ventilatory
depression may occur in spontaneously breathing patients
with elevated arterial carbon dioxide levels.2,35
Hypothermia and increased oxygen consumption may
result from administering cool oxygen. Pressure injuries may
develop on the patient’s head and face and around the nose
during prolonged oxygen administration.
Documentation
Record the date and time of oxygen administration; the type
of delivery device; the oxygen flow rate; the patient’s vital
signs,4 skin color, respiratory effort, and breath sounds; the
patient’s response before and after initiation of therapy;
complications and the nursing actions taken; and any
patient or family teaching and their understanding of the
teaching.
EQUIPMENT
Types of home oxygen therapy
Oxygen therapy can be administered at home using an oxygen tank, an
oxygen concentrator, or liquid oxygen.
Oxygen tank
Commonly used for patients who need oxygen on a standby basis or who
need a ventilator at home, the oxygen tank has several disadvantages,
including its cumbersome design and the need for frequent replacement.
Because oxygen is stored under high pressure, the oxygen tank also poses a
potential hazard.
Oxygen concentrator
The oxygen concentrator extracts oxygen molecules from room air. It can be
used for low oxygen flow (less than 4 L/minute) and doesn’t need to be
refilled with oxygen. However, because the oxygen concentrator runs on
electricity, it won’t function during a power failure.
Liquid oxygen
This option is commonly used by patients who are oxygen-dependent but still
mobile. The system includes a large liquid reservoir for home use. When the
patient wants to leave the house, he fills a portable unit worn over the
shoulder; this supplies oxygen for up to several hours, depending on the liter
flow.
REFERENCES
1 Kacmarek, R. M., et al. (2017). Egan’s fundamentals of respiratory care (11th
ed.). St. Louis, MO: Mosby.
2 American Association for Respiratory Care (AARC). (2002). AARC clinical
practice guideline: Oxygen therapy for adults in the acute care facility—2002
revision & update. Respiratory Care, 47(6), 717–720. Accessed via the Web at
http://www.rcjournal.com/cpgs/otachcpg-update.html (Level VII)
3 World Health Organization. (2009). “Glove use information leaflet” [Online].
Accessed via the Web at
http://www.who.int/gpsc/5may/Glove_Use_Information_Leaflet.pdf (Level VII)
4 National Patient Safety Agency. (2010). Safety in practice: Making oxygen use
safer in hospitals. Nursing Times, 106(19), 10–11 . Accessed via the Web at
http://www.nursingtimes.net/Journals/1/Files/2010/5/18/Safety%20in%20pract
ice%20-%20making%20oxygen%20use%20safer%20in%20hospitals.pdf
5 The Joint Commission. (2019). Standard NPSG.07.01.01. Comprehensive
accreditation manual for hospitals. Oakbrook Terrace, IL: The Joint
Commission. (Level VII)
6 Centers for Disease Control and Prevention. (2002). Guideline for hand
hygiene in health-care settings: Recommendations of the Healthcare Infection
Control Practices Advisory Committee and the HICPAC/SHEA/APIC/IDSA Hand
Hygiene Task Force. MMWR Recommendations and Reports, 51(RR-16), 1–45.
Accessed via the Web at https://www.cdc.gov/mmwr/pdf/rr/rr5116.pdf (Level
II)
7 World Health Organization. (2009). “WHO guidelines on hand hygiene in
health care: First global patient safety challenge, clean care is safer care”
[Online]. Accessed via the Web at
http://apps.who.int/iris/bitstream/10665/44102/1/9789241597906_eng.pdf
(Level IV)
8 Centers for Medicare and Medicaid Services, Department of Health and
Human Services. (2015). Condition of participation: Infection control. 42 C.F.R.
§ 482.42.
9 Accreditation Association for Hospitals and Health Systems. (2017). Standard
07.01.21. Healthcare Facilities Accreditation Program: Accreditation
requirements for acute care hospitals. Chicago, IL: Accreditation Association
for Hospitals and Health Systems. (Level VII)
10 DNV GL-Healthcare USA, Inc. (2016). IC.1 .SR.1 . NIAHO® accreditation
requirements: Interpretive guidelines & surveyor guidance (version 11).
Milford, OH: DNV GL-Healthcare USA, Inc. (Level VII)
11 The Joint Commission. (2019). Standard NPSG.01.01.01. Comprehensive
accreditation manual for hospitals. Oakbrook Terrace, IL: The Joint
Commission. (Level VII)
12 The Joint Commission. (2019). Standard RI.01.01.01. Comprehensive
accreditation manual for hospitals. Oakbrook Terrace, IL: The Joint
Commission. (Level VII)
13 Centers for Medicare and Medicaid Services, Department of Health and
Human Services. (2015). Condition of participation: Patient’s rights. 42 C.F.R.
§ 482.13(c)(1).
14 Accreditation Association for Hospitals and Health Systems. (2017). Standard
15.01.16. Healthcare Facilities Accreditation Program: Accreditation
requirements for acute care hospitals. Chicago, IL: Accreditation Association
for Hospitals and Health Systems. (Level VII)
15 DNV GL-Healthcare USA, Inc. (2016). PR.1.SR.5 . NIAHO® accreditation
requirements: Interpretive guidelines & surveyor guidance (version 11).
Milford, OH: DNV GL-Healthcare USA, Inc. (Level VII)
16 The Joint Commission. (2019). Standard PC.02.01.21. Comprehensive
accreditation manual for hospitals. Oakbrook Terrace, IL: The Joint
Commission. (Level VII)
17 Waters, T. R., et al. (2009). “Safe patient handling training for schools of
nursing” [Online]. Accessed via the Web at
http://www.cdc.gov/niosh/docs/2009-127/pdfs/2009-127.pdf (Level VII)
18 Centers for Disease Control and Prevention. (2004). Guidelines for preventing
health-care–associated pneumonia, 2003: Recommendations of CDC and the
Healthcare Infection Control Practices Advisory Committee. MMWR
Recommendations and Reports, 53(RR-3), 1–32. Accessed via the Web at
http://www.cdc.gov/mmwr/pdf/rr/rr5303.pdf (Level II)
19 Klompas, M., et al. (2014). Strategies to prevent ventilator-associated
pneumonia in acute care hospitals: 2014 update. Infection Control and
Hospitals Epidemiology, 35(8), 915–936 . Accessed via the Web at
http://www.jstor.org/stable/10.1086/677144 (Level I)
20 Siegel, J. D ., et al. (2007, revised 2017). “2007 guideline for isolation
precautions: Preventing transmission of infectious agents in healthcare
settings” [Online]. Accessed via the Web at
https://www.cdc.gov/infectioncontrol/pdf/guidelines/isolation-guidelines.pdf
(Level II)
21 Accreditation Association for Hospitals and Health Systems. (2017). Standard
07.01.10. Healthcare Facilities Accreditation Program: Accreditation
requirements for acute care hospitals. Chicago, IL: Accreditation Association
for Hospitals and Health Systems. (Level VII)
22 DNV GL-Healthcare USA, Inc. (2016). IC.1 .SR.2 . NIAHO® accreditation
requirements: Interpretive guidelines & surveyor guidance (version 11).
Milford, OH: DNV GL-Healthcare USA, Inc. (Level VII)
23 The Joint Commission. (2013). “Sentinel event alert: Medical device alarm
safety in hospitals” [Online]. Accessed via the Web at
https://www.jointcommission.org/assets/1/6/SEA_50_alarms_4 _26_16.final
(Level VII)
24 The Joint Commission. (2019). Standard NPSG.06 .01.01. Comprehensive
accreditation manual for hospitals. Oakbrook Terrace, IL: The Joint
Commission. (Level VII)
25 Graham, K. C., & Cvach, M. (2010). Monitor alarm fatigue: Standardizing use
of physiological monitors and decreasing nuisance alarms. American Journal
of Critical Care, 19(1), 28–37. Accessed via the Web at
http://ajcc.aacnjournals.org/content/19/1/28.full.pdf
26 American Association of Critical-Care Nurses. (2013). “A ACN practice alert:
Alarm management” [Online]. Accessed via the Web at
https://www.aacn.org/aacn-website/shared/content/practice-
alerts/2015/11/25/alarm-management (Level VII)
27 The Joint Commission. (2019). Standard NPSG.02.03 .01. Comprehensive
accreditation manual for hospitals. Oakbrook Terrace, IL: The Joint
Commission. (Level VII)
28 Ganz, D. A., et al. (2013). Preventing falls in hospitals: A toolkit for improving
quality of care (AHRQ Publication No. 13-0015-EF). Rockville, MD: Agency for
Healthcare Research and Quality. Accessed via the Web at
https://www.ahrq.gov/sites/default/files/publications/files/fallpxtoolkit.pdf
(Level VII)
29 Rutala, W. A., et al. (2008, revised 2017). “Guideline for disinfection and
sterilization in healthcare facilities, 2008” [Online]. Accessed via the Web at
https://www.cdc.gov/hicpac/pdf/guidelines/Disinfection_Nov_2008.pdf (Level I)
30 Accreditation Association for Hospitals and Health Systems. (2017). Standard
07.02.03. Healthcare Facilities Accreditation Program: Accreditation
requirements for acute care hospitals. Chicago, IL: Accreditation Association
for Hospitals and Health Systems. (Level VII)
31 The Joint Commission. (2019). Standard RC.01.03 .01. Comprehensive
accreditation manual for hospitals. Oakbrook Terrace, IL: The Joint
Commission. (Level VII)
32 Centers for Medicare and Medicaid Services, Department of Health and
Human Services. (2015). Condition of participation: Medical record services.
42 C.F.R. § 482.24(b).
33 Accreditation Association for Hospitals and Health Systems. (2017). Standard
10.00 .03. Healthcare Facilities Accreditation Program: Accreditation
requirements for acute care hospitals. Chicago, IL: Accreditation Association
for Hospitals and Health Systems. (Level VII)
34 DNV GL-Healthcare USA, Inc. (2016). MR.2 .SR.1 . NIAHO® accreditation
requirements: Interpretive guidelines & surveyor guidance (version 11).
Milford, OH: DNV GL-Healthcare USA, Inc. (Level VII)
35 National Heart, Lung, and Blood Institute. (2018). “Oxygen therapy” [Online].
Accessed via the Web at https://www.nhlbi.nih.gov/health/health-
topics/topics/oxt
P
PAIN MANAGEMENT
Defined as the sensory and emotional experience
associated with actual or potential tissue damage, pain
includes not only the perception of an uncomfortable
stimulus, but also the response to that perception.
The patient’s report of pain is the most reliable indicator
of the existence of pain.1 A person who feels severe pain
seeks medical help because he or she believes the pain
signals a serious problem. This perception produces anxiety,
which, in turn, increases the pain. To assess and manage
pain properly, the nurse must depend on both the person’s
subjective description and objective tools.
Each facility should have defined criteria to screen,
assess, and reassess pain.2 These criteria should be
consistent with the patient’s age, condition, and ability to
understand.2 Pain assessment should include personal,
cultural, spiritual, and ethnic beliefs. Patients and families
should be educated about their role in pain management.
They should also be informed about potential limitations
and adverse effects of pain treatment. It’s important to
reassess pain at designated intervals and the effectiveness
of the type of pain intervention used (for example, oral, IV,
or transdermal route) to evaluate progress toward pain
management goals.
Several interventions can be used to manage pain,
including analgesics, emotional support, comfort measures,
and complementary and alternative therapies such as
cognitive techniques to distract the patient and Reiki or
aromatherapy to promote relaxation. Severe pain usually
requires an opioid analgesic. Invasive measures, such as
epidural analgesia or patient-controlled analgesia (PCA),
may also be required.
Equipment
Facility-approved pain assessment tool or scale ▪ oral care
supplies ▪ water ▪ soap ▪ washcloth and towel ▪ cup of
water ▪ prescribed nonopioid analgesic (such as aspirin or
acetaminophen) ▪ Optional: PCA device, prescribed mild
opioid (such as codeine), prescribed strong opioid (such as
morphine or hydromorphone), pulse oximeter and probe,
capnography equipment, sedation scale, pillow, cold
compresses, lotion, radio or other device to listen to music.
Implementation
■ Review the patient’s medical record for information
related to the patient’s current clinical condition, past
medical history, and pain management goals, when
available.2
■ Review the patient’s pain history, including previous use
or abuse of analgesics, possible adverse effects associated
with potential opioid tolerance or intolerance, and previous
pain level, when available, to help avoid accidental opioid
overdose.3
■ Perform hand hygiene.4,5,6,7,8,9
■ Confirm the patient’s identity using at least two patient
identifiers.10
■ Provide privacy.11,12,13,14
■ Obtain the assistance of a medical interpreter as
needed.15,16
■ Raise the patient’s bed to waist level when providing
patient care to prevent caregiver back strain.17
■ Perform hand hygiene.4,5,6,7,8,9
■ Screen and assess the patient’s pain using facility-defined
criteria that are consistent with the patient’s age, condition,
and ability to understand.2 As directed, use a facility-
approved pain assessment tool or scale.
■ Ask key questions and note the patient’s response.2 For
example, ask the patient to describe the pain’s duration,
severity, and location. Look for physiologic or behavioral
clues to the pain’s severity.18 (See How to assess pain.)
■ In collaboration with the multidisciplinary team, involve
the patient in the pain management planning process.
Provide education on pain management, treatment options,
and the safe use of opioid and non-opioid medications when
prescribed. Develop realistic expectations and measurable
goals that the patient understands for the degree, duration,
and reduction of pain. Discuss objectives used to evaluate
treatment progress (for example, relief of pain and improved
physical and psychosocial function).2
■ Treat the patient’s pain as needed and ordered using
nonpharmacologic or pharmacologic approaches, or a
combination of approaches. Base the treatment plan on
evidence-based practices and the patient’s clinical
condition, past medical history, and pain management
goals.2
Providing emotional support
■ Show your concern by spending time talking with the
patient. Because of the pain and the inability to manage it,
the patient may be anxious and frustrated. Such feelings
can worsen pain.
■ Assess the patient’s spiritual and cultural needs and
incorporate spiritual and cultural practices as desired by the
patient.
Performing comfort measures
■ Perform hand hygiene.4,5,6,7,8,9
■ Reposition the patient periodically to reduce muscle
spasms and tension and to relieve pressure on bony
prominences. Increasing the angle of the bed can reduce
pull on an abdominal incision, diminishing pain. If
appropriate, elevate a limb to reduce swelling,
inflammation, and pain.
■ Have the patient splint or support abdominal and chest
incisions with a pillow when coughing or changing position
to help decrease pain.
■ Apply cold compresses as appropriate to decrease
discomfort.18
■ Give the patient a back massage to help relax tense
muscles.18
■ Perform passive range-of-motion exercises to prevent
stiffness and further loss of mobility, relax tense muscles,
and provide comfort.
■ Provide oral hygiene. Keep a fresh water glass or cup at
the bedside, because many pain medications tend to dry
out the mouth.
■ Wash the patient’s face and hands to soothe the patient,
which may reduce the perception of pain.
Using cognitive techniques
■ Help the patient enhance the effect of analgesics by
using such techniques as distraction, guided imagery, deep
breathing, and relaxation.1,18 Choose the method the
patient prefers. If possible, start these techniques when the
patient feels little or no pain. If the patient feels persistent
pain, begin with short, simple exercises. Before beginning,
dim the lights, loosen or remove the patient’s restrictive
clothing, and eliminate noise from the environment.
■ For distraction, have the patient focus attention on an
enjoyable activity. For instance, have the patient use music
as a distraction by turning on the radio or another device
that lets the patient listen to music when the pain begins.
Have the patient close the eyes and concentrate on
listening to the music and raising or lowering the volume as
the pain increases or subsides. Note, however, that
distraction is mainly helpful in relieving pain lasting for brief
episodes or for painful procedures of short duration.
■ For imagery, help the patient concentrate on a peaceful,
pleasant image, such as walking on the beach. Encourage
the patient to concentrate on the details of that image by
asking about the associated sights, sounds, smells, tastes,
and touch. The positive emotions evoked by this exercise
minimize pain.
■ For deep breathing, have the patient stare at an object,
then slowly inhale and exhale as the patient counts aloud to
maintain a comfortable rate and rhythm. Have the patient
concentrate on the rise and fall of the abdomen. Encourage
the patient to feel more and more weightless with each
breath while the patient concentrates on the rhythm of
breathing or on any restful image.
■ For muscle relaxation, have the patient focus on a
particular muscle group. Then ask the patient to tense the
muscles and note the sensation. After 5 to 7 seconds, tell
the patient to relax the muscles and concentrate on the
relaxed state. Have the patient note the difference between
the tense and relaxed states. After the patient tenses and
relaxes one muscle group, have the patient proceed to
another and then another until the patient has covered the
entire body.
Giving medications
■ Perform hand hygiene.4,5,6,7,8,9
■ If the patient is allowed oral medications, begin with a
nonopioid analgesic, such as acetaminophen or aspirin,
every 4 to 6 hours as ordered, following safe medication
administration practices.19,20,21,22,23
■ If the patient needs more relief than a nonopioid
analgesic provides, administer a mild opioid (such as
oxycodone or codeine) as ordered, following safe medication
administration practices.19,20,21,22,23
■ If the patient needs still more pain relief, administer a
strong opioid (such as morphine or hydromorphone), as
ordered (administer oral medications if possible), following
safe medication administration practices.19,20,21,22,23 For the
patient receiving IV opioid medication, do the following:
Monitor the patient closely if identified as high risk for
adverse outcomes related to opioid treatment.2 Frequently
monitor the patient’s respiratory rate, oxygen saturation
level by pulse oximetry, end-tidal carbon dioxide level by
capnography (if available), and sedation level using a
standardized sedation scale, to decrease the risk of adverse
events associated with IV opioid use.20,24 Explain the
assessment and monitoring process to the patient and
family
members
according to their individual
communication and learning needs to increase their
understanding, allay their fears, and enhance cooperation.16
Tell them to alert staff if breathing problems or other
changes occur that might be a reaction to the
medication.20,24
■ If ordered, teach the patient to use a PCA device, which
can help manage the pain and decrease anxiety. (See the
“Patient-controlled analgesia” procedure.)
Completing the procedure
■ Reassess and respond to the patient’s pain by evaluating
the response to treatment and progress toward pain
management goals. Assess for adverse reactions and risk
factors for adverse events that may result from treatment.
■ Return the bed to the lowest position to prevent falls and
maintain the patient’s safety.25
■ Perform hand hygiene.4,5,6,7,8,9
■ Document the procedure.26,27,28,29
Special considerations
■ During periods of intense pain, the patient’s ability to
concentrate diminishes. If the patient is in severe pain, help
the patient to select a cognitive technique that’s easy to
use. After the patient selects a technique, encourage the
patient to use it consistently. Remind the patient that results
of cognitive therapy techniques improve with practice. Help
the patient through the initial sessions.
■ Pain shouldn’t be considered a normal part of the aging
process. Provide pain relief for older adult patients using
pharmacologic and
nonpharmacologic approaches.
Remember, safety is a special concern, especially the risk of
falls resulting from impaired mobility due to pain and from
adverse effects of pain medications.30
■ Identify age-related factors that affect assessment and
pain management in older adult patients.30
ELDER ALERT Because of adverse effects, avoid certain medications
(such as meperidine) in elderly patients.
■ Cultural remedies for pain, such as the involvement of
extended family and the use of complementary therapies
such as acupuncture, should be permitted and even
encouraged. Research indicates that family support
improves patient outcomes, and that acupuncture can be
effective in managing pain.15
■ Be aware that patients receiving opioid analgesics may
be at risk for addiction, physical dependence, or tolerance.
■ Addiction is defined as psychological dependence
characterized by a persistent pattern of dysfunctional drug
use; during acute pain treatment, it occurs in less than 1%
of patients.18 Addiction is characterized by a craving for the
drug to experience effects other than pain relief. A patient
demonstrating such behavior usually has a preexisting
problem that’s exacerbated by opioid use.18 Discuss with
the practitioner an addicted patient’s problem, and make
appropriate referrals to experts.
■ Physical dependence is a physiologic state in which
withdrawal signs and symptoms occur with abrupt cessation
or reversal of the drug. Physical dependence doesn’t mean
that addiction coexists. Signs and symptoms include
anxiety, irritability, chills and hot flashes, excessive
salivation and tearing, rhinorrhea, sweating, nausea,
vomiting, and seizures. These signs and symptoms are likely
to begin within 12 hours and peak within 72 hours of
discontinuing the drug. To reduce the risk of dependence,
discontinue an opioid by decreasing the dose gradually each
day.
■ Tolerance is a neuroadaptive response in which one or
more of a drug’s effects, such as analgesia or sedation,
decreases over time. Tolerance and addiction may be
exclusive of one another.
■ Don’t assume that the patient who has dementia or
another cognitive impairment can’t understand the pain
scale or communicate about pain. Experiment with several
pain scales to find one that works. A scale featuring faces,
such as the Wong-Baker FACES Pain Rating Scale, is a good
choice for many cognitively impaired patients and those
with limited language skills. (See Visual pain rating scale,
page 572.)
How to assess pain
To assess pain properly, you need to consider the patient’s description and
your observations of the patient’s physical and behavioral responses. A
comprehensive, culturally sensitive pain assessment tool can help capture
the effects of cultural norms on the patient’s pain experiences, examine the
meaning that the pain has to the patient, and determine the patient’s
treatment preferences (such as herbs, home remedies, complementary
therapies, or the services of alternative or cultural healers).15
Start by asking the following questions (bearing in mind that the patient’s
responses will be shaped by previous experiences, self-image, and beliefs
about the condition):
■ Where is the pain located? How long does it last? How often does it occur?
■ How would you describe the pain?
■ What brings the pain on?
■ What relieves the pain or makes it worse?
■ What do you think is causing your pain?
■ What do you fear most about the pain?
■ What problems does the pain cause you?
■ Who else have you consulted about the pain? Family members? A
traditional healer?
■ What treatments do you think might help you with the pain?
Ask the patient to rank the pain on a scale from 0 to 10, with 0 denoting
lack of pain and 10 denoting the worst pain possible. Establish with the
patient what would be considered a low pain level, usually 4 or lower on a 0-
to-10 scale. Observe the patient’s behavioral and physiologic responses to
pain. Physiologic responses may be sympathetic or parasympathetic.
Behavioral responses
Behavioral responses include altered body position, moaning, sighing,
grimacing, withdrawal, crying, restlessness, muscle twitching, and immobility.
Sympathetic responses
Sympathetic responses are commonly associated with mild to moderate pain
and include pallor, elevated blood pressure, dilated pupils, skeletal muscle
tension, dyspnea, tachycardia, and diaphoresis.
Parasympathetic responses
Parasympathetic responses are commonly associated with severe, deep pain
and include pallor, decreased blood pressure, bradycardia, nausea, vomiting,
weakness, dizziness, and loss of consciousness.
Assess pain at regular intervals, usually at least every 2 hours; during rest
and activity; and throughout the night (when pain is usually heightened).
Keep in mind that the ability to sleep doesn’t indicate absence of pain.
Complications
The most common adverse effects of analgesics include
respiratory depression (the most serious), sedation,
constipation, pruritus, nausea, vomiting, and addiction.
Documentation
Document each step of the nursing process. Describe the
subjective information you elicited from the patient, using
the patient’s own words. Note the location, quality, and
duration of the pain as well as precipitating factors.
Record the pain-relief method selected and the patient’s
rating of the pain before and after pain management
interventions. Use a flow sheet to document pain
assessment findings. Summarize your actions, including the
name and dosage of any medication given and the patient’s
response. If the patient’s pain wasn’t relieved, note
alternative treatments to consider the next time pain
occurs. Also record any complications of drug therapy.
Document any patient teaching provided and the patient’s
understanding of the teaching.
Visual pain rating scale
Patients with language difficulties can indicate pain using many instruments.
One such instrument is the Wong-Baker FACES Pain Rating Scale (shown
below), which uses six faces to help the patient describe the level of pain.
Another nonverbal instrument involves the use of a smiling face and a
frowning face, such as the ones shown below. Ask the patient to choose the
face that describes how the patient’s feeling—either happy because of
having no pain or sad because of having pain. Alternatively, to pinpoint
varying levels of pain, you can ask the patient to draw a face.
[© 1983 Wong-Baker FACES® Foundation, www.wongbakerFACES.org. Used
with permission. Originally published in Whaley & Wong’s Nursing Care of
Infants and Children. © Elsevier Inc.]
REFERENCES
1 Slade, S. (2014). Pain (acute): Management. Adelaide: Joanna Briggs Institute.
2 The Joint Commission. (2019). Standard PC.01.02.07. Comprehensive
accreditation manual for hospitals. Oakbrook Terrace, IL: The Joint
Commission. (Level VII)
3 The Joint Commission. (2012). “Sentinel event alert: Safe use of opioids in
hospitals” [Online]. Accessed via the Web at
http://www.jointcommission.org/assets/1/18/SEA_49_opioids_8 _2 _12_final.pdf
(Level VII)
4 The Joint Commission. (2019). Standard NPSG.07.01.01. Comprehensive
accreditation manual for hospitals. Oakbrook Terrace, IL: The Joint
Commission. (Level VII)
5 Centers for Disease Control and Prevention. (2002). Guideline for hand
hygiene in health-care settings: Recommendations of the Healthcare Infection
Control Practices Advisory Committee and the HICPAC/SHEA/APIC/IDSA Hand
Hygiene Task Force. MMWR Recommendations and Reports, 51(RR-16), 1–45.
Accessed via the Web at https://www.cdc.gov/mmwr/pdf/rr/rr5116.pdf (Level
II)
6 World Health Organization. (2009). “WHO guidelines on hand hygiene in
health care: First global patient safety challenge, clean care is safer care”
[Online]. Accessed via the Web at
http://apps.who.int/iris/bitstream/10665/44102/1/9789241597906_eng.pdf
(Level IV)
7 Centers for Medicare and Medicaid Services, Department of Health and
Human Services. (2015). Condition of participation: Infection control. 42 C.F.R.
§ 482.42.
8 Accreditation Association for Hospitals and Health Systems. (2017). Standard
07.01.21. Healthcare Facilities Accreditation Program: Accreditation
requirements for acute care hospitals. Chicago, IL: Accreditation Association
for Hospitals and Health Systems. (Level VII)
9 DNV GL-Healthcare USA, Inc. (2016). IC.1.SR.1 . NIAHO® accreditation
requirements: Interpretive guidelines & surveyor guidance (version 11).
Milford, OH: DNV GL-Healthcare USA, Inc. (Level VII)
10 The Joint Commission. (2019). Standard NPSG.01.01.01. Comprehensive
accreditation manual for hospitals. Oakbrook Terrace, IL: The Joint
Commission. (Level VII)
11 The Joint Commission. (2019). Standard RI.01.01.01. Comprehensive
accreditation manual for hospitals. Oakbrook Terrace, IL: The Joint
Commission. (Level VII)
12 Centers for Medicare and Medicaid Services, Department of Health and
Human Services. (2015). Condition of participation: Patient’s rights. 42. C.F.R.
§ 482.13(c)(1).
13 Accreditation Association for Hospitals and Health Systems. (2017). Standard
15.01.16. Healthcare Facilities Accreditation Program: Accreditation
requirements for acute care hospitals. Chicago, IL: Accreditation Association
for Hospitals and Health Systems. (Level VII)
14 DNV GL-Healthcare USA, Inc. (2016). PR.1.SR.5 . NIAHO® accreditation
requirements: Interpretive guidelines & surveyor guidance (version 11).
Milford, OH: DNV GL-Healthcare USA, Inc. (Level VII)
15 Narayan, M. C . (2010). Culture’s effects on pain assessment and
management. American Journal of Nursing, 110(4), 38–47 .
16 The Joint Commission. (2019). Standard PC.02.01.21. Comprehensive
accreditation manual for hospitals. Oakbrook Terrace, IL: The Joint
Commission. (Level VII)
17 Waters, T. T., et al. (2009). “Safe patient handling training for schools of
nursing” [Online]. Accessed via the Web at
https://www.cdc.gov/niosh/docs/2009-127/pdfs/2009-127.pdf (Level VII)
18 American Society of PeriAnesthesia Nurses (ASPAN). (2003). ASPAN pain and
comfort clinical guideline. Journal of PeriAnesthesia Nursing, 18, 232–236.
Accessed via the Web at
http://www.aspan.org/Portals/6/docs/ClinicalPractice/Guidelines/ASPAN_Clinica
lGuideline_PainComfort.pdf (Level VII)
19 World Health Organization (WHO). (n.d .). “WHO’s cancer pain relief ladder for
adults” [Online]. Accessed via the Web at
http://www.who.int/cancer/palliative/painladder/en/
20 Centers for Medicare and Medicaid Services, Department of Health and
Human Services. (2015). Condition of participation: Nursing services. 42
C.F.R. § 482.23(c).
21 Accreditation Association for Hospitals and Health Systems. (2017). Standard
16.01.03. Healthcare Facilities Accreditation Program: Accreditation
requirements for acute care hospitals. Chicago, IL: Accreditation Association
for Hospitals and Health Systems. (Level VII)
22 The Joint Commission. (2019). Standard MM.06.01.01. Comprehensive
accreditation manual for hospitals. Oakbrook Terrace, IL: The Joint
Commission. (Level VII)
23 DNV GL-Healthcare USA, Inc. (2016). MM.1 .SR.2. NIAHO® accreditation
requirements: Interpretive guidelines & surveyor guidance (version 11).
Milford, OH: DNV GL-Healthcare USA, Inc. (Level VII)
24 Centers for Medicare and Medicaid Services. (2014). “Requirements for
hospital medication administration, particularly intravenous (IV) medications
and post-operative care of patients receiving IV opioids” [Online]. Accessed
via the Web at https://www.cms.gov/Medicare/Provider-Enrollment-and-
Certification/SurveyCertificationGenInfo/Downloads/Survey-and-Cert-Letter-
14-15.pdf
25 Ganz, D. A., et al. (2013). Preventing falls in hospitals: A toolkit for improving
quality of care (AHRQ Publication No. 13-0015-EF). Rockville, MD: Agency for
Healthcare Research and Quality. Accessed via the Web at
https://www.ahrq.gov/sites/default/files/publications/files/fallpxtoolkit_0 .pdf
26 The Joint Commission. (2019). Standard RC.01.03 .01. Comprehensive
accreditation manual for hospitals. Oakbrook Terrace, IL: The Joint
Commission. (Level VII)
27 Centers for Medicare and Medicaid Services, Department of Health and
Human Services. (2015). Condition of participation: Medical record services.
42 C.F.R. § 482.24(b).
28 Accreditation Association for Hospitals and Health Systems. (2017). Standard
10.00 .03. Healthcare Facilities Accreditation Program: Accreditation
requirements for acute care hospitals. Chicago, IL: Accreditation Association
for Hospitals and Health Systems. (Level VII)
29 DNV GL-Healthcare USA, Inc. (2016). MR.2 .SR.1 . NIAHO® accreditation
requirements: Interpretive guidelines & surveyor guidance (version 11).
Milford, OH: DNV GL-Healthcare USA, Inc. (Level VII)
30 Harmon, J. R., et al. (2012). Efficacy of the use of evidence-based algorithmic
guidelines in the acute care setting for pain assessment and management in
older people: A critical review of the literature. International Journal of Older
People Nursing, 7(2), 127–140. (Level V)
PARENTERAL NUTRITION ADMINISTRATION
The patient who can’t meet nutritional needs by oral or
enteral feedings may require IV nutritional support, or
parenteral nutrition (PN). The patient’s diagnosis, history,
and prognosis determine the need for PN. Generally, this
treatment is prescribed for any patient who hasn’t been
able to absorb nutrients though the GI tract for more than 7
days. More specific indications include debilitating illness
lasting longer than 2 weeks; loss of 10% or more of pre-
illness weight; serum albumin level below 3.5 g/dL;
excessive nitrogen loss from wound infection, fistulas, or
abscesses; renal or hepatic failure; or a nonfunctioning GI
tract for 5 to 7 days in a severely catabolic patient.
Types of parenteral nutrition
Common illnesses that can trigger the need for PN include
inflammatory bowel disease, radiation enteritis, severe
diarrhea, intractable vomiting, and moderate to severe
pancreatitis. A massive small-bowel resection, bone marrow
transplantation, high-dose chemotherapy or radiation
therapy, and major surgery can also hinder a patient’s
ability to absorb nutrients, requiring PN.1
PN shouldn’t be given to patients with a normally
functioning GI tract, and it has limited value for well-
nourished patients whose GI tract will resume normal
function within 10 days. It also may be inappropriate for
patients with a poor prognosis or if the risks of PN outweigh
the benefits.
PN may be given through a peripheral or central venous
(CV) access device. Depending on the solution, it may be
used to boost the patient’s caloric intake, supply full caloric
needs, or surpass the patient’s caloric requirements.
The type of PN prescribed depends on the patient’s
condition and metabolic needs and on the administration
route. The solution usually contains protein, carbohydrates,
electrolytes, vitamins, and trace minerals. A lipid emulsion
provides the necessary fat. Standard IV solutions, such as
dextrose 5% in water, dextrose 10% in water, and normal
saline solution, are nutritionally incomplete and don’t
provide sufficient calories to maintain a patient’s nutritional
status. (See Types of parenteral nutrition.)
Total parenteral nutrition (TPN) refers to any nutrient
solution, including lipids, given through a CV access device.
Peripheral parenteral nutrition (PPN), which is given through
a peripheral catheter, supplies full caloric needs while
avoiding the risks that accompany CV access. To keep from
sclerosing the vein through which it’s administered, the
dextrose in PPN solution must be limited to 10% and the
osmolarity must be less than 900 mOsm/L.2 Therefore, the
success of PPN depends on the patient’s tolerance of the
large volume of fluid necessary to supply nutritional needs.
In many cases, the patient may need an increase in the
dextrose content and osmolarity beyond the level a
peripheral vein can handle. For example, most TPN solutions
are six times more concentrated than blood. As a result,
they must be delivered into a vein with a high blood flow
rate to dilute the solution. The most common delivery route
for TPN is through a CV access device into the superior vena
cava. Follow sterile technique when administering TPN to
reduce the risk of vascular catheter-associated infection.
HOSPITAL-ACQUIRED CONDITION ALERT Keep in mind that a vascular
catheter–associated infection is considered a hospital-acquired
condition by the Centers for Medicare and Medicaid Services because
it can be reasonably prevented using best practices. Make sure to use
infection prevention techniques (such as performing hand hygiene,
performing a vigorous mechanical scrub of the needleless connector,
and following sterile technique) when administering parenteral
nutrition to reduce the risk of vascular catheter–associated
bloodstream infections.3,4,5
Equipment
Prescribed PN solution ▪ sterile IV administration set for the
infusion device ▪ 0.2 -micron filter (or 1.2-micron filter if
using a [3-in-1] parenteral solution contains lipids or
albumin)2 ▪ syringe prefilled with preservative-free normal
saline solution ▪ antiseptic pad (chlorhexidine-based,
povidone iodine, or alcohol) ▪ electronic infusion pump with
anti-free-flow protection2 ▪ intake-and-output record ▪
gloves ▪ scale ▪ Optional: mask, glucometer, supplies for
blood specimen collection.
Preparation of equipment
Keep the PN solution refrigerated and protected from light
until 1 hour before use to prevent vitamin oxidation.
Remove the PN solution from the refrigerator 60 minutes
before use to reduce the risk of hypothermia, venospasm,
and pain.2,6,7
Inspect all IV equipment and supplies; if a product is
expired, if its integrity compromised, or if it’s defective,
remove it from patient use, label it as expired or defective,
and report the expiration or defect as directed by your
facility.8 Ensure that any administration set to be used for
lipids is di-(2-ethylhexyl)phthalate (DEHP)-free.2
Implementation
■ Avoid distractions and interruptions when preparing and
administering the PN solution to prevent administration
errors.9,10
■ Verify the practitioner’s order and make sure that the
prescribed therapy is appropriate for the patient’s age,
condition, and access device. Confirm that the access
device catheter tip is located as appropriate and that the
dose, rate, and route are appropriate for the patient.
Address concerns about the order with the practitioner,
pharmacist, or your supervisor, and, if needed, with the risk
management department, or as directed by your
facility.6,7,11,12,13,14,15,16
■ Make sure that the solution container is labeled with the
patient’s identifiers, patient’s weight and age, the
administration date and time, the expiration date, the route
of administration (central or peripheral), the dextrose
concentration, and component names and dosages. (All
components should be labeled as amounts per day and
listed in the same sequence and same unit of measure as
the practitioner’s order.) Make sure the total volume of
solution and the infusion rate are included, as well as the
duration of the infusion (continuous or cycled) and the
appropriate size filter to use.2 Inspect the integrity of the
container and solution, and return the solution to the
pharmacy if the integrity of the container is compromised,
the solution is cloudy or contains particles, or the solution is
expired.6,7,11,12,13,14,16
■ If required, confirm that the practitioner has obtained
written informed consent and that the consent is in the
patient’s medical record.6,17,18,19,20
■ Perform hand hygiene.4,21,22,23,24,25,26,27
■ Confirm the patient’s identity using at least two patient
identifiers.16,28
■ Provide privacy.29,30,31,32
■ Explain the procedure to the patient and family (if
appropriate) according to their individual communication
and learning needs to increase their understanding, allay
their fears, and enhance cooperation.33 Answer any
questions the patient has about PN.18,19
■ Compare the patient’s name and second patient identifier
on the solution container against the name on the patient’s
identification band.
■ If your facility uses a bar-code technology, scan your
identification badge, the patient’s identification bracelet,
and the solution’s bar code.
■ Raise the bed to waist level when providing care to
prevent caregiver back strain.34
■ Perform hand hygiene.4,21,22,23,24,25,26,27
■ Put on gloves as well as a mask, if required by your
facility.35,36
NURSING ALERT If administering lipid emulsion as a separate
solution, use a separate 1.2 micron filter for the lipid emulsion (if a
filter is required by the manufacturer; consult the manufacturer’s
instructions for use). Piggyback the lipid emulsion solution below the
parenteral nutrition filter.37
■ Connect the IV infusion pump administration set and
micron filter (if the tubing doesn’t contain an in-line filter);
insert the filter as close to the catheter insertion site as
possible.37
■ Squeeze the IV administration set drip chamber and,
holding the drip chamber upright, insert the IV
administration set spike into the IV bag or bottle. Then
release the drip chamber.
■ Prime the IV administration set by inverting the filter at
the distal end of the tubing and then opening the roller
clamp. Let the solution fill the filter and the tubing; gently
tap the tubing, filter, and Y-ports to dislodge trapped air and
prevent air embolism.38
■ Attach the IV administration set to the infusion pump
following the manufacturer’s instructions, and set the
infusion rate, concentration, and volume to be infused.
Make sure the alarms limits are set appropriately for the
patient’s current condition and that the alarms are turned
on, functioning, and audible to staff.2,16,39,40,41
■ Label the container and IV administration set with the
date of initiation or the date when change is required, as
directed by your facility.42
■ Perform a vigorous mechanical scrub of the needleless
connector for at least 5 seconds using an antiseptic pad.
Allow it to dry completely.5,43
■ Verify patency of the access device by aspirating for
blood return and flushing the catheter to reduce the risk of
infiltration and extravasation.15,44
■ While maintaining sterility of the syringe tip, attach a
prefilled syringe containing preservative-free normal saline
solution to the needleless connector. (Use a 10-mL syringe
or a syringe specifically designed to generate lower injection
pressure.) Unclamp the catheter and slowly aspirate for a
blood return that’s the color and consistency of whole blood.
If you don’t obtain a blood return, take steps to locate an
external cause of obstruction.44
■ If you do obtain a blood return, slowly inject preservative-
free normal saline solution into the catheter. Use a minimum
volume of twice the internal volume of the catheter system.
Don’t forcibly flush the device; further evaluate the device if
you meet resistance. Flush the catheter with preservative-
free normal saline solution according to the catheter type.44
■ Clamp the access device before disconnecting it to
prevent air from entering the catheter. If the catheter is a
CV access device and a clamp isn’t available, ask the
patient to perform the Valsalva maneuver just as you
change the tubing, if possible. Or, if the patient is being
mechanically ventilated, change the IV tubing immediately
after the machine delivers a breath at peak inspiration. Both
of these measures increase intrathoracic pressure and
prevent air embolism.38
■ Using sterile technique, attach the IV administration set
to the needleless connector.
■ Trace the tubing from the patient to its point of origin to
make sure that you’ve connected it to the proper port
before beginning the PN infusion.15,16,45,46 Route the tubing
in a standardized direction if the patient has other tubing
and catheters that have different purposes. Label the tubing
at the distal end (near the patient connection) and proximal
end (near the source container) to reduce the risk of
misconnection if you’ll be using multiple IV lines.46
■ After connecting the tubing, remove the clamp, if
applicable. Secure all connections to prevent harmful
disconnections.
NURSING ALERT Parenteral nutrition preparations are considered
high-alert medications because they can cause significant harm when
used in error.47
■ Before beginning the PN infusion, have another nurse
perform an independent double-check, if required by your
facility, to verify the patient’s identity and to make sure that
the correct solution is hanging in the prescribed
concentration, the solution’s indication corresponds with the
patient’s diagnosis, the dosage calculations are correct and
the dosing formula used to derive the final dose is correct,
the route of administration is safe and proper for the
patient, the pump settings are correct, and the infusion line
is attached to the correct port.16,48
■ After comparing the results of the independent double-
check with the other nurse (if required), begin infusing the
PN, as ordered, if there are no discrepancies. If
discrepancies exist, rectify them before beginning the
infusion.48
NURSING ALERT Maintain PN infusions at the prescribed rate. Avoid
interrupting the infusion for routine care or patient transport.2 Don’t
adjust the rate for “off-schedule” infusion starts or alter the infusion
rate in response to changes in fluid needs.49
■ Return the bed to the lowest position to prevent falls and
maintain patient safety.50
■
Discard used supplies in the appropriate
receptacles.35,36,51
■ Remove and discard your gloves and mask, if worn.35,36,51
■ Perform hand hygiene.4,21,22,23,24,25,26,27
■ Monitor the patient’s glucose level according to the
ordered parameters.2 Notify the practitioner of abnormal
blood glucose results. Insulin may be added to the PN
solution; however, the patient may still need additional
subcutaneous doses, if ordered. (See the “Parenteral
nutrition monitoring” procedure, page 578.)
■ Obtain blood specimens for laboratory analysis according
to the ordered parameters to monitor the patient’s
metabolic status. Report abnormalities to the practitioner.
■ Monitor intake and output and weigh the patient daily at
the same time each morning, after the patient voids if
possible.2 Suspect fluid imbalance if the patient gains more
than 1 lb (0.5 kg) daily.
■ Perform hand hygiene.4,21,22,23,24,25,26,27
■ Document the procedure.52,53,54,55,56
TROUBLESHOOTING
Correcting common parenteral nutrition
problems
Special considerations
■ Change dressings according to the type of access device
and type of dressing. If the patient has a short peripheral
catheter, change the dressing every 5 to 7 days. If the
patient has a short-term CV access device, routine dressing
changes depend on the type of dressing. Change
transparent semipermeable dressings every 5 to 7 days;
change gauze dressings at least every 2 days. Change
either type if it becomes damp, loosened, or visibly soiled.
Dressing changes should also include cleaning the catheter–
skin junction with an antiseptic solution and changing the
stabilization device, if used.57
■ Change the IV administration set (tubing and filter) with
each new container of PN, and at least every 24 hours. For
IV lipid emulsion, change the IV administration set with each
new container, and at least every 12 hours. Change the IV
administration set immediately if you suspect contamination
or when the integrity of the product or system has been
compromised to reduce the risk of vascular catheter–
associated infection. Hang time for a container of PN
shouldn’t exceed 24 hours; for IV lipid emulsion, it shouldn’t
exceed 12 hours.16,42
■ Closely monitor the catheter site for signs of catheter site
infection and local tissue swelling, which may indicate
infiltration.58,59 Extravasation of PN solution can lead to
tissue necrosis. (See Correcting common parenteral
nutrition problems.)
■ For patients at risk for refeeding syndrome, administer IV
potassium, phosphate, and magnesium supplements, as
ordered. Monitor blood levels daily or more frequently, as
ordered.1,49
■ Take caution when using the PN line for other functions.2
Don’t use a single-lumen CV access device to infuse blood
or blood products, give a bolus injection, administer
simultaneous IV solutions, measure CV pressure, or draw
blood for laboratory tests without a practitioner’s order.
Seek compatibility information or consult the facility
pharmacist before co-administering medications with PN.
■ Provide oral care regularly. Also provide emotional
support. Keep in mind that patients commonly associate
eating with positive feelings and can become disturbed
when they can’t eat.
■ Teach the patient the potential adverse effects and
complications of PN. Encourage the patient to inspect the
mouth regularly for signs of parotitis, glossitis, and oral
lesions. Tell the patient to anticipate fewer bowel
movements while receiving PN therapy. Encourage the
patient to remain physically active to help the body use the
nutrients more fully.
■ The Joint Commission has issued a sentinel event alert
related to managing risk during transition to new
International Organization for Standardization tubing
standards designed to prevent dangerous tubing
misconnections, which can lead to serious patient injury and
death. During the transition, be sure to trace the tubing and
catheter from the patient to the point of origin before
connecting or reconnecting any device or infusion, at any
care transition (such as a new setting or service), and as
part of the hand-off process; route tubes and catheters with
different purposes in different standardized directions; when
there are different access sites or several bags hanging,
label the tubing at the distal and proximal ends; use tubing
and equipment only as intended; and store medications for
different delivery routes in separate locations.46
■ The Joint Commission issued a sentinel event alert
concerning medical device alarm safety, because alarm-
related events have been associated with permanent loss of
function or death. Among the major contributing factors
were improper alarm settings, alarm settings turned off
inappropriately, and alarm signals not audible to staff. Make
sure alarm limits are set appropriately, and that alarms are
turned on, functioning properly, and audible to staff. Follow
facility guidelines for preventing alarm fatigue.39
Patient teaching
Patients who require prolonged or indefinite PN may be able
to receive the therapy at home. Home PN reduces the need
for long hospitalizations and allows the patient to resume
normal activities. Make a home care referral, and begin
patient teaching before discharge to make sure the patient
knows how to perform the administration procedure and
how to handle complications.
Complications
Catheter-related sepsis is the most serious complication of
PN. Although rare, a malpositioned subclavian or jugular
vein catheter may lead to thrombosis or sepsis. An air
embolism—a potentially fatal complication—can occur
during IV tubing changes if the tubing is inadvertently
disconnected. It may also result from undetected hairline
cracks in the tubing or hub. Extravasation of PN solution can
cause necrosis and then sloughing of the epidermis and
dermis.
Documentation
Document the type and location of the access device used,
including catheter tip confirmation, as appropriate; the PN
formulation and additives; the volume of solution
administered and the rate of infusion; the verification
process; the condition of the catheter insertion site;
presence of blood return; your assessment findings; and the
patient’s response to therapy, any complications and
interventions, and the patient’s response to those
interventions. If you discontinued the central venous access
device or peripheral IV catheter used for parenteral
nutrition, document the date and time you removed the
catheter, the condition of the catheter insertion site, and the
type of dressing applied. Document any patient teaching
provided and the patient’s understanding of your
teaching.16,53
REFERENCES
1 Fletcher, J. (2013). Parenteral nutrition: Indications, risks and nursing care.
Nursing Standard, 27(46), 50–57.
2 Standard 61. Parenteral nutrition. Infusion therapy standards of practice.
(2016). Journal of Infusion Nursing, 39, S133–S135. (Level VII)
3 Jarrett, N., & Callaham, M. (2016). “Evidence-based guidelines for selected
hospital-acquired conditions: Final report” [Online]. Accessed via the Web at
https://www.cms.gov/Medicare/Medicare-Fee-for-Service-
Payment/HospitalAcqCond/Downloads/2016-HAC-Report.pdf
4 Centers for Disease Control and Prevention. (2011, revised 2017). “Guidelines
for the prevention of intravascular catheter–related infections” [Online].
Accessed via the Web at
https://www.cdc.gov/infectioncontrol/pdf/guidelines/bsi-guidelines.pdf (Level
I)
5 Marschall, J., et al. (2014). SHEA/IDSA practice recommendation: Strategies to
prevent central line-associated bloodstream infections in acute care
hospitals. Infection Control and Hospital Epidemiology, 35(7), 753–771 .
Accessed via the Web at http://www.jstor.org/stable/10.1086/676533 (Level I)
6 Infusion Nurses Society. (2016). Policies and procedures for infusion therapy
(5th ed.). Boston, MA: Infusion Nurses Society.
7 Nettina, S. M. (2014). Lippincott manual of nursing practice (10th ed.).
Philadelphia, PA: Wolters Kluwer.
8 Standard 12. Product evaluation, integrity, and defect reporting. Infusion
therapy standards of practice. (2016). Journal of Infusion Nursing, 39, S32–
S34. (Level VII)
9 Westbrook, J., et al. (2010). Association of interruptions with an increased risk
and severity of medication administration errors. Archives of Internal
Medicine, 170(8), 683–690 . (Level IV)
10 Institute for Safe Medication Practices. (2012). Side tracks on the safety
express: Interruptions lead to errors and unfinished...Wait, what was I doing?
Nurse Advise-ERR, 11(2), 1–4 . Accessed via the Web at
https://www.ismp.org/Newsletters/acutecare/showarticle.aspx?id=37
11 The Joint Commission. (2019). Standard MM.06.01.01. Comprehensive
accreditation manual for hospitals. Oakbrook Terrace, IL: The Joint
Commission. (Level VII)
12 Centers for Medicare and Medicaid Services, Department of Health and
Human Services. (2015). Condition of participation: Nursing services. 42
C.F.R. § 482.23(c).
13 Accreditation Association for Hospitals and Health Systems. (2017). Standard
16.01.03. Healthcare Facilities Accreditation Program: Accreditation
requirements for acute care hospitals. Chicago, IL: Accreditation Association
for Hospitals and Health Systems. (Level VII)
14 DNV GL-Healthcare USA, Inc. (2016). MM.1 .SR.2. NIAHO® accreditation
requirements: Interpretive guidelines & surveyor guidance (version 11).
Milford, OH: DNV GL-Healthcare USA, Inc. (Level VII)
15 Standard 57. Parenteral medication and solution administration. Infusion
therapy standards of practice. (2016). Journal of Infusion Nursing, 39, S125–
S127. (Level VII)
16 Ayers, P., et al. (2014). A.S .P.E .N. parenteral nutrition safety consensus
recommendations. Journal of Parenteral and Enteral Nutrition, 38(3), 296–
333. Accessed via the Web at
http://pen.sagepub.com/content/38/3/296.full.pdf (Level VII)
17 Accreditation Association for Hospitals and Health Systems. (2017). Standard
15.01.11. Healthcare Facilities Accreditation Program: Accreditation
requirements for acute care hospitals. Chicago, IL: Accreditation Association
for Hospitals and Health Systems. (Level VII)
18 Centers for Medicare and Medicaid Services, Department of Health and
Human Services. (2015). Condition of participation: Patient’s rights. 42 C.F.R.
§ 482.13(b)(2).
19 The Joint Commission. (2019). Standard RI.01.03 .01. Comprehensive
accreditation manual for hospitals. Oakbrook Terrace, IL: The Joint
Commission. (Level VII)
20 DNV GL-Healthcare USA, Inc. (2016). PR.1.SR.3 . NIAHO® accreditation
requirements: Interpretive guidelines & surveyor guidance (version 11).
Milford, OH: DNV GL-Healthcare USA, Inc. (Level VII)
21 Centers for Disease Control and Prevention. (2002). Guideline for hand
hygiene in health-care settings: Recommendations of the Healthcare Infection
Control Practices Advisory Committee and the HICPAC/SHEA/APIC/IDSA Hand
Hygiene Task Force. MMWR Recommendations and Reports, 51(RR-16), 1–45.
Accessed via the Web at https://www.cdc.gov/mmwr/pdf/rr/rr5116.pdf (Level
II)
22 World Health Organization. (2009). “WHO guidelines on hand hygiene in
health care: First global patient safety challenge, clean care is safer care”
[Online]. Accessed via the Web at
http://apps.who.int/iris/bitstream/10665/44102/1/9789241597906_eng.pdf
(Level IV)
23 The Joint Commission. (2019). Standard NPSG.07.01.01. Comprehensive
accreditation manual for hospitals. Oakbrook Terrace, IL: The Joint
Commission. (Level VII)
24 Standard 16. Hand hygiene. Infusion therapy standards of practice. (2016).
Journal of Infusion Nursing, 39, S38–S39 . (Level VII)
25 Accreditation Association for Hospitals and Health Systems. (2017). Standard
07.01.21. Healthcare Facilities Accreditation Program: Accreditation
requirements for acute care hospitals. Chicago, IL: Accreditation Association
for Hospitals and Health Systems. (Level VII)
26 Centers for Medicare and Medicaid Services, Department of Health and
Human Services. (2015). Condition of participation: Infection control. 42 C.F.R.
§ 482.42.
27 DNV GL-Healthcare USA, Inc. (2016). IC.1 .SR.1 . NIAHO® accreditation
requirements: Interpretive guidelines & surveyor guidance (version 11).
Milford, OH: DNV GL-Healthcare USA, Inc. (Level VII)
28 The Joint Commission. (2019). Standard NPSG.01.01.01. Comprehensive
accreditation manual for hospitals. Oakbrook Terrace, IL: The Joint
Commission. (Level VII)
29 Accreditation Association for Hospitals and Health Systems. (2017). Standard
15.01.16. Healthcare Facilities Accreditation Program: Accreditation
requirements for acute care hospitals. Chicago, IL: Accreditation Association
for Hospitals and Health Systems. (Level VII)
30 Centers for Medicare and Medicaid Services, Department of Health and
Human Services. (2015). Condition of participation: Patient’s rights. 42 C.F.R.
§ 482.13 (c)(1).
31 DNV GL-Healthcare USA, Inc. (2016). PR.1.SR.5 . NIAHO® accreditation
requirements: Interpretive guidelines & surveyor guidance (version 11).
Milford, OH: DNV GL-Healthcare USA, Inc. (Level VII)
32 The Joint Commission. (2019). Standard RI.01.01.01. Comprehensive
accreditation manual for hospitals. Oakbrook Terrace, IL: The Joint
Commission. (Level VII)
33 The Joint Commission. (2019). Standard PC.02.01.21. Comprehensive
accreditation manual for hospitals. Oakbrook Terrace, IL: The Joint
Commission. (Level VII)
34 Waters, T. R., et al. (2009). “Safe patient handling training for schools of
nursing” [Online]. Accessed via the Web at
https://www.cdc.gov/niosh/docs/2009-127/pdfs/2009-127.pdf (Level VII)
35 Siegel, J. D ., et al. (2007, revised 2017). “2007 guideline for isolation
precautions: Preventing transmission of infectious agents in healthcare
settings” [Online]. Accessed via the Web at
https://www.cdc.gov/infectioncontrol/pdf/guidelines/isolation-guidelines.pdf
(Level II)
36 Occupational Safety and Health Administration. (n.d .). “Bloodborne
pathogens, standard number 1910.1030” [Online]. Accessed via the Web at
https://www.osha.gov/pls/oshaweb/owadisp.show_document?
p_id=10051&p_table=STANDARDS (Level VII)
37 Standard 35. Filtration. Infusion therapy standards of practice. (2016). Journal
of Infusion Nursing, 39, S70–S71. (Level VII)
38 Standard 50. Air embolism. Infusion therapy standards of practice. (2016).
Journal of Infusion Nursing, 39, S108–S109. (Level VII)
39 The Joint Commission. (2013). “Sentinel event alert: Medical device alarm
safety in hospitals” [Online]. Accessed via the Web at
https://www.jointcommission.org/assets/1/6/SEA_50_alarms_4 _26_16.pdf
(Level VII)
40 The Joint Commission. (2019). Standard NPSG.06 .01.01. Comprehensive
accreditation manual for hospitals. Oakbrook Terrace, IL: The Joint
Commission. (Level VII)
41 Graham, K. C., & Cvach, M. (2010). Monitor alarm fatigue: Standardizing use
of physiological monitors and decreasing nuisance alarms. American Journal
of Critical Care, 19(1), 28–37. Accessed July 2017 via the Web at
http://ajcc.aacnjournals.org/content/19/1/28.full.pdf
42 Standard 42. Administration set change. Infusion therapy standards of
practice. (2016). Journal of Infusion Nursing, 39, S84–S85. (Level VII)
43 Standard 34. Needleless connectors. Infusion therapy standards of practice.
(2016). Journal of Infusion Nursing, 39, S68–S70. (Level VII)
44 Standard 40. Flushing and locking. Infusion therapy standards of practice.
(2016). Journal of Infusion Nursing, 39, S77–S81. (Level VII)
45 U.S . Food and Drug Administration. (n.d .). “Look. Check. Connect. Safe
medical device connections save lives” [Online]. Accessed via the Web at
https://www.fda.gov/downloads/MedicalDevices/Safety/AlertsandNotices/UCM
134873.pdf
46 The Joint Commission. (2014). “Sentinel event alert: Managing risk during
transition to new ISO tubing connector standards” [Online]. Accessed via the
Web at
http://www.jointcommission.org/assets/1/6/SEA_53_Connectors_8 _19_14 _final.
pdf
47 Institute for Safe Medication Practices. (2014). “ISMP list of high-alert
medications in acute care settings” [Online]. Accessed via the Web at
http://www.ismp.org/Tools/highalertmedications.pdf (Level VII)
48 Institute for Safe Medication Practices. (2014). Independent double-check:
Undervalued and misused. ISMP Medication Safety Alert! Nurse Advise-ERR,
12(3), 1. Accessed via the Web at
http://www.ismp.org/newsletters/nursing/Issues/NurseAdviseERR201403.pdf
(Level VII)
49 Agency for Clinical Innovation. (2011). “Parenteral nutrition pocketbook: For
adults” [Online]. Accessed via the Web at
http://www.aci.health.nsw.gov.au/__data/assets/pdf_file/0010/159805/aci_pare
nteral_nutrition_pb.pdf
50 Ganz, D. A., et al. (2013). Preventing falls in hospitals: A toolkit for improving
quality of care (AHRQ Publication No. 13-0015-EF). Rockville, MD: Agency for
Healthcare Research and Quality. Accessed via the Web at
https://www.ahrq.gov/sites/default/files/publications/files/fallpxtoolkit.pdf
(Level VII)
51 Standard 18. Medical waste and sharp safety. Infusion therapy standards of
practice. (2016). Journal of Infusion Nursing, 39, S40–S41. (Level VII)
52 The Joint Commission. (2019). Standard RC.01.03 .01. Comprehensive
accreditation manual for hospitals. Oakbrook Terrace, IL: The Joint
Commission. (Level VII)
53 Standard 10. Documentation in the medical record. Infusion therapy
standards of practice. (2016). Journal of Infusion Nursing, 39, S28–S30 . (Level
VII)
54 Accreditation Association for Hospitals and Health Systems. (2017). Standard
10.00 .03. Healthcare Facilities Accreditation Program: Accreditation
requirements for acute care hospitals. Chicago, IL: Accreditation Association
for Hospitals and Health Systems. (Level VII)
55 Centers for Medicare and Medicaid Services, Department of Health and
Human Services. (2015). Condition of participation: Medical record services.
42 C.F.R. § 482.24(b).
56 DNV GL-Healthcare USA, Inc. (2016). MR.2 .SR.1 . NIAHO® accreditation
requirements: Interpretive guidelines & surveyor guidance (version 11).
Milford, OH: DNV GL-Healthcare USA, Inc. (Level VII)
57 Standard 41. Vascular access device (VAD) assessment, care and dressing
changes. Infusion therapy standards of practice. (2016). Journal of Infusion
Nursing, 39, S81–S84. (Level VII)
58 Standard 46. Infiltration and extravasation. Infusion therapy standards of
practice. (2016). Journal of Infusion Nursing, 39, S98–S102. (Level VII)
59 Centers for Medicare and Medicaid Services, & The Joint Commission. (2017).
“The specifications manual for national hospital inpatient quality measures
(version 5.2a)” [Online]. Accessed via the Web at
https://www.jointcommission.org/specifications_manual_for_national_hospital_
inpatient_quality_measures.aspx
60 Standard 45. Phlebitis. Infusion therapy standards of practice. (2016). Journal
of Infusion Nursing, 39, S95–S98 . (Level VII)
61 Standard 49. Infection. Infusion therapy standards of practice. (2016). Journal
of Infusion Nursing, 39, S106–S108. (Level VII)
62 Standard 52. Catheter venous access device (CVAD)-associated venous
thrombosis. Infusion therapy standards of practice. (2016). Journal of Infusion
Nursing, 39, S112–S114. (Level VII)
PARENTERAL NUTRITION MONITORING
A patient who is receiving parenteral nutrition (PN) requires
careful monitoring.1,2 Because the typical patient is in a
protein-wasting state, PN therapy causes marked changes in
fluid and electrolyte status and glucose, amino acid,
mineral, and vitamin levels. Administration of a lipid
emulsion can also cause the patient’s lipid level to rise.
Careful monitoring can help to detect adverse reactions and
signs and symptoms of other complications, which require
practitioner notification. The PN regimen can be changed as
needed with a practitioner’s order.
Monitoring a patient’s condition during PN therapy
requires recognition of the signs and symptoms of possible
complications, understanding of laboratory test results, and
careful record keeping. Assessing a patient’s nutritional
status includes a physical examination and a review of body
weight, body composition, somatic and visceral protein
stores, and laboratory values. Because a PN solution is high
in dextrose content, the infusion must be started slowly to
allow the patient’s pancreatic beta cells to adapt to it by
increasing insulin output. Within the first 5 days of PN
therapy, an adult patient can typically tolerate 3 L of
solution daily without adverse reactions.
Monitoring the venous access device during PN
administration is also essential because of the risk of
vascular catheter–associated infection and other access
device complications.1,3
HOSPITAL-ACQUIRED CONDITION ALERT Keep in mind that vascular
catheter–associated infection is considered a hospital-acquired
condition because it can be reasonably prevented using best practices.
Follow infection prevention techniques (such as performing hand
hygiene and following sterile technique) when administering PN to
reduce the risk of vascular catheter–associated infection.4,5
Equipment
PN solution ▪ electronic infusion device with anti-free-flow
protection6 ▪ sterile IV administration set ▪ 0.2-micron filter
(or 1.2 -micron filter if solution contains lipids or albumin)6 ▪
gloves ▪ glucometer ▪ thermometer ▪ stethoscope ▪
sphygmomanometer ▪ watch with second hand ▪ scale ▪
input and output record ▪ additional equipment for
nutritional assessment, as ordered (such as a tape measure
and skinfold calipers) ▪ supplies for blood specimen
collection ▪ disinfectant pad ▪ oral care supplies ▪ Optional:
sterile gloves and dressing change kit, antiseptic solution,
stabilizing device, 24-hour urine collection supplies.
Preparation of equipment
For information on preparing the infusion pump and PN
solution, see the appropriate procedures. Make sure that
each PN bag or bottle is labeled with the patient’s
identifiers, patient’s weight, administration date and time,
expiration date, route of administration (central or
peripheral), dextrose concentration, component names, and
dosages. All components should be listed in the same
sequence and labeled as amounts per day for adults, and
amounts per kilogram per day for children. The total volume
of solution and the infusion rate should be included as well
as the duration of the infusion (continuous or cycled) and
the appropriate size filter to use.2 (If the bag or bottle is
damaged and you don’t have an immediate replacement,
hang a bag of dextrose 10% in water, as prescribed, until
the new container is ready.)
Implementation
■ Perform hand hygiene.7,8,9,10,11,12,13,14
■ Confirm the patient’s identity using at least two patient
identifiers.2,15
■ Provide privacy.16,17,18,19
■ Explain the procedure to the patient and family (if
appropriate) according to their individual communication
and learning needs to increase their understanding, allay
their fears, and enhance cooperation.20 Instruct the patient
to report any unusual sensations during the infusion.
■ Raise the bed to waist level when providing care to
prevent back strain.21
■ Perform hand hygiene.7,8,9,10,11,12,13,14
■ Put on gloves, as needed, to comply with standard
precautions.22,23
■ Monitor the patient’s vital signs at an interval determined
by the patient’s condition to promptly recognize changes in
the patient’s condition.
■ Change the IV administration tubing and filters with each
new container of PN and at least every 24 hours. For a lipid
emulsion, change the IV administration set with each new
container and at least every 12 hours. Change the
administration tubing immediately if contamination is
suspected or if the integrity of the product or system has
been compromised, to reduce the risk of vascular catheter-
associated infection.24
■ Perform site care and dressing changes according to the
type of dressing; use strict sterile technique.24 If the patient
has a short peripheral catheter, change the dressing every 5
to 7 days. If the patient has a short-term central venous
(CV) access device, routine dressing changes depend on the
type of dressing. Change transparent semipermeable
dressings every 5 to 7 days; change gauze dressings at
least every 2 days. Immediately change either type if the
dressing becomes damp, loosened, or visibly soiled. During
a dressing change, also clean the catheter–skin junction
with antiseptic solution and replace the stabilizing device, if
used.
■ Assess the patient daily;6 monitor for signs of peripheral
and pulmonary edema. Inspect the vascular catheter exit
site and palpate for tenderness through the intact dressing.
Remove the dressing and thoroughly examine the site if
fever, tenderness, or other findings that suggest a local or
bloodstream infection exist.3,11,25 If ordered, measure the
patient’s arm circumference at 10-cm above the antecubital
fossa and compare the finding to the baseline measurement
to assess for edema and possible deep vein thrombosis.25
■ Weigh the patient in kilograms at the same time each
morning (after the patient voids), in similar-weight clothing,
and on the same scale. Compare the data with the fluid
intake and output record.1,6 Weight gain, particularly early
in treatment, may indicate fluid overload rather than
increasing fat and protein stores. A patient shouldn’t gain
more than 1.5 kg per week; a weight gain of 0.5 kg per
week is a reasonable goal for most patients; suspect fluid
imbalance if the patient gains more than 0.5 kg daily.
■ Monitor the patient’s bowel function by auscultating
bowel sounds and assessing the number, volume, and
consistency of bowel movements.3
■ Monitor the patient for signs and symptoms of glucose
metabolism disturbance, fluid and electrolyte imbalances,
and nutritional aberrations.1,2,6 Some patients may require
supplemental insulin for the duration of PN; the pharmacy
should add insulin directly to the PN solution.2 Monitor
electrolyte levels frequently—daily at first.1,6 Monitor serum
albumin levels weekly. (See Laboratory monitoring of
parenteral nutrition.) Later, as the patient’s condition
stabilizes, reduce the frequency of monitoring these values,
as indicated. (Be aware that in a severely dehydrated
patient, albumin levels may actually drop initially as
treatment restores hydration.)
■ Monitor potassium, magnesium, phosphate, and calcium
levels. If these electrolytes have been added to the PN
solution, the dosage may need adjusting to maintain normal
serum levels.1
■ Monitor serum glucose levels every 6 hours initially, and
then once per day or according to the ordered parameters.2
Watch for signs and symptoms of hyperglycemia, such as
thirst, hunger, and polyuria. Periodically confirm blood
glucose meter readings with laboratory tests.
■ Assess renal function by monitoring blood urea nitrogen
and creatinine levels, because increases can indicate excess
amino acid intake. Also assess nitrogen balance with 24-
hour urine collection, as ordered.1
■ Assess liver function by periodically monitoring liver
enzyme, bilirubin, triglyceride, and cholesterol levels.
Abnormal values may indicate an intolerance or excess of
lipid emulsions or problems with metabolizing the protein or
glucose in the PN formula.1
■ Provide emotional support. Patients tend to associate
eating with positive feelings and can become disturbed
when eating is prohibited.6
■ Provide frequent oral care. (See the “Oral care,”
procedure, page 552.)
■ Keep the patient active so the nutrients will be used more
fully.
■ When discontinuing PN, taper the infusion rate, as
ordered or as directed by the facility. In adults receiving
insulin, closely monitor the patient’s glucose level; adjust
the insulin, as needed and ordered, to reduce the risk of
hyperinsulinemia and subsequent hypoglycemia. If you
must stop PN abruptly, begin a dextrose infusion, as
ordered, to reduce the risk of hypoglycemia.1
■ While weaning the patient from PN, document the dietary
intake and work with the nutritionist to determine the total
calorie and protein intake. Also teach other health care staff
members caring for the patient the importance of recording
food intake. Use percentages of food consumed (such as
“ate 50% of a baked potato”) instead of subjective
descriptions (such as “had a good appetite”) to provide a
more accurate account of patient intake.
■ Return the bed to the lowest position to prevent falls and
maintain patient safety.29
■ Discard used supplies in appropriate receptacles. Clean
nondisposable items, and return them for sterilization.30
■ Remove and discard your gloves.23,30
■ Perform hand hygiene.7,8,9,10,11,12,13,14
■ Clean and disinfect your stethoscope using a disinfectant
pad.31,32
■ Perform hand hygiene.7,8,9,10,11,12,13,14
■ Document the procedure.33,34,35,36,37
Special considerations
■ Always maintain strict sterile technique when handling
the equipment used to administer PN therapy.6 Because the
PN solution serves as a medium for bacterial growth and the
CV access device provides systemic access, the patient is at
risk for infection and sepsis.
■ During daily multidisciplinary rounds, discuss the
patient’s readiness for enteral feeding; switch to enteral
feeding as soon as the patient’s condition warrants. Make
sure the CV access device is removed as soon as it’s no
longer needed to reduce the risk of vascular catheter–
related bloodstream infection.6,11
■ When using a filter, position it as close to the access site
as possible.38 Check the filter’s porosity and pounds-per-
square-inch (psi) capacity to make sure it exceeds the
number of psi exerted by the infusion pump.
■ Don’t allow PN solutions to hang for more than 24 hours;
hang time for lipids shouldn’t exceed 12 hours.6
■ Don’t use the PN access device for other functions.16 If
using a single-lumen CV access device, don’t use the device
to infuse blood or blood products, give a bolus injection,
administer simultaneous IV solutions, measure CV pressure,
or obtain blood samples for laboratory testing without a
practitioner’s order. Never add medication to a PN solution
container.2 Also, don’t use a three-way stopcock, if possible,
because add-on devices increase the risk of infection.
■ When a patient is severely malnourished, starting PN may
spark refeeding syndrome, which includes a rapid drop in
potassium, magnesium, and phosphorus levels. To avoid
compromising cardiac function, initiate feeding slowly and
monitor the patient’s blood values especially closely until
they stabilize.1
■ Teach the patient and family (if appropriate) about
measures to prevent intravascular catheter–related
infections, including the importance of hand hygiene.39
Encourage the patient and family to remind staff members if
they fail to perform hand hygiene before delivering care.
Teach the patient about signs and symptoms of
complications and to report them immediately.
Laboratory monitoring of parenteral
nutrition
Laboratory tests are usually ordered by the practitioner as part of monitoring
for a patient receiving parenteral nutrition (PN). When collecting specimens
for laboratory testing, be sure to label the specimens in the presence of the
patient to prevent mislabeling.15 Notify the practitioner of critical test results
within your facility’s time frame so that the patient can receive prompt
treatment.26
Baseline tests
Baseline tests include complete blood count (CBC); comprehensive metabolic
panel (CMP);* cholesterol and triglycerides; liver function tests (LFT),
including prothrombin time (PT), International Normalized Ratio (INR), lactate
dehydrogenase, and bilirubin; and magnesium, phosphate, and transferrin
levels. (Additional tests that may be performed upon initiation of PN include
trace elements and vitamin levels.)1,27
Daily tests
Daily tests include weight, intake and output, glucose by fingerstick every 6
hours until stable† (then as directed), basic metabolic panel (BMP),
magnesium and phosphate levels, and liver function tests until stable (then
two to three times a week, as directed).1
Weekly tests
Weekly tests include CBC, CMP, PT, INR, and cholesterol, triglycerides, and c-
reactive protein (CRP) and transferrin levels.1
Additional tests
For patients receiving long-term PN, practitioners may also order additional
tests as indicated, including bone mineral density assessment, and zinc,
copper, selenium, manganese, folate, and vitamin A, B12, D, and E
levels.1,28
*CMP includes blood urea nitrogen (BUN), creatinine, sodium, chloride,
carbon dioxide (CO2), glucose, potassium, calcium, albumin, total protein,
alkaline phosphatase, alanine transaminase, aspartate transaminase, and
bilirubin.
†BMP includes BUN, creatinine, sodium, chloride, CO2, glucose, and
potassium levels.
Patient teaching
Patients who require prolonged or indefinite PN may be able
to receive the therapy at home. Home PN reduces the need
for long hospitalizations and allows the patient to resume
many normal activities. Make a home care referral and
begin patient teaching before discharge to make sure that
the patient knows how to perform the administration
procedure and how to handle complications.
Complications
Catheter-related, metabolic, and mechanical complications
can occur during PN administration. (See the “Parenteral
nutrition administration” procedure, page 572.)
Documentation
Document the type of access device used, PN formulation,
additives, volume of solution, rate of infusion, assessment
findings, and patient response to therapy. Note laboratory
results, the name of the practitioner notified, the date and
time of notification, any prescribed interventions, and the
patient’s response to those interventions. Record any
adverse effects that occur, the name of the practitioner
notified, the date and time of notification, any prescribed
interventions, and the patient’s response to those
interventions. Also document patient and family teaching
provided, their understanding of the teaching, and any
necessary follow-up teaching.
REFERENCES
1 Agency for Clinical Innovation. (2011). Parenteral nutrition pocketbook: For
adults. Chatswood, Australia: Agency for Clinical Innovation. Accessed via the
Web at
http://www.aci.health.nsw.gov.au/__data/assets/pdf_file/0010/159805/aci_pare
nteral_nutrition_pb.pdf (Level VII)
2 Ayers, P., et al. (2014). A.S.P.E .N. parenteral nutrition safety consensus
recommendations. Journal of Parenteral and Enteral Nutrition, 38(3), 296–
333. Accessed via the Web at
http://journals.sagepub.com/doi/pdf/10.1177/0148607113511992 (Level VII)
3 Centers for Medicare and Medicaid Services & The Joint Commission. (2017).
“The specifications manual for national hospital inpatient quality measures
(version 5.2a)” [Online]. Accessed via the Web at
https://www.jointcommission.org/specifications_manual_for_national_hospital_
inpatient_quality_measures.aspx
4 Jarrett, N., & Callaham, M. (2016). “Evidence-based guidelines for selected
hospital-acquired conditions: Final report” [Online]. Accessed via the Web at
https://www.cms.gov/Medicare/Medicare-Fee-for-Service-
Payment/HospitalAcqCond/Downloads/2016-HAC-Report.pdf
5 Standard 49. Infection. Infusion therapy standards of practice. (2016). Journal
of Infusion Nursing, 39, S106–S108. (Level VII)
6 Standard 61. Parenteral nutrition. Infusion therapy standards of practice.
(2016). Journal of Infusion Nursing, 39, S133–S135. (Level VII)
7 Centers for Disease Control and Prevention. (2002). Guideline for hand
hygiene in health-care settings: Recommendations of the Healthcare Infection
Control Practices Advisory Committee and the HICPAC/SHEA/APIC/IDSA Hand
Hygiene Task Force. MMWR Recommendations and Reports, 51(RR–16), 1–45.
Accessed via the Web at https://www.cdc.gov/mmwr/pdf/rr/rr5116.pdf (Level
II)
8 World Health Organization. (2009). “WHO guidelines on hand hygiene in
health care: First global patient safety challenge, clean care is safer care”
[Online]. Accessed via the Web at
http://apps.who.int/iris/bitstream/10665/44102/1/9789241597906_eng.pdf
(Level IV)
9 The Joint Commission. (2019). Standard NPSG.07.01.01. Comprehensive
accreditation manual for hospitals. Oakbrook Terrace, IL: The Joint
Commission. (Level VII)
10 Standard 16. Hand hygiene. Infusion therapy standards of practice. (2016).
Journal of Infusion Nursing, 39, S38–S39 . (Level VII)
11 Centers for Disease Control and Prevention. (2011, revised 2017). “Guidelines
for the prevention of intravascular catheter–related infections” [Online].
Accessed via the Web at https://www.cdc.gov/hicpac/pdf/guidelines/bsi-
guidelines-2011.pdf (Level I)
12 Centers for Medicare and Medicaid Services, Department of Health and
Human Services. (2015). Condition of participation: Infection control. 42 C.F.R.
§ 482.42.
13 American Association for Hospitals and Health Systems. (2017). Standard
07.01.21. Healthcare Facilities Accreditation Program: Accreditation
requirements for acute care hospitals. Chicago, IL: American Association for
Hospitals and Health Systems. (Level VII)
14 DNV GL-Healthcare USA, Inc. (2016). IC.1 .SR.1 . NIAHO® accreditation
requirements: Interpretive guidelines & surveyor guidance (version 11).
Milford, OH: DNV GL-Healthcare USA, Inc. (Level VII)
15 The Joint Commission. (2019). Standard NPSG.01.01.01. Comprehensive
accreditation manual for hospitals. Oakbrook Terrace, IL: The Joint
Commission. (Level VII)
16 Accreditation Association for Hospitals and Health Systems. (2017). Standard
15.01.16. Healthcare Facilities Accreditation Program: Accreditation
requirements for acute care hospitals. Chicago, IL: Accreditation Association
for Hospitals and Health Systems. (Level VII)
17 Centers for Medicare and Medicaid Services, Department of Health and
Human Services. (2015). Condition of participation: Patient’s rights. 42 C.F.R.
§ 482.13 (c)(1).
18 DNV GL-Healthcare USA, Inc. (2016). PR.1.SR.5 . NIAHO® accreditation
requirements: Interpretive guidelines & surveyor guidance (version 11).
Milford, OH: DNV GL-Healthcare USA, Inc. (Level VII)
19 The Joint Commission. (2019). Standard RI.01.01.01. Comprehensive
accreditation manual for hospitals. Oakbrook Terrace, IL: The Joint
Commission. (Level VII)
20 The Joint Commission. (2019). Standard PC.02.01.21. Comprehensive
accreditation manual for hospitals. Oakbrook Terrace, IL: The Joint
Commission. (Level VII)
21 Waters, T. R., et al. (2009). “Safe patient handling training for schools of
nursing” [Online]. Accessed via the Web at
https://www.cdc.gov/niosh/docs/2009-127/pdfs/2009-127.pdf (Level VII)
22 Accreditation Association for Hospitals and Health Systems. (2017). Standard
07.01.10. Healthcare Facilities Accreditation Program: Accreditation
requirements for acute care hospitals. Chicago, IL: Accreditation Association
for Hospitals and Health Systems. (Level VII)
23 Siegel, J. D ., et al. (2007, revised 2017). “2007 guideline for isolation
precautions: Preventing transmission of infectious agents in healthcare
settings” [Online]. Accessed via the Web at
https://www.cdc.gov/infectioncontrol/pdf/guidelines/isolation-guidelines.pdf
(Level II)
24 Standard 42. Administration set change. Infusion therapy standards of
practice. (2016). Journal of Infusion Nursing, 39, S84–S85. (Level VII)
25 Standard 41. Vascular access device (VAD) assessment, care and dressing
changes. Infusion therapy standards of practice. (2016). Journal of Infusion
Nursing, 39, S81–S84. (Level VII)
26 The Joint Commission. (2019). Standard NPSG.02.03 .01. Comprehensive
accreditation manual for hospitals. Oakbrook Terrace, IL: The Joint
Commission. (Level VII)
27 Fessler, T. A. (2013). Trace elements in parenteral nutrition: A practical guide
for dosage and monitoring for adult patients. Nutrition in Clinical Practice,
28(6), 722–729.
28 Staun, M., et al. (2009). ESPEN guidelines on parenteral nutrition: Home
parenteral nutrition (HPN) in adult patients. Clinical Nutrition, 28(4), 467–479.
Accessed via the Web at
http://espen.info/documents/0909/Home%20Parenteral%20Nutrition%20in%2
0adults.pdf (Level VII)
29 Ganz, D. A., et al. (2013). Preventing falls in hospitals: A toolkit for improving
quality of care (AHRQ Publication No. 13-0015-EF). Accessed via the Web at
https://www.ahrq.gov/sites/default/files/publications/files/fallpxtoolkit.pdf
(Level VII)
30 Occupational Safety and Health Administration. (n.d .). “Bloodborne
pathogens, standard number 1910.1030” [Online]. Accessed via the Web at
https://www.osha.gov/pls/oshaweb/owadisp.show_document?
p_id=10051&p_table=STANDARDS (Level VII)
31 Accreditation Association for Hospitals and Health Systems. (2017). Standard
07.02.03. Healthcare Facilities Accreditation Program: Accreditation
requirements for acute care hospitals. Chicago, IL: Accreditation Association
for Hospitals and Health Systems. (Level VII)
32 Rutala, W. A., et al. (2008, revised 2017). “Guideline for disinfection and
sterilization in healthcare facilities, 2008” [Online]. Accessed via the Web at
https://www.cdc.gov/hicpac/pdf/guidelines/Disinfection_Nov_2008.pdf (Level I)
33 The Joint Commission. (2019). Standard RC.01.03 .01. Comprehensive
accreditation manual for hospitals. Oakbrook Terrace, IL: The Joint
Commission. (Level VII)
34 Standard 10. Documentation in the medical record. Infusion therapy
standards of practice. (2016). Journal of Infusion Nursing, 39, S28–S30 . (Level
VII)
35 Centers for Medicare and Medicaid Services, Department of Health and
Human Services. (2015). Condition of participation: Medical record services.
42 C.F.R. § 482.24(b).
36 Accreditation Association for Hospitals and Health Systems. (2017). Standard
10.00 .03. Healthcare Facilities Accreditation Program: Accreditation
requirements for acute care hospitals. Chicago, IL: Accreditation Association
for Hospitals and Health Systems. (Level VII)
37 DNV GL-Healthcare USA, Inc. (2016). MR.2 .SR.1 . NIAHO® accreditation
requirements: Interpretive guidelines & surveyor guidance (version 11).
Milford, OH: DNV GL-Healthcare USA, Inc. (Level VII)
38 Standard 35. Filtration. Infusion therapy standards of practice. (2016). Journal
of Infusion Nursing, 39, S70–S71. (Level VII)
39 The Joint Commission. (2019). Standard NPSG.07.04.01. Comprehensive
accreditation manual for hospitals. Oakbrook Terrace, IL: The Joint
Commission. (Level VII)
PASSIVE RANGE-OF-MOTION EXERCISES
Passive range-of-motion (ROM) exercises are indicated for a
patient with temporary or permanent loss of mobility,
sensation, or consciousness. These exercises have been
shown to improve or maintain joint mobility, strength, and
endurance and prepare the patient for ambulation.
During passive ROM exercises, another person, such as a
nurse, physical therapist, or caregiver, moves the patient’s
extremities so that the joints go through as full a range of
motion as possible, maximally stretching all muscle groups
within each plane over each joint. When included as a key
component of care, ROM exercises can enhance patient
outcomes, improve gas exchange, reduce rates of
ventilator-associated pneumonia, shorten the duration of
mechanical ventilation, reduce the risk of contractures,1,2
and enhance long-term functional ability.
Glossary of joint movements
The different joint movements are illustrated in the images below, including
abduction and adduction, dorsiflexion and plantar flexion, extension and
flexion, external and internal rotation, eversion and inversion, and supination
and pronation.
The exercises described here treat all joints, but they do
not have to be performed in the order given or all at once.
You can schedule them over the course of a day, whenever
the patient is in the most convenient position. You’ll
typically perform these exercises three times for each joint,
at least twice a day.3 Perform all exercises slowly, gently,
and to the end of the normal ROM or to the point of pain but
no further. (See Glossary of joint movements.) Hold each
position for 1 to 2 seconds. It is important to note that
passive ROM exercises require recognition of the patient’s
limits of motion and support of all joints during movements.
Contraindications to passive ROM exercises include
patients with septic joints, acute thrombophlebitis, severe
arthritic joint inflammation, bone tumors or metastases,
acute myocardial infarction, or recent trauma with possible
hidden fractures or internal injuries.
Equipment
Optional: gloves, other personal protective equipment.
Implementation
■ Determine the joints that need ROM exercises.
■ Consult the practitioner or physical therapist about
limitations or precautions for specific exercises.
■ Perform hand hygiene.4,5,6,7,8,9
■ Confirm the patient’s identity using at least two patient
identifiers.10
■ Provide privacy.11,12,13,14
■ Explain the procedure to the patient.
■ Raise the patient’s bed to waist level when providing
patient care to prevent caregiver back strain.15
■ Put on gloves and other personal protective equipment,
as needed, to comply with standard precautions.16,17,18
Exercising the neck
■ While supporting the patient’s head with your hands,
extend the neck, flex the chin to the chest, and tilt the head
laterally toward each shoulder.
■ Rotate the patient’s head from right to left (as shown
below).
Exercising the shoulders
■ Support the patient’s arm in an extended, neutral
position; then extend the forearm and flex it back.
■ Abduct the patient’s arm outward from the side of her
body, and then adduct it back to the side.
■ Rotate the shoulder so that the patient’s arm crosses the
midline, and then bend the elbow so that the hand touches
the opposite shoulder and then touches the mattress for
complete internal rotation.
■ Return the patient’s shoulder to a neutral position and,
with elbow bent, push the patient’s arm backward so that
the back of the hand touches the mattress for complete
external rotation (as shown below).
Exercising the elbow
■ Place the patient’s arm at the side with palm facing up.
■ Flex and extend the patient’s arm at the elbow (as shown
below).
Exercising the forearm
■ Stabilize the patient’s elbow, and then twist the hand to
bring the palm up (supination, as shown below).
■ Twist it back again to bring the palm down (pronation).
Exercising the wrist
■ Stabilize the patient’s forearm, and then flex and extend
the wrist.
■ Rock the patient’s hand sideways for lateral flexion.
■ Rotate the patient’s hand in a circular motion (as shown
below).
Exercising the fingers and thumb
■ Extend the patient’s fingers, and then flex the hand into a
fist; repeat extension and flexion of each joint of each finger
and thumb separately.
■ Spread two adjoining fingers apart (abduction, as shown
top), and then bring them together (adduction).
■ Oppose each fingertip to the patient’s thumb.
■ Rotate the thumb and each finger in a circle.
Exercising the hip and knee
■ Fully extend the patient’s leg, and then bend the hip and
knee toward the chest, allowing full joint flexion.
■ Move the patient’s straight leg sideways, out and away
from the other leg (abduction), and then back, over, and
across it (adduction).
■ Rotate the patient’s straight leg internally toward the
midline (as shown below), and then externally away from
the midline.
Exercising the ankle
■ Bend the patient’s foot so that the toes push upward
(dorsiflexion), and then bend the foot so that her toes push
downward (plantar flexion).
■ Rotate the ankle in a circular motion.
■ Invert the patient’s ankle so that the sole of the foot faces
the midline (as shown below), and evert the ankle so that
the sole faces away from the midline.
Exercising the toes
■ Flex the patient’s toes toward the sole, and then extend
them back toward the top of the foot.
■ Spread two adjoining toes apart (abduction, as shown
below), and bring them together (adduction).
Completing the procedure
■ Return the bed to the lowest position to prevent falls and
maintain patient safety.19
■ Assess the patient’s comfort level and response to ROM.
■ Remove and discard your gloves and other personal
protective equipment, if worn.18
■ Perform hand hygiene.4,5,6,7,8,9
■ Document the procedure.20,21,22,23
Special considerations
■ Because joints begin to stiffen within 24 hours of disuse,
start passive ROM exercises as soon as possible, and
perform them at least once each shift, or three times a day,
usually while bathing or turning the patient. Use proper
body mechanics, and repeat each exercise at least three
times.
■ Patients on prolonged bed rest or limited activity without
profound weakness can also be taught to perform ROM
exercises on their own (called active ROM), or they may
benefit from isometric exercises. (See Learning about
isometric exercises, page 584.)
■ If a disabled patient requires long-term rehabilitation after
discharge, consult with a physical therapist and teach a
family member or caregiver to perform passive ROM
exercises.
Documentation
Record the joints exercised, the presence of edema or
pressure areas, any pain resulting from the exercises, any
limitation of ROM, and the patient’s tolerance of the
exercises.
REFERENCES
1 Skalsky, A. J ., & McDonald, C. M . (2012). Prevention and management of limb
contractures in neuromuscular diseases. Physical Medicine and Rehabilitation
Clinics of North America, 23(3), 675–687. (Level VII)
2 Amidei, C., & Sole, M. (2013). Physiological response to passive exercise in
adults receiving mechanical ventilation. American Journal of Critical Care,
22(4), 337–348. Accessed via the Web at
http://ajcc.aacnjournals.org/content/22/4/337.full.pdf (Level III)
3 Hinkle, J. L., & Cheever, K. H. (2018). Brunner and Suddarth’s textbook of
medical-surgical nursing (14th ed.). Philadelphia, PA: Wolters Kluwer.
4 The Joint Commission. (2019). Standard NPSG.07.01.01. Comprehensive
accreditation manual for hospitals. Oakbrook Terrace, IL: The Joint
Commission. (Level VII)
5 Centers for Disease Control and Prevention. (2002). Guideline for hand
hygiene in health-care settings: Recommendations of the Healthcare Infection
Control Practices Advisory Committee and the HICPAC/SHEA/APIC/IDSA Hand
Hygiene Task Force. MMWR Recommendations and Reports, 51(RR-16), 1–45.
Accessed via the Web at http://www.cdc.gov/mmwr/pdf/rr/rr5116.pdf (Level II)
6 World Health Organization. (2009). “WHO guidelines on hand hygiene in
health care: First global patient safety challenge, clean care is safer care”
[Online]. Accessed via the Web at
http://apps.who.int/iris/bitstream/10665/44102/1/9789241597906_eng.pdf
(Level IV)
7 Accreditation Association for Hospitals and Health Systems. (2017). Standard
07.01.21. Healthcare Facilities Accreditation Program: Accreditation
requirements for acute care hospitals. Chicago, IL: Accreditation Association
for Hospitals and Health Systems. (Level VII)
Learning about isometric exercises
Patients can strengthen and increase muscle tone by contracting muscles
against resistance (from other muscles or from a stationary object, such as a
bed or a wall) without joint movement. These exercises require only a
comfortable position—standing, sitting, or lying down—and proper body
alignment. For each exercise, instruct the patient to hold each contraction for
2 to 5 seconds and to repeat it three to four times daily, below peak
contraction level for the first week and at peak level thereafter.
Neck rotators
The patient places the heel of the hand above one ear, then pushes the head
toward the hand as forcefully as possible, without moving the head, neck, or
arm. The patient then repeats the exercise on the other side.
Neck flexors
The patient places both palms on the forehead. Without moving the neck, the
patient pushes the head forward while resisting with the palms.
Neck extensors
The patient clasps the fingers behind the head, and then pushes the head
against the clasped hands without moving the neck.
Shoulder elevators
Holding the right arm straight down at the side, the patient grasps the right
wrist with the left hand. The patient then tries to shrug the right shoulder,
but prevents it from moving by holding the arm in place. The patient repeats
this exercise, alternating arms.
Shoulder, chest, and scapular musculature
The patient places the right fist in the left palm and raises both arms to
shoulder height. The patient pushes the fist into the palm as forcefully as
possible without moving either arm. Then, with the arms in the same
position, the patient clasps the fingers and tries to pull the hands apart. The
patient repeats the pattern, beginning with the left fist in the right palm.
Elbow flexors and extensors
With the right elbow bent 90 degrees and the right palm facing upward, the
patient places the left fist against the right palm. The patient tries to bend
the right elbow further while resisting with the left fist. The patient repeats
the pattern, bending the left elbow.
Abdomen
The patient assumes a sitting position and bends slightly forward, with the
hands in front of the middle of the thighs. The patient tries to bend forward
further, resisting by pressing the palms against the thighs.
Alternatively, in the supine position, the patient clasps the hands behind
the head. Then the patient raises the shoulders about 1′′ (2.5 cm), holding
this position for a few seconds.
Back extensors
In a sitting position, the patient bends forward and places the hands under
the buttocks. The patient tries to stand up, resisting with both hands.
Hip abductors
While standing, the patient squeezes the inner thighs together as tightly as
possible. Placing a pillow between the knees supplies resistance and
increases the effectiveness of this exercise.
Hip extensors
The patient squeezes the buttocks together as tightly as possible.
Knee extensors
The patient straightens the knee fully. Then the patient vigorously tightens
the muscle above the knee so that it moves the kneecap upward. The patient
repeats this exercise, alternating legs.
Ankle flexors and extensors
The patient pulls the toes upward, holding briefly. Then the patient pushes
them down as far as possible, again holding briefly.
8 Centers for Medicare and Medicaid Services, Department of Health and
Human Services. (2015). Condition of participation: Infection control. 42 C.F.R.
§ 482.42.
9 DNV GL-Healthcare USA, Inc. (2016). IC.1.SR.1 . NIAHO® accreditation
requirements: Interpretive guidelines & surveyor guidance (version 11).
Milford, OH: DNV GL-Healthcare USA, Inc. (Level VII)
10 The Joint Commission. (2019). Standard NPSG.01.01.01. Comprehensive
accreditation manual for hospitals. Oakbrook Terrace, IL: The Joint
Commission. (Level VII)
11 The Joint Commission. (2019). Standard RI.01.03 .01. Comprehensive
accreditation manual for hospitals: The official handbook. Oakbrook Terrace,
IL: The Joint Commission. (Level VII)
12 Accreditation Association for Hospitals and Health Systems. (2017). Standard
15.01.16. Healthcare Facilities Accreditation Program: Accreditation
requirements for acute care hospitals. Chicago, IL: Accreditation Association
for Hospitals and Health Systems. (Level VII)
13 Centers for Medicare and Medicaid Services, Department of Health and
Human Services. (2015). Condition of participation: Patient’s rights. 42 C.F.R.
§ 482.13(c)(1).
14 DNV GL-Healthcare USA, Inc. (2016). PR.1.SR.5 . NIAHO® accreditation
requirements: Interpretive guidelines & surveyor guidance (version 11).
Milford, OH: DNV GL-Healthcare USA, Inc. (Level VII)
15 Waters, T. R., et al. (2009). “Safe patient handling training for schools of
nursing” [Online]. Accessed via the Web at
http://www.cdc.gov/niosh/docs/2009-127/pdfs/2009-127.pdf (Level VII)
16 Accreditation Association for Hospitals and Health Systems. (2017). Standard
07.01.10. Healthcare Facilities Accreditation Program: Accreditation
requirements for acute care hospitals. Chicago, IL: Accreditation Association
for Hospitals and Health Systems. (Level VII)
17 Siegel, J. D ., et al. (2007, revised 2017). “2007 guideline for isolation
precautions: Preventing transmission of infectious agents in healthcare
settings” [Online]. Accessed via the Web at
https://www.cdc.gov/infectioncontrol/pdf/guidelines/isolation-guidelines.pdf
(Level II)
18 Occupational Safety and Health Administration. (n.d .). “Bloodborne
pathogens, standard number 1910.1030” [Online]. Accessed via the Web at
https://www.osha.gov/pls/oshaweb/owadisp.show_document?
p_id=10051&p_table=STANDARDS (Level VII)
19 Ganz, D. A., et al. (2013). Preventing falls in hospitals: A toolkit for improving
quality of care (AHRQ Publication No. 13-0015-EF). Rockville, MD: Agency for
Healthcare Research and Quality. Accessed via the Web at
http://www.ahrq.gov/sites/default/files/publications/files/fallpxtoolkit.pdf
(Level VII)
20 The Joint Commission. (2019). Standard RC.01.03 .01. Comprehensive
accreditation manual for hospitals. Oakbrook Terrace, IL: The Joint
Commission. (Level VII)
21 Centers for Medicare and Medicaid Services, Department of Health and
Human Services. (2015). Condition of participation: Medical record services.
42 C.F.R. § 482.24(b).
22 Accreditation Association for Hospitals and Health Systems. (2017). Standard
10.00 .03. Healthcare Facilities Accreditation Program: Accreditation
requirements for acute care hospitals. Chicago, IL: Accreditation Association
for Hospitals and Health Systems. (Level VII)
23 DNV GL-Healthcare USA, Inc. (2016). MR.2 .SR.1 . NIAHO® accreditation
requirements: Interpretive guidelines & surveyor guidance (version 11).
Milford, OH: DNV GL-Healthcare USA, Inc. (Level VII)
PATIENT-CONTROLLED ANALGESIA
Patient-controlled analgesia (PCA) is a drug delivery system
providing IV analgesia, usually morphine, when the patient
presses a button at the end of a cord. Analgesia is provided
at the level and time needed by the patient. The device
prevents the patient from accidentally overdosing by
imposing a lockout time between doses, usually 6 to 10
minutes. During this interval, the patient won’t receive any
analgesic, even if the patient pushes the button. Another
key safety feature of PCA is that a sedated patient can’t
press the PCA button to deliver additional doses of
analgesia.1
A PCA system can also be programmed to administer a
continuous analgesia infusion at a prescribed basal rate.2,3
Morphine is the drug most commonly administered via this
method, although hydromorphone and fentanyl may also be
prescribed.4
PCA offers several advantages. It eliminates the need for
IM analgesics, provides pain relief tailored to each patient’s
size and pain tolerance, gives the patient a sense of control
over pain, and allows the patient to sleep at night with
minimal daytime drowsiness. It also improves postoperative
deep breathing, coughing, and ambulation and reduces
opioid use compared with those who don’t receive PCA.
PCA is typically given to patients postoperatively and to
those with terminal cancer or other chronic diseases. To
receive PCA therapy, a patient must be mentally alert and
able to understand and comply with instructions and
procedures and have no history of allergy to the analgesic.
To ensure patient safety, standardized medication
concentrations and standardized or preprinted order sets for
PCA or authorized agent–controlled analgesia are
recommended.5,6 PCA is intended to be controlled by the
patient, but for patients who can’t use PCA independently,
authorized agent–controlled analgesia—analgesia controlled
by an authorized, educated agent such as a nurse or
caregiver—offers a safe alternative. To increase the safety of
authorized agent–controlled analgesia, authorized agents
must receive proper education, keep accurate clinical
documentation, and carefully adhere to institutional
guidelines, and eligible patients and agents must be
carefully selected.7 To prevent unauthorized analgesia
administration, hazard warning signs should be placed on
the PCA equipment, and family members and health care
practitioners should be taught about the potential dangers
of administering PCA without authorization.5,6 The Institute
for Safe Medication Practices, The Joint Commission, and the
American Society for Pain Management Nursing don’t
support PCA by proxy owing to the risk of adverse events,
such
as
respiratory depression,
oversedation,
cardiopulmonary arrest, and death.1,7,8
Equipment
Patient’s medication administration record ▪ programmable
PCA pump ▪ PCA administration set ▪ syringe, cassette, or
bag with prescribed medication ▪
antiseptic pads
(chlorhexidine-based, povidone, or alcohol) ▪ compatible IV
solution ▪ gloves ▪ labels ▪ naloxone ▪ standardized
sedation scale ▪
oxygen administration setup and
equipment ▪ vital signs monitoring equipment ▪ emergency
equipment (code care with cardiac medications,
defibrillator, handheld resuscitation bag with mask,
intubation and suction equipment) ▪ Optional: pulse
oximeter with probe, capnography monitoring equipment, IV
catheter insertion equipment.
Preparation of equipment
Inspect all IV equipment and supplies; if a product is
expired, if its integrity is compromised, or if it’s defective,
remove it from patient use, label it as expired or defective,
and report the expiration or defect as directed by your
facility.9
Several types of PCA devices are available, so follow the
manufacturer’s instructions for setting up the device. Plug
the PCA device into an electrical outlet, if applicable. If the
device is battery-operated, make sure that the battery is
fully charged and working.
Have oxygen and naloxone readily available in case the
patient develops respiratory depression.6 Make sure
emergency equipment is functioning and readily available.
Implementation
■ Avoid distractions and interruptions when preparing and
administering
medication
to prevent
medication
administration errors.10,11
■ Review the practitioner’s order to make sure that the
prescribed infusion solution or medication, dose, rate, and
route of administration are appropriate for the patient’s age,
condition, and access device. Address concerns about the
order with the practitioner, the pharmacist, or your
supervisor and, if needed, the risk management
department, as directed by your facility.12,13,14,15,16
■ Reconcile the patient’s medications when a new
medication is ordered to reduce the risk of medication
errors, including omissions, duplications, dosing errors, and
drug interactions.17
■ Review the patient’s medical record for factors that place
the patient at risk for respiratory depression and other
adverse events; risk factors include advanced age, morbid
obesity, obstructive sleep apnea, chronic obstructive
pulmonary disease, and renal insufficiency.5
■ Gather the necessary equipment at the patient’s bedside
and prepare the equipment as needed.
■ Compare the medication label with the order in the
patient’s medical record.12,13,14,15
■ Check the patient’s medical record for an allergy or a
contraindication to the prescribed medication. If an allergy
or a contraindication exists, don’t administer the
medication; instead, notify the practitioner.12,13,14,15
■ Check the expiration date on the medication. If the
medication is expired, return it to the pharmacy and obtain
new medication.12,13,14,15
■ Visually inspect the solution for particles, discoloration, or
other loss of integrity; don’t administer the medication if its
integrity is compromised.12,13,14,15
■ Discuss any unresolved concerns about the medication
with the patient’s practitioner.12,13,14,15
■ Verify that the medication is being administered at the
proper time, in the prescribed dose, and by the correct route
to reduce the risk of medication errors.12,13,14,15
■ Perform hand hygiene.18,19,20,21,22,23,24,25
■ Confirm the patient’s identity using at least two patient
identifiers.26
■ Provide privacy.27,28,29,30
■ Explain the procedure to the patient and family (if
appropriate) according to their individual communication
and learning needs to increase their understanding, allay
their fears, and enhance cooperation.31,32
■ If the patient is receiving the medication for the first time,
teach the patient about potential adverse reactions and
discuss any
other
concerns
related to the
medication.12,13,14,15 Teach the patient how to use the PCA
device, and assess the patient’s comprehension by using
the teach-back method. Notify the practitioner if the patient
can’t participate safely in PCA therapy.5
■ Verify that the medication is being administered at the
proper time, in the prescribed dose, and by the correct route
to reduce the risk of medication errors.12,13,14,15
■ Raise the bed to waist level when providing care to
prevent caregiver back strain.33
■ Perform a comprehensive pain assessment using
techniques that are appropriate for the patient’s age,
condition, and ability to understand.34
■ Obtain vital signs to serve as a baseline for comparison.
■ Perform hand hygiene18,19,20,21,22,23,24,25 and put on
gloves to comply with standard precautions.4,35
■ Assess the patency of the patient’s vascular access
device; insert a new catheter, if needed.15 (See the “IV
catheter insertion and removal” procedure, page 443.)
■ Prime the PCA administration set according to the
manufacturer’s instructions.
■ Program the pump to deliver the prescribed parameters,
such as loading dose, basal rate, bolus amount, bolus
lockout period, and maximum limit. Have a second nurse
confirm these settings to prevent possible errors.5,6
■ Perform a vigorous mechanical scrub of the lowest
needleless port of the patient’s primary IV administration
set for at least 5 seconds using an antiseptic pad. Then
allow it to dry completely.36,37
■ Attach the needleless connector from the PCA
administration set to the lowest needleless port on the
primary IV administration set.6
■ Trace the tubing from the patient to its point of origin to
make sure that it’s connected to the correct port.16,38 Route
the tubing in a standardized direction if the patient has
other tubing and catheters that have different purposes. If
multiple IV lines will be used, label the tubing at both the
distal end (near the patient connection) and proximal end
(near the source container) to reduce the risk of
misconnection.39
■ Have another nurse perform an independent double-
check, if required by your facility, to verify the patient’s
identity and the correct medication and concentration.5,6
NURSING ALERT Opioids are considered a high-alert medication
because they can cause significant patient harm when used in error.40
Before beginning an opioid infusion, have another nurse perform an
independent double-check, if required by your facility, to verify the
patient’s identity and to make sure that the correct medication is in
the syringe in the prescribed concentration, the medication’s
indication corresponds with the patient’s diagnosis, the dosage
calculations are correct, the route of administration is safe and proper
for the patient, the pump settings are correct, and the infusion line is
attached to the correct port.
■ Compare the results of the independent double-check
with another nurse if required. If discrepancies exist, rectify
them before beginning PCA.
■ If your facility uses a bar code scanning system, scan
your identification badge, the patient’s identification
bracelet, and the medication’s bar code.
■ Label the PCA pump, PCA administration set, and IV
administration set tubing with the date of initiation or date
of change, as directed by your facility.41
■ Instruct the patient to push the button each time pain
occurs and the patient needs relief.5
■ Frequently monitor the patient’s vital signs, sedation level
(using a standardized sedation scale), and respiratory status
(including oxygen saturation level and carbon dioxide level
by capnography, if ordered) to identify adverse effects
related to IV opioid use, such as respiratory depression and
oversedation.5,42 Be aware of the amount of analgesia the
patient receives when the device is activated and the
maximum amount the patient can receive within a specified
time frame (if an adjustable device is used).6
■ For a patient who is receiving an IV opioid medication,
explain the assessment and monitoring process to the
patient and family, and tell them to alert staff if a breathing
problem or sedation occurs.43
NURSING ALERT If the respiratory rate falls below 8 breaths/minute
or the patient becomes overly sedated, becomes unarousable, has a
change in cognition, or has an adverse reaction to the medication,
suspend the use of PCA and notify the practitioner.2
■ Reassess the patient’s pain level.5,6,34,44 Notify the
practitioner if the patient’s pain isn’t being adequately
relieved.
■ Monitor the vascular access site for signs of infection,
infiltration, and catheter-associated venous thrombosis.
■ Return the bed to the lowest position to prevent falls and
maintain patient safety.45
■ Discard used equipment in appropriate receptacles.35
■ Remove and discard your gloves,35 and perform hand
hygiene.18,19,20,21,22,23,24,25
■ Document the procedure.46 47,48,49
Special considerations
■ Encourage the patient to cough and deep breathe to
promote ventilation.
■ Administer an antiemetic, as needed and prescribed,
following safe medication administration practices if the
patient develops nausea related to PCA therapy.12,13,14,15
■ Verify PCA pump settings at the beginning of each shift
and during or immediately after receiving hand-off
communications.2
■ PCA use should be one component of a comprehensive
pain management strategy, which should also include
nonpharmacologic strategies and
nonopioid pain
medication. This approach, according to American Pain
Society guidelines, is more effective and produces fewer
adverse effects and complications than opioid use alone.3
■ The Joint Commission issued a sentinel event alert related
to managing risk during transition to new International
Organization for Standardization tubing standards that were
designed to prevent dangerous tubing misconnections,
which can lead to serious patient injury and death. During
the transition, make sure to trace each tubing and catheter
from the patient to its point of origin before connecting or
reconnecting any device or infusion, at any care transition
(such as to a new setting or service), and as part of the
hand-off process. In addition, route tubes and catheters with
different purposes in different, standardized directions; label
tubing at both the distal and proximal ends when the
patient has different access sites or several bags hanging;
use tubing and equipment only as intended; and store
medications for different delivery routes in separate
locations.39
Patient teaching
Before initiating PCA therapy, teach the patient how the
device works.6 Allow the patient to practice with a sample
device. Reinforce that the patient should take enough
analgesic to relieve acute pain but not enough to make the
patient feel drowsy.
Complications
Potential complications include infection, IV infiltration, and
adverse reactions to the prescribed medication including
respiratory depression, oversedation, nausea, vomiting,
constipation, urine retention, and pruritus.
Documentation
Record the date and time of PCA therapy initiation; the IV
access device used and its location; baseline vital signs and
pain assessment findings; medication (concentration,
loading dose, basal rate, bolus amount, bolus lockout
period, maximum limit, and total dose delivered); and
ongoing assessments of vital signs, pain, sedation,
respiratory status (including oxygen saturation and carbon
dioxide level, if monitored), and the IV site. Also document
the patient’s understanding and tolerance of the procedure,
any unexpected outcomes, nursing interventions provided,
and the patient’s response to those interventions. Also
document patient and family teaching provided, their
understanding of the teaching, and any necessary follow-up
teaching.
REFERENCES
1 Institute for Safe Medication Practices (ISMP). (2016). “Worth repeating...
Recent PCA by proxy event suggests reassessment of practices that may
have fallen by the wayside” [Online]. Accessed via the Web at
https://www.ismp.org/resources/worth-repeating-recent-pca-proxy-event-
suggests-reassessment-practices-may-have-fallen
2 Infusion Nurses Society. (2016). Policies and procedures for infusion therapy
(5th ed.). Boston, MA: Infusion Nurses Society.
3 Chou, R., et al. (2016). Management of postoperative pain: A clinical practice
guideline from the American Pain Society, the American Society of Regional
Anesthesia and Pain Medicine, and the American Society of Anesthesiologists’
Committee on Regional Anesthesia, Executive Committee, and Administrative
Council. Journal of Pain, 17(2), 131–157. Accessed via the Web at
http://www.jpain.org/article/S1526-5900(15)00995-5/fulltext (Level VII)
4 Accreditation Association for Hospitals and Health Systems. (2017). Standard
07.01.10. Healthcare Facilities Accreditation Program: Accreditation
requirements for acute care hospitals. Chicago, IL: Accreditation Association
for Hospitals and Health Systems. (Level VII)
5 Standard 60. Patient-controlled analgesia. Infusion therapy standards of
practice. (2016). Journal of Infusion Nursing, 39, S131–S133. (Level VII)
6 Institute for Safe Medication Practices. (2003). “Safety issues with patient-
controlled analgesia Part II—How to prevent errors” [Online]. Accessed via the
Web at https://www.ismp.org/resources/safety-issues-pca-part-ii-how-prevent-
errors (Level VII)
7 Cooney, M. F., et al. (2013). American Society for Pain Management Nursing
position statement with clinical practice guidelines: Authorized agent
controlled analgesia. Pain Management Nursing, 14(3), 176–181. Accessed
via the Web at
http://www.aspmn.org/documents/AuthorizedAgentControlledAnalgesia_PMN_
August2013.pdf (Level VII)
8 The Joint Commission. (2012). “Sentinel event alert: Safe use of opioids in
hospitals” [Online]. Accessed via the Web at
https://www.jointcommission.org/assets/1/18/SEA_49_opioids_8 _2 _12_final.pd
f (Level VII)
9 Standard 12. Product evaluation, integrity, and defect reporting. Infusion
therapy standards of practice. (2016). Journal of Infusion Nursing, 39, S32–
S34. (Level VII)
10 Westbrook, J., et al. (2010). Association of interruptions with an increased risk
and severity of medication administration errors. Archives of Internal
Medicine, 170(8), 683–690 . (Level IV)
11 Institute for Safe Medication Practices. (2012). Side tracks on the safety
express: Interruptions lead to errors and unfinished...Wait, what was I doing?
Nurse Advise-ERR, 11(2), 1–4 . Accessed via the Web at
https://www.ismp.org/resources/side-tracks-safety-express-interruptions-lead-
errors-and-unfinished-wait-what-was-i-doing
12 The Joint Commission. (2019). Standard MM.06.01.01. Comprehensive
accreditation manual for hospitals. Oakbrook Terrace, IL: The Joint
Commission. (Level VII)
13 Accreditation Association for Hospitals and Health Systems. (2017). Standard
16.01.03. Healthcare Facilities Accreditation Program: Accreditation
requirements for acute care hospitals. Chicago, IL: Accreditation Association
for Hospitals and Health Systems. (Level VII)
14 Centers for Medicare and Medicaid Services, Department of Health and
Human Services. (2015). Condition of participation: Nursing services. 42
C.F.R. § 482.23(c).
15 DNV GL-Healthcare USA, Inc. (2016). MM.1 .SR.2. NIAHO® accreditation
requirements: Interpretive guidelines & surveyor guidance (version 11).
Milford, OH: DNV GL-Healthcare USA, Inc. (Level VII)
16 Standard 57. Parenteral medication and solution administration. Infusion
therapy standards of practice. (2016). Journal of Infusion Nursing, 39, S125–
S127. (Level VII)
17 Standard 13. Medication verification. Infusion therapy standards of practice.
(2016). Journal of Infusion Nursing, 39, S34–S35. (Level VII)
18 The Joint Commission. (2019). Standard NPSG.07.01.01. Comprehensive
accreditation manual for hospitals. Oakbrook Terrace, IL: The Joint
Commission. (Level VII)
19 World Health Organization. (2009). “WHO guidelines on hand hygiene in
health care: First global patient safety challenge, clean care is safer care”
[Online]. Accessed via the Web at
http://apps.who.int/publications/iris/bitstream/10665/44102/1/978924159790
6_eng.pdf (Level IV)
20 Centers for Disease Control and Prevention. (2002). Guideline for hand
hygiene in health-care settings: Recommendations of the Healthcare Infection
Control Practices Advisory Committee and the HICPAC/SHEA/APIC/IDSA Hand
Hygiene Task Force. MMWR Recommendations and Reports, 51(RR-16), 1–45.
Accessed via the Web at https://www.cdc.gov/mmwr/pdf/rr/rr5116.pdf (Level
II)
21 Standard 16. Hand hygiene. Infusion therapy standards of practice. (2016).
Journal of Infusion Nursing, 39, S38–S39 . (Level VII)
22 Centers for Disease Control and Prevention. (2011). “Guidelines for the
prevention of intravascular catheter-related infections” [Online]. Accessed via
the Web at https://www.cdc.gov/hicpac/pdf/guidelines/bsi-guidelines-2011.pdf
(Level I)
23 Accreditation Association for Hospitals and Health Systems. (2017). Standard
07.01.21. Healthcare Facilities Accreditation Program: Accreditation
requirements for acute care hospitals. Chicago, IL: Accreditation Association
for Hospitals and Health Systems. (Level VII)
24 Centers for Medicare and Medicaid Services, Department of Health and
Human Services. (2015). Condition of participation: Infection control. 42 C.F.R.
§ 482.42.
25 DNV GL-Healthcare USA, Inc. (2016). IC.1 .SR.1 . NIAHO® accreditation
requirements: Interpretive guidelines & surveyor guidance (version 11).
Milford, OH: DNV GL-Healthcare USA, Inc. (Level VII)
26 The Joint Commission. (2019). Standard NPSG.01.01.01. Comprehensive
accreditation manual for hospitals. Oakbrook Terrace, IL: The Joint
Commission. (Level VII)
27 The Joint Commission. (2019). Standard RI.01.01.01. Comprehensive
accreditation manual for hospitals. Oakbrook Terrace, IL: The Joint
Commission. (Level VII)
28 Centers for Medicare and Medicaid Services, Department of Health and
Human Services. (2015). Condition of participation: Patient’s rights. 42 C.F.R.
§ 482.13(c)(1).
29 DNV GL-Healthcare USA, Inc. (2016). PR.1.SR.5 . NIAHO® accreditation
requirements: Interpretive guidelines & surveyor guidance (version 11).
Milford, OH: DNV GL-Healthcare USA, Inc. (Level VII)
30 Accreditation Association for Hospitals and Health Systems. (2017). Standard
15.01.16. Healthcare Facilities Accreditation Program: Accreditation
requirements for acute care hospitals. Chicago, IL: Accreditation Association
for Hospitals and Health Systems. (Level VII)
31 The Joint Commission. (2019). Standard PC.02.01.21. Comprehensive
accreditation manual for hospitals. Oakbrook Terrace, IL: The Joint
Commission. (Level VII)
32 The Joint Commission. (2010). Advancing effective communication, cultural
competence, and patient- and family-centered care: A roadmap for hospitals.
Oakbrook Terrace, IL: The Joint Commission. Accessed via the Web at
http://www.jointcommission.org/assets/1/6/ARoadmapforHospitalsfinalversion
727.pdf (Level VII)
33 Waters, T. R., et al. (2009). “Safe patient handling training for schools of
nursing” [Online]. Accessed via the Web at
https://www.cdc.gov/niosh/docs/2009-127/pdfs/2009-127.pdf (Level VII)
34 The Joint Commission. (2019). Standard PC.01.02.07. Comprehensive
accreditation manual for hospitals. Oakbrook Terrace, IL: The Joint
Commission. (Level VII)
35 Siegel, J. D ., et al. (2007, revised 2017). “2007 guideline for isolation
precautions: Preventing transmission of infectious agents in healthcare
settings” [Online]. Accessed via the Web at
https://www.cdc.gov/infectioncontrol/pdf/guidelines/isolation-guidelines.pdf
(Level II)
36 Marschall, J., et al. (2014). SHEA/IDSA practice recommendation: Strategies
to prevent central line–associated bloodstream infections in acute care
hospitals: 2014 update. Infection Control and Hospital Epidemiology, 35(7),
753–771 . Accessed via the Web at
http://www.jstor.org/stable/10.1086/676533 (Level I)
37 Standard 34. Needleless connectors. Infusion therapy standards of practice.
(2016). Journal of Infusion Nursing, 39, S68–S70. (Level VII)
38 U.S . Food and Drug Administration. (n.d .). “Look. Check. Connect. Safe
medical device connections save lives” [Online]. Accessed via the Web at
https://www.fda.gov/downloads/MedicalDevices/Safety/AlertsandNotices/UCM
134873.pdf
39 The Joint Commission. (2014). “Sentinel event alert: Managing risk during
transition to new ISO tubing connector standards” [Online]. Accessed via the
Web at
http://www.jointcommission.org/assets/1/6/SEA_53_Connectors_8 _19_14 _final.
pdf (Level VII)
40 Institute for Safe Medication Practices (ISMP). (2014). “ISMP list of high-alert
medications in acute care settings” [Online]. Accessed via the Web at
http://www.ismp.org/Tools/highalertmedications.pdf (Level VII)
41 Standard 42. Administration set change. Infusion therapy standards of
practice. (2016). Journal of Infusion Nursing, 39, S84–S85. (Level VII)
42 Jarzyna, D., et al. (2011). American Society for Pain Management Nursing
guidelines on monitoring for opioid-induced sedation and respiratory
depression. Pain Management Nursing, 12(3), 118–145. Accessed via the Web
at http://www.aspmn.org/documents/GuidelinesonMonitoringforOpioid-
InducedSedationandRespiratoryDepression.pdf (Level VII)
43 Centers for Medicare and Medicaid Services. (2014). “Requirements for
hospital medication administration, particularly intravenous (IV) medications
and post-operative care of patients receiving IV opioids” [Online]. Accessed
via the Web at http://www.cms.gov/Medicare/Provider-Enrollment-and-
Certification/SurveyCertificationGenInfo/Downloads/Survey-and-Cert-Letter-
14-15.pdf
44 Accreditation Association for Hospitals and Health Systems. (2017). Standard
16.02.05. Healthcare Facilities Accreditation Program: Accreditation
requirements for acute care hospitals. Chicago, IL: Accreditation Association
for Hospitals and Health Systems. (Level VII)
45 Ganz, D. A., et al. (2013). Preventing falls in hospitals: A toolkit for improving
quality of care (AHRQ Publication No. 13-0015-EF). Rockville, MD: Agency for
Healthcare Research and Quality. Accessed via the Web at
https://www.ahrq.gov/sites/default/files/publications/files/fallpxtoolkit.pdf
(Level VII)
46 The Joint Commission. (2019). Standard RC.01.03 .01. Comprehensive
accreditation manual for hospitals. Oakbrook Terrace, IL: The Joint
Commission. (Level VII)
47 Accreditation Association for Hospitals and Health Systems. (2017). Standard
10.00 .03. Healthcare Facilities Accreditation Program: Accreditation
requirements for acute care hospitals. Chicago, IL: Accreditation Association
for Hospitals and Health Systems. (Level VII)
48 Centers for Medicare and Medicaid Services, Department of Health and
Human Services. (2015). Condition of participation: Medical record services.
42 C.F.R. § 482.24(b). (Level VII)
49 DNV GL-Healthcare USA, Inc. (2016). MR.2 .SR.1 . NIAHO® accreditation
requirements: Interpretive guidelines & surveyor guidance (version 11).
Milford, OH: DNV GL-Healthcare USA, Inc. (Level VII)
PERCUTANEOUS CORONARY INTERVENTION
CARE
Percutaneous coronary intervention (PCI), also referred to as
percutaneous transluminal coronary angioplasty, is a
procedure to open narrowed or occluded coronary arteries
and restore blood flow to the heart in patients with coronary
artery disease. PCI is commonly performed in a cardiac
catheterization laboratory. (See Understanding PCI, page
588.) The American Heart Association recommends it as the
treatment of choice for managing ST-elevation myocardial
infarction (STEMI). The period of time from arrival at the
emergency department until angioplasty is performed is
commonly referred to as door-to-balloon time. When door-
to-balloon time is less than 90 minutes, mortality rates are
lower.1,2
When PCI is used to treat STEMI, it may be performed with
or without stent placement. However, when a stent is
placed, it decreases the risk of target vessel
revascularization and may reduce the risk of myocardial
reinfarction (MI). For these reasons, stent placement has
become routine during PCI in patients with STEMI.3,4,5 Drug-
eluting stents are inserted more commonly than are metal
stents, because drug-eluting stents are associated with low
restenosis rates.6
PCI provides an alternative for patients who are poor
surgical candidates because of chronic medical problems.
It’s also useful for patients who have total coronary
occlusion, unstable angina, and plaque buildup in several
areas, and for those with poor left ventricular function.
Equipment
Antiseptic solution (preferably chlorhexidine-based) ▪ local
anesthetic ▪ prescribed IV solution ▪ IV administration set ▪
cardiac monitor and electrodes ▪ oxygen and oxygen
delivery system ▪ disposable-head clippers ▪ prescribed
antiplatelet medication ▪ prescribed sedative ▪ contrast
medium ▪ emergency medications ▪ emergency equipment
(defibrillator, handheld resuscitation bag, and intubation
equipment) ▪ heparin (or other prescribed anticoagulant) for
injection8 ▪ introducer kit for PCI catheter ▪ sterile gloves ▪
sterile gown ▪ sterile drapes ▪ surgical cap ▪ mask with
goggles or mask and face shield ▪ Optional: Doppler
ultrasound flow detector, nitroglycerin, pulmonary artery
catheter, IV catheter insertion kit, prescribed statin
medication, eye protection.
Understanding PCI
Percutaneous coronary intervention (PCI) begins with cardiac catheterization,
which involves inserting a sheath and a guide catheter through a vessel in
the groin or arm (commonly the femoral or radial artery) and advancing the
catheter into the heart. A radial artery approach is particularly useful in
patients with coagulopathy, elevated international ratio, or morbid obesity,
because this approach reduces the risk of bleeding.7
After the catheter is advanced into the heart, an imaging technique called
coronary angiography or coronary arteriography is performed. Contrast
medium is injected through the catheter into the heart’s vascular system to
allow visualization of the coronary arteries and identify areas of occlusion,
narrowing, and other abnormalities of the coronary arteries. If narrowing or
blockage is identified during cardiac catheterization, PCI may be performed
to open up the narrowed or blocked vessel. During this procedure, the
practitioner directs a balloon through the guide catheter into the narrowed
artery. When the balloon is in place (shown below), the practitioner
alternately inflates and deflates it, compressing the plaque against the vessel
wall and subsequently restoring blood flow through the vessel.
During PCI, the practitioner may also insert a stent (shown below) to
prevent vessel reclosure and restenosis. A bare-metal or drug-eluting stent
may be used. A bare-metal stent is most commonly made of stainless steel.
A drug-eluting stent is coated with a medication or polymer. The medication
coating is released at the implantation site to reduce the risk of restenosis.
The polymer coating acts to decrease platelet aggregation; some polymers
also contain medication. The polymer allows the medication to be released
gradually to help reduce inflammation at the site, which reduces the risk of
restenosis. However, the medication’s effect is localized.
Preparation of equipment
Make sure that emergency equipment is available and
functioning properly.
Implementation
Before PCI
■ Verify the practitioner’s orders.
■ Check the patient’s medical record for allergies (including
any to the prescribed medications, contrast medium, latex,
or the local anesthetic) or other contraindications; if the
patient has any allergies or other contraindications, notify
the practitioner.7,9,10,11,12
■ Confirm that the practitioner has obtained written
informed consent and that the consent form is in the
patient’s medical record.13,14,15,16
■ Conduct a preprocedure verification to make sure that all
relevant documentation, related information, and equipment
are available and correctly identified with the patient’s
identifiers.17,18
■ Verify that ordered laboratory and imaging studies have
been completed and that the results are in the patient’s
medical record. Notify the doctor of any unexpected results.
■ Ensure that the results of coagulation studies (to
determine the risk of bleeding), complete blood count,
serum electrolyte studies, and blood typing and
crossmatching are available.17 Notify the practitioner of any
critical test results within your facility’s established time
frame so that the patient can be promptly treated.7,19
■ Review baseline hemodynamic parameters and patient
medications for contraindications to the procedure.7,20
■ Perform hand hygiene.21,22,23,24,25,26
■ Confirm the patient’s identity using at least two patient
identifiers.20,27
■ Provide privacy.28,29,30,31
■ Reinforce the practitioner’s explanation of the procedure
according to the patient’s individual communication and
learning needs to increase understanding, allay fears, and
enhance cooperation. Answer the patient’s questions.32
■ Inform the patient that the procedure can last from 1 to 4
hours and that some discomfort may occur from lying on a
hard table for that long.
■ Tell the patient that the practitioner will insert a catheter
into an artery or a vein in the groin or wrist, and that
pressure may be felt as the catheter moves along the
vessel.
■ Explain that although the patient will be awake during the
procedure, a sedative will be given. Explain that the
practitioner or nurse may ask how the patient feels during
the procedure; encourage the patient to report any
experiences of angina.
■ Explain that the practitioner will inject a contrast medium
through the catheter to help visualize the heart structures.
Warn the patient that a hot, flushing sensation or transient
nausea may occur during the injection.
■ Administer a statin medication, as prescribed, following
safe medication administration practices to reduce the risk
of periprocedural myocardial infarction (MI).7,9,10,11,12
■ If the procedure isn’t an emergency, confirm the patient’s
nothing-by-mouth status before the procedure; minimum
fasting recommendations are 2 hours for clear liquids, 6 or
more hours for nonhuman milk or a light meal, and 8 hours
or more for fried or fatty foods or meat.33
■ Perform hand hygiene.21,22,23,24,25,26
■ Insert an IV catheter, as needed, in case emergency
medications are required. (See the “IV catheter insertion
and removal” procedure.)
■ Following safe medication administration practices,
administer antiplatelet drugs (such as aspirin and a P2Y12
inhibitor), as ordered, to reduce the risk of periprocedure
mortality and stroke.3,7,9,10,11,12
■ Clip hair from the insertion site.34
■ Clean the area of skin at the insertion site with antiseptic
solution.
■ Administer a sedative, as prescribed, following safe
medication administration practices.9,10,11,12
■ Obtain vital signs to serve as a baseline for comparison
during and after the procedure.
■ Assess for the presence and quality of distal pulses to
evaluate the neurovascular status of the patient’s
extremities. If the pulses are weak or nonpalpable, use a
portable Doppler ultrasonic flow detector to help detect and
assess pulses. (See the “Doppler use” procedure.)20
■ Perform hand hygiene.21,22,23,24,25,26
■ Provide hand-off communication about the patient’s
history, condition, and care to the person who will assume
responsibility for the patient’s care during the procedure.
Allow time for questions, as necessary, to avoid
miscommunications that can cause patient care errors
during transition of care. As part of the hand-off process,
allow time for the receiving staff member to trace each
tubing and catheter from the patient to its point of origin
using a standardized line reconciliation process.35,36,37
■ Document the procedure.38,39,40,41
During PCI
■ Receive hand-off communication from the person who
was responsible for the patient’s care before the procedure.
Ask questions, as necessary, to avoid miscommunications
that can cause patient care errors during transitions of care.
Trace each tubing and catheter from the patient to its point
of origin; use a standardized line reconciliation
process.35,36,37
■ Perform hand hygiene.21,22,23,24,25,26
■ When the patient arrives at the cardiac catheterization
laboratory, confirm the patient’s identity using at least two
patient identifiers.27
■ Conduct a preprocedure verification to make sure that all
relevant documentation, related information, and equipment
are available and correctly identified with the patient’s
identifiers.17
■ Attach the patient to a cardiac monitor. Make sure that
alarm limits are set appropriately for the patient’s current
condition, and that alarms are turned on, functioning
properly, and audible to staff.42,43,44,45
■ Ensure that the IV catheter is patent.
■ Administer oxygen through an appropriate oxygen
delivery device, as ordered.
■ The practitioner puts on a surgical cap, a sterile gown, a
mask, eye protection, and sterile gloves if needed. Put on
the same personal protective equipment.46,47,48,49
■ Open the sterile supplies and label all medications,
medication containers, and other solutions on and off the
sterile field.50,51
■ The practitioner prepares the site, injects a local
anesthetic, and then drapes the patient from head to toe,
leaving the insertion site exposed. Maximal barrier
precautions prevent infection.46
■ Conduct a time-out immediately before starting the
procedure to ensure that the correct patient, site,
positioning, and procedure are identified, and, as applicable,
that all relevant information and necessary equipment are
available.52
■ The practitioner inserts a sheath and a guide catheter
through a vessel in the patient’s groin or arm (commonly
the femoral or radial artery) and advances the catheter into
the heart.
■ The practitioner injects contrast medium through the
catheter into the heart’s vascular system to allow
visualization of the coronary arteries and help identify areas
of occlusion, narrowing, and other abnormalities of the
coronary arteries. The practitioner also injects heparin or
another anticoagulant8 to prevent the catheter from
clotting, and, if needed, intracoronary nitroglycerin to dilate
the coronary vessels and prevent spasms.
NURSING ALERT Because coronary spasms can occur during or after
PCI, monitor the patient’s electrocardiogram for ST-segment and T-
wave changes, and obtain vital signs frequently. Be alert for signs of
ischemia, which requires emergency coronary revascularization.
■ The practitioner directs a balloon through the guide
catheter into the narrowed artery. When the balloon is in
place, the practitioner alternately inflates and deflates it,
compressing the plaque against the vessel wall and
subsequently restoring blood flow through the vessel.
■ The practitioner inserts a stent, if needed, to prevent
reclosure and restenosis of the vessel.
■ Assist with coronary angiography to help determine the
effectiveness of treatment.
■ Monitor the insertion site for bleeding throughout the
procedure.
■ Monitor the patient’s International Normalized Ratio,
prothrombin time, partial thromboplastin time, activated
clotting time, and platelet count, as ordered.8,20
■ The practitioner removes the guide catheter. Note that
the practitioner may leave the sheath in place until the
effects of any anticoagulant medication given during the
procedure wear off.53 The sheath is generally removed 4 to
6 hours after the procedure;53,54 assist with suturing it in
place, as appropriate. (See the “Arterial and venous sheath
removal” procedure.)
■ Discard used supplies in appropriate receptacles.47,48
■ Remove and discard your gloves and other personal
protective equipment.47,48
■ Perform hand hygiene.21,22,23,24,25,26
■ Document the procedure.38,39,30,41
After PCI
■ Receive hand-off communication from the person who
was responsible for the patient’s care during the procedure.
Ask questions, as necessary, to avoid miscommunications
that can cause patient care errors during transitions of care.
As part of the hand-off process, trace each tubing and
catheter from the patient to its point of origin; use a
standardized line reconciliation process.35,36,37
■ Verify the practitioner’s orders.
■ Perform hand hygiene.21,22,23,24,25,26
■ Confirm the patient’s identity using at least two patient
identifiers.27
■ Provide privacy.28,29,30,31
■ Perform hand hygiene.21,22,23,24,25,26
■ Assess the catheter insertion site for bleeding. If the
patient is bleeding at the catheter insertion site, confirm the
presence of a compression device, which is used to prevent
hematoma formation, or apply manual pressure
approximately 3⁄4′′ to 1′′ (2 cm to 3 cm) above the puncture
site.
■ Attach the patient to a cardiac monitor and monitor the
electrocardiogram (ECG) rhythm and arterial pressures.
Make sure that alarm limits are set appropriately for the
patient’s current condition, and that alarms are turned on,
functioning properly, and audible to staff.42,43,44,45
■ Monitor the patient’s vital signs according to the patient’s
condition and at an interval determined by your facility; no
evidence-based research is available to indicate best
practice for frequency of vital signs monitoring.55
■ Monitor neurovascular status distal to the catheter
insertion site, including peripheral pulses, color,
temperature, and capillary refill time of the affected
extremity. Watch for signs of neurovascular compromise; if
present, notify the practitioner. Immediate surgical
consultation may be necessary if compartment syndrome
develops after a radial approach.56
NURSING ALERT Because coronary artery spasm can occur during or
after PCI, monitor the patient’s ECG for ST-segment and T-wave
changes, and take vital signs frequently. Be alert for symptoms of
ischemia, which requires emergency coronary revascularization.57
■ Instruct the patient to remain in bed for the amount of
time specified by the practitioner, and to keep the affected
extremity straight and immobilized while on bed rest.
Elevate the head of the bed 15 to 30 degrees, as ordered.
Bed positioning and rest times vary depending on the
arterial site selected, the technique used for closure during
PCI, the size of the sheath used, and the patient’s receipt of
antiplatelet therapy after the procedure.
■ Assess the catheter insertion site for hematoma or
hemorrhage: If a hematoma develops, apply pressure to the
site, mark the area to evaluate for any change in size, and
notify the patient’s practitioner. If hemorrhage develops,
apply pressure to the site and notify the practitioner. For
hematoma or hemorrhage, interrupt anticoagulant and
antiplatelet medications, as ordered; prolong bed rest, as
needed; monitor serial complete blood counts, as
prescribed; and administer a blood transfusion if indicated
and ordered.8,58
■ Administer IV fluids, as ordered (usually 100 mL/hour), to
promote excretion of the contrast medium. Monitor for signs
of fluid overload (jugular vein distention, atrial and
ventricular gallops, dyspnea, pulmonary congestion,
tachycardia, hypertension, and hypoxemia).
■ Monitor intake and output and electrolyte levels, as
ordered, to promptly recognize fluid and electrolyte
imbalances.10,59 Notify the practitioner of critical test results
within your facility’s established time frame so the patient
can be promptly treated.19
When the catheter is ready for removal:
■ Perform hand hygiene.21,22,23,24,25,26
■
Put on gloves to comply with standard
precautions.46,47,48,49
■ Remove the catheter and apply direct pressure for at
least 10 minutes; apply a compression or hemostatic device
or a topical hemostatic agent, as ordered.60,61
■ Place a dressing over the site, preferably a transparent
semipermeable dressing.62 Monitor the site often.
■ Discard used supplies in appropriate receptacles.47,48
■ Remove and discard your gloves.47,48
■ Perform hand hygiene.21,22,23,24,25,26
■ Document the procedure.38,39,30,41
Special considerations
■ Devices to prevent lower extremity embolism, such as a
sequential compression device or an embolic capture
device, are recommended for use during PCI for a
saphenous vein graft.7,63
■ The current recommendation is to administer 75 mg of
clopidogrel daily or 10 mg of ticagrelor 90 mg twice daily
after the procedure for a period of 1 to 12 months,
depending on the exact procedure completed. If the patient
isn’t already receiving long-term aspirin therapy, 81 mg/day
of aspirin may also be prescribed to be continued
indefinitely, depending on the patient’s condition and
history.3,57,64
■ If the patient exhibits signs and symptoms of an MI after
the procedure, expect the practitioner to order a 12-lead
ECG as well as laboratory tests to assess creatinine kinase-
MB and troponin levels.57
■ The Joint Commission has issued a sentinel event alert
concerning medical device alarm safety, because alarm-
related events have been associated with permanent loss of
function and death. Among the major contributing factors
were improper alarm settings, inappropriately turned off
alarms, and alarm signals not audible to staff. Make sure
that alarm limits are set appropriately, and that alarms are
turned on, functioning properly, and audible to staff. Follow
facility guidelines for preventing alarm fatigue.42
■ The Joint Commission has issued a sentinel event alert
related to managing risk during transition to the new
International Organization for Standardization tubing
standards designed to prevent dangerous tubing
misconnections, which can lead to serious patient injury and
death. During the transition, make sure to trace all tubing
and catheters from the patient to their points of origin
before connecting or reconnecting any device or infusion, at
any care transition (such as to a new setting or service), and
as part of the hand-off process. In addition, route tubes and
catheters with different purposes in different, standardized
directions; label tubing at the distal and proximal ends when
there are different access sites or several bags hanging; use
tubing and equipment only as intended; and store
medications for different delivery routes in separate
locations.36
Patient teaching
Instruct the patient to avoid heavy lifting or strenuous
activities after the procedure, because these actions could
affect the puncture site. Tell the patient to drink plenty of
fluids during the first 24 hours following the procedure to
flush the contrast medium from the system. Instruct the
patient to report any signs of infection at the puncture site,
such as fever or redness, drainage, or swelling at the
puncture site. Teach the patient about any new medication
prescribed.
Complications
The most common complication of PCI is restenosis. Other
complications include prolonged angina, coronary artery
perforation, balloon rupture, reocclusion (necessitating a
coronary artery bypass graft), MI, pericardial tamponade,
hematoma,
hemorrhage,
reperfusion
arrhythmias,
vasospasm of the coronary artery, closure of the vessel, and
contrast-induced nephropathy65 or allergic reaction.
Complications associated with radial artery access include
local area bleeding, infection, arterial spasm, compartment
syndrome, radial artery perforation, and pseudoaneurysm.61
Documentation
Note the patient’s status before the procedure and the
patient’s response during the procedure. Include vital signs
and the condition of the extremity distal to the insertion
site. Document any complications and interventions
performed before, during, or after the procedure. Document
patient and family teaching and their comprehension of
your teaching.
REFERENCES
1 Brodie, B. R., et al. (2010). When is door-to-balloon time critical? Analysis
from the HORIZONS-AMI (Harmonizing Outcomes with Revascularization and
Stents in Acute Myocardial Infarction) and CADILLAC (Controlled Abciximab
and Device Investigation to Lower Late Angioplasty Complications) trials.
Journal of the American College of Cardiology, 56(5), 407–413. Accessed via
the Web at
http://www.sciencedirect.com/science/article/pii/S0735109710019066 (Level
II)
2 Centers for Medicare and Medicaid Services, & The Joint Commission. (2017).
“The specifications manual for national hospital inpatient quality measures
(version 5.2a)” [Online]. Accessed via the Web at
https://www.jointcommission.org/specifications_manual_for_national_hospital_
inpatient_quality_measures.aspx
3 O’Gara, P. T., et al. (2013). 2013 ACCF/AHA guideline for the management of
ST-elevation myocardial infarction: Executive summary. A report of the
American College of Cardiology Foundation/American Heart Association Task
Force on Practice Guidelines. Circulation, 127(4), 529–555 . Accessed via the
Web at http://circ.ahajournals.org/content/127/4/529.full.pdf+html (Level VII)
4 American Heart Association. (2010). 2010 American Heart Association
guidelines for cardiopulmonary resuscitation and emergency cardiovascular
care. Circulation, 122, S787–S817. (Level II)
5 American Heart Association. (2015). 2015 American Heart Association
guidelines update for cardiopulmonary resuscitation and emergency
cardiovascular care. Circulation, 132, S483–S500. (Level II)
6 Gibson, C. M., et al. Primary percutaneous coronary intervention in acute ST
elevation myocardial infarction: Periprocedural management. (2016). In:
UpToDate, Cutlip, D., & Saperia, G. M. (Eds). Retrieved from:
www.uptodate.com
7 Levin, G.N., et al. (2016). ACC/AHA/SCAI focused update on primary
percutaneous coronary intervention for patients with ST-elevation myocardial
infarction: An update of the 2011 ACCF/AHA/SCAI guideline for percutaneous
coronary intervention and the 2013 ACCF/AHA guideline for the management
of ST-elevation myocardial infarction. Circulation 133(11), 1135–1147 .
Accessed via the Web at http://circ.ahajournals.org/content/133/11/1135.long
(Level VII)
8 Merriweather, N., & Sulzbach-Hoke, L. M . (2012). Managing risk of
complications at femoral vascular access sites in percutaneous coronary
intervention. Critical Care Nurse, 32(5), 16–29. Accessed via the Web at
http://ccn.aacnjournals.org/content/32/5/16.full.pdf+html
9 The Joint Commission. (2019). Standard MM.06 .01.01. Comprehensive
accreditation manual for hospitals. Oakbrook Terrace, IL: The Joint
Commission. (Level VII)
10 Centers for Medicare and Medicaid Services, Department of Health and
Human Services. (2015). Condition of participation: Nursing services. 42
C.F.R. § 482.23(c).
11 Accreditation Association for Hospitals and Health Systems. (2017). Standard
16.01.03. Healthcare Facilities Accreditation Program: Accreditation
requirements for acute care hospitals. Chicago, IL: Accreditation Association
for Hospitals and Health Systems. (Level VII)
12 DNV GL-Healthcare USA, Inc. (2016). MM.1 .SR.2. NIAHO® accreditation
requirements: Interpretive guidelines & surveyor guidance (version 11).
Milford, OH: DNV GL-Healthcare USA, Inc. (Level VII)
13 The Joint Commission. (2019). Standard RI.01.03 .01. Comprehensive
accreditation manual for hospitals. Oakbrook Terrace, IL: The Joint
Commission. (Level VII)
14 Centers for Medicare and Medicaid Services, Department of Health and
Human Services. (2015). Condition of participation: Patient’s rights. 42 C.F.R.
§ 482.13(b)(2).
15 Accreditation Association for Hospitals and Health Systems. (2017). Standard
30.01.11. Healthcare Facilities Accreditation Program: Accreditation
requirements for acute care hospitals. Chicago, IL: Accreditation Association
for Hospitals and Health Systems. (Level VII)
16 DNV GL-Healthcare USA, Inc. (2016). PR.1.SR.3 . NIAHO® accreditation
requirements: Interpretive guidelines & surveyor guidance (version 11).
Milford, OH: DNV GL-Healthcare USA, Inc. (Level VII)
17 The Joint Commission. (2019). Standard UP.01.01.01. Comprehensive
accreditation manual for hospitals. Oakbrook Terrace, IL: The Joint
Commission. (Level VII)
18 Accreditation Association for Hospitals and Health Systems. (2017). Standard
30.00 .14. Healthcare Facilities Accreditation Program: Accreditation
requirements for acute care hospitals. Chicago, IL: Accreditation Association
for Hospitals and Health Systems. (Level VII)
19 The Joint Commission. (2019). Standard NPSG.02.03 .01. Comprehensive
accreditation manual for hospitals. Oakbrook Terrace, IL: The Joint
Commission. (Level VII)
20 Gulanick, M., & Myers, J. L. (2017). Nursing care plans: Diagnosis,
interventions, and outcomes (9th ed.). St. Louis, MO: Elsevier.
21 The Joint Commission. (2017). Standard NPSG.07.01.01. Comprehensive
accreditation manual for hospitals. Oakbrook Terrace, IL: The Joint
Commission. (Level VII)
22 World Health Organization. (2009). “WHO guidelines on hand hygiene in
health care: First global patient safety challenge, clean care is safer care”
[Online]. Accessed via the Web at
http://apps.who.int/iris/bitstream/10665/44102/1/9789241597906_eng.pdf
(Level IV)
23 Centers for Disease Control and Prevention. (2002). Guideline for hand
hygiene in health-care settings: Recommendations of the Healthcare Infection
Control Practices Advisory Committee and the HICPAC/SHEA/APIC/IDSA Hand
Hygiene Task Force. MMWR Recommendations and Reports, 51(RR-16), 1–45.
Accessed via the Web at https://www.cdc.gov/mmwr/pdf/rr/rr5116.pdf (Level
II)
24 Centers for Medicare and Medicaid Services, Department of Health and
Human Services. (2015). Condition of participation: Infection control. 42 C.F.R.
§ 482.42.
25 Accreditation Association for Hospitals and Health Systems. (2017). Standard
07.01.21. Healthcare Facilities Accreditation Program: Accreditation
requirements for acute care hospitals. Chicago, IL: Accreditation Association
for Hospitals and Health Systems. (Level VII)
26 DNV GL-Healthcare USA, Inc. (2016). IC.1 .SR.1 . NIAHO® accreditation
requirements: Interpretive guidelines & surveyor guidance (version 11).
Milford, OH: DNV GL-Healthcare USA, Inc. (Level VII)
27 The Joint Commission. (2019). Standard NPSG.01.01.01. Comprehensive
accreditation manual for hospitals. Oakbrook Terrace, IL: The Joint
Commission. (Level VII)
28 The Joint Commission. (2019). Standard RI.01.01.01. Comprehensive
accreditation manual for hospitals. Oakbrook Terrace, IL: The Joint
Commission. (Level VII)
29 Centers for Medicare and Medicaid Services, Department of Health and
Human Services. (2015). Condition of participation: Patient’s rights. 42 C.F.R.
§ 482.13(c)(1).
30 Accreditation Association for Hospitals and Health Systems. (2017). Standard
15.01.16. Healthcare Facilities Accreditation Program: Accreditation
requirements for acute care hospitals. Chicago, IL: Accreditation Association
for Hospitals and Health Systems. (Level VII)
31 DNV GL-Healthcare USA, Inc. (2016). PR.1.SR.5 . NIAHO® accreditation
requirements: Interpretive guidelines & surveyor guidance (version 11).
Milford, OH: DNV GL-Healthcare USA, Inc. (Level VII)
32 The Joint Commission. (2019). Standard PC.02.01.21. Comprehensive
accreditation manual for hospitals. Oakbrook Terrace, IL: The Joint
Commission. (Level VII)
33 American Society of Anesthesiologists. (2017). Practice guidelines for
preoperative fasting and the use of pharmacologic agents to reduce the risk
of pulmonary aspiration: Application to healthy patients undergoing elective
procedures. Anesthesiology, 126(3), 376–393 . (Level V)
34 The Joint Commission. (2019). Standard NPSG.07.05.01. Comprehensive
accreditation manual for hospitals. Oakbrook Terrace, IL: The Joint
Commission. (Level VII)
35 The Joint Commission. (2019). Standard PC.02.02.01. Comprehensive
accreditation manual for hospitals. Oakbrook Terrace, IL: The Joint
Commission. (Level VII)
36 The Joint Commission. (2014). “Sentinel event alert: Managing risk during
transition to new ISO tubing connector standards” [Online]. Accessed via the
Web at
http://www.jointcommission.org/assets/1/6/SEA_53_Connectors_8 _19_14 _final.
pdf (Level VII)
37 U.S . Food and Drug Administration. (n.d .). “Look. Check. Connect. Safe
medical device connections save lives” [Online]. Accessed via the Web at
https://www.fda.gov/downloads/MedicalDevices/Safety/AlertsandNotices/UCM
134873.pdf
38 The Joint Commission. (2019). Standard RC.01.03 .01. Comprehensive
accreditation manual for hospitals. Oakbrook Terrace, IL: The Joint
Commission. (Level VII)
39 Centers for Medicare and Medicaid Services, Department of Health and
Human Services. (2015). Condition of participation: Medical record services.
42 C.F.R. § 482.24(b).
40 Accreditation Association for Hospitals and Health Systems. (2017). Standard
10.00 .03. Healthcare Facilities Accreditation Program: Accreditation
requirements for acute care hospitals. Chicago, IL: Accreditation Association
for Hospitals and Health Systems. (Level VII)
41 DNV GL-Healthcare USA, Inc. (2016). MR.2 .SR.1 . NIAHO® accreditation
requirements: Interpretive guidelines & surveyor guidance (version 11).
Milford, OH: DNV GL-Healthcare USA, Inc. (Level VII)
42 The Joint Commission. (2013). “Sentinel event alert: Medical device alarm
safety in hospitals” [Online]. Accessed via the Web at
https://www.jointcommission.org/assets/1/6/SEA_50_alarms_4 _26_16.pdf
(Level VII)
43 The Joint Commission. (2019). Standard NPSG.06 .01.01. Comprehensive
accreditation manual for hospitals. Oakbrook Terrace, IL: The Joint
Commission. (Level VII)
44 Graham, K. C., & Cvach, M. (2010). Monitor alarm fatigue: Standardizing use
of physiological monitors and decreasing nuisance alarms. American Journal
of Critical Care, 19(1), 28–37. Accessed via the Web at
http://ajcc.aacnjournals.org/content/19/1/28.full.pdf
45 American Association of Critical-Care Nurses. (2013). “A ACN practice alert:
Alarm management” [Online]. Accessed via the Web at
https://www.aacn.org/aacn-website/shared/content/practice-
alerts/2015/11/25/alarm-management (Level VII)
46 Centers for Disease Control and Prevention. (2011). “Guidelines for the
prevention of intravascular catheter-related infections” [Online]. Accessed via
the Web at https://www.cdc.gov/hicpac/pdf/guidelines/bsi-guidelines-2011.pdf
(Level I)
47 Siegel, J. D ., et al. (2007, revised 2017). “2007 guideline for isolation
precautions: Preventing transmission of infectious agents in healthcare
settings” [Online]. Accessed via the Web at
https://www.cdc.gov/infectioncontrol/pdf/guidelines/isolation-guidelines.pdf
(Level II)
48 Occupational Safety and Health Administration. (n.d .). “Bloodborne
pathogens, standard number 1910.1030” [Online]. Accessed via the Web at
https://www.osha.gov/pls/oshaweb/owadisp.show_document?
p_id=10051&p_table=STANDARDS (Level VII)
49 Accreditation Association for Hospitals and Health Systems. (2017). Standard
07.01.10. Healthcare Facilities Accreditation Program: Accreditation
requirements for acute care hospitals. Chicago, IL: Accreditation Association
for Hospitals and Health Systems. (Level VII)
50 The Joint Commission. (2019). Standard NPSG.03 .04.01. Comprehensive
accreditation manual for hospitals. Oakbrook Terrace, IL: The Joint
Commission. (Level VII)
51 Accreditation Association for Hospitals and Health Systems. (2017). Standard
25.01.27. Healthcare Facilities Accreditation Program: Accreditation
requirements for acute care hospitals. Chicago, IL: Accreditation Association
for Hospitals and Health Systems. (Level VII)
52 The Joint Commission. (2017). Standard UP.01.03.01. Comprehensive
accreditation manual for hospitals. Oakbrook Terrace, IL: The Joint
Commission. (Level VII)
53 John Hopkins Medicine Health Library. (n.d.) . “Angioplasty and stent
placement for the heart” [Online]. Accessed via the Web at
http://www.hopkinsmedicine.org/healthlibrary/test_procedures/cardiovascular/
percutaneous_transluminal_coronary_angioplasty_ptca_and_stent_placement
_92,p07981/
54 Galli, A., & Palatnik, A. (2005). Ask the experts. Critical Care Nurse, 25,(2),
88–95. Accessed via the Web at
http://ccn.aacnjournals.org/content/25/2/88.full
55 American Society of PeriAnesthesia Nurses. (2018). 2017–2018
Perianesthesia nursing standards, practice recommendations and interpretive
statements. Cherry Hill, NJ: American Society of PeriAnesthesia Nurses. (Level
VII)
56 Balaji, N. R., & Shah, P. B. (2011). Cardiology patient page: Radial artery
catheterization. Circulation, 124, e407–e408. Accessed via the Web at
http://circ.ahajournals.org/content/124/16/e407.full (Level VII)
57 Levine, G. N., et al. (2011). 2011 ACCF/AHA/SCAI guideline for percutaneous
coronary intervention: A report of the American College of Cardiology
Foundation/American Heart Association Task Force on Practice Guidelines and
the Society for Cardiovascular Angiography and Interventions. Circulation,
124(23), e574–e651. Accessed via the Web at
http://circ.ahajournals.org/content/124/23/e574.full (Level VII)
58 Shoulders-Odom, B. (2008). Management of patients after percutaneous
coronary interventions. Critical Care Nurse, 28(5), 26–41 . Accessed via the
Web at http://ccn.aacnjournals.org/content/28/5/26.full.pdf+html
59 Centers for Medicare and Medicaid Services. (2014). “Requirements for
hospital medication administration, particularly intravenous (IV) medications
and post-operative care of patients receiving IV opioids” [Online]. Accessed
via the Web at http://www.cms.gov/Medicare/Provider-Enrollment-and-
Certification/SurveyCertificationGenInfo/Downloads/Survey-and-Cert-Letter-
14-15.pdf
60 Kordestani, S. S., et al. (2012). A randomized controlled trial on the
hemostasis of femoral artery using topical hemostatic agent. Clinical and
Applied Thrombosis/Hemostasis, 18(5), 501–505. (Level II)
61 Altin, S. E ., & Singh, V. P. (2012). Managing radial access complications.
Cardiac Interventions Today, 3, 48–52 . Accessed via the Web at
http://bmctoday.net/citoday/pdfs/cit0512_F5_Singh.pdf (Level V)
62 Mcle, S., et al. (2009). Transparent film dressing vs pressure dressing after
percutaneous transluminal coronary angiography. American Journal of Critical
Care, 18(1), 14–20. Accessed via the Web at
http://ajcc.aacnjournals.org/content/18/1/14.full (Level II)
63 Zankar, A., et al. (2011). Embolic capture angioplasty of lower extremity
lesion following distal embolization. Cardiovascular Revascularization
Medicine, 12(5), 337–340.
64 Xian, Y., et al (2015). The association of discharge aspirin dose with outcomes
after acute myocardial infarction: Insights from the TRANSLATE-ACS Study.
Circulation, 132(3), 174–181. Accessed via the Web at
http://circ.ahajournals.org/content/early/2015/05/20/CIRCULATIONAHA.114 .01
4992.full.pdf+html (Level VI)
65 Caruso, M., et al. (2011). Contrast-induced nephropathy after percutaneous
coronary intervention in simple lesions: Risk factors and incidence are
affected by the definition utilized. Internal Medicine, 50(9), 983–989 . (Level
IV)
Pericardial effusions: Transudates
and exudates
Transudates are protein-poor effusions that usually arise from mechanical
factors altering fluid formation or resorption, such as increased hydrostatic
pressure, decreased plasma oncotic pressure, or obstruction of the
pericardial lymphatic drainage system by a tumor.
Most exudates result from inflammation and contain large amounts of
protein. Inflammation damages the capillary membrane, allowing protein
molecules to leak into the pericardial fluid.
Both effusion types occur in pericarditis, neoplasms, acute myocardial
infarction, tuberculosis, rheumatoid disease, and systemic lupus
erythematosus.
PERICARDIOCENTESIS, ASSISTING
Pericardiocentesis is needle aspiration of pericardial fluid.
Echocardiogram imaging or ultrasound generally guides
needle insertion.1,2,3,4 This procedure can be therapeutic
and diagnostic but is most useful as an emergency measure
to relieve cardiac tamponade. It can also provide a fluid
sample to confirm and identify the cause of pericardial
effusion (excess pericardial fluid) and help determine
appropriate therapy.
Normally, small amounts of plasma-derived fluid within
the pericardium lubricate the heart, reducing friction for the
beating heart. Excess pericardial fluid may accumulate after
inflammation, cardiac surgery, rupture, or penetrating
trauma of the pericardium (such as a gunshot or stab
wound). Rapidly forming effusions, such as those that
develop after cardiac surgery or penetrating trauma, may
induce cardiac tamponade, a potentially lethal syndrome
marked by increased intrapericardial pressure that prevents
complete ventricular filling and thus reduces cardiac output.
Slowly forming effusions, such as those that occur in
pericarditis, typically pose less immediate danger because
they allow the pericardium more time to adapt to the
accumulating fluid, and may be better managed medically
or surgically.1,5,6
The pericardium normally contains 15 to 30 mL of sterile
fluid.1 Pericardial fluid is clear and straw-colored, without
evidence of pathogens, blood, or malignant cells. The white
blood cell count in the fluid is usually less than 1,000/mm3.
Its glucose concentration should approximate the glucose
levels in blood. Pericardial effusions are typically classified
as transudates or exudates. (See Pericardial effusions:
Transudates and exudates.)
Equipment
Prepackaged pericardiocentesis tray ▪ vital signs monitoring
equipment ▪ oxygen source ▪ supplemental oxygen delivery
equipment ▪ pulse oximeter ▪ Kelly clamp ▪ two-
dimensional echocardiography equipment and echocontrast
medium ▪ Emergency equipment (code cart with cardiac
medications, handheld resuscitation bag and mask,
defibrillator, intubation and suction equipment, and
temporary pacemaker3) ▪ laboratory request form ▪ sterile
gloves ▪ sterile marker ▪ sterile labels ▪ gloves ▪ masks ▪
protective eyewear ▪ surgical caps ▪ sterile gowns ▪
electrocardiograph (ECG) or bedside monitor ▪ prescribed
sedative
▪
Optional: disposable-head
clippers,
hemodynamic monitoring equipment, nasogastric tube,
suction apparatus, ultrasound equipment.
If a prepackaged equipment tray isn’t available, you’ll
need the following: antiseptic solution (2% chlorhexidine-
based solution) ▪ 1% lidocaine for local anesthetic ▪ 3-mL
and 5-mL syringes ▪ sterile needles (25G for anesthetic and
14G, 16G, and 18G 4′′ or 5′′ [10- to 12.7 -cm] cardiac or
spinal needles)1,2 ▪ 50- or 60-mL syringe with Luer-lock tip ▪
sterile specimen containers for culture ▪ laboratory
biohazard transport bags ▪ sterile drapes and towels ▪ 4′′ ×
4′′ (10-cm × 10-cm) sterile gauze pads ▪ sterile occlusive
dressing ▪ three-way stopcock ▪ Optional: laboratory
specimen tubes.
Preparation of equipment
Make sure that the defibrillator and other emergency
equipment are functioning and readily available. Check the
expiration date on each sterile package and inspect all
packages for tears; replace as necessary. Assist the
practitioner
with arterial
catheter
insertion
for
hemodynamic monitoring, as required.1
Implementation
■ Verify the practitioner’s order.
■ Gather and prepare the appropriate equipment.
■ Conduct a preprocedure verification to make sure that all
relevant documentation, related information, and equipment
are available and correctly identified to the patient’s
identifiers.7,8
■ Verify that the laboratory and imaging studies are
complete and as ordered, and that the results are in the
patient’s medical record. Notify the practitioner of any
unexpected results.
■ Confirm that informed consent has been obtained by the
practitioner and that the consent is in the patient’s medical
record.9,10,11,12
■ Perform hand hygiene.13,14,15,16,17,18
■ Confirm the patient’s identity using at least two patient
identifiers.19
■ Provide privacy.20,21,22,23
■ Reinforce the practitioner’s explanation of the procedure,
and answer the patient’s questions to ease anxiety and
ensure cooperation. Inform the patient that some pressure
may be felt when the needle is inserted into the pericardial
sac.
■ Check the patient’s health history for hypersensitivity to
latex or to the local anesthetic.
■ Confirm the patient’s nothing-by-mouth status before the
procedure for sufficient time to allow for gastric emptying to
prevent pulmonary
aspiration;
minimum
fasting
recommendations are 2 hours for clear liquids, 4 hours for
breast milk, 6 hours for infant formula, 6 or more hours for a
light meal or nonhuman milk, and 8 hours or more for fried
or fatty foods or meat.23
■ Raise the patient’s bed to waist level when providing
patient care to prevent caregiver back strain.24
■ Perform hand hygiene.13,14,15,16,17,18
■ Verify patent IV access in case fluids and medications are
needed during the procedure.
■ If not already done, connect the patient to the bedside
monitor, which is set to read lead V1. Also connect the
patient to a pulse oximeter.6
■ Obtain the patient’s vital signs, cardiac rhythm, heart
sounds, oxygen saturation, respiratory status, and
neurologic status to serve as a baseline for comparison
during and after the procedure.3
■ Administer supplemental oxygen, as ordered.2,6
■ Insert a nasogastric tube, as ordered and as time allows,
to decompress the stomach and decrease the risk of gastric
perforation. (See the “Nasogastric tube insertion and
removal” procedure, page 524.)2
■ Administer sedation as ordered, following safe medication
administration practices.6,25,26,27,28
■ Perform hand hygiene.13,14,15,16,17,18
■ Prepare a sterile field by carefully opening the equipment
tray on the overbed table. Be careful not to contaminate the
sterile field as you open the wrapper.3 Label all medications,
medication containers, and other solutions on and off the
sterile field, maintaining the sterility of the sterile field.29,30
■ Provide adequate lighting at the puncture site.
■ Position the patient in the supine position with the head
of the bed elevated 30 to 45 degrees, if not contraindicated,
to facilitate breathing and bring the heart closer to the
anterior chest wall, which eases fluid aspiration.1,3,6,31
■ Attach the cardiac monitoring leads, if not already
attached. Monitor the patient’s cardiac rhythm to evaluate
the patient’s response to the procedure.
■ Perform hand hygiene.13,14,15,16,17,18
■ Assist the practitioner, as necessary, with putting on
protective eyewear, a mask, a cap, a sterile gown, and
sterile gloves. Then put on the same equipment.32,33
■ The practitioner cleans the skin with sterile gauze pads
soaked in antiseptic solution from the left costal margin to
the xiphoid process. As needed, clip the hair from the area
before the practitioner applies the antiseptic solution.3,34
Assist with fully draping the patient with only the site
exposed.3 Using maximum barrier precautions helps prevent
infection.
■ Conduct a time-out immediately before starting the
procedure to ensure that the correct patient, site,
positioning, and procedure are identified and that, as
applicable, all relevant information and necessary
equipment are available.35
■ If the anesthetic is only available in a multidose vial,
clean the injection port of the vial with an alcohol pad. Then
invert the vial 45 degrees so that the practitioner can insert
a 25G needle and syringe and withdraw the anesthetic for
injection.
■ Before the practitioner injects the anesthetic, tell the
patient that a transient burning sensation and local pain
may be felt.
■ The practitioner attaches a 50- or 60-mL syringe to one
end of a three-way stopcock and the cardiac or spinal
needle to the other end.3
■ Assist the practitioner and the echocardiogram
technician, as needed. The practitioner may inject
echocontrast medium to verify needle placement.
■ The practitioner inserts the needle through the chest wall
into the pericardial sac, maintaining gentle aspiration until
fluid appears in the syringe. The practitioner angles the
needle 35 to 45 degrees toward the tip of the right scapula
between the left costal margin and the xiphoid process. This
subxiphoid approach minimizes the risk of lacerating the
coronary vessels or the pleura.
■ Carefully observe the ECG tracing when the practitioner
inserts the needle; ST-segment elevation indicates that the
needle has reached the epicardial surface, and the
practitioner should retract it slightly; an abnormally shaped
QRS complex may indicate perforation of the myocardium.
Premature ventricular contractions usually indicate that the
needle has touched the ventricular wall.
■ Once the needle is positioned properly, the practitioner
attaches a Kelly clamp to the skin surface so that the needle
won’t advance any further.
■ Assist the practitioner during aspiration of the pericardial
fluid and labeling and numbering of the specimen
containers. (See Aspirating pericardial fluid.)
■ If bacterial culture and sensitivity tests are scheduled,
record on the laboratory request any antimicrobial drugs the
patient is receiving. If you suspect anaerobic organisms,
consult the laboratory about proper collection technique to
avoid exposing the aspirate to air. Label all specimens in the
presence of the patient with the patient’s name,
identification number, and the date and time of the
collection to prevent mislabeling.19 Make sure that the
containers are clearly labeled with the source of the
specimen. Send them to the laboratory immediately in a
laboratory biohazard transport bag.32
■ When the practitioner withdraws the needle, immediately
apply pressure to the site with sterile gauze pads for 3 to 5
minutes. Clean the area around the site with an antiseptic
solution and then apply a sterile occlusive dressing.3
■ Return the bed to the lowest position to prevent falls and
maintain patient safety.36
■ Remove and discard personal protective equipment32,33
and perform hand hygiene.13,14,15,16,17,18
■ Arrange for a portable chest X-ray immediately after the
procedure to assess for pneumothorax and hemothorax.3
■ Monitor blood pressure, pulse, respirations, oxygen
saturation level, heart sounds, and respiratory and
neurologic status every 15 minutes until the patient’s
condition stabilizes to assess for complications.3 Your facility
may require more frequent monitoring. Reassure the patient
that such monitoring is routine.
■ Monitor the puncture site for bleeding every 15 minutes
until the patient’s condition stabilizes, and then every 4
hours for 24 hours.3
■ Monitor continually for cardiac arrhythmias and document
rhythm strips.
■ Monitor hemoglobin, hematocrit, and coagulation levels,
as ordered and indicated, to assess for effusion recurrence
or bleeding at the pericardiocentesis site.3 Notify the
practitioner of critical test results within the time frame
determined by your facility to prevent treatment delays.37
■ To show the effectiveness of the procedure, arrange for
an echocardiogram within several hours of the procedure, as
ordered.3
■ Return all equipment to the proper location and dispose
of used supplies in appropriate receptacles.32
■ Perform hand hygiene.13,14,15,16,17,18
■ Document the procedure.38,39,40,41
Special considerations
■ To minimize the risk of complications, echocardiography
should precede pericardiocentesis to determine the effusion
rate. Generally, surgical drainage and biopsy are safer than
pericardiocentesis.
■ Watch for grossly bloody fluid aspirate, which may
indicate inadvertent puncture of a cardiac chamber.
■ After the procedure, be alert for respiratory and cardiac
distress. Watch especially for signs of cardiac tamponade,
which include muffled and distant heart sounds, distended
jugular veins, paradoxical pulse, and shock. Cardiac
tamponade may result from rapid accumulation of
pericardial fluid or puncture of a coronary vessel, causing
bleeding into the pericardial sac.31
Aspirating pericardial fluid
In pericardiocentesis, a needle and syringe assembly is inserted through the
chest wall into the pericardial sac (as illustrated below). Electrocardiographic
(ECG) monitoring, with a lead wire attached to the needle and electrodes
placed on the limbs (right arm [RA], right leg [RL], left arm [LA], and left leg
[LL]), helps ensure proper needle placement and avoids damage to the heart.
■ Depending on the patient’s condition, the practitioner
may place a catheter in the pericardium to enable
continuous drainage. Monitor and record the amount and
appearance of any drainage collected.1,31
Complications
Pericardiocentesis should be performed cautiously because
of the risk of potentially fatal complications, such as
laceration of a coronary artery or the myocardium. Other
possible complications include ventricular fibrillation or
vasovagal arrest; supraventricular arrhythmias; air
embolism; ventricular dysfunction; pleural infection;
accidental puncture of the lung (pneumothorax or
hemothorax), liver, or stomach; recurrence of pericardial
effusion; and cardiac tamponade.6
Documentation
Record the initiation and completion time of the procedure,
the patient’s response, vital signs, cardiac rhythm, and any
medications administered. Also record and document ECG
recording strips from before, during, and after the
procedure. Document the amount, color, and consistency of
the fluid; the number of specimen containers collected; and
the time of transport to the laboratory. Document any
complications that occur and interventions performed.
Document patient and family teaching provided and their
understanding of your teaching.
REFERENCES
1 Fitch, M. T., et al. (2012). Emergency pericardiocentesis. New England Journal
of Medicine, 366, e17–e21.
2 Shlamovitz, G. Z. (2015). “Pericardiocentesis” [Online]. Accessed via the Web
at http://emedicine.medscape.com/article/80602-overview#a1
3 Wiegand, D. L. (2017). AACN procedure manual for high acuity, progressive,
and critical care (7th ed.). St. Louis, MO: Elsevier.
4 Salazar, M., et al. (2012). Use of contrast echocardiography to detect
displacement of the needle during pericardiocentesis. Echocardiography,
29(3), E60–E61.
5 Lee, T. H., et al. (2013). Pericardiocentesis in trauma: A systematic review.
Journal of Trauma and Acute Care Surgery, 75(4), 543–549. (Level I)
6 Heffner, A. C . Emergency pericardiocentesis. (2015). In: UpToDate, Wolfson,
A. B., et al. (Eds.). Retrieved from: www.uptodate.com
7 The Joint Commission. (2019). Standard UP.01.01.01. Comprehensive
accreditation manual for hospitals. Oakbrook Terrace, IL: The Joint
Commission. (Level VII)
8 Accreditation Association for Hospitals and Health Systems. (2017). Standard
30.00 .14. Healthcare Facilities Accreditation Program: Accreditation
requirements for acute care hospitals. Chicago, IL: Accreditation Association
for Hospitals and Health Systems. (Level VII)
9 The Joint Commission. (2019). Standard RI.01.03 .01. Comprehensive
accreditation manual for hospitals. Oakbrook Terrace, IL: The Joint
Commission. (Level VII)
10 Centers for Medicare and Medicaid Services, Department of Health and
Human Services. (2015). Condition of participation: Patient’s rights. 42 C.F.R.
§ 482.13(b)(2).
11 Accreditation Association for Hospitals and Health Systems. (2017). Standard
15.01.11. Healthcare Facilities Accreditation Program: Accreditation
requirements for acute care hospitals. Chicago, IL: Accreditation Association
for Hospitals and Health Systems. (Level VII)
12 DNV GL-Healthcare USA, Inc. (2016). PR.1.SR.3 . NIAHO® accreditation
requirements: Interpretive guidelines & surveyor guidance (version 11).
Milford, OH: DNV GL-Healthcare USA, Inc. (Level VII)
13 The Joint Commission. (2019). Standard NPSG.07.01.01. Comprehensive
accreditation manual for hospitals. Oakbrook Terrace, IL: The Joint
Commission. (Level VII)
14 Centers for Disease Control and Prevention. (2002). Guideline for hand
hygiene in health-care settings: Recommendations of the Healthcare Infection
Control Practices Advisory Committee and the HICPAC/SHEA/APIC/IDSA Hand
Hygiene Task Force. MMWR Recommendations and Reports, 51(RR-16), 1–45.
Accessed via the Web at https://www.cdc.gov/mmwr/pdf/rr/rr5116.pdf (Level
II)
15 World Health Organization. (2009). “WHO guidelines on hand hygiene in
health care: First global patient safety challenge, clean care is safer care”
[Online]. Accessed via the Web at
http://apps.who.int/publications/iris/bitstream/10665/44102/1/978924159790
6_eng.pdf (Level IV)
16 Accreditation Association for Hospitals and Health Systems. (2017). Standard
07.01.21. Healthcare Facilities Accreditation Program: Accreditation
requirements for acute care hospitals. Chicago, IL: Accreditation Association
for Hospitals and Health Systems. (Level VII)
17 Centers for Medicare and Medicaid Services, Department of Health and
Human Services. (2015). Condition of participation: Infection control. 42 C.F.R.
§ 482.42.
18 DNV GL-Healthcare USA, Inc. (2016). IC.1 .SR.1 . NIAHO® accreditation
requirements: Interpretive guidelines & surveyor guidance (version 11).
Milford, OH: DNV GL-Healthcare USA, Inc. (Level VII)
19 The Joint Commission. (2019). Standard NPSG.01.01.01. Comprehensive
accreditation manual for hospitals. Oakbrook Terrace, IL: The Joint
Commission. (Level VII)
20 Accreditation Association for Hospitals and Health Systems. (2017). Standard
15.01.16. Healthcare Facilities Accreditation Program: Accreditation
requirements for acute care hospitals. Chicago, IL: Accreditation Association
for Hospitals and Health Systems. (Level VII)
21 Centers for Medicare and Medicaid Services, Department of Health and
Human Services. (2015). Condition of participation: Patient’s rights. 42 C.F.R.
§ 482.13(c)(1).
22 The Joint Commission. (2019). Standard RI.01.01.01. Comprehensive
accreditation manual for hospitals. Oakbrook Terrace, IL: The Joint
Commission. (Level VII)
23 American Society for Anesthesiologists. (2011). Practice guidelines for
preoperative fasting and the use of pharmacologic agents to reduce the risk
of pulmonary aspiration: Application to healthy patients undergoing elective
procedures: An updated report by the American Society of Anesthesiologists
Committee on Standards and Practice Parameters. Anesthesiology, 114(3),
495–511. Accessed via the Web at
http://anesthesiology.pubs.asahq.org/article.aspx?articleid=1933410 (Level
V)
24 Waters, T. R., et al. (2009). “Safe patient handling training for schools of
nursing” [Online]. Accessed via the Web at
https://www.cdc.gov/niosh/docs/2009-127/pdfs/2009-127.pdf (Level VII)
25 Accreditation Association for Hospitals and Health Systems. (2017). Standard
16.01.03. Healthcare Facilities Accreditation Program: Accreditation
requirements for acute care hospitals. Chicago, IL: Accreditation Association
for Hospitals and Health Systems. (Level VII)
26 The Joint Commission. (2019). Standard MM.06.01.01. Comprehensive
accreditation manual for hospitals. Oakbrook Terrace, IL: The Joint
Commission. (Level VII)
27 Centers for Medicare and Medicaid Services, Department of Health and
Human Services. (2015). Condition of participation: Nursing services. 42
C.F.R. § 482.23(c).
28 DNV GL-Healthcare USA, Inc. (2016). MM.1 .SR.2. NIAHO® accreditation
requirements: Interpretive guidelines & surveyor guidance (version 11).
Milford, OH: DNV GL-Healthcare USA, Inc. (Level VII)
29 The Joint Commission. (2019). Standard NPSG.03 .04.01. Comprehensive
accreditation manual for hospitals. Oakbrook Terrace, IL: The Joint
Commission. (Level VII)
30 Accreditation Association for Hospitals and Health Systems. (2017). Standard
25.01.27. Healthcare Facilities Accreditation Program: Accreditation
requirements for acute care hospitals. Chicago, IL: Accreditation Association
for Hospitals and Health Systems. (Level VII)
31 Shiavone, W. A. (2013). Cardiac tamponade: 12 pearls in diagnosis and
management. Cleveland Clinic Journal of Medicine, 80(2), 109–116. Accessed
via the Web at
http://www.mdedge.com/ccjm/article/95940/cardiology/cardiac-tamponade-
12-pearls-diagnosis-and-management
32 Occupational Safety and Health Administration. (n.d .). “Bloodborne
pathogens, standard number 1910.1030” [Online]. Accessed via the Web at
https://www.osha.gov/pls/oshaweb/owadisp.show_document?
p_id=10051&p_table=STANDARDS (Level VII)
33 Siegel, J. D ., et al. (2007, revised 2017). “2007 guideline for isolation
precautions: Preventing transmission of infectious agents in healthcare
settings” [Online]. Accessed via the Web at
https://www.cdc.gov/infectioncontrol/pdf/guidelines/isolation-guidelines.pdf
(Level II)
34 The Joint Commission. (2019). Standard NPSG.07.05.01. Comprehensive
accreditation manual for hospitals. Oakbrook Terrace, IL: The Joint
Commission. (Level VII)
35 The Joint Commission. (2019). Standard UP.01.03.01. Comprehensive
accreditation manual for hospitals. Oakbrook Terrace, IL: The Joint
Commission. (Level VII)
36 Ganz, D. A., et al. (2013). Preventing falls in hospitals: A toolkit for improving
quality of care (AHRQ Publication No. 13-0015-EF). Rockville, MD: Agency for
Healthcare Research and Quality. Accessed via the Web at
https://www.ahrq.gov/sites/default/files/publications/files/fallpxtoolkit.pdf
(Level VII)
37 The Joint Commission. (2019). Standard NPSG.02.03 .01. Comprehensive
accreditation manual for hospitals. Oakbrook Terrace, IL: The Joint
Commission. (Level VII)
38 The Joint Commission. (2019). Standard RC.01.03 .01. Comprehensive
accreditation manual for hospitals. Oakbrook Terrace, IL: The Joint
Commission. (Level VII)
39 Accreditation Association for Hospitals and Health Systems. (2017). Standard
10.00 .03. Healthcare Facilities Accreditation Program: Accreditation
requirements for acute care hospitals. Chicago, IL: Accreditation Association
for Hospitals and Health Systems. (Level VII)
40 Centers for Medicare and Medicaid Services, Department of Health and
Human Services. (2015). Condition of participation: Medical record services.
42 C.F.R. § 482.24(b).
41 DNV GL-Healthcare USA, Inc. (2016). MR.2 .SR.1 . NIAHO® accreditation
requirements: Interpretive guidelines & surveyor guidance (version 11).
Milford, OH: DNV GL-Healthcare USA, Inc. (Level VII)
PERINEAL CARE
Perineal care, which includes care of the external genitalia
and the anal area, should be performed during the daily
bath and, if the patient is incontinent, at bedtime and after
urination and bowel movements. The procedure promotes
cleanliness and prevents infection. It also removes irritating
and odorous secretions, such as smegma, a cheeselike
substance that collects under the foreskin of the penis. For a
patient with perineal skin breakdown, frequent bathing
followed by application of a moisture-barrier skin protectant
aids healing.
Standard precautions must be followed when providing
perineal care, with great consideration for the patient’s
privacy.1,2,3
Equipment
Gloves ▪ bath blanket, sheet, or towel ▪ bathing supplies
(disposable cleaning cloths; prepackaged bath product; or
washcloths, a towel, and mild soap or pH-balanced skin
cleanser) ▪ fluid-impermeable pad ▪ Optional: facility-
approved disinfectant, bath basin, moisture-barrier skin
protectant, absorbent underpad or brief.
After genital or rectal surgery, you may need to use sterile
supplies, including sterile gloves, gauze, and cotton balls.
Preparation of equipment
Obtain ointment or cream as needed. If you’re using a basin,
fill it two-thirds full with warm water. If using a prepackaged
bath product, warm the product, if desired, following the
manufacturer’s instructions, or use at room temperature.
NURSING ALERT Studies have shown that patients’ bath basins are a
reservoir for bacteria, and may be a source of transmission of health
care facility–acquired infections.4 Clean and disinfect the basin after
use with a facility-approved disinfectant and allow it to dry thoroughly
before storing.5,6
Implementation
■ Gather the equipment at the patient’s bedside.
■ Perform hand hygiene.7,8,9,10,11,12
■ Confirm the patient’s identity using at least two patient
identifiers.13
■ Provide privacy.14,15,16,17
■ Explain the procedure to the patient and family (if
appropriate) according to their individual communication
and learning needs to increase their understanding, allay
their fears, and enhance cooperation.18
■ Raise the patient’s bed to waist level when performing
patient care to prevent back strain.19
■ Perform hand hygiene.7,8,9,10,11,12
■ Put on gloves to comply with standard precautions.1,2,3
■ Help the patient into the supine position. Place a fluid-
impermeable pad under the patient’s buttocks to protect
the bed from stains and moisture. Lower the head of the
bed if allowed.
■ Drape the patient with a towel, bath blanket, or sheet
exposing the perineum, to minimize exposure and
embarrassment, and expose the genital area.
■ Wet the washcloth with warm water from a running spigot
or the bath basin and apply mild soap. If you’re using
disposable cleaning cloths or a prepackaged bath product,
open the packages and obtain the wet cloths. If warmed,
check the temperature before applying it to the patient’s
skin. If there’s any indication that the cloth is excessively
hot, don’t use it.
For a female patient
■ Ask the patient to bend her knees slightly and to spread
her legs.
■ Assess the patient’s perineal area for color changes, skin
breakdown, drainage, discharge, or tenderness. Notify the
practitioner and the wound ostomy continence nurse, as
needed.
■ Separate the patient’s labia with one hand. If the patient
has an indwelling urinary catheter in place, use the other
hand to clean the urethral meatus with the washcloth to
reduce the risk of catheter-associated urinary tract
infection.20 Avoid traction on the catheter. Don’t
aggressively clean the meatal area; aggressive cleaning can
lead to meatal irritation, increasing the risk of infection.
■ Using gentle downward strokes, clean from the front to
the back of the perineum to prevent intestinal organisms
from contaminating the urethra or vagina. Avoid the area
around the anus, and use a clean section of washcloth for
each stroke by folding each used section inward. This
method prevents the spread of contaminated secretions or
discharge.
■ If you’re using soap and water, wet a clean washcloth and
rinse the perineum thoroughly from front to back, because
soap residue can cause skin irritation. Pat the area dry with
a bath towel because moisture can also cause skin irritation
and discomfort.
■ Turn the patient on her side to the Sims position, if
possible, to expose the anal area.
■ Clean, rinse, and dry the anal area, starting at the
posterior vaginal opening and wiping from front to back.
■ After cleaning the perineum, apply a moisture-barrier skin
protectant as needed (cream, ointment, or film-forming skin
protectant) to protect and maintain intact skin or to treat
nonintact skin.21
For a male patient
■ Hold the shaft of the penis with one hand. If the patient
has an indwelling urinary catheter in place, use the other
hand to clean the urethral meatus with the washcloth to
reduce the risk of catheter-associated urinary tract infection.
Avoid tension on the catheter. Don’t aggressively clean the
meatal area; aggressive cleaning can lead to meatal
irritation, increasing the risk of infection.
■ Wash the penis with the wash cloth, beginning at the tip
and working in a circular motion from the center to the
periphery (as shown on top right) to avoid introducing
microorganisms into the urethra. Use a clean section of
washcloth for each stroke to prevent the spread of
contaminated secretions or discharge. For an uncircumcised
patient, gently retract the foreskin and clean beneath it.
■ If you’re using soap and water, wet a clean washcloth and
rinse thoroughly, using the same circular motion.
■ If the patient is uncircumcised, rinse well but don’t dry,
because moisture provides lubrication and prevents friction
when replacing the foreskin. Replace the foreskin to avoid
constriction of the penis, which causes edema and tissue
damage.
■ Clean the top and sides of the scrotum; rinse thoroughly
and pat dry. Handle the scrotum gently to avoid causing
discomfort.
■ Clean the bottom of the scrotum and the anal area. If
appropriate, rinse well and pat dry.
■ After cleaning the perineum, apply a moisture-barrier skin
protectant (cream, ointment, or film-forming skin
protectant) as needed to protect and maintain intact skin or
to treat nonintact skin.21
Completing the procedure
■ Reposition the patient comfortably.
■ Remove the bath blanket, sheet, or towel and fluid-
impermeable pad, and then replace the bed linens if
necessary.
■ Return the bed to the lowest position to prevent falls and
to maintain the patient’s safety.22
■ Dispose of soiled articles in the appropriate receptacle.23
Don’t flush disposable cloths down the toilet.
■ Remove and discard your gloves.1
■ Perform hand hygiene.7,8,9,10,11,12
■ If you’re using a bath basin: Put on gloves.1 Clean and
disinfect the basin using a facility-approved disinfectant,5,6
and allow it to dry thoroughly before storing. Remove and
discard your gloves1 and perform hand hygiene.7,8,9,10,11,12
■ Document the procedure.24,25,26,27
Special considerations
■ Provide perineal care to a patient of the opposite gender
in a matter-of-fact way to minimize embarrassment.
■ If the patient is incontinent, gently clean the skin with
water or pH-balanced skin cleaner. Note: Soap, an alkaline,
can strip the skin of natural oils and lead to secondary
infection from fungi and bacteria; therefore, pH-balanced
skin cleansers are recommended for patients at risk for
incontinence-associated dermatitis.21 Avoid excessive
friction and scrubbing, which can further traumatize the
patient’s skin.21
■ If the patient is incontinent, select an absorbent underpad
or brief to wick incontinence moisture away from the skin
rather than trapping moisture against the skin, which can
cause maceration.
Documentation
Record perineal care and any special treatment in your
notes. Document the need for continued treatment, if
necessary. Describe perineal skin condition and odor or
discharge. Record any patient teaching and the patient’s
understanding of the teaching.
REFERENCES
1 Siegel, J. D., et al. (2007, revised 2017). “2007 guideline for isolation
precautions: Preventing transmission of infectious agents in healthcare
settings” [Online]. Accessed via the Web at
https://www.cdc.gov/infectioncontrol/pdf/guidelines/isolation-guidelines.pdf
(Level II)
2 Accreditation Association for Hospitals and Health Systems. (2017). Standard
07.01.10. Healthcare Facilities Accreditation Program: Accreditation
requirements for acute care hospitals. Chicago, IL: Accreditation Association
for Hospitals and Health Systems. (Level VII)
3 DNV GL-Healthcare USA, Inc. (2016). IC.1.SR.2 . NIAHO® accreditation
requirements: Interpretive guidelines & surveyor guidance (version 11).
Milford, OH: DNV GL-Healthcare USA, Inc. (Level VII)
4 Johnson, D., et al. (2009). Patient’s bath basins as potential sources of
infection: A multicenter sampling study. American Journal of Critical Care,
18(1), 31–40. Accessed via the Web at
http://ajcc.aacnjournals.org/content/18/1/31.full (Level IV)
5 Rutala, W. A., et al. (2008, revised 2017). “Guideline for disinfection and
sterilization in healthcare facilities, 2008” [Online]. Accessed via the Web at
https://www.cdc.gov/hicpac/guidelines/Disinfection_Nov_2008.pdf (Level I)
6 Accreditation Association for Hospitals and Health Systems. (2017). Standard
07.02.03. Healthcare Facilities Accreditation Program: Accreditation
requirements for acute care hospitals. Chicago, IL: Accreditation Association
for Hospitals and Health Systems. (Level VII)
7 Centers for Disease Control and Prevention. (2002). Guideline for hand
hygiene in health-care settings: Recommendations of the Healthcare Infection
Control Practices Advisory Committee and the HICPAC/SHEA/APIC/IDSA Hand
Hygiene Task Force. MMWR Recommendations and Reports, 51(RR–16), 1–45.
Accessed via the Web at https://www.cdc.gov/mmwr/pdf/rr/rr5116.pdf (Level
II)
8 The Joint Commission. (2019). Standard NPSG.07.01.01. Comprehensive
accreditation manual for hospitals. Oakbrook Terrace, IL: The Joint
Commission. (Level VII)
9 World Health Organization. (2009). “WHO guidelines on hand hygiene in
health care: First global patient safety challenge, clean care is safer care”
[Online]. Accessed via the Web at
http://apps.who.int/iris/bitstream/10665/44102/1/9789241597906_eng.pdf
(Level IV)
10 Centers for Medicare and Medicaid Services, Department of Health and
Human Services. (2015). Condition of participation: Infection control. 42 C.F.R.
§ 482.42.
11 Accreditation Association for Hospitals and Health Systems. (2017). Standard
07.01.21. Healthcare Facilities Accreditation Program: Accreditation
requirements for acute care hospitals. Chicago, IL: Accreditation Association
for Hospitals and Health Systems. (Level VII)
12 DNV GL-Healthcare USA, Inc. (2016). IC.1 .SR.1 . NIAHO® accreditation
requirements: Interpretive guidelines & surveyor guidance (version 11).
Milford, OH: DNV GL-Healthcare USA, Inc. (Level VII)
13 The Joint Commission. (2019). Standard NPSG.01.01.01. Comprehensive
accreditation manual for hospitals. Oakbrook Terrace, IL: The Joint
Commission. (Level VII)
14 Centers for Medicare and Medicaid Services, Department of Health and
Human Services. (2015). Condition of participation: Patient’s rights. 42 C.F.R.
§ 482.13(c)(1).
15 Accreditation Association for Hospitals and Health Systems. (2017). Standard
15.01.16. Healthcare Facilities Accreditation Program: Accreditation
requirements for acute care hospitals. Chicago, IL: Accreditation Association
for Hospitals and Health Systems. (Level VII)
16 The Joint Commission. (2019). Standard RI.01.01.01. Comprehensive
accreditation manual for hospitals. Oakbrook Terrace, IL: The Joint
Commission. (Level VII)
17 DNV GL-Healthcare USA, Inc. (2016). PR.1.SR.5 . NIAHO® accreditation
requirements: Interpretive guidelines & surveyor guidance (version 11).
Milford, OH: DNV GL-Healthcare USA, Inc. (Level VII)
18 The Joint Commission. (2019). Standard PC.02.01.21. Comprehensive
accreditation manual for hospitals. Oakbrook Terrace, IL: The Joint
Commission. (Level VII)
19 Waters, T. R., et al. (2009). “Safe patient handling training for schools of
nursing” [Online]. Accessed via the Web at
https://www.cdc.gov/niosh/docs/2009-127/pdfs/2009-127.pdf (Level VII)
20 Le, L. K. (2015). Urethral catheter (indwelling short-term): Urinary tract
infection prevention. Adelaide: Joanna Briggs Institute.
21 Beeckmann, D., et al. (2016). Interventions for preventing and treating
incontinence-associated dermatitis in adults. Cochrane Database of
Systematic Reviews, 2016(11), CD011627. (Level II)
22 Ganz, D. A., et al. (2013). Preventing falls in hospitals: A toolkit for improving
quality of care (AHRQ Publication No. 13-0015-EF). Rockville, MD: Agency for
Research and Quality. Accessed via the Web at
https://www.ahrq.gov/sites/default/files/publications/files/fallpxtoolkit.pdf
(Level VII)
23 Occupational Safety and Health Administration. (n.d .). “Bloodborne
pathogens, standard number 1910.1030” [Online]. Accessed via the Web at
https://www.osha.gov/pls/oshaweb/owadisp.show_document?
p_id=10051&p_table=STANDARDS (Level VII)
24 The Joint Commission. (2019). Standard RC.01.03 .01. Comprehensive
accreditation manual for hospitals. Oakbrook Terrace, IL: The Joint
Commission. (Level VII)
25 Centers for Medicare and Medicaid Services, Department of Health and
Human Services. (2015). Condition of participation: Medical record services.
42 C.F.R. § 482.24(b).
26 Accreditation Association for Hospitals and Health Systems. (2017). Standard
10.00 .03. Healthcare Facilities Accreditation Program: Accreditation
requirements for acute care hospitals. Chicago, IL: Accreditation Association
for Hospitals and Health Systems. (Level VII)
27 DNV GL-Healthcare USA, Inc. (2016). MR.2 .SR.1 . NIAHO® accreditation
requirements: Interpretive guidelines & surveyor guidance (version 11).
Milford, OH: DNV GL-Healthcare USA, Inc. (Level VII)
PERIPHERALLY INSERTED CENTRAL CATHETER
USE
For a patient who needs long-term central venous (CV)
infusion therapy or requires repeated venous access, a
peripherally inserted central catheter (PICC) may be the
best option. It provides safe, reliable access for drug
administration and other infusions as well as for blood
sampling. Infusions commonly given by PICC include total
parenteral nutrition, chemotherapy, blood and blood
products, antibiotics, intermittent inotropes, fluids, and
analgesics. The decision to place a PICC is part of an
interprofessional collaboration with the patient and
caregiver and is based on the prescribed therapy and
treatment plan.1,2
PICCs are made of silicone or polyurethane and vary in
diameter and length. They’re available in single-, double-,
and triple-lumen versions. You should use a PICC with the
minimal number of lumens essential for managing the
patient’s care.2,3 The type and size of the PICC depends on
the patient’s size and anatomic measurements and the
required therapy. Power injection–capable PICCs are also
available for patients who require injection of contrast
media for computed tomography and other studies.
Most PICCs are manufactured with smooth, rounded tips
to reduce trauma on the vein wall during insertion. To avoid
the need to trim a PICC, the best option is to select a
catheter length that’s as close to the desired patient length
measurement as possible. Groshong PICCs can’t be
trimmed; instead, subtract the desired patient length from
the total length of the PICC, and leave any length outside
the insertion site, safely secured.
Most PICCs have a preloaded stylet wire inside the
catheter to add stiffness to the soft catheter, easing its
advancement through the vein. The stylet terminates 1 to 2
cm away from the catheter tip. If the catheter length does
require trimming, you must withdraw and reposition the
stylet 1 to 2 cm from the cut end. You should never cut the
stylet; rather, remove it after insertion.
PICC devices are easier to insert than other CV access
devices. You may use a single catheter for the entire course
of therapy with greater convenience and reduced cost. If the
state nurse practice act permits, a nurse with proper
training may insert a PICC. (The nurse may have to
demonstrate competence every year.)4
Veins you may consider for PICC insertion include the
basilic, median cubital, cephalic, and brachial veins. When
selecting a site, avoid areas that are painful on palpation;
those compromised by bruising, infiltration, phlebitis,
sclerosing, or cording; and, in patients with stage 4 or 5
chronic kidney disease, forearm and upper arm veins that
could be of use for vascular access. Also avoid using the
arm on the side of breast surgery with axillary node
dissection, on the side with lymphedema, or on the side
affected by stroke or radiation therapy.2,5 Use of an
ultrasound device to guide insertion increases the rate of
success and reduces the risk of insertion-related
complications.2,5,6,7,8 After insertion, advance the catheter
until it reaches the cavoatrial junction.2,6 To reduce the risk
of vascular catheter–associated infection, PICC insertion
requires the use of maximal barrier precautions.3
HOSPITAL-ACQUIRED CONDITION ALERT Keep in mind that a vascular
catheter–associated infection is considered a hospital-acquired
condition because it can be reasonably prevented using best practices.
Make sure that infection-prevention techniques (such as performing
hand hygiene, using maximal barrier precautions, following sterile
technique, and properly preparing the insertion site) are followed
during insertion to reduce the risk of vascular catheter–associated
infection.2,9,10,11,12
PICCs may be inserted with a modified Seldinger
technique (discussed here), or with a through-the-introducer
technique.
Equipment
For insertion
PICC insertion kit ▪ PICC catheter ▪ insertion checklist ▪
antiseptic swabs (chlorhexidine-based [preferred]; tincture
of iodine, povidone-iodine, or alcohol-based may also be
used if a contraindication to chlorhexidine exists) ▪ sterile
and clean single-use disposable measuring tapes ▪ 10-mL
syringes prefilled with preservative-free normal saline
solution ▪ syringes and needles of appropriate size ▪ sterile
gauze pads ▪ fluid-impermeable pads ▪ sterile drapes ▪
disposable skin marker ▪ single-patient-use tourniquet ▪
sterile marker ▪ sterile labels ▪ clean gloves ▪ sterile gloves
▪ sterile gown ▪ mask ▪ protective eyewear ▪ head cover ▪
1% lidocaine without epinephrine ▪ engineered stabilization
device ▪ sterile transparent semipermeable dressing ▪
sterile 2′′ × 2′′ (5-cm × 5-cm) gauze pads ▪ Optional:
bedside ultrasound equipment, sterile and clean disposable
ultrasound probe covers, ultrasound gel, locator system,
chlorhexidine-impregnated
sponge dressing, topical
anesthetic cream, sterile needleless connectors, prefilled
10-mL syringe of heparin lock solution (10 units/mL), single-
patient-use scissors or disposable-head surgical clippers,
sterile tape, sterile surgical strips, skin barrier solution.
Use an all-inclusive insertion kit or cart that contains all of
the necessary components for maintaining sterile technique
during catheter insertion to reduce the risk of catheter-
related bloodstream infection.6,13,14
For flushing
Gloves ▪ 10 mL-syringe prefilled with preservative-free
normal saline solution ▪ antiseptic pads (chlorhexidine-
based, povidone iodine, or alcohol) ▪ Optional: prescribed
locking solution (such as heparin lock solution), prescribed
IV fluid, disinfectant-containing end cap.
For a dressing change
Gloves ▪ sterile gloves ▪ masks ▪ sterile drape ▪ antiseptic
swabs (chlorhexidine-based [preferred], tincture of iodine,
povidone-iodine, or alcohol)3 ▪ transparent semipermeable
dressing ▪ sterile disposable tape measure ▪ engineered
stabilization device ▪ label ▪ Optional: 4′′ × 4′′ (10-cm × 10-
cm) gauze dressing, chlorhexidine-impregnated sponge
dressing, skin barrier solution, sterile tape.
Many facilities stock commercially prepared or facility-
prepared sterile dressing change kits that contains the
necessary supplies.
For drug administration
Gloves ▪ prescribed medication in an IV container with
administration set (for infusion) or in a syringe (for IV bolus)
▪ 10-mL syringes prefilled with preservative-free normal
saline solution ▪ antiseptic pads (chlorhexidine-based,
povidone iodine, or alcohol) ▪ Optional: vital sign monitoring
equipment, locking solution, electronic infusion device,
pulse oximeter, capnography, standardized sedation scale,
disinfectant-containing end cap, automated blood pressure
monitoring equipment, barcode technology, locking
solution.
For removal
Gloves ▪ fluid-impermeable pad ▪ sterile transparent
semipermeable dressing ▪ petroleum-based ointment ▪
tape ▪ sterile gauze pads ▪ tape measure ▪ Optional: other
personal protective
equipment,
single-patient-use
tourniquet, suture removal kit, emergency resuscitation
equipment.
Preparation of equipment
Inspect all IV equipment and supplies; if a product is
expired, if its integrity is compromised, or if it’s defective,
remove it from patient use, label it as expired or defective,
and report the expiration or defect as directed by your
facility.2,15
Implementation
Inserting a PICC
■ Verify the practitioner’s order for PICC insertion. If
necessary, before placing the PICC, collaborate with the
practitioner about any relative contraindications to
placement.2
■ Gather the appropriate equipment.
■ Ensure that informed consent has been obtained and that
the consent form is in the patient’s medical
record.14,15,16,17,18,19
■ Conduct a preprocedure verification to make sure that all
relevant documentation, related information, and equipment
are available and correctly identified to the patient’s
identifiers.20
■ Check the patient’s allergy status to prevent
anaphylaxis.2
■ Obtain the assistance of a second nurse or appropriate
assistant who’s been properly trained to make sure that
sterile technique is maintained during the procedure.21
■ Perform hand hygiene.3,13,22,23,24,25,26,27,28
■ Confirm the patient’s identity using at least two patient
identifiers.29
■ Provide privacy.30,31,32,33
■ Provide the patient with information related to the PICC
insertion procedure, including the benefits, management,
and potential risks. Teach the patient and family about
measures to prevent central line–associated bloodstream
infections, including the importance of hand hygiene.2,34
Encourage them to remind staff members to perform hand
hygiene and to follow infection prevention practices when
providing care.13
■ Use an insertion checklist to help adhere to infection
prevention and safety practices during insertion.2,6,13,21,22
Have your assistant stop the procedure immediately if any
breaks in sterile technique are observed.
■ Raise the patient’s bed to waist level when providing
patient care to prevent caregiver back strain.35
■ Position the patient in a supine flat position, with the arm
extended at a 90-degree angle away from the body. If the
patient can’t tolerate a flat position, raise the head of the
bed for patient comfort.2
■ Assess the patient’s upper extremities and chest for a
contraindication to PICC placement.2,10
■ If you’re using ultrasound, disinfect the ultrasound probe
with an antiseptic wipe and place a clean disposable cover
on it.2
■ Perform hand hygiene.3,13,22,23,24,25,26,27,28
■ Put on clean gloves.
■ Apply a liberal amount of ultrasound gel to the patient’s
arm, and use the probe to locate the veins, arteries, and
nerves surrounding the proposed insertion site.2
■ Without a tourniquet in place, assess veins for size, path,
shape, and compressibility. Healthy veins should compress
easily when you apply light, downward pressure with the
probe. Determine the depth of the intended vein for
venipuncture and measure its diameter.2 Use this
information to select a catheter with a catheter-to-vein ratio
of 45% or less to prevent thrombosis.2,36
■ Mark the level of the expected insertion site with a single-
use disposable skin marker on the outer aspect of the arm
to avoid leaving ink under the dressing and enable
appropriate skin cleansing.2
■ Remove the ultrasound gel from the patient’s skin.
■ Using a clean, single-use disposable measuring tape,
measure the upper-arm circumference of the selected
extremity to provide a baseline measurement. Take this
measurement 4′′ (10 cm) above the antecubital fossa.2,6,10
■ Measure the distance from the intended insertion site to
the clavicular head on the right side and then down to the
bottom of the third intercostal space on the right (desired
terminal tip location) to determine insertion depth. Add
length, as needed, to accommodate use of the stabilization
device.2
■ Clean the intended insertion site with soap and water if
it’s visibly soiled.2,6,10,21
■ Remove excess hair from the intended insertion site, if
needed, using single-patient-use scissors or disposable-head
surgical clippers to facilitate dressing application.2,6,10,21
■ If you’re using a topical anesthetic cream: Apply the
anesthetic cream to the insertion site. Cover the site with a
sterile transparent semipermeable dressing. Note the time
of application on a label and then place the label on the
dressing. Wait the recommended period of time (per the
manufacturer’s directions), usually 15 to 60 minutes, to
allow the cream to work.2 While waiting, return the bed to
the lowest position to prevent falls and maintain patient
safety,35 and position the patient for comfort. Remove and
discard your gloves. Close the door to the room and put a
sign on the door that states, “STERILE PROCEDURE IN PROGRESS. DO
NOT ENTER.”2 Perform hand hygiene.3,13,22,23,24,25 After the
recommended application time, put on gloves to avoid
touching the cream, remove the dressing, wipe off the
cream, evaluate the effectiveness of the anesthetic, and
assess for adverse reactions to the anesthetic.10 Remove
and discard your gloves. Perform hand hygiene.3,13,22,23,24,25
■ Place a fluid-impermeable pad under the arm.2,10
■ Put on a surgical head cover, protective eyewear, and a
mask. Have the second person do the same.3,6,21,37,38
■ Perform hand hygiene.3,22,23,24,25
■ Disinfect your work area using a hospital-grade
disinfectant, and then allow it to dry.2,10
■ Prepare a sterile field using a sterile drape.
■ Set up the PICC supplies on the sterile field.2
■ If you didn’t use a topical anesthetic, prepare a lidocaine
injection.
■ Label all medications, medication containers, and other
solutions on and off the sterile field using a sterile marker
and labels.39
■ Perform hand hygiene.3,22,23,24,25
■ Put on a sterile gown and two pairs of sterile
gloves.2,10,40,41
■ Follow the manufacturer’s recommendations and
guidelines for using the stylet wire and altering the device
length if the device requires trimming. Don’t use scissors to
adjust the PICC length, because trimming with scissors
causes rough, irregular surfaces.1,2
■ Prepare the catheter according to the manufacturer’s
recommendations; flush the device and extension set (if
needed) with preservative-free normal saline solution.2,10
■ Place the catheter on the sterile field.
■ Place a sterile drape under the patient’s arm. If using the
external jugular insertion site, place the sterile drape under
the patient’s shoulder.2
■ Prepare the insertion site by scrubbing with chlorhexidine
swabs using a back-and-forth motion for about 30 seconds.
Allow the area to dry for at least 3 minutes. Don’t touch the
intended insertion site.2,3,6,10 If a contraindication to
chlorhexidine exists, prepare the site with another
recommended antiseptic following the manufacturer’s
instructions. For povidone-iodine, apply it with swabs
beginning at the intended insertion site and moving outward
in a concentric circle. Allow the povidone-iodine to remain
on the skin for at least 2 minutes to dry completely.2,6,10
■ Apply a single-patient-use tourniquet about 4′′ (10 cm)
above the antecubital fossa. Make sure that an arterial pulse
is easily palpable distal to the tourniquet.2
■ Remove the outer set of gloves.2
■ Place a full body drape over the patient from head to toe.
Cover everything except the insertion site to comply with
maximal barrier precautions, thereby reducing the risk of
vascular catheter–associated infection.2,6,10 If the patient
can’t tolerate having the face covered, tent the drape and
have the patient wear a mask or turn the head away from
the insertion site.2
■ If using ultrasound, place and secure a sterile probe cover
on the ultrasound probe to prevent cross-contamination
between patients. If using a locator system, follow the
manufacturer’s directions regarding its use.2
■ Conduct a time-out immediately before starting the
procedure to determine that the correct patient, site,
positioning, and procedure are identified, and to confirm, as
applicable, that relevant information and necessary
equipment are available.42
■ If using ultrasound, apply sterile ultrasound gel to the
probe and use it to locate the appropriate vein as well as
the adjacent artery and nerve. Verify that the vein is
nonpulsatile and compressible.2
■ If you didn’t use a topical anesthetic cream, anesthetize
the area with lidocaine to provide for patient comfort during
insertion.2,10
■ While visualizing the vessel, insert the micro-introducer
needle through the skin at a 45-degree angle. The micro-
introducer needle will appear as an echogenic white dot on
the ultrasound screen. Move the ultrasound probe and
needle in the same direction, keeping the needle tip in view
on the ultrasound screen as it approaches the vein. Align
the path of the needle to enter the centermost superficial
area of the vein wall. Observe for blood return, and visualize
the needle tip in the center of the vein on the ultrasound
screen.2
■ Put the ultrasound probe down on the sterile field.
■ Reduce the angle of the micro-introducer needle and
stabilize it.2
■ Insert the guidewire into the micro-introducer and
carefully advance it at least 4′′ (10 cm) but not more than 6′′
(15 cm) into the vein.2 Stop advancing the guidewire if you
meet resistance, and don’t advance it past the axilla.2,10
■ Gently remove the micro-introducer needle, taking care
not to dislodge or damage the guidewire.2,10 Secure the
guidewire with your nondominant hand to prevent migration
in or out of the vein.2
■ If necessary, using a safety scalpel, make a small skin
nick at the insertion site to facilitate the advancement of the
peel-away dilator-introducer.2
■ Thread the peel-away dilator-introducer over the
guidewire until you’re sure the tip is well within the vein.
After successful vein entry, you should see blood return.2
■ Carefully remove the guidewire and place it on the sterile
field.2,10
■ Release the tourniquet, being careful not to break sterile
technique.2,10
■ Confirm the preinsertion measurement for the desired
catheter insertion depth.2,10
■ Carefully separate and remove the dilator from the peel-
away introducer while holding the introducer still.2,10 To
minimize blood loss, try applying finger pressure on the vein
just beyond the distal end of the introducer sheath, or place
a finger over the opening of the introducer.
■ If using a locator system, activate it now and follow the
manufacturer’s directions, or use electrocardiographic
(ECG)-guided technology to detect the desired tip
location.2,43 Advance the catheter through the introducer
sheath at a slow, steady pace until it’s in position at the
premeasured length.2,10
■ If you aren’t using tip-location technology, withdraw the
stylet wire from the catheter lumen, using air emboli
precautions.2
■ Attach a prefilled syringe with preservative-free normal
saline solution and aspirate for blood return; if present, flush
the catheter to determine patency.2
■ Grasp the tabs of the introducer sheath and flex them
toward its distal end to split the sheath. Peel the introducer
away from the catheter while pulling away from the
insertion site. Take care to ensure that the catheter tip
remains at its terminal tip location.2,10
■ If appropriate, connect a primed extension set to the
catheter hub.2
■ Attach a needleless connector to each lumen.2
■ If available, apply a disinfectant-containing end cap to the
end of the needleless connector.21
■ Clean the site and secure the catheter with an engineered
stabilization device, following the manufacturer’s directions.
Guidelines recommend the use of an engineered
stabilization device, because it reduces vascular access
device motion, which increases the risk of unintentional
catheter dislodgment and other complications that require
premature catheter removal.44 If appropriate, first apply a
skin barrier solution to the area to be covered by the
stabilization device and dressing, and allow it to dry. If using
a chlorhexidine-impregnated sponge dressing, don’t apply
the skin barrier solution directly under the sponge, because
the solution will block its action at the puncture site.2,45
■ If necessary, apply a sterile 2′′ × 2′′ (5-cm × 5-cm) gauze
pad directly over the site and a sterile transparent
semipermeable dressing over the gauze pad. Leave this
dressing in place for 24 hours.2,45
■ Lock the catheter with the prescribed locking solution or
according to facility protocol.2,10
■ Return the bed to the lowest position to prevent falls and
maintain patient safety.35
■ Dispose of used items properly.37,46
■ Remove and discard your personal protective
equipment.40,41
■ Perform hand hygiene.3,22,23,24,26,27,28,37,47
■ Label the dressing with the date you performed the
procedure or the date the dressing is next due to be
changed, as directed by your facility.2,45
■ If you didn’t use a tip-locating device or ECG-guided
technology, obtain a chest X-ray, as ordered, to verify
proper placement before initiating an infusion.2,6
■ Perform hand hygiene.22,23,24,26,27,28,29,37
■ Document the procedure.47,48,49,50,51
Flushing a PICC
■ Review the patient’s medical records to confirm the type
and size of the catheter and the location of the catheter tip,
because the flush protocol depends on the type and size of
the catheter.
■ Gather the appropriate equipment.
■ Perform hand hygiene.3,13,22,23,24,25,26,27,28
■ Confirm the patient’s identity using at least two patient
identifiers.29
■ Put on gloves.40,41
■ Provide privacy.30,31,32,33
■ Explain the procedure to the patient and family (if
appropriate) according to their individual communication
and learning needs to increase their understanding, allay
their fears, and enhance cooperation.34
■ Raise the patient’s bed to waist level when providing
patient care to prevent caregiver back strain.35
■ If a disinfectant-containing end cap is covering the
needleless connector, remove and discard it.
■ Perform a vigorous mechanical scrub of the needleless
connector for at least 5 seconds using an antiseptic pad;
allow it to dry completely.2,3,10,21,52
■ Trace the tubing from the patient to its point of origin to
make sure that you’re accessing the correct port.53,54
■ While maintaining the sterility of the syringe tip, attach a
prefilled syringe containing preservative-free normal saline
solution to the needleless connector. (Use a 10-mL syringe
or a syringe specifically designed to generate low injection
pressure.) Unclamp the catheter and slowly aspirate for
blood return that’s the color and consistency of whole blood.
If no blood return occurs, take steps to locate an external
cause of obstruction.2,10,55
■ If blood return occurs, slowly inject preservative-free
normal saline solution into the catheter. Use a minimum
volume of twice the internal volume of the catheter system.
Don’t forcibly flush the device; further evaluate the device if
you meet resistance.2,10,55
■ Remove and discard the syringe.2,10,56,57
■ Perform a vigorous mechanical scrub of the needleless
connector for at least 5 seconds using an antiseptic pad;
allow it to dry completely.2,3,10,21,52
■ Administer IV fluid through the catheter, as prescribed, or
proceed with locking the device if indicated.
Locking a PICC
■ Maintaining sterility of the syringe tip, attach the syringe
of facility-approved locking solution (heparin flush or
preservative-free normal saline solution), as required, to the
needleless connector. Use a volume equal to the internal
volume of the PICC and any add-on devices, plus 20%.55
■ Slowly inject the solution into the catheter.2,10,52,55
■ Clamp the device according to the type of needleless
connector used.55
■ For a positive-pressure needleless connector, disconnect
the syringe and then clamp the catheter. For a negative-
pressure needleless connector, clamp the catheter while
maintaining pressure on the syringe plunger and then
disconnect the syringe. For a neutral needleless connector,
clamp the catheter before or after removing the syringe.2,10
■ If available at your facility, place a disinfectant-containing
end cap on the needleless connector to reduce the risk of
vascular catheter–associated infection.21
■ Double-check all connections to prevent tubing
misconnections and air embolism.56
Completing the procedure
■ Return the bed to the lowest position to prevent falls and
maintain patient safety.35
■ Discard the syringe and other used supplies in
appropriate receptacles.37,46
■ Remove and discard your gloves.40,41
■ Perform hand hygiene.22,23,24,26,27,28,29,37
■ Document the procedure.47,48,49,50,51
Performing a PICC dressing change
■ Gather the necessary equipment.
■ Perform hand hygiene.3,13,22,23,24,25,26,27,28
■ Confirm the patient’s identity using at least two patient
identifiers.29
■ Provide privacy.30,31,32,33
■ Explain the procedure to the patient.34
■ Raise the bed to waist while providing patient care to
prevent caregiver back strain.35
■ Put on a mask.2,3,10
■ Perform hand hygiene.3,13,22,23,24,25,26,27,28
■ Assemble your supplies on a sterile field.2,10
■ Perform hand hygiene.3,13,22,23,24,25,26,27,28
■ Put on gloves.40,41
■ Position the patient with arm extended away from the
body to gain access to the insertion site, and so that the
insertion site is below heart level to reduce the risk of air
embolism.2,10
■ Visually inspect the entire infusion system for clarity of
the solution, integrity of the system (such as absence of
leakage and secure Luer lock connections), accurate flow
rate, and expiration dates of the solution and administration
set, as applicable.45
■ Inspect the catheter–skin junction and surrounding area
and palpate through the intact dressing for redness,
tenderness, swelling, and drainage. Pay attention to the
patient’s reports of pain, paresthesias, numbness, or
tingling.45
■ Remove the existing dressing beginning at the device
hub, and gently pulling the dressing perpendicular to the
skin toward the insertion site to prevent catheter
dislodgment and tearing or stripping of fragile skin.2,10
■ If the patient had a chlorhexidine-impregnated sponge
dressing to provide sustained antimicrobial action at the
insertion site, remove and discard it in the appropriate
receptacle.46
■ Remove and discard the engineered stabilization device if
present.2,10
■ Inspect the integrity of the catheter and hub to detect
any defects, such as cracks or splits.45
■ Remove and discard your gloves.5,6
■ Perform hand hygiene.3,13,22,23,24,25,26,27,28
■ Put on sterile gloves.2,3,10,40,41
■ Use a sterile tape measure to measure the external
length of the catheter from hub to skin entry to make sure
that the catheter hasn’t migrated.2,10,45
■ Clean the catheter insertion site with an antiseptic
following the
manufacturer’s
instructions.
Apply
chlorhexidine (preferred) with an applicator using a vigorous
side-to-side motion for at least 30 seconds. Allow the
solution to dry completely.2,10,45 For povidone-iodine, apply
it with swabs in concentric circles. Allow the solution to dry
completely (typically 11⁄2 to 2 minutes).2,10,45
■ If applicable, apply a chlorhexidine-impregnated sponge
dressing at the catheter base.2,10,45 Position it with the
catheter resting on or near the radial slit of the disk. The
edges of the slit must touch to maximize antimicrobial
action. Always follow the manufacturer’s directions.
■ If applicable, apply a skin barrier solution to reduce the
risk of medical adhesive–related skin injury.45 Follow the
manufacturer’s directions for use. Avoid the use of
compound tincture of benzoin due to increased risk of
medical adhesive-related skin injury, because benzoin
increases
bonding
of
adhesive-based
engineered
stabilization devices, causing skin injury upon removal of
the device.45
■ Secure the catheter with an engineered stabilization
device, if available, because it reduces motion of the
vascular access device; such motion increases the risk of
unintentional catheter dislodgment and complications
requiring premature catheter removal.2,10,44
■ Apply a transparent semipermeable (or gauze and tape)
dressing to the insertion site.45
■ Return the bed to the lowest level to prevent falls and
maintain the patient’s safety.35
■ Discard used supplies in appropriate receptacles.37,46
■ Remove and discard your gloves and mask.40,41
■ Perform hand hygiene.22,23,24,26,27,28,29,37
■ Label the dressing with the date and time and your
initials.45
■ Perform hand hygiene.22,23,24,26,27,28,29,37
■ Document the procedure.47,48,49,50,51
Administering drugs using a PICC
■ Avoid distractions and interruptions when preparing and
administering
medications
to prevent
medication
errors.44,45,58,59
■ Verify the practitioner’s order; make sure it contains the
type of fluid and volume, medication and dosage, route of
administration, and frequency and duration,5,6,46,47 and that
these parameters, the prescribed infusion solution or
medication, dose, rate, and route of administration are
appropriate for the patient’s age, condition, and access
device. Address concerns about the order with the
practitioner, pharmacist, your supervisor, and, if necessary,
the risk management department, or as directed by your
facility.60
■ Check the patient’s medical record for an allergy or a
contraindication to the prescribed medication. If one exists,
don’t
administer
the
medication;
notify the
practitioner.61,62,63,64
■ Review the patient’s medical record for confirmation of
catheter type, size, and tip location. Review laboratory test
results and assess the appropriateness of therapy.10
■ Reconcile the patient’s medication when the practitioner
orders a new medication to reduce the risk of medication
errors, including omissions, duplications, dosing errors, and
drug interactions.60
■ Gather the appropriate equipment, including a prefilled
syringe of the prescribed medication or a prepared infusion
container with the prescribed medication.
■ Compare the medication label with the practitioner’s
order to verify the correct medication, indication, dose,
route, and time of administration.60,61,62,63,64,65
■ Check the expiration date on the medication. If the
medication has expired, return it to the pharmacy and
obtain new medication.5,6,46,47,48
■ Visually inspect the solution for particles, discoloration,
and other signs of loss of integrity; don’t administer the
medication if its integrity is compromised.2,10,60,61,62,63,64,65
■ Discuss any unresolved concerns about the medication
with the patient’s practitioner.61,62,63,64
■ Verify that the medication is being administered at the
proper time, in the prescribed dose, and by the correct route
to reduce the risk of medication errors.60,61,62,63,65
NURSING ALERT Some medications may be considered high-alert
medications because they can cause significant patient harm when
used in error. If required by your facility, before beginning an infusion
or administering a bolus injection, have another nurse perform an
independent double-check to verify the patient’s identity and to
ensure that you’re administering the correct medication in the
prescribed
concentration,
that the
medication’s
indication
corresponds with the patient’s diagnosis, the dosage calculations are
correct and the dosing formula used to derive the final dose is correct,
the route of administration is safe and proper for the patient, the
pump settings are correct (if indicated), and the infusion line is
attached to the correct port.58,65
■ Perform hand hygiene.3,13,22,23,24,25,26,27,28
■ Confirm the patient’s identity using at least two patient
identifiers.29
■ Explain the procedure to the patient. If the patient is
receiving the medication for the first time, teach the patient
or family about potential adverse reactions, and discuss any
other concerns related to the medication.34,61,62,63,64
■ Raise the patient’s bed to waist level when providing
patient care to prevent caregiver back strain.35
■ Obtain the patient’s vital signs and assess the patient’s
condition, if applicable.2,10
■ Perform hand hygiene.1,13,21,22,23,24,25,26
■ Put on gloves to comply with standard precautions.40,41
■ If a disinfectant-containing cap is in place at the end of
the needleless connector, remove and discard it.21,66
■ Perform a vigorous mechanical scrub of the needleless
connector for at least 5 seconds using an antiseptic pad.
Allow it to dry completely.2,10,45
■ While maintaining sterility of the syringe tip, attach a
prefilled syringe containing preservative-free normal saline
solution to the needleless connector. (Use a 10-mL syringe
or a syringe designed to generate lower injection pressure.)
Unclamp the catheter, and slowly aspirate until you obtain a
brisk, positive blood return that is the color and consistency
of whole blood. If you don’t obtain a blood return, take steps
to locate an external cause of obstruction.2,10,55
■ If you obtain a blood return, slowly inject preservative-
free normal saline solution into the catheter. Use a minimum
volume of twice the internal volume of the catheter system.
Don’t forcibly flush the device. Further evaluate the device if
you meet resistance.2,10,55
■ Remove and discard the syringe in the appropriate
container.2,10,46
■ Perform a vigorous mechanical scrub of the needleless
connector for at least 5 seconds using an antiseptic pad.
Allow it to dry completely.2,10,45
■ If your facility uses a bar code technology, scan your
identification badge, the patient’s identification bracelet,
and the medication’s bar code.
Administering an IV bolus injection
■ Attach the syringe containing the prescribed medication
for IV bolus injection to the needleless connector.2,10
■ Inject the medication into the PICC at the rate indicated
on the medication label. Consult with the pharmacist if a
rate isn’t specified.2,10
■ Remove and discard the syringe in the appropriate
container.2,10
Administering an infusion
■ Spike the IV infusion container, prime the IV tubing, and
insert the tubing into the IV infusion pump.
■ Perform a vigorous mechanical scrub of the needleless
connector for at least 5 seconds using an antiseptic pad.
Allow it to dry completely.2,10,45
■ Clamp the PICC.
■ Connect the IV administration set tubing to the PICC.
■ Trace the tubing from the patient to its point of origin to
make sure that you’re connecting the tubing to the correct
port.54,60 Route the tubing in a standardized direction if the
patient has other tubing and catheters that have different
purposes. If you’ll be using multiple IV lines, label the tubing
at the distal end (near the patient connection) and the
proximal end (near the source container) to reduce the risk
of misconnection.53,60
■ Set the electronic infusion device according to the
practitioner’s order. Make sure that the alarm limits are set
appropriately, and that the alarms are turned on,
functioning properly, and audible to staff.67,68,69
■ Unclamp the PICC and administration set tubing; begin
the infusion, as ordered.
■ When the infusion is complete, clamp the catheter and
disconnect the administration set tubing.
Completing the procedure
■ Return the bed to the lowest level to prevent falls and
maintain the patient’s safety.35
■ Discard used supplies in appropriate receptacles.37,46
■ Remove and discard your gloves.40,41
■ Perform hand hygiene.22,23,24,26,27,28,29,37
■ Document the procedure.47,48,49,50,51
Removing a PICC
■ Verify the practitioner’s order to discontinue the
catheter.1
■ Gather and prepare the necessary supplies.
■ Perform hand hygiene.3,13,22,23,24,25,26,27,28
■ Confirm the patient’s identity using at least two patient
identifiers.29
■ Provide privacy.30,31,32,33
■ Explain the procedure to the patient to reduce anxiety
and promote cooperation.34
■ Raise the bed to waist level while providing care to
prevent caregiver back strain.35
■ Position the patient in a supine flat or Trendelenburg
position, unless contraindicated, so that the insertion site is
at or below heart level to reduce the risk of air
embolism.56,70
■ Perform hand hygiene.3,13,22,23,24,25,26,27,28
■ Put on gloves and other personal protective equipment,
as indicated.3,5,6,28
■ Trace the catheter from the patient to its point of origin to
make sure that you’re removing the proper catheter.
■ Discontinue all infusions, and document the volume
infused in the patient’s intake and output record.2,10
■ Place a fluid-impermeable pad under the patient’s arm.
■ Instruct the patient in how to perform the Valsalva
maneuver during removal, unless contraindicated, to
prevent air embolism.57
■ Stabilize the catheter at the hub with one hand.
■ Carefully remove the dressing with your other hand,
beginning at the device hub and gently pulling the dressing
perpendicular to the skin toward the insertion site, to
prevent skin tearing or stripping.2,10
■ If an engineered stabilization device holds the catheter in
place, remove the device. If the catheter is secured with
sutures, carefully cut and remove them.2
■ Assess the site for signs of infection, including swelling,
drainage, redness, and inflammation.70
■ Apply gauze to the insertion site; with your dominant
hand, slowly withdraw the catheter using gentle, even
pressure (as shown below).2,10
■ If you meet resistance, don’t forcibly remove the
catheter, because forcible removal can result in catheter
fracture and embolization. Instead, stop the removal
procedure and cover the catheter site with a sterile
dressing. Perform interventions, such as applying a warm
compress above the exit site, having the patient perform
relaxation techniques, and elevating the limb. Reattempt
removal after 15 to 30 minutes. Consult with the
practitioner to discuss interventions for successful
removal.2,10
■ Have the patient perform the Valsalva maneuver as you
withdraw the final catheter segment, to prevent air
embolism. If the Valsalva maneuver is contraindicated, use
the Trendelenburg or left lateral decubitus position, or have
the patient hold the breath, as applicable.57
■ After successful removal of the catheter, apply manual
pressure to the site with a sterile gauze pad until
hemostasis is achieved. (Guidelines recommend 1 to 5
minutes.)56,57
■ Cover the site with petroleum-based ointment and a
sterile dressing for at least 24 hours to seal the skin-to-vein
tract and reduce the risk of air embolus.2,10,56,57
■ Assess the integrity of the removed catheter. Compare
the length of the catheter with the original insertion length
(as shown below) to ensure that the entire catheter has
been removed.2,10 If you note any damage, notify the
practitioner and assess the patient for signs and symptoms
of catheter embolism (palpitations, arrhythmia, dyspnea,
cough, and thoracic pain). Note that a chest X-ray may be
needed for further evaluation.2,10
NURSING ALERT If a PICC isn’t intact after removal, apply a
tourniquet to the upper arm, above the insertion site, close to the
axilla, to prevent the advancement of the broken piece into the right
atrium. Maintain the patient on strict bed rest, notify the practitioner,
and monitor the patient closely for signs of distress. Have emergency
resuscitative equipment available. If radiographic extraction of the
catheter embolus is necessary, explain the procedure to the
patient.2,10
■ Return the bed to the lowest position to prevent falls and
maintain patient safety.35
■ Instruct the patient to remain in a flat or reclining position
for at least 30 minutes after device removal to reduce the
risk of air embolism.2,56
■ Dispose of used supplies in the appropriate
receptacles.37,46
■ Remove and discard your gloves and any other personal
protective equipment worn.40,41
■ Perform hand hygiene.22,23,24,26,27,28,29,37
■ Document the procedure.47,48,49,50,51
Special considerations
■ After insertion, you may withdraw a PICC using a sterile
dressing change procedure to ensure proper tip location;
however, you should never advance a PICC.2
■ Assess the catheter insertion site daily by inspection and
palpation through the transparent semipermeable dressing
to discern tenderness.30,45 Look at the catheter and cannula
pathway, and check for bleeding, redness, drainage, and
swelling. Although oozing is common for the first 24 hours
after insertion, excessive bleeding after that period should
be evaluated. Ask the patient about pain associated with
therapy.
■ To prevent catheter damage when flushing and locking a
PICC, use the syringe size recommended by the
manufacturer. Assess patency using a minimum 10-mL
syringe filled with preservative-free normal saline solution,
unless a flush syringe holding a smaller volume that’s
designed specifically to generate lower pressure is
available.55
■ PICC therapy works best when introduced early in
treatment; it shouldn’t be considered a last resort for
patients with sclerotic or repeatedly punctured veins.
■ Confirm a venous blood return and catheter patency
before initiating any infusion.
■ For catheters that aren’t being used routinely, flush
nonvalved catheters at least every 24 hours and valved
catheters at least weekly.71 Flush the catheter with
preservative-free normal saline solution; lock with heparin
(10 units/mL) if applicable.55
■ If necessary, use a declotting agent to clear a clotted
PICC, but make sure you read the manufacturer’s
recommendations first. (See Troubleshooting a PICC, page
602.)
■ Changes in the eye, such as pupil constriction with equal
light reaction and upper eyelid drooping, are signs of nerve
injury. PICCs and jugular-inserted catheters have been
reported to produce eye changes, which are suggestive of
inflammation of cervical sympathetic nerves (Horner
syndrome) caused by trauma from insertion technique and
vein thrombosis.72
■ The Joint Commission issued a sentinel event alert
concerning medical device alarm safety, because alarm-
related events have been associated with permanent loss of
function or death. Among the major contributing factors
were improper alarm settings, alarms turned off, and alarm
signals not audible to staff. Make sure alarm limits are set
appropriately, and that alarms are turned on, functioning
properly, and audible to staff. Follow facility guidelines for
preventing alarm fatigue.67
■ The Joint Commission issued a sentinel event alert related
to managing risk during transition to new International
Organization for Standardization tubing standards that were
designed to prevent dangerous tubing misconnections,
which can lead to serious patient injury and death. During
the transition, make sure to trace the tubing and catheter
from the patient to the point of origin before connecting or
reconnecting any device or infusion, at any care transition
(such as a new setting or service), and as part of the hand-
off process; route tubes and catheters having different
purposes in different standardized directions; label the
tubing at the distal and proximal ends when there are
different access sites or several bags hanging; use tubing
and equipment only as intended; and store medications for
different delivery routes in separate locations.53
■ Encourage the patient to report changes in the catheter
site or any new discomfort.3
■ Assess catheter necessity daily during multidisciplinary
rounds, and discontinue the PICC as soon as it’s no longer
needed to reduce the risk of vascular catheter–associated
infection.21
■ If you inadvertently withdraw the catheter a significant
amount during a dressing change, measure from the exit
site to the hub and reapply a sterile dressing. Notify the
practitioner, and prepare for a chest X-ray to determine the
position of the PICC tip.
■ When a medication is incompatible with preservative-free
normal saline solution, flush the device with dextrose 5% in
water and then follow by flushing with preservative-free
normal saline solution, heparin flush solution, or both.
Dextrose 5% in water should be flushed from the catheter,
because it provides nutrients for biofilm growth, which
increases the risk of vascular catheter–associated
infection.55
■ Follow the PICC manufacturer’s flushing instructions after
the administration of contrast media.
Patient teaching
If the patient will be discharged with the PICC, teach the
patient and caregiver infection prevention techniques,
including hand hygiene and aseptic technique. Be sure to
cover flushing and locking technique, dressing changes,
activity limitations, and device protection during activities of
daily living. Use demonstration, return demonstration, and
the teach-back method to confirm that you’ve provided
information to the patient and caregiver in a way that they
understand.
Complications
PICCs are associated with higher rates of deep vein
thrombosis (DVT) than other CV access devices owing to
insertion into veins with a smaller diameter and greater
movement in the upper extremity. Critical care patients and
those with cancer are also at greater risk for DVT with PICCs
when compared with other CV access devices. PICC
insertion sites in the antecubital fossa have higher rates of
DVT than mid-upper arm insertion sites.36 Infection and
catheter breakage on removal are other possible
complications. Critical care patients may also have a
tendency for a higher rate of malposition on PICC insertion
because of difficulty in patient positioning, use of
mechanical ventilation, and different venous blood flow
characteristics.77 Power injection can result in catheter tip
malposition.2 Air embolism, always a potential risk of
venipuncture, is less likely with PICC therapy than with
traditional CV access devices, because you insert the line
below heart level.
TROUBLESHOOTING
Troubleshooting a PICC
The patient may experience adverse reactions to the
particular drug you administer.
Catheter tip migration may occur with vigorous flushing.
Patients receiving chemotherapy are most vulnerable to this
complication because of frequent nausea and vomiting and
subsequent changes in intrathoracic pressure. Infection,
thrombosis, and air embolism may also occur.56
Possible complications during PICC removal include
venospasm, thrombosis, and catheter breakage. With
venospasm and thrombosis, you’ll feel resistance during
removal.
Air embolism is always a potential risk as well, so be alert
for sudden onset of dyspnea, continued coughing,
breathlessness, chest pain, hypotension, jugular vein
distention, tachyarrhythmias, wheezing, tachypnea, altered
mental status, altered speech, changes in facial
appearance, numbness, and paralysis.56,57 If any of these
signs or symptoms occur, take immediate action to prevent
more air from entering the bloodstream by covering the
puncture site with an air-occlusive dressing or pad.
Immediately place the patient on the left side in the
Trendelenburg position or in the left lateral decubitus
position if not contraindicated,57 and administer 100%
oxygen.56
Documentation
For PICC insertion, record the insertion site location,
including specific site preparation, local anesthetic (if used),
and infection prevention and safety precautions you took.
Also document the type, lot number, length, and size of the
catheter you inserted; external catheter length and length
of the catheter you inserted; date and time of insertion; and
number of insertion attempts. Record the patient’s arm
circumference, the device functionality, and your insertion
method, including visualization and guidance technology,
confirmation of the anatomic location of the catheter tip,
and the patient’s tolerance of the procedure. Document
patient and family teaching and their understanding of that
teaching.2
For flushing, document the site’s appearance as well as
the date, time, and type and amount of flush solution used.
Document patency, absence of signs and symptoms of
complications, lack of resistance when flushing, and
presence of blood return upon aspiration. Document
whether the patient experienced pain or discomfort during
flushing. Note patient teaching performed and the patient’s
understanding of that teaching.
For dressing change, documentation should include the
condition and length of the external catheter, the
appearance of the site, and any reports of pain or
tenderness. Record the date and the time of the dressing
change, site care, dressing type, stabilization device type,
any unexpected outcomes, and your interventions. Also
document teaching provided to the patient and family and
their understanding of that teaching.
For drug administrations, document the type of therapy,
drug, dose, rate, time, route, and method of administration.
Include the condition and patency of the site before and
after administration. When multiple catheter lumens are in
use, document which solutions and medications are infusing
through each lumen. Note the patient’s response to infusion
therapy, including symptoms, adverse effects, adverse
events, and laboratory tests (as appropriate), as well as the
patient’s or family’s participation in and understanding of
therapy, interventions, and patient education. If any
complications occurred, note them and your interventions.
For PICC removal, document interventions and the
condition, length, and site of the catheter.
REFERENCES
1 Standard 26. Vascular access device (VAD) planning. Infusion therapy
standards of practice. (2016). Journal of Infusion Nursing, 39, S51–S54. (Level
VII)
2 Infusion Nurses Society. (2016). Policies and procedures for infusion therapy
(5th ed.). Boston, MA: Infusion Nurses Society.
3 Centers for Disease Control and Prevention. (2011). “Guidelines for the
prevention of intravascular catheter–related infections” [Online]. Accessed
via the Web at http://www.cdc.gov/hicpac/pdf/guidelines/bsi-guidelines-
2011.pdf (Level I)
4 Standard 5. Competency assessment and validation. (2016). Journal of
Infusion Nursing, 39, S18–S21. (Level VII)
5 Standard 27. Site selection. Infusion therapy standards of practice. (2016).
Journal of Infusion Nursing, 39, S54–S58. (Level VII)
6 Standard 33. Vascular access site preparation and device placement. Infusion
therapy standards of practice. (2016). Journal of Infusion Nursing, 39, S64–
S67. (Level VII)
7 Standard 22. Vascular visualization. Infusion therapy standards of practice.
(2016). Journal of Infusion Nursing, 39, S44–S46. (Level VII)
8 Li, Z., & Chen, L. (2015). Comparison of ultrasound-guided modified Seldinger
technique versus blind puncture for peripherally inserted central catheter: A
meta-analysis of randomized controlled trials. Critical Care, 19(1), 64. (Level
I)
9 Jarrett, N., & Callaham, M. (2016). “Evidence-based guidelines for selected,
candidate, and previously considered hospital-acquired conditions: Final
report” [Online]. Accessed via the Web at
https://www.cms.gov/Medicare/Medicare-Fee-for-Service-
Payment/HospitalAcqCond/Downloads/2016-HAC-Report.pdf
10 Infusion Nurses Society. (2017). Policies and procedures for infusion therapy
of the older adult (3rd ed.). Boston, MA: Infusion Nurses Society.
11 Accreditation Association for Hospitals and Health Systems. (2017). Standard
07.01.02. Healthcare Facilities Accreditation Program: Accreditation
requirements for acute care hospitals. Chicago, IL: Accreditation Association
for Hospitals and Health Systems. (Level VII)
12 Accreditation Association for Hospitals and Health Systems. (2017). Standard
07.01.19. Healthcare Facilities Accreditation Program: Accreditation
requirements for acute care hospitals. Chicago, IL: Accreditation Association
for Hospitals and Health Systems. (Level VII)
13 The Joint Commission. (2019). Standard NPSG.07.04.01. Comprehensive
accreditation manual for hospitals. Oakbrook Terrace, IL: The Joint
Commission. (Level VII)
14 The Joint Commission. (2019). Standard RI.01.03 .01. Comprehensive
accreditation manual for hospitals. Oakbrook Terrace, IL: The Joint
Commission. (Level VII)
15 Standard 12. Product evaluation, integrity, and defect reporting. Infusion
therapy standards of practice. (2016). Journal of Infusion Nursing, 39, S32–
S34. (Level VII)
16 Standard 9. Informed consent. Infusion therapy standards of practice. (2016).
Journal of Infusion Nursing, 39, S26–S28. (Level VII)
17 Centers for Medicare and Medicaid Services, Department of Health and
Human Services. (2015). Condition of participation: Patient’s rights. 42 C.F.R.
§ 482.13(b)(2).
18 Accreditation Association for Hospitals and Health Systems. (2017). Standard
15.01.11. Healthcare Facilities Accreditation Program: Accreditation
requirements for acute care hospitals. Chicago, IL: Accreditation Association
for Hospitals and Health Systems. (Level VII)
19 DNV GL-Healthcare USA, Inc. (2016). PR.1.SR.3 . NIAHO® accreditation
requirements: Interpretive guidelines & surveyor guidance (version 11).
Milford, OH: DNV GL-Healthcare USA, Inc. (Level VII)
20 The Joint Commission. (2019). Standard UP.01.01.01. Comprehensive
accreditation manual for hospitals. Oakbrook Terrace, IL: The Joint
Commission. (Level VII)
21 Marschall, J., et al. (2014). SHEA/IDSA practice recommendation: Strategies
to prevent central line-associated bloodstream infections in acute care
hospitals. Infection Control and Hospital Epidemiology, 35(7), 753–771 .
Accessed via the Web at http://www.jstor.org/stable/10.1086/676533 (Level I)
22 The Joint Commission. (2019). Standard NPSG.07.01.01. Comprehensive
accreditation manual for hospitals. Oakbrook Terrace, IL: The Joint
Commission. (Level VII)
23 Centers for Disease Control and Prevention. (2002). Guideline for hand
hygiene in health-care settings: Recommendations of the Healthcare Infection
Control Practices Advisory Committee and the HICPAC/SHEA/APIC/IDSA Hand
Hygiene Task Force. MMWR Recommendations and Reports, 51(RR-16), 1–45.
Accessed via the Web at http://www.cdc.gov/mmwr/pdf/rr/rr5116.pdf (Level II)
24 World Health Organization. (2009). “WHO guidelines on hand hygiene in
health care: First global patient safety challenge, clean care is safer care”
[Online]. Accessed via the Web at
http://apps.who.int/iris/bitstream/10665/44102/1/9789241597906_eng.pdf
(Level IV)
25 Standard 16. Hand hygiene. Infusion therapy standards of practice. (2016).
Journal of Infusion Nursing, 39, S38–S39 . (Level VII)
26 Accreditation Association for Hospitals and Health Systems. (2017). Standard
07.01.21. Healthcare Facilities Accreditation Program: Accreditation
requirements for acute care hospitals. Chicago, IL: Accreditation Association
for Hospitals and Health Systems. (Level VII)
27 Centers for Medicare and Medicaid Services, Department of Health and
Human Services. (2015). Condition of participation: Infection control. 42 C.F.R.
§ 482.42.
28 DNV GL-Healthcare USA, Inc. (2016). IC.1 .SR.1 . NIAHO® accreditation
requirements: Interpretive guidelines & surveyor guidance (version 11).
Milford, OH: DNV GL-Healthcare USA, Inc. (Level VII)
29 The Joint Commission. (2019). Standard NPSG.01.01.01. Comprehensive
accreditation manual for hospitals. Oakbrook Terrace, IL: The Joint
Commission. (Level VII)
30 The Joint Commission. (2019). Standard RI.01.01.01. Comprehensive
accreditation manual for hospitals. Oakbrook Terrace, IL: The Joint
Commission. (Level VII)
31 Centers for Medicare and Medicaid Services, Department of Health and
Human Services. (2015). Condition of participation: Patient’s rights. 42 C.F.R.
§ 482.13(c)(1).
32 DNV GL-Healthcare USA, Inc. (2016). PR.1.SR.5 . NIAHO® accreditation
requirements: Interpretive guidelines & surveyor guidance (version 11).
Milford, OH: DNV GL-Healthcare USA, Inc. (Level VII)
33 Accreditation Association for Hospitals and Health Systems. (2017). Standard
15.01.16. Healthcare Facilities Accreditation Program: Accreditation
requirements for acute care hospitals. Chicago, IL: Accreditation Association
for Hospitals and Health Systems. (Level VII)
34 Standard 8. Patient education. Infusion therapy standards of practice. (2016).
Journal of Infusion Nursing, 39, S25–S26. (Level VII)
35 Waters, T. R., et al. (2009). “Safe patient handling training for schools of
nursing” [Online]. Accessed via the Web at
http://www.cdc.gov/niosh/docs/2009-127/pdfs/2009-127.pdf (Level VII)
36 Standard 52. Central vascular access device (CVAD)-associated thrombosis.
Infusion therapy standards of practice. (2016). Journal of Infusion Nursing, 39,
S112–S114. (Level VII)
37 Occupational Safety and Health Administration. (n.d .). “Bloodborne
pathogens, standard number 1910.1030” [Online]. Accessed via the Web at
https://www.osha.gov/pls/oshaweb/owadisp.show_document?
p_id=10051&p_table=STANDARDS (Level VII)
38 Standard 19. Standard precautions. Infusion therapy standards of practice.
(2016). Journal of Infusion Nursing, 39, S41–S42. (Level VII)
39 The Joint Commission. (2019). Standard NPSG.03 .04.01. Comprehensive
accreditation manual for hospitals. Oakbrook Terrace, IL: The Joint
Commission. (Level VII)
40 Siegel, J. D ., et al. (2007, revised 2017). “2007 guideline for isolation
precautions: Preventing transmission of infectious agents in healthcare
settings” [Online]. Accessed via the Web at
https://www.cdc.gov/infectioncontrol/pdf/guidelines/isolation-guidelines.pdf
(Level II)
41 Accreditation Association for Hospitals and Health Systems. (2017). Standard
07.01.10. Healthcare Facilities Accreditation Program: Accreditation
requirements for acute care hospitals. Chicago, IL: Accreditation Association
for Hospitals and Health Systems. (Level VII)
42 The Joint Commission. (2019). Standard UP.01.03.01. Comprehensive
accreditation manual for hospitals. Oakbrook Terrace, IL: The Joint
Commission. (Level VII)
43 Standard 23. Central vascular access device (CVAD) tip location. Infusion
therapy standards of practice. (2016). Journal of Infusion Nursing, 39, S46–
S48. (Level VII)
44 Standard 37. Vascular access device (VAD) stabilization. Infusion therapy
standards of practice. (2016). Journal of Infusion Nursing, 39, S72–S74. (Level
VII)
45 Standard 41. Vascular access device (VAD) assessment, care, and dressing
changes. Infusion therapy standards of practice. (2016). Journal of Infusion
Nursing, 39, S81–S84. (Level VII)
46 Standard 18. Medical waste and sharps safety. Infusion therapy standards of
practice. (2016). Journal of Infusion Nursing, 39, S40–S41. (Level VII)
47 The Joint Commission. (2019). Standard RC.01.03 .01. Comprehensive
accreditation manual for hospitals. Oakbrook Terrace, IL: The Joint
Commission. (Level VII)
48 Standard 10. Documentation in the medical record. Infusion therapy
standards of practice. (2016). Journal of Infusion Nursing, 39, S28–S30 . (Level
VII)
49 Accreditation Association for Hospitals and Health Systems. (2017). Standard
10.00 .03. Healthcare Facilities Accreditation Program: Accreditation
requirements for acute care hospitals. Chicago, IL: Accreditation Association
for Hospitals and Health Systems. (Level VII)
50 Centers for Medicare and Medicaid Services, Department of Health and
Human Services. (2015). Condition of participation: Medical record services.
42 C.F.R. § 482.24(b).
51 DNV GL-Healthcare USA, Inc. (2016). MR.2 .SR.1 . NIAHO® accreditation
requirements: Interpretive guidelines & surveyor guidance (version 11).
Milford, OH: DNV GL-Healthcare USA, Inc. (Level VII)
52 Standard 34. Needleless connectors. Infusion therapy standards of practice.
(2016). Journal of Infusion Nursing, 39, S68–S70. (Level VII)
53 The Joint Commission. (2014). “Sentinel event alert: Managing risk during
transition to new ISO tubing connector standards” [Online] Accessed via the
Web at
http://www.jointcommission.org/assets/1/6/SEA_53_Connectors_8 _19_14 _final.
pdf (Level VII)
54 U.S . Food and Drug Administration. (n.d .). “Look. Check. Connect. Safe
medical device connections save lives” [Online]. Accessed via the Web at
http://www.fda.gov/downloads/MedicalDevices/Safety/AlertsandNotices/UCM1
34873.pdf
55 Standard 40. Flushing and locking. Infusion therapy standards of practice.
(2016). Journal of Infusion Nursing, 39, S77–S81. (Level VII)
56 Feil, M. (2012). Reducing risk of air embolism associated with central venous
access devices. Pennsylvania Patient Safety Advisory, 9(2), 58–64. Accessed
via the Web at http://patientsafety.pa.gov/ADVISORIES/Pages/201206_58.aspx
57 Standard 50. Air embolism. Infusion therapy standards of practice. (2016).
Journal of Infusion Nursing, 39, S108–S109. (Level VII)
58 Westbrook, J., et al. (2010). Association of interruptions with an increased risk
and severity of medication administration errors. Archives of Internal
Medicine, 170(8), 683–690 . (Level IV)
59 Institute for Safe Medication Practices. (2012). Side tracks on the safety
express: Interruptions lead to errors and unfinished...Wait what was I doing?
Nurse Advise-ERR, 11(2), 1–4 . Accessed via the Web at
https://www.ismp.org/Newsletters/acutecare/showarticle.aspx?id=37
60 Standard 57. Parenteral medication and solution administration. Infusion
therapy standards of practice. (2016). Journal of Infusion Nursing, 39, S125–
S127. (Level VII)
61 Accreditation Association for Hospitals and Health Systems. (2017). Standard
16.01.03. Healthcare Facilities Accreditation Program: Accreditation
requirements for acute care hospitals. Chicago, IL: Accreditation Association
for Hospitals and Health Systems. (Level VII)
62 Centers for Medicare and Medicaid Services, Department of Health and
Human Services. (2015). Condition of participation: Nursing services. 42
C.F.R. § 482.23(c).
63 DNV GL-Healthcare USA, Inc. (2016). MM.1 .SR.2. NIAHO® accreditation
requirements: Interpretive guidelines & surveyor guidance (version 11).
Milford, OH: DNV GL-Healthcare USA, Inc. (Level VII)
64 The Joint Commission. (2019). Standard MM.06.01.01. Comprehensive
accreditation manual for hospitals. Oakbrook Terrace, IL: The Joint
Commission. (Level VII)
65 Standard 13. Medication verification. Infusion therapy standards of practice.
(2016). Journal of Infusion Nursing, 39, S34–S35. (Level VII)
66 Moureau, N. L., & Flynn, J. (2015). “Disinfection of needleless connector hubs:
Clinical evidence systematic review” [Online]. Accessed via the Web at
https://www.hindawi.com/journals/nrp/2015/796762/ (Level V)
67 The Joint Commission. (2013). “Sentinel event alert: Medical device alarm
safety in hospitals” [Online]. Accessed via the Web at
https://www.jointcommission.org/assets/1/6/SEA_50_alarms_4 _26_16.pdf
(Level VII)
68 The Joint Commission. (2019). Standard NPSG.06 .01.01. Comprehensive
accreditation manual for hospitals. Oakbrook Terrace, IL: The Joint
Commission. (Level VII)
69 Graham, K. C., & Cvach, M. (2010). Monitor alarm fatigue: Standardizing use
of physiological monitors and decreasing nuisance alarms. American Journal
of Critical Care, 19(1), 28–37. Accessed via the Web at
http://ajcc.aacnjournals.org/content/19/1/28.full.pdf
70 Standard 44. Vascular access device removal. Infusion therapy standards of
practice. (2016). Journal of Infusion Nursing, 39, S91–S94. (Level VII)
71 Infusion Nurses Society. (2008, revised 2011). Flushing protocols. Boston, MA:
Infusion Nurses Society. (Level VII)
72 Standard 47. Nerve injuries. Infusion therapy standards of practice. (2016).
Journal of Infusion Nursing, 39, S102–S104. (Level VII)
73 Standard 48. Central venous access device (CVAD) occlusion. Infusion
therapy standards of practice. (2016). Journal of Infusion Nursing, 39, S104–
S106. (Level VII)
74 Standard 46. Infiltration and extravasation. Infusion therapy standards of
practice. (2016). Journal of Infusion Nursing, 39, S98–S102. (Level VII)
75 Standard 45. Phlebitis. Infusion therapy standards of practice. (2016). Journal
of Infusion Nursing, 39, S95. (Level VII)
76 Standard 51. Catheter damage (embolism, repair exchange). Infusion therapy
standards of practice. (2016). Journal of Infusion Nursing, 39, S109–S112.
(Level VII)
77 Liem, T. K ., et al. (2012). Peripherally inserted central catheter usage
patterns and associated symptomatic upper extremity venous thrombosis.
Journal of Vascular Surgery, 55(3), 761–767. (Level IV)
PERIPHERAL NERVE STIMULATION
Peripheral nerve stimulation assesses and monitors the
transmission of nerve impulses at the neuromuscular
junction of certain skeletal muscles to monitor the depth of
neuromuscular
blockade in patients
receiving
neuromuscular-blocking drugs.1,2 Neuromuscular-blocking
drugs may be given to help synchronize breathing and
mechanical ventilation in patients with severe lung injury;
assist with the treatment of severe muscle spasms in
patients with seizures, tetanus, or drug overdose; and help
in the management of increased intracranial pressure in
patients with head injury.1,3
A peripheral nerve stimulator (PNS) is used to evaluate
the level of neuromuscular blockade and determine the
lowest therapeutic dose of the neuromuscular-blocking drug
needed to produce paralysis. The PNS works by stimulating
a peripheral nerve with a series of brief electrical pulses to
produce a muscle response or twitch.
The train of four (TOF) is the most commonly used method
for monitoring neuromuscular blockade.3 In this method, a
series of four electrical impulses are delivered to a particular
peripheral nerve and the muscle response is observed. The
ulnar nerve site is the recommended and most commonly
used location for the test, but the facial and posterior tibial
nerves may also be used.1 If four twitches occur, then up to
70% of the receptors are blocked. Three twitches occur
when about 75% of the receptors are blocked. One or two
twitches correspond to approximately 80% to 90%
neuromuscular blockade.1 After the neuromuscular-blocking
drug is administered, it’s titrated so that each set of four
electrical impulses produces one or two muscle twitches.
The absence of twitches may indicate that 100% of the
receptors are blocked, exceeding the desired level of
neuromuscular blockade.1
Equipment
PNS ▪ two electrode gel patches ▪ two lead wires ▪ alcohol
pads ▪ Optional: disposable-head clippers.
Implementation
■ Verify the practitioner’s order.
■ Perform hand hygiene.4,5,6,7,8,9
■ Confirm the patient’s identity using at least two patient
identifiers.10
■ Provide privacy.11,12,13,14
■ Raise the bed to waist level while performing patient care
to prevent caregiver back strain.15
■ Explain the reasons for neuromuscular blockade and
peripheral nerve stimulation to the patient and family to
increase their understanding and reduce anxiety.
■ Select a site for electrode placement that’s accessible
and free from edema, wounds, catheters, and dressings to
ensure optimum placement for conduction of stimulating
current. The preferred monitoring site is the ulnar nerve, but
if it isn’t accessible, other sites may be used.
■ If the patient has excessive hair where an electrode is to
be placed, remove the hair with disposable-head clippers to
improve contact of the pad with the skin.1
Ulnar nerve stimulation
■ Use an alcohol pad to clean the site on the patient’s arm
where the electrodes are to be placed, and allow the site to
dry to reduce skin resistance.
■ Place the patient’s arm in a relaxed position with the
palm up so that the ulnar nerve is easily accessible.
■ Place one electrode over the ulnar nerve at the crease of
the wrist and the other electrode 1 to 2 cm (0.4′′ to 0.8′′)
away, parallel to the carpi ulnaris tendon (as shown below)
to ensure stimulation of the ulnar nerve.
■ Attach the lead wires to the PNS.
■ Connect the black lead (negative) to the electrode
nearest the wrist and the red lead (positive) to the electrode
on the forearm.
■ Turn on the PNS on and choose a low amplitude—
commonly 10 to 20 milliampere (mA)—because higher
current can cause overstimulation of the nerve and rhythmic
nerve firing.1
■ Press the TOF button to initiate the four impulses. Count
the number of thumb adductions or twitches that the
stimulator produces while lightly feeling for twitches. Don’t
count finger movement that’s caused by muscle
stimulation.
■ Turn off the PNS.
■ Perform hand hygiene.4,5,6,7,8,9
Facial nerve stimulation
■ Use an alcohol pad to clean the site on the patient’s face
where the electrodes are to be placed, and allow the site to
dry to improve contact of the electrode with the skin.
■ Place one electrode near the outer canthus of the eye and
a second electrode 2 cm (0.8′′) below and at the level of the
tragus of the ear (as shown below) to ensure stimulation of
the facial nerve.
■ Attach the lead wires to the PNS.
■ Connect the black lead (negative) to the electrode
nearest the tragus and the red lead (positive) to the
electrode near the outer canthus of the eye.
■ Turn on the PNS on and choose a low amplitude—
commonly 10 to 20 mA—because higher current can cause
overstimulation of the nerve and rhythmic nerve firing.
■ Press the TOF button to initiate the four impulses. Count
the number of twitches you observe while lightly feeling for
twitches.
■ Turn off the PNS.
■ Perform hand hygiene.4,5,6,7,8,9
Posterior tibial nerve stimulation
■ Use an alcohol pad to clean the site on the patient’s foot
where the electrodes are to be placed and allow it to dry to
improve contact of the electrode with the skin.
■ Place one electrode 2 cm (0.8′′) behind the medial
malleolus and a second electrode 2 cm above the first
electrode (as shown below) to ensure stimulation of the
posterior tibial nerve.
■ Attach the lead wires to the PNS.
■ Connect the black lead (negative) to the electrode behind
the medial malleolus and the red lead (positive) to the
electrode above the first.
■ Turn on the PNS on and choose a low mA—commonly 10
to 20 mA—because higher current can cause
overstimulation of the nerve and rhythmic nerve firing.
■ Press the TOF button to initiate the four impulses. Note
plantar flexion of the great toe and count the number of
twitches that the stimulation produces.
■ Turn off the PNS.
■ Perform hand hygiene.4,5,6,7,8,9
Establishing supramaximal stimulation
■ To determine the baseline amplitude setting for a patient
who hasn’t received neuromuscular blockade, set the
amplitude to 5 mA and press the TOF button to initiate the
stimulus.1
■ Note the number of twitches produced.
■ Increase the amplitude 5 mA at a time until four muscle
twitches are produced by the TOF stimulation. This step
establishes the amount of current that should be used for
peripheral nerve stimulation and enhances the reliability of
testing.1
Establishing TOF after neuromuscular blockade
■ Determine the TOF 10 to 15 minutes following a bolus
dose or any change in neuromuscular drug administration to
assess the level of neuromuscular blockade.1
■ If no twitches occur, troubleshoot the equipment. Next,
increase the stimulating current and then retest another
nerve. If there’s still no response, check the neuromuscular
blocker infusion rate, concentration, and dose, and then
hold the bolus dose or reduce the infusion rate, as ordered.1
Retest the TOF in 10 to 15 minutes.2
■ If one or two twitches occur, continue the current rate of
the infusion.
■ If three or four twitches occur, increase the rate of the
neuromuscular blockade and then retest the TOF in 10 to 15
minutes.
Ongoing care
■ Perform respiratory, cardiovascular, and neurologic
assessments before any increase in the level of
neuromuscular blockade.
■ Perform neurovascular checks hourly.
■ Change electrodes daily, or more frequently if they
become loose or the gel has dried out, to ensure optimum
conduction.1
■ Assess the skin under the electrodes for signs of irritation
or breakdown, which could impede conduction.
■ Reevaluate the level of neuromuscular blockade every 4
to 8 hours during therapy with neuromuscular-blocking
drugs, as ordered, after the patient is stable and an
adequate level of neuromuscular blockade is reached.1
■ Return the bed to the lowest position to prevent falls and
maintain patient safety.16
■ Perform hand hygiene.4,5,6,7,8,9
■ Document the procedure.17,18,19,20
Special considerations
■ Because neuromuscular-blocking drugs don’t produce
amnesia, sedation, or analgesia, sedative and analgesic
drugs should always be administered before giving a
neuromuscular-blocking drug.2
■ Assess the patient’s baseline electrolyte, blood urea
nitrogen, and creatinine levels, because imbalances may
potentiate the effects of neuromuscular-blocking drugs.2
■ To avoid complications of neuromuscular blockade, the
patient will require routine frequent oral care and
suctioning, deep vein thrombosis prophylaxis (as ordered),
GI prophylaxis (as ordered), eye lubrication, and footdrop
prevention measures.2
■ Peripheral nerve stimulators are unreliable for discerning
the degree of neuromuscular recovery necessary for
spontaneous ventilation and tracheal extubation. To assess
readiness for tracheal extubation, more precise medical
devices are needed, such as neuromuscular monitors that
provide objective responses to nerve stimulation. Such
monitors use different methods to measure the evoked
muscle responses to electrical nerve stimulation.21
■ If the patient has hemiplegia, hemiparesis, or peripheral
neuropathy (from diabetes or other conditions), keep in
mind that the motor response to PNS may not be as
pronounced, which may lead to the incorrect belief that a
higher dose of neuromuscular-blocking drugs is needed.
With hemiplegia and hemiparesis, place the electrodes on
the unaffected limb, if possible.
■ Check the site of electrode placement carefully, because
incorrect placement can lead to muscle, rather than nerve,
stimulation.1
■ If no twitches are elicited at a level that previously
elicited a response, troubleshoot the PNS before decreasing
the level of neuromuscular blockade. Check the polarity of
the leads, battery charge, electrode contact with the skin,
condition of electrode gel pads, and lead wire connections.1
Complications
Excessive neuromuscular blockade can cause protracted
paralysis and muscle weakness. During TOF testing, the
patient may experience mild discomfort. Skin irritation and
breakdown can occur under the electrode pads. Cardiac
arrhythmias can result if the PNS lead wires come in contact
with an external pacing catheter or lead wire.
Documentation
Record the date and time of the assessment. Record the
initial TOF assessment, amplitude used, and dose of
neuromuscular-blocking drug being administered. Document
each subsequent TOF assessment on the appropriate flow
sheet as a ratio of twitches per four stimulations—for
example, 0/4, 1/4, 2/4, 3/4, 4/4.
Note the current used as well as any bolus doses or
changes in the rate of infusion of the neuromuscular-
blocking drug. Record respiratory, cardiovascular, and
neurologic assessments on a frequent assessment form.
Note any adverse effects of neuromuscular blockade, the
time and name of the practitioner notified, orders given,
nursing interventions performed, and the patient’s
response. Include any patient and family teaching and their
understanding of the teaching.
REFERENCES
1 Wiegand, D. L. (2017). AACN procedure manual for high acuity, progressive
and critical care (7th ed.). Philadelphia PA: Elsevier.
2 Saenz, A. D. (2015). “Peripheral nerve stimulator: Train of four monitoring”
[Online]. Accessed via the Web at
http://emedicine.medscape.com/article/2009530-overview
3 Tietze, K. J. Use of neuromuscular blocking medications in critically ill
patients. (2017). In: UpToDate, Parsons, P. E., & Finlay, G. (Eds). Retrieved
from: www.uptodate.com
4 The Joint Commission. (2019). Standard NPSG.07.01.01. Comprehensive
accreditation manual for hospitals. Oakbrook Terrace, IL: The Joint
Commission. (Level VII)
5 Centers for Disease Control and Prevention. (2002). Guideline for hand
hygiene in health-care settings: Recommendations of the Healthcare Infection
Control Practices Advisory Committee and the HICPAC/SHEA/APIC/IDSA Hand
Hygiene Task Force. MMWR Recommendations and Reports, 51(RR-16), 1–45.
Accessed via the Web at https://www.cdc.gov/mmwr/pdf/rr/rr5116.pdf (Level
II)
6 World Health Organization. (2009). “WHO guidelines on hand hygiene in
health care: First global patient safety challenge, clean care is safer care”
[Online]. Accessed via the Web at
http://apps.who.int/iris/bitstream/10665/44102/1/9789241597906_eng.pdf
(Level IV)
7 Centers for Medicare and Medicaid Services, Department of Health and
Human Services. (2015). Condition of participation: Infection control. 42 C.F.R.
§ 482.42.
8 Accreditation Association for Hospitals and Health Systems. (2017). Standard
07.01.21. Healthcare Facilities Accreditation Program: Accreditation
requirements for acute care hospitals. Chicago, IL: Accreditation Association
for Hospitals and Health Systems. (Level VII)
9 DNV GL-Healthcare USA, Inc. (2016). IC.1.SR.1 . NIAHO® accreditation
requirements: Interpretive guidelines & surveyor guidance (version 11).
Milford, OH: DNV GL-Healthcare USA, Inc. (Level VII)
10 The Joint Commission. (2019). Standard NPSG.01.01.01. Comprehensive
accreditation manual for hospitals. Oakbrook Terrace, IL: The Joint
Commission. (Level VII)
11 Centers for Medicare and Medicaid Services, Department of Health and
Human Services. (2015). Condition of participation: Patient’s rights. 42 C.F.R.
§ 482.13(c)(1).
12 Accreditation Association for Hospitals and Health Systems. (2017). Standard
15.01.16. Healthcare Facilities Accreditation Program: Accreditation
requirements for acute care hospitals. Chicago, IL: Accreditation Association
for Hospitals and Health Systems. (Level VII)
13 The Joint Commission. (2019). Standard RI.01.01.01. Comprehensive
accreditation manual for hospitals. Oakbrook Terrace, IL: The Joint
Commission. (Level VII)
14 DNV GL-Healthcare USA, Inc. (2016). PR.1.SR.5 . NIAHO® accreditation
requirements: Interpretive guidelines & surveyor guidance (version 11).
Milford, OH: DNV GL-Healthcare USA, Inc. (Level VII)
15 Waters, T. R., et al. (2009). “Safe patient handling training for schools of
nursing” [Online]. Accessed via the Web at
https://www.cdc.gov/niosh/docs/2009-127/pdfs/2009-127.pdf (Level VII)
16 Ganz, D. A., et al. (2013). Preventing falls in hospitals: A toolkit for improving
quality of care (AHRQ Publication No. 13-0015-EF). Rockville, MD: Agency for
Healthcare Research and Quality. Accessed via the Web at
https://www.ahrq.gov/sites/default/files/publications/files/fallpxtoolkit_0 .pdf
(Level VII)
17 The Joint Commission. (2019). Standard RC.01.03 .01. Comprehensive
accreditation manual for hospitals. Oakbrook Terrace, IL: The Joint
Commission. (Level VII)
18 Centers for Medicare and Medicaid Services, Department of Health and
Human Services. (2015). Condition of participation: Medical record services.
42 C.F.R. § 482.24(b).
19 Accreditation Association for Hospitals and Health Systems. (2017). Standard
10.00 .03. Healthcare Facilities Accreditation Program: Accreditation
requirements for acute care hospitals. Chicago, IL: Accreditation Association
for Hospitals and Health Systems. (Level VII)
20 DNV GL-Healthcare USA, Inc. (2016). MR.2 .SR.1 . NIAHO® accreditation
requirements: Interpretive guidelines & surveyor guidance (version 11).
Milford, OH: DNV GL-Healthcare USA, Inc. (Level VII)
21 Brull, S. J ., & Murphy, G. S . (2010). Residual neuromuscular block: Lessons
unlearned. Part II: Methods to reduce the risk of residual weakness.
Anesthesia & Analgesia, 111(1), 129–140. Accessed via the Web at
http://journals.lww.com/anesthesia-
analgesia/Fulltext/2010/07000/Residual_Neuromuscular_Block_Lessons_Unlea
rned_ . 2 5.aspx
PERITONEAL DIALYSIS
Peritoneal dialysis requires insertion of a peritoneal catheter
(such as a Tenckhoff catheter) to circulate dialysate in the
peritoneal cavity. The practitioner inserts a catheter under
general or local anesthesia, sutures it in place, and tunnels
the distal portion subcutaneously to the skin surface. There,
it serves as a port for the dialysate solution (the solution
instilled into the peritoneal cavity through the catheter),
which draws waste products, excess fluid, and electrolytes
from the blood across the semipermeable peritoneal
membrane. After a prescribed period, dialysate drains from
the peritoneal cavity. (See How peritoneal dialysis works.)
The procedure is indicated in patients with stage 5 chronic
kidney disease1 or earlier stages of kidney disease when
signs and symptoms become severe.2 Patients with acute
kidney injury, hemodialysis vascular access issues, chronic
heart failure, and ischemic heart disease can also benefit
from peritoneal dialysis.2,3 This procedure gives the patient
more independence, requires less travel for treatments, and
results in more stable fluid and electrolyte levels than
conventional hemodialysis. Because the patient can resume
normal daily activities between dialysate solution changes,
peritoneal dialysis helps the patient return to a near-normal
lifestyle. It also costs less than hemodialysis. Methods of
peritoneal dialysis include manual and continuous-cycle
methods. This procedure covers the manual exchange
method.
Contraindications to peritoneal dialysis include inability for
self-care or lack of a capable caregiver to assist with
peritoneal dialysis after discharge, recent major intra-
abdominal surgery, and severe morbid obesity (body mass
index greater than 40).4 Extraperitoneal procedures, such as
nephrectomy,
aren’t
necessarily
contraindications.4
Contraindications to urgent peritoneal dialysis for acute
kidney injury include ileus, appendicitis, ischemic bowel,
intestinal obstruction or perforation, bacterial or fungal
peritonitis, new aortic grafts, abdominal or diaphragmatic
fistulae, abdominal burns, cellulitis, severe hypercatabolic
states, and profound metabolic acidosis.4
The practitioner may insert the catheter in the operating
room or in the interventional radiology department under
sterile conditions. Peritoneal dialysis may be performed by a
nephrology nurse, acute care hemodialysis nurse, acute
care dialysis technician with nurse supervision, critical care
nurse, expert medical-surgical nurse, or contracted nurse
from an agency who is trained and competent to perform
peritoneal dialysis.4 Know who may perform peritoneal
dialysis in your facility.
You may perform dialysis manually or using an automatic
or a semiautomatic cycle machine. (See Comparing
peritoneal dialysis catheters, page 608.)
Equipment
Scale ▪ vital signs monitoring equipment ▪ stethoscope ▪
disinfectant pad.
To infuse and drain dialysate
Prescribed dialysate solution ▪ transfer set ▪ heating pad or
commercial warmer ▪ IV pole ▪ masks ▪ gloves ▪ sterile
gloves ▪ sterile 4′′ × 4′′ (10-cm × 10-cm) gauze pads ▪
antiseptic solution (povidone-iodine or chlorhexidine) ▪
fluid-impermeable pad ▪ Optional: sterile basin, sterile
drape, transfer set change kit with patient connector, sterile
caps or commercially prepared sterile caps with prefilled
antiseptic, sterile swabs, specimen container or sterile
culture tube with transport medium, specimen label.
How peritoneal dialysis works
Peritoneal dialysis works through a combination of diffusion and osmosis.
Diffusion
In diffusion, particles move through a semipermeable membrane from an
area of high-solute concentration to an area of low-solute concentration. In
peritoneal dialysis, the water-based dialysate being infused contains glucose,
sodium chloride, calcium, magnesium, acetate or lactate, and no waste
products. Therefore, the waste products and excess electrolytes in the blood
cross through the semipermeable peritoneal membrane into the dialysate.
Removing the waste-filled dialysate and replacing it with fresh solution keeps
the waste concentration low and encourages further diffusion.
Osmosis
In osmosis, fluids move through a semipermeable membrane from an area of
low-solute concentration to an area of high-solute concentration. In
peritoneal dialysis, dextrose is added to the dialysate to give it a higher
solute concentration than the blood, creating a high osmotic gradient. Water
migrates from the blood through the membrane at the beginning of each
infusion, when the osmotic gradient is highest.
For catheter dressing change
Sterile drapes ▪ sterile 4′′ × 4′′ (10-cm × 10-cm) gauze pads
▪ dressing ▪ masks ▪ hypoallergenic tape or catheter
securement device ▪ antiseptic solution ▪ sterile gloves ▪
sterile cap ▪ Optional: sterile basin, commercially prepared
sterile cap with prefilled antiseptic, prescribed antibiotic
ointment.
Commercially prepared sterile continuous ambulatory
peritoneal dialysis kits are available.
Preparation of equipment
Inspect peritoneal dialysis equipment and supplies; if a
product is expired, if its integrity compromised, or if it’s
found defective, remove it from patient use, label it as
expired or defective, and report the expiration or defect as
directed by your facility.5
EQUIPMENT
Comparing peritoneal dialysis catheters
The first step in any type of peritoneal dialysis is insertion of a catheter to
allow instillation of dialyzing solution. The surgeon may insert one of the
three catheters described here.
Tenckhoff catheter
To implant a Tenckhoff catheter, the surgeon inserts the first 63⁄4′′ (17 cm) of
the catheter into the patient’s abdomen. The next 7-cm (23⁄4′′) segment,
which may have a Dacron cuff at one or both ends, is imbedded
subcutaneously. Within a few days after insertion, the patient’s tissues grow
around the cuffs, forming a tight barrier against bacterial infiltration. The
remaining 37/8′′ (10 cm) of the catheter extends outside of the abdomen and
is equipped with a metal adapter at the tip that connects to dialyzer tubing.
Flanged-collar catheter
To insert this kind of catheter, the surgeon positions its flanged collar just
below the skin so that the device extends through the abdominal wall,
keeping the distal end of the cuff from extending into the peritoneum, where
it could cause adhesions.
Column-disk peritoneal catheter
To insert a column-disk peritoneal catheter (CDPC), the surgeon rolls up the
flexible disk section of the implant, inserts it into the peritoneal cavity, and
retracts it against the abdominal wall. The implant’s first cuff rests just
outside the peritoneal membrane, and its second cuff rests just underneath
the skin.
Because the CDPC doesn’t float freely in the peritoneal cavity, it keeps
inflowing dialyzing solution from being directed at the sensitive organs, which
increases patient comfort during dialysis.
Warm dialysis solution bags to body temperature using
dry heat.6
Implementation
■ Review the patient’s medical record for primary kidney
disease and other comorbid conditions, response to prior
peritoneal dialysis treatments (if applicable), medication
history, and pertinent laboratory test results (blood urea
nitrogen, serum creatinine, albumin, bicarbonate, glucose,
potassium, and hemoglobin levels; hematocrit; and white
blood cell and platelet counts).1
■ Avoid distractions and interruptions when preparing and
administering dialysate solution to prevent administration
errors.7,8
■ Verify the practitioner’s order, which should include the
number of daily exchanges, frequency of exchanges, fill
volume, dextrose and calcium concentrations, and added
medications.4
■ Compare the dialysate solution label with the order in the
patient’s medical record.9,10,11,12
■ Check the patient’s medical record for an allergy or a
contraindication to the prescribed dialysate solution or its
additives. If an allergy or a contraindication exists, don’t
administer the dialysate solution, and notify the
practitioner.9,10,11,12
■ Inspect the dialysate solution visually for particles,
discoloration, or other signs of loss of integrity; don’t
administer the dialysate solution if its integrity has been
compromised.9,10,11,12
■ Discuss any unresolved concerns about the dialysate
solution with the patient’s practitioner.11
■ Gather the appropriate equipment.
■ Perform hand hygiene.13,14,15,16,17,18
■ Confirm the patient’s identity using at least two patient
identifiers.19
■ Close the door to the room or pull the curtain around the
bedside to minimize airborne contaminants.6
■ Provide privacy.20,21,22,23
■ Explain the procedure to the patient and family (if
appropriate) according to their individual communication
and learning needs to increase their understanding, allay
their fears, and enhance cooperation.24 If the patient
previously received peritoneal dialysis, ask about the
response to previous treatment.
■ Assess the patient’s respiratory and abdominal status.5
Assess for signs of dehydration and for unusual insensible
fluid loss.4
■ Obtain the patient’s baseline weight (in kilograms) before
initiation of peritoneal dialysis therapy, and then weigh the
patient daily. Obtain the patient’s weight consistently with
or without fluid dwelling. Use the same scale and make sure
the patient wears similar clothing to ensure consistency for
accurate weight measurement.4
■ Clean and disinfect your identified work surface.6
Draining the dialysate
■ Perform hand hygiene.13,14,15,16,17,18
■ Raise the patient’s bed to waist level when providing care
to prevent caregiver back strain.25
■ Position the patient with the head and upper torso
elevated during infusion and drainage of dialysate, if
possible, to prevent respiratory compromise when infusing
dialysate and to maximize gravity effect when draining
dialysate.4 Position the patient supine if peritoneal dialysis
becomes necessary during the first 2 weeks after catheter
insertion.
■ Perform hand hygiene.13,14,15,16,17,18
■ Hang the dialysate solution bag on an IV pole, and clamp
the tubing between the dialysate bag and the patient to
avoid introducing air into the peritoneal cavity.5
■ Place the drainage bag on a clean surface below the mid-
abdominal area to facilitate drainage.5
■ Put on a mask and assist the patient in putting on a
mask.4
■ Perform hand hygiene.13,14,15,16,17,18
■ Prepare a sterile field. Open a sterile container package
or sterile 4′′ × 4′′ (10-cm × 10-cm) gauze pads. Pour
antiseptic solution into a sterile container or onto the gauze
pads.5
■ Put on gloves.
■ If there’s a dressing covering the peritoneal catheter,
carefully remove the dressing and discard it.
■ Be careful not to touch the catheter or the skin. Check the
skin integrity at the catheter exit site and assess for signs of
infection, such as purulent drainage, redness, or edema. If
drainage is present, obtain a specimen using a sterile swab,
put it in a specimen container or a sterile culture tube with
transport medium, label the specimen in the presence of the
patient to prevent mislabeling, and notify the practitioner.
■ Palpate the catheter exit site and subcutaneous tunnel
route for tenderness or pain. If these symptoms occur, notify
the practitioner.
■ Remove and discard your gloves.
■ Perform hand hygiene.13,14,15,16,17,18
■ Put on sterile gloves.4,5
■ Scrub the catheter-cap connection using a gauze pad
soaked in disinfectant.4
■ Wrap another antiseptic-soaked gauze pad around the
distal end of the transfer set–cap connection and leave it in
place for 5 minutes to reduce the transmission of
microorganisms.4
■ Remove and discard the used gauze pad and allow the
catheter–cap connection to dry.4
■ Remove the cap and wrap another antiseptic-soaked
gauze pad around the catheter adapter to disinfect the open
catheter adapter.4
■ Connect the sterile transfer set.4
■ Trace the tubing from the double-bag Y set to the transfer
set to make sure that you’re connecting the tubing to the
correct port.26,27 Attach the double-bag Y-set connector to
the transfer set.4 Be sure to secure the Luer-lock connector
tightly (as shown below).
■ Confirm that the clamp on the drain line of the double-
bag Y-set is open and that the clamp on the fill line of the
double-bag Y-set is closed.
■ Open the transfer set clamp to drain effluent from the
peritoneal cavity.28 Observe the effluent for cloudiness.28
■ Remove and discard the patient’s mask.
■ Return the bed to the lowest position to prevent falls and
maintain the patient’s safety.29
■ Monitor the patient’s vital signs, as ordered or according
to the patient’s condition, to assess for signs of hypovolemia
(hypotension and tachycardia) and sudden release of
intraperitoneal pressure. Notify the practitioner if the patient
develops hypotension, tachycardia, or abdominal pain.5
■ After dialysate draining is complete, clamp the drain line
of the double-bag Y-set and close the transfer set clamp.28
■ Weigh or measure the effluent as directed by your facility.
■ Discard used supplies in the appropriate receptacles.
■ Remove and discard your gloves and mask.
■ Perform hand hygiene.13,14,15,16,17,18
Flushing and infusing the dialysate
■ After dialysate draining is complete, perform hand
hygiene.13,14,15,16,17,18
■ Confirm the patient’s identity using at least two patient
identifiers.19
■ Perform hand hygiene.13,14,15,16,17,18
■ Put on gloves.30
■ Break the seal or frangible pin on the dialysate solution
bag.28
■ Open the clamp on the double-bag Y-set fill line, open the
clamp on the Y-set drain line for 5 seconds to flush fresh
dialysate solution into the drainage collection bag, and close
the clamp on the drain line immediately after flushing to
avoid draining too much dialysate solution.28
■ Open the transfer set clamp to allow dialysate solution to
enter the peritoneal cavity.28 After the dialysate solution has
filled the peritoneal cavity, clamp the fill line on the double-
bag Y-set and close the clamp on the transfer set. 28 Allow
the solution to dwell for the prescribed dwell time.
Catheter site care
■ Perform hand hygiene.13,14,15,16,17,18
■ Raise the patient’s bed to waist level when providing care
to prevent caregiver back strain.25
■ Perform hand hygiene.13,14,15,16,17,18
■ Put on a mask and assist the patient in putting on a
mask.4
■ Perform hand hygiene.13,14,15,16,17,18
■ Set up a sterile field. Open a sterile container package or
sterile 4′′ × 4′′ (10-cm × 10-cm) gauze pads. Pour antiseptic
solution into a sterile container or onto the gauze pads.4
■ Put on sterile gloves.4
■ Disconnect the double-bag Y-set connector from the
transfer set.28
■ If required by your facility, disinfect the end of the
transfer set.4 Some facilities don’t require disinfection of the
catheter if a new sterile cap is attached to the transfer
set.28 If using a disinfectant-containing disconnect cap,
visually inspect the cap to ensure wetness.
■ With the transfer set pointing downward, attach the cap
to the transfer set using sterile no-touch technique.28
■ Using the antiseptic-soaked gauze pads, clean the
catheter and exit site junction (following the antiseptic
manufacturer’s instructions) and then allow them to air-dry.5
■ Apply an antibiotic ointment to the catheter exit site if
ordered.
■ Apply a new dressing to the catheter exit site if needed.
■ Secure the catheter and transfer set to the patient’s
abdomen using hypoallergenic tape or other securement
device to prevent accidental dislodgment.5
■ Explain that the patient may resume normal activities
during the prescribed dialysate solution dwell time.
■ Remove and discard the patient’s mask.
■ Return the bed to the lowest position to prevent falls and
maintain the patient’s safety.29
■ Discard used supplies in the appropriate receptacles.5,31
■ Remove and discard your gloves and mask.30
■ Perform hand hygiene.13,14,15,16,17,18
■ Clean and disinfect your stethoscope using a disinfectant
pad.32
■ Perform hand hygiene.13,14,15,16,17,18
■ Document the procedure.33,34,35,36
Special considerations
■ Change the catheter dressing at an interval determined
by your facility or whenever it becomes wet or soiled.
■ To prevent protein depletion, the practitioner may order a
high-protein diet or a protein supplement as well as monitor
serum albumin levels.
■ To prevent respiratory distress, place the patient in a
position that maximizes lung expansion. Promote lung
expansion through turning and deep-breathing exercises. In
some patients, decreasing the dialysate volume may be
necessary.
NURSING ALERT If the patient suffers severe respiratory distress
during the dwell phase of dialysis, immediately drain the peritoneal
cavity and notify the practitioner. Carefully monitor any patient on
peritoneal dialysis who’s being weaned from a ventilator.
■ Dialysate is available in three concentrations: 4.25%
dextrose, 2.5% dextrose, and 1.5% dextrose. The 4.25%
solution usually removes the largest amount of fluid from
the blood because its glucose concentration is highest. If
your patient receives this concentrated solution, monitor the
patient carefully to prevent excess fluid loss. Also, some of
the glucose in the 4.25% solution may enter the patient’s
bloodstream, causing hyperglycemia severe enough to
require an insulin injection or an insulin addition to the
dialysate.
■ Patients with low serum potassium levels may require the
addition of potassium to the dialysate solution to prevent
further losses.37
■ Heparin is sometimes added to the dialysate to prevent
occlusion of fibrin in the dialysis catheter.5,37
■ To reduce the risk of peritonitis, use strict sterile
technique during the catheter insertion, dialysate
exchanges, and dressing changes. Ensure all personnel and
the patient wear masks in the room whenever the dialysis
system is opened or entered.5
■ Monitor the patient’s hemodynamic status. Note the fluid
balance at the end of each infusion–dwell–drain cycle (the
fluid balance is positive if the patient retains fluid at the end
of an exchange and negative if you recover more fluid than
was instilled with the exchange). Notify the practitioner if
the patient retains 500 mL or more of fluid for three
consecutive cycles or loses 1 L of fluid for three consecutive
cycles.
■ If dialysate instillation or drainage is slow or absent,
check all of the tubing for kinks. You can also try raising the
IV pole or repositioning the patient to increase the inflow
rate. Repositioning the patient or applying manual pressure
to the lateral aspects of the patient’s abdomen may also
help increase drainage. If these maneuvers fail, notify the
practitioner, because the catheter may be improperly
positioned or an accumulation of fibrin may be obstructing
the catheter.5
■ Always examine the drained fluid from each exchange
(effluent) for color and clarity. Normally, the fluid is clear or
pale yellow, but pink-tinged effluent may appear during the
first three or four cycles. If the effluent remains pink-tinged
or if it’s grossly bloody, suspect bleeding into the peritoneal
cavity and notify the practitioner. Also notify the practitioner
if the effluent contains feces, which suggests bowel
perforation, or if it’s cloudy, which suggests peritonitis.
Obtain a specimen for culture and Gram stain. Send the
specimen in a labeled specimen container to the laboratory
with a laboratory request form.
■ Expect patient discomfort at the start of the procedure. If
the patient experiences pain during the procedure,
determine when it occurs, its quality and duration, and
whether it radiates to other body parts, and notify the
practitioner. Pain during infusion usually results from a
dialysate that’s too cool or acidic. Pain may also result from
rapid instillation; slowing the inflow rate may reduce the
pain. Severe, diffuse pain with rebound tenderness and
cloudy effluent may indicate peritoneal infection. Pain that
radiates to the shoulder often results from air accumulation
under the diaphragm. Severe, persistent perineal or rectal
pain can result from improper catheter placement.
■ Remember that a patient undergoing peritoneal dialysis
commonly requires a great deal of assistance in daily care.
To minimize discomfort, perform daily care during a drain
phase in the cycle, when the abdomen is less distended.
■ During and after dialysis, monitor the patient and assess
abdominal and respiratory status and response to
treatment.
■ Monitor the patient’s vital signs according to the patient’s
condition and at an interval determined by your facility;
there’s no evidence-based research to indicate best practice
for frequency of vital signs assessment.38 Notify the
practitioner of any abrupt changes in the patient’s
condition.
■ Monitor the patient’s fluid and electrolyte status. Report
unexpected results to the practitioner and administer fluids
and electrolytes, as prescribed.
■ Check whether your facility has a clearly developed
curriculum for peritoneal dialysis training.39
■ Consider the potential alteration in the patient’s body
image, and support the patient’s ability to live a satisfying
lifestyle as a peritoneal dialysis patient. Encourage the
patient and caregiver to build a support system or use
available support systems.40,41
■ The Joint Commission issued a sentinel event alert related
to managing risk during transition to new International
Organization for Standardization tubing standards designed
to prevent dangerous misconnections, which can lead to
serious patient injury and death. During the transition, be
sure to trace the tubing and catheter from the patient to the
point of origin before connecting or reconnecting any device
or infusion, at any care transition (such as a new setting or
service), and as part of the hand-off process; route tubes
and catheters with different purposes in different
standardized directions; label the tubing at the distal and
proximal ends (when there are different access sites or
several bags hanging); use tubing and equipment only as
intended; and store medications for different delivery routes
in separate locations.42
Patient teaching
If the patient or a caregiver is to perform peritoneal dialysis
in the home, begin teaching about its purpose and
indications, as well as appropriate techniques for
preparation, installation, and drainage of dialysate, and
methods to troubleshoot complications. Ensure that the
patient is aware of the importance of infection control,
proper diet and hydration, routine care and maintenance of
the catheter and insertion site, and compliance with the
prescribed regimen. Review potential complications, and
instruct the patient or caregiver to immediately report
cloudy effluent, abdominal pain, and fever, and to save any
drained, cloudy dialysate to bring to the dialysis clinic.43
Give the patient contact information to report complications,
and additional educational information and resources as
indicated.
Complications
Peritonitis, the most common complication, usually follows
contamination of the dialysate, but it may develop if
solution leaks from the catheter exit site and flows back into
the catheter tract. Respiratory distress may result when
dialysate in the peritoneal cavity increases pressure on the
diaphragm, which decreases lung expansion.
Protein depletion may result from the diffusion of protein
in the blood into the dialysate solution through the
peritoneal membrane. As much as 14 g of protein may be
lost daily—more in patients with peritonitis.
Constipation is a major cause of inflow–outflow problems;
be aware that the patient may require laxatives or stool
softeners.
Excessive fluid loss from the use of 4.25% solution can
cause hypovolemia, hypotension, and shock. Excessive fluid
retention may lead to blood volume expansion,
hypertension, peripheral edema, and even pulmonary
edema and heart failure.
Other possible complications include electrolyte
imbalance and hyperglycemia, which can be identified by
frequent blood tests.
Documentation
Record the amount of dialysate infused and drained, any
medications added to the dialysate solution, and the color
and character of the effluent. Record the patient’s daily
weight and fluid balance. Use a peritoneal dialysis flowchart
to compute total fluid balance after each exchange. Note
the patient’s vital signs and tolerance of the treatment as
well as other pertinent observations. Note any complications
and nursing actions taken, as well as home instruction
provided.
REFERENCES
1 American Nephrology Nurses’ Association. (2017). Nephrology nursing: Scope
and standards of practice (8th ed.). Pitman, NJ: American Nephrology Nurses’
Association.
2 National Kidney Foundation. (2006). “2006 updates: Clinical practice
guidelines and clinical practice recommendations: Peritoneal dialysis
adequacy” [Online]. Accessed via the Web at
http://kidneyfoundation.cachefly.net/professionals/KDOQI/guideline_upHD_PD
_VA/index.htm (Level VII)
3 Golper, T. A. Use of peritoneal dialysis for the treatment of acute kidney injury
(acute renal failure). (2016). In: UpToDate, Schwab, S. J ., & Sheridan, A. M.
(Eds.). Retrieved from: www.uptodate.com
4 American Nephrology Nurses’ Association. (2015). Core curriculum for
nephrology nurses (6th ed.). Pitman, NJ: American Nephrology Nurses’
Association.
5 Wiegand, D. L. (2017). AACN procedure manual for critical care (7th ed.). St.
Louis, MO: Elsevier.
6 The Joanna Briggs Institute. (2017). JBI recommended practice: Evidence-
informed practice at the point of care: Peritoneal dialysis: Exchange.
Adelaide: The Joanna Briggs Institute.
7 Westbrook, J., et al. (2010). Association of interruptions with an increased risk
and severity of medication administration errors. Archives of Internal
Medicine, 170(8), 683–690 . (Level IV)
8 Institute for Safe Medication Practices. (2012). Side tracks on the safety
express: Interruptions lead to errors and unfinished . . . Wait, what was I
doing? Nurse Advise-ERR, 11(2), 1–4 . Accessed via the Web at
https://www.ismp.org/Newsletters/acutecare/showarticle.aspx?id=37
9 Accreditation Association for Hospitals and Health Systems. (2017). Standard
16.01.03. Healthcare Facilities Accreditation Program: Accreditation
requirements for acute care hospitals. Chicago, IL: Accreditation Association
for Hospitals and Health Systems. (Level VII)
10 Centers for Medicare and Medicaid Services, Department of Health and
Human Services. (2015). Condition of participation: Nursing services. 42
C.F.R. § 482.23(c).
11 The Joint Commission. (2017). Standard MM.06.01.01. Comprehensive
accreditation manual for hospitals. Oakbrook Terrace, IL: The Joint
Commission. (Level VII)
12 DNV GL-Healthcare USA, Inc. (2016). MM.1 .SR.2. NIAHO® accreditation
requirements: Interpretive guidelines & surveyor guidance (version 11).
Milford, OH: DNV GL-Healthcare USA, Inc. (Level VII)
13 Centers for Disease Control and Prevention. (2002). Guideline for hand
hygiene in health-care settings: Recommendations of the Healthcare Infection
Control Practices Advisory Committee and the HICPAC/SHEA/APIC/IDSA Hand
Hygiene Task Force. MMWR Recommendations and Reports, 51(RR-16), 1–45.
Accessed via the Web at https://www.cdc.gov/mmwr/pdf/rr/rr5116.pdf (Level
II)
14 World Health Organization. (2009). “WHO guidelines on hand hygiene in
health care: First global patient safety challenge, clean care is safer care”
[Online]. Accessed via the Web at
http://apps.who.int/iris/bitstream/10665/44102/1/9789241597906_eng.pdf
(Level IV)
15 The Joint Commission. (2019). Standard NPSG.07.01.01. Comprehensive
accreditation manual for hospitals. Oakbrook Terrace, IL: The Joint
Commission. (Level VII)
16 Centers for Medicare and Medicaid Services, Department of Health and
Human Services. (2015). Condition of participation: Infection control. 42 C.F.R.
§ 482.42.
17 Accreditation Association for Hospitals and Health Systems. (2017). Standard
07.01.21. Healthcare Facilities Accreditation Program: Accreditation
requirements for acute care hospitals. Chicago, IL: Accreditation Association
for Hospitals and Health Systems. (Level VII)
18 DNV GL-Healthcare USA, Inc. (2016). IC.1 .SR.1 . NIAHO® accreditation
requirements: Interpretive guidelines & surveyor guidance (version 11).
Milford, OH: DNV GL-Healthcare USA, Inc. (Level VII)
19 The Joint Commission. (2019). Standard NPSG.01.01.01. Comprehensive
accreditation manual for hospitals. Oakbrook Terrace, IL: The Joint
Commission. (Level VII)
20 Centers for Medicare and Medicaid Services, Department of Health and
Human Services. (2015). Condition of participation: Patient’s rights. 42 C.F.R.
§ 482.13(c)(1).
21 Accreditation Association for Hospitals and Health Systems. (2016). Standard
15.01.16. Healthcare Facilities Accreditation Program: Accreditation
requirements for acute care hospitals. Chicago, IL: Accreditation Association
for Hospitals and Health Systems. (Level VII)
22 The Joint Commission. (2019). Standard RI.01.01.01. Comprehensive
accreditation manual for hospitals. Oakbrook Terrace, IL: The Joint
Commission. (Level VII)
23 DNV GL-Healthcare USA, Inc. (2016). PR.1.SR.5 . NIAHO® accreditation
requirements: Interpretive guidelines & surveyor guidance (version 11).
Milford, OH: DNV GL-Healthcare USA, Inc. (Level VII)
24 The Joint Commission. (2019). Standard PC.02.01.21. Comprehensive
accreditation manual for hospitals. Oakbrook Terrace, IL: The Joint
Commission. (Level VII)
25 Waters, T. R., et al. (2009). “Safe patient handling training for schools of
nursing” [Online]. Accessed via the Web at
https://www.cdc.gov/niosh/docs/2009-127/pdfs/2009-127.pdf
26 U.S . Food and Drug Administration. (n.d .). “Look. Check. Connect. Safe
medical device connections save lives” [Online]. Accessed via the Web at
http://www.fda.gov/downloads/MedicalDevices/Safety/AlertsandNotices/UCM1
34873.pdf
27 The Joint Commission. (2014). “Sentinel event alert: Managing risk during
transition to new ISO tubing connector standards” [Online]. Accessed via the
Web at
http://www.jointcommission.org/assets/1/6/SEA_53_Connectors_8 _19_14 _final.
pdf
28 Baxter, P. D . (2007). “Ultrabag aseptic exchange procedure” [Online].
Accessed via the Web at http://www.capd.org.tw/4_2/UltraBagusa.pdf
29 Ganz, D. A., et al. (2013). Preventing falls in hospitals: A toolkit for improving
quality of care (AHRQ Publication No. 13-0015-EF). Rockville, MD: Agency for
Healthcare Research and Quality. Accessed via the Web at
https://www.ahrq.gov/sites/default/files/publications/files/fallpxtoolkit_0 .pdf
(Level VII)
30 Siegel, J. D ., et al. (2007, revised 2017). “2007 guideline for isolation
precautions: Preventing transmission of infectious agents in healthcare
settings” [Online]. Accessed via the Web at
https://www.cdc.gov/infectioncontrol/pdf/guidelines/isolation-guidelines.pdf
(Level II)
31 Occupational Safety and Health Administration. (n.d .). “Bloodborne
pathogens, standard number 1910.1030” [Online]. Accessed via the Web at
https://www.osha.gov/pls/oshaweb/owadisp.show_document?
p_id=10051&p_table=STANDARDS (Level VII)
32 Rutala, W. A., et al. (2008, revised 2017). “Guideline for disinfection and
sterilization in healthcare facilities, 2008” [Online]. Accessed via the Web at
https://www.cdc.gov/infectioncontrol/pdf/guidelines/disinfection-
guidelines.pdf
33 The Joint Commission. (2019). Standard RC.01.03 .01. Comprehensive
accreditation manual for hospitals. Oakbrook Terrace, IL: The Joint
Commission. (Level VII)
34 Centers for Medicare and Medicaid Services, Department of Health and
Human Services. (2015). Condition of participation: Medical record services.
42 C.F.R. § 482.24(b).
35 Accreditation Association for Hospitals and Health Systems. (2017). Standard
10.00 .03. Healthcare Facilities Accreditation Program: Accreditation
requirements for acute care hospitals. Chicago, IL: Accreditation Association
for Hospitals and Health Systems. (Level VII)
36 DNV GL-Healthcare USA, Inc. (2016). MR.2 .SR.1 . NIAHO® accreditation
requirements: Interpretive guidelines & surveyor guidance (version 11).
Milford, OH: DNV GL-Healthcare USA, Inc. (Level VII)
37 Alam, M., & Kranse, M. W. Peritoneal dialysis solutions. (2016). In: UpToDate,
Golper, T. A., & Sheridan, A. M . (Eds.) . Retrieved from: www.uptodate.com
38 American Society of PeriAnesthesia Nurses. (2018). 2017–2018
Perianesthesia nursing standards, practice recommendations and interpretive
statements. Cherry Hill, NJ: American Society of PeriAnesthesia Nurses. (Level
VII)
39 Piraino, B., et al. (2011). ISPD position statement on reducing the risks of
peritoneal dialysis–related infections. Peritoneal Dialysis International, 31(6),
614–630 . Accessed via the Web at http://ispd.org/media/pdf/Perit_Dial_Int-
2011-Piraino-614-30 .pdf (Level VII)
40 Moore, R., & Teitelbaum, I. (2009). Preventing burnout in peritoneal dialysis
patients. Advances in Peritoneal Dialysis, 25, 92–95. Accessed via the Web at
http://www.advancesinpd.com/adv09/308a-Moore-Final.pdf (Level V)
41 Burkart, J. M . Patient information: Peritoneal dialysis (beyond the basics).
(2015). In: UpToDate, Golper, T. A., & Sheridan, A. M . (Eds.). Retrieved from:
www.uptodate.com
42 The Joint Commission. (2014). “Sentinel event alert: Managing risk during
transition to new ISO tubing connector standards” [Online]. Accessed via the
Web at
http://www.jointcommission.org/assets/1/6/SEA_53_Connectors_8 _19_14 _final.
pdf (Level VII)
43 Li, P. K., et al. (2010). ISPD guidelines/recommendations: Peritoneal dialysis-
related infections—Recommendations, 2010 update. Peritoneal Dialysis
International, 30(4), 393–423. Accessed via the Web at
http://www.pdiconnect.com/content/30/4/393.full.pdf+html (Level VII)
PERITONEAL LAVAGE, ASSISTING
Peritoneal lavage may be used by the practitioner for both
diagnostic and therapeutic purposes.1 It’s used mainly as a
diagnostic tool in patients with blunt abdominal trauma to
help detect bleeding in the peritoneal cavity or obtaining
cytology specimens in a patient with cancer. It’s used
therapeutically in patients with hypothermia to warm the
abdominal cavity, and in those with peritonitis or intra-
abdominal abscess to provide irrigation.
The test may proceed through several steps. Initially, the
practitioner inserts a catheter through the abdominal wall
into the peritoneal cavity and aspirates the peritoneal fluid
with a syringe. If blood isn’t visible in the aspirated fluid, a
balanced saline solution is infused and then siphoned from
the cavity. The practitioner inspects the siphoned fluid for
blood and also sends fluid samples to the laboratory for
microscopic examination. When possible, the patient may
undergo abdominal ultrasound before peritoneal lavage for
assessment of fluid in the abdominal cavity, or during the
procedure for assistance with catheter placement.1
The medical team maintains strict sterile technique
throughout this procedure to avoid introducing
microorganisms into the peritoneum and causing peritonitis.
(See Tapping the peritoneal cavity, page 612.)
Peritoneal lavage is contraindicated in a patient who
requires immediate laparotomy.2 Relative contraindications
include multiple abdominal surgeries, an abdominal wall
hematoma, medical instability, morbid obesity, advanced
cirrhosis, obvious infection at the site of insertion,
coagulopathies,
or
inability to perform
urinary
catheterization before the procedure.1 The procedure
requires great caution and a different technique if the
patient is pregnant.
Equipment
Vital signs measurement ▪ indwelling urinary (Foley)
catheter insertion equipment ▪ nasogastric (NG) tube
insertion equipment ▪ gastric suction machine ▪ disposable-
head clippers ▪ IV pole ▪ macrodrip IV tubing ▪ IV solutions
(1 L of warmed, lactated Ringer solution or normal saline
solution) ▪ peritoneal dialysis tray ▪ sterile gloves ▪ gown ▪
masks with face shields or goggles ▪ gloves ▪ antiseptic
solution (povidone-iodine or chlorhexidine) ▪ 3-mL syringe
with 25G 1′′ (2.5 -cm) needle ▪ 1% lidocaine with
epinephrine if needed ▪ 8′′ (20.2 -cm) #14 intracatheter
extension tubing and a small sterile hemostat (to clamp
tubing) ▪ 30-mL syringe ▪ 20G 11⁄2′′ (3.8 -cm) needle ▪ sterile
towels ▪ three containers for specimen collection, including
one sterile tube for a culture and sensitivity specimen ▪
labels ▪ sterile 4′′ × 4′′ (10-cm × 10-cm) gauze pads ▪
alcohol pads ▪ 1′′ (2.5 -cm) hypoallergenic tape ▪ 2-0 and 3-
0 sutures ▪ laboratory biohazard transport bag ▪ Optional:
prescribed analgesia or sedation, laboratory request form.
Tapping the peritoneal cavity
After preparing the patient’s skin with an antiseptic solution and
administering a local anesthetic to numb the area near the patient’s navel,
the practitioner will make a small incision (about 3⁄4′′ [2 cm]) through the skin
and subcutaneous tissues of the abdominal wall. The practitioner will retract
the tissue, ligate several blood vessels, and use sterile 4′′ × 4′′ (10-cm × 10-
cm) gauze pads to absorb and keep incisional blood from entering the wound
and producing a false-positive test result. Next, the practitioner directs a
trocar through the incision into the pelvic midline until the instrument enters
the peritoneum. Then the practitioner advances the peritoneal catheter (via
the trocar) 6′′ to 8′′ (15.2 to 20.2 cm) into the pelvis.
Using a syringe attached to the catheter, the practitioner aspirates fluid
from the peritoneal cavity and look for blood or other abnormal findings.
If using a commercially prepared peritoneal dialysis kit
(containing a #15 peritoneal dialysis catheter, trocar, and
extension tubing with roller clamp), make sure the
macrodrip IV tubing doesn’t have a reverse-flow (or
backcheck) valve that prevents infused fluid from draining
out of the peritoneal cavity.
Preparation of equipment
Check the expiration date on each sterile package and
inspect each for tears. Replace any items as needed.
Implementation
■ Confirm that written informed consent was obtained by
the practitioner and that the consent is in the patient’s
medical record.3,4,5,6
■ Check the patient’s medical history for allergies to
medications or latex.
■ Conduct a preprocedure verification to make sure that all
relevant documentation, related information, and equipment
are available and correctly identified to the patient’s
identifiers.7,8
■ Verify that the laboratory and imaging studies have been
completed as ordered, and that the results are in the
patient’s medical record. Notify the practitioner of any
abnormal results.
■ Perform hand hygiene.9,10,11,12,13,14
■ Confirm the patient’s identity using at least two patient
identifiers.15
■ Provide privacy.16,17,18,19
■ Reinforce the practitioner’s explanation of the procedure
to the patient and family (if appropriate) according to their
individual communication and learning needs to increase
their understanding, allay their fears, and enhance
cooperation.20 Answer the patient’s or family’s questions.
■ Confirm that the correct procedure has been identified for
the correct patient at the correct site.7
■ Raise the patient’s bed to waist level when providing
patient care to prevent back strain.21
■ Perform hand hygiene.9,10,11,12,13,14
■ Obtain the patient’s vital signs to serve as a baseline for
comparison during and after the procedure.
■ If family members remain present for the procedure, ask
them to perform hand hygiene and to put on gowns, gloves,
masks, and goggles.22
■ Inform the patient to expect a sensation of abdominal
fullness and also possibly a chill if the lavage solution isn’t
warmed or doesn’t reach body temperature.
■ Insert an indwelling urinary catheter and attach it to a
drainage bag, as ordered, to decrease the risk of the
practitioner accidentally perforating the bladder during the
procedure. (See the “Indwelling urinary catheter insertion”
procedure.)
■ Insert an NG tube, as ordered. (See the “Nasogastric tube
insertion and removal” procedure, page 524.) Trace the
tubing from the patient to its point of origin to make sure
that you’re assessing the correct tubing.23,24 Attach this
tube to the gastric suction machine (set for low intermittent
suction) to drain the patient’s stomach contents.
Decompressing the stomach prevents vomiting and
subsequent aspiration, and minimizes the possibility of
bowel perforation during trocar or catheter insertion. Ensure
an X-ray is obtained to verify placement of the NG tube.
■ Clip the hair, as ordered, from the area between the
patient’s umbilicus and pubis.
■ Set up the IV pole. Attach the macrodrip tubing to the
lavage solution container, and clear air from the tubing to
avoid introducing air into the peritoneal cavity during
lavage.
■ Place the patient in the supine position.1
■ Administer analgesia or sedatives, if ordered and
indicated, following safe medication administration
practices.25,26,27,28 Pain or agitation in the patient may
indicate the need for analgesia or sedation to facilitate
patient comfort, safety, and cooperation.
■ Perform hand hygiene.9,10,11,12,13,14
■ Put on a gown, a mask and goggles or a mask with face
shield,
and
gloves
to comply with standard
precautions.29,30,31,32
■ Using sterile technique, open the peritoneal dialysis tray.
Label all medications, medication containers, and other
solutions on and off the sterile field.33,34
■ Assist the practitioner with applying personal protective
equipment. The practitioner prepares the patient’s abdomen
from the costal margin to the pubic area and from flank to
flank with the antiseptic solution and allows it to dry. The
practitioner drapes the area with sterile towels from the
dialysis tray to create a sterile field.
■ Conduct a time-out immediately before starting the
procedure to perform a final assessment that the correct
patient, site, positioning, and procedure are identified and,
as applicable, that relevant information and necessary
equipment are available.35
■ Using sterile technique, hand the practitioner the 3-mL
syringe and the 25G 1′′ (2.5 -cm) needle. If the peritoneal
dialysis tray doesn’t contain a sterile ampule of anesthetic,
disinfect the top of a multidose vial of 1% lidocaine with
epinephrine with an alcohol pad and allow it to dry, and
invert the vial at a 45-degree angle to allow the practitioner
to insert the needle and withdraw the anesthetic without
touching the nonsterile vial.
■ The practitioner injects the anesthetic directly below the
umbilicus (or at an adjacent site if the patient has a surgical
scar). After the area is anesthetized, the practitioner makes
an incision, inserts the catheter or trocar, withdraws fluid,
and checks the findings. The fluid sample is then sent for
laboratory analysis. If findings are positive, the procedure
will end and you’ll prepare the patient for laparotomy and
further measures. Even if retrieved fluid looks normal,
lavage will continue. (See Interpreting peritoneal lavage
results.)
■ Wearing gloves, trace the catheter extension tubing to its
point of origin to make sure that you’re assessing the
correct tubing;23,24 connect it to the IV tubing, if ordered;
and instill 700 to 1,000 mL (10 mL/kg body weight) of the
warmed IV solution into the peritoneal cavity over 10 to 15
minutes. Then clamp the tubing with the hemostat.1
■ Unless contraindicated by the patient’s injuries (such as a
spinal cord injury, fractured ribs, or unstable pelvic
fracture), gently tilt the patient from side to side to
distribute the fluid throughout the peritoneal cavity. If the
patient’s condition contraindicates tilting, the practitioner
may gently palpate the sides of the abdomen to distribute
the fluid.1
■ After 5 to 10 minutes, place the IV container below the
level of the patient’s body and open the clamp on the IV
tubing. Lowering the container helps excess fluid to drain.
Gently drain as much of the fluid as possible from the
peritoneal cavity to the container. Be careful not to
disconnect the tubing from the catheter. The peritoneal
cavity may take 20 to 30 minutes to drain completely.
■ To obtain a fluid specimen, while maintaining sterile
technique, thoroughly disinfect the port on the IV tubing
using an alcohol pad, and allow it to dry. Withdraw between
25 and 30 mL of fluid from a port in the IV tubing, using a
30-mL syringe. Disinfect the top of each specimen container
with an alcohol pad and allow it to dry. Deposit fluid
specimens in the containers for culture and sensitivity
analysis, Gram stain, red and white blood cell counts,
amylase, lipase, alkaline phosphatase level determinations,1
and spun-down sediment evaluation, or as ordered. Note: If
you didn’t obtain the culture and sensitivity specimen first,
change the needle before drawing this fluid sample to avoid
contaminating the specimen.
■ Label all the specimens in the presence of the patient to
prevent mislabeling15 and send them to the laboratory
immediately in a laboratory biohazard transport bag.31 If
needed, indicate the ordered tests on the laboratory request
form.
■ With positive test results, the practitioner will usually
perform surgery. If test results are normal, the practitioner
will close the incision with sutures.1
■ Remove and discard your gloves.29,31
■ Perform hand hygiene.9,10,11,12,13,14
■ Put on sterile gloves29,31 and dress the incision with a
sterile 4′′ × 4′′ (10-cm × 10-cm) gauze pad secured with 1′′
(2.5 -cm) hypoallergenic tape.
NURSING ALERT If the patient has fragile skin, use dressings and
tape specially formulated for fragile skin to prevent skin stripping and
tearing during removal.36
■ Remove and discard your gloves and other personal
protective equipment.29,31
■ Perform hand hygiene.9,10,11,12,13,14
■ Monitor vital signs according to the patient’s condition
and at an interval determined by your facility; there’s no
evidence-based research to indicate best practice for
frequency of vital signs assessment.37 Report signs and
symptoms of shock (tachycardia, decreased blood pressure,
diaphoresis, dyspnea or shortness of breath, and vertigo)
immediately. Assess the incisional site frequently for
bleeding.
■ Perform a comprehensive pain assessment using
techniques appropriate for the patient’s age, condition, and
ability to understand.38 Administer pain medication, as
needed and ordered, following safe medication
administration practices.25,26,27,28
■ Return the bed to the lowest position to prevent falls and
maintain patient safety.39
■ Discard used supplies in the appropriate receptacle.31
■ Return reusable equipment to the appropriate
department for cleaning and sterilization.40,41
■ Perform hand hygiene.9,10,11,12,13,14
■ Document the procedure.42,43,44,45
Special considerations
■ If the practitioner orders abdominal X-rays, they will
probably precede peritoneal lavage. X-ray films taken after
lavage may be unreliable because of air introduced into the
peritoneal cavity.
■ The Joint Commission has issued a sentinel event alert
related to managing risk during transition to new
International Organization for Standardization tubing
standards designed to prevent dangerous tubing
misconnections, which can lead to serious patient injury and
death. During the transition, be sure to trace the tubing and
catheter from the patient to the point of origin before
connecting or reconnecting any device or infusion, at any
care transition (such as a new setting or service), and as
part of the hand-off process. Route tubes and catheter with
different purposes in different standardized directions. When
there are different access sites or several bags hanging,
label the tubing at the distal and proximal ends. Use tubing
and equipment only as intended. Store medications for
different delivery routes in separate locations.24
Interpreting peritoneal lavage
results
If test findings in peritoneal lavage are abnormal, the patient may need
laparotomy and further treatment. The most common abnormal findings
include:
■ unclotted blood, bile, or intestinal contents in aspirated peritoneal fluid (20
mL in an adult)
■ bloody or pinkish red fluid returned from lavage—dark enough to obscure
reading newsprint through it (if you can read newsprint through the fluid, test
results are considered negative, although the practitioner may order more
tests)
■ green, cloudy, turbid, or milky peritoneal fluid return (it normally appears
clear to pale yellow)
■ red blood cell count exceeding 100,000/mm3
■ white blood cell count exceeding 500/mm3
■ bacteria in fluid (identified by culture and sensitivity testing or Gram
stain).
If the patient’s condition is stable, borderline positive results may suggest
the need for additional tests, such as echography and arteriography. If test
results are questionable or inconclusive, the practitioner may leave the
catheter in place to repeat the procedure.
Complications
Bleeding from lacerated blood vessels may occur at the
incisional site or intra-abdominally. A visceral perforation will
cause peritonitis and requires laparotomy for repair. If the
patient has respiratory distress, infusion of a balanced
saline solution may cause additional stress and trigger
respiratory arrest.1
The bladder may be lacerated or punctured if it isn’t
emptied completely before peritoneal lavage.2 Local or
systemic infection may develop.1
Documentation
Record the type and size of the peritoneal dialysis catheter
used, the type and amount of solution instilled and
withdrawn from the peritoneal cavity, and the amount and
color of fluid returned. Document whether the fluid flowed
freely into and out of the abdomen. Note which specimens
were obtained and sent to the laboratory. Document X-rays
obtained and results. Also note any complications
encountered and any nursing actions taken to handle them.
Document any patient teaching and the patient’s
understanding of the teaching.
REFERENCES
1 Wiegand, D. L. (2017). AACN procedure manual for high acuity, progressive
and critical care (7th ed.). Philadelphia, PA: Elsevier.
2 Simon, R. J . Diagnostic peritoneal lavage. (2017). In: UpToDate, Bulger, E. M.,
& Collins, K. A. (Ed.). Retrieved from: www.uptodate.com
3 The Joint Commission. (2019). Standard RI.01.03 .01. Comprehensive
accreditation manual for hospitals. Oakbrook Terrace, IL: The Joint
Commission. (Level VII)
4 DNV GL-Healthcare USA, Inc. (2016). PR.1 .SR.3 . NIAHO® accreditation
requirements: Interpretive guidelines & surveyor guidance (version 11).
Milford, OH: DNV GL-Healthcare USA, Inc. (Level VII)
5 Centers for Medicare and Medicaid Services, Department of Health and
Human Services. (2015). Condition of participation: Patient’s rights. 42 C.F.R.
§ 482.13(b)(2).
6 Accreditation Association for Hospitals and Health Systems. (2017). Standard
15.01.11. Healthcare Facilities Accreditation Program: Accreditation
requirements for acute care hospitals. Chicago, IL: Accreditation Association
for Hospitals and Health Systems. (Level VII)
7 The Joint Commission. (2019). Standard UP.01.01.01. Comprehensive
accreditation manual for hospitals. Oakbrook Terrace, IL: The Joint
Commission. (Level VII)
8 Accreditation Association for Hospitals and Health Systems. (2017). Standard
30.00 .14. Healthcare Facilities Accreditation Program: Accreditation
requirements for acute care hospitals. Chicago, IL: Accreditation Association
for Hospitals and Health Systems. (Level VII)
9 Centers for Disease Control and Prevention. (2002). Guideline for hand
hygiene in health-care settings: Recommendations of the Healthcare Infection
Control Practices Advisory Committee and the HICPAC/SHEA/APIC/IDSA Hand
Hygiene Task Force. MMWR Recommendations and Reports, 51(RR-16), 1–45.
Accessed via the Web at https://www.cdc.gov/mmwr/pdf/rr/rr5116.pdf (Level
II)
10 World Health Organization. (2009). “WHO guidelines on hand hygiene in
health care: First global patient safety challenge, clean care is safer care”
[Online]. Accessed via the Web at
http://apps.who.int/iris/bitstream/10665/44102/1/9789241597906_eng.pdf
(Level IV)
11 The Joint Commission. (2019). Standard NPSG.07.01.01. Comprehensive
accreditation manual for hospitals. Oakbrook Terrace, IL: The Joint
Commission. (Level VII)
12 Centers for Medicare and Medicaid Services, Department of Health and
Human Services. (2015). Condition of participation: Infection control. 42 C.F.R.
§ 482.42.
13 Accreditation Association for Hospitals and Health Systems. (2017). Standard
07.01.21. Healthcare Facilities Accreditation Program: Accreditation
requirements for acute care hospitals. Chicago, IL: Accreditation Association
for Hospitals and Health Systems. (Level VII)
14 DNV GL-Healthcare USA, Inc. (2016). IC.1 .SR.1 . NIAHO® accreditation
requirements: Interpretive guidelines & surveyor guidance (version 11).
Milford, OH: DNV GL-Healthcare USA, Inc. (Level VII)
15 The Joint Commission. (2019). Standard NPSG.01.01.01. Comprehensive
accreditation manual for hospitals. Oakbrook Terrace, IL: The Joint
Commission. (Level VII)
16 Centers for Medicare and Medicaid Services, Department of Health and
Human Services. (2015). Condition of participation: Patient’s rights. 42 C.F.R.
§ 482.13(c)(1).
17 Accreditation Association for Hospitals and Health Systems. (2017). Standard
15.01.16. Healthcare Facilities Accreditation Program: Accreditation
requirements for acute care hospitals. Chicago, IL: Accreditation Association
for Hospitals and Health Systems. (Level VII)
18 The Joint Commission. (2019). Standard RI.01.01.01. Comprehensive
accreditation manual for hospitals. Oakbrook Terrace, IL: The Joint
Commission. (Level VII)
19 DNV GL-Healthcare USA, Inc. (2016). PR.1.SR.5 . NIAHO® accreditation
requirements: Interpretive guidelines & surveyor guidance (version 11).
Milford, OH: DNV GL-Healthcare USA, Inc. (Level VII)
20 The Joint Commission. (2019). Standard PC.02.01.21. Comprehensive
accreditation manual for hospitals. Oakbrook Terrace, IL: The Joint
Commission. (Level VII)
21 Waters, T. R., et al. (2009). “Safe patient handling training for schools of
nursing” [Online]. Accessed via the Web at
https://www.cdc.gov/niosh/docs/2009-127/pdfs/2009-127.pdf (Level VII)
22 American Association of Critical-Care Nurses (AACN). (2010). “A ACN practice
alert: Family presence during resuscitation and invasive procedures” [Online].
Accessed via the Web at https://www.aacn.org/clinical-resources/practice-
alerts/family-presence-during-resuscitation-and-invasive-procedures (Level
VII)
23 U.S . Food and Drug Administration. (n.d .). “Look. Check. Connect. Safe
medical device connections save lives” [Online]. Accessed via the Web at
http://www.fda.gov/downloads/MedicalDevices/Safety/AlertsandNotices/UCM1
34873.pdf
24 The Joint Commission. (2014). “Sentinel event alert: Managing risk during
transition to new ISO tubing connector standards” [Online]. Accessed via the
Web at
http://www.jointcommission.org/assets/1/6/SEA_53_Connectors_8 _19_14 _final.
pdf (Level VII)
25 Centers for Medicare and Medicaid Services, Department of Health and
Human Services. (2015). Condition of participation: Nursing services. 42
C.F.R. § 482.23(c).
26 Accreditation Association for Hospitals and Health Systems. (2017). Standard
16.01.03. Healthcare Facilities Accreditation Program: Accreditation
requirements for acute care hospitals. Chicago, IL: Accreditation Association
for Hospitals and Health Systems. (Level VII)
27 The Joint Commission. (2019). MM .06 .01.01. Comprehensive accreditation
manual for hospitals. Oakbrook Terrace, IL: The Joint Commission. (Level VII)
28 DNV GL-Healthcare USA, Inc. (2016). MM.1 .SR.2. NIAHO® accreditation
requirements: Interpretive guidelines & surveyor guidance (version 11).
Milford, OH: DNV GL-Healthcare USA, Inc. (Level VII)
29 Siegel, J. D ., et al. (2007, revised 2017). “2007 guideline for isolation
precautions: Preventing transmission of infectious agents in healthcare
settings” [Online]. Accessed via the Web at
https://www.cdc.gov/infectioncontrol/pdf/guidelines/isolation-guidelines.pdf
(Level II)
30 Accreditation Association for Hospitals and Health Systems. (2017). Standard
07.01.10. Healthcare Facilities Accreditation Program: Accreditation
requirements for acute care hospitals. Chicago, IL: Accreditation Association
for Hospitals and Health Systems. (Level VII)
31 Occupational Safety and Health Administration. (n.d .). “Bloodborne
pathogens, standard number 1910.1030” [Online]. Accessed via the Web at
https://www.osha.gov/pls/oshaweb/owadisp.show_document?
p_id=10051&p_table=STANDARDS (Level VII)
32 DNV GL-Healthcare USA, Inc. (2016). IC.1 .SR.2 . NIAHO® accreditation
requirements: Interpretive guidelines & surveyor guidance (version 11).
Milford, OH: DNV GL-Healthcare USA, Inc. (Level VII)
33 The Joint Commission. (2019). Standard NPSG.03 .04.01. Comprehensive
accreditation manual for hospitals. Oakbrook Terrace, IL: The Joint
Commission. (Level VII)
34 Accreditation Association for Hospitals and Health Systems. (2017). Standard
25.01.27. Healthcare Facilities Accreditation Program: Accreditation
requirements for acute care hospitals. Chicago, IL: Accreditation Association
for Hospitals and Health Systems. (Level VII)
35 The Joint Commission. (2019). Standard UP.01.03.01. Comprehensive
accreditation manual for hospitals. Oakbrook Terrace, IL: The Joint
Commission. (Level VII)
36 LeBlanc, K., et al. (2013). International skin tear advisory panel: A tool kit to
aid in the prevention, assessment, and treatment of skin tears using a
simplified classification system. Advances in Skin and Wound Care, 26(10),
459–476. (Level IV)
37 American Society of PeriAnesthesia Nurses. (2018). 2017–2018
Perianesthesia nursing standards, practices and interpretative statements.
Cherry Hill, NJ: American Society of PeriAnesthesia Nurses. (Level VII)
38 The Joint Commission. (2019). Standard PC.01.02.07. Comprehensive
accreditation manual for hospitals. Oakbrook Terrace, IL: The Joint
Commission. (Level VII)
39 Ganz, D. A., et al. (2013). Preventing falls in hospitals: A toolkit for improving
quality of care (AHRQ Publication No. 13-0015-EF). Rockville, MD: Agency for
Healthcare Research and Quality. Accessed via the Web at
https://www.ahrq.gov/sites/default/files/publications/files/fallpxtoolkit_0 .pdf
(Level VII)
40 Rutala, W. A., et al. (2008, revised 2017). “Guideline for disinfection and
sterilization in healthcare facilities, 2008” [Online]. Accessed via the Web at
https://www.cdc.gov/infectioncontrol/pdf/guidelines/disinfection-
guidelines.pdf (Level I)
41 Accreditation Association for Hospitals and Health Systems. (2017). Standard
07.02.03. Healthcare Facilities Accreditation Program: Accreditation
requirements for acute care hospitals. Chicago, IL: Accreditation Association
for Hospitals and Health Systems. (Level VII)
42 The Joint Commission. (2019). Standard RC.01.03 .01. Comprehensive
accreditation manual for hospitals. Oakbrook Terrace, IL: The Joint
Commission. (Level VII)
43 Centers for Medicare and Medicaid Services, Department of Health and
Human Services. (2015). Condition of participation: Medical record services.
42 C.F.R. § 482.24(b).
44 Accreditation Association for Hospitals and Health Systems. (2017). Standard
10.00 .03. Healthcare Facilities Accreditation Program: Accreditation
requirements for acute care hospitals. Chicago, IL: Accreditation Association
for Hospitals and Health Systems. (Level VII)
45 DNV GL-Healthcare USA, Inc. (2016). MR.2 .SR.1 . NIAHO® accreditation
requirements: Interpretive guidelines & surveyor guidance (version 11).
Milford, OH: DNV GL-Healthcare USA, Inc. (Level VII)
PERMANENT PACEMAKER CARE
Designed to operate for 3 to 20 years, a permanent
pacemaker is a self-contained device that provides electrical
stimulation to the myocardium. The surgeon implants the
pacemaker in a pocket beneath the patient’s skin. This
procedure is usually done in the operating room or cardiac
catheterization laboratory. Nursing responsibilities involve
monitoring the electrocardiogram (ECG) and maintaining
sterile technique.
EQUIPMENT
Understanding pacemaker codes
A permanent pacemaker’s three-letter (or sometimes five-letter) code simply
refers to how it’s programmed. The first letter represents the chamber that is
paced; the second letter, the chamber that is sensed; and the third letter,
how the pulse generator responds. The fourth letter describes rate
modulation, and the fifth letter specifies the location or absence of multisite
pacing. Typically, only the first three letters are shown.
Examples of two common programming codes
HOSPITAL-ACQUIRED CONDITION ALERT A surgical site infection
following electronic cardiac device implantation is considered a
hospital-acquired condition because it can reasonably be prevented
using various best practices. Be sure to follow infection prevention
techniques (such as performing hand hygiene, advising the patient to
shower or bathe with soap or an antiseptic agent the day before
surgery, administering prophylactic antibiotics, maintaining glycemic
control, and preparing the skin with an alcohol-based antiseptic agent
[unless contraindicated]) to reduce the risk of surgical site
infection.1,2,3,4
Permanent pacemakers function in the demand mode,
allowing the patient’s heart to beat on its own but
preventing it from falling below a preset rate. Pacing
electrodes can be placed in the atria, the ventricles, or both
chambers (atrioventricular [AV] sequential, dual chamber).
(See Understanding pacemaker codes.) The most common
pacing codes are VVI for single-chamber pacing and DDD for
dual-chamber pacing.
Candidates for permanent pacemakers include patients
with symptomatic sinus node dysfunction, acquired
atrioventricular (AV) block, chronic bifascicular block,
persistent AV block after the acute phase of myocardial
infarction, hypersensitive carotid sinus syndrome,
neurocardiogenic syncope, bradycardia or syncope after
cardiac transplantation, detection and determination of
symptomatic recurrent supraventricular tachycardia,
hypertrophic cardiomyopathy with sinus node dysfunction or
AV block, and congenital heart diseases.5
A biventricular pacemaker is effective in patients with
heart failure who have intraventricular conductor defects.
This device differs from a standard pacemaker in that it has
three leads instead of one or two. One lead is placed in the
right atrium and the others are placed in each of the
ventricles, where they simultaneously stimulate the right
and left ventricle. This allows the ventricles to coordinate
their pumping action, making the heart more efficient.
Equipment
Blood pressure monitoring device ▪ stethoscope ▪ pulse
oximeter and probe ▪ electrocardiogram (ECG) monitor and
recorder ▪ gloves ▪ sterile gauze dressing ▪ hypoallergenic
tape ▪ IV catheter insertion equipment ▪ prescribed IV fluid
▪ disinfectant pads ▪ prescribed antibiotics ▪ prescribed
sedation ▪ backup pacing, defibrillation, and resuscitation
equipment6 ▪ Optional: prescribed analgesic, prescribed
antiseptic ointment, disposable-head clippers, ice pack.
Preparation of equipment
Ensure that backup pacing, defibrillation, and resuscitation
equipment are readily available in the event of pacemaker
failure.6
Implementation
Preoperative care
■ Verify the practitioner’s order.
■ Gather and prepare the necessary equipment.
■ Confirm that written informed consent has been obtained
and that the consent is in the patient’s medical
record.7,8,9,10
■ Review the patient’s medical records for allergies to local
anesthetics, iodine, or latex.
■ Conduct a preprocedure verification to make sure that all
relevant documentation, related information, and equipment
are available and correctly identified to the patient’s
identifiers.11,12
■ Verify that ordered laboratory and imaging studies are
complete and that the results are in the patient’s medical
record. Notify the practitioner of any unexpected results.11
■ Perform hand hygiene.13,14,15,16,17,18
■ Confirm the patient’s identity using at least two patient
identifiers.19
■ Provide privacy.20,21,22,23
■ Reinforce the practitioner’s explanation of the procedure
to the patient and family (if appropriate) according to their
individual communication and learning needs to increase
their understanding, allay their fears, and enhance
cooperation. Answer any questions.24 Provide and review
literature from the manufacturer or from the American Heart
Association so that the patient can learn about the
pacemaker and how it works. Emphasize that the
pacemaker merely augments the patient’s natural heart
rate.
■ Raise the patient’s bed to waist level when providing
patient care to prevent caregiver back strain.25
■ Perform hand hygiene13,14,15,16,17,18 and put on gloves to
comply with standard precautions.26,27,28
■ Obtain the patient’s vital signs, oxygen saturation level
using pulse oximetry and an ECG to serve as a baseline for
comparison during and after the procedure.
■ Using disposable-head clippers, remove chest hair from
the axilla to the midline and from the clavicle to the nipple
line on the side selected by the surgeon, if necessary.29
■ Insert an IV catheter and administer IV fluid as ordered.
(See the “IV catheter insertion and removal” procedure,
page 443.)
■ Confirm the patient’s nothing-by-mouth status before the
procedure; minimum fasting recommendations include 2
hours for clear liquids, 4 hours for breast milk, 6 hours for
infant formula, 6 or more hours for a light meal or
nonhuman milk, and 8 hours or more for fried or fatty foods
or meat.30
■ Administer antibiotics, as ordered, following safe
medication administration practices.31,32,33,34,35
■ Administer sedation, as ordered, following safe
medication administration practices.32,33,34,35
■ Return the bed to the lowest position to prevent falls and
maintain patient safety.36
■ Discard all used supplies appropriately.26,27
■ Remove and discard your gloves26,27 and perform hand
hygiene.13,14,15,16,17,18
■ Disinfect your stethoscope using a disinfectant pad.37,38
■ Perform hand hygiene.13,14,15,16,17,18
■ Provide hand-off communication for the person who will
assume responsibility for the patient’s care. Allow time for
questions, as necessary, to avoid miscommunications that
may cause patient care errors during transitions of care.39
■ Document the procedure.40,41,42,43
Postoperative care
■ Receive hand-off communication from the health care
team member who was responsible for the patient’s care
during the procedure. Ask questions, as necessary, to avoid
miscommunications that can cause patient care errors
during transitions of care. As part of the hand-off process,
allow time for the receiving staff member to trace each
tubing and catheter from the patient to its point of origin; a
standardized line reconciliation process should be used.44,45
■ Verify the practitioner’s orders.
■ Perform hand hygiene.13,14,15,16,17,18
■ Confirm the patient’s identity using at least two patient
identifiers.19
■ Raise the patient’s bed to waist level when providing
patient care to prevent caregiver back strain.25
■ Perform hand hygiene.13,14,15,16,17,18
■ Put on gloves to comply with standard precautions.26,27,28
■ Verify and document the pacemaker settings and
parameters.46
■ Attach the patient to an ECG monitor. Make sure that
alarm limits are set appropriately for the patient’s current
condition, and that alarms are turned on, functioning
properly, and audible to staff.47,48,49,50
■ Monitor the patient’s ECG to check for arrhythmias and to
ensure correct pacemaker functioning. Inspect the ECG for
pacemaker spikes, and evaluate for evidence of failure to
sense or failure to capture.51
■ Monitor for pacemaker malfunction, such as pulse
generator failure, failure to sense, failure to capture, or
decreased cardiac output.
■ Arrange for a chest X-ray to verify lead placement and to
check for lead fragmentation, dislodgment of the generator
leads, or heart enlargement.52
■ Obtain a 12-lead ECG, if ordered.
■ Monitor the IV flow rate; the IV catheter is usually kept in
place for 24 to 48 hours postoperatively to allow for possible
treatment of arrhythmias.
■ Inspect the dressing for signs of bleeding, and regularly
assess the incision site for signs of infection (swelling,
redness, or exudate).51
■ Change the dressing and apply antiseptic ointment to the
incision line, as ordered.46 If the dressing becomes soiled or
the site is exposed to air, change the dressing immediately.
■ Monitor the patient’s vital signs as required by the
patient’s condition and your facility; there’s no evidence-
based research to indicate best practice for frequency of
vital signs assessment.53
■ Monitor the patient’s level of consciousness, cardiac
status, and respiratory status, as required by your facility
and the patient’s condition.
ELDER ALERT Confused elderly patients with second-degree heart
block won’t show immediate improvement in level of consciousness.
■ Perform a comprehensive pain assessment using
techniques appropriate for the patient’s age, condition, and
ability to understand.54
As indicated, provide
nonpharmacologic pain relief interventions, such as
repositioning the patient and applying an ice pack. Also
administer an analgesic, as ordered and indicated, following
safe medication administration practices.32,33,34,35
■ Return the bed to the lowest position to prevent falls and
maintain patient safety.36
■ Discard all used supplies appropriately.26,27
■ Remove and discard your gloves26,27 and perform hand
hygiene.13,14,15,16,17,18
■ Disinfect your stethoscope using a disinfectant pad.37,38
■ Perform hand hygiene.13,14,15,16,17,18
■ Document the procedure.40,41,42,43
Special considerations
■ Be aware that electronic interference may occur with
implanted devices; take the necessary precautions to
prevent interference.
■ The Joint Commission issued a sentinel event alert related
to managing risk during transition to the new International
Organization for Standardization tubing standards that were
designed to prevent dangerous tubing misconnections,
which can lead to serious patient injury and death. During
the transition, make sure to trace each tubing and catheter
from the patient to its point of origin before connecting or
reconnecting any device or infusion, at any care transition
(such as a new setting or service), and as part of the hand-
off process. In addition, route tubes and catheters having
different purposes in different standardized directions; label
the tubing at the distal and proximal ends when there are
different access sites or several bags hanging; use tubing
and equipment only as intended; and store medications for
different delivery routes in separate locations.45
■ The Joint Commission issued a sentinel event alert
concerning medical device alarm safety, because alarm-
related events have been associated with permanent loss of
function or death. Among the major contributing factors
were
improper
alarm
settings,
alarm
settings
inappropriately turned off, and alarm signals not audible to
staff. Make sure alarm limits are set appropriately, and that
alarms are turned on, functioning properly, and audible to
staff. Follow facility guidelines for preventing alarm
fatigue.47
Patient teaching
Teach the patient and family about pacemaker precautions
and care. Tell them to report syncope or near syncope,
muscle twitching over the pacemaker site, frequent hiccups,
a pulse rate lower than the pacemaker’s lowest preset limit,
and any redness, pain, swelling, or discharge from incision
sites or over the pacemaker pocket. Tell them that if they
aren’t able to palpate the pacemaker at the insertion site,
then the pacemaker may have migrated and follow-up
medical care is necessary.
Instruct the patient to avoid close contact with machinery
and to avoid placing cellular devices directly over the
pacemaker because of electromagnetic interference. Explain
that pacemakers require regular follow-up care to assess
battery and pacemaker function.51 The practitioner can
perform assessments during follow-up visits or through
transtelephonic monitoring. (See Teaching the patient who
has a permanent pacemaker.)
Make sure that the patient receives a pacemaker
identification card with the pacemaker information,
including the type and manufacturer, serial number,
pacemaker rate setting, date implanted, and the
practitioner’s name. Instruct the patient to keep the card on
hand and to present the card at practitioner appointments
and emergency department visits. Suggest obtaining a
MedicAlert bracelet or necklace that says the patient has a
pacemaker.
Complications
NURSING ALERT Watch for signs and symptoms of a perforated
ventricle, with resultant cardiac tamponade: persistent hiccups,
distant heart sounds, pulsus paradoxus, hypotension with narrow
pulse pressure, increased venous pressure, cyanosis, distended jugular
veins, decreased urine output, restlessness, or complaints of fullness
in the chest. If the patient develops any of these, notify the
practitioner immediately.
Insertion of a permanent pacemaker also places the
patient at risk for infection, pneumothorax, hemorrhage,
inadequate pacing or sensing, device malfunction, and lead
dislodgement.58
Documentation
Document the type of pacemaker used, the serial number
and the manufacturer’s name, the pacing rate, the date and
site of implantation, and the surgeon’s name. Note whether
the pacemaker successfully treated the patient’s
arrhythmias and the condition of the incision site. Document
the patient’s vital signs, cardiac status, respiratory status,
and ECG results. Record the patient’s pain assessment, any
interventions provided, and the patient’s response to the
interventions. Document any teaching provided and the
patient’s understanding of the teaching.
REFERENCES
1 The Joint Commission. (2019). Standard NPSG.07.05.01. Comprehensive
accreditation manual for hospitals. Oakbrook Terrace, IL: The Joint
Commission. (Level VII)
2 Centers for Medicare and Medicaid Services, & The Joint Commission. (2017).
“The specifications manual for national hospital inpatient quality measures
(version 5.2a)” [Online]. Accessed via the Web at
https://www.jointcommission.org/specifications_manual_for_national_hospital_
inpatient_quality_measures.aspx
3 Centers for Medicare and Medicaid Services, Department of Health and
Human Services. (2017). “Appendix I: Hospital-acquired conditions (HACS)
list” [Online]. Accessed via the Web at
https://www.cms.gov/ICD10Manual/version33-fullcode-
cms/fullcode_cms/P0386.html
4 Berríos-Torres, S. I., et al. (2017). Centers for Disease Control and Prevention
guideline for the prevention of surgical site infection, 2017. JAMA Surgery,
152(8), 784–791. Accessed via the Web at
http://jamanetwork.com/journals/jamasurgery/fullarticle/2623725 (Level VII)
PATIENT TEACHING
Teaching the patient who has a
permanent pacemaker
If your patient is going home with a permanent pacemaker, teach the patient
about daily care, safety and activity guidelines, and other precautions. Be
sure to cover the instructions listed below.
Daily care
■ Clean your pacemaker site gently with soap and water when you take a
shower or a bath. Leave the incision exposed to the air.
■ Inspect your skin around the incision. A slight bulge is normal, but call your
practitioner if you feel discomfort or notice swelling, redness, a discharge, or
other problems.55,56
■ Check your pulse for 1 minute as your nurse or practitioner showed you:
on the side of your neck, inside your elbow, or on the thumb side of your
wrist. Your pulse rate should be the same as your pacemaker rate or faster.
Contact your practitioner if you think your heart is beating too fast or too
slow.
■ Take your medications, including those for pain, as prescribed. Even with a
pacemaker, you still need the medication that your practitioner ordered.
Safety and activity
■ Keep your pacemaker instruction booklet handy, and carry your
pacemaker identification card at all times. This card has your pacemaker
model number and other information needed by health care personnel who
treat you.
■ You can resume most of your usual activities when you feel comfortable
doing so, but don’t drive until the practitioner gives you permission. Also
avoid heavy lifting and stretching exercises for at least 6 weeks or as
directed by your practitioner.
■ Use both arms equally to prevent stiffness. Check with your practitioner
before you golf, swim, play tennis, or perform other strenuous activities.
Electromagnetic interference
■ Today’s pacemakers are designed and insulated to eliminate most
electrical interference. You can safely operate common household electrical
devices, including microwave ovens, razors, and sewing machines. And you
can ride in or operate a motor vehicle without it affecting your pacemaker.
■ Avoid direct contact with large running motors, high-powered CB radios
and other similar equipment, welding machinery, and radar devices.
■ Electromagnetic anti-theft security systems, located near workplaces,
airports, and courthouses, are unlikely to cause clinical interference;
however, you should be aware of their location, move through them at a
normal pace, and avoid leaning or standing close to the system.
■ If your pacemaker activates the metal detector in an airport, show your
pacemaker identification card to the security official.57
■ Because the metal in your pacemaker makes you ineligible for certain
diagnostic studies, such as magnetic resonance imaging, be sure to inform
your practitioners, dentist, and other health care personnel that you have a
pacemaker.
Special precautions
■ If you feel lightheaded or dizzy when you’re near any electrical equipment,
moving away from the device should restore normal pacemaker function. Ask
your practitioner about particular electrical devices.
■ Notify your practitioner if you experience any signs or symptoms of
pacemaker failure, such as palpitations, a fast heart rate, a slow heart rate (5
to 10 beats less than the pacemaker’s setting), dizziness, fainting, shortness
of breath, swollen ankles or feet, anxiety, forgetfulness, or confusion.
■ If you feel like you’re going to faint, immediately call 911 and lie down to
prevent falling.
Checkups
■ Be sure to schedule a follow-up visit, and keep regular checkup
appointments with your practitioner.
■ If your practitioner monitors your pacemaker status remotely by wireless
telemetry, keep your transmission schedule and instructions handy.5
5 Tracy, C. M., et al. (2012). 2012 ACCF/AHA/HRS focused update of the 2008
guidelines for device-based therapy of cardiac rhythm abnormalities: A report
of the American College of Cardiology Foundation/American Heart Association
Task Force on Practice Guidelines and the Heart Rhythm Society. Circulation,
126, 1784–1800. Accessed via the Web at
http://circ.ahajournals.org/content/126/14/1784.full.pdf+html (Level VII)
6 American Society of Anesthesiologists. (2011). Practice advisory for the
perioperative management of patients with cardiac implanted electronic
devices: Pacemakers and implantable cardioverter-defibrillators.
Anesthesiology, 114(2), 247–261. Accessed via the Web at
http://anesthesiology.pubs.asahq.org/article.aspx?articleid=1933226 (Level
VII)
7 The Joint Commission. (2019). Standard RI.01.03 .01. Comprehensive
accreditation manual for hospitals. Oakbrook Terrace, IL: The Joint
Commission. (Level VII)
8 Centers for Medicare and Medicaid Services, Department of Health and
Human Services. (2015). Condition of participation: Patient’s rights. 42 C.F.R.
§ 482.13(b)(2).
9 Accreditation Association for Hospitals and Health Systems. (2017). Standard
30.01.11. Healthcare Facilities Accreditation Program: Accreditation
requirements for acute care hospitals. Chicago, IL: Accreditation Association
for Hospitals and Health Systems. (Level VII)
10 DNV GL-Healthcare USA, Inc. (2016). PR.1.SR.3 . NIAHO® accreditation
requirements: Interpretive guidelines & surveyor guidance (version 11).
Milford, OH: DNV GL-Healthcare USA, Inc. (Level VII)
11 The Joint Commission. (2019). Standard UP.01.01.01. Comprehensive
accreditation manual for hospitals. Oakbrook Terrace, IL: The Joint
Commission. (Level VII)
12 Accreditation Association for Hospitals and Health Systems. (2017). Standard
30.00 .14. Healthcare Facilities Accreditation Program: Accreditation
requirements for acute care hospitals. Chicago, IL: Accreditation Association
for Hospitals and Health Systems. (Level VII)
13 Centers for Disease Control and Prevention. (2002). Guideline for hand
hygiene in health-care settings: Recommendations of the Healthcare Infection
Control Practices Advisory Committee and the HICPAC/SHEA/APIC/IDSA Hand
Hygiene Task Force. MMWR Recommendations and Reports, 51(RR-16), 1–45.
Accessed via the Web at https://www.cdc.gov/mmwr/pdf/rr/rr5116.pdf (Level
II)
14 The Joint Commission. (2019). Standard NPSG.07.01.01. Comprehensive
accreditation manual for hospitals. Oakbrook Terrace, IL: The Joint
Commission. (Level VII)
15 World Health Organization. (2009). “WHO guidelines on hand hygiene in
health care: First global patient safety challenge, clean care is safer care”
[Online]. Accessed via the Web at
http://apps.who.int/iris/bitstream/10665/44102/1/9789241597906_eng.pdf
(Level IV)
16 Accreditation Association for Hospitals and Health Systems. (2017). Standard
07.01.21. Healthcare Facilities Accreditation Program: Accreditation
requirements for acute care hospitals. Chicago, IL: Accreditation Association
for Hospitals and Health Systems. (Level VII)
17 Centers for Medicare and Medicaid Services, Department of Health and
Human Services. (2015). Condition of participation: Infection control. 42 C.F.R.
§ 482.42
18 DNV GL-Healthcare USA, Inc. (2016). IC.1 .SR.1 . NIAHO® accreditation
requirements: Interpretive guidelines & surveyor guidance (version 11).
Milford, OH: DNV GL-Healthcare USA, Inc. (Level VII)
19 The Joint Commission. (2019). Standard NPSG.01.01.01. Comprehensive
accreditation manual for hospitals. Oakbrook Terrace, IL: The Joint
Commission. (Level VII)
20 The Joint Commission. (2019). Standard RI.01.01.01. Comprehensive
accreditation manual for hospitals. Oakbrook Terrace, IL: The Joint
Commission. (Level VII)
21 Centers for Medicare and Medicaid Services, Department of Health and
Human Services. (2015). Condition of participation: Patient’s rights. 42 C.F.R.
§ 482.13(c)(1).
22 Accreditation Association for Hospitals and Health Systems. (2017). Standard
15.01.16. Healthcare Facilities Accreditation Program: Accreditation
requirements for acute care hospitals. Chicago, IL: Accreditation Association
for Hospitals and Health Systems. (Level VII)
23 DNV GL-Healthcare USA, Inc. (2016). PR.1.SR.5 . NIAHO® accreditation
requirements: Interpretive guidelines & surveyor guidance (version 11).
Milford, OH: DNV GL-Healthcare USA, Inc. (Level VII)
24 The Joint Commission. (2019). Standard PC.02.01.21. Comprehensive
accreditation manual for hospitals. Oakbrook Terrace, IL: The Joint
Commission. (Level VII)
25 Waters, T. R., et al. (2009). “Safe patient handling training for schools of
nursing” [Online]. Accessed via the Web at
https://www.cdc.gov/niosh/docs/2009-127/pdfs/2009-127.pdf (Level VII)
26 Siegel, J. D ., et al. (2007, revised 2017). “2007 guideline for isolation
precautions: Preventing transmission of infectious agents in healthcare
settings” [Online]. Accessed via the Web at
https://www.cdc.gov/infectioncontrol/pdf/guidelines/isolation-guidelines.pdf
(Level II)
27 Occupational Safety and Health Administration. (n.d .). “Bloodborne
pathogens, standard number 1910.1030” [Online]. Accessed via the Web at
https://www.osha.gov/pls/oshaweb/owadisp.show_document?
p_id=10051&p_table=STANDARDS (Level VII)
28 Accreditation Association for Hospitals and Health Systems. (2017). Standard
07.01.10. Healthcare Facilities Accreditation Program: Accreditation
requirements for acute care hospitals. Chicago, IL: Accreditation Association
for Hospitals and Health Systems. (Level VII)
29 Institute for Healthcare Improvement. (2012). How-to guide: Prevent surgical
site infections. Cambridge, MA: Institute for Healthcare Improvement. (Level
VII)
30 American Society of Anesthesiologists. (2017). Practice guidelines for
preoperative fasting and the use of pharmacologic agents to reduce the risk
of pulmonary aspiration: Application to healthy patients undergoing elective
procedures. Anesthesiology, 126(3), 376–393 . (Level V)
31 Anderson, D. J ., & Sexton, D. J . Antimicrobial prophylaxis for prevention of
surgical site infection in adults. (2017). In: UpToDate, Harris, A., & Baron, E. L.
(Eds.). Retrieved from: www.uptodate.com
32 Accreditation Association for Hospitals and Health Systems. (2017). Standard
16.01.03. Healthcare Facilities Accreditation Program: Accreditation
requirements for acute care hospitals. Chicago, IL: Accreditation Association
for Hospitals and Health Systems. (Level VII)
33 The Joint Commission. (2019). Standard MM.06.01.01. Comprehensive
accreditation manual for hospitals. Oakbrook Terrace, IL: The Joint
Commission. (Level VII)
34 Centers for Medicare and Medicaid Services, Department of Health and
Human Services. (2015). Condition of participation: Nursing services. 42
C.F.R. § 482.23(c).
35 DNV GL-Healthcare USA, Inc. (2016). MM.1 .SR.2. NIAHO® accreditation
requirements: Interpretive guidelines & surveyor guidance (version 11).
Milford, OH: DNV GL-Healthcare USA, Inc. (Level VII)
36 Ganz, D. A., et al. (2013). Preventing falls in hospitals: A toolkit for improving
quality of care (AHRQ Publication No. 13-0015-EF). Rockville, MD: Agency for
Healthcare Research and Quality. Accessed via the Web at
https://www.ahrq.gov/sites/default/files/publications/files/fallpxtoolkit.pdf
(Level VII)
37 Rutala, W. A., et al. (2008, revised 2017). “Guideline for disinfection and
sterilization in healthcare facilities, 2008” [Online]. Accessed via the Web at
https://www.cdc.gov/hicpac/pdf/guidelines/Disinfection_Nov_2008.pdf (Level I)
38 Accreditation Association for Hospitals and Health Systems. (2017). Standard
07.02.03. Healthcare Facilities Accreditation Program: Accreditation
requirements for acute care hospitals. Chicago, IL: Accreditation Association
for Hospitals and Health Systems. (Level VII)
39 The Joint Commission. (2019). Standard PC.02.02.01. Comprehensive
accreditation manual for hospitals. Oakbrook Terrace, IL: The Joint
Commission. (Level VII)
40 The Joint Commission. (2019). Standard RC.01.03 .01. Comprehensive
accreditation manual for hospitals. Oakbrook Terrace, IL: The Joint
Commission. (Level VII)
41 Accreditation Association for Hospitals and Health Systems. (2017). Standard
10.00 .03. Healthcare Facilities Accreditation Program: Accreditation
requirements for acute care hospitals. Chicago, IL: Accreditation Association
for Hospitals and Health Systems. (Level VII)
42 Centers for Medicare and Medicaid Services, Department of Health and
Human Services. (2015). Condition of participation: Medical record services.
42 C.F.R. § 482.24(b).
43 DNV GL-Healthcare USA, Inc. (2016). MR.2 .SR.1 . NIAHO® accreditation
requirements: Interpretive guidelines & surveyor guidance (version 11).
Milford, OH: DNV GL-Healthcare USA, Inc. (Level VII)
44 U.S . Food and Drug Administration. (n.d .). “Look. Check. Connect. Safe
medical device connections save lives” [Online]. Accessed via the Web at
https://www.fda.gov/downloads/MedicalDevices/Safety/AlertsandNotices/UCM
134873.pdf
45 The Joint Commission. (2014). “Sentinel event alert: Managing risk during
transition to new ISO tubing connector standards” [Online] Accessed via the
Web at
http://www.jointcommission.org/assets/1/6/SEA_53_Connectors_8 _19_14 _final.
pdf (Level VII)
46 Ellenbogen, K. A., et al. (2016). Clinical cardiac pacing, defibrillation, and
resynchronization therapy (5th ed.). Philadelphia, PA: Elsevier.
47 The Joint Commission. (2013). “Sentinel event alert: Medical device alarm
safety in hospitals” [Online]. Accessed via the Web at
https://www.jointcommission.org/assets/1/6/SEA_50_alarms_4 _26_16.pdf
(Level VII)
48 The Joint Commission. (2019). Standard NPSG.06 .01.01. Comprehensive
accreditation manual for hospitals. Oakbrook Terrace, IL: The Joint
Commission. (Level VII)
49 American Association of Critical-Care Nurses. (2013). “A ACN practice alert:
Alarm management” [Online]. Accessed via the Web at
https://www.aacn.org/aacn-website/shared/content/practice-
alerts/2015/11/25/alarm-management (Level VII)
50 Graham, K. C., & Cvach, M. (2010). Monitor alarm fatigue: Standardizing use
of physiological monitors and decreasing nuisance alarms. American Journal
of Critical Care, 19(1), 28–37. Accessed via the Web at
http://ajcc.aacnjournals.org/content/19/1/28.full.pdf
51 Wiegand, D. L. (2017). AACN procedure manual for high acuity, progressive,
and critical care (7th ed.). St. Louis, MO: Elsevier.
52 Dissman, R., et al. (2013). Double left ventricular pacing following accidental
malpositioning of the right ventricular electrode during implantation of a
cardiac resynchronization therapy device. Journal of Cardiothoracic Surgery,
8, 162. Accessed via the Web at
http://www.cardiothoracicsurgery.org/content/pdf/1749-8090 -8 -162.pdf
53 American Society of PeriAnesthesia Nurses. (2018). 2017–2018
Perianesthesia nursing standards, practice recommendations and interpretive
statements. Cherry Hill, NJ: American Society of PeriAnesthesia Nurses. (Level
VII)
54 The Joint Commission. (2019). Standard PC.01.02.07. Comprehensive
accreditation manual for hospitals. Oakbrook Terrace, IL: The Joint
Commission. (Level VII)
55 Karchmer, A. W. Infections involving cardiac implantable electronic devices.
(2016). In: UpToDate, Calderwood, S. B., et al. (Eds.) . Retrieved from:
www.uptodate.com
56 Baddour, L. M., et al. (2010). Update on cardiovascular implantable electronic
device infections and their management: A scientific statement from the
American Heart Association. Circulation, 121, 458–477 . Accessed via the Web
at http://circ.ahajournals.org/content/121/3/458.long (Level VII)
57 Olshansky, B., & Hayes, D. L. Patient education: Pacemakers (Beyond the
basics). (2016). In: UpToDate, Ganz, L. I ., & Downey, B. C . (Eds.). Retrieved
from: www.uptodate.com
58 Gillis, A. M ., et al. (2012). HRS/ACCF expert consensus statement on
pacemaker device and mode selection. Heart Rhythm, 9(8), 1344–1365.
(Level VII)
PERSONAL PROTECTIVE EQUIPMENT
Standard and transmission-based precautions help to
prevent the spread of infection from patient to patient, from
patients to health care workers, and from health care
workers to patients.1,2,3,4 They also reduce the risk of
infection in immunocompromised patients. Central to the
success of these procedures is the selection of the proper
personal protective equipment (PPE), such as gowns,
gloves, masks, and eye protection, as well as adequate
training of those who use it.5
NURSING ALERT Please refer to the latest recommendations from the
Centers for Disease Control and Prevention,
located at
http://www.cdc.gov/vhf/ebola/hcp/index.html, when caring for a patient
with known or suspected Ebola virus disease.
Equipment
Materials required for standard and transmission-based
isolation typically include PPE, a cart or anteroom for storing
equipment, and a door card or sign alerting staff members
and others entering the room that isolation precautions are
in effect.
Personal protective equipment
Fluid-resistant gown ▪ gloves ▪ goggles or face shield ▪
mask or respirator (each staff member must be trained in its
proper use).
Preparation of equipment
Remove the cover from the isolation cart if necessary and
set up the work area. Check the cart or anteroom to make
sure an adequate amount of the proper isolation supplies
are available for the designated transmission-based
isolation category.
Implementation
Donning PPE
■ Remove your watch (or push it well up on your arm) and
your rings if required by your facility. These actions help to
prevent the spread of microorganisms hidden under these
adornments.
■ Perform hand hygiene.6,7,8,9,10,11
■ Pick up the fluid-resistant gown and allow it to unfold in
front of you without touching areas of your body that may
be contaminated, to minimize the transmission of
microorganisms.
■ Put on the gown and wrap it around the back of your
uniform, making sure it overlaps and completely covers your
uniform, to prevent contact with the patient or the patient’s
environment.3,4 Tie the strings or fasten the snaps or
pressure-sensitive tabs at the neck. Then tie the waist
strings.
■ Place the mask snugly over your nose and mouth and
below your chin.12 Secure the ear loops around your ears or
tie the strings at the middle of the back of your head and
neck so the mask won’t slip off. If the mask has a metal
strip, squeeze it to fit your nose firmly but comfortably.3,4
(See Putting on a face mask.) If you wear eyeglasses, tuck
the upper edge of the mask under the lower edge of the
glasses to minimize the likelihood of clouding your glasses.
■ Choose eye protection according to your risk of exposure.
Although goggles provide eye protection, they don’t protect
the rest of the face from splashing of potentially infectious
substances. Wear a face shield for any procedures that may
involve spraying or splashing of respiratory secretions or
other body fluids.3,4
■ Select gloves according to your hand size to make sure
they fit securely. Put on the gloves and pull them over the
cuffs of your gown to cover the edges of the gown’s
sleeves.3,4,12
Removing PPE
■ After completing patient care, prepare to leave the room
by collecting items that need to be removed.
■ Remember that the outside surfaces of your goggles or
face shield, mask or respirator, and barrier clothes (e.g .,
gown) are contaminated.3,4
■ Except for a respirator mask, remove all PPE at the
patient’s doorway or in the anteroom. Remove a respirator
mask after leaving the patient’s room and closing the
door.3,4,12
■ Remove your gloves using the appropriate technique.
(See Removing contaminated gloves, page 620.) Don’t
touch any of your skin surfaces with the outside of either
glove.4
■ Discard your gloves in the appropriate receptacle.3,4
■ Perform hand hygiene.6,7,8,9,10,11
■ To remove your goggles or face shield: Grasp the ear
pieces or headband, and remove the goggles or face shield
carefully. Place the equipment in the appropriate receptacle
for reprocessing, or discard it in the appropriate
receptacle.3,4,12
■ To remove your gown, untie the neck straps and then the
waist ties. Pull the gown away from your neck and
shoulders, touching only the inside of the gown. Turn the
gown inside out as you remove it, folding it or rolling it into
a bundle to help ensure containment of pathogens. Discard
the gown in the appropriate receptacle.3,4,12 (See also
Removing your gown and gloves together, page 620.)
■ To remove your mask or respirator, grasp the bottom tie
or elastic and lift it over your head. Then grasp the top tie or
elastic and carefully remove the mask or respirator. Don’t
touch the front of the mask to help prevent contamination.
Discard the mask or respirator in the appropriate
receptacle.3,4,12
■ Perform hand hygiene immediately.6,7,8,9,10,11
Special considerations
■ If airborne precautions are required, an N95 or higher
level particulate respirator approved by the Occupational
Safety and Health Administration should be worn rather
than a surgical mask.3,4,14 (See the “Airborne precautions”
procedure, page 12.) Employees who wear respirators must
be properly fit-tested initially, and then periodically
thereafter according to federal, state, and local
regulations.15,16
■ Always perform hand hygiene before putting on gloves to
avoid contaminating the gloves with microorganisms from
your hands.6,7,8,9,10
■ Use gloves only once.3,4
EQUIPMENT
Putting on a face mask
To avoid spreading airborne particles, wear a face mask. Position the mask to
cover your nose and mouth, and secure it high enough to ensure stability. Tie
the top strings at the back of your head above the ears. Then tie the bottom
strings at the base of your neck. Alternatively, if the mask has ear loops,
secure them around your ears.3,4
Adjust the metal nose strip if the mask has one.3,4
■ Be aware that isolation garb loses its effectiveness when
wet, because moisture permits organisms to seep through
the material. Change masks and gowns as soon as moisture
is noticeable, or according to the manufacturer’s
recommendations or your facility’s guidelines.3,4,17
■ Keep PPE and other isolation precaution supplies stocked
so they’re readily available for those who must enter the
patient’s room.
Documentation
None needed.
REFERENCES
1 The Joint Commission. (2019). Standard IC.02.01.01. Comprehensive
accreditation manual for hospitals. Oakbrook Terrace, IL: The Joint
Commission. (Level VII)
Removing contaminated gloves4
Proper removal techniques are essential for helping to prevent the spread of
pathogens from your gloves to your skin surfaces.
Follow these steps carefully to remove your contaminated gloves properly:
■ Grasp the outside of one glove with your opposite gloved hand and peel it
off, turning the glove inside out as you pull it off. Hold the removed glove in
your remaining gloved hand.
■ Slide two fingers of your ungloved hand under the remaining glove at the
wrist, taking care not to touch the outer surface of the glove.
■ Peel off the glove over the first removed glove, containing the one glove
inside the other.
■ Discard your gloves in the appropriate receptacle.3,4
■ Perform hand hygiene.6,7,8,9,10,11
Removing your gown and gloves
together13
The CDC discusses an alternate method for removing your gown and gloves.
In this method, a disposable gown is used, and the gown and gloves are
removed together. Follow these steps to remove your gown and gloves
together:
■ With your gloved hands, grasp the gown in the front.
■ Pull the gown away from your body so that the ties break.
■ While removing the gown, fold or roll the gown inside-out into a bundle.
■ As you remove the gown, peel off your gloves at the same time; touch only
the inside of your gloves and gown with your bare hands.
■ Discard the gown and gloves in the appropriate receptacle.3,4,12
■ Perform hand hygiene immediately.6,7,8,9,10,11
2 Centers for Medicare and Medicaid Services, Department of Health and
Human Services. (2015). Condition of participation: Patient’s rights. 42 C.F.R.
§ 482.13(b)(2).
3 Accreditation Association for Hospitals and Health Systems. (2017). Standard
07.01.10. Healthcare Facilities Accreditation Program: Accreditation
requirements for acute care hospitals. Chicago, IL: Accreditation Association
for Hospitals and Health Systems. (Level VII)
4 Siegel, J. D., et al. (2007, revised 2017). “2007 guideline for isolation
precautions: Preventing transmission of infectious agents in healthcare
settings” [Online]. Accessed via the Web at
https://www.cdc.gov/infectioncontrol/pdf/guidelines/isolation-guidelines.pdf
(Level II)
5 Centers for Disease Control and Prevention. (n.d .). “Guidance for the
selection and use of personal protective equipment (PPE) in healthcare
settings” [Online]. Accessed via the Web at
http://www.cdc.gov/HAI/pdfs/ppe/PPEslides6-29-04.pdf (Level VII)
6 The Joint Commission. (2019). Standard NPSG.07.01.01. Comprehensive
accreditation manual for hospitals. Oakbrook Terrace, IL: The Joint
Commission. (Level VII)
7 Centers for Disease Control and Prevention. (2002). Guideline for hand
hygiene in health-care settings: Recommendations of the Healthcare Infection
Control Practices Advisory Committee and the HICPAC/SHEA/APIC/IDSA Hand
Hygiene Task Force. MMWR Recommendations and Reports, 51(RR-16), 1–45.
Accessed via the Web at http://www.cdc.gov/mmwr/pdf/rr/rr5116.pdf (Level II)
8 World Health Organization. (2009). “WHO guidelines on hand hygiene in
health care: First global patient safety challenge, clean care is safer care”
[Online]. Accessed via the Web at
http://apps.who.int/iris/bitstream/10665/44102/1/9789241597906_eng.pdf
(Level IV)
9 Accreditation Association for Hospitals and Health Systems. (2017). Standard
07.01.21. Healthcare Facilities Accreditation Program: Accreditation
requirements for acute care hospitals. Chicago, IL: Accreditation Association
for Hospitals and Health Systems. (Level VII)
10 Centers for Medicare and Medicaid Services, Department of Health and
Human Services. (2015). Condition of participation: Infection control. 42 C.F.R.
§ 482.42.
11 DNV GL-Healthcare USA, Inc. (2016). IC.1 .SR.1 . NIAHO® accreditation
requirements: Interpretive guidelines & surveyor guidance (version 11).
Milford, OH: DNV GL-Healthcare USA, Inc. (Level VII)
12 Centers for Disease Control and Prevention. (n.d .). “Sequence for donning
personal protective equipment (PPE)” [Online]. Accessed via the Web at
http://www.cdc.gov/HAI/pdfs/ppe/ppeposter1322.pdf
13 Centers for Disease Control and Prevention. (n.d .). “Sequence for putting on
personal protective equipment (PPE); How to safely remove personal
protective equipment (PPE)” [Online]. Accessed via the Web at
http://www.cdc.gov/hai/pdfs/ppe/PPE-Sequence.pdf (Level VII)
14 Occupational Safety and Health Administration. (n.d .). “Respiratory
protection, standard number 1910.134” [Online]. Accessed via the Web at
http://www.osha.gov/pls/oshaweb/owadisp.show_document?
p_table=STANDARDS&p_id=12716 (Level VII)
15 Centers for Disease Control and Prevention. (2005). Guidelines for preventing
the transmission of Mycobacterium tuberculosis in health-care settings, 2005.
MMWR Recommendations and Reports, 54(RR-17), 1–141 . Accessed via the
Web at http://www.cdc.gov/mmwr/pdf/rr/rr5417.pdf (Level I)
16 Rebmann, T., et al. (2009). “APIC position paper: Extending the use and/or
reusing respiratory protection in healthcare settings during disasters”
[Online]. Accessed via the Web at
http://www.apic.org/Resource_/TinyMceFileManager/Advocacy-
PDFs/APIC_Position_Ext_the_Use_and_or_Reus_Resp_Prot_in_Hlthcare_Settings
1209l.pdf (Level VII)
17 Occupational Health and Safety Administration. (n.d .). “Bloodborne
pathogens, standard number 1910.1030” [Online]. Accessed via the Web at
http://www.osha.gov/pls/oshaweb/owadisp.show_document?
p_id=10051&p_table=STANDARDS (Level VII)
POSTMORTEM CARE
After a patient dies, care includes preparing the body for
family viewing, arranging transportation to the morgue or
funeral home, and determining the disposition of the
patient’s belongings. In addition, postmortem care entails
comforting and supporting the patient’s family and friends
and providing for their privacy. Postmortem care usually
begins after a practitioner certifies the patient’s death. If the
patient died violently or under suspicious circumstances,
postmortem care may be postponed until the medical
examiner completes an autopsy.
Equipment
Gloves ▪ bath supplies (towels, washcloths, water-filled
basin, and soap) ▪ cotton balls ▪ shroud kit (includes three
identification tags, a plastic shroud or body wrap, chin
straps, and gauze or soft string ties) ▪ abdominal pads ▪
adhesive bandages clean sheet ▪ plastic bag for belongings
▪ stretcher or morgue cart ▪ Optional: tape, personal
protective equipment, dressings, organ procurement
consent, clean gown.
Implementation
■ Gather the necessary equipment.
■ Notify the appropriate facility personnel (such as the
nursing supervisor) that the patient has been pronounced
dead.
■ Speak with the medical examiner, if an autopsy is
necessary, to determine whether tubes and catheters must
remain intact to avoid altering the body before the autopsy.
Ensure that the practitioner or another member of the
health care team has explained the need for an autopsy to
the family members and that the consent has been
obtained, if indicated.
■ Notify support services (such as the clergy person, social
worker) as needed, to assist the family.
■ Notify any spiritual, cultural, or other wishes of the
deceased patient and family members, including immediate
release of the deceased patient’s body for burial or
cremation.1
■ Notify the local organ procurement agency of the
patient’s death, if applicable.2,3,4,5
■ Provide privacy by pulling curtains and closing doors to
maintain patient dignity.1,6,7,8,9
■ Offer age-appropriate support to family members.1
■ Perform hand hygiene.10,11,12,13,14,15
■ Put on gloves and other personal protective equipment as
needed to comply with standard precautions, or maintain
isolation precautions if they were being used. Offer personal
protective equipment to other staff and family members as
required to ensure the health and safety of all people
coming in contact with the body.1,16,17
■ Raise the deceased patient’s bed to waist level to prevent
caregiver back strain.18
■ Place the deceased patient’s body in the supine position,
with the arms at the sides and the head on a pillow, to
support alignment and help keep the jaw closed. Then
elevate the head of the bed 30 degrees to prevent
discoloration from blood settling in the face.
■ If the patient wore dentures, gently insert them; then
close the mouth.
■ Close the eyes by gently pressing on the lids with your
fingertips. If they don’t stay closed, place moist cotton balls
on the eyelids for a few minutes, and then try again to close
them.
■ Place a folded towel under the chin to keep the jaw
closed.
■ Turn off all equipment.
■ If an autopsy is to be performed, leave tubes and
catheters intact, if instructed by the medical examiner, to
avoid altering the body before the autopsy is performed. If
no autopsy is to be performed, remove all tubes and
catheters.
■ Apply adhesive bandages to all puncture sites and
replace soiled dressings.
■ Ask the family if they would prefer to leave the patient’s
jewelry on the body, and collect all the patient’s valuables
to prevent loss. If you’re unable to remove a ring, cover it
with gauze, tape it in place, and tie the gauze to the wrist to
prevent slippage and subsequent loss.
■ If family members wish to remain with and assist with
caring for the body or perform after-death rituals because of
ethnic, religious, or cultural requirements, allow them to do
so.1,19
■ Clean the body thoroughly, using soap, a water-filled
basin, and washcloths.
■ Place one or more abdominal pads between the buttocks
to absorb rectal discharge or drainage.
■ Cover the body up to the chin with a clean sheet.
■ Return the deceased patient’s bed to the lowest
position.20
■ Remove gloves.
■ Perform hand hygiene.10,11,12,13,14,15
■ Offer comfort and emotional support to the family and
intimate friends. Ask if they wish to see the patient. If they
do, allow them to do so in privacy.6,7
■ After the family members and friends have left, remove
the towel from under the chin of the deceased patient’s
body. If performed in your facility, pad the chin, wrap chin
straps under the chin, and tie the straps loosely on top of
the head. Then pad the wrists and ankles to prevent bruises,
and tie them together with gauze or soft string ties.
■ Fill out the three identification tags with then appropriate
information, usually the deceased patient’s name,
identification number, date and time of death, and the
practitioner’s name. Tie one tag to the deceased patient’s
hand or foot as directed by your facility, but don’t remove
the identification bracelet, to ensure correct identification.
■ If required by your facility, notify the morgue or security
that the patient is being transferred to the morgue.
■ Prepare the body on the stretcher. Place a shroud or body
wrap on the morgue stretcher and, with assistance, transfer
the body to the stretcher. Wrap the body, and tie the shroud
or wrap with the string provided. Attach the second
identification tag to the front of the shroud or wrap. Cover
the shroud or wrap with a clean sheet. If a shroud or wrap
isn’t available, dress the deceased patient in a clean gown
and cover the body with a sheet. If the patient required
isolation precautions, follow your facility’s methods for
identifying them.16,17
■ Place the deceased patient’s personal belongings,
including valuables, in a bag and attach the third
identification tag to the bag.
■ Remove and discard your gloves and any other personal
protective equipment, if worn.16,17
■ Perform hand hygiene.10,11,12,13,14,15
■ Be mindful of other patients and families on the unit
when transferring the body to the morgue. Close the doors
of adjacent rooms, if possible. Then take the body to the
morgue, using corridors that aren’t crowded and, if possible,
a service elevator.
■ Document the procedure.21,22,23,24
Special considerations
■ Honor the spiritual or cultural wishes of the deceased
patient and the family and caregivers while ensuring that
legal obligations are met.1,25
■ Give the deceased patient’s personal belongings to the
family or bring them to the morgue. If you give the family
jewelry or money, make sure a coworker is present as a
witness. Obtain the signature of an adult family member to
verify receipt of valuables or to state their preference that
jewelry remain on the patient.
■ When a patient’s family members can’t view the body
within the designated time frame on the health care facility
unit, make arrangements for viewing the body at another
appropriate location, if desired.1
■ If the deceased patient’s family members wish to donate
tissues or organs, ensure that all necessary paperwork has
been completed and follow appropriate precautions.
Family teaching
Provide the family with written information on the processes
to be followed after death and the role of such people and
resources as funeral homes, social workers, and
bereavement support agencies. Allow an opportunity for the
family to ask questions.1
Documentation
Document that postmortem care was provided. Although
the extent of documentation varies among facilities, always
record the disposition of the patient’s possessions,
especially jewelry and money. Also note the date and time
the deceased patient was transported to the morgue and
the name of the person who received the body.
REFERENCES
1 National End of Life Care Programme and National Nurse Consultant Group
(Palliative Care). (2011). “Guidance for staff responsible for care after death
(last offices)” [Online]. Accessed via the Web at
http://endoflifecareambitions.org.uk/wp-
content/uploads/2016/09/care_after_death.pdf (Level VII)
2 Centers for Medicare and Medicaid Services, Department of Health and
Human Services. (2015). Condition of participation: Organ, tissue, and eye
procurement. 42 C.F.R. § 482.45.
3 Accreditation Association for Hospitals and Health Systems. (2017). Standard
14.00 .01. Healthcare Facilities Accreditation Program: Accreditation
requirements for acute care hospitals. Chicago, IL: Accreditation Association
for Hospitals and Health Systems. (Level VII)
4 DNV GL-Healthcare USA, Inc. (2016). TO.1.SR.1 . NIAHO® accreditation
requirements: Interpretive guidelines & surveyor guidance (version 11).
Milford, OH: DNV GL-Healthcare USA, Inc. (Level VII)
5 The Joint Commission. (2019). Standard TS.01.01.01. Comprehensive
accreditation manual for hospitals. Oakbrook Terrace, IL: The Joint
Commission. (Level VII)
6 Accreditation Association for Hospitals and Health Systems. (2017). Standard
15.01.16. Healthcare Facilities Accreditation Program: Accreditation
requirements for acute care hospitals. Chicago, IL: Accreditation Association
for Hospitals and Health Systems. (Level VII)
7 Centers for Medicare and Medicaid Services, Department of Health and
Human Services. (2015). Condition of participation: Patient’s rights. 42 C.F.R.
§ 482.13(c)(1).
8 The Joint Commission. (2016). Standard RI.01.01.01. Comprehensive
accreditation manual for hospitals. Oakbrook Terrace, IL: The Joint
Commission. (Level VII)
9 DNV GL-Healthcare USA, Inc. (2016). PR.1 .SR.5 . NIAHO® accreditation
requirements: Interpretive guidelines & surveyor guidance (version 11).
Milford, OH: DNV GL-Healthcare USA, Inc. (Level VII)
10 Centers for Disease Control and Prevention. (2002). Guideline for hand
hygiene in health-care settings: Recommendations of the Healthcare Infection
Control Practices Advisory Committee and the HICPAC/SHEA/APIC/IDSA Hand
Hygiene Task Force. MMWR Recommendations and Reports, 51(RR-16), 1–45.
Accessed via the Web at http://www.cdc.gov/mmwr/pdf/rr/rr5116.pdf (Level II)
11 Centers for Medicare and Medicaid Services, Department of Health and
Human Services. (2015). Condition of participation: Infection control. 42 C.F.R.
§ 482.42.
12 Accreditation Association for Hospitals and Health Systems. (2017). Standard
07.01.21. Healthcare Facilities Accreditation Program: Accreditation
requirements for acute care hospitals. Chicago, IL: Accreditation Association
for Hospitals and Health Systems. (Level VII)
13 World Health Organization. (2009). “WHO guidelines on hand hygiene in
health care: First global patient safety challenge, clean care is safer care”
[Online]. Accessed via the Web at
http://apps.who.int/iris/bitstream/10665/44298/1/9789241599252_eng.pdf
(Level IV)
14 The Joint Commission. (2019). Standard NPSG.07.01.01. Comprehensive
accreditation manual for hospitals. Oakbrook Terrace, IL: The Joint
Commission. (Level VII)
15 DNV GL-Healthcare USA, Inc. (2016). IC.1 .SR.1 . NIAHO® accreditation
requirements: Interpretive guidelines & surveyor guidance (version 11).
Milford, OH: DNV GL-Healthcare USA, Inc. (Level VII)
16 Accreditation Association for Hospitals and Health Systems. (2017). Standard
07.01.10. Healthcare Facilities Accreditation Program: Accreditation
requirements for acute care hospitals. Chicago, IL: Accreditation Association
for Hospitals and Health Systems. (Level VII)
17 Siegel, J. D ., et al. (2007, revised 2017). “2007 guideline for isolation
precautions: Preventing transmission of infectious agents in healthcare
settings” [Online]. Accessed via the Web at
https://www.cdc.gov/infectioncontrol/pdf/guidelines/isolation-guidelines.pdf
(Level II)
18 Waters, T. R., et al. (2009). “Safe patient handling training for schools of
nursing” [Online]. Accessed via the Web at
http://www.cdc.gov/niosh/docs/2009-127/pdfs/2009-127.pdf (Level VII)
19 National Institute on Aging. (2016). “Things to do after someone dies”
[Online]. Accessed via the Web at
http://www.nia.nih.gov/health/publication/end-life-helping-comfort-and-
care/things-do-after-someone-dies
20 Ganz, D. A., et al. (2013). Preventing falls in hospitals: A toolkit for improving
quality of care (AHRQ Publication No. 13-0015-EF). Rockville, MD: Agency for
Healthcare Research and Quality. Accessed via the Web at
http://www.ahrq.gov/sites/default/files/publications/files/fallpxtoolkit.pdf
(Level VII)
21 The Joint Commission. (2019). Standard RC.01.03 .01. Comprehensive
accreditation manual for hospitals. Oakbrook Terrace, IL: The Joint
Commission. (Level VII)
22 Centers for Medicare and Medicaid Services, Department of Health and
Human Services. (2015). Condition of participation: Medical record services.
42 C.F.R. § 482.24(b).
23 Accreditation Association for Hospitals and Health Systems. (2017). Standard
10.00 .03. Healthcare Facilities Accreditation Program: Accreditation
requirements for acute care hospitals. Chicago, IL: Accreditation Association
for Hospitals and Health Systems. (Level VII)
24 DNV GL-Healthcare USA, Inc. (2016). MR.2 .SR.1 . NIAHO® accreditation
requirements: Interpretive guidelines & surveyor guidance (version 11).
Milford, OH: DNV GL-Healthcare USA, Inc. (Level VII)
25 Hand, M. W. (2014). Lasting impressions: Using the perspective of the funeral
director to guide post mortem nursing care practice. Medsurg Matters
Newsletter, 23(6), 4–6 . (Level VII)
POSTOPERATIVE CARE
Postoperative care begins when the patient arrives on the
postanesthesia care unit (PACU) and continues as the
patient moves to the short procedure unit, medical-surgical
unit, or critical care area. The purpose of postoperative care
is to minimize postoperative complications, such as pain,
inadequate oxygenation, or adverse physiologic effects of
sudden movement, through early detection and prompt
treatment.1
Recovery from general anesthesia takes longer than its
induction because the anesthetic is retained in fat and
muscle. Because fat has a meager blood supply, it releases
the anesthetic slowly, providing enough anesthesia to
maintain adequate blood and brain levels during surgery.
The patient’s recovery time varies with the amount of body
fat, the patient’s overall condition, the premedication
regimen, and the type, dosage, and duration of anesthesia.
Equipment
Gloves ▪ vital signs monitoring equipment ▪ stethoscope ▪
pulse oximeter ▪ facility-approved assessment tools ▪ blood
glucose monitor ▪ prescribed medications and fluids ▪
disinfectant pad ▪ Optional: transfer device, oxygen delivery
equipment, suction equipment, other personal protective
equipment, cardiac monitoring equipment, capnography
equipment.
Implementation
■ Gather the necessary equipment at the patient’s bedside.
■ Perform hand hygiene.2,3,4,5,6,7
■ Put on gloves and other personal protective equipment as
needed to comply with standard precautions.8,9
■ Confirm the patient’s identity using at least two patient
identifiers.10
■ Receive hand-off communication from the perianesthesia
nurse to obtain information about the patient’s
intraoperative status, immediate postoperative condition
before admission to the PACU, and condition during the
patient’s stay in the PACU. Ask questions as necessary to
avoid miscommunication that may cause patient care errors
during the transition of care.11,12 As part of the hand-off
process, trace each tubing and catheter from the patient to
its point of origin to make sure they’re attached to the
proper port; also use a standardized line reconciliation
process.12,13,14 Hand-off communication should include
relevant preoperative status, operative procedure,
estimated fluid and blood loss and replacement,
medications administered, anesthesia or sedation technique
and agents administered, length of time anesthesia or
sedation was administered, complications that occurred
during the course of anesthesia and treatment for those
complications (including the time at which reversal agents
were given), pain and comfort management interventions
and plan, and emotional status.11
■ Provide privacy.15,16,17,18
■ Transfer the patient from the PACU stretcher to the bed,
and position the patient properly. Get a coworker to help, if
necessary. When moving the patient, raise the patient’s bed
to waist level to prevent caregiver back strain19 and keep
transfer movements smooth to minimize pain and
postoperative complications. Use a transfer device as
needed.20
■ Raise the bed’s side rails to ensure the patient’s safety.21
NURSING ALERT For the patient who has had orthopedic surgery,
always have coworkers help with transfers. Ask one coworker to move
only the affected extremity. If the patient is in skeletal traction, you
may receive special orders for transferring. If you must move the
patient, have one coworker move the weights as you and another
coworker move the patient.
■ Monitor the patient’s respiratory status by assessing the
airway for movement, depth of respirations, breath sounds,
and oxygen saturation level. Administer supplemental
oxygen, as ordered, for a patient at risk for hypoxemia.22
Simple face masks are generally used until the patient is
more awake.
■ Monitor the patient’s vital signs at a frequency
determined by your facility and the patient’s condition.
There’s no evidence-based research to indicate best
practice for frequency of vital signs checks; therefore,
frequency is determined by each facility.23
■ Monitor the patient’s pulse rate, which should be strong
and easily palpable. The heart rate should be within 20% of
the preoperative heart rate. Monitor the patient’s cardiac
rhythm, if indicated.22
■ Compare postoperative blood pressure with preoperative
blood pressure. It should be within 20% of the preoperative
level unless the patient suffered a hypotensive episode
during surgery.
■ Elevate the head of the bed, if not contraindicated, to
improve ventilation and to prevent aspiration of
secretions.20
■ At frequent intervals, assess the patient’s level of
consciousness. A patient who’s somnolent or disoriented is
unable to protect the airway or interact properly with the
environment, and is at risk of aspiration, hypoventilation,
poor pain management, and falls.
■ Obtain the patient’s core body temperature, because
anesthesia lowers body temperature. If the patient has a
temperature lower than 96.8°F (36°C) or is shivering or
demonstrating other signs of hypothermia, use active
rewarming measures, and assess the patient’s temperature
and thermal comfort level at a minimum of every 15
minutes until you achieve normothermia.24 Hypothermia
adversely affects many systems and inhibits the metabolism
of inhaled, IV, and regional anesthetics, and increases the
risk of surgical site infection.23,24,25,26,27
■ Perform a neurologic assessment, particularly in a patient
who has undergone a surgical procedure involving
components of the neurologic system.
■ Monitor blood glucose levels, as ordered. Postoperative
control of blood glucose levels is linked to surgical site
infection prevention, especially after cardiac surgery.26,27,28
HOSPITAL-ACQUIRED CONDITION ALERT Keep in mind that a surgical
site infection after certain cardiac surgeries, bariatric surgeries, or
orthopedic procedures is considered a hospital-acquired condition
because it can be reasonably prevented using best practices. Make
sure that infection prevention techniques (such as performing hand
hygiene, monitoring blood glucose levels postoperatively, and
maintaining normothermia) are followed to reduce the risk of surgical
site infection.28,29,30,31
■ Complete a GI assessment and verify the patency of any
nasogastric or orogastric drainage tubes present. Also verify
whether they should be connected to suction; after
connecting to suction, if ordered, trace the tubing from the
patient to its point of origin to make sure that you’ve
connected it to the proper port.32 Assess the patient’s bowel
sounds, especially if the patient underwent surgery
involving the abdomen.
■ Assess for nausea as soon as the patient awakens and
regularly thereafter. If nausea is present, quantify the
severity using a facility-approved assessment tool. Nausea
and
vomiting
should be treated
early
and
aggressively.4,22,33,34
■ Perform a genitourinary assessment. If the patient has an
indwelling urinary catheter, assess the color, quantity, and
quality of urine. Ensure that the catheter is secure and that
there are no dependent loops in the drainage tubing.
Maintain the drainage bag below the level of the bladder
and hips to prevent backflow of urine into the bladder,
which increases the risk of catheter-associated urinary tract
infection (CAUTI). Remove the catheter as ordered or
according to facility protocol as soon as it’s no longer
needed to reduce the risk of CAUTI.35,36,37,38
■ Some patients who undergo urinary tract surgery may
require continuous bladder irrigation to control bleeding and
reduce the chance of blockage or clots forming in the
bladder. Maintain continuous bladder irrigation as ordered
by the practitioner.39
■ Perform a comprehensive pain assessment using
techniques appropriate for the patient’s age, condition, and
ability to understand.40 Evaluate the pain using a facility-
approved pain assessment tool. Assess pain type, location,
frequency, and duration. Also assess other sources of
discomfort, such as nausea, vomiting, positioning, and
anxiety. Guidelines recommend a multimodal pain
management approach that may include opioid and
nonopioid therapy, positioning, cold or heat application, and
treatment for anxiety.41 (See the “Pain management”
procedure, page 570.)
■ Administer pain medication as ordered and indicated
following safe medication administration practices.42,43,44,45
Assess the patient’s pain level before and after
administration.
■ For a patient receiving IV opioid medication, frequently
monitor respiratory rate, oxygen saturation level by pulse
oximetry, end-tidal carbon dioxide level by capnography (if
available), and sedation levels using a standardized
sedation scale, to decrease the risk of adverse events
associated with IV opioid use.42,46
■ For a patient receiving IV opioid medication, explain to
the patient and family members about the assessment and
monitoring process and tell them to alert staff if breathing
problems or sedation occur.42,46
■ Assess the patient’s infusion sites for redness, pain,
swelling, or drainage. These findings indicate infiltration and
require discontinuing the IV line and restarting it at another
site.47 Trace the lines from the patient to their point of origin
to make sure they’re attached to the proper port to prevent
dangerous misconnections.14
■ Assess surgical wound dressings; they should be clean
and dry. If they’re soiled, assess the characteristics of the
drainage and outline the soiled area. Note the date and time
of assessment on the dressing. Assess the soiled area
frequently; if it enlarges, reinforce the dressing and alert the
practitioner.23,48
■ Note the presence and condition of any drains and tubes.
Note the color, type, odor, and amount of drainage. Make
sure all drains are properly connected and free from kinks
and obstructions.
■ If the patient has had vascular or orthopedic surgery,
assess the appropriate extremity, or all extremities,
depending on the surgical procedure. Perform a
neurovascular assessment, including color, temperature,
sensation, movement, and presence and quality of pulses,
and notify the practitioner of any abnormalities.
■ Continue venous thromboembolism (VTE) prophylaxis,
such as using sequential compression sleeves or boots,
according to the practitioner’s order or facility protocol.35
HOSPITAL-ACQUIRED CONDITION ALERT Keep in mind that VTE after
total knee or hip replacement is considered a hospital-acquired
condition because it can be reasonably prevented using best practices.
Make sure that VTE prevention techniques (such as using sequential
compression sleeves or boots) are followed to reduce the risk of
VTE.30,49
■ Encourage coughing and deep-breathing exercises
(unless the patient has just had nasal, ophthalmic, or
neurologic surgery) and incentive spirometry use, as
indicated and prescribed.50
■ Administer IV fluids4 and medications, such as antibiotics,
analgesics, antiemetics, or reversal agents, as ordered and
appropriate, following safe medication administration
practices.42,43,44,45
■ If the patient was receiving a beta-adrenergic blocker
before surgery, collaborate with the patient’s practitioner to
make sure that the patient receives it during the
perioperative period, as appropriate.35
■ If administering IV fluids or medications through an
electronic infusion device, make sure that alarm limits are
set according to the patient’s current condition, and that the
alarms are turned on, functioning properly, and audible to
staff.51,52,53
■ Assess and address the patient’s safety needs.23
■ Remove all oral fluids from the bedside until the patient is
alert enough to eat and drink.
■ Monitor the patient’s intake and output.
■ Remove and discard your gloves and other personal
protective equipment, if worn.8
■ Perform hand hygiene.2,3,4,5,6,7
■ Clean and disinfect your stethoscope using a disinfectant
pad.54,55
■ Perform hand hygiene.2,3,4,5,6,7
■ Document the procedure.56,57,58,59
Special considerations
■ Notify the anesthesia practitioner if the patient reports
awareness while under general anesthesia. This rare
condition, known as anesthetic awareness or intraoperative
awareness, occurs when surgical patients can recall their
surroundings or an event (sometimes even pressure or pain)
related to their surgery while they are under general
anesthesia. Severe cases of anesthetic awareness happen
infrequently, but researchers are trying to determine a
cause to prevent it from happening. When it does occur,
patients should be encouraged to discuss the experience
and personal feelings with the anesthesia practitioner. Early
counseling after an episode of awareness is important to
lessening feelings of stress, confusion, or trauma associated
with the experience. Rarely, patients develop post-traumatic
stress disorder, which is associated with repetitive
nightmares, anxiety, irritability, and preoccupation with
death.60,61
■ The Joint Commission has issued a sentinel event alert
concerning medical device alarm safety, because alarm-
related events have been associated with permanent loss of
function or death. Among the major contributing factors
were improper alarm settings, alarms inappropriately turned
off, and alarm signals not audible to staff. Make sure that
alarm limits are set appropriately, and that alarms are
turned on and audible to staff. Follow facility guidelines for
preventing alarm fatigue.62
■ The Joint Commission issued a sentinel event alert related
to managing risk during transition to new International
Organization for Standardization tubing standards designed
to prevent dangerous tubing misconnections, which can
lead to serious patient injury and death. During the
transition, be sure to trace the tubing and catheter from the
patient to the point of origin before connecting or
reconnecting any device or infusion, at any care transition
(such as a new setting or service), and as part of the hand-
off process. Route tubes and catheters with different
purposes in different standardized directions. When there
are different access sites or several bags hanging, label the
tubing at the distal and proximal ends. Use tubing and
equipment only as intended. Store medications for different
delivery routes in separate locations.13
■ Fear, pain, anxiety, hypothermia, confusion, and
immobility can upset the patient and jeopardize safety and
postoperative status. Offer emotional support to the patient
and family. Keep in mind that the patient who has lost a
body part or who has been diagnosed with an incurable
disease will need ongoing emotional support. Refer the
patient and family for counseling as needed.
■ As the patient recovers from general anesthesia, reflexes
appear in reverse order to that in which they disappeared.
Hearing recovers first, so avoid holding inappropriate
conversations.
■ A patient under general anesthesia can’t protect the
airway because of muscle relaxation. As the patient
recovers, cough and gag reflexes reappear. The patient who
can lift his or her head without assistance can usually
breathe independently.
■ If the anesthesia provider administered spinal anesthesia,
the patient may require supine positioning with the bed
adjusted to between 0 and 20 degrees for at least 6 hours to
reduce the risk of spinal headache from leakage of
cerebrospinal fluid. The patient won’t be able to move the
legs, so reassure the patient that sensation and mobility will
return. (See Assessing level of blockade from spinal
anesthesia, page 624.)
■ If the patient has had an epidural analgesia infusion for
postoperative pain control, monitor respiratory status
closely. Respiratory arrest may result from the respiratory
depressant effects of the opioid. Also monitor the patient’s
blood pressure, heart rate, and arterial oxygen saturation at
an interval determined by your facility or the patient’s
condition. The patient may also suffer from nausea,
vomiting, or itching. Epidural analgesia may also include
administering a local anesthetic with the opioid. (See the
“Epidural analgesic administration” procedure, page 287.)
Assess the patient’s lower-extremity motor strength every 2
to 4 hours. If sensorimotor loss occurs (numbness or
weakness of the legs), notify the practitioner, because the
dosage may need to be decreased.
Assessing level of blockade from
spinal anesthesia
Spinal anesthesia produces a sympathetic, sensory, and motor block. If the
patient received spinal anesthesia, be ready to assess the downward
progression of the level of blockade. Using a dermatome chart aids this
assessment. Each dermatome represents a specific body area supplied with
nerve fibers from an individual spinal root (cervical, thoracic, lumbar, or
sacral). To document the patient’s sensory and motor function, mentally
divide the patient’s body into dermatomes. Anatomic reference points
include the nipple line at T4, xiphoid at T6, umbilicus at T10, and groin at L1.
Anterior view
Posterior view
■ If the patient will be using a patient-controlled anesthesia
unit, make sure the patient understands how to use it.
Caution the patient to activate it only when experiencing
pain, not when feeling sleepy or pain-free.
ELDER ALERT If the patient is older, be aware of age-related changes
that will alter your assessment. Monitor cardiovascular status
carefully, because blood loss, pain, bed rest, and fluid and electrolyte
imbalances can alter it. Also carefully monitor respiratory status,
because ventilation and oxygenation can be altered by age-related
changes or years of smoking or chronic diseases. Closely monitor level
of consciousness and pain, because mental status changes can affect
these and make pain control more difficult. Drug metabolism slows
with age, so monitor the older adult’s risk of drug reactions, toxicity,
and interactions. Monitor intake and output carefully and watch for
urinary tract infections because of decreased renal functioning and
bladder capacity. Position the older patient carefully, and prevent
postoperative falls because the patient may have osteoporosis and may
be prone to fractures. Also monitor for signs and symptoms of
infection, because the risk of infection increases with age.
Complications
Postoperative
complications
may
include
cardiac
arrhythmias, hypotension, hypovolemia, septicemia, septic
shock, atelectasis, pneumonia, thrombophlebitis, pulmonary
embolism, urine retention, wound infection, wound
dehiscence, evisceration, abdominal distention, paralytic
ileus, constipation, altered body image, and postoperative
psychosis.
Recovery from anesthesia isn’t a linear progression.
Patients can, and often do, regress to a less awake status,
have occluded airways, become unstable because of slow
bleeding or sepsis, have spikes or dips in blood pressure and
heart rate due to peaking or wearing off of medication, or
become suddenly nauseated with severe emesis that puts
them at risk for aspiration. Hypothermia, hypoxemia,
hypoventilation, and airway obstruction are the primary
complications monitored for on the PACU.63
Documentation
Document vital signs according to your facility’s
documentation format. Record the condition of dressings
and drains and characteristics of drainage. Document all
interventions taken to alleviate pain and anxiety and the
patient’s responses to them. Record all medications you
administered. Document
any
complications
and
interventions taken.
REFERENCES
1 The Joint Commission. (2019). Standard PC.03 .01.07. Comprehensive
accreditation manual for hospitals. Oakbrook Terrace, IL: The Joint
Commission. (Level VII)
2 The Joint Commission. (2019). Standard NPSG.07.01.01. Comprehensive
accreditation manual for hospitals. Oakbrook Terrace, IL: The Joint
Commission. (Level VII)
3 Centers for Disease Control and Prevention. (2002). Guideline for hand
hygiene in health-care settings: Recommendations of the Healthcare Infection
Control Practices Advisory Committee and the HICPAC/SHEA/APIC/IDSA Hand
Hygiene Task Force. MMWR Recommendations and Reports, 51(RR-16), 1–45.
Accessed via the Web at https://www.cdc.gov/mmwr/pdf/rr/rr5116.pdf (Level
II)
4 World Health Organization. (2009). “WHO guidelines on hand hygiene in
health care: First global patient safety challenge, clean care is safer care”
[Online]. Accessed via the Web at
http://apps.who.int/iris/bitstream/10665/44102/1/9789241597906_eng.pdf
(Level IV)
5 Centers for Medicare and Medicaid Services, Department of Health and
Human Services. (2015). Condition of participation: Infection control. 42 C.F.R.
§ 482.42.
6 Accreditation Association for Hospitals and Health Systems. (2017). Standard
07.01.21. Healthcare Facilities Accreditation Program: Accreditation
requirements for acute care hospitals. Chicago, IL: Accreditation Association
for Hospitals and Health Systems. (Level VII)
7 DNV GL-Healthcare USA, Inc. (2016). IC.1.SR.1 . NIAHO® accreditation
requirements: Interpretive guidelines & surveyor guidance (version 11).
Milford, OH: DNV GL-Healthcare USA, Inc. (Level VII)
8 Siegel, J. D., et al. (2007, revised 2017). “2007 guideline for isolation
precautions: Preventing transmission of infectious agents in healthcare
settings” [Online]. Accessed via the Web at
https://www.cdc.gov/infectioncontrol/pdf/guidelines/isolation-guidelines.pdf
(Level II)
9 Accreditation Association for Hospitals and Health Systems. (2017). Standard
07.01.10. Healthcare Facilities Accreditation Program: Accreditation
requirements for acute care hospitals. Chicago, IL: Accreditation Association
for Hospitals and Health Systems. (Level VII)
10 The Joint Commission. (2019). Standard NPSG.01.01.01. Comprehensive
accreditation manual for hospitals. Oakbrook Terrace, IL: The Joint
Commission. (Level VII)
11 Van Wicklin, S. A., & Conner, R. (2018). Guideline for transfer of patient care
information. In R. Conner (Ed.), Guidelines for perioperative practice 2018
edition. Denver, CO: AORN, Inc. (Level VII)
12 The Joint Commission. (2019). Standard PC.02.02.01. Comprehensive
accreditation manual for hospitals. Oakbrook Terrace, IL: The Joint
Commission. (Level VII)
13 The Joint Commission. (2014). “Sentinel event alert: Managing risk during
transition to new ISO tubing connector standards” [Online]. Accessed via the
Web at
http://www.jointcommission.org/assets/1/6/SEA_53_Connectors_8 _19_14 _final.
pdf
14 U.S . Food and Drug Administration. (n.d .). “Look. Check. Connect. Safe
medical device connections save lives” [Online]. Accessed via the Web at
http://www.fda.gov/downloads/MedicalDevices/Safety/AlertsandNotices/UCM1
34873.pdf
15 Accreditation Association for Hospitals and Health Systems. (2017). Standard
15.01.16. Healthcare Facilities Accreditation Program: Accreditation
requirements for acute care hospitals. Chicago, IL: Accreditation Association
for Hospitals and Health Systems. (Level VII)
16 The Joint Commission. (2019). Standard RI.01.01.01. Comprehensive
accreditation manual for hospitals. Oakbrook Terrace, IL: The Joint
Commission. (Level VII)
17 DNV GL-Healthcare USA, Inc. (2016). PR.1.SR.5 . NIAHO® accreditation
requirements: Interpretive guidelines & surveyor guidance (version 11).
Milford, OH: DNV GL-Healthcare USA, Inc. (Level VII)
18 Centers for Medicare and Medicaid Services, Department of Health and
Human Services. (2015). Condition of participation: Patient’s rights. 42 C.F.R.
§ 482.13(c)(1).
19 Waters, T. R., et al. (2009). “Safe patient handling training for schools of
nursing” [Online]. Accessed via the Web at
http://www.cdc.gov/niosh/docs/2009-127/pdfs/2009-127.pdf (Level VII)
20 Van Wicklin, S. A., & Conner, R. (2018). Guideline for positioning the patient.
In R. Conner (Ed.), Guidelines for perioperative practice 2018 edition. Denver,
CO: AORN, Inc. (Level VII)
21 Ganz, D. A., et al. (2013). Preventing falls in hospitals: A toolkit for improving
quality of care (AHRQ Publication No. 13-0015-EF). Rockville, MD: Agency for
Healthcare Research and Quality. Accessed via the Web at
http://www.ahrq.gov/sites/default/files/publications/files/fallpxtoolkit.pdf
(Level VII)
22 American Society of Anesthesiologists Task Force on Postanesthetic Care.
(2013). Practice guidelines for postanesthetic care: An updated report by the
American Society of Anesthesiologists Task Force on Postanesthetic Care.
Anesthesiology, 118(2), 291–307. Accessed via the Web at
http://www.asahq.org/~/media/Sites/ASAHQ/Files/Public/Resources/standards-
guidelines/practice-guidelines-for-postanesthetic-care.pdf (Level VII)
23 American Society of PeriAnesthesia Nurses. (2018). 2017–2018
Perianesthesia nursing standards, practice recommendations and interpretive
statements. Cherry Hill, NJ: American Society of PeriAnesthesia Nurses. (Level
VII)
24 American Society of PeriAnesthesia Nurses. (2010). ASPAN’s evidence-based
clinical practice guideline for the promotion of perioperative normothermia,
second edition. Journal of PeriAnesthesia Nursing, 25(6), 346–365. Accessed
via the Web at
http://www.aspan.org/Portals/6/docs/ClinicalPractice/Guidelines/Normothermia
_Guideline_12-10_JoPAN.pdf (Level VII)
25 Van Wicklin, S. A., & Conner, R. (2018). Guideline for the prevention of
hypothermia. In R. Conner (Ed.), Guidelines for perioperative practice 2018
edition. Denver, CO: AORN, Inc. (Level VII)
26 Institute for Healthcare Improvement. (2012). How-to guide: Prevent surgical
site infections. Cambridge, MA: Institute for Healthcare Improvement. (Level
VII)
27 Berríos-Torres, S. I ., et al. (2017). Centers for Disease Control and Prevention
guideline for the prevention of surgical site infection, 2017. JAMA Surgery,
152(8), 784–791. Accessed via the Web at
http://jamanetwork.com/journals/jamasurgery/fullarticle/2623725
28 Accreditation Association for Hospitals and Health Systems. (2017). Standard
07.01.20. Healthcare Facilities Accreditation Program: Accreditation
requirements for acute care hospitals. Chicago, IL: Accreditation Association
for Hospitals and Health Systems. (Level VII)
29 The Joint Commission. (2019). Standard NPSG.07.05.01. Comprehensive
accreditation manual for hospitals. Oakbrook Terrace, IL: The Joint
Commission. (Level VII)
30 Jarrett, N., & Callaham, M. (2016). “Evidence-based guidelines for selected,
candidate, and previously considered hospital-acquired conditions: Final
report” [Online]. Accessed via the Web at
https://www.cms.gov/Medicare/Medicare-Fee-for-Service-
Payment/HospitalAcqCond/Downloads/2016-HAC-Report.pdf
31 Anderson, D. J ., et al. (2014). SHEA/IDSA practice recommendation:
Strategies to prevent surgical site infections in acute care hospitals, 2014
update. Infection Control and Hospital Epidemiology, 35(6), 605–627.
Accessed via the Web at http://www.jstor.org/stable/10.1086/676022 (Level I)
32 U.S . Food and Drug Administration. (n.d .). “Look. Check. Connect. Safe
medical device connections save lives” [Online]. Accessed via the Web at
http://www.fda.gov/downloads/MedicalDevices/Safety/AlertsandNotices/UCM1
34873.pdf
33 American Society of PeriAnesthesia Nurses. (2006). ASPAN’S evidence-based
clinical practice guideline for the prevention and/or management of
PONV/PDNV. Journal of PeriAnesthesia Nursing, 21(4), 230–250. Accessed via
the Web at
http://www.aspan.org/Portals/6/docs/ClinicalPractice/Guidelines/PONV-
PDNV_Clinical_Guideline_Aug_2006_JoPAN.pdf (Level VII)
34 Habib, A. S ., et al. (2006). Postoperative nausea and vomiting following
inpatient surgeries in a teaching hospital: A retrospective database analysis.
Current Medical Research and Opinion, 22(6), 1093–1099. (Level IV)
35 Centers for Medicare and Medicaid Services & The Joint Commission. (2017).
“The specifications manual for national hospital inpatient quality measures
(version 5.2a)” [Online]. Accessed via the Web at
https://www.jointcommission.org/specifications_manual_for_national_hospital_
inpatient_quality_measures.aspx (Level VII)
36 Association of Professionals in Infection Control and Epidemiology. (2014).
“APIC implementation guide: Guide to preventing catheter-associated urinary
tract infections” [Online]. Accessed via the Web at
http://apic.org/Resource_/EliminationGuideForm/6473ab9b-e75c-457a-8d0f-
d57d32bc242b/File/APIC_CAUTI_web_0603 .pdf (Level IV)
37 Healthcare Infection Control Practices Advisory Committee. (2010, revised
2017). “Guideline for prevention of catheter-associated urinary tract
infections 2009” [Online]. Accessed via the Web at
https://www.cdc.gov/infectioncontrol/pdf/guidelines/cauti-guidelines.pdf
(Level I)
38 The Joint Commission. (2019). Standard NPSG.07.06 .01. Comprehensive
accreditation manual for hospitals. Oakbrook Terrace, IL: The Joint
Commission. (Level VII)
39 Feliciano, T., et al. (2008). A retrospective, descriptive, exploratory study
evaluating incidence of postoperative urinary retention after spinal
anesthesia and its effect on PACU discharge. Journal of Perianesthesia
Nursing, 23(6), 394–400. (Level IV)
40 The Joint Commission. (2019). Standard PC.01.02.07. Comprehensive
accreditation manual for hospitals. Oakbrook Terrace, IL: The Joint
Commission. (Level VII)
41 American Society of Anesthesiologists, Committee on Standards and Practice
Parameters. (2012). Practice guidelines for acute pain management in the
perioperative setting: An updated report by the American Society of
Anesthesiologists Task Force on Acute Pain Management. Anesthesiology,
116(2), 248–273. (Level VII)
42 Centers for Medicare and Medicaid Services, Department of Health and
Human Services. (2015). Condition of participation: Nursing services. 42
C.F.R. § 482.23(c).
43 Accreditation Association for Hospitals and Health Systems. (2017). Standard
16.01.03. Healthcare Facilities Accreditation Program: Accreditation
requirements for acute care hospitals. Chicago, IL: Accreditation Association
for Hospitals and Health Systems. (Level VII)
44 DNV GL-Healthcare USA, Inc. (2016). MM.1 .SR.2. NIAHO® accreditation
requirements: Interpretive guidelines & surveyor guidance (version 11).
Milford, OH: DNV GL-Healthcare USA, Inc. (Level VII)
45 The Joint Commission. (2019). Standard MM.06.01.01. Comprehensive
accreditation manual for hospitals. Oakbrook Terrace, IL: The Joint
Commission. (Level VII)
46 Centers for Medicare and Medicaid Services. (2014). “Requirements for
hospital medication administration, particularly intravenous (IV) medications
and post-operative care of patients receiving IV opioids” [Online]. Accessed
via the Web at http://www.cms.gov/Medicare/Provider-Enrollment-and-
Certification/SurveyCertificationGenInfo/Downloads/Survey-and-Cert-Letter-
14-15.pdf
47 Standard 46. Infiltration and extravasation. Infusion therapy standards of
practice. (2016). Journal of Infusion Nursing, 39, S98–S102. (Level VII)
48 The Joint Commission. (2019). Standard NPSG.07.05.01. Comprehensive
accreditation manual for hospitals. Oakbrook Terrace, IL: The Joint
Commission. (Level VII)
49 Accreditation Association for Hospitals and Health Systems. (2017). Standard
16.02.02. Healthcare Facilities Accreditation Program: Accreditation
requirements for acute care hospitals. Chicago, IL: Accreditation Association
for Hospitals and Health Systems. (Level VII)
50 Restrepo, R. D., et al. (2011). AARC clinical practice guideline: Incentive
spirometry, 2011. Respiratory Care, 56(10), 1600–1604. Accessed via the
Web at http://rc.rcjournal.com/content/56/10/1600.full.pdf (Level VII)
51 American Association of Critical-Care Nurses. (2013). “A ACN practice alert:
Alarm management” [Online]. Accessed via the Web at
https://www.aacn.org/aacn-website/shared/content/practice-
alerts/2015/11/25/alarm-management (Level VII)
52 The Joint Commission. (2019). Standard NPSG.06 .01.01. Comprehensive
accreditation manual for hospitals. Oakbrook Terrace, IL: The Joint
Commission. (Level VII)
53 Graham, K. C., & Cvach, M. (2010). Monitor alarm fatigue: Standardizing use
of physiological monitors and decreasing nuisance alarms. American Journal
of Critical Care, 19(1), 28–35. Accessed via the Web at
http://ajcc.aacnjournals.org/content/19/1/28.full.pdf
54 Rutala, W. A., et al. (2008, revised 2017). “Guideline for disinfection and
sterilization in healthcare facilities, 2008” [Online]. Accessed via the Web at
https://www.cdc.gov/infectioncontrol/pdf/guidelines/disinfection-
guidelines.pdf (Level I)
55 Accreditation Association for Hospitals and Health Systems. (2017). Standard
07.02.03. Healthcare Facilities Accreditation Program: Accreditation
requirements for acute care hospitals. Chicago, IL: Accreditation Association
for Hospitals and Health Systems. (Level VII)
56 The Joint Commission. (2019). Standard RC.01.03 .01. Comprehensive
accreditation manual for hospitals: The official handbook. Oakbrook Terrace,
IL: The Joint Commission. (Level VII)
57 Centers for Medicare and Medicaid Services, Department of Health and
Human Services. (2015). Condition of participation: Medical record services.
42 C.F.R. § 482.24(b).
58 Accreditation Association for Hospitals and Health Systems. (2017). Standard
10.00 .03. Healthcare Facilities Accreditation Program: Accreditation
requirements for acute care hospitals. Chicago, IL: Accreditation Association
for Hospitals and Health Systems. (Level VII)
59 DNV GL-Healthcare USA, Inc. (2016). MR.2 .SR.1 . NIAHO® accreditation
requirements: Interpretive guidelines & surveyor guidance (version 11).
Milford, OH: DNV GL-Healthcare USA, Inc. (Level VII)
60 American Society of Anesthesiologists. (n.d .). “Intraoperative awareness
under general anesthesia” [Online]. Accessed via the Web at
https://www.aana.com/docs/default-source/pr-aana-com-web-documents-
(all)/patients/awareness_brochure0110.pdf?sfvrsn=801d49b1_4 61. American
Association of Nurse Anesthetists. (n.d .). “Anesthetic awareness fact sheet”
[Online]. Accessed via the Web at https://www.aana.com/patients/all-about-
anesthesia/anesthetic-awareness/anesthetic-awareness-fact-sheet
61 The Joint Commission. (2013). “Sentinel event alert: Medical device alarm
safety in hospitals” [Online]. Accessed via the Web at
https://www.jointcommission.org/assets/1/6/SEA_50_alarms_4 _26_16.pdf
(Level VII)
62 Flockton, E. A., et al. (2008). Reversal of rocuronium-induced neuromuscular
block with sugammadex is faster than reversal of cisatracurium-induced
block with neostigmine. British Journal of Anaesthesia, 100(5), 622–630 .
(Level II)
PREOPERATIVE CARE
Preoperative care is the preparation and management of a
patient before surgery. Preoperative care begins when
surgery is planned and ends with the administration of
anesthesia. This phase of care includes a preoperative
interview and assessment to collect baseline subjective and
objective data from the patient and family; diagnostic tests
such as urinalysis, electrocardiography (ECG), and chest
radiography; preoperative teaching; informed consent from
the patient; and physical preparation.
If the patient is having same-day surgery, nursing
interventions include providing instructions before the day
of surgery that cover the arrival time to the facility, the
need to leave all jewelry and valuables at home, the need to
have someone accompany and stay with the patient after
surgery, fasting guidelines, medication use, and any
prescribed surgical preparation, such as showering with an
antimicrobial cleaner.
Equipment
Vital signs monitoring equipment ▪ stethoscope ▪ pulse
oximetry monitor ▪ scale ▪ tape measure ▪ patient gown ▪
facility-approved pain assessment scale ▪ preoperative
checklist ▪ prescribed medications ▪ prescribed IV fluids ▪
patient education materials ▪ blood glucose monitoring
supplies ▪ disinfectant pad ▪ Optional: gloves, gown, mask
with face shield or mask and goggles, IV insertion kit,
cardiac monitor, specimen collection supplies, disposable-
head clippers.
Implementation
■ Verify the practitioner’s orders.
■ Gather the appropriate equipment.
■ Review the patient’s preadmission assessment findings,
including X-ray examinations, laboratory test results, and
other preoperative tests, as indicated.1,2
■ Perform hand hygiene.3,4,5,6,7,8
■ Put on personal protective equipment as needed to
comply with standard precautions.9,10
■ Confirm the patient’s identity using at least two patient
identifiers.11
■ Make sure the patient who is having same-day surgery
has arranged for someone to accompany him or her home
after surgery.12
■ Provide privacy.13,14,15,16
■ Explain all procedures to the patient and family (if
appropriate) according to their individual communication
and learning needs to increase their understanding, allay
their fears, and enhance cooperation.17
■ Obtain a health history, including previous surgery, skin
condition, history of multiple drug-resistant organisms,
external or implanted medical devices, sensory limitations,
and home use of noninvasive positive-pressure ventilation
or apnea monitors.12,18 Use your facility’s preoperative
surgical assessment database, if available, to gather this
information.
■ Assess the patient’s knowledge, perceptions, and
expectations about the planned surgery.1
■ Ask whether the patient has allergies to latex,
medications, food, or other substances to determine the risk
of an allergic reaction.12,18
■ Ask whether the patient has a personal or family history
of a serious reaction to anesthesia or intraoperative
awareness (also known as anesthetic awareness).12
■ Obtain a complete list of medications the patient uses,
including prescription drugs, over-the-counter medications,
herbal preparations and supplements, alcohol, tobacco, and
illicit drugs.1,12,18,19,20 It may be necessary to adjust or
continue medications whose sudden cessation may provoke
a withdrawal syndrome.21 In addition, certain herbs
(nutraceuticals) have unknown interactions with anesthetic
drugs and effects on blood coagulation. Consult with the
practitioner about discontinuation before surgery and
continuation after surgery for any medications the patient
takes.
■ If the patient was receiving a beta-adrenergic blocker,
collaborate with the practitioner to make sure the patient
receives it during the perioperative period, as appropriate.22
■ Ask whether the patient has an advance directive.23,24
Provide information about advance directives as
appropriate. (See the “Advance directives” procedure, page
9.)
■ Obtain the patient’s height, weight (in kilograms), vital
signs, and oxygen saturation level.12,18
■ Perform a comprehensive pain assessment using
techniques appropriate for the patient’s age, condition, and
ability to understand.18,25
■ Obtain a pain and analgesic history; ask about measures
that have helped to effectively relieve or control pain in the
past. Also ask about expectations for controlling pain after
surgery. By obtaining a thorough pain history preoperatively,
the health care team may be able to better control pain
postoperatively.12,18
■ Perform educational, socioeconomic, cultural, and
spiritual assessments to determine the patient’s level of
understanding about the surgical procedure and whether
the patient has special needs while in the facility.12,18
■ Assess for mobility limitations and disabilities, including
mental and physical impairments, which may require the
use of additional equipment or supplies. Assess and address
the patient’s safety needs, including the risk of falling, and
implement fall prevention interventions as needed.12,18,20,26
■ Assess the patient’s risk of postoperative nausea and
vomiting (PONV) to help determine whether PONV
prophylaxis should be administered to decrease
postoperative discomfort. Consider the patient’s history of
PONV, the duration of surgery, and the type of surgery
being performed in your assessment.12,18
■ Assess the patient’s cognitive and mental status,
cardiopulmonary status,20,27 skin condition, functional and
sensory limitations, and use of any hearing or visual aids
and assistive or prosthetic devices.
■ Obtain other assessment data as pertinent to the surgical
procedure.1,12,18
■ Perform a suicide risk assessment.12
■ Identify risk factors that may interfere with a positive
expected outcome. Consider age, general health,
medications, mobility, nutritional status, fluid and
electrolyte disturbances, and lifestyle. Also consider the
location, nature, and extent of the surgical procedure.18
ELDER ALERT Be aware that the development of postoperative
delirium is a common complication of surgery in older patients.20
■ Provide patient education using methods appropriate to
the patient’s and caregiver’s preference and level of
understanding,
addressing
any potential
visual
impairments.28 Include typical events that the patient can
expect. Explain the incision, dressings, and staples or
sutures that the surgeon typically uses. Use the teach-back
method to assess comprehension and guide additional
teaching, if needed.12 Preoperative teaching can help
reduce postoperative anxiety and pain, increase patient
compliance, hasten recovery, and decrease length of stay.18
■ Teach the patient how to use a pain assessment scale
that’s appropriate for the patient’s age, condition, and
ability to understand. Tell the patient how to rate and report
pain, and discuss analgesic tools and methods such as
patient-controlled analgesia.18,21,29,30
■ Provide patient and family education on behavioral pain
control techniques, such as biofeedback and progressive
relaxation, to help the patient manage perioperative pain
and anxiety.18,21
■ Discuss possible postoperative equipment, such as
nasogastric tubes and IV equipment.12,18
■ Determine whether the patient will require home health
care services and, if so, help make the necessary
arrangements.12,18
■ Teach the patient the importance of performing coughing
and deep breathing exercises after surgery (while splinting
the incision, if necessary) to minimize respiratory and
circulatory complications.18,31
NURSING ALERT Be aware that a the patient who is undergoing
ophthalmic or neurologic surgery should avoid coughing, because
coughing increases intracranial pressure.
■ Talk the patient through the sequence of events from the
operating room (OR), to the postanesthesia care unit, and
back to the patient’s room or to an intensive care unit or
surgical care unit, as appropriate, to allay the patient’s
anxiety.18
■ When discussing transfer procedures and techniques,
describe sensations the patient will experience. Tell the
patient that the use of a stretcher is necessary for travel to
the OR, and explain the procedure for transfer from the
stretcher to the OR table. Explain that, for safety reasons,
the patient will be held securely to the table with soft straps.
■ Tell the patient that the OR may feel cool.
■ Explain that the OR nurses will check vital signs
frequently, and electrodes may be put on the chest to
monitor heart rate during surgery.
■ Describe the drowsy, floating sensation the patient will
feel as the anesthetic takes effect. Tell the patient it’s
important to relax at this time.
■ Tell the patient about the need to fast before the
procedure, according to the practitioner’s order, to reduce
vomiting and the risk of aspiration. Minimum fasting
recommendations include 2 hours for clear liquids, 6 or
more hours for a light meal or nonhuman milk, and 8 hours
or more for fried or fatty foods or meat.32
■ If ordered by the practitioner, administer a combination of
parenteral and oral antimicrobial agents to reduce the risk
of surgical site infection after colorectal surgery. If ordered,
administer mechanical bowel preparation in combination
with oral antimicrobial agents. Research supports the use of
oral antimicrobials to reduce the risk of surgical site
infection in combination with mechanical bowel
preparation.33
■ Advise the patient not to shave or remove hair at or near
the surgical site before surgery to prevent the risk of
surgical site infection.34,35 Also tell the patient to clean the
skin the night before or the morning of surgery. Some
studies support the use of 2% chlorhexidine cloths wiped on
the surgical site the night before and the morning of surgery
for specific procedures, such as cardiothoracic and total
joint procedures.1,33
■ If ordered, administer an antiseptic mouthwash and have
the patient gargle with it, because research supports
gargling with bactericidal mouthwash to reduce bioburden
in the oropharynx.36
■ Obtain IV access, as needed and ordered, and begin IV
fluid administration to provide a route for medication
administration and prevent dehydration caused by the
required nothing-by-mouth status.
■ Remove and discard your personal protective equipment
if worn.9,10
■ Perform hand hygiene.3,4,5,6,7,8
■ Clean and disinfect your stethoscope with a disinfectant
pad.37,38
■ Perform hand hygiene.3,4,5,6,7,8
■ Document the procedure.39,40,41
On the day of surgery
■ Verify the practitioner’s orders.
■ Perform hand hygiene.3,4,5,6,7,8
■ Confirm that written informed consent was obtained by
the practitioner and that the consent form is in the patient’s
medical record.42,43,44,45
■ Conduct a preprocedure verification to make sure that all
documentation, related information, and equipment are
available and correctly identified to the patient’s
identifiers.2,46
■ Verify that the laboratory and imaging studies have been
completed, as ordered, and that the results are in the
patient’s medical record. Notify the practitioner of any
unexpected results.
■ Collect additional laboratory specimens and perform
other tests as indicated, such as an ECG.12
■ Assess vital signs to serve as a baseline for comparison
during and after the procedure.
■ Ensure patent IV access.
■ To prevent surgical site infection: Don’t remove hair at
the operative site unless the presence of hair will interfere
with the operative procedure. If hair removal is necessary,
remove the hair using disposable-head clippers; don’t use a
razor.1,33,35 Administer the prescribed prophylactic antibiotic
within 1 hour before incision to maximize tissue
concentration; administer fluoroquinolones and vancomycin
within 2 hours before incision.33,35 Obtain the patient’s
blood glucose level, as ordered, to identify hyperglycemia;
initiate treatment as needed and ordered.34,35
HOSPITAL-ACQUIRED CONDITION ALERT Keep in mind that the
Centers for Medicare and Medicaid Services considers surgical site
infection following certain cardiac surgeries, bariatric surgeries, or
orthopedic procedures a hospital-acquired condition because it can be
reasonably prevented using best practices. Make sure that infection
prevention techniques (such as using clippers for hair removal,
administering antibiotics 1 hour before incision, and monitoring for
hyperglycemia) are followed to reduce the risk of surgical site
infection.35,47,48,49
■ Administer ordered preoperative medications, including
analgesics as part of a multimodal analgesic pain-
management program.21
■ Complete the preoperative checklist such as the World
Health Organization’s Surgical Safety checklist.
■ Provide support to the patient and family.
■ Notify the surgeon and anesthesia care provider about
any abnormal assessment findings, and document
responding orders.12
■ Assess the patient’s retention of preoperative teaching
and reinforce education as indicated.12,18
■ Make sure that the patient is accompanied by a
responsible adult who can provide transportation home and
assume the patient’s care after discharge. Instruct the
patient not to drive to maintain patient safety.12
■ Allow loved ones time to be with the patient before
surgery so that the patient feels comforted and supported
from the physical and emotional presence of the family
preoperatively.50
Just before moving the patient to the surgical
area
■ Make sure that the patient’s vital signs are documented
in the patient’s medical record.
■ Make sure the patient is wearing a hospital gown and
identification band. Check to ensure that no hairpins, nail
polish, or jewelry remain on the patient. Note whether
dentures, contact lenses, or prosthetic devices have been
removed or left in place.
■ Verify with the patient that the surgeon has marked the
correct surgical site, as directed by your facility.46,51
■ Provide hand-off communication to the staff member who
will assume responsibility for the patient in the OR. As part
of the hand-off process, allow time for the receiving staff to
trace each tubing and catheter from the patient to its point
of origin using a standardized line reconciliation
process.32,52,53,54,55 Allow time for questions as necessary to
avoid miscommunication that can cause patient care errors
during transition of care.
■ Perform hand hygiene.3,4,5,6,7,8
■ Clean and disinfect your stethoscope with a disinfectant
pad.37,38
■ Perform hand hygiene.3,4,5,6,7,8
■ Document the procedure.39,40,41,56
Special considerations
■ The patient may benefit from receiving a tour of the areas
in which perioperative events will occur. Arrange such a
tour, as time allows and as permitted by the facility.
■ The Joint Commission issued a sentinel event alert related
to managing risk during transition to new International
Organization for Standardization tubing standards that were
designed to prevent dangerous tubing misconnections,
which can lead to serious patient injury and death. During
the transition, make sure to trace each tubing and catheter
from the patient to its point of origin before connecting or
reconnecting any device or infusion, at any care transition
(such as to a new setting or service), and as part of the
hand-off process. In addition, route tubes and catheters with
different purposes in different, standardized directions; label
tubing at both the distal and proximal ends when the
patient has different access sites or several bags hanging;
use tubing and equipment only as intended; and store
medications for different delivery routes in separate
locations.55
■ If family members or others are present, direct them to
the appropriate waiting area and offer support as needed.50
Documentation
Complete the preoperative checklist used by your facility.
Record all nursing care measures performed, preoperative
medications administered, results of diagnostic tests, and
the time the patient is transferred to the surgical area. Make
sure the patient’s medical record and the surgical checklist
accompany the patient to surgery.
REFERENCES
1 Card, R., et al. (2014). Perioperative protocol. Health care protocol.
Bloomington, MN: Institute for Clinical Systems Improvement. Accessed via
the Web at http://www.guideline.gov/content.aspx?id=48408 (Level VII)
2 The Joint Commission. (2019). Standard UP.01.01.01. Comprehensive
accreditation manual for hospitals. Oakbrook Terrace, IL: The Joint
Commission. (Level VII)
3 Centers for Disease Control and Prevention. (2002). Guideline for hand
hygiene in health-care settings: Recommendations of the Healthcare Infection
Control Practices Advisory Committee and the HICPAC/SHEA/APIC/IDSA Hand
Hygiene Task Force. MMWR Recommendations and Reports, 51(RR-16), 1–45.
Accessed via the Web at https://www.cdc.gov/mmwr/pdf/rr/rr5116.pdf (Level
II)
4 World Health Organization. (2009). “WHO guidelines on hand hygiene in
health care: First global patient safety challenge, clean care is safer care”
[Online]. Accessed via the Web at
http://apps.who.int/iris/bitstream/10665/44102/1/9789241597906_eng.pdf
(Level IV)
5 The Joint Commission. (2019). Standard NPSG.07.01.01. Comprehensive
accreditation manual for hospitals. Oakbrook Terrace, IL: The Joint
Commission. (Level VII)
6 Centers for Medicare and Medicaid Services, Department of Health and
Human Services. (2015). Condition of participation: Infection control. 42 C.F.R.
§ 482.42.
7 Accreditation Association for Hospitals and Health Systems. (2017). Standard
07.01.21. Healthcare Facilities Accreditation Program: Accreditation
requirements for acute care hospitals. Chicago, IL: Accreditation Association
for Hospitals and Health Systems. (Level VII)
8 DNV GL-Healthcare USA, Inc. (2016). IC.1.SR.1 . NIAHO® accreditation
requirements: Interpretive guidelines & surveyor guidance (version 11).
Milford, OH: DNV GL-Healthcare USA, Inc. (Level VII)
9 Siegel, J. D., et al. (2007, revised 2017). “2007 guideline for isolation
precautions: Preventing transmission of infectious agents in healthcare
settings” [Online]. Accessed via the Web at
https://www.cdc.gov/infectioncontrol/pdf/guidelines/isolation-guidelines.pdf
(Level II)
10 Accreditation Association for Hospitals and Health Systems. (2017). Standard
07.01.10. Healthcare Facilities Accreditation Program: Accreditation
requirements for acute care hospitals. Chicago, IL: Accreditation Association
for Hospitals and Health Systems. (Level VII)
11 The Joint Commission. (2019). Standard NPSG.01.01.01. Comprehensive
accreditation manual for hospitals. Oakbrook Terrace, IL: The Joint
Commission. (Level VII)
12 American Society of PeriAnesthesia Nurses. (2018). 2017–2018
Perianesthesia nursing standards, practice recommendations and
interpretative statements. Cherry Hill, NJ: American Society of PeriAnesthesia
Nurses. (Level VII)
13 Accreditation Association for Hospitals and Health Systems. (2017). Standard
15.01.16. Healthcare Facilities Accreditation Program: Accreditation
requirements for acute care hospitals. Chicago, IL: Accreditation Association
for Hospitals and Health Systems. (Level VII)
14 Centers for Medicare and Medicaid Services, Department of Health and
Human Services. (2015). Condition of participation: Patient’s rights. 42 C.F.R.
§ 482.13(c)(1).
15 DNV GL-Healthcare USA, Inc. (2016). PR.1.SR.5 . NIAHO® accreditation
requirements: Interpretive guidelines & surveyor guidance (version 11).
Milford, OH: DNV GL-Healthcare USA, Inc. (Level VII)
16 The Joint Commission. (2019). Standard RI.01.01.01. Comprehensive
accreditation manual for hospitals. Oakbrook Terrace, IL: The Joint
Commission. (Level VII)
17 The Joint Commission. (2019). Standard PC.02.01.21. Comprehensive
accreditation manual for hospitals. Oakbrook Terrace, IL: The Joint
Commission. (Level VII)
18 The Joint Commission. (2019). Standard PC.03 .01.03 . Comprehensive
accreditation manual for hospitals. Oakbrook Terrace, IL: The Joint
Commission. (Level VII)
19 The Joint Commission. (2019). Standard NPSG.03 .06 .01. Comprehensive
accreditation manual for hospitals. Oakbrook Terrace, IL: The Joint
Commission. (Level VII)
20 American College of Surgeons (ACS) National Surgical Quality Improvement
Program (NSQIP). (2012). “ACS NSQIP/AGS best practice guidelines: Optimal
preoperative assessment of the geriatric surgical patient” [Online]. Accessed
via the Web at
https://www.facs.org/~/media/files/quality%20programs/nsqip/acsnsqipagsge
riatric2012guidelines.ashx (Level VII)
21 American Society of Anesthesiologists Committee on Standards and Practice
Parameters. (2012). Practice guidelines for acute pain management in the
perioperative setting: An updated report by the American Society of
Anesthesiologists Task Force on Acute Pain Management. Anesthesiology,
116(2), 248–273. (Level VII)
22 Centers for Medicare and Medicaid Services & The Joint Commission. (2017).
“The specifications manual for national hospital inpatient quality measures
(version 5.2a)” [Online]. Accessed via the Web at
https://www.jointcommission.org/specifications_manual_for_national_hospital_
inpatient_quality_measures.aspx
23 The Joint Commission. (2019). Standard RI.01.05.01. Comprehensive
accreditation manual for hospitals. Oakbrook Terrace, IL: The Joint
Commission. (Level VII)
24 Accreditation Association for Hospitals and Health Systems. (2017). Standard
15.01.12. Healthcare Facilities Accreditation Program: Accreditation
requirements for acute care hospitals. Chicago, IL: Accreditation Association
for Hospitals and Health Systems. (Level VII)
25 The Joint Commission. (2019). Standard PC.01.02.07. Comprehensive
accreditation manual for hospitals. Oakbrook Terrace, IL: The Joint
Commission. (Level VII)
26 The Joint Commission. (2019). Standard PC.01.02.08 . Comprehensive
accreditation manual for hospitals. Oakbrook Terrace, IL: The Joint
Commission. (Level VII)
27 Fleisher, L. A., et al. (2014). 2014 ACC/AHA guideline on perioperative
cardiovascular evaluation and management of patients undergoing
noncardiac surgery. A report of the American College of Cardiology/ American
Heart Association Task Force on Practice Guidelines. Journal of the American
College of Cardiology, 64(22), e77–e137. Accessed via the Web at
http://www.onlinejacc.org/content/64/22/e77 (Level VII)
28 The Joint Commission. (2019). Standard PC.02.01.21. Comprehensive
accreditation manual for hospitals. Oakbrook Terrace, IL: The Joint
Commission. (Level VII)
29 American Society of PeriAnesthesia Nurses (ASPAN). (2003). ASPAN pain and
comfort clinical guideline. Journal of PeriAnesthesia Nursing, 18(4), 232–236.
Accessed via the Web at
http://www.aspan.org/Portals/6/docs/ClinicalPractice/Guidelines/ASPAN_Clinica
lGuideline_PainComfort.pdf (Level VII)
30 The Joint Commission. (2019). Standard PC.01.02.07. Comprehensive
accreditation manual for hospitals. Oakbrook Terrace, IL: The Joint
Commission. (Level VII)
31 Clarke, H. D., et al. (2012). Preoperative patient education reduces in-hospital
falls after total knee arthroplasty. Clinical Orthopaedics and Related Research,
470(1), 244–249. (Level III)
32 American Society of Anesthesiologists. (2017). Practice guidelines for
preoperative fasting and the use of pharmacologic agents to reduce the risk
of pulmonary aspiration: Application to healthy patients undergoing elective
procedures. Anesthesiology, 126(3), 376–393 . (Level V)
33 Anderson, D. J ., et al. (2014). SHEA/IDSA practice recommendation:
Strategies to prevent surgical site infections in acute care hospitals: 2014
update. Infection Control and Hospital Epidemiology, 35(6), 605–627.
Accessed via the Web at http://www.jstor.org/stable/10.1086/676022 (Level I)
34 Institute for Healthcare Improvement. (2012). How-to guide: Prevent surgical
site infections. Cambridge, MA: Institute for Healthcare Improvement. (Level
VII)
35 Berríos-Torres, S. I ., et al. (2017). Centers for Disease Control and Prevention
guideline for the prevention of surgical site infection, 2017. JAMA Surgery,
152(8), 784–791. Accessed via the Web at
http://jamanetwork.com/journals/jamasurgery/fullarticle/2623725 (Level VII)
36 Suzuki, T., et al. (2012). Bactericidal activity of topical antiseptics and their
gargles against Bordetella pertussis. Journal of Infection & Chemotherapy,
18(2), 272–275. (Level VI)
37 Rutala, W. A., et al. (2008, revised 2017). “Guideline for disinfection and
sterilization in healthcare facilities, 2008” [Online]. Accessed via the Web at
https://www.cdc.gov/infectioncontrol/pdf/guidelines/disinfection-
guidelines.pdf (Level I)
38 Accreditation Association for Hospitals and Health Systems. (2017). Standard
07.02.03. Healthcare Facilities Accreditation Program: Accreditation
requirements for acute care hospitals. Chicago, IL: Accreditation Association
for Hospitals and Health Systems. (Level VII)
39 Centers for Medicare and Medicaid Services, Department of Health and
Human Services. (2015). Condition of participation: Medical record services.
42 C.F.R. § 482.24(b).
40 Accreditation Association for Hospitals and Health Systems. (2017). Standard
10.00 .03. Healthcare Facilities Accreditation Program: Accreditation
requirements for acute care hospitals. Chicago, IL: Accreditation Association
for Hospitals and Health Systems. (Level VII)
41 DNV GL-Healthcare USA, Inc. (2016). MR.2 .SR.1 . NIAHO® accreditation
requirements: Interpretive guidelines & surveyor guidance (version 11).
Milford, OH: DNV GL-Healthcare USA, Inc. (Level VII)
42 Accreditation Association for Hospitals and Health Systems. (2017). Standard
30.01.11. Healthcare Facilities Accreditation Program: Accreditation
requirements for acute care hospitals. Chicago, IL: Accreditation Association
for Hospitals and Health Systems. (Level VII)
43 The Joint Commission. (2019). Standard RI.01.03 .01. Comprehensive
accreditation manual for hospitals. Oakbrook Terrace, IL: The Joint
Commission. (Level VII)
44 Centers for Medicare and Medicaid Services, Department of Health and
Human Services. (2015). Condition of participation: Patient’s rights. 42 C.F.R.
§ 482.13(b)(2).
45 DNV GL-Healthcare USA, Inc. (2016). PR.1.SR.3 . NIAHO® accreditation
requirements: Interpretive guidelines & surveyor guidance (version 11).
Milford, OH: DNV GL-Healthcare USA, Inc. (Level VII)
46 Accreditation Association for Hospitals and Health Systems. (2017). Standard
30.00 .14. Healthcare Facilities Accreditation Program: Accreditation
requirements for acute care hospitals. Chicago, IL: Accreditation Association
for Hospitals and Health Systems. (Level VII)
47 The Joint Commission. (2019). Standard NPSG.07.05.01. Comprehensive
accreditation manual for hospitals. Oakbrook Terrace, IL: The Joint
Commission. (Level VII)
48 Jarrett, N., & Callaham, M. (2016). “Evidence-based guidelines for selected
hospital-acquired conditions: Final report” [Online]. Accessed via the Web at
https://www.cms.gov/Medicare/Medicare-Fee-for-Service-
Payment/HospitalAcqCond/Downloads/2016-HAC-Report.pdf (Level VII)
49 Accreditation Association for Hospitals and Health Systems. (2017). Standard
07.01.20. Healthcare Facilities Accreditation Program: Accreditation
requirements for acute care hospitals. Chicago, IL: Accreditation Association
for Hospitals and Health Systems. (Level VII)
50 Trimm, D. R., & Sanford, J. T. (2010). The process of family waiting during
surgery. Journal of Family Nursing, 16(4), 435–461. (Level VI)
51 The Joint Commission. (2019). Standard UP.01.02.01. Comprehensive
accreditation manual for hospitals. Oakbrook Terrace, IL: The Joint
Commission. (Level VII)
52 Van Wicklin, S. A., & Conner, R. (2018). Guideline for transfer of patient care
information. In R. Conner (Ed.), Guidelines for perioperative practice, 2018
edition. Denver, CO: AORN, Inc. (Level VII)
53 The Joint Commission. (2019). Standard PC.02.02.01. Comprehensive
accreditation manual for hospitals. Oakbrook Terrace, IL: The Joint
Commission. (Level VII)
54 The Joint Commission. (2012). “Hot topics in health care: Transitions of care:
The need for more effective approach to continuing patient care” [Online].
Accessed via the Web at
http://www.jointcommission.org/assets/1/18/Hot_Topics_Transitions_of_Care.p
df (Level VII)
55 The Joint Commission. (2014). “Sentinel event alert: Managing risk during
transition to new ISO tubing connector standards” [Online]. Accessed via the
Web at
http://www.jointcommission.org/assets/1/6/SEA_53_Connectors_8 _19_14 _final.
pdf (Level VII)
56 The Joint Commission. (2019). Standard RC.01.03 .01. Comprehensive
accreditation manual for hospitals. Oakbrook Terrace, IL: The Joint
Commission. (Level VII)
PREOPERATIVE SKIN PREPARATION
Proper preparation of the patient’s skin for surgery renders
it as free as possible from microorganisms, which reduces
the risk of infection at the incision site.1
Unless contraindicated, before an open Class 1 surgical
procedure below the chin, the patient should have two
preoperative baths or showers with 4% chlorhexidine
gluconate to reduce the number of microorganisms on the
skin and to decrease the risk of contaminating the surgical
incision.2 After each preoperative shower, the patient’s skin
should be thoroughly rinsed to remove residual
chlorhexidine gluconate, which may cause skin irritation.
The patient’s skin should be dried with a fresh, clean, dry
towel, and the patient should put on clean clothing to
reduce the risk of reintroducing microorganisms to clean
skin.1
Patients undergoing surgery of the head should be
instructed in or assisted with performing two preoperative
shampoos with chlorhexidine shampoo. Contact with the
eyes, ears, and other mucous membranes should be
avoided.2 Conditioners and other hair care products
shouldn’t be used, because a chemical reaction between the
chlorhexidine and the hair care product may impede the
antiseptic effectiveness of chlorhexidine.1
Only hair interfering with the surgical procedure should be
removed, because hair removal may increase the risk of
infection. If hair removal is necessary, disposable-head
electric clippers should be used.3 The hair should be clipped
on the day of surgery in a location outside of the operating
or procedure room to decrease the risk of surgical site
infection.1,4,5
The area of preparation always exceeds that of the
expected incision to minimize the number of
microorganisms in the areas adjacent to the proposed
incision and to allow surgical draping of the patient without
contamination.1 The procedure described here doesn’t
duplicate or replace the full sterile preparation that
immediately precedes surgery. Instead, it covers preparation
of the skin when preoperative showers haven’t been
performed. Because the efficacy of antiseptic agents
depends on the cleanliness of the skin, superficial soil,
debris, and transient microbes should be removed first to
reduce the risk of wound contamination.1
Equipment
Antiseptic skin cleaner (4% chlorhexidine gluconate) ▪
gloves ▪ tap water ▪ bath blanket ▪ washcloth(s) ▪ towel ▪
fluid-impermeable pad ▪ adjustable light ▪ Optional: 4′′ × 4′′
(10-cm × 10-cm) gauze pads, cotton-tipped applicators, nail
polish remover, nonirritating makeup remover, plastic or
paper trash bag, electric or battery-operated clippers for
single use or with a reusable head that can be disinfected,
other personal protective equipment.
Preparation of equipment
Use warm water, because heat reduces the skin’s surface
tension and facilitates removal of soil and hair. Pour plain
warm water into the basin for rinsing.
Implementation
■ Verify the practitioner’s order.
■ Review the patient’s medical record for an allergy or a
sensitivity to skin preparation agents. Use an alternative
antiseptic agent if indicated.1
■ Gather the appropriate equipment.
■ Perform hand hygiene.6,7,8,9,10,11
■ Confirm the patient’s identity using at least two patient
identifiers.12
■ Explain the procedure to the patient, including the reason
for the extensive preparations, to decrease the patient’s
anxiety.
■ Provide privacy.13,14,15,16 Put on gloves and, if needed,
other personal protective equipment.17,18
■ Raise the patient’s bed to waist level while providing
patient care to prevent caregiver back strain.19
■ Place the patient in a comfortable position, drape the
patient with the bath blanket, and expose the preparation
area. To ensure privacy and avoid chilling the patient,
expose only one small area at a time while performing skin
preparation.
■ Place a fluid-impermeable pad beneath the patient to
catch spills and avoid linen changes.
■ Adjust the light to illuminate the preparation area.
■ Assess skin condition in the preparation area, and report
a rash, an abrasion, or a laceration to the practitioner before
beginning the procedure. Any break in the skin increases
the risk of infection and could cause cancellation of planned
surgery.1
■ Have the patient remove all jewelry.1
■ Remove cosmetics using a nonirritating agent to facilitate
securing an endotracheal tube, if needed, and to provide
adequate skin assessment during surgery.1
■ Clean under the patient’s fingernails and remove nail
polish, if necessary. If the patient is having hand or wrist
surgery, make sure that the nails are short and natural, with
no artificial nail surfaces, such as extensions, overlays,
acrylic, silk wraps, or enhancements.1
■ If hair would interfere with the surgical procedure, remove
it using electric or battery-operated clippers for single use or
with a reusable head that can be disinfected between
patients. Clipping hair, if necessary, the day of surgery
reduces the risk of surgical site infection. As possible, limit
the amount of clipping to reduce the risk of microscopic
nicks, which increase the risk of surgical site infection.1,5
■ Wash the skin around the surgical site to remove gross
contaminants and oils that might block the penetration of
the antiseptic agent.1 Carefully clean skin folds and
crevices, because they harbor greater numbers of
microorganisms. Clean anatomic areas that contain more
debris separately to prevent the distribution of
microorganisms from these areas to the surgical site.1
■ If the patient is having abdominal surgery, clean the
umbilicus. If necessary, instill antiseptic solution into the
umbilicus to soften debris. Then remove the debris using a
cotton-tipped applicator, because debris within the
umbilicus is a contaminant and can’t be adequately
disinfected.1
■ If an intestinal or urinary stoma is within the surgical field,
clean the area gently and separately from the rest of the
prepped area to remove organic material that might
interfere with the effectiveness of the antiseptic agent.1
■ For a surgical field that includes the penis, retract the
foreskin, if present, and then gently clean the penis,
because organic material and microorganisms accumulate
under the foreskin. After cleaning the foreskin, pull it back
over the glans to prevent circulatory compromise.1
■ Dry the area with a clean towel and remove the fluid-
impermeable pad.
■ Return the bed to the lowest position to prevent falls and
maintain patient safety.20
■ Give the patient any special instructions for care of the
prepared area, and remind the patient to keep the area
clean for surgery. Make sure that the patient is comfortable.
■ Dispose of used supplies appropriately.
■ Remove and discard your gloves and any other personal
protective equipment worn.17,18
■ Perform hand hygiene.6,7,8,9,10,11
■ Document the procedure.21,22,23,24
Special considerations
■ In cases of head surgery, verify the surgical site before
hair removal. The practitioner should identify the surgical
site in advance of the surgical time-out to ensure that the
correct site is prepared, reducing the risk of wrong-site
surgery.25
■ Avoid removing facial and neck hair on women and
children unless ordered. Scalp hair removal is usually
performed in the operating room, but if you’re required to
prepare the patient’s scalp, put all hair in a plastic or paper
trash bag and store it with the patient’s possessions.
■ Depilatory cream can also be used to remove hair.
Although this method produces clean, intact skin without
risking lacerations or abrasions, it can cause skin irritation
or rash, especially in the groin area.1 Before using depilatory
cream to remove hair, perform a skin test to determine
whether the cream irritates the skin.1 If possible, cut long
hairs with scissors before applying the cream, because the
remaining hair will require less cream; then use a glove to
apply the cream in a 1⁄2′′ (1.3 -cm) thick layer. After about 10
minutes, remove the cream with moist gauze pads. Then
wash the area with antiseptic soap solution, rinse, and pat
dry.
■ Traumatic orthopedic wounds with exposed bone may be
cleaned using pulse lavage, high-pressure parallel water jet,
or brush-suction irrigation. Use sterile normal saline solution
and cautiously irrigate the wound to prevent aerosolization
of contaminants; use a pulse lavage protective shield if
available to prevent harm to the area.1
Complications
Rashes, nicks, lacerations, and abrasions are the most
common complications of skin preparation. They also
increase the risk of postoperative infection.
Documentation
Documentation should include the product used, date, time,
and area prepared as well as the condition of the skin before
and after preparation. Include documentation about hair
removal, if performed, including the time, method, and area
of removal.1 Document patient and family teaching, patient
and family understanding of your teaching, and whether
follow-up teaching was necessary.
REFERENCES
1 Van Wicklin, S. A., & Conner, R. (2018). Guideline for preoperative skin
antisepsis. In R. Conner (Ed.), Guidelines for perioperative practice, 2018
edition. Denver, CO: AORN, Inc. (Level VII)
2 Barzoloski-O’Connor, B. (2011). Infection control: Surgical site infection: New
solutions for an old problem. OR Nurse 2011, 5(1), 8–9 .
3 Tanner, J., et al. (2011). Preoperative hair removal to reduce surgical site
infection. Cochrane Database of Systematic Reviews, 2011(11), CD004122.
(Level II)
4 Anderson, D. J., et al. (2014). SHEA/IDSA practice recommendation: Strategies
to prevent surgical site infections in acute care hospitals: 2014 update.
Infection Control and Hospital Epidemiology, 35(6), 605–627. Accessed via
the Web at http://www.jstor.org/stable/10.1086/676022 (Level II)
5 Institute for Healthcare Improvement. (2012). How-to guide: Prevent surgical
site infections. Cambridge, MA: Institute for Healthcare Improvement. (Level
VII)
6 Centers for Disease Control and Prevention. (2002). Guideline for hand
hygiene in health-care settings: Recommendations of the Healthcare Infection
Control Practices Advisory Committee and the HICPAC/SHEA/APIC/IDSA Hand
Hygiene Task Force. MMWR Recommendations and Reports, 51(RR-16), 1–45.
Accessed via the Web at http://www.cdc.gov/mmwr/pdf/rr/rr5116.pdf (Level II)
7 The Joint Commission. (2019). Standard NPSG.07.01.01. Comprehensive
accreditation manual for hospitals. Oakbrook Terrace, IL: The Joint
Commission. (Level VII)
8 World Health Organization. (2009). “WHO guidelines on hand hygiene in
health care: First global patient safety challenge, clean care is safer care”
[Online]. Accessed via the Web at
http://apps.who.int/iris/bitstream/10665/44102/1/9789241597906_eng.pdf
(Level IV)
9 Accreditation Association for Hospitals and Health Systems. (2017). Standard
07.01.21. Healthcare Facilities Accreditation Program: Accreditation
requirements for acute care hospitals. Chicago, IL: Accreditation Association
for Hospitals and Health Systems. (Level VII)
10 Centers for Medicare and Medicaid Services, Department of Health and
Human Services. (2015). Condition of participation: Infection control. 42 C.F.R.
§ 482.42.
11 DNV GL-Healthcare USA, Inc. (2016). IC.1 .SR.1 . NIAHO® accreditation
requirements: Interpretive guidelines & surveyor guidance (version 11).
Milford, OH: DNV GL-Healthcare USA, Inc. (Level VII)
12 The Joint Commission. (2019). Standard NPSG.01.01.01. Comprehensive
accreditation manual for hospitals. Oakbrook Terrace, IL: The Joint
Commission. (Level VII)
13 Accreditation Association for Hospitals and Health Systems. (2017). Standard
15.01.16. Healthcare Facilities Accreditation Program: Accreditation
requirements for acute care hospitals. Chicago, IL: Accreditation Association
for Hospitals and Health Systems. (Level VII)
14 Centers for Medicare and Medicaid Services, Department of Health and
Human Services. (2015). Condition of participation: Patient’s rights. 42 C.F.R.
§ 482.13(c)(1).
15 The Joint Commission. (2019). Standard RI.01.01.01. Comprehensive
accreditation manual for hospitals. Oakbrook Terrace, IL: The Joint
Commission. (Level VII)
16 DNV GL-Healthcare USA, Inc. (2016). PR.1.SR.5 . NIAHO® accreditation
requirements: Interpretive guidelines & surveyor guidance (version 11).
Milford, OH: DNV GL-Healthcare USA, Inc. (Level VII)
17 Accreditation Association for Hospitals and Health Systems. (2017). Standard
07.01.10. Healthcare Facilities Accreditation Program: Accreditation
requirements for acute care hospitals. Chicago, IL: Accreditation Association
for Hospitals and Health Systems. (Level VII)
18 Siegel, J. D ., et al. (2007, revised 2017). “2007 guideline for isolation
precautions: Preventing transmission of infectious agents in healthcare
settings” [Online]. Accessed via the Web at
https://www.cdc.gov/infectioncontrol/pdf/guidelines/isolation-guidelines.pdf
(Level II)
19 Waters, T. R., et al. (2009). “Safe patient handling training for schools of
nursing” [Online]. Accessed via the Web at
http://www.cdc.gov/niosh/docs/2009-127/pdfs/2009-127.pdf (Level VII)
20 Ganz, D. A., et al. (2013). Preventing falls in hospitals: A toolkit for improving
quality of care (AHRQ Publication No. 13-0015-EF). Rockville, MD: Agency for
Healthcare Research and Quality. Accessed via the Web at
http://www.ahrq.gov/sites/default/files/publications/files/fallpxtoolkit.pdf
(Level VII)
21 The Joint Commission. (2019). Standard RC.01.03 .01. Comprehensive
accreditation manual for hospitals. Oakbrook Terrace, IL: The Joint
Commission. (Level VII)
22 Centers for Medicare and Medicaid Services, Department of Health and
Human Services. (2015). Condition of participation: Medical record services.
42 C.F.R. § 482.24(b).
23 DNV GL-Healthcare USA, Inc. (2016). MR.2 .SR.1 . NIAHO® accreditation
requirements: Interpretive guidelines & surveyor guidance (version 11).
Milford, OH: DNV GL-Healthcare USA, Inc. (Level VII)
24 Accreditation Association for Hospitals and Health Systems. (2017). Standard
10.00 .03. Healthcare Facilities Accreditation Program: Accreditation
requirements for acute care hospitals. Chicago, IL: Accreditation Association
for Hospitals and Health Systems. (Level VII)
25 The Joint Commission. (2019). Standard UP.01.02.01. Comprehensive
accreditation manual for hospitals. Oakbrook Terrace, IL: The Joint
Commission. (Level VII)
PRESSURE DRESSING APPLICATION
For effective control of capillary or small-vein bleeding,
temporary application of pressure directly over a wound
may be achieved with a bulk dressing held by a glove-
protected hand, bound into place with a pressure bandage,
or held under pressure by an inflated air splint. A pressure
dressing requires frequent checks for wound drainage to
determine its effectiveness in controlling bleeding. The
wound shouldn’t be cleaned until the bleeding stops.
Equipment
Two or more sterile gauze pads ▪ roller gauze ▪ adhesive
tape ▪ gloves ▪ metric ruler ▪ Optional: air splint.
Preparation of equipment
Obtain the pressure dressing quickly to avoid excessive
blood loss. Use clean cloth for the dressing if sterile gauze
pads are unavailable.
Implementation
■ Gather and prepare the equipment.
■ Perform hand hygiene.1,2,3,4,5,6
■ Put on gloves and other personal protective equipment as
needed to comply with standard precautions.7,8,9
■ Quickly explain the procedure to the patient to help
decrease anxiety and promote cooperation.
■ Elevate and immobilize the injured body part to help
reduce bleeding.
■ Place enough gauze pads over the wound to cover it.
■ For an extremity or a trunk wound, hold the gauze pad
dressing firmly over the wound, and wrap the roller gauze
tightly across it and around the body part to provide
pressure on the wound. Secure the bandage with adhesive
tape. If needed and available, apply an air splint to an
extremity to provide pressure on the wound.
■ To apply a dressing to the neck, the shoulder, or another
location that can’t be tightly wrapped, don’t use roller
gauze. Instead, apply tape directly over the gauze pad
dressings to provide the necessary pressure at the wound
site.
■ Assess the patient’s pulses, capillary refill, and skin
temperature, sensation, and color distal to the wound site,
because excessive pressure can compromise circulation.
■ Inspect the dressing frequently to monitor wound
drainage. Use the metric standard of measurement to
determine the amount of drainage, and document these
serial measurements for later reference. Don’t circle a
potentially wet dressing with ink, because such markings
don’t provide permanent documentation in the medical
record and also risk contaminating the dressing.
■ If the dressing becomes saturated, don’t remove it;
removal would interfere with the pressure. Instead, apply an
additional dressing over the saturated one and continue to
monitor and record drainage.
■ Obtain additional medical care as soon as possible.
■ Remove and discard your gloves and any other personal
protective equipment worn.7,8
■ Perform hand hygiene.1,2,3,4,5,6
■ Document the procedure.10,11,12,13
Special considerations
■ Apply pressure directly to the wound with your gloved
hand if sterile gauze pads and clean cloth are unavailable.
■ Avoid using an elastic bandage to bind the dressing,
because it can’t be wrapped tightly enough to create
pressure on the wound site.
Complications
A pressure dressing that’s applied too tightly can impair
circulation.
Documentation
When the bleeding is controlled, record the date and time of
dressing application, site of the wound, circulation
assessment findings distal to the wound, amount of wound
drainage, and the patient’s tolerance of the procedure.
REFERENCES
1 The Joint Commission. (2019). Standard NPSG.07.01.01. Comprehensive
accreditation manual for hospitals. Oakbrook Terrace, IL: The Joint
Commission. (Level VII)
2 Centers for Disease Control and Prevention. (2002). Guideline for hand
hygiene in health-care settings: Recommendations of the Healthcare Infection
Control Practices Advisory Committee and the HICPAC/SHEA/APIC/IDSA Hand
Hygiene Task Force. MMWR Recommendations and Reports, 51(RR-16), 1–45.
Accessed via the Web at https://www.cdc.gov/mmwr/pdf/rr/rr5116.pdf (Level
II)
3 World Health Organization. (2009). “WHO guidelines on hand hygiene in
health care: First global patient safety challenge, clean care is safer care”
[Online]. Accessed via the Web at
http://apps.who.int/iris/bitstream/10665/44102/1/9789241597906_eng.pdf
(Level IV)
4 Accreditation Association for Hospitals and Health Systems. (2017). Standard
07.01.21. Healthcare Facilities Accreditation Program: Accreditation
requirements for acute care hospitals. Chicago, IL: Accreditation Association
for Hospitals and Health Systems. (Level VII)
5 Centers for Medicare and Medicaid Services, Department of Health and
Human Services. (2015). Condition of participation: Infection control. 42 C.F.R.
§ 482.42.
6 DNV GL-Healthcare USA, Inc. (2016). IC.1.SR.1 . NIAHO® accreditation
requirements: Interpretive guidelines & surveyor guidance (version 11).
Milford, OH: DNV GL-Healthcare USA, Inc. (Level VII)
7 Siegel, J. D., et al. (2007, revised 2017). “2007 guideline for isolation
precautions: Preventing transmission of infectious agents in healthcare
settings” [Online]. Accessed via the Web at
https://www.cdc.gov/infectioncontrol/pdf/guidelines/isolation-guidelines.pdf
(Level II)
8 Occupational Safety and Health Administration. (n.d .). “Bloodborne
pathogens, standard number 1910.1030” [Online]. Accessed via the Web at
https://www.osha.gov/pls/oshaweb/owadisp.show_document?
p_id=10051&p_table=STANDARDS (Level VII)
9 Accreditation Association for Hospitals and Health Systems. (2017). Standard
07.01.10. Healthcare Facilities Accreditation Program: Accreditation
requirements for acute care hospitals. Chicago, IL: Accreditation Association
for Hospitals and Health Systems. (Level VII)
10 The Joint Commission. (2017). Standard RC.01.03 .01. Comprehensive
accreditation manual for hospitals. Oakbrook Terrace, IL: The Joint
Commission. (Level VII)
11 Accreditation Association for Hospitals and Health Systems. (2017). Standard
10.00 .03. Healthcare Facilities Accreditation Program: Accreditation
requirements for acute care hospitals. Chicago, IL: Accreditation Association
for Hospitals and Health Systems. (Level VII)
12 Centers for Medicare and Medicaid Services, Department of Health and
Human Services. (2015). Condition of participation: Medical record services.
42 C.F.R. § 482.24(b).
13 DNV GL-Healthcare USA, Inc. (2016). MR.2 .SR.1 . NIAHO® accreditation
requirements: Interpretive guidelines & surveyor guidance (version 11).
Milford, OH: DNV GL-Healthcare USA, Inc. (Level VII)
PRESSURE INJURY CARE
As the name implies, pressure injuries result when pressure
— applied with great force for a short period or with less
force over a long period—impairs circulation, depriving
tissues of oxygen and other life-sustaining nutrients. This
process damages skin and underlying structures. Untreated,
resulting ischemic lesions can lead to serious infection.
Most pressure injuries develop over bony prominences,
where friction and shearing force combine with pressure to
break down skin and underlying tissues. Persistent pressure
on bony prominences obstructs capillary blood flow, leading
to tissue necrosis. Common sites include the sacrum,
coccyx, ischial tuberosities, and greater trochanters. Other
common sites include the skin over the vertebrae, scapulae,
elbows, knees, and heels in bedridden and relatively
immobile patients.
Successful pressure injury treatment involves relieving
pressure, restoring circulation, promoting adequate nutrition
and, if possible, resolving or managing related disorders.
Typically, the effectiveness and duration of treatment
depend on the pressure injury’s characteristics. (See
Staging pressure injuries.)
Ideally, prevention is the key to avoiding extensive
therapy. Preventive measures include off-loading pressure,
maintaining adequate nourishment, and ensuring mobility
to relieve pressure and promote circulation. A risk
assessment may be an important part of an overall
prevention plan. Several risk assessment tools are available.
(See Braden scale: Predicting pressure injury risk, pages
636, 637.)
When a pressure ulcer develops despite preventive
efforts, treatment includes methods to decrease pressure,
such as frequent repositioning to shorten pressure duration
and the use of special equipment to reduce pressure
intensity. Treatment also may involve pressure-reducing
devices, such as special beds, mattresses, mattress
overlays, and chair cushions.
Equipment
Facility-approved skin assessment tool ▪ pressure-
redistribution devices ▪ pillows ▪ appropriate skin cleaner
and bath supplies ▪ lotion ▪ protective moisture barrier ▪
Optional: gloves, trapeze bar, heel protection devices.
Implementation
■ Gather the necessary equipment.
■ Perform hand hygiene.3,4,5,6,7,8
■ Confirm the patient’s identity using at least two patient
identifiers.9
■ Provide privacy.10,11,12,13
■ Explain the procedure to the patient and family (if
appropriate) according to their individual communication
and learning needs to increase their understanding, allay
their fears, and enhance cooperation.14
■ Raise the bed to waist level when providing patient care
to prevent caregiver back strain.15
■ Perform hand hygiene.3,4,5,6,7,8
■ Put on gloves, as indicated.16,17
■ Perform a comprehensive skin assessment using a
facility-approved skin assessment tool; a comprehensive
skin assessment may be the first step in pressure injury
prevention.6,18 (See Distinguishing between pressure
injuries and moisture-associated skin damage, page 636.)
■ Turn and reposition the patient regularly and frequently
unless contraindicated.20 Base the frequency of
repositioning on the patient’s tissue tolerance, skin
condition, mobility, medical condition, and treatment goals.
When turning or repositioning the patient, inspect the skin
for signs of pressure injury or damage, and avoid positioning
the patient on areas that have nonblanchable erythema
■ For patients with limited mobility, use a pressure-
redistribution device, such as an air, gel, or 4′′ (10.2 cm)
foam mattress overlay.21 The patient’s condition may
indicate the need for low- or high-air-loss bed therapy to
redistribute excessive pressure and promote evaporation of
excess moisture.
■ Implement the use of trapeze bars to facilitate mobility in
a patient who can assist.20
■ When turning the patient, lift rather than slide the
patient, because sliding increases friction and shear.22 Use a
turning sheet and get help from coworkers, if necessary.
NURSING ALERT Avoid placing the patient directly on the trochanter
(hip). Instead, position the patient on the side, at about a 30-degree
angle.22
■ Use positioning devices (for example, pillows or foam
wedges) to avoid positioning the patient on a pressure injury
or other area at risk for pressure.20 (See the “Alignment and
pressure-reducing devices” procedure, page 16.)
■ Eliminate sheet wrinkles that could increase pressure and
cause discomfort.
■ Make sure the patient’s heels don’t rest on the bed.22
Apply heel protection devices, as required, to prevent heel
pressure injuries. The devices should completely off-load
pressure from the heels. If you’re placing pillows under the
patient’s calves to decrease pressure, place each pillow
longitudinally underneath the calf with the heel suspended
in the air.20
■ Work with the patient and multidisciplinary team to
implement a regular repositioning routine, because patients
at risk for pressure injuries require teaching and
encouragement to perform regular repositioning movements
that redistribute pressure, preventing the buildup of
pressure around areas at risk.23 Post a repositioning
schedule at the patient’s bedside. Adapt position changes to
the patient’s situation. Emphasize the importance of regular
position changes to the patient and family, and encourage
their participation in the treatment and prevention of
pressure injuries by having them perform a position change
correctly, after you have demonstrated the proper
technique.23
■ As appropriate, implement active or passive range-of-
motion exercises to redistribute pressure and promote
circulation. To save time, combine these exercises with
bathing, if applicable.
■ Direct a patient confined to a chair or wheelchair to shift
weight every 15 minutes to promote blood flow to
compressed tissues.20,22
■ Show a patient with paraplegia how to shift weight in a
wheelchair by doing push-ups in the wheelchair. If the
patient needs your help, sit next to the patient and help
shift the weight to one buttock for 60 seconds; then repeat
the procedure on the other side. Provide pressure-
redistribution cushions, as appropriate; however, avoid
seating the patient on a rubber or plastic doughnut, which
can increase localized pressure at vulnerable points.
NURSING ALERT The Wound, Ostomy and Continence Nurses Society
(WOCN) recommends avoiding the use of doughnuts, foam rings, foam
cut-outs, and synthetic sheepskin.20
■ If a patient confined to a chair or wheelchair can stand,
assist the patient into a standing position every hour, if
possible.23
■ Inspect the skin under and around medical devices for
signs of pressure-related injury.22 Adjust or pad devices,
appliances, casts, or splints, as needed, to ensure proper fit
and to avoid increased pressure and impaired circulation.
■ Tell the patient to avoid using hot water, drying bar
soaps, and irritating cleaning agents, such as those with
fragrance or alcohol, because these items can dry the
skin.20 Teach the patient how to apply lotion after bathing,
or help the patient do so, to keep the skin hydrated. Also
instruct the patient to avoid vigorous massage because it
can damage capillaries.
■ If diarrhea develops or if the patient is incontinent,
change underpants and briefs after soiling. Clean the skin
with a no-rinse cleanser that has a pH similar to normal
skin.19,24 Apply a protective ointment or barrier film to
protect the skin from constant moisture and to prevent
moisture-associated skin damage.19,20,24
Staging pressure injuries
Pressure injury staging reflects the depth and extent of tissue involvement.
The classification system developed by the National Pressure Ulcer Advisory
Panel is the most widely used system. It categorizes pressure injuries into
four stages, two categories (deep tissue pressure injury and unstageable
pressure injury), and two additional types of pressure injury (medical device–
related pressure injury and mucosal membrane pressure injury).1
Stage 1
Stage 1 pressure injuries are characterized by intact skin with nonblanchable
redness of a localized area, which may appear differently in darkly pigmented
skin. Presence of blanchable erythema or changes in sensation, temperature,
or firmness may precede color changes. Color changes don’t include purple
or maroon discolorations, which may indicate deep tissue pressure injury.
Lightly pigmented
Darkly pigmented
Edema
Stage 2
A stage 2 pressure injury is characterized by partial-thickness loss of skin
with exposed dermis. The wound bed is viable, pink or red, and moist. It may
also present as an intact or open serum-filled blister. Adipose and deeper
tissues aren’t visible, and granulation tissue, slough, and eschar aren’t
present. Stage 2 injuries commonly result from an adverse microclimate and
shear in the skin over the pelvis or shear in the heel. This stage shouldn’t be
used to describe moisture-associated skin damage, including incontinence-
associated dermatitis, intertriginous dermatitis, medical-adhesive-related
skin injury, or traumatic wounds, such as skin tears, burns, or abrasions.
Stage 3
A stage 3 pressure injury is characterized by full-thickness loss of skin.
Subcutaneous fat is visible in the injury, but fascia, muscle, tendon, ligament,
cartilage, and bone aren’t exposed. Granulation tissue and rolled wound
edges (epibole) often are present. Slough, eschar, or both as well as
undermining and tunneling may be present. If slough or eschar obscures the
extent of the tissue loss, the injury is an unstageable pressure injury. The
depth of a stage 3 injury varies by anatomic location. Areas with significant
fatty tissue can develop deep wounds.
With epibole
Stage 4
A stage 4 pressure injury involves full-thickness skin and tissue loss with
exposed or directly palpable fascia, bone, tendon, ligament, cartilage, or
muscle. Slough or eschar may be present on some parts of the wound bed.
Rolled wound edges (epibole), undermining, and tunneling are also common.
The depth of a stage 4 injury varies by anatomic location. If slough or eschar
obscures the extent of the tissue loss, the injury is an unstageable pressure
injury.
Unstageable pressure injury
An unstageable pressure injury is characterized by full-thickness skin and
tissue loss in which the base of the injury in the wound bed is covered by
slough, eschar, or both obscuring the extent of damage. Until enough slough
or eschar can be removed to expose the base of the wound, the true depth
and, therefore, stage of the injury can’t be determined. Stable eschar (dry,
adherent, intact without erythema or fluctuance) on an ischemic limb or heel
shouldn’t be removed.
Dark eschar
Slough and eschar
Suspected deep tissue injury
A deep tissue pressure injury is characterized by an intact or nonintact skin
with a localized area of persistent nonblanchable deep red, purple, or maroon
discoloration or epidermal separation revealing a dark wound bed or blood-
filled blister. Pain and temperature changes often precede skin color changes.
Discoloration may appear differently in darkly pigmented skin, making it
difficult to detect. This injury results from intense or prolonged pressure and
shear forces at the bone-muscle interface. The injury may evolve rapidly to
reveal the extent of the tissue damage or may resolve without tissue loss.
Visibility of necrotic, subcutaneous, or granulation tissue, fascia, muscle, or
other underlying structures indicates a full thickness pressure injury
(unstageable, stage 3, or stage 4). Don’t use deep tissue pressure injury to
describe vascular, traumatic, neuropathic, or dermatologic conditions.
Additional pressure injuries
Medical device–related pressure injury
A medical device–related pressure injury results from use of a medical device
that was applied for diagnostic or therapeutic purposes. The injury commonly
appears in the shape or pattern of the medical device. This type of injury
should be staged using the staging system.
Mucosal membrane pressure injury
A mucosal membrane pressure injury occurs on mucous membranes as a
result of medical device use in the injury location. This type of injury can’t be
staged due to the injury location.
Used with permission from National Pressure Ulcer Advisory Panel.
■ If the patient’s condition permits, recommend a diet that
includes adequate calories, protein, and vitamins. Dietary
therapy may involve nutritional consultation, food
supplements, enteral feeding, or total parenteral
nutrition.25,26
■ Consult with your facility’s wound, continence, and
ostomy nurse, nutritionist or registered dietician, and
physical or occupational therapist, as indicated, because
pressure injury prevention requires a multidisciplinary
approach.18,23,27
■ Return the bed to the lowest position to prevent falls and
maintain patient safety.28
■ Remove and discard your gloves.16,17
■ Perform hand hygiene.3,4,5,6,7,8
■ Document the procedure.29,30,31,32
Special considerations
■ Comprehensive skin assessment shouldn’t be a one-time
event limited to admission. Repeat it regularly to determine
whether changes in skin condition have occurred. Perform a
comprehensive skin assessment when the patient is
admitted to the unit, daily while the patient is on the unit,
and when the patient is transferred or discharged. In some
settings, such an assessment may be done as frequently as
every shift. It may be appropriate to conduct more frequent
assessments on units in which pressure injuries may
develop rapidly, such as in a critical care unit. Staff on each
unit should know the frequency with which they should
perform comprehensive skin assessments.18,33 The
admission assessment is particularly important on arrival at
the emergency department, operating room, or
postanesthesia care unit.
■ Except for brief periods, avoid raising the head of the bed
more than 30 degrees to prevent shearing forces.
■ Avoid using elbow and heel protectors that fasten with a
single narrow strap. The strap may impair neurovascular
function in the involved hand or foot.
■ For an incontinent patient, use absorbent underpads or
undergarments that wick moisture away from the skin. The
WOCN also recommends establishing a bowel and bladder
management retraining program and possibly using a
pouching system or a bowel or fecal containment device to
contain excessive stool output and protect the skin. In
situations in which the severity of urinary incontinence has
contributed to or may contaminate a pressure injury, the
WOCN recommends considering use of an indwelling
catheter.20
■ Depending on the patient’s needs, repair of stage 3 and
stage 4 pressure injuries may require surgical intervention,
such as direct closure, skin grafting, and flaps.
Patient teaching
Make sure the patient, family members, and caregivers
learn pressure injury prevention and treatment strategies so
that they understand the importance of care, the available
choices, the rationales for treatments, and their own role in
selecting goals and shaping the care plan.23
Complications
If left untreated, pressure injuries may produce ischemia
and local infection. Advancing infection or cellulitis can lead
to septicemia. Severe erythema may signal worsening
cellulitis, which indicates that the offending organisms have
invaded the tissue and are no longer localized.
Documentation
Update the care plan, as required. On the clinical record,
document a complete skin assessment and interventions
used to prevent pressure injuries and the patient’s response
to those interventions. If a pressure injury develops, note
changes in the condition or size of the pressure injury and
elevations of skin temperature. Document when the
practitioner was notified of pertinent observations of
abnormalities, interventions performed, and the patient’s
response to interventions. Document teaching provided to
the patient and family (if applicable), their understanding of
that teaching, and whether they require follow-up teaching.
Braden scale: Predicting pressure
injury risk
The Braden scale is the most reliable of several instruments used to assess
the risk of developing pressure injuries. The numbers to the left of each
description are the points to be tallied; the lower the score, the greater the
risk.2
Patient’s name: ______________________________________
Evaluator’s name: ____________________________________
Distinguishing between pressure
injuries and moisture-associated
skin damage
Distinguishing between a stage 1 or 2 pressure injury and moisture-
associated skin damage often is difficult. Both conditions can occur over the
buttocks of an ill person. However, pressure injuries require pressure or shear
to develop. In addition, they normally occur over bony prominences and have
distinct edges. Necrosis may be present in a deep tissue pressure injury.19
Moisture-associated skin damage presents as an area of erythema. It can
extend into skinfolds, between buttocks, and down the thighs; skin damage is
shallow or superficial. Scaling of the skin may be present, with papule and
vesicle formation. Maceration and whitening of the skin may also be present.
The wound edges are irregular or diffuse. Patients commonly report burning,
itching, and pain. Necrosis isn’t present in moisture-associated skin
damage.19
Proper identification of the cause of a patient’s skin damage as pressure or
moisture is necessary to providing adequate treatment. Keep in mind that
incontinent patients who can’t reposition themselves may have a condition
that results from both pressure and moisture.19
REFERENCES
1 National Pressure Ulcer Advisory Panel. (2016). “NPUAP pressure injury
stages” [Online]. Accessed via the Web at
http://www.npuap.org/resources/educational-and-clinical-resources/npuap-
pressure-injury-stages/ (Level VII)
2 Braden, B., & Bergstrom, N. (1988). “Braden Scale—for predicting pressure
sore risk” [Online]. Accessed via the Web at
http://www.in.gov/isdh/files/Braden_Scale.pdf
3 Centers for Disease Control and Prevention. (2002). Guideline for hand
hygiene in health-care settings: Recommendations of the Healthcare Infection
Control Practices Advisory Committee and the HICPAC/SHEA/APIC/IDSA Hand
Hygiene Task Force. MMWR Recommendations and Reports, 51(RR-16), 1–45.
Accessed via the Web at https://www.cdc.gov/mmwr/pdf/rr/rr5116.pdf (Level
II)
4 World Health Organization. (2009). “WHO guidelines on hand hygiene in
health care: First global patient safety challenge, clean care is safer care”
[Online]. Accessed via the Web at
http://apps.who.int/iris/bitstream/10665/44102/1/9789241597906_eng.pdf
(Level IV)
5 The Joint Commission. (2019). Standard NPSG.07.01.01. Comprehensive
accreditation manual for hospitals. Oakbrook Terrace, IL: The Joint
Commission. (Level VII)
6 Accreditation Association for Hospitals and Health Systems. (2017). Standard
07.01.21. Healthcare Facilities Accreditation Program: Accreditation standards
for acute care hospitals. Chicago, IL: Accreditation Association for Hospitals
and Health Systems. (Level VII)
7 Centers for Medicare and Medicaid Services, Department of Health and
Human Services. (2015). Condition of participation: Infection control. 42 C.F.R.
§ 482.42.
8 DNV GL-Healthcare USA, Inc. (2016). IC.1.SR.1 . NIAHO® accreditation
requirements: Interpretive guidelines & surveyor guidance (version 11).
Milford, OH: DNV GL-Healthcare USA, Inc. (Level VII)
9 The Joint Commission. (2019). Standard NPSG.01.01.01. Comprehensive
accreditation manual for hospitals. Oakbrook Terrace, IL: The Joint
Commission. (Level VII)
10 Accreditation Association for Hospitals and Health Systems. (2017). Standard
15.01.16. Healthcare Facilities Accreditation Program: Accreditation
requirements for acute care hospitals. Chicago, IL: Accreditation Association
for Hospitals and Health Systems. (Level VII)
11 The Joint Commission. (2019). Standard RI.01.01.01. Comprehensive
accreditation manual for hospitals. Oakbrook Terrace, IL: The Joint
Commission. (Level VII)
12 Centers for Medicare and Medicaid Services, Department of Health and
Human Services. (2015). Condition of participation: Patient’s rights. 42 C.F.R.
§ 482.13(c)(1).
13 DNV GL-Healthcare USA, Inc. (2016). PR.1.SR.5 . NIAHO® accreditation
requirements: Interpretive guidelines & surveyor guidance (version 11).
Milford, OH: DNV GL-Healthcare USA, Inc. (Level VII)
14 The Joint Commission. (2019). Standard PC.02.01.21. Comprehensive
accreditation manual for hospitals. Oakbrook Terrace, IL: The Joint
Commission. (Level VII)
15 Waters, T. R., et al. (2009). “Safe patient handling training for schools of
nursing” [Online]. Accessed via the Web at
https://www.cdc.gov/niosh/docs/2009-127/pdfs/2009-127.pdf (Level VII)
16 Siegel, J. D ., et al. (2007, revised 2017). “2007 guideline for isolation
precautions: Preventing transmission of infectious agents in healthcare
settings” [Online]. Accessed via the Web at
https://www.cdc.gov/infectioncontrol/pdf/guidelines/isolation-guidelines.pdf
(Level II)
17 Accreditation Association for Hospitals and Health Systems. (2017). Standard
16.02.02. Healthcare Facilities Accreditation Program: Accreditation
requirements for acute care hospitals. Chicago, IL: Accreditation Association
for Hospitals and Health Systems. (Level VII)
18 Agency for Healthcare Research and Quality (AHRQ). (2014). Preventing
pressure ulcers in hospitals: A toolkit for improving quality of care. Rockville,
MD: ARHQ. Accessed via the Web at
http://www.ahrq.gov/professionals/systems/hospital/pressureulcertoolkit/inde
x.html (Level VII)
19 Zulkowski, K. (2012). Diagnosing and treating moisture-associated skin
damage. Advances in Skin & Wound Care, 25(5), 231–236. (Level VII)
20 Wound, Ostomy and Continence Nurses Society. (2016). Guideline for
prevention and management of pressure ulcers (injuries). Mount Laurel, NJ:
Wound, Ostomy, and Continence Nurses Society (WOCN). (Level VII)
21 McInnes, E., et al. (2015). Support surfaces for pressure ulcer prevention.
Cochrane Database of Systematic Reviews, 2015(9), CD001735. (Level I)
22 National Pressure Ulcer Advisory Panel and European Pressure Ulcer Advisory
Panel. (2014). “Prevention and treatment of pressure ulcers: Quick reference
guide” [Online]. Accessed via the Web at http://www.npuap.org/wp-
content/uploads/2014/08/Quick-Reference-Guide-DIGITAL-NPUAP-EPUAP-
PPPIA.pdf (Level VII)
23 Schofield, R., et al. (2013). Reviewing the literature on the effectiveness of
pressure relieving movements. Nursing Research and Practice, 2013, 124095.
Accessed via the Web at http://www.hindawi.com/journals/nrp/2013/124095/
(Level V)
24 Beeckman, D., et al. (2016). Interventions for preventing and treating
incontinence-associated dermatitis in adults. Cochrane Database of
Systematic Reviews, 2016(11), CD0011627. (Level I)
25 Sernekos, L. A. (2013). Nutritional treatment of pressure ulcers: What is the
evidence? Journal of the American Association of Nurse Practitioners, 25(6),
281–288. Accessed via the Web at
http://onlinelibrary.wiley.com/doi/10.1002/2327-6924.12025/pdf (Level V)
26 Doley, J. (2010). Nutrition management of pressure ulcers. Nutrition in
Clinical Practice, 25(1), 50–60 . (Level VII)
27 Posthauer, M.E ., et al. (2015). The role of nutrition for pressure ulcer
management: National Pressure Ulcer Advisory Panel, European Pressure
Ulcer Advisory Panel, and Pan Pacific Pressure Injury Alliance white paper.
Advances in Skin and Wound Care, 28(4), 175–188. Accessed via the Web at
https://cme.lww.com/files/TheRoleofNutritionforPressureUlcerManagementNat
ionalPressureUlcerAdvisoryPanelEuropeanPressureUlcerAdvisoryPanelandPanP
acificPressureInjuryAllianceWhitePaper-1426768197512.pdf (Level VII)
28 Ganz, D. A., et al. (2013). Preventing falls in hospitals: A toolkit for improving
quality of care (AHRQ Publication No. 13-0015-EF). Rockville, MD: Agency for
Healthcare Research and Quality. Accessed via the Web at
https://www.ahrq.gov/sites/default/files/publications/files/fallpxtoolkit_0 .pdf
(Level VII)
29 The Joint Commission. (2019). Standard RC.01.03 .01. Comprehensive
accreditation manual for hospitals. Oakbrook Terrace, IL: The Joint
Commission. (Level VII)
30 Centers for Medicare and Medicaid Services, Department of Health and
Human Services. (2015). Condition of participation: Medical record services.
42 C.F.R. § 482.24(b).
31 Accreditation Association for Hospitals and Health Systems. (2017). Standard
10.00 .03. Healthcare Facilities Accreditation Program: Accreditation
requirements for acute care hospitals. Chicago, IL: Accreditation Association
for Hospitals and Health Systems. (Level VII)
32 DNV GL-Healthcare USA, Inc. (2016). MR.2 .SR.1 . NIAHO® accreditation
requirements: Interpretive guidelines & surveyor guidance (version 11).
Milford, OH: DNV GL-Healthcare USA, Inc. (Level VII)
33 Accreditation Association for Hospitals and Health Systems. (2017). Standard
10.01.24. Healthcare Facilities Accreditation Program: Accreditation
requirements for acute care hospitals. Chicago, IL: Accreditation Association
for Hospitals and Health Systems. (Level VII)
PROGRESSIVE AMBULATION
After surgery or a period of bed rest, patients must begin
the gradual return to full ambulation. When it’s begun
promptly and properly, progressive ambulation thwarts
many of the complications of prolonged inactivity.
Immobility strongly increases the risk for venous
thromboembolism (VTE) in hospitalized medical, surgical,
and critically ill patients. These patients should be
encouraged to ambulate as soon and as often as possible.1
The American Academy of Orthopaedic Surgeons
recommends early progressive ambulation after hip and
knee arthroplasty to prevent VTE.2 Other complications
prevented by early progressive ambulation include
respiratory stasis and hypostatic pneumonia; urine
retention, urinary tract infection, urinary stasis, and calculus
formation; abdominal distention, constipation, and
decreased appetite; and sensory deprivation. Progressive
ambulation also helps restore the patient’s sense of
equilibrium and enhances self-confidence and self-image.3
In patients who have undergone hip replacement, early
dangling and ambulation result in excellent postoperative
pain management and a shortened length of stay.4
HOSPITAL-ACQUIRED CONDITION ALERT Keep in mind that VTE in
patients who underwent total knee replacement or hip replacement is
considered a hospital-acquired condition because it can be reasonably
prevented using best practices. Make sure you follow VTE prevention
practices (such as early ambulation) to reduce the risk of VTE.1,2,5,6
Progressive ambulation begins with dangling the patient’s
feet over the edge of the bed and progresses to seating the
patient in an armchair or wheelchair, walking around the
room with the patient, and then walking with the patient in
the halls until the patient can walk independently. The rate
of progress depends on the patient’s physical condition and
tolerance. Successful return to full ambulation requires
correct body mechanics, careful patient observation, and
open communication among patient, practitioner, and
nurse.
Equipment
Robe ▪ chair or wheelchair ▪ slippers for sitting or hard-
soled shoes for walking ▪ Optional: assistive device (such as
a cane, crutches, or a walker), prescribed analgesic, blood
pressure monitoring equipment, stethoscope, disinfectant
pad, gait belt, powered stand-assist lift.
If the patient requires an assistive device, the physical
therapist usually selects the appropriate one and teaches
about its use.
Implementation
■ Check the patient’s history, diagnosis, and therapeutic
regimen.
■ Gather the appropriate equipment.
■ Perform hand hygiene.7,8,9,10,11,12
■ Confirm the patient’s identity using at least two patient
identifiers.13
■ Provide privacy.14,15,16,17
■ Perform a comprehensive pain assessment using
techniques appropriate for the patient’s age, condition, and
ability to understand.18
■ Administer an analgesic, as needed and ordered,
following safe medication practices.19,20,21,22 Wait 30 to 60
minutes for it to take effect before attempting ambulation.
NURSING ALERT Keep in mind a medicated patient may develop
hypotension, dizziness, and drowsiness, increasing the patient’s risk
of falling. Review the patient’s medications to determine whether the
patient is at an increased risk.
■ Explain the goal of ambulation. Provide encouragement,
because the patient may be hesitant or fearful; provide
reassurance that the patient need not attempt more than
the he or she can reasonably do. If the patient fears pain in
an incision, show the patient how to support the incision by
placing a hand alongside or gently over the dressing site, or
splint the incision for the patient.
■ Ask a coworker for assistance, as needed.
■ Remove equipment or other objects from the patient’s
path, if appropriate, to provide a clear path and to help
prevent falls.23
■ If the patient has IV tubing, or other tubing or catheters,
secure them to prevent accidental dislodgement. Don’t let
them discourage ambulation.
■ Lock the wheels on the bed or chair, if appropriate.23
Dangling the patient’s legs
■ Position the bed horizontally and the patient laterally,
facing you.
■ Assist with moving the patient’s legs over the side of the
bed.
■ Grasp the patient’s shoulders, standing with your feet
apart so you have a wide base of support.
■ Help the patient to rise slowly to reduce the risk of falls.24
Ask the patient to help by pushing up from the bed with the
arms. Then shift your weight from the foot closest to the
patient’s head to the other foot as you steadily raise the
patient to the sitting position. Pull with your whole body, not
just your arms, to avoid straining your back and jostling the
patient. Alternatively, you can raise the head of the bed to a
45-degree angle to allow easier elevation of the patient.
Don’t use this method if the patient has trouble balancing
while sitting. Ask a coworker for assistance whenever
necessary.
■ While the patient adjusts to an upright position, continue
to stand facing the patient to keep the patient from falling,
and observe the patient closely. Be alert for signs and
symptoms of orthostatic hypotension, such as fainting,
dizziness, and complaints of blurred vision. Be prepared to
respond quickly if these signs and symptoms develop to
prevent the patient from falling.
■ Check the patient’s pulse rate and blood pressure, as
needed. If the pulse rate increases more than 20
beats/minute, allow the patient to rest before slowly
progressing.
Helping the patient stand
■ Before attempting the standing position, help the patient
put on a robe and nonskid slippers first (if the patient’s not
going to walk) or hard-soled shoes (if the patient’s going to
try to walk).
■ Don’t allow the robe, a drainage tube, or anything else to
dangle around the patient’s feet.
HOSPITAL-ACQUIRED CONDITION ALERT Keep in mind that an injury
from a fall is considered a hospital-acquired condition because it can
be reasonably prevented using best practices. Make sure to follow fall
prevention practices (such as using a gait belt if necessary and having
the patient rise slowly and wear nonskid footwear) to reduce the risk
of injury from patient falls.5,6,24
■ If the patient is cooperative and can bear weight fully,
have the patient place the feet flat on the floor and allow
the patient to stand. Stand by for safety.23 Alternatively, if
the patient is cooperative and can partially bear weight,
apply a gait belt and use another assistive device, as
ordered, to assist with standing. (See the “Gait belt use”
procedure, page 326.) If you’re required to life more than 35
lb (15.8 kg) of the patient’s weight to assist with standing,
use a powered stand-assist life to help the patient stand.23
■ Encourage the patient to look forward and not at the floor
to help maintain balance.
Helping the patient sit
■ Make sure the chair is secure or the wheelchair brakes
are applied to prevent the patient from falling as the patient
lowers to a sitting position.24
■ After the patient stands, have the patient pivot and lower
into a chair with armrests and a straight back, or into a
wheelchair.
■ Instruct the patient to sit with the lower back against the
rear of the chair, feet flat on the floor, hips and knees at
right angles, and upper body straight. Tell the patient to flex
the elbows and rest the forearms on the armrests of the
chair (as shown below).
Make sure to provide a call light or other signal device if
you leave the patient sitting in the chair to reduce the risk
of falling.24
Helping the patient walk
■ If the patient can bear weight fully, have the patient
begin walking while you stand by for safety.23
■ If the patient requires a gait belt, place one hand under
the gait belt in back of the patient. If the patient is weaker
on one side, make sure to walk on that side when
ambulating (as shown on top right) because the patient will
tend to lean to this side. Encourage the patient to use an
assistive device if needed.
■ Walk closely behind and slightly to the side of the patient,
keeping the same pattern and pace as the patient.
■ Give the patient verbal and tactile cues for
encouragement.
■ Allow for rest periods as needed.
Completing the procedure
■ Perform hand hygiene.7,8,9,10,11,12
■ Clean and disinfect your stethoscope using a disinfectant
pad, as needed.25
■ Perform hand hygiene.7,8,9,10,11,12
■ Document the procedure.26,27,28,29
Special considerations
■ If early ambulation is impossible, encourage bed
exercises.
■ Check dressings and tubes carefully after ambulation for
proper position and changes in drainage.
■ If the patient begins to fall, try to break the fall by easing
the patient to the bed, chair, or floor, making sure the
patient doesn’t strike the head. Then summon help. Don’t
leave the patient alone; stay and provide comfort and
reassurance.
■ If the patient experiences dyspnea, diaphoresis, or
orthostatic hypotension, stabilize the patient’s position and
take vital signs. Place the patient in the semi-Fowler position
to facilitate breathing. If the patient’s condition doesn’t
improve rapidly, notify the practitioner.
Complications
Orthostatic hypotension, dyspnea, diaphoresis, and falls are
common complications of progressive ambulation.
Documentation
Record the type of transfer and assistance needed; the
duration of sitting, standing, or walking; the distance
walked, if applicable; the patient’s response to ambulation;
and any significant changes in blood pressure, pulse, and
respiration.
REFERENCES
1 American Association for Critical-Care Nurses. (2016). “A ACN practice alert:
Preventing venous thromboembolism in adults” [Online]. Accessed via the
Web at https://www.aacn.org/~/media/aacn-website/clincial-
resources/practice-alerts/venous-thromboembolism-pa.pdf
2 American Academy of Orthopaedic Surgeons (AAOS). (2011). “Preventing
venous thromboembolic disease in patients undergoing elective hip and knee
arthroplasty: Evidence-based guideline and evidence report” [Online].
Accessed via the Web at
http://www.aaos.org/research/guidelines/VTE/VTE_full_guideline.pdf (Level I)
3 Killey, B., & Watt, E. (2006). The effect of extra walking on the mobility,
independence and exercise self-efficacy of elderly hospital in-patients: A pilot
study. Contemporary Nurse, 22(1), 120–133.
4 Morris, B. A., et al. (2010). Clinical practice guidelines for early mobilization
hours after surgery. Orthopaedic Nursing, 29(5), 290–316. Accessed via the
Web at http://www.nursingcenter.com/lnc/CEArticle?an=00006416-
201009000-00003&Journal_ID=403341&Issue_ID=1092086 (Level IV)
5 Accreditation Association for Hospitals and Health Care. (2017). Standard
16.02.02. Healthcare Facilities Accreditation Program: Accreditation
requirements for acute care hospitals. Chicago, IL: Accreditation Association
for Hospitals and Health Care. (Level VII)
6 Jarrett, N., & Callaham, M. (2016). “Evidence-based guidelines for selected
hospital-acquired conditions: Final report” [Online]. Accessed via the Web at
https://www.cms.gov/Medicare/Medicare-Fee-for-Service-
Payment/HospitalAcqCond/Downloads/2016-HAC-Report.pdf
7 The Joint Commission. (2017). Standard NPSG.07.01.01. Comprehensive
accreditation manual for hospitals. Oakbrook Terrace, IL: The Joint
Commission. (Level VII)
8 Centers for Disease Control and Prevention. (2002). Guideline for hand
hygiene in health-care settings: Recommendations of the Healthcare Infection
Control Practices Advisory Committee and the HICPAC/SHEA/APIC/IDSA Hand
Hygiene Task Force. MMWR Recommendations and Reports, 51(RR-16), 1–45.
Accessed via the Web at http://www.cdc.gov/mmwr/pdf/rr/rr5116.pdf (Level II)
9 World Health Organization. (2009). “WHO guidelines on hand hygiene in
health care: First global patient safety challenge, clean care is safer care”
[Online]. Accessed via the Web at
http://apps.who.int/iris/bitstream/10665/44102/1/9789241597906_eng.pdf
(Level IV)
10 Centers for Medicare and Medicaid Services, Department of Health and
Human Services. (2015). Condition of participation: Infection control. 42 C.F.R.
§ 482.42.
11 Accreditation Association for Hospitals and Health Care. (2017). Standard
07.01.21. Healthcare Facilities Accreditation Program: Accreditation
requirements for acute care hospitals. Chicago, IL: Accreditation Association
for Hospitals and Health Care. (Level VII)
12 DNV GL-Healthcare USA, Inc. (2016). IC.1 .SR.1 . NIAHO® accreditation
requirements: Interpretive guidelines & surveyor guidance (version 11).
Milford, OH: DNV GL-Healthcare USA, Inc. (Level VII)
13 The Joint Commission. (2019). Standard NPSG.01.01.01. Comprehensive
accreditation manual for hospitals. Oakbrook Terrace, IL: The Joint
Commission. (Level VII)
14 The Joint Commission. (2019). Standard RI.01.01.01. Comprehensive
accreditation manual for hospitals. Oakbrook Terrace, IL: The Joint
Commission. (Level VII)
15 DNV GL-Healthcare USA, Inc. (2016). PR.1.SR.5 . NIAHO® accreditation
requirements: Interpretive guidelines & surveyor guidance (version 11).
Milford, OH: DNV GL-Healthcare USA, Inc. (Level VII)
16 Centers for Medicare and Medicaid Services, Department of Health and
Human Services. (2015). Condition of participation: Patient’s rights. 42 C.F.R.
§ 482.13(c)(1).
17 Accreditation Association for Hospitals and Health Care. (2017). Standard
15.01.16. Healthcare Facilities Accreditation Program: Accreditation
requirements for acute care hospitals. Chicago, IL: Accreditation Association
for Hospitals and Health Care. (Level VII)
18 The Joint Commission. (2019). Standard PC.01.02.07. Comprehensive
accreditation manual for hospitals. Oakbrook Terrace, IL: The Joint
Commission. (Level VII)
19 Accreditation Association for Hospitals and Health Care. (2017). Standard
16.01.03. Healthcare Facilities Accreditation Program: Accreditation
requirements for acute care hospitals. Chicago, IL: Accreditation Association
for Hospitals and Health Care. (Level VII)
20 Centers for Medicare and Medicaid Services, Department of Health and
Human Services. (2015). Condition of participation: Nursing services. 42
C.F.R. § 482.23(c).
21 The Joint Commission. (2019). Standard MM.06.01.01. Comprehensive
accreditation manual for hospitals. Oakbrook Terrace, IL: The Joint
Commission. (Level VII)
22 DNV GL-Healthcare USA, Inc. (2016). MM.1 .SR.2. NIAHO® accreditation
requirements: Interpretive guidelines & surveyor guidance (version 11).
Milford, OH: DNV GL-Healthcare USA, Inc. (Level VII)
23 Waters, T. R., et al. (2009). “Safe patient handling training for schools of
nursing” [Online]. Accessed via the Web at
http://www.cdc.gov/niosh/docs/2009-127/pdfs/2009-127.pdf
24 Ganz, D. A., et al. (2013). Preventing falls in hospitals: A toolkit for improving
quality of care (AHRQ Publication No. 13-0015-EF). Rockville, MD: Agency for
Healthcare Research and Quality. Accessed via the Web at
http://www.ahrq.gov/sites/default/files/publications/files/fallpxtoolkit.pdf
(Level VII)
25 Rutala, W. A., et al. (2008, revised 2017). “Guideline for disinfection and
sterilization in healthcare facilities, 2008” [Online]. Accessed via the Web at
http://www.cdc.gov/hicpac/pdf/guidelines/Disinfection_Nov_2008.pdf (Level I)
26 The Joint Commission. (2019). Standard RC.01.03 .01. Comprehensive
accreditation manual for hospitals. Oakbrook Terrace, IL: The Joint
Commission. (Level VII)
27 Centers for Medicare and Medicaid Services, Department of Health and
Human Services. (2015). Condition of participation: Medical record services.
42 C.F.R. § 482.24.
28 Accreditation Association for Hospitals and Health Care. (2017). Standard
10.00 .03. Healthcare Facilities Accreditation Program: Accreditation
requirements for acute care hospitals. Chicago, IL: Accreditation Association
for Hospitals and Health Care. (Level VII)
29 DNV GL-Healthcare USA, Inc. (2016). MR.2 .SR.1 . NIAHO® accreditation
requirements: Interpretive guidelines & surveyor guidance (version 11).
Milford, OH: DNV GL-Healthcare USA, Inc. (Level VII)
PRONE POSITIONING
Prone positioning is a therapeutic maneuver to improve
oxygenation and pulmonary mechanics in patients with
acute lung injury or mechanically ventilated patients with
acute respiratory distress syndrome (ARDS) who require
high concentrations of inspired oxygen. Also known as
proning, the procedure involves physically turning a patient
from a supine position (on the back) to a face-down position
(prone) position.
The recommended criteria for using prone positioning
include patients with ARDS who require high plateau
pressure or a high fraction of inspired oxygen, which make
mechanical ventilation potentially damaging to the lungs.1
The physical challenges of prone positioning have been a
traditional barrier to its use. However, equipment
innovations (such as a lightweight, cushioned frame that
straps to the front of the patient before turning) have helped
to minimize the risks associated with moving patients and
maintaining them in the prone position for several hours at
a time. Several bed manufacturers have also developed
automated systems designed to provide multiple intervals
of prone therapy automatically over an extended time. With
the appropriate equipment, prone positioning may promote
better movement of the diaphragm by allowing the
abdomen to expand more fully.
There isn’t an established recommended timeframe for
prone positioning. Most studies used repeated sessions of
prone positioning that lasted either 6 to 8 hours per day or
17 to 20 hours per day, with similar results.2 Prone
positioning usually is performed until the requirement for a
high concentration of inspired oxygen resolves.3 Patients
with ARDS have improved oxygenation when prone
positioning is used during mechanical ventilation. Research
has demonstrated increased survival rates when prone
positioning is used during mechanical ventilation in patients
with moderate to severe ARDS who received protective lung
ventilation (tidal volume of less than 8 mL/kg).4 In these
patients, prone positioning was used for 16 or more hours
per day.5
Prone positioning can be accomplished by manually
turning the patient or by using an automated proning
device, such as the RotoProneTM Therapy System. Prone
positioning is contraindicated in patients whose heads can’t
be supported in a face-down position as well as in those who
can’t
tolerate
a
head-down
position.
Relative
contraindications include increased intracranial pressure;
unstable spine, chest, or pelvis; unstable bone fractures;
left-sided heart failure (nonpulmonary respiratory failure);
shock; abdominal compartment syndrome; abdominal
surgery; extreme obesity (greater than 300 lb [136 kg]); and
pregnancy. Thorough evaluation of hemodynamically
unstable patients (systolic blood pressure less than 90 mm
Hg [12kPa] despite aggressive fluid resuscitation and
vasopressors) is essential before initiating prone positioning.
Contraindications specific to RotoProneTM Therapy include
unstable cervical, thoracic, lumbar, pelvic, skull, or facial
fractures; cervical or skeletal traction; uncontrolled
intracranial pressure; body weight below 88 lb (40 kg) or
above 350 lb (159 kg); or height less than 54′′ (137 cm) or
greater than 78′′ (198 cm).5
Equipment
Hospital bed, specialty bed, or automated prone-positioning
device ▪ small towels ▪ small pillows or rolled towels or gel
or foam positioning devices ▪ foam or other padded
dressings6 ▪ drawsheet ▪ suction equipment ▪ oral care
supplies (see the “Oral care” procedure, page 552) ▪ vital
signs monitoring equipment ▪
pulse oximeter ▪
capnography equipment ▪ stethoscope ▪ disinfectant pad ▪
cardiac monitoring equipment ▪ arterial blood gas sampling
equipment ▪ emergency equipment (code cart with cardiac
medications, defibrillator, handheld resuscitation bag with
mask, intubation equipment) ▪ hospital-grade disinfectant ▪
gloves ▪ Optional: other personal protective equipment,
wound and ostomy care supplies, skin care supplies, tape,
bite block, dental mouth prop, eye lubricant, labels.
Preparation of equipment
Turn off the patient’s enteral tube feeding 1 hour before
prone positioning to reduce the risk of aspiration during the
turning procedure.1,7 Make sure that emergency equipment
is readily available and functioning properly.1 Using a
hospital-grade disinfectant, clean and disinfect the
positioner between positioning turns and
when
discontinuing prone positioning.8,9
Implementation
■ Verify the practitioner’s order. If your facility requires the
presence of a practitioner for initial proning, collaborate with
the practitioner to set up a time for initial proning.
■ Perform hand hygiene.10,11,12,13,14,15
■ Confirm the patient’s identity using at least two patient
identifiers.16
■ Provide privacy.17,18,19,20
Assessing the patient
■ Assess the patient’s hemodynamic status to determine
whether the patient can tolerate the prone position.
■ Assess the patient’s neurologic status before prone
positioning. Typically, the patient will be sedated heavily.
Although agitation isn’t a contraindication for the procedure,
you must manage it effectively.
■ Determine whether the patient’s size and weight will
allow turning 180 degrees on a narrow critical care bed. If
needed, consider obtaining a wider specialty bed or the
RotoProneTM Therapy System.
■ Explain the procedure to the patient and family (if
appropriate) according to their individual communication
and learning needs to increase their understanding, allay
their anxiety, and enhance and promote cooperation.21
Before turning the patient
■ Gather the equipment.
■ Perform hand hygiene.10,11,12,13,14,15
■ Put on gloves or other protective equipment, as needed,
to comply with standard precautions.22,23
■ Provide eye care, including lubrication and horizontal
taping of eyelids, if indicated.1
■ Ensure that the patient’s tongue is inside the mouth; if
it’s edematous or protruding, insert a dental mouth prop or
bite block. Avoid bite blocks that fit over the tongue because
of the risk of tongue breakdown.1
■ Secure the patient’s endotracheal (ET) tube or
tracheotomy tube to prevent accidental dislodgment.1
■ Perform anterior body wound care and dressing changes,
as needed.1
■ Use foam or other padded dressings or positioning
devices to protect anterior bony prominences and other
areas that are likely to have prolonged contact with bed
surfaces (such as shoulders, hips, knees, anterior lower legs,
great toes, outer ears and chin).24
■ Empty ileostomy or colostomy drainage bags.1
■ Remove anterior chest wall electrocardiogram (ECG)
monitoring leads while ensuring the ability to monitor the
patient’s cardiac rate and rhythm. You’ll position these leads
on the patient’s back after the patient is in the prone
position.1
■ Ensure that the bed’s brake is engaged.
Turning the patient manually
■ Raise the bed to hip level to prevent back strain while
turning the patient.25
■ Position at least three and up to six staff members
appropriately on either side of the bed and at the head of
the bed, depending on the size and complexity of the
patient.1,5
NURSING ALERT The staff member at the head of the bed is
responsible for monitoring the ET tube and mechanical ventilator
tubing.
■ Adjust all patient tubing and invasive monitoring lines to
prevent dislodgment, kinking, disconnection, or contact with
the patient’s body during the turning procedure and while
the patient remains in the prone position.
NURSING ALERT Place all lines inserted in the upper torso over the
right or left shoulder, with the exception of chest tubes, which are
placed at the foot of the bed. Position all lines inserted in the lower
torso at the foot of the bed.1
■ Turn the patient’s face away from the ventilator, placing
the ET tubing on the side of the patient’s face that’s turned
away from the ventilator.1 Loop the remaining tubing above
the patient’s head to prevent disconnection of the ventilator
tubing or kinking of the ET tube.
■ Lower the side rails of the bed and move the patient to
the edge of the bed farthest away from the ventilator using
a drawsheet or transfer device. The person closest to the
patient maintains body contact with the bed at all times,
serving as a side rail.1
■ Tuck the patient’s arm and hand that are resting in the
center of the bed under the buttocks. Cross the leg closest
to the edge of the bed over the opposite leg at the ankle,
which will help with forward motion when the turning
process begins.1
NURSING ALERT If you can’t straighten and tuck the patient’s arm
under the buttocks, tuck the arm into the open space between the
chest and pelvic pads.
■ Turn the patient toward the ventilator, first turning the
patient onto the side, and then roll the patient into the
prone position.1
NURSING ALERT Always turn the patient in the direction of the
mechanical ventilator.
■ Gently move the patient’s tucked arm and hand so
they’re parallel to the body, and then flex them to a
comfortable position.1 Alternatively, place one of the
patient’s arms up and one down, as in a swimmer’s
position.1,5
■ Support the patient’s ankles and feet with a pillow or
towel roll to provide correct flexion while prone.1
■ Pad the patient’s elbows with small towels to prevent
ulnar nerve compression.
■ Replace ECG monitoring leads on the patient’s back.
Make sure that ECG alarm limits are set appropriately for
the patient’s current condition, and that alarms are turned
on, functioning properly, and audible to staff.26,27,28,29
■ Readjust all patient tubing and invasive monitoring lines.
Route the tubing toward the patient’s feet, and place the
enteral feeding pump toward the foot of the bed, because a
standardized approach of keeping IV lines routed toward the
head and enteric lines routed toward the feet helps prevent
dangerous misconnections. If different access sites are
used, label each tubing at both the distal end (near the
patient connection) and the proximal end (near the source
container) to distinguish the different tubing and prevent
misconnections.30
■ Readjust the bed to waist level for patient care to prevent
back strain.25
Turning the patient using the RotoProneTM
Therapy system1,5
■ Ask a coworker to help you position the patient on the
RotoProneTM Therapy System.
■ Secure ventilator tubes and other upper body lines into
the tube management system at the head of the bed.
■ Secure all lower body tubes and lines through the circular
opening at the foot of the bed.
■ Make sure all tubes have enough slack and can slide
freely without being pinched or compressed by the tube
management system during turning.
NURSING ALERT Don’t hang or attach any equipment to the side of
the RotoProneTM Therapy System support frame.5
■ Secure the patient into the system following the
manufacturer’s instructions, as described in the following
steps:
■ Secure the patient within the side packs to prevent shear
or friction injuries during turning.
■ Secure the abdominal support mesh over the patient’s
abdomen.
■ Position the lower leg packs, pelvic pack, and chest pack
appropriately.
■ Make sure the patient’s head is secure within the
headpiece.
■ Place the face pack on the patient’s face, making sure the
top pad is above the eyebrows and the side pieces are
around the mouth.
■ Remove all equipment from around the RotoProneTM
Therapy System before turning to prevent patient or
caregiver injury.5
■ Use the RotoProneTM touch screen to turn the patient
prone following the manufacturer’s instructions.
■ Using the touch screen, place the patient in the reverse
Trendelenburg position to elevate the head of the bed,
decrease edema, and prevent aspiration.1
■ Open back hatches and replace ECG monitoring leads.
Make sure that alarm limits are set appropriately for the
patient’s current condition, and that alarms are turned on,
functioning properly, and audible to staff.26,27,28,29
■ Readjust all patient tubing and invasive monitoring lines.
Route the tubing toward the patient’s feet, and place the
enteral feeding pump toward the foot of the bed, because a
standardized approach of keeping IV lines routed toward the
head and enteric lines routed toward the feet prevents
dangerous misconnections. If different access sites are
used, label each tubing at both the distal end (near the
patient connection) and the proximal end (near the source
container) to distinguish the different tubing and prevent
misconnections.30
Monitoring the patient
■ Monitor the patient’s response to the prone position by
assessing vital signs, oxygen saturation level (by pulse
oximeter), and capnography. The patient’s vital signs should
return to normal within 10 minutes of initiating the prone
position. Obtain an arterial sample for blood gas analysis, as
ordered, within 30 minutes of a position change.1
■ Assess the patient’s skin at intervals determined by the
patient’s condition, and provide skin care as needed. Keep
the patient’s skin clean and dry to prevent pressure
injuries.6,31
■ Reposition the patient’s head hourly while the patient is
in the prone position to prevent facial breakdown. As one
person lifts the patient’s head, the second person moves the
headpieces to provide head support in a different position.1
■ Perform range-of-motion exercises to the shoulders, arms,
and legs every 2 hours.
■ If the patient was turned prone manually, adjust the
patient’s position frequently to prevent skin breakdown.5
HOSPITAL-ACQUIRED CONDITION ALERT A stage 3 or 4 pressure
injury is considered a hospital-acquired condition by the Centers for
Medicare and Medicaid Services because it can be reasonably
prevented using best practices. Follow pressure injury prevention
practices (such as performing a skin assessment, repositioning the
patient, and managing moisture) to reduce the risk of pressure
injuries.6,31,32
■ Give frequent oral care, and suction the patient’s airway
as needed. The prone position promotes postural drainage.
■ After the patient is prone, restart the patient’s tube
feeding, as ordered and tolerated; prone position involves
minimal risk of aspiration because the patient is in a head-
down position.1
■ Assess the security of the ET tube or tracheostomy tube
and all lines and tubes.5
■ Monitor the length of time the patient is prone; the
duration and frequency of proning should be individualized
according to the patient’s tolerance or the practitioner’s
order, or as directed by the facility.5
■ Return the bed to the lowest position to prevent falls and
maintain patient safety.33
■ Remove and discard your gloves and any other personal
protective equipment worn,23 and perform hand
hygiene.10,11,12,13,14,15
Returning the patient to the supine position
■ Perform hand hygiene.10,11,12,13,14,15
■ Put on gloves and other personal protective equipment as
needed to comply with standard precautions.22,23
■ Remove the posterior chest ECG leads while ensuring the
ability to monitor the patient’s cardiac rate and rhythm;
you’ll reposition the leads on the patient’s chest once the
patient is in the supine position.
■ To return the patient to the supine position manually:
Raise the bed to hip level to prevent back strain while
turning the patient.25 Position the patient on the edge of the
bed closest to the ventilator.1 Adjust all patient tubing and
monitoring lines to prevent dislodgment.1 Position at least
three and up to six staff members appropriately on either
side of the bed and at the head of the bed, depending on
the size and complexity of the patient.15 Straighten the
patient’s arms and rest them on either side. Cross the leg
closest to the edge of the bed over the opposite leg.1 Turn
the patient onto the side and then onto the back. Position
the patient’s arms parallel to the body.
■ To return the patient to the supine position using the
RotoProneTM Therapy System: Use the touch screen and
follow manufacturer’s instructions to turn the patient to the
supine position. Insert the locking pin.1 Remove the face
pack. Using the touch screen, place the patient in the
reverse Trendelenburg position to elevate the head of the
bed, decrease edema, and prevent aspiration.1
■ Replace ECG monitoring leads on the patient’s chest.
Make sure that ECG alarm limits are set appropriately for
the patient’s current condition, and that alarms are turned
on, functioning properly, and audible to staff.26,27,28,29
■ Readjust all patient tubing and invasive monitoring lines.
Route the tubing toward the patient’s feet, and place the
enteral feeding pump toward the foot of the bed, because a
standardized approach of keeping IV lines routed toward the
head and enteric lines routed toward the feet prevents
dangerous misconnections. If different access sites are
used, label each tubing at both the distal end (near the
patient connection) and the proximal end (near the source
container) to distinguish the different tubings and prevent
misconnections.30
■ Assess the patient’s response.
■ If you raised the bed, return it to the lowest position to
prevent falls and maintain the patient’s safety.33
■ Remove and discard your gloves and any other personal
protective equipment worn.22,23
■ Perform hand hygiene.10,11,12,13,14,15
■ Clean and disinfect your stethoscope.8,9
■ Perform hand hygiene.10,11,12,13,14,15
■ Document the procedure.34,35,36,37
Special considerations
■ You’ll usually need a practitioner’s order before prone
positioning of a critically ill patient.
■ The Joint Commission issued a sentinel event alert
concerning medical device alarm safety, because alarm-
related events have been associated with permanent loss of
function or death. Among the major contributing factors
were improper alarm settings, alarms turned off
inappropriately, and alarm signals not audible to staff. Make
sure alarm limits are set appropriately, and that alarms are
turned on and audible. Follow facility guidelines for
preventing alarm fatigue.29
■ The Joint Commission issued a sentinel event alert related
to managing risk during transition to new International
Organization for Standardization tubing standards that were
designed to prevent dangerous tubing misconnections,
which can lead to serious patient injury and death. During
the transition, make sure to trace the tubing and catheter
from the patient to the point of origin before connecting or
reconnecting any device or infusion, at any care transition
(such as a new setting or service), and as part of the hand-
off process; route tubes and catheters having different
purposes in different, standardized directions; label the
tubing at both the distal and proximal ends (when there are
different access sites or several bags hanging); use tubing
and equipment only as intended; and store medications for
different delivery routes in separate locations.30
■ The procedure requires special training and established
guidelines to ensure patient safety.
■ Not all patients with ARDS respond favorably to prone
positioning, and the benefit sometimes decreases over time.
■ The patient may not have an immediate positive
response to the prone position. Maximum response to the
position may take up to 6 hours in some patients.1
■ Some patients may require increased sedation during the
procedure.
■ The prone-positioning schedule is generally determined
by the patient’s ability to maintain improvements in partial
pressure of arterial oxygen while in the prone position.1
■ Use capnography, if possible, to detect dislodgement of
the ET tube.
■ Discontinue the procedure when the patient no longer
demonstrates improved oxygenation with the position
change.
NURSING ALERT Lateral rotation therapy is strongly recommended
with prone positioning.
Complications
Potential complications of prone positioning include
inadvertent ET extubation; airway obstruction; decreased
oxygen saturation; apical atelectasis; obstructed chest tube;
pressure injuries on the weight-bearing parts of the body,
including the knees and chest; hemodynamic instability;
dislodgment of central venous access; transient
arrhythmias; reversible dependent edema of the face
(forehead, eyelids, conjunctiva, lips, and tongue) and
anterior chest wall; contractures; enteral feeding
intolerance; aspiration of enteral feeding when repositioned;
and corneal ulceration.
NURSING ALERT Critically ill patients with active intra-abdominal
processes, regardless of position, are at risk for sepsis and septic
shock.
Documentation
Document the patient’s response to therapy, ability to
tolerate the turning procedure, length of time in the
position, and positioning schedule. Also document your
assessments, monitoring details, any complications during
or after the procedure, and any nursing interventions.
Record patient and family teaching and their understanding
of your teaching.
REFERENCES
1 Wiegand, D. L. (2017). AACN procedure manual for high acuity, progressive
and critical care (7th ed.). Philadelphia, PA: Elsevier.
2 Schwartz, D., et al. Prone ventilation for adult patients with acute respiratory
distress syndrome. (2016). In: UpToDate, Parsons, P. (Ed.). Retrieved from:
www.uptodate.com
3 Scholten, E. L ., et al. (2017). Treatment of ARDS with prone positioning.
Chest, 151(1), 215–224. (Level I)
4 Sud, S., et al. (2014). Effect of prone positioning during mechanical
ventilation on mortality among patients with acute respiratory distress
syndrome: A systematic review and meta-analysis. Canadian Medical
Association Journal, 186(10), E381–E390. Accessed via the Web at
http://www.cmaj.ca/content/186/10/E381.full (Level I)
5 ArjoHuntleigh, Inc. (n.d.) . “RotoproneTM Therapy System therapy guidelines”
[Online]. Accessed via the Web at
http://www.arjohuntleigh.com/knowledge/critical-care/clinical-guidelines/
6 National Pressure Ulcer Advisory Panel, et al. (2014). “Prevention and
treatment of pressure ulcers: Quick reference guide” [Online]. Accessed via
the Web at http://www.npuap.org/wp-content/uploads/2014/08/Quick-
Reference-Guide-DIGITAL-NPUAP-EPUAP-PPPIA.pdf (Level VII)
7 Reignier, J., et al. (2010). Before-after study of a standardized ICU protocol for
early enteral feeding in patients turned in the prone position. Clinical
Nutrition, 29(2), 210–216. (Level VI)
8 Rutala, W. A., et al. (2008, revised 2017). “Guideline for disinfection and
sterilization in healthcare facilities, 2008” [Online]. Accessed via the Web at
https://www.cdc.gov/infectioncontrol/pdf/guidelines/disinfection-
guidelines.pdf (Level I)
9 Accreditation Association for Hospitals and Health Systems. (2017). Standard
07.02.03. Healthcare Facilities Accreditation Program: Accreditation
requirements for acute care hospitals. Chicago, IL: Accreditation Association
for Hospitals and Health Systems. (Level VII)
10 Centers for Disease Control and Prevention. (2002). Guideline for hand
hygiene in health-care settings: Recommendations of the Healthcare Infection
Control Practices Advisory Committee and the HICPAC/SHEA/APIC/IDSA Hand
Hygiene Task Force. MMWR Recommendations and Reports, 51(RR-16), 1–45.
Accessed via the Web at https://www.cdc.gov/mmwr/pdf/rr/rr5116.pdf (Level
II)
11 World Health Organization. (2009). “WHO guidelines on hand hygiene in
health care: First global patient safety challenge, clean care is safer care”
[Online]. Accessed via the Web at
http://apps.who.int/iris/bitstream/10665/44102/1/9789241597906_eng.pdf
(Level IV)
12 The Joint Commission. (2019). Standard NPSG.07.01.01. Comprehensive
accreditation manual for hospitals. Oakbrook Terrace, IL: The Joint
Commission. (Level VII)
13 Accreditation Association for Hospitals and Health Systems. (2017). Standard
07.01.21. Healthcare Facilities Accreditation Program: Accreditation
requirements for acute care hospitals. Chicago, IL: Accreditation Association
for Hospitals and Health Systems. (Level VII)
14 Centers for Medicare and Medicaid Services, Department of Health and
Human Services. (2015). Condition of participation: Infection control. 42 C.F.R.
§ 482.42.
15 DNV GL-Healthcare USA, Inc. (2016). IC.1 .SR.1 . NIAHO® accreditation
requirements: Interpretive guidelines & surveyor guidance (version 11).
Milford, OH: DNV GL-Healthcare USA, Inc. (Level VII)
16 The Joint Commission. (2019). Standard NPSG.01.01.01. Comprehensive
accreditation manual for hospitals. Oakbrook Terrace, IL: The Joint
Commission. (Level VII)
17 Accreditation Association for Hospitals and Health Systems. (2017). Standard
15.01.16. Healthcare Facilities Accreditation Program: Accreditation
requirements for acute care hospitals. Chicago, IL: Accreditation Association
for Hospitals and Health Systems. (Level VII)
18 Centers for Medicare and Medicaid Services, Department of Health and
Human Services. (2015). Condition of participation: Patient’s rights. 42 C.F.R.
§ 482.13(c)(1).
19 DNV GL-Healthcare USA, Inc. (2016). PR.1.SR.5 . NIAHO® accreditation
requirements: Interpretive guidelines & surveyor guidance (version 11).
Milford, OH: DNV GL-Healthcare USA, Inc. (Level VII)
20 The Joint Commission. (2019). Standard RI.01.01.01. Comprehensive
accreditation manual for hospitals. Oakbrook Terrace, IL: The Joint
Commission. (Level VII)
21 The Joint Commission. (2019). Standard PC.02.01.21. Comprehensive
accreditation manual for hospitals. Oakbrook Terrace, IL: The Joint
Commission. (Level VII)
22 Accreditation Association for Hospitals and Health Systems. (2017). Standard
07.01.10. Healthcare Facilities Accreditation Program: Accreditation
requirements for acute care hospitals. Chicago, IL: Accreditation Association
for Hospitals and Health Systems. (Level VII)
23 Siegel, J. D ., et al. (2007, revised 2017). “2007 guideline for isolation
precautions: Preventing transmission of infectious agents in healthcare
settings” [Online]. Accessed via the Web at
https://www.cdc.gov/infectioncontrol/pdf/guidelines/isolation-guidelines.pdf
(Level II)
24 Baldi, M., et al. (2017). Prone positioning? Remember ABCDEFG. Chest,
151(5), 1184–1185. (Level VII)
25 Waters, T. R., et al. (2009). “Safe patient handling training for schools of
nursing” [Online]. Accessed via the Web at
https://www.cdc.gov/niosh/docs/2009-127/pdfs/2009-127.pdf (Level VII)
26 American Association of Critical-Care Nurses (AACN). (2013). “A ACN practice
alert: Alarm management” [Online]. Accessed via the Web at
https://www.aacn.org/aacn-website/shared/content/practice-
alerts/2015/11/25/alarm-management (Level VII)
27 Graham, K. C., & Cvach, M. (2010). Monitor alarm fatigue: Standardizing use
of physiological monitors and decreasing nuisance alarms. American Journal
of Critical Care, 19(1), 28–37. Accessed via the Web at
http://ajcc.aacnjournals.org/content/19/1/28.full.pdf
28 The Joint Commission. (2019). Standard NPSG.06 .01.01. Comprehensive
accreditation manual for hospitals. Oakbrook Terrace, IL: The Joint
Commission. (Level VII)
29 The Joint Commission. (2013). “Sentinel event alert: Medical device alarm
safety in hospitals” [Online]. Accessed via the Web at
https://www.jointcommission.org/assets/1/6/SEA_50_alarms_4 _26_16.pdf
(Level VII)
30 The Joint Commission. (2014). “Sentinel event alert: Managing risk during
transition to new ISO tubing connector standards” [Online]. Accessed via the
Web at
http://www.jointcommission.org/assets/1/6/SEA_53_Connectors_8 _19_14 _final.
pdf (Level VII)
31 Accreditation Association for Hospitals and Health Systems. (2017). Standard
16.02.02. Healthcare Facilities Accreditation Program: Accreditation
requirements for acute care hospitals. Chicago, IL: Accreditation Association
for Hospitals and Health Systems. (Level VII)
32 Jarrett, N., & Callaham, M. (2016). “Evidence-based guidelines for selected,
candidate, and previously considered hospital-acquired conditions: Final
report” [Online]. Accessed via the Web at
https://www.cms.gov/Medicare/Medicare-Fee-for-Service-
Payment/HospitalAcqCond/Downloads/2016-HAC-Report.pdf
33 Ganz, D. A., et al. (2013). Preventing falls in hospitals: A toolkit for improving
quality of care (AHRQ Publication No. 13-0015-EF). Rockville, MD: Agency for
Healthcare Research and Quality. Accessed via the Web at
https://www.ahrq.gov/sites/default/files/publications/files/fallpxtoolkit_0 .pdf
(Level VII)
34 The Joint Commission. (2019). Standard RC.01.03 .01. Comprehensive
accreditation manual for hospitals. Oakbrook Terrace, IL: The Joint
Commission. (Level VII)
35 Accreditation Association for Hospitals and Health Systems. (2017). Standard
10.00 .03. Healthcare Facilities Accreditation Program: Accreditation
requirements for acute care hospitals. Chicago, IL: Accreditation Association
for Hospitals and Health Systems. (Level VII)
36 Centers for Medicare and Medicaid Services, Department of Health and
Human Services. (2015). Condition of participation: Medical record services.
42 C.F.R. § 482.24(b).
37 DNV GL-Healthcare USA, Inc. (2016). MR.2 .SR.1 . NIAHO® accreditation
requirements: Interpretive guidelines & surveyor guidance (version 11).
Milford, OH: DNV GL-Healthcare USA, Inc. (Level VII)
PROTECTIVE ENVIRONMENT GUIDELINES
The Centers for Disease Control and Prevention (CDC)
recommends that patients
undergoing
allogeneic
hematopoietic stem cell transplantation (in which bone
marrow is taken from a person other than the recipient) be
placed in a protective environment (PE) to prevent the
development of opportunistic infections.1,2,3 To prevent
exposure to fungal spores, an effective PE requires a
positive-pressure room whose door is kept closed to
maintain the proper air pressure balance between the PE
room and the adjoining hallway (at least 12 air changes per
hour [ACH]). The incoming air passes through a high-
efficiency particulate air (HEPA) filtration unit before
circulation.4,5,6 Positive air pressure must be monitored daily
using smoke tubes or flutter strips, with monitoring results
documented.7,8
Equipment
PE precautions signs ▪ gloves ▪ gown ▪ mask ▪ facility- and
Environmental
Protection
Agency (EPA)-approved
disinfectant ▪ N95 respirator mask ▪ positive-pressure room
with HEPA filter unit ▪ new thermometer ▪ new blood
pressure cuff ▪ new disposable stethoscope.
Use of the equipment should be restricted to the patient’s
room.
Preparation of equipment
Ensure that all equipment is cleaned properly using facility-
and EPA-approved disinfectant before it is taken into the
room. Follow the manufacturer’s guidelines for the
disinfectant’s use, because products have different contact
times, and are effective only if the product remains on the
item to be cleaned for the appropriate amount of time.5,9
Implementation
■ Gather the necessary equipment.
■ Review the patient’s medical record and verify the need
for a PE.
■ Perform hand hygiene before putting on gloves, after
removing gloves, and as indicated during patient
care.2,5,10,11,12,13,14,15
■ Put on gloves, a gown, and a mask according to standard
and other (droplet, contact, and airborne) precautions as
indicated.3,16
■ Confirm the patient’s identity using at least two patient
identifiers.17
■ Place the patient in the PE room, and explain the PE
requirements to the patient and family to reduce patient
anxiety and promote cooperation.
■ Keep the patient’s door (and the anteroom door, if
applicable) closed at all times to maintain the proper air
pressure balance between the PE room and the adjoining
hallway.3
■ Place a PE precautions sign on the door of the patient’s
room to notify anyone entering the room of the PE and
associated requirements.
■ Screen visitors to prevent anyone with a known or
suspected infection from entering the room.
■ Ensure daily room cleaning with techniques that minimize
dust, such as wet-dusting horizontal surfaces.5
■ Avoid transporting the patient out of the PE room; if the
patient must be moved, make sure the patient wears a
regular mask until the patient returns to the PE room to
protect the patient from breathing in small particles that
may cause infection.3 Also, notify the receiving department
that the patient is on PE requirements and must be returned
to the room promptly.
■ Assess the patient daily for signs of anxiety or depression
while in a PE.18
■ Prohibit fresh flowers in water, dried flowers, and potted
plants from being brought into the patient’s PE room or
area, because standing water supports the growth of micro-
organisms, and soil may harbor fungi.19
■ Document the procedure.20,21,22,23
Special considerations
■ If the patient requires airborne precautions and the room
has an anteroom, implement the precautions in the
patient’s room, because air in the anteroom is filtered by a
portable HEPA filtration unit. If the patient’s room does not
have an anteroom, place the patient in an airborne infection
isolation room with portable ventilation units and HEPA
filters to increase the filtration of fungal spores.3
Complications
Failure to appropriately follow PE guidelines may cause
infection. A patient may experience anxiety or depression
while in a PE.18
Documentation
Record the need for a PE on the patient’s nursing care plan
and as otherwise indicated by your facility. Document
initiation and maintenance of the PE and the patient’s
tolerance of the PE. Document any teaching provided to the
patient and family, their understanding of your teaching,
and whether they require follow-up teaching. Also document
the date the protective environment was discontinued.
REFERENCES
1 Centers for Disease Control and Prevention. (2000). Guidelines for preventing
opportunistic infections among hematopoietic stem cell transplant recipients.
MMWR Recommendations and Reports, 49(RR-10), 1–125. Accessed via the
Web at http://www.cdc.gov/mmwr/PDF/RR/RR4910.PDF (Level I)
2 Ezzone, S. (Ed.) (2013). Hematopoietic stem cell transplantation: A manual
for nursing practice (2nd ed.). Pittsburgh, PA: Oncology Nursing Society.
3 Siegel, J. D., et al. (2007, revised 2017). “2007 guideline for isolation
precautions: Preventing transmission of infectious agents in healthcare
settings” [Online]. Accessed via the Web at
https://www.cdc.gov/infectioncontrol/pdf/guidelines/isolation-guidelines.pdf
(Level II)
4 Grota, P., et al. (Eds.). (2014). APIC text of infection control and epidemiology
(4th ed.).Washington, DC: Association for Professionals in Infection Control
and Epidemiology.
5 Riley, M., & Flood, A. (2009). Are your isolation precautions up-to-date?
Nursing2015 Critical Care, 4(3), 8–10.
6 Garbin, L. M., et al. (2011). Infection prevention measures used in
hematopoietic stem cell transplantation: Evidences for practice. Revista
Latino-Americana de Enfermagem, 19(3), 640–650. Accessed via the Web at
http://www.scielo.br/pdf/rlae/v19n3/25.pdf
7 Sehulster, L., & Chinn, R. Y. W. (2003). Guidelines for environmental infection
control in health-care facilities: Recommendations of CDC and the Healthcare
Infection Control Practices Advisory Committee (HICPAC). MMWR
Recommendations and Reports, 52(RR-10), 1–42. Accessed via the Web at
http://www.cdc.gov/mmwr/preview/mmwrhtml/rr5210a1.htm (Level VII)
8 Beam, E., et al. (2015). Clinical challenges in isolation care. American Journal
of Nursing, 115(4), 44–49.
9 Rutala, W. A., et al. (2008, revised 2017). “Guideline for disinfection and
sterilization in healthcare facilities, 2008” [Online]. Accessed via the Web at
http://www.cdc.gov/hicpac/pdf/guidelines/Disinfection_Nov_2008.pdf (Level I)
10 Centers for Disease Control and Prevention. (2002). Guideline for hand
hygiene in health-care settings: Recommendations of the Healthcare Infection
Control Practices Advisory Committee and the HICPAC/SHEA/APIC/IDSA Hand
Hygiene Task Force. MMWR Recommendations and Reports, 51(RR-16), 1–45.
Accessed via the Web at http://www.cdc.gov/mmwr/pdf/rr/rr5116.pdf (Level II)
11 World Health Organization. (2009). “WHO guidelines on hand hygiene in
health care: First global patient safety challenge, clean care is safer care”
[Online]. Accessed via the Web at
http://apps.who.int/iris/bitstream/10665/44102/1/9789241597906_eng.pdf
(Level IV)
12 The Joint Commission. (2019). Standard NPSG.07.01.01. Comprehensive
accreditation manual for hospitals. Oakbrook Terrace, IL: The Joint
Commission. (Level VII)
13 Accreditation Association for Hospitals and Health Systems. (2017). Standard
07.01.21. Healthcare Facilities Accreditation Program: Accreditation
requirements for acute care hospitals. Chicago, IL: Accreditation Association
for Hospitals and Health Systems. (Level VII)
14 Centers for Medicare and Medicaid Services, Department of Health and
Human Services. (2015). Condition of participation: Infection control. 42 C.F.R.
§ 482.42.
15 DNV GL-Healthcare USA, Inc. (2016). IC.1 .SR.1 . NIAHO® accreditation
requirements: Interpretive guidelines & surveyor guidance (version 11).
Milford, OH: DNV GL-Healthcare USA, Inc. (Level VII)
16 Accreditation Association for Hospitals and Health Systems. (2017). Standard
07.01.10. Healthcare Facilities Accreditation Program: Accreditation
requirements for acute care hospitals. Chicago, IL: Accreditation Association
for Hospitals and Health Systems. (Level VII)
17 The Joint Commission. (2019). Standard NPSG.01.01.01. Comprehensive
accreditation manual for hospitals. Oakbrook Terrace, IL: The Joint
Commission. (Level VII)
18 Tecchio, C., et al. (2013). Predictors of anxiety and depression in
hematopoietic stem cell transplant patients during protective isolation.
Psycho-oncology, 22(8), 1790–1797.
19 Craven, R. F., et al. (2017). Fundamentals of nursing: Human health and
function (8th ed.). Philadelphia, PA: Wolters Kluwer.
20 The Joint Commission. (2019). Standard RC 01.03 .01. Comprehensive
accreditation manual for hospitals. Oakbrook Terrace, IL: The Joint
Commission. (Level VII)
21 Centers for Medicare and Medicaid Services, Department of Health and
Human Services. (2015). Condition of participation: Medical record services.
42 C.F.R. § 482.24(b).
22 Accreditation Association for Hospitals and Health Systems. (2017). Standard
10.00 .03. Healthcare Facilities Accreditation Program: Accreditation
requirements for acute care hospitals. Chicago, IL: Accreditation Association
for Hospitals and Health Systems. (Level VII)
23 DNV GL-Healthcare USA, Inc. (2016). MR.2 .SR.1 . NIAHO® accreditation
requirements: Interpretive guidelines & surveyor guidance (version 11).
Milford, OH: DNV GL-Healthcare USA, Inc. (Level VII)
PULMONARY ARTERY PRESSURE AND
PULMONARY ARTERY OCCLUSION PRESSURE
MONITORING
Continuous pulmonary artery pressure (PAP) and
intermittent pulmonary artery occlusion pressure (PAOP)
measurements provide important information about left
ventricular function and preload. PAOP may also be referred
to as pulmonary artery wedge pressure.1 This information is
useful not only for monitoring but also for aiding diagnosis,
refining assessments, guiding interventions, and projecting
patient outcomes. All acutely ill patients are candidates for
PAP monitoring, especially those who are hemodynamically
unstable, who need fluid management or continuous
cardiopulmonary assessment, or who are receiving multiple
or frequently administered cardioactive drugs.
A pulmonary artery (PA) catheter is recommended for
many clinical conditions, and can be used to assess
intravascular volume, particularly in patients with severe
pulmonary edema, heart failure, or acute renal injury;
evaluate pulmonary hypertension; guide therapy in severe
refractory shock or multiple organ dysfunction syndrome;
and guide therapy to maximize oxygen delivery to tissues in
some selected patients.
PA catheters can have up to six lumens, allowing more
hemodynamic information to be gathered. In addition to
distal and proximal lumens used to measure pressures, a PA
catheter has a balloon inflation lumen that inflates the
balloon for PAOP measurement, and a thermistor connector
lumen that allows cardiac output measurement. Some
catheters also have a pacemaker wire lumen that provides a
port for pacemaker electrodes and measures continuous
mixed venous oxygen saturation. (See PA catheters: From
basic to complex.)
The practitioner inserts the PA catheter into a central
vessel and directs it through the right atrium, across the
tricuspid valve, and into the right ventricle until the catheter
tip is positioned in the pulmonary artery, where it assesses
left ventricular function indirectly.
Some facilities allow only practitioners or specially trained
nurses to measure PAOP because of the risk of pulmonary
artery rupture, a rare but life-threatening complication. If
your facility permits you to perform this procedure, do so
with extreme caution, and make sure that you’re thoroughly
familiar with intracardiac waveform interpretation.
You should remove the PA catheter, as ordered, as soon as
the patient no longer needs, it to reduce the risk of central
line-associated bloodstream infection.2,3,4
HOSPITAL-ACQUIRED CONDITION ALERT Keep in mind that a vascular
catheter–associated infection is considered a hospital-acquired
condition because it can be reasonably prevented using various best
practices. Be sure to follow infection-prevention techniques, such as
performing hand hygiene, following sterile no-touch technique when
accessing and changing the transducer system, and removing the PA
catheter as soon as it’s no longer needed to reduce the risk of vascular
catheter–associated infections.2,3,4,5
Equipment
1.5 -mL syringe attached to balloon port or catheter.
Implementation
■ Verify the practitioner’s order for PAP monitoring.
■ Perform hand hygiene.6,7,8,9,10,11
■ Confirm the patient’s identity using at least two patient
identifiers.12
■ Provide privacy.13,14,15,16
EQUIPMENT
PA catheters: From basic to complex
Depending on the intended use, a pulmonary artery (PA) catheter may be
basic or complex. The basic PA catheter has a distal and proximal lumen, a
thermistor, and a balloon inflation gate valve. The distal lumen, which exits in
the pulmonary artery, monitors PA pressure. Its hub usually is marked PA
DISTAL. The proximal lumen exits in the right atrium or vena cava, depending
on the size of the patient’s heart. It monitors right atrial pressure, and can be
used as the injected solution lumen for cardiac output determination and for
infusing solutions. The proximal lumen hub usually is marked PROXIMAL.
The thermistor, located about 11⁄2′′ (4 cm) from the distal tip, measures
temperature (aiding core temperature evaluation) and allows cardiac output
measurement. The thermistor connector attaches to a cardiac output
connector cable and then to a cardiac output monitor. Typically, the
thermistor connector is red. The balloon inflation gate valve is used for
inflating the balloon tip with air. A stopcock connection, typically color-coded
red, may be used.
Additional lumens
Some PA catheters have additional lumens used to obtain other
hemodynamic data or permit certain interventions. For instance, a proximal
infusion port, which exits in the right atrium or vena cava, allows additional
fluid administration. A right ventricular lumen, exiting in the right ventricle,
allows fluid administration, right ventricular pressure measurement, or use of
a temporary ventricular pacing lead.
Some catheters have additional right atrial and right ventricular lumens for
atrioventricular pacing. A right ventricular ejection fraction test-response
thermistor, with PA and right ventricular sensing electrodes, allows
volumetric and ejection fraction measurements. Fiberoptic filaments, such as
those used in pulse oximetry, exit into the pulmonary artery and permit
measurement of continuous mixed venous oxygen saturation.
■ Explain the procedure to the patient and family (if
appropriate) according to their individual communication
and learning needs to increase their understanding, allay
their fears, and enhance cooperation.17
■ Raise the patient’s bed to waist level when providing
patient care to prevent caregiver back strain.18
■ Perform hand hygiene.6,7,8,9,10,11
Performing a square wave test
When using a pressure monitoring system, you must ensure and document
the system’s accuracy. Along with leveling and zeroing the system to
atmospheric pressure at the phlebostatic axis and interpreting waveforms,
you can ensure accuracy by performing the square wave test (or dynamic
response test).1,9,27 To perform the test, take the following steps:
■ Activate the fast-flush device for 1 second, and then release. Obtain a
graphic printout.
■ Observe for the desired response: The pressure wave rises rapidly, squares
off, and is followed by a series of oscillations. (See illustration below.)
■ Know that these oscillations should have an initial downstroke, which
extends below the baseline and just 1 to 2 oscillations after the initial
downstroke. Usually, but not always, the first upstroke is about one-third the
height of the initial downstroke.
■ Be aware that the intervals between oscillations should be no more than
0.08 second (2 small boxes).1
Underdamped square wave
If you observe extra oscillations after the initial downstroke or more than 0.08
second between oscillations, the waveform is underdamped. (See illustration
top right.) This can cause falsely high pressure readings and artifact in the
waveforms. It can be corrected by:
■ removing excess tubing or extra stopcocks from the system
■ inserting a damping device (available from pressure tubing companies).
Repeat the square wave test and read the pressure waveform.
Overdamped square wave
If you observe a slurred upstroke at the beginning of the square wave and a
loss of oscillations after the initial downstroke, the waveform is overdamped.
(See illustration below.) This can cause falsely low pressure readings, and you
can lose the sharpness of waveform peaks and the dicrotic notch. It can be
corrected by:
■ clearing the line of any blood or air
■ checking to make sure there are no kinks or obstructions in the line
■ ensuring that you’re using short, low-compliance tubing.
■ checking to make sure that the flush bag has fluid and the pressure is
maintained at 300 mm Hg
■ tightening loose connections
■ Place the patient in the supine position, with the head of
the bed elevated at 0 to 60 degrees, or position the patient
in a 20-, 30-, or 90-degree lateral position with the head of
the bed flat. Allow the patient to stabilize for 5 to 15
minutes after the position change.19
■ Trace the tubing from the patient to its point of origin to
make sure that you’re accessing the proper port.20,21 Zero
and calibrate the pressure monitoring system, making sure
that the transducer air-fluid interface is leveled to the
phlebostatic axis (located at the 4th intercostal space at
one-half the anterior posterior diameter of the chest) if the
patient is supine. If the air-fluid interface is positioned below
the phlebostatic axis, the readings will be erroneously high;
if it’s positioned above the phlebostatic axis, the readings
will be erroneously low.19 If the patient is in a lateral
position, use the following reference points: for a 30-degree
lateral position, one-half the distance from the bed surface
to the sternal border; for a 90-degree right lateral position,
4th intercostal space at the midsternum; and for a 90-
degree left lateral position, 4th intercostal space at the left
parasternal border.22
■ Mark the phlebostatic axis or appropriate-angle specific
reference point to ensure consistent monitoring.19
■ Make sure that the alarm limits are set appropriately for
the patient’s current condition, and that the alarms are
turned on, functioning properly, and audible to
staff.23,24,25,26
Obtaining a PAP measurement
■ Inspect the waveform and pressure readings to make sure
that the PA catheter is in the correct location and
functioning properly.1
■ Verify that the transducer is properly leveled and zeroed.
■ Perform a square wave test (dynamic response test) at
the start of each shift, with a change in the waveform
configuration, or when the system is opened to air;
document the results.19,27 (See Performing a square wave
test.)
■ Monitor PA systolic and diastolic pressures continuously to
detect early changes in the patient’s condition.1
■ Obtain PAP values at end expiration (when the patient
completely exhales).19 At end expiration, intrathoracic
pressure approaches atmospheric pressure and has the
least effect on PAP.1 If you obtain a reading during other
phases of the respiratory cycle, respiratory interference may
occur. For instance, during inspiration, when intrathoracic
pressure drops, PAP may be falsely low because the
negative pressure is transmitted to the catheter. During
expiration, when intrathoracic pressure rises, PAP may be
falsely high.
■ Obtain a dual-channel electrocardiogram (ECG) strip and
PA waveform trace to identify the correct pressure readings.
If a dual-channel recording isn’t available, use the cursor on
the monitor to identify the pressure reading that correctly
correlates with the waveform. Digital readouts may reflect
pressures obtained throughout respiration and may not be
accurate. Use of the monitor cursor line may be a
reasonable alternative if simultaneous graphic recording of
the ECG and PA waveform isn’t possible.1,19,28
■ Make sure that the scale of the PAP tracing is set
appropriately on the monitor. Most PA scales are commonly
setat40mmHg.
■ Align the QT interval with the PA waveform. The peak of
the PA waveform is the PA systolic pressure.1
■ Align the end of the QRS complex with the PA waveform.
Measure the PA diastolic pressure at the point of the
intersection of the QRS complex and the PA waveform.1
Obtaining a PAOP measurement
■ PAOP is recorded by inflating the balloon and letting it
float in the distal portion of the artery.
■ Verify that the transducer is properly leveled and zeroed.
■ Detach the syringe from the balloon inflation hub. Draw
1.5 mL of air into the syringe, and then reattach the syringe
to the hub.
■ Being running a dual-chamber recording of the ECG and
PA waveform to assist in the interpretation of the pressure
reading.
■ Watching the monitor, inject the air through the hub
slowly and smoothly. When you see an occlusion tracing on
the monitor, immediately stop inflating the balloon. (See
Observing the PAOP waveform.)
NURSING ALERT Never inflate the balloon beyond the volume needed
to obtain an occlusion pressure tracing. Never inflate the balloon for
more than 15 seconds (two to four respiratory cycles) or leave the
balloon inflated, because this may cause a pulmonary infarction and
rupture.1
■ Take the pressure reading at end expiration. Note the
amount of air needed to change the PA tracing to an
occluded tracing (normally, 1.25 to 1.5 mL). If the occluded
tracing appeared with the injection of less than 1.25 mL,
suspect that the catheter has migrated into a more distal
branch and requires repositioning. If the balloon is in a more
distal branch, the tracings may move up the oscilloscope,
indicating that the catheter tip is recording balloon pressure
rather than PAOP, which may lead to PA rupture.
■ After obtaining the PAOP measurement, detach the
syringe from the balloon inflation port and allow the balloon
to deflate on its own. Observe the waveform tracing and
make sure the tracing returns from the wedge tracing to the
normal PA tracing.
■ Expel air from the syringe and then reconnect it to the
end of the balloon-inflation valve.1
■ Looking at the dual-channel recorded strip, identify the a
wave of the PAOP waveform. (The a wave represents atrial
contraction, correlates with the end of the QRS complex,
and occurs approximately 20 msec after the p wave.)
Measure the mean of the a wave to obtain an accurate
PAOP.1
Completing the procedure
■ Return the bed to the lowest position to prevent falls and
maintain patient safety.29
■ Report changes in the patient’s measurements to the
practitioner, and intervene as ordered.
■ Perform hand hygiene.6,7,8,9,10,11
■ Document the procedure.30,31,32,33
Special considerations
■ Advise the patient to use caution when moving about in
bed to avoid dislodging the catheter.
■ Never inflate the balloon with more than the
recommended air volume (specified on the catheter shaft),
because this action may cause loss of elasticity or balloon
rupture. With appropriate inflation volume, the balloon floats
easily through the heart chambers and rests in the main
branch of the pulmonary artery, producing accurate
waveforms. Never inflate the balloon with fluids, because
they may not be able to be retrieved from inside the
balloon, preventing deflation.
■ Be aware that the catheter may slip back into the right
ventricle. Because the tip may irritate the ventricle and
cause arrhythmias, check the monitor for a right ventricular
waveform to detect this problem promptly.
■ To minimize valvular trauma, make sure the balloon is
deflated whenever the catheter is withdrawn from the
pulmonary artery to the right ventricle or from the right
ventricle to the right atrium.
■ Never flush the PA catheter for longer than 2 seconds,
because PA rupture may occur with prolonged flushing of
high-pressure fluids.1
■ If you find a close correlation between the PA diastolic
pressure and the PA occlusive pressure, follow the diastolic
pressure to minimize the number of times the PA catheter
balloon is inflated.
■ Change transparent semipermeable dressings every 5 to
7 days and gauze dressings at least every 2 days. Change
the dressing immediately to closely assess, cleanse, and
disinfect the site if signs and symptoms of infection are
present and the dressing becomes visibly spoiled, loosens,
or dislodges.34
Observing the PAOP waveform
Upon balloon inflation, you should see the normal pulmonary artery pressure
(PAP) waveform flatten to the characteristic pulmonary artery occlusion
pressure (PAOP) waveform. Balloon inflation should be stopped upon
observation of this waveform. Upon balloon deflation, the PAP waveform
should immediately reappear.
■ Change disposable or reusable transducer systems
(including continuous flush device and flush solution used
for invasive hemodynamic pressure monitoring) every 96
hours, immediately upon suspected contamination, and
when the integrity of the system has been compromised.
Limit the number of manipulations and entries to the
system.2,35
■ The Joint Commission issued a sentinel event alert
concerning medical device alarm safety, because alarm-
related events have been associated with permanent loss of
function or death. Among the major contributing factors
were improper alarm settings, alarm settings turned off
inappropriately, and alarm signals not audible to staff. Make
sure alarm limits are set appropriately, and that alarms are
turned on, functioning properly, and audible to staff. Follow
facility guidelines for preventing alarm fatigue.23
■ The Joint Commission issued a sentinel event alert related
to managing risk during transition to new International
Organization for Standardization tubing standards that were
designed to prevent dangerous tubing misconnections,
which can lead to serious patient injury and death. During
the transition, make sure to trace the tubing and catheter
from the patient to the point of origin before connecting or
reconnecting any device or infusion, at any care transition
(such as a new setting or service), and as part of the hand-
off process; route tubes and catheters having different
purposes in different standardized directions; label the
tubing at both the distal and proximal ends (when there are
different access sites or several bags hanging); use tubing
and equipment only as intended; and store medications for
different delivery routes in separate locations.20
Complications
Complications of PA catheter insertion include PA
perforation, pulmonary infarction, catheter knotting, local or
systemic infection, cardiac arrhythmias, and air embolism.
Documentation
Document the date and time that the measurements were
taken, the results of the square wave (dynamic response)
test, the patient’s position, the measurement results, the
amount of air needed to obtain an occlusion tracing, and the
patient’s tolerance of the procedure. Record the date and
time and the name of the practitioner notified of the
measurements, if necessary, as well as prescribed
interventions and the patient’s response to those
interventions. Document any teaching provided and the
patient’s understanding of the teaching.
REFERENCES
1 Wiegand, D. L. (Ed.). (2017). AACN procedure manual for high acuity,
progressive, and critical care (7th ed.) . St. Louis, MO: Elsevier.
2 Centers for Disease Control and Prevention. (2011). “Guidelines for the
prevention of intravascular catheter-related infections” [Online]. Accessed via
the Web at https://www.cdc.gov/hicpac/pdf/guidelines/bsi-guidelines-2011.pdf
(Level I)
3 Institute for Healthcare Improvement. (2012). How-to-guide: Prevent central
line-associated bloodstream infections. Cambridge, MA: Institute for
Healthcare Improvement. (Level VII)
4 Marschall, J., et al. (2014). SHEA/IDSA practice recommendation: Strategies to
prevent central line-associated bloodstream infections in acute care
hospitals. Infection Control and Hospital Epidemiology, 35(7), 753–771 .
Accessed via the Web at http://www.jstor.org/stable/10.1086/676533 (Level I)
5 Jarrett, N., & Callaham, M. (2016). “Evidence-based guidelines for selected
hospital-acquired conditions: Final report” [Online]. Accessed via the Web at
https://www.cms.gov/Medicare/Medicare-Fee-for-Service-
Payment/HospitalAcqCond/Downloads/2016-HAC-Report.pdf
6 The Joint Commission. (2019). Standard NPSG.07.01.01. Comprehensive
accreditation manual for hospitals. Oakbrook Terrace, IL: The Joint
Commission. (Level VII)
7 Centers for Disease Control and Prevention. (2002). Guideline for hand
hygiene in health-care settings: Recommendations of the Healthcare Infection
Control Practices Advisory Committee and the HICPAC/SHEA/APIC/IDSA Hand
Hygiene Task Force. MMWR Recommendations and Reports, 51(RR-16), 1–45.
Accessed via the Web at https://www.cdc.gov/mmwr/pdf/rr/rr5116.pdf (Level
II)
8 World Health Organization. (2009). “WHO guidelines on hand hygiene in
health care: First global patient safety challenge, clean care is safer care”
[Online]. Accessed via the Web at
http://apps.who.int/iris/bitstream/10665/44102/1/9789241597906_eng.pdf
(Level IV)
9 Accreditation Association for Hospitals and Health Systems. (2017). Standard
07.01.10. Healthcare Facilities Accreditation Program: Accreditation
requirements for acute care hospitals. Chicago, IL: Accreditation Association
for Hospitals and Health Systems. (Level VII)
10 Centers for Medicare and Medicaid Services, Department of Health and
Human Services. (2015). Condition of participation: Infection control. 42 C.F.R.
§ 482.42.
11 DNV GL-Healthcare USA, Inc. (2016). IC.1 .SR.1 . NIAHO® accreditation
requirements: Interpretive guidelines & surveyor guidance (version 11).
Milford, OH: DNV GL-Healthcare USA, Inc. (Level VII)
12 The Joint Commission. (2019). Standard NPSG.01.01.01. Comprehensive
accreditation manual for hospitals. Oakbrook Terrace, IL: The Joint
Commission. (Level VII)
13 The Joint Commission. (2019). Standard RI.01.01.01. Comprehensive
accreditation manual for hospitals. Oakbrook Terrace, IL: The Joint
Commission. (Level VII)
14 Centers for Medicare and Medicaid Services, Department of Health and
Human Services. (2015). Condition of participation: Patient’s rights. 42 C.F.R.
§ 482.13(c)(1).
15 Accreditation Association for Hospitals and Health Systems. (2017). Standard
15.01.16. Healthcare Facilities Accreditation Program: Accreditation
requirements for acute care hospitals. Chicago, IL: Accreditation Association
for Hospitals and Health Systems. (Level VII)
16 DNV GL-Healthcare USA, Inc. (2016). PR.1.SR.5 . NIAHO® accreditation
requirements: Interpretive guidelines & surveyor guidance (version 11).
Milford, OH: DNV GL-Healthcare USA, Inc. (Level VII)
17 The Joint Commission. (2019). Standard PC.02.01.21. Comprehensive
accreditation manual for hospitals. Oakbrook Terrace, IL: The Joint
Commission. (Level VII)
18 Waters, T. R., et al. (2009). “Safe patient handling training for schools of
nursing” [Online]. Accessed via the Web at
https://www.cdc.gov/niosh/docs/2009-127/pdfs/2009-127.pdf (Level VII)
19 American Association of Critical-Care Nurses. (2015). “A ACN practice alert:
Pulmonary artery/central venous pressure monitoring in adults” [Online].
Accessed via the Web at https://www.aacn.org/clinical-resources/practice-
alerts/pulmonary-artery-pressure-measurement (Level VII)
20 The Joint Commission. (2014). “Sentinel event alert: Managing risk during
transition to new ISO tubing connector standards” [Online] Accessed via the
Web at
http://www.jointcommission.org/assets/1/6/SEA_53_Connectors_8 _19_14 _final.
pdf (Level VII)
21 U.S . Food and Drug Administration. (n.d .). “Look. Check. Connect. Safe
medical device connections save lives” [Online]. Accessed via the Web at
https://www.fda.gov/downloads/MedicalDevices/Safety/AlertsandNotices/UCM
134873.pdf
22 Rauen, C., et al. (2009). Evidence based practice habits: Transforming
research into bedside practice. Critical Care Nurse, 29(2), 46–59.
23 The Joint Commission. (2013). “Sentinel event alert: Medical device alarm
safety in hospitals” [Online]. Accessed via the Web at
https://www.jointcommission.org/assets/1/6/SEA_50_alarms_4 _26_16.pdf
(Level VII)
24 The Joint Commission. (2019). Standard NPSG.06 .01.01. Comprehensive
accreditation manual for hospitals. Oakbrook Terrace, IL: The Joint
Commission. (Level VII)
25 American Association of Critical-Care Nurses. (2013). “A ACN practice alert:
Alarm management” [Online]. Accessed via the Web at
https://www.aacn.org/aacn-website/shared/content/practice-
alerts/2015/11/25/alarm-management (Level VII)
26 Graham, K. C., & Cvach, M. (2010). Monitor alarm fatigue: Standardizing use
of physiological monitors and decreasing nuisance alarms. American Journal
of Critical Care, 19(1), 28–37. Accessed via the Web at
http://ajcc.aacnjournals.org/content/19/1/28.full.pdf
27 Quaal, S. J . (2001). Improving the accuracy of pulmonary artery catheter
measurements. Journal of Cardiovascular Nursing, 15(2), 71–82. (Level I)
28 Pasion, E., et al. (2010). Evaluation of the monitor cursor-line method for
measuring pulmonary artery and central venous pressures. American Journal
of Critical Care, 19(7), 511–521. Accessed via the Web at
http://ajcc.aacnjournals.org/content/19/6/511.full.pdf+html (Level VI)
29 Ganz, D. A., et al. (2013). Preventing falls in hospitals: A toolkit for improving
quality of care (AHRQ Publication No. 13-0015-EF). Rockville, MD: Agency for
Healthcare Research and Quality. Accessed via the Web at
https://www.ahrq.gov/sites/default/files/publications/files/fallpxtoolkit.pdf
(Level VII)
30 The Joint Commission. (2019). Standard RC.01.03 .01. Comprehensive
accreditation manual for hospitals. Oakbrook Terrace, IL: The Joint
Commission. (Level VII)
31 Accreditation Association for Hospitals and Health Systems. (2017). Standard
10.00 .03. Healthcare Facilities Accreditation Program: Accreditation
requirements for acute care hospitals. Chicago, IL: Accreditation Association
for Hospitals and Health Systems. (Level VII)
32 Centers for Medicare and Medicaid Services, Department of Health and
Human Services. (2015). Condition of participation: Medical record services.
42 C.F.R. § 482.24(b).
33 DNV GL-Healthcare USA, Inc. (2016). MR.2 .SR.1 . NIAHO® accreditation
requirements: Interpretive guidelines & surveyor guidance (version 11).
Milford, OH: DNV GL-Healthcare USA, Inc. (Level VII)
34 Standard 41. Vascular access device (VAD) assessment, care and dressing
changes. Infusion therapy standards of practice. (2016). Journal of Infusion
Nursing, 39, S81–S84. (Level VII)
35 Standard 42. Administration set change. Infusion therapy standards of
practice. (2016). Journal of Infusion Nursing, 39, S84–S85. (Level VII)
PULSE AMPLITUDE MONITORING
Determining the presence and strength of peripheral pulses,
an essential part of cardiovascular assessment, helps you to
evaluate the adequacy of peripheral perfusion. A pulse
amplitude monitor simplifies this procedure. A sensor taped
to the patient’s skin over a pulse point sends signals to a
monitor, which measures the amplitude of the pulse and
displays it as a waveform on a screen. (See Identifying a
normal pulse amplitude waveform.) The system
continuously monitors the patient’s peripheral pulse so you
can perform other patient care duties.
The pulse amplitude monitor can be used after peripheral
vascular reconstruction on the upper or lower extremities or
after percutaneous transluminal peripheral or coronary
angioplasty (either with the sheaths in place or after they’ve
been removed).
Because the sensor monitors only relatively flat pulse
points, it can’t be used for the posterior tibial pulse point.
Also, movement distorts the waveform, so the patient must
stay as still as possible during monitoring. The patient
shouldn’t have lesions on the skin where the pulse will be
monitored because the sensor must be placed directly on
this site; the sensor and tape could irritate the lesion, or the
lesion could impair transmission of the pulse amplitude. If
the patient has a strong peripheral pulse, you’ll see an
adequate waveform.
Equipment
Pulse amplitude display monitor with sensor ▪ facility-
approved disinfectant.
Preparation of equipment
Plug the monitor into a grounded outlet.
Implementation
■ Verify the practitioner’s order
■ Gather and prepare the necessary equipment.
■ Perform hand hygiene.1,2,3,4,5,6
■ Confirm the patient’s identity using at least two patient
identifiers.7
■ Provide privacy.8,9,10,11
■ Explain the procedure to the patient and family (if
appropriate) according to their individual communication
and learning needs to increase their understanding, allay
their fears, and enhance cooperation.12 Explain that you’ll
tape the sensor to a selected site, usually the foot.
Initiating monitor use
■ Turn on the monitor and allow it to warm up, which may
take up to 10 seconds.
■ Plug the sensor cable into the monitor; then tap the
sensor gently. If tapping causes interference on the display
screen, you can assume the sensor-monitor connection is
functioning properly.
■ Raise the patient’s bed to waist level when providing care
to prevent caregiver back strain.13
Identifying a normal pulse
amplitude waveform
If the patient has adequate peripheral perfusion, the pulse amplitude monitor
will usually display a normal waveform, like the one shown here. This
waveform resembles the waveform seen when a patient has an arterial line.
■ Locate the pulse you want to monitor.
■ Place the sensor over the strongest point of the pulse
you’re going to monitor. While observing the display screen,
move the sensor until you see a strong upright waveform.
■ Without moving the sensor from this site, peel off the
adhesive strips and affix the sensor securely to the patient’s
foot. The sensor must maintain proper skin contact, so be
sure to tape it firmly.
■ Adjust the height of the pulse wave signal to half the
height of the display screen. This will give the waveform
room to fluctuate as the pulse amplitude increases and
decreases.
■ Set the low and high waveform amplitude alarms so you’ll
be alerted to any waveform changes. Make sure that the
alarm limits are set appropriately for the patient’s current
condition and that the alarms are turned on, functioning
properly, and audible to staff.14,15,16,17
■ Print out a strip of the patient’s waveform during every
shift and whenever you notice a change in the waveform or
the patient’s condition.
Discontinuing monitor use
■ Print out a strip of the patient’s waveform.
■ Peel the sensor tape from the patient’s skin and discard
it.
■ Turn the machine off but keep it plugged in.
■ Perform hand hygiene.1,2,3,4,5,6
■
Disinfect the monitor using a hospital-grade
disinfectant.18,19
Completing the procedure
■ Perform hand hygiene.1,2,3,4,5,6
■ Return the bed to the lowest position to prevent falls and
maintain patient safety.20
■ Place the strip printout in the patient’s medical record.
■ Document the procedure.21,22,23,24
Special considerations
■ Be aware that, although the waveform displayed by a
pulse
amplitude
monitor
may
resemble an
electrocardiogram or blood pressure waveform, it’s not the
same, because it is measuring a different parameter.
■ Don’t apply much pressure on the pulse sensor film or
press on it with a sharp object, because such stress may
warp or destroy the sensor.
■ Never place the sensor over an open wound or on
ulcerated skin.
■ If waveform amplitude decreases, assess the site distal to
the sensor for capillary refill time, temperature, color, and
sensation. The amplitude change may stem from a
malfunction in the monitor itself (such as a low battery) or
from a thrombus, hematoma, or significant change in the
patient’s hemodynamic status.
■ If the display screen is blank when you turn on the
machine, make sure that the monitor is plugged in. If it’s
plugged in but the screen remains blank, the screen may
need repair.
■ If the screen is functioning but no waveform appears on
it, first check the sensor–monitor connection. Then check
the sensor by gently tapping it to see if interference appears
on the screen. If the sensor is working properly, relocate the
peripheral pulse on the patient’s foot, and reapply the
sensor. If your interventions don’t work, the screen may
need servicing.
■ The Joint Commission issued a sentinel event alert
concerning medical device alarm safety, because alarm-
related events have been associated with permanent loss of
function or death. Among the major contributing factors
were
improper
alarm
settings,
alarm
settings
inappropriately turned off, and alarm signals not audible to
staff. Make sure alarm limits are set appropriately, and that
alarms are turned on, functioning properly, and audible to
staff. Follow facility guidelines for preventing alarm
fatigue.15
Complications
Local irritation from the sensor adhesive tape may occur.
Documentation
Document the date and time, the site where the sensor was
affixed, the waveform amplitude, and the patient’s
tolerance of the procedure. Record any waveform amplitude
decreases, interventions taken, and the patient’s response
to the interventions. Document any patient teaching
provided and the patient’s understanding of the teaching.
Include a strip of the patient’s waveform in the patient’s
medical record. Note the reference scale used to measure
amplitude height, usually located on the left side of the
strip, in your documentation.
REFERENCES
1 The Joint Commission. (2019). Standard NPSG.07.01.01. Comprehensive
accreditation manual for hospitals. Oakbrook Terrace, IL: The Joint
Commission. (Level VII)
2 Centers for Disease Control and Prevention. (2002). Guideline for hand
hygiene in health-care settings: Recommendations of the Healthcare Infection
Control Practices Advisory Committee and the HICPAC/SHEA/APIC/IDSA Hand
Hygiene Task Force. MMWR Recommendations and Reports, 51(RR-16), 1–45.
Accessed via the Web at https://www.cdc.gov/mmwr/pdf/rr/rr5116.pdf (Level
II)
3 World Health Organization. (2009). “WHO guidelines on hand hygiene in
health care: First global patient safety challenge, clean care is safer care”
[Online]. Accessed via the Web at
http://apps.who.int/iris/bitstream/10665/44102/1/9789241597906_eng.pdf
(Level IV)
4 Accreditation Association for Hospitals and Health Systems. (2017). Standard
07.01.21. Healthcare Facilities Accreditation Program: Accreditation
requirements for acute care hospitals. Chicago, IL: Accreditation Association
for Hospitals and Health Systems. (Level VII)
5 Centers for Medicare and Medicaid Services, Department of Health and
Human Services. (2015). Condition of participation: Infection control. 42 C.F.R.
§ 482.42.
6 DNV GL-Healthcare USA, Inc. (2016). IC.1.SR.1 . NIAHO® accreditation
requirements: Interpretive guidelines & surveyor guidance (version 11).
Milford, OH: DNV GL-Healthcare USA, Inc. (Level VII)
7 The Joint Commission. (2019). Standard NPSG.01.01.01. Comprehensive
accreditation manual for hospitals. Oakbrook Terrace, IL: The Joint
Commission. (Level VII)
8 Accreditation Association for Hospitals and Health Systems. (2017). Standard
15.01.16. Healthcare Facilities Accreditation Program: Accreditation
requirements for acute care hospitals. Chicago, IL: Accreditation Association
for Hospitals and Health Systems. (Level VII)
9 DNV GL-Healthcare USA, Inc. (2016). PR.1 .SR.5 . NIAHO® accreditation
requirements: Interpretive guidelines & surveyor guidance (version 11).
Milford, OH: DNV GL-Healthcare USA, Inc. (Level VII)
10 Centers for Medicare and Medicaid Services, Department of Health and
Human Services. (2015). Condition of participation: Patient’s rights. 42 C.F.R.
§ 482.13(c)(1).
11 The Joint Commission. (2019). Standard RI.01.01.01. Comprehensive
accreditation manual for hospitals. Oakbrook Terrace, IL: The Joint
Commission. (Level VII)
12 The Joint Commission. (2019). Standard PC.02.01.21. Comprehensive
accreditation manual for hospitals. Oakbrook Terrace, IL: The Joint
Commission. (Level VII)
13 Waters, T. R., et al. (2009). “Safe patient handling training for schools of
nursing” [Online]. Accessed via the Web at
https://www.cdc.gov/niosh/docs/2009-127/pdfs/2009-127.pdf (Level VII)
14 The Joint Commission. (2019). Standard NPSG.06 .01.01. Comprehensive
accreditation manual for hospitals. Oakbrook Terrace, IL: The Joint
Commission. (Level VII)
15 The Joint Commission. (2013). “Sentinel event alert: Medical device alarm
safety in hospitals” [Online]. Accessed via the Web at
https://www.jointcommission.org/assets/1/6/SEA_50_alarms_4 _26_16.pdf
(Level VII)
16 American Association of Critical-Care Nurses. (2013). “A ACN practice alert:
Alarm management” [Online]. Accessed via the Web at
https://www.aacn.org/aacn-website/shared/content/practice-
alerts/2015/11/25/alarm-management (Level VII)
17 Graham, K. C., & Cvach, M. (2010). Monitor alarm fatigue: Standardizing use
of physiological monitors and decreasing nuisance alarms. American Journal
of Critical Care, 19(1), 28–37. Accessed via the Web at
http://ajcc.aacnjournals.org/content/19/1/28.full.pdf
18 Rutala, W. A., et al. (2008, revised 2017). “Guideline for disinfection and
sterilization in healthcare facilities, 2008” [Online]. Accessed via the Web at
https://www.cdc.gov/hicpac/pdf/guidelines/Disinfection_Nov_2008.pdf (Level I)
19 Accreditation Association for Hospitals and Health Systems. (2017). Standard
07.02.03. Healthcare Facilities Accreditation Program: Accreditation
requirements for acute care hospitals. Chicago, IL: Accreditation Association
for Hospitals and Health Systems. (Level VII)
20 Ganz, D. A., et al. (2013). Preventing falls in hospitals: A toolkit for improving
quality of care (AHRQ Publication No. 13-0015-EF). Rockville, MD: Agency for
Healthcare Research and Quality. Accessed via the Web at
https://www.ahrq.gov/sites/default/files/publications/files/fallpxtoolkit.pdf
(Level VII)
21 The Joint Commission. (2019). Standard RC.01.03 .01. Comprehensive
accreditation manual for hospitals. Oakbrook Terrace, IL: The Joint
Commission. (Level VII)
22 Accreditation Association for Hospitals and Health Systems. (2017). Standard
10.00 .03. Healthcare Facilities Accreditation Program: Accreditation
requirements for acute care hospitals. Chicago, IL: Accreditation Association
for Hospitals and Health Systems. (Level VII)
23 Centers for Medicare and Medicaid Services, Department of Health and
Human Services. (2015). Condition of participation: Medical record services.
42 C.F.R. § 482.24(b).
24 DNV GL-Healthcare USA, Inc. (2016). MR.2 .SR.1 . NIAHO® accreditation
requirements: Interpretive guidelines & surveyor guidance (version 11).
Milford, OH: DNV GL-Healthcare USA, Inc. (Level VII)
PULSE ASSESSMENT
Blood pumped into an already-full aorta during ventricular
contraction creates a fluid wave that travels from the heart
to the peripheral arteries. This recurring wave—called a
pulse—is palpable at locations on the body where an artery
crosses over bone or firm tissue. The radial artery in the
wrist is the most common palpation site in adults and
children older than 3. (See Pulse points.) In infants and
children younger than age 3, a stethoscope is used to listen
to the heart itself rather than palpating a pulse. Because
auscultation is done at the heart’s apex, this is called the
apical pulse.
Pulse points
Shown below are anatomic locations where an artery crosses bone or firm
tissue and can be palpated for a pulse.
An apical-radial pulse is taken by simultaneously counting
apical and radial beats—the first by auscultation at the apex
of the heart, the second by palpation at the radial artery.
Some heartbeats detected at the apex can’t be detected at
peripheral sites. When this occurs, the apical pulse rate is
higher than the radial; the difference is the pulse deficit.
Pulse taking involves determining the rate (number of
beats per minute), rhythm (pattern or regularity of the
beats), and volume (amount of blood pumped with each
beat).
Equipment
Watch with second hand ▪ Optional: blanket or sheet,
stethoscope, disinfectant pad.
Preparation of equipment
Clean and disinfect the stethoscope with an disinfectant pad
to ensure it is clean and to prevent cross-contamination.1,2 If
you aren’t using your own stethoscope, also disinfect the
earpieces with a disinfectant pad before and after use to
prevent cross-contamination.1,2
Implementation
■ Gather and prepare the appropriate equipment.
■ Perform hand hygiene.3,4,5,6,7
■ Confirm the patient’s identity using at least two patient
identifiers.8
■ Provide privacy.9,10,11,12
■ Explain the procedure to the patient and family (if
appropriate) according to their individual communication
and learning needs to increase their understanding, allay
their fears, and enhance cooperation.13
■ Make sure the patient is comfortable and relaxed,
because an awkward, uncomfortable position may affect the
heart rate.
Taking a radial pulse
■ Place the patient in a sitting or supine position, with the
arm at the side or across the chest.
■ Gently press your index, middle, and ring fingers on the
radial artery, inside the patient’s wrist, using moderate
pressure (as shown on next page); excessive pressure may
obstruct blood flow distal to the pulse site. Don’t use your
thumb to take the patient’s pulse, because your thumb’s
own strong pulse may be confused with the patient’s pulse.
Identifying pulse patterns
■ After locating the pulse, if the rhythm is regular and the
rate seems normal, count for 30 seconds and then multiply
by 2. If the rate is unusually fast or slow, count for 60
seconds.
■ While counting the rate, assess pulse rhythm and
amplitude. If the pulse is irregular, note whether the
irregularity occurs in a pattern or randomly. If you aren’t
sure, use your stethoscope to obtain an apical pulse.14 (See
Identifying pulse patterns.)
■ Perform hand hygiene.3,4,5,6,7
■ Document the procedure.15,16,17,18
Taking an apical pulse
■ Help the patient to the supine position for better accuracy
in pulse counting.19
■ Drape the patient with a blanket or sheet, if necessary.
■ Warm the diaphragm or bell of the stethoscope in your
hand. Placing a cold stethoscope against the skin may
startle the patient and momentarily increase the heart rate.
Keep in mind that the bell transmits low-pitched sounds
more effectively than the diaphragm does.
■ Place the diaphragm or bell of the stethoscope over the
apex of the heart (normally located at the fifth intercostal
space left of the midclavicular line). Then insert the
earpieces into your ears.
■ Count the beats for 60 seconds (as shown on top right),
and note their rhythm, volume, and intensity (loudness).
■ Remove the stethoscope and make the patient
comfortable.
■ Perform hand hygiene.3,4,5,6,7
■ Clean the stethoscope with an alcohol pad to prevent
cross-contamination.1,2
■ Perform hand hygiene.3,4,5,6,7
■ Document the procedure.15,16,17,18
Taking an apical-radial pulse
■ Obtain the assistance of another nurse to obtain the
apical-radial pulse; one person palpates the radial pulse
while the other auscultates the apical pulse with a
stethoscope. Both must use the same watch when counting
beats.
■ Help the patient to the supine position for better
accuracy.19
■ Drape the patient with a blanket or sheet, if necessary.
■ Locate the apical or radial pulse, while the other nurse
locates the other pulse.
■ Determine a time to begin counting.
■ Count beats for 60 seconds, starting at the appropriate
time and using the same watch.
■ Remove the stethoscope.
■ Make the patient comfortable.
■ Perform hand hygiene.3,4,5,6,7
■ Clean and disinfect the stethoscope with a disinfectant
pad to prevent cross-contamination.1,2
■ Perform hand hygiene.3,4,5,6,7
■ Document the procedure.15,16,17,18
Special considerations
■ When the pulse is faint or weak, use a Doppler ultrasound
blood flow detector if available. (See the “Doppler use”
procedure, page 239.) Note that a rapid, weak, or faint pulse
may indicate dehydration.
■ If another nurse isn’t available for an apical-radial pulse,
hold the stethoscope in place with the hand that holds the
watch while palpating the radial pulse with the other hand.
You can then feel any discrepancies between the apical and
radial pulses.
Documentation
Record the pulse rate, rhythm, and volume as well as the
time of measurement. Describe the amplitude as
diminished, brisk, or bounding. When recording the apical
pulse, also include intensity of heart sounds. When
recording the apical-radial pulse, document the rate
according to the pulse site—for example, A/R 80/76.
REFERENCES
1 Rutala, W. A., et al. (2008, revised 2017). “Guideline for disinfection and
sterilization in healthcare facilities, 2008” [Online]. Accessed via the Web at
https://www.cdc.gov/infectioncontrol/pdf/guidelines/disinfection-
guidelines.pdf (Level I)
2 Accreditation Association for Hospitals and Health Systems. (2017). Standard
07.02.03. Healthcare Facilities Accreditation Program: Accreditation
requirements for acute care hospitals. Chicago, IL: Accreditation Association
for Hospitals and Health Systems. (Level VII)
3 World Health Organization. (2009). “WHO guidelines on hand hygiene in
health care: First global patient safety challenge, clean care is safer care”
[Online]. Accessed via the Web at
http://apps.who.int/iris/bitstream/10665/44102/1/9789241597906_eng.pdf
(Level VII)
4 Centers for Disease Control and Prevention. (2002). Guideline for hand
hygiene in health-care settings: Recommendations of the Healthcare Infection
Control Practices Advisory Committee and the HICPAC/SHEA/APIC/IDSA Hand
Hygiene Task Force MMWR Recommendations and Reports, 51(RR-16), 1–45.
Accessed via the Web at http://www.cdc.gov/mmwr/pdf/rr/rr5116.pdf (Level II)
5 Accreditation Association for Hospitals and Health Systems. (2017). Standard
07.01.21. Healthcare Facilities Accreditation Program: Accreditation
requirements for acute care hospitals. Chicago, IL: Accreditation Association
for Hospitals and Health Systems. (Level VII)
6 Centers for Medicare and Medicaid Services, Department of Health and
Human Services. (2015). Condition of participation: Infection control. 42 C.F.R.
§ 482.42.
7 DNV GL-Healthcare USA, Inc. (2016). IC.1.SR.1 . NIAHO® accreditation
requirements: Interpretive guidelines & surveyor guidance (version 11).
Milford, OH: DNV GL-Healthcare USA, Inc. (Level VII)
8 The Joint Commission. (2019). Standard NPSG.01.01.01. Comprehensive
accreditation manual for hospitals. Oakbrook Terrace, IL: The Joint
Commission. (Level VII)
9 The Joint Commission. (2019). Standard RI.01.01.01. Comprehensive
accreditation manual for hospitals. Oakbrook Terrace, IL: The Joint
Commission. (Level VII)
10 DNV GL-Healthcare USA, Inc. (2016). PR.1.SR.5 . NIAHO® accreditation
requirements: Interpretive guidelines & surveyor guidance (version 11).
Milford, OH: DNV GL-Healthcare USA, Inc. (Level VII)
11 Centers for Medicare and Medicaid Services, Department of Health and
Human Services. (2015). Condition of participation: Patient’s rights. 42 C.F.R.
§ 482.13(c)(1).
12 Accreditation Association for Hospitals and Health Systems. (2017). Standard
15.01.16. Healthcare Facilities Accreditation Program: Accreditation
requirements for acute care hospitals. Chicago, IL: Accreditation Association
for Hospitals and Health Systems. (Level VII)
13 The Joint Commission. (2019). Standard PC.02.01.21. Comprehensive
accreditation manual for hospitals. Oakbrook Terrace, IL: The Joint
Commission. (Level VII)
14 Bickley, L. (2017). Bates’ guide to physical examination and health history
taking (12th ed.). Philadelphia, PA: Wolters Kluwer.
15 The Joint Commission. (2019). Standard RC.01.03 .01. Comprehensive
accreditation manual for hospitals. Oakbrook Terrace, IL: The Joint
Commission. (Level VII)
16 Centers for Medicare and Medicaid Services, Department of Health and
Human Services. (2015). Condition of participation: Medical record services.
42 C.F.R. § 482.24(b).
17 Accreditation Association for Hospitals and Health Systems. (2017). Standard
10.00 .03. Healthcare Facilities Accreditation Program: Accreditation
requirements for acute care hospitals. Chicago, IL: Accreditation Association
for Hospitals and Health Systems. (Level VII)
18 DNV GL-Healthcare USA, Inc. (2016). MR.2 .SR.1 . NIAHO® accreditation
requirements: Interpretive guidelines & surveyor guidance (version 11).
Milford, OH: DNV GL-Healthcare USA, Inc. (Level VII)
19 Kobayashi, H. (2013). Effect of measurement duration on accuracy of pulse-
counting. Ergonomics, 56(12), 1940–1944. Accessed via the Web at
http://www.ncbi.nlm.nih.gov/pmc/articles/PMC3877911/ (Level IV)
PULSE OXIMETRY
Performed intermittently or continuously, pulse oximetry is a
relatively simple procedure used to monitor arterial oxygen
saturation noninvasively. Pulse oximeters usually denote
arterial oxygen saturation values with the symbol Spo2,
whereas invasively measured arterial oxygen saturation
values are denoted by the symbol Sao2. Pulse oximetry can
aid clinical decision-making; however, it isn’t a substitute for
a clinical assessment. Arterial blood gas (ABG)
measurements, obtained by arterial puncture, are the gold
standard for measuring oxygen saturation level.1
In this procedure, two diodes send red and infrared light
through a pulsating arterial vascular bed, like the one in the
fingertip. A photodetector slipped over the finger measures
the transmitted light as it passes through the vascular bed,
detects the relative amount of color absorbed by arterial
blood, and calculates the Spo2 without interference from
surrounding venous blood, skin, connective tissue, or bone.
Oximetry using the ear probe works by monitoring the
transmission of light waves through the vascular bed of a
patient’s earlobe. Results will be inaccurate if the patient’s
earlobe is poorly perfused, as from a low cardiac output. If a
patient is hemodynamically unstable, a forehead sensor
may be a better alternative for obtaining an accurate
reading, because the forehead is reasonably resistant to the
vasoconstrictive effects of the sympathetic nervous
system.2 (See How oximetry works.)
Equipment
Pulse oximeter ▪ finger probe, ear probe, forehead sensor
(preferably a disposable, adhesive sensor)3 ▪ hospital-grade
disinfectant wipe or pad ▪ Optional: blanket, nail polish
remover, supplemental oxygen delivery equipment, alcohol
pad.
Preparation of equipment
Follow the manufacturer’s guidelines for proper operation of
pulse oximeters, probes, and sensors.
Implementation
■ Gather and prepare the necessary equipment.
■ Perform hand hygiene.4,5,6,7,8,9
■ Confirm the patient’s identity using at least two patient
identifiers.10
■ Explain the procedure to the patient and family (if
appropriate) according to their individual communication
and learning needs to increase their understanding, allay
their fears, and enhance cooperation.11
■ Select a desired sensor site that has warmth and
adequate blood flow to ensure adequate arterial pulse
strength for accurate monitoring.2 If necessary, warm the
sensor site with a cloth or blanket. Avoid placing a sensor on
edematous tissue to reduce possible loss of light
transmission. Avoid placing the sensor on the same
extremity being used for automated noninvasive blood
pressure monitoring to reduce intermittent interference with
pulsatility.12
■ Choose a sensor according to the patient’s size, duration
of use, level of activity, and infection control concerns.12
Using a finger probe
■ Make sure the patient isn’t wearing false fingernails, and
remove any nail polish from the test finger.
■ Place the transducer (photodetector) probe over the
patient’s finger so that light beams and sensors oppose
each other. If the patient has long fingernails, position the
probe perpendicular to the finger, if possible, or clip the
fingernail.
■ Always position the patient’s hand at heart level to
eliminate venous pulsations and to promote accurate
readings.
■ Turn on the power switch (as shown on next page). If the
device is working properly, a beep will sound, a display will
light momentarily, and the pulse searchlight will flash. The
Spo2 and pulse rate displays will show stationary zeros.
After four to six heartbeats, the Spo2 and pulse rate displays
will supply information with each beat, and the pulse
amplitude indicator will begin tracking the pulse. Confirm
the pulse rate displayed corresponds with the patient’s
radial pulse to ensure an accurate reading.
EQUIPMENT
How oximetry works
The pulse oximeter allows noninvasive monitoring of arterial oxygen
saturation (Spo2) levels by measuring the absorption (amplitude) of light
waves as they pass through areas of the body that are highly perfused by
arterial blood. Oximetry also monitors pulse rate and amplitude.
Light-emitting diodes in a transducer (photodetector) attached to the
patient’s body (shown below on the index finger) send red and infrared light
beams through tissue. The photodetector records the relative amount of each
color absorbed by arterial blood and transmits the data to a monitor, which
displays the information with each heartbeat. If the Spo2 level or pulse rate
varies from preset limits, the monitor triggers visual and audible alarms.
Using an ear probe
■ Clean the earlobe with an alcohol pad (as shown below),
if necessary, to remove oils from the skin, and then allow it
to dry. Mild erythema indicates adequate vascularization.
■ Following the manufacturer’s instructions, attach the ear
probe to the patient’s earlobe or pinna. Use the ear probe
stabilizer for prolonged or exercise testing. Be sure to
establish good contact on the ear; an unstable probe may
set off the low-perfusion alarm.
■ After the probe has been attached for a few seconds, a
saturation reading and pulse waveform will appear on the
oximeter’s screen.
■ Leave the ear probe in place for 3 or more minutes until
readings stabilize at the highest point, or take three
separate readings and average them. Make sure you
revascularize the patient’s earlobe each time.
Using a forehead sensor
■ Clean the patient’s forehead site with an alcohol pad, if
necessary, to remove oils from the skin.12 Allow it to dry
completely.
■ Following the manufacturer’s instructions, attach the
forehead sensor to the patient’s forehead.
■ Turn on the device.
■ After the probe has been attached for a few seconds, a
saturation reading and pulse waveform will appear on the
oximeter’s screen.
Completing the procedure
■ If monitoring continuous pulse oximetry, confirm that
alarm limits are set appropriately for the patient’s current
condition, and that the alarms are turned on, functioning
properly, and audible to staff.3,13,14
■ If the pulse oximeter alarms, assess the patient’s
respiratory status and make sure the sensor remains
attached properly.
■ If you detect and confirm low saturation levels,
administer supplemental oxygen, as needed and prescribed.
Reassess the patient to evaluate the effectiveness of the
supplemental oxygen therapy.
■ Regularly monitor and document the patient’s Spo2 level
and the condition of the skin under the probe. Change the
sensor site as needed or at an interval established by your
facility to reduce incidence of pressure injury.15
■ When monitoring is completed, remove the probe, turn
off and unplug the unit, and, if using a reusable probe, clean
it by gently rubbing it with a disinfectant wipe or pad.16,17
■ Perform hand hygiene.4,5,6,7,8,9
■ Document the procedure.18,19,20,21
Special considerations
■ The pulse rate on the pulse oximeter should correspond
with the patient’s actual pulse. If the rates don’t correspond,
the saturation reading can’t be considered accurate. Assess
the patient, check the oximeter, and reposition the probe, if
necessary.22
TROUBLESHOOTING
Diagnosing pulse oximeter problems
To maintain a continuous display of arterial oxygen saturation (Spo2) levels,
keep the monitoring site clean and dry. Make sure the skin doesn’t become
irritated from adhesives used to keep disposable probes in place. You may
need to change the site if this happens. Disposable probes that irritate the
skin also can be replaced by nondisposable models.
Another common problem with pulse oximeters is the failure of the devices
to obtain a signal. If the device you’re using fails to obtain a signal, first
assess the patient’s vital signs. If they’re sufficient to produce a signal, check
for a poor connection, inadequate or intermittent blood flow to the site, or
equipment malfunctions.
Poor connection
To check for a poor connection, make sure that the sensors are properly
aligned. Make sure that wires are intact and securely fastened, and that the
pulse oximeter is plugged into a power source.
Inadequate or intermittent blood flow to the site
To determine inadequate or intermittent blood flow to the site, assess the
patient’s pulse rate and capillary refill time. If blood flow to the site is
decreased, take corrective action by loosening restraints, removing tight-
fitting clothes, taking off a blood pressure cuff, or assessing arterial and IV
catheters. If none of these interventions works, you may need to find an
alternate site. Finding a site with proper circulation may also prove
challenging when a patient is receiving vasoconstrictive drugs. Refer to the
manufacturer’s recommendations regarding the effects of low perfusion
states on pulse oximeter performance.1
Equipment malfunctions
If you suspect an equipment malfunction, remove the pulse oximeter from
the patient, set the alarm limits, and try the instrument on yourself or
another healthy person. This test will tell you if the equipment is working
correctly.
■ Collaborate with an interprofessional team, including
biomedical engineering, to determine the best delay and
threshold settings.3
■ Use disposable, adhesive sensors (if available), and
replace the sensors when they no longer adhere properly to
the patient’s skin.3
■ If you’ve performed oximetry properly, readings are
typically accurate to within plus-or-minus 2% of Spo2 at
higher levels, but may reflect Spo2 less accurately when
Spo2 falls below 80%.23
■ Certain factors may interfere with accuracy, including
elevated carboxyhemoglobin or methemoglobin levels
(possible in heavy smokers and urban dwellers), which can
cause a falsely elevated Spo2 reading; certain intravascular
substances, such as lipid emulsions and dyes; excessive
light (for example, from phototherapy, surgical lamps, direct
sunlight, and excessive ambient lighting); excessive patient
movement; dark skin; hypothermia; hypotension;
vasoconstriction; poor perfusion; and venous return at the
sensor site.1,2
■ Forehead sensors are a good alternative for patients with
poor peripheral circulation and in patients under general
anesthesia whose extremities aren’t readily accessible.
■ If you’re using Spo2 to guide weaning the patient from
forced inspiratory oxygen, obtain samples for ABG analysis
occasionally to correlate Spo2 readings with Sao2 levels.
■ If you’re using an automatic blood pressure cuff on the
same extremity used for measuring Spo2, the cuff will
interfere with Spo2 readings during inflation.
■ If light is a problem, cover the probes; if patient
movement is a problem, move the probe or select a
different probe; and if placement is a problem, reposition
the probe, revascularize the site, or use a finger probe. (See
Diagnosing pulse oximeter problems.)
■ Normal Spo2 levels for pulse oximetry are 95% to 100%
for adults. An Spo2 of 92% or less suggests hypoxemia.1 In
this case, follow your facility’s protocol or the practitioner’s
orders, which may include increasing oxygen therapy. If
Spo2 levels decrease suddenly, you may need to resuscitate
the patient immediately. Notify the practitioner of any
significant change in the patient’s condition.
NURSING ALERT Be aware that anemic patients may be hypoxic but
will demonstrate normal Spo2 levels, because total oxygen content of
the arterial blood is decreased.2
■ The Joint Commission issued a sentinel event alert
concerning medical device alarm safety, because alarm-
related events have been associated with permanent loss of
function or death. Among the major contributing factors
were improper alarm settings, alarms inappropriately turned
off, and alarm signals not audible to staff. Make sure alarm
limits are set appropriately, and that alarms are turned on,
functioning properly, and audible to staff. Follow facility
guidelines for preventing alarm fatigue.24
Patient teaching
Explain to the patient and family why you’re using pulse
oximetry, how it works, and what the readings indicate in
language that they can comprehend. Also explain the
factors that can lead to false alarms and the importance of
frequent site assessment and rotation.
Documentation
Document the date, time, procedure type, patient’s activity
level and position, probe site, and amount of supplemental
oxygen and oxygen saturation, as well as any action taken.
Record readings on appropriate flowcharts, if indicated.
REFERENCES
1 Mohammad, Y., et al. (2010). “Clinical use of pulse oximetry: Pocket reference
2010” [Online]. Accessed via the Web at http://www.copd-
alert.com/OximetryPG.pdf
2 Wiegand, D.L. (2017). AACN procedure manual for high acuity, progressive,
and critical care (7th ed.). St. Louis, MO: Elsevier.
3 American Association of Critical-Care Nurses (AACN). (2013). “AACN practice
alert: Alarm management” [Online]. Accessed via the Web at
https://www.aacn.org/aacn-website/shared/content/practice-
alerts/2015/11/25/alarm-management (Level VII)
4 Centers for Disease Control and Prevention. (2002). Guideline for hand
hygiene in health-care settings: Recommendations of the Healthcare Infection
Control Practices Advisory Committee and the HICPAC/SHEAP/APIC/IDSA Hand
Hygiene Task Force. MMWR Recommendations and Reports, 51(RR-16), 1–45.
Accessed via the Web at https://www.cdc.gov/mmwr/pdf/rr/rr5116.pdf (Level
II)
5 World Health Organization. (2009). “WHO guidelines on hand hygiene in
health care: First global patient safety challenge, clean care is safer care”
[Online]. Accessed via the Web at
http://apps.who.int/iris/bitstream/10665/44102/1/9789241597906_eng.pdf
(Level IV)
6 The Joint Commission. (2019). Standard NPSG.07.01.01. Comprehensive
accreditation manual for hospitals. Oakbrook Terrace, IL: The Joint
Commission. (Level VII)
7 Centers for Medicare and Medicaid Services, Department of Health and
Human Services. (2015). Condition of participation: Infection control. 42 C.F.R.
§ 482.42.
8 Accreditation Association for Hospitals and Health Systems. (2017). Standard
07.01.21. Healthcare Facilities Accreditation Program: Accreditation standards
for acute care hospitals. Chicago, IL: Accreditation Association for Hospitals
and Health Systems. (Level VII)
9 DNV GL-Healthcare USA, Inc. (2016). IC.1.SR.1 . NIAHO® accreditation
requirements: Interpretive guidelines & surveyor guidance (version 11).
Milford, OH: DNV GL-Healthcare USA, Inc. (Level VII)
10 The Joint Commission. (2019). Standard NPSG.01.01.01. Comprehensive
accreditation manual for hospitals. Oakbrook Terrace, IL: The Joint
Commission. (Level VII)
11 The Joint Commission. (2019). Standard PC.02.01.21. Comprehensive
accreditation manual for hospitals. Oakbrook Terrace, IL: The Joint
Commission. (Level VII)
12 Nellcor. (n.d .). “Clinician’s guide to Nellcor sensors” [Online]. Accessed via
the Web at http://nbninfusions.com/wp-
content/uploads/nbnmanuals/Ventilator%20Manuals/Nellcor%20Sensors%20C
linician’s%20Manual.pdf
13 The Joint Commission. (2019). Standard NPSG.06 .01.01. Comprehensive
accreditation manual for hospitals. Oakbrook Terrace, IL: The Joint
Commission. (Level VII)
14 Graham, K. C., & Cvach, M. (2010). Monitor alarm fatigue: Standardizing use
of physiological monitors and decreasing nuisance alarms. American Journal
of Critical Care, 19(1), 28–37. Accessed via the Web at
http://ajcc.aacnjournals.org/content/19/1/28.full.pdf
15 National Pressure Ulcer Advisory Panel, et al. (2014). “Prevention and
treatment of pressure ulcers: Quick reference guide” [Online]. Accessed via
the Web at http://www.npuap.org/wp-content/uploads/2014/08/Quick-
Reference-Guide-DIGITAL-NPUAP-EPUAP-PPPIA.pdf (Level VII)
16 Rutala, W. A., et al. (2008, revised 2017). “Guideline for disinfection and
sterilization in healthcare facilities, 2008” [Online]. Accessed via the Web at
https://www.cdc.gov/infectioncontrol/pdf/guidelines/disinfection-
guidelines.pdf (Level I)
17 Accreditation Association for Hospitals and Health Systems. (2017). Standard
07.02.03. Healthcare Facilities Accreditation Program: Accreditation
requirements for acute care hospitals. Chicago, IL: Accreditation Association
for Hospitals and Health Systems. (Level VII)
18 The Joint Commission. (2019). Standard RC.01.03 .01. Comprehensive
accreditation manual for hospitals. Oakbrook Terrace, IL: The Joint
Commission. (Level VII)
19 Centers for Medicare and Medicaid Services, Department of Health and
Human Services. (2015). Condition of participation: Medical record services.
42 C.F.R. § 482.24(b).
20 Accreditation Association for Hospitals and Health Systems. (2017). Standard
10.00 .03. Healthcare Facilities Accreditation Program: Accreditation
requirements for acute care hospitals. Chicago, IL: Accreditation Association
for Hospitals and Health Systems. (Level VII)
21 DNV GL-Healthcare USA, Inc. (2016). MR.2 .SR.1 . NIAHO® accreditation
requirements: Interpretive guidelines & surveyor guidance (version 11).
Milford, OH: DNV GL-Healthcare USA, Inc. (Level VII)
22 World Health Organization. (2011). “Pulse oximetry training manual” [Online].
Accessed via the Web at
http://www.who.int/patientsafety/safesurgery/pulse_oximetry/who_ps_pulse_o
xymetry_training_manual_en.pdf (Level VII)
23 Casey, G. (2011). Pulse oximetry—What are we really measuring? Nursing
New Zealand, 17(3), 24–29. (Level VII)
24 The Joint Commission. (2013). “Sentinel event alert: Medical device alarm
safety in hospitals” [Online]. Accessed via the Web at
https://www.jointcommission.org/assets/1/6/SEA_50_alarms_4 _26_16.pdf
(Level VII)
R
RADIATION IMPLANT THERAPY
For this treatment, also called brachytherapy, the
practitioner uses implants of radioactive isotopes
(encapsulated in seeds, needles, or sutures)1 to deliver
ionizing radiation within a body cavity or interstitially to a
tumor site. Implants can deliver a continuous radiation dose
over several hours or days to a specific site while
minimizing exposure to adjacent tissues. The implants may
be permanent or temporary. Isotopes such as cesium-137
and -131, gold-198, iodine-125, iridium-192, palladium-103,
and phosphorus-32 are used to treat cancers. (See
Radioisotopes and their uses, page 656.) Common implant
sites include the brain, breast, cervix, endometrium, lung,
neck, oral cavity, prostate, and vagina. Radiation implant
therapy is commonly combined with external radiation
therapy (teletherapy) for increased effectiveness.
For treatment, the patient is usually placed in a private
room (with its own bathroom) located as far away from high-
traffic areas as practical. If monitoring shows an increased
radiation hazard, adjacent rooms and hallways may also
need to be restricted. Consult your facility’s radiation safety
guidelines.
Equipment
Patient medical record ▪ film badge or pocket dosimeter ▪
RADIATION PRECAUTION sign for door ▪ RADIATION PRECAUTION labels
▪ masking tape ▪ lead-lined container ▪ long-handled
forceps ▪ Optional: lead shield and lead strip.
For implants inserted in the oral cavity or neck
Emergency tracheotomy tray.
Preparation of equipment
Place the lead-lined container and long-handled forceps in a
corner of the patient’s room. Mark a “safe line” on the floor
with masking tape 6′ (1.8 M) from the patient’s bed to warn
visitors to keep clear of the patient to minimize their
radiation exposure. If desired, place a portable lead shield in
the back of the room to use when providing care.
Place an emergency tracheotomy tray in the room if an
implant will be inserted in the oral cavity or neck.
Implementation
■ Verify the practitioner’s order.
■ Confirm that written informed consent has been obtained
by the practitioner and is documented in the patient’s
medical record.2,3,4,5,6
■ Perform hand hygiene.7,8,9,10,11,12
■ Confirm the patient’s identity using at least two patient
identifiers.13,14
■ Explain the procedure to the patient and family (if
appropriate) according to their individual communication
and learning needs to increase their understanding, allay
their fears, and enhance cooperation. Discuss the treatment
and its goals. Before treatment begins, review your facility’s
radiation safety and visitation procedures, potential adverse
effects, and interventions for those effects. Also review long-
term concerns and home care issues.
■ Make sure that all laboratory tests are performed before
beginning treatment.
After radiation implantation
■ Review the practitioner’s orders regarding the level of
shielding and patient care required for the type of radiation
implant.15
■ Place a RADIATION PRECAUTION sign on the patient’s door.
■ If laboratory studies are required during treatment, a
technician (equipped with a film badge) should obtain the
specimen and label the specimen with the patient’s name,
identification number, and date and time of collection in the
presence of the patient to prevent mislabeling13 and affix it
with a RADIATION PRECAUTION label, and then alert laboratory
personnel before taking the samples to the laboratory. If
urine tests are needed for phosphorus-32 therapy, ask the
radiation oncology department or a laboratory technician
about how to safely transport these specimens.16,17,18,19
■ Affix a RADIATION PRECAUTION warning label to the patient’s
identification wristband.
■ Alert staff members that the patient is receiving radiation
implant therapy by placing a RADIATION PRECAUTION warning in
the patient’s medical record to prevent accidental exposure
to radiation.
■ Each nurse must wear a personal, nontransferable film
badge or ring badge placed at or above waist level for the
entire shift. The badge must only be worn within the work
environment.15 Badges document each person’s cumulative
lifetime radiation exposure. Only primary caregivers are
badged and allowed into the patient’s room.15 Turn in the
radiation badge monthly, or according to your facility’s
protocol.
■ If using a pocket dosimeter, be aware that these devices
measure immediate exposures to radiation.20 In many
facilities, these measurements aren’t part of the permanent
exposure record but are used to ensure that nurses receive
the lowest possible exposure.
■ To minimize exposure to radiation, use the three
principles of time, distance, and shielding: Time—Limit the
amount of time spent near the radiation source,15 and plan
to give care in the shortest time possible, because less time
equals less exposure. Distance—Work as far away from the
radiation source as possible; give care from the side
opposite the implant or from a position allowing the greatest
working distance possible, because the intensity of radiation
exposure varies inversely as the square of the distance from
the source. Shielding—Add a protective barrier between
yourself and the radioactive source, if needed and desired;
the type of shielding used depends on the type of
radiation.15,16,17,18,19
■ Provide essential nursing care only, limiting time in the
patient’s room.
■ Make sure that perineal wipes, sanitary pads, and similar
items are bagged correctly and monitored. (Refer to your
facility’s radiation guideline.)
■ Keep soiled linens in the patient’s room until scanned and
cleared by the radiation officer.15
■ Dressing changes over an implanted area must be
supervised by the radiation technician or another
designated caregiver.
■ Before discharge, a patient’s temporary implant must be
removed and properly stored by the radiation oncology
department.16,17,18,19 A patient with a permanent implant
may not be released until the radioactivity level is less than
5 millirems/hour at a distance of 3.3′ (1 M).
■ Perform hand hygiene.7,8,9,10,11,12
■ Document the procedure.21,22,23,24
Radioisotopes and their uses
Unstable elements, radioisotopes emit three kinds of energy particles as they
decay to a stable state. These particles are ranked by their penetrating
power. Alpha particles possess the lowest energy level and are easily stopped
by a sheet of paper. More powerful beta particles can be stopped by the
skin’s surface. Gamma rays, the most powerful, can be stopped only by
dense shielding, such as lead. Some isotopes commonly used in cancer
treatments are listed below.
Special considerations
■ Nurses and visitors who are pregnant or trying to
conceive or father a child must not care for patients
receiving radiation implant therapy, because the gonads
and developing embryo and fetus are highly susceptible to
the damaging effects of ionizing radiation.
■ If the patient must be moved out of the room, notify the
appropriate department of the patient’s status to give
receiving personnel time to make appropriate preparations
to receive the patient. When moving the patient, make sure
that the route is clear of equipment and other people, and
that the elevator (if there is one) is keyed and ready to
receive the patient. Move the patient in a bed or wheelchair,
accompanied by two caregivers equipped with badges. If
the patient is delayed along the way, stand as far away from
the bed as possible until you can continue.
■ The patient’s room must be monitored daily by the
radiation oncology department, and disposables must be
monitored and removed according to facility guidelines.
■ If a code is called on a patient with an implant, follow
your facility’s code procedures as well as these steps: Notify
the code team of the patient’s radioactive status to exclude
any team member who is pregnant or trying to conceive or
father a child. Also notify the radiation oncology
department. Cover the implant site with a strip of lead
shielding, if possible. Don’t allow anything to leave the
patient’s room until it’s monitored for radiation. Limit those
entering the room to personnel essential to performing code
procedures. The primary care nurse must remain in the
room (as far away from the patient as possible) to act as a
resource person for the patient and to provide film badges
or dosimeters to code team members.
■ If an implant becomes dislodged, notify the radiation
oncology department staff members and follow their
instructions. Typically, the dislodged implant is collected
with long-handled forceps and placed in a lead-shielded
container.
■ If the patient has radiation seeds implanted for treatment
of prostate cancer, strain the urine for the seeds. Tell the
patient not to allow children or young animals to sit on the
patient’s lap for 1 to 2 months after seed implantation.
Advise a male patient to wear a condom during intercourse
for 1 to 2 weeks after seed implantation, and tell him that
his semen may be dark from blood.20,25
■ Tell the patient who has had a cervical implant to expect
slight to moderate vaginal bleeding after being discharged.
This flow normally changes color from pink to brown to
white. Instruct her to notify the practitioner if bleeding
increases, persists for more than 48 hours, or has a foul
odor. Explain to the patient that she may resume most
normal activities but should avoid sexual intercourse and
the use of tampons until after her follow-up visit to the
practitioner (about 6 weeks after discharge). Instruct her to
take showers rather than baths for 2 weeks, to avoid
douching unless allowed by the practitioner, and to avoid
activities that cause abdominal strain for 6 weeks.
■ Refer the patient for sexual or psychological counseling if
needed.
■ If a patient with an implant dies on the unit, notify the
radiation oncology department so they can remove a
temporary implant and store it properly. If the implant was
permanent, radiation oncology staff members will determine
which precautions to follow before postmortem care can be
provided and before the body can be moved to the morgue.
Patient teaching
Teach the patient about radiation therapy, the need for
temporary isolation, adverse effects, and complications.
Review activity restrictions (usually bedrest unless
otherwise permitted) with the patient. Help the patient and
family consider alternatives to in-person visits, such as
phone calls, social media, video chat, and e-mail. Tell the
patient that full benefits of treatment may not occur for
several months. Assure the patient and family that radiation
exposure isn’t measurable once the patient is discharged.
Complications
Depending on the implant site and total radiation dose,
complications of implant therapy may include dislodgment
of the radiation source or applicator, tissue fibrosis,
xerostomia, radiation pneumonitis, muscle atrophy, sterility,
vaginal dryness or stenosis, fistulas, hypothyroidism, altered
bowel habits, infection, airway obstruction, diarrhea,
cystitis, myelosuppression, neurotoxicity, and secondary
cancers. Encourage the patient and family members to keep
in contact with the radiation oncology department and to
call them if concerns or physical changes occur.
Documentation
Record date and time of therapy, radiation precautions
taken during and after treatment, and the patient’s
tolerance of the procedure and radiation precautions.
Document any adverse effects of therapy, any interventions
taken, and the patient’s response to the interventions. Note
any teaching provided to the patient and family, including
referrals to local cancer services, and their understanding of
the teaching.
REFERENCES
1 Bruner, D., et al. (Eds.). (2012). Manual for radiation oncology nursing
practice and education (4th ed.). Pittsburgh, PA: Oncology Nursing Society.
2 The Joint Commission. (2017). Standard RI.01.03 .01. Comprehensive
accreditation manual for hospitals. Oakbrook Terrace, IL: The Joint
Commission. (Level VII)
3 Centers for Medicare and Medicaid Services, Department of Health and
Human Services. (2015). Condition of participation: Patient’s rights. 42 C.F.R.
§ 482.13(b)(2).
4 American College of Radiology. (2015). “ACR-ABS practice parameter for the
performance of radionuclide-based high-dose-rate brachytherapy” [Online].
Accessed via the Web at https://www.acr.org/-/media/ACR/Files/Practice-
Parameters/hdr-brachyro.pdf (Level I)
5 Accreditation Association for Hospitals and Health Systems. (2017). Standard
15.01.11. Healthcare Facilities Accreditation Program: Accreditation
requirements for acute care hospitals. Chicago, IL: Accreditation Association
for Hospitals and Health Systems. (Level VII)
6 DNV GL-Healthcare USA, Inc. (2016). PR.1 .SR.3 . NIAHO® accreditation
requirements: Interpretive guidelines & surveyor guidance (version 11).
Milford, OH: DNV GL-Healthcare USA, Inc. (Level VII)
7 Centers for Disease Control and Prevention. (2002). Guideline for hand
hygiene in health-care settings: Recommendations of the Healthcare Infection
Control Practices Advisory Committee and the HICPAC/SHEA/APIC/IDSA Hand
Hygiene Task Force. MMWR Recommendations and Reports, 51(RR–16), 1–45.
Accessed via the Web at https://www.cdc.gov/mmwr/pdf/rr/rr5116.pdf (Level
II)
8 World Health Organization. (2009). “WHO guidelines on hand hygiene in
health care: First global patient safety challenge, clean care is safer care”
[Online]. Accessed via the Web at
http://apps.who.int/iris/bitstream/10665/44102/1/9789241597906_eng.pdf
(Level IV)
9 The Joint Commission. (2019). Standard NPSG.07.01.01. Comprehensive
accreditation manual for hospitals. Oakbrook Terrace, IL: The Joint
Commission. (Level VII)
10 Accreditation Association for Hospitals and Health Systems. (2017). Standard
07.01.21. Healthcare Facilities Accreditation Program: Accreditation
requirements for acute care hospitals. Chicago, IL: Accreditation Association
for Hospitals and Health Systems. (Level VII)
11 Centers for Medicare and Medicaid Services, Department of Health and
Human Services. (2015). Condition of participation: Infection control. 42 C.F.R.
§ 482.42.
12 DNV GL-Healthcare USA, Inc. (2016). IC.1 .SR.1 . NIAHO® accreditation
requirements: Interpretive guidelines & surveyor guidance (version 11).
Milford, OH: DNV GL-Healthcare USA, Inc. (Level VII)
13 The Joint Commission. (2019). Standard NPSG.01.01.01. Comprehensive
accreditation manual for hospitals. Oakbrook Terrace, IL: The Joint
Commission. (Level VII)
14 Accreditation Association for Hospitals and Health Systems. (2017). Standard
30.00 .14. Healthcare Facilities Accreditation Program: Accreditation
requirements for acute care hospitals. Chicago, IL: Accreditation Association
for Hospitals and Health Systems. (Level VII)
15 Polovich, M., et al., (Eds.). (2014). Chemotherapy and biotherapy guidelines
and recommendations for practice (4th ed.). Pittsburgh, PA: Oncology Nursing
Society.
16 The Joint Commission. (2019). Standard EC.02.02.01. Comprehensive
accreditation manual for hospitals. Oakbrook Terrace, IL: The Joint
Commission. (Level VII)
17 Centers for Medicare and Medicaid Services, Department of Health and
Human Services. (2015). Condition of participation: Radiologic services. 42
C.F.R. § 482.26(b)(1).
18 Accreditation Association for Hospitals and Health Systems. (2017). Standard
19.00 .03. Healthcare Facilities Accreditation Program: Accreditation
requirements for acute care hospitals. Chicago, IL: Accreditation Association
for Hospitals and Health Systems. (Level VII)
19 DNV GL-Healthcare USA, Inc. (2016). MI .2.SR.1 . NIAHO® accreditation
requirements: Interpretive guidelines & surveyor guidance (version 11).
Milford, OH: DNV GL-Healthcare USA, Inc. (Level VII)
20 Esparza, D. M. (2014). Oncology policies and procedures. Pittsburgh, PA:
Oncology Nurses Society.
21 The Joint Commission. (2019). Standard RC.01.03 .01. Comprehensive
accreditation manual for hospitals. Oakbrook Terrace, IL: The Joint
Commission. (Level VII)
22 Accreditation Association for Hospitals and Health Systems. (2017). Standard
10.00 .03. Healthcare Facilities Accreditation Program: Accreditation
requirements for acute care hospitals. Chicago, IL: Accreditation Association
for Hospitals and Health Systems. (Level VII)
23 Centers for Medicare and Medicaid Services, Department of Health and
Human Services. (2015). Condition of participation: Medical record services.
42 C.F.R. § 482.24(b).
24 DNV GL-Healthcare USA, Inc. (2016). MR.2 .SR.1 . NIAHO® accreditation
requirements: Interpretive guidelines & surveyor guidance (version 11).
Milford, OH: DNV GL-Healthcare USA, Inc. (Level VII)
25 Hsu, I., et al. (2008). “American Brachytherapy Society: Prostate high-dose
rate task group” [Online]. Accessed via the Web at
http://www.americanbrachytherapy.org/guidelines/HDRTaskGroup.pdf
RADIATION THERAPY, EXTERNAL
About 60% of all cancer patients are treated with some form
of external radiation therapy. Also called radiotherapy or
external beam radiation,1 this treatment delivers radiation—
X-rays or gamma rays—directly to the cancer site. Radiation
therapy in combination with surgery and systemic therapy is
gaining widespread use; when used in combination, it
controls tumor growth and improves quality of life by
minimizing toxicity and preserving the organs.2
Radiation doses are based on the type, stage, and location
of the tumor as well as on the patient’s size, condition, and
overall treatment goals. Doses are given in increments,
usually three to five times a week, until the total dose is
reached, typically 5 to 8 weeks.1
The goals of radiation therapy include cure, in which the
cancer is completely destroyed and not expected to recur;
control, in which the cancer doesn’t progress or regress but
is expected to progress at some later time; or palliation, in
which radiation is given to relieve signs and symptoms
(such as bone pain, seizures, bleeding, and headache)
caused by the cancer.
External beam radiation therapy is delivered by machines
that aim a concentrated beam of high-energy particles
(photons and gamma rays) at the target site. Two types of
machines are commonly used: units containing cobalt or
cesium as radioactive sources for gamma rays, and linear
accelerators that use electricity to produce X-rays. Linear
accelerators produce high energy with great penetrating
ability.
Radiation therapy may be augmented by chemotherapy,
brachytherapy (radiation implant therapy), or surgery, as
needed.
Equipment
Radiation therapy machine.
Implementation
■ Verify the practitioner’s order.
■ Confirm that written informed consent has been obtained
by the practitioner and is in the patient’s medical
record.3,4,5,6
■ Perform hand hygiene.7,8,9,10,11,12
■ Confirm the patient’s identity using at least two patient
identifiers.13,14
■ Explain the procedure to the patient and family (if
appropriate) according to their individual communication
and learning needs to increase their understanding, allay
their fears, and enhance cooperation.15 Explain that
because radiation beams must be delivered to a precise
location, a special mold, mask, or cast may be needed to
help maintain positioning during therapy. Tell the patient
that it may be necessary to mark the treatment field with
semipermanent ink that will need to remain in place during
therapy. Review the treatment goals and discuss the range
of potential adverse effects as well as interventions to
minimize them. Also discuss possible long-term
complications and treatment issues. Educate the patient
and family about local cancer services.
■ Review the patient’s clinical record for recent laboratory
and imaging results and alert the radiation oncology staff to
any abnormalities or pertinent results (such as
myelosuppression, paraneoplastic syndromes, oncologic
emergencies, and tumor progression).
■ Reassure the patient throughout the treatment planning
simulation, during which the target area is mapped out on
the body using a machine similar to the radiation therapy
machine and is then tattooed or marked in ink on the body
to ensure accurate treatments.
■ The practitioner and radiation oncologist determine the
duration and frequency of treatments, depending on the
patient’s body size, size of portal, extent and location of
cancer, and treatment goals.
■ The patient is positioned on the treatment table beneath
the machine.16 Treatments last from a few seconds to a few
minutes. Reassure the patient that he or she won’t feel
anything and won’t be radioactive.
■ After treatment is complete, the patient may return home
or be transported to the hospital room.
■ Perform hand hygiene.7,8,9,10,11,12
■ Document the procedure.17,18,19,20
Special considerations
■ Emphasize the importance of keeping all scheduled
radiation treatment appointments, because missed
appointments may affect treatment outcomes. Make sure
that the patient is aware of how to prepare for the specified
treatment, such as having a full bladder for prostate
radiation, or learning to hold the breath for respiratory
gating.21
■ Emphasize the importance of keeping follow-up
appointments so that the practitioner can address treatment
outcomes and resolution of signs and symptoms.
■ Tell the patient to avoid the use of lotions, topical
medications, deodorants, perfumes, and powders before
treatment.
■ Encourage the patient to avoid sun exposure for 1 year
after treatment, and to use a sunblock with a sun protection
factor of 15 or higher.
■ Refer the patient to a support group, such as a local
chapter of the American Cancer Society.
Patient teaching
Instruct the patient and family on proper skin care and
management of the possible adverse effects of treatment.
Explain to the patient that the full benefit of radiation
treatments may not occur until several weeks or months
after treatments begin. Instruct the patient to report any
long-term adverse effects. Stress that the patient isn’t
considered radioactive at any time during or after
treatment. Instruct the patient about the importance of
leaving the target area markings intact to ensure treatment
accuracy.
Complications
Adverse effects arise gradually and diminish gradually after
treatments. They may be acute, subacute (accumulating as
treatment progresses), chronic (following treatment), or
long-term (arising months to years after treatment).
Adverse effects are localized to the area of treatment, and
their severity depends on the total radiation dosage,
underlying organ sensitivity, and the patient’s overall
condition.
Common acute and subacute adverse effects can include
altered skin integrity, altered GI and genitourinary function,
altered fertility and sexual function, altered bone marrow
production, anxiety, fatigue, sleep disturbances, and
alopecia. Adverse effects during radiation therapy may be
increased when the patient receives concurrent
chemotherapy and biotherapy.
Long-term complications or adverse effects may include
radiation pneumonitis, neuropathy, skin and muscle
atrophy, telangiectasia, fistulas, altered endocrine function,
and secondary cancers. Other long-term treatment
complications include headache, alopecia, xerostomia,
dysphagia, stomatitis, altered skin integrity (wet or dry
desquamation), nausea, vomiting, heartburn, diarrhea,
cystitis, and fatigue.
Documentation
Document the date and time of radiation therapy, radiation
precautions taken during treatment, and the patient’s
tolerance of the procedure. Record any adverse effects,
interventions used, and the patient’s response to the
interventions. Document any teaching provided to the
patient and family and their understanding of your teaching.
Note discharge plans and teaching and referrals to local
cancer services, if applicable.
REFERENCES
1 American Cancer Society. (2017). “External radiation therapy” [Online].
Accessed via the Web at http://www.cancer.org/treatment/treatments-and-
side-effects/treatment-types/radiation/radiation-therapy-guide/external-
radiation-therapy.html
2 Loeffler, J. S ., & Durante, M. (2013). Charged particle therapy—Optimization,
challenges and future directions. Nature Reviews Clinical Oncology, 10(7),
411–424. (Level VII)
3 Centers for Medicare and Medicaid Services, Department of Health and
Human Services. (2015). Condition of participation: Patient’s rights. 42 C.F.R.
§ 482.13(b)(2).
4 The Joint Commission. (2019). Standard RI.01.03 .01. Comprehensive
accreditation manual for hospitals. Oakbrook Terrace, IL: The Joint
Commission. (Level VII)
5 Accreditation Association for Hospitals and Health Systems. (2017). Standard
15.01.11. Healthcare Facilities Accreditation Program: Accreditation
requirements for acute care hospitals. Chicago, IL: Accreditation Association
for Hospitals and Health Systems. (Level VII)
6 DNV GL-Healthcare USA, Inc. (2016). PR.1 .SR.3 . NIAHO® accreditation
requirements: Interpretive guidelines & surveyor guidance (version 11).
Milford, OH: DNV GL-Healthcare USA, Inc. (Level VII)
7 Centers for Disease Control and Prevention. (2002). Guideline for hand
hygiene in health-care settings: Recommendations of the Healthcare Infection
Control Practices Advisory Committee and the HICPAC/SHEA/APIC/IDSA Hand
Hygiene Task Force. MMWR Recommendations and Reports, 51(RR-16), 1–45.
Accessed via the Web at https://www.cdc.gov/mmwr/pdf/rr/rr5116.pdf (Level
II)
8 World Health Organization. (2009). “WHO guidelines on hand hygiene in
health care: First global patient safety challenge, clean care is safer care”
[Online]. Accessed via the Web at
http://apps.who.int/iris/bitstream/10665/44102/1/9789241597906_eng.pdf
(Level IV)
9 The Joint Commission. (2019). Standard NPSG.07.01.01. Comprehensive
accreditation manual for hospitals. Oakbrook Terrace, IL: The Joint
Commission. (Level VII)
10 Accreditation Association for Hospitals and Health Systems. (2017). Standard
07.01.21. Healthcare Facilities Accreditation Program: Accreditation
requirements for acute care hospitals. Chicago, IL: Accreditation Association
for Hospitals and Health Systems. (Level VII)
11 Centers for Medicare and Medicaid Services, Department of Health and
Human Services. (2015). Condition of participation: Infection control. 42 C.F.R.
§ 482.42.
12 DNV GL-Healthcare USA, Inc. (2016). IC.1 .SR.1 . NIAHO® accreditation
requirements: Interpretive guidelines & surveyor guidance (version 11).
Milford, OH: DNV GL-Healthcare USA, Inc. (Level VII)
13 The Joint Commission. (2019). Standard NPSG.01.01.01. Comprehensive
accreditation manual for hospitals. Oakbrook Terrace, IL: The Joint
Commission. (Level VII)
14 Accreditation Association for Hospitals and Health Systems. (2017). Standard
30.00 .14. Healthcare Facilities Accreditation Program: Accreditation
requirements for acute care hospitals. Chicago, IL: Accreditation Association
for Hospitals and Health Systems. (Level VII)
15 The Joint Commission. (2019). Standard PC.02.01.21. Comprehensive
accreditation manual for hospitals. Oakbrook Terrace, IL: The Joint
Commission. (Level VII)
16 American College of Radiology. (2016). “ACR-ASTRO practice parameter for
3D external beam radiation planning and conformal therapy” [Online].
Accessed via the Web at https://www.acr.org/-/media/ACR/Files/Practice-
Parameters/3d-conformal.pdf (Level VII)
17 The Joint Commission. (2019). Standard RC.01.03 .01. Comprehensive
accreditation manual for hospitals. Oakbrook Terrace, IL: The Joint
Commission. (Level VII)
18 Accreditation Association for Hospitals and Health Systems. (2017). Standard
10.00 .03. Healthcare Facilities Accreditation Program: Accreditation
requirements for acute care hospitals. Chicago, IL: Accreditation Association
for Hospitals and Health Systems. (Level VII)
19 Centers for Medicare and Medicaid Services, Department of Health and
Human Services. (2015). Condition of participation: Medical record services.
42 C.F.R. § 482.24(b).
20 DNV GL-Healthcare USA, Inc. (2016). MR.2 .SR.1 . NIAHO® accreditation
requirements: Interpretive guidelines & surveyor guidance (version 11).
Milford, OH: DNV GL-Healthcare USA, Inc. (Level VII)
21 Iwamoto, R.R., et al. (Eds.). (2012). Manual for radiation oncology nursing
practice and education (4th ed.). Pittsburgh, PA: Oncology Nursing Society.
RADIOACTIVE IODINE THERAPY
Because the thyroid gland concentrates iodine, radioactive
iodine-131 (131I) can be used to treat thyroid cancer. Usually
administered orally, this isotope is used to treat
postoperative residual cancer, recurrent disease, inoperable
primary thyroid tumors, invasion of the thyroid capsule, and
thyroid ablation, as well as cancers that have metastasized
to cervical or mediastinal lymph nodes or other distant sites.
Radioiodine is usually given orally as a solution or a capsule.
The radioiodine is rapidly incorporated into the thyroid, and
its beta-emissions result in extensive local tissue damage.1
Because 131I is absorbed systemically, all body secretions,
especially urine, must be considered radioactive. For 131I
treatments, the patient usually is placed in a private room
(with its own bathroom) located as far away from high-traffic
areas as practical. Adjacent rooms and hallways may also
need to be restricted. Consult your facility’s radiation safety
guidelines.
In lower doses, 131I also may be used to treat
hyperthyroidism. Most patients receive this treatment on an
outpatient basis and are sent home with appropriate home
care instructions.
Equipment
Patient’s medical record ▪ film badges, pocket dosimeters,
or ring badges ▪ RADIATION PRECAUTION sign for door ▪ RADIATION
PRECAUTION warning labels ▪ waterproof gowns ▪ gloves ▪
hazardous-waste containers ▪ sealable leak-proof trash bags
(clear and red)2 ▪ sealable leak-proof bags ▪ nondisposable
radioresistant gloves ▪ emergency tracheotomy tray ▪
Optional: portable lead shield.
Preparation of equipment
Assemble all necessary equipment in the patient’s room.
Keep a hazardous-waste container lined with a clear and
then a red leak-proof bag in the patient’s room. Keep
sealable leak-proof bags in the patient’s room for containing
linens. Keep objects in the patient’s room until they’ve been
scanned and cleared by the radiation safety officer.3,4
Keep an emergency tracheotomy tray just outside the
room or in a handy place at the nurses’ station because of
the potential for neck swelling following treatment.
Implementation
■ Verify the practitioner’s order.
■ Review the patient’s health history for vomiting, diarrhea,
productive cough, and sinus drainage, which could increase
the risk of radioactive secretions.
■ Confirm that written informed consent has been obtained
by the practitioner and is in the patient’s medical
record.4,5,6,7,8
■ Perform hand hygiene.9,10,11,12,13,14
■ Confirm the patient’s identity using at least two patient
identifiers.15,16
■ Explain the procedure to the patient and family (if
appropriate) according to their individual communication
and learning needs to increase their understanding, allay
their fears, and enhance cooperation.17 Review treatment
goals with the patient and family. Before treatment begins,
review with the patient your facility’s radiation safety and
visitation
procedures,
potential
adverse
effects,
interventions, and home care procedures.4
■ Check for allergies to iodine-containing substances, such
as contrast media or shellfish. Review the patient’s
medication history for thyroid-containing or thyroid-altering
drugs and for lithium carbonate, which may increase 131I
uptake.
■ Ensure that all ordered laboratory tests are performed
before beginning treatment.4
■ If necessary, remove the patient’s dentures to avoid
contaminating them and to reduce radioactive secretions.
Tell the patient the dentures will be returned 48 hours after
treatment.
After the treatment
■ Place the RADIATION PRECAUTION sign on the door.
■ Place a RADIATION PRECAUTION label in the patient’s medical
record to ensure staff awareness of the patient’s radioactive
status.
■ Affix a RADIATION PRECAUTION label to the patient’s
identification band.
■ Notify the dietitian to supply foods and beverages only in
disposable containers and with disposable utensils.2
■ Encourage the patient to use the toilet rather than a
bedpan or urinal and to flush it three times after each use to
reduce radiation levels.4,18 To help avoid splash and aerosol
contamination, close the lid or cover the toilet before
flushing.
■ Tell the patient to remain in the room except for tests or
procedures.4 Allow the patient to ambulate.
■ Unless contraindicated, instruct the patient to increase
fluid intake to 3 qt (3 L) daily to help flush the iodine from
the body’s system.
■ Encourage the patient to chew or suck on hard candy to
keep salivary glands stimulated and prevent them from
becoming inflamed (which may occur in the first 24 hours).
■ If laboratory testing is required, a laboratory technician
equipped with a radiation badge obtains the specimen;
labels it with the patient’s name, identification number, and
the date and time of the collection in the presence of the
patient to prevent mislabeling;15 affixes the specimen with a
RADIATION PRECAUTION warning label; and alerts laboratory
department personnel before transporting it. If urine tests
are needed, ask the radiation oncology department or
laboratory technician how to transport the specimens safely.
■ Each nurse must have a personal, nontransferable film
badge or ring badge placed at or above waist level for the
entire shift.2 The badge must only be worn within the work
environment. Badges document each person’s cumulative
lifetime radiation exposure. Only primary caregivers should
have a badge and be permitted in the patient’s room.3 Turn
in the radiation badge monthly or as directed by your
facility, and be sure to record your exposures accurately.
■ If using a pocket dosimeter, be aware that these devices
measure immediate exposures to radiation. In many
facilities, these measurements aren’t part of the permanent
exposure record but are used to ensure that nurses receive
the lowest possible exposure.
■ Wear gloves to touch the patient or objects in the room.
Any item that the patient touches must be kept in the
room.2
■ Wear a waterproof gown and gloves when handling the
patient’s body secretions (for example, when moving the
emesis basin).
■ Restrict visiting time to 30 minutes every 24 hours to
limit radiation exposure.2,4 Stress that visitors who are
pregnant or trying to conceive or father a child won’t be
allowed to visit the patient.
PEDIATRIC ALERT Visitors younger than age 18 shouldn’t be
permitted to visit a patient receiving 131I therapy.2
■ Restrict direct contact to 30 minutes or 20 millirems per
day. If the patient is receiving 200 millicuries of 131I, remain
with the patient only 2 to 4 minutes and stand no closer
than 1′ (30 cm) away. If standing 3′ (1 m) away, the time
limit is 20 minutes; if standing 5′ (1.5 m) away, the limit is
30 minutes.
■ Perform only essential nursing care, limiting time in the
room.
■ Make sure that perineal wipes, sanitary pads, and similar
items are bagged correctly.
■ If the patient vomits or urinates on the floor, notify the
nuclear medicine department, and use nondisposable
radioresistant gloves when cleaning the floor. After cleanup,
wash your gloved hands, and remove the gloves and leave
them in the room. Then rewash your hands.
What to do after 131I treatment
■ Instruct the patient to report any long-term adverse reactions. In
particular, review signs and symptoms of hypothyroidism and
hyperthyroidism. Also ask the patient to report any signs and symptoms of
thyroid cancer, such as enlarged lymph nodes, dyspnea, bone pain, nausea,
vomiting, and abdominal discomfort.
■ Although the patient’s radiation level at discharge will be safe, suggest
that the patient take extra precautions during the first week, such as using
separate eating utensils, sleeping in a separate bedroom, and avoiding body
contact.18
■ Sexual intercourse may be resumed 1 week after 131I treatment.
However, urge a female patient to avoid pregnancy for 6 months after
treatment.18 Male patients may have decreased sperm counts and
temporary infertility for approximately 2 years. The patient may want to
consider the option of sperm banking.18
■ If the patient must be moved from the room, notify the
appropriate department of the patient’s status so that
receiving personnel can make appropriate arrangements to
receive the patient. When moving the patient, ensure that
the route is clear of equipment and other people, and that
the elevator (if there is one) is keyed and ready to receive
the patient. Move the patient in a bed or wheelchair,
accompanied by two badged caregivers. If delayed, stand as
far away from the patient as possible until you can continue.
■ The patient’s room must be cleaned by the radiation
oncology department, not by housekeeping personnel. The
room must be monitored daily, and disposables must be
monitored and removed according to your facility’s
guidelines.
■ At discharge, schedule the patient for a follow-up
examination.2 Also arrange for a whole-body scan
approximately 7 to 10 days after 131I treatment, as ordered.
■ Inform the patient and family of community support
services for cancer patients.
■ Perform hand hygiene.9,10,11,12,13,14
■ Document the procedure.19,20,21,22
Special considerations
■ Nurses and visitors who are pregnant or trying to
conceive or father a child must not attend or visit patients
receiving 131I therapy, because the gonads and developing
embryo and fetus are highly susceptible to the damaging
effects of ionizing radiation.
■ If a code is called on a patient undergoing 131I therapy,
follow your facility’s code procedures as well as these steps:
Notify the code team of the patient’s radioactive status to
exclude any team member who is pregnant or trying to
conceive or father a child. Also notify the radiation oncology
department. Don’t allow anything (including resuscitation
equipment) or anyone out of the patient’s room until all are
monitored and cleared by the radiation safety officer.2 The
primary care nurse must remain in the room (as far as
possible from the patient) to act as a resource person and to
provide film badges or dosimeters to code team members.
■ If the patient dies on the unit, notify the radiology safety
officer, who will determine which precautions to follow
before postmortem care is provided and before the body
can be removed to the morgue.
Patient teaching
Teach the patient about precautions that will need to be
followed when the patient returns home. (See What to do
after 131I treatment.)
Complications
Myelosuppression is common in patients who undergo
repeated 131I treatments. Radiation pulmonary fibrosis may
develop if extensive lung metastasis was present when 131I
was administered.
Other complications that may be experienced include
nausea, vomiting, headache, radiation thyroiditis, fever,
sialadenitis, and pain and swelling.
Documentation
Record radiation precautions taken during treatment,
teaching provided to the patient and family and their
understanding of the teaching, the patient’s tolerance of
(and the family’s compliance with) radiation safety and
visitation procedures, and referrals to local cancer
counseling services.
REFERENCES
1 American Thyroid Association Taskforce on Radioiodine Safety, et al. (2011).
Radiation safety in the treatment of patients with thyroid diseases by
radioiodine 131I: Practice recommendations of the American Thyroid
Association. Thyroid, 21(4), 335–346. Accessed via the Web at
http://www.thyca.org/download/document/184/ataradiation.pdf (Level VII)
2 Esparza, D.M . (2014). Oncology policies and procedures. Pittsburgh, PA:
Oncology Nursing Society.
3 Polovich, M., et al., (Eds.). (2014). Chemotherapy and biotherapy guidelines
and recommendations for practice (4th ed.). Pittsburgh, PA: Oncology Nursing
Society.
4 American College of Radiology (ACR). (2015). “ACR practice parameter for the
performance of therapy with unsealed radiopharmaceutical sources” [Online].
Accessed via the Web at https://www.acr.org/-/media/ACR/Files/Practice-
Parameters/unsealedsources.pdf (Level VII)
5 Centers for Medicare and Medicaid Services, Department of Health and
Human Services. (2015). Condition of participation: Patient’s rights. 42 C.F.R.
§ 482.13(b)(2).
6 The Joint Commission. (2019). Standard RI.01.03 .01. Comprehensive
accreditation manual for hospitals. Oakbrook Terrace, IL: The Joint
Commission. (Level VII)
7 Accreditation Association for Hospitals and Health Systems. (2017). Standard
15.01.11. Healthcare Facilities Accreditation Program: Accreditation
requirements for acute care hospitals. Chicago, IL: Accreditation Association
for Hospitals and Health Systems. (Level VII)
8 DNV GL-Healthcare USA, Inc. (2016). PR.1 .SR.3 . NIAHO® accreditation
requirements: Interpretive guidelines & surveyor guidance (version 11).
Milford, OH: DNV GL-Healthcare USA, Inc. (Level VII)
9 Centers for Disease Control and Prevention. (2002). Guideline for hand
hygiene in health-care settings: Recommendations of the Healthcare Infection
Control Practices Advisory Committee and the HICPAC/SHEA/APIC/IDSA Hand
Hygiene Task Force. MMWR Recommendations and Reports, 51(RR-16), 1–45.
Accessed via the Web at https://www.cdc.gov/mmwr/pdf/rr/rr5116.pdf (Level
II)
10 World Health Organization. (2009). “WHO guidelines on hand hygiene in
health care: First global patient safety challenge, clean care is safer care”
[Online]. Accessed via the Web at
http://apps.who.int/iris/bitstream/10665/44102/1/9789241597906_eng.pdf
(Level IV)
11 The Joint Commission. (2019). Standard NPSG.07.01.01. Comprehensive
accreditation manual for hospitals. Oakbrook Terrace, IL: The Joint
Commission. (Level VII)
12 Accreditation Association for Hospitals and Health Systems. (2017). Standard
07.01.21. Healthcare Facilities Accreditation Program: Accreditation
requirements for acute care hospitals. Chicago, IL: Accreditation Association
for Hospitals and Health Systems. (Level VII)
13 Centers for Medicare and Medicaid Services, Department of Health and
Human Services. (2015). Condition of participation: Infection control. 42 C.F.R.
§ 482.42.
14 DNV GL-Healthcare USA, Inc. (2016). IC.1 .SR.1 . NIAHO® accreditation
requirements: Interpretive guidelines & surveyor guidance (version 11).
Milford, OH: DNV GL-Healthcare USA, Inc. (Level VII)
15 The Joint Commission. (2019). Standard NPSG.01.01.01. Comprehensive
accreditation manual for hospitals. Oakbrook Terrace, IL: The Joint
Commission. (Level VII)
16 Accreditation Association for Hospitals and Health Systems. (2017). Standard
30.00 .14. Healthcare Facilities Accreditation Program: Accreditation
requirements for acute care hospitals. Chicago, IL: Accreditation Association
for Hospitals and Health Systems. (Level VII)
17 The Joint Commission. (2019). Standard PC.02.01.21. Comprehensive
accreditation manual for hospitals. Oakbrook Terrace, IL: The Joint
Commission. (Level VII)
18 American Thyroid Association. (2014). “Radioactive iodine” [Online].
Accessed via the Web at http://www.thyroid.org/wp-
content/uploads/patients/brochures/Radioactive_iodine_brochure.pdf
19 The Joint Commission. (2019). Standard RC.01.03 .01. Comprehensive
accreditation manual for hospitals: The official handbook. Oakbrook Terrace,
IL: The Joint Commission. (Level VII)
20 Accreditation Association for Hospitals and Health Systems. (2017). Standard
10.00 .03. Healthcare Facilities Accreditation Program: Accreditation
requirements for acute care hospitals. Chicago, IL: Accreditation Association
for Hospitals and Health Systems. (Level VII)
21 Centers for Medicare and Medicaid Services, Department of Health and
Human Services. (2015). Condition of participation: Medical record services.
42 C.F.R. § 482.24(b).
22 DNV GL-Healthcare USA, Inc. (2016). MR.2 .SR.1 . NIAHO® accreditation
requirements: Interpretive guidelines & surveyor guidance (version 11).
Milford, OH: DNV GL-Healthcare USA, Inc. (Level VII)
RECTAL SUPPOSITORIES AND OINTMENTS
A rectal suppository is a small, solid, medicated mass,
usually cone-shaped, with a cocoa butter or glycerin base,
intended as a single-dose rectal application.1,2 It can help
stimulate peristalsis and defecation or relieve pain,
vomiting, and local irritation. Rectal suppositories commonly
contain drugs that reduce fever and induce relaxation but
that can’t be given orally because they interact poorly with
digestive enzymes or have an offensive taste. They may
also help when a patient can’t take medications orally
because of nausea, vomiting, or another GI condition. Rectal
suppositories melt at body temperature and are absorbed
slowly by the rectal mucosa. Suppositories aren’t used for
colon cleansing for a scheduled colonoscopy because they
only exert their effect on the distal colon.3
Because insertion of a rectal suppository may stimulate
the vagus nerve, this procedure is contraindicated in
patients who have the potential for cardiac arrhythmias. It
may also be contraindicated in patients who have active
rectal bleeding or who’ve had recent rectal or prostate
surgery because of the risk of local trauma or discomfort
during insertion.
An ointment is a semisolid medication used to produce
local effects. It may be applied externally to the anus or
internally to the rectum with an applicator. Rectal ointments
commonly contain drugs that reduce inflammation or relieve
pain and itching. Rectal medications may also be used when
a patient is vomiting, unable to swallow, or unconscious.1
They should be used with caution in patients who have a
history of rectal ulcers or fissures.
Equipment
Rectal suppository or ointment ▪ applicator ▪ patient’s
medication administration record ▪ gloves ▪ water-soluble
lubricant ▪ 4′′ × 4′′ (10-cm × 10-cm) gauze pads ▪ Optional:
bedpan, soap and water.
Preparation of equipment
Store rectal suppositories in the refrigerator until needed to
prevent softening and possible decreased effectiveness of
the medication. A softened suppository is also difficult to
handle and insert. To harden a softened suppository, hold it
(in its wrapper) under cold running water.
Implementation
■ Avoid distractions and interruptions when preparing and
administering
medications
to prevent
medication
administration errors.4,5
■ Verify the practitioner’s order.6,7,8,9
■ Reconcile the patient’s medications when the practitioner
orders a new medication to reduce the risk of medication
errors, including omissions, duplications, dosing errors, and
drug interactions.
■ Compare the medication label with the order in the
patient’s medical record.6,7,8,9
■ Check the expiration date on the medication. If the
medication is expired, return it to the pharmacy and obtain
a new medication.6,7,8,9
■ Visually inspect the medication for discoloration or any
other loss of integrity; don’t administer the medication if its
integrity is compromised.6,7,8,9
■ Discuss any unresolved concerns about the medication
with the patient’s practitioner.6,7,8,9
■ Perform hand hygiene.10,11,12,13,14,15
■ Confirm the patient’s identity using at least two patient
identifiers.16
■ Provide privacy.17,18,19,20
■ Explain the procedure to the patient and family (if
appropriate) according to their individual communication
and learning needs to increase their understanding, allay
their fears, and enhance cooperation.21
■ If the patient is receiving the medication for the first time,
teach about potential adverse reactions and discuss any
other
concerns
related to administering the
medication.6,7,8,9
■ Verify that the medication is being administered at the
proper time, in the prescribed dose, and by the correct route
to reduce the risk of medication errors.6,7,8,9
How to administer a rectal
suppository
When inserting a suppository, direct its tapered end toward the side of the
rectum so that it contacts the membranes, which encourages absorption of
the medication.
■ If your facility uses a bar code technology, scan your
identification badge, the patient’s identification bracelet,
and the medication’s bar code.
■ Raise the patient’s bed to waist level when providing
patient care to prevent caregiver back strain.22
■ Perform hand hygiene.10,11,12,13,14,15
■ Put on gloves to comply with standard precautions.23,24
■ Position the patient on the left side in the Sims position.
Drape the patient with the bedcovers to expose only the
buttocks.
Rectal suppository administration
■ Remove the suppository from its wrapper and lubricate it
with water-soluble lubricant.
■ Lift the patient’s upper buttock with your nondominant
hand to expose the anus.
■ Instruct the patient to take several deep breaths through
the mouth to help relax the anal sphincters and reduce
anxiety or discomfort during insertion.
■ Using the index finger of your dominant hand, insert the
suppository—tapered end first—about 1′′ (2.5 cm), until you
feel it pass the internal anal sphincter.25 Ensure the
suppository is in direct contact with the rectal wall.3 Try to
direct the tapered end toward the side of the rectum so that
it contacts the membranes. (See How to administer a rectal
suppository.)
■ Ensure the patient’s comfort. Encourage the patient to lie
quietly and, if applicable, to squeeze or hold the buttocks
together to retain the suppository for the appropriate length
of time. The patient should retain a suppository
administered to relieve constipation as long as possible (at
least 20 minutes) to be effective. If appropriate, keep a
bedpan close by to place underneath the patient in case
there’s difficulty retaining the suppository.
Rectal ointment administration
To apply externally
■ Use gloves or a gauze pad to spread medication over the
anal area.
To apply internally
■ Expect to use about 1′′ (2.5 cm) of ointment. To gauge
how much pressure to use during application, squeeze a
small amount from the tube before you attach the
applicator. Then attach the applicator to the tube of
ointment and coat the applicator with water-soluble
lubricant.
■ Lift the patient’s upper buttock with your nondominant
hand to expose the anus.
■ Instruct the patient to take several deep breaths through
the mouth to relax the anal sphincters and reduce anxiety
or discomfort during insertion.
How to administer rectal ointment
When applying a rectal ointment internally, be sure to lubricate the
applicator to minimize pain on insertion. Direct the applicator tip toward the
patient’s umbilicus.
■ Gently insert the applicator, directing it toward the
umbilicus. (See How to administer rectal ointment.)
■ Slowly squeeze the tube to eject the medication.
■ Remove the applicator and place a folded 4′′ × 4′′ (10-cm
× 10-cm) gauze pad between the patient’s buttocks to
absorb excess ointment.
■ Detach the applicator from the tube and recap the tube.
Then clean the applicator thoroughly with soap and warm
water.
Completing the procedure
■ Return the bed to the lowest position to prevent falls and
maintain patient safety.26
■ Remove and discard your gloves23,24 and perform hand
hygiene.10,11,12,13,14,15
■ Document the procedure.27,28,29,30
Special considerations
■ Because the intake of food and fluid stimulates
peristalsis, a suppository for relieving constipation should be
inserted about 30 minutes before mealtime to help soften
the feces in the rectum and facilitate defecation. A
medicated retention suppository should be inserted
between meals.
■ Make sure the patient’s call light is handy, and watch for
the signal, because the patient may be unable to suppress
the urge to defecate. For example, a patient with proctitis
has a highly sensitive rectum and may not be able to retain
a suppository for long.
■ Inform the patient that the suppository may discolor the
next bowel movement. For example, hydrocortisone
suppositories can give feces a silver-gray, pasty
appearance.
■ Advise the patient to report any increase in itching or
burning in the rectal area. This may indicate increased
irritation.
Patient teaching
Some rectal suppositories and ointments are available over
the counter. Teach the patient how to self-administer the
suppositories or ointment if appropriate. A patient
experiencing constipation may need further teaching about
proper diet, maintaining hydration, daily exercise, and
proper use of laxatives.3
Complications
Complications may be related to the action of the
medication. Occasionally, vagal nerve stimulation may
occur, causing a vagal reaction. Irritation of the rectal area
may occur.
Documentation
Record the administration time, dosage, medication name,
and patient response to the medication. Document patient
teaching and the patient’s understanding of your teaching.
Note any adverse reactions and record interventions
required and the patient’s response to those interventions.
REFERENCES
1 Emblin, K. (2013). Drug formulations and delivery systems. Nurse Prescribing,
11(2), 83–88 .
2 Schmidt, H. (2014). Revision of general monograph: Suppositories. WHO Drug
Information, 28(1), 45–49. Accessed via the Web at
http://www.who.int/medicines/publications/druginformation/DI_28-1 _web.pdf
(Level VII)
3 Daniels, G., & Schmelzer, M. (2013). Giving laxatives safely and effectively.
Medsurg Nursing, 22(5), 290–302. (Level VII)
4 Westbrook, J., et al. (2010). Association of interruptions with an increased risk
and severity of medication administration errors. Archives of Internal
Medicine, 170(8), 683–690 . (Level IV)
5 Institute for Safe Medication Practices. (2012). Side tracks on the safety
express: Interruptions lead to errors and unfinished...Wait, what was I doing?
Nurse Advise-ERR, 11(2), 1–4 . Accessed via the Web at
https://www.ismp.org/Newsletters/acutecare/showarticle.aspx?id=37
6 Centers for Medicare and Medicaid Services, Department of Health and
Human Services. (2015). Condition of participation: Nursing services. 42
C.F.R. § 482.23(c).
7 DNV GL-Healthcare USA, Inc. (2016). MM .1 .SR.2 . NIAHO® accreditation
requirements: Interpretive guidelines & surveyor guidance (version 11).
Milford, OH: DNV GL-Healthcare USA, Inc. (Level VII)
8 Accreditation Association for Hospitals and Health Systems. (2017). Standard
16.01.03. Healthcare Facilities Accreditation Program: Accreditation
requirements for acute care hospitals. Chicago, IL: Accreditation Association
for Hospitals and Health Systems. (Level VII)
9 The Joint Commission. (2019). Standard MM.06 .01.01. Comprehensive
accreditation manual for hospitals. Oakbrook Terrace, IL: The Joint
Commission. (Level VII)
10 The Joint Commission. (2019). Standard NPSG.07.01.01. Comprehensive
accreditation manual for hospitals. Oakbrook Terrace, IL: The Joint
Commission. (Level VII)
11 Centers for Disease Control and Prevention. (2002). Guideline for hand
hygiene in health-care settings: Recommendations of the Healthcare Infection
Control Practices Advisory Committee and the HICPAC/SHEA/APIC/IDSA Hand
Hygiene Task Force. MMWR Recommendations and Reports, 51(RR-16), 1–45.
Accessed via the Web at https://www.cdc.gov/mmwr/pdf/rr/rr5116.pdf (Level
II)
12 World Health Organization. (2009). “WHO guidelines on hand hygiene in
health care: First global patient safety challenge, clean care is safer care”
[Online]. Accessed via the Web at
http://apps.who.int/iris/bitstream/10665/44102/1/9789241597906_eng.pdf
(Level IV)
13 Accreditation Association for Hospitals and Health Systems. (2017). Standard
07.01.21. Healthcare Facilities Accreditation Program: Accreditation
requirements for acute care hospitals. Chicago, IL: Accreditation Association
for Hospitals and Health Systems. (Level VII)
14 Centers for Medicare and Medicaid Services, Department of Health and
Human Services. (2015). Condition of participation: Infection control. 42 C.F.R.
§ 482.42.
15 DNV GL-Healthcare USA, Inc. (2016). IC.1 .SR.1 . NIAHO® accreditation
requirements: Interpretive guidelines & surveyor guidance (version 11).
Milford, OH: DNV GL-Healthcare USA, Inc. (Level VII)
16 The Joint Commission. (2019). Standard NPSG.01.01.01. Comprehensive
accreditation manual for hospitals. Oakbrook Terrace, IL: The Joint
Commission. (Level VII)
17 Centers for Medicare and Medicaid Services, Department of Health and
Human Services. (2015). Condition of participation: Patient’s rights. 42 C.F.R.
§ 482.13(c)(1).
18 DNV GL-Healthcare USA, Inc. (2016). PR.1.SR.5 . NIAHO® accreditation
requirements: Interpretive guidelines & surveyor guidance (version 11).
Milford, OH: DNV GL-Healthcare USA, Inc. (Level VII)
19 Accreditation Association for Hospitals and Health Systems. (2017). Standard
15.01.16. Healthcare Facilities Accreditation Program: Accreditation
requirements for acute care hospitals. Chicago, IL: Accreditation Association
for Hospitals and Health Systems. (Level VII)
20 The Joint Commission. (2019). Standard RI.01.01.01. Comprehensive
accreditation manual for hospitals. Oakbrook Terrace, IL: The Joint
Commission. (Level VII)
21 The Joint Commission. (2019). Standard PC.02.01.21. Comprehensive
accreditation manual for hospitals. Oakbrook Terrace, IL: The Joint
Commission. (Level VII)
22 Waters, T. R., et al. (2009). “Safe patient handling training for schools of
nursing” [Online]. Accessed via the Web at
https://www.cdc.gov/niosh/docs/2009-127/pdfs/2009-127.pdf (Level VII)
23 Siegel, J. D ., et al. (2007, revised 2017). “2007 guideline for isolation
precautions: Preventing transmission of infectious agents in healthcare
settings” [Online]. Accessed via the Web at
https://www.cdc.gov/infectioncontrol/pdf/guidelines/isolation-guidelines.pdf
(Level II)
24 Accreditation Association for Hospitals and Health Systems. (2017). Standard
07.01.10. Healthcare Facilities Accreditation Program: Accreditation
requirements for acute care hospitals. Chicago, IL: Accreditation Association
for Hospitals and Health Systems. (Level VII)
25 Craven, R. F., et al. (2017). Fundamentals of nursing: Human health and
function. (8th ed.) . Philadelphia, PA: Wolters Kluwer
26 Ganz, D. A., et al. (2013). Preventing falls in hospitals: A toolkit for improving
quality of care (AHRQ Publication No. 13-0015-EF). Rockville, MD: Agency for
Healthcare Research and Quality. Accessed via the Web at
https://www.ahrq.gov/sites/default/files/publications/files/fallpxtoolkit.pdf
(Level VII)
27 Accreditation Association for Hospitals and Health Systems. (2017). Standard
10.00 .03. Healthcare Facilities Accreditation Program: Accreditation
requirements for acute care hospitals. Chicago, IL: Accreditation Association
for Hospitals and Health Systems. (Level VII)
28 Centers for Medicare and Medicaid Services, Department of Health and
Human Services. (2015). Condition of participation: Medical record services.
42 C.F.R. § 482.24(b).
29 DNV GL-Healthcare USA, Inc. (2016). MR.2 .SR.1 . NIAHO® accreditation
requirements: Interpretive guidelines & surveyor guidance (version 11).
Milford, OH: DNV GL-Healthcare USA, Inc. (Level VII)
30 The Joint Commission. (2019). Standard RC.01.03 .01. Comprehensive
accreditation manual for hospitals. Oakbrook Terrace, IL: The Joint
Commission. (Level VII)
RECTAL TUBE INSERTION AND REMOVAL
Whether gastrointestinal (GI) hypomotility simply slows the
normal release of gas and feces or results in paralytic ileus,
inserting a rectal tube may relieve the discomfort of
distention and flatus. Decreased motility may result from
various medical or surgical conditions, certain medications
(such as atropine and opioids), or even swallowed air.
Abdominal discomfort and bloating can also occur during
colonoscopy.1
Contraindications to rectal tube insertion include recent
rectal or prostatic surgery, recent myocardial infarction, and
diseases of the rectal mucosa.
Equipment
Stethoscope ▪ fluid-impermeable pads ▪ drape ▪ water-
soluble lubricant ▪ commercial kit or #22 to #34 French
rectal tube of soft rubber or plastic ▪ tape ▪ gloves ▪
equipment for performing perineal care ▪ disinfectant pad ▪
Optional: collection container, other personal protective
equipment, clean linens, labels.
Implementation
■ Verify the practitioner’s order.
■ Gather the appropriate equipment at the patient’s
bedside.
■ Perform hand hygiene.2,3,4,5,6,7
■ Confirm the patient’s identity using at least two patient
identifiers.8
■ Provide privacy.9,10,11,12
■ Explain the procedure to the patient and family (if
appropriate) according to their individual communication
and learning needs to increase their understanding, allay
their fears, and enhance cooperation.13
■ Raise the patient’s bed to waist level when providing
patient care to prevent caregiver back strain.14
■ Perform hand hygiene.2,3,4,5,6,7
■ Put on gloves and, as needed, other personal protective
equipment to comply with standard precautions.15,16
■ Assess the patient for abdominal distention.
■ Using the stethoscope, auscultate for bowel sounds.
■ Place fluid-impermeable pads under the patient’s
buttocks to absorb any drainage that may leak from the
rectal tube.
■ Place the patient in the left-lateral Sims position to
facilitate rectal tube insertion.
■ Drape the patient’s exposed buttocks to maintain the
patient’s dignity and privacy.
■ Lubricate the rectal tube tip with water-soluble lubricant
to ease insertion and prevent rectal irritation.
■ Lift the patient’s right buttock to expose the anus.
■ Insert the rectal tube tip into the patient’s anus. As you
insert the tube, instruct the patient to breathe slowly and
deeply, or suggest that the patient bear down as if having a
bowel movement to relax the anal sphincter and ease tube
insertion.
■ Advance the tube 2′′ to 4′′ (5 to 10 cm) into the rectum (as
shown below). Direct the tube toward the umbilicus along
the anatomic course of the patient’s large intestine. Never
force a rectal tube if you feel an obstruction.
■ Using tape, secure the rectal tube to the patient’s
buttocks.
■ If necessary, attach the tube to a collection container to
collect possible leakage.
■ Route the rectal tubing in a standardized direction, if
tubing and catheters for different purposes are present.
Label the tubing at the distal end (near the patient
connection) and proximal end (near the source container) to
reduce the risk of misconnection, if the patient has multiple
tubing and catheters.17
■ Remove the rectal tube after it has been in place for 20
minutes. If the patient reports continued discomfort or if gas
wasn’t expelled, you can repeat the procedure in 2 or 3
hours if ordered.
■ Perform perineal care, and replace soiled linens and fluid-
impermeable pads, if necessary. Ensure the patient feels as
comfortable as possible.
■ Assess the patient for abdominal distention, and
auscultate for bowel sounds.
■ Return the bed to its lowest position to prevent falls and
maintain patient safety.18
■ Discard used equipment appropriately.
■ Remove and discard your gloves and any other personal
protective equipment worn.15,16
■ Perform hand hygiene.2,3,4,5,6,7
■ Clean and disinfect your stethoscope using a disinfectant
pad.19,20
■ Perform hand hygiene.2,3,4,5,6,7
■ Document the procedure.21,22,23,24
Special considerations
■ Fastening a plastic bag to the external end of the tube
lets you observe gas expulsion (like a balloon).
■ Repeat insertion periodically to stimulate GI activity. If
the tube fails to relieve distention, notify the practitioner.
■ The Joint Commission issued a sentinel event alert related
to managing risk during transition to new International
Organization for Standardization tubing standards that were
designed to prevent dangerous tubing misconnections,
which can lead to serious patient injury and death. During
the transition, make sure to trace each tubing and catheter
from the patient to its point of origin before connecting or
reconnecting any device or infusion, at any care transition
(such as to a new setting or service), and as part of the
hand-off process. In addition, route tubes and catheters with
different purposes in different, standardized directions; label
tubing at both the distal and proximal ends when the
patient has different access sites or several bags hanging;
use tubing and equipment only as intended; and store
medications for different delivery routes in separate
locations.17
Complications
Leaving a rectal tube in place indefinitely does little to
promote peristalsis, may reduce sphincter responsiveness,
and may lead to permanent sphincter damage or pressure
necrosis of the mucosa.
Documentation
Record the date and time that you inserted the rectal tube.
Record the amount, color, and consistency of any evacuated
matter. Describe the patient’s abdomen—hard, distended,
soft, or drumlike on percussion. Note the patient’s bowel
sounds before and after insertion and the patient’s
tolerance of the procedure.
REFERENCES
1 Yi, C. H., et al. (2016). Influence of rectal decompression on abdominal
symptoms and anorectal physiology following colonoscopy in healthy adults.
Gastroenterology Research and Practice, 2016, Art. ID 4101248. Accessed via
the Web at https://www.ncbi.nlm.nih.gov/pmc/articles/PMC5019887/
2 World Health Organization. (2009). “WHO guidelines on hand hygiene in
health care: First global patient safety challenge, clean care is safer care”
[Online]. Accessed via the Web at
http://apps.who.int/iris/bitstream/10665/44102/1/9789241597906_eng.pdf
(Level IV)
3 Centers for Disease Control and Prevention. (2002). Guideline for hand
hygiene in health-care settings: Recommendations of the Healthcare Infection
Control Practices Advisory Committee and the HICPAC/SHEA/APIC/IDSA Hand
Hygiene Task Force. MMWR Recommendations and Reports, 51(RR-16), 1–45.
Accessed via the Web at https://www.cdc.gov/mmwr/pdf/rr/rr5116.pdf (Level
II)
4 The Joint Commission. (2019). Standard NPSG.07.01.01. Comprehensive
accreditation manual for hospitals. Oakbrook Terrace, IL: The Joint
Commission. (Level VII)
5 Centers for Medicare and Medicaid Services, Department of Health and
Human Services. (2015). Condition of participation: Infection control. 42 C.F.R.
§ 482.42.
6 Accreditation Association for Hospitals and Health Systems. (2017). Standard
07.01.21. Healthcare Facilities Accreditation Program: Accreditation
requirements for acute care hospitals. Chicago, IL: Accreditation Association
for Hospitals and Health Systems. (Level VII)
7 DNV GL-Healthcare USA, Inc. (2016). IC.1.SR.1 . NIAHO® accreditation
requirements: Interpretive guidelines & surveyor guidance (version 11).
Milford, OH: DNV GL-Healthcare USA, Inc. (Level VII)
8 The Joint Commission. (2019). Standard NPSG.01.01.01. Comprehensive
accreditation manual for hospitals. Oakbrook Terrace, IL: The Joint
Commission. (Level VII)
9 Centers for Medicare and Medicaid Services, Department of Health and
Human Services. (2015). Condition of participation: Patient’s rights. 42 C.F.R.
§ 482.13(c)(1).
10 Accreditation Association for Hospitals and Health Systems. (2017). Standard
15.01.16. Healthcare Facilities Accreditation Program: Accreditation
requirements for acute care hospitals. Chicago, IL: Accreditation Association
for Hospitals and Health Systems. (Level VII)
11 DNV GL-Healthcare USA, Inc. (2016). PR.1.SR.5 . NIAHO® accreditation
requirements: Interpretive guidelines & surveyor guidance (version 11).
Milford, OH: DNV GL-Healthcare USA, Inc. (Level VII)
12 The Joint Commission. (2019). Standard RI.01.01.01. Comprehensive
accreditation manual for hospitals. Oakbrook Terrace, IL: The Joint
Commission. (Level VII)
13 The Joint Commission. (2019). Standard PC.02.01.21. Comprehensive
accreditation manual for hospitals. Oakbrook Terrace, IL: The Joint
Commission. (Level VII)
14 Waters, T. R., et al. (2009). “Safe patient handling training for schools of
nursing” [Online]. Accessed via the Web at
http://www.cdc.gov/niosh/docs/2009-127/pdfs/2009-127.pdf (Level VII)
15 Siegel, J. D ., et al. (2007, revised 2017). “2007 guideline for isolation
precautions: Preventing transmission of infectious agents in healthcare
settings” [Online]. Accessed via the Web at
https://www.cdc.gov/infectioncontrol/pdf/guidelines/isolation-guidelines.pdf
(Level II)
16 Accreditation Association for Hospitals and Health Systems. (2017). Standard
07.01.10. Healthcare Facilities Accreditation Program: Accreditation
requirements for acute care hospitals. Chicago, IL: Accreditation Association
for Hospitals and Health Systems. (Level VII)
17 The Joint Commission. (2014). “Sentinel event alert: Managing risk during
transition to new ISO tubing connector standards” [Online]. Accessed via the
Web at
http://www.jointcommission.org/assets/1/6/SEA_53_Connectors_8 _19_14 _final.
pdf (Level VII)
18 Ganz, D. A., et al. (2013). Preventing falls in hospitals: A toolkit for improving
quality of care (AHRQ Publication No. 13-0015-EF). Rockville, MD: Agency for
Healthcare Research and Quality. Accessed via the Web at
http://www.ahrq.gov/sites/default/files/publications/files/fallpxtoolkit.pdf
(Level VII)
19 Rutala, W. A., et al. (2008, revised 2017). “Guideline for disinfection and
sterilization in healthcare facilities, 2008” [Online]. Accessed via the Web at
https://www.cdc.gov/infectioncontrol/pdf/guidelines/disinfection-
guidelines.pdf (Level I)
20 Accreditation Association for Hospitals and Health Systems. (2017). Standard
07.02.03. Healthcare Facilities Accreditation Program: Accreditation
requirements for acute care hospitals. Chicago, IL: Accreditation Association
for Hospitals and Health Systems. (Level VII)
21 The Joint Commission. (2019). Standard RC.01.03 .01. Comprehensive
accreditation manual for hospitals. Oakbrook Terrace, IL: The Joint
Commission. (Level VII)
22 Accreditation Association for Hospitals and Health Systems. (2017). Standard
10.00 .03. Healthcare Facilities Accreditation Program: Accreditation
requirements for acute care hospitals. Chicago, IL: Accreditation Association
for Hospitals and Health Systems. (Level VII)
23 Centers for Medicare and Medicaid Services, Department of Health and
Human Services. (2015). Condition of participation: Medical record services.
42 C.F.R. § 482.24(b).
24 DNV GL-Healthcare USA, Inc. (2016). MR.2 .SR.1 . NIAHO® accreditation
requirements: Interpretive guidelines & surveyor guidance (version 11).
Milford, OH: DNV GL-Healthcare USA, Inc. (Level VII)
RESIDUAL LIMB CARE
Patient care immediately after limb amputation includes
monitoring drainage from the residual limb, controlling pain,
reducing edema, positioning the affected limb, assisting
with exercises prescribed by a physical therapist, and
wrapping and conditioning the residual limb.
Postoperative care of the residual limb will vary slightly,
depending on the amputation site (arm or leg) and the type
of dressing applied to the residual limb (elastic bandage or
plaster cast).
After the residual limb heals, it requires daily care,
including proper hygiene and continued muscle-
strengthening exercises. While recovering from the physical
and psychological trauma of amputation, the patient will
need to learn correct procedures for routine daily care of the
residual limb.
Equipment
For postoperative residual limb care
Gloves ▪ pressure dressing ▪ abdominal pad ▪ overhead
trapeze ▪ 1′′ (2.5 -cm) adhesive tape or bandage clips ▪
trochanter roll (for a leg) ▪ elastic residual limb shrinker or
4′′ (10-cm) elastic bandage ▪
Optional: tourniquet,
prescribed skin and wound care products.
For ongoing residual limb care
Mild soap ▪ residual limb socks or athletic tube socks ▪ two
washcloths ▪ two towels.
Implementation
■ Perform hand hygiene.1,2,3,4,5,6
■ Confirm the patient’s identity using at least two patient
identifiers.7
■ Provide privacy.8,9,10,11
■ Explain the procedure to the patient and family (if
appropriate) according to their individual communication
and learning needs to increase their understanding, allay
their fears, and enhance cooperation.12
■ Raise the patient’s bed to waist level while providing
direct patient care to prevent caregiver back strain.13
■ Perform hand hygiene.1,2,3,4,5,6
■ Put on gloves to comply with standard precautions.14,15
■ Perform routine postoperative care. Frequently assess the
patient’s respiratory status and level of consciousness,
monitor IV infusions, assess tube patency, and provide for
the patient’s comfort, pain management, and safety.
Monitor vital signs at an interval determined by your facility
and the patient’s condition; there’s no evidence-based
research to indicate best practice for frequency of
monitoring vital signs. (See the “Postoperative care”
procedure, page 622.)16
Wrapping a residual limb
Proper residual limb care helps protect the limb, reduces swelling, and
prepares the limb for a prosthesis. As you perform the procedure, teach it to
the patient.
Start by elevating the residual limb to reduce edema and vascular stasis.17
Obtain two 4′′ (10-cm) elastic bandages and center the end of the first 4′′ (10-
cm) bandage at the top of the patient’s thigh. Unroll the bandage downward
over the residual limb and to the back of the leg.
Make three figure-eight turns to adequately cover the ends of the residual
limb. As you wrap, be sure to include the roll of flesh in the groin area. Use
enough pressure to ensure that the residual limb narrows toward the end so
that it fits comfortably into the prosthesis.
Use the second 4′′ (10-cm) bandage to anchor the first bandage around the
waist. For a below-the-knee amputation, use the knee to anchor the bandage
in place. Secure the bandage with clips or adhesive tape. Check the residual
limb bandage regularly, and rewrap it if it bunches at the end.
Monitoring residual limb drainage
■ Because gravity causes fluid to accumulate at the
residual limb, frequently inspect the dressing to assess the
amount of blood and drainage on the dressing. Notify the
practitioner if accumulations of drainage or blood increase
rapidly. If excessive bleeding occurs, notify the practitioner
immediately, and apply a pressure dressing or compress the
appropriate pressure points. If this doesn’t control bleeding,
use a tourniquet only as a last resort, and notify the
practitioner.
■ Tape the abdominal pad over the moist part of the
dressing as necessary. Doing so provides a dry area to help
prevent bacterial infection.
Positioning the extremity
■ Elevate the extremity for the first 24 to 48 hours, as
ordered, to reduce swelling and promote venous return.17
■ For an arm amputation, position the patient’s arm with
the elbow extended and the shoulder abducted to prevent
contractures.
■ For a leg amputation, elevate the foot of the bed slightly
and place a trochanter roll against the patient’s hip to
prevent external rotation.
NURSING ALERT Don’t place a pillow under the patient’s thigh to flex
the hip, because this positioning can cause hip flexion contracture.
For the same reason, tell the patient to avoid prolonged sitting.17
■ After a below-the-knee amputation, maintain knee
extension to prevent hamstring muscle contractures.
■ After any level of leg amputation, place the patient on a
firm surface in the prone position for at least 2 hours a day,
with legs close together and without pillows under the
stomach, hips, knees, or residual limb, unless this position is
contraindicated. This position helps prevent hip flexion,
contractures, and abduction; it also stretches the flexor
muscles.
Assisting with prescribed exercises
■ After arm amputation, encourage the patient to exercise
the remaining arm to prevent muscle contractures. Help the
patient perform isometric and range-of-motion (ROM)
exercises for both shoulders, as prescribed by the physical
therapist, because use of a prosthesis requires both
shoulders.
■ After leg amputation, stand behind the patient and, if
necessary, support the patient with your hands at the waist
during balancing exercises.
■ Instruct the patient to exercise the affected and
unaffected limbs to maintain muscle tone and increase
muscle strength. The patient with a leg amputation may
perform push-ups, as ordered (in the sitting position, arms
at the sides), or pull-ups on the overhead trapeze to
strengthen the arms, shoulders, and back in preparation for
using crutches.
Wrapping and conditioning a residual limb
■ Apply an elastic residual limb shrinker to prevent edema
and shape the limb in preparation for the prosthesis. Wrap
the residual limb so that it narrows toward the distal end to
help ensure comfort when the patient wears the prosthesis.
■ If an elastic residual limb shrinker isn’t available, you can
wrap the residual limb of an amputated limb in a 4′′ (10-cm)
elastic bandage. To do this, stretch the bandage to about
two-thirds its maximum length as you wrap it diagonally
around the residual limb, with the greatest pressure distally.
(Depending on the size of the leg, you may need to use two
4′′ [10-cm] bandages.) Secure the bandage with clips or
adhesive tape. Make sure the bandage covers the residual
limb smoothly, because wrinkles or exposed areas
encourage skin breakdown. (See Wrapping a residual limb.)
■ To wrap an amputated arm, follow the same technique as
described for the leg using a 4′′ (10-cm) elastic bandage and
wrapping the patient’s remaining arm using figure-eight
turns until the entire residual limb is covered. Pass the
bandage wrap across the patient’s back and shoulders to
anchor it, and then secure the bandage with clips or
adhesive tape.
■ If the patient experiences throbbing after the residual
limb is wrapped, the bandage may be too tight; remove the
bandage immediately and reapply it less tightly. Throbbing
indicates impaired circulation.
■ Unwrap the residual limb every 4 to 6 hours for the first 2
days postoperatively, as prescribed, and then at least once
daily.17 Assess for signs and symptoms of infection and skin
irritation or breakdown. Assess the color, temperature, and
most-proximal pulse on the residual limb before rewrapping
it, comparing findings with the contralateral extremity.17
Report your findings to the practitioner.
■ After removing the bandage to rewrap it, massage the
residual limb gently, always pushing toward the suture line
rather than away from it. Massage stimulates circulation and
prevents scar tissue from adhering to the bone.
■ Perform residual limb skin care and wound care as
needed and prescribed.17
■ When healing begins, instruct the patient to push the
residual limb against a pillow. Then have the patient
progress gradually to pushing against harder surfaces, such
as a padded chair, and then a hard chair. These conditioning
exercises will help the patient adjust to experiencing
pressure and sensation in the residual limb.17
Caring for the healed residual limb
■ To shape the residual limb, have the patient wear an
elastic bandage 24 hours a day except while bathing.
■ To prevent infection, bathe the residual limb but never
shave it. If possible, bathe the residual limb at the end of
the day, because the warm water may cause swelling,
making reapplication of the prosthesis difficult. Don’t soak
the residual limb for long periods.
■ Avoid applying lotions, oils, or creams to the residual
limb, unless prescribed; these may clog follicles, which
increases the risk of infection.17
■ Inspect the residual limb for redness, swelling, irritation,
and calluses. Report any of these to the practitioner. Tell the
patient to avoid putting weight on the residual limb. (The
skin should be firm but not taut over the bony end of the
limb.)
■ Continue muscle-strengthening exercises so that the
patient can build the strength needed to control the
prosthesis.
■ Change and wash the patient’s elastic bandages or sock
every day to avoid exposing the skin to excessive
perspiration, which can lead to skin breakdown.18 Wash the
elastic bandages in warm water and gentle, nondetergent
soap; lay them flat on a towel to dry. Machine washing or
drying may shrink the elastic bandages.
Completing the procedure
■ Remove and discard your gloves.
■ Perform hand hygiene.1,2,3,4,5,6
■ Return the bed to the lowest position to prevent falls and
maintain patient safety.19
■ Document the procedure.20,21,22,23
Special considerations
■ Semirigid or rigid residual limb dressings may be applied
following amputation. Assess the surgical dressing for
integrity and drainage, and remove and replace them as
ordered. Some designs require training in the proper
application.17
■ For a below-the-knee amputation, you may substitute an
athletic tube sock for a residual limb sock by cutting off the
elastic band.
Patient teaching
Emphasize to the patient that proper care of the residual
limb can speed healing. Tell the patient to inspect the
residual limb carefully every day, using a mirror, and to
continue proper daily residual limb care. Instruct the patient
to call the practitioner if the incision appears to be opening,
looks red or swollen, feels warm, is painful to touch, or is
seeping drainage.
Make sure the patient knows the signs and symptoms that
indicate problems in the residual limb. Explain that a 10-lb
(4.5 -kg) change in body weight will alter the residual limb
size and require a new prosthesis socket to ensure a correct
fit.
Tell the patient to massage the residual limb toward the
suture line to mobilize the scar and prevent its adherence to
bone. Advise the patient to avoid exposing the skin around
the residual limb to excessive perspiration, which can be
irritating. Tell the patient to change the elastic bandages or
residual limb sock daily to avoid this irritation.
Explain that the patient may experience twitching,
spasms, or phantom limb sensations (such as pain, warmth,
cold, or itching) as the residual limb muscles adjust to
amputation. Tell the patient that phantom pain usually
peaks about 1 month after amputation, but a second peak
may occur about 1 year after amputation.24 Measures such
as imagery, biofeedback, and distraction may help relieve
phantom limb pain or other sensations. Advise the patient
that these symptoms may be reduced with heat, massage,
or gentle pressure. If the residual limb is sensitive to touch,
tell the patient to rub it with a dry washcloth for 4 minutes
three times a day.
Inform the patient that exercise of the remaining muscles
in an amputated limb must begin the day after surgery. A
physical therapist will direct these exercises. For example,
arm exercises progress from isometrics to assisted ROM to
active ROM. Leg exercises include rising from a chair,
balancing on one leg, and ROM exercises of the knees and
hips.
Stress the importance of performing prescribed exercises
to help minimize complications, maintain muscle strength
and tone, prevent contractures, and promote independence.
Also stress the importance of positioning to prevent
contractures and edema.
Complications
The most common postoperative complications include
hemorrhage, infection, contractures, and a swollen or flabby
residual limb. Complications that may develop at any time
after an amputation include hematoma formation; skin
breakdown or irritation from lack of ventilation; bone erosion
or osteomyelitis; a sebaceous cyst or boil from tight socks;
psychological problems, such as denial, depression, or
withdrawal; and phantom limb pain caused by stimulation of
nerves that once carried sensations from the distal part of
the extremity.
Documentation
Record the date and time of your observations and specific
procedures you performed for all postoperative care,
including the amount and type of drainage, the presence
and appearance of any drains, condition of the dressing,
need for dressing reinforcement, appearance of the suture
line and surrounding tissue, and pain assessment. Also note
any signs of skin irritation or infection, any complications
and the nursing actions taken, the patient’s tolerance of
exercises, and the patient’s psychological reaction to the
amputation.
During routine daily care, document the date, time, type
of care given, and condition of the skin and suture line,
noting any signs of irritation, such as redness or tenderness.
Also record the patient’s progress in caring for the residual
limb or prosthesis.
REFERENCES
1 Centers for Disease Control and Prevention. (2002). Guideline for hand
hygiene in health-care settings: Recommendations of the Healthcare Infection
Control Practices Advisory Committee and the HICPAC/SHEA/APIC/IDSA Hand
Hygiene Task Force. MMWR Recommendations and Reports, 51(RR-16), 1–45.
Accessed via the Web at https://www.cdc.gov/mmwr/pdf/rr/rr5116.pdf (Level
II)
2 World Health Organization. (2009). “WHO guidelines on hand hygiene in
health care: First global patient safety challenge, clean care is safer care”
[Online]. Accessed via the Web at
http://apps.who.int/iris/bitstream/10665/44102/1/9789241597906_eng.pdf
(Level IV)
3 The Joint Commission. (2019). Standard NPSG.07.01.01. Comprehensive
accreditation manual for hospitals. Oakbrook Terrace, IL: The Joint
Commission. (Level VII)
4 Centers for Medicare and Medicaid Services, Department of Health and
Human Services. (2015). Condition of participation: Infection control. 42 C.F.R.
§ 482.42.
5 Accreditation Association for Hospitals and Health Systems. (2017). Standard
07.01.21. Healthcare Facilities Accreditation Program: Accreditation
requirements for acute care hospitals. Chicago, IL: Accreditation Association
for Hospitals and Health Systems. (Level VII)
6 DNV GL-Healthcare USA, Inc. (2016). IC.1.SR.1 . NIAHO® accreditation
requirements: Interpretive guidelines & surveyor guidance (version 11).
Milford, OH: DNV GL-Healthcare USA, Inc. (Level VII)
7 The Joint Commission. (2019). Standard NPSG.01.01.01. Comprehensive
accreditation manual for hospitals. Oakbrook Terrace, IL: The Joint
Commission. (Level VII)
8 The Joint Commission. (2019). Standard RI.01.01.01. Comprehensive
accreditation manual for hospitals. Oakbrook Terrace, IL: The Joint
Commission. (Level VII)
9 Centers for Medicare and Medicaid Services, Department of Health and
Human Services. (2015). Condition of participation: Patient’s rights. 42 C.F.R.
§ 482.13(c)(1).
10 Accreditation Association for Hospitals and Health Systems. (2017). Standard
15.01.16. Healthcare Facilities Accreditation Program: Accreditation
requirements for acute care hospitals. Chicago, IL: Accreditation Association
for Hospitals and Health Systems. (Level VII)
11 DNV GL-Healthcare USA, Inc. (2016). PR.1.SR.5 . NIAHO® accreditation
requirements: Interpretive guidelines & surveyor guidance (version 11).
Milford, OH: DNV GL-Healthcare USA, Inc. (Level VII)
12 The Joint Commission. (2019). Standard PC.02.01.21. Comprehensive
accreditation manual for hospitals. Oakbrook Terrace, IL: The Joint
Commission. (Level VII)
13 Waters, T. R., et al. (2009). “Safe patient handling training for schools of
nursing” [Online]. Accessed via the Web at
https://www.cdc.gov/niosh/docs/2009-127/pdfs/2009-127.pdf (Level VII)
14 Siegel, J. D ., et al. (2007, revised 2017). “2007 guideline for isolation
precautions: Preventing transmission of infectious agents in healthcare
settings” [Online]. Accessed via the Web at
https://www.cdc.gov/infectioncontrol/pdf/guidelines/isolation-guidelines.pdf
(Level II)
15 Accreditation Association for Hospitals and Health Systems. (2017). Standard
07.01.10. Healthcare Facilities Accreditation Program: Accreditation
requirements for acute care hospitals. Chicago, IL: Accreditation Association
for Hospitals and Health Systems. (Level VII)
16 American Society of PeriAnesthesia Nurses. (2018). 2017–2018
Perianesthesia nursing standards, practice recommendations and interpretive
statements. Cherry Hill, NJ: American Society of PeriAnesthesia Nurses. (Level
VII)
17 Pullen, R. L. (2010). Clinical queries: Caring for a patient after amputation.
Nursing 2017, 40(1), 15. (Level VII)
18 Klute, G.K., et al. (2016). Prosthesis management of residual-limb
perspiration with subatmospheric vacuum pressure. Journal of Rehabilitation
Research and Development, 53(6), 721–728. (Level II)
19 Ganz, D. A., et al. (2013). Preventing falls in hospitals: A toolkit for improving
quality of care (AHRQ Publication No. 13-0015-EF). Accessed via the Web at
https://www.ahrq.gov/sites/default/files/publications/files/fallpxtoolkit_0 .pdf
(Level VII)
20 The Joint Commission. (2019). Standard RC.01.03 .01. Comprehensive
accreditation manual for hospitals. Oakbrook Terrace, IL: The Joint
Commission. (Level VII)
21 Centers for Medicare and Medicaid Services, Department of Health and
Human Services. (2015). Condition of participation: Medical record services.
42 C.F.R. § 482.24(b).
22 Accreditation Association for Hospitals and Health Systems. (2017). Standard
10.00 .03. Healthcare Facilities Accreditation Program: Accreditation
requirements for acute care hospitals. Chicago, IL: Accreditation Association
for Hospitals and Health Systems. (Level VII)
23 DNV GL-Healthcare USA, Inc. (2016). MR.2 .SR.1 . NIAHO® accreditation
requirements: Interpretive guidelines & surveyor guidance (version 11).
Milford, OH: DNV GL-Healthcare USA, Inc. (Level VII)
24 Schley, M. T., et al. (2008). Painful and nonpainful phantom and stump
sensations in acute traumatic amputees. Journal of Trauma and Acute Care
Surgery, 65(4), 858–864. (Level VI)
RESPIRATION ASSESSMENT
Controlled by the respiratory center in the lateral medulla
oblongata, respiration is the exchange of oxygen and carbon
dioxide between the atmosphere and body cells. External
respiration, or breathing, is accomplished by the diaphragm
and chest muscles and delivers oxygen to the lower
respiratory tract and alveoli.
Four measures of respiration—rate, rhythm, depth, and
sound—reflect the body’s metabolic state, diaphragm and
chest-muscle condition, and airway patency. Respiratory
rate is recorded as the number of cycles (with one cycle
consisting of inspiration and expiration) per minute; rhythm,
as the regularity of these cycles; depth, as the volume of air
inhaled and exhaled with each respiration; and sound, as
the audible digression from normal, effortless breathing.
Normal respiratory rates for an adult range from 12 to 20
breaths/minute;1 however, it’s important to know the
patient’s normal baseline respiratory rate so that you can
detect changes in the patient’s condition.
The best time to assess the patient’s respirations is
immediately after taking the pulse rate; however you should
observe the patient’s breathing with each contact.
Equipment
Watch or clock with second hand ▪ stethoscope ▪
disinfectant pad.
Implementation
■ Perform hand hygiene.2,3,4,5,6,7 (If you performed hand
hygiene before taking the patient’s pulse, you don’t need to
repeat this step.)
■ Confirm the patient’s identity using at least two patient
identifiers.8
■ Provide privacy.9,10,11,12
■ Place your fingertips over the patient’s radial artery, and
don’t tell the patient you’re counting respirations. If you tell
the patient, the patient will become conscious of
respirations and the rate may change.
■ Count respirations by observing the rise and fall of the
patient’s chest during breathing. Alternatively, position the
patient’s opposite arm across the chest and count
respirations by feeling its rise and fall. Consider one rise and
one fall as one respiration.
■ If the patient’s respirations are regular, count the
respirations for 30 seconds and multiply by two to
determine the respiratory rate. Alternatively, count the
patient’s respirations for 60 seconds if respirations are
irregular to account for variations in respiratory rate and
pattern.
■ As you count respirations, be alert for and record such
breath sounds as stertor, stridor, wheezing, and expiratory
grunting. Stertor is a snoring sound resulting from
secretions in the trachea and large bronchi. Listen for it in
patients with neurologic disorders and in those who are
comatose. Stridor is an inspiratory crowing sound that
occurs with upper airway obstruction in laryngitis, croup, or
the presence of a foreign body. Wheezing is caused by
partial obstruction in the smaller bronchi and bronchioles.
This high-pitched, musical sound is common in patients with
emphysema or asthma. Expiratory grunting is a deep, low-
pitched sound heard at the end of each breath that
coincides with the closure of the glottis and may indicate
respiratory distress.
ELDER ALERT In older patients, an expiratory grunt may result from
partial airway obstruction or neuromuscular reflex.
■ Observe chest movements for depth of respirations. If the
patient inhales a small volume of air, record this as shallow;
record the inhalation of a large volume as deep.
■ Listen to breathing to determine the rhythm and sound of
respirations. (See Identifying respiratory patterns, page
668.)
■ Auscultate breath sounds using a stethoscope. You’ll hear
four types of breath sounds over normal lungs. Tracheal
sounds are heard over the trachea and are harsh and
discontinuous Bronchial sounds are usually heard over the
fourth intercostal space, between the sternum and the
midclavicular line; they are loud, high-pitched, and
discontinuous, and loudest when the patient exhales.
Bronchovesicular sounds are heard when the patient inhales
or exhales; medium-pitched and continuous, they are best
heard over the upper third of the sternum and between the
scapulae. Vesicular sounds are heard over the rest of the
lungs; soft and low-pitched, they are prolonged during
inspiration and shortened during expiration.
■ Adventitious breath sounds are abnormal no matter
where you hear them over the lungs. Crackles are
intermittent, nonmusical, brief crackling sounds caused by
collapsed or fluid-filled alveoli popping open; heard primarily
during inspiration, they are classified as fine or coarse, and
usually don’t clear with coughing unless caused by
secretions. Wheezes are high-pitched sounds heard first
during expiration due to blocked airflow; they are also heard
during inspiration when airflow is severely blocked. Rhonchi
are low-pitched, snoring, rattling sounds that occur primarily
when the patient exhales, usually due to fluid or secretions
in the large bronchial airways that may change or disappear
with coughing. Stridor is a loud, high-pitched crowing sound
that is heard, usually without a stethoscope, during
inspiration; caused by obstruction of the upper airway
stridor requires immediate intervention. A pleural friction
rub—a low-pitched, grating, rubbing sound heard when the
patient inhales and exhales— results from pleural
inflammation that causes the two layers of the pleura to rub
together; it may result in pain in the areas where the sound
is heard.
■ Observe the patient for use of accessory muscles, such as
the scalene, sternocleidomastoid, trapezius, and latissimus
dorsi. Use of these muscles reflects a weakness of the
diaphragm and the external intercostal muscles, the primary
muscles of respiration.
■ Clean and disinfect your stethoscope using a disinfectant
pad.13,14
■ Perform hand hygiene.2,3,4,5,6,7
■ Document your findings.15,16,17,18
Special considerations
■ When assessing the patient’s respiratory status, consider
the patient’s personal and family history. Ask if the patient
smokes; if the patient says yes, find out how many years
the patient has smoked and how many packs a day.
■ A more detailed assessment (including palpating the
chest for lymph node abnormalities, assessing tracheal
position, and percussing for signs of fluid or trapped air in
the chest) may be necessary for a patient with underlying
respiratory disease, such as chronic obstructive pulmonary
disease or asthma.19
Identifying respiratory patterns
■ If the patient’s respiratory rate suddenly increases,
assess the patient for other signs of respiratory distress,
such as anxiety, nasal flaring, accessory muscle use,
abnormal breath sounds, grunting, and cyanosis. To detect
cyanosis, look for characteristic bluish discoloration under
the tongue and in the nail beds or lips, buccal mucosa, or
conjunctiva. Report your findings to the patient’s
practitioner.
■ If the patient’s respiratory rate suddenly decreases,
assess for an underlying cause and notify the patient’s
practitioner, as needed.1
■ If you find the patient unresponsive, shout for nearby help
and activate the emergency response system via mobile
device (if appropriate). Check for absent breathing or only
gasping while simultaneously checking for a pulse to
minimize delay in detecting cardiac arrest and initiating
cardiopulmonary resuscitation.20 If the patient has a pulse
but breathing is inadequate, administer 1 rescue breath
every 5 to 6 seconds; check the patient’s pulse about every
2 minutes.20 If breathing is absent, or if the patient is only
gasping and you don’t feel a pulse within 10 seconds, have
a coworker retrieve the defibrillator (or automated external
defibrillator [AED]) and other emergency equipment. If
you’re alone, retrieve them yourself.20 Immediately begin
chest compressions until the defibrillator (or AED) is ready
for use. Compress an adult’s chest at a rate of 100 to 120
compressions per minute, with a compression depth of at
least 2′′ (5 cm) for an average adult, but do not exceed a
depth of 2.4′′ (6 cm). Avoid leaning on the chest between
compressions to allow full chest wall recoil.20 After starting
compressions, open the patient’s airway and deliver breaths
(each over approximately 1 second); use a ratio of 30
compressions to 2 breaths. When the defibrillator is ready
for use, check the patient’s rhythm, and defibrillate if the
patient has a shockable rhythm; otherwise, continue
cardiopulmonary resuscitation.20
Documentation
Record the rate, depth, rhythm, and sound of the patient’s
respirations. If the patient is not breathing adequately,
document the date, time, and name of the practitioner
notified, as well as any interventions provided (such as
oxygen therapy) and the patient’s response to the
interventions. Document any patient teaching, the patient’s
understanding of the teaching, and whether follow-up
teaching is required.
REFERENCES
1 Hunter, J., & Rawlings-Anderson, K. (2008). Respiratory assessment. Nursing
Standard, 22(41), 41–43.
2 The Joint Commission. (2019). Standard NPSG.07.01.01. Comprehensive
accreditation manual for hospitals. Oakbrook Terrace, IL: The Joint
Commission. (Level VII)
3 World Health Organization. (2009). “WHO guidelines on hand hygiene in
health care: First global patient safety challenge, clean care is safer care”
[Online]. Accessed via the Web at
http://whqlibdoc.who.int/publications/2009/9789241597906_eng.pdf (Level
IV)
4 Centers for Disease Control and Prevention. (2002). Guideline for hand
hygiene in health-care settings: Recommendations of the Healthcare Infection
Control Practices Advisory Committee and the HICPAC/SHEA/APIC/IDSA Hand
Hygiene Task Force. MMWR Recommendations and Reports, 51(RR-16), 1–45.
Accessed via the Web at http://www.cdc.gov/mmwr/pdf/rr/rr5116.pdf (Level II)
5 Accreditation Association for Hospitals and Health Systems. (2017). Standard
07.01.21. Healthcare Facilities Accreditation Program: Accreditation
requirements for acute care hospitals. Chicago, IL: Accreditation Association
for Hospitals and Health Systems. (Level VII)
6 Centers for Medicare and Medicaid Services, Department of Health and
Human Services. (2015). Condition of participation: Infection control. 42 C.F.R.
§ 482.42.
7 DNV GL-Healthcare USA, Inc. (2016). IC.1.SR.1 . NIAHO® accreditation
requirements: Interpretive guidelines & surveyor guidance (version 11).
Milford, OH: DNV GL-Healthcare USA, Inc. (Level VII)
8 The Joint Commission. (2019). Standard NPSG.01.01.01. Comprehensive
accreditation manual for hospitals. Oakbrook Terrace, IL: The Joint
Commission. (Level VII)
9 The Joint Commission. (2019). Standard RI.01.01.01. Comprehensive
accreditation manual for hospitals. Oakbrook Terrace, IL: The Joint
Commission. (Level VII)
10 DNV GL-Healthcare USA, Inc. (2016). PR.1.SR.5 . NIAHO® accreditation
requirements: Interpretive guidelines & surveyor guidance (version 11).
Milford, OH: DNV GL-Healthcare USA, Inc. (Level VII)
11 Centers for Medicare and Medicaid Services, Department of Health and
Human Services. (2015). Condition of participation: Patient’s rights. 42 C.F.R.
§ 482.13(c)(1).
12 Accreditation Association for Hospitals and Health Systems. (2017). Standard
15.01.16. Healthcare Facilities Accreditation Program: Accreditation
requirements for acute care hospitals. Chicago, IL: Accreditation Association
for Hospitals and Health Systems. (Level VII)
13 Rutala, W. A., et al. (2008, revised 2017). “Guideline for disinfection and
sterilization in healthcare facilities, 2008” [Online]. Accessed via the Web at
http://www.cdc.gov/hicpac/pdf/guidelines/Disinfection_Nov_2008.pdf (Level I)
14 Accreditation Association for Hospitals and Health Systems. (2017). Standard
07.02.03. Healthcare Facilities Accreditation Program: Accreditation
requirements for acute care hospitals. Chicago, IL: Accreditation Association
for Hospitals and Health Systems. (Level VII)
15 The Joint Commission. (2019). Standard RC.01.03 .01. Comprehensive
accreditation manual for hospitals. Oakbrook Terrace, IL: The Joint
Commission. (Level VII)
16 Accreditation Association for Hospitals and Health Systems. (2017). Standard
10.00 .03. Healthcare Facilities Accreditation Program: Accreditation
requirements for acute care hospitals. Chicago, IL: Accreditation Association
for Hospitals and Health Systems. (Level VII)
17 Centers for Medicare and Medicaid Services, Department of Health and
Human Services. (2015). Condition of participation: Medical record services.
42 C.F.R. § 482.24(b).
18 DNV GL-Healthcare USA, Inc. (2016). MR.2 .SR.1 . NIAHO® accreditation
requirements: Interpretive guidelines & surveyor guidance (version 11).
Milford, OH: DNV GL-Healthcare USA, Inc. (Level VII)
19 Miller, S., et al. (2015). Physical examination of the adult patient with chronic
respiratory disease. Medsurg Nursing, 24(3), 195–198.
20 American Heart Association. (2015). 2015 International consensus on
cardiopulmonary resuscitation and emergency cardiovascular care science
with treatment recommendations. Circulation, 132(16), S414–S435. (Level II)
RESTRAINT APPLICATION
The Centers for Medicare and Medicaid Services (CMS) and
The Joint Commission define restraints as devices that
immobilize or reduce the ability of a patient to move the
arms, legs, body, or head freely, except in situations
involving orthopedic devices, surgical bandages, and similar
devices required for the patient’s care.1,2 The Healthcare
Facilities Accreditation Program (HFAP) defines physical
restraint as any manual method, physical or mechanical
device, material, or equipment attached or adjacent to the
patient that restricts freedom of movement or normal
access to one’s body.3 DNV GL–Healthcare USA defines
restraint as any manual method, physical or mechanical
device, material, or equipment that immobilizes or reduces
the ability of the patient to move arms, legs, head, or body
freely.4
A vest restraint can be used to prevent self-injury from
falls, or to immobilize a patient to assist medical treatment.
It’s applied to a patient’s torso over the hospital gown or
clothing. The straps are then secured to the patient’s bed
frame or chair.5
A limb restraint is a device consisting of a cuff, typically
made of padded fabric or foam, applied to a patient’s wrists
or ankles with straps that are secured to the patient’s bed
frame or chair. Limb restraints are used to prevent self-
injury or the removal of therapeutic equipment, such as IV
lines, indwelling catheters, and nasogastric tubes.
A mitt restraint is a pocket enclosure that’s applied over a
patient’s hand to prevent self-injury or the removal of
therapeutic equipment, such as IV lines, indwelling
catheters, and nasogastric tubes. Mitt restraints may be
padded or rigid, and may include finger separators or leave
the fingers exposed. Optional straps that can be secured to
the patient’s bed frame or chair may be included with the
device or may need to be ordered separately, if indicated.
Most mitt restraints can be applied to either hand.
A belt restraint consists of a strip of material—usually
cotton fabric or mesh—that’s applied over a patient’s gown
or clothing, around the waist or lap. The straps are then
secured to the patient’s bed frame or chair. Belt restraints
can be used to prevent self-injury from falling or to
immobilize a patient, if needed, during medical treatment.
A leather or leather-like restraint is made of leather or a
synthetic substitute for leather, such as polyurethane or
vinyl. The restraint is applied to a patient’s wrists or ankles
and then secured to a bed frame or chair. Leather restraints
are used to prevent self-injury or injury to others, and to
immobilize a patient for medical treatment. Although some
facilities prefer to use traditional leather restraints because
of the perceived strength of the material, synthetic
materials offer the advantage of being easier to clean and
disinfect.
The CMS, The Joint Commission, HFAP, and DNV GL–
Healthcare USA recognize the rights of patients to be free
from restraint or seclusion, of any form, imposed as a
means of coercion, discipline, convenience, or retaliation by
staff. Restraint or seclusion may only be used to ensure the
immediate physical safety of the patient, a staff member, or
others, and should be used only when all other methods
have failed to keep the patient from self-harm or from
harming others. This standard has been established with the
intent of reducing the overall use of restraint. If restraint
must be used, the health care provider must choose a
restraint that’s the least restrictive to the patient, and
discontinue restraint use at the earliest possible time.1,2,3,4
Only staff members trained in the use of restraints as well
as less restrictive techniques aimed at avoiding restraint are
permitted to evaluate the need for restraint, apply
restraints, and monitor patients who are restrained.6,7
Interventions that can reduce the need for restraint
include pain management techniques, conversation with the
patient, exercise, activity involvement, meditation, prayer,
contact with familiar people or places, and such therapies as
massage, therapeutic touch, aromatherapy, music therapy,
pet therapy, and reminiscence therapy.8
Equipment
Restraint device (vest, limb, mitt, belt, or leather) ▪
Optional: gloves, gown, mask, eye protection, straps, key,
cuff liners (if recommended by the manufacturer).
Preparation of equipment
Because there are various types of body restraints, refer to
the manufacturer’s preparation and application instructions.
Some vest restraints wrap around the patient with the
straps crossing in the front, whereas other types close with
a zipper at the patient’s back. Check to see that you have
obtained the correct size for the patient’s build and weight.
Some devices require that the straps be fed through the cuff
before application. Check the device for damage, and obtain
a new device as necessary. Because there are various types
of belt restraints, make sure you’ve chosen a restraint that’s
appropriate for your patient. For example, a restraint may
hold a patient in a stationary position or allow the patient to
roll from side to side, may wrap around the pelvis in addition
to the waist for additional security when sitting up, or be
padded or unpadded. Some belt restraints wrap around the
patient with the straps crossing in the back; others have
straps that cross in the front.
If using leather or leather-like restraints, make sure the
straps are unlocked and the key fits the lock. If indicated by
the manufacturer, apply cuff liners to the restraint cuffs to
reduce friction between the patient’s skin and the restraint,
which helps prevent skin irritation and breakdown.
Check the device for damage before use; obtain a new
device if necessary.
Implementation
■ Obtain a practitioner’s order for the restraint. In an
emergency situation, obtain an order as soon as possible
after applying the restraint.6,9
NURSING ALERT If the patient is being restrained because of violent
or self-destructive behavior that jeopardizes the patient’s physical
safety or that of staff members or others, the doctor, clinical
psychologist, or other licensed independent practitioner responsible
for the patient’s care must conduct an in-person evaluation within 1
hour of initiation of the restraint. A specially trained nurse or
physician’s assistant may perform the face-to-face evaluation;
however, the nurse or physician’s assistant must consult the attending
doctor, clinical psychologist, or other licensed independent
practitioner who’s responsible for the care of the patient as soon as
possible after completing the 1-hour face-to-face evaluation.1,10,11
■ Gather the appropriate equipment.
■ Perform hand hygiene.12,13,14,15,16
■ Put on gloves and personal protective equipment as
needed to comply with standard precautions.17,18
■ If the patient’s condition allows, confirm the patient’s
identity using at least two patient identifiers.19
■ Tell the patient that you’re applying a restraint. Assure
the patient that you’re using the restraint as a protection
from injury rather than a punishment. Emphasize that the
restraint will be removed as soon as it is safe to do so, and
tell the patient the criteria you’ll use for discontinuing
restraint.
■ If necessary, obtain the assistance of additional staff
members to apply the restraint.
Applying a criss-cross vest restraint
■ If the patient’s condition permits, assist the patient to a
sitting position. If the patient is unable to sit, apply the vest
restraint by rolling the patient side-to-side.
■ Smooth out the patient’s gown or clothing, removing as
many wrinkles as possible to prevent skin breakdown.
■ Slip the vest over the patient’s gown or clothing.
■ Assist the patient in putting the arms through the
armholes with the V-shape neck in front. Criss-cross the
straps in the front of the vest. Never criss-cross the flaps in
the back, because doing so may cause the patient to choke
if the patient tries to squirm out of the vest.
■ Feed the straps through the holes in the front of the vest,
as indicated by manufacturer’s instructions.
Applying a zipper vest restraint
■ Place the vest over the patient with the zipper in back.
■ Assist the patient in placing the arms through the
armholes.
■ Zip up the back of the restraint.
■ Adjust the vest for a comfortable fit. Make sure that the
restraint doesn’t compromise breathing or circulation. You
should be able to slip an open, flat hand between the vest
and the patient.5
■ If the patient is in bed, fasten the restraint straps securely
to a movable part of the bed frame, out of the patient’s
reach. Don’t fasten the straps to the bed’s side rails.
Alternatively, if the patient is in a chair or wheelchair,
secure the restraint to a movable part of the chair frame,
out of the patient’s reach. Some restraints have quick-
release clips or buckles, whereas others require tying a
quick-release knot that you can easily release in an
emergency.5 (See Tying a quick-release knot.) Follow the
manufacturer’s instructions for the type of restraint used in
your facility.
Applying a limb restraint
■ Position the patient’s wrist or ankle in the soft padded
cuff portion of the restraint by slipping the cuff over the
patient’s hand or foot. If using a wrap-type device, wrap the
wrist or ankle so that the fasteners are on the outside of the
device.
■ If indicated, fasten the buckle or Velcro fastener.
■ Adjust the straps for a snug fit that doesn’t compromise
the patient’s circulation. You should be able to slip one or
two fingers between the restraint and the patient’s skin.
Applying the restraint too tightly may impair circulation
distal to the restraint.
Applying a mitt restraint
■ Assess for baseline hand and finger circulation to
determine the appropriateness of the device and to
determine whether circulatory changes may occur after
application.
■ Insert the patient’s hand into the mitt with the palm
facing down according to the manufacturer’s instructions. If
finger separators are available in the device, separate each
finger into its own slot.
■ Wrap the strap over the mitt and around the patient’s
wrist to secure the mitt to the patient.
■ Secure the strap with the device’s fastener, which may be
Velcro or some other type of fastener.
■ Adjust the straps for a snug fit that doesn’t compromise
the patient’s circulation. You should be able to slip one or
two fingers between the restraint and the patient’s skin.
Applying the restraint too tightly may impair circulation
distal to the restraint.
Applying a belt restraint
Restraining a patient in a chair or wheelchair
■ Position the patient as far back in the seat as possible. If
the patient is in a wheelchair, make sure that the wheels are
locked.
NURSING ALERT Do not apply a belt restraint to a chair or
wheelchair that doesn’t permit proper application as directed by the
manufacturer’s instructions for use.
■ Wrap the device around the patient’s hips and over the
smoothed-out gown or clothing so that the straps end up at
the back of the chair.
■ If the belt is padded, place the padded side toward the
patient.
■ If the device includes a pelvic holder, place the narrow
side to the back of the chair and bring the wide part of the
holder up between the patient’s legs and connect the
straps.
■ Criss-cross the straps at the back of the chair for added
security.
■ If the chair has an adjustable seat, secure the straps to a
movable part of the chair frame, out of the patient’s reach.5
Some restraints have a quick-release device, such as clips
or buckles, whereas others require tying a quick-release
knot that you can release easily in an emergency. (See Tying
a quick-release knot.) Follow the manufacturer’s instructions
for the type of restraint used in your facility.
Restraining a patient in a bed
■ Raise the patient’s bed to waist level when providing
patient care to prevent caregiver back strain.20
■ Position the belt under the patient at waist level.
■ Thread the straps through the slots at either the front or
back of the patient, according to the manufacturer’s
directions and the desired movement limitation.
■ Fasten the restraint straps securely to a movable part of
the bed frame, out of the patient’s reach.5 Do not fasten the
straps to the bed’s side rails. Some restraints have a quick-
release device, such as clips or buckles, whereas others
require tying a quick-release knot that you can release
easily in an emergency. Follow the manufacturer’s
instructions for the type of restraint used in your facility.
■ Return the bed to the lowest position (if applicable) to
prevent falls and maintain patient safety.21
Applying a leather or leather-like restraint
■ Ensure the safety of the patient and staff members by
having enough trained staff members available to assist in
properly applying restraints. Never attempt to apply leather
restraints to a patient alone. Give each staff member a
specific task to immobilize the patient before applying the
restraints.6,22,23,24
■ Place the patient on the bed in the supine position, with
each arm and leg securely held down to minimize
combative behavior and to prevent injury to the patient and
others. Immobilize the patient’s arms and legs above and
below the joints—knee, ankle, shoulder, and wrist—to
minimize movement without exerting excessive force.
■ For each restraint, wrap the restraint around the
extremity and adjust it to fit. Apply the restraint securely but
not too tightly. You should be able to slip one finger between
the restraint and the patient’s skin. A tight restraint can
compromise circulation; a loose one can slip off or move up
the patient’s arm or leg, causing skin irritation and
breakdown.
■ Secure the locking mechanism and make sure that it
clicks. Tug it gently to be sure it’s secure.
■ Attach the connecting strap to the restraint, and then
secure the strap to the bed frame, out of the patient’s
reach.5 Flex the patient’s arm or leg slightly before locking
the strap to allow room for movement and to prevent frozen
joints and dislocations.
■ Once the restraint is secure, allow the coworker to release
the arm or leg. Then recheck the restraint for proper fit.
■ Repeat the procedure for each restraint.
■ Place the key in an accessible location at the nurse’s
station.
Completing the procedure
■ Tie all the straps of the restraints securely to the frame of
the bed, chair, or wheelchair and out of the patient’s reach.
Never secure the restraint to a bed rail. Use a bow or knot
that you can release quickly and easily in an emergency.
(See Tying a quick-release knot.) Never tie a regular knot to
secure the straps. Leave 1′′ to 2′′ (2.5 to 5 cm) of slack in the
straps to allow room for movement.
■ Monitor the patient’s physical and psychological well-
being, including (but not limited to) vital signs, respiratory
and circulatory status, skin integrity, and any special
requirements identified during the practitioner’s
assessment, at a frequency determined by your facility, the
patient’s condition, and the type of device used.1,25 Be alert
for complications, such as impaired breathing and
circulation, skin breakdown, and psychological distress.
Make sure that the restraint doesn’t tighten with the
patient’s movements. Adjust the fit if necessary. Notify the
practitioner if signs and symptoms persist.
■ If the patient consented to have family members (or
another significant person) informed about care, notify them
of the use of restraint, the patient monitoring that will be
used during restraint, and the criteria for discontinuing
restraint.1,25
Tying a quick-release knot
A quick-release knot allows you to quickly release the knot, using one hand, if
the patient is in distress or has an emergency. Follow the steps below to tie a
quick-release knot.
1. Wrap the attachment strap once around the bed frame, leaving at least an
8′′ (20-cm) tail. Fold the loose end in half to create a loop.
2. Cross the loop over the other end of the tie.
3. Insert the folded strap where the straps cross over each other. This step
will feel like when you are tying your shoes.
4. Pull on the loop to tighten.
■ Assist the restrained patient with nutrition, hydration,
hygiene, elimination, pain control, and comfort measures.
■ To prevent pressure injuries, reposition the patient
regularly, pad bony prominences and other vulnerable
areas, and keep the skin clean and dry.26,27 If the patient is
sitting, encourage the patient to shift weight every 15
minutes; reposition hourly if patient can’t reposition himself
or herself.26
■ If you can do so safely and while continually monitoring
the patient, release the restraint regularly as required by
your facility to allow the patient to participate in care,
perform range-of-motion (ROM) exercises, turn, stretch, and
breathe deeply. Have a coworker assist as needed when
releasing the restraint.
■ Continue to reassess the need for restraint, and release
the restraints as soon as the patient’s condition permits,
according to the practitioner’s order.28
■ Debrief the patient after removal of the restraint to
identify what led to use of the restraint and what could have
been done differently, and counsel the patient for physical
or psychological trauma that may have resulted from the
use of the restraint.29
■ Remove and discard your gloves and personal protection
equipment, if worn.17
■ Perform hand hygiene.12,13,14,15,16
■ Document the procedure.30,31,32
Special considerations
■ Use a vest restraint with caution in a patient with heart
failure or respiratory disorder.
■ When the patient is at high risk for aspiration, restrain the
patient on the side. Never secure all four restraints to one
side of the bed, because the patient may fall out of bed.
■ Don’t apply a limb or mitt restraint above an IV site,
because the constriction may occlude the infusion or cause
infiltration into surrounding tissue.
■ Never secure restraints to the side rails, because
someone might inadvertently lower the rail before noticing
the attached restraint. This movement may jerk the
patient’s limb or body, causing discomfort and trauma.
Never secure restraints to the fixed frame of the bed if you
must change the patient’s position.
■ Don’t restrain a patient in the prone position. This
position limits the patient’s field of vision, intensifies
feelings of helplessness and vulnerability, and impairs
respiration, especially if the patient has been sedated.
■ If the patient continues to require restraint, obtain a new
order from the practitioner in accordance with your facility’s
policy and at least within 24 hours of the previous order. The
practitioner will need to evaluate the patient before writing
a new restraint order.
■ If the patient is being restrained because of violent or
self-destructive behavior, follow The Joint Commission,
HFAP, DNV GL–Healthcare USA, and CMS guidelines for order
limits1,33,34 unless your facility has more restrictive
guidelines: 4 hours for adults, 2 hours for children and
adolescents ages 9 to 17, and 1 hour for children younger
than age 9.
■ Note that the practitioner may renew orders for patient
restraint because of violent or self-destructive behavior to
the above time limits for a maximum of 24 consecutive
hours. After 24 hours, the practitioner must write a new
order for restraint use.1,33,34
■ Follow your facility’s channels for reporting to CMS any
death that occurs while a patient is in restraint or within 24
hours of restraint removal.35,36,37
■ After removing restraints, disinfect them according to the
manufacturer’s instructions. You may wash synthetic
restraints by machine or wipe them down with a
disinfectant. You may clean soiled leather restraints with a
disinfectant; however, you must discard leather restraints if
they were exposed to blood or other body fluids.38,39
Complications
Follow the U.S . Food and Drug Administration’s
recommendations regarding bed safety, and be alert for a
restrained patient’s potential for entrapment and serious
injury.40 Some patients resist restraint and, in the course of
resisting, may injure themselves or others.
Excessively tight limb restraints can reduce peripheral
circulation. Apply restraints carefully and check them
regularly. Skin breakdown can occur under limb restraints.
To prevent this complication, make sure that the restraint is
padded around the patient’s wrists and ankles, loosen or
remove the restraints frequently, and provide regular skin
care.
Long periods of immobility can predispose the patient to
pneumonia, urine retention, constipation, and sensory
deprivation. Reposition the patient and attend to elimination
requirements as needed. Provide regular skin care, and
make sure the patient wears garments under the vest to
protect the skin.5
Documentation
Document each episode of the use of restraint, including the
date and time of initiation of restraint use as well as the
total number of minutes of physical restraint use. Document
the patient’s signs and symptoms, the less restrictive
interventions you tried first, your assessment of the need
for restraint, and the name of the doctor or other licensed
independent practitioner who evaluated the patient and
ordered the restraints. Document the patient’s response to
the restraints. Include the conditions or behaviors necessary
for discontinuing the restraint and whether these conditions
were communicated to the patient.41,42,43,44,45
Document
each
in-person
evaluation
by the
practitioner.41,46
Record regular patient assessments, according to your
facility’s documentation format, including signs of injury,
nutrition, hydration, circulation, ROM, vital signs, hygiene,
elimination, comfort, physical and psychological status, and
readiness for removing restraints. Record your interventions
to help the patient meet the conditions for removing the
restraint. Document any injuries or complications, nursing
interventions, and the name of the practitioner notified and
the time notified.
REFERENCES
1 Centers for Medicare and Medicaid Services, Department of Health and
Human Services. (2015). Condition of participation: Patient’s rights. 42 C.F.R.
§ 482.13(e).
2 The Joint Commission. (2019). Standard PC.03 .05.01. Comprehensive
accreditation manual for hospitals. Oakbrook Terrace, IL: The Joint
Commission.
3 Accreditation Association for Hospitals and Health Systems. (2017). Standard
32.02.01. Healthcare Facilities Accreditation Program: Accreditation
requirements for acute care hospitals. Chicago, IL: Accreditation Association
for Hospitals and Health Systems. (Level VII)
4 DNV GL-Healthcare USA, Inc. (2016). PR.6 .SR.1 . NIAHO® accreditation
requirements: Interpretive guidelines & surveyor guidance (version 11).
Milford, OH: DNV GL-Healthcare USA, Inc.
5 Posey Company. (2017). “Posey® jackets and vests with tie straps application
instructions” [Online]. Accessed via the Web at
http://www.posey.com/sites/default/files/product-docs/I9294-Posey%C2%AE-
Jackers-And-Vests.pdf
6 Centers for Medicare and Medicaid Services, Department of Health and
Human Services. (2015). Condition of participation: Patient’s rights. 42 C.F.R.
§ 482.13.
7 The Joint Commission. (2019). Standard PC.03 .03 .07. Comprehensive
accreditation manual for hospitals. Oakbrook Terrace, IL: The Joint
Commission. (Level VII)
8 American Nurses Association. (2012). “Position statement: Reduction of
patient restraint and seclusion in health care settings” [Online]. Accessed via
the Web at
https://www.nursingworld.org/~4af287/globalassets/docs/ana/ethics/ps_reduc
tion-of-patient-restraint-and-seclusion-in-health-care-settings.pdf
9 The Joint Commission. (2019). Standard PC.03 .03 .13. Comprehensive
accreditation manual for hospitals. Oakbrook Terrace, IL: The Joint
Commission. (Level VII)
10 The Joint Commission. (2019). Standard PC.03 .05.11 . Comprehensive
accreditation manual for hospitals. Oakbrook Terrace, IL: The Joint
Commission. (Level VII)
11 Accreditation Association for Hospitals and Health Systems. (2017). Standard
15.02.20. Healthcare Facilities Accreditation Program: Accreditation
requirements for acute care hospitals. Chicago, IL: Accreditation Association
for Hospitals and Health Systems. (Level VII)
12 Centers for Disease Control and Prevention. (2002). Guideline for hand
hygiene in health-care settings: Recommendations of the Healthcare Infection
Control Practices Advisory Committee and the HICPAC/SHEA/APIC/IDSA Hand
Hygiene Task Force. MMWR Recommendations and Reports, 51(RR-16), 1–45.
Accessed via the Web at http://www.cdc.gov/mmwr/pdf/rr/rr5116.pdf (Level II)
13 World Health Organization. (2009). “WHO guidelines on hand hygiene in
health care: First global patient safety challenge, clean care is safer care”
[Online]. Accessed via the Web at
http://apps.who.int/iris/bitstream/10665/44102/1/9789241597906_eng.pdf
(Level IV)
14 The Joint Commission. (2019). Standard NPSG.07.01.01. Comprehensive
accreditation manual for hospitals. Oakbrook Terrace, IL: The Joint
Commission. (Level VII)
15 Accreditation Association for Hospitals and Health Systems. (2017). Standard
07.01.21. Healthcare Facilities Accreditation Program: Accreditation
requirements for acute care hospitals. Chicago, IL: Accreditation Association
for Hospitals and Health Systems. (Level VII)
16 DNV GL-Healthcare USA, Inc. (2016). IC.1 .SR.1 . NIAHO® accreditation
requirements: Interpretive guidelines & surveyor guidance (version 11).
Milford, OH: DNV GL-Healthcare USA, Inc. (Level VII)
17 Siegel, J. D ., et al. (2007, revised 2017). “2007 guideline for isolation
precautions: Preventing transmission of infectious agents in healthcare
settings” [Online]. Accessed via the Web at
https://www.cdc.gov/infectioncontrol/pdf/guidelines/isolation-guidelines.pdf
(Level II)
18 Accreditation Association for Hospitals and Health Systems. (2017). Standard
07.01.10. Healthcare Facilities Accreditation Program: Accreditation
requirements for acute care hospitals. Chicago, IL: Accreditation Association
for Hospitals and Health Systems. (Level VII)
19 The Joint Commission. (2019). Standard NPSG.01.01.01. Comprehensive
accreditation manual for hospitals. Oakbrook Terrace, IL: The Joint
Commission. (Level VII)
20 Waters, T. R., et al. (2009). “Safe patient handling training for schools of
nursing” [Online]. Accessed via the Web at
http://www.cdc.gov/niosh/docs/2009-127/pdfs/2009-127.pdf (Level VII)
21 Ganz, D. A., et al. (2013). Preventing falls in hospitals: A toolkit for improving
quality of care (AHRQ Publication No. 13-0015-EF). Rockville, MD: Agency for
Healthcare Research and Quality. Accessed via the Web at
http://www.ahrq.gov/sites/default/files/publications/files/fallpxtoolkit.pdf
(Level VII)
22 DNV GL-Healthcare USA, Inc. (2016). PR.7. NIAHO® accreditation
requirements: Interpretive guidelines & surveyor guidance (version 11).
Milford, OH: DNV GL-Healthcare USA, Inc. (Level VII)
23 Accreditation Association for Hospitals and Health Systems. (2017). Standard
15.02.09. Healthcare Facilities Accreditation Program: Accreditation
requirements for acute care hospitals. Chicago, IL: Accreditation Association
for Hospitals and Health Systems. (Level VII)
24 Accreditation Association for Hospitals and Health Systems. (2017). Standard
15.02.29. Healthcare Facilities Accreditation Program: Accreditation
requirements for acute care hospitals. Chicago, IL: Accreditation Association
for Hospitals and Health Systems. (Level VII)
25 The Joint Commission. (2019). Standard PC.03 .05.07. Comprehensive
accreditation manual for hospitals. Oakbrook Terrace, IL: The Joint
Commission. (Level VII)
26 Wound Ostomy and Continence Nurses Society. (2016). Guideline for
prevention and management of pressure ulcers (injuries): WOCN clinical
practice guideline series 2. Mount Laurel, NJ: WOCN.
27 Fletcher, J. (2017). Reposition patients effectively to prevent pressure ulcers.
Wounds International, 18(1), 7–10.
28 The Joint Commission. (2019). Standard PC.03 .03 .27. Comprehensive
accreditation manual for hospitals. Oakbrook Terrace, IL: The Joint
Commission. (Level VII)
29 The Joint Commission. (2019). Standard PC.03 .03 .29. Comprehensive
accreditation manual for hospitals. Oakbrook Terrace, IL: The Joint
Commission. (Level VII)
30 The Joint Commission. (2019). Standard RC.01.03 .01. Comprehensive
accreditation manual for hospitals. Oakbrook Terrace, IL: The Joint
Commission. (Level VII)
31 Accreditation Association for Hospitals and Health Systems. (2017). Standard
10.00 .03. Healthcare Facilities Accreditation Program: Accreditation
requirements for acute care hospitals. Chicago, IL: Accreditation Association
for Hospitals and Health Systems. (Level VII)
32 DNV GL-Healthcare USA, Inc. (2016). MR.2 .SR.1 . NIAHO® accreditation
requirements: Interpretive guidelines & surveyor guidance (version 11).
Milford, OH: DNV GL-Healthcare USA, Inc. (Level VII)
33 The Joint Commission. (2019). Standard PC.03 .05.05. Comprehensive
accreditation manual for hospitals. Oakbrook Terrace, IL: The Joint
Commission. (Level VII)
34 Accreditation Association for Hospitals and Health Systems. (2017). Standard
15.02.13. Healthcare Facilities Accreditation Program: Accreditation
requirements for acute care hospitals. Chicago, IL: Accreditation Association
for Hospitals and Health Systems. (Level VII)
35 The Joint Commission. (2019). Standard PC.03 .05.19. Comprehensive
accreditation manual for hospitals. Oakbrook Terrace, IL: The Joint
Commission. (Level VII)
36 Centers for Medicare and Medicaid Services, Department of Health and
Human Services. (2015). Condition of participation: Patient’s rights. 42 C.F.R.
482.13(g).
37 Accreditation Association for Hospitals and Health Systems. (2017). Standard
15.02.41. Healthcare Facilities Accreditation Program: Accreditation
requirements for acute care hospitals. Chicago, IL: Accreditation Association
for Hospitals and Health Systems. (Level VII)
38 Accreditation Association for Hospitals and Health Systems. (2017). Standard
07.02.03. Healthcare Facilities Accreditation Program: Accreditation
requirements for acute care hospitals. Chicago, IL: Accreditation Association
for Hospitals and Health Systems. (Level VII)
39 Rutala, W. A., et al. (2008, revised 2017). “Guideline for disinfection and
sterilization in healthcare facilities, 2008” [Online]. Accessed via the Web at
http://www.cdc.gov/hicpac/pdf/guidelines/Disinfection_Nov_2008.pdf (Level I)
40 U.S . Food and Drug Administration. (2018). “Hospital beds” [Online].
Accessed via the Web at
http://www.fda.gov/MedicalDevices/ProductsandMedicalProcedures/GeneralHo
spitalDevicesandSup
41 The Joint Commission. (2019). Standard PC.03 .05.15. Comprehensive
accreditation manual for hospitals. Oakbrook Terrace, IL: The Joint
Commission. (Level VII)
42 Accreditation Association for Hospitals and Health Systems. (2017). Standard
15.02.25. Healthcare Facilities Accreditation Program: Accreditation
requirements for acute care hospitals. Chicago, IL: Accreditation Association
for Hospitals and Health Systems. (Level VII)
43 Accreditation Association for Hospitals and Health Systems. (2017). Standard
15.02.26. Healthcare Facilities Accreditation Program: Accreditation
requirements for acute care hospitals. Chicago, IL: Accreditation Association
for Hospitals and Health Systems. (Level VII)
44 Accreditation Association for Hospitals and Health Systems. (2017). Standard
15.02.27. Healthcare Facilities Accreditation Program: Accreditation
requirements for acute care hospitals. Chicago, IL: Accreditation Association
for Hospitals and Health Systems. (Level VII)
45 Accreditation Association for Hospitals and Health Systems. (2017). Standard
15.02.28. Healthcare Facilities Accreditation Program: Accreditation
requirements for acute care hospitals. Chicago, IL: Accreditation Association
for Hospitals and Health Systems. (Level VII)
46 Accreditation Association for Hospitals and Health Systems. (2017). Standard
15.02.24. Healthcare Facilities Accreditation Program: Accreditation
requirements for acute care hospitals. Chicago, IL: Accreditation Association
for Hospitals and Health Systems. (Level VII)
RING REMOVAL
A ring can become excessively tight on a patient’s finger or
toe after an injury such as a sprain, or from some other
cause of swelling such as the swelling that can occur in a
localized allergic reaction. Very tight-fitting rings can
obstruct lymphatic drainage, causing swelling and further
constriction. Removal may be necessary to relieve chronic
or acute edema and to prevent vascular compromise in a
finger or toe constricted by a ring or metal or plastic band.
Equipment
Ice or cold pack ▪ soap and water ▪ towel ▪ lubricant
(petroleum jelly, lotion) ▪ rubber tourniquet or Penrose drain
▪ Optional: local anesthetic without epinephrine, syringe,
needles, alcohol pads, gloves.
Coiled-string method
String, umbilical tape, ribbon gauze, or thick suture material
▪ Optional: hemostat.
Ring-cutter method
Ring-cutter (manual or battery- or electric-powered) ▪
lubricant (some cutters require a water-soluble lubricant) ▪
pliers, hemostat, or ring spreader ▪ protective eyewear ▪
20-mL syringe filled with water.
Preparation of equipment
Check any item that has an expiration date to ensure that it
hasn’t expired. If a product has expired, if its integrity has
been compromised, or if you find it’s defective or not
working, remove it from patient use, label it as expired or
defective, and report the expiration or defect as directed by
your facility.
Implementation
■ Perform hand hygiene.1,2,3,4,5,6
■ Confirm the patient’s identity using at least two patient
identifiers.7
■ Explain the procedure to the patient.
■ Provide privacy.8,9,10,11
■ Put on gloves as needed to comply with standard
precautions.12,13
■ Inspect the digit for wounds, lacerations, fractures, or
dislocations. Assess the digit’s capillary refill, sensation, and
movement.
NURSING ALERT If vascular compromise is present, the ring should
be removed with a ring cutter as quickly as possible.
■ Perform a comprehensive pain assessment using
techniques appropriate for the patient’s age, condition, and
ability to understand.14 Intervene as necessary.
■ Arrange for an X-ray of the digit, if ordered, and report
abnormal findings to the practitioner.
■ To limit further swelling, apply ice and elevate the
affected extremity above heart level. You may also wrap a
rubber tourniquet or Penrose drain circumferentially in a
distal-to-proximal direction to reduce swelling. Leave the
wrap in place for 5 minutes, and then unwrap it.
■ Lubricate the skin beneath the ring with soap and water
or a lubricant to make it easier for the ring to be slipped off
of the finger or toe. Hold the ring with a towel, and pull with
a rocking motion in an attempt to remove the ring from the
patient’s digit.
NURSING ALERT Even if the patient tells you he or she has tried to
remove the object from the finger at home, it’s generally worthwhile to
attempt removal with soap and water or a lubricant before trying
other techniques. The pain from constriction often prevents the
patient from applying adequate circular traction to remove the ring.
■ If the ring can’t be removed using soap and water or a
lubricant, use one of the methods below.
■ If required, assist the practitioner when administering
digital anesthesia using a local anesthetic without
epinephrine.
NURSING ALERT Never use products containing epinephrine on a
patient’s finger or toe, because epinephrine exerts a vasoconstrictive
effect.
Using the coiled-string method
NURSING ALERT Don’t use the coiled-string method if the patient
has any lacerations, fractures, or dislocations involving the affected
digit; instead, use a ring cutter method.
■ While the affected digit is elevated, slip the end of a long
strip of string or alternative material under the ring. Use a
hemostat, if necessary, to thread the string under the ring.
■ Anchor the string with your nondominant hand, or ask the
patient to anchor it.
■ Wrap the string around the patient’s digit, beginning
adjacent to the ring margin. Wrap the string in a snug,
smooth, single layer in a clockwise fashion, slightly
overlapping the previous layer, progressing from proximal to
distal until it covers the area of greatest swelling. Because
the area of the proximal interphalangeal joint is the most
difficult area to slip the ring over, make sure that you wrap
this area firmly (as shown below).
Using locking pliers
Tungsten carbide, ceramic, and natural stone rings made of onyx or jade are
removed by cracking them into pieces with standard locking pliers. Follow
these steps:
■ Place the locking pliers over the band, and adjust the jaws to clamp lightly.
■ Release the clamp and then readjust the jaws, tightening the screw one-
quarter turn to clamp it again.
■ Repeat this process until you hear a crack. The ring will break into two or
more pieces.
■ Take care when removing the pieces. Because the cracked edges are
sharp, don’t rotate the cracked ring on the patient’s digit.
■ When the wrapping is complete, pull the proximal end of
the string against the ring and then start to unwrap the
string in a clockwise direction, moving the ring toward the
tip of the finger (as shown below). If needed, place a small
amount of lubricant over the string to facilitate sliding the
ring.
NURSING ALERT Moving the ring over the proximal interphalangeal
joint will be the most difficult and may cause the most pain to the
patient. It’s common for this procedure to cause abrasions.
Using the manual ring-cutter method
■ Obtain written consent from the patient for cutting and
removing the ring.15,16,17,18
■ Put on protective eyewear to avoid possible injury caused
by metal fragments.
■ Slip the curved finger guard of the ring cutter under the
ring. Use lubricant if necessary. Rotate the ring, if possible,
so that the thinnest part of the band is located under the
saw blade (as shown below).
■ Clamp the cutting disk down firmly on the ring, and use
the turnkey to manually turn the cutting disk until the ring is
severed.
■ After the ring has been cut through, bend the ring apart
with pliers, a hemostat, or a ring spreader (as shown below)
to allow ring removal.
■ If the ring is a wide band, it may be necessary to make a
second cut to remove a wedge from the ring.
■ Remove the ring.
■ Irrigate the skin with water to remove any metal particles.
■ Remove protective eyewear.
Using the battery- or electric-powered ring-
cutter method
■ Obtain written consent from the patient for cutting and
removing the ring.15,16,17,18
■ Put on protective eyewear to avoid possible injury caused
by metal fragments.
■ Ensure that the correct cutting blade of the ring cutter is
in place. Some manufacturers supply different blades for
different types of metals. Always follow the manufacturer’s
instructions.
■ Place the finger guard of the ring cutter under the ring.
Use lubricant if necessary. Rotate the ring, if possible, so
that the thinnest part of the band is located under the saw
blade of the ring cutter.
■ Turn on the power to the cutting blade so that it’s rotating
before it makes contact with the ring.
■ Apply gentle pressure to make contact between the
rotating blade and the ring.
NURSING ALERT The friction caused by cutting may produce an
uncomfortable amount of heat in the ring and the patient’s hand. Ask
if the patient is comfortable, and regularly check the temperature of
the ring and cutter blade with your fingers. Stop briefly to allow the
ring and cutter to cool down if necessary.
■ After you’ve cut through the ring, bend the ring apart with
pliers, a hemostat, or a ring spreader to allow removal, or
make a second cut on the opposite side of the ring and
remove the wedge.
■ Remove the ring.
■ Irrigate the skin with water to remove any metal particles.
■ Remove your protective eyewear.
Completing the procedure
■ Reassess the neurovascular status of the patient’s digit.
■ Elevate the digit and apply cold packs, as ordered.
■ Return all pieces of the removed ring to the patient.
■ Discard the supplies in the appropriate receptacle.
■ Remove and discard your gloves, if worn.
■ Perform hand hygiene.1,2,3,4,5,6
■ Document the procedure.19,20,21,22
Special considerations
■ Some rings are made of tungsten carbide, ceramic, or
natural stone; these rings can be removed with locking
pliers (vise-grip pliers). (See Using locking pliers.)
■ Reassess the neurovascular status of the patient’s digit
frequently after ring removal. Notify the practitioner
immediately of any abnormalities.
■ Assess the patient’s pain level, and administer analgesics
as ordered, following safe medication administration
practices.23,24,25
■ Clean any open wounds and cover them with a sterile
dressing to prevent infection.
■ Administer tetanus immunization, as indicated and
ordered, following safe medication administration
practices.23,24,25
■ When removing rings or other objects from a child’s digit,
use age-appropriate terms when explaining the procedure.
Allow the child’s parents or guardian to stay and hold the
child during the procedure. Allow the child to examine the
equipment, if appropriate.
Patient teaching
Inform the patient that pain should dissipate in 1 to 2 hours
and that edema should resolve within 24 hours (or as
indicated by initial trauma to the digit). Usually, all signs
and symptoms should resolve within 48 hours. Tell the
patient that no follow-up is needed unless complications
arise. Instruct the patient to apply an ice pack to the digit
for 20 minutes four times daily for 36 to 48 hours to relieve
edema and pain. Caution the patient to avoid wearing
constricting objects on fingers and toes and to remove rings
from digits whenever edema is possible. Instruct the patient
to contact the practitioner promptly if the patient
experiences signs and symptoms of infection (warmth,
increased edema, and pain).
Complications
If a ring remains in place on an injured finger, the
constricting effects of the circumferential object can lead to
obstruction of lymphatic drainage, which in turn leads to
more swelling and further constriction. Venous and,
eventually, arterial circulation can be compromised by this
constriction. Skin on the affected digit can be cut by the
coiled-string technique or by a ring cutter.
Documentation
Document your assessment findings, including the skin
condition and neurovascular status of the digit before and
after ring removal. Document the methods used to remove
the ring, the success achieved, and the disposition of the
ring. Record the patient’s pain status and interventions
provided. Record any patient teaching and discharge
instructions provided, questions asked by the patient and
your responses, and the patient’s understanding of digit
care and whether follow-up teaching is required.19
REFERENCES
1 Centers for Disease Control and Prevention. (2002). Guideline for hand
hygiene in health-care settings: Recommendations of the Healthcare Infection
Control Practices Advisory Committee and the HICPAC/SHEA/APIC/IDSA Hand
Hygiene Task Force. MMWR Recommendations and Reports, 51(RR-16), 1–45.
Accessed via the Web at http://www.cdc.gov/mmwr/pdf/rr/rr5116.pdf (Level II)
2 The Joint Commission. (2019). Standard NPSG.07.01.01. Comprehensive
accreditation manual for hospitals. Oakbrook Terrace, IL: The Joint
Commission. (Level VII)
3 World Health Organization. (2009). “WHO guidelines on hand hygiene in
health care: First global patient safety challenge, clean care is safer care”
[Online]. Accessed via the Web at
http://whqlibdoc.who.int/publications/2009/9789241597906_eng.pdf (Level
IV)
4 Accreditation Association for Hospitals and Health Systems. (2017). Standard
07.01.21. Healthcare Facilities Accreditation Program: Accreditation
requirements for acute care hospitals. Chicago, IL: Accreditation Association
for Hospitals and Health Systems. (Level VII)
5 Centers for Medicare and Medicaid Services, Department of Health and
Human Services. (2015). Condition of participation: Infection control. 42 C.F.R.
§ 482.42.
6 DNV GL-Healthcare USA, Inc. (2016). IC.1.SR.1 . NIAHO® accreditation
requirements: Interpretive guidelines & surveyor guidance (version 11).
Milford, OH: DNV GL-Healthcare USA, Inc. (Level VII)
7 The Joint Commission. (2019). Standard NPSG.01.01.01. Comprehensive
accreditation manual for hospitals. Oakbrook Terrace, IL: The Joint
Commission. (Level VII)
8 DNV GL-Healthcare USA, Inc. (2016). PR.1 .SR.5 . NIAHO® accreditation
requirements: Interpretive guidelines & surveyor guidance (version 11).
Milford, OH: DNV GL-Healthcare USA, Inc. (Level VII)
9 Centers for Medicare and Medicaid Services, Department of Health and
Human Services. (2015). Condition of participation: Patient’s rights. 42 C.F.R.
§ 482.13(c)(1).
10 Accreditation Association for Hospitals and Health Systems. (2017). Standard
15.01.16. Healthcare Facilities Accreditation Program: Accreditation
requirements for acute care hospitals. Chicago, IL: Accreditation Association
for Hospitals and Health Systems. (Level VII)
11 The Joint Commission. (2019). Standard RI.01.01.01. Comprehensive
accreditation manual for hospitals. Oakbrook Terrace, IL: The Joint
Commission. (Level VII)
12 Accreditation Association for Hospitals and Health Systems. (2017). Standard
07.01.10. Healthcare Facilities Accreditation Program: Accreditation
requirements for acute care hospitals. Chicago, IL: Accreditation Association
for Hospitals and Health Systems. (Level VII)
13 Siegel J. D., et al. (2007, revised 2017). “2007 guideline for isolation
precautions: Preventing transmission of infectious agents in healthcare
settings” [Online]. Accessed via the Web at
https://www.cdc.gov/infectioncontrol/pdf/guidelines/isolation-guidelines.pdf
(Level II)
14 The Joint Commission. (2019). Standard PC.01.02.07. Comprehensive
accreditation manual for hospitals. Oakbrook Terrace, IL: The Joint
Commission. (Level VII)
15 Centers for Medicare and Medicaid Services, Department of Health and
Human Services. (2015). Condition of participation: Patient’s rights. 42 C.F.R.
§ 482.13(b)(2).
16 The Joint Commission. (2019). Standard RI.01.03 .01. Comprehensive
accreditation manual for hospitals. Oakbrook Terrace, IL: The Joint
Commission. (Level VII)
17 Accreditation Association for Hospitals and Health Systems. (2017). Standard
15.01.11. Healthcare Facilities Accreditation Program: Accreditation
requirements for acute care hospitals. Chicago, IL: Accreditation Association
for Hospitals and Health Systems. (Level VII)
18 DNV GL-Healthcare USA, Inc. (2016). PR.1.SR.3 . NIAHO® accreditation
requirements: Interpretive guidelines & surveyor guidance (version 11).
Milford, OH: DNV GL-Healthcare USA, Inc. (Level VII)
19 The Joint Commission. (2019). Standard RC.01.03 .01. Comprehensive
accreditation manual for hospitals. Oakbrook Terrace, IL: The Joint
Commission. (Level VII)
20 Accreditation Association for Hospitals and Health Systems. (2017). Standard
10.00 .03. Healthcare Facilities Accreditation Program: Accreditation
requirements for acute care hospitals. Chicago, IL: Accreditation Association
for Hospitals and Health Systems. (Level VII)
21 Centers for Medicare and Medicaid Services, Department of Health and
Human Services. (2015). Condition of participation: Medical record services.
42 C.F.R. § 482.24(b).
22 DNV GL-Healthcare USA, Inc. (2016). MR.2 .SR.1 . NIAHO® accreditation
requirements: Interpretive guidelines & surveyor guidance (version 11).
Milford, OH: DNV GL-Healthcare USA, Inc. (Level VII)
23 Accreditation Association for Hospitals and Health Systems. (2017). Standard
16.01.03. Healthcare Facilities Accreditation Program: Accreditation
requirements for acute care hospitals. Chicago, IL: Accreditation Association
for Hospitals and Health Systems. (Level VII)
24 Centers for Medicare and Medicaid Services, Department of Health and
Human Services. (2015). Condition of participation: Nursing services. 42
C.F.R. § 482.23(c).
25 DNV GL-Healthcare USA, Inc. (2016). MM.1 .SR.2. NIAHO® accreditation
requirements: Interpretive guidelines & surveyor guidance (version 11).
Milford, OH: DNV GL-Healthcare USA, Inc. (Level VII)
ROTATION BEDS
Rotation beds—such as the RotoRestTM Delta Advanced
Kinetic Therapy System, promote postural drainage and
peristalsis, and help prevent ventilator-associated
pneumonia and complications of immobility.1,2,3 Because
the bed holds the patient motionless, it’s especially helpful
for patients with spinal cord injury, multiple trauma, stroke,
multiple sclerosis, coma, severe burns, hypostatic
pneumonia, and atelectasis or other unilateral lung
involvement causing poor ventilation and perfusion.
The RotoRestTM Delta Advanced Kinetic Therapy System
turns in an arc up to 124 degrees (62 degrees to each side)
and can be set to pause on either side for up to 30
minutes.4 It can accommodate cervical traction devices and
tongs. Arm and leg hatches on the bed fold down to allow
for range-of-motion (ROM) exercises. Other bed features
include a fan, access for X-rays, and supports and clips for
chest tubes, catheters, and drains. Racks beneath the bed
hold X-ray plates in place for chest and spinal films. (See
Understanding the RotoRestTM Delta Advanced Kinetic
Therapy System, page 676.)
EQUIPMENT
Understanding the RotoRestTM Delta
Advanced Kinetic Therapy System
Various companies make several types and models of rotation beds, and
each may vary slightly. Be sure to follow the instructions specific to the type
of bed you’re using. The instructions below apply to the RotoRestTM Delta
Advanced Kinetic Therapy System.
Driven by a silent motor, the RotoRestTM Delta bed turns the immobilized
patient slowly and continuously. The motion provides constant passive
exercise and peristaltic stimulation without depriving the patient of sleep or
risking further injury. The bed is radiolucent, permitting X-rays to be taken
through it without moving the patient. It also has a built-in cooling fan, and
allows access for surgery on patients with multiple trauma without disrupting
spinal alignment or traction.
The bed’s hatches give access to various parts of the patient’s body. Arm
hatches permit full range of motion and have holes for chest tubes. Leg
hatches allow full hip extension. The perineal hatch provides access for bowel
and bladder care, the thoracic hatch for chest auscultation and lumbar
puncture, and the cervical hatch for wound care, bathing, and shampooing.
Top view
Back view
Equipment
Rotation bed with appropriate accessories ▪ pillowcases or
fluid-impermeable pads ▪ flat sheet or padding (packs come
with the bed) ▪ soap and water (for cleaning) ▪ towel ▪
Optional: gloves, resuscitation equipment, tape.
Preparation of equipment
When using the RotoRestTM Delta Advanced Kinetic Therapy
System, carefully inspect the bed and run it through a
complete cycle in both automatic and manual modes to
ensure that it’s working properly. Check the tightness of the
set screws at the head of the bed, if applicable for that
model.
To prepare the bed for the patient, remove the
counterbalance weights from the keel and place them in the
base frame’s storage area. Release the connecting arm by
pulling down on the cam handle and depressing the lower
side of the footboard. Next, lock the table (the main surface
of the bed) in the horizontal position, and place all side
supports in the extreme lateral position by loosening the
cam handles on the underside of the table. Slide the side
supports off the bed. Note that all supports and packs are
labeled RIGHT or LEFT on the bottom to facilitate reassembly.
Remove the knee packs by depressing the snap button
and rotating and pulling the packs from the tube. Then
remove the abductor packs by depressing and sliding them
toward the head of the bed. Next, loosen the foot and knee
assemblies by lifting the cam handle at its base, and slide
them to the foot of the bed. Last, loosen the shoulder clamp
assembly and knobs; swing the shoulder clamps to the
vertical position and retighten them.
If applicable for the bed model, remove the cervical,
thoracic, and perineal packs. Cover them with pillowcases or
fluid-impermeable pads, smooth all wrinkles, and replace
the packs. Cover the upper half of the bed, which is a solid
unit, with padding or a sheet. Install new disposable foam
cushions for the patient’s head, shoulders, and feet.
Implementation
■ Perform hand hygiene.5,6,7,8,9,10
■ Put on gloves, if needed, to comply with standard
precautions.11,12
■ Confirm the patient’s identity using at least two patient
identifiers.13
■ Provide privacy.14,15,16,17
■ If possible, show the patient the bed before use. Explain
and demonstrate its operation, and reassure the patient
that the bed will hold the patient securely.
■ Before positioning the patient on the rotation bed, make
sure it’s turned off. Then, place and lock the bed in the
horizontal position, out of gear. Latch all hatches and lock
the wheels to ensure patient safety.
■ Obtain assistance and transfer the patient. Move the
patient gently to the center of the bed to prevent contact
with the pillar posts and to ensure proper balance during
bed operation. Smooth the pillowcase or fluid-impermeable
pad beneath the hips and other bony prominences. Then
place any tubes through the appropriate notches in the
hatches and ensure that any traction weights hang freely.
■ Insert the thoracic side supports in their posts. Adjust the
patient’s longitudinal position to allow a 1′′ (2.5 -cm) space
between the axillae and the supports to avoid pressure on
the axillary blood vessels and the brachial plexus. Push the
thoracic side supports against the patient’s chest, and lock
the cam arms securely to provide support and ensure
patient safety.
■ Place the disposable supports under the patient’s legs to
remove pressure from the heels and prevent pressure
injuries.
■ Install and adjust the foot supports so that the patient’s
feet lie in the normal anatomic position, which helps prevent
footdrop. The foot supports should be in position for only 2
hours every shift to prevent excessive pressure on the soles
and toes.
■ Place the abductor packs in the appropriate supports,
allowing a 6′′ (15.2 -cm) space between the packs and the
patient’s groin. Tighten the knobs on the bed’s underside at
the base of the support tubes.
■ Install the leg side supports snugly against the patient’s
hips and tighten the cam arms. Position the knee assemblies
slightly above the knees and tighten the cam arms. Then
place your hand on the patient’s knee and move the knee
pack until it rests lightly on the top of your hand. Repeat for
the other knee.
■ Loosen the retaining rings on the crossbar and slide the
head and shoulder assembly laterally. The retaining rings
maintain correct lateral position of the shoulder clamp
assembly and head support pack.
■ Carefully lower the head and shoulder assembly into
place and slide it to touch the patient’s head.
■ Place your hand on the patient’s shoulder and move the
shoulder pack until it touches your hand. Tighten it in place.
Repeat for the other shoulder. The 1′′ (2.5 -cm) clearance
between the shoulders and the packs prevents excess
pressure, which can lead to pressure ulcers.
■ Place the head pack close to, but not touching, the
patient’s ears (or cervical traction tongs) to prevent
pressure injuries.
■ Tighten the head and shoulder assembly securely so it
won’t lift off the bed. Position the restraining rings next to
the shoulder assembly bracket and tighten them.
■ Place the patient’s arms on the disposable supports.
Install the side arm supports and secure the safety straps,
placing one across the shoulder assembly and the other
over the thoracic supports to prevent falls and injury. If
necessary, cover the patient with a flat sheet.
Balancing the bed
■ Place one hand on the footboard to prevent the bed from
turning rapidly if it’s unbalanced. Then remove the locking
pin. If the bed rotates to one side, reposition the patient in
its center; if it tilts to the right, gently turn it slightly to the
left and slide the packs on the right side toward the patient;
if it tilts to the left, reverse the process. If a large imbalance
exists, you may have to adjust the packs on both sides.
■ After the patient is centered, gently turn the bed into
position.
■ Measure the space between the patient’s chest, hip, and
thighs and the inside of the packs. If the space appears too
tight, slide both packs outward. Excessively loose packs
cause the patient to slide from side to side during turning,
possibly resulting in unnecessary movement at fracture
sites, skin irritation from shearing force, and bed imbalance.
Overly tight packs can place pressure on the patient during
turning.
■ After adjusting the packs, check the bed; balance it and
make any necessary adjustments.
Initiating automatic bed rotation
■ Ensure that all packs are securely in place. Then hold the
footboard firmly and remove the locking pin to start the
bed’s motor. The bed will continue to rotate until the pin is
reinserted.
■ Raise the connecting arm cam handle until the
connecting assembly snaps into place, locking the bed into
automatic rotation.
■ Remain with the patient for at least three complete turns
from side to side to evaluate the patient’s comfort and
safety. Observe the patient’s response and offer emotional
support.
■ Remove and discard your gloves if worn.11,12
■ Perform hand hygiene.5,6,7,8,9,10
■ Document the procedure.18,19,20,21
Special considerations
■ If the patient goes into cardiac arrest while on the bed,
perform cardiopulmonary resuscitation after taking the bed
out of gear, locking it in horizontal position, removing the
side arm support and the thoracic pack, lifting the shoulder
assembly, and dropping the arm pack. Doing all these steps
takes only 5 to 10 seconds. You won’t need a cardiac board
because of the bed’s firm surface.
■ If the electricity fails, lock the bed in horizontal or lateral
position and rotate it manually every 30 minutes to prevent
pressure injuries. If cervical traction causes the patient to
slide upward, place the bed in the reverse Trendelenburg
position; if extremity traction causes the patient to migrate
toward the foot of the bed, use the Trendelenburg position.
■ Lock the bed in the extreme lateral position for access to
the back of the head, thorax, and buttocks through the
appropriate hatches.
■ Clean the mattress and nondisposable packs during
patient care and rinse them thoroughly to remove all soap
residue.
■ When replacing the packs and hatches, take care not to
pinch the patient’s skin between the packs, which can cause
pain and tissue necrosis.
■ Expect increased drainage from any pressure injury for
the first few days the patient is on the bed, because the
motion helps debride necrotic tissue and improves local
circulation.
■ Perform or schedule daily ROM exercises, as ordered,
because the bed allows full access to all extremities without
disturbing spinal alignment. Drop the arm hatch for shoulder
rotation, remove the thoracic packs for shoulder abduction,
and drop the leg hatch and remove leg and knee packs for
hip rotation and full leg motion.
■ For a female patient, tape an indwelling urinary catheter
to the thigh before bringing it through the perineal hatch.
For a male patient with spinal cord lesions, tape the
catheter to the abdomen and then to the thigh to facilitate
gravity drainage. Hang the drainage bag on the clips
provided, and make sure it doesn’t become caught between
the bed frames during rotation.
■ If the patient has a tracheal or endotracheal tube and is
on mechanical ventilation, attach the tube support bracket
between the cervical pack and the arm packs. Tape the
connecting T tubing to the support and run it beside the
patient’s head and off the center of the table to help
prevent reflux of condensation.
■ For a patient with pulmonary congestion or pneumonia,
suction secretions more often during the first 12 to 24 hours
on the bed, because the motion will increase drainage.
Documentation
Document the preparation of the bed and the transfer of the
patient into the bed. Record changes in the patient’s
condition and the patient’s response to therapy in your
progress notes. Note turning times and ongoing care on the
flowchart. Document all teaching of the patient and family
(if applicable), their understanding of the teaching you
provided, and whether they require follow-up teaching.
REFERENCES
1 Coppadora, A., et al. (2012). Novel preventive strategies for ventilator-
associated pneumonia. Critical Care, 16(2), 210.
2 Staudinger, T., et al. (2010). Continuous lateral rotation therapy to prevent
ventilator-associated pneumonia. Critical Care Medicine, 38(2), 486–490.
(Level II)
3 Goldhill, D. R., et al. (2007). Rotational bed therapy to prevent and treat
respiratory complications: A review and meta-analysis. American Journal of
Critical Care, 16(1), 50–61. (Level I)
4 ArjoHuntleigh, Inc. (2014). “RotoRestTM Delta advanced kinetic therapy
system user manual” [Online]. Accessed via the Web at
http://www.arjohuntleighlibrary.com/ExternalLink/ShowFile.aspx?
Id=%7BC2E7E792-94E4-48EC-ABA6-8B53B143577B%7D
5 The Joint Commission. (2019). Standard NPSG.07.01.01. Comprehensive
accreditation manual for hospitals. Oakbrook Terrace, IL: The Joint
Commission. (Level VII)
6 Centers for Disease Control and Prevention. (2002). Guideline for hand
hygiene in health-care settings: Recommendations of the Healthcare Infection
Control Practices Advisory Committee and the HICPAC/SHEA/APIC/IDSA Hand
Hygiene Task Force. MMWR Recommendations and Reports, 51(RR-16), 1–45.
Accessed via the Web at http://www.cdc.gov/mmwr/pdf/rr/rr5116.pdf (Level II)
7 World Health Organization. (2009). “WHO guidelines on hand hygiene in
health care: First global patient safety challenge, clean care is safer care”
[Online]. Accessed via the Web at
http://apps.who.int/iris/bitstream/10665/44102/1/9789241597906_eng.pdf
(Level IV)
8 Centers for Medicare and Medicaid Services, Department of Health and
Human Services. (2015). Condition of participation: Infection control. 42 C.F.R.
§ 482.42.
9 Accreditation Association for Hospitals and Health Systems. (2017). Standard
07.01.21. Healthcare Facilities Accreditation Program: Accreditation
requirements for acute care hospitals. Chicago, IL: Accreditation Association
for Hospitals and Health Systems. (Level VII)
10 DNV GL-Healthcare USA, Inc. (2016). IC.1 .SR.1 . NIAHO® accreditation
requirements: Interpretive guidelines & surveyor guidance (version 11).
Milford, OH: DNV GL-Healthcare USA, Inc. (Level VII)
11 Siegel, J. D ., et al. (2007, revised 2017). “2007 guideline for isolation
precautions: Preventing transmission of infectious agents in healthcare
settings” [Online]. Accessed via the Web at
https://www.cdc.gov/infectioncontrol/pdf/guidelines/isolation-guidelines.pdf
(Level II)
12 Accreditation Association for Hospitals and Health Systems. (2017). Standard
07.01.10. Healthcare Facilities Accreditation Program: Accreditation
requirements for acute care hospitals. Chicago, IL: Accreditation Association
for Hospitals and Health Systems. (Level VII)
13 The Joint Commission. (2019). Standard NPSG 01.01.01. Comprehensive
accreditation manual for hospitals. Oakbrook Terrace, IL: The Joint
Commission. (Level VII)
14 DNV GL-Healthcare USA, Inc. (2016). PR.1.SR.5 . NIAHO® accreditation
requirements: Interpretive guidelines & surveyor guidance (version 11).
Milford, OH: DNV GL-Healthcare USA, Inc. (Level VII)
15 Centers for Medicare and Medicaid Services, Department of Health and
Human Services. (2015). Condition of participation: Patient’s rights. 42 C.F.R.
§ 482.13(c)(1).
16 Accreditation Association for Hospitals and Health Systems. (2017). Standard
15.01.16. Healthcare Facilities Accreditation Program: Accreditation
requirements for acute care hospitals. Chicago, IL: Accreditation Association
for Hospitals and Health Systems. (Level VII)
17 The Joint Commission. (2019). Standard RI.01.01.01. Comprehensive
accreditation manual for hospitals. Oakbrook Terrace, IL: The Joint
Commission. (Level VII)
18 The Joint Commission. (2019). Standard RC.01.03 .01. Comprehensive
accreditation manual for hospitals. Oakbrook Terrace, IL: The Joint
Commission. (Level VII)
19 Centers for Medicare and Medicaid Services, Department of Health and
Human Services. (2015). Condition of participation: Medical record services.
42 C.F.R. § 482.24(b).
20 Accreditation Association for Hospitals and Health Systems. (2017). Standard
10.00 .03. Healthcare Facilities Accreditation Program: Accreditation
requirements for acute care hospitals. Chicago, IL: Accreditation Association
for Hospitals and Health Systems. (Level VII)
21 DNV GL-Healthcare USA, Inc. (2016). MR.2 .SR.1 . NIAHO® accreditation
requirements: Interpretive guidelines & surveyor guidance (version 11).
Milford, OH: DNV GL-Healthcare USA, Inc. (Level VII)
S
SAFE MEDICATION ADMINISTRATION PRACTICES, GENERAL
An adverse drug event (ADE) is defined as harm to the
patient, including mental harm, physical harm, or loss of
function, that results from a medication error. A medication
error is a mistake that occurs during the medication
administration process. If a mistake occurs, it doesn’t
matter whether the patient was harmed or whether there
was only a potential for injury; it’s still considered a
medication error.1 An ADE is a more direct measure of harm
to the patient than a medication error.
ADEs can be further defined as preventable or
nonpreventable. A preventable ADE occurs as a result of a
clinician error or a systematic error and thus could have
been prevented. A nonpreventable ADE results from a
drug’s pharmacologic properties.1 A potential ADE is also
known as a near miss or close call: although the patient
wasn’t harmed, the potential for risk or harm was averted
because of actions taken by the patient or clinician.1
To promote a culture of safety and to prevent medication
errors, nurses must avoid distractions and interruptions
when preparing and administering medications2,3 and
adhere to the “five rights” of medication administration:
identify the right patient by using at least two patient-
specific identifiers; select the right medication; administer
the right dose; administer the medication at the right time;
and administer the medication by the right route. Recent
literature identifies nine rights of medication administration,
which in addition to the five rights includes the right
documentation, the right action (or appropriate reason for
prescribing the medication), the right form, and the right
response.4,5
Equipment
Patient’s medical record ▪
patient’s medication
reconciliation form or list ▪ medication order sheets,
preprinted or plain ▪ medication administration record
(MAR) or electronic medication administration record
(EMAR) ▪ Optional: conversion weight chart.
Implementation
■ Avoid distractions and interruptions when preparing and
administering medication to prevent medication errors.2,3
Verifying the medication order
■ Follow a written or typed order or an order entered into a
computer order-entry system, because these types of orders
are less likely to result in error or misunderstanding.6
■ Make sure that the prescriber’s order contains a
diagnosis, a condition, or an indication for the
medication.4,7,8
■ Verify that other essential elements of the medication
order are present, including the patient’s name, age, and
weight (in kilograms);9 the date and time the order was
written; the name of the drug to be administered; the drug
dosage; the route of administration; the frequency of
administration; dose calculation requirements (when
applicable); the exact strength or concentration of the drug
(when applicable); the quantity of the drug or duration of
administration (when applicable); specific instructions for
use (when applicable); and the signature of the person
writing the information.4,8,10
■ Review the practitioner’s order to make sure that the
prescribed infusion solution or medication, dose, rate, and
route of administration are appropriate for the patient’s age,
condition, and access device (if applicable). Address
concerns about the order with the practitioner, pharmacist,
or your supervisor and, if needed, the risk management
department or as directed by your facility.11
■ Reconcile the patient’s medications when the practitioner
orders a new medication to reduce the risk of medication
errors, including omissions, duplications, dosing errors, and
drug interactions.12
Identifying the patient
■ Check the patient’s medical record to make sure that all
the
required
documents,
medication
information,
sensitivities, history, physical examination, diagnoses, and
laboratory results are present with current information.13
■ Perform hand hygiene.14,15,16,17,18,19
■ Confirm the patient’s identity using at least two patient
identifiers to minimize the potential for a medication error
because it is the wrong patient. Compare the information
with the MAR or EMAR.10,20
■ Explain the name and purpose of each medication and
when and how it the patient will take it. Discuss important
and common adverse effects for each medication and what
to do if the patient experiences any symptoms. Discuss any
possible drug–drug, drug–food,
or
drug–disease
interactions.8,21,22,23
Obtaining an accurate medication listing
■ Ensure that the admitting clinician obtained a complete
list of the patient’s current medications, including all
prescription and over-the-counter medications and dietary
supplements, as well as a history of known drug or food
allergies, when the patient arrived at the facility.13,21 If
possible, involve the patient in creating this list. If the
patient can’t participate, obtain help from an immediate
family member or another authorized person. If the list was
obtained before the patient’s date of admission, update it to
provide the most accurate listing of the medications that the
patient is taking.13
■ Ensure that the medication list is readily available in the
patient’s medical record, and that the patient’s practitioners
have reviewed it. This practice helps reduce the risk of drug
interactions, allergic reactions, and dose-related errors, and
helps identify contraindications.
■ Send a copy of the patient’s medication list and new
medication orders to the pharmacy to enable the pharmacy
to check the appropriateness of the new medication against
what the patient has been taking. Doing so helps prevent
drug interactions, allergic reactions, improper routes of
administration, duplication of medications or types or
classes of medications, and administration of a
contraindicated medication.24,25
Checking for medication contraindications
■ Obtain and update the patient’s allergy information and
current medications during each admission or transfer to
ensure that all health care providers have access to the
most up-to-date information.26
■ Communicate the patient’s current allergy information to
all members of the health care team.
■ Send medication orders to the pharmacy before the
medication is administered so that the pharmacist can
check the medication against the patient’s current active
medications.24,25
■ Have all health care providers review the list of current
medications and allergies at each patient encounter to
determine the appropriateness of each medication for the
intended condition.1,21
■ If any health care team member has questions about a
medication, whether it’s a new drug or part of the patient’s
existing regimen, that team member should contact the
pharmacist before administering it.1
Ensuring accurate dosage calculations
■ Make sure that the patient’s most recent weight (in
kilograms) is documented in the medical record to enable
accurate weight-related dosage calculations.9
■ Have a conversion chart readily available in case weight
is documented in only one unit of measure.
■ Calculate the correct dosage of medications that are
ordered using weight-based dose schedules. Have two
licensed practitioners verify these calculations.
■ Use automated dosage calculations whenever possible,
especially with IV infusion pumps, to eliminate dosage
calculation errors for drugs with narrow therapeutic dose
ranges.
Administering high-alert medications
■ Identify high-alert medications based on your facility’s
approved list.4,27
High-alert
medications
include
anticoagulants, antidiabetic agents, sedatives, and
chemotherapeutic drugs.1,28
■ Monitor medication dosing carefully, especially if dosing
adjustments are necessary because of narrow therapeutic
windows.1
■ Obtain and review any laboratory values required for
dosing adjustments; collaborate with the practitioner if
values are out of the therapeutic range; watch for adverse
effects.1
NURSING ALERT If a patient is receiving an IV opioid, frequently
monitor respiratory rate, sedation level, and oxygen saturation level by
continuous pulse oximetry, or exhaled carbon dioxide by continuous
capnography, to decrease the risk of adverse events associated with IV
opioid use. If adverse reactions occur, respond promptly to prevent
treatment delays.5
NURSING ALERT Before administering a high-alert medication, if
required by your facility, ask another nurse to perform an independent
double-check to verify the patient’s identity and to make sure that the
right medication is on hand, the medication’s indication corresponds
with the patient’s diagnosis, dosage calculations are correct, the route
of administration is safe and proper for the patient, and, if giving an
infusion, the pump settings are correct and the infusion line is
attached to the correct port.29
Handling verbal orders
■ Minimize the use of verbal orders, because verbal orders
are especially susceptible to error.4,7
■ Have the prescriber repeat and verify the verbal order.30
■ Record the verbal order in the patient’s medical record,
and make sure to include the date and name of the
prescriber who gave the verbal order, your name as the
person who received and recorded the order, and the name
of the person who implemented the order.
■ Read back the order to the prescriber as you have written
it down to confirm correct documentation.4,31
Administering scheduled medications in a
timely manner32
■ Keep in mind that maintenance doses administered
according to a standard repeated cycle of frequency, such
as every 4 hours or 3 times per day, are considered
scheduled medications.
■ Identify a time-critical list of common scheduled
medications specific to the patient population of the facility
unit, such as the oncology unit.
■ Identify a time-critical list of scheduled medications that
might be used on all units. Examples of time-critical
scheduled medications include antibiotics, anticoagulants,
insulin, anticonvulsants, immunosuppressive agents, non-IV
pain medications, medications prescribed for administration
within a specific time of the medication order, medications
that must be administered apart from other medications for
optimal therapeutic effect, and medications prescribed more
frequently than every 4 hours.4
■ Establish guidelines to facilitate the administration of
time-critical medications to be administered 30 minutes
before or after the regular scheduled time.10
■ Establish guidelines to facilitate the administration of
non–time-critical daily, weekly, and monthly medications
that are to be administered 2 hours before or after the
scheduled time.10
■ Give medications that are administered more frequently
than daily but less frequently than every 4 hours (for
instance, twice daily or three times per day) no more than 1
hour before or after the scheduled time.10
Completing the procedure
■ Monitor and document the effectiveness of all
medications administered.33,34,35,36
■ Document any medication errors or adverse effects
according to your facility’s event-reporting system.4,37
■ Dispose of all containers to avoid cross-contamination
issues. Keep in mind that after a medication is removed
from its original container, it should be used for one patient
only.
■ Perform hand hygiene.14,15,16,17,18,19
Evaluating the medication management process
■ Make sure that there’s a defined method for reviewing
and updating any preprinted order sheets or standing
orders.38 Routinely review this process to look for points of
failure that could contribute to a medication error.39
■ Make sure that the pharmacy annually reviews the high-
risk medications and look-alike and sound-alike medications
it stores and uses. The pharmacy should remove
medications if they aren’t being used.40,41
■ Make sure that a list of “Do Not Use” abbreviations,
symbols, and acronyms is updated regularly and is posted
prominently where medications are prepared.
Special considerations
■ Maintain a nonpunitive culture for reporting medication
errors to encourage reporting compliance.
■ Adjust dosages as needed based on the patient’s age or if
renal insufficiency is identified. Pediatric patients, patients
with identified renal dysfunction, and patients older than
age 80 are at higher risk for ADEs.1,21
■ Perform a medication reconciliation at transition points,
such as during admission, discharge, and transfer between
units.7,42
■ Your facility should establish standards for a medication
delivery process and develop ways to ensure ongoing
review and evaluation.
■ Use smart pump technology and standardized medication
concentrations when available to reduce the risk of IV
medication infusion errors.
■ Make sure that the infusion pump alarm limits are set
according to the patient’s current condition, and that the
alarms are turned on, functioning properly, and audible to
staff.43,44,45,46
■ Use a bar technology (if available) to scan the bar codes
on medications and the patient’s identification bracelet in
addition to verifying the practitioner’s order entry and EMAR
(as shown below) to reduce medication administration
errors and as a final step to intercept a medication error
before drug administration.21
■ If indicated, include the patient’s age and weight in the
patient’s medical and medication records.
■ When possible, medications should be prescribed
electronically.1,21
■ Handle medications brought by the patient from home as
directed by your facility.4,47
■ If any questions arise about a prescribed medication,
collaborate with the prescriber or pharmacist.7,8,23
■ Be especially alert during high-risk situations, such as
when you’re stressed, tired, or angry, or when supervising
inexperienced personnel. Monitor and modify work
schedules to minimize work- or fatigue-related medication
errors.
■ If an automated dispensing cabinet is used to dispense
medications, follow the manufacturer’s instructions for use.
■ Report all medication errors and adverse effects; this
includes preventable ADEs, close calls, and hazardous
conditions.4,7,48
■ Investigate patient-reported medication errors and
adverse events, and verify them in a timely manner to
prevent dangerous consequences.49
Patient teaching
Teach the patient to keep a current list of medications. This
list should include all prescription medications, over-the-
counter
or
nonprescription
medications,
herbal
supplements, vitamins, and minerals. The patient should be
familiar with the list and directions for the proper use of the
medications, and should understand any possible adverse
effects and what to do if such effects occur.21
Encourage the patient and family or caregiver to ask
questions about any medications that the patient is taking,
especially any newly prescribed drugs. The patient shouldn’t
take any medication without knowing its purpose. Tell the
patient that it’s acceptable to ask for written instructions
about medications to use as a reference.21
Complications
With any medication use, there’s the potential for an ADE or
medication error. Familiarize yourself with all medications
that you administer; be aware of potential ADEs, and know
the required antidotes if indicated. Resources should be
readily available to confirm any potential ADE if you aren’t
familiar with the medications being used. Report any
medication errors, adverse drug reactions, and medication
incompatibilities immediately to the attending practitioner
or clinical psychologist.37
Documentation
Document all medications administered in the patient’s MAR
or EMAR. Documentation must include the medication
strength, dose, route of administration, and date and time of
administration.50 The record should also include any access
site for the medication, administration devices used, and
the rate of administration.50 If a medication wasn’t
administered, document the reason why, any interventions
taken, practitioner notification, and the patient’s response
to interventions.
If the patient experiences an ADE or medication error,
document the event as required by your facility. Your facility
may require that you submit a medication error report to the
National Medication Errors Reporting Program (MERP)
operated by the Institute for Safe Medication Practices, a
patient safety organization certified by the Agency for
Healthcare Research and Quality. The MERP is a confidential,
voluntary medication error reporting program that performs
expert analysis of system-based causes of medication
errors.48
REFERENCES
1 Zhu, J., & Weingart, S. N. Prevention of adverse drug events in hospitals.
(2016). In: UpToDate, Auerbach, D. A., & Park, L. (Eds.). Retrieved from:
www.uptodate.com
2 Westbrook, J., et al. (2010). Association of interruptions with an increased risk
and severity of medication administration errors. Archives of Internal
Medicine, 170(8), 683–690 . (Level IV)
3 Institute for Safe Medication Practices. (2012). Side tracks on the safety
express: Interruptions lead to errors and unfinished...Wait what was I doing?
Nurse Advise-ERR, 11(2), 1–4 . Accessed via the Web at
https://www.ismp.org/resources/side-tracks-safety-express-interruptions-lead-
errors-and-unfinished-wait-what-was-i-doing
4 Centers for Medicare and Medicaid Services, Department of Health and
Human Services. (2015). Condition of participation: Nursing services. 42
C.F.R. § 482.23(c).
5 Centers for Medicare and Medicaid Services. (2014). “Requirements for
hospital medication administration, particularly intravenous (IV) medications
and post-operative care of patients receiving IV opioids” [Online]. Accessed
via the Web at http://www.cms.gov/Medicare/Provider-Enrollment-and-
Certification/SurveyCertificationGenInfo/Downloads/Survey-and-Cert-Letter-
14-15.pdf
6 Taylor, C. R., et al. (2015). Fundamentals of nursing: The art and science of
person-centered nursing care (8th ed.). Philadelphia, PA: Wolters Kluwer.
7 The Joint Commission. (2019). Standard MM.04.01.01. Comprehensive
accreditation manual for hospitals. Oakbrook Terrace, IL: The Joint
Commission. (Level VII)
8 Accreditation Association for Hospitals and Health Systems. (2017). Standard
16.01.03. Healthcare Facilities Accreditation Program: Accreditation
requirements for acute care hospitals. Chicago, IL: Accreditation Association
for Hospitals and Health Systems. (Level VII)
9 Institute for Safe Medication Practices. (2016). “2016–2017 targeted
medication safety best practices for hospitals” [Online]. Accessed via the
Web at http://www.ismp.org/tools/bestpractices/TMSBP-for-Hospitals.pdf
10 DNV GL-Healthcare USA, Inc. (2016). MM.1 .SR.2. NIAHO® accreditation
requirements: Interpretive guidelines & surveyor guidance (version 11).
Milford, OH: DNV GL-Healthcare USA, Inc. (Level VII)
11 Standard 57. Parenteral medication and solution administration. Infusion
therapy standards of practice. (2016). Journal of Infusion Nursing, 39, S125–
S127.
12 Standard 13. Medication verification. Infusion therapy standards of practice.
(2016). Journal of Infusion Nursing, 39, S34–S35.
13 The Joint Commission. (2019). Standard NPSG.03 .06 .01. Comprehensive
accreditation manual for hospitals. Oakbrook Terrace, IL: The Joint
Commission. (Level VII)
14 The Joint Commission. (2019). Standard NPSG.07.01.01. Comprehensive
accreditation manual for hospitals. Oakbrook Terrace, IL: The Joint
Commission. (Level VII)
15 World Health Organization. (2009). “WHO guidelines on hand hygiene in
health care: First global patient safety challenge, clean care is safer care”
[Online]. Accessed via the Web at
http://apps.who.int/iris/bitstream/10665/44102/1/9789241597906_eng.pdf
(Level IV)
16 Centers for Disease Control and Prevention. (2002). Guideline for hand
hygiene in health-care settings: Recommendations of the Healthcare Infection
Control Practices Advisory Committee and the HICPAC/SHEA/APIC/IDSA Hand
Hygiene Task Force. MMWR Recommendations and Reports, 51(RR-16), 1–45.
Accessed via the Web at https://www.cdc.gov/mmwr/pdf/rr/rr5116.pdf (Level
II)
17 Centers for Medicare and Medicaid Services, Department of Health and
Human Services. (2015). Condition of participation: Infection control. 42 C.F.R.
§ 482.42.
18 Accreditation Association for Hospitals and Health Systems. (2017). Standard
07.01.21. Healthcare Facilities Accreditation Program: Accreditation
requirements for acute care hospitals. Chicago, IL: Accreditation Association
for Hospitals and Health Systems. (Level VII)
19 DNV GL-Healthcare USA, Inc. (2016). IC.1 .SR.1 . NIAHO® accreditation
requirements: Interpretive guidelines & surveyor guidance (version 11).
Milford, OH: DNV GL-Healthcare USA, Inc. (Level VII)
20 The Joint Commission. (2019). Standard NPSG.01.01.01. Comprehensive
accreditation manual for hospitals. Oakbrook Terrace, IL: The Joint
Commission. (Level VII)
21 Institute of Medicine of the National Academies Committee on Identifying and
Preventing Medication Errors, Board on Health Care Services. (2007).
Preventing medication errors: Quality chasm series. Washington, DC: National
Academies Press.
22 The Joint Commission. (2019). Standard PC.02.03 .01. Comprehensive
accreditation manual for hospitals. Oakbrook Terrace, IL: The Joint
Commission. (Level VII)
23 The Joint Commission. (2019). Standard MM.06.01.01. Comprehensive
accreditation manual for hospitals. Oakbrook Terrace, IL: The Joint
Commission. (Level VII)
24 The Joint Commission. (2019). Standard MM.05.01.01. Comprehensive
accreditation manual for hospitals. Oakbrook Terrace, IL: The Joint
Commission. (Level VII)
25 Centers for Medicare and Medicaid Services, Department of Health and
Human Services. (2015). Condition of participation: Pharmaceutical services.
42 C.F.R. § 482.25 (b).
26 The Joint Commission. (2019). Standard MM.01.01.01. Comprehensive
accreditation manual for hospitals. Oakbrook Terrace, IL: The Joint
Commission. (Level VII)
27 The Joint Commission. (2017). Standard MM.01.01.03 . Comprehensive
accreditation manual for hospitals. Oakbrook Terrace, IL: The Joint
Commission. (Level VII)
28 Institute for Safe Medication Practices. (2014). “ISMP list of high-alert
medications in acute care settings” [Online]. Accessed via the Web at
http://www.ismp.org/Tools/highalertmedications.pdf (Level VII)
29 Institute for Safe Medication Practices. (2014). Independent double-checks:
Undervalued and misused. ISMP Medication Safety Alert! Nurse Advise-ERR,
12(3), 1. Accessed via the Web at
http://www.ismp.org/newsletters/nursing/issues/NurseAdviseERR201403.pdf
(Level VII)
30 Centers for Medicare and Medicaid Services, Department of Health and
Human Services. (2015). Condition of participation: Nursing services. 42
C.F.R. § 482.23.
31 The Joint Commission. (2017). Standard PC.02.01.03 . Comprehensive
accreditation manual for hospitals. Oakbrook Terrace, IL: The Joint
Commission. (Level VII)
32 Institute for Safe Medication Practices. (2011). “ISMP acute care guidelines
for timely administration of scheduled medications” [Online]. Accessed via
the Web at http://www.ismp.org/tools/guidelines/acutecare/tasm.pdf (Level
VII)
33 DNV GL-Healthcare USA, Inc. (2016). MR.2 .SR.1 . NIAHO® accreditation
requirements: Interpretive guidelines & surveyor guidance (version 11).
Milford, OH: DNV GL-Healthcare USA, Inc. (Level VII)
34 The Joint Commission. (2019). Standard RC.01.03 .01. Comprehensive
accreditation manual for hospitals. Oakbrook Terrace, IL: The Joint
Commission. (Level VII)
35 Accreditation Association for Hospitals and Health Systems. (2017). Standard
10.00 .03. Healthcare Facilities Accreditation Program: Accreditation
requirements for acute care hospitals. Chicago, IL: Accreditation Association
for Hospitals and Health Systems. (Level VII)
36 Centers for Medicare and Medicaid Services, Department of Health and
Human Services. (2015). Condition of participation: Medical record services.
42 C.F.R. § 482.24(b).
37 The Joint Commission. (2019). Standard MM.07.01.03 . Comprehensive
accreditation manual for hospitals. Oakbrook Terrace, IL: The Joint
Commission. (Level VII)
38 DNV GL-Healthcare USA, Inc. (2016). MM.1 .SR.9. NIAHO® accreditation
requirements: Interpretive guidelines & surveyor guidance (version 11).
Milford, OH: DNV GL-Healthcare USA, Inc. (Level VII)
39 Institute for Safe Medication Practices. (2010). “ISMP’s guidelines for
standard order sets” [Online]. Accessed via the Web at
http://www.ismp.org/tools/guidelines/StandardOrderSets.pdf (Level VII)
40 Institute for Safe Medication Practices. (2015). “ISMP’s list of error-prone
abbreviations, symbols and dose-designations” [Online]. Accessed via the
Web at http://www.ismp.org/tools/errorproneabbreviations.pdf (Level VII)
41 The Joint Commission. (2019). Standard MM.01.02.01. Comprehensive
accreditation manual for hospitals. Oakbrook Terrace, IL: The Joint
Commission. (Level VII)
42 Accreditation Association for Hospitals and Health Systems. (2017). Standard
25.02.13. Healthcare Facilities Accreditation Program: Accreditation
requirements for acute care hospitals. Chicago, IL: Accreditation Association
for Hospitals and Health Systems. (Level VII)
43 American Association of Critical-Care Nurses. (2013). “A ACN practice alert:
Alarm management” [Online]. Accessed via the Web at
https://www.aacn.org/aacn-website/shared/content/practice-
alerts/2015/11/25/alarm-management (Level VII)
44 Graham, K. C., & Cvach, M. (2010). Monitor alarm fatigue: Standardizing use
of physiological monitors and decreasing nuisance alarms. American Journal
of Critical Care, 19(1), 28–37. Accessed via the Web at
http://ajcc.aacnjournals.org/content/19/1/28.full.pdf
45 The Joint Commission. (2019). Standard NPSG.06 .01.01. Comprehensive
accreditation manual for hospitals. Oakbrook Terrace, IL: The Joint
Commission. (Level VII)
46 The Joint Commission. (2013). “Sentinel event alert: Medical device alarm
safety in hospitals” [Online]. Accessed via the Web at
https://www.jointcommission.org/assets/1/6/SEA_50_alarms_4 _26_16.pdf
(Level VII)
47 The Joint Commission. (2019). Standard MM.03.01.05. Comprehensive
accreditation manual for hospitals. Oakbrook Terrace, IL: The Joint
Commission. (Level VII)
48 Institute for Safe Medication Practices. (n.d). “The National Medication Errors
Reporting Program (ISMP MERP)” [Online]. Accessed via the Web at
https://www.ismp.org/orderforms/reporterrortoismp.asp
49 Institute for Safe Medication Practices. (2015). Unverified patient-reported
error: A false alarm can have real consequences. Nurse Advise-ERR, 13(2), 1–
4. Accessed via the Web at
http://www.ismp.org/newsletters/nursing/issues/NurseAdviseERR201502.pdf
50 The Joint Commission. (2019). Standard RC.02.01.01. Comprehensive
accreditation manual for hospitals. Oakbrook Terrace, IL: The Joint
Commission. (Level VII)
SEIZURE MANAGEMENT
Seizures are paroxysmal events associated with abnormal
excessive electrical discharges of neurons in the brain.1
(See Classifying seizure types, page 682.) When a patient
has a generalized motor seizure, nursing care aims to
protect the patient from injury and prevent serious
complications. Appropriate care also includes observation of
seizure characteristics to help determine the area of the
brain involved.
Adults who experience an initial seizure have a greater
chance for a recurrent seizure within the first 2 years after
the first seizure.4 Patients considered at risk for seizures are
those with a history of seizures and those with conditions
that predispose them to seizures. These conditions include
metabolic abnormalities, such as hypocalcemia and
pyridoxine deficiency; brain tumors or other space-
occupying lesions; infections, such as meningitis,
encephalitis, and brain abscess; traumatic injury, especially
if the dura mater was penetrated; ingestion of toxins, such
as mercury, lead, or carbon monoxide; genetic
abnormalities,
such
as
tuberous
sclerosis
and
phenylketonuria; perinatal injuries; and stroke. For patients
at risk for seizures, precautionary measures are needed to
help prevent injury if a seizure occurs.
Equipment
Stethoscope ▪ vital signs monitoring equipment ▪ pulse
oximeter ▪ gloves ▪ padding for side rails ▪ disinfectant pad
▪ clock or watch ▪ Optional: oral airway, suction equipment,
emergency equipment (code cart with emergency
medications and endotracheal intubation equipment),
prescribed thiamine, seizure activity record, IV catheter
insertion equipment, oxygen administration equipment,
adhesive tape.
Preparation of equipment
If the patient is at risk for seizures, pad the patient’s side
rails and have IV equipment, suction apparatus, and oxygen
administration equipment available at the patient’s bedside.
Make sure emergency equipment is readily available and in
working condition.2
Implementation
■ Gather and prepare the necessary equipment.
■ Perform hand hygiene.5,6,7,8,9,10
■ Confirm the patient’s identify using at least two patient
identifiers.11
■ Provide privacy if possible.12,13,14,15
■ Put on gloves, as needed, to comply with standard
precautions.16,17
For focal seizures with impaired awareness
■ If you’re present when the patient experiences a focal
seizure with impaired awareness, guide the patient from
danger.2
■ Time the seizure.2 If you find the patient during a seizure,
begin timing as soon as you discover the event.
■ Remain with the patient until the baseline level of
consciousness returns.2
■ If the patient is agitated, stay a distance away but close
enough to provide protection from injury until full awareness
returns.2
■ Monitor the patient’s vital signs to promptly detect
changes in condition.2
■ Administer medications, as needed and prescribed,
following safe medication practices.18,19,20,21
For generalized seizures
■ If you’re present when a generalized seizure occurs, ease
the patient into bed and put up the side rails to prevent a
fall. If you’re away from the bed, ease the patient to the
floor and place something soft, such as a pillow or blanket,
under the head to protect it from injury.22
HOSPITAL-ACQUIRED CONDITION ALERT Keep in mind that an injury
from a fall is considered a hospital-acquired condition by the Centers
for Medicare and Medicaid Services, because it can be reasonably
prevented using various best practices. Make sure to follow fall
prevention practices (such as keeping the bed in its lowest position
with the wheels locked and the side rails up) to reduce the risk of
injury from patient falls.23,24,25
■ Time the seizure. If you find the patient during a seizure,
begin timing as soon as you observe it. If the seizure
continues for more than 5 minutes, or if the patient has
trouble breathing or has significant injury, call for help to
activate an emergency response.
■ Position the patient on the side as soon as possible to
maintain airway patency.2,22
NURSING ALERT During a seizure, don’t put anything into the
patient’s mouth, to prevent patient or caregiver injury.2
■ Remain with the patient until the patient’s level of
consciousness returns to baseline.2
■ Protect the patient from injury, but don’t restrain the
patient, because the force of the patient’s movements
against restraints could cause muscle strain or even joint
dislocation.2
■ Remove the patient’s eyeglasses if present.2,22
■ Loosen anything from around the patient’s neck that
might restrict breathing.2,22
■ Clear the area around the patient of anything hard or
sharp to prevent injury.22
■ Assess the patient during the seizure, including level of
consciousness (LOC). Observe the earliest sign of the
seizure, such as head or eye deviation, as well as how the
seizure progresses, what form it takes, and how long it lasts.
Your description may help determine the seizure’s type and
cause.2
■ If this is the patient’s first seizure, notify the practitioner
immediately. If the patient has had seizures before, notify
the practitioner only if the seizure activity is prolonged or if
the patient fails to regain consciousness. (See
Understanding status epilepticus.)
Classifying seizure types
The International League Against Epilepsy (ILAE) has revised the
classification system for seizure types, as noted below, to provide consistent
communication among health care professionals who care for patients with
seizures. The ILAE’s revised operational classification recognizes three
seizure types: focal onset, generalized onset, and unknown onset.1
Focal onset seizures
Focal seizures arise within networks limited to one hemisphere of the brain.
They may be discretely localized or more widely distributed, and may
originate in the subcortical structures.1 Focal seizures can have motor and
non-motor signs and symptoms. If both are present at the start of the
seizure, the motor signs usually dominate. A key differentiator is awareness.
A patient may be aware, have impaired awareness, or unknown awareness.
Focal seizures are characterized as focal aware, focal with impaired
awareness, focal with unknown awareness, and focal to bilateral tonic-
clonic.1
Focal aware seizures
A focal aware seizure can present in several ways, depending on the focal
point of the seizure in the brain. Focal aware seizures don’t cause altered
awareness, recall, responsiveness, or consciousness; the patient is alert and
oriented but can’t control the symptoms. An aura, or warning of an
impending seizure, is actually a focal aware seizure.1,2,3 Some of the ways
that a focal aware seizure can manifest itself include:
■ motor symptoms (jerking of the thumb or the cheek)
■ somatosensory symptoms (visual, vestibular, gustatory, olfactory, or
auditory hallucinations or sensations)
■ autonomic signs (such as tachycardia, sweating, and pupillary dilation)
■ psychic symptoms (such as feelings of déjà-vu or dreamy states).2
Focal with impaired awareness seizures
Awareness, recall, responsiveness, and consciousness become altered with a
focal with impaired awareness seizure.1,2,3 During this type of seizure, the
patient isn’t aware of the environment. A focal with impaired awareness
seizure may be preceded by a focal aware seizure.
Characteristics of a focal with impaired awareness seizure vary and depend
on the location of the abnormal discharge. During a focal with impaired
awareness seizure, the patient may experience automatic purposeless
movements, such as lip-smacking, eye-blinking, picking at clothing, and
walking aimlessly.2
Focal with unknown awareness seizures
If the state of awareness is unknown, then the seizure is classified as being
focal with unknown awareness.1
Focal to bilateral tonic-clonic seizures
Beginning in a focal or localized part of the brain, a focal to bilateral tonic-
clonic seizure may progress to a generalized seizure as both hemispheres of
the brain become involved. Loss of consciousness may occur immediately or
in 1 to 2 minutes as the seizure activity progresses.1,2
Generalized onset seizures
As the term suggests, generalized seizures cause a general electrical
abnormality involving both sides of the brain. Generalized seizures are
divided into generalized motor and generalized absence seizures.
Generalized motor seizures include tonic-clonic, tonic, atonic, myoclonic,
myoclonic-atonic, clonic, clonic-tonic-clonic, and epileptic spasms.
Generalized absence seizures include typical, atypical, myoclonic, and eyelid
myoclonia.1
Generalized tonic-clonic seizures
Typically, a generalized tonic-clonic seizure begins with a loss of awareness
that’s followed by tonic and clonic activity.1 The body stiffens (tonic phase)
and then alternates between episodes of muscle spasm and relaxation
(clonic phase).2 These seizures engage networks in both hemispheres at the
start of the seizure. Tongue biting, incontinence, labored breathing, apnea,
and subsequent cyanosis may also occur. The seizure stops after 2 to 5
minutes when abnormal electrical conduction of the neurons is complete. The
patient then regains consciousness but may be somewhat confused and may
have difficulty talking. If able to talk, the patient may complain of drowsiness,
fatigue, headache, muscle soreness, and arm or leg weakness. The patient
may fall into a deep sleep after the seizure.
Generalized tonic seizures
Generalized tonic seizures involve a sustained increase in muscle contraction
lasting a few seconds to minutes; it usually involves stiffening of one or more
limbs or the neck. It can be a sustained abnormal posture (flexion or
extension), sometimes accompanied by tremor.1
Generalized atonic seizures
Generalized atonic seizures are characterized by a sudden loss or diminution
of muscle tone without apparent preceding myoclonic or tonic event. They
usually last 1 to 2 seconds. These seizures may involve head, trunk, jaw, or
limb musculature. When leg tone is lost, the patient falls on the buttocks or
sometimes falls forward onto the knees and face.1
Generalized myoclonic seizures
Generalized myoclonic seizures can occur in isolation or along with tonic or
atonic activity. A generalized myoclonic seizure is a sudden, brief (less than
100 milliseconds [msec]), involuntary, single or multiple contraction of
muscle or muscles.1 Seizure activity may occur in the patient’s face or it may
be generalized.2
Generalized myoclonic-atonic seizures
Generalized myoclonic-atonic seizures start with a myoclonic jerk leading to
an atonic drop.1
Generalized clonic seizures
During a generalized clonic seizure, the patient experiences jerking, either
symmetric or asymmetric, that is regularly repetitive and involves the same
muscle groups.1
Generalized clonic-tonic-clonic seizures
Generalized clonic-tonic-clonic seizures begin with a few rhythmic clonic jerks
and then tonic-clonic activity. They are seen most commonly in patients with
juvenile myoclonic epilepsy.1
Epileptic spasms
An epileptic spasm presents as a sudden flexion, extension, or mixed
extension–flexion of predominantly proximal and truncal muscles that’s
usually more sustained than a myoclonic movement but not as sustained as
a tonic seizure. Limited forms may occur, including grimacing, head nodding,
or subtle eye movements. Epileptic spasms commonly occur in clusters and
can occur at all ages.1
Generalized absence, typical seizures
A generalized typical absence seizure involves a sudden onset interruption of
ongoing activities, a blank stare, and sometimes a brief upward deviation of
the eyes. The patient usually is unresponsive when spoken to. The duration
of the seizure is a few seconds to one-half minute with very rapid recovery.1
Generalized absence, atypical seizures
A generalized atypical absence seizure displays more pronounced changes in
tone than in a typical absence seizure. The onset, cessation, or both aren’t
typically abrupt.1
Myoclonic absence seizures
A myoclonic absence seizure includes an absence and myoclonic movements
of the limbs.1
Absence with eyelid myoclonia
Eyelid myoclonia are myoclonic jerks of the eyelids and upward deviation of
the eyes, often precipitated by closing the eyes or by light. Eyelid myoclonia
can be associated with absences.1
Unknown onset seizures
Unknown onset seizures are those for which the type of onset—focal or
generalized—can’t be specified.1
■ If ordered, insert an IV catheter to obtain IV access for
medication administration.2
NURSING ALERT Don’t attempt to insert an IV catheter during an
active seizure unless absolutely necessary, because doing so can cause
injuries.
■ Administer medication, as needed and prescribed,
following safe medication administration practices.18,19,20,21
■ If the seizure is prolonged and the patient becomes
hypoxemic, administer oxygen as ordered.2 Some patients
may require endotracheal intubation. Attach the patient to a
pulse oximeter as needed to monitor oxygen saturation
levels.
■ For suspected hypoglycemia in a patient with diabetes,
follow your facility’s protocol for treating severe
hypoglycemia.28
■ After the seizure, suction the patient’s airway as needed
to clear secretions and maintain airway patency.2
■ Assess the patient for postictal injury, specifically tongue
and cheek lacerations, bruising, and fractures.2 Notify the
practitioner as needed.
■ Assess the patient for urinary incontinence that may have
occurred as a result of seizure activity.2 Provide perineal
care as needed.
■ If the patient experiences postictal confusion and
wandering, gently guide the patient to the bed or a chair.2
■ If not already in place, pad the patient’s side rails and
place the bed in the lowest position with the wheels locked
to prevent injury should seizure activity recur.2
■ For a patient known to have alcohol use disorder who
may be experiencing severe withdrawal, administer
thiamine, as prescribed, following safe medication
administration practices.29,30
Completing the procedure
■ Monitor the patient’s vital signs; oxygen saturation level
by pulse oximetry, if needed; simple cognitive ability
(orientation, response to simple motor commands, naming
of objects, and recall of simple phrases); level of awareness;
and responsiveness.2
■ Ask the patient about activities that preceded the seizure.
■ Remove and discard your gloves.16
■ Perform hand hygiene.5,6,7,8,9,10
■ Clean and disinfect your stethoscope using a disinfectant
pad.31,32
■ Perform hand hygiene.5,6,7,8,9,10
■ Document the procedure.33,34,35,36
Special considerations
■ Because a seizure can indicate an underlying disorder,
such as meningitis or a metabolic imbalance (especially
hypoglycemia) or an electrolyte imbalance (especially
hyponatremia), the practitioner may order a complete
diagnostic laboratory workup if the cause of the seizure isn’t
evident.37
Patient teaching
Caution the patient who has epileptic seizures and other
sudden-onset seizures about ascending heights, working
with fire or cooking, using power tools, taking unsupervised
baths, swimming, and driving. Individual state laws restrict
operation of motorized vehicles by those with seizure
disorders, so consult your state law. Encourage the use of
helmets to prevent head trauma while biking, skiing, riding
a motorcycle, or participating in other activities, as
indicated, based on the patient’s lifestyle, seizure type, and
degree of seizure control.38 Review with the patient and
family first-aid for seizures in the home and strategies to
prevent injury.39,40 Review the patient’s medication
regimen, and reinforce the importance of complying with
laboratory testing to determine therapeutic drug levels, as
indicated.41
Make sure the patient understands that abrupt withdrawal
of an antiseizure medication can trigger status epilepticus.
When there’s a need for reduction, discontinuation, or
substitution of the medication, explain that the patient
should do so gradually and under the practitioner’s care.
Tell the patient that various stimuli can trigger seizures.
Instruct the patient to maintain a seizure diary and include
potential triggers. Advise the patient to avoid exposure to
stimuli known to trigger a seizure as much as possible.
Instruct the patient to tell all practitioners about the
seizure disorder and the medications that the patient is
taking before any medical or dental treatment or surgery.
Recommend that the patient wear a medical identification
bracelet or necklace stating that the patient has a seizure
disorder or is taking antiseizure medication.
Understanding status epilepticus
The Commission on Classification and Terminology and the Commission on
Epidemiology of the International League Against Epilepsy have proposed a
new definition of status epilepticus: “Status epilepticus is a condition
resulting either from the failure of the mechanisms responsible for seizure
termination or from the initiation of mechanisms, which lead to abnormally,
prolonged seizures (after time point t1). It is a condition, which can have
long-term consequences (after time point t2), including neuronal death,
neuronal injury, and alteration of neuronal networks, depending on the type
and duration of seizures.” This definition is conceptual, with two operational
dimensions. The first is the length of the seizure and the time point (t1)
beyond which the seizure should be regarded as “continuous seizure
activity.” The second time point (t2) is the time of ongoing seizure activity
after which there’s a risk of long-term consequences.26
Always an emergency, status epilepticus is accompanied by respiratory
distress. It can result from abrupt withdrawal of anticonvulsant medications,
hypoxic or metabolic encephalopathy, acute head trauma, or septicemia
secondary to encephalitis or meningitis.
In 2016, the American Epilepsy Society issued new guidelines for the
treatment of status epilepticus using a phased treatment approach. After the
initial stabilization phase, the treatment algorithm recommends a
benzodiazepine as the initial therapy of choice. One of the following first-line
drugs is administered: IM midazolam, IV lorazepam, or IV diazepam. If none
of the first line drug options is available, then one of the following is
administered: IV phenobarbital, rectal diazepam, or intranasal or buccal
midazolam. If the seizure continues, then one of the second therapy–phase
drugs should be given as a single dose; second therapy drugs include IV
fosphenytoin, IV valproic acid, and IV levetiracetam. If the seizure continues,
then second line therapy should be repeated, or anesthetic doses of
thiopental, midazolam, pentobarbital, or propofol should be administered.27
Complications
The patient who experiences a seizure may experience an
injury, respiratory difficulty, and decreased mental
capability. Common injuries include scrapes and bruises
suffered when the patient hits objects during the seizure,
and traumatic injury to the tongue and cheek caused by
biting.
Changes in respiratory function may include aspiration,
airway obstruction, and hypoxemia.
Documentation
Document that the patient requires seizure precautions, and
record all precautions taken.
If a seizure occurs, document the event on a seizure
activity record (if used in your facility) or other appropriate
location in the patient’s medical record. Document the date
and time the seizure began, as well as its duration and any
precipitating factors.
Record involuntary behavior that occurred at the onset of
the seizure, such as lip smacking, chewing movements, or
hand and eye movements. Describe where the movement
began and the parts of the body involved. Note the
progression or pattern of the activity. Document whether the
patient’s eyes deviated to one side and if the pupils
changed in size, shape, equality, or reaction to light. Note if
the patient’s teeth were clenched or open. Record
incontinence, vomiting, or salivation that occurred during
the seizure.
Note the patient’s response to the seizure. Was the
patient aware of what happened? Did the patient fall into a
deep sleep following the seizure? Was he or she upset or
ashamed? Also note any medications the patient received,
complications the patient experienced during the seizure,
and interventions you performed. Lastly, note the patient’s
postseizure vital signs, oxygen saturation level, and
neurologic status.
Document instructions provided regarding seizure
management and injury prevention.
REFERENCES
1 International League Against Epilepsy. (2017). Operational classifications of
seizure types by the International League Against Epilepsy: Position paper of
the ILAE Commission for Classification and Terminology. Epilepsia, 58(4), 522–
530. Accessed via the Web at
http://onlinelibrary.wiley.com/doi/10.1111/epi.13670/full (Level VII)
2 American Association of Neuroscience Nurses. (2016). AANN clinical practice
guideline series: Care of adults and children with seizures and epilepsy.
Chicago, IL: AANN. (Level VII)
3 Spray, J. (2015). Seizures: Awareness and observation in the ward
environment. British Journal of Nursing, 24(19), 946–955. (Level VII)
4 Krumholz, A., et al. (2015). Evidence-based guideline: Management of an
unprovoked first seizure in adults. Neurology, 84(16), 1705–1713. Accessed
via the Web at
https://www.guideline.gov/summaries/summary/49218/evidencebased-
guideline-management-of-an-unprovoked-first-seizure-in-adults-report-of-the-
guideline-development-subcommittee-of-the-american-academy-of-
neurology-and-the-american-epilepsy-society (Level I)
5 The Joint Commission. (2019). Standard NPSG.07.01.01. Comprehensive
accreditation manual for hospitals. Oakbrook Terrace, IL: The Joint
Commission. (Level VII)
6 Centers for Disease Control and Prevention. (2002). Guideline for hand
hygiene in health-care settings: Recommendations of the Healthcare Infection
Control Practices Advisory Committee and the HICPAC/SHEA/APIC/IDSA Hand
Hygiene Task Force. MMWR Recommendations and Reports, 51(RR-16), 1–45.
Accessed via the Web at https://www.cdc.gov/mmwr/pdf/rr/rr5116.pdf (Level
II)
7 World Health Organization. (2009). “WHO guidelines on hand hygiene in
health care: First global patient safety challenge, clean care is safer care”
[Online]. Accessed via the Web at
http://apps.who.int/iris/bitstream/10665/44102/1/9789241597906_eng.pdf
(Level IV)
8 Centers for Medicare and Medicaid Services, Department of Health and
Human Services. (2015). Condition of participation: Infection control. 42 C.F.R.
§ 482.42.
9 Accreditation Association for Hospitals and Health Systems. (2017). Standard
07.01.21. Healthcare Facilities Accreditation Program: Accreditation
requirements for acute care hospitals. Chicago, IL: Accreditation Association
for Hospitals and Health Systems. (Level VII)
10 DNV GL-Healthcare USA, Inc. (2016). IC.1 .SR.1 . NIAHO® accreditation
requirements: Interpretive guidelines & surveyor guidance (version 11).
Milford, OH: DNV GL-Healthcare USA, Inc. (Level VII)
11 The Joint Commission. (2019). Standard NPSG.01.01.01. Comprehensive
accreditation manual for hospitals. Oakbrook Terrace, IL: The Joint
Commission. (Level VII)
12 Centers for Medicare and Medicaid Services, Department of Health and
Human Services. (2015). Condition of participation: Patient’s rights. 42 C.F.R.
§ 482.13(c)(1).
13 Accreditation Association for Hospitals and Health Systems. (2017). Standard
15.01.16. Healthcare Facilities Accreditation Program: Accreditation
requirements for acute care hospitals. Chicago, IL: Accreditation Association
for Hospitals and Health Systems. (Level VII)
14 DNV GL-Healthcare USA, Inc. (2016). PR.1.SR.5 . NIAHO® accreditation
requirements: Interpretive guidelines & surveyor guidance (version 11).
Milford, OH: DNV GL-Healthcare USA, Inc. (Level VII)
15 The Joint Commission. (2019). Standard RI.01.01.01. Comprehensive
accreditation manual for hospitals. Oakbrook Terrace, IL: The Joint
Commission. (Level VII)
16 Siegel, J. D ., et al. (2007, revised 2017). “2007 guideline for isolation
precautions: Preventing transmission of infectious agents in healthcare
settings” [Online]. Accessed via the Web at
https://www.cdc.gov/infectioncontrol/pdf/guidelines/isolation-guidelines.pdf
(Level II)
17 Accreditation Association of Hospitals and Health Systems. (2017). Standard
07.01.10. Healthcare Facilities Accreditation Program: Accreditation
requirements for acute care hospitals. Chicago, IL: Accreditation Association
for Hospitals and Health Systems. (Level VII)
18 Centers for Medicare and Medicaid Services, Department of Health and
Human Services. (2015). Condition of participation: Nursing services. 42
C.F.R. § 482.23(c).
19 Accreditation Association for Hospitals and Health Systems. (2017). Standard
16.01.03. Healthcare Facilities Accreditation Program: Accreditation
requirements for acute care hospitals. Chicago, IL: Accreditation Association
for Hospitals and Health Systems. (Level VII)
20 The Joint Commission. (2019). Standard MM.06.01.01. Comprehensive
accreditation manual for hospitals. Oakbrook Terrace, IL: The Joint
Commission. (Level VII)
21 DNV GL-Healthcare USA, Inc. (2016). MM.1 .SR.2. NIAHO® accreditation
requirements: Interpretive guidelines & surveyor guidance (version 11).
Milford, OH: DNV GL-Healthcare USA, Inc. (Level VII)
22 Centers for Disease Control and Prevention. (2018). “Seizure first aid”
[Online]. Accessed via the Web at https://www.cdc.gov/epilepsy/basics/first-
aid.htm
23 Accreditation Association for Hospitals and Health Systems. (2017). Standard
16.02.02. Healthcare Facilities Accreditation Program: Accreditation
requirements for acute care hospitals. Chicago, IL: Accreditation Association
for Hospitals and Health Systems. (Level VII)
24 Ganz, D. A., et al. (2013). Preventing falls in hospitals: A toolkit for improving
quality of care (AHRQ publication no. 13-0015-EF). Rockville, MD: Agency for
Healthcare Research and Quality. Accessed via the Web at
http://www.ahrq.gov/sites/default/files/publications/files/fallpxtoolkit.pdf
(Level VII)
25 Jarrett, N., & Callaham, M. (2016). “Evidence-based guidelines for selected,
candidate, and previously considered hospital-acquired conditions: Final
report” [Online]. Accessed via the Web at
https://www.cms.gov/Medicare/Medicare-Fee-for-Service-
Payment/HospitalAcqCond/Downloads/2016-HAC-Report.pdf
26 Trinka, E., et al. (2015). A definition and classification of status epilepticus—
Report of the ILAE Task Force on Classification of Status Epilepticus. Epilepsia,
56(10), 1515–1523. Accessed via the Web at
http://onlinelibrary.wiley.com/doi/10.1111/epi.13121/abstract
27 Glauser, T., et al. (2016). Treatment of convulsive status epilepticus in
children and adults: Report of the Guideline Committee of the American
Epilepsy Society. Epilepsy Currents, 16(1), 48–61. Accessed via the Web at
http://www.epilepsycurrents.org/doi/pdf/10.5698/1535-7597-16.1 .48 (Level
VII)
28 American Diabetes Association. (2017). American Diabetes Association
standards of medical care in diabetes, 2017. Diabetes Care, 40(Suppl. 1), S1–
S131. Accessed via the Web at
http://professional.diabetes.org/sites/professional.diabetes.org/files/media/dc_
40_s1_final.pdf
29 World Health Organization. (2012). “Management of alcohol withdrawal”
[Online]. Accessed via the Web at
http://www.who.int/mental_health/mhgap/evidence/alcohol/q2/en/
30 Schuck, M. A. (2014). Recognition and management of withdrawal delirium
(delirium tremens). The New England Journal of Medicine, 371(22), 2109–
2113.
31 Rutala, W. A., et al. (2008, revised 2017). “Guideline for disinfection and
sterilization in healthcare facilities, 2008” [Online]. Accessed via the Web at
https://www.cdc.gov/infectioncontrol/pdf/guidelines/disinfection-
guidelines.pdf (Level I)
32 Accreditation Association for Hospitals and Health Systems. (2017). Standard
07.02.03. Healthcare Facilities Accreditation Program: Accreditation
requirements for acute care hospitals. Chicago, IL: Accreditation Association
for Hospitals and Health Systems. (Level VII)
33 The Joint Commission. (2019). Standard RC.01.03 .01. Comprehensive
accreditation manual for hospitals. Oakbrook Terrace, IL: The Joint
Commission. (Level VII)
34 Centers for Medicare and Medicaid Services, Department of Health and
Human Services. (2015). Condition of participation: Medical record services.
42 C.F.R. § 482.24(b).
35 Accreditation Association for Hospitals and Health Systems. (2017). Standard
10.00 .03. Healthcare Facilities Accreditation Program: Accreditation
requirements for acute care hospitals. Chicago, IL: Accreditation Association
for Hospitals and Health Systems. (Level VII)
36 DNV GL-Healthcare USA, Inc. (2016). MR.2 .SR.1 . NIAHO® accreditation
requirements: Interpretive guidelines & surveyor guidance (version 11).
Milford, OH: DNV GL-Healthcare USA, Inc. (Level VII)
37 Schachter, S.C . Evaluation and management of the first seizure in adults.
(2017). In UpToDate, Garcia, P., & Eichler, A. F. (Eds.) Retrieved from:
www.uptodate.com
38 Ko, D. Y. (2018). “Epilepsy and seizures” [Online]. Accessed via the Web at
http://emedicine.medscape.com/article/1184846-overview
39 Epilepsy Foundation. (2014). “Seizure first aid” [Online]. Accessed via the
Web at https://www.epilepsy.com/learn/seizure-first-aid-and-safety/adapting-
first-aid-plans/seizure-first-aid
40 Epilepsy Foundation. (2013). “Staying safe” [Online]. Accessed via the Web
at https://www.epilepsy.com/learn/seizure-first-aid-and-safety/staying-safe
41 Stepanova, D., & Beran, R. G . (2015). The benefits of antiepileptic drug (AED)
blood level monitoring to complement clinical management of people with
epilepsy. Epilepsy and Behavior 42, 7–9 . (Level V)
SELF-CATHETERIZATION
Self-catheterization is performed by many patients who
have some form of impaired or absent bladder function. This
form of intermittent catheterization is preferable to an
indwelling urinary catheter, because intermittent self-
catheterization has a lower risk of infection and other
complications.1,2,3
Self-catheterization
and
bladder
management promotes independence and improves quality
of life by allowing normal sexual intimacy without the fear of
incontinence, decreases the chance of urinary reflux,
reduces the use of aids and appliances, and in many cases
allows the patient to return to work. However, patients
performing self-catheterization may experience pain and
bleeding on insertion, and may have difficulty inserting and
removing the catheter.4
Nursing responsibilities regarding self-catheterization
include providing the patient with instruction and ensuring
that the patient receives periodic follow-up care to maintain
adherence.1 Before teaching the patient, the nurse should
assess for physical barriers (such as poor eyesight and
reduced manual dexterity), psychological barriers (such as
fear or anxiety), and cultural or religious beliefs that may
interfere with teaching.1 At home, the patient will use clean
technique for self-catheterization.5 In the hospital, the nurse
and the patient can use clean or sterile technique
depending on the patient’s medical condition.1
Equipment
Sterile catheter (of appropriate material, diameter, and
length)2 ▪ washcloth ▪ soap and water ▪ small packet of
water-soluble lubricant ▪ gloves ▪ Optional: drainage
container,
paper
towels,
fluid-impermeable pads,
catheterization record.
Implementation
■ Review the patient’s medical record for contraindications
to the procedure and any allergy or sensitivity to latex.
■ Verify the practitioner’s order.
■ Gather the necessary equipment.
■ Perform hand hygiene.5,6,7,8,9,10,11
■ Confirm the patient’s identity using at least two patient
identifiers.12
■ Provide privacy.13,14,15,16
■ Explain the procedure to the patient and family (if
appropriate) according to their individual communication
and learning needs to increase understanding, allay their
fears, and enhance cooperation.17 Obtain the assistance of
a medical interpreter, as needed.18,19
■ Instruct the patient to wash his or her hands thoroughly
with soap and water and then dry them.4
■ Perform hand hygiene.5,6,7,8,9,10,11
■ Put on gloves.20,21
■ Arrange the patient’s clothing so that it’s out of the way.
■ Demonstrate how the patient should perform the
catheterization, explaining each step clearly and carefully.
Teaching the male patient
■ Instruct the patient to wash and rinse the end of the penis
thoroughly with soap and water. Instruct the patient to pull
back the foreskin for cleaning and to keep it pulled back
during the procedure, if applicable.4
■ Tell the patient to lubricate the first 6′′ to 8′′ (15.3 cm to
20.3 cm) of the catheter, and observe this being done.
Explain that dry catheters can cause excoriation in the
urethra that can serve as entry points for bacterial
contamination, and that copious lubricant will make the
procedure more comfortable.2
■ Instruct the patient to insert the catheter into the urethra
and to allow all of the urine to drain. (See Teaching the male
patient self-catheterization.)
■ When the urine stops draining, tell the patient to remove
the catheter slowly and, if necessary, pull the foreskin
forward again.4
■ Have the patient get dressed.
Teaching the female patient
■ Demonstrate and explain to the patient that she should
separate the vaginal folds as widely as possible with the
fingers of her nondominant hand to obtain a full view of the
urinary meatus. She may need to use a mirror to visualize
the meatus. Ask if she’s right- or left-handed and, if
necessary, tell her which is her nondominant hand.
■ Instruct the patient to hold her labia open with the
nondominant hand and then to use the dominant hand to
wash the perineal area thoroughly with a soapy washcloth,
using downward strokes. Tell her to rinse the soap from the
area with another clean wet or damp washcloth using
downward strokes as well.
■ Show the patient how to squeeze some lubricant onto the
first 2′′ to 4′′ (5 to 10 cm) of the catheter and then how to
insert the catheter. (See Teaching the female patient self-
catheterization, page 686.)
■ When the urine stops draining, tell the patient to remove
the catheter slowly and get dressed.
Completing the procedure
■ Tell the patient to dispose of equipment appropriately and
to perform hand hygiene.
■ Remove and discard your gloves.20,21
PATIENT TEACHING
Teaching the male patient self-
catheterization
Teach the patient to find a comfortable position; some men prefer to stand
for the procedure but it can be done just as easily in the sitting position.22
Have the patient hold his penis in his nondominant hand, at a right angle to
his body. He should hold the catheter in his dominant hand as if it were a
pencil or a dart and slowly insert it 6′′ to 8′′ (15.2 to 20.3 cm) into the urethra
until urine begins flowing. If the patient feels resistance at the passage of the
catheter at the prostatic urethra, instruct him to apply firm, gently, steady
pressure to the pelvic floor muscles; the muscles should relax, allowing the
catheter to pass.22 Then the patient should gently advance the catheter
about 1′′ (2.5 cm) further, allowing all urine to drain into the toilet or drainage
container.
■ Perform hand hygiene.5,6,7,8,9,10,11
■ Document the procedure.23,24,25,26
Special considerations
■ Avoid latex exposure in patients who require frequent
catheterization.
■ Hydrophilic catheters might be preferable to standard
catheters
for
patients
requiring
intermittent
catheterization.5 Catheter choice more often depends on
the patient’s general clinical situation—such as injury,
manual dexterity, visual impairment, urethral sensibility,
and age—than on the cause of the bladder dysfunction.2,4
■ A female patient may prefer a shorter catheter of 6′′ to
12′′ (15.3 cm to 30.5 cm), which is easier to grasp and
manipulate. Women have shorter urethras than men, and a
shorter catheter won’t loop or kink, allowing urine to more
easily drain through the catheter.2
■ Catheters with lengths of approximately 12′′ (about 40
cm) allow for adequate passage through a male urethra.2
■ Curved and olive-tipped catheters are available as
needed for certain clinical conditions, such as urethral
strictures or enlarged prostates. Closed intermittent
catheterization systems are also available and have been
designed to reduce contamination of the bladder (the
catheter never comes in direct contact with the inserter’s
hands).2
■ Follow the manufacturer’s instructions for catheter use.
Single-use devices shouldn’t be reused in any setting.2
Instruct the patient to keep a supply of catheters at home
and to use a new catheter each time.
■ Explain to the patient that the timing of catheterization is
critical to prevent overdistention of the bladder, which can
lead to infection. Self-catheterization is usually performed
every 4 to 6 hours around the clock (more often at first).
■ Stress the importance of regulating fluid intake, as
ordered, to prevent incontinence while maintaining
adequate hydration. However, explain that incontinent
episodes may occur occasionally. For managing
incontinence, the practitioner or a home health care nurse
can help develop a plan such as more frequent
catheterizations. After an incontinent episode, tell the
patient to wash with soap and water, pat the area dry with a
towel, and expose the skin to the air for as long as possible.
Bedding and furniture can be protected by covering them
with rubber or plastic sheets and then covering the rubber
or plastic with fabric.
PATIENT TEACHING
Teaching the female patient self-
catheterization
Instruct the female patient to hold the catheter in her dominant hand as if it
were a pencil or a dart, about 1⁄2′′ (1.25 cm) from its tip. Tell her to keep the
vaginal folds separated and slowly insert the lubricated catheter about 2′′ to
4′′ (5 to 10 cm) into the urethra. Inform her that if she feels resistance, she
should apply firm, gentle, steady pressure to the pelvic floor muscles; the
muscles should then relax, allowing the catheter to pass.22 Tell the patient to
press down with her abdominal muscles to empty the bladder, allowing all
urine to drain through the catheter and into the toilet or drainage container.
■ Stress the importance of taking medications as ordered to
increase urine retention and help prevent incontinence.
■ Explain that if the patient can’t pass the catheter and can
feel that the bladder is full, the patient should contact the
practitioner immediately.22
Patient teaching
At discharge, give the patient individualized written
instructions regarding home care.4,27,28 To prevent urinary
tract infections (UTIs) associated with catheterization,
emphasize the importance of hand and perineal hygiene.
Also instruct the patient to perform catheterization after
voiding (if the patient maintains the capacity to void
spontaneously),2 before a bowel movement to minimize
bacterial contamination of the urethra, and right before bed
to minimize nocturia.4 Encourage the female patient to
clean the perineal area immediately after vaginal
intercourse, and to avoid the use of spermicidal lubricants,
because these products may alter vaginal and urethral
flora.2 Also instruct the patient to use a generous amount of
lubricant along the length of the catheter, because dry
catheters can cause excoriations in the urethra that provide
an entry point for bacterial contamination.2 Advise the
patient to keep a voiding diary to help evaluate bladder
emptying over time.4 If the patient has difficulty practicing
self-catheterization because of limited mobility, vision, or
dexterity, family members and caregivers can be taught the
procedure, as appropriate. Provide the patient and family
with contact information for appropriate follow-up and peer
support to enhance compliance.4
Complications
Advancing the catheter too far into the bladder can cause
irritation of the bladder wall, kinking of the catheter in the
urethra if the catheter moves around in the bladder and
then back into the urethra, and knotting of the catheter
inside the bladder. Forcing the catheter can cause trauma,
bleeding, and scar formation, leading to strictures, false
passage, and obstruction of the urethra. Improper hand
washing or equipment cleaning can cause a UTI.2
Documentation
Document the date and time of the procedure, amount and
characteristics of urine obtained, size and description of the
catheter used, and tolerance of the procedure. Document
that the self-catheterization procedure was taught and the
method of instruction, the names of those who received the
instruction, their readiness to learn, and their understanding
(knowledge and skill). Note and document whether the
patient had difficulty performing a return demonstration and
action taken.
REFERENCES
1 Bardsley, A. (2015). Assessing and teaching female intermittent self-
catheterization. British Journal of Community Nursing, 20(7), 344–346.
Accessed via the Web at https://curve.coventry.ac .uk/open/file/730462ae-
d6de-417d-aa36-4f5b0fc57046/1/bardsleycomb.pdf (Level VII)
2 Newman, D. K ., & Wilson, M. M. (2011). Review of intermittent catheterization
and current best practices. Urology Nursing, 31(1), 12–29. Accessed via the
Web at
https://www.suna.org/sites/default/files/download/education/2013/article3101
229.pdf (Level VII)
3 National Institute for Health and Care Excellence (NICE). (2010, revised
2015). “Lower urinary tract symptoms: The management of lower urinary
tract symptoms in men” [Online]. Accessed via the Web at
https://www.nice.org.uk/Guidance/cg97 (Level VII)
4 Vahr, S., et al. (2013). Guideline summary: Catheterisation: Urethral
intermittent in adults: Dilatation, urethral intermittent in adults. Arnhem,
Netherlands: European Association of Urology Nurses. Accessed via the Web
at https://www.guideline.gov/summaries/summary/43945/catheterisation-
urethral-intermittent-in-adults-dilatation-urethral-intermittent-in-adults (Level
I)
5 Healthcare Infection Control Practices Advisory Committee. (2010, revised
2017). “Guideline for prevention of catheter-associated urinary tract
infections 2009” [Online]. Accessed via the Web at
https://www.cdc.gov/infectioncontrol/pdf/guidelines/cauti-guidelines.pdf
(Level I)
6 Centers for Disease Control and Prevention. (2002). Guideline for hand
hygiene in health-care settings: Recommendations of the Healthcare Infection
Control Practices Advisory Committee and the HICPAC/SHEA/APIC/IDSA Hand
Hygiene Task Force. MMWR Recommendations and Reports, 51(RR-16), 1–45.
Accessed via the Web at https://www.cdc.gov/mmwr/pdf/rr/rr5116.pdf (Level
II)
7 World Health Organization. (2009). “WHO guidelines on hand hygiene in
health care: First global patient safety challenge, clean care is safer care”
[Online]. Accessed via the Web at
http://apps.who.int/iris/bitstream/10665/44102/1/9789241597906_eng.pdf
(Level IV)
8 The Joint Commission. (2019). Standard NPSG.07.01.01. Comprehensive
accreditation manual for hospitals. Oakbrook Terrace, IL: The Joint
Commission. (Level VII)
9 Accreditation Association for Hospitals and Health Systems. (2017). Standard
07.01.21. Healthcare Facilities Accreditation Program: Accreditation
requirements for acute care hospitals. Chicago, IL: Accreditation Association
for Hospitals and Health Systems. (Level VII)
10 Centers for Medicare and Medicaid Services, Department of Health and
Human Services. (2015). Condition of participation: Infection control. 42 C.F.R.
§ 482.42.
11 DNV GL-Healthcare USA, Inc. (2016). IC.1 .SR.1 . NIAHO® accreditation
requirements: Interpretive guidelines & surveyor guidance (version 11).
Milford, OH: DNV GL-Healthcare USA, Inc. (Level VII)
12 The Joint Commission. (2019). Standard NPSG.01.01.01. Comprehensive
accreditation manual for hospitals. Oakbrook Terrace, IL: The Joint
Commission. (Level VII)
13 The Joint Commission. (2019). Standard RI.01.01.01. Comprehensive
accreditation manual for hospitals. Oakbrook Terrace, IL: The Joint
Commission. (Level VII)
14 Accreditation Association for Hospitals and Health Systems. (2017). Standard
15.01.16. Healthcare Facilities Accreditation Program: Accreditation
requirements for acute care hospitals. Chicago, IL: Accreditation Association
for Hospitals and Health Systems. (Level VII)
15 Centers for Medicare and Medicaid Services, Department of Health and
Human Services. (2015). Condition of participation: Patient’s rights. 42 C.F.R.
§ 482.13(c)(1).
16 DNV GL-Healthcare USA, Inc. (2016). PR.1.SR.5 . NIAHO® accreditation
requirements: Interpretive guidelines & surveyor guidance (version 11).
Milford, OH: DNV GL-Healthcare USA, Inc (Level VII)
17 The Joint Commission. (2019). Standard PC.02.01.21. Comprehensive
accreditation manual for hospitals. Oakbrook Terrace, IL: The Joint
Commission. (Level VII)
18 The Joint Commission. (2019). Standard PC.04.01.05. Comprehensive
accreditation manual for hospitals. Oakbrook Terrace, IL: The Joint
Commission. (Level VII)
19 The Joint Commission. (2010). Advancing effective communication, cultural
competence, and patient-, and family-centered care: A roadmap for hospitals.
Oakbrook Terrace, IL: The Joint Commission. Accessed via the Web at
http://www.jointcommission.org/assets/1/6/ARoadmapforHospitalsfinalversion
727.pdf (Level VII)
20 Accreditation Association for Hospitals and Health Systems. (2017). Standard
07.01.10. Healthcare Facilities Accreditation Program: Accreditation
requirements for acute care hospitals. Chicago, IL: Accreditation Association
for Hospitals and Health Systems. (Level VII)
21 Siegel, J. D ., et al. (2007, revised 2017). “2007 guideline for isolation
precautions: Preventing transmission of infectious agents in healthcare
settings” [Online]. Accessed via the Web at
https://www.cdc.gov/infectioncontrol/pdf/guidelines/isolation-guidelines.pdf
(Level VII)
22 Society of Urologic Nurses and Associates. (2006). “Clinical practice
guidelines: Adult clean intermittent catheterization” [Online]. Accessed via
the Web at http://www.suna.org/resources/adultCICGuide.pdf (Level VII)
23 The Joint Commission. (2019). Standard RC.01.03 .01. Comprehensive
accreditation manual for hospitals. Oakbrook Terrace, IL: The Joint
Commission. (Level VII)
24 Centers for Medicare and Medicaid Services, Department of Health and
Human Services. (2015). Condition of participation: Medical record services.
42 C.F.R. § 482.24(b).
25 Accreditation Association for Hospitals and Health Systems. (2017). Standard
10.00 .03. Healthcare Facilities Accreditation Program: Accreditation
requirements for acute care hospitals. Chicago, IL: Accreditation Association
for Hospitals and Health Systems. (Level VII)
26 DNV GL-Healthcare USA, Inc. (2016). MR.2 .SR.1 . NIAHO® accreditation
requirements: Interpretive guidelines & surveyor guidance (version 11).
Milford, OH: DNV GL-Healthcare USA, Inc. (Level VII)
27 Centers for Medicare and Medicaid Services, Department of Health and
Human Services. (2015). Condition of participation: Discharge planning. 42
C.F.R. § 482.43.
28 DNV GL-Healthcare USA, Inc. (2016). DC.1 .SR.1 . NIAHO® accreditation
requirements: Interpretive guidelines & surveyor guidance (version 11).
Milford, OH: DNV GL-Healthcare USA, Inc. (Level VII)
SEQUENTIAL COMPRESSION THERAPY
Sequential compression therapy helps prevent venous
thromboembolism, a disorder that includes deep vein
thrombosis (DVT) and pulmonary embolism in patients at
risk. This safe, effective, noninvasive therapy massages the
legs in a wavelike, milking motion that promotes blood flow
in the lower extremities to decrease the risk of thrombosis.
HOSPITAL-ACQUIRED CONDITION ALERT Venous thromboembolism in
patients who underwent total knee or hip replacement is considered a
hospital-acquired condition, because using best practices can
reasonably prevent the condition.1,2 Prevention practices—such as the
use of mechanical compression devices, including antiembolism
stockings and intermittent pneumatic compression devices (also
known as sequential compression therapy); early ambulation; and
pharmacologic prophylaxis—reduce
the
risk
of
venous
thromboembolism.3
Sequential compression therapy is used in combination
with anticoagulant medications to prevent DVT in low- to
moderate-risk patients. For patients at high risk for
bleeding, however, sequential compression is used without
anticoagulants.4,5,6,7,8 Preventive measures continue for as
long as the patient remains at risk.
Both antiembolism stockings and sequential compression
sleeves are commonly used preoperatively and
postoperatively because blood clots tend to form during
surgery. Sequential compression therapy counteracts blood
stasis and coagulation changes, two of the three major
factors that promote DVT. It reduces stasis by increasing
peak blood flow velocity, which helps empty the femoral
vein’s valve cusps of pooled or static blood. The
compressions also have an anticlotting effect by increasing
fibrinolytic activity, which stimulates the release of a
plasminogen activator.
Studies show that many patients at risk for developing
DVT don’t comply with sequential compression therapy.5
Explaining the therapy to patients, including the importance
of complying with therapy, may promote adherence.
Sequential compression therapy shouldn’t be used in
patients with acute DVT (or DVT diagnosed within the last 6
months), serious arterial insufficiency, ischemic vascular
disease, massive edema of the legs resulting from
pulmonary edema or heart failure, or any local condition
that the compression sleeves would aggravate, such as
dermatitis, recent skin graft, cellulitis, gangrene, or vein
ligation (in the immediate postoperative period).9 It’s also
unlikely to benefit patients with pronounced leg deformities.
Equipment
Measuring tape and brand-specific sizing chart ▪
appropriately sized compression sleeves ▪ connecting
tubing ▪ compression controller ▪ facility-approved
disinfectant.
Implementation
■ Verify the practitioner’s order.
■ Perform hand hygiene.10,11,12,13,14,15
■ Confirm the patient’s identity using at least two patient
identifiers.16,17
■ Provide privacy.18,19,20,21
■ Explain the procedure to the patient and family (if
appropriate) according to their individual communication
and learning needs to increase their understanding, allay
their fears, and enhance cooperation.22
Determining the proper sleeve size
■ Measure the circumference of the upper thigh while the
patient rests in bed by placing the measuring tape under
the thigh at the gluteal furrow (as shown below).
■ Hold the tape snugly, but not tightly, around the patient’s
leg. Note the exact circumference.
■ Find the patient’s thigh measurement on the sizing chart,
and locate the corresponding size of compression sleeves.
■ Remove the compression sleeves from the package and
unfold them.
■ Lay the unfolded sleeves on a flat surface with the cotton
lining facing up (as shown below).
■ Note the markings on the lining denoting the ankle and
the area behind the knee at the popliteal pulse point. Use
these markings to position the sleeve at the appropriate
landmarks.
Applying the sleeves
■ Place the patient’s leg on the sleeve lining. Position the
back of the knee over the popliteal opening.
■ Make sure that the back of the ankle is over the ankle
marking.
■ Starting at the side opposite the clear plastic tubing, wrap
the sleeve snugly around the patient’s leg.
■ Fasten the sleeve securely with the Velcro fasteners. For
the best fit, first secure the ankle and calf sections, and
then the thigh.
■ The sleeve should fit snugly, but not tightly. Check the fit
by inserting two fingers between the sleeve and the
patient’s leg at the knee opening. Loosen or tighten the
sleeve by readjusting the Velcro fastener.
■ Using the same procedure, apply the second sleeve (as
shown below).
Operating the system
■ Connect each sleeve to the tubing leading to the
controller. (Some devices require that both sleeves be
attached to the controller for the controller to function,
whereas others can operate with one or both attached.
Follow your manufacturer’s instructions for use.)9 Line up
the blue arrows on the sleeve connector with the arrows on
the tubing connectors and push the ends together firmly.
Listen for a click, signaling a firm connection. Make sure that
the tubing is not kinked.
■ Plug the compression controller into the proper wall
outlet. Turn on the power. If your controller can function with
one or both sleeves attached, be sure to turn on the sleeves
that are needed. The controller automatically sets the
compression sleeve pressure at 45 mm Hg, which is the
midpoint of the normal range (35 to 55 mm Hg).
■ Observe to see how well the patient tolerates the therapy
and to make sure the controller is working properly as the
system completes its first cycle.
■ Check the AUDIBLE ALARM key. The green light should be lit,
indicating that the alarm is working.
■ Perform hand hygiene.10,11,12,13,14,15
■ Document the procedure.23,24,25,26
Discontinuing compression therapy
■ Verify the practitioner’s order.
■ Perform hand hygiene.10,11,12,13,14,15
■ Confirm the patient’s identity using at least two patient
identifiers.16,17
■ Provide privacy.18,19,20,21
■ Explain the procedure to the patient to increase
compliance.
■ Turn off the power.
■ Open the Velcro fasteners on the sleeves and remove
them from the extremity.
■ Dispose of the sleeves in the proper waste container.
■ Disconnect the tubing from the compressor by depressing
the latches on each side of the connector and pull them
apart.
■ Clean and disinfect the tubing and compressor using a
facility-approved disinfectant.27,28
■ Store the tubing and compressor as determined by your
facility, because this equipment isn’t disposable.
■ Perform hand hygiene.10,11,12,14,15
■ Document the procedure.23,24,25,26
Special considerations
■ The compression sleeves should function continuously
(24 hours daily) until the patient is fully ambulatory. Check
the sleeves at least once each shift to ensure proper fit and
inflation.
■ Remove the sleeves when the patient is walking, bathing,
or leaving the room for tests or other procedures by undoing
the Velcro fasteners. Reapply them immediately after any of
these activities.9
■ Assess the patient’s skin under the sleeves at least every
8 hours to avoid skin breakdown.9
■ Assess the extremities for peripheral pulses, edema,
changes in sensation, and movement at least once each
shift.
■ Knee-length sleeves are also available. Measure the
patient’s calf circumference to determine the proper size.
Application is similar to thigh-length sleeves.
■ The compression controller also has a mechanism to help
cool the patient.
■ If a malfunction triggers the instrument’s alarm, you’ll
hear beeping. The system shuts off whenever the alarm is
activated. To respond to the alarm, follow the instructions
provided by the manufacturer.
Complications
The most common complication of compression therapy is
skin irritation, which usually results from sweating.
Documentation
Document the procedure, the patient’s response to and
understanding of the procedure, and the status of the alarm
and cooling settings.
REFERENCES
1 Centers for Medicare and Medicaid Services, Department of Health and
Human Services. (2017). “Appendix 1: Hospital-acquired conditions (HACS)
list” [Online]. Accessed via the Web at
https://www.cms.gov/ICD10Manual/version33-fullcode-
cms/fullcode_cms/P0386.html
2 Centers for Medicare and Medicaid Services & The Joint Commission. (2017).
“The specifications manual for national hospital inpatient quality measures
(version 5.2a)” [Online]. Accessed via the Web at
https://www.jointcommission.org/specifications_manual_for_national_hospital_
inpatient_quality_measures.aspx
3 Jarrett, N., & Callaham, M. (2016). “Evidence-based guidelines for selected,
candidate, and previously considered hospital-acquired conditions: Final
report” [Online]. Accessed via the Web at
https://www.cms.gov/Medicare/Medicare-Fee-for-Service-
Payment/HospitalAcqCond/Downloads/2016-HAC-Report.pdf
4 Forsh, D. A. (2017). “Deep venous thrombosis prophylaxis in orthopedic
surgery” [Online]. Accessed via the Web at
http://emedicine.medscape.com/article/1268573-overview#a1 (Level V)
5 American Association of Critical-Care Nurses (AACN). (2016). AACN practice
alert: Preventing venous thromboembolism in adults. Critical Care Nurse,
36(5), e-20–e23. Accessed via the Web at
https://www.aacn.org/~/media/aacn-website/clincial-resources/practice-
alerts/venous-thromboembolism-pa.pdf (Level II)
6 Meyer, S. (2010). Leg compression and pharmacologic prophylaxis for venous
thromboembolism prevention in high-risk patients. American Family
Physician, 81(3), 284–285. (Level I)
7 Qaseem, A., et al. (2011). Venous thromboembolism prophylaxis in
hospitalized patients: A clinical practice guideline from the American College
of Physicians. Annals of Internal Medicine, 155(9), 625–632. (Level I)
8 Zareba, P., et al. (2014). Meta-analysis of randomized trials comparing
combined compression and anticoagulation with either modality alone for
prevention of venous thromboembolism after surgery. British Journal of
Surgery, 101(9), 1053–1062. (Level I)
9 Coviden. (2013). “Kendall SCD 700 sequential compression system” [Online].
Accessed via the Web at
http://www.medtronic.com/content/dam/covidien/library/us/en/product/vascul
ar-compression/kendall-scd-700-series-controller-operation-and-service-
manual.pdf
10 The Joint Commission. (2019). Standard NPSG.07.01.01. Comprehensive
accreditation manual for hospitals. Oakbrook Terrace, IL: The Joint
Commission. (Level VII)
11 Centers for Disease Control and Prevention. (2002). Guideline for hand
hygiene in health-care settings: Recommendations of the Healthcare Infection
Control Practices Advisory Committee and the HICPAC/SHEA/APIC/IDSA Hand
Hygiene Task Force. MMWR Recommendations and Reports, 51(RR-16), 1–45.
Accessed via the Web at https://www.cdc.gov/mmwr/pdf/rr/rr5116.pdf (Level
II)
12 World Health Organization. (2009). “WHO guidelines on hand hygiene in
health care: First global patient safety challenge, clean care is safer care”
[Online]. Accessed via the Web at
http://apps.who.int/iris/bitstream/10665/44102/1/9789241597906_eng.pdf
(Level IV)
13 Accreditation Association for Hospitals and Health Systems. (2017). Standard
07.01.21 Healthcare Facilities Accreditation Program: Accreditation
requirements for acute care hospitals. Chicago, IL: Accreditation Association
for Hospitals and Health Systems. (Level VII)
14 Centers for Medicare & Medicaid Services, Department of Health and Human
Services. (2015). Condition of participation: Infection control. 42 C.F.R. §
482.42.
15 DNV GL-Healthcare USA, Inc. (2016). IC.1 .SR.1 . NIAHO® accreditation
requirements: Interpretive guidelines & surveyor guidance (version 11).
Milford, OH: DNV GL-Healthcare USA, Inc. (Level VII)
16 The Joint Commission. (2019). Standard NPSG.01.01.01. Comprehensive
accreditation manual for hospitals. Oakbrook Terrace, IL: The Joint
Commission. (Level VII)
17 Accreditation Association for Hospitals and Health Systems. (2017). Standard
30.00 .14. Healthcare Facilities Accreditation Program: Accreditation
requirements for acute care hospitals. Chicago, IL: Accreditation Association
for Hospitals and Health Systems. (Level VII)
18 Accreditation Association for Hospitals and Health Systems. (2017). Standard
15.01.16. Healthcare Facilities Accreditation Program: Accreditation
requirements for acute care hospitals. Chicago, IL: Accreditation Association
for Hospitals and Health Systems. (Level VII)
19 Centers for Medicare and Medicaid Services, Department of Health and
Human Services. (2015). Condition of participation: Patient’s rights. 42 C.F.R.
§ 482.13(c)(1).
20 DNV GL-Healthcare USA, Inc. (2016). PR.1.SR.5 . NIAHO® accreditation
requirements: Interpretive guidelines & surveyor guidance (version 11).
Milford, OH: DNV GL-Healthcare USA, Inc. (Level VII)
21 The Joint Commission. (2019). Standard RI.01.01.01. Comprehensive
accreditation manual for hospitals. Oakbrook Terrace, IL: The Joint
Commission. (Level VII)
22 The Joint Commission. (2019). Standard PC.02.01.21. Comprehensive
accreditation manual for hospitals. Oakbrook Terrace, IL: The Joint
Commission. (Level VII)
23 The Joint Commission. (2019). Standard RC.01.03 .01. Comprehensive
accreditation manual for hospitals. Oakbrook Terrace, IL: The Joint
Commission. (Level VII)
24 Accreditation Association for Hospitals and Health Systems. (2017). Standard
10.00 .03. Healthcare Facilities Accreditation Program: Accreditation
requirements for acute care hospitals. Chicago, IL: Accreditation Association
for Hospitals and Health Systems. (Level VII)
25 Centers for Medicare & Medicaid Services, Department of Health and Human
Services. (2015). Condition of participation: Medical record services. 42 C.F.R.
§ 482.24(b).
26 DNV GL-Healthcare USA, Inc. (2016). MR.2 .SR.1 . NIAHO® accreditation
requirements: Interpretive guidelines & surveyor guidance (version 11).
Milford, OH: DNV GL-Healthcare USA, Inc. (Level VII)
27 Rutala, W. A., et al. (2008, revised 2017). “Guideline for disinfection and
sterilization in healthcare facilities, 2008” [Online]. Accessed via the Web at
https://www.cdc.gov/hicpac/pdf/guidelines/Disinfection_Nov_2008.pdf (Level I)
28 Accreditation Association for Hospitals and Health Systems. (2017). Standard
07.02.03. Healthcare Facilities Accreditation Program: Accreditation
requirements for acute care hospitals. Chicago, IL: Accreditation Association
for Hospitals and Health Systems. (Level VII)
SEXUAL ASSAULT EXAMINATION
You should emergently triage a patient who has been the
victim of a sexual assault as soon as the patient arrives at
the emergency department; place the patient in a treatment
room as quickly as possible.1,2 Each facility or agency has a
specific protocol for specimen collection in cases involving
sexual assault. Collected from various sources, specimens
can include blood, hair, nails, tissues, and such body fluids
as urine, semen, saliva, and cervical and vaginal secretions.
In addition, evidence can be obtained from the results of
diagnostic tests such as computed tomography and
radiography. Regardless of the protocol or specimen source,
accurate and precise specimen collection is essential in
conjunction with thorough, objective documentation,
because in many cases this information will be used as
evidence in legal proceedings.
Many facilities have a sexual assault forensic examiner
(SAFE) available to care for patients who are victims of
sexual assault. The SAFE is a skilled professional who can
provide comprehensive care to the sexual assault patient
and collect evidence. The SAFE may also be called upon at a
later date to testify in legal proceedings.
If you’re responsible for collecting specimens in a sexual
assault, follow these important guidelines:
■ Know your facility’s method for specimen collection in
sexual assault cases.
■ When obtaining specimens, collect them from the victim
and, if possible, from the suspect.
■ Inform local law enforcement about the suspected assault
after consent for release of information has been obtained
from the patient.3,4
■ Check with local law enforcement agencies about
additional specimens they may need—for example, such
trace evidence as soot, grass, gravel, glass, or other debris.
■ Wear gloves and change them frequently; use disposable
equipment and instruments if possible.2
■ Avoid coughing, sneezing, or talking over specimens or
touching your face, nose, or mouth when collecting
specimens.
■ Include the victim’s clothing as part of the collection
procedure.
■ Place all items collected in a paper bag.2
NURSING ALERT Never allow a specimen or item considered as
evidence to be left unattended.
■ Document each item or specimen collected.
■ Label each specimen in the presence of the patient to
prevent mislabeling.5
■ Obtain photographs of all injuries for documentation.2
■ Include written documentation of the victim’s physical
and psychological condition on the first encounter,
throughout specimen collection, and afterward.
Equipment
Powder-free, nonlubricated gloves ▪ ultraviolet lamp (such
as a Wood lamp) ▪ sexual assault evidence collection kit
that includes examination paper, tweezers, tape, nail
clippers and scrapers, saline solution or distilled water,
clean paper bags (one for each article of clothing),
envelopes, scissors, sterile containers, pencil or pen, swabs
for specimen collection, comb, ethylenediaminetetraacetic
acid (EDTA) blood collection tube or blood collection filter
paper, slides, envelope, deoxyribonucleic acid (DNA) stain
card2 ▪ speculum ▪ supplies for venipuncture (see the
“Venipuncture” procedure) ▪ supplies for urine specimen
collection ▪ patient labels ▪ camera ▪ Optional: colposcope,
anoscope,2 tetanus toxoid, hepatitis B vaccination,
antibiotics, sexually transmitted infection (STI) prophylaxis,
human immunodeficiency virus (HIV) prophylaxis,
emergency contraception.6
Contents of sexual assault evidence collection kits can
vary; some jurisdictions have a customized kit.
Preparation of equipment
Make sure that the sexual assault collection kit contains the
necessary items for specimen collection, based on the
evidence required by the local crime laboratory. The kit
contains a form that must be completed, signed, and dated
by the examiner.
Implementation
■ Perform hand hygiene.7,8,9,10,11,12
■ Ensure patient privacy throughout the collection
procedure.2,13,14,15,16
■ Confirm the patient’s identity using at least two patient
identifiers.5
■ Assess the patient’s ability to undergo the specimen
collection procedure.
■ Explain the procedures that the patient will undergo,
explain what specimens will be collected and from where,
and obtain consent as required.2
■ Provide emotional support throughout the procedure.
Obtain the assistance of a social worker or patient advocate
to advocate and support the patient during the examination,
as indicated.2
■ Inform the patient that the presence of family members,
friends, and others offering personal support during the
examination may influence or be perceived as influencing
the patient’s statements. If the patient chooses to have
anyone else present despite this knowledge, those present
should not actively participate in the process.2
■ Obtain a detailed forensic history from the patient, which
is intended to guide the forensic examination, evidence
collection, and the patient’s medical treatment. If able,
coordinate your forensic history taking with a law
enforcement investigator.2
■ Put on powder-free, nonlubricated gloves.17,18
■ If the patient can stand, ask the patient to stand on a
clean piece of examination paper; if the patient can’t stand,
then have the patient remain on the examination table or
bed.
■ Have the patient remove each article of clothing, one at a
time. Place each article in a separate, clean paper bag.2
■ If the clothing is wet, allow it to dry first before placing
the item into the paper bag.
NURSING ALERT Don’t use plastic bags to collect clothing. Plastic
promotes bacterial growth and can destroy DNA evidence.2
■ Fold the examination paper onto itself and place it into a
clean paper bag.
■ Fold over, seal, label, and initial each bag.
■ Before obtaining specimens, inspect the genital area
using a Wood lamp. This device uses long-wave ultraviolet
light to scan the area for secretions and helps identify areas
of trauma.
NURSING ALERT In some jurisdictions, toluidine blue dye may be
used to highlight areas of trauma, but its use is controversial, because
it may be perceived by the court as changing the appearance of the
tissue; therefore, it isn’t universally used. When used, toluidine blue
dye should be applied using a cotton swab before an internal or digital
speculum examination is performed.2
Collecting vaginal or cervical secretions
■ Keep in mind when collecting specimens that the quality
of the swabs collected is specific to the type of specimen.
For moist secretions, typically a one-swab technique is used;
if secretions are dry, then a two-swab technique is used.
■ Swab the vaginal area thoroughly with four swabs, or
according to local jurisdiction; swab the cervical area with
two swabs, making sure to keep the vaginal swabs separate
from the cervical swabs.
■ Gently roll each vaginal swab over a slide and allow the
slides and swabs to air-dry; do the same for the cervical
swabs.
■ Place the vaginal swabs in the swab container and close
it; place the slides in the cardboard sleeve, close it, and
tape it shut; repeat this procedure for the cervical swabs.
■ Place the swab container and cardboard sleeve into the
envelope, and seal it securely.
■ Complete the information requested on the front of the
envelope; if vaginal and cervical swabs are obtained, use a
separate envelope for each.
Collecting anal secretions
■ Moisten the provided swabs with sterile water.
■ Insert each swab gently, approximately 11⁄4′′ (3.2 cm) into
the patient’s rectum.
■ Rotate the swab gently, and then remove it.
■ Allow the swabs to air-dry and then place them in an
envelope.
■ Seal and label the envelope appropriately.
Collecting penile secretions
■ Moisten the provided swabs with sterile water.
■ Swab the entire external surface of the penis.
■ Repeat this at least one more time (so that you obtain at
least two swabs).
■ Allow the swabs to air-dry and then place them in an
envelope.
■ Seal and label the envelope appropriately.
Collecting pubic hair
■ Place the provided collection paper under the patient’s
buttocks and, using the comb provided in the kit, comb
through the pubic hair2 to collect any debris, trace
evidence, or hair from the suspect that may be present.
■ Fold the collection paper containing the comb, hair, and
other debris, and place it in an envelope. Seal and label the
envelope appropriately.
■ Alternatively, if requested in your local jurisdiction, obtain
20 to 30 plucked hairs from the patient as reference
samples; allow the patient the option of plucking his or her
own pubic hair.
■ Place the plucked hair in the envelope; seal and label it
appropriately.
Collecting blood samples
■ After performing a venipuncture, obtain at least 5 mL of
blood in an EDTA tube.
■ Write the patient’s name and date on the label of the
tube.
■ Remove the DNA stain card from the kit and label it with
the patient’s name.
■ Withdraw 1 mL of blood from the EDTA blood collection
tube and apply blood to each of the four circles on the card,
completely filling each circle if possible.
■ Let the card air-dry and then place the card in the
envelope.
■ Seal and label the envelope appropriately.
■ Place the blood tube into the tube holder supplied in the
kit and seal the holder with the tape supplied in the kit (it
may be referred to as evidence tape).
■ Place the tube and holder in the zippered bag provided.
■ Collect additional blood samples to test for pregnancy,
STIs such as HIV and syphilis, or toxicology, as appropriate,
and send them to the laboratory immediately.
Collecting urine specimens
■ Obtain a random urine specimen from the patient.
Remind the patient not to use cleaning wipes to avoid
destroying possible evidence.
■ Obtain a urine specimen for drug screening immediately
if it’s suspected that the patient was given drugs to
facilitate the sexual assault, and if the examination takes
place within 96 hours of the assault.2
Storing and transporting specimens
■ Place blood samples inside the evidence collection
envelope, which must be refrigerated while maintaining the
chain of custody.2
■ You may store evidence collection envelopes without
blood samples at room temperature while maintaining the
chain of custody.2
■ Remove and discard your gloves17,18 and perform hand
hygiene.7,8,9,10,11,12
■ Give all the specimens to the law enforcement officer.
■ Carefully document the hand-off of the specimens to
ensure proper chain of custody.2
■ Document the procedure.19,20,21,22
Special considerations
■ Follow the directions in the sexual assault evidence
collection kit precisely, to ensure the proper chain of
custody.
■ If a female or transgender male patient is menstruating,
collect tampons and sanitary napkins. Air-dry them as much
as possible, and then place them in a separate paper
collection bag.2
■ Provide culturally sensitive follow-up counseling and
support to the patient. Provide referrals as necessary.2
■ If necessary, administer ordered medications, such as
tetanus toxoid, antibiotics for STI prophylaxis, emergency
contraceptives, and HIV prophylaxis following safe
medication administration practices.6,23,24,25
■ Assess the patient’s hepatitis B immunization status;
vaccinate the patient, as needed and prescribed, following
safe medication administration practices.6,23,24,25
■ Make sure a support person is available to accompany the
patient home.
■ Arrange for a referral to a local support group or a trained
sexual assault counselor for follow-up.
■ Report cases of suspected child abuse in accordance with
state guidelines.6
Patient teaching
At the initial examination and, if indicated, at follow-up
examinations, provide information about the signs and
symptoms of STIs, the need for immediate examination if
symptoms occur, and the importance of abstaining from
sexual intercourse until STI prophylaxis is completed.6
Provide discharge instructions that include planning for
safety. Discuss examination payment and reimbursement
information, steps and options in the criminal justice
process, community resources that are available to sexual
assault victims, and procedures for patients to access their
medical records and applicable law enforcement reports.2 If
the patient gives permission, include family members or
significant others in the teaching when possible, because
the patient may be distressed.
Documentation
For each specimen collected, document the type, location
from which you collected the specimen, the time, the
patient’s name and identification number, and other
relevant information. Include photographs as appropriate,
and include relevant information about each photo.
Regardless of the protocol or specimen source, collect all
specimens accurately and precisely, and document
thoroughly and objectively, because in many cases this
information will be used as evidence in legal proceedings.
Record the name of the sexual assault counselor, if present,
and any referrals. Document any teaching you provided, the
patient’s and family’s understanding of the teaching, and
whether they require follow-up teaching.
REFERENCES
1 Agency for Healthcare Research. (2014). “Chapter 3: ESI level 2” [Online].
Accessed via the Web at
http://www.ahrq.gov/professionals/systems/hospital/esi/esi3.html (Level VII)
2 U.S. Department of Justice, Office on Violence Against Women. (2013). “A
national protocol for sexual assault medical forensic examinations:
Adults/adolescents, second edition” [Online]. Accessed via the Web at
https://www.ncjrs.gov/pdffiles1/ovw/241903.pdf (Level VII)
3 The Joint Commission. (2019). Standard RI.01.06 .03 . Comprehensive
accreditation manual for hospitals. Oakbrook Terrace, IL: The Joint
Commission. (Level VII)
4 The Joint Commission. (2019). Standard PC.01.02.09 . Comprehensive
accreditation manual for hospitals. Oakbrook Terrace, IL: The Joint
Commission. (Level VII)
5 The Joint Commission. (2019). Standard NPSG.01.01.01. Comprehensive
accreditation manual for hospitals. Oakbrook Terrace, IL: The Joint
Commission. (Level VII)
6 Centers for Disease Control and Prevention. (2015, updated 2017). “Sexual
assault and abuse and STDs” [Online]. Accessed via the Web at
https://www.cdc.gov/std/tg2015/sexual-assault.htm (Level II)
7 The Joint Commission. (2019). Standard NPSG.07.01.01. Comprehensive
accreditation manual for hospitals. Oakbrook Terrace, IL: The Joint
Commission. (Level VII)
8 Centers for Disease Control and Prevention. (2002). Guideline for hand
hygiene in health-care settings: Recommendations of the Healthcare Infection
Control Practices Advisory Committee and the HICPAC/SHEA/APIC/IDSA Hand
Hygiene Task Force. MMWR Recommendations and Reports, 51(RR-16), 1–45.
Accessed via the Web at https://www.cdc.gov/mmwr/pdf/rr/rr5116.pdf (Level
II)
9 World Health Organization. (2009). “WHO guidelines on hand hygiene in
health care: First global patient safety challenge, clean care is safer care”
[Online]. Accessed via the Web at
http://apps.who.int/iris/bitstream/10665/44102/1/9789241597906_eng.pdf
(Level IV)
10 Accreditation Association for Hospitals and Health Systems. (2017). Standard
07.01.21. Healthcare Facilities Accreditation Program: Accreditation standards
for acute care hospitals. Chicago, IL: Accreditation Association for Hospitals
and Health Systems. (Level VII)
11 Centers for Medicare and Medicaid Services, Department of Health and
Human Services. (2015). Condition of participation: Infection control. 42 C.F.R.
§ 482.42.
12 DNV GL-Healthcare USA, Inc. (2016). IC.1 .SR.1 . NIAHO® accreditation
requirements: Interpretive guidelines & surveyor guidance (version 11).
Milford, OH: DNV GL-Healthcare USA, Inc. (Level VII)
13 The Joint Commission. (2019). Standard RI.01.01.01. Comprehensive
accreditation manual for hospitals. Oakbrook Terrace, IL: The Joint
Commission. (Level VII)
14 Centers for Medicare and Medicaid Services, Department of Health and
Human Services. (2015). Condition of participation: Patient’s rights. 42 C.F.R.
§ 482.13(c)(1).
15 Accreditation Association for Hospitals and Health Systems. (2017). Standard
15.01.16. Healthcare Facilities Accreditation Program: Accreditation
requirements for acute care hospitals. Chicago, IL: Accreditation Association
for Hospitals and Health Systems. (Level VII)
16 DNV GL-Healthcare USA, Inc. (2016). PR.1.SR.5 . NIAHO® accreditation
requirements: Interpretive guidelines & surveyor guidance (version 11).
Milford, OH: DNV GL-Healthcare USA, Inc. (Level VII)
17 Siegel, J. D ., et al. (2007, revised 2017). “2007 guideline for isolation
precautions: Preventing transmission of infectious agents in healthcare
settings” [Online]. Accessed via the Web at
https://www.cdc.gov/infectioncontrol/pdf/guidelines/isolation-guidelines.pdf
(Level II)
18 Accreditation Association for Hospitals and Health Systems. (2017). Standard
07.01.10. Healthcare Facilities Accreditation Program: Accreditation
requirements for acute care hospitals. Chicago, IL: Accreditation Association
for Hospitals and Health Systems. (Level VII)
19 The Joint Commission. (2019). Standard RC.01.03 .01. Comprehensive
accreditation manual for hospitals. Oakbrook Terrace, IL: The Joint
Commission. (Level VII)
20 Accreditation Association for Hospitals and Health Systems. (2017). Standard
10.00 .03. Healthcare Facilities Accreditation Program: Accreditation
requirements for acute care hospitals. Chicago, IL: Accreditation Association
for Hospitals and Health Systems. (Level VII)
21 Centers for Medicare and Medicaid Services, Department of Health and
Human Services. (2015). Condition of participation: Medical record services.
42 C.F.R. § 482.24(b).
22 DNV GL-Healthcare USA, Inc. (2016). MR.2 .SR.1 . NIAHO® accreditation
requirements: Interpretive guidelines & surveyor guidance (version 11).
Milford, OH: DNV GL-Healthcare USA, Inc. (Level VII)
23 Centers for Medicare and Medicaid Services, Department of Health and
Human Services. (2015). Condition of participation: Nursing services. 42
C.F.R. § 482.23(c).
24 Accreditation Association for Hospitals and Health Systems. (2017). Standard
16.01.03. Healthcare Facilities Accreditation Program: Accreditation
requirements for acute care hospitals. Chicago, IL: Accreditation Association
for Hospitals and Health Systems. (Level VII)
25 DNV GL-Healthcare USA, Inc. (2016). MM.1 .SR.2. NIAHO® accreditation
requirements: Interpretive guidelines & surveyor guidance (version 11).
Milford, OH: DNV GL-Healthcare USA, Inc. (Level VII)
SHARP DEBRIDEMENT
Debridement involves removing necrotic tissue or
contaminated foreign debris from a wound. As necrotic
tissue develops, it becomes a barrier to wound healing and
a medium for bacterial growth. Removing this tissue
decreases the risk of infection, accelerates wound healing,
and prevents further complications associated with tissue
destruction. Surgical debridement is recommended for large
or deep wounds. However, when surgical debridement isn’t
appropriate for the patient’s condition, sharp, chemical (or
enzymatic),
mechanical,
autolytic,
or
biosurgical
debridement may be used.
Sharp debridement involves using a scalpel, scissors, or
other sharp instrument to excise a wound’s necrotic
material and accumulated debris (biofilm) up to the viable
tissue.1 It’s the most rapid form of debridement and can be
combined with other forms of debridement as needed. A
practitioner, physical therapist, or specially trained nurse
may perform sharp debridement.2
Sharp debridement should be used cautiously in patients
with a compromised immune system, compromised vascular
supply to the limb, or sepsis.2 Relative contraindications for
sharp debridement include anticoagulant therapy and
bleeding disorders.2
Equipment
Prescribed analgesic ▪ gloves ▪ sterile gloves3 ▪ sterile
gowns ▪ mask ▪ goggles4 ▪ cap ▪ wound measuring device
▪ sterile scissors or scalpel ▪ sterile forceps ▪ prescribed
cleaning solutions and medications ▪ sterile 4′′ × 4′′ (10-cm
× 10-cm) gauze pads ▪ dressings ▪ Optional: camera,
hemostatic agent, calcium alginate dressing.
Implementation
■ Review the patient’s medical record and check the history
for hypersensitivity to latex or analgesics.
■ Confirm that the practitioner has obtained written
informed consent and that the consent form is in the
patient’s medical record.5,6,7,8
■ Conduct a preprocedure verification to make sure that all
relevant documentation, related information, and equipment
are available and correctly identified to the patient
identifiers.9,10
■ Verify that laboratory studies are complete, as ordered,
and that the results are in the patient’s medical record.
Notify the practitioner of any unexpected results.9,10
■ Perform hand hygiene.11,12,13,14,15,16
■ Confirm the patient’s identity using at least two patient
identifiers according to your facility’s policy.17
■ Provide privacy.18,19,20,21
■ Explain the procedure to the patient and family (if
appropriate) according to their individual communication
and learning needs and answer any questions to increase
their understanding, allay their fears, and enhance
cooperation.22
■ Screen and assess the patient’s pain using facility-defined
criteria that are consistent with the patient’s age, condition,
and ability to understand.23
■ Treat the patient’s pain, as needed and ordered using
nonpharmacologic or pharmacologic approaches, or a
combination of approaches. Base the treatment plan on
evidence-based practices and the patient’s clinical
condition, past medical history, and pain management
goals.23
■ Teach the patient distraction and relaxation techniques, if
possible, to minimize discomfort.
■ Administer an oral analgesic, following safe medication
administration practices, at an appropriate time before
debridement begins based on the onset and peak of the
medication prescribed, or give an IV analgesic immediately
before the procedure, as ordered.24,25,26,27
■ Raise the patient’s bed to waist level when providing
patient care to prevent caregiver back strain.28
■ Perform hand hygiene.11,12,13,14,15,16
■ Keep the patient warm. Expose only the area to be
debrided to prevent chilling and fluid and electrolyte loss.
■ If the wound to be debrided is on a lower extremity,
perform a neurovascular assessment before beginning the
procedure to obtain a baseline for comparison.2 Inadequate
perfusion can result in wound extension.4
■ Perform hand hygiene.11,12,13,14,15,16
■ Prepare a sterile field and then, using sterile no-touch
technique, set up the necessary supplies on the sterile
field.3
■ Label all medications, medication containers, and
solutions on and off the sterile field.29,30
■ Conduct a time-out immediately before starting the
procedure to perform a final assessment that the correct
patient, site, positioning, and procedure are identified and,
as applicable, that all relevant information and necessary
equipment are available.31
■Putonacapandmask.
■ Perform hand hygiene.11,12,13,14,15,16
■ Put on a gown and gloves.3,32,33
■ Gently remove the dressings and discard carefully in an
impervious plastic trash bag, because soiled dressings
harbor infectious microorganisms.34
■ Remove and discard your gown and gloves.32,33
■ Perform hand hygiene.11,12,13,14,15,16
■ Put on a sterile gown and sterile gloves.32,33
■ Clean the wound to remove debris and bacterial load.1,24
(See the “Wound irrigation” procedure.)
■ Measure the wound to determine how wound healing is
progressing. If applicable, photograph the wound for
additional documentation.2
■ Lift the necrotic tissue with forceps. Use the scalpel or
scissors to cut the tissue. Keep the scalpel or scissors
parallel to or angled away from the wound bed.
■ Replace the dressing over the wound.
■ Return the bed to the lowest position to prevent falls and
maintain patient safety.35
■ Dispose of all equipment in the appropriate
receptacle.32,33
■ Remove and discard your gloves and remove your
personal protective equipment.32,33
■ Perform hand hygiene.11,12,13,14,15,16
■ Reassess and respond to the patient’s pain by evaluating
the response to treatment and progress toward pain
management goals. Assess for adverse reactions and risk
factors for adverse events that may result from treatment.23
■ Perform hand hygiene.11,12,13,14,15,16
■ Document the procedure.36,37,38,39
Special considerations
■ Because debridement removes dead tissue, bleeding
should be minimal. If bleeding occurs, apply gentle pressure
on the wound with sterile 4′′ × 4′′ (10-cm × 10-cm) gauze
pads. Then apply a hemostatic agent or calcium alginate
dressing, as ordered.24 If bleeding persists, notify the
practitioner, and maintain pressure on the wound until the
practitioner arrives. Excessive bleeding or spurting vessels
may require ligation.
Complications
Infection may develop despite the use of sterile technique
and equipment. Bleeding, the most common complication,
may occur if debridement exposes an eroded blood vessel
or if you inadvertently cut a vessel. Fluid and electrolyte
imbalances may result from exudate lost during the
procedure.
Documentation
Record the date and time of wound debridement, the area
debrided, and solutions and medications used. Describe the
wound’s condition, noting signs of infection or skin
breakdown. Record the patient’s tolerance of and reaction to
the procedure. Note indications for additional therapy.
Record the administration of preprocedure pain medication
and pain assessment before and after the procedure.
Document any teaching you provided, the patient’s and
family’s understanding of the teaching, and whether they
require follow-up teaching.
REFERENCES
1 Armstrong, D. G ., & Meyr, A. J . Basic principles of wound management.
(2016). In UpToDate, Sanfey, H., et al. (Eds). Retrieved from:
www.uptodate.com
2 National Pressure Ulcer Advisory Panel, et al. (2014). “Prevention and
treatment of pressure ulcers: Quick reference guide” [Online]. Accessed via
the Web at http://www.npuap.org/wp-content/uploads/2014/08/Quick-
Reference-Guide-DIGITAL-NPUAP-EPUAP-PPPIA.pdf (Level VII)
3 Wound, Ostomy, and Continence Nurses Society Wound Committee &
Association for Professionals in Infection Control and Epidemiology. (2012).
Clean vs. sterile dressing techniques for management of chronic wounds: A
fact sheet. Journal of Wound, Ostomy and Continence Nursing, 39(Suppl. 2),
S30–S34. Accessed via the Web at
http://journals.lww.com/jwocnonline/Fulltext/2012/03001/Clean_vs__Sterile_Dr
essing_Techniques_for.7 .aspx (Level VII)
4 Wiegand, D. (2017). AACN procedure manual for high acuity, progressive, and
critical care (7th ed.). St. Louis, MO: Elsevier.
5 Centers for Medicare and Medicaid Services, Department of Health and
Human Services. (2015). Condition of participation: Patient’s rights. 42 C.F.R.
§ 482.13(b)(2).
6 The Joint Commission. (2019). Standard RI.01.03 .01. Comprehensive
accreditation manual for hospitals. Oakbrook Terrace, IL: The Joint
Commission. (Level VII)
7 Accreditation Association for Hospitals and Health Systems. (2017). Standard
15.01.11. Healthcare Facilities Accreditation Program: Accreditation
requirements for acute care hospitals. Chicago, IL: Accreditation Association
for Hospitals and Health Systems. (Level VII)
8 DNV GL-Healthcare USA, Inc. (2016). PR.1 .SR.3 . NIAHO® accreditation
requirements: Interpretive guidelines & surveyor guidance (version 11).
Milford, OH: DNV GL-Healthcare USA, Inc. (Level VII)
9 The Joint Commission. (2019). Standard UP.01.01.01. Comprehensive
accreditation manual for hospitals. Oakbrook Terrace, IL: The Joint
Commission. (Level VII)
10 Accreditation Association for Hospitals and Health Systems. (2017). Standard
30.00 .14. Healthcare Facilities Accreditation Program: Accreditation
requirements for acute care hospitals. Chicago, IL: Accreditation Association
for Hospitals and Health Systems. (Level VII)
11 Centers for Disease Control and Prevention. (2002). Guideline for hand
hygiene in health-care settings: Recommendations of the Healthcare Infection
Control Practices Advisory Committee and the HICPAC/SHEA/APIC/IDSA Hand
Hygiene Task Force. MMWR Recommendations and Reports, 51(RR-16), 1–45.
Accessed via the Web at https://www.cdc.gov/mmwr/pdf/rr/rr5116.pdf (Level
II)
12 World Health Organization. (2009). “WHO guidelines on hand hygiene in
health care: First global patient safety challenge, clean care is safer care”
[Online]. Accessed via the Web at
http://apps.who.int/iris/bitstream/10665/44102/1/9789241597906_eng.pdf
(Level IV)
13 The Joint Commission. (2019). Standard NPSG.07.01.01. Comprehensive
accreditation manual for hospitals. Oakbrook Terrace, IL: The Joint
Commission. (Level VII)
14 Centers for Medicare and Medicaid Services, Department of Health and
Human Services. (2015). Condition of participation: Infection control. 42 C.F.R.
§ 482.42.
15 Accreditation Association for Hospitals and Health Systems. (2017). Standard
07.01.21. Healthcare Facilities Accreditation Program: Accreditation
requirements for acute care hospitals. Chicago, IL: Accreditation Association
for Hospitals and Health Systems. (Level VII)
16 DNV GL-Healthcare USA, Inc. (2016). IC.1 .SR.1 . NIAHO® accreditation
requirements: Interpretive guidelines & surveyor guidance (version 11).
Milford, OH: DNV GL-Healthcare USA, Inc. (Level VII)
17 The Joint Commission. (2019). Standard NPSG.01.01.01. Comprehensive
accreditation manual for hospitals. Oakbrook Terrace, IL: The Joint
Commission. (Level VII)
18 Accreditation Association for Hospitals and Health Systems. (2017). Standard
15.01.16. Healthcare Facilities Accreditation Program: Accreditation
requirements for acute care hospitals. Chicago, IL: Accreditation Association
for Hospitals and Health Systems. (Level VII)
19 Centers for Medicare and Medicaid Services, Department of Health and
Human Services. (2015). Condition of participation: Patient’s rights. 42 C.F.R.
§ 482.13(c)(1).
20 DNV GL-Healthcare USA, Inc. (2016). PR.1.SR.5 . NIAHO® accreditation
requirements: Interpretive guidelines & surveyor guidance (version 11).
Milford, OH: DNV GL-Healthcare USA, Inc. (Level VII)
21 The Joint Commission. (2019). Standard RI.01.01.01. Comprehensive
accreditation manual for hospitals. Oakbrook Terrace, IL: The Joint
Commission. (Level VII)
22 The Joint Commission. (2019). Standard PC.02.01.21. Comprehensive
accreditation manual for hospitals. Oakbrook Terrace, IL: The Joint
Commission. (Level VII)
23 The Joint Commission. (2019). Standard PC.01.02.07. Comprehensive
accreditation manual for hospitals. Oakbrook Terrace, IL: The Joint
Commission. (Level VII)
24 Woo, K. Y., & Sibbald, R. G. (2010). Local wound care for malignant and
palliative wounds. Advances in Skin and Wound Care, 23(9), 417–428. (Level
VII)
25 Centers for Medicare and Medicaid Services, Department of Health and
Human Services. (2015). Condition of participation: Nursing services. 42
C.F.R. § 482.23(c).
26 Accreditation Association for Hospitals and Health Systems. (2017). Standard
16.01.03. Healthcare Facilities Accreditation Program: Accreditation
requirements for acute care hospitals. Chicago, IL: Accreditation Association
for Hospitals and Health Systems. (Level VII)
27 DNV GL-Healthcare USA, Inc. (2016). MM.1 .SR.2. NIAHO® accreditation
requirements: Interpretive guidelines & surveyor guidance (version 11).
Milford, OH: DNV GL-Healthcare USA, Inc. (Level VII)
28 Waters, T. R., et al. (2009). “Safe patient handling training for schools of
nursing” [Online]. Accessed via the Web at
https://www.cdc.gov/niosh/docs/2009-127/pdfs/2009-127.pdf (Level VII)
29 The Joint Commission. (2019). Standard NPSG.03 .04.01. Comprehensive
accreditation manual for hospitals. Oakbrook Terrace, IL: The Joint
Commission. (Level VII)
30 Accreditation Association for Hospitals and Health Systems. (2017). Standard
25.01.27. Healthcare Facilities Accreditation Program: Accreditation
requirements for acute care hospitals. Chicago, IL: Accreditation Association
for Hospitals and Health Systems. (Level VII)
31 The Joint Commission. (2019). Standard UP.01.03.01. Comprehensive
accreditation manual for hospital. Oakbrook Terrace, IL: The Joint
Commission. (Level VII)
32 Siegel, J. D ., et al. (2007, revised 2017). “2007 guideline for isolation
precautions: Preventing transmission of infectious agents in healthcare
settings” [Online]. Accessed via the Web at
https://www.cdc.gov/infectioncontrol/pdf/guidelines/isolation-guidelines.pdf
(Level II)
33 Accreditation Association for Hospitals and Health Systems. (2017). Standard
07.01.10. Healthcare Facilities Accreditation Program: Accreditation
requirements for acute care hospitals. Chicago, IL: Accreditation Association
for Hospitals and Health Systems. (Level VII)
34 Occupational Safety and Health Administration. (n.d .). “Bloodborne
pathogens, standard number 1910.1030” [Online]. Accessed via the Web at
http://www.osha.gov/pls/oshaweb/owadisp.show_document?
p_table=STANDARDS&p_id=10051 (Level VII)
35 Ganz, D. A., et al. (2013). Preventing falls in hospitals: A toolkit for improving
quality of care (AHRQ Publication No. 13-0015-EF). Rockville, MD: Agency for
Healthcare Research and Quality. Accessed via the Web at
https://www.ahrq.gov/sites/default/files/publications/files/fallpxtoolkit_0 .pdf
(Level VII)
36 The Joint Commission. (2019). Standard RC.01.03 .01. Comprehensive
accreditation manual for hospitals. Oakbrook Terrace, IL: The Joint
Commission. (Level VII)
37 Centers for Medicare and Medicaid Services, Department of Health and
Human Services. (2015). Condition of participation: Medical record services.
42 C.F.R. § 482.24(b).
38 Accreditation Association for Hospitals and Health Systems. (2017). Standard
10.00 .03. Healthcare Facilities Accreditation Program: Accreditation
requirements for acute care hospitals. Chicago, IL: Accreditation Association
for Hospitals and Health Systems. (Level VII)
39 DNV GL-Healthcare USA, Inc. (2016). MR.2 .SR.1 . NIAHO® accreditation
requirements: Interpretive guidelines & surveyor guidance (version 11).
Milford, OH: DNV GL-Healthcare USA, Inc. (Level VII)
SHAVING
Performed with a safety or electric razor, shaving is part of
the male patient’s usual daily care. Besides reducing
bacterial growth on the face, shaving promotes patient
comfort by removing facial hair that can itch and irritate the
skin and produce an unkempt appearance. Because nicks
and cuts occur more frequently with a safety razor, shaving
with an electric razor is indicated for a patient with a
clotting disorder or a patient undergoing anticoagulant
therapy. Shaving may be contraindicated in the patient with
a facial skin disorder or wound.
Equipment
For a disposable safety razor
Gloves ▪ soap or shaving cream ▪ bath towel ▪ washcloth ▪
basin ▪ Optional: aftershave lotion.
For an electric or battery-operated razor
Gloves ▪ bath towel ▪ Optional: preshave and aftershave
lotions, mirror, grounded three-pronged plug.
Preparation of equipment
For a safety razor, make sure the blade is sharp, clean,
even, and rust-free. A razor may be used more than once,
but only for the same patient. If the patient is bedridden,
gather the equipment on the bedside stand or overbed
table; if he’s ambulatory, gather it at the sink.
For an electric razor, check its cord for fraying or other
damage that could create an electrical hazard. If the razor
isn’t double-insulated or battery operated, use a grounded
three-pronged plug. Examine the razor head for sharp edges
and dirt. Read the manufacturer’s instructions, if available.
Gather the equipment at the bedside.
Implementation
■ Perform hand hygiene.1,2,3,4,5,6
■ Tell the patient that you’re going to shave him. Ask him to
assist you as much as possible to promote his
independence.
■ Provide privacy.7,8,9,10
■ Unless contraindicated, place the conscious patient in the
high Fowler or semi-Fowler position. If the patient is
unconscious, elevate his head to prevent soap and water or
facial hair from running behind it.
■ Make sure there is adequate lighting.
■ Put on gloves.11,12,13
Using a safety razor
■ Drape a bath towel around the patient’s shoulders, and
tuck it under his chin to protect the bed from moisture and
to catch falling facial hair.
■ Fill the basin with warm water. Using the washcloth, wet
the patient’s entire beard with warm water. Let the warm
cloth soak the beard for at least 1 minute to soften facial
hair.
■ Apply shaving cream or soap to the beard; if you’re using
soap, rub it to form a lather.
■ Gently stretch the patient’s skin taut with one hand and
shave with the other, holding the razor firmly. Ask the
patient to puff his cheeks or turn his head, as necessary, to
shave hard-to-reach areas.
■ Begin at the patient’s sideburns and work toward his chin
using short, firm, downward strokes in the direction of hair
growth (as shown below). This method reduces skin
irritation and helps prevent nicks and cuts.
■ Rinse the razor often to remove facial hair. Apply more
warm water or shaving cream to the patient’s face, as
needed, to maintain adequate lather.
■ Shave across the patient’s chin and up the neck and
throat. Use short, gentle strokes for the neck and the area
around the nose and mouth to avoid skin irritation.
■ Change the water, and rinse any remaining lather and
facial hair from the patient’s face. Then dry his face with a
bath towel and, if the patient desires, apply aftershave
lotion.
■ Rinse the razor, rinse and disinfect the basin as
indicated,14,15 and then return the razor to its storage area
or dispose of it in a sharps container.11
Using an electric or battery-operated razor
■ Drape a bath towel around the patient’s shoulders and
tuck it under his chin to catch falling facial hair.
■ Plug in the razor, if applicable, and apply preshave lotion,
if available, to remove skin oils. If the razor head is
adjustable, select the appropriate setting.
■ Using a circular motion and pressing the razor firmly
against the skin, shave each area of the patient’s face until
smooth.
■ If the patient desires, apply aftershave lotion.
■ Clean the razor head, and return the razor to its storage
area.14,15
Completing the procedure
■ Remove and discard your gloves11,12,13 and perform hand
hygiene.1,2,3,4,5,6
■ Document the procedure.16,17,18,19
Special considerations
■ If the patient is conscious, find out his usual shaving
routine. Although shaving in the direction of hair growth is
most common, the patient may prefer the opposite
direction.
■ Don’t interchange patients’ shaving equipment to prevent
cross-contamination.
■ Be aware of cultural or religious beliefs that may affect
the patient’s desire for routine shaving to be performed.
■ A safety inspection by medical maintenance may need to
be performed before using an electric razor brought from
home.
Complications
Cuts and abrasions are the most common complications of
shaving; folliculitis may also occur.20
Documentation
If applicable, record nicks or cuts resulting from shaving.
REFERENCES
1 The Joint Commission. (2019). Standard NPSG.07.01.01. Comprehensive
accreditation manual for hospitals. Oakbrook Terrace, IL: The Joint
Commission. (Level VII)
2 Centers for Disease Control and Prevention. (2002). Guideline for hand
hygiene in health-care settings: Recommendations of the Healthcare Infection
Control Practices Advisory Committee and the HICPAC/SHEA/APIC/IDSA Hand
Hygiene Task Force. MMWR Recommendations and Reports, 51(RR-16), 1–45.
Accessed via the Web at http://www.cdc.gov/mmwr/pdf/rr/rr5116.pdf (Level II)
3 World Health Organization. (2009). “WHO guidelines on hand hygiene in
health care: First global patient safety challenge, clean care is safer care”
[Online]. Accessed via the Web at
http://apps.who.int/iris/bitstream/10665/44102/1/9789241597906_eng.pdf
(Level IV)
4 Accreditation Association for Hospitals and Health Systems. (2017). Standard
07.01.21. Healthcare Facilities Accreditation Program: Accreditation
requirements for acute care hospitals. Chicago, IL: Accreditation Association
for Hospitals and Health Systems. (Level VII)
5 Centers for Medicare and Medicaid Services, Department of Health and
Human Services. (2015). Condition of participation: Infection control. 42 C.F.R.
§ 482.42.
6 DNV GL-Healthcare USA, Inc. (2016). IC.1.SR.1 . NIAHO® accreditation
requirements: Interpretive guidelines & surveyor guidance (version 11).
Milford, OH: DNV GL-Healthcare USA, Inc. (Level VII)
7 Accreditation Association for Hospitals and Health Systems. (2017). Standard
15.01.16. Healthcare Facilities Accreditation Program: Accreditation
requirements for acute care hospitals. Chicago, IL: Accreditation Association
for Hospitals and Health Systems. (Level VII)
8 Centers for Medicare and Medicaid Services, Department of Health and
Human Services. (2015). Condition of participation: Patient’s rights. 42 C.F.R.
§ 482.13(c)(1).
9 DNV GL-Healthcare USA, Inc. (2016). PR.1 .SR.5 . NIAHO® accreditation
requirements: Interpretive guidelines & surveyor guidance (version 11).
Milford, OH: DNV GL-Healthcare USA, Inc. (Level VII)
10 The Joint Commission. (2019). Standard RI.01.01.01. Comprehensive
accreditation manual for hospitals. Oakbrook Terrace, IL: The Joint
Commission. (Level VII)
11 Occupational Safety and Health Administration. (n.d .). “Bloodborne
pathogens, standard 1910.1030” [Online]. Accessed via the Web at
https://www.osha.gov/pls/oshaweb/owadisp.show_document?
p_id=10051&p_table=STANDARDS (Level VII)
12 Accreditation Association for Hospitals and Health Systems. (2017). Standard
07.01.10. Healthcare Facilities Accreditation Program: Accreditation
requirements for acute care hospitals. Chicago, IL: Accreditation Association
for Hospitals and Health Systems. (Level VII)
13 Siegel, J. D ., et al. (2007, revised 2017). “2007 guideline for isolation
precautions: Preventing transmission of infectious agents in healthcare
settings” [Online]. Accessed via the Web at
https://www.cdc.gov/infectioncontrol/pdf/guidelines/isolation-guidelines.pdf
(Level II)
14 Rutala, W. A. (2008). “Guideline for disinfection and sterilization in healthcare
facilities, 2008” [Online]. Accessed via the Web at
http://www.cdc.gov/hicpac/pdf/guidelines/Disinfection_Nov_2008.pdf (Level I)
15 Accreditation Association for Hospitals and Health Systems. (2017). Standard
07.02.03. Healthcare Facilities Accreditation Program: Accreditation
requirements for acute care hospitals. Chicago, IL: Accreditation Association
for Hospitals and Health Systems. (Level VII)
16 Centers for Medicare and Medicaid Services, Department of Health and
Human Services. (2015). Condition of participation: Medical record services.
42 C.F.R. § 482.24(b).
17 Accreditation Association for Hospitals and Health Systems. (2017). Standard
10.00 .03. Healthcare Facilities Accreditation Program: Accreditation
requirements for acute care hospitals. Chicago, IL: Accreditation Association
for Hospitals and Health Systems. (Level VII)
18 The Joint Commission. (2019). Standard RC.01.03 .01. Comprehensive
accreditation manual for hospitals. Oakbrook Terrace, IL: The Joint
Commission. (Level VII)
19 DNV GL-Healthcare USA, Inc. (2016). MR.2 .SR.1 . NIAHO® accreditation
requirements: Interpretive guidelines & surveyor guidance (version 11).
Milford, OH: DNV GL-Healthcare USA, Inc. (Level VII)
20 Goldstein, B. G., & Goldstein, A. O. Pseudofolliculitis barbae. (2015). In:
UpToDate, Dellavalle, R. P., et al. (Eds.). Retrieved from: www.uptodate.com
SITZ BATH
A sitz bath involves immersion of the pelvic area in warm or
hot water. It is used to relieve discomfort, especially after
perineal or rectal surgery or childbirth. The bath promotes
wound healing by cleaning the perineum and anus,
increasing circulation, and reducing inflammation. It also
helps relax local muscles.
To be performed correctly, the sitz bath requires frequent
checks of water temperature to ensure safety, comfort, and
therapeutic effects. Correct draping of the patient during
and prompt dressing after the bath help prevent
vasoconstriction.
Equipment
Sitz tub, portable sitz bath, or regular bathtub ▪ bath mat ▪
rubber mat ▪ bath (utility) thermometer ▪ two bath blankets
▪ towels ▪ patient gown ▪ facility-approved disinfectant ▪
gloves ▪ Optional: rubber ring, footstool, overbed table, IV
pole (to hold irrigation bag), wheelchair or stretcher, wound
dressings, personal protective equipment, blood pressure
monitoring device, stethoscope, watch or clock with a
second hand.
A portable sitz bath kit is available in a commercial
disposable kit for single-patient use. The kit includes a
plastic basin that fits over a commode and an irrigation bag
with tubing and clamp.
Preparation of equipment
Make sure the sitz tub, portable sitz bath, or regular bathtub
is clean and disinfected. As an alternative, obtain a
disposable sitz bath kit from the central supply department.
Sitz bath and regular bathtub
Position the bath mat next to the bathtub, sitz tub, or
commode. If you’re using a tub, place the rubber mat on its
surface to prevent falls. Place the rubber ring on the bottom
of the tub to serve as a seat for the patient, and cover the
ring with a towel for comfort. Keep the patient elevated to
improve water flow over the wound site and to avoid
unnecessary pressure on tender tissues.
Fill the sitz tub or bathtub one-third to one-half full so that
the water will reach the seated patient’s umbilicus. Use
warm water (94° to 98°F [34.4° to 36.7°C]) for relaxation or
wound cleaning and healing, and hot water (110° to 115°F
[43.3° to 46.1°C]) for heat application. Run the water
slightly warmer than desired, because it will cool while the
patient prepares for the bath. Measure the water
temperature using the bath thermometer.
Commercial sitz bath kit
Open the package and familiarize yourself with the
equipment.
Fill the basin to the specified line with water at the
prescribed temperature. Place the basin under the
commode seat, clamp the irrigation tubing to block water
flow, and fill the irrigation bag with water of the same
temperature as that in the basin. To create flow pressure,
hang the bag above the patient’s head on a hook, towel
rack, or IV pole.
Implementation
■ Gather and prepare the necessary equipment.
■ Verify the practitioner’s order.
■ Perform hand hygiene.1,2,3,4,5,6
■ Confirm the patient’s identity using at least two patient
identifiers.7,8
■ Explain the procedure according to the patient’s
individual communication and learning needs to increase
the patient’s understanding, allay fears, and enhance
cooperation.9 Answer any questions about the sitz bath.
■ Assess the patient’s condition.
■ Instruct the patient to void.
■ Assist the patient to the bath area.
■ Provide privacy.10,11,12,13
■ Make sure that the area is warm and free from drafts.
■ Help the patient undress, as needed.
■ Perform hand hygiene.1,2,3,4,5,6
■ Put on gloves and, as needed, other personal protective
equipment to comply with standard precautions.14,15,16
■ Remove and dispose of any soiled dressings.15 If a
dressing adheres to a wound, allow it to soak off in the
water.
■ Assist the patient into the tub or onto the commode, as
needed. Instruct the patient to use the safety rail for
balance.
■ Explain that the sensation may be unpleasant initially
because the wound area is already tender. Assure the
patient that this discomfort will soon be relieved by the
warm water.
■ For any apparatus except a regular bathtub: if the
patient’s feet don’t reach the floor and the weight of the
legs presses against the edge of the equipment, place a
small stool under the patient’s feet to decrease pressure on
local blood vessels. Also place a folded towel against the
patient’s lower back to prevent discomfort and promote
correct body alignment.
■ Drape the patient’s shoulders and knees with bath
blankets to avoid chills that may cause vasoconstriction.
■ If you’re using a sitz tub or bathtub, check the water
temperature frequently with the bath thermometer. If the
temperature drops significantly, add warm water. For
maximum safety, first help the patient stand up slowly to
prevent dizziness and loss of balance. Then, with the patient
holding the safety rail for support, run warm water into the
tub. Check water temperature. When the water reaches the
correct temperature, help the patient sit down again to
resume the bath.
■ If you’re using a commercial sitz bath kit, open the clamp
on the irrigation tubing to allow a stream of water to flow
continuously over the wound site. Refill the bag with water
of the correct temperature as needed, and encourage the
patient to regulate the flow. Place the patient’s overbed
table in front of the patient to provide support and comfort.
■ If necessary, stay with the patient during the bath. If you
must leave, place the call light within the patient’s reach,
show the patient how to use it, and ensure privacy.
■ Assess the patient’s color and general condition
frequently. If the patient complains of feeling weak, faint, or
nauseated or shows signs of cardiovascular distress,
discontinue the bath, check the patient’s pulse and blood
pressure, and assist the patient back to bed. Use a
wheelchair or stretcher to transport the patient to his or her
room if necessary, and notify the practitioner.
■ When the prescribed sitz bath time has elapsed—usually
15 to 20 minutes—tell the patient to use the safety rail for
balance, and help the patient to a standing position, moving
slowly to prevent dizziness and to allow the patient to regain
equilibrium.
■ If necessary, help the patient to dry.
■ Remove and discard your gloves.14,15
■ Perform hand hygiene1,2,3,4,5,6 and put on a new pair of
gloves.14,15
■ Redress the wound as needed.
■ Provide the patient with a clean gown, and help the
patient dress and return to bed or back to the room.
■ Dispose of soiled materials properly.15
■ Empty, clean, and disinfect the sitz tub, bathtub, or
portable sitz bath using a facility-approved disinfectant.16,17
Return the commercial sitz bath kit to the patient’s bedside
for later use.
■ Remove and discard your gloves and other personal
protective equipment, if worn,14,15 and perform hand
hygiene.1,2,3,4,5,6
■ Document the procedure.18,19,20,21
Special considerations
■ Use a regular bathtub only if a sitz tub, portable sitz bath,
or commercial sitz bath kit is unavailable. A regular bathtub
is less effective for local treatment than a sitz device, and
should be avoided, because the application of heat to the
extremities causes vasodilation and draws blood away from
the perineal area.
■ If the patient will be sitting in a bathtub with the
extremities immersed in the hot water, check the patient’s
pulse before, during, and after the bath to help detect
vasodilation that could make the patient feel faint when
standing up.
■ Tell the patient never to touch an open wound because of
the risk of infection.
Patient teaching
Teach the patient who will continue sitz baths at home how
to perform a sitz bath and how to care for the equipment.
Complications
Weakness or faintness can result from heat or the exertion
of changing position during a sitz bath. An irregular or
accelerated pulse may indicate cardiovascular distress.
Documentation
Record the date, time, duration, and temperature of the
bath; wound condition before and after treatment, including
color, odor, and amount of drainage; any complications,
your interventions, and the patient’s response to your
interventions; and the patient’s response to treatment. Also
document any teaching you provided and the patient’s
understanding of your teaching.
REFERENCES
1 The Joint Commission. (2019). Standard NPSG.07.01.01. Comprehensive
accreditation manual for hospitals. Oakbrook Terrace, IL: The Joint
Commission. (Level VII)
2 Centers for Disease Control and Prevention. (2002). Guideline for hand
hygiene in health-care settings: Recommendations of the Healthcare Infection
Control Practices Advisory Committee and the HICPAC/SHEA/APIC/IDSA Hand
Hygiene Task Force. MMWR Recommendations and Reports, 51(RR-16), 1–45.
Accessed via the Web at https://www.cdc.gov/mmwr/pdf/rr/rr5116.pdf (Level
II)
3 World Health Organization. (2009). “WHO guidelines on hand hygiene in
health care: First global patient safety challenge, clean care is safer care”
[Online]. Accessed via the Web at
http://apps.who.int/iris/bitstream/10665/44102/1/9789241597906_eng.pdf
(Level IV)
4 Accreditation Association for Hospitals and Health Systems. (2017). Standard
07.01.21. Healthcare Facilities Accreditation Program: Accreditation
requirements for acute care hospitals. Chicago, IL: Accreditation Association
for Hospitals and Health Systems. (Level VII)
5 Centers for Medicare and Medicaid Services, Department of Health and
Human Services. (2015). Condition of participation: Infection control. 42 C.F.R.
§ 482.42.
6 DNV GL-Healthcare USA, Inc. (2016). IC.1.SR.1 . NIAHO® accreditation
requirements: Interpretive guidelines & surveyor guidance (version 11).
Milford, OH: DNV GL-Healthcare USA, Inc. (Level VII)
7 The Joint Commission. (2019). Standard NPSG.01.01.01. Comprehensive
accreditation manual for hospitals. Oakbrook Terrace, IL: The Joint
Commission. (Level VII)
8 Accreditation Association for Hospitals and Health Systems. (2017). Standard
30.00 .14. Healthcare Facilities Accreditation Program: Accreditation
requirements for acute care hospitals. Chicago, IL: Accreditation Association
for Hospitals and Health Systems. (Level VII)
9 The Joint Commission. (2019). Standard PC.02.01.21. Comprehensive
accreditation manual for hospitals. Oakbrook Terrace, IL: The Joint
Commission. (Level VII)
10 Centers for Medicare and Medicaid Services, Department of Health and
Human Services. (2015). Condition of participation: Patient’s rights. 42 C.F.R.
§ 482.13(c)(1).
11 Accreditation Association for Hospitals and Health Systems. (2017). Standard
15.01.16. Healthcare Facilities Accreditation Program: Accreditation
requirements for acute care hospitals. Chicago, IL: Accreditation Association
for Hospitals and Health Systems. (Level VII)
12 DNV GL-Healthcare USA, Inc. (2016). PR.1.SR.5 . NIAHO® accreditation
requirements: Interpretive guidelines & surveyor guidance (version 11).
Milford, OH: DNV GL-Healthcare USA, Inc. (Level VII)
13 The Joint Commission. (2019). Standard RI.01.01.01. Comprehensive
accreditation manual for hospitals. Oakbrook Terrace, IL: The Joint
Commission. (Level VII)
14 Siegel, J. D ., et al. (2007, revised 2017). “2007 guideline for isolation
precautions: Preventing transmission of infectious agents in healthcare
settings” [Online]. Accessed July 2017 via the Web at
https://www.cdc.gov/hicpac/pdf/isolation/Isolation2007.pdf (Level II)
15 Occupational Safety and Health Administration. (n.d .). “Bloodborne
pathogens, standard number 1910.1030” [Online]. Accessed via the Web at
http://www.osha.gov/pls/oshaweb/owadisp.show_document?
p_id=10051&p_table=STANDARDS (Level VII)
16 Rutala, W. A., et al. (2008, revised 2017). “Guideline for disinfection and
sterilization in healthcare facilities, 2008” [Online]. Accessed via the Web at
https://www.cdc.gov/hicpac/pdf/guidelines/Disinfection_Nov_2008.pdf (Level I)
17 Accreditation Association for Hospitals and Health Systems. (2017). Standard
07.02.03. Healthcare Facilities Accreditation Program: Accreditation
requirements for acute care hospitals. Chicago, IL: Accreditation Association
for Hospitals and Health Systems. (Level VII)
18 The Joint Commission. (2019). Standard RC.01.03 .01. Comprehensive
accreditation manual for hospitals. Oakbrook Terrace, IL: The Joint
Commission. (Level VII)
19 Accreditation Association for Hospitals and Health Systems. (2017). Standard
10.00 .03. Healthcare Facilities Accreditation Program: Accreditation
requirements for acute care hospitals. Chicago, IL: Accreditation Association
for Hospitals and Health Systems. (Level VII)
20 Centers for Medicare and Medicaid Services, Department of Health and
Human Services. (2015). Condition of participation: Medical record services.
42 C.F.R. § 482.24(b).
21 DNV GL-Healthcare USA, Inc. (2016). MR.2 .SR.1 . NIAHO® accreditation
requirements: Interpretive guidelines & surveyor guidance (version 11).
Milford, OH: DNV GL-Healthcare USA, Inc. (Level VII)
SKIN BIOPSY
Skin biopsy is a diagnostic test in which a small piece of
tissue is removed, under local anesthesia, from a lesion
that’s suspected of being malignant, or from another
dermatosis.
One of three techniques may be used: shave biopsy,
punch biopsy, or excisional biopsy. Shave biopsy cuts the
lesion above the skin line, which allows further biopsy of the
site. Punch biopsy removes an oval or round core plug from
the center of the lesion. Excisional biopsy removes the
entire lesion and is indicated for rapidly expanding lesions;
malignant or dysplastic tissue; cases in which the margins
of the skin surrounding the lesion need to be clear; sclerotic,
bullous, or atrophic lesions; and examining the border of a
lesion surrounding normal skin.
Lesions suspected of being malignant usually have
changed in color, size, or appearance or have failed to heal
properly. (See The ABCDEs of malignant melanoma.)1 Fully
developed lesions should be selected for biopsy whenever
possible because they provide more diagnostic information
than lesions that are resolving or in early stages of
development. For example, if the skin shows blisters, the
biopsy should include the most mature blisters.
Normal skin consists of squamous epithelium (epidermis)
and fibrous connective tissue (dermis). Benign growths
include cysts, seborrheic keratoses, warts, pigmented nevi
(moles), keloids, dermatofibromas, and neurofibromas.
Malignant tumors include dysplastic nevi, basal cell
carcinoma, squamous cell carcinoma, and malignant
melanoma.
Equipment
Gloves ▪ sterile gloves ▪ #15 scalpel for shave or excisional
biopsy ▪ antiseptic agent (isopropyl alcohol, povidone-iodine
solution, or chlorhexidine) ▪ punch for punch biopsy ▪ local
anesthetic ▪ sterile specimen bottle containing 10%
formaldehyde solution or other preservative2 ▪ 3-0, 4-0, or
5-0 sutures for punch or excisional biopsy ▪ adhesive
bandage ▪ sterile forceps ▪ adhesive strips ▪ labels ▪
laboratory request form ▪ laboratory biohazard transport
bag ▪ Optional: topical hemostatic agent, analgesics.2
Preparation of equipment
Some biopsy specimens require special fixation techniques
and may need to be delivered to the laboratory in different
preservative fluids. Consult your facility’s pathologist if you
are unsure of any required techniques.2
Implementation
■ Verify the practitioner’s order.
■ Confirm that the patient’s informed consent has been
obtained and that the consent form is in the patient’s
medical record.3,4,5,6
■ Check the patient’s history for hypersensitivity to latex or
to the local anesthetic.
■ Gather the appropriate equipment.
■ Perform hand hygiene.7,8,9,10,11,12
■ Confirm the patient’s identity using at least two patient
identifiers.13
■ Provide privacy.14,15,16,17
■ Reinforce the practitioner’s explanation of the procedure.
Explain to the patient that the biopsy provides a skin
specimen for microscopic study. Describe the procedure,
and tell the patient who will perform it. Answer any
questions that the patient may have to ease anxiety and
ensure cooperation.
■ Inform the patient that it’s not necessary to restrict food
or fluids.
■ Tell the patient that a local anesthetic will be given for
pain.
■ Inform the patient that the biopsy will take about 15
minutes and that the test results are usually available within
7 days, depending on the facility.
■ Perform hand hygiene.7,8,9,10,11,12
■ Put on gloves to comply with standard precautions.18,19
■ Label all medications, medication containers, and other
solutions on and off the sterile field.20
■ Position the patient comfortably, and clean the skin with
an antiseptic agent, such as isopropyl alcohol, povidone-
iodine solution, or chlorhexidine,21 before the practitioner
administers the local anesthetic.
■ Assist with the biopsy procedure, as needed.
■ The practitioner performs hand hygiene and puts on
sterile gloves.
■ For a shave biopsy, the practitioner cuts the growth off at
the skin line with a #15 scalpel and immediately places the
tissue in a properly labeled specimen bottle containing 10%
formaldehyde solution. Apply pressure to the biopsy area to
stop bleeding. Apply an adhesive bandage.
■ For a punch biopsy, the practitioner pulls the skin
surrounding the lesion taut, introduces the punch into the
lesion firmly, and rotates the punch to obtain a tissue
specimen. The practitioner lifts the plug with forceps or a
needle and severs as deeply into the fat layer as possible.
The practitioner then places the specimen in a properly
labeled specimen bottle containing 10% formaldehyde
solution or a sterile container if indicated. After the
procedure, the practitioner closes the wound according to
the size of the punch; the wound may require an adhesive
bandage alone or sutures.
■ For an excisional biopsy, the practitioner uses a #15
scalpel to excise the lesion; the practitioner makes the
incision as wide and as deep as necessary. The practitioner
removes the tissue specimen and places it immediately in a
properly labeled specimen bottle containing 10%
formaldehyde solution. The practitioner applies pressure to
the site to stop bleeding and then closes the wound
according to the location of the biopsy. If the incision is
large, it may need skin grafting; if it’s small, adhesive strips
may be sufficient.
NURSING ALERT Handle biopsy specimens carefully to minimize
injury and excess tissue drying that may interfere with histopathologic
evaluation.2
■ Check the biopsy site for bleeding. Apply a topical
hemostatic agent as needed.2
■ Remove and discard your gloves18,19 and perform hand
hygiene.7,8,9,10,11,12
■ Label the specimen container in the presence of the
patient to prevent mislabeling and send it to the laboratory
immediately.11
■ If the patient experiences pain, administer analgesics as
prescribed following safe medication administration
practices.22,23,24
■ Perform hand hygiene.7,8,9,10,11,12
■ Document the procedure.25,26,27,28
Special considerations
■ Shave biopsies aren’t recommended for suspected
melanomas.
Patient teaching
Advise the patient going home with sutures to keep the area
clean and as dry as possible for 24 hours. Tell the patient
that facial sutures will be removed in 3 to 5 days and trunk
sutures in 7 to 14 days. Instruct the patient with adhesive
strips to leave them in place for 14 to 21 days or until they
fall off. After a shave biopsy, instruct the patient to apply an
antibiotic ointment daily until the wound heals, or to use
transparent wound dressings.2 Instruct the patient to report
signs and symptoms of infection—including redness,
swelling, pain, discharge from the wound, and skin that’s
warm or hot—to the practitioner as soon as possible.
Complications
Possible complications may include bleeding and infection of
the surrounding tissue as well as subsequent scar formation.
Documentation
Document the time of the biopsy, the site from which the
specimen was obtained, the appearance of the specimen
and site, and whether bleeding occurred at the biopsy site.
Document patient teaching provided.
REFERENCES
1 The Skin Cancer Foundation. (n.d .). “Melanoma” [Online]. Accessed via the
Web at http://www.skincancer.org/skin-cancer-information/melanoma
2 Zuber, T. J . (2012). Skin biopsy techniques: When and how to perform shave
and excisional biopsy. Consultant, 52(7), 522–526. Accessed via the Web at
http://www.consultant360.com/article/skin-biopsy-techniques-when-and-how-
perform-shave-and-excisional-biopsy
3 Accreditation Association for Hospitals and Health Systems. (2017). Standard
30.01.11. Healthcare Facilities Accreditation Program: Accreditation
requirements for acute care hospitals. Chicago, IL: Accreditation Association
for Hospitals and Health Systems. (Level VII)
4 Centers for Medicare and Medicaid Services, Department of Health and
Human Services. (2015). Condition of participation: Patient’s rights. 42 C.F.R.
§ 482.13(b)(2).
5 The Joint Commission. (2019). Standard RI.01.03 .01. Comprehensive
accreditation manual for hospitals. Oakbrook Terrace, IL: The Joint
Commission. (Level VII)
6 DNV GL-Healthcare USA, Inc. (2016). PR.1 .SR.3 . NIAHO® accreditation
requirements: Interpretive guidelines & surveyor guidance (version 11).
Milford, OH: DNV GL-Healthcare USA, Inc. (Level VII)
7 The Joint Commission. (2019). Standard NPSG.07.01.01. Comprehensive
accreditation manual for hospitals. Oakbrook Terrace, IL: The Joint
Commission. (Level VII)
8 Centers for Disease Control and Prevention. (2002). Guideline for hand
hygiene in health-care settings: Recommendations of the Healthcare Infection
Control Practices Advisory Committee and the HICPAC/SHEA/APIC/IDSA Hand
Hygiene Task Force. MMWR Recommendations and Reports, 51(RR-16), 1–45.
Accessed via the Web at https://www.cdc.gov/mmwr/pdf/rr/rr5116.pdf (Level
II)
9 World Health Organization. (2009). “WHO guidelines on hand hygiene in
health care: First global patient safety challenge, clean care is safer care”
[Online]. Accessed via the Web at
http://apps.who.int/iris/bitstream/10665/44102/1/9789241597906_eng.pdf
(Level IV)
10 Accreditation Association for Hospitals and Health Systems. (2017). Standard
07.01.21. Healthcare Facilities Accreditation Program: Accreditation
requirements for acute care hospitals. Chicago, IL: Accreditation Association
for Hospitals and Health Systems. (Level VII)
11 Centers for Medicare and Medicaid Services, Department of Health and
Human Services. (2015). Condition of participation: Infection control. 42 C.F.R.
§ 482.42.
The ABCDEs of malignant
melanoma1
Keep in mind the ABCDE rule to help you remember the warning signs of
malignant melanoma.
ASYMMETRY: One half of a mole or birthmark doesn’t match the other.
BORDER: The edges are irregular, ragged, notched, or blurred.
COLOR: The pigmentation isn’t uniform; it may have varying degrees of brown,
black, or sometimes red.
DIAMETER: The diameter is greater than 1⁄4” (6 mm), about the size of a pencil
eraser. There’s a sudden or progressive increase in size.
EVOLVING: The size, shape, color, elevation, or another trait has changed, or a
new sign or symptom, such as bleeding, itching, or crusting, has developed.
12 DNV GL-Healthcare USA, Inc. (2016). IC.1 .SR.1 . NIAHO® accreditation
requirements: Interpretive guidelines & surveyor guidance (version 11).
Milford, OH: DNV GL-Healthcare USA, Inc. (Level VII)
13 The Joint Commission. (2019). Standard NPSG.01.01.01. Comprehensive
accreditation manual for hospitals. Oakbrook Terrace, IL: The Joint
Commission. (Level VII)
14 DNV GL-Healthcare USA, Inc. (2016). PR.1.SR.5 . NIAHO® accreditation
requirements: Interpretive guidelines & surveyor guidance (version 11).
Milford, OH: DNV GL-Healthcare USA, Inc. (Level VII)
15 Centers for Medicare and Medicaid Services, Department of Health and
Human Services. (2015). Condition of participation: Patient’s rights. 42 C.F.R.
§ 482.13(c)(1).
16 Accreditation Association for Hospitals and Health Systems. (2017). Standard
15.01.16. Healthcare Facilities Accreditation Program: Accreditation
requirements for acute care hospitals. Chicago, IL: Accreditation Association
for Hospitals and Health Systems. (Level VII)
17 The Joint Commission. (2019). Standard RI.01.01.01. Comprehensive
accreditation manual for hospitals. Oakbrook Terrace, IL: The Joint
Commission. (Level VII)
18 Accreditation Association for Hospitals and Health Systems. (2017). Standard
07.01.10. Healthcare Facilities Accreditation Program: Accreditation
requirements for acute care hospitals. Chicago, IL: Accreditation Association
for Hospitals and Health Systems. (Level VII)
19 Siegel, J. D ., et al. (2007, revised 2017). “2007 guideline for isolation
precautions: Preventing transmission of infectious agents in healthcare
settings” [Online]. Accessed via the Web at
https://www.cdc.gov/infectioncontrol/pdf/guidelines/isolation-guidelines.pdf
(Level II)
20 The Joint Commission. (2019). Standard NPSG.03 .04.01. Comprehensive
accreditation manual for hospitals. Oakbrook Terrace, IL: The Joint
Commission. (Level VII)
21 Zuber, T. J . (2012). Skin biopsy techniques: When and how to perform punch
biopsy. Consultant360, 52(6), 462–465. Accessed via the Web at
http://www.consultant360.com/article/skin-biopsy-techniques-when-and-how-
perform-punch-biopsy
22 Accreditation Association for Hospitals and Health Systems. (2017). Standard
16.01.03. Healthcare Facilities Accreditation Program: Accreditation
requirements for acute care hospitals. Chicago, IL: Accreditation Association
for Hospitals and Health Systems. (Level VII)
23 Centers for Medicare and Medicaid Services, Department of Health and
Human Services. (2015). Condition of participation: Nursing services. 42
C.F.R. § 482.23(c).
24 DNV GL-Healthcare USA, Inc. (2016). MM.1 .SR.2. NIAHO® accreditation
requirements: Interpretive guidelines & surveyor guidance (version 11).
Milford, OH: DNV GL-Healthcare USA, Inc. (Level VII)
25 Centers for Medicare and Medicaid Services, Department of Health and
Human Services. (2015). Condition of participation: Medical record services.
42 C.F.R. § 482.24(b).
26 Accreditation Association for Hospitals and Health Systems. (2017). Standard
10.00 .03. Healthcare Facilities Accreditation Program: Accreditation
requirements for acute care hospitals. Chicago, IL: Accreditation Association
for Hospitals and Health Systems. (Level VII)
27 The Joint Commission. (2019). Standard RC.01.03 .01. Comprehensive
accreditation manual for hospitals. Oakbrook Terrace, IL: The Joint
Commission. (Level VII)
28 DNV GL-Healthcare USA, Inc. (2016). MR.2 .SR.1 . NIAHO® accreditation
requirements: Interpretive guidelines & surveyor guidance (version 11).
Milford, OH: DNV GL-Healthcare USA, Inc. (Level VII)
SKIN GRAFT CARE
A skin graft consists of healthy skin taken either from the
patient (autograft) or a donor (allograft) and applied to the
patient’s body to resurface an area damaged by burns,
traumatic injury, chronic nonhealing cutaneous ulcers, or
surgery (for
example
removal
of
cutaneous
malignancies).1,2 The procedures for caring for both types of
grafts are essentially the same. However, an autograft
requires care for two sites: the graft site and the donor site.
The graft itself may be one of several types: split-
thickness, full-thickness, or pedicle-flap. (See Understanding
types of grafts.) Successful grafting depends on various
factors, including clean wound granulation with adequate
vascularization, complete contact of the graft with the
wound bed, sterile technique to prevent infection, adequate
graft immobilization, and skilled care.
The size and depth of a wound determine whether it
requires grafting. Grafting usually occurs at the completion
of wound debridement. The goal is to cover all wounds with
an autograft or allograft within 2 weeks. With enzymatic
debridement, grafting may be performed 5 to 7 days after
debridement is complete; with surgical debridement,
grafting can occur the same day as surgery.
Traditionally, petroleum gauze dressings have been used
to cover skin graft sites, but this practice isn’t currently
recommended, because these dressings form a poor
bacterial barrier, thereby increasing the risk of infection.
Various dressings are available to cover skin graft and donor
sites; these dressings have been evaluated based on their
clinical efficacy, the number of dressing changes required
for optimal healing, patient reports of pain with application
and removal, and health care provider preference. Examples
of materials used include paraffin gauze-based,
hydrocolloid, alginate, semipermeable film, silicone, and
hydrofiber dressings.2,5,6,7 Initial skin graft dressings are
applied in the operating room and covered with elastic
gauze or a compression bandage to promote hemostasis
and minimize exudate. Splints may also be applied, if
needed, to immobilize and protect the grafted area.8
A practitioner or a specially trained nurse may change
graft dressings. The dressings usually stay in place for 3 to 5
days after surgery to avoid disturbing the graft site.
The skin graft donor site also requires diligent care. (See
How to care for a donor graft site.)
Equipment
Prescribed analgesic ▪ gloves ▪ sterile gloves ▪ sterile gown
▪ cap ▪ mask ▪ sterile forceps ▪ sterile scissors ▪ sterile 4′′
× 4′′ (10-cm × 10-cm) gauze pads ▪ prescribed skin graft
dressing ▪ elastic gauze or compression dressing ▪ warm
normal saline solution ▪ moisturizing cream ▪ topical
medication (such as micronized silver sulfadiazine cream) ▪
Optional: sterile cotton-tipped applicators, sterile scalpel,
sterile skin compresses, supplies for wound specimen
collection.
Preparation of equipment
Check any item that has an expiration date to ensure that it
hasn’t expired. If a product is expired, if its integrity is
compromised, or if you find that it’s defective, remove it
from patient use, label it as expired or defective, and report
the expiration or defect as directed by your facility.
Implementation
■ Verify the practitioner’s order.
■ Gather the equipment.
■ Perform hand hygiene.9,10,11,12,13,14
■ Prepare a sterile field and, using sterile technique, set up
the supplies on the sterile field.
■ Label all medications, medication containers, and
solutions on and off the sterile field.17,18
■ Confirm the patient’s identity using at least two patient
identifiers.19
■ Provide privacy.20,21,22
■ Explain the procedure to the patient and family (if
appropriate) according to their individual communication
and learning needs to increase understanding, allay fears,
and enhance cooperation.20,21,22,23,24
■ Screen and assess the patient’s pain using facility-defined
criteria that are consistent with the patient’s age, condition,
and ability to understand.25
■ Treat the patient’s pain as needed and ordered using
nonpharmacologic or pharmacologic approaches, or a
combination of approaches. Base the treatment plan on
evidence-based practices and the patient’s clinical
condition, past medical history, and pain management
goals.25
■ Administer an oral analgesic, as ordered, at an
appropriate time (depending on the medication’s peak and
onset of action) before beginning the procedure.
Alternatively, give an IV analgesic immediately before the
procedure. Follow safe medication administration practices
when administering these medications.26,27,28,29
■ If the patient is receiving IV opioid medication, frequently
monitor vital signs, respiratory status, and sedation level to
promptly recognize and treat oversedation and respiratory
depression related to IV opioid use. Explain the monitoring
process to the patient and family (including that it may be
necessary to awaken the patient to assess the effects of
medication). Advise the patient and family to alert a staff
member immediately if breathing problems or other
changes occur that might be a reaction to the
medication.28,29,30
■ Raise the patient’s bed to waist level while providing
direct patient care to prevent caregiver back strain.31
■ Remove the patient’s splint if worn.
■Putonacapandmask.
■ Perform hand hygiene.9,10,11,12,13,14
■ Put on a sterile gown and gloves.15,16
■ Gently lift off all outer dressings.
■ Soak the middle dressings with warm saline solution to
make their removal easier, and then remove them carefully
and slowly to avoid disturbing the graft site.
■ Remove and discard your gloves.15,16
■ Perform hand hygiene.9,10,11,12,13,14
■ Put on the sterile gloves.15,16
■ Assess the condition of the graft. Estimate the percentage
of skin graft that has adhered successfully to the wound
bed.2 Also assess for signs of infection. Notify the
practitioner if you note purulent drainage. Obtain a wound
culture if ordered. (See the “Swab specimen collection”
procedure, page 733.)
■ If ordered, remove the inner graft dressing with sterile
forceps, and clean the area gently. If necessary, soak the
dressing with warm normal saline solution to ease
removal.32
■ Inspect an allograft for signs of rejection, such as
infection and delayed healing. Inspect a sheet graft
frequently for blebs; if ordered, evacuate them carefully
with a sterile scalpel. If the sheet graft has been in place for
less than 48 hours and the fluid is near the edge of the
graft, gently roll the fluid to the edge and out from under
the graft using sterile cotton-tipped applicators.32 (See
Evacuating fluid from a sheet graft, page 700.)
■ Apply topical medication if ordered, following safe
medication administration practices.26,27,28,29
■ If you removed the dressing, place a new prescribed
dressing over the site to promote wound healing and
prevent infection.32 Use sterile scissors to cut the new
dressing to the appropriate size.
■ Cover the inner dressing with sterile 4′′ × 4′′ (10-cm × 10-
cm) gauze and elastic gauze dressing or a compression
bandage.
■ Clean the splint and reapply it, if indicated.
■ Assess the donor site, if the patient received an autograft.
■ Clean any completely healed areas, and apply prescribed
moisturizing cream to them to keep the skin pliable and to
retard scarring.32
■ Discard used equipment and supplies in appropriate
receptacles.15,16
■ Remove and discard your gloves, gown, mask, and
cap.15,16
■ Perform hand hygiene.9,10,11,12,13,14
■ Return the bed to the lowest position to prevent falls and
maintain patient safety.33
■ Reassess and respond to the patient’s pain by evaluating
the response to treatment and progress toward pain
management goals. Assess for adverse reactions and risk
factors for adverse events that may result from treatment.25
■ Perform hand hygiene.9,10,11,12,13,14
■ Document the procedure.34,35,36,37
Special considerations
■ Discontinue hydrotherapy 3 to 4 days after grafting, as
ordered by the practitioner, to avoid dislodging the graft.
Avoid using a blood pressure cuff over the graft. Don’t tug or
pull dressings during dressing changes. Keep the patient
from lying on the graft.
■ If the graft dislodges, apply sterile skin compresses to
keep the area moist until the surgeon reapplies the graft. If
the graft affects an arm or a leg, elevate the affected
extremity to reduce postoperative edema. Check for
bleeding and signs and symptoms of neurovascular
impairment, such as increasing pain, numbness or tingling,
coolness, and pallor.
■ Apply negative pressure to the graft site, if ordered,
because recent research demonstrates that applying topical
negative pressure increases the quantity and quality of split
skin graft success compared with traditional dressings.8,38,39
(See “Negative-pressure wound therapy,” page 534.)
■ The patient is generally allowed to shower after the fifth
postoperative day at the practitioner’s discretion.
Patient teaching
Teach the patient about graft and donor site care, including
how to apply moisturizing cream to healed areas. Stress the
importance of using a sunscreen containing titanium dioxide
or oxybenzone and with a sun protection factor of 20 or
higher on all grafted areas to avoid sunburn and
discoloration.
Complications
Graft failure may result from traumatic injury, hematoma or
seroma formation, infection, an inadequate graft bed,
rejection, mechanical shearing force, or compromised
nutritional status.8
Understanding types of grafts
A patient may receive one or more of the graft types described below, based
on the location, thickness, extent, and aesthetic concerns of the area that
requires grafting.
Split-thickness graft
A split-thickness graft includes the epidermis and part of the dermis.2 It may
be applied as a sheet (usually on the face or neck to preserve the cosmetic
result) or as a mesh. A mesh graft has tiny slits cut in it, which allow the graft
to expand up to nine times its original size. Mesh grafts prevent fluids from
collecting under the graft and typically are used over extensive full-thickness
burns. A split-thickness graft is used most commonly for covering open burns
or areas of extensive skin loss (other than the face).3
Full-thickness graft
A full-thickness graft includes the epidermis and the entire dermis.2
Consequently, the graft contains hair follicles, sweat glands, and sebaceous
glands, which typically aren’t included in split-thickness grafts. Full-thickness
grafts usually are used for small burns that cause deep wounds and for
visible areas of the face, hands, and joints, because they undergo less
contraction while healing.4
Pedicle-flap graft
A pedicle-flap graft includes not only skin and subcutaneous tissue but also
subcutaneous blood vessels to ensure a continued blood supply to the graft.
Pedicle-flap grafts may be used during reconstructive surgery to cover
previous defects.
How to care for a donor graft site
Autografts are usually taken from another area of the patient’s body with a
dermatome, an instrument that cuts uniform, split-thickness skin portions—
typically, about 0.013 to 0.05 cm thick. Autografting makes the donor site a
partial-thickness wound, which may bleed, drain, and cause pain.
The donor site needs scrupulous care to prevent infection, which could
convert the site to a full-thickness wound. Depending on the graft’s
thickness, tissue may be obtained from the donor site again in as few as 10
days.
A donor site dressing is applied intraoperatively and helps protect new
epithelial proliferation. In addition to the inner dressing, the donor site may
be dressed in antibiotic-impregnated gauze or a synthetic skin substitute.
This outer gauze dressing can be taken off on the first postoperative day.
Care for the donor site as you would the autograft, using dressing changes
at the initial stages to prevent infection and promote healing. To dressing the
wound, follow these steps:
■ Perform hand hygiene9,10,11,12,13,14 and put on sterile gloves.15,16
■ Remove the outer gauze dressings within 24 hours.
■ Inspect the inner dressing for signs of infection, and then leave it open to
the air to speed drying and healing.
■ Leave small amounts of fluid accumulation alone. Using sterile technique,
aspirate larger amounts through the dressing with a small-gauge needle and
syringe.
■ Don’t apply any creams to the donor site until it’s dry.
■ When dry, you may apply a thin layer of cream daily, according to the
practitioner’s preference, to keep the skin tissue pliable.
■ As the donor site heals, different types of dressings may be required based
on the amount of exudate and level of re-epithelialization.2
Documentation
Record the time and date of all dressing changes and
additional treatments provided. Document all medications
administered and the patient’s response to those
medications, including pain assessment. Describe the
condition of the graft, and note any signs and symptoms of
infection or rejection. Record any additional treatment, and
note the patient’s reaction to the graft. Document any
patient teaching provided.
Evacuating fluid from a sheet graft
When a small pocket of fluid (called a bleb) accumulates beneath a sheet
graft, the practitioner or specially trained nurse will need to evacuate the
fluid using a sterile scalpel and sterile cotton-tipped applicators. First, using
the scalpel, carefully make a small nick in the sheet graft directly over the
area of the bleb (as shown below). Express the fluid by rolling sterile cotton-
tipped applicators gently over the graft toward the nick to express the fluid.
Then gently dab away the expressed fluid using a sterile gauze pad
moistened with normal saline solution.3,32
REFERENCES
1 Grande, D. J . (2017). “Skin grafting” [Online]. Accessed via the Web at
http://emedicine.medscape.com/article/1129479-overview
2 Beldon, P. (2007). What you need to know about skin grafts and donor site
wounds. Wound Essentials, 2, 149–155. Accessed via the Web at
http://www.woundsinternational.com/pdf/content_196.pdf (Level VII)
3 Joanna Briggs Institute. (2016). Care of split thickness skin graft (sheet skin
graft). Adelaide: Joanna Briggs Institute. (Level VII)
4 Khosh, M. M. (2016). “Full-thickness skin grafts” [Online]. Accessed via the
Web at http://emedicine.medscape.com/article/876379-overview#a2
5 Canadian Agency for Drugs and Technologies in Health (CADTH). (2013).
Dressings and care of skin graft sites: A review of clinical evidence and
guidelines. Ottawa: CADTH. Accessed via the Web at
https://www.ncbi.nlm.nih.gov/pubmedhealth/PMH0064411/ (Level VII)
6 Jeong, H. S ., et al. (2011). Hydrocolloid dressings in skin grafting for
immobilization and compression. Dermatologic Surgery, 37(3), 320–324.
(Level IV)
7 Kaiser, D., et al. (2013). Alginate dressing and polyurethane film versus
paraffin gauze in the treatment of split-thickness skin graft donor sites: A
randomized controlled pilot study. Advances in Skin & Wound Care, 26(2), 67–
73. (Level II)
8 Morris, D. Principles of grafts and flaps for reconstructive surgery. (2017). In:
UpToDate, Butler, C. E. (Ed.). Retrieved from: www.uptodate.com
9 Centers for Disease Control and Prevention. (2002). Guideline for hand
hygiene in health-care settings: Recommendations of the Healthcare Infection
Control Practices Advisory Committee and the HICPAC/SHEA/APIC/IDSA Hand
Hygiene Task Force. MMWR Recommendations and Reports, 51(RR-16), 1–45.
Accessed via the Web at https://www.cdc.gov/mmwr/pdf/rr/rr5116.pdf (Level
II)
10 World Health Organization. (2009). “WHO guidelines on hand hygiene in
health care: First global patient safety challenge, clean care is safer care”
[Online]. Accessed via the Web at
http://apps.who.int/iris/bitstream/10665/44102/1/9789241597906_eng.pdf
(Level IV)
11 The Joint Commission. (2019). Standard NPSG.07.01.01. Comprehensive
accreditation manual for hospitals. Oakbrook Terrace, IL: The Joint
Commission. (Level VII)
12 Accreditation Association for Hospitals and Health Systems. (2017). Standard
07.01.21. Healthcare Facilities Accreditation Program: Accreditation
requirements for acute care hospitals. Chicago, IL: Accreditation Association
for Hospitals and Health Systems. (Level VII)
13 Centers for Medicare and Medicaid Services, Department of Health and
Human Services. (2015). Condition of participation: Infection control. 42 C.F.R.
§ 482.42.
14 DNV GL-Healthcare USA, Inc. (2016). IC.1 .SR.1 . NIAHO® accreditation
requirements: Interpretive guidelines & surveyor guidance (version 11).
Milford, OH: DNV GL-Healthcare USA, Inc. (Level VII)
15 Siegel, J. D ., et al. (2007, revised 2017). “2007 guideline for isolation
precautions: Preventing transmission of infectious agents in healthcare
settings” [Online]. Accessed via the Web at
https://www.cdc.gov/infectioncontrol/pdf/guidelines/isolation-guidelines.pdf
(Level II)
16 Accreditation Association for Hospitals and Health Systems. (2017). Standard
07.01.10. Healthcare Facilities Accreditation Program: Accreditation
requirements for acute care hospitals. Chicago, IL: Accreditation Association
for Hospitals and Health Systems. (Level VII)
17 The Joint Commission. (2019). Standard NPSG.03 .04.01. Comprehensive
accreditation manual for hospitals. Oakbrook Terrace, IL: The Joint
Commission. (Level VII)
18 Accreditation Association for Hospitals and Health Systems. (2017). Standard
25.01.27. Healthcare Facilities Accreditation Program: Accreditation
requirements for acute care hospitals. Chicago, IL: Accreditation Association
for Hospitals and Health Systems. (Level VII)
19 The Joint Commission. (2019). Standard NPSG.01.01.01. Comprehensive
accreditation manual for hospitals. Oakbrook Terrace, IL: The Joint
Commission. (Level VII)
20 Accreditation Association for Hospitals and Health Systems. (2017). Standard
15.01.16. Healthcare Facilities Accreditation Program: Accreditation
requirements for acute care hospitals. Chicago, IL: Accreditation Association
for Hospitals and Health Systems. (Level VII)
21 Centers for Medicare and Medicaid Services, Department of Health and
Human Services. (2015). Condition of participation: Patient’s rights. 42 C.F.R.
§ 482.13(c)(1).
22 DNV GL-Healthcare USA, Inc. (2016). PR.1.SR.5 . NIAHO® accreditation
requirements: Interpretive guidelines & surveyor guidance (version 11).
Milford, OH: DNV GL-Healthcare USA, Inc. (Level VII)
23 The Joint Commission. (2019). Standard RI.01.01.01. Comprehensive
accreditation manual for hospitals. Oakbrook Terrace, IL: The Joint
Commission. (Level VII)
24 The Joint Commission. (2019). Standard PC.02.01.21. Comprehensive
accreditation manual for hospitals. Oakbrook Terrace, IL: The Joint
Commission. (Level VII)
25 The Joint Commission. (2019). Standard PC.01.02.07. Comprehensive
accreditation manual for hospitals. Oakbrook Terrace, IL: The Joint
Commission. (Level VII)
26 The Joint Commission. (2019). Standard MM.06.01.01. Comprehensive
accreditation manual for hospitals. Oakbrook Terrace, IL: The Joint
Commission. (Level VII)
27 Accreditation Association for Hospitals and Health Systems. (2017). Standard
16.01.03. Healthcare Facilities Accreditation Program: Accreditation
requirements for acute care hospitals. Chicago, IL: Accreditation Association
for Hospitals and Health Systems. (Level VII)
28 Centers for Medicare and Medicaid Services, Department of Health and
Human Services. (2015). Condition of participation: Nursing services. 42
C.F.R. § 482.23(c).
29 DNV GL-Healthcare USA, Inc. (2016). MM.1 .SR.2. NIAHO® accreditation
requirements: Interpretive guidelines & surveyor guidance (version 11).
Milford, OH: DNV GL-Healthcare USA, Inc. (Level VII)
30 Centers for Medicare and Medicaid Services. (2014). “Requirements for
hospital medication administration, particularly intravenous (IV) medications
and post-operative care of patients receiving IV opioids” [Online]. Accessed
via the Web at http://www.cms.gov/Medicare/Provider-Enrollment-and-
Certification/SurveyCertificationGenInfo/Downloads/Survey-and-Cert-Letter-
14-15.pdf
31 Waters, T. R., et al. (2009). “Safe patient handling training for schools of
nursing” [Online]. Accessed via the Web at
https://www.cdc.gov/niosh/docs/2009-127/pdfs/2009-127.pdf (Level VII)
32 Wiegand, D. (2017). AACN procedure manual for high acuity, progressive,
and critical care (7th ed.). St. Louis, MO: Elsevier.
33 Ganz, D. A., et al. (2013). Preventing falls in hospitals: A toolkit for improving
quality of care (AHRQ Publication No. 13-0015-EF). Rockville, MD: Agency for
Healthcare Research and Quality. Accessed via the Web at
https://www.ahrq.gov/sites/default/files/publications/files/fallpxtoolkit_0 .pdf
(Level VII)
34 The Joint Commission. (2019). Standard RC.01.03 .01. Comprehensive
accreditation manual for hospitals. Oakbrook Terrace, IL: The Joint
Commission. (Level VII)
35 Centers for Medicare and Medicaid Services, Department of Health and
Human Services. (2015). Condition of participation: Medical record services.
42 C.F.R. § 482.24(b).
36 Accreditation Association for Hospitals and Health Systems. (2017). Standard
10.00 .03. Healthcare Facilities Accreditation Program: Accreditation
requirements for acute care hospitals. Chicago, IL: Accreditation Association
for Hospitals and Health Systems. (Level VII)
37 DNV GL-Healthcare USA, Inc. (2016). MR.2 .SR.1 . NIAHO® accreditation
requirements: Interpretive guidelines & surveyor guidance (version 11).
Milford, OH: DNV GL-Healthcare USA, Inc. (Level VII)
38 Azzopardi, E. A., et al. (2013). Application of topical negative pressure
(vacuum-assisted closure) to split-thickness skin grafts: A structured
evidence-based review. Annals of Plastic Surgery, 70(1), 23–29. (Level V)
39 Petkar, K. S ., et al. (2011). A prospective randomized controlled trial
comparing negative pressure dressing and conventional dressing methods on
split-thickness skin grafts in burned patients. Burns, 37(6), 925–929. (Level II)
SKIN STAPLE AND CLIP REMOVAL
A practitioner may use skin staples or clips instead of
standard sutures to close lacerations or surgical wounds.
Because they can secure a wound more quickly than
sutures, they may substitute for surface sutures where
cosmetic results aren’t a prime consideration, such as in
abdominal closure. When properly placed, staples and clips
distribute tension evenly along the suture line with minimal
tissue trauma and compression, promoting healing and
minimizing scarring. Because staples and clips are made
from surgical stainless steel, tissue reaction to them is
minimal. Practitioners typically remove skin staples and
clips, but some facilities permit qualified nurses to perform
this procedure.
The timing of skin staple or clip removal depends on the
location of the wound, the condition of the wound (absence
of inflammation, drainage, and infection), and the patient’s
general condition. Sterile technique typically isn’t required
for removal unless the patient’s condition warrants it; a no-
touch technique can usually be used.
Equipment
Gloves ▪ sterile staple or clip extractor ▪ 4′′ × 4′′ (10-cm ×
10-cm) gauze pads ▪ Optional: adhesive remover, adhesive
strips or butterfly adhesive strips, sterile drape, sterile
gloves, antiseptic cleaning agent, sterile normal saline
solution, tape, alcohol-free skin protectant.
Preparation of equipment
■ Check any item that has an expiration date to ensure that
it has not expired. If a product is expired, if its integrity is
compromised, or if it’s defective, remove it from patient
use, label it as expired or defective, and report the
expiration or defect as directed by your facility.
Implementation
■ If your facility allows you to remove skin staples and clips,
verify the practitioner’s order to confirm the exact timing
and details for this procedure.1 The practitioner may want
you to remove only alternate staples or clips initially and to
leave others in place for an additional day or two to support
the incision.
■ Check the patient’s medical record for a history of
allergies, especially to adhesive tape and topical solutions
or medications.
■ Gather and prepare the equipment in the patient’s room.
■ Perform hand hygiene.2,3,4,5,6,7
■ Confirm the patient’s identity using at least two patient
identifiers.8
■ Provide privacy.9,10,11,12
■ Explain the procedure to the patient and family (if
appropriate) according to their individual communication
and learning needs to increase their understanding, allay
their fears, and enhance cooperation.13 Tell the patient to
expect to feel a slight pulling or tickling sensation—but little
discomfort—during staple or clip removal. Reassure the
patient that, because the incision is healing properly,
removing the supporting staples or clips won’t weaken the
incision line.
■ Screen and assess the patient’s pain using facility-defined
criteria that are consistent with the patient’s age, condition,
and ability to understand.13
■ Treat the patient’s pain, as needed and ordered, using
nonpharmacologic or pharmacologic methods, or a
combination of approaches. Base the treatment plan on
evidence-based practices and the patient’s clinical
condition, past medical history, and pain management
goals.14
■ Raise the patient’s bed to waist level while providing
direct patient care to prevent caregiver back strain.15
■ Perform hand hygiene.2,3,4,5,6,7
■ Assist the patient into a comfortable position for the
procedure. Be sure that the patient’s position doesn’t create
tension on the incision.
■ Ensure adequate lighting.
■ Drape the patient so that only the incisional area is
exposed to provide privacy.
■ Perform hand hygiene.2,3,4,5,6,7
■ Put on gloves.16,17
■ If the patient’s wound has a dressing, carefully remove
the dressing to prevent skin stripping and tearing. Use
adhesive remover, if needed, to remove old adhesive from
the skin. Discard the dressing in a waterproof trash
container.16,17
■ Assess the incision site. Note redness, warmth, swelling,
and drainage, which may indicate infection. Be aware that a
localized reaction to the staples or clips may cause some
faint erythema; this finding is normal, but you must
differentiate it from pathologic erythema. Note whether the
wound margins are well approximated.
■ Report abnormal findings to the practitioner. If the wound
isn’t adequately healed, the staples or clips may need to
remain in place longer. Evidence of infection may
necessitate pharmacologic intervention.
■ Remove and discard your gloves.16,17
■ Perform hand hygiene.2,3,4,5,6,7
■ Put on a new pair of gloves.18,19
■ Open the package containing the sterile staple or clip
extractor, maintaining asepsis.
■ Gently clean the incision using an antiseptic agent, if
directed, working from the inner aspect to the outer aspects
of the wound, to decrease the number of microorganisms
present, thereby reducing the risk of infection. Alternatively,
moisten dried crusts with sterile normal saline solution, if
directed, to ease staple or clip removal.20
■ Pick up the sterile staple or clip extractor.
■ Place the bottom of the staple or clip extractor under the
center of the first staple.
■ Keeping the lower jaw of the instrument against the
patient’s skin, squeeze the handles of the staple or clip
extractor together to close it (as shown below). Don’t lift the
staple or clip extractor while squeezing it to avoid causing
tension on the skin.
■ Lift the staple or clip out of the skin in a swift, smooth
motion to minimize pain.
■ Discard the staple or clip onto a gauze pad.
■ Remove the staples or clips in succession, as ordered by
the practitioner. Alternatively, remove every other staple or
clip until you reach the end of the incisional area, and then
return to the start and remove the rest, if ordered. The latter
approach facilitates detection of dehiscence, and allows for
every other staple or clip to be left in place if needed as the
wound continues to heal.
■ If an incision is gaping and incompletely healed upon
staple or clip removal, apply adhesive strips and notify the
practitioner.
■ If desired, apply adhesive strips or butterfly adhesive
strips even if the wound is healing normally to give added
support to the incision and to prevent lateral tension from
resulting in a wide scar. Leave the strips in place for 3 to 5
days.1 (See Applying adhesive strips, page 702.)
■ Assess the need for a dressing. Apply a sterile gauze
dressing, if needed, to reduce the risk of infection and
irritation from clothing.
■ Return the bed to the lowest position to prevent falls and
maintain patient safety.21
■ Properly dispose of used equipment and waste.16,17,22,23
If you used a reusable staple or clip extractor, prepare it for
reprocessing.22
Applying adhesive strips
Adhesive strips made of thin strips of sterile, nonwoven, porous fabric tape
are a primary means of keeping a wound closed after staple or clip removal.
Use these steps to apply adhesive strips:
■ Apply alcohol-free skin protectant to the outside of the incision, as ordered
and according to the manufacturer’s instructions.
■ Allow the skin protectant to become tacky before applying the adhesive
strips to help the strips stick to the skin.
■ Attach one end of an adhesive strip to one side of the incision line, and
then pull the strip gently across the incision line and attach it on the opposite
side.
■ Continue to place adhesive strips about 1⁄2′′ (1.3 cm) apart or closer,
depending on the size and location of the incision line.
Butterfly adhesive strips are wider sterile, waterproof adhesive strips that
are connected by a narrow, nonadhesive bridge. These strips help close small
wounds and assist with healing after staple or clip removal.
■ Remove and discard your gloves.16,17
■ Perform hand hygiene.2,3,4,5,6,7
■ Report abnormal findings to the patient’s practitioner.
■ Reassess and respond to the patient’s pain by evaluating
the response to treatment and progress toward pain
management goals. Assess for adverse reactions and risk
factors for adverse events that may result from treatment.14
■ Perform hand hygiene.2,3,4,5,6,7
■ Document the procedure.24,25,26,27
Special considerations
If extraction is difficult, notify the practitioner; staples
placed too deeply within the skin or left in place too long
may resist removal.
Patient teaching
Provide instructions on how to remove the dressing and care
for the wound at home, if appropriate. Inform the patient
about the practitioner’s guidelines regarding showering.
Instruct the patient to call the practitioner immediately if
the wound opens, drains, or becomes inflamed. Explain that
the redness around the incision should gradually disappear
and that, after a few weeks, only a thin line should be
visible. Encourage the patient to cover the wound or use a
sunblock product on the wound for 3 to 6 months when sun
exposure is likely to aid healing and reduce scar
formation.28
Complications
Potential complications of staple or clip removal include
infection, failure to remove a staple or clip, and incomplete
healing on removal, which may require application of
adhesive strips or wound repair.
Documentation
Record the date and time of staple or clip removal, the
number of staples or clips removed, the appearance of the
incision, application of a dressing or adhesive strips, signs of
wound complications, and the patient’s tolerance of the
procedure. Document any teaching you provided, the
patient’s and family’s understanding of the teaching, and
whether they require follow-up teaching.
REFERENCES
1 Wiegand, D. L. (2017). AACN procedure manual for high acuity, progressive,
and critical care (7th ed.). St. Louis, MO: Elsevier.
2 Centers for Disease Control and Prevention. (2002). Guideline for hand
hygiene in health-care settings: Recommendations of the Healthcare Infection
Control Practices Advisory Committee and the HICPAC/SHEA/APIC/IDSA Hand
Hygiene Task Force. MMWR Recommendations and Reports, 51(RR-16), 1–45.
Accessed via the Web at https://www.cdc.gov/mmwr/pdf/rr/rr5116.pdf (Level
II)
3 World Health Organization. (2009). “WHO guidelines on hand hygiene in
health care: First global patient safety challenge, clean care is safer care”
[Online]. Accessed via the Web at
http://apps.who.int/iris/bitstream/10665/44102/1/9789241597906_eng.pdf
(Level IV)
4 The Joint Commission. (2019). Standard NPSG.07.01.01. Comprehensive
accreditation manual for hospitals. Oakbrook Terrace, IL: The Joint
Commission. (Level VII)
5 Centers for Medicare and Medicaid Services, Department of Health and
Human Services. (2015). Condition of participation: Infection control. 42 C.F.R.
§ 482.42.
6 Accreditation Association for Hospitals and Health Systems. (2017). Standard
07.01.21. Healthcare Facilities Accreditation Program: Accreditation
requirements for acute care hospitals. Chicago, IL: Accreditation Association
for Hospitals and Health Systems. (Level VII)
7 DNV GL-Healthcare USA, Inc. (2016). IC.1.SR.1 . NIAHO® accreditation
requirements: Interpretive guidelines & surveyor guidance (version 11).
Milford, OH: DNV GL-Healthcare USA, Inc. (Level VII)
8 The Joint Commission. (2019). Standard NPSG.01.01.01. Comprehensive
accreditation manual for hospitals. Oakbrook Terrace, IL: The Joint
Commission. (Level VII)
9 Centers for Medicare and Medicaid Services, Department of Health and
Human Services. (2015). Condition of participation: Patient’s rights. 42 C.F.R.
§ 482.13(c)(1).
10 The Joint Commission. (2019). Standard RI.01.01.01. Comprehensive
accreditation manual for hospitals. Oakbrook Terrace, IL: The Joint
Commission. (Level VII)
11 Accreditation Association for Hospitals and Health Systems. (2017). Standard
15.01.16. Healthcare Facilities Accreditation Program: Accreditation
requirements for acute care hospitals. Chicago, IL: Accreditation Association
for Hospitals and Health Systems. (Level VII)
12 DNV GL-Healthcare USA, Inc. (2016). PR.1.SR.5 . NIAHO® accreditation
requirements: Interpretive guidelines & surveyor guidance (version 11).
Milford, OH: DNV GL-Healthcare USA, Inc. (Level VII)
13 The Joint Commission. (2019). Standard PC.02.01.21. Comprehensive
accreditation manual for hospitals. Oakbrook Terrace, IL: The Joint
Commission. (Level VII)
14 The Joint Commission. (2019). Standard PC.01.02.07. Comprehensive
accreditation manual for hospitals. Oakbrook Terrace, IL: The Joint
Commission. (Level VII)
15 Waters, T. R., et al. (2009). “Safe patient handling training for schools of
nursing” [Online]. Accessed via the Web at
https://www.cdc.gov/niosh/docs/2009-127/pdfs/2009-127.pdf (Level VII)
16 Siegel, J. D ., et al. (2007, revised 2017). “2007 guideline for isolation
precautions: Preventing transmission of infectious agents in healthcare
settings” [Online]. Accessed via the Web at
https://www.cdc.gov/infectioncontrol/pdf/guidelines/isolation-guidelines.pdf
(Level II)
17 Accreditation Association for Hospitals and Health Systems. (2017). Standard
07.01.10. Healthcare Facilities Accreditation Program: Accreditation
requirements for acute care hospitals. Chicago, IL: Accreditation Association
for Hospitals and Health Systems. (Level VII)
18 Centers for Disease Control and Prevention. (1988, reviewed 2001).
Perspectives in disease prevention and health promotion update: Universal
precautions for prevention of transmission of human immunodeficiency virus,
hepatitis B virus, and other bloodborne pathogens in health-care settings.
Morbidity and Mortality Weekly Report, 37(24), 377–388 . Accessed via the
Web at https://www.cdc.gov/mmwr/preview/mmwrhtml/00000039.htm (Level
VII)
19 World Health Organization. (2009). “Glove use information leaflet” [Online].
Accessed via the Web at
http://www.who.int/gpsc/5may/Glove_Use_Information_Leaflet.pdf (Level VII)
20 Academy of Medical-Surgical Nurses. (2014). “Question: What is the best
practice to remove sutures/staples from a surgical site? Specifically, should
cleansers or antiseptics be used prior to removing the staples/sutures?”
[Online]. Accessed via the Web at https://www.amsn.org/practice-
resources/care-term-reference/post-op-wound-care/question-what-best-
practice-remove
21 Ganz, D. A., et al. (2013). Preventing falls in hospitals: A toolkit for improving
quality of care (AHRQ Publication No. 13-0015-EF). Rockville, MD: Agency for
Healthcare Research and Quality. Accessed via the Web at
https://www.ahrq.gov/sites/default/files/publications/files/fallpxtoolkit_0 .pdf
(Level VII)
22 Rutala, W. A., et al. (2008, revised 2017). “Guideline for disinfection and
sterilization in healthcare facilities, 2008” [Online]. Accessed via the Web at
https://www.cdc.gov/infectioncontrol/pdf/guidelines/disinfection-
guidelines.pdf (Level I)
23 Accreditation Association for Hospitals and Health Systems. (2017). Standard
07.02.03. Healthcare Facilities Accreditation Program: Accreditation
requirements for acute care hospitals. Chicago, IL: Accreditation Association
for Hospitals and Health Systems. (Level VII)
24 The Joint Commission. (2019). Standard RC.01.03 .01. Comprehensive
accreditation manual for hospitals. Oakbrook Terrace, IL: The Joint
Commission. (Level VII)
25 Centers for Medicare and Medicaid Services, Department of Health and
Human Services. (2015). Condition of participation: Medical record services.
42 C.F.R. § 482.24(b).
26 Accreditation Association for Hospitals and Health Systems. (2017). Standard
10.00 .03. Healthcare Facilities Accreditation Program: Accreditation
requirements for acute care hospitals. Chicago, IL: Accreditation Association
for Hospitals and Health Systems. (Level VII)
27 DNV GL-Healthcare USA, Inc. (2016). MR.2 .SR.1 . NIAHO® accreditation
requirements: Interpretive guidelines & surveyor guidance (version 11).
Milford, OH: DNV GL-Healthcare USA, Inc. (Level VII)
28 Nicks, B. A., et al. (2010). Acute wound management: Revisiting the approach
to assessment, irrigation, and closure considerations. International Journal of
Emergency Medicine, 3(4), 399–407. Accessed via the Web at
http://www.ncbi.nlm.nih.gov/pmc/articles/PMC3047833/ (Level I)
SOAKS
A soak involves immersion of a body part in warm water or
a medicated solution. This treatment helps to soften
exudates, facilitate debridement, enhance suppuration,
clean wounds or burns, rehydrate wounds, apply medication
to infected areas, and increase local blood supply and
circulation.
Most soaks are applied with clean tap water and clean
technique. Sterile solution and sterile equipment are
required for treating wounds, burns, and other breaks in the
skin.
Equipment
Soak basin or tub ▪ bath (utility) thermometer ▪ warm tap
water or prescribed solution ▪ cup ▪ pitcher ▪ fluid-
impermeable pad ▪ overbed table ▪ footstool ▪ pillows ▪
towels ▪ gloves ▪ facility-approved disinfectant ▪ Optional:
gauze pads, sterile gloves, sterile dressing materials.
Preparation of equipment
Perform hand hygiene.1,2,3,4,5,6 Clean and disinfect the basin
or tub using a facility-approved disinfectant.7,8 Run warm
tap water into a pitcher, or heat the prescribed solution, as
applicable. Measure the water or solution temperature with
a bath thermometer. If the temperature isn’t within the
prescribed range (usually 105° to 110°F [40.6° to 43.3°C]),
add hot or cold water, or reheat or cool the solution, as
needed. If you’re preparing the soak outside the patient’s
room, heat the liquid slightly above the correct temperature
to allow for cooling during transport. If the solution for a
medicated soak isn’t premixed, prepare the solution and
heat it to the prescribed temperature.
Implementation
■ Verify the practitioner’s order.
■ Check the patient’s medical record for an allergy to the
prescribed solution, as appropriate. If an allergy exists,
notify the practitioner.
■ Perform hand hygiene.1,2,3,4,5,6
■ Confirm the patient’s identity using at least two patient
identifiers.9
■ Provide privacy.10,11,12,13
■ Explain the procedure to the patient and family (if
appropriate) according to their individual communication
and learning needs to increase their understanding, allay
their fears, and enhance cooperation.14
■ Put on gloves as necessary to comply with standard
precautions.15,16
■ Position the patient appropriately, according to the area
of the body for which the soak is intended. For an arm soak,
instruct the patient to sit erect. For a leg or foot soak,
instruct the patient to lie down and bend the appropriate
knee. For a foot soak in the sitting position, have the patient
to sit on the edge of the bed or transfer to a chair.
■ Place a fluid-impermeable pad under the treatment site
and, if necessary, cover the pad with a towel to absorb
spillage.
■ Expose the treatment site.
■ Remove and properly dispose of any dressing, unless it’s
stuck to the wound.15 If the dressing is encrusted and stuck
to the wound, leave it in place and proceed with the soak.
Remove the dressing several minutes later, when it has
begun to soak free.
■ Position the soak basin or tub under the treatment site on
the bed, overbed table, footstool, or floor, as appropriate. If
the soak basin or tub will be placed in the bed, make sure
that the bed is flat beneath it to prevent spills.
■ Pour the heated liquid into the soak basin or tub.
■ Lower the patient’s affected area into the basin or tub
gradually to allow adjustment to the temperature change.
Make sure the soak solution covers the treatment site.
■ Make the patient comfortable, and ensure proper body
alignment. Support other body parts with pillows or towels
as needed to prevent discomfort and muscle strain.
■ Remove and discard your gloves.15,16
■ Check the temperature of the soak solution with the bath
thermometer every 5 minutes. If the temperature drops
below the prescribed range, remove some of the cooled
solution with a cup, lift the patient’s arm or leg from the
basin to avoid burns, and add hot water or solution to the
basin. Mix the liquid thoroughly and then recheck the
temperature. If the temperature is within the prescribed
range, lower the affected area back into the basin.
■ Observe the patient for signs of tissue intolerance,
including extreme redness at the treatment site, excessive
drainage, bleeding, and maceration. If such signs develop or
if the patient complains of pain, discontinue the treatment
and notify the practitioner.
■ Perform hand hygiene1,2,3,4,5,6 and put on a new pair of
gloves.15,16
■ After 15 to 20 minutes, or as ordered, lift the patient’s
treatment area from the basin or tub, and remove the basin
or tub.
■ Dry the area thoroughly with a towel. If the patient has a
wound, dry the skin around it without touching the wound.
■ While the skin is hydrated from the soak, use gauze pads
to remove loose scales or crusts.
■ Observe the treatment area for general appearance,
degree of swelling, debridement, suppuration, and healing.
■ If the patient’s wound requires redressing, remove and
discard your gloves,15,16 perform hand hygiene,1,2,3,4,5,6 put
on new gloves,15,16 and then redress the wound.
■ Remove the towel and fluid-impermeable pad, and make
the patient comfortable in bed.
■ Discard the soak solution and dispose of soiled materials
in appropriate receptacles.15
■ Remove and discard your gloves.15,16
■ Perform hand hygiene.1,2,3,4,5,6
■ Put on new gloves.15,16
■ Clean and disinfect the basin or tub using a facility-
approved disinfectant.7,8
■ Remove and discard your gloves.15,16
■ Perform hand hygiene.1,2,3,4,5,6
■ If the soak treatment is to be repeated, store the
equipment in the patient’s room, out of the patient’s reach;
otherwise, return it to the central supply department.
■ Document the procedure.17,18,19,20
Special considerations
■ To treat large areas, particularly burns, a soak may be
administered in a whirlpool or Hubbard tank.
Complications
Tissue intolerance may occur; its signs and symptoms
include extreme redness, excessive drainage, bleeding,
maceration, and pain at the treatment site.
Documentation
Record the date, time, and duration of the soak; the
treatment site; the solution used and its temperature; skin
and wound appearance before, during, and after treatment;
and the patient’s tolerance of treatment.
REFERENCES
1 The Joint Commission. (2019). Standard NPSG.07.01.01. Comprehensive
accreditation manual for hospitals. Oakbrook Terrace, IL: The Joint
Commission. (Level VII)
2 Centers for Disease Control and Prevention. (2002). Guideline for hand
hygiene in health-care settings: Recommendations of the Healthcare Infection
Control Practices Advisory Committee and the HICPAC/SHEA/APIC/IDSA Hand
Hygiene Task Force. MMWR Recommendations and Reports, 51(RR-16), 1–45.
Accessed via the Web at https://www.cdc.gov/mmwr/pdf/rr/rr5116.pdf (Level
II)
3 World Health Organization. (2009). “WHO guidelines on hand hygiene in
health care: First global patient safety challenge, clean care is safer care”
[Online]. Accessed via the Web at
http://apps.who.int/iris/bitstream/10665/44102/1/9789241597906_eng.pdf
(Level IV)
4 Accreditation Association for Hospitals and Health Systems. (2017). Standard
07.01.21. Healthcare Facilities Accreditation Program: Accreditation
requirements for acute care hospitals. Chicago, IL: Accreditation Association
for Hospitals and Health Systems. (Level VII)
5 Centers for Medicare and Medicaid Services, Department of Health and
Human Services. (2015). Condition of participation: Infection control. 42 C.F.R.
§ 482.42.
6 DNV GL-Healthcare USA, Inc. (2016). IC.1.SR.1 . NIAHO® accreditation
requirements: Interpretive guidelines & surveyor guidance (version 11).
Milford, OH: DNV GL-Healthcare USA, Inc. (Level VII)
7 Rutala, W. A., et al. (2008, revised 2017). “Guideline for disinfection and
sterilization in healthcare facilities, 2008” [Online]. Accessed via the Web at
https://www.cdc.gov/hicpac/pdf/guidelines/Disinfection_Nov_2008.pdf (Level I)
8 Accreditation Association for Hospitals and Health Systems. (2017). Standard
07.02.03. Healthcare Facilities Accreditation Program: Accreditation
requirements for acute care hospitals. Chicago, IL: Accreditation Association
for Hospitals and Health Systems. (Level VII)
9 The Joint Commission. (2019). Standard NPSG.01.01.01. Comprehensive
accreditation manual for hospitals. Oakbrook Terrace, IL: The Joint
Commission. (Level VII)
10 Accreditation Association for Hospitals and Health Systems. (2017). Standard
15.01.16. Healthcare Facilities Accreditation Program: Accreditation
requirements for acute care hospitals. Chicago, IL: Accreditation Association
for Hospitals and Health Systems. (Level VII)
11 Centers for Medicare and Medicaid Services, Department of Health and
Human Services. (2015). Condition of participation: Patient’s rights. 42 C.F.R.
§ 482.13(c)(1).
12 DNV GL-Healthcare USA, Inc. (2016). PR.1.SR.5 . NIAHO® accreditation
requirements: Interpretive guidelines & surveyor guidance (version 11).
Milford, OH: DNV GL-Healthcare USA, Inc. (Level VII)
13 The Joint Commission. (2019). Standard RI.01.01.01. Comprehensive
accreditation manual for hospitals. Oakbrook Terrace, IL: The Joint
Commission. (Level VII)
14 The Joint Commission. (2019). Standard PC.02.01.21. Comprehensive
accreditation manual for hospitals. Oakbrook Terrace, IL: The Joint
Commission. (Level VII)
15 Siegel, J. D ., et al. (2007, revised 2017). “2007 guideline for isolation
precautions: Preventing transmission of infectious agents in healthcare
settings” [Online]. Accessed via the Web at
https://www.cdc.gov/hicpac/pdf/isolation/Isolation2007.pdf (Level II)
16 Accreditation Association for Hospitals and Health Systems. (2017). Standard
07.01.10. Healthcare Facilities Accreditation Program: Accreditation
requirements for acute care hospitals. Chicago, IL: Accreditation Association
for Hospitals and Health Systems. (Level VII)
17 The Joint Commission. (2019). Standard RC.01.03 .01. Comprehensive
accreditation manual for hospitals. Oakbrook Terrace, IL: The Joint
Commission. (Level VII)
18 Accreditation Association for Hospitals and Health Systems. (2017). Standard
10.00 .03. Healthcare Facilities Accreditation Program: Accreditation
requirements for acute care hospitals. Chicago, IL: Accreditation Association
for Hospitals and Health Systems. (Level VII)
19 Centers for Medicare and Medicaid Services, Department of Health and
Human Services. (2015). Condition of participation: Medical record services.
42 C.F.R. § 482.24(b).
20 DNV GL-Healthcare USA, Inc. (2016). MR.2 .SR.1 . NIAHO® accreditation
requirements: Interpretive guidelines & surveyor guidance (version 11).
Milford, OH: DNV GL-Healthcare USA, Inc. (Level VII)
SPIRITUAL CARE
Religious beliefs can profoundly influence a patient’s
recovery rate, attitude toward treatment, and overall
response to hospitalization. In certain religious groups,
beliefs can preclude diagnostic tests and therapeutic
treatments, require dietary restrictions, or prohibit organ
donation and artificial prolongation of life. (See Beliefs and
practices of selected religions.)
Effective patient care requires recognition of and respect
for the patient’s religious beliefs.1 Recognizing the patient’s
beliefs and need for spiritual care may require close
attention to nonverbal cues or to seemingly casual remarks
that express spiritual concerns. Respecting the patient’s
beliefs may require setting aside your own beliefs. Providing
spiritual care may require contacting an appropriate
member of the clergy in the facility or community, gathering
equipment needed to help the patient perform rites and
administer sacraments, and preparing the patient for a
pastoral visit.
Equipment
Supplies specific to the patient’s religious affiliation ▪
Optional: clean towels (one or two), container of water (for
emergency baptism), teaspoon or medicine cup.
Some facilities, particularly those with a religious
affiliation, provide baptismal trays. The clergy member may
bring holy water, holy oil, or other religious articles to
minister to the patient.
Preparation of equipment
For baptism, cover a small table with a clean towel. Fold a
second towel and place it on the table, along with the
teaspoon or medicine cup. For communion and anointing,
cover the bedside stand with a clean towel.
Implementation
■ Check the patient’s admission record to determine
religious affiliation. Remember that some patients may
claim no religious beliefs. However, even an agnostic may
wish to speak with a clergy member, so watch and listen
carefully for subtle expressions of this desire.
■ Perform hand hygiene.2,3,4,5,6,7
■ Confirm the patient’s identity using at least two patient
identifiers.8
■ Provide privacy.1,9,10,11
■ Assess the patient’s spiritual needs, resources, and
preferences.8 Evaluate the patient’s behavior for signs of
loneliness, anxiety, or fear, emotions that may signal the
need for spiritual counsel. Also consider whether the patient
is facing a health crisis, which may occur with chronic illness
and before childbirth, surgery, or impending death.
Remember that a patient may feel acutely distressed
because of the inability to participate in religious
observances; help such a patient verbalize beliefs to relieve
stress. Listen to the patient, and let the patient express
concerns, but carefully refrain from imposing your beliefs on
the patient to avoid conflict and further stress.12
■ If the patient requests, arrange a visit by an appropriate
member of the clergy. Consult this clergy member if you
need more information about the patient’s beliefs.
■ If your patient faces the possibility of abortion,
amputation, transfusion, or other medical procedures with
important religious implications, try to discover the patient’s
spiritual attitude. Also, try to determine your patient’s
attitude toward the importance of laying on of hands,
confession, communion, observance of holy days (such as
the Sabbath), and restrictions in diet or physical
appearance. Helping the patient continue his or her normal
religious practices during hospitalization can help reduce
stress.
Beliefs and practices of selected
religions
Religious beliefs can affect the patient’s attitudes toward illness and
traditional medicine. By trying to accommodate religious beliefs and
practices in your plan of care, you can increase the patient’s willingness to
learn and comply with treatment regimens. Because religious beliefs may
vary within particular sects, individual practices may differ from those
described here.
Adventist
■ Birth and death rituals: None (baptism of adults only)
■ Dietary restrictions: Alcohol, coffee, tea, opioids, stimulants, and meat or
animal products (in some groups)
■ Practices in health crisis: Communion, baptism, divine healing and
anointing with oil, prayer, and Saturday Sabbath
Baptist
■ Birth and death rituals: At birth, none (baptism of believers only); before
death, counseling by clergy member and prayer
■ Dietary restrictions: Alcohol, coffee, and tea (in some groups)
■ Practices in health crisis: Healing by laying on of hands (in some groups)
as well as resistance to medical therapy (occasionally approved)
Christian Scientist
■ Birth and death rituals: At birth, none; before death, counseling by a
Christian Science practitioner
■ Dietary restrictions: Alcohol, coffee, and tobacco
■ Practices in health crisis: Refusal of all treatments (most groups), including
drugs, biopsies, physical examination, and blood transfusions; vaccination
permitted only when required by law; alteration of thoughts believed to cure
illness; hypnotism and psychotherapy prohibited (Christian Scientist nurses
and nursing homes honor these beliefs)
Church of Christ
■ Birth and death rituals: None (baptism at age 8 or older)
■ Dietary restrictions: Alcohol discouraged
■ Practices in health crisis: Communion, anointing with oil, laying on of
hands, and counseling (all performed by a minister)
Eastern Orthodox
■ Birth and death rituals: At birth, baptism and confirmation; before death,
last rites; for members of the Russian Orthodox Church, arms are crossed
after death, fingers set in cross, and unembalmed body clothed in natural
fiber
■ Dietary restrictions: For members of the Russian Orthodox Church and
usually the Greek Orthodox Church, no meat or dairy products on Wednesday
or Friday or during Lent
■ Practices in health crisis: Anointing of the sick; for members of the Russian
Orthodox Church, cross necklace is replaced immediately after surgery, and
shaving of male patients is prohibited except in preparation for surgery; for
members of the Greek Orthodox Church, communion and Sacrament of Holy
Unction
Episcopalian
■ Birth and death rituals: At birth, baptism; before death, occasional last
rites
■ Dietary restrictions: For some members, abstention from meat on Friday,
fasting before communion (which may be daily)
■ Practices in health crisis: Communion, prayer, and counseling (all
performed by a minister)
Jehovah’s Witnesses
■ Birth and death rituals: None
■ Dietary restrictions: Abstention from foods to which blood has been added
■ Practices in health crisis: Typically, no blood transfusions permitted; a
court order may be required for emergency transfusion.
Judaism
■ Birth and death rituals: Ritual circumcision on 8th day after birth; burial of
dead fetus; ritual washing of dead; burial (including organs and other body
tissues) as soon as possible; no autopsy or embalming
■ Dietary restrictions: For Orthodox and Conservative Jews, kosher dietary
laws (for example, pork and shellfish prohibited); for Reform Jews, usually no
restrictions
■ Practices in health crisis: Rabbinical consultation required for donation or
transplantation of organs; for Orthodox and Conservative Jews, medical
procedures possibly prohibited on the Sabbath (from sundown Friday to
sundown Saturday) and on special holidays
Lutheran
■ Birth and death rituals: Baptism usually performed 6 to 8 weeks after birth
■ Dietary restrictions: None
■ Practices in health crisis: Communion, prayer, and counseling (all
performed by a minister)
Mormon
■ Birth and death rituals: At birth, none (baptism at age 8 or older); before
death, baptism and gospel preaching
■ Dietary restrictions: Alcohol, tobacco, tea, and coffee prohibited; meat
intake limited
■ Practices in health crisis: Belief in divine healing through the laying on of
hands; communion on Sunday; refusal of medical treatment by some
members; special undergarment worn by many
Muslim
■ Birth and death rituals: If spontaneous abortion occurs before 130 days,
fetus treated as discarded tissue; after 130 days, fetus treated as a human
being; before death, confession of sins with family present; after death, only
relatives or friends may touch the body
■ Dietary restrictions: Pork prohibited; daylight fasting during 9th month of
Islamic calendar
■ Practices in health crisis: Faith healing (for the patient’s morale only);
conservative members reject medical therapy
Orthodox Presbyterian
■ Birth and death rituals: Infant baptism; scripture reading and prayer before
death
■ Dietary restrictions: None
■ Practices in health crisis: Communion, prayer, and counseling (all
performed by a minister)
Pentecostal Assembly of God, Foursquare Church
■ Birth and death rituals: None (baptism only after age of accountability)
■ Dietary restrictions: Abstention from alcohol, tobacco, meat slaughtered by
strangling, any food to which blood has been added, and sometimes pork
■ Practices in health crisis: Divine healing through prayer, anointing with oil,
laying on of hands
Roman Catholic
■ Birth and death rituals: Infant baptism, including baptism of aborted fetus
without sign of clinical death (tissue necrosis); before death, anointing of the
sick
■ Dietary restrictions: Fasting or abstention from meat on Ash Wednesday
and on Fridays during Lent (practice usually waived for the hospitalized)
■ Practices in health crisis: Burial of major amputated limb (sometimes) in
consecrated ground; donation or transplantation of organs allowed if the
benefit to recipient outweighs the donor’s potential harm; Sacrament of the
Sick also performed when patients are ill, not just before death, and
sometimes performed shortly after admission
United Methodist
■ Birth and death rituals: None (baptism of children and adults only)
■ Dietary restrictions: None
■ Practices in health crisis: Communion before surgery or similar crisis;
donation of body parts encouraged
■ If the patient is pregnant, find out her beliefs concerning
infant baptism and circumcision, and comply with them
after birth.
PEDIATRIC ALERT If a neonate is in critical condition, call an
appropriate clergy member immediately. In an extreme emergency,
you can perform a Roman Catholic baptism using a container of any
available water. If you do so, be sure to notify the priest when he
arrives because this sacrament should occur only once.
■ If a Jewish woman delivers a male infant prematurely or
by cesarean birth, ask her whether she plans to observe the
rite of circumcision, or a bris, a significant ceremony
performed on the 8th day after birth. (Because a patient
who delivers a healthy, full-term baby vaginally is usually
discharged quickly, this ceremony is normally performed
outside the facility.) For a bris, ensure privacy and, if
requested, sterilize the instruments.
■ If the patient requests communion, prepare the patient
for it before the clergy member arrives. First, place the
patient in the Fowler or semi-Fowler position if condition
permits. Otherwise, allow the patient to remain supine. Tuck
a clean towel under the patient’s chin and straighten the
bed linens.
■ If a terminally ill patient requests the Sacrament of the
Sick (Last Rites) or special treatment of the body after
death, call an appropriate clergy member. For the Roman
Catholic patient, call a Roman Catholic priest to administer
the sacrament, even if the patient is unresponsive or
comatose. To prepare the patient for this sacrament,
uncover the arms and fold back the top linens to expose the
feet. After the clergy member anoints the patient’s
forehead, eyes, nose, mouth, hands, and feet, straighten
and retuck the bed linens.
■ Perform hand hygiene.2,3,4,5,6,7
■ Document the procedure.13,14,15,16
Special considerations
■ Handle the patient’s religious articles carefully to avoid
damage or loss.
■ Become familiar with religious resources in your facility.
Some facilities employ one or more clergy members who
counsel patients and staff members and link patients to
other pastoral resources.
■ If the patient tries to convert you to his or her personal
beliefs, tell the patient that you respect the beliefs but are
content with your own. Likewise, avoid attempts to convert
the patient to your personal beliefs.14
Documentation
If baptism was performed, complete a baptismal form and
attach it to the patient’s record; send a copy of the form to
the appropriate clergy member. Record the rites of
circumcision and Sacrament of the Sick in the patient’s
medical record.
REFERENCES
1 The Joint Commission. (2019). Standard RI.01.01.01. Comprehensive
accreditation manual for hospitals. Oakbrook Terrace, IL: The Joint
Commission. (Level VII)
2 Centers for Disease Control and Prevention. (2002). Guideline for hand
hygiene in health care settings: Recommendations of the Healthcare Infection
Control Practices Advisory Committee and the HICPAC/SHEA/APIC/IDSA Hand
Hygiene Task Force. MMWR Recommendations and Reports, 51(RR-16), 1–45.
Accessed via the Web at https://www.cdc.gov/mmwr/pdf/rr/rr5116.pdf (Level
II)
3 World Health Organization. (2009). “WHO guidelines on hand hygiene in
health care: First global patient safety challenge, clean care is safer care”
[Online]. Accessed via the Web at
http://apps.who.int/iris/bitstream/10665/44102/1/9789241597906_eng.pdf
(Level IV)
4 The Joint Commission. (2019). Standard NPSG.07.01.01. Comprehensive
accreditation manual for hospitals. Oakbrook Terrace, IL: The Joint
Commission. (Level VII)
5 Accreditation Association for Hospitals and Health Systems. (2017). Standard
07.01.21. Healthcare facilities accreditation program: Accreditation
requirements for acute care hospitals. Chicago, IL: Accreditation Association
for Hospitals and Health Systems. (Level VII)
6 Centers for Medicare and Medicaid Services, Department of Health and
Human Services. (2015). Condition of participation: Infection control. 42 C.F.R.
§ 482.42.
7 DNV GL-Healthcare USA, Inc. (2016). IC.1.SR.1 . NIAHO® accreditation
requirements: Interpretive guidelines & surveyor guidance (version 11).
Milford, OH: DNV GL-Healthcare USA, Inc. (Level VII)
8 The Joint Commission. (2019). Standard NPSG.01.01.01. Comprehensive
accreditation manual for hospitals. Oakbrook Terrace, IL: The Joint
Commission. (Level VII)
9 DNV GL-Healthcare USA, Inc. (2016). PR.1 .SR.5 . NIAHO® accreditation
requirements: Interpretive guidelines & surveyor guidance (version 11).
Milford, OH: DNV GL-Healthcare USA, Inc. (Level VII)
10 Centers for Medicare and Medicaid Services, Department of Health and
Human Services. (2015). Condition of participation: Patient’s rights. 42 C.F.R.
§ 482.13(c)(1).
11 Accreditation Association for Hospitals and Health Systems. (2017). Standard
15.01.16. Healthcare Facilities Accreditation Program: Accreditation
requirements for acute care hospitals. Chicago, IL: Accreditation Association
for Hospitals and Health Systems. (Level VII)
12 Taylor, E. J . (2011). Spiritual care: Evangelism at the bedside? Journal of
Christian Nursing, 28(4), 194–202.
13 The Joint Commission. (2019). Standard RC.01.03 .01. Comprehensive
accreditation manual for hospitals. Oakbrook Terrace, IL: The Joint
Commission. (Level VII)
14 Centers for Medicare and Medicaid Services, Department of Health and
Human Services. (2015). Condition of participation: Medical record services.
42 C.F.R. § 482.24(b).
15 Accreditation Association for Hospitals and Health Systems. (2017). Standard
10.00 .03. Healthcare Facilities Accreditation Program: Accreditation
requirements for acute care hospitals. Chicago, IL: Accreditation Association
for Hospitals and Health Systems. (Level VII)
16 DNV GL-Healthcare USA, Inc. (2016). MR.2 .SR.1 . NIAHO® accreditation
requirements: Interpretive guidelines & surveyor guidance (version 11).
Milford, OH: DNV GL-Healthcare USA, Inc. (Level VII)
SPLINT APPLICATION
By immobilizing the site of an injury, a splint alleviates pain
and allows the injury to heal in proper alignment. It also
minimizes possible complications, such as excessive
bleeding into tissues and restricted blood flow caused by
bone pressing against vessels. In cases of multiple serious
injuries, a splint allows caretakers to move the patient
without risking further damage to bones, muscles, nerves,
blood vessels, and skin.
Splints have traditionally been made of plaster of Paris;
however, in recent years, many different types of splints
and splinting materials have become available, including
preformed plaster, fiberglass, padded fiberglass, aluminum,
air splints, and vacuum splints. Preformed, rigid commercial
splints are available for use on various body parts, come in
multiple sizes, and are usually made of hard plastic and
Velcro.1 Commercial splints may be removed to enable skin
assessment; however, repeated removal by the patient may
delay healing or cause additional injury.1
A practitioner may order a splint to immobilize a simple or
compound fracture, dislocation, or subluxation. (See Rigid
splint.)
During an emergency, splint any injury you suspect of
being a fracture, dislocation, or subluxation. No
contraindications exist for rigid splints.
Equipment
Rigid splint ▪ tape measure ▪ padding ▪ Velcro straps, 2′′ (5-
cm) roller gauze, or 2′′ (5-cm) cloth strips ▪ tape ▪ pillows ▪
vital signs monitoring equipment ▪ Optional: gloves and
other personal protective equipment, ice, prescribed pain
medication.
A practitioner may prefer to use an air splint (an
inflatable, semirigid splint) to secure an injured extremity.
(See Using an air splint.) You can use Velcro straps, roller
gauze, or cloth strips as bindings for a rigid or air splint.
However, avoid using twine or rope, if possible, because
they can restrict circulation.
Implementation
■ Perform hand hygiene.3,4,5,6,7,8
■ Confirm the patient’s identity using at least two patient
identifiers.9
■ Provide privacy.10,11,12,13
■ Obtain a history of the circumstances surrounding the
injury (including the time and mechanism of injury) and
significant medical history, including alcohol use,
medications, allergies, and tetanus immunization status if
known. Ask the time of the patient’s last oral intake, and
keep the patient on nothing-by-mouth status if procedural
sedation or surgical intervention is possible. (See the
“Moderate sedation” procedure, page 498.)2
■ Explain the procedure to the patient and family (if
appropriate) according to their individual communication
and learning needs to increase their understanding, allay
their fears, and enhance cooperation.14
■ Raise the patient’s bed to waist level when providing
patient care to prevent caregiver back strain.15
■ Perform hand hygiene.3,4,5,6,7,8
■ Put on gloves and other personal protective equipment,
as needed.16,17
■ If necessary, remove or cut away the patient’s clothing,
and remove jewelry if the injury involves the hand, foot, or
toes where jewelry is worn.2
■ Begin a thorough head-to-toe assessment, inspecting for
obvious deformities, swelling, or bleeding.
■ Screen and assess the patient’s pain using facility-defined
criteria consistent with the patient’s age, condition, and
ability to understand.18
■ Treat the patient’s pain, as needed and ordered, using
nonpharmacologic or pharmacologic approaches, or a
combination of approaches. Base the treatment plan on
evidence-based practices and the patient’s clinical
condition, past medical history, and pain management
goals. If administering pain medications, follow safe
medication administration practices.19,20,21,22 It’s important
to ensure adequate analgesia during and after splinting,
because splint application may involve painful movement of
the injured limb.
■ Assess the affected extremity’s range of motion (ROM).
■ Inspect and gently palpate the injured area for evidence
of fracture or dislocation.
■ Assess neurovascular integrity distal to the injury site.2
■ If possible, align the injured extremity in its normal
anatomic position.
■ To avoid damaging misplaced vessels and nerves, don’t
attempt to straighten a dislocation.
■ Measure the uninjured side to determine the proper splint
size. Choose a splint that will immobilize the joints above
and below the fracture.23
■ Pad the splint, as needed, to protect bony prominences.
■ Support the injured extremity above and below the
fracture site while applying firm, gentle traction.23
■ Have an assistant place the splint under, beside, or on
top of the extremity.
■ Have the assistant apply the bindings to secure the splint,
being careful not to compromise the circulation; the splint
should fit snugly but not be constrictive.23
■ Assess the neurovascular status of the extremity. If it’s
impaired by the bindings, release and reapply them.
■ Elevate the injured extremity, keeping in mind that
excessive elevation may compromise arterial circulation.2,23
■ Monitor the patient’s vital signs frequently to detect signs
of shock. Fractured bones may cause significant bleeding
into surrounding tissues.
■ Monitor the patient’s neurovascular status by assessing
skin color, temperature of the extremities, the presence of
paresthesia, and pulses, as well as the patient’s ability to
move the extremities. Numbness or paralysis distal to an
injury indicates nerve injury. (See Assessing neurovascular
status.)
■ Reassess and respond to the patient’s pain by evaluating
the response to treatment and progress toward pain
management goals. Assess for adverse reactions and risk
factors for adverse events that may result from
treatment.18,24
■ Apply ice to the injury, as needed, to minimize swelling.2
■ Assess the patient for signs of skin breakdown on an
ongoing basis; skin breakdown may result from contact with
the splint or immobility.
■ Return the bed to the lowest position to prevent falls and
maintain patient safety.25
■ Remove and discard your gloves and other personal
protective equipment if worn.16,17
■ Perform hand hygiene.3,4,5,6,7,8
■ Document the procedure.26,27,28,29
Special considerations
■ If a commercially prepared splint isn’t available, the
practitioner, physical therapist, or occupational therapist
may develop a customized splint for the patient.
■ Another body part may serve as a temporary splint. To
splint a leg in this manner, pad the inner aspect and secure
it to the other leg with roller gauze or cloth strips.
■ Collaborate with the practitioner, physical therapist, or
occupational therapist about the splint application and
removal schedule, the activities permitted, and
recommended ROM and strengthening exercises.
EQUIPMENT
Rigid splint
A rigid splint, as shown below, can help immobilize a fracture or dislocation in
an extremity. Ideally, two people should apply a rigid splint to an extremity.
EQUIPMENT
Using an air splint
In an emergency, you can apply an air splint, shown below, to immobilize a
fracture or control bleeding, especially from a forearm or lower leg. This
compact, comfortable splint is made of double-walled plastic and provides
gentle, diffuse pressure over an injured area. After choosing the appropriate
splint, wrap it around the affected extremity, secure it with Velcro or other
strips, and then inflate it. Inflate the splint only to the point where you can
slip a finger between the splint and the skin so that it fits snugly enough to
immobilize the extremity without impairing circulation.2
An air splint may actually control bleeding better than a local pressure
bandage. Its clear plastic construction simplifies inspection of the affected
site for bleeding, pallor, or cyanosis. An air splint also allows the patient to be
moved without further damage to the injured limb.
Assessing neurovascular status
When assessing an injured extremity, include these steps and compare your
findings bilaterally.
■ Inspect the color of the patients fingers or toes.
■ To detect edema, note the size of the patient’s digits.
■ Simultaneously touch the digits of the affected and unaffected extremities
and compare temperature.
■ Check capillary refill by pressing on the distal tip of one digit until it’s
white. Then release the pressure and note how soon the normal color returns.
It should return quickly in both the affected and unaffected extremities.
■ Check sensation by touching the fingers or toes and asking the patient
how they feel. Note reports of any numbness or tingling.
■ To check proprioception, tell the patient to close the eyes; then move one
of the digits and ask which position it’s in.
■ To test movement, tell the patient to wiggle the toes or move the fingers.
■ Palpate the distal pulses to assess vascular patency.
Record your findings for the affected and the unaffected extremities, using
standard terminology to avoid ambiguity. Warmth, free movement, rapid
capillary refill, and normal color, sensation, and proprioception indicate
sound neurovascular status.
■ Under a practitioner’s direct supervision, apply gentle
traction, and carefully remove a splint if there’s evidence of
improper application or vascular impairment.
Patient teaching
Teach the patient how to remove and apply the splint
properly and the schedule that the patient should follow.
Also review permissible activities while wearing the splint.
Tell the patient to check the skin beneath the splint several
times per day and report numbness, tingling, pain, a change
in skin temperature, and skin breakdown in the affected
extremity. Instruct the patient never to place foreign objects
between the splinting material and the skin.
Teach the patient and family about pain management
strategies during discharge planning. Include information
about the patient’s pain management plan and adverse
effects of pain management treatment. Discuss activities of
daily living and items in the home environment that might
exacerbate pain or reduce the effectiveness of the pain
management plan, and include strategies to address these
issues. Teach the patient and family about safe use, storage,
and disposal of opioids if prescribed.18
Complications
Multiple transfers and repeated manipulation of a fracture
may cause fat embolism. This complication usually occurs
within 36 hours of an injury or manipulation.30 Signs and
symptoms of fat embolism include dyspnea, agitation,
hypoxia, changes in mental status, and a petechial rash,
most commonly seen on the head, neck, anterior thorax,
axillae, and subconjunctiva.31 Other possible complications
include pressure injuries or contact dermatitis beneath the
splint, neurovascular compromise, and decreased ROM.
Documentation
Record the circumstances surrounding the injury, including
the time and mechanism of injury. Document the patient’s
complaints, noting whether the symptoms are localized.
Document any medication administered; the strength, dose,
route, and date and time of administration; and any adverse
effects.32 Record the neurovascular assessment before and
after applying the splint. Note the type of wound and the
type and amount of any drainage. Note the time of splint
application. Be sure to note if the bone end slips into
surrounding tissue or if transportation causes a change in
the degree of dislocation. Document teaching provided to
the patient and family (if applicable), their understanding of
that teaching, and whether they require follow-up teaching.
REFERENCES
1 Stracciolini, A. Basic techniques for splinting of musculoskeletal injuries.
(2017). In: UpToDate, Fields, K. B., et al. (Eds.). Retrieved from:
www.uptodate.com
2 Emergency Nurses Association. (2013). Sheehy’s manual of emergency care
(7th ed.). St. Louis, MO: Mosby.
3 Centers for Disease Control and Prevention. (2002). Guideline for hand
hygiene in health-care settings: Recommendations of the Healthcare Infection
Control Practices Advisory Committee and the HICPAC/SHEA/APIC/IDSA Hand
Hygiene Task Force. MMWR Recommendations and Reports, 51(RR-16), 1–45.
Accessed via the Web at https://www.cdc.gov/mmwr/pdf/rr/rr5116.pdf (Level
II)
4 World Health Organization. (2009). “WHO guidelines on hand hygiene in
health care: First global patient safety challenge, clean care is safer care”
[Online]. Accessed via the Web at
http://apps.who.int/iris/bitstream/10665/44102/1/9789241597906_eng.pdf
(Level IV)
5 The Joint Commission. (2019). Standard NPSG.07.01.01. Comprehensive
accreditation manual for hospitals. Oakbrook Terrace, IL: The Joint
Commission. (Level VII)
6 Centers for Medicare and Medicaid Services, Department of Health and
Human Services. (2015). Condition of participation: Infection control. 42 C.F.R.
§ 482.42.
7 Accreditation Association for Hospitals and Health Systems. (2017). Standard
07.01.21. Healthcare Facilities Accreditation Program: Accreditation
requirements for acute care hospitals. Chicago, IL: Accreditation Association
for Hospitals and Health Systems. (Level VII)
8 DNV GL-Healthcare USA, Inc. (2016). IC.1.SR.1 . NIAHO® accreditation
requirements: Interpretive guidelines & surveyor guidance (version 11).
Milford, OH: DNV GL-Healthcare USA, Inc. (Level VII)
9 The Joint Commission. (2019). Standard NPSG.01.01.01. Comprehensive
accreditation manual for hospitals. Oakbrook Terrace, IL: The Joint
Commission. (Level VII)
10 Centers for Medicare and Medicaid Services, Department of Health and
Human Services. (2015). Condition of participation: Patient’s rights. 42 C.F.R.
§ 482.13(c)(1).
11 Accreditation Association for Hospitals and Health Systems. (2017). Standard
15.01.16. Healthcare Facilities Accreditation Program: Accreditation
requirements for acute care hospitals. Chicago, IL: Accreditation Association
for Hospitals and Health Systems. (Level VII)
12 The Joint Commission. (2019). Standard RI.01.01.01. Comprehensive
accreditation manual for hospitals. Oakbrook Terrace, IL: The Joint
Commission. (Level VII)
13 DNV GL-Healthcare USA, Inc. (2016). PR.1.SR.5 . NIAHO® accreditation
requirements: Interpretive guidelines & surveyor guidance (version 11).
Milford, OH: DNV GL-Healthcare USA, Inc. (Level VII)
14 The Joint Commission. (2019). Standard PC.02.01.21. Comprehensive
accreditation manual for hospitals. Oakbrook Terrace, IL: The Joint
Commission. (Level VII)
15 Waters, T. R., et al. (2009). “Safe patient handling training for schools of
nursing” [Online]. Accessed via the Web at
https://www.cdc.gov/niosh/docs/2009-127/pdfs/2009-127.pdf (Level VII)
16 Siegel, J. D ., et al. (2007, revised 2017). “2007 guideline for isolation
precautions: Preventing transmission of infectious agents in healthcare
settings” [Online]. Accessed via the Web at
https://www.cdc.gov/infectioncontrol/pdf/guidelines/isolation-guidelines.pdf
(Level II)
17 Accreditation Association for Hospitals and Health Systems. (2017). Standard
07.01.10. Healthcare Facilities Accreditation Program: Accreditation
requirements for acute care hospitals. Chicago, IL: Accreditation Association
for Hospitals and Health Systems. (Level VII)
18 The Joint Commission. (2019). Standard PC.01.02.07. Comprehensive
accreditation manual for hospitals. Oakbrook Terrace, IL: The Joint
Commission. (Level VII)
19 Centers for Medicare and Medicaid Services, Department of Health and
Human Services. (2015). Condition of participation: Nursing services. 42
C.F.R. § 482.23(c).
20 The Joint Commission. (2019). Standard MM.06.01.01. Comprehensive
accreditation manual for hospitals. Oakbrook Terrace, IL: The Joint
Commission. (Level VII)
21 Accreditation Association for Hospitals and Health Systems. (2017). Standard
16.01.03. Healthcare Facilities Accreditation Program: Accreditation
requirements for acute care hospitals. Chicago, IL: Accreditation Association
for Hospitals and Health Systems. (Level VII)
22 DNV GL-Healthcare USA, Inc. (2016). MM.1 .SR.2. NIAHO® accreditation
requirements: Interpretive guidelines & surveyor guidance (version 11).
Milford, OH: DNV GL-Healthcare USA, Inc. (Level VII)
23 Proehl, J. A. (2009). Emergency nursing procedures (4th ed.) . Philadelphia, PA:
Saunders.
24 Accreditation Association for Hospitals and Health Systems. (2017). Standard
16.02.05. Healthcare Facilities Accreditation Program: Accreditation
requirements for acute care hospitals. Chicago, IL: Accreditation Association
for Hospitals and Health Systems. (Level VII)
25 Ganz, D. A., et al. (2013). Preventing falls in hospitals: A toolkit for improving
quality of care (AHRQ Publication No. 13-0015-EF). Rockville, MD: Agency for
Healthcare Research and Quality. Accessed via the Web at
https://www.ahrq.gov/sites/default/files/publications/files/fallpxtoolkit_0 .pdf
(Level VII)
26 The Joint Commission. (2019). Standard RC.01.03 .01. Comprehensive
accreditation manual for hospitals. Oakbrook Terrace, IL: The Joint
Commission. (Level VII)
27 Centers for Medicare and Medicaid Services, Department of Health and
Human Services. (2015). Condition of participation: Medical record services.
42 C.F.R. § 482.24(b).
28 Accreditation Association for Hospitals and Health Systems. (2017). Standard
10.00 .03. Healthcare Facilities Accreditation Program: Accreditation
requirements for acute care hospitals. Chicago, IL: Accreditation Association
for Hospitals and Health Systems. (Level VII)
29 DNV GL-Healthcare USA, Inc. (2016). MR.2 .SR.1 . NIAHO® accreditation
requirements: Interpretive guidelines & surveyor guidance (version 11).
Milford, OH: DNV GL-Healthcare USA, Inc. (Level VII)
30 Porpodis, K., et al. (2012). Fat embolism due to bilateral femoral fracture: A
case report. International Journal of General Medicine, 2012(5), 59–63. (Level
VI)
31 Weinhouse, G. L. Fat embolism syndrome. (2017). In: UpToDate, Parsons, P. E.
(Ed.). Retrieved from: www.uptodate.com
32 The Joint Commission. (2019). Standard RC.02.01.01. Comprehensive
accreditation manual for hospitals. Oakbrook Terrace, IL: The Joint
Commission. (Level VII)
SPONGE BATH
A sponge bath with tepid water reduces fever by dilating
superficial blood vessels, which releases heat and lowers
body temperature. It may lower systemic temperature when
routine fever treatments fail.
Equipment
Basin of tepid water, about 80° to 93°F (27° to 34°C) ▪ bath
(utility) thermometer ▪ bath blanket ▪ fluid-impermeable
pad ▪ washcloths ▪ patient thermometer ▪ towel ▪ clean
hospital gown (for patient) ▪ facility-approved disinfectant ▪
Optional: gloves, prescribed antipyretic, ice bag and cover.
Preparation of equipment
Prepare an ice bag and cover; the cover prevents skin
irritation and tissue damage.1 Then place the bath
thermometer in a basin, and run water over it until the
temperature reaches the high end of the tepid range (93°F
[34°C]), because the water will cool during the sponge bath.
Immerse the washcloths in the tepid solution until
saturated.
PEDIATRIC ALERT Tepid-water sponge baths are no longer
recommended for children; they can lead to extreme chilling and
shock (because children’s nervous systems are still immature) and
they offer little advantage over the use of antipyretics.2
Implementation
■ Verify the practitioner’s order.
■ Review the patient’s medication record for recent
administration of an antipyretic. If not administered
recently, administer an antipyretic as ordered, 15 to 20
minutes before the sponge bath, following safe medication
administration practices, to achieve more rapid fever
reduction.3,4,5,6
■ Gather and prepare the necessary equipment.
■ Perform hand hygiene.7,8,9,10,11,12
■ Confirm the patient’s identity using at least two patient
identifiers.13,14
■ Provide privacy.15,16,17,18
■ Explain the procedure to the patient and family (if
appropriate) according to their individual communication
and learning needs to increase their understanding, allay
their fears, and enhance cooperation.19
■ Ensure the room is warm and free from drafts.
■ Raise the patient’s bed to waist level when providing
patient care to prevent caregiver back strain.20
■ Perform hand hygiene.7,8,9,10,11,12
■ Put on gloves as needed to comply with standard
precautions.9,21
■ Assess the patient’s condition.
■ Place a fluid-impermeable pad under the patient to catch
any spills, and a bath blanket on top of the patient for
privacy. Then remove the patient’s gown. Also remove the
top bed linen to avoid wetting it.
■ Obtain and document the patient’s vital signs
(temperature, pulse, and respirations) to serve as baseline
for comparison.
■ Place a covered ice bag on the patient’s head to prevent
headache and nasal congestion that occur as the rest of the
body cools.
■ Wring out each washcloth before sponging the patient so
that the water doesn’t drip and cause discomfort.
■ Place moist washcloths over the major superficial blood
vessels in the axillae, groin, and popliteal areas to
accelerate cooling. Change the washcloths as they warm.
■ Bathe each extremity separately for about 5 minutes;
then sponge the chest and abdomen for 5 minutes. Turn the
patient, and bathe the back and buttocks for 5 to 10
minutes. Keep the patient covered except for the body part
you’re sponging.
■ Pat each area dry after sponging but avoid rubbing with
the towel, because rubbing increases cell metabolism and
produces heat.
■ Add tepid water to the basin as necessary to maintain the
desired water temperature.
■ Monitor the patient’s temperature, pulse, and respirations
every 10 minutes or as needed. Notify the practitioner if the
patient’s temperature doesn’t fall within 30 minutes.
■ Observe the patient for chills, shivering, pallor, mottling,
cyanosis of the lips or nail beds, and changes in vital signs—
especially a rapid, weak, or irregular pulse—because such
signs may indicate an emergency. If any of these signs
occur, discontinue the bath, cover the patient lightly, and
notify the practitioner.
■ If no adverse effects occur, bathe the patient for at least
30 minutes or until the patient’s temperature reaches 1° to
2°F (0.6° to 1°C) above the desired level, because the
temperature will continue to fall naturally. Continue to
monitor the temperature until it stabilizes.
■ After the bath, make sure the patient is dry and
comfortable. Dress the patient in a fresh gown and cover
lightly.
■ Return the patient’s bed to the lowest position to prevent
falls and maintain patient safety.22
■ Dispose of used supplies in the appropriate receptacles.23
■ Remove and discard your gloves, if worn.10,23
■ If the treatment will be repeated, clean and disinfect the
equipment using a facility-approved disinfectant,24,25 and
store the equipment in the patient’s room.
■ Perform hand hygiene.7,8,9,10,11,12
■ Obtain the patient’s temperature, pulse, and respirations
30 minutes after the bath to determine the treatment’s
effectiveness.
■ Perform hand hygiene.7,8,9,10,11,12
■ Document the procedure.26,27,28,29
Special considerations
■ Consider covering the patient’s trunk with a wet towel for
15 minutes to speed cooling. Resaturate the towel as
necessary.
■ Refrain from bathing the breasts of a postpartum patient,
because the nipples could become overly dry or develop
fissures.
■ Take a rectal temperature, unless contraindicated, for
accuracy.
Complications
Accelerated temperature reduction can provoke seizure
activity.
Documentation
Record the date, time, and duration of the sponge bath; the
temperature of the water; the patient’s temperature, pulse,
and respirations before, during, and after the procedure;
any complications and interventions; and the patient’s
tolerance to the treatment.
REFERENCES
1 Craven, R. F., et al. (2017). Fundamentals of nursing: Human health and
function (8th ed.). Philadelphia, PA: Wolters Kluwer.
2 Silbert-Flagg, J., & Pillitteri, A. (2017). Maternal & child health nursing: Care of
the childbearing & childrearing family (8th ed.). Philadelphia, PA: Wolters
Kluwer.
3 Institute for Safe Medication Practices. (2012). Side tracks on the safety
express: Interruptions lead to errors and unfinished...Wait, what was I doing?
Nurse Advise-ERR, 11(2), 1–4 . Accessed via the Web at
https://www.ismp.org/resources/side-tracks-safety-express-interruptions-lead-
errors-and-unfinished-wait-what-was-i-doing
4 DNV GL-Healthcare USA, Inc. (2016). MM .1 .SR.2 . NIAHO® accreditation
requirements: Interpretive guidelines & surveyor guidance (version 11).
Milford, OH: DNV GL-Healthcare USA, Inc. (Level VII)
5 Centers for Medicare and Medicaid Services, Department of Health and
Human Services. (2015). Condition of participation: Nursing services. 42
C.F.R. § 482.23(c).
6 Accreditation Association for Hospitals and Health Systems. (2017). Standard
16.01.03. Healthcare Facilities Accreditation Program: Accreditation
requirements for acute care hospitals. Chicago, IL: Accreditation Association
for Hospitals and Health Systems. (Level VII)
7 The Joint Commission. (2019). Standard NPSG.07.01.01. Comprehensive
accreditation manual for hospitals. Oakbrook Terrace, IL: The Joint
Commission. (Level VII)
8 Centers for Disease Control and Prevention. (2002). Guideline for hand
hygiene in health-care settings: Recommendations of the Healthcare Infection
Control Practices Advisory Committee and the HICPAC/SHEA/APIC/IDSA Hand
Hygiene Task Force. MMWR Recommendations and Reports, 51(RR-16), 1–45.
Accessed via the Web at https://www.cdc.gov/mmwr/pdf/rr/rr5116.pdf (Level
II)
9 World Health Organization. (2009). “WHO guidelines on hand hygiene in
health care: First global patient safety challenge, clean care is safer care”
[Online]. Accessed via the Web at
http://apps.who.int/iris/bitstream/10665/44102/1/9789241597906_eng.pdf
(Level IV)
10 Accreditation Association for Hospitals and Health Systems. (2017). Standard
07.01.21. Healthcare Facilities Accreditation Program: Accreditation
requirements for acute care hospitals. Chicago, IL: Accreditation Association
for Hospitals and Health Systems. (Level VII)
11 Centers for Medicare and Medicaid Services, Department of Health and
Human Services. (2015). Condition of participation: Infection control. 42 C.F.R.
§ 482.42.
12 DNV GL-Healthcare USA, Inc. (2016). IC.1 .SR.1 . NIAHO® accreditation
requirements: Interpretive guidelines & surveyor guidance (version 11).
Milford, OH: DNV GL-Healthcare USA, Inc. (Level VII)
13 The Joint Commission. (2019). Standard NPSG.01.01.01. Comprehensive
accreditation manual for hospitals. Oakbrook Terrace, IL: The Joint
Commission. (Level VII)
14 Accreditation Association for Hospitals and Health Systems. (2017). Standard
30.00 .14. Healthcare Facilities Accreditation Program: Accreditation
requirements for acute care hospitals. Chicago, IL: Accreditation Association
for Hospitals and Health Systems. (Level VII)
15 Accreditation Association for Hospitals and Health Systems. (2017). Standard
15.01.16. Healthcare Facilities Accreditation Program: Accreditation
requirements for acute care hospitals. Chicago, IL: Accreditation Association
for Hospitals and Health Systems. (Level VII)
16 Centers for Medicare and Medicaid Services, Department of Health and
Human Services. (2015). Condition of participation: Patient’s rights. 42 C.F.R.
§ 482.13(c)(1).
17 The Joint Commission. (2017). Standard RI.01.01.01. Comprehensive
accreditation manual for hospitals. Oakbrook Terrace, IL: The Joint
Commission. (Level VII)
18 DNV GL-Healthcare USA, Inc. (2016). PR.1.SR.5 . NIAHO® accreditation
requirements: Interpretive guidelines & surveyor guidance (version 11).
Milford, OH: DNV GL-Healthcare USA, Inc. (Level VII)
19 The Joint Commission. (2019). Standard PC.02.01.21. Comprehensive
accreditation manual for hospitals. Oakbrook Terrace, IL: The Joint
Commission. (Level VII)
20 Waters, T. R., et al. (2009). “Safe patient handling training for schools of
nursing” [Online]. Accessed via the Web at
https://www.cdc.gov/niosh/docs/2009-127/pdfs/2009-127.pdf (Level VII)
21 Accreditation Association for Hospitals and Health Systems. (2017). Standard
07.01.10. Healthcare Facilities Accreditation Program: Accreditation
requirements for acute care hospitals. Chicago, IL: Accreditation Association
for Hospitals and Health Systems. (Level VII)
22 Ganz, D. A., et al. (2013). Preventing falls in hospitals: A toolkit for improving
quality of care (AHRQ Publication No. 13-0015-EF). Rockville, MD: Agency for
Healthcare Research and Quality. Accessed via the Web at
http://www.ahrq.gov/sites/default/files/publications/files/fallpxtoolkit.pdf
(Level VII)
23 Siegel, J. D ., et al. (2007, revised 2017). “2007 guideline for isolation
precautions: Preventing transmission of infectious agents in healthcare
settings” [Online]. Accessed via the Web at
https://www.cdc.gov/infectioncontrol/pdf/guidelines/isolation-guidelines.pdf
(Level II)
24 Rutala, W. A., et al. (2008, revised 2017). “Guideline for disinfection and
sterilization in healthcare facilities, 2008” [Online]. Accessed via the Web at
https://www.cdc.gov/infectioncontrol/pdf/guidelines/disinfection-
guidelines.pdf (Level I)
25 Accreditation Association for Hospitals and Health Systems. (2017). Standard
07.02.03. Healthcare Facilities Accreditation Program: Accreditation
requirements for acute care hospitals. Chicago, IL: Accreditation Association
for Hospitals and Health Systems. (Level VII)
26 The Joint Commission. (2019). Standard RC.01.03 .01. Comprehensive
accreditation manual for hospitals. Oakbrook Terrace, IL: The Joint
Commission. (Level VII)
27 Accreditation Association for Hospitals and Health Systems. (2017). Standard
10.00 .03. Healthcare Facilities Accreditation Program: Accreditation
requirements for acute care hospitals. Chicago, IL: Accreditation Association
for Hospitals and Health Systems. (Level VII)
28 Centers for Medicare and Medicaid Services, Department of Health and
Human Services. (2015). Condition of participation: Medical record services.
42 C.F.R. § 482.24(b).
29 DNV GL-Healthcare USA, Inc. (2016). MR.2 .SR.1 . NIAHO® accreditation
requirements: Interpretive guidelines & surveyor guidance (version 11).
Milford, OH: DNV GL-Healthcare USA, Inc. (Level VII)
SPUTUM COLLECTION
Secreted by mucous membranes lining the bronchioles,
bronchi, and trachea, sputum helps protect the respiratory
tract from infection. When expelled from the respiratory
tract, sputum carries saliva, nasal and sinus secretions,
dead cells, and normal oral bacteria from the respiratory
tract. Sputum specimens may be cultured for identification
of respiratory pathogens. Laboratory examination of sputum
helps in the diagnosis and treatment of such conditions as
pneumonia and tuberculosis (TB).
Sputum specimens collected by expectoration are
commonly used for cytology, culture and sensitivity, and
acid-fast bacilli (AFB) testing. Cytologic examination helps
identify abnormal cells. Culture and sensitivity testing
identifies specific microorganisms and antibiotic sensitivity.
Smear specimens that test positive for AFB must also
undergo culture and sensitivity testing to confirm TB.
When a patient is unable to produce an adequate
specimen, additional treatments may be needed to help
mobilize secretions. These treatments include nebulizer use,
hydration, deep breathing exercises, chest percussion, and
postural drainage.
Equipment
For expectoration
Sterile specimen container with tight-fitting cap ▪ gloves ▪
glass of water ▪ label ▪ laboratory request form ▪ laboratory
biohazard transport bag ▪ oral hygiene supplies ▪
stethoscope ▪ Optional: gown, goggles or face shield, mask,
respirator (such as an N95) if TB or other airborne
pathogens are suspected, small-volume nebulizer, pillow
(for splinting), prescribed solution for aerosolization
(hypertonic saline, N-acetylcysteine,1 propylene glycol, or
sterile or distilled water), disinfectant wipes.
For tracheal suctioning
#12 to #14 French sterile suction catheter ▪ sterile gloves ▪
sterile in-line specimen trap ▪ sterile container with sterile
normal saline solution ▪ suction source with regulator ▪
suction canister ▪ oxygen therapy equipment ▪ stethoscope
▪ pulse oximeter ▪ label ▪ laboratory biohazard transport
bag ▪ oral hygiene supplies ▪ disinfectant pad ▪ emergency
equipment (code cart with emergency medications,
defibrillator, handheld resuscitation bag with mask,
intubation equipment) ▪ Optional: laboratory request form,
respirator (such as an N95 or powered air purifying
respirator if TB or other airborne pathogens are suspected),
gown, mask with face shield or mask and goggles, water-
soluble lubricant.
Commercial suction kits are available but the equipment
in them varies. Check the package label when gathering
equipment.
Implementation
■ Verify the practitioner’s order.
■ Gather the appropriate equipment.
■ Perform hand hygiene.1,2,3,4,5,6
■ Confirm the patient’s identity using at least two patient
identifiers.7
■ Provide privacy.8,9,10,11
■ Explain the procedure to the patient to allay fears and
enhance cooperation. Stress the importance of coughing
and then expectorating the sputum to ensure that the
sample is sputum and not saliva.
■ Position all supplies within reach.
■ Instruct the patient to sit in a chair or at the edge of the
bed. If the patient can’t sit up, place the patient in the high
Fowler position. These positions help the patient exert a
greater force when coughing, increasing the likelihood of
gathering an adequate sputum sample.
■ Perform hand hygiene.1,2,3,4,5,6
■ Put on a mask, eye protection, gloves, and a gown as
needed to comply with standard precautions.12,13
NURSING ALERT If the patient is on airborne precautions, wear a fit-
tested N95 or higher-level disposable respirator when caring for the
patient; put on the respirator before entering the room and remove it
after exiting the room. If you anticipate spraying of respiratory fluids,
wear a gown, mask, and face shield or goggles, as well as gloves.13
■ Perform treatment as ordered (such as small-volume
nebulizer use, chest percussion, and postural drainage) to
assist in specimen production. (See the “Chest
physiotherapy” procedure, page 164, and the “Nebulizer
therapy” procedure, page 530.)
Sputum collection by expectoration
■ Instruct the patient to rinse the mouth with water to
reduce specimen contamination with normal flora.14 Avoid
mouthwash or toothpaste, because they may affect the
mobility of organisms in the sputum sample.
■ If the patient has a surgical incision or localized area of
discomfort, have the patient place the hands firmly over the
affected area or place a pillow over the area to provide
splinting, which reduces tension on the incision during
coughing.
■ Instruct the patient to take three slow, deep breaths and
to then cough deeply from a maximal inspiration. Repeat
the procedure as necessary until the patient produces
sputum. Allow rest periods between each maneuver.
EQUIPMENT
Attaching a specimen trap to a suction
catheter
Wearing gloves, push the suction tubing onto the male adapter of the in-line
specimen trap.
Insert the suction catheter into the rubber tubing of the trap.
After suctioning, disconnect the in-line trap from the suction tubing and
catheter. To seal the container, connect the rubber tubing to the male
adapter of the trap.
■ When sputum is mobilized, instruct the patient to
expectorate directly into the specimen container without
touching the inside or rim of the container. Have the patient
continue producing sputum until the amount totals at least
5 mL if possible.
■ Assess the sputum to ensure it’s actually sputum and not
saliva, because saliva produces inaccurate test results.
Sputum appears thick and opaque, while saliva appears
thin, clear, and watery.15
■ Cap the specimen container tightly and, if necessary,
clean its exterior with disinfectant wipes.
Sputum collection by tracheal suctioning
■ Inform the patient of the need to collect a sputum
specimen, and explain the procedure, including physiologic
responses that might occur during the procedure, such as
the need to cough or gag and shortness of breath, to
promote cooperation.
■ Raise the bed to waist level when providing care to
prevent caregiver back strain.16
■ Position the patient in the high or semi-Fowler position to
promote lung expansion and to facilitate the patient’s ability
to cough.
■ Assess the patient’s respiratory status, including
respiratory rate, depth, and pattern; breath sounds; oxygen
saturation level by pulse oximetry17; and the color of the
nail beds and mucous membranes. Continue to monitor the
patient’s respiratory status throughout the procedure.
■ Hyperoxygenate the patient with an appropriate oxygen
delivery device, as indicated and ordered, to prevent
hypoxia during tracheal suctioning.17
■ Perform hand hygiene.1,2,3,4,5,6
■ Put on personal protective equipment, as needed, to
comply with standard precautions.12,13
■ Open equipment packages following sterile no-touch
technique.
■ Put on sterile gloves. Consider the hand you’ll be using to
hold the suction catheter as sterile and your other hand as
clean to prevent cross-contamination.18
■ Connect the suction tubing to the male adapter of the in-
line specimen trap. Attach the sterile suction catheter to the
rubber tubing of the trap. (See Attaching a specimen trap to
a suction catheter.)
■ Lubricate the catheter with normal saline solution or
water-soluble lubricant.
■ Gently pass the catheter through the patient’s nostril,
directing it toward the septum and floor of the nasal cavity,
without applying suction.17,18,19 Gently twist the catheter if
you feel resistance in the nostril. If twisting doesn’t help,
withdraw the catheter and insert it in the other nostril.19
■ When the catheter reaches the larynx, have the patient
assume a “sniffing” position (flexion of the neck on the body
and extension of the head on the neck) to help align the
opening of the larynx with the lower pharynx, easing
passage of the catheter through the larynx. Advance the
catheter into the trachea until the patient coughs or you feel
resistance.19 Tell the patient to take several deep breaths
through the mouth to ease insertion.
■ To obtain the specimen, apply suction for 5 to 10 seconds,
but never for longer than 15 seconds, because prolonged
suctioning can cause atelectasis and hypoxia. If the
procedure must be repeated, administer oxygen and wait at
least 1 minute to allow the patient time to return to
preprocedure condition.19
NURSING ALERT Adjust the suction pressure to the lowest level
necessary to remove secretions, usually 100 to 150 mm Hg for
adults.17 Suctioning with excessive negative pressure can cause
atelectasis, hypoxia, and mucosal damage.17
■ When collection is completed, gently remove the
catheter.
■ Administer oxygen, as ordered.
■ Verify that the patient is in stable condition.
■ Turn off the suction source.
■ Detach the catheter from the in-line specimen trap,
gather it up in your dominant hand, and pull your glove cuff
inside out and down around the used catheter to enclose it
for disposal.
■ Detach the trap from the tubing connected to the suction
device. Seal the trap tightly by connecting the rubber tubing
to the male adapter of the trap.
■ Clear the suction tubing with normal saline solution.
■ Examine the specimen to make sure you obtained an
adequate sample.
Completing the procedure
■ Remove and discard your gloves and any other personal
protective equipment worn.12,13
■ Perform hand hygiene.1,2,3,4,5,6
■ Label the specimen container in the presence of the
patient to prevent mislabeling.7 Include on the laboratory
request form whether the patient was febrile or taking
antibiotics, and whether sputum was induced, because such
specimens commonly appear watery and may resemble
saliva.
■ Send the specimen to the laboratory immediately in a
laboratory biohazard transport bag.20 A delay in transport of
the sample to the laboratory could damage the specimen
and alter the accuracy of the results.
■ Offer the patient oral care.
■ Perform hand hygiene.1,2,3,4,5,6
■ Document the procedure.21,22,23,24
Special considerations
■ If possible, collect the specimen early in the morning,
before breakfast, because secretions accumulate overnight,
making collection easier, and an empty stomach decreases
the risk of vomiting food.
■ If normal maximal cough efforts fail to produce a
specimen, consider having the patient attempt the forced
expiratory technique, also known as huff coughing, which
consists of one or two huffs (forced expirations) from mid- to
low-lung volumes with the glottis open. Have the patient
repeat the process until he or she obtains maximal bronchial
clearance; the patient can reinforce the process by
compressing the chest wall using a brisk adduction
movement of the upper arms.25,26
■ Because expectorated sputum is contaminated by normal
mouth flora, tracheal suctioning provides a more reliable
specimen for diagnosis.
■ Sputum induction increases TB case detection; it’s useful
for patients who have negative results on spontaneous
smear microscopy or who can’t expectorate spontaneously.
It’s well-tolerated by children and adults.27
■ As many as three consecutive morning specimens may be
required if the suspected organism is Mycobacterium
tuberculosis.
■ If TB is suspected, place the patient on airborne
precautions in an airborne infection isolation room to reduce
the risk of transmission.13,28
■ If the patient becomes hypoxic or cyanotic during
tracheal suctioning, immediately remove the catheter and
administer oxygen. Be prepared to provide manual
ventilation if respiratory support is necessary.
Complications
Patients with cardiac disease may develop arrhythmias
during the procedure as a result of vagus nerve stimulation
caused by coughing. Because of the increased intrathoracic
pressure associated with forced coughing, neurologic
symptoms such as light-headedness and headache may
occur. Other potential complications include nasal,
pharyngeal and tracheal trauma; infection; increased
intracranial pressure; increased or decreased blood
pressure;
vomiting;
aspiration;
laryngospasm;
bronchospasm; hypoxemia and hypoxia; atelectasis;
pneumothorax; and respiratory arrest.17
Documentation
Document the sputum collection method used; the time and
date of collection; the patient’s tolerance of the procedure;
the color, volume, and consistency of the specimen; and the
specimen’s proper disposition.21 In your notes, document
your assessment of the patient’s respiratory status,
including oxygen saturation, before, during, and after the
procedure, as well as the patient’s tolerance of the
procedure. Document any unexpected outcomes, your
interventions, and the patient’s response to them.
REFERENCES
1 Centers for Disease Control and Prevention. (2002). Guideline for hand
hygiene in health-care settings: Recommendations of the Healthcare Infection
Control Practices Advisory Committee and the HICPAC/SHEA/APIC/IDSA Hand
Hygiene Task Force. MMWR Recommendations and Reports, 51(RR-16), 1–45.
Accessed via the Web at https://www.cdc.gov/mmwr/pdf/rr/rr5116.pdf (Level
II)
2 The Joint Commission. (2019). Standard NPSG.07.01.01. Comprehensive
accreditation manual for hospitals. Oakbrook Terrace, IL: The Joint
Commission. (Level VII)
3 World Health Organization. (2009). “WHO guidelines on hand hygiene in
health care: First global patient safety challenge, clean care is safer care”
[Online]. Accessed via the Web at
http://apps.who.int/iris/bitstream/10665/44102/1/9789241597906_eng.pdf
(Level IV)
4 Accreditation Association for Hospitals and Health Systems. (2017). Standard
07.01.21. Healthcare Facilities Accreditation Program: Accreditation
requirements for acute care hospitals. Chicago, IL: Accreditation Association
for Hospitals and Health Systems. (Level VII)
5 Centers for Medicare and Medicaid Services, Department of Health and
Human Services. (2015). Condition of participation: Infection control. 42 C.F.R.
§ 482.42.
6 DNV GL-Healthcare USA, Inc. (2016). IC.1.SR.1 . NIAHO® accreditation
requirements: Interpretive guidelines & surveyor guidance (version 11).
Milford, OH: DNV GL-Healthcare USA, Inc. (Level VII)
7 The Joint Commission. (2019). Standard NPSG.01.01.01. Comprehensive
accreditation manual for hospitals. Oakbrook Terrace, IL: The Joint
Commission. (Level VII)
8 DNV GL-Healthcare USA, Inc. (2016). PR.1 .SR.5 . NIAHO® accreditation
requirements: Interpretive guidelines & surveyor guidance (version 11).
Milford, OH: DNV GL-Healthcare USA, Inc. (Level VII)
9 Centers for Medicare and Medicaid Services, Department of Health and
Human Services. (2015). Condition of participation: Patient’s rights. 42 C.F.R.
§ 482.13(c)(1).
10 Accreditation Association for Hospitals and Health Systems. (2017). Standard
15.01.16. Healthcare Facilities Accreditation Program: Accreditation
requirements for acute care hospitals. Chicago, IL: Accreditation Association
for Hospitals and Health Systems. (Level VII)
11 The Joint Commission. (2019). Standard RI.01.01.01. Comprehensive
accreditation manual for hospitals. Oakbrook Terrace, IL: The Joint
Commission. (Level VII)
12 Accreditation Association for Hospitals and Health Systems. (2017). Standard
07.01.10. Healthcare Facilities Accreditation Program: Accreditation
requirements for acute care hospitals. Chicago, IL: Accreditation Association
for Hospitals and Health Systems. (Level VII)
13 Siegel, J. D ., et al. (2007, revised 2017). “2007 guideline for isolation
precautions: Preventing transmission of infectious agents in healthcare
settings” [Online]. Accessed via the Web at
https://www.cdc.gov/infectioncontrol/pdf/guidelines/isolation-guidelines.pdf
(Level II)
14 Septimus, E. (2015). “Clinician guide for collecting cultures” [Online]. Centers
for Disease Control and Prevention. Accessed via the Web at
https://www.cdc.gov/getsmart/healthcare/implementation/clinicianguide.html
15 Craven, R. F., et. al. (2017). Fundamentals of nursing: Human health and
function (8th ed.). Philadelphia, PA: Wolters Kluwer.
16 Waters, T. R., et al. (2009). “Safe patient handling training for schools of
nursing” [Online]. Accessed via the Web at
https://www.cdc.gov/niosh/docs/2009-127/pdfs/2009-127.pdf (Level VII)
17 American Association for Respiratory Care (AARC). (2004). AARC clinical
practice guideline: Nasotracheal suctioning—2004 revision & update.
Respiratory Care, 49(9), 1080–1084. Accessed via the Web at
http://www.rcjournal.com/cpgs/pdf/09.04.1080.pdf (Level VII)
18 Centers for Disease Control and Prevention. (2004). Guidelines for preventing
health-care-associated pneumonia, 2003: Recommendations of CDC and the
Healthcare Infection Control Practices Advisory Committee. MMWR
Recommendations and Reports, 53(RR-3), 1–32. Accessed via the Web at
https://www.cdc.gov/mmwr/pdf/rr/rr5303.pdf (Level II)
19 Kacmarek, R. M ., et al. (2016). Egan’s fundamentals of respiratory care (11th
ed.). St Louis, MO: Mosby.
20 Occupational Safety and Health Administration. (n.d .). “Bloodborne
pathogens, standard number 1910.1030” [Online]. Accessed via the Web at
https://www.osha.gov/pls/oshaweb/owadisp.show_document?
p_id=10051&p_table=STANDARDS (Level VII)
21 The Joint Commission. (2019). Standard RC.01.03 .01. Comprehensive
accreditation manual for hospitals. Oakbrook Terrace, IL: The Joint
Commission. (Level VII)
22 Accreditation Association for Hospitals and Health Systems. (2017). Standard
10.00 .03. Healthcare Facilities Accreditation Program: Accreditation
requirements for acute care hospitals. Chicago, IL: Accreditation Association
for Hospitals and Health Systems. (Level VII)
23 Centers for Medicare and Medicaid Services, Department of Health and
Human Services. (2015). Condition of participation: Medical record services.
42 C.F.R. § 482.24(b).
24 DNV GL-Healthcare USA, Inc. (2016). MR.2 .SR.1 . NIAHO® accreditation
requirements: Interpretive guidelines & surveyor guidance (version 11).
Milford, OH: DNV GL-Healthcare USA, Inc. (Level VII)
25 Strickland, S. L., et. al. (2013). AARC clinical practice guideline: Effectiveness
of nonpharmacologic airway clearance therapies in hospitalized patients.
Respiratory Care, 58(12), 2187–2193. (Level VII)
26 Fink, J. B. (2013). Forced expiratory technique, directed cough, and autogenic
drainage. Respiratory Care, 52(9), 1210–1223.
27 Hepple, P., et al. (2012). Microscopy compared to culture for the diagnosis of
tuberculosis in induced sputum samples: A systematic review. International
Journal of Tuberculosis and Lung Disease, 16(5), 579–588. Accessed via the
Web at
http://tbevidence.org/documents/sysrev/specimen/Hepple%20Ford%20Mcner
ney%20-%202012.pdf (Level V)
28 Centers for Disease Control and Prevention. (2005). Guidelines for preventing
the transmission of Mycobacterium tuberculosis in health-care settings, 2005.
MMWR Recommendations and Reports, 54(RR-17), 1–141 . Accessed via the
Web at https://www.cdc.gov/mmwr/PDF/rr/rr5417.pdf (Level I)
Transmission-based precautions1
Transmission-based precautions may be necessary in addition to standard
precautions, depending on the patient’s condition.
STANDARD PRECAUTIONS
Standard precautions were developed by the Centers for
Disease Control and Prevention (CDC) to protect against the
transmission of infection. CDC officials recommend that
health care workers assume that all patients are potentially
infected or colonized (carriers without signs or symptoms of
infection) with an organism that could be transmitted in the
health care setting, regardless of their diagnosis.1
Part of routine infection control practices, following
standard precautions includes wearing gloves for situations
involving known or anticipated contact with blood, body
fluids, tissue, mucous membranes, or nonintact skin.1 If the
task or procedure being performed may result in splashing
or splattering of blood or body fluids to the face, a mask and
goggles or face shield should be worn. If the task or
procedure being performed may result in splashing or
splattering of blood or body fluids to the body, a fluid-
resistant gown or apron should be worn.1,2 Additional
protective clothing such as shoe covers may be appropriate
to protect the feet in situations that may expose the health
care worker to large amounts of blood or body fluids (or
both), such as when caring for a trauma patient in the
operating room or emergency department.
Standard precautions should be combined with
transmission-based precautions for patients with confirmed
or suspected infection with highly transmissible
pathogens.1,3,4 (See Transmission-based precautions as well
as the “Airborne precautions,” “Contact precautions,” and
“Droplet precautions” procedures, pages 12, 200, 240.)
NURSING ALERT For information on Ebola virus disease, please refer
to the latest recommendations from the CDC, located at
https://www.cdc.gov/vhf/ebola/healthcare-us/hospitals/infection-
control.html, when caring for a patient with known or suspected Ebola
virus disease.
Equipment
Gloves ▪ mask and goggles, or mask with face shield ▪
gown ▪ resuscitation bag ▪ facility-approved disinfectant ▪
bags for specimens ▪ Optional: shoe covers, apron.
Implementation
■ Gather the appropriate equipment.
■ Wash your hands immediately if they become
contaminated with blood or body fluids, excretions,
secretions, or drainage.2,5,6,7,8,9,10
■ Perform hand hygiene before and after patient care and
before and after putting on and removing gloves.11 Hand
hygiene removes microorganisms from your skin.5,6,7,8,9,10 If
your hands aren’t visibly soiled, use an alcohol-based hand
sanitizer for routine decontamination.1,5,6,7,8,9,10
■ Wear gloves if you will or could come in contact with
blood, specimens, tissue, body fluids, secretions or
excretions,
mucous
membrane, broken skin, or
contaminated surfaces or objects.1,2
■ Change your gloves and perform hand hygiene when
moving from a contaminated to a clean site during patient
care and in between patient contacts to avoid cross-
contamination.1,5,6,7,8,9,10,11
■ Wear a fluid-resistant gown as well as a mask and
goggles or a mask with face shield during procedures likely
to generate splash or splatter of blood or body fluids, such
as surgery, endoscopic procedures, dialysis, catheter
insertion, and intubation or manipulation of arterial
lines.1,2,11
■ Wear a mask during lumbar puncture procedures, such as
a myelogram and spinal or epidural anesthesia. The health
care worker performing the procedure should wear a mask
with a face shield.1
■ Follow safe injection practices; whenever possible, use
single-dose vials instead of multidose vials. Use a sterile,
single-use disposable needle and syringe for each injection.1
Use safety needles if available.2
■ Handle used needles and other sharp instruments
carefully. Don’t bend or break them, reinsert them into their
original sheaths, remove needles from syringes, or
unnecessarily handle them. Activate any safety mechanisms
immediately after use. Discard the instruments intact
immediately after use into a puncture-resistant sharps
disposal container. Use tools to pick up broken glass or other
sharp objects. These measures reduce the risk of accidental
injury or infection. Use a needleless IV system whenever
possible.1,2
■ Immediately notify your employee health provider (or the
provider’s designee) of all needle-stick or other sharp-object
injuries, mucosal splashes, or contamination of open
wounds or nonintact skin with blood or body fluids, to allow
investigation of the incident and appropriate care and
documentation. Complete all follow-up screening and care
as recommended by your employee health provider.2
■ Properly label all specimens collected from patients in the
presence of the patient to prevent mislabeling, and place
them in plastic bags at the collection site.12 Attach
requisition slips to the outside of the bags.2
■ Place all items that have come in direct contact with the
patient’s secretions, excretions, blood, drainage, or body
fluids—such as nondisposable utensils or instruments—in a
single impervious bag or container labelled “Biohazardous”
before removal from the room. Place linens and trash in
single bags of sufficient thickness to contain the contents.1,2
■ While wearing the appropriate personal protective
equipment, promptly clean all blood and body fluid spills.
Blot the spill with an absorbent material (such as a paper
towel) first, and then clean the area with detergent and
water. Notify the environmental services department of the
spill so they can properly clean the area.2
■ If you have an exudative lesion, avoid all direct patient
contact until the condition has resolved and you’ve been
cleared by the employee health provider.13
■ If you have dermatitis or another condition resulting in
broken skin on your hands, avoid situations where you may
have contact with blood and body fluids (even though
gloves could be worn) until the condition has resolved and
you’ve been cleared by the employee health care provider.
■ Following the manufacturer’s instructions, properly clean
and disinfect or sterilize reusable equipment with hospital-
grade disinfectant before using it for another patient.1,14,15
■ Teach patients, family members, and visitors about
respiratory hygiene and cough etiquette. Provide a mask for
anyone who presents with signs or symptoms of respiratory
infection. Tell people to cover their mouths and noses with a
tissue when coughing or sneezing, dispose of the tissue
promptly, and then perform hand hygiene.1,5,6,7,8,9,10
■ Document the type of transmission-based precautions
necessary, if applicable, in addition to standard
precautions.16,17,18
Special considerations
■ Keep mouthpieces, resuscitation bags, and other
ventilation devices nearby to eliminate the need for
emergency mouth-to-mouth resuscitation, which in turn
reduces the risk of exposure to body fluids.
■ Be aware that disposable food trays and dishes aren’t
necessary for standard precautions.1
NURSING ALERT Because you may not always know which organisms
may be present in every clinical situation, you must use standard
precautions for every contact with blood, body fluids, secretions,
excretions, drainage, mucous membranes, and nonintact skin.1 Use
your judgment in individual cases about whether to implement
additional isolation precautions, such as airborne, droplet, or contact
precautions or a combination of them. In addition, if your work
requires you to be exposed to blood, you should receive the hepatitis B
virus vaccine series.
Complications
Failure to follow standard precautions may lead to exposure
to bloodborne pathogens or other infectious agents and to
all the complications they may cause.
Documentation
Record any isolation precautions that may be needed in
addition to standard precautions. Record any teaching you
provided, the patient’s, family’s, and other visitor’s
understanding of the teaching, and whether follow-up
teaching was required.
REFERENCES
1 Siegel, J. D., et al. (2007, revised 2017). “2007 guideline for isolation
precautions: Preventing transmission of infectious agents in healthcare
settings” [Online]. Accessed via the Web at
https://www.cdc.gov/infectioncontrol/pdf/guidelines/isolation-guidelines.pdf
(Level II)
2 Occupational Safety and Health Administration. (n.d .). “Bloodborne
pathogens, standard number 1910.1030” [Online]. Accessed via the Web at
https://www.osha.gov/pls/oshaweb/owadisp.show_document?
p_id=10051&p_table=STANDARDS (Level VII)
3 The Joint Commission. (2019). Standard IC.02.01.01. Comprehensive
accreditation manual for hospitals. Oakbrook Terrace, IL: The Joint
Commission. (Level VII)
4 Accreditation Association for Hospitals and Health Systems. (2017). Standard
07.01.10. Healthcare Facilities Accreditation Program: Accreditation
requirements for acute care hospitals. Chicago, IL: Accreditation Association
for Hospitals and Health Systems. (Level VII)
5 Centers for Disease Control and Prevention. (2002). Guideline for hand
hygiene in health care settings: Recommendations of the Healthcare Infection
Control Practices Advisory Committee and the HICPAC/SHEA/APIC/IDSA Hand
Hygiene Task Force. MMWR Recommendations and Reports, 51(RR-16), 1–45.
Accessed via the Web at https://www.cdc.gov/mmwr/pdf/rr/rr5116.pdf (Level
II)
6 The Joint Commission. (2019). Standard NPSG.07.01.01. Comprehensive
accreditation manual for hospitals. Oakbrook Terrace, IL: The Joint
Commission. (Level VII)
7 Centers for Medicare and Medicaid Services, Department of Health and
Human Services. (2015). Condition of participation: Infection control. 42 C.F.R.
§ 482.42.
8 DNV GL-Healthcare USA, Inc. (2016). IC.1.SR.1 . NIAHO® accreditation
requirements: Interpretive guidelines & surveyor guidance (version 11).
Milford, OH: DNV GL-Healthcare USA, Inc. (Level VII)
9 World Health Organization. (2009). “WHO guidelines on hand hygiene in
health care: First global patient safety challenge, clean care is safer care”
[Online]. Accessed via the Web at
http://apps.who.int/iris/bitstream/10665/44102/1/9789241597906_eng.pdf
(Level IV)
10 Accreditation Association for Hospitals and Health Systems. (2017). Standard
07.01.21. Healthcare Facilities Accreditation Program: Accreditation
requirements for acute care hospitals. Chicago, IL: Accreditation Association
for Hospitals and Health Systems. (Level VII)
11 World Health Organization. (2007). “Standard precautions in healthcare”
[Online]. Accessed via the Web at
http://www.who.int/csr/resources/publications/EPR_AM2_E7 .pdf
12 The Joint Commission. (2019). Standard NPSG.01.01.01. Comprehensive
accreditation manual for hospitals. Oakbrook Terrace, IL: The Joint
Commission. (Level VII)
13 The Joint Commission. (2019). Standard IC.02.03 .01. Comprehensive
accreditation manual for hospitals. Oakbrook Terrace, IL: The Joint
Commission. (Level VII)
14 Rutala, W. A., et al. (2008, revised 2017). “Guideline for disinfection and
sterilization in healthcare facilities, 2008” [Online]. Accessed via the Web at
https://www.cdc.gov/infectioncontrol/pdf/guidelines/disinfection-
guidelines.pdf (Level I)
15 The Joint Commission. (2019). Standard IC.02.02.01. Comprehensive
accreditation manual for hospitals. Oakbrook Terrace, IL: The Joint
Commission. (Level VII)
16 Accreditation Association for Hospitals and Health Systems. (2017). Standard
10.00 .03. Healthcare Facilities Accreditation Program: Accreditation
requirements for acute care hospitals. Chicago, IL: Accreditation Association
for Hospitals and Health Systems. (Level VII)
17 Centers for Medicare and Medicaid Services, Department of Health and
Human Services. (2015). Condition of participation: Medical record services.
42 C.F.R. § 482.24(b).
18 DNV GL-Healthcare USA, Inc. (2016). MR.2 .SR.1 . NIAHO® accreditation
requirements: Interpretive guidelines & surveyor guidance (version 11).
Milford, OH: DNV GL-Healthcare USA, Inc. (Level VII)
STERILE TECHNIQUE, BASIC
Sterile technique involves using specific actions and
activities to prevent contamination and maintain sterility of
specific areas during surgical and other invasive procedure.1
Sterile technique should be followed whenever a patient’s
skin is intentionally perforated, during procedures that
involve entry into a sterile body cavity, or when contact with
nonintact skin resulting from trauma or surgery is possible.
Procedures requiring sterile technique include any surgical
procedure; vaginal birth; invasive radiologic procedures;
vascular access insertion, care, and maintenance;
preparation
of total parenteral
nutrition
and
chemotherapeutic agents; and vascular access insertion,
care, and maintenance.2 Other procedures, such as urinary
catheter insertion, tracheostomy care, and surgical or
wound irrigation and dressing changes, may also require
sterile technique depending on the patient’s condition and
facility protocols.
Certain patients with compromised immune systems (such
as those with burns or recent organ transplants and those
receiving chemotherapy or radiation therapy) may require
sterile technique more often, even for some procedures that
would normally require only clean technique.
Equipment
Sterile gloves ▪ personal protective equipment ▪ sterile
supplies, as required by the procedure to be performed ▪
Optional: sterile bowl, sterile normal saline solution, sterile
drape, sterile transfer device.
Many procedures have commercially prepared kits that
provide all of the necessary components.
Preparation of equipment
Check each package carefully and discard any package that
is wet or has a hole or tear.1 Note the expiration date and
discard any packages that are expired.1 Report the
expiration or defect as directed by your facility. Ensure that
the sterilization tape has turned the appropriate color. (See
your facility’s guidelines; color depends on the product used
and sterilization method.) Prepare a clean surface to set up
the equipment for the sterile procedure.
Implementation
■ Verify the practitioner’s order to ensure that the right
procedure is being performed on the right patient at the
right time.3
■ Review the patient’s medical record for history of
allergies to latex or medications.
■ If required, confirm that written informed consent has
been obtained by the practitioner and that the consent form
is in the patient’s medical record.4,5,6,7
■ Gather all the necessary equipment in the patient’s room.
■ Perform hand hygiene.8,9,10,11,12,13
■ Confirm the patient’s identity using at least two patient
identifiers.14
■ Provide privacy.15,16,17,18
■ Explain the procedure to the patient and family (if
appropriate) according to their individual communication
and learning needs to increase their understanding, allay
their fears, and enhance cooperation.19
■ Screen and assess the patient’s pain using facility-defined
criteria that are consistent with the patient’s age, condition,
and ability to understand.20
■ Treat the patient’s pain, as needed and ordered, using
nonpharmacologic or pharmacologic methods or a
combination of approaches. Base the treatment plan on
evidence-based practices and the patient’s clinical
condition, past medical history, and pain management
goals.20 Consider administering an analgesic 20 to 30
minutes before the procedure, as needed and ordered,
following safe medication administration practices, to
promote patient comfort.21,22,23
■ Remove you rings, watch, and bracelets.
■ Perform hand hygiene.8,9,10,11,12,13
■ Follow standard precautions by putting on the necessary
personal protective equipment for the procedure.24,25 (See
the “Standard precautions” procedure, page 713.)
Opening a sterile kit
■ Remove the plastic outer wrapper from the procedure kit,
if one is present.
■ Place the inner wrapped kit on a clean, dry, flat surface,
because any moisture on the table could be absorbed
through the wrapper and contaminate the sterile supplies.
■ Position the kit so that the you can open the farthest
wrapper first, because doing so prevents contamination that
may occur from moving your unsterile arm over the sterile
items.1
■ Grasp the outer portion of the flap and open the flap
away from your body, keeping your arm outstretched to the
side so that it doesn’t cross over the sterile field (as shown
below).1
■ Grasp the outer surface of the first side flap with your
hand on the same side as the flap (as shown below) to avoid
crossing over the sterile field. Open the flap fully to avoid
allowing the wrapper to spring back in place.
■ Grasp the outer surface of the second side flap and open
it with your hand on the same side as the flap (as shown
below).1
■ Grasp the outer surface of the innermost flap and open it
toward your body (as shown below).1
■ Secure the wrapper edges to prevent them from
contaminating sterile areas or items.1
Opening a wrapped sterile item
■ Grasp the sterile item wrapped in paper or linen in your
nondominant hand.
■ Break the sterilization tape.
■ Use your dominant hand to grasp the outer surface of the
top outermost flap to avoid touching a sterile surface.
■ Open the flap away from your body.
■ Grasp the outer surface of the first side flap and open it
fully to the side.
■ Repeat with the other side flap.
■ Secure all flaps in your nondominant hand to avoid
dangling and contaminating the sterile field.
■ Grasp the outer surface of the inner flap and open it
toward you.
■ Place the item on the sterile field, ensuring that only
sterile surfaces touch other sterile surfaces to avoid
contamination.1
■ Make sure the item is at least 1′′ (2.5 cm) from the edge
of the sterile field.
Opening a peel-pack container or pouch
■ Grasp the unsealed corner of the wrapper and pull it
toward you.
■ Open a peel-pack pouch (such as gloves and syringes) by
grasping each side of the unsealed edge with the thumb
side of each hand parallel to the seal and pulling apart
gently.
■ Hold the sides back so the wrap covers your hands and
exposes the sterile item.
■ If the item is light, drop it onto the sterile field. Don’t
allow the item to slide across the package side when
dropping the item onto the sterile field. If the item is heavy,
give it to a scrubbed person, or open it on a separate
surface.1
Pouring a sterile solution
■ Open the wrapped package containing the sterile bowl as
described above to avoid contaminating the sterile field.
Label the bowl with the name of the solution to be poured
into it.26
■ Place the bowl on the edge of the sterile field but inside
of the 1′′ (2.5 -cm) safety margin so that solution can be
poured without reaching across the sterile field.
■ Visually inspect the solution container; don’t use the
solution if the expiration date has passed or if there is an
indication that the solution has been compromised.1
■ Unwrap the seal on the sterile solution bottle.
■ Unscrew the cap without touching the edges of the bottle.
■ Pour the solution into the appropriately labeled bowl
without reaching over the sterile field.1 Use a sterile transfer
device, if available, to reduce the risk of contamination of
the sterile field from splashing and spilling.
■ Pour the solution slowly to avoid splashing onto the drape
and contaminating the sterile field.1
■ Discard any unused solution, because you can’t ensure
sterility of the contents of the open solution container when
replacing the cap.1
Opening and putting on sterile gloves
■ Open the package containing the sterile gloves, touching
only the outer side of the glove wrapper. Keep in mind that
some commercially prepared kits (such as the kit for
inserting an indwelling urinary catheter) include a pair of
sterile gloves; if gloves are included they will be the
uppermost item in the pack.
■ Perform hand hygiene.8,9,10,11,12,13
■ Grasp the paper glove wrapper and place it on a clean,
dry, flat surface.
■ Open the inner package, touching only the outer edges of
the wrapper (as shown below).
■ Use the thumb and fingers of your nondominant hand to
grasp the folded inner surface portion of the glove for the
dominant hand, touching only the inner portion of the glove
(as shown below) to avoid contaminating the outer portion
of the glove.
■ Lift up the glove and insert your dominant hand into the
glove, palm side up (as shown below).
■ Pull down the cuff by touching only the inner surface of
the glove. Gently stretch the glove over your hand. Make
sure the outside of the glove doesn’t touch the nonsterile
surface.27
■ Insert the four fingers of your dominant gloved hand into
the sterile outer cuff of the other glove, keeping your thumb
pulled back out of the way (as shown below).
■ Lift up the glove and insert the nondominant hand into
the glove. Allow the cuff to come uncuffed as you finish
putting it on, but don’t touch the skin of the arm with your
gloved hand.
■ Adjust the fingers of the gloves after both your hands are
gloved.
■ Keep your hands above waist level to decrease the
potential for contamination.27
Special considerations
■ Be sure to open supplies away from the already set up
sterile field to avoid contaminating the field.28 Hold the
opened additional supplies above the sterile field and drop
them onto the field.1
■ Be aware that medical asepsis, also called clean
technique, isn’t the same as sterile technique. Medical
asepsis is focused on the absence of pathogenic organisms
and doesn’t require items to be sterile. Sterile technique
and surgical asepsis are focused on the elimination of all
microorganisms.
Complications
Infection may result from failure to properly follow sterile
technique.
Documentation
Document the procedure that you and the health care team
performed, using guidelines for that procedure. Within this
documentation, note the sterile supplies used and that
sterile technique was followed. Note the date and time of
the procedure.
REFERENCES
1 Van Wicklin, S. A., & Conner, R. (2018). Guideline for sterile technique. In R.
Conner (Ed.), Guidelines for perioperative practice, 2018 edition. Denver, CO:
AORN, Inc. (Level VII)
2 World Health Organization. (2009). “Glove use information leaflet” [Online].
Accessed via the Web at
http://www.who.int/gpsc/5may/Glove_Use_Information_Leaflet.pdf (Level VII)
3 The Joint Commission. (2019). Standard UP.01.01.01. Comprehensive
accreditation manual for hospitals. Oakbrook Terrace, IL: The Joint
Commission. (Level VII)
4 The Joint Commission. (2019). Standard RI.01.03 .01. Comprehensive
accreditation manual for hospitals. Oakbrook Terrace, IL: The Joint
Commission. (Level VII)
5 Centers for Medicare and Medicaid Services, Department of Health and
Human Services. (2015). Condition of participation: Patient’s rights. 42 C.F.R.
§ 482.13(b)(2).
6 Accreditation Association for Hospitals and Health Systems. (2017). Standard
15.01.11. Healthcare Facilities Accreditation Program: Accreditation
requirements for acute care hospitals. Chicago, IL: Accreditation Association
for Hospitals and Health Systems. (Level VII)
7 DNV GL-Healthcare USA, Inc. (2016). PR.1 .SR.3 . NIAHO® accreditation
requirements: Interpretive guidelines & surveyor guidance (version 11).
Milford, OH: DNV GL-Healthcare USA, Inc. (Level VII)
8 The Joint Commission. (2019). Standard NPSG.07.01.01. Comprehensive
accreditation manual for hospitals. Oakbrook Terrace, IL: The Joint
Commission. (Level VII)
9 Centers for Disease Control and Prevention. (2002). Guideline for hand
hygiene in health-care settings: Recommendations of the Healthcare Infection
Control Practices Advisory Committee and the HICPAC/SHEA/APIC/IDSA Hand
Hygiene Task Force. MMWR Recommendations and Reports, 51(RR-16), 1–45.
Accessed via the Web at https://www.cdc.gov/mmwr/pdf/rr/rr5116.pdf (Level
II)
10 World Health Organization. (2009). “WHO guidelines on hand hygiene in
health care: First global patient safety challenge, clean care is safer care”
[Online]. Accessed via the Web at
http://apps.who.int/iris/bitstream/10665/44102/1/9789241597906_eng.pdf
(Level IV)
11 Accreditation Association for Hospitals and Health Systems. (2017). Standard
07.01.21. Healthcare Facilities Accreditation Program: Accreditation
requirements for acute care hospitals. Chicago, IL: Accreditation Association
for Hospitals and Health Systems. (Level VII)
12 Centers for Medicare and Medicaid Services, Department of Health and
Human Services. (2015). Condition of participation: Infection control. 42 C.F.R.
§ 482.42.
13 DNV GL-Healthcare USA, Inc. (2016). IC.1 .SR.1 . NIAHO® accreditation
requirements: Interpretive guidelines & surveyor guidance (version 11).
Milford, OH: DNV GL-Healthcare USA, Inc. (Level VII)
14 The Joint Commission. (2019). Standard NPSG.01.01.01. Comprehensive
accreditation manual for hospitals. Oakbrook Terrace, IL: The Joint
Commission. (Level VII)
15 DNV GL-Healthcare USA, Inc. (2016). PR.1.SR.5 . NIAHO® accreditation
requirements: Interpretive guidelines & surveyor guidance (version 11).
Milford, OH: DNV GL-Healthcare USA, Inc. (Level VII)
16 Centers for Medicare and Medicaid Services, Department of Health and
Human Services. (2015). Condition of participation: Patient’s rights. 42 C.F.R.
§ 482.13(c)(1).
17 Accreditation Association for Hospitals and Health Systems. (2017). Standard
15.01.16. Healthcare Facilities Accreditation Program: Accreditation
requirements for acute care hospitals. Chicago, IL: Accreditation Association
for Hospitals and Health Systems. (Level VII)
18 The Joint Commission. (2019). Standard RI.01.01.01. Comprehensive
accreditation manual for hospitals. Oakbrook Terrace, IL: The Joint
Commission. (Level VII)
19 The Joint Commission. (2019). Standard PC.02.01.21. Comprehensive
accreditation manual for hospitals. Oakbrook Terrace, IL: The Joint
Commission. (Level VII)
20 The Joint Commission. (2019). Standard PC.01.02.07. Comprehensive
accreditation manual for hospitals. Oakbrook Terrace, IL: The Joint
Commission. (Level VII)
21 Accreditation Association for Hospitals and Health Systems. (2017). Standard
16.01.03. Healthcare Facilities Accreditation Program: Accreditation
requirements for acute care hospitals. Chicago, IL: Accreditation Association
for Hospitals and Health Systems. (Level VII)
22 Centers for Medicare and Medicaid Services, Department of Health and
Human Services. (2015). Condition of participation: Nursing services. 42
C.F.R. § 482.23(c).
23 DNV GL-Healthcare USA, Inc. (2016). MM.1 .SR.2. NIAHO® accreditation
requirements: Interpretive guidelines & surveyor guidance (version 11).
Milford, OH: DNV GL-Healthcare USA, Inc. (Level VII)
24 Accreditation Association for Hospitals and Health Systems. (2017). Standard
07.01.10. Healthcare Facilities Accreditation Program: Accreditation
requirements for acute care hospitals. Chicago, IL: Accreditation Association
for Hospitals and Health Systems. (Level VII)
25 Siegel, J. D ., et al. (2007, revised 2017). “2007 guideline for isolation
precautions: Preventing transmission of infectious agents in healthcare
settings” [Online]. Accessed via the Web at
https://www.cdc.gov/infectioncontrol/pdf/guidelines/isolation-guidelines.pdf
(Level II)
26 The Joint Commission. (2019). Standard NPSG.03 .04.01. Comprehensive
accreditation manual for hospitals. Oakbrook Terrace, IL: The Joint
Commission. (Level VII)
27 Timby, B. K . (2016). Fundamental nursing skills and concepts (11th ed.).
Philadelphia, PA: Wolters Kluwer.
28 Taylor, C., et al. (2015). Fundamentals of nursing: The art and science of
person-centered nursing care (8th ed.). Philadelphia, PA: Wolters Kluwer.
STOOL SPECIMEN COLLECTION
Stool is collected to determine the presence of blood, ova
and parasites, pathogens, or such substances as ingested
drugs. Gross examination of stool characteristics, including
color, consistency, and odor, can reveal such conditions as
GI bleeding and steatorrhea.
Stool specimens may be collected over a specific time
period, such as 48, 72, or 96 hours. Typically, timed
specimens are used to test for fat, porphyrins, urobilinogen,
nitrogen, and electrolytes. Because stool specimens can’t be
obtained on demand, proper collection requires careful
instructions to the patient to ensure an uncontaminated
specimen.
Equipment
Sample container with lid ▪ gloves ▪ specimen hat, bedpan
or portable commode ▪ laboratory biohazard transport bag
▪ specimen label ▪ tongue blade ▪ patient care reminder ▪
Optional: fluid-impermeable pad, absorbent adult briefs,
gown, goggles, face mask, laboratory request form, enema
equipment (see the “Enema administration” procedure,
page 280), paper bag.
Commercial kits are available for stool specimen
collection, preservation, and transport, depending on the
specific testing requirements. Follow the manufacturer’s
instructions for use.
Implementation
■ Verify the practitioner’s order for the stool collection.
■ Perform hand hygiene.1,2,3,4,5,6
■ Confirm the patient’s identity using at least two patient
identifiers.7
■ Provide privacy.
■ Explain the procedure to the patient and family (if
appropriate) according to their individual communication
and learning needs to increase their understanding, allay
their fears, and enhance cooperation.8
■ Tell the patient to notify you when the urge to defecate
occurs. At that time, have the patient defecate into a
specimen hat on the toilet; clean, dry bedpan; or portable
commode. Instruct the patient not to contaminate the
sample with urine or toilet tissue, because urine inhibits
fecal bacterial growth, and toilet tissue contains bismuth,
which interferes with test results. If the patient is female, as
appropriate, instruct her not to contaminate the sample with
menstrual blood, which may interfere with test results.
■ Perform hand hygiene.1,2,3,4,5,6
■ Put on gloves and, as needed other personal protective
equipment to comply with standard precautions.9,10
Random stool collection
■ If the patient is incontinent, collect a stool sample from a
fluid-impermeable pad or absorbent adult briefs.
■ Using a tongue blade, transfer the most representative
stool sample from the specimen hat, bedpan, or portable
commode to the container, and place the lid on the
specimen container.
■ If the patient passes blood, mucus, or pus with the stool,
include it with the specimen. Notify the practitioner of
abnormal findings.
■ Discard the tongue blade in the appropriate
receptacle.9,10
Timed stool collection
■ Place a patient care reminder that says SAVE ALL STOOLS
over the patient’s bed and in the bathroom.
■ Tell the patient to notify you when the urge to defecate
occurs. At that time, have the patient defecate into a
specimen hat on the toilet; clean, dry bedpan; or portable
commode. Instruct the patient not to contaminate the
specimen with urine or toilet tissue, because urine inhibits
fecal bacterial growth, and toilet tissue contains bismuth,
which interferes with test results. As appropriate, instruct a
female patient to avoid contaminating the specimen with
menstrual blood.
■ Begin the timing of collections with the passage of the
first stool.
■ Collect the first specimen by using a tongue blade to
transfer the stool from the specimen hat, bedpan, or
portable commode to the container, and include all the stool
in the total specimen.
■ Continue to collect stools passed, remembering to
transfer all stool to the specimen container.
■ If stool must be obtained with an enema, use only tap
water or normal saline solution.
Completing the procedure
■ Remove and discard your gloves.9,10
■ Perform hand hygiene.1,2,3,4,5,6
■ Label all specimens in the presence of the patient to
prevent mislabeling.7
■ Provide the patient with the opportunity to thoroughly
clean the perianal area and perform hand hygiene. Assist as
necessary.
■ Place the labeled specimen in the laboratory biohazard
bag and immediately send each stool specimen to the
laboratory with a laboratory request form (if required in your
facility). Alternatively, if permitted, refrigerate the
specimens collected during the test period and send them
to the laboratory when the collection is complete.11
■ Perform hand hygiene.1,2,3,4,5,6
■ Document the procedure.12,13,14,15
Special considerations
■ Never place a stool specimen in a refrigerator that
contains food or medication, to prevent contamination.
■ If testing for Clostridium difficile, collect only diarrheal
(unformed) stool unless ileus due to infection is
suspected.16,17
■ Certain drugs and substances render stool specimens
unsatisfactory for laboratory testing. If possible, collect
specimens before these substances are administered;
otherwise, wait to collect specimens until after the effects
have passed. Such drugs and substances include antacids,
kaolin, mineral oil and other oily materials, nonabsorbable
antidiarrheal preparations, barium or bismuth (which need 7
to 10 days for effects to clear), antimicrobial agents (which
need 2 to 3 weeks), and gallbladder dyes (which need 3
weeks).18
Patient teaching
Instruct the patient who will be obtaining a specimen at
home to collect it in a clean container with a tight-fitting lid,
wrap the container in a paper bag, and keep it in the
refrigerator (separate from food items) until it can be
transported.
Documentation
Record the date and time you collected the specimen and
sent it to the laboratory. Record the stool’s color, odor, and
consistency as well as any unusual characteristics; also note
whether the patient had difficulty passing the stool.
REFERENCES
1 The Joint Commission. (2019). Standard NPSG.07.01.01. Comprehensive
accreditation manual for hospitals. Oakbrook Terrace, IL: The Joint
Commission. (Level VII)
2 Centers for Disease Control and Prevention. (2002). Guideline for hand
hygiene in health-care settings: Recommendations of the Healthcare Infection
Control Practices Advisory Committee and the HICPAC/SHEA/APIC/IDSA Hand
Hygiene Task Force. MMWR Recommendations and Reports, 51(RR-16), 1–45.
Accessed via the Web at https://www.cdc.gov/mmwr/pdf/rr/rr5116.pdf (Level
II)
3 World Health Organization. (2009). “WHO guidelines on hand hygiene in
health care: First global patient safety challenge, clean care is safer care”
[Online]. Accessed via the Web at
http://apps.who.int/iris/bitstream/10665/44102/1/9789241597906_eng.pdf
(Level IV)
4 Accreditation Association for Hospitals and Health Systems. (2017). Standard
07.01.21. Healthcare Facilities Accreditation Program: Accreditation
requirements for acute care hospitals. Chicago, IL: Accreditation Association
for Hospitals and Health Systems. (Level VII)
5 Centers for Medicare and Medicaid Services, Department of Health and
Human Services. (2015). Condition of participation: Infection control. 42 C.F.R.
§ 482.42.
6 DNV GL-Healthcare USA, Inc. (2016). IC.1.SR.1 . NIAHO® accreditation
requirements: Interpretive guidelines & surveyor guidance (version 11).
Milford, OH: DNV GL-Healthcare USA, Inc. (Level VII)
7 The Joint Commission. (2019). Standard NPSG.01.01.01. Comprehensive
accreditation manual for hospitals. Oakbrook Terrace, IL: The Joint
Commission. (Level VII)
8 The Joint Commission. (2019). Standard PC.02.01.21. Comprehensive
accreditation manual for hospitals. Oakbrook Terrace, IL: The Joint
Commission. (Level VII)
9 Siegel, J. D., et al. (2007, revised 2017). “2007 guideline for isolation
precautions: Preventing transmission of infectious agents in healthcare
settings” [Online]. Accessed via the Web at
https://www.cdc.gov/infectioncontrol/pdf/guidelines/isolation-guidelines.pdf
(Level II)
10 Accreditation Association for Hospitals and Health Systems. (2017). Standard
07.01.10. Healthcare Facilities Accreditation Program: Accreditation
requirements for acute care hospitals. Chicago, IL: Accreditation Association
for Hospitals and Health Systems. (Level VII)
11 Occupational Safety and Health Administration. (n.d .). “Bloodborne
pathogens, standard number 1910.1030” [Online]. Accessed via the Web at
https://www.osha.gov/pls/oshaweb/owadisp.show_document?
p_id=10051&p_table=STANDARDS (Level VII)
12 The Joint Commission. (2019). Standard RC.01.03 .01. Comprehensive
accreditation manual for hospitals. Oakbrook Terrace, IL: The Joint
Commission. (Level VII)
13 Centers for Medicare and Medicaid Services, Department of Health and
Human Services. (2015). Condition of participation: Medical record services.
42 C.F.R. § 482.24(b).
14 Accreditation Association for Hospitals and Health Systems. (2017). Standard
10.00 .03. Healthcare Facilities Accreditation Program: Accreditation
requirements for acute care hospitals. Chicago, IL: Accreditation Association
for Hospitals and Health Systems. (Level VII)
15 DNV GL-Healthcare USA, Inc. (2016). MR.2 .SR.1 . NIAHO® accreditation
requirements: Interpretive guidelines & surveyor guidance (version 11).
Milford, OH: DNV GL-Healthcare USA, Inc. (Level VII)
16 Dubberke, E. R., et al. (2014). Strategies to prevent Clostridium difficile
infections in acute care hospitals: 2014 update. Infection Control and Hospital
Epidemiology, 35(6), S48–S65. Accessed via the Web at
http://www.jstor.org/stable/10.1086/676023 (Level VII)
17 Cohen, S. H., et al. (2010). Clinical practice guidelines for Clostridium difficile
infection in adults: 2010 update by the Society for Healthcare Epidemiology
of America (SHEA) and the Infectious Diseases Society of America (IDSA).
Infection Control and Hospital Epidemiology, 31(5), 431–455. Accessed via
the Web at https://www.cdc.gov/HAI/pdfs/cdiff/Cohen-IDSA-SHEA-CDI-
guidelines-2010.pdf (Level I)
18 Centers for Disease Control and Prevention. (2016). “DPDx—Laboratory
identification of parasitic diseases of public health concern: Stool specimens
—specimen collection” [Online]. Accessed via the Web at
https://www.cdc.gov/dpdx/diagnosticprocedures/stool/specimencoll.html
(Level VII)
ST-SEGMENT MONITORING
A sensitive indicator of myocardial damage, the ST segment
is normally flat or isoelectric. A depressed ST segment may
result from cardiac glycosides, myocardial ischemia, or a
subendocardial infarction. An elevated ST segment suggests
myocardial infarction (MI).
Continuous ST-segment monitoring is helpful for patients
with acute coronary syndromes and for those who have
received thrombolytic therapy or have undergone coronary
angioplasty or cardiac surgery.1 ST-segment monitoring
allows early detection of reocclusion. It’s also useful for
patients who have had previous episodes of cardiac
ischemia without chest pain, for those who have difficulty
distinguishing cardiac pain from pain associated with other
sources, and for those who have difficulty communicating.2
It gives the practitioner the ability to identify and reverse
ischemia by starting early interventions.3
Because ischemia typically occurs in only one portion of
the heart muscle, not all electrocardiogram (ECG) leads
detect it. Continuous ST-segment monitoring of all 12 leads
is preferred if available.4 If it isn’t available, examining ECG
tracings obtained during an ischemic episode allows
selection of the most appropriate lead. The leads showing
ischemia are the same leads used for ST-segment
monitoring; they’re referred to as the “ST fingerprint.”4
Because of frequent false alarms, ST-segment monitoring
isn’t useful for patients with a ventricular paced rhythm,
those with a rhythm that obscures the ST segment (such as
coarse atrial fibrillation or flutter, or intermittent accelerated
ventricular rhythm), and restless patients.3 Although ST-
segment monitoring has been discouraged in patients with
existing left bundle-branch block, it may help diagnose MI in
these patients.4
Equipment
ECG electrodes ▪ ECG monitor cable ▪ lead wires ▪ cardiac
monitor programmed for ST-segment monitoring ▪ soap and
water or cleaning pads ▪ gauze pad or washcloth ▪ black
indelible marker ▪ Optional: gloves, disposable-head
clippers, single-patient-use scissors, alcohol pad.
Preparation of equipment
Bring the equipment to the patient’s bedside, plug the
cardiac monitor into an electrical outlet, and turn the
monitor on.
Implementation
■ Verify the practitioner’s order.
■ Gather and prepare the necessary equipment.
■ Perform hand hygiene.5,6,7,8,9,10
■ Confirm the patient’s identity using at least two patient
identifiers.11
■ Provide privacy.12,13,14,15
■ Explain the procedure to the patient and family (if
appropriate) according to their communication and learning
needs to increase their understanding, allay their fears, and
enhance cooperation.16
■ Raise the patient’s bed to waist level when providing
patient care to prevent caregiver back strain.17
■ Place the patient in the supine position with the head of
the bed elevated less than 45 degrees, because ST-segment
changes that mimic ischemia can occur with changes in
body position.4
■ Perform hand hygiene.5,6,7,8,9,10
■ Put on gloves to comply with standard precautions.18,19
■ Select the sites for electrode placement.
■ Properly prepare the patient’s skin for electrode
placement. If necessary, remove excess hair from intended
sites with disposable-head clippers or single-patient-use
scissors to ensure good skin contact with the electrodes.20
Clean the intended sites with soap and water or cleaning
pads, and then dry them thoroughly with a washcloth or
gauze pad to enhance electrode contact. If necessary, clean
oily skin with an alcohol pad and allow it to dry.20 Gently
abrade the skin at the intended sites with a gauze pad, a
washcloth, or the sandpaper on the electrode to roughen a
small area of the skin and promote electrode adherence.20
■ Mark the intended sites with black indelible ink when
electrode placement has been determined to prevent
inaccurate electrode placement if an electrode needs to be
replaced.4,20
■ Attach the lead wires to the electrodes, check the
conductive gel on each electrode placement to make sure
it’s sufficiently moist, and position the electrodes
appropriately on the patient’s skin.
■ Activate ST-segment monitoring according to the
manufacturer’s instruction.
■ Select the appropriate ECG for each ST channel to be
monitored. If continuous 12-lead ST-segment monitoring is
unavailable, use the patient’s ST fingerprint to determine
the leads to monitor. If the ST fingerprint isn’t available,
choose the leads most likely to show arrhythmias and ST-
segment changes:3,4 Lead III (or aVF) is sensitive to inferior
wall or right coronary artery ischemia. Lead V3 (or V2) is
sensitive to anterior wall or left anterior descending artery
ischemia. Lead V5 or V4 is recommended to identify
demand-related ischemia in high-risk patients undergoing
noncardiac surgical procedures as well as in those with
critical medical illness. Lead V6 is sensitive to left circumflex
artery ischemia. Lead V4R is recommended to assess for
coexisting right ventricular MI in patients with acute ST-
segment elevation MI in the inferior wall. Leads III (or aVF)
and V3 (or V2) are recommended for patients with suspected
acute coronary syndrome who haven’t yet shown ECG
changes or changes in coronary anatomy.4
■ Identify the ECG complex landmarks, as prompted by the
monitor.20
■ Adjust the ST point to 60 msec after the J point (as shown
below).3,4
■ Set the alarm limits for each ST-segment parameter by
manipulating the high- and low-limit keys. Set the alarm
parameter to 1 mm above and below the patient’s baseline
ST segment in all leads except V2 and V3. In those leads, set
the upper alarm limit at 1.5 mm from baseline for a female
patient and 2 mm from the baseline for a male patient.4
Make sure the alarms are turned on, functioning properly,
and audible to staff members.21,22,23,245
■ Press the appropriate key to return to the display screen.
■ Assess the waveform shown on the monitor.
■ Print a baseline ECG tracing to evaluate the quality of the
signal.20 Evaluate for ST-segment depression or elevation.
(See Changes in the ST segment, page 720.) Measure ST-
segment changes 60 milliseconds beyond the J point of the
ECG complex. ST-segment depression or elevation that lasts
for at least 1 minute may be clinically significant; assess the
patient further and notify the patient’s practitioner.4
■ Return the bed to the lowest position to prevent falls and
maintain patient safety.25
■ Discard supplies in the appropriate receptacles.18,19
■ Remove and discard your gloves, if worn.18,19
■ Perform hand hygiene.5,6,7,8,9,10
■ Document the procedure.26,27,28,29
Special considerations
■ Check electrode placement every shift, evaluate ST-
segment trends when obtaining vital signs, and respond
appropriately to all ST-segment alarms. If you note
ischemia, obtain a 12-lead ECG and assess the patient for
signs and symptoms of acute ischemia (for example,
arrhythmias, angina, and hemodynamic changes).20
■ Patients with acute coronary syndrome should undergo
ST-segment monitoring for at least 48 hours.4
■ The Joint Commission issued a sentinel event alert
concerning medical device alarm safety, because alarm-
related events have been associated with permanent loss of
function or death. Among the major contributing factors
were improper alarm settings, alarms inappropriately turned
off, and alarm signals not audible to staff. Make sure that
alarm limits are set appropriately, and that alarms are
turned on, functioning properly, and audible to staff. Follow
facility guidelines for preventing alarm fatigue.23
Complications
Complications include skin irritation at the electrode sites.
Documentation
Document in the patient’s medical record the leads being
monitored and the ST-segment measurement points.
Document the initial ECG strip and baseline ST-segment
monitoring, and any strips that suggest ST-segment
changes.
Changes in the ST segment
Closely monitoring the ST segment on a patient’s ECG can help you detect
ischemia or injury before the infarction develops.
ST-segment depression
An ST segment is considered depressed when it’s 0.5 mm or more below the
baseline. A depressed ST segment may indicate myocardial ischemia or
digoxin toxicity.
ST-segment elevation
An ST segment is considered elevated when it’s 1 mm or more above the
baseline. An elevated ST segment may indicate myocardial injury.
REFERENCES
1 Yan, A. T., et al. (2007). Long-term prognostic value and therapeutic
implications of continuous ST-segment monitoring in acute coronary
syndrome. American Heart Journal, 153(4), 500–506. (Level IV)
2 Drew, B. J ., et al. (2002). Frequency, characteristics, and clinical significance
of transient ST segment elevation in patients with acute coronary syndromes.
European Heart Journal, 23(12), 941–947. (Level V)
3 Drew, B. J ., et al. (2004). AHA scientific statement: Practice standards for
electrocardiographic monitoring in hospital settings. Circulation, 110(17),
2721–2746. Accessed via the Web at
http://circ.ahajournals.org/content/110/17/2721.full?sid=819c6857-5b98-
48fe-9787-98ea99381ec9 (Level I)
4 American Association of Critical-Care Nurses. (2016). “AACN practice alert:
Ensuring accurate ST-segment monitoring” [Online]. Accessed via the Web at
https://www.aacn.org/clinical-resources/practice-alerts/st-segment-monitoring
(Level I)
5 World Health Organization. (2009). “WHO guidelines on hand hygiene in
health care: First global patient safety challenge, clean care is safer care”
[Online]. Accessed via the Web at
http://apps.who.int/iris/bitstream/10665/44102/1/9789241597906_eng.pdf
(Level IV)
6 Centers for Disease Control and Prevention. (2002). Guideline for hand
hygiene in health-care settings: Recommendations of the Healthcare Infection
Control Practices Advisory Committee and the HICPAC/SHEA/APIC/IDSA Hand
Hygiene Task Force. MMWR Recommendations and Reports, 51(RR-16), 1–45.
Accessed via the Web at https://www.cdc.gov/mmwr/pdf/rr/rr5116.pdf (Level
II)
7 Centers for Medicare and Medicaid Services, Department of Health and
Human Services. (2015). Condition of participation: Infection control. 42 C.F.R.
§ 482.42.
8 The Joint Commission. (2019). Standard NPSG.07.01.01. Comprehensive
accreditation manual for hospitals. Oakbrook Terrace, IL: The Joint
Commission. (Level VII)
9 Accreditation Association for Hospitals and Health Systems. (2017). Standard
07.01.21. Healthcare Facilities Accreditation Program: Accreditation
requirements for acute care hospitals. Chicago, IL: Accreditation Association
for Hospitals and Health Systems. (Level VII)
10 DNV GL-Healthcare USA, Inc. (2016). IC.1 .SR.1 . NIAHO® accreditation
requirements: Interpretive guidelines & surveyor guidance (version 11).
Milford, OH: DNV GL-Healthcare USA, Inc. (Level VII)
11 The Joint Commission. (2019). Standard NPSG.01.01.01. Comprehensive
accreditation manual for hospitals. Oakbrook Terrace, IL: The Joint
Commission. (Level VII)
12 Accreditation Association for Hospitals and Health Systems. (2017). Standard
15.01.16. Healthcare Facilities Accreditation Program: Accreditation
requirements for acute care hospitals. Chicago, IL: Accreditation Association
for Hospitals and Health Systems. (Level VII)
13 Centers for Medicare and Medicaid Services, Department of Health and
Human Services. (2015). Condition of participation: Patient’s rights. 42 C.F.R.
§ 482.13(c)(1).
14 The Joint Commission. (2019). Standard RI.01.01.01. Comprehensive
accreditation manual for hospitals. Oakbrook Terrace, IL: The Joint
Commission. (Level VII)
15 DNV GL-Healthcare USA, Inc. (2016). PR.1.SR.5 . NIAHO® accreditation
requirements: Interpretive guidelines & surveyor guidance (version 11).
Milford, OH: DNV GL-Healthcare USA, Inc. (Level VII)
16 The Joint Commission. (2019). Standard PC.02.01.21. Comprehensive
accreditation manual for hospitals. Oakbrook Terrace, IL: The Joint
Commission. (Level VII)
17 Waters, T. R., et al. (2009). “Safe patient handling training for schools of
nursing” [Online]. Accessed via the Web at
https://www.cdc.gov/niosh/docs/2009-127/pdfs/2009-127.pdf (Level VII)
18 Siegel, J. D ., et al. (2007, revised 2017). “2007 guideline for isolation
precautions: Preventing transmission of infectious agents in healthcare
settings” [Online]. Accessed via the Web at
https://www.cdc.gov/infectioncontrol/pdf/guidelines/isolation-guidelines.pdf
(Level II)
19 Accreditation Association for Hospitals and Health Systems. (2017). Standard
07.01.10. Healthcare Facilities Accreditation Program: Accreditation
requirements for acute care hospitals. Chicago, IL: Accreditation Association
for Hospitals and Health Systems. (Level VII)
20 Wiegand, D. L. (2017). AACN procedure manual for high acuity, progressive,
and critical care (7th ed.). Philadelphia, PA: Elsevier.
21 American Association of Critical-Care Nurses. (2013). “A ACN practice alert:
Alarm management” [Online]. Accessed via the Web at
https://www.aacn.org/aacn-website/shared/content/practice-
alerts/2015/11/25/alarm-management (Level VII)
22 The Joint Commission. (2019). Standard NPSG.06 .01.01. Comprehensive
accreditation manual for hospitals. Oakbrook Terrace, IL: The Joint
Commission. (Level VII)
23 The Joint Commission. (2013). “Sentinel event alert: Medical device alarm
safety in hospitals” [Online]. Accessed via the Web at
https://www.jointcommission.org/assets/1/6/SEA_50_alarms_4 _26_16.pdf
(Level VII)
24 Graham, K. C., & Cvach, M. (2010). Monitor alarm fatigue: Standardizing use
of physiological monitors and decreasing nuisance alarms. American Journal
of Critical Care, 19(1), 28–37. Accessed via the Web at
http://ajcc.aacnjournals.org/content/19/1/28.full.pdf
25 Ganz, D. A., et al. (2013). Preventing falls in hospitals: A toolkit for improving
quality of care (AHRQ Publication No. 13-0015-EF). Rockville, MD: Agency for
Healthcare Research and Quality. Accessed via the Web at
http://www.ahrq.gov/sites/default/files/publications/files/fallpxtoolkit.pdf
(Level VII)
26 The Joint Commission. (2019). Standard RC.01.03 .01. Comprehensive
accreditation manual for hospitals. Oakbrook Terrace, IL: The Joint
Commission. (Level VII)
27 Accreditation Association for Hospitals and Health Systems. (2017). Standard
10.00 .03. Healthcare Facilities Accreditation Program: Accreditation
requirements for acute care hospitals. Chicago, IL: Accreditation Association
for Hospitals and Health Systems. (Level VII)
28 Centers for Medicare and Medicaid Services, Department of Health and
Human Services. (2015). Condition of participation: Medical record services.
42 C.F.R. § 482.24(b).
29 DNV GL-Healthcare USA, Inc. (2016). MR.2 .SR.1 . NIAHO® accreditation
requirements: Interpretive guidelines & surveyor guidance (version 11).
Milford, OH: DNV GL-Healthcare USA, Inc. (Level VII)
SUBCUTANEOUS INJECTION
Subcutaneous injection delivers a drug into the adipose
(fatty) tissue beneath the skin.1 This method allows the drug
to move into the bloodstream more rapidly than when given
by mouth, because it’s absorbed mainly through capillaries.
When compared with IM injection, subcutaneous injection
provides slower, more sustained drug delivery, minimizes
tissue trauma, and carries little risk of striking large blood
vessels and nerves.
Drugs recommended for subcutaneous injection include
nonirritating aqueous solutions and suspensions contained
in 0.5 to 2 mL of fluid.1 Larger volumes may cause
discomfort and inadequate medication absorption. Heparin
and insulin, for example, are usually administered
subcutaneously. (Some diabetic patients may benefit from
an insulin infusion pump.) Some vaccines are also
administered by subcutaneous injection.
Subcutaneous injections are performed using a relatively
short needle. The most common sites are the outer aspect
of the upper arm, anterior thigh, loose tissue of the lower
abdomen, upper hips, buttocks, and upper back. (See
Locating subcutaneous injection sites.) Subcutaneous
injections are contraindicated in sites that are inflamed,
edematous, infected, scarred, or covered by a mole,
birthmark, or other lesion. They may also be contraindicated
in patients with impaired coagulation mechanisms.
Equipment
Prescribed medication ▪ patient’s medical and medication
records ▪ 25G to 27G 1⁄2′′ (1.3 -cm) to 5⁄8′′ (1.6 -cm) needle ▪
1- to 3-mL syringe ▪ antiseptic pads ▪ gauze pads ▪
Optional: gloves, ice pack, filter needle, antiseptic cleaning
agent, insulin syringe (see Types of insulin infusion pumps,
page 722).
Implementation
■ Gather the necessary medication and supplies.
■ Avoid distractions and interruptions when preparing and
administering medication to prevent medication errors.2,3,4
■ Verify the practitioner’s order.4,5,6
■ Reconcile the patient’s medications when a new
medication is ordered to reduce the risk of medication
errors, including omissions, duplications, dosing errors, and
drug interactions.
■ Compare the medication label with the order in the
patient’s medication administration record.4,5,6
■ Review the patient’s medical record for allergies or
contraindications to the prescribed medication. If an allergy
or a contraindication exists, don’t administer the
medication; instead, notify the practitioner.4,5,6
■ Check the expiration date on the medication. If the
medication is expired, return it to the pharmacy and obtain
new medication.4,5,6
■ Visually inspect the medication for particles,
discoloration, and other signs of loss of integrity; don’t
administer
the
medication
if its integrity is
compromised.4,5,6
■ Discuss any unresolved concerns about the medication
with the patient’s practitioner.4,5,6
■ Choose equipment appropriate to the prescribed
medication and injection site, and make sure it works
properly.
■ Calculate the dosage and have another nurse verify it, if
necessary.
NURSING ALERT Insulin and heparin are considered high-alert
medications because they can cause significant patient harm when
used in error. Before administering either medication, have another
nurse perform an independent double-check (if required by your
facility) to verify the patient’s identity and to make sure that the
correct medication is being administered in the prescribed
concentration, the medication’s indication corresponds with the
patient’s diagnosis, the dosage calculations are correct and the dosing
formula used to derive the final dose is correct, and the route of
administration is safe and appropriate for the patient. Compare your
results with the results of the independent double-check and, if no
discrepancies exist, administer the medication. If discrepancies exist,
rectify them before administering the drug.7,8
■ Perform hand hygiene.9,10,11,12,13,14
■ Read the label again as you draw up the medication for
injection.
Drawing up medication from a single-dose
ampule
■ Wrap a gauze pad around the ampule’s neck and snap off
the top, directing the force away from your body.
Alternatively, insert the ampule’s head into an ampule
breaker. Attach a filter needle to the syringe and withdraw
the medication, keeping the needle’s bevel tip below the
level of the solution. Tap the syringe to clear air from it.
Cover the needle with the needle sheath.
■ Before discarding the ampule, check the medication label
against the patient’s medication administration record.
Locating subcutaneous injection
sites
Subcutaneous injection sites (highlighted below) include the fat pads on the
abdomen, upper hips, upper back, and lateral upper arms and thighs. For
subcutaneous injections administered repeatedly, such as insulin, rotate
sites. Choose one injection site in one area, move to a corresponding
injection site in the next area, and so on. When returning to an area, choose
a new site in that area.
Preferred injection sites for insulin are the arms, abdomen, thighs, and
buttocks. The preferred injection site for heparin is the lower abdominal fat
pad, just below the umbilicus.
■ Detach the filter needle, and discard the filter needle and
ampule in a puncture-resistant sharps container. Attach the
appropriate needle to the syringe.
■ If the medication isn’t going to be administered
immediately, clearly label the medication syringe to prevent
a medication error. An immediately administered medication
is one that is prepared, taken directly to the patient, and
administered without any break in the process.15,16
Drawing up medication from a single-dose or
multidose vial
■ Roll the vial between your palms, if necessary, to ensure
the drug is mixed equally throughout.
■ Remove the vial lid and disinfect the vial’s rubber stopper
with an antiseptic pad using friction, and then allow it to
dry.17,18
■ Pull the syringe plunger back until the volume of air in the
syringe equals the volume of drug to be withdrawn from the
vial.
■ Without inverting the vial, insert the needle into the vial.
Inject the air, invert the vial, and keep the needle’s bevel tip
below the level of the solution as you withdraw the
prescribed amount of medication. Tap the syringe to clear
any air from it.
■ Cover the needle with the needle sheath.
■ Check the medication label against the patient’s
medication record before discarding the single-dose vial or
returning the multidose vial to the shelf.
■ If the medication isn’t going to be administered
immediately, clearly label the medication syringe to prevent
a medication error. An immediately administered medication
is one that is prepared, taken directly to the patient, and
administered without any break in the process.15,16
EQUIPMENT
Types of insulin infusion pumps
Open-loop system
The open-loop pump (shown below) is used most commonly. It infuses insulin
but can’t respond to changes in the patient’s serum glucose levels. These
portable, self-contained, programmable insulin pumps are small and
unobtrusive.
The pump delivers insulin in small (basal) doses every few minutes and
large (bolus) doses that the patient sets manually. The system consists of a
reservoir containing the insulin syringe, a small pump, an infusion-rate
selector that allows insulin release adjustments, a battery, and a plastic
catheter with an attached needle leading from the syringe to the
subcutaneous injection site. The needle is typically held in place with
waterproof tape. The patient can wear the pump on his or her belt or in a
pocket—practically anywhere as long as the infusion line has a clear path to
the injection site.
The infusion-rate selector automatically releases about one-half the total
daily insulin requirement. The patient releases the remainder in bolus doses
before meals and snacks. The patient must change the syringe daily and the
needle, catheter, and injection site every other day.
Closed-loop system
The self-contained closed-loop system detects and responds to changing
serum glucose levels. A typical closed-loop system includes a glucose sensor,
a programmable computer, a power supply, a pump, and an insulin reservoir.
The computer triggers continuous insulin delivery in appropriate amounts
from the reservoir.
Nonneedle catheter system
In a nonneedle delivery system, a tiny plastic catheter is inserted into the
skin over a needle using a special insertion device (shown below). The needle
is then withdrawn, leaving the catheter in place. This catheter can be placed
in the abdomen, thigh, or flank and should be changed every 2 to 3 days.
Administering the subcutaneous injection
■ Confirm the patient’s identity using at least two patient
identifiers.19
■ Provide privacy.20,21,22,23
■ Explain the procedure to the patient and family (if
appropriate) according to their individual communication
and learning needs to increase their understanding, allay
their fears, and enhance cooperation.24 Answer any
questions the patient has about the procedure.25,26
■ Teach the patient who is receiving the medication for the
first time about potential adverse reactions, and discuss any
other concerns related to the medication.4
■ Verify that the medication is being administered at the
proper time, in the prescribed dose, and by the correct
route, to reduce the risk of medication errors.4,5
■ If your facility uses a bar code technology, scan your
identification badge, the patient’s identification bracelet,
and the medication’s bar code, or follow the procedure for
your facility’s bar code system.
■ Assess the patient’s condition to determine the need for
the medication.
■ Select an appropriate injection site. Rotate sites
according to a schedule for repeated injections, using
different areas of the body unless contraindicated (heparin,
for example, should be injected only in the abdomen if
possible).
■ Position the patient and expose the injection site. If
appropriate, raise the bed to waist level when providing care
to prevent caregiver back strain.27
■ Perform hand hygiene.9,10,11,12,13,14
■ Put on gloves if contact with blood or body fluids is likely,
or if your skin or the patient’s skin isn’t intact; gloves aren’t
required for routine subcutaneous injections because they
don’t protect against needlestick injury.17,28,29,30
■ Clean the injection site with an antiseptic pad, beginning
at the center of the site and moving outward in a circular
motion. Allow the skin to dry before injecting the drug to
avoid a stinging sensation from introducing alcohol into
subcutaneous tissues.
■ Remove the protective needle sheath.
■ With your nondominant hand, grasp the skin around the
injection site firmly to elevate the subcutaneous tissue,
forming a 1′′ (2.5-cm) fat fold.
■ While pinching the skin with your nondominant hand, use
your dominant hand to position the syringe over the
injection site with the needle bevel up. Don’t touch the
needle.
■ Tell the patient to expect to feel a needle prick.
■ Insert the needle quickly in one motion at a 45- or 90-
degree angle. (See Technique for subcutaneous injections.)
Release the patient’s skin to avoid injecting the drug into
compressed tissue and irritating nerve fibers.
■ Inject the medication.
■ Remove the needle gently but quickly at the same angle
used for insertion and, if present, activate the safety
mechanism to prevent accidental needle-stick injury.28
■ Cover the site with a gauze pad and apply gentle
pressure. Don’t massage the site.31
■ Remove and discard the gauze pad.28
■ Check the injection site for bleeding and bruising.
■ Carefully observe the patient for a rash, pruritus, cough,
or other signs of an adverse reaction to a previously
administered drug.
■ If appropriate, return the bed to the lowest position to
prevent falls and maintain safety.32
■ Discard the syringe and needle in a puncture-resistance
sharps container. To avoid needle-stick injuries, don’t
resheath the needle.28,30
■ Remove and discard your gloves, if worn.28,30,33
■ Perform hand hygiene.9,10,11,12,13,14
■ Document the procedure.34,35,36,37
Special considerations
■ Aspiration for blood is no longer recommended, because
administration into the bloodstream with subcutaneous
injections is rare.31 Aspiration for blood also isn’t
recommended for the administration of immunizations and
vaccines.38
■ Vaccine doses shouldn’t be drawn up into a syringe until
immediately before administration.29
■ When using prefilled syringes, adjust the angle and depth
of insertion according to needle length.
For insulin injections
■ To establish more consistent blood insulin levels, rotate
insulin injection sites within anatomic regions. Preferred
insulin injection sites are the arms, abdomen, thighs, and
buttocks.
■ Make sure the type of insulin, unit dosage, and syringe
are correct.
■ When combining insulins in a syringe, make sure they’re
compatible. Follow your facility’s guidelines regarding which
type of insulin to draw up first.
■ Before drawing up insulin suspension, gently roll and
invert the bottle. Don’t shake the bottle, because shaking
can cause foam or bubbles to develop in the syringe.
■ Insulin may be administered through an inserted insulin
pump. However, before administering the drug, make sure
the patient doesn’t already have a pump in place.
For heparin injections
■ The preferred site for a heparin injection is the lower
abdominal fat pad, 2′′ (5 cm) beneath the umbilicus,
between the right and left iliac crests. Injecting heparin into
this area, which isn’t involved in muscle activity, reduces
the risk of local capillary bleeding. Always rotate the sites
from one side to the other.
■ Inject the drug slowly into the fat pad. Leave the needle
in place for 10 seconds after injection, and then withdraw it.
■ Don’t administer any injections within 2′′ (5 cm) of a scar,
a bruise, or the umbilicus.
■ Don’t rub or massage the site after the injection, because
doing so can cause localized minute hemorrhages and
bruises.
■ If the patient bruises easily, apply ice to the site for the
first 5 minutes after the injection to minimize local
hemorrhage, and then apply pressure.
Patient teaching
Teach the patient about the medication and how to perform
the injection if the patient will be self-administering at
home. Have the patient perform a return demonstration to
determine medication administration competency.
Complications
Concentrated or irritating solutions may cause sterile
abscesses to form. Repeated injections in the same site can
cause lipodystrophy, a localized reaction affecting adipose
tissue.
Documentation
Record the time and date of the injection, the medication
and dose administered, the injection site and route, and the
patient’s response.
REFERENCES
1 Ogston-Tuck, S. (2014). Subcutaneous injection technique: An evidence-based
approach. Nursing Standard, 29(3), 53–58. (Level I)
2 Westbrook, J., et al. (2010). Association of interruptions with an increased risk
and severity of medication administration errors. Archives of Internal
Medicine, 170(8), 683–690 . (Level IV)
3 Institute for Safe Medication Practices. (2012). Side tracks on the safety
express: Interruptions lead to errors and unfinished...Wait, what was I doing?
Nurse Advise-ERR, 11(2), 1–4 . Accessed via the Web at
https://www.ismp.org/resources/side-tracks-safety-express-interruptions-lead-
errors-and-unfinished-wait-what-was-i-doing
4 Accreditation Association for Hospitals and Health Systems. (2017). Standard
16.01.03. Healthcare Facilities Accreditation Program: Accreditation
requirements for acute care hospitals. Chicago, IL: Accreditation Association
for Hospitals and Health Systems. (Level VII)
5 Centers for Medicare and Medicaid Services, Department of Health and
Human Services. (2015). Condition of participation: Nursing services. 42
C.F.R. § 482.23(c).
6 DNV GL-Healthcare USA, Inc. (2016). MM .1 .SR.2 . NIAHO® accreditation
requirements: Interpretive guidelines & surveyor guidance (version 11).
Milford, OH: DNV GL-Healthcare USA, Inc. (Level VII)
Technique for subcutaneous
injections
Before giving the injection, elevate the subcutaneous tissue at the site by
grasping it firmly.
Insert the needle at a 45- or 90-degree angle to the skin surface,
depending on needle length and the amount of subcutaneous tissue at the
site. Some medications, such as heparin, should always be injected at a 90-
degree angle.
7 Institute for Safe Medication Practices. (2014). “ISMP list of high-alert
medications in acute care settings” [Online]. Accessed via the Web at
http://www.ismp.org/tools/highalertmedications.pdf (Level VII)
8 Institute for Safe Medication Practices. (2014). Independent double-checks:
Undervalued and misused. ISMP Medication Safety Alert! Nurse Advise-ERR,
12(3), 1. Accessed via the Web at
http://www.ismp.org/newsletters/nursing/issues/NurseAdviseERR201403.pdf
(Level VII)
9 The Joint Commission. (2017). Standard NPSG.07.01.01. Comprehensive
accreditation manual for hospitals. Oakbrook Terrace, IL: The Joint
Commission. (Level VII)
10 Centers for Disease Control and Prevention. (2002). Guideline for hand
hygiene in health-care settings: Recommendations of the Healthcare Infection
Control Practices Advisory Committee and the HICPAC/SHEA/APIC/IDSA Hand
Hygiene Task Force. MMWR Recommendations and Reports, 51(RR-16), 1–45.
Accessed via the Web at https://www.cdc.gov/mmwr/pdf/rr/rr5116.pdf (Level
II)
11 World Health Organization. (2009). “WHO guidelines on hand hygiene in
health care: First global patient safety challenge, clean care is safer care”
[Online]. Accessed via the Web at
http://apps.who.int/iris/bitstream/10665/44102/1/9789241597906_eng.pdf
(Level IV)
12 Accreditation Association for Hospitals and Health Systems. (2017). Standard
07.01.21. Healthcare Facilities Accreditation Program: Accreditation
requirements for acute care hospitals. Chicago, IL: Accreditation Association
for Hospitals and Health Systems. (Level VII)
13 Centers for Medicare and Medicaid Services, Department of Health and
Human Services. (2015). Condition of participation: Infection control. 42 C.F.R.
§ 482.42.
14 DNV GL-Healthcare USA, Inc. (2016). IC.1 .SR.1 . NIAHO® accreditation
requirements: Interpretive guidelines & surveyor guidance (version 11).
Milford, OH: DNV GL-Healthcare USA, Inc. (Level VII)
15 The Joint Commission. (2019). Standard NPSG.03 .04.01. Comprehensive
accreditation manual for hospitals. Oakbrook Terrace, IL: The Joint
Commission. (Level VII)
16 Accreditation Association for Hospitals and Health Systems. (2017). Standard
25.01.18. Healthcare Facilities Accreditation Program: Accreditation
requirements for acute care hospitals. Chicago, IL: Accreditation Association
for Hospitals and Health Systems. (Level VII)
17 World Health Organization. (2010). “WHO best practices for injections and
related procedures toolkit” [Online]. Accessed via the Web at
http://apps.who.int/iris/bitstream/10665/44298/1/9789241599252_eng.pdf
18 Standard 17. Compounding of parenteral solutions and medications. Infusion
nursing standards of practice. (2016). Journal of Infusion Nursing, 39, S39–
S40. (Level VII)
19 The Joint Commission. (2017). Standard NPSG.01.01.01. Comprehensive
accreditation manual for hospitals. Oakbrook Terrace, IL: The Joint
Commission. (Level VII)
20 Accreditation Association for Hospitals and Health Systems. (2017). Standard
15.01.16. Healthcare Facilities Accreditation Program: Accreditation
requirements for acute care hospitals. Chicago, IL: Accreditation Association
for Hospitals and Health Systems. (Level VII)
21 Centers for Medicare and Medicaid Services, Department of Health and
Human Services. (2015). Condition of participation: Patient’s rights. 42 C.F.R.
§ 482.13(c)(1).
22 The Joint Commission. (2019). Standard RI.01.01.01. Comprehensive
accreditation manual for hospitals. Oakbrook Terrace, IL: The Joint
Commission. (Level VII)
23 DNV GL-Healthcare USA, Inc. (2016). PR.1.SR.5 . NIAHO® accreditation
requirements: Interpretive guidelines & surveyor guidance (version 11).
Milford, OH: DNV GL-Healthcare USA, Inc. (Level VII)
24 The Joint Commission. (2019). Standard PC.02.01.21. Comprehensive
accreditation manual for hospitals. Oakbrook Terrace, IL: The Joint
Commission. (Level VII)
25 The Joint Commission. (2019). Standard RI.01.03 .01. Comprehensive
accreditation manual for hospitals. Oakbrook Terrace, IL: The Joint
Commission. (Level VII)
26 Centers for Medicare and Medicaid Services, Department of Health and
Human Services. (2015). Condition of participation: Patient’s rights. 42 C.F.R.
§ 482.13(b)(2).
27 Waters, T. R., et al. (2009). “Safe patient handling training for schools of
nursing” [Online]. Accessed via the Web at
https://www.cdc.gov/niosh/docs/2009-127/pdfs/2009-127.pdf (Level VII)
28 Occupational Safety and Health Administration. (n.d .). “Bloodborne
pathogens, standard number 1910.1030” [Online]. Accessed via the Web at
http://www.osha.gov/pls/oshaweb/owadisp.show_document?
p_id=10051&p_table=STANDARDS (Level VII)
29 Centers for Disease Control and Prevention. (2016). “Epidemiology and
prevention of vaccine-preventable diseases: Vaccine administration” [Online].
Accessed via the Web at https://www.cdc.gov/vaccines/pubs/pinkbook/vac-
admin.html
30 Siegel, J. D ., et al. (2007, revised 2017). “2007 guideline for isolation
precautions: Preventing transmission of infectious agents in healthcare
settings” [Online]. Accessed via the Web at
https://www.cdc.gov/infectioncontrol/pdf/guidelines/isolation-guidelines.pdf
(Level II)
31 Craven, R. F., et al. (2017). Fundamentals of nursing: Human health and
function (8th ed.). Philadelphia, PA: Wolters Kluwer.
32 Ganz, D. A., et al. (2013). Preventing falls in hospitals: A toolkit for improving
quality of care (AHRQ Publication No. 13-0015-EF). Rockville, MD: Agency for
Healthcare Research and Quality. Accessed via the Web at
http://www.ahrq.gov/sites/default/files/publications/files/fallpxtoolkit.pdf
(Level VII)
33 Accreditation Association for Hospitals and Health Systems. (2017). Standard
07.01.10. Healthcare Facilities Accreditation Program: Accreditation
requirements for acute care hospitals. Chicago, IL: Accreditation Association
for Hospitals and Health Systems. (Level VII)
34 The Joint Commission. (2019). Standard RC.01.03 .01. Comprehensive
accreditation manual for hospitals. Oakbrook Terrace, IL: The Joint
Commission. (Level VII)
35 Accreditation Association for Hospitals and Health Systems. (2017). Standard
10.00 .03. Healthcare Facilities Accreditation Program: Accreditation
requirements for acute care hospitals. Chicago, IL: Accreditation Association
for Hospitals and Health Systems. (Level VII)
36 Centers for Medicare and Medicaid Services, Department of Health and
Human Services. (2015). Condition of participation: Medical record services.
42 C.F.R. § 482.24(b).
37 DNV GL-Healthcare USA, Inc. (2016). MR.2 .SR.1 . NIAHO® accreditation
requirements: Interpretive guidelines & surveyor guidance (version 11).
Milford, OH: DNV GL-Healthcare USA, Inc. (Level VII)
38 Centers for Disease Control and Prevention. (2011). General
recommendations on immunization: Recommendations of the Advisory
Committee on Immunization Practices (ACIP). MMWR Recommendations and
Reports, 60(RR-02), 1–60 . Accessed via the Web at
https://www.cdc.gov/mmwr/pdf/rr/rr6002.pdf (Level I)
SUBDERMAL DRUG IMPLANTS
A method of drug delivery, subdermal implants come in the
form of flexible capsules or rods, which are placed under the
skin. This method is most commonly used to inject various
hormones (such as contraceptive hormones) that diffuse
slowly and are absorbed into the bloodstream. A subdermal
implant is inserted just under the dermis of the skin,
typically in the nondominant upper arm about 3′′ to 4′′ (8 to
10 cm) above the medial epicondyle of the humerus,
avoiding the groove between the biceps and triceps muscles
(and the large blood vessels and nerves that lie there in the
neurovascular bundle deeper in the subcutaneous tissue) to
reduce the risk of neural or vascular injury.1
Equipment
Patient’s medical record and medication administration
record ▪ sterile surgical drapes ▪ sterile gloves ▪ antiseptic
solution ▪ local anesthetic ▪ prescribed implants (some
medications include an implantation kit with insertion
tool)1,2 ▪ needles ▪ 5-mL syringe ▪ #11 scalpel ▪ #10 trocar
▪ forceps ▪ sterile absorbable sutures or sterile adhesive
surgical strips ▪ sterile gauze ▪ tape ▪ gloves.
Implementation
■ Avoid distractions and interruptions when preparing and
administering the medication to prevent medication
errors.3,4,5,6
■ Verify the practitioner’s order.3,4,7
■ Compare the medication label with the order in the
patient’s medical record.3,4,5,6,7
■ Confirm that written informed consent is obtained by the
practitioner, and that the consent form is in the patient’s
medical record.1,8,9,10
■ Conduct a preprocedure verification to make sure that all
relevant documentation, related information, and equipment
are available and correctly identified to the patient’s
identifiers.10,11
■ Check the patient’s medical record for allergies or
contraindications to the prescribed medication. If an allergy
or a contraindication exists, don’t administer the
medication; instead, notify the practitioner.3,4,6,7
■ Check the expiration date on the medication. Don’t give
the medication if it has expired; instead, return it to the
pharmacy and obtain new medication.3,4,6,7
■ Visually inspect the medication for loss of integrity; don’t
administer
the
medication
if its integrity is
compromised.3,4,6,7
■ Discuss any unresolved concerns about the medication
with the patient’s practitioner.3,4,6,7
■ Perform hand hygiene.12,13,14,15,16,17
■ Confirm the patient’s identity using at least two patient
identifiers.10,18
■ Provide privacy.19,20,21,22
■ Reinforce the practitioner’s explanation of the procedure,
and answer the patient’s questions.
■ Check the patient’s history for hypersensitivity to latex or
to the local anesthetic.
■ If the patient is receiving the medication for the first time,
teach about potential adverse reactions, and discuss any
other concerns related to the medication.3,4,6,7
■ Verify that the medication is being administered at the
proper time, in the prescribed dose, and by the correct route
to reduce the risk for medication errors.3,4,6,7
■ Perform hand hygiene.12,13,14,15,16
■ Put on gloves.23,24,25
■ Assist the patient into the supine position on the
examination table.
■ If appropriate, make sure that the insertion site is marked
as required by your facility.10,26
■ During the procedure, stay and provide support, as
necessary, while the practitioner inserts the implants.
■ The practitioner performs hand hygiene and then puts on
sterile gloves.12,13,14,23
■ The practitioner cleans the site with antiseptic solution
and then drapes the site with sterile drapes.
■ Conduct a time-out immediately before starting the
procedure to perform a final assessment, to ensure that the
correct patient, site, positioning, and procedure are
identified and, as applicable, that all relevant information
and necessary equipment are available.10,27
■ After anesthetizing the upper portion of the nondominant
arm, the practitioner uses a #10 trocar or insertion tool to
insert each capsule through a 2-mm incision.
■ After insertion, the practitioner removes the trocar or
insertion tool and palpates the area to verify the presence of
the implant. If the practitioner can’t palpate the implant, the
insertion tool (if used) should be checked to see whether it
still contains the implant. Implant placement can also be
verified
using
X-ray,
computed
tomography,
ultrasonography, or magnetic resonance imaging.1,2
■ The practitioner closes the incision with sterile absorbable
sutures or sterile adhesive surgical strips, and covers it with
sterile gauze and tape.
■ Discard used supplies and sharps in appropriate
receptacles.23,24,25
■ Remove and discard your gloves.23,24,25
■ Perform hand hygiene.12,13,14,15,16
■ Document the procedure.28,29,30,31
Special considerations
■ If the implant is a contraceptive and it becomes
dislodged, the patient will need an alternative form of birth
control until the implant is replaced.
■ If the implant is a contraceptive, confirm that the patient
isn’t pregnant before implant insertion.1
Patient teaching
Tell the patient to resume normal activities but to protect
the site during the first few days after implantation. Advise
the patient not to bump the insertion site and to keep the
area dry and covered with a gauze bandage for 3 days. Tell
the patient to report signs of bleeding or infection at the
insertion site. Instruct the patient to notify the practitioner
immediately if one of the implants falls out before the skin
heals.
Complications
Complications include pain, bleeding, infection, and scarring
at the insertion site.
Documentation
Document the name of the drug, insertion or administration
site, date and time of insertion, and patient’s response to
the procedure. Note the date when the implant should be
removed and a new implant inserted. Document patient
teaching and the patient’s comprehension of your teaching.
REFERENCES
1 Merck and Company, Inc. (2017). “Nexplanon prescribing information”
[Online]. Accessed via the Web at
https://www.merck.com/product/usa/pi_circulars/n/nexplanon/nexplanon_pi.pd
f
2 Endo Pharmaceuticals Solutions Inc. (2011). “VANTAS prescribing
information” [Online]. Accessed via the Web at
http://www.endo.com/File%20Library/Products/Prescribing%20Information/Van
tas_prescribing_information.html
3 Institute for Safe Medication Practices. (2012). Side tracks on the safety
express: Interruptions lead to errors and unfinished...Wait, what was I doing?
Nurse Advise-ERR, 11(2), 1–4 . Accessed via the Web at
https://www.ismp.org/resources/side-tracks-safety-express-interruptions-lead-
errors-and-unfinished-wait-what-was-i-doing
4 Accreditation Association for Hospitals and Health Systems. (2017). Standard
16.01.03. Healthcare Facilities Accreditation Program: Accreditation standards
for acute care hospitals. Chicago, IL: Accreditation Association for Hospitals
and Health Systems. (Level VII)
5 Westbrook, J., & Ling, L. (2013). Interruptions are significantly associated with
the frequency and severity of medication administration errors. Research of
Nursing and Health, 36(2), 116–119. (Level IV)
6 DNV GL-Healthcare USA, Inc. (2016). MM .1 .SR.2 . NIAHO® accreditation
requirements: Interpretive guidelines & surveyor guidance (version 11).
Milford, OH: DNV GL-Healthcare USA, Inc. (Level VII)
7 Centers for Medicare & Medicaid Services, Department of Health and Human
Services. (2015). Condition of participation: Nursing services. 42 C.F.R. §
482.23(c).
8 The Joint Commission. (2019). Standard RI.01.03 .01. Comprehensive
accreditation manual for hospitals. Oakbrook Terrace, IL: The Joint
Commission. (Level VII)
9 Centers for Medicare & Medicaid Services, Department of Health and Human
Services. (2015). Condition of participation: Patient’s rights. 42 C.F.R. §
482.13(b)(2).
10 Accreditation Association for Hospitals and Health Systems. (2017). Standard
30.00 .14. Healthcare Facilities Accreditation Program: Accreditation standards
for acute care hospitals. Chicago, IL: Accreditation Association for Hospitals
and Health Systems. (Level VII)
11 The Joint Commission. (2019). Standard UP.01.01.01. Comprehensive
accreditation manual for hospitals. Oakbrook Terrace, IL: The Joint
Commission. (Level VII)
12 The Joint Commission. (2019). Standard NPSG.07.01.01. Comprehensive
accreditation manual for hospitals. Oakbrook Terrace, IL: The Joint
Commission. (Level VII)
13 Centers for Disease Control and Prevention. (2002). Guideline for hand
hygiene in health-care settings: Recommendations of the Healthcare Infection
Control Practices Advisory Committee and the HICPAC/SHEA/APIC/IDSA Hand
Hygiene Task Force. MMWR Recommendations and Reports, 51(RR-16), 1–45.
Accessed via the Web at https://www.cdc.gov/mmwr/pdf/rr/rr5116.pdf (Level
II)
14 World Health Organization. (2009). “WHO guidelines on hand hygiene in
health care: First global patient safety challenge, clean care is safer care”
[Online]. Accessed via the Web at
http://apps.who.int/iris/bitstream/10665/44102/1/9789241597906_eng.pdf
(Level IV)
15 Accreditation Association for Hospitals and Health Systems. (2017) Standard
07.01.21. Healthcare Facilities Accreditation Program: Accreditation standards
for acute care hospitals. Chicago, IL: Accreditation Association for Hospitals
and Health Systems. (Level VII)
16 Centers for Medicare & Medicaid Services, Department of Health and Human
Services. (2015). Condition of participation: Infection control. 42 C.F.R. §
482.42.
17 DNV GL-Healthcare USA, Inc. (2016). IC.1 .SR.1 . NIAHO® accreditation
requirements: Interpretive guidelines & surveyor guidance (version 11).
Milford, OH: DNV GL-Healthcare USA, Inc. (Level VII)
18 The Joint Commission. (2019). Standard NPSG.01.01.01. Comprehensive
accreditation manual for hospitals. Oakbrook Terrace, IL: The Joint
Commission. (Level VII)
19 Accreditation Association for Hospitals and Health Systems. (2017). Standard
15.01.16. Healthcare Facilities Accreditation Program: Accreditation
requirements for acute care hospitals. Chicago, IL: Accreditation Association
for Hospitals and Health Systems. (Level VII)
20 Centers for Medicare and Medicaid Services, Department of Health and
Human Services. (2015). Condition of participation: Patient’s rights. 42 C.F.R.
§ 482.13(c)(1).
21 DNV GL-Healthcare USA, Inc. (2016). PR.1.SR.5 . NIAHO® accreditation
requirements: Interpretive guidelines & surveyor guidance (version 11).
Milford, OH: DNV GL-Healthcare USA, Inc. (Level VII)
22 The Joint Commission. (2019). Standard RI.01.01.01. Comprehensive
accreditation manual for hospitals. Oakbrook Terrace, IL: The Joint
Commission. (Level VII)
23 Siegel, J. D ., et al. (2007, revised 2017). “2007 guideline for isolation
precautions: Preventing transmission of infectious agents in healthcare
settings” [Online]. Accessed via the Web at
https://www.cdc.gov/infectioncontrol/pdf/guidelines/isolation-guidelines.pdf
(Level II)
24 Occupational Safety and Health Administration. (n.d .). “Bloodborne
pathogens, standard number 1910.1030” [Online]. Accessed via the Web at
http://www.osha.gov/pls/oshaweb/owadisp.show_document?
p_id=10051&p_table=STANDARDS (Level VII)
25 Accreditation Association for Hospitals and Health Systems. (2017). Standard
07.01.10. Healthcare Facilities Accreditation Program: Accreditation standards
for acute care hospitals. Chicago, IL: Accreditation Association for Hospitals
and Health Systems. (Level VII)
26 The Joint Commission. (2019). Standard UP.01.02.01. Comprehensive
accreditation manual for hospitals. Oakbrook Terrace, IL: The Joint
Commission. (Level VII)
27 The Joint Commission. (2019). Standard UP.01.03.01. Comprehensive
accreditation manual for hospitals. Oakbrook Terrace, IL: The Joint
Commission. (Level VII)
28 The Joint Commission. (2019). Standard RC.01.03 .01. Comprehensive
accreditation manual for hospitals. Oakbrook Terrace, IL: The Joint
Commission. (Level VII)
29 Accreditation Association for Hospitals and Health Systems. (2017). Standard
10.00 .03. Healthcare Facilities Accreditation Program: Accreditation standards
for acute care hospitals. Chicago, IL: Accreditation Association for Hospitals
and Health Systems. (Level VII)
30 Centers for Medicare & Medicaid Services, Department of Health and Human
Services. (2015). Condition of participation: Medical record services. 42 C.F.R.
§ 482.24(b).
31 DNV GL-Healthcare USA, Inc. (2016). MR.2 .SR.1 . NIAHO® accreditation
requirements: Interpretive guidelines & surveyor guidance (version 11).
Milford, OH: DNV GL-Healthcare USA, Inc. (Level VII)
SURGICAL DRAIN REMOVAL
Surgical drains are important adjuncts to postoperative care
because they promote wound healing by providing an exit
site for fluid that accumulates in or near the wound bed.
Drains should be removed when they malfunction or when
drainage becomes minimal.1 Drains commonly inserted
during surgery include the Hemovac drain, the bulb suction
drain, and the Penrose drain.
Equipment
Sterile 4′′ × 4′′ (10-cm × 10-cm) gauze pads ▪ tape (paper or
silicone for frail skin)2 ▪ gown ▪ gloves ▪ sterile gloves ▪
labels ▪ Optional: suture removal kit, prescribed pain
medication, sterile specimen swabs, sterile specimen
collection containers, laboratory request form, laboratory
biohazard transport bag, gown, mask with face shield or
mask and goggles, nonadherent contact layers,
nonadherent or silicone foam dressing, other topical
dressing specifically formulated for fragile skin.
Implementation
■ Verify the practitioner’s order.
■ Review the patient’s medical record to determine the
type of drain to be removed, its location, and the method
used to secure it to ensure proper removal.
■ Verify whether a surgical drain, drain tip, or drainage
culture needs to be sent for culturing upon drain removal.
■ Gather the necessary equipment.
■ Perform hand hygiene.3,4,5,6,7,8
■ Confirm the patient’s identity using at least two patient
identifiers.9
■ Provide privacy.10,11,12,13
■ Explain the procedure to the patient to allay fear and
anxiety.
■ Raise the patient’s bed to waist level when providing care
to prevent caregiver back strain.14
■ Screen and assess the patient’s pain using facility-defined
criteria that are consistent with the patient’s age, condition,
and ability to understand.15
■ Administer pain medications, as ordered, following safe
medication administration practices.16,17,18,19
■ Put on gloves and a gown; also put on a mask and a face
shield, if
necessary,
comply with
standard
precautions.20,21,22,23
■ Position the patient comfortable and in a manner that
provides you with adequate access to the surgical site.
■ If the drain contains suction from its initial closure,
release the suction from the drain.16
■ Note the volume, color, consistency, and odor of drainage
within the drain.
■ Remove the drain dressing to gain access to the exit site.
Remove the dressing and tape carefully to prevent skin
tears. Dispose of it in an appropriate receptacle.21
■ Remove and discard your gloves.20,21
■ Perform hand hygiene.3,4,5,6,7,8
■ Establish a sterile field. Open the sterile gauze pads and
suture-removal kit if necessary.
■ Put on sterile gloves.20,21
■ Using the suture removal kit, cut and remove any sutures
present.
■ Place a sterile gauze pad close to the exit site to absorb
any remaining drainage while you remove the drain.24
■ Have the patient breathe deeply and smoothly. Grasp the
drain close to the skin with a sterile-gloved hand.1
■ Gently withdraw the drain using smooth, steady traction.
If you feel resistance, stop the procedure and notify the
practitioner.16,24
■ Check that you’ve removed the entire drain. Examine the
drain tip for irregularities or other signs of breakage. The
drain should have a clean-cut edge and not appear jagged
or torn.1,25
■ If the tip is required for culture, cut it with sterile scissors
and place it in a sterile specimen container. Label the
specimen container in the presence of the patient to
prevent mislabeling.9 Place the specimen in a laboratory
biohazard transport bag21 and send it to the laboratory with
a completed laboratory request form (if required).
■ Dispose of the drain in the appropriate receptacle.21
■ Assess the patient’s skin integrity at the exit site for signs
of infection, such as redness, swelling, a foul odor, or
purulent drainage, and for signs of fluid accumulation.24
■ If purulent drainage and inflammation are present at the
exit site, obtain a specimen using a sterile specimen swab.
Place the swab in its container and then label the container
in the presence of the patient to prevent mislabeling.9 Place
the specimen container in a laboratory biohazard transport
bag21 and send it to the laboratory with a completed
laboratory request form (if required).
■ Maintain pressure over the drain site with a gauze pad
until drainage or bleeding is minimal.
■ Remove and discard your gloves,20,21 perform hand
hygiene,3,4,5,6,7,8 and put on gloves.20,21
■ Place a sterile gauze pad over the drain exit site and
secure it with tape. Alternatively, if the patient has fragile
skin, cover the site with nonadherent contact layers, a
nonadherent or silicone foam dressing, or other topical
dressing specifically formulated for fragile skin. Secure the
dressing with paper or silicone tape to prevent skin stripping
or tearing.2 Label the dressing with the date, the time, and
your initials.24
■ Return the bed to the lowest position to prevent falls and
maintain patient safety.26
■ Discard used materials in an appropriate receptacle.21
■ Reassess the patient’s pain and respond appropriately.15
■ Remove and discard your gloves and any other personal
protective equipment worn.20,21
■ Perform hand hygiene.3,4,5,6,7,8
■ Document the procedure.27,28,29
Special considerations
■ Drainage from the exit site should be minimal and should
cease within 24 hours of drain removal. If drainage
continues, notify the practitioner, because fluid may be
accumulating beneath the skin and require evacuation.24
Patient teaching
Teach the patient about the signs and symptoms of
infection, such as fever, chills, nausea, vomiting, and
evidence of redness, swelling, purulent drainage, or odor
from the drain site. Tell the patient to notify the practitioner
if these signs and symptoms develop or if a sudden increase
in pain at the drain site occurs.
Complications
Pain may accompany drain removal and persist after
removal. Impaired wound healing may be a complication if
fluid accumulates beneath the skin. Infection and injury to
adjacent tissues may also occur.
Documentation
Document the date and time of drain removal, the type of
drain removed, the condition of the exit site, and the
presence and characteristics of drainage. Document your
pain assessments and any medications given, as well as any
specimens collected and sent for microbiologic examination.
Document the patient’s tolerance of the procedure, patient
teaching performed, and the patient’s understanding of the
teaching.
REFERENCES
1 Walker, J. (2007). Patient preparation for safe removal of surgical drains.
Nursing Standard, 21(49), 39–41 . Accessed via the Web at
https://journals.rcni.com/doi/abs/10.7748/ns2007.08.21.49.39 .c4603
2 LeBlanc, K., et al. (2013). International Skin Tear Advisory Panel: A tool kit to
aid in the prevention, assessment, and treatment of skin tears using a
simplified classification system. Advances in Skin and Wound Care, 26(10),
459–476. (Level IV)
3 Centers for Disease Control and Prevention. (2002). Guideline for hand
hygiene in health-care settings: Recommendations of the Healthcare Infection
Control Practices Advisory Committee and the HICPAC/SHEA/APIC/IDSA Hand
Hygiene Task Force. MMWR Recommendations and Reports, 51(RR-16), 1–45.
Accessed via the Web at https://www.cdc.gov/mmwr/pdf/rr/rr5116.pdf (Level
II)
4 The Joint Commission. (2019). Standard NPSG.07.01.01. Comprehensive
accreditation manual for hospitals. Oakbrook Terrace, IL: The Joint
Commission. (Level VII)
5 World Health Organization. (2009). “WHO guidelines on hand hygiene in
health care: First global patient safety challenge, clean care is safer care”
[Online]. Accessed via the Web at
http://apps.who.int/iris/bitstream/10665/44102/1/9789241597906_eng.pdf
(Level IV)
6 Centers for Medicare and Medicaid Services, Department of Health and
Human Services. (2015). Condition of participation: Infection control. 42 C.F.R.
§ 482.42.
7 Accreditation Association for Hospitals and Health Systems. (2017). Standard
07.01.21. Healthcare Facilities Accreditation Program: Accreditation
requirements for acute care hospitals. Chicago, IL: Accreditation Association
for Hospitals and Health Systems. (Level VII)
8 DNV GL-Healthcare USA, Inc. (2016). IC.1.SR.1 . NIAHO® accreditation
requirements: Interpretive guidelines & surveyor guidance (version 11).
Milford, OH: DNV GL-Healthcare USA, Inc. (Level VII)
9 The Joint Commission. (2019). Standard NPSG.01.01.01. Comprehensive
accreditation manual for hospitals. Oakbrook Terrace, IL: The Joint
Commission. (Level VII)
10 Centers for Medicare and Medicaid Services, Department of Health and
Human Services. (2015). Condition of participation: Patient’s rights. 42 C.F.R.
§ 482.13(c)(1).
11 Accreditation Association for Hospitals and Health Systems. (2017). Standard
15.01.16. Healthcare Facilities Accreditation Program: Accreditation
requirements for acute care hospitals. Chicago, IL: Accreditation Association
for Hospitals and Health Systems. (Level VII)
12 The Joint Commission. (2019). Standard RI.01.01.01. Comprehensive
accreditation manual for hospitals. Oakbrook Terrace, IL: The Joint
Commission. (Level VII)
13 DNV GL-Healthcare USA, Inc. (2016). PR.1.SR.5 . NIAHO® accreditation
requirements: Interpretive guidelines & surveyor guidance (version 11).
Milford, OH: DNV GL-Healthcare USA, Inc. (Level VII)
14 Waters, T. R., et al. (2009). “Safe patient handling training for schools of
nursing” [Online]. Accessed via the Web at
https://www.cdc.gov/niosh/docs/2009-127/pdfs/2009-127.pdf (Level VII)
15 The Joint Commission. (2019). Standard PC.01.02.07. Comprehensive
accreditation manual for hospitals. Oakbrook Terrace, IL: The Joint
Commission. (Level VII)
16 Durai, R., & Ng, P. C . H. (2010). Surgical vacuum drains: Types, uses, and
complications. AORN Journal, 91(2), 266–271. Accessed via the Web at
https://aornjournal.onlinelibrary.wiley.com/doi/abs/10.1016/j.aorn.2009.09 .02
4
17 Centers for Medicare and Medicaid Services, Department of Health and
Human Services. (2015). Condition of participation: Nursing services. 42
C.F.R. § 482.23(c).
18 Accreditation Association for Hospitals and Health Systems. (2017). Standard
16.01.03. Healthcare Facilities Accreditation Program: Accreditation
requirements for acute care hospitals. Chicago, IL: Accreditation Association
for Hospitals and Health Systems. (Level VII)
19 DNV GL-Healthcare USA, Inc. (2016). MM.1 .SR.2. NIAHO® accreditation
requirements: Interpretive guidelines & surveyor guidance (version 11).
Milford, OH: DNV GL-Healthcare USA, Inc. (Level VII)
20 Siegel, J. D ., et al. (2007, revised 2017). “2007 guideline for isolation
precautions: Preventing transmission of infectious agents in healthcare
settings” [Online]. Accessed via the Web at
https://www.cdc.gov/infectioncontrol/pdf/guidelines/isolation-guidelines.pdf
(Level II)
21 Occupational Safety and Health Administration. (n.d .). “Bloodborne
pathogens, standard number 1910.1030” [Online]. Accessed via the Web at
https://www.osha.gov/pls/oshaweb/owadisp.show_document?
p_id=10051&p_table=STANDARDS (Level VII)
22 Accreditation Association for Hospitals and Health Systems. (2017). Standard
07.01.10. Healthcare Facilities Accreditation Program: Accreditation
requirements for acute care hospitals. Chicago, IL: Accreditation Association
for Hospitals and Health Systems. (Level VII)
23 DNV GL-Healthcare USA, Inc. (2016). IC.1 .SR.2 . NIAHO® accreditation
requirements: Interpretive guidelines & surveyor guidance (version 11).
Milford, OH: DNV GL-Healthcare USA, Inc. (Level VII)
24 Wiegand, D. L. (Ed.). (2017). AACN procedure manual for high acuity,
progressive, and critical care (7th ed.) . Philadelphia, PA: Elsevier.
25 Knowlton, M. C . (2015). Nurse’s guide to surgical drain removal. Nursing,
45(9), 59–61.
26 Ganz, D. A., et al. (2013). Preventing falls in hospitals: A toolkit for improving
quality of care (AHRQ Publication No. 13-0015-EF). Rockville, MD: Agency for
Healthcare Research and Quality. Accessed via the Web at
http://www.ahrq.gov/sites/default/files/publications/files/fallpxtoolkit.pdf
(Level VII)
27 The Joint Commission. (2019). Standard RC.01.03 .01. Comprehensive
accreditation manual for hospitals. Oakbrook Terrace, IL: The Joint
Commission. (Level VII)
28 Centers for Medicare and Medicaid Services, Department of Health and
Human Services. (2015). Condition of participation: Medical record services.
42 C.F.R. § 482.24(b).
29 Accreditation Association for Hospitals and Health Systems. (2017). Standard
10.00 .03. Healthcare Facilities Accreditation Program: Accreditation
requirements for acute care hospitals. Chicago, IL: Accreditation Association
for Hospitals and Health Systems. (Level VII)
SURGICAL WOUND MANAGEMENT
When caring for a patient with a surgical wound, the nurse
carries out procedures that help prevent infection by
stopping pathogens from entering the wound. Besides
promoting patient comfort, such procedures protect the skin
surface from maceration and excoriation caused by contact
with irritating drainage. They also allow for measurement of
wound drainage to monitor fluid balance.
The two primary methods used to manage a draining
surgical wound are dressing and drainage collection
pouching. Dressing is preferred, unless caustic or excessive
drainage is compromising the patient’s skin integrity.
Usually, lightly seeping wounds with drains and wounds with
minimal purulent drainage can be managed with packing
and gauze dressings. Some wounds, such as those that
become chronic, may require occlusive dressings. Dressing
changes must occur often enough to keep the skin dry. In
addition to an appropriate dressing, a patient with a surgical
wound requires close monitoring.
When dressing a wound, use sterile no-touch technique
and sterile supplies to prevent contamination. Observe the
color of the wound; this will help you determine which type
of dressing to apply. (See Tailoring wound care to wound
color, page 728.) Change the dressing often enough to keep
the skin dry, and always follow standard precautions set by
the Centers for Disease Control and Prevention.
Equipment
Gloves ▪ sterile gloves ▪ sterile 4′′ × 4′′ (10-cm × 10-cm)
gauze pads ▪ sterile dressing set ▪ prescribed antiseptic
cleaning agent ▪ adhesive or other tape ▪ soap and water ▪
sterile scissors ▪ sterile 4′′ × 4′′ (10-cm × 10-cm) precut
drain dressings or tracheostomy pads ▪ Optional: gown and
face shield or goggles; acetone-free adhesive remover;
wound irrigant and irrigation supplies; sterile cotton-tipped
applicators; wound culture collection equipment; skin
protectant; 2′′ × 2′′ (5-cm × 5-cm) gauze pads,; sterile
forceps; large absorbent dressings; Montgomery straps, a
fishnet tube elasticized dressing support, or a T-binder.
Implementation
■ Verify the practitioner’s order for specific wound care and
medication instructions.
■ Ask the patient about allergies, especially to tape, topical
solutions, or medications.
■ Gather the appropriate equipment.
■ Check the expiration date on each sterile package, and
inspect the packages for tears.
■ Perform hand hygiene.1,2,3,4,5,6
■ Confirm the patient’s identity using at least two patient
identifiers.7
■ Provide privacy.8,9,10,11
■ Explain the procedure to the patient and family (if
appropriate) according to their individual communication
and learning needs to increase their understanding, allay
their fears, and enhance cooperation.12
■ Raise the patient’s bed to waist level when providing
patient care to prevent caregiver back strain.13
■ Perform a comprehensive pain assessment using
techniques appropriate for the patient’s age, condition, and
ability to understand.
■ Before dressing application, administer pain medications,
as needed and ordered, following safe medication
administration practices.14,15,16,17,18
Tailoring wound care to wound color
To promote healing in any wound, keep it moist, clean, and free of debris. For
an open wound, use wound color to guide the specific management approach
and to assess how well the wound is healing.
Red wounds
Red, the color of healthy granulation tissue, indicates normal healing. When a
wound begins to heal, a layer of pale pink granulation tissue covers the
wound bed. As this layer thickens, it becomes beefy red. Cover a red wound,
keep it moist and clean, and protect it from trauma. Use a transparent
dressing, hydrocolloid dressing, or gauze dressing moistened with sterile
normal saline solution or impregnated with petroleum jelly or an antibiotic.
Yellow wounds
Yellow is the color of exudate produced by microorganisms in an open wound.
When a wound heals without complications, the immune system removes
microorganisms. However, if there are too many microorganisms to remove,
exudate accumulates and becomes visible. Exudate usually appears whitish
yellow, creamy yellow, yellowish green, or beige. Dry exudate appears
darker.
If the patient has a yellow wound, clean it and remove exudate using
irrigation; then cover it with a moist dressing. Use absorptive products or a
moist gauze dressing with or without an antibiotic. You may also use
hydrotherapy with whirlpool or high-pressure irrigation.
Black wounds
Black, the least healthy color, signals necrosis, with dead, avascular tissue
that slows healing and provides a site for microorganisms to proliferate.
A black wound should be debrided. After removing dead tissue, apply a
dressing to keep the wound moist and guard against external contamination.
As ordered, use enzyme products, surgical debridement, hydrotherapy with
whirlpool or irrigation, or a moist gauze dressing.
Multicolored wounds
You may note two or even all three colors in a wound. In this case, classify
the wound according to the least healthy color present. For example, if your
patient’s wound is both red and yellow, classify it as a yellow wound.
Removing the old dressing
■ Position the patient as necessary to gain access to the
wound. To avoid chilling the patient, expose only the wound
site.
■ Perform hand hygiene.1,2,3,4,5,6
■ Put on a gown and a face shield or goggles, if necessary,
to comply with standard precautions.
■ Put on clean gloves.19,20
■ Assess the patient’s condition.
■ Loosen the soiled dressing by holding the patient’s skin
and pulling the tape or dressing toward the wound. This
technique protects the newly formed tissue and prevents
stress on the incision. Moisten the tape with acetone-free
adhesive remover, if necessary, to make the removal less
painful (particularly if the skin is hairy). Don’t apply solvents
to the incision, because they could contaminate the wound.
ELDER ALERT Remove adhesive tape carefully to prevent skin tears in
older adult patients.
■ Slowly remove the soiled dressing. If the gauze adheres
to the wound, loosen the gauze by moistening it with sterile
normal saline solution.
■ Observe the dressing for the amount, type, color, and
odor of drainage.
■ Discard the dressing and your gloves in the appropriate
receptacle.19,20,21
Caring for the wound
■ Perform hand hygiene.1,2,3,4,5,6
■ Put on a new pair of gloves.
■ Saturate the sterile gauze pads with the prescribed
cleaning agent. Avoid using cotton balls, because they may
shed fibers in the wound, causing irritation, infection, or
adhesion.
■ If ordered, irrigate the wound using the specified solution.
(See the “Wound irrigation” procedure.)
■ Pick up the moistened gauze pad, and squeeze out the
excess solution.
■ For an open wound, clean the wound in a full or half
circle, beginning in the center and working outward (as
shown below). Use a new pad for each circle. Clean to at
least 1′′ (2.5 cm) beyond the end of the new dressing or 2′′
(5 cm) beyond the wound margins if you aren’t applying a
new dressing.
■ For a linear incision, work from the top of the incision,
wipe once to the bottom, and then discard the gauze pad.
With a second moistened pad, wipe from top to bottom in a
vertical path next to the incision. Continue to work outward
from the incision in lines running parallel to it (as shown
below). Always wipe from the clean area toward the less
clean area (usually from top to bottom). Use each gauze pad
for only one stroke to avoid tracking wound exudate and
normal body flora from surrounding skin to the clean areas.
Remember that the suture line is cleaner than the adjacent
skin, and the top of the suture line is usually cleaner than
the bottom, because more drainage collects at the bottom
of the wound.
■ Use sterile cotton-tipped applicators for efficient cleaning
of tight-fitting wire sutures, deep and narrow wounds, and
wounds with pockets. Remember to wipe only once with
each applicator. Because the cotton on the applicator is
wrapped tightly, it’s less likely to leave fibers in the wound
than a cotton ball is.
■ Clean all areas of the wound to wash away debris, pus,
blood, and necrotic material. Try not to disturb sutures or
irritate the incision. Clean to at least 1′′ (2.5 cm) beyond the
end of the new dressing.
■ Check to make sure the edges of the incision are lined up
properly, and check for signs of infection (heat, redness,
swelling, induration, and odor), dehiscence, and
evisceration. If you observe such signs, or if the patient
reports pain at the wound site, notify the practitioner.
■ Wash the skin surrounding the wound with soap and
water, and pat it dry using a sterile 4′′ × 4′′ (10-cm × 10-cm)
gauze pad. Avoid oil-based soap, because it may interfere
with tape adherence.
■ If ordered, obtain a wound culture. (See the “Swab
specimen collection” procedure, page 733.)
■ Apply any prescribed skin protectant, if needed.
■ If ordered, pack the wound with sterile 4′′ × 4′′ (10-cm ×
10-cm) or 2′′ × 2′′ (5-cm × 5-cm) gauze pads or strips folded
to fit using a sterile forceps. Avoid using cotton-lined gauze
pads, because cotton fibers can adhere to the wound
surface and cause complications. Pack the wound using the
wet-to-damp method. Soaking the packing material in
sterile saline solution and wringing it out so that it’s slightly
moist provides a moist wound environment that absorbs
debris and drainage without disrupting new tissue when the
packing is removed. Don’t pack the wound tightly, because
doing so exerts pressure and can damage the wound.
Applying a fresh gauze dressing
■ Gently place sterile 4′′ × 4′′ (10-cm × 10-cm) gauze pads
at the center of the wound, and move progressively outward
to the edges of the wound site. Extend the gauze at least 1′′
(2.5 cm) beyond the incision in each direction, and cover
the wound evenly with enough sterile dressings (usually two
or three layers) to absorb all drainage until the next
dressing change. Use large absorbent dressings to form
outer layers, if needed, to provide greater absorbency.
■ Secure the dressing’s edges to the patient’s skin with
strips of tape (as shown below) to maintain the sterility of
the wound site.
■ Alternatively, secure the dressing with a T-binder or
Montgomery straps (as shown below) to prevent skin
excoriation, which can occur with repeated tape removal
necessitated by frequent dressing changes.
■ If the wound is on a limb, secure the dressing with a
fishnet tube elasticized dressing support.
Dressing a wound with a drain
■ Press one sterile commercially precut gauze drain
dressing close to the skin around the drain so that the
tubing fits into the slit.
■ Press a second sterile commercially precut gauze drain
dressing around the drain from the opposite direction so
that the two dressings encircle the drain.
■ Layer as many uncut, sterile 4′′ × 4′′ (10-cm × 10-cm)
gauze pads or large absorbent dressings around the tubing
as needed to absorb expected drainage.
■ Tape the dressing in place, or use a T-binder or
Montgomery straps.
Completing the procedure
■ Make sure the patient is comfortable.
■ Return the bed to the lowest position to prevent falls and
maintain patient safety.22
■ Discard all used supplies in appropriate receptacles.20,21
■ Remove and discard your gloves.19,20,21
■ Perform hand hygiene.1,2,3,4,5,6
■ Document the procedure.23,24,25,26
Special considerations
■ If the patient has two wounds in the same area, cover
each wound separately with layers of sterile 4′′ × 4′′ (10-cm
× 10-cm) gauze pads. Then cover each site with a large
absorbent dressing secured to the patient’s skin with tape.
Don’t use a single large absorbent dressing to cover both
sites, because drainage quickly saturates a pad, promoting
cross-contamination.
■ If a wound drains more than about 11⁄2 oz (50 mL) per day
not captured by the drain, apply a pouch to collect excess
drainage.
■ When packing a wound, don’t pack it too tightly, because
this compresses adjacent capillaries and may prevent the
wound edges from contracting. Avoid overlapping damp
packing onto surrounding skin, because it macerates the
intact tissue.
■ To save time when dressing a wound with a drain, use
precut tracheostomy pads or drain dressings instead of
custom-cutting gauze pads to fit around the drain.
■ If your patient is sensitive to adhesive tape, use paper or
silk tape, because it’s less likely to cause a skin reaction and
peels off more easily than adhesive tape does.
■ Use a surgical mask to cradle a chin or jawline dressing;
doing so secures the dressing and avoids the need to shave
the patient’s hair.
■ If ordered, use a collodion spray or similar topical
protectant instead of a gauze dressing. Moisture- and
contaminant-proof, this covering dries in a clear,
impermeable film that leaves the wound visible for
observation and avoids the friction caused by a dressing.
■ Because many practitioners prefer to change the first
postoperative dressing themselves to check the incision,
don’t change the first dressing unless you have specific
instructions to do so. If you have no such order and
drainage comes through the dressings, reinforce the
dressing with fresh sterile gauze. Request an order to
change the dressing, or ask the practitioner to change it as
soon as possible. A reinforced dressing shouldn’t remain in
place longer than 24 hours, because it’s an excellent
medium for bacterial growth.
■ For a recent postoperative patient or a patient with
complications, check the dressing every 15 to 30 minutes,
or as ordered. For the patient with a properly healing
wound, check the dressing at least once every 8 hours.
■ If the dressing becomes wet from the outside (for
example, from spilled drinking water), replace it as soon as
possible to prevent wound contamination.
Patient teaching
If the patient will need wound care after discharge, provide
appropriate teaching. If the patient will be caring for the
wound, stress the importance of using sterile technique, and
teach the patient how to examine the wound for signs of
infection and other complications. Also show the patient
how to change dressings. Provide written instructions for all
procedures to be performed at home.
Complications
A major complication of a dressing change is an allergic
reaction to an antiseptic cleaning agent, a prescribed topical
medication, or adhesive tape. This reaction may lead to skin
redness, rash, excoriation, or infection. Skin tears are also a
potential complication.
Documentation
Document the date, time, and type of wound management
procedure; amount of soiled dressing and packing removed;
wound appearance (size, condition of margins, and
presence of necrotic tissue) and odor (if present); type,
color, consistency, and amount of drainage (for each
wound); presence and location of drains; additional
procedures, such as irrigation, packing, or application of a
topical medication; type and amount of new dressing or
pouch applied; patient’s tolerance of the procedure; and any
patient teaching provided.
Document special or detailed wound care instructions and
pain management steps in the care plan. Record the color
and amount of drainage on the intake-and-output sheet.
REFERENCES
1 The Joint Commission. (2019). Standard NPSG.07.01.01. Comprehensive
accreditation manual for hospitals. Oakbrook Terrace, IL: The Joint
Commission. (Level VII)
2 Centers for Disease Control and Prevention. (2002). Guideline for hand
hygiene in health-care settings: Recommendations of the Healthcare Infection
Control Practices Advisory Committee and the HICPAC/SHEA/APIC/IDSA Hand
Hygiene Task Force. MMWR Recommendations and Reports, 51(RR-16), 1–45.
Accessed via the Web at https://www.cdc.gov/mmwr/pdf/rr/rr5116.pdf (Level
II)
3 World Health Organization. (2009). “WHO guidelines on hand hygiene in
health care: First global patient safety challenge, clean care is safer care”
[Online]. Accessed via the Web at
http://apps.who.int/iris/bitstream/10665/44102/1/9789241597906_eng.pdf
(Level IV)
4 Accreditation Association for Hospitals and Health Systems. (2017). Standard
07.01.21. Healthcare Facilities Accreditation Program: Accreditation
requirements for acute care hospitals. Chicago, IL: Accreditation Association
for Hospitals and Health Systems. (Level VII)
5 Centers for Medicare and Medicaid Services, Department of Health and
Human Services. (2016). Condition of participation: Infection control. 42 C.F.R.
§ 482.42.
6 DNV GL-Healthcare USA, Inc. (2016). IC.1.SR.1 . NIAHO® accreditation
requirements: Interpretive guidelines & surveyor guidance (version 11).
Milford, OH: DNV GL-Healthcare USA, Inc. (Level VII)
7 The Joint Commission. (2019). Standard NPSG.01.01.01. Comprehensive
accreditation manual for hospitals. Oakbrook Terrace, IL: The Joint
Commission. (Level VII)
8 Accreditation Association for Hospitals and Health Systems. (2017). Standard
15.01.16. Healthcare Facilities Accreditation Program: Accreditation
requirements for acute care hospitals. Chicago, IL: Accreditation Association
for Hospitals and Health Systems. (Level VII)
9 Centers for Medicare and Medicaid Services, Department of Health and
Human Services. (2015). Condition of participation: Patient’s rights. 42 C.F.R.
§ 482.13(c)(1).
10 The Joint Commission. (2019). Standard RI.01.01.01. Comprehensive
accreditation manual for hospitals. Oakbrook Terrace, IL: The Joint
Commission. (Level VII)
11 DNV GL-Healthcare USA, Inc. (2016). PR.1.SR.5 . NIAHO® accreditation
requirements: Interpretive guidelines & surveyor guidance (version 11).
Milford, OH: DNV GL-Healthcare USA, Inc. (Level VII)
12 The Joint Commission. (2019). Standard PC.02.01.21. Comprehensive
accreditation manual for hospitals. Oakbrook Terrace, IL: The Joint
Commission.
13 Waters, T. R., et al. (2009). “Safe patient handling training for schools of
nursing” [Online]. Accessed via the Web at
https://www.cdc.gov/niosh/docs/2009-127/pdfs/2009-127.pdf
14 The Joint Commission. (2019). Standard PC.01.02.07. Comprehensive
accreditation manual for hospitals. Oakbrook Terrace, IL: The Joint
Commission. (Level VII)
15 Accreditation Association for Hospitals and Health Systems. (2017). Standard
16.01.03. Healthcare Facilities Accreditation Program: Accreditation
requirements for acute care hospitals. Chicago, IL: Accreditation Association
for Hospitals and Health Systems. (Level VII)
16 Centers for Medicare and Medicaid Services, Department of Health and
Human Services. (2015). Condition of participation: Nursing services. 42
C.F.R. § 482.23(c).
17 DNV GL-Healthcare USA, Inc. (2016). MM.1 .SR.2. NIAHO® accreditation
requirements: Interpretive guidelines & surveyor guidance (version 11).
Milford, OH: DNV GL-Healthcare USA, Inc. (Level VII)
18 Institute for Safe Medication Practices. (2012). Side tracks on the safety
express: Interruptions lead to errors and unfinished...Wait, what was I doing?
Nurse Advise-ERR, 11(2), 1–4 . Accessed via the Web at
https://www.ismp.org/resources/side-tracks-safety-express-interruptions-lead-
errors-and-unfinished-wait-what-was-i-doing
19 Siegel, J. D ., et al. (2007, revised 2017). “2007 guideline for isolation
precautions: Preventing transmission of infectious agents in healthcare
settings” [Online]. Accessed via the Web at
https://www.cdc.gov/infectioncontrol/pdf/guidelines/isolation-guidelines.pdf
(Level II)
20 Accreditation Association. for Hospitals and Health Systems (2017). Standard
07.01.10. Healthcare Facilities Accreditation Program: Accreditation
requirements for acute care hospitals. Chicago, IL: Accreditation Association
for Hospitals and Health Systems. (Level VII)
21 Occupational Safety and Health Administration. (n.d .). “Bloodborne
pathogens, standard number 1910.1030” [Online]. Accessed via the Web at
http://www.osha.gov/pls/oshaweb/owadisp.show_document?
p_id=10051&p_table=STANDARDS (Level VII)
22 Ganz, D. A., et al. (2013). Preventing falls in hospitals: A toolkit for improving
quality of care (AHRQ Publication No. 13-0015-EF). Rockville, MD: Agency for
Healthcare Research and Quality. Accessed via the Web at
http://www.ahrq.gov/sites/default/files/publications/files/fallpxtoolkit.pdf
23 The Joint Commission. (2019). Standard RC.01.03 .01. Comprehensive
accreditation manual for hospitals. Oakbrook Terrace, IL: The Joint
Commission. (Level VII)
24 Accreditation Association for Hospitals and Health Systems. (2017). Standard
10.00 .03. Healthcare Facilities Accreditation Program: Accreditation
requirements for acute care hospitals. Chicago, IL: Accreditation Association
for Hospitals and Health Systems. (Level VII)
25 Centers for Medicare and Medicaid Services, Department of Health and
Human Services. (2015). Condition of participation: Medical record services.
42 C.F.R. § 482.24(b).
26 DNV GL-Healthcare USA, Inc. (2016). MR.2 .SR.1 . NIAHO® accreditation
requirements: Interpretive guidelines & surveyor guidance (version 11).
Milford, OH: DNV GL-Healthcare USA, Inc. (Level VII)
SUTURE REMOVAL
A practitioner may use skin sutures to close a laceration or
surgical wound. The goal during suture removal is to remove
the sutures from a healed wound without damaging newly
formed tissue. Sterile technique typically isn’t required for
removal; a no-touch technique can usually be used unless
the patient’s condition warrants sterile technique.1,2 The
technique used for suture removal depends on the method
of suturing. Sutures are usually removed by a practitioner;
however, in many facilities a nurse may remove them
according to the practitioner’s order.1,2
The timing of suture removal depends on the patient’s
condition and the location of the sutured incision. In
general, sutures on the face are removed in 3 to 5 days;3 on
the arm, in 7 to 10 days;3 on the scalp, in 7 to 14 days;4 on
the hand, foot, leg, or trunk, in 10 to 14 days;3 and on the
palm or sole, in 14 to 21 days.3
Equipment
Gloves ▪ suture removal kit (sterile forceps or hemostat,
sterile curved-tipped suture scissors) ▪ Optional: adhesive
remover, normal saline solution, adhesive strips or adhesive
butterfly strips, sterile gloves, sterile drape, antiseptic
cleaning agent, tape, sterile 4′′ × 4′′ (10-cm × 10-cm)
dressings, alcohol-free skin protectant.
Preparation of equipment
■ Check any item that has an expiration date to ensure that
it has not expired. If a product is expired, if its integrity is
compromised, or if it’s defective, remove it from patient
use, label it as expired or defective, and report the
expiration or defect as directed by your facility.
Implementation
■ If your facility allows you to remove sutures, check the
practitioner’s order to confirm the details of the procedure.
■ Review the patient’s medical record for a history of
allergies, especially to adhesive tape, topical solutions, and
medications.5,6,7
■ Gather and prepare the equipment in the patient’s room.
■ Perform hand hygiene.8,9,10,11,12,13
■ Confirm the patient’s identity using at least two patient
identifiers.14
■ Provide privacy.15,16,17,18
■ Explain the procedure to the patient and family (if
appropriate) according to their individual communication
and learning needs to increase their understanding, allay
their fears, and enhance cooperation.19 Assure the patient
that this procedure typically is painless, but that the patient
might feel a tickling sensation as the sutures are removed
from the skin. Reassure the patient that, because the wound
is healing properly, removing the sutures won’t weaken the
incision.
■ Screen and assess the patient’s pain using facility-defined
criteria that are consistent with the patient’s age, condition,
and ability to understand.20,21
■ Treat the patient’s pain, as needed and ordered, using
nonpharmacologic or pharmacologic methods, or a
combination of approaches. Base the treatment plan on
evidence-based practices and the patient’s clinical
condition, past medical history, and pain management
goals.20
■ Raise the patient’s bed to waist level while providing
direct patient care to prevent caregiver back strain.22
■ Perform hand hygiene.8,9,10,11,11,13
■ Assist the patient to a comfortable position. Make sure
that the patient’s position doesn’t create tension on the
suture line. Because some patients experience nausea and
dizziness during the procedure, have the patient recline, if
possible.
■ Drape the patient so that only the suture area is exposed
to provide privacy.
■ Perform hand hygiene.8,9,10,11,11,13
■ Put on gloves.23,24
■ If the patient’s wound has a dressing, remove the
dressing carefully to prevent skin stripping and tearing;
discard it in the appropriate receptacle.23,24
■ Assess the wound site for redness, warmth, and drainage,
which may indicate infection. Be aware that a localized
reaction to the sutures can cause some faint erythema; this
finding is normal, but you must differentiate it from
pathologic erythema. Note whether the wound margins
appear well approximated. Report abnormal findings to the
patient’s practitioner. If the wound isn’t adequately healed,
the sutures may need to remain in place longer. Evidence of
infection may require pharmacologic intervention.
■ Remove and discard your gloves23,24 and perform hand
hygiene.8,9,10,11,11,13
■ Put on a new pair of gloves.23,24
■ Open the suture removal kit, maintaining asepsis.
■ Gently clean the suture line with an antiseptic cleaning
agent, if directed, to decrease the number of
microorganisms present, thereby reducing the risk of
infection. Alternatively, moisten dried crusts with normal
saline solution, if directed, to ease suture removal.25
■ Grasp and cut each suture at the appropriate place,
according to the suture type, and then remove it. Proceed
according to the type of sutures you’re removing. (See
Methods for removing sutures, page 732.) Because the
visible part of a suture is exposed to skin bacteria and is
considered contaminated, be sure to cut sutures at the skin
surface on one side of the visible part of the suture. Remove
the suture by lifting and pulling the visible end off the skin
to avoid drawing this contaminated portion back through
subcutaneous tissue.
■ If ordered, remove every other suture to maintain some
support for the incision. Then go back and remove the
remaining sutures.
■ After removing sutures, wipe the incision gently with
gauze pads soaked in an antiseptic cleaning agent.
■ Assess the site for approximation of margins to determine
whether adhesive strips are needed.
■ Assess the need for a dressing; apply one, as needed.
■ Return the bed to the lowest position to prevent falls and
to maintain patient safety.26
■ Properly dispose of the solutions, and clean or dispose of
soiled equipment and supplies.23,24,27,28
■ Remove and discard your gloves.23,24
■ Perform hand hygiene.8,9,10,11,11,13
■ Reassess and respond to the patient’s pain by evaluating
the response to treatment and progress toward pain
management goals. Assess for adverse reactions and risk
factors for adverse events that may result from treatment.20
■ Perform hand hygiene.8,9,10,11,11,13
■ Document the procedure.29,30,31,32
Special considerations
■ If the patient has retention and regular sutures in place,
check the practitioner’s order for the sequence in which
they are to be removed. Because retention sutures link
underlying fat and muscle tissue and give added support to
the obese or slow-healing patient, they usually remain in
place for 14 to 21 days.
■ If the wound dehisces during suture removal, apply
butterfly or regular adhesive strips to support and
approximate the edges, and call the practitioner
immediately to repair the wound.
Patient teaching
Provide instructions on how to remove the dressing and care
for the wound at home, if appropriate. Inform the patient
about the practitioner’s guidelines regarding showering.
Instruct the patient to notify the practitioner immediately if
the wound opens, drains, or becomes inflamed. Explain that
the redness around the incision should gradually disappear,
and that, after a few weeks, only a thin line should be
visible. Encourage the patient to cover the wound or use a
sunblock product on the wound for 3 to 6 months when sun
exposure is likely to aid healing and reduce scar
formation.33
Complications
Complications of suture removal include infection, missed
removal of a suture, and incomplete healing resulting from
removing the sutures too soon.
Documentation
Record the date and time of suture removal, the type and
number of sutures removed, the number of sutures that
remain (if any), the appearance of the suture line, signs of
wound complications, dressings or adhesive strips or
butterfly adhesive strips applied, and the patient’s tolerance
of the procedure. Document any teaching you provided, the
patient’s and family’s understanding of the teaching, and
whether follow-up teaching was required.
REFERENCES
1 Centers for Disease Control and Prevention. (1988, reviewed 2001).
Perspectives in disease prevention and health promotion update: Universal
precautions for prevention of transmission of human immunodeficiency virus,
hepatitis B virus, and other bloodborne pathogens in health-care settings.
Morbidity and Mortality Weekly Report, 37(24), 377–388 . Accessed via the
Web at https://www.cdc.gov/mmwr/preview/mmwrhtml/00000039.htm (Level
VII)
2 World Health Organization. (2009). “Glove use information leaflet” [Online].
Accessed via the Web at
http://www.who.int/gpsc/5may/Glove_Use_Information_Leaflet.pdf (Level VII)
3 Forsch, R. T. (2008). Essentials of skin laceration repair. American Family
Physician, 78(8), 945–951. Accessed via the Web at
https://www.aafp.org/afp/2008/1015/p945.html (Level VII)
4 Hollander, J. E ., & Camancho, M. Assessment and management of scalp
lacerations. (2017). In: UpToDate, Stack, A. M., & Wolfson, A. B. (Eds.).
Retrieved from: www.uptodate.com
5 Accreditation Association for Hospitals and Health Systems. (2017). Standard
16.01.03. Healthcare Facilities Accreditation Program: Accreditation
requirements for acute care hospitals. Chicago, IL: Accreditation Association
for Hospitals and Health Systems. (Level VII)
6 The Joint Commission. (2019). Standard MM.06 .01.01. Comprehensive
accreditation manual for hospitals. Oakbrook Terrace, IL: The Joint
Commission. (Level VII)
7 Centers for Medicare and Medicaid Services, Department of Health and
Human Services. (2015). Condition of participation: Nursing services. 42
C.F.R. § 482.23(c).
8 Centers for Disease Control and Prevention. (2002). Guideline for hand
hygiene in health-care settings: Recommendations of the Healthcare Infection
Control Practices Advisory Committee and the HICPAC/SHEA/APIC/IDSA Hand
Hygiene Task Force. MMWR Recommendations and Reports, 51(RR-16), 1–45.
Accessed via the Web at https://www.cdc.gov/mmwr/pdf/rr/rr5116.pdf (Level
II)
9 World Health Organization. (2009). “WHO guidelines on hand hygiene in
health care: First global patient safety challenge, clean care is safer care”
[Online]. Accessed via the Web at
http://apps.who.int/iris/bitstream/10665/44102/1/9789241597906_eng.pdf
(Level IV)
10 The Joint Commission. (2019). Standard NPSG.07.01.01. Comprehensive
accreditation manual for hospitals. Oakbrook Terrace, IL: The Joint
Commission. (Level VII)
11 Accreditation Association for Hospitals and Health Systems. (2017). Standard
07.01.21. Healthcare Facilities Accreditation Program: Accreditation
requirements for acute care hospitals. Chicago, IL: Accreditation Association
for Hospitals and Health Systems. (Level VII)
12 Centers for Medicare and Medicaid Services, Department of Health and
Human Services. (2015). Condition of participation: Infection control. 42 C.F.R.
§ 482.42.
13 DNV GL-Healthcare USA, Inc. (2016). IC.1 .SR.1 . NIAHO® accreditation
requirements: Interpretive guidelines & surveyor guidance (version 11).
Milford, OH: DNV GL-Healthcare USA, Inc. (Level VII)
14 The Joint Commission. (2019). Standard NPSG.01.01.01. Comprehensive
accreditation manual for hospitals. Oakbrook Terrace, IL: The Joint
Commission. (Level VII)
15 Accreditation Association for Hospitals and Health Systems. (2017). Standard
15.01.16. Healthcare Facilities Accreditation Program: Accreditation
requirements for acute care hospitals. Chicago, IL: Accreditation Association
for Hospitals and Health Systems. (Level VII)
Methods for removing sutures
Removal techniques usually depend on the type of sutures to be removed.
The first two illustrations below depict the cutting and grasping of sutures;
the remaining four illustrations show removal steps for four common suture
types. Keep in mind that, for all suture types, it’s important to grasp and cut
sutures in the correct place to avoid pulling the exposed (and thus
contaminated) suture material through subcutaneous tissue.
Cutting the suture
Plain interrupted sutures
Using sterile forceps, grasp the knot of the first suture and raise it off the
skin. Doing so exposes a small portion of the suture that was below skin
level. Place the rounded tips of sterile curved-tip suture scissors against the
skin, and cut through the exposed portion of the suture. Then, still holding
the knot with the forceps, pull the cut suture up and out of the skin in a
smooth, continuous motion to avoid causing the patient pain. Discard the
suture. Repeat the process for every other suture (alternating sutures)
initially; if the wound doesn’t gape, you can then remove the remaining
sutures as ordered.
Plain continuous sutures
Cut the first suture on the side opposite the knot. Next, cut the same side of
the next suture in line. Then lift the first suture out in the direction of the
knot. Proceed along the suture line, grasping each suture where you grasped
the knot on the first one.
Grasping the suture
Mattress interrupted sutures
If possible, remove the small, visible portion of the suture opposite the knot
by cutting it at each visible end and lifting the small piece away from the skin
to prevent pulling it through and contaminating subcutaneous tissue. Then
remove the rest of the suture by pulling it out in the direction of the knot. If
the visible portion is too small to cut twice, cut it once and pull the entire
suture out in the opposite direction. Repeat these steps for the remaining
sutures.
Mattress continuous sutures
Follow the procedure for removing mattress interrupted sutures, first
removing the small visible portion of the suture, if possible, to prevent pulling
it through and contaminating subcutaneous tissue. Then extract the rest of
the suture in the direction of the knot.
16 The Joint Commission. (2019). Standard RI.01.01.01. Comprehensive
accreditation manual for hospitals. Oakbrook Terrace, IL: The Joint
Commission. (Level VII)
17 Centers for Medicare and Medicaid Services, Department of Health and
Human Services. (2015). Condition of participation: Patient’s rights. 42 C.F.R.
§ 482.13(c)(1).
18 DNV GL-Healthcare USA, Inc. (2016). PR.1.SR.5 . NIAHO® accreditation
requirements: Interpretive guidelines & surveyor guidance (version 11).
Milford, OH: DNV GL-Healthcare USA, Inc. (Level VII)
19 The Joint Commission. (2019). Standard PC.02.01.21. Comprehensive
accreditation manual for hospitals. Oakbrook Terrace, IL: The Joint
Commission. (Level VII)
20 The Joint Commission. (2019). Standard PC.01.02.07. Comprehensive
accreditation manual for hospitals. Oakbrook Terrace, IL: The Joint
Commission. (Level VII)
21 The Joint Commission. (2010). Advancing effective communication, cultural
competence, and patient- and family-centered care: A roadmap for hospitals.
Oakbrook Terrace, IL: The Joint Commission. Accessed via the Web at
http://www.jointcommission.org/assets/1/6/ARoadmapforHospitalsfinalversion
727.pdf (Level VII)
22 Waters, T. R., et al. (2009). “Safe patient handling training for schools of
nursing” [Online]. Accessed via the Web at
https://www.cdc.gov/niosh/docs/2009-127/pdfs/2009-127.pdf (Level VII)
23 Siegel, J. D ., et al. (2007, revised 2017). “2007 guideline for isolation
precautions: Preventing transmission of infectious agents in healthcare
settings” [Online]. Accessed via the Web at
https://www.cdc.gov/infectioncontrol/pdf/guidelines/isolation-guidelines.pdf
(Level II)
24 Accreditation Association for Hospitals and Health Systems. (2017). Standard
07.01.10. Healthcare Facilities Accreditation Program: Accreditation
requirements for acute care hospitals. Chicago, IL: Accreditation Association
for Hospitals and Health Systems. (Level VII)
25 Academy of Medical-Surgical Nurses. (2014). “Question: What is the best
practice to remove sutures/staples from a surgical site? Specifically, should
cleansers or antiseptics be used prior to removing the staples/sutures?”
[Online]. Accessed via the Web at https://www.amsn.org/practice-
resources/care-term-reference/post-op-wound-care/question-what-best-
practice-remove
26 Ganz, D. A., et al. (2013). Preventing falls in hospitals: A toolkit for improving
quality of care (AHRQ Publication No. 13-0015-EF). Rockville, MD: Agency for
Healthcare Research and Quality. Accessed via the Web at
https://www.ahrq.gov/sites/default/files/publications/files/fallpxtoolkit_0 .pdf
(Level VII)
27 Rutala, W. A., et al. (2008, revised 2017). “Guideline for disinfection and
sterilization in healthcare facilities, 2008” [Online]. Accessed via the Web at
https://www.cdc.gov/infectioncontrol/pdf/guidelines/disinfection-
guidelines.pdf (Level I)
28 Accreditation Association for Hospitals and Health Systems. (2017). Standard
07.02.03. Healthcare Facilities Accreditation Program: Accreditation
requirements for acute care hospitals. Chicago, IL: Accreditation Association
for Hospitals and Health Systems. (Level VII)
29 The Joint Commission. (2019). Standard RC.01.03 .01. Comprehensive
accreditation manual for hospitals. Oakbrook Terrace, IL: The Joint
Commission. (Level VII)
30 Centers for Medicare and Medicaid Services, Department of Health and
Human Services. (2015). Condition of participation: Medical record services.
42 C.F.R. § 482.24(b).
31 Accreditation Association for Hospitals and Health Systems. (2017). Standard
10.00 .03. Healthcare Facilities Accreditation Program: Accreditation
requirements for acute care hospitals. Chicago, IL: Accreditation Association
for Hospitals and Health Systems. (Level VII)
32 DNV GL-Healthcare USA, Inc. (2016). MR.2 .SR.1 . NIAHO® accreditation
requirements: Interpretive guidelines & surveyor guidance (version 11).
Milford, OH: DNV GL-Healthcare USA, Inc. (Level VII)
33 Nicks, B. A., et al. (2010). Acute wound management: Revisiting the approach
to assessment, irrigation, and closure considerations. International Journal of
Emergency Medicine, 3(4), 399–407. Accessed via the Web at
http://www.ncbi.nlm.nih.gov/pmc/articles/PMC3047833/ (Level I)
SWAB SPECIMEN COLLECTION
Correct collection and handling of swab specimens helps
laboratory staff members accurately identify pathogens with
a minimum of contamination from normal bacterial flora.
Collection methods vary depending on the type of
specimen being collected. For instance, collection of throat,
nasopharyngeal, external ear, and eye specimens usually
involves sampling inflamed tissues and exudates, typically
using sterile swabs of cotton or other absorbent material;
wound exudate may also be aspirated into a syringe. Wound
specimen collection normally involves sampling wound
tissues and exudates expressed from the wound with sterile
swabs of cotton or another absorbent material. The Levine
technique (described in this procedure) offers greater
accuracy and specificity for diagnosing infection than does
tissue biopsy and culture.1
Collection of fluid from the middle ear is performed by a
practitioner using a needle and syringe to withdraw fluid
from the middle ear through the tympanic membrane; this
method is referred to as tympanocentesis.2
Inflammatory eye conditions can result from a number of
diseases, and various organisms can cause eye infections.
Aerobes, anaerobes, fungi, mycobacteria, viruses, parasites,
and Chlamydia trachomatis can all be recovered using
appropriate collection techniques.
Normal bacterial flora in stool includes several potentially
pathogenic organisms. Bacteriologic examinations help
identify pathogens that cause overt GI disease (such as
typhoid and dysentery) and carrier states. A sensitivity test
may follow isolation of the pathogen. Correctly identifying
the causative organism is vital for treating the patient,
helping to prevent possible fatal complications (especially in
a debilitated patient), and preventing the spread of a severe
infectious disease.
Equipment
Gloves ▪ penlight ▪ sterile swab (cotton wool or synthetic
fiber) ▪ sterile culture tube with transport medium or
commercial collection kit ▪ specimen label ▪ laboratory
request form ▪ laboratory biohazard transport bag ▪
Optional: mask and other personal protective equipment.
Additional equipment for throat and
nasopharyngeal specimen collection
Tongue blade ▪ Optional: commercially prepared kit with
flocked swabs.
Additional equipment for wound specimen
collection
Sterile normal saline solution.
Additional equipment for external and middle
ear specimen collection
Normal saline solution ▪ 2′′ × 2′′ (5-cm × 5-cm) gauze pads
▪ otoscope ▪ ear speculum ▪ sterile 3-mL syringe and
sterile 21G 3.5′′ (90-mm) spinal needle2 ▪ Optional: wax
hook, prescribed local anesthetic.
Additional equipment for eye specimen
collection
Sterile normal saline solution ▪ two sterile 2′′ × 2′′ (5-cm ×
5-cm) gauze pads ▪ sterile wire culture loop (for corneal
scraping).
Additional equipment for rectal specimen
collection
Soap and water ▪ washcloth ▪ normal saline solution or
sterile broth medium.
Implementation
■ Verify the practitioner’s order.
■ Perform hand hygiene.3,4,5,6,7,8
■ Confirm the patient’s identity using at least two patient
identifiers.9
■ Provide privacy.10,11,12,13
■ Explain the procedure to the patient according to
individual communication and learning needs to increase
their understanding, allay their fears, and enhance
cooperation.
■ Raise the patient’s bed to waist level to prevent caregiver
back strain.14
Throat specimen collection
■ Tell the patient that gagging may occur during the
swabbing but that the swabbing will take only 10 to 15
seconds.15
■ Instruct the patient to sit erect at the edge of the bed or
in a chair, facing you.15
■ Put on gloves and other personal protective equipment,
as needed.16,17
■ Ask the patient to tilt back the head and open the mouth
wide.15,18
■ Depress the back third of the tongue with the tongue
blade, and illuminate the throat with the penlight.15,18
■ Inspect the throat for swelling, pus, and red or white
spots.18
■ If the patient gags, withdraw the tongue blade and tell
the patient to breathe deeply. After the patient is relaxed,
reinsert the tongue blade but not as deeply as before.
Encourage the patient to close the eyes or stare at the
ceiling to promote cooperation.15
■ Open and remove the swab, taking care not to touch the
tip with your hands because the swab is sterile. If you touch
the swab, discard it and obtain a new swab.
■ Rub the swab quickly but thoroughly over both tonsils,
including inflamed or purulent sites, using light pressure.
Don’t touch the tongue, cheeks, saliva, or teeth with the
swab to avoid contaminating it with oral bacteria.15,18
■ Withdraw the swab and immediately place it in the
culture tube. If you’re using a commercial kit, crush the
ampule of culture medium at the bottom of the tube, and
then push the swab into the medium to keep the swab
moist. If you’re using a rapid strep test kit, follow the
manufacturer’s instructions.15,18
Nasopharyngeal specimen collection
■ Tell the patient that gagging or the urge to sneeze may
occur during the swabbing but that the procedure takes less
than 1 minute.15
■ Have the patient sit erect at the edge of the bed or in a
chair, facing you.15
■ Perform hand hygiene.3,4,5,6,7,8
Obtaining a nasopharyngeal
specimen
After the sterile, flexible cotton-tipped swab passes into the nasopharynx,
gently but quickly rotate it to collect a specimen. Then remove the swab,
taking care not to injure the nasal mucous membrane.
EQUIPMENT
Understanding anaerobic specimen
collection tubes
Some anaerobes die when exposed to toxic amounts of oxygen. To facilitate
anaerobic collection and culturing, tubes that limit oxygen exposure are used
to transport the specimen in an anaerobic atmosphere. Some anaerobic
collection tubes are filled with carbon dioxide (CO2) or nitrogen; others
contain hydrogen in an oxygen-free atmosphere.21
The anaerobic specimen collector shown here consists of a rubber-stopper
tube filled with CO2, a small inner tube, and a swab attached to a plastic
plunger. The drawing on the left shows the tube before specimen collection.
The small inner tube containing the swab is held in place by the rubber
stopper.
After specimen collection, the swab is quickly replaced in the inner tube,
and the plunger is depressed (below right). This procedure separates the
inner tube from the stopper, forcing it into the larger tube and exposing the
specimen to the CO2-rich environment.
The tube should be kept upright.
■ Put on gloves, a mask, and other personal protective
equipment as necessary.16,17
■ Ask the patient to blow the nose to clear the nasal
passages.
■ Determine the more patent nostril by having the patient
exhale and occlude one nostril first and then the other.
■ While it’s still in the package, bend the sterile swab in a
curve; then open the package without contaminating the
swab.
■ Ask the patient to cough to bring organisms to the
nasopharynx for a better specimen.
■ Ask the patient to tilt the head back.
■ Gently pass the swab through the more patent nostril
about 3′′ to 4′′ (7.6 to 10.2 cm) into the nasopharynx,
keeping the swab near the septum and floor of the nose.
Rotate the swab quickly and remove it. (See Obtaining a
nasopharyngeal specimen.)
■ Alternatively, depress the patient’s tongue with a tongue
blade, and pass the bent swab up behind the uvula. Rotate
the swab and withdraw it.
■ Remove the cap from the culture tube, insert the swab
into the transport medium, and break off the contaminated
end of the swab.
■ Close the tube tightly.
Wound specimen collection
■ Carefully remove the dressing to expose the wound.
Dispose of the soiled dressings properly.16
■ Remove and discard your gloves and perform hand
hygiene.3,4,5,6,7,8
■ Prepare a sterile field and put on a new pair of
gloves.16,17,19
■ Clean the wound with sterile normal saline solution to
remove old drainage, to prevent specimen contamination.
■ For an aerobic culture of a deep wound, identify a 1-cm2
area of clean wound tissue.20 Moisten the sterile swab with
sterile normal saline solution.20 Using the swab, apply light
pressure to the identified area; then rotate the swab to try
to produce exudate.20 Remove the swab from the wound
and immediately place it in an aerobic culture tube.20
■ For an anaerobic culture of a deep wound, identify a 1-
cm2 area of clean wound tissue.20 Moisten the swab with
sterile normal saline solution.20 Using the swab, apply light
pressure to the identified area; then rotate the swab to try
to produce exudate.13 Remove the swab from the wound.20
Immediately place the swab in an anaerobic culture tube
and press the plunger with continuous gentle force to create
an anaerobic environment inside the culture tube.20 (See
Understanding anaerobic specimen collection.)
NURSING ALERT Make sure the quality of the specimen you obtain is
adequate for a culture and Gram stain.22 Note that the culture must
come from the cleanest tissue possible—not pus, slough, eschar, or
necrotic material. Never collect exudate from the skin.20
External ear specimen collection
■ Gently clean excess debris from the patient’s ear with
normal saline solution and gauze pads.
■ Insert the sterile swab into the ear canal, and rotate it
gently along the walls of the canal to avoid damaging the
eardrum.
■ Withdraw the swab, being careful not to touch other
surfaces to avoid contaminating the specimen.
■ Place the swab in the sterile culture tube with transport
medium.
Middle ear specimen collection
■ Clean the patient’s outer ear with normal saline solution
and gauze pads.
■ Assist the practitioner with wax removal, if needed, to
remove any wax that might obscure the view and aid in
visualization.2
■ If the practitioner prescribes a local anesthetic, assist
with administration, as needed.2 Keep in mind, if eutectic
mixture of local anesthetic (EMLA) is used, it requires at
least 30 minutes for onset of action.2
■ The practitioner prepares the syringe and needle,
visualizes the affected ear using an otoscope with ear
speculum, punctures the eardrum with a sterile needle
attached to a syringe, and aspirates fluid into the syringe.
The practitioner may also collect a specimen using a sterile
culture swab.
■ The practitioner places the fluid or swab specimen in a
sterile specimen container or culture tube with transport
medium.
Eye specimen collection
■ Gently clean excess debris from the outside of the
patient’s eye using sterile normal saline solution and sterile
gauze pads, wiping from the inner to the outer canthus.
■ Retract the lower eyelid to expose the conjunctival sac.
Gently rub a sterile swab over the conjunctiva, being careful
not to touch other surfaces. Move from the inner canthus to
the outer canthus. Hold the swab parallel to the eye, rather
than pointed directly at it to prevent corneal irritation or
trauma due to sudden movement. If a corneal scraping is
required, this procedure is performed by a practitioner,
using a wire culture loop.
■ Immediately place the swab or wire loop in the culture
tube with transport medium.
Rectal swab specimen collection
■ Clean the area around the patient’s anus using a
washcloth and soap and water to minimize contamination of
the specimen.
■ Insert the swab, moistened with normal saline solution or
sterile broth medium, through the anus and advance it
about 11⁄2′′ (3.8 cm). While withdrawing the swab, gently
rotate it against the walls of the lower rectum to sample a
large area of the rectal mucosa.
■ Place the swab in a culture tube with transport medium.
Completing the procedure
■ Remove and discard your gloves17,19 and perform hand
hygiene.3,4,5,6,7,8
■ Return the bed to the lowest position to prevent falls and
maintain patient safety.23
■ Label the specimen in the presence of the patient to
prevent mislabeling.9
■ Complete a laboratory request form if necessary.
■ Place the specimen in a laboratory biohazard transport
bag and send it to the laboratory immediately to prevent
growth or deterioration of microbes.16
■ Perform hand hygiene.3,4,5,6,7,8
■ Document the procedure.24,25,26,27
Special considerations
■ Note recent antibiotic therapy on the form, if appropriate,
and indicate whether an organism is strongly suspected—
especially Corynebacterium diphtheriae (which requires two
swabs and special growth medium) or Neisseria meningitis
(which requires enriched selective media).
■ If possible, obtain a specimen before starting
antimicrobial therapy.
■ Check with the laboratory for special instructions for viral
studies.
■ To maximize sensitivity for a large number of viruses,
collection of combined nasopharyngeal and oropharyngeal
specimens is the most effective approach.28
■ Because throat swabs and anterior nasal swabs have
unacceptably low rates of deoxyribonucleic acid recovery,
don’t use them for pertussis diagnosis.29
■ Instruct the patient to avoid antiseptic mouthwash before
the procedure.
■ To avoid stimulating the gag reflex during the procedure
and possibly causing the patient to vomit, it’s advisable to
wait 1 hour after a meal before conducting the procedure.
■ Notify the practitioner if the patient shows signs or
symptoms of a systemic infection or has difficulty breathing
because of swelling of the tongue or throat.
■ When collecting an eye specimen, don’t use an antiseptic
before culturing to avoid irritating the eye and inhibiting
growth of organisms in the culture. If the patient is a child or
an uncooperative adult, ask a coworker to restrain the
patient’s head to prevent eye trauma resulting from sudden
movement.
■ Collect each eye and ear specimen separately to avoid
cross-contamination.
■ Don’t refrigerate eye specimens.
Patient teaching
Instruct the patient about the importance of respiratory
hygiene, cough etiquette, hand hygiene, and other
infection-control measures used to control the spread of
respiratory infections.19
Complications
Laryngospasm may occur after the culture is obtained if the
patient has epiglottiditis or diphtheria. Keep resuscitation
equipment nearby.
With ear specimen collection, the patient may experience
pain due to sensitivity of the tympanic membrane. Other
potential complications include bleeding, risk of permanent
perforation, and damage to middle ear structures, including
the ossicles and facial nerve.2
Documentation
Record the time, date, and site of specimen collection, and
recent or current antibiotic therapy. Also note whether the
specimen has an unusual appearance or odor. Document
the patient’s tolerance of the procedure. Document any
patient teaching and the patient’s understanding of that
teaching.
REFERENCES
1 Angel, D. E., et al. (2011). The clinical efficacy of two semi-quantitative
wound-swabbing techniques in identifying the causative organism(s) in
infected cutaneous wounds. International Wound Journal, 8(2), 176–185.
2 Van Wyk, F. C., & Tostevin, P. M. J . (2016). “Tympanocentesis” [Online].
Accessed via the Web at http://emedicine.medscape.com/article/1413525-
overview (Level VII)
3 Centers for Disease Control and Prevention. (2002). Guideline for hand
hygiene in health care settings: Recommendations of the Healthcare Infection
Control Practices Advisory Committee and the HICPAC/SHEA/APIC/IDSA Hand
Hygiene Task Force. MMWR Recommendations and Reports, 51(RR-16), 1–45.
Accessed via the Web at https://www.cdc.gov/mmwr/pdf/rr/rr5116.pdf (Level
II)
4 The Joint Commission. (2019). Standard NPSG.07.01.01. Comprehensive
accreditation manual for hospitals. Oakbrook Terrace, IL: The Joint
Commission. (Level VII)
5 World Health Organization. (2009). “WHO guidelines on hand hygiene in
health care: First global patient safety challenge, clean care is safer care”
[Online]. Accessed via the Web at
http://apps.who.int/iris/bitstream/10665/44102/1/9789241597906_eng.pdf
(Level IV)
6 Accreditation Association for Hospitals and Health Systems. (2017). Standard
07.01.21. Healthcare Facilities Accreditation Program: Accreditation
requirements for acute care hospitals. Chicago, IL: Accreditation Association
for Hospitals and Health Systems. (Level VII)
7 Centers for Medicare and Medicaid Services, Department of Health and
Human Services. (2015). Condition of participation: Infection control. 42 C.F.R.
§ 482.42.
8 DNV GL-Healthcare USA, Inc. (2016). IC.1.SR.1 . NIAHO® accreditation
requirements: Interpretive guidelines & surveyor guidance (version 11).
Milford, OH: DNV GL-Healthcare USA, Inc. (Level VII)
9 The Joint Commission. (2019). Standard NPSG.01.01.01. Comprehensive
accreditation manual for hospitals. Oakbrook Terrace, IL: The Joint
Commission. (Level VII)
10 DNV GL-Healthcare USA, Inc. (2016). PR.1.SR.5 . NIAHO® accreditation
requirements: Interpretive guidelines & surveyor guidance (version 11).
Milford, OH: DNV GL-Healthcare USA, Inc. (Level VII)
11 Centers for Medicare and Medicaid Services, Department of Health and
Human Services. (2015). Condition of participation: Patient’s rights. 42 C.F.R.
§ 482.13(c)(1).
12 Accreditation Association for Hospitals and Health Systems. (2017). Standard
15.01.16. Healthcare Facilities Accreditation Program: Accreditation
requirements for acute care hospitals. Chicago, IL: Accreditation Association
for Hospitals and Health Systems. (Level VII)
13 The Joint Commission. (2019). Standard RI.01.01.01. Comprehensive
accreditation manual for hospitals. Oakbrook Terrace, IL: The Joint
Commission. (Level VII)
14 Waters, T. R., et al. (2009). “Safe patient handling training for schools of
nursing” [Online]. Accessed via the Web at
https://www.cdc.gov/niosh/docs/2009-127/pdfs/2009-127.pdf (Level VII)
15 Hinkle, J. L., & Cheever, K. H. (2014). Brunner and Suddarth’s handbook of
laboratory and diagnostic tests (2nd ed.) . Philadelphia, PA: Wolters Kluwer
Health.
16 Occupational Safety and Health Administration. (n.d .). “Bloodborne
pathogens, standard number 1910.1030” [Online]. Accessed via the Web at
https://www.osha.gov/pls/oshaweb/owadisp.show_document?
p_id=10051&p_table=STANDARDS (Level VII)
17 Accreditation Association for Hospitals and Health Systems. (2017). Standard
07.01.10. Healthcare Facilities Accreditation Program: Accreditation
requirements for acute care hospitals. Chicago, IL: Accreditation Association
for Hospitals and Health Systems. (Level VII)
18 Association of Public Health Laboratories. (2011). “Good laboratory practice:
CLIA non-waived tests” [Online]. Accessed via the Web at
https://www.aphl.org/programs/quality_systems/Documents/CLIA_2011_Non-
Waived-Tests.pdf
19 Siegel, J. D ., et al. (2007, revised 2017). “2007 guideline for isolation
precautions: Preventing transmission of infectious agents in healthcare
settings” [Online]. Accessed via the Web at
https://www.cdc.gov/infectioncontrol/pdf/guidelines/isolation-guidelines.pdf
(Level II)
20 Bryant, R. A., & Nix, D. P. (2015). Acute & chronic wounds: Current
management concepts (5th ed.) . St Louis, MO: Mosby.
21 Septimus, E. (2015). “Clinician guide for collecting cultures” [Online]. Centers
for Disease Control and Prevention. Accessed via the Web at
https://www.cdc.gov/getsmart/healthcare/implementation/clinicianguide.html
22 Becton, Dickinson and Company. (2008). “BBLTM collection and transport
systems: BBLTM VacutainerTM anaerobic specimen collector (sterile)” [Online].
Accessed via the Web at
http://www.bd.com/ds/technicalCenter/inserts/8082048(0308).pdf
23 Ganz, D. A., et al. (2013). Preventing falls in hospitals: A toolkit for improving
quality of care (AHRQ Publication No. 13-0015-EF). Rockville, MD: Agency for
Healthcare Research and Quality. Accessed via the Web at
http://www.ahrq.gov/sites/default/files/publications/files/fallpxtoolkit.pdf
(Level VII)
24 The Joint Commission. (2019). Standard RC.01.03 .01. Comprehensive
accreditation manual for hospitals. Oakbrook Terrace, IL: The Joint
Commission. (Level VII)
25 Accreditation Association for Hospitals and Health Systems. (2017). Standard
10.00 .03. Healthcare Facilities Accreditation Program: Accreditation
requirements for acute care hospitals. Chicago, IL: Accreditation Association
for Hospitals and Health Systems. (Level VII)
26 Centers for Medicare and Medicaid Services, Department of Health and
Human Services. (2015). Condition of participation: Medical record services.
42 C.F.R. § 482.24(b).
27 DNV GL-Healthcare USA, Inc. (2016). MR.2 .SR.1 . NIAHO® accreditation
requirements: Interpretive guidelines & surveyor guidance (version 11).
Milford, OH: DNV GL-Healthcare USA, Inc. (Level VII)
28 Kim, C., et al. (2011). Comparison of nasopharyngeal and oropharyngeal
swabs for the diagnosis of eight respiratory viruses by real-time reverse
transcription-PCR assays. PLoS One, 6(6), e21610. Accessed via the Web at
http://www.plosone.org/article/info%3Adoi%2F10.1371%2Fjournal.pone.0021
610
29 Centers for Disease Control and Prevention. (2015). “Best practices for health
care professionals on the use of polymerase chain reaction (PCR) for
diagnosing pertussis” [Online]. Accessed via the Web at
https://www.cdc.gov/pertussis/clinical/downloads/diagnosis-pcr-
bestpractices.pdf
T
TEMPERATURE ASSESSMENT
Normal body temperature ranges vary by site, with higher
temperatures at the core of the body and lower
temperatures at the periphery.1 Core body temperature can
only be measured invasively, commonly with a pulmonary
artery catheter; however, even though it’s considered the
gold standard, pulmonary artery temperature can only be
monitored in specialized clinical settings. An esophageal
probe or an indwelling urinary catheter with a temperature
probe can also be used to measure temperature
invasively.2,3
The American College of Critical Care and the Infectious
Diseases Society of America recommend using the most
accurate and reliable method to measure temperature,
taking into consideration the clinical circumstances of the
patient. They state that temperature is most accurately
measured using invasive measures, followed by rectal, oral,
and temporal
membrane
measurement. Axillary
temperature measurement, temporal artery estimates, and
chemical dot thermometers shouldn’t be used on the
intensive care unit, and rectal temperature measurements
should be avoided in neutropenic patients.2
Normal body temperature is commonly thought of as
98.6°F (37°C). In healthy patients, this temperature may
vary by about 0.9°F to 1.8°F (0.5°C to 1°C), according to the
patient’s circadian rhythm and menstrual cycle. Mean
temperature is lower in older adults.1 With strenuous
exercise, temperature can rise about 3.6°F to 5.4°F (2°C to
3°C).
Not only biological process, but also environmental factors
can alter body temperature, including hot lights, specialized
mattresses, air conditioning, dialysis, cardiopulmonary
bypass, peritoneal lavage, and continuous hemofiltration.
Medications or damage to the central or autonomic nervous
system can also alter a patient’s ability to regulate
temperature. With so many factors potentially influencing
temperature, it may be difficult to determine whether a
change results from a physiologic process, a medication, or
an environmental influence.1,2
This procedure covers noninvasive methods for measuring
temperature, such as rectal, oral, and temporal membrane
measurement. When selecting the best temperature
measuring system for the patient, choose one that provides
reliable, reproducible values safely and conveniently. For
example, oral temperature measurement is safe,
convenient, and familiar for alert and cooperative patients.2
Because temperature can vary greatly among methods
and sites, use the same method and site consistently
throughout an episode of care, if possible, and document it
in the patient’s medical record.4,5 If a patient develops a
new fever, note trends in the patient’s temperature data
and evaluate other vital signs; don’t make clinical decisions
based on a single temperature reading.2,5
Equipment
Electronic thermometer (standard or tympanic) ▪ disposable
thermometer sheath or probe cover ▪ disinfectant pad ▪
Optional: gloves, water-soluble lubricant, wipe, facial tissue,
washcloth, toilet paper.
Preparation of equipment
Make sure that any device used to measure temperature is
maintained and calibrated appropriately. Follow the
manufacturer’s instructions for use, and cover the
thermometer probe with a cover or sheath, as needed.
Implementation
■ Gather and prepare the necessary equipment.
■ Perform hand hygiene.6,7,8,9,10,11
■ Confirm the patient’s identity using at least two patient
identifiers.12
■ Provide privacy.13,14,15,16
■ Explain the procedure to the patient and family (if
appropriate) according to their individual communication
and learning needs to increase their understanding, allay
their fears, and enhance cooperation.17
■ Raise the patient’s bed to waist level when providing
patient care to prevent caregiver back strain.18
Assessing rectal temperature
■ Perform hand hygiene.6,7,8,9,10,11
■ Put on gloves to comply with standard precautions.19
■ Assist the patient to a side-lying position with the top leg
flexed.
■ Lubricate about 11⁄2′′ (3.8 cm) of the tip of the covered
probe to ease insertion, or use a prelubricated sheath.20
■ Lift the patient’s upper buttock and gently insert the
lubricated thermometer probe into the anus about 11⁄2′′ (3.8
cm).20
■ Hold the thermometer in place for the duration of time
indicated by the manufacturer to ensure that the maximum
temperature is displayed. Read the temperature display.
■ Carefully remove the thermometer probe.
■ Remove and dispose of the rectal probe cover or sheath.
■ Clean the lubricant from the patient’s anal area if
necessary.
■ Remove and discard your gloves.19,21
■ Perform hand hygiene.6,7,8,9,10,11
■ Assist the patient to a comfortable position.
Assessing oral temperature
■ If the patient has recently had hot or cold liquids, chewed
gum, or smoked, wait 15 minutes before taking an oral
temperature.4
■ Position the tip of the thermometer under the patient’s
tongue in the posterior sublingual pocket, because the
external carotid artery perfuses the area, reflecting changes
in core temperature.4
■ Instruct the patient to close the lips but to avoid biting
down.
■ Leave the thermometer in place for the duration of time
indicated by the manufacturer to ensure that the maximum
temperature is displayed. Read the temperature display.
■ Remove the thermometer and discard the oral probe
cover or sheath.
Assessing tympanic membrane temperature
■ Make sure the tympanic lens is clean before using the
thermometer; a dirty lens may produce inaccurate
temperature measurements.2
■ If the patient has been lying with the ear on a pillow,
allow 20 minutes to elapse to allow the temperature to
normalize.
■ Examine the patient’s ear, because cerumen may reduce
the accuracy of readings.4 Choose the other ear or an
alternative method for measuring the patient’s temperature
if cerumen is present.
■ Cover the thermometer probe with the probe cover.
■ Gently pull the ear up and back (for adults), as shown
below.
■ Insert the thermometer into the patient’s ear following
the manufacturer’s instructions. Depending on the
thermometer’s design, some thermometers require a light
seal, whereas others require a full seal and a twist of the
thermometer.1
■ Press the activation button and hold the thermometer in
place for the duration of time indicated by the manufacturer
to ensure that the maximum temperature is displayed. Read
the temperature display.
■ Remove the thermometer and discard the probe cover.
Completing the procedure
■ Return the bed to the lowest position to prevent falls and
maintain patient safety.22
■ Perform hand hygiene.6,7,8,9,10,11
■ Clean and disinfect the thermometer using a disinfectant
pad to prevent the spread of infection.23,24
■ Perform hand hygiene.6,7,8,9,10,11
■ Document the procedure.25,26,27,28
Special considerations
■ Keep in mind that the accuracy of a temperature
measurement is influenced by the equipment and your
technique; closely follow the manufacturer’s instructions for
use.1
■ Mouth breathing, heated supplemental gases, and hot or
cold fluids can distort oral temperature measurements.2
■ Rectal temperature measurement has been implicated in
the spread of enteric pathogens such as Clostridium difficile
or vancomycin-resistant enterococci through the device or
health care worker. Make sure the thermometer and probe
are properly cleaned and disinfected between use, and that
other infection-prevention guidelines are followed to prevent
the spread of infection.2
Complications
Inaccurate technique may lead to a delay in treatment or
inappropriate treatment. Rectal trauma or perforation may
occur with rectal temperature assessment. Oral temperature
assessment may cause damage to the oral mucosa,
especially in patients with abnormal mucosa due to trauma,
thermal injury, infection, surgery, cancer, or cytotoxic
medications. Tympanic membrane temperature assessment
may cause trauma to the tympanic membrane.2
Documentation
Record the time, site, device, and temperature in the
patient’s medical record. Document prescribed interventions
and the patient’s response to those interventions. Record
any patient teaching and the patient’s comprehension of
your teaching.
REFERENCES
1 Davie, A., & Amoore, J. (2010). Best practice in the measurement of body
temperature. Nursing Standard, 24(42), 42–49. (Level VII)
2 O’Grady, N. P., et al. (2008). Guidelines for evaluation of new fever in critically
ill adult patients: 2008 update from the American College of Critical Care
Medicine and the Infectious Disease Society of America. Critical Care
Medicine, 36(4), 1330–1349. (Level VII)
3 Munro, N. (2014). Fever in acute and critical care: A diagnostic approach.
AACN Advanced Critical Care, 25(3), 237–248. (Level VII)
4 McCallum, L., & Higgins, D. (2012). Measuring body temperature. Nursing
Times, 108(45), 20–22 . (Level IV)
5 Makic, M. B., et al. (2011). Evidence-based practice habits: Putting more
sacred cows out to pasture. Critical Care Nurse, 31(2), 38–62. (Level VII)
6 The Joint Commission. (2019). Standard NPSG.07.01.01. Comprehensive
accreditation manual for hospitals. Oakbrook Terrace, IL: The Joint
Commission. (Level VII)
7 Centers for Disease Control and Prevention. (2002). Guideline for hand
hygiene in health-care settings: Recommendations of the Healthcare Infection
Control Practices Advisory Committee and the HICPAC/SHEA/APIC/IDSA Hand
Hygiene Task Force. MMWR Recommendations and Reports, 51(RR-16), 1–45.
Accessed via the Web at https://www.cdc.gov/mmwr/pdf/rr/rr5116.pdf (Level
II)
8 World Health Organization. (2009). “WHO guidelines on hand hygiene in
health care: First global patient safety challenge, clean care is safer care”
[Online]. Accessed via the Web at
http://apps.who.int/iris/bitstream/10665/44102/1/9789241597906_eng.pdf
(Level IV)
9 Centers for Medicare and Medicaid Services, Department of Health and
Human Services. (2015). Condition of participation: Infection control. 42 C.F.R.
§ 482.42.
10 Accreditation Association for Hospitals and Health Systems. (2017). Standard
07.01.21. Healthcare Facilities Accreditation Program: Accreditation
requirements for acute care hospitals. Chicago, IL: Accreditation Association
for Hospitals and Health Systems. (Level VII)
11 DNV GL-Healthcare USA, Inc. (2016). IC.1 .SR.1 . NIAHO® accreditation
requirements: Interpretive guidelines & surveyor guidance (version 11).
Milford, OH: DNV GL-Healthcare USA, Inc. (Level VII)
12 The Joint Commission. (2019). Standard NPSG.01.01.01. Comprehensive
accreditation manual for hospitals. Oakbrook Terrace, IL: The Joint
Commission. (Level VII)
13 Centers for Medicare and Medicaid Services, Department of Health and
Human Services. (2015). Condition of participation: Patient’s rights. 42 C.F.R.
§ 482.13(c)(1).
14 Accreditation Association for Hospitals and Health Systems. (2017). Standard
15.01.16. Healthcare Facilities Accreditation Program: Accreditation
requirements for acute care hospitals. Chicago, IL: Accreditation Association
for Hospitals and Health Systems. (Level VII)
15 The Joint Commission. (2018). Standard RI.01.01.01. Comprehensive
accreditation manual for hospitals. Oakbrook Terrace, IL: The Joint
Commission. (Level VII)
16 DNV GL-Healthcare USA, Inc. (2016). PR.1.SR.5 . NIAHO® accreditation
requirements: Interpretive guidelines & surveyor guidance (version 11).
Milford, OH: DNV GL-Healthcare USA, Inc. (Level VII)
17 The Joint Commission. (2019). Standard PC.02.01.21. Comprehensive
accreditation manual for hospitals. Oakbrook Terrace, IL: The Joint
Commission. (Level VII)
18 Waters, T. R., et al. (2009). “Safe patient handling training for schools of
nursing” [Online]. Accessed via the Web at
https://www.cdc.gov/niosh/docs/2009-127/pdfs/2009-127.pdf (Level VII)
19 Accreditation Association for Hospitals and Health Systems. (2017). Standard
07.01.10. Healthcare Facilities Accreditation Program: Accreditation
requirements for acute care hospitals. Chicago, IL: Accreditation Association
for Hospitals and Health Systems. (Level VII)
20 Taylor, C., et al. (2015). Fundamentals of nursing: The art and science of
person-centered nursing care (8th ed.). Philadelphia, PA: Wolters Kluwer.
21 Siegel, J. D ., et al. (2007, revised 2017). “2007 guideline for isolation
precautions: Preventing transmission of infectious agents in healthcare
settings” [Online]. Accessed via the Web at
https://www.cdc.gov/infectioncontrol/pdf/guidelines/isolation-guidelines.pdf
(Level II)
22 Ganz, D. A., et al. (2013). Preventing falls in hospitals: A toolkit for improving
quality of care (AHRQ Publication No. 13-0015-EF). Rockville, MD: Agency for
Healthcare Research and Quality. Accessed via the Web at
https://www.ahrq.gov/sites/default/files/publications/files/fallpxtoolkit_0 .pdf
(Level VII)
23 Rutala, W. A., et al. (2008, revised 2017). “Guideline for disinfection and
sterilization in healthcare facilities, 2008” [Online]. Accessed the Web at
https://www.cdc.gov/infectioncontrol/pdf/guidelines/disinfection-
guidelines.pdf (Level I)
24 Accreditation Association for Hospitals and Health Systems. (2017). Standard
07.02.03. Healthcare Facilities Accreditation Program: Accreditation
requirements for acute care hospitals. Chicago, IL: Accreditation Association
for Hospitals and Health Systems. (Level VII)
25 The Joint Commission. (2019). Standard RC.01.03 .01. Comprehensive
accreditation manual for hospitals. Oakbrook Terrace, IL: The Joint
Commission. (Level VII)
26 Centers for Medicare and Medicaid Services, Department of Health and
Human Services. (2015). Condition of participation: Medical record services.
42 C.F.R. § 482.24(b).
27 Accreditation Association for Hospitals and Health Systems. (2017). Standard
10.00 .03. Healthcare Facilities Accreditation Program: Accreditation
requirements for acute care hospitals. Chicago, IL: Accreditation Association
for Hospitals and Health Systems. (Level VII)
28 DNV GL-Healthcare USA, Inc. (2016). MR.2 .SR.1 . NIAHO® accreditation
requirements: Interpretive guidelines & surveyor guidance (version 11).
Milford, OH: DNV GL-Healthcare USA, Inc. (Level VII)
THERAPEUTIC BATH
Also referred to as balneotherapy, the therapeutic bath
combines water and additives to soothe and relax the
patient; relieve fatigue, sore muscles and joints, and
inflammation and pruritus; clean the skin; and soften and
remove crusts, scales, debris, and old medications. Used
primarily for their antipruritic and emollient actions, these
baths coat irritated skin with a soothing, protective film.
Because they constrict surface blood vessels, they also have
an anti-inflammatory effect.
The addition of oatmeal powder, soluble cornstarch, or
soybean complex to water creates a colloid bath, which has
a soothing effect and is used to treat generalized itching. Oil
baths are useful for lubricating dry skin and easing
eczematous eruptions. Sodium bicarbonate added to water
produces an alkaline bath that has a cooling effect and
helps relieve pruritus. A medicated tar bath may be used to
treat psoriasis; the film of tar left on the skin works in
combination with ultraviolet light to inhibit the rapid cell
turnover characteristic of psoriasis. (See Comparing
therapeutic baths.)
A bedridden patient may benefit from a local soak with
the therapeutic additive instead of a therapeutic tub bath.
(See the “Soaks” procedure, page 703.)
Equipment
Bathtub ▪ bath mat ▪ rubber mat ▪ bath (utility)
thermometer ▪ therapeutic additive ▪ measuring device ▪
colander or sieve for oatmeal powder ▪ washcloths ▪ towels
▪ patient gown or loose-fitting cotton pajamas ▪ gloves ▪
facility-approved disinfectant ▪ Optional: lubricating cream
or ointment, plastic apron or protective gown.
Preparation of equipment
Make sure the tub is clean and disinfected,1 because a
patient with skin breakdown is particularly vulnerable to
infection. Place the bath mat next to the tub and the rubber
mat on the bottom of the tub to prevent falls; the
therapeutic additive may make the tub exceptionally
slippery.
If you are giving a tar bath, wear a plastic apron or
protective gown, because tar preparations stain clothing.
Implementation
■ Gather and prepare the necessary equipment.
■ Verify the practitioner’s order.
■ Draw the bath before bringing the patient to the bath
area to prevent chilling. Fill the tub with 6′′ to 8′′ (15 cm to
20 cm) of water at 95°F to 100°F (35°C to 38°C).
■ Measure the correct amount of therapeutic additive,
according to the practitioner’s order or package instructions.
As the tub is filling, perform hand hygiene and thoroughly
mix the additive in the water. Add most substances directly
to the water, but place oatmeal powder in a sieve or
colander under the tub faucet to help it dissolve. Begin with
2 tbs (about 30 mL) of oatmeal powder; then add more
powder or water as needed to regulate the thickness of the
oatmeal bath.
■ Perform hand hygiene.2,3,4,5,6,7
■ Confirm the patient’s identity using at least two patient
identifiers.8
■ Provide privacy.9,10,11,12
■ Explain the procedure to the patient and family (if
appropriate) according to their individual communication
and learning needs to increase their understanding, allay
their fears, and enhance cooperation.13
■ Have the patient void, if needed.
■ Escort the patient to the bath area.
■ Close the door to maintain privacy and eliminate drafts.
NURSING ALERT Make sure that the bathroom is well ventilated.
Some patients may experience allergic reactions or hypersensitivity to
the additive in the water or to the smell of the additive. If a reaction
occurs, limit the patient’s time in the bath and notify the practitioner.
If a skin reaction to the additive occurs, gently wash the additive from
the skin and notify the practitioner.
■ Perform hand hygiene.2,3,4,5,6,7
■ Put on gloves to comply with standard precautions.14,15
■ Check the water temperature using a bath thermometer.
■ Help the patient undress, and then help the patient into
the tub, if necessary. Advise the patient to use the safety
rails to prevent falls.
■ Tell the patient that the bath may feel unpleasant at first
because the skin is irritated, but assure the patient that the
medication will soon coat and soothe the skin.
■ Ask the patient to stretch out in the tub and submerge
the body up to the chin. Support the head and neck, if
needed. If the patient’s capable, give the him or her a
washcloth to apply the bath solution gently to the face and
other body areas not immersed if these areas require
treatment.
NURSING ALERT Tell the patient taking a tar bath not to get the bath
solution in the eyes, because tar is an eye irritant.
■ Warn the patient against scrubbing the skin to prevent
further irritation.
■ Add warm water to the bath as needed to maintain a
comfortable temperature.
■ Remove and discard your gloves14,15 and perform hand
hygiene.2,3,4,5,6,7
■ Allow the patient to soak for 15 to 30 minutes. Periods of
soaking longer than this may cause skin softening and
damage to the skin. If you stay with the patient, pull the
bath curtain to give the patient some privacy and protect
the patient from drafts. If you must leave the room, show
the patient how to use the call light, and ensure the
patient’s privacy.
■ After the bath, assist the patient from the tub. Have the
patient use the safety rails to prevent falls.
■ Help the patient pat the skin dry with towels. Don’t rub
the skin, because rubbing removes some solutes and oils
clinging to the skin and produces friction, worsening
pruritus.
■ Put on new gloves.14,15
■ Apply lubricating cream or ointment, if ordered, to help
hold water in the newly hydrated skin.
■ Provide a fresh patient gown or loose-fitting cotton
pajamas. Tight clothing and scratchy or synthetic materials
can aggravate skin conditions by causing friction and
increasing perspiration.
■ Escort the patient back to the room and make sure the
patient is comfortable.
■ Drain the bath water, and clean and disinfect the tub
using a facility-approved disinfectant.1,16 If you’ve given an
oatmeal powder bath, drain and rinse the tub immediately;
otherwise the powder will cake, making later removal
difficult.
■
Discard soiled materials in the appropriate
receptacles.14,15
■ Remove and discard your gloves,14,15 and perform hand
hygiene.2,3,4,5,6,7
■ Document the procedure.17,18,19,20
Special considerations
■ The treatment’s purpose and type of additive used will
determine the water temperature. Cool to lukewarm water is
used for relieving pruritus and when adding tar or starch.
Warm baths soothe, but baths warmer than 100°F (38°C)
causes vasodilation, which could aggravate pruritus.
■ Because pruritus seems worse at night, a therapeutic
bath is best before bedtime, unless ordered otherwise, to
promote restful sleep.
■ Because the patient with a skin disorder may be self-
conscious, maintain eye contact during conversation and
avoid staring at the skin. Also avoid nonverbal expressions
and gestures that show revulsion. If the patient wishes,
allow him or her to talk about the condition and how it
affects self-esteem.
■ Refrain from using soap during a therapeutic bath,
because its drying effect counteracts the bath emollient.
■ A patient with skin breakdown chills easily, so protect the
patient from drafts. However, avoid covering or dressing the
patient too warmly after the bath, because perspiration
aggravates pruritus. Instruct the patient not to scratch the
skin to prevent excoriation and infection.
■ If the patient is confined to bed, you can place the
therapeutic additive in a basin of water at 95°F to 100°F
(35°C to 38°C) and apply it with a washcloth, using light,
gentle strokes.
Comparing therapeutic baths
Patient teaching
Instruct the patient to bathe only as often as prescribed,
because excessive bathing can dry the skin. Advise the
patient to purchase commercial bath oil, because salad or
cooking oils may give clothes an unpleasant odor, and
mineral oil mixes poorly with water. Tell the patient to follow
manufacturer’s instructions for commercially prepared
colloid preparations. Colloid for an oatmeal bath can be
made at home by putting 1⁄2 cup of raw oatmeal into a
blender and blending at medium-high speed until the
material has the consistency of flour, and then sifting it to
remove unground pieces. Advise the patient to avoid
wearing pajamas, underwear, or other clothing that isn’t
cotton and loose-fitting.
Complications
The patient may experience an allergic reaction or
hypersensitivity to the additive.
Documentation
Record the date, time, and duration of the bath. Note the
water temperature, type and amount of additive, skin
appearance before and after the bath, the patient’s
tolerance of the treatment, and the bath’s effectiveness.
Document patient teaching and the patient’s understanding
of your teaching.
REFERENCES
1 Rutala, W. A., et al. (2008, revised 2017). “Guideline for disinfection and
sterilization in healthcare facilities, 2008” [Online]. Accessed via the Web at
https://www.cdc.gov/hicpac/pdf/guidelines/Disinfection_Nov_2008.pdf (Level I)
2 The Joint Commission. (2019). Standard NPSG.07.01.01. Comprehensive
accreditation manual for hospitals. Oakbrook Terrace, IL: The Joint
Commission. (Level VII)
3 Centers for Disease Control and Prevention. (2002). Guideline for hand
hygiene in health-care settings: Recommendations of the Healthcare Infection
Control Practices Advisory Committee and the HICPAC/SHEA/APIC/IDSA Hand
Hygiene Task Force. MMWR Recommendations and Reports, 51(RR-16), 1–45.
Accessed via the Web at https://www.cdc.gov/mmwr/pdf/rr/rr5116.pdf (Level
II)
4 World Health Organization. (2009). “WHO guidelines on hand hygiene in
health care: First global patient safety challenge, clean care is safer care”
[Online]. Accessed via the Web at
http://apps.who.int/iris/bitstream/10665/44102/1/9789241597906_eng.pdf
(Level IV)
5 Accreditation Association for Hospitals and Health Systems. (2017). Standard
07.01.21. Healthcare Facilities Accreditation Program: Accreditation
requirements for acute care hospitals. Chicago, IL: Accreditation Association
for Hospitals and Health Systems. (Level VII)
6 Centers for Medicare and Medicaid Services, Department of Health and
Human Services. (2015). Condition of participation: Infection control. 42 C.F.R.
§ 482.42.
7 DNV GL-Healthcare USA, Inc. (2016). IC.1.SR.1 . NIAHO® accreditation
requirements: Interpretive guidelines & surveyor guidance (version 11).
Milford, OH: DNV GL-Healthcare USA, Inc. (Level VII)
8 The Joint Commission. (2019). Standard NPSG.01.01.01. Comprehensive
accreditation manual for hospitals. Oakbrook Terrace, IL: The Joint
Commission. (Level VII)
9 Accreditation Association for Hospitals and Health Systems. (2017). Standard
15.01.16. Healthcare Facilities Accreditation Program: Accreditation
requirements for acute care hospitals. Chicago, IL: Accreditation Association
for Hospitals and Health Systems. (Level VII)
10 Centers for Medicare and Medicaid Services, Department of Health and
Human Services. (2015). Condition of participation: Patient’s rights. 42 C.F.R.
§ 482.13(c)(1).
11 The Joint Commission. (2017). Standard RI.01.01.01. Comprehensive
accreditation manual for hospitals. Oakbrook Terrace, IL: The Joint
Commission. (Level VII)
12 DNV GL-Healthcare USA, Inc. (2016). PR.1.SR.5 . NIAHO® accreditation
requirements: Interpretive guidelines & surveyor guidance (version 11).
Milford, OH: DNV GL-Healthcare USA, Inc. (Level VII)
13 The Joint Commission. (2019). Standard PC.02.01.21. Comprehensive
accreditation manual for hospitals. Oakbrook Terrace, IL: The Joint
Commission. (Level VII)
14 Siegel, J. D ., et al. (2007, revised 2017). “2007 guideline for isolation
precautions: Preventing transmission of infectious agents in healthcare
settings” [Online]. Accessed via the Web at
https://www.cdc.gov/infectioncontrol/pdf/guidelines/isolation-guidelines.pdf
(Level II)
15 Accreditation Association for Hospitals and Health Systems. (2017). Standard
07.01.10. Healthcare Facilities Accreditation Program: Accreditation
requirements for acute care hospitals. Chicago, IL: Accreditation Association
for Hospitals and Health Systems. (Level VII)
16 Accreditation Association for Hospitals and Health Systems. (2017). Standard
07.02.03. Healthcare Facilities Accreditation Program: Accreditation
requirements for acute care hospitals. Chicago, IL: Accreditation Association
for Hospitals and Health Systems. (Level VII)
17 The Joint Commission. (2019). Standard RC.01.03 .01. Comprehensive
accreditation manual for hospitals. Oakbrook Terrace, IL: The Joint
Commission. (Level VII)
18 Accreditation Association for Hospitals and Health Systems. (2017). Standard
10.00 .03. Healthcare Facilities Accreditation Program: Accreditation
requirements for acute care hospitals. Chicago, IL: Accreditation Association
for Hospitals and Health Systems. (Level VII)
19 Centers for Medicare and Medicaid Services, Department of Health and
Human Services. (2015). Condition of participation: Medical record services.
42 C.F.R. § 482.24(b).
20 DNV GL-Healthcare USA, Inc. (2016). MR.2 .SR.1 . NIAHO® accreditation
requirements: Interpretive guidelines & surveyor guidance (version 11).
Milford, OH: DNV GL-Healthcare USA, Inc. (Level VII)
THORACENTESIS, ASSISTING
Thoracentesis involves aspiration of fluid or air from the
pleural space. Fluid and air can build up in the pleural space
as a result of an injury or due to such conditions as
tuberculosis, cancer, and heart failure. Removal of this
accumulation relieves pulmonary compression and
respiratory distress. Thoracentesis can also be used to
obtain a specimen of pleural fluid or tissue for analysis, and
allows instillation of chemotherapeutic agents and other
medications into the pleural space. Ultrasound-guided
thoracentesis has been shown to reduce the risk of
complications.1,2,3,4
Positioning for thoracentesis
The choice of the position may vary. Usually, the patient is sitting upright and
leaning forward. If the patient is sitting on the edge of the bed, support the
legs and have the patient lean forward and rest the head and arms on a
pillow on the overbed table (as shown). If the patient can’t sit, turn the
patient on the unaffected side positioned at the edge of the bed1 with the
arm of the affected side raised comfortably above the patient’s head. Elevate
the head of the bed 30 to 45 degrees, unless contraindicated. Recumbent
thoracentesis may be performed with ultrasound guidance.31 Proper
positioning stretches the chest or back and allows easier access to the
intercostal spaces.
Thoracentesis should be used cautiously in patients who
are uncooperative, who take anticoagulants or have
uncorrected bleeding disorders, who have chest wall
cellulitis at the point of puncture, who have uncontrolled
coughing, whose pleural fluid location is uncertain, who
have only one functional lung, or who are on positive end-
expiratory pressure (PEEP) mechanical ventilation.1,5 A
practitioner performs the procedure with a nurse assisting,
as needed.
Equipment
Most facilities use a prepackaged thoracentesis tray that
typically includes the following: sterile gloves ▪ sterile
drapes ▪ 1% or 2% lidocaine ▪ 5-mL syringe with 21G and
25G needles for anesthetic injection ▪ 17G thoracentesis
needle for aspiration or Teflon over-the-needle catheters ▪
50-mL syringe ▪ three-way stopcock and tubing ▪ sterile
specimen containers ▪ sterile hemostat ▪ sterile 4′′ × 4′′ (10-
cm × 10-cm) gauze pads ▪ antiseptic cleaning swabs.
You’ll also need the following: Sterile marker ▪ sterile
labels ▪ vital signs monitoring equipment ▪ pulse oximeter
▪ gowns ▪ masks and goggles or masks with face shields ▪
gloves ▪ stethoscope ▪ laboratory request forms ▪
specimen collection bottles ▪ laboratory biohazard transport
bag ▪ tape ▪ biopsy needle ▪ drainage container ▪
prescribed sedative or analgesic ▪ disinfectant pad ▪
emergency equipment (code cart with cardiac medications,
defibrillator, handheld resuscitation bag with mask,
intubation equipment) ▪ Optional: preprocedure verification
checklist,3,6,7,8 bedside ultrasound equipment,2,3,4 sterile
and clean disposable ultrasound probe covers, sterile
ultrasound gel, disposable-head hair clippers, pillow.
Preparation of equipment
Check the expiration date on each sterile package, and
inspect for tears. Replace expired or damaged packages.
Prepare the necessary laboratory request forms. Be sure to
list current antibiotic therapy on the laboratory forms,
because this can affect specimen analysis. Prepare the
ultrasound equipment if appropriate. Make sure that
emergency equipment is functioning properly and readily
available.
Implementation
■ Verify the practitioner’s orders.
■ Check the patient’s medical history for any allergies,
especially to latex, antiseptic cleaning solution, or the local
anesthetic.
■ Gather and prepare the equipment at the patient’s
bedside or in the treatment area.
■ Confirm that an informed consent has been obtained by
the practitioner and that the consent form is in the patient’s
medical record.9,10,11,12
■ Conduct a preprocedure verification to make sure that all
relevant documentation, related information, and equipment
are available and correctly identified to the patient’s
identifiers.3,13,14 If required, complete a preprocedure
verification checklist or confirm that one is complete.3,6,7,8
■ Verify that the laboratory and imaging studies have been
completed as ordered, and that the results are in the
patient’s medical record. Notify the practitioner of any
unexpected results.
■ Perform hand hygiene.15,16,17,18,19,20
■ Confirm the patient’s identity using at least two patient
identifiers.21
■ Reinforce the practitioner’s explanation of the procedure
and answer any questions. Inform the patient that some
discomfort and pressure may occur during the needle
insertion.
■ Allow the patient’s family members to remain throughout
the procedure if they wish to do so.22 Assist them in putting
on personal protective equipment, as needed.
■ Provide privacy and emotional support.9,23,24,25
■ If required by your facility, make sure that the procedure
site is marked.3,6,14,26
■ Assess vital signs, oxygen saturation level, pain level, and
respiratory function to serve as a baseline for comparison
during and after the procedure.1,27
■ Auscultate the patient’s breath sounds.
■ Administer the prescribed sedative or analgesia as
ordered, following safe medication administration
practices.28,29,30
■ Position the patient appropriately to ease the withdrawal
of pleural fluid.1 Make sure that the patient is firmly
supported and comfortable. (See Positioning for
thoracentesis.)
■ Remind the patient not to cough, breathe deeply, or move
suddenly during the procedure to avoid puncture of the
visceral pleura or lung. If the patient coughs, the
practitioner will briefly halt the procedure and withdraw the
needle slightly to prevent puncture.
■ Expose the patient’s entire chest or back as appropriate.
■ Clip hair from the aspiration site if needed.
■ Perform hand hygiene.15,16,17,18,19,20
■ Put on a gown, a mask and goggles or mask with face
shield, and gloves.32,33
■ Using sterile technique, open the thoracentesis tray. Label
all medications, medication containers, and other solutions
on and off the sterile field.34,35
■ Assist the practitioner as necessary in disinfecting the
site and allowing it to dry.
■ Conduct a time-out immediately before starting the
procedure to perform a final assessment to ensure that the
correct patient, site, positioning, and procedure are
identified, and that, as applicable, all relevant information
and necessary equipment are available.3,6,14,36
■ After draping the patient and injecting the local
anesthetic, the practitioner may use ultrasonography to
identify landmarks. Ultrasound guidance reduces the risk of
pneumothorax and increases thoracentesis success.1,2,3,4
■ The practitioner attaches a three-way stopcock with
tubing to the aspirating needle and opens the stopcock
valve between the syringe and the needle, to allow for the
aspiration of pleural fluid during needle insertion and to
prevent air from entering the pleural space.1
■ Attach the other end of the tubing to the drainage
container.
■ The practitioner inserts the needle into the pleural space
and attaches a 50-mL syringe to the needle’s stopcock. A
hemostat might be used to hold the needle in place and
prevent a pleural tear or lung puncture. Alternatively, the
practitioner may introduce a Teflon catheter into the needle,
remove the needle, and attach a stopcock and syringe or
drainage tubing to the catheter to reduce the risk of pleural
puncture by the needle.
■ Reassure the patient throughout the procedure, assessing
for signs of anxiety. Keep the patient informed of each step.
■ Monitor the patient’s vital signs and oxygen saturation
level regularly during the procedure.1 Continually observe
the patient for signs of distress such as pallor, vertigo,
faintness, weak or rapid pulse, decreased blood pressure,
dyspnea, tachypnea, diaphoresis, chest pain, blood-tinged
mucus, and excessive coughing. Alert the practitioner if any
of these develop, because they may indicate complications
such as hypovolemic shock or tension pneumothorax.
■ Assist the practitioner as necessary in specimen
collection, fluid drainage, and site dressing.
■ Label the specimens with the patient’s name,
identification number, and the date and time of collection in
the presence of the patient to prevent mislabeling, and send
them to the laboratory in a laboratory biohazard transport
bag.37
■ After the practitioner withdraws the needle or catheter,
apply pressure to the puncture site using a sterile 4′′ × 4′′
(10-cm × 10-cm) gauze pad. Apply a new sterile gauze pad
and secure it with tape.
■ Place the patient in a comfortable position.
■ Assess the patient’s vital signs, oxygen saturation level,
and respiratory status.1 Continue to monitor vital signs at a
frequency determined by the patient’s condition and your
facility, because there’s no evidence-based research
available to indicate best practice for frequency of assessing
vital signs after a procedure.38
■ Perform a comprehensive pain assessment using
techniques appropriate for the patient’s age, condition, and
ability to understand.27 Administer pain medication, as
needed and ordered, following safe medication
administration practices.28,29,30
■ Examine the dressing for drainage.1
■ Discard used supplies in the appropriate receptacles.37
Clean nondisposable items, and return them for sterilization.
■ Obtain a chest X-ray as ordered, after the procedure.1,39
■ Remove and discard your gloves and personal protective
equipment, if worn.32,33
■ Perform hand hygiene.15,16,17,18,19,20
■ Clean and disinfect your stethoscope with a disinfectant
pad.40,41
■ Perform hand hygiene.15,16,17,18,19,20
■ Document the procedure.42,43,44,45
Special considerations
■ The maximum volume of fluid that can be safely removed
during therapeutic thoracentesis is unknown; the
occurrence of reexpansion pulmonary edema and
procedure-related pneumothorax don’t clearly correlate with
the onset of symptoms or the volume of fluid removed. A
traditional method to avoid these complications has been to
discontinue fluid removal at the onset of chest discomfort or
when the total amount of fluid removed reaches 1,000 to
1,500 mL. However, this practice doesn’t always prevent
adverse effects and, in fact, many patients do well with
removal of more than 1,500 mL.46
■ Some coughing is common as the lung re-expands.
■ Pleuritic or shoulder pain may indicate pleural irritation by
the needle point.
■ The practitioner may decide to place a small-bore (pigtail)
chest tube for continued drainage of a large effusion.31
Complications
Pneumothorax (possibly leading to mediastinal shift and
requiring chest tube insertion) can occur if the thoracentesis
needle punctures the lung and air enters the pleural cavity.
Hemoptysis may also occur if the lung is punctured.
Pyogenic infection can result from contamination during the
procedure. Hemothorax may occur if the thoracentesis
needle punctures one of the intercostal vessels. Laceration
of the liver or spleen may also occur.1 Other potential
difficulties include pain, hypotension,1 cough, anxiety, dry
thoracentesis, lever or spleen laceration, subcutaneous
hematoma, and vasovagal syncope.
Documentation
Record the date and time of the procedure and the name of
the practitioner who performed it. Include the location of the
puncture site; volume and description (color, viscosity, odor)
of the fluid withdrawn; specimens sent to the laboratory;
vital signs, oxygen saturation level, pain level, and
respiratory assessment findings before, during, and after
the procedure; any postprocedural tests, such as a chest X-
ray; any complications that occurred and the nursing actions
taken; and the patient’s reaction to the procedure.
Document all medications given and the patient’s response.
If later symptoms of pneumothorax, subcutaneous
emphysema, or infection occur, notify the practitioner
immediately, and document your observations and
interventions in the patient’s medical record.
REFERENCES
1 Wiegand, D. L. (2017). AACN procedure manual for high acuity, progressive,
and critical care (7th ed.). Philadelphia, PA: Elsevier.
2 Perazzo, A., et al. (2014). Can ultrasound guidance reduce the risk of
pneumothorax following thoracentesis? Journal Brasileiro de Pneumologia,
40(1), 6–12.
3 DeBiasi, E. M., & Puchalski, J. (2016). Thoracentesis: State-of-the-art in
procedural safety, patient outcomes, and physiologic impact. Pleura, 3, 1–10.
Accessed via the Web at
http://journals.sagepub.com/doi/pdf/10.1177/2373997516646554
4 Soldati, G., et al. (2013). Ultrasound-guided pleural puncture in supine or
recumbent lateral position—feasibility study. Multidisciplinary Respiratory
Medicine, 8(1), 18. Accessed via the Web at
https://www.ncbi.nlm.nih.gov/pmc/articles/PMC3605139/
5 Goligher, E. C ., et al. (2011). Utility and safety of draining pleural effusions in
mechanically ventilated patients: A systematic review and meta-analysis.
Critical Care, 15(1), R46. Accessed via the Web at
http://www.ncbi.nlm.nih.gov/pmc/articles/PMC3221976/pdf/cc10009.pdf
(Level I)
6 Miller, K. E ., et al. (2014). Wrong-side thoracentesis: Lessons learned from
root cause analysis. JAMA Surgery, 149(8), 774–779. Accessed via the Web at
http://jamanetwork.com/journals/jamasurgery/fullarticle/1879844
7 See, K. C ., et al. (2013). Effect of a pleural checklist on patient safety in the
ultrasound era. Respirology, 18(3), 534–539.
8 World Health Organization (WHO). (2009). “Implementation manual: WHO
surgical safety checklist 2009” [Online]. Accessed via the Web at
http://apps.who.int/iris/bitstream/10665/44186/1/9789241598590_eng.pdf
(Level IV)
9 Centers for Medicare and Medicaid Services, Department of Health and
Human Services. (2015). Condition of participation: Patient’s rights. 42 C.F.R.
§ 482.13(b)(2).
10 The Joint Commission. (2019). Standard RI.01.03 .01. Comprehensive
accreditation manual for hospitals. Oakbrook Terrace, IL: The Joint
Commission. (Level VII)
11 Accreditation Association for Hospitals and Health Systems. (2017). Standard
15.01.11. Healthcare Facilities Accreditation Program: Accreditation
requirements for acute care hospitals. Chicago, IL: Accreditation Association
for Hospitals and Health Systems. (Level VII)
12 DNV GL-Healthcare USA, Inc. (2016). PR.1.SR.3 . NIAHO® accreditation
requirements: Interpretive guidelines & surveyor guidance (version 11).
Milford, OH: DNV GL-Healthcare USA, Inc. (Level VII)
13 The Joint Commission. (2019). Standard UP.01.01.01. Comprehensive
accreditation manual for hospitals. Oakbrook Terrace, IL: The Joint
Commission. (Level VII)
14 Accreditation Association for Hospitals and Health Systems. (2017). Standard
30.00 .14. Healthcare Facilities Accreditation Program: Accreditation
requirements for acute care hospitals. Chicago, IL: Accreditation Association
for Hospitals and Health Systems. (Level VII)
15 The Joint Commission. (2019). Standard NPSG.07.01.01. Comprehensive
accreditation manual for hospitals. Oakbrook Terrace, IL: The Joint
Commission. (Level VII)
16 World Health Organization. (2009). “WHO guidelines on hand hygiene in
health care: First global patient safety challenge, clean care is safer care”
[Online]. Accessed via the Web at
http://apps.who.int/iris/bitstream/10665/44102/1/9789241597906_eng.pdf
(Level IV)
17 Centers for Disease Control and Prevention. (2002). Guideline for hand
hygiene in health-care settings: Recommendations of the Healthcare Infection
Control Practices Advisory and the HICPAC/SHEA/APIC/IDSA Hand Hygiene
Task Force. MMWR Recommendations and Reports, 51(RR-16), 1–45.
Accessed via the Web at https://www.cdc.gov/mmwr/pdf/rr/rr5116.pdf (Level
II)
18 Centers for Medicare and Medicaid Services, Department of Health and
Human Services. (2015). Condition of participation: Infection control. 42 C.F.R.
§ 482.42.
19 Accreditation Association for Hospitals and Health Systems. (2017). Standard
07.01.21. Healthcare Facilities Accreditation Program: Accreditation
requirements for acute care hospitals. Chicago, IL: Accreditation Association
for Hospitals and Health Systems. (Level VII)
20 DNV GL-Healthcare USA, Inc. (2016). IC.1 .SR.1 . NIAHO® accreditation
requirements: Interpretive guidelines & surveyor guidance (version 11).
Milford, OH: DNV GL-Healthcare USA, Inc. (Level VII)
21 The Joint Commission. (2019). Standard NPSG.01.01.01. Comprehensive
accreditation manual for hospitals. Oakbrook Terrace, IL: The Joint
Commission. (Level VII)
22 American Association of Critical-Care Nurses (AACN). (2016). “A ACN practice
alert: Family presence during resuscitation and invasive procedures” [Online].
Accessed via the Web at https://www.aacn.org/clinical-resources/practice-
alerts/family-presence-during-resuscitation-and-invasive-procedures (Level
VII)
23 Accreditation Association for Hospitals and Health Systems. (2017). Standard
15.01.16. Healthcare Facilities Accreditation Program: Accreditation
requirements for acute care hospitals. Chicago, IL: Accreditation Association
for Hospitals and Health Systems. (Level VII)
24 DNV GL-Healthcare USA, Inc. (2016). PR.1.SR.5 . NIAHO® accreditation
requirements: Interpretive guidelines & surveyor guidance (version 11).
Milford, OH: DNV GL-Healthcare USA, Inc. (Level VII)
25 The Joint Commission. (2019). Standard RI.01.01.01. Comprehensive
accreditation manual for hospitals. Oakbrook Terrace, IL: The Joint
Commission. (Level VII)
26 The Joint Commission. (2019). Standard UP.01.02.01. Comprehensive
accreditation manual for hospitals. Oakbrook Terrace, IL: The Joint
Commission. (Level VII)
27 The Joint Commission. (2019). Standard PC.01.02.07. Comprehensive
accreditation manual for hospitals. Oakbrook Terrace, IL: The Joint
Commission. (Level VII)
28 Centers for Medicare and Medicaid Services, Department of Health and
Human Services. (2015). Condition of participation: Nursing services. 42
C.F.R. § 482.23(c).
29 Accreditation Association for Hospitals and Health Systems. (2017). Standard
16.01.03. Healthcare Facilities Accreditation Program: Accreditation
requirements for acute care hospitals. Chicago, IL: Accreditation Association
for Hospitals and Health Systems. (Level VII)
30 DNV GL-Healthcare USA, Inc. (2016). MM.1 .SR.2. NIAHO® accreditation
requirements: Interpretive guidelines & surveyor guidance (version 11).
Milford, OH: DNV GL-Healthcare USA, Inc. (Level VII)
31 Liu, Y. H., et al. (2010). Ultrasound-guided pigtail catheters for drainage of
various pleural diseases. American Journal of Emergency Medicine, 28(8),
915–921. (Level IV)
32 Siegel, J. D ., et al. (2007, revised 2017). “2007 guideline for isolation
precautions: Preventing transmission of infectious agents in healthcare
settings” [Online]. Accessed via the Web at
https://www.cdc.gov/infectioncontrol/pdf/guidelines/isolation-guidelines.pdf
(Level II)
33 Accreditation Association for Hospitals and Health Systems. (2017). Standard
07.01.10. Healthcare Facilities Accreditation Program: Accreditation
requirements for acute care hospitals. Chicago, IL: Accreditation Association
for Hospitals and Health Systems. (Level VII)
34 The Joint Commission. (2019). Standard NPSG.03 .04.01. Comprehensive
accreditation manual for hospitals. Oakbrook Terrace, IL: The Joint
Commission. (Level VII)
35 Accreditation Association for Hospitals and Health Systems. (2017). Standard
25.01.27. Healthcare Facilities Accreditation Program: Accreditation
requirements for acute care hospitals. Chicago, IL: Accreditation Association
for Hospitals and Health Systems. (Level VII)
36 The Joint Commission. (2019). Standard UP.01.03.01. Comprehensive
accreditation manual for hospitals. Oakbrook Terrace, IL: The Joint
Commission. (Level VII)
37 Occupational Safety and Health Administration. (n.d .). “Bloodborne
pathogens, standard number 1910.1030” [Online]. Accessed via the Web at
https://www.osha.gov/pls/oshaweb/owadisp.show_document?
p_id=10051&p_table=STANDARDS (Level VII)
38 American Society of PeriAnesthesia Nurses. (2017). 2017–2018
Perianesthesia nursing standards, practice recommendations and interpretive
statements. Cherry Hill, NJ: American Society of Perianesthesia Nurses. (Level
VII)
39 National Heart, Lung, and Blood Institute. (n.d .). “Thoracentesis” [Online].
Accessed via the Web at http://www.nhlbi.nih.gov/health/health-
topics/topics/thor/
40 Rutala, W. A., et al. (2008, revised 2017). “Guideline for disinfection and
sterilization in healthcare facilities, 2008” [Online]. Accessed via the Web at
https://www.cdc.gov/infectioncontrol/pdf/guidelines/disinfection-
guidelines.pdf (Level I)
41 Accreditation Association for Hospitals and Health Systems. (2017). Standard
07.02.03. Healthcare Facilities Accreditation Program: Accreditation
requirements for acute care hospitals. Chicago, IL: Accreditation Association
for Hospitals and Health Systems. (Level VII)
42 The Joint Commission. (2019). Standard RC.01.03 .01. Comprehensive
accreditation manual for hospitals. Oakbrook Terrace, IL: The Joint
Commission. (Level VII)
43 Centers for Medicare and Medicaid Services, Department of Health and
Human Services. (2015). Condition of participation: Medical record services.
42 C.F.R. § 482.24(b).
44 Accreditation Association for Hospitals and Health Systems. (2017). Standard
10.00 .03. Healthcare Facilities Accreditation Program: Accreditation
requirements for acute care hospitals. Chicago, IL: Accreditation Association
for Hospitals and Health Systems. (Level VII)
45 DNV GL-Healthcare USA, Inc. (2016). MR.2 .SR.1 . NIAHO® accreditation
requirements: Interpretive guidelines & surveyor guidance (version 11).
Milford, OH: DNV GL-Healthcare USA, Inc. (Level VII)
46 Huggins, J. T., & Chopra, A. Large volume thoracentesis. (2016). In: UpToDate,
Broaddus, V. C. (Ed.). Retrieved from: www.uptodate.com
THORACIC ELECTRICAL BIOIMPEDANCE
MONITORING
A noninvasive alternative for tracking hemodynamic status,
thoracic electrical bioimpedance monitoring, also known as
impedance cardiography, provides information about a
patient’s cardiac index, preload, afterload, contractibility,
cardiac output, and blood flow. In this procedure, electrodes
are placed on the patient’s thorax. The electrodes have two
purposes: to send harmless low-level electricity through the
patient’s body and to detect return electrical signals. These
signals, which are interruptions in the electrical flow, come
from changes in the volume and velocity of blood as it flows
through the aorta. The bioimpedance monitor interprets the
signals as a waveform. Cardiac output is then computed
from this waveform and the electrocardiogram (ECG).
Thoracic electrical bioimpedance monitoring eliminates
the risk of infection, bleeding, pneumothorax, emboli, and
arrhythmias associated with traditional invasive monitoring.
The accuracy of results obtained by this method is
comparable to results obtained by thermodilution; the
bioimpedance monitor also automatically updates
information every 2nd to 10th heartbeat.1
Equipment
Thoracic electrical bioimpedance unit ▪ color-coded ECG
lead wires ▪ connecting cable ▪ four sets of thoracic
electrical bioimpedance electrodes ▪ three ECG electrodes ▪
sterile 3′′ × 3′′ (7.6-cm × 7.6-cm) or 4′′ × 4′′ (10-cm × 10-cm)
gauze pads ▪ tape measure ▪ Optional: gloves.
Implementation
■ Gather the necessary equipment.
■ Perform hand hygiene.2,3,4,5,6,7
■ Confirm the patient’s identity using at least two patient
identifiers.8
■ Provide privacy.9,10,11,12
■ Explain the procedure to the patient and family (if
appropriate) according to their individual communication
and learning needs to increase their understanding, allay
their fears, and enhance cooperation.13
■ Plug the thoracic electrical bioimpedance unit into a
power supply.
■ Press the POWER button.
■ Enter the patient’s information into the device as
prompted by the initial display screen appearing on the unit.
■ Raise the patient’s bed to waist level when providing
patient care to prevent caregiver back strain.14
■ Assist the patient into a supine position, with the head of
the bed elevated no more than 30 degrees.
■ Expose the patient’s chest.
■ Perform hand hygiene.2,3,4,5,6,7
■ Put on gloves, if necessary, to comply with standard
precautions.15,16
■Wet4′′×4′′(10-cm×10-cm)or3′′×3′′(7.6-cm×7.6-
cm) gauze pads with warm water and clean the skin on each
side of the patient’s neck from the base of the neck to 2′′ (5
cm) above the base. Then dry the skin with clean, dry gauze
pads. Also clean and dry the skin on both sides of the chest
at the midaxillary line directly across the xiphoid process. To
ensure that you’ve cleaned a large enough area for
electrode placement, clean at least two fingerbreadths
above and below the site.
■ Place one thoracic bioimpedance electrode set vertically
on the side of the neck in line with the ear. Make sure that
the bottom of the electrode set isn’t lower than the junction
of the shoulder at the base of the neck.
■ Place the second set of electrodes on the opposite side of
the neck in line with the ear and about 180 degrees from
the first set.
■ Place the remaining two sets of electrodes on either side
of the patient’s chest. To determine the correct location,
draw a line with your finger from the xiphoid process to the
midaxillary line on one side of the chest and place the first
remaining set at this location; ensure that the top electrode
is at the level of the xiphoid process. Place the second
remaining set on the opposite chest wall.
■ Attach the ECG lead wires and try different lead
selections until you obtain a consistent QRS signal. Don’t
remove the patient from the primary monitor, because the
regular system must be maintained to ensure monitoring at
the central station and to keep the alarms intact.
■ Attach the lead wires of the bioimpedance harness to the
thoracic electrical bioimpedance electrodes and the ECG
electrodes.
■ Measure the distance between the bottom of an electrode
set on one side of the patient’s neck and the top of an
electrode set on the same side of the chest. This distance,
the thorax length, is the numeric value required by the
thoracic electrical bioimpedance monitor’s computer to
calculate accurate stroke volume. Enter this value on the
patient data screen; then return to the waveform screen.
■ Begin monitoring the results provided by the thoracic
electrical bioimpedance unit.
■ Return the bed to the lowest position to prevent falls and
maintain patient safety.17
■ Remove and discard your gloves if worn.15,16
■ Perform hand hygiene.2,3,4,5,6,7
■ Document the procedure.18,19,20,21
Special considerations
■ Baseline bioimpedance values may be reduced in
patients who have conditions characterized by increased
fluid in the chest, such as pulmonary edema and pleural
effusion.
■ Bioimpedance values may be lower than thermodilution
values in patients with tachycardia and other arrhythmias.
■ Some bioimpedance devices allow for application of
electrodes on an endotracheal tube. Follow the
manufacturer’s guidelines regarding the proper locations for
electrode placement for such devices.22
■ Electrodes are single use and should be replaced every
24 hours to maintain a strong reading.22,23
Documentation
Note the waveforms and the bioimpedance values on the
monitor, and document these values by pressing PRINT on
the waveform screen to print a strip containing all the
values monitored at the ordered interval. Place the strip in
the patient’s chart.
REFERENCES
1 Gujjar, A. R., et al. (2008). Non-invasive cardiac output by transthoracic
electrical bioimpedance in post-cardiac surgery patients: Comparison with
thermodilution method. Journal of Clinical Monitoring and Computing, 22(3),
175–180. (Level VI)
2 The Joint Commission. (2019). Standard NPSG.07.01.01. Comprehensive
accreditation manual for hospitals. Oakbrook Terrace, IL: The Joint
Commission. (Level VII)
3 Centers for Disease Control and Prevention. (2002). Guideline for hand
hygiene in health-care settings: Recommendations of the Healthcare Infection
Control Practices Advisory Committee and the HICPAC/SHEA/APIC/IDSA Hand
Hygiene Task Force Hand Hygiene Task Force. MMWR Recommendations and
Reports, 51(RR-16), 1–45. Accessed via the Web at
https://www.cdc.gov/mmwr/pdf/rr/rr5116.pdf (Level II)
4 World Health Organization. (2009). “WHO guidelines on hand hygiene in
health care: First global patient safety challenge, clean care is safer care”
[Online]. Accessed via the Web at
http://apps.who.int/iris/bitstream/10665/44102/1/9789241597906_eng.pdf
(Level IV)
5 Accreditation Association for Hospitals and Health Systems. (2017). Standard
07.01.21. Healthcare Facilities Accreditation Program: Accreditation
requirements for acute care hospitals. Chicago, IL: Accreditation Association
for Hospitals and Health Systems. (Level VII)
6 Centers for Medicare and Medicaid Services, Department of Health and
Human Services. (2015). Condition of participation: Infection control. 42 C.F.R.
§ 482.42.
7 DNV GL-Healthcare USA, Inc. (2016). IC.1.SR.1 . NIAHO® accreditation
requirements: Interpretive guidelines & surveyor guidance (version 11).
Milford, OH: DNV GL-Healthcare USA, Inc. (Level VII)
8 The Joint Commission. (2019). Standard NPSG.01.01.01. Comprehensive
accreditation manual for hospitals. Oakbrook Terrace, IL: The Joint
Commission. (Level VII)
9 Accreditation Association for Hospitals and Health Systems. (2017). Standard
15.01.16. Healthcare Facilities Accreditation Program: Accreditation
requirements for acute care hospitals. Chicago, IL: Accreditation Association
for Hospitals and Health Systems. (Level VII)
10 Centers for Medicare and Medicaid Services, Department of Health and
Human Services. (2015). Condition of participation: Patient’s rights. 42 C.F.R.
§ 482.13(c)(1).
11 The Joint Commission. (2019). Standard RI.01.01.01. Comprehensive
accreditation manual for hospitals. Oakbrook Terrace, IL: The Joint
Commission. (Level VII)
12 DNV GL-Healthcare USA, Inc. (2016). PR.1.SR.5 . NIAHO® accreditation
requirements: Interpretive guidelines & surveyor guidance (version 11).
Milford, OH: DNV GL-Healthcare USA, Inc. (Level VII)
13 The Joint Commission. (2019). Standard PC.02.01.21. Comprehensive
accreditation manual for hospitals. Oakbrook Terrace, IL: The Joint
Commission. (Level VII)
14 Waters, T. R., et al. (2009). “Safe patient handling training for schools of
nursing” [Online]. Accessed via the Web at
https://www.cdc.gov/niosh/docs/2009-127/pdfs/2009-127.pdf (Level VII)
15 Siegel, J. D ., et al. (2007, revised 2017). “2007 guideline for isolation
precautions: Preventing transmission of infectious agents in healthcare
settings” [Online]. Accessed via the Web at
https://www.cdc.gov/infectioncontrol/pdf/guidelines/isolation-guidelines.pdf
(Level II)
16 Accreditation Association for Hospitals and Health Systems. (2017). Standard
07.01.10. Healthcare Facilities Accreditation Program: Accreditation
requirements for acute care hospitals. Chicago, IL: Accreditation Association
for Hospitals and Health Systems. (Level VII)
17 Ganz, D. A., et al. (2013). Preventing falls in hospitals: A toolkit for improving
quality of care (AHRQ Publication No. 13-0015-EF). Rockville, MD: Agency for
Healthcare Research and Quality. Accessed via the Web at
http://www.ahrq.gov/sites/default/files/publications/files/fallpxtoolkit.pdf
18 The Joint Commission. (2019). Standard RC.01.03 .01. Comprehensive
accreditation manual for hospitals. Oakbrook Terrace, IL: The Joint
Commission. (Level VII)
19 Accreditation Association for Hospitals and Health Systems. (2017). Standard
10.00 .03. Healthcare Facilities Accreditation Program: Accreditation
requirements for acute care hospitals. Chicago, IL: Accreditation Association
for Hospitals and Health Systems. (Level VII)
20 Centers for Medicare and Medicaid Services, Department of Health and
Human Services. (2015). Condition of participation: Medical record services.
42 C.F.R. § 482.24(b).
21 DNV GL-Healthcare USA, Inc. (2016). MR.2 .SR.1 . NIAHO® accreditation
requirements: Interpretive guidelines & surveyor guidance (version 11).
Milford, OH: DNV GL-Healthcare USA, Inc. (Level VII)
22 Wiegand, D. L. (2017). AACN procedure manual for high acuity, progressive,
and critical care (7th ed.). Philadelphia, PA: Elsevier.
23 CardioDynamics International Corporation. (2009). Bioz operator/service
manual. San Diego CA: CardioDynamics International Corporation. Accessed
via the Web at
https://www.sonosite.com/sites/default/files/bioz_operator_service_manual.pd
f
TILT TABLE
A tilt table—a padded table or bed-length board that can be
raised gradually from a horizontal to a vertical position—can
help prevent the complications of prolonged bed rest. Used
for a patient with a spinal cord injury, brain damage,
orthostatic hypotension, or other condition that prevents
free standing, a tilt table increases tolerance for the upright
position, conditions the cardiovascular system, stretches
muscles, and helps prevent contractures, bone
demineralization, and urinary calculus formation.1,2,3,4
Tilting a patient with a tilt table is performed once or twice
per day, usually in a separate room, depending on the
patient’s tolerance. In patients with orthostatic hypotension
and postural orthostatic tachycardia, the tilt table is used as
part of a diagnostic test meant to produce signs and
symptoms characteristic of the disease.
Equipment
Tilt table with footboard and safety straps ▪ blood pressure
monitoring equipment ▪
antiembolism stockings or
compression bandages ▪ Optional: gloves, gown, mask and
goggles or mask with face shield, continuous ECG monitor,
abdominal binder, wooden block, stretcher.
Implementation
■ Perform hand hygiene.5,6,7,8,9,10
■ Confirm the patient’s identity using at least two patient
identifiers.11
■ Provide privacy.12,13,14,15
■ Explain the procedure to the patient to allay fears and
enhance cooperation.
■ Put on gloves and other personal protective equipment as
needed to comply with standard precautions.16,17
■ Apply antiembolism stockings or compression bandages
to restrict vessel walls and help prevent blood pooling and
edema. If necessary, apply an abdominal binder to avoid
pooling of blood in the splanchnic region, which contributes
to insufficient cerebral circulation and orthostatic
hypotension.
■ Make sure the tilt table is locked in the horizontal
position.
■ Summon assistance and transfer the patient to the table,
placing the patient in the supine position with feet flat
against the footboard.
■ If the patient can’t bear weight on one leg, place a
wooden block between the footboard and the weight-
bearing foot, permitting the leg that can’t bear weight to
dangle freely.
■ Fasten the safety straps.
■ Take the patient’s blood pressure and pulse rate. Review
the patient’s medications to determine whether any of them
have the potential to alter blood pressure or pulse rate.
■ Tilt the table slowly in 5- to 10-degree increments,
evaluating the patient constantly.18 Take the patient’s blood
pressure every 3 to 5 minutes, because movement from the
supine to the upright position decreases systolic pressure.
Be alert for signs and symptoms of insufficient cerebral
circulation:
dizziness,
nausea, pallor,
diaphoresis,
tachycardia, or a change in mental status. If the patient
experiences any of these signs or symptoms, or develops
hypotension or seizures, return the table immediately to the
horizontal position.
NURSING ALERT Never leave the patient unattended on the tilt table,
because marked physiologic changes, such as hypotension or severe
headache, can occur suddenly.
■ If the patient tolerates the position shift, continue to tilt
the table until reaching the desired angle, usually 45 to 80
degrees. A 60-degree tilt gives the patient the physiologic
effects and sensations of standing upright.
■ The patient may remain tilted for 5 to 45 minutes, as
ordered, or until the patient becomes symptomatic. Signs
and symptoms may include nausea, light-headedness,
diaphoresis, tachycardia, low blood pressure, and anxiety.
■ Gradually return the patient to the horizontal position
while checking vital signs.
■ Obtain assistance and transfer the patient onto a
stretcher for transport back to the room.
■ Perform hand hygiene.5,6,7,8,9,10
■ Document the procedure.19,20,21,22
Special considerations
■ If the tilt table is being used for diagnostic purposes, a
cardiologist will be present and the patient should be on
continuous ECG monitoring.
■ Let the patient’s response determine the angle of tilt and
duration of elevation, but avoid prolonged upright
positioning (greater than 45 minutes), because it may lead
to venous stasis.
■ In some instances, the patient may need to fast for up to
4 hours before the test.
Complications
Use of a tilt table can lead to sudden hypotension, severe
headache, and other dramatic physiologic changes.
Documentation
Record the angle and duration of elevation; changes in the
patient’s pulse rate, blood pressure, and physical and
mental status; and response to treatment. Document any
teaching you provided, the patient’s and family’s
understanding of the teaching, and whether follow-up
teaching was required.
REFERENCES
1 Trees, D. (2007). Tilting in a patient’s favor: Early mobilization emphasizes
upright positioning and weight bearing. Advance for Physical Therapy &
Rehab Medicine, 18(10), 29.
2 Trees, D. W., et al. (2013). Innovative mobility strategies for the patient with
intensive care unit–acquired weakness: A case report. Physical Therapy,
93(2), 237–247.
3 Labandz, S. (2012). Upward and onward: Adding standing to your current
practice can benefit patients of all ages. Advance for Physical Therapy &
Rehab Medicine, 23(11), 20.
4 Kim, C. Y., et al., (2015). The effect of progressive task-oriented training on a
supplementary tilt table on lower extremity muscle strength and gait
recovery in patients with hemiplegic stroke. Gait & Posture, 41(2), 425–430.
5 The Joint Commission. (2019). Standard NPSG.07.01.01. Comprehensive
accreditation manual for hospitals. Oakbrook Terrace, IL: The Joint
Commission. (Level VII)
6 Centers for Disease Control and Prevention. (2002). Guideline for hand
hygiene in health-care settings: Recommendations of the Healthcare Infection
Control Practices Advisory Committee and the HICPAC/SHEA/APIC/IDSA Hand
Hygiene Task Force. MMWR Recommendations and Reports, 51(RR-16), 1–45.
Accessed via the Web at https://www.cdc.gov/mmwr/pdf/rr/rr5116.pdf (Level
II)
7 World Health Organization. (2009). “WHO guidelines on hand hygiene in
health care: First global patient safety challenge, clean care is safer care”
[Online]. Accessed via the Web at
http://apps.who.int/iris/bitstream/10665/44102/1/9789241597906_eng.pdf
(Level IV)
8 Accreditation Association for Hospitals and Health Systems. (2017). Standard
07.01.21. Healthcare Facilities Accreditation Program: Accreditation
requirements for acute care hospitals. Chicago, IL: Accreditation Association
for Hospitals and Health Systems. (Level VII)
9 Centers for Medicare and Medicaid Services, Department of Health and
Human Services. (2015). Condition of participation: Infection control. 42 C.F.R.
§ 482.42.
10 DNV GL-Healthcare USA, Inc. (2016). IC.1 .SR.1 . NIAHO® accreditation
requirements: Interpretive guidelines & surveyor guidance (version 11).
Milford, OH: DNV GL-Healthcare USA, Inc. (Level VII)
11 The Joint Commission. (2019). Standard NPSG.01.01.01. Comprehensive
accreditation manual for hospitals. Oakbrook Terrace, IL: The Joint
Commission. (Level VII)
12 DNV GL-Healthcare USA, Inc. (2016). PR.1.SR.5 . NIAHO® accreditation
requirements: Interpretive guidelines & surveyor guidance (version 11).
Milford, OH: DNV GL-Healthcare USA, Inc. (Level VII)
13 Centers for Medicare and Medicaid Services, Department of Health and
Human Services. (2015). Condition of participation: Patient’s rights. 42 C.F.R.
§ 482.13(c)(1).
14 Accreditation Association for Hospitals and Health Systems. (2017). Standard
15.01.16. Healthcare Facilities Accreditation Program: Accreditation
requirements for acute care hospitals. Chicago, IL: Accreditation Association
for Hospitals and Health Systems. (Level VII)
15 The Joint Commission. (2019). Standard RI.01.01.01. Comprehensive
accreditation manual for hospitals. Oakbrook Terrace, IL: The Joint
Commission. (Level VII)
16 Siegel, J. D ., et al. (2007, revised 2017). “2007 guideline for isolation
precautions: Preventing transmission of infectious agents in healthcare
settings” [Online]. Accessed via the Web at
https://www.cdc.gov/infectioncontrol/pdf/guidelines/isolation-guidelines.pdf
(Level II)
17 Accreditation Association for Hospitals and Health Systems. (2017). Standard
07.01.10. Healthcare Facilities Accreditation Program: Accreditation
requirements for acute care hospitals. Chicago, IL: Accreditation Association
for Hospitals and Health Systems. (Level VII)
18 Hinkle, J. L., & Cheever, K. H. (2018). Brunner and Suddarth’s textbook of
medical-surgical nursing (14th ed.). Philadelphia, PA: Wolters Kluwer.
19 The Joint Commission. (2019). Standard RC.01.03 .01. Comprehensive
accreditation manual for hospitals. Oakbrook Terrace, IL: The Joint
Commission. (Level VII)
20 Accreditation Association for Hospitals and Health Systems. (2017). Standard
10.00 .03. Healthcare Facilities Accreditation Program: Accreditation
requirements for acute care hospitals. Chicago, IL: Accreditation Association
for Hospitals and Health Systems. (Level VII)
21 Centers for Medicare and Medicaid Services, Department of Health and
Human Services. (2015). Condition of participation: Medical record services.
42 C.F.R. § 482.24(b).
22 DNV GL-Healthcare USA, Inc. (2016). MR.2 .SR.1 . NIAHO® accreditation
requirements: Interpretive guidelines & surveyor guidance (version 11).
Milford, OH: DNV GL-Healthcare USA, Inc. (Level VII)
TOPICAL SKIN DRUG APPLICATION
Topical drugs are applied directly to the skin surface or
mucous membranes, and are absorbed through the
epidermal layer into the dermis. The extent of absorption
depends on the vascularity of the region. Topical
nitroglycerin, fentanyl, nicotine, and certain supplemental
hormone replacements are used for systemic effects. Most
other topical medications are used for local effects.
Topical medications may be in the form of lotions, pastes,
ointments, creams, powders, shampoos, and aerosol sprays.
Ointments have a fatty base, which is an ideal vehicle for
such drugs as antimicrobials and antiseptics. Typically,
topical medications should be applied two or three times a
day to achieve their therapeutic effect.
Equipment
Patient’s medication administration record ▪ prescribed
medication ▪ gloves ▪ Optional: soap, water, washcloth,
towel, sterile gloves, sterile gauze, transparent
semipermeable dressing, adhesive tape, white cotton
gloves, terry cloth slippers.
Implementation
■ Avoid distractions and interruptions when preparing and
administering the medication to prevent medication
errors.1,2,3
■ Verify the practitioner’s order.4,5
■ Reconcile the patient’s medications when the practitioner
orders a new medication to reduce the risk of medication
errors, including omissions, duplications, dosing errors, and
drug interactions.
■ Compare the medication label with the order in the
patient’s medical record.4,5,6
■ Check the patient’s medical record for an allergy or a
contraindication to the prescribed medication. If an allergy
or a contraindication exists, don’t administer the
medication; instead, notify the practitioner.4,5,6
■ Check the expiration date on the medication. If the
medication is expired, return it to the pharmacy and obtain
new medication.4,5,6
■ Visually inspect the medication for loss of integrity; don’t
administer
the
medication
if its integrity is
compromised.4,5,6
■ Discuss any unresolved concerns about the medication
with the patient’s practitioner.4,5,6
■ Perform hand hygiene.7,8,9,10,11,12
■ Confirm the patient’s identity using at least two patient
identifiers.13
■ Provide privacy.14,15,16,17
■ Explain the procedure to the patient and family (if
appropriate) according to their individual communication
and learning needs to increase their understanding, allay
their fears, and enhance cooperation.18 Answer any
questions.
■ Teach the patient who is receiving the medication for the
first time about potential adverse reactions, and discuss any
other concerns related to the medication.4,5,6
■ Verify that the medication is being administered at the
proper time, in the prescribed dose, and by the correct route
to reduce the risk of medication errors.4,5,6
■ If your facility uses a bar code technology, scan your
identification badge, the patient’s identification bracelet,
and the medication’s bar code.
■ Perform hand hygiene.7,8,9,10,11,12
■ Put on gloves to comply with standard precautions and
prevent absorption of the medication by your skin.19,20
■ Help the patient assume a comfortable position that
provides access to the area to be treated.
■ Expose the area to be treated. Make sure the skin or
mucous membrane is intact (unless the medication has
been ordered to treat a skin lesion, such as an ulcer).
Applying medication to broken or abraded skin may cause
unwanted systemic absorption and result in further
irritation.
■ If necessary, clean the skin of debris, including crusts and
epidermal scales, with mild soap and water and a
washcloth. Blot gently with a towel.
■ Remove medication from the skin if it remains from a
previous dose to prevent skin irritation from an
accumulation of medication.
■ Change your gloves if they become soiled.
Applying paste, cream, or ointment
■ Open the container. Place the lid or cap upside down to
prevent contamination of the inside surface.
Using medicated shampoos
Medicated shampoos include keratolytic and cytostatic agents, coal tar
preparations, and lindane (gamma benzene hexachloride) solutions. They
can be used to treat such conditions as dandruff, psoriasis, and head lice.
However, they’re contraindicated in patients with broken or abraded skin.
Because application instructions may vary among brands, check the label
on the shampoo before starting the procedure to ensure use of the correct
amount. Keep the shampoo away from the patient’s eyes; if any shampoo
should accidentally get in the eyes, irrigate promptly with water. Selenium
sulfide, used in cytostatic agents, is extremely toxic if ingested.
To apply a medicated shampoo, follow these steps:
■ Perform hand hygiene.7,8,9,10,11,12
■ Put on gloves.19,20
■ Prepare the patient for shampoo treatment.
■ Shake the bottle of shampoo well to mix the solution.
■ Wet the patient’s hair thoroughly and wring out excess water.
■ Apply the proper amount of shampoo, as directed on the label.
■ Work the shampoo into a lather, adding water as necessary. Part the hair
and work the shampoo into the scalp, taking care not to use your fingernails.
■ Leave the shampoo on the scalp and hair for as long as instructed (usually
5 to 10 minutes). Then rinse the hair thoroughly.
■ Towel-dry the patient’s hair.
■ After the hair is dry, comb or brush it. Use a fine-tooth comb to remove
nits if necessary.
■ Remove and discard your gloves, and perform hand
hygiene.7,8,9,10,11,12
■ Using your gloved hands, apply the medication to the
affected area with long, smooth strokes that follow the
direction of hair growth (as shown below). This technique
avoids forcing medication into hair follicles, which can cause
irritation and lead to folliculitis. Avoid excessive pressure
when applying the medication, because excessive pressure
could abrade the skin.
Applying other topical medications
■ To apply shampoos, follow package directions. (See Using
medicated shampoos.)
■ To apply aerosol sprays, shake the container, if indicated,
to completely mix the medication. Hold the container 6′′ to
12′′ (15 to 30 cm) from the skin, or follow the
manufacturer’s recommendation. Spray a thin film of
medication evenly over the treatment area, away from the
patient’s face to prevent direct inhalation of the spray.
■ To apply powders, dry the skin surface, being sure to
spread skin folds where moisture collects. Then apply a thin
layer of powder over the treatment area; apply the powder
away from the patient’s face to prevent direct inhalation of
the powder.
■ To protect applied medications and prevent them from
soiling the patient’s clothes, tape an appropriate number of
sterile gauze pads or a transparent semipermeable dressing
over the treated area, if appropriate. With certain
medications (such as topical steroids), applying a
semipermeable dressing may be contraindicated. Check the
medication’s prescribing information and cautions. If you’re
applying a topical medication to the patient’s hands or feet,
cover the hands with white cotton gloves and the feet with
terry cloth slippers if appropriate.
Completing the procedure
■ Monitor the patient’s skin for adverse effects of the
medication, such as irritation, an allergic reaction, or skin
breakdown.
■ Dispose of used supplies and dressings in the appropriate
receptacles.19,20
■ Remove and discard your gloves,19,20 and perform hand
hygiene.7,8,9,10,11,12
■ Document the procedure.21,22,23,24
Special considerations
■ Don’t apply ointments to mucous membranes as liberally
as you would to skin, because mucous membranes are
usually moist and absorb ointment more quickly than skin
does.
■ Never apply ointment to the eyelids or ear canal unless
ordered. The ointment may congeal and occlude the tear
duct or ear canal.
Patient teaching
Teach the patient who’ll be applying the medication at home
how to apply and remove it. To ensure understanding, ask
for a return demonstration. Also teach the patient about the
medication’s potential adverse effects.
Complications
Skin irritation, a rash, or an allergic reaction may occur.
Documentation
Document the name of the medication, the dose, and the
date and time of administration in the patient’s medication
administration record. Include the route and site used.
Document the appearance and integrity of the skin before
administration. Record the presence or absence of adverse
effects; if adverse effects occur, note the name of the
practitioner notified, if applicable. Document the patient’s
response to and tolerance of therapy. Include any patient
teaching you performed, as well as the patient’s
understanding of that teaching.
REFERENCES
1 Westbrook, J., et al. (2010). Association of interruptions with an increased risk
and severity of medication administration errors. Archives of Internal
Medicine, 170(8), 683–690 . (Level IV)
2 Institute for Safe Medication Practices. (2012). Side tracks on the safety
express: Interruptions lead to errors and unfinished . . . Wait, what was I
doing? Nurse Advise-ERR, 11(2), 1–4 . Accessed via the Web at
https://www.ismp.org/resources/side-tracks-safety-express-interruptions-lead-
errors-and-unfinished-wait-what-was-i-doing
3 Westbrook, J. I., & Li, L. (2013). Interruptions are significantly associated with
the frequency and severity of medication administration errors. Research in
Nursing and Health, 36(2), 116–117.
4 Accreditation Association for Hospitals and Health Systems. (2017). Standard
16.01.03. Healthcare Facilities Accreditation Program: Accreditation
requirements for acute care hospitals. Chicago, IL: Accreditation Association
for Hospitals and Health Systems. (Level VII)
5 Centers for Medicare and Medicaid Services, Department of Health and
Human Services. (2015). Condition of participation: Nursing services. 42
C.F.R. § 482.23(c).
6 DNV GL-Healthcare USA, Inc. (2016). MM .1 .SR.2 . NIAHO® accreditation
requirements: Interpretive guidelines & surveyor guidance (version 11).
Milford, OH: DNV GL-Healthcare USA, Inc. (Level VII)
7 The Joint Commission. (2019). Standard NPSG.07.01.01. Comprehensive
accreditation manual for hospitals. Oakbrook Terrace, IL: The Joint
Commission. (Level VII)
8 Centers for Disease Control and Prevention. (2002). Guideline for hand
hygiene in health-care settings: Recommendations of the Healthcare Infection
Control Practices Advisory Committee and the HICPAC/SHEA/APIC/IDSA Hand
Hygiene Task Force. MMWR Recommendations and Reports, 51(RR-16), 1–45.
Accessed via the Web at https://www.cdc.gov/mmwr/pdf/rr/rr5116.pdf (Level
II)
9 World Health Organization. (2009). “WHO guidelines on hand hygiene in
health care: First global patient safety challenge, clean care is safer care”
[Online]. Accessed via the Web at
http://apps.who.int/iris/bitstream/10665/44102/1/9789241597906_eng.pdf
(Level IV)
10 Accreditation Association for Hospitals and Health Systems. (2017). Standard
07.01.21. Healthcare Facilities Accreditation Program: Accreditation
requirements for acute care hospitals. Chicago, IL: Accreditation Association
for Hospitals and Health Systems. (Level VII)
11 Centers for Medicare and Medicaid Services, Department of Health and
Human Services. (2015). Condition of participation: Infection control. 42 C.F.R.
§ 482.42.
12 DNV GL-Healthcare USA, Inc. (2016). IC.1 .SR.1 . NIAHO® accreditation
requirements: Interpretive guidelines & surveyor guidance (version 11).
Milford, OH: DNV GL-Healthcare USA, Inc. (Level VII)
13 The Joint Commission. (2019). Standard NPSG.01.01.01. Comprehensive
accreditation manual for hospitals. Oakbrook Terrace, IL: The Joint
Commission. (Level VII)
14 Centers for Medicare and Medicaid Services, Department of Health and
Human Services. (2015). Condition of participation: Patient’s rights. 42 C.F.R.
§ 482.13(c)(1).
15 Accreditation Association for Hospitals and Health Systems. (2017). Standard
15.01.16. Healthcare Facilities Accreditation Program: Accreditation
requirements for acute care hospitals. Chicago, IL: Accreditation Association
for Hospitals and Health Systems. (Level VII)
16 DNV GL-Healthcare USA, Inc. (2016). PR.1.SR.5 . NIAHO® accreditation
requirements: Interpretive guidelines & surveyor guidance (version 11).
Milford, OH: DNV GL-Healthcare USA, Inc. (Level VII)
17 The Joint Commission. (2019). Standard RI.01.01.01. Comprehensive
accreditation manual for hospitals. Oakbrook Terrace, IL: The Joint
Commission. (Level VII)
18 The Joint Commission. (2019). Standard PC.02.01.21. Comprehensive
accreditation manual for hospitals. Oakbrook Terrace, IL: The Joint
Commission. (Level VII)
19 Siegel, J. D ., et al. (2007, revised 2017). “2007 guideline for isolation
precautions: Preventing transmission of infectious agents in healthcare
settings” [Online]. Accessed via the Web at
https://www.cdc.gov/infectioncontrol/pdf/guidelines/isolation-guidelines.pdf
(Level II)
20 Accreditation Association for Hospitals and Health Systems. (2017). Standard
07.01.10. Healthcare Facilities Accreditation Program: Accreditation
requirements for acute care hospitals. Chicago, IL: Accreditation Association
for Hospitals and Health Systems. (Level VII)
21 The Joint Commission. (2019). Standard RC.01.03 .01. Comprehensive
accreditation manual for hospitals. Oakbrook Terrace, IL: The Joint
Commission. (Level VII)
22 Accreditation Association for Hospitals and Health Systems. (2017). Standard
10.00 .03. Healthcare Facilities Accreditation Program: Accreditation
requirements for acute care hospitals. Chicago, IL: Accreditation Association
for Hospitals and Health Systems. (Level VII)
23 Centers for Medicare and Medicaid Services, Department of Health and
Human Services. (2015). Condition of participation: Medical record services.
42 C.F.R. § 482.24(b).
24 DNV GL-Healthcare USA, Inc. (2016). MR.2 .SR.1 . NIAHO® accreditation
requirements: Interpretive guidelines & surveyor guidance (version 11).
Milford, OH: DNV GL-Healthcare USA, Inc. (Level VII)
TRACHEAL CUFF PRESSURE MEASUREMENT
When inflated properly, an endotracheal (ET) or
tracheostomy cuff provides a closed system for mechanical
ventilation, delivering the desired tidal volume to the
patient’s lungs. To function properly, the cuff must exert
enough pressure on the tracheal wall to seal the airway
without compromising the blood supply to the tracheal
mucosa. The ideal pressure is the lowest amount needed to
seal the airway. Many authorities recommend maintaining a
cuff pressure lower than capillary perfusion pressure, which
typically ranges from 25 to 30 mm Hg; they recommend
inflating the cuff to 20 to 25 mm Hg (20 to 25 cm H2O).1,2,3
Cuff pressure shouldn’t exceed 25 mm Hg (26 cm H2O).2
When cuff pressure is inadequate, oropharyngeal
secretions can leak around the cuff, increasing the risk of
ventilator-associated pneumonia.3 Cuff leaks can lead to
aspiration in ventilator-dependent and spontaneously
breathing patients.1 Overinflation of the cuff can cause
tracheal necrosis, tracheomalacia, tracheoinnominate artery
fistula, tracheal ulceration, tracheal fibrosis, tracheal
stenosis, and tracheoesophageal fistula.4 Malpositioning the
tracheostomy or ET tube or inserting a tube that’s too small
in diameter can also cause high cuff pressure due to
overfilling the cuff to achieve a seal in the trachea.5 Cuff
pressures vary with each patient, the type of tracheostomy
tube, and the mode of ventilation.6 To keep pressure within
safe limits, measurement should occur at least once each
shift or at an interval determined by the facility. A nurse or
respiratory therapist can measure cuff pressure.
Equipment
Cuff pressure manometer ▪ suction equipment ▪ handheld
resuscitation bag ▪ oxygen source and tubing ▪ gloves ▪
facility-approved disinfectant.
Preparation of equipment
Assemble all equipment at the patient’s bedside. Calibrate
the manometer following the manufacturer’s instructions.
Make sure the oxygen source and handheld resuscitation
bag are readily available at the patient’s bedside.
Implementation
■ Verify the practitioner’s order.
■ Gather and prepare the necessary equipment.
■ Perform hand hygiene.7,8,9,10,11,12
■ Confirm the patient’s identity using at least two patient
identifiers.13
■ Provide privacy.14,15,16,17
■ Explain the procedure to the patient and family (if
appropriate) according to their individual communication
and learning needs to increase their understanding, allay
their fears, and enhance cooperation.18
■ Raise the patient’s bed to waist level when providing care
to prevent caregiver back strain.19
■ Place the patient in the semi-Fowler position, if
appropriate, to promote oxygenation and reduce the risk of
aspiration.6,20,21
■ Perform hand hygiene.7,8,9,10,11,12
■ Put on gloves.22,23
■ Hyperoxygenate the patient, if necessary, by adjusting
the fraction of inspired oxygen on the mechanical ventilator
or by using the temporary oxygen-rich environment
program available on the ventilator, to prevent hypoxia.24
■ Suction the ET or tracheostomy tube and the patient’s
oropharynx to remove accumulated secretions above the
cuff.6,20,21 (See the “Tracheal suctioning, intubated patient”
procedure, page 748.)
■ Attach the cuff pressure manometer to the cuff pilot
balloon port and then read the measurement.
■ Adjust the pressure, as necessary (see the “Tracheostomy
care” procedure).
■ If the cuff pressure measures greater than 25 mm Hg (25
cm H2O), press the pressure-release button on the device
until the pressure reaches 20 to 25 mm Hg (20 to 25 cm
H2O).6
■ If the pressure measures less than 20 mm Hg (20 cm
H2O), add air by squeezing the bulb until the pressure
reaches 20 to 25 mm Hg (20 to 25 cm H2O).6
■ If you aren’t able to maintain adequate pressure, notify
the practitioner.6
NURSING ALERT Minimal occlusive volume and minimal leak
inflation techniques have been found to increase the risk of silent
aspiration. Guidelines recommend using a measuring device, such as a
manometer, to achieve optimal cuff pressure to decrease the risk of
adverse advents.1,6,25
■ Disconnect the cuff pressure manometer from the cuff
pilot balloon port.
■ Make sure that the ventilator alarms are set appropriately
for the patient’s current condition, and that alarms are
turned on, functioning properly, and audible to staff.26,27,28
■ Make sure that the patient is comfortable and can easily
reach the call light and communication aids.
■ Return the bed to the lowest position to prevent falls and
maintain patient safety.29
■ Remove and discard your gloves.22
■ Perform hand hygiene.7,8,9,10,11,12
■ Clean and disinfect the surface of the manometer with a
facility-approved disinfectant.22
■ Perform hand hygiene.7,8,9,10,11,12
■ Document the procedure.30,31,32
Special considerations
■ The Joint Commission issued a sentinel event alert
concerning medical device alarm safety, because alarm-
related events have been associated with permanent loss of
function and death. Among the major contributing factors
were improper alarm settings, inappropriately turned off
alarms, and alarm signals not audible to staff. Make sure
that alarm limits are appropriately set, and that alarms are
turned on, functioning properly, and audible to staff. Follow
facility guidelines for preventing alarm fatigue.33
■ Most cuff pressure manometers are designed only for use
with air-filled cuffs. Use with a saline-filled cuff can damage
the unit.34
■ Cuff pressure values vary and decrease over time. Unless
you perform continuous monitoring or attach an automatic
regulating device, maintaining a cuff pressure value within
the therapeutic range can be difficult because of changes in
body position and head alignment, tube migration,
coughing, lung compliance, and airway and intrathoracic
pressures.35,36 Guidelines recommend frequent, routine
assessment of cuff pressure but don’t identify optimal
frequency.37
■ Be familiar with the cuff manufacturer’s instructions
before adjusting cuff pressure, because cuff types and
procedures vary.
■ When measuring cuff pressure, keep the connection
between the measuring device and the cuff pilot balloon
port tight to avoid an air leak that could compromise cuff
pressure.
■ Note the volume of air needed to inflate the cuff. A
gradual increase in this volume indicates tracheal dilation or
erosion. A sudden increase in volume indicates rupture of
the cuff and requires immediate reintubation if the patient is
receiving mechanical ventilation.
Complications
Aspiration of upper airway secretions, underventilation, or
coughing spasms may occur if a leak is created during cuff
pressure measurement. Overinflation of the cuff can cause
tracheal wall injury.1
Documentation
Record the date and time of the procedure, cuff pressure,
total amount of air in the cuff after the procedure, any
complications and nursing action taken, and the patient’s
tolerance of the procedure. Document patient teaching
performed and the patient’s understanding of that teaching.
REFERENCES
1 Kacmarek, R. M. (2017). Egan’s fundamentals of respiratory care (11th ed.).
St. Louis, MO: Elsevier.
2 Intensive Care Society. (2014). “Standards for the care of adult patients with
a temporary tracheostomy: Standards and guidelines” [Online]. Accessed via
the Web at https://www.ics.ac .uk/AsiCommon/Controls/BSA/Downloader.aspx?
iDocumentStorageKey=5b70a7af-c79c-4e49-bca1-
648b98c06598&iFileTypeCode=PDF&iFileName=ICS Tracheostomy Standards
(2014) (Level VII)
3 Morris, L. L ., et al. (2013). Tracheostomy care and complications in the
intensive care unit. Critical Care Nurse, 33(5), 18–30 .
4 Morris, L. L ., & Afifi, S. (Eds.). (2010). Tracheostomies: The complete guide.
New York, NY: Springer Publishing Company.
5 Regan, E. N., & Dallachiesa, L. (2009). How to care for a patient with a
tracheostomy. Nursing2009, 39(8), 34–39 . Accessed via the Web at
http://journals.lww.com/nursing/fulltext/2009/08000/how_to_care_for_a_patien
t_with_a _tracheostomy.17 .aspx
6 Wiegand, D. L. (2017). AACN procedure manual for high acuity, progressive,
and critical care (7th ed.). St. Louis, MO: Elsevier.
7 The Joint Commission. (2019). Standard NPSG.07.01.01. Comprehensive
accreditation manual for hospitals. Oakbrook Terrace, IL: The Joint
Commission. (Level VII)
8 World Health Organization. (2009). “WHO guidelines on hand hygiene in
health care: First global patient safety challenge, clean care is safer care”
[Online]. Accessed via the Web at
http://apps.who.int/iris/bitstream/10665/44102/1/9789241597906_eng.pdf
(Level IV)
9 Centers for Disease Control and Prevention. (2002). Guideline for hand
hygiene in health-care settings: Recommendations of the Healthcare Infection
Control Practices Advisory Committee and the HICPAC/SHEA/APIC/IDSA Hand
Hygiene Task Force. MMWR Recommendations and Reports, 51(RR-16), 1–45.
Accessed via the Web at https://www.cdc.gov/mmwr/pdf/rr/rr5116.pdf (Level
II)
10 Accreditation Association for Hospitals and Health Systems. (2017). Standard
07.01.21. Healthcare Facilities Accreditation Program: Accreditation
requirements for acute care hospitals. Chicago, IL: Accreditation Association
for Hospitals and Health Systems. (Level VII)
11 Centers for Medicare and Medicaid Services, Department of Health and
Human Services. (2014). Condition of participation: Infection control. 42 C.F.R.
§ 482.42.
12 DNV GL-Healthcare USA, Inc. (2016). IC.1 .SR.1 . NIAHO® accreditation
requirements: Interpretive guidelines & surveyor guidance (version 11).
Milford, OH: DNV GL-Healthcare USA, Inc. (Level VII)
13 The Joint Commission. (2019). Standard NPSG.01.01.01. Comprehensive
accreditation manual for hospitals. Oakbrook Terrace, IL: The Joint
Commission. (Level VII)
14 Accreditation Association for Hospitals and Health Systems. (2017). Standard
15.01.16. Healthcare Facilities Accreditation Program: Accreditation
requirements for acute care hospitals. Chicago, IL: Accreditation Association
for Hospitals and Health Systems. (Level VII)
15 Centers for Medicare and Medicaid Services, Department of Health and
Human Services. (2014). Condition of participation: Patient’s rights. 42 C.F.R.
§ 482.13(c)(1).
16 DNV GL-Healthcare USA, Inc. (2016). PR.1.SR.5 . NIAHO® accreditation
requirements: Interpretive guidelines & surveyor guidance (version 11).
Milford, OH: DNV GL-Healthcare USA, Inc. (Level VII)
17 The Joint Commission. (2019). Standard RI.01.01.01. Comprehensive
accreditation manual for hospitals. Oakbrook Terrace, IL: The Joint
Commission. (Level VII)
18 The Joint Commission. (2019). Standard PC.02.01.21. Comprehensive
accreditation manual for hospitals. Oakbrook Terrace, IL: The Joint
Commission. (Level VII)
19 Waters, T. R., et al. (2009). “Safe patient handling training for schools of
nursing” [Online]. Accessed via the Web at
https://www.cdc.gov/niosh/docs/2009-127/pdfs/2009-127.pdf (Level VII)
20 American Association of Critical-Care Nurses. (2017). “A ACN practice alert:
Ventilator-associated pneumonia” [Online]. Accessed via the Web at
https://www.aacn.org/clinical-resources/practice-alerts/ventilator-associated-
pneumonia-vap (Level VII)
21 Accreditation Association for Hospitals and Health Systems. (2017). Standard
07.01.02. Healthcare Facilities Accreditation Program: Accreditation
requirements for acute care hospitals. Chicago, IL: Accreditation Association
for Hospitals and Health Systems. (Level VII)
22 Siegel, J. D ., et al. (2007, revised 2017). “2007 guideline for isolation
precautions: Preventing transmission of infectious agents in healthcare
settings” [Online]. Accessed via the Web at
https://www.cdc.gov/infectioncontrol/pdf/guidelines/isolation-guidelines.pdf
(Level II)
23 Accreditation Association for Hospitals and Health Systems. (2017). Standard
07.01.10. Healthcare Facilities Accreditation Program: Accreditation
requirements for acute care hospitals. Chicago, IL: Accreditation Association
for Hospitals and Health Systems. (Level VII)
24 American Association for Respiratory Care (AARC). (2010). AARC clinical
practice guidelines: Endotracheal suctioning of mechanically ventilated
patients with artificial airways 2010. Respiratory Care, 55(6), 758–764.
Accessed via the Web at http://www.rcjournal.com/cpgs/pdf/06.10.0758.pdf
(Level VII)
25 Jordan, P., et al. (2012). Endotracheal tube cuff pressure management in
adult critical care units. South African Journal of Critical Care, 28(1), 13–16.
Accessed via the Web at
http://www.sajcc.org.za/index.php/SAJCC/article/view/129/148
26 The Joint Commission. (2019). Standard NPSG.06 .01.01. Comprehensive
accreditation manual for hospitals. Oakbrook Terrace, IL: The Joint
Commission. (Level VII)
27 Graham, K. C., & Cvach, M. (2010). Monitor alarm fatigue: Standardizing use
of physiological monitors and decreasing nuisance alarms. American Journal
of Critical Care, 19(1), 28–37. Accessed via the Web at
http://ajcc.aacnjournals.org/content/19/1/28.full.pdf
28 American Association of Critical-Care Nurses. (2018). “A ACN practice alert:
Managing alarms in acute care across the life span: Electrocardiography and
pulse oximetry” [Online]. Accessed via the Web at
https://www.aacn.org/clinical-resources/practice-alerts/managing-alarms-in-
acute-care-across-the-life-span
29 Ganz, D. A., et al. (2013). Preventing falls in hospitals: A toolkit for improving
quality of care (AHRQ Publication No. 13-0015-EF). Rockville, MD: Agency for
Healthcare Research and Quality. Accessed via the Web at
http://www.ahrq.gov/sites/default/files/publications/files/fallpxtoolkit.pdf
(Level VII)
30 The Joint Commission. (2019). Standard RC.01.03 .01. Comprehensive
accreditation manual for hospitals. Oakbrook Terrace, IL: The Joint
Commission. (Level VII)
31 Accreditation Association for Hospitals and Health Systems. (2017). Standard
10.00 .03. Healthcare Facilities Accreditation Program: Accreditation
requirements for acute care hospitals. Chicago, IL: Accreditation Association
for Hospitals and Health Systems. (Level VII)
32 Centers for Medicare and Medicaid Services, Department of Health and
Human Services. (2014). Condition of participation: Medical record services.
42 C.F.R. § 482.24(b).
33 The Joint Commission. (2013). “Sentinel event alert: Medical device alarm
safety in hospitals” [Online]. Accessed via the Web at
http://www.jointcommission.org/assets/1/18/SEA_50_alarms_4 _5 _13_FINAL1 .P
DF (Level VII)
34 Posey Company. (2015). “Posey Cufflator: Application instructions” [Online].
Accessed via the Web at http://www.posey.com/sites/default/files/product-
docs/M1410-Posey%C2%AE-Cufflator.pdf
35 Sole, M. L., et al. (2011). Evaluation of an intervention to maintain
endotracheal tube cuff pressure within therapeutic range. American Journal of
Critical Care, 20(2), 109–118. Accessed via the Web at
https://www.ncbi.nlm.nih.gov/pmc/articles/PMC3506174/pdf/nihms419038.pdf
(Level II)
36 Lizy, C., et al. (2014). Cuff pressure of endotracheal tubes after changes in
body position in critically ill patients treated with mechanical ventilation.
American Journal of Critical Care, 23(1), e1–e8.
37 Rose, L., & Redl, L. (2008). Survey of cuff management practices in intensive
care units in Australia and New Zealand. American Journal of Critical Care,
17(5), 428–435. Accessed via the Web at
http://ajcc.aacnjournals.org/content/17/5/428.full.pdf+html (Level VI)
TRACHEAL SUCTIONING, INTUBATED PATIENT
Tracheal suction is used to remove pulmonary secretions
from a patient’s artificial airway to prevent obstruction.
Maintaining a patent airway is essential to promote the
optimal exchange of oxygen and carbon dioxide and to
prevent pneumonia, which can result from the pooling of
secretions.1,2
There are two methods of tracheal suctioning: open and
closed. The open tracheal suction system requires
disconnecting the patient from the ventilator for suctioning.
The closed tracheal suction system uses a sterile in-line
suction catheter attached to the ventilator circuit, which
permits suctioning without disconnecting the patient from
the ventilator. Closed tracheal suctioning provides
continuous mechanical ventilation and oxygenation during
the procedure.
Indications for suctioning include presence of secretions in
the airway, adventitious breath sounds on auscultation,
increased peak airway pressure, frequent coughing,
suspected aspiration of gastric or upper airway secretions,
sudden onset of respiratory distress with suspected airway
obstruction, and a decrease in oxygen saturation level.3
According to the guidelines from the American Association
for Respiratory Care (AARC), you should hyperoxygenate the
patient with 100% oxygen for 30 to 60 seconds before
undertaking tracheal suctioning and before and after each
pass of the suction catheter.1,3,4 Each suctioning event,
which includes the placement and withdrawal of the suction
catheter, should take no longer than 15 seconds.4 Suction
pressure should be set at the lowest possible level that
clears secretions effectively.5 After suctioning, the patient
should be hyperoxygenated again for at least 1 minute
using the same technique used for preoxygenation.4
Equipment
Oxygen source ▪ handheld resuscitation bag with tubing ▪
suction apparatus ▪ collection container ▪ connecting
tubing ▪ suction catheter kit (a sterile suction catheter, one
sterile glove, one clean glove, goggles, and a disposable
sterile solution container) ▪ 1-L bottle of sterile water or
normal saline solution ▪ disinfectant pad ▪ stethoscope ▪
vital signs monitoring equipment ▪ pulse oximeter ▪
Optional: gown, mask and goggles or mask with face shield,
sterile towel, 10-mL syringe, positive end-expiratory
pressure (PEEP) valve, extra suction catheter, sterile gloves.
Preparation of equipment
Choose an appropriately sized suction catheter. The
catheter diameter should be no larger than half the inside
diameter of the tracheostomy or endotracheal (ET) tube to
minimize hypoxia during suctioning. (A #12 or #14 French
catheter may be used for an 8-mm or larger tube.)4,5,6,7
Place the suction equipment on the patient’s overbed table
or bedside stand. Position the table or stand on your
preferred side of the bed to facilitate suctioning.
Attach the collection container to the suction apparatus
and the connecting tube to the collection container. Label
and date the normal saline solution or sterile water bottle.
Attach the handheld resuscitation bag to the oxygen source,
and make sure it’s readily available. Attach the PEEP valve
to the handheld resuscitation bag if indicated.
Implementation
■ Verify the practitioner’s order, if needed.
■ Gather the appropriate equipment.
■ Perform hand hygiene.1,8,9,10,11,12,13
■ Confirm the patient’s identity using at least two patient
identifiers.14
■ Provide privacy.15,16,17,18
■ Assess the patient’s vital signs, breath sounds,
respiratory effort, and general appearance, and whether
copious secretions are present, to establish a baseline for
comparison after tracheal suctioning. Review the patient’s
arterial blood gas values and oxygen saturation level before,
during, and after the procedure.4 Evaluate the patient’s
ability to cough and deep-breathe to help move secretions
up the tracheobronchial tree.4
■ Explain the procedure to the patient and family (if
appropriate) according to their individual communication
and learning needs to increase their understanding, allay
their fears, and enhance cooperation.19 Provide instruction
even if the patient is unresponsive. Explain that tracheal
suctioning usually causes transient coughing or gagging but
that coughing is helpful for removing secretions. Continue to
reassure the patient throughout the procedure to minimize
anxiety, promote relaxation, and decrease oxygen demand.
■ Unless contraindicated, elevate the head of the bed at a
30- to 45-degree angle to promote lung expansion and
productive coughing and to prevent aspiration.2,20,21,22
■ Perform hand hygiene.1,8,9,10,11,12,13
■ Put on a mask and goggles or mask with face shield and
other personal protective equipment as appropriate.4,23,24
■ Remove the top from the bottle of normal saline solution
or water.
■ Open the package containing the sterile solution
container.
■ Using strict, no-touch technique, open the suction
catheter kit and put the sterile glove on your dominant hand
and the clean (nonsterile) glove on your non dominant
hand. If using individual supplies, open the suction catheter
and the gloves, placing the clean (nonsterile) glove on your
nondominant hand first and then the sterile glove on your
dominant hand.1,4
■ Using your nondominant (nonsterile) hand, pour the
normal saline solution or sterile water into the disposable
sterile solution container.
■ Place a sterile towel over the patient’s chest, if desired, to
provide an additional sterile area.
■ Using your dominant (sterile) hand, remove the catheter
from its wrapper. Keep it coiled to prevent it from touching a
nonsterile object.
■ Using your nondominant (sterile) hand to manipulate the
connecting tubing, attach the suction catheter to the tubing
(as shown below).
■ Using your nondominant (nonsterile) hand, set the
suction pressure at the lowest possible level that clears
secretions effectively.3,4,5 Higher pressures don’t enhance
secretion removal and may cause traumatic injury. Occlude
the suction port to assess suction pressure.4
NURSING ALERT Experts recommend using suction pressures of up
to 120 mm Hg (15.9 kPa) for open tracheal suction systems and of up
to 150 mm Hg (20 kPa) for closed systems.4,7
■ Dip the catheter tip in the normal saline solution or sterile
water (as shown on top right) to lubricate the outside of the
catheter and reduce tissue trauma during insertion.
■ With the catheter tip in the sterile normal saline solution
or sterile water, occlude the suction control valve with the
thumb of your nondominant (nonsterile) hand (as shown
below). Suction a small amount of solution or water through
the catheter to lubricate the inside of the catheter, which
facilitates passage of secretions through it. For a closed
tracheal suction system. (see Closed tracheal suctioning,
page 750.)
■ Hyperoxygenate the patient with 100% oxygen for 30 to
60 seconds.2,3,4,5 You can do so with a ventilator by pressing
the hyperoxygenate button or by increasing the baseline
fraction of inspired oxygen (FIO2) level. If these methods
aren’t available, disconnect the ventilator from the
tracheostomy tube, attach the handheld resuscitation bag
to the tracheostomy tube, and administer five to six breaths
over 30 seconds.3
■ Using your nondominant (nonsterile) hand, disconnect the
patient from the ventilator.
■ Using your dominant (sterile) hand, advance the suction
catheter gently to the premeasured distance needed for
insertion (generally, the length of the adapter plus the
length of the tracheostomy tube) without applying suction.
Measuring the depth ensures that the suction catheter
doesn’t extend beyond the end of the tracheostomy or ET
tube, which may cause trauma to the tracheal mucosa.4,27
NURSING ALERT Research hasn’t shown deep tracheal suctioning to
be superior to shallow tracheal suctioning and suggests that it may be
associated with more adverse events.4
■ After inserting the suction catheter, apply suction
intermittently by removing and replacing the thumb of your
nondominant (nonsterile) hand over the suction control
valve. Simultaneously, use your dominant (sterile) hand to
withdraw the catheter as you roll it between your thumb
and forefinger. This rotating motion prevents the catheter
from pulling tissue into the tube as it exits, avoiding tissue
trauma.
■ Use your nondominant (nonsterile) hand to stabilize the
tip of the tracheostomy tube as you withdraw the catheter
to prevent mucous membrane irritation or accidental
extubation. The suctioning event should take no longer than
15 seconds.4
Closed tracheal suctioning
A closed tracheal suction system can ease removal of secretions and reduce
patient complications. The system—which consists of a sterile suction
catheter in a clear plastic sleeve—allows the patient to remain connected to
the ventilator during suctioning, letting the ventilator maintain tidal volume,
oxygen concentration, and positive end-expiratory pressure, which reduces
the risk of suction-induced hypoxemia.
Because the catheter remains in a protective sleeve, you don’t need to
touch the catheter, and the ventilator circuit remains closed. The closed
tracheal suctioning method reduces the risk of spraying of respiratory
secretions, especially during suction-induced coughing.3
A closed tracheal suction device allows the patient to remain connected to
the ventilator during suctioning. As a result, the patient may continue to be
oxygenated and receive PEEP while undergoing suctioning. In patients
receiving intermittent mandatory mechanical ventilation, closed tracheal
suctioning may reduce arterial desaturation and eliminate the need for
preoxygenation.4
Research doesn’t suggest the best practice for closed or open suctioning
technique, nor does it determine that a closed system is better or worse than
an open system for reducing bacterial colonization and ventilator-associated
pneumonia.20,25,26 On the negative side, closed tracheal suctioning may
produce increased negative airway pressure when certain ventilatory modes
are used, increasing the risk of atelectasis and hypoxemia.
Implementation
To perform the procedure, gather the equipment for the closed tracheal
suction system, which consists of a suction control valve, a T-piece to
connect the artificial airway to the ventilator breathing circuit, and a catheter
sleeve that encloses the catheter and has connections at each end for the
control valve and the T-piece. Then follow these steps:
■ Perform hand hygiene.1,8,9,10,11,12,13
■ Put on gloves.23,24
■ Remove the closed suction system from its wrapping.
■ Attach the control valve to the connecting tubing.
■ Depress the suction control valve, and keep it depressed while setting the
suction pressure to the desired level.
■ Connect the T-piece to the ventilator breathing circuit; make sure that the
irrigation port is closed. Then connect the T-piece to the patient’s ET or
tracheostomy tube.
■ Hyperoxygenate the patient with 100% oxygen for 30 to 60
seconds.2,3,4,5
■ Steadying the T-piece, use the thumb and index finger of the other hand to
advance the catheter through the ET or tracheostomy tube and into the
patient’s tracheobronchial tree (as shown). It may be necessary to gently
retract the catheter sleeve as you advance the catheter.
■ While continuing to hold the T-piece and control valve, apply intermittent
suction and withdraw the catheter until it reaches its fully extended length in
the sleeve. Repeat the procedure only if necessary.
■ After you’ve finished tracheal suctioning, flush the catheter by maintaining
suction while slowly introducing the sterile normal saline solution or sterile
water into the irrigation port.
■ Place the thumb control valve in the OFF position.
■ Dispose of and replace the suction equipment and supplies, as needed.
■ Remove and discard your gloves.23,24
■ Perform hand hygiene.1,8,9,10,11,12,13
■ Resume oxygen delivery by reconnecting the source of
oxygen or ventilation and hyperoxygenating the patient’s
lungs with 100% oxygen for 30 to 60 seconds before
continuing tracheal suctioning, to prevent or relieve
hypoxia.2,3,4
■ Observe the patient, and allow the patient to rest for a
few minutes before the next tracheal suctioning. The timing
of each suctioning and the length of each rest period
depend on the patient’s tolerance of the procedure and the
absence of complications. Encourage the patient to cough
between suctioning attempts to enhance secretion removal.
■ Observe the secretions. Normal sputum is watery and
tends to be sticky. If the secretions are thick, clear the
catheter periodically by dipping the tip in the sterile normal
saline solution or sterile water and applying suction.
Tenacious or thick sputum usually indicates dehydration.
Also observe for color variations. Normal sputum is white or
translucent; discolored secretions (yellow, green) may
indicate infection, brown usually indicates old blood, and red
indicates fresh blood. When sputum contains blood, note
whether it’s streaked or well mixed. Also, note how often
blood appears.
■ If the patient’s heart rate and rhythm are being
monitored, observe for arrhythmias. If they occur, stop
suctioning and ventilate the patient.
■ After tracheal suctioning, hyperoxygenate the patient
with 100% oxygen for at least 1 minute using the same
technique described earlier.2,3,4
■ Readjust the FIO2 and, for ventilated patients, the
parameters and alarms to the ordered settings. Set alarm
limits according to the patient’s condition, and ensure that
the alarms are turned on, functioning properly, and audible
to staff.28,29,30
■ After suctioning the lower airway, assess the patient’s
need for
upper
airway
suctioning. (See the
“Oronasopharyngeal suction” procedure, page 560.) Always
change the suction catheter and sterile glove before
resuctioning the lower airway, if necessary, to avoid
introducing microorganisms into the lower airway.1
■ Clear the connecting tubing by aspirating the remaining
sterile normal saline solution or sterile water.
■ Remove your gloves and other personal protective
equipment and discard used supplies in the appropriate
receptacles.23 Replace supplies as needed.
■ Perform hand hygiene.1,8,9,10,11,12,13
■ Maintain the head of the patient’s bed at 30 to 45
degrees, if the patient’s condition allows, to prevent
ventilator-associated pneumonia.20,21,22,31
■ Auscultate the patient’s breath sounds bilaterally, obtain
vital signs, and monitor oxygen saturation levels, if
indicated, to assess the procedure’s effectiveness.
■ Perform hand hygiene.1,8,9,10,11,12,13
■ Clean and disinfect your stethoscope using a disinfectant
pad.32,33
■ Perform hand hygiene.1,8,9,10,11,12,13
■ Document the procedure.34,35,36,37
Special considerations
■ The Joint Commission has issued a sentinel event alert
concerning medical device alarm safety, because alarm-
related events have been associated with permanent loss of
function or death. Among the major contributing factors
noted were improper alarm settings, alarms inappropriately
turned off, and alarm signals not audible to staff. Ensure
that alarm limits are set appropriately, and that alarms are
turned on, functioning properly, and audible to staff. Follow
facility guidelines for preventing alarm fatigue.38
■ Although research is mixed regarding the effects of
instilling normal saline into the trachea before suctioning, it
isn’t a recommended practice.4,7,39 Studies show that
instillation of normal saline solution into the trachea before
suctioning may stimulate the patient’s cough but doesn’t
liquefy secretions. Keeping the patient adequately hydrated
and using bronchial hygiene techniques seem to have a
greater effect on mobilizing secretions. In addition, instilling
normal saline solution may also decrease arterial and mixed
venous oxygenation and contribute to lower airway
contamination, increasing the risk of ventilator-associated
pneumonia.3,4,5,7 One study showed that instilling normal
saline solution into the trachea before suctioning lowered
the rate of microbiologically confirmed ventilator-associated
pneumonia but had no impact on clinical ventilator-
associated pneumonia or patient outcomes.20
■ Don’t allow the collection container on the suction
machine to become more than three-quarters full to keep
from damaging the machine.
■ Change the suction catheter and sleeve and ventilator
circuit tubing only when visibly soiled to avoid frequent
disruptions in the closed circuit, which increase the risk of
ventilator-associated pneumonia.20
■ If the cuff of the ET or tracheostomy tube is inflated and
needs to be deflated, suction the lower airway using the
above procedure, then suction the upper airway before
deflating the cuff using a syringe.1,2
■ If appropriate, provide music therapy as needed
throughout the procedure. Music therapy has been shown to
reduce pain and control sedation levels in patients receiving
mechanical ventilation.40
Patient teaching
Teach the patient and family about measures to prevent
ventilator-associated pneumonia, and involve them in
maintaining the head of the bed at a 30 to 45 degree
angle.22 If the patient will be discharged with an artificial
airway, educate the patient and family members on
performing tracheal suctioning.
Complications
Because oxygen is removed along with secretions during
tracheal suctioning, the patient may experience hypoxemia
and dyspnea. Anxiety may alter respiratory patterns during
the procedure. Cardiac arrhythmias can result from hypoxia
and stimulation of the vagus nerve in the tracheobronchial
tree. Tracheal or bronchial trauma can result from traumatic
or prolonged suctioning.
Patients with compromised cardiovascular or pulmonary
status are at risk for hypoxemia, arrhythmias, hypertension,
or hypotension. Patients who are taking anticoagulants,
have undergone a tracheostomy recently, have a blood
dyscrasia, or have a history of nasopharyngeal bleeding are
at increased risk for bleeding as a result of tracheal
suctioning. Use caution when suctioning patients who have
increased intracranial pressure, because suction may further
increase pressure.
If the patient experiences laryngospasm or bronchospasm
(rare complications) during tracheal suctioning, disconnect
the suction catheter from the connecting tubing and allow
the catheter to act as an airway. Discuss with the patient’s
practitioner the use of bronchodilators or lidocaine to reduce
the risk of this complication.
Documentation
Record the date and time of the procedure; the technique
used; the reason for tracheal suctioning; the amount, color,
consistency, and odor (if any) of the secretions; your
assessment findings; any complications and nursing actions
taken; and pertinent data regarding the patient’s subjective
response to the procedure. Document any teaching
provided to the patient and family. If the patient will be
performing the procedure at home, document return
demonstration and the patient’s and family members’
understanding of the teaching provided.
REFERENCES
1 Centers for Disease Control and Prevention. (2004). Guidelines for preventing
health-care-associated pneumonia, 2003: Recommendations of CDC and the
Healthcare Infection Control Practices Advisory Committee. MMWR
Recommendations and Reports, 53(RR-3), 1–32. Accessed via the Web at
https://www.cdc.gov/mmwr/pdf/rr/rr5116.pdf (Level II)
2 American Association of Critical-Care Nurses. (2017). “AACN practice alert:
Ventilator-associated pneumonia” [Online]. Accessed Month Year via the Web
at https://www.aacn.org/clinical-resources/practice-alerts/ventilator-
associated-pneumonia-vap (Level VII)
3 Wiegand, D. L. (2017). AACN procedure manual for high acuity, progressive,
and critical care (7th ed.). St. Louis: Elsevier.
4 American Association for Respiratory Care. (2010). AARC clinical practice
guidelines: Endotracheal suctioning of mechanically ventilated patients with
artificial airways 2010. Respiratory Care, 55(6), 758–764. Accessed via the
Web at http://www.rcjournal.com/cpgs/pdf/06.10.0758.pdf (Level VII)
5 Mackenzie, S., et al. (2014). “Intensive Care Society standards: Standards for
the care of adult patients with a temporary tracheostomy” [Online]. Accessed
via the Web at
http://www.theawsomecourse.co.uk/ICS/ICS%20Tracheostomy%20standards%
20(2014).pdf (Level VII)
6 Morris, L. L ., & Afifi, M. S . (Eds.) . (2010). Tracheostomies: The complete guide.
New York, NY: Springer.
7 Nance-Floyd, B. (2011). Tracheostomy care: An evidence-based guide to
suctioning and dressing changes. American Nurse Today, 6(7), 14–16.
Accessed via the Web at https://www.americannursetoday.com/tracheostomy-
care-an-evidence-based-guide-to-suctioning-and-dressing-changes/
8 Centers for Disease Control and Prevention. (2002). Guideline for hand
hygiene in health-care settings: Recommendations of the Healthcare Infection
Control Practices Advisory Committee and the HICPAC/SHEA/APIC/IDSA Hand
Hygiene Task Force. MMWR Recommendations and Reports, 51(RR-16), 1–45.
Accessed via the Web at https://www.cdc.gov/mmwr/pdf/rr/rr5303.pdf (Level
II)
9 The Joint Commission. (2019). Standard NPSG.07.01.01. Comprehensive
accreditation manual for hospitals. Oakbrook Terrace, IL: The Joint
Commission. (Level VII)
10 World Health Organization. (2009). “WHO guidelines on hand hygiene in
health care: First global patient safety challenge, clean care is safer care”
[Online]. Accessed via the Web at
http://apps.who.int/iris/bitstream/10665/44102/1/9789241597906_eng.pdf
(Level IV)
11 Centers for Medicare and Medicaid Services, Department of Health and
Human Services. (2015). Condition of participation: Infection control. 42 C.F.R.
§ 482.42.
12 Accreditation Association for Hospitals and Health Systems. (2017). Standard
07.01.21. Healthcare Facilities Accreditation Program: Accreditation
requirements for acute care hospitals. Chicago, IL: Accreditation Association
for Hospitals and Health Systems. (Level VII)
13 DNV GL-Healthcare USA, Inc. (2016). IC.1 .SR.1 . NIAHO® accreditation
requirements: Interpretive guidelines & surveyor guidance (version 11).
Milford, OH: DNV GL-Healthcare USA, Inc. (Level VII)
14 The Joint Commission. (2019). Standard NPSG.01.01.01. Comprehensive
accreditation manual for hospitals. Oakbrook Terrace, IL: The Joint
Commission. (Level VII)
15 The Joint Commission. (2017). Standard RI.01.01.01. Comprehensive
accreditation manual for hospitals. Oakbrook Terrace, IL: The Joint
Commission. (Level VII)
16 DNV GL-Healthcare USA, Inc. (2016). PR.1.SR.5 . NIAHO® accreditation
requirements: Interpretive guidelines & surveyor guidance (version 11).
Milford, OH: DNV GL-Healthcare USA, Inc. (Level VII)
17 Centers for Medicare and Medicaid Services, Department of Health and
Human Services. (2015). Condition of participation: Patient’s rights. 42 C.F.R.
§ 482.13(c)(1).
18 Accreditation Association for Hospitals and Health Systems. (2017). Standard
15.01.16. Healthcare Facilities Accreditation Program: Accreditation
requirements for acute care hospitals. Chicago, IL: Accreditation Association
for Hospitals and Health Systems. (Level VII)
19 The Joint Commission. (2019). Standard PC.02.01.21. Comprehensive
accreditation manual for hospitals. Oakbrook Terrace, IL: The Joint
Commission. (Level VII)
20 Klompas, M., et al. (2014). Strategies to prevent ventilator-associated
pneumonia in acute care hospitals: 2014 update. Infection Control and
Hospital Epidemiology, 35(8), 915–936. Accessed via the Web at
http://www.jstor.org/stable/10.1086/677144 (Level I)
21 Association of Professionals in Infection Control and Epidemiology. (2009). “An
APIC guide 2009: Guide to the elimination of ventilator-associated
pneumonia” [Online]. Accessed via the Web at
http://www.apic.org/Resource_/EliminationGuideForm/18e326ad-b484-471c-
9c35-6822a53ee4a2/File/VAP_09 .pdf (Level IV)
22 Accreditation Association for Hospitals and Health Systems. (2017). Standard
07.01.02. Healthcare Facilities Accreditation Program: Accreditation
requirements for acute care hospitals. Chicago, IL: Accreditation Association
for Hospitals and Health Systems. (Level VII)
23 Siegel, J. D ., et al. (2007, revised 2017). “2007 guideline for isolation
precautions: Preventing transmission of infectious agents in healthcare
settings” [Online]. Accessed via the Web at
https://www.cdc.gov/infectioncontrol/pdf/guidelines/isolation-guidelines.pdf
(Level II)
24 Accreditation Association for Hospitals and Health Systems. (2017). Standard
07.01.10. Healthcare Facilities Accreditation Program: Accreditation
requirements for acute care hospitals. Chicago, IL: Accreditation Association
for Hospitals and Health Systems. (Level VII)
25 Kjonegaard, R., et al. (2010). Current practices in airway management: A
descriptive evaluation. American Journal of Critical Care, 19(2), 168–173.
(Level VI)
26 Favretto, D. O., et al. (2012). Endotracheal suction in intubated critically ill
adult patients undergoing mechanical ventilation: A systematic review.
Revista Latino-Americana de Enfermagem, 20(5), 997–1007. Accessed via the
Web at http://www.scielo.br/pdf/rlae/v20n5/23.pdf (Level I)
27 Pedersen, C. M ., et al. (2009). Endotracheal suctioning of the adult intubated
patient—What is the evidence? Intensive and Critical Care Nursing, 25(1), 21–
30. (Level V)
28 American Association of Critical-Care Nurses. (2018). “A ACN practice alert:
Managing alarms in acute care across the life span: Electrocardiography and
pulse oximetry” [Online]. Accessed via the Web at
https://www.aacn.org/clinical-resources/practice-alerts/managing-alarms-in-
acute-care-across-the-life-span (Level VII)
29 Graham, K. C., & Cvach, M. (2010). Monitor alarm fatigue: Standardizing use
of physiological monitors and decreasing nuisance alarms. American Journal
of Critical Care, 19(1), 28–37. Accessed via the Web at
http://ajcc.aacnjournals.org/content/19/1/28.full.pdf
30 The Joint Commission. (2019). Standard NPSG.06 .01.01. Comprehensive
accreditation manual for hospitals. Oakbrook Terrace, IL: The Joint
Commission. (Level VII)
31 Institute for Healthcare Improvement. (2012). How-to guide: Prevent
ventilator-associated pneumonia. Cambridge, MA: Institute for Healthcare
Improvement. (Level VII)
32 Rutala, W. A., et al. (2008, revised 2017). “Guideline for disinfection and
sterilization in healthcare facilities, 2008” [Online]. Accessed via the Web at
https://www.cdc.gov/infectioncontrol/pdf/guidelines/disinfection-
guidelines.pdf (Level I)
33 Accreditation Association for Hospitals and Health Systems. (2017). Standard
07.02.03. Healthcare Facilities Accreditation Program: Accreditation
requirements for acute care hospitals. Chicago, IL: Accreditation Association
for Hospitals and Health Systems. (Level VII)
34 The Joint Commission. (2019). Standard RC.01.03 .01. Comprehensive
accreditation manual for hospitals. Oakbrook Terrace, IL: The Joint
Commission. (Level VII)
35 Centers for Medicare and Medicaid Services, Department of Health and
Human Services. (2015). Condition of participation: Medical record services.
42 C.F.R. § 482.24(b).
36 Accreditation Association for Hospitals and Health Systems. (2017). Standard
10.00 .03. Healthcare Facilities Accreditation Program: Accreditation
requirements for acute care hospitals. Chicago, IL: Accreditation Association
for Hospitals and Health Systems. (Level VII)
37 DNV GL-Healthcare USA, Inc. (2016). MR.2 .SR.1 . NIAHO® accreditation
requirements: Interpretive guidelines & surveyor guidance (version 11).
Milford, OH: DNV GL-Healthcare USA, Inc. (Level VII)
38 The Joint Commission. (2013). “Sentinel event alert: Medical device alarm
safety in hospitals” [Online]. Accessed via the Web at
https://www.jointcommission.org/assets/1/6/SEA_50_alarms_4 _26_16.pdf
(Level VII)
39 Ayah, H., et al. (2015). Normal saline instillation before endotracheal
suctioning: “What does the evidence say? What do the nurses think?”:
Multimethod study. Journal of Critical Care, 30(4), 762–767. Accessed via the
Web at http://www.jccjournal.org/article/S0883-9441(15)00082-9/fulltext
(Level V)
40 Yaman, A. Y., & Karabulut, N. (2016). The effects of music therapy in
endotracheal suctioning of mechanically ventilated patients. Nursing in
Critical Care, 21(1), 44–52.
TRACHEOSTOMY AND VENTILATOR SPEAKING
VALVE
Patients with a conventional tracheostomy tube can’t speak
because the cuffed tracheostomy tube that directs air into
the lungs on inspiration expels air through the tracheostomy
tube rather than the vocal cords, mouth, and nose.
Providing a means of communication for such patients is
crucial for their physical and emotional well-being.
Nonverbal means of communicating, such as writing, lip-
reading, alphabet boards, and gestures, can be frustrating
for the patient and family members as well as for health
care personnel.
The Passy-Muir tracheostomy and ventilator speaking
valve (PMV) allows the ventilator-dependent patient to
speak. The PMV is a positive-closure, one-way speaking
valve developed by David Muir (a ventilator-dependent
patient). It opens upon inspiration to allow the patient to
inspire through the tracheostomy tube and then closes after
inspiration, redirecting the exhaled air around the tube,
through the vocal cords, and out of the mouth. Other
speaking valves, such as the Montgomery Ventrach and the
Shiley Phonate, are also available. Some have a closed
valve like the PMV; others have different types of valves.1
Ideally, the tracheostomy should be cuffless; however, if
the tube is cuffed, it must be completely deflated to enable
the patient to exhale and to function safely.1,2 For maximum
airflow around the tube, the tube should be no larger than
two-thirds the size of the tracheal lumen.
Short- and long-term adult, pediatric, and infant
tracheostomy and ventilator-dependent patients may
benefit from the use of a PMV. The PMV 005 is most
commonly used by nonventilated tracheostomy patients,
but it can be used by ventilator patients with rubber,
nondisposable ventilator tubing. The PMV 007 fits easily into
the ventilator tubing used by mechanically ventilated
tracheostomy patients.1 Both valves fit the 15-mm hub of
adult, pediatric, and neonatal tracheostomy tubes, and can
be used by patients either on or off the ventilator.
Two other PMV valves are available: the PMV 2000 and the
PMV 2001. Both of these valves are low-profile and low-
resistance, feature the positive-closure design, and can be
used on or off the ventilator. The PMV 2000 is clear and is
used more readily in the home care setting because it’s less
noticeable. The PMV 2001 is bright purple and is used more
often in health care facilities because the color is more
noticeable. These valves also include safety ties that
prevent valve loss if the patient inadvertently coughs the
PMV out of the tracheostomy tube.
A PMV oxygen adapter is now available for use with the
PMV 2000 series speaking valves. This adapter allows
improved mobility and comfort for patients who require a
tracheostomy tube, speaking valve, and low-flow
supplemental oxygen.
PMV use is contraindicated in patients who require
significant ventilator support, such as those with a high
respiratory rate and minute ventilation requirements, high
fraction of inspired oxygen, positive end-expiratory pressure
greater than 5 cm H2O, respiratory distress, frequent
bronchospasm, or air-trapping problems. It’s also
contraindicated in patients with pneumothorax with or
without air leaks if there’s a potential for increased lung
pressures; in those with a larger-diameter tracheostomy
tube, or a tracheostomy tube with inflated cuff or foam cuff;
in patients with airway obstruction above the tracheostomy,
such as bilateral vocal cord paralysis, severe tracheal or
laryngeal stenosis, or tumor obstruction; in those who have
copious, excessive, or thick secretions; in patients with
paralysis of the lips, tongue, and other muscles involved in
speech; and in those with a laryngectomy.1,3,4
PMV use requires a multidisciplinary team approach. A
practitioner’s order is required for placement of the PMV,
and sometimes for cuff deflation. The nurse, speech-
language pathologist, and respiratory therapist are
responsible for monitoring and assessing the patient while
he or she is using the PMV.2 Ventilator adjustments for the
ventilator-dependent tracheostomy patient are the
respiratory therapist’s responsibility. A speech-language
pathologist should assess the patient’s cognitive, language,
and oral motor function, and may also evaluate swallowing
status and the risk for aspiration. The patient must also be
involved in the decision about whether to use the PMV.
An initial trial assesses the patient’s tolerance. Make sure
that the patient understands how the PMV functions and
what to expect during the trial. The patient who is anxious,
especially during cuff deflation, may be unwilling to use the
valve, so provide emotional support. Assess the patient’s
ability to tolerate cuff deflation before using the PMV.1 The
patient shouldn’t be left unsupervised with the valve in
place until tolerance is determined.1
If the patient can’t tolerate the PMV initially, the team
should troubleshoot to determine the cause. Problem-
solving to increase patient tolerance of the one-way
speaking valve may include tracheostomy tube downsizing,
or continued therapeutic trials with implementation of
strengthening programs to address respiration, voice, and
swallowing.2 Some patients are only able to wear the PMV
for a few minutes at a time, building up time gradually as
tolerated. If repeated trials fail, the speech-language
pathologist should assess the patient for other
communication options.
Equipment
Appropriate-sized PMV ▪ gloves ▪ stethoscope ▪ pulse
oximeter ▪ vital signs monitoring equipment ▪ suction
equipment ▪ handheld resuscitation bag ▪ oxygen source ▪
10-mL Luer-lock syringe ▪ PMV instruction booklet ▪
disinfectant pad ▪ cuff-deflation warning sign.
Keep in mind that the PMV 005 is for a more ambulatory
tracheostomy patient and can be used with flexible rubber
tubing. The PMV 007 and PMV 2001 are more convenient to
use with disposable ventilator tubing. Their color, which is
different from the ventilator tubing, makes it easier to
identify their position in the ventilator circuitry.
Preparation of equipment
Make sure that the oxygen source and handheld
resuscitation bag are readily available at the patient’s
bedside.
Implementation
■ Verify the practitioner’s order.
■ Gather the appropriate equipment.
■ Perform hand hygiene.5,6,7,8,9,10
■ Confirm the patient’s identity using at least two patient
identifiers.11
■ Provide privacy.12,13,14,15
■ Explain the procedure to the patient and family (if
appropriate) according to their individual communication
and learning needs to increase their understanding, allay
their fears, and enhance cooperation.16 Provide the patient
and family (if appropriate) with the written instructions
included in the PMV booklet.
■ If this is the patient’s first experience, coordinate the trial
with the respiratory therapist and speech-language
pathologist.2
■ Raise the bed to waist level when performing patient care
to prevent caregiver back strain.17
■ Elevate the head of the patient’s bed about 45 degrees.
■ Perform hand hygiene.5,6,7,8,9,10
■ Put on gloves.18,19
■ Assess the patient’s vital signs, oxygen saturation level,
breath sounds, level of consciousness, work of breathing,
and tracheal and oral secretions.3
■ Perform tracheal and oral suctioning to clear the airway of
pooled secretions that could leak past the cuff after the cuff
is deflated, increasing the patient’s risk of pneumonia.3
■ Deflate the cuff slowly so the patient can become
accustomed to using the upper airways again. Do this by
first tracing the tubing from the patient to its point of origin
to make sure that you’re connecting the syringe to the pilot
balloon.20 Then attach a 10-mL syringe to the tracheostomy
tube’s pilot balloon (as shown below), and remove the air
until air can no longer be extracted and a vacuum is
created. Suction the trachea and oral cavity as needed. The
tracheostomy cuff must be completely deflated before the
PMV is placed.
NURSING ALERT Never place the PMV on the tracheostomy tube
before deflating the cuff because the patient won’t be able to breathe.
■ Hold the PMV between your fingers. For a patient who
isn’t ventilator-dependent, attach the PMV to the existing
tracheostomy hub with a quarter-turn twist (as shown
below).
■ For the patient who is ventilator-dependent, insert the
PMV into the end of the wide-mouth, short-flex tubing (as
shown below).
■ Connect the other end of the short-flex tubing to the
ventilator tubing.
■ Attach the PMV (connected to the short-flex tubing) and
the ventilator tubing to the closed-suction system (as shown
on next page, top left). Alternatively, attach the PMV
between the swivel adapter and the short-flex tubing and
ventilator tubing.
■ Adjust ventilator settings as needed and ordered. You
may have to increase the tidal volume if air leaks around
the tube.4 Make sure that the ventilator alarms are set
appropriately for the patient’s current condition, and that
the alarms are turned on, functioning properly, and audible
to staff.21,22,23
■ After the PMV is in place, encourage the patient to relax,
and tell the patient to notice how the lungs fill with air when
the machine delivers a breath of air. Instruct the patient to
breathe out through the nose and mouth.
■ Coach the patient to take a breath in first, then speak. Tell
the patient to initially try vocalizing simple sounds, such as
“Ahhhh,” or to count “1, 2, 3, 4.”4
■ Provide reassurance as needed; the speech-language
pathologist can help facilitate voice production and speech
as needed.
■ Evaluate the patient’s response during PMV use. Monitor
vital signs, color, breath sounds, level of consciousness,
work of breathing, and tracheal and oral secretions.
■ Monitor the patient’s oxygen saturation level by pulse
oximetry; maintain a level of at least 90% (or as ordered),
and be alert for signs of respiratory distress.4
NURSING ALERT Remove the PMV at once if the patient shows signs
and symptoms of distress, such as a significant change in blood
pressure or heart rate, increased respiratory rate, dyspnea,
diaphoresis, anxiety, uncontrollable coughing, or arterial oxygen
saturation less than 90%. Reassess the patient before trying the valve
again.2,3
■ Remove the valve and suction as needed to maintain a
patent airway.4
NURSING ALERT Secretions can obstruct air passage outside the
tube, causing respiratory distress and valve intolerance. Although a
one-way speaking valve can improve the strength of the cough, it may
be difficult for the patient to cough secretions up to the mouth with
the valve in place because of the small space between the tube and the
trachea, thicker secretions, inability to take deep breaths, and weak
cough.4
■ Post cuff-deflation warning signs in the room.
■ Label the tracheostomy pilot balloon to remind health
care providers to reinflate the pilot balloon after removing
the PMV.3
■ Gently twist the PMV to remove it. Only when it’s
removed and the original setup is in place should you return
the ventilator settings to their original levels and reinflate
the pilot balloon cuff. Always remember to reinflate the
tracheostomy cuff after removing the PMV.
■ Return the bed to the lowest position to prevent falls and
maintain patient safety.24
■ Remove and discard your gloves.18,19
■ Perform hand hygiene.5,6,7,8,9,10
■ Clean and disinfect your stethoscope using a disinfectant
pad to prevent transmission of microorganisms.25,26
■ Perform hand hygiene.5,6,7,8,9,10
■ Document the procedure.27,28,29,30
Special considerations
■ The PMV 007 and PMV 2001 are more convenient to use
on patients who are ventilator-dependent, because they are
tapered to fit into disposable ventilator tubing.
■ If the patient requiring mechanical ventilation uses a
PMV, the patient’s positive end-expiratory pressure
requirement may lessen, because the PMV causes airway
pressures to rise.3
■ The Joint Commission has issued a sentinel event alert
concerning medical device alarm safety, because alarm-
related events have been associated with permanent loss of
function or death. Among the major contributing factors
were improper alarm settings, alarms inappropriately turned
off, and alarm signals not audible to staff. Make sure that
alarm limits are set appropriately, and that alarms are
turned on, functioning properly, and audible to staff. Follow
facility guidelines for preventing alarm fatigue.31
■ Remove the PMV before administering medicated
nebulizer treatments. If the PMV is inadvertently used
during a nebulizer treatment, remove it immediately and
rinse it thoroughly to remove the medication residue that
may affect performance of the diaphragm.3,4
■ Remove the valve when the patient is sleeping.4
■ If the patient’s tracheostomy tube has a disposable inner
cannula with a grasp ring, you may need to remove the
inner cannula if the grasp ring extends beyond the
tracheostomy tube hub.3
■ A PMV may be used 48 to 72 hours after a tracheotomy in
a non-ventilator-dependent patient if tracheal edema and
secretions from the surgical procedure have decreased.3
■ PMV use may need to be delayed for 48 to 72 hours after
a tracheostomy tube change if tracheal swelling or
bronchospasm occurs as a result of the procedure.3
Complications
Complications of ventilator valve use may include aspiration
of secretions and respiratory distress.
Documentation
Document the type of PMV used and the time the device
was placed. Document the patient’s response to the
procedure, including the amount of time the PMV is in place,
respiratory
and hemodynamic
status,
secretion
management, and ability to vocalize. Document patient
teaching and the patient’s understanding of the teaching.
REFERENCES
1 Morris, L. L ., & Afifi, M. S . (Eds.) . (2010). Tracheostomies: The complete guide.
New York, NY: Springer Publishing Company.
2 Windhorst, C., et al. (2009). Patients requiring tracheostomy and mechanical
ventilation: A model for interdisciplinary decision-making. The ASHA Leader,
14(1), 10–13. Accessed via the Web at
http://leader.pubs.asha.org/article.aspx?articleid=2289674
3 Passy-Muir, Inc. (2015). “Passy-Muir tracheostomy and ventilator swallowing
and speaking valves instruction booklet” [Online]. Accessed via the Web at
http://www.passy-muir.com/sites/default/files/pdf/instructbklt.pdf
4 Grossbach, I., et al. (2011). Promoting effective communication for patients
receiving mechanical ventilation. Critical Care Nurse, 31(3), 46–60 . Accessed
via the Web at http://ccn.aacnjournals.org/content/31/3/46.full.pdf+html
(Level VII)
5 World Health Organization. (2009). “WHO guidelines on hand hygiene in
health care: First global patient safety challenge, clean care is safer care”
[Online]. Accessed via the Web at
http://apps.who.int/iris/bitstream/10665/44102/1/9789241597906_eng.pdf
(Level IV)
6 The Joint Commission. (2017). Standard NPSG.07.01.01. Comprehensive
accreditation manual for hospitals. Oakbrook Terrace, IL: The Joint
Commission. (Level VII)
7 Centers for Disease Control and Prevention. (2002). Guideline for hand
hygiene in health-care settings: Recommendations of the Healthcare Infection
Control Practices Advisory Committee and the HICPAC/SHEA/APIC/IDSA Hand
Hygiene Task Force. MMWR Recommendations and Reports, 51(RR-16), 1–45.
Accessed via the Web at https://www.cdc.gov/mmwr/pdf/rr/rr5116.pdf (Level
II)
8 Centers for Medicare and Medicaid Services, Department of Health and
Human Services. (2015). Condition of participation: Infection control. 42 C.F.R.
§ 482.42.
9 Accreditation Association for Hospitals and Health Systems. (2017). Standard
07.01.21. Healthcare Facilities Accreditation Program: Accreditation
requirements for acute care hospitals. Chicago, IL: Accreditation Association
for Hospitals and Health Systems. (Level VII)
10 DNV GL-Healthcare USA, Inc. (2016). IC.1 .SR.1 . NIAHO® accreditation
requirements: Interpretive guidelines & surveyor guidance (version 11).
Milford, OH: DNV GL-Healthcare USA, Inc. (Level VII)
11 The Joint Commission. (2019). Standard NPSG.01.01.01. Comprehensive
accreditation manual for hospitals. Oakbrook Terrace, IL: The Joint
Commission. (Level VII)
12 The Joint Commission. (2019). Standard RI.01.01.01. Comprehensive
accreditation manual for hospitals. Oakbrook Terrace, IL: The Joint
Commission. (Level VII)
13 DNV GL-Healthcare USA, Inc. (2016). PR.1.SR.5 . NIAHO® accreditation
requirements: Interpretive guidelines & surveyor guidance (version 11).
Milford, OH: DNV GL-Healthcare USA, Inc. (Level VII)
14 Centers for Medicare and Medicaid Services, Department of Health and
Human Services. (2015). Condition of participation: Patient’s rights. 42 C.F.R.
§ 482.13(c)(1).
15 Accreditation Association for Hospitals and Health Systems. (2017). Standard
15.01.16. Healthcare Facilities Accreditation Program: Accreditation
requirements for acute care hospitals. Chicago, IL: Accreditation Association
for Hospitals and Health Systems. (Level VII)
16 The Joint Commission. (2019). Standard PC.02.01.21. Comprehensive
accreditation manual for hospitals. Oakbrook Terrace, IL: The Joint
Commission. (Level VII)
17 Waters, T. R., et al. (2009). “Safe patient handling training for schools of
nursing” [Online]. Accessed via the Web at
https://www.cdc.gov/niosh/docs/2009-127/pdfs/2009-127.pdf (Level VII)
18 Siegel, J. D ., et al. (2007, revised 2017). “2007 guideline for isolation
precautions: Preventing transmission of infectious agents in healthcare
settings” [Online]. Accessed via the Web at
https://www.cdc.gov/infectioncontrol/pdf/guidelines/isolation-guidelines.pdf
(Level II)
19 Accreditation Association for Hospitals and Health Systems. (2017). Standard
07.01.10. Healthcare Facilities Accreditation Program: Accreditation
requirements for acute care hospitals. Chicago, IL: Accreditation Association
for Hospitals and Health Systems. (Level VII)
20 U.S . Food and Drug Administration. (n.d .). “Look. Check. Connect. Safe
medical device connections save lives” [Online]. Accessed via the Web at
http://www.fda.gov/downloads/MedicalDevices/Safety/AlertsandNotices/UCM1
34873.pdf
21 American Association of Critical-Care Nurses. (2018). “A ACN practice alert:
Managing alarms in acute care across the life span: Electrocardiography and
pulse oximetry” [Online]. Accessed via the Web at
https://www.aacn.org/clinical-resources/practice-alerts/managing-alarms-in-
acute-care-across-the-life-span (Level VII)
22 The Joint Commission. (2019). Standard NPSG.06 .01.01. Comprehensive
accreditation manual for hospitals. Oakbrook Terrace, IL: The Joint
Commission (Level VII)
23 Graham, K. C., & Cvach, M. (2010). Monitor alarm fatigue: Standardizing use
of physiological monitors and decreasing nuisance alarms. American Journal
of Critical Care, 19(1), 28–37. Accessed via the Web at
http://ajcc.aacnjournals.org/content/19/1/28.full.pdf
24 Ganz, D. A., et al. (2013). Preventing falls in hospitals: A toolkit for improving
quality of care (AHRQ Publication No. 13-0015-EF). Rockville, MD: Agency for
Healthcare Research and Quality. Accessed via the Web at
http://www.ahrq.gov/sites/default/files/publications/files/fallpxtoolkit.pdf
(Level VII)
25 Rutala, W. A., et al. (2008, revised 2017). “Guideline for disinfection and
sterilization in healthcare facilities, 2008” [Online]. Accessed via the Web at
https://www.cdc.gov/infectioncontrol/pdf/guidelines/disinfection-
guidelines.pdf (Level I)
26 Accreditation Association for Hospitals and Health Systems. (2017). Standard
07.02.03. Healthcare Facilities Accreditation Program: Accreditation
requirements for acute care hospitals. Chicago, IL: Accreditation Association
for Hospitals and Health Systems. (Level VII)
27 The Joint Commission. (2019). Standard RC.01.03 .01. Comprehensive
accreditation manual for hospitals. Oakbrook Terrace, IL: The Joint
Commission. (Level VII)
28 Accreditation Association for Hospitals and Health Systems. (2017). Standard
10.00 .03. Healthcare Facilities Accreditation Program: Accreditation
requirements for acute care hospitals. Chicago, IL: Accreditation Association
for Hospitals and Health Systems. (Level VII)
29 Centers for Medicare and Medicaid Services, Department of Health and
Human Services. (2015). Condition of participation: Medical record services.
42 C.F.R. § 482.24(b).
30 DNV GL-Healthcare USA, Inc. (2016). MR.2 .SR.1 . NIAHO® accreditation
requirements: Interpretive guidelines & surveyor guidance (version 11).
Milford, OH: DNV GL-Healthcare USA, Inc. (Level VII)
31 The Joint Commission. (2013). “Sentinel event alert: Medical device alarm
safety in hospitals” [Online]. Accessed via the Web at
http://www.jointcommission.org/assets/1/6/SEA_50_alarms_4 _26_16.PDF
(Level VII)
TRACHEOSTOMY CARE
Whether a tracheotomy is performed in an emergency
situation or after careful preparation, as a permanent
measure or as temporary therapy, tracheostomy care has
identical goals: to ensure airway patency by keeping the
tube free of mucus buildup, to maintain mucous membrane
and skin integrity, to prevent infection, and to provide
psychological support.
The patient may have one of three types of tracheostomy
tube: uncuffed, cuffed, or fenestrated. Tube selection
depends on the patient’s condition and the practitioner’s
preference.
An uncuffed tube, which may be plastic or metal, allows
air to flow freely around the tracheostomy tube and through
the larynx, reducing the risk of tracheal damage. A cuffed
tube, made of plastic, is disposable. The cuff and the tube
won’t separate accidentally inside the trachea because the
cuff is bonded to the tube. A cuffed tube doesn’t require
periodic deflating to lower pressure because cuff pressure is
low and evenly distributed against the tracheal wall. A
plastic fenestrated tube permits speech through the upper
airway when the external opening is capped and the cuff is
deflated. It also allows easy removal of the inner cannula for
cleaning. However, a fenestrated tube may become
occluded. (See Types of tracheostomy tubes, page 756.)
The maximum acceptable tracheostomy tube cuff
pressure is 25 mm Hg.1,2 Cuff inflation or deflation may be
necessary to maintain this optimal pressure. When cuff
pressure is inadequate, oropharyngeal secretions can leak
around the cuff, increasing the risk of ventilator-associated
pneumonia (VAP).3 Overinflation of the cuff can cause
tracheal necrosis, tracheomalacia, tracheoinnominate artery
fistula, tracheal ulceration, fibrosis, tracheoesophageal
fistula, and tracheal stenosis.4 High cuff pressure can also
result from malposition of the tracheostomy or insertion of a
tube that’s too small in diameter, requiring overfilling of the
cuff to achieve a seal in the trachea.1 Actual cuff pressure
varies with each patient, however. To keep the pressure
within safe limits, measure cuff pressure at least once each
shift or at an interval determined by your facility.5 (See the
“Tracheal cuff pressure measurement” procedure.) A
respiratory therapist or nurse can maintain and measure
tracheal cuff pressure.
Tracheostomy cuff deflation is necessary to remove the
tube, secure a decannulation cap, attach a speaking valve
to the tube, and enable the patient to eat or drink.2
To prevent infection, all tracheostomy care should be
performed using sterile technique until the stoma has
healed. For recently performed tracheotomies, sterile gloves
are required for all manipulations at the tracheostomy site.
When the stoma has healed, clean gloves can be
substituted for sterile ones.
Changing tracheostomy ties helps prevent infection and
the skin underneath the ties from becoming excoriated and
wet. Two types of tracheostomy ties may be used to secure
tracheostomy tubes: twill tape or a commercially prepared
tracheostomy tube holder. A commercially prepared
tracheostomy tube holder is recommended because it
protects the patient from pressure on the back of the neck
and is easily adjustable. 2
Equipment
For cuff inflation and deflation
10-mL syringe ▪ gloves ▪ stethoscope ▪ facility-approved
disinfectant pad ▪ handheld resuscitation bag ▪ sterile
tracheostomy tubes (same size as the tube currently in
place and one a size smaller)4 ▪ obturator ▪ Optional:
tracheostomy cuff manometer, gown, mask, goggles, mask
with face shield.
For tracheostomy ties change
30′′ (76.2-cm) length of tracheostomy twill tape or a
commercially prepared tracheostomy tube holder with
Velcro ties ▪ bandage scissors ▪ gloves ▪ stethoscope ▪
disinfectant pad ▪ normal saline solution ▪ sterile 4′′ × 4′′
(10-cm × 10-cm) gauze pads ▪ oral care supplies ▪
emergency equipment: handheld resuscitation bag attached
to oxygen source and mask, sterile tracheostomy tubes
(same size as the tube currently in place and one a size
smaller)4 obturator ▪ Optional: gown, mask with face shield
or mask and goggles, sterile precut tracheostomy dressing,
hemostat, suction equipment, skin barrier.
EQUIPMENT
Types of tracheostomy tubes
Cuffed and uncuffed tracheostomy tubes each have advantages and
disadvantages. Cuffed tubes help seal the area between the tube and
trachea, decreasing the patient’s risk of aspiration. However, if the cuff
pressure isn’t regularly monitored, this type of tube can erode the trachea.
Also, if the cuff is inflated, the patient can’t talk and needs an alternate
means of communication.
Uncuffed tubes allow the patient to eat and talk. However, this type of tube
can’t be used in a patient who is receiving mechanical ventilation, because
oxygen may escape from around the tube.
For tracheostomy tube cannula and stoma care
Disposable inner cannula ▪ two or three sterile solution
containers ▪ sterile normal saline solution or sterile water ▪
sterile cotton-tipped applicators ▪ sterile 4′′ × 4′′ (10-cm ×
10-cm) gauze pads ▪ sterile gloves ▪ clean gloves ▪
prepackaged sterile tracheostomy dressing ▪ sterile nylon
brush ▪ suctioning supplies ▪ oral care supplies ▪
stethoscope ▪ disinfectant pad ▪ handheld resuscitation bag
connected to an oxygen source ▪ extra tracheostomy tubes
and obturator4 ▪ Optional: skin barrier,6 sterile pipe
cleaners, tracheostomy ties, other personal protective
equipment (gown, mask and goggles or mask with face
shield), extra inner cannula, foam tracheostomy dressing,
water-soluble lubricant or topical antibiotic cream.
Note: Commercially prepared tracheostomy care kits are
available.
Preparation of equipment
For tracheostomy tube cannula and stoma care
Make sure the extra tracheostomy tubes and obturator and
the handheld resuscitation bag attached to an oxygen
source are readily available in case of an emergency. Check
the expiration date on each sterile package, and inspect for
tears.
Place equipment and supplies on a clean table or stand
near the patient’s bed. Open the tracheostomy care kit (if
available in your facility) using sterile technique. Using
sterile technique, pour sterile normal saline solution or
sterile water into one of the sterile solution containers, and
then pour sterile normal saline solution or sterile water into
the second sterile container for rinsing.7 For inner cannula
care, you may use a third sterile solution container to hold
the gauze pads and cotton-tipped applicators saturated with
normal saline solution.
If you’ll be replacing the disposable inner cannula, open
the package containing the new inner cannula while
maintaining sterile technique.8 Obtain or prepare new
tracheostomy ties if indicated.
Implementation
■ Gather and prepare the equipment.
■ Perform hand hygiene.9,10,11,12,13,14
■ Confirm the patient’s identity using at least two patient
identifiers.15
■ Provide privacy.16,17,18,19
■ Assess the patient’s condition to determine the need for
care.
■ Explain the procedure to the patient and family (if
appropriate) according to their individual communication
and learning needs to increase their understanding, allay
their fears, and enhance cooperation. This should be done
even if the patient is unresponsive.20
■ Raise the patient’s bed to waist level while performing
patient care to prevent caregiver back strain.21
■ Elevate the head of the bed to 30 to 45 degrees (unless
it’s contraindicated) to decrease abdominal pressure on the
diaphragm, promote lung expansion, and reduce the risk of
aspiration.8,22,23,24,25
■ Perform hand hygiene.9,10,11,12,13,14
■ Put on gloves and other personal protective equipment,
as needed.8,26,27 Use a mask with a face shield or a mask
and goggles if spraying with respiratory secretions is likely.28
■ Assess the need for suctioning.8
■ Hyperoxygenate the patient for 30 to 60 seconds before
suctioning (if needed) by adjusting the fraction of inspired
oxygen on the mechanical ventilator or using the temporary
oxygen-enrichment program available on the ventilator to
prevent hypoxemia.28
For cuff inflation and deflation
■ Remove the ventilation device or humidified oxygen.
■ Trace the tubing from the patient to its point of origin to
make sure that you’re connecting the syringe to the cuff
pilot balloon port.29
■ Insert a 10-mL syringe into the cuff pilot balloon.
■ To deflate the cuff, ventilate the patient with a handheld
resuscitation bag, and slowly withdraw air from the cuff until
you hear a small leak with a stethoscope over the larynx
during inspiration. Slow deflation allows positive lung
pressure to push secretions upward from the bronchi. Cuff
deflation can also stimulate the patient’s cough reflex,
producing additional secretions. Remove the syringe if you
aren’t immediately reinflating the cuff.
■ Inflate the cuff per the manufacturer’s recommendation
or practitioner’s order.
■ Remove the syringe.
■ Attach a cuff pressure manometer to the cuff pilot balloon
port and read the measurement.
■ Adjust the pressure, as needed. If the cuff pressure
measures greater than 25 mm Hg (25 cm H2O), press the
pressure-release button on the device until the pressure
reaches 20 to 25 mm Hg (20 to 25 cm H2O).8 If the pressure
measures less than 20 mm Hg (20 cm H2O), add air by
squeezing the bulb until the pressure reaches 20 to 25 mm
Hg (20 to 25 cm H2O).8
■ If you’re not able to maintain adequate pressure, notify
the practitioner.8
NURSING ALERT Minimal occlusive volume and minimal leak
inflation techniques have been found to increase the risk of silent
aspiration. Guidelines recommend using a measuring device, such as a
manometer, to achieve optimal cuff pressures and decrease the risk of
adverse events.5,8,30,31
■ Disconnect the cuff pressure manometer from the cuff
pilot balloon port.
■ Reconnect the ventilation device or humidified oxygen.
■ If the patient is on a ventilator, make sure that the
ventilator alarms are set appropriately for the patient’s
current condition, and that the alarms are turned on,
functioning properly, and audible to staff.32,33,34
■ Reassess the patient’s respiratory status and compare
the findings to baseline findings.8
■ Note the exact amount of air used to inflate the cuff to
help detect tracheomalacia if more air is consistently
needed.
For tracheostomy ties change
■ Obtain assistance from another nurse or a respiratory
therapist because of the risk of accidental tube
dislodgement.6
NURSING ALERT Research overwhelmingly recommends a two-person
technique for changing a tracheostomy tube securing device to
prevent tube dislodgment. In the two-person technique, one person
holds the tracheostomy tube in place while the other person changes
the securing device.6
Ties change using twill tape
■ If you aren’t using a commercially packaged
tracheostomy tube holder, prepare new ties from a 30′′
(76.2 -cm) length of twill tape by folding one end back 1′′
(2.5 cm) on itself. Then, with the bandage scissors, cut a 1⁄2′′
(1.3 -cm) slit down the center of the tape from the folded
edge.
■ Prepare the other end of the tape the same way.
■ Hold both ends together and, using scissors, cut the
resulting circle of tape so that one piece is approximately
10′′ (25 cm) long and the other is about 20′′ (51 cm) long.
■ Instruct the assistant to hold the tracheostomy tube in
place to prevent its expulsion during replacement of the ties
and to minimize irritation and coughing due to tube
manipulation.4,8
■ With the assistant’s gloved fingers holding the
tracheostomy tube in place, cut the soiled tracheostomy ties
with the bandage scissors, or untie them and discard the
ties. Be careful not to cut the tube of the pilot balloon.
■ Thread the slit end of one new tie a short distance
through the eye of one tracheostomy tube flange from the
underside; use the hemostat, if needed, to pull the tie
through. Then thread the other end of the tie completely
through the slit end, and pull it taut so it loops firmly
through the flange. This technique avoids knots that can
cause throat discomfort, tissue irritation, pressure, and
necrosis of the patient’s throat.
■ Fasten the second tie to the opposite flange in the same
manner.
■ Instruct the patient to flex the neck while you bring the
ties around to the side, and tie them together with a square
knot. Flexion produces the same neck circumference as
coughing and helps prevent an overly tight tie. Instruct your
assistant to place one finger under the tapes as you tie
them to ensure that they’re tight enough to avoid slippage
but loose enough to prevent choking or jugular vein
constriction.3,4 Placing the closure on the side allows easy
access and prevents pressure necrosis at the back of the
neck when the patient is recumbent.
■ After securing the ties, cut off the excess tape with the
scissors, and instruct the assistant to release the
tracheostomy tube.
Changing a commercially prepared
tracheostomy tube holder
■ Instruct the assistant to put on gloves and then hold the
tracheostomy tube in place to prevent its expulsion during
replacement of the ties.4,8
■ Remove the old tracheostomy tube holder by opening the
Velcro tabs.
■ Thread one Velcro tab through the flange and secure it.
■ Bring the loose end of the tracheostomy tube holder
around the back of the patient’s neck.
■ Thread the remaining Velcro tab through the other flange
and secure it.
■ Adjust the right and left Velcro tabs, as needed, to ensure
that only one finger can slide under the tie.4 Fastening too
tightly can lead to skin breakdown and vascular obstruction;
fastening too loosely can lead to tube expulsion.3
■ Check tracheostomy tie tension frequently on a patient
with traumatic injury, radical neck dissection, or cardiac
failure, because neck diameter can increase from swelling
and cause constriction; also check a restless patient
frequently, because ties can loosen and cause tube
dislodgment.
■ If necessary, apply a sterile, precut tracheostomy
dressing by sliding the dressing under the flanges of the
tracheostomy tube, starting at the bottom and moving to
the top.
NURSING ALERT Use a manufactured split dressing; don’t cut a
gauze pad, because loose fibers around the stoma or tracheostomy
tube can cause irritation and increase the risk of infection.6
For tracheostomy tube cannula and stoma care
■ Perform hand hygiene.9,10,11,12,13,14
■ Put on gloves and other personal protective equipment as
needed.8,26,27 Use a mask with face shield or mask and
goggles if spraying of respiratory secretions is likely.28
■ Assess the need for suctioning.8
■ Hyperoxygenate the patient for 30 to 60 seconds before
suctioning (if needed) by adjusting the fraction of inspired
oxygen on the mechanical ventilator or by using the
temporary oxygen-enrichment program available on the
ventilator to prevent hypoxemia.28
■ If needed, suction the tracheostomy tube by inserting the
suction catheter to a premeasured distance6,8 to clear the
airway of any secretions that may hinder oxygenation.
Determine the volume of secretions, and assess them for
color, consistency, and odor. (See the “Tracheal suctioning,
intubated patient” procedure, page 748.)
■ With your nondominant hand, reconnect the patient to
the humidifier or ventilator, if necessary. Hyperoxygenate
the patient for at least 1 minute following suctioning.8,28
■ Remove the patient’s tracheostomy dressing, inspect it
for drainage, and then discard it.8
■ Assess the patient’s cardiac and respiratory status to
evaluate response to suctioning.1,28
■ Remove and discard your gloves.26,27
■ Perform hand hygiene.9,10,11,12,13,14
Cleaning a nondisposable inner cannula
■ Put on sterile gloves.8,26,27
■ Using your nondominant hand, disconnect the ventilator
or humidification device and unlock the tracheostomy tube’s
inner cannula by rotating it counterclockwise (as shown
below).8
■ Remove the inner cannula and place it in the container of
sterile normal saline solution or sterile water, but don’t allow
it to soak.7
■ Place the ventilator oxygen device or humidification
device over or near the outer cannula to maintain the
oxygen supply.
■ Working quickly, use your dominant hand to scrub the
cannula with the sterile nylon brush (as shown on next
page, top left).8 You may also use a sterile pipe cleaner
(provided in a commercially prepared tracheostomy care kit)
if necessary to clean the inner cannula.1
■ Immerse the cannula in the container of normal saline
solution or sterile water (as shown below), and agitate it for
about 10 seconds to rinse it thoroughly.
■ Inspect the cannula for cleanliness. Repeat the cleaning
process if necessary. When it’s clean, tap it gently against
the inside edge of the sterile container to remove excess
liquid and prevent aspiration. Alternatively, you can use a
pipe cleaner to dry the inside of the inner cannula.3 Don’t
dry the outer surface, because a thin film of moisture acts
as a lubricant during insertion.
■ Reinsert the inner cannula into the patient’s
tracheostomy tube. Lock it in place and then gently pull on
it to make sure it’s positioned securely. Reconnect the
mechanical ventilator or humidification device.8
■ If the patient can’t tolerate being disconnected from the
ventilator for the time it takes to clean the inner cannula,
replace the existing inner cannula with a clean one and
reattach the mechanical ventilator. Then clean the cannula
that you just removed from the patient and store it in a
sterile container for the next time.8
Replacing a disposable inner cannula
■ Perform hand hygiene.9,10,11,12,13,14
■ Put on clean gloves.8,26,27
■ Using your dominant hand, remove the patient’s inner
cannula.8 After evaluating the secretions in the cannula,
discard it properly.
■ Pick up the new inner cannula, touching only the outer
locking portion. Insert the cannula into the tracheostomy
and, following the manufacturer’s instructions, lock it
securely.8
■ Replace any humidification or ventilation device.27
■ Remove and discard your gloves.26,12
Cleaning the stoma and outer cannula
■ Perform hand hygiene.9,10,11,12,13,14
■ Put on clean gloves.8,26,27
■ With your dominant hand, moisten a sterile gauze pad
with sterile normal saline solution or sterile water. Squeeze
out the excess liquid to prevent accidental aspiration. Then
wipe the patient’s neck under the tracheostomy tube
flanges and the twill tape or commercially prepared
tracheostomy tube holder.
■ Assess the stoma site and surrounding skin for redness,
swelling, and drainage, which may indicate infection.4,8
■ Use a sterile cotton-tipped applicator and a sterile gauze
pad to clean the stoma site and the tube’s flanges. Wipe
only once with each applicator or gauze pad and then
discard it, to prevent contamination of a clean area with a
soiled applicator or pad.8 Loosen dried secretions with a
sterile, cotton-tipped applicator or sterile gauze pad
containing diluted hydrogen peroxide solution, if necessary.
However, keep in mind that hydrogen peroxide has been
shown to delay wound healing.35
■ Rinse debris with one or more sterile 4′′ × 4′′ (10-cm × 10-
cm) gauze pads dampened in sterile normal saline solution
or sterile water.
■ Dry the area thoroughly with additional sterile gauze
pads; apply a skin barrier, as needed.6
■ Remove the tracheostomy ties and apply new ties, if
needed.
■ Apply a new sterile tracheostomy dressing.4,8 Sites with
excessive moisture may require a foam tracheostomy
dressing.20
NURSING ALERT Always use a manufactured split dressing; don’t cut
a gauze pad, because loose fibers around the stoma or tracheostomy
tube can cause irritation and increase the risk of infection.6
Completing the procedure
■ Make sure that the patient is comfortable, the head of the
patient’s bed is elevated 30 to 45 degrees to prevent
ventilator-associated pneumonia,23,24,25 and the patient can
easily reach the call light and communication aids.
■ Properly clean or dispose of all equipment and supplies in
the appropriate receptacles.
■ Return the bed to the lowest position to prevent falls and
maintain patient safety.36
■ Remove and discard your gloves and any other personal
protective equipment worn.8,26,27
■ Make sure all necessary supplies are readily available at
the bedside.
■ Perform hand hygiene.9,10,11,12,13,14
■ As needed, clean and disinfect your stethoscope using a
disinfectant pad.37,38
■ Perform hand hygiene.9,10,11,12,13,14
■ Document the procedure.39,40,41,42
Special considerations
■ Follow your facility’s guidelines regarding the correct
procedure if a tracheostomy tube is expelled or if the outer
cannula becomes blocked. If the patient’s breathing is
obstructed—for example, when the tube is blocked with
mucus that can’t be removed by suctioning or by
withdrawing the inner cannula—call the appropriate code
and provide manual resuscitation with a handheld
resuscitation bag, or reconnect the patient to the ventilator.
Don’t remove the tracheostomy tube entirely, because
removal may allow the airway to completely close. Use
extreme caution when attempting to reinsert an expelled
tracheostomy tube because of the risk of tracheal trauma,
perforation, compression, and asphyxiation.
■ Commercially prepared tracheostomy tube holders are
typically more comfortable and easier to apply than ties
made from twill tape; however, they may degrade over
time, especially when washed with hot water.3
■ Refrain from changing tracheostomy ties unnecessarily
during the immediate postoperative period before the
stoma track is well formed (usually 4 days) to avoid
accidental dislodgement and expulsion of the tube.3,8
■ Refrain from changing a single-cannula tracheostomy
tube or the outer cannula of a double-cannula tube.
Because of the risk of tracheal complications, the
practitioner typically changes the cannula; the frequency of
change depends on the patient’s condition.
■ If the patient’s neck or stoma is excoriated or infected,
consult the practitioner or a wound, ostomy, and continence
nurse for an individualized care plan.1 Don’t use a powder or
an oil-based substance on or around a stoma, because
aspiration can cause infection and abscess.
■ The optimal frequency for cleaning the inner cannula
hasn’t been determined.3,4 Clean or change the inner
cannula when needed, and inspect it regularly, at least two
times per day.3,4
■ Clean the stoma site every 4 to 8 hours.4
■ Change the dressing frequently whenever secretions
begin to collect, because a wet dressing with exudate or
secretions predisposes the patient to skin excoriation,
breakdown, and infection.4
■ If you accidentally remove the outer cannula of a cuffed
tracheostomy tube or the patient coughs it out, never use
hydrogen peroxide to clean it. Using hydrogen peroxide may
affect the integrity of the cuff. Instead, replace it with a new
tracheostomy tube.
■ Replace all equipment, including solutions, regularly
according to your facility’s policy to reduce the risk of health
care–acquired infections.
■ The Joint Commission issued a sentinel event alert
concerning medical device alarm safety, because alarm-
related events have been associated with permanent loss of
function and death. Among the major contributing factors
were improper alarm settings, inappropriately turned off
alarms, and alarm signals not audible to staff. Make sure
that alarm limits are appropriately set, and that alarms are
turned on, functioning properly, and audible to staff. Follow
facility guidelines for preventing alarm fatigue.43
■ Note that cuff pressure values vary and decrease over
time. Unless you perform continuous monitoring or attach
an automatic regulating device, maintaining a cuff pressure
value within the therapeutic range can be difficult owing to
changes in body position and head alignment, tube
migration, coughing, lung compliance, and airway and
intrathoracic pressures.44,45
Guidelines
recommend
frequent, routine assessment of cuff pressure, but don’t
identify optimal frequency.5,46
Patient teaching
If the patient is being discharged with a tracheostomy, start
self-care teaching as soon as the patient is receptive. Teach
the patient how to change and clean the tube. If the patient
is being discharged with suction equipment, make sure both
patient and family understand the equipment and feel
comfortable using it.
Teach the patient and family about measures to prevent
ventilator-associated pneumonia, including maintaining the
head of the bed at 30 to 45 degrees, and encourage them to
alert staff members when the bed doesn’t appear to be
positioned correctly.23,24
Complications
Secretions that collect under dressings can encourage skin
excoriation and infection. Hardened mucus or a slipped cuff
can occlude the cannula opening and obstruct the airway.
Tube displacement can stimulate the cough reflex if the tip
rests on the carina, or it can cause blood vessel erosion and
hemorrhage. Just the presence of the tube or excessive cuff
pressure can produce tracheal erosion and necrosis. The
cuff can rupture from overinflation, or the tube can dislodge
during deflation.
Complications associated with changing tracheostomy ties
include dislodgement of the tube. Skin breakdown and
vascular obstruction can occur if the ties are too tight.
Expulsion of the tube can occur if the ties are too loose.
Tracheal wall injury and aspiration are possible with
inadequate cuff pressures.30
Documentation
Record the date and time of the procedure; the type of
procedure; the amount, consistency, color, and odor of
secretions; stoma and skin condition; the patient’s
respiratory status; changing of the tracheostomy tube by
the practitioner; the duration of any cuff deflation; the
amount of any cuff inflation; and cuff pressure readings and
specific body position. Note complications and nursing
actions taken, any teaching you provided, patient or family
comprehension of the teaching and progress, and the
patient’s tolerance of the treatment.
REFERENCES
1 Regan, E. N., & Dallachiesa, L. (2009). How to care for a patient with a
tracheostomy. Nursing2009, 39(8), 34–39 . Accessed via the Web at
http://journals.lww.com/nursing/Citation/2009/08000/How_to_care_for_a _patie
nt_with_a _tracheostomy.16.aspx (Level VII)
2 Intensive Care Society. (2014). “Standards for the care of adult patients with
a temporary tracheostomy; Standards and guidelines” [Online]. Accessed via
the Web at https://www.ics.ac .uk/AsiCommon/Controls/BSA/Downloader.aspx?
iDocumentStorageKey=5b70a7af-c79c-4e49-bca1-
648b98c06598&iFileTypeCode=PDF&iFileName=ICS Tracheostomy Standards
(2014) (Level VII)
3 Morris, L. L ., & Afifi, S. (Eds.). (2010). Tracheostomies: The complete guide.
New York, NY: Springer.
4 Morris, L. L ., et al. (2013). Tracheostomy care and complications in the
intensive care unit. Critical Care Nurse, 33(5), 18–30 . (Level VII)
5 Khan, M. U ., et al. (2016). Measurement of endotracheal tube cuff pressure:
Instrumental versus conventional method. Saudi Journal of Anaesthesia,
10(4), 428–431. Accessed via the Web at
https://www.ncbi.nlm.nih.gov/pmc/articles/PMC5044728/
6 Nance-Floyd, B. (2011). Tracheostomy care: An evidence-based guide to
suctioning and dressing changes. American Nurse Today, 6(7), 14–16.
Accessed via the Web at https://www.americannursetoday.com/tracheostomy-
care-an-evidence-based-guide-to-suctioning-and-dressing-changes/ (Level VII)
7 Joanna Briggs Institute. (2016). Tracheostomy: Cleaning inner cannula. South
Australia: Joanna Briggs Institute. (Level V)
8 Wiegand, D. L. (2017). AACN procedure manual for high acuity, progressive,
and critical care (7th ed.). St. Louis: Elsevier.
9 Centers for Disease Control and Prevention. (2002). Guideline for hand
hygiene in health-care settings: Recommendations of the Healthcare Infection
Control Practices Advisory Committee and the HICPAC/SHEA/APIC/IDSA Hand
Hygiene Task Force. MMWR Recommendations and Reports, 51(RR-16), 1–45.
Accessed via the Web at https://www.cdc.gov/mmwr/pdf/rr/rr5116.pdf (Level
II)
10 The Joint Commission. (2019). Standard NPSG.07.01.01. Comprehensive
accreditation manual for hospitals. Oakbrook Terrace, IL: The Joint
Commission. (Level VII)
11 World Health Organization. (2009). “WHO guidelines on hand hygiene in
health care: First global patient safety challenge, clean care is safer care”
[Online]. Accessed via the Web at
http://apps.who.int/iris/bitstream/10665/44102/1/9789241597906_eng.pdf
(Level IV)
12 Centers for Medicare and Medicaid Services, Department of Health and
Human Services. (2015). Condition of participation: Infection control. 42 C.F.R.
§ 482.42.
13 Accreditation Association for Hospitals and Health Systems. (2017). Standard
07.01.21. Healthcare Facilities Accreditation Program: Accreditation
requirements for acute care hospitals. Chicago, IL: Accreditation Association
for Hospitals and Health Systems. (Level VII)
14 DNV GL-Healthcare USA, Inc. (2016). IC.1 .SR.1 . NIAHO® accreditation
requirements: Interpretive guidelines & surveyor guidance (version 11).
Milford, OH: DNV GL-Healthcare USA, Inc. (Level VII)
15 The Joint Commission. (2019). Standard NPSG.01.01.01. Comprehensive
accreditation manual for hospitals. Oakbrook Terrace, IL: The Joint
Commission. (Level VII)
16 Accreditation Association for Hospitals and Health Systems. (2017). Standard
15.01.16. Healthcare Facilities Accreditation Program: Accreditation
requirements for acute care hospitals. Chicago, IL: Accreditation Association
for Hospitals and Health Systems. (Level VII)
17 Centers for Medicare and Medicaid Services, Department of Health and
Human Services. (2015). Condition of participation: Patient’s rights. 42 C.F.R.
§ 482.13(c)(1).
18 The Joint Commission. (2019). Standard RI.01.01.01. Comprehensive
accreditation manual for hospitals. Oakbrook Terrace, IL: The Joint
Commission. (Level VII)
19 DNV GL-Healthcare USA, Inc. (2016). PR.1.SR.5 . NIAHO® accreditation
requirements: Interpretive guidelines & surveyor guidance (version 11).
Milford, OH: DNV GL-Healthcare USA, Inc. (Level VII)
20 The Joint Commission. (2019). Standard PC.02.01.21. Comprehensive
accreditation manual for hospitals. Oakbrook Terrace, IL: The Joint
Commission. (Level VII)
21 Waters, T. R., et al. (2009). “Safe patient handling training for schools of
nursing” [Online]. Accessed via the Web at
https://www.cdc.gov/niosh/docs/2009-127/pdfs/2009-127.pdf (Level VII)
22 American Association of Critical-Care Nurses. (2008). “A ACN practice alert:
Ventilator-associated pneumonia” [Online]. Accessed via the Web at
https://www.aacn.org/clinical-resources/practice-alerts/ventilator-associated-
pneumonia-vap (Level VII)
23 Institute for Healthcare Improvement. (2012). How-to guide: Prevent
ventilator-associated pneumonia. Cambridge, MA: Institute for Healthcare
Improvement. (Level VII)
24 Association of Professionals in Infection Control and Epidemiology. (2009). “An
APIC guide 2009: Guide to the elimination of ventilator-associated
pneumonia” [Online]. Accessed via the Web at
http://www.apic.org/Resource_/EliminationGuideForm/18e326ad-b484-471c-
9c35-6822a53ee4a2/File/VAP_09 .pdf (Level IV)
25 Accreditation Association for Hospitals and Health Systems. (2017). Standard
07.01.02. Healthcare Facilities Accreditation Program: Accreditation
requirements for acute care hospitals. Chicago, IL: Accreditation Association
for Hospitals and Health Systems. (Level VII)
26 Siegel, J. D ., et al. (2007, revised 2017). “2007 guideline for isolation
precautions: Preventing transmission of infectious agents in healthcare
settings” [Online]. Accessed via the Web at
https://www.cdc.gov/infectioncontrol/pdf/guidelines/isolation-guidelines.pdf
(Level II)
27 Accreditation Association for Hospitals and Health Systems. (2017). Standard
07.01.10. Healthcare Facilities Accreditation Program: Accreditation
requirements for acute care hospitals. Chicago, IL: Accreditation Association
for Hospitals and Health Systems. (Level VII)
28 American Association for Respiratory Care. (2010). AARC clinical practice
guideline: Endotracheal suctioning of mechanically ventilated patients with
artificial airways 2010. Respiratory Care, 55(6), 758–764. Accessed via the
Web at http://www.rcjournal.com/cpgs/pdf/06.10.0758.pdf (Level VII)
29 U.S . Food and Drug Administration. (n.d .). “Look. Check. Connect. Safe
medical device connections save lives” [Online]. Accessed via the Web at
http://www.fda.gov/downloads/MedicalDevices/Safety/AlertsandNotices/UCM1
34873.pdf
30 Kacmarek, R. M . (2017). Egan’s fundamentals of respiratory care (11th ed.) .
St. Louis, MO: Elsevier.
31 Jordan, P., et al. (2012). Endotracheal tube cuff pressure management in
adult critical care units. South African Journal of Critical Care, 28(1), 13–16.
Accessed via the Web at
http://www.sajcc.org.za/index.php/SAJCC/article/view/129/148
32 The Joint Commission. (2019). Standard NPSG.06 .01.01. Comprehensive
accreditation manual for hospitals. Oakbrook Terrace, IL: The Joint
Commission. (Level VII)
33 Graham, K. C., & Cvach, M. (2010). Monitor alarm fatigue: Standardizing use
of physiological monitors and decreasing nuisance alarms. American Journal
of Critical Care, 19(1), 28–37. Accessed via the Web at
http://ajcc.aacnjournals.org/content/19/1/28.full.pdf
34 American Association of Critical-Care Nurses. (2018). “Managing alarms in
acute care across the life span: Electrocardiography and pulse oximetry”
[Online]. Accessed via the Web at https://www.aacn.org/clinical-
resources/practice-alerts/managing-alarms-in-acute-care-across-the-life-span
35 Thomas, G. L., et al. (2009). Mechanisms of delayed wound healing by
commonly used antiseptics. The Journal of Trauma, 66(1), 82–90 .
36 Ganz, D. A., et al. (2013). Preventing falls in hospitals: A toolkit for improving
quality of care (AHRQ Publication No. 13-0015-EF). Rockville, MD: Agency for
Healthcare Research and Quality. Accessed via the Web at
http://www.ahrq.gov/sites/default/files/publications/files/fallpxtoolkit.pdf
(Level VII)
37 Accreditation Association for Hospitals and Health Systems. (2017). Standard
07.02.03. Healthcare Facilities Accreditation Program: Accreditation
requirements for acute care hospitals. Chicago, IL: Accreditation Association
for Hospitals and Health Systems. (Level VII)
38 Rutala, W. A., et al. (2008, revised 2017). “Guideline for disinfection and
sterilization in healthcare facilities, 2008” [Online]. Accessed via the Web at
https://www.cdc.gov/infectioncontrol/pdf/guidelines/disinfection-
guidelines.pdf (Level I)
39 The Joint Commission. (2019). Standard RC.01.03 .01. Comprehensive
accreditation manual for hospitals. Oakbrook Terrace, IL: The Joint
Commission. (Level VII)
40 Centers for Medicare and Medicaid Services, Department of Health and
Human Services. (2015). Condition of participation: Medical record services.
42 C.F.R. § 482.24(b).
41 Accreditation Association for Hospitals and Health Systems. (2017). Standard
10.00 .03. Healthcare Facilities Accreditation Program: Accreditation
requirements for acute care hospitals. Chicago, IL: Accreditation Association
for Hospitals and Health Systems. (Level VII)
42 DNV GL-Healthcare USA, Inc. (2016). MR.2 .SR.1 . NIAHO® accreditation
requirements: Interpretive guidelines & surveyor guidance (version 11).
Milford, OH: DNV GL-Healthcare USA, Inc. (Level VII)
43 The Joint Commission. (2013). “Sentinel event alert: Medical device alarm
safety in hospitals” [Online]. Accessed via the Web at
http://www.jointcommission.org/assets/1/18/SEA_50_alarms_4 _5 _13_FINAL1 .P
DF (Level VII)
44 Sole, M. L., et al. (2011). Evaluation of an intervention to maintain
endotracheal tube cuff pressure within therapeutic range. American Journal of
Critical Care, 20(2), 109–118. Accessed via the Web at
https://www.ncbi.nlm.nih.gov/pubmed/21362715
45 Lizy, C., et al. (2014). Cuff pressure of endotracheal tubes after changes in
body position in critically ill patients treated with mechanical ventilation.
American Journal of Critical Care, 23(1), e1–e8.
46 Rose, L., & Redl, L. (2008). Survey of cuff management practices in intensive
care units in Australia and New Zealand. American Journal of Critical Care,
17(5), 428–435. Accessed via the Web at
http://ajcc.aacnjournals.org/content/17/5/428.full.pdf+html (Level VI)
TRACHEOTOMY, ASSISTING
A tracheotomy involves surgically creating an external
opening—called a tracheostomy—into the trachea and
inserting an indwelling tube to maintain the airway’s
patency. If all other attempts to establish an airway have
failed, a practitioner may perform a tracheotomy at a
patient’s bedside. This procedure may be necessary when
an airway obstruction results from laryngeal edema, foreign-
body obstruction, or a tumor. An emergency tracheotomy
also may be performed when endotracheal intubation is
contraindicated.
Use of a cuffed tracheostomy tube provides and maintains
a patent airway, prevents an unconscious or paralyzed
patient from aspirating food or secretions, allows removal of
tracheobronchial secretions from the patient unable to
cough, replaces an endotracheal tube, and permits the use
of positive-pressure ventilation.
When laryngectomy accompanies a tracheostomy, the
practitioner may insert a laryngectomy tube, a shorter
version of a tracheostomy tube. In addition, the patient’s
trachea is sutured to the skin surface. Consequently, with a
laryngectomy, accidental tube expulsion doesn’t precipitate
immediate closure of the tracheal opening. When healing
occurs, the patient has a permanent neck stoma through
which respiration takes place.
Although tracheostomy tubes come in plastic and metal,
plastic tubes are much more commonly used because they
have a universal adapter for respiratory support equipment,
such as a mechanical ventilator, and a cuff to allow positive-
pressure ventilation.
Equipment
Appropriate-sized tracheostomy tube with obturator ▪
sterile tracheotomy tray (usually contains tracheal dilator,
vein retractor, hemostats, and clamps) ▪ sutures and
needles ▪ 4′′ × 4′′ (10-cm ×10-cm) gauze pads ▪ sterile
drapes ▪ sterile gloves ▪ gloves ▪ gown ▪ mask with face
shield or mask and goggles ▪ sterile gown ▪ sterile bowls ▪
stethoscope ▪ disinfectant pad ▪ prepackaged, sterile
tracheostomy dressing ▪ blanket or towel ▪ tracheostomy
ties or commercially prepared tracheostomy tube holder ▪
suction apparatus and tubing ▪ alcohol pad ▪ antiseptic
cleaning solution ▪ sterile water ▪ 5-mL syringe with 22G
needle ▪ local anesthetic ▪ prescribed sedative ▪ oxygen
therapy device ▪ oxygen source ▪ humidification source or
device ▪ syringe for cuff inflation ▪ manometer (or other
cuff pressure measurement device) ▪ cardiac monitoring
equipment ▪ pulse oximeter ▪ end-tidal carbon dioxide
detector ▪ vital signs monitoring equipment ▪ emergency
equipment (code cart with cardiac medications, defibrillator,
handheld resuscitation bag, intubation equipment) ▪
Optional: IV catheter insertion kit, mechanical ventilator.
Many facilities use prepackaged, sterile tracheotomy
trays.
Preparation of equipment
Make sure emergency equipment is functioning properly and
readily available.
Perform hand hygiene1,2,3,4,5,6 and then, maintaining
sterile technique, open the tray. Take the tracheostomy tube
from its container and place it on the sterile field. If
necessary, set up the suction equipment and make sure it
works. When the practitioner opens the sterile bowls, pour
in the antiseptic cleaning solution.
Implementation
■ Have one person stay with the patient while another
obtains the necessary equipment.
■ Perform hand hygiene.1,2,3,4,5,6
■ Confirm the patient’s identity using at least two patient
identifiers.7
■ Provide privacy.8,9,10,11
■ Explain the procedure to the patient and family (if
appropriate) according to their individual communication
and learning needs to increase their understanding, allay
their fears, and enhance cooperation.12 Provide an
explanation even if the patient is unresponsive.
Assisting with a tracheotomy
After preparing the skin with an antiseptic and allowing it to dry, the
practitioner will make a horizontal or vertical incision into the skin. (A vertical
incision helps avoid arteries, veins, and nerves on the lateral borders of the
trachea.) Then the practitioner will dissect subcutaneous fat and muscle and
move the muscle aside with vein retractors to locate the tracheal rings. The
practitioner will make an incision between the second and third tracheal
rings, using hemostats to control bleeding.46
The practitioner will inject a local anesthetic into the tracheal lumen to
suppress the cough reflex and create a stoma in the trachea. When this is
done, carefully apply suction to remove blood and secretions that may
obstruct the airway or be aspirated into the lungs. The practitioner will then
insert the tracheostomy tube and obturator into the stoma (as shown below).
After inserting the tube, the practitioner will remove the obturator.
Apply a sterile tracheostomy dressing, and anchor the tube with
tracheostomy ties (as shown below). Check for air movement through the
tube, and auscultate breath sounds to ensure proper placement.
An alternative approach
A minimally invasive percutaneous tracheotomy may also be performed at
the bedside. Unlike the surgical technique, this method dilates rather than
cuts the tissue structures. During this procedure, the practitioner passes a
needle into the trachea and then threads a dilator over a guidewire, which
progressively dilates until a tracheostomy tube can be placed. This method
has a similar success rate compared with the surgical approach.35,47
After the skin is prepared and anesthetized, the practitioner makes a 1-cm
midline incision. When the stoma reaches the desired size, the practitioner
inserts the tracheostomy tube. After the tube is in place, inflate the cuff,
secure the tube, and check the patient’s breath sounds. The practitioner will
suture the corners of the incision. Then obtain a portable chest X-ray.
■ If possible, confirm that written informed consent has
been obtained by the practitioner and is in the patient’s
medical record.13,14,15,16
■ Check the patient’s medical record for allergies,
especially to anesthetics or latex.
■ Conduct a preprocedure verification to make sure that all
relevant documentation, related information, and equipment
are available and correctly identified to the patient’s
identifiers.17,18
■ Assess the patient’s condition.
■ Perform hand hygiene.1,2,3,4,5,6
■ Put on a gown, a mask with face shield or a mask and
goggles, and gloves.19
■ Maintain ventilation until the tracheotomy is performed.
■ Make sure the patient has patent IV access; insert an IV
catheter if necessary.20
■ Sedate the patient for the procedure, as ordered,
following safe medication administration practices to
decrease pain and anxiety.21,22,23,24
■ Monitor the patient’s cardiac rhythm, oxygen saturation
level, blood pressure, and exhaled carbon dioxide
throughout the procedure.20
■ Make sure that the alarm limits are appropriately set for
the patient’s current condition, and that the alarms are
turned on, functioning properly, and audible to staff.25,26,27
■ Raise the patient’s bed to waist level to allow access to
the tracheotomy site and to prevent back strain.28
■ Roll a blanket or towel to form a shoulder roll, and place it
under the patient’s shoulders and neck to extend the neck.
If the patient is in respiratory distress and optimal neck
extension isn’t tolerated, place the patient in the semi-
Fowler position.20
NURSING ALERT Use caution and don’t extend the neck in a patient
with a cervical spine injury to prevent further injury.29
■ Conduct a time-out immediately before starting the
procedure to perform a final assessment that the correct
patient, site, positioning, and procedure are identified, and
that, as applicable, all relevant information and necessary
equipment are available during and after the procedure.18,30
■ Disinfect the top of the local anesthetic vial with an
alcohol pad and allow it to dry. Invert the vial so that the
practitioner can withdraw the anesthetic using the 22G
needle attached to the 5-mL syringe.
■ The practitioner will put on a sterile gown, a mask with
face shield or a mask and goggles, and sterile gloves.19
Assist with the procedure as needed. (See Assisting with a
tracheotomy.)
■ When the tube is in position, attach it to the appropriate
oxygen therapy device, which is connected to an oxygen
source.
■ Provide adequate humidification of inspired oxygen,
because when a tracheostomy bypasses the upper airway,
alternative methods of conditioning inspired air must be
used to avoid airway damage and thickening of mucosal
secretions.31,32
■ Inject air into the distal cuff port to inflate the cuff.
Measure the tracheal cuff pressure. (See “Tracheal cuff
measurement” procedure.) If the patient is receiving
mechanical ventilation, make sure that ventilator alarm
limits are set appropriately for the patient’s current
condition, and that alarms are turned on, functioning
properly, and audible to staff.25,26,27
NURSING ALERT Limit tracheostomy tube cuff pressure to 25 mm Hg
to prevent ischemia and mucosal injury.33
■ Auscultate the patient’s breath sounds using a
stethoscope.
■ Remove and discard your gloves,19,34 perform hand
hygiene,1,2,3,4,5,6 and put on sterile gloves.19
■ Apply the sterile tracheostomy dressing under the
tracheostomy tube flange. Place the tracheostomy ties
through the openings of the tube flanges and tie them on
the side of the patient’s neck; alternately, apply
commercially prepared tracheostomy tube holder straps
through the openings of the tube flanges and fasten the
straps on the side of the patient’s neck following the
manufacturer’s instructions. Doing so allows easy access
and prevents pressure necrosis at the back of the neck.33,35
■ Clean used equipment or dispose of it in appropriate
receptacles. Replenish all supplies as needed.
■ Assess the patient’s vital signs and respiratory status at
an interval determined by your facility or the patient’s
condition; there’s no evidence-based research to indicate
best practice for frequency of vital signs monitoring, so it
should be determined by each facility.36
■ Return the bed to the lowest position to prevent falls and
maintain patient safety.37
■ Make sure the head of the patient’s bed is elevated 30 to
45 degrees (unless contraindicated) to prevent ventilator-
associated pneumonia and to make sure that the patient is
comfortable and can easily reach the call light.38,39
■ Obtain a chest X-ray to confirm tube placement.
■ Remove and discard your gloves and other personal
protective equipment.19,34
■ Perform hand hygiene.1,2,3,4,5,6
■ Clean and disinfect your stethoscope using a disinfectant
pad.40,41
■ Perform hand hygiene.1,2,3,4,5,6
■ Document the procedure.42,43,44,45
Special considerations
■ The Joint Commission issued a sentinel event alert
concerning medical device alarm safety, because alarm-
related events have been associated with permanent loss of
function and death. Among the major contributing factors
were improper alarm settings, alarms inappropriately turned
off, and alarm signals not audible to staff. Make sure that
alarm limits are appropriately set, and are turned on and
audible to staff. Follow facility guidelines for preventing
alarm fatigue.48
■ Monitor the patient carefully for signs of infection. Ideally,
the tracheotomy should be performed using sterile
technique as described; however, in an emergency, this
may not be possible, increasing the risk of infection.
■ Make sure the following equipment is always at the
patient’s bedside: suctioning equipment because the
patient may need the airway cleared at any time; the sterile
obturator used to insert the tracheostomy tube in case the
tube is expelled; a sterile tracheostomy tube and obturator
(the same size as the one used) in case the tube must be
replaced quickly; a spare, sterile inner cannula that can be
used if the cannula is expelled; a sterile tracheostomy tube
and obturator one size smaller than the one used, which
may be needed if the tube is expelled and the trachea
begins to close; and a sterile tracheal dilator or sterile
hemostats to maintain an open airway before inserting a
new tracheostomy tube.
■ Review emergency first-aid measures. When a blocked
tube can’t be cleared by suctioning or withdrawing the inner
cannula, your facility may require you to stay with the
patient while someone else calls the practitioner or the
appropriate code. Continue trying to ventilate the patient
with whatever method works, such as a handheld
resuscitation bag. Don’t remove the tracheostomy tube
entirely; doing so may close the airway completely.
■ Use extreme caution if you try to reinsert an expelled
tracheostomy tube to avoid tracheal trauma, perforation,
compression, and asphyxiation.
Complications
A tracheotomy can cause an airway obstruction (from
improper tube placement), hemorrhage, edema, a
perforated esophagus, subcutaneous or mediastinal
emphysema, aspiration of secretions, tracheal necrosis
(from cuff pressure), infection, or lacerations of arteries,
veins, or nerves.
Documentation
Record the reason for the procedure, the date and time it
took place, the patient’s respiratory status before and after
the procedure, and the results of the chest X-ray. Note the
type and size of tube used. Include any complications that
occurred during the procedure, the amount of cuff pressure,
and the respiratory therapy initiated after the procedure.
Also note the patient’s response to respiratory therapy.
REFERENCES
1 The Joint Commission. (2019). Standard NPSG.07.01.01. Comprehensive
accreditation manual for hospitals. Oakbrook Terrace, IL: The Joint
Commission. (Level VII)
2 Centers for Disease Control and Prevention. (2002). Guideline for hand
hygiene in health-care settings: Recommendations of the Healthcare Infection
Control Practices Advisory Committee and the HICPAC/SHEA/APIC/IDSA Hand
Hygiene Task Force. MMWR Recommendations and Reports, 51(RR-16), 1–45.
Accessed via the Web at https://www.cdc.gov/mmwr/pdf/rr/rr5116.pdf (Level
II)
3 World Health Organization. (2009). “WHO guidelines on hand hygiene in
health care: First global patient safety challenge, clean care is safer care”
[Online]. Accessed via the Web at
http://apps.who.int/iris/bitstream/10665/44102/1/9789241597906_eng.pdf
(Level IV)
4 Centers for Medicare and Medicaid Services, Department of Health and
Human Services. (2015). Condition of participation: Infection control. 42 C.F.R.
§ 482.42.
5 Accreditation Association for Hospitals and Health Systems. (2017). Standard
07.01.21. Healthcare Facilities Accreditation Program: Accreditation
requirements for acute care hospitals. Chicago, IL: Accreditation Association
for Hospitals and Health Systems. (Level VII)
6 DNV GL-Healthcare USA, Inc. (2016). IC.1.SR.1 . NIAHO® accreditation
requirements: Interpretive guidelines & surveyor guidance (version 11).
Milford, OH: DNV GL-Healthcare USA, Inc. (Level VII)
7 The Joint Commission. (2019). Standard NPSG.01.01.01. Comprehensive
accreditation manual for hospitals. Oakbrook Terrace, IL: The Joint
Commission. (Level VII)
8 Accreditation Association for Hospitals and Health Systems. (2017). Standard
15.01.16. Healthcare Facilities Accreditation Program: Accreditation
requirements for acute care hospitals. Chicago, IL: Accreditation Association
for Hospitals and Health Systems. (Level VII)
9 Centers for Medicare and Medicaid Services, Department of Health and
Human Services. (2015). Condition of participation: Patient’s rights. 42 C.F.R.
§ 482.13(c)(1).
10 DNV GL-Healthcare USA, Inc. (2016). PR.1.SR.5 . NIAHO® accreditation
requirements: Interpretive guidelines & surveyor guidance (version 11).
Milford, OH: DNV GL-Healthcare USA, Inc. (Level VII)
11 The Joint Commission. (2019). Standard RI.01.01.01. Comprehensive
accreditation manual for hospitals. Oakbrook Terrace, IL: The Joint
Commission. (Level VII)
12 The Joint Commission. (2019). Standard PC.02.01.21. Comprehensive
accreditation manual for hospitals. Oakbrook Terrace, IL: The Joint
Commission. (Level VII)
13 The Joint Commission. (2019). Standard RI.01.03 .01. Comprehensive
accreditation manual for hospitals. Oakbrook Terrace, IL: The Joint
Commission. (Level VII)
14 Centers for Medicare and Medicaid Services, Department of Health and
Human Services. (2015). Condition of participation: Patient’s rights. 42C.F.R. §
482.13 (b)(2).
15 Accreditation Association for Hospitals and Health Systems. (2017). Standard
15.01.11. Healthcare Facilities Accreditation Program: Accreditation
requirements for acute care hospitals. Chicago, IL: Accreditation Association
for Hospitals and Health Systems. (Level VII)
16 DNV GL-Healthcare USA, Inc. (2016). PR.1.SR.3 . NIAHO® accreditation
requirements: Interpretive guidelines & surveyor guidance (version 11).
Milford, OH: DNV GL-Healthcare USA, Inc. (Level VII)
17 The Joint Commission. (2019). Standard UP.01.01.01. Comprehensive
accreditation manual for hospitals. Oakbrook Terrace, IL: The Joint
Commission. (Level VII)
18 Accreditation Association for Hospitals and Health Systems. (2017). Standard
30.00 .14. Healthcare Facilities Accreditation Program: Accreditation
requirements for acute care hospitals. Chicago, IL: Accreditation Association
for Hospitals and Health Systems. (Level VII)
19 Siegel, J. D ., et al. (2007, revised 2017). “2007 guideline for isolation
precautions: Preventing transmission of infectious agents in healthcare
settings” [Online]. Accessed via the Web at
https://www.cdc.gov/infectioncontrol/pdf/guidelines/isolation-guidelines.pdf
(Level II)
20 Morris, L. L., & Afifi, M. S . (Eds.). (2010). Tracheostomies: The complete guide.
New York, NY: Springer Publishing Company.
21 The Joint Commission. (2019). Standard MM.06.01.01. Comprehensive
accreditation manual for hospitals. Oakbrook Terrace, IL: The Joint
Commission. (Level VII)
22 Accreditation Association for Hospitals and Health Systems. (2017). Standard
16.01.03. Healthcare Facilities Accreditation Program: Accreditation
requirements for acute care hospitals. Chicago, IL: Accreditation Association
for Hospitals and Health Systems. (Level VII)
23 Centers for Medicare and Medicaid Services, Department of Health and
Human Services. (2015). Condition of participation: Nursing services. 42
C.F.R. § 482.23(c).
24 DNV GL-Healthcare USA, Inc. (2016). MM.1 .SR.2. NIAHO® accreditation
requirements: Interpretive guidelines & surveyor guidance (version 11).
Milford, OH: DNV GL-Healthcare USA, Inc. (Level VII)
25 Graham, K. C., & Cvach, M. (2010). Monitor alarm fatigue: Standardizing use
of physiological monitors and decreasing nuisance alarms. American Journal
of Critical Care, 19(1), 28–37. Accessed via the Web at
http://ajcc.aacnjournals.org/content/19/1/28.full.pdf
26 American Association of Critical-Care Nurses. (2018). “Managing alarms in
acute care across the life span: Electrocardiography and pulse oximetry”
[Online]. Accessed via the Web at https://www.aacn.org/clinical-
resources/practice-alerts/managing-alarms-in-acute-care-across-the-life-span
27 The Joint Commission. (2019). Standard NPSG.06 .01.01. Comprehensive
accreditation manual for hospitals. Oakbrook Terrace, IL: The Joint
Commission. (Level VII)
28 Waters, T. R., et al. (2009). “Safe patient handling training for schools of
nursing” [Online]. Accessed via the Web at
https://www.cdc.gov/niosh/docs/2009-127/pdfs/2009-127.pdf (Level VII)
29 Hebert, R. B., et al. (2014). Roberts and Hedges’ clinical procedures in
emergency medicine (6th ed.) . Philadelphia: Saunders.
30 The Joint Commission. (2019). Standard UP.01.03.01. Comprehensive
accreditation manual for hospitals. Oakbrook Terrace, IL: The Joint
Commission. (Level VII)
31 Regan, K., & Hunt, K. (2008). Tracheostomy management. Continuing
Education in Anaesthesia, Critical Care & Pain, 8(1), 31–35. Accessed via the
Web at https://academic.oup.com/bjaed/article/8/1/31/277687 (Level VII)
32 American Association for Respiratory Care (AARC). (2002). AARC clinical
practice guideline: Oxygen therapy for adults in the acute care facility—2002
revision & update. Respiratory Care, 47(6), 717–720. Accessed via the Web at
http://www.rcjournal.com/cpgs/otachcpg-update.html (Level VII)
33 Regan, E. N., & Dallachiesa, L. (2009). How to care for a patient with a
tracheostomy. Nursing2009, 39(8), 34–39 . (Level VII)
34 Accreditation Association for Hospitals and Health Systems. (2017). Standard
07.01.10. Healthcare Facilities Accreditation Program: Accreditation
requirements for acute care hospitals. Chicago, IL: Accreditation Association
for Hospitals and Health Systems. (Level VII)
35 Wiegand, D. L. (2017). AACN procedure manual for high acuity, progressive,
and critical care (7th ed.). St. Louis: Elsevier.
36 American Society of PeriAnesthesia Nurses. (2018). 2017–2018
Perianesthesia nursing standards, practice recommendations and interpretive
statements. Cherry Hill, NJ: American Society of PeriAnesthesia Nurses. (Level
VII)
37 Ganz, D. A., et al. (2013). Preventing falls in hospitals: A toolkit for improving
quality of care (AHRQ Publication No. 13-0015-EF). Rockville, MD: Agency for
Healthcare Research and Quality. Accessed via the Web at
http://www.ahrq.gov/sites/default/files/publications/files/fallpxtoolkit.pdf
(Level VII)
38 Klompas, M., et al. (2014). Strategies to prevent ventilator-associated
pneumonia in acute care hospitals: 2014 update. Infection Control and
Hospital Epidemiology, 35(8), 915–936. Accessed via the Web at
http://www.jstor.org/stable/10.1086/677144 (Level I)
39 Accreditation Association for Hospitals and Health Systems. (2017). Standard
07.01.02. Healthcare Facilities Accreditation Program: Accreditation
requirements for acute care hospitals. Chicago, IL: Accreditation Association
for Hospitals and Health Systems. (Level VII)
40 Rutala, W. A., et al. (2008, revised 2017). “Guideline for disinfection and
sterilization in healthcare facilities, 2008” [Online]. Accessed via the Web at
https://www.cdc.gov/infectioncontrol/pdf/guidelines/disinfection-
guidelines.pdf (Level I)
41 Accreditation Association for Hospitals and Health Systems. (2017). Standard
07.02.03. Healthcare Facilities Accreditation Program: Accreditation
requirements for acute care hospitals. Chicago, IL: Accreditation Association
for Hospitals and Health Systems. (Level VII)
42 The Joint Commission. (2019). Standard RC.01.03 .01. Comprehensive
accreditation manual for hospitals. Oakbrook Terrace, IL: The Joint
Commission. (Level VII)
43 Accreditation Association for Hospitals and Health Systems. (2017). Standard
10.00 .03. Healthcare Facilities Accreditation Program: Accreditation
requirements for acute care hospitals. Chicago, IL: Accreditation Association
for Hospitals and Health Systems. (Level VII)
44 Centers for Medicare and Medicaid Services, Department of Health and
Human Services. (2015). Condition of participation: Medical record services.
42 C.F.R. § 482.24(b).
45 DNV GL-Healthcare USA, Inc. (2016). MR.2 .SR.1 . NIAHO® accreditation
requirements: Interpretive guidelines & surveyor guidance (version 11).
Milford, OH: DNV GL-Healthcare USA, Inc. (Level VII)
46 Kacmarek, R. M ., et al. (2017). Egan’s fundamentals of respiratory care (11th
ed.). St Louis, MO: Elsevier.
47 Dempsey, G. A., et al. (2010). Percutaneous tracheostomy: A 6 yr prospective
evaluation of the single tapered dilator technique. British Journal of
Anaesthesia, 105(6), 782–788. Accessed via the Web at
https://academic.oup.com/bja/article/105/6/782/323068/Percutaneous-
tracheostomy-a -6-yr-prospective (Level IV)
48 The Joint Commission. (2013). “Sentinel event alert: Medical device alarm
safety in hospitals” [Online]. Accessed via the Web at
https://www.jointcommission.org/assets/1/6/SEA_50_alarms_4 _26_16.PDF
(Level VII)
TRANSABDOMINAL TUBE FEEDING AND CARE
To access the stomach, duodenum, or jejunum, a
practitioner may place a tube through a patient’s abdominal
wall when long-term enteral feedings are needed (longer
than 4 to 6 weeks). This procedure may be done surgically
or percutaneously.
A gastrostomy or jejunostomy tube is usually inserted
during intra-abdominal surgery. The tube may be used for
feeding during the immediate postoperative period, or it
may provide long-term enteral access, depending on the
type of surgery. Typically, the practitioner sutures the tube
in place to prevent gastric contents from leaking.
In contrast, a percutaneous endoscopic gastrostomy (PEG)
or percutaneous endoscopic jejunostomy (PEJ) tube can be
inserted endoscopically without the need for laparotomy or
general anesthesia. Typically, the insertion is done in the
endoscopy suite or at the patient’s bedside. Ultrasound can
be used to confirm placement. A PEG or PEJ tube may be
used for nutrition, drainage, and decompression.
Contraindications to endoscopic placement include
obstruction (such as an esophageal stricture or duodenal
blockage), previous gastric surgery, morbid obesity, and
ascites. These conditions necessitate surgical placement.
Long-term feeding devices should be considered when the
need for enteral feeding is at least 4 weeks in adults,
children, and infants of term age.1
With PEJ tube placement, feedings may begin after 24
hours (or when peristalsis resumes). A PEG tube can be
used for feedings within several hours of placement. Current
research supports PEG tube usage beginning 4 hours or less
after placement in both children and adults.1 Commercially
prepared enteral administration sets and pumps allow for
continuous formula administration.1
Nursing care for patients receiving intermittent enteral
tube feedings includes providing skin care at the tube site,
maintaining the feeding tube, administering the enteral
formula, monitoring the patient’s response to feedings,
adjusting the feeding schedule, and preparing the patient
for self-care after discharge.
Equipment
For intermittent or continuous feeding
Fluid-impermeable pad or towel ▪ enteral syringe (20-mL or
larger)1 ▪ prescribed enteral formula ▪ drinking or purified
(sterile, distilled, ultrafiltrated, or ultraviolet-light treated)
water1 ▪ container ▪ enteral administration set ▪ IV pole ▪
gloves ▪ labels ▪ oral care supplies ▪ Optional: enteral
feeding pump.
For site care
4′′ × 4′′ (10-cm × 10-cm) gauze pads ▪ soap and water or
normal saline solution ▪ water ▪ cotton-tipped applicators ▪
hypoallergenic tape ▪ gloves ▪ label ▪ Optional: external
stabilization device, sterile gauze or foam dressing, skin
protectant.
Preparation of equipment
Allow the enteral formula to warm to room temperature
before administration, because feeding the patient room-
temperature formula may reduce the risk of diarrhea.2,3
Implementation
■ Verify the practitioner’s order, including the patient’s
identifiers, the prescribed route based on the enteral tube’s
tip location, enteral feeding device, prescribed enteral
formula, administration method, volume and rate of
administration, and type, volume, and frequency of water
flushes.1
■ Review the patient’s medical record to make sure that
catheter placement was confirmed before beginning the
feeding.
■ Gather and prepare the necessary equipment.
■ Visually inspect the enteral formula for damage to the
container, altered formula characteristics, and expiration
date. Don’t use the formula if its integrity is compromised or
if it’s expired; instead, obtain a new container of the
formula.1
■ Compare the label on the enteral formula container to the
order in the patient’s medical record.
■ Perform hand hygiene.4,5,6,7,8,9
■ Confirm the patient’s identity using at least two patient
identifiers.10
■ Provide privacy.11,12,13,14
■ Explain the procedure to the patient and family (if
appropriate) according to their individual communication
and learning needs to increase their understanding, allay
their fears, and enhance cooperation.15
■ Raise the patient’s bed to waist level when providing care
to prevent caregiver back strain.16
■ Assess the patient to determine the risk for aspiration.1,17
■ Position the patient with the head of the bed elevated to
at least 30 degrees or upright in a chair to prevent
aspiration. If this position is contraindicated, consider a
reverse Trendelenburg position.1,18
■ Perform hand hygiene.4,5,6,7,8,9
■ Put on gloves to comply with standard precautions.19,20
■ Verify tube placement by assessing for a change in the
external length or incremental marking on the tube at the
exit site to determine whether the tube has migrated.1,18 If
you suspect tube migration, don’t administer the enteral
feeding, and notify the practitioner.
For an intermittent or a continuous feeding
■ Flush the feeding tube with 30 mL of water; use sterile
water if the patient is immunocompromised or critically ill.1
■ Connect the enteral administration set tubing to the distal
end of the enteral feeding tube. Trace the tubing from the
patient to its point of origin to ensure it’s connected to the
proper port before beginning the tube feeding.1,21,22
■ Open the administration set clamp and regulate the flow
to the desired rate. If using an enteral feeding pump, follow
the manufacturer’s instructions for setting the flow rate and
starting the infusion.1 Make sure that the enteral feeding
pump alarm limits are set according to the patient’s current
condition, and that alarms are turned on, functioning
properly, and audible to staff.23,24,25
■ Monitor the gravity drip rate or pump infusion rate
frequently to ensure accurate delivery of the enteral
formula.
■ Flush the enteral feeding tube every 4 hours with at least
30 mL of water (use purified water for immunocompromised
or critically ill patients), if ordered and tolerated, to maintain
patency and provide hydration.1
■ Monitor the patient at least every 4 hours for appropriate
positioning.1
■ Assess for GI intolerance to enteral tube feedings every 4
hours by assessing for abdominal distention, monitoring for
complaints of abdominal pain, and observing for passage of
flatus and stool.1,18 Don’t monitor gastric residual volume
(GRV) routinely.1,17 If GRV is used in critically ill patients,
avoid holding the enteral feeding for GRV less than 500 mL
if there are no other signs of feeding intolerance to prevent
inappropriate stoppage of enteral feedings.1,26
■ Perform oral care routinely to decrease oral bacterial
colonization and, subsequently, reduce the risk of health
care–acquired pneumonia.27 (See the “Oral care”
procedure.)
■ Remove and discard the fluid-impermeable pad or towel.
■ Monitor the patient’s weight and nutritional, fluid,
electrolyte, and metabolic statuses, as ordered, to evaluate
the effectiveness of enteral feedings.
For site care
■ Gently remove the dressing to prevent skin stripping or
tearing.17 Don’t cut away the dressing over the catheter,
because you might cut the tube or the sutures holding the
tube in place.
■ Remove and discard your gloves.19,20
■ Perform hand hygiene.4,5,6,7,8,9
■ Put on a new pair of gloves.19,20
Gastrostomy or jejunostomy tube site
■ Assess the tube exit site for signs of skin breakdown,
redness, edema, or the presence of purulent drainage.1
■ Inspect the tube for wear and tear. A tube that has worn
out needs to be replaced.1
■ Observe for a change in external tube length or the
incremental marking at the exit site to assess for tube
migration.1
■ Until healing occurs, clean the skin immediately around
the gastrostomy or jejunostomy tube’s exit site daily (and as
needed) using a cotton-tipped applicator moistened with
normal saline solution. Next, using a 4′′ × 4′′ (10-cm × 10-
cm) gauze pad soaked in normal saline solution, clean the
adjacent skin and pat it dry using another gauze pad. When
the exit site has healed, wash the skin around it with soap
and water daily. Rinse the area with water and pat it dry.
■ Apply skin protectant, if necessary, to prevent skin
maceration.
■ Secure the gastrostomy or jejunostomy tube to the skin
with hypoallergenic tape or other external stabilization
device to prevent peristaltic migration of the tube and
tension on the suture that anchors the tube in place.
■ Coil the tube, if necessary, and tape it to the abdomen to
prevent pulling and contamination of the tube. Rotate the
taping site to prevent skin damage.
PEG or PEJ site
■ Slide the tube’s outer bumper carefully away from the
skin about 1⁄2′′ (1.3 cm). Depress the skin surrounding the
tube gently and inspect for leakage. Minimal wound
drainage, which appears initially after implantation, should
subside in about 1 week.
■ Assess the skin at the exit site for signs of infection, such
as redness, edema, and purulent drainage.
■ Inspect the tube for wear and tear. A tube that wears out
needs to be replaced.1
■ Observe for a change in external tube length or the
incremental marking on the tube at the exit site to assess
for tube migration.1
■ Clean the exit site with soap and water-moistened gauze
pads (as shown below), and allow it to dry.28
■ Rotate the outer bumper 90 degrees to avoid applying
the same tension to the same skin area and to prevent
pressure ulcer formation at the exit site,29 and slide the
bumper back over the exit site. Ensure that the outer
bumper isn’t resting too tightly against the skin; one finger’s
breadth should fit between the skin and the outer bumper.
■ If leakage appears at the PEG tube exit site, or if the
patient risks dislodging the tube, apply a sterile gauze or
foam dressing and an external stabilization device around
the site, as needed. Apply the dressing over the outer
bumper, because applying it underneath the outer bumper
creates pressure on the gastrostomy tube tract, which could
lead to wound abscess.28,30
■ Label the dressing with the date, the time, and your
initials.
Completing the procedure
■ Return the patient’s bed to the lowest position to prevent
falls and maintain the patient’s safety.31
■ Remove and discard your gloves.19,20
■ Perform hand hygiene.4,5,6,7,8,9
■ Document the procedure.32,33,34,35
Special considerations
■ The Joint Commission issued a sentinel event alert
concerning medical device alarm safety, because alarm-
related events have been associated with permanent loss of
function and death. Among the major contributing factors
were improper alarm settings, alarms inappropriately turned
off, and alarm signals not audible to staff. Make sure that
alarm limits are appropriately set, and that alarms are
turned on, functioning properly, and audible to staff. Follow
facility guidelines for preventing alarm fatigue.25
■ The Joint Commission has issued a sentinel event alert
related to managing risk during transition to new
International Organization for Standardization tubing
standards that were designed to prevent dangerous tubing
misconnections, which can lead to serious patient injury and
death. During the transition, be sure to trace the tubing and
catheter from the patient to the point of origin before
connecting or reconnecting any device or infusion, at any
care transition (such as a new setting or service), and as
part of the hand-off process; route tubes and catheters with
different purposes in different standardized directions; label
the tubing at the distal and proximal ends (when there are
different access sites or several bags hanging); use tubing
and equipment only as intended; and store medications for
different delivery routes in separate locations.22
PATIENT TEACHING
Teaching the patient about syringe
feeding
Teach the patient to administer tube feeding by syringe at home, as
appropriate, before being discharged. Here are some points to emphasize.
Initial instructions
First, show the patient how to clamp the feeding tube, remove the syringe’s
bulb or plunger, and place the tip of the syringe into the feeding tube (as
shown below). Then tell the patient to instill between 30 and 60 mL of water
into the feeding tube to make sure it stays open and patent.
Next, tell the patient to pour the feeding solution into the syringe and begin
the feeding (as shown below). As the solution flows into the stomach, show
the patient how to tilt the syringe to allow air bubbles to escape. Describe
the discomfort that air bubbles may cause.
Tips for free flow
When about one-fourth of the feeding solution remains, direct the patient to
refill the syringe. Caution the patient to avoid letting the syringe empty
completely, because doing so may result in abdominal cramping and gas.
Show the patient how to increase and decrease the solution’s flow rate by
raising or lowering the syringe. Explain that the patient may need to dilute a
thick solution to promote free flow.
Finishing up
Inform the patient that the feeding infusion process should take at least 15
minutes. If the process takes less than 15 minutes, dumping syndrome may
result.
Show the patient the steps needed to finish the feeding, including how to
flush the tube with water, clamp the tube, and clean the equipment for later
use. If the patient is using disposable gear, urge the patient to discard it
properly. Review instructions for storing unused feeding solution as
appropriate.
■ Be aware that an enteral feeding pump is generally
required for small-bowel feedings and is preferred for gastric
feedings in critically ill patients.1
■ If the patient experiences diarrhea, a risk management
algorithm is recommended to evaluate the patient’s risk and
determine the treatment plan.36,37
■ If skin problems develop, consult a wound ostomy
continence nurse if available.
■ Ensure that the patient doesn’t remove the enteral
feeding tube. Consider placing an abdominal binder loosely
around a confused patient’s abdomen to prevent the patient
from pulling at the tube.1
■ If the patient has fragile skin, use dressings and tape
specially formulated for fragile skin to prevent skin stripping
and tearing during removal.38
■ Don’t use occlusive dressings over the tube exit site,
because they can lead to skin maceration and breakdown at
the exit site.28
Patient teaching
Teach the patient and family members or other caregivers
all aspects of enteral feedings, including tube maintenance
and site care. Specify signs and symptoms to report to the
practitioner, define emergency situations, and review
actions to take.
When the enteral tube must be replaced, advise the
patient that the practitioner may insert a replacement
gastrostomy button after removing the initial feeding tube.
The procedure may be done in the practitioner’s office or
your facility’s endoscopy suite.
As the patient’s tolerance of tube feeding improves, the
patient may wish to try syringe feedings rather than
intermittent feedings. If appropriate, teach the patient how
to administer the feeding using the syringe method. (See
Teaching the patient about syringe feeding.)
Complications
Common complications related to enteral feeding tubes
include GI and other systemic problems, mechanical
malfunction, and metabolic disturbances. Abdominal
cramping, nausea, vomiting, bloating, and diarrhea may be
related to medication, rapid infusion rate (dumping
syndrome), formula contamination,
osmolarity, or
temperature (too cold or too warm), fat malabsorption, or
intestinal atrophy from malnutrition. Constipation may result
from inadequate hydration, low fiber intake, fecal impaction,
or electrolyte and hormonal imbalance.2
Systemic problems may be caused by pulmonary
aspiration, infection at the tube exit site, or contaminated
formula.
Typical mechanical problems include tube dislodgment,
obstruction, or impairment. For example, a PEG or PEJ tube
may migrate if the external bumper loosens. Occlusion may
result from incompletely crushed and liquefied medication
particles or inadequate tube flushing. The tube may also
rupture or crack from age, drying, or frequent manipulation.
Other complications include vitamin and mineral
deficiencies, impaired glucose tolerance, and fluid and
electrolyte imbalances, which may follow bouts of diarrhea
or constipation.
Documentation
On the intake and output record, note the date, time, and
amount of each feeding and the water volume instilled.
Maintain total volumes for nutrients and water separately to
allow calculation of nutrient intake. In your notes, document
the type of formula, the infusion method and rate, the
patient’s tolerance of the procedure and formula, and the
amount of residual gastric contents. Also record
complications and abdominal assessment findings. Note
patient-teaching topics covered and the patient’s progress
in self-care. Note the date and time site care was
performed. Record the appearance of the site, including any
signs of infection, such as redness, swelling, and drainage.
REFERENCES
1 Boullata, J. I ., et al. (2016). ASPEN safe practices for enteral nutrition therapy.
Journal of Parenteral & Enteral Nutrition, 41(1), 15–103. Accessed via the Web
at http://journals.sagepub.com/doi/10.1177/0148607116673053 (Level VII)
2 Blumenstein, I., et al. (2014). Gastroenteric tube feeding: Techniques,
problems and solutions. World Journal of Gastroenterology, 20(26), 8505–
8524. Accessed via the Web at
http://www.ncbi.nlm.nih.gov/pmc/articles/PMC4093701/
3 Joanna Briggs Institute. (2016). Nasoenteric tube feeding: Administration of
feed and medication. Adelaide: Joanna Briggs Institute.
4 Centers for Disease Control and Prevention. (2002). Guideline for hand
hygiene in health-care settings: Recommendations of the Healthcare Infection
Control Practices Advisory Committee and the HICPAC/SHEA/APIC/IDSA Hand
Hygiene Task Force. MMWR Recommendations and Reports, 51(RR-16), 1–45.
Accessed via the Web at https://www.cdc.gov/mmwr/pdf/rr/rr5116.pdf (Level
II)
5 The Joint Commission. (2019). Standard NPSG.07.01.01. Comprehensive
accreditation manual for hospitals. Oakbrook Terrace, IL: The Joint
Commission. (Level VII)
6 World Health Organization. (2009). “WHO guidelines on hand hygiene in
health care: First global patient safety challenge, clean care is safer care”
[Online]. Accessed via the Web at
http://apps.who.int/iris/bitstream/19665/44102/1/978241597906_eng.pdf
(Level IV)
7 Centers for Medicare and Medicaid Services, Department of Health and
Human Services. (2015). Condition of participation: Infection control. 42 C.F.R.
§ 482.42.
8 Accreditation Association for Hospitals and Health Systems. (2017). Standard
07.01.21. Healthcare Facilities Accreditation Program: Accreditation
requirements for acute care hospitals. Chicago, IL: Accreditation Association
for Hospitals and Health Systems. (Level VII)
9 DNV GL-Healthcare USA, Inc. (2016). IC.1.SR.1 . NIAHO® accreditation
requirements: Interpretive guidelines & surveyor guidance (version 11).
Milford, OH: DNV GL-Healthcare USA, Inc. (Level VII)
10 The Joint Commission. (2019). Standard NPSG.01.01.01. Comprehensive
accreditation manual for hospitals. Oakbrook Terrace, IL: The Joint
Commission. (Level VII)
11 Accreditation Association for Hospitals and Health Systems. (2017). Standard
15.01.16. Healthcare Facilities Accreditation Program: Accreditation
requirements for acute care hospitals. Chicago, IL: Accreditation Association
for Hospitals and Health Systems. (Level VII)
12 Centers for Medicare and Medicaid Services, Department of Health and
Human Services. (2015). Condition of participation: Patient’s rights. 42 C.F.R.
§ 482.13(c)(1).
13 DNV GL-Healthcare USA, Inc. (2016). PR.1.SR.5 . NIAHO® accreditation
requirements: Interpretive guidelines & surveyor guidance (version 11).
Milford, OH: DNV GL-Healthcare USA, Inc. (Level VII)
14 The Joint Commission. (2019). Standard RI.01.01.01. Comprehensive
accreditation manual for hospitals. Oakbrook Terrace, IL: The Joint
Commission. (Level VII)
15 The Joint Commission. (2019). Standard PC.02.01.21. Comprehensive
accreditation manual for hospitals. Oakbrook Terrace, IL: The Joint
Commission. (Level VII)
16 Waters, T. R., et al. (2009). “Safe patient handling training for schools of
nursing” [Online]. Accessed via the Web at
https://www.cdc.gov/niosh/docs/2009-127/pdfs/2009-127.pdf (Level VII)
17 McClave, S. A., et al. (2016). ACG clinical guidelines: Nutrition therapy in the
adult hospitalized patient. American Journal of Gastroenterology, 111(3), 315–
344. Accessed via the Web at http://gi.org/wp-
content/uploads/2016/03/Apr2016-Nutrition-Therapy-in-the-Adult-
Hospitalized-Patient.pdf (Level VII)
18 American Association of Critical-Care Nurses (AACN). (2016). “A ACN practice
alert: Prevention of aspiration in adults” [Online]. Accessed via the Web at
http://ccn.aacnjournals.org/content/36/1/e20.full (Level VII)
19 Siegel, J. D ., et al. (2007, revised 2017). “2007 guideline for isolation
precautions: Preventing transmission of infectious agents in healthcare
settings” [Online]. Accessed via the Web at
https://www.cdc.gov/infectioncontrol/pdf/guidelines/isolation-guidelines.pdf
(Level II)
20 Accreditation Association for Hospitals and Health Systems. (2017). Standard
07.01.10. Healthcare Facilities Accreditation Program: Accreditation
requirements for acute care hospitals. Chicago, IL: Accreditation Association
for Hospitals and Health Systems. (Level VII)
21 U.S . Food and Drug Administration. (n.d .). “Look. Check. Connect. Safe
medical device connections save lives” [Online]. Accessed via the Web at
http://www.fda.gov/downloads/MedicalDevices/Safety/AlertsandNotices/UCM1
34873.pdf
22 The Joint Commission. (2014). “Sentinel event alert: Managing risk during
transition to new ISO tubing connector standards” [Online]. Accessed via the
Web at
http://www.jointcommission.org/assets/1/6/SEA_53_Connectors_8 _19_14 _final.
pdf (Level VII)
23 The Joint Commission. (2017). Standard NPSG.06 .01.01. Comprehensive
accreditation manual for hospitals. Oakbrook Terrace, IL: (Level VII)
24 Graham, K. C., & Cvach, M. (2010). Monitor alarm fatigue: Standardizing use
of physiological monitors and decreasing nuisance alarms. American Journal
of Critical Care, 19(1), 28–37. Accessed via the Web at
http://ajcc.aacnjournals.org/content/19/1/28.full.pdf
25 The Joint Commission. (2013). “Sentinel event alert: Medical device alarm
safety in hospitals” [Online]. Accessed via the Web at
http://www.jointcommission.org/assets/1/6/SEA_50_alarms_4 _26_16.PDF
(Level VII)
26 McClave, S. A., et al. (2016). Guidelines for the provision and assessment of
nutrition support therapy in the adult critically ill patient: Society of Critical
Care Medicine (SCCM) and American Society for Parenteral and Enteral
Nutrition (A.S .P.E.N.). Journal of Parenteral and Enteral Nutrition, 40(2), 159–
211. (Level VII)
27 Association for Professionals in Infection Control and Epidemiology. (2014).
“Top 9 ways to reduce the risk of pneumonia if you or a loved one is
hospitalized” [Online]. Accessed via the Web at http://www.apic.org/For-
Consumers/Monthly-alerts-for-consumers/Article?id=top-9 -ways-to-reduce-
the-risk-of-pneumonia-if
28 Itkin, M., et al. (2011). Multidisciplinary practical guidelines for
gastrointestinal access for enteral nutrition and decompression from the
Society of Interventional Radiology and American Gastroenterological
Association (AGA) Institute, with endorsement by Canadian Interventional
Radiological Association (CIRA) and Cardiovascular and Interventional
Radiological Society of Europe (CIRSE). Journal of Vascular and Interventional
Radiology, 22(8), 1089–1106. Accessed via the Web at
http://www.jvir.org/article/S1051-0443(11)00850-5/pdf (Level VII)
29 Soscia, J., & Friedman, J. N. (2011). A guide to the management of common
gastrostomy and gastrojejunostomy tube problems. Paediatrics & Child
Health, 16(5), 281–287. Accessed via the Web at
http://europepmc.org/articles/PMC3114992
30 DeLegge, M. H. (2015). Gastrostomy tubes: Complications and their
management. In: UpToDate, Saltzman, J. R., et al. (Eds.). Retrieved from:
www.uptodate.com
31 Ganz, D. A., et al. (2013). Preventing falls in hospitals: A toolkit for improving
quality of care (AHRQ Publication No. 13-0015-EF). Rockville, MD: Agency for
Healthcare Research and Quality. Accessed via the Web at
http://www.ahrq.gov/sites/default/files/publications/files/fallpxtoolkit.pdf
(Level VII)
32 The Joint Commission. (2019). Standard RC.01.03 .01. Comprehensive
accreditation manual for hospitals. Oakbrook Terrace, IL: The Joint
Commission. (Level VII)
33 Centers for Medicare and Medicaid Services, Department of Health and
Human Services. (2015). Condition of participation: Medical record services.
42 C.F.R. § 482.24(b).
34 Accreditation Association for Hospitals and Health Systems. (2017). Standard
10.00 .03. Healthcare Facilities Accreditation Program: Accreditation
requirements for acute care hospitals. Chicago, IL: Accreditation Association
for Hospitals and Health Systems. (Level VII)
35 DNV GL-Healthcare USA, Inc. (2016). MR.2 .SR.1 . NIAHO® accreditation
requirements: Interpretive guidelines & surveyor guidance (version 11).
Milford, OH: DNV GL-Healthcare USA, Inc. (Level VII)
36 Blumenstein, I., et al. (2014). Gastroenteric tube feeding: Techniques,
problems and solutions. World Journal of Gastroenterology, 20(26), 8505–
8524. Accessed via the Web at
http://www.ncbi.nlm.nih.gov/pmc/articles/PMC4093701/
37 Barrett, J. S ., et al. (2009). Strategies to manage gastrointestinal symptoms
complicating enteral feeding. Journal of Parenteral and Enteral Nutrition,
33(1), 21–26.
38 LeBlanc, K., et al. (2013). International skin tear advisory panel: A tool kit to
aid in the prevention, assessment, and treatment of skin tears using a
simplified classification system. Advances in Skin & Wound Care, 26(10), 459–
476. (Level IV)
TRANSCRANIAL DOPPLER MONITORING
Transcranial Doppler ultrasonography is a noninvasive
method of monitoring blood flow in the intracranial vessels,
specifically the circle of Willis.1 This procedure is used on
the intensive care unit to monitor patients who have
experienced cerebrovascular disorders, such as stroke, head
trauma, or subarachnoid hemorrhage. It can help detect
intracranial stenosis, vasospasm, and arteriovenous
malformations as well as assess collateral pathways.2,3
Because it displays a continuous waveform, it can be used
in intraoperative monitoring of cerebral circulation.
Transcranial Doppler ultrasonography is also used to
monitor the effect of intracranial pressure changes on the
cerebral circulation, to monitor patient response to various
medications, and to evaluate carbon dioxide reactivity,
which may be impaired or lost from arterial obstruction or
trauma. It has also been used to confirm brain death.3
The transcranial Doppler unit transmits pulses of high-
frequency ultrasound, which are then reflected back to the
transducer by the red blood cells moving in the vessel being
monitored. This information is then processed by the
instrument into an audible signal and a velocity waveform,
which is displayed on the monitor. The displayed waveform
is actually a moving graph of blood flow velocities with time
displayed along the horizontal axis, velocity displayed along
the vertical axis, and amplitude represented by various
colors or intensities within the waveform. The heart’s
contractions speed up the movement of blood cells during
systole and slow it down during diastole, resulting in a
waveform that varies in velocity over the cardiac cycle.
The major benefits of transcranial Doppler monitoring are
that it provides instantaneous, real-time information about
cerebral blood flow and that it’s noninvasive and painless
for the patient. Also, the unit itself is portable and easy to
use. The major disadvantage is that it relies on the ability of
the ultrasound waves to penetrate thin areas of the
cranium; this is difficult if the patient has thickening of the
temporal bone, which increases with age.
This procedure requires specialized training to ensure
accurate vessel identification and correct interpretation of
the signals. The transcranial Doppler unit should always be
used with its power set at the lowest level needed to
provide an adequate waveform.
Equipment
Transcranial Doppler unit ▪ transducer with an attachment
system ▪ terry cloth headband ▪ ultrasonic coupling gel ▪
marker ▪ Optional: headphones.
Implementation
■ Verify the practitioner’s order.
■ Gather the necessary equipment.
■ Perform hand hygiene.4,5,6,7,8,9
■ Confirm the patient’s identity using at least two patient
identifiers.10
■ Provide privacy.11,12,13,14
■ Explain the procedure to the patient and family (if
appropriate) according to their communication and learning
needs to increase understanding, allay fears, and enhance
cooperation.15
■ Raise the patient’s bed to waist level when providing
patient care to prevent back strain.16
■ Perform hand hygiene.4,5,6,7,8,9
■ Place the patient in the proper position, usually the
supine position.
■ Turn the Doppler unit on and observe as it performs a
self-test.
■ Enter information as prompted by the Doppler unit.
Depending on the unit you’re using, you may need to enter
the patient’s name, identification number, or diagnosis, or
the practitioner’s name.
■ Indicate the vessel that you wish to monitor, usually the
right or left middle cerebral artery. You’ll also need to set the
approximate depth of the vessel within the skull (50 mm to
56 mm for the middle cerebral artery).
■ Increase the power level to 100% to initially locate the
signal. You can later decrease the level as needed,
depending on the thickness of the patient’s skull.
■ Examine the temporal region of the patient’s head, and
mentally identify the three windows of the transtemporal
access route: posterior, middle, and anterior (as shown
below).
■ Apply a generous amount of ultrasonic gel at the level of
the temporal bone between the tragus of the ear and the
end of the eyebrow, over the area of the three windows.
■ Place the transducer on the posterior window. Angle the
transducer slightly in an anterior direction, and slowly move
it in a narrow circle. This movement is commonly called the
flashlighting technique. As you hold the transducer at an
angle and perform flashlighting, also begin to very slowly
move the transducer forward across the temporal area. As
you do this, listen for the audible signal with the highest
pitch. This sound corresponds to the highest velocity signal,
which corresponds to the signal of the vessel you are
assessing. You can also use headphones to let you better
evaluate the audible signal and provide patient privacy.
■ After you’ve located the highest-pitched signal, use a
marker to draw a circle around the transducer head on the
patient’s temple (as shown below). Note the angle of the
transducer so that you can duplicate it after the transducer
attachment system is in place.
■ Next, place the transducer system on the patient. To do
this, first place the plate of the transducer attachment
system over the patient’s temporal area; match the circular
opening in the plate exactly with the circle drawn on the
patient’s head. Then, holding the plate in place, encircle the
patient’s head with the straps attached to the system.
Finally, tighten the straps so that the transducer attachment
system will stay in place on the patient’s head.
■ Fill the circular opening in the plate with the ultrasonic
gel.
■ Place the transducer in the gel-filled opening in the
attachment system plate. Using the plastic screws provided,
loosely secure the two plates together to hold the
transducer in place while allowing it to rotate for the best
angle.
■ Adjust the position and angle of the transducer until you
again hear the highest-pitched audible signal. When you
hear this signal, look at the waveform on the monitor
screen. You should see a clear waveform with a bright white
line (called an envelope) at the upper edge of the
waveform. The envelope exactly follows the contours of the
waveform itself.
Comparing velocity waveforms
A normal transcranial Doppler signal is usually characterized by mean
velocities that fall within the normal reported values. Additional information
can be gathered by evaluating the shape of the velocity waveform.
Effect of significant proximal vessel obstruction
A delayed systolic upstroke can be seen in a waveform when significant
proximal vessel obstruction is present.
Effect of increased cerebrovascular resistance
Changes in cerebrovascular resistance, such as those that occur with
increased intracranial pressure, cause a decrease in diastolic flow.
■ If the envelope doesn’t follow the waveform’s contours,
adjust the gain setting. If the signal is wrapping around the
screen, increase the scale to drop the baseline.
■ When you’ve determined that you have the strongest,
highest-pitched signal and the best waveform, lock the
transducer in place by tightening the plastic screws (as
shown below). The tightened plates will hold the transducer
at the angle you’ve chosen.
■ Disconnect the transducer handle.
■ Place a wide terry cloth headband over the transducer
attachment system, and secure it around the patient’s head
to provide additional stability for the transducer.
■ Look at the monitor screen. You should be able to see a
waveform and read the numeric values of the peak, mean
velocities, and pulsatility index (PI+) above the displayed
waveform. The shape of the waveform reveals more
information. (See Comparing velocity waveforms.)
■ Return the bed to the lowest position to prevent falls and
maintain patient safety.17
■ Perform hand hygiene.4,5,6,7,8,9
■ Document the procedure.18,19,20,21
Special considerations
■ Before using the transcranial Doppler system, remove
turban head dressings or thick dressings over the test site.
■ Consider behavioral or pharmacologic intervention for a
combative or confused patient before beginning the
procedure. The patient must cooperate and lie still to ensure
accurate tracings.22
■ Velocity changes in the transcranial Doppler signal
correlate with changes in cerebral blood flow. The
parameter that most clearly reflects this change is the mean
velocity. To determine this, first establish a baseline for the
mean velocity. Then, as the patient’s velocity increases or
decreases, the value (%) will change negatively or positively
from the baseline.3
■ Emboli appear as high-intensity transients occurring
randomly during the cardiac cycle. Emboli make a
distinctive clicking, chirping, or plunking sound. You can set
up an emboli counter to count either the total number of
emboli aggregates or the rate of embolic events per minute.
■ Various screens can be stored on the system’s hard drive
and then recalled or printed.
Documentation
Record the date and the time that the monitoring began and
which artery is being monitored. Document any patient
teaching as well as the patient’s tolerance of the procedure.
REFERENCES
1 Filho, J. O. Neuroimaging of acute ischemic stroke. (2016). In: UpToDate,
Kasner, S. E., et al. (Eds.). Retrieved from: www.uptodate.com
2 Le Roux, P., et al. (2014). Consensus summary statement of the International
Multidisciplinary Consensus Conference on Multimodality Monitoring in
Neurocritical Care: A statement for healthcare professionals from the
Neurocritical Care Society and the European Society of Intensive Care
Medicine. Neurocritical Care, 21(Suppl. 2), S1–S26. Accessed via the Web at
http://www.guideline.gov/content.aspx?
id=49236&search=transcranial+doppler+monitoring (Level I)
3 Naqvi, J., et al. (2013). Transcranial Doppler ultrasound: A review of the
physical principles and major applications in critical care. International Journal
of Vascular Medicine, 2013, Article ID 629378. Accessed via the Web at
https://www.hindawi.com/journals/ijvm/2013/629378/ (Level V)
4 World Health Organization. (2009). “WHO guidelines on hand hygiene in
health care: First global patient safety challenge, clean care is safer care”
[Online]. Accessed via the Web at
http://apps.who.int/iris/bitstream/10665/44102/1/9789241597906_eng.pdf
(Level IV)
5 The Joint Commission. (2019). Standard NPSG.07.01.01. Comprehensive
accreditation manual for hospitals. Oakbrook Terrace, IL: The Joint
Commission. (Level VII)
6 Centers for Disease Control and Prevention. (2002). Guideline for hand
hygiene in health-care settings: Recommendations of the Healthcare Infection
Control Practices Advisory Committee and the HICPAC/SHEA/APIC/IDSA Hand
Hygiene Task Force. MMWR Recommendations and Reports, 51(RR-16), 1–45.
Accessed via the Web at https://www.cdc.gov/mmwr/pdf/rr/rr5116.pdf (Level
II)
7 Centers for Medicare and Medicaid Services, Department of Health and
Human Services. (2015). Condition of participation: Infection control. 42 C.F.R.
§ 482.42.
8 Accreditation Association for Hospitals and Health Systems. (2017). Standard
07.01.21. Healthcare Facilities Accreditation Program: Accreditation
requirements for acute care hospitals. Chicago, IL: Accreditation Association
for Hospitals and Health Systems. (Level VII)
9 DNV GL-Healthcare USA, Inc. (2016). IC.1.SR.1 . NIAHO® accreditation
requirements: Interpretive guidelines & surveyor guidance (version 11).
Milford, OH: DNV GL-Healthcare USA, Inc. (Level VII)
10 The Joint Commission. (2019). Standard NPSG.01.01.01. Comprehensive
accreditation manual for hospitals. Oakbrook Terrace, IL: The Joint
Commission. (Level VII)
11 The Joint Commission. (2019). Standard RI.01.01.01. Comprehensive
accreditation manual for hospitals. Oakbrook Terrace, IL: The Joint
Commission. (Level VII)
12 DNV GL-Healthcare USA, Inc. (2016). PR.1.SR.5 . NIAHO® accreditation
requirements: Interpretive guidelines & surveyor guidance (version 11).
Milford, OH: DNV GL-Healthcare USA, Inc. (Level VII)
13 Centers for Medicare and Medicaid Services, Department of Health and
Human Services. (2015). Condition of participation: Patient’s rights. 42 C.F.R.
§ 482.13(c)(1).
14 Accreditation Association for Hospitals and Health Systems. (2017). Standard
15.01.16. Healthcare Facilities Accreditation Program: Accreditation
requirements for acute care hospitals. Chicago, IL: Accreditation Association
for Hospitals and Health Systems. (Level VII)
15 The Joint Commission. (2019). Standard PC.02.01.21. Comprehensive
accreditation manual for hospitals. Oakbrook Terrace, IL: The Joint
Commission. (Level VII)
16 Waters, T. R., et al. (2009). “Safe patient handling training for schools of
nursing” [Online]. Accessed via the Web at
https://www.cdc.gov/niosh/docs/2009-127/pdfs/2009-127.pdf (Level VII)
17 Ganz, D. A., et al. (2013). Preventing falls in hospitals: A toolkit for improving
quality of care (AHRQ Publication No. 13-0015-EF). Rockville, MD: Agency for
Healthcare Research and Quality. Accessed via the Web at
https://www.ahrq.gov/sites/default/files/publications/files/fallpxtoolkit_0 .pdf
(Level VII)
18 The Joint Commission. (2019). Standard RC.01.03 .01. Comprehensive
accreditation manual for hospitals. Oakbrook Terrace, IL: The Joint
Commission. (Level VII)
19 Accreditation Association for Hospitals and Health Systems. (2017). Standard
10.00 .03. Healthcare Facilities Accreditation Program: Accreditation
requirements for acute care hospitals. Chicago, IL: Accreditation Association
for Hospitals and Health Systems. (Level VII)
20 Centers for Medicare and Medicaid Services, Department of Health and
Human Services. (2015). Condition of participation: Medical record services.
42 C.F.R. § 482.24(b).
21 DNV GL-Healthcare USA, Inc. (2016). MR.2 .SR.1 . NIAHO® accreditation
requirements: Interpretive guidelines & surveyor guidance (version 11).
Milford, OH: DNV GL-Healthcare USA, Inc. (Level VII)
22 Harris, C. (2014). Neuromonitoring indications and utility in the intensive care
unit. Critical Care Nurse, 34(3), 30–40.
Current uses of TENS
Transcutaneous electrical nerve stimulation (TENS) has been helpful in
temporary relief of acute pain, such as postoperative pain, and in ongoing
relief of chronic pain, such as sciatica. It can also be used to prevent
migraine headache pain. Additionally, randomized control trials have shown
successful use of TENS in patients experiencing labor pain.6
Other the types of pain that may respond to TENS are arthritis, bone
fracture pain, bursitis, cancer-related pain, diabetic neuropathy pain,
dysmenorrhea, musculoskeletal pain, myofascial pain, neuralgias and
neuropathies, residual limb pain, and whiplash.
A practitioner must prescribe TENS when used in the facility setting. Use of
the device is most successful if administered and taught to the patient by a
therapist skilled in its use.
TRANSCUTANEOUS ELECTRICAL NERVE
STIMULATION
Transcutaneous electrical nerve stimulation (TENS) is the
application of electrical stimulation to the skin for pain relief.
It’s based on the gate-control theory of pain, which proposes
that painful impulses pass through a “gate” in the brain.
TENS is performed with a portable, battery-powered device
that transmits painless electrical current to peripheral
nerves or directly to a painful area over relatively large
nerve fibers. This treatment effectively alters the patient’s
perception of pain by blocking painful stimuli traveling over
smaller fibers.
Used for postoperative patients and those with chronic
pain, TENS reduces the need for analgesic drugs and may
allow the patient to resume normal activities. Typically, a
course of TENS treatments lasts 3 to 5 days. Some
conditions such as phantom limb pain may require
continuous stimulation; other conditions such as a painful
arthritic joint require shorter periods (3 to 4 hours). TENS
has also been found to decrease knee pain associated with
osteoarthritis. However, recent studies have shown TENS
isn’t helpful in patients with chronic lower back pain.1 (See
Current uses of TENS.)
In 2014, the Food and Drug Administration approved the
Cefaly TENS device for prevention of migraine headaches;
it’s the first TENS device approved for pain prevention.2 The
Cefaly TENS device, worn across the forehead, is battery
powered and emits electrical current that stimulates the
trigeminal nerve.3
TENS is contraindicated for patients with cardiac
pacemakers because it can interfere with pacemaker
function.4 The procedure is also contraindicated for
pregnant patients not in labor and in patients with cardiac
disease (because it may cause arrhythmias), as well as in
patients with a spinal cord stimulator or an intrathecal
pump.5 You should avoid electrode placement on the
anterior neck, because the electrodes may cause
laryngospasm. You should also avoid placement over an
area with sensory impairment, because the device may
cause burns.5
Equipment
TENS device ▪ pregelled, self-stick electrodes ▪ warm water
and soap ▪ washcloth ▪ towel ▪ lead wires ▪ charged
battery pack ▪ battery recharger ▪ Optional: alcohol pads,
hypoallergenic tape.
Commercial TENS kits are available. They include the
stimulator, lead wires, electrodes, spare battery pack,
battery recharger, and sometimes the adhesive patch.
Preparation of equipment
Before beginning the procedure, always test the battery
pack to make sure it’s fully charged.
Implementation
■ Verify the practitioner’s order.
■ Gather and prepare the equipment.
■ Perform hand hygiene.7,8,9,10,11,12
■ Confirm the patient’s identity using at least two patient
identifiers.13
■ Provide privacy.14,15,16,17
EQUIPMENT
Positioning TENS electrodes
In transcutaneous electrical nerve stimulation (TENS), electrodes placed
around peripheral nerves (or an incisional site) transmit mild electrical pulses
to the brain. The current is thought to block pain impulses. The patient can
influence the level and frequency of pain relief by adjusting the controls on
the device.
Typically, electrode placement varies, even though patients may have
similar complaints. You can place electrodes:
■ to cover the painful area or surround it, as with painful joints or muscle
tenderness or spasm
■ to “capture” the painful area between electrodes, as with incisional pain
■ to evoke “sensory analgesia” at trigger points.5
In peripheral nerve injury, place electrodes proximal to the injury (between
the brain and the injury site) to avoid increasing pain. Placing electrodes in a
hypersensitive area also increases pain. In an area lacking sensation, you
should place electrodes on adjacent dermatomes.
In labor pain, one pair of electrodes is usually placed paravertebrally at the
level of T10 to L1, and another at the level of S2 to S4. This produces a
buzzing or prickling sensation, reducing the awareness of contraction pain.
The patient controls the intensity of the current and stimulation pattern.6
The illustrations show combinations of electrode placement (red squares)
and areas of nerve stimulation (shaded red) for lower back and leg pain.
■ If the patient has never seen a TENS unit, show the
patient the device and explain the procedure to the patient
and family (if appropriate) according to their individual
communication and learning needs to increase their
understanding, allay their fears, and enhance cooperation.18
Before TENS treatment
■ Using soap and water, thoroughly clean the skin where
you’ll apply the electrodes. Dry the skin before application.
Use an alcohol pad, if necessary, to remove excess oil or
lotion.
■ Apply the ordered number of electrodes on the proper
skin area, leaving at least 2′′ (5 cm) between them. (See
Positioning TENS electrodes.) If necessary, secure them with
hypoallergenic tape. Tape all sides evenly so that the
electrodes are firmly attached to the skin.
■ Plug the pin connectors into the electrode sockets. To
protect the cords, hold the connectors—not the cords
themselves—during insertion.
■ Turn the channel controls to the OFF position or as
recommended in the operator’s manual.
■ Plug the lead wires into the jacks in the control box.
■ Turn the AMPLITUDE and RATE dials slowly as the manual
directs. (The patient should feel a tingling sensation.) Then
adjust the controls on this device to the prescribed settings
or to settings that are most comfortable for the patient.
Most patients select stimulation frequencies of 60 to 100 Hz.
■ Attach the TENS control box to part of the patient’s
clothing, such as a belt, pocket, or bra.
■ To make sure the device is working effectively, monitor
the patient for signs of excessive stimulation, such as
muscle twitches, and for signs of inadequate stimulation,
signaled by the patient’s inability to feel a mild tingling
sensation.
To remove the device
■ Turn off the controls and unplug the electrode lead wires
from the control box.
■ If another treatment will be given soon, leave the
electrodes in place; if not, remove them by lifting the edge
of each electrode and gently pulling each one off the skin
gently.
■ Clean the patient’s skin with soap and water, and dry it
with a towel.
■ Recharge the used battery pack so that it’s always ready
for use.
Completing the procedure
■ Perform hand hygiene.7,8,9,10,11,12
■ Document the procedure.19,20,21
Special considerations
■ If you must move the electrodes during the procedure,
turn off the controls first.
■ Follow the practitioner’s orders regarding electrode
placement and control settings. Incorrect placement of the
electrodes will result in inappropriate pain control.
■ Keep in mind that setting the controls too high can cause
pain, and setting them too low will fail to relieve pain.
NURSING ALERT Never place the electrodes near the patient’s eyes
or over the nerves that innervate the carotid sinus or laryngeal or
pharyngeal muscles to avoid interference with critical nerve function.5
■ If TENS is used continuously for pain, remove the
electrodes at least daily to check for skin irritation, provide
skin care, and rotate sites of electrode placement.
■ Patients using TENS therapy at home have reported
problems with electrode connectivity, difficulty with correct
electrode placement, and unpleasant sensations.22
Patient teaching
If appropriate, let the patient study the operator’s manual. If
the TENS unit is to be used at home, instruct the patient on
proper preparation and care of the unit, as well as correct
placement of the electrodes. Encourage the patient to
always follow the manufacturer’s instructions when using
the TENS unit, and to discontinue stimulation and notify the
provider should TENS therapy become ineffective or
unpleasant.23
Documentation
On the patient’s medical record and the nursing care plan,
record the electrode sites and the control settings.
Document the patient’s tolerance of treatment. Also
evaluate pain control, and record the location of pain and
how the patient rates the pain using a pain scale. Document
patient teaching and the patient’s understanding of the
teaching.
REFERENCES
1 Dubinsky, R. M., & Miyasaki, J. (2010). Assessment: Efficacy of transcutaneous
electric nerve stimulation in the treatment of pain in neurologic disorders (an
evidence-based review). Neurology, 74(2), 173–176. (Level I)
2 Jeffrey, S. (2014). “FDA approves first device to prevent migraine” [Online].
Accessed via the Web at http://www.medscape.com/viewarticle/821810
3 U.S. Food and Drug Administration Consumer health Information. (2017).
“Treating migraines: More ways to fight the pain” [Online]. Accessed via the
Web at
https://www.fda.gov/ForConsumers/ConsumerUpdates/ucm414707.htm
4 Moroz, A. (n.d .) . “Treatment of pain and inflammation” [Online]. Accessed via
the Web at
http://www.merckmanuals.com/home/fundamentals/rehabilitation/treatment_
of_pain_and_inflammation.html
5 Kaye, V. (2015). “Transcutaneous electrical nerve stimulation” [Online].
Accessed via the Web at http://emedicine.medscape.com/article/325107-
overview#a1
6 Simpin, P., & Klein, M. Nonpharmacologic approaches to management of labor
pain. (2017). In: UpToDate, Lockwood, C. (Ed). Retrieved from:
www.uptodate.com
7 World Health Organization. (2009). “WHO guidelines on hand hygiene in
health care: First global patient safety challenge, clean care is safer care”
[Online]. Accessed via the Web at
http://apps.who.int/iris/bitstream/10665/44102/1/9789241597906_eng.pdf
(Level IV)
8 The Joint Commission. (2017). Standard NPSG.07.01.01. Comprehensive
accreditation manual for hospitals. Oakbrook Terrace, IL: The Joint
Commission. (Level VII)
9 Centers for Disease Control and Prevention. (2002). Guideline for hand
hygiene in health-care settings: Recommendations of the Healthcare Infection
Control Practices Advisory Committee and the HICPAC/SHEA/APIC/IDSA Hand
Hygiene Task Force. MMWR Recommendations and Reports, 51(RR-16), 1–45.
Accessed via the Web at https://www.cdc.gov/mmwr/pdf/rr/rr5116.pdf (Level
II)
10 Centers for Medicare and Medicaid Services, Department of Health and
Human Services. (2015). Condition of participation: Infection control. 42 C.F.R.
§ 482.42.
11 Accreditation Association for Hospitals and Health Systems. (2017). Standard
07.01.21. Healthcare Facilities Accreditation Program: Accreditation
requirements for acute care hospitals. Chicago, IL: Accreditation Association
for Hospitals and Health Systems. (Level VII)
12 DNV GL-Healthcare USA, Inc. (2016). IC.1 .SR.1 . NIAHO® accreditation
requirements: Interpretive guidelines & surveyor guidance (version 11).
Milford, OH: DNV GL-Healthcare USA, Inc. (Level VII)
13 The Joint Commission. (2019). Standard NPSG.01.01.01. Comprehensive
accreditation manual for hospitals. Oakbrook Terrace, IL: The Joint
Commission. (Level VII)
14 Centers for Medicare and Medicaid Services, Department of Health and
Human Services. (2015). Condition of participation: Patient’s rights. 42 C.F.R.
§ 482.13(c)(1).
15 Accreditation Association for Hospitals and Health Systems. (2017). Standard
15.01.16. Healthcare Facilities Accreditation Program: Accreditation
requirements for acute care hospitals. Chicago, IL: Accreditation Association
for Hospitals and Health Systems. (Level VII)
16 DNV GL-Healthcare USA, Inc. (2016). PR.1.SR.5 . NIAHO® accreditation
requirements: Interpretive guidelines & surveyor guidance (version 11).
Milford, OH: DNV GL-Healthcare USA, Inc. (Level VII)
17 The Joint Commission. (2019). Standard RI.01.01.01. Comprehensive
accreditation manual for hospitals. Oakbrook Terrace, IL: The Joint
Commission. (Level VII)
18 The Joint Commission. (2019). Standard PC.02.01.21. Comprehensive
accreditation manual for hospitals. Oakbrook Terrace, IL: The Joint
Commission. (Level VII)
19 The Joint Commission. (2019). Standard RC.01.03 .01. Comprehensive
accreditation manual for hospital. Oakbrook Terrace, IL: The Joint
Commission. (Level VII)
20 Accreditation Association for Hospitals and Health Systems. (2017). Standard
10.00 .03. Healthcare Facilities Accreditation Program: Accreditation
requirements for acute care hospitals. Chicago, IL: Accreditation Association
for Hospitals and Health Systems. (Level VII)
21 Centers for Medicare and Medicaid Services, Department of Health and
Human Services. (2015). Condition of participation: Medical record services.
42 C.F.R. § 482.24(b).
22 Gladwell, P. W., et al. (2016). Problems, solutions, and strategies reported by
users of transcutaneous electrical nerve stimulation for chronic
musculoskeletal pain: Qualitative exploration using patient interviews,
Physical Therapy, 96(7), 1039–1048. Accessed via the Web at
http://eprints.uwe.ac .uk/27765/7/1039.full.pdf
23 PhysioMed. (n.d .). “A practical guide to TENS therapy” [Online]. Accessed via
the Web at
http://www.vetinst.com/skin1/admin/UserFiles/File/JS%20PDF/EMS%20UNIT.pd
f
TRANSCUTANEOUS PACING
Transcutaneous pacing is a method of external electrical
stimulation of the heart through a set of electrode pads. It
isn’t as efficient as transvenous pacing because the
electrical stimulus (the pad) isn’t in direct contact with the
heart muscle. In a life-threatening situation, when time is
critical, a transcutaneous pacemaker is the best choice.
(See Indications for transcutaneous pacing, page 772.)
Transcutaneous pacing works by sending an electrical
impulse from the pulse generator to the patient’s heart by
way of two electrodes, which are placed on the front and
back of the patient’s chest. Transcutaneous pacing is quick
and effective, but it’s used only until the practitioner can
institute transvenous pacing.3
Transcutaneous pacing is recommended by the American
Heart Association Guidelines for Cardiopulmonary
Resuscitation and Emergency Cardiovascular Care for
symptomatic bradycardia when a pulse is present. It isn’t
recommended for cardiac arrest, because research shows
that it’s ineffective in this situation.1
Equipment
Transcutaneous pacing generator ▪ transcutaneous pacing
electrodes ▪ cardiac monitor ▪ monitoring leads ▪ 12-lead
electrocardiogram (ECG) machine ▪ ECG cables and monitor
▪ cardiac monitor output cable ▪ washcloth ▪ towel ▪
nonemollient soap ▪ tap water ▪ blood pressure monitor ▪
Optional: disposable-head clippers, prescribed analgesic or
sedative.
Implementation
■ Perform hand hygiene.4,5,6,7,8,9
■ Confirm the patient’s identity using at least two patient
identifiers.10
■ Provide privacy.11,12,13,14
■ Explain the procedure to the patient and family (if
appropriate) according to their individual communication
and learning needs to increase their understanding, allay
their fears, and enhance cooperation.15
■ Assist the patient to the supine position and expose the
torso.16
■ If necessary, clip the patient’s hair over the areas of
electrode placement. However, don’t shave the area,
because if you nick the skin, the current from the pulse
generator could cause discomfort, and the nicks could
become irritated or infected after the electrodes are
applied.16
Indications for transcutaneous
pacing
The American Heart Association recommends transcutaneous pacing for
these Class IIa indications:
■ bradycardia with hemodynamic instability unresponsive to atropine while
preparing for emergent transvenous pacing
■ high-degree block (Mobitz type II second-degree block or third-degree
atrioventricular block)
■ symptomatic bradycardia
■ sinus arrest.1,2
EQUIPMENT
Transcutaneous electrode placement
For a noninvasive temporary pacemaker, the two pacing
electrodes are placed at heart level on the patient’s chest
(anterior) and back (posterior), as shown below. You can
apply this type of pacemaker quickly in an emergency;
however, it’s uncomfortable for the patient.
■ Prepare the skin on the patient’s chest and back by
washing it with nonemollient soap and water; dry the skin
thoroughly to improve electrode adherence.16
■ Plug the ECG cable into the ECG input connection on the
front of the transcutaneous pacing generator. Turn on the
monitor.
■ Attach ECG monitoring electrodes to the patient in lead I,
II, or III position to monitor the patient’s rhythm. Do this
even if the patient is already on telemetry monitoring,
because you’ll need to connect the electrodes to the
pacemaker. If you select the lead II position, adjust the left
leg (LL) electrode placement to accommodate the anterior
pacing electrode and the patient’s anatomy. You should see
the ECG waveform on the monitor.
■ Adjust the ECG size to the maximum R-wave size, and
look for the device indicator signaling that the device senses
the QRS complex of the patient’s intrinsic rhythm. Adjust
the audible R-wave signal to a suitable volume level, and
activate the alarm by pressing the appropriate button. Set
the alarm for 10 to 20 beats lower and 20 to 30 beats higher
than the intrinsic heart rate. Make sure the alarm limits are
set properly for the patient’s current condition, and that the
alarms are turned on, functioning properly, and audible to
staff.17,18,19
■ Press the appropriate button for a printout of the
waveform.
■ Apply the posterior transcutaneous pacing electrode
(marked BACK), to the skin on the left side of the back, just
below the scapula and to the left of the spine.16 Follow the
manufacturer’s instructions for electrode application.
■ Apply the anterior transcutaneous pacing electrode
(marked FRONT) to the left side of the precordium in the usual
lead V2 to V5 position. With female patients, place the
anterior electrode under and lateral to the patient’s breast
tissue, but avoid placing it over her diaphragm.16 Follow the
manufacturer’s instructions for electrode application.(See
Transcutaneous electrode placement.)
■ After making sure the energy output in milliamperes (mA)
is on zero, connect the transcutaneous pacing electrodes to
the pacemaker cable, which is connected to the pulse
generator.
■ Check the waveform, looking for a tall QRS complex in
lead II.
■ Turn on the pulse generator. Inform the patient that a
thumping or twitching sensation may occur. Reassure the
patient that you’ll give provide medication if the discomfort
is intolerable.
■ Set the pulse generator mode (demand or asynchronous)
as ordered. The demand mode senses intrinsic myocardial
activity and only paces when the patient’s intrinsic rate falls
below the set rate. In the asynchronous mode, pacing
occurs at a set rate regardless of the patient’s intrinsic rate.
■ Set the pacemaker rate to maintain an adequate cardiac
output. Some pacemakers have a default setting (for
example, 80 beats/minute) that can be adjusted as
needed.16
■ Set the energy output. Slowly increase the amount of
energy delivered to the heart by adjusting the milliampere
(mA) setting. Do this until capture is achieved; you’ll see a
pacing spike followed by a widened QRS complex that
resembles a premature ventricular contraction. This is the
pacing threshold. To ensure consistent capture, increase
output by 10%. Don’t increase output any higher; doing so
may cause the patient needless discomfort.
■ With full capture, the patient’s heart rate should be
approximately the same as the pacing rate set on the
machine (pacemaker). The usual pacing threshold is
between 40 and 80 mA. Assess the patient’s pulse to ensure
adequate blood flow with paced complexes;16 don’t just rely
on the monitor to determine the patient’s heart rate.
■ Assess the patient’s vital signs, skin color, level of
consciousness, and peripheral pulses to determine the
effectiveness of the paced rhythm.
■ Perform a 12-lead ECG to serve as a baseline, and then
obtain additional ECGs as required by your facility or when
clinical changes occur.
■ Perform a comprehensive pain assessment using
techniques appropriate for the patient’s age, condition, and
ability to understand.20,21
■ Administer an analgesic or sedative as ordered and
indicated, following safe medication administration
practices.16,22,23,24
■ Perform hand hygiene.4,5,6,7,8,9
■ Document the procedure.25,26,27,28
Special considerations
■ The Joint Commission issued a sentinel event alert
concerning medical device alarm safety, because alarm-
related events have been associated with permanent loss of
function or death. Among the major contributing factors
were
improper
alarm
settings,
alarm
settings
inappropriately turned off, and alarm signals not audible to
staff. Make sure that alarm limits are set appropriately, and
that alarms are turned on, functioning properly, and audible
to staff. Follow facility guidelines for preventing alarm
fatigue.17
■ If a patient is hemodynamically unstable and the back is
difficult to access, the posterior electrode may be placed in
the anterior-lateral position at the second or third intercostal
space over the right sternal area.16
■ Take care to prevent microshock, including warning the
patient not to use any electrical equipment that isn’t
grounded, such as landline telephones, electric shavers,
televisions, and lamps.
■ Don’t place the electrodes over a bony area, because
bone conducts current poorly.
■ Obtain a rhythm strip before, during, and after pacemaker
placement; any time that pacemaker settings are changed;
and whenever the patient receives treatment for a
complication due to the pacemaker.
■ Monitor the ECG reading continuously, noting capture,
sensing, rate, intrinsic beats, and competition of paced and
intrinsic rhythms. If the pacemaker is sensing correctly, the
sense indicator on the pulse generator should flash with
each beat.
Complications
Complications associated with pacemaker therapy include
microshock, equipment failure, and competitive or fatal
arrhythmias. Transcutaneous pacemakers may also cause
skin breakdown as well as muscle pain and twitching when
the pacemaker fires.
Documentation
Record the reason for transcutaneous pacing, the date and
time it started, the type of pacemaker used, and the
locations of the electrodes. Also record the pacemaker
settings. Note the patient’s response to the procedure,
along with any complications and interventions
implemented. If possible, obtain rhythm strips before,
during, and after pacemaker placement; whenever
pacemaker settings are changed; and when the patient
receives treatment for a complication caused by the
pacemaker.
REFERENCES
1 American Heart Association. (2010). 2010 American Heart Association
guidelines for cardiopulmonary resuscitation and emergency cardiovascular
care: Parts 6-9 . Circulation, 122, S706–S767. (Level II)
2 American Heart Association. (2015). 2015 American Heart Association
guidelines update for cardiopulmonary resuscitation and emergency
cardiovascular care. Circulation, 132, S444–S464. (Level II)
3 Hayes, D. L. Temporary cardiac pacing. (2015). In: UpToDate, Ganz, L. I ., &
Downey, B. C . (Eds.) . Retrieved from: www.uptodate.com
4 The Joint Commission. (2019). Standard NPSG.07.01.01. Comprehensive
accreditation manual for hospitals. Oakbrook Terrace, IL: The Joint
Commission. (Level VII)
5 Centers for Disease Control and Prevention. (2002). Guideline for hand
hygiene in health-care settings: Recommendations of the Healthcare Infection
Control Practices Advisory Committee and the HICPAC/SHEA/APIC/IDSA Hand
Hygiene Task Force. MMWR Recommendations and Reports, 51(RR–16), 1–45.
Accessed via the Web at https://www.cdc.gov/mmwr/pdf/rr/rr5116.pdf (Level
II)
6 World Health Organization. (2009). “WHO guidelines on hand hygiene in
health care: First global patient safety challenge, clean care is safer care”
[Online]. Accessed via the Web at
http://apps.who.int/iris/bitstream/10665/44102/1/9789241597906_eng.pdf
(Level IV)
7 Accreditation Association for Hospitals and Health Systems. (2017). Standard
07.01.21. Healthcare Facilities Accreditation Program: Accreditation
requirements for acute care hospitals. Chicago, IL: Accreditation Association
for Hospitals and Health Systems. (Level VII)
8 Centers for Medicare and Medicaid Services, Department of Health and
Human Services. (2015). Condition of participation: Infection control. 42 C.F.R.
§ 482.42.
9 DNV GL-Healthcare USA, Inc. (2019). IC.1.SR.1 . NIAHO® accreditation
requirements: Interpretive guidelines & surveyor guidance (version 11).
Milford, OH: DNV GL-Healthcare USA, Inc. (Level VII)
10 The Joint Commission. (2019). Standard NPSG.01.01.01. Comprehensive
accreditation manual for hospitals. Oakbrook Terrace, IL: The Joint
Commission. (Level VII)
11 DNV GL-Healthcare USA, Inc. (2016). PR.1.SR.5 . NIAHO® accreditation
requirements: Interpretive guidelines & surveyor guidance (version 11).
Milford, OH: DNV GL-Healthcare USA, Inc. (Level VII)
12 The Joint Commission. (2019). Standard RI.01.01.01. Comprehensive
accreditation manual for hospitals. Oakbrook Terrace, IL: The Joint
Commission. (Level VII)
13 Centers for Medicare and Medicaid Services, Department of Health and
Human Services. (2015). Condition of participation: Patient’s rights. 42 C.F.R.
§ 482.13(c)(1).
14 Accreditation Association for Hospitals and Health Systems. (2017). Standard
15.01.16. Healthcare Facilities Accreditation Program: Accreditation
requirements for acute care hospitals. Chicago, IL: Accreditation Association
for Hospitals and Health Systems. (Level VII)
15 The Joint Commission. (2019). Standard PC.02.01.21. Comprehensive
accreditation manual for hospitals. Oakbrook Terrace, IL: The Joint
Commission. (Level VII)
16 Wiegand, D. L. (2017). AACN procedure manual for high acuity, progressive,
and critical care (7th ed.). St. Louis, MO: Elsevier.
17 The Joint Commission. (2013). “Sentinel event alert: Medical device alarm
safety in hospitals” [Online]. Accessed via the Web at
https://www.jointcommission.org/assets/1/6/SEA_50_alarms_4 _26_16.pdf
(Level VII)
18 Graham, K. C., & Cvach, M. (2010). Monitor alarm fatigue: Standardizing use
of physiological monitors and decreasing nuisance alarms. American Journal
of Critical Care, 19(1), 28–37. Accessed via the Web at
http://ajcc.aacnjournals.org/content/19/1/28.full.pdf
19 American Association of Critical-Care Nurses. (2013). “A ACN practice alert:
Alarm management” [Online]. Accessed via the Web at
https://www.aacn.org/aacn-website/shared/content/practice-
alerts/2015/11/25/alarm-management (Level VII)
20 The Joint Commission. (2019). Standard PC.01.02.07. Comprehensive
accreditation manual for hospitals. Oakbrook Terrace, IL: The Joint
Commission. (Level VII)
21 Institute for Safe Medication Practices. (2012). Side tracks on the safety
express: Interruptions lead to errors and unfinished . . . Wait, what was I
doing? Nurse Advise-ERR, 11(2), 1–4 . Accessed via the Web at
https://www.ismp.org/resources/side-tracks-safety-express-interruptions-lead-
errors-and-unfinished-wait-what-was-i-doing
22 DNV GL-Healthcare USA, Inc. (2016). MM.1 .SR.2. NIAHO® accreditation
requirements: Interpretive guidelines & surveyor guidance (version 11).
Milford, OH: DNV GL-Healthcare USA, Inc. (Level VII)
23 Accreditation Association for Hospitals and Health Systems. (2017). Standard
16.01.03. Healthcare Facilities Accreditation Program: Accreditation
requirements for acute care hospitals. Chicago, IL: Accreditation Association
for Hospitals and Health Systems. (Level VII)
24 Centers for Medicare and Medicaid Services, Department of Health and
Human Services. (2015). Condition of participation: Nursing services. 42
C.F.R. § 482.23(c).
25 The Joint Commission. (2019). Standard RC.01.03 .01. Comprehensive
accreditation manual for hospitals. Oakbrook Terrace, IL: The Joint
Commission. (Level VII)
26 Accreditation Association for Hospitals and Health Systems. (2017). Standard
10.00 .03. Healthcare Facilities Accreditation Program: Accreditation
requirements for acute care hospitals. Chicago, IL: Accreditation Association
for Hospitals and Health Systems. (Level VII)
27 Centers for Medicare and Medicaid Services, Department of Health and
Human Services. (2015). Condition of participation: Medical record services.
42 C.F.R. § 482.24(b).
28 DNV GL-Healthcare USA, Inc. (2016). MR.2 .SR.1 . NIAHO® accreditation
requirements: Interpretive guidelines & surveyor guidance (version 11).
Milford, OH: DNV GL-Healthcare USA, Inc. (Level VII)
TRANSDERMAL DRUG APPLICATION
Through a measured dose of ointment or an adhesive patch
applied to the skin, transdermal drugs deliver constant,
controlled medication directly into the bloodstream for a
prolonged systemic effect.
Nitroglycerin is a commonly administered transdermal
medication. It’s indicated for the treatment of angina in
patients with coronary artery disease. Nitroglycerin
ointment dilates coronary vessels for up to 7 hours.1 (See
Applying nitroglycerin ointment, page 774.)
Medications available as transdermal patches include
scopolamine, which treats motion sickness; granisetron for
chemotherapy-induced nausea and vomiting; estradiol for
postmenopausal hormone replacement; estrogen and
progesterone for hormonal contraception; clonidine for
hypertension; nicotine for smoking cessation; and fentanyl,
an opioid analgesic for controlling chronic pain. Transdermal
scopolamine can relieve motion sickness for as long as 72
hours; transdermal granisetron lasts for 5 days; transdermal
estradiol, estrogen, and progesterone last for up to 1 week;
transdermal clonidine and nicotine last for 24 hours; and
transdermal fentanyl can last for up to 72 hours.
Contraindications for transdermal drug application include
skin allergies or skin reactions to the drug. Transdermal
drugs shouldn’t be applied to broken or irritated skin, which
would increase irritation, or to scarred or callused skin,
which might impair absorption.
NURSING ALERT Don’t apply heat over a fentanyl transdermal system
or its surrounding area, because an increase in temperature increases
fentanyl release, which may result in overdose and death.2,3
Equipment
Patient’s medication administration record ▪ prescribed
medication ▪ application strip or ruled measuring paper (for
nitroglycerin ointment) ▪ adhesive tape ▪ Optional: gloves,
transparent semipermeable dressing, disposable-head
clippers, blood pressure equipment.
Implementation
■ Avoid distractions and interruptions when preparing and
administering the medication to prevent medication
errors.4,5
■ Verify the practitioner’s order order.6
■ Reconcile the patient’s medications when the practitioner
orders a new medication to reduce the risk of medication
errors, including omissions, duplications, dosing errors, and
drug interactions.
■ Compare the medication label with the order in the
patient’s medical record and verify that the medication is
correct.6,7,8
Applying nitroglycerin ointment
Unlike many topical medications, nitroglycerin ointment is used for its
transdermal systemic effect. It’s used to dilate the veins and arteries,
improving cardiac perfusion in a patient with cardiac ischemia or angina
pectoris.
To apply nitroglycerin ointment transdermally, start by taking the patient’s
baseline blood pressure so that you can compare it with later readings.
Remove any previously applied nitroglycerin ointment. Gather your
equipment. Nitroglycerin ointment, which is prescribed by the inch, comes
with a rectangular piece of ruled paper to be used in applying the
medication. Put on gloves if needed. Squeeze the prescribed amount of
ointment onto the ruled paper (as shown below).
After measuring the correct amount of ointment, tape the ruled measuring
paper, drug side down, directly to the skin (as shown below). (Some facilities
require you to use the paper to apply the medication to the patient’s skin,
usually on the chest or arm. Do so by spreading a thin layer of the ointment
over an area of 3′′ [7.6 cm].) For increased absorption, the practitioner may
request that you cover the site with a transparent semipermeable dressing.
After 5 minutes, record the patient’s blood pressure. If the blood pressure
has dropped significantly and the patient has a headache (from vasodilation
of blood vessels in the head), notify the practitioner immediately; the
practitioner may reduce the medication dose. If the patient’s blood pressure
has dropped but the patient has no symptoms, instruct the patient to lie still
until the blood pressure returns to normal.
■ Check the patient’s medical record for allergies or
contraindications to the prescribed medication. If an allergy
or a contraindication exists, don’t administer the
medication; notify the practitioner.6,7,8
■ Check the expiration date on the medication. If the
medication has expired, return it to the pharmacy and
obtain new medication.6,7,8
■ Visually inspect the medication for loss of integrity; don’t
administer the medication if its integrity has been
compromised.6,7,8
■ Discuss any unresolved concerns about the medication
with the practitioner.6,7,8
■ Perform hand hygiene.9,10,11,12,13,14
■ Confirm the patient’s identity using at least two patient
identifiers.15
■ Provide privacy.16,17,18,19
■ Explain the procedure to the patient and family (if
appropriate) according to their individual communication
and learning needs to increase their understanding, allay
their fears, and enhance cooperation.20 Answer any
questions.
■ Teach the patient who is receiving the medication for the
first time about potential adverse reactions, and discuss any
other concerns related to the medication.6,7,8
■ Verify that the medication is being administered at the
correct time, in the prescribed dose, and by the correct
route to reduce the risk of medication errors.6,7,8
■ If your facility uses a bar code technology, scan your
identification badge, the patient’s identification bracelet,
and the medication’s bar code.
■ Put on gloves if needed to comply with standard
precautions.21,22
■ Open the package and remove the patch.
■ Write the date, the time, and your initials on the new
patch.
■ Without touching the adhesive surface, remove the clear
plastic backing.
■ Apply the patch to a dry, hairless area—behind the ear,
for example, as with scopolamine. If necessary, use
disposable-head clippers to remove excess hair.
■ Instruct the patient to keep the area around the ointment
or patch as dry as possible.
■ Remove and discard your gloves, if worn,21,22 and
perform hand hygiene.9,10,11,12,13,14
■ Document the procedure.23,24,25,26
Special considerations
■ Reapply transdermal medications at the same time every
day to ensure a continuous effect, but alternate the
application sites to avoid skin irritation.
■ When applying a scopolamine or fentanyl patch, instruct
the patient not to drive or operate machinery until the
response to the drug has been determined.2,27
■ Warn a patient using a clonidine patch to check with the
practitioner before taking an over-the-counter cough
preparation, because such drugs may counteract clonidine’s
effects.28
■ If a fentanyl patch won’t adhere, tape the edges of the
patch with adhesive tape; if problems with adhesion persist,
apply a transparent semipermeable dressing over the
patch.2
■ Some transdermal patches aren’t compatible with
magnetic resonance imaging (MRI), and may cause skin
burns if not removed. Consult with the practitioner about
removing a transdermal patch prior to MRI, as applicable.28
■ Store the transdermal medication at room temperature
with the cap closed tightly.
Patient teaching
Teach the patient how to apply the patch. (See Applying a
transdermal medication patch.)
Complications
Transdermal medications can cause skin irritation, such as
pruritus and a rash. The patient may also suffer adverse
effects of the specific drug administered. For example,
transdermal nitroglycerin may cause headaches and, in
older adult patients, orthostatic hypotension. Adverse
effects of scopolamine include dry mouth and drowsiness
(most common); for estradiol, increased risk of endometrial
cancer, thromboembolic disease, and birth defects; and for
clonidine, possible severe rebound hypertension, especially
if withdrawn suddenly. Anaphylactic reaction to the
medication may occur; monitor for signs and symptoms of
this complication.
Documentation
Document the name of the medication, the dose, and the
date and time it was administered in the patient’s
medication administration record. Include the route and site
used. Document the appearance and integrity of the skin
before administration. Record the presence or absence of
adverse effects and whether the practitioner was notified of
their presence. Document the patient’s response to and
tolerance of therapy. Document any patient teaching, the
patient’s understanding of the teaching, and whether you
gave the patient written information about the prescribed
medication.
REFERENCES
1 Fougera Pharmaceuticals, Inc. (2009). “Nitro-Bid® (nitroglycerin ointment
USP 2%) prescribing information” [Online]. Accessed via the Web at
https://dailymed.nlm.nih.gov/dailymed/drugInfo.cfm?setid=30934ddc-0823-
4097-8699 -d10988011d7c
2 Janssen Pharmaceuticals, Inc. (2016). “Duragesic (fentanyl transdermal
system) for transdermal administration” [Online]. Accessed via the Web at
https://www.accessdata.fda.gov/drugsatfda_docs/label/2016/019813s069lbl.p
df
3 Institute for Safe Medication Practices. (2015). Transdermal patches and heat
sources. Nurse AdviseERR, 13(4), 1. Accessed via the Web at
http://www.ismp.org/newsletters/nursing/issues/NurseAdviseERR201504.pdf
4 Westbrook, J., et al. (2010). Association of interruptions with an increased risk
and severity of medication administration errors. Archives of Internal
Medicine, 170(8), 683–690 . (Level IV)
5 Institute for Safe Medication Practices. (2012). Side tracks on the safety
express: Interruptions lead to errors and unfinished...Wait, what was I doing?
Nurse Advise-ERR, 11(2), 1–4 . Accessed via the Web at
https://www.ismp.org/resources/side-tracks-safety-express-interruptions-lead-
errors-and-unfinished-wait-what-was-i-doing
6 Accreditation Association for Hospitals and Health Systems. (2017). Standard
16.01.03. Healthcare Facilities Accreditation Program: Accreditation
requirements for acute care hospitals. Chicago, IL: Accreditation Association
for Hospitals and Health Systems. (Level VII)
7 Centers for Medicare and Medicaid Services, Department of Health and
Human Services. (2015). Condition of participation: Nursing services. 42
C.F.R. § 482.23(c).
8 DNV GL-Healthcare USA, Inc. (2016). MM .1 .SR.2 . NIAHO® accreditation
requirements: Interpretive guidelines & surveyor guidance (version 11).
Milford, OH: DNV GL-Healthcare USA, Inc. (Level VII)
9 Centers for Disease Control and Prevention. (2002). Guideline for hand
hygiene in health-care settings: Recommendations of the Healthcare Infection
Control Practices Advisory Committee and the HICPAC/SHEA/APIC/IDSA Hand
Hygiene Task Force. MMWR Recommendations and Reports, 51(RR-16), 1–45.
Accessed via the Web at https://www.cdc.gov/mmwr/pdf/rr/rr5116.pdf (Level
II)
10 The Joint Commission. (2019). Standard NPSG.07.01.01. Comprehensive
accreditation manual for hospitals. Oakbrook Terrace, IL: The Joint
Commission. (Level VII)
11 World Health Organization. (2009). “WHO guidelines on hand hygiene in
health care: First global patient safety challenge, clean care is safer care”
[Online]. Accessed via the Web at
http://apps.who.int/iris/bitstream/10665/44102/1/9789241597906_eng.pdf
(Level IV)
12 Accreditation Association for Hospitals and Health Systems. (2017). Standard
07.01.21. Healthcare Facilities Accreditation Program: Accreditation
requirements for acute care hospitals. Chicago, IL: Accreditation Association
for Hospitals and Health Systems. (Level VII)
13 Centers for Medicare and Medicaid Services, Department of Health and
Human Services. (2016). Condition of participation: Infection control. 42 C.F.R.
§ 482.42.
14 DNV GL-Healthcare USA, Inc. (2016). IC.1 .SR.1 . NIAHO® accreditation
requirements: Interpretive guidelines & surveyor guidance (version 11).
Milford, OH: DNV GL-Healthcare USA, Inc. (Level VII)
15 The Joint Commission. (2019). Standard NPSG.01.01.01. Comprehensive
accreditation manual for hospitals. Oakbrook Terrace, IL: The Joint
Commission. (Level VII)
16 Accreditation Association for Hospitals and Health Systems. (2017). Standard
15.01.16. Healthcare Facilities Accreditation Program: Accreditation
requirements for acute care hospitals. Chicago, IL: Accreditation Association
for Hospitals and Health Systems. (Level VII)
17 Centers for Medicare and Medicaid Services, Department of Health and
Human Services. (2015). Condition of participation: Patient’s rights. 42 C.F.R.
§ 482.13(c)(1).
18 DNV GL-Healthcare USA, Inc. (2016). PR.1.SR.5 . NIAHO® accreditation
requirements: Interpretive guidelines & surveyor guidance (version 11).
Milford, OH: DNV GL-Healthcare USA, Inc. (Level VII)
19 The Joint Commission. (2019). Standard RI.01.01.01. Comprehensive
accreditation manual for hospitals. Oakbrook Terrace, IL: The Joint
Commission. (Level VII)
20 The Joint Commission. (2019). Standard PC.02.01.21. Comprehensive
accreditation manual for hospitals. Oakbrook Terrace, IL: The Joint
Commission. (Level VII)
21 Siegel, J. D ., et al. (2007, revised 2017). “2007 guideline for isolation
precautions: Preventing transmission of infectious agents in healthcare
settings” [Online]. Accessed via the Web at
https://www.cdc.gov/infectioncontrol/pdf/guidelines/isolation-guidelines.pdf
(Level II)
PATIENT TEACHING
Applying a transdermal medication patch
If the patient will be receiving medication by transdermal patch, instruct in its
proper use. Explain to the patient that the patch consists of several layers.
The layer closest to the skin contains a small amount of the drug and allows
prompt introduction of the drug into the bloodstream. The next layer controls
release of the drug from the main portion of the patch. The third layer
contains the main dose of the drug. The outermost layer consists of an
aluminized polyester barrier.
Teach the patient to apply the patch to appropriate skin areas, such as the
upper arm or chest or behind the ear. Warn the patient to avoid touching the
gel or surrounding tape. Tell the patient to use a different site for each
application to avoid skin irritation. If necessary, you can clip the hair at the
site. Caution the patient to avoid any area that may cause uneven
absorption, such as skin folds, scars, and calluses, or any irritated or
damaged skin areas. Also, tell the patient not to apply the patch below the
elbow or knee.
Warn the patient to avoid touching the gel or surrounding tape during
application. Instruct the patient to wash the skin where the old patch was
removed and to wash the hands after application to remove any medication
that may have rubbed off.
Warn the patient not to get the patch wet, and to discard it if it leaks or
falls off, and then to clean the site and apply a new patch at a different site.
If the transdermal patch contains fentanyl or granisetron, warn the patient to
avoid applying heat over the fentanyl or granisetron transdermal system or
its surrounding area, because an increase in temperature increases drug
release from the system, which can result in overdose.2,29
Instruct the patient to apply the patch at the same time at the prescribed
interval to ensure continuous drug delivery. Bedtime application is ideal
because body movement is reduced during the night. Lastly, tell the patient
not to forget to remove the old patch, and to dispose of it properly.
Caution the patient that accidental exposure to a fentanyl patch, especially
by a child, can be fatal. Exposure can occur when a child or caregiver
touches skin that hasn’t been cleansed after removal of an old patch or by
contact with a removed patch. The patient should fold the old patch in half
and then flush it down the toilet to prevent inadvertent contact.2,30
22 Accreditation Association for Hospitals and Health Systems. (2017). Standard
07.01.10. Healthcare Facilities Accreditation Program: Accreditation
requirements for acute care hospitals. Chicago, IL: Accreditation Association
for Hospitals and Health Systems. (Level VII)
23 The Joint Commission. (2019). Standard RC.01.03 .01. Comprehensive
accreditation manual for hospitals. Oakbrook Terrace, IL: The Joint
Commission. (Level VII)
24 Accreditation Association for Hospitals and Health Systems. (2017). Standard
10.00 .03. Healthcare Facilities Accreditation Program: Accreditation
requirements for acute care hospitals. Chicago, IL: Accreditation Association
for Hospitals and Health Systems. (Level VII)
25 Centers for Medicare and Medicaid Services, Department of Health and
Human Services. (2015). Condition of participation: Medical record services.
42 C.F.R. § 482.24(b).
26 DNV GL-Healthcare USA, Inc. (2016). MR.2 .SR.1 . NIAHO® accreditation
requirements: Interpretive guidelines & surveyor guidance (version 11).
Milford, OH: DNV GL-Healthcare USA, Inc. (Level VII)
27 Perrigo. (2014). “Scopolamine transdermal system prescribing information”
[Online]. Accessed via the Web at
https://www.accessdata.fda.gov/drugsatfda_docs/label/2015/078830Orig1s00
0lbl.pdf
28 Boehringer Ingelheim, (2011). “Catapres-TTS (clonidine) prescribing
information” [Online]. Accessed via the Web at
https://www.accessdata.fda.gov/drugsatfda_docs/label/2012/018891s028lbl.p
df
29 ProStrakan, Inc. (2015). “Sancuso (granisetron transdermal system)
prescribing information” [Online]. Accessed via the Web at
https://www.accessdata.fda.gov/drugsatfda_docs/label/2015/022198s003lbl.p
df
30 Food and Drug Administration. (2018). “FDA drug safety communication: FDA
requiring color changes to Duragesic (fentanyl) pain patches to aid safety—
emphasizing that accidental exposure to used patches can cause death”
[Online]. Accessed via the Web at
https://www.fda.gov/Drugs/DrugSafety/ucm368902.htm
TRANSDUCER SYSTEM SETUP
Transducer systems detect intravascular and intracardiac
pressures and convert them to an electrical signal that’s
transmitted to a monitor. The exact type of transducer
system used depends on the patient’s needs and the
practitioner’s preference. Some systems monitor pressure
continuously,
whereas
others
monitor
pressure
intermittently. Single-pressure transducers monitor only one
type of pressure—for example, pulmonary artery pressure
(PAP). Multiple-pressure transducers can monitor two or
more types of pressure, such as PAP and central venous
pressure.
Use sterile no-touch technique when setting up a
transducer system to reduce the risk of vascular catheter–
associated infection.
HOSPITAL-ACQUIRED CONDITION ALERT A vascular catheter–
associated infection is considered a hospital-acquired condition,
because various best practices can reasonably prevent it. Make sure
that infection-prevention practices (such as performing hand hygiene,
using sterile no-touch technique, and changing the transducer system
setup when indicated) are performed to reduce the risk of vascular
catheter–associated infection.1,2
Equipment
Bag of flush solution (usually 500 mL of normal saline
solution) ▪ pressure infuser bag ▪ preassembled disposable
pressure tubing with flush device and disposable transducer
▪ monitor, pressure module, and pressure cable ▪ IV pole
with transducer mount ▪ leveling device (carpenter’s level
or laser) ▪ sterile, nonvented stopcock caps ▪ labels ▪
Optional: 500 to 1,000 units of heparin, gloves, antiseptic
pad, syringe, needleless transfer device.
Preparation of equipment
For initial setup, turn on the monitor and insert the correct
pressure module. Plug the pressure cable into the
appropriate pressure module. Turn on the correct
parameters (for example, pulmonary artery, right atrial, or
arterial pressure) to visualize the correct waveforms. Set the
appropriate scale for the pressure monitored to obtain
accurate pressure readings.3
Implementation
Setting up the system
■ Verify the practitioner’s orders.
■ Gather the appropriate equipment.
■ Perform hand hygiene.4,5,6,7,8,9
■ Confirm the patient’s identity using at least two patient
identifiers.10
■ Explain the procedure to the patient and family (if
appropriate) according to their individual communication
and learning needs to increase their understanding, allay
their fears, and enhance cooperation.11
■ If used in your facility, add the heparin to the flush
solution—usually, 1 to 2 units of heparin per milliliter of
solution drawn up in a syringe.
NURSING ALERT Although heparin may prevent thrombosis, its use
has been associated with thrombocytopenia and other hematologic
risks. Because the risks outweigh the benefits, many facilities no
longer use it in flush solutions.3,12
■ Label the IV flush solution bag with the date and time the
solution was prepared, the dose of heparin (if added), and
your initials.3
■ Remove the preassembled pressure tubing from the
package. If necessary, connect the pressure tubing to the
transducer. Tighten all tubing connections to prevent
dangerous disconnections.13
■ Spike the outlet port of the IV flush solution bag with the
pressure tubing spike, invert the bag, and open the roller
clamp. Then compress the tubing’s drip chamber, filling it
halfway with the flush solution to help prevent air bubbles
from entering the tubing.3 Roll the roller clamp to the closed
position.
■ Place the IV flush solution bag into the pressure infuser
bag. To do this, hang the pressure infuser bag on the IV
pole, and then position the IV flush solution bag inside the
pressure infuser bag. Don’t inflate the pressure bag,
because priming the tubing under pressure can cause air
bubbles to enter the system.3
■ Open the tubing’s roller clamp, uncoil the tube if you
haven’t already done so, and remove the protective cap at
the end of the pressure tubing. Squeeze the continuous
flush device slowly to prime the entire system, including the
stopcock ports, with the IV flush solution to eliminate air
from the system.
■ As the IV flush solution nears the disposable transducer,
hold the transducer at a 45-degree angle (as shown below)
to force any air out of the transducer system.
■ When the IV flush solution nears a stopcock, open the
stopcock to air, allowing the solution to flow into the
stopcock (as shown below). When the stopcock fills, close it
to air and turn it open to the remainder of the tubing.
■ After removing the air from the stopcock, replace the
vented cap with a sterile, nonvented cap to prevent bacteria
and air from entering the transducer system.
■ After you’ve completely primed the system, replace the
protective cap at the end of the pressure tubing.
■ Inflate the pressure infuser bag to 300 mm Hg to allow
delivery of 1 to 3 mL/hour of IV flush solution through the IV
catheter, minimizing clot formation and maintaining IV
catheter patency.3 Ensure that the pressure tubing’s drip
chamber doesn’t completely fill with fluid as you inflate the
pressure bag.
■ Insert the transducer device into the IV pole mount holder
to secure the transducer, if used.3
■ Label the pressure tubing with the date of initiation or the
date of change as directed by your facility.14
■ Before connecting the pressure monitoring system to the
patient’s IV catheter, level and zero the transducer. Zero the
system during initial setup or before IV catheter insertion, if
the monitor cable is disconnected from the monitor at the
beginning of each shift,15 and when the values obtained
don’t correlate with the patient’s clinical condition.3
Leveling and zeroing the system
■ Place the patient supine, with the head of the bed
elevated up to 60 degrees.16 If the patient can’t tolerate
such positioning, use a prone or a 20-, 30-, or 90-degree
lateral position, as appropriate.3,16
■ If the patient is in the supine or prone position, use a
leveling device to position the air-reference stopcock or the
air–fluid interface of the transducer level with the
phlebostatic axis (midway between the posterior chest and
the sternum at the fourth intercostal space, midaxillary
line).3,16 If the patient is in a lateral position, reference the
stopcock or the air–fluid interface of the transducer at the
lateral angle-specific reference.16
■ After leveling the transducer, turn the stopcock located
next to the transducer off to the patient and open to air.
Remove the cap to the stopcock port.
■ Zero the transducer following the manufacturer’s
directions for zeroing.
■ When you’ve finished zeroing the transducer, turn the
stopcock so that it’s in a monitoring position with the
stopcock closed to air and open to the side of the pressure
tubing that leads to the patient. Place a new, sterile,
nonvented cap on the stopcock to maintain sterility. Now
you’ve assembled a single-pressure transducer system (as
shown below).
Connecting the pressure tubing to the
appropriate IV catheter port
■ Perform hand hygiene.4,5,6,7,8,9
■ Put on gloves if necessary to comply with standard
precautions.17,18
■ Using sterile no-touch technique, remove the cap at the
end of the pressure tubing and then connect the end of the
pressure tubing to the appropriate IV catheter port
(pulmonary artery, right atrial, or arterial) to enable
pressure monitoring.3
■ Trace the tubing from the patient to its point of origin to
make sure that you’ve connected it to the proper port.13
■ Assess the pressure waveforms to ensure that the
transducer system is functioning properly. Perform a square
wave test to ensure that the pressure waveform
components are clearly defined to aid in accurate pressure
measurement.3
■ Ensure that the hemodynamic monitoring system alarms
are turned on, alarm limits are appropriate for the patient’s
present condition, and alarms are audible and functioning
properly.19,20,21
■ Remove and discard your gloves, if worn.17,18
Completing the procedure
■ Perform hand hygiene.4,5,6,7,8,9
■ Document the procedure.22,23,24,25
Special considerations
■ The Joint Commission has issued a sentinel event alert
concerning medical device alarm safety, because alarm-
related events have been associated with permanent loss of
function or death. Among the major contributing factors
were improper alarm settings, alarms improperly turned off,
and alarm signals not audible to staff. Ensure that alarm
limits are set appropriately, and that alarms are turned on,
functioning properly, and audible to staff. Follow facility
guidelines for preventing alarm fatigue.19
■ You may use any of several methods to set up a multiple-
pressure transducer system. The easiest way is to add to
the single-pressure system. You’ll also need another bag of
heparin IV flush solution in a second pressure infuser bag.
Prime the pressure tubing, mount the second transducer,
and connect an additional cable to the monitor. Lastly, zero
the second transducer.
■ Alternatively, your facility may set up a multiple-pressure
transducer system by using a Y-type pressure tubing setup
with two attached pressure transducers. This method
requires only one bag of IV flush solution. To set up the
system, proceed as you would for a single transducer, with
this exception: First, prime one branch of the Y-type
pressure tubing and then the other branch. Next, attach two
cables to the monitor in the pressure modules for each
pressure that you’ll be measuring. Lastly, zero each
transducer.
■ Minimize the number of manipulations and entries into
the pressure monitoring system to reduce the risk of
infection.1
■ If you must access the pressure monitoring system
through a diaphragm instead of a stopcock, thoroughly
disinfect the diaphragm with an antiseptic pad using friction
and allow it to dry before accessing the system.1,14
■ Regularly assess the transducer system to make sure that
the IV flush solution bag contains fluid, the system is free of
air bubbles, the pressure infuser bag pressure is maintained
at 300 mm Hg, and all connections are secured tightly.3
■ Change disposable or reusable transducer systems,
including continuous flush device and flush solution used for
invasive hemodynamic pressure monitoring, every 96 hours;
change immediately when contamination is suspected or
when the integrity of the product or system is compromised.
Limit the number of manipulations and entries to the
system.14
Complications
Infection may result if sterility of the transducer system isn’t
maintained.
Documentation
Document the patient’s position for leveling and zeroing so
that other health care team members can replicate the
positioning. Document the type of IV flush solution used and
the date and time of pressure tubing changes. Record any
unexpected outcomes and your interventions. Document
patient and family teaching and their comprehension of the
teaching.3
REFERENCES
1 Centers for Disease Control and Prevention. (2011, revised 2017). “Guidelines
for the prevention of intravascular catheter-related infections” [Online].
Accessed via the Web at
https://www.cdc.gov/infectioncontrol/pdf/guidelines/bsi-guidelines.pdf (Level
I)
2 Jarrett, N., & Callaham, M. (2016). “Evidence-based guidelines for selected
hospital-acquired conditions: Final report” [Online]. Accessed via the Web at
https://www.cms.gov/Medicare/Medicare-Fee-for-Service-
Payment/HospitalAcqCond/Downloads/2016-HAC-Report.pdf
3 Wiegand, D. L. (2017). AACN procedure manual for high acuity, progressive,
and critical care (7th ed.). St. Louis, MO: Elsevier.
4 The Joint Commission. (2019). Standard NPSG.07.01.01. Comprehensive
accreditation manual for hospitals. Oakbrook Terrace, IL: The Joint
Commission. (Level VII)
5 Centers for Disease Control and Prevention. (2002). Guideline for hand
hygiene in health-care settings: Recommendations of the Healthcare Infection
Control Practices Advisory Committee and the HICPAC/SHEA/APIC/IDSA Hand
Hygiene Task Force. MMWR Recommendations and Reports, 51(RR-16), 1–45.
Accessed via the Web at https://www.cdc.gov/mmwr/pdf/rr/rr5116.pdf (Level
II)
6 World Health Organization. (2009). “WHO guidelines on hand hygiene in
health care: First global patient safety challenge, clean care is safer care”
[Online]. Accessed via the Web at
http://apps.who.int/iris/bitstream/10665/44102/1/9789241597906_eng.pdf
(Level IV)
7 Accreditation Association for Hospitals and Health Systems. (2017). Standard
07.01.21. Healthcare Facilities Accreditation Program: Accreditation
requirements for acute care hospitals. Chicago, IL: Accreditation Association
for Hospitals and Health Systems. (Level VII)
8 Centers for Medicare and Medicaid Services, Department of Health and
Human Services. (2015). Condition of participation: Infection control. 42 C.F.R.
§ 482.42.
9 DNV GL-Healthcare USA, Inc. (2016). IC.1.SR.1 . NIAHO® accreditation
requirements: Interpretive guidelines & surveyor guidance (version 11).
Milford, OH: DNV GL-Healthcare USA, Inc. (Level VII)
10 The Joint Commission. (2019). Standard NPSG.01.01.01. Comprehensive
accreditation manual for hospitals. Oakbrook Terrace, IL: The Joint
Commission. (Level VII)
11 The Joint Commission. (2019). Standard PC.02.01.21. Comprehensive
accreditation manual for hospitals. Oakbrook Terrace, IL: The Joint
Commission. (Level VII)
12 Coutre, S. Clinical presentation and diagnosis of heparin-induced
thrombocytopenia. (2016). In: UpToDate, Leung, L. L. K ., & Tirnauer, J. S .
(Eds.). Retrieved from: www.uptodate.com
13 U.S . Food and Drug Administration. (n.d .). “Look. Check. Connect. Safe
medical device connections save lives” [Online]. Accessed via the Web at
http://www.fda.gov/downloads/MedicalDevices/Safety/AlertsandNotices/UCM1
34873.pdf
14 Standard 42. Administration set change. Infusion therapy standards of
practice. (2016). Journal of Infusion Nursing, 39, S58–S59. (Level VII)
15 Sole, M. L., et al. (2016). Introduction to critical care nursing (7th ed.) . St.
Louis, MO: Saunders.
16 American Association of Critical-Care Nurses. (2017). “A ACN practice alert:
Pulmonary artery/central venous pressure monitoring in adults” [Online].
Accessed via the Web at https://www.aacn.org/~/media/aacn-website/clincial-
resources/practice-alerts/pap2017practicealert.pdf (Level I)
17 Accreditation Association for Hospitals and Health Systems. (2017). Standard
07.01.10. Healthcare Facilities Accreditation Program: Accreditation
requirements for acute care hospitals. Chicago, IL: Accreditation Association
for Hospitals and Health Systems. (Level VII)
18 Siegel, J. D ., et al. (2007, revised 2017). “2007 guideline for isolation
precautions: Preventing transmission of infectious agents in healthcare
settings” [Online]. Accessed via the Web at
https://www.cdc.gov/infectioncontrol/pdf/guidelines/isolation-guidelines.pdf
(Level II)
19 The Joint Commission. (2013). “Sentinel event alert: Medical device alarm
safety in hospitals” [Online]. Accessed via the Web at
https://www.jointcommission.org/assets/1/6/SEA_50_alarms_4 _26_16.pdf
(Level VII)
20 Graham, K. C., & Cvach, M. (2010). Monitor alarm fatigue: Standardizing use
of physiological monitors and decreasing nuisance alarms. American Journal
of Critical Care, 19(1), 28–37. Accessed via the Web at
http://ajcc.aacnjournals.org/content/19/1/28.full.pdf
21 American Association of Critical-Care Nurses. (2013). “A ACN practice alert:
Alarm management” [Online]. Accessed via the Web at
https://www.aacn.org/aacn-website/shared/content/practice-
alerts/2015/11/25/alarm-management (Level VII)
22 The Joint Commission. (2019). Standard RC.01.03 .01. Comprehensive
accreditation manual for hospitals. Oakbrook Terrace, IL: The Joint
Commission. (Level VII)
23 Accreditation Association for Hospitals and Health Systems. (2017). Standard
10.00 .03. Healthcare Facilities Accreditation Program: Accreditation
requirements for acute care hospitals. Chicago, IL: Accreditation Association
for Hospitals and Health Systems. (Level VII)
24 Centers for Medicare and Medicaid Services, Department of Health and
Human Services. (2015). Condition of participation: Medical record services.
42 C.F.R. § 482.24(b).
25 DNV GL-Healthcare USA, Inc. (2016). MR.2 .SR.1 . NIAHO® accreditation
requirements: Interpretive guidelines & surveyor guidance (version 11).
Milford, OH: DNV GL-Healthcare USA, Inc. (Level VII)
TRANSFER WITHIN A FACILITY
Patient transfer requires thorough preparation and
documentation. Preparation includes an explanation of the
transfer to the patient and family and discussion of the
patient’s condition and care plan with staff members on the
receiving unit.1 Documentation of the patient’s condition
before and during transfer and adequate communication
between the nursing staff from each unit ensures continuity
of nursing care, and provides legal protection for the
transferring unit and its staff members.2
Equipment
Admission inventory of belongings ▪ patient’s medical and
medication records ▪ medications ▪ patient belongings ▪
bag ▪ transfer vehicle (wheelchair, bed, or stretcher) ▪
Optional: oxygen tank and tubing, blankets, pulse oximeter,
cardiac monitor and defibrillator, handheld resuscitation bag
and mask, equipment specific to the patient’s condition,
reusable supplies, wheeled poles for equipment.
Implementation
■ Verify the practitioner’s order for transfer.
■ If the patient is being transferred from or to an intensive
care unit, your facility may require new care orders from the
patient’s practitioner. If so, review the new orders with the
nursing staff at the receiving unit during hand-off
communication.2,3
■ Perform hand hygiene.4,5,6,7,8,9
■ Confirm the patient’s identity using at least two patient
identifiers.10
■ Provide privacy.11,12,13,14
■ Explain the transfer to the patient and family (if
appropriate) according to their individual communication
and learning needs to increase their understanding, allay
their fears, and enhance cooperation.15 If the patient is
anxious about the transfer or the patient’s condition
precludes patient teaching, be sure to explain the reason for
the transfer to family, especially if the transfer is the result
of a serious change in the patient’s condition.1
■ Assess the patient’s physical condition to determine the
means of transfer, such as a wheelchair, bed, or stretcher.16
■ If the patient requires continuous oxygen or mechanical
ventilation, arrange for the respiratory therapy department
to provide support during the transfer.3
■ Provide hand-off communication to the nurse who will
assume responsibility for the patient’s care. Make sure to
cover everything needed to safely care for the patient in a
timely fashion, including the drug regimen and the patient’s
nursing care plan, to ensure continuity of care.3,17,18,19
Provide face-to-face hand-off communication when possible.
If not possible, communicate in real time by telephone or
video conference.19 Provide ample time and opportunity for
questions to avoid miscommunications that can cause
patient care errors.3,17,18,19
■ Use a hand-off communication technique, such as the
Situation-Background-Assessment-Recommendation (SBAR)
or other facility-approved communication technique, to
improve communication and reduce errors.19,20
■ Make sure that the reconciled list of the patient’s
medications has been communicated to the next
practitioner who will be caring for the patient, and that the
communication is documented in the patient’s medical
record, to reduce the risk of transition-related adverse
medication events.21,22
■ Use the admissions inventory of belongings from the
patient’s medical record as a checklist to collect the
patient’s property and place them in a patient’s belongings
bag. Be sure to check the entire room, including the closet,
bedside stand, overbed table, and bathroom.
■ Gather the patient’s medications that are stored outside
of the automated dispensing machine and send them to the
receiving unit upon transfer. Send any special equipment
and other required materials to the receiving unit.3 Moving
articles with the patient helps prevent loss and duplicate
charges for equipment and supplies.
■ Obtain assistance, as needed. Additional personnel may
be needed based on the patient’s condition and the amount
of support equipment being transferred.
■ Secure all IV lines, feeding tubes, monitoring leads, and
other equipment, as needed, to help prevent lines from
becoming dislodged during the transfer. If possible, attach
electronic infusion devices and other equipment to the
transfer vehicle. If equipment can’t be attached to the
transfer vehicle, have someone assist with wheeling the
poles.
■ Use a wheelchair to transport the ambulatory patient to
the newly assigned room unless it’s on the same unit as the
present one, in which case you may allow the patient to
walk. Use a stretcher or bed to transport a patient whose
condition doesn’t permit transfer in a wheelchair.
■ Cover the patient with blankets, as needed, to prevent
the patient from becoming hypothermic.
■ Raise the patient’s bed to waist level before transferring
the patient in a bed or stretcher to prevent caregiver back
strain.23 Then take the patient to the assigned room and,
depending on the patient’s condition, place the patient in
the bed or seat the patient in a chair.
■ Notify the receiving unit’s nursing staff of the patient’s
arrival.
■ Set up electronic infusion devices and monitors, as
appropriate. If medical devices are necessary, make sure
that you set alarm limits appropriately for the patient’s
condition and turn alarms on. Verify that alarms are
functioning properly and are audible to staff to ensure the
patient’s safety.24,25,26
■ If present, trace IV tubing from the patient to the point of
origin to make sure that it’s connected to the proper port.
Route the tubing in a standardized direction if the patient
has other tubing and catheters that have different purposes.
If the patient requires multiple IV lines, label the tubing at
the distal end (near the patient) and proximal end (near the
source container) to reduce the risk of misconnection.27,28
■ Return the bed to the lowest position to prevent falls and
maintain patient safety.29
■ Introduce the patient and family to the receiving nurse.
Tell the patient about any unfamiliar equipment. Make sure
the call light is within the patient’s reach to ensure patient
safety.
■ Give additional hand-off communication to the patient’s
new nurse, as needed. Answer any questions the receiving
nurse may have regarding the patient’s condition or care, to
avoid miscommunication that can cause patient care errors
during transition of care.3,17,18,19 As part of the hand-off
process, allow time for the receiving staff member to trace
each tubing and catheter from the patient to its point of
origin using a standardized line reconciliation process.28
■ Perform hand hygiene.4,5,6,7,8,9
■ Document the procedure.30,31,32,33
Special considerations
■ Before transferring the patient, make sure that, as
appropriate, you have suctioned the patient’s airway,
administered prescribed medications, completed scheduled
procedures, changed soiled dressings, bathed the
incontinent patient, and emptied drainage collection
devices.
■ Make sure that the business office, dietary department,
pharmacy, facility telephone operator, and other
appropriate departments are notified of the transfer so that
the patient’s meals, medications, and other therapies can
continue without delay.3
■ The Joint Commission issued a sentinel event alert
concerning inadequate hand-off communication, because of
the potential for patient harm that can result when a
receiver receives inaccurate, incomplete, untimely,
misinterpreted, or otherwise inadequate information. To
improve hand-off communication, standardize the critical
information communicated by the sender. At a minimum,
include the sender contact information; illness assessment;
patient summary, including events leading up to the illness
or admission, hospital course, ongoing assessment, and
plan of care; to-do action list; contingency plans; allergy list;
code status; medication list; and dated laboratory test
results and vital signs. Provide face-to-face communication
whenever possible in an interruption-free location, using
facility-approved, standardized tools and methods (for
example, forms, templates, checklists, protocols, and
mnemonics). Provide ample time and opportunity for
questions, and include the multidisciplinary team members
and the patient and family, when appropriate.19
■ The Joint Commission issued a sentinel event alert related
to managing risk during transition to new International
Organization for Standardization tubing standards that were
designed to prevent dangerous tubing misconnections,
which can lead to serious patient injury and death. During
the transition, make sure to trace the tubing and catheter
from the patient to the point of origin before connecting or
reconnecting any device or infusion, at any care transition
(such as a new setting or service), and as part of the hand-
off process; route tubes and catheters having different
purposes in different standardized directions; when there
are different access sites or several bags hanging, label the
tubing at both the distal and proximal ends; use tubing and
equipment only as intended; and store medications for
different delivery routes in separate locations.28
■ The Joint Commission issued a sentinel event alert
concerning medical device alarm safety, because alarm-
related events have been associated with permanent loss of
function or death. Among the major contributing factors
were
improper
alarm
settings,
alarm
settings
inappropriately turned off, and alarm signals not audible to
staff. Make sure to set alarm limits appropriately and turn
alarms on. Verify that alarms are functioning properly and
are audible to staff. Follow facility guidelines for preventing
alarm fatigue.24
Documentation
Record the time and date of transfer, the patient’s condition
during transfer, the name of the receiving unit, and the
mode of transportation. Include equipment accompanying
the patient, such as IV lines and pumps, surgical drains, and
oxygen therapy. Note the name and title of the person you
gave your report to; also include the names of staff or family
members accompanying the patient.
REFERENCES
1 The Joint Commission. (2019). Standard PC.04.01.05. Comprehensive
accreditation manual for hospitals. Oakbrook Terrace, IL: The Joint
Commission. (Level VII)
2 The Joint Commission. (2019). Standard PC.04.01.01. Comprehensive
accreditation manual for hospitals. Oakbrook Terrace, IL: The Joint
Commission. (Level VII)
3 The Joint Commission. (2019). Standard PC.04.02.01. Comprehensive
accreditation manual for hospitals. Oakbrook Terrace, IL: The Joint
Commission. (Level VII)
4 Centers for Disease Control and Prevention. (2002). Guideline for hand
hygiene in health-care settings: Recommendations of the Healthcare Infection
Control Practices Advisory Committee and the HICPAC/SHEA/APIC/IDSA Hand
Hygiene Task Force. MMWR Recommendations and Reports, 51(RR-16), 1–45.
Accessed via the Web at https://www.cdc.gov/mmwr/pdf/rr/rr5116.pdf (Level
II)
5 World Health Organization. (2009). “WHO guidelines on hand hygiene in
health care: First global patient safety challenge, clean care is safer care”
[Online]. Accessed January 2018 via the Web at
http://apps.who.int/iris/bitstream/10665/44102/1/9789241597906_eng.pdf
(Level IV)
6 The Joint Commission. (2019). Standard NPSG.07.01.01. Comprehensive
accreditation manual for hospitals. Oakbrook Terrace, IL: The Joint
Commission. (Level VII)
7 Accreditation Association for Hospitals and Health Systems. (2017). Standard
07.01.21. Healthcare Facilities Accreditation Program: Accreditation
requirements for acute care hospitals. Chicago, IL: Accreditation Association
for Hospitals and Health Systems. (Level VII)
8 Centers for Medicare and Medicaid Services, Department of Health and
Human Services. (2015). Condition of participation: Infection control. 42 C.F.R.
§ 482.42
9 DNV GL-Healthcare USA, Inc. (2016). IC.1.SR.1 . NIAHO® accreditation
requirements: Interpretive guidelines & surveyor guidance (version 11).
Milford, OH: DNV GL-Healthcare USA, Inc. (Level VII)
10 The Joint Commission. (2019). Standard NPSG.01.01.01. Comprehensive
accreditation manual for hospitals. Oakbrook Terrace, IL: The Joint
Commission. (Level VII)
11 Accreditation Association for Hospitals and Health Systems. (2017). Standard
15.01.16. Healthcare Facilities Accreditation Program: Accreditation
requirements for acute care hospitals. Chicago, IL: Accreditation Association
for Hospitals and Health Systems. (Level VII)
12 The Joint Commission. (2019). Standard RI.01.01.01. Comprehensive
accreditation manual for hospitals. Oakbrook Terrace, IL: The Joint
Commission. (Level VII)
13 DNV GL-Healthcare USA, Inc. (2016). PR.1.SR.5 . NIAHO® accreditation
requirements: Interpretive guidelines & surveyor guidance (version 11).
Milford, OH: DNV GL-Healthcare USA, Inc. (Level VII)
14 Centers for Medicare and Medicaid Services, Department of Health and
Human Services. (2015). Condition of participation: Patient’s rights. 42 C.F.R.
§ 482.13(c)(1).
15 The Joint Commission. (2019). Standard PC.02.01.21. Comprehensive
accreditation manual for hospitals. Oakbrook Terrace, IL: The Joint
Commission. (Level VII)
16 The Joint Commission. (2019). Standard PC.04.01.03 . Comprehensive
accreditation manual for hospitals. Oakbrook Terrace, IL: The Joint
Commission. (Level VII)
17 The Joint Commission. (2019). Standard PC.02.02.01. Comprehensive
accreditation manual for hospitals. Oakbrook Terrace, IL: The Joint
Commission. (Level VII)
18 Joint Commission Center for Transforming Healthcare. (2014). “Improving
transitions of care: Hand-off communications” [Online]. Accessed via the Web
at http://www.centerfortransforminghealthcare.org/assets/4/6/hand-
off_comm_storyboard.pdf (Level IV)
19 The Joint Commission. (2017). “Sentinel event alert, Issue 58: Inadequate
hand-off communication” [Online]. Accessed via the Web at
https://www.jointcommission.org/assets/1/18/SEA_58_Hand_off_Comms_9_6 _1
7_FINAL_(1).pdf (Level VII)
20 Institute for Healthcare Improvement. (2011). SBAR technique for
communication: A situational briefing model. Cambridge, MA: Institute for
Healthcare Improvement. (Level V)
21 The Joint Commission. (2019). Standard NPSG.03 .06 .01. Comprehensive
accreditation manual for hospitals. Oakbrook Terrace, IL: The Joint
Commission. (Level VII)
22 Accreditation Association for Hospitals and Health Systems. (2017). Standard
25.02.13. Healthcare Facilities Accreditation Program: Accreditation
requirements for acute care hospitals. Chicago, IL: Accreditation Association
for Hospitals and Health Systems. (Level VII)
23 Waters, T. R., et al. (2009). “Safe patient handling training for schools of
nursing” [Online]. Accessed via the Web at
https://www.cdc.gov/niosh/docs/2009-127/pdfs/2009-127.pdf (Level VII)
24 The Joint Commission. (2013). “Sentinel event alert: Medical device alarm
safety in hospitals” [Online]. Accessed via the Web at
https://www.jointcommission.org/assets/1/6/SEA_50_alarms_4 _26_16.pdf
(Level VII)
25 The Joint Commission. (2018). Standard NPSG.06 .01.01. Comprehensive
accreditation manual for hospitals. Oakbrook Terrace, IL: The Joint
Commission. (Level VII)
26 Jacques, S., & Williams, E. (2016). “Reducing the safety hazards of monitor
alert and alarm fatigue” [Online]. Accessed via the Web at
https://psnet.ahrq.gov/perspectives/perspective/199/reducing-the-safety-
hazards-of-monitor-alert-and-alarm-fatigue (Level VII)
27 U.S . Food and Drug Administration. (2008). “Look. Check. Connect. Safe
medical device connections save lives” [Online]. Accessed via the Web at
http://www.fda.gov/downloads/MedicalDevices/Safety/AlertsandNotices/UCM1
34873.pdf (Level VII)
28 The Joint Commission. (2014). “Sentinel event alert: Managing risk during
transition to new ISO tubing connector standards” [Online]. Accessed via the
Web at
http://www.jointcommission.org/assets/1/6/SEA_53_Connectors_8 _19_14 _final.
pdf (Level VII)
29 Ganz, D. A., et al. (2013). Preventing falls in hospitals: A toolkit for improving
quality of care (AHRQ Publication No. 13-0015-EF). Accessed via the Web at
https://www.ahrq.gov/sites/default/files/publications/files/fallpxtoolkit_0 .pdf
(Level VII)
30 The Joint Commission. (2019). Standard RC.01.03 .01. Comprehensive
accreditation manual for hospitals. Oakbrook Terrace, IL: The Joint
Commission. (Level VII)
31 Centers for Medicare and Medicaid Services, Department of Health and
Human Services. (2015). Condition of participation: Medical record services.
42 C.F.R. § 482.24(b).
32 Accreditation Association for Hospitals and Health Systems. (2017). Standard
10.00 .03. Healthcare Facilities Accreditation Program: Accreditation
requirements for acute care hospitals. Chicago, IL: Accreditation Association
for Hospitals and Health Systems. (Level VII)
33 DNV GL-Healthcare USA, Inc. (2016). MR.2 .SR.1 . NIAHO® accreditation
requirements: Interpretive guidelines & surveyor guidance (version 11).
Milford, OH: DNV GL-Healthcare USA, Inc. (Level VII)
TRANSFUSION OF BLOOD AND BLOOD
PRODUCTS
The transfusion of blood and blood products can be a
lifesaving procedure, but it does have its risks. Errors, such
as the administration of the wrong blood to the wrong
patient, can lead to long-term health problems and even
death. Use extreme caution when preparing a patient to
receive a blood transfusion. Following procedures that
ensure accurate identification of the patient and verifying
blood transfusion components can help prevent potentially
fatal errors.1
HOSPITAL-ACQUIRED CONDITION ALERT The Centers for Medicare &
Medicaid Services has identified blood incompatibility errors as a
hospital-acquired condition, because the application of evidence-
based practices can reasonably prevent such errors. Follow evidence-
based practices, such as carefully identifying the patient and blood
sample for compatibility testing, and participating in a two-person
verification process before blood or blood product administration, to
reduce the risk of incompatibility errors.2,3
When implementing your facility’s identification and
verification process, don’t transfuse any blood product that
doesn’t match the patient’s assigned identification number.
Keep in mind that plasma, platelets, and blood derivatives
can also cause serious transfusion reactions, so administer
them with care.1
Before administering blood or a blood product, nurses
should be familiar with the different types of blood and
blood products. (See Transfusing blood and selected blood
products.)
Equipment
Blood or blood component administration set ▪ IV pole ▪
gloves ▪ blood or blood product ▪ preservative-free normal
saline solution ▪
10-mL syringe ▪ antiseptic pad
(chlorhexidine-based, povidone-iodine, or alcohol) ▪
disinfectant pad ▪
stethoscope ▪
thermometer ▪
sphygmomanometer or automated blood pressure device ▪
blood request form ▪ Optional: prescribed premedications,
250 mL of normal saline solution, IV catheter equipment
(should include 14G to 24G catheter),6 electronic infusion
device indicated for blood transfusion use,6 blood warming
device and administration set, mask, protective eyewear,
gown, bar code technology, pulse oximeter.
Straight line and Y-type blood administration sets contain
a standard 170- to 260-micron blood filter designed to
eliminate blood clots and cellular debris that occur during
blood storage. Sometimes, however, a specialized blood
filter may be required.1 (See Specialized blood filters, page
782.)
Preparation of equipment
Avoid obtaining the blood or blood product until you’re
ready to begin the transfusion. Prepare the equipment when
you’re ready to start the infusion. If the patient has a history
of adverse reactions, administer premedication, as
prescribed, following safe medication administration
practices.7,8,9,10 To ensure effectiveness, administer oral
medication 30 minutes before starting the transfusion. If IV
medication is prescribed, administer it immediately before
starting the transfusion.1
Implementation
■ Verify the practitioner’s order. Be sure that the order
addresses the indication for transfusion, the preparation of
the product, and administration (including the start time
and rate of infusion).1,11 Confirm that the order and the
medical record are labeled with the patient’s first and last
name and unique identification number.6
■ Unless the transfusion is an emergency, confirm that the
practitioner has obtained written informed consent before
initiating transfusion therapy, and that the consent is in the
patient’s medical record.12,13,14,15,16
■ Review the patient’s medication regimen; certain
medications, such as antifungal agents and chemotherapy,
might not be recommended for infusion during blood
transfusion.1 Consult with the patient’s practitioner if
necessary.
■ Ensure that a blood sample was obtained for compatibility
testing; collect a blood sample if one hasn’t been collected.
(See the “Venipuncture” procedure.) Blood samples must be
collected within 3 days of red blood cell (RBC) transfusion if
the patient has been pregnant within the preceding 3
months or has been transfused within the preceding 3
months, or if the patient’s history is uncertain or
unavailable.1
■ Make sure that transfusion services receives a blood
request form that contains the patient’s first and last name,
an identification number unique to the patient, the
prescribed blood component and amount ordered, and the
name of the responsible practitioner. (A computer-
transmitted request is acceptable if it contains the required
information.) Additional information, such as the patient’s
age, sex, diagnosis, transfusion history, pregnancy history,
and special blood component or service needs, as well as
the date and time of blood sample collection for
compatibility testing, may be helpful in resolving any
problems that may occur.1
■ Gather and prepare the necessary equipment.
■ Perform hand hygiene.17,18,19,20,21,22,23,24
■ Confirm the patient’s identity using at least two patient
identifiers.1,25
■ Verify that the patient’s religious beliefs don’t prohibit
blood transfusion therapy.1
Transfusing blood and selected
blood products
EQUIPMENT
Specialized blood filters
When determined to be medically necessary, specialized
filters are used to transfuse blood and blood products.6
■ Assess the patient’s previous knowledge and
understanding of the procedure. If the patient is disoriented
or unconscious, assess the family’s knowledge and
understanding of the procedure.1
■ Develop a teaching plan based on your assessment
findings and then use it to explain the procedure to the
patient and family, because an informed patient and family
can aid in the early detection of transfusion-related
problems.
■ Perform hand hygiene.17,18,19,20,21,22,23,24
■
Put on gloves to comply with standard
precautions.21,26,27,28,29,30
■ Ensure that the patient has adequate venous access with
an appropriate-sized catheter (for short peripheral
catheters, 20G to 24 G based on vein size and patient
preference; 14G to 19G if rapid infusion is required).6 Verify
patency by aspirating for blood return.6,31 Insert an IV
catheter if necessary. (See the “IV catheter insertion and
removal” procedure, page 443.) A central venous catheter is
also an acceptable option for blood transfusion,1,6 but be
aware that catheter length affects the rate of infusion (the
longer the catheter, the slower the rate of infusion).6
■ Remove and discard your gloves.26,28,32
■ Perform hand hygiene.17,18,19,20,21,22,23,24
■ Obtain and record the patient’s vital signs before
initiating the transfusion to serve as a baseline for
comparison.1,6,33
■ Assess the patient’s breath and heart sounds, skin color,
and current laboratory test results, such as hemoglobin and
hematocrit. Identify any conditions that may increase the
risk of a transfusion reaction, such as fever, heart failure,
kidney disease, or the risk of fluid volume excess.5,6
■ Question the patient about the presence of signs and
symptoms that may later be mistaken for a transfusion
reaction, such as chills, itching, rash, hematuria, muscle
aches, and difficulty breathing.1
■ Assist the patient to the bathroom if necessary before
beginning the transfusion.1
■ Help the patient assume a comfortable position either in
a chair or bed; providing patient comfort before the
transfusion helps to reduce the number of manipulations of
the blood and tubing during the course of the procedure.1
■ If the patient is in bed, raise the bed to waist level when
providing care to prevent caregiver back strain.34
■ Offer the patient diversional activities, such as reading
materials, television, radio, and games, to allay anxiety
during the transfusion.1
■ Perform hand hygiene.17,18,19,20,21,22,23,24
■ Obtain the blood or blood product from transfusion
services. When receiving the blood or blood product from
transfusion services representative, verify the patient’s two
independent identifiers; the donor identification number,
ABO group and, if required, Rh type; interpretation of
crossmatch tests (if required); special transfusion
requirements (if applicable); the expiration date and time (if
applicable); and the date and time of blood issue. Wear
gloves, or transport the blood component units in a
container that prevents direct contact with the blood unit
bag.1,28
■ If not already wearing gloves, perform hand
hygiene.17,18,19,20,21,22,23,24
■ Put on gloves and other personal protective equipment as
needed to comply with standard precautions.21,26,27,28,29,30
■ Use a two-person verification process in the presence of
the patient to match the blood or blood component with the
practitioner’s order and the patient with the blood
component.6,35 One of the individuals conducting the
verification must be qualified to administer the blood or
blood product, and is usually a registered nurse. The second
individual conducting the verification must be qualified to
participate in the process as determined by your facility.35
Each employee must independently compare the
information as follows:1 compare the name and
identification number on the patient’s identification bracelet
with those on the blood bag label; check the blood bag
identification number, ABO blood group, Rh compatibility,
and interpretation of compatibility testing; compare the
patient’s blood bank identification number with the number
on the blood bag.1
■ Check the expiration date on the blood bag, and observe
for leaks, abnormal color, clots, excessive air or bubbling,
and unusual odor.1,6 Return expired or abnormal blood to
transfusion services.1
■ After checking all of the identifying information, sign the
transfusion form to indicate that the identification was
correct and that you’re the person starting the transfusion;
other items that may be included on the transfusion form
include the name and volume of the blood product, the
blood product’s identification number, and the date and
time of the transfusion.1
NURSING ALERT All identification attached to the blood or blood
product bag should remain attached until you’ve terminated the
transfusion.1
■ If your facility uses a bar code technology, scan your
identification badge, the patient’s identification bracelet,
and the blood product label as indicated by your facility’s
procedure.
■ Prime the blood administration set. When using a Y-type
set, use normal saline solution to prime the tubing; when
using a straight set, use the blood product.1
NURSING ALERT Medications should never be mixed with blood
components.6 If the patient requires IV medications during
transfusion, start a separate IV line for the administration of
medications so that the patient can receive the therapeutic benefits of
the blood component and the medication simultaneously. Other IV
solutions (with the exception of Plasma-Lyte 148) aren’t compatible
with blood products and should be avoided.1,33
■ If you’re using a blood warmer or an electronic infusion
device, insert the tubing into the device and operate the
device following the manufacturer’s instructions for use.1,6
(See Blood warmers.)
■ Perform a vigorous mechanical scrub of the vascular
access device hub for at least 5 seconds using an antiseptic
pad. Allow it to dry completely.37,38
■ Trace the blood administration set tubing from the patient
to its point of origin before beginning the transfusion to
make sure that you’re connecting the tubing to the correct
port, and then attach it to the venous access device.31,39
Route the tubing in a standardized direction if the patient
has other tubing and catheters that have different purposes.
Label the tubing at the distal end (near the patient
connection) and proximal end (near the source container) to
reduce the risk of misconnection if multiple IV lines will be
used.39,40
■ Start the blood transfusion at a slow rate (about 2
mL/minute for the first 15 minutes), and increase the rate as
prescribed if there are no signs of a reaction to ensure
completion of the transfusion within 4 hours.1,6
■ Remain near the patient during the first 15 minutes to
monitor for signs of transfusion reaction, because if a major
incompatibility exists, or a severe allergic reaction such as
anaphylaxis occurs, signs and symptoms usually appear
before the first 50 mL of the unit have been transfused.6
■ If a reaction occurs, immediately stop the transfusion and
notify transfusion services and the patient’s practitioner.1,6
(See the “Transfusion reaction management” procedure,
page 785.)
■ Assess the patient’s respiratory status (including breath
sounds and, if indicated, oxygen saturation level), skin
appearance, and urine output.41
■ If no evidence of a transfusion reaction occurs within the
first 15 minutes of the transfusion, increase the infusion rate
to the prescribed rate.6
■ Before leaving the patient’s room, instruct the patient to
immediately report anything unusual.1
■ Observe the patient periodically during the transfusion to
identify early signs and symptoms of a possible transfusion
reaction.1 Monitor vital signs during the transfusion if
directed by your facility or if the patient’s condition
warrants.33
■ Closely monitor the flow rate and inspect the IV insertion
site for signs of infiltration. If signs of infiltration are present,
stop the transfusion immediately, disconnect the
administration set, and aspirate fluid from the catheter
using a 3-mL syringe. Remove the catheter and estimate
the volume of fluid infiltrated. Notify the practitioner, and
insert a new IV catheter in a different location to prevent an
interruption in transfusion therapy.42
■ Remove and discard your gloves and any other personal
protective equipment worn.26,28,32
■ Perform hand hygiene.17,18,19,20,21,22,23,24
■ At the completion of blood product administration, obtain
the patient’s vital signs to compare with baseline
measurements to detect signs of a possible transfusion
reaction.1,33
■ If you must administer additional units, repeat the
procedure. If more than one unit can be infused within 4
hours, note that the transfusion administration set and filter
can be used for up to 4 hours. (Most filters have a four-unit
capacity; check the manufacturer’s instructions.)1,6,43
■ If additional units aren’t prescribed, perform hand
hygiene17,18,19,20,21,22,23,24 and put on gloves.26,27,28
Reconnect the original IV fluid, saline-lock the catheter, or
discontinue the IV infusion, as prescribed.5,44
■ Return the bed to the lowest position, if applicable, to
prevent falls and maintain the patient’s safety.45
■ Discard used infusion supplies in an appropriate
container, and discard the blood bag, tubing, and filter in an
appropriate hazardous waste container.26,28,32
■ Remove and discard your gloves.26,21,23
■ Perform hand hygiene.17,18,19,20,21,22,23,24
■ Clean and disinfect your stethoscope using a disinfectant
pad.46,47
■ Perform hand hygiene.17,18,19,20,21,22,23,24
■ Continue to assess and monitor the patient for signs and
symptoms of a delayed transfusion reaction for 1 hour after
the transfusion.6 If the patient isn’t under direct observation
after the transfusion (for example, if the patient receives a
transfusion as an outpatient), provide patient teaching
about signs and symptoms of a delayed transfusion reaction
and the importance of reporting them.1,6
■ Document the procedure.48,49,50,51
Special considerations
■ A one-person verification process accompanied by
automated identification technology, such as bar code
technology, is acceptable.6,35
■ If necessary, using sterile technique, change the blood or
blood component administration set after each unit is
infused or after 4 hours. Change it immediately if you
suspect contamination, or if the integrity of the product or
system has been compromised.52
■ Be aware that a donor unit of blood can be split if a
patient might not be able to tolerate the fluid volume of an
entire unit at one time. Individual portions of the unit can be
released for administration while the remainder is safely
stored.1,6 Consult with transfusion services if unit splitting is
necessary.
■ Note that the U.S. Food and Drug Administration has
approved the compatibility of Plasma-Lyte 148 with blood
components; it may be administered before or after the
infusion of blood through the same administration set (for
example, as priming solution), added to or infused
concurrently with blood components, and used as a diluent
in the transfusion of RBCs.1
■ For rapid blood replacement, you may need to use a
pressure bag or an electronic rapid infusion device. Always
follow the manufacturer’s instructions for use. Pressure bags
should be equipped with a pressure gauge, totally encase
the blood bag, and exert uniform pressure against all parts
of the blood bag; a blood pressure cuff shouldn’t be used
because it can’t deliver uniform pressure.6
■ If the blood bag empties before the next one arrives,
administer normal saline solution slowly to keep the vein
patent. If you’re using a Y-type set, close the blood-line
clamp, open the clamp to the normal saline solution, and let
it infuse slowly until the new unit of blood arrives. Decrease
the flow rate or clamp the line before attaching the new unit
of blood.
■ Blood products must be infused within 4 hours of removal
from the transfusion services refrigerator.6 If any blood
product remains after 4 hours, discontinue the infusion and
discard the remaining product, as directed.
■ Many organized religions don’t prohibit the use of blood
products by their members when a medical need arises.
However, Jehovah’s Witnesses and Christian Scientists
include teachings that prohibit transfusion therapy
(although some believers of these and other faiths accept
some blood components). Provide the opportunity for all
patients to discuss their beliefs regarding blood
transfusion.1
EQUIPMENT
Blood warmers
Blood warmers may be used to prevent hypothermia, which can result from
rapid infusion of large volumes of refrigerated blood.1 Various types of blood
and fluid warmers are available.
The blood and fluid warmer should be capable of safely delivering fluids
and blood products at normothermia at both high and low flow rates;27 the
warmer must be tested and approved for use with blood components.1 The
blood and fluid warmer should be equipped with a temperature gauge and an
audible alarm system.26 No matter what type of device is available at your
facility, be sure to follow the manufacturer’s instructions for use.
A blood warmer may be indicated for use in the following clinical situations:
■ plasma exchange transfusion
■ surgery
■ trauma
■ cold agglutinin disease.1,36
■ Be aware that whole blood is rarely used. It may be used
on rare occasions to restore blood volume from hemorrhage
or in an exchange transfusion.
■ The Joint Commission has issued a sentinel event alert
related to managing risk during transition to new
International Organization for Standardization tubing
standards that were designed to prevent dangerous tubing
misconnections, which can lead to serious patient injury and
death. During the transition, be sure to trace the tubing and
catheter from the patient to the point of origin before
connecting or reconnecting any device or infusion, at any
care transition (such as a new setting or service), and as
part of the hand-off process; route tubes and catheters
having different purposes in different standardized
directions; label the tubing at the distal and proximal ends
when there are different access sites or several bags
hanging; use tubing and equipment only as intended; and
store medications for different delivery routes in separate
locations.40
Complications
Despite improvements in crossmatching precautions,
transfusion reactions can still occur during a transfusion or
within 96 hours after a transfusion. Transfusion reactions
typically stem from a major antigen-antibody reaction.
Monitor the patient closely for signs and symptoms,
especially if the patient can’t report the symptoms. A
transfusion reaction requires prompt action to prevent
further complications and, possibly, death.
Unlike a transfusion reaction, an infectious disease
transmitted during a transfusion may go undetected until
days, weeks, or even months later, when it produces signs
and symptoms. Measures to prevent disease transmission
include laboratory testing of blood products and careful
screening of potential donors, neither of which is
guaranteed. Hepatitis C accounts for most posttransfusion
hepatitis cases. The tests that detect hepatitis B and
hepatitis C can produce false-negative results and may
allow some hepatitis cases to go undetected. The risk of
transmitting human immunodeficiency virus during
transfusion is rare. Blood products are tested rigorously
using highly sensitive testing.53,54 Many transfusion services
screen blood for cytomegalovirus (CMV). Blood with CMV is
especially dangerous
for
an
immunosuppressed,
seronegative patient. Blood banks also test blood for
syphilis, but refrigerating blood virtually eliminates the risk
of transfusion-related syphilis.
Transfusion-related circulatory overload, transfusion-
related acute lung injury, and hemolytic, allergic, febrile,
and pyogenic reactions can result from any transfusion.
Coagulation
disturbances,
citrate
intoxication,
hyperkalemia, acid-base imbalance, loss of 2,3-
diphosphoglycerate,
ammonia
intoxication,
and
hypothermia can result from massive transfusion.
Documentation
Record the date and time of the transfusion; confirmation
that informed consent was obtained; indications for the
transfusion; any premedications administered; the type and
amount of blood product transfused; the amount of normal
saline solution infused; the patient’s vital signs before,
during (if required), and after transfusion; your check of all
identification data; and the patient’s response. Document
any transfusion reaction and treatment. Document any
patient teaching and family (if applicable) teaching and their
understanding of the teaching.1,33 (See Documenting blood
transfusions.)
Documenting blood transfusions
After matching the patient’s name, medical record number, blood group (or
type) and Rh factor (the patient’s and the donor’s); the crossmatch data; and
the transfusion services identification number with the label on the blood
bag, you’ll need to clearly document that you did so. The blood or blood
product must be identified and documented properly by two health care
professionals as well.
On the transfusion record, document
■ the date and time the transfusion was started and completed
■ the name of the health care professional who verified the information
■ the type and gauge of the catheter
■ the total amount of the transfusion
■ the patient’s vital signs before, during, and after the transfusion
■ any infusion device used
■ the flow rate
■ any blood warming unit used.
If the patient receives autologous blood, document on the intake and
output record
■ the amount of autologous blood retrieved
■ the amount reinfused
■ laboratory data during and after the autotransfusion
■ the patient’s pretransfusion and posttransfusion vital signs.
Pay particular attention to the patient’s
■ coagulation profile
■ hemoglobin level, hematocrit, arterial blood gas values, and calcium level
■ tolerance of the procedure, especially fluid status.
REFERENCES
1 AABB. (2012). Primer of blood administration. Bethesda, MD: AABB. Accessed
via the Web at
http://www.bloodcenter.org/webres/File/Hospital%20.pdf%20forms/primerofbl
oodadministration.pdf (Level VII)
2 Jarrett, N., & Callaham, M. (2016). “Evidence-based guidelines for selected
hospital-acquired conditions: Final report” [Online]. Accessed via the Web at
https://www.cms.gov/Medicare/Medicare-Fee-for-Service-
Payment/HospitalAcqCond/Downloads/2016-HAC-Report.pdf
3 Centers for Medicare and Medicaid Services, Department of Health and
Human Services. (2017). “Hospital-acquired conditions” [Online]. Accessed
via the Web at https://www.cms.gov/ICD10Manual/version33-fullcode-
cms/fullcode_cms/P0386.html
4 Friday, J. L., et al. (2017). A compendium of transfusion practice guidelines
(3rd ed.) . Accessed via the Web at
http://success.redcross.org/success/file.php/1/TransfusionPractices-
Compendium_3rdEdition.pdf
5 Infusion Nurses Society. (2016). Policies and procedures for infusion therapy
(5th ed.). Boston, MA: Infusion Nurses Society.
6 Standard 62. Transfusion therapy. Infusion therapy standards of practice.
(2016). Journal of Infusion Nursing, 39, S135–S137. (Level VII)
7 The Joint Commission. (2019). Standard MM.06 .01.01. Comprehensive
accreditation manual for hospitals. Oakbrook Terrace, IL: The Joint
Commission. (Level VII)
8 Centers for Medicare and Medicaid Services, Department of Health and
Human Services. (2015). Condition of participation: Nursing services. 42
C.F.R. § 23(c).
9 Accreditation Association for Hospitals and Health Systems. (2017). Standard
16.01.03. Healthcare Facilities Accreditation Program: Accreditation
requirements for acute care hospitals. Chicago, IL: Accreditation Association
for Hospitals and Health Systems. (Level VII)
10 DNV GL-Healthcare USA, Inc. (2016). MM.1 .SR.2. NIAHO® accreditation
requirements: Interpretive guidelines & surveyor guidance (version 11).
Milford, OH: DNV GL-Healthcare USA, Inc. (Level VII)
11 The Joint Commission. (2017). Standard PBMPC.8 . Patient blood management
certification revisions: Patient blood management (PBM) certification
program. [Online]. Accessed via the Web at
https://www.jointcommission.org/assets/1/18/PBM_Prepublication_Run_20170
929.pdf
12 The Joint Commission. (2019). Standard RI.01.03 .01. Comprehensive
accreditation manual for hospitals. Oakbrook Terrace, IL: The Joint
Commission. (Level VII)
13 Centers for Medicare and Medicaid Services, Department of Health and
Human Services. (2015). Condition of participation: Patient’s rights. 42 C.F.R.
§ 482.13(b)(2).
14 Standard 9. Informed consent. Infusion therapy standards of practice. (2016).
Journal of Infusion Nursing, 39, S26–S28. (Level VII)
15 Accreditation Association for Hospitals and Health Systems. (2017). Standard
15.01.11. Healthcare Facilities Accreditation Program: Accreditation
requirements for acute care hospitals. Chicago, IL: Accreditation Association
for Hospitals and Health Systems. (Level VII)
16 DNV GL-Healthcare USA, Inc. (2016). PR.1.SR.3 . NIAHO® accreditation
requirements: Interpretive guidelines & surveyor guidance (version 11).
Milford, OH: DNV GL-Healthcare USA, Inc. (Level VII)
17 The Joint Commission. (2019). Standard NPSG.07.01.01. Comprehensive
accreditation manual for hospitals. Oakbrook Terrace, IL: The Joint
Commission. (Level VII)
18 Centers for Disease Control and Prevention. (2002). Guideline for hand
hygiene in health-care settings: Recommendations of the Healthcare Infection
Control Practices Advisory Committee and the HICPAC/SHEA/APIC/IDSA Hand
Hygiene Task Force. MMWR Recommendations and Reports, 51(RR-16), 1–45.
Accessed via the Web at https://www.cdc.gov/mmwr/pdf/rr/rr5116.pdf (Level
II)
19 World Health Organization. (2009). “WHO guidelines on hand hygiene in
health care: First global patient safety challenge, clean care is safer care”
[Online]. Accessed July 2017 via the Web at
http://apps.who.int/iris/bitstream/10665/44102/1/9789241597906_eng.pdf
(Level IV)
20 Standard 16. Hand hygiene. Infusion therapy standards of practice. (2016).
Journal of Infusion Nursing, 39, S38–S39 . (Level VII)
21 Centers for Disease Control and Prevention. (2011, revised 2017). “Guidelines
for the prevention of intravascular catheter-related infections” [Online].
Accessed via the Web at
https://www.cdc.gov/infectioncontrol/pdf/guidelines/bsi-guidelines.pdf (Level
I)
22 Centers for Medicare and Medicaid Services, Department of Health and
Human Services. (2015). Condition of participation: Infection control. 42 C.F.R.
§ 482.42.
23 Accreditation Association for Hospitals and Health Systems. (2017). Standard
07.01.21. Healthcare Facilities Accreditation Program: Accreditation
requirements for acute care hospitals. Chicago, IL: Accreditation Association
for Hospitals and Health Systems. (Level VII)
24 DNV GL-Healthcare USA, Inc. (2016). IC.1 .SR.1 . NIAHO® accreditation
requirements: Interpretive guidelines & surveyor guidance (version 11).
Milford, OH: DNV GL-Healthcare USA, Inc. (Level VII)
25 The Joint Commission. (2017). Standard NPSG.01.01.01. Comprehensive
accreditation manual for hospitals. Oakbrook Terrace, IL: The Joint
Commission. (Level VII)
26 Siegel, J. D ., et al. (2007, revised 2017). “2007 guideline for isolation
precautions: Preventing transmission of infectious agents in healthcare
settings” [Online]. Accessed via the Web at
https://www.cdc.gov/infectioncontrol/pdf/guidelines/isolation-guidelines.pdf
(Level II)
27 Standard 19. Standard precautions. Infusion therapy standards of practice.
(2016). Journal of Infusion Nursing, 39, S41–S42. (Level VII)
28 Occupational Safety and Health Administration. (n.d .). “Bloodborne
pathogens, standard number 1910.1030” [Online]. Accessed via the Web at
http://www.osha.gov/pls/oshaweb/owadisp.show_document?
p_table=STANDARDS&p_id=12716 (Level VII)
29 DNV GL-Healthcare USA, Inc. (2016). IC.1 .SR.2 . NIAHO® accreditation
requirements: Interpretive guidelines & surveyor guidance (version 11).
Milford, OH: DNV GL-Healthcare USA, Inc. (Level VII)
30 Accreditation Association for Hospitals and Health Systems. (2017). Standard
07.01.10. Healthcare Facilities Accreditation Program: Accreditation
requirements for acute care hospitals. Chicago, IL: Accreditation Association
for Hospitals and Health Systems. (Level VII)
31 Standard 57. Parenteral medication and solution administration. Infusion
therapy standards of practice. (2016). Journal of Infusion Nursing, 39, S125–
S127. (Level VII)
32 Standard 18. Medical waste and sharps safety. Infusion therapy standards of
practice. (2016). Journal of Infusion Nursing, 39, S40–S41. (Level VII)
33 AABB. (2018). Standards for blood banks and transfusion services (31th ed.).
Bethesda, MD: AABB.
34 Waters, T. R., et al. (2009). “Safe patient handling training for schools of
nursing” [Online]. Accessed via the Web at
https://www.cdc.gov/niosh/docs/2009-127/pdfs/2009-127.pdf (Level VII)
35 The Joint Commission. (2019). Standard NPSG.01.03 .01. Comprehensive
accreditation manual for hospitals. Oakbrook Terrace, IL: The Joint
Commission. (Level VII)
36 Standard 25. Blood and fluid warming. Infusion therapy standards of practice.
(2016). Journal of Infusion Nursing, 39, S49–S50. (Level VII)
37 Marschall, J., et al. (2014). SHEA/IDSA practice recommendation: Strategies
to prevent central line-associated bloodstream infections in acute care
hospitals. Infection Control and Hospital Epidemiology, 35(7), 753–771 .
Accessed via the Web at http://www.jstor.org/stable/10.1086/676533 (Level I)
38 Standard 34. Needleless connectors. Infusion therapy standards of practice.
(2016). Journal of Infusion Nursing, 39, S68–S70. (Level VII)
39 U.S . Food and Drug Administration. (n.d .). “Look. Check. Connect. Safe
medical device connections save lives” [Online]. Accessed via the Web at
http://www.fda.gov/downloads/MedicalDevices/Safety/AlertsandNotices/UCM1
34873.pdf
40 The Joint Commission. (2014). “Sentinel event alert: Managing risk during
transition to new ISO tubing connector standards” [Online]. Accessed via the
Web at
http://www.jointcommission.org/assets/1/6/SEA_53_Connectors_8 _19_14 _final.
pdf (Level VII)
41 Fredrich, N. L. (2016). Evidence-based practice for red blood cell transfusions.
Nursing2016 Critical Care, 11(1), 31–37. (Level VII)
42 Standard 46. Infiltration and extravasation. Infusion therapy standards of
practice. (2016). Journal of Infusion Nursing, 39, S98–S102. (Level VII)
43 Standard 35. Filtration. Infusion nursing therapy standards of practice.
(2016). Journal of Infusion Nursing, 39, S70–S71. (Level VII)
44 Infusion Nurses Society. (2017). Policies and procedures for infusion nursing
of the older adult (3rd ed.). Boston, MA: Infusion Nurses Society.
45 Ganz, D. A., et al. (2013). Preventing falls in hospitals: A toolkit for improving
quality of care (AHRQ Publication No. 13-0015-EF). Rockville, MD: Agency for
Healthcare Research and Quality. Accessed via the Web at
http://www.ahrq.gov/sites/default/files/publications/files/fallpxtoolkit.pdf
46 Rutala, W. A., et al. (2008, revised 2017). “Guideline for disinfection and
sterilization in healthcare facilities, 2008” [Online]. Accessed via the Web at
https://www.cdc.gov/hicpac/pdf/guidelines/Disinfection_Nov_2008.pdf (Level I)
47 Accreditation Association for Hospitals and Health Systems. (2017). Standard
07.02.03. Healthcare Facilities Accreditation Program: Accreditation
requirements for acute care hospitals. Chicago, IL: Accreditation Association
for Hospitals and Health Systems. (Level VII)
48 The Joint Commission. (2019). Standard RC.01.03 .01. Comprehensive
accreditation manual for hospitals. Oakbrook Terrace, IL: The Joint
Commission. (Level VII)
49 Centers for Medicare and Medicaid Services, Department of Health and
Human Services. (2015). Condition of participation: Medical record services.
42 C.F.R. § 482.24(b).
50 Accreditation Association for Hospitals and Health Systems. (2017). Standard
10.00 .03. Healthcare Facilities Accreditation Program: Accreditation
requirements for acute care hospitals. Chicago, IL: Accreditation Association
for Hospitals and Health Systems. (Level VII)
51 DNV GL-Healthcare USA, Inc. (2016). MR.2 .SR.1 . NIAHO® accreditation
requirements: Interpretive guidelines & surveyor guidance (version 11).
Milford, OH: DNV GL-Healthcare USA, Inc. (Level VII)
52 Standard 42. Administration set change. Infusion therapy standards of
practice. (2016). Journal of Infusion Nursing, 39, S84–S85. (Level VII)
53 American Red Cross. (2017). “Infectious disease testing” [Online]. Accessed
via the Web at http://www.redcrossblood.org/learn-about-blood/blood-testing
(Level VII)
54 Centers for Disease Control and Prevention. (2017). “Blood safety: Diseases
and organisms” [Online]. Accessed via the Web at
https://www.cdc.gov/bloodsafety/bbp/diseases-organisms.html
TRANSFUSION REACTION MANAGEMENT
A transfusion reaction is any unfavorable event that occurs
in a patient during or following transfusion of blood or a
blood component that can be related to the transfusion. It’s
estimated that about 5% to 6% of all blood transfusion
recipients experience a recognizable adverse effect as a
result of the transfusion.1 Any adverse change in the
patient’s condition should be considered a possible
indication of a transfusion reaction and calls for prompt
evaluation to prevent further complications.1 (See A guide
to transfusion reactions, pages 786, 787.)
Equipment
Gloves ▪ sterile cap ▪ normal saline solution ▪ IV
administration set ▪ supplies for blood collection (see the
“Venipuncture” procedure) ▪ transfusion reaction report
form ▪ stethoscope ▪ sphygmomanometer or automated
blood pressure device ▪ pulse oximeter and probe ▪
thermometer ▪ laboratory specimen labels ▪ laboratory
request form ▪ laboratory biohazard transport bags ▪
Optional: oxygen, epinephrine, hypothermia blanket,
indwelling urinary catheter and insertion kit, prescribed
medications, prescribed IV fluid, resuscitation equipment.
Preparation of equipment
Inspect all IV equipment and supplies; if a product is
expired, if its integrity is compromised, or if it’s found
defective, remove it from patient use, label it as expired or
defective, and report the expiration or defect as directed by
your facility.5
Implementation
■ Perform hand hygiene.6,7,8,9,10,11,12,13
■
Put on gloves to comply with standard
precautions.14,15,16,17,18
■ Confirm the patient’s identity using at least two patient
identifiers.19
■ Trace the blood administration tubing from the patient to
its point of origin, disconnect it from the IV catheter, and
cover the hub with a sterile cap; don’t discard the
administration set or the blood product.1,20
■ Prime a new administration set with normal saline
solution, attach the administration set to the IV catheter,
and infuse normal saline solution at a keep-vein-open rate.1
Trace the tubing from the patient to its point of origin to
make sure that you’ve connected the tubing to the correct
port.20
■ Remain with the patient and notify transfusion services
personnel and the patient’s practitioner immediately.
■ Closely monitor the patient’s vital signs for indications of
shock.1 Monitor oxygen saturation level using pulse
oximetry and assess cardiac and respiratory status
frequently, as indicated by the patient’s condition and the
type of reaction suspected.
■ Administer treatment as prescribed to provide
symptomatic relief.1,2
■ Place the blood bag (even if it’s empty), attached IV
fluids, and administration set with the related forms and
labels in a laboratory biohazard transport bag14 and return
them to transfusion services, because transfusion services
will test these materials to further evaluate the reaction.1
■ Perform a venipuncture in a different vein and obtain
blood samples for laboratory testing for hemolysis; obtain a
blood sample for repeat ABO group determination and direct
antiglobulin testing, as ordered.1 The practitioner may order
additional laboratory testing such as blood cultures if
bacterial contamination is suspected. The practitioner may
also order blood urea nitrogen and creatinine levels to
monitor renal function. In addition, coagulation studies, such
as prothrombin time, partial thromboplastin time, fibrinogen
level, and D-dimer, may also be ordered to identify red
blood cell destruction and to monitor for disseminated
intravascular coagulation. Report critical test results to the
practitioner within the time frame determined by your
facility to ensure prompt treatment.21
NURSING ALERT Limit phlebotomy and blood loss from laboratory
testing to reduce the risk of iatrogenic anemia.22
■ Label all samples in the presence of the patient to
prevent mislabeling.19
■ Complete and send the appropriate documentation—
usually a transfusion reaction form—to the laboratory along
with the samples in a laboratory biohazard transport bag.14
■
Discard used supplies in the appropriate
receptacle.14,15,23
■ Remove and discard your gloves.14,15,23
■ Perform hand hygiene.6,7,8,9,10,11,12,13
■ Closely monitor intake and output; insert an indwelling
urinary catheter, if ordered, to monitor urine output in a
critically ill patient.24 Note evidence of oliguria or anuria,
because hemoglobin deposition in the renal tubes can cause
renal damage.
■ Make sure the patient is comfortable, and provide
reassurance to the patient and family as necessary.
■ Clean and disinfect your stethoscope using a disinfectant
pad.25,26
■ Perform hand hygiene.6,7,8,9,10,11,12,13
■ Document the procedure.27,28,29,30,31
Special considerations
HOSPITAL-ACQUIRED CONDITION ALERT The Centers for Medicare &
Medicaid Services has identified blood incompatibility errors as a
hospital-acquired condition, because the application of evidence-
based practices can reasonably prevent such errors. Follow evidence-
based practices, such as carefully identifying the patient and blood
sample for compatibility testing, and participating in a two-person
verification process, before blood or blood product administration to
reduce the risk of incompatibility errors.32,33
A guide to transfusion reactions
Any patient receiving a transfusion of blood or blood products is at risk for a
transfusion reaction. A transfusion reaction may be immediate, occurring
during the transfusion or within several hours of transfusion completion, or
delayed. The chart below describes immediate and delayed reactions.1
■ A blood incompatibility error is considered a sentinel
event by The Joint Commission. A sentinel event is an
unexpected occurrence involving death or serious physical
or psychological injury or the risk thereof. Sentinel events
require immediate investigation and response. Follow your
facility’s process for reporting a blood incompatibility error if
you suspect one.34
■ Be aware that transfusion-related acute lung injury
(TRALI) is the leading cause of transfusion-related mortality.
Monitor the patient closely for signs and symptoms of
TRALI.1
■ Be alert for signs and symptoms of shock or
cardiovascular collapse. Be prepared to intervene with
emergency medications and rapid fluid administration.
Follow advanced cardiac life support protocols if respiratory
or cardiac arrest occurs.
■ You must report all fatalities from transfusion of blood or
a blood product to the Food and Drug Administration (FDA).
You should make an initial notification by e-mail at
fatalities2@fda.hhs.gov as soon as possible after the event.
You must send a follow-up report to the FDA by e-mail,
telephone (240-402-9160), facsimile (301-595 -1304,
Attention: CBER Fatality Program Manager), or mail (Food
and Drug Administration, Center for Biologics Evaluation
and Research, Document Control Center, 10903 New
Hampshire Ave.,
WO71-G112, Silver Spring, MD 20993-
0002).35
Patient teaching
Because blood transfusion reactions may occur after the
transfusion is complete, teach the patient the signs and
symptoms of transfusion reaction. Tell the patient to be alert
to the possibility of a delayed reaction, and advise the
patient to report signs and symptoms promptly.
Documentation
Record the time and date the transfusion was started, the
type of blood component transfused, the unit identification
number, the patient’s condition at the start of the
transfusion, the patient’s vital signs, and your assessment
findings. Record the time the transfusion was stopped, the
volume infused, the patient’s condition, and the identity of
the person who stopped the transfusion and observed the
patient. Record any specimens sent to the laboratory for
analysis, any nursing interventions performed, any
treatment given, and the patient’s response to treatment.
Note any unexpected outcomes and interventions
performed in response to those treatments. If required by
your facility, complete the transfusion reaction form.
Document any teaching you provided and the patient’s and
family’s understanding of your teaching.
REFERENCES
1 AABB. (2012). Primer of blood administration. Bethesda, MD: AABB. Accessed
via the Web at
http://www.bloodcenter.org/webres/File/Hospital%20.pdf%20forms/primerofbl
oodadministration.pdf (Level VII)
2 Standard 62. Transfusion therapy. Infusion therapy standards of practice.
(2016). Journal of Infusion Nursing, 39, S135–S137. (Level VII)
3 AABB, et al. (2017). “Circular of information for use of human blood and blood
components” [Online]. Accessed via the Web at
http://www.aabb.org/tm/coi/Pages/default.aspx (Level VII)
4 Infusion Nurses Society. (2016). Policies and procedures for infusion therapy
(5th ed.). Boston, MA: Infusion Nurses Society.
5 Standard 12. Product evaluation, integrity, and defect reporting. Infusion
therapy standards of practice. (2016). Journal of Infusion Nursing, 39, S32–
S34. (Level VII)
6 Centers for Disease Control and Prevention. (2002). Guideline for hand
hygiene in health-care settings: Recommendations of the Healthcare Infection
Control Practices Advisory Committee and the HICPAC/SHEA/APIC/IDSA Hand
Hygiene Task Force. MMWR Recommendations and Reports, 51(RR-16), 1–45.
Accessed via the Web at https://www.cdc.gov/mmwr/pdf/rr/rr5116.pdf (Level
II)
7 World Health Organization. (2009). “WHO guidelines on hand hygiene in
health care: First global patient safety challenge, clean care is safer care”
[Online]. Accessed via the Web at
http://apps.who.int/iris/bitstream/10665/44102/1/9789241597906_eng.pdf
(Level IV)
8 Centers for Disease Control and Prevention. (2011, revised 2017). “Guidelines
for the prevention of intravascular catheter-related infections” [Online].
Accessed via the Web at
https://www.cdc.gov/infectioncontrol/pdf/guidelines/bsi-guidelines.pdf (Level
I)
9 Standard 16. Hand hygiene. Infusion therapy standards of practice. (2016).
Journal of Infusion Nursing, 39, S38–S39 . (Level VII)
10 The Joint Commission. (2019). Standard NPSG.07.01.01. Comprehensive
accreditation manual for hospitals. Oakbrook Terrace, IL: The Joint
Commission. (Level VII)
11 Centers for Medicare and Medicaid Services, Department of Health and
Human Services. (2015). Condition of participation: Infection control. 42 C.F.R.
§ 482.42.
12 Accreditation Association for Hospitals and Health Systems. (2016). Standard
07.01.21. Healthcare Facilities Accreditation Program: Accreditation
requirements for acute care hospitals. Chicago, IL: Accreditation Association
for Hospitals and Health Systems. (Level VII)
13 DNV GL-Healthcare USA, Inc. (2016). IC.1 .SR.1 . NIAHO® accreditation
requirements: Interpretive guidelines & surveyor guidance (version 11).
Milford, OH: DNV GL-Healthcare USA, Inc. (Level VII)
14 Occupational Safety and Health Administration. (n.d .). “Bloodborne
pathogens, standard number 1910.1030” [Online]. Accessed via the Web at
https://www.osha.gov/pls/oshaweb/owadisp.show_document?
p_id=10051&p_table=STANDARDS (Level VII)
15 Siegel, J. D ., et al. (2007, revised 2017). “2007 guideline for isolation
precautions: Preventing transmission of infectious agents in healthcare
settings” [Online]. Accessed via the Web at
https://www.cdc.gov/infectioncontrol/pdf/guidelines/isolation-guidelines.pdf
(Level II)
16 Standard 19. Standard precautions. Infusion therapy standards of practice.
(2016). Journal of Infusion Nursing, 39, S41–S42. (Level VII)
17 Accreditation Association for Hospitals and Health Systems. (2016). Standard
07.01.10. Healthcare Facilities Accreditation Program: Accreditation
requirements for acute care hospitals. Chicago, IL: Accreditation Association
for Hospitals and Health Systems. (Level VII)
18 DNV GL-Healthcare USA, Inc. (2016). IC.1 .SR.2 . NIAHO® accreditation
requirements: Interpretive guidelines & surveyor guidance (version 11).
Milford, OH: DNV GL-Healthcare USA, Inc. (Level VII)
19 The Joint Commission. (2019). Standard NPSG.01.01.01. Comprehensive
accreditation manual for hospitals. Oakbrook Terrace, IL: The Joint
Commission. (Level VII)
20 U.S . Food and Drug Administration. (n.d .). “Look. Check. Connect. Safe
medical device connections save lives” [Online]. Accessed via the Web at
http://www.fda.gov/downloads/MedicalDevices/Safety/AlertsandNotices/UCM1
34873.pdf
21 The Joint Commission. (2019). Standard NPSG.02.03 .01. Comprehensive
accreditation manual for hospitals. Oakbrook Terrace, IL: The Joint
Commission. (Level VII)
22 Tolich, D. J ., et al. (2013). Blood management: Best-practice transfusion
strategies. Nursing, 43(1), 40–47 . Accessed via the Web at
http://journals.lww.com/nursing/Fulltext/2013/01000/Blood_management_Best
_practice_transfusion.13.aspx (Level V)
23 Standard 18. Medical waste and sharps safety. Infusion therapy standards of
practice. (2016). Journal of Infusion Nursing, 39, S40–S41. (Level VII)
24 Healthcare Infection Control Practices Advisory Committee. (2010).
“Guideline for prevention of catheter-associated urinary tract infections,
2009” [Online]. Accessed via the Web at
https://www.cdc.gov/hicpac/pdf/CAUTI/CAUTIguideline2009final.pdf (Level I)
25 Rutala, W. A., et al. (2008, revised 2017). “Guideline for disinfection and
sterilization in healthcare facilities, 2008” [Online]. Accessed via the Web at
https://www.cdc.gov/hicpac/pdf/guidelines/Disinfection_Nov_2008.pdf (Level I)
26 Accreditation Association for Hospitals and Health Systems. (2016). Standard
07.02.03. Healthcare Facilities Accreditation Program: Accreditation
requirements for acute care hospitals. Chicago, IL: Accreditation Association
for Hospitals and Health Systems. (Level VII)
27 The Joint Commission. (2019). Standard RC.01.03 .01. Comprehensive
accreditation manual for hospitals. Oakbrook Terrace, IL: The Joint
Commission. (Level VII)
28 Centers for Medicare and Medicaid Services, Department of Health and
Human Services. (2015). Condition of participation: Medical record services.
42 C.F.R. § 482.24(b).
29 Accreditation Association for Hospitals and Health Systems. (2016). Standard
10.00 .03. Healthcare Facilities Accreditation Program: Accreditation
requirements for acute care hospitals. Chicago, IL: Accreditation Association
for Hospitals and Health Systems. (Level VII)
30 DNV GL-Healthcare USA, Inc. (2016). MR.2 .SR.1 . NIAHO® accreditation
requirements: Interpretive guidelines & surveyor guidance (version 11).
Milford, OH: DNV GL-Healthcare USA, Inc. (Level VII)
31 Standard 10. Documentation in the medical record. Infusion therapy
standards of practice. (2016). Journal of Infusion Nursing, 39, S28–S30 . (Level
VII)
32 Jarrett, N., & Callaham, M. (2016). “Evidence-based guidelines for selected
hospital-acquired conditions: Final report” [Online]. Accessed via the Web at
https://www.cms.gov/Medicare/Medicare-Fee-for-Service-
Payment/HospitalAcqCond/Downloads/2016-HAC-Report.pdf
33 Centers for Medicare and Medicaid Services, Department of Health and
Human Services. (2017). “Appendix I: Hospital-acquired conditions (HACS)
list” [Online]. Accessed via the Web at
https://www.cms.gov/ICD10Manual/version33-fullcode-
cms/fullcode_cms/P0386.html
34 The Joint Commission. (2015). “Sentinel event data: Event type by year
1995–2015” [Online]. Accessed via the Web at
https://www.jointcommission.org/assets/1/18/Event_Type_by_Year_1995-
2015.pdf (Level VII)
35 U.S . Food and Drug Administration (2003). “Guidance for industry: Notifying
FDA of fatalities related to blood collection or transfusion” [Online]. Accessed
via the Web at
https://www.fda.gov/downloads/BiologicsBloodVaccines/GuidanceCompliance
RegulatoryInformation/Guidances/Blood/ucm062897.pdf
TRANSVENOUS PACING
Usually inserted in an emergency, a temporary pacemaker
consists of an external, battery-powered pulse generator
and a lead or electrode system. The purpose of a
transvenous pacemaker (the most common type of
temporary pacemaker) is to maintain circulatory integrity by
providing for standby pacing if sudden complete heart block
occurs, to increase the heart rate during periods of
symptomatic bradycardia, and, occasionally, to control
sustained supraventricular or ventricular tachycardia. In
addition to being more comfortable for the patient, a
transvenous pacemaker is more reliable than a
transcutaneous pacemaker.
Transvenous pacing involves threading an electrode
catheter through a vein into the patient‘s right atrium or
right ventricle; single-chamber pacing is most appropriate in
an emergency, because the goal is to establish the patient’s
heart rate as quickly as possible.1 Veins used for insertion
include the subclavian, brachial, internal jugular, and
femoral.1 The femoral site should be used as a last resort
because it’s associated with an increased risk of infection.
The electrode then attaches to an external pulse generator,
which can provide an electrical stimulus directly to the
endocardium.
Indications for transvenous pacing include management of
symptomatic bradycardia, tachyarrhythmias, and other
conduction system disturbances. It may also help diagnose
conduction abnormalities. According to the American Heart
Association Guidelines for Cardiopulmonary Resuscitation
and Emergency Cardiovascular Care, pacing isn’t
recommended in cardiac arrest.2,3
Equipment
Temporary pacemaker generator with new battery ▪
guidewire or introducer ▪ pacing electrode catheter ▪ gloves
▪ sterile gloves ▪ sterile occlusive dressing ▪ sterile marker
▪ antiseptic solution (2% chlorhexidine-based solution) ▪
nonconducting tape, a rubber surgical glove, or an external
pulse generator pouch ▪ emergency cardiac drugs ▪
intubation equipment ▪ defibrillator ▪ vital signs monitoring
equipment ▪ cardiac monitor with strip-chart recorder ▪
prescribed local anesthetic ▪ bridging cable ▪ percutaneous
introducer tray or venous cutdown tray ▪ sterile gowns ▪
head covers ▪ masks and goggles or masks with face shield
▪ sterile fenestrated drape ▪ suturing equipment ▪ Optional:
alligator clip, fluoroscopy equipment and protective aprons,
ultrasound equipment, disposable-head clippers, peripheral
IV insertion equipment, IV fluids.
Preparation of equipment
Connect the patient to the cardiac monitor. Make sure
intubation equipment, emergency cardiac drugs, and a
defibrillator are at the patient’s bedside.
Implementation
■ Verify the practitioner’s order.
■ Gather and prepare the appropriate equipment.
■ Confirm that written informed consent has been obtained
by the practitioner and is in the patient’s medical
record.4,5,6,7
■ Conduct a preprocedure verification to make sure that all
relevant documentation, related information, and equipment
are available and correctly identified to the patient’s
identifiers.8,9
■ Perform hand hygiene.10,11,12,13,14,15
■ Confirm the patient’s identity using at least two patient
identifiers.9,16
■ Provide privacy.17,18,19,20
■ Explain the procedure to the patient and family (if
appropriate) according to their individual communication
and learning needs to increase their understanding, allay
their fears, and enhance cooperation.21
■ Check the patient’s history for hypersensitivity to local
anesthetics or latex.
■ Raise the patient’s bed to waist level when providing
patient care to prevent caregiver back strain.22
■ Perform hand hygiene10,11,12,13,14,15 and put on
gloves.23,24,25
■ Assess the patient’s vital signs, skin color, level of
consciousness (LOC), heart rate and rhythm, peripheral
pulses, and emotional state to serve as a baseline for
comparison during and after the procedure.
■ If ordered, insert a peripheral IV catheter and initiate the
prescribed IV infusion at the ordered rate. (See the “IV
catheter insertion and removal” procedure, page 443.)
■ Insert a new battery into the external pacemaker
generator, and test it to make sure it has a strong charge.
Connect the bridging cable to the generator, and align the
positive and negative poles. This cable allows slack between
the electrode catheter and the generator, reducing the risk
of accidental catheter displacement.
■ Connect the patient to the bedside monitoring system
and monitor the electrocardiogram (ECG) continuously.1
■ Place the patient in the supine position.
■ If necessary, clip the hair around the insertion site.26
■ Remove and discard your gloves23,24 and perform hand
hygiene.10,11,12,13,14,15
■ Open the appropriate supply tray while maintaining a
sterile field. Label all medications, medication containers,
and other solutions on and off the sterile field.27
■ Assist the practitioner in putting on a sterile gown, a
mask and goggles or a mask with face shield, a head cover,
and sterile gloves. If assisting, put on the same personal
protective equipment.23,24
■ Assist the practitioner with insertion as necessary. The
practitioner may use fluoroscopy-guided technique,
ultrasound-guided technique, or ECG-guided technique. If
the practitioner is using fluoroscopy-guided technique, place
a protective apron on the patient below the waist; ensure all
staff members also put on protective aprons. If the
practitioner is using ultrasound-guided technique for
placement, prepare the ultrasound equipment. If the
practitioner is using ECG-guided technique, connect an
alligator clip to the V lead of the cardiac monitor and the
distal end of the electrode catheter. Set the cardiac monitor
to display the V lead continuously.1
■ The practitioner disinfects the insertion site with an
antiseptic solution and allows it to dry. Assist as needed.
■ Following maximal barrier precautions, the practitioner
covers the patient from head to toe with a sterile
fenestrated drape, leaving a small opening for the insertion
site.
■ Conduct a time-out immediately before starting the
procedure to perform a final assessment that the correct
patient, site, positioning, and procedure are identified, and
that, as applicable, all relevant information and necessary
equipment are available.9,28
■ After anesthetizing the insertion site, the practitioner will
puncture the brachial, femoral, subclavian, or jugular vein.
The practitioner will insert a guidewire or an introducer and
advance the electrode catheter.
■ As the catheter advances, watch the cardiac monitor. If
the practitioner is using ECG-guided technique, when the
electrode catheter reaches the right atrium, you’ll notice
large P waves and small QRS complexes. Then, as the
catheter reaches the right ventricle, the P waves will
become smaller while the QRS complexes enlarge. When
the catheter touches the right ventricular endocardium,
expect to see elevated ST segments, premature ventricular
contractions, or both. When the electrode catheter is in the
right ventricle, it will send an impulse to the myocardium,
causing depolarization. If the patient needs atrial pacing,
either alone or with ventricular pacing, the practitioner may
place an electrode in the right atrium.
■ Meanwhile, continuously monitor the patient’s cardiac
status and treat arrhythmias, as appropriate. Also assess
the patient for jaw pain and earache; these symptoms
indicate that the electrode catheter has missed the superior
vena cava and has moved into the neck instead.
■ When the electrode catheter is in place, attach the
catheter leads to the bridging cable, lining up the positive
and negative poles. Make sure all connections are secure.
■ Turn the pacemaker on and obtain settings (mode, rate,
and energy level) from the practitioner. Set the pacing
mode, rate, and energy level (output and milliamperes)
according to the practitioner’s order or as determined by
sensitivity (level of intrinsic cardiac activity as sensed by
electrodes) and stimulation threshold (the minimum amount
of voltage necessary to initiate depolarization) testing.1 (See
Sensitivity and stimulation threshold testing.) Ensure that
the settings are correct.
■ The practitioner will then secure the catheter to the
insertion site, usually by suturing.
■ Assess the patient’s vital signs, skin color, LOC, heart rate
and rhythm, peripheral pulses, and emotional state to
determine the effectiveness of the paced rhythm.
■ Apply a sterile occlusive dressing to the site. Label the
dressing with the date, the time, and your initials. Secure
the pulse generator and pacemaker wires, as necessary.
■ Return the bed to the lowest position to prevent falls and
maintain patient safety.29
■ Obtain a chest X-ray, as ordered, to detect complications
associated with insertion, such as pneumothorax.1
■ Discard supplies in the appropriate receptacle.23,24
■ Remove and discard your personal protective
equipment.23,24
■ Perform hand hygiene.10,11,12,13,14,15
■ Document the procedure.30,31,32,33
Sensitivity and stimulation
threshold testing
Sensitivity and stimulation threshold testing help determine the appropriate
pacemaker rate and amount of electrical current needed to initiate
depolarization of the myocardium. Testing should occur on both chambers, as
appropriate. Sensitivity threshold testing isn’t necessary if the patient has no
intrinsic rhythm. In some facilities, critical care nurses are permitted to
perform sensitivity and stimulation threshold testing; in other facilities, the
practitioner must perform the testing. Frequency of testing also varies by
facility. Testing typically occurs at least every 24 hours to make sure that the
pacemaker is functioning properly and that it isn’t delivering high levels of
energy to the myocardium.1
Performing sensitivity threshold testing
■ Slowly turn the sensitivity dial counterclockwise to a higher setting until
the sensing indicator light stops flashing; this occurs when the device no
longer senses the patient’s intrinsic rhythm.
■ Gradually turn the sensitivity dial clockwise to a lower setting until the
sensing light begins flashing with each complex and the pacing light stops
flashing; this setting is the sensing threshold.
■ Set the sensitivity dial to the setting that’s one-half the value of the
sensing threshold.
Performing stimulation threshold testing
■ Set the pacing rate about 10 beats/minute above the patient’s intrinsic
rate.
■ Beginning at 20 milliamperes (mA), slowly decrease the output until
capture is lost.
■ Gradually increase the mA until you see a 1:1 capture and the pacing light
flashes; this is the stimulation threshold.
■ Set the mA at least two times higher than the stimulation threshold.
Special considerations
■ Confirm positioning of the lead wire by ultrasound,
fluoroscopy, or chest X-ray.1
■ Take steps to prevent microshock, including warning the
patient not to use any electrical equipment that isn’t
grounded, such as landline telephones, electric shavers,
televisions, and lamps.
■ Other safety measures include placing a plastic cover
supplied by the manufacturer over the pacemaker controls
to avoid an accidental setting change. Also, insulate the
pacemaker by covering all exposed metal parts, such as
electrode connections and pacemaker terminals, with
nonconducting tape, or place the pacing unit in a dry rubber
surgical glove or pouch. If the patient needs emergency
defibrillation, make sure the pacemaker can withstand the
procedure. If you’re unsure, disconnect the pulse generator
to avoid damage.
■ Perform a 12-lead ECG to serve as a baseline, and then
perform additional ECGs daily or with clinical changes. Also,
if possible, obtain a rhythm strip before, during, and after
pacemaker placement; any time that pacemaker settings
change; and whenever the patient receives treatment
because of a complication caused by the pacemaker.
■ Continuously monitor the ECG reading, noting capture,
sensing, rate, intrinsic beats, and competition of paced and
intrinsic rhythms.34 If the pacemaker is sensing correctly,
the sense indicator on the pulse generator should flash with
each beat. (See Handling pacemaker malfunctions, page
790.)
Complications
Complications associated with pacemaker therapy include
microshock, equipment failure, and competitive or fatal
arrhythmias. Transvenous pacemakers can cause such
complications as pneumothorax or hemothorax, cardiac
perforation and tamponade, diaphragmatic stimulation,
pulmonary embolism, thrombophlebitis, and infection, air
embolism, and bleeding.35 Also, if the practitioner threads
the electrode through the antecubital or femoral vein,
venous spasm, thrombophlebitis, or lead displacement can
result.
Documentation
Record the reason for the temporary pacing, the date and
time of pacemaker insertion, the time pacing started,
pacemaker settings, and the locations of the electrodes.
Note the patient’s response to the procedure along with any
complications and interventions taken. Document electrode
placement confirmation. If possible, obtain rhythm strips
before, during, and after pacemaker placement and
whenever pacemaker settings are changed, or when the
patient receives treatment for a complication caused by the
pacemaker. As you monitor the patient, record responses to
temporary pacing and note any changes in the patient’s
condition.
TROUBLESHOOTING
Handling pacemaker malfunctions
Occasionally, a temporary pacemaker may fail to function properly. When
failure occurs, you need to take immediate action to correct the problem.
Follow these guidelines when your patient’s pacemaker fails to pace, capture,
or sense intrinsic beats.
Failure to pace
Failure to pace happens when the pacemaker either doesn’t fire or fires too
often. The pulse generator may not be working properly, or it may not be
conducting the impulse to the patient.
Nursing interventions
■ If the pacing or sensing indicator flashes, check the patient, all
connections, and the battery. Check the position of the pacing electrode in
the patient by X-ray, as ordered.
■ If the pulse generator is turned on but the indicators still aren’t flashing,
change the battery. If that doesn’t help, use a different pulse generator.
■ Check the settings if the pacemaker is firing too rapidly. If the settings are
correct, or if altering them (according to your facility’s guideline or the
practitioner’s order) doesn’t help, change the pulse generator.
■ Have a transcutaneous pacemaker on standby in case the pacemaker
continues to malfunction and the patient becomes symptomatic.
■ Notify the practitioner.
Failure to capture
In failure to capture, pacemaker spikes appear on the rhythm strip (as shown
right), but the heart isn’t responding. This malfunction can be caused by
changes in the pacing threshold due to ischemia, an electrolyte imbalance
(high or low potassium or magnesium levels), acidosis, an adverse reaction
to a medication, a perforated ventricle, fibrosis, or the electrode position.
Nursing interventions
■ Verify that the settings are correct according to the practitioner’s order.
■ If the heart isn’t responding, carefully check all connections, increase the
milliamperes slowly as determined by your facility, and notify the practitioner
of the failure to capture.
■ Have a transcutaneous pacemaker on standby in case the pacemaker
continues to malfunction and the patient become symptomatic.
■ Notify the practitioner.
Failure to sense intrinsic beats
Failure to sense intrinsic beats could cause ventricular tachycardia or
ventricular fibrillation if the pacemaker fires on the vulnerable T wave.
Possible causes include the pacemaker sensing an external stimulus as a QRS
complex, which could lead to asystole, or the pacemaker not being sensitive
enough, which means it could fire anywhere within the cardiac cycle.
Nursing interventions
■ If the pacemaker is undersensing, increase the sensitivity by turning down
the voltage, usually to 2 to 5 millivolts (mV). If it’s oversensing, decrease the
sensitivity by turning the voltage to 5 mV or higher.
■ Change the battery and then the pulse generator.
■ Remove items in the room that could be causing electromechanical
interference (such as razors, radios, and cautery devices). Check the ground
wires on the bed and other equipment for obvious damage. Unplug each
piece and see if the interference stops. When you locate the cause, notify the
staff engineer and ask for it to be checked.
■ If the pacemaker is still firing on the T wave and all other efforts to correct
it have failed, attach the patient to a transcutaneous pacemaker, turn off the
epicardial pacemaker, and notify the practitioner.
REFERENCES
1 Wiegand, D. L. (2017). AACN procedure manual for high acuity, progressive,
and critical care (7th ed.). St. Louis, MO: Elsevier.
2 American Heart Association. (2010). 2010 American Heart Association
guidelines for cardiopulmonary resuscitation and emergency cardiovascular
care. Circulation, 122, S706–S719. (Level VII)
3 American Heart Association. (2015). 2015 American Heart Association
guidelines update for cardiopulmonary resuscitation and emergency
cardiovascular care. Circulation, 132, S444–S464. (Level II)
4 The Joint Commission. (2019). Standard RI.01.03 .01. Comprehensive
accreditation manual for hospitals. Oakbrook Terrace, IL: The Joint
Commission. (Level VII)
5 Centers for Medicare and Medicaid Services, Department of Health and
Human Services. (2015). Condition of participation: Patient’s rights. 42 C.F.R.
§ 482.13(b)(2).
6 Accreditation Association for Hospitals and Health Systems. (2017). Standard
30.01.11. Healthcare Facilities Accreditation Program: Accreditation
requirements for acute care hospitals. Chicago, IL: Accreditation Association
for Hospitals and Health Systems. (Level VII)
7 DNV GL-Healthcare USA, Inc. (2016). PR.1 .SR.3 . NIAHO® accreditation
requirements: Interpretive guidelines & surveyor guidance (version 11).
Milford, OH: DNV GL-Healthcare USA, Inc. (Level VII)
8 The Joint Commission. (2019). Standard UP.01.01.01. Comprehensive
accreditation manual for hospitals. Oakbrook Terrace, IL: The Joint
Commission. (Level VII)
9 Accreditation Association for Hospitals and Health Systems. (2017). Standard
30.00 .14. Healthcare Facilities Accreditation Program: Accreditation
requirements for acute care hospitals. Chicago, IL: Accreditation Association
for Hospitals and Health Systems. (Level VII)
10 Centers for Disease Control and Prevention. (2002). Guideline for hand
hygiene in health-care settings: Recommendations of the Healthcare Infection
Control Practices Advisory Committee and the HICPAC/SHEA/APIC/IDSA Hand
Hygiene Task Force. MMWR Recommendations and Reports, 51(RR-16), 1–45.
Accessed via the Web at https://www.cdc.gov/mmwr/pdf/rr/rr5116.pdf (Level
II)
11 The Joint Commission. (2019). Standard NPSG.07.01.01. Comprehensive
accreditation manual for hospitals. Oakbrook Terrace, IL: The Joint
Commission. (Level VII)
12 World Health Organization. (2009). “WHO guidelines on hand hygiene in
health care: First global patient safety challenge, clean care is safer care”
[Online]. Accessed via the Web at
http://apps.who.int/iris/bitstream/10665/44102/1/9789241597906_eng.pdf
(Level IV)
13 Accreditation Association for Hospitals and Health Systems. (2017). Standard
07.01.21. Healthcare Facilities Accreditation Program: Accreditation
requirements for acute care hospitals. Chicago, IL: Accreditation Association
for Hospitals and Health Systems. (Level VII)
14 Centers for Medicare and Medicaid Services, Department of Health and
Human Services. (2015). Condition of participation: Infection control. 42 C.F.R.
§ 482.42.
15 DNV GL-Healthcare USA, Inc. (2016). IC.1 .SR.1 . NIAHO® accreditation
requirements: Interpretive guidelines & surveyor guidance (version 11).
Milford, OH: DNV GL-Healthcare USA, Inc. (Level VII)
16 The Joint Commission. (2019). Standard NPSG.01.01.01. Comprehensive
accreditation manual for hospitals. Oakbrook Terrace, IL: The Joint
Commission. (Level VII)
17 Accreditation Association for Hospitals and Health Systems. (2017). Standard
15.01.16. Healthcare Facilities Accreditation Program: Accreditation
requirements for acute care hospitals. Chicago, IL: Accreditation Association
for Hospitals and Health Systems. (Level VII)
18 Centers for Medicare and Medicaid Services, Department of Health and
Human Services. (2015). Condition of participation: Patient’s rights. 42 C.F.R.
§ 482.13(c)(1).
19 DNV GL-Healthcare USA, Inc. (2016). PR.1.SR.5 . NIAHO® accreditation
requirements: Interpretive guidelines & surveyor guidance (version 11).
Milford, OH: DNV GL-Healthcare USA, Inc. (Level VII)
20 The Joint Commission. (2019). Standard RI.01.01.01. Comprehensive
accreditation manual for hospitals. Oakbrook Terrace, IL: The Joint
Commission. (Level VII)
21 The Joint Commission. (2019). Standard PC.02.01.21. Comprehensive
accreditation manual for hospitals. Oakbrook Terrace, IL: The Joint
Commission. (Level VII)
22 Waters, T. R., et al. (2009). “Safe patient handling training for schools of
nursing” [Online]. Accessed via the Web at
https://www.cdc.gov/niosh/docs/2009-127/pdfs/2009-127.pdf (Level VII)
23 Siegel, J. D ., et al. (2007, revised 2017). “2007 guideline for isolation
precautions: Preventing transmission of infectious agents in healthcare
settings” [Online]. Accessed via the Web at
https://www.cdc.gov/infectioncontrol/pdf/guidelines/isolation-guidelines.pdf
(Level II)
24 Occupational Safety and Health Administration. (n.d .). “Bloodborne
pathogens, standard number 1910.1030” [Online]. Accessed via the Web at
http://www.osha.gov/pls/oshaweb/owadisp.show_document?
p_id=10051&p_table=STANDARDS (Level VII)
25 Accreditation Association for Hospitals and Health Systems. (2017). Standard
07.01.10. Healthcare Facilities Accreditation Program: Accreditation
requirements for acute care hospitals. Chicago, IL: Accreditation Association
for Hospitals and Health Systems. (Level VII)
26 The Joint Commission. (2019). Standard NPSG.07.05.01. Comprehensive
accreditation manual for hospitals. Oakbrook Terrace, IL: The Joint
Commission. (Level VII)
27 The Joint Commission. (2019). Standard NPSG.03 .04.01. Comprehensive
accreditation manual for hospitals. Oakbrook Terrace, IL: The Joint
Commission. (Level VII)
28 The Joint Commission. (2019). Standard UP.01.03.01. Comprehensive
accreditation manual for hospitals. Oakbrook Terrace, IL: The Joint
Commission. (Level VII)
29 Ganz, D. A., et al. (2013). Preventing falls in hospitals: A toolkit for improving
quality of care (AHRQ Publication No. 13-0015-EF). Rockville, MD: Agency for
Healthcare Research and Quality. Accessed via the Web at
http://www.ahrq.gov/sites/default/files/publications/files/fallpxtoolkit.pdf
(Level VII)
30 The Joint Commission. (2019). Standard RC.01.03 .01. Comprehensive
accreditation manual for hospitals. Oakbrook Terrace, IL: The Joint
Commission. (Level VII)
31 Centers for Medicare and Medicaid Services, Department of Health and
Human Services. (2015). Condition of participation: Medical record services.
42 C.F.R. § 482.24(b).
32 Accreditation Association for Hospitals and Health Systems. (2017). Standard
10.00 .03. Healthcare Facilities Accreditation Program: Accreditation
requirements for acute care hospitals. Chicago, IL: Accreditation Association
for Hospitals and Health Systems. (Level VII)
33 DNV GL-Healthcare USA, Inc. (2016). MR.2 .SR.1 . NIAHO® accreditation
requirements: Interpretive guidelines & surveyor guidance (version 11).
Milford, OH: DNV GL-Healthcare USA, Inc. (Level VII)
34 Sandau, K. E., et al. (2017). Update to practice standards for
electrocardiographic monitoring in hospital settings: An American Heart
Association scientific statement. Circulation, 136(19), e273–e344. Accessed
via the Web at
http://circ.ahajournals.org/content/early/2017/10/03/CIR.0000000000000527
(Level I)
35 Hayes, D. L . (2015). Temporary cardiac pacing. In: UpToDate, Ganz, L. I . (Ed.).
Retrieved from: www.uptodate.com
TRAUMATIC WOUND MANAGEMENT
Traumatic wounds include puncture wounds, abrasions,
lacerations, and amputations.
A puncture wound occurs when a pointed object, such as
a knife, glass fragment, or nail, penetrates the skin. It can
also result from a human or animal bite. A puncture wound
typically doesn’t cause excessive bleeding, and may appear
to close almost immediately; however, puncture wounds can
be dangerous because of the risk of infection. Puncture
wounds caused by human or animal bites are particularly
prone to infection.1,2
In a traumatic abrasion, contact with a hard object, such
as the road, floor, or carpet, scrapes the skin, resulting in
loss of the epidermis and partial loss of the dermis of the
skin. These partial-thickness wounds are typically shallow,
red, painful, and highly exudative, and may contain debris
from the surface that caused the abrasion.3 Occasionally,
abrasions are full-thickness, involving the complete
epidermis and dermis; these wounds may require
debridement and skin grafting or flap coverage.3 If they
involve the head or neck, they may appear worse than they
are because of the increased blood supply in these areas.4
A traumatic laceration is a tear in the skin that occurs
from an injury. Most lacerations are located on the head or
neck or an upper extremity. The most common mechanism
of injury is the application of blunt force that crushes the
skin against underlying bone, causing the skin to split. Other
causes of lacerations include sharp instruments, glass, and
wooden objects.5,6
A traumatic amputation is the severing of part of the
body, such as a limb or part of a limb.
When caring for a patient with a traumatic wound, your
first priority is to assess the patient’s circulation, airway,
and breathing.7 Once these are stabilized, you can address
the traumatic wound. Initial management focuses on
controlling bleeding, usually by applying firm, direct
pressure and elevating the extremity. If bleeding continues,
you may need to compress a pressure point. You must also
assess the condition of the wound; puncture wounds may
contain foreign bodies, such as fragments from the object
that caused the wound or from clothing driven into the
wound by the object.1 You would then clean and manage the
puncture wound according to the extent of the injury.
Equipment
Normal saline solution ▪ sterile basin ▪ sterile 4′′ × 4′′ (10-
cm × 10-cm) gauze pads ▪ gloves ▪ sterile occlusive low-
adherent dressing ▪ fluid-impermeable pad ▪ wound
measuring device ▪ vital signs monitoring equipment ▪
pulse oximeter ▪ oxygen and oxygen delivery system ▪
sterile roller gauze ▪ sterile gloves ▪ adhesive film dressing
▪ prescribed IV fluid ▪ two watertight containers or bags
and labels ▪ ice ▪ prescribed antibiotics ▪ normal saline
solution or tap water ▪ wound irrigation device (35-mL or
65-mL catheter-tip syringe with 19G needle or
angiocatheter, or a commercial wound irrigation device) ▪
sutures and suture kit, tissue adhesive, staples, or skin-
closure strips ▪ prescribed antibacterial ointment ▪
prescribed local or regional anesthetic and administration
supplies ▪ soap and water ▪ washcloth ▪ dry, sterile
dressing ▪ Optional: mask and goggles or mask with face
shield, gown, single-patient-use scissors, disposable-head
clippers, tetanus toxoid vaccine, prescribed pain medication,
camera, tourniquet, IV catheter insertion equipment.
Preparation of equipment
Fill a sterile basin with normal saline solution or potable tap
water. Make sure the treatment area has enough light to
allow close observation of the wound.
Implementation
■ Gather and prepare the appropriate equipment.
■ Perform hand hygiene.8,9,10,11,12,13
■ Put on gloves and other personal protective equipment if
spraying or splashing of body fluids is possible.14,15,16
■ Confirm the patient’s identity using at least two patient
identifiers.17
■ Assess the patient’s circulation, airway, and breathing. If
necessary, begin cardiopulmonary resuscitation, because a
wound may be associated with a more serious, life-
threatening injury.7
(See the
“Cardiopulmonary
resuscitation” procedures.)
■ Provide privacy.18,19,20,21
■ Explain the procedure to the patient and family (if
appropriate) according to their individual communication
and learning needs to increase their understanding, allay
their fears, and enhance cooperation.22
■ Raise the patient’s bed to waist level when providing
patient care to prevent caregiver back strain.23
■ Remove the patient’s clothing to expose the wound, if
necessary.
■ Control bleeding by applying gentle pressure using a
sterile gauze pad, elevating the injured area (if applicable),
or, if necessary, applying compression to pressure points.
■ Obtain a history from the patient, if possible, or from an
eye witnesses to the injury or a family member. The history
should include the time and mechanism of injury; whether
any contaminants were present; the type, size, or weight of
the object, instrument, or machinery involved; whether the
object was sharp or dull; the angle and speed of
penetration; the environment in which the injury occurred;
and the patient’s tetanus immunization history.
■ Ask about risk factors that may complicate wound
healing, such as diabetes mellitus, peripheral vascular
disease, chronic renal failure, human immunodeficiency
virus infection, immunosuppressive medication or
anticoagulant use, and bleeding disorders. Inquire about
allergies to latex, medications, and dressing materials.24
■ Obtain the patient’s vital signs, and assess for other
injuries, because traumatic wounds are commonly
associated with other injuries.25
■ Perform a comprehensive pain assessment using
techniques that are appropriate for the patient’s age,
condition, and ability to understand.26
■ Administer pain medication, as ordered and needed,
following safe medication administration practices to
prevent medication errors.26,27,28,29,30
■ Remove jewelry near and distal to the wound to prevent
neurovascular compromise as swelling occurs in response to
the injury.24
■ Place a fluid-impermeable pad under the injured area.
For a traumatic puncture wound
■ Clean the skin surrounding the puncture wound with soap
and water to prevent skin contaminants from entering the
wound.
■ Inspect the wound; estimate its depth, and determine the
degree of contamination and the likelihood of injury to
internal tissues.31
■ If a penetrating object remains in the wound, support the
object until removal is possible. If the foreign body is in a
joint or a highly mobile area, splint the joint or area to
prevent further damage.32
■ Assist the practitioner during inspection of the wound and
assessment of the injured area and the area distal to the
injury for sensation, muscle movement, and adequate
circulation to determine whether significant nerve or vessel
damage has occurred.31
■ Perform a comprehensive pain assessment using
techniques that are appropriate for the patient’s age,
condition, and ability to understand.26
■ Administer pain medication, as needed and ordered,
following safe medication administration practices.26,27,28,29
■ If the wound is deep, assist the practitioner with the
administration of a local or regional anesthetic, as needed,
following safe medication practices, to further inspect the
wound.
■ Irrigate the wound with sterile normal saline solution or
potable tap water using an irrigation device to reduce the
number of contaminants in the wound.33
■ Arrange for an X-ray, ultrasonography, or computed
tomography scan, as ordered, to locate or assess for a
retained foreign body.31
■ Obtain consent and photograph the wound, if indicated.34
■ Clip local hair, as needed, to prevent wound
contamination; don’t clip eyebrows, because regrowth is
unpredictable.34
■ Remove and discard your gloves.14,15,16
■ Perform hand hygiene.8,9,10,11,12,13
■ Put on new gloves (clean or sterile, depending on the
nature and location of the wound).14,15,16
■ Assist the practitioner with foreign body removal, if
indicated, and assist with wound closure using sutures or
skin-closure strips.32
■ Apply antibacterial ointment, if prescribed, to help
prevent infection.
■ Apply a dry, sterile dressing over the wound to absorb
drainage and help prevent bacterial contamination.
■ Administer the tetanus toxoid vaccine, as needed and
ordered, following safe medication administration
practices.27,28,30,34
■ Reassess the patient’s pain and respond appropriately.26
■ Administer systemic antibiotics, if ordered, following safe
medication administration practices.27,28,30,32
■ Discard used supplies in appropriate receptacles.14,15,16
■ Remove and discard your gloves and other personal
protective equipment, if worn.14,15,16
■ Perform hand hygiene.8,9,10,11,12,13
■ If the wound was caused by an animal or a human bite,
report the bite to the local health department following the
procedures specified by your facility.
For a traumatic abrasion
■ Irrigate the wound with normal saline solution or tap
water (as directed) using a wound irrigation device to
remove wound debris and bacteria. Alternatively, if the
patient is able, have the patient shower and clean the
wound with a surgical scrub brush or sponge containing
chlorhexidine (or another prescribed antiseptic solution) or,
if the wound is small, use a shower attachment at a faucet
to clean the wound with tap water.3
■ Obtain consent and then photograph the wound, if
indicated.25
■ Assess the wound, measure the wound size, and remove
any remaining debris using a surgical scrub sponge or brush
containing chlorhexidine or another prescribed antiseptic
solution, if needed.3
■ If debris continues to remain in the wound, notify the
patient’s practitioner, because the site may need to be
anesthetized before further cleaning. Be sure to remove all
debris from the wound to prevent tattooing, which occurs
when debris becomes embedded in the dermal layer.3
■ Arrange for an X-ray, if ordered, to rule out the presence
of a foreign body, especially if gravel or other material is
present in the wound.
■ If surgical intervention is necessary to clean the wound,
prepare the patient for transfer to an operating room.
■ Apply antibacterial ointment, if ordered, following safe
medication administration practices.25,27,28,29,30
■ Cover the wound with a sterile, occlusive, low-adherent
dressing, because occlusive dressings promote wound
healing.25,35,36
■ Administer a tetanus toxoid vaccine, if needed and
prescribed, following safe medication administration
practices.27,28,29,30
For a traumatic laceration
■ Irrigate the wound with normal saline solution or tap
water (as directed) using an irrigation device to remove
wound debris and bacteria.5,6,33,34
■ Assess the wound to determine its severity as well as the
involvement of underlying muscle, tendons, nerves, blood
vessels, and bones. Determine whether your clinical findings
are consistent with the patient’s history.34
■ Arrange for an X-ray or ultrasound, if ordered, to assess
the extent of injury and detect the presence of any foreign
body.6
■ Obtain consent and photograph the wound, if indicated.34
■ Clip local hair, as needed, to prevent wound
contamination; don’t clip eyebrows, because regrowth is
unpredictable.34
■ Remove and discard your gloves.14,15,16
■ Perform hand hygiene.8,9,10,11,12,13
■ Put on sterile gloves.14,15,16
■ Assist as the practitioner administers a local anesthetic
(for a small wound) or a regional block (for a large extremity
wound) and provides wound care; the practitioner will
remove any visible foreign matter with forceps and
devitalized tissue with sharp debridement to reduce the risk
of infection. If indicated, prepare the patient for surgical
intervention to control bleeding and treat underlying injuries
immediately.34
■ Assist the practitioner with wound closure (if appropriate),
using sutures, tissue adhesive, staples, or skin-closure
strips.5,34 If closure must be delayed, assist the practitioner
with packing the wound.
■ Apply antibacterial ointment or petrolatum ointment, if
ordered, to help prevent infection. Don’t apply a topical
ointment if the wound was closed with a tissue adhesive,
because topical ointments loosen the adhesive and can
cause wound dehiscence.5,27,28,29,30
■ Apply a dry, sterile dressing over the wound, if ordered;
cover sutured or stapled wounds with a protective
nonadherent dressing for 24 to 48 hours until adequate
epithelization takes place to protect the wound from gross
contamination.5
■ Administer tetanus toxoid vaccine, as needed and
prescribed, following safe medication administration
practices.27,28,29,30
For a traumatic amputation
■ Control bleeding by applying direct pressure to the
wound, by elevating the injured area or, if necessary, by
applying compression to pressure points. If bleeding
continues, apply a tourniquet.37
NURSING ALERT Keep in mind that prolonged tourniquet use can
cause ischemia; assess the continued need for tourniquet use and
remove it as soon as possible, preferably within 2 hours of
application.37
■ Attach the patient to a continuous cardiac monitor, pulse
oximeter, and automated blood pressure device, as
indicated. Make sure that the alarm limits are set
appropriately for the patient’s current condition, and that
the alarms are turned on, functioning properly, and audible
to staff.38,39,40,41
■ Obtain the patient’s vital signs and assess for signs of
shock, such as hypotension, tachycardia, diminished pulses,
altered level of consciousness, and pallor. Assess for other
injuries.
■ Administer supplemental oxygen, as prescribed.25
■ Insert an IV catheter, as ordered, if the patient doesn’t
already have one in place. (See the “IV catheter insertion
and removal” procedure, page 443.) Administer IV fluids as
prescribed.37
■ Perform a comprehensive pain assessment using
techniques that are appropriate for the patient’s age,
condition, and ability to understand.26
■ Administer pain medication, as needed and ordered,
following safe medication administration practices;
administering pain medication as soon as possible after
injury controls acute pain and reduces the risk of chronic
pain.26,27,28,29,42
■ Cover the wound with sterile gauze soaked in normal
saline solution and then cover the gauze with an adhesive
film dressing to prevent evaporation. Avoid repeated wound
inspection and dressing changes, because they increase the
risk of infection.37
■ Administer antibiotics, as ordered, to prevent infection
following
safe
medication
administration
practices.25,27,28,30,37
■ As ordered, obtain blood samples for coagulation studies;
hemoglobin, hematocrit, and electrolyte levels; and typing
and crossmatching in case blood transfusion is needed.
■ Administer tetanus toxoid vaccine, as needed and
prescribed, following safe medication administration
practices.27,28,29,30
■ Preserve the severed body part, if possible. (See Caring
for a severed body part.)
Completing the procedure
■ Reassess the patient’s pain and respond appropriately.26
■
Discard used supplies in the appropriate
receptacle.14,15,16
■ Remove and discard your gloves and any other personal
protective equipment worn.14,15,16
■ Perform hand hygiene.8,9,10,11,12,13
■ Document the procedure.43,44,45,46
Special considerations
■ When irrigating a traumatic wound, avoid using more
than 8 psi of pressure. High-pressure irrigation can seriously
interfere with healing, kill cells, and allow bacteria to
infiltrate the tissue. A 19G needle or catheter on a 60-mL
syringe creates an irrigation pressure of 5 to 8 psi.47
Caring for a severed body part
After traumatic amputation, a surgeon may be able to reimplant the severed
body part through microsurgery. The chance of successful reimplantation is
much greater if the amputated part has received proper care.
If a patient arrives at the health care facility with a severed body part, first
make sure that bleeding at the amputation site has been controlled. Then
follow these guidelines for preserving the body part.
■ Perform hand hygiene8,9,10,11,12,13 and put on sterile gloves.14,15,16
■ Place several sterile gauze pads and an appropriate amount of sterile roller
gauze in a sterile basin, and pour sterile normal saline or sterile lactated
Ringer solution over them. Never use any other solution, and don’t try to
scrub or debride the part.
■ Holding the body part in one gloved hand, carefully pat it dry with sterile
gauze. Place saline-moistened gauze pads over the severed end; then wrap
the whole body part with saline-moistened roller gauze. Wrap the gauze with
a sterile towel, if available. Then put this package in a watertight bag or
container and seal it.
■ Fill another plastic bag with ice and water to make an ice-water slurry and
place the part, still in its watertight container, inside. Seal the outer bag.
(Always protect the part from direct contact with ice—and never use dry ice—
to prevent irreversible tissue damage, which would make the part unsuitable
for reimplantation.) Keep this bag ice-cold until the surgeon is ready to do the
reimplantation surgery.
■ Label the bag with the patient’s name and identification number,
identification of the amputated part, the health care facility’s identification
number, and the date and time when cooling began.
Note: The body part must be wrapped and cooled
quickly. Irreversible tissue damage occurs after only 6
hours at ambient temperature. However, hypothermic
management seldom preserves tissues for more than 24
hours.
■ Avoid cleaning a traumatic wound with alcohol, because
alcohol causes pain and tissue dehydration. Also, avoid
using antiseptics for wound cleaning because they can
impede healing. In addition, never use a cotton ball or
cotton-filled gauze pad to clean a wound, because cotton
fibers left in the wound can cause contamination.
■ After cleaning a wound, the practitioner may want to
debride it to remove dead tissue and reduce the risk of
infection and scarring. If this is necessary, pack the wound
with gauze pads soaked in normal saline solution until
debridement.
■ Observe for signs of infection, such as warm, red skin at
the site or purulent discharge. Be aware that infection of a
traumatic wound can delay healing, increase scar formation,
and trigger systemic infection such as septicemia.
■ Observe all dressings for tightness, which may be a sign
of edema. If edema is present, adjust the dressing to avoid
impairing circulation to the area.
■ The Joint Commission issued a sentinel event alert
concerning medical device alarm safety, because alarm-
related events have been associated with permanent loss of
function and death. Among the major contributing factors
were improper alarm settings, inappropriately turned off
alarms, and alarm signals not audible to staff. Make sure
that alarm limits are appropriately set, and that alarms are
turned on, functioning properly, and audible to staff. Follow
facility guidelines for preventing alarm fatigue.40
Patient teaching
Teach the patient how to clean the wound and change
dressings, if appropriate, and to report signs of infection,
such as reddened skin and purulent drainage. Tell the
patient when to return for suture or staple removal, if
indicated; the timing of suture or staple removal varies with
wound location.
Complications
Cleaning and care of traumatic wounds may temporarily
increase the patient’s pain. Excessive, vigorous cleaning
may further disrupt tissue integrity. Localized or systemic
infection can result from a traumatic puncture wound.
Documentation
Document the date and time of the procedure, wound size
and condition, medication administration, specific wound
care measures. Document patient teaching provided and
the patient’s understanding of your teaching. Document the
location of the wound, the type of injury, evidence collected
(if appropriate), and a brief description on a body diagram,
as indicated.25
REFERENCES
1 Baddour, L. M . Soft tissue infections due to dog and cat bites. (2015). In:
UpToDate, Sexton, D. J ., & Baron, E. L. (Eds.) . Retrieved from:
www.uptodate.com
2 Baddour, L. M . Soft tissue infections due to human bites. (2016). In:
UpToDate, Sexton, D. J ., & Baron, E. L. (Eds.) . Retrieved from:
www.uptodate.com.
3 Chardon, Z. (2011). Abrasion care in healthy young adults. Nursing, 41(5),
68–69. (Level VII)
4 Castana, O., et al. (2009). Traumatic injuries with deep abrasion: “A burn.”
Annals of Burns and Fire Disasters, 22(1), 44–47 . (Level IV)
5 Capellan, O., & Hollander, J. E. (2003). Management of lacerations in the
emergency department. Emergency Medicine Clinics of North America, 21(1),
205–231. (Level VII)
6 deLemos, D. Closure of minor skin wound with sutures. (2016). In: UpToDate,
Stack, A. M ., et al. (Eds.). Retrieved from: www.uptodate.com
7 American Heart Association. (2015). 2015 American Heart Association
guidelines update for cardiopulmonary resuscitation and emergency
cardiovascular care. Circulation, 132, S414–S435. (Level II)
8 The Joint Commission. (2019). Standard NPSG.07.01.01. Comprehensive
accreditation manual for hospitals. Oakbrook Terrace, IL: The Joint
Commission. (Level VII)
9 Centers for Disease Control and Prevention. (2002). Guideline for hand
hygiene in health-care settings: Recommendations of the Healthcare Infection
Control Practices Advisory Committee and the HICPAC/SHEA/APIC/IDSA Hand
Hygiene Task Force. MMWR Recommendations and Reports, 51(RR-16), 1–45.
Accessed via the Web at https://www.cdc.gov/mmwr/pdf/rr/rr5116.pdf (Level
II)
10 World Health Organization. (2009). “WHO guidelines on hand hygiene in
health care: First global patient safety challenge, clean care is safer care”
[Online]. Accessed via the Web at
http://apps.who.int/iris/bitstream/10665/44102/1/9789241597906_eng.pdf
(Level IV)
11 Accreditation Association for Hospitals and Health Systems. (2017). Standard
07.01.21. Healthcare Facilities Accreditation Program: Accreditation
requirements for acute care hospitals. Chicago, IL: Accreditation Association
for Hospitals and Health Systems. (Level VII)
12 Centers for Medicare and Medicaid Services, Department of Health and
Human Services. (2015). Condition of participation: Infection control. 42 C.F.R.
§ 482.42.
13 DNV GL-Healthcare USA, Inc. (2016). IC.1 .SR.1 . NIAHO® accreditation
requirements: Interpretive guidelines & surveyor guidance (version 11).
Milford, OH: DNV GL-Healthcare USA, Inc. (Level VII)
14 Siegel, J. D ., et al. (2007, revised 2017). “2007 guideline for isolation
precautions: Preventing transmission of infectious agents in healthcare
settings” [Online]. Accessed via the Web at
https://www.cdc.gov/infectioncontrol/pdf/guidelines/isolation-guidelines.pdf
(Level II)
15 Occupational Safety and Health Administration. (n.d .). “Bloodborne
pathogens, standard number 1910.1030” [Online]. Accessed via the Web at
https://www.osha.gov/pls/oshaweb/owadisp.show_document?
p_id=10051&p_table=STANDARDS (Level VII)
16 Accreditation Association for Hospitals and Health Systems. (2017). Standard
07.01.10. Healthcare Facilities Accreditation Program: Accreditation
requirements for acute care hospitals. Chicago, IL: Accreditation Association
for Hospitals and Health Systems. (Level VII)
17 The Joint Commission. (2019). Standard NPSG.01.01.01. Comprehensive
accreditation manual for hospitals. Oakbrook Terrace, IL: The Joint
Commission. (Level VII)
18 The Joint Commission. (2019). Standard RI.01.01.01. Comprehensive
accreditation manual for hospitals. Oakbrook Terrace, IL: The Joint
Commission. (Level VII)
19 Accreditation Association for Hospitals and Health Systems. (2017). Standard
15.01.16. Healthcare Facilities Accreditation Program: Accreditation
requirements for acute care hospitals. Chicago, IL: Accreditation Association
for Hospitals and Health Systems. (Level VII)
20 Centers for Medicare and Medicaid Services, Department of Health and
Human Services. (2015). Condition of participation: Patient’s rights. 42 C.F.R.
§ 482.13(c)(1).
21 DNV GL-Healthcare USA, Inc. (2016). PR.1.SR.5 . NIAHO® accreditation
requirements: Interpretive guidelines & surveyor guidance (version 11).
Milford, OH: DNV GL-Healthcare USA, Inc. (Level VII)
22 The Joint Commission. (2019). Standard PC.02.01.21. Comprehensive
accreditation manual for hospitals. Oakbrook Terrace, IL: The Joint
Commission. (Level VII)
23 Waters, T. R., et al. (2009). “Safe patient handling training for schools of
nursing” [Online]. Accessed via the Web at
https://www.cdc.gov/niosh/docs/2009-127/pdfs/2009-127.pdf (Level VII)
24 Trott, A. T. (2012). Wounds and lacerations: Emergency care and closure (4th
ed.). Philadelphia, PA: Saunders.
25 Emergency Nurses Association. (2013). Sheehy’s manual of emergency care
(7th ed.). St. Louis, MO: Mosby.
26 The Joint Commission. (2019). Standard PC.01.02.07. Comprehensive
accreditation manual for hospitals. Oakbrook Terrace, IL: The Joint
Commission. (Level VII)
27 DNV GL-Healthcare USA, Inc. (2016). MM.1 .SR.2. NIAHO® accreditation
requirements: Interpretive guidelines & surveyor guidance (version 11).
Milford, OH: DNV GL-Healthcare USA, Inc. (Level VII)
28 Centers for Medicare and Medicaid Services, Department of Health and
Human Services. (2015). Condition of participation: Nursing services. 42
C.F.R. § 482.23(c).
29 Institute for Safe Medication Practices. (2012). Side tracks on the safety
express: Interruptions lead to errors and unfinished...Wait, what was I doing?
Nurse Advise-ERR, 11(2), 1–4 . Accessed via the Web at
https://www.ismp.org/resources/side-tracks-safety-express-interruptions-lead-
errors-and-unfinished-wait-what-was-i-doing
30 Accreditation Association for Hospitals and Health Systems. (2017). Standard
16.01.03. Healthcare Facilities Accreditation Program: Accreditation
requirements for acute care hospitals. Chicago, IL: Accreditation Association
for Hospitals and Health Systems. (Level VII)
31 Baddour, L. M., & Brown, A. M . Infectious complications of puncture wounds.
(2016). In: UpToDate, Sexton, D. J ., & Bloom, A. (Eds.). Retrieved from:
www.uptodate.com
32 Winland-Brown, J. E., & Allen, S. (2010). Diagnosis and management of
foreign bodies in the skin. Advances in Skin and Wound Care, 23(10), 471–
476.
33 Emergency Nurses Association. (2011, revised 2015). Clinical practice
guideline: Wound preparation. Des Plaines, IL: Emergency Nurses Association.
Accessed via the Web at https://www.ena.org/docs/default-source/resource-
library/practice-resources/cpg/woundpreparationcpg.pdf?sfvrsn=ae51bb1f_10
(Level I)
34 Forsch, R. T. (2008). Essentials of skin laceration repair. American Family
Physician, 78(8), 945–951. (Level V)
35 Fonder, M. A., et al. (2007). Occlusive wound dressings in emergency
medicine and acute care. Emergency Medicine Clinics of North America,
25(1), 235–242. (Level VII)
36 Beam, J. W. (2008). Occlusive dressings and the healing of standardized
abrasions. Journal of Athletic Training, 43(6), 600–607. (Level III)
37 Perkins, Z. B., et al. (2011). Factors affecting outcome after traumatic limb
amputation. British Journal of Surgery, 99(Suppl. 1), 75–86 . Accessed via the
Web at http://onlinelibrary.wiley.com/doi/10.1002/bjs.7766/pdf (Level V)
38 Graham, K. C., & Cvach, M. (2010). Monitor alarm fatigue: Standardizing use
of physiological monitors and decreasing nuisance alarms. American Journal
of Critical Care, 19(1), 28–37. Accessed July 2017 via the Web at
http://ajcc.aacnjournals.org/content/19/1/28.full.pdf (Level VII)
39 The Joint Commission. (2019). Standard NPSG.06 .01.01. Comprehensive
accreditation manual for hospitals. Oakbrook Terrace, IL: The Joint
Commission. (Level VII)
40 The Joint Commission. (2013). “Sentinel event alert: Medical device alarm
safety in hospitals” [Online]. Accessed via the Web at
https://www.jointcommission.org/assets/1/6/SEA_50_alarms_4 _26_16.pdf
(Level VII)
41 American Association of Critical-Care Nurses. (2013). “A ACN practice alert:
Alarm management” [Online]. Accessed via the Web at
https://www.aacn.org/aacn-website/shared/content/practice-
alerts/2015/11/25/alarm-management (Level VII)
42 Kalapatapu, V. Lower extremity amputation. (2016). In: UpToDate, Mills, J. L.,
et al. (Eds.) . Retrieved from: www.uptodate.com (Level II)
43 The Joint Commission. (2019). Standard RC.01.03 .01. Comprehensive
accreditation manual for hospitals. Oakbrook Terrace, IL: The Joint
Commission. (Level VII)
44 Accreditation Association for Hospitals and Health Systems. (2017). Standard
10.00 .03. Healthcare Facilities Accreditation Program: Accreditation
requirements for acute care hospitals. Chicago, IL: Accreditation Association
for Hospitals and Health Systems. (Level VII)
45 Centers for Medicare and Medicaid Services, Department of Health and
Human Services. (2015). Condition of participation: Medical record services.
42 C.F.R. § 482.24(b).
46 DNV GL-Healthcare USA, Inc. (2016). MR.2 .SR.1 . NIAHO® accreditation
requirements: Interpretive guidelines & surveyor guidance (version 11).
Milford, OH: DNV GL-Healthcare USA, Inc. (Level VII)
47 Brancato, J. C. Minor wound preparation and irrigation. (2016). In: UpToDate,
Stack, A. M ., & Wiley J. F. (Eds.). Retrieved from: www.uptodate.com
TUB BATHS AND SHOWERS
Tub baths and showers provide personal hygiene, stimulate
circulation, and reduce tension for the patient. They also
allow you to observe skin conditions and assess joint
mobility and muscle strength. If not precluded by the
patient’s condition or safety considerations, privacy during
bathing promotes the patient’s sense of well-being by
allowing the patient to assume responsibility for self-care.
Patients who are recovering from recent surgery, who are
emotionally unstable, or who have casted extremities or
dressings in place usually require the practitioner’s
permission for a tub bath or shower.
Equipment
One or two washcloths ▪ bath towels ▪ bath blanket ▪ skin
cleanser ▪ nonskid bath mat if tub lacks nonskid strips ▪
nonskid shower chair for shower ▪ towel mat ▪ OCCUPIED sign
▪ clean clothing or hospital gown ▪ facility-approved
disinfectant ▪ Optional: chair, shower cap, plastic bag, bath
oil, shampoo.
Preparation of equipment
Prepare the bathing area before the patient arrives. Close
any doors or windows and adjust the room temperature to
avoid chilling the patient. Check that the bathtub or shower
is clean. Then gather bathing articles and observe
appropriate safety measures.
For a bath
Position a chair next to the tub to help the patient get in and
out of the tub and to provide a seat if the patient becomes
weak. Place a bath blanket over the chair to cover the
patient if the patient becomes chilled. If the tub doesn’t
have nonskid strips, place a nonskid bath mat in the tub.
Then, fill the tub halfway with warm water and test the
temperature; it should feel comfortable to the touch. Adjust
water flow and temperature just before the patient gets into
the tub. Place a towel mat on the floor in front of the tub to
prevent slipping.
For a shower
Cover the floor of the shower with a nonskid mat unless it
already has nonskid strips. Place a nonskid chair or shower
chair in the locked position in the shower to provide support
and to provide a place where the patient can sit down to
wash his or her legs and feet, to reduce the risk of falling.
Next, place a towel mat next to the bathing area to avoid
contact with cold flooring and to prevent slipping. Remove
electrical appliances, such as hair dryers and heaters, from
the patient’s reach to prevent electrical accidents. Adjust
water flow and temperature just before the patient gets into
the shower.
Implementation
■ Gather and prepare the necessary equipment.
■ Perform hand hygiene.1,2,3,4,5,6
■ Confirm the patient’s identity using at least two patient
identifiers.7
■ Explain the procedure to the patient.
■ Escort the patient to the bathing area.
■ Provide privacy.8,9,10,11
■ Help the patient undress, as necessary.
■ Offer the patient a shower cap if the patient wants to
keep the hair dry. Otherwise, provide shampoo. Place all
items within easy reach of the patient to prevent reaching.12
■ Help the patient into the tub or shower. Encourage the
patient to use the handrails to prevent falling.
■ Provide washcloths and skin cleaner. If the patient has dry
skin, add bath oil to the water. Wait until after the patient
gets into the tub before adding bath oil, because oil makes
the tub slick and increases the risk of falling.
■ Taking care to respect privacy, help the patient bathe, as
needed; cover the patient with a towel and wash beneath it
to alleviate embarrassment. Be aware of signs of discomfort
with bathing.8,9,10,11,13
■ Allow family members to assist the patient with bathing,
as desired, to minimize fear. Allow the patient to schedule
bathing according to the patient’s energy level and other
preferences.13
■ If you can safely leave the patient alone, place the call
light within reach and show the patient how to use it. If the
patient is confused, don’t leave the patient alone.
■ Tell the patient to leave the door unlocked for safety, but
assure the patient that you’ll post an OCCUPIED sign on the
door. Stay nearby in case of emergency, and check on the
patient every 5 to 10 minutes.
■ When the patient finishes bathing, drain the tub or turn
off the shower.
■ To prevent slipping, dry the patient’s feet before the
patient steps out of the tub if bath oil was used.
■ Assist the patient onto the bath mat to prevent falling.
Help the patient dry off and put on a clean gown or other
clothing, as appropriate.
■ Escort the patient to the room or bed.
■ Dry the floor of the bathing area well to prevent slipping.
■ Ensure that the tub or shower and shower chair, if used,
are cleaned and disinfected.14,15
■ Dispose of soiled towels and return the patient’s personal
belongings to the bedside.
■ Perform hand hygiene.1,2,3,4,5,6
■ Document the procedure.16,17,18,19
Special considerations
■ If you’re giving a tub bath to a patient with a cast or
dressing on an arm or leg, wrap the extremity in a clear
plastic bag. Secure the bag with tape, being careful not to
constrict circulation. Instruct the patient to dangle the arm
or leg over the edge of the tub and keep it above the water.
■ Separate hair washing from body washing if either is
distressing or overwhelming for the patient.13
■ Encourage the patient to use safety devices, bars, and
rails when bathing.
■ Remove electrical appliances, such as hair dryers and
heaters, from the patient’s reach to prevent electrical
accidents.
■ Because bathing in warm water causes vasodilation, the
patient may feel faint. If so, open the drain or turn off the
shower. Cover the patient’s shoulders and back with a bath
towel. If the patient was taking a shower, assist him or her
to a chair to prevent injury from falling. Have the patient
cross the legs, if able, and tighten the thigh, abdominal, and
buttock muscles. This technique increases venous return,
cardiac filling pressure, and cardiac output, which increases
cerebral perfusion, preventing a vasovagal reaction and
fainting.20,21
Complications
A patient fall or burns may occur if safety precautions aren’t
followed.
Documentation
Describe the patient’s skin condition and record any
discoloration or redness in your notes. Document the
patient’s tolerance of the procedure. Document any patient
teaching, the patient’s understanding of the teaching, and
whether the patient requires follow-up teaching.
REFERENCES
1 The Joint Commission. (2019). Standard NPSG.07.01.01. Comprehensive
accreditation manual for hospitals. Oakbrook Terrace, IL: The Joint
Commission. (Level VII)
2 Centers for Disease Control and Prevention. (2002). Guideline for hand
hygiene in health-care settings: Recommendations of the Healthcare Infection
Control Practices Advisory Committee and the HICPAC/SHEA/APIC/IDSA Hand
Hygiene Task Force. MMWR Recommendations and Reports, 51(RR-16), 1–45.
Accessed via the Web at https://www.cdc.gov/mmwr/pdf/rr/rr5116.pdf (Level
II)
3 World Health Organization. (2009). “WHO guidelines on hand hygiene in
health care: First global patient safety challenge, clean care is safer care”
[Online]. Accessed via the Web at
http://apps.who.int/iris/bitstream/10665/44102/1/9789241597906_eng.pdf
(Level IV)
4 Centers for Medicare and Medicaid Services, Department of Health and
Human Services. (2015). Condition of participation: Infection control. 42 C.F.R.
§ 482.42.
5 Accreditation Association for Hospitals and Health Systems. (2017). Standard
07.01.21. Healthcare Facilities Accreditation Program: Accreditation
requirements for acute care hospitals. Chicago, IL: Accreditation Association
for Hospitals and Health Systems. (Level VII)
6 DNV GL-Healthcare USA, Inc. (2016). IC.1.SR.1 . NIAHO® accreditation
requirements: Interpretive guidelines & surveyor guidance (version 11).
Milford, OH: DNV GL-Healthcare USA, Inc. (Level VII)
7 The Joint Commission. (2019). Standard NPSG.01.01.01. Comprehensive
accreditation manual for hospitals. Oakbrook Terrace, IL: The Joint
Commission. (Level VII)
8 DNV GL-Healthcare USA, Inc. (2016). PR.1 .SR.5 . NIAHO® accreditation
requirements: Interpretive guidelines & surveyor guidance (version 11).
Milford, OH: DNV GL-Healthcare USA, Inc. (Level VII)
9 Centers for Medicare and Medicaid Services, Department of Health and
Human Services. (2015). Condition of participation: Patient’s rights. 42 C.F.R.
§ 482.13(c)(1).
10 Accreditation Association for Hospitals and Health Systems. (2017). Standard
15.01.16. Healthcare Facilities Accreditation Program: Accreditation
requirements for acute care hospitals. Chicago, IL: Accreditation Association
for Hospitals and Health Systems. (Level VII)
11 The Joint Commission. (2019). Standard RI.01.01.01. Comprehensive
accreditation manual for hospitals. Oakbrook Terrace, IL: The Joint
Commission. (Level VII)
12 Taylor, C., et al. (2015). Fundamentals of nursing: The art and science of
person-centered nursing care (8th ed.). Philadelphia, PA: Wolters Kluwer.
13 Rader, J., et al. (2006). The bathing of older adults with dementia. American
Journal of Nursing, 106(4), 40–48.
14 Rutala, W. A., et al. (2008, revised 2017). “Guideline for disinfection and
sterilization in healthcare facilities, 2008” [Online]. Accessed via the Web at
https://www.cdc.gov/hicpac/pdf/guidelines/Disinfection_Nov_2008.pdf (Level I)
15 Accreditation Association for Hospitals and Health Systems. (2017). Standard
07.02.03. Healthcare Facilities Accreditation Program: Accreditation
requirements for acute care hospitals. Chicago, IL: Accreditation Association
for Hospitals and Health Systems. (Level VII)
16 The Joint Commission. (2019). Standard RC.01.03 .01. Comprehensive
accreditation manual for hospitals: The official handbook. Oakbrook Terrace,
IL: The Joint Commission. (Level VII)
17 Accreditation Association for Hospitals and Health Systems. (2017). Standard
10.00 .03. Healthcare Facilities Accreditation Program: Accreditation
requirements for acute care hospitals. Chicago, IL: Accreditation Association
for Hospitals and Health Systems. (Level VII)
18 Centers for Medicare and Medicaid Services, Department of Health and
Human Services. (2015). Condition of participation: Medical record services.
42 C.F.R. § 482.24(b).
19 DNV GL-Healthcare USA, Inc. (2016). MR.2 .SR.1 . NIAHO® accreditation
requirements: Interpretive guidelines & surveyor guidance (version 11).
Milford, OH: DNV GL-Healthcare USA, Inc. (Level VII)
20 Olshansky, B. Reflex syncope. (2014). In: UpToDate, Ganz, L. I . (Ed.) .
Retrieved from: www.uptodate.com
21 Marchiondo, K. J . (2010). Recognizing and treating vasovagal syncope.
American Journal of Nursing, 110(4), 50–53.
TUBE FEEDINGS
Gastric enteral tube feeding involves delivery of a liquid
feeding formula directly to the stomach via an enteral tube.
It’s typically indicated for patients who can’t eat normally
because of dysphagia or oral or esophageal obstruction or
injury. Gastric feedings also may be given to unconscious or
intubated patients or to those recovering from GI tract
surgery who can’t ingest food orally.
Duodenal or jejunal enteral tube feeding involves delivery
of a liquid feeding formula directly to the small intestine,
specifically the duodenum or jejunum. Nasoduodenal or
nasojejunal enteral tube feeding is indicated when the
esophagus and stomach need to be bypassed or when the
patient is at risk for aspiration. Jejunostomy tubes are
preferred for long-term administration of medications or
food (longer than 4 weeks). Duodenal or jejunal feedings
decrease the risk of aspiration because the formula
bypasses the pylorus. However, jejunal feedings result in
reduced pancreatic stimulation; as a result, the patient may
require an elemental diet.
Enteral feedings should be started postoperatively in
surgical patients without waiting for flatus or a bowel
movement; current literature indicates starting the feedings
in 24 to 48 hours.1 Patients usually receive gastric feedings
on an intermittent schedule. However, for duodenal or
jejunal feedings, most patients seem to better tolerate a
continuous slow drip.
Liquid nutrient solutions come in various formulas for
administration through a nasogastric tube, small-bore
feeding tube, gastrostomy or jejunostomy tube,
percutaneous endoscopic gastrostomy tube, or gastrostomy
feeding button. Tube feeding is contraindicated in patients
who have no bowel sounds or a suspected bowel
obstruction, upper GI bleeding, or intractable vomiting or
diarrhea.
Equipment
Prescribed enteral formula ▪ enteral administration set ▪
fluid-impermeable pad ▪ gloves ▪ graduated container ▪
drinking or purified (sterile, distilled, ultrafiltrated, or
ultraviolet-light treated) water1 ▪ enteral syringe (20-mL or
larger)1 ▪ oral care supplies ▪ labels ▪ Optional: IV pole,
enteral feeding pump, administration set, pH test supplies.
An enteral infusion pump is generally required for small-
bowel feedings1 to ensure accurate delivery of the
prescribed formula.
Preparation of equipment
Allow the formula to warm to room temperature before
administration, because feeding the patient room
temperature formula may reduce the risk of diarrhea.2,3
Implementation
■ Verify the practitioner’s order, including the patient’s
identifiers, prescribed route based on the enteral tube’s tip
location, enteral feeding device, prescribed enteral formula,
administration method, volume and rate of administration,
and type, volume, and frequency of water flushes.1
■ Review the patient’s medical record for X-ray
confirmation of tube placement, if necessary.1
■ Gather and prepare the necessary equipment.
■ Visually inspect the enteral feeding formula for damage
to the container, altered formula characteristics, and
expiration date. Don’t use the formula if its integrity is
compromised or if it’s expired. Instead, obtain a new
container of the formula.1
■ Compare the label on the enteral feeding container with
the order in the patient’s medical record.1
■ Perform hand hygiene.4,5,6,7,8,9
■ Confirm the patient’s identity using at least two patient
identifiers.10
■ Provide privacy.11,12,13,14
■ Explain the procedure to the patient and family (if
appropriate) according to their individual communication
and learning needs to increase their understanding, allay
their fears, and enhance cooperation.15
■ Raise the patient’s bed to waist level when providing care
to prevent caregiver back strain.16
■ Assess the patient’s GI status and risk for
aspiration.1,17,18
■ Position the patient with the head of the bed elevated to
at least 30 degrees or upright in a chair to prevent
aspiration; if this position is contraindicated, then consider a
reverse Trendelenburg position.1,17
■ If using an enteral feeding pump, attach the pump to an
IV pole and plug the pump into a bedside electrical outlet.
■ Perform hand hygiene.4,5,6,7,8,9
■ Put on gloves to comply with standard precautions.19,20
■ Open an enteral feeding bag with administration set
tubing if using an open administration system. If using a
closed system, open the enteral administration set tubing.
■ Pour only a premeasured 4-hour volume of enteral
formula into the feeding bag and hang the bag on the IV
pole.1 Limiting the volume decreases the risk of bacterial
overgrowth in the formula. Alternatively, open the sterile
enteral formula container and attach it to the enteral
administration set.
■ If using an enteral feeding pump, attach the enteral
administration set tubing to the enteral feeding pump
following the manufacturer’s instructions.
■ Prime the enteral administration set according to the
manufacturer’s recommendations to minimize the delivery
of air into the GI tract.
■ Make sure that the enteral formula container is labeled
with the patient’s identifiers; formula name (and strength if
diluted); date and time of formula preparation; date and
time the formula was hung; administration route; rate of
administration; administration duration (if cycled or
intermittent); initials of who prepared, hung, and checked
the enteral formula against the order; expiration date and
time; dosing weight (if appropriate); and notation “ENTERAL
USE ONLY.”
■ Label the enteral administration set with the date and
time that it was first hung. If you’re using an open system,
the administration set and tubing can be used continuously
for a maximum of 24 hours.1 Change the open-system
administration set every 24 hours to prevent bacterial
growth. If you’re using a closed system, change the
administration set according to the manufacturer’s
instructions.1
■ Place a fluid-impermeable pad or towel under the
patient’s feeding tube to prevent soiling of linens.1
■ Verify tube placement before administration using at least
two of the following methods:1,17,21,22 Observe for a change
in external tube length or the incremental marking where
the tube exits the patient’s nose or mouth to detect tube
migration.1,21,22 Review routine chest and abdominal X-ray
reports.1,21,22 Aspirate contents from the tube with an
enteral syringe (as shown below) and evaluate the color of
the aspirate; fasting gastric secretions commonly appear
grassy-green or brown or else clear and colorless. If
performed in your facility, measure the pH of aspirate from
the tube; fasting gastric pH is usually 5 or less, even in
patients receiving gastric acid inhibitors.1,21,22 If placement
is in doubt, notify the practitioner and arrange for an X-ray,
if ordered, to confirm tube location.21
■ Flush the enteral tube with 30 mL of water, if ordered
(use purified water in immunocompromised or critically ill
patients).1
■ Connect the end of the enteral administration set tubing
to the end of the feeding tube (as shown below).
■ Trace the tubing from the patient to its point of origin to
make sure you’ve connected it to the proper port before
beginning the tube feeding.1,23,24 Tape the connection to
prevent accidental disconnection of the tubing. Route the
tubing toward the patient’s feet and place the enteral
feeding pump, if used, toward the foot of the bed, because a
standardized approach of keeping IV lines routed toward the
head and enteric lines routed toward the feet prevents
dangerous misconnections. If different access sites are
used, label each tubing at both the distal end (near the
patient connection) and proximal end (near the source
container) to distinguish the different tubings and prevent
misconnections.24
■ Open the administration set clamp. Regulate the flow to
the desired rate. If using an enteral pump, follow the
manufacturer’s instructions for setting the flow rate.1
■ Make sure that the enteral feeding pump alarm limits are
set according to the patient’s current condition, and that the
alarms are turned on, functioning properly, and audible to
staff.4,23,25,26,27
■ Monitor the gravity drip or pump infusion rate frequently
to ensure accurate delivery of the enteral formula.
■ If you’re using a bulb or catheter-tip syringe, remove the
bulb or plunger (as shown below) and attach the syringe to
the clamped feeding tube to prevent excess air from
entering the patient’s stomach, causing distention.
■ Fill the syringe with enteral formula and release the
feeding tube clamp to allow formula to flow through it. The
height at which you hold the syringe will determine the flow
rate. When the syringe is three-quarters empty, pour more
formula into it (as shown below). To prevent air from
entering the tube and the patient’s stomach, never allow
the syringe to empty completely
■ If you’re administering a continuous feeding, flush the
enteral feeding tube every 4 hours with at least 30 mL of
water, if ordered and tolerated, to maintain patency and
provide
hydration
(use
purified
water
for
immunocompromised or critically ill patients).1
■ Assess every 4 hours for GI intolerance to enteral tube
feedings by assessing for abdominal distention, monitoring
for complaints of abdominal pain, and observing for passage
of flatus and stool.1,17 Don’t monitor gastric residual volume
(GRV) routinely.1,18 If GRV is used in a critically ill patient,
don’t suspend the enteral feeding if the GRV is less than 500
mL unless there are other signs of feeding intolerance;
stopping the enteral feeding based on GRV along is
inappropriate.1
■ To discontinue gastric feeding (depending on the
equipment you’re using), close the clamp on the enteral
administration set tubing or turn off the enteral feeding
pump.
■ Disconnect the administration set tubing from the feeding
tube. Flush the enteral feeding tube with at least 30 mL of
water, if ordered and tolerated, to maintain patency (use
purified water in immunocompromised or critically ill
patients).1 Flushing maintains the tube’s patency by
removing excess formula, which could occlude the tubing.
■ Cover the end of the feeding tube with its plug or cap to
prevent leakage and contamination of the tube.
■ Perform oral care routinely to decrease oral bacterial
colonization and the risk of aspiration pneumonia.28
TROUBLESHOOTING
Managing enteral tube feeding problems
■ Remove and discard the fluid-impermeable pad or towel.
■ Monitor the patient’s weight and nutritional, fluid,
electrolyte, and metabolic status, as ordered, to evaluate
the effectiveness of enteral feedings.1
■ Return the bed to the lowest position to prevent falls and
maintain patient safety.29
■ Clean and dry the syringe and container used for flush
administration.1
■ Remove and discard your gloves.19,20
■ Perform hand hygiene.4,5,6,7,8,9
■ Store clean equipment away from potential sources of
contamination.1
■ Perform hand hygiene.4,5,6,7,8,9
■ Document the procedure.30,31,32,33
Special considerations
■ The Joint Commission issued a sentinel event alert
concerning medical device alarm safety, because alarm-
related events have been associated with permanent loss of
function and death. Among the major contributing factors
were improper alarm settings, alarms inappropriately turned
off, and alarm signals not audible to staff. Make sure that
alarm limits are appropriately set, and that alarms are
turned on, functioning properly, and audible to staff. Follow
facility guidelines for preventing alarm fatigue.4
■ The Joint Commission has issued a sentinel event alert
related to managing risk during transition to new
International Organization for Standardization tubing
standards designed to prevent dangerous tubing
misconnections, which can lead to serious patient injury and
death. During the transition, be sure to trace the tubing and
catheter from the patient to the point of origin before
connecting or reconnecting any device or infusion, at any
care transition (such as a new setting or service), and as
part of the hand-off process; route tubes and catheters
having different purposes in different standardized
directions; label the tubing at the distal and proximal ends
when there are different access sites or several bags
hanging; use tubing and equipment only as intended; and
store medications for different delivery routes in separate
locations.24
■ If the patient experiences diarrhea, a risk-management
algorithm is recommended to evaluate the patient’s risk and
determine the treatment plan.34
Patient teaching
Patient education for home tube feeding includes
instructions on an infusion control device to maintain
accuracy, use of the syringe or bag and tubing, care of the
tube and insertion site, and formula mixing. Formula may be
mixed in an electric blender according to package
directions. Formula not used within 24 hours must be
discarded. If the formula must hang for more than 4 hours,
advise the patient to use an enteral feeding bag or enteral
administration set with an ice pouch to decrease the
incidence of bacterial growth. Tell the patient and family to
use a new bag daily.
Teach the patient and family members signs and
symptoms to report to the practitioner or home care nurse
as well as measures to take in an emergency.
Complications
Erosion of esophageal, tracheal, nasal, and oropharyngeal
mucosa can result if tubes are left in place for a long time.
(See Managing enteral tube feeding problems.)
When using the gastric route, frequent or large-volume
feedings can cause bloating and retention. Dehydration,
diarrhea, and vomiting can cause metabolic disturbances.
Glycosuria, cramping, and abdominal distention usually
indicate intolerance.
The patient may experience dumping syndrome, in which
a large amount of hyperosmotic solution in the duodenum
causes excessive diffusion of fluid through the
semipermeable membrane and results in diarrhea. In a
patient with low serum albumin levels, these signs and
symptoms may result from low oncotic pressure in the
duodenal mucosa.
Documentation
Document the date, volume of formula, and volume of
water. In your notes, document abdominal assessment
findings (including the tube exit site if appropriate), amount
of residual gastric contents if used, tube patency, and
verification of tube placement. Also note the amount, type,
and time of feeding. Discuss the patient’s tolerance of the
feeding, including whether the patient experienced nausea,
vomiting, cramping, diarrhea, or distention. Note the result
of blood and urine tests, hydration status, and any drugs
given through the tube. Include the date and time of enteral
administration set changes and oral and nasal hygiene
performed. Document any tube feeding problems, the date
and time the practitioner was notified, interventions
provided, and the patient’s response to the interventions.
Document any teaching you provided, the patient’s and
family’s understanding of the teaching, and whether follow-
up teaching was required.
REFERENCES
1 Boullata, J. I ., et al. (2016). ASPEN safe practices for enteral nutrition therapy.
Journal of Parenteral & Enteral Nutrition, 41(1), 15–103. Accessed via the Web
at http://journals.sagepub.com/doi/10.1177/0148607116673053 (Level VII)
2 Blumenstein, I., et al. (2014). Gastroenteric tube feeding: Techniques,
problems and solutions. World Journal of Gastroenterology, 20(26), 8505–
8524. Accessed via the Web at
http://www.ncbi.nlm.nih.gov/pmc/articles/PMC4093701/
3 Joanna Briggs Institute. (2016). Nasoenteric tube feeding: Administration of
feed and medication. Adelaide, Australia: Joanna Briggs Institute. (Level VII)
4 Centers for Disease Control and Prevention. (2002). Guideline for hand
hygiene in health-care settings: Recommendations of the Healthcare Infection
Control Practices Advisory Committee and the HICPAC/SHEA/APIC/IDSA Hand
Hygiene Task Force. MMWR Recommendations and Reports, 51(RR-16), 1–45.
Accessed via the Web at https://www.cdc.gov/mmwr/pdf/rr/rr5116.pdf (Level
II)
5 The Joint Commission. (2019). Standard NPSG.07.01.01. Comprehensive
accreditation manual for hospitals. Oakbrook Terrace, IL: The Joint
Commission. (Level VII)
6 World Health Organization. (2009). “WHO guidelines on hand hygiene in
health care: First global patient safety challenge, clean care is safer care”
[Online]. Accessed via the Web at
http://apps.who.int/iris/bitstream/10665/44102/1/9789241597906_eng.pdf
(Level IV)
7 Accreditation Association for Hospitals and Health Systems. (2017). Standard
07.01.21. Healthcare Facilities Accreditation Program: Accreditation
requirements for acute care hospitals. Chicago, IL: Accreditation Association
for Hospitals and Health Systems. (Level VII)
8 Centers for Medicare and Medicaid Services, Department of Health and
Human Services. (2015). Condition of participation: Infection control. 42 C.F.R.
§ 482.42.
9 DNV GL-Healthcare USA, Inc. (2016). IC.1.SR.1 . NIAHO® accreditation
requirements: Interpretive guidelines & surveyor guidance (version 11).
Milford, OH: DNV GL-Healthcare USA, Inc. (Level VII)
10 The Joint Commission. (2019). Standard NPSG.01.01.01. Comprehensive
accreditation manual for hospitals. Oakbrook Terrace, IL: The Joint
Commission. (Level VII)
11 Centers for Medicare and Medicaid Services, Department of Health and
Human Services. (2015). Condition of participation: Patient’s rights. 42 C.F.R.
§ 482.13(c)(1).
12 Accreditation Association for Hospitals and Health Systems. (2017). Standard
15.01.16. Healthcare Facilities Accreditation Program: Accreditation
requirements for acute care hospitals. Chicago, IL: Accreditation Association
for Hospitals and Health Systems. (Level VII)
13 The Joint Commission. (2019). Standard RI.01.01.01. Comprehensive
accreditation manual for hospitals. Oakbrook Terrace, IL: The Joint
Commission. (Level VII)
14 DNV GL-Healthcare USA, Inc. (2016). PR.1.SR.5 . NIAHO® accreditation
requirements: Interpretive guidelines & surveyor guidance (version 11).
Milford, OH: DNV GL-Healthcare USA, Inc. (Level VII)
15 The Joint Commission. (2019). Standard PC.02.01.21. Comprehensive
accreditation manual for hospitals. Oakbrook Terrace, IL: The Joint
Commission. (Level VII)
16 Waters, T. R., et al. (2009). “Safe patient handling training for schools of
nursing” [Online]. Accessed via the Web at
https://www.cdc.gov/niosh/docs/2009-127/pdfs/2009-127.pdf (Level VII)
17 American Association of Critical-Care Nurses (AACN). (2016). “A ACN practice
alert: Prevention of aspiration in adults” [Online]. Accessed via the Web at
https://www.aacn.org/newsroom/aspiration-prevention (Level VII)
18 McClave, S. A., et al. (2016). ACG clinical guideline: Nutrition therapy in the
adult hospitalized patient. American Journal of Gastroenterology, 111(3), 315–
334. Accessed via the Web at http://gi.org/wp-
content/uploads/2016/03/Apr2016-Nutrition-Therapy-in-the-Adult-
Hospitalized-Patient.pdf (Level VII)
19 Siegel, J. D ., et al. (2007, revised 2017). “2007 guideline for isolation
precautions: Preventing transmission of infectious agents in healthcare
settings” [Online]. Accessed via the Web at
https://www.cdc.gov/infectioncontrol/pdf/guidelines/isolation-guidelines.pdf
(Level II)
20 Accreditation Association for Hospitals and Health Systems. (2017). Standard
07.01.10. Healthcare Facilities Accreditation Program: Accreditation
requirements for acute care hospitals. Chicago, IL: Accreditation Association
for Hospitals and Health Systems. (Level VII)
21 American Association of Critical-Care Nurses (AACN). (2016). “A ACN practice
alert: Initial and ongoing verification of feeding tube placement in adults”
[Online]. Accessed via the Web at https://www.aacn.org/clinical-
resources/practice-alerts/initial-and-ongoing-verification-of-feeding-tube-
placement-in-adults (Level VII)
22 Simons, S. R., & Abdallah, L. M. (2012). Bedside assessment of enteral tube
placement: Aligning practice with evidence. American Journal of Nursing,
112(2), 40–46. Accessed via the Web at
http://journals.lww.com/ajnonline/Fulltext/2012/02000/Bedside_Assessment_o
f_Enteral_Tube_Placement_. 23.aspx (Level V)
23 U.S . Food and Drug Administration. (n.d .). “Look. Check. Connect. Safe
medical device connections save lives” [Online]. Accessed via the Web at
http://www.fda.gov/downloads/MedicalDevices/Safety/AlertsandNotices/UCM1
34873.pdf
24 The Joint Commission. (2014). “Sentinel event alert: Managing risk during
transition to new ISO tubing connector standards” [Online]. Accessed via the
Web at
http://www.jointcommission.org/assets/1/6/SEA_53_Connectors_8 _19_14 _final.
pdf (Level VII)
25 The Joint Commission. (2019). Standard NPSG.06 .01.01. Comprehensive
accreditation manual for hospitals. Oakbrook Terrace, IL: The Joint
Commission. (Level VII)
26 Graham, K. C., & Cvach, M. (2010). Monitor alarm fatigue: Standardizing use
of physiological monitors and decreasing nuisance alarms. American Journal
of Critical Care, 19(1), 28–37. Accessed via the Web at
http://ajcc.aacnjournals.org/content/19/1/28.full.pdf
27 The Joint Commission. (2013). “Sentinel event alert: Medical device alarm
safety in hospitals” [Online]. Accessed via the Web at
https://www.jointcommission.org/assets/1/6/SEA_50_alarms_4 _26_16.pdf
(Level VII)
28 Association for Professionals in Infection Control and Epidemiology. (2014).
“Top 9 ways to reduce the risk of pneumonia if you or a loved one is
hospitalized” [Online]. Accessed via the Web at http://www.apic.org/For-
Consumers/Monthly-alerts-for-consumers/Article?id=top-9 -ways-to-reduce-
the-risk-of-pneumonia-if
29 Ganz, D. A., et al. (2013). Preventing falls in hospitals: A toolkit for improving
quality of care (AHRQ Publication No. 13-0015-EF). Rockville, MD: Agency for
Healthcare Research and Quality. Accessed via the Web at
https://www.ahrq.gov/sites/default/files/publications/files/fallpxtoolkit_0 .pdf
(Level VII)
30 The Joint Commission. (2019). Standard RC.01.03 .01. Comprehensive
accreditation manual for hospitals. Oakbrook Terrace, IL: The Joint
Commission. (Level VII)
31 Centers for Medicare and Medicaid Services, Department of Health and
Human Services. (2015). Condition of participation: Medical record services.
42 C.F.R. § 482.24(b).
32 Accreditation Association for Hospitals and Health Systems. (2017). Standard
10.00 .03. Healthcare Facilities Accreditation Program: Accreditation
requirements for acute care hospitals. Chicago, IL: Accreditation Association
for Hospitals and Health Systems (Level VII)
33 DNV GL-Healthcare USA, Inc. (2016). MR.2 .SR.1 . NIAHO® accreditation
requirements: Interpretive guidelines & surveyor guidance (version 11).
Milford, OH: DNV GL-Healthcare USA, Inc. (Level VII)
34 Barrett, J. S ., et al. (2009). Strategies to manage gastrointestinal symptoms
complicating enteral feeding. Journal of Parenteral and Enteral Nutrition,
33(1), 21–26.
Comparing skin types
U
ULTRAVIOLET LIGHT THERAPY
Ultraviolet (UV) light causes profound biological changes,
including UV light–induced immunosuppression and
temporary suppression of epidermal basal cell division
followed by a later increase in cell turnover. Such skin
conditions as psoriasis, mycosis fungoides, atopic
dermatitis, and uremic pruritus may respond to therapy that
uses timed exposure to UV light rays.
Emitted by the sun, the UV spectrum is subdivided into
three bands—A, B, and C—each of which affects the skin
differently. Ultraviolet A (UVA) radiation (with a relatively
long wavelength of 320 to 400 nanometers [nm]) rapidly
darkens preformed melanin pigment, may augment
ultraviolet B (UVB) in causing sunburn and skin aging, and
may induce phototoxicity in the presence of some drugs.
UVB radiation (with a wavelength of 280 to 320 nm) causes
sunburn and erythema. Ultraviolet C (UVC) radiation (with a
wavelength of 200 to 280 nm) normally is absorbed by the
earth’s ozone layer and doesn’t reach the ground; it’s used
in operating-room germicidal lamps because it kills bacteria.
Treating skin with a photosensitizing agent such as
methoxsalen and UVA is called psoralen-plus-UVA (PUVA)
therapy, or photochemotherapy. The drug methoxsalen, a
psoralen agent, creates artificial sensitivity to UVA by
binding with the deoxyribonucleic acid in epidermal basal
cells. Administered before UVA light treatment, methoxsalen
photosensitizes the skin to enhance therapeutic effects.
Other drugs used in PUVA therapy include acitretin (an oral
vitamin A derivative) and methotrexate.
For PUVA therapy, the initial dose is based on the patient’s
skin type, and is increased according to the treatment
protocol and as tolerated. The practitioner calculates the
UVB dose based on skin type estimation or by determining a
minimal erythema dose—the smallest amount of UV light
needed to produce mild erythema. (See Comparing skin
types.)
Contraindications to both PUVA and UVB therapy include
lupus erythematosus and xeroderma pigmentosa. Caution
should be used in patients with skin types I and II; patients
with a history of liver disease, photosensitivity disease, skin
cancer, or arsenic ingestion; patients currently using
photosensitivity-inducing drugs; and patients with previous
skin irradiation (which can induce skin cancer).1 PUVA
therapy is contraindicated in pregnant and nursing women
because of increased risk of birth defects from psoralen
agents. Women of childbearing age who undergo PUVA
therapy should have a pregnancy test before beginning
therapy and should use a reliable form of birth control
during and for 3 months after treatment.
Contraindications to UVB therapy include lupus
erythematosus and xeroderma pigmentosum. Caution
should be used in patients with skin types I and II; patients
with a history of photosensitivity disease, skin cancer, or
arsenic ingestion; patients currently using photosensitivity-
inducing drugs; and patients with previous skin irradiation.
According to established guidelines, UVB therapy is
considered safe during pregnancy.1
UV light therapy is contraindicated in patients who have
undergone previous ionizing chemotherapy and in those
who are using immunosuppressant drugs or medications
that can cause photosensitivity (other than photosensitizing
psoralen agent).
A patient can undergo UV light therapy in a health care
facility or practitioner’s office, or at home. Typically set into
a reflective cabinet, the light source consists of a bank of
high-intensity fluorescent bulbs. (At home, the patient may
use a small fluorescent sunlamp.)
Equipment
For UVA radiation
Fluorescent black-light lamp ▪ high-intensity UVA
fluorescent bulbs ▪ UV-opaque sunglasses.
For UVB radiation
Fluorescent sunlamp or hot quartz lamp ▪ florescent
sunlamp bulbs or quartz halogen bulbs ▪ goggles with gray
or green polarized lenses.
For all UV treatments
Phototherapy unit ▪ hospital gown ▪ Optional: prescribed
oral or topical phototherapeutic medications, sunscreen,
towels.
Implementation
■ Review the patient’s health history for contraindications
to UV light therapy.
■ Verify the practitioner’s orders to confirm the light
treatment type and dose.
■ Perform hand hygiene.2,3,4,5,6,7
■ Confirm the patient’s identity using at least two patient
identifiers.8
■ Provide privacy.9,10,11,12
■ Ask the patient about the use of photosensitizing drugs,
such as anticonvulsants, certain antihypertensives,
phenothiazines, salicylates, sulfonamides, tetracyclines,
tretinoin, and various cancer drugs.
■ Explain the procedure to the patient and family (if
appropriate) according to their individual communication
and learning needs to increase their understanding, allay
their fears, and enhance cooperation.13 Inform the patient
that UV light treatments produce a mild sunburn that will
help reduce or resolve skin lesions.
For PUVA therapy
■ Confirm that the patient took the prescribed psoralen
agent (with food) 11⁄2 hours before treatment.
■ Instruct the patient to disrobe and put on a hospital
gown.
■ Ensure that the patient uses sunscreen, towels, or a
hospital gown to protect vulnerable skin areas. All male
patients receiving PUVA must wear protection over the groin
area.
■ Have the patient enter or assume an appropriate position
in the phototherapy unit.
■ Instruct the patient to remove the gown or expose only
the area to undergo therapy.
■ Instruct the patient to put on UV-opaque sunglasses, and
ensure that the patient wears them throughout therapy to
protect the eyes from harmful UV light. Tell the patient to
wear these glasses for 24 hours after treatment, because
the prescribed psoralen agent can cause photosensitivity.
For UVB therapy
■ Position the patient at the correct distance from the light
source. For facial therapy with a sunlamp, position the
patient’s face about 12′′ (30.5 cm) from the sunlamp. For
body therapy, position the patient’s body about 30′′ (76 cm)
from either the florescent sunlamp or the hot quartz lamp.
■ If the patient must stand for the treatment, ask the
patient to report any dizziness to ensure safety.
■ Instruct the patient to put on dark, polarized goggles, and
ensure that the patient wears them throughout UV light
therapy to protect the eyes from harmful UV light.
Completing the procedure
■ If you’re observing the patient through light-chamber
windows, put on goggles.
■ After delivering the prescribed UVB dose, help the patient
out of the phototherapy unit.
■ Instruct the patient to avoid sun exposure to treated
areas after therapy.14
■ Perform hand hygiene.2,3,4,5,6,7
■ Document the procedure.15,16,17,18
Special considerations
■ If the patient is prescribed methoxsalen, ensure that
baseline liver function studies have been completed before
administration.
■ If the patient is prescribed acitretin, confirm completion of
liver function and blood lipid studies before administration
and at regular intervals during therapy.
■ If the patient is prescribed methotrexate, confirm
completion of liver function studies and a complete blood
count before administration, and at regular intervals during
therapy (as ordered) according to dosage adjustments, the
patient’s condition, and previous test results.19
■ If the practitioner prescribes tar preparations with UVB
treatment, watch for signs of sensitivity, such as erythema,
pruritus, and eczematous reactions; notify the practitioner if
any of these signs occur. If you apply carbonis detergens to
the patient’s skin before UV light therapy, remove it
completely with mineral oil just before treatment begins to
let the light penetrate the skin.
Patient teaching
Instruct the patient to look for marked erythema, blistering,
peeling, or other signs of overexposure 4 to 6 hours after
UVB therapy and 24 to 48 hours after UVA therapy. In either
case, the erythema should disappear within another 24
hours. Explain to the patient that mild dryness and
desquamation (skin peeling) will occur in 1 to 2 days. Teach
the patient appropriate skin care measures. (See Skin care
guidelines.) Advise the patient to notify the practitioner if
overexposure
occurs.
Typically, the practitioner
recommends stopping treatment for a few days and then
starting over at a lower exposure level.
Complications
Overexposure to UV light (sunburn) can result from
prolonged therapy or an inadequate distance between the
patient and the light source. Sunburn can also result from
the use of photosensitizing drugs and from overly sensitive
skin.
Erythema, nausea, and pruritus are the three major short-
term adverse effects of PUVA therapy. Long-term adverse
effects are similar to those caused by excessive exposure to
sunlight, including premature aging (xerosis, wrinkles, and
mottled skin), lentigines, telangiectasia, increased risk of
skin cancer, and cataracts if eye protection isn’t used.
Erythema is the major adverse effect of UVB therapy.
Although minimal erythema without discomfort is
acceptable, UVB therapy is suspended if marked edema,
swelling, or blistering occurs.
Documentation
Record the date and time of initial and subsequent UV light
therapy treatments, the UV light wavelength used, and the
name, route, time, and dose of any oral or topical
medications administered. Record the exact duration of UV
light therapy, the distance between the light source and the
skin, and the patient’s tolerance of the procedure. Note any
safety measures used (including eye protection). Also
describe the patient’s skin condition before and after UV
light therapy. Note improvements and adverse reactions,
such as increased pruritus, oozing, and scaling. Document
any teaching you provided, the patient’s and family’s
understanding of the teaching, and whether follow-up
teaching was required.
PATIENT TEACHING
Skin care guidelines
A patient who’s receiving ultraviolet light treatments must
know how to protect the skin from injury. Provide your
patient with the following skin care tips:
■ Encourage the patient to use emollients and drink plenty of fluids to
combat dry skin and maintain adequate hydration. Warn the patient to avoid
hot baths or showers and to use soap sparingly. Heat and soap promote dry
skin.
■ Instruct the patient to notify the practitioner before taking any medication,
including aspirin, to prevent heightened photosensitivity.
■ If the patient is receiving PUVA therapy, review the psoralen agent dosage
schedule. Explain that deviating from it could result in burns or ineffective
treatment. Urge the patient to wear appropriate sunglasses outdoors for at
least 24 hours after taking the psoralen agent. Recommend annual eye
examinations to detect cataract formation. Recommend that the patient have
annual eye examinations to detect cataract formation.
■ If the patient uses a sunlamp at home, advise the patient to let the lamp
warm for 5 minutes before treatment. Stress the importance of exposing the
skin to the light for the exact amount of time prescribed by the practitioner.
Instruct the patient to protect the eyes with goggles and to use a dependable
timer or have someone else time the therapy. Above all, urge the patient
never to use the sunlamp when tired to avoid falling asleep under the lamp
and sustaining a burn.
■ Teach the patient first aid for localized burning: Tell the patient to apply
cool water soaks for 20 minutes or until skin temperature cools. For more
extensive burns, recommend tepid tap water baths after notifying the
practitioner about the burn. After the patient bathes, suggest using an oil-in-
water moisturizing lotion (not a petroleum jelly–based product, which can
trap radiant heat).
■ Instruct the patient to limit natural-light exposure (not only to outside light
but also to light through windows), to use a sunscreen when outdoors, and to
notify the practitioner immediately if the patient discovers any unusual skin
lesions.
■ Advise the patient to avoid harsh soaps and chemicals, such as paints and
solvents, and to discuss ways to manage physical and psychological stress,
which may exacerbate skin disorders.
REFERENCES
1 Menter, A., et al. (2010). Guidelines of care for the management of psoriasis
and psoriatic arthritis: Section 5. Guidelines of care for the treatment of
psoriasis with phototherapy and photochemotherapy. Journal of the American
Academy of Dermatology, 62(1), 114–135. (Level V)
2 Centers for Disease Control and Prevention. (2002). Guideline for hand
hygiene in health-care settings: Recommendations of the Healthcare Infection
Control Practices Advisory Committee and the HICPAC/SHEA/APIC/IDSA Hand
Hygiene Task Force. MMWR Recommendations and Reports, 51(RR-16), 1–45.
Accessed via the Web at https://www.cdc.gov/mmwr/pdf/rr/rr5116.pdf (Level
II)
3 World Health Organization. (2009). “WHO guidelines on hand hygiene in
health care: First global patient safety challenge, clean care is safer care”
[Online]. Accessed via the Web at
http://apps.who.int/iris/bitstream/10665/44102/1/9789241597906_eng.pdf
(Level IV)
4 The Joint Commission. (2019). Standard NPSG.07.01.01. Comprehensive
accreditation manual for hospitals. Oakbrook Terrace, IL: The Joint
Commission. (Level VII)
5 Accreditation Association for Hospitals and Health Systems. (2017). Standard
07.01.21. Healthcare Facilities Accreditation Program: Accreditation
requirements for acute care hospitals. Chicago, IL: Accreditation Association
for Hospitals and Health Systems. (Level VII)
6 Centers for Medicare and Medicaid Services, Department of Health and
Human Services. (2015). Condition of participation: Infection control. 42 C.F.R.
§ 482.42.
7 DNV GL-Healthcare USA, Inc. (2016). IC.1.SR.1 . NIAHO® accreditation
requirements: Interpretive guidelines & surveyor guidance (version 11).
Milford, OH: DNV GL-Healthcare USA, Inc. (Level VII)
8 The Joint Commission. (2019). Standard NPSG.01.01.01. Comprehensive
accreditation manual for hospitals. Oakbrook Terrace, IL: The Joint
Commission. (Level VII)
9 Accreditation Association for Hospitals and Health Systems. (2017). Standard
15.01.16. Healthcare Facilities Accreditation Program: Accreditation
requirements for acute care hospitals. Chicago, IL: Accreditation Association
for Hospitals and Health Systems. (Level VII)
10 Centers for Medicare and Medicaid Services, Department of Health and
Human Services. (2015). Condition of participation: Patient’s rights. 42 C.F.R.
§ 482.13(c)(1).
11 DNV GL-Healthcare USA, Inc. (2016). PR.1.SR.5 . NIAHO® accreditation
requirements: Interpretive guidelines & surveyor guidance (version 11).
Milford, OH: DNV GL-Healthcare USA, Inc. (Level VII)
12 The Joint Commission. (2019). Standard RI.01.01.01. Comprehensive
accreditation manual for hospitals. Oakbrook Terrace, IL: The Joint
Commission. (Level VII)
13 The Joint Commission. (2019). Standard PC.02.01.21. Comprehensive
accreditation manual for hospitals. Oakbrook Terrace, IL: The Joint
Commission. (Level VII)
14 Feldman, S. R. Treatment of psoriasis in adults. (2017). In: UpToDate,
Dellavalle, R. P., & Duffins, K. C . (Eds.) . Retrieved from: www.uptodate.com
15 The Joint Commission. (2019). Standard RC.01.03 .01. Comprehensive
accreditation manual for hospital. Oakbrook Terrace, IL: The Joint
Commission. (Level VII)
16 Centers for Medicare and Medicaid Services, Department of Health and
Human Services. (2015). Condition of participation: Medical record services.
42 C.F.R. § 482.24(b).
17 Accreditation Association for Hospitals and Health Systems. (2017). Standard
10.00 .03. Healthcare Facilities Accreditation Program: Accreditation
requirements for acute care hospitals. Chicago, IL: Accreditation Association
for Hospitals and Health Systems. (Level VII)
18 DNV GL-Healthcare USA, Inc. (2016). MR.2 .SR.1 . NIAHO® accreditation
requirements: Interpretive guidelines & surveyor guidance (version 11).
Milford, OH: DNV GL-Healthcare USA, Inc. (Level VII)
19 American Academy of Dermatology. (2010). Psoriasis: Treatment guide for
methotrexate. Schaumburg, IL: American Academy of Dermatology.
UNNA BOOT APPLICATION
Named for dermatologist Paul Gerson Unna, this nonelastic
paste bandage boot can be used to treat uninfected,
nonnecrotic leg and foot ulcers that result from such
conditions as venous insufficiency and stasis dermatitis. A
commercially prepared Unna boot is a gauze compression
dressing that’s impregnated with a preparation known as
Unna paste (gelatin, zinc oxide, calamine lotion, and
glycerin). The dressing wraps around the affected foot and
leg. The boot’s effectiveness results from compression
applied by the bandage, which decreases edema, combined
with moisture supplied by the paste.1,2
The Unna boot is contraindicated in patients allergic to
any ingredient used in the paste and in patients with arterial
ulcers, weeping eczema, or cellulitis.
Equipment
Gauze sponge with prescribed cleaning agent ▪ normal
saline solution ▪ commercially prepared paste bandage
(impregnated with gelatin, zinc oxide, glycerin, and
calamine) ▪ gloves ▪ elastic bandage or self-adherent wrap
to cover the Unna boot ▪ tape or clip ▪ Optional: roller
gauze for excessive drainage, bandage scissors, clip or tape,
Doppler ultrasound equipment.
Implementation
■ Gather the appropriate equipment.
■ Perform hand hygiene.3,4,5,6,7,8
■ Confirm the patient’s identity using at least two patient
identifiers.9
■ Provide privacy.10,11,12,13
■ Explain the procedure to the patient and family (if
appropriate) according to their individual communication
and learning needs to increase their understanding, allay
their fears, and enhance cooperation.14
■ Raise the patient’s bed to waist level when providing
patient care to prevent caregiver back strain.15
■ Perform hand hygiene.3,4,5,6,7,8
■ Put on gloves.16,17
■ Assess the ulcer and the surrounding skin. Evaluate ulcer
size, drainage, and appearance.
■ Perform a neurovascular assessment of the affected foot
to ensure adequate circulation. If you don’t detect a dorsalis
pedis or posterior tibial pulse in the foot by palpation,
Doppler ultrasound, or ankle brachial index, notify the
practitioner before applying the Unna boot.
■ Place the patient in the supine position, elevating the leg
on which you’re going to place the Unna boot.
■ Open all the bandage wrappers. Make sure that you have
enough supplies to cover the extremity.
■ Have the patient dorsiflex the foot 90 degrees.
■ Clean the affected area gently with the gauze sponge and
cleaning agent to slow bacterial growth and to remove dirt
and wound debris, which can create pressure points after
you apply the bandage.
■ Rinse the affected area with normal saline solution and
let it dry thoroughly.
■ Remove and discard your gloves.
■ Perform hand hygiene.3,4,5,6,7,8
■ Put on new gloves.16,17
■ Have the patient flex the knee.
■ Starting with the foot positioned at a right angle to the
leg, wrap the impregnated gauze bandage firmly in a spiral
motion, beginning just above the toes. Wrap the bandage
twice around, just above the toes, without tension. Continue
wrapping upward, overlapping the dressing 50% or more
with each turn. Make sure the dressing covers the heel.
Smooth the boot with your free hand as you go (as shown
below).
■ Stop wrapping about 1′′ (2.5 cm) below the knee and
popliteal fossa, as shown below, to prevent irritation when
the knee is bent. The wrap should be snug but not tight.
Mold the boot with your free hand as you apply the bandage
to make it smooth and even. If necessary, make a 2′′ (5-cm)
slit in the boot just below the knee to relieve constriction
that may develop as the dressing hardens.
■ If drainage is excessive, you may wrap a roller gauze
dressing over the Unna boot.
■ As the final layer, wrap an elastic bandage in a figure-
eight pattern to provide external compression, and secure it
in place using a clip or tape.
■ Instruct the patient to remain in bed with the leg
outstretched and elevated on a pillow until the paste dries
(approximately 30 minutes).
■ Observe the patient’s foot for signs and symptoms of
neurovascular impairment, such as cyanosis, loss of
sensation, and swelling. These findings indicate that the
bandage is too tight and must be removed.
■ Remove and discard your gloves.16,17
■ Return the bed to the lowest position to prevent falls and
maintain patient safety.18
■ Perform hand hygiene.3,4,5,6,7,8
■ Document the procedure.19,20,21,22
Special considerations
■ Change the boot weekly or as ordered to assess the
underlying skin and ulcer healing; also change the boot
when the patient detects a loosening of the boot, or anytime
the wrap becomes saturated with drainage. Remove the
boot by unwrapping the bandage from the knee down to the
foot.
■ If the boot is applied over a swollen leg, change the boot
as the edema subsides—if necessary, more frequently than
every 3 days.
■ Don’t make reverse turns while wrapping the bandage.
This could create excessive pressure areas that may cause
discomfort as the bandage hardens.
■ Other two- or four-layer wraps are available that follow
the same principles as an Unna boot. Some products can be
removed daily, such as compression stockings, which
require measurement for accurate fit after any edema has
subsided.
Patient teaching
Tell the patient to leave the boot on for the ordered
duration, typically 3 to 7 days. Instruct the patient to walk
on and handle the wrap carefully to avoid damaging it. Tell
the patient that the boot will stiffen but won’t be as hard as
a cast. Instruct the patient to protect the boot from
becoming wet when bathing by covering it with a plastic
bag sealed at the knee with an elastic bandage, or by using
a commercially produced product designed to keep it dry,
because a wet boot softens and loses its effectiveness. If
safety is a concern, instruct the patient to take a sponge
bath.
Complications
Contact dermatitis may result from hypersensitivity to Unna
paste. Neurovascular impairment (cyanosis, loss of
sensation, and swelling) may also occur if the boot is too
tight.
Documentation
Record the date and time of application and the presence of
a pulse in the affected foot. Specify which leg you
bandaged. Describe the appearance of the patient’s skin
before and after boot application. Name the equipment used
(a commercially prepared bandage or Unna paste and
lightweight gauze). Describe any allergic reaction.
Document any teaching you provided, the patient’s
understanding of the teaching, and whether follow-up
teaching was required.
REFERENCES
1 Kelechi, T. J ., et al. (2014). Guideline for the management of wounds in
patients with lower-extremity venous disease: An executive summary. Journal
of Wound, Ostomy, Continence Nursing, 39(6), 598-606 . (Level I)
2 Association for the Advancement of Wound Care (AAWC). (2014). Association
for the Advancement of Wound Care (AAWC) venous and pressure ulcer
guidelines. Ostomy Wound Management, 60(11), 24–66. Accessed via the
Web at http://www.o -wm.com/article/association-advancement-wound-care-
aawc-venous-and-pressure-ulcer-guidelines (Level I)
3 Centers for Disease Control and Prevention. (2002). Guideline for hand
hygiene in health-care settings: Recommendations of the Healthcare Infection
Control Practices Advisory Committee and the HICPAC/SHEA/APIC/IDSA Hand
Hygiene Task Force. MMWR Recommendations and Reports, 51(RR-16), 1–45.
Accessed via the Web at https://www.cdc.gov/mmwr/pdf/rr/rr5116.pdf (Level
II)
4 World Health Organization. (2009). “WHO guidelines on hand hygiene in
health care: First global patient safety challenge, clean care is safer care”
[Online]. Accessed via the Web at
http://apps.who.int/iris/bitstream/10665/44102/1/9789241597906_eng.pdf
(Level IV)
5 The Joint Commission. (2019). Standard NPSG.07.01.01. Comprehensive
accreditation manual for hospitals. Oakbrook Terrace, IL: The Joint
Commission. (Level VII)
6 Accreditation Association for Hospitals and Health Systems. (2017). Standard
07.01.21. Healthcare Facilities Accreditation Program: Accreditation
requirements for acute care hospitals. Chicago, IL: Accreditation Association
for Hospitals and Health Systems. (Level VII)
7 Centers for Medicare and Medicaid Services, Department of Health and
Human Services. (2015). Condition of participation: Infection control. 42 C.F.R.
§ 482.42.
8 DNV GL-Healthcare USA, Inc. (2016). IC.1.SR.1 . NIAHO® accreditation
requirements: Interpretive guidelines & surveyor guidance (version 11).
Milford, OH: DNV GL-Healthcare USA, Inc. (Level VII)
9 The Joint Commission. (2019). Standard NPSG.01.01.01. Comprehensive
accreditation manual for hospitals. Oakbrook Terrace, IL: The Joint
Commission. (Level VII)
10 Accreditation Association for Hospitals and Health Systems. (2017). Standard
15.01.16. Healthcare Facilities Accreditation Program: Accreditation
requirements for acute care hospitals. Chicago, IL: Accreditation Association
for Hospitals and Health Systems. (Level VII)
11 Centers for Medicare and Medicaid Services, Department of Health and
Human Services. (2015). Condition of participation: Patient’s rights. 42 C.F.R.
§ 482.13(c)(1).
12 DNV GL-Healthcare USA, Inc. (2016). PR.1.SR.5 . NIAHO® accreditation
requirements: Interpretive guidelines & surveyor guidance (version 11).
Milford, OH: DNV GL-Healthcare USA, Inc. (Level VII)
13 The Joint Commission. (2019). Standard RI.01.01.01. Comprehensive
accreditation manual for hospitals. Oakbrook Terrace, IL: The Joint
Commission. (Level VII)
14 The Joint Commission. (2019). Standard PC.02.01.21. Comprehensive
accreditation manual for hospitals. Oakbrook Terrace, IL: The Joint
Commission. (Level VII)
15 Waters, T. R., et al. (2009). “Safe patient handling training for schools of
nursing” [Online]. Accessed via the Web at
https://www.cdc.gov/niosh/docs/2009-127/pdfs/2009-127.pdf (Level VII)
16 Siegel, J. D ., et al. (2007, revised 2017). “2007 guideline for isolation
precautions: Preventing transmission of infectious agents in healthcare
settings” [Online]. Accessed via the Web at
https://www.cdc.gov/infectioncontrol/pdf/guidelines/isolation-guidelines.pdf
(Level II)
17 Accreditation Association for Hospitals and Health Systems. (2018). Standard
07.01.10. Healthcare Facilities Accreditation Program: Accreditation
requirements for acute care hospitals. Chicago, IL: Accreditation Association
for Hospitals and Health Systems. (Level VII)
18 Ganz, D. A., et al. (2013). Preventing falls in hospitals: A toolkit for improving
quality of care (AHRQ Publication No. 13-0015-EF). Rockville, MD: Agency for
Healthcare Research and Quality. Accessed via the Web at
https://www.ahrq.gov/sites/default/files/publications/files/fallpxtoolkit.pdf
(Level VII)
19 The Joint Commission. (2018). Standard RC.01.03 .01. Comprehensive
accreditation manual for hospitals. Oakbrook Terrace, IL: The Joint
Commission. (Level VII)
20 Centers for Medicare and Medicaid Services, Department of Health and
Human Services. (2015). Condition of participation: Medical record services.
42 C.F.R. § 482.24(b).
21 Accreditation Association for Hospitals and Health Systems. (2017). Standard
10.00 .03. Healthcare Facilities Accreditation Program: Accreditation
requirements for acute care hospitals. Chicago, IL: Accreditation Association
for Hospitals and Health Systems. (Level VII)
22 DNV GL-Healthcare USA, Inc. (2016). MR.2 .SR.1 . NIAHO® accreditation
requirements: Interpretive guidelines & surveyor guidance (version 11).
Milford, OH: DNV GL-Healthcare USA, Inc. (Level VII)
URINARY DIVERSION STOMA CARE
Urinary diversions provide an alternative route for urine flow
when a disorder impedes normal drainage, as in the case of
an invasive bladder tumor. A permanent urinary diversion is
indicated in any condition that requires a total cystectomy.
In conditions requiring temporary urinary drainage or
diversion, a suprapubic or urethral catheter is usually
inserted to divert the flow of urine temporarily. The catheter
remains in place until the incision heals. Urinary diversions
may also be indicated for patients with neurogenic bladder,
congenital anomaly, traumatic injury to the lower urinary
tract, or severe chronic urinary tract infection.
Ileal conduit and continent urinary diversion are the two
types of permanent urinary diversions with stomas. (See
Types of permanent urinary diversion, page 804.) These
procedures usually require the patient to wear a urine-
collection appliance and to care for a newly created stoma.
Evaluation by a wound, ostomy, and continence nurse
(WOCN) will facilitate site selection and postoperative stoma
care.
Equipment
Gloves ▪ fluid-impermeable pad ▪ graduated cylinder ▪
washcloth ▪ warm water1 ▪ absorbent, lint-free material for
wicking (rolled gauze pad or tampon) ▪ gauze pads ▪
pouching system (one-piece or two-piece, disposable or
reusable, with a spout for ease of emptying; see Urinary
diversion pouching systems, page 805) ▪ stoma measuring
guide ▪ Optional: scissors, gown, goggles and mask or mask
with face shield, marker or pen, disposable head clippers,
mild soap (oil-, perfume-, and deodorant-free).1
Implementation
■ Gather the appropriate equipment.
■ Perform hand hygiene.2,3,4,5,6,7
■ Confirm the patient’s identity using at least two patient
identifiers.8
■ Provide privacy.9,10,11,12
■ Explain the procedure to the patient and family (if
appropriate) according to their individual communication
and learning needs to increase their understanding, allay
their fears, and enhance cooperation.13 Offer constant
reinforcement and reassurance to counteract negative
reactions that stoma care may elicit. The patient or a family
member will eventually need to perform the procedure.
Types of permanent urinary
diversion
The two types of permanent urinary diversion are the ileal conduit and the
continent urinary diversion, or Indiana pouch, both described below. Other
types of catheterizable continent pouches include the Kock, Mainz, and
Florida pouches. Another type of continent urinary diversion, the orthotopic
neobladder, hooks back to the urethra, making a stoma unnecessary.
Ileal conduit
A segment of the ileum is excised, and the two ends of the ileum that result
from excision of the segment are sutured closed. Then the ureters are
dissected from the bladder and anastomosed to the ileal segment. One end
of the ileal segment is closed with sutures; the opposite end is brought
through the abdominal wall, forming a stoma.
Continent urinary diversion (Indiana pouch)
The surgeon introduces the ureters into a segment of ileum and cecum. Urine
is drained periodically by inserting a catheter into the stoma.
■ Raise the patient’s bed to waist level when providing care
to prevent caregiver back strain.14
■ Position the patient in a low Fowler position so the
patient’s abdomen is flat. This position eliminates skin folds
that could cause the appliance to slip or irritate the skin,
and allows the patient to observe or participate.
■ Perform hand hygiene.2,3,4,5,6,7
■ Put on gloves and, as needed, other personal protective
equipment to comply with standard precautions.15,16
■ Place a fluid-impermeable pad under the patient’s side,
near the stoma.
■ Open the drain valve of the appliance you’re replacing
and empty the urine in the pouch into a graduated cylinder.
■ Remove the appliance by loosening and lifting the edges
of the pouch while pushing the skin back from the pouch,
starting at the top of the pouch and working down to the
bottom.1
■ If the appliance is disposable, discard it into the waste
receptacle.17 If it’s reusable, follow the manufacturer’s
cleaning instructions.
■ To prevent a constant flow of urine onto the skin while
you’re changing the appliance, wick the urine with an
absorbent, lint-free material, as shown on top right.
■ Using warm water and a washcloth, carefully wash around
the stoma.1 Note that you need not use soap and water
around the stoma; however, if the patient prefers that you
use soap, use a very mild soap without oils, perfumes, or
deodorants.1 Be sure to rinse the soap off the skin around
the stoma very well, because soap residue can cause skin
irritation and prevent adherence of the skin barrier.1
■ Dry the peristomal area thoroughly with a gauze pad,
because moisture will keep the appliance from sticking.
■ If necessary, remove any hair from the area with hair
clippers to prevent hair follicles from becoming irritated
when the pouch is removed, which can cause folliculitis.
■ Inspect the stoma for proper healing and to detect
complications. Check the color and the appearance of the
suture line, and examine any moisture or drainage. Inspect
the peristomal skin for redness, irritation, and intactness.
■ Consult with a WOCN, if needed, when skin problems
arise.
■ For a pouch with an attached skin barrier (one-piece
system), measure the stoma with the measuring guide.
Select an opening size that matches the stoma.
■ For an adhesive-backed pouch with a separate skin
barrier (two-piece), measure the stoma with the measuring
guide and select the opening that matches the stoma. Trace
the selected size opening onto the paper back of the skin
barrier’s adhesive side. Cut out the opening. (If the pouch
has precut openings, which can be handy for a round stoma,
select an opening no more than 1⁄8′′ [3 mm] larger than the
stoma.1 If the pouch comes without an opening, cut a hole
1⁄8′′ [3 mm] wider than the measured tracing.) Many
pouching systems can be fit up to the stoma edge without
risk of trauma to the stoma. The cut-to-fit system works
best for an irregularly shaped stoma.
■ Remove the material used for wicking urine and place it
in the appropriate receptacle.17
■ When using a one-piece system, center it over the stoma,
adhesive side down, and gently press it to the skin.
■ When using a two-piece system with a wafer, apply the
wafer, then gently press the pouch opening onto the ring
until it snaps into place.
■ When using a two-piece adhesive system with a coupling
device, line up the adhesive portion of the pouch to the
“landing zone” of the wafer. Press together for adhesion. You
can attach the pouches used in a two-piece system to the
wafer before application if the patient is still experiencing
incisional discomfort.
■ Return the bed to the lowest position to prevent falls and
maintain patient safety.18
■ Dispose of used materials in the appropriate
receptacles.17
■ Encourage the patient to stay quietly in position for 5
minutes to promote appliance adhesion.
■ Remove and discard your gloves and other personal
protective equipment if worn.15,16
■ Perform hand hygiene.2,3,4,5,6,7
■ Document the procedure.19,20,21,22
Special considerations
■ If the patient has a continent urinary diversion, make sure
you know how to meet the patient’s special needs. (See
Caring for the patient with a continent urinary diversion.)
Patient teaching
■ The patient or a family member can learn to care for a
urinary diversion stoma at home (see Home care for the
patient with a continent urinary diversion, page 806).
However, you must give special consideration to the
patient’s emotional adjustment to the stoma before you can
expect the patient to maintain it properly. To encourage a
positive attitude, help the patient get used to the idea of
caring for the stoma and the appliance as though they’re
natural extensions of the patient. When teaching the patient
how to perform the procedure, give the patient written
instructions and provide positive reinforcement after the
patient completes each step. Suggest that the patient
perform the procedure in the morning when urine flows
most slowly.
■ Arrange for a visiting nurse or a wound ostomy
continence nurse to assist the patient at home. Tell the
patient about ostomy support groups, the United Ostomy
Associations of America, and the American Cancer Society.
Members of these organizations routinely visit health care
facilities to explain ostomy care and the types of appliances
available, and to help patients learn to function normally
with a stoma.
■ Help the patient choose between disposable and reusable
appliances by telling the patient the advantages and
disadvantages of each. Emphasize the importance of correct
placement and of a well-fitted appliance to prevent seepage
of urine onto the skin. When positioned correctly, most
appliances remain in place for at least 3 days and for as
long as 5 days if no leakage occurs. After 5 days, the
appliance should be changed. With the improved adhesives
and pouches available, belts aren’t always necessary.
■ Because urine flows constantly, it accumulates quickly,
becoming even heavier than stools. To prevent the weight of
the urine from loosening the seal around the stoma and
separating the appliance from the skin, tell the patient to
empty the appliance through the drain valve when it’s one-
third to one-half full. Teach the patient sanitary and dietary
measures that can protect the peristomal skin and control
the odor that commonly results from alkaline urine,
infection, and poor hygiene. Explain that generous fluid
intake also helps to reduce odor by diluting the urine.
■ Instruct the patient to connect the appliance to a urine-
collection container before going to sleep. The continuous
flow of urine into the container during the night prevents
the urine from accumulating and stagnating in the
appliance.
■ Advise the patient to wash reusable appliances with soap
and lukewarm water and then air-dry them thoroughly to
prevent brittleness.
Complications
Because a segment of the intestine forms the conduit, and
intestinal mucosa is delicate, an ill-fitting appliance can
cause bleeding. Bleeding is especially likely with an ileal
conduit, the most common urinary diversion stoma.
Peristomal skin may become reddened or excoriated from
too-frequent changing or improper placement of the
appliance, poor skin care, or allergic reaction to the
appliance or adhesive. Constant leakage around the
appliance can result from improper placement of the
appliance or from poor skin turgor. Other complications
include mechanical injury, pressure ulcers, skin stripping
injuries, mucocutaneous separation, and infections.24
Documentation
Record the appearance and color of the stoma and whether
it’s inverted, flush with the skin, or protruding. If it
protrudes, note by how much it protrudes above the skin.
(The normal range is 1⁄2′′ to 3⁄4′′ [1.3 to 2 cm].) Record the
appearance and condition of the peristomal skin, noting any
redness or irritation or complaints by the patient of itching
or burning, as well as any nursing interventions, including
consultation with the WOCN. Document any patient
teaching and return demonstrations performed.
EQUIPMENT
Urinary diversion pouching systems
Disposable pouching systems
Options for disposable pouching systems include a one-piece disposable
system with spout closure and a two-piece drainable, disposable pouch with
a skin barrier. The one-piece system consists of a transparent or opaque,
odor-proof plastic pouch with attached adhesive backing. Some pouches
have microporous tape edges or belt tabs. The spout opening enables easy
draining. The two-piece drainable, disposable pouch with a separate skin
barrier permits more frequent pouch changes. Also made of transparent or
opaque, odor-proof plastic, this style comes with belt tabs and usually snaps
to the skin barrier with a flange mechanism. Newer two-piece pouches have
an adhesive coupling. The pouch sticks to the wafer, allowing greater
flexibility and comfort.
Reusable pouching system
Typically manufactured from sturdy, opaque, hypoallergenic plastic, the
reusable pouch comes with a separate, custom-made faceplate and O-ring.
The device has a 1- to 3-month life span, depending on how frequently the
patient empties the pouch. Reusable equipment may benefit a patient who
needs a firm faceplate, has sensitivity to any type of adhesive, or wishes to
minimize cost.
Caring for the patient with a
continent urinary diversion
With a continent urinary diversion, an alternative to the traditional ileal
conduit, a pouch created from the ascending colon and terminal ileum serves
as a new bladder, which empties through a stoma. To drain urine
continuously, several drains are inserted into this reconstructed bladder by
the practitioner and left in place for 3 to 6 weeks until the new stoma heals.
First hospitalization care
■ Immediately after surgery, monitor intake and output from each drain. Be
alert for decreased output, which may indicate that urine flow is obstructed.
■ Watch for common postoperative complications, such as infection or
bleeding. Also watch for signs of urinary leakage, which include increased
abdominal distention and urine appearing around the drains or midline
incision.
■ Irrigate the drains as ordered.
■ Perform hand hygiene2,3,4,5,6,7 and put on gloves.15,16 Clean the area
around the drains daily, first with an antiseptic swab and then with sterile
water. Apply a dry, sterile dressing to the area. Use precut 4′′ × 4′′ (10-cm ×
10-cm) drain dressings around the drains to absorb leakage.
■ To increase the patient’s mobility and comfort, connect the drains to a leg
bag.
Second hospitalization or outpatient care
■ After the patient’s drains are removed by the practitioner, teach the
patient how to catheterize the stoma. Begin by gathering the following
equipment on a clean towel: latex-free catheter (usually #14 or #16 French),
water-soluble lubricant, washcloth, towel, urine-collection container, and an
irrigating solution (optional).
■ Apply water-soluble lubricant to the catheter tip to facilitate insertion.
■ Remove and discard the stoma cover. Using the washcloth and water,
clean the stoma and the area around it, starting at the stoma and working
outward in a circular motion. Dry the area thoroughly with a towel.
■ Hold the urine-collection container under the catheter, then slowly insert
the catheter into the stoma. Urine should begin to flow into the container. If it
doesn’t, gently rotate the catheter or redirect its angle. If the catheter drains
slowly, it may be plugged with mucus. Irrigate it with sterile saline solution or
sterile water to clear it. When the flow stops, pinch the catheter closed and
remove it.
PATIENT TEACHING
Home care for the patient with a
continent urinary diversion
The patient will be discharged from the health care facility with the drains in
place and must return after 3 to 6 weeks to have them removed and to learn
to catheterize the stoma.
■ Explain that the stoma is commonly swollen in the initial postoperative
period, and that its size will gradually reduce over 6 to 8 weeks.
■ Teach the patient how to care for the drains and their insertion sites during
the 3 to 6 weeks the patient will be at home before their removal, and teach
the patient how to attach them to a leg bag. Also teach the patient how to
recognize the signs and symptoms of infection and obstruction.
■ After the drains are removed, teach the patient how to empty the pouch,
and establish a schedule. Initially, the patient should catheterize the stoma
and empty the pouch every 2 to 3 hours. Later, the patient should
catheterize every 4 hours while awake and also irrigate the pouch each
morning and evening, if ordered. Instruct the patient to empty the pouch
whenever the patient feels a sensation of fullness.
■ Tell the patient that the catheters are reusable, but only after they’ve been
cleaned. The patient should clean the catheter thoroughly with warm, soapy
water; rinse it thoroughly; and hang it to dry over a clean towel. The patient
should store cleaned and dried catheters in plastic bags. Tell that patient to
reuse catheters for up to 1 month before discarding them. However, the
patient should immediately discard any catheter that becomes discolored or
cracked.
■ Provide a contact telephone number for acute problems or questions.
■ Provide the patient with information on what to do when such problems as
odor, urinary tract infection, and leakage occur.
■ Explain that mucus is a normal finding, and tell the patient what to do
when there is more mucus than is normally observed.
■ Explain that the stoma can bleed easily on contact.
■ Discuss with the patient how to manage the stoma while performing
activities of daily living, such as bathing, dressing, traveling, working,
engaging in hobbies, and sexual activity.23
REFERENCES
1 Wound, Ostomy and Continence Nurses Society (WOCN). (2012). Basic
ostomy skin care: A guide for patients and health care providers. Mt. Laurel,
NJ: WOCN. Accessed via the Web at https://www.ostomy.org/wp-
content/uploads/2018/01/wocn_basic_ostomy_skin_care_2012.pdf
2 The Joint Commission. (2019). Standard NPSG.07.01.01. Comprehensive
accreditation manual for hospitals. Oakbrook Terrace, IL: The Joint
Commission. (Level VII)
3 Centers for Disease Control and Prevention. (2002). Guideline for hand
hygiene in health-care settings: Recommendations of the Healthcare Infection
Control Practices Advisory Committee and the HICPAC/SHEA/APIC/IDSA Hand
Hygiene Task Force. MMWR Recommendations and Reports, 51(RR-16), 1–45.
Accessed via the Web at https://www.cdc.gov/mmwr/pdf/rr/rr5116.pdf (Level
II)
4 World Health Organization. (2009). “WHO guidelines on hand hygiene in
health care: First global patient safety challenge, clean care is safer care”
[Online]. Accessed via the Web at
http://apps.who.int/iris/bitstream/10665/44102/1/9789241597906_eng.pdf
(Level IV)
5 Accreditation Association for Hospitals and Health Systems. (2017). Standard
07.01.21. Healthcare Facilities Accreditation Program: Accreditation
requirements for acute care hospitals. Chicago, IL: Accreditation Association
for Hospitals and Health Systems. (Level VII)
6 Centers for Medicare and Medicaid Services, Department of Health and
Human Services. (2015). Condition of participation: Infection control. 42 C.F.R.
§ 482.42.
7 DNV GL-Healthcare USA, Inc. (2016). IC.1.SR.1 . NIAHO® accreditation
requirements: Interpretive guidelines & surveyor guidance (version 11).
Milford, OH: DNV GL-Healthcare USA, Inc. (Level VII)
8 The Joint Commission. (2019). Standard NPSG.01.01.01. Comprehensive
accreditation manual for hospitals. Oakbrook Terrace, IL: The Joint
Commission. (Level VII)
9 The Joint Commission. (2019). Standard RI.01.01.01. Comprehensive
accreditation manual for hospitals. Oakbrook Terrace, IL: The Joint
Commission. (Level VII)
10 DNV GL-Healthcare USA, Inc. (2016). PR.1.SR.5 . NIAHO® accreditation
requirements: Interpretive guidelines & surveyor guidance (version 11).
Milford, OH: DNV GL-Healthcare USA, Inc. (Level VII)
11 Centers for Medicare and Medicaid Services, Department of Health and
Human Services. (2015). Condition of participation: Patient’s rights. 42 C.F.R.
§ 482.13(c)(1).
12 Accreditation Association for Hospitals and Health Systems. (2017). Standard
15.01.16. Healthcare Facilities Accreditation Program: Accreditation
requirements for acute care hospitals. Chicago, IL: Accreditation Association
for Hospitals and Health Systems. (Level VII)
13 The Joint Commission. (2019). Standard PC.02.01.21. Comprehensive
accreditation manual for hospitals. Oakbrook Terrace, IL: The Joint
Commission. (Level VII)
14 Waters, T. R., et al. (2009, revised 2017). “Safe patient handling training for
schools of nursing” [Online]. Accessed via the Web at
https://www.cdc.gov/niosh/docs/2009-127/pdfs/2009-127.pdf (Level VII)
15 Siegel, J. D ., et al. (2007, revised 2017). “2007 guideline for isolation
precautions: Preventing transmission of infectious agents in healthcare
settings” [Online]. Accessed via the Web at
https://www.cdc.gov/infectioncontrol/pdf/guidelines/isolation-guidelines.pdf
(Level II)
16 Accreditation Association for Hospitals and Health Systems. (2017). Standard
07.01.10. Healthcare Facilities Accreditation Program: Accreditation
requirements for acute care hospitals. Chicago, IL: Accreditation Association
for Hospitals and Health Systems. (Level VII)
17 Occupational Safety and Health Administration. (n.d .). “Bloodborne
pathogens, standard number 1910.1030” [Online]. Accessed via the Web at
https://www.osha.gov/pls/oshaweb/owadisp.show_document?
p_id=10051&p_table=STANDARDS (Level VII)
18 Ganz, D. A., et al. (2013). Preventing falls in hospitals: A toolkit for improving
quality of care (AHRQ Publication No. 13-0015-EF). Rockville, MD: Agency for
Healthcare Research and Quality. Accessed via the Web at
http://www.ahrq.gov/sites/default/files/publications/files/fallpxtoolkit.pdf
(Level VII)
19 The Joint Commission. (2019). Standard RC.01.03 .01. Comprehensive
accreditation manual for hospitals. Oakbrook Terrace, IL: The Joint
Commission. (Level VII)
20 Accreditation Association for Hospitals and Health Systems. (2017). Standard
10.00 .03. Healthcare Facilities Accreditation Program: Accreditation
requirements for acute care hospitals. Chicago, IL: Accreditation Association
for Hospitals and Health Systems. (Level VII)
21 Centers for Medicare and Medicaid Services, Department of Health and
Human Services. (2015). Condition of participation: Medical record services.
42 C.F.R. § 482.24(b).
22 DNV GL-Healthcare USA, Inc. (2016). MR.2 .SR.1 . NIAHO® accreditation
requirements: Interpretive guidelines & surveyor guidance (version 11).
Milford, OH: DNV GL-Healthcare USA, Inc. (Level VII)
23 National Institute of Diabetes and Digestive and Kidney Diseases. (2013).
“Urinary diversion” [Online]. Accessed via the Web at
http://kidney.niddk.nih.gov/KUdiseases/pubs/urostomy/index.aspx
24 Szymanski, K. M., et al. (2010). External stoma and peristomal complications
following radical cystectomy and ileal conduit diversion: A systematic review.
Ostomy Wound Management, 56(1), 28–35. (Level I)
URINE COLLECTION, 12- OR 24-HOUR TIMED
Because hormones, proteins, and electrolytes are excreted
in small, variable amounts in urine, specimens for
measuring these substances must typically be collected
over an extended period to yield quantities of diagnostic
value. A 24 -hour specimen is used most commonly because
it provides an average excretion rate for substances
eliminated during this period. Timed specimens may also be
collected for shorter periods, such as 12 hours, depending
on the specific information needed.
All urine voided within the prescribed time period is
collected in a suitable collection container. Depending on
the intended test, a preservative may be added to the
specimen collection container, and the specimen may need
to be kept refrigerated or on ice.1
Equipment
24-hour urine specimen collection container ▪ gloves ▪
specimen label ▪ laboratory biohazard transport bag ▪
patient-care reminders ▪ Optional: preservative, specimen
collection hat, ice-filled basin, graduated collection
container, bedpan, urinal, bedside commode, laboratory
request form.
Implementation
■ Verify the practitioner’s order for urine specimen
collection.
■ Check with the laboratory to determine the proper
container and preservative (if needed) for the ordered test.1
■ Gather and prepare the equipment. If preservative is
needed, check the expiration date on the preservative
container and add the preservative to the specimen
container.1
■ Perform hand hygiene.2,3,4,5,6,7
■ Confirm the patient’s identity using at least two patient
identifiers.8
■ Label the specimen container in the presence of the
patient to help prevent mislabeling.8 The label should
include the patient’s name and identification number, the
date, the start time of the collection, the time the collection
should end, the test ordered, any other pertinent
information, and your initials.1
■ Provide privacy.9,10,11,12
■ Explain the procedure to the patient and family members
(if appropriate) according to their individual communication
and learning needs to help increase their understanding,
allay their fears, enhance cooperation, and prevent
accidental disposal of urine during the collection period.13
Emphasize that failure to collect even one specimen during
the collection period invalidates the test and requires that it
be started over.
■ If you are collecting a voided specimen, explain that the
patient should empty the bladder just before the 12- or 24-
hour collection period begins, and that this specimen will be
discarded. Explain that the patient should save and store all
urine voided during the 12- or 24-hour collection period in
one specimen collection container.1 Instruct the patient to
notify you after each void and to avoid contaminating the
urine with stool or toilet tissue.1
■ Instruct the patient to avoid exercise and ingestion of
coffee, tea, and drugs (unless directed otherwise by the
practitioner) right before and during the test to avoid
altering test results. Make sure that the patient understands
the instructions and is willing to comply with the
restrictions.
■ Place patient-care reminders over the patient’s bed, in
the bathroom, and on the urinal, bedpan, bedside
commode, or indwelling catheter collection bag. Include the
date and the collection interval.1
Collecting a voided specimen
■ If the patient is using the bathroom toilet, place a
specimen collection hat in the toilet bowl to collect and
measure urine.
■ At the beginning of the collection period, ask the patient
to void.
■ Perform hand hygiene2,3,4,5,6,7 and then put on gloves to
comply with standard precautions.14,15
■ Measure the amount of urine using a graduated collection
container, if output is being recorded.
■ Discard the urine specimen so that the patient starts the
collection period with an empty bladder.
■ Note the time as the beginning time for the collection
period.
■ Remove and discard your gloves.
■ Perform hand hygiene.2,3,4,5,6,7
■ After each time the patient voids during the collection
period, perform hand hygiene2,3,4,5,6,7 and put on
gloves.14,15 Measure the amount of urine, if output is to be
recorded. Pour the urine specimen to be saved into the
specimen collection container. Then remove and discard
your gloves and perform hand hygiene.2,3,4,5,6,7
■ Keep the specimen collection container refrigerated or on
ice to preserve the specimen, as appropriate.
■ At the end of the collection period, perform hand
hygiene2,3,4,5,6,7 and put on gloves.14,15 Instruct the patient
to void again, if possible, and add this final specimen to the
collection container.1 Note the ending time on the specimen
label.
Collecting an indwelling urinary catheter
specimen
■ Perform hand hygiene2,3,4,5,6,7 and put on gloves to
comply with standard precautions.14,15
■ Empty the drainage bag. During emptying, avoid
splashing, and don’t allow the drainage spigot to come in
contact with the nonsterile container to help reduce the risk
of catheter-associated urinary tract infections.16,17,18,19,20,21
HOSPITAL-ACQUIRED CONDITION ALERT Keep in mind that the
Centers for Medicare and Medicaid Services has identified catheter-
associated urinary tract infection (CAUTI) as a hospital-acquired
condition, because it can be prevented reasonably using best
practices. Make sure to follow CAUTI prevention practices (such as
performing hand hygiene before and after any catheter manipulation;
maintaining a sterile, continuously closed drainage system;
maintaining unobstructed urine flow; emptying the urine collection
bag regularly; replacing the catheter and urine collection system
using sterile technique when breaks in sterile technique,
disconnection, or leakage occur; and discontinuing the catheter as
soon as it’s no longer indicated clinically) when caring for a patient
with an indwelling urinary catheter to help reduce the risk of
CAUTI.16,17,18,19,22,23
■ Measure the amount of urine if output is being recorded.
■ Discard all the urine.
■ Note the time as the beginning time for the collection
period.
■ Put the urine drainage bag in an ice-filled basin at the
bedside.
■ Remove and discard your gloves.
■ At regular intervals during the collection period, perform
hand hygiene2,3,4,5,6,7 and put on gloves to comply with
standard precautions.14,15 Empty the urine drainage bag.
Measure the amount of urine, if output is being recorded.
Pour the urine specimen to be saved into the specimen
collection container. Remove and discard your gloves and
perform hand hygiene.2,3,4,5,6,7
■ Keep the collection container refrigerated or on ice to
preserve the specimen, as appropriate.
■ At the end of the collection period, perform hand
hygiene2,3,4,5,6,7 and put on gloves to comply with standard
precautions.14,15 Collect the remaining urine from the
indwelling urinary catheter collection bag. If recording
output, measure the volume of urine, and then add this final
specimen to the collection container. Note the ending time
on the specimen label.
Completing the procedure
■ Place the specimen collection container in an approved
laboratory biohazard transport container.24
■ Remove and discard your gloves.
■ Perform hand hygiene.2,3,4,5,6,7
■ Immediately send the container to the laboratory with a
properly completed laboratory request form, if required by
your facility.24
■ Remove the patient-care reminders, and inform the
patient and family that the specimen collection period is
complete.
■ Perform hand hygiene.2,3,4,5,6,7
■ Document the procedure.25,26,27,28
Special considerations
■ If appropriate, keep the patient well hydrated before and
during the test to ensure adequate urine flow.
■ Never store a specimen in a refrigerator that contains
food or medication to avoid contamination.
■ If a urine specimen is accidentally discarded during the
collection period, restart the procedure. Emphasize the need
to save all of the patient’s urine during the collection period
to everyone involved in the patient’s care as well as to the
patient, family, and other visitors.
■ If the patient is menstruating, postpone the test to avoid
specimen contamination.
Patient teaching
If the patient must collect urine at home, provide written
instructions for the appropriate method. Instruct the patient
to keep the collection container in a brown bag in a
refrigerator at home, separate from other refrigerator
contents.
Documentation
Record the date, time, and method of collection. Also record
the name of the test, the amount of urine collected (if
necessary), and the time of specimen transport to the
laboratory. Note teaching provided to the patient and family
and their response to it.
REFERENCES
1 Fischbach, F., & Dunning, M. B. (2017). A manual of laboratory and diagnostic
tests (10th ed.) . Philadelphia, PA: Wolters Kluwer.
2 The Joint Commission. (2019). Standard NPSG.07.01.01. Comprehensive
accreditation manual for hospitals. Oakbrook Terrace, IL: The Joint
Commission. (Level VII)
3 World Health Organization. (2009). “WHO guidelines on hand hygiene in
health care: First global patient safety challenge, clean care is safer care”
[Online]. Accessed via the Web at
http://apps.who.int/iris/bitstream/10665/44102/1/9789241597906_eng.pdf
(Level IV)
4 Centers for Disease Control and Prevention. (2002). Guideline for hand
hygiene in health-care settings: Recommendations of the Healthcare Infection
Control Practices Advisory Committee and the HICPAC/SHEA/APIC/IDSA Hand
Hygiene Task Force. MMWR Recommendations and Reports, 51(RR-16), 1–45.
Accessed via the Web at https://www.cdc.gov/mmwr/pdf/rr/rr5116.pdf (Level
II)
5 Centers for Medicare and Medicaid Services, Department of Health and
Human Services. (2015). Condition of participation: Infection control. 42 C.F.R.
§ 482.42.
6 Accreditation Association for Hospitals and Health Systems. (2017). Standard
07.01.21. Healthcare Facilities Accreditation Program: Accreditation
requirements for acute care hospitals. Chicago, IL: Accreditation Association
for Hospitals and Health Systems. (Level VII)
7 DNV GL-Healthcare USA, Inc. (2016). IC.1.SR.1 . NIAHO® accreditation
requirements: Interpretive guidelines & surveyor guidance (version 11).
Milford, OH: DNV GL-Healthcare USA, Inc. (Level VII)
8 The Joint Commission. (2019). Standard NPSG.01.01.01. Comprehensive
accreditation manual for hospitals. Oakbrook Terrace, IL: The Joint
Commission. (Level VII)
9 Centers for Medicare and Medicaid Services, Department of Health and
Human Services. (2015). Condition of participation: Patient’s rights. 42 C.F.R.
§ 482.13(c)(1).
10 Accreditation Association for Hospitals and Health Systems. (2017). Standard
15.01.16. Healthcare Facilities Accreditation Program: Accreditation
requirements for acute care hospitals. Chicago, IL: Accreditation Association
for Hospitals and Health Systems. (Level VII)
11 The Joint Commission. (2019). Standard RI.01.01.01. Comprehensive
accreditation manual for hospitals. Oakbrook Terrace, IL: The Joint
Commission. (Level VII)
12 DNV GL-Healthcare USA, Inc. (2016). PR.1.SR.5 . NIAHO® accreditation
requirements: Interpretive guidelines & surveyor guidance (version 11).
Milford, OH: DNV GL-Healthcare USA, Inc. (Level VII)
13 The Joint Commission. (2019). Standard PC.02.01.21. Comprehensive
accreditation manual for hospitals. Oakbrook Terrace, IL: The Joint
Commission. (Level VII)
14 Siegel, J. D ., et al. (2007, revised 2017). “2007 guideline for isolation
precautions: Preventing transmission of infectious agents in healthcare
settings” [Online]. Accessed via the Web at
https://www.cdc.gov/infectioncontrol/pdf/guidelines/isolation-guidelines.pdf
(Level II)
15 Accreditation Association for Hospitals and Health Systems. (2017). Standard
07.01.10. Healthcare Facilities Accreditation Program: Accreditation
requirements for acute care hospitals. Chicago, IL: Accreditation Association
for Hospitals and Health Systems. (Level VII)
16 Lo, E., et al. (2014). SHEA/IDSA practice recommendation: Strategies to
prevent catheter-associated urinary tract infections in acute care hospitals:
2014 update. Infection Control and Hospital Epidemiology, 35(5), 464–479.
Accessed via the Web at http://www.jstor.org/stable/10.1086/675718 (Level I)
17 Accreditation Association for Hospitals and Health Systems. (2017). Standard
07.01.02. Healthcare Facilities Accreditation Program: Accreditation
requirements for acute care hospitals. Chicago, IL: Accreditation Association
for Hospitals and Health Systems. (Level VII)
18 The Joint Commission. (2019). Standard NPSG.07.06 .01. Comprehensive
accreditation manual for hospitals. Oakbrook Terrace, IL: The Joint
Commission. (Level VII)
19 Healthcare Infection Control Practices Advisory Committee. (2010, revised
2017). “Guideline for prevention of catheter-associated urinary tract
infections 2009” [Online]. Accessed via the Web at
https://www.cdc.gov/infectioncontrol/pdf/guidelines/cauti-guidelines.pdf
(Level I)
20 Society of Urologic Nurses and Associates. (2016). Clinical practice
guidelines: Prevention & control of catheter-associated urinary tract infection
(CAUTI). Pittman, NJ: Society of Urologic Nurses and Associates. Accessed via
the Web at https://www.suna.org/download/cautiGuideline (Level VII)
21 Khanh, D. L. (2016). Urinary drainage bags: Emptying, changing and
securing. South Australia: The Joanna Briggs Institute. (Level V)
22 Association of Professionals in Infection Control and Epidemiology (APIC).
(2014). “APIC Implementation Guide: Guide to preventing catheter-associated
urinary tract infections” [Online]. Accessed via the Web at
http://apic.org/Resource_/EliminationGuideForm/6473ab9b-e75c-457a-8d0f-
d57d32bc242b/File/APIC_CAUTI_web_0603 .pdf (Level IV)
23 Jarrett, N., & Callaham, M. (2016). “Evidence-based guidelines for selected
hospital-acquired conditions: Final report” [Online]. Accessed via the Web at
https://www.cms.gov/Medicare/Medicare-Fee-for-Service-
Payment/HospitalAcqCond/Downloads/2016-HAC-Report.pdf
24 Occupational Safety and Health Administration. (n.d .). “Bloodborne
pathogens, standard number 1910.1030” [Online]. Accessed via the Web at
https://www.osha.gov/pls/oshaweb/owadisp.show_document?
p_id=10051&p_table=STANDARDS (Level VII)
25 The Joint Commission. (2019). Standard RC.01.03 .01. Comprehensive
accreditation manual for hospitals. Oakbrook Terrace, IL: The Joint
Commission. (Level VII)
26 Centers for Medicare and Medicaid Services, Department of Health and
Human Services. (2015). Condition of participation: Medical record services.
42 C.F.R. § 482.24(b).
27 Accreditation Association for Hospitals and Health Systems. (2017). Standard
10.00 .03. Healthcare Facilities Accreditation Program: Accreditation
requirements for acute care hospitals. Chicago, IL: Accreditation Association
for Hospitals and Health Systems. (Level VII)
28 DNV GL-Healthcare USA, Inc. (2016). MR.2 .SR.1 . NIAHO® accreditation
requirements: Interpretive guidelines & surveyor guidance (version 11).
Milford, OH: DNV GL-Healthcare USA, Inc. (Level VII)
URINE GLUCOSE AND KETONE TESTS
Glucose and ketones aren’t normally found in urine,1 so
their presence signifies an underlying cause. Reagent strip
tests help monitor urine glucose and ketone levels and
screen for diabetes. Urine ketone tests monitor fat
metabolism, help diagnose carbohydrate deprivation and
diabetic ketoacidosis, and help distinguish between diabetic
and nondiabetic coma. Urine glucose testing isn’t as
accurate as blood glucose testing,2 and should be used only
when blood glucose testing isn’t available.3
Glucose oxidase tests (such as Diastix and Clinistix strips)
produce color changes when patches of reagents implanted
in handheld plastic strips react with glucose in the patient’s
urine. Urine ketone strip tests (such as Keto-Diastix and
Ketostix) work similarly. Test results are read by comparing
color changes with a standardized reference chart.
Equipment
Clean-catch urine collection kit ▪ urine specimen container
▪ gloves ▪ glucose or ketone test strips ▪ timer, or watch or
clock with second hand ▪ reference color chart.
Preparation of equipment
Check the expiration date on the reagent strips and discard
them if they’re expired. Allow time for refrigerated items,
including reagents and patient specimens, to reach room
temperature before testing, if specified in the product insert.
Check and record lot numbers for test kits, test devices, and
controls. (Don’t mix reagents from different products or lot
numbers. If you’re using a new lot, set up quality control, as
needed, and refer to the product insert for changes in
control ranges.) Visually inspect reagent vials and the strips
within them for damage, discoloration, and contamination.
Prepare and store reagents according to the manufacturer’s
instructions. If opening a new reagent strip vial or kit, write
the date opened on the outside of the vial or test kit.4,5
Implementation
■ Verify the practitioner’s order.
■ Gather and prepare the appropriate equipment.
■ Check the patient’s history for medications that may
interfere with test results.
■ Perform hand hygiene.6,7,8,9,10,11
■ Confirm the patient’s identity using at least two patient
identifiers.12
■ Provide privacy.13,14,15,16
■ Explain the procedure to the patient to allay fears and
enhance cooperation.
■ Provide the patient with a specimen container, and
instruct the patient to collect a clean-catch, midstream urine
specimen. (See the “Urine specimen collection” procedure,
page 811.)
■ Put on gloves.17,18
■ Test the urine specimen immediately after the patient
voids.
Glucose oxidase strip tests
■ If you’re using a Clinistix strip, dip the reagent end of the
strip into the urine specimen for 2 seconds. Remove excess
urine by tapping the strip against the container’s rim, wait
for exactly 10 seconds, and then compare its color with the
standardized color chart on the test strip container. Ignore
color changes that occur after 10 seconds. Record the
result.
■ If you’re using a Diastix strip, dip the reagent end of the
strip into the urine specimen for 2 seconds. Remove excess
urine by tapping the strip against the container’s rim, wait
for exactly 30 seconds, and then compare the strip’s color
with the standardized color chart on the test strip container.
Ignore color changes that occur after 30 seconds. Record
the result.
Ketone strip tests
■ If you’re using a Ketostix strip, dip the reagent end of the
strip into the urine specimen and remove it immediately.
Wait exactly 15 seconds, and then compare the color of the
strip with the standardized color chart on the test strip
container. Ignore color changes that occur after 15 seconds.
Record the result.
■ If you’re using a Keto-Diastix strip, dip the reagent end of
the strip into the urine specimen and remove it immediately.
Remove excess urine by tapping the strip against the
container’s rim, and hold the strip horizontally to prevent
mixing of chemicals between the two reagent squares. Wait
exactly 15 seconds, and then compare the color of the
ketone part of the strip with the standardized color chart on
the test strip container. After 30 seconds, compare the color
of the glucose part of the strip with the color chart. Record
the result.
NURSING ALERT Always be sure to read results during the correct
timeframe, especially if you’re conducting more than one test at a
time. Time intervals longer than those specified in the product insert
can result in false-positive, false-negative, or invalid results because
of exaggerated color development, fading of reaction products, and
migration beyond a visible range.5
Completing the procedure
■ Measure and record the amount of urine collected if the
patient’s intake and output is being monitored.
■ Discard the urine specimen, specimen container, and
reagent strips in appropriate receptacles.19
■ Remove and discard your gloves.17,18
■ Perform hand hygiene.6,7,8,9,10,11
■ Document the procedure and the test results.20,21,22,23
Notify the practitioner of critical test results within your
facility’s established time frame so the patient can be
promptly treated.24
Special considerations
■ If you’re testing a refrigerated urine specimen, allow it to
warm to room temperature and mix the specimen before
testing.25
■ Agents containing free sulfhydryl groups can cause
interference with ketone detection.1
■ Highly pigmented urine can result in false-positive
results.1
■ Improper specimen or test strip storage may result in
false-negative results.1
Documentation
Record the test results according to the information on the
reagent containers, or use a flowchart designed to record
this information. Indicate whether the practitioner was
notified of the test results. If you’re teaching a patient how
to perform the test, keep a record of the patient’s progress.
Also, record any treatment given as a result of the testing.
REFERENCES
1 Dumonceaux, M., & Gamez, M. (2016). Rediscovering urine chemistry—and
understanding its limitations. Medical Laboratory Observer, 48, 12–14 .
Accessed via Web at http://www.mlo-online.com/rediscovering-urine-
chemistry%e2%80%94and-understanding-its-limitations
2 Kuru, B., et al. (2014). Comparing finger-stick β-hydroxybutyrate with dipstick
urine tests in the detection of ketone bodies. Turkish Journal of Emergency
Medicine, 14(2), 47–52. (Level IV)
3 Klocker, A. A., et al. (2013). Blood β-hydroxybutyrate vs. urine acetoacetate
testing for the prevention and management of ketoacidosis in type 1
diabetes: A systematic review. Diabetic Medicine, 30(7), 818–824.
4 Chernecky, C. C ., & Berger, B. J . (2013). Laboratory tests and diagnostic
procedures (6th ed.) . St. Louis, MO: Saunders.
5 Centers for Disease Control and Prevention. (2005). Good laboratory practices
for waived testing sites: Survey findings from testing sites holding a
certificate of waiver under the Clinical Laboratory Improvement Amendments
of 1988 and Recommendations for Promoting Quality Testing. MMWR
Recommendations and Reports, 54(RR-13), 1–25 . Accessed via the Web at
https://www.cdc.gov/mmwr/PDF/rr/rr5413.pdf (Level II)
6 The Joint Commission. (2019). Standard NPSG.07.01.01. Comprehensive
accreditation manual for hospitals. Oakbrook Terrace, IL: The Joint
Commission. (Level VII)
7 Centers for Disease Control and Prevention. (2002). Guideline for hand
hygiene in health-care settings: Recommendations of the Healthcare Infection
Control Practices Advisory Committee and the HICPAC/SHEA/APIC/IDSA Hand
Hygiene Task Force. MMWR Recommendations and Reports, 51(RR-16), 1–45.
Accessed via the Web at https://www.cdc.gov/mmwr/pdf/rr/rr5116.pdf (Level
II)
8 World Health Organization. (2009). “WHO guidelines on hand hygiene in
health care: First global patient safety challenge, clean care is safer care”
[Online]. Accessed via the Web at
http://apps.who.int/iris/bitstream/10665/44102/1/9789241597906_eng.pdf
(Level IV)
9 Centers for Medicare and Medicaid Services, Department of Health and
Human Services. (2015). Condition of participation: Infection control. 42 C.F.R.
§ 482.42.
10 Accreditation Association for Hospitals and Health Systems. (2017). Standard
07.01.21. Healthcare Facilities Accreditation Program: Accreditation
requirements for acute care hospitals. Chicago, IL: Accreditation Association
for Hospitals and Health Systems. (Level VII)
11 DNV GL-Healthcare USA, Inc. (2016). IC.1 .SR.1 . NIAHO® accreditation
requirements: Interpretive guidelines & surveyor guidance (version 11).
Milford, OH: DNV GL-Healthcare USA, Inc. (Level VII)
12 The Joint Commission. (2019). Standard NPSG.01.01.01. Comprehensive
accreditation manual for hospitals. Oakbrook Terrace, IL: The Joint
Commission. (Level VII)
13 DNV GL-Healthcare USA, Inc. (2016). PR.1.SR.5 . NIAHO® accreditation
requirements: Interpretive guidelines & surveyor guidance (version 11).
Milford, OH: DNV GL-Healthcare USA, Inc. (Level VII)
14 Centers for Medicare and Medicaid Services, Department of Health and
Human Services. (2015). Condition of participation: Patient’s rights. 42 C.F.R.
§ 482.13(c)(1).
15 Accreditation Association for Hospitals and Health Systems. (2017). Standard
15.01.16. Healthcare Facilities Accreditation Program: Accreditation
requirements for acute care hospitals. Chicago, IL: Accreditation Association
for Hospitals and Health Systems. (Level VII)
16 The Joint Commission. (2019). Standard RI.01.01.01. Comprehensive
accreditation manual for hospitals. Oakbrook Terrace, IL: The Joint
Commission. (Level VII)
17 Accreditation Association for Hospitals and Health Systems. (2017). Standard
07.01.10. Healthcare Facilities Accreditation Program: Accreditation
requirements for acute care hospitals. Chicago, IL: Accreditation Association
for Hospitals and Health Systems. (Level VII)
18 Siegel, J. D ., et al. (2007, revised 2017). “2007 guideline for isolation
precautions: Preventing transmission of infectious agents in healthcare
settings” [Online]. Accessed via the Web at
https://www.cdc.gov/infectioncontrol/pdf/guidelines/isolation-guidelines.pdf
(Level II)
19 Occupational Safety and Health Administration. (n.d .). “Bloodborne
pathogens, standard number 1910.1030” [Online]. Accessed via the Web at
https://www.osha.gov/pls/oshaweb/owadisp.show_document?
p_id=10051&p_table=STANDARDS (Level VI)
20 The Joint Commission. (2019). Standard RC.01.03 .01. Comprehensive
accreditation manual for hospitals. Oakbrook Terrace, IL: The Joint
Commission. (Level VII)
21 Centers for Medicare and Medicaid Services, Department of Health and
Human Services. (2015). Condition of participation: Medical record services.
42 C.F.R. § 482.24(b).
22 Accreditation Association for Hospitals and Health Systems. (2017). Standard
10.00 .03. Healthcare Facilities Accreditation Program: Accreditation
requirements for acute care hospitals. Chicago, IL: Accreditation Association
for Hospitals and Health Systems. (Level VII)
23 DNV GL-Healthcare USA, Inc. (2016). MR.2 .SR.1 . NIAHO® accreditation
requirements: Interpretive guidelines & surveyor guidance (version 11).
Milford, OH: DNV GL-Healthcare USA, Inc. (Level VII)
24 The Joint Commission. (2019). Standard NPSG.02.03 .01. Comprehensive
accreditation manual for hospitals. Oakbrook Terrace, IL: The Joint
Commission. (Level VII)
25 Fischbach, F., & Dunning, M. B . (2017). A manual of laboratory and diagnostic
tests (10th ed.) . Philadelphia, PA: Wolters Kluwer.
URINE PH
The pH of urine—its alkalinity or acidity—reflects the
kidneys’ ability to maintain a normal hydrogen ion
concentration in plasma and extracellular fluids. The normal
hydrogen ion concentration in urine varies, ranging from 4.6
to 8, but it usually averages around a pH of 6.1,2
The simplest procedure for testing the pH of urine consists
of dipping a reagent strip (such as Combistix) into a fresh
specimen of the patient’s urine and comparing the resulting
color change with a standardized color chart.
An alkaline pH (above 7) may result from a diet low in
meat but high in vegetables, dairy products, and citrus
fruits.3 Alkaline urine causes turbidity and the formation of
phosphate, carbonate, and amorphous crystals. Alkaline
urine may also result from urinary tract infection (UTI) with
urease-producing bacteria, gastric suctioning, vomiting,
hyperventilation, and metabolic or respiratory alkalosis.1,3
An acid pH (below 7), which may result from a high-
protein diet and a diet high in cranberries, also causes
turbidity as well as the formation of oxalate, cystine,
amorphous urate, and uric acid crystals. Acidic urine may
also result from renal tuberculosis, phenylketonuria,
alkaptonuria, pyrexia, diarrhea, starvation, diabetic
ketoacidosis, kidney failure, and all forms of acidosis.1,3 Low
urine pH is also associated with insulin resistance and
metabolic syndrome.4
Measuring urine pH can also help monitor some
medications—including methenamine, ammonium chloride,
and such diuretics as thiazides—that are active only at
certain pH levels.
Equipment
Clean-catch kit urine collection kit ▪ urine specimen
container ▪ gloves ▪ reagent strips that include pH
indicators ▪ reference color chart.
Preparation of equipment
Check the expiration dates on the reagent strips and discard
them if they’re expired. Allow time for refrigerated items,
including reagents and patient specimens, to reach room
temperature before testing, if specified in the product insert.
Check and record lot numbers for test kits, test devices, and
controls. (Don’t mix reagents from different products or lot
numbers. If you’re using a new lot, set up quality control, as
needed, and refer to the product insert for changes in
control ranges.) Visually inspect the reagent vials and the
strips within them for damage, discoloration, and
contamination. Prepare and store reagents strips according
to the manufacturer’s instructions. If opening a new reagent
strip vial or kit, write the date opened on the outside of the
vial or test kit.5,6
Implementation
■ Verify the practitioner’s order, if required.
■ Gather and prepare the appropriate equipment.
■ Perform hand hygiene.7,8,9,10,11,12
■ Confirm the patient’s identity using at least two patient
identifiers.13
■ Provide privacy.14,15,16,17
■ Explain the procedure to the patient to allay fears and
enhance cooperation.
■ Put on gloves.18,19
■ Provide the patient with a urine specimen container and
instruct the patient to collect a clean-catch midstream
specimen. (See the “Urine specimen collection” procedure,
page 811.)
■ Dip the reagent strip into the urine, remove it, and tap
the reagent strip against the container’s rim to remove
excess urine.
■ While holding the strip horizontally to avoid mixing
reagents from adjacent test areas on the strip, compare the
color on the strip with the standardized color chart on the
strip package. This comparison can be made up to 60
seconds after immersing the strip.
NURSING ALERT Always be sure to read results during the correct
time frame, especially if conducting more than one test at a time.
Time intervals longer than those specified in the product insert can
result in false-positive, false-negative, or invalid results because of
exaggerated color development, fading of reaction products, and
migration beyond a visible range.5
■ If you’re monitoring the patient’s urinary intake and
output, measure and record the amount of urine collected.
■ Discard the urine specimen, specimen container, and
reagent strip in appropriate receptacles.20
■ Remove and discard your gloves.18,19
■ Perform hand hygiene.7,8,9,10,11,12
■ Document the procedure.21,22,23,24 Notify the practitioner
of critical test results within your facility’s established time
frame so the patient can be promptly treated.25
Special considerations
■ Use only a fresh urine specimen to measure urine pH
because bacterial growth at room temperature changes
urine pH.
■ Avoid letting a drop of urine run onto adjacent reagent
spots on the strip, because the other reagents can change
the pH result.
■ Be aware that urine collected at night is usually more
acidic than urine collected during the day.
Documentation
Record the urine pH measurement test results, the time of
voiding, and the amount of urine voided, if applicable.
Document the date, time, and name of the practitioner
notified of test results, prescribed interventions, and the
patient’s response to those interventions, if applicable.
Document any teaching you provided and the patient’s
comprehension of the teaching.
REFERENCES
1 Wald, R. Urinalysis in the diagnosis of kidney disease (2016). In: UpToDate,
Curhan, G. C., & Forman, J. P. (Eds.). Retrieved from: www.uptodate.com
2 Fischbach, F., & Dunning, M. B. (2017). A manual of laboratory and diagnostic
tests (10th ed.) . Philadelphia, PA: Wolters Kluwer.
3 Dumonceaux, M., & Gamez, M. (2016). Rediscovering urine chemistry—and
understanding its limitations. Medical Laboratory Observer, 48, 12–14 .
Accessed via Web at http://www.mlo-online.com/rediscovering-urine-
chemistry%e2%80%94and-understanding-its-limitations
4 Maalouf, N. M. (2011). Metabolic syndrome and the genesis of uric acid
stones. Journal of Renal Nutrition, 21(1), 128–131.
5 Centers for Disease Control and Prevention. (2005). Good laboratory practices
for waived testing sites: Survey findings from testing sites holding a
certificate of waiver under the Clinical Laboratory Improvement Amendments
of 1988 and Recommendations for Promoting Quality Testing. MMWR
Recommendations and Reports, 54(RR-13), 1–25 . Accessed via the Web at
https://www.cdc.gov/mmwr/PDF/rr/rr5413.pdf (Level II)
6 Chernecky, C. C ., & Berger, B. J . (2013). Laboratory tests and diagnostic
procedures (6th ed.) . St. Louis, MO: Saunders.
7 The Joint Commission. (2019). Standard NPSG.07.01.01. Comprehensive
accreditation manual for hospitals. Oakbrook Terrace, IL: The Joint
Commission. (Level VII)
8 Centers for Disease Control and Prevention. (2002). Guideline for hand
hygiene in health-care settings: Recommendations of the Healthcare Infection
Control Practices Advisory Committee and the HICPAC/SHEA/APIC/IDSA Hand
Hygiene Task Force. MMWR Recommendations and Reports, 51(RR-16), 1–45.
Accessed via the Web at https://www.cdc.gov/mmwr/pdf/rr/rr5116.pdf (Level
II)
9 World Health Organization. (2009). “WHO guidelines on hand hygiene in
health care: First global patient safety challenge, clean care is safer care”
[Online]. Accessed via the Web at
http://apps.who.int/iris/bitstream/10665/44102/1/9789241597906_eng.pdf
(Level IV)
10 Accreditation Association for Hospitals and Health Systems. (2017). Standard
07.01.21. Healthcare Facilities Accreditation Program: Accreditation
requirements for acute care hospitals. Chicago, IL: Accreditation Association
for Hospitals and Health Systems. (Level VII)
11 Centers for Medicare and Medicaid Services, Department of Health and
Human Services. (2015). Condition of participation: Infection control. 42 C.F.R.
§ 482.42.
12 DNV GL-Healthcare USA, Inc. (2016). IC.1 .SR.1 . NIAHO® accreditation
requirements: Interpretive guidelines & surveyor guidance (version 11).
Milford, OH: DNV GL-Healthcare USA, Inc. (Level VII)
13 The Joint Commission. (2019). Standard NPSG.01.01.01. Comprehensive
accreditation manual for hospitals. Oakbrook Terrace, IL: The Joint
Commission. (Level VII)
14 DNV GL-Healthcare USA, Inc. (2016). PR.1.SR.5 . NIAHO® accreditation
requirements: Interpretive guidelines & surveyor guidance (version 11).
Milford, OH: DNV GL-Healthcare USA, Inc. (Level VII)
15 Centers for Medicare and Medicaid Services, Department of Health and
Human Services. (2015). Condition of participation: Patient’s rights. 42 C.F.R.
§ 482.13(c)(1).
16 Accreditation Association for Hospitals and Health Systems. (2017). Standard
15.01.16. Healthcare Facilities Accreditation Program: Accreditation
requirements for acute care hospitals. Chicago, IL: Accreditation Association
for Hospitals and Health Systems. (Level VII)
17 The Joint Commission. (2019). Standard RI.01.01.01. Comprehensive
accreditation manual for hospitals. Oakbrook Terrace, IL: The Joint
Commission. (Level VII)
18 Accreditation Association for Hospitals and Health Systems. (2017). Standard
07.01.10. Healthcare Facilities Accreditation Program: Accreditation
requirements for acute care hospitals. Chicago, IL: Accreditation Association
for Hospitals and Health Systems. (Level VII)
19 Siegel, J. D ., et al. (2007, revised 2017). “2007 guideline for isolation
precautions: Preventing transmission of infectious agents in healthcare
settings” [Online]. Accessed via the Web at
https://www.cdc.gov/hicpac/pdf/isolation/Isolation2007.pdf (Level II)
20 Occupational Safety and Health Administration. (n.d .). “Bloodborne
pathogens, standard number 1910.1030” [Online]. Accessed via the Web at
https://www.osha.gov/pls/oshaweb/owadisp.show_document?
p_id=10051&p_table=STANDARDS (Level VII)
21 The Joint Commission. (2019). Standard RC.01.03 .01. Comprehensive
accreditation manual for hospitals. Oakbrook Terrace, IL: The Joint
Commission. (Level VII)
22 Accreditation Association for Hospitals and Health Systems. (2017). Standard
10.00 .03. Healthcare Facilities Accreditation Program: Accreditation
requirements for acute care hospitals. Chicago, IL: Accreditation Association
for Hospitals and Health Systems. (Level VII)
23 Centers for Medicare and Medicaid Services, Department of Health and
Human Services. (2015). Condition of participation: Medical record services.
42 C.F.R. § 482.24(b).
24 DNV GL-Healthcare USA, Inc. (2016). MR.2 .SR.1 . NIAHO® accreditation
requirements: Interpretive guidelines & surveyor guidance (version 11).
Milford, OH: DNV GL-Healthcare USA, Inc. (Level VII)
25 The Joint Commission. (2019). Standard NPSG.02.03 .01. Comprehensive
accreditation manual for hospitals. Oakbrook Terrace, IL: The Joint
Commission. (Level VII)
URINE SPECIMEN COLLECTION
A random urine specimen is usually collected as part of the
physical examination or at various times during
hospitalization. This specimen permits laboratory screening
for urinary and systemic disorders; it’s also used for drug
screening.
A clean-catch urine specimen is collected using the clean-
catch midstream specimen method; this collection method
is commonly used in place of random specimen collection
because it provides a virtually uncontaminated specimen
without the need for catheterization. This method also
provides a specimen that more accurately indicates the
constituents of the urine being produced by the body. The
patient first voids a small amount of urine, then collects the
specimen during midstream in a sterile specimen container,
and then allows the last amount of urine to be discarded.
An indwelling urinary catheter specimen—obtained by
aspiration with a syringe—requires maintaining a closed
urinary drainage system and using sterile collection
technique to prevent catheter-associated urinary tract
infections.1,2
Urine specimens for culture should be processed as soon
as possible, preferably within 2 hours. If urine specimens
can’t be processed within 30 minutes of collection, they
should be refrigerated, placed on ice, inoculated into
primary isolation medium before transport, or transported in
an appropriate urine preservative. Refrigerated specimens
should be cultured within 24 hours.3
Equipment
For a random specimen
Bedpan, bedside commode, urinal with cover, or specimen
collection hat ▪ gloves ▪ specimen container with lid ▪ label
▪ laboratory biohazard transport bag ▪ soap ▪ water ▪
washcloth ▪ Optional: laboratory request form, graduated
container, perineal care supplies, ice, laboratory request
form.
For a clean-catch midstream specimen
Gloves ▪ cleansing towelettes ▪ sterile specimen container
with lid ▪ label ▪ laboratory biohazard transport bag ▪
Optional: laboratory request form, graduated container,
specimen collection hat (if using a bathroom toilet), bedside
commode, illustrations.
Commercial clean-catch kits are available that contain the
necessary equipment.
For an indwelling catheter specimen
Gloves ▪ antiseptic pad ▪ syringe (3-mL to 20-mL,
depending on the volume of urine required for the ordered
test) or Luer-lock access device ▪ sterile or nonsterile
specimen container with lid (depending on the ordered test)
or urine collection tube ▪ label ▪ laboratory biohazard
transport bag ▪ Optional: ice, laboratory request form.
Implementation
■ Gather the appropriate equipment.
■ Verify the practitioner’s order for the urine specimen.
■ Perform hand hygiene.4,5,6,7,8,9
■ Confirm the patient’s identity using at least two patient
identifiers.10
■ Provide privacy.11,12,13,14
■ Explain the procedure and its purpose to the patient and
family (if appropriate) according to their individual
communication and learning needs to increase their
understanding, allay their fears, and enhance cooperation.15
Collecting a random specimen
■ Instruct the patient on bed rest to void into a clean
bedpan or urinal; instruct the ambulatory patient to void
into a clean bedpan or urinal or into a specimen collection
hat placed in the bedside commode or in the toilet in the
bathroom.
■ Perform hand hygiene.4,5,6,7,8,9
■ Put on gloves to comply with standard precautions.16,17
Then pour 30 to 60 mL of urine into the specimen container,
and place the lid on the container securely.
■ If the patient’s urine output must be measured and
recorded, pour the remaining urine into the graduated
container. Otherwise, discard the remaining urine. If you
inadvertently spill urine on the outside of the container,
clean and dry it to prevent cross-contamination.
Collecting a clean-catch midstream specimen,
female
■ Instruct the patient perform hand hygiene, and then to sit
far back on the toilet seat or bedside commode with her
legs apart.
■ If you’re using a commercial clean-catch kit, open it.
■ Perform hand hygiene.4,5,6,7,8,9
■ Put on gloves to comply with standard precautions.16,17
■ Open the sterile specimen container and place the cap
down with the sterile inside surface facing up. To prevent
contamination of the specimen, avoid touching the inside of
the container and lid and instruct the patient to avoid
touching them.
■ Instruct the patient to separate the folds of skin around
the urinary opening.18 Instruct her to clean the urinary
opening and surrounding area from front to back using a
towelette; to discard the towelette in a waste receptacle;
and to repeat with a second towelette.18 Assist the patient,
as needed.
■ Instruct the patient to straddle the bedside commode or
toilet to allow labial spreading and to keep her skin folds
separated while voiding. Assist, as needed.
■ Instruct the patient to begin voiding into the bedside
commode or toilet, because the first urine voided washes
microorganisms and cellular debris out of the meatus.18
Then, without stopping the urine stream, the patient (or
you, if assisting) should move the collection container into
the stream, collecting 30 to 50 mL at the midstream portion
of the voiding.
■ Tell the patient to move the container out of the
continuing urine stream after she has collected the
specimen, and to finish voiding into the bedside commode
or toilet.
■ Take the sterile container from the patient and cap it
securely. Avoid touching the inside of the container and lid
to prevent contamination. If the outside of the container is
soiled, clean it and wipe it dry.
■ If intake and output are being recorded, measure the
remaining urine (from the first and last portions of the
voiding) in a graduated container. Include the amount in the
specimen container when recording the total amount
voided.
Collecting a clean-catch midstream specimen,
male
■ If you’re using a commercial clean-catch kit, open it.
■ Perform hand hygiene.4,5,6,7,8,9
■ Put on gloves to comply with standard precautions.16,17
■ Open the sterile specimen container and place the cap
down with the sterile inside surface facing up. Avoid
touching the inside of the container and lid, and instruct the
patient to avoid touching them to prevent contamination of
the specimen.
■ Instruct the patient to perform hand hygiene, and then
hold his penis with one hand and use the other hand to
clean the end of the penis with a towelette, beginning with
the urethral opening and working away from it (the foreskin
of an uncircumcised male must first be retracted), then to
repeat using a second clean towelette.18 Assist the patient
as needed.
■ Instruct the patient to begin voiding into the bedside
commode or toilet, because the first urine washes
microorganisms and cellular debris from the urethra.18
Then, without stopping the urine stream, the patient (or
you, if assisting) should move the collection container into
the stream, collecting 30 to 50 mL at the midstream portion
of the voiding.
■ Tell the patient to move the container out of the stream
after he has collected the specimen, and to finish voiding
into the bedside commode or toilet.
■ Take the sterile container from the patient and cap it
securely. Avoid touching the inside of the container and lid
to prevent contamination. If the outside of the container is
soiled, clean it and wipe it dry.
■ If intake and output are being recorded, measure the
remaining urine (from the first and last portions of the
voiding) in a graduated container. Include the amount in the
specimen container when recording the total amount
voided.
Collecting an indwelling catheter specimen
■ Perform hand hygiene4,5,6,7,8,9 and put on gloves.16,17
■ Drain urine from the drainage tube into the collection
bag.
■ Disinfect the sampling port with an antiseptic pad and
allow it to dry.1
If using a syringe, attach the syringe to the port. When
fresh urine appears in the tubing, aspirate the specimen into
the syringe. Remove the syringe from the sampling port.
Slowly transfer the specimen to the appropriate container.
Dispose of the syringe in an appropriate receptacle.16
■ If using a Luer-lock access device, attach the device to
the sampling port. When fresh urine appears in the tubing,
grasp the access device securely and push the collection
tube into the device. Allow the natural vacuum of the tube
to draw the specimen into the tube until the vacuum no
longer continues to draw, which indicates complete filling.19
Remove the Luer-lock access device from the sampling port.
Dispose of the device in an appropriate receptacle.
Completing the procedure
■ Label the specimen container in the presence of the
patient to prevent mislabeling.10
■ Place the specimen container in the laboratory biohazard
transport bag with a laboratory request form (if required in
your facility), and send it to the laboratory immediately, or
place it on ice if transport may be delayed.20 Delayed
transport of the specimen at room temperature may alter
test results.
■ Assist the patient with perineal care, as needed.
■ Offer the patient a washcloth and soap and water to wash
the hands.
■ Clean the graduated container. Also clean the urinal,
bedside commode, or bedpan and return it to its proper
storage area.21
■ Discard disposable items in appropriate receptacles.16,17
■ Remove and discard your gloves.16,17
■ Perform hand hygiene.4,5,6,7,8,9
■ Document the procedure.22,23,24,25
Special considerations
■ If the specimen is to be collected at home, instruct the
patient to collect the specimen in the appropriate container
with a tight-fitting lid and to keep it on ice or in the
refrigerator (separate from food items) for up to 24 hours.
Specimens are stable at room temperature for only 1 hour.
■ If a large volume of urine is needed for special analyses
(not culture), obtain the urine specimen directly from the
indwelling urinary catheter drainage bag, not the sampling
port.1
■ Be aware that some urinary drainage collection bag outlet
tubes are coated with an antimicrobial agent that can
interfere with the results of a urine culture if the specimen is
obtained directly from the drainage bag.
Complications
Contamination of the specimen (such as with stool) may
alter results. Catheter-associated urinary tract infection may
result from improper technique.
Documentation
Record the time of specimen collection and when the
specimen was transported to the laboratory. Specify the test
as well as the appearance, odor, color, and any unusual
characteristics of the specimen. If necessary, record the
urine volume on the intake and output record.
REFERENCES
1 Healthcare Infection Control Practices Advisory Committee. (2010, revised
2017). “Guideline for prevention of catheter-associated urinary tract
infections 2009” [Online]. Accessed via the Web at
https://www.cdc.gov/infectioncontrol/pdf/guidelines/cauti-guidelines.pdf
(Level I)
2 The Joint Commission. (2019). Standard NPSG.07.06 .01. Comprehensive
accreditation manual for hospitals. Oakbrook Terrace, IL: The Joint
Commission. (Level VII)
3 Association of Professionals in Infection Control and Epidemiology (APIC).
(2014). “APIC implementation guide: Guide to preventing catheter-associated
urinary tract infections” [Online]. Accessed via the Web at
http://apic.org/Resource_/EliminationGuideForm/6473ab9b-e75c-457a-8d0f-
d57d32bc242b/File/APIC_CAUTI_web_0603 .pdf (Level IV)
4 Centers for Disease Control and Prevention. (2002). Guideline for hand
hygiene in health-care settings: Recommendations of the Healthcare Infection
Control Practices Advisory Committee and the HICPAC/SHEA/APIC/IDSA Hand
Hygiene Task Force. MMWR Recommendations and Reports, 51(RR-16), 1–45.
Accessed via the Web at https://www.cdc.gov/mmwr/pdf/rr/rr5116.pdf (Level
II)
5 World Health Organization. (2009). “WHO guidelines on hand hygiene in
health care: First global patient safety challenge, clean care is safer care”
[Online]. Accessed via the Web at
http://apps.who.int/iris/bitstream/10665/44102/1/9789241597906_eng.pdf
(Level IV)
6 The Joint Commission. (2019). Standard NPSG.07.01.01. Comprehensive
accreditation manual for hospitals. Oakbrook Terrace, IL: The Joint
Commission. (Level VII)
7 Accreditation Association for Hospitals and Health Systems. (2017). Standard
07.01.21. Healthcare Facilities Accreditation Program: Accreditation
requirements for acute care hospitals. Chicago, IL: Accreditation Association
for Hospitals and Health Systems. (Level VII)
8 Centers for Medicare and Medicaid Services, Department of Health and
Human Services. (2015). Condition of participation: Infection control. 42 C.F.R.
§ 482.42.
9 DNV GL-Healthcare USA, Inc. (2016). IC.1.SR.1 . NIAHO® accreditation
requirements: Interpretive guidelines & surveyor guidance (version 11).
Milford, OH: DNV GL-Healthcare USA, Inc. (Level VII)
10 The Joint Commission. (2019). Standard NPSG.01.01.01. Comprehensive
accreditation manual for hospitals. Oakbrook Terrace, IL: The Joint
Commission. (Level VII)
11 Accreditation Association for Hospitals and Health Systems. (2017). Standard
15.01.16. Healthcare Facilities Accreditation Program: Accreditation
requirements for acute care hospitals. Chicago, IL: Accreditation Association
for Hospitals and Health Systems. (Level VII)
12 Centers for Medicare and Medicaid Services, Department of Health and
Human Services. (2015). Condition of participation: Patient’s rights. 42 C.F.R.
§ 482.13(c)(1).
13 The Joint Commission. (2019). Standard RI.01.01.01. Comprehensive
accreditation manual for hospitals. Oakbrook Terrace, IL: The Joint
Commission. (Level VII)
14 DNV GL-Healthcare USA, Inc. (2016). PR.1.SR.5 . NIAHO® accreditation
requirements: Interpretive guidelines & surveyor guidance (version 11).
Milford, OH: DNV GL-Healthcare USA, Inc. (Level VII)
15 The Joint Commission. (2019). Standard PC.02.01.21. Comprehensive
accreditation manual for hospitals. Oakbrook Terrace, IL: The Joint
Commission. (Level VII)
16 Siegel, J. D ., et al. (2007, revised 2017). “2007 guideline for isolation
precautions: Preventing transmission of infectious agents in healthcare
settings” [Online]. Accessed via the Web at
https://www.cdc.gov/infectioncontrol/pdf/guidelines/isolation-guidelines.pdf
(Level II)
17 Accreditation Association for Hospitals and Health Systems. (2017). Standard
07.01.10. Healthcare Facilities Accreditation Program: Accreditation
requirements for acute care hospitals. Chicago, IL: Accreditation Association
for Hospitals and Health Systems. (Level VII)
18 Becton Dickinson. (2004). “Midstream clean catch urine procedure” [Online].
Accessed via the Web at http://legacy.bd .com/resource.aspx?IDX=11181
19 Becton, Dickinson and Company. (2008). “BD Vacutainer® urine Foley
catheter collection kit” [Online]. Accessed via the Web at
http://www.bd.com/documents/guides/directions-for-use/PAS_UC_Vacutainer-
urine-Foley-catheter-collection-kits_DF _EN.pdf
20 Occupational Safety and Health Administration. (n.d .). “Bloodborne
pathogens, standard number 1910.1030” [Online]. Accessed via the Web at
https://www.osha.gov/pls/oshaweb/owadisp.show_document?
p_id=10051&p_table=STANDARDS (Level VII)
21 Accreditation Association for Hospitals and Health Systems. (2017). Standard
07.02.03. Healthcare Facilities Accreditation Program: Accreditation
requirements for acute care hospitals. Chicago, IL: Accreditation Association
for Hospitals and Health Systems. (Level VII)
22 The Joint Commission. (2019). Standard RC.01.03 .01. Comprehensive
accreditation manual for hospitals. Oakbrook Terrace, IL: The Joint
Commission. (Level VII)
23 Centers for Medicare and Medicaid Services, Department of Health and
Human Services. (2015). Condition of participation: Medical record services.
42 C.F.R. § 482.24(b).
24 Accreditation Association for Hospitals and Health Systems. (2017). Standard
10.00 .03. Healthcare Facilities Accreditation Program: Accreditation
requirements for acute care hospitals. Chicago, IL: Accreditation Association
for Hospitals and Health Systems. (Level VII)
25 DNV GL-Healthcare USA, Inc. (2016). MR.2 .SR.1 . NIAHO® accreditation
requirements: Interpretive guidelines & surveyor guidance (version 11).
Milford, OH: DNV GL-Healthcare USA, Inc. (Level VII)
URINE STRAINING, FOR CALCULI
Renal calculi, or kidney stones, may develop anywhere in
the urinary tract. They may be excreted with the urine or
become lodged in the urinary tract, causing hematuria,
urine retention, renal colic, and possibly hydronephrosis.
Ranging in size from microscopic to several centimeters,
calculi form in the kidneys when mineral salts—principally
calcium oxalate or calcium phosphate—collect around a
nucleus of bacterial cells, blood clots, or other particles.
Other substances involved in calculus formation include uric
acid, xanthine, and ammonia. To prevent further recurrence,
the components of the kidney stones can be determined by
laboratory testing to assist the practitioner in planning
therapy.1
Renal calculi result from many causes, including
hypercalcemia (which may occur with hyperparathyroidism,
excessive dietary intake of calcium, and prolonged
immobility), abnormal urine pH levels, dehydration,
hyperuricemia associated with gout, and some hereditary
disorders. Most commonly, calculi form as a result of urine
stasis stemming from dehydration (which concentrates
urine), benign prostatic hyperplasia, neurologic disorders, or
urethral strictures. Anatomic abnormalities may worsen
stone formation (such as ureteropelvic junction obstruction
or horseshoe kidney).2
Testing for the presence of calculi requires careful
straining of all of the patient’s urine through a gauze pad or
fine-mesh sieve and, at times, quantitative laboratory
analysis of questionable specimens. Such testing typically
continues until the patient passes the calculi or until
surgery, as ordered.
Equipment
■ Commercial strainer ▪ graduated collection container ▪
specimen label ▪ gloves ▪ urinal or bedpan ▪ laboratory
request form ▪ three patient-care reminders stating STRAIN
ALL URINE ▪ specimen container ▪ biohazard laboratory
transport bag ▪ Optional: rubber band, 4′′ × 4′′ (10-cm × 10-
cm) gauze pad.
Implementation
■ Gather all necessary equipment.
■ Perform hand hygiene.3,4,5,6,7,8
■ Confirm the patient’s identity using at least two patient
identifiers.9
■ Provide privacy.10,11,12,13
■ Explain the procedure to the patient and his family (if
appropriate) according to their individual communication
and learning needs to increase their understanding, allay
their fears, and enhance cooperation.14
■ Post patient-care reminders stating STRAIN ALL URINE over
the patient’s bed, in the bathroom, and on the graduated
collection container.
■ Tell the patient to notify you after each voiding.
■ Leave the urinal or bedpan within the patient’s reach.
■ After the patient voids, perform hand hygiene.3,4,5,6,7,8
■ Put on gloves to comply with standard precautions.15,16
■ Secure a commercial strainer over the mouth of a
graduated collection container. If a commercial strainer isn’t
available, unfold a 4′′ × 4′′ (10-cm × 10-cm) gauze pad,
place it over the top of a graduated collection container,
and secure it with a rubber band.
■ Pour the specimen from the urinal or bedpan into the
container. If the patient has an indwelling urinary catheter in
place, strain all urine from the collection bag before
discarding it.
■ Examine the strainer (or gauze pad) for calculi. If you
detect calculi or if you aren’t sure, notify the practitioner
and place the filtrate (the urine that has passed through the
strainer) in a specimen container.
■ Label the specimen in the presence of the patient to help
prevent mislabeling.9
■ Place the specimen in a biohazard laboratory transport
bag and send it to the laboratory immediately.17
■ If the strainer is intact, rinse it carefully and reuse it.18 If
it has become damaged, discard it and replace it with a new
strainer. If a gauze pad was used, replace it.
■ Remove and discard your gloves.15,16
■ Perform hand hygiene.3,4,5,6,7,8
■ Put on gloves.15,16
■ Clean and disinfect other reusable equipment (such as
the bedpan, urinal, and graduated collection container)
according to the manufacturer’s instructions to prevent the
spread of infection.18,19
■ Remove and discard your gloves.15,16
■ Perform hand hygiene.3,4,5,6,7,8
■ Document the procedure.20,21,22,23
Special considerations
■ Don’t leave calculi in contact with urine or other fluids,
because this contact may alter the results of the analysis.
■ Be aware that calculi may appear in various colors, each
of which has diagnostic value.
Patient teaching
Teach the patient who will be straining urine at home how to
use a strainer, and emphasize the importance of straining
all urine for the prescribed period.
Documentation
Document the date and time of the specimen collection as
well as transport to the laboratory, if applicable. Note the
characteristics of the urine and any filtrate passed. Also
note pain or hematuria that occurred during voiding.
Document all patient teaching, the patient’s understanding
of the teaching you provided, and whether the patient
requires follow-up teaching.
REFERENCES
1 Curhan, G. C ., et al. Diagnosis and acute management of suspected
nephrolithiasis in adults. (2017). In: UpToDate, Goldfarb, S., et al. (Eds.).
Retrieved from: www.uptodate.com
2 Cunningham, P., et al. (2016). Kidney stones: Pathophysiology, diagnosis and
management. British Journal of Nursing, 25(20), 1112–1116. (Level VII)
3 Centers for Disease Control and Prevention. (2002). Guideline for hand
hygiene in health-care settings: Recommendations of the Healthcare Infection
Control Practices Advisory Committee and the HICPAC/SHEA/APIC/IDSA Hand
Hygiene Task Force. MMWR Recommendations and Reports, 51(RR-16), 1–45.
Accessed via the Web at https://www.cdc.gov/mmwr/pdf/rr/rr5116.pdf (Level
II)
4 The Joint Commission. (2019). Standard NPSG.07.01.01. Comprehensive
accreditation manual for hospitals. Oakbrook Terrace, IL: The Joint
Commission. (Level VII)
5 World Health Organization. (2009). “WHO guidelines on hand hygiene in
health care: First global patient safety challenge, clean care is safer care”
[Online]. Accessed via the Web at
http://apps.who.int/iris/bitstream/10665/44102/1/9789241597906_eng.pdf
(Level IV)
6 Accreditation Association for Hospitals and Health Systems. (2017). Standard
07.01.21. Healthcare Facilities Accreditation Program: Accreditation
requirements for acute care hospitals. Chicago, IL: Accreditation Association
for Hospitals and Health Systems. (Level VII)
7 Centers for Medicare and Medicaid Services, Department of Health and
Human Services. (2015). Condition of participation: Infection control. 42 C.F.R.
§ 482.42.
8 DNV GL-Healthcare USA, Inc. (2016). IC.1.SR.1 . NIAHO® accreditation
requirements: Interpretive guidelines & surveyor guidance (version 11).
Milford, OH: DNV GL-Healthcare USA, Inc. (Level VII)
9 The Joint Commission. (2019). Standard NPSG.01.01.01. Comprehensive
accreditation manual for hospitals. Oakbrook Terrace, IL: The Joint
Commission. (Level VII)
10 DNV GL-Healthcare USA, Inc. (2016). PR.1.SR.5 . NIAHO® accreditation
requirements: Interpretive guidelines & surveyor guidance (version 11).
Milford, OH: DNV GL-Healthcare USA, Inc. (Level VII)
11 Centers for Medicare and Medicaid Services, Department of Health and
Human Services. (2015). Condition of participation: Patient’s rights. 42 C.F.R.
§ 482.13(c)(1).
12 Accreditation Association for Hospitals and Health Systems. (2017). Standard
15.01.16. Healthcare Facilities Accreditation Program: Accreditation
requirements for acute care hospitals. Chicago, IL: Accreditation Association
for Hospitals and Health Systems. (Level VII)
13 The Joint Commission. (2019). Standard RI.01.01.01. Comprehensive
accreditation manual for hospitals. Oakbrook Terrace, IL: The Joint
Commission. (Level VII)
14 The Joint Commission. (2019). Standard PC.02.01.21. Comprehensive
accreditation manual for hospitals. Oakbrook Terrace, IL: The Joint
Commission. (Level VII)
15 Accreditation Association for Hospitals and Health Systems. (2017). Standard
07.01.10. Healthcare Facilities Accreditation Program: Accreditation
requirements for acute care hospitals. Chicago, IL: Accreditation Association
for Hospitals and Health Systems. (Level VII)
16 Siegel, J. D ., et al. (2007, revised 2017). “2007 guideline for isolation
precautions: Preventing transmission of infectious agents in healthcare
settings” [Online]. Accessed via the Web at
https://www.cdc.gov/infectioncontrol/pdf/guidelines/isolation-guidelines.pdf
(Level II)
17 Occupational Safety and Health Administration. (n.d .). “Bloodborne
pathogens, standard number 1910.1030” [Online]. Accessed via the Web at
https://www.osha.gov/pls/oshaweb/owadisp.show_document?
p_id=10051&p_table=STANDARDS (Level VII)
18 Accreditation Association for Hospitals and Health Systems. (2017). Standard
07.02.03. Healthcare Facilities Accreditation Program: Accreditation
requirements for acute care hospitals. Chicago, IL: Accreditation Association
for Hospitals and Health Systems. (Level VII)
19 Rutala, W. A., et al. (2008, revised 2017). “Guideline for disinfection and
sterilization in healthcare facilities, 2008” [Online]. Accessed via the Web at
https://www.cdc.gov/infectioncontrol/pdf/guidelines/disinfection-
guidelines.pdf (Level I)
20 The Joint Commission. (2019). Standard RC.01.03 .01. Comprehensive
accreditation manual for hospitals. Oakbrook Terrace, IL: The Joint
Commission. (Level VII)
21 Accreditation Association for Hospitals and Health Systems. (2017). Standard
10.00 .03. Healthcare Facilities Accreditation Program: Accreditation
requirements for acute care hospitals. Chicago, IL: Accreditation Association
for Hospitals and Health Systems. (Level VII)
22 Centers for Medicare and Medicaid Services, Department of Health and
Human Services. (2015). Condition of participation: Medical record services.
42 C.F.R. § 482.24(b).
23 DNV GL-Healthcare USA, Inc. (2016). MR.2 .SR.1 . NIAHO® accreditation
requirements: Interpretive guidelines & surveyor guidance (version 11).
Milford, OH: DNV GL-Healthcare USA, Inc. (Level VII)
V
VAGINAL MEDICATION ADMINISTRATION
Vaginal medications include creams, gels, ointments, and
suppositories. The medications may be contraceptives,
lubricants, moisturizers, topical treatments for inflammation
or infection (caused by bacterial vaginosis or Candida), or
hormone replacement therapy for menopausal women.1
Vaginal suppositories can also be used as a method to
introduce probiotics to restore vaginal flora.1 Suppositories
melt when they come into contact with the vaginal mucosa,
allowing the medication to diffuse topically as effectively as
creams, gels, and ointments.
Vaginal medications usually come with a disposable
applicator that enables placement of medication in the
anterior and posterior fornices. Administration is most
effective when the patient can remain lying down afterward
to retain the medication.
Equipment
Prescribed medication ▪ applicator ▪ water-soluble lubricant
▪ gloves ▪ small sanitary pad ▪ fluid-impermeable pad ▪
washcloth and warm water ▪ Optional: applicator for
suppository.
Implementation
■ Avoid distractions and interruptions when preparing and
administering
medications
to prevent
medication
administration errors.2,3
■ Gather the necessary equipment.
■ Verify the practitioner’s order.4
■ Reconcile the patient’s medications when the practitioner
orders a new medication to reduce the risk of medication
errors, including omissions, duplications, dosing errors, and
drug interactions.
■ Compare the medication label with the order in the
patient’s medical record.4,5,6
■ Check the patient’s medical record for an allergy or a
contraindication to the prescribed medication. If an allergy
or a contraindication exists, don’t administer the
medication; notify the practitioner.4,5,6
■ Check the expiration date on the medication. If the
medication is expired, return it to the pharmacy and obtain
new medication.4,5,6
■ Visually inspect the medication for signs of loss of
integrity; if its integrity is compromised, return it to the
pharmacy.4,5,6
■ Discuss any unresolved concerns about the medication
with the patient’s practitioner.4,5,6
■ Perform hand hygiene.7,8,9,10,11,12
■ Confirm the patient’s identity using at least two patient
identifiers.4,13
■ Provide privacy.14,15,16,17
■ Explain the procedure to the patient and family (if
appropriate) according to their individual communication
and learning needs to increase their understanding, allay
their fears, and enhance cooperation.18
■ If the patient is receiving the medication for the first time,
teach her about potential adverse effects and discuss any
other concerns related to the medication.4,5,6
■ Verify that the medication is being administered to the
correct patient, at the proper time, in the prescribed dose,
and by the correct route, and that its indication is
appropriate for the patient’s condition, to prevent
medication administration errors.4,5,6
■ Ask the patient to void.
■ If your facility uses a bar code technology, scan your
identification badge, the patient’s identification bracelet,
and the medication’s bar code.
■ Ask the patient if she would rather insert the medication
herself. If so, provide appropriate instructions.
■ If you’re inserting the medication, proceed with the
following steps.
■ If applicable, raise the patient’s bed to waist level when
providing patient care to prevent caregiver back strain.19
■ Provide privacy.7,8,9,10,11,12
■ Perform hand hygiene.7,8,9,10,11,12
■ Put on gloves to comply with standard precautions.20,21
■ Help the patient into the lithotomy position or the supine
position with the knees bent, and expose the perineum.
■ Place a fluid-impermeable pad underneath the patient.
■ Wash the vaginal orifice using a washcloth and warm
water, wiping from front to back.
Administration of vaginal creams, gels, and
ointments
■ Insert the plunger into the applicator. Then attach the
applicator to the tube of medication.
■ Gently squeeze the tube to fill the applicator with the
prescribed amount of medication. Detach the applicator
from the tube, and lubricate the applicator or apply a small
amount of ointment to the outside of the applicator.
■ Expose the vagina by spreading the labia with your
fingers.
■ Insert the applicator following the manufacturer’s
instructions.
■ Administer the medication by depressing the plunger on
the applicator.
■ Remove the applicator.
■ Cover the patient to promote dignity and comfort.
■ Remove and discard your gloves20,21 and perform hand
hygiene.7,8,9,10,11,12
■ Help the patient into a comfortable position and advise
her to remain recumbent in bed as much as possible for the
next several hours.
■ If applicable, return the bed to the lowest position to
prevent falls and maintain patient safety.22
■ Put on gloves20,21 and wash the applicator with soap and
warm water.23,24 If the applicator can be used again, label it
with the proper patient identifiers so that its use will be
limited to the same patient, and store it. Alternatively, if the
applicator is disposable, discard it in the appropriate
container.
Administration of a vaginal suppository
■ Remove the suppository from the wrapper and lubricate it
with water-soluble lubricant.
■ Expose the vagina by spreading the labia.
■ With an applicator or the forefinger of your free hand,
insert the suppository about 2′′ (5 cm) into the vagina.
Completing the procedure
■ Remove and discard your gloves.20,21 Perform hand
hygiene.7,8,9,10,11,12
■ To prevent the medication from soiling the patient’s
clothing and bedding, provide a sanitary pad.
■ Document the procedure.25,26,27,28
Special considerations
■ If possible, plan to insert vaginal medications at bedtime,
when the patient is most likely to be recumbent for several
hours after administration.
■ Refrigerate vaginal suppositories that melt at room
temperature.
Patient teaching
If the patient will have to administer the medication herself
after discharge, teach her how to insert it, and give her a
patient teaching aid if available. Instruct the patient not to
wear a tampon after inserting vaginal medication, because
it would absorb the medication and decrease its
effectiveness. Also instruct her to avoid sexual intercourse
during treatment unless the product is prescribed for
lubrication or moisturizing. The patient should not douche
during treatment. Instruct the patient to monitor her
response to the medication and to inform the practitioner of
unusual discharges, bleeding, pain, fever, or other adverse
effects.
Complications
Vaginal medications may cause local irritation. Medications
contained in the ointment, cream, or gel may have local and
systemic adverse effects.
Documentation
Record the medication administered as well as the time and
date. Note adverse reactions; the date, time, and name of
the practitioner notified; prescribed interventions; and the
patient’s response to those interventions. Document patient
teaching and the patient’s understanding of your teaching.
REFERENCES
1 The North American Menopause Society. (n.d.) . “Vaginal and vulvar comfort:
Lubricants, moisturizers, and low-dose vaginal estrogen” [Online]. Accessed
via the Web at http://www.menopause.org/for-women/sexual-health-
menopause-online/effective-treatments-for-sexual-problems/vaginal-and-
vulvar-comfort-lubricants-moisturizers-and-low-dose-vaginal-estrogen
2 Westbrook, J., et al. (2010). Association of interruptions with an increased risk
and severity of medication administration errors. Archives of Internal
Medicine, 170(8), 683–690 . (Level IV)
3 Institute for Safe Medication Practices. (2012). Side tracks on the safety
express: Interruptions lead to errors and unfinished...Wait, what was I doing?
Nurse Advise-ERR, 11(2), 1–4 . Accessed via the Web at
https://www.ismp.org/resources/side-tracks-safety-express-interruptions-lead-
errors-and-unfinished-wait-what-was-i-doing
4 Accreditation Association for Hospitals and Health Systems. (2017). Standard
16.01.03. Healthcare Facilities Accreditation Program: Accreditation
requirements for acute care hospitals. Chicago, IL: Accreditation Association
for Hospitals and Health Systems. (Level VII)
5 Centers for Medicare and Medicaid Services, Department of Health and
Human Services. (2015). Condition of participation: Nursing services. 42
C.F.R. § 482.23(c).
6 DNV GL-Healthcare USA, Inc. (2016). MM .1 .SR.2 . NIAHO® accreditation
requirements: Interpretive guidelines & surveyor guidance (version 11).
Milford, OH: DNV GL-Healthcare USA, Inc. (Level VII)
7 The Joint Commission. (2019). Standard NPSG.07.01.01. Comprehensive
accreditation manual for hospitals. Oakbrook Terrace, IL: The Joint
Commission. (Level VII)
8 Centers for Disease Control and Prevention. (2002). Guideline for hand
hygiene in health-care settings: Recommendations of the Healthcare Infection
Control Practices Advisory Committee and the HICPAC/SHEA/APIC/IDSA Hand
Hygiene Task Force. MMWR Recommendations and Reports, 51(RR-16), 1–45.
Accessed via the Web at http://www.cdc.gov/mmwr/pdf/rr/rr5116.pdf (Level II)
9 World Health Organization. (2009). “WHO guidelines on hand hygiene in
health care: First global patient safety challenge, clean care is safer care”
[Online]. Accessed via the Web at
http://apps.who.int/iris/bitstream/10665/44102/1/9789241597906_eng.pdf
(Level IV)
10 Accreditation Association for Hospitals and Health Systems. (2017). Standard
07.01.21. Healthcare Facilities Accreditation Program: Accreditation
requirements for acute care hospitals. Chicago, IL: Accreditation Association
for Hospitals and Health Systems. (Level VII)
11 Centers for Medicare and Medicaid Services, Department of Health and
Human Services. (2015). Condition of participation: Infection control. 42 C.F.R.
§ 482.42.
12 DNV GL-Healthcare USA, Inc. (2016). IC.1 .SR.1 . NIAHO® accreditation
requirements: Interpretive guidelines & surveyor guidance (version 11).
Milford, OH: DNV GL-Healthcare USA, Inc. (Level VII)
13 The Joint Commission. (2019). Standard NPSG.01.01.01. Comprehensive
accreditation manual for hospitals. Oakbrook Terrace, IL: The Joint
Commission. (Level VII)
14 Accreditation Association for Hospitals and Health Systems. (2017). Standard
15.01.16. Healthcare Facilities Accreditation Program: Accreditation
requirements for acute care hospitals. Chicago, IL: Accreditation Association
for Hospitals and Health Systems. (Level VII)
15 Centers for Medicare and Medicaid Services, Department of Health and
Human Services. (2015). Condition of participation: Patient’s rights. 42 C.F.R.
§ 482.13(c)(1).
16 The Joint Commission. (2019). Standard RI.01.01.01. Comprehensive
accreditation manual for hospitals. Oakbrook Terrace, IL: The Joint
Commission. (Level VII)
17 DNV GL-Healthcare USA, Inc. (2016). PR.1.SR.5 . NIAHO® accreditation
requirements: Interpretive guidelines & surveyor guidance (version 11).
Milford, OH: DNV GL-Healthcare USA, Inc. (Level VII)
18 The Joint Commission. (2019). Standard PC.02.01.21. Comprehensive
accreditation manual for hospitals. Oakbrook Terrace, IL: The Joint
Commission. (Level VII)
19 Waters, T. R., et al. (2009). “Safe patient handling training for schools of
nursing” [Online]. Accessed via the Web at
http://www.cdc.gov/niosh/docs/2009-127/pdfs/2009-127.pdf (Level VII)
20 Siegel, J. D ., et al. (2007, revised 2017). “2007 guideline for isolation
precautions: Preventing transmission of infectious agents in healthcare
settings” [Online]. Accessed via the Web at
https://www.cdc.gov/infectioncontrol/pdf/guidelines/isolation-guidelines.pdf
(Level II)
21 Accreditation Association for Hospitals and Health Systems. (2017). Standard
07.01.10. Healthcare Facilities Accreditation Program: Accreditation
requirements for acute care hospitals. Chicago, IL: Accreditation Association
for Hospitals and Health Systems. (Level VII)
22 Ganz, D. A., et al. (2013). Preventing falls in hospitals: A toolkit for improving
quality of care (AHRQ Publication No. 13-0015-EF). Accessed via the Web at
http://www.ahrq.gov/sites/default/files/publications/files/fallpxtoolkit.pdf
(Level VII)
23 Accreditation Association for Hospitals and Health Systems. (2017). Standard
07.02.03. Healthcare Facilities Accreditation Program: Accreditation
requirements for acute care hospitals. Chicago, IL: Accreditation Association
for Hospitals and Health Systems. (Level VII)
24 Rutala, W. A., et al. (2008, revised 2017). “Guideline for disinfection and
sterilization in healthcare facilities, 2008” [Online]. Accessed via the Web at
https://www.cdc.gov/infectioncontrol/pdf/guidelines/disinfection-
guidelines.pdf (Level I)
25 The Joint Commission. (2019). Standard RC.01.03 .01. Comprehensive
accreditation manual for hospitals: The official handbook. Oakbrook Terrace,
IL: The Joint Commission. (Level VII)
26 Accreditation Association for Hospitals and Health Systems. (2017). Standard
10.00 .03. Healthcare Facilities Accreditation Program: Accreditation
requirements for acute care hospitals. Chicago, IL: Accreditation Association
for Hospitals and Health Systems. (Level VII)
27 Centers for Medicare and Medicaid Services, Department of Health and
Human Services. (2015). Condition of participation: Medical record services.
42 C.F.R. § 482.24(b).
28 DNV GL-Healthcare USA, Inc. (2016). MR.2 .SR.1 . NIAHO® accreditation
requirements: Interpretive guidelines & surveyor guidance (version 11).
Milford, OH: DNV GL-Healthcare USA, Inc. (Level VII)
EQUIPMENT
Collection tube guide
Blood collection tubes come in various sizes; they’re filled by vacuum when a
needle is inserted through the stopper. The tube type and the test the tube is
intended for determine the amount of blood collected in each tube. The
maximum draw volume for each size tube is commonly indicated by a mark
(which is the same color as the stopper or closure) that you’ll see at the top
of the label when you hold the tube upright. Filling the tube to 50% capacity
is sufficient for most testing; however, for coagulation studies, you must
completely fill the tube to ensure accurate test results.6
Most tube types contain additives in varying concentrations. When
performing venipuncture, make sure you obtain samples in the correct order,
because contamination from the additive in the previous collection tube can
cause erroneous test results. You’ll also need to mix the additive in the tube
with the blood sample immediately after drawing the blood; to do so, hold
the tube upright and gently invert it 180 degrees and back. The number of
times you need to invert the tube varies by tube type.
The table below shows the recommended order of draw for commonly used
collection tubes, the stopper or closure color, the typical laboratory studies
performed, and the number of tube inversion needed to mix the sample.
Consult with laboratory personnel for information concerning less commonly
ordered testing.1,7
VENIPUNCTURE
Venipuncture involves puncturing a vein with a needle or
winged collection device to collect a venous blood sample in
an evacuated tube or syringe.
Blood collected using a syringe should be transferred
cautiously to the appropriate tubes using a needleless
device to prevent needlestick injury. Depressing the syringe
plunger during transfer can create positive pressure,
displacing the stopper and potentially resulting in exposure
to the patient’s blood. Using a syringe may also result in
overfilling or underfilling of tubes with blood, leading to
inaccurate test results.1
When performing venipuncture for phlebotomy, use the
extremity opposite an infusion. If you must perform
venipuncture in the extremity with a vascular access device
infusion, use a vein below the device or infusion. Avoid
venipuncture on the side of the body where a patient has
had lymphedema or has undergone radiation therapy or
breast surgery with axillary node dissection. Also avoid
venipuncture in an extremity with an actual or planned
fistula access or that has been affected by stroke.2,3,4
The most commonly used veins for venipuncture for
phlebotomy include the median cubital, the cephalic, and
the basilic veins in the antecubital area. Only the volume of
blood needed for accurate testing should be obtained,
because phlebotomy contributes to iron deficiency and
blood loss in critically ill patients, making the patient
susceptible to other complications. Measures to conserve
the patient’s blood include using low-volume blood
collection tubes when possible, recording the volume of
blood obtained for laboratory testing, avoiding routine
testing, consolidating daily tests into one blood draw, and
using point-of-care testing methods when possible.2,3,4
Although phlebotomy personnel commonly perform this
procedure in health care facilities, nurses and other trained
personnel may also perform venipuncture. To reduce the risk
of culture contamination, a dedicated phlebotomy team is
recommended for obtaining blood cultures.
Before performing venipuncture, assess the patient for
possible risks factors, such as anticoagulant therapy, low
platelet count, bleeding disorders, and other abnormalities
that increase the risk of bleeding and hematoma formation.
Equipment
Gloves ▪ syringe or needle holder (Vacutainer) ▪ appropriate
antiseptic swab (alcohol, tincture of iodine, povidone-iodine,
or chlorhexidine)5 ▪ evacuated blood collection tubes ▪
venipuncture needle (21G to 23G) or winged collection
device (21G, 23G, or 25G) ▪ single-patient-use tourniquet ▪
labels ▪ laboratory transport bag ▪ 2′′ × 2′′ (5-cm × 5-cm)
gauze pads ▪ adhesive bandage ▪ Optional: needleless
device, ice or cold pack, laboratory request form, sterile
gloves, gown, mask with face shield or mask and goggles.
Preparation of equipment
If you’re using evacuated tubes, open the needle packet or
winged collection device and attach the needle or winged
device to the needle holder. If you’re using a syringe, attach
the appropriate needle to it. Be sure to choose a syringe
large enough to hold all the blood required for the test.
Gather the appropriate collection tubes for the ordered
laboratory tests. (See Collection tube guide.) Check the
expiration date on the blood collection tubes; obtain a new
tube if any are expired. Inspect the collection tube additives;
don’t use the collection tubes if additives are discolored.
Gently tap collection tubes containing additives to dislodge
any material that may be adhering to the stopper. Inspect
the needle to make sure its integrity is intact.1
Common venipuncture sites
The illustrations below show the anatomic locations of veins commonly used
for venipuncture. The most commonly used veins include the median cubital,
cephalic, and basilic veins in the antecubital area. You may also use veins in
the hand if necessary.
Implementation
■ Review the patient’s medical record for allergies to
antiseptic, adhesive, and latex (if used in your facility). Use
an alternative product if necessary to avoid adverse
reactions.8
■ Verify the practitioner’s order.
■ Check the laboratory labels to verify the patient and
testing information. If a requisition form is also needed,
verify the information.
■ Gather the appropriate equipment.
■ Perform hand hygiene.9,10,11,12,13,14,15,16,17
■ Confirm the patient’s identity using at least two patient
identifiers.18
■ Provide privacy.19,20,21,22
■ Tell the patient that you’re about to take a blood sample;
then explain the procedure to ease anxiety and ensure
cooperation. Ask whether the patient has ever felt faint,
sweaty, or nauseated when having blood drawn, to prepare
to manage a vasovagal reaction in the patient at risk.2
■ If fasting was required for an ordered test, confirm that
the patient has fasted.2 Some tests require other dietary
restrictions, so verify that such restrictions were
implemented if applicable.
■ Put on gloves and, if needed, other personal protective
equipment to comply with standard precautions.10,23
■ If the patient is in bed, raise the bed to waist level when
performing patient care to prevent caregiver back strain.24
■ Ask the patient on bed rest to lie in the supine position,
with the head slightly elevated and arms at the sides. Ask
the ambulatory patient to sit in a chair and support the arm
securely on an armrest or table.9 If possible, position the
patient’s arm in a dependent position.3
■ Assess the patient’s veins to determine the best puncture
site and needle size.2 (See Common venipuncture sites.)
Limit 25G needles to situations in which veins are too fragile
to use a larger-sized needle; however, keep in mind that
improper technique may cause hemolysis.
■ Assess the patient for such factors as easy bruising,
increased risk of bleeding, compromised circulation, and
fragile veins or skin, which indicate that you should either
not apply a tourniquet or apply it loosely.
■ Avoid use of a tourniquet if possible. If you must use one,
apply it about 2′′ (5 cm) above the intended venipuncture
site, as indicated; make sure you can palpate an arterial
pulse distal to the tourniquet to prevent circulatory
impairment. To prevent pseudohyperkalemia, don’t ask the
patient to tightly clench or repetitively open and close the
fist.2
■ Clean the venipuncture site with an antiseptic swab
according to the manufacturer’s instructions and allow it to
dry completely before performing venipuncture.3,5 Don’t
touch the intended venipuncture site after preparation
unless you’re wearing sterile gloves, to prevent
contamination.25
NURSING ALERT Don’t use an alcohol-based antiseptic to clean the
venipuncture site if you’re collecting samples for blood alcohol
testing.1
■ Immobilize the vein by pressing 1′′ to 2′′ (2.5 to 5 cm)
below the venipuncture site with your thumb and drawing
the skin taut.
■ Position the needle holder or syringe with the needle
bevel up and the shaft parallel to the path of the vein and at
a 30-degree angle to the arm. If you’re using a winged
collection device attached to a needle holder, grasp the
wings and position the bevel up. Insert the needle into the
vein. If you’re using a syringe, venous blood will appear in
the hub; withdraw the blood slowly, pulling the plunger of
the syringe gently to create steady suction until you obtain
the required sample. Pulling the plunger too forcibly may
collapse the vein. If you’re using a needle holder and an
evacuated tube, grasp the holder securely to stabilize it in
the vein, and push down on the collection tube until the
needle punctures the rubber stopper. Blood will flow into the
tube automatically.9
■ For coagulation studies, don’t discard the initial sample
unless you’re using a winged needle with an attached
extension set, because air in the extension set prevents the
correct ratio of blood to anticoagulant additive in the tube.2
■ If you’re using a tourniquet, immediately release it when
blood begins to flow into the collection container. Limit
tourniquet time to less than 1 minute to reduce the risk of
hemolysis, which can impair test results.2
■ When the first tube has filled to its correct volume and
blood flow ceases, remove it from the holder. Continue to fill
the required tubes using the correct order of draw, removing
one and inserting another. Gently invert each tube and then
return it to an upright position as you remove it to help mix
the additive with the sample;7,9 this counts as one complete
inversion.
■ After you’ve drawn the sample, place a gauze pad over
the puncture site, and slowly and gently remove the needle
from the vein. When you’re using an evacuated tube,
remove it from the needle holder to release the vacuum
before withdrawing the needle from the vein.
■ Activate the needle protector safety device if necessary.9
■ Apply gentle pressure to the puncture site for 2 or 3
minutes or until bleeding stops to prevent extravasation into
the surrounding tissue, which can cause a hematoma.9
■ After bleeding stops, apply an adhesive bandage.9
■ If you’ve used a syringe, transfer the sample to a
collection tube immediately using a needleless device. Be
careful to avoid foaming, which can cause hemolysis.9
■ To make sure that tube additives are properly mixed with
the blood sample, carefully invert each tube the appropriate
number of times indicated by the tube’s additive. Don’t
shake the collection tubes; vigorous mixing may causing
foaming and hemolysis.1,6,9
■ Label all specimens in the presence of the patient to help
prevent mislabeling.18 Label the specimens with the
patient’s name and identification number, the practitioner’s
name, date and time of collection, and your initials if
required.9,18 If you’re obtaining a blood bank specimen, sign
the collection tube label if required by your facility.
■ Place all tubes in a laboratory biohazard transport bag.26
■ Discard syringes and needles in a puncture-resistant
sharps disposal container.26,27
■ Check the venipuncture site to see if a hematoma has
developed. If it has, apply pressure until you’re sure the
bleeding has stopped; then you may apply warm soaks to
the site to help reabsorption.9
■ If the patient is in bed, return the bed to the lowest
position to prevent falls and maintain patient safety.28
■ Remove and discard your gloves and any other personal
protective equipment worn.
■ Perform hand hygiene.11,12,13,14,15,16,17
■ Send the specimen tubes and the completed laboratory
request form (if used in your facility) to the laboratory.
■ Provide ice or a cold pack for transport, if required;
coagulation studies may require ice or a cold pack for
transport.
■ Document the procedure.29,30,31,32
Special considerations
■ Don’t collect a venous sample from an infection site,
because pathogens may be introduced into the vascular
system. Likewise, avoid drawing blood from edematous
areas or sites of previous hematoma or vascular injury.
■ Limit your attempts at venipuncture to two; after two
attempts, notify the practitioner or a specially trained
phlebotomist to obtain the sample.33
Complications
A hematoma at the needle insertion site is the most
common complication of venipuncture. Infection may result
from poor technique.
Documentation
Record the date, time, and site of venipuncture; name of the
test; time you sent the sample to the laboratory; and
amount of blood you collected. Note any adverse reactions
and how the patient tolerated the procedure. Document any
patient teaching and the patient’s understanding of the
teaching provided.
REFERENCES
1 Becton, Dickinson and Company. (2012). “BD vacutainer® evacuated blood
collection system: For in vitro diagnostic use” [Online]. Accessed via the Web
at http://www.bd.com/vacutainer/pdfs/VDP40161.pdf
2 Standard 43. Phlebotomy. Infusion therapy standards of practice. (2016).
Journal of Infusion Nursing, 39, S85–S91. (Level VII)
3 Infusion Nurses Society. (2016). Policies and procedures for infusion therapy
(5th ed.). Boston, MA: Infusion Nurses Society.
4 Infusion Nurses Society. (2017). Policies and procedures for infusion therapy
of the older adult (3rd ed.). Boston, MA: Infusion Nurses Society.
5 Caldeira, D., et al. (2011). Skin antiseptics in venous puncture-site
disinfection for prevention of blood culture contamination: Systematic review
with meta-analysis. Journal of Hospital Infection, 77(3), 223–232.
6 Johnson, L. (2017). “Phlebotomy order of draw: Who, what, when, where, why,
and how” [Online]. Accessed via the Web at
http://www.ncctinc.com/documents/Phlebotomy%20Order%20of%20Draw.pdf
7 Becton, Dickinson and Company. (2010). “BD vacutainer® order of draw for
multiple tube collections” [Online]. Accessed via the Web at
https://education.bd .com/bd-order-of-draw-wall-chart.aspx
8 Standard 14. Latex sensitivity or allergy. Infusion therapy standards of
practice. (2016). Journal of Infusion Nursing, 39, S35–S36 . (Level VII)
9 Clinical Laboratory and Standards Institute (CLSI). (2017). GP41: collection of
diagnostic venous blood specimens (7th ed.) . Wayne, PA: CLSI.
10 Accreditation Association for Hospitals and Health Systems. (2017). Standard
07.01.10. Healthcare Facilities Accreditation Program: Accreditation
requirements for acute care hospitals. Chicago, IL: Accreditation Association
for Hospitals and health Systems. (Level VII)
11 The Joint Commission. (2019). Standard NPSG.07.01.01. Comprehensive
accreditation manual for hospitals. Oakbrook Terrace, IL: The Joint
Commission. (Level VII)
12 Centers for Disease Control and Prevention. (2002). Guideline for hand
hygiene in health-care settings: Recommendations of the Healthcare Infection
Control Practices Advisory Committee and the HICPAC/SHEA/APIC/IDSA Hand
Hygiene Task Force. MMWR Recommendations and Reports, 51(RR-16), 1–45.
Accessed via the Web at http://www.cdc.gov/mmwr/pdf/rr/rr5116.pdf (Level II)
13 World Health Organization. (2009). “WHO guidelines on hand hygiene in
health care: First global patient safety challenge, clean care is safer care”
[Online]. Accessed via the Web at
http://apps.who.int/iris/bitstream/10665/44102/1/9789241597906_eng.pdf
(Level IV)
14 Standard 16. Hand hygiene. Infusion therapy standards of practice. (2016).
Journal of Infusion Nursing, 39, S38–S39 . (Level VII)
15 Centers for Medicare and Medicaid Services, Department of Health and
Human Services. (2015). Condition of participation: Infection control. 42 C.F.R.
§ 482.42.
16 Accreditation Association for Hospitals and Health Systems. (2017). Standard
07.01.21. Healthcare Facilities Accreditation Program: Accreditation
requirements for acute care hospitals. Chicago, IL: Accreditation Association
for Hospitals and Health Systems. (Level VII)
17 DNV GL-Healthcare USA, Inc. (2016). IC.1 .SR.1 . NIAHO® accreditation
requirements: Interpretive guidelines & surveyor guidance (version 11).
Milford, OH: DNV GL-Healthcare USA, Inc. (Level VII)
18 The Joint Commission. (2019). Standard NPSG.01.01.01. Comprehensive
accreditation manual for hospitals. Oakbrook Terrace, IL: The Joint
Commission. (Level VII)
19 DNV GL-Healthcare USA, Inc. (2016). PR.1.SR.5 . NIAHO® accreditation
requirements: Interpretive guidelines & surveyor guidance (version 11).
Milford, OH: DNV GL-Healthcare USA, Inc. (Level VII)
20 Centers for Medicare and Medicaid Services, Department of Health and
Human Services. (2015). Condition of participation: Patient’s rights. 42 C.F.R.
§ 482.13(c)(1).
21 Accreditation Association for Hospitals and Health Systems. (2017). Standard
15.01.16. Healthcare Facilities Accreditation Program: Accreditation
requirements for acute care hospitals. Chicago, IL: Accreditation Association
for Hospitals and Health Systems. (Level VII)
22 The Joint Commission. (2019). Standard RI.01.01.01. Comprehensive
accreditation manual for hospitals. Oakbrook Terrace, IL: The Joint
Commission. (Level VII)
23 Siegel, J. D ., et al. (2007, revised 2017). “2007 guideline for isolation
precautions: Preventing transmission of infectious agents in healthcare
settings” [Online]. Accessed via the Web at
https://www.cdc.gov/infectioncontrol/pdf/guidelines/isolation-guidelines.pdf
(Level II)
24 Waters, T. R., et al. (2009). “Safe patient handling training for schools of
nursing” [Online]. Accessed via the Web at
http://www.cdc.gov/niosh/docs/2009-127/pdfs/2009-127.pdf (Level VII)
25 Standard 33. Vascular access site preparation and device placement. Infusion
therapy standards of practice. (2016). Journal of Infusion Nursing, 39, S64–
S67. (Level VII)
26 Occupational Safety and Health Administration. (n.d .). “Bloodborne
pathogens, standard number 1910.1030” [Online]. Accessed via the Web at
https://www.osha.gov/pls/oshaweb/owadisp.show_document?
p_id=10051&p_table=STANDARDS (Level VII)
27 Standard 18. Medical waste and sharps safety. Infusion therapy standards of
practice. (2016). Journal of Infusion Nursing, 39, S40–S42. (Level VII)
28 Ganz, D. A., et al. (2013). Preventing falls in hospitals: A toolkit for improving
quality of care (AHRQ Publication No. 13-0015-EF). Rockville, MD: Agency for
Healthcare Research and Quality. Accessed via the Web at
http://www.ahrq.gov/sites/default/files/publications/files/fallpxtoolkit.pdf
(Level VII)
29 The Joint Commission. (2019). Standard RC.01.03 .01. Comprehensive
accreditation manual for hospitals. Oakbrook Terrace, IL: The Joint
Commission. (Level VII)
30 Accreditation Association for Hospitals and Health Systems. (2017). Standard
10.00 .03. Healthcare Facilities Accreditation Program: Accreditation
requirements for acute care hospitals. Chicago, IL: Accreditation Association
for Hospitals and Health Systems. (Level VII)
31 Centers for Medicare and Medicaid Services, Department of Health and
Human Services. (2015). Condition of participation: Medical record services.
42 C.F.R. § 482.24(b).
32 DNV GL-Healthcare USA, Inc. (2016). MR.2 .SR.1 . NIAHO® accreditation
requirements: Interpretive guidelines & surveyor guidance (version 11).
Milford, OH: DNV GL-Healthcare USA, Inc. (Level VII)
33 Fischbach, F., & Dunning, M. B . (2017). A manual of laboratory and diagnostic
tests (10th ed.) . Philadelphia, PA: Wolters Kluwer.
VENTRICULAR ASSIST DEVICE CARE
A ventricular assist device (VAD) is implanted to provide
support to a failing heart by assisting with the pumping
function. VADs are designed to decrease the heart’s
workload and increase cardiac output in patients with
ventricular failure. They’re commonly used as a bridge to
cardiac transplantation in patients who are at risk for death
from refractory end-stage left ventricular heart failure,1 or
as destination therapy for patients who don’t qualify for or
desire cardiac transplantation. Other indications for VAD
therapy include an inability to be weaned from
cardiopulmonary bypass and heart failure that doesn’t
respond to optimal medical therapy.2 The improved
secondary organ function, reduced pulmonary hypertension,
and improved nutritional status associated with VADs may
also serve as a bridge to decision in patients who weren’t
previously eligible for cardiac transplantation.3
Inserting a VAD involves a specific surgical procedure in
which blood flow is diverted from a ventricle to an artificial
pump. Commonly used devices include the HeartWare and
HeartMate VADs. The HeartWare VAD uses a centrifugal
blood pump that’s implanted in the pericardial space with
left ventricular apex to ascending aortic cannulation to
provide left ventricular support. The inflow conduit is
integrated with the pump, and an outflow graft with a strain
relief is attached to the pump. A percutaneous driveline
connects the pump to an external controller, powered by
batteries or electricity from an outlet. The monitor is used to
display system performance and to change controller
operating parameters.1 The HeartMate II VAD, an axial-flow,
rotary ventricular assist system, generates blood flow at a
rate of up to 10 L/minute. One end of the VAD is attached to
the apex of the left ventricle; the other end connects to the
ascending aorta. The VAD diverts blood from the weakened
left ventricle and propels it into the aorta. A small external
computer monitors the system’s operation. A drive line,
which passes through the patient’s abdomen, connects the
implanted pump to the system controller. The system is
powered by either a power module that connects to an
electrical outlet or two lithium batteries.4
VAD use is contraindicated in patients who are allergic to
or can’t tolerate anticoagulation therapy, as well as in
pregnant patients (because of the need for anticoagulation).
Safety and effectiveness in patients younger than 18 years
of age and in those with a body surface area of less than 1.5
m2 hasn’t been established. Because VADs have limited use
in patients with artificial mitral or aortic valves, the risks are
currently unknown.1
Equipment
VAD ▪ VAD batteries ▪ AC or DC adapter ▪ battery charger ▪
system monitor ▪ system controller ▪ mild antiseptic soap
or cleaning agent (preferably chlorhexidine) ▪ sterile normal
saline solution ▪ sterile gauze pad ▪ prescribed analgesics ▪
thermometer ▪ prescribed medications ▪ dressing supplies
▪ gloves ▪ sterile gloves ▪ mask ▪ cap ▪ blood pressure
monitoring equipment ▪ stethoscope ▪ disinfectant pad ▪
prescribed IV fluid ▪ IV administration set ▪ IV infusion
device ▪ suction equipment ▪ oral care supplies ▪ cardiac
monitor ▪
hemodynamic monitoring equipment ▪
emergency resuscitation equipment (handheld resuscitation
bag and mask, crash cart, defibrillator) ▪ Optional: sterile
gown, specialized clip, Montgomery strap, customized
percutaneous lead immobilization binder or belt, other
personal protective equipment, antiembolism stockings or
sequential compression device, Doppler device, ultrasound
gel, 12-lead electrocardiograph (ECG) machine, IV dextran.
Preparation of equipment
Make sure emergency equipment is readily available and
functioning properly. Have a backup controller available and
programmed identically to the primary controller in case the
primary controller fails or malfunctions; using a backup
controller with settings different from the patient’s current
system may result in diminished support and patient harm.
Ensure that fully charged batteries are available at all
times.1
Implementation
■ Review the patient’s medical record for medical and
surgical history, allergies, and current medications.
■ Verify the practitioner’s orders.
■ Perform hand hygiene.5,6,7,8,9,10
■ Put on gloves and, as needed, other personal protective
equipment to comply with standard precautions.11,12
■ Confirm the patient’s identity using at least two patient
identifiers.13
■ Provide privacy.14,15,16,17
■ Explain the procedure to the patient and family (if
appropriate) according to their communication and learning
needs to increase their understanding, allay their fears, and
enhance cooperation.18
■ Provide emotional support to the patient and family.
■ Raise the patient’s bed to waist level when providing
patient care to prevent caregiver back strain.19
■ Receive hand-off communication from the person who
was responsible for the patient’s care. Ask questions as
necessary to avoid miscommunications that could lead to
patient care errors during transitions of care.20,21 Trace each
tubing and catheter from the patient to its point of origin;
use a standardized reconciliation process.
■ Make sure that the VAD, controller, monitor, and power
sources are set up according to the device manufacturer’s
instructions for use.
■ Attach the patient to a continuous cardiac monitor, and
attach hemodynamic monitoring equipment to the monitor
modules if present. Make sure that alarm limits are set
appropriately for the patient’s current condition, and that
the alarms are turned on, functioning properly, and audible
to staff members.22,23
■ Closely monitor the patient’s vital signs at an interval
determined by your facility and the patient’s condition.
Manually auscultate the patient’s blood pressure to ensure
accurate results. If you can’t manually auscultate blood
pressure, use a Doppler device. Blood pressure monitoring
using an arterial catheter should be considered if
hypotension precludes either method.14 To measure blood
pressure using a Doppler device, place an appropriately
sized blood pressure cuff around the patient’s upper arm so
thattheendofthecuffis3⁄4′′to1′′(2to2.5cm)abovethe
antecubital fossa. Align the cuff so that the mark on the cuff
for “artery” is positioned over the artery.24 Alternatively,
place the cuff on the patient’s forearm for radial artery
measurement or the ankle for tibial artery measurement.25
Apply ultrasound gel to the general location of the artery
intended for blood pressure measurement.25 Locate the
vessel by turning on the Doppler device and placing the
probe over the area until you locate the audible blood
flow.25 Hold the probe still over the artery; don’t press down
too hard or you’ll compress the vessel and be unable to
hear blood flow.25 Inflate the blood pressure cuff until the
flow sounds disappear, and then add an additional 30 mm
Hg.25 Release the bulb and slowly deflate the cuff while
watching the pressure manometer.25 Note the pressure at
the point where flow returns to the artery, as indicated by
continuous flow or a mildly pulsatile sound.25 Document this
pressure as XX/Doppler or XX/D (for example, 88/Doppler or
88/D); note the location where you measured the
pressure.25
■ Monitor the patient’s cardiovascular, respiratory, and
neurologic status to enable prompt recognition of changes
in the patient’s condition. Assess the exit site, and monitor
the mediastinal and chest tube sites and drainage.14 Report
immediately bleeding from the exit site, a sudden increase
or cessation of chest or mediastinal tube drainage, and
other associated complications.
■ Perform a comprehensive pain assessment using
techniques appropriate for the patient’s age, condition, and
ability to understand. Administer analgesics as needed and
ordered following
safe
medication
administration
practices.26,27,28,29
■ If the patient requires endotracheal intubation and
mechanical ventilation during the immediate postoperative
period, confirm the ventilator settings and keep the head of
the bed elevated at least 30 degrees, if tolerated. Assess
the patient’s readiness for extubation; extubate the patient
as soon as clinically indicated to reduce the risk of
ventilator-associated pneumonia.1
■ Weigh the patient and record the weight in kilograms to
ensure accurate medication dosing.
For the patient with a HeartWare VAD
■ Confirm the controller settings on the monitor, including
the pump speed, hematocrit setting, VAD identification,
pump serial number, suction response setting, controller
date and time, low-flow alarm limit, high-power alarm limit,
and patient identification.1 Make sure the connections to the
power, monitor, and driveline are secure.1 Make sure that
alarms are turned on, functioning properly, and audible to
staff members
■ Closely monitor the VAD parameters to enable prompt
recognition of changes in the patient’s condition.
■ Monitor the patient’s cardiac index, because pump
speeds are adjusted according to a calculated cardiac index;
pump speeds of 2,400 to 3,200 revolutions per minute
(RPM) are recommended. Unless there’s a clear clinical need
for higher flows, the cardiac index should be set at 2.6 to
2.8 L/minute/m2 until the patient has fully recovered from
the implant surgery (2 to 3 months) and physical activities
require higher levels of support.1
■ Administer IV fluid as prescribed to maintain a pump flow
index (pump flow ÷ body surface area) greater than 2
L/minute/m2, with central venous pressure and left atrial
pressure less than 20 mm Hg. Maintain mean arterial
pressure at less than 85 mm Hg as tolerated; the VAD pump
is sensitive to preload and afterload.1
■ Administer a vasopressor or vasodilator as prescribed,
following safe medication administration practices, to adjust
vasomotor tone as needed.1
■ Administer an inotropic agent, as ordered and needed, to
improve right ventricular function.1
■ Administer anticoagulant therapy as prescribed to reduce
the risk of stroke.1 Anticoagulation therapy should be
individualized for
each patient. Before
starting
anticoagulation, make sure chest tube drainage is less than
40 mL/hour for about 3 hours, hematocrit is stable without
the need for blood transfusion, and coagulation factors are
approaching normal.1 Administer low-dose heparin at 10
units/kg/hour on postoperative day 1 to a target partial
thromboplastin time (PTT) of 40 to 50 seconds as ordered.1
Gradually increase the heparin dosage as prescribed to
maintain the PTT between 50 and 60 seconds.1 Monitor
platelet reactivity as ordered to assess for aspirin
resistance; administer aspirin monotherapy or combination
therapy with dipyridamole or clopidogrel as prescribed
within 24 hours after implantation if there are no
postoperative bleeding complications, to reduce the risk of
stroke.1 For patients who are aspirin sensitive or otherwise
intolerant, administer clopidogrel as ordered.1 Begin
warfarin within 4 days postoperatively and titrate to
maintain the patient’s International Normalized Ratio (INR)
at 2 to 3 for long-term therapy as ordered.1
NURSING ALERT Anticoagulant medications are considered high-
alert medications because they can cause significant patient harm
when used in error. If required by your facility, before administering
an anticoagulant, have another nurse perform an independent double-
check to verify the patient’s identity and make sure that the correct
medication is hanging in the prescribed concentration (if applicable),
the medication’s indication corresponds with the patient’s diagnosis,
the dosage calculations are correct and the dosing formula used to
derive the final dose is correct, the route of administration is safe and
proper for the patient, the pump settings are correct, and the infusion
line is attached to the correct port (if applicable).30
■ Administer systemic antibiotics as ordered for 48 to 72
hours following safe medication administration practices to
reduce the risk of infection.1
■ Turn the patient from side to side at least every 2 hours
as soon as the patient is clinically stable; begin physical
therapy and range-of-motion (ROM) exercises on the first
postoperative day if possible to reduce the risk of pressure
injury and other complications of immobility.1 As soon as
the patient is able, assist him or her to a chair; progress to
ambulation in the hallways within a few days of VAD
implantation.1
■ Perform driveline exit site care routinely (every 24 to 48
hours) as ordered, following strict sterile technique. Perform
hand hygiene.5,6,7,8,9,10 Put on a cap, a mask, and sterile
gloves.1 Put on a sterile gown and use maximal barrier
precautions if required in your facility.25 Remove and discard
the dressing in an appropriate receptacle. Remove and
discard your gloves. Perform hand hygiene.5,6,7,8,9,10 Put on
a new pair of sterile gloves. Inspect the driveline for kink,
tears, punctures, breakdown of material, or other damage.
Notify the practitioner if you see blood within the driveline
lumen or if the driveline is damaged.1 Clean the exit site
with an antiseptic cleaning agent (diluted chlorhexidine
scrub solution is preferred), rinse with sterile normal saline
solution, and dry the site with a sterile gauze pad to avoid
tissue injury.1 Immobilize the percutaneous lead with a
sterile occlusive dressing and, if necessary, a specialized
clip, Montgomery strap, or customized percutaneous lead
immobilization binder or belt. Keep the extra external length
of the driveline under a binder or clothing.1
■ If the patient requires defibrillation, use an external
defibrillator to deliver shocks as indicated, following
Advanced Cardiac Life Support (ACLS) protocol; the VAD can
be left intact and doesn’t need to be turned off.1 If internal
defibrillation is required, the VAD can also be left intact and
doesn’t need to be turned off as the practitioner delivers the
shock.1
■ Respond to alarms promptly, and troubleshoot the device
as permitted and necessary. Always refer to the
manufacturer’s instructions for use.
■ If a red or high-priority alarm signals because of controller
failure, change the controller per manufacturer’s
instructions.1
For the patient with a HeartMate II VAD
■ Assess the system settings and parameters, including
pump flow (estimate of blood flow out of the pump, which is
based on pump speed and the amount of power provided to
the pump motor); pump speed (speed of the pump in RPM);
pulsatility index, (displayed as pulse index, a calculation
related to the amount of assistance that’s provided by the
pump; pulse index typically ranges from 1 to 10; higher
values indicate higher pulsatility, which means the pump is
providing less support and the heart is providing more
support); and pump power (amount of power provided by
the pump motor, which ranges from 0 to 25.5 watts).4 Make
sure that alarm limits are set appropriately for the patient’s
current condition, and that alarms are turn on, functioning
properly, and audible to staff members.22,23
■ Suspect thrombus formation if you note an increase in the
VAD system power requirement and a reduction in the pulse
index. Notify the practitioner of your findings, because
pump replacement may be necessary.4
■ Monitor the patient for signs and symptoms of blood leak
from any system component (unexplained internal bleeding,
possibly with painful abdominal distention; blood draining
from the driveline exit site; or decreased hemoglobin and
hematocrit).4
■ Closely monitor the patient’s hemodynamic status; small
increases in afterload (systemic vascular resistance) and
small decreases in preload (left ventricular filling) may result
in diminished pump flow, a reduction that may result in a
clinically significant decrease in perfusion.4 Assess the
patient for signs and symptoms of decreased perfusion with
changes in preload and afterload. Monitor mixed venous
oxygen saturation levels as ordered.4
■ Auscultate over the pump pocket to verify that the pump
is running if the patient exhibits condition changes.4
■ Administer IV fluid as prescribed.
■ Administer medications as prescribed to maintain mean
arterial pressure at less than 85 mm Hg.
■ Administer 10% low-molecular-weight dextran at 25
mL/hour if prescribed, following safe medication
administration practices.4
■ Administer anticoagulant therapy as prescribed to reduce
the risk of stroke, following safe medication administration
practices.4 Anticoagulation therapy should be individualized
for each patient. Begin IV heparin therapy 12 to 24 hours
after surgery or when chest tube drainage is less than 50
mL/hour for a period of 2 to 3 hours as ordered.4 Initially,
titrate the heparin dose to maintain a PTT of 45 to 50
seconds for 24 hours, as ordered.4 After 24 hours, increase
the heparin dose and titrate to a PTT of 50 to 60 seconds, as
ordered.4 After another 24 hours, increase the heparin dose
and titrate to a PTT 55 to 65 seconds, as ordered.4 Day 2 to
3 postoperatively, administer aspirin and dipyridamole as
prescribed.4 Day 3 to 5 postoperatively, after chest tubes
have been removed and there’s no evidence of bleeding,
begin warfarin (overlapping with heparin), as ordered.4
Discontinue heparin as ordered after the patient’s INR
stabilizes to a range of 2 to 3 on warfarin therapy.4
■ If the patient requires defibrillation, use an external
defibrillator to deliver shocks as indicated, following ACLS
protocol; leave the pump running, and don’t disconnect the
system controller from the percutaneous lead before
delivering the shock. If internal defibrillation is required,
disconnect the VAD from the controller, because the paddles
will be in close proximity to the device. Because retrograde
flow may occur through the pump when it’s off, it may be
necessary to clamp the outflow graft while the device is
stopped.4
■ Administer prophylactic antibiotics postoperatively, as
prescribed, to reduce the risk of infection.4
■ If the patient reports dizziness, immediately assess the
patient and evaluate the system.4
■ Turn the patient from side to side at least every 2 hours
as soon as the patient is clinically stable; begin physical
therapy and ROM exercises on the first postoperative day, if
possible, to reduce the risk of pressure injury and other
complications of immobility.1,4 As soon as the patient is
able, assist him or her to a chair; progress to ambulation in
the hallways within a few days of VAD implantation.1,4
■ Respond to alarms promptly, and troubleshoot the device
as permitted and necessary. Always refer to the
manufacturer’s instructions for use.31,32
■ If an alarm signals controller failure, change the controller
per manufacturer’s instructions.
■ Perform percutaneous lead exit site care daily, using strict
sterile technique. Perform hand hygiene.5,6,7,8,9,10 Put on a
cap, a mask, and sterile gloves.4 Put on a sterile gown and
use maximal barrier precautions if required in your facility.25
Remove and discard the dressing in an appropriate
receptacle. Remove and discard your gloves. Perform hand
hygiene.5,6,7,8,9,10 Put on sterile gloves.4 Gently clean the
site with a mild antiseptic soap (preferably chlorhexidine
solution), rinse with sterile normal saline solution, and then
dry the clean site with a sterile gauze pad.4 Inspect the
percutaneous lead to make sure it’s free from bending or
kinking. Cover the site with a dry sterile dressing.4
Immobilize the percutaneous lead with a stabilization belt or
abdominal binder to reduce trauma to the exit site. Keep the
stabilization belt or abdominal binder in place at all times
except when the patient showers (if permitted), or when the
belt or binder is being replaced with a newly cleaned belt or
binder.4
■ Arrange for echocardiography, if ordered, to perform a
ramped speed study to determine the patient’s appropriate
fixed-speed setting. A ramped speed study is intended for
hemodynamically stable, euvolemic patients in the
postoperative period or later.4
Completing the procedure
■ Monitor the patient’s intake and output closely to
promptly detect changes in the patient’s condition.
■ Monitor the patient closely for signs of right-sided heart
failure; when this occurs, it typically develops within 24
hours after left VAD implantation. Warning signs include
increasing right atrial pressure (RAP) with concurrent
decreases in pulmonary artery occlusion pressure (PAOP)
and left VAD flow. Systemic hypotension, tachycardia, and a
decrease in urine output soon follow. Administer IV fluids as
prescribed to increase RAP to 15 to 18 mm Hg. After
optimizing intravascular fluid volume, administer inotropic
therapy and a pulmonary vasodilator such as nitric oxide as
prescribed.1,4
■ Monitor the patient for signs of cardiac tamponade, such
as unexplained low VAD flow or cardiac output despite
adequate intravascular fluid volume (RAP or PAOP 10 to 15
mm Hg), narrowed pulse pressure beyond what’s expected
from a device recipient, elevated RAP or PAOP despite
inadequate pump or cardiac output, reduced mixed venous
oxygen saturation, tachycardia, reduced urine output,
sudden cessation of chest tube drainage, decreased
electrical voltage on the ECG, and enlargement of the
cardiac silhouette or widened mediastinum on chest X-ray.
Notify the practitioner immediately if such signs occur.25
■ If the patient suffers cardiac arrest and needs
cardiopulmonary resuscitation, compressions may pose a
risk because of the pump location and position of the
outflow graft on the aorta. Collaborate with the patient’s
practitioner in advance, and be familiar with your facility’s
guidelines for which ACLS measure to follow in the event of
cardiac arrest. If compressions are performed, make sure
function and positioning of the VAD are confirmed after the
patient’s condition stabilizes. Cardiac massage under direct
vision performed by a skilled surgeon may be effective for a
patient who has had recent device implantation (before
mediastinal healing).1,25
■ Obtain a 12-lead ECG as ordered if the patient complains
of “feeling different” to determine an underlying cause.4
■ Provide oral nutrition as ordered as soon as the patient’s
condition warrants to correct nutritional deficiencies and
reduce the risk of infection. Alternatively, if the patient
remains intubated, begin an enteral tube feeding as
ordered.1,4
■ Remove invasive monitoring lines and catheters as
ordered as soon as the patient’s condition allows to reduce
the risk of infection.1,4
■ Monitor laboratory test results (electrolyte and lactate
levels, complete blood count, prothrombin time, INR, and
PTT) as ordered.1,4
■ Monitor the patient’s blood glucose levels, and administer
antidiabetic agents as prescribed to maintain strict blood
glucose control, which helps to reduce the risk of infection.4
■ Avoid situations and use of devices that can cause strong
electrostatic discharges, because electrostatic discharges
can damage the electrical parts of the VAD system and
cause the VAD to stop or perform improperly.1,4
■ Provide oral care to reduce oral bacterial colonization,
which helps reduce the risk of health care–associated
pneumonia. Gently brush the patient’s teeth, gums, and
tongue at least twice daily using a soft-bristle toothbrush,
toothpaste, and sterile water.32,33,34 Moisturized the oral
mucosa and lips every 2 to 4 hours to reduce oral
inflammation and improve oral health.32,33 Use a
chlorhexidine mouth rinse twice daily during the
perioperative period as prescribed to prevent ventilator-
associated pneumonia.32,33
■ Use antiembolism prevention strategies, such as applying
antiembolism stockings or sequential compression device,
as ordered, to promote venous return and prevent venous
thromboembolism.
■ If the patient was receiving a beta-adrenergic blocker
before surgery, collaborate with the patient’s practitioner to
make sure the patient receives it during the perioperative
period, as appropriate.34
■ If the patient has an indwelling urinary catheter inserted
for surgery, remove the catheter on postoperative day 1 or
2 (with the day of surgery considered day 0) or as soon as
the patient no longer needs it to reduce the risk of catheter-
associated urinary tract infection.35,36,37 (See the
“Indwelling urinary catheter care and removal” procedure.)
■ Return the bed to the lowest position to prevent falls and
maintain patient safety.38
■ Maintain the device following the manufacturer’s
instructions for use.
■ Remove and discard your gloves.11,12
■ Perform hand hygiene.5,6,7,8,9,10
■ Clean and disinfect your stethoscope using a disinfectant
pad.39
■ Perform hand hygiene.5,6,7,8,9,10
■ Document the procedure.40,41,42,43
Special considerations
■ Don’t subject the patient to magnetic resonance imaging
(MRI) because the VAD contains magnetic components; MRI
can cause device failure or patient injury.1,4
■ Keep cell phones at least 20′′ (50 cm) from the controller
because phones may interfere with the device function.1,4
■ Don’t expose the patient to therapeutic levels of
ultrasound energy, because lithotripsy and other procedures
that use high-intensity ultrasound may cause harm if the
implanted device inadvertently concentrates the ultrasound
field.1,4
■ Don’t expose the patient to high-power electrical
treatments such as diathermy.1,4
■ Keep in mind that therapeutic ionizing radiation may
damage the device, although the damage may not be
immediately detectable.1,4
■ The Joint Commission issued a sentinel event alert
concerning medical device alarm safety, because alarm-
related events have been associated with permanent loss of
function or death. Among the major contributing factors
were improper alarm settings, alarm settings turned off
inappropriately, and alarm signals not audible to staff. Make
sure that alarm limits are set appropriately for the patient’s
current condition, and that alarms are turned on, functioning
properly, and audible to staff. Follow facility guidelines for
preventing alarm fatigue.22
Patient teaching
The patient and family must receive extensive training and
be able to teach back VAD care and maintenance. Provide
the patient with written materials for reference after
discharge.
Complications
Complications associated with both the HeartWare and
HeartMate II devices include death, bleeding (perioperative
or late), cardiac arrhythmia, local infection, respiratory
failure, device malfunction, sepsis, right-sided heart failure,
driveline infection, kidney failure, stroke, neurologic
dysfunction,
psychiatric
episodes,
peripheral
thromboembolism, hemolysis, hepatic dysfunction, device
thrombosis, and myocardial infarction.1,4 Other potential
complications associated with the HeartWare device include
air embolism, aortic insufficiency, driveline perforation,
erosions and other tissue damage, GI bleeding,
arteriovenous malformations, hypertension, multiorgan
failure, pericardial effusion or tamponade, platelet
dysfunction, worsening heart failure, and wound
dehiscence.1
Documentation
Document the patient’s vital signs, hemodynamic
parameters, your assessment findings, system parameters,
any pump adjustments, and medications administered.
Document complications, the date and time, the name of
the practitioner notified, prescribed interventions, and the
patient’s response to those interventions. Record dressing
changes and the condition of the insertion site. Document
any teaching provided to the patient and family and their
understanding of your teaching.
REFERENCES
1 HeartWare, Inc. (2015). “HeartWare® ventricular assist system instructions
for use” [Online]. Accessed via the Web at
http://www.heartware.com/sites/default/files/uploads/docs/ifu00001.21_us _p
ma_ifu_060815.pdf
2 Wiegand, D. L. (2017). AACN procedure manual for high acuity, progressive,
and critical care (7th ed.). St. Louis, MO: Elsevier.
3 Birks, E. J. Intermediate- and long-term mechanical circulatory support.
(2017). In: UpToDate, Mancini, D., et al. (Eds.) . Retrieved from:
www.uptodate.com
4 Thoratec Corporation. (2015). “HeartMate II® left ventricular assist system”
[Online]. Accessed via the Web at http://www.thoratec.com/_assets/download-
tracker/HMII/106020/106020_H.pdf
5 Centers for Disease Control and Prevention. (2002). Guideline for hand
hygiene in health-care settings: Recommendations of the Healthcare Infection
Control Practices Advisory Committee and the HICPAC/SHEA/APIC/IDSA Hand
Hygiene Task Force. MMWR Recommendations and Reports, 51(RR-16), 1–45.
Accessed via the Web at http://www.cdc.gov/mmwr/pdf/rr/rr5116.pdf (Level II)
6 World Health Organization. (2009). “WHO guidelines on hand hygiene in
health care: First global patient safety challenge, clean care is safer care”
[Online]. Accessed via the Web at
http://apps.who.int/iris/bitstream/10665/44102/1/9789241597906_eng.pdf
(Level IV)
7 The Joint Commission. (2019). Standard NPSG.07.01.01. Comprehensive
accreditation manual for hospitals. Oakbrook Terrace, IL: The Joint
Commission. (Level VII)
8 Accreditation Association for Hospitals and Health Systems. (2017). Standard
07.01.21. Healthcare Facilities Accreditation Program: Accreditation
requirements for acute care hospitals. Chicago, IL: Accreditation Association
for Hospitals and Health Systems. (Level VII)
9 Centers for Medicare and Medicaid Services, Department of Health and
Human Services. (2015). Condition of participation: Infection control. 42 C.F.R.
§ 482.42.
10 DNV GL-Healthcare USA, Inc. (2016). IC.1 .SR.1 . NIAHO® accreditation
requirements: Interpretive guidelines & surveyor guidance (version 11).
Milford, OH: DNV GL-Healthcare USA, Inc. (Level VII)
11 Siegel, J. D ., et al. (2007, revised 2017). “2007 guideline for isolation
precautions: Preventing transmission of infectious agents in healthcare
settings” [Online]. Accessed via the Web at
https://www.cdc.gov/infectioncontrol/pdf/guidelines/isolation-guidelines.pdf
(Level II)
12 Accreditation Association for Hospitals and Health Systems. (2017). Standard
07.01.10. Healthcare Facilities Accreditation Program: Accreditation
requirements for acute care hospitals. Chicago, IL: Accreditation Association
for Hospitals and Health Systems. (Level VII)
13 The Joint Commission. (2019). Standard NPSG.01.01.01. Comprehensive
accreditation manual for hospitals. Oakbrook Terrace, IL: The Joint
Commission. (Level VII)
14 Accreditation Association for Hospitals and Health Systems. (2017). Standard
15.01.16. Healthcare Facilities Accreditation Program: Accreditation
requirements for acute care hospitals. Chicago, IL: Accreditation Association
for Hospitals and Health Systems. (Level VII)
15 Centers for Medicare and Medicaid Services, Department of Health and
Human Services. (2015). Condition of participation: Patient’s rights. 42 C.F.R.
§ 482.13(c)(1).
16 DNV GL-Healthcare USA, Inc. (2016). PR.1.SR.5 . NIAHO® accreditation
requirements: Interpretive guidelines & surveyor guidance (version 11).
Milford, OH: DNV GL-Healthcare USA, Inc. (Level VII)
17 The Joint Commission. (2019). Standard RI.01.01.01. Comprehensive
accreditation manual for hospitals. Oakbrook Terrace, IL: The Joint
Commission. (Level VII)
18 The Joint Commission. (2019). Standard PC.02.01.21. Comprehensive
accreditation manual for hospitals. Oakbrook Terrace, IL: The Joint
Commission. (Level VII)
19 Waters, T. R., et al. (2009). “Safe patient handling training for schools of
nursing” [Online]. Accessed via the Web at
http://www.cdc.gov/niosh/docs/2009-127/pdfs/2009-127.pdf (Level VII)
20 The Joint Commission. (2019). Standard PC.02.02.01. Comprehensive
accreditation manual for hospitals. Oakbrook Terrace, IL: The Joint
Commission. (Level VII)
21 The Joint Commission. (2012). “Hot topics in health care, transitions of care:
The need for a more effective approach to continuing patient care” [Online].
Accessed via the Web at
http://www.jointcommission.org/assets/1/18/Hot_Topics_Transitions_of_Care.p
df
22 The Joint Commission. (2013). “Sentinel event alert: Medical device alarm
safety in hospitals” [Online]. Accessed via the Web at
https://www.jointcommission.org/assets/1/6/SEA_50_alarms_4 _26_16.pdf
(Level VII)
23 Graham, K. C., & Cvach, M. (2010). Monitor alarm fatigue: Standardizing use
of physiological monitors and decreasing nuisance alarms. American Journal
of Critical Care, 19(1), 28–37. Accessed via the Web at
http://ajcc.aacnjournals.org/content/19/1/28.full.pdf
24 American Association of Critical-Care Nurses. (2016). “Obtaining accurate
noninvasive blood pressure measurements in adults” [Online]. Accessed via
the Web at https://www.aacn.org/clinical-resources/practice-alerts/obtaining-
accurate-noninvasive-blood-pressure-measurements-in-adults
25 O’Shea, G. (2012). Ventricular assist devices: What intensive care unit nurses
need to know about postoperative management. AACN Advanced Critical
Care, 23(1), 69–83. (Level V)
26 DNV GL-Healthcare USA, Inc. (2016). MM.1 .SR.2. NIAHO® accreditation
requirements: Interpretive guidelines & surveyor guidance (version 11).
Milford, OH: DNV GL-Healthcare USA, Inc. (Level VII)
27 Accreditation Association for Hospitals and Health Systems. (2017). Standard
16.01.03. Healthcare Facilities Accreditation Program: Accreditation
requirements for acute care hospitals. Chicago, IL: Accreditation Association
for Hospitals and Health Systems. (Level VII)
28 Centers for Medicare and Medicaid Services, Department of Health and
Human Services. (2015). Condition of participation: Nursing services. 42
C.F.R. § 482.23(c).
29 The Joint Commission. (2019). Standard PC.01.02.07. Comprehensive
accreditation manual for hospitals. Oakbrook Terrace, IL: The Joint
Commission. (Level VII)
30 Institute for Safe Medication Practices. (2014). Independent double-checks:
Undervalued and misused. ISMP Medication Safety Alert! Nurse Advise-ERR,
12(3), 1. Accessed via the Web at
http://www.ismp.org/newsletters/nursing/issues/NurseAdviseERR201403.pdf
31 Thoratec Corporation. (2013). “HeartMate II® alarms for clinicians” [Online].
Accessed via the Web at http://www.thoratec.com/_assets/download-
tracker/107526_D_- _H MI I _Pocket_Guide_Alarms_Clinicians_WW _ENGLISH.pdf
32 American Association of Critical-Care Nurses. (2017). “Oral care for acutely
and critically ill patients” [Online]. Accessed via the Web at
https://www.aacn.org/clinical-resources/practice-alerts/oral-care-for-acutely-
and-critically-ill-patients (Level VII)
33 Kiyoshi-Teo, H., & Blegen, M. (2015). Influences of institutional guidelines on
oral hygiene practices in intensive care units. American Journal of Critical
Care, 24(4), 309–318.
34 Ames, N. J ., et al. (2011). Effects of systematic oral care in critically ill
patients: A multicenter study. American Journal of Critical Care, 20(5), e103–
e114. Accessed via the Web at
http://ajcc.aacnjournals.org/content/20/5/e103.full.pdf+html
35 Centers for Medicare and Medicaid Services, & The Joint Commission. (2017).
“The specifications manual for national hospital inpatient quality measures
(version 5.2a)” [Online]. Accessed via the Web at
https://www.jointcommission.org/specifications_manual_for_national_hospital_
inpatient_quality_measures.aspx
36 Healthcare Infection Control Practices Advisory Committee. (2010).
“Guideline for prevention of catheter-associated urinary tract infections,
2009” [Online]. Accessed via the Web at
http://www.cdc.gov/hicpac/pdf/CAUTI/CAUTIguideline2009final.pdf (Level I)
37 The Joint Commission. (2019). Standard NPSG.07.06 .01. Comprehensive
accreditation manual for hospitals. Oakbrook Terrace, IL: The Joint
Commission. (Level VII)
38 Ganz, D. A., et al. (2013). Preventing falls in hospitals: A toolkit for improving
quality of care (AHRQ Publication No. 13-0015-EF). Rockville, MD: Agency for
Healthcare Research and Quality. Accessed July 2017 via the Web at
http://www.ahrq.gov/sites/default/files/publications/files/fallpxtoolkit.pdf
(Level VII)
39 Rutala, W. A., et al. (2008, revised 2017). “Guideline for disinfection and
sterilization in healthcare facilities, 2008” [Online]. Accessed via the Web at
https://www.cdc.gov/infectioncontrol/pdf/guidelines/disinfection-
guidelines.pdf (Level I)
40 The Joint Commission. (2019). Standard RC.01.03 .01. Comprehensive
accreditation manual for hospitals. Oakbrook Terrace, IL: The Joint
Commission. (Level VII)
41 Accreditation Association for Hospitals and Health Systems. (2017). Standard
10.00 .03. Healthcare Facilities Accreditation Program: Accreditation
requirements for acute care hospitals. Chicago, IL: Accreditation Association
for Hospitals and Health Systems. (Level VII)
42 Centers for Medicare and Medicaid Services, Department of Health and
Human Services. (2015). Condition of participation: Medical record services.
42 C.F.R. § 482.24(b).
43 DNV GL-Healthcare USA, Inc. (2016). MR.2 .SR.1 . NIAHO® accreditation
requirements: Interpretive guidelines & surveyor guidance (version 11).
Milford, OH: DNV GL-Healthcare USA, Inc. (Level VII)
VENTRICULAR DRAIN INSERTION, ASSISTING
Cerebrospinal fluid (CSF) drainage aims to reduce CSF
pressure to the desired level and then to maintain it at that
level. Fluid can be withdrawn from the lateral ventricle or
the lumbar subarachnoid space, depending on the indication
and the desired outcome, via a catheter or an external
ventricular drain (EVD) attached to a sterile, closed-
drainage collection system. Intracranial pressure (ICP) can
also be monitored by an external transducer connected to
the external ventricular drainage system.1 Indications for
ventricular
drain insertion
include
obstructive
hydrocephalus, subarachnoid hemorrhage resulting in acute
hydrocephalus due to obstruction of arachnoid villi, Hunt
and Hess grade 3 or higher subarachnoid hemorrhage,
cerebral edema, surgical mass lesions, infections (such as
meningitis), Chiari malformations, shunt failure caused by
mechanical disruption or infection, and brain relaxation in
an operating room (OR).2
To insert the ventricular drain, the practitioner inserts a
ventricular catheter through a burr hole in the patient’s skull
using sterile technique. This procedure is usually performed
in the operating room with the patient receiving general
anesthesia, but it can also be done in the emergency
department or on the intensive care unit.
Strict sterile technique must be maintained throughout
equipment setup, catheter insertion, and care of the
ventricular drain, because the catheter’s location in the
brain poses an increased risk of infection.1,2 Because of the
risk of resistant microorganisms, the use of prophylactic
antibiotics is controversial and isn’t recommended.2
Equipment
Overbed table ▪ gloves ▪ sterile gloves ▪ gowns ▪ sterile
gowns ▪ caps2 ▪ masks ▪ cardiac monitor ▪ pulse oximeter
and probe ▪ antiseptic solution or sterile preparation kit2 ▪
sterile drapes ▪ 3-mL syringe ▪ 25G 3⁄4′′ (1.9 -cm) needle ▪
local anesthetic (usually 1% lidocaine) ▪ ventricular
catheter2 ▪ EVD set, including drainage tubing, drip
chamber, and drainage bag2 ▪ suture material ▪ 18G spinal
needle ▪ tape ▪ light source ▪ IV pole ▪ sterile occlusive
dressing ▪ intracranial access kit2 ▪ level or laser leveling
device ▪
ICP monitoring equipment with flushless
transducer setup2 ▪ pressure cable and module ▪ sterile
preservative-free normal saline solution in a 30-mL or 40-mL
syringe2 ▪ nonvented dead-end caps2 ▪ emergency
equipment (code cart with emergency medications,
handheld resuscitation bag and mask, defibrillator,
intubation equipment) ▪ Optional: prescribed sedation or
analgesia, alcohol pad, IV catheter insertion supplies,
clippers.
Some of the equipment may be available in a
prepackaged ventriculostomy tray.
Preparation of equipment
Make sure that emergency equipment is readily available
and properly functioning.
If the practitioner elects to perform the procedure in an
OR, prepare the equipment in that location using sterile
technique. If the practitioner elects to perform the
procedure at the bedside, open all equipment on a sterile
field using sterile technique. Inspect all equipment and
supplies; if a product is expired, if its integrity is
compromised, or if it’s defective, remove it from patient
use, label it as expired or defective, and report the
expiration or defect as directed by your facility.
Using sterile technique, prepare the ICP monitoring
equipment by priming the pressure tubing and EVD system
with sterile preservative-free saline solution in a 30-mL or
40-mL syringe; turn the stopcocks, as needed, to prime the
system. Then remove the syringe and replace it with a
sterile nonvented cap.1 (See the “Intracranial pressure
monitoring” procedure.)
Implementation
■ Verify the practitioner’s order.
■ Confirm that written informed consent has been obtained
by the practitioner and is in the patient’s medical
record.3,4,5,6
■ Conduct a preprocedure verification to make sure that all
relevant documentation, related information, and equipment
are available and correctly identified to the patient’s
identifiers.7,8
■ Verify that ordered laboratory and imaging studies have
been completed, and that the results are in the patient’s
medical record. International Normalized Ratio should range
between 1.2 and 1.6 in a patient with traumatic brain injury
who requires emergency ventriculostomy to reduce the risk
of hemorrhage.9 Notify the practitioner of any unexpected
results.
■ Check the patient’s history for hypersensitivity to latex,
antiseptic solution, and the local anesthetic and other
medications.
■ Gather and prepare the necessary equipment.
■ Perform hand hygiene.10,11,12,13,14,15
■ Confirm the patient’s identity using at least two patient
identifiers.16
■ Provide privacy.17,18,19,20
■ Reinforce the practitioner’s explanation of the procedure
to the patient and family (if appropriate) according to their
individual communication and learning needs to increase
their understanding, allay their fears, and enhance
cooperation.21 Discuss patient activity restrictions that will
be necessary after EVD placement. Answer any questions.
■ Explain to the patient and family (if applicable) that the
patient must restrict activity while the drain is in place. The
patient may not sit up, stand, or walk when the drain is
open, and must ask for assistance with movement. Explain
that a nurse must turn off the system when the patient is
repositioning or transferring. Instruct the patient to avoid
straining, coughing, and sneezing.
■ Make sure that the procedure room door remains closed
and limit traffic in the room to reduce the risk of
contamination.2
■ Raise the patient’s bed to waist level when providing care
to prevent caregiver back strain.22
■ Perform hand hygiene.10,11,12,13,14,15
■ Attach the patient to a cardiac monitor and pulse
oximeter to monitor heart rate and rhythm and oxygen
saturation level during the procedure.2 Make sure alarm
limits are set appropriately for the patient’s current
condition, and that alarms are turned on, functioning
properly, and audible to staff.23,24,25,26
■ Obtain vital signs and oxygen saturation level and
perform a baseline neurologic assessment to help detect
alterations or signs of deterioration during and after the
procedure.
■ Make sure that the practitioner marks the catheter
insertion site using the process determined by your facility;
involve the patient or family in the process, if possible, to
avoid wrong-site insertion.8,27
■ Assess the patency of IV access or initiate IV access, as
needed and ordered. (See the “IV catheter insertion and
removal” procedure.)
■ Assess the patient’s sedation and pain management
needs in collaboration with the practitioner.2,28 Administer
sedation or analgesia, as indicated and prescribed, following
safe medication administration practices, to ensure the
patient’s comfort during the procedure.2,29,30,31,32
■ Position the patient in the supine position with the head
of the bed elevated 30 degrees. Obtain assistance if needed
to immobilize the patient’s head to prevent movement
during catheter insertion.2
■ Illuminate the catheter insertion area with a light source.
■ Braid or clip the patient’s hair, if needed, to expose the
insertion site. If you clip the hair, use tape or another
similarly sticky product to remove residual hair clippings.2
■ Put on a cap and mask.2 Make sure everyone in the room
is wearing a cap and mask.2
■ Perform hand hygiene.10,11,12,13,14,15
■ Put on a gown, protective eyewear, and gloves.33,34
■ Set up the overbed table as a sterile field and unwrap the
EVD tray using sterile technique. If the tray is unavailable,
set up a sterile field and open all supplies using sterile
technique.
■ Label all medications, medication containers, and other
solutions on and off the sterile field.35,36
■ If assisting with sterile supplies, remove and discard your
gloves.33,34
■ Perform hand hygiene.10,11,12,13,14,15
■ Put on sterile gloves.33,34
■ The practitioner cleans the insertion site with antiseptic
solution and allows it to dry,2 drapes the site with a sterile
drape, and administers a local anesthetic using a 3-mL
syringe and a 25G, 3⁄4′′ (1.9 cm) needle.2 Assist the
practitioner as needed.
■ Conduct a time-out immediately before the start of the
procedure to perform a final assessment that the correct
patient, site, positioning, and procedure are identified and
that, as applicable, all relevant information and necessary
equipment are available.2,8,37
■ During drain insertion, continuously monitor the patient’s
heart rate and rhythm, respiratory rate, oxygen saturation
level, and blood pressure.2 Guidelines recommend use of an
arterial catheter for blood pressure monitoring to ensure
vigilant monitoring of mean arterial pressure to avoid
decreased cerebral perfusion pressure.2
■ Assess the patient’s neurologic status every 15 minutes
during drain insertion. Serial assessments are necessary for
immediate identification and treatment of neurologic
changes.2
■ Using sterile technique, assist the practitioner as needed
throughout the insertion procedure.
■ To insert the drain, the practitioner makes an incision in
the scalp and subcutaneous tissue, drills a burr hole through
the cranium, and rinses the area with sterile preservative-
free normal saline solution. Next, the practitioner uses an
18G spinal needle to puncture the dura and inserts the
catheter through the burr hole to the desired depth, secures
it using a tunneling method through a separate incision, and
sutures it. After completing EVD insertion, the practitioner
covers the insertion site with a sterile occlusive dressing
and secures the catheter to prevent accidental removal.2
■ After the practitioner inserts the catheter, connect the
prepared ICP monitoring system and the prepared EVD
system to the distal tip of the catheter. Attach the pressure
cables and the module, following the manufacturer’s
instructions for use. Trace each tube from the patient to its
point of origin to make sure that it’s connected to the
correct port.38,39 Label each tube at the distal end (near the
patient) and proximal end (near the drainage bag) to
distinguish the tubing and reduce the risk of
misconnections. Secure connection points with tape or a
connector to prevent accidental disconnections.39
■ Place the EVD system, including the drip chamber and
collection bag, on an IV pole. Set the drip chamber
manometer at the pressure level ordered by the
practitioner.1,2 Using the level or laser leveling device, level
the ICP transducer at the foramen of Monro. Anatomically,
the external reference point to approximate the foramen of
Monro is the level of the external auditory meatus (tragus of
the ear) or the outer canthus of the eye. Maintaining the
proper position of the ICP transducer ensures accurate
waveform and pressure data. Use the same landmark every
time you check the zero reference level.2
■ Ensure that the monitoring system is free from air, which
could alter the pressure reading.
■ After EVD insertion, monitor the patient’s vital signs,
oxygen saturation level, neurologic status, and ICP
waveform at least every hour, according to the patient’s
condition, or as directed by your facility. Ensure that the
drainage system is appropriately clamped or open
depending on the patient’s situation and the practitioner’s
order. Assess and record the volume, clarity, and color of
CSF drainage hourly or as ordered.2 Check the patient’s
position to ensure that the transducer is at the ordered
reference level. If the patient is very active and moving
around in the bed, frequently assess that the drainage
system is leveled appropriately to prevent overdrainage or
underdrainage. Check drain patency, as needed, by
lowering the entire system briefly to assess drip rate into
the graduated burette. Notify the practitioner immediately if
drainage ceases and you find no external cause (for
example, kinking or disconnection).2
■ Discard used supplies in the appropriate receptacles.
■ Remove and discard your gloves and personal protective
equipment.33,34
■ Return the bed to the lowest position to prevent falls and
maintain patient safety.40
■ Perform hand hygiene.10,11,12,13,14,15
■ Screen and assess the patient’s pain using facility-defined
criteria consistent with the patient’s age, condition, and
ability to understand.28 Respond appropriately.
■ Perform hand hygiene.10,11,12,13,14,15
■ Document the procedure.41,42,43,44
Special considerations
■ Vigilant assessment of CSF drainage volume throughout
the hour is essential to prevent overdrainage and
underdrainage.1 Overdrainage can occur if the drip chamber
is placed too far below the catheter insertion site.
Underdrainage may reflect kinked tubing, catheter
displacement, or a drip chamber placed higher than the
catheter insertion site.
■ Maintain the collection system in the upright position; if
you need to lay the system down, drain the CSF into the
lower collection bag to reduce the incidence of infection and
backflow.1
■ Raising or lowering the head of the bed can affect the CSF
flow rate. When changing the patient’s position, level the
transducer to the tragus of the ear or the outer canthus of
the eye.
■ Patients may experience a chronic headache during
continuous CSF drainage. Reassure the patient that this
symptom isn’t unusual; administer analgesics, as
appropriate, following safe medication administration
practices.29,30,31,32
■ Ensure continuous monitoring of ICP waveforms. Note
dampened or excessively arched waveforms, which may
indicate alterations in ICP.
■ Guidelines discourage taking the patient off the patient
floor to perform tests and procedures to avoid catheter
dislodgment. Check your facility’s requirements for
scheduling such tests and procedures at the patient’s
bedside.
■ Follow strict sterile technique when connecting and
flushing the tubing, when taking samples from the drainage
system, and during dressing changes.1,2
■ Don’t routinely change the drainage tubing; allow it to
remain for the duration to maintain sterility and reduce the
risk of infection.2 When changing the drainage bag, wear
sterile gloves and a mask to reduce the incidence of
infection. Only change the drainage bag when it’s nearly
full.2
■ Change the EVD insertion site dressing daily, as ordered,
or as directed by your facility, using sterile technique to
maintain sterility and observe the insertion site.1
■ The Joint Commission has issued a sentinel event alert
concerning medical device alarm safety, because alarm-
related events have been associated with permanent loss of
function and death. Among the major contributing factors
were improper alarm settings, inappropriately turned off
alarms, and alarm signals not audible to staff. Make sure
that the alarm limits are appropriately set, and that the
alarms are turned on, functioning properly, and audible to
staff. Follow facility guidelines for preventing alarm
fatigue.26
■ The Joint Commission has issued a sentinel event alert
related to managing risk during transition to new
International Organization for Standardization tubing
standards designed to prevent dangerous tubing
misconnections, which can lead to serious patient injury and
death. During the transition, be sure to trace all tubing and
catheters from the patient to their points of origin before
connecting or reconnecting any device or infusion, at any
care transition (such as to a new setting or service), and as
part of the hand-off process. In addition, route tubes and
catheters with different purposes in different, standardized
directions; label tubing at both the distal and proximal ends
when the patient has different access sites or several bags
hanging; use tubing and equipment only as intended; and
store medications for different delivery routes in separate
locations.39
Complications
Complications may include infection, which can cause
meningitis, and excessive CSF drainage. Signs of excessive
CSF drainage include headache, tachycardia, diaphoresis,
and nausea. Acute overdrainage can result in collapsed
ventricles, tonsillar herniation, and medullary compression.
NURSING ALERT If drainage accumulates too rapidly, clamp the
system, notify the practitioner immediately, and perform a complete
neurologic assessment. This complication constitutes a potential
neurosurgical emergency.
Documentation
Document the preprocedure verification process and the
time-out performed immediately before the procedure.
Record the date and time the practitioner inserted the drain,
the patient’s position, and the transducer’s position at the
ordered reference level. Document the patient’s tolerance of
the insertion process, including neurologic assessments,
vital signs, and oxygen saturation levels; medication
administration; and ICP. Obtain an ICP pressure tracing and
place it in the patient’s medical record.2 Document hourly
CSF output and neurologic and hemodynamic status. Also
document any teaching you provided, the patient’s and
family’s understanding of the teaching, and whether follow-
up teaching was required.
REFERENCES
1 Wiegand, D. L. (2017). AACN procedure manual for high acuity, progressive,
and critical care (7th ed.). St. Louis, MO: Elsevier.
2 American Association of Neuroscience Nurses (AANN). (2012). Care of the
patient undergoing intracranial pressure monitoring/external ventricular
drainage or lumbar drainage: AANN clinical practice guideline series.
Glenview, IL: AANN. (Level I)
3 The Joint Commission. (2019). Standard RI.01.03 .01. Comprehensive
accreditation manual for hospitals. Oakbrook Terrace, IL: The Joint
Commission. (Level VII)
4 Accreditation Association for Hospitals and Health Systems. (2017). Standard
30.01.11. Healthcare Facilities Accreditation Program: Accreditation
requirements for acute care hospitals. Chicago, IL: Accreditation Association
for Hospitals and Health Systems. (Level VII)
5 Centers for Medicare and Medicaid Services, Department of Health and
Human Services. (2015). Condition of participation: Patient’s rights. 42 C.F.R.
§ 482.13(b)(2).
6 DNV GL-Healthcare USA, Inc. (2016). PR.1 .SR.3 . NIAHO® accreditation
requirements: Interpretive guidelines & surveyor guidance (version 11).
Milford, OH: DNV GL-Healthcare USA, Inc. (Level VII)
7 The Joint Commission. (2019). Standard UP.01.01.01. Comprehensive
accreditation manual for hospitals. Oakbrook Terrace, IL: The Joint
Commission. (Level VII)
8 Accreditation Association for Hospitals and Health Systems. (2017). Standard
30.00 .14. Healthcare Facilities Accreditation Program: Accreditation
requirements for acute care hospitals. Chicago, IL: Accreditation Association
for Hospitals and Health Systems. (Level VII)
9 Bauer, D. F., et al. (2011). The relationship between INR and development of
hemorrhage with placement of ventriculotomy. Journal of Trauma, 70(5),
1112–1117 . (Level IV)
10 The Joint Commission. (2019). Standard NPSG.07.01.01. Comprehensive
accreditation manual for hospitals. Oakbrook Terrace, IL: The Joint
Commission. (Level VII)
11 Centers for Disease Control and Prevention. (2002). Guideline for hand
hygiene in health-care settings: Recommendations of the Healthcare Infection
Control Practices Advisory Committee and the HICPAC/SHEA/APIC/IDSA Hand
Hygiene Task Force. MMWR Recommendations and Reports, 51(RR-16), 1–45.
Accessed via the Web at https://www.cdc.gov/mmwr/pdf/rr/rr5116.pdf (Level
II)
12 World Health Organization. (2009). “WHO guidelines on hand hygiene in
health care: First global patient safety challenge, clean care is safer care”
[Online]. Accessed via the Web at
http://apps.who.int/iris/bitstream/10665/44102/1/9789241597906_eng.pdf
(Level IV)
13 Accreditation Association for Hospitals and Health Systems. (2017). Standard
07.01.21. Healthcare Facilities Accreditation Program: Accreditation
requirements for acute care hospitals. Chicago, IL: Accreditation Association
for Hospitals and Health Systems. (Level VII)
14 Centers for Medicare and Medicaid Services, Department of Health and
Human Services. (2015). Condition of participation: Infection control. 42 C.F.R.
§ 482.42.
15 DNV GL-Healthcare USA, Inc. (2016). IC.1 .SR.1 . NIAHO® accreditation
requirements: Interpretive guidelines & surveyor guidance (version 11).
Milford, OH: DNV GL-Healthcare USA, Inc. (Level VII)
16 The Joint Commission. (2019). Standard NPSG.01.01.01. Comprehensive
accreditation manual for hospitals. Oakbrook Terrace, IL: The Joint
Commission. (Level VII)
17 Accreditation Association for Hospitals and Health Systems. (2017). Standard
15.01.16. Healthcare Facilities Accreditation Program: Accreditation
requirements for acute care hospitals. Chicago, IL: Accreditation Association
for Hospitals and Health Systems. (Level VII)
18 Centers for Medicare and Medicaid Services, Department of Health and
Human Services. (2015). Condition of participation: Patient’s rights. 42 C.F.R.
§ 482.13(c)(1).
19 The Joint Commission. (2019). Standard RI.01.01.01. Comprehensive
accreditation manual for hospitals. Oakbrook Terrace, IL: The Joint
Commission. (Level VII)
20 DNV GL-Healthcare USA, Inc. (2016). PR.1.SR.5 . NIAHO® accreditation
requirements: Interpretive guidelines & surveyor guidance (version 11).
Milford, OH: DNV GL-Healthcare USA, Inc. (Level VII)
21 The Joint Commission. (2019). Standard PC.02.01.21. Comprehensive
accreditation manual for hospitals. Oakbrook Terrace, IL: The Joint
Commission. (Level VII)
22 Waters, T. R., et al. (2009). “Safe patient handling training for schools of
nursing” [Online]. Accessed via the Web at
https://www.cdc.gov/niosh/docs/2009-127/pdfs/2009-127.pdf (Level VII)
23 Graham, K. C., & Cvach, M. (2010). Monitor alarm fatigue: Standardizing use
of physiological monitors and decreasing nuisance alarms. American Journal
of Critical Care, 19(1), 28–37. Accessed via the Web at
http://ajcc.aacnjournals.org/content/19/1/28.full.pdf
24 The Joint Commission. (2019). Standard NPSG.06 .01.01. Comprehensive
accreditation manual for hospitals. Oakbrook Terrace, IL: The Joint
Commission. (Level VII)
25 American Association of Critical-Care Nurses. (2013). “A ACN practice alert:
Alarm management” [Online]. Accessed via the Web at
https://www.aacn.org/aacn-website/shared/content/practice-
alerts/2015/11/25/alarm-management (Level VII)
26 The Joint Commission. (2013). “Sentinel event alert: Medical device alarm
safety in hospitals” [Online]. Accessed via the Web at
https://www.jointcommission.org/assets/1/6/SEA_50_alarms_4 _26_16.pdf
(Level VII)
27 The Joint Commission. (2019). Standard UP.01.02.01. Comprehensive
accreditation manual for hospitals. Oakbrook Terrace, IL: The Joint
Commission. (Level VII)
28 The Joint Commission. (2019). Standard PC.01.02.07. Comprehensive
accreditation manual for hospitals. Oakbrook Terrace, IL: The Joint
Commission. (Level VII)
29 Accreditation Association for Hospitals and Health Systems. (2017). Standard
16.01.03. Healthcare Facilities Accreditation Program: Accreditation
requirements for acute care hospitals. Chicago, IL: Accreditation Association
for Hospitals and Health Systems. (Level VII)
30 Centers for Medicare and Medicaid Services, Department of Health and
Human Services. (2015). Condition of participation: Nursing services. 42
C.F.R. § 482.23(c).
31 DNV GL-Healthcare USA, Inc. (2016). MM.1 .SR.2. NIAHO® accreditation
requirements: Interpretive guidelines & surveyor guidance (version 11).
Milford, OH: DNV GL-Healthcare USA, Inc. (Level VII)
32 The Joint Commission. (2019). Standard MM.06.01.01. Comprehensive
accreditation manual for hospitals. Oakbrook Terrace, IL: The Joint
Commission. (Level VII)
33 Siegel, J. D ., et al. (2007, revised 2017). “2007 guideline for isolation
precautions: Preventing transmission of infectious agents in healthcare
settings” [Online]. Accessed via the Web at
https://www.cdc.gov/infectioncontrol/pdf/guidelines/isolation-guidelines.pdf
(Level II)
34 Accreditation Association for Hospitals and Health Systems. (2017). Standard
07.01.10. Healthcare Facilities Accreditation Program: Accreditation
requirements for acute care hospitals. Chicago, IL: Accreditation Association
for Hospitals and Health Systems. (Level VII)
35 The Joint Commission. (2019). Standard NPSG.03 .04.01. Comprehensive
accreditation manual for hospitals. Oakbrook Terrace, IL: The Joint
Commission. (Level VII)
36 Accreditation Association for Hospitals and Health Systems. (2017). Standard
25.01.27. Healthcare Facilities Accreditation Program: Accreditation
requirements for acute care hospitals. Chicago, IL: Accreditation Association
for Hospitals and Health Systems. (Level VII)
37 The Joint Commission. (2019). Standard UP.01.03.01. Comprehensive
accreditation manual for hospitals. Oakbrook Terrace, IL: The Joint
Commission. (Level VII)
38 U.S . Food and Drug Administration. (n.d .). “Look. Check. Connect. Safe
medical device connections save lives” [Online]. Accessed via the Web at
https://www.fda.gov/downloads/MedicalDevices/Safety/AlertsandNotices/UCM
134873.pdf
39 The Joint Commission. (2014). “Sentinel event alert: Managing risk during
transition to new ISO tubing connector standards” [Online]. Accessed via the
Web at
http://www.jointcommission.org/assets/1/6/SEA_53_Connectors_8 _19_14 _final.
pdf
40 Ganz, D. A., et al. (2013). Preventing falls in hospitals: A toolkit for improving
quality of care (AHRQ Publication No. 13-0015-EF). Rockville, MD: Agency for
Healthcare Research and Quality. Accessed via the Web at
https://www.ahrq.gov/sites/default/files/publications/files/fallpxtoolkit_0 .pdf
(Level VII)
41 The Joint Commission. (2019). Standard RC.01.03 .01. Comprehensive
accreditation manual for hospitals. Oakbrook Terrace, IL: The Joint
Commission. (Level VII)
42 Centers for Medicare and Medicaid Services, Department of Health and
Human Services. (2015). Condition of participation: Medical record services.
42 C.F.R. § 482.24(b).
43 Accreditation Association for Hospitals and Health Systems. (2017). Standard
10.00 .03. Healthcare Facilities Accreditation Program: Accreditation
requirements for acute care hospitals. Chicago, IL: Accreditation Association
for Hospitals and Health Systems. (Level VII)
44 DNV GL-Healthcare USA, Inc. (2016). MR.2 .SR.1 . NIAHO® accreditation
requirements: Interpretive guidelines & surveyor guidance (version 11).
Milford, OH: DNV GL-Healthcare USA, Inc. (Level VII)
VOLUME-CONTROL SET PREPARATION
A volume-control set is similar to a standard IV
administration set, with the addition of a graduated
chamber immediately above the drip chamber of the tubing.
This graduated chamber, which includes a separate
medication port and air filter, allows administration of
medications or a precise volume of fluid.
Accurate control of the flow rate prevents IV dosing errors.
Controlling the dose and flow rate is particularly important
when administering highly potent, irritating, or potentially
toxic IV medications to children or older adults. The volume-
control set design also prevents free flow of fluid and shuts
off when the fluid is exhausted, preventing air from entering
the IV catheter.
Despite the potential advantages, there’s little evidence
to support the use of volume-control sets, and research has
identified medication and flushing errors associated with
their use.1
HOSPITAL-ACQUIRED CONDITION ALERT Vascular catheter–associated
infection is considered a hospital-acquired condition because a variety
of best practices can reasonably prevent it. Follow infection prevention
techniques (such as performing hand hygiene and following sterile,
no-touch technique) when preparing an IV volume-control set to
reduce the risk of vascular catheter–associated infections.2,3,4,5,6
Equipment
Volume-control set ▪ IV pole ▪ prescribed IV solution ▪
antiseptic pads (alcohol, tincture of iodine, or chlorhexidine-
based) ▪ medication in labeled syringe ▪ label.
Although various models of volume-control sets are
available, each one consists of a graduated fluid chamber
(120 to 250 mL) with a spike and a filtered air line on the
top and administration tubing underneath. Floating valve
sets have a valve at the bottom that closes when the
chamber empties; membrane filter sets have a rigid filter at
the bottom that, when wet, prevents the passage of air.
NURSING ALERT Make sure the volume-control set is labeled clearly
when medications are added to the system. Check with the pharmacy
for incompatibilities before adding the drug, and always use sterile
technique. Keep in mind that chemical inactivation or precipitation
may occur when multiple medications are administered using the
same volume-control set.1,7
Preparation of equipment
Prepare any ordered medication and verify compatibility of
the medication and diluent before administration. Whenever
possible, administer pharmacy-prepared or commercially
available products.8
Inspect all IV equipment and supplies; if a product is
expired, if its integrity compromised, or if you find it’s
defective, remove it from patient use, label it as expired or
defective, and report the expiration or defect as directed by
your facility.9,10
Implementation
■ Avoid distractions and interruptions when preparing and
administering IV solutions and medication to prevent
administration errors.10,11
■ Review the practitioner’s order to make sure that the
prescribed infusion solution or medication, dose, rate, and
route of administration are appropriate for the patient’s age,
condition, and access device. Address concerns about the
order with the practitioner,12 pharmacist, or your supervisor
and, if needed, the risk management department, or as
directed by your facility.12,13,14,15,16
■ Gather and prepare the necessary equipment.
■ Compare the label on the solution container and
prescribed medication with the order in the patient’s
medical record. Verify the practitioner’s order, patient’s
name, dosage, concentration, administration route,
frequency, and infusion rate.16,17
■ Check the patient’s medical record for an allergy or
contraindication to the prescribed medication or solution. If
an allergy or contraindications exist, don’t administer the
medication; notify the practitioner.
■ Discuss any unresolved concerns about the IV solution or
medication with the patient’s practitioner.
■ Perform hand hygiene.2,18,19,20,21,22,23
■ Confirm the patient’s identity using at least two patient
identifiers.24
■ Provide privacy.25,26,27,28
■ Explain the procedure to the patient.29
■ If an IV catheter is already in place, assess the insertion
site for signs of infiltration and infection.30,31
■ Remove the volume-control set from its box and close all
the clamps.
■ Remove the protective cap from the volume-control set
spike, insert the spike into the IV solution container, and
hang the container on the IV pole.
■ Open the air vent clamp and close the upper slide clamp.
■ Open the lower clamp on the IV tubing, slide it upward
until it’s slightly below the drip chamber, and close the
clamp.
■ Open the upper clamp until the fluid chamber fills with
about 30 mL of solution. Then close the clamp.
■ Gently squeeze the chamber.
■ Release the drip chamber and let it fill to the level
recommended by the manufacturer.
■ Open the lower clamp, prime the tubing, and close the
clamp.
■ To use the set as a primary line, perform a vigorous
mechanical scrub of the catheter hub or needleless
connector for at least 5 seconds5 using an antiseptic pad.
Allow it to dry completely.5,32,33 Then attach the distal end
of the tubing directly to the catheter hub or needleless
access device.
■ To use the set as a secondary line, perform a vigorous
mechanical scrub of the Y-port of the primary tubing for at
least 5 seconds5 using an antiseptic pad.5,32 Allow it to dry
completely. Then attach the distal end of the tubing to the Y-
port of the primary tubing, following the manufacturer’s
instructions.
■ To add medication, perform a vigorous mechanical scrub
of the injection port on the volume-control set for at least 5
seconds5 using an antiseptic pad.5,32 Allow it to dry
completely, and inject the medication (as shown below).
Follow safe medication administration practices.5,32,34,35,36
NURSING ALERT Don’t administer continuous high-alert medications
as secondary infusions or connect a secondary medication to a high-
alert primary continuous infusion, to avoid patient harm caused by
inadvertent medication administration at incorrect or indeterminate
rates.37
■ Place a label on the chamber indicating the drug, dose,
date, and your initials. Don’t write directly on the chamber,
because the plastic absorbs ink.38
■ Open the upper clamp (as shown below), fill the fluid
chamber with the prescribed amount of solution, and close
the clamp. Gently rotate the chamber to mix the
medication.
■ If using the volume-control set to deliver a secondary
infusion, turn off the primary solution or lower the drip rate
to maintain an open line. Verify that the secondary infusion
is active and the primary infusion is inactive by viewing the
drip chambers, as indicated.37
■ Trace the tubing from the patient to its point of origin to
make sure that the set is connected to the proper
port.16,39,40 Route the tubing in a standardized direction if
the patient has other tubing and catheters that have
different purposes. If you’re using multiple IV lines, label the
tubing at the distal end (near the patient connection) and
proximal end (near the source container) to reduce the risk
of misconnection.16,40
■ Open the lower clamp on the volume-control set and
adjust the drip rate as ordered.
■ After completion of the infusion, open the upper clamp
and let 10 mL of IV solution flow into the chamber and
through the tubing to flush them.
■ If you’re using the volume-control set as a secondary IV
line, close the lower clamp and reset the flow rate of the
primary line. If you’re using the set as a primary IV line,
close the lower clamp, refill the chamber to the prescribed
amount, and begin the infusion again.
■ Monitor the IV volume-control set regularly, inspect the IV
insertion site for complications, and evaluate the patient’s
response to therapy.16
■ Perform hand hygiene.2,18,19,20,21,22,23
■ Document the procedure.41,42,43,44,45
Special considerations
■ Administration sets for primary and secondary continuous
infusion of fluids other than lipids or blood products should
be changed no more often than every 96 hours, but at least
every 7 days. Primary intermittent administration sets
should be changed every 24 hours.46,47
■ Label any medication added to volume-control sets to
avoid the inadvertent addition of multiple, potentially
incompatible medications.
■ Become familiar with the type or types of volume-control
sets used in your facility. Although all volume-control sets
work in a similar fashion, it’s important to follow the
manufacturer’s directions for use.1
■ Always check compatibility of the medication and the IV
solution. If you’re using a membrane-filter set, avoid
administering suspensions, lipid emulsions, blood, or blood
components through it.
■ If you’re using a floating-valve set, the diaphragm may
stick after repeated use. If it does, close the air vent and
upper clamp, invert the drip chamber, and squeeze it. If the
diaphragm opens, reopen the clamp and continue to use the
set.
■ If the drip chamber of a floating-valve diaphragm set
overfills, immediately close the upper clamp and air vent,
invert the chamber, and squeeze the excess fluid from the
drip chamber back into the graduated fluid chamber.
■ The Joint Commission issued a sentinel event alert related
to managing risk during transition to the new International
Organization for Standardization tubing standards designed
to prevent dangerous tubing misconnections, which can
lead to serious patient injury and death. During the
transition, trace all tubing and catheters from the patient to
their points of origin before connecting or reconnecting any
device or infusion, at any care transition (such as to a new
setting or service), and as part of the hand-off process;
route tubes and catheters with different purposes in
different standardized directions; label the tubing at the
distal and proximal ends when there are different access
sites or several bags hanging; use tubing and equipment
only as intended; and store medications for different
delivery routes in separate locations.40
Complications
Complications of IV infusion therapy include local or
systemic infection, infiltration, extravasation, air embolism,
catheter occlusion or dislodgment, and circulatory overload.
Improper labeling and flushing may result in drug
incompatibilities or medication administration errors.
Documentation
Document the type of fluid administered; the rate, time,
route, and method of administration; and the condition of
the venipuncture or access site before and after infusion
therapy. If you add a drug to the volume-control set, record
the name and dosage of the medication, the amount of fluid
used to dilute it, and the date and time of the infusion.
Document the patient’s response to the medication, any
teaching you provided, and the patient’s understanding of
the teaching.45
REFERENCES
1 Institute for Safe Medication Practices. (2009). Volume control set safety. ISMP
Medication Safety Alert!, 14(11), 2. (Level VII)
2 Centers for Disease Control and Prevention. (2002). Guideline for hand
hygiene in health-care settings: Recommendations of the Healthcare Infection
Control Practices Advisory Committee and the HICPAC/SHEA/APIC/IDSA Hand
Hygiene Task Force. MMWR Recommendations and Reports, 51(RR-16), 1–45.
Accessed via the Web at http://www.cdc.gov/mmwr/pdf/rr/rr5116.pdf (Level II)
3 The Joint Commission. (2019). Standard NPSG.07.04.01. Comprehensive
accreditation manual for hospitals. Oakbrook Terrace, IL: The Joint
Commission. (Level VII)
4 Infusion Nurses Society. (2016). Policies and procedures for infusion therapy
(5th ed.). Boston, MA: Infusion Nurses Society.
5 Marschall, J., et al. (2014). SHEA/IDSA practice recommendation: Strategies to
prevent central line–associated bloodstream infections in acute care
hospitals: 2014 update. Infection Control and Hospital Epidemiology, 35(7),
753–771 . Accessed via the Web at
http://www.jstor.org/stable/10.1086/676533 (Level I)
6 Jarrett, N., & Callaham, M. (2016). “Evidence-based guidelines for selected
hospital-acquired conditions: Final report” [Online]. Accessed via the Web at
https://www.cms.gov/Medicare/Medicare-Fee-for-Service-
Payment/HospitalAcqCond/Downloads/2016-HAC-Report.pdf
7 Foinard, A., et al. (2012). Impact of physical incompatibility on drug mass flow
rates: Example of furosemide-midazolam incompatibility. Annals of Intensive
Care, 2, 28. Accessed via the Web at
http://www.annalsofintensivecare.com/content/pdf/2110-5820-2 -28.pdf (Level
IV)
8 Standard 17. Compounding and preparation of parenteral solutions and
medications. Infusion therapy standards of practice. (2016). Journal of
Infusion Nursing, 39, S39. (Level VII)
9 Standard 12. Product evaluation, integrity, and defect reporting. Infusion
therapy standards of practice. (2016). Journal of Infusion Nursing, 39, S32–
S34. (Level VII)
10 Institute for Safe Medication Practices. (2012). Side tracks on the safety
express: Interruptions lead to errors and unfinished...Wait, what was I doing?
Nurse Advise-ERR, 11(2), 1–4 . Accessed via the Web at
https://www.ismp.org/resources/side-tracks-safety-express-interruptions-lead-
errors-and-unfinished-wait-what-was-i-doing
11 Westbrook, J., et al. (2010). Association of interruptions with an increased risk
and severity of medication administration errors. Archives of Internal
Medicine, 170(8), 683–690 . (Level IV)
12 The Joint Commission. (2019). Standard MM.06.01.01. Comprehensive
accreditation manual for hospitals. Oakbrook Terrace, IL: The Joint
Commission. (Level VII)
13 Centers for Medicare and Medicaid Services, Department of Health and
Human Services. (2015). Condition of participation: Pharmaceutical services.
42 C.F.R. § 482.25
14 DNV GL-Healthcare USA, Inc. (2016). MM.1 .SR.2. NIAHO® accreditation
requirements: Interpretive guidelines & surveyor guidance (version 11).
Milford, OH: DNV GL-Healthcare USA, Inc. (Level VII)
15 The Joint Commission. (2019). Standard MM.04.01.01. Comprehensive
accreditation manual for hospitals. Oakbrook Terrace, IL: The Joint
Commission. (Level VII)
16 Standard 57. Parenteral medication and solution administration. Infusion
therapy standards of practice. (2016). Journal of Infusion Nursing, 39, S125–
S127. (Level VII)
17 Standard 13. Medication verification. Infusion therapy standards of practice.
(2016). Journal of Infusion Nursing, 39, S34–S35. (Level VII)
18 The Joint Commission. (2019). Standard NPSG.07.01.01. Comprehensive
accreditation manual for hospitals. Oakbrook Terrace, IL: The Joint
Commission. (Level VII)
19 Standard 16. Hand hygiene. Infusion therapy standards of practice. (2016).
Journal of Infusion Nursing, 39, S38–S39 . (Level VII)
20 World Health Organization. (2009). “WHO guidelines on hand hygiene in
health care: First global patient safety challenge, clean care is safer care”
[Online]. Accessed via the Web at
http://apps.who.int/iris/bitstream/10665/44102/1/9789241597906_eng.pdf
(Level IV)
21 Centers for Medicare and Medicaid Services, Department of Health and
Human Services. (2015). Condition of participation: Infection control. 42 C.F.R.
§ 482.42.
22 Accreditation Association for Hospitals and Health Systems. (2017). Standard
07.01.21. Healthcare Facilities Accreditation Program: Accreditation
requirements for acute care hospitals. Chicago, IL: Accreditation Association
for Hospitals and Health Systems. (Level VII)
23 DNV GL-Healthcare USA, Inc. (2016). IC.1 .SR.1 . NIAHO® accreditation
requirements: Interpretive guidelines & surveyor guidance (version 11).
Milford, OH: DNV GL-Healthcare USA, Inc. (Level VII)
24 The Joint Commission. (2019). Standard NPSG.01.01.01. Comprehensive
accreditation manual for hospitals. Oakbrook Terrace, IL: The Joint
Commission. (Level VII)
25 The Joint Commission. (2019). Standard RI.01.01.01. Comprehensive
accreditation manual for hospitals. Oakbrook Terrace, IL: The Joint
Commission. (Level VII)
26 DNV GL-Healthcare USA, Inc. (2016). PR.1.SR.5 . NIAHO® accreditation
requirements: Interpretive guidelines & surveyor guidance (version 11).
Milford, OH: DNV GL-Healthcare USA, Inc. (Level VII)
27 Centers for Medicare and Medicaid Services, Department of Health and
Human Services. (2015). Condition of participation: Patient’s rights. 42 C.F.R.
§ 482.13(c)(1).
28 Accreditation Association for Hospitals and Health Systems. (2017). Standard
15.01.16. Healthcare Facilities Accreditation Program: Accreditation
requirements for acute care hospitals. Chicago, IL: Accreditation Association
for Hospitals and Health Systems. (Level VII)
29 Standard 8. Patient education. Infusion therapy standards of practice. (2016).
Journal of Infusion Nursing, 39, S25–S26. (Level VII)
30 Standard 41. Vascular access device (VAD) assessment, care, and dressing
changes. Infusion therapy standards of practice. (2016). Journal of Infusion
Nursing, 39, S81–S84. (Level VII)
31 Standard 46. Infiltration and extravasation. Infusion therapy standards of
practice. (2016). Journal of Infusion Nursing, 39, S98–S102. (Level VII)
32 The Joint Commission. (n.d .). “CLABSI toolkit: Preventing central line–
associated bloodstream infections: Useful tools, an international perspective”
[Online]. Accessed via the Web at
http://www.jointcommission.org/topics/clabsi_toolkit.aspx (Level VII)
33 Standard 34. Needleless connectors. Infusion therapy standards of practice.
(2016). Journal of Infusion Nursing, 39, S68–S70. (Level VII)
34 Standard 36. Add-on devices. Infusion therapy standards of practice. (2016).
Journal of Infusion Nursing, 39, S71. (Level VII)
35 Centers for Medicare and Medicaid Services, Department of Health and
Human Services. (2015). Condition of participation: Nursing services. 42
C.F.R. § 482.23(c).
36 Accreditation Association for Hospitals and Health Systems. (2017). Standard
16.01.03. Healthcare Facilities Accreditation Program: Accreditation
requirements for acute care hospitals. Chicago, IL: Accreditation Association
for Hospitals and Health Systems. (Level VII)
37 Health Technology Safety Research Team and Institute for Safe Medication
Practices Canada. (2012). “Mitigating the risks associated with multiple IV
infusions: Recommendations based on a field study of twelve Ontario
hospitals” [Online]. Accessed via the Web at
http://s3.amazonaws.com/rdcms-
aami/files/production/public/FileDownloads/Foundation/Infusion/062012_Multi
pleIVInfusions_Phase1bSummary_Recommendations_Rationale.pdf (Level VII)
38 Accreditation Association for Hospitals and Health Systems. (2017). Standard
25.01.18. Healthcare Facilities Accreditation Program: Accreditation
requirements for acute care hospitals. Chicago, IL: Accreditation Association
for Hospitals and Health Systems. (Level VII)
39 U.S . Food and Drug Administration. (n.d .). “Look. Check. Connect. Safe
medical device connections save lives” [Online]. Accessed via the Web at
http://www.fda.gov/downloads/MedicalDevices/Safety/AlertsandNotices/UCM1
34873.pdf
40 The Joint Commission. (2014). “Sentinel event alert: Managing risk during
transition to new ISO tubing connector standards” [Online]. Accessed via the
Web at
http://www.jointcommission.org/assets/1/6/SEA_53_Connectors_8 _19_14 _final.
pdf (Level VII)
41 The Joint Commission. (2019). Standard RC.01.03 .01. Comprehensive
accreditation manual for hospitals. Oakbrook Terrace, IL: The Joint
Commission. (Level VII)
42 Centers for Medicare and Medicaid Services, Department of Health and
Human Services. (2015). Condition of participation: Medical record services.
42 C.F.R. § 482.24(b).
43 Accreditation Association for Hospitals and Health Systems. (2017). Standard
10.00 .03. Healthcare Facilities Accreditation Program: Accreditation
requirements for acute care hospitals. Chicago, IL: Accreditation Association
for Hospitals and Health Systems. (Level VII)
44 DNV GL-Healthcare USA, Inc. (2016). MR.2 .SR.1 . NIAHO® accreditation
requirements: Interpretive guidelines & surveyor guidance (version 11).
Milford, OH: DNV GL-Healthcare USA, Inc. (Level VII)
45 Standard 10. Documentation in the medical record. Infusion therapy
standards of practice. (2016). Journal of Infusion Nursing, 39, S28–S30 . (Level
VII)
46 Centers for Disease Control and Prevention. (2011, revised 2017). “Guidelines
for the prevention of intravascular catheter-related infections” [Online].
Accessed via the Web at
https://www.cdc.gov/infectioncontrol/pdf/guidelines/bsi-guidelines.pdf (Level
I)
47 Standard 42. Administration set change. Infusion therapy standards of
practice. (2016). Journal of Infusion Nursing, 39, S84–S85. (Level VII)
W
WALKERS
A walker—an assistive device that consists of a metal frame
with handgrips and four legs—buttresses the patient on
three sides, with the fourth side remaining open. Because
this device provides greater stability and security than other
ambulatory aids, it’s recommended for the patient who has
insufficient strength and balance to use crutches or a cane,
or who is weak and requires frequent rest periods. A walker
may help improve balance, increase mobility, reduce pain,
and increase confidence.1
Attachments for standard walkers and modified walkers
help meet special needs. For example, a walker may have a
platform added to support an injured arm, brakes to assist in
controlling descents, or a seat to allow for rest breaks.
Equipment
Walker ▪ nonskid shoes or slippers ▪ Optional: platform,
wheel attachments.
Various types of walkers are available. A standard walker
requires arm strength and balance, because it must be lifted
off the ground to advance forward. This type of walker is the
most stable and promotes a slow gait pattern. A rolling
walker (“rollator ”) may have two or four wheels and may
have a seat; it offers the patient a more fluid gait pattern as
well as enhanced maneuverability with turns. Rollators are
appropriate only for patients with intact cognition because
of the increased risk of falls. On the plus side, they offer
instantly available seating for patients with poor endurance
or cardiopulmonary disease. A platform walker has one or
two platforms attached to the frame of the walker for a
patient who can’t bear weight directly on hand, wrist, or
forearm because of pain, upper extremity weight-bearing
limitations, or both. This type of walker is also a rolling
walker because a patient with concurrent upper extremity
limitations is typically unable to lift and advance a standard
walker. A reciprocal walker is used by a patient with very
weak arms or impaired balance; it allows one side to be
advanced ahead of the other. A stair walker has an extra set
of handles extending toward the patient on the open side to
allow for use on stairs.
PATIENT TEACHING
Teaching safe use of a walker
Sitting down
■ First, tell the patient to stand with the back of the stronger leg against the
front of the chair, the weaker leg slightly off the floor, and the walker directly
in front.
■ Then tell the patient to grasp the armrests on the chair, one arm at a time,
while supporting most of the weight on the stronger leg. (In the illustrations
below, the patient has left leg weakness.)
■ Finally, tell the patient to lower into the chair and slide backward. Once
seated, have the patient place the walker beside the chair.
Getting up
■ After bringing the walker to the front of the chair, tell the patient to slide
forward in the chair. Have the patient place the back of the stronger leg
against the seat and then advance the weaker leg.
■ Next, instruct the patient to place both hands on the chair’s armrests and
push to a standing position. Have the patient use the stronger leg and the
opposite hand for support while grasping the walker’s handgrip with the free
hand.
■ Then have the patient grasp the free handgrip with the other hand.
Because research shows that 30% to 50% of patients stop
using their assistive device soon after receiving it, selection
of the appropriate device and thorough instruction on its
benefits and use become even more important to effectively
increase mobility and reduce disability.1
Preparation of equipment
Obtain the appropriate walker with the advice of a physical
therapist, and adjust it to the patient’s height. The patient’s
elbows should be flexed at a 15- to 30-degree angle when
standing comfortably within the walker with hands on the
grips. To adjust the length of the walker’s legs, turn the
walker upside down, push in the button on each shaft, and
release it when the leg is in the correct position. Make sure
the walker is level before the patient attempts to use it.
Implementation
■ Gather and prepare the necessary equipment.
■ Review the patient’s medical record for appropriateness
of treatment, including history of falls and current fall
risk.2,3,4
■ Verify the practitioner’s order, if needed.2
■ Perform hand hygiene.5,6,7,8,9,10
■ Confirm the patient’s identity using at least two patient
identifiers.11
■ Provide privacy.12,13,14,15
■ Explain the procedure to the patient and, if appropriate,
the family according to their individual communication and
learning needs to increase their understanding, allay their
fears, and enhance cooperation.16
■ Make sure the patient is wearing nonskid shoes or
slippers.
■ Help the patient stand within the walker, and instruct the
patient to hold the hand grips firmly and equally to help
stabilize the walker and promote safety.16 Make sure that
the patient is standing as upright as possible. Stand behind
the patient, closer to the involved leg.
■ If the patient has one-sided leg weakness, tell the patient
to advance the walker 6′′ to 8′′ (15 to 20 cm), and to step
forward with the involved leg and follow with the uninvolved
leg, placing support on the arms. Encourage the patient to
take equal strides. Instruct the patient who has equal
strength in both legs to advance the walker 6′′ to 8′′ (15 to
20 cm) and to step forward with either leg. Tell the patient
who can’t use one leg to advance the walker 6′′ to 8′′ (15 to
20 cm) and to swing onto it, supporting the weight on the
arms.
■ If the patient is using a reciprocal walker, teach the two-
point gait. Instruct the patient to stand with the weight
evenly distributed between the legs and the walker. Stand
behind the patient, slightly to one side. Tell the patient to
simultaneously advance the walker’s right side and the left
foot. Then have the patient advance the walker’s left side
and the right foot.
■ If the patient is using a reciprocal walker, you may also
teach the four-point gait. Instruct the patient to evenly
distribute the weight between the legs and the walker.
Stand behind the patient and slightly to one side. Have the
patient move the right side of the walker forward; then have
the patient move the left foot forward. Next, instruct the
patient to move the left side of the walker forward; then
have the patient move the right foot forward.
■ Instruct the patient to step into the walker with each step,
and not to walk behind it.
■ If the patient is using a wheeled or stair walker, reinforce
the physical therapist’s instructions. Stress the need for
caution when using a stair walker.
■ Teach the patient how to use a walker safely. (See
Teaching safe use of a walker.)
■ Observe as the patient returns the demonstration,
assisting as necessary.
■ Perform hand hygiene.5,6,7,8,9,10
■ Document the procedure.17,18,19,20
Special considerations
■ If the patient starts to fall, support the hips and shoulders
to help maintain an upright position if possible. If
unsuccessful, ease the patient slowly to the closest surface
— bed, floor, or chair—to prevent injury.
■ If the patient will be using the walker on carpet, you can
place cut tennis balls on the rubber tips to help ease
movement.
■ Routinely observe a patient using the walker, and
regularly assess the walker for appropriateness and
maintenance, including checking proper height and the
condition of the walker’s legs, wheels, tips, and hand grips.1
The frequency of fall injuries in people using walkers
suggests that they may not use these walking aids
effectively.3
■ Refer the patient to a home health agency for a home
environment assessment, if needed, because extrinsic or
environmental factors may play a greater role in falls in
people using walkers.3,4
Patient teaching
Focus patient teaching on the practitioner’s and physical
therapist’s treatment plans, and include these safety
instructions:21,22
■ Maintain an erect posture, and avoid looking down while
using the walker.
■ Maintain the rubber tips of the walker, and replace them
when they become worn.
■ Use firm chairs with armrests if possible.
■ Avoid pulling on the walker to stand.
■ Avoid stepping too far into the walker while walking.
■ Avoid leaning on the walker when getting up or
attempting to sit down.
■ Feel for chair arms to redistribute weight when sitting
down or standing up.
■ Avoid wet surfaces. However, if you’re unable to avoid
ambulating on a wet or slippery surface, take small steps.
■ Remove throw rugs, cords, furniture, or anything that
may interfere with walking.
■ Avoid hurrying and taking large steps with turns.
■ Change direction slowly and carefully.
Complications
An improperly fitted walker can lead to falls and injury.23
Documentation
Record the type of walker and attachments used, the degree
of guarding required, the distance walked, and the patient’s
tolerance of and proficiency with safe ambulation.1
Document any teaching you provided, the patient’s and
family’s understanding of your teaching, and whether they
require follow-up teaching.
REFERENCES
1 Bradley, S. M ., & Hernandez, C. R. (2011). Geriatric assistive devices.
American Family Physician, 84(4), 405–411 . Accessed via the Web at
http://www.aafp.org/afp/2011/0815/p405.html
2 The Joint Commission. (2019). Standard NPSG.09 .02.01. Comprehensive
accreditation manual for hospitals. Oakbrook Terrace, IL: The Joint
Commission. (Level VII)
3 Stevens, J. A., et al. (2009). Unintentional fall injuries associated with walkers
and canes in older adults treated in U.S . emergency departments. Journal of
the American Geriatrics Society, 57(8),1464–1469.
4 Panel on Prevention of Falls in Older Persons, American Geriatrics Society and
British Geriatrics Society. (2010). Summary of the updated American
Geriatrics Society/British Geriatrics Society clinical practice guideline for
prevention of falls in older persons. Journal of the American Geriatrics
Society, 59(1), 148–157.
5 The Joint Commission. (2019). Standard NPSG.07.01.01. Comprehensive
accreditation manual for hospitals. Oakbrook Terrace, IL: The Joint
Commission. (Level VII)
6 Centers for Disease Control and Prevention. (2002). Guideline for hand
hygiene in health-care settings: Recommendations of the Healthcare Infection
Control Practices Advisory Committee and the HICPAC/SHEA/APIC/IDSA Hand
Hygiene Task Force. MMWR Recommendations and Reports, 51(RR-16), 1–45.
Accessed via the Web at https://www.cdc.gov/mmwr/pdf/rr/rr5116.pdf (Level
II)
7 World Health Organization. (2009). “WHO guidelines on hand hygiene in
health care: First global patient safety challenge, clean care is safer care”
[Online]. Accessed via the Web at
http://apps.who.int/iris/bitstream/10665/44102/1/9789241597906_eng.pdf
(Level IV)
8 Accreditation Association for Hospitals and Health Systems. (2017). Standard
07.01.21. Healthcare Facilities Accreditation Program: Accreditation
requirements for acute care hospitals. Chicago, IL: Accreditation Association
for Hospitals and Health Systems. (Level VII)
9 Centers for Medicare and Medicaid Services, Department of Health and
Human Services. (2015). Condition of participation: Infection control. 42 C.F.R.
§ 482.42.
10 DNV GL-Healthcare USA, Inc. (2016). IC.1 .SR.1 . NIAHO® accreditation
requirements: Interpretive guidelines & surveyor guidance (version 11).
Milford, OH: DNV GL-Healthcare USA, Inc. (Level VII)
11 The Joint Commission. (2019). Standard NPSG.01.01.01. Comprehensive
accreditation manual for hospitals. Oakbrook Terrace, IL: The Joint
Commission. (Level VII)
12 DNV GL-Healthcare USA, Inc. (2016). PR.1.SR.5 . NIAHO® accreditation
requirements: Interpretive guidelines & surveyor guidance (version 11).
Milford, OH: DNV GL-Healthcare USA, Inc. (Level VII)
13 Centers for Medicare and Medicaid Services, Department of Health and
Human Services. (2015). Condition of participation: Patient’s rights. 42 C.F.R.
§ 482.13(c)(1).
14 Accreditation Association for Hospitals and Health Systems. (2017). Standard
15.01.16. Healthcare Facilities Accreditation Program: Accreditation
requirements for acute care hospitals. Chicago, IL: Accreditation Association
for Hospitals and Health Systems. (Level VII)
15 The Joint Commission. (2019). Standard RI.01.01.01. Comprehensive
accreditation manual for hospitals. Oakbrook Terrace, IL: The Joint
Commission. (Level VII)
16 Taylor, C. R. (2015). Fundamentals of nursing: The art and science of person-
centered nursing care (8th ed.) . Philadelphia, PA: Wolters Kluwer.
17 The Joint Commission. (2019). Standard RC.01.03 .01. Comprehensive
accreditation manual for hospitals. Oakbrook Terrace, IL: The Joint
Commission. (Level VII)
18 Accreditation Association for Hospitals and Health Systems. (2017). Standard
10.00 .03. Healthcare Facilities Accreditation Program: Accreditation
requirements for acute care hospitals. Chicago, IL: Accreditation Association
for Hospitals and Health Systems. (Level VII)
19 Centers for Medicare and Medicaid Services, Department of Health and
Human Services. (2015). Condition of participation: Medical record services.
42 C.F.R. § 482.24(b).
20 DNV GL-Healthcare USA, Inc. (2014). MR.2 .SR.1 . NIAHO® accreditation
requirements: Interpretive guidelines & surveyor guidance (version 11).
Milford, OH: DNV GL-Healthcare USA, Inc. (Level VII)
21 Mayo Foundation for Medical Education and Research. (n.d .) . “Slide show:
Tips for choosing and using walkers” [Online]. Accessed via the Web at
https://www.mayoclinic.org/healthy-lifestyle/healthy-
aging/multimedia/walker/sls-20076469?sl=?&slide=3
22 American Association of Orthopedic Surgeons. (2015). “How to use crutches,
canes, and walkers” [Online]. Accessed via the Web at
https://orthoinfo.aaos .org/en/recovery/how-to-use -crutches-canes-and-
walkers
23 Luz, C., et al. (2015). Do canes or walkers make any difference? Non-use and
fall injuries. The Gerontologist, 57(2), 211–218. Accessed via the Web at
http://www.ncbi.nlm.nih.gov/pubmed/26209797
WATER INTOXICATION ASSESSMENT
Water intoxication occurs when the body’s water and
sodium levels become imbalanced as a result of excessive
water intake that’s accompanied by inadequate sodium
intake, resulting in severe hyponatremia. This imbalance
allows more water to enter the cells, causing them to swell
and place excess pressure on the body’s organs, especially
the brain.
In patients with chronic psychiatric disorders, water
intoxication may result from compulsive water drinking, or
psychogenic polydipsia. The cause of psychogenic
polydipsia is unknown, but the condition may be related to
the interaction of several factors, including delusions having
to do with fluid intake, adverse effects of medications, and
hyperactivity of the hypothalamic thirst center. Water
intoxication resulting from psychogenic polydipsia is
considered self-induced.
Water intoxication typically produces no signs and
symptoms in its early stages; however, over time, it causes
neurologic, GI, cardiac, behavioral, and cognitive changes.
The signs and symptoms of water intoxication are
commonly mistaken for those of alcohol intoxication, and
behavioral changes are commonly attributed to the
patient’s psychiatric diagnosis. (See Signs and symptoms of
water intoxication.)
Early detection of water intoxication is crucial to prevent
seizures, coma, and death, which can occur with severe
hyponatremia when serum sodium concentrations are 90 to
105 mmol/L.
Equipment
Vital
signs
equipment
(stethoscope
and
sphygmomanometer or electronic vital signs monitor) ▪
scale ▪ graduated urine collection container ▪ venipuncture
equipment and tubes ▪ laboratory request forms ▪ Optional:
gloves, IV infusion equipment and fluids, prescribed
medications.
Implementation
■ Review the patient’s medical history, psychiatric
diagnosis, and therapeutic regimen.
■ Perform hand hygiene.2,3,4,5,6,7
■ Put on gloves to comply with standard precautions.8,9
■ Confirm the patient’s identity using at least two patient
identifiers.10
■ Provide privacy.11,12,13,14
■ Ask the patient and family, if applicable, to describe any
signs or symptoms the patient has experienced to help
identify signs and symptoms that would indicate water
intoxication. Ask them to quantify the patient’s water intake,
if able.
NURSING ALERT Be aware that patients with psychiatric disorders
may not recognize signs and symptoms of water intoxication or may
not admit to having them.
■ Assess the patient for signs and symptoms of water
intoxication.
■ Obtain the patient’s vital signs.
■ Weigh the patient in kilograms on the appropriate scale.15
■ Calculate an estimated total daily fluid requirement based
on the patient’s body weight to assess for excess water
intake. (See Calculating maintenance fluid requirements.)
■ Perform a venipuncture to obtain baseline and serial
serum sodium levels, as ordered. Notify the practitioner of
critical test results within your facility’s established time
frame so that the patient can be treated promptly.
■ Verify the practitioner’s treatment orders based on your
assessment findings.
■
Provide interventions (which may include IV
administration of a hypertonic saline solution) or
medications (such as clozapine or an oral vasopressin
antagonist), as ordered.16 Treatment may also include
discontinuing contributing medications.16,17
■ Monitor the patient’s water intake to prevent self-induced
water intoxication.
■ Measure the patient’s urine output hourly or as ordered.
Immediately report an output of less than 30 mL/hour to the
patient’s practitioner.
■ Monitor the patient, using one-to-one precautions as
necessary, to decrease excessive water intake.
■ Provide alternative activities to redirect the patient from
drinking excessive amounts of water while awake.
■ Continue to monitor the patient’s mental status,
behavior, level of consciousness, weight, vital signs, and
serum sodium levels.
■ Remove and discard your gloves, if worn.8,9
■ Perform hand hygiene.2,3,4,5,6,7
■ Document the procedure.18,19,20,21
Special considerations
■ If the patient has severe water intoxication, the
practitioner may order IV furosemide to promote diuresis.
Patient teaching
Teach the patient and family about the dangers related to
excess water intake. Provide suggestions on ways for the
family to redirect the patient during waking hours. If the
patient demonstrates that a willingness to cooperate with
restrictions, suggest alternative behaviors when the patient
has the urge to drink excessively.
Provide the patient and family with the patient’s
estimated total daily fluid requirement based on body
weight to ensure that the patient is adequately hydrated.
Review the signs and symptoms of water intoxication with
family members and instruct them to call the practitioner or
seek medical attention immediately if the patient develops
them.
Complications
Untreated or undiagnosed water intoxication can lead to
seizures, coma, and death. Too-rapid replacement of saline
could lead to permanent brain damage.
Signs and symptoms of water
intoxication
These signs and symptoms of water intoxication may occur over time.
Neurologic
■ Headache
■ Vertigo
■ Drowsiness
■ Blurred vision
■ Weakness
■ Tremors
■ Lethargy
■ Seizures
GI
■ Nausea
■ Repeated vomiting
Cardiac
■ Hypotension
■ Tachycardia
■ Cardiac arrhythmias
■ Heart failure
Behavioral and cognitive
■ Restlessness
■ Agitation
■ Disorientation
■ Confusion
■ Delirium
Other
■ Rapid breathing
■ Decreased urination
■ Sudden weight gain
■ Metabolic abnormalities
■ Muscle cramps1
Calculating maintenance fluid
requirements
The formula below helps you calculate the maintenance fluid requirements
for your patient:
(1,500 mL for the first 20 kg) + (20 mL for each kg over 20 kg)
For example, if you have a patient who weighs 75 kg, use the formula as
follows:
1,500mL+(20mL×55)=1,500+1,100=2,600mLoffluidperday.
Documentation
Record your assessment findings and the patient’s vital
signs, serum sodium levels, and weight in the medical
record. Also record all signs and symptoms of water
intoxication, any treatments given, and the patient’s
response to those treatments. Document the patient’s
estimated total daily fluid requirement and the efforts made
to maintain this amount. Document intake and output.
Document any teaching provided to the patient and family
members and their understanding of the information, and
whether they require follow-up teaching.
REFERENCES
1 Sterns, R. H. Overview of the treatment of hyponatremia in adults. (2015). In:
UpToDate, Emmett, M. & Forman, J. P. (Eds.). Retrieved from:
www.uptodate.com
2 The Joint Commission. (2019). Standard NPSG.07.01.01. Comprehensive
accreditation manual for hospitals. Oakbrook Terrace, IL: The Joint
Commission. (Level VII)
3 Centers for Disease Control and Prevention. (2002). Guideline for hand
hygiene in health-care settings: Recommendations of the Healthcare Infection
Control Practices Advisory Committee and the HICPAC/SHEA/APIC/IDSA Hand
Hygiene Task Force. MMWR Recommendations and Reports, 51(RR-16), 1–45.
Accessed via the Web at https://www.cdc.gov/mmwr/pdf/rr/rr5116.pdf (Level
II)
4 World Health Organization. (2009). “WHO guidelines on hand hygiene in
health care: First global patient safety challenge, clean care is safer care”
[Online]. Accessed via the Web at
http://apps.who.int/iris/bitstream/10665/44102/1/9789241597906_eng.pdf
(Level IV)
5 Centers for Medicare and Medicaid Services, Department of Health and
Human Services. (2015). Condition of participation: Infection control. 42 C.F.R.
§ 482.42.
6 Accreditation Association for Hospitals and Health Systems. (2017). Standard
07.01.21. Healthcare Facilities Accreditation Program: Accreditation
requirements for acute care hospitals. Chicago, IL: Accreditation Association
for Hospitals and Health Systems. (Level VII)
7 DNV GL-Healthcare USA, Inc. (2016). IC.1.SR.1 . NIAHO® accreditation
requirements: Interpretive guidelines & surveyor guidance (version 11).
Milford, OH: DNV GL-Healthcare USA, Inc. (Level VII)
8 Siegel, J. D., et al. (2007, revised 2017). “2007 guideline for isolation
precautions: Preventing transmission of infectious agents in healthcare
settings” [Online]. Accessed via the Web at
https://www.cdc.gov/infectioncontrol/pdf/guidelines/isolation-guidelines.pdf
(Level II)
9 Accreditation Association for Hospitals and Health Systems. (2017). Standard
07.01.10. Healthcare Facilities Accreditation Program: Accreditation
requirements for acute care hospitals. Chicago, IL: Accreditation Association
for Hospitals and Health Systems. (Level VII)
10 The Joint Commission. (2019). Standard NPSG.01.01.01. Comprehensive
accreditation manual for hospitals. Oakbrook Terrace, IL: The Joint
Commission. (Level VII)
11 DNV GL-Healthcare USA, Inc. (2016). PR.1.SR.5 . NIAHO® accreditation
requirements: Interpretive guidelines & surveyor guidance (version 11).
Milford, OH: DNV GL-Healthcare USA, Inc. (Level VII)
12 Centers for Medicare and Medicaid Services, Department of Health and
Human Services. (2015). Condition of participation: Patient’s rights. 42 C.F.R.
§ 482.13(c)(1).
13 Accreditation Association for Hospitals and Health Systems. (2017). Standard
15.01.16. Healthcare Facilities Accreditation Program: Accreditation
requirements for acute care hospitals. Chicago, IL: Accreditation Association
for Hospitals and Health Systems. (Level VII)
14 The Joint Commission. (2019). Standard RI.01.01.01. Comprehensive
accreditation manual for hospitals. Oakbrook Terrace, IL: The Joint
Commission. (Level VII)
15 Institute for Safe Medication Practices. (2016). “2016–2017 targeted
medication safety best practices for hospitals” [Online]. Accessed via the
Web at http://www.ismp.org/tools/bestpractices/TMSBP-for-Hospitals.pdf
16 Goldman, M. B. (2010). The assessment and treatment of water imbalance in
patients with psychosis. Clinical Schizophrenia & Related Psychoses, 4(2),
115–123.
17 Josiassen, R. C ., et al. (2012). Vaptans: A potential new approach for treating
chronic hyponatremia in psychotic patients. Clinical Schizophrenia & Related
Psychoses, 6(1), 21–26.
18 The Joint Commission. (2019). Standard RC.01.03 .01. Comprehensive
accreditation manual for hospitals. Oakbrook Terrace, IL: The Joint
Commission. (Level VII)
19 Centers for Medicare and Medicaid Services, Department of Health and
Human Services. (2015). Condition of participation: Medical record services.
42 C.F.R. § 482.24(b).
20 Accreditation Association for Hospitals and Health Systems. (2017). Standard
10.00 .03. Healthcare Facilities Accreditation Program: Accreditation
requirements for acute care hospitals. Chicago, IL: Accreditation Association
for Hospitals and Health Systems. (Level VII)
21 DNV GL-Healthcare USA, Inc. (2016). MR.2 .SR.1 . NIAHO® accreditation
requirements: Interpretive guidelines & surveyor guidance (version 11).
Milford, OH: DNV GL-Healthcare USA, Inc. (Level VII)
WEANING A PATIENT FROM A VENTILATOR
Successful weaning from a ventilator depends on the
patient’s ability to breathe independently, which means that
the patient must have a spontaneous respiratory effort for
effective gas exchange, a stable cardiovascular system, and
sufficient respiratory muscle strength and level of
consciousness for weaning.
Weaning entails gradually reducing ventilator support until
the patient can be removed from mechanical ventilation and
successfully extubated. As soon as the patient’s condition
allows, sedation should be reduced so that the
multidisciplinary team can adequately assess the patient’s
readiness to wean. The team should then plan to use either
a facility-approved weaning protocol or an individualized
weaning plan.1
Weaning should be initiated as soon as possible, because
ventilator use for longer than 24 hours increases the
patient’s risk of developing such complications as ventilator-
associated
pneumonia,
GI
bleeding,
venous
thromboembolism, and sinusitis.1
Common methods for weaning a patient from ventilatory
support include:
■ spontaneous breathing trials using the ventilator’s
continuous positive airway pressure mode or a T-tube
(alternating with mechanical ventilation)
■ synchronized intermittent mandatory ventilation
■ pressure support ventilation (PSV).2
Regardless of the approach used, all multidisciplinary
team members who are involved with weaning the patient
from the ventilator must understand the process and the
schedule, and be aware of the measures of success or
failure appropriate to that approach. Before weaning, you
should assess the patient’s readiness to wean, which is
usually determined by spontaneous breathing trials—the
most widely accepted tool for such assessments.3,4 Weaning
is indicated for all patients who are determined to be ready
to wean. It’s contraindicated for those who are determined
to be unready to wean, as well as those for whom weaning
would be considered futile, such as in the presence of
irreversible disease.5
Equipment
Ventilator ▪
alternative oxygen delivery system ▪
practitioner-ordered or facility-approved weaning protocol ▪
pulse oximeter ▪ stethoscope ▪ vital signs monitoring
equipment ▪ cardiac monitor ▪ disinfectant pad ▪ gloves ▪
suction equipment ▪ Optional: gown, mask and goggles or
mask with face shield, capnography equipment, arterial
blood gas sampling equipment.
Preparation of equipment
Make sure that the alternative oxygen delivery system and
suction equipment are readily available and functioning
properly.
Implementation
■ Verify the practitioner’s order.
■ Gather and prepare the appropriate equipment.
■ Perform hand hygiene.6,7,8,9,10,11
■ Put on gloves and other personal protective equipment as
needed.12,13
■ Confirm the patient’s identity using at least two patient
identifiers.14
■ Provide privacy.15,16,17,18
■ In collaboration with the respiratory therapist, initiate a
spontaneous awakening trial. Interrupt the patient’s
sedative infusion according to the practitioner’s order or
your facility-approved weaning protocol.19,20,21
■ Explain the procedure to the patient and family (if
appropriate) according to their individual communication
and learning needs to increase their understanding, allay
their fears, and enhance cooperation.22
■ Assure the patient that you’ll provide coaching through
the weaning process.
■ Raise the patient’s bed to waist level when providing care
to prevent caregiver back strain.23
■ Perform hand hygiene.6,7,8,9,10,11
■ Make sure that the patient is attached to a cardiac
monitor, as ordered. Make sure that the alarm limits are set
appropriately for the patient’s current condition, and that
the alarms are turned on, functioning properly, and audible
to staff.24,25,26,27
■ Perform a complete physical assessment to evaluate
patient readiness, and discuss your results during
multidisciplinary rounds.5 (See Readiness criteria.)
■ In collaboration with a respiratory therapist, if the patient
passes the awakening trial, institute a spontaneous
breathing trial (SBT), as ordered or according to your
facility’s protocol (usually 5 to 10 minutes). After a patient is
deemed ready to wean, the best method to assess whether
the patient can breathe independently is to perform an
SBT.5
■ Instruct the patient to breath normally.1
■ Assess the patient’s vital signs, oxygenation, and mental
status.
■ Monitor for findings associated with weaning intolerance:
respiratory rate greater than 35 breaths/minute; arterial pH
less than 7.32; oxygen saturation level by pulse oximetry
less than 90%; end-tidal carbon dioxide increased by more
than 10 mm Hg; heart rate greater than 140 beats/minute
or a 20% increase over baseline; increased respiratory
effort; systolic blood pressure greater than 180 mm Hg,
diastolic blood pressure greater than 90 mm Hg, or
hypotension; anxiety; and marked diaphoresis.2,29,30
■ If the patient doesn’t tolerate the SBT, if the cardiac
monitor reveals a cardiac arrhythmia, or if the patient
develops chest pain, immediately return the patient to
resting ventilator settings; then monitor the patient’s vital
signs to make sure that they return to baseline, and notify
the practitioner.29
■ Reassure the patient that setbacks are common. Explain
that the patient will have another SBT the next day if the
patient meets the readiness criteria, and encourage the
patient to rest.1
■ If the patient tolerates the SBT, follow your facility’s
weaning protocol (or the practitioner’s order), or continue
the SBT for up to 2 hours5 (1 hour is usually sufficient)1 and
then return to resting ventilator settings.1 (See After
weaning.)
■ Assess the patient’s vital signs, cardiac status, breath
sounds, and oxygen saturation level by pulse oximetry
frequently throughout the weaning process. Notify the
practitioner if signs of weaning intolerance are noted.15
■ Return the bed to the lowest level to prevent falls and
maintain patient safety.31
■ Remove and discard your gloves and other personal
protective equipment.12,13
■ Perform hand hygiene.6,7,8,9,10,11
■ Clean and disinfect your stethoscope using a disinfectant
pad.32,33
■ Perform hand hygiene.6,7,8,9,10,11
■ Document the procedure.34,35,36,37
Special considerations
■ The Joint Commission has issued a sentinel event alert
concerning medical device alarm safety, because alarm-
related events have been associated with permanent loss of
function or death. Among the major contributing factors
were improper alarm settings, alarms inappropriately turned
off, and alarm signals not audible to staff. Make sure that
alarm limits are set appropriately, and that alarms are
turned on and audible to staff. Follow facility guidelines for
preventing alarm fatigue.27
■ Be aware that capnography may be useful during
ventilator management and weaning.38
■ Make sure that the patient gets adequate rest and sleep,
because fatigue can delay weaning from the ventilator.
Provide subdued lighting, safely muffle equipment noises,
and restrict staff access to the area to promote quiet during
rest periods.
■ Schedule weaning to fit comfortably and realistically
within the patient’s daily regimen. Avoid scheduling sessions
after meals, baths, or lengthy therapeutic or diagnostic
procedures, because the patient will be fatigued. Have the
patient help you set up the schedule to give the patient
some sense of control over a frightening procedure.
■ As the patient’s tolerance for weaning increases, help the
patient sit up in bed to improve breathing and sense of well-
being. Suggest diversionary activities to take the patient’s
mind off breathing.
■ Keep in mind that setbacks are common during the
weaning process, especially after long-term ventilation.
Provide the patient and family with reassurance and
support.
■ Be aware that the outcome of weaning trials can range
from complete, successful weaning to incomplete weaning,
in which long-term partial or full mechanical ventilatory
support is required, or terminal weaning, in which natural
death may occur as the result of withdrawal of life support.
■ When the patient is ready for extubation, manage the
process appropriately. See the “Endotracheal tube care”
procedure, page 274.
Complications
Hypoxia may occur if the patient isn’t ready to breathe
independently or tolerate decreased ventilator settings.
Documentation
Record your assessment findings that determined the
patient’s readiness to wean. Record the results after each
weaning episode, including specific parameters. List all
complications and nursing actions taken. If the patient was
receiving pressure support ventilation or using a T-piece or
tracheostomy collar, note the duration of spontaneous
breathing and the patient’s ability to maintain the weaning
schedule. If the patient received intermittent mandatory
ventilation, with or without pressure support ventilation,
record the control breath rate, the time of each breath
reduction, and the rate of spontaneous respirations. Also
document any patient teaching provided.
Readiness criteria
■ Resolved or improved condition that no longer requires ventilation
■ Adequate natural airway or a functioning tracheostomy
■ Ability to cough and mobilize secretions
■ Successful withdrawal from sedation
■ Clear or clearing chest X-ray
■ Arterial oxygen saturation greater than 92% or partial pressure of
oxygen/fraction of inspired oxygen (PaO2/FIO2) ratio greater than or equal to
150 mm Hg (19.75 kPa) on FIO2 less than or equal to 40% with positive end-
expiratory pressure less than or equal to 5 cm H2O (0.49 kPa)2,28 (PaO2/FIO2
ratio of greater than or equal to 120 mm Hg for patients with chronic
hypoxemia)28
■ Arterial blood gas values within normal limits or at patient’s baseline
■ Hemoglobin greater than or equal to 9 g/dL (70g/L)28
■ Hemodynamic stability, without myocardial ischemia, adequate
resuscitation, and no need for vasoactive support, or requires low-dose
vasoactive support28
■ Core body temperature greater than 96.8°F (36°C) and less than 102.2°F
(39°C)
■ Absence of infection, acid-base or electrolyte imbalance, hyperglycemia,
arrhythmias, kidney failure, anemia, or excessive fatigue
■ Adequate pain management with minimal use of pain medication
■ Awake and alert or easily arousable28
After weaning
After being weaned, the patient should demonstrate:
■ respiratory rate less than 24 breaths/minute
■ heart rate and blood pressure within 15% of personal baseline
■ tidal volume of 3 to 5 mL/kg
■ arterial pH greater than 7.35
■ partial pressure of arterial oxygen maintained at greater than 60 mm Hg
(7.9 kPa)
■ partial pressure of arterial carbon dioxide maintained at less than 45 mm
Hg (5.9 kPa)
■ oxygen saturation level maintained at greater than 90%
■ absence of cardiac arrhythmias
■ absence of accessory muscle use.1,29
The patient may require supplemental oxygen to achieve
these goals.
REFERENCES
1 Wiegand, D. L. (Ed.). (2017). AACN procedure manual for high acuity,
progressive, and critical care (7th ed.) . St. Louis, MO: Mosby.
2 Amri, P., et al. (2016). Weaning the patient from the mechanical ventilator: A
review article. Archives of Critical Care Medicine, 1(4), e8363. Accessed via
the Web at http://accmedicine.com/en/articles/8363.html
3 Haas, C. F., & Loik, P. S . (2012). Ventilator discontinuation protocols.
Respiratory Care, 57(10), 1649–1662. Accessed via the Web at
http://rc.rcjournal.com/content/57/10/1649
4 MacIntyre, N. R. (2013). The ventilator discontinuation process: An expanding
evidence base. Respiratory Care, 58(6), 1074–1086. Accessed via the Web at
http://rc.rcjournal.com/content/58/6/1074
5 American College of Chest Physicians, et al. (2002). Evidence-based
guidelines for weaning and discontinuing ventilatory support. Respiratory
Care, 47(1), 69–90. Accessed via the Web at
http://www.rcjournal.com/cpgs/pdf/ebgwdvscpg.pdf (Level VII)
6 Centers for Disease Control and Prevention. (2002). Guideline for hand
hygiene in health-care settings: Recommendations of the Healthcare Infection
Control Practices Advisory Committee and the HICPAC/SHEA/APIC/IDSA Hand
Hygiene Task Force. MMWR Recommendations and Reports, 51(RR-16), 1–45.
Accessed via the Web at https://www.cdc.gov/mmwr/pdf/rr/rr5116.pdf (Level
II)
7 The Joint Commission. (2019). Standard NPSG.07.01.01. Comprehensive
accreditation manual for hospitals. Oakbrook Terrace, IL: The Joint
Commission. (Level VII)
8 World Health Organization. (2009). “WHO guidelines on hand hygiene in
health care: First global patient safety challenge, clean care is safer care”
[Online]. Accessed via the Web at
http://apps.who.int/iris/bitstream/10665/44102/1/9789241597906_eng.pdf
(Level IV)
9 Accreditation Association for Hospitals and Health Systems. (2017). Standard
07.01.21. Healthcare Facilities Accreditation Program: Accreditation
requirements for acute care hospitals. Chicago, IL: Accreditation Association
for Hospitals and Health Systems. (Level VII)
10 Centers for Medicare and Medicaid Services, Department of Health and
Human Services. (2015). Condition of participation: Infection control. 42 C.F.R.
§ 482.42.
11 DNV GL-Healthcare USA, Inc. (2016). IC.1 .SR.1 . NIAHO® accreditation
requirements: Interpretive guidelines & surveyor guidance (version 11).
Milford, OH: DNV GL-Healthcare USA, Inc. (Level VII)
12 Siegel, J. D ., et al. (2007, revised 2017). “2007 guideline for isolation
precautions: Preventing transmission of infectious agents in healthcare
settings” [Online]. Accessed via the Web at
https://www.cdc.gov/infectioncontrol/pdf/guidelines/isolation-guidelines.pdf
(Level II)
13 Accreditation Association for Hospitals and Health Systems. (2017). Standard
07.01.10. Healthcare Facilities Accreditation Program: Accreditation
requirements for acute care hospitals. Chicago, IL: Accreditation Association
for Hospitals and Health Systems. (Level VII)
14 The Joint Commission. (2019). Standard NPSG.01.01.01. Comprehensive
accreditation manual for hospitals. Oakbrook Terrace, IL: The Joint
Commission. (Level VII)
15 DNV GL-Healthcare USA, Inc. (2016). PR.1.SR.5 . NIAHO® accreditation
requirements: Interpretive guidelines & surveyor guidance (version 11).
Milford, OH: DNV GL-Healthcare USA, Inc. (Level VII)
16 The Joint Commission. (2019). Standard RI.01.01.01. Comprehensive
accreditation manual for hospitals. Oakbrook Terrace, IL: The Joint
Commission. (Level VII)
17 Centers for Medicare and Medicaid Services, Department of Health and
Human Services. (2015). Condition of participation: Patient’s rights. 42 C.F.R.
§ 482.13(c)(1).
18 Accreditation Association for Hospitals and Health Systems. (2017). Standard
15.01.16. Healthcare Facilities Accreditation Program: Accreditation
requirements for acute care hospitals. Chicago, IL: Accreditation Association
for Hospitals and Health Systems. (Level VII)
19 Klompas, M., et al. (2014). Strategies to prevent ventilator-associated
pneumonia in acute care hospitals: 2014 update. Infection Control and
Hospital Epidemiology, 35(8), 915–936. Accessed October 2017 via the Web
at http://www.jstor.org/stable/10.1086/677144 (Level I)
20 Institute for Healthcare Improvement. (2012). How-to guide: Prevent
ventilator-associated pneumonia. Cambridge, MA: Institute for Healthcare
Improvement. (Level VII)
21 Vanderbilt University. (2008). “‘Wake up and breathe’ protocol: Spontaneous
awakening trials (SATS) + spontaneous breathing trials (SBTs)” [Online].
Accessed via the Web at
https://www.mnhospitals.org/Portals/0/Documents/ptsafety/LEAPT%20Deliriu
m/Vanderbilt%20Wake%20Up%20and%20Breath%20Protocol%20Flowsheet.p
df
22 The Joint Commission. (2019). Standard PC.02.01.21. Comprehensive
accreditation manual for hospitals. Oakbrook Terrace, IL: The Joint
Commission. (Level VII)
23 Waters, T. R., et al. (2009). “Safe patient handling training for schools of
nursing” [Online]. Accessed via the Web at
https://www.cdc.gov/niosh/docs/2009-127/pdfs/2009-127.pdf (Level VII)
24 American Association of Critical-Care Nurses (AACN). (2013). “A ACN practice
alert: Alarm management” [Online]. Accessed via the Web at
https://www.aacn.org/aacn-website/shared/content/practice-
alerts/2015/11/25/alarm-management (Level VII)
25 Graham, K. C., & Cvach, M. (2010). Monitor alarm fatigue: Standardizing use
of physiological monitors and decreasing nuisance alarms. American Journal
of Critical Care, 19(1), 28–37. Accessed via the Web at
http://ajcc.aacnjournals.org/content/19/1/28.full.pdf
26 The Joint Commission. (2019). Standard NPSG.06 .01.01. Comprehensive
accreditation manual for hospitals. Oakbrook Terrace, IL: The Joint
Commission. (Level VII)
27 The Joint Commission. (2013). “Sentinel event alert: Medical device alarm
safety in hospitals” [Online]. Accessed via the Web at
http://www.jointcommission.org/assets/1/18/SEA_50_alarms_4 _5 _13_FINAL1 .P
DF (Level VII)
28 Epstein, S. K . Weaning from mechanical ventilation: Readiness testing.
(2017). In: UpToDate, Parsons, P. E., & Finlay, G. (Eds.). Retrieved from:
www.uptodate.com
29 Conti, G, et al. (2014). Sedation and weaning from mechanical ventilation:
Time for “best practice” to catch up with realities? Multidisciplinary
Respiratory Medicine, 9(1), 45. Accessed via the Web at
https://www.ncbi.nlm.nih.gov/pmc/articles/PMC4252852/
30 Abdo, M., et al. (2014). Difficult weaning from mechanical ventilation in the
pediatric ICU. Ain-Shams Journal of Anaesthesiology, 7(1), 76–79. Accessed
via the Web at http://www.asja.eg.net/article.asp?issn=1687-
7934;year=2014;volume=7;issue=1;spage=76;epage=79;aulast=Abdo
31 Ganz, D. A., et al. (2013). Preventing falls in hospitals: A toolkit for improving
quality of care (AHRQ Publication No. 13-0015-EF). Rockville, MD: Agency for
Healthcare Research and Quality. Accessed via the Web at
http://www.ahrq.gov/sites/default/files/publications/files/fallpxtoolkit.pdf
(Level VII)
32 Rutala, W. A., et al. (2008, revised 2017). “Guideline for disinfection and
sterilization in healthcare facilities, 2008” [Online]. Accessed via the Web at
https://www.cdc.gov/hicpac/pdf/guidelines/Disinfection_Nov_2008.pdf (Level I)
33 Accreditation Association for Hospitals and Health Systems. (2017). Standard
07.02.03. Healthcare Facilities Accreditation Program: Accreditation
requirements for acute care hospitals. Chicago, IL: Accreditation Association
for Hospitals and Health Systems. (Level VII)
34 The Joint Commission. (2019). Standard RC.01.03 .01. Comprehensive
accreditation manual for hospitals. Oakbrook Terrace, IL: The Joint
Commission. (Level VII)
35 Accreditation Association for Hospitals and Health Systems. (2017). Standard
10.00 .03. Healthcare Facilities Accreditation Program: Accreditation
requirements for acute care hospitals. Chicago, IL: Accreditation Association
for Hospitals and Health Systems. (Level VII)
36 Centers for Medicare and Medicaid Services, Department of Health and
Human Services. (2015). Condition of participation: Medical record services.
42 C.F.R. § 482.24(b).
37 DNV GL-Healthcare USA, Inc. (2016). MR.2 .SR.1 . NIAHO® accreditation
requirements: Interpretive guidelines & surveyor guidance (version 11).
Milford, OH: DNV GL-Healthcare USA, Inc. (Level VII)
38 Walsh, B. K ., et al. (2011). AARC clinical practice guideline:
Capnography/capnometry during mechanical ventilation: 2011. Respiratory
Care, 56(4), 503–509. Accessed via the Web at
http://www.rcjournal.com/cpgs/pdf/04.11.0503.pdf (Level VII)
WOUND DEHISCENCE AND EVISCERATION
MANAGEMENT
Although surgical wounds typically heal without incident,
occasionally the edges of a wound may fail to join or may
separate even after they seem to be healing normally. This
development, called wound dehiscence, may lead to an
even more serious complication: evisceration, in which a
portion of the viscera (usually a bowel loop) protrudes
through the incision. Evisceration, in turn, can lead to
peritonitis and septic shock. (See Recognizing dehiscence
and evisceration.) Dehiscence and evisceration are most
likely to occur 6 or 7 days after surgery. By then, sutures
may have been removed and the patient can cough easily
and breathe deeply—both of which strain the incision.
Several factors can contribute to these complications.
Poor nutrition—whether from inadequate intake, obesity, or
a condition such as diabetes mellitus—may hinder wound
healing. Chronic pulmonary or cardiac disease, preoperative
radiation therapy, and metastatic cancer may also slow
healing, because the injured tissue doesn’t get needed
nutrients and oxygen. Localized wound infection may limit
closure, delay healing, and weaken the incision. Stress on
the incision from coughing or vomiting may cause
abdominal distention or severe stretching.1 A midline
abdominal incision, for instance, poses a high risk of wound
dehiscence.
Equipment
Sterile towels ▪ sterile normal saline solution ▪ sterile
irrigation set, including a basin, a solution container, and a
60-mL catheter-tip syringe ▪ labels ▪ sterile abdominal
dressings ▪ sterile, waterproof drape ▪ sterile gloves.
If the patient will return to the operating room (OR), be
sure you also gather the following equipment: Prescribed
preoperative medications ▪ Optional: IV administration set,
prescribed IV fluids, equipment for nasogastric (NG)
intubation.
Implementation
■ Perform hand hygiene.2,3,4,5,6,7
■ Provide privacy.8,9,10,11
■ Provide reassurance and support to ease the patient’s
anxiety. Instruct the patient to stay in bed. If possible,
remain with the patient while someone else notifies the
practitioner and collects the necessary equipment.
■ Explain the procedure to the patient and the family
members (if appropriate) according to their individual
communication and learning needs to help increase their
understanding, allay their fears, and enhance cooperation.12
■ Raise the patient’s bed to waist level when providing
patient care to help prevent caregiver back strain.13
■ Perform hand hygiene.2,3,4,5,6,7
■ Using sterile technique (see the “Sterile technique, basic”
procedure, page 714), unfold a sterile towel to create a
sterile field.
■ Open the package containing the irrigation set, and place
the basin, solution container, and 60-mL syringe on the
sterile field.
■ Pour sterile normal saline solution into the sterile basin.
■ Label all solutions on and off the sterile field, maintaining
the sterility of the sterile field, to provide information
regarding the solutions they contain.14,15
■ Open the sterile abdominal dressings and place them on
the sterile field.
■ Perform hand hygiene.2,3,4,5,6,7
■ Put on sterile gloves.16,17
■ Place the moistened sterile abdominal dressings over the
exposed viscera and then cover the dressings with a sterile,
waterproof drape to retain the moisture.18
■ Remove and discard your gloves.16,17
■ Perform hand hygiene.2,3,4,5,6,7
■ Return the patient’s bed to the lowest position to help
prevent falls and maintain patient safety.19
■ Monitor the patient’s wound regularly, and moisten the
dressings as needed to maintain moisture. To moisten the
dressings, pour sterile normal saline solution into the
irrigation solution container. Use the syringe to withdraw
normal saline solution from the container; remove the
waterproof drape from the dressings, and then irrigate the
abdominal dressings gently using the syringe. Inspect the
color of the viscera. If they appear dusky or black, notify the
practitioner immediately. With their blood supply
interrupted, protruding viscera may become ischemic and
necrotic. Cover the dressings with the waterproof drape.
■ Remove and discard your gloves16,17 and perform hand
hygiene.2,3,4,5,6,7
■ Maintain the patient on bed rest in the low Fowler position
(no more than 20 degrees of elevation) with the knees
flexed to prevent injury and reduce stress on an abdominal
incision.
■ Don’t allow the patient to have anything by mouth to
decrease the risk of aspiration during surgery.
■ Monitor the patient’s vital signs frequently to help in
recognizing a change in the patient’s condition promptly.
Preparing the patient for return to the OR
■ Confirm that written informed consent has been obtained
by the practitioner and is in the patient’s medical
record.20,21,22,23
■ Conduct a preprocedure verification to make sure that all
relevant documentation, related information, and equipment
are available and correctly identified to the patient’s
identifiers.24,25
■ Gather the appropriate equipment.
■ Perform hand hygiene.2,3,4,5,6,7
■ Confirm the patient’s identity using at least two patient
identifiers.26
■ Provide privacy.8,9,10,11
■ Confirm that the patient has adequate IV access. Insert
an IV catheter, if needed and ordered. (See the “IV catheter
insertion and removal” procedure.) Administer IV fluids if
prescribed. (See the “IV therapy preparation” and “IV pump
use” procedures.)
■ Insert an NG tube if ordered. Connect the tube to
continuous or low intermittent suction, as ordered. (See the
“Nasogastric tube insertion and removal” procedure, page
524.)
■ Administer preoperative medications, as ordered,
following safe medication administration practices.27,28
■ Continue to reassure the patient while you prepare him or
her for surgery.
■ Make sure that the OR staff has been informed about the
surgical procedure. Provide hand-off communication for the
person who will assume responsibility for care of the patient
during surgery. Allow time for questions and answers.29
■ Perform hand hygiene.2,3,4,5,6,7
■ Document the procedure.30,31,32,33
Special considerations
■ The Joint Commission has issued a sentinel event alert
concerning inadequate hand-off communication because of
the potential for patient harm that can result when a
receiver receives inaccurate, incomplete, untimely,
misinterpreted, or otherwise inadequate information. To
improve hand-off communication, standardize the critical
information communicated by the sender. At a minimum,
include the sender contact information, illness assessment,
patient summary (including events leading up to the illness
or admission, hospital course, ongoing assessment, and
plan of care), to-do action list, contingency plans, allergy
list, code status, medication list, and dated laboratory test
results and vital signs. Provide face-to-face communication
whenever possible in an interruption-free location, using
facility-approved, standardized tools and methods (for
example, forms, templates, checklists, protocols, and
mnemonics). Provide ample time and opportunity for
questions, and include the multidisciplinary team members
and the patient and family members when appropriate.34
■ Depending on the patient’s condition, you may not
perform some of these procedures at the bedside. For
instance, NG intubation may make the patient gag or vomit,
causing further evisceration. For this reason, the practitioner
may choose to have the NG tube inserted in the OR with the
patient under anesthesia.
Recognizing dehiscence and
evisceration
Wound dehiscence
In wound dehiscence, the layers of the surgical wound separate.
Evisceration of bowel loop
With evisceration, the viscera (in this case, a bowel loop) protrude through
the surgical incision.
Complications
The most common complication of wound dehiscence and
evisceration management is infection, which can lead to
peritonitis and possibly septic shock.
Documentation
Note when the wound problem occurred, the patient’s
activity preceding the wound problem, the patient’s
condition, and the time when you notified the practitioner.
Describe the appearance of the wound or eviscerated organ;
the amount, color, consistency, and odor of any drainage;
and any nursing actions taken. Record the patient’s vital
signs, the patient’s response to the wound problem, and the
practitioner’s actions. Note the name and title of the person
who received your hand-off communication. Document any
patient teaching provided, the patient’s understanding of
the teaching, and whether the patient requires follow-up
teaching.
REFERENCES
1 Iqbal, A., et al. (2008). A study of intragastric and intravesicular pressure
changes during rest, coughing, weight lifting, retching, and vomiting. Surgical
Endoscopy, 22(12), 2571–2575. (Level IV)
2 Centers for Disease Control and Prevention. (2002). Guideline for hand
hygiene in health-care settings: Recommendations of the Healthcare Infection
Control Practices Advisory Committee and the HICPAC/SHEA/APIC/IDSA Hand
Hygiene Task Force. MMWR Recommendations and Reports, 51(RR-16), 1–45.
Accessed via the Web at https://www.cdc.gov/mmwr/pdf/rr/rr5116.pdf (Level
II)
3 World Health Organization. (2009). “WHO guidelines on hand hygiene in
health care: First global patient safety challenge, clean care is safer care”
[Online]. Accessed via the Web at
http://apps.who.int/iris/bitstream/10665/44102/1/9789241597906_eng.pdf
(Level IV)
4 The Joint Commission. (2019). Standard NPSG.07.01.01. Comprehensive
accreditation manual for hospitals. Oakbrook Terrace, IL: The Joint
Commission. (Level VII)
5 Accreditation Association for Hospitals and Health Systems. (2017). Standard
07.01.21. Healthcare Facilities Accreditation Program: Accreditation
requirements for acute care hospitals. Chicago, IL: Accreditation Association
for Hospitals and Health Systems. (Level VII)
6 Centers for Medicare and Medicaid Services, Department of Health and
Human Services. (2015). Condition of participation: Infection control. 42 C.F.R.
§ 482.42.
7 DNV GL-Healthcare USA, Inc. (2016). IC.1.SR.1 . NIAHO® accreditation
requirements: Interpretive guidelines & surveyor guidance (version 11).
Milford, OH: DNV GL-Healthcare USA, Inc. (Level VII)
8 DNV GL-Healthcare USA, Inc. (2016). PR.1 .SR.5 . NIAHO® accreditation
requirements: Interpretive guidelines & surveyor guidance (version 11).
Milford, OH: DNV GL-Healthcare USA, Inc. (Level VII)
9 Centers for Medicare and Medicaid Services, Department of Health and
Human Services. (2015). Condition of participation: Patient’s rights. 42 C.F.R.
§ 482.13(c)(1).
10 Accreditation Association for Hospitals and Health Systems. (2017). Standard
15.01.16. Healthcare Facilities Accreditation Program: Accreditation
requirements for acute care hospitals. Chicago, IL: Accreditation Association
for Hospitals and Health Systems. (Level VII)
11 The Joint Commission. (2019). Standard RI.01.01.01. Comprehensive
accreditation manual for hospitals. Oakbrook Terrace, IL: The Joint
Commission. (Level VII)
12 The Joint Commission. (2019). Standard PC.02.01.21. Comprehensive
accreditation manual for hospitals. Oakbrook Terrace, IL: The Joint
Commission.
13 Waters, T. R., et al. (2009). “Safe patient handling training for schools of
nursing” [Online]. Accessed via the Web at
https://www.cdc.gov/niosh/docs/2009-127/pdfs/2009-127.pdf (Level VII)
14 Accreditation Association for Hospitals and Health Systems. (2017). Standard
25.01.27. Healthcare Facilities Accreditation Program: Accreditation
requirements for acute care hospitals. Chicago, IL: Accreditation Association
for Hospitals and Health Systems. (Level VII)
15 The Joint Commission. (2019). Standard NPSG.03 .04.01. Comprehensive
accreditation manual for hospitals. Oakbrook Terrace, IL: The Joint
Commission. (Level VII)
16 Siegel, J. D ., et al. (2007, revised 2017). “2007 guideline for isolation
precautions: Preventing transmission of infectious agents in healthcare
settings” [Online]. Accessed via the Web at
https://www.cdc.gov/infectioncontrol/pdf/guidelines/isolation-guidelines.pdf
(Level II)
17 Accreditation Association for Hospitals and Health Systems. (2017). Standard
07.01.10. Healthcare Facilities Accreditation Program: Accreditation
requirements for acute care hospitals. Chicago, IL: Accreditation Association
for Hospitals and Health Systems. (Level VII)
18 Mizell, J. S . Complications of abdominal surgical incisions. (2017). In:
UpToDate, Rosen, M., & Chen, W. (Eds.). Retrieved from: www.uptodate.com
19 Ganz, D. A., et al. (2013). Preventing falls in hospitals: A toolkit for improving
quality of care (AHRQ Publication No. 13-0015-EF). Rockville, MD: Agency for
Healthcare Research and Quality. Accessed via the Web at
http://www.ahrq.gov/sites/default/files/publications/files/fallpxtoolkit.pdf
(Level VII)
20 The Joint Commission. (2019). Standard RI.01.03 .01. Comprehensive
accreditation manual for hospitals. Oakbrook Terrace, IL: The Joint
Commission. (Level VII)
21 Centers for Medicare and Medicaid Services, Department of Health and
Human Services. (2015). Condition of participation: Patient’s rights. 42 C.F.R.
§ 482.13(b)(2).
22 Accreditation Association for Hospitals and Health Systems. (2017). Standard
30.01.11. Healthcare Facilities Accreditation Program: Accreditation
requirements for acute care hospitals. Chicago, IL: Accreditation Association
for Hospitals and Health Systems. (Level VII)
23 DNV GL-Healthcare USA, Inc. (2016). PR.1.SR.3 . NIAHO® accreditation
requirements: Interpretive guidelines & surveyor guidance (version 11).
Milford, OH: DNV GL-Healthcare USA, Inc. (Level VII)
24 The Joint Commission. (2019). Standard UP.01.01.01. Comprehensive
accreditation manual for hospitals. Oakbrook Terrace, IL: The Joint
Commission. (Level VII)
25 Accreditation Association for Hospitals and Health Systems. (2017). Standard
30.00 .14. Healthcare Facilities Accreditation Program: Accreditation
requirements for acute care hospitals. Chicago, IL: Accreditation Association
for Hospitals and Health Systems. (Level VII)
26 The Joint Commission. (2019). Standard NPSG.01.01.01. Comprehensive
accreditation manual for hospitals. Oakbrook Terrace, IL: The Joint
Commission. (Level VII)
27 Accreditation Association for Hospitals and Health Systems. (2017). Standard
16.01.03. Healthcare Facilities Accreditation Program: Accreditation
requirements for acute care hospitals. Chicago, IL: Accreditation Association
for Hospitals and Health Systems. (Level VII)
28 Centers for Medicare and Medicaid Services, Department of Health and
Human Services. (2015). Condition of participation: Nursing services. 42
C.F.R. § 482.23(c).
29 The Joint Commission. (2019). Standard PC.02.02.01. Comprehensive
accreditation manual for hospitals. Oakbrook Terrace, IL: The Joint
Commission. (Level VII)
30 The Joint Commission. (2019). Standard RC.01.03 .01. Comprehensive
accreditation manual for hospitals. Oakbrook Terrace, IL: The Joint
Commission. (Level VII)
31 Centers for Medicare and Medicaid Services, Department of Health and
Human Services. (2015). Condition of participation: Medical record services.
42 C.F.R. § 482.24(b).
32 Accreditation Association for Hospitals and Health Systems. (2017). Standard
10.00 .03. Healthcare Facilities Accreditation Program: Accreditation
requirements for acute care hospitals. Chicago, IL: Accreditation Association
for Hospitals and Health Systems. (Level VII)
33 DNV GL-Healthcare USA, Inc. (2016). MR.2 .SR.1 . NIAHO® accreditation
requirements: Interpretive guidelines & surveyor guidance (version 11).
Milford, OH: DNV GL-Healthcare USA, Inc. (Level VII)
34 The Joint Commission. (2017). “Sentinel event alert, issue 58: Inadequate
hand-off communication” [Online]. Accessed via the Web at
https://www.jointcommission.org/assets/1/18/SEA_58_Hand_off_Comms_9_6 _1
7_FINAL_(1).pdf (Level VII)
WOUND IRRIGATION
Wound irrigation involves directing a steady flow of an
irrigation solution across an open wound to remove debris
and drainage from the wound. Wound irrigation can be
performed using a catheter-tip syringe with a 19G
angiocatheter or a commercial wound irrigation device.
Irrigation pressure should be adequate to clean the surface
of the wound without causing trauma to the wound bed; 4 to
15 psi (0.28 to 1.05 kg/cm2) generally is considered safe
and sufficient for cleaning an open wound.1,2
After irrigation, open wounds usually are packed to absorb
additional drainage. Follow standard precautions when
irrigating a wound to prevent exposure to blood or body
fluids.3
Equipment
Waterproof trash container ▪ emesis basin ▪ gloves ▪ mask
and goggles or mask with face shield ▪ gown ▪ irrigation
solution (normal saline solution or other prescribed wound
cleanser)4 ▪ irrigation container (sterile or clean) ▪ sterile
gauze pad ▪ sterile dressing ▪ wound irrigation device (35-
or 60-mL catheter-tip syringe with 19G angiocatheter or
commercial wound irrigation device)1,2 ▪ skin-protectant
wipe ▪ Optional: prescribed pain medication, wound packing
material, fluid-impermeable pad.
Preparation of equipment
Check the expiration date on each sterile package and
inspect the packages for tears. Follow the manufacturer’s
recommendations and your facility’s guidelines regarding
the shelf life of solutions once they have been opened.4
Ensure that the irrigation solution is at room temperature.5
Implementation
■ Verify the practitioner’s order.
■ Gather and prepare the necessary equipment.
■ Perform hand hygiene.6,7,8,9,10,11
■ Confirm the patient’s identity using at least two patient
identifiers.12
■ Provide privacy.13,14,15,16
■ Explain the procedure to the patient and family (if
appropriate) according to their individual communication
and learning needs to help increase their understanding,
allay their fears, and enhance cooperation.17
■ Screen and assess the patient’s pain using facility-defined
criteria that are consistent with the patient’s age, condition,
and ability to understand.18
■ Treat the patient’s pain as needed and ordered using
nonpharmacologic or pharmacologic methods, or a
combination of approaches.18 Administer prescribed pain
medication to the patient at least 20 minutes before wound
irrigation, as needed and ordered, following safe medication
administration practices, because dressing changes may be
painful.19,20 Base the treatment plan on evidence-based
practices and the patient’s clinical condition, medical
history, and pain management goals.18
■ Encourage the patient to request a time-out during the
procedure if he or she experiences pain.
■ Raise the patient’s bed to waist level when providing
patient care to help prevent caregiver back strain.21
■ Perform hand hygiene.6,7,8,9,10,11
■ Position the patient in a way that maximizes comfort
while allowing easy access to the wound site.
■ Depending on the location of the wound, cover the bed
linens with a fluid-impermeable pad to help prevent soiling.
■ Place an emesis basin below the wound so that the
irrigation solution flows from the wound into the basin and
drains from the clean to the dirty end of the wound.
■ Perform hand hygiene.6,7,8,9,10,11
■ Put on a gown, a mask with a face shield or goggles and a
mask, and gloves, because splashing may occur during
pressurized irrigation.1,2,3,22
■ Remove the existing dressing gently, irrigating it with
normal saline if necessary to help ease removal.
■ Discard the soiled dressing in a waterproof trash
container.3
■ Remove and discard your gloves.3,22
■ Perform hand hygiene.6,7,8,9,10,11
■ Inspect the wound and surrounding tissue to gauge the
healing process and to assess for the presence of infection.
■ Establish a clean field that contains all of the equipment
and supplies you’ll need for irrigation and wound care.
■ Pour the prescribed amount of irrigating solution into a
clean or sterile container.
■ Perform hand hygiene.6,7,8,9,10,11
■ Put on gloves.3,22
■ If you’re using a 30- or 60-mL catheter-tip syringe and
19G angiocatheter, attach the angiocatheter to the syringe
and then irrigate the wound using normal saline solution or
another prescribed wound cleanser. Alternately, irrigate the
wound using a commercial wound irrigation device. Apply
sufficient irrigation pressure to clean the wound without
damaging tissue. Also irrigate the surrounding skin. Ensure
that the solution flows from the clean to the dirty area of the
wound to help prevent contamination of clean tissue by the
exudate. Also, ensure that the solution reaches all areas of
the wound.
■ Repeat the wound irrigation process as needed.
■ Continue to irrigate the wound until you’ve administered
the prescribed amount of irrigation solution or until the
solution returns clear.23 Note the amount of solution
administered.
■ Discard the syringe (if used) in a puncture-resistant
sharps container.
■ Keep the patient positioned to allow further wound
drainage into the basin.
■ Dry the patient’s intact skin with a sterile gauze pad.
■ Apply a skin-protectant wipe and allow it to dry
completely to help prevent skin breakdown and infection.
■ Pack the wound loosely, if ordered, to stimulate
granulation.24
■ Apply a sterile dressing.
■ Dispose of drainage and solutions properly, and clean or
dispose of soiled equipment and supplies.3 To prevent
contamination of other equipment, don’t return unopened
sterile supplies to the sterile supply cabinet. Store them in
an appropriate location in the patient’s room or as directed
by your facility.
■ Return the patient’s bed to the lowest position to help
prevent falls and maintain patient safety.25
■ Remove and discard your gloves and other personal
protective equipment in the appropriate receptacles.3,22
■ Perform hand hygiene.6,7,8,9,10,11
■ Reassess and respond to the patient’s pain by evaluating
the response to treatment and progress toward pain
management goals. Assess the patient for any adverse
reactions and risk factors for adverse events that may result
from treatment.18
■ Perform hand hygiene.6,7,8,9,10,11
■ Document the procedure.26,27,28,29
Special considerations
■ Try to coordinate wound irrigation with the practitioner’s
visit so the practitioner can inspect the patient’s wound.
■ Use only the irrigant specified by the practitioner,
because others may be erosive or otherwise harmful.
■ Note that some facilities may use a splash guard for
wound irrigation to help prevent exposure to contaminated
returned irrigation solution.
Patient teaching
If the wound must be irrigated at home, teach the patient
and family (if applicable) how to perform the procedure. Ask
for a return demonstration of the proper technique. Provide
written instructions. Arrange for home health supplies and
nursing visits, as appropriate. Urge the patient to call the
practitioner if there are signs of infection.
Complications
Wound irrigation increases the risk of infection and may
cause excoriation and increased pain. Pressure over 15 psi
causes trauma to the wound and directs bacteria back into
the tissue.
Documentation
Record the date and time of wound irrigation, the amount
and type of irrigation solution used, the appearance of the
wound, the presence of any sloughing tissue or exudate, the
amount of solution returned, any skin care performed
around the wound, the dressings applied, and the patient’s
tolerance of the treatment. Document teaching provided to
the patient and family (if applicable), their understanding of
your teaching, and whether they require follow-up teaching.
REFERENCES
1 Wound, Ostomy and Continence Nurses Society (WOCN). (2016). Guideline for
prevention and management of pressure ulcers (injuries): WOCN clinical
practice guideline series 2. Mount Laurel, NJ: WOCN.
2 National Pressure Ulcer Advisory Panel, et al. (2014). “Prevention and
treatment of pressure ulcers: Quick reference guide” [Online]. Accessed via
the Web at http://www.npuap.org/wp-content/uploads/2014/08/Quick-
Reference-Guide-DIGITAL-NPUAP-EPUAP-PPPIA.pdf (Level VII)
3 Siegel, J. D., et al. (2007, revised 2017). “2007 guideline for isolation
precautions: Preventing transmission of infectious agents in healthcare
settings” [Online]. Accessed via the Web at
https://www.cdc.gov/infectioncontrol/pdf/guidelines/isolation-guidelines.pdf
(Level II)
4 Wound, Ostomy and Continence Nurses Society. (2012). Clean vs. sterile
dressing techniques for management of chronic wounds: A fact sheet. Journal
of Wound Ostomy and Continence Nursing, 39(Suppl. 2), S30–S34. (Level VII)
5 Sardina, D. (2013). Is your wound-cleansing practice up to date? Wound Care
Advisor, 2(3), 15–17 . Accessed via the Web at
https://woundcareadvisor.com/is-your-wound-cleansing-practice-up-to-
date_vol2_no3/
6 The Joint Commission. (2019). Standard NPSG.07.01.01. Comprehensive
accreditation manual for hospitals. Oakbrook Terrace, IL: The Joint
Commission. (Level VII)
7 Centers for Disease Control and Prevention. (2002). Guideline for hand
hygiene in health-care settings: Recommendations of the Healthcare Infection
Control Practices Advisory Committee and the HICPAC/SHEA/APIC/IDSA Hand
Hygiene Task Force. MMWR Recommendations and Reports, 51(RR-16), 1–45.
Accessed via the Web at https://www.cdc.gov/mmwr/pdf/rr/rr5116.pdf (Level
II)
8 World Health Organization. (2009). “WHO guidelines on hand hygiene in
health care: First global patient safety challenge, clean care is safer care”
[Online]. Accessed via the Web at
http://apps.who.int/iris/bitstream/10665/44102/1/9789241597906_eng.pdf
(Level IV)
9 Accreditation Association for Hospitals and Health Systems. (2017). Standard
07.01.21. Healthcare Facilities Accreditation Program: Accreditation
requirements for acute care hospitals. Chicago, IL: Accreditation Association
for Hospitals and Health Systems. (Level VII)
10 Centers for Medicare and Medicaid Services, Department of Health and
Human Services. (2015). Condition of participation: Infection control. 42 C.F.R.
§ 482.42.
11 DNV GL-Healthcare USA, Inc. (2016). IC.1 .SR.1 . NIAHO® accreditation
requirements: Interpretive guidelines & surveyor guidance (version 11).
Milford, OH: DNV GL-Healthcare USA, Inc. (Level VII)
12 The Joint Commission. (2019). Standard NPSG.01.01.01. Comprehensive
accreditation manual for hospitals. Oakbrook Terrace, IL: The Joint
Commission. (Level VII)
13 Accreditation Association for Hospitals and Health Systems. (2017). Standard
15.01.16. Healthcare Facilities Accreditation Program: Accreditation
requirements for acute care hospitals. Chicago, IL: Accreditation Association
for Hospitals and Health Systems. (Level VII)
14 Centers for Medicare and Medicaid Services, Department of Health and
Human Services. (2015). Condition of participation: Patient’s rights. 42 C.F.R.
§ 482.13(c)(1).
15 DNV GL-Healthcare USA, Inc. (2016). PR.1.SR.5 . NIAHO® accreditation
requirements: Interpretive guidelines & surveyor guidance (version 11).
Milford, OH: DNV GL-Healthcare USA, Inc. (Level VII)
16 The Joint Commission. (2019). Standard RI.01.01.01. Comprehensive
accreditation manual for hospitals. Oakbrook Terrace, IL: The Joint
Commission. (Level VII)
17 The Joint Commission. (2019). Standard PC.02.01.21. Comprehensive
accreditation manual for hospitals. Oakbrook Terrace, IL: The Joint
Commission. (Level VII)
18 The Joint Commission. (2019). Standard PC.01.02.07. Comprehensive
accreditation manual for hospitals. Oakbrook Terrace, IL: The Joint
Commission. (Level VII)
19 Accreditation Association for Hospitals and Health Systems. (2017). Standard
16.01.03. Healthcare Facilities Accreditation Program: Accreditation
requirements for acute care hospitals. Chicago, IL: Accreditation Association
for Hospitals and Health Systems. (Level VII)
20 Centers for Medicare and Medicaid Services, Department of Health and
Human Services. (2015). Condition of participation: Nursing services. 42
C.F.R. § 482.23(c).
21 Waters, T. R., et al. (2009). “Safe patient handling training for schools of
nursing” [Online]. Accessed via the Web at
https://www.cdc.gov/niosh/docs/2009-127/pdfs/2009-127.pdf (Level VII)
22 Accreditation Association for Hospitals and Health Systems. (2017). Standard
07.01.10. Healthcare Facilities Accreditation Program: Accreditation
requirements for acute care hospitals. Chicago, IL: Accreditation Association
for Hospitals and Health Systems. (Level VII)
23 Mak, S. S ., et al. (2015). Pressurised irrigation versus swabbing method in
cleansing wounds healed be secondary intention: A randomised controlled
trial with cost-effectiveness analysis. International Journal of Nursing Studies,
52(1), 88–101. (Level II)
24 Baranoski, S., & Ayello, E. A. (2016). Wound care essentials: Practice
principles (4th ed.). Philadelphia, PA: Wolters Kluwer.
25 Ganz, D. A., et al. (2013). Preventing falls in hospitals: A toolkit for improving
quality of care (AHRQ Publication No. 13-0015-EF). Rockville, MD: Agency for
Healthcare Research and Quality. Accessed via the Web at
http://www.ahrq.gov/sites/default/files/publications/files/fallpxtoolkit.pdf
(Level VII)
26 The Joint Commission. (2019). Standard RC.01.03 .01. Comprehensive
accreditation manual for hospitals. Oakbrook Terrace, IL: The Joint
Commission. (Level VII)
27 Centers for Medicare & Medicaid Services, Department of Health and Human
Services. (2015). Condition of participation: Medical record services. 42 C.F.R.
§ 482.24(b).
28 Accreditation Association for Hospitals and Health Systems. (2017). Standard
10.00 .03. Healthcare Facilities Accreditation Program: Accreditation
requirements for acute care hospitals. Chicago, IL: Accreditation Association
for Hospitals and Health Systems. (Level VII)
29 DNV GL-Healthcare USA, Inc. (2016). MR.2 .SR.1 . NIAHO® accreditation
requirements: Interpretive guidelines & surveyor guidance (version 11).
Milford, OH: DNV GL-Healthcare USA, Inc. (Level VII)
Z
Z-TRACK INJECTION
The Z-track method is the preferred method for
administering IM injections because it prevents leakage, or
tracking, of medication into the subcutaneous tissue (which
can cause patient discomfort and may permanently stain
some tissue). Lateral displacement of the skin during the
injection helps to seal the drug in the muscle. This
procedure requires careful attention to technique.
Equipment
Patient’s medication and medical records ▪ single-use
sterile syringe and needle of appropriate size (at least 11⁄2′′
[3.8 cm] recommended)1 and gauge (self-sheathing needle
recommended)2 ▪ prescribed medication ▪ alcohol pads ▪
Optional: labels, gloves, 1′′ (2.5 -cm) filter needle.
Implementation
■ Avoid distractions and interruptions when preparing and
administering the medication to prevent medication
errors.3,4
■ Verify the practitioner’s order for medication.
■ Reconcile the patient’s medications when a new
medication is ordered to reduce the risk of medication
administration errors, including omissions, duplications,
dosing errors, and drug interactions.5
■ Compare the medication label to the order in the
patient’s medical record.6,7,8
■ Check the patient’s medical record for an allergy or a
contraindication to the prescribed medication. If an allergy
or a contraindication exists, don’t administer the
medication; instead, notify the practitioner.6,7,8
■ Check the expiration date on the medication. If the
medication is expired, return it to the pharmacy and obtain
new medication.6,7,8
■ Visually inspect the solution for particles, discoloration, or
other loss of integrity; don’t administer the medication if its
integrity is compromised.6,7 Keep in mind that for some
drugs (such as suspensions), the presence of drug particles
is normal. If in doubt, check with the pharmacist and the
manufacturer’s instructions.
■ Discuss any unresolved concerns about the medication
with the patient’s practitioner.6,7,8
■ Perform hand hygiene.9,10,11,12,13,14
■ Carefully calculate the dose. If you’re administering a
high-alert medication that may cause significant patient
harm when used in error, perform an independent double-
check with another nurse if required by your facility.15,16,17
■ Read the medication label again as you draw up the
medication for injection, if needed.
■ Perform hand hygiene.9,10,11,12,13,14
■ Confirm the patient’s identity using at least two patient
identifiers.6,18
■ Provide privacy.19,20,21,22
■ If the patient is receiving the medication for the first time,
teach the patient about potential adverse reactions and
discuss any other concerns related to the medication.6,7,8
■ Verify that the medication is being administered at the
proper time, in the prescribed dose, and by the correct route
to reduce the risk of medication administration errors.6,7,8
■ Explain the procedure to the patient and family (if
appropriate) according to their individual communication
and learning needs to increase their understanding, allay
their fears, and enhance cooperation.23
■ If your facility uses a bar code technology, scan your
identification badge, the patient’s identification bracelet,
and the medication’s bar code.
■ Raise the patient’s bed to waist level when providing
patient care to prevent caregiver back strain.24
■ Perform hand hygiene.9,10,11,12,13,14
■ Put on gloves if contact with blood or body fluids is likely,
or if your skin or the patient’s skin isn’t intact; glove use
isn’t necessary for routine IM injection.25,26
■ Select an appropriate injection site. The ventrogluteal site
is used most commonly for healthy adults, although the
deltoid muscle may be used for a small-volume injection (2
mL or less). Remember to always rotate injection sites for
patients who require repeated injections.
■ Position and drape the patient appropriately using the
bed linens, making sure the site is well exposed and that
lighting is adequate.
■ Clean the patient’s skin at the injection site with an
alcohol pad, moving the pad outward in a circular motion to
a circumference of about 2′′ (5 cm) from the injection site.
Then allow the skin to dry.2
■ Remove the needle sheath.
■ With your nondominant hand, displace the skin laterally
by pulling or pushing it 3/4′′ to 11⁄4′′ (2 to 3 cm) away from
the injection site.1
■ Position the syringe at a 90-degree angle to the patient’s
skin surface, with the needle about 2′′ (5 cm) from the skin.
Tell the patient that he or she will feel a prick as you insert
the needle. Insert the needle quickly and smoothly through
the skin and subcutaneous tissue and deep into the muscle
at a 90-degree angle.
■ Aspirate for blood return if appropriate; refer to the
medication manufacturer’s prescribing information. The
aspiration of blood may be appropriate for IM injections of
certain medications such as penicillin.27
NURSING ALERT Aspiration of blood isn’t recommended when
administering vaccines or toxoids by the IM route, because large
blood vessels aren’t present at recommended injection sites.28
■ Inject the medication slowly according to the
manufacturer’s prescribing information.
■ Wait 10 seconds to ensure dispersion of the medication,
and then withdraw the needle slowly at a 90-degree
angle.29
■ Remove your thumb and index finger from the surface of
the patient’s skin, allowing the displaced skin and
subcutaneous tissue to return to their normal positions to
seal the needle track, trapping the medication in the
muscle. Don’t massage the injection site or allow the patient
to wear a tight-fitting garment over the site, because doing
so may force the medication into subcutaneous tissue.
■ Activate the needle safety device, if available, and
discard the needle and syringe in a puncture-resistant
sharps container. To avoid needle-stick injuries, don’t recap
needles.2
■ Return the bed to the lowest position to prevent falls and
maintain patient safety.30
■ Remove and discard your gloves if worn.2,30
■ Perform hand hygiene.9,10,11,12,13,14
■ Document the procedure.315,32,33,348
Special considerations
■ If the patient is receiving multiple injections or an
injection daily, alternate IM injection sites.
■ Always encourage the patient to relax the muscles you’ll
be injecting, because injections into tense muscle are more
painful and may bleed more readily.
■ IM injections may damage local muscle cells, causing
elevated serum enzyme levels (for example, of creatine
kinase) that can be confused with the elevated enzyme
levels resulting from damage to cardiac muscle, as in
myocardial infarction. If measuring enzyme levels is
important, suggest that the practitioner switch to IV
administration, if appropriate, and adjust dosages
accordingly.
Complications
Discomfort and tissue irritation may result from drug
leakage into subcutaneous tissue. Failure to rotate sites in
patients who require repeated injections can interfere with
the absorption of medication. Unabsorbed medications may
build up in deposits that may reduce the desired
pharmacologic effect and may lead to abscess formation or
tissue fibrosis. Other complications may occur depending on
the medication administered.
Documentation
Record the medication, dosage, date, time, and site of
injection on the patient’s medication record. Include the
patient’s response to the injected drug.
REFERENCES
1 Hopkins, U., & Arias, C. Y. (2013). Large-volume IM injections: A review of best
practices. Oncology Nurse Advisor, 2013, 32–37. Accessed via the Web at
http://media.oncologynurseadvisor.com/documents/44/ona_feature0213_injec
tions_10767.pdf (Level V)
2 Occupational Safety and Health Administration. (n.d .). “Bloodborne
pathogens, standard number 1910.1030” [Online]. Accessed via the Web at
http://www.osha.gov/pls/oshaweb/owadisp.show_document?
p_id=10051&p_table=STANDARDS (Level VII)
3 Westbrook, J., et al. (2010). Association of interruptions with an increased risk
and severity of medication administration errors. Archives of Internal
Medicine, 170(8), 683–690 . (Level IV)
4 Institute for Safe Medication Practices. (2012). Side tracks on the safety
express: Interruptions lead to errors and unfinished...Wait, what was I doing?
Nurse Advise-ERR, 11(2), 1–4 . Accessed via the Web at
https://www.ismp.org/resources/side-tracks-safety-express-interruptions-lead-
errors-and-unfinished-wait-what-was-i-doing
5 Accreditation Association for Hospitals and Health Systems. (2017). Standard
25.02.13. Healthcare Facilities Accreditation Program: Accreditation
requirements for acute care hospitals. Chicago, IL: Accreditation Association
for Hospitals and Health Systems. (Level VII)
6 Accreditation Association for Hospitals and Health Systems. (2017). Standard
16.01.03. Healthcare Facilities Accreditation Program: Accreditation
requirements for acute care hospitals. Chicago, IL: Accreditation Association
for Hospitals and Health Systems. (Level VII)
7 Centers for Medicare and Medicaid Services, Department of Health and
Human Services. (2015). Condition of participation: Nursing services. 42
C.F.R. § 482.23(c).
8 DNV GL-Healthcare USA, Inc. (2016). MM .1 .SR.2 . NIAHO® accreditation
requirements: Interpretive guidelines & surveyor guidance (version 11).
Milford, OH: DNV GL-Healthcare USA, Inc. (Level VII)
9 The Joint Commission. (2019). Standard NPSG.07.01.01. Comprehensive
accreditation manual for hospitals. Oakbrook Terrace, IL: The Joint
Commission. (Level VII)
10 Centers for Disease Control and Prevention. (2002). Guideline for hand
hygiene in health-care settings: Recommendations of the Healthcare Infection
Control Practices Advisory Committee and the HICPAC/SHEA/APIC/IDSA Hand
Hygiene Task Force. MMWR Recommendations and Reports, 51(RR-16), 1–45.
Accessed via the Web at https://www.cdc.gov/mmwr/pdf/rr/rr5116.pdf (Level
II)
11 World Health Organization. (2009). “WHO guidelines on hand hygiene in
health care: First global patient safety challenge, clean care is safer care”
[Online]. Accessed via the Web at
http://apps.who.int/iris/bitstream/10665/44102/1/9789241597906_eng.pdf
(Level IV)
12 Accreditation Association for Hospitals and Health Systems. (2017). Standard
07.01.21. Healthcare Facilities Accreditation Program: Accreditation
requirements for acute care hospitals. Chicago, IL: Accreditation Association
for Hospitals and Health Systems. (Level VII)
13 Centers for Medicare and Medicaid Services, Department of Health and
Human Services. (2015). Condition of participation: Infection control. 42 C.F.R.
§ 482.42.
14 DNV GL-Healthcare USA, Inc. (2016). IC.1 .SR.1 . NIAHO® accreditation
requirements: Interpretive guidelines & surveyor guidance (version 11).
Milford, OH: DNV GL-Healthcare USA, Inc. (Level VII)
15 Institute for Safe Medication Practices. (2014). “ISMP list of high-alert
medications in acute care settings” [Online]. Accessed via the Web at
http://www.ismp.org/Tools/highalertmedications.pdf (Level VII)
16 Institute for Safe Medication Practices. (2014). Independent double-checks:
Undervalued and misused. ISMP Medication Safety Alert! Nurse Advise-ERR,
12(3), 1. Accessed via the Web at
http://www.ismp.org/newsletters/nursing/issues/NurseAdviseERR201403.pdf
(Level VII)
17 Institute for Safe Medication Practices. (2016). “2016–2017 targeted
medication safety best practices for hospitals” [Online]. Accessed via the
Web at http://www.ismp.org/tools/bestpractices/TMSBP-for-Hospitals.pdf
18 The Joint Commission. (2019). Standard NPSG.01.01.01. Comprehensive
accreditation manual for hospitals. Oakbrook Terrace, IL: The Joint
Commission. (Level VII)
19 Centers for Medicare and Medicaid Services, Department of Health and
Human Services. (2015). Condition of participation: Patient’s rights. 42 C.F.R.
§ 482.13(c)(1).
20 Accreditation Association for Hospitals and Health Systems. (2017). Standard
15.01.16. Healthcare Facilities Accreditation Program: Accreditation
requirements for acute care hospitals. Chicago, IL: Accreditation Association
for Hospitals and Health Systems. (Level VII)
21 DNV GL-Healthcare USA, Inc. (2016). PR.1.SR.5 . NIAHO® accreditation
requirements: Interpretive guidelines & surveyor guidance (version 11).
Milford, OH: DNV GL-Healthcare USA, Inc. (Level VII)
22 The Joint Commission. (2019). Standard RI.01.01.01. Comprehensive
accreditation manual for hospitals. Oakbrook Terrace, IL: The Joint
Commission. (Level VII)
23 The Joint Commission. (2019). Standard PC.02.01.21. Comprehensive
accreditation manual for hospitals. Oakbrook Terrace, IL: The Joint
Commission.
24 Waters, T. R., et al. (2009). “Safe patient handling training for schools of
nursing” [Online]. Accessed via the Web at
https://www.cdc.gov/niosh/docs/2009-127/pdfs/2009-127.pdf (Level VII)
25 World Health Organization. (2010). “WHO best practices for injections and
related procedures toolkit” [Online]. Accessed via the Web at
http://apps.who.int/iris/handle/10665/44298
26 Accreditation Association for Hospitals and Health Systems. (2017). Standard
07.01.10. Healthcare Facilities Accreditation Program: Accreditation
requirements for acute care hospitals. Chicago, IL: Accreditation Association
for Hospitals and Health Systems. (Level VII)
27 Davidson, K. M ., & Rourke, L. (2013). Teaching best-evidence: Deltoid
intramuscular injection technique. Journal of Nursing Education and Practice,
3(7), 120–128. Accessed via the Web at
http://www.sciedu.ca/journal/index.php/jnep/article/viewFile/1888/1291 (Level
V)
28 Crawford, C. L., & Johnson J. A. (2012). To aspirate or not: An integrative
review of the evidence. Nursing2012, 42(3), 20–25 . (Level VII)
29 Taylor, C., et al. (2015). Fundamentals of nursing: The art and science of
person-centered nursing care (8th ed.). Philadelphia, PA: Wolters Kluwer.
30 Ganz, D. A., et al. (2013). Preventing falls in hospitals: A toolkit for improving
quality of care (AHRQ Publication No. 13-0015-EF). Rockville, MD: Agency for
Healthcare Research and Quality. Accessed via the Web at
http://www.ahrq.gov/sites/default/files/publications/files/fallpxtoolkit.pdf
(Level VII)
31 The Joint Commission. (2019). Standard RC.01.03 .01. Comprehensive
accreditation manual for hospitals. Oakbrook Terrace, IL: The Joint
Commission. (Level VII)
32 Accreditation Association for Hospitals and Health Systems. (2017). Standard
10.00 .03. Healthcare Facilities Accreditation Program: Accreditation
requirements for acute care hospitals. Chicago, IL: Accreditation Association
for Hospitals and Health Systems. (Level VII)
33 Centers for Medicare and Medicaid Services, Department of Health and
Human Services. (2015). Condition of participation: Medical record services.
42 C.F.R. § 482.24(b).
34 DNV GL-Healthcare USA, Inc. (2016). MR.2 .SR.1 . NIAHO® accreditation
requirements: Interpretive guidelines & surveyor guidance (version 11).
Milford, OH: DNV GL-Healthcare USA, Inc. (Level VII)
Index
Note: The letter i following a page number indicates an
illustration; t indicates a table A
Abbreviations to avoid, 238t
Abdominal binder, 67–68, 67i Abdominal paracentesis, 1–2
Abduction pillow, 16, 17i Adenosine, 186t
Adhesive strips, 702i
Admission to unit, 3–5
and assessment, 3
emergency, 4
patient care reminders and, 5
steps in admission procedures, 3
Admixture of drugs in syringe, 6–8
cartridge-injection system, 7
contraindications to, 7
drug incompatibility and, 8
from multidose vial and ampule, 7
from two ampules, 7–8
from two multidose vials, 7
Adrenalin. See Epinephrine.
Advanced cardiac life support (ACLS), 41, 116, 185
Advance directives, 9
health care proxies, 9, 11i living wills, 9, 10i Adverse drug event (ADE), 678,
679
Aerosols, 568i
Airborne precautions, 12–13
airborne infection isolation room for, 12
CDC recommendation, 12
conditions requiring, 13t
high-efficiency particulate air (HEPA) filtration, 12
powered air-purifying respirator (PAPR), 12
respirator seal check, 14, 14i Air-fluidized therapy beds, 14–15, 15i air
temperature adjustment for, 14
contraindications to use of, 14
Air splint, 707i
Airway clearance, tips on, 561
Alignment and pressure-reducing devices, 16–17, 17i Allen test, 32i
Alternating pressure pad, 53, 54i, 54
Ambulation, progressive, 638–639, 639i American Academy of Clinical
Toxicology, 328
American Association for Respiratory Care (AARC), 748
American Heart Association (AHA), 41, 116, 122
algorithm for treating adult in cardiac arrest, 188i basic life support algorithm,
117i
on transcutaneous pacing, 772
Amiodarone, 186t
Amniotic membrane dressing, 101, 102t Amphetamines, 243t
Anacrotic limb, 29i
Anaerobic specimen collection, 734i
Anticoagulant therapy, 22–23
Antiembolism stocking application, 18–20
knee-length stocking, 18–19, 19i measurements, 19, 19i thigh-length
stocking, 19i, 20
waist-length stocking, 20
Antiseptic solution, 587
Apnea, 668t
Aquadex FlexFlow ultrafiltration system, 21–24, 21i, 22i Aquapheresis, 21–24,
22i anticoagulant therapy for, 22
device for, 21, 21i double-checking high-alert medications before, 23
hematocrit (HCT) monitor for, 23
heparin infusion and, 22
Arterial blood gas (ABG) analysis, 31
arterial puncture for, 31–33, 32i Arterial pressure monitoring, 28–30
abnormal waveforms, 30t
arterial waveform, 29i
blood sample collection and, 28–29
changing tubing for, 28, 29
direct, 28
Arterial puncture
for blood gas analysis, 31–33
technique for, 32i
Arterial sheath removal, 25–27
bleeding control following, methods for, 25
preparing for, 25–26
using manual/mechanical compression, 26
using noninvasive hemostasis pad with manual compression, 26
Arterial waveform
abnormal, 30t
components of, 29i
Arteriovenous (AV) fistulas, 345
creation of, 346i
Arteriovenous graft, creation of, 346i Arthroplasty, hip, 354–356
Ascites, diagnosis of, abdominal paracentesis for, 1–2
Aspiration, 81
bone marrow, 84–85, 85i precautions for, 368–370
Assessment, 34–36
and admission, 3–4
physical, 34–36, 34i, 35t, 36i (See also Physical assessment) Assistive
devices, at home, 16, 17i Atropine, 186t
Auscultation, 34, 35
Autologous blood recovery systems, 39i
Autologous blood transfusion
advantages of, 36
adverse effects of, 36
contraindications to, 36–37, 38
managing problems of, 40t
perioperative, 38–39, 40i preoperative, 36–37
Automated external defibrillators (AEDs), 41–42, 42i Autotransfusion. See
Autologous blood transfusion.
B
Back care, 43, 44i Back massage, 43, 44i effleurage, 44i
friction, 44i
petrissage, 44i
Balloon valvuloplasty, 46
care, 45–48
mechanics of, 46i
preprocedure verification, 45
Ballottement technique, 34, 34i Balneotherapy. See Bath, therapeutic
Bariatric beds, 49–50
Barthel index, 324
Barthel Self-Care Rating Scale, 324
Basic life support (BLS), 41, 185
Bath, therapeutic, 738–739
types of, 739t
use of, 738
Bed bath, 50–52
Bed board, 53
Bed equipment, supplemental, 53–55
types of, 54i
Bed making
with mitered corners, 59i
for occupied bed, 55–56
for surgical bed, 60i
for traction bed, 57i
for unoccupied bed, 58
Bedpans, 60–62
placing, 61
after use of, 61
Bed scale, for measuring weight, 343–345, 344i Bedside spirometry, 62–63
Belt restraint, 669, 670
Biliary drainage catheter
caring for, 64–66
changing dressing of, 64–65
clamping, 65
emptying drainage, 65
managing obstruction of, 66i
placement of, 64, 65i Biobrane dressing, 112t
Biopsy, 85
bone marrow aspiration and, 84–86, 86i skin, 696–697, 697i Biphasic
defibrillator, 231. See also Defibrillation Biphasic waveforms, 42i
Bispectral index monitoring, 68–70
interpreting values in, 70i
mechanics of, 69i
troubleshooting sensor problems in, 70t Bladder ultrasonography, 71–72
Blakemore-Sengstaken tube, 291i
Blebs, 699
Blood culture, sample collection for, 72–73
Blood filters, 781, 782
Blood gas sampling
arterial, 31–33
capillary, 105
Blood glucose, monitoring of, 75–76
Blood pressure
cuff, positioning, 80i
diastolic, 77
measurement of, 77–80
correcting problems of, 79t
systolic, 77
Blood pressure cuff positioning, 80i
Blood transfusions, 780–784
documenting, 784
filters used in, 782
types of blood components and, 781
Blood warmers, 783
Body jewelry, removal of, 81–82, 82t Body mass index (BMI), 343
calculating, 345, 545
determining, 545i
Body mechanics, 83–84
in lifting and carrying, 84, 84i principles, 83
in pushing and pulling, 83–84, 84i in stooping, 83, 83i Body surface area
(BSA), estimation of, 98i Lund and Browder chart, 98i
Rule of Nines, 98i
Bone marrow aspiration and biopsy, 84–86
preferred sites for, 86i
Brachytherapy. See Radiation implant therapy.
Braden scale, 636t
Bradypnea, 668t
Brain tissue oxygen monitoring, 89–90
bolt system for, 90i
device insertion for, 89–90
tunneled system for, 90i
Bronchoscope, 100i
Bronchoscopy, assisting, 91–93
indications for, 93i
Buccal drug administration, 95, 95i Burn care, 96–100. See also Burns.
for arm and leg, 98
for chest, abdomen, and back, 99
after discharge, 100
for ear, 100
for eye, 100
for face, 99
for hand and foot, 98
for nose, 100
at scene, 97
Burns
body surface area (BSA), estimation of, 98i Lund and Browder chart, 98i
Rule of Nines, 98i
patient positioning to prevent deformity from, 99
superficial, 99i
wound excision, 97
Butterfly adhesive strips, 702i
C
Cadaver dressing, 102t
Canes, 104–105
contraindications for, 104
indications for, 104
negotiating stairs with, 104–105
types of, 104
using chair with, 105
Capillary blood gas sampling, 106–107
Carbon monoxide oximetry, 107–108
Cardiac monitoring, 108–112
EASI system, 109, 109i identifying problems with, 111t
lead selection for, 109t
positioning leads for
five-lead system, 110i
three-lead system, 110i
types of
hardwire monitoring, 111
telemetry monitoring, 111
Cardiac output measurement, 113–115
analyzing thermodilution curves in, 115i setup for, 115i
technique used for, 113i
using iced injectant for, 113
using room-temperature injectant for, 113
Cardiopulmonary resuscitation (CPR), 41–42
basic life support algorithm, 117i
for child, 122–125
for infant, 126–127
use of AED, 41–42
Care plan, 130–131
Care reminders, use of, 5
Cartridge-injection system, 7
Casts, 132–135
completing, 134
contraindications to use of, 132
cotton-polyester, 134
fiberglass, 134
petaling, 135i
plaster, 134
types of, 133i
Catheter
central venous access, 138–145, 140t column-disk peritoneal, 608i
condom, 380–381
flanged-collar, 608i
Tenckhoff, 608i
Catheterization
femoral vein, 346i
Central venous access catheter, 148–151
Central venous pressure monitoring, 148–150
interpreting CVP measurements, 150i
measuring CVP with a water manometer, 149i Cerebrospinal fluid drainage,
152–154
overdrainage, 153
Ommaya reservoir and, 548–550
underdrainage, 153
ventricular drainage, 53
Cervical collar, 155–156
Chair scale, for measuring weight, 344
Charting, types of
computerized, 237t
core, 237t
flow sheet, assessment, concise timely (FACT), 237t FOCUS, 237t
Lund and Browder chart, 98i
narrative, 237t
problem-intervention-evaluation, 237t problem oriented medical record
(POMR), 237t Charting by exception (CBE), 237t
Chemical-dot thermometer, 740
Chemotherapeutic drugs, 157–161
classifying, 158i
and managing extravasation, 160i
safe handling of, 159i
Chest physiotherapy (PT), 164–167
performing percussion and vibration in, 167i positioning patients for postural
drainage, 165i–166i Chest tube drainage system, 168–172
checking and changing chest tube dressing, 168–169
chest tube problems, causes and -interventions, 171t replacing collection
device, 172
setup, 173–175
dry seal–dry suction system, 174
water-seal–dry suction system, 174
water-seal–wet suction system, 173
Cheyne-Stokes respiratory pattern, 668t Clavicle strap, 181
applying, 181–182
commercially made figure-eight strap, 182
elastic bandage strap, 182
types of, 181i
Clean-catch urine specimen collection, 811
Closed wound drain, 182
managing, 183–184
types of, 183i
Cocaine, 243t
Cocaine metabolite, 243t
Code management, 185–189
AHA algorithm, 188i
emergency drugs used for, 186–187t goals of, 185
Cold application, 190–192
devices for
chemical cold packs, 190, 191
cold compress/pack, 190, 191
ice bag/collar, 190, 191
dry, 190
moist, 190
for muscle sprain, 192
reducing pain with ice massage, 191
ColoCARE test, 312
Colostomy irrigation, 196–197
Colostomy pouch, 193–196
applying, 193–195, 195i changing, 193–195
emptying, 193, 194
fitting, 193
selecting, 193
skin barrier for, 193, 195i types of, 193, 194i Column-disk peritoneal catheter,
608i
Commode, using, 61
Computerized charting system, 237t
Condom catheter, 380–381
applying, 380–381, 381i removing, 381
Contact lens, 198–200
cleaning, 199
disinfecting, 199
soft vs. rigid, 198
Contact precautions, 200–203
Continent ileostomy, 204–207
Continuous ambulatory peritoneal dialysis (CAPD), 208–211, 209i automated
continuous-cycle system and, 210
contraindications to, 209
Continuous arteriovenous hemofiltration (CAVH), 220
Continuous bladder irrigation, 212–214
setup for, 213i
Continuous-cycle peritoneal dialysis (CCPD), 210
Continuous passive motion (CPM) device, 215–216
Continuous positive airway pressure (CPAP), 217–219
Continuous renal replacement therapy (CRRT), 220–223
Continuous venovenous hemodiafiltration (CVVHDF), 220
Continuous venovenous hemodialysis (CVVHD), 220
Continuous venovenous hemofiltration (CVVH), 220
Core charting system, 237t
Coughing, 180i
Cradle boots, 16, 17i Credés maneuver, 224–225
Cricothyrotomy, assisting, 225–227
needle, 225–226
scalpel, 226
Crutches, 228–229
fitting patient for, 229i
gaits for, 230i
types of, 228
Cuffed tube, 755, 756i Cylindrical casts, types of, 133i
Cystostomy tube, 538
changing dressing for, 538–539
D
Debridement, sharp, 691–692
Deep-breathing exercises, 180
Defibrillation, 231–234
biphasic, 231, 233
implantable cardioverter defibrillator (ICD), 232i implantable device for, 232,
232i methods of current delivery in, 231
monophasic, 231, 233
paddle placement for, 230, 231i using defibrillator, 231i
using defibrillator paddles, 233
using self-adhesive defibrillation pads, 232–233
Dentures care, 553i
Dialyzers, types of, 345, 347i hollow-fiber, 347i
Diaphragmatic breathing, 561
Dicrotic limb, 29i
Dicrotic notch, 29i
Diltiazem, 186t
Discharge, 234–236
against medical advice, 235
planning for, 235
teaching goals for, 236
Disposable pouching systems, urinary diversion, 805
Dobutamine, 186t
Documentation, 236–238
abbreviations to avoid in, 238t
of administration of controlled substances, 367
of blood transfusions, 784
charting systems for, 237t
Dopamine, 186t
Dopppler ultrasonography
transcranial, 767–768
Door-to-balloon time, 587
Dressings
amniotic membrane, 101, 102t biobrane, 101, 102t biological, 101–103, 102t.
See also Burns.
cadaver, 102t
pigskin, 101, 102t pressure-type, 631
Droplet precautions, 240–242
conditions requiring, 241t
Drug administration
buccal, 95–96, 95i endotracheal, 267–268, 268i epidural, 287–289, 288i eye,
299
by intermittent infusion device, 396–398
intrapleural, 396–398, 435i nasal, 509–510
oral, 556–558
sublingual, 95–96, 95i Drug and alcohol specimen collection, 242–244, 243t
Durable power of attorney for health care. See Health care proxy.
Dying patient, caring for, 245–246
Dying, stages of, 245t
E
Eardrops, instilling, 247–248
positioning patient for, 247, 248i Ear irrigation, 249–250
guidelines for, 250i
Ear specimen collection, 734
EASI system, 109, 109i Edlich tube, 329i
Elastic antiembolism stockings, 18
Elastic bandage application, 251–253
techniques for
circular, 252i
figure eight, 252i
recurrent, 252i
spiral, 252i
spiral-reverse, 252i
Electrical bone growth stimulation, 253–255
direct current, 254–255
electromagnetic, 254
methods of, 254i
percutaneous, 254
Electrocardiogram (ECG)
electrode placement for, 258i, 261i, 262i 12-lead, 255–257
posterior chest lead, 260–261, 261i right chest lead, 258–259
signal-averaged, 262–263, 262i waveforms and components of, 256i
Electronic thermometer, 736
Emergency admissions, management of, 4
Emergency department (ED) treatment, 4
End diastole, 29i
Endoscopic therapy, 264–265
Endotracheal drug administration, 267–268
methods for, 268i
adapter method, 268i
syringe method, 268i
Endotracheal intubation, 269–274
advantages of, 268
blind, 269
with direct visualization, 270
disadvantages of, 269
nasotracheal, 269, 270
oral, 269
Endotracheal tube. See also Endotracheal intubation.
caring for, 274–277
managing impaired swallowing due to, 369
methods to secure, 272–273i removing, 275
repositioning, 275
End-tidal carbon dioxide monitoring, 277–280
analyzing carbon dioxide levels in, 280
disposable detector for, 281
waveform in, 279i
Enemas
administration of, 280–281
cleansing, 280
retention, 281
use of, 280
Epicardial pacing, 283–285
and handling pacemaker malfunction, 286i insertion and care, 283–284
sensitivity and stimulation threshold testing, 284
wire removal, 284
Epidural analgesic administration, 287–289, 288i Epinephrine, 186t
Escharotomy, 97
Esophageal dysphagia, managing impaired swallowing due to, 368, 369
Esophagogastric tamponade tube, 290
care of, 290–293
insertion and removal of, 293–296
securing of, with football helmet, 295i types of, 291i
Ethanol, 243t
Eupnea, 668t
Ewald tube, 329i
Excisional biopsy, 696. See also Skin biopsy.
Expiratory grunting, 667
External fixation, 296–298
advantage of, 297
devices for, 297, 297i Eye care, 299
Eye compresses, 300–301
cold, 300, 301
warm, 300
Eye irrigation, 301–304
copious, 301, 303
devices for, 302i
moderate-volume, 301, 303
uses of, 301
Eye medications, administering, 305–306
in drop form, 305, 305i in ointment form, 305
Eye specimen collection, 733, 735
F
Face mask, 619i
Facial nerve stimulation, 605
Falls, 307–309
cause of, 307
in elderly patients, 307
management of, 308
medications associated with, 308t
prevention of, 307–308
risk factors for, 307, 308t who’s at risk for a fall, 307t
Fecal immunochemical test (FIT), 311
Fecal impaction, digital removal of, 309–311
Fecal incontinence, 382–383
Fecal occult blood tests, 311–313
home tests, 312
Feeding, 313–316
assistive devices for, 314i
and recording fluid intake and output, 315
Feeding tube, 316–318
inserting
nasally, 317
orally, 317
managing patient with, 369–370
managing problems of, 798t
positioning, 317
removing, 317
Femoral compression, 319–320
applying device for, 319–320
after arterial access procedure, 319
removal of device for, 319
Femoral vein catheterization, 346i
Figure-eight strap. See Clavicle strap.
Flanged-collar catheter, 608i
Flashlighting technique, 767
Flow sheet, assessment, concise timely (FACT) charting system, 237t Flutter. See
Mucus clearance device.
FOCUS charting system, 237t
Foley catheter. See Urinary catheter, indwelling.
Footboard, 53
adjustable, 54i
Foot care, 320–321
for diabetes patients, 320
Foot cradle, 53, 54i Forced expiration, 561
Forced expiratory volume (FEV), 62–63
Forced vital capacity (FVC), 62–63
Foreign-body airway obstruction management, 322–323
for conscious adult/child, 322–323
for infant, 323
for obese/pregnant adult, 323
for unconscious adult/child, 323
Full-thickness graft, 699
Functional assessment, 324
G
Gait belt, 326–327
for ambulating patient, 327
for transferring patient, 326–327
Gastric gavage, 796. See also Tube feedings.
Gastric lavage, 328–330
contraindication to, 328
tube placement in, 328
tubes used for, 329i
use of, 328
Gastrostomy feeding button, 331
care of, 331–332
reinserting, 331–332
Glasgow Coma Scale, 547, 548
Glucose oxidase strip tests, 808–809
Grafts, types of
arteriovenous, 346i
full-thickness, 699
pedicle-flap, 699
skin, 699
split-thickness, 699
H
Hair care, 332–333
Halo-vest traction, 333–335
applying vest for, 334
assisting with application of, 334
caring for patient in, 334–335
devices for, 333, 334
use of, 333
Hand hygiene, 336–338, 337i, 338i failure, 338i
hand sanitizing, 338
hand washing, 337–338
Hand roll, 16, 17i Hardwire monitoring, cardiac, 108, 109
Health care proxy, 9, 11i Hearing aids
care of, 339–340
inserting of, 339
removal of, 339
types of, 339
Hearing loss, 339
Heat application, direct, 340–342
by chemical hot pack, 340, 341
dry, 340
by electric heating pad, 340, 341
by hot-water bottle, 340, 341
by K pad, 340, 341
moist, 340, 342
by warm compress/pack, 340, 341
Height, measuring, 343–345
overcoming problems of, 545
Heimlich maneuver, 322
Hematocrit (HCT) monitor, 23
Hemoccult SENSA test, 311
Hemodialysis, 345–351
access sites for, 345, 346i dialyzers for, 347i
discontinuing
with double-lumen catheter, 347
mechanics of, 345–355, 347i types of catheters for, 347, 349
Hemoglobin testing, bedside, 352
Hematocrit (HCT) monitor, 23
Hemovac drain, 183i
High-efficiency particulate air (HEPA) respirator, 12
Hip replacement, total, 354, 355i Hour-of-sleep care, 357–358
Humidifier therapy, 359–361
with bedside humidifier, 359, 360t, 360
with cascade bubble diffusion humidifier, 359, 360t, 360
with diffusion head humidifier, 359, 360t, 360
with heated vaporizer, 359, 360t, 360
Hyperthermia-hypothermia blanket, 361–363
automatic operation, 361
manual operation, 361
types of, 362i
uses of, 361
I
Ice massage, reducing pain with, 191
Ileostomy pouch, 193–195
applying, 195i
changing, 193–194
fitting, 193
skin barrier for, 193
types of, 194i
Ilizarov fixator, 297
Impedance cardiography. See Thoracic electrical bioimpedance monitoring.
Implantable cardioverter-defibrillator (ICD), 232
Implanted port, 371–377, 371i accessing top-entry port, 372
administering bolus injection by, 372
administering continuous infusion by, 372–373
discard method, 374
managing problems with, 373t
push-pull method, 374
Incentive spirometry, 378–379
devices used for, 380
and documenting flow and volume levels, 379t Incontinence device, male
application, 380–381
apply condom catheter, 381i
Incontinence management, 382–383
Induction chemotherapy, 157. See also Chemotherapeutic drugs.
Infusion bag, changing, 4, 485
Infusion pumps, 452i
Infusion rate, calculation of, 452i
Injections
intradermal, 429–430
intramuscular (IM), 364–366
IV bolus, 439–442
subcutaneous, 720–724
Z-track, 838–839
In-line filter, 459i
Inspection, physical assessment, 34, 35
Insulin infusion pump
closed-loop system, 722
nonneedle delivery system, 722
open-loop system, 722
Intermittent infusion device, 396
complications of IV therapy, 400t
converting IV line to, 404
Intermittent positive-pressure breathing (IPPB), 401–402
Intermittent urinary catheterization, 407–409
for female patient, 407–408
for male patient, 408–409
Internal fixation, 410–412
devices for, 411i
uses of, 410
Intra-abdominal pressure (IAP) monitoring, 414–415
Intra-aortic balloon counterpulsation (IABC), 416–422
contraindications for, 417
indications for, 417
interpreting waveforms in, 420i
maintaining of, 418
surgical insertion sites for, 419i
weaning patient from, 421
Intra-aortic balloon pump, 418i
Intracranial pressure monitoring, 423–428
setting up system for, 425i
Intradermal injections, 429–430
sites for, 429, 429i Intramuscular (IM) injection, 364–367
drawing up medication for, 366
site for, 366
locating, 366i
syringe and needle selection for, 365
Intraosseous infusion, 431–433
mechanics of, 432i
use of, 431
Intrapleural drug administration, 434–437
chemotherapy administration, 436
Iontophoresis, 438–439
Isometric exercises, 584i
Isoproterenol, 186t
IV bolus injection, 397
IV clamps, using, 451i
IV glucose tolerance test, 76
IV pump, 452–454
IV tube, for eye irrigation, 302i
J
Jackson-Pratt drain, 183i
Jewelry, removal of, 81–82, 82t Joint Commission’s Hand Hygiene Project, 338i J
point, 256i
Jugular venous oxygen saturation (SjvO2) monitoring, 460–462
criteria for, 460
inserting catheter in, 460
periods of desaturation in, 461
use of, 460
K
Katz Index of Independence in Activities of Daily Living, 324
Ketone strip tests, 809
Knee arthroplasty, postprocedure care, 463–465
Knee-length stocking, 18–20, 19i Koch ileostomy. See Continent ileostomy.
Kussmaul’s respiratory pattern, 668t
L
Laryngeal mask airway (LMA), 465
choosing right size of, 466t
indications for, 465
inserting, 465–469
types of, 465
use of, 465
Laser therapy, 470–471
advantages of, 470
hazard associated with, 470–471
types of, 470
Latex allergy
anesthesia induction and, 474t
diagnosis of, 472
groups at risk for developing, 472
protocol for, 472–473
screening questionnaire for, 473
signs and symptoms of, 473, 474t Lawton Instrumental Activities of Daily
Living Scale, 324, 325
12-lead electrocardiogram, 255–257
Leather restraints, 669, 670
Leg bags, 388i
Levacuator tube, 329i
Levin tube, 524, 525i Lidocaine, 186t
Limb restraints, 669, 670
Linton tube, 299i
Lipid emulsions, 474
administration of, 474–476
contraindications to use of, 474
Liquid medications, measuring, 557
Living will, 9, 10i Locking pliers, using, 674
Low-air-loss therapy bed, 477–478, 478i Lumbar puncture, 479–480
contraindication to, 479
positioning for, 480i
use of, 479
Lund and Browder chart, 98i
M
Magnesium sulfate, 187t
Male incontinence device
application, 380–381
apply condom catheter, 381i
Malignant melanoma, ABCDEs of, 697i
Malnutrition, risk factors for, 546
Manual ventilation, 482–483
applying bag and mask for, 482, 483i guidelines for using, 482–483
positive end-expiratory pressure and, 482–483
Marijuana, 243t
Marijuana metabolite, 243t
Massive infusion device, 483–486
Mechanical ventilator, 490
negative pressure, 490
positive pressure, 490
responding to alarms in, 492t
Medicated shampoos, applying, 745
Medication administration, safe practices, 678–680
abbreviations to avoid, 237t
accurate dosage calculations, 678
accurate medication listing, 678
administering high-alert medications, 678–679
administering scheduled medications in timely manner, 679
checking for medication contraindications, 678
handling verbal orders, 679
identifying patient, 678
verifying medication order, 678
Medication error, 678
Metered-dose inhaler (MDI), 494–495
Methoxsalen, 800
Minimal occlusive volume, 747
Minimum Data Set, 324
Minnesota esophagogastric tamponade tube, 291i Mitt restraints, 669, 670
Mixed venous oxygen saturation monitoring, 496–497
equipment for, 497i
recalibrating monitor for, 496
Monophasic defibrillators, 231, 233. See also Defibrillation.
Montgomery Ventrach, 752
Morgan lens, for eye irrigation, 302i
Mucus clearance device, 502–503
Muscle spasm, moist heat application for, 342
Muscle sprain, cold application for, 192
Mycobacterium tuberculosis, 12, 13
N
Naloxone, 187t
Narrative charting system, 237t
Nasal balloon catheterization, 511
Nasal bridle, 503–506
insertion, 503–506
removing, 505–506
Nasal cannula, 566i
Nasal irrigation, 507–508
bulb syringe for, 507
contraindications for, 507
indications for, 507
oral irrigating device for, 507
positioning patient for, 507i
Nasal medications, administering, 509–511
in aerosol form, 509
in drop form, 509
in inhaler form, 509
positioning patient for, 510i
Nasal packing, 511–514
anterior, 513i
posterior, 512i
Nasoenteric-decompression tube, 515–516
assisting with insertion of, 515, 517–518
care of, 515–516
removing, 517–518
types of, 517
use of, 515
Nasogastric tube, 524
applications for, 524
caring for, 519–520
home use of, 527
inserting, 524–527
instilling drugs through, 521–523
removing, 526
types of, 524i
Nasopharyngeal airway, 528
care, 528–529
insertion of, 528–529, 528i Nasopharyngeal specimen collection, 733–734,
734
National Association of Orthopaedic Nurses, 297
National Organ Transplant Act, 559
Nebulizer therapy, 530–533
with in-line nebulizer, 530
with large-volume nebulizer, 530
with small-volume nebulizer, 530
with ultrasonic nebulizer, 530–531
Negative-pressure wound therapy, 534–537, 535i with foam packing, 535
with gauze packing, 535
indications for, 534
Nephrostomy tube, 538
Neurologic assessment, 540–544
evaluating motor function in, 542–543
evaluating sensory function in, 543–544
examining pupils and eye movement in, 540, 542i identifying warning
postures and, 543i level of consciousness and orientation in, 540
Nitroglycerin ointment, applying, 774i Nonrebreather mask, 567i
Norepinephrine, 187t
Normal pulse amplitude waveform, identification of, 649i Nosebleeds, recurrent,
preventing, 513
Nutritional disorders, evaluating, 547t Nutritional screening, 544–546
O
OASIS-C, 324
Obese patients, bariatric beds for, 49
Ommaya reservoir, 548–550
mechanics of, 548i
use of, 548
Opiates, 243t
Oral care, 552–555
in intubated patient, 554–555
performing, 553–554
supervising, 552–553
using oral irrigating device, 554
Oral drug administration, 556–558
Oral glucose tolerance test (OGTT), 76
Oral irrigating device, using, 554
Organ donor, identification, 559–560
Organ Procurement and Transplant Network, 559
Organ Procurement Organization (OPO), 559
Oronasopharyngeal suction, 560–562
nasal insertion for, 561
oral insertion for, 562
Oropharyngeal airway, 562
caring for, 563–564
inserting, 564i
Oropharyngeal dysphagia, managing impaired swallowing due to, 368–369
Outcome and Assessment Information Set (OASIS), 324
Overbed cradle, 54i
Oxygen administration, 565–569
advantages, 566i
CPAP mask, 567i
disvantages, 566i
indication, 565
nasal cannula, 566i
nonrebreather mask, 567i
simple mask, 566i
P
Pacemakers
permanent, 614–616
temporary, 286i, 790i Pain. See also Pain management.
assessment of, 571
definition of, 570
Pain management, 570–572
complementary and alternative therapies for, 571
giving medications for, 570–571
providing comfort measures for, 570
providing emotional support for, 570
Palpation, 34, 34i performing, 34i
techniques of, 34, 34i Parenteral nutrition, 572–576
correcting common problems with, 575–576t delivery route for, 573
documenting, 576
indications for, 572
laboratory monitoring of, 579
monitoring, 578–579
types of, 572, 573t Passive range-of-motion exercises, 580–583
for ankle, 583
contraindications to, 581
for elbow, 582
for fingers and thumb, 582–583
for forearm, 582
for hip and knee, 583
for neck, 582
for shoulders, 582
and terminology related to joint movements, 581i for toes, 583
for wrist, 582
Passy-Muir tracheostomy and ventilator speaking valve (PMV), 752–754
Patient care reminders, use of, 4, 5
Patient-controlled analgesia (PCA), 584–586
advantages of, 585
contraindication to, 585
Patient Self-Determination Act of 1990, 9
Pediatric advanced life support (PALS), 41
Pedicle-flap graft, 699
Penile sheath. See Condom catheter
Percussion
blunt, 34, 35
direct, 34, 35
indirect, 34, 35, 36i sounds, identification of, 35t
techniques of, 34
Percutaneous coronary intervention (PCI), 587
hand-off communication, 589
understanding, 588i
Pericardial effusions, types of, 592
Pericardiocentesis, 592–593, 593i Perineal care, 594–595
for female patients, 595
for male patients, 595
Peripherally inserted central catheter (PICC), 596–603
administering drugs through, 596, 599–600
changing dressing for, 599
flushing, 598–599
inserting, 597–598
removing, 600–601
troubleshooting, 602t
uses for, 596
Peripheral nerve stimulation, 604–606
Peripheral parenteral nutrition (PPN), 573
Peritoneal dialysis, 607–610
catheters for, 608i
continuous ambulatory, 208–211, 209i continuous-cycle, 210
contraindication to, 607
indications for, 607
mechanics of, 607i
setup for, 607i
Peritoneal lavage, 611–613
contraindication to, 611
interpreting results of, 613
tapping peritoneal cavity for, 612i
use of, 611
Permanent pacemaker, 614–616
candidates for, 615
codes for, 615, 615t patient teaching for, 617
postoperative care for, 616
preoperative care for, 615–616
Personal protective equipment, 618
Phencyclidine (PCP), 243t
Physical assessment, 34–36
auscultation, 34, 35
inspection, 34, 35
palpation, 34–36, 34i percussion, 34–36, 35t, 36i Piggyback port, 455
Piggyback set, 455, 457i Pigskin dressing, 102, 102t Portable syringe pump, 452
Portsmouth external fixation bar, 297
Posterior tibial nerve stimulation, 605
Postmortem care, 620–621
Postoperative care, 622–624, 624i Pouching systems, urinary diversion, 805
Powered air-purifying respirator (PAPR), 12
Preoperative care, 626–628
Preoperative skin preparation, 629–630
hair removal for surgery, 630
Pressure dressing application, 631–632
PR interval, 256i
Problem intervention evaluation (PIE) charting system, 237t Problem oriented
medical record (POMR), 237t Problem oriented medical record (POMR)
charting system, 237t Procainamide, 187t
Prone positioning, 640–643
contraindications to, 640
criteria for, 640
patient assessment before, 640
procedure before turning patient in, 640
returning patient to supine position in, 642
turning patient in, 642
Prosthesis
applying, 666
caring for, 666
Protective environment, 644
Psoralen plus UVA (PUVA) therapy, 800
Psychogenic polydipsia, 830
Pulmonary artery (PA) catheter, 645, 644i Pulmonary artery pressure (PAP)
monitoring, 645–647
candidates for, 645
and square wave test, 646, 646i taking reading of, 646
Pulmonary artery wedge pressure (PAWP) monitoring, 645–647
observing PAWP waveform, 646i
taking reading of, 646
Pulmonary embolism, 18
Pulse, 650–652
apical, 651
apical-radial, 651
Doppler ultrasound detection of, 652
patterns of, 651i
radial, 651
sites for palpating, 650, 650i Pulse amplitude monitoring, 648–649
normal pulse amplitude waveform, identification of, 649i Pulse oximetry, 652–
654
diagnosing problems with, 654
mechanics of, 652–653, 653i using ear probe, 653
using finger probe, 652
using forehead sensor, 653
Punch biopsy, 696
P wave, 256i
Q
QRS complex, 256i
QT interval, 256i
R
Radiation implant therapy, 655–657
complications of, 657
implant sites, 655
radioactive isotopes used in, 655, 656t Radiation therapy, 657–658
adverse effects of, 658
doses of, 657
goals of, 657
machines used for, 657
Radioactive iodine therapy, 657–658
precautions after, 660
Radioisotopes, 655
Radiotherapy. See Radiation therapy.
Rancho Los Amigos Cognitive Scale, 541
Ready injectable, using, 440
Rectal ointments, applying, 661–662, 662i Rectal suppositories, inserting, 661–
662, 661i Rectal swab specimen collection, 735
Rectal tube, inserting and removing, 663–664
Red blood cell (RBC) salvage, 39
Reduced-lead continuous 12-lead electrocardiogram (ECG) system (EASI
system), 109, 109i Residual limb
care of, 664–666
wrapping, 665i
Respiration, 667–668
measures of, 667
patterns of, 668t
Respirator, 12
seal check, 14i
use of, 12
Restraints
application of, 669–672
belt, 669, 670
CMS and Joint Commission on use of, 669
definition of, 669
leather, 669, 670
limb, 669, 670
mitt, 669, 670
orders for, 671
and tying quick-release knot, 670, 671i use of, 669
vest, 669, 670
Retention catheter. See Urinary catheter, indwelling.
Reusable pouching system, urinary diversion, 805
Right chest lead ECG, 258–259
Rigid splint, 706, 707i Ring removal, 673–675
coiled-string method for, 673
ring-cutter method for, 674
Rotation beds, 675–677, 676i RotoRestTM Delta therapy system, 676i
Rule of Nines, 98i
S
Salem sump tube, 525, 524i Sedation
complications of, 500t
moderate, 498–500
Seizures
focal onset, 682
generalized, precautions for, 683
patients at risk for, 681
types of, 682
Self-catheterization, 684–686
for female patient, 685, 686i for male patient, 685, 685i Sensitivity and
stimulation threshold testing, 284i Sequential compression therapy, 687–
689
Sexual assault examination, 689–691
anal secretion collection for, 690
blood samples collection in, 690
penile secretion collection for, 690
pubic hair collection for, 690
urine specimen collection for, 690
vaginal/cervical secretion collection for, 690
Sharp debridement, 691–692
Shave biopsy, 696. See also Skin biopsy.
Shaving, 693–694
using electric razor for, 693
using safety razor for, 693
Shiley Phonate, 752
Short-term multilumen catheter, 140t
Short-term single-lumen catheter, 140t Showers, 795
Signal-averaged electrocardiography, 262–263, 262i Simple mask, for oxygen
delivery, 566i Sitz bath, 694–695
Skin biopsy, 696–697, 697i Skin graft, 698
caring for, 698–700
caring for donor site, 698
evacuating fluid from, 699, 700i types of, 698
Skin staples and clips, removing, 701–702
Slow extended daily dialysis (SLEDD), 220
Smart pumps, 452, 453
Smoke evacuator, 471
Soaks, 703–704
Sodium bicarbonate, 187t
Sotalol, 187t
Speaking valve, managing impaired swallowing due to, 370
Sphygmomanometer, 77
Spinal anesthesia, assessing level of blockade from, 623, 624i Spiritual care,
704–706
beliefs and practices of selected religions and, 705
Spirometry
bedside, 62–63
incentive, 378–379
Splint, 706–708
applying, 706–708
assessing neurovascular status and, 707
rigid, 706, 707i Split-thickness graft, 699
Sponge bath, 709
Sputum collection, 710–712
by expectoration, 710–711
by tracheal suctioning, 711
Square wave test, 646i
Squeeze bottle, for eye irrigation, 302i Standard precautions, 713–714, 713t
Standing scale, for measuring weight, 343–345
Status epilepticus, 683
Sterile technique, 714–717
Stertor, 667
Stool specimen collection, 717–718
random, 717
timed, 718
Stress incontinence, 384. See also Urinary incontinence.
strengthening pelvic floor muscles for, 386
Stridor, 667
ST-segment, 256i
changes in, 720i
depression, 720i
elevation, 720i
monitoring, 718–720
Subclavian vein catheterization, 346i
Subcutaneous cerebrospinal fluid (CSF) reservoir
drugs and solutions for, 720
of heparin, 721, 723
of insulin, 721, 722i, 723
sites for, 721i
technique for, 723i
Subdermal drug implants, 724–725
Sublingual drug administration, 95
Suction catheter, attaching specimen trap to, 711i Surgical drains, 726–727
removing, 726
Surgical wound management, 727–730
applying fresh gauze dressing in, 729
caring for wound in, 728
dressing wound with drain in, 729
removing old dressing in, 728
wound color and, 728
Sustained maximal inspiration, 379
Suture removal, 730, 731
methods for, 732i
techniques for, 730
timing of, 730
Swab specimen collection, 733–735
anaerobic, 734i
external ear, 734
eye specimen, 735
middle ear, 734
nasopharyngeal, 733–734, 734i rectal swab, 735
throat, 735
wound, 734
Swallowing, impaired, precautions for, 368–370
Synchronized cardioversion, 128–129
Synthetic dressing, in burns, 101–103, 102t. See also Burns.
Syringe feeding, 765i
Systemic vascular resistance (SVR), 28
Systolic peak, 29i
T
Tachypnea, 668t
Telemetry monitoring, cardiac, 109, 11
Temperature, 736–737
axillary measurement of, 736
factors that influence, 736
normal range of, 736
oral measurement of, 736
rectal, 736
tympanic measurement of, 736–737
types of thermometers used to measure, 736, 737
Temporary pacemaker
correcting malfunctions in, 790i
handling malfunction in, 286i
Tenckhoff catheter, 608i
Therapeutic bath, 738–739
types of, 739t
use of, 739
Thermodilution method, for cardiac output measurement, 113–115, 115i Thigh-
length stocking, 20, 19i Thoracentesis, 739–741
positioning patient for, 740i
use of, 740
Thoracic electrical bioimpedance monitoring, 742–743
Throat specimen collection, 733
Tilt table, 743–744
Topical skin drug application, 745–746
Total parenteral nutrition (TPN), 573. See also Parenteral nutrition.
Tracheal cuff–pressure measurement, 746–747
Tracheal suction, 748
closed, 750i
in intubated patient, 748–751
Tracheostomy, 752, 754
caring for, 755–759
managing impaired swallowing due to, 370
tubes, 755–756, 756i Tracheostomy and ventilator speaking valve, 752–754
Tracheotomy, 760
assisting with, 760–762, 761i Traction, mechanical, 487–489
claw-type basic frame for, 487, 488i contraindications for, 487
IV-type Balkan traction frame for, 487, 488i IV-type basic frame for, 487, 488i
skeletal traction, 487
skin traction, 487
use of, 487
Traction bed, making of, 57i
Train of four (TOF) method, for monitoring neuromuscular blockade, 606
Transabdominal tube, 763–766
for intermittent feedings, 765
site care, 763, 764i teaching patient about syringe feedings through, 765i
Transcranial Doppler monitoring, 767–768
benefits of, 767
use of, 767
velocity waveforms in, 768i
Transcutaneous electrical nerve stimulation (TENS), 769–771
contraindications to, 769
positioning electrodes for, 770i
uses of, 769
Transcutaneous pacing, 771–773
electrode placement for, 772i
indications for, 771
Transdermal drugs, administering, 773–775
in ointment form, 774
in patch form, 774
Transdermal patch, applying, 775
Transducer system, 776–777
setting up, 776–777
zeroing, 777
Transfer of patients, within facility, 778–779
Transfusion of blood and blood products, 780–784
Transfusion reaction
guide to, 786–787
management of, 785–787
Transmission-based precautions, 713t
Transtracheal oxygen, 568i
Transvenous pacing, 788–790, 790i sensitivity threshold testing, 789
stimulation threshold testing, 789
Trapeze and basic frame, 54, 54i Traumatic wounds, 791–794
abrasion, 791, 792
amputation, 793
laceration, 791
puncture wounds, 792
Trochanter roll, 16, 17i Tub baths, 795
Tube feedings, 796–799
to duodenum, 796
to jejunum, 796
managing problems with, 798t
Tubes
Blakemore-Sengstaken, 291i
chest, 173–175
cuffed, 755–759, 756i Edlich, 329i
endotracheal, 274–276
esophagogastrictamponade, 290
Ewald, 329i
feeding, 316–318
IV tube, for eye irrigation, 302i
levacuator, 329i
Levin, 524, 525i Linton, 291i
minnesota esophagogastric tamponade, 291i percutaneous endoscopic
gastrostomy, 763
percutaneous endoscopic jejunostomy, 763
rectal, 662
salem sump, 524
tracheostomy, 755–759
transabdominal, 763–766
uncuffed, 755
T wave, 256i
Tympanic thermometer, 736
U
Ulnar nerve stimulation, 605
Ultrasonography, bladder, 71
Ultraviolet light therapy, 800–801
adverse effect of, 801
skin care guidelines for, 801i
skin types and, 800
spectrum of, 800
uses for, 800
Uncuffed tube, 755–756, 756i United Network for Organ Sharing, 246
Universal day frame, 297i
Unna paste, 802
Unna’s boot, 802
application, 802–803
how to wrap, 802i
Urinal, 60–62
placing, 61
after use of, 61
Urinary catheter, indwelling, 388
caring for, 386–389
indications for, 387
inserting, 390–393
for female patient, 391–392
for male patient, 392–393
irrigating, 394–395
removing, 386, 387
urine drainage bags and, 388i
Urinary diversion
caring for patient with continent, 805
indications for, 804
permanent, types of, 804i
pouching systems, 805
stoma care for, 803–806
Urinary diversion techniques, 538, 539i cystostomy, 539i
nephrostomy, 539i
Urinary incontinence, 384–386
acute, 384
causes of, 384
chronic, 384
correcting, by bladder retraining, 385i Urinary sphincter implant, artificial,
384, 384i Urine collection, timed, 806–808
Urine glucose tests, 808–809
Urine ketone tests, 808–809
Urine pH, 809–810
Urine specimen collection, 811–812
clean-catch midstream, 811–812
from indwelling catheter, 812
random, 811
Urine straining, for calculi, 813
U wave, 256i
V
Vaginal medications, administration, 814–815
Vaginal suppositories, administration of, 814–815
Valsalva maneuver, 144, 600
Vascular access device. See Implanted port.
Vascular access port. See Implanted port.
Venipuncture, 816–818, 816t, 817i collection tube guide, 816t, 817i risks of,
assessment for, 817
sites for, 817, 817i Venous sheath removal, 25–27
Venous thromboembolism (VTE), 18
Ventilation, mechanical, 489–492, 819. See also Mechanical ventilator.
positive pressure, 489
terminology for, 490
Ventricular assist device (VAD), 819
candidates for, 819
caring for, 819–821
Ventricular drain insertion, 823–824
Venturi mask, 568i
Verapamil, 187t
Vest restraint, 669, 670
Visual pain rating scale, 572i
Vital signs, recording of, on admission, 3
Volume-control sets, 826–827
Volumetric pumps, 452
W
Waist-length stocking, 20
Walkers, 828–830
teaching safe use of, 829, 829i Washcloth mitt, making of, 43, 44i Water
intoxication
assessment of, 830–832
maintenance fluid requirements, calculation of, 831
signs and symptoms of, 831
Water mattress, 53
Weaning patient from ventilator, 832–833
readiness criteria, 833
after weaning, 833
Weight, measuring, 343–345
guideline for determining healthy weights, 343, 344
scales for, 344i
Wheelchair cushion, 17i
Wheezing, 667
Wong-Baker FACES pain rating scale, 572i World Health Organization (WHO), 336
on hand hygiene, 336, 336i Wound dehiscence and evisceration
managing, 834–835
recognizing, 835i
Wound irrigation, 836–837
Wounds
black, 728
multicolored, 728
puncture, 791
red, 728
surgical management of, 791–794
traumatic, 791
yellow, 728
Wound specimen collection, 734
Z
Z-track injection, 838–840