/


Теги: programming languages programming windows operating system tricks
Год: 2023


Текст
TRICKS
&TIPS
Wi ndows
Advanced guides
and tutorials ensure
that you master your
Windows 11 desktop
OVER
490
SECRETS &
HACKS
Everything you need to
take your Windows 11
skills to the next level
Next level fixes
and secrets get to
the heart of your
PC and Laptop
We share our
awesome tips and
tricks for Windows
apps & software
Get Your Exclusive
FREE Gift Worth
£9.99 Here!
Download
Your FREEZ^
Copy of ,
Tech Shopper
Magazine
Head over to your web
browser and follow these
simple instructions...
FREE Software! Great Games! Essential м»л.
1/ Enter the following URL: www.pclpublications.com/exclusives
2/ Sign up/in and from the listings of our exclusive customer
downloads, highlight the Tech Shopper Magazine option.
3/ Enter your unique download code (Listed below) in the "Enter
download code" bar.
4/ Click the Download Now! Button and your file will automatically
download.
5/ Your file is a high resolution PDF file, which is compatible with
the majority of customer devices/platforms.
Exclusive Download Code: pcl37862re
NOTE: This is a limited reader offer running from 1st July 2023 to 1st December 2023.
Terms and conditions apply and can be found at www.pclpublications.com
TRICKS
&TIPS
Wi ndows
Windows 11 Tricks and Tips is the perfect digital publication
for the user that wants to take their skill set to the next
level. Do you want to enhance your user experience? Or
wish to gain insider knowledge? Do you want to learn
directly from experts in their field? Learn the numerous
short cuts that the professionals use? Over the pages of the
new advanced user guide you will learn everything you will
need to know to become a more
confident, better skilled and
experienced owner. A user that
will make the absolute most of
their Windows 11 use and
ultimately your home computer
itself. An achievement you can
earn by simply enabling us to
exclusively help and teach you the
abilities we have gained over our
decades of experience.
you i
9° farther.
you
•ее,
tke рЛ9е
,о^еуСоиС^
toe и,Ц/ be *!tk
Contents
6 Do More with Windows 11 20 Using the Cloud Clipboard
8 Manage Libraries in Windows 11
9 How to Use AutoPlay 22 Facebook App on Windows 11 \
10 20 Command Line Actions for Windows 11 24 Twitter App on Windows 11
14 Windows Networking Command Cheat Sheet 26 WhatsApp Desktop on Windows 11
16 Skype in Windows 11 28 Windows 11 Touchpad Gestures
18 Making Calls with the Skype App 29 Touchscreen Gestures
19 Using Bots 30 Essential Windows Apps
34 Maintain & Protect Windows 11
36 Using the Windows 11 Defender Tools 68 Check and Optimise RAM Usage
38 What To Do If You’re Hacked 69 Using Windows ReadyBoost
42 Using the Windows 11 Task Manager 70 Creating a Windows 11 System Image
44 MonitorTasks with the Task Manager 72 Setting Up Dual Monitors
46 Defragment Your Hard Drive 74 How to Create a Recovery Drive
48 Update Your Device Drivers 76 Fix Wireless Network Connection Problems
49 Finding Other Drivers 78 What is Encryption?
50 Using the Power Menu 80 Encrypting Your Windows 11 Laptop
51 Using Windows 11 Storage Sense 82 Windows 11 Power Options
52 Improving the Windows 11 Firewall 84 Manage Your Privacy in Windows 11
54 Secure Your Home Network 86 Windows 11 Maintenance Tools
56 Limiting Data Usage when Tethering 88 Removing Malware from Windows 11
57 Pause or Disable OneDrive 90 Six Steps to a Faster PC
58 Protect Devices on Public Wi-Fi 91 Scan for Viruses & Malware
60 Make Public Wi-Fi Safer 92 How to Reset or Fresh Start
62 How a VPN can Improve Windows Security 94 Laptop Care and Maintenance
64 Blocking PUPs with Windows Defender 96 Troubleshooting Windows Problems
65 Installing New Fonts 98 TroubleshootingYourWi-Fi Network
66 Manage Disk Partitions in Windows 11 100 Troubleshooting Your Wired Network
Settings
F»nd a settm
Russ
russl
Sy*
0 B\u<
< N<
tt
Scanning for malware...
4 www.pclpublications.com
System
p
jtooth & devices
& internet
joundde^es
ir$onal>sation
kpPs
ba«er(«*e’
. Gaming
OneOt"«
M»r*9«
DtSKlOP-ЮЬ^4
$ate«ixe?roR50-B
Rename
0 x
, MktosoH36S
• j^bewrtt
Accounts
Not»0"5 ..„да.
Windows^1*
® un <*****"**'“'40
^***^<*
^cces^b'uty
@ ^<^ирда“
n О*4** -
Q Won»wvb^Wnett
focus
0
Ware
»bdmpub\kations.com
“/n here you’ll find tutorials and tips, secrets of
the Windows 11 OS will be unlocked, and your
understanding of everything works will help make
you become an advanced user.”
www.pclpublicatioris.com 5
Exploring the Microsoft Store
Using OneDrive Cloud Storage
Do More with
Windows 11
Want to do more with Windows 11 and its new features?
Excellent, then this is the chapter for you. Within the
coming pages, you’ll learn how to utilise Microsoft’s
apps to your best advantage, and how to get to grips
with some of the more technical aspects of the operating
system. From learning how OneDrive works through
to working with Windows 11 Widgets, and exploring
the Windows 11 Command Line with some interesting
features, there’s something for every user here.
www.pcLpublications.com 7
Manage Libraries
in Windows 11
Libraries are virtual containers for users’ content. A library can contain files and folders
stored on the local computer or in a remote storage location. In Windows Explorer, users
interact with libraries in ways similar to how they would interact with other folders.
Quiet in the Library
By default, Libraries are not displayed in Windows 11 - even later versions of Windows 10 did away with the
Library display - so they’ll need to be reactivated for them to appear.
Stepl
If you open Windows 11 File Explorer, you’ll notice
that Libraries are no longer visible by default,
which is a shame as many users rely on them. However, they can
be returned, and the process is remarkably simple. Start by
pressing the Windows Key and R, then enter: control folders.
Step3
At the bottom of the Advanced Settings section,
you’ll notice a box labelled Show Libraries. Click
the box to tick, and re-enable the option. When you’ve done that,
click the Apply button to activate the change and you’ll see that
the Libraries are now available via File Explorer.
Step 2
Hit enter, orclick the OK button and the File
Explorer Options window will pop up. The options
available in here can drastically alter the way Windows Explorer
works, so be careful what you enable or disable. Head to the View tab,
and scroll down to the bottom of the Advanced Settings section.
Step 4
You can now close the File Explorer Options
pop-up window. The Libraries are, by default,
setup as area specific shortcuts. You can right-click each Library
entry, select Properties from the menu, and create new Library
locations, change the icon and much more. Restore Defaults will
return the Library to its original setup.
8 www.pclpubLications.com
Libraries-AutoPlay
How to
Use AutoPlay
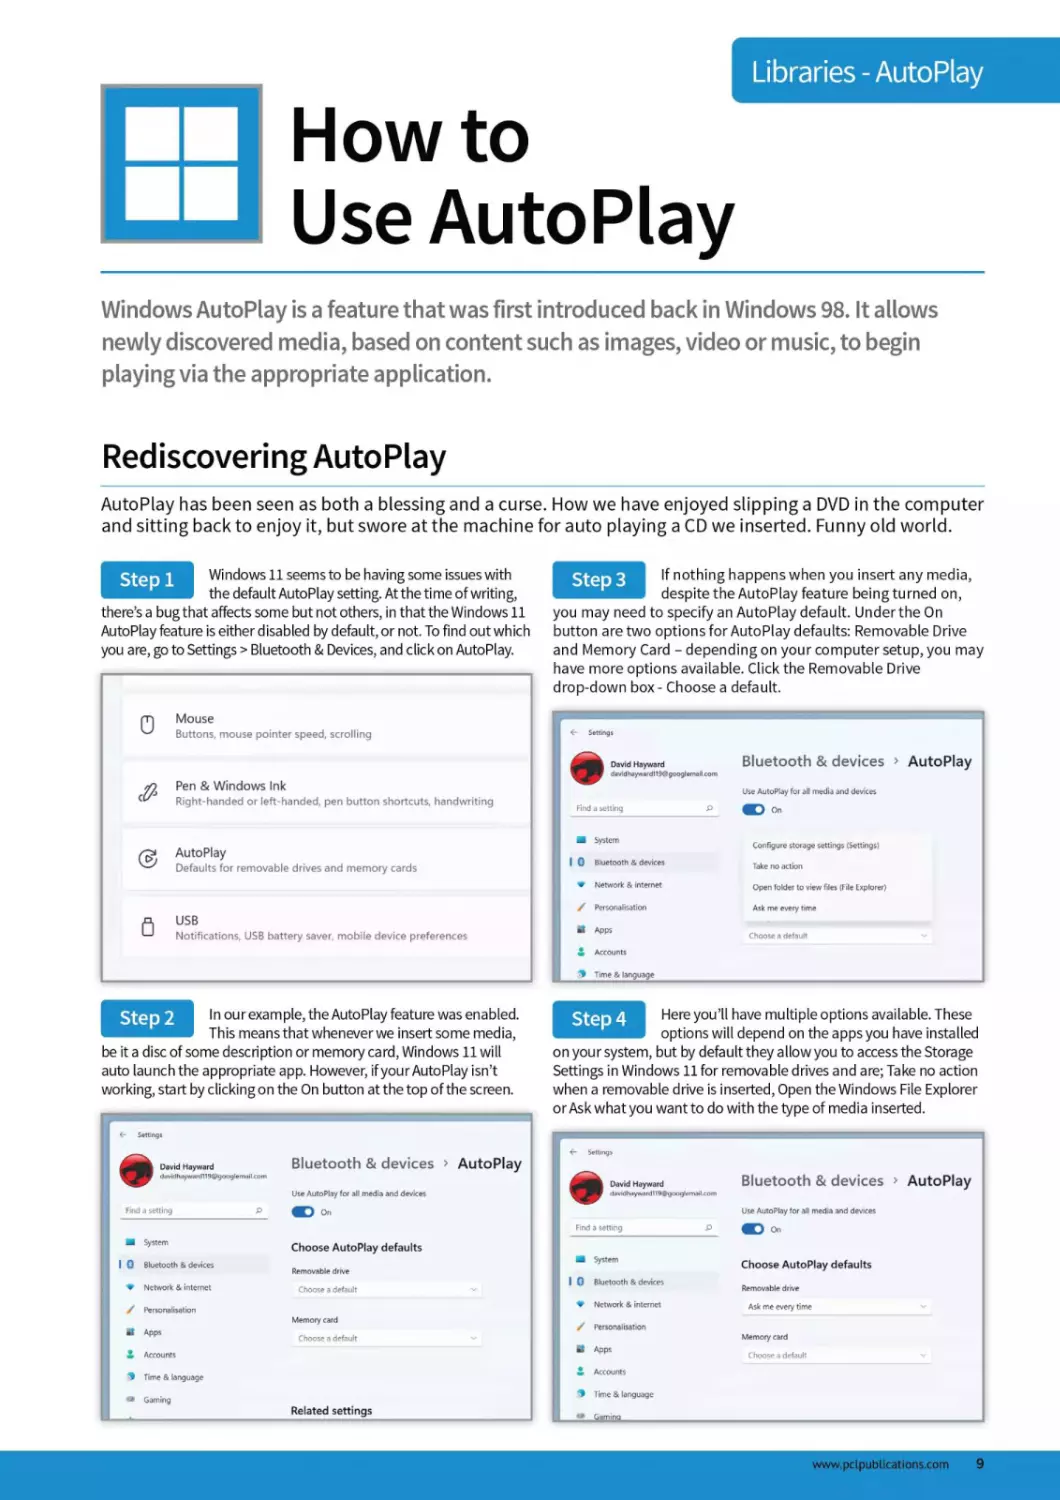
Windows AutoPlay is a feature that was first introduced back in Windows 98. It allows
newly discovered media, based on content such as images, video or music, to begin
playing via the appropriate application.
Rediscovering AutoPlay
AutoPlay has been seen as both a blessing and a curse. How we have enjoyed slipping a DVD in the computer
and sitting back to enjoy it, but swore at the machine for auto playing a CD we inserted. Funny old world.
Stepl
Windows 11 seems to be having some issues with
the default AutoPlay setting. At the time of writing,
there’s a bug that affects some but not others, in that the Windows 11
AutoPlay feature is either disabled by default, or not. To find out which
you are, go to Settings > Bluetooth & Devices, and click on AutoPlay.
Step3
If nothing happens when you insert any media,
despitethe AutoPlay feature being turned on,
you may need to specify an AutoPlay default. Under the On
button are two optionsfor AutoPlay defaults: Removable Drive
and Memory Card - depending on your computer setup, you may
have more options available. Click the Removable Drive
drop-down box - Choose a default.
Mouse
Buttons, mouse pointer speed, scrolling
Pen & Windows Ink
Right-handed or left-handed, pen button shortcuts, handwriting
AutoPlay
Defaults for removable drives and memory cards
fl USB
’ Notifications, USB battery saver, mobile device preferences
Step 2
In our example, the AutoPlay feature was enabled.
This means that whenever we insert some media,
be it a disc of some description or memory card, Windows 11 will
auto launch the appropriate app. However, if your Auto Play isn’t
working, start by clicking on the On button at the top of the screen.
Step 4
Here you’ll have multiple options available. These
options will depend on the apps you have installed
on your system, but by default they allow you to access the Storage
Settings in Windows 11 for removable drives and are; Take no action
when a removable drive is inserted, Open the Windows File Explorer
or Ask what you want to do with the type of media inserted.
www.pcLpublications.com 9
20 Command Line
Actions for Windows 11
Ever since the early days of DOS, the command line has proved to be the ultimate play-
ground forthose who aren’t afraid to delve into its murky depths. From the command
line, you can do almost anything - even within Windows 11.
Take Command
The command lines used to be what early versions of Windows were built on top of, but there’s still a lot that
can be done from the old command line. Here are twenty cool actions for you to try out.
Action 1
To open the Command Prompt, where we’ll enter
the lines of commands, click on the Windows
Start button and type: cmd. The first entry will be the Command
Prompt. Click on this to open it. You can also click on Run as
administrator, which will give you elevated access within the
command line - but we won’t do that just yet.
Action 3
You can change the colours of the Command Line by
right-clicking the bar at the top of the window,
choosing Properties from the menu, then clicking on the Colours tab.
Screen Text, Pop-up Text and Background can all be clicked and altered
using the colour bar. Green text on a black background is our favourite.
Action 2
This is the Command Prompt (or Command Line).
It may not look like much, but here be dragons, so
Action 4
The current prompt is your specific user account on
the computer. In our case it’s: C:\Users\David, since
I’m signed in under my name. However, you can change that with the
following command. Enter:
prompt WindowsllPC$G
be careful. From this simple interface you can ping network routers
around the world, connect to ancient Bulletin board Services, wipe
your entire hard drive, or start Global Thermonuclear War (extra
points to those who can spot the movie reference).
10 www.pclpublications.com
20 Command Line actions for Windows 11
Action 5
You can further customise the Command Prompt
window by changing its title. By default it’s Command
Prompt, but it can be altered to anything you want, by typing:
title Awesome Lines of Power
Obviously, you’ll choose a different title. When you close the
Command Line window, and re-open it, the title will be gone.
ш Awesome Lines of Power
Action 8
Did you know you can chain two separate
commands together? Also, did you know that
you can launch any of the apps on your system within the
Command Line? Let’s mix the last two entries, and auto-launch
Notepad to view the contents:
driverquery /FO list /v > driverlist.txt && notepad,
exe driverlist.txt
Providing the command after the && part is correct, the entire
line will be executed.
:\Users\david>title Awesome Lines of Power
:\Users\david>e
Action 6
Something a little more complex now. If you’re
trying to resolve a driver issue on Windows 11, you
can list all the currently installed drivers on the system by entering:
driverquery /FO list /v
With this you can see the driver module name, type, start
mode, path and more.
Action 9
The Function keys are great shortcuts to learn
when navigating the Windows 11 Command Line.
Fl to F9 are used, with each doing a different task and making life
a little easier when dealing with multiple commands, and
commands that contain special characters that can be error
prone when entering.
S3 Command Prompt
Microsoft Windows [Version 10.0.22000.194]
(c) Microsoft Corporation. All rights reserved.
:\Users\david>driverquery /FO list /v
'Module Name:
Display Name:
Description:
Driver Type:
Start Mode:
State:
Status:
1394ohci
1394 OHCI Compliant Host Controller
1394 OHCI Compliant Host Controller
Kernel
Manual
Stopped
OK
• Fl: Tap or hold this key to retype your last command letter by letter.
• F2: Copies the current conunand up to a specified character.
• F3: Retypes the entire previous line
• F4: Aulo-deleles the currenl command up to a specified character.
• F5: Similar to F3, but lets you eyrie through previous commands.
• F6: Enters the EOF indicator into CMD.
• F7: Opens a list of previously entered commands.
• F8: Similar to F5, but doesn’t stop at the end of your command history’ in the
session. Instead, it goes all the way to the start.
• F9: Enters a previous command by entering a number associated with that line.
Action 7
Sadly, the list from number 6 is often ridiculously
long to scroll through, and you’ll soon come to
realise a lot of available content via the Command Line is quite
expansive. If only there was a way to output the content directly
into a text file...? Try this:
driverquery /FO list /v > driverlist.txt
It makes things a little easier.
Action 10
You’re able to list all the currently installed
apps on your Windows 11 system by entering
the following command:
wmic product get name
Remember, if the list is getting a bit too long to look at in the
command window, use:
wmic product get name > productname.txt &&
notepad.exe productname.txt
S3 Command Prompt
C:\Users\david>wmic product get name
OldSchool RuneScape Launcher 1.2.7
Windows PC Health Check
Office 16 Click-to-Run Extensibility Component
bffice 16 Click-to-Run Localization Component
Office 16 Click-to-Run Licensing Component
Intel(R) Wireless Bluetooth(R)
Microsoft Visual C++ 2015 x86 Minimum Runtime - 14.0.24215
Microsoft Update Health Tools
www.pcLpublications.com 11
Action 11
To change folders (or directories, if you prefer) in
the command window, you’ll need to use the CD
(Change Directory) command. So, to change into the Documents
folder, you would use:
cd Documents
To change back a folder level, use:
cd"
Note: the CD command isn’t case sensitive, so the following works
just as well:
cd documents
31 Command Prompt
Ic:\Users\david>cd Documents
Ic:\Users\david\Documents>cd..
Ic:\Users\david>cd documents
Ic:\Users\david\Documents>cd..
Ic:\Users\david>e
Action 13
If you’re running low on space, then it’s
recommended that you clean out the Temp area
that Windows 11 uses to store stray and temporary data. You can
enterthis command:
del /q/f/s %temp%\*
This is your localised temp storage area. To clear out the global
(Windows whole) temp storage area, you’ll need admin privileges.
SB Command Prompt
|C:\Users\david>del /q/f/s XtempXX*
Deleted file - C:\Users\david\AppData\Local\TempX.ses
beleted file - C:\Users\david\AppData\Local\Temp\033d3193-3fe7-4185-
Deleted file - C:\Users\david\AppData\Local\Temp\0439790d-e6f3-4c89-
beleted file - C:\Users\david\AppData\Local\Temp\0b0872ff-d65b-4824-
peleted file - C:\Users\david\AppData\Local\Temp\0e936el8-6138-450c-
IDeleted file - C:\Users\david\AppData\Local\Temp\0fd89293-b400-4al6j
Deleted file - C:\Users\david\AppData\Local\Temp\la672486-d436-4bbtJ
[Deleted file - C:\Users\david\AppData\Local\Temp\2754a685-c580-42d7J
[Deleted file - C:\Users\david\AppData\Local\Temp\3395082a-a34a-42c5J
Action 14
Close your current command window, then
return to the Windows Start button and enter
cmd again. This time, however, click on the Run as administrator
option. You’ll be warned if you want to continue, so click Yes. This
is the admin-level Command Line, so be careful in here. To clear
the Windows global temp area, enter the following command:
del /s/q C:\Windows\temp\*
S3 Administrator: Command Prompt
Instead of changing directories within the
command window, you can instantly launch a
command window from within the File Explorer. Simply open the
File Explorer, go to the directory you want to open a command line
window from, and enter: cmd, into the Address Bar. Hit Enter, and a
new command line window will be displayed, in that directory.
Action 12
[Microsoft Windows [Version 10.0.22000.194]
(c) Microsoft Corporation. All rights reserved.
C:\WINDOWS\system32>del /s/q C:\Windows\Temp\+e
This one needs you to enable Telnet. Press the
Windows Key + R, then enter:
pkgmgr /iu:”TelnetClient”
Click the OK button to install Telnet. Now, in the command
window enter:
Action 15
telnet ateraan.com 4002
Now you can play a remotely located, RPG game from inside the
command line window.
12 www.pcLpubLications.com
Another favourite of the Telnet world, is the original
Star Wars: A New Hope played out in glorious ASCII.
Incredible as it sounds, here it is:
telnet towel.blinkenlights.nl
Remarkably, it’s still better than the most recent trilogy of Star Wars
movies. Hit CTRL+] to exit.
Action 16
If you don’t want to send the output of a
command through to a text file, which you can
then open with Notepad, you can always copy the entire content
from the command to the Windows 11 Clipboard. This way you
can copy it anywhere you like. Try this:
ipconfig /all | clip
Now open Word, for example, and Paste the contents in.
Action 18
Sl Command Prompt
\Us*rs\devid>ipconfig /all | clip
\Users\david
You can scan the core Windows 11 system files for
any discrepancies or problems by using the SFC
command, but you’ll need to be running the command line window
at the administrator level. Do Run as administrator, then enter
Action 19
sfc /scnnow
The process may take some time.
П Administrator: Command Prompt
Action 17
One of the most remarkable Telnet servers
available is Telehack.com. The server admin here
has recreated most of the original ARPANet for users to explore.
Features include Advent, the original 1976 text adventure, the Eliza
Chatbot, and even the classic text adventure, The Oregon Trail. To
enter it, use:
telnet telehack.com
33 Telnet telehack.com
Microsoft Windows [Version 10.0.22000.194]
(c) Microsoft Corporation. All rights reserved.
C:\WIND0WS\system32>sfc /scannow
Beginning system scan. This process will take some time.
Beginning verification phase of system scan.
Verification 100% complete.
Windows Resource Protection did not find any integrity violatii
C:\WINDOWS\system32>e
Connected to TELEHACK port 95
Lt is 12:23 pm on Tuesday, October 12, 2021 in Mountain View,
rhere are 78 local users. There are 26641 hosts on the networ
Type HELP for a detailed command list.
Type NEWUSER to create an account.
»y the command line live forever.
Command, one of the following:
2048 ? a2 ac advent
basic bf c8 cal calc
clear clock cowsay date ddate
eliza factor figlet finger fnord
help hosts ipaddr joke login
md5 morse newuser notes octopus
pig ping primes privacy qr
rand rfc rig roll rot 13
traceroute units uptime Usenet users
uuplot weather when zc zork
advent
Action 20
If you ever need any extra help with the
commands you’re entering, all you need to do is
ask. By this we mean, enter the command followed by a slash and
a question mark. For example:
ipconfig /?
This will details all the various flags and options you can apply to
the command to get what you want from it.
I Command Prompt
: \u»ers\david>ip<enfig »
Ipconfig [/allcoatpartmants] [// | /all |
/renew [adapter] | /release [adapter] 1
/гепонб [adaptor] | /raleaiefc [adapter] |
Zfluahdns | /diapleydna | Zragisterdns |
Zshowclassld adapter |
/setclasaid adapter [dasaid] |
/shoeclassldd adapter |
ZsetclassidG adapter [claosid] )
Display this help message
/all Display full configuration information
/release Release the IPv4 address for the specified adapter.
www.pclpublications.com 13
Windows Networking
Command Cheat Sheet
Windows contains numerous built-in commands for networking. These utilities and tools
will help you discover problems with your network, as well as help you improve
performance and monitor what’s going on.
Netsat actually stands for Network Statistics.
This command will display connection
information, routing tables and so on. Entering the command
will display what’s going on while you use the network and
Internet. Use netstat -e for interface stats.
Netstat
SS mand Prompt
C:\Users\david>nbtstat -c
Ethernet 2:
Node IpAddress: [0.0.0.0] Scope Id: []
No names in cache
VirtualBox Host-Only Network:
Node IpAddress: [192.168.56.1] Scope Id: []
No names in cache
The nbtstat command is a diagnostic tool for
NetBIOS over TCP/IP. Its primary design is to
help troubleshoot NetBIOS name resolution problems. It’ll
display the human-friendly names of devices on the network
along with their IP addresses.
S3 Command Prompt
NbtStat
C:\Users\david>nbtstat -c
Ethernet 2:
Node IpAddress: [0.0.0.0] Scope Id: []
No names in cache
VirtualBox Host-Only Network:
Node IpAddress: [192.168.56.1] Scope Id: []
No names in cache
Stands for Trace Route and is used to examine
the path to a remote computer, either locally
or on the Internet. For example, entering tracert google.com
will display the hops taken over networking devices to get to
one of the Google servers.
Tracert
Stands for Address Resolution Protocol displays
and modifies entries in the ARP cache, which
contains one or more tables that are used to store IP addresses
and their resolved Ethernet or Token Ring physical addresses.
Arp
14 www.pclpublications.com
Windows Networking Command Cheat Sheet
Ipconfig
Probably one of the most used networking
command in Windows. Ipconfig will display
information on the local computer’s network interfaces, such as IP
addresses (both IPv4 and IPv6), Hostname, gateway and so on.
NSlookup
This troubleshooting tool can be used to look
up and diagnose the Domain Name System
(DNS) of a location on the local network or Internet, and check DNS
records propagation and resolution with different servers.
Route
The Windows Route command allows you to
view the device’s routing tables. To do so,
simply type Route Print. This will print the network interfaces,
IPv4 and IPv6 route tables.
Hostname
If you’re struggling to find the name of a
Windows computer you’ve got on your
network, simply enter the hostname command and it’ll display
the computer’s local name.
Path ping
This is a handy command that combines the
best elements of Ping and Tracert. It will
display the latency and packet loss between one computer and
another (either locally or on the Internet), and after 300
seconds display a detailed report.
QQB Command Prompt
c:\Users\david>pathping google.com
Tracing route to google.com [2a00:1450:4009:80f::200e]
over a maximum of 30 hops:
0 Windows.home [2a00:23c7:c87:dl01:5507:a05b:bd21:47d9]
1 broadband.bt.com [2a00:23c7:c87:dl01:46fe:3bff:fef6:dll5]
2 2a00:2302::1100:203:3c5
3 * * 2a00:2302::1102:100:32
4 2a00:2302::1102:100:3b
5 2a00:2380:3014:9000::c
6 2a00:2380:14::97
7 2a00:2380:2001:7000::23
8 2a00:1450:80ea::1
9 2001:4860:0:1::22
10 2001:4860:0:1::1757
11 Ihr25s02-in-x0e.lel00.net [2a00:1450:4009:80f::200e]
computing statistics for 275 seconds...
Source to Here This Node/Link
Hop RTT Lost/Sent = Pct Lost/Sent = Pct Address
0 Windows.home [2a00:23c
0/ 100 ° 0% |
1 0ms 0/ 100 - 0% 0/ 100 - 0% broadband.bt.com [2a0€
0/ 100 = 0% |
Getmac
Every network interface has a unique Media
Access Code assigned to it. Some routers are
able to limit connection to the network by only allowing
user-entered MAC addresses in. You can get the MAC address of a
windows computer by entering getmac.
Netsh
This is a complex command that when entered will
put you into a different shell, the Network Shell
(netsh). It’s capable of displaying and configuring information
regarding a computer’s networking setup.
Telnet
This is a command that can be used to connect to
another computer, or manage a router or switch.
You can send and receive files, send commands and much more.
With Telnet you’re also able to connect to active Bulletin Board
Systems. For example, enter: telnet bbs.balcos.net
Ping
Ping is probably the most familiar of networking
command line tools. With it you’re able to send an echo
request to a device locally, or on the Internet, and receive a reply.
www.pclpublications.com 15
< Skype in
Windows 11
Although Skype took something of a backseat to Teams during the world-wide
Covid-19 lockdown, it still proved immensely useful for individuals to
keep in contact with
loved ones and friends
around the world.
Although it’s expected for
you to appear on camera
when using Skype, it’s always best to
remember that you don’t have to. You
can easily connect to a session and
spea к or type without showing you r
face by simply covering the camera.
This is your Profile, click
the image to open details
about your Microsoft account, as well
as manage your Skype profile.
Further settings are available, along
with Bookmarks and being able to
add call credit in your local currency.
This panel details the
recent chats and calls
you’ve had with others in Skype.
From here you can arrange new
Skype video calls, new chats, look at
your contacts and see any
notifications. Click recent chats to
display the contents in the main
Skype window. You can also run an
Echo/sound Test here, to test your
microphone and camera.
The main Skype window
is where all your video
calls and chats will take place.
Grouped calls split the screen
depending on how many people are
in the call, and chats can have
attachments added and viewed -
such as images and videos.
umpo™
Untitled ch»
n*ndHeyward WOO
Meet Now
О» Meet No*
New O'*
Rrctfrt ch»"'-’
VNe..od.cc589bt67536TS- ’
•c <$• Missed call
Meet No*
Dew'd Hay*a<d
Daniel Ha^a-d
Hay*a'd
Missed cal'
L’S.’S-*-*
Hay*»d^e*s
16 www.pclpublications.com
Skype in Windows 11
Skype has been
redesigned in recent years
to perform better, and to offer a more
high-resolution experience. If you
think your video is lacking in quality,
then take a look at the hardware
settings for the webcam and see if
you can improve it.
The top bar details the
number of participants,
any images and videos included in
the chat or call, and allows you to
find any specific keyword for
participants. You can also Start a Call,
and add more contacts as you need
from the two buttons in the top-right
of the screen.
It’s worth mentioning that
video quality can often be
degraded due to a lack of bandwidth.
Skype will automatically throttle itself
to keep the connection alive, often at
the detriment of video quality. If you
find this happening, stop any other
downloads from your browser, or
check your Internet settings.
Use this link to send to
others so they can join in
the conversation. They will need
access to Skype, either as their own
installed app on their system, or they
can use the link to access the call via
the Skype webpage. You can also add
more people via your contacts, or
create specific shared invites.
You’ll enter your chat and
video message texts in
here. You can also include emoji,
attach files, share contact details,
create a poll, schedule a call, share
your location and access your
OneDrive area to collaborate with
others on content.
www.pcLpublications.com 17
Making Calls with
the Skype App
Skype is now a much bigger part of Windows 11 than it once was, and has its own app
that comes pre-installed with the OS. Getting to grips with the different tools in Skype is
fairly simple but learning how to use it more efficiently and easily takes a little more time.
Install and Use Skype
Recently updated, Skype has now been turned into a proper Windows 11 app and follows the Windows
design style more closely.
Skype has a dedicated Windows 11 app and this
may be preinstalled on your Windows PC but you
might need to download it from the Windows store. You can also
download Skype directly from www.skype.com as well as check
that you have the latest version available.
Stepl
The Skype window should now be open on
screen. The default view is the Recent
conversations screen but this may be completely empty if you
are new to Skype. The first thing you need to do as a fresh user,
is to begin adding contacts.
Step3
Once installed, you will need to sign in to the
Skype app. If you already have a Skype account,
which is completely free to set up, just enter your login details
when prompted. If not, you can go to www.login.skype.com and
create a new account in just a few minutes.
Step 2
Click the Contacts button (2nd button down
from the top) and either select the add contact
icon at the bottom of the sidebar or click directly in the search
text box and type the name, Skype name or email of the person
you want to add. Click Search Skype.
Step 4
□ ж 0» Q w a i>
Create account
Phone number
Cieale password
Use your emad address instead
СГкял»»у N«xl ir**» Uwt yvu lu It* Suienw.il
and Microsoft Services Agreement.
Baek T Next
18 www.pclpublications.com
Making calls with the Skype App
Select your friend from the search results,
assuming you can see them in the list, and
click Add to Contacts. Type a quick note to introduce yourself and
then click Send. They will receive a request from you, along with
the message and can choose whether to accept you or not.
Step 5
If you want to make calls to contacts not using
Skype (although you can make calls to mobiles
and landlines too), you will need to add some Skype credit first.
To do this, click on your profile picture in the bottom left and
click the ‘Add Skype credit’ link.
Step 8
You can select any contact from your contacts list
and then either instant message them or start a
voice or video call. If the contact you click on has Skype, the call
option buttons will appear in the top right corner of the window.
Click the relevant button to start a call.
Step 6
Skype also now includes Bots. Bots are artificially
intelligent programs that can do many useful
things like search for news, summarise webpages, play games
and more. You can start chatting with a bot just like you chat with
friends, just choose a bot and click Get started.
Step 9
Skype instant messaging makes it easy to keep
in touch with your contacts and groups
wherever they are. You can share files, photos and contacts. To
instant message one of your contacts, select their name and
start typing at the bottom of the main window.
Step 7
Bots vary in how useful they are but some are
well worth taking a look at. Take the Bing News
bot for example. Add this and then type a word (“Crime” for
example) in the conversation window. The bot will return news
stories based on that subject.
Step 10
www.pclpublications.com 19
Using the
Cloud Clipboard
Copying and pasting is something we all do. However, what do you do if you need to copy
the same few things again and again and how do you copy content across your devices?
The new Cloud Clipboard solves both of those problems in a single, simple interface.
A New Way to Copy + Paste
The Cloud Clipboard gives you a new way to cut and paste. Simply press the Windows key + V at any time
and you’ll seethe Cloud Clipboard panel appear in the bottom corner of the screen.
Stepl
Before you can use all the features of the Cloud
Clipboard in Windows 11, you will need to
enable them in the settings. Go to Settings > System and look for
the Clipboard section. You can turn on the clipboard history
using the slider toggle. To sync across devices, click ‘Get started’.
Step3
With the Cloud Clipboard settings configured to
how you want, you can start using the feature.
Just like the old clipboard, things are added to it when you copy
something. This can either be by pressing Ctrl + C with some text
highlighted or right-clicking on an image or file and selecting Copy.
hill-country above Fredncksburg seen in a mist of winter rain'. (The Coming of Canon the Cimmerian. 2003).
The poem was first published in The Howard CoHector (Winter 1965) and most recently published tn The Coming
of Conan the Cimmerian (2003)
Step 2
Follow the instructions to confirm your Microsoft
account (if this is requested) and then choose
whether you want to enable automatic syncing across devices or
not. If you want to be able to sync the clipboard to your phone,
you will also need to download and install an app on that device.
Step 4
The difference now is each thing you copy is
stored in the clipboard, rather than being
overwritten by the next thing you copy. To see the things stored in
the Cloud Clipboard, press Windows Key+ V. In the new Cloud
Clipboard window, you will see a list of the things you have copied.
n logo key • V to view your clipboard history and paste from it
S" Microsoft
davidhayward
Verify your identity
Email
I have a code
J
I don’t have any of these
Cancel
3
20 www.pclpubLications.com
Using the Cloud Clipboard
Step 5
The things you have copied can be made ready
to paste by selecting them in the Cloud
Clipboard. You canthen use Ctrl+ V to paste or right-click and
select Paste from the menu. When you select something in the
Cloud Clipboard, it remains there to be pasted again.
Step 8
Pinned items even remain in the Cloud Clipboard
when you restart your computer. The only way to
remove them now is to unpin them from the clipboard. To do this,
highlight the item again and click the pinned icon. Copying
something that is already saved in the clipboard doesn’t overwrite it.
Undo
Cut
Copy
Paste
Delete
Select AH
Right to left Reading order
SIkjw Unicode control clididclers
Insert Unicode control character
Open IME
Reconversion
Search wrth Bing...
Step 6
You can clear the items from the clipboard easily,
either by opening settings > System > Clipboard
and clicking on ‘Clear clipboard data’ or by opening the clipboard
window and clicking the ‘Clear all’ button. Once the clipboard is
cleared, you cannot recover the copied data.
Step 9
Syncing clipboard data between devices works
using the same Microsoft Graph technology that
powers the Timeline, introduced in Windows 10’s April 2018
Update. You need to be signed into both devices with the same
Microsoft account for this feature to work.
Clear clipboard data
Pinned items won't be removed on this device
Q Privacy Statement
Learn how clipboard keeps your data safe
Related links
|e] Get help with clipboard
Q How to seamlessly transfer content between your devices
Step 7
If there is copied data in the Cloud Clipboard that
you think you will always need to keep, you can pin
it. Pinned items in the clipboard do not get cleared when using the
methods described in the previous step. To pin something, move
your mouse over the item and then click the pin icon that appears.
Step 10
If you select ‘Never automatically sync text that I
copy’, you’ll have to manually choose what you
want to copy. To do so, open your Clipboard history with Windows+V,
hover over an item in your Clipboard history and click the
cloud-shaped Sync to Other Devices icon.
Sync across your devices
Paste text from your PC to supported devices
Q Automatically sync text that I copy
Manually sync text that I copy
Clear clipboard data
Pinned items won't be removed on this device
Privacy Statement
Learn how clipboard keeps your data safe
www.pcLpublications.com 21
О Facebook App
I on Windows 11
Facebook’s popularity peaks and falls with alarming regularity throughout the
course of the year. However, it’s still one of the most
used social media platforms. Naturally, an app is
available for it in the Windows Store and, once signed
in, it offers the user a wealth of options.
Within the app you can
search for people, places,
companies and Facebook pages from
the Search function in the top-left of
the app. A list of recent searches is
displayed, which can be cleared by
clicking on the ‘x’ next to the name,
or by clicking on the Edit link.
««•cent
(-------------------------------------------\
The options to the left of
the main timeline Feed
allow you to switch views, browse the
Marketplace fora local bargain that
someone is selling, look for Facebook
Groups setup by likeminded
individuals, Watch Facebook Videos,
Find Friends, look back at your
previously posted Memories and
much more.
tavidHjywwd
X»
О Most recent
Q ****
О M«se,.gef
Group*
W M*k«p4ace
О
fl S**«
more
yoL"- shortcuts
e*TOW <n funw« in OW Pho^
The Your Shortcuts section
is where you’ll find quick
launches to Groups and Pages you’re
a member of or have Liked on
Facebook. This saves you trawling
through your Facebook Feed to find
any relevant new posts that may
have appeared while you’ve been
away, or have missed. You can edit
your available Shortcuts by hovering
over the section and clicking Edit.
This is your main Facebook
Feed, where you’ll post your
own comments, videos, photos and so
on, and where you’ll see your friends
posts and any Groups or pages you’ve
Liked and signed up with to receive
notifications. You can create video chat
rooms, and quickly see who’s currently
online via their profile image.
22 www.pclpublications.com
Facebook Арр on Windows 11
The top bar options include: Home, your main Facebook Feed;
Friends, where you can find new Friend suggestions and manage
Friend Requests; Pages, which covers items like invitations and where you can
create your own unique business page; Watch, which displays Facebook’s
video library from around the world; and finally Groups, where you can browse
groups you’re a part of, and find new ones. Further to the right is your Profile,
followed by Menu (detailing all of Facebook’s functions), Messenger for private
and group chats, Notifications and finally Account settings.
Sometimes, the App version
of Facebook won’t display a
post from a friend properly. This is usually
when a video or an animated GIF appears
in the Timeline. If this happens, try
refreshing the Feed, and if it still doesn’t
work, then open the Feed in a browser to
check if it’s loaded properly.
«'s on your mind. David?
Uv* video
₽boto/Vid<4j
^"og/ActMty
‘«arirWommentedooi
post
’^tography,, ^hCeHumKendM
Contacts
Grou₽ conveys
Group
,o9'**-y.com
Shearer
> Russ Ware
George Heyward
Neil Hurley
Barnaby
Oliver Frey
" C'aretoui«Zaccarini
John Maddox Roberts
C? SuzannaHurtey
AothonyEntkknap
Ц? u« Wilson
Juliette Rignall
Whitaker
s'monBrew
It’s easy to search through
your friends by clicking on
the magnifying glass icon in the
Contacts pane. Simple start typing their
name, and Facebook will begin to drill
down the choices available. All you
need now is more friends - unlike us!
It’s always responsible to
mention that safety on
Facebook is paramount. Don’t let anyone
persuade you into divulging personal
information, or passwords, and don’t
accept friend requests from people you
don’t know or recognise.
The Contacts drop-down
link will display all your
friends, and whether they’re online or
when they were last online. You can
click each contact and start a
Messenger text or video chat with
them, or click the Create New Group
link at the bottom to group individual
Contacts together for a group chat.
www.pcLpublications.com 23
О Twitter App on
. Windows 11
The Twittersphere is often a
place for some very interesting
discussions, but also a haven
for news that’s not published
in the mainstream media. Like
it or loathe it, Twitter has its
uses and is freely available in
the Windows Store; so you too
can join the ‘debates’.
£
©
The menu on the
left-hand side of the
Twitter app will give you access to
everything from your profile setup
and management, through to
exploring trending Tweets. Plus, any
Notifications you’ve had from your
own Tweets, DMs (direct Messages),
Bookmarks and Lists you’ve made,
and quick links to privacy settings,
analytics, ads and a help centre.
The Tweet button brings up
a pop-out window where
you can enter a new Tweet, and post it
for the world of Twitter to see,
comment on and hopefully like. It does
exactly the same function as the What’s
Happening section at the top of your
Twitter Feed, so it’s a little redundant
these days - it seems to be left over
from older versions of the platform.
Your Twitter Feed, where
you can view your own
posts, as well as those who you’ve
liked and followed, alongside any
advertising the company decides to
place on your Feed. It’s from here you
can like, comment, share, delete,
report and generally remark on how
you feel about the current
government or whether aliens exist
or not.
Hom*/Twitter
Home
#
Explore
Q
Notifications
Messages
Bookmarks
Lists
Profile
More
24 www.pclpubLications.com
Twitter App on Windows 11
Don’t Feed The Troll! If you
engage on Twitter, you’ll likely
come across, sooner or later, someone who
disagrees with you on such an extent that
things get a little too personal for comfort.
If this happens, back off, and as the saying
goes, don’t feed those trolls.
Like Facebook, or any other
social media platform, safety
comes first. Don’t be fooled into giving
away personal details, don’t be
click-baited into clicking on links you can’t
identify, and always be on guard forthose
who try to scam others.
You can search for people
from the Twitter Search
function in the upper-right of the
app. Enter a person’s name, be they a
celebrity, politician, or humble writer
of Windows 11 books, and the results
will appear here.
This is the What’s
Happening section - which
is different to the What’s Happening
section where you can enter your own
Tweets. This section displays the
current trending stories in the
Twittersphere depending on your
location. In the UK we’ll naturally have
a different set of trending feeds
compared to someone in the US. Click
the Show more link to display trends
that have dropped off due to the
limitations of your screen size.
Who to follow displays a
brief list of people who
Twitter thinks you’d like. Some of
them may already follow you, but
you don’t follow them back, whereas
some are promoted by Twitter to
help boost their follower numbers.
The Messages section here
is collapsible, and
contains all the current and previous
Direct Messages you’ve had over your
time on Twitter. Open it, click a
person, and you can continue the
message or start a new one.
www.pclpublications.com 25
WhatsApp Desktop
on Windows 11
WhatsApp has proved to be a
vital addition to many of us in
our daily digital lives. It’s used to
keep in contact with family,
friends and work colleagues, and
thanks to its high levels of
encryption and easy to use
interface, it can be used by even
hardened technophobes.
® WhatsApp
Search or start new chat
Ш AM
This section displays your
WhatsApp profile picture,
as well as enabling you to start a new
conversation with any of your
WhatsApp contacts, or start a new
Group chat. Click the Plus symbol for
a new chat, or the three dots for
more options and group setups.
Whitmans Chat
Ned: Xeah.i think Unowwha...
Stewart Fam'ty
j/ steve: Great, thanks'
Д2-.52 AM
M\ce Whitman
yesterday
yesterday
These are all your
contacts, along with the
last comment they made on either the
group chat or with you individually.
You can see when they last
commented, as well as be informed
on any profile status updates they
may post about themselves.
jack\Nhhman
у Чои: Sounds good’.
Lunch Group
yesterday
la"eTl^'“5',w
N’\ce'.' dejjp*®
Scroll down the contacts
list for more, and you can
also use the Search bar at the top of
the contacts list to look for
individuals; and even start a new
chat. Click an individual to open
more options, such as mute, archive,
delete or pin to keep for later.
Peter \Nhitman
26 www.pclpublications.com
WhatsApp Desktop on Windows 11
4
WhatsApp has the unique
ability to encrypt all of its
point-to-point communications. That
means anything you post in a chat
with someone else is encrypted to
the highest current level, AES-256
Military Grade.
This section displays all
the contacts currently
involved in a group chat, as well as
the name of the group you or
someone else has created. From
here, you can also attach any photos
or videos, or click the three-dots
more options.
ttAO MA
IKrtjmansthat
hands, Jack. Ma<got, Ж to)»'.toou
Peter Whitman
.. .
Usboa jshnusvd & •
(g
The main part of
WhatsApp, this is where all
the chatting takes place, as well as
any media you or a member of your
contacts will upload. Your comments
are highlighted to the right of the
chat pane, whereas your contacts are
put to the left of the pane. Photos
and videos can be clicked to expand
and then viewed.
Enter your chats in this
box, and then they’ll
appear in the main chat window.
You can also click the microphone
icon to begin a voice conversation.
This is handy, as the voice
communications are as encrypted as
the text communications. Clicking
the smiley face icon will open the
available emoji list, where you can
insert all manner of strange and
useful iconography.
There’s a rise in WhatsApp
scamming incidents, so if
you find yourself being asked to join
a group by someone you don’t know,
or someone you don’t know is trying
to add you, opt to ignore or delete
them as soon as you can. Scams can
be quite clever, so on be your guard.
www.pclpublications.com 27
Windows 11
Touchpad Gestures
There’s so much you can do with gestures, and Windows 11 has greatly improved the
technology over its predecessor. Some apps have their own, unique, gestures, but the
default and majority are listed here.
Touchy Feely
Gone are the days where we paw ineffectually at our screens, like a cat trying to capture a video of a bird.
Windows 11 gestures encompass nearly every aspect of the operating system.
Touchpad Gestures
Here are the main gestures for use on Windows 11 touchpad
laptops. It’s worth noting that some of these gestures will
only work with new precision touchpads. To find out if your
laptop has one, click Start > Settings > Bluetooth &
devices > Touchpad.
Action
Select an item
Tap touchpad
Show all open windows
Swipe with three fingers up on
the touchpad
Gestures
Scroll
Place two fingers on the touchpad and
slide horizontally or vertically
Show the desktop
Swipe with three fingers down on
the touchpad
Zoom in or out
Place two fingers on the touchpad and
pinch in or stretch out
Switch open apps or windows
Swipe with three fingers left or right on
the touchpad
Show Context Menu
Tap the touchpad with two fingers or
press down in the lower-right corner
Switch desktops
Swipe with four fingers to the left or
right on the touchpad
Note: Remember, some laptop manufacturer touch pads may operate differently to others. That shouldn’t be the case, but for a long
time there was little standardisation. This doesn’t happen so much now, but if you own an older model laptop that works with
Windows 11, then you may experience some problems or simply different gestures depending on the touchpad device you’re using.
In such circumstances, it’s always best to consult the laptop manual, or see if there’s an updated BIOS or driver to apply.
28 www.pclpublications.com
Windows 11 Touchpad Gestures
Other gestures
Choose what each gesture does
Three finger gestures
Swipes
Touchscreen Gestures
Switching apps v
You can use these gestures on the touchscreen of any of your
modern Windows 11 devices. To turn touch gestures on, click
Start > Settings > Bluetooth & devices > Touch > Three- and
four-finger touch gestures.
Action
Select an item
Tap the screen
Show the desktop
Swipe with three fingers down on
the screen
Scroll
Place two fingers on the screen and
slide horizontally or vertically
Switch to the last open app
Swipe with three fingers to the left or
right on the screen
Zoom in or out
Place two fingers on the screen and
pinch in or stretch out
Open notification centre
Swipe with one finger in from the right
edge of the screen
Show Context Menu
Press and hold the item
See widgets
Swipe with one finger in from the
left edge of screen
Show all open windows
Swipe with three fingers up on the screen
KI
/4 Multitasking view
v Show desktop
< Switch apps
Gestures
Switch desktops
Swipe with four fingers to the left
or right on the screen
Four finger gestures
Multitaskin
Show desk
в
www.pcLpublications.com 29
Essential
Windows 11 Apps
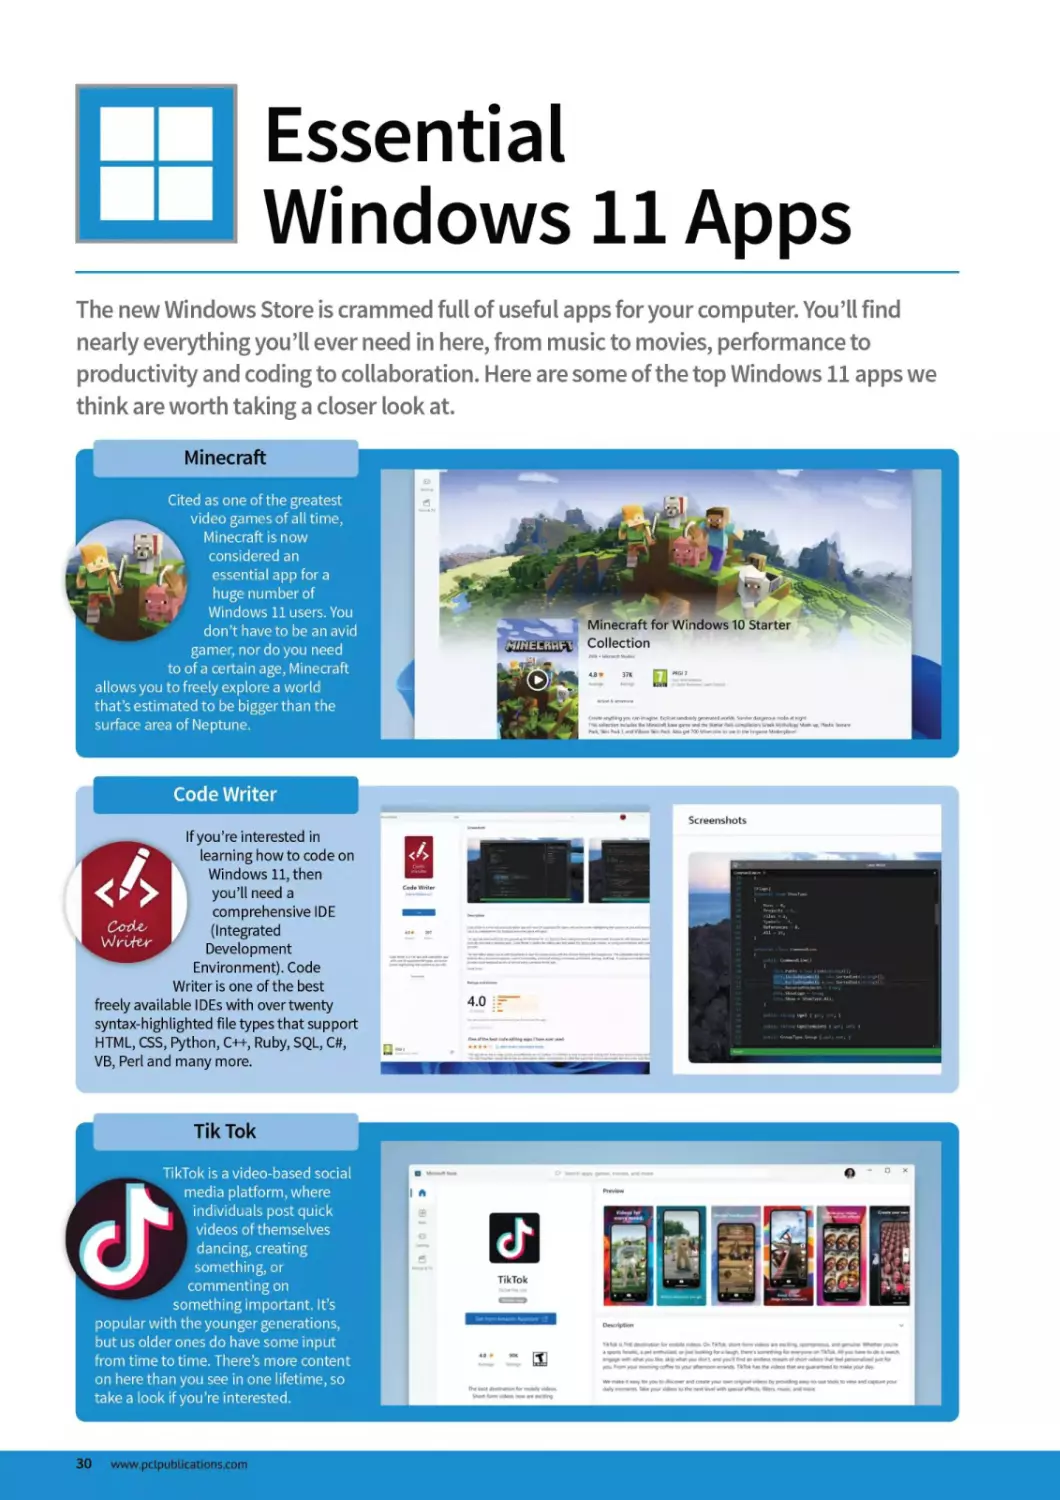
The new Windows Store is crammed full of useful apps for your computer. You’ll find
nearly everything you’ll ever need in here, from music to movies, performance to
productivity and coding to collaboration. Here are some of the top Windows 11 apps we
think are worth taking a closer look at.
Minecraft
Cited as one of the greatest
video games of all time,
Minecraft is now
considered an
essential app for a
. T * huge number of
Windows 11 users. You
don’t have to be an avid
gamer, nor do you need
to of a certain age, Minecraft
allows you to freely explore a world
that’s estimated to be bigger than the
surface area of Neptune.
Code Writer
If you’re interested in
learning how to code on
Windows 11, then
you’ll need a
comprehensive IDE
(Integrated
Development
Environment). Code
Writer is one of the best
freely available IDEs with over twenty
syntax-highlighted file types that support
HTML, CSS, Python, C++, Ruby, SQL, C#,
VB, Perl and many more.
Tik Tok
TikTok is a video-based social
media platform, where
individuals post quick
videos of themselves
dancing, creating
something, or
commenting on
something important. It’s
popular with the younger generations,
but us older ones do have some input
from time to time. There’s more content
on here than you see in one lifetime, so
take a look if you’re interested.
30 www.pclpublications.com
Essential Windows 11 Apps
Netflix
Adobe Photoshop Elements
NETFLIX
The king of the streaming services, Netflix has
become one of the most installed apps across
any platform. Watch your favourite films, and
| binge on top series until the wee hours of the
morning; there’s something for everyone
within the ever-growing genres on Netflix.
Don’t forget though, after the first month,
Netflix is a paid subscription service.
Unleash your inner digital photographer and
artist with Adobe’s Photoshop Elements. If you
don’t want to go down the Adobe Photoshop
Professional route, then this is the app for
you. There’s tons of features available that
will greatly enhance your photos and unlock
your hidden potential. It costs £83.49, but there
are often deals available, so keep checking back.
= inrui
Unlimited Entertainment
Watch all you want for one low price.
STRANGER
THINGS
WhatsApp Desktop
WhatsApp has increasingly become an
essential part of communications between
colleagues, friends and family. Thanks to
encrypted chats, group communications,
and voice and video calling over Wi-Fi, it’s
easy to see how important the app is in
today’s modern, digital world.
Network Speed Test
Working from home over the last year has
proved just how vital our Internet connections
really are. The slightest drop in connectivity
can cause havoc, especially when you have
deadlines to meet and gigabytes of work to
upload. With Network Speed Test you can
closely monitor your bandwidth, and ensure
you’re getting the maximum from your ISP.
Network Speed Test
Last Test (6/25/2013 2:52 PM)
4 10
3
Description
With WhatsApp on the desktop, you can seamlessly sync all of your
convenient to you.
Ratings and reviews
0 50
www.pclpublications.com 31
Essential Windows 11 Apps continued...
Microsoft Flight Simulator
If you’re into a different kind
of gaming on your PC,
then why not give
I Microsoft’s latest Flight
Simulator a try? This is
the next generation of
the famous, and
long-running sim, and
features incredible realism and
graphics that will blow your mind.
According to Microsoft, the sim uses
actual satellite terrain footage, so you
could fly over your own house!
Spotify
With a catalogue of music
numbering the tens of
thousands, Spotify
enables you to browse
everything from Abba to
ZZ Top. You can go free
and tolerate the
occasional ad break, or pay
fora Premium subscription and play
across multiple devices without any ads.
Drawboard
Drawboard PDF allows you to mark-up,
read, edit and annotate any PDF. You
can create hyperlinks, linking text to
web pages, or other PDF pages within
the document; add grids and lines to
enhance note taking; including
engineering line styles; choose colours for
annotations, and much more. It’s free, but
there’s also a paid for Advanced Toolset
you can buy to further the experience
Audible
Audio books are a great way
to get into the classics, as
well as new and
upcoming titles without
having to pick up a book
and read it For many,
that’s an ideal setup, as
work and life can get in the way
of a good book. Listen to the Adventures of
Sherlock Holmes while doing your work, or
The Handmaid’s Tale during your break.
Audiobooks from Audible will open even
greater worlds for you to explore.
32 www.pclpubLications.com
Essential Windows 11 Apps
Disney+
Despite being the newcomer to the streaming
video service model, Disney+ has quickly
become one of the most downloaded apps in
the Windows Store. With shows such as The
Mandolorian, What If..?, and WandaVision,
you can catch up on everything that’s Marvel,
Star Wars, Pixar and National Geographic.
Remember, though, it’s a subscription service.
Twitter
Say what you like about Twitter, you can’t
ignore the fact that it’s often better informed
than the news presented on the TV or in the
paper. Instead of going to the website, install
the app, and you can join the many millions
who always seem to take the opposite view
from you; and end up shouting at each other.
о q о в
VLC
Known as the Ultimate Video Player, VLC can
play pretty much anything you throw at it
without the need to install extra codecs. This
particular version is cut-down slightly, so you
won’t be able to play DVD or Blu-Ray discs,
but any digital media file can be played
without a problem - and it’s free!
Python 3.9
Python is a powerful programming language
that’s easy to learn and use, and can be
found throughout the Internet, as well as
onboard the ISS. This is the latest version
of the free-to-use language, and can help
open many doors for you in terms of career
opportunities; as well as just enjoying
learning how coding works.
www.pcLpublications.com 33
Maintain
and Protect
Windows 11
What do you do if you’re hacked? How do you protect your
devices on a public Wi-Fi? What is encryption? These and many
more questions are answered throughout this chapter, as you
begin to move into the more advanced user techniques and
skills needed to make Windows 11 both secure, while keeping it
in tip-top shape.
Learn how to manage your system’s memory more effectively,
how to create a system image, manage your privacy and get
much needed maintenance and performance tips.
www.pclpublications.com 35
□ Using the Windows 11
Defender Tools
The Windows Defender set of tools may not be quite as comprehensive as one of the
bigger Anti-Malware suites, such
as BitDefender, but it does a good
job of protecting the average user
from the wealth of nasties out in
the Internet.
Virus & Threat
Protection
This is where to check and scan for viruses
and other threats to your Windows 11
security. Here you will find tools for
preventing viruses and other malware from
ever taking hold of your computer, as well
as the tools needed to check for anything
which already got through your defences.
Account Protection
This is where you manage
account and sign-in security for Windows
11. This includes the Microsoft account
you are signed in to (or the option to sign
in to one), Windows Hello and Dynamic
lock. Clicking on any of the options here
will simply take you to the relevant area of
the main settings.
Device Performance
& Health
Displays issues with the health and
performance of your computer, including
the status of the Storage capacity, Apps
and software and the Windows Time
service. This is also where you come if you
want to begin the process of performing a
Fresh Start on your computer.
Family Options
The Family options feature in
Windows Security provides you with easy
access to tools for managing your
children’s digital life. Use Family options to
help keep your children’s devices clean
and up to date with the latest version of
Windows 11 as well as protecting your kids
when they’re online.
Family options
Manage how your family uses
their devices.
Windows Security
<-
Security at a glance
See what's happening with the security an
and take any actions needed.
Virus & threat protection
No action needed.
Device performance & health
&
Family options
Protection history
App & browser control
No action needed.
| Home
О Virus & threat protection
S Account protection
(<f) Firewall & network protec
□ App & browser control
£2 Device security
36 www.pclpublications.com
Using the Windows 11 Defender Tools
Apps & Browser
Control
This section contains the settings for
Windows Defender SmartScreen. This
helps to protect your Windows 10 device
from potentially dangerous apps, files,
websites and downloads. It also includes a
link to download Application Guard and
lets you control Exploit protection.
«id
health of your device
Firewall & Network
Protection
Windows Defender includes three firewalls,
for: Domain network, Private network and
Public network. You can turn each of these
firewalls on or off at will, although you will
normally only be connected to one type of
network at a time (if you are at home,
usually a Private network).
Account protection
No action needed
Firewall & network
protection
No action needed.
Device security
View status and manage
hardware security features.
Device Security
Despite the title, this isn’t really
a hub for device security. You can learn
more about Core isolation (virtualisation-
based security) and enable the memory-
integrity feature, helping to prevent
malicious attacks to core, high-security
processes. Note: The exact options here
can vary depending on device.
Protection history
View latest protection actions
and recommendations.
Device performance &
health
No action needed.
Protection History
The Protection History option
really speaks for itself. In here you will find
a history of all the actions and
recommendations that the Windows
Security system has discovered. You can
look th rough the history a nd see if a ny
trends form, so you’ll know what to avoid
in the future.
Windows Defender Dashboard
The dashboard is the main screen of
Windows Defender and opens when you
click the “Defender shield” icon in the
taskbar. It lets you check the security of
your computer at a glance, but doesn’t
really give you much information beyond
whether an action is needed or not needed
within the various security sections.
Ideally, you want to see a green tick on
each section of the dashboard.
If you see a warning symbol, there are
suggested actions that you should take a
look at, while a red X means something
needs your immediate attention.
www.pclpublications.com 37
IF
What To Do if
You’re Hacked
There are literally hundreds of millions of email
addresses and account details stolen by hackers
each year, sometimes in a single massive breach,
such as the Equifax attack from a few years ago,
but sometimes directly from your own computer.
Being the victim of a hack sounds scary to most
people, but while you should take it seriously,
there is often no need to panic. If you think you
have been hacked, just follow the instructions here
to get your online life back on track.
38 www.pclpubLications.com
What To Do if You’re Hacked
How Will You Know?
You may hear about a big data breach in the news, or from
friends and colleagues, and if the company hacked is one you
have accounts with, it is worth following all of the steps
below just in case. Often, the first you will know about being
hacked is a call from your credit card company or bank about
unusual activity, or from friends/relatives suddenly receiving
strange requests for money from you.
Many of the large email providers, such as Gmail, will alert
you if there is a new login to your account from an
unrecognised location or device. Or you may simply find that
you have been logged out of an account and your password is
no longer working.
The most important thing is not how you discover how you
have been hacked, although we urge you to keep a close eye
on all your online activity, but how you act immediately after
you find out.
You can check if your email address has potentially been
involved in a data breach by entering it in to the Have I Been
Pwned website.
https://haveibeenpwned.com/
What To Do Next
Even if you think only one account has been targeted, you
should still move to protect ALL of your important accounts.
This is especially true if you main email account has been
breached, or if you use the same email and password for all
of your online accounts.
Change Your
Passwords
The very first thing you need to do is change all of your
passwords, especially for your email account, banking
accounts, credit card accounts, PayPal, etc. Many online
accounts now offer 2-step verification, which adds an extra
layer of security by sending you a passcode each time you try
to login. If this is available, set it up as soon as possible.
If your email account password has been changed by the
hacker, you will need to contact the provider and prove you
are the rightful owner of that account. For Gmail, there are
instructions for recovering a hacked account on the Google
support pages (https://support.google.com). The other
main email providers should offer similar advice.
www.pcLpublications.com 39
Examine AllA'our
Accounts Carefully
This includes banking, email, online shopping accounts,
especially if you use the same password for multiple logins.
Check your email inbox and sent mail box for things you haven’t
signed up to or sent. Think about how you recover a forgotten
password on almost any website: You request a password reset
to your email address. If someone has got hold of access to your
emails, they could do the same.
Look for any unusual activity at all, and if you spot some,
contact the website or company to let them know your account
may have been breached. Often, they can help you sort it out
the fastest way.
If your email account has been taken over, and the password
changed, you will need a way to prove that you are the rightful
owner. This is why it is important to have two separate email
addresses, as you can usually use a second email address as the
alternate contact for the main address.
c—Hacked Accounts
Friending
Your Home Page
Mwsag.ng My ACCOUnt
I think my account was hacked of someone Is using it without my permission.
vrdeoe How do I deal with spam?
Pages
G(OUPS My Facebook account was hacked and used to make purchases on apps.
Event»
Payments What 10 d0 you don ‘ recognize activity on your advertising account
MvtMptoca
app« My Friend's Account
Facebook Mobile and Desktop
дрр, My friend s account is sending out spam.
Accessibility
I think my friend s account was hacked
How do I report an account for impersonation?
Pages
_________________________ I think my Page was hacked or taken over by someone else. __
Check your bank and
Credit Card Statements
Check both your bank account and credit card statement for
any unusual activity (online and immediately if possible, but if
not contact your bank/credit card company and ask for a
statement). It is also worth informing both your bank and credit
card company what has happened, so that they can be.aware
and alert for any unusual activity in the near future.
Having to get new cards issued may be a hassle, but it is less
hassle than trying to sort out the mess left when a hacker starts
buying things using your card details.
Recover Your Accounts
Major companies such as Google, Facebook, Twitter and
Microsoft are well aware of the possibility of accounts being
hacked, and most offer processes to get the account back to
normal. Indeed, the company may well be the first to realise an
account has been hijacked and shut it down for you. Head over
to the homepage of the website in question and check the
knowledge base/help desk for advice on what to do next.
Just remember that if you get an email from Facebook, Twitter,
etc., telling you that your account has been breached, make
sure that it is legitimate and not someone phishing foryour
login information.
You can read more about spotting
scam emails at https://
bdmpublications.com.
40 www.pclpubLications.com
What To Do if You’re Hacked
3 Notifications = Menu
X
Scanning for malware...
SVC: amdxata > C:\WlK.2\drivers\amdxata.sys
STOP SCAN
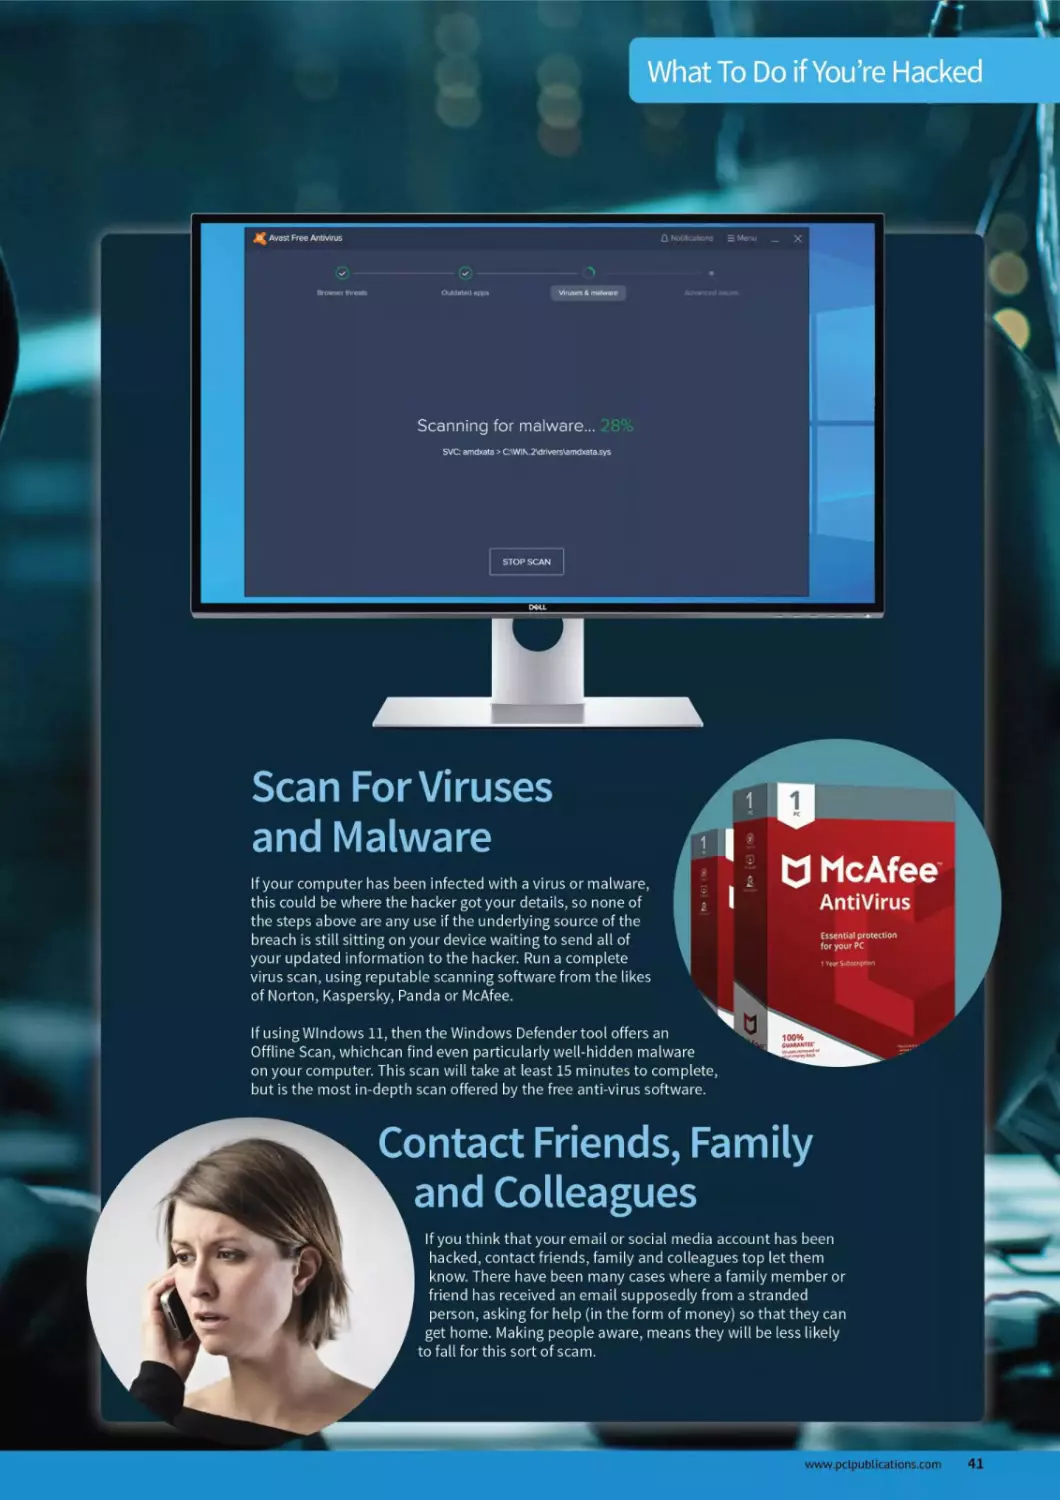
Scan For Viruses
and Malware
If your computer has been infected with a virus or malware,
this could be where the hacker got your details, so none of
the steps above are any use if the underlying source of the
breach is still sitting on your device waiting to send all of
your updated information to the hacker. Run a complete
virus scan, using reputable scanning software from the likes
of Norton, Kaspersky, Panda or McAfee.
1 I
7 f U McAfee
j I AntiVirus
If using Windows 11, then the Windows Defender tool offers an
Offline Scan, whichcan find even particularly well-hidden malware
on your computer. This scan will take at least 15 minutes to complete,
Essential protection
for your PC
1 SutftC» <Х>ол
but is the most in-depth scan offered by the free anti-virus software.
ill
Contact Friends, Family
and Colleagues
If you think that your email or social media account has been
hacked, contact friends, family and colleagues top let them
know. There have been many cases where a family member or
friend has received an email supposedly from a stranded
person, asking for help (in the form of money) so that they can
get home. Making people aware, means they will be less likely
to fall for this sort of scam.
www.pcLpublications.com 41
Using the Windows 11
*—A Task Manager
The Task Manager is a very useful tool but even if you have been using Windows for some
time, you might never have looked at it before. The Task Manager contains information
on PC performance, the number of running apps, how many processes are pulling power
from the processor and much more.
Processes Tab
The Processes tab is the default
tab when the Task Manager is opened. You
can open the task manager by simply
searching for it in the main search panel.
Just as with any other app or piece of
software in Windows 11, you can pin a
shortcut to the Task Manager, to the taskbar
or as a desktop icon.
Start-up Tab
The Start-up tab contains a list
of all the apps, programs and processes
that are enabled every time you start your
computer. Ifyour computer is brand new,
this list should be fairly small and filled with
essential items. But as you install new apps
and software, this start-up list can become
bloated and slow down boot up. You can
disable auto start-up here.
e.vk ।
1023 MB
B2S MB
□
Ъ Googto Cnd> Htndlv (32 b*)
1пШ Orwr a Stoport AuiSMTt Ir«f lli Ы)
0.Л
13.0 MB
0.7 MB
10.6 MB
329 MB
162 MB
0.7 MB
Process List
With the Processes tab selected,
a list of all processes is shown. Processes
are bits of software that run in the
background, either running or waiting to
run when a corresponding action is taken.
As you can see from the list here, things like
Cortana and AVG are shown; these you
would obviously want to leave.
42 www.pclpublications.com
Using the Windows 11 Task Manager
View Options
The View options at the top of the
Task Manager window allows you to
do several things. You can manually
refresh the current tab and also
change the automatic update
speed. For example you can change
how the processes are displayed.
Either by grouping them by type,
expanding or collapsing the list, or
showing status values.
Task Manager
File Options View
Processes Per
-
Name
Apps (9)
Refresh now
Update speed
Group by type
Expand all
Collapse all
Status values
up Users Details Services
> W. GNU Image Manipulation Progr...
2% 45% 4%
______CPU Memory [_________Disk
Show suspended status
• | Hide suspended status B/s
> (F Google Chrome (12)
0.1% 1,719.1 MB 0 MB/s
Performance Tab
Another useful tab in the Task
Manager is Performance. This gives you a
real-time performance overview, allowing
you to pinpoint exactly how well your
hardware is coping with whatever you are
doing atthetime. If Task Manager is the
only app open, the performance chart
should be very stable but if you are running
several apps, it will show any power spikes.
Resource Usage
If you find your PC becoming
slow and sluggish during normal use, you
may have too many processes running. By
looking at the resource usage chart, you
can see exactly which apps are taking up
the most processing power, physical
memory, disk space and even network
bandwidth. If something is particularly
resource hungry, you can right-click and
stop it.
Fewer Details
You can view a limited version of
the Task Manager by clicking on the “Fewer
Details” button at the bottom of the
window. This makes the window small
enough that it can be left open, in the
corner of your desktop for example, but still
show relevant information. You can get
more information at any time by clicking
“More Details”
www.pclpubLications.com 43
Monitor Tasks with
the Task Manager
If you have a program that isn’t working, want to control what starts up when your PC
does or you want to see what’s running on your PC, then Task Manager is the place to go.
Access it via the Power Menu (right-click on Start) or by pressing Ctrl+Alt+Delete and
selecting it from the Security Options menu.
Manage Your PC
Task Manager is a lot more complex than it used to be and it’s now a useful insight into your PC and app
performance, allowing you to check anything from Wi-Fi usage to app crashes and much more.
Stepl
Task Manager starts life as this fairly unassuming
little window. If you have an app that is
unresponsive, select it and click End Task. Beware that if you do this
to an app with unsaved work in it, you will lose your work. Clicking
the More Details button will expand the Task Manager window.
Step3
You can see what system resources each app is
using in each column. Here Excel is using around
74MB of memory, for example. Memory use is almost at its maximum,
as you can see at the top of the column. Maxed out resources are no
bad thing - after all your PC is there to be used - but when apps
crash, they are usually using resources and not relinquishing them.
Step 2
This window is a little more complex, but the ‘Apps’
part of the window is essentially what we were
looking at in Step 1. Now the apps have been joined by background
processes. Your PC will most likely be running tens of these unless it’s
box-fresh. Here we’ve got 41. These are things such as Cortana,
which runs in the background, and our trackpad software.
Step 4
If an app crashes, then you need to select it and
click End Task as before. You should always try
and give it time to recover (especially if you will lose work). Now
we’ve clicked the Performance tab at the top of the window and
we can see the usage of important elements of our PC.
44 www.pclpubLications.com
Monitor Tasks with the Task Manager
Step 5
Here’s our disk usage - as you can see it’s pretty
active! You will also have this if you have several
big apps open (we’ve got Edge, Spotify, Word and Excel open in
this example). In the previous step you could see our processor
usage, and as you may have noticed, we’ve only been using
around 40 per cent of its capability during the last minute.
Step 8
Although it’s of limited general use, the Users tab
details what apps and processes are running on
a per-user basis. This might be useful if your PC is running slowly
and you want to see what resources someone else who is logged
into the PC is hogging. They might have something wasteful
running in the background, for example.
Step 6
Wi-Fi usage (you can also see wired network
usage if you use that to connect) is more
sporadic as the network connection tends to be used
intermittently - unless you’re copying files or similar. Here we’re
streaming music, which appears to download in chunks. Notice
there’s no data being received or sent right at this moment.
Step 9
The Details tab is really for pro users only and
has full information on each running process and
which user is responsible for it. You can also see how much
resource the process is taking up as well as what is called a
Process ID, or PID, that identifies the process on your machine.
Step 7
The Start-up tab is one of the most important in
Task Manager. While you can configure an app
such as Skype to start-up when Windows does and disable the
same within the app, some applications are sneaky and enable
themselves to start when Windows does. Here you can select the
app and either enable or stop this from happening.
Step 10
Services are programs that run in the
background. The chances are your PC is running
lots of them. For example Windows Defender, the built-in security
software, runs in the background as a service. As well as viewing
the active services in Task Manager, you can click the Open
Services link to manage services on your PC.
vwvw.pcLpublications.com 45
Defragment Your
Hard Drive
The act of Defragging your drive goes back to the early days of computing, where data
was written to the drive in various sectors across the disk platters. This data could be
spread all over, taking time to read, so a Defrag packs it all neatly into readable areas.
Defrag
Most of us have a modern PC with a relatively modern operating system installed on it, regardless of
whether that’s Windows 11, macOSorthe latest distribution of Linux. These systems have been updated and
tweaked in accordance with the advanced hardware technology that’s now available, and will more than
likely see you through a good year or so without you ever having to even look at a defrag tool.
I
liiiiiiiiiimhiii.................
Horton bisk tfoclor
iiiiiiiiiiiiiiiiiiiiiiiiiiiiiiiiiiiiiiiiniiiiiiiiiimiiiiiiiiiiiiiiiifi
iiimiiiiiiiiiiiiiiiiiiiiiiiiijiiiiiiHiiiiniiniiiiiiiiifiiiiim пи
Uritiwlze ~
ООО ООООООООООООООООООООООООООООООООООООООООО^^ДООООООООООООООООО ООО ool
FJ = sto.
о о о о о о о о о о о о о о о о о о о о о о о о о о о оооооооооДДооооооооооооооооооооооооооооооо|
llllllllllllnllllllllllllllill
Cluster 2359 8*
HIIIHIIIIIHIIIHIIIIIHIIHI
Elapsed tine: 88:88:47
------------ Legend -------------
Q - used | - unused
r - reading U - writing
b - bad X - unnovable
Defragging is one of those utilities that exist to cause arguments.
The for camp declare it the best thing you can do with a PC, and
therefore it must be done every week. The against camp laugh
heartily at the amount of time wasted, watching little blocks
being moved around the screen while your hard drive has the
computing equivalent of an extreme workout.
Although there are studies that show defragging every so often
can help older operating systems and hardware, there’s nothing
concrete that suggests a weekly defrag will help out a modern
operating system and hardware. In fact, if you’ve got a
solid-state drive (SSD) installed you shouldn’t be defragging
at all, especially if the SSD is one of the first or second
к generation models. But, and here’s where things get a
little grey, there are also many experts who think that
defragging a modern SSD won’t do too much
harm, and won’t necessarily impede the overall
lifetime of the device - since SSDs have a
к significantly lower read/write lifespan
^k compared to a more traditional,
mechanical hard drive.
46 www.pclpublications.com
Defragment Your Hard Drive
In truth, a monthly check of the state of fragmentation of your
drives is considered a good idea. If Windows 11 recommends that
you perform a defrag, then go ahead and do one. Otherwise, stick
to the old adage: if it ain’t broke...
So, What is Defragging?
As explained in the main intro of this page, overtime the
operating system will write numerous files to your hard drive.
Those files can be the data you’re working with, your personal
data, work and such, and it can be temporary files that the OS
works on in the background. For example, when you browse the
Internet, temporary files are created for every page you visit,
sometimes many per page depending on what’s going on with
the page in question. Most of these files are deleted once the
browser has been closed down, some aren’t. This creates areas of
a drive that files now exist on, and areas where files did exist,
which causes fragmentation.
Each of these blocks of saved, deleted and moved data soon
create fragmented sectors across the physical disk platter (we’re
talking about hard drives here, not SSDs). As the drive heads
move along the platters to retrieve and write data - much like the
needle on a vinyl record player - it has to travel more and from
one end to the other to fetch the data, due to the inconsistencies
created by the frequent writes and deletes.
Defragging will move all that readable data to areas at the front
of the drive platter, so the drive heads don’t have as far to travel
to read the data. This speeds up the reading of data, and helps
get rid of any unwanted leftovers from the number of times a disk
is accessed.
Granted it does go into further depth, but we’re not going to delve
too deep here. If you want to understand more, then we’d
recommend you look up defragmentation online.
Do SSDs need Defragging?
Ask most folks in the know, and they’d say no, an SSD does not
need to be defragged. This is understandable, as there are no
physical platters or drive heads. The data written to an SSD via a
modern operating system is often put into a temporary position
first, then committed to an area of the drive. If you defrag an SSD,
then you’re moving temporary files around before they’re
committed, then moving them once they are, so you’re doubling
the workload of the SSD. And, as we’ve already mentioned, an SSD
has a much lower read/write lifetime than a mechanical drive.
Plus, mechanical drives have average read/access times of around
15ms, whereas an SSD has access times measuring in the 0.1ms
mark. So a defrag won’t make any difference in access times.
However, even ones and zeros written to solid state memory can
get slightly fragmented over time. In which case, it’s often best to
check the state of the drive.
To do this, right-click the drive in File Manager, select Properties
from the menu. Click the tools tab, and click the Optimise button
in the Optimise and Defragment Drive section.
In the Optimise Drives window, click Analyse, to check the state
of the drive. If Windows 11 recommends a defrag, click the
Optimise button.
Conclusion
In short, checking on the health of your drive(s) is something you
should factor into your monthly computer checks - updates, AV
updates, drivers etc. However, you may never need to use a
defrag during the lifespan of your Windows 11 PC.
www.pclpublications.com 47
Update Your
Device Drivers
Keeping your device drivers up to date ensures that your Windows 11 computer is
running at its maximum efficiency. Using the latest drivers for your peripherals and
internal devices improves performance and keeps Windows 11 secure.
Updating Drivers
There are different ways to keep your device drivers up to date. One of the easiest is via the Windows 11
Updater. Here’s how it works.
Stepl
Updating your device drivers through the Windows
Update service is a perfect solution for those who
don’t want to trawl the manufacturer support web pages or forums
for the latest drivers. To start click on the Windows button in the
taskbar. Go to the Windows Update Section, and look for the
Advanced Options entry.
Step3
Each individual update, be it a device driver or
some update to a third-party, supported product,
will have a tick box to the left of its title. Click each device and
update you want to have installed, then click on the Download &
Install button located in the bottom-right of the current update
window, to begin the update process.
Windows Update > Advanced options > Optional updates
Driver updates (3)
N you h»vw * tpeofic problem, one of these dnvers might help. Otherwise, automatic updates will keep your drivers up to date.
Q HP - Printer -12/5/2017 12:0000 AM - 24.94.1.7079
Q AOC International (Europe) GmbH Monitor 8/26/201512:00:00 AM 1.0.0.0
Q Realtek - LAN. Other hardware • Realtek USB GBE Family Controller
Install selected updates (3)
Ct Get help
Download & install
Step 2
Within the Advanced Options window, click on
the Optional Updates entry. In here are where
all the official Microsoft supported updates for your device
drivers will be, among other specific updates for non-Microsoft
related apps. You may need to click the Driver Updatesentry to
expand and view what’s available.
Step 4
Windows 11 will now download the install the
selected updates. Depending on the size of the
update and the speed of your Internet connection, it may take some
time to download. Once the selected entries are downloaded, they’ll
automatically be installed and updated. You may need to restart
your computer; Windows 11 will inform you if necessary.
Windows Update > Advanced options > Optional updates
Driver updates (3)
II you hevw • «росНк. problem orw ol th«M driver* might help Otfwrwrw «ulcmatu update* will keep your driver* up to date
□ HP Printer 12/5/201712:00:00 AM 24.94.1.7079
Q AOC international (Europe) GmbH Monitor • 8/26/201512ЧЮОО AM • 1000
Q Realtek LAN. Other hardware Realtek USB GBE Family Controller
Select the updates you want to install
• Get help
Updates available
Last checked: Today, 10:15
[ Install now |
HP - Printer -12/5/2017 12:00:00 AM - 24.94.1.7079 Installing 0%
More options
0 0 Pause updates
Pause for 1 week
Update history
48 www.pclpubLications.com
Update Your Device Drivers
Finding Other Drivers
Good as it may be, the Windows 11 Update service doesn’t pick up all the latest drivers. A graphics card
driver may offer better performance in a new game, so you’ll need to look elsewhere.
Stepl
Step 4
Many device manufacturers develop their own
driver update software. The major graphics
card manufacturers do (Nvidia and AMD), as well as the processor
manufactures, Intel and AMD. For example, Intel uses the Intel Driver
There are times when you may need to force
Windows 11 to look for an updated driver beyond
the one that it’s installed by default. When you connect a device,
Windows 11 will automatically interrogate the device, and install
the driver that fits the device signature. However, these aren’t
always the best drivers. Right-click the Windows Start button, and
select Device Manager.
Step 2
You may need to dig a little deeper to locate
updated drivers for your devices. Printers are
often covered by the Windows 11 Update service, but they can take
time to filter through the service before reaching your desktop.
To check on the latest drivers, go to your printer manufacturer’s
support page, look for drivers and find the product you have.
Step5
From within Device Manager, find the newly
installed device from the available list of
categories. Click the arrow to the left of it to expand its details - in
case there are more than one device available in the category.
Right-click the device, and select Update Driver. This will open a
new Update Driver window.
Human Interface Devices
*• IDE ATA/ATAP1 controllers
! Keyboards
Щ Mice and other pointing devices
“ И Monitors
Q Generic Non-PnP M—
Л Generic PnP Monit
Network adapters
Other devices
I Portable Devices
S Print queues
Ж Pnnters
□ Processors
SO host adaptors
| Security devices
f* Software components
Д Software devices
Update dnver
Disable device
Uninstall device
Scon for hardware changes
Properties
Step3
Graphics card are devices that frequently having
driver updates. This is mainly due new games
being released, and tweaked for certain cards, be that an NVIDIA
or AMD card. There are also security fixes, and quality updates that
can be applied, as well as some performance updates over time.
Windows 11 is still quite young, so expect better drivers overtime.
Step 6
The Update Driver window enables you to search
for the device driver. There are two options: you
can have Windows 11 automatically search your computer for
updated drivers, or you can specify a location for Windows 11 to
look for any drivers (such as any you’ve downloaded). Click the
option that applies best for you.
www.pclpublications.com 49
Using the
Power Menu
Windows 11 boasts a secret power menu, that gives you access to several useful system
and maintenance tools and features. We show you how you can use it to your advantage
to quickly access networking settings and extra features that power users need.
Power Up
The secret Power Menu enables the more advanced Windows 11 users among you to quickly access key
settings that you probably commonly use, but are buried deeper within the system.
Start it Up
Open the Power Menu using the Start button,
but instead of just left-clicking it to open the
Start menu, right-click the button. Note that you can also shut
down or sign out here, too. This menu was originally created for
users who felt the old Windows 8 Start screen didn’t give them
access to what they needed.
Uninstall Desktop Apps
The topmost available option
within the Power Menu, Apps &
Features, takes you directly to the Apps section within the Windows
11 Settings. From here, you can modify, uninstall and get to advanced
options for all the apps you currently have installed on your system. It
may only save a couple ofclicks, but every shortcut saves time.
Command
There are numerous shortcut access options
available in the Power Menu. For example, you
can access the new Windows 11 Terminal, both as standard access or
as an elevated, Administrator access. You can also Run commands
directly from the Power Menu, Search for files or folders, and more;
plus view your Windows 11 Events and logs.
Hot Keys
You can access the Power Menu by pressing the
Windows key + X on your keyboard. As well as
opening the Power Menu, it enables you to use hot keys to quickly
launch any of the options within the menu. You can only use the
hot keys if you use the Windows shortcut key to open the Power
Menu - unless Microsoft change that option in a future update.
Windows PowerShell
Copyright (C) Microsoft Corporation. All rights reserved.
Install the latest PowerShell for new features and inprovenents! https://aka.ms/PSWindows
PS C:\Users\david»
Option HotKeys Description
Programs (Apps) & Features F Opens Windows Programs & Features
Mobility Center В Launch Windows Mobility Center
Power Option О Opens Windows Power Options
Event Viewer V Opens Windows Events viewer
System Y Opens Windows Systems Properties
Network Connections W Opens Network Connection pane
Disk Management К Opens Disk Management on Windows
Computer Management G Opens Computer Management settings
Command Prompt C Opens Windows Command Prompt
Cgmmgnd Prompt Admin A gB&ulhsJwamaand frame! Admin
50 www.pclpublications.com
Power Menu - Storage Sense
Using
Storage Sense
Carrying over from Windows 10, Windows Il’s Storage Sense helps keep your computer
in tip-top shape by deleting unwanted content as your hard drive begins to run out of
space - which it inevitably will do.
Sense and Sensibility
Storage Sense looks different in Windows 11 compared to Windows 10, so if you’re used to using it, check
this page out first to see how it works.
Stepl
To get to the Storage Sense options, click on the
Windows Start button, and go to Settings >
Storage > Storage Sense. Alternatively, you can get there via the
Power Menu (right-click the Windows button, or press the Windows
key + X) and choose Settings, then Storage.
Step3
Click the sliding button to enable Automatic
User Content Cleanup. Here you can opt to
configure cleanup schedules, such as removing files every day,
week or month; or just when Windows 11 reports that your hard
drive is running low on space.
Step 2
Click the Storage Sense option within the Storage
section, if you haven’t already done so. Don’t worry
about turning on just yet, though. In Storage Sense you have a
number of options available. The first is enabled by default: ‘Cleanup
of temporary files’, which will remove unnecessary temp files from
your system as you update Windows 11.
Step 4
You can choose when to delete files in your
Recycle bin. The default is 30 days, but you can
opt for 1,14 or 60 days. Files in your Downloads folder can be
auto-deleted if they haven’t been opened for more than 1 day,
through to 60 days. However, ensure you backup your files, if
Storage Sense deletes them from the Downloads folder.
Delete files in my recycle bin if they have been there for over
30 days (default)
jcurity
Delete files in my Downloads folder if they haven t been opened for
pdate more than:
| Never (default)
1 day
14 days
30 days
60 days
wwvv.pcLpublications.com 51
Improving the
Windows 11 Firewall
The built-in Windows 11 firewall is a surprisingly good security application. While it may
not be as efficient as something offered by one of the third-party security suites, it’s
certainly more than adequate for the average user.
Getting to Know Your Firewall
Generally, there’s little need to ever configure the Windows 11 firewall. However, getting to know how it works
and improving it, is part of being more security conscious. Here’s some tips on how to better manage it.
Stepl
You can open the main Windows 11 firewall console
window by clicking on the Windows Start button
and entering ‘firewall’ into the search box. Click the returned link,
Firewall & Network Protection, to launch it.
Step3
Under the status of the networks are some links
that will help you configure and improve the
firewall, as well as turning it on or off (which isn’t recommended
under any circumstance other than the installation of an
improved third-party firewall). To begin with, start by clicking on
the Advanced Settings link.
Step 2
The Windows 11 firewall console window should
be On by default, unless you’ve installed a
third-party security suite which contains its own firewall. There are
two kinds of network listed: Private and Public (and Domain if you
have Windows 11 Pro version). Private is for home or work, whereas
Public is for cafes and the like.
Step 4
The Advanced Settings link launches a new console
window. This new console defines the inbound and
outbound rules for the entire system and its installed programs and
applications. You can set authentication rules between computers,
view and create new firewall rules, view the current firewall policies,
and even monitor what’s being blocked in real-time.
Inbound connections that do net mach a nJe ere blocked О Outbound connection» that do not match a rUe are slowed P5 Window* Frewal Properties
Getting Started Authenticate communications between computers Create connection security role* to speedy how and when connection* between computer* are authenticated and protected by usng Hemet Protocol security OPtec) C5 Connection Secuity Rule* View and create firewall rules Create frewal role* to alow or block connecters to specified program* or port* You can also alow a cormecten only i 11* ajhenbcated or 11 come* from an authorized user group or computer By defaut nbound connection» are Mocked unless they match a rule that allows them, and outbound connections are alowed iriees they match a nje that Mocks them П Inbound fiUes Q Outbound Rules View current firewall and IPsec policy and activity network connection» Q Moneomg
52 www.pclpubLications.com
Improving the Windows 11 Firewall
Step 5
Click on Inbound Rules to the right-hand side of
the main console window. This will list the current
rules that allow traffic onto your computer and to the applications
that require it. For example, in this screenshot there’s rules for
various games that allow multiplayer interaction and the ability to
‘talk’ to the game server, as well as install updates.
Step 8
Sometimes, uninstalling a program doesn’t
automatically remove it from the Windows
firewall. The exact reasons why are varied, but to help improve
the efficiency of the Windows firewall, whenever you remove a
program from your system, it’s worth checking the firewall to see
if its entry has been deleted. To delete an entry, right-click then
select Delete from the menu.
Cl Assassins Creed Syndicate И Allow “Ho— d:\games\Ubrtoft C
О Borderlands Private Ves Allow No D:\games\bordertai
9 Borderlands Private Yes Allow No D:\games\bordeiiai
Q Borderlands Public Yes Block No D:\games\borderlai
Q Borderlands Public Yes Block No D:\games\bordertai
9 Borderlands.exe Public Yes Allow No D:\games\Bordert»
О Borderlands.exe Public Yes Allow No DA games', Bordeitai
ЩьХД Disable Rule
О t All Yes Allow No DAgames'Steam'st
O Conan 1 Cut - Yes Allow No D:\games\Steam\st
9 Conan 1 All Yes Allow No D:\games\Sleam\rt
OCountei De)ete All Yes Allow No DA.games\Steam\st
©Counter" All Yes Allow No D:\games\Steam\st
9 DC Unn Properties Private Yes Allow No DAgames\dc unrve
ODCUnn Private Yes Allow No D:\games\dc unrve
9df Private Yes Allow No D:\games\dforce\d
9df Private Yes Allow No D:\games\dfoice\d
О DOOM Yes Allow No D:\games\Steam\st
О DOOM All Yes Allow No D:\games\Sleam\st
9 EVERSPACE— All Vies Allow No D:\games\Steam\st
9 EVERSPACE- All Yes Allow No DAgamesASteamXst
9 Firefox (CAProgram Files (х96)\МогШа Rr._ Private Yes Allow No CAProgram Fites (x;
9 Firefox (CAProgram Files Ix86i' Moiilla Fir... Private Yes Allow No CAProgram Files (x
Yn _jUc
Step 6
These rules are automatically entered into the
firewall when you install the program, game or
app. When you install a program you’re required to accept and
authenticate the process, clicking on Yes to start the installation.
This level of administrative access also allows entry of the program
into the firewall. Pick one of the entries and double-click it.
Step 9
You may not want to delete a rule as it could be
used later, or if you re-install the program and it
fails to re-create the firewall entry. The recommended process
then is to block the rule from communicating with the outside
world. To do this, double-click the rule, and from the General tab
click the Block the connection button.
D:\games. borderlands'
DAgamesXborderlands'
D:\games\borderlands'
DAgamesXBorderlands'
D'games'Borderlands'
DAgames\$team\rtean
DAgames\Steam\stean
DAga meASteamXstean
DA games',$team',stean
DA games Steam , stean
D:\games\Steam\stean
D\games\dc universe i
D:\games\dc universe <
D:\games\dforce\df.eo
D:\games\dforce\df.exi
DAgames\Steam\stean
DAgames\$team\stean
DAgames\Steam\stean
DA games , Steam , stean
CAProgram Files (x86)\
CAProgram Files (x86)\
D'games'Steam,stean
D:\games\steam\steen
View
fl Refresh
j, Export list..
Q Help
Conan Eales
* Disable Rule
.< Cut
life СоРУ
X D*«e
3 Properties
Ц Help
Step 7
The properties of each firewall entry allow a
greater degree of control forthat particular
program. You can change the name of the entry, allow or block
the connection, define the physical location of the program on
your computer, allow access to the program from remote
computers, set the protocol and port number it’ll use, and even
which network controller to use.
Step 10
Similarly, the Outbound Rules link will detail the
various programs that are allowed to
communicate from your computer to an external destination. It’s
good practise to familiarise yourself with the rules of the firewall,
as a rogue program will need to set a rule to communicate. You
can then block that rule and stop the threat from reporting out.
www.pcLpublications.com 53
Secure Your
Home Network
We’ve mentioned previously that an attack doesn’t always come from the other side of
the globe but can indeed be a little too close to home at times. Home network hacking is
possible with the simplest of tools; easily found on the Internet.
Network Protection
Without being too paranoid, it’s remarkably easy to get into a neighbour’s home network. If you live in a block
of flats or you use powerline adapters, you may need to consider these ten stepsfor better network protection.
Stepl
The most common entry point to gain access to
your network is via the router. The router from your
ISP may well be offering the latest forms of encryption but it doesn’t
take a genius to trawl the less reputable sections of the Internet to
obtain a list of passwords. Therefore, change the default username
and password needed to access it.
Step3
It can be a pain but try disabling DHCP on your
router and opting for static IP addresses. Every
device that connects to a DHCP router will receive an IP address. By
eliminating that you get to specify the address range available. It’s
not fool proof but it’s worth considering.
Step 2
Most routers these days come with a form of
authentication called MAC (Media Access Code)
address filtering. Every networkable device, computers, tablets,
games consoles, come with a unique MAC address. The filtering
allows you to enter the MAC addresses of your devices, so only
they can be used on your router. Consult your router
documentation for more details if required.
Step 4
According to Trustwave’s 2013 Global Security
Report, many home network hacks are conducted
when the household is away or asleep. This leaves the hacker with
ample opportunity to steal bandwidth and view files you may have
on a NAS drive. The short, simple solution is to power off the router
at night or if you go out for the day.
54 www.pclpublications.com
Secure Your Home Network
Step 5
Powerline adapters are an excellent resource for
connecting wired network devices, without trailing
lengths of cable around the home. However, depending on the
adapter, it is possible to use another adapter to gain access to yours.
In newer homes it’s an easy enough task to pick up another user’s
network, so use the Encryption button if the adapter has one.
Step 8
Sharing resources and files from one computer
to another is perfectly fine but consider sharing
less if you live in close proximity to others. Once a hacker has
gained access to your network, getting to any shared folders you
have will be a doddle. In extreme cases don’t share anything,
but generally tighten password control.
Step 6
Networking a home with Ethernet cables isn’t a
difficult project and it offers faster connection
speeds than that of wireless. However, if you’re living in shared
accommodation ora block of flats, make sure that any unseen
cable lengths can’t be accessed by a neighbour. It’s easy enough to
splice into an Ethernet cable and steal bandwidth.
Step 9
Remote administration on both the router and
computer certainly can help you out when you’re
not at the keyboard. Perhaps you connect to your home network
from work? Whatever the reasons, it does leave a potential gap in
your home network security. Consider closing it completely or
double-checking the authentication is top notch.
0 Allow this computer to be controlled remotely
Invitations
Set the maximum amount of time invitations can remain open
Hours ~Я
I—I Create invitations that can only be used from computers running
L_ Windows Vista or later
OK Cancel
Consider using a network mapping program, such
as Open-AudIT, to gain a better understanding of
what devices are attached to your network. Become familiar with
the addresses, manufacturer, model IDs and so on of every
connected object. That way, should anything new appear, you’ll
know it’s not something you allowed.
Step 7
If you run a small office make sure that all your
wall ports are located in areas where they are
secure. Behind desks and generally away from where the public or
any visitors may be able sneakily plug a laptop in.
Step 10
Open-AudIT
__-________
HOME QUERIES ADMIN HELP
List Devices
Workstation
sy stem-10
Microsoft(R) Windows(R) XP Professional 172.16Л.0, All, Windows, XP
Debian Serge
172.16.0.0, All, Debian, Linux
Status production
Manufacturer VMware, Inc. 7 Ultimate
’i. vmwo'e Model VMware Virtual Platform
Serial 1234511
All, Linux, virtual
172.16.0.0, All, Wm7, Windows
172.16.0.0, All, Linux, Ubuntu
10.255.0.0, All, Printers
system-5 Printer
10.255.0.5
HP LaserJet 4100tn
10.255.0.0, All, Printers
Workstation 192.168.0.6
10.255.0.7
192.168.0.8
system-9 Router
192.168.0.9
Microsoft(R) Wmdows(R) XP Professional 192.168.0.0, All Windows, XP
Microsoft Windows 2000 Server
Cisco 1841 Router (IOS vlO.l)
Cisco 1841 Router (IOS vlO.l)
10.255.0.0, All. Win 2000, Win Svr
192.168.0.0, AR, Routers
192 .168.0.0, АИ. Routers
www.pclpublications.com 55
Ш Limiting Data Usage
when Tethering
Tethering means connecting your phone to the mobile data network and then connecting
a second device via Wi-Fi to the phone to make use of that connection. Windows 11 can be
data-heavy; a problem if your phone has limited mobile data allowance.
Set Your Tethered Connection to Metered
Windows 11 can be quite data-heavy, as mentioned, especially if an update happens to become available when
tethered. Luckily, you can tell Windows to automatically limit data use.
Stepl
Cellular data connections are set as metered by
default. Wi-Fi and Ethernet network connections can
be set to metered but aren’t by default. Some apps might work differently
on a metered connection to help reduce your data usage. Some updates
for Windows won’t be installed automatically either.
Step 2
To set a Wi-Fi network connection as metered,
click Start > Settings > Network & Internet >
Wi-Fi > Manage known networks. Select the Wi-Fi network > Properties >
turn on Set as metered connection. Unfortunately, many Windows apps
completely ignore the metered connection setting.
Network & internet
Connect manage known networkc meter«J network
Ethernet
Authentication. IP and DNS tattingv metered network
(<f>) Mobile hotspot
' Share your internet connection
(JV, Flight mode
Network profile type
Public (Recommended)
Your device H nor discoverable on the network Use this In most rases when connected to a network ar horn
О Private
Your device it discoverable on the network. Select this if you need file sharing or use apps that communicate <
people and devices on the network
Configure firewall and security settings
Authentication settings
Metered connection
Some apps might work differenlly tu reduce data usage when you're connected to this network
Set a data limit to help control data usage on this network
IP assignment Automatic (DHCP)
DNS server assignment Automatic (DHCP)
Check Network Usage Details
Manage Browsing Data
You can also view a log of how much data applications on
your PC have used in the last 30 days. This can help you
identify applications that might be using data in the
background. To check this, head to Settings > Network &
Internet > Data usage and click the graph to see more details.
You should now have reduced background data use, including
updates and cloud syncing, so data use will be in the apps you
use; for example, Google Chrome. You can install a handy
extension for Chrome which limits data. Go to www.chrome.
google.com/webstore/ and search for Data Saver.
56 www.pclpubLications.com
Limiting Data Usage when Tethering
Pause or Disable OneDrive
If you use OneDrive to backup images etc., pausing it while you are tethering can help to reduce data use. If you
never use OneDrive, you can even completely disable it.
Stepl
When you close your laptop lid, the default
setting will be for Windows 11 to go into low
power sleep mode. This is obviously no good if you are using
your laptop with an external monitor, as it will make the laptop
unusable. To solve this problem, click on the Battery icon > power
and sleep settings in the taskbar.
Step3
Press the Windows key + R to open
the Run box. Type gpedit.msc and click OK.
In the Local Group Policy Editor, in the folder list under
Local Computer Policy, navigate the folders to Local
Computer Policy > Computer Configuration > Administrative
Templates > Windows Components > OneDrive.
Step 2
OneDrive in Windows 11 can be disabled through
your computer’s Local Group Policy Editor. This
doesn’t remove OneDrive from your PC but it stops it from syncing
with the cloud or connecting with other apps, and removes it from
the navigation pane in File Explorer.
Step 4
On the OneDrive screen, under Settings,
click Prevent the usage of OneDrive for file
storage. In the Prevent the usage of OneDrive for file storage box,
select Enabled, then click OK. Be aware that disabling OneDrive like
this will disable it for all users of the PC, not just you.
Check Task Manager
Reduce Streaming Video Quality
The Task Manager is a great tool for checking to see which
apps or services are using a lot of data at any time. To open
the Task Manager, press Ctrl+Shift+Esc or search for it in the
Start menu search field. Click at the top of the Network tab to
display high usage services at the top.
Streaming or downloading videos is a surefire way to
burn through your data quickly and is best avoided when
tethering. However, if you need to view video over a tethered
connection, you can tell Windows to reduce quality in Settings
> Apps > Video Playback. Click Allow video to play at low res’.
www.pclpublications.com 57
Protect Devices
on Public Wi-Fi
There are few places where you can’t now find a wireless connection for your laptop. And
while this is great for those of us that want to stay connected day and night, accessing
Wi-Fi in a public place does bring with it some dangers not found on your home network.
What Makes Public Wi-Fi Unsafe?
The very same features that make publicly accessible Wi-Fi hotspots desirable for you and us, such as the lack
of authentication needed to connect, also makes them desirable for hackers.
58 www.pclpublications.com
Protect Devices on Public Wi-Fi
Let us start by saying that not all public Wi-Fi is equally unsafe. A
coffee shop that has a new Wi-Fi password chalked up on the board
every day is probably safer to use than one where the password
has been the same for five years, but not by much. As a rule of
thumb, you should assume that any network connection you do
not control will have fewer defences against interception and
should be treated as unsafe.
Hackers are able to insert themselves (virtually) between your
device and the network connection point, so all of the information
sent to and from the network passes through the hacker, who then
passes it on. As this information passes, it can be collected without
you even knowing it has passed through a third party device. Even
if a hacker doesn’t want to farm your data directly, if you allow
file-sharing across a network then public Wi-Fi connections can be
used to distribute malware. This malware could hide itself on your
device and cause all sorts of problems, from logging keystrokes to
sending spam emails to contacts as if they are from you.
As the use of public Wi-Fi increases, you can expect the number of
different ways hackers can find to attack those using it to
increase, as well. That doesn’t mean you need to stop using Wi-Fi
Hotspots, you just need to ensure that you are not the easy target
most hackers are looking for.
If you want to stay connected, but also want to keep yourself and
your device safe, there are a few simple things you can do to
tighten up security without compromising your Internet access.
Five Ways to Make Public Wi-Fi Safer to Use
Following any one of these steps will increase your security when using public Wi-Fi. Using all of them will
make your PC many, many times safer and more secure.
1 - Keep Your Device Updated
Software updates, as well as providing new features,
will often include security updates, so it is important to
make sure all of your device software is the most recent
version. This includes apps and programs, as well as OS
updates. Almost all modern devices, from your laptop to the
smartphones and tablets you use, make it very easy to keep
things updated, often alerting you to the availability of an
update or processing updates automatically.
If you have turned off automatic updating on your device (and
don’t want to turn it back on in the settings), make a point to
regularly check for them yourself and of course apply them,
as soon as possible, especially on devices that may be used to
connect to public Wi-Fi.
In Windows 11, you can find update information in Settings >
Windows Update. If updates are available to download, they will
be displayed here (along with any previous failed updates, etc.).
Settings
David Hayward
Find a setting
Windows Update
Updates available
Last checked Today. 09 0 7
System
Bluetooth & devices
Network & internet
Personalisation
Apps
Accounts
Time & language
Gaming
Accessibility
Privacy & security
Windows Update
2071 JO Cumulative Update for Windows 11 for «64 based Systems (I
2021-10 Cumulative Update for NET Framework 3.5 and 4.8 for Wine
Windows Malicious Software Removal Tool «64 vS 94 (КВвЭДвЗО)
More options
00
Pause updates
Update history
Advanced options
0
t
О
%
www.pcLpublications.com 59
о
Protect Devices on Public Wi-Fi continued...
2-Turn off Sharing
Unpack the new
CyberGhost 7!
Your PCs, phones and tablets are designed to interact easily
with other devices you own, using a system known as
Sharing. Sharing, as the name suggests, allows data or files
to be shared or accessed from devices on the same network.
This is normally perfectly fine when all ofyour devices are
connected to your home network, but not so fine when you
are connected to a public Wi-Fi hotspot. When using your
devices online in public, you should always turn Sharing off.
This can be done in Network and Sharing (on a Windows PC).
In Windows, you can also just select “Public” when asked
about a new network connection. Many mobile
devices also allow you to turn off Network
Discovery or Device Visibility, meaning
it is hidden from other devices
connected to the same network. You
can normally find this option in the
Connections or Wi-Fi settings. In
Windows 11, you can find further sharing options in
Settings > Apps > Apps & Features > Share Across Devices.
3-Use a VPN
Apps > Apps & features
Choose where to get apps
Share across devices
Continue app experiences on other devices connected to your account
О Off
О My devices only
(2 Everyone nearby
View apps and services you've given access to through these accounts: Microsoft account
Related links Privacy Statement
A VPN, or Virtual Private Network, is a great way of protecting
yourself and your device from hackers. They are becoming
increasingly popular and therefore increasingly cheap and
easy to use.
I
A VPN provides you with a secure, private and encrypted
network to log in to, from your device. Any data sent to and
from your device is then encrypted by the VPN at both ends
(known as end-to-end encryption). Anyone trying to access
your data would need the encryption key to decode it.
There are hundreds, if not thousands, of VPN services
available, for computers, smartphones and tablets. Some of
these are free and others charge a small monthly fee,
depending on the level of security offered. Even a basic, free
VPN is better to have than no VPN at all!
Once the VPN is set up, all you need to do is log in to it from the
device you want to protect before using the public Wi-Fi connection
as you normally would to browse the Internet, send emails, etc.
60 www.pcLpubLications.com
Protect Devices on Public Wi-Fi
5 - Use Only SSL Connections
4 - Install and Maintain Anti-virus Software
Having a good Antivirus package installed is
extremely important, even if you only ever
use your device in your own home and
even more important if you regularly
use public Wi-Fi hotspots.
Many modern antivirus packages
offer browser protection, helping
you to identify malicious websites
before you click a single link on
them. They also make it very hard for
hackers to install malicious software on
your device remotely, by offering
improved firewalls and malware scanning.
Notably, it is not enough simply to have
antivirus software installed. You also need to
make sure that it is regularly updated with the
latest malware definitions, so that it knows
about the latest threats and is able to counter
them effectively.
Some of the biggest names in Antivirus
software include: Norton, McAfee, Symantec,
Bitdefender and Kaspersky, all of whom offer a
range of packages for home and business. You
can also find very good, free software from the
likes of AVG, Panda Security and Avast.
= Security at a glance
1 Л Home Q Virus & threat protection Я Account protection Firewall & network protection See whats happening with the security and health of your device and take any actions needed. Q Я <ча
В App & browser control Д Device secunty Device performance Bi health Virus & threat protection Account protection Firewall & network No action needed. No action needed protection No action needed
rfi Family options □ App & browser control Device secunty Device performance & No action needed. View status and manage health hardware security features No action needed.
Many of the biggest, frequently used websites, now use SSL
connections (particularly since Google suggested that
websites not using the HTTPS protocol would be flagged
as unsafe and potentially appear lower in the search results).
As a general rule, even when not browsing through public
Wi-Fi, any websites you use regularly and that require you to
log in or enter your credentials, should be set to “Always use
HTTPS”. Most websites that ask for details about you have an
HTTPS option somewhere in their account settings (if
they don’t already force HTTPS across the site).
CO bdmpublications.com
IDM Publicatic
Connection is secure
Your information (for example, passwords or credit
card numbers) is private when it is sent to this site.
Learn more
г
Certificate (Valid)
u
This might not seem as important on a
videogame forum as it does on a
banking website, but hackers are
aware that people use the same
passwords over and over again,
so seemingly “safe” websites can
be a goldmine of information
about you for those clever
enough to realise it.
ft
0
Cookies (26 in use)
Site settings
Photogra,
The Beginners' (
www.pcLpublications.com 61
HHow a VPN Can Improve
Windows Security
We’ve emphasised the enhanced privacy that a VPN offers when you’re connected to its
services, and the heightened levels of anonymity, but what security benefits does a VPN
bring to a Windows 11 computer with an antivirus program already installed?
Security Beyond Anonymity
It’s a good question: how can a VPN improve Windows security? While the privacy side is well catered for, there
are some good security enhancements and features a VPN brings to the table.
Feature 1
This doesn’t happen often, but an ISP can
become compromised and details of user
activities leaked or stolen. Using a VPN can hide your browsing
activity from trackers and even your ISP, enabling you to browse
without the fear of having your details leaked or accessed by others.
Feature 3
To expand the previous feature, VPNs filter web
pages that are dangerous or contain threats. Even
with a good antivirus client installed, you can still access a dangerous
site. Using a VPN prevents the site from even being loaded.
4^
CyberGhost has protected you
from malicious content!
Feature!
Many VPN providers utilise a level of antimalware
into their security layers. This enhances your
security by filtering any downloads through the VPN first. Should
there be a virus present, then it can be removed or stopped at the
VPN before it even reaches you.
Feature 4
The connection between you and the VPN server
is encrypted to the highest possible standards.
This makes it near impossible for some external element to gain
access to the data you’re transmitting. Online banking and shopping
are extremely secure with a VPN.
62 www.pclpublications.com
How a VPN Can Improve Windows Security
Feature 5
Public and free Wi-Fi hotspots are notorious
when it comes to mobile security. Anyone with a
little knowledge and some free tools via the Internet can intercept
public Wi-Fi networksand hijack your connection, revealing all your
data. A VPN encrypts the data and protects you.
Feature 8
Most VPNs also add an extra layer of security
whereby they actively block any advertising
from websites. Internet ads are a necessary evil in some ways,
as they provide much-needed funds for your favourite freely
available websites. However, some contain malicious content
and need to be blocked.
Feature 6
If you’re working abroad, or you’re a remote
worker, a VPN connection to the company’s
servers ensures that all the sensitive business data remains secure.
It’s difficult for a company to ensure 100 per cent security with
mobile and off-site workers, but a VPN provides a secure tunnel
straight to the company itself.
Feature 9
Using HTTPS instead of HTTP utilises the secure
side of the Internet protocol. Sadly, it’s not
always implemented either in browsers or by users. Many VPNs
force all websites to use the secure connection that a HTTPS site
offers, thereby enhancing your browsing security.
Feature 7
The availability of iOS and Android VPN clients
means that your call data and data stored on
your device is also secure. Mobile VPN apps use the same levels
of protection and security, so your data can’t be stolen when
you’re not even aware of it.
Feature 10
In some countries, data retention laws are quite
archaic, meaning governments and other
bodies are able to access your data log for as long as you’ve been
able to access the Internet. A good VPN won’t detail any logs of
your browsing and in most cases won’t even hand over any
personal information relating to you to other agencies.
Automatic Country Manual
The best server is chosen automatically
www.pcLpublications.com 63
Blocking PUPs with
Windows Defender
PUPs, Potentially Unwanted Programs, are bits of software that can sometimes be
stealthily installed when you install other free software, usually by making it a default
installation option with the choice to opt out.
Enable PUP blocking
PUPs can include toolbars, browser extensions, adware and other unwanted software. In almost all cases, this
software should be called DUPs (Definitely Unwanted Programs).
You can enable PUP protection with System Centre
Config Manager, PowerShell or Microsoft Intune. For
this guide, we’ll be using the PowerShell, as this is available within
Windows 11 without installing any additional software; as long as
you follow the instructions carefully, it isn’t as scary as it sounds.
Stepl
The PUP blocker is now enabled on your PC. You
will not see any new options displayed in Windows
Defender but you will see “Potentially unwanted software” listed
once something is blocked. If you want to disable it in the future, just
run the above command again, replacing the 1 with a 0.
Step3
To access the PowerShell interface, click the
Windows Start button and type ‘powershell’. Within
the returned result, for Windows PowerShell, click on the Run as
Administrator. Type the following command at the prompt:
Set-MpPreference -PUAProtection 1, and press Enter.
Step 2
PS C:\WINDOWS\system32> Set-MpPreference PUAProtect: 1_
PUPs are blocked when a user attempts to
download or install a suspicious file or if the file
meets one of these conditions: the file is being scanned from the
browser, it is in a folder with “downloads” in the path; or it is in a
folder with “temp” in the path. The offending file will then be
placed in the quarantine section.
Step 4
64 www.pclpubLications.com
Block PUPs - Fonts
Аа
Installing
New Fonts
Windows 11 now includes a new, easier way to install and manage system fonts. This is
part of Microsoft’s ongoing process of moving all the system options and features to the
main Settings interface. It even allows you to download from the Store.
Install and Manage Fonts
Installing and Managing fonts required a bit of effort, but now you can install any font available fordownload in
the TrueType, OpenType or PostScript file formats.
Stepl
You can now find the fonts controls in Settings >
Personalisation > Fonts. Here you will see a
scrollable list of your current fonts, each with a visual example of
how they look. This is a much more user-friendly way of viewing your
fonts, letting you see exactly what each will look like when used.
Step3
Click on any font in the list to view the available
font faces and to see the font as it will display at
different sizes, using the slider. You can type a word or sentence into
the box at the top to see how it will look in that font. To uninstall a
font, simply click the Uninstall button on the font preview screen.
Metadata
Full name
Font file
Version
Designed language
Designer/Foundry
Manufacturer
Copyright
Select a font face to see its metadata
Light v
Metadata may differ between font faces within a f
Calibri Light
C.\WINDOWS\FO
Uninstall
Version 6.23
Arabic; Armenian;
latin
Luc(as) de Groot
Microsoft Curpor
© 2018 Microsoft
Hebrew OpenTyp
Hancock & John I
source software u
dauiuliun fui dt
Step 2
You can search for fonts using the search field at the
top or just look through the alphabetical list. You
can also filter the list by language. Each font is shown with the
number of font faces it includes. A font face is a different version of
the same font, i.e. regular, bold, italic, italic bold, etc.
Step 4
To find new fonts, click the Store link at the top of
the main fonts page in the settings. The Store will
open with all available fonts displayed. To install one, click on it in
the Store and then click the Get button, or the Buy button if the font
is not a free one. Installation is automatic, and now complete.
Type here to search
All languages
Adlm'
Bamu'
Ethi
'Nkoo'
Osma'
Tfng
Arabic
liable.
Bang la
Bopomofo
Brahma
Braille
presence
LND1D
;Works
PTED OV...
г tlie
zon comes
break of
Kaleidoscopes They waltzed The so
display gracefully ocean
beautiful through the calms
patterns. air.
Arial Arial Rounded MT Bahnschri
9 font faces 1 font face IS font fa
The starry night Meteors created a
brightens our sky-symphony ol tKeiRUd
dreams. lidhi.
Berlin Sans F8 Bernard MT Blackaddt
3 font faces 1 font face 1 font faci
5ab60t)bftF60 A cflncpfire The st
HhlfMmNP cmcfeLts as the bright
children. aatlntr. dream
www.pclpubLications.com 65
Ш Manage Disk Partitions
in Windows 11
Disk partitioning is the creation of one or more separate regions on a PC hard disk (hard
drive) and all modern drives need at least one partition to begin storing files. A partition
could be the size of the whole drive or just a tiny part of it.
The Disk Management Tool
There are several free programs available for creating partitions but the Disk Management tool is just as
good and built right in to Windows 11.
Stepl
The first thing you need to do is find the Disk
Management tool. The easiest way to open the tool
is to use the hidden Start button menu. Right-click on the Start menu
button and select Disk Management from the menu that appears.
There are several system tools here, so it is a useful trick to know.
Step3
You can use the seemingly simple Disk
Management tool to resize, create, delete and
format partitions and volumes, as well as change their drive letters
and all without downloading or paying for any other software. You
can also simply use it to check the health of your disks.
Step 2
The Disk Management tool shows all of your
internal and removable drives (even USB flash
drives, etc.) along with details of the capacity and current amount
of space being used. Depending how your hard drive was initially
configured,you will see one or more partitions in place.
Step 4
The tool shows partitions and volumes, which are
similar but different. A partition is space that’s set
aside on a disk separate from the other space on that disk. A
volume is a partition that’s been formatted with a file system. We
will mainly be talking about volumes in this guide.
66 www.pclpubLications.com
Manage Disk Partitions in Windows 11
Resizing a Volume
If your disk is set up as one big volume and you want to create an extra partition for a second volume, you
will need to know how to resize the existing one.
Stepl
You will need to make sure that there is enough free
space on the drive before you can shrink a volume.
For example, if you have a 500GB volume which has 200GB of data
already stored on it, you will only be able to shrink it by a maximum
of 300GB, the amount of remaining space.
Step 4
To create a new volume in that unallocated space,
right-click on it and select New Simple Volume
from the Action menu. In the New Simple Volume Wizard window,
click Next to get started. Specify the volume size you want to create
and then assign it a drive letter on the next screen.
New RAID-5 Volume...
Properties
Help
Step 2
Right click on the volume you want to shrink in
either the top panel or the bottom one and click
‘Shrink volume’ from the Action menu. You will then need to enter
the amount you want to shrink the volume by in MB. So if you
wanted to shrink it by approximately 500GB, you enter ‘500000MB’.
Step5
You will then need to decide whether to format
the partition. You will need to format it before you
can begin using it but if you are planning on installing a second
operating system, in order to dual-boot, you will need to let the
new OS format the partition during its installation.
Step3
When you have clicked the Shrink button,
you should see that the disk now contains the
shrunken volume and some new, unallocated space. If desired, you
could now extend the volume back into that space, by right-clicking
and selecting ‘Extend volume’ from the Action menu.
Step 6
Otherwise, go ahead and format the disk; pick
a file system to use and assign a volume label.
Click Next when you’re ready and then click the Finish button;
Windows will now start to create the volume and, if you chose to,
format it. When finished, you will see your new volume listed.
p. Primary Partition) 195.31 GB Unallocated 450 MB Healthy (Recovery Partiti
www.pcLpublications.com 67
Check and Optimise
RAM Usage
Adding RAM, or Random Access Memory, is a good way to give your PC an instant boost
but before you go to the expense and trouble of installing new RAM modules, it is worth
checking what is using your existing RAM and whether it can be optimised.
Checking Memory and Memory Usage
The first thing you need to do, when trying to optimise RAM usage and performance, is check how much you
have and how it is used.
Stepl
To check up on your RAM, you need to open the
Task Manager. Press Ctrl + Alt + Delete on the
keyboard and then select Task Manager from the list that appears. If
Task Manager opens showing just a simple list of tasks, click the More
details button to see a more advanced view.
Step3
If it seems like most of your available RAM is
regularly being used, and if less than 4GB is installed,
consider adding more RAM. You can find out what kind of RAM your PC
model uses by looking at the memory info in Task Manager. Then visit
the PC manufacturer’s website for more specific info.
Step 2
Click the Performance tab at the top and then the
Memory tab on the left side. You can now see how
much you have in total and then check the graph to see how much
RAM is being used. Try opening a few different apps while Task
Manager is open, to see RAM usage increase or change.
Step 4
In theory, Windows 11 (64-bit) can run on a PC with
just 2 GB of RAM but in reality you will want at least
4 GB if you plan regular use. If you can afford to double th is to 8 GB,
you will not only instantly improve performance but also add some
time to the longterm lifespan of your computer.
68 www.pclpublications.com
Check and Optimise RAM Usage
Using Windows ReadyBoost
If you don’t want to spend out on more RAM right now, there are ways you can attempt to optimise your
existing memory performance. One way is to use ReadyBoost.
Stepl
ReadyBoost is a way to boost memory performance
by creating an extra memory cache on an external
USB-connected drive, such as a flash drive. You will need a USB drive
with at least 500MB of free space and a high data transfer rate. A USB
3.0 drive can peak at a data rate of бООМВ/s.
Step3
Select the ReadyBoost tab, then select ‘Use this
device’. Windows 11 determines if the device can
use ReadyBoost. If it is not able to use the feature, it will let you
know. Windows will then determine how much free space to assign
to memory. Click Ok to reserve this space on the connected drive.
Step 2
Insert the drive into a free USB port on your PC and
then open the File Explorer. Right-click on the name
of the drive in the left-hand sidebar and select Properties from the
action menu. Be aware that computers with a solid-state drive (SSD)
installed, will not be able to take advantage of ReadyBoost.
Step 4
If you look at the contents of the drive in
File Explorer, you will see a file called ReadyBoost.
sfcache. This file shows how much space is reserved for ReadyBoost.
If you don’t have a USB flash drive handy, you can sometimes use a
smartphone, connected via USB, as a temporary ReadyBoost drive
— NEO Storar 0 ® > ifci Network Expand Cj Open in new window di Format... ф Pin to Quick access Pin to Start @ Properties Alt»Enter Й Show more options Shift »F1O
Changing Paging File Size
The paging file is an area on your hard disk that Windows uses like memory. Increasing the paging file
size can help improve your PC’s performance.
Stepl
In the search box on the taskbar, type ‘advanced
system’ and then select ‘View advanced system
settings’. In System Properties, on the Advanced tab, select
Settings in the Performance area, and then select
the Advanced tab > Change in the Virtual memory area.
Step 2
In Performance Options, Clear the ‘Automatically
manage paging file size for all drives’ check box.
Select Custom size, then enter an initial size (in MB) and maximum
size in the corresponding boxes. Select Set > OK and then restart
your PC by selecting the Start button > Power > Restart.
System Properties
X
Advanced llata Htwunan Prevmtlan
Computer Name Hardware Advanced System Protection Remote
You must be logged on as an Administrator to make most of these changes
Performance
visual effects, processor scheduing memory usage and virtual memory
System Property
Viiluel Memory
Computer Name 1 lart*
You must do logged <
Pw luunei ICV
Visual enacts proa
□ Automatically manage paging file we for all drives
Paging tile size lor each drive
Drive (Volume I ahelj Paging File <Uze (MR)
www.pcLpublications.com 69
Create a Windows 11
System Image
Backing up your files is perfectly fine, but in the event of having to wipe your hard drive
and start again, getting everything back in order can be time-consuming. However,
creating a system image means you can almost instantly restore the entire system.
System Imaging
A system image is essentially a snapshot of your entire system. This can then be quickly restored and
conveniently saves you from having to reinstall Windows 11, all your programs and your data.
Stepl
To begin, click on the Windows Start button and
start typing ‘control panel’, then click on the
Control Panel app. From there, go to System and Security >
Backup and Restore (Windows 7). Odd as it sounds, it still uses
the old Windows 7 backup technology here.
Step3
Windows now scans your system for a drive
capable of housing the system image files. You
may need to make some changes to any drives according to
what messages you get back from the scan. In this example,
the drive we’re using needs to be formatted as NTFS before
Windows 11 can use it.
drives. A system image can be used to restore your computer if your hard drive or computer ever
stops working; however, you can't choose individual items to restore.
©Ona hard disk
_ RECOVERY (E:) 12.79 GB free
, This drive cannot be used to store a system image because it is not formatted with NTFS.
О On one or more DVDs
О On a network location
Step 2
This launches a new window, the Backup and
Restore (Windows 7) console. Microsoft has kept
this feature intact through Windows 8.1,10 and 11, purely due
to compatibility support for backups created under older
versions of the OS. To the left, there are two links, click on the
Create a system image link to proceed.
Step 4
Providing you’ve met the requirements, you’re
offered a choice of to where the system image can
be written. A drive is the quickest solution when it comes to
restoring the image, but you can opt for DVDs; it depends on the
size of the image as to how many DVDs you need. You can even
select a network location if required.
Backup and Restore (Windows 7)
& > Control Panel > System and Security > Backup and Restore (Windows 7)
Control Panel Home
Ф Create a system image
Ф Create a system repair disc
Back up or restore your files
Backup
Windows Backup has not been set up.
Restore
Windows could not find a backup for this computer.
^Select another backup to restore files from
A system image is a copy of the drives required for Windows to run. It can also include additional
drives. A system image can be used to restore your computer if your hard drive or computer ever
stops working; however, you can't choose individual items to restore.
© On a hard disk
[^Backup (L) 13.11 GB free v|
О On one or more DVDs
О On a network location
70 www.pclpublications.com
Creating a Windows 11 System Image
For this example, let’s use an internal second hard
drive. Make sure that the correct drive (it could be a
high capacity USB stick or even a portable USB hard drive) is
selected, and then click the Next button to continue.
Step 5
Once the process is complete, Windows will ask
you to create a System Repair Disc. This disc
allows you to boot into the environment where you are able to
launch the system image restore.
Step 8
Create a system image
Where do you want to save the backup?
A system image is a copy of the drives required for Windows to run. It can also in
drives. A system image can be used to restore your computer if your hard drive о
stops working; however, you can t choose individual items to restore.
(•) On a hard disk
О On one or more DVDs
The next window displays the drives included in the
system imaging process. In this example, the C:\
drive, the System drive and the System Reserved partition are all to
be backed up. When it comes to restoring the system, you’ll need
both partitions for Windows 11 to be able to boot up correctly.
Step 6
If you click Yes to creating the System Repair Disc,
you need to make sure you have a blank DVD to
hand. Follow the on-screen instructions and click on the Create Disc
button to burn the repair files to the disc.
Step 9
jD Create a system repair disc
Confirm your backup settings
Backup location:
Backup (b)
The backup could take up to В GB of disk space.
The following drives will be backed up:
System Reserved (System)
=• (G) (System)
Select a CD/DVD drive and insert a blank disc into the drive
A system repair disc can be used to boot your computer. It also contains
Windows system recovery tools that can help you recover Windows from a
serious error or restore your computer from a system image.
Drive:
Cancel
When you’re ready to continue, click the Start
Backup button. This begins the imaging process,
which can take some time depending on the amount of space used
on the C:\ drive and the speed of the drive to which you’re writing.
Allocate ample time if you’re writing to DVDs.
Step 7
Should you need to restore Windows 11 from the
system image, you can boot into the System
Repair Disc and select the System Image Recovery option from
within the Advanced Options of the Trouble Shoot menu. Follow
the instructions, and within minutes, Windows 11 is back as it was
when the system image was taken.
Step 10
Advanced options
www.pcLpublications.com 71
Setting Up
Dual Monitors
With a second monitor and the required connectors on your PC, setting up Windows 11
to display over two screens is easy. Having a second monitor can really help to increase
productivity, and allow you to stay more organised when you’re at your computer.
Setting Up a Dual Display
Matching up the resolution and size of your two chosen monitorswill give the best results but even
mismatched monitors can work really well in dual format.
Stepl
You will obviously need to ensure that your PC has
the requisite connections for two monitors (two
HDMI, VGA or DVI ports, or a combination of these). Check the back
of your PC tower or the side of your laptop to find out With your PC
turned off, connect both monitors to the available ports.
Step3
You will now need to configure the dual monitor
setup to your liking. Windows 11 allows you to
easily choose how the dual monitors display. Press Windows Key
+ P to see the Project side panel. Here you can choose from PC
Screen Only, Duplicate, Extend or Second screen Only options.
<- Project a - p
3 -' PC screen only
raC3 Duplicate
| SQ Extend
= C3 Second screen only
More Display settings
Step 2
Boot up the computer and log in. Windows
should automatically detect that two displays are
connected and you should see both of them displaying a desktop.
Your main display will have all of your icons on it, whilst the new
second display will be blank apart from the taskbar along the bottom.
Step 4
PC screen Only and Second Screen only are fairly
self-explanatory, displaying an image on one or the
other screens. Duplicate is also fairly easy to understand, showing
exactly the same display on both screens. Extend turns the two
monitors to one long screen that you can spread out across.
<- Project я - P
Ш1—1 PC screen only
□И Duplicate
| ИбЗ Extend
□И Second screen only
More Display settings
ENG (J4>
UK
0919
15/10/2021
72 www.pclpubLications.com
Setting Up Dual Monitors
The Extend option is the one which needs the
most setting up. On the main display, right-click
anywhere on the desktop and choose Display settings from the
Action menu. Scrolling to the bottom of the display settings gives
you another way to choose the display mode.
Step 5
If you don’t want to see the taskbar on both
displays, go to Settings > Personalisation >
Taskbar, and scroll down to Multiple displays. You can then
choose to turn off the taskbar on the second display. You can
also spread a single wallpaper across both screen by selecting
Span in Background settings.
Step 8
Д M Ruu Wart
ru»9bdmpublic«tiom.com
Personalisation > Taskbar
find a setting
System
0 Bluetooth & devices
> Network & internet
I / Personalisation
tt Apps
* Accounts
3 Time & language
• Gaming
Taskbar corner overflow
Choose which icons may appear in the taskbar comer - ail others will appear in the tail
Taskbar behaviours
Taskbar alignment, badging, automatically hide, and multiple displays
Taskbar alignment
Automatically hide the taskbar
(J Show badges (unread messages counter) on taskbar apps
Д Show my taskbar on all displays
________Wtisfl usiaa mbirtinle айвата. mv aalstei an_________________
At the top of the display settings are the two
displays side-by-side. 1 is your main display and 2
is the secondary display. Which side of the screen the two monitors
“join” at (which side allows you to move on to the second monitor)
is controlled by dragging the display boxes here to the left or right.
Step 6
Spreading out across the two monitors in Extend
mode is as easy as clicking and dragging a window,
be that a browser window, app or anything else, to the “joined” side
of the main screen. Just keep the mouse pointer moving and it will
continue on to the second screen seamlessly.
Step 9
System > Display
Select a display to change the settings for it Drag displays to rearrange them
Identify Extend these displays *
Multiple displays
Choose the presentation mode for your displays
You can view settings for each display
independently, by clicking on one you want
to see, and then scrolling down. You can change the scaling,
orientation and resolution of each display to best suit the
specification of the monitor, if it is the case that the two
monitors have different maximum resolutions.
Step 7
Depending on the graphics card software you have
installed (Radeon for example), you will usually
have further display options for the second monitor in the graphics
adapter settings. This might include Virtual Super Resolution and
GPU scaling, helping you match up resolution settings.
Step 10
www.pcLpublications.com 73
HHow to Create a
Recovery Drive
A recovery drive is a useful way to ensure that you don’t lose data in the event of a critical
malfunction. It can help you both troubleshoot and fix problems, even if the PC won’t
start as it normally would. All you need is a blank, formatted USB flash drive.
Protecting Your PC and Files
Creating a recovery drive is a relatively simple process. It does however take a bit of time to create but it’s
worth the effort as it could save you a lot of frustration in the future.
Stepl
The first thing you need to do is find a USB drive
that is large enough and then make sure it is
ready to be used. The USB drive you decide to use won’t be able
to be used for anything else like storing other files, etc. so make
sure it is a spare, or bought specifically for the task.
Step3
Your USB drive needs to be wiped of everything
currently on it before the recovery drive is created.
You can do this during the set up process later or you can format it
yourself right now: a useful thing to know how to do. Insert your
USB drive into a free USB slot on in your computer.
Step 2
A basic Windows 11 recovery file will be less than
500MB but if you choose to include system files in
the backup (recommended), so you can use it to reinstall Windows,
you will need much more space. A basic recovery drive can be as
small as 1GB but a full recovery drive needs to be at least 8GB.
Step 4
Open the File Explorer on your computer and you
should see the USB flash drive listed in the sidebar.
It will probably be labelled as the (E:) or (F:) drive. Right-click on the
drive label and select Format from the action menu. Leave the
settings as default (should be FAT32) and then click Start.
74 www.pclpublications.com
How to Create a Recovery Drive
You should now be ready to create your recovery
drive. In the search field, type “Recovery Drive”
and select the Recovery Drive app result. In newer versions of
Windows 11, you might also be able to find the Recovery Drive in
the main apps list, opened by clicking the Start menu button.
Step 5
Click Create on the next screen and the process will
begin. This may take a while to complete,
so go make a coffee and leave it to run. A progress bar shows how far
along it is, should you need to check. Do not remove the USB drive,
or turn off your computer, before the process finishes.
Step 8
Allow the software to “make changes to this PC”
and the setup wizard will open. This first screen is
where you choose whether you want to back up system files with
the recovery drive, so you can use it to reinstall Windows 11. If you
do, tick the checkbox and then click Next.
Step 6
When the process is complete, you should be
prompted to delete the recovery partition on your
PC, to save some space; as long as you plan to keep your recovery
drive, this is safe to do. If you are not sure, you can leave the recovery
partition in place; it can be deleted at a later date if you wish.
Step 9
After a few moments, you will be asked to select
the USB flash drive you wish to use. If you only have
one USB drive inserted, it will be the only one shown and will be
automatically selected. You are reminded again how much storage
space the drive needs, and that all existing data will be wiped.
Step 7
If you did not already have a recovery partition on
your computer, you won’t see this step. You will
simply be informed that the recovery drive is ready, and to click
Finish. Remove the USB drive from your computer and put it
somewhere safe. It is a good idea to label the drive so it is not reused.
Step 10
www.pclpubl.ications.com 75
Fix Wireless Network
Connection Problems
It’s certainly frustrating when you’ve just sat down at your computer to browse YouTube
videos or play some online games, only to find that you have no Internet connection. If
the same problem occurs when you need to start work or finish that important essay, it
can cause a ripple of panic to spread through your body. Try to stay calm by focusing on
fixing it and initially try these solutions.
1 Make Sure Wi-Fi is On
If you are trying to connect wirelessly, check that
Wi-Fi hasn’t somehow been switched off: click
the Start button, select Settings > Network &
Internet > Wi-Fi. Next, select “Show available
networks” and if your network appears in the list,
select it, then select Connect.
If using a laptop, make sure the physical Wi-Fi
switch (if there is one), is turned on. An indicator
light usually shows when it’s on or off.
Again, if using a laptop (or Windows 11 tablet),
check to see that Flight mode is turned off: select
the Start button, then select Settings > Network &
Internet > Flight mode and if it’s on, turn it off.
Network & internet > WiFi
Wi-Fi On
Show available networks v
Manage known networks >
* Add, remove, and edit networks
Hardware properties >
View and manage WiFi adaptor properties
Random hardware addresses
"* Help protect your privacy by making it harder for people to track your device location.
2 Restart Your Modem and/or Wireless Router
If you’ve never experienced network problems before, you may never have touched your modem or wireless router, however,
occasionally problems arise with its configuration and it needs to be reset to establish a new connection to your Internet
service provider (ISP). When you do this, take into consideration that everyone connected to your Wi-Fi network will be
temporarily disconnected.
Step 1
Unplug the power cable for the router and/or
wireless modem from the power source.
Step 2
Some modems have a backup battery, if so, remove
this and wait around 30 seconds.
Step 3
Replace the battery and plug the modem/router
back into the power socket. The lights on the modem
will blink for a few minutes as it reconnects.
Step 4
Wait until the status lights on the box stop blinking (if
any fail to come on or light up red, there is another
problem) and then try again to connect your PC to
the network.
76 www.pclpubLications.com
Fix Wireless Network Connection Problems
3 Create a Wireless Network Report
With the simplest attempts at a fix out of the way, it is time to dig
a little deeper by generating a Wireless Network Report. This
takes a bit of work with the Command Prompt, but is actually
nothi ng to be sea red of a nd q uite si mp le if у ou fol low these
steps. Generating the report creates a HTML file that you can
open in your web browser (even with no Internet connection).
The report will contain a lot of information that will most likely
be hard to decipher, but the main thing you need to look out for
are the Connection Successes/Failures, where information
about network connection attempts will be shown.
4 Perform a Ping Trace
To check if the problem is with your ISP or router, rather than
your PC or software, you can perform a ping test. This tests to
see if data can be sent and received over the network. If the
ping test is successful, but you cannot connect to the Internet
on your PC, it means there is more likely a problem at the ISP
end and you will need to contact them for help.
Step 1
In the Search box on the taskbar, type “Command Prompt”,
select it in the results and then select “Run as administrator”.
Step 2
At the Command Prompt, type ipconfig and look for the IP
address listed next to Default Gateway (something like
192.168.1.2).
Step3
Now type: “ping<Default Gateway IP>” and press Enter. It
should look something like “ping 192.168.1.2”.
A successful result should be something like this:
Reply from 192.168.1.1: bytes=32 time=5ms TTL=64
Reply from 192.168.1.1: bytes=32 time=5ms TTL=64
Reply from 192.168.1.1: bytes=32 time=5ms TTL=64
Reply from 192.168.1.1: bytes=32 time=5ms TTL=64
' Administrator Command Prompt
[Microsoft Windows [Version 10.0.17763.194]
(c) 2018 Microsoft Corporation. All rights reserved.
C:\WIND0WS\system32>ipconfig
[windows IP Configuration
:hernet adapter Ethernet:
Connection-specific DNS Suffix
Link-local IPv6 Address . . . ,
IPv4 Address...................
Subnet Mask....................
Default Gateway ............. .
C:\WIND0WS\system32>ping 192.168.1.1
Pinging 192.168.1.1 with 32 bytes of
Reply from 192.168.1.1:
Reply from 192.168.1.1:
Reply from 192.168.1.1:
Reply from 192.168.1.1:
bytes=32
bytes=32
bytes=32
bytes=32
: lan
: fe80::48c5:a41c:2b70:fb5%3
: 192.168.1.127
: 255.255.255.0
: 192.168.1.1
data:
time<lms
time<lms
timedms
time<lms
Ping statistics for 192.168.1.1:
Packets: Sent = 4, Received = 4, Lost
[Approximate round trip times in milli-seconds:
Minimum = 0ms, Maximum = 0ms, Average = 0ms
C:\WIND0WS\system32>_
= 0 (0% loss),
Ping statistics for 192.168.1.1: Packets: Sent = 4, Received = 4,
Lost = 0 (0% loss), Approximate round trip times in milli-
seconds: Minimum = 4ms, Maximum = 5ms,
Average = 4ms
www.pcLpublications.com 77
What is
Encryption?
To better understand encryption, it’s worth taking a moment to learn about its origins,
how it has developed over the years and how it applies to our modern communications.
The word encryption comes from the ancient Greek word Kryptos, which means hidden or secret. Interestingly,
the practise of hiding messages from others can be traced back to early Egyptian scribes who inserted non-
standard hieroglyphs within other communications in order to hide the message from casual viewers. According
to historians, the Spartans used strips of leather engraved with messages. When the strips were read, they were
meaningless, but when wrapped around a staff of a certain diameter, the characters would be decipherable.
Of course, the modern forms of encryption are far more advanced,
but the overall core concept has remained the same: to be able to
send a message to others without anyone else being able to
decipher it. However, modern encryption now requires more than
merely sending coded messages. Not only is confidentiality
required, encryption must perform a level of authentication, so the
origin of the communication can be verified; integrity of the
communications, where both the sender and those who receive the
communication can be sure that the message hasn’t been altered
in between; and some form of nonrepudiation, where the sender
cannot deny having sent the communication in the first place.
During the early digital age, the only users of encryption were the
government and military. As such, between them they created a
set of algorithms and standards to protect the communication on
the battlefield and from one government agency to the next.
These algorithms grew in complexity as technology advanced and
it wasn’t long before the military-based forms of encryption were
being used in commercial modes of communications. Within a
few short years, bank transfers, cash withdrawals and data sent
to and from modems began utilising these new protocols to
protect sensitive information.
Today we’re regularly seeing and using devices that boast
‘military-grade 256-bit AES’ forms of encryption, a standard that is
regarded as nearly impossible to break without spending billions
on specialist hardware and software. In plain English, the modern
form of encryption takes data and passes it through an algorithm
78 www.pclpubLications.com
Forms of encryption can be traced as far back as ancient Egypt, using non-standard hieroglyphs
together with a key. This creates a garbled file
of characters that can only be read if the correct
key is applied to decrypt the data. Algorithms
today are divided into two categories: symmetric
and asymmetric.
Symmetric key cyphers use the same key to both
encrypt and decrypt data. The most popular
symmetric cypher is AES (Advanced Encryption
Standard), developed by the military and
government to protect communications and data.
This is a quick form of decryption that requires the
sender to exchange the key used to encrypt the data
with the recipient before they’re able to read it.
Making data impossible to read is just one step; you also need the key to decrypt that data
Asymmetric key cyphers are also known as public-key
cryptography and utilise two mathematically linked keys, public
and private. The public key can be shared with everyone and is
usually generated by software or provided by a designated
authority. The private key is something that’s usually only known
by the individual user. Interestingly both types of keys can be
applied, where one user has a public key and another a private key,
which can be combined to form a shared encryption level. These
keys are many characters in length, making it nigh impossible for
someone to Brute Force hack them. The Brute Force method
involves using a program on a computer to try every possible
combination of a key until the correct one is found. In the case of
the 256-bit encryption, it would take 2256 different combinations to
break the key. If you were able to force one trillion keys per second,
it would still take you somewhere in the region of 1057 years in
order to crack 256-bit encryption. However, a powerful computer
can probably manage around two billion calculations per second,
so in theory, it would take 9.250 years for your standard desktop to
crack it. Keep in mind that the universe has theoretically only been
in existence for 1.410 years.
Numbers this big are generally far too mind-boggling to
comprehend. Suffice to say that if you’re able to use 256-bit
encryption for your communications or to protect your data,
then you’re going to be protected for at least seven times the
current age of the universe.
www.pclpublications.com 79
Ы Encrypting Your
Windows 11 Laptop
Windows 11 Pro comes with Microsoft’s BitLocker program to encrypt the file
system; however, Windows 11 Home versions do not have this feature. Luckily,
there are many other encryption programs available for download.
Protecting Your PC and Files
We’re going to encrypt a 2GB USB flash in this example, purely for ease of use and to demonstrate how you can
encrypt your entire laptop hard drive(s).
Stepl
Encryption doesn’t affect the core data, other than
making it impossible to read without the
decryption key. Still, it’s always worth making sure you have a
backup of all your data prior to any system related changes. If you
store your work or data in the Documents folder, then start by
opening it in Windows Explorer.
Step3
It’s always best to save data before commencing
with anything like this. It’s also always worth
doing (as we are) a test of the software first, on a disk that you
don’t mind messing up should you get the process wrong. Let’s
start by navigating to the DiskCryptor homepage, at www.
diskcryptor.net/wiki/Main_Page.
Press Ctrl+A to highlight all the files, then press
Ctrl+C to copy them to the clipboard. Next, choose
a suitable backup location - such as an external or network drive -
and when ready, press Ctrl+V to paste the copied data into the new
location. Then, should something go wrong, you have a recent
backup of your most used data.
Step 2
Share View
> This PC > New Volume (&) > Backup > C Backup 2017
N*me
Date modified
Type
* Quick access
File folder
File folder
Add-in Express
File folder
04/08/2016 14:48
04/08/2016 14:48
14/02/2017 0&19
30 Printing Book
Accounts
Desktop
Downloads
Using the menu to the top left, click on the
Downloads link. Look for the latest version in the
Download section and click the link for the Installer. This opens a
confirmation box; click the Save File button to download the
DiskCryptor executable file.
Step 4
80 www.pclpubLications.com
Encrypting Your Windows 11 Laptop
The dcrypt_setup.exe file should now be in your
Downloads folder. Double-click it and select Yes to
accept the Windows confirmation. With the DiskCryptor setup
window open, click the Next button and accept the license
agreement on the following page. For the remainder of the options,
choose the defaults by clicking Next. When done, click the Install
button and reboot the computer.
Step 5
You’re now offered a selection of available
algorithms from which to choose. Click the
drop-down box to view them all, however, we recommend staying
with the default AES algorithm for the time being. Leave the Wipe
Mode box as None and when you’re ready, click the Next button.
Step 8
After a reboot, click the Windows Start button and
locate the newly installed DiskCryptor program. You
need to click Yes to authorise its administrative access. With
DiskCryptor open you can see the list of currently installed hard
drives in your system. You can click each in turn and view its
information at the bottom of the DiskCryptor window.
Step 6
In the next section, choose a unique password for
accessing the encrypted disk; you’re notified how
strong the password is. When you’re ready, enter it again in the
Confirm box. Click the OK box to start the encryption process.
Step 9
Encrypt
decrypt
Mounts
ynmour
a
Start by selecting the disk you want to encrypt. As
mentioned before, in our example we’re going to
test this out on a USB stick. We recommend you also do this until
you’re comfortable with the process. With the correct drive
selected, either click the Encrypt button to the right or right-click
and choose Encrypt from the menu.
Step 7
Depending on the size ofthe drive, and how much
data is on it, the encryption process could take
some time. When it’s complete, you’re notified and the selected
drive will be fully encrypted, with you able to access and decrypt it
using the password you set up in the previous step.
Step 10
К DiskCryptor 1.1.846.118
File Volumes Tools Help
Disk Drives
Size |_ Label Type Status
) ST8000VN0002-1Z8112
3 D: 7.27 TB New Volume NTFS
i Samsung SSD 750 EVO 250GB
S C: 210 GB NTFS sys
S Volume? 800 MB AOMEI FAT32
S Volumes 21.4GB AOMEIRecove... NTFS
9 Volume3 450 MB Recovery NTFS
Kingston DataTraveler 2.0
£: 1.86 GB KINGSTON FAT encrypt 00% boot
vwvw.pcLpubLications.com 81
Ы Windows 11
Power Options
If you use Windows 11 on a desktop PC, you might adjust the power options for how long
the PC sleeps or when the display turns off when inactive. With a laptop, the Windows 11
power options should definitely be something with which you are more familiar with.
View, Switch and Create Power Plans
Within the Power Options panel you can choose from preset Windows 11 power plans, or you can create
your own based on your computers’ power requirements.
Stepl
Click on the Windows 11 Start button and enter:
Control, then click the first result, Control Panel
App. From there, select System and Security > Power Options.
Windows 11 will, by default, have selected the Balanced power
plan. This is designed to balance performance and energy
consumption, and is best for PC’s that are connected to the mains.
Step3
The High Performance power plan is, as the name
suggests, best for overall performance, but will
use more power and is unsuitable for use on a laptop using battery
power. To switch between power plans, simply select the one you
want to use. For many users, this is all you will need to do.
On a laptop, you can access the power options by
right-clicking on battery indicator in the taskbar
tools. There are two other, default power plans alongside Balanced;
Power Saver is designed to reduce energy use by scaling back
performance when possible. Good for laptops using battery power.
Step 2
@ Power and sleep settings
10:49 О
13/10/2021 w
To customise any of the power plans, click the
link next to the relevant one. The next screen
will let you set when the display turns off and when the
computer sleeps after inactivity. You can also click “Change
Advanced Power Settings” to see settings for the hard disk,
desktop, USB and processor and more.
Step 4
82 www.pclpublications.com
Windows 11 Power Options
Step 5
You should be fairly careful when changing these
advanced settings, especially for things like the
processor (although Windows should prevent you from making a
damaging change). It is best to make small changes, and then test to
see if the change has had the desired effect, before making more.
Step 6
Your laptop might have software installed that
automatically switches power plans, depending
on whether it is working on battery power or plugged into the
mains. The settings for this can usually be found in the taskbar
tools panel at the bottom right of the screen.
Use Your Laptop with the Lid Closed
If you want to be able to use your laptop with an external keyboard, mouse and monitor, without having to
keep it on your desk and switched on, you need to change some power settings.
Stepl
When you close your laptop lid, the default
setting will be for Windows 11 to go into low
power sleep mode. This is obviously no good if you are using your
laptop with an external monitor, as it will make the laptop
unusable. To solve this problem, click on the Battery icon > power
and sleep settings in the taskbar.
Step3
Use the drop-down menus to select what happens
when you close the lid, both when on battery and
when the laptop is plugged into the mains. When you are happy with
your settings, click the Save the changes button and you will be able
to use the laptop as a desktop replacement with the lid closed.
Step 2
In the Power Options panel, look in the left sidebar
for the option to “Choose what closing the lid
does”. Click this and you will see the Power button, Sleep button, and
lid closing settings. You can change the settings for each individually.
Settings include: Do Nothing, Sleep, Hibernate and Shut Down.
Step 4
If you also take your laptop to different locations
out of the house, it is a good idea to revert these
changes. If you don’t, you run the risk of having the laptop continue
to run while in a bag, etc., which, if the cooling vents are covered,
can be damaging to the hardware.
Control Panel > Hardware and Sound > Power Options System Settings v Ci Search Coni
Define power buttons and turn on password protection
Choose the power settings that you want for your computer The changes that you make to the settings on
this page apply to all of your power plans.
4) Change settings that are currently ипе»айаЫе
Power and sleep buttons and hd settings
Д On battery Plugged in
When I press the power button Sleep Sleep
When I press the sleep button Steep Sleep
When I rime the M- Steep Sleep
Shut-down seHwrgs
Turn on fast start up Ireconsmendedl
This helps start your PC taster after shut-down. Restart isn't affected. Learn t.tcre
Sleep
Show m Power menu.
Show m Power menu,
www.pclpublications.com 83
Manage Your Privacy
in Windows 11
Controlling security on your computer is important but almost as important is being
able to control your privacy settings. Microsoft recently launched a web-based privacy
dashboard tool and this has now become available to everyone in the Creators update.
The Privacy Dashboard
The privacy dashboard is web-based rather than in the settings and it allows you to manage multiple devices
from a single interface, as long as you are logged in to a single account.
Open your browser and navigate to www.account.
microsoft.com/privacy. If prompted, use your
Microsoft account details to log in. You will be logged in to the
privacy overview page that lets you quickly see what privacy
settings the dashboard contains and controls.
Stepl
Click on one of the main categories, Search,
Browsing, Location or Cortana, and you will see
more information. This could include a list of searches you have
made or websites visited (in Edge only, not other browsers),
interests Cortana has saved for you or locations you have been.
Step3
Along with the main Search, Browsing and
Location privacy categories, if you scroll down to
the bottom of the page you will see entries for everything from
Apps to Xbox, with simple links to take you to the settings and
options forthose privacy areas.
Step 2
Each section has a Clear button, whether that
is clearing browsing history, search history and
so on. It is next to a warning that states clearing data will stop
Windows being able to provide you with accurate and relevant
information. You need to decide what is more important,
privacy or recommendations.
Step 4
84 www.pclpubLications.com
F
Manage Your Privacy in Windows 11
L________________________________________
Another useful privacy section in the dashboard
is the Advertising Preferences. This lets you
control whether personalised adverts are shown to you in the Edge
browser. Some of the ads you may receive on Microsoft websites
and apps are tailored to your previous activities and searches.
Step 5
There is also a browser tool that lets you choose if
the adverts you see come from companies other
than Microsoft. Click the option under More Choices and wait for
the Digital Advertising Alliance scan to finish. You can then choose
from the list to see adverts from different advert providers.
Step 6
Privacy Settings
There are, of course, still privacy options in the main Settings app in Windows 11. This is generally added to
and improved with each OS update.
General Privacy
Privacy has its own section within the
settings; here there are many different
categories covering everything from Location to Background Apps.
Click on each of the privacy categories to see the options within that
category. Use the slider switches to allow or block privacy actions.
Account Info
Apps are able to access very basic personal
settings such as your name and account
information. This is so they can sign you in automatically to your
Windows account for things like Xbox Live or the Windows Store.
You can turn this off wholesale or on an app by app basis.
Messaging Apps
We’re using Windows 11 on a laptop
here but if we had a tablet with a SIM
card we would be able to get control over which apps were able
to send messages over SMS and MMS. You probably want this to
be restricted to just your Messaging app; most apps really
shouldn’t have access to yourtexts.
Background Apps
You can control which apps you allow
to run in the background. Go to the
Apps section, then Apps & Features, and locate an app you don’t
want running in the background. Click the three dots to the right of
the app, select Advanced Options and change the Background
Apps Permissions via the drop-down box.
www.pclpubLications.com 85
Windows 11
Maintenance Tools
Before you start to add software to help with maintenance, it is worth checking out the
numerous tools included with the OS. These are spread out over several menus but once
you find them you will see that they can really help with security and performance.
Maintaining Windows 11
Windows 11 is a lot better at keeping you informed of problems than previous versions were. It is, however,
up to you to keep on top of maintaining the OS if you want the best experience.
Storage Sense
Activating Storage Sense lets the system
software automatically free up storage
space by getting rid of files you no longer need. These can include
temporary files such as cookies and the contents of your Recycle Bin.
Background Apps
One of the easiest ways to conserve
power (for laptop users) and reduce
processor strain, is to take control of Background Apps. These are
apps that are, by default, allowed to receive info, send notifications
and update in the background.
You can choose when files are deleted, e.g. after 30 days in the
Recycle Bin or if apps don’t use them for a certain amount of time.
Alternatively you can simply click a button to Clean Now rather than
setting automatic cleaning. You can find the Storage Sense option in
Settings > System > Storage.
You can either stop all background apps with a single slider click or
you can prevent individual apps from running in the background.
Go to Settings > Privacy > Background Apps and look through the
apps listed. If you see apps that you don’t need notifications or
updates from, click the slider to disable its background activity.
System > Storage > Storage Sense
Cleanup of temporary files
D Keep Windows running smoothly by automatically cleaning up temporary system and app files
Automatic User content cleanup
(ji ) off
Storage Sense runs when disk space is low. We clean up enough space
to help your system run its best We cleaned up 0 bytes of space in the
past month
Configure cleanup schedules
Run Storage Sense
During low free disk space (default) v
Delete files in my recycle bin if they have been there for over:
Delete files in my Downloads folder if they haven’t been opened for
Apps > Apps & features > Facebook
Specifications
Publisher Facebook Inc
Version 2021.927.1.0
App 1.70 MB
Data 160 KB
Total usage 1.72 MB
Background apps permissions
Let this app run in background
Never
Learn more about the options
86 www.pclpubLications.com
Windows 11 Maintenance Tools
Windows 11 includes a number of
troubleshooting tools, aimed specifically
at certain problems such as audio loss or patchy Internet connection.
This is often the best place to start when trying to solve problems with
your PC and Windows 11, as the OS contains many drivers for
common devices and may just need a small software update.
Troubleshooters
Disk Tools
There are several tools built in to
Windows 11 (and also in older
versions of the OS) that allow you to clean, fix and manage your
hard disk. Open the File Explorer and look in the left-hand column
for ‘This PC’. Select it and then right-click on Local Disk (C:). In the
General tab, you will see a button for Disk Clean-up that lets you
get rid of temporary Internet files, old program files and so on.
System > Troubleshoot
О Share optional diagnostic data to get additional troubleshooting recommendations.
Options
r-j Recommended trouble-shooter preferences
Microsoft can recommend and run trouble shooters to <i« issues
{J) Recommended troubleshooter history
ft Other trouble-shooters
A Get help
Give feedback
You simply look through the list of troubleshooters and click on the
one which applies. Choose Run the Troubleshooter and then follow
the instructions to try and solve the problem. You can find the
troubleshooters in Settings > System > Troubleshoot.
If you click the Tools tab, you can use the Error Checking tool and
the Disk Defragment tool. Both of these tools can help your hard
disk run more efficiently. Click on either button and follow the
instructions for each tool chosen.
Open Diagnostics & feedback
Run automatically, don't notify me
Run automatically, then notify me
| Ask me before running
Don't run any
>
Disk Management
The Disk Management tool is more
about diagnostics than actual
maintenance but it is a useful way of checking whether your hard
disk has space available and is healthy. The panel will show all of
your disks, as well as all of the partitions.
Each column contains information about capacity, free space in
MB, percentage of free space and health status. There are some
further options, such as the ability to change drive letters and mark
partitions as active but they are probably not worth playing around
with unless you know what you are doing.
www.pcLpublications.com 87
Removing Malware
from Windows 11
The Windows 11 Defender and Security suite is very good, but what if you’re unlucky
enough to already have some form of digital infection? Thankfully, there’s a way to
remove malware and viruses from your computer.
Malware Busters
For this tutorial we’ll use a pre-configured rescue disk from Kaspersky. We’ll need to transfer, or burn, the disk
contents to a CD or a USB stick and boot into the safe environment through one of those mediums.
Stepl
Make sure you have a blank CD or a USB stick
that’s at least 1GB in size. The Kaspersky Rescue
Disk is downloaded as an ISO (which is an image file containing all
the disk information), and can be downloaded from https://www.
kaspersky.com.au/downloads/thank-you/free-rescue-disk.
Step3
Click the Select option, and using Windows
Explorer, locate the downloaded Kaspersky Rescue
ISO - it’ll be called krd.iso. Click the Start button to select the image
and continue with the process. This will copy the contents of the ISO
to the USB while also making the USB a bootable device.
kaspersky
THANK YOU FOR CHOOSING US TO HELP YOU RECOVER
YOUR PC
To transfer the ISO to a USB, download Rufus;
which is an executable that doesn’t require any
installation, from: https://rufus.ie/. Insert your USB stick and
double-click Rufus. Check that the Device label is pointing to your
inserted USB stick, if not then you may need to close Rufus, remove
the USB, then re-insert the USB and re-start Rufus. The remaining
options can be left as their defaults.
Step 2
If you’re using a CD, start by inserting the CD into
the drive. Locate the downloaded Kaspersky
Rescue ISO, right-click it and choose Burn Disc Image from the
context menu. Tick the ‘Verify disc after burning’ option, and click
the Burn button to start the process. Once the ISO is burnt to the
disc, you can power off your computer.
Step 4
I < InstallJJK
f Rufus 3.9.1624 - X
Drive Properties ----------------------------------------------
Device
Persistent partition size
• 0 (No persistence)
Partition scheme Target system
MBR » BIOSorUEFI v
v Show advanced dnve properties
Format Options -----------------------------------------------------------
Volume label
krd
-J IIIOu
@ Learn
® Learn
§ MS-C
3ms-c
§ NASA
•4 Nighl
4 Pano
Pano
® Ranki
П Ranki
Mount
Burn disc image
Edit with Notepad* +
s Scan with Windows Defender...
L£? Share
Open with
Open with WinRAR
Add to archive...
§ Add to "krd.rar"
Compress and email...
Compress to "krd.rar" and email
88 www.pclpublications.com
Removing Malware from Windows 11
Step 5
You’ll now need to allow your PC to boot up into
the Kaspersky Rescue CD environment. Power up
your PC and open the Boot Option Menu. This could be accessed
by pressing F12 (depending on the make and manufacturer of
your PC motherboard). With the boot options available, select
either the CD or USB stick and press Enter.
Step 8
Once connected, relaunch the Kaspersky Rescue
Tool from the desktop icon, agree to the license
once more. Before you begin, click on the Change Parameters link
in the Kaspersky Rescue Tool window. This will enable you to
choose which drives the tool can scan for infections and malware.
Tick all the drives in your system.
Step 6
The PC will now boot into the Kaspersky Rescue
Disc environment. This is a custom Linux operating
system with all the necessary security tools pre-installed. First, you’ll
need to choose which language to load the environment. Use the
arrow keys, and press Enter for your language choice. After that,
choose the Graphic Mode.
Step 9
When you’re ready to continue, click on the
Start Scan button in the Kaspersky Rescue Tool
window. This will begin the process of scanning all the drives
selected in the previous step. Be aware, that, depending on the
size of your drives and the amount of data on them, this could
take quite some time.
О Change parameters
Start scan
Ready to scan
Free anti-virus scanner Kaspersky Rescue Tool is designed to detect
viruses, trojans, adware and other programs that can be used by an
attacker to damage the computer or user data on operating systems
that are not started and to disinfect the infected system.
Kaspersky Rescue Tool does not provide real-time protection.
Step 7
Begin by accepting the license agreement. After
that, the rescue disc will check its status and open a
window asking for you to start scanning the system. However, it’s best
to check you’ve got access to the Internet in order for it to update
first. Close down the Rescue Tool window, and click on the Network
box in the bottom-right. Connect to Wi-П, or Wired as required.
Step 10
While the scan is working, you’ll see the area that
the tool is currently processing. You’ll also get a
brief run-down of any threats currently found, time taken, and
number of files scanned. Once complete, you can view a report by
clicking on Details. Hopefully, you’re malware free, and you can
remove the USB/disc and reboot the system.
Kaspersky
Rescue Tool
Scan in progress...
Duration:
Processed:
00:00:03
624 objects, no threats found
© Quarantine ,il Report
Custom folder scanner (2/2)
Object: ditk>ns-6.0.18/src/vboxguest-6.0.18/vboxsf/include/iprt/uint64.h
Help About
www.pcLpublications.com 89
Six Steps to
a Faster PC
A slow computer is both inconvenient and frustrating. When everything you try to do
takes twice as long as it should, you might be tempted to think about buying a new PC;
before you do, there are several things you can try to make your Windows 11 PC run
faster and smoother.
1 Update Windows 11 and Drivers
The first step along your path to a faster computer is making sure that
the Windows OS and all of the various drivers installed are up to date.
Simply updating drivers to the latest versions can have a noticeable
effect on the overall loading speed of any PC and fortunately, this is
very easy to do.
Open Settings > Update & Security > Windows Update and click “Check
for updates”. Windows 11 will scan for available updates (to both the
OS and drivers), before displaying all those available as a list.
If no updates are available, it will say “Your device is up to date” and
you can move on to the next tip. If updates are available, select those
you want to download and install, then click “Install”. When installation
is complete, restart your PC.
2 Check Program Compatibility
Software that is designed to run on older versions of Windows can
sometimes cause Windows 11 to slow down as it struggles to manage
this incompatibility issue. To find out if this is a potential problem, run
the Program Compatibility Troubleshooter.
Select the program you're having problems with
In the taskbar search field, type “program compatibility troubleshooter’
and click the first result in the search panel. Run the troubleshooter;
testing any software you think is causing problems.
The troubleshooter will offer you various ways to test and fix software
compatibility issues.
i Not Шted_____________
Adobe Creative Cloud
Adobe InDe-Uqn CC ?01Я
Adobe InDwrQn CC 2019
AMD Sctlinyb
Backup and Sync from Gooqle
Check for WPS Qfflcr Update-:
Dropbox
3 Check and Clear Disk Space
If your hard drive is very full, it can affect performance. To check: open Settings
> System > Storage and see how much space you have left. If your storage is
looking full, try the following options to make some space:
Delete Temporary Files - Click the “This PC” bar and then click the
“Temporary files” bar. Select everything you want to delete, click the “Remove
Files” button and then restart your PC.
Remove Unwanted Apps - Open Settings > Apps > Apps & Features, click on
any app you want to remove and then click “uninstall”. Repeat this for a II
unwanted or unused apps before restarting.
Move Files to an External Drive - Connect a removable hard drive to your PC
(a small USB flash drive for example) and open the File Explorer. Select the files
you want to move, click “Move to” in the Home tab at the top and select the
external drive. Files will still be accessible as long as the drive is still connected.
90 www.pclpublications.com
Six Steps to a Faster PC
4 Disable Unneeded
Apps > Startup
Startup Programs
Startup apps
Now that you have removed any unwanted apps and software, it is
time to checkifany remaining apps are running unnecessarily at
startup. Many software manufacturers will set their programs to
start-up in the background when Windows 11 starts up. This helps
the programs to open more quickly and makes sense for software
you frequently use, but not for software you only use occasionally.
Apps ran be configured to start when you log in In most rases, apps
will start minimised or may only start a background task.
Sort by: Name
Cortana
Microsoft Corporation
Not measured
A quick way to see what software is running in the background is
to look at the icons on the right side of the taskbar and open the
hidden icons panel by clicking the small arrow. You can hover the
mouse over icons to see what they are.
ExpressVPN.NotificationServiceStarter
ExpressVPN
If you want to have a deeper look at which software initiates
during startup, open Settings > Apps > Start-up. Here you will see
a list of all startup apps, along with an estimation of their
performance/speed impact and a sliderto prevent each one
from starting automatically.
5 Scan for Viruses & Malware
Viruses, malware and other malicious software could cause
your computer to run slowly or behave strangely. Things to
look out for include: unexpected pop-up messages,
programs that suddenly start or stop, or the sound of your
hard disk constantly working.
To scan for and remove viruses, open Settings > Update &
Security > Windows Security (previously Windows Defender) >
Open Windows Security, click on “Virus
^'*7 Threats & Protection” and then
A CVOkclick the “Quick Scan” button.
д \ \j\J л t You can do a more advanced
к к. ** ** V scan by clicking “Scan options”
and choosing which you want
to perform. If viruses or
malware are found, you will be
given options to quarantine and
remove them.
Medium impact
Not measured
Microsoft Teams
Microsoft
Window» s.rurt»y
Home
Virus & threet protection
Account protection
Firewall & network protection
□
App & browser control
Device security
Quick scan
Device performance & health
*
Family options
Protection history
Manage settings
ft
|o
&
d Virus & threat protection updates
Security intelligence is up to date
Scan options
Allowed threats
Protection history
°® Virus & threat protection settings
No action needed
Q Current threats
No current threats.
Last scan: 12/10/202109:09 (quick scan)
0 threats found
Scan lasted 4 minutes 21 seconds
42759 files scanned
Intel Driver & Support Assistant Tray
Intel
О Virus & threat protection
Protection for your device against threats.
Off
No impact
Off
No impact
Intel® Graphics Command Center S...
INTEL CORP
6 Check for Corrupted System Files
Occasionally, the core system files in Windows can become
corrupted (for a variety of reasons) and cause performance
problems. Windows 11 includes a tool: the Deployment
Image Service and Management Tool, that will check for such
files and automatically replace them, either with a cached
version or by downloading a new version.
Use the DISM Tool - In the Search box in the taskbar, type
“powershell”. Right-click on “Windows Powershell” in the
results and choose “Run as Administrator” from the menu.
At the Command prompt, that opens in the blue Powershell
window, type “dism.exe /Online /Cleanup-image /
Restorehealth” without the quotation marks (note the space
between “dism.exe” and and each switch (/)).
X Windows PowerShell
Windows PowerShell
Copyright (C) Microsoft Corporation. All rights reserved.
PS C:\Users\Russw> dism.exe /Online /Cleanup-image /Restorehealth,,
If the tool findsand replaces any corrupted files, restart your
computer and check to see if it has helped with your current
performance issues.
www.pcLpublications.com 91
□
How to Reset
or Fresh Start
Resetting a PC reinstalls Windows, with a choice to deletes your files, settings and apps,
and main system files. Restoring will undo recent system changes, without deleting files.
A Fresh Start completely removes all apps and reinstalls Windows.
Fresh or Reset?
Refreshing and resetting your Windows 11 PC are two very different things and you should always make sure
you know which is the best choice to solve your current problem.
Stepl
If your PC isn’t performing as well as it once did,
and you don’t know why, you can reset your
PC without deleting any of your personal files or changing your
settings. Apps or software not installed through the Store will be
removed but Windows store apps will be reinstalled.
Step3
In System > Recovery, click on ‘Reset PC’ button
to begin the process. You will now need to choose
whether to keep your files (just remove apps and settings), or
remove everything. If you choose Remove everything, you will then
need to choose whether to ‘Remove and clean the drive’.
Recovery options
b Reset this PC
Choose to keep or remove your personal files, then reinstall Windows
Go back
This option is no longer available on this PC
Q Get help
a? Give feedback
Step 2
Open the main Settings app and head into the
Windows Update > Advanced Options section.
Click on Recovery and you will see several options, including
Reset this PC. If you can’t get into Settings, you can access reset
by restarting your computer while holding the Shift key; then
select Troubleshoot > Reset.
Additional options
лл Optional updates
Feature, quality, and driver updates
p-q Delivery Optimisation
Bandwidth limits lor updates, downloads horn other devic.es
Recovery
Reset, advanced start-up, go back
(=i Restart apps
Automatically save my restartable apps when I sign out and restart them after I sign in
fo Configured update policies
Step 4
You will be warned that you won’t be able to roll
back to a previous version of Windows after the
reset (old Windows files will be deleted). Click Next and then Reset
when prompted. Windows will restart and take several minutes to
reset itself. Click Continue when promoted.
92 www.pclpublications.com
How to Reset or Fresh Start
Perform a Fresh Start
Performing a Fresh Start allows you to do a clean reinstallation and update of Windows, while keeping your
personal data and most Windows settings intact; an easier option than a full wipe and reinstall.
Stepl
Be aware that Fresh Start will remove most of
your apps from your device, so you will have some
reinstalling to do. In some cases, a clean installation may improve your
device’s start-up and shutdown experience, memory usage, Microsoft
Store apps performance, browsing experience and battery life.
Step 4
Looking at the website that Windows 11 sends
you to when you click on the Give your PC a Fresh
Start link, there will be a blue Open Recovery Settings box. Click
this, and you will automatically open the Recovery Settings section,
or you can access it via System > Recovery.
Apps
Apps & features
Installed apps. app execution aliases
Default apps
Defaults tor file and link types, other defaults
Give your PC a Fresh Start
Rvwttmg your PC let* you perform a dean remitallation and update of Window* while keeping your
personal data and most Windows settings intact. In some cases a dean installation may improve your
device's performance, security, browsing experience, and battery Me.
To reset your PC. go to Start Я Settings - Update & Security О > Recovery О » Reset this PC >
Get Started Then, select Keep my files choose cloud or local, change your settings, and set Restore
preinstalled apps? to No
фт Offline maps
Downloads storage location, map updates
Open Recovery settings
Optional features
Extra functionality for your device
Note If you don't see the option to Restore preinstalled apps 4 means your К doesn't have premsta*ed
apps configured
In versions of Windows 10 pnor to version 2004 this feature was called Fresh Start and to use it you d select
Start Я > Settings ® > Update 8c security О * Windows Defender Device performance 81 health
Under Fmah Start «aurt iwfa , Grt S^rtad
Step 2
To find the Fresh Start tool, open the Windows
Defender tool (click on the shield icon in the
taskbar), and then click on the Device Performance & Health
section. You will need to click on Additional Info and then click
Give your PC a Fresh Start. If Fresh Start has previously been
performed, the date will be displayed here.
Step 5
As you can see, all roads lead back to the Recovery
section in Windows 11. To perform a Fresh Start,
you’ll need to click the Reset PC button. This again brings up the
option pop-up window. Fora Fresh Start, you’ll need to click the
Remove Everything button. It’s worth saying again: Ensure your
data is backed up before doing this.
□ Device security
Device performance & health
Family options
® Protection history
© Storage capacity
© Apps and software
No issues
t5> Fresh start
Start afresh with a clean and up-to-date installation of Windows This will
keep your personal files and some Windows settings and remove some of
yourapps
In some cases, this may improve your device's startup and shutdown
experience, memory usage. Store apps performance, browsing experience
and battery life.
Additional information
Step3
Microsoft recommends that you back up your files
before making changes like a clean installation
of Windows to your device. Make sure that you have access to all
reinstallation media (such as CDs), product keys, license or login
information and other materials needed to manually reinstall apps.
Step 6
You’ll now have the option to download
Windows 11 and re-install it using the Cloud
(meaning you’ll download it from the Microsoft servers), or as a
local reinstallation (which means you’ll have a physical copy of
Windows 11 either on disk or as a USB). Whichever method you
prefer, click the box and the process will begin.
x
<- Set up backup
Select where you want to save your backup
We recommend that you save your backup on an external hard drive.
Save backup on:
Backup Destination Free Space Total Size
WO Storage (D:) [Recommended! 221.09 GO 223.57 GB
How would you like to re-install Windows?
(Cloud download
Download and re-install Windows
Local reinstall
Reinstall Windows from this device
Cloud download can use more than 4 GB of data.
www.pclpublications.com 93
Laptop Care and
Maintenance Tips
Laptops are great! They are small, portable and can be easily put away when not in use.
They are also increasingly powerful, although they still lag behind a good desktop
system unless you pay huge sums of money for them. They are not, however, as robust
as a desktop, so good care and
maintenance is a must if you
want your laptop to last.
Caring for Your Laptop
Some of these tips may seem obvious,
and some might not apply to you, but
even following a few of these
suggestions will help keep your laptop
in good shape.
Keep Food and
Drink Away
However careful you are when eating and
drinking, if you do it while using your laptop
it is inevitable that at some point, crumbs
and splashes will hit the screen, keyboard,
etc. Unlike a desktop, replacing a
crumb-filled keyboard on a laptop is not
just a case of buying a new one.
Wipe the Screen
Carefully
Laptop screens are generally not as clear or
bright as a desktop monitor screen, so
keeping them clean is important. Use a
lint-free cloth regularly to gently wipe away
dust and dirt. If there are more stubborn
marks, buy and use an LCD screen cleaner.
These are cheap to buy online.
Clean the Keys and
Ports Regularly
Laptop keyboards are hard to replace, so
keep yours clean and free from dust. You
can buy small USB keyboard vacuums fairly
cheaply, and these can help keep dust from
building up. You can also buy keyboard
cleaner putty very cheaply online. The
same rule applies to the various ports on
your laptop.
A LmmM№ Euffcfk /
Photos
fl P L Ш О
0
WMIsApp
[ P
f PREMIER LEAGUE
Watford
5 Liverpool
b Photos
On this day
Top stories
E Christmas presents mey not
arrive in time as cargo...
09:26
See ful forecast
Sf Suggested tor you
142.55 -f.M% ®
141.99 -1Л4Ч ®
Go to watchlist
Add wxlgets
J Driven could be hit with
£100 fine and three licence...
E Over-605 should not take
aspirin regularly to prevent
Queen uses walking stick for
comfort" as she attends...
What are the new retirement
status symbob and how...
Israel accuses Sally Rooney
of impeding Middle East.
Ryanair passengers who claimed
refunds banned from flights unless
they pay the money back
Q 5 5
Gareth Southgate plans England
attacking evolution to stay
challenging among world's elite
Go
P Type here to search
Pinned
О
4
Word
в
Recommended
□ Twitter
Recently edrfod
Qaype
Recently eddwJ
94 www.pclpublications.com
Laptop Care and Maintenance Tips
Back Up
While not so much a hardware maintenance tip, it’s always
mentioning. No matter how much care you take, accidents happen.
Maintaining your laptop will prevent most, but just in case something really
bad happens, then it’s best to ensure you have a good, working full backup
of all your important data and work.
о
□
Adobe
UohtiocMTi
Don’t Block Vents
Despite the name, few laptops
are actually designed to be used on your
lap (or on any soft surface). This is because
the heat vents of many laptops are on the
bottom, and soft surfaces will often block
them, if it happens regularly, this can cause
lasting heat damage to the laptop.
Buy a Laptop Stand
If your laptop sits in one place
and is rarely moved around, consider
buying a laptop stand. These not only help
to give you a better screen viewing angle,
but they also give the laptop vents some
extra clearance and, therefore, better
airflow. You can even buy stands with
built-in cooling fans.
Don’t Overcharge
the Battery
Try not to keep your laptop plugged into
the mains all the time. Charge it, and then
use the battery power until you need to
charge it again. This helps to keep the
battery in good condition. If you only ever
use your laptop at home on a desk, keep it
plugged in, but remove the battery.
□
Photo «ditix
IMG 20201009 >U?19
Thursday *10 33
□ <r » s
Close the Lid
When you have finished using
your laptop for the day, close the lid. When
you are movingyour laptop, close the lid.
When you leave your laptop for any length
of time, close the lid. This not only protects
the screen from accidental damage, but it
will also help keep your laptop running
between charges.
Buy a Good
Laptop Bag
If you ever take your laptop with you out of
the house, make sure buy and use a decent
laptop bag. Go for one that is at least water
resistant, if not waterproof, to protect your
laptop from rain. Try to buy one that is
padded, or even better, has a floating
laptop “sling” for better impact protection.
www.pclpublications.com 95
Troubleshooting
Windows Problems
Windows 10 includes some useful tools for checking on and solving problems but
sometimes you need to look a bit further and deeper. Occasionally you just need to
go back to basics. These tips will help you solve some common problems
encountered in Windows 11.
First Things to Check
If you’re having problems with Windows Update, the Windows Update Troubleshooter might be able to
automatically fix the problem. Go to Microsoft.com and search for Update Troubleshooter.
Windows Update Troubleshooter
Microsoft knows
that things don’t
always go smoothly when updating and have provided a dedicated
troubleshooting tool for use during this key task. If you’re having
problems with Windows Update, the Windows Update
Troubleshooter might be able to automatically fix the problem. Go
to Microsoft.com and search for Update Troubleshooter.
Checking System Spec
If you’re having trouble
installing or running a
particular app or game, it may be that your PC hardware is notup
to scratch. All commercial software will provide details of required
and (sometimes) recommended specification needed to run it. You
can check system spec at any time, just go to Control Panel and
select System and Security, then System.
System > About
MINIX-Office
□«fault string
© Device specifications
Device name MINIX Office
Processor Intel(R) Pentium(R) Silver J500S CPU 9 1.50GHz I SO GHz
Installed RAM 800 GB (7 84 GB usable)
Device ID F93CDB9A 271D 4D19 9D96 6S221CD150AE
Product ID 00330 81485 63548 AA988
System type M bit operating system. <M-based processor
Pen and touch No pen or touch input is available for this display
Related links Domain or workgroup System protection Advanced system settings
Check for Updates
Keeping your copy of Windows 11
up-to-date with the latest releases
can really help to avoid problems before they happen. Press the
Windows logo key and click Settings. Then choose Windows
Update and then select Check for updates. Install any available
updates and restart your PC if required.
App Updates
If an app or program isn’t working with
Windows 11, particularly after the
Anniversary update, try looking in the Windows Store for an update
and if that doesn’t work, delete and reinstall it. To check for
available app updates on the store, click the user icon next to the
search bar and select Downloads and Updates.
96 www.pclpubLications.com
Troubleshooting Windows Problems
Slow Boot Fix
Like Windows 10 before it, Windows 11
uses a hybrid boot to enable fast boot
times. It sounds great but can actually slow down boot for some
users. Disable it by searching for Power Options in the Start menu
and running the matching Control Panel applet, then in the settings
click Choose to decide what the power buttons do.
Check the Troubleshooters
Go to System >
Troubleshoot > Other
Trouble-shooters. This is where you’ll find troubleshooter tests that
can be carried out for a wide range of Windows 11 componentsand
situations. Everything from Internet connectivity to keyboard
issues, power and video playback can be run from here.
f Puww Option»
<- ’ ф t/ > Control Piiwl > Syltvm and Security > Power Option*
Control Panel Home Choose or customise a power plan
Choose what the power A power plan b a codwcliun ol hardware and »y»lvin wfling» (like display brightness, к
buttons do how your computer uses power lell me more about power plans
% Create a power plan % Change settings that are currently unavailable
ba Choose when to turn off the
display Preferred plans
Э Charge when the uxnputer Balanced (recommended) (
sleeps Automatically balances performance with energy consumption on capable hard
ОI liqh performance I I
Favours performance but may use more energy
Show additional plans
System > Troubleshoot > Other trouble-shooters
Most frequent
Internet Connections
<3’>) Playing Audio
0 Printer
О Windows Update
-Othsj
Windows 11 has a completely
different shell than previous
versions. The Explorer.exe process is still at its core but there are a
few additional components as well. If you click the Start button
and nothing happens or if the entire taskbar refuses to respond to
an interaction, open Task Manager (press Ctrl+Shift+Esc), find
Windows Explorer in the task list and click the Restart button.
Non-Responsive PC
Often, a problem could simply be a
Windows 11 service hasn’t started, or
failed to start. For example, a printer not printing may not be the
fault of the printer, but the Print Spooler Service. Click the Start
button, type ‘services’ and click to open the Services App. Find the
service, right-click, then click Restart or Start.
Restart Services
C^PNRP Machine Name Public. This service _
Portable Device Enumerator _ Enforces gro-
Power Manages po_ Running
Printer Extensions and Notifi- This ser
4^ PrintWorkflow c61b0 Provide Stop
Problem Reports Control Pa_ This ser
Program Compatibility Assrs- This ser 4
Quality Windows Audio Vid- Quality
Radio Management Service Radio К
Recommended Troubleshoo. Enables All Tasks
ЗД Remote Access Auto Connec. Creates
Remote Access Connection _ Manag< Refresh
Remote Desktop Configurati- Remote Propertiee
4^ Remote Desktop Services Allows i
Remote Desktop Services Us_ Allows t Help
Remote Procedure Call (RPC) The RPCSS s_ Running
Remote Procedure Call (RPQ- In Windows-
Manual Local Service
Manual (Trigg. Local System
Automatic Local System
(Trigg-
itic (De-
lta
Automatic
Manual
Local System
Local System
Local System
Local System
Local Service
Local Service
Local System
Local System
Local System
Local System
Network Se_
local System
Network Se-
Network Se_
Check Event Logs
You can scrutinise the Windows 11
event logs to see if they reveal any
more information regarding the problem you’re having.
Right-click the Windows Start button, and select Event Viewer
from the list. In here you’ll find everything that’s happened to
your system since the day you turned it on.
Free Up Disk Space
There are times when a lack of
available disk space can lead to
an unresponsive, or slow PC. System > Storage is a good place to
start, then follow the Clean-up Recommendations. Also, right-click
the C:\ drive in File Explorer, select Properties > Disk Clean-up.
Finally, also check Clean up Systems Files in the same window.
www.pcLpubLications.com 97
Troubleshooting
Your Wi-Fi Network
Wi-Fi is like electricity, you only notice it when it’s not working. Then panic begins to set in.
Thankfully, there’s no need to, as most Wi-Fi issues can easily be fixed with a few simple
tweaks here and there. Here’s our top ten troubleshooting tips for your wireless network.
Slow or No Access in Some Rooms
There’s a good
chance that the
room in question has become a bit of Wi-Fi dead zone. Load up a
network analyser and check the signal output in the room in
question. If needs be, reboot any network extenders and the router.
Refusal to Connect
Occasionally, there’s a device that
will refuse to establish a connection
with your wireless network. First thing to try is a physical,
Ethernet, connection (if it has one). If it works, try re-installing the
Wi-Fi drivers on the device. If that’s not possible, try another Wi-Fi
network, it could be a problem with the device’s Wi-Fi card.
Slow Internet
This could one of two things: a problem
with the router and your network, or a
problem with the ISP. Test the connection by directly plugging a
device into the router’s Ethernet ports. If the problem persists,
then call your ISP. If it’s okay, then turn off all your networking
equipment and one-by-one power them up and keep testing to
find the culprit.
Random Loss of Bandwidth
The first check is to
establish a pattern.
Does it happen when you power on something else in the house, if
so, it could be causing interference with the signal. Does it happen
when a certain device is connected? Check the device, as it could
be downloading a huge file, or it could have some form of malware.
© PING ms (i) DOWNLOAD Mbps • UPLOAD Mbps
ВТ о
ф) Voicehost Ltd
98 www.pclpubLications.com
Troubleshooting Your Wi-Fi Network
Unknown Device Discovered
If you maintain good
network order, and
you’ve just spotted an unknown device on your network, then you
need to act quickly. If possible, drop the connection via the router’s
web interface, then change your access password. Check all devices
for malware, ask other family members if they know who it could
be. Worst case, change all passwords.
Forgot the Wi-Fi Password
If you’ve forgotten your
Wi-Fi password, then
you may need to factory reset the router. Use a paperclip and
locate the tiny pin-hole (usually marked Reset). Poke the paperclip
in for 30 seconds. Reboot the router. It should be reset back to the
its original settings and password.
Wi-Fi Has Completely Gone
If nothing is connecting
to your Wi-Fi, then the
problem is likely with your router. Check the router and, if you can
access its web interface, check the access logs and check for any
recent updates (an update from the ISP could have damaged it). If
a reboot doesn’t fix it, contact your ISP.
Overall Poor Signal
Providing your router is working
well, check with a wireless device
while standing next to the router. If it’s okay, then the problem is
likely poor signal spread. Try and reposition the router, don’t put it in
a cupboard, and see if that helps. If the signal is poor while next to it,
there could be a problem. Try rebooting, otherwise contact your ISP.
Everything Works, But No Internet
Check the
indicator lights
on the router, if the Internet LED is off, then reboot the routerand
wait for a connection. If the LED is on, but still no Internet, try
installing a VPN and see if you can connect; it could be an issue
with the ISP’s DNS entries.
Speeds Aren’t as Advertised
If your network
extender or router isn’t
performing at the speeds it was advertised, try the following. Ensure
that the router’s configuration is setup for maximum signal strength.
If it has external antennae, move them around to change the signal
spread. Reboot the routerand any Wi-Fi extenders. Reposition the
router and extenders for better signal through walls etc.
www.pclpublications.com 99
Troubleshooting
Your Wired Network
Wired networks are often a lot more sturdy compared to a wireless network, but they’re
not bulletproof. Thankfully, problems can easily be fixed, so here are our top ten
troubleshooting tips for solving wired network issues.
If your computer
is reporting no
connection, it’s time to get behind the machine and double-check
the Ethernet port. Check that the cable is fully inserted, as they can
get caught by feet and pulled slightly. Check the cable end isn’t
damaged. If there’s still no connection, check other machines (a
router reboot may be needed).
No Connection (one PC)
One of the main
reasons as to why
wired connections keep dropping is a damaged, or poorly created
network cable end. Check the cable with a cable tester, check the
ends by giving them a pull. If they’re loose, or the cable test fails,
then replace the ends or the cable itself.
Connection Keeps Dropping
Connect to a Network
Windows was unable to connect to this network
Tell me more about Internet connection problems
Cancel j
No Connection (all PCs)
If all your computers and
other devices aren’t
connecting, check any switches that they’re connected to. Switch
plugs, and even powerline adapters, can blow a fuse. Check your
router’s switch connection LED is lit up, if not try a different port. If
all else fails, try direct connection to the router, as it could be faulty.
Poor Speeds
A main culprit of poor wired network
speeds is the cable is too long. If the cable
is over 100 metres (300 ft), then the signal will begin to drop
significantly. If your cable is coiled up behind furniture, or in the loft
space, try to shorten its length and check the connection speed.
100 www.pclpublications.com
Troubleshooting Your Wired Network
Poor Connection, or No Connection,
Between Powerline Adapters
Often powerline adapters will lose their connection with each
other. When this happens, power off both adapters, then power up
one and after a few seconds power up the other. Wait for a few
more seconds to see if the connection is okay. If it fails, try pin-hole
resetting the adapters.
Can’t Connect to Another PC
If you’re unable to
connect to another
PC on your network, check the connections to the router, on
both PCs. Also, check that the PC you’re connecting to isn’t
blockingyour connection via the firewall.
Powerline Adapters Won’t Pair
Sometimes
powerline adapters
won’t pair with each other if there are already a set of powerline
adapters already on the network. Turn off the existing powerline
adapters, then power up the new pair. After a connection has
been made, power up the existing pair.
No Internet Connection
No Internet connection
usually means there’s
something going on with the router, so that should be your first port
of call. Check the router’s LEDs, if the Internet is off, try and reboot,
otherwise use a phone to check the status of the ISP’s services.
0
There is no Internet connection
There is something wrong with the proxy server or tl
Try.
• Contacting the system admin
• Checking the proxy address
• Running Network Diagnostics
гия.реоху.соглсс'гюн.гм.го
Some Ports on a Switch Connect Slow
If you
discover
that some of the ports on your switch appear to be operating at
ЮОМЬ/s instead of IGb/s, then check the following. Ensure that
devices connected to the port have a IGb/s Ethernet port (some
smart TVs don’t). Check that the switch has more than one IGb/s
port - some are lOOMb/s with a IGb/s uplink port.
PC Won’t Connect via Ethernet
This could one of
several reasons.
First check the cable going into the Ethernet port; use a different
cable if necessary. Check the drivers by opening Device Manager and
locating the network device. Right-click and select Update Driver.
Also, try Uninstall Device, then Search for New Devices.
Human Interface Devices
“Я IDE АТД/АТАР1 controllers
Imaging devices
_ Keyboards
(У Mice and other pointing devices
□3 Monitors
Network adapters
C? Intel(R) Ethernet Connection (2) 1219-
TAP-Windows Adapter V9
VirtualBox Host-Only Ethernet Adapt»
5 WAN Miniport (IKEv2)
9 WAN Miniport (IP)
(> WAN Miniport (IPv6)
ф WAN Miniport (L2TP)
WAN Miniport (Network Monitor)
WAN Miniport (PPPOE)
ф WAN Miniport (PPIP)
Я шлм /cctda_______________
Update driver
Disable device
Uninstall device
Scan for hardware changes
Properties
vwvw.pcLpubLications.com 101
The Complete
Manual Series
Available on в Readlij
The Complete
Black & White
Photography
The Complete
Build Your
Own PC
Manual
team how to build a new computer
The Complete V"1
Internet
Security
Manual
Master security ord stay safe online
CI
f The Complete
Canon
Camera Manual
The Complete
C++
& Python
Manual
* The Complete
Chromebook
User Manual
Masfer your Chtomebaoic and
Google s Chrome OS
F The complete
Photoshop
Elements
* The Complete
GoPro
Manual
880
Master your GoPro camera and
shoot arnaringphdtos and videos
The Complete *
Home
Networking
Manual *
MQ£fe'^'ne^and зтогт aeWce,
840
* The Complete
Instagram
User Ma
fssendof step by step glides to
postering Instagram
The Complete
Windows 11
User Manual
the essential step-by-step manual
to mastering Microsoft's
Windows 11 operating system
UpDAItDKK AU. PAD MODUS ф
The Complete
iPad
tSciPadOS^
User Manual
Master your iPad and iPodOS 16
The Complete
iPhone
& iOSi.16'
User Manual
MasteryBU' iPhone and iOS 16
For a full list of titles available visit:
www.pclpublications.com
Congratulations, we have reached the end of your latest
tech adventure. With help from our team of tech experts,
you have been able to answer all your questions, grow in
confidence and ultimately master any issues you had. You
can now proudly proclaim that you are getting the absolute
best from your latest choice from the ever changing world
of consumer technology and software.
Do y ou u,ahC Co sCahC а ней,
Are you looking Co upgrade
to а ней, device? Or singly looking
to /вАА'И А Ивк/ skill?
Whatever your plans we are here to help you. Just check
our expansive range of Tricks & Tips and For Beginners
guidebooks and we are positive you will find what you are
looking for. This adventure with us may have ended, but
that's not to say that your journey is over. Every new
hardware or software update brings its new features and
challenges, and of course you already know we are here to
help. So we will look forward to seeing you again soon.
Popercut
www.pclpublications.com
For Beginners
Readlu
GET STARTED WITH APHIS MAT BOO A & marOS VENTURA
GET STARTED WITH MK 1S & IPadOS 1S FOR IP HOME & IPAD
GET STARTED WITH GOOGLE'S CHROME OS NOTEBOOKS
MACBOOK PRO • MACBOOK AIR
©
'DC*. ШККЮШ
NCtl^NjtUT
ЫТ SMARTED W TH TODH WHATSAPP ACCOJM
475
Tech Guides
Available on
MacBook
<macOS Ventura
For Beginners
Jorgor-t-ee л Step-by-step ~ dear Full
TipsGAcvtoe Tutorials Cobur Guides
iOS 15
For Beginners
Chromebook
& Chrome OS
For Beginners
Clear Ful
Nikon
For Beginners
ежа ежа-’
440
Adobe©
Elements
For Beginners
Canon
For Beginners
Ja4or-Tvc Skip-Ь>-Яир CieurFuf
I js b Ad-. lu-uiuL .uIlhi.^fJ*^
^^tcdwitinadobeelemfnts rhoto t;Mri)№
GET STARTED WITH CANON CAMERAS» PHOTOGRAPHY
GET STARTED WITH NIKON CAMERAS t PHOTOGRAPHY
GET STARTED WITH ADOBE LIGHTROOM PHOTO EDITING
AdobeQ
Lightroom
For Beginners
©Jargon-free ~ Step-by-etep л Clear FuA
Tips & Ad. Ice О Tizcxlal s кУ Colour GuOes
1W5 IMCrtUCChr
Щ STARTED WETH APPLE'S IPHONE^SM^,^
GET STARTED WITH HOME NETWORKING & SMART DEVICES
GET STARTED WITH INTERNET SAFETY & DATA PROTECTION
GE1 STARTED WITH CODING I PROGRAMMING
440
"%iS“
455
»»»!!!
GET STARTED WITH DIGITAL CAMERAS & PHOTOGRAPHY
Digital
Photography
For Beginners
&ИХ.
455
npAMlMs
GET STARTED WITH CREATIVE OUTDOOR PHOTOGRAPHY
Outdoor
Photography
For Beginners
©SS2S. 0Ж2'-* 0S&.
,|1(
GET STARTED WITH ADOBE PHOTOSHOP IMAGE EDITING
I Adobe □
Photoshop
For Beginners
__ ®якй.
6ET STARTED WITH WINDOWS ID ON PC. LAPTOP t SURFACE
450
r'<«* Hints
ДРорегеиг
For a full list of titles available visit
www.pclpublications.com
Want to master your PC?
Then don't miss our Windows PC
& Laptop magazine on К Readlq now!
Windows 11 Tricks & Tips
8th Edition | ISBN: 978-1-914404-29-0
Published by: Papercut Limited
Digital distribution by: Readly AB
© 2023 Papercut Limited. All rights reserved. No part of this publication
may be reproduced in any form, stored in a retrieval system or integrated
into any other publication, database or commercial programs without the
express written permission of the publisher. Under no circumstances
should this publication and its contents be resold, loaned out or used in
any form by way of trade without the publisher's written permission.
While we pride ourselves on the quality of the information we provide.
Papercut Limited reserves the right not to be held responsible for any
mistakes or inaccuracies found within the text of this publication. Due to
the nature of the tech industry, the publisher cannot guarantee that all
apps and software will work on every version of device. It remains the
purchaser's sole responsibility to determine the suitability of this book and
its contents for whatever purpose. Any app, hardware or software images
reproduced on the front cover are solely for design purposes and are not
necessarily representative of content. We advise all potential buyers to
check listings prior to purchase for confirmation of actual content
All editorial herein is that of the reviewer - as an individual - and is not
representative of the publisher or any of its affiliates. Therefore the
publisher holds no responsibility in regard to editorial opinion or content.
This is an independent publication and as such does not necessarily reflect
the views or opinions of the producers of apps, software or products
contained within. This publication is 100% unofficial and in no way
associated with any other company, app developer, software developer or
manufacturer. All copyrights, trademarks and registered trademarks for
the respective companies are acknowledged. Relevant graphic imagery
reproduced with courtesy of brands, apps, software and product
manufacturers. Additional images are reproduced under licence from
Shutterstock. Prices, international availability, ratings, titles and content
are subject to change. Some content may have been previously published
in other editions. All information was correct at time of publication.
Э Papercut Limited
Registered in England & Wales No: 04308513
ADVERTISING - For our latest media packs please contact:
Richard Rowe richard@tandemmedia.co.uk
Will Smith - will@tandemmedia.co.uk
INTERNATIONAL LICENSING - Papercut Limited has many great
publications and all are available for licensing worldwide.
For more information email: jgale@pclpublications.com
OVER
OVER
SECRETS &
кHACKS л
SECRETS &
< HACKS
(yf TRICKS & TIPS
Reodlu
TRICKS
TRICKS
& TIPS
Everything you need to take
your Canon photographic
skills to the next level
Everything you need to
take amazing photos with
your GoPro action camera
TRICKS
&TIPS
Tech Guides
Available on
TRICKS r
№Canon
| ▼ j Cameras &
Photography
Everything you need
to take your photographic
skills Y6 the ndft level
Mac
Cloud
&iPadOS16
OVER
OVER
OVER
OVER
Linux
OVER
OVER
OVER
For a full list of titles available visit
www.pclpublications.com
SECRETS &
< HACKS >
SECRETS &
<HACKS /
SECRETS &
< HACKS >
SECRETS &
ч HACKS >
SECRETS &
VHACKS a
SECRETS &
\HACKS
SECRETS &
ч HACKS z
Online
Й1 Security
Coding
_ and .
Programming
Z^OVER^
445
< SECRETS & ,
vHACKS V
Make Your
Own PC
TRICKS
& TIPS,
Everything you need to
master essential coding
and programming skills
Everything you need to
master doud storage and
services on your device
Everything you need to keep
your computers and devices
safe and secure on the internet
Everything you need to take
k your Unux programming
I skills to the next level
Everything you need to
take your Mac experience
k to the next level
TRICKS
&TIPS
TRICKS
&TIPS
TRICKS
&TIPS
TRICKS
&TIPS
TRICKS
&TIPS
Everything you need to take
your Lightroom photo editing
TRICKS A..
& tips Adobe
fZ Lightroom
TRICKS
& TIPS
Everything you need to
take your iPad &
iPadOS 16 experience
to the next level