/


Текст
too» macOS
& TIPS . llldUUD
S к ДЩ| < eehh
v< Monterey
▼
• Advanced guides
and tutorials for
your Apple iMac, Mac
Pro and MacBook
Everything you need to
take your macOS
skills to the next Level
Z OVER
498
SECRETS &
4 HACKS >
Listen Live
• Next level fixes
and secrets help
you get to the heart
of macOS Monterey
• We share our
awesome tips and
shortcuts for Mac
apps and software
QQOOOQOO
wvvwvww
ЛЛЛЛОЛЛ
"ЛЛЛОЛЛ*
vvvvvuv
Swvvvvv©
лллллло
оооллол
* Лч* ЛЛЛО *
ллолллл
л»м>ОЛЛЛЛС)
олллллл
оллоолл
^лллоолс
лллоллл
^ЛййЛЛЛС
ЛЛЛЛЛйЛ
^ЛОЛЛЛЛС
Save a whopping
25% Off!
Apple Tech Manuals
with 3 Popercut
rhe ultimate guide to getting the
best from Apple s NEW iPhones.
. The 1
iPhone
Manual
’9s
Manual
The^^L9UiCie to ^n9
best from Apples NEW OS!
Manual
Я Pod©reut
Getting
Started
Wl
SIP 2022 Е01ТЮЧ
Popercut
The Complete Manual Senes
insider
Secrets
FOR USE WITH Ail MACBOOKS
The Complete
MacBook
User Manual
essential step-by-step manual tc mastering
your MacBook and macOS Ventura
Guidebook
The
y The Complete
iPad
SiPadOS*
User Manual
°—Л
850
IHpmacOS
Ventura
. MANUAL
FREE
SB •
WRAfW WATCH 4 watches^
The Complete
в S
Not only can you learn new skills and master your
Apple tech, but you can now SAVE 25% off all of our tech
digital and print publications!
Simply use the following exclusive code at checkout
NYHF23CN
www.pclpublications.com
TRICKS
&TIPS
macOS
Monterey
macOS Monterey Tricks & Tips is the perfect
digital publication for the user that wants to take their skill
set to the next level. Do you want to enhance your user
experience? Or wish to gain insider knowledge? Do you want
to learn directly from experts in their field? Learn the
numerous short cuts that the professionals use? Over the
pages of this essential advanced user guide you will learn
everything you will need to know to -__
become a more confident, bett
skilled and experienced owner.
A user that will make the
absolute most of their * |
macOS use and ultimately \'
your Mac or MacBook itself. 4
An achievement you can
earn by simply enabling us to
exclusively help and teach you
the abilities we have gained ov
our decades of experience.
О''61'tke f>*ae \
°ш-юшъеу C0Ht!hue!
ус<u,e
StA9e to
you t0
3° further.
□ Contents
Contents
6 macOS Monterey’s Key Apps
8 Contacts - Your Address Book
10 Calendar - Plan Your Events
11 Creating a Backup
14 Reminders - Never Forget Again
16 Messages - For On-screen Chats
20 Books - Buy & Read eBooks
21 Shared with You
60 Going Further with macOS Monterey
62 macOS Monterey’s System Preferences
68 Multi-use Touch Bar - On a MacBook Pro
70 Split View Screens - macOS Multitasking
72 Managing Your Desktop
74 Continuity Feature - On Apple Devices
75 Calling from a Mac
76 SMS and MMS Messaging
23 Adding PDF’s to Books
24 FaceTime - Video & Audio Calls
25 FaceTime Audio Calls
28 Maps - Plan Your Routes
29 Getting Traffic Information
32 TV App - Watch on Your Mac
34 Notes - Store Your Jottings
37 Collaborative Notes & Folders
38 Quick Note - Speedy Jottings
40 Find My - Find Your Gear
42 App Store - Buy More Software
44 Pages - Word Processor
50 Numbers - Spreadsheet App
56 Keynote - For Presentations
77 Universal Clipboard - Copy and Share
78 Universal Control - On Macs and iPads
79 Using Universal Control
80 Sidecar - With Your iPad
81 Using the iPad as an Input
82 Continuity Camera - Use That Photo
82 Scanning Documents
83 The App Switcher - Speed Your Workflow
84 Using iCloud - For Storage & Syncing
85 Sharing an iCloud File
87 The iCloud Keychain
88 Upgrade Your iCloud Drive
89 Apple’s iCloud+ Service
90 iCloud Desktop - Documents & Folders
91 The Siri Feature - Your Digital PA
93 Siri Dictation Commands
94 Shortcuts on Your Mac
95 Going Further with Shortcuts
96 Live Text - Pics to Words
98 Focus - Reduce Distractions
4 | www.pclpublications.com
Contents
100 iPad Apps on an M1 Mac
101 Search for an App
102 The Time Machine - Back Up & Restore
103 Backing Up to Time Machine
104 External Hard Drives Advice
105 Setting Up a New Mac
106 The Keyboard - Customised Shortcuts
107 Display and Accessibility
108 Update macOS to Monterey
110 Top Tips for macOS Monterey
111 System-Wide Translation
113 Shared Files and Folders
114 Maintenance and Troubleshooting
115 Clearing a Frozen Screen
116 Using the Recovery Drive
116 Problems with Wi-Fi
117 Resetting the SMC
118 Glossary of Mac and Computing Terms
“macOS Monterey has some awesome new features, and we bring you
tip-top and tutorials to its advanced features. Our guides to Monterey’s
key apps cover both the basics and their advanced features like
Universal Control, Live Text, Focus, Quick Notes, iCloud+ and more.
With our help, you’ll soon be using your Mac like a pro. ”
MacBook Early 2016 and later
MacBook Air Early 2015 and later
Can You Run
macOS Monterey?
Older Macs cannot be updated to the new
operating system, so if you want to
upgrade your Mac to macOS Monterey, it
must be one of the following models:
MacBook Pro Early 2015 and later
All Apple Silicon Macs
Mac Pro
Mac mini
Late 2013 and later
Late 2014 and later
Late 2015 and later
2017 and later
iMac
iMac Pro
www.pclpublications.com | 5
macOS Monterey’s Key Apps
6 I “wwpdpubllcations.com
macOS
Monterey’s
Key Apps
One of the best things about the Mac is
that it comes with a wealth of preinstalled
applications, or ‘apps’. There’s the Safari
web browser, the Mail email client,
productivity apps such as Calendar, Notes
and Reminders, entertainment apps like
Apple TV, Music and books, and more.
Here we tell you all about them.
Learn more >
www.pclpublications.com | 7
П macOS Monterey’s Key Apps
Contacts
' Your Address Book
Contacts is your digital address book, in which you can store contact details
for friends, family, workmates, professional associates and more. You can
add addresses, telephone numbers, social media accounts and other such
information, and store your contacts in user-defined categories.
Managing and Maintaining Contacts
This guide shows you to how to add new contacts to
your Contacts address book, edit existing ones and
share a completed contact card with other people. To create a
new contact card, click on the plus button in the bottom left of
the current card. Select New Contact from the window that
pops up and you’re given a blank card to fill in.
To add details, click on the field and then type in the
information. After entering a phone number or address,
another blank is offered, in case you want to add a second one.
Click on the name of the detail (in blue) for a pop-up window that
lets you change it. When you’re finished, click Done. To change
or add information to a card you’ve completed, click Edit.
To add a photo to a contact card, which is then
displayed against messages, incoming calls and emails
from that contact, drag a picture onto the grey circle then crop
and resize it to your requirements. You can also click on this
circle or the Picture tab and navigate to a photo or default
image or even take a new one.
If you need a piece of information in a contact card
that doesn’t currently have a blank field, open the
Card menu from the top bar and go to Add Field. You can
then choose one of the options on offer, such as: Maiden
Name, Nickname or Twitter name. This new field is then
added to the card, for you to fill in.
8 | www.pclpublications.com
Contacts &
Smart Group Name: |MMrt group___________________________________________________________________|
Contains cards that match the following condition.
5
You can organise your contact cards into groups. To
show and hide the Groups panel, click on the View
menu and select Show/Hide Groups. To add a contact to a
group, simply drag it from the middle panel onto the group in
question. A card can be in more than one group at a time,
without being duplicated.
6
Smart Groups are groups with a set of rules. They
automatically include every card that satisfies the
parameters of chosen rules. Go to File > New Smart Group to
open one. Here we’re making a Smart Group for every contact
that says ‘Xmas card’ in the notes. Great for sending out
greetings cards at Christmas!
BDM Publications
Kaya Kanumba
Q Company
mobile 0 055 5537 905
iPhone 0 Phone
work 0 kaya@bdmpublications.com
7
To set up a card from a company rather than an
individual or display a contact according to the
person’s employer instead of his or her name, check the box
marked Company at the top of the card. This reverses the
name and company details of the contact and indexes them
according to the company name.
8
If you get an email, a message or other communication
with contact details in them, you can add them directly
to Contacts. Click on the details in question, and a pop-up
window lets you start a new Contacts card with those details
already in place. If you want to add the details to an existing
card, click Contacts and click on it in the new sidebar
Sharing Contacts.
If you want to share a contact card with someone else, click the
icon showing a box with an up-pointing arrow and choose a
sharing option. You can send the contact as a v-card by AirDrop,
Mail, Messages and more. The person receiving it then
double-clicks the v-card to add it to their own address book.
Using Contacts on iCloud.
You can also access your contacts using a web browser on any
computer, tablet or smartphone that’s connected to the Internet.
Just go to www.icloud.com, enter your details and then click on
Contacts. Only cards stored under iCloud in your Contacts app
appear here, so bear this in mind when adding cards.
www.pclpublications.com | 9
macOS Monterey’s Key Apps
ич Calendar
1' Plan Your Events
The Calendar app, as you’d expect, is there to help you organise your life.
With it you can add events, set reminders and synchronise your calendars
with your iPad or iPhone. Birthdays and anniversaries can be stored and
you’re able to set annually reoccurring events, as well as scheduled alerts.
Changing the View
There are several different ways to view your
calendars. To move between Day Week, Month and
Year views, you can use the corresponding buttons that
appear in the top bar of the Calendar application.
2
The Year view shows you a complete year in a single
window. Clicking on the title bar for any month takes you
to its Month view Double-click a specific day in either Year,
Week or Month view to open its page in the Day view.
3
Click the Calendars button (top left) to open and close
the sidebar; as shown here. This sidebar is visible
regardless of whether you’re in Day, Week, Month or Year view
and lets you mute or reveal individual calendars and more.
Click the Today button in the top right corner to get to the
Day, Week, Month or Year (depending on view) with the
current day in it. The arrows either side take you forward or back
one year, month, week or day at a time; depending on the display.
10 | www.pclpublications.com
Calendar
17
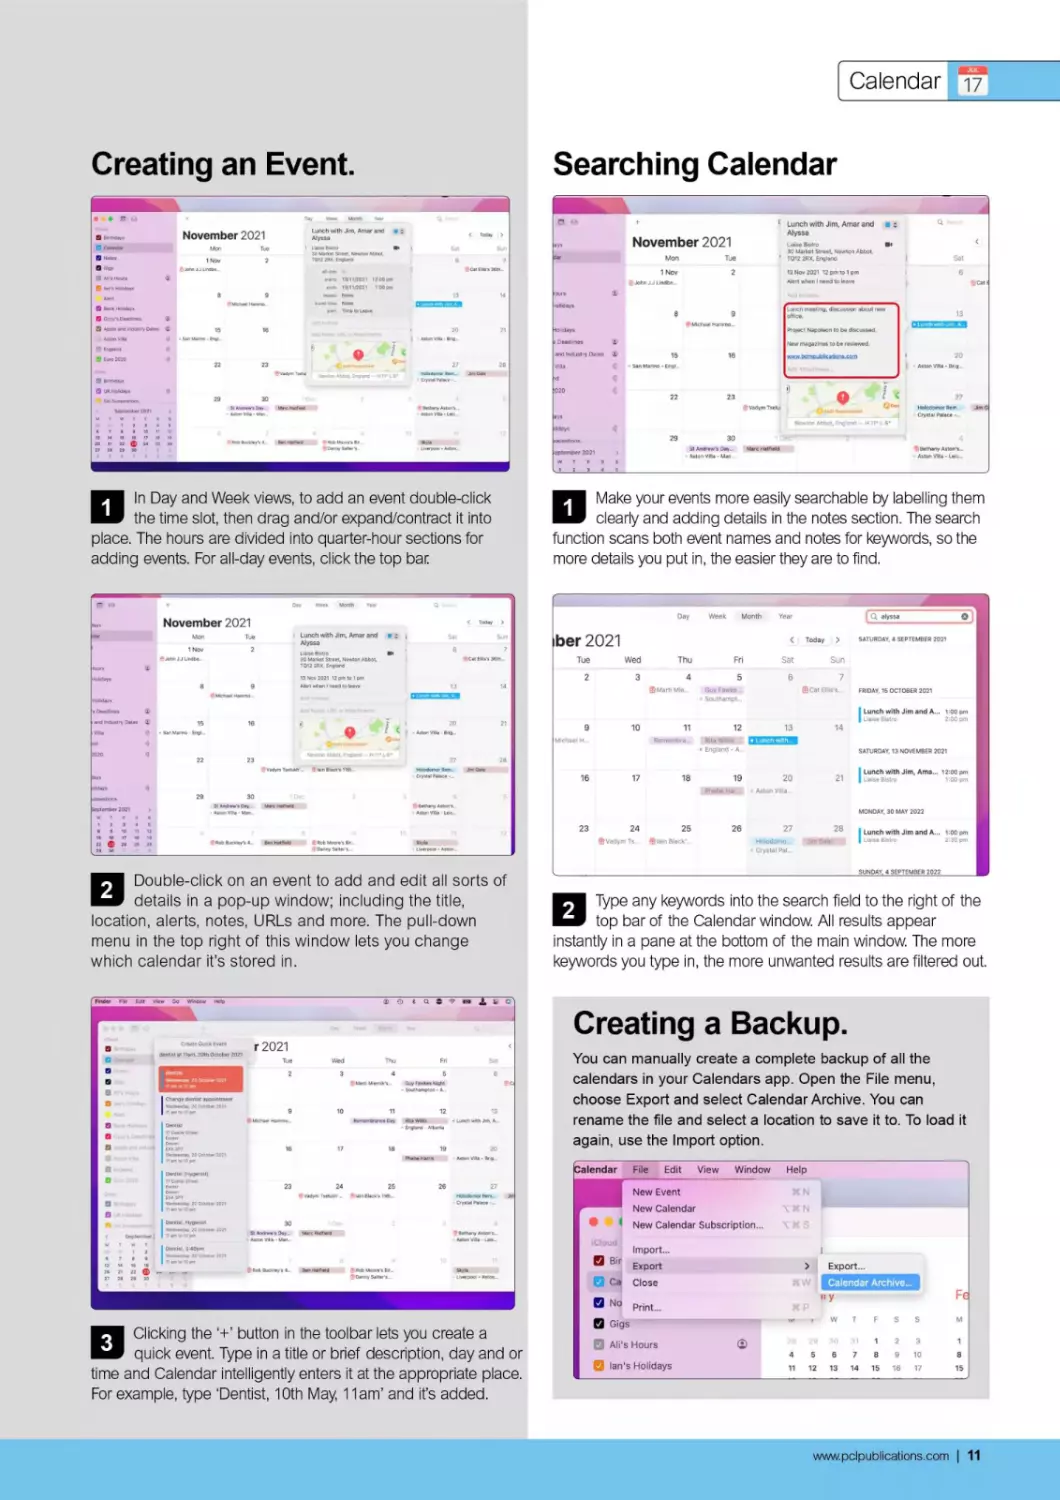
Creating an Event.
Searching Calendar
In Day and Week views, to add an event double-click
the time slot, then drag and/or expand/contract it into
place. The hours are divided into quarter-hour sections for
adding events. For all-day events, click the top bar
Make your events more easily searchable by labelling them
clearly and adding details in the notes section. The search
function scans both event names and notes for keywords, so the
more details you put in, the easier they are to find.
2
Double-click on an event to add and edit all sorts of
details in a pop-up window; including the title,
location, alerts, notes, URLs and more. The pull-down
menu in the top right of this window lets you change
which calendar it’s stored in.
2
Type any keywords into the search field to the right of the
top bar of the Calendar window. All results appear
instantly in a pane at the bottom of the main window. The more
keywords you type in, the more unwanted results are filtered out.
3
Clicking the * *+' button in the toolbar lets you create a
quick event. Type in a title or brief description, day and or
time and Calendar intelligently enters it at the appropriate place.
For example, type ‘Dentist, 10th May, 11am’ and it’s added.
Creating a Backup.
You can manually create a complete backup of all the
calendars in your Calendars app. Open the File menu,
choose Export and select Calendar Archive. You can
rename the file and select a location to save it to. To load it
again, use the Import option.
endar File Edit View Window
В New Event
New Calendar
• 1 New Calendar Subscription...
iCloud
Import...
QBir Export
Q Ca close
О No Print...
Q Gigs
Q Ali’s Hours ©
Q Ian's Holidays
Help
XN I
tXS
1
> Export...
Calendar Archive...
»'У
www.pclpublications.com | 11
П macOS Monterey’s Key Apps
Adding and Viewing Additional Calendars
1
The flexible, versatile Calendar app lets you add as
many different calendars as you want and use them for
different things. To add a new calendar, open the File menu
and select New Calendar. A box appears, prompting you to
enter a name for your new calendar.
2
To see a complete list of all the calendars you’ve created in
the Calendars app, click the calendars button on the left
side of the top bar of the Calendar window, shown as a calendar
icon. A sidebar on the left of the window is revealed, showing all
the calendars you currently have set up.
10 am
Mucic festival,
Norfolk
Birthdays
Calendar
Notes
Music festival, Norfolb
Add location or Video Call All's Hours
Ian's Holidays
4 Aug 2022 10 am to 6 pm a Bank Holidays
Ozzy's Deadlines
Apple and Industry Dates
3
To select which calendars you want to appear active in the
main view, check or uncheck the boxes as appropriate. Each
calendar is colour-coded, as are their events. Unchecked calendars
aren’t erased; you can check them again later if you wish.
4
To change the calendar under which an event is listed,
double-click the event to edit it then select a different calendar
from the drop-down menu. Alternatively, right or ctrl-click the event,
go to Calendar on the pop-up menu and select a new one.
Calendar Preferences.
About Calendar
Accounts...
Add Account...
Services
Hide Others
Show All
Quit Calendar
• Bank Holidays
Preferences...
Calendar File Edit View Window Help
Я ,
August 20
Hide Calendar
Mon 1
To open the Calendar Preferences, use the Calendar menu as
shown. Under the General tab, you can change the way the app
presents itself, set when a day starts and ends, change the default
calendar and even switch to a Chinese, Hebrew or Islamic calendar.
Under the Accounts tab, you can disable calendars you don’t wish to
be active on the Mac in question, and also choose how each
calendar account refreshes. The Alerts tab lets you set default alert
settings, and under ‘Advanced’ you can make more customisations.
12 | www.pclpublications.com
Calendar “
Sending Invitations
iCloud Calendar.
Double-click an event you created. In the pop-up window
that appears, click Add Invitees and begin typing the name
of a person in your Contacts whom you’d like to invite; or if the
person isn’t in your contacts, enter their email address instead.
First of all, open System Preferences from the Apple menu
as shown. Click on the Apple ID preference pane, found in
the top right, and then, in the next window, click on iCloud in the
sidebar Make sure the Calendar checkbox is ticked.
2
When you’ve finished adding all the people you intend
to invite to your Calendar event, click on the Send
button and an invitation is sent to everyone on the list. You’ll
get notifications of responses. You can cancel invitations or
send them to more of your contacts later if you wish.
2
To activate iCloud syncing on an iPadOS or iOS device,
open Settings, tap your name at the top and then tap
iCloud. Make sure the Calendars switch is on. If it isn’t, switch
it on to sync your calendars between the device in question
and all other Macs and iOS devices with syncing on.
10 «m
Musk: fsstivsl,
Norfolk
Music festival, Norfolk
4 Aug 2022 10 am to 6 pm
@ Alison Willis
® Amar Yapp
® James Gale
3
Your calendar entry shows who you’ve invited, and
whether they’ve replied. If your invitee has an iCloud
email, the event is automatically added to their Calendar app
and updated whenever you make edits.
3
Now, when you return to your Calendar app, all the
entries you made on your iOS devices are also shown
on your Mac and vice versa. It’s a great way of keeping your
computer and your tablet or smartphone calendars in sync.
www.pclpublications.com | 13
П macOS Monterey’s Key Apps
•= Reminders
® Never Forget Again
If you want to make a shopping list, set up a regular reminder or schedule an
alert, you need the Reminders app. It syncs across your Apple devices using
iCloud, so you can add a reminder on your Mac and get an alert when you’re
out and about with your iPhone, and it’s straightforward to use too.
Weekly Jobs
All
316 Completed • Clear
Paignton
Rowcroft charity shop
Rowcroft furniture shop
Rain jacket
Paignton
Odds & Ends
О
Room clear out: garage
Room clear out: sheds and greenhouse
New shed, roof
Outside wall
© Add List
Look into tattoos
Get bikes up and running
Inner tubes and tyres
(J) halfords.co.uk
О
©
Scheduled
О
Odds & Ends
To Do In 2021
Work To-Do
Little jobs
Shopping/Car Boot Sale
Vacation Planning
Shopping List
Ian's Odd Jobs
To Do In 2021
9
2
5
1
This is your search field.
Use it to search your
reminders, regardless of which
list they’re organised in.
2
This is the Reminders
app’s front page,
showing smart lists as well as
the lists you’ve created
yourself. A ‘list’ is a group of
reminders you’ve set up and
can be titled anything you like.
Click the plus sign to add
a reminder to the open
3
list. You can call it anything you
like. When added, it appears in
that list until you mark it as done.
4
These boxes at the top of
the sidebar are your
smart lists. Click on one to open
it. ‘Today* is all reminders
scheduled forthat day
‘Scheduled’ shows reminders
due in the future, All’ lists all your
reminders and ‘Flagged’ shows
those that you’ve flagged.
5
Here, you can see the
currently selected list or
smart list displayed in the main
Reminders window. As All’ is
the currently selected smart
list, this column shows all of
your reminders, regardless of
where they’re stored.
6
Your lists can be
called anything you
like. Click one to open it and
see the reminders you’ve
added, mark reminders
you’ve done as complete
and also add new ones.
These icons show a
Reminders list is shared.
You can share a list with anyone
with a Mac or iOS/iPadOS
device. The list then appears in
their own Reminders app
8
The numbers on the
right of each list show
how many outstanding
reminders it contains. When
you mark one as done, it’s
removed from the list.
9
To mark a reminder as
done, click the circle
next to it and it disappears
from the list. If you want to
get it back, click Show (top
right), and then click a filled
circle to clear it.
10
Click here to create a
new list, which appears
in the My Lists section of the
Reminders home page. You
can then add reminders to
this list in the usual way.
14 | www.pclpublications.com
Reminders :
Creating and Using Reminders
1
To create a new list, click the Add List link in the
bottom left. Add a title, choose a colour and click on
the smiley or the three lines to add an emoticon or an icon.
Check the ‘Make into Smart List box’, if you want to create a
Smart List based on tags or filters.
2
To add a reminder to a list, click the Plus button (top right).
Add a name and, if you wish, tap the T icon next to it to:
add notes, a URL or a flag or tag, set a priority as low, medium or
high and more. When you’ve carried out the task, tap the circle to
its left to check and dismiss it.
To schedule a reminder; click it, tap the T icon that
appears and then switch on ‘Remind me on a day’. You
can add an alarm, set a date and time and set it to repeat, if
necessary You can also be reminded when you reach or leave
a location or when messaging a certain person.
Also in the ‘I’ menu, click the Add Image link near the
bottom of the Details window and you can add a photo,
take a new one or scan a document. Click Notes and you can
type a short note, and if you click URL near the bottom you
can add a web address too.
5
To share a list with another Mac or iOS user, hover
over the list in the sidebar, then click on the Silhouette
icon that appears. Choose a method of inviting people.
Reminders created in Monterey are compatible with macOS
Catalina but not earlier than that.
Using Tags.
If you have a lot of reminders you’d like to group but
they’re distributed throughout your lists, use Tags. Tap a
reminder’s T icon, and either type a new tag, or choose an
existing one from the list that appears. You can then click
on one of your tags at the foot of the sidebar to see all the
reminders on which you’ve used that tag.
www.pclpublications.com | 15
macOS Monterey’s Key Apps
Messages
For On-screen Chats
Messages is one of the most popular apps in macOS. With it, you can
exchange short text messages with friends, family and colleagues, attach
photos, web links and more and brighten up your messages with emoticons
and emojis. If you’re sending to another Apple device, they’re free too.
Setting Up Messages
1
When you first open Messages, you might need to sign
in with your Apple ID. If you’re not asked to do so, you’re
already signed in. Open Messages and select Preferences
from the Messages menu in the top bar, or press cmd-comma
on your keyboard. The Preferences window appears.
Click the iMessage tab and ensure the email address
associated with your Apple ID is enabled. Set more than
one email address and phone number, so messages sent to
them appear on your Mac. Check the Enable Messages in the
iCloud box, to sync Messages with your other Apple gear.
3
Once you’re signed in, click back to the General tab and
click on the Set up Name and Photo Sharing button. This
opens a setup wizard that guides you through the process of
setting up personalised messages with a name and photo. It’s
not essential, but it’s a useful thing to do.
You can change your Messages image, which appears
on outgoing messages, to any picture on your Mac, as
well as the Memoji that are available through macOS
Monterey You’re also able to create your own unique Memoji
via the new Memoji Editor.
16 | www.pclpublications.com
Start a Conversation
1
To message someone you’re already chatting with, click
their name on the left. To start a new message, click on
the pencil and paper icon for a blank message. Type the email
address, phone number or name (if they’re in your Contacts
app) of the person you want to message in the To field.
2
Type your message into the text field at the bottom of the
window. Click the wave form icon in the right of the text
field to send a voice message instead of text. Record your
message then click the Stop icon. Click on the smiling face on
the right-hand side of the text field to add an emoticon.
3
Click on the button to the left of the text entry box for a
pop-up box where you can opt to add a Memoji, add a
photo, Message Effect or the #lmage option for pictures and
memes. When you’ve finished making your message, click
the up-pointing arrow in the text field or tap return to send it.
When conversing, messages you’ve sent are shown on
the right-hand side of the conversation window, and
replies are shown in grey on the left. Under your last message,
you’re shown when it was read. While your contact is typing, a
three-dots speech bubble is shown.
5
Paste a web link into a message, and a site preview is
shown. Paste a link to a video and it can be played within
Messages or clicked on to go to the site. You can drag photos
onto the conversation and send them as an attachment too.
Click on the icon above the pics to see their thumbnails.
6
Type more than one person’s details into the To field and
you can start a group conversation. Your outgoing
messages are sent to everyone in the group, and their replies
in grey show the picture and the name of the person who sent
it; so you can see who said what.
www.pclpublications.com | 17
П macOS Monterey’s Key Apps
More Messages Tips
1
You can pin up to nine conversations, so they’re always at
the top of the list; swipe a conversation left and click the
yellow pin icon. To unpin, right-click a pinned chat and choose
that option. Click a pin to open that chat. Incoming messages
from pinned chats are shown on the pin.
2
Messages sent by you appear as blue or green speech
bubbles. If the bubble is blue, your message is being
sent to an Apple device. These messages are free, as they’re
sent over the Internet. If the bubbles are green, they’re sent to
a non-Apple device and might incur SMS charges.
3
In a conversation, click the T in the top right corner for a
details window on that person. This window shows their
location (if they're sharing it) and buttons to contact them by
phone, video, email and more. Scroll up to see photos, links
and other attachments you’ve shared with each other.
4
Click the video camera icon in the top-right of the window
to initiate a FaceTime call to the person you’re messaging
with. The pop-up window that appears lets you make a
FaceTime video or audio call. This icon only appears when the
person you’re messaging with also has an Apple device.
5
If you want to delete an individual speech bubble,
right-click on it and select Delete from the contextual
menu. To delete an entire conversation, swipe it left in the
left-hand panel and click the dustbin icon. The bell icon mutes
notifications from that conversation. Repeat to unmute it.
Photo Stacks.
If someone sends you several photos at once, they appear
in the Messages conversation as a stack of fanned
thumbnails. Double-click on this stack to open them in
Preview. Above the stack is an icon and an indication of
how many photos are stacked. Click this for thumbnails.
18 | www.pclpublications.com
Shared with You
1
Photos, Podcasts, web links, Apple News and Apple TV
shared in Messages are now shown in their respective
apps too. If you don’t want this, you can disable it on a per-app
basis by opening Messages preferences, clicking Shared with
You at the top and unchecking apps.
Photos: In the Photos app, click on Shared with You in
the left-hand sidebar, and pictures that have been sent
to you in the Messages app are shown in the main window.
Double click to open one and see who sent it. Right-click for
further options like forwarding or sharing.
3
Safari: Open the sidebar and click Shared with You.
Thumbnails of websites sent to you through Messages
are shown. Click one to open it, click the ‘From’ bubble
underneath to open the Messages conversation and
right-click for more options.
4
Apple News: Click on the Shared with You option in the
sidebar to see Apple News articles that have been
shared with you in Messages. Click the person’s name
underneath to return to the Messages chat, or click the three
dots icon for extra options.
5
Podcasts: In the Podcasts app, Shared with You is found
in the Listen Now section; scroll up until you see ‘Shared
with You’. The person who sent it to you in Messages is once
again stated underneath. Click it to return to the conversation.
Apple TV: The Shared with You section is found under
the Watch Now tab at the top of the window. Scroll up to
find it. Click on a show to be taken to its home page, and click
the name of the person who sent it, to chat in Messages.
www.pclpublications.com | 19
П macOS Monterey’s Key Apps
Books
Buy & Read eBooks
The Books app offers much more than simply being a portal to viewing your
collection of electronic literature. You’re can browse a huge library of titles, buy
new eBooks, sample content and organise your ever-growing collection, and
even add PDFs to your Books app; all of which syncs between your Apple gear.
First Steps with Books
1
The Books app’s sidebar is divided into three sections;
Apple Books shows what you’re reading now and offers
two shop options; Library lets you view your book collection; In
My Collections, you can organise them into categories.
If you’re already a Books user on your iPad or iPhone,
you can access your books by clicking the All Books
option under Library. Here you can see your book collection.
Books not currently on your Mac have a cloud under the cover
Download
Delete Everywhere
Add to Want To Read
Add to Collection...
Mark as Finished
Share >
The Great Battles of
World War II
MONTE 7
<3 ••• тгатв
3
Click on a cloud, or the three-dots icon next to it, for
options to download a book to your Mac, delete it from
your Mac (it remains on iCloud, so you can download it again
later) or add it to Library categories like Want to Read.
Click the chevron in the top-right corner for a menu. Here
you can change the way the books are sorted; according
to when you got them, their author or manually by dragging them
into place. You can also switch between a Grid and List view
20 | www.pclpublications.com
Books
Buying Books in the Books App
1
If you know what you’re looking for, use the Search bar in
the top-left. Otherwise, click Book Store in the sidebar to
go to the Apple Book Store. Click Browse Sections (top right) to
browse according to genre and other categories.
2
When you’ve found a book you like, click on it to be taken
to its page. As well as buying it (or downloading it for
free in some cases), you can use this page to add it to your
Want to Read list, and/or download a free sample.
3
When you’re ready to make a purchase (or download for
free), click the price button (or Get for free books). A
sign-in might be required; if so, use your Apple ID. It works the
same way as buying apps or iTunes media for your Mac.
When the book or sample has downloaded, it opens so
you can read it. It's also placed in your book library, which
is synced between your Apple devices using iCloud. You can
download it on an iPad or iPhone without paying again.
Adding PDFs to Books.
You can copy PDF documents onto your Mac and into the Books app and sync them using your iCloud account.
In the Books app’s File menu, select the Import option at the
bottom. In the window that pops up, navigate to the PDF file
on your Mac, and click on it.
Now click the Import button in the bottom right comer of this
window. The PDF is imported into your Books app, and can be
opened and read from your Library.
www.pclpublications.com | 21
П macOS Monterey’s Key Apps
Viewing Titles in Books
DRACULA
Bram Stoker
Chapter 1
Chapter 2
Chapters
Chapters
Chapter?
Chapter 8
Chapter 10
1S2
1
To open a book, go to your Library and click on it. It
automatically opens at the start of the book or at the last
page you read to, if you’ve already started it. The control icons
are revealed by dragging the pointer over the book.
Navigate the pages by clicking the right or left chevron to
turn the page, or using the slider at the bottom of the
screen. Skip back to the table of contents using the first icon in
the top left. Return to reading by clicking Done (top right).
ictrate. The time I waited seemed
Is and fears crowding upon me. What
: to. and among what kind of people9
nture w as it on which I had
ustomary incident in the life of a
to explain the purchase of a London
slicitor’s clerk! Mina would not like
before leaving Hindoo 1 got word
is successful; and I am now a full-
i to rub my eyes and pinch myself to
ill seemed like a horrible nightmare
mt 1 should suddenly awake, and find
c dawn struggling in through the
and again felt in the morning after a
ty flesh answered the pinching lest.
coming of the morning
to this conclusion I heard a heavy
:i the great door, and saw through the
oming light. Then there was the
and the clanking of massive bolts
turned with the loud grating noise of
at door swung back.
I old man. clean shaven save for a
ind clad m black from head to loot,
if colour about him anywhere. He
que silver lamp, in which the flame
cy or globe of any kind, throwing
like a statue, as though
fixed
the threshold, he move*
molding
wince. an effect which
open door. The old man motioned me in with his right hand
with a courtly gesture, saying tn excellent English. but with
a strange intonation: —
'Welcome to my house! Enter freely and of your own
my house. Come in; the
..tust need
Bram Stoker
living man. Again he &
•Welcome to my I
leave something of the
of the handshake was s
noticed in the driver, w
moment I doubted if it
‘Count Dracula?*
replied:
Щ Search Selection
8 copy
bracket on the wall, and stepping out. took my luggage; he
had earned it in before I could forestall him. I protested but
he insisted —
‘Nay. xir. you are my guest It is late, and my people
are not available. Let me see to your comfort myself.' He
DRACULA
Mh
Click and drag your pointer over a portion of text to
select it, then right-click on the selected text. This brings
up an options window where you can add a note, highlight the
text, remove a highlight, copy or share it and more.
To view your notes and highlights, click on the third icon in
the top-left of the toolbar Your notes and highlights are
shown on the left. Click on one of these notes or highlights to be
taken directly to that place in the book.
dre the trouble Io loti?* ?
in back over his gums, til
ut strangely. He answer»
"Because your peas»
hose flumes only appear
tan of this land will. if Ik
nd. dear sir. even if he di
fhy, even the peasant t hat
lace of the flame would r
ven for hi* own work. Ek
worn, be able to find the»
There you are right,
ead where even io look f
(her matters
"Come.* he said al la
ouse which you have pro
ir my remissaess. I went
open from my bug Whi
card a rattling of china al
assed through, noticed III
№ tamp lit, for it was by
nips were also bt in die
bunt lying on the sofa.n
i English Bradshaw's Gr
le books and papers true
iln plans and deeds and I
7:23 pm
Dona
Al Purfleel. on a byroad, I came across just such a place as seemed to be
required, and where was displayed a dilapidated notice that the place...
Interesting dialogue. This would be a good thing to discuss in our
Book Club on Tuesday.
*< the end knew very mis
this, he answered
needful that I should''
, and my friend Harker
o my country s habit of
riend Jonathan Harker
id aid me. lie will be in
ng at papers of the law
Its. So!"
Miuness of the purchase
i1 told him the facts and
•pen. and liad written i
Hawkins, he began in
uttabic t place I read ti
the time, and which I
is h*. wk I. was
n doubt a corrupt кт of
four sided, agreeing
11 '. 1 ! ’ . ‘ . i :i- . |
content if I am like the rest, so that no man stops if he secs
A stranger!' I have *
Hawkins, of Exetet Blu*
londnn You shall. Ипк
by our talking I ma ₽u,₽l*
would thal you tell У Underline
long today, but you
many important afl ® Loos Up SaWclxn
Of course I sa 0 Search Selection
asked if 1 might co: ® Copy
"You may go i
' ouldbe
S master of
riend Peter
restate in
vhile. so that
«1 Andi
of the
Io be away so
Ding, and
stlc. except
wish to go. There is reason that all thmgs are a
and did you see with my eyes and know with my
knowledge, you would perhaps better understand.* I said 1
‘We are in Transylvania, and Transylvania is not
England. Our ways are not your ways, and there shall be to
you many strange things. Nay. from what you have told me
of your experiences already, you know something of what
strange things there may be.*
so
to me or come within my notice.!
the subject, or turned the convert;
understand, but generally he ansu
frankly I hen as time went on. an
bolder. I asked him of some of thi
preceding night, as for instance, v
explained to me that it was comm
certain night of the year, last nigh
spirits arc supposed to have unctu
seen over any place where treasui
’That treasure has been hidd
region through which you came I.
little doubt. For it was the ground
by the Wallachian, the Saxon, ant
hardly a foot of soil in all this reg
enriched by the blood of men. pal
days there were stirring times, wh
Hungarian came up in hordes, am
meet them. men and women, the ,
and wailed their coming on the ro
they might sweep destruction on I
avalanche*. When the invader wa
little, for whatever there was had
friendly soil.*
undiscovered, when there is a sur
5
When looking at a note added to your book, there’s a
coloured square in the margin next to the highlighted text.
Click on it to open a pop-up page showing a snippet of the text
and the entire note, which you can add to here if you wish.
6
Right/Ctrl click anywhere on the page and you can use the
pop-up menu to have the text spoken to you via the Mac’s
own speech software. Simply select Speech > Start Speaking,
then Speech > Stop Speaking to stop again.
22 | www.pclpublications.com
Books
® 0 *
This led to much conversation, a-
at he wanted to talk, if only for talk
any questions regarding things that
me or come within my notice. Sonr
e subject, or turned the convcrsatioi
iderstand, but generally he answerei '
ankly. Then as time went on, and 11
)lder, I asked him of some of the str
eceding night, as for instance, why
e places where he had seen the blue
;plained to me that it was commonb
rtain night of the year, last night, in
lirits are supposed to have unchecke
en over any place where treasure hi
"That treasure has been hidden,"
gion through which you came last night, there can be but
tie doubt. For it was the ground fought over for centuries
Ч tha Wnlln^hinn—thx> —ипЯ tha TitrV—Wh'i ihara ic
A fej C Tue 21 Sep 7:48 pm
± aA Q □
Original
Athelas
Charter
Georgia
Iowan
Paia lino
San Francisco
New York
Seravek
l imes New Roman
D Click on the ‘aA icon (top right) for a window that lets you
increase or decrease the font size (the small and large A
at the top), change the background colour to beige, grey or
black and change the font to one of the others available.
8
Also in the top-right is the Search option (the magnifying
glass icon). Click it and type a word or phrase, and all
occurrences of that search term in the book are listed. Click on
one to go to that page; the search term is highlighted.
9
The final top-right icon is Bookmark (the ribbon). Click it
to place a bookmark on the current page. To see your
bookmarks, click on the middle icon in the top-left to see them
listed (you can have more than one). Click on one to go there.
10
Some books have integrated content such as images and
videos presented within their pages. These are viewed by
following the specific instructions given by the book title in
question, such as pressing the Play button on video clips.
Sharing eBooks and Using
the Books Wish List.
When you find a title in the Apple Books Store that you wish
to share with a friend, or if you are a little short on funds and
want to add the title to your Wish List to remind you at a later
date, you can use the following features. When you are on a
title’s home page, click on the button marked ‘Want to Read’
to add it to your Want to Read list, accessed in the sidebar.
To remove a book from Want to Read, click the three-dots
icon to its right and select Remove from Want to Read.
Also on the book’s home page is the Share icon, the
square with the up-pointing arrow. Click on this and you can
add a note or a reminder about the book, or use the Mail or
Messages app to send an email or a message to your friends
and family to recommend it, or not.
www.pclpublications.com | 23
П macOS Monterey’s Key Apps
FaceTime
Video & Audio Calls
Video chat has grown in popularity during the global pandemic, and Apple’s
own FaceTime video chat app has grown with Monterey. It’s now even
more powerful and feature-packed, and you can even take (but not initiate),
FaceTime calls on Android and Windows devices. Let’s take a look at it.
Using FaceTime
1
Click on the FaceTime app to launch the program. It
should start straight away, and you’ll see your own face
on the screen, as well as a panel inviting you to log in with your
Apple ID. Type in your Apple ID password and click OK.
2
Next you’ll need to log on with your Apple ID. People can
use your Apple ID email to call you through the
FaceTime app. There might be a brief pause while FaceTime
verifies your details and logs you on.
3
Before you make a video call, it’s a good idea to make
sure they can see you properly. Using the camera view
shown here, make sure there are no distracting bright lights
behind you and your face is well lit. You don’t need to light up
like a movie studio, but turning on a desk light could help.
To start, look up the person you want to call in your
Contacts list, scroll down and you find the FaceTime call
button. If the person in question isn’t in your Contacts app, you
can call them by typing their name, email address or phone
number in the field provided and pressing Return.
24 | www.pclpublications.com
FaceTime
Accepting a call in FaceTime is also extremely simple.
When you receive a call, the app automatically opens
and you’re given several options. These are Accept or Decline
the call, and under the chevron, Remind me in five minutes, 15
minutes or an hour; or Reply with Message. You also see your
camera view in a small inset window.
6
Whilst you’re in the call you can mute the microphone by
hovering your pointer over the picture and clicking the
icon that appears at the bottom. Hover over the inset video
feed of yourself and you can toggle between landscape and
portrait modes. Take a Live Photo with the button at the bottom
left. To end the call click on the red button.
Hover over the FaceTime window and click the green
gumdrop in the top left corner to gofull-screen with your
video chat. If the other person’s chat is shown in portrait mode,
it’s because they’re holding an iOS device in that orientation.
Ask them to turn it to landscape mode for a bigger picture.
8
You can use FaceTime to make and receive regular phone
calls on your Mac, as long as it’s signed into the same
Apple ID as your iPhone, and your phone is nearby and on
Wi-Fi. Click the FaceTime menu and select Preferences. In the
window that appears, check the box marked Calls From iPhone.
FaceTime Audio Calls.
It’s also possible to make audio only FaceTime calls. From
the Contacts app, find the person you want to call and
right-click on the telephone receiver icon at the top. Choose
the option for a FaceTime Audio call. Alternatively, in the
FaceTime app, right-click on a previous video conversation
found in the left-hand sidebar, and select FaceTime Audio. If
the entry shows a telephone receiver icon, it was already an
audio conversation, so you can just click it to repeat the call.
Naturally, you can enter an email or phone number in the top
field and as long as the other person has registered that
email or number with their FaceTime account, you can make
the FaceTime call. Because they’re made over the Internet,
FaceTime calls, audio and video, are free.
www.pclpublications.com | 25
macOS Monterey’s Key Apps
Group FaceTime Calls
1
To add another person to a FaceTime chat, drag the
pointer onto the FaceTime window and open the
sidebar. Click Add Person and then enter their details,
followed by Add. That person then gets a call and can join
the chat, alongside the person you’re already chatting with.
2
To launch a Group FaceTime Chat, click the New
FaceTime button, and then add as many people as you
like in the New FaceTime window, either from the suggestions
or using their name, email or number. Tap FaceTime to send a
text message inviting them to the chat.
3
To invite people to a chat that’s to take place in the future,
on the FaceBook window, click the button marked Create
Link. You can send this link with a range of apps, or copy it to
distribute another way. This link can be used to join a Group Chat,
immediately or at an agreed time.
Up to 32 people can join a Group FaceTime chat. To
leave, click on the red button marked with an ‘X’. The rest
of the group is unaffected. During a Group Chat, the tile of the
person who’s speaking automatically becomes larger, but you
can turn this off in FaceTime Preferences.
5
Providing your operating systems are up to date, you can
mix Macs, iPhones, iPads and iPod touches, and even
Android and Windows devices in Group Chats. They all work fine.
6
You can even Group FaceTime from an Apple Watch or
a HomePod speaker, though as these devices don’t have
built-in cameras, you are limited to audio chat only.
26 | www.pclpublications.com
FaceTime
New for Monterey
Grid View
macOS Monterey brings a host of improvements and new
features to the FaceTime app. In a Group Chat, toggle the
floating tiles and have a regular grid that gives everyone the
same space by clicking the Grid button in the top-right. Click
it again to go back to the default view.
Windows & Android
You can take a FaceTime video call initiated on a device
running macOS Monterey, iOS 15 or iPadOS 15, on a
Windows or Android device. The Apple users sends a link,
and the Windows/Android user opens it in a Google Chrome
or Microsoft Edge web browser.
Spacial Audio
Spacial Audio makes the voices of those you’re chatting to
sound like they’re coming from the direction in which they’re
placed on the screen. The person on the right sounds like
they’re on your right, and so on. This makes for a much
more natural conversation in FaceTime.
New Mic Modes
You can use three different mic modes in FaceTime calls.
Open Control Centre and click on Mic Modes to switch
between Standard, Voice Isolation (which only picks up your
voice), and Wide Spectrum Mode (picks up every sound
going on around you).
SharePlay.
The SharePlay feature, coming with a future Monterey
update, lets you play your movies, TV shows and music with
your friends over a FaceTime chat. Your media is played in
sync, so you can chat about it as you enjoy it.
To share movies and TV shows during a FaceTime chat,
open the TV app or a compatible third-party TV app and
press Play. For audio, open Apple Music, find a track or
album and press Play. Everyone can add and queue songs.
www.pclpublications.com | 27
П macOS Monterey’s Key Apps
Maps
Plan Your Routes
macOS Monterey brings some new features to the Maps app. Major cities such
as San Francisco, Los Angeles, New York and London enjoy greater detail;
showing roads, trees and buildings. Its 3D capabilities have been enhanced,
public transport now shows nearby stations and transit times and more.
Finding Places with Maps
1
To focus the view on your current location, click the arrow
icon in the toolbar. The map zooms to your current
whereabouts. To search for a specific location, type the
address, postcode/zip code or road name into the search field.
Possible matches are shown as you type.
2
You can search for a business by entering the business
name or type, for example ‘Fast Food’, into the search
field. Icons appear on the map indicating all matching
businesses in the area. To get more information, click on an
icon, then on any relevant information that accompanies it.
3
To change the view, click the map icon at the top of the
pane. The options are: Explore, for a simple graphical
map; Driving, for motorists; Public Transport, fortransport
options; and Satellite, which displays a photographic map.
Drop a Pin.
To add a pin to your map, right-click and choose Drop
Pin. A pin is placed where you clicked, giving access to
an information box like the one shown here. To remove
the pin, right-click on it and choose Remove Pin.
28 | www.pclpublications.com
Maps о
Route Planning Explained
1
For directions, click the Directions button (arrow in a
circle), and enter your start (if it’s not your current
location), and finish points. Alternatively search for your
destination and click Directions in the pop-up. Choose your
transport method with the four buttons in the window.
Maps calculates the best route, based on your chosen
transport. It’s displayed on the map as a blue line. The
distance and travel time are also offered. If alternative routes
are available, they’re shown as lighter blue lines. You can
switch between routes by clicking on a light blue line.
When you’ve chosen a route, click on the right-facing
chevron next to the route in the window to expand the
details. You can view a step-by-step breakdown of the journey.
Click on any of these points to be taken to that stage on the route.
If there are alternative branches leading off your chosen
route, they’re displayed as lighter blue lines once more.
Again, you can opt to follow these alternative routes by clicking
on them, causing Maps to change your route.
Getting and Using
Traffic Information.
When on a road journey, there’s nothing
worse than getting caught up in a traffic
jam or running into major roadworks.
Luckily, Maps covers that one too. You can
add or remove real-time traffic information
in the View menu at the top of the screen.
Just select Show/Hide Traffic. When traffic
information is turned on, closed roads are
shown as no-entry signs, roadworks as
road men and accidents as a red sign.
Click on one of these indicators for more
details, including possible length of delays
and for how long the works is likely to
continue. Where traffic is heavier than
usual, an orange line is added on the road.
If it’s very heavy, a red line is used.
www.pclpublications.com | 29
П macOS Monterey’s Key Apps
Viewing Maps in 3D
1
To get the best effect when viewing the maps in 3D,
switch to Satellite view. You can show or hide the labels
such as the street names and feature locations using the View
top-bar menu or the checkboxes under the map options.
2
To now switch to 3D view, click the 3D button next to the
map selection icon in the top bar The camera angle will
shift when you do this but if you’re zoomed out too far; you’ll
hardly notice any difference.
3
Zoom in and the 3D aspect begins to unfold. While not
everything on the planet is rendered in 3D, you can get
to see some of the more famous buildings and locations,
usually within major cities and with major landmarks. It’s like
you’re there, minus the crowds!
4
You can use trackpad gestures such as pinch in and out
to zoom and twist to rotate the camera and see different
parts of buildings and features. You can also tilt the camera by
using the slider located next to the compass, in the
bottom-right of the map screen.
3D Flyover Tours.
Some of the world’s major cities offer Flyover Tours. To start
a 3D Flyover Tour search for a city by name, and on the
window that appears, click the Flyover Tour button. If it’s not
there, that city doesn’t offer Flyover Tours.
The 3D camera flies over major features and attractions,
showing them off in great detail. What you’re looking at is
indicated in a panel at the foot of the Maps window. To end a
Flyover Tour, click the ‘x’ found at the end of this panel.
30 | www.pclpublications.com
Maps ________
Customising the Maps App
Location Aware
If Maps isn’t authorised to access your location, you get a
message. Several of the options covered in this tutorial won’t work
unless you authorise the Location Services function. Click Open
Privacy Settings, then the lock in the bottom left corner and enter
your admin password. In the right-hand panel, tick Maps.
Adding and Removing Favourites
To bookmark a location, click on its icon or right-click to Drop a
Pin if there isn’t one. In the information window, click the three
horizontal dots. From the pop-up menu, select Add to
Favourites. Once a Favourite is added, it appears in the
left-panel; click the T then Remove Favourite to delete it.
Sharing Routes
Having selected your choice of route, you can share it via social
media or email or send directly to other macOS, OS X or iOS
devices. The recipient receives a message with a link which,
when accessed, opens the Maps app to display the route.
Using Maps Favourites
Your Favourites are located in the left-pane, click the T next to
one of them for more information. You can create a Type:
Work, Home, School and rename it to something more
meaningful if you want to find it again easily.
Changing the View.
Click on the icon that looks like a folded-out map in the toolbar to access the different viewing options available in the Maps
app. There are four types of map available, ranging from a regular line drawing to a satellite view taken from above.
Explore: A regular map
that looks just like the ones
you buy from a shop.
Driving: Similar to Explore,
but with traffic and roadworks
information added.
Public Transport: Here
bus and rail information is
conveniently displayed.
Satellite: A view made up
of photographs. Zoom in and
out for detail.
www.pclpublications.com | 31
□
macOS Monterey’s Key Apps
TV App
Watch on Your Mac
The TV app has long been a popular means of buying and watching
television shows and movies on iOS, and now it’s come to the Mac. If you’ve
already bought video media on the iTunes Store, in macOS Monterey, you’ll
find it in the TV app. How does it work? Let’s tune in and find out.
What to Watch
1
Open the TV app, and click on the Account menu in the
top bar. If you’re not signed into your Apple account,
select Sign In and enter your Apple ID and Password in the
fields provided, then click the Sign In button below them.
2
Look at the tabs at the top of the window. Watch Now is
the TV app’s front page, showing movies and TV shows
you’ve previously bought alongside those available to buy or
rent from the app. Scroll up for more suggestions.
3
If you subscribe, watch <TV+ in the tab. Under the
Movies and TV shows tabs you can buy and/or rent
films and programmes. TV shows can be bought individually
or on a per-series basis; scroll up for available episodes.
4
The Kids tab is, unsurprisingly, for children’s
programmes. Again, click a show, and scroll up to see
which episodes are available. Click the triangle next to the
Season number and you can switch to a different season.
32 | www.pclpublications.com
TV Ш
The Others
5
The Library tab takes you to your collection of movies
and shows, those you’ve purchased previously. In the left
hand sidebar, you can view according to when you added
them, films only, TV only, or according to genre.
6
Hover the mouse pointer over a movie or TV show in your
library and you get these icons. Click on the Play icon to
play it. The cloud with the arrow on it lets you download it for
later viewing. This is essential if you watch offline.
О Click on the Three-dots icon, found by hovering over a
show, and you get a pop-up menu. This lets you
download the show, mark it as watched or unwatched, add it
to a playlist, get an interesting information window and more.
8
When looking at a movie to buy or rent, scroll up and you
might find a trailer These, of course, can be viewed for
free. The Add To Up Next button adds them to your Up Next
list, which is found at the top of the Watch Now screen.
Witch Now ttvt Ucvwt TV Shorn Kids UtHvy Q
9
Click a Buy or Rent button and a window appears,
showing you how much it is to do each. Click one of the
prices to do so. Rented media is removed 30 days after renting
it, or 48 hours after you start watching it, whichever is sooner.
10
When watching a show, move the mouse pointer for
controls. These include pause/play, skip forward or
backward, close the viewing window, add subtitles, and watch
the show in a small window that floats on top of the desktop.
www.pclpublications.com | 33
П macOS Monterey’s Key Apps
Notes
Store Your Jottings
The Notes app is a remarkably powerful, yet simple, virtual notepad. With it
you can jot down your thoughts and ideas or create complex notes that are
easily edited and fully searchable; and you can also sync your notes to your
iCloud account. There’s more to Notes than first meets the eye.
Creating, Editing and Searching Notes
1
To create a new note, first of all, click on the
pen-and-paper symbol found in the toolbar at the top
of the Notes window. A new blank note appears. Start typing
your note. The first line of a new note is used as its title in the
notes list, so bear this in mind.
2
Your notes are listed in the left-hand pane. Click on a note
to open it. To change the font or use bold, underline or
italicise, select the text and right-click or ctrl-click for a menu;
these options are found under Font. To attach an image, simply
drag it onto the note or copy and paste it.
3
To search notes, use the search icon (the magnifying glass)
in the top right. Searches cover all your notes, not just the
titles. Searches are very powerful and can recognise objects and
scenes in attached images. When you click on the search field,
you get a window that helps you focus your search.
To delete a note, open it and use the Delete option in the
Edit menu, the dustbin button in the toolbar or swipe it left
and click the dustbin. Deleted notes are kept in the Recently
Deleted folder for 30 days. To email a note or share it in
Messages, click on the Share button.
34 | www.pclpublications.com
Using Folders
1
There are several ways to create a new folder in your
sidebar Press cmd-N, use the New Folder in the File
menu or press the New Folder link in the bottom left corner
Notes created in the iCloud section are stored on your iCloud
and can be synced with other Apple devices.
Highlight a folder by clicking on it to view all the notes in
that folder Click on the All option at the top of each
category to list every note stored there, including those in
individual folders. Click on a folder and then on the three-dots icon
that’s revealed when you hover over it for more folder options.
@ 0
В All iCloud
Notes
^eofty^eck
Personal \
В Software ]
♦ Web artic|fes
E3 Work 9
Offline printer issues
18/08/2021 if some of the things y.
George MacDonald Fraser
09/02/2018 I’sNeed. read)
• AppleUser magazine
Recently Deleted
Resident Evil series
06/04/2016 Bullet for got, strike-th .
The Complete Sherlock Holmes
07/10/2015 • A Study in Scarlet
CJ Sansom
05/03/2015 Matthew Shardlake Se..
Notes
Mac Pro WiFi ac and ВТ 4.0
Offli
If some
printers
Print is
Check
For Clot
foliowin
• Por
• Por
Check
Your rot
applica
issue, ft
1. Acc
3. Self
4. Allo
18/02/2015 httn /Iwww mncviricnrfl
You can edit the name of a folder by clicking on it to
highlight it, then clicking on its name to turn it into a text
field. You can then type in your new name. You can also
reorder folders by dragging them up and down the folders list,
and dropping them into a new position.
If you’re syncing your notes with iCloud, they sync with
other Macs and iOS devices logged into the same iCloud
account. In System Preferences, click on Apple ID > iCloud and
then make sure Notes is ticked. This is useful if you use an
iPhone, as the note is always in your pocket.
5
You can view your notes either as a list or as thumbnails. To
switch between the two, use the buttons at the top of the
Folders panel. Click the left-hand button, showing lines, fora list or
the right-hand button, showing four squares, for thumbnails.
Notes Online.
You can view and edit your iCloud notes from any
computer or mobile device with Internet access and a web
browser. Just go to www.icloud.com and sign in with your
Apple ID, then click on the Notes option. All your
iCloud-synced notes are there.
www.pclpublications.com | 35
П macOS Monterey’s Key Apps
Advanced Notes Features
1
To format a piece of text, highlight it then press the Aa
icon. In the pop-up window, you can make several
formatting changes. You can also highlight a word or phrase
and use cmd-l, В or U to make it Italic, Bold or Underlined.
2
You can turn any list into a handy checklist. Highlight all
the items in a list, then click on the lines-and-ticks icon.
Your list becomes a checklist. Click a circle to tick and untick it.
You can reorder lists by dragging items up and down within it.
3
Click on the grid icon for a table. You can type in each of
the table’s cells. Click on a row or column, then the small
icon that appears and drag it to move. Click this icon, then the
chevron that appears for options to delete it or add another
If you have a Safari window open, you can paste a link
into a note using the Add Link icon. Click it, and you’re
invited to add a link to your note, which appears as an
attractive preview instead of a regular underlined URL.
5
You can drag pictures onto your Notes from anywhere.
There’s also a Photo Browser for using pics from your
Photos app. Choose Photos from the Photos icon in the toolbar
and drag photos from the browser into your notes.
6
Click on a photo in a note and then click on the button
that appears in the top-right corner for the Markup
feature. This lets you scribble on and add text to the picture,
using the Markup drawing tools, just like those in the Mail app.
36 I www.pclpublications.com
Notes
OTo password-protect a note, click the lock icon and
select Lock Note. You can then set a password for the
Notes app. Then you can only open locked notes with that
password. Also use the lock icon to open and close all locked
notes, and remove a lock.
8
The Share icon lets you send a note to someone else
using Mail, Messages or AirDrop; or add it to a reminder.
You can make a note with an attachment from another app
using the Share icon in the app in question; just select Notes.
Here we did it with a website.
You can pin a note, so it always appears at the top of your
list, regardless of how that list is sorted. To do this, swipe
the note right and click the Pin icon. To unpin a note, repeat this
step. You can pin as many notes this way as you like.
10
Type a word with a hash (#) at the front and it becomes a
tag. Tags you’ve created are listed at the foot of the
left-hand panel. Click on a tag to see all notes that share that tag.
A note can have more than one tag if you wish.
Collaborative Notes and Folders.
To do
Annual leave, 2021
08/09/2021 I MiHsmsnt
12/04/2021
20/10/2020
Wash car
Do shopping
(J Messages
©
https J/www.icloudcom/notes/
0PsWHn71214rA21iiunH1mcPw«To_do
Clothe» Shopping
Invite to Visit
11:49 am Mvm
В Nats*
Collaborative Notes are shared with other people, and can be
edited by more than one person too. You can also make a
folder collaborative, and share notes and folders giving
read-only rights too. Open a note, or highlight a folder, and click
the button with a head and a plus sign on it.
Use the permission pull-down to decide who can make
changes, and use the checkbox to decide whether anyone can
add more people. Choose how you want to send the invite,
dick Share, then enter their details and they’re sent an
invitation. Once accepted, they can share the note or folder.
www.pclpublications.com | 37
П macOS Monterey’s Key Apps
Quick Note
Speedy Jottings
When using your Mac, have you ever wanted to jot down a phone number,
save a website or simply scribble down a thought as soon as it comes to you?
That’s where Quick Note comes in. This new feature, introduced with macOS
Monterey, is perfect for speedy jottings you can review later.
Getting Started with Quick Note
1
You can open a Quick Note from anywhere on your Mac,
and access it in the Notes app. There are three ways of
opening a Quick Note. The easiest is to drag your pointer to
the bottom-right corner and click the white box that appears.
2
In the Safari app, you can highlight a piece of text,
right-click or ctrl-click on it and select New Quick Note
from the contextual menu. A Quick Note is created containing
both the text and the URL from which it came.
3
You can open your Quick Notes using a key command;
Fn-Q. However you open a Quick Note, the last one you
created is opened. If you need to start a new one, type cmd-N. A
blank Quick Note appears, which you can fill in.
4
You can also open and use a Quick Note on your iPad,
as long as it’s running iPadOS 15 or later Just swipe into
the screen from the bottom-right corner. Quick Notes are
synced through iCloud, so you can open it on your Mac.
38 | www.pclpublications.com
Quick Note
More About Quick Note
1
At the top of a Quick Note, you’ll see the same tool icons
you get in the Notes app, such as formatting, make a
checklist, set up a table and more. You can use these in
exactly the same way as you do with regular notes.
2
When you open the Notes app, at the top of the folders
column on the left-hand side, you’ll see a new entry; Quick
Notes. Click on it and you can review and edit your Quick Notes.
They open like a regular note; just double click on one.
If you’d rather change one of your Quick Notes into a
regular note, you can do that too. Right-click or ctrl-click
on it, move the pointer down to the Move To option and from
there, navigate to a folder in your Notes app.
4
You can drag a picture onto a Quick Note, and it appears
as an attachment, just like in regular Notes. Also like in
regular notes, you can click on a picture, click on the chevron in
the top-right corner and then mark it up.
5
If you’d rather a new note appear when you open your Quick
Note instead of the last one you created being opened, in
the Notes app, under the Notes menu open Preferences. Uncheck
the first checkbox, Resume last Quick Note.
6
Quick Notes are synced between your Apple devices,
though as the iPhone doesn’t offer the feature, they appear
as regular notes there. You can scribble on an iPad Quick Note
using an Apple Pencil, and it appears as such on your Mac.
www.pclpublications.com | 39
Q macOS Monterey’s Key Apps
Find My
Find Your Gear
With Find My, you can keep track of your friends’ whereabouts, and they can
keep an eye on yours. You can also track down a missing Mac, iPad, iPhone
or Apple Watch, find your missing AirPods and keep track of your AirTags. It’s
great if you’re arranging a meeting, or finding lost or stolen Apple gear.
The People Tab
1
____J
Click the People tab. Click on your own picture in the
left-hand sidebar, and click on the T in the window that
pops up on the map. In the next window, you can change the
device through which your location is represented, switch off
sharing, Notifications and more.
2
To start sharing your location with someone else, click
Share My Location in the bottom-left corner, Enter the
name, phone number or email of another Apple user in the To
field or navigate to their details using the + icon. People with
whom you’ve recently shared your location are listed below.
3
Decide whether to share for an hour, the rest of the day
or indefinitely, and your location is shared with that
person. If they reciprocate, you can see their whereabouts on
the map in the right-hand side of the window. Click their
picture, then the *i* for information on them.
4
If someone starts sharing their location with you, you get
a notification letting you know. Using this notification - or
by opening that person’s information window in the Find My
app itself - you can choose to share your location with them
too; so they can see where you are.
40 | www.pclpublications.com
Find My
The Devices and Items Tabs
The Devices and Items tabs work in the same way, with
Devices being for Macs, iPhones, iPads, AirPods and
Apple Watches, and Items being for gear you’ve protected by
attaching an Apple AirTag to it. Click on either tab to see your
property’s current whereabouts.
If you’ve mislaid something in the house, click on it in
the left-hand sidebar and then click the device’s T icon
on the map. In the window that pops up, click Play Sound in
the top-left and the missing device beeps, allowing you to
locate it. Just follow the sounds.
finds your device and a message for the finder You can then
click Activate to mark it as lost.
also follow its whereabouts on the map, so you’ve an
excellent chance of getting it back.
5
If you think your device is lost forever; click Erase This
Device in its information window. This wipes it clean, so
your information can’t be accessed from it. You can no longer
track it in the Find My app, though, so don’t use this option
unless you’ve given up hope of seeing it again.
Find My Online.
You can find your missing Apple gear using any device
with a web browser. Go to www.icloud.com, log in with
your apple I.D. details and click Find My iPhone. Using
this online version of the app, you can find a lost or stolen
Apple device, whether or not it’s actually an iPhone.
www.pclpublications.com | 41
Q macOS Monterey’s Key Apps
App Store
Buy More Software
The App Store is the best place to download applications for your Mac. It’s
quick and secure, and has an easy-to-use interface so you can find all those
obscure apps and utilities you’ve been wondering about. There’s some great
software out there to discover, purchase and download in the App Store.
• Finder File Edit View Go Window Help
About This Mac
System Preferences...
App Store...
Recent Items
To open the App Store,
click the Apple menu and
select App Store.
Alternatively, you can use
the Monterey Launchpad
or the App Store icon found
in the Dock.
• App Store Edit Store Window
Force Quit Finder
If you know the name of the application
you’re looking for type it in the Search
Barto go straight to it. Suggestions are offered
as you type, so click on one to select it. You
can search for developers here too.
1
Ever wanted to write your own software?
The Develop section is where they list
the apps for developers, including art and
drawing tools, as well as coding.
7
Click on Discover for the App Store’s
main page, where you can see
Apple’s picks of the best and most essential
apps for your Mac.
2
Click on the Categories link for a list of
genres such as Business,
Entertainment, Finance, Music and more. It’s
another easy way to navigate the App Store.
8
For a monthly fee, Apple’s all-you-
can-eat Arcade gaming subscription
service lets you play as many games as you
want, for as long as you want.
3
If any apps on your Mac have been
updated, the Updates page is badged
in the sidebar, as it is here. Click on this page
to update these apps and see the ones that
have been recently updated.
9
1
3
4
6
8
9
Q Search
☆ Discover
& Arcade
Create
Work
р1аУ
5
Develop
8° Categories
Й Updates
4
Click Create to look for apps designed
for creativity, such as image editing,
music making, photography, video editing,
desktop publishing and more.
10
Featured Apps are chosen by Apple’s
editors, and are shown at the top of each
of the pages listed in the sidebar Here we’re
showing the Discover page.
Under Work you’ll find the App Store’s
productivity apps, such as note taking
apps, software for getting things done, apps
to organise your life and more.
5
Click here for your account details,
including a list of apps you’ve already
purchased. You can download those that
aren’t on your Mac by clicking the cloud
symbol next to the app.
11
Unsurprisingly, the Play section is for
video games. The number and quality
of games on the Mac has increased
dramatically over the last few years, and this is
where you get them.
6
Underneath the featured apps are lists
showing the top paid-for; top free and
editor’s choice apps in the category in question.
Click See Al for the full list.
,an Osborne
12
42 | www.pclpublications.com
AppStore Е!
Install Applications.
When you’ve found an app you want to
install, click on its icon to open the
details page. To install the app, simply
click the price button under the app’s
title (or ‘Get’ for free apps), followed by
the Install button that replaces it, then
input your Apple ID.
Redeem/Add Funds.
In the App Store, if you scroll all the way to
the bottom of the page, you see two
buttons: Redeem and Add Funds to Apple
ID. The Redeem button is for adding the
value of an iTunes gift card to your
account. Add Funds to Apple ID lets you
pay money in by other means.
Auto App Updates.
You can update your apps in the
background, removing the need to check
for app updates manually. To activate this
very useful addition, open the App Store
preferences from the App Store menu
and ensure that the Automatic Updates
option is selected.
MacBook Pro
www.pclpublications.com | 43
П macOS Monterey’s Key Apps
Pages
Word Processor
Apple’s own Pages is the Mac’s premiere word processor, and it’s free too.
Download it from the App Store and you can write letters, design leaflets and
flyers, import photos and pictures, and even produce an illustrated book, Pages
is the app to get it done and published.
What's New
. tmprovrd book putAtftfng with 2-peg* tpcMds, OfXMnM <
You need to
download Pages
from the App Store
as it isn’t
pre-installed, but
it’s free.
1
E 125% v 0
Pages at a Glance
Every app on the Mac
has its own pull-down
menus, and Pages is no
exception. When you see a
reference to a pull-down
menu in the tutorials, this is
where you’ll find them. For
example, you can open a new
document in the File
pull-down menu. To do this,
click on the word ‘File’ in this
top bar and select New from
the menu that appears.
1
Choose the size your
document is shown on
the screen, or select a preset
option such as fit to the width
of the window, or fit the whole
page in the viewing area. This
doesn’t change the size of the
document; just the screen.
The View button, found
here, opens a menu
with several options about
showing and hiding
on-screen tools and guides.
You can choose between
thumbnails and a list of
contents in the left-hand
sidebar, or hide it altogether.
You can also show or hide
comments, the word count,
an on-screen ruler, the Find &
Replace window and more.
Take a look at this menu and
familiarise yourself with
these options as they come
in very useful as you design
your documents.
This button allows you
to add a page to your
document. If it’s greyed,
you’re probably working on a
word processing document
(as opposed to a Pages
layout document), and new
pages are added as soon as
your text reaches the end of
the current last page.
This row of buttons lets
you add features to
your layouts. The Insert button
lets you add page breaks and
more. You can add a Table or
Chart and the Text option
gives you a box in which you
can type text. Shape lets you
add a geometric shape, and
Media gives access to
_______________________. View Zoom Add Page
Class 2 Enjoy В
The children of Class 2 us
and a tower. And they rea
44 | www.pclpublications.com
Pages
photos, videos, audio clips and
more. Highlight a piece of text
or an object on the page, and
you can add a comment.
If you want to collaborate
on your document with
another Pages usee click this
button and send an invite. You
can set whether they can edit
or just view the document.
6
when you click their respective
buttons. Format lets you work on
specific elements within the
document, while the Document
button sets parameters for the
document as a whole.
The left-hand sidebar
shows the individual
pages in your document.
Click on one to zoom to it You
can drag and reorder the
pages here too, and using the
View button above it, can
switch to showing a contents
8
7
The Format and
Document controls
9
changes such as changing a
font, making your copy bold,
italicised and lots of other
formatting options.
listing or hiding it altogether
The document you’re
currently working on.
Click on an element such as a
box, text or a picture to make
changes. You can scroll it up
and down, and/or left and right
if it’s not all on the screen.
10
___J
The right-hand sidebar
shows a wide range of
controls relating to the
document’s formatting and its
parameters. You can make
The Word Count, shows
how many words there
are in your document. Highlight
a piece of text or click on a text
box to show how many words
are in that section, click on the
chevrons to switch to character
counts. Hide this window in the
View menu or by pressing
Shift-cmd-W.
11
appear in the right-hand sidebar
Heading 2
Style
Layout
More
Font
5
6
12 NOVEMBER 2021
10
Bold
Spacing
1.0 - Single
uildmg
Bullets & Lists
None
ed their toys to build a house, a car
Drop Cap
508 words
Origami for
older childrenl
are Window Help
® О
Thu 30 Sep 11:36 am
Dolphin
Z“ s ® Га] (?) '
Insert Table Chart Text Shape Media Comment у
lolphin School
er of the county’s premiere play school
A handful
of toys
Multicoloured tiles,
or a great way of
learning Maths?
Collaborate
Superclarendon
Character Styles
Text Colour
Format Document
Arrange
10 pt
MacBook Pro
www.pclpublications.com | 45
П macOS Monterey’s Key Apps
Top Tips for Pages
There’s so much to learn about Pages. Here’s a round-up of some tips and
tricks to help you get even more from the word processor.
Headers and Footers
Word Count
aved a I
/elopes
a mensv
gave his
ent him
jmmend
<ed his 1
nessagt
later, an
fep, it w
nat Arrange View Share Window Help
Show Tab Bar
Show All Tabs
Inspector
® © * Q C *
vel. pages
a gj
Media Comment
Collaborate
iat they Pa9e Thumbnails
eededit
У Document Only
rd procc
Hide Word Count OXW
Show Ruler
e-dimen Guides
Show Layout
Show Invisibles
Show Comments Pane
Comments & Changes
Hide Smart Annotations
Show Arrange Tools
Show Colours
iy, and it sufficed for
jndane office
ind looking at pom-on----
ally appeared, Bob non-
vire tray filled with un-
was his monthly news-
about six years ago,
ered into a prize draw.
- special offers and
n hope than expecta-
he small print at the bot-
jbscribe link. One tap of
message, 404: Page
had been every other
Bo
For
Hi
R<
В
Chi
Texi
Hover over the top or bottom of a Pages document and a row
of three rectangular boxes are shown. This is for headers and
footers. Whatever you type in these boxes appears on every
page in the document. Click a blank box and an optional
button for inserting page numbers appears. With this you can
add automatically-applied page numbers in various formats.
Under the view pull-down menu, there’s an option to show or
hide the word count. This is a movable window that shows how
many words there are in your document as a whole, or a piece
of highlighted text. Click the chevrons for a menu that lets you
switch between showing words, characters with and without
spaces, paragraphs or pages.
Show One or Two Pages
Spread and Pinch
When reviewing a multi-page document, you can view a single
page at a time, or two pages side by side as if they were laid
out in a book. To switch between these two view options, click
on the Zoom button on the right of the toolbar and select an
option from the top of the pop-up menu. You can also set the
view to page width and a single page here too.
If you’re using a Mac with a trackpad (that is, a laptop or a
desktop with a Magic Trackpad), you can zoom in and out of a
Pages document using the Pinch and Spread gestures on the
trackpad instead of using the Zoom menu in the toolbar; and drag
it around the window with two fingers. Changing the display size
like this is more precise and configurable, and it’s quicker too.
46 | www.pclpublications.com
Pages
Advanced Font Options.
Image Fills
Highlight a piece of text and in the Format sidebar’s Style tab,
click the cog button in the Font section for advanced options.
Character Spacing increases and decreases the distance
between the letters in the text (the tracking) and Baseline Shift
does the same for the distance between the lines (the
leading). It’s useful if your copy doesn’t quite fit the space.
Another tip that’s mostly for headers. Highlight a piece of text, and
in the Format > Style sidebar click the words Text Colour and
select Image Fill or Advanced Image Fill, the latter giving more
options. Click the Choose button, and you can fill the text with an
image of your choice instead of a colour The Scale slider
increases and decreases the style of this image. In this
screenshot, we also added an outline.
Select More Than One Object
With the Baseline menu, you can change a character or text
string to superscript (small and above the baseline, as in ’62’
for ‘six squared’) or subscript (small and below the baseline,
as in H2O). You can change the capitalisation of the entire
text in one go with the Capitalisation menu, and Ligatures lets
you change this setting for a specific piece of text.
To select more than one object at a time, hold down the Shift key
and click on them in turn. They can now be dragged around the
page together; retaining their positions relative to each other Here
we’ve selected all three of the pictures; note they all have handles
showing on their borders. Some, but not all, style changes can be
applied to multiple objects in this way
Line and Page Breaks
- s ffi ®
Add Page I _ _ .
Page Break
it a surprise. As the Amig Line Break
of our rivals. Amiga Pow Break
developing a CD-based Column Break
this? We'd heard nothin»
icial health at the time, it Pa9® Number
it the rest of the day pho Page count
ishers and developers w Date & Time
e of them would talk. 'W(
est I could get to an on-ti Foo,TK>‘*
lehow getting an inside s
ga Force, we had to wait Equa,l0n
Link
for long, though. A Short Bookmark
l.nz, at tKa.r Clnonh aHLaa-------------
a <b a ud
Shape Media Comment
through the latest issue of
tews items that Commodore
d on the Amiga 1200. What
nmodore wasn't in the best
ley'd invest in a new launch. I
arious contacts at software
knew about this new device,
closure agreement' was the
-ull marks to Amiga Power for
ough official channels, but at
xe summoned us to a
.wtor a a.xLn» aaa.Haalae
Collaborate
Body*
Style
Font
Helvetica
Regular
В I
The last three options in this menu are mainly for headlines.
You can add an outline around each letter in any colour, or a
drop shadow (sometimes called a step-and-repeat). You can
also add a background to the text, in any colour you like. This
is a useful alternative to putting it on a shape.
If you’re using a word processing Pages document and not a
layout (that is, one which is mostly continuous text), you can use
the Insert menu to add line and page breaks. A line break, also
known as a soft return, starts a new line without starting a new
paragraph. A page break starts a new page with the next line.
www.pclpublications.com | 47
П macOS Monterey’s Key Apps
Multiple Columns
Substitutions
Paste
Paste and Match Style
Select All
Deselect All
Track Changes
Find
Spelling and Grammar
Substitutions
Transformations
Speech
Arrange View Share Window Help
My Novel.pages
’ I ® a <0 ы ©
XX to chart Text Shape Media Comment
Robbie
the full-length mirror and grinned. He
more than handsome. He was a min
ion. The sort of person men wanted
> with. With his chiselled jawline, curl
netrating blue eyes, his was the sort
>n movie posters and aftershave adv
reet.
oom for imperfection, with a six-pack
torals with just the right amount of ch
Show Substitutions
j only by a fig
jination. Life vt
Smart Quotes
•J Smart Dashes
V Smart Web and Email Links
Smart Phone Number Links
У Text Replacement
:e, left his cab
tost uncomforl
jarefoot acros
Start Dictation. . ..........nv тж» «. ...ОПЭСО. His ПЭ
Emoji & symbols 11 miserable early summer, but here
ur» । vi eu net । cute cut pi n luipaiity the sun blazed overhead.
Taking a deep breath of sea air, he listened as the irregular squa
of the seagulls diving for fish and scraps failed to drown out the
Manage Bookmark Suggestions...
If you want to use multiple columns on your word processor
page, in the right-hand sidebar; select the Format tab and next
to the word ‘Columns, use the buttons to increase and
decrease the number of columns on your page. When the first
column overflows, the text flows onto the next column, not the
next page. Click on the chevron next to Columns for more
options, such as changing the column width and choosing
whether they’re of an equal size.
Do you want hyphens to automatically change to proper
dashes, quotes to be ‘smart’ rather than ‘dumb’ (that is,
correctly shaped for the start and end of words instead of
being generic lines) and make links automatically turn into
hyperlinks? In the Edit menu, go to Substitutions and make
sure these options (or at least the ones you want), are ticked.
Then, these substitutions are made automatically as you type,
with no further action needed.
Publishing to Apple Books.
nei Connect
• C • < Ф О to touneecormct idd* com
Get Started with iTunes Connect
Apps Artists Books Media Podcasts Conn
If you’ve written a book and would like to publish it on Apple
Books, open the document and click the File menu. Select
Publish to Apple Books. Follow the on-screen instructions. You
have to sign into your Apple ID, if you’re not already signed in.
Before you can publish your book, you have to set up iTunes
Connect, if you haven’t already. Follow the on-screen
instructions; it’s simple enough. You have to set up the digital
rights you wish to use, agree to terms and conditions and so on.
48 | www.pclpublications.com
Pages
Rotate Text & Images.
You can rotate text that’s in a
text box, but not text that’s
typed straight into the
document. To do so, click on
the text box and in the
Format > Arrange sidebar, go
to Rotate. Use the circle icon
to drag the text around, or the
stats to rotate a degree at a
time. It works the same way
for images. You can flip them
too, using the Flip icons.
Keylines Bullet Points & Spacing
Graphic designers often use things called keylines in their
designs. Here, for example, we have long horizontal lines atop
the page and above and below the headline, and vertical
lines separating the four items. To add lines like this, choose
the line from the Shapes menu, and then tweak it to your own
requirements using the Format > Style sidebar tab. You can
make your document’s keylines as wide as you want, and in
any colour you choose.
There’s a couple of neat tricks that come in very useful when
making lists. In the Format tab, under Bullets & Lists, pick an
option then every time you start a new paragraph, it begins with a
bullet point, a number or letter, a dash or other options. If this list
then looks a little squashed, you can space out the paragraphs
using the Spacing options, also found in the Format tab. Use the
pull-down menu for a new setting, or click the chevron in front of
the word ‘Spacing’ for advanced options.
Preferences.
In the Pages menu in the menu bar,
select Preferences for this window.
These settings apply across the app,
not just your current document. Take a
look at its various settings, so you can
set up the Pages app to suit your own
needs. The Auto-Correction tab is
especially useful, as you can set up
auto-replacements such as fractions,
smart quotes and more.
www.pclpublications.com | 49
П macOS Monterey’s Key Apps
ИЙ
Numbers
Spreadsheet App
Numbers is Apple’s free spreadsheet application, which you can download
from the Mac App Store. Use it to create attractive, powerful spreadsheets
using over 30 templates to get you started, or you can start from scratch
with a blank document.
Numbers
You need to
download
Numbers from the
App Store as it
isn’t pre-installed,
but it’s free.
What's New
Numbers at a Glance
These are the Numbers
pull-down menus,
located at the top of the
screen in the Menu Bar. Click
on one of the words here for
a pull-down menu. Take a
look at each in turn. They
offer controls such as
opening new or existing
documents, adding elements
to a Numbers doc and more.
The keyboard commands on
the right of each menu are
shortcuts you can use.
1
4
Return on Investment
Use this calculator to determine the return on investment over fivt
revenues and costs. Enter the discount rate (the interest rate use
value of future cash flows), then enter your projected benefits an
Click the View button
for options regarding
how the document is
displayed on screen. You’ll
get a pop-up menu offering
the Find & Replace option,
Show and Hide Rulers, Show
and Hide Comments and if
applicable, Show or Hide
Collaboration Activity
The Zoom button
increases and
decreases the size of the
document on screen. Click
on it for a menu that lets you
see it at between 25% and
400% of its actual size. Note;
this doesn’t increase or
decrease the size of the
document itself. It only zooms
it in and out, to show greater
detail or greater area.
If you have a large
spreadsheet full of a
lot of disparate information,
you can add categories to
organise it all. For example, a
shop could view its sales
information by price, date,
product, sales person,
department and more.
A pivot table is used in
data analysis to
aggregate information taken
from a larger table. Select a
table or a range of cells on
your spreadsheet and click
the Pivot Table icon to create
this type of table on a new
sheet. The data in the original
table is your source data,
which can be added as
Columns, Rows and Values.
Present Value of Return on Investment (PV ROI)
Net Present Value (NPV) (In Thousands)
Internal Rate of Return (IRR)
О A В
Year J 1
Discount Factor 0.91
3 Increased Revenue
4 Decreased Costs
5 Annual Benefits
6 Present Value (Benefits)
One-Off Costs
Recurring Costs
Annual Costs
50 | www.pclpublications.com
Numbers
6
These tools help you
create your
spreadsheet. With them, you
can use Insert to add or edit
cell properties, Add a new
Table or Chart to the sheet,
add a floating Text box or
Shape, add Media or make a
Comment associated with a
specific cell.
Store your spreadsheet
on iCloud and more
than one person can work on
it at a time. Use the
Collaborate button to invite
other people to work on your
document with you.
These buttons toggle the
right-hand sidebar
8
___J
between Format, for producing
and editing your spreadsheet,
and Organise, for changing
the ways it shows information
you’ve added.
9
A Numbers document
can have any number
of sheets associated with it.
If you want another sheet,
click the + sign. If your
document has more than one
sheet, you can switch
between them using the tabs
to the right of the + button.
Here, we have the main
sheet, titled ‘ROI’, and a pivot
table called Summary Pivot.
10
This is the main part of
your Numbers
document, the spreadsheet
itself. This one is the Return
on Investment template.
11
The right-hand sidebar
offers various tools and
controls for formatting and
organising your document.
What’s displayed in this
sidebar depends on what
you’re currently working on in
the spreadsheet.
Arrange View Share Window Help
© О * Q
£ О Thu 30 Sep 1:56 pm
Return on Investment
Categories
years based on projected
d to determine the present
I costs in the tables below.
Discount Rate
10%
Summary
10
Group rows into categories to organise
and summarise the table.
Add a Category...
11
50% The sum of net present value divided by the sum of present value of costs
£45 The sum of annual net present values
0% The discount rate that yields a net present value of 0
£100
£50
£150
£136
£85
£15
£100
£91
Costs
MacBook Pro
www.pclpublications.com | 51
П macOS Monterey’s Key Apps
Top Tips for Numbers
Numbers is a complicated app, and there’s always something to learn. These
handy hints and terrific tips help you to get more from your spreadsheets.
New and
Open.
When you have the Numbers
app open, you can click on
the File menu and choose
Open to open a document
you’ve previously worked on,
through the browser shown
here, or New to open the
Templates window. If the
Open Document browser is
already open, click the New
Document button in the
bottom-left to bring up the
Templates window.
Numbers Checklists
From the Templates window, you can select a checklist
template if you wish. This is slightly different from the usual
table as it has a column of blank boxes you can check by
clicking on them. It’s great for setting up a checklist on your
Mac and checking it off as you go on your iPhone. You can
add photos, colours, shapes and more to your checklist table.
The template called ‘Checklist Total’ includes a ready-made
calculation column that adds the values of every entry in the
column, but only when its checkbox is ticked. It’s a great way of
keeping track of what you’ve spent on a project, and what you’re
going to spend. Naturally, these tables can be customised with
illustrations and formatted text, just like other documents.
52 | www.pclpublications.com
Numbers
The Preferences Pane.
Sheets, Tabs & Controls
Open the Preferences pane through the Numbers menu, or
by typing cmd-Comma. The General tab sets defaults for
future new documents. When you next start a new document,
they conform to the parameters you set here (though you can
then edit them if you choose). You can also set the author’s
name here, and the default text size.
The Rulers tab lets you turn off features you don’t want, such
as showing size and point position when moving objects,
showing guides at the centre and edges of objects and also
for relative sizing and spacing. These features are all switched
on to begin with, but can be turned off if you wish. You can
also change the colour of the alignment guides that appear as
you move things on the page.
Under Auto-Correction, you can set the spelling checker, and
add ignored words for non-standard spellings you regularly
use. Choose whether single or double quotes are preferred,
and how they’re displayed. You can also edit and add to the
Symbol and Text Substitution list too. For example, typing ‘(c)’
automatically morphs into the copyright sign.
If you want to add another sheet to your document, click the *+’
icon in the tab as shown. This lets you add another page to your
spreadsheet. For example, we made a spreadsheet of model
cars sold on eBay earlier Here, we added a second sheet, a
checklist to note when they’re posted. Click the chevron on a tab
for controls such as Rename, Duplicate and more.
Moving Rows and Columns.
You can move and reorder columns and rows by double-
clicking and holding on the number or letter representing that
row or column, and then dragging it into a new position on
your table. When in place, look for the thick line that shows
where the item will go. When it appears, release the row or
column you’re moving and it’s placed in its new position.
If you release a column or a row without finding a new place
for it in the table, it’s separated out into a new table
completely, as you can see here. If you do this by accident
and want to put it back, first add a new, blank row or column
(click the chevron next to the number or letter of an adjacent
row/column and choose add row/column before/after). Then
select the entire row or column you want to add back in
again, and copy and paste the data back into your main
table. You can then delete the rogue floater.
www.pclpublications.com | 53
П macOS Monterey’s Key Apps
Hide and Unhide Rows and Columns
To temporarily hide a row or
column, click on the chevron
in its letter or number for a
pop-up menu. In this menu is
an option to hide the row or
column. Select multiple rows
or columns and you can hide
them all at once. To show
them again, click any letter (if
you’ve hidden columns), or
number (for rows), and
choose Unhide All Rows/
Columns from the menu.
Ш,
AdO Category Pivot Table
Spreadsheet
И S ® И Q
totwt Tabto Chart Text Shape Media
•J Freeze Header Columns
I34nch tMneh 13-mch 13-mch
MacBook Air 1 MacBook Air 2 MacBook Pro 1 MacBook Pro 2
4x Ttwnderbok 3 Delete Column
10 Hours
WIRMttac
Б.0
1.4 kg
Sort Ascending
Sort Descending
Show Sort Options
Quick Filter.
Show Fitter Options
Add Category for "13-inch MacBook Pro 4'
Show Category Options
Add Column Before
Add Column After
Unhide All Columns
Unhide Column F
Fit Width to Content
Copy
Paste
Paste and Match Style
Group Multiple Cells into One.
In this table, we grouped
three cells into one so we
could add our windfall into the
table, and add it to our total
savings. To do this, you select
the cells you want to combine
in this way, and then, in the
Table pull-down menu, select
Merge Cells. To unmerge
them again, select the newly
merged cell and from this
menu, select Unmerge Cells.
The Columns Contextual Menu
Hover your pointer over the letters
bar above the columns, and a
chevron is shown for each segment.
Click on one of these for a
contextual menu. You can sort the
entire table according to what’s in
this column, add a column to the left
or the right of the selected column
or delete it altogether. There’s a
useful quick filter option too.
54 | www.pclpublications.com
Numbers
The Rows Contextual Menu
Naming a Document.
To add tickboxes to your table, first of all, select all the cells
you wish to modify in this way; click and drag over them to
select. In the sidebar, click the Format button, and then the
Cell tab. Click the Data Format pull-down menu and select
the Tickbox option near the bottom.
You can access a similar contextual menu by clicking the chevron
on the number next to a row. Again you can add a new row,
above or below the one you’ve selected, or delete it This menu
also gives you quick access to the Sort, Filter and Categories
sidebar options, create a group for that row and more.
Adding Tickboxes to a Table.
® ® и <0 Ы
ТэЫе Chart Text Shape Mede
S ® И Q (£>
table Chart Text Shape Media Comment
Collaborate
Data Format
Tickbox
Text
Arrange
e
-10% Paid
15.00
£9.51
£9 50
37.00
.28.01
£25.21
£5.27
£15.27
16.97
£166.81
17.45
£15.71
17.00
£509
£6.76
£7.00
£6.30
•39.00
£35.10
£13.50
£33.30
£15.30
Fill
a
Border
□
ffl
Border Styles
Q
e
) 0.35 pt
Conditional Highlighting...
To add tickboxes to your table, first of all, select all the cells
you wish to modify in this way; click and drag over them to
select. In the sidebar, click the Format button, and then the
Cell tab. Click the Data Format pull-down menu and select the
Tickbox option near the bottom.
Tickboxes, also called Checkboxes, appear in the cells you
selected. These can be ticked and unticked as appropriate.
The Data Format menu can also be used to add star ratings,
steppers and sliders, a date and time and more. Take a look
and experiment with them to your hearts content.
www.pclpublications.com | 55
П macOS Monterey’s Key Apps
Keynote
For Presentations
Keynote was originally created by Apple for the company’s own presentations,
and then it was released to the public. It’s free, and it’s great for putting on
displays. Create slideshows, add transition effects, include text, images and
videos and more. There are themes too.
You need to
download Keynote
from the App Store
as it isn’t
pre-installed, but
it’s free.
Keynote at a Glance
As you’d expect,
Keynote has a series
of pull-down menus in the
Desktop’s top bar Click on
one for the menu, and drag
your pointer down this list to
select an option. Some tools
have a keyboard shortcut too,
displayed on the right of the
menu bars.
1
Click here to add a
slide to your current
presentation. You get a
pop-up window offering a
variety of designs, depending
on the template in question.
Choose one to add it to the
end of the presentation.
The Play button lets you
watch the presentation
as it currently stands. Press
the mouse button or the
space bar to move to the next
slide, and the ESC button to
go back to the editing window
shown here.
4
5
Keynote’s View button
lets you change the
way the slide is shown in the
window You can hide the
sidebars, show the slides as
thumbnails, show and hide
an Object list and the Find &
Replace option and more.
2
Like the other iWork
apps, Keynote lets you
zoom in on the currently
shown slide to see more
detail, or zoom out to see
more of the slide. This
doesn’t change the size of
the document; only the way
it’s viewed on the screen. To
see the whole of the slide,
select Fit Slide in the menu.
3
These are your main
editing tools, used to
add elements to a Keynote
slide. As you can see, you
can add a Table, a Chart,
Text, a Shape, Media such as
music, video and photos and
also add comments that
aren’t part of the presentation
but act as useful notes to
yourself and others working
on the presentation.
6
56 | www.pclpublications.com
Keynote hd
When you’re
collaborating on a
Keynote project, any edits
you make are also visible to
the others who are working
with you on it, and vice versa.
If you want to share a project
without giving other people
editing rights, change the
Permission pull-down menu
on the pop-up window to
‘View only’.
8
These controls toggle
the contents of the
right-hand sidebar Format
lets you edit the slide’s
contents, Animate gives
access to tools such as
transition effects, as the
presentation moves from one
slide to another and
Document offers tools that
cover the presentation as a
whole, rather than one
particular slide or transition.
9
The left-hand sidebar
shows the total
presentation, as thumbnails.
Click and drag to reorder
them, click and delete to
remove and use the View
button above it to change
the way they’re displayed.
This is the slide you’re
currently working on.
If you start with a template,
you can change the pictures,
text, fonts and other
elements to suit your own
presentation. There are lots
of themes to choose from.
10
11
The right-hand
sidebar’s Format tools,
which you use to edit, modify
and build your presentation.
You can choose a colour for
your background. Click on
an image and choose an
image style, and set a
border and shadow if you
wish, and more.
range of slides in your
MacBook Pro
www.pclpublications.com | 57
□
macOS Monterey’s Key Apps
Top Tips for Keynote
Mastering the Keynote app isn’t as tricky as you think. Follow these tips as you
practice making your presentations and you’ll soon have an impressive show.
Keynote Live
Keynote Live lets you broadcast your presentations over the
Internet, so it can be watched by up to 500 viewers online or
35 on your local Wi-Fi. Make sure your presentation is in
iCloud Drive. The Keynote app used to have a Keynote Live
button in the toolbar, but in the latest version you find this
option in the Share menu.
Click Keynote Live in the Share menu, and a Keynote Live link
is created for your presentation, and you’re invited to add
viewers. You can do so, or copy the link under More Options,
and send it in another way. Those you invite can watch your
Keynote presentation, which you can password-protect to
restrict who can see it if you wish.
Using an iPhone or iPad as a Remote.
459:07 pm
Оиея SMe1ol7
You can use your mobile device as a
remote for a Keynote presentation
running on your Mac. First of all, make
sure Wi-Fi is turned on for both of them
and that they’re both on the same
network. On your Mac, open Keynote and
in the Keynote menu at the top, select
Preferences. Click the Remotes tab, and
then tick the Enable box.
On your iPhone or iPad, open the
Keynote app and tap the Keynote Remote
icon (it looks like an iPhone with a Play
symbol on it). The name of your mobile
device appears on your Mac, in the
Remotes preferences window. Click the
button marked Link, and you can run a
presentation on your Mac while controlling
it on an iPhone or iPad.
After confirming the four-digit code that
appears on both your Mac and mobile
device, you’re ready to start. Tapping your
mobile device’s screen acts like pressing
a mouse button or the Space bar; it
activates the next animation or slide. Tap
the middle icon in the top-right and you
can choose to view the current and next
slide, if you wish, side by side.
58 I www.pclpublications.com
Keynote
Using an Apple Watch as a Remote.
If you play your Keynote presentation on your iPhone, maybe
linked to a bigger screen through the Lightning port or AirPlay,
you can use your Apple Watch as a remote. First make sure
your iPhone’s Keynote app isn’t paired with any other
presentation devices. Launch Keynote on your iPhone, tap the
Keynote Remote icon and follow the on-screen instructions so
you can pair it with your Mac’s Keynote app.
Open Keynote on your Apple Watch. It tells you it’s setting up
as a presenter for your iPhone. When instructed to do so (on
your watch), open your Keynote presentation on your iPhone.
From now on, you can use your watch as a remote presenter
for your iPhone’s Keynote show. Just tap the screen to bring
forth the next slide, in-slide feature or transition. You can switch
to using your iPhone as a presenter if you wish too.
Keynote Preferences
Open the Preferences panel from the Keynote menu in the menu
bar Take a look through them - there’s some great customisation
options in there. The Slideshow pane, for example, lets you decide
whether to scale a presentation to fit the screen, change the way
others can interact with your presentations or if you require a
password to exit a presentation.
Go Easy!
Sometimes, less is more, and that’s certainly true for
Keynote presentations. Just because you can use a
different animation for every object on the screen, it doesn’t
mean you should. Sticking to two or three animations per
presentation can be much more effective than having
everything in sight bounce around the screen in a
distracting, confusing manner.
RESTAURANT SALES, FOUR MONTHS, STARTING IN APRIL
www.pclpublications.com | 59
Going Further with macOS
> Sat 2 Oct 12’29 pm
4 days ago
7 days ago
OCTOBER
20
MacBook Pro
23
30
New Edits
Ian & Alison’s Jobs List
New Photos Memory
Pet Friends
28m ago
House of Felix Yesterday. 7:19 ₽m
The home hub is not responding.
After All 3 days ago
Elton John & Charlie Puth — The
Lockdown Sessions
Notification Centre
Weekly Report Available
d 4 hours, 56 minutes of
per day last week.
Things
Cross-Trainer
Newton Abbot
13°
Heavy rain in the
next hour
60 I www.pclpublications.com
Going Further
with macOS
Monterey
When you’re ready to take things further,
we’ve a host of guides for your Mac and
the Monterey operating system. The new
Focus and Live Text features are covered,
and there’s a guide to the Shortcuts app,
which makes its debut on the Mac with
Monterey. Look out too for guides to
iCloud and iCloud+, Sih, System
Preferences and more.
Learn more >
www.pclpublications.com I 61
П Going Further with macOS Monterey
macOS Monterey’s
System Preferences
When using a new Mac for the first time, it’s easy to begin using it for day-
to-day tasks without configuring it properly or exploring the settings. It’s
well worth spending a few minutes familiarising yourself with the System
Preferences controls and the many options contained therein. So let’s take
a look at what they can do.
Accessing the System
Preferences.
As long as you read up on what you’re adjusting before
making any changes, delving into System Preferences is
not a scary experience, and it can make using your Mac
a lot more enjoyable. There are several ways to open the
System Preferences pane. You can click on the Apple
icon in the top left corner of the screen and select
System Preferences, click on the Dock icon showing
cogs on a silver square or open it from the Launchpad or
Applications folder. Opening System Preferences reveals
a window with a grid of icons split into categories, each
representing a different area of options you can
configure. Wherever you are in System Preferences, the
grid of squares in the toolbar takes you back to this, the
System Preferences’ front page.
Apple ID
The Apple ID preference pane takes you to the controls for
your Apple ID. You can manage things such as iCloud-
syncing apps, iCloud storage, media and purchase options
and more. Through the Overview button you can sign out of
your Apple ID if you want, and you can change personal
details under Name, Phone, Email. Just the thing if you have
a new phone number. At the foot of the left-hand column, all
your other Apple devices that are signed into the same
Apple ID as this one are listed.
Family Sharing
If you have set up Family Sharing on your Mac, you can
access the feature here. With Family Sharing, you can share
media and applications with your family. If, for example,
yourself and some of your children all want the same music
album, you can buy it once and all three of you can enjoy it;
you no longer have to buy it multiple times. The same
applies to apps too. Up to six members of your household
can link up with Family Sharing, and you can activate
safeguards and parental controls too.
62 | www.pclpublications.com
System Preferences
Desktop & Screen Saver - Desktop
Desktop & Screen Saver is split into two tabs. The Wallpaper tab
lets you set your wallpaper; or a folder with multiple wallpapers
on your Mac. The + and - icons at the bottom of the left column
add or remove folders of pictures to use as desktops. This is
handy when used with the Change Picture feature.
Desktop & Screen Saver - Screen Saver
The Screen Saver tab lets you select the source of photos to
be displayed in your screen saver, the style in which they are
displayed, and the duration your Mac should be idle before the
screen saver starts. If you don’t want photographs, scroll down
the left column to select a more traditional screen saver.
General
The General options customise several things, such as the
colour of buttons and icons, the colour of highlighted items in
Finder and how scrollbars appear. It also lets you control
whether applications should open the windows or documents
you last viewed when you relaunch an app. Each option is
clearly explained. By default, menus and highlights are blue.
Dock & Menu Bar
The Dock & Menu Bar preferences actually govern three
things: the Dock at the foot of your screen, the menu bar at the
top of it and the Control Centre, accessed using the
two-switches icon in the top-right of the menu bar You can
change the way the Dock behaves, decide whether you want
to hide the menu bar and customise your Control Centre.
Mission Control
Ш Mission Control gives you »n overview of all your open windows and thumbnails of your full-
screen applications, all arranged in a unified view
Q Automatically rearrange Spaces based on most recent use
Q When switching to an application, switch to a Space with open windows for the application
Group windows by application
Q Displays have separate Spaces
Keyboard and Mouse Shortcuts
With а клдм keystroke, view sti open windows, windows ot the current application, or hide windows to locate an
item on the desktop that might be covered up
Mission Control: ЛТ 0 0
Application windows: e 0
Show Desktop: 0 -___________________________________В
________________________(tor additional choices press Shalt. Control, Option or Command)________________
Sih helps you get things done, just by asking. Dictate a note, check
the weather and more.
Keyboard Shortcut Hold Command Space 0
language: English (United Kingdom) 0
Voice Variety: British 0
Siri voice: voice 1
Voice 2
Voice Feedback О On Off
Sin History: Delete Siri & Dictation History
Q Show Siri in menu bar
Siri Suggestions & Privacy...
Mission Control
The Mission Control options lets you control how applications
are grouped and arranged in the Mission Control screen,
which is accessed from the Applications folder, LaunchPad, or
by pressing the F3 key. Mission Control is useful for quickly
switching between applications or open windows, and seeing
what is currently running on your Mac.
Siri
This is where you configure the Mac’s Siri feature. You can
switch it on or off with the checkbox in the left column and
change the language, accent, input source, keyboard shortcut
and more in the right. If you don’t want to show Siri in the top
bar, uncheck the box at the bottom of the pane. For privacy,
you can also delete your Siri and Dictation History here.
www.pclpublications.com | 63
П Going Further with macOS Monterey
Spotlight
Spotlight, the magnifying glass at the top right of the
preferences window, lets you control which items are indexed
and searchable through Spotlight. You can select or deselect
file types, or head in to the Privacy section to ensure no files in
a specific location are returned in Spotlight results.
Language & Region
To change your Mac’s language, first add a new one to the list
of Preferred Languages; click the *+’ icon and select the one
you want. Now drag the language you wish to use to the top of
the Preferred Languages list and restart. You can also change
the Mac’s region, the calendar used and more.
Notifications & Focus
This preference pane is divided into two sections. Click the
Notifications tab and you can choose which apps are allowed to
send you notifications, how each app’s notifications are to arrive
on the screen and more. Click on the Focus tab and you can set
up and edit Focuses, for when you want fewer distractions.
Internet Accounts
Internet Accounts is a hub for all of the accounts your Mac has
set up on it. These accounts are used for sending e-mails, as
well as syncing Calendar events, Contacts details and more.
The + and - icons can be used to add and remove accounts,
and clicking an account allows you to further modify its settings.
Passwords
Click Passwords and enter your administrator’s password (the
one you use when you log on), and you can access all the
passwords you’ve used on your Mac. You’re also told if your
password has turned up on a known data leak so you can
change it. Hover over a password to see it, and click it to copy.
Users & Groups
Here you can add new user accounts to your Mac, change the
password, configure which apps run when you log in, and set
up the Guest User account. The Guest User account is useful if
you want to let people use your Mac for a short amount of time
without being able to access your files or saved passwords.
64 | www.pclpublications.com
System Preferences
Accessibility
Accessibility helps you use your Mac if you have a disability
such as poor hearing or visual impairments, with features such
as VoiceOver; Spoken Content, Pointer Control, Captions and
more. Accessibility controls are divided into Vision, Hearing,
Motor and General; explore the ones you need.
Screen Time
Screen Time shows you how you’ve used your Mac recently,
how much time you’ve spent on it in total and on individual apps,
and more. You can see what apps have sent you notifications
and how many too. If you feel you’re spending too much time on
your Mac - or at least on certain apps - set up downtime.
Extensions
Here you can activate and deactivate extensions you’ve installed
yourself and also Apple extensions. For example, you can
change which apps appear in the Share menu. Very useful if, for
example, you’ve installed a third-party email client and would
like it to appear in the Share options, just like Apple’s Mail app.
Security & Privacy
Control and modify a range of features relating to security and
privacy. If you try to install a third-party app from an unidentified
developer; you have to come here to allow it permission when its
installation is blocked. You can also change your login password,
encrypt your storage drive, turn on a firewall and more.
Software Update
If a software update is available for your Mac, this is indicated
on the System Preferences option in the Apple menu, and the
Software Update pane in the main System Preferences window
is badged. Open it and you can update your Mac, or tick the
box to have updates installed automatically in the future.
Network
Here you can make various changes to your Mac’s network
settings. You can add or remove connection options like Wi-Fi or
Ethernet, turn Wi-Fi on or off and decide whether your Mac
should ask you before joining a network. Under the Advanced
button you can delete saved networks too.
www.pclpublications.com | 65
П Going Further with macOS Monterey
Bluetooth
If you want to pair your Mac with a Bluetooth peripheral like a
keyboard, mouse, speaker or earbuds, this is where you do it.
You can also delete paired products here (click on it and then
click the ‘X’ that appears), and turn Bluetooth off and on. Check
the bottom box to have Bluetooth displayed in the menu bar.
Sound
With Sound, you can enable, disable and change the default
sound effects for different events within macOS. You can also
select the default input and output devices, which is useful if you
happen to be using external audio interfaces or microphones.
It’s here you change the alert volume and output volume too.
Keyboard
Here you can also control whether keys repeat when you hold
them down, and the backlight settings if you’re using a backlit
keyboard. You can also view the keys required for keyboard
shortcuts, and change them to different shortcuts if you’d prefer
The Dictation settings and text shortcuts are also found here.
Trackpad
Trackpad settings are for notebooks or those who have a Magic
Trackpad connected. Like the mouse settings, you can control
tracking, scroll and click speeds, as well as enable and disable
gestures. Adding the secondary (right) click to the bottom right
corner of the trackpad is a very handy setting here.
Displays
Brightness:
Resolution: О Default for Display
Scaled
do ьи □ i к bdmo
Butti-m Retina Display
Automatically adjust brightness
Colour Profile: Colour LCD
Set Up Bluetooth Mouse
Night Shift...
Mouse
Mouse allows you to control the tracking, scroll and click speed
of the mouse (if you’re using one). You can also find settings for
adding and troubleshooting Bluetooth mice here. Remember;
you don’t have to use Apple’s own Magic Mouse. You can use a
third-party wireless or USB mouse if you prefer to do so.
Displays
The Displays options vary depending on the type of Mac you’re
using. Typically you can control the screen resolution of your
Mac, and also the mirroring settings if any AirPlay devices are
available on your network. You can also configure and calibrate
the colour profile of your screen(s), and set their brightness.
66 | www.pclpublications.com
System Preferences
Printers & Scanners
The Printers & Scanners preference pane controls the settings
for any printers and scanners you have connected to your
computer; and also allows you to browse the network your Mac
is connected to, so you can add new printers and scanners. You
can also select the default printer and paper size.
Battery
On a notebook Mac, the Battery preference pane gives various
information and options on your Mac’s internal battery. It shows
how much charge it holds, maps its charge over time and more.
You can set various energy saving options for when you’re
running on battery power or a power adapter too.
Date & Time
Date & Time lets you select whether your time zone is set
automatically, based on your current location or manually if
you prefer. You can also select to have the time and date set
automatically, and control whether macOS displays a 12 or
24-hour clock plus change the date formats and more.
Sharing
Here you can change your computer’s name by which it’s
identified on a network, as well as turning on and off a variety
of sharing options such as Screen Sharing, File Sharing,
Media Sharing and more. You can set who can access the
various sharing features too.
Time Machine
Time Machine is a fantastic automated backup utility that
ensures your files are kept backed up. Here you can enable and
disable Time Machine, manage your backups and configure
new backup disks, and more. A Time Machine backup lets you
retrieve accidentally deleted files, and you can boot from it too.
Startup Disk
Startup Disk is a setting that you will likely never change, but
should you ever attach an additional hard drive to your Mac from
which you would like to be able to boot, or if you’d like to
configure your Mac’s hard drive so that you can connect it to
another Mac and boot from it, this is where you do so.
www.pclpublications.com | 67
П Going Further with macOS Monterey
Multi-use Touch Bar
On a MacBook Pro
The Touch Bar is an OLED touchscreen that replaces the function keys on
the newer models of MacBook Pro. What it does depends on what you’re
currently doing on your Mac; if you’re using Messages, for example, it might
offer emoticons to tap and use. If you’re using Music, it offers audio controls.
The Touch Bar Explained
1
App-specific: What the Touch
Bar shows depends on the app
you’re currently using. Here it’s used
with a video app but it can be
configured for other software too.
3
Regular Buttons: As you
can see, regular buttons like the
Escape key and media controls can be
replicated on the Touch Bar and placed
where their function keys were.
5
Slider Bar: The versatility of
the Touch Bar means you can use
it as a slider; should the app allow. Here
we can scroll forwards and backwards
through a video.
2
The Touch Bar: The Touch
Bar runs along the top of the
keyboard, where the function keys used
to be. What it displays depends on what
app you’re using.
DApp-related Buttons:
Because the OLED Touch Bar is in
itself a mini screen, it can also display
buttons that are specific to the app that
you’re currently using.
6
Siri Button: Here we see the
Siri button, for activating Apple’s
digital assistant. Should the need arise,
this part of the Touch Bar can also be
used for Touch ID.
68 | www.pclpublications.com
Multi-use Touch Bar
Touch Bar Behaviour
System Functions: When in the Finder, the Touch Bar
shows the regular function keys we’re already used to, such as
media controls and keyboard brightness.
Safari Touch Bar: When you open Safari, the Touch Bar
gives you buttons for your favourite websites. Slide along it to
scroll for even more website buttons.
Website Touch Bar: When you’re using a website, the
Touch Bar gives you back buttons, a search field and more.
The perfect tools for the job you're currently doing.
Messages Touch Bar: Switch to Messages and your
most recently used emoticons will all be within easy reach,
right there on the MacBook Pro’s Touch Bar
Touch ID: On the extreme right of the Touch Bar is a
fingerprint scanner. This can read your fingerprint to unlock
your Mac, or for the Apple Pay payments service.
Finding the Function Keys.
If you find you need the function keys, as found on other
Mac and MacBook keyboards, press the fn key (bottom
left) and they appear.
www.pclpublications.com | 69
П Going Further with macOS Monterey
Split View Screens
“L macOS Multitasking
Split View Screens is a feature of macOS that allows you to view two
applications in full-screen mode on a single display. It enables efficient workflow
and is superb for researching something in Safari, while using the Notes app or
reading about a venue and looking it up via Maps. Here’s how it works.
1
To use Split View mode, first open an app you want to
use as a split-screen app Here we’ve chosen Safari but
any app that’s compatible will do. Just open the app window;
there’s no need to open it as a full screen.
2
Click on the window’s top bar and drag it upwards, onto
the menu bar A strip appears, offering the current
desktop image and a receptacle for the app you’re dragging.
Drop the window onto the plus sign to make it a full screen app.
3
Go back to the desktop and open the second app you
wish to use as a full-screen app in Split View mode. Here
we’re using Apple’s own Pages word processor app, though
once again, you can use almost any app on your Mac.
4
Drag the window for this second app upwards, onto the
menu bar as you did with the first one. The strip appears
again. Drop the second app onto the desktop you created earlier
showing the first app, which is represented by an icon on this strip.
70 | www.pclpublications.com
Split View Screens
5
The two apps now offer a combined icon, which you can
see here, labelled ‘Safari & Pages’. This is a single
desktop, in which both those apps are running, in split view To
open them, click on the icon in the usual way
6
In Split View mode, you can make full use of the two
apps, just as if they were each running singly in
full-screen mode. If you wish to allocate one app more space
than the other, click and drag the black line that divides them.
Another way of setting up is by using the green window
expand/decrease size button (located in the upper left of
any open window). With an open app, move the mouse pointer over
to the green icon. A sub-menu will appear with options. Choose to
either Tile the window to the left or right of the display.
8
Once the window has been Tiled to the side of the screen
you wanted, simply click on the remaining open app which
is now displayed in the other half of the screen. This will expand
the app to fill the other half of the screen. Again, you can adjust
the split by dragging the divider left or right.
Replace Tiled Window
Move Window to Desktop
Make Window Full Screen
Д bdmpublications.com C
В Millions of Readers Worldwide
A Easy & Secure Online Checkout
Dog Media - Tech Guidebooks and Guides
9
To take an app out of full Split View mode, move the pointer
to the top of the screen and click on the green gumdrop.
Click and hold it to replace the tiled app with a different one, or
move the window to the desktop to take it out of full screen mode.
10
A useful trick with split view apps is to open two Finder
windows, allowing you to manually compare and copy
between two folders. To copy an item (instead of simply
moving it) hold alt while you drag an item from one to another.
www.pclpublications.com | 71
П Going Further with macOS Monterey
Managing
Your Desktop
The macOS desktop has evolved considerably over the last decade. With
cutting-edge features such as Mission Control and Expose, you’re able to make
Monterey not just a personalised workspace but also one that’s efficient and
helps you get the job done. Here’s some tips on managing your desktop.
1
To activate Mission Control, swipe upwards with three
fingers on a trackpad or tap the F3 key on your keyboard.
This is unchanged from previous versions of the Mac’s operating
system, unless you’ve modified the gesture settings yourself.
2
Unlike older versions of Mission Control, open windows
are presented in a single layer instead of being stacked
according to which application produced them. Click on a
window to bring its app to the fore.
upwards, onto the strip showing the desktops. You can also
create a new desktop space by clicking the plus sign,
whether this Spaces bar is open or not.
4
You can still use the Expose buttons, just like in
previous versions of macOS. F3 takes you straight to
Mission Control. You can clear the Desktop with Fn-F11 too.
Or alternatively, place four fingers on the trackpad and move
them away from each other.
72 | www.pclpublications.com
Managing Your Desktop
To return your apps to the desktop, either click on the
edge of the app, as seen in the margins of the
desktop while in the Expose view, or place four fingers on
your trackpad and move them towards each other, instead
of away from each other or use the Expose button.
6
You can quickly cycle through the currently open apps
on your desktop in macOS by holding the Command key
and pressing the Tab key. You can also press ‘Q’ to quit any of
the applications or *H’ to minimise them. This is called the App
Switcher, and it’s a much underused feature of macOS.
Regardless of whether you’ve set your Dock to
automatically show and hide, you can quickly open and
close it by pressing cmd-alt-D. If it’s open, this hides it. If it’s
closed, the key combination opens it.
8
You can group multiple files into a single folder by
highlighting them, right-clicking and selecting ‘New
Folder with Selection’ from the menu. This creates a new folder
containing the files. You can then name the folder.
If you’re after something a little alternative, then try this.
You can add the Apple icon to any file or folder name or
even enter it into Notes or any other app. For example, create a
new folder on the desktop and when you’re ready to name it
press Alt-Shift-K to create the Apple icon.
10
You can take a screenshot of your desktop by
pressing cmd-Shift-3 but if you want a more specific
area to screenshot, then try cmd-Shift-4. This will change
the cursor into a crosshair, for you to drag a box around the
actual area you want instead of the whole screen.
www.pclpublications.com | 73
П Going Further with macOS Monterey
Continuity Feature
On Apple Devices
With a Mac running OS X 10.10 or later, and a mobile device with iPadOS or
iOS 8 or later installed, your Apple gear works together seamlessly. You can make
and receive calls on your Mac, send and receive text messages on any of your
devices, and share files between your Mac, iPad, and iOS devices with AirDrop.
Wi-Fi Instant Hotspot
1
Instant Hotspot’s system requirements are stringent. A
Mac must be mid-2012 or newer and running Yosemite
or later To find out when your Mac was made, click on the
Apple icon in the top left and select About This Mac. An iOS
device must be an iPhone 5 or later iPad (4th gen) or later, an
iPod touch (5th gen) or later or any iPad mini.
2
Make sure your Mac and all the devices you want to use
with Instant Hotspot are signed into the same iCloud
account. On an iPadOS or iOS device, go to Settings > [Your
Name] > iCloud and on a Mac, open System Preferences
(under the Apple menu, top left corner or from the Dock) and
click on Apple ID > Overview.
Make sure your iPhone
has a cellular
connection to the Internet. You
should see a 3G or 4G symbol
at the top of the screen. Make
sure Personal Hotspot is
switched on too. To do this
open the Settings app and
then open the Mobile Data link.
Look for the Personal Hotspot
option, and if it isn’t on already
switch it on.
3
2:09 V .i «'
< Back Personal Hotspot
Personal Hotspot on your iPhone can provide
internet access to other devices signed in to your
iCloud account without requinng you to enter the
password
Allow Others to Join
To access your Instant Hotspot Internet connection, on a
Mac, click on the Wi-Fi menulet in the top right of the
screen and select your iPhone from the list. On an iOS device,
do the same through Settings > Wi-Fi. An indicator on the top of
the iPhone’s screen shows a connection. If this fails, check your
mobile phone carrier supports personal hotspots.
4
74 | www.pclpublications.com
Continuity Feature
Phone Calls
1
All Macs and iOS devices you wish to use for Continuity
phone calls must be logged into the same iCloud
account, and also on the same Wi-Fi network. On your Mac,
click the Wi-Fi menulet in the top right end of the menu bar at
the top of the desktop On an iPadOS or iOS device, open
Settings and look at what’s listed under Wi-Fi.
2
All devices must be signed into FaceTime with the same
iCloud account. On a Mac, launch FaceTime and sign in. If
already signed in with a different account, from the FaceTime
pull-down menu, open Preferences and sign out. On an iOS
device, go to Settings > FaceTime and sign in. On your iPhone,
FaceTime and iPhone Mobile Calls must be on.
® О * Q
Д ё О Sun 26 Sep 2:38 pm
Alison Willis
from your iPhone
Accept
Decline
To answer a call on your Mac, wait for the notification to
appear You can then click on one of the options.
Answering the call on your Mac means using its built-in mic
and speakers, so be careful about taking a private call in a
public place. To make a call on your Mac, click a phone
number in Contacts, Calendar or Safari.
3
To initiate a call using
an iPad or iOS device
other than an iPhone, tap on
a number in Contacts,
Calendar or Safari. To
answer an incoming call on
this device, use Slide to
Answer, as instructed on the
screen. With your Mac and
your iOS devices set up to
use Continuity Phone Calls,
all your devices ring when
there’s an incoming call.
4
Alison Willis
% Ш ф
+ n« ®
Calling from a Mac.
You can place a call from your Mac too. Wherever you see a
phone number, you can click on it and get a menu. From this
menu, select the ‘call from your iPhone’ option and the call is
placed. It works in most Apple apps, such as Safari (as seen
here), Notes and Messages.
Contact Us
BDM Extras
To switch off Continuity Phone Calls on one or more of
your Apple devices, on a Mac, open FaceTime’s
preferences and uncheck the box marked ‘Calls From iPhone’.
On an iOS device, go to Settings > FaceTime and turn off
‘iPhone Mobile Calls'. The device is then unable to use
Continuity Phone Calls until you switch it on again.
5
(+44) 01803446068
enquiries@bdmpublic<
Advertise
Licensing
Privacy Policy
sbies
jnt
iback
Website Terms of Use
ishop
www.pclpublications.com | 75
П Going Further with macOS Monterey
SMS and MMS Messaging
macOS Mont
Version 12.0 Bota (21A55O
MacBook Pro (Retina, 13-1
Processor 2 7 GHz Dual-<
Memory 8 GB 1867 MHz
Startup Disk Macintosh h
Graphics Intel Iris Graphic
Serial Number C02P902t
System Report... Sol
1
To send or receive an SMS (Short Message Service) or
MMS (Multimedia Messaging Service), from your Mac you
must be running Yosemite or later. You also need an iPhone
running iOS 8.1 or later. Text messaging from an iPad or iPod
touch also demands they be using iOS 8.1 or later
2
On a Mac, open Messages and in the Messages menu,
open Preferences. Click on iMessage, then on Settings
and make sure the required numbers and email addresses are
enabled. On an iOS device, go to Settings > Messages > Send
& Receive and again enter your Apple ID if necessary.
Finally, on your iPhone,
you must go to Settings
> Messages and turn on Text
Message Forwarding. Tap on
this option, and you’re shown a
list of devices logged into the
same iCloud account. Switch
on all the ones with which you
want to share your text
messages. Each device
displays a verification code you
must type on your iPhone.
3
Ako» these devices to send and receme test
messages from this iPhone
Ian Osborne's iPad Pro (iPad)
iMac (Mac)
Ian's MacBook Pro (Mac)
All your SMS and MMS messages now appear on your
Mac and/or iOS devices, regardless of whether the
person who sent them uses an iPhone. If the sender is using a
non-Apple device, the speech bubbles you send are green
instead of the blue that’s used for iMessages, that is,
messages sent between Apple devices.
5
Sending text messages through your Mac is incredibly
convenient, especially for long messages. It’s great for
replying too - you can just use whichever device is nearest. If
you’re working on your Mac, you get to read and reply to your
text messages without even reaching for your phone.
6
You can initiate a text message chat regardless of
whether the other person uses an Apple device by
clicking a phone number or Message icon in Safari, Contacts
or Calendar. Here, in Contacts, click on the icon and select a
number from the pop-up. A message window soon appears.
76 | www.pclpublications.com
Continuity Feature & Universal Clipboard
Universal Clipboard
Copy and Share
Universal Clipboard is a great way to shuttle small sections of data between Mac
and iOS devices; as long as the Macs are running at least macOS Sierra, and
iOS devices are on iOS 10 or later (including iPadOS), and all your devices are
signed into the same Apple account. Here’s a guide to copying on one device and
pasting to another using Macs and iOS devices.
1
To use the Universal Clipboard feature, the devices in
question must be logged into the same iCloud account. If
they’re yours, they probably already are but if you have trouble
using this tutorial, it might be worth checking.
Now you can copy and paste a piece of text from one
device to another, quickly and easily. On your Mac, simply
copy it to your clipboard by highlighting the text in question, then
pressing either cmd-X to cut it or cmd-C to copy.
3
Now, on your iOS device, double tap on the place where
you want to paste the text you cut or copied on your
Mac. From the pop-up menu, select Paste and it appears.
There might be a slight lag while the text uploaded to iCloud.
You can copy text from your device running iPadOS, or
iOS 10 or later, and paste it on your Mac using cmd-V. It
works for images and video too. We copied this photo from
Safari on our iPad and pasted it into TextEdit on our Mac.
www.pclpublications.com | 77
П Going Further with macOS Monterey
Universal Control
On Macs and iPads
Universal Control is a new Continuity feature that lets you use a Mac and an
iPad side by side; using your Mac’s keyboard and mouse/trackpad. You can
control up to three computers and tablets with one set of input devices.
Here’s how to set up and use Universal Control.
Universal Control is available with compatible Macs and iPads running
macOS Monterey and iPadOS 15 respectively. They have to be signed
into the same iCloud account, and both must have Wi-Fi and Bluetooth
switched on.
Switch on ‘Allow Handoff between this Mac and your
iCloud devices’ by clicking the box next to this option.
Open System Preferences from the Apple menu (top left),
and click General.
When using Universal Control, you can drag your Mac’s pointer off the
Mac’s screen and onto the iPad’s screen, and then operate the iPad
with the keyboard and mouse/trackpad from your Mac. Unlike Sidecar,
Apple’s earlier Continuity feature that let you use your iPad as a second
screen for your Mac, Universal Control lets you use your iPad’s own
apps and features, and even drag files between your computer and
your tablet.
On Your Mac
78 | www.pclpublications.com
Universal Control
Using Universal Control
Having set up Universal Control, place your iPad next to your
Mac. With your Mac’s mouse or trackpad (on a desktop or
notebook Mac), move your pointer off the screen. A bar
appears showing a connection with your iPad has been
made. Continue moving your pointer until it appears on your
iPad. You can then use your pointer to open and close apps,
click links, drag files between your iPad to your Mac and
more; while your keyboard can type in text fields on your
iPad. To return control to your Mac, just move your pointer
back onto the Mac’s screen again. It works with up to three
devices, so add another if you wish.
System Requirements
• Macs
MacBook Pro (2016 and later)
MacBook (2016 and later)
MacBook Air (2018 and later)
iMac (2017 and later)
iMac (5K Retina 27-inch, Late 2015)
iMac Pro, Mac mini (2018 and later)
Mac Pro (2019);
• iPads
iPad Pro
iPad Air (3rd generation and later)
iPad (6th generation and later)
iPad mini (5th generation and later)
www.pclpublications.com | 79
П Going Further with macOS Monterey
Sidecar:
With Your iPad
If your Mac and iPad are recent enough, you can use your iPad as a second
screen for your Mac; expanding your desktop space. This is especially good
news if you also use an Apple Pencil. You can draw on your iPad, using it as
a high-resolution input device for your Mac. Just the thing for budding artists.
To use Sidecar on your Mac and iPad, first of all, open
System Preferences on your Mac then click on the Displays
preference pane. In the pull-down in the lower left, select your
iPad. If it isn’t there, your Mac’s too old to use Sidecar
Make sure your iPad is switched on and placed where
you want it. You can drag the small display desktop,
which represents your iPad as an external screen, into any
position you like regarding your main Mac display
2
There’s a brief flash, and your Apple devices connect;
sharing screen space between your Mac and your iPad.
Your iPad can now be used as an input device or second - or
even third or fourth - screen.
You can drag and drop windows and files between your
Mac’s screen and your iPad. If you need to access your
iPad as a tablet, swipe up from the foot of the screen. You can
relaunch Sidecar by tapping the Sidecar icon in the Dock.
3
4
80 | www.pclpublications.com
Using the iPad as an Input Device
With Sidecar, you can also use your iPad as a graphics tablet. According to Apple, any Mac app that supports stylus input
works in this way, but the company has also come up with a preliminary list of apps that you can use with the Mac, iPad,
and Apple Pencil:
Adobe Illustrator
Affinity Designer
Affinity Photo
Cinema 4D
CorelDRAW
DaVinci Resolve
Final Cut Pro
Maya
Motion
Painter
Principle
Sketch
Substance Designer
Substance Painter
ZBrush
System Requirements
To use Sidecar, your Mac must meet the following requirements;
MacBook Pro 2016 or later
MacBook Air 2018 or later
MacBook 2016 or later
iMac 27-inch 2015 or later
Mac mini 2018 or later
Mac Pro 2019 or later
BBS
BBBBBBBBBI
MBBBBBBBBBBBB
www.pclpublications.com | 81
П Going Further with macOS Monterey
Continuity Camera
Use That Photo
Continuity Camera lets you take a photograph using your iPhone or iPad and
have it appear instantly on your Mac. It works with Finder, Mail, Messages,
Notes, Pages, Keynote, and Numbers. It’s a great way of adding a photo to your
designs, emails, presentations and more, and it’s easy to set up and use too.
On your Mac, open the document you wish to import a
photo into, or start a new one. Right-click where you
want it to appear, select Import from iPhone or iPad, then Take
Photo on whichever device you're using. Devices only appear
here if they’re on the same Apple ID as your Mac.
Switch to the device you chose to take the photo from.
The Camera app should already be open, so take a
photo. You get fewer options in the Camera app than usual.
When you’ve taken your snap, you can discard it or use it;
make your choice from the links at the bottom of the screen.
1
2
Scanning Documents.
In addition to taking photos, you can also use Continuity
Camera to scan documents in the same way. Just select
Scan Documents from the menu covered in Step 1, switch
to the device you wish to use and then frame the document
on the screen until it’s covered with a yellow box. It’s then
scanned and your Mac imports it.
The photo instantly appears on your Mac, in the
application you chose to import it to. You can edit and use
it like you would any other photo. The pic isn’t retained on your
mobile device though, so if you want it there too, you might be
better off taking a photo in the traditional manner
3
82 | www.pclpublications.com
Continuity Camera & App Switcher
The App Switcher
Speed Your Workflow
With App Switcher you can toggle between apps that are currently open and
running on your Mac without taking your hands off the keyboard. It’s a really
great feature that significantly speeds your workflow if you use it on a regular
basis. If you don’t use the App Switcher already, you should give it a try.
1
The App Switcher is easy to use. Hold the cmd key and press Tab. A window showing the icons of all your open apps is
displayed in a floating panel in the centre of your desktop. If you release the keys, they disappear again.
2
You can toggle through these apps by repeatedly pressing the Tab key and releasing cmd when you’ve highlighted the app
you want. This app is then brought to the front of your Mac, so you can make use of it straight away.
3
You can move forwards or backwards through the list of open apps using the arrow keys at the bottom right of your
keyboard, or to the left of the numeric keypad on a large keyboard. Alternatively, just click on one with your pointer.
4
If you see an icon on the left with a badge in the corner; it means you have that app open on another Apple device. Click it to
open it on your Mac too, showing the same document, page or site as it does on your mobile device.
www.pclpublications.com | 83
П Going Further with macOS Monterey
Using iCloud
For Storage & Syncing
With Apple’s iCloud service, you can store documents and data on a ‘cloud
server’, that is, a storage facility accessed over the Internet. Files stored on iCloud
can be worked on using any device with a browser anywhere in the world, and
you can sync settings and information over iCloud too. Here’s how it works.
Storing Your Documents in iCloud
Click on your desktop to open Finder, then open iCloud
Drive from the Go menu. You may need to log into iCloud
using your Apple ID. You’ll see a Finder window showing the
contents of your iCloud drive folder, with folders for some apps
that store output in iCloud.
To save files of any type into your iCloud Drive folder,
simply drag them from their current location (in this
screenshot, that’s the desktop) and drop them in the open
iCloud window. They are now stored remotely and accessible
from any connected Apple device.
1
2
You can organise your iCloud folder like any other
folder, including creating new folders within it. To move
files into a new folder in your iCloud Drive, just drag and
drop them to where you want them, just like you would with
any other Finder folder.
To move files out of iCloud storage and back to your
hard drive, drag them out of the iCloud folder and onto
your desktop or into a folder that isn’t in your iCloud Drive.
Confirm the move when you’re asked to and the files are
removed from your iCloud storage.
3
4
84 | www.pclpublications.com
iCloud
iCloud Photos
1
To enable iCloud Photo Library on your Mac, first of all,
open the Photos app and in the Photos pull-down menu,
select Preferences as shown, to get the Preferences window
2
In the Preferences window, click on iCloud and then
check the box labelled iCloud Photos. Your photos are
uploaded to your iCloud. This may take some time.
3
You can choose between 'Download Originals to this Mac’,
to keep a backup copy of your library on your Mac and
‘Optimise Mac Storage’ to leave it all on the cloud.
4
Now do the same on any other Macs you have. Any
duplicates should be resolved by iCloud as you go.
Naturally, you only need a backup of your library on one Mac.
Sharing an iCloud File.
You can share a file in your iCloud Drive just by sending
someone a link. Right or Ctrl-Click on the file and select
Share > Share File. From the window that pops up,
choose a means of sending the link. You can select
whether the people to whom you send the link can make
changes to the file or only view it.
5
To sync your iPhone or iPad’s Photos app with your
iCloud Photo Library, first open the Settings app from the
Home screen. It’s the one that looks like a machine cog.
www.pclpublications.com | 85
П Going Further with macOS Monterey
Syncing Apps in iCloud.
You can sync apps such as Mail, Contacts and Notes in
iCloud, so edits made on one device also appear on others.
6
Click your name at the top of the left column, then iCloud in
the right. Click Photos and switch on iCloud Photo Library
Open System Preferences, through the Apple menu, the
to enable syncing and upload your device’s photos to iCloud.
Dock or the Applications Folder. It doesn’t matter which. Click
on Internet Accounts, in the second row.
7
All your photos are shown as thumbnails and you can
select and import them. Here you can see a collection
Click on the iCloud option in the left sidebar to see which
apps are currently set to sync via your iCloud account. If any
of photos imported to our Mac using iCloud Photo Library.
are unticked that you want to sync, tick them.
You can also review your photos from any computer with
a web browser Just go to www.icloud.com, log into your
iCloud account and open the Photos web application.
Your chosen apps are now synchronised across all your
Apple devices signed into the same iCloud account, as long
as those devices are also set to sync the same data.
86 | www.pclpublications.com
iCloud
Safari in iCloud.
iCloud Keychain
To let iCloud share all your information from Safari across
your devices, first of all, open System Preferences and click
on the Apple ID icon in the top row. Now click on iCloud in the
left-hand sidebar.
DWhen you sign up for an account on a website in
Safari, maybe to join a forum or register for a
newsletter, Safari suggests a password to use. You can use
that password at the click of a button.
iCloud Unve
upnons
Ct
Ian Osborne
ian osborne ®d si pipoi.com
О Overview
Name, Phone, Email
j 'l Password & Security
□ Payment & Shipping
Л iCloud
u Media & Purchases
e Ian's MacBook Pro
* □ iCloud Mail
«/ MR Contacts
Do you want to merge your
bookmarks and Reading List with
iCloud?
Your Information on this Mac will be
uploaded and merged with the
bookmarks and Reading List stored in
iCloud.
The full contents of iCloud Drive will be stored on this Mac if you have enough
space Older documents wilt be stored only In ICloud when space is needed.
g Ian Osborne's iPa...
iCloud Storage: 50 GB (2318 G8 Available)
Find Safari and check its checkbox. You can now access
your bookmarks and reading list on your other Apple devices,
as long as they’re linked to the same iCloud account and also
have Safari ticked. Click OK to merge information, should the
box appear.
2
It’s then saved to your iCloud Keychain and synced
across your Apple devices. If you ever need to see
your password, open the Keychain Access app (it’s in the
Applications > Utilities folder).
If you have tabs open in Safari on another Apple device, you
can access them on your Mac via the cloud. In Safari, click
the URL bar to see the Start Page icons, and scroll it up to
see the sites you have open on other devices.
Find and double-click on the account you wish to
view, then in the pop-up window, click the Show
Password box. Type your admin password in the next
window and the password is shown.
www.pclpublications.com | 87
П Going Further with macOS Monterey
Messages in iCloud
Upgrade Your iCloud Drive.
1
Messages can be synced over iCloud, so your
conversations are displayed on all your Apple devices.
To activate this on your Mac, open Messages. Under the
Messages menu, select Preferences.
In the Preferences window, click on the ‘iMessage tab at
the top of the window. Make sure Enable Messages in
iCloud is checked. You can sync your messages from here by
pressing the Sync Now button.
On an iPad or iPhone, go to Settings > [Your name] >
iCloud, and make sure Messages is switched on. Your
want to downgrade to a cheaper plan, click the Downgrade
Options button in the bottom-left. You can then choose a
3
messages are now stored on iCloud and synced between all
your Macs and iOS devices.
To upgrade your iCloud storage, go to System Preferences >
Apple ID > iCloud. Click the Manage button (bottom right).
From the next screen, you can delete documents and data
from your iCloud if you wish.
Click Change Storage Plan, in the top right. On the next screen,
you’re shown your current plan and options to upgrade for a
higher monthly fee. Click on one to choose and click Next.
cheaper plan, and will see a warning if you’re currently using
more space than is in the new plan.
88 | www.pclpublications.com
iCloud
Apple’s iCloud+ Service
1
iCloud+ is a new service offering new iCloud features for
subscribers to iCloud. You can’t get it with the free 5GB
you have with your Apple account, but if you pay for more
space - at whatever level - the iCloud+ features are yours.
iCloud Private Relay routes your web-browsing traffic
through a relay to hide your IP address (Internet
Protocol, the identifier on your networked devices), your
location and your browsing habits. It encrypts your data too.
To activate it, go to System Preferences > Apple ID and,
under Private Relay, tick the checkbox to its left and click
the Options button to its right. From there, you can turn the
Private Relay on and off, and read about the feature.
Hide my email is also in System Preferences > Apple ID.
It generates a random email address connected to your
own email account. Use it for mail subscriptions and
competitions, and if you’re getting too much spam - delete it.
5
Click Options, then the'+’ icon on the left of the new
window to create a new random email address, which
you can use to sign up to newsletters, register for accounts
and more. You can manage your generated emails here too.
With iCloud+, you can use up to five custom domains to
send and receive email with iCloud Mail. Go to www.icloud.
com, click Account Settings and under Custom Email Domain,
click the Manage button. Follow the on-screen instructions.
www.pclpublications.com | 89
П Going Further with macOS Monterey
iCloud Desktop
Documents & Folders
With macOS and iOS, you can not only store your documents on your
iCloud but also files and folders that are found on your desktop. It’s done
automatically, so a file on your Mac’s desktop is accessible from your iOS
device and other Macs. Here’s how to use the iCloud Desktop.
1
To switch on iCloud Desktop Documents and Folders,
open System Preferences and click on Apple ID > iCloud.
Click on the Options button next to iCloud Drive, then check
Desktop & Documents Folders. It may take time to set up.
2
On an iPhone or an iPad, first of all open the Files
app. Go to the left-hand sidebar, under Locations (tap
the chevron to its right to open it if necessary). Tap on
iCloud, and then tap the Desktop folder.
3
Files on your Mac’s desktop can be accessed in this
way through the iCloud Drive folder of any Mac or
iOS/iPadOS device signed into the same Apple ID. All Macs
must be running High Sierra or later; and all mobile devices
must have iOS 10 or later.
4
You can also access your Desktop documents and
folders using the website. Just point your browser at
www.icloud.com and sign in. Open the iCloud Drive and the
Desktop folder is there. You can do this on any Internet-
capable device with a web browser
90 | www.pclpublications.com
iCloud Desktop & Siri П
The Siri Feature
Your Digital PA
Apple’s digital personal assistant lets you communicate with your computer by
speaking, just like you do with the iPad and iPhone. Siri can organise your day,
access your apps and even share a joke or two. Here’s a look at what the Siri
digital assistant can do for you and your Mac, and how to make the most of it.
Setting Up Siri
X
1791
1
You might have activated Siri during the set up
procedure. If not, under the Apple menu, select
System Preferences. Click on Siri in the top row. If it isn’t
already ticked, click on Enable Siri, on the left. If you want
Siri in the menu bar, check that box too.
2
You can change the language that Siri understands and
also speaks in using the pull-down menu. You can also
change the English language voice from a British male to a
female voice and a different accent, and set up a keyboard
shortcut for Siri if you wish.
Д g | © | Wed 29 Sep 5:20 pm
3
To launch Siri, click on the icon in the Dock, click on the
menu bar icon if you’ve opted for one or press the
keyboard shortcut, again if you have one set up. A Siri
window appears in the top right corner of the screen.
4
Using Siri requires an Internet connection, so your Mac
can send your voice message to Apple’s servers to be
analysed. If you don’t currently have an Internet connection,
you cannot use Siri until you take your Mac back online again.
www.pclpublications.com | 91
П Going Further with macOS Monterey
Using Siri
Check Appointments: Siri is great for checking your
appointments. You can ask what appointments you have coming
up for the rest of the week or month, what’s coming up between
two elates, and more. Just ask Siri a question in regular English
and it will probably understand you perfectly.
Send a Message: You can send a message using Siri,
instead of looking up the person in Contacts and then typing
the message itself. Just say, “Send a message to X”, and Siri
will find the person and ask what you want to say. Speak your
message and you can then check and send it.
Conversions: You can use Siri to do conversions between
weights, length, time, currencies and more. Just ask, for example,
‘What is 12 kilometres in miles?’, and Siri tells you. It’s great for
currency conversions when shopping online.
Open Apps: You can open an app with Siri. Just say, ‘Open
the [X] app’, with ‘X’ being replaced by the name of the app in
question. The app is then opened, without your having to use
Launchpad. You can’t close an app with Siri, though.
Play Music: Activate Siri and say (for example), ‘Play some
soft rock’, and if you have Apple Music, the Music app opens and
it plays. You can play individual tracks, artists and albums too;
from the streaming service or your library
Calculations: Siri can get information from a lot of
macOS’s preinstalled apps. For example, you can make
calculations and conversions using Siri, which harnesses the
power of the Calculator app.
92 | www.pclpublications.com
Siri Q
-f ф ф < Q S * £ S 6 *4d 29 S«p 5 44 pm
General knowledge: If you have a question to ask, such
as ‘What is the height of Mount Everest’, or ‘How far is it from
Sydney to Melbourne?’, you’ll get an answer Siri draws
knowledge from websites such as Wikipedia.
Sports Scores & Fixtures: Ask Siri how your favourite
soccer team did in their last match, or who your local basketball
team are playing next, and Siri is right on the nail with the
information. Try some other sporting questions too.
® 0 < Q. $ « X £ О Wed 29 Sep 5 50 pm
What's the weather going to be like nest
Tuesday
Some bad weather coming up on
Tuesday... down to 9eC and raining.
< ® ф | Q C Д S О Wed 29 Sep 5:52 pm
Will you marry me
Oh... dear. Um... look, a bird! Probably...
Anyway, let’s not.
Weather: You can ask Siri what the weather will be like today
Siri also makes predictions further forwards, for example, What
will the weather be like next Tuesday?’. Ask for the weather in
locations all over the world too. You need never get caught
outdoors without your umbrella again.
Fun Questions: You can ask Siri a collection of fun
questions, such as ‘How old are you?’, 'Tell me a joke’ and
‘Do you have any pets?’. There are hundreds more and they
change regularly, so see if you can hunt them down. And for
a laugh, try ‘Tell me a joke.
Siri Dictation Commands.
Siri also understands dictation as well as words, so if you are dictating an email, for instance, this useful list of dictation commands that Siri
recognises prove very useful. Just “speak the word” and the action or punctuation is added.
“New line” lowercase ’ “Apostrophe” - “Hyphen” “At sign
Move to the next line “No caps on ... no ! “Exclamation mark” - “Em dash” # “Pound sign”
“New paragraph” caps off” ? “Question mark” % “Percent sign” > “Greater than sign”
Start a new paragraph Make sure part of & “Ampersand” © “Copyright sign” < “Less than sign”
“All caps” Make the next word all uppercase what you say is all lowercase “Space bar” * “Asterisk” ( “Open parenthesis” ® “Registered sign” § “Section sign” / \ “Forward slash” “Back slash”
“All caps on ... all caps Prevent a hyphen ) “Close parenthesis” $ “Dollar sign” | “Vertical bar”
off” from appearing in a [ “Open bracket” С “Cent sign” :-) “Smiley”
Make part of what normally hyphenated ] “Close bracket” £ “Pound Sterling
you say uppercase word { “Open brace” sign” :-( “Frowny face”
“No caps” Make the next word . “Period” , “Comma” } “Close brace” - “Dash” ° “Degree sign” A “Caret” ;-) “Wink”
www.pclpublications.com | 93
Q Going Further with macOS Monterey
Shortcuts
On Your Mac
Shortcuts was first released on the iPhone and iPad, but with the release
of macOS Monterey, it has come to the Mac as well. Shortcuts group
instructions on your Mac, meaning you can execute a series of functions with
a single command. You can use pre-built shortcuts, or design your own.
Getting Started with Shortcuts
1
The Shortcuts app comes preinstalled with macOS
Monterey. It’s can be found in Applications > Other. You
can open it through a Finder window, by using the Launchpad
or simply by typing ‘Shortcuts’ into the spotlight search.
2
The Shortcuts app is compatible with, and syncs with,
Shortcuts on your iPhone or iPad, so if you’ve already
created Shortcuts on those devices, they’re seen here, along
with some ‘Starter Shortcuts’ which are prebuilt by Apple.
3
In the left-hand sidebar; click on the Gallery option at the
top. Here you see a range of pre-built shortcuts which you
can download by clicking on the + icon in their top-right corners.
They then appear with your own Shortcuts.
Drag a shortcut from your own collection in the My
Shortcuts section (not from the Gallery), into the Menu
Bar folder and you can launch them from the Shortcuts icon in
the Menu Bar. It’s great for getting quick access.
94 | www.pclpublications.com
Shortcuts
Going Further with Shortcuts
To build a new Shortcut, click the + icon in the toolbar
The editor window will then open. Click on ‘Shortcut
Name’ in the top bar and type a name for the Shortcut, then
click the icon to its left and choose a colour and symbol for it.
2
Shortcuts are built up by adding chained commands
from the right-hand sidebar. Here, for example, we
added a ‘Search Local Businesses’ option from Maps to
search for coffee shops within a mile of the current location.
3
When the Maps app has found the coffee shops, we want
to be shown where they are, so we added the ‘Show in
Maps’ action. Add an action by dragging it into place or clicking
on it and then clicking the T icon on its right for a window.
4
Click the Play icon in the toolbar at the top of the editing
screen to test it out. The app shows what it’s doing step
by step. Here, it successfully searches for nearby coffee shops,
opens the Maps app and displays the results.
5
It takes time and practice to get the most from the
Shortcuts app. A good way to learn about it is to download
a complicated Shortcut from the Gallery, and open it in the editor
by double-clicking on it. You can then inspect its functions.
Launch Using Siri.
Shortcuts are built to be launched by Siri, using the
shortcuts’ name as a command. We called our shortcut 1
Need a Coffee’, so if we open Siri and use that phrase, the
shortcut is executed and we’re shown the local cafes.
www.pclpublications.com | 95
П Going Further with macOS Monterey
Live Text
Pics to Words
Live Text lets you take writing and numbers from photographs or using
your Mac’s webcam, and convert it into editable text. You can, for example,
photograph a phone number and paste it into your Contacts application. It’s a
great new feature that’s new to the Mac with macOS Monterey.
• E- iMO.jevjpG Ф Q й □' ®
BOOK
PUBLISHING
Authors invited to submit manuscripts
all categories including poetry I
New Authors welcome
A.H. STOCKWELL LTD |
Dept. 833, Torrs Park,
Ilfracombe, Devon, EX34 8BA.
Tel: 01271 862557
www.ahstockwell.co.uk
Publishers for 100 Years |
1
First of all, open a photo containing the text you wish to
copy Here we’ve opened the photograph in the Preview
app, but you can use Photos instead if you like. Click and drag
to select the text you wish to copy and paste.
2
To copy the text from the photo, type cmd-C on the
keyboard or in the Edit menu in whichever app you’re
using, choose the Copy option. Again, this works in the Photos
app as well as Previews. The text is saved to your clipboard.
3
Now open an app into which you can paste the text. Here
we’re using Pages, but you could as easily paste it into an
email in Mail, a note in Notes, a TextEdit document and more. To
paste, type cmd-V or use the Paste option in the Edit menu.
When you’ve pasted the text into an editable document
like those listed in the previous step, you can edit and
reformat them at will. Sometimes a little formatting is necessary
due to misplaced returns or misreads on the text.
96 | www.pclpublications.com
Live Text
If you click on a phone number that’s contained within a
photograph, a chevron appears beside it. Click this for
options to add that number to your Contacts app, and call or
message to it using FaceTime (iPhone connection required).
6
If you highlight a date and then right-click or ctrl-click it,
you can add it to the Calendar app as an event, or the
Reminders app as a new reminder; then add alerts and
choose a list for it to go in.
D Click on a web address (also known as a URL) in a
photograph and it opens in the Safari app. Right-click on it
for a menu, from which you can Quick Look the link (giving you
a preview of the website), or open it in Safari.
8
You can also translate highlighted text, both into and out
of your native language. Highlight the text, right or
ctrl-click on it and select the Translate option. Choose which
language to translate it into using the pull-down.
(' Enter
The construction site
© Q Q t*)
Prohibited!
Parents are liable for their
RiVu.TJ
Betreten
der Baustelle
verboten!
Eltern haften fur ihre
Kinder!
Children!
из . л; ь'еа
b Add Utf Ct
ь o.r i-u. мл»
Ub ,ЛЭ
IWc
9
Click the Copy Translation button at the foot of the pop-up
window and you can copy the translation of the in-photo
text and paste it as editable text into another app, where you can
once more reformat and edit it at will.
10
You can copy and paste text in Live Text regardless of what
font it’s written in, and you can even take a photo of
handwriting and turn it into editable text. Again, though, you might
have to make edits and corrections after pasting.
www.pclpublications.coin | 97
П Going Further with macOS Monterey
Focus
Reduce Distractions
Focus takes Do Not Disturb to the next level, with customisable categories
that let you concentrate on what’s important at the time. For example, a Work
focus can block social media and leisure apps, but let through things that
might be relevant to your job. You can set up multiple categories, or ‘focuses’,
and choose to have them activate automatically if you wish.
1
Go to System Preferences > Notifications & Focus and
click the Focus tab. Some categories are already offered,
namely Do Not Disturb, Driving and Personal. Turn on Share
Across Devices to sync your settings across your Apple gear
2
Tap the + icon in the bottom-left to choose a new focus. You
can choose one for when you’re Gaming, for Mindfulness,
for when Reading or for when Working. If none of these are a fit,
choose a Custom focus and call it whatever you like.
Frofn:
If you’re making a Custom focus, the first thing you must
do is give it a name, choose an icon from the range on
offer (scroll up for more) and choose a colour for that icon. It's
simple enough to do. When you’ve finished, press Add.
Under Allowed Notifications From:’, click People then
the + sign, and add the names of people you would
like to get through even when this focus is active. Then click
Apps, and do the same for applications you wish to let
through when the focus is active.
98 | www.pclpublications.com
Focus
5
Under ‘Turn On Automatically’ at the bottom of the window,
you can set up automations based on time, location or
apps. That is, you can set the focus to turn on at a certain time, at
a certain location or when you’re using a certain app. Just the
thing if you use Focus on a regular basis.
6
The Options button brings up a window with several
available customisations. You can allow time-sensitive
notifications to get through when the focus is active, allow calls
from a select Contacts group or allow a second call within a
couple of minutes to get through.
S I V О © <D * Q c 2 6 Tue 28 Sep 4:11
Focus
C Do Not Disturb
For 1 hour
Until this evening
X Personal
S During Radio Programmes
ft Driving
Focus Preferences...
V О НЙ ® * Q W S Q Tue 28 Sep frITpmj
Focus
On
C Do Not Disturb
X Personal
During Radio Programmes
For 1 hour
Until this evening
7
To manually activate a focus when you’ve set it up, click
the Control Centre icon in the menu bar at the top of the
screen, and on the Control Centre window, click Focus. You can
now click on the focus you wish to activate in the list.
8
Now decide whether you want it on for an hour or until that
evening. Choose, and the focus is active. Incoming calls and
notifications are silenced, with the exception of the ones specifically
excluded when you set it up; those get through as normal.
9
To manually turn off a focus, click the Control Centre icon in
the menu bar (the one that looks like two switches), and
click the box showing the active focus. Then click on the active
focus in the list that pops up, and it switches off again.
10
To edit a focus, in the Focus Preferences click on the focus
you want to edit. Remove items from the windows by clicking
on them and clicking the minus icon. Delete a focus by swiping it
left (two-fingered swipe on a trackpad), and clicking the bin.
www.pclpublications.com | 99
П Going Further with macOS Monterey
iPad Apps
w On an M1 Mac
The newest Macs and the top-of-the-range iPad Pro use the same processor,
an ARM-based chip from Apple Silicon rather than Intel. Other iPads currently
on sale also use Apple Silicon processors, such as the A13, A14 and A15. As
a result, you can use iPad apps on your Apple Silicon Mac!
1
First of all, check you have an Apple Silicon Mac.
Under the Apple menu in the top-left corner; select
About this Mac. Look for the Chip listing. If it says Apple МГ
or later, you can run iPad apps.
Open the App Store on your Mac. Click on your
account in the bottom left corner of the App Store
window to take you to a list of your purchased apps. Click
on ‘iPhone & iPad apps’.
Scroll up and down and you’ll see a complete list of all
the apps you’ve bought and/or downloaded on your
Apple mobile devices. A cloud under the description means
you can download it to your Mac.
If an app doesn’t have a cloud, it’s either no longer on
the App Store or it’s too old to run on your Mac. Either
way, it cannot be downloaded. Click on it to open its page
and you’re told as much.
100 I www.pclpublications.com
iPad Apps
5
'Designed for iPad. Not verified for macOS’ means it’s
not been tested on a Mac. It might well still run, but the
user experience might be poor. For example, touch controls
might not translate well to the Mac.
6
Some apps have a three-dots icon under them. Click on
this for a contextual menu offering the chance to copy
its App Store link, send it via Mail, Messages or AirDrop,
make a new Note or Reminder of it and more.
When you’ve found a mobile app you’d like to have on
your Mac, click the small cloud underneath it to download
it. As you’d expect, a circle gradually fills around a Stop icon.
When complete, it’s downloaded.
8
When an app has downloaded, you can click the Open
button in the App Store to launch it. Otherwise, you can
open it in Launchpad, the Applications folder or the Spotlight
feature; just like any other app on your Mac.
Search for an App.
If you want to download a mobile app to your Mac which you
don’t own on your iPad or iPhone, you can search for it in the
App Store, and click the iPhone & iPad Apps button to see
mobile apps answering that search query. Then you can buy
and download them as you would a Mac app.
When you’ve launched an iOS or iPadOS app on your
Mac, you can use it just like any other app. A mouse
click replaces a tap, trackpad gestures replace on-screen
gestures. The experience might not be perfect, as the
interface was designed with touchscreen mobile devices in
mind, but it should work just fine.
9
www.pclpublications.com | 101
П Going Further with macOS Monterey
®The Time Machine
Back Up & Restore
It’s always a good idea to back up your data to guard against disk failure and
accidental deletion. macOS Monterey has a built-in backup system called Time
Machine. With it, you can retrieve files that have been lost or corrupted, and even
reinstall an entire system after a major drive problem. Here’s how to do it.
Getting started
1
Connect an external hard drive, via USB, FireWire or
Thunderbolt, to your Mac. It should be at least the size
of your Mac’s hard drive. The larger the drive, the further back
in time you will be able to store backups. Now open System
Preferences and click on Time Machine in the bottom row.
2
Click the Select Disk... button and you will be presented
with a window listing your connected drives. Select the
drive on which you would like to store your backups. If your
external drive isn’t already formatted as ‘Mac OS Extended
(Journaled)’, Time Machine invites you to erase and reformat it.
3
If you choose to reformat your disk, all data currently on
the drive is wiped. You might get a pop-up asking if you
would like to use the connected drive with Time Machine. Click
Decide Later so the Time Machine settings can be configured
to your requirements first.
Once your external drive is connected correctly, you
can always access Time Machine by opening System
Preferences from Launchpad or the Applications folder on
your Mac. Check the Show Time Machine in Menu Bar box
and you can also access it from the menu bar.
102 | www.pclpublications.corn
Time Machine
Backing Up to Time Machine
1
There’s an option to encrypt backups. To activate it, click
the Select Disk button, then choose your Time Machine
disk in the Available Disks section. Check the Encrypt backups
option, then click Use Disk. You’re invited to add a password
and a hint in case you forget it. Do so and no one can access
your backups without this password.
2
You’re now presented with a window that shows the
status of your currently selected drive, the one that’s
to be used for your Time Machine backups. This window lets
you know how much space is available, as well as the date
of your oldest and latest backup and when the next backup
will take place.
By default, Time Machine is configured to back up all
data on your Mac’s hard drive. If you click the Options
button, you can add locations on your Mac’s hard drive not to
be backed up. To exclude a new item, press the *+’ icon to
reveal the file browser. Browse to the file or folder you don’t
want included in your backups and click the Exclude button.
To remove an item from the list of excluded backup
items, click the item once to highlight it and then click
the icon. You can either Cancel or Save your changes to
return to the previous screen. The item you removed is
dropped from the list and will once more be backed up with
your Mac’s next Time Machine backup.
5
To retrieve a file from Time Machine, Choose Enter Time
Machine in the Time Machine menu and then navigate to
the file you want. You can get hold of an older version of a
current file or one you’ve deleted. When you’ve found it,
highlight it and press Restore.
6
It's important that you keep your Time Machine backups
separate to your data files. Never, for example, partition a
hard drive and keep data on one partition and Time Machine
backups on the other. If you do, both your data and your
backups are lost if the hard drive fails.
www.pclpublications.com | 103
П Going Further with macOS Monterey
Recovery File Edit Utilities Window
Restoring a Mac from a
Time Machine Backup
If something has gone very wrong with your Mac, and you
want to wipe your hard drive clean and reinstall from a
Time Machine backup, this is what you should do.
Naturally, to restore from a backup you need to actually
have a backup, and anything you’ve done on your Mac
between the last time you ran Time Machine and the time
when you restore to your last backup, will be lost. That’s
why you should back up on a regular basis.
• First of all, make sure a notebook Mac is powered using
the power adapter, and regardless of what Mac you have,
make sure your Time Machine backup drive is connected.
• Power down your Mac, count to ten then switch it on
again and immediately press cmd-R. Hold these keys until
the Apple logo appears on the screen.
• Your Mac boots up into Recovery Mode. Click on your
name in the macOS Recovery window, then click Next.
Enter your administrator’s password, and click Next again
• On the next screen, you’re offered four options; Restore
from Time Machine, Reinstall macOS Monterey, Safari
and Disk Utility. If you think reinstalling macOS over the
top of your current install, keeping your files and folders as
they are will work, do this. But if you’ve tried this, or you’re
sure your system is beyond help, go for Restore from
Time Machine. Click Continue.
• After a screen of information on what restoring a Time
Machine backup will do, click Continue if you’re sure you
want to proceed with it.
• You must now select the drive containing your Time
Machine backups. Click on your Time Machine drive - and
if it isn’t there, make sure it’s plugged in - then click the
Continue button.
External Hard Drives Advice
A word to the wise about external Time Machine hard drives.
It’s tempting to get a huge drive and partition it, with your data
on one side and your Time Machine backups on the other. This
is a really bad idea. If your external drive fails, you lose not only
your data, but also your backups of that data. It’s best to make
sure everything - your boot drive and any data drives you use
- is backed up, but do it on a different drive.
• The drive is scanned for Time Machine backups. Choose
the most recent backup made before your problems
started; click on it and then click Continue.
• Now select the drive you want to install the Time
Machine backup on. This is presumably your hard drive,
but you could install it on a secondary drive if you wanted
If you have FileVault turned on, you have to enter your
password again to unlock the disk.
• The system is restored, and you’re invited to restart.
Once you do, your Mac should be up and running again.
104 | www.pclpublications.com
Time Machine
lafari
kowse Apple Support to get help with your Mac.
einstall macOS Monterey beta
stall a now copy of macOS Monterey beta onto your Mac.
Disk Utility
Repair or erase a disk using Disk Utility.
>store from Time Machine
u have a backup of your system that you want to restore.
Which Backup?
When restoring a Time Machine backup, you don’t have to use
the most recent one. If your Mac started giving you grief last
Tuesday, for example, you might prefer to use the last backup
on Monday evening, and see if that solves the problem. Any
documents created or edited after this backup won’t be carried
over, of course, but you can always delve back into Time
Machine and recover individual files.
Continue
Setting Up a New Mac from a
Time Machine Backup
If you’ve bought a new Mac and want to set it up using a
Time Machine backup from your old one, follow the First-Time
Setup guide until you get to this step, the Migration Assistant.
Click on the first option, which includes transferring from a
Time Machine backup, then Continue. Follow the on-screen
instructions to have your files, folders and settings transferred
to your new Mac from Time Machine.
Migration Assistant
www.pclpublications.com | 105
П Going Further with macOS Monterey
The Keyboard
Customised Shortcuts
While Apple’s classic pointer-driven interface is great for pretty much everything,
you can make using your Mac even more quick and efficient by memorising a few
simple keyboard shortcuts. The macOS has dozens of pre-configured keyboard
shortcuts. Here are some of the most useful and most used shortcuts on your Mac.
Finder Shortcuts
These shortcuts are available when you’re using Mojave’s
Finder features, like windows and folders.
Command + [............Go to the previous folder
Command +].............Go to the next folder
Command + T............Navigate up one level
Command 4- 1...........Navigate down one level
Option + Double dick...Open the selected folder in a new
window and close the current
window
Command + Double click . . . Open selected folder in a new tab
Command + Tab..........Cycle forward through your opened
applications
Command 4-Shift 4-Tab . . . .Cycle backward through your
opened applications
Space..................Launch Quick Look
Command 4- A...........Select all items in Finder
Command 4-Option + A. . . .Deselect any selected items
Command 4-N............Open new Finder window
Command 4- Shift 4- К..Open Network window
Command 4-1............Get info on an item
Command 4- J...........Show view options
Command 4-Option 4-Esc. . . Force quit an application
Command + Delete.......Move the selected item to Trash
Common Application Shortcuts
Not every application supports every one of these
shortcuts, but where they do, they come in very useful.
Command 4-'............Cycle through open App windows
Command 4-H............Hide the current window
Command 4-Option 4-H. . . . Hide all open windows
Command 4-M............Minimise the current window
Command 4-Option 4-M. . . . Minimise all windows
Command 4-W............Close the selected window
Command + Option+ W . . . Close all windows
Function 4- F3.........Launch/Quit Mission Control
File and Folder Shortcuts
You can cut, copy, paste, duplicate, open files and folders
directly from the keyboard, using these handy shortcuts.
Command 4-Shift 4-Delete . . Empty Trash
Command 4-drag file/folder. Move the selected item to another
location
Option 4-drag file/folder. . . . Copy item to another location
Command 4- L..............Make alias of selected items
Command 4-D...............Duplicate the selected item
Command 4- C..............Copy the selected item
Command 4- X..............Cut the selected item
Command 4- V..............Paste copied/cut item
Command 4-Z...............Undo action
Command 4- Shift 4- N.....Create new folder
Command 4- Option 4- N. . . . Create new Smart folder
Command 4-О...............Open the selected item
Shift 4- Command +/.......Show the Help menu
Command 4-,...............Open App Preferencer
Desktop Shortcuts
With these shortcuts, you can access Mission Control,
your application windows and hide/show the Dock.
Function 4-F10.....See all Application windows
Function 4- F11 -..Show the Desktop
Option 4- Command 4- D. . . . Toggle Dock On/Off
Control+ *-........Moveto space on left
Mission Control Shortcuts
When you’re in Mission Control, these shortcuts help you
navigate your way around your desktop and apps.
Control 4- ->...................Move to space on right
Control 4- #..................Switch to a specific numbered (#)
desktop
106 | www.pclpublications.com
Keyboard Shortcuts
Screenshots
There are plenty of reasons why you might want to take a
screenshot on your Mac. This is how you do it.
Snap selected area....Cmd-Shift-4 and drag over an area
while dragging, hold the space
bar to move the selected area,
hold Shift to change size in one
direction only or Option to start
selecting from the centre
Snap a window.......Cmd-Shift-4, press space bar and
click on the window
Snap entire screen....Cmd-Shift-3
New screenshots options . . . cmd-Shift-5
Display and Accessibility
Shortcuts
These shortcuts control your display, and also features
associated with Apple’s Accessibility options.
Fl...............
F2...............
Command + F5.....
Option + Command 4- F5
Command 4- Option + 8 .
Command + Option + +.
Command + Option + - .
Decrease screen brightness
Increase screen brightness
VoiceOver on/off
Di spl ay Accessi bi I i ty control s
Zoom On/Off
Zoom in
Zoom out
Document Shortcuts
These shortcuts come in very handy when you’re creating
or editing a document, and they work in most apps.
Command +1.................Italicise the selected text, or turn
italics on or off
Command + U.................Underline the selected text, or turn
underlining on or off
Command + T................Show or hide the Fonts pane
Command+ D.................When saving a document, this
selects the Desktop folder
Command + Control + D. . . . Highlight a word and this shortcut
shows its definition
Command 4-Shift 4-:........Display the Spelling and Grammar pane
Command 4-;................Spellcheck the document
Option 4- Delete...........Delete the word to the left of the cursor
Control 4- H...............Delete thecharactertothe left of the
insertion point. Or use Shift 4- Delete
Control 4- D...............Delete the character to the right of
the cursor
Fn 4- Delete...............Forward delete on keyboards
without a Forward Delete key
Control 4- К...............Delete the text between the cursor
and the end of the line or paragraph
Fn 4-Up Arrow..............Scroll up one page
Fn 4-Down Arrow............Scroll down one page
Fn 4- Left Arrow...........Move to the beginning of a document
Fn 4- Right Arrow..........Move to the end of a document
Command 4- Up Arrow........Move the cursor to the beginning of
the document
Command 4-Down Arrow. . . Move the cursor to the end of the
document
Command 4-Left Arrow .... Move the cursor to the beginning of
the current line
Command 4-Right Arrow . . . Move the cursor to the end of the
current line
Boot, Sleep and Shutdown Shortcuts.
These are not strictly speaking keyboard shortcuts, but are used when starting or shutting down your Mac to access
various options. Some of these options are especially useful if you have a problem with your Mac.
Power Button (Ф)
Press once................Put Mac to sleep
Press again...............Wake Mac up
Hold......................Force Mac shutdown
Command + Control + (D. . . . Force Mac to restart
While Starting
Option (hold).............Display bootable volumes
Shift (hold)..............Start in Safe Mode
Left Shift (hold).........Bypass automatic login
C(hold)...................Boot from other media
T (hold)..................Start in FireWire target disk mode
N (hold)..................Start from NetBoot server
X (hold)..................Force Mac startup
Command + R (hold)........Start in Recovery Mode
(hold).................Eject discs
Shutting Down
Control + —.......
Show restart/sleep/
shutdown
Command + Option + Control + ^. . . .Quit all of your opened
applications
Put displays to sleep
Log out
Log out (immediately)
Shift + Control + ..
Command + Shift + Q.
Command + Shift + Option + Q
тппГОВВВВВВВВ
'SSgll
ГДППППВВВДиДтп
www.pclpublications.com | 107
П Going Further with macOS Monterey
Update macOS
To Monterey
You can also use these tips
to upgrade to future macOS
releases, whenever they are
made available.
If your Mac is running an older version of the operating system, you’re probably
keen to upgrade to the latest release of macOS Monterey. It’s completely free of
charge, and as long as your Mac meets the minimum system requirements, it’s
very easy to do. To update your Mac to macOS Monterey, you need an Internet
connection, and it’s best to plug in your charger too.
update listed in System Preferences too.
2
Open System Preferences from the Apple menu, the Dock
or LaunchPad (it doesn’t matter which), and click on the
badged Software Update icon. It checks for an update, then tells
you what it is. Click the Upgrade Now button.
Minimum Requirements
For macOS Monterey.
Apple can’t support older Macs forever, and in the step up to
macOS Monterey, a few models have been left behind. If you’re
running macOS Big Sur on a 2014 or early 2015 iMac, a MacBook
Air from 2014 or earlier or a first-generation, 2015 MacBook, for
example, you’re out of luck. But if you have one of the models listed
below, you can upgrade to the latest version of macOS right now. If
you’re unsure which model of Mac you have, click on the Apple icon
in the menu bar (top left), and select About This Mac.
Make a Backup
Before You Start.
Upgrading the macOS operating system is a big step, so as always,
before making any major change to your computer, it’s a good idea
to make a backup of your data using Time Machine. The upgrade is
a very safe process and won’t damage your files by itself, but there’s
always the unexpected risk of a drive failure or a power cut during
the installation process, which could leave your Mac crippled. In the
unlikely event of this happening, you can simply restore your Time
Machine backup to your Mac and try again.
MacBook
MacBook Air
MacBook Pro
Mac Pro
Mac mini
iMac
iMac Pro
Early 2016 and later
Early 2015 and later
Early 2015 and later
Late 2013 and later
Late 2014 and later
Late 2015 and later
2017 and later
108 | www.pclpublications.com
Update macOS
The installer downloads and automatically launches with
this screen. Click Continue if you’re ready to install and
if not, quit it and install from the Applications folder later
4
Next step is terms and conditions. You have to click on
Agree to continue. If you don’t have time to read them,
there’s a copy available in About This Mac, after the installation.
SecOS Monterey bellГНе totWindow
5
Next choose the hard drive you want to install Monterey on.
It will probably be your Mac’s own hard drive, but you can
6
After entering your admin password, Monterey begins the
first stage of its installation. All you can do now is wait. Make
also use an attached external drive. Choose then click continue.
sure you don’t turn off or unplug your Mac during the process.
DThe new operating system downloads and installs on
your Mac. When the installation is complete, your Mac
closes down any open apps and restarts, continuing the
installation of macOS Monterey.
8
When instructed, click Restart and your Mac reboots into
macOS Monterey. You’re asked to choose a few options,
which can be changed later if you wish, and after that, the
setup of Monterey is complete.
www.pclpublications.com | 109
• Going Further with macOS Monterey
□ Top Tips for
macOS Monterey
These Mac tips will help you get the most from your Monterey experience
and improve your knowledge and efficiency for when you need to get the job
done. Every Mac user needs to know these tips, so let’s get cracking.
AirPlay to Mac
You can use the AirPlay feature to play, present and share
content from a mobile device to your Mac. You can enjoy
your music using your Mac’s sound system as an AirPlay
speaker, or watch your videos on its Retina screen.
Hot Corners
Hot Corners are the physical corners of the desktop, that can
be customised to perform certain tasks when your mouse
hovers over them. Go to System Preferences > Mission
Control > Hot Corners to set them up.
Immediate Deletion
If you wanted to delete a file immediately, simply select a file,
press alt and cmd together and then press Delete. You get a
window inviting you to delete the file. Do so and it’s deleted,
without being placed into the bin first.
Use Stacks
If you’ve got a lot of content on your desktop, there’s a quick
and easy way of sorting them by Stacks. Right-click the
desktop and choose Use Stacks from the menu. Then
Monterey automatically organises everything by its file type.
110 | www.pclpublications.com
Top Tips for macOS Monterey
Low Power Mode
Another feature that’s come to the Mac from the iPhone is
Low Power Mode. If your notebook Mac is recent enough, go
to System Preferences > Battery, and click on the Battery
option in the left-hand sidebar and check Low Power Mode.
Force Touch Previews
If you own a Mac with a Force Touch Trackpad, you can get
previews of website pages or YouTube videos by deep
clicking (one finger) and holding on a link. A window pops up
giving you a preview of where the link takes you.
Force Touch for Dictionary
Also, when using a Force Touch Trackpad, if you see a word
you’re not familiar with, you can highlight it then press down
to get a dictionary definition and usually thesaurus options
too. This works in most apps on your Mac.
Unlock with Apple Watch
If you own an Apple Watch you can unlock your Mac with it
instead of typing your password. You need to check the box
in System Preferences > Security & Privacy > General. You
still need your password after restarting, though.
System-Wide Translation.
You can translate any piece of text on your Mac by highlighting
it, right-clicking and selecting the Translate option, which is found
near the top of the contextual window that pops up. Almost any
text you can highlight can be translated.
You can change the language the text is translated into using the
pull-down above the translated text. Click the Play icon to have it
read out to you, and the buttons to replace the text with the
translation or copy it to your clipboard.
www.pclpublications.com | 111
• Going Further with macOS Monterey
Quick Do Not Disturb
If you hold down the Alt key, then click on the date and time
in the menu bar (top-right corner), you can instantly activate
the Do Not Disturb mode. You can tell by the crescent moon
icon appearing in the top menu bar. Repeat to turn off again.
Quick Spotlight
You can access the Spotlight feature quickly and easily by
pressing cmd and the Space Bar. The Spotlight window
appears, which you can drag around the desktop if you wish.
To dismiss it again, click anywhere on the desktop.
Go to Folder
Select Go to Folder in the Finder’s Go menu, or press
Shift-cmd-G, and a window pops up. Type the name of the
folder you want and you’re offered options. Select one to
open that folder without going through Finder windows.
Turn off Coloured Safari Toolbar
If you dislike the coloured tabs and toolbar in Safari, open
Safari’s preferences and click on Tabs. Uncheck the box marked
‘Show Colour in Tab Bar’, and the top of a Safari window no
longer takes its colour from the website being displayed.
Screenshots.
Take a screenshot with cmd-3, or shoot a portion of the screen
with cmd-4; click and drag the crosshairs over the part you want
to shoot then release. Press cmd-4 then the Space Bar and click
on a window to shoot that window alone.
Press Shift-cmd-5 to bring up a screenshots bar. With this, you
can capture the entire screen, capture a selected window,
capture a selected portion of the screen, record the screen or a
portion thereof and more. Press Esc to close it again.
112 | www.pclpublications.com
Top Tips for macOS Monterey
New Mouse Pointer Colour
You can change the colour and size of your mouse pointer.
Open System Preferences > Accessibility, and click on
Display. Click on the Pointer tab, and use the slider to change
its size and the colour boxes to change its colour.
Resizing a Window
You can resize a Finder or app window by clicking and
dragging the edge of that window. If you hold the Alt key while
resizing a window, it resizes from the centre as opposed to the
corner or side you’re controlling with the mouse.
Shared Files and Folders
In a Finder window, in the left-hand sidebar, there’s a folder
called ‘Shared’ in the iCloud section. Click on this to review
all the files and folders that are shared with you by other
people, and also shared with others by you.
Password Manager
A much better password manager was introduced with macOS
Monterey. Go to System Preferences > Passwords and then
enter your administrator password to review your passwords,
including checks for vulnerabilities.
Account Recovery.
What happens to your iCloud data if you forget your password or
device passcode? You can recover it if you set up a recovery
contact. Open System Preferences > Apple ID and click
Password & Security in the sidebar.
Under Account Recovery, click the Manage button. Read about
the service in the window that pops up, and then click the + icon
below the Recovery Assistance panel. Choose someone with an
Apple device, and they can help you get your account back, but
can’t see your data themselves.
www.pclpublications.com | 113
П Going Further with macOS Monterey
Maintenance and
Troubleshooting
Macs are well known for their stability and reliability, but even so, things can and
do occasionally go wrong. Don’t panic though, we’ve put together a guide to
solving some of the most common issues you might have on your desktop or
notebook Mac. So if you’re having trouble, take a look at these tips and guides.
They might solve your problem and save you a trip to the Apple Store.
Modem computers like the Mac are amongst
the most complicated machines ever designed.
It’s an amazing testament to the quality of both
the Mac hardware and software that they’re
usually so stable and reliable. However, no
machine can ever be 100 percent perfect. If
your Mac stops working, the screen freezes up,
there’s a battery problem or other such issues,
you don’t always need to call the Genius Bar to
get it fixed. There are a number of things you
can try for yourself that might help and could
save you the cost of a service call.
Clearing a Frozen Screen
• Bean File Edit Insert View Font Format Style Documen
Services >
Hide Bean
Hide Others
Show All
Quit Bean
1
Press cmd+OPT+Esc or choose Apple menu > Force
Quit from the menu bar. The Force Quit window appears.
If the app is identified as ‘not responding’, select it and click
Force Quit. The app quits. If you still have problems, try
restarting your Mac. Under the Apple menu, choose Restart.
Your open windows reopen if you check the box in the pop-up.
2
If the problem occurs only when you use a particular
application, try updating it. Open the App Store and
check for updates or use the option in the app’s menu on the
top bar, found next to the Apple menu. If you still have
problems with that app, try reinstalling it. Drag it into the trash,
empty the trash then reinstall the app.
114 | www.pclpublications.com
Maintenance and Troubleshooting
If Your Mac Won’t Start
If your Mac fails to start or it won’t finish booting up, try these simple fixes to get you back up and running once more.
Make sure the power cable or adapter is plugged into
your Mac and a mains power outlet and make sure
your mains electricity is working. This sounds silly but you’d
be surprised how many people call computer service
centres during a power cut.
For notebooks, check whether the battery needs to be
charged. Plug it into the mains. If the light on the power
adapter glows amber, it’s charging. Let it charge up for about 30
minutes and then try starting it up again. You should only use
the charger that came with your Mac.
3
Again for notebooks, if the charger fails to start charging
or simply stops charging, and you don’t see the indicator
light on the power adapter turn on when you plug in the power
cord, try unplugging and replugging the power cord to reseat
the USB-C or MagSafe plug.
If the problem persists and you can find no way of fixing
it, book a Genius Bar appointment at your local Apple
Store. Here Apple’s team of experts can talk you through the
problem and if they can’t solve it, they can advise as to
whether a repair is needed.
Using the Recovery Drive.
If your Mac won’t boot up, help is at hand. Recent versions of OS X and macOS have their own Recovery Drive.
If your Mac begins to start up but won’t finish, stopping perhaps
on the grey screen or giving you a folder with a question mark on
it, try rebooting from the Recovery Drive. Press the power button
to turn off the Mac, then turn it on again whilst holding cmd-R.
Let go when you see the Apple logo. Your Mac boots using its
Recovery Partition; enter your admin password. You can use
Disk Utility or research a problem in Safari. Use the Apple
menu to restart your Mac, and it should boot normally.
www.pclpublications.com | 115
П Going Further with macOS Monterey
Problems with Wi-Fi
Wi-Fi is usually reliable, but sometimes problems occur. If
you’re having issues, here’s how to troubleshoot it.
Use Disk Utility
The Mac’s Disk Utility application can do much to
diagnose and even repair problems with drives.
1
First make sure the router you’re trying to connect to is
switched on and has a wireless access point. Usually
there are indicator lights on the front that tell you this, so check
in the manual. If there seems to be a problem, restart your
router by switching it off and on again.
1
You can find your Disk Utility app in the Utilities folder
within the Applications folder. Or just open Launchpad,
the Dock icon with the nine coloured squares, and launch Disk
Utility from there. On the Launchpad screen, Disk Utility is
found in the folder marked ‘Other’.
2
Check the Wi-Fi status icon in the menu bar. It can have
up to four bars indicating signal strength. If signal
strength is low, try moving closer to the router Remember, the
signal can be blocked by thick walls or other obstructions, so
moving around in the room might help.
3
If you’re still having problems, go to the Apple menu and
open System Preferences. Click on Network and select
your Wi-Fi connection. From here you can turn Wi-Fi off and
on, choose another network and also Advanced options if you
know what you’re doing.
Click on the drive you wish to check and then press the
First Aid button. Disk Utility’s First Aid feature then
checks your disk for errors and if necessary, repairs and
corrects them. This process might take some time if you
haven’t run First Aid recently.
3
When you’re done, click the triangle next to Show Details
to see what was repaired. Please note that you can also
run First Aid from the Recovery HD. This might be necessary if
you’re having difficulties booting your Mac.
116 I www.pclpublications.com
Maintenance and Troubleshooting
Boot into Safe Mode: Booting into Safe Mode, sometimes
called a ‘safe boot’, runs an automatic startup check and can
repair problems. Restart your Mac whilst holding the Shift key.
Enter your password and the Mac checks your disks (it might take
a while). When it’s done, reboot your Mac.
Ejecting an Optical Disk: If you have an older Mac that
still has a CD/DVD drive and a disc gets stuck, shut down your
Mac. Boot it up again with the mouse button or trackpad button
held down. This forces the optical drive to eject a stuck disc
during the startup sequence.
Reset NVRAM
Resetting the NVRAM, also called PRAM, can solve a range of problems if your Mac is misbehaving. Just follow these steps.
NVRAM stores information such as speaker volume, screen
resolution, startup disk solution and more. If you’re having
problems with any of these things, try resetting your NVRAM.
First of all, you must shut down your Mac in the usual way.
Turn on your Mac and as soon as you hear the startup chime,
press and hold the cmd+OPT+P+R keys. The computer restarts
once more and you hear a second startup chime. At this point,
release the keys and let your computer restart as normal.
Reset the SMC.
Your Mac’s SMC (System Management Controller) deals with hardware issues. Here’s how to reset it.
If your Mac is displaying minor hardware
issues such as fans running at high speed
or expansion ports not working, try
resetting the SMC. For a desktop
computer, turn it off and unplug it from
the mains. Wait 15 seconds, then plug it
in and power it up again.
For a notebook Mac, unplug its charger and
power it off. Plug the charger back in again,
then press and hold Shift+Control+Option
on the left side of the notebook’s keyboard
and also the power button. Release all the
buttons and then press power again to start
up your MacBook.
www.pclpublications.com | 117
П Going Further with macOS Monterey
Glossary of Mac and
Computing Terms
We’ve tried to keep this guide as jargon free as possible, but inevitably there
are some words and phrases that might still seem mysterious to the newcomer.
Where that’s the case, this glossary should help. If you’re confused by a
technical term, take a look; you might just find the definition you need in here.
Accessibility: A series of tools
and features designed to
make an Apple device such
as the Mac and mobile
devices easier to use by
those with disabilities such
as vision or hearing
impairments. You can find
the Mac’s Accessibility
features and customise them
in System Preferences.
AirPlay: A protocol for
streaming sounds and video
from an Apple device to a
set of compatible speakers,
or a device such as an
Apple TV. It’s wireless, and
easy to use as well.
AirTag: A small Bluetooth
device that can be tracked
using the Find My app. It’s
used to locate property like
keys or luggage.
App: Short for ‘application’,
another name for a
computer software program.
Your Mac comes with a
selection of pre-installed
apps, and you can buy more
from the Mac App Store.
App Store: The App Store is
where you can download free
and paid programs to your
device using your Apple ID.
You can access it through the
application that comes
bundled with your Mac.
Apple ID: This is the email
address and password that
you have registered with
Apple. It’s required to
access many online
applications on your Mac,
including iTunes, App
Store and Books.
Apple Menu: The menu that’s
opened by clicking on the
Apple icon in the left of the
menu bar. It gives access to
system functions such as
Preferences, App Store,
Force Quit and more.
Apple Silicon: Apple’s new
series of processors, used
in the latest Macs. They
replace the older, Intel
CPUs previously used.
в
Bluetooth: Bluetooth is a
wireless technology used to
link and exchange data with
another compatible device. It
has a range of approximately
eight metres (25ft). The Mac
supports many Bluetooth
devices, including
headphones, keyboards and
fitness trackers.
Books: This is Apple’s eBook
application, which is
available for free from the
App Store and is also
bundled with recent
versions of macOS. It
handles the standard
electronic publishing
formats protected by
FairPlay DRM, and also
PDF documents. It was
introduced in 2010 along
with the iPad.
Browser: An app used to
access websites found on
the worldwide web. The
Mac comes with Apple’s
Safari browser preinstalled,
but others are available in
the App Store.
c
Calendar: This is one of Apple’s
preloaded apps. Use it to
keep track of events,
invitations, and reminders
on your Mac, iPhone, iPod
touch and iPad.
Closed Clamshell Mode: By
connecting your notebook
Mac to a display, an external
keyboard and a controller
such as a mouse or Magic
Trackpad, you can use it like
a desktop computer, with the
notebook closed.
D
Desktop: A computer that’s
designed to be used on a desk
while plugged into the mains, at
home or in the office, as
opposed to a notebook or
laptop. Apple’s range of
desktop computers is the iMac,
the Mac mini and the Mac Pro.
Dock: The opaque strip at the
bottom of the screen. Apps
in the dock are easy to
access and open, and you
can customise it to best suit
your requirements. Apps
that are currently running
are also shown in the dock.
E
Emoticon: A small drawing
used to augment a message
or text. Typically, these are
yellow faces showing a
variety of expressions.
Facebook: Currently the most
popular social networking
site on the Internet. Add
your Facebook account to
your list of Internet Accounts
in System Preferences and
you can share material
directly to it using the
macOS Share button.
FaceTime: You can make video
and audio calls to other Apple
devices using the FaceTime
app. These are made over
the Internet so are free
unless using mobile data.
Finder: The Finder is the Mac’s
user interface. It deals with
management of folders,
windows, menus and more.
Its feature set has grown over
the years, with recent
introductions including tabbed
Finder windows and tags.
Folders: A folder is a container
for a group of apps or files.
You can create one by
using Finder’s File menu, or
right-clicking on the desktop
and using the contextual
menu. You can drag items
into and out of a folder.
Force Quit: The act of forcing
an application to close
down, perhaps because it’s
crashed or frozen. It’s
achieved by right-clicking its
dock icon, or opening the
Apple menu and selecting
Force Quit. Unfortunately,
unsaved work will be lost.
G
Gestures: These are actions
performed with your fingers
on the Mac’s trackpad.
You can use gestures on a
notebook trackpad, an
Apple Magic Trackpad or to
a limited extent, an Apple
Magic Mouse.
Gumdrops: A colloquial term for
the three coloured buttons
found in the top left corner of
an app or finder window.
They close the window (red),
minimise the window (yellow)
or switch to and from
full-screen mode (green)
H
HTML: Hypertext Markup
Language, the standard for
building websites, and a
cornerstone technology of
the worldwide web.
118 | www.pclpublications.com
Glossary of Mac and Computing Terms *
iCloud: The collective name for
Apple’s online services, it
replaced MobileMe and
integrates with all iOS/
iPadOS and macOS/OS X
Mac computers.
iMessage: A text message
that’s sent from one Apple
device to another.
iMessages use the Internet
rather than the mobile
phone network, so they’re
sent free of charge from
iPhones and iPads.
iOS: Apple’s mobile operating
system. iOS is the software
that powers the iPhone, iPod
touch, iPad and Apple TV.
iPadOS: The latest operating
system used by the iPad. It
evolved from iOS.
iTunes: Apple’s abandoned
music playing software,
which was also used to
activate and sync iPads and
iOS devices. In macOS
Catalina, iTunes was
replaced by three new apps;
Music, TV and Podcasts.
LaunchPad: Found in the dock
represented by a rocket
icon, the LaunchPad is an
easy way of opening apps.
It resembles and behaves
like an iOS Home screen.
Lightning: The cable connection
used by modern iPads and
iPhones. It replaces the old
30-pin dock connectors, and
is used to charge these
mobile devices and sync
them with your Mac.
Location Services: Features
and software on your Mac
that pinpoint and use your
current location. The Maps
app is one example.
M
macOS: Formerly known as
OS X, macOS is the
operating system on which
the Mac runs. The current
version of macOS is
Monterey. Like most recent
versions of macOS,
Monterey is a free upgrade.
Mail: The Mac’s bundled email
client. It can handle a wide
range of email accounts,
including Apple iCloud
accounts, Microsoft’s and
Google’s mail services,
Yahoo email accounts and
those accounts that are
provided by your Internet
Service Provider. Third party
email apps are available.
Menu Bar: The macOS Menu
Bar sits atop the desktop, at
the top of the screen. On
the left are pull-down
menus, which vary
according to what app
you’re using. On the right
are menulets and controls,
along with info such as the
time and date.
Messages: One of Apple’s
built-in apps that handles
SMS text messages and
MMS multimedia messages.
MMS: Multimedia Messages
(MMS) supports images,
videos, sound, contact
cards, and location data.
Sent and received via the
Messages app on the Mac
to other Macs and mobile
cell phones.
Monitor: Also called a display,
this is an external screen
that’s essential for Mac
minis and Mac Pros. You
can also add a monitor to
an iMac or notebook Mac
as a second or even
primary display.
Mouse: A controller used to
move your pointer around
your Mac’s screen, and to
select options using the
mouse buttons. A mouse is
traditionally used with a
desktop computer such as
the iMac or Mac Pro, but if
you don’t like trackpads,
you can use one with your
notebook too.
N
Notebook: A portable computer,
sometimes called a laptop.
Notebooks can be mains or
battery powered and have
their own built-in screen,
which folds down for
portability. Apple’s notebook
range includes of the
MacBook, MacBook Air and
MacBook Pro.
Notification Centre: A list of
recent notifications,
accessible by clicking on
the icon in the top-right
corner of the Mac’s desktop.
p
Photo Stream: Part of iCloud,
Photo Stream stores your
last thirty days or 1000
photos online and on your
iOS/iPadOS devices, and all
your photos on your Mac.
Photos: A bundled Mac
application that lets you
store, manage and edit your
photo collections and share
them with your other Apple
devices using iCloud.
Q
QuickTime: Apple’s 2D video
and graphics player, used to
play movies and other video
on your Mac.
R
Retina Display: This is Apple’s
term for its high-resolution
screens. The pixels are so
small it’s impossible to
distinguish between them at
a normal viewing distance,
making the on-screen images
very smooth and clear.
Right Click: On a two-button
mouse, a right-click is a click
with the right-hand mouse
button instead of the left. On
a Mac, with a trackpad or
Magic Mouse, a right-click is
achieved by holding the
Control button and clicking,
or setting up the device so a
two-fingered click or a click
on the right-hand side of the
Magic Mouse or Trackpad
delivers a right-click.
s
Safari: Apple’s web browser,
similar in function to
Microsoft Explorer or Google
Chrome. It’s available for
both Macs and iOS/iPadOS
devices, and it lets you surf
the worldwide web.
SharePlay: A feature that lets
you share movies and
music while in a FaceTime
chat. All parties in the chat
enjoy the same media,
which is played in sync so
no one’s a few seconds
ahead or behind.
Siri: Apple’s voice activated
digital assistant. You can
give Siri spoken instructions
and the service replies by
giving you the information
you asked for; or by
activating the requested
Mac function.
SMS (Short Message Service):
Text messages sent from
the Messages app from a
Mac’s Messages app or
mobile device such as the
iPad or iPhone to other cell
mobile phones.
Tablet: A computer in a flat,
‘tablet’ form factor, such as
the iPad. While the iPad is the
most popular tablet computer,
other models are available.
Text Field: Any area of the
screen where you can add
text. For example, when
completing a web form, there
are text fields for things like
your name, address and
more. Tap on a text field to
bring up the cursor, so you
can start typing.
Thunderbolt: A high-speed
connectivity port offered on
recent Macs. A Thunderbolt
port can carry a video signal
as well as data, so it can be
used for an external display.
Touch Bar: The very latest
models of the MacBook Pro
replaces the function keys
with a touch-sensitive
screen which displays
functions and controls
according to the app or
feature you’re currently
using. It also has a Touch
ID fingerprint scanner for
unlocking your Mac.
Trackpad: The controller device
used in notebook Macs. You
control your on-screen pointer
by dragging your finger across
the trackpad. Apple’s Magic
Trackpad is available for
desktop computers.
Twitter: One of the most
popular social networks
built around a follower/
following system rather
than friends, with
messages limited to 280
characters. There’s an
official Twitter app for the
Mac, and several third
party options for sending
Tweets too.
и
URL: Uniform Resource
Locator, the address used
to access a web page. For
example, Apple’s URL (its
website) is www.apple.com.
USB: (Universal Serial Bus) an
industry standard for
connecting computers and
peripherals introduced in the
mid-Nineties. The latest
version, USB-C, has a
similar plug to Thunderbolt
3, and is compatible with
Thunderbolt 3 ports.
V
VPN: (Virtual Private Network):
This provides secure access
over the Internet to private
networks, such as the network
at your company or school.
w
Wi-Fi: A wireless means of
getting onto the Internet or
connecting two devices. At
home, your Wi-Fi network is
established through your
router. Whilst away from
home, you might have
access to public Wi-Fi
networks like those offered
in coffee shops or libraries.
YouTube: The Internet’s most
popular video viewing and
sharing service. Owned by
Google, you can access
YouTube through a web
browser, or through a
dedicated app available for
the Mac, iPhone, iPad or
iPod Touch.
www.pclpublications.com | 119
Congratulations, we have reached the end of your latest
tech adventure. With help from our team of tech experts,
you have been able to answer all your questions, grow in
confidence and ultimately master any issues you had. You
can now proudly proclaim that you are getting the absolute
best from your latest choice from the ever changing world
of consumer technology and software.
Whatever your plans we are here to help you. Just check
our expansive range of Tricks & Tips and For Beginners
guidebooks and we are positive you will find what you are
looking for. This adventure with us may have ended, but
that's not to say that your journey is over. Every new
hardware or software update brings its new features and
challenges, and of course you already know we are here to
help. So we will look forward to seeing you again soon.
Popercut
www.pclpublications.com
gf TRICKS & TIPS
Available on Ei Readlij
TRICKS
&TIPS
ia
• Advanced guides
and tutorials for your
Apple iPhone 14
and iOS 16
iPhone
Everything you need to take
your iOS 16 experience
to the next level
awesome 1
Apple
• Next level secrets
and fixes get to the
heart of your iPhone
14 and iOS 16
• Advanced guides
and tutorials for your
Samsung tablet and
smartphote
Z OVER \
435
, SECRETS &
\HACKS У
• Advanced guides
and tutorials for your
Apple Mac and
macOS Ventura
• Next level
secrets and fixes get
to the heart of your
Mac and macOS
• We share our (
awesome tips and \
shortcuts for your '
Mac apps & software
Ж Samsung
Everything you need to
take your Samsung Galaxy
experience to the next level
• Next level secrets
and fixes get to the
heart of the Android
operating system
• We share our
awesome tips and
shortcuts for your
Galaxy device
TRICKS
&TIPS
Everything you need to
take your macOS Ventura
experience to the next level
/"OVER^I
480
. SECRETS & t
\НАСК5~Л
< New i
Update for
macOS
k^ntura J
Ж Black &
White
Photography
™ ipSs Landscape
101
Landscape
Photography
• Advanced guides
and tutorials for
creating amazing
black & white photos
• We share our
awesome tps for
converting to mono
with Silver Ef ex Pro
• Next level tips
and secrets get you
to the heart of pro
level digital editing
take your mono photography
skills to the nexffeVel
• Advanced guides
and tutorials for
shooting stunning
landscapes
Everything you need to take
your landscape photography
to the next level
• We share our
awesome tips and
techniques for pro
level photography
OVER
SECRETS &
HACKS
• Next level tips
and secrets get you
to the heart of digital
image editing
TRICKS J
ж Cloud
|v| Computing
• We share out
awesome tips and
shortcuts for Cloud
services and more
Everything you need to
master cloud storage and
services on your device
TRICKS
&TIPS
Codiri
Programming
• Advanced guides
and tutorials for
coding Linux and
Windows Batch Files
• We share our
awesome coding tips
and projects to push
your skills further
Everything you need to
master essential coding
and programming skills
For a full list of titles available visit:
www.pclpublications.com
Want to master your Mac?
Then don't miss our Mac & MacBook
magazine on » Readlij now!
Click our handy link to read now: https://bit.ly/3tPJHdl
macOS Monterey Tricks & Tips
9th Edition I ISBN: 978-1-914404-28-3
Published by: Papercut Limited
Digital distribution by: Readly AB
© 2023-2024 Papercut Ltd. All rights reserved. No part of this publication
may be reproduced in any form, stored in a retrieval system or integrated
into any other publication, database or commercial programs without the
express written permission of the publisher. Under no circumstances
should this publication and its contents be resold, loaned out or used in
any form by way of trade without the publisher’s written permission.
While we pride ourselves on the quality of the information we provide,
Papercut Limited reserves the right not to be held responsible for any
mistakes or inaccuracies found within the text of this publication. Due to
the nature of the tech industry, the publisher cannot guarantee that all
apps and software will work on every version of device. It remains the
purchaser's sole responsibility to determine the suitability of this book and
its contents for whatever purpose. Any app, hardware or software images
reproduced on the front cover are solely for design purposes and are not
necessarily representative of content. We advise all potential buyers to
check listings prior to purchase for confirmation of actual content.
All editorial herein is that of the reviewer - as an individual - and is not
representative of the publisher or any of its affiliates. Therefore the
publisher holds no responsibility in regard to editorial opinion or content
This is an independent publication and as such does not necessarily reflect
the views or opinions of the producers of apps, software or products
contained within. This publication is 100% unofficial and in no way
associated with any other company, app developer, software developer or
manufacturer. All copyrights, trademarks and registered trademarks for
the respective companies are acknowledged. Relevant graphic imagery
reproduced with courtesy of brands, apps, software and product
manufacturers. Additional images are reproduced under licence from
Shutterstock. Prices, international availability, ratings, titles and content
are subject to change. Some content may have been previously published
in other editions. All information was correct at time of publication.
Э Papercut Limited
Registered in England & Wales No: 04308513
ADVERTISING - For our latest media packs please contact:
Brad Francis - brad@papercutltd.co.uk
Web - www.pclpublications.com
INTERNATIONAL LICENSING - Papercut Limited has many great
publications and all are available for licensing worldwide.
For more information email: jgale@pclpublications.com