/


Автор: Van Winkle L.
Теги: programming languages programming computer science microprocessors packt publisher reverse engineering
ISBN: 978-1-78934-986-3
Год: 2019
Похожие


Текст
Hands-On Network
Programming with C
Learn socket programming in C and write secure and
optimized network code
Lewis Van Winkle
BIRMINGHAM - MUMBAI
Hands-On Network Programming with C
Copyright © 2019 Packt Publishing
All rights reserved. No part of this book may be reproduced, stored in a retrieval system, or transmitted in any form
or by any means, without the prior written permission of the publisher, except in the case of brief quotations
embedded in critical articles or reviews.
Every effort has been made in the preparation of this book to ensure the accuracy of the information presented.
However, the information contained in this book is sold without warranty, either express or implied. Neither the
author, nor Packt Publishing or its dealers and distributors, will be held liable for any damages caused or alleged to
have been caused directly or indirectly by this book.
Packt Publishing has endeavored to provide trademark information about all of the companies and products
mentioned in this book by the appropriate use of capitals. However, Packt Publishing cannot guarantee the accuracy
of this information.
Commissioning Editor: Richa Tripathi
Acquisition Editor: Shriram Shekhar
Content Development Editor: Digvijay Bagul
Technical Editor: Abin Sebastian
Copy Editor: Safis Editing
Project Coordinator: Prajakta Naik
Proofreader: Safis Editing
Indexer: Tejal Daruwale Soni
Graphics Coordinator: Tom Scaria
Production Coordinator: Aparna Bhagat
First published: May 2019
Production reference: 1100519
Published by Packt Publishing Ltd.
Livery Place
35 Livery Street
Birmingham
B3 2PB, UK.
ISBN 978-1-78934-986-3
www.packtpub.com
For Doogie
– Lewis Van Winkle
mapt.io
Mapt is an online digital library that gives you full access to over 5,000 books and videos, as
well as industry leading tools to help you plan your personal development and advance
your career. For more information, please visit our website.
Why subscribe?
Spend less time learning and more time coding with practical eBooks and Videos
from over 4,000 industry professionals
Improve your learning with Skill Plans built especially for you
Get a free eBook or video every month
Mapt is fully searchable
Copy and paste, print, and bookmark content
Packt.com
Did you know that Packt offers eBook versions of every book published, with PDF and
ePub files available? You can upgrade to the eBook version at www.packt.com and as a print
book customer, you are entitled to a discount on the eBook copy. Get in touch with us at
customercare@packtpub.com for more details.
At www.packt.com, you can also read a collection of free technical articles, sign up for a
range of free newsletters, and receive exclusive discounts and offers on Packt books and
eBooks.
Contributors
About the author
Lewis Van Winkle is a software programming consultant, entrepreneur, and founder of a
successful IoT company. He has over 20 years of programming experience after publishing
his first successful software product at the age of 12. He has over 15 years of programming
experience with the C programming language on a variety of operating systems and
platforms. He is active in the open source community and has published several popular
open source programs and libraries—many of them in C. Today, Lewis spends much of his
time consulting, where he loves taking on difficult projects that other programmers have
given up on. He specializes in network systems, financial systems, machine learning, and
interoperation between different programming languages.
I would like to thank the publisher, Packt. This book wouldn't exist without their
encouragement and backing. I would also like to extend a special thank you to my
reviewer, Daniele Lacamera, for the careful work he carried out. This book improved
significantly as a result of his valuable feedback. I also want to acknowledge the patience
and support that my friends and family have shown over the last year while I've been
away writing.
About the reviewer
Daniele Lacamera is a software technologist and researcher with vast experience in
software design and development on embedded systems for different industries. He is
currently working as freelance software developer and trainer. He is a worldwide expert in
TCP/IP and transport protocol design and optimization, with more than 20 academic
publications on the topic. He supports free software by contributing to several projects,
including the Linux kernel, and is involved within a number of communities and
organizations that promote the use of free and open source software in the IoT.
Packt is searching for authors like you
If you're interested in becoming an author for Packt, please visit authors.packtpub.com
and apply today. We have worked with thousands of developers and tech professionals,
just like you, to help them share their insight with the global tech community. You can
make a general application, apply for a specific hot topic that we are recruiting an author
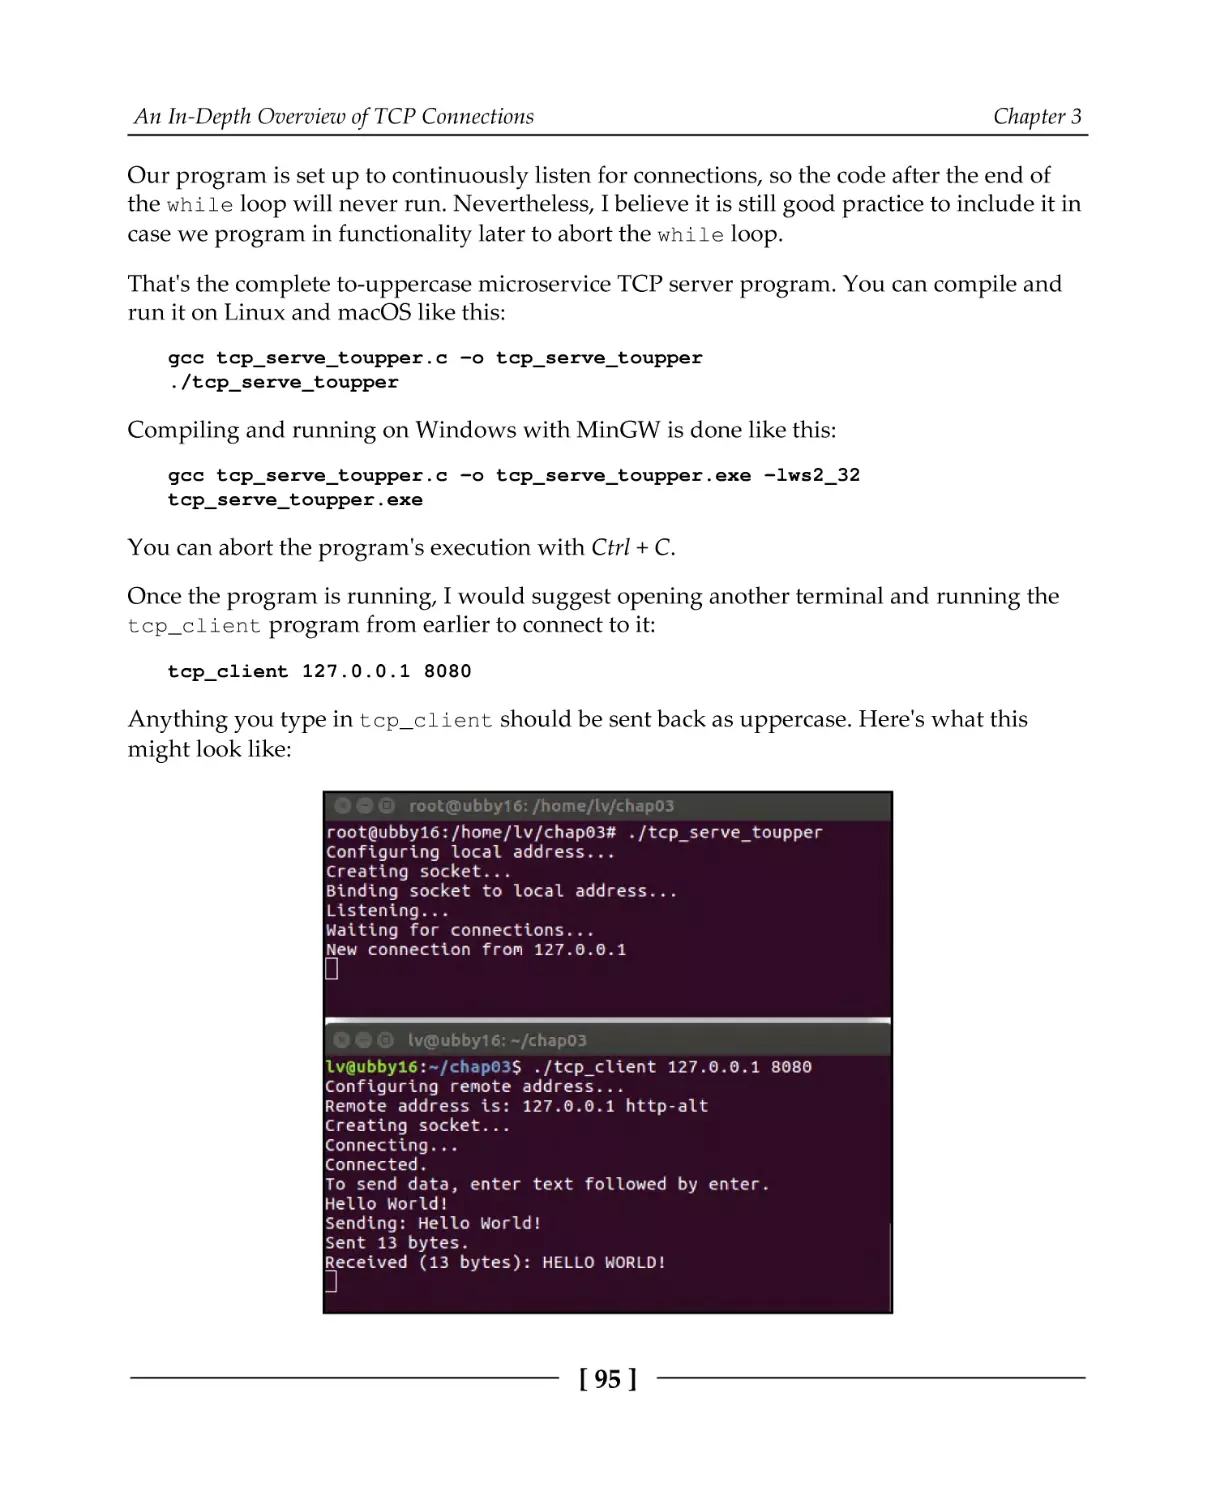
for, or submit your own idea.
Table of Contents
Preface
1
Section 1: Getting Started with Network
Programming
Chapter 1: Introducing Networks and Protocols
Technical requirements
The internet and C
OSI layer model
TCP/IP layer model
Data encapsulation
Internet Protocol
What is an address?
Domain names
Internet routing
Local networks and address translation
Subnetting and CIDR
Multicast, broadcast, and anycast
Port numbers
Clients and servers
Putting it together
What's your address?
Listing network adapters from C
Listing network adapters on Windows
Listing network adapters on Linux and macOS
Summary
Questions
Chapter 2: Getting to Grips with Socket APIs
Technical requirements
What are sockets?
Socket setup
Two types of sockets
Socket functions
Anatomy of a socket program
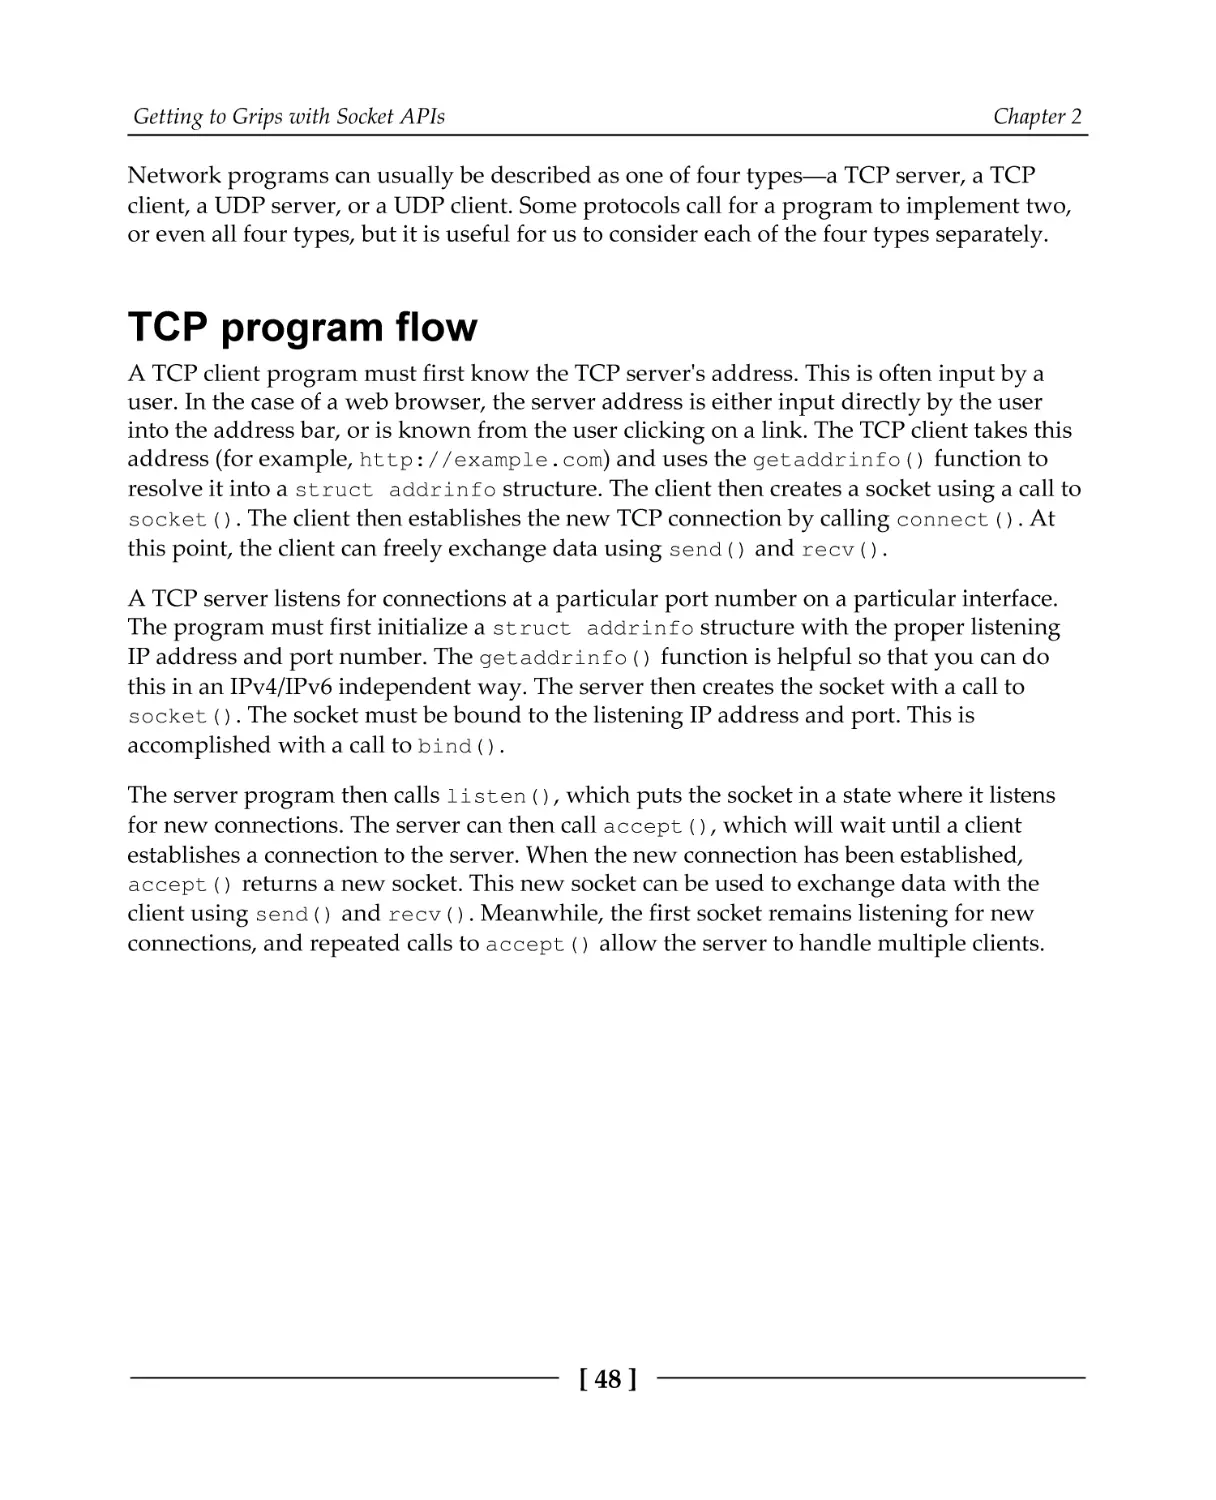
TCP program flow
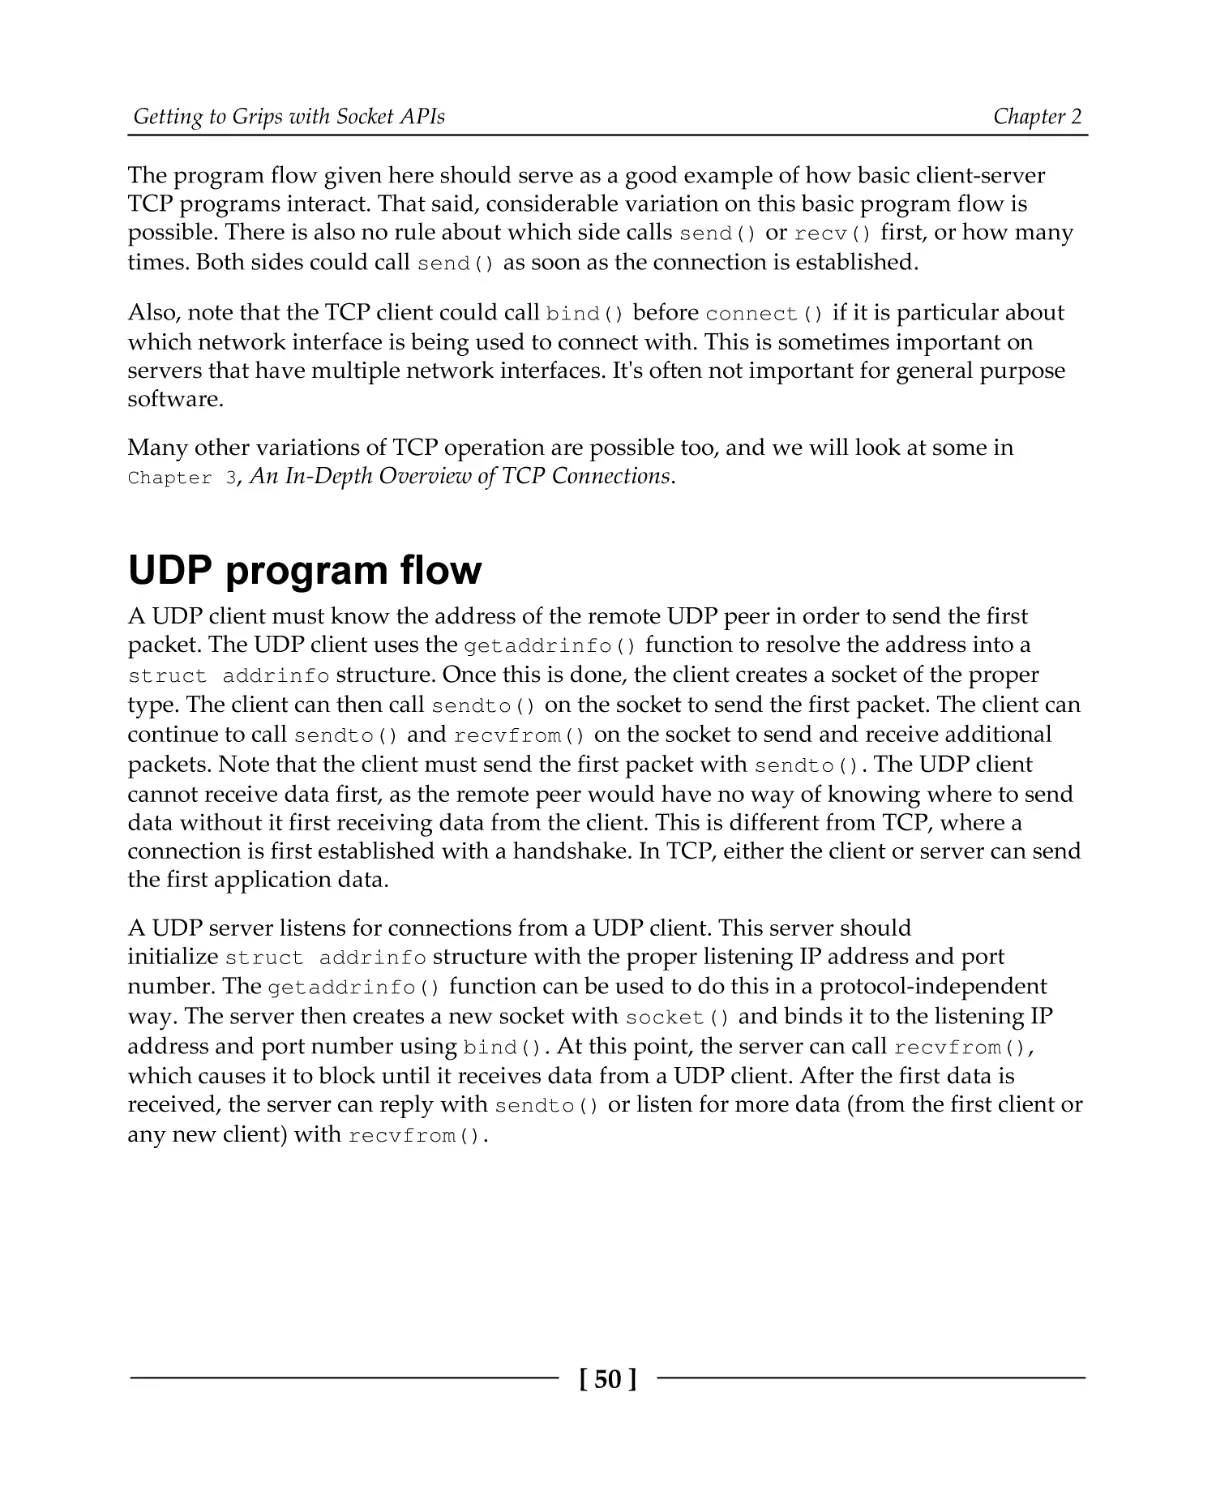
UDP program flow
Berkeley sockets versus Winsock sockets
Header files
8
8
9
10
12
14
17
17
20
21
23
25
26
27
28
28
29
32
32
37
39
39
40
40
41
42
44
46
47
48
50
51
52
Table of Contents
Socket data type
Invalid sockets
Closing sockets
Error handling
Our first program
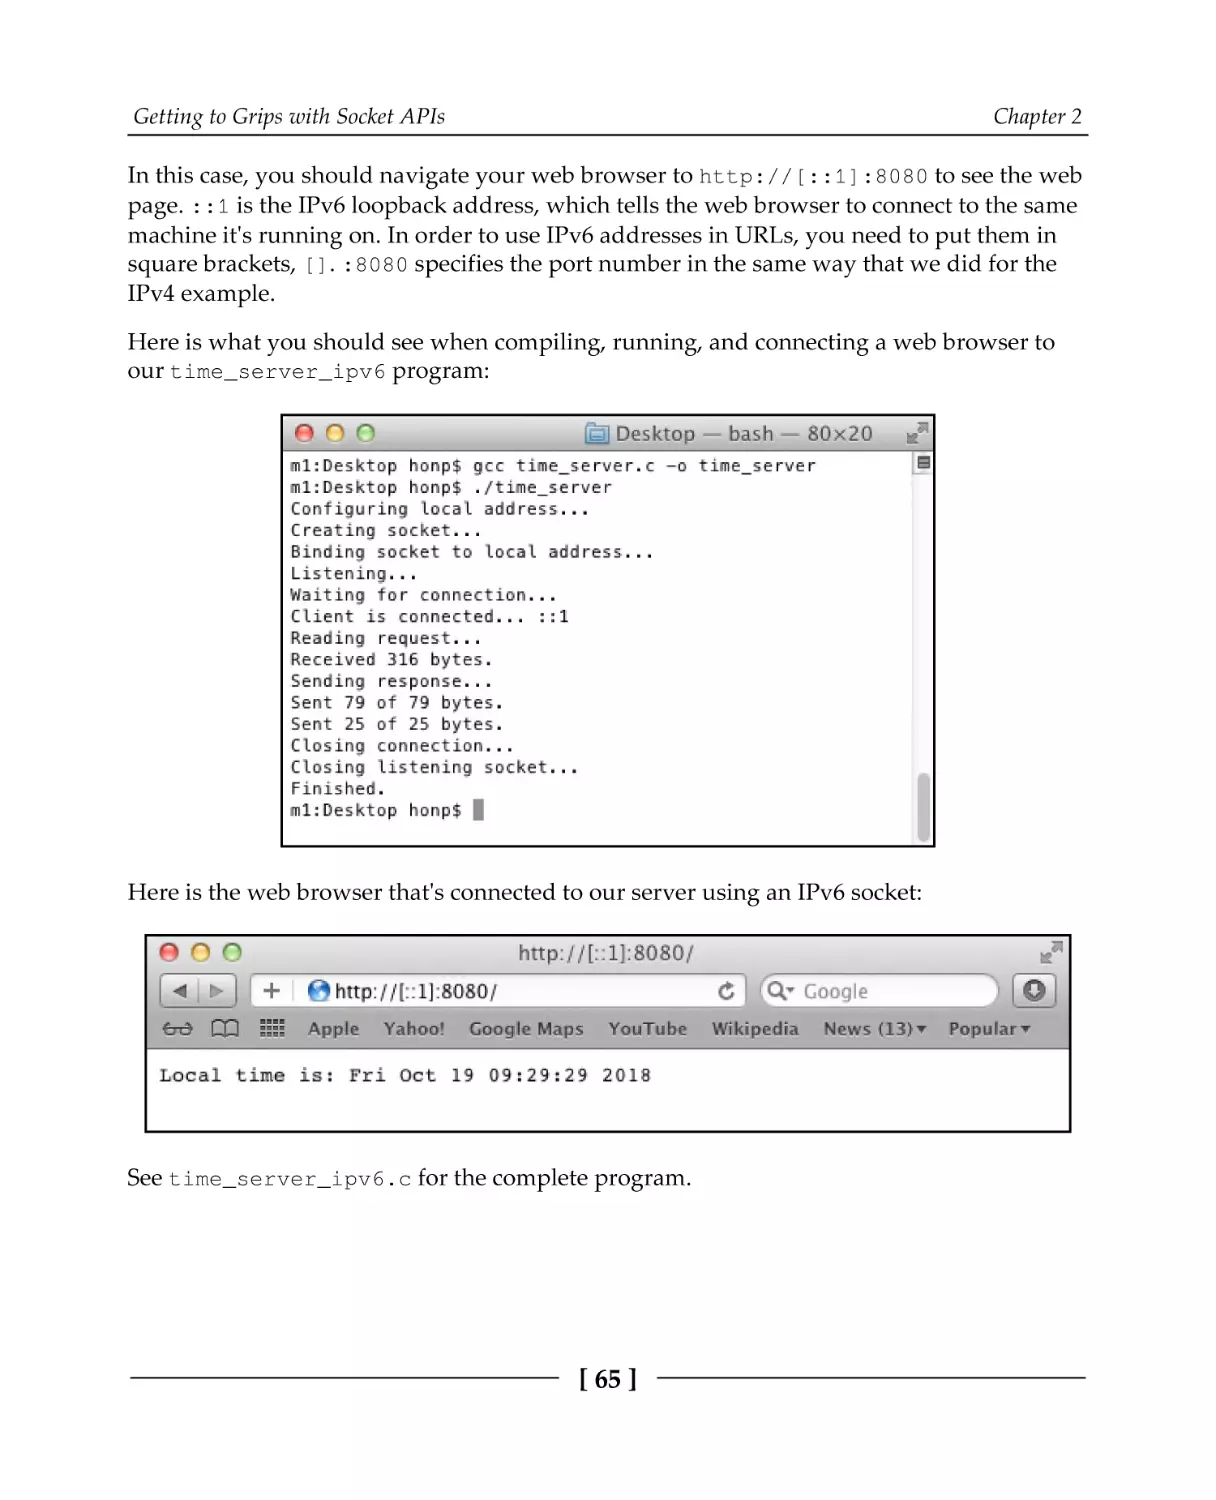
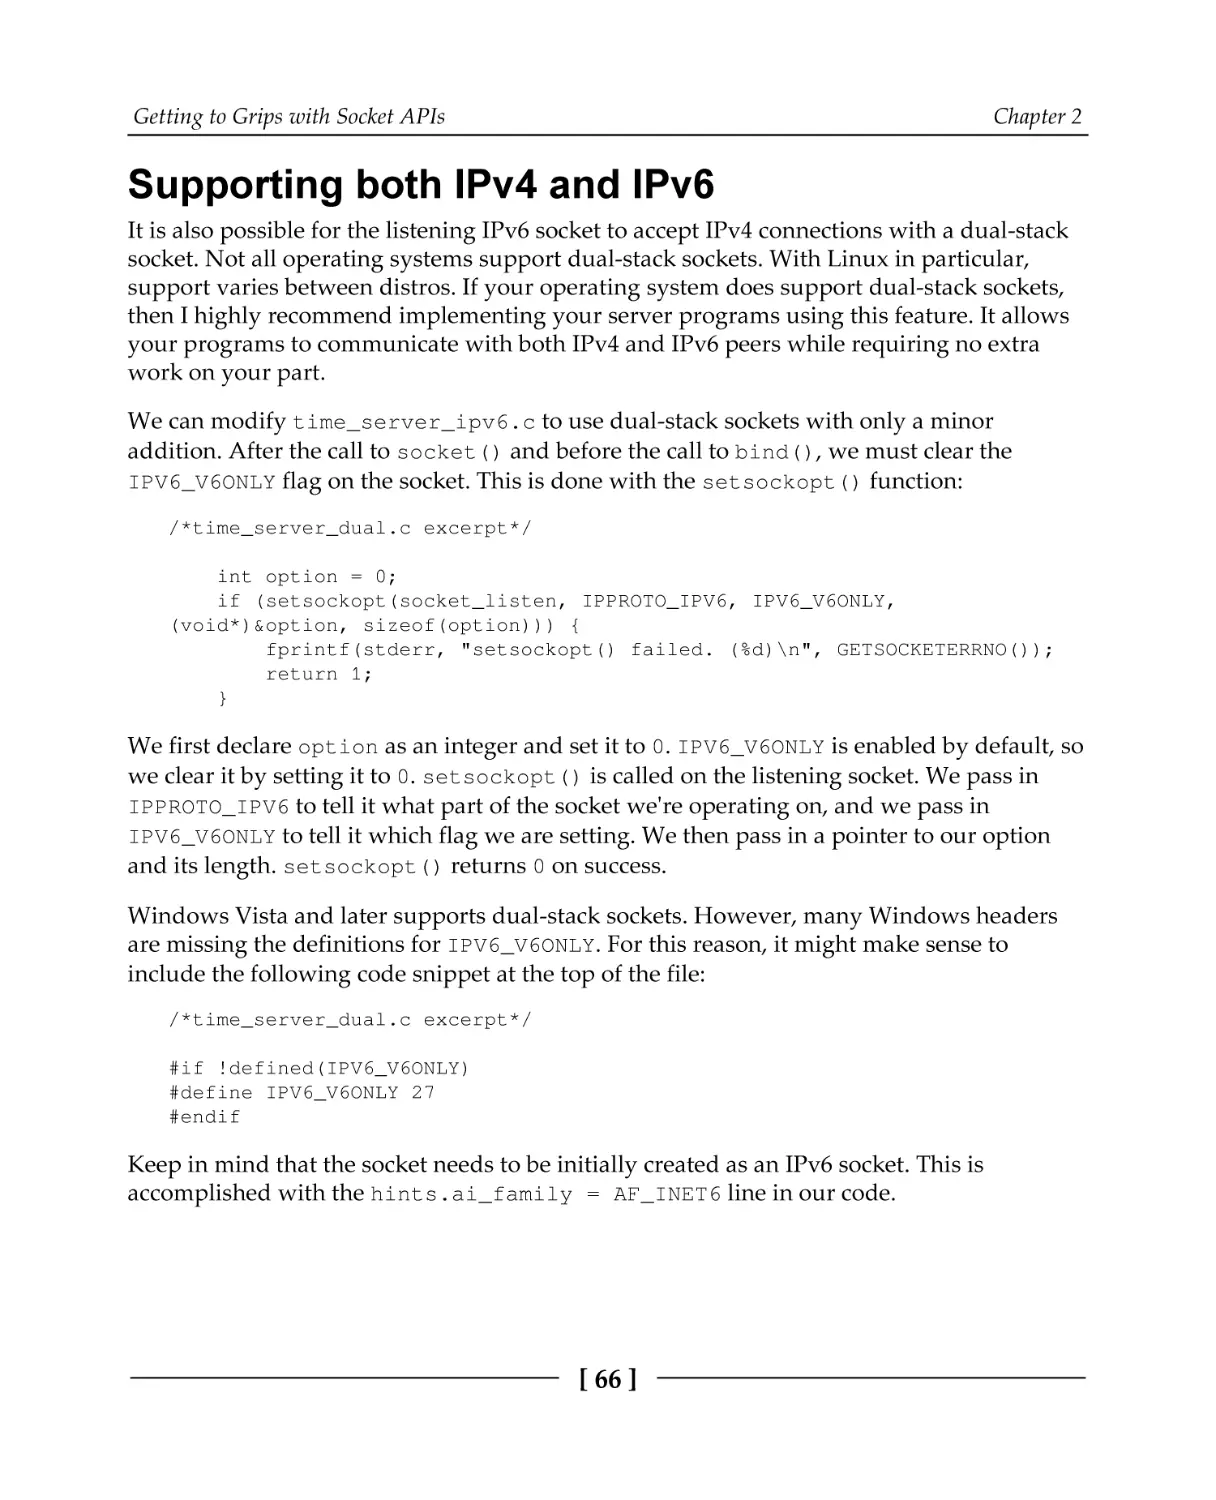
A motivating example
Making it networked
Working with IPv6
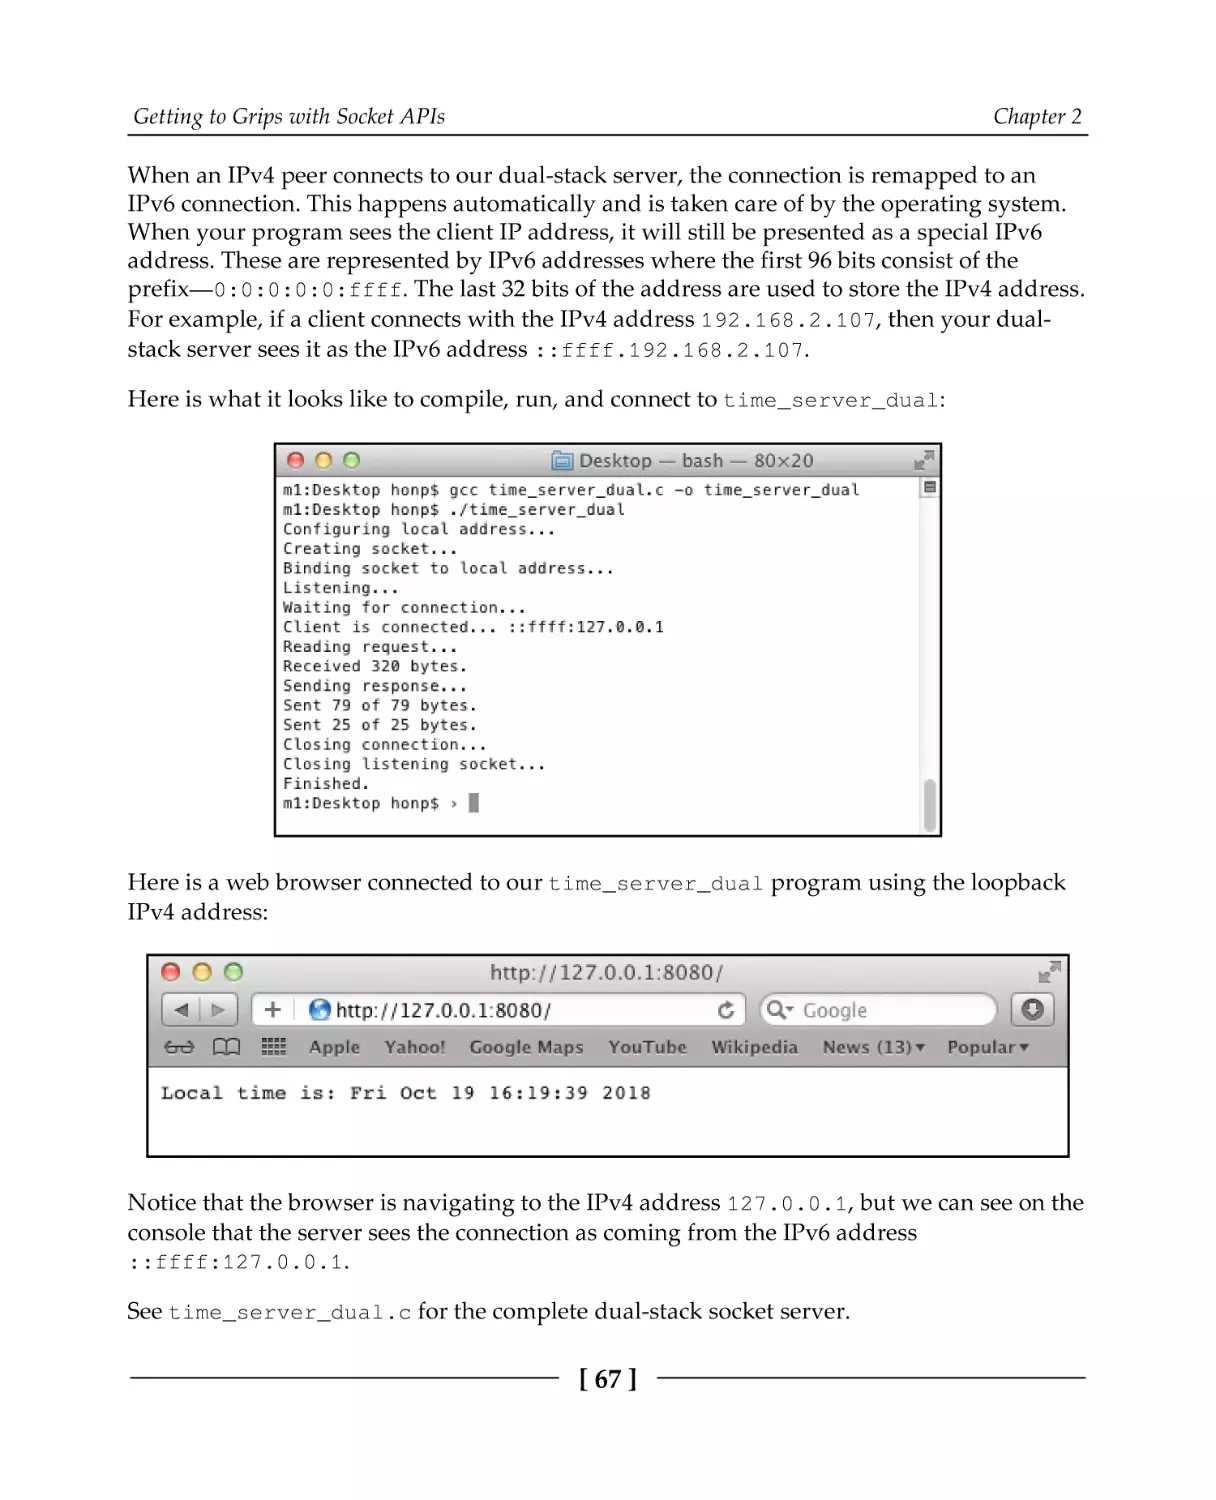
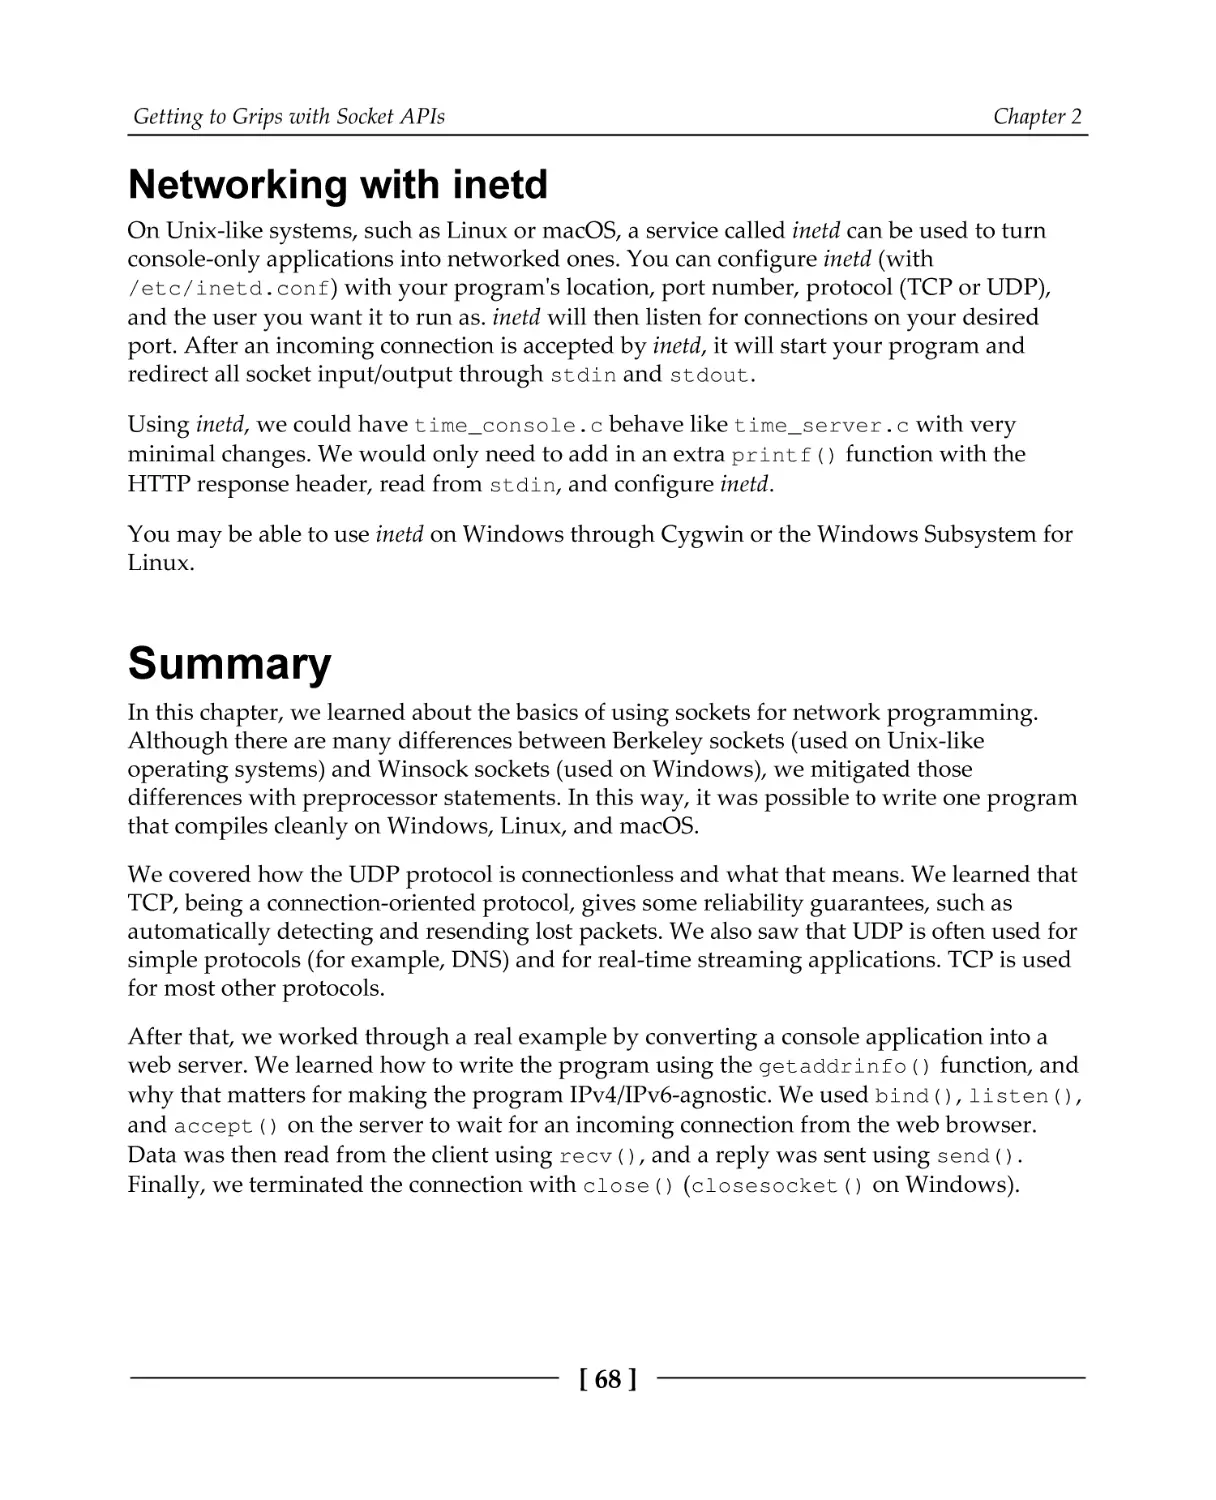
Supporting both IPv4 and IPv6
Networking with inetd
Summary
Questions
Chapter 3: An In-Depth Overview of TCP Connections
Technical requirements
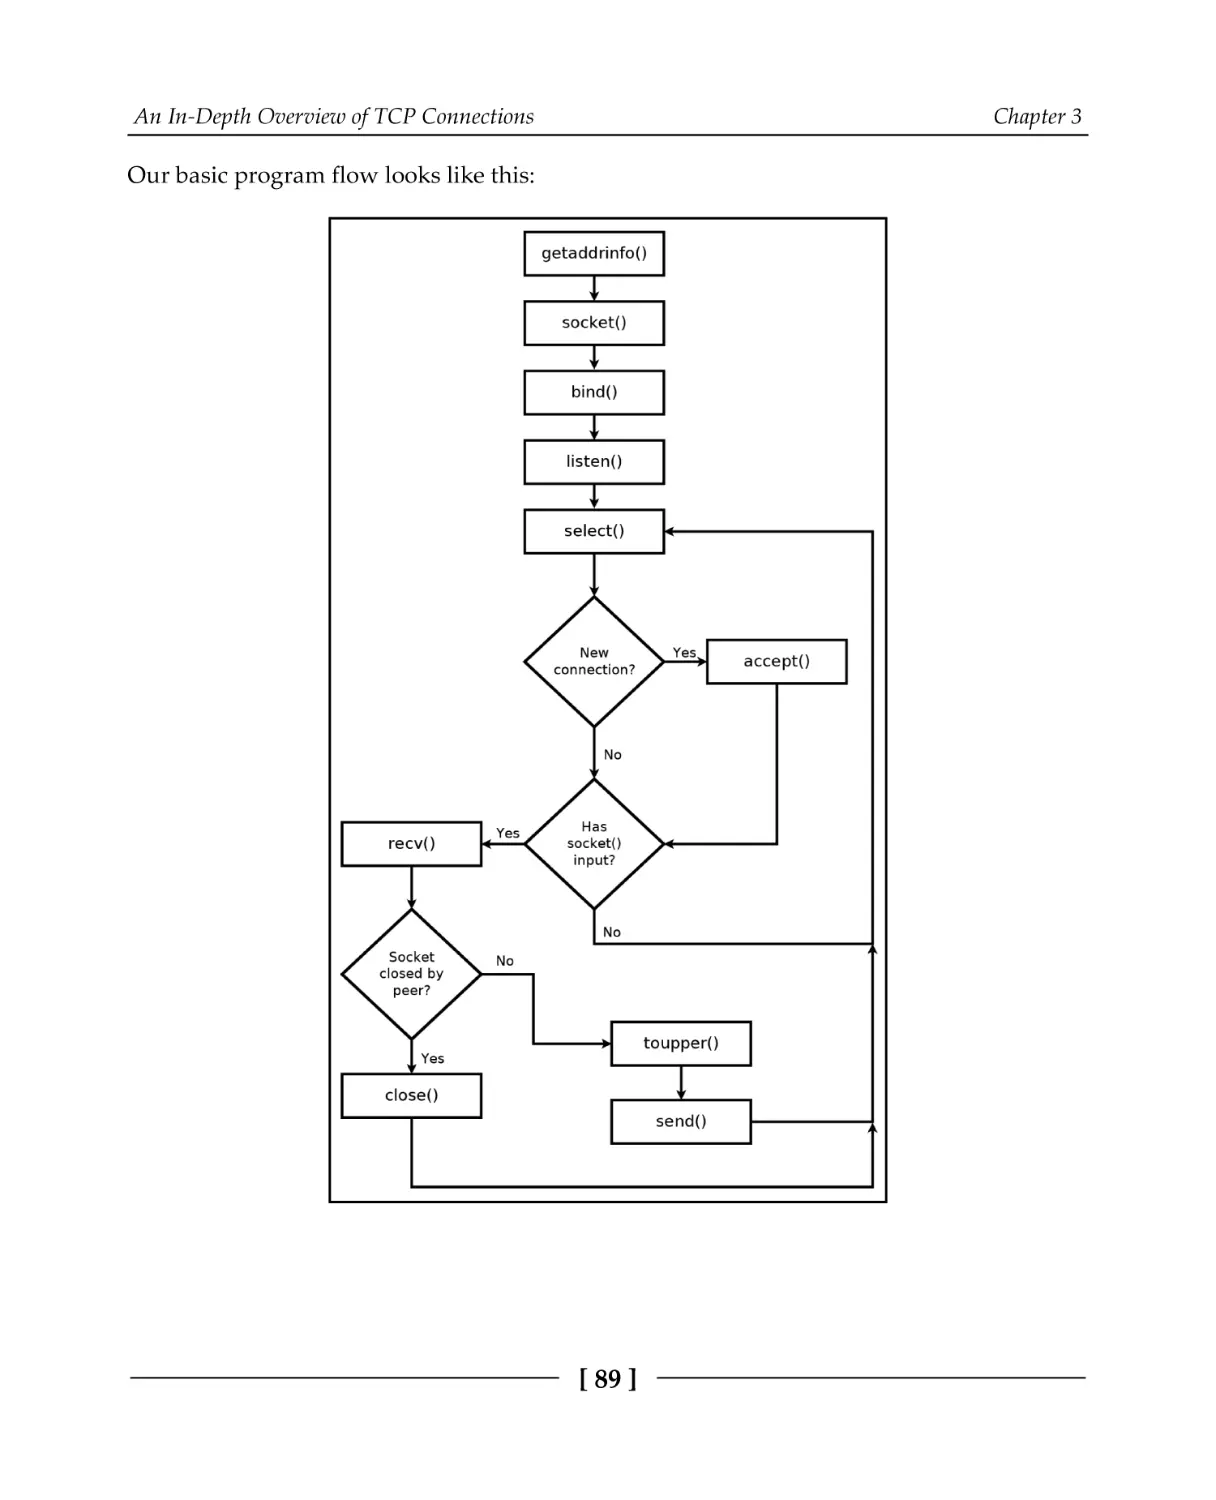
Multiplexing TCP connections
Polling non-blocking sockets
Forking and multithreading
The select() function
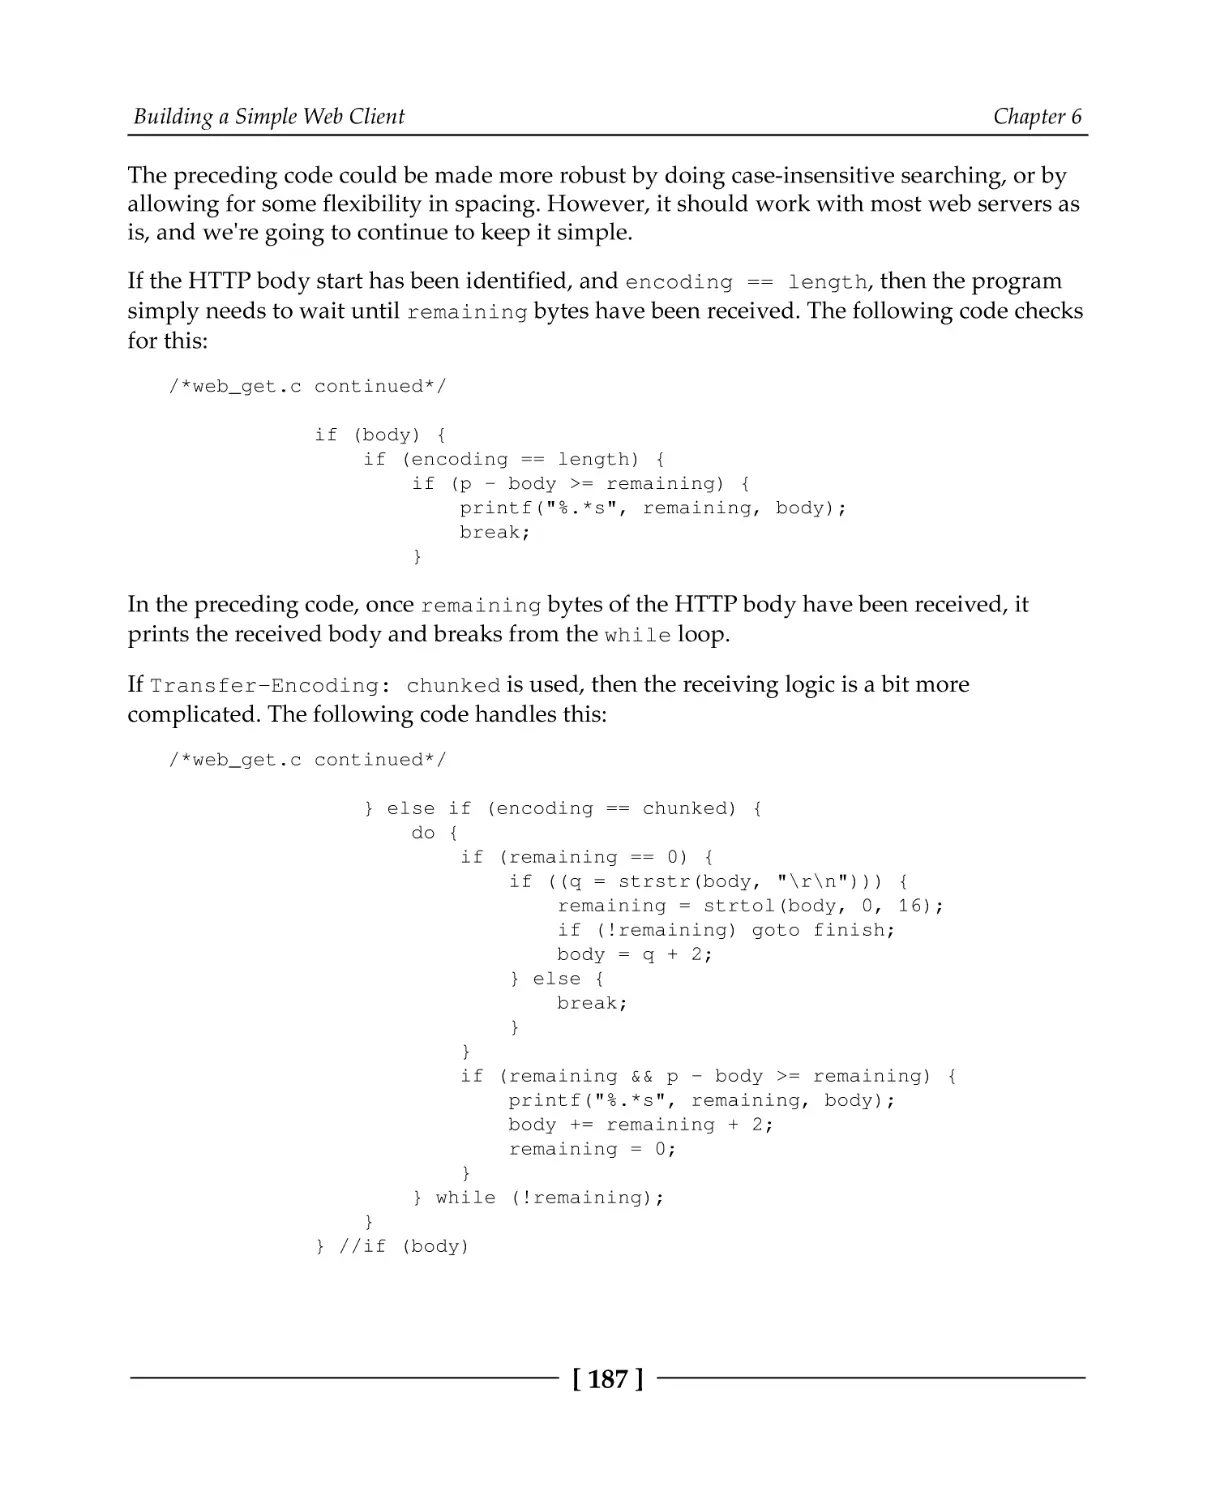
Synchronous multiplexing with select()
select() timeout
Iterating through an fd_set
select() on non-sockets
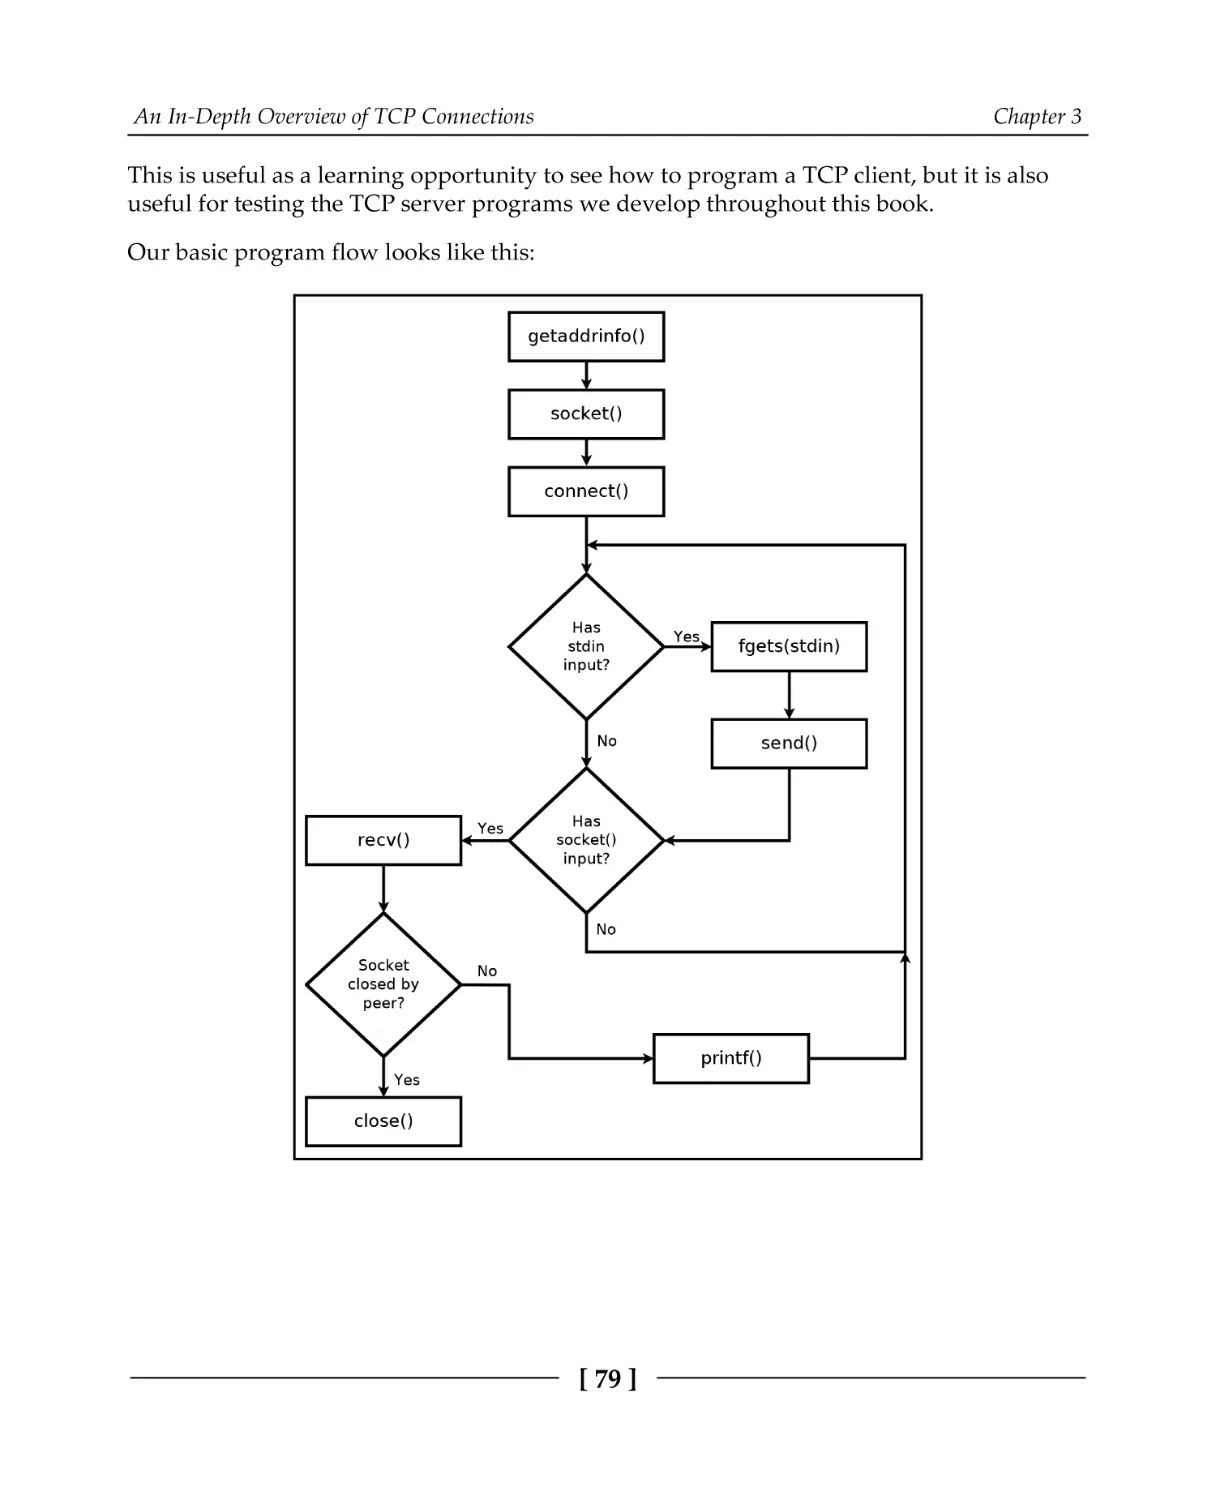
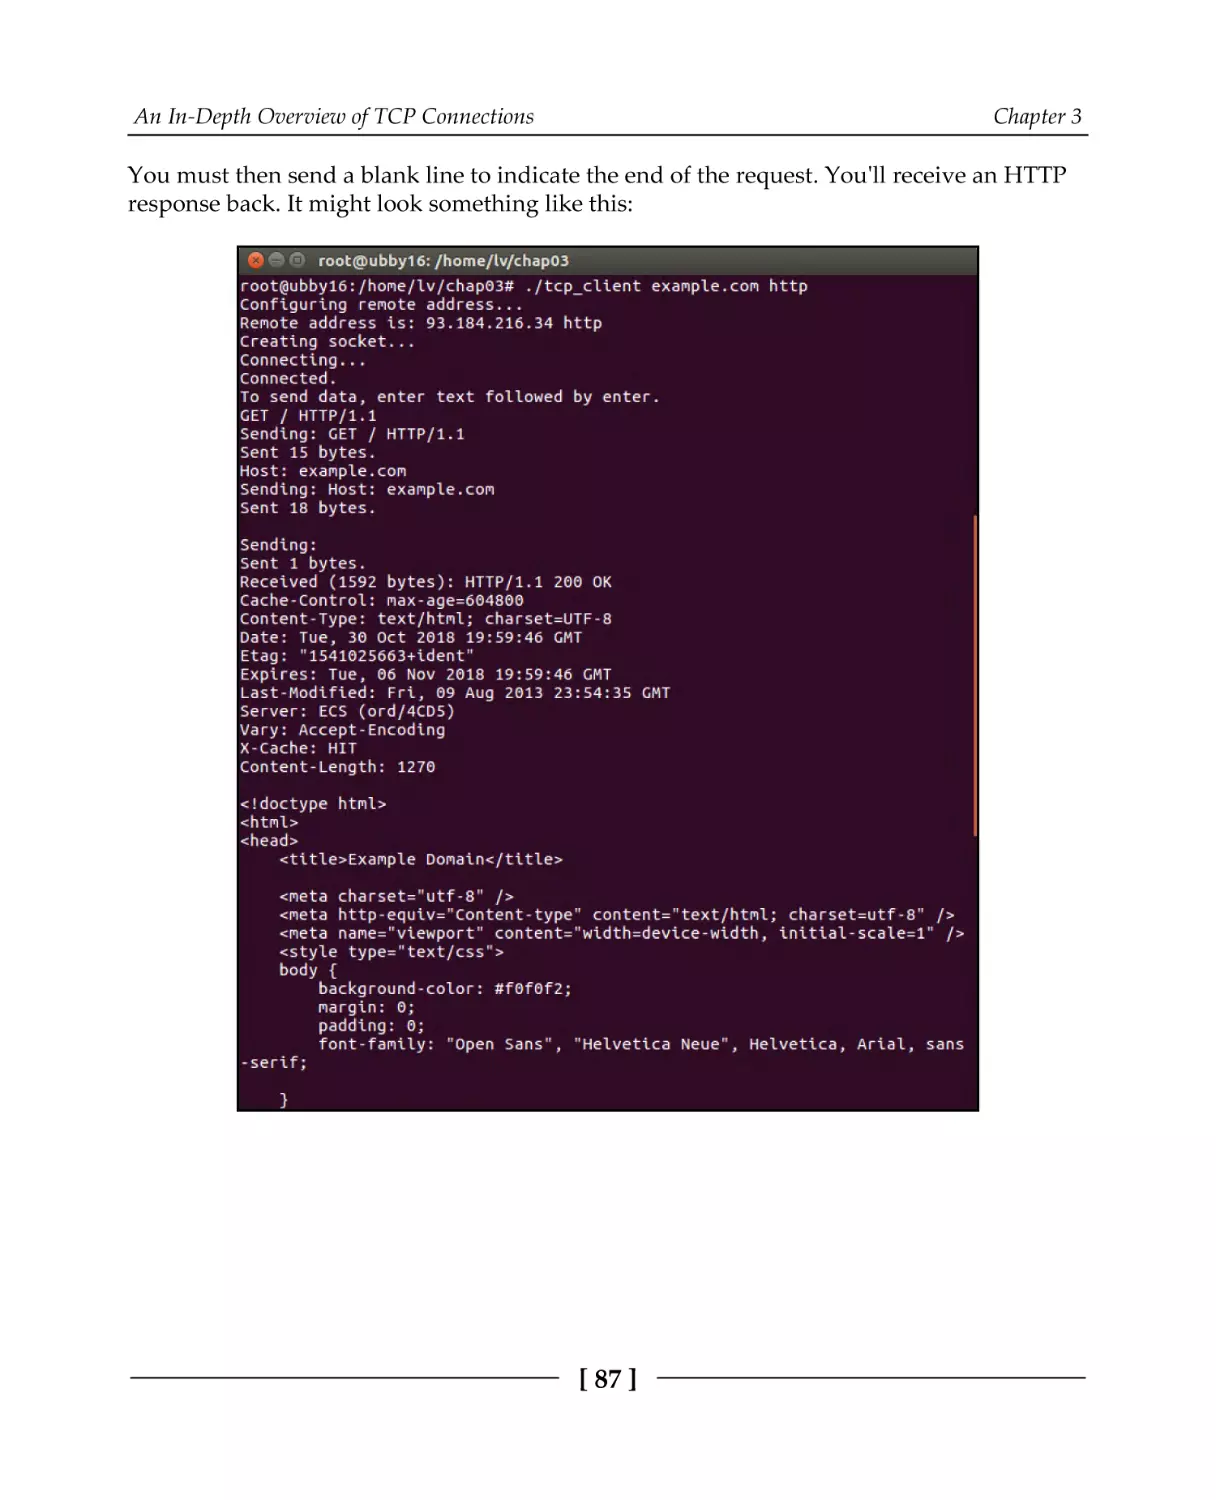
A TCP client
TCP client code
A TCP server
TCP server code
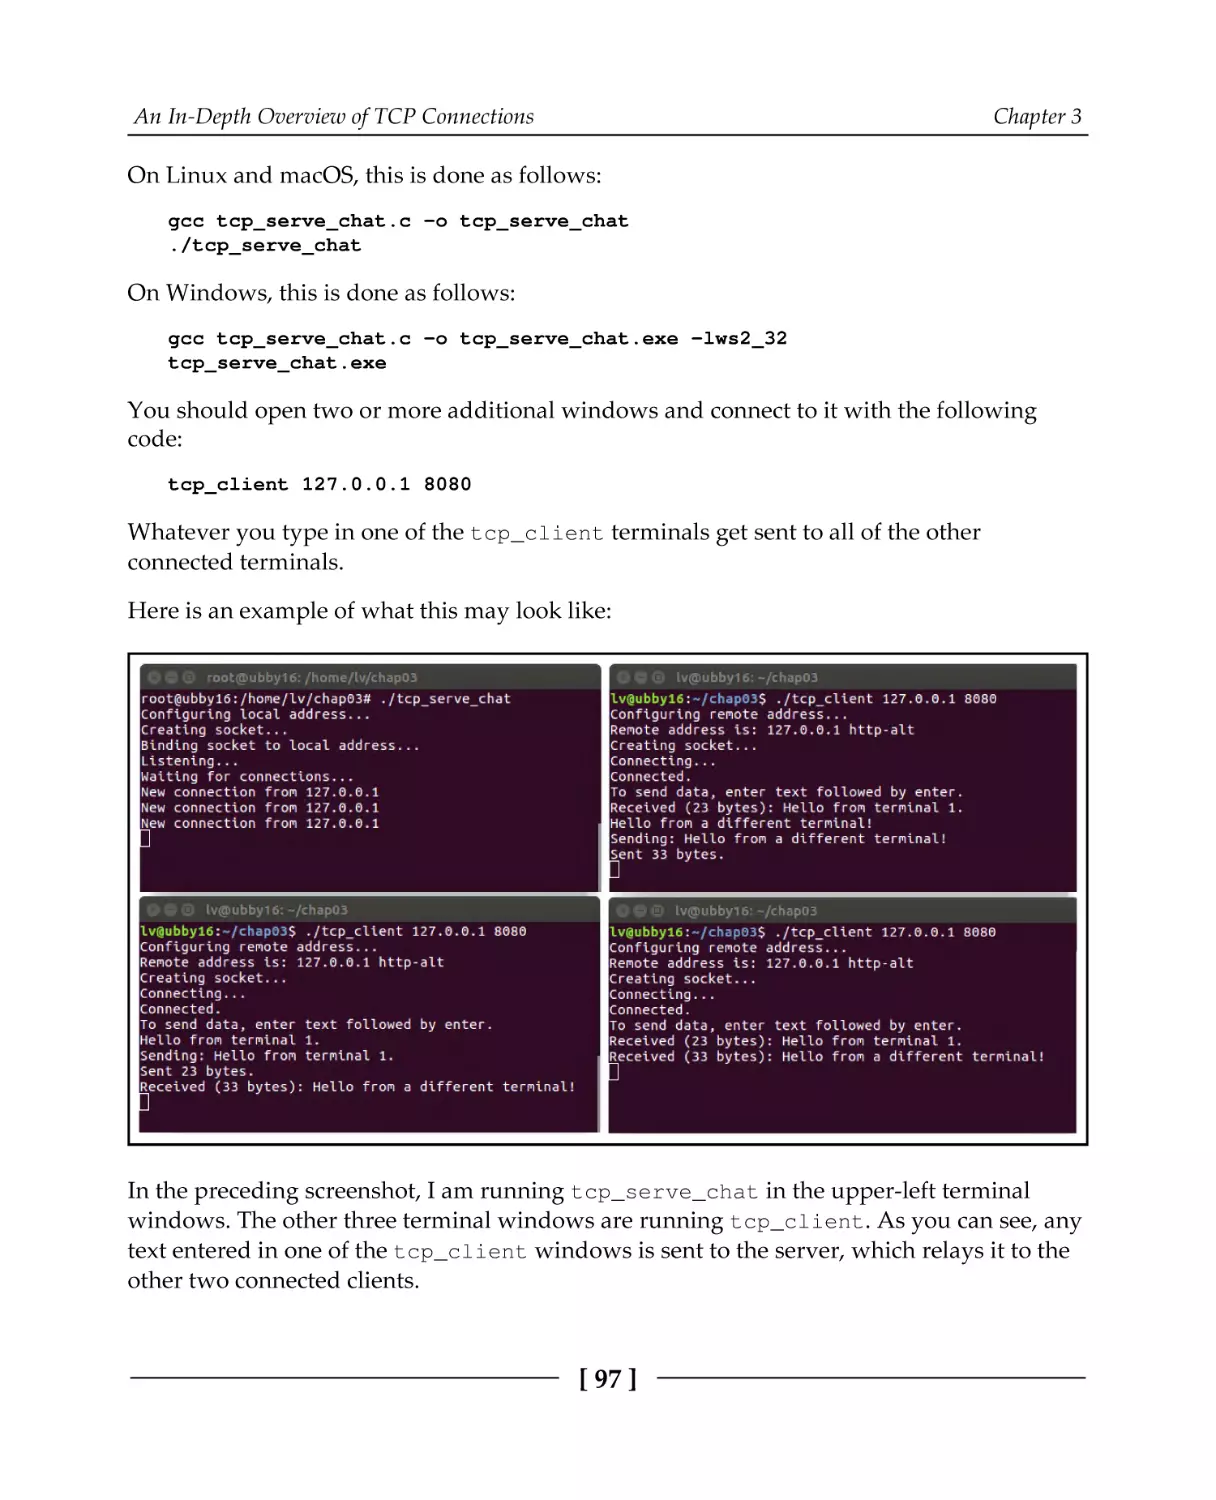
Building a chat room
Blocking on send()
TCP is a stream protocol
Summary
Questions
Chapter 4: Establishing UDP Connections
Technical requirements
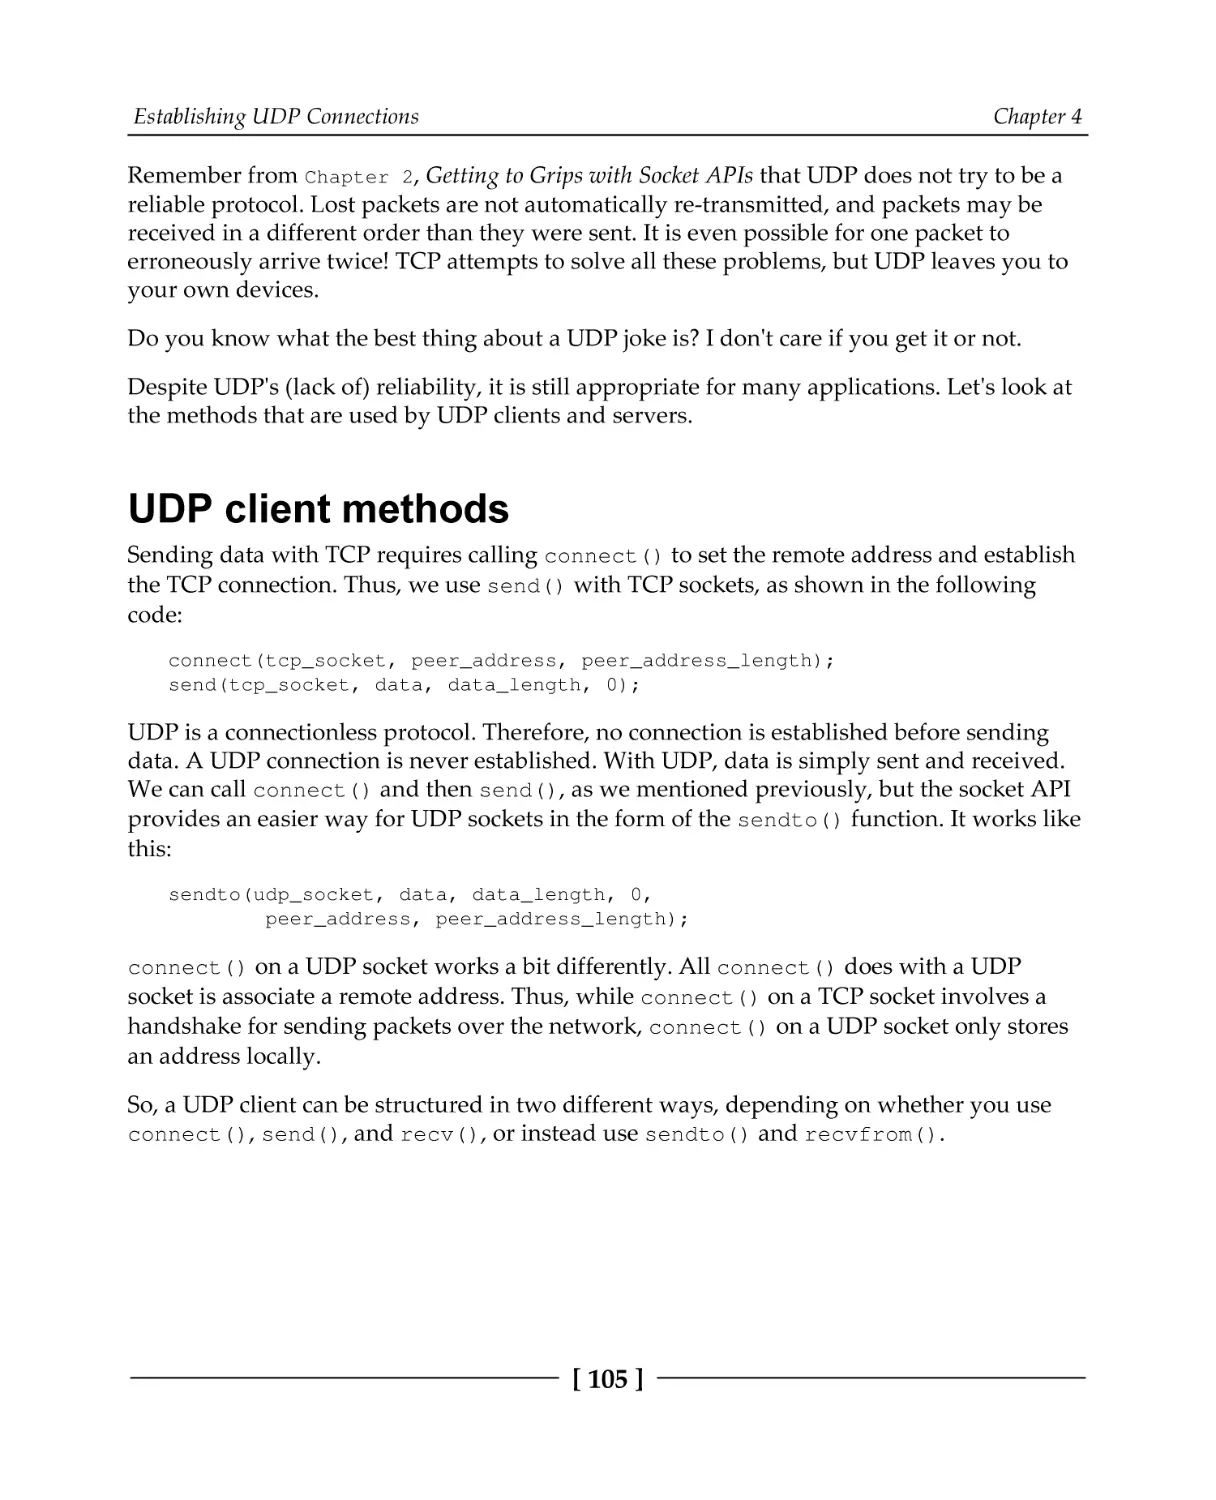
How UDP sockets differ
UDP client methods
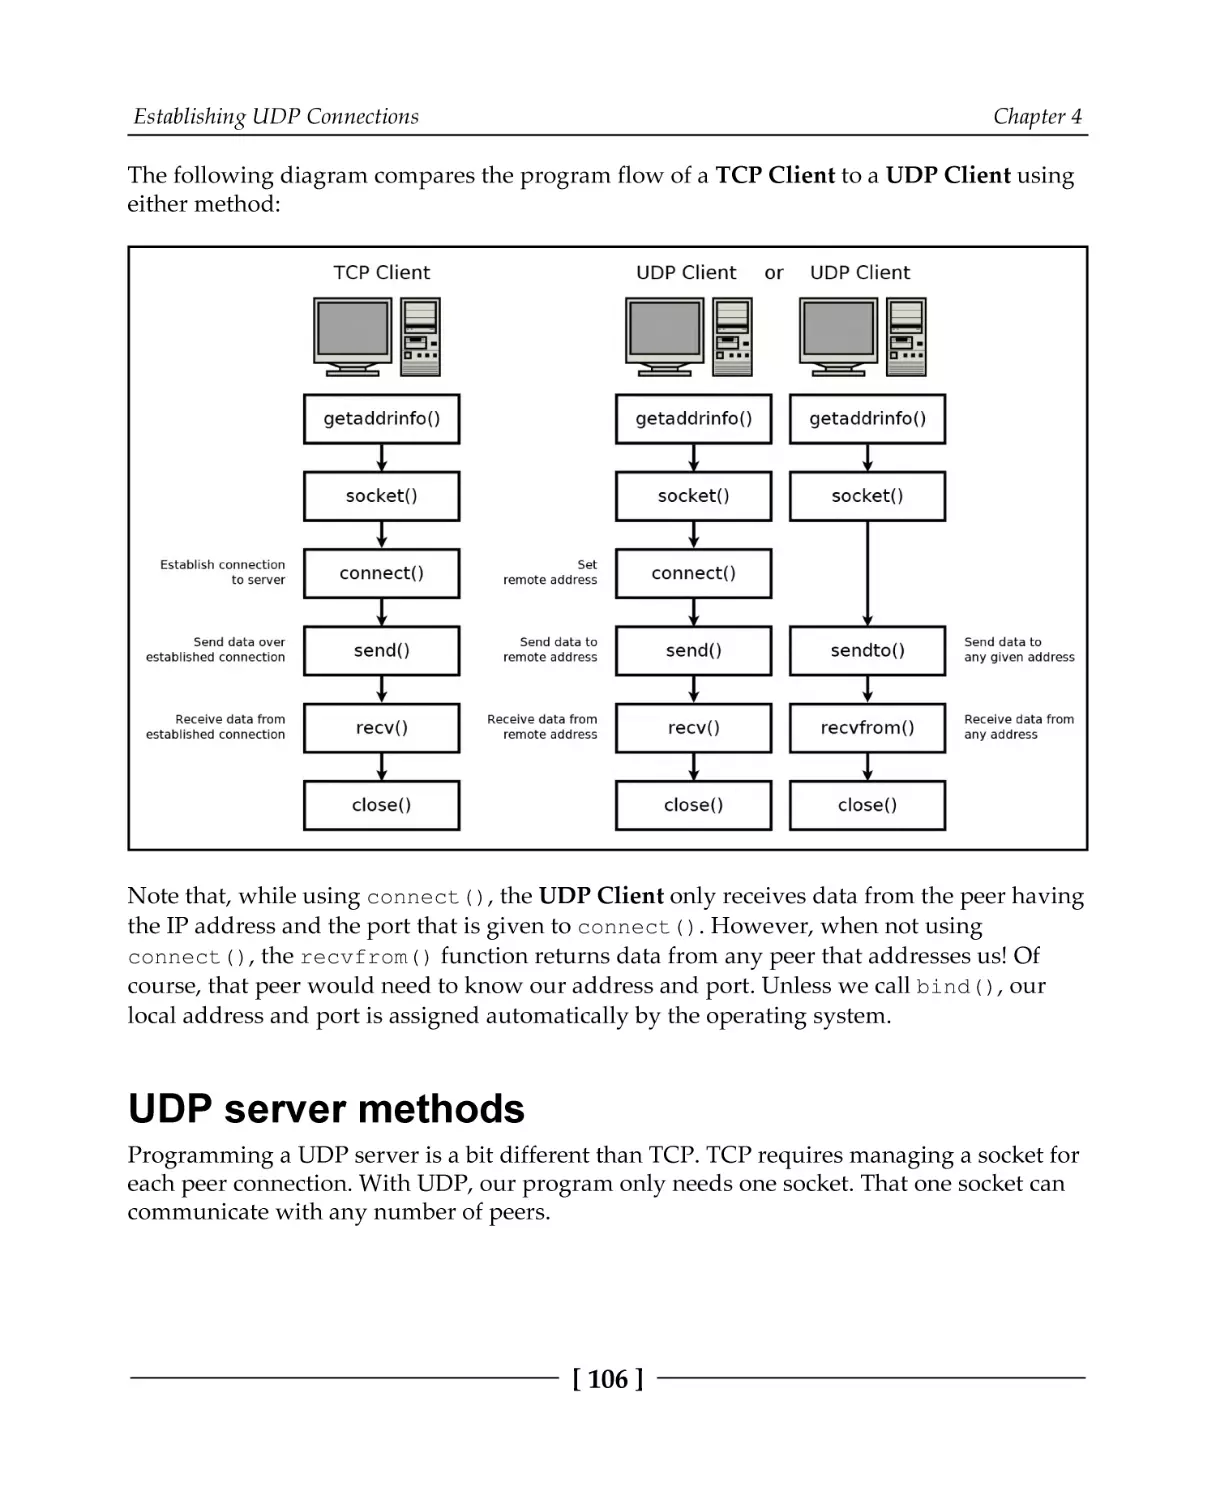
UDP server methods
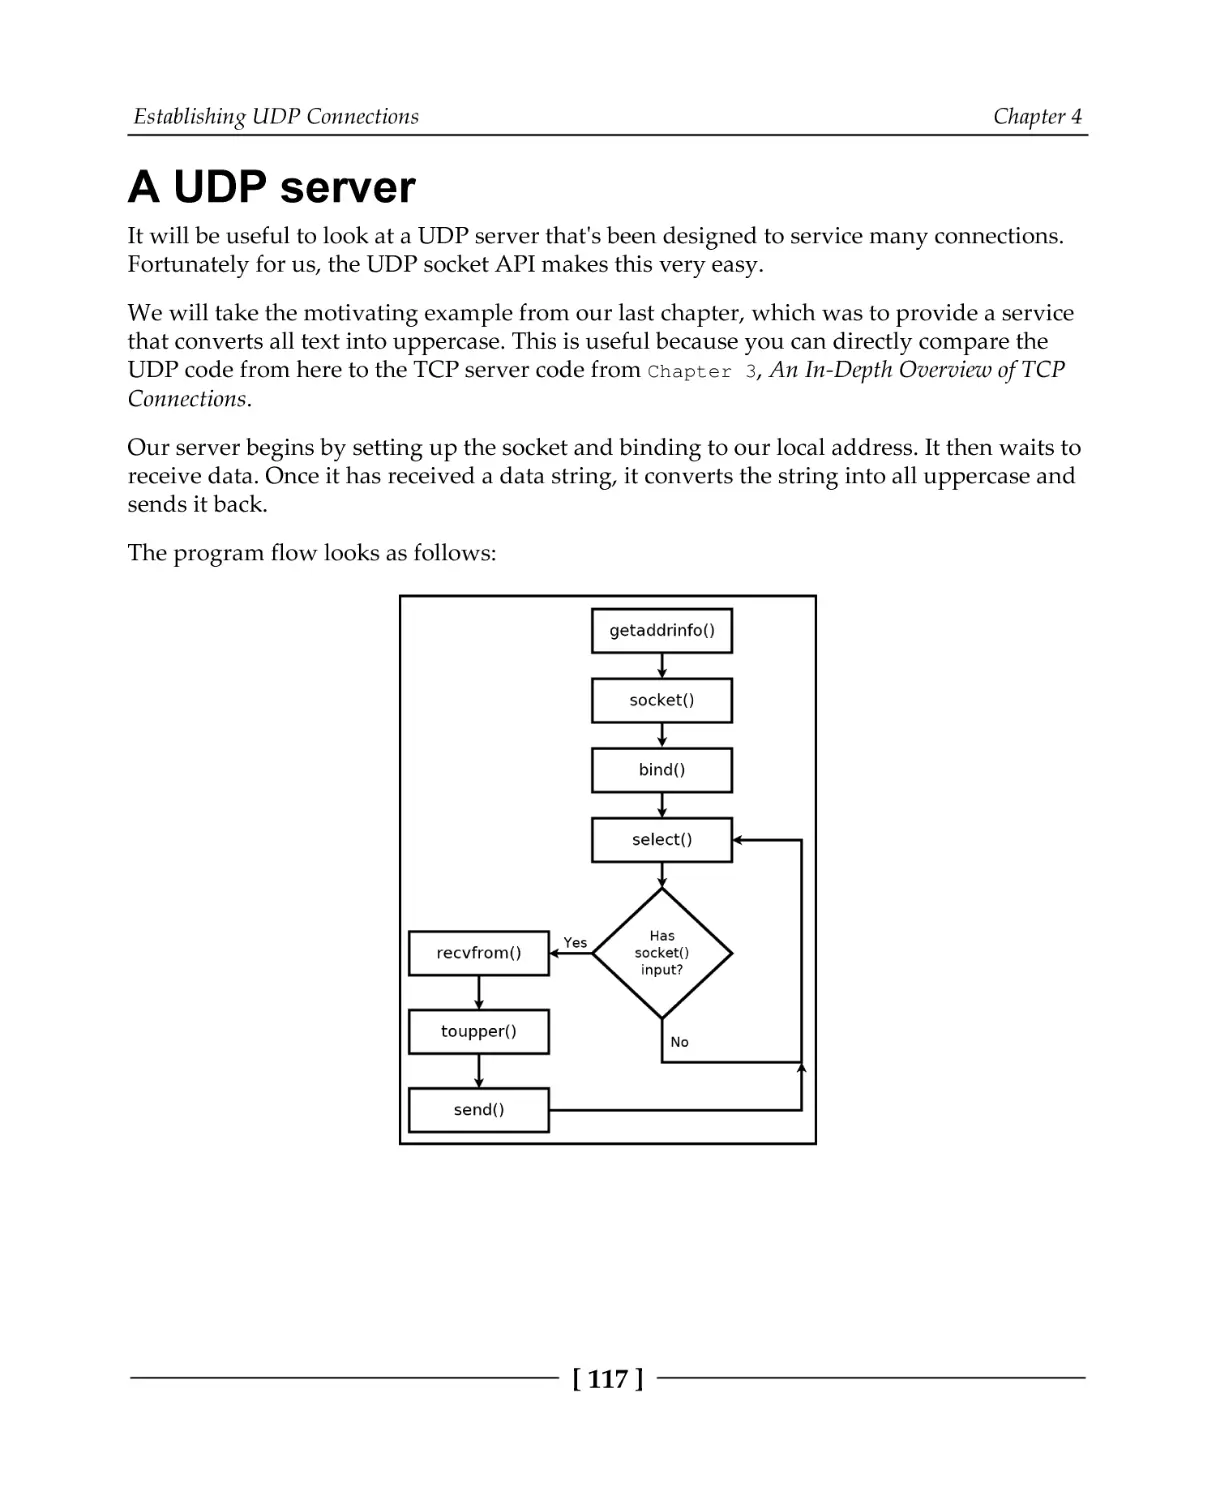
A first UDP client/server
A simple UDP server
A simple UDP client
A UDP server
Summary
Questions
[ ii ]
52
52
53
53
53
54
55
64
66
68
68
69
70
71
72
73
73
75
75
77
78
78
78
80
88
90
96
98
99
100
101
102
102
104
105
106
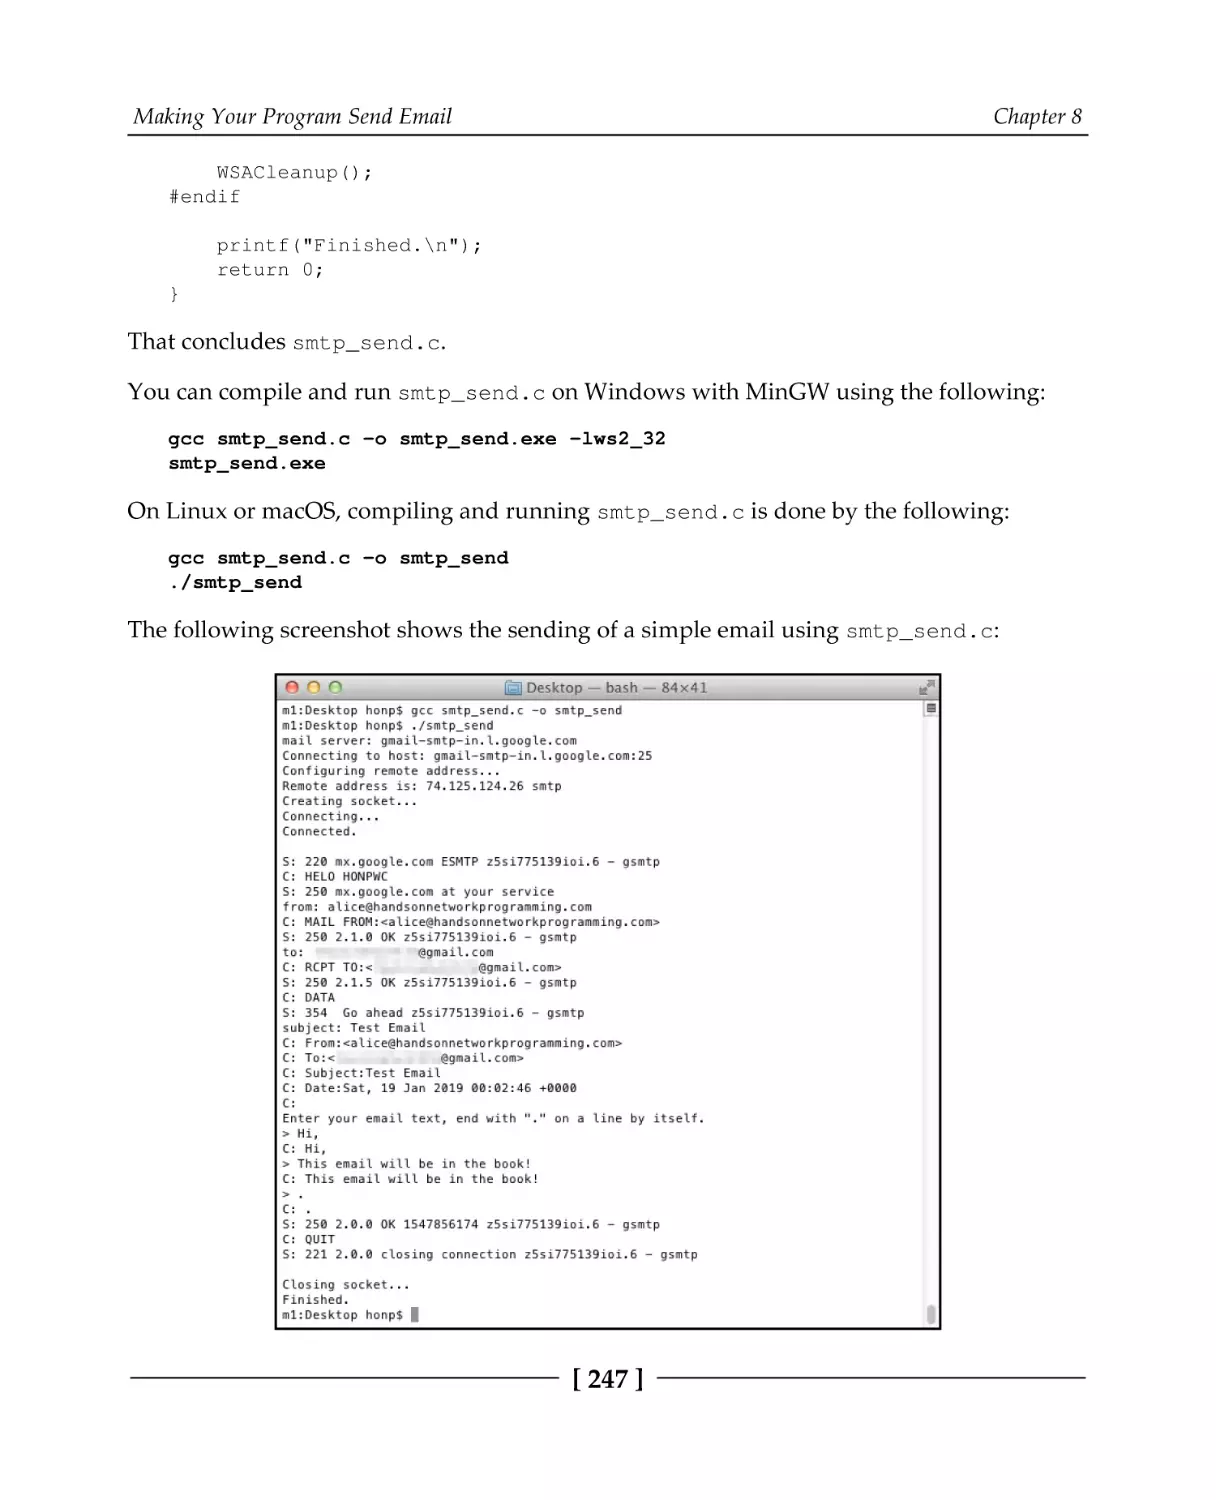
108
108
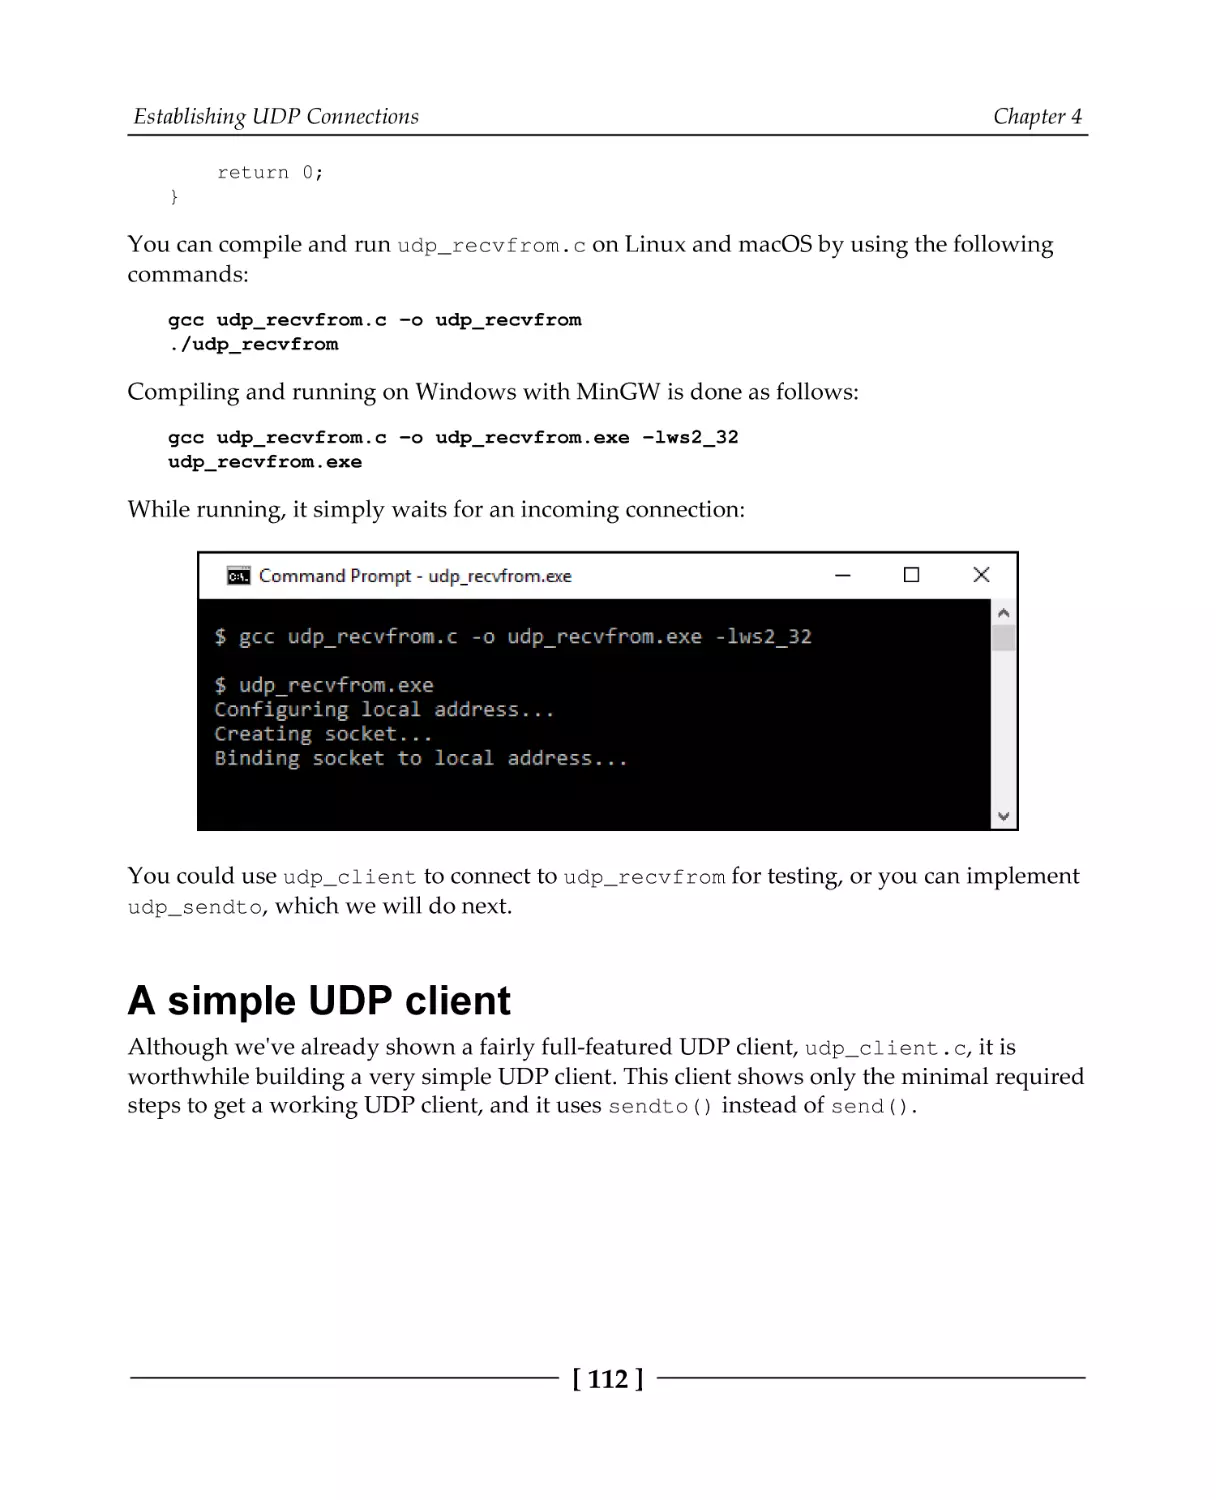
112
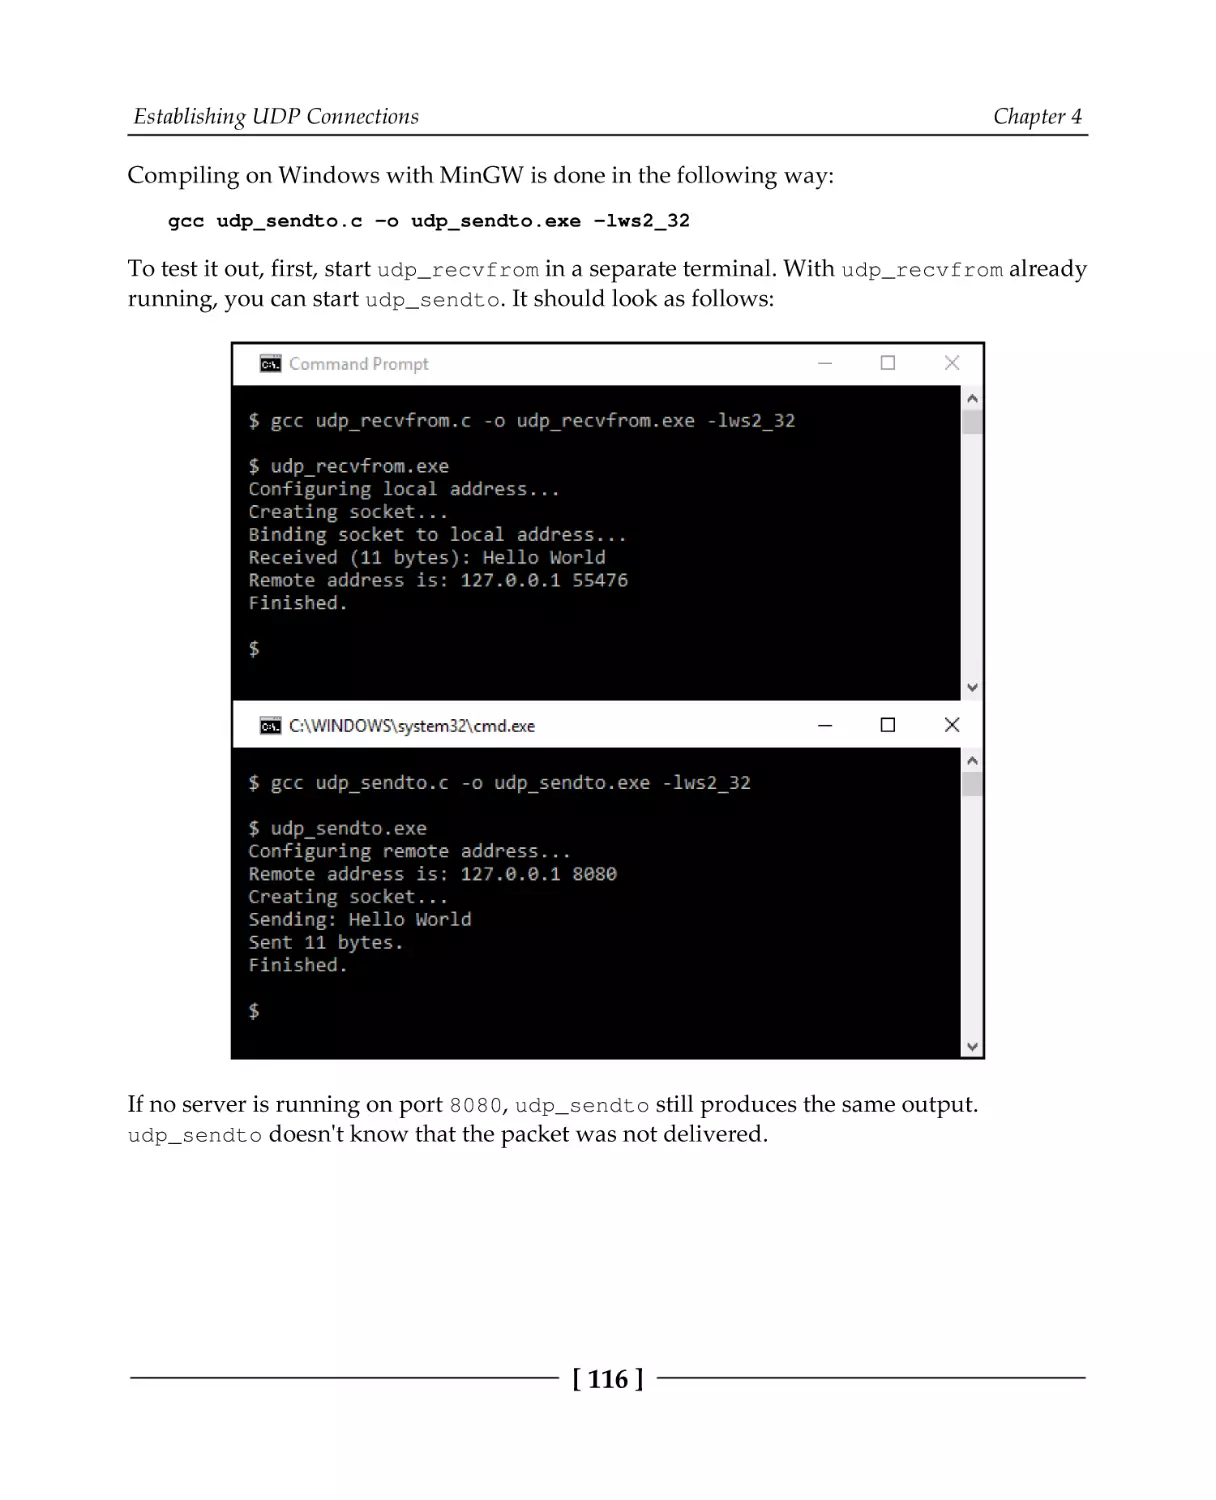
117
123
123
Table of Contents
Chapter 5: Hostname Resolution and DNS
Technical requirements
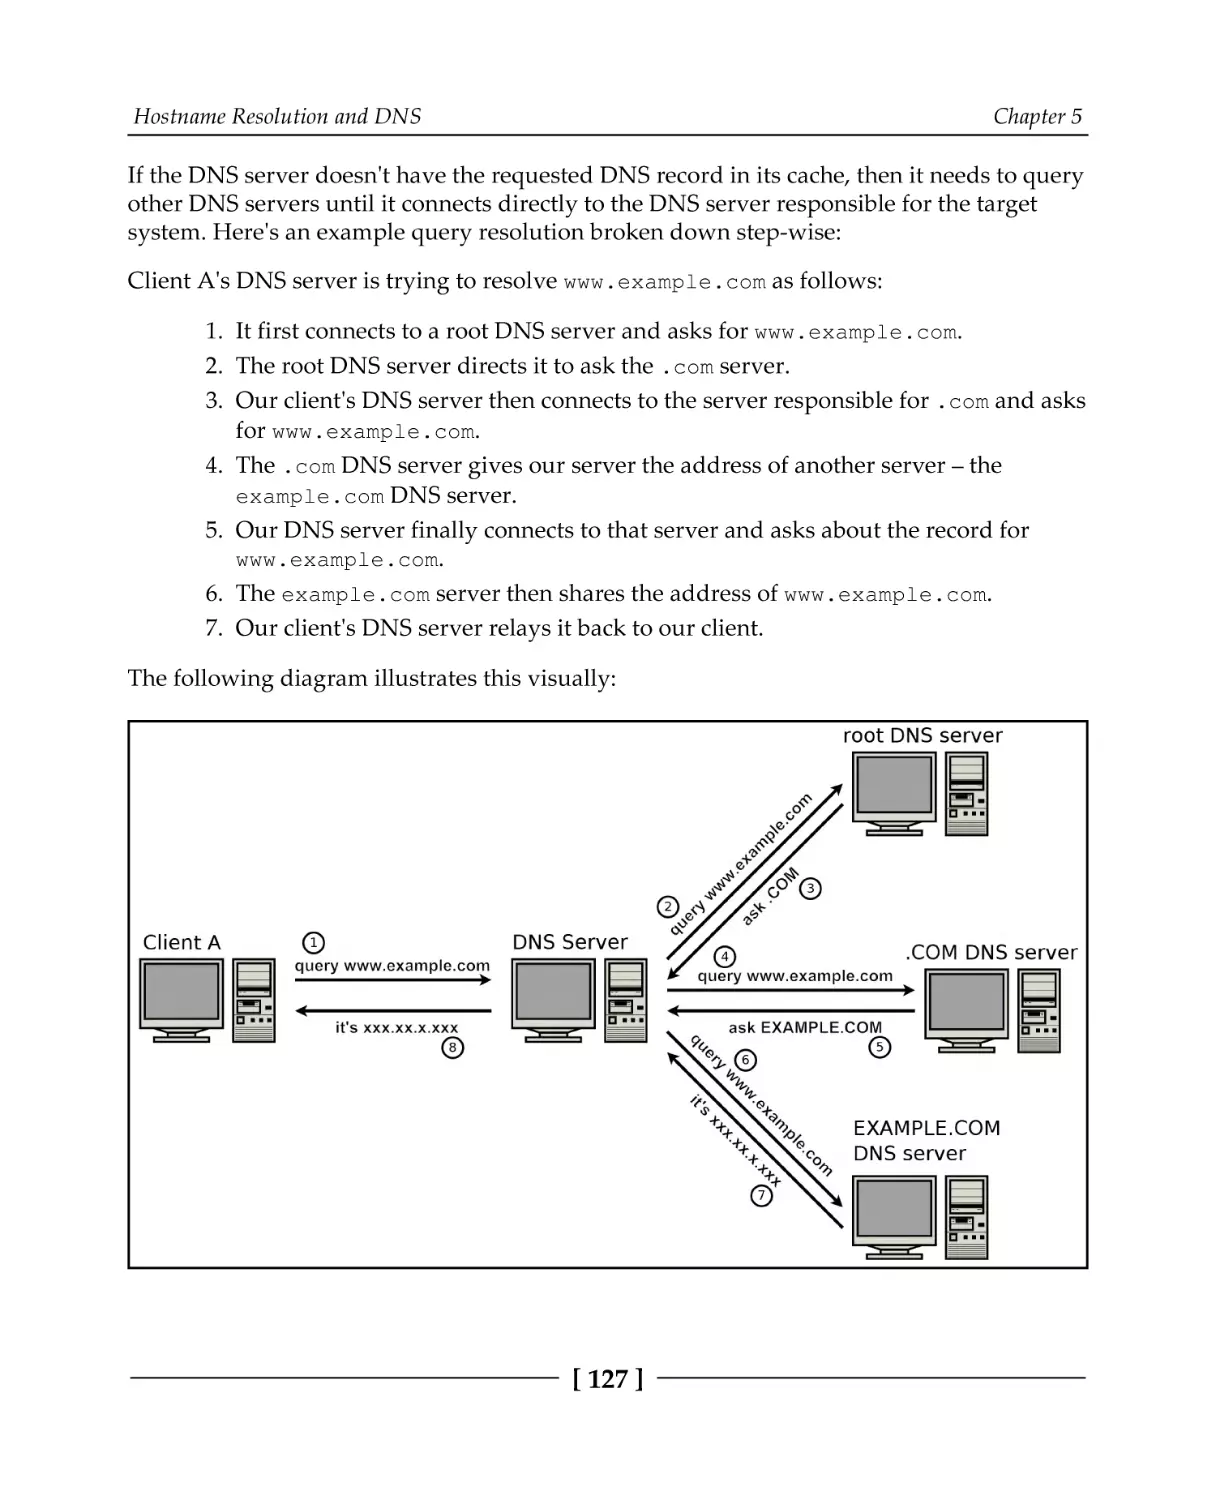
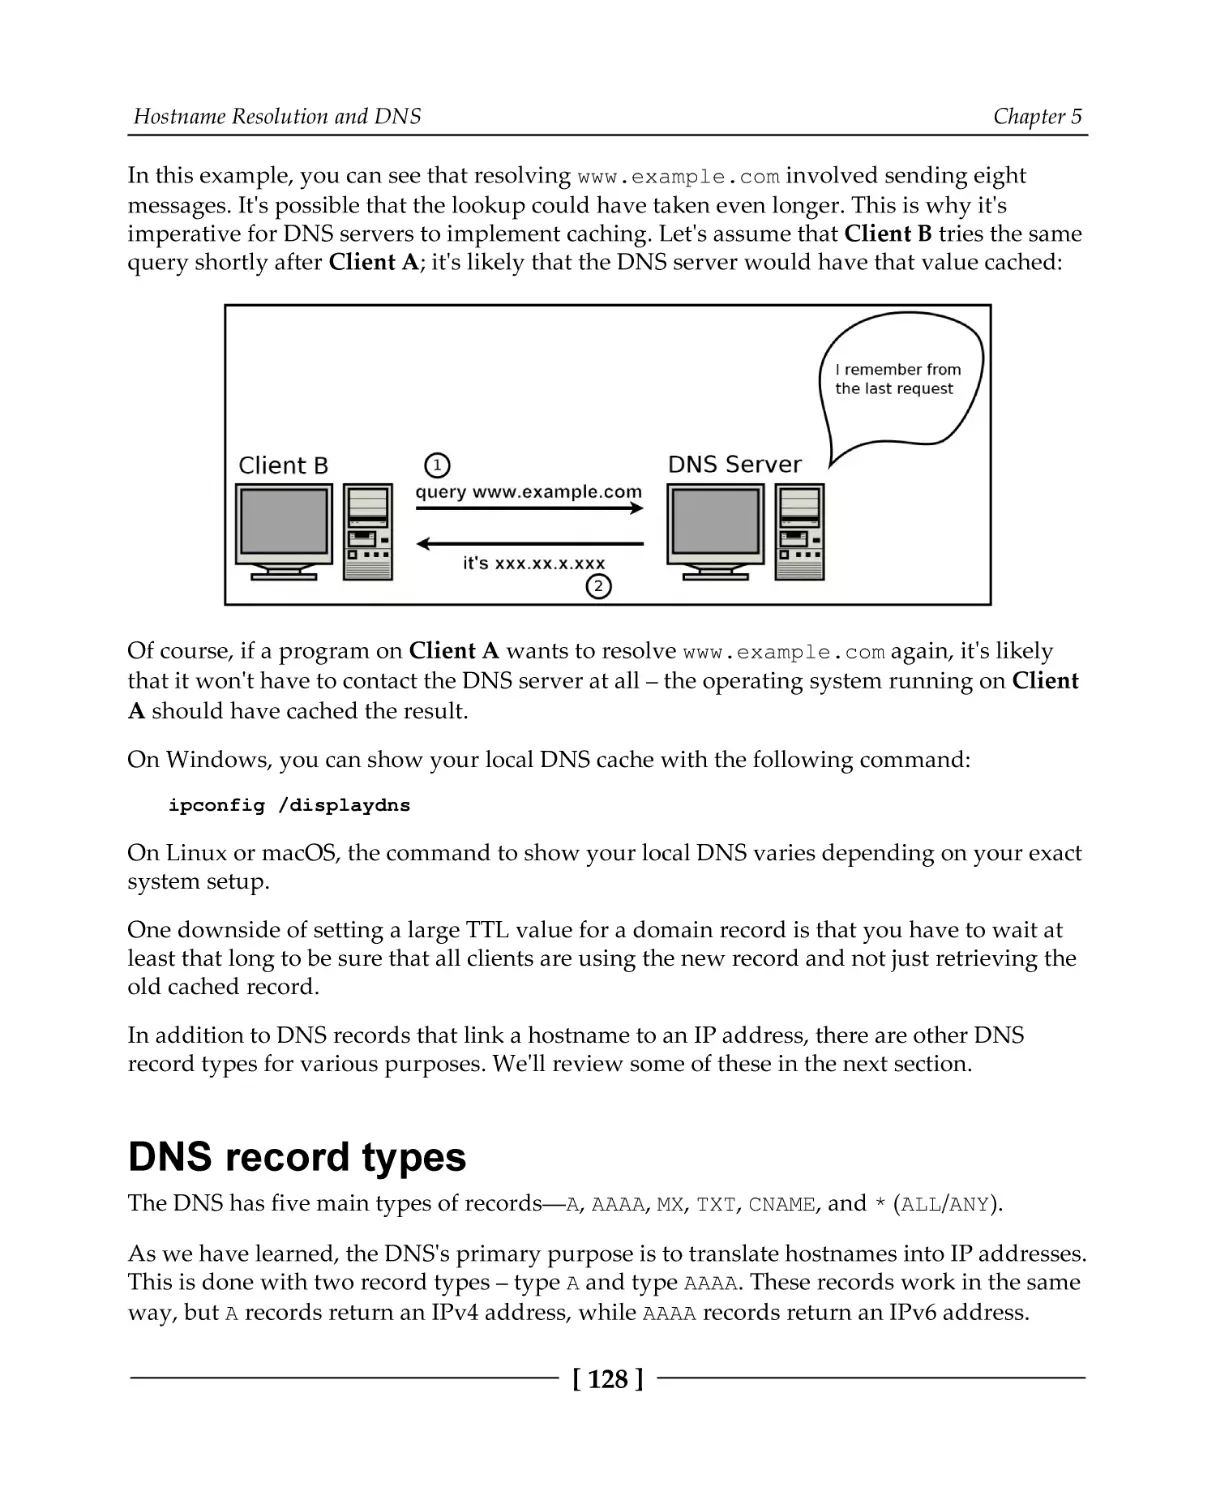
How hostname resolution works
DNS record types
DNS security
Name/address translation functions
Using getaddrinfo()
Using getnameinfo()
Alternative functions
IP lookup example program
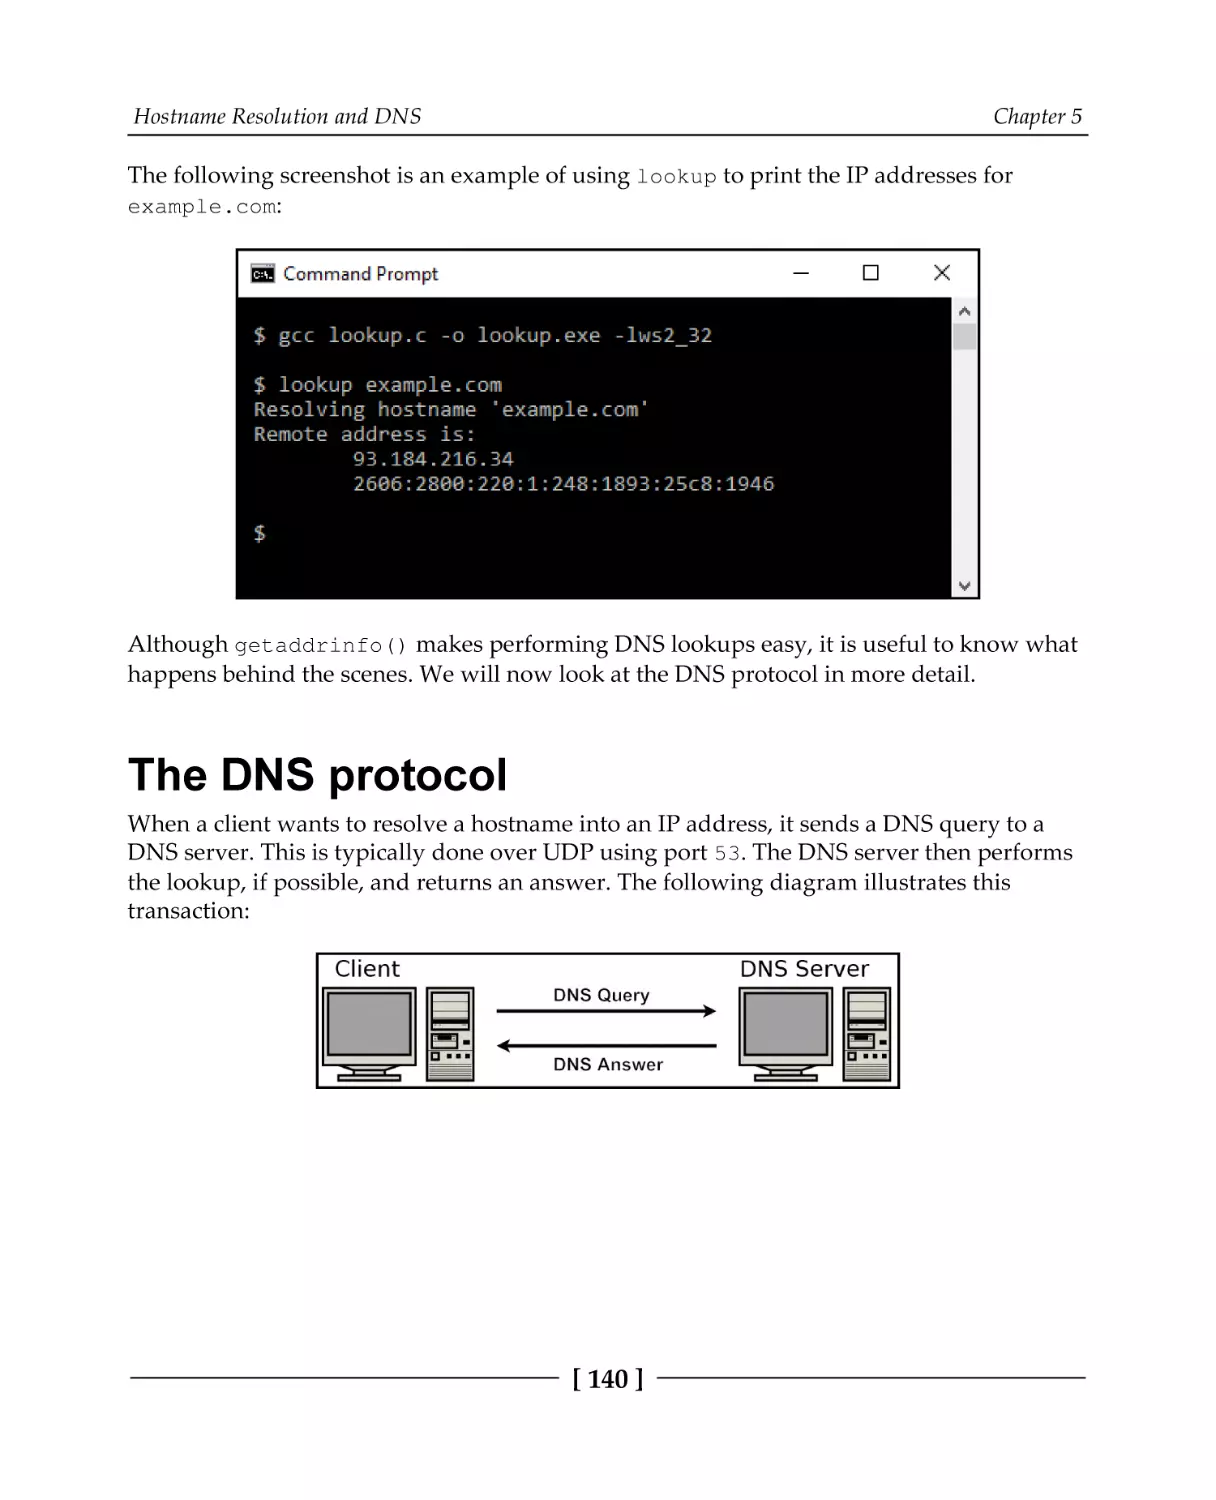
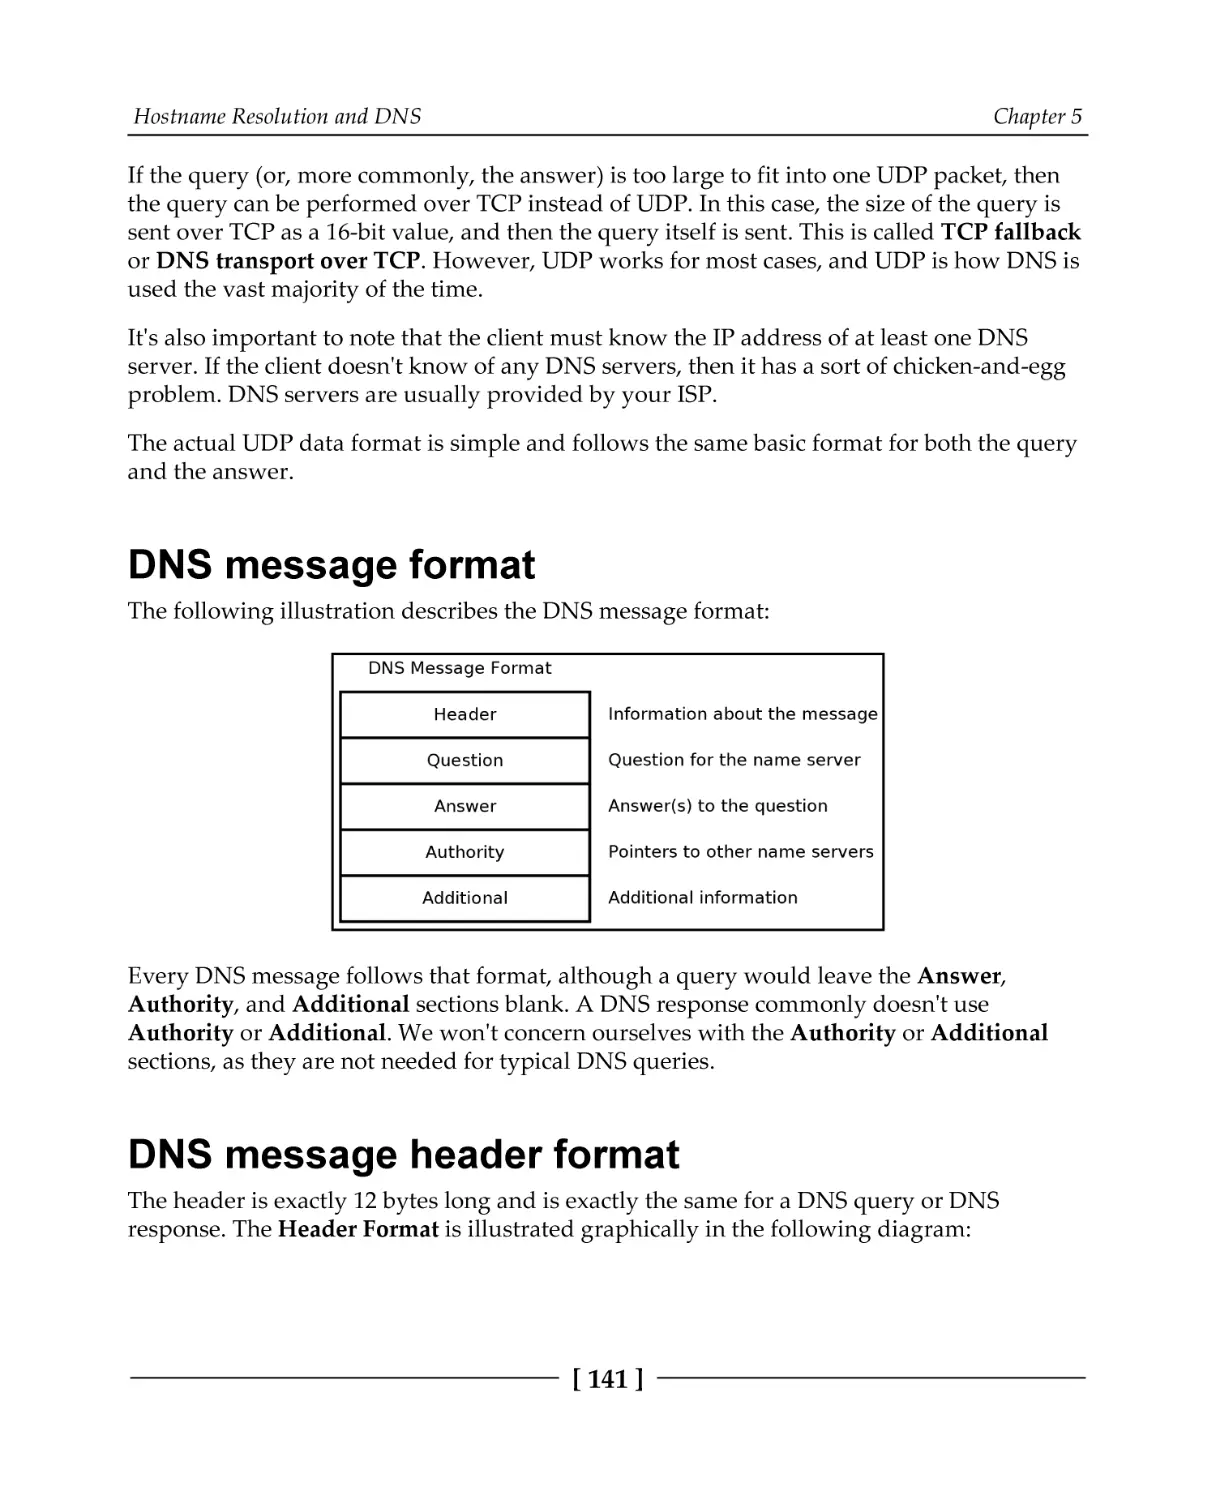
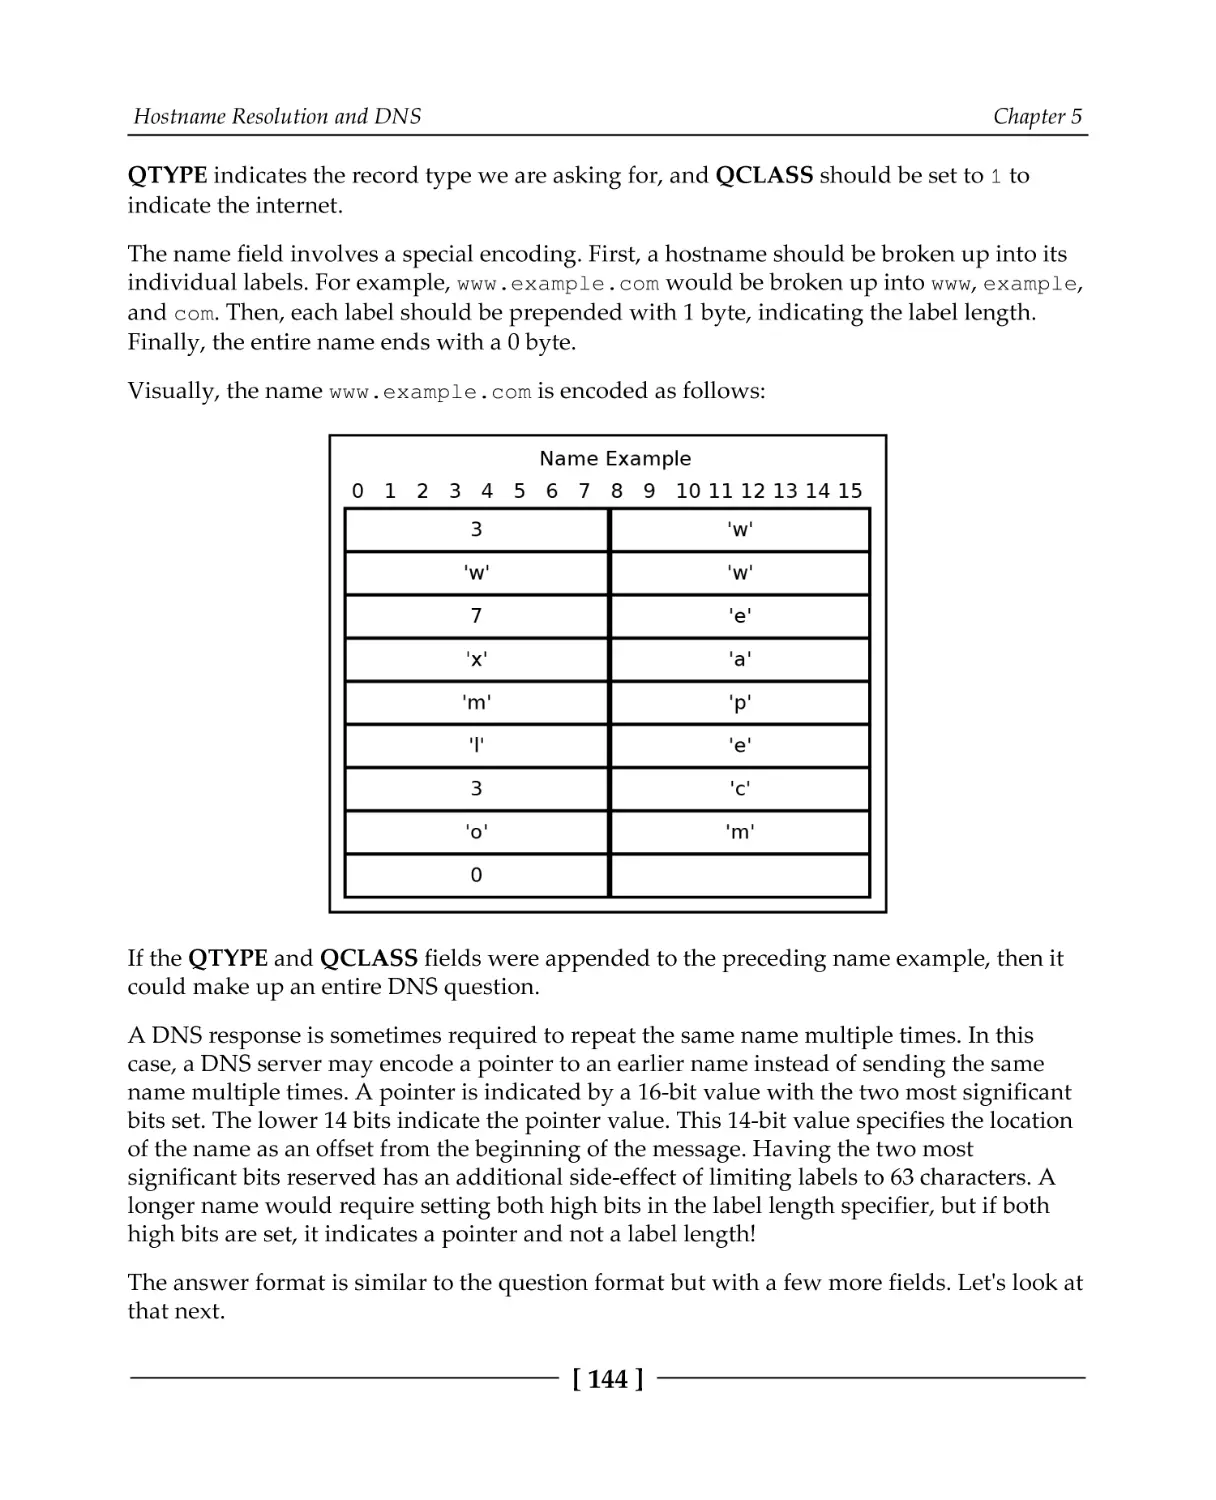
The DNS protocol
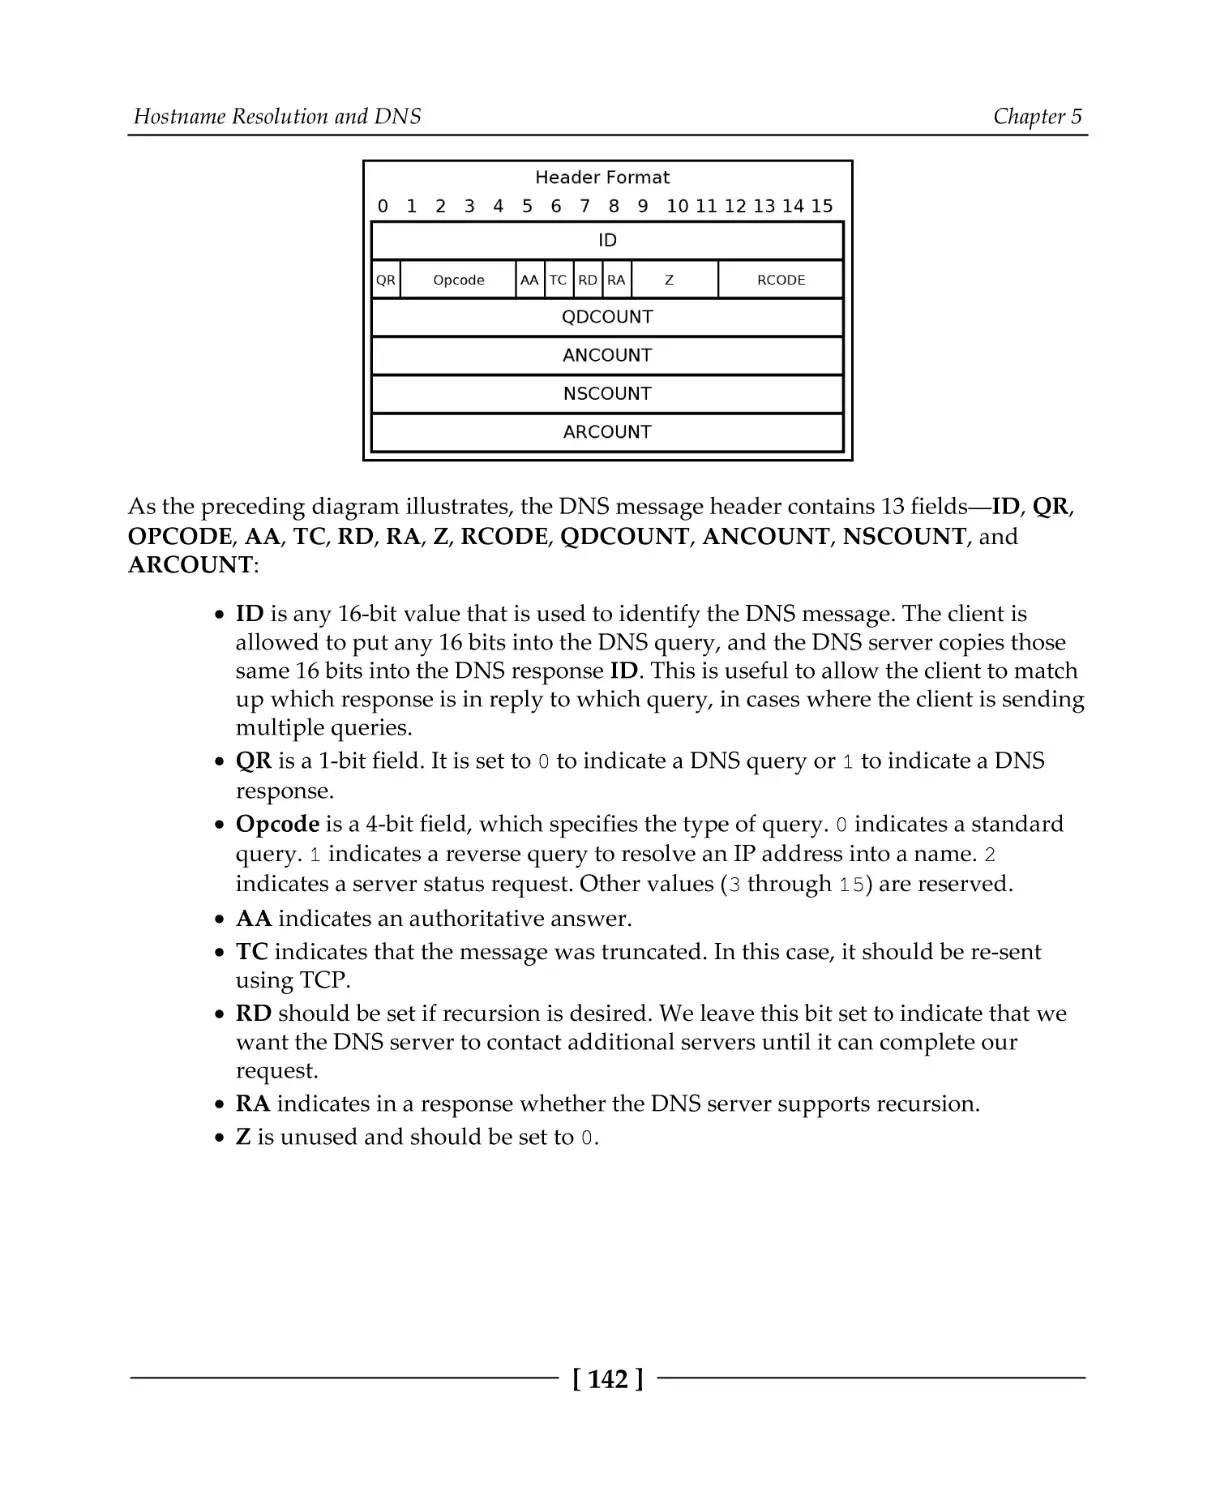
DNS message format
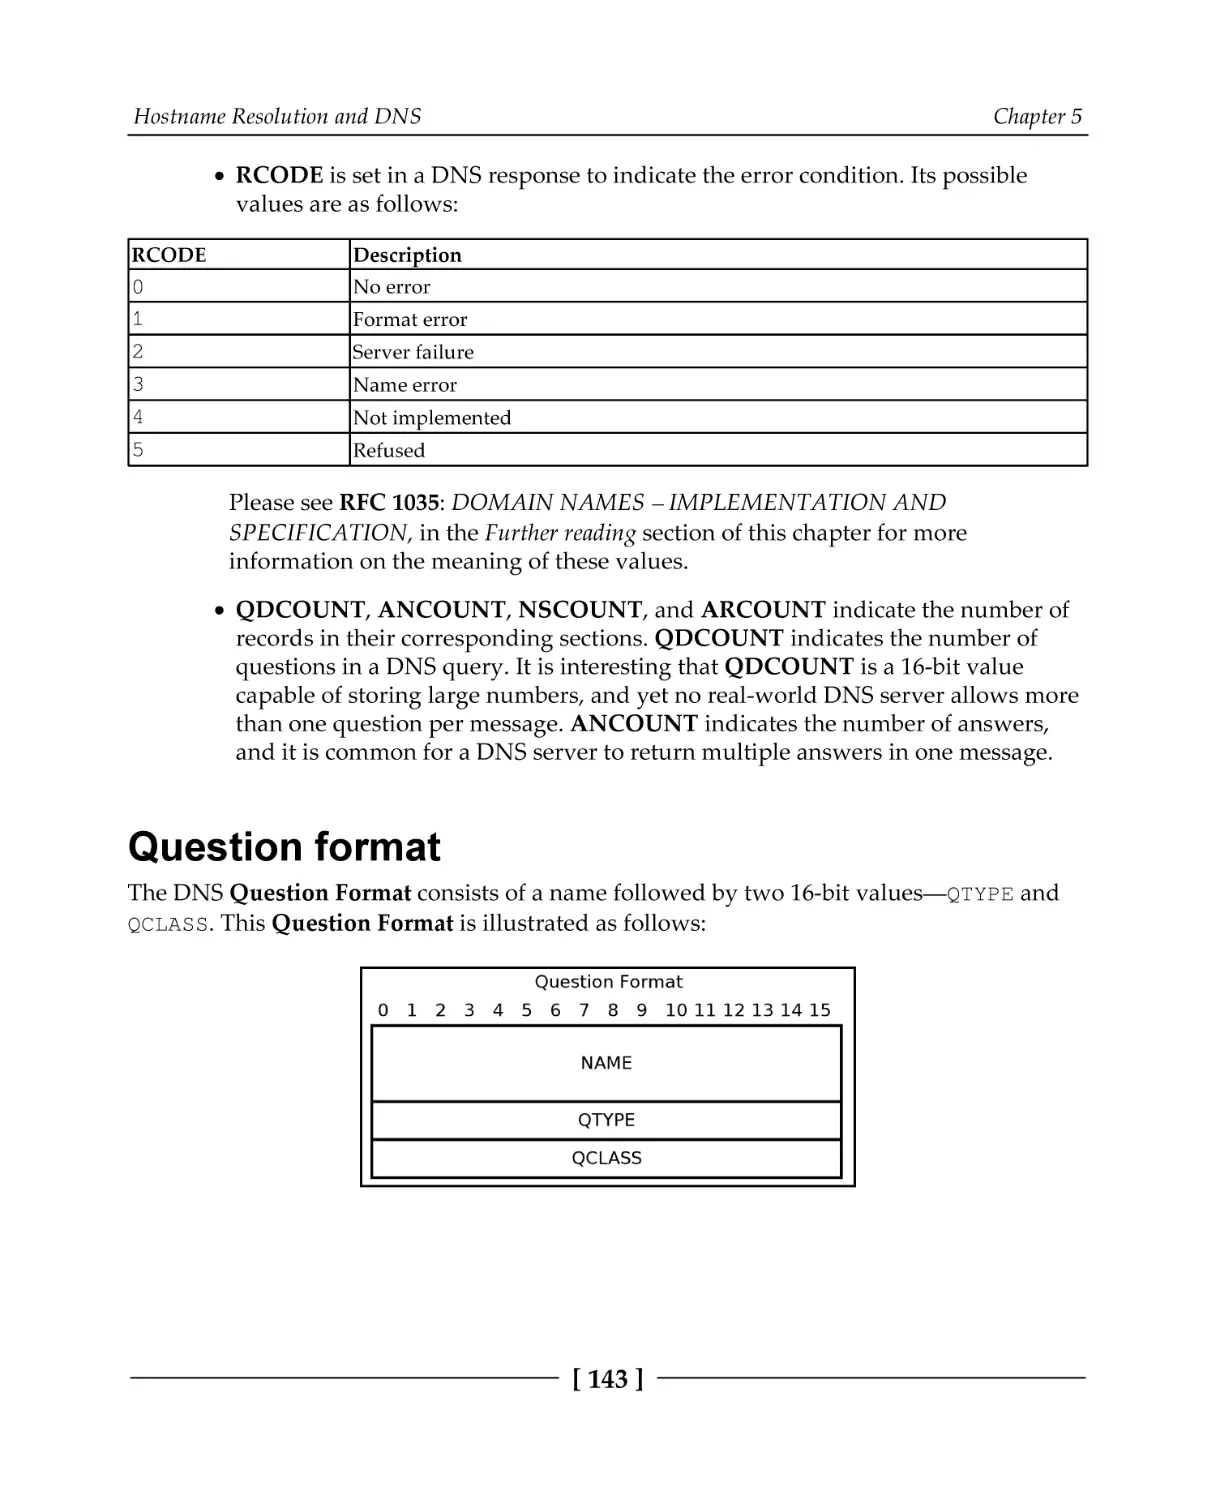
DNS message header format
Question format
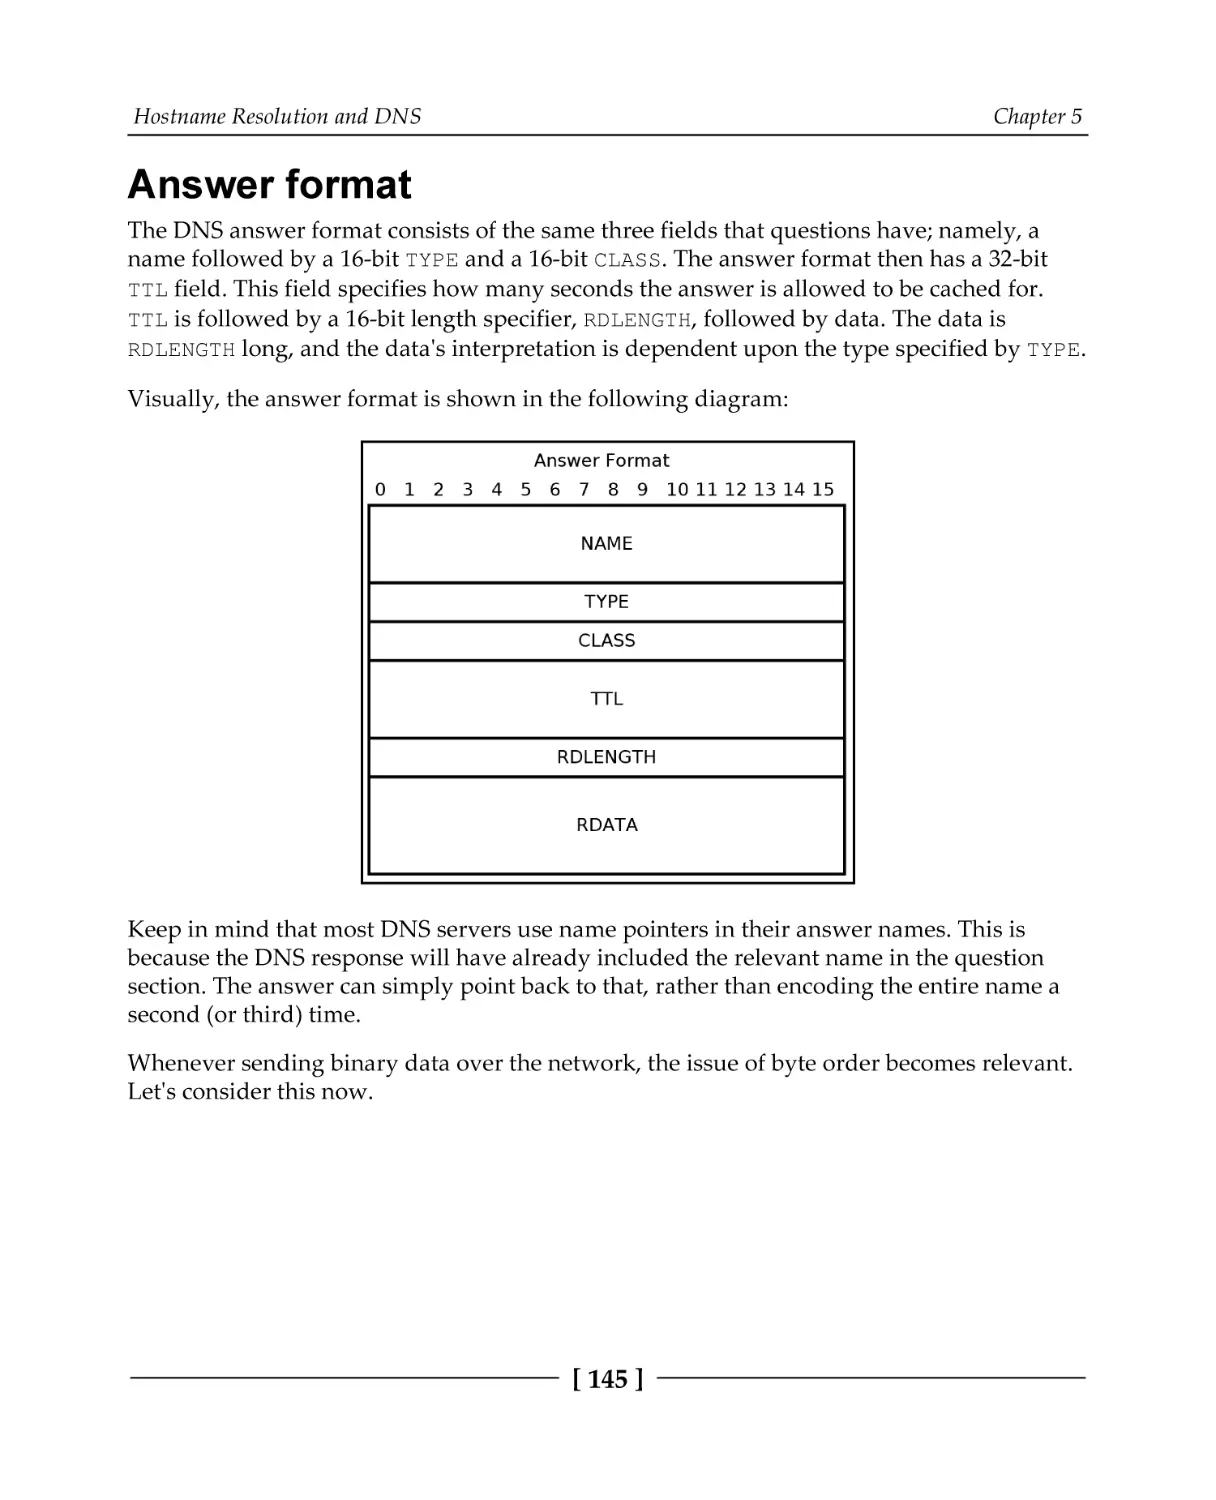
Answer format
Endianness
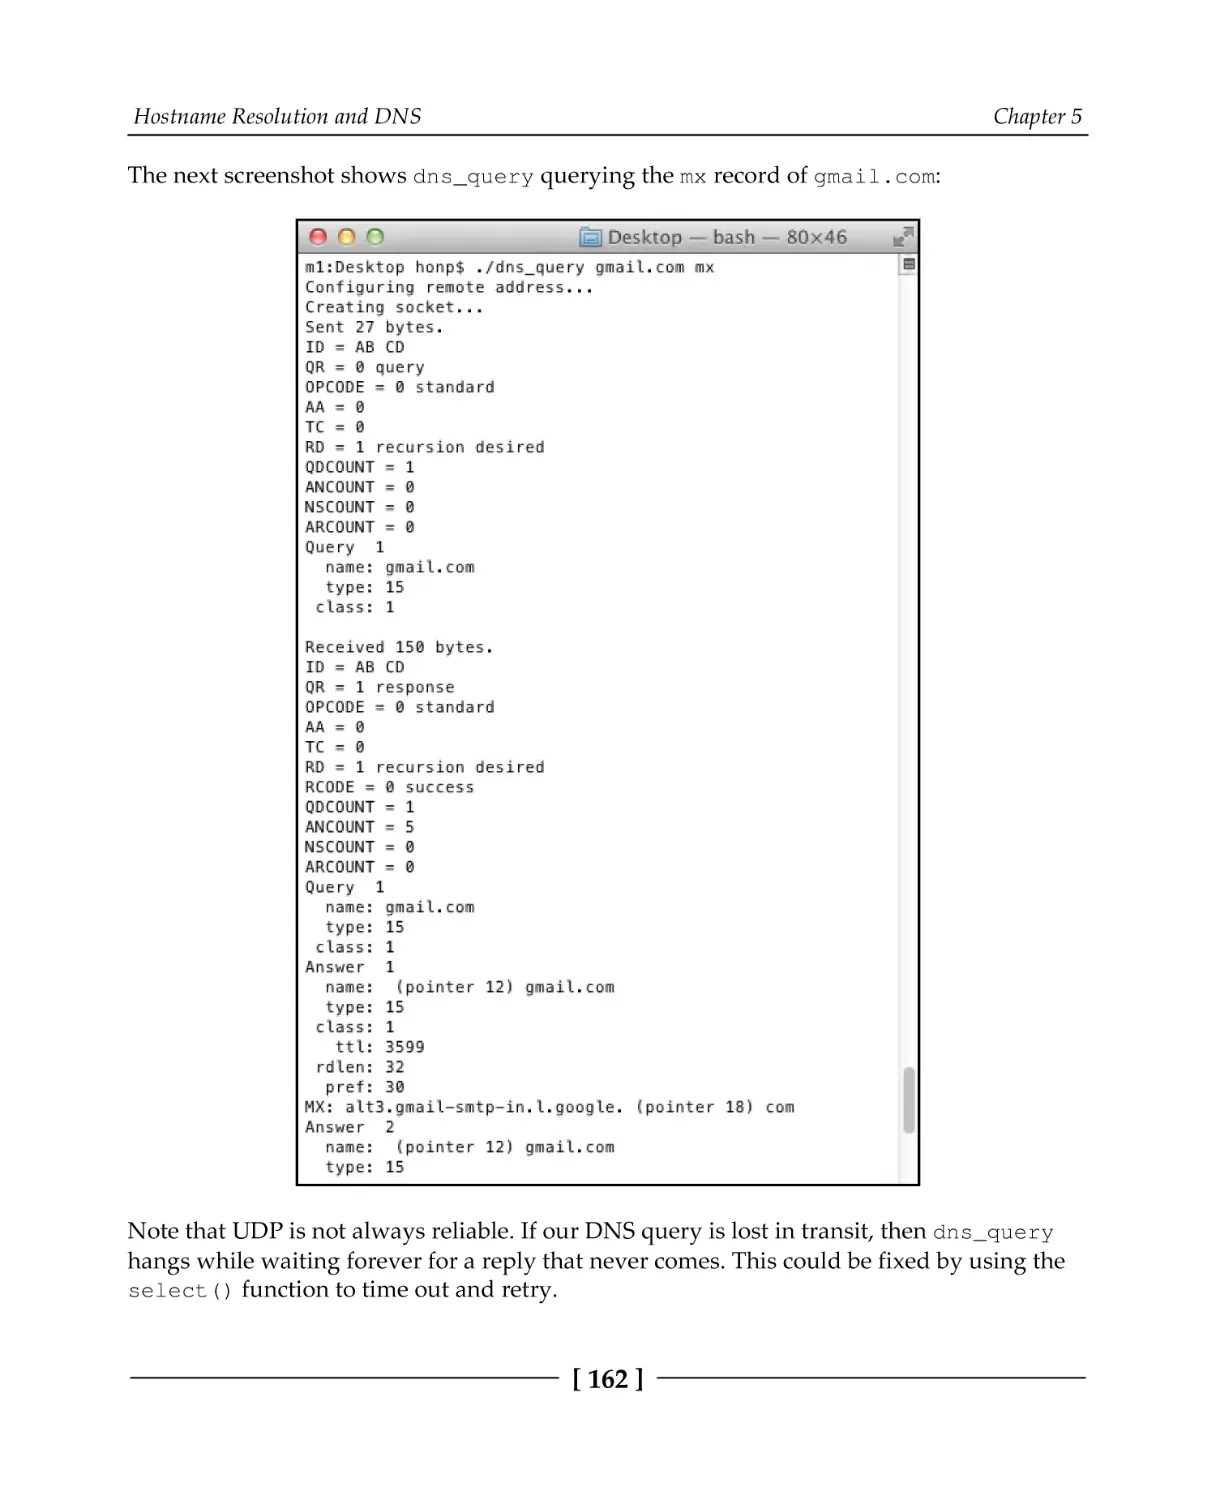
A simple DNS query
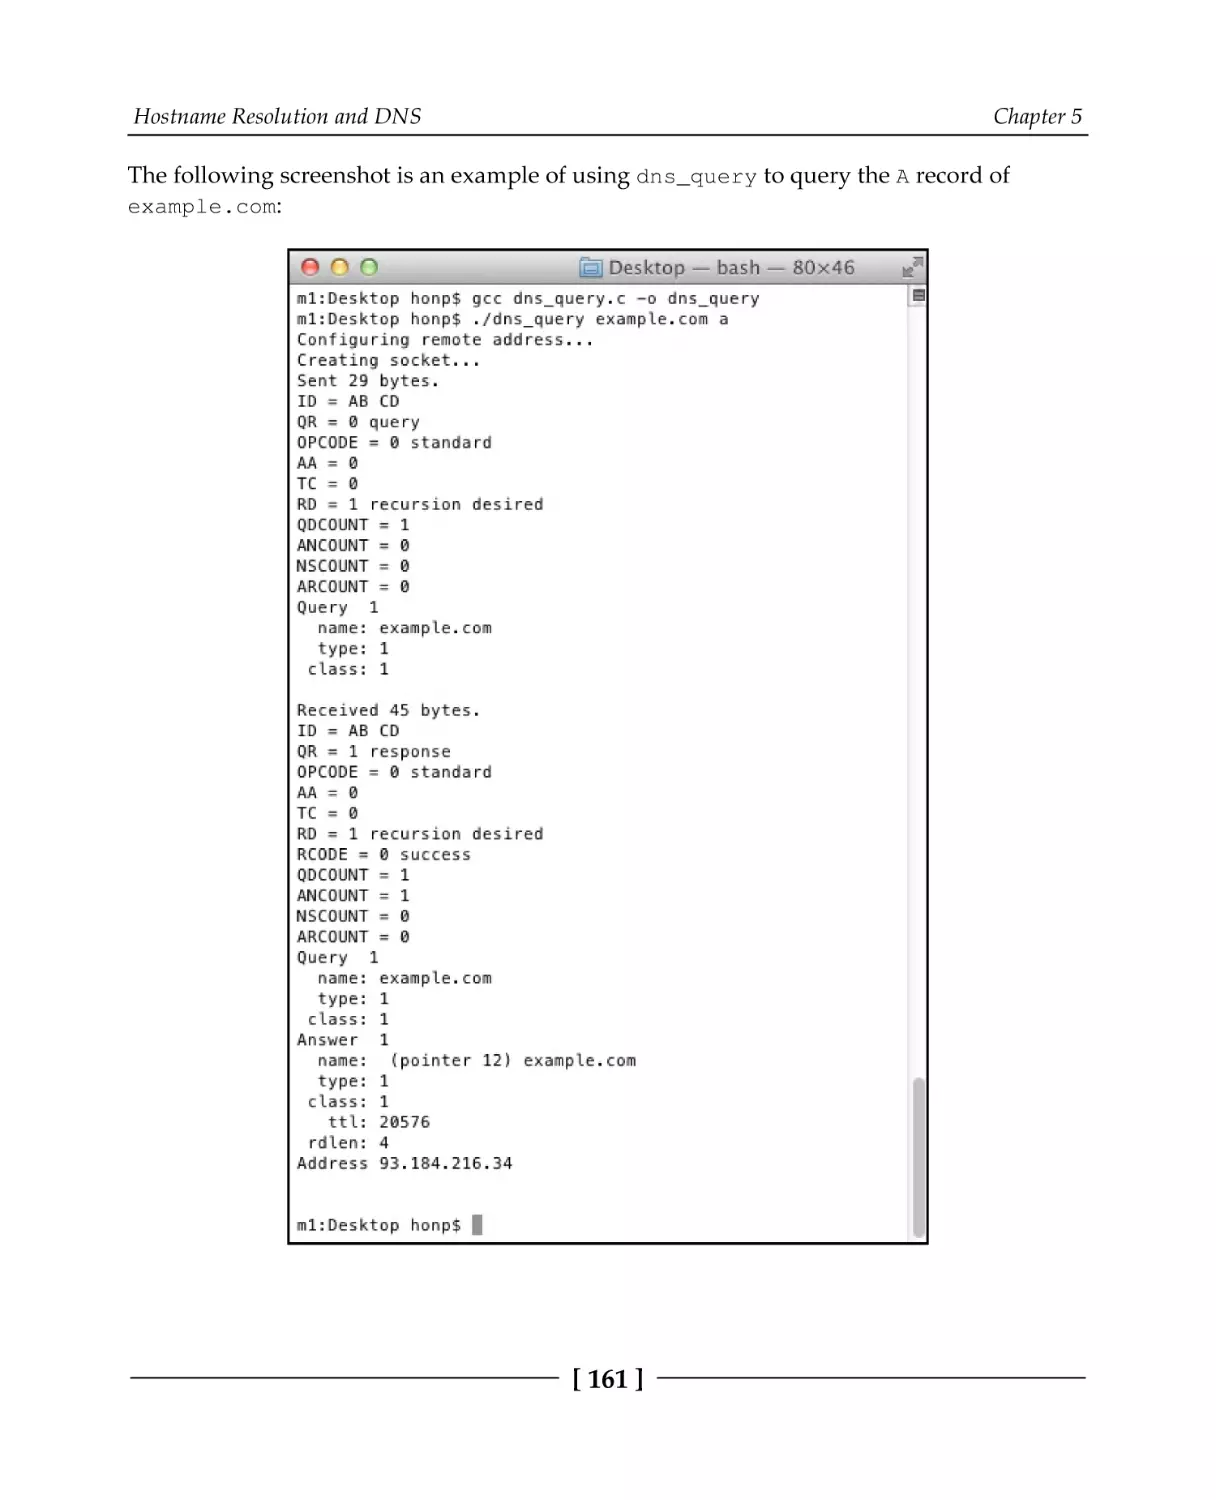
A DNS query program
Printing a DNS message name
Printing a DNS message
Sending the query
Summary
Questions
Further reading
124
124
126
128
130
131
131
134
136
137
140
141
141
143
145
146
146
147
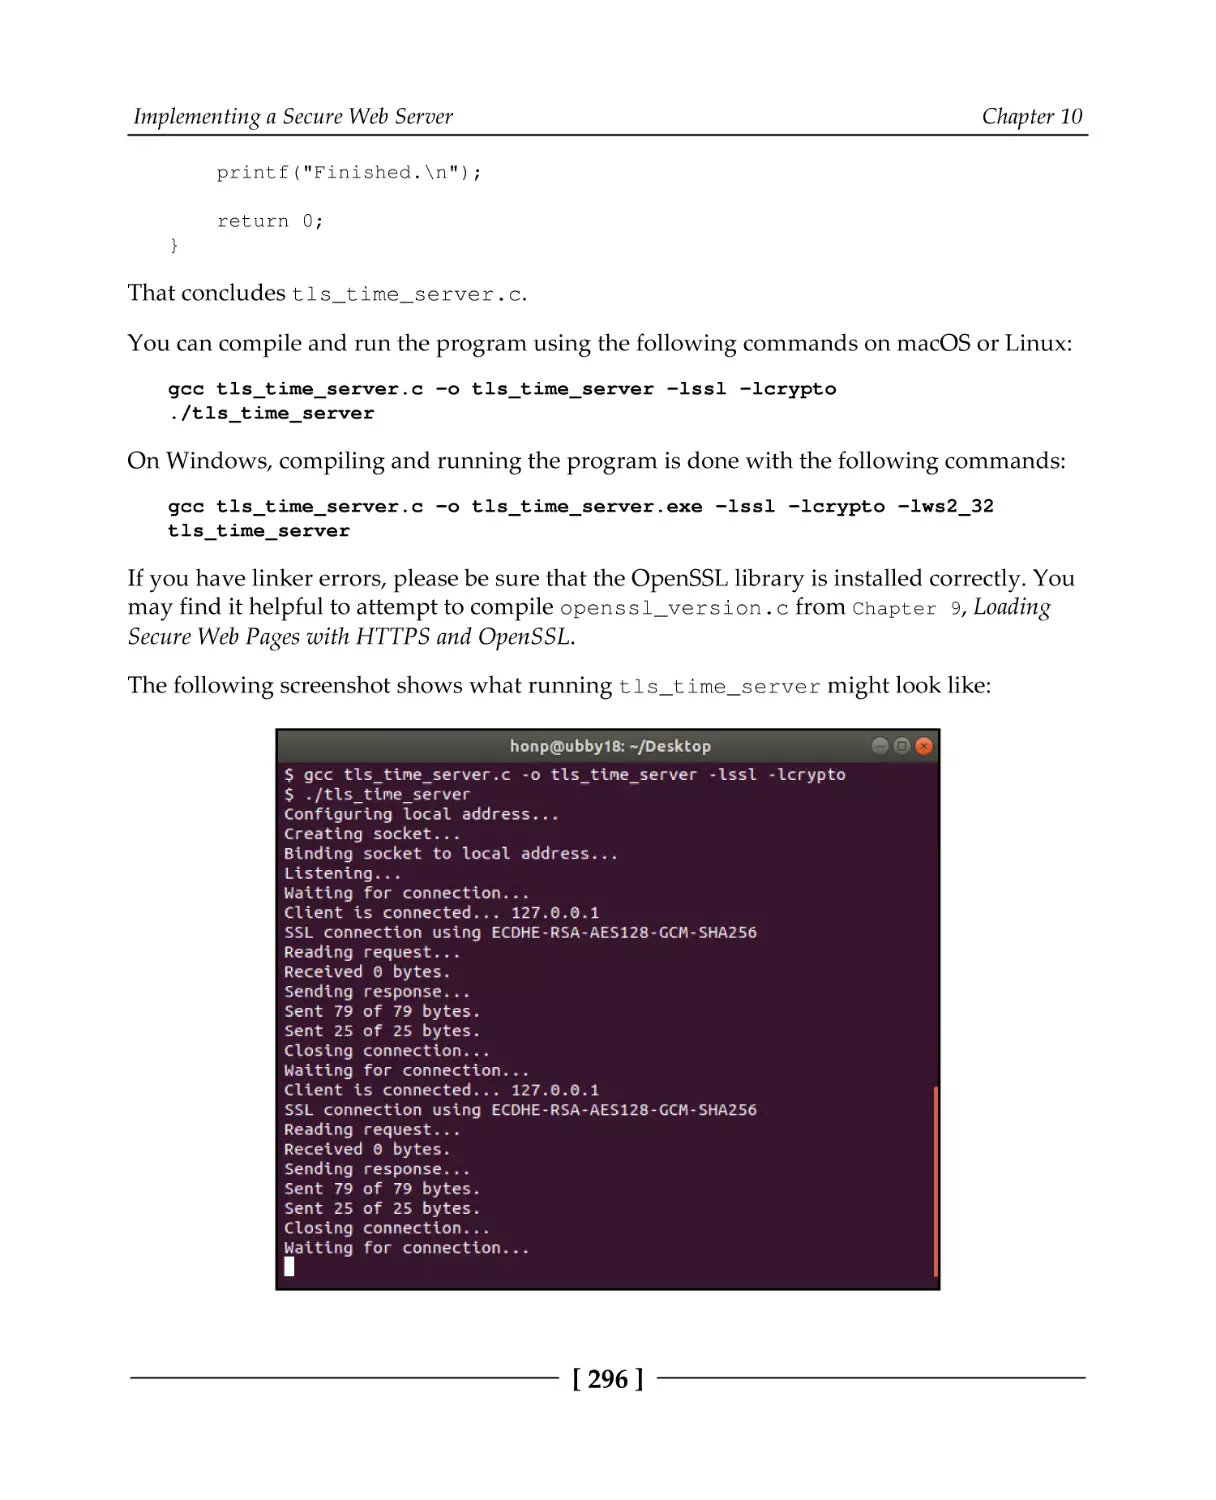
147
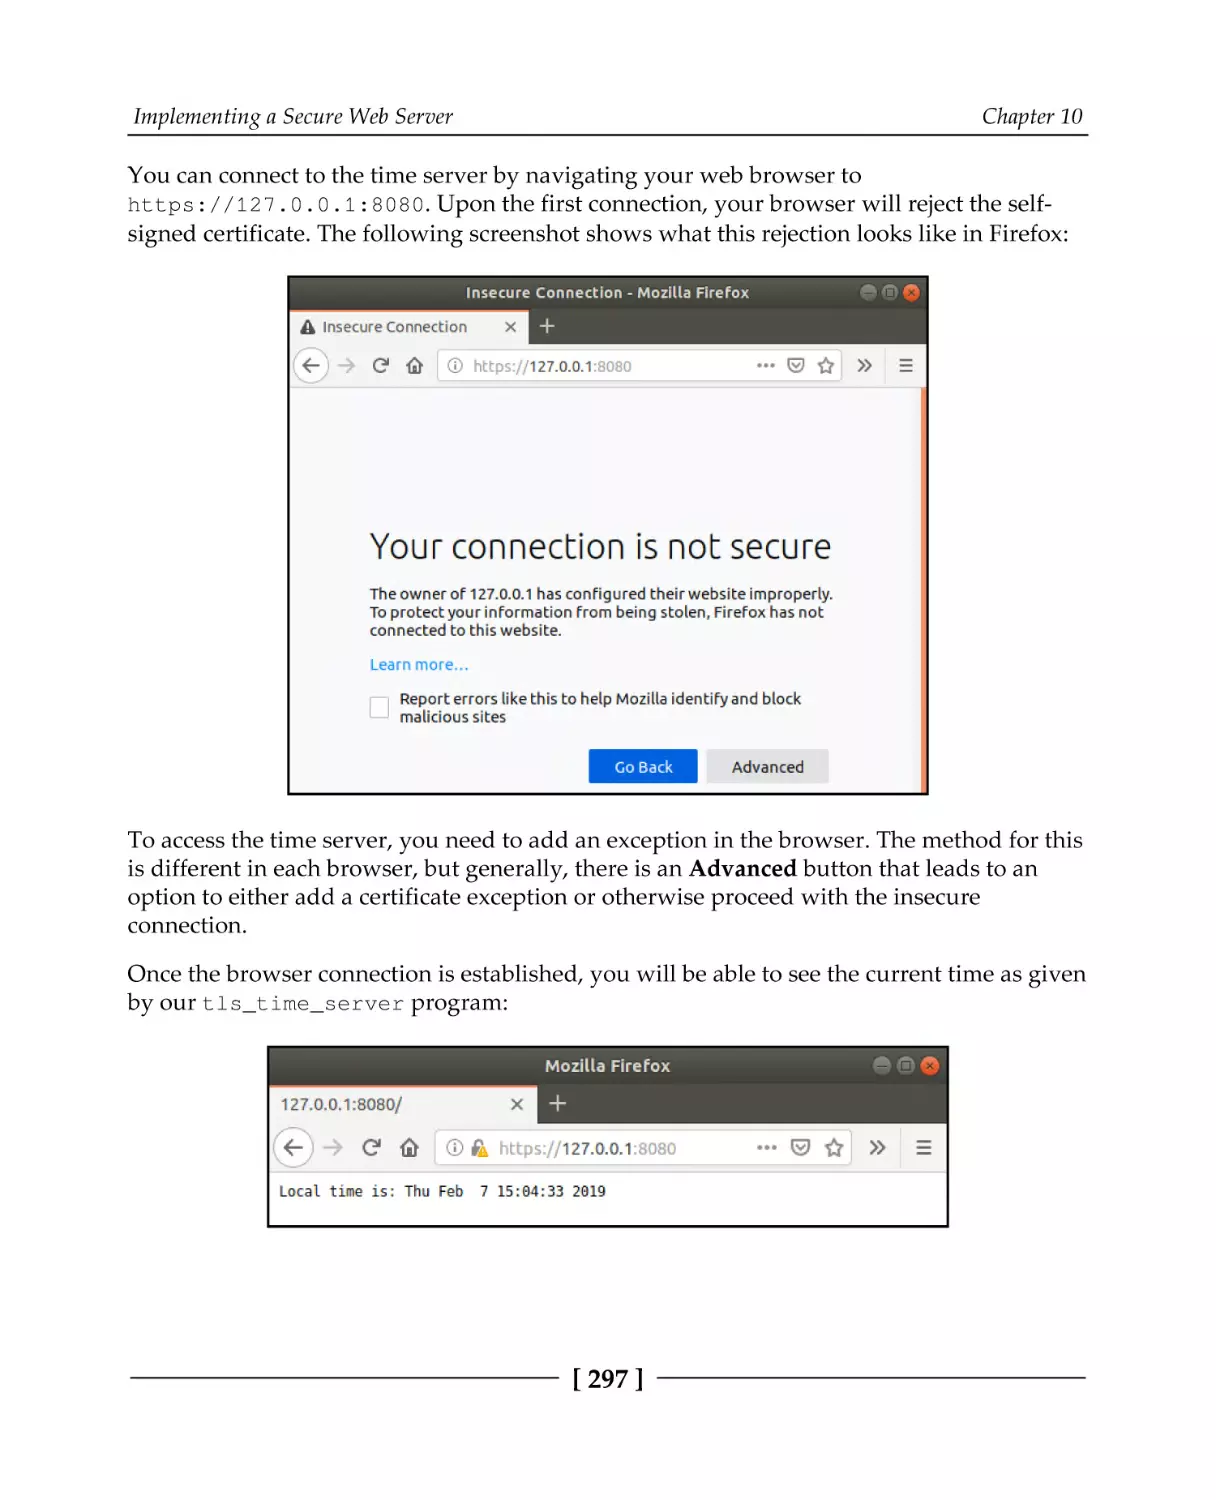
149
155
163
163
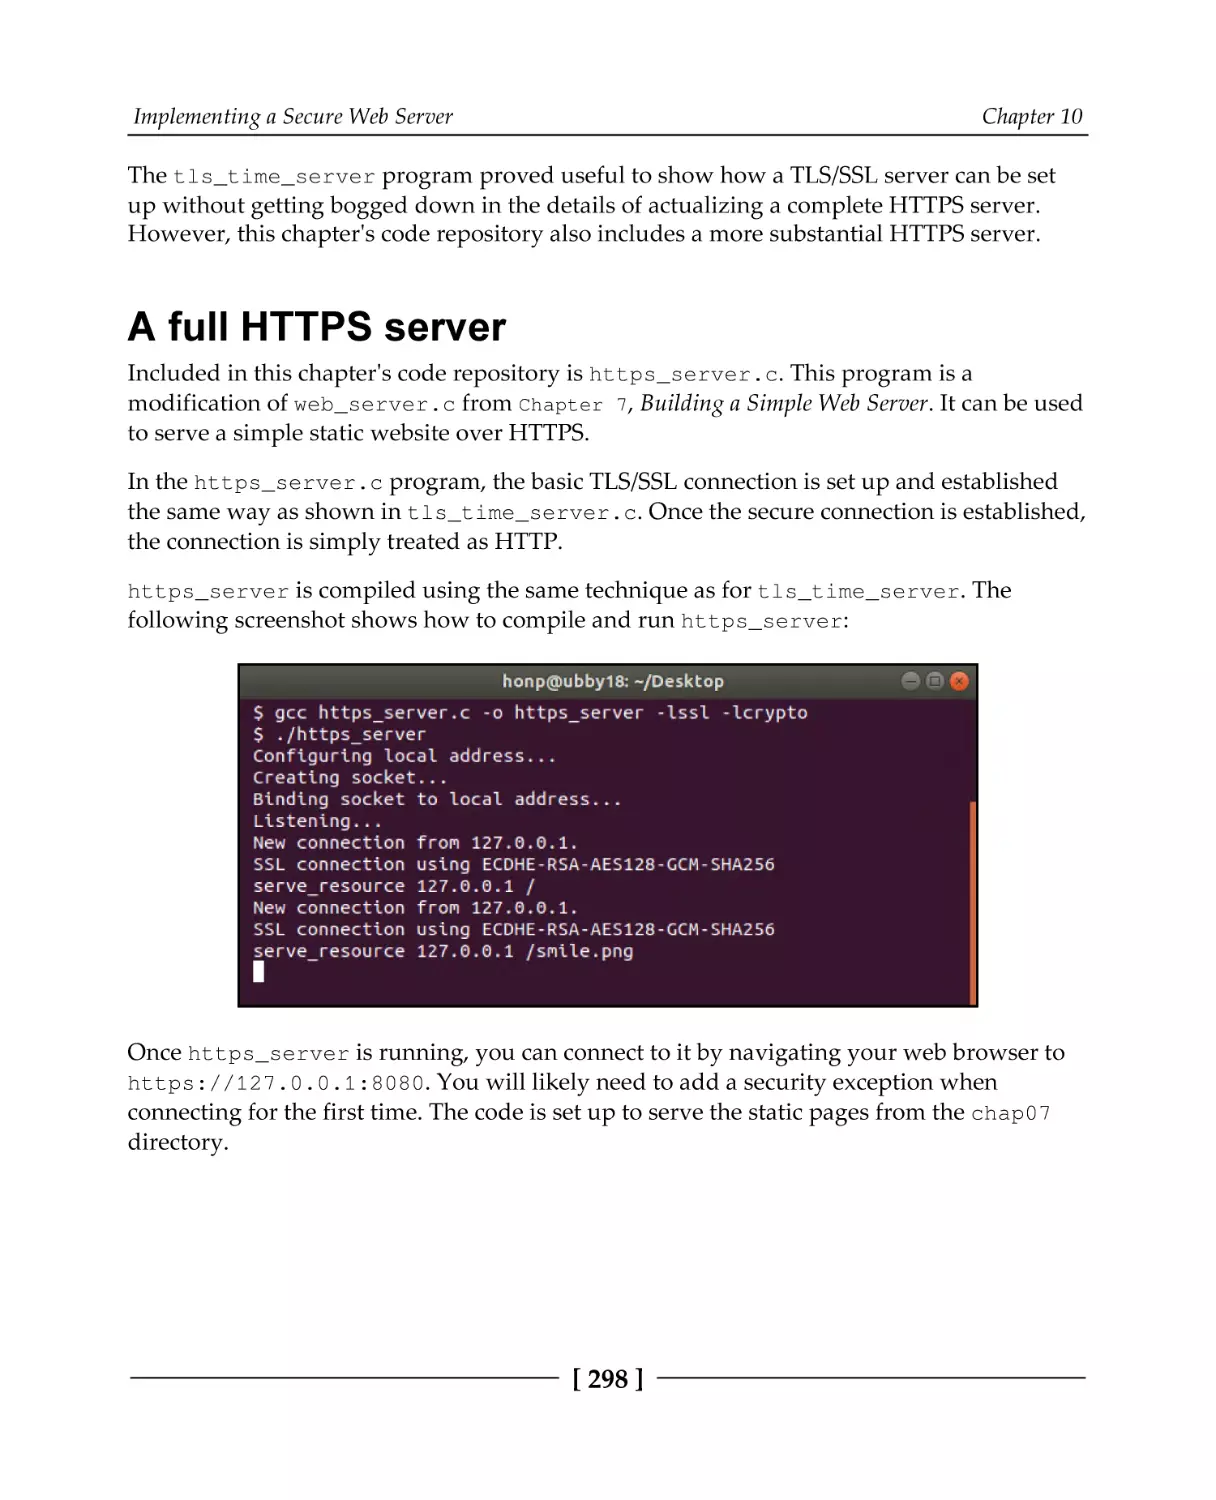
164
Section 2: An Overview of Application Layer
Protocols
Chapter 6: Building a Simple Web Client
Technical requirements
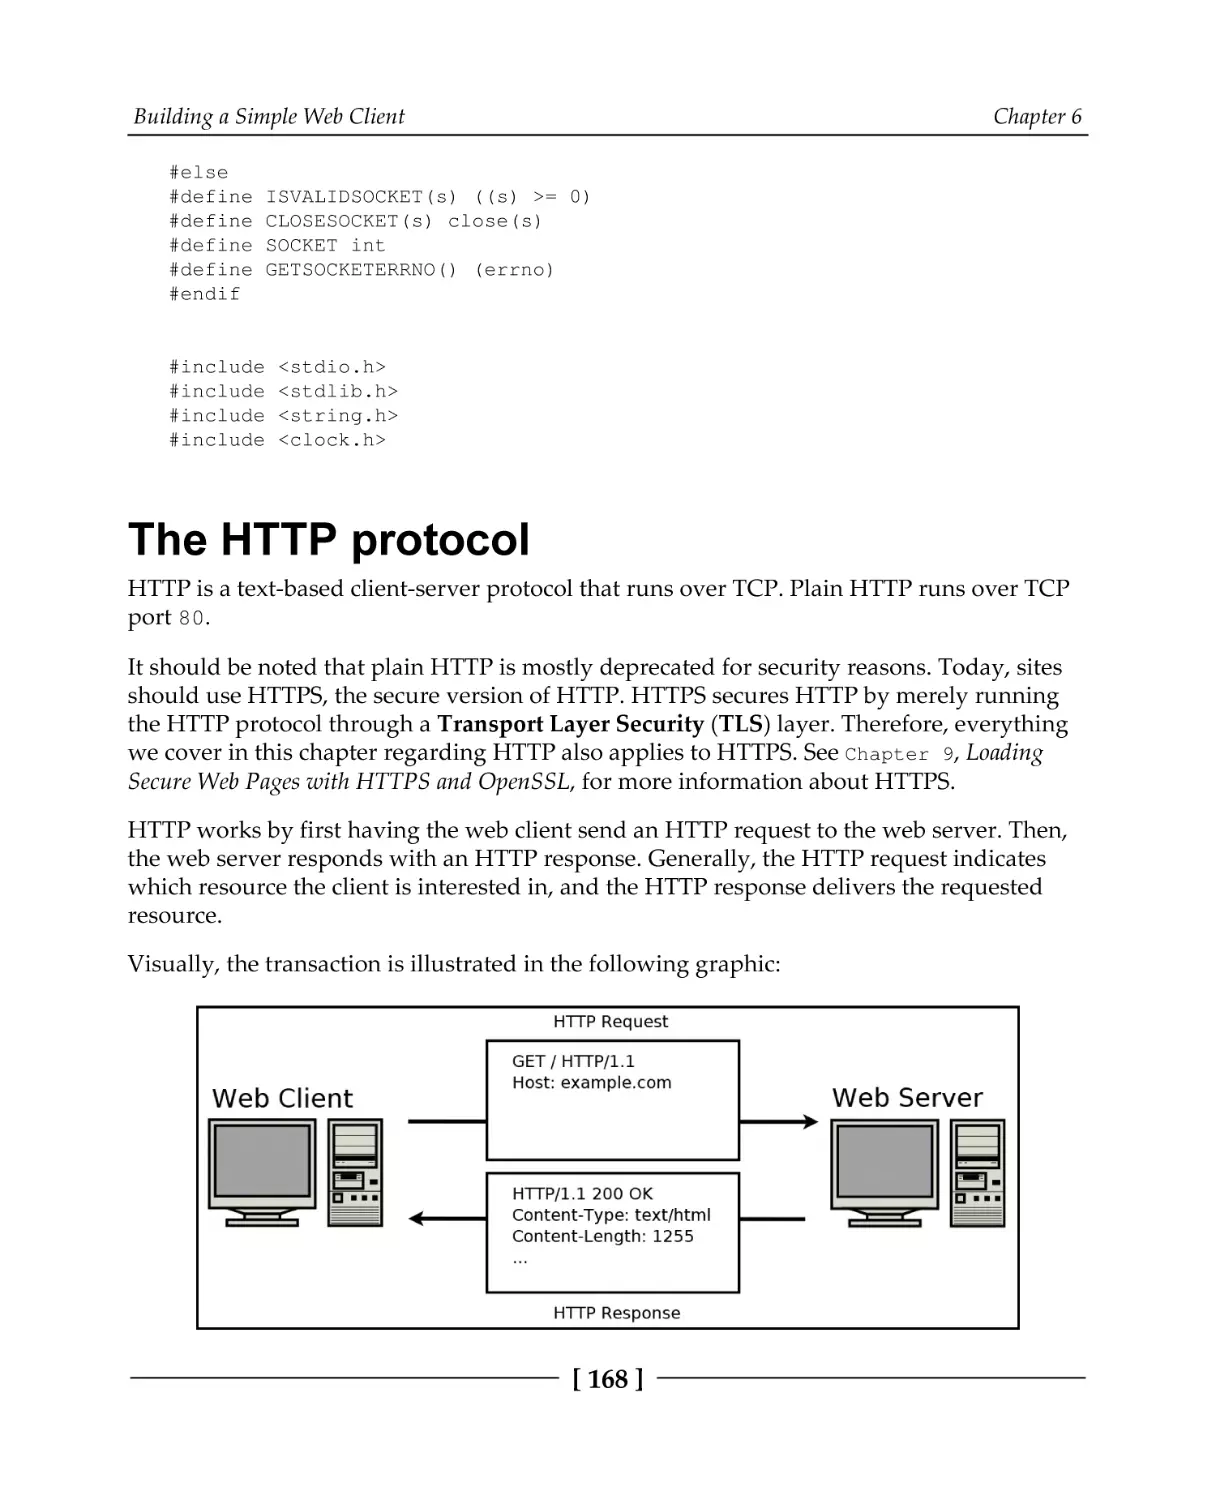
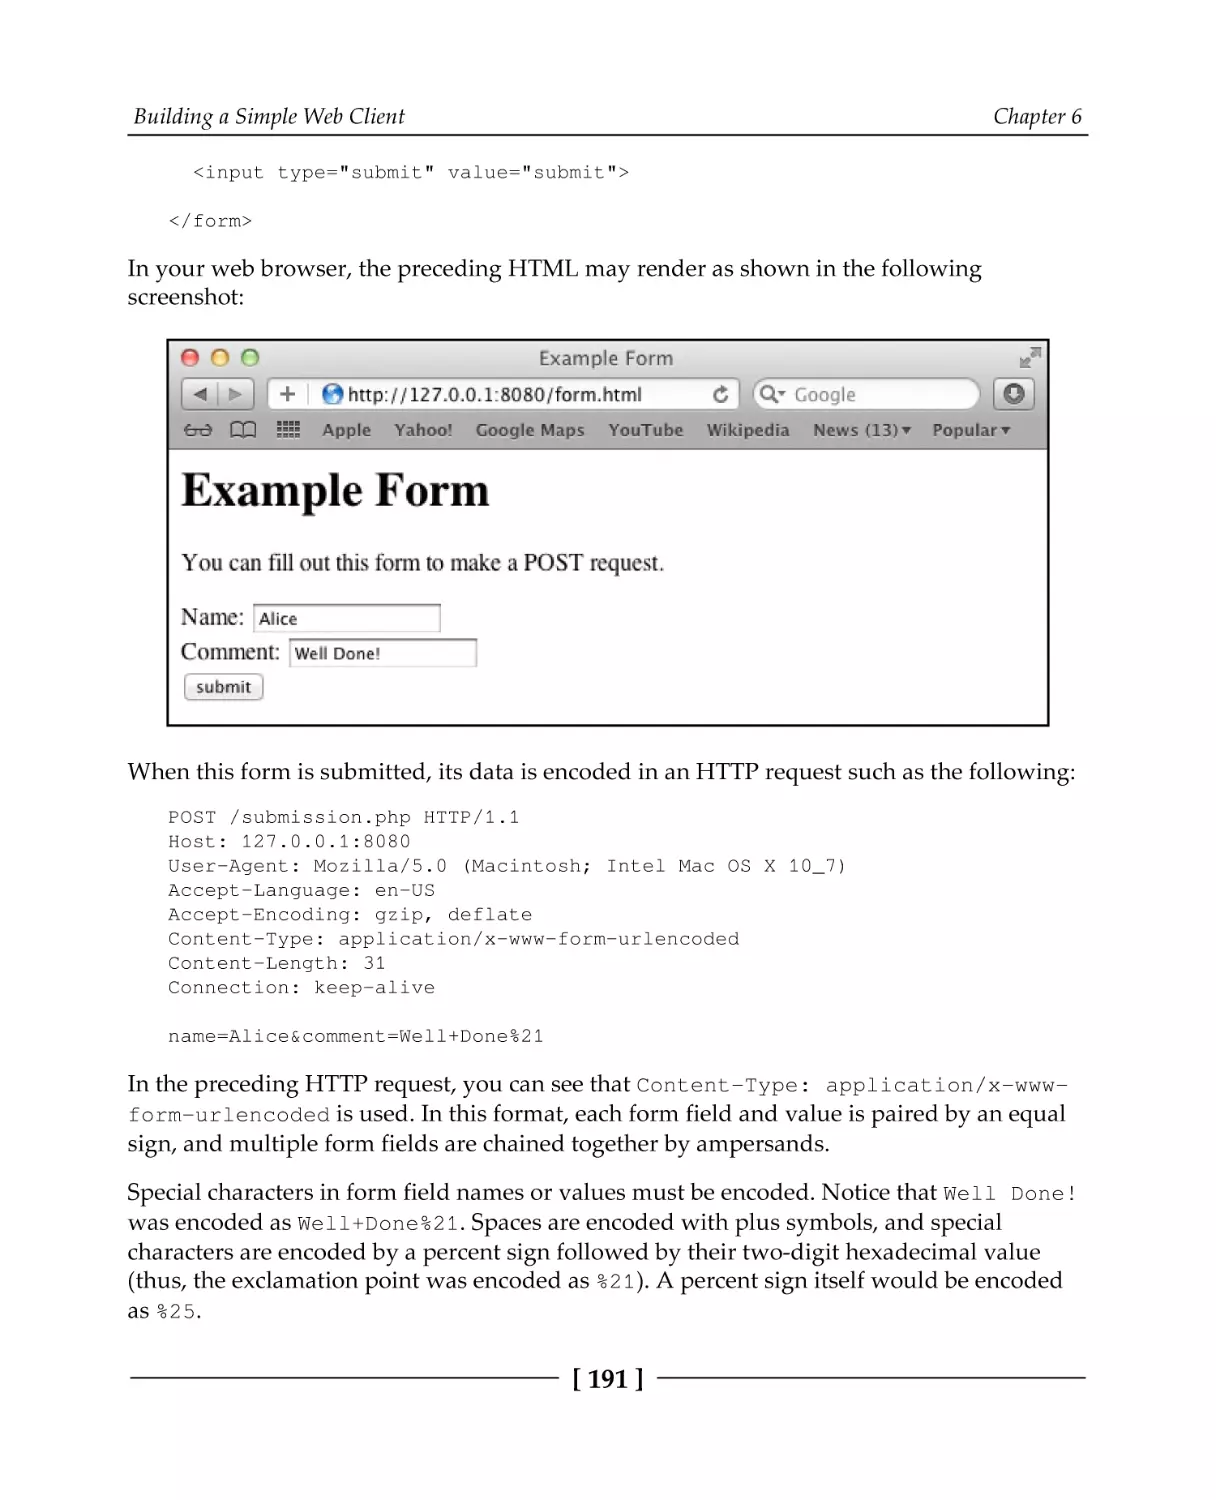
The HTTP protocol
HTTP request types
HTTP request format
HTTP response format
HTTP response codes
Response body length
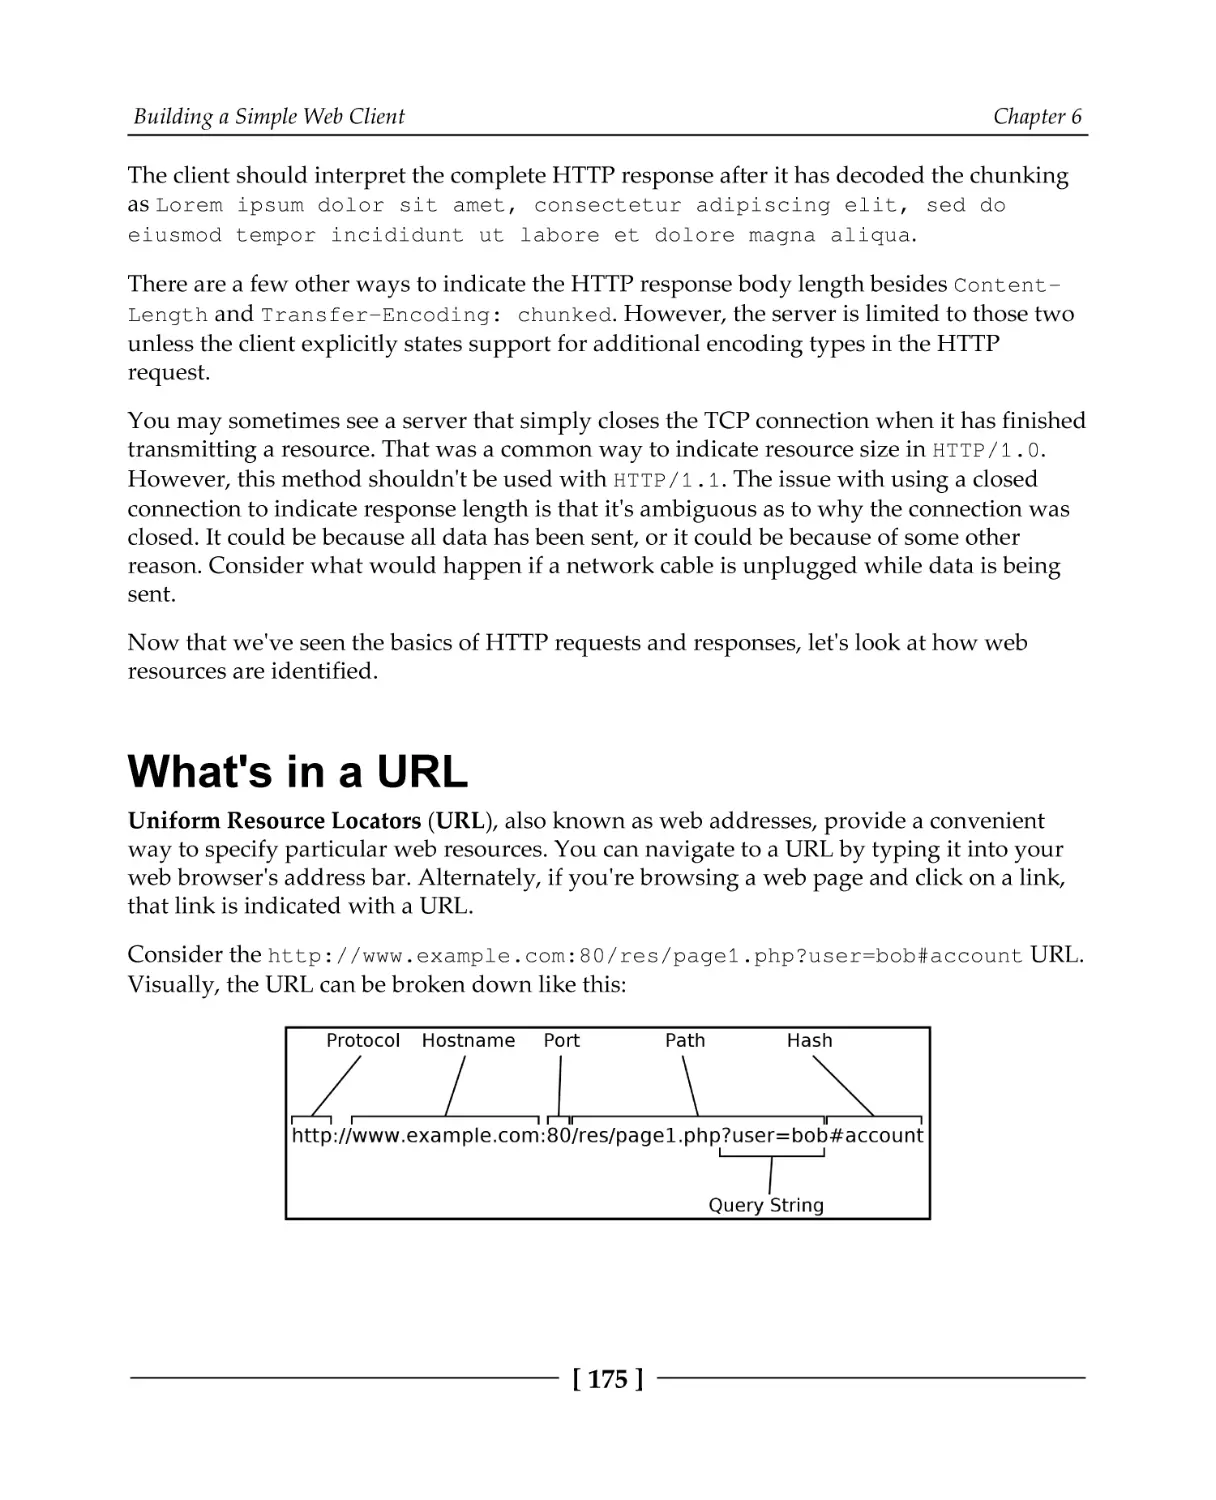
What's in a URL
Parsing a URL
Implementing a web client
HTTP POST requests
Encoding form data
File uploads
Summary
Questions
[ iii ]
166
166
168
169
170
171
173
174
175
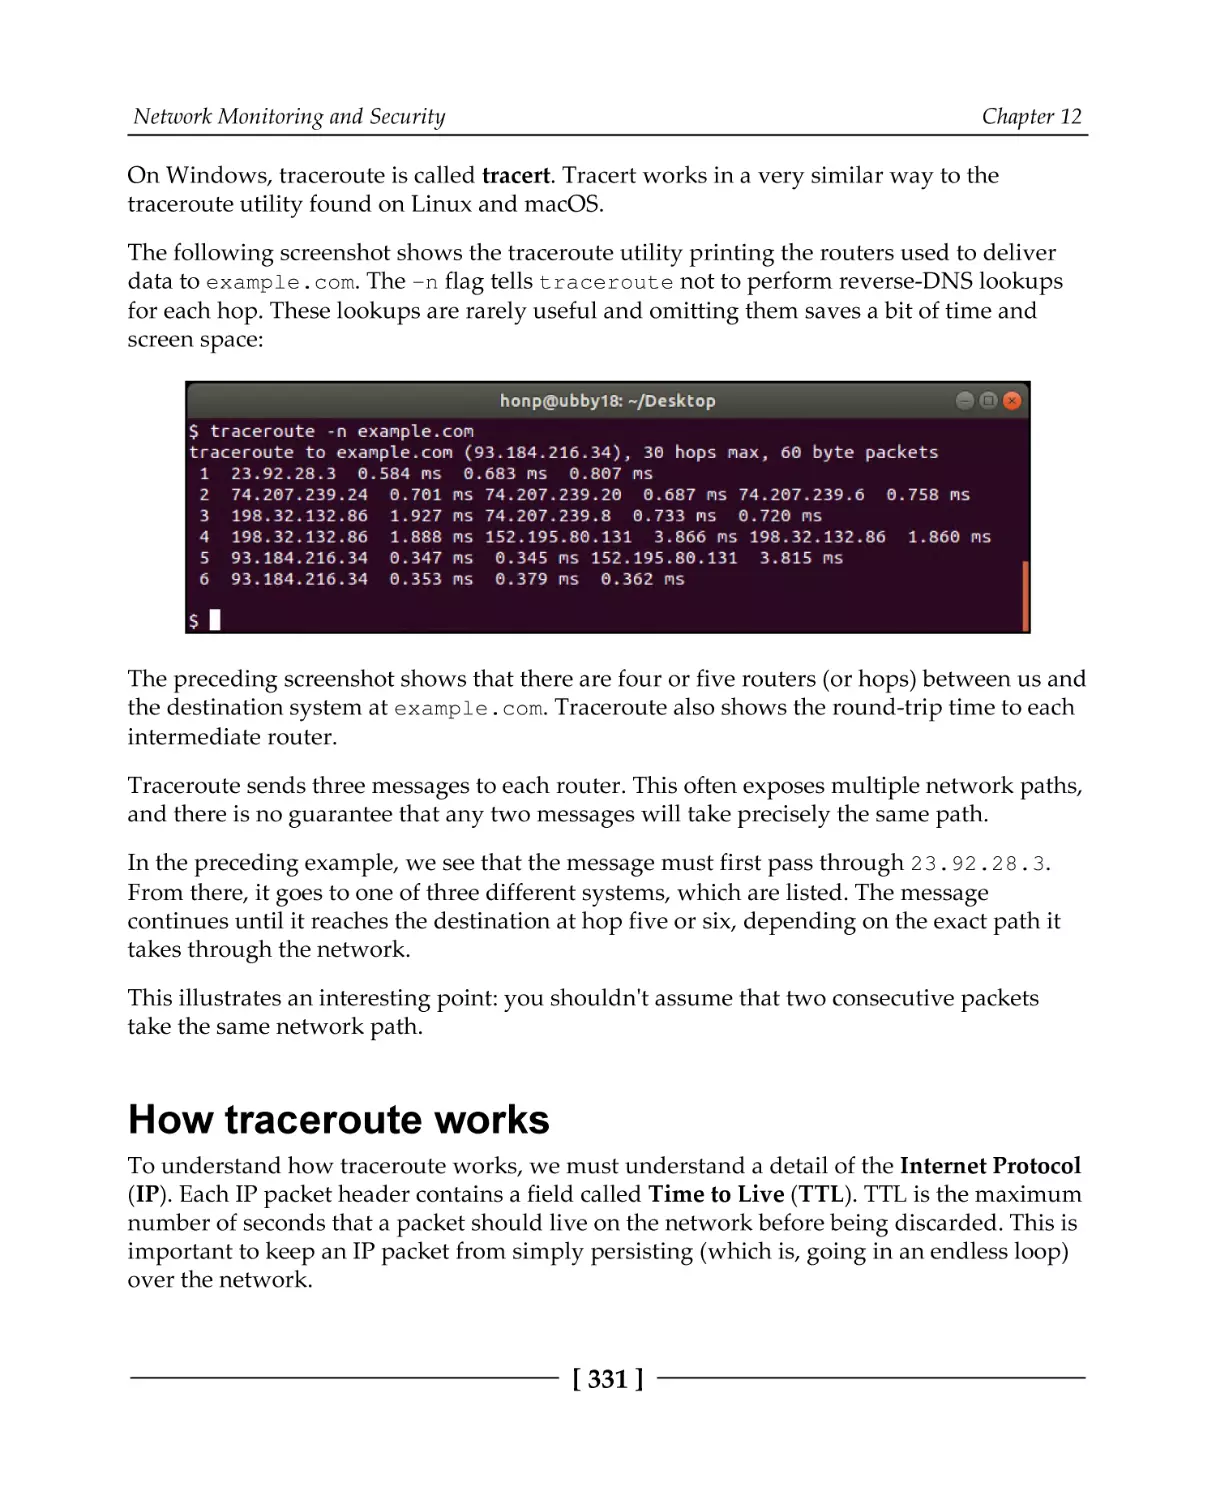
176
179
190
190
192
193
193
Table of Contents
Further reading
Chapter 7: Building a Simple Web Server
Technical requirements
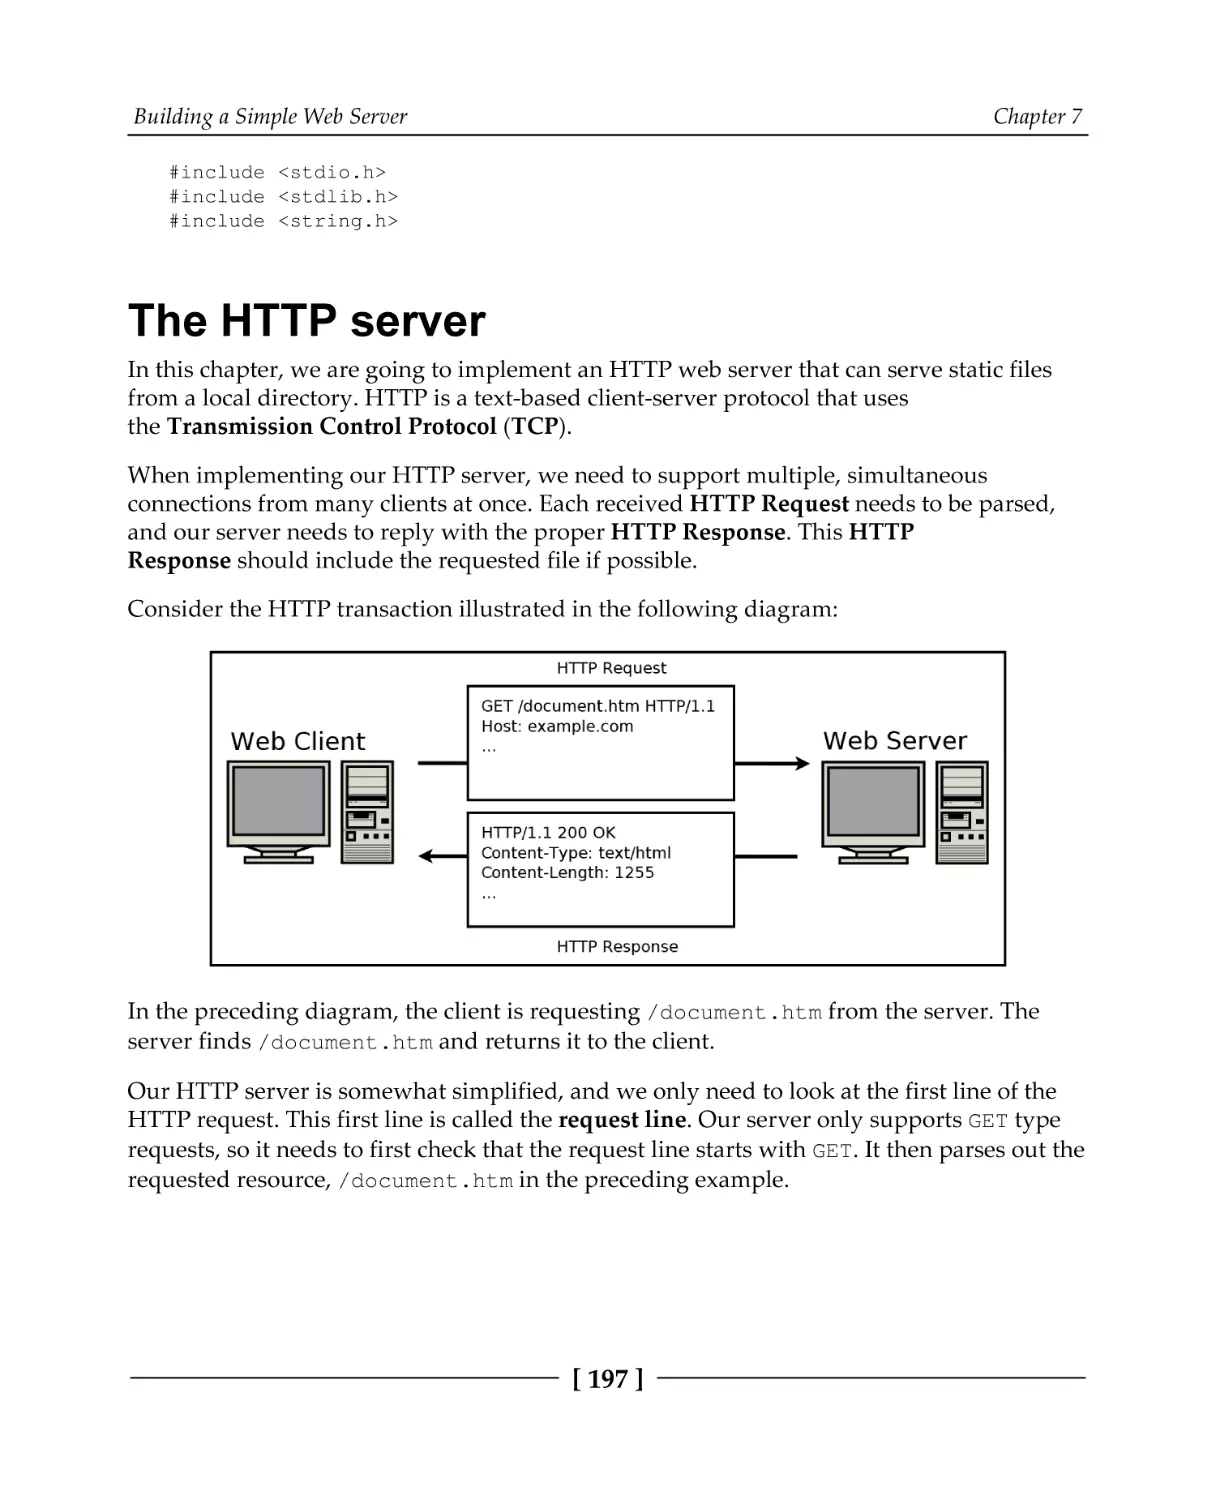
The HTTP server
The server architecture
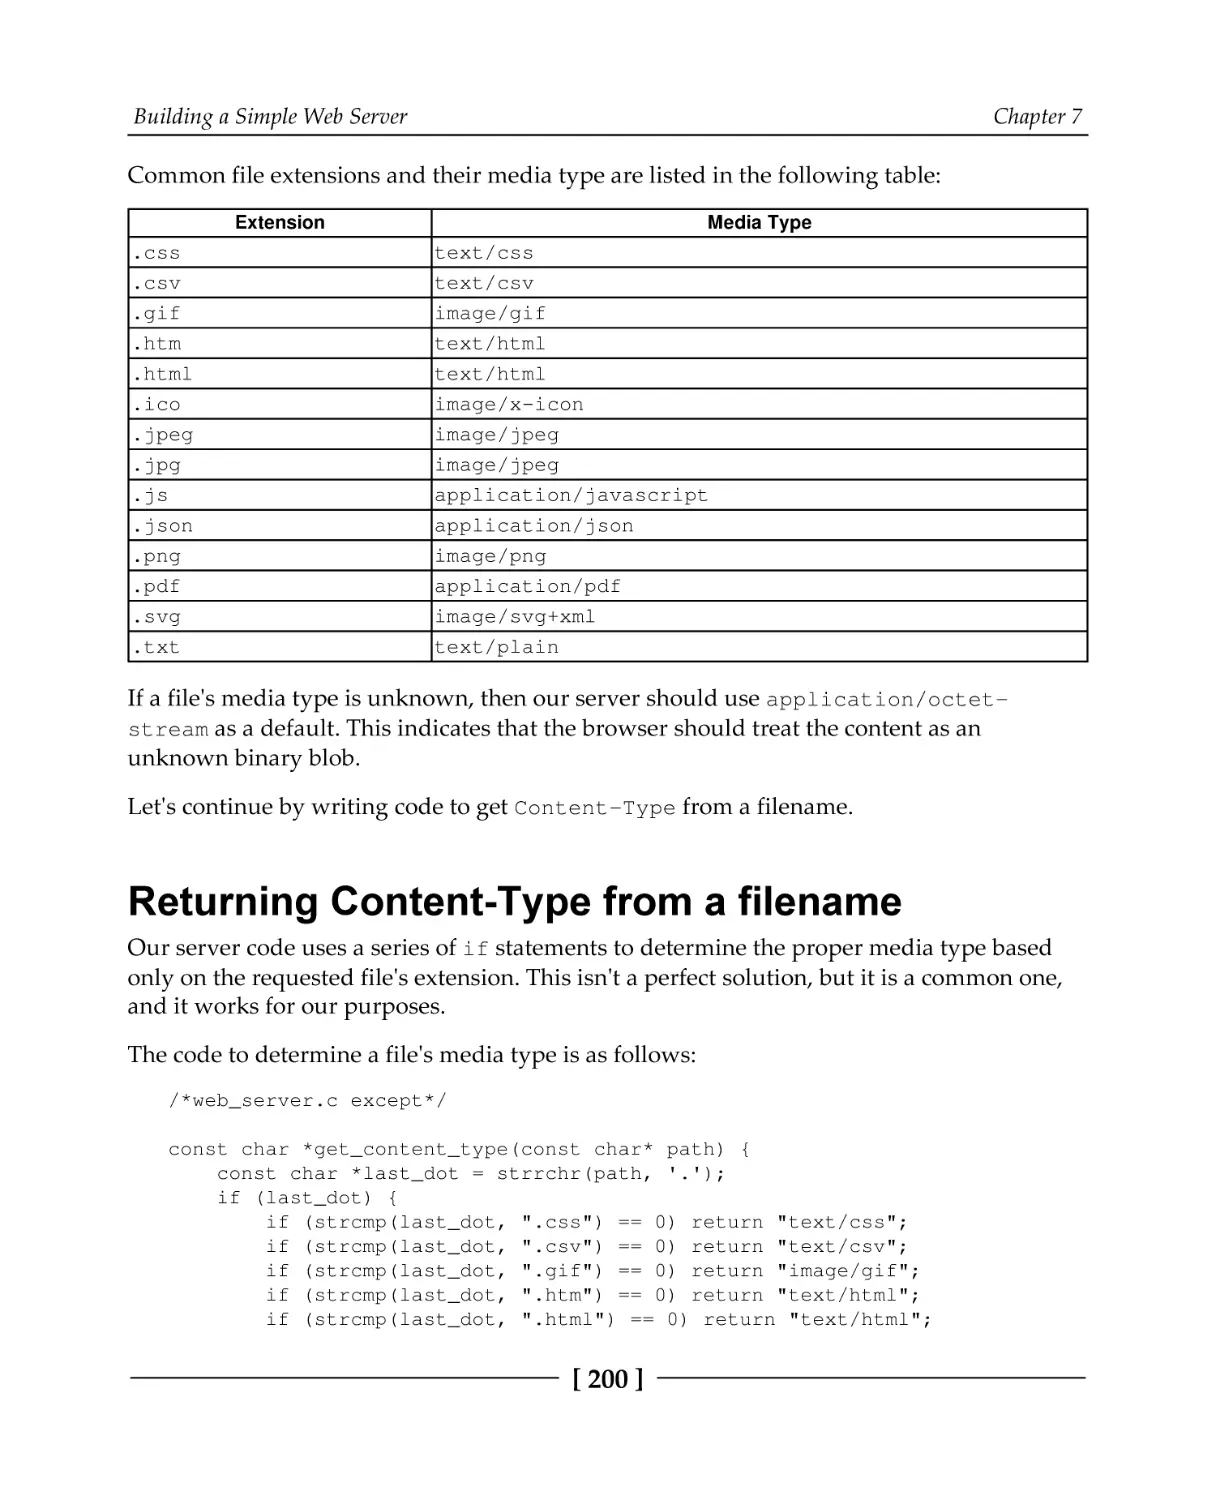
Content types
Returning Content-Type from a filename
Creating the server socket
Multiple connections buffering
get_client()
drop_client()
get_client_address()
wait_on_clients()
send_400()
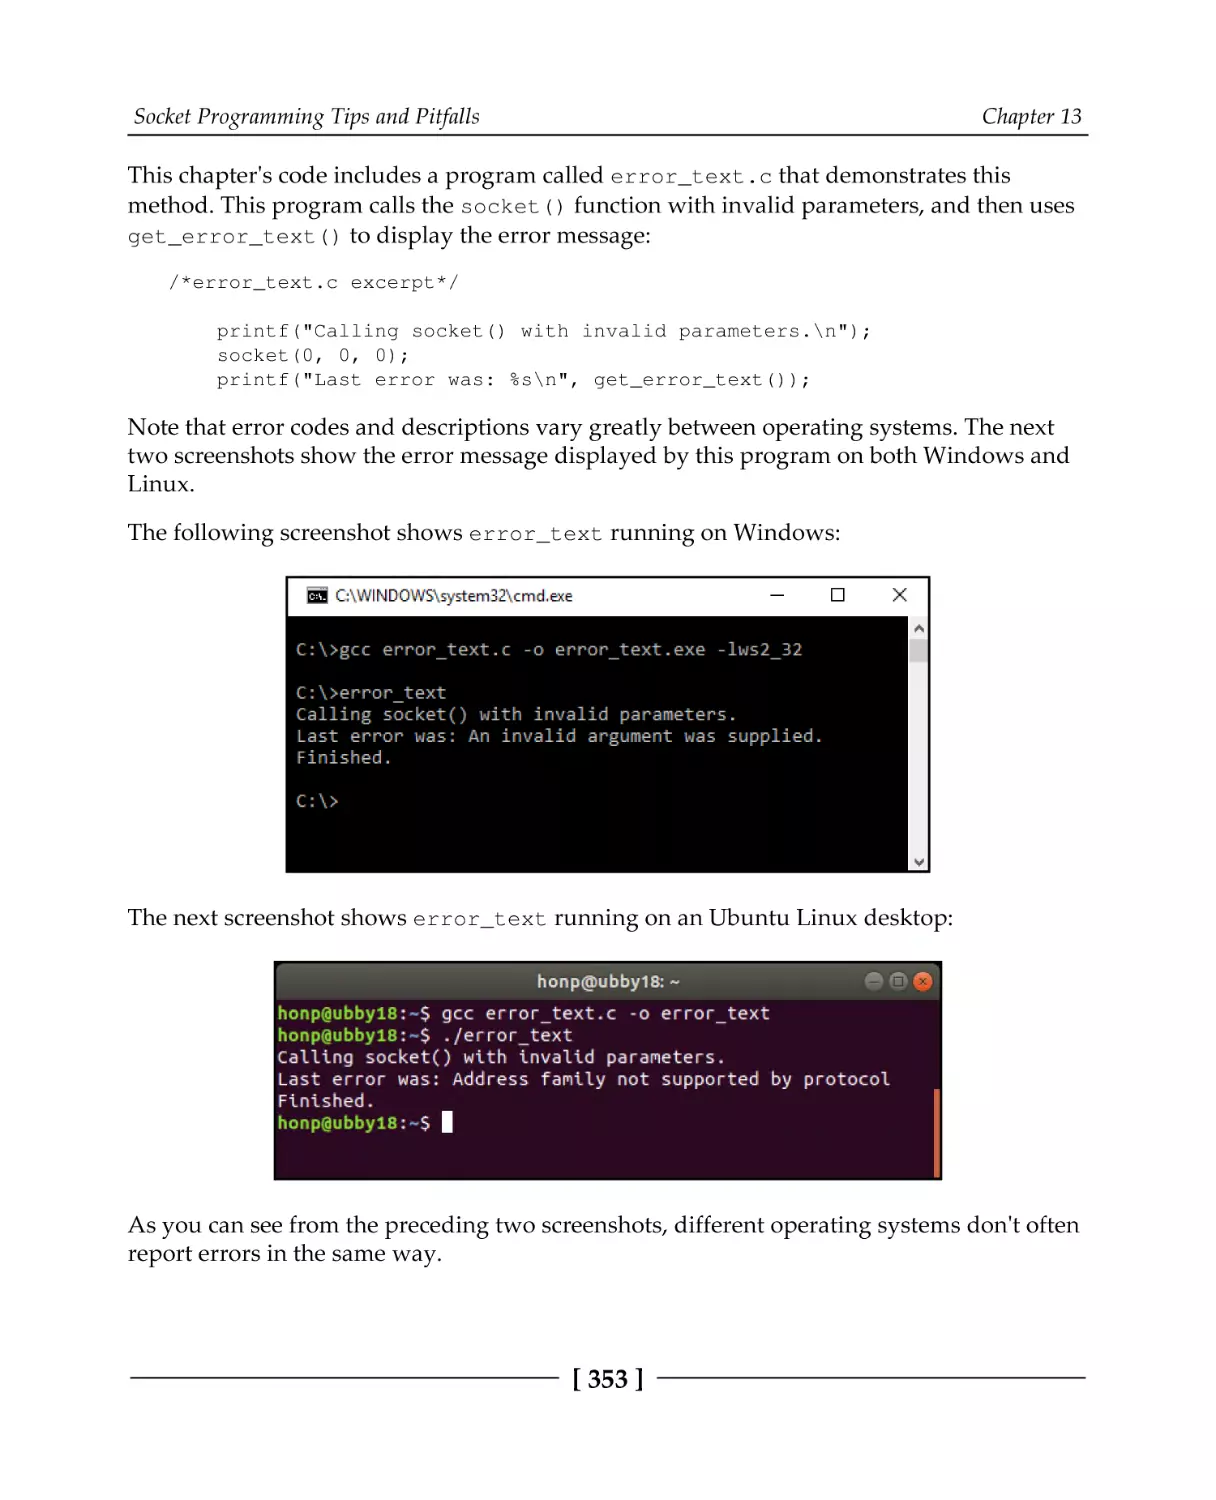
send_404()
serve_resource()
The main loop
Security and robustness
Open source servers
Summary
Questions
Further reading
Chapter 8: Making Your Program Send Email
Technical requirements
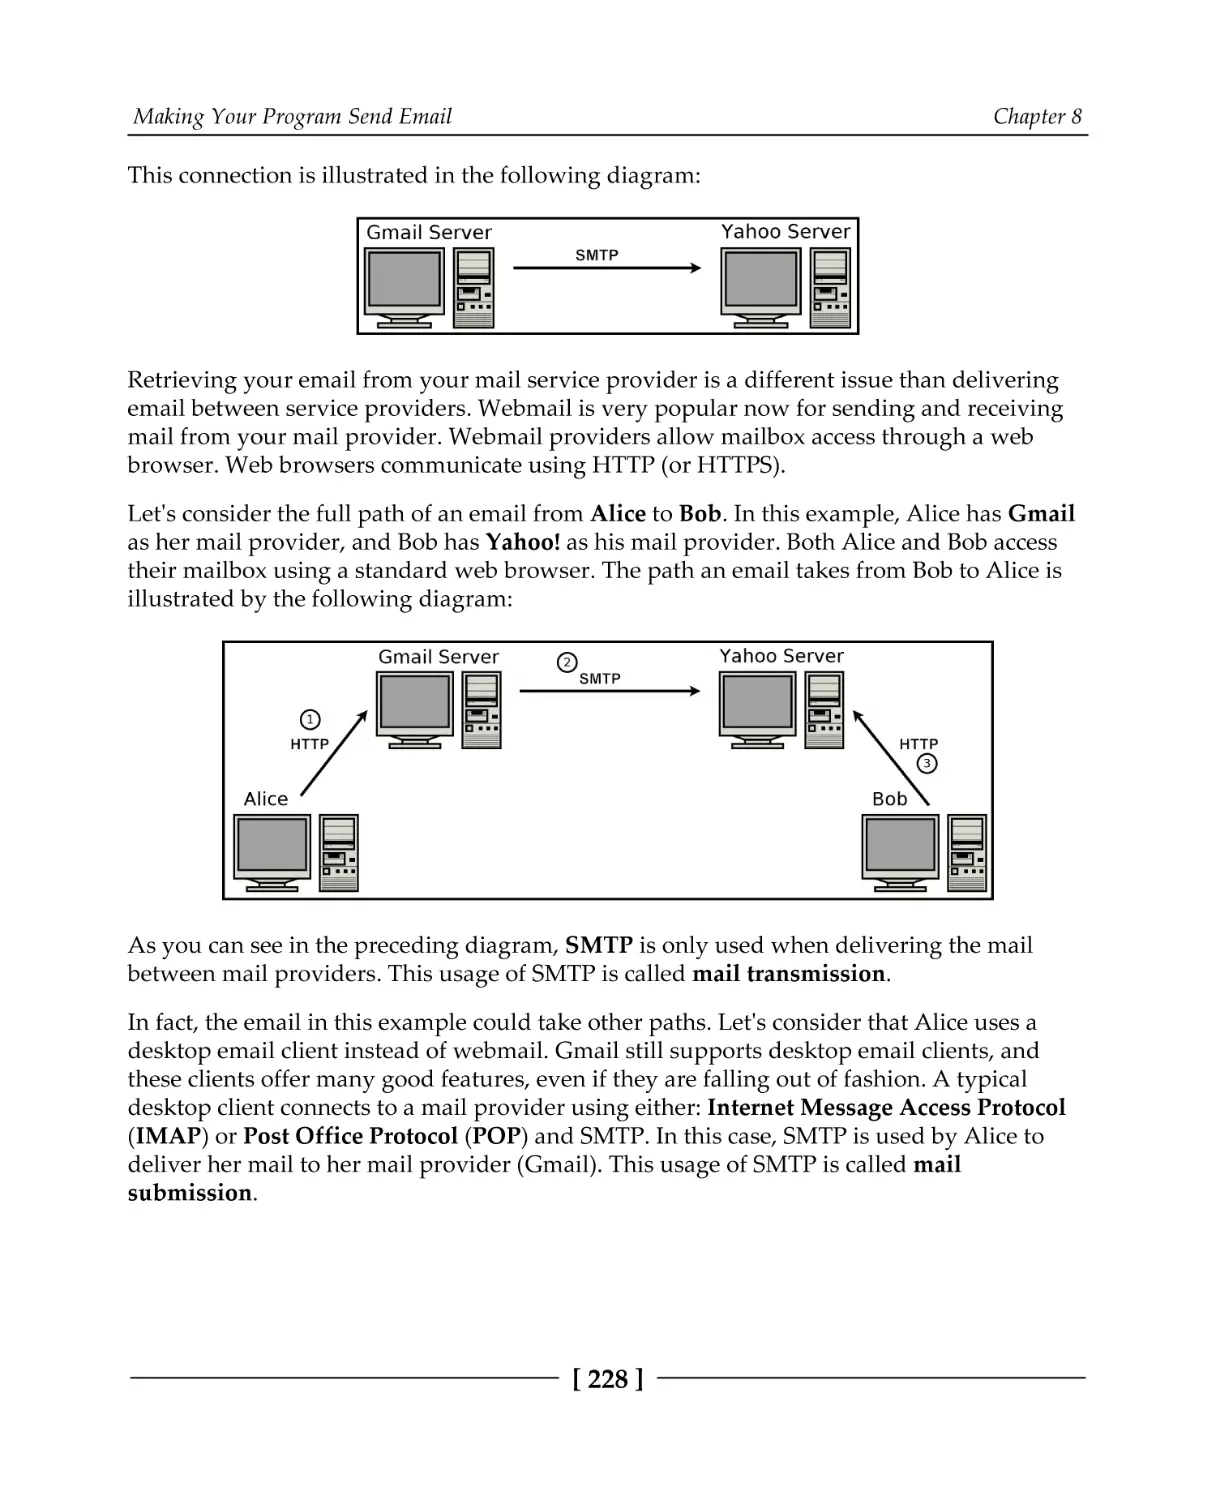
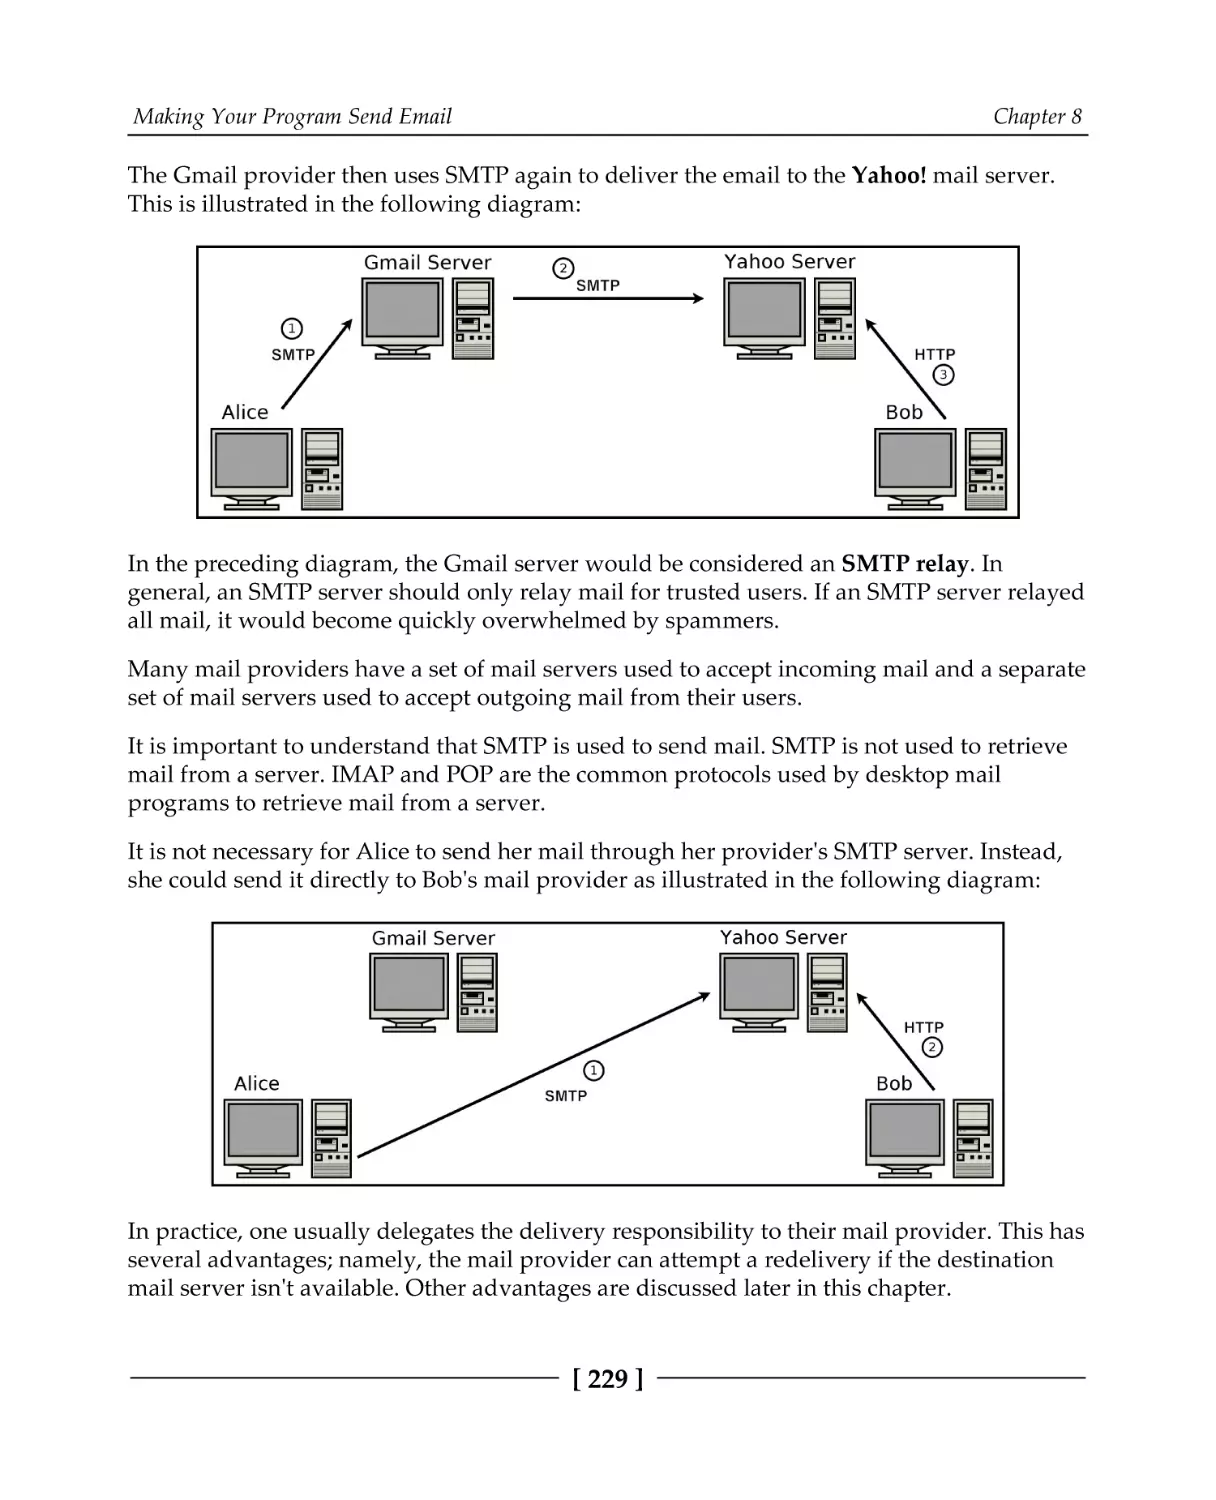
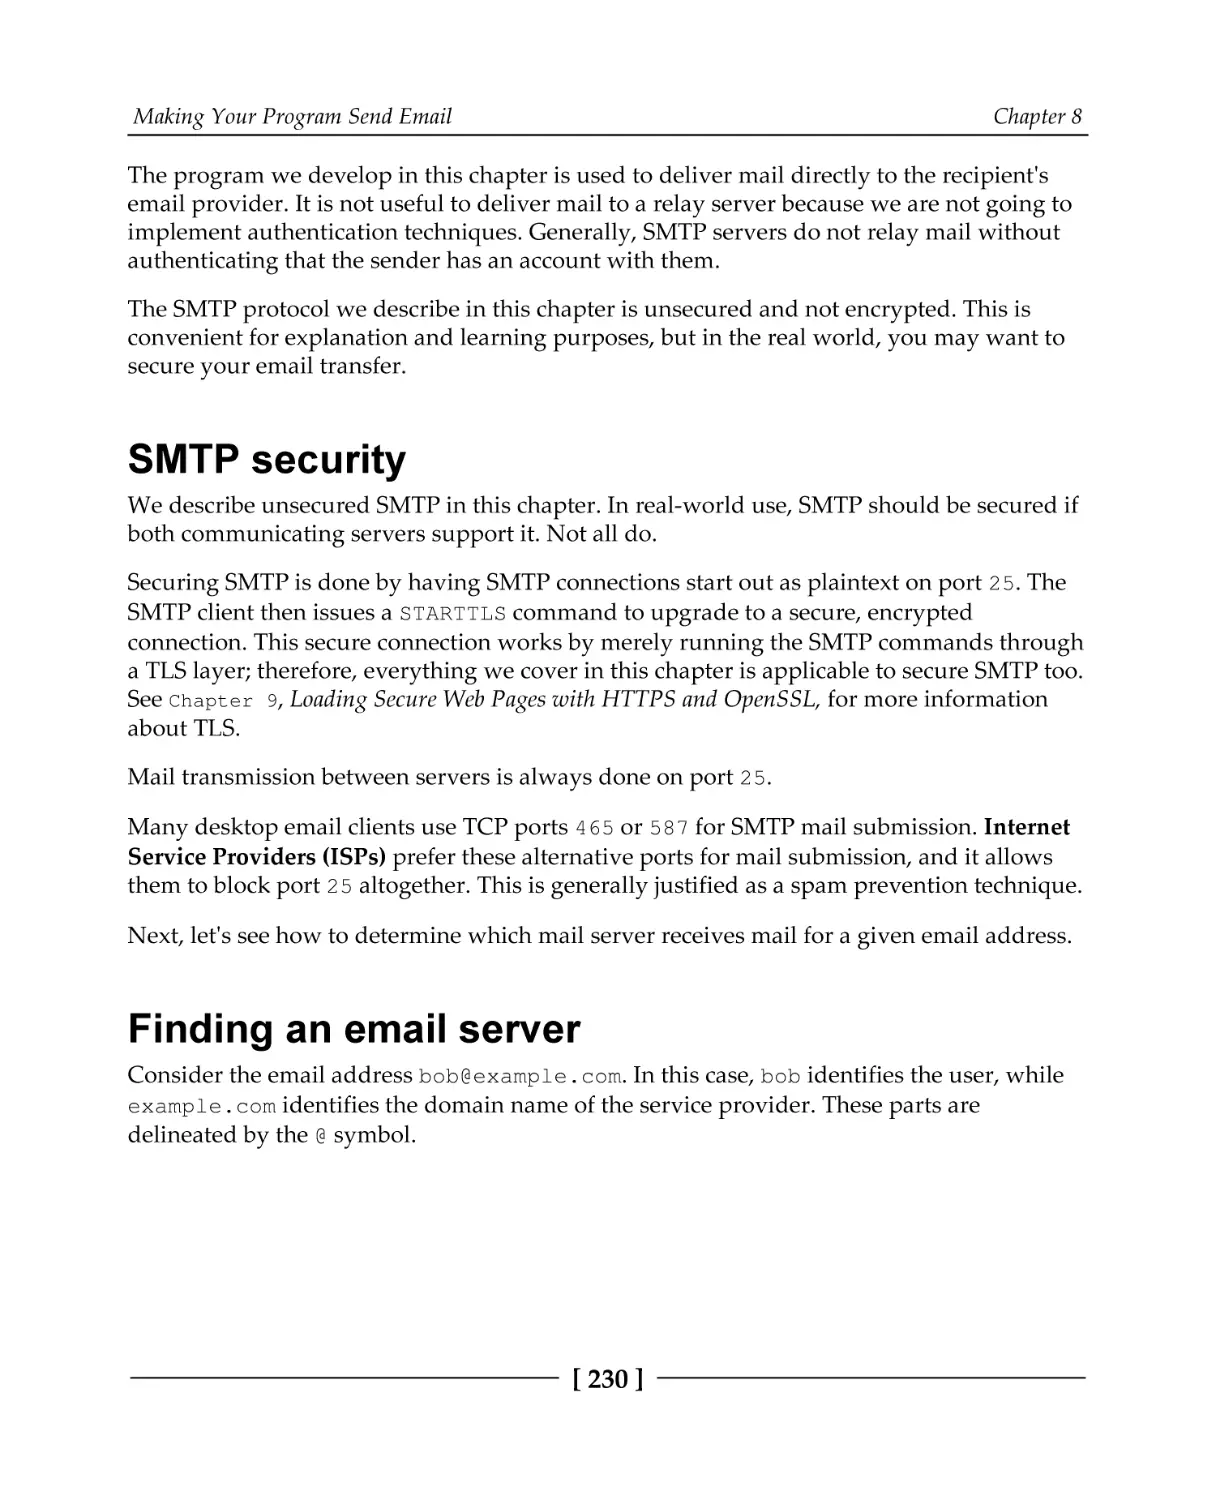
Email servers
SMTP security
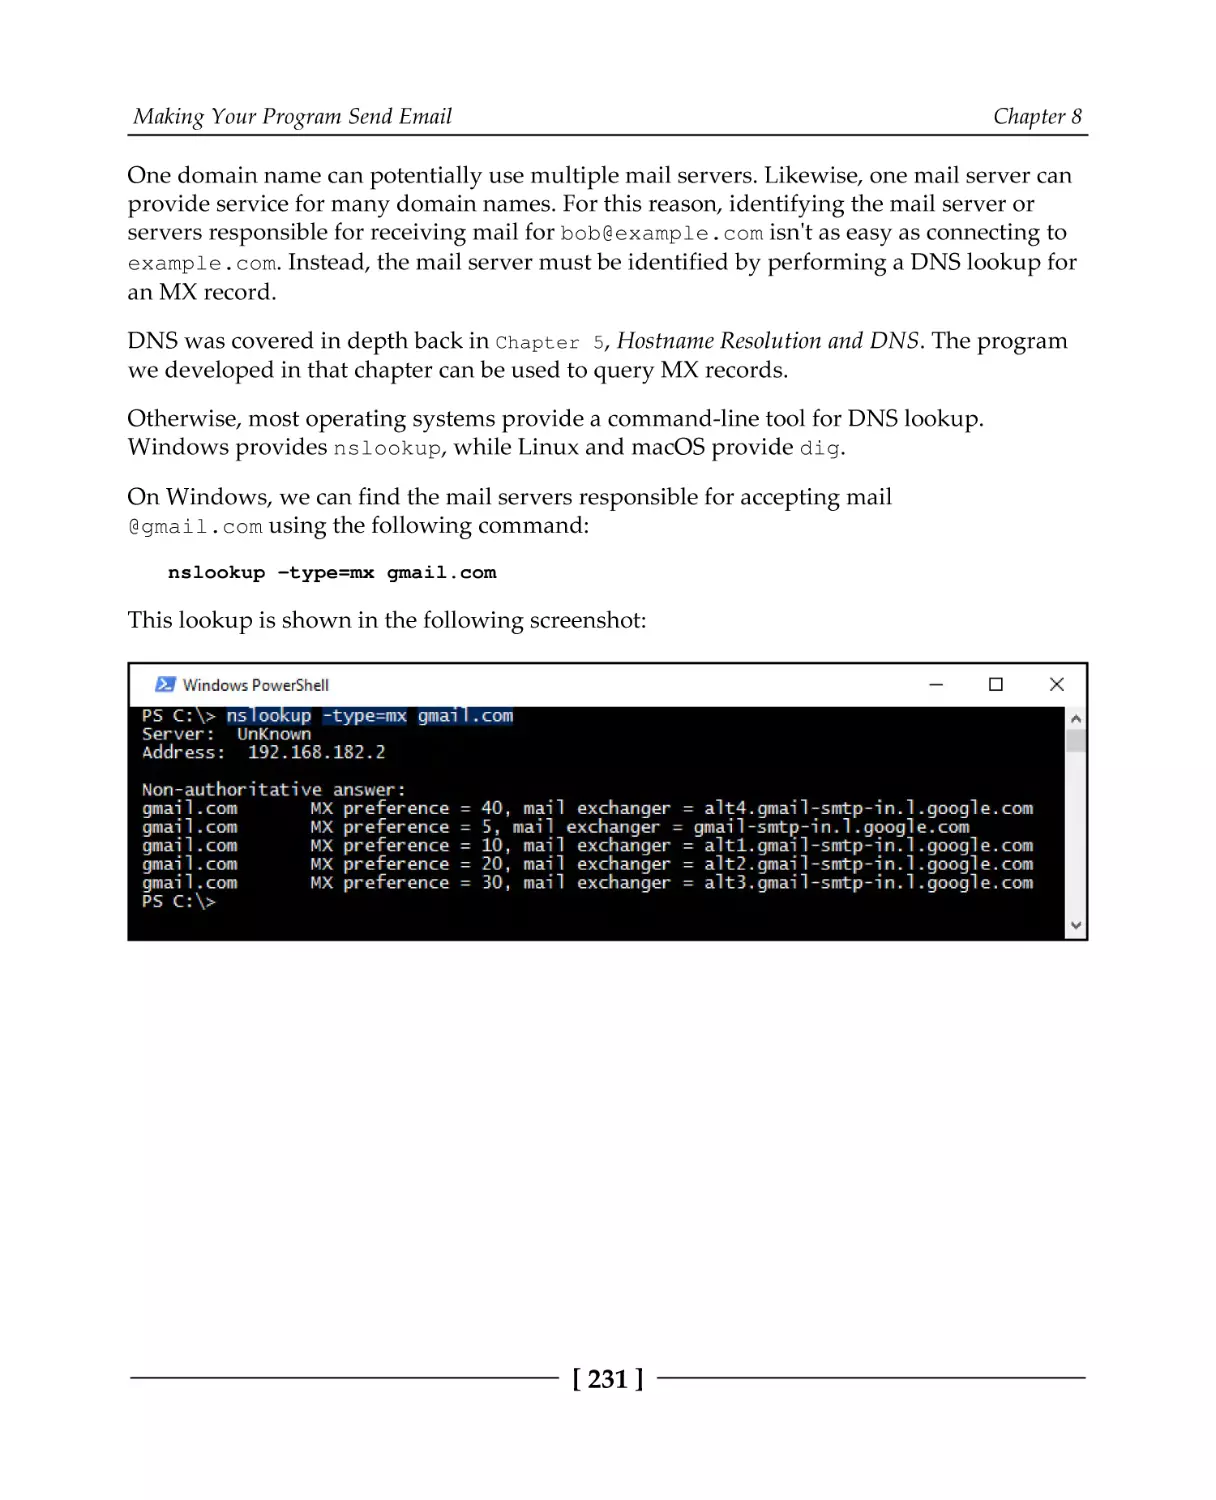
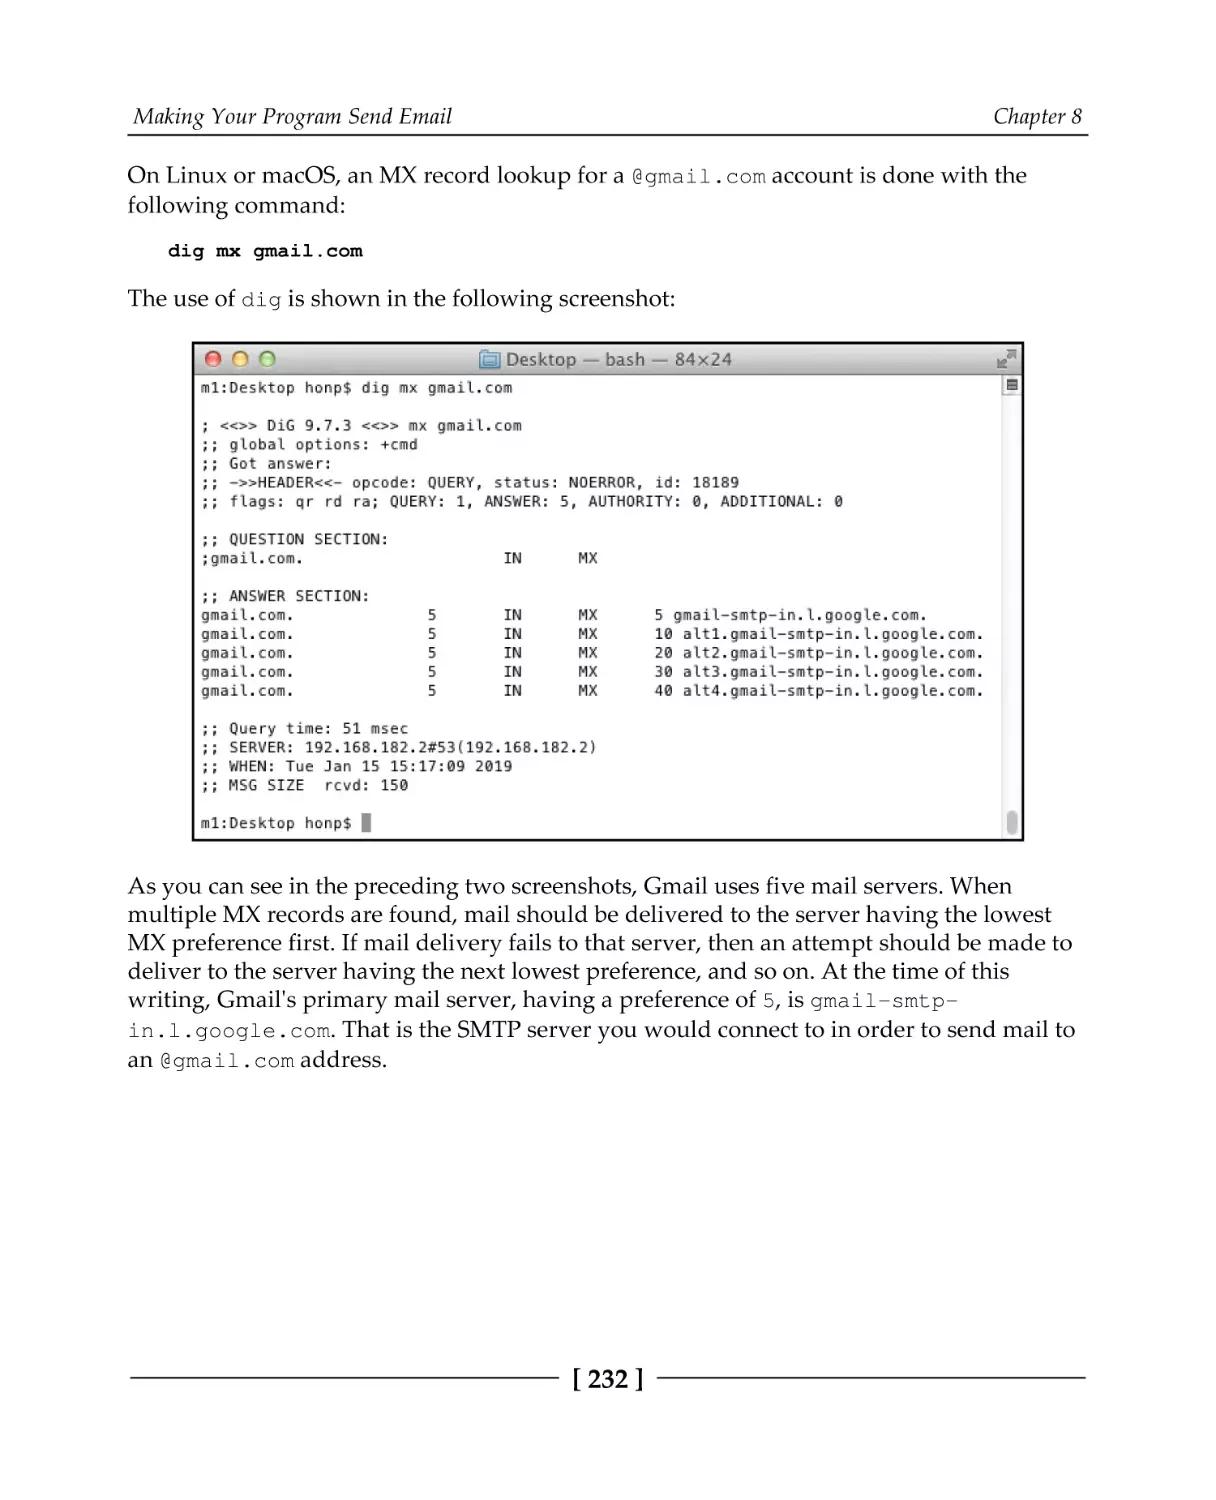
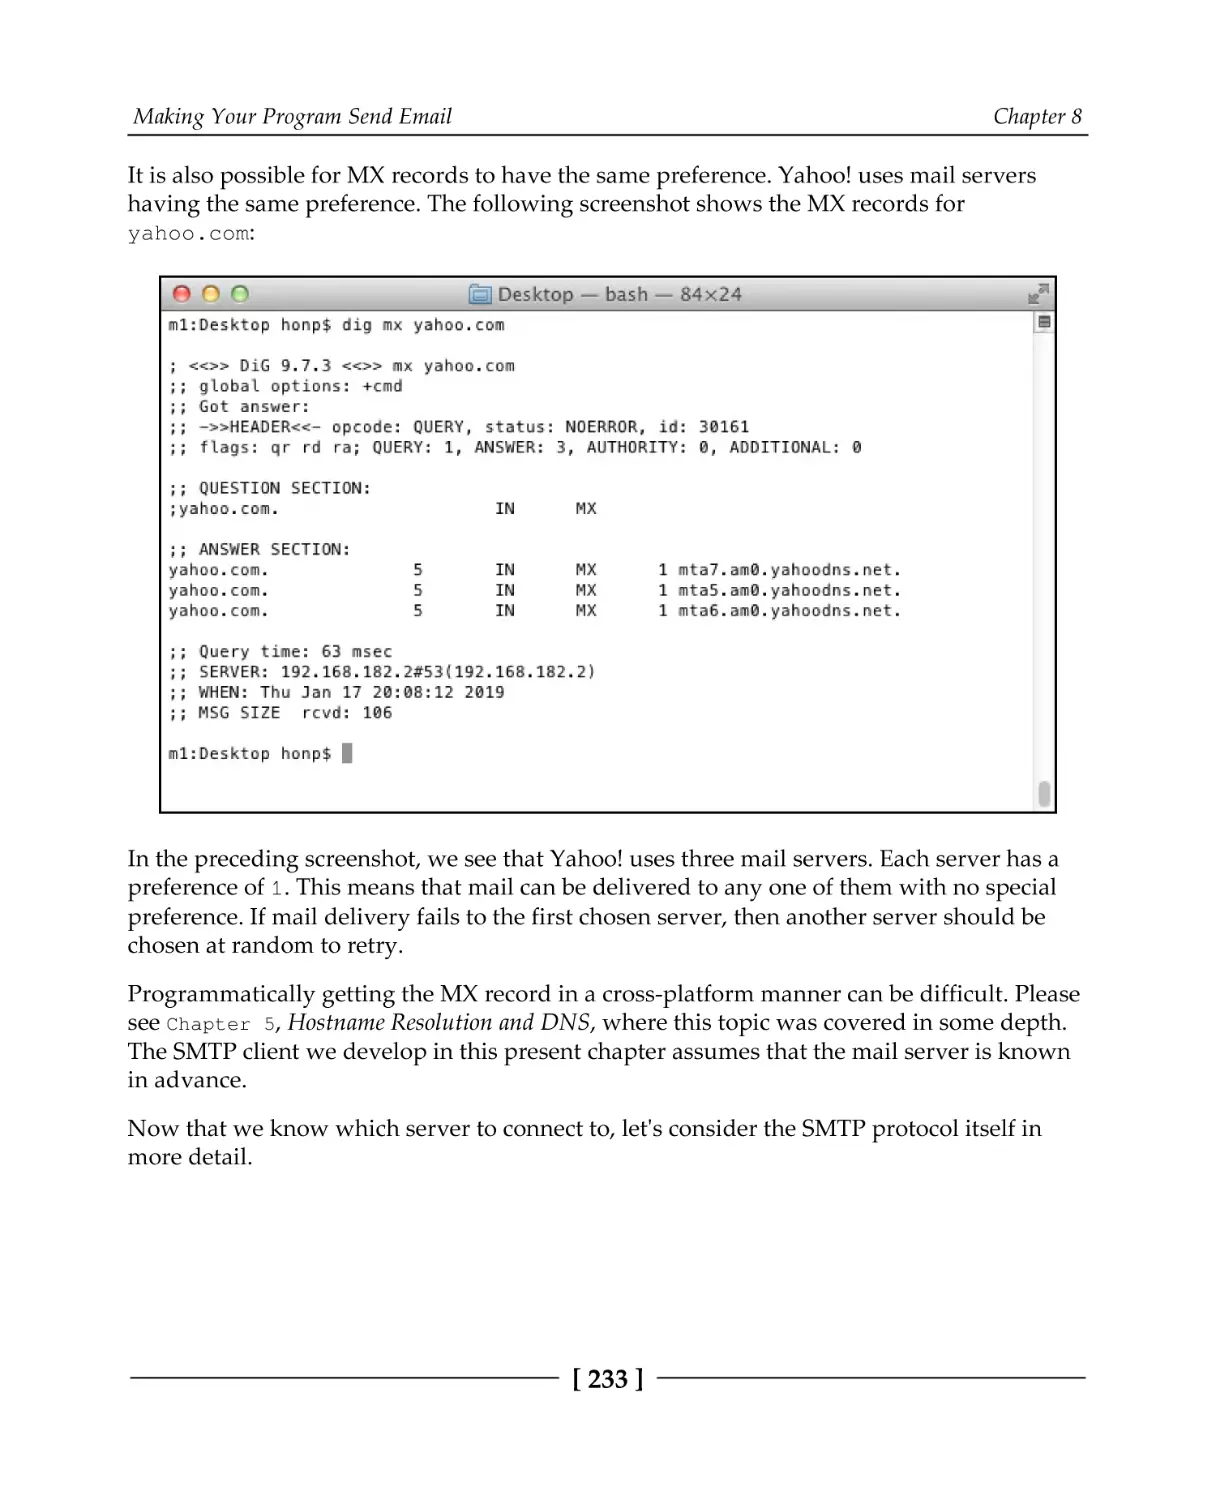
Finding an email server
SMTP dialog
The format of an email
A simple SMTP client program
Enhanced emails
Email file attachments
Spam-blocking pitfalls
Summary
Questions
Further reading
194
195
195
197
198
199
200
201
202
204
206
207
207
208
209
209
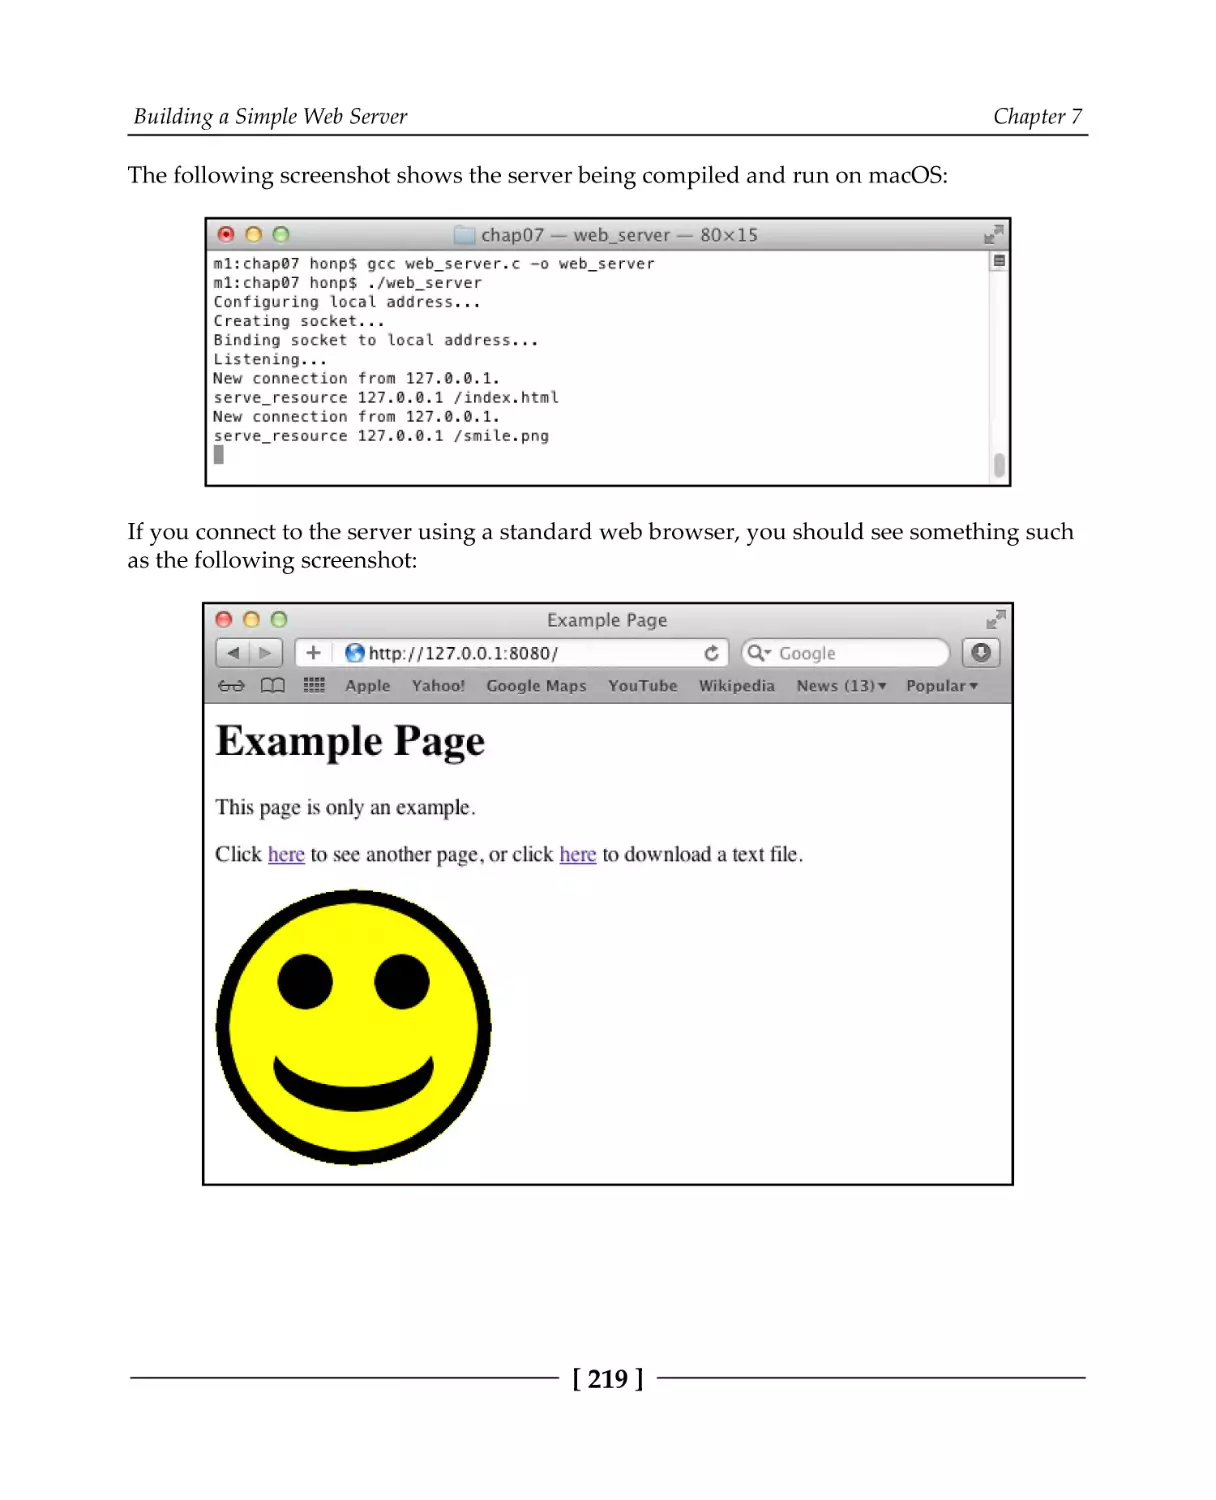
214
220
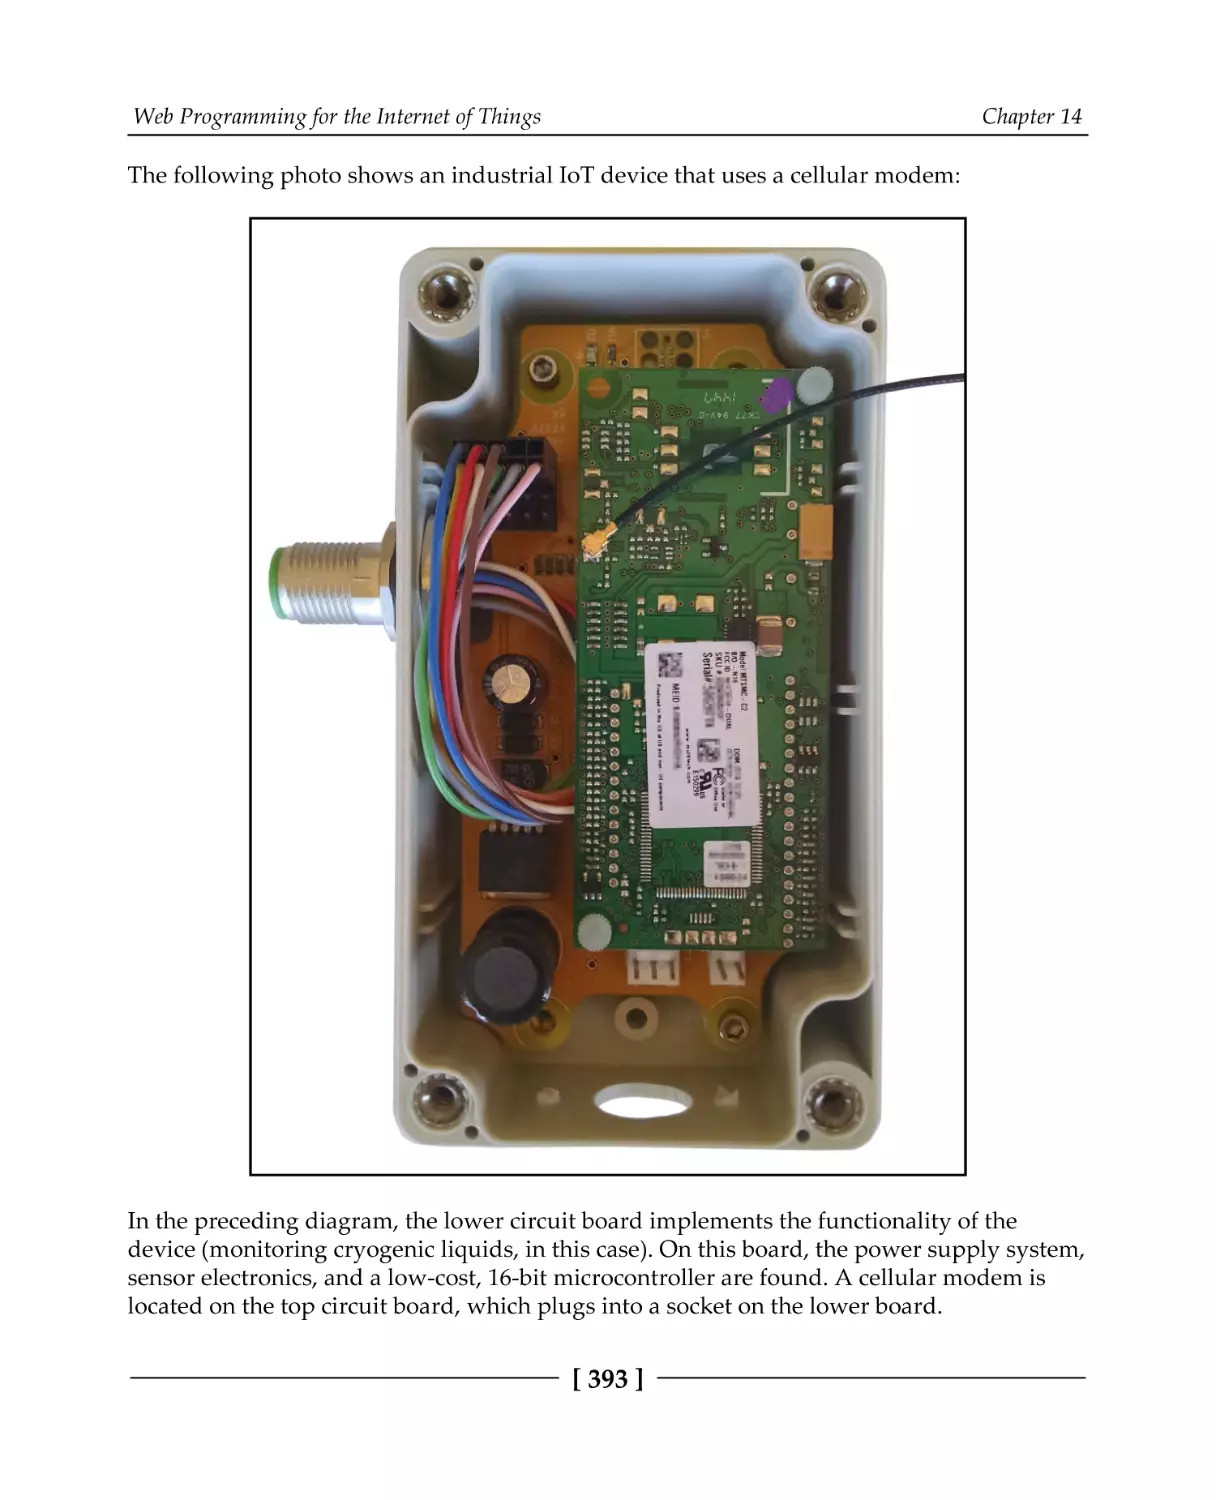
223
223
224
224
225
225
227
230
230
234
236
237
248
250
251
253
253
253
Section 3: Understanding Encrypted Protocols and
OpenSSL
Chapter 9: Loading Secure Web Pages with HTTPS and OpenSSL
Technical requirements
HTTPS overview
[ iv ]
255
255
257
Table of Contents
Encryption basics
Symmetric ciphers
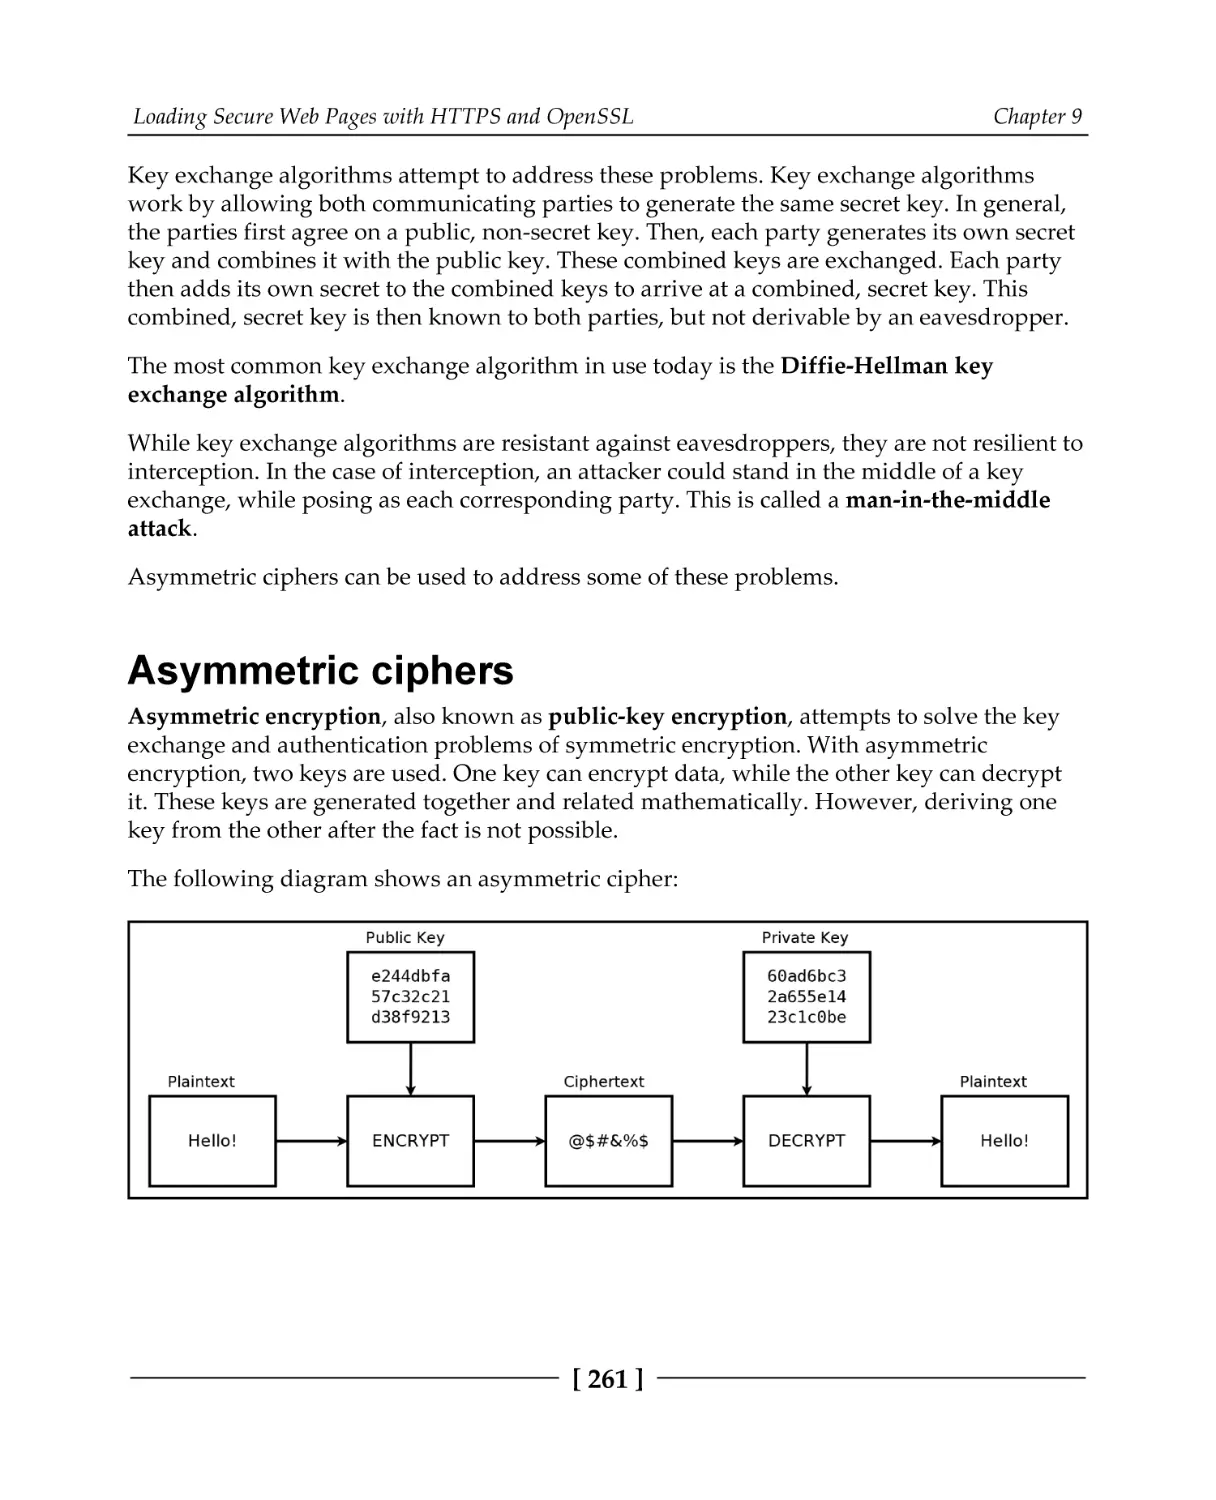
Asymmetric ciphers
How TLS uses ciphers
The TLS protocol
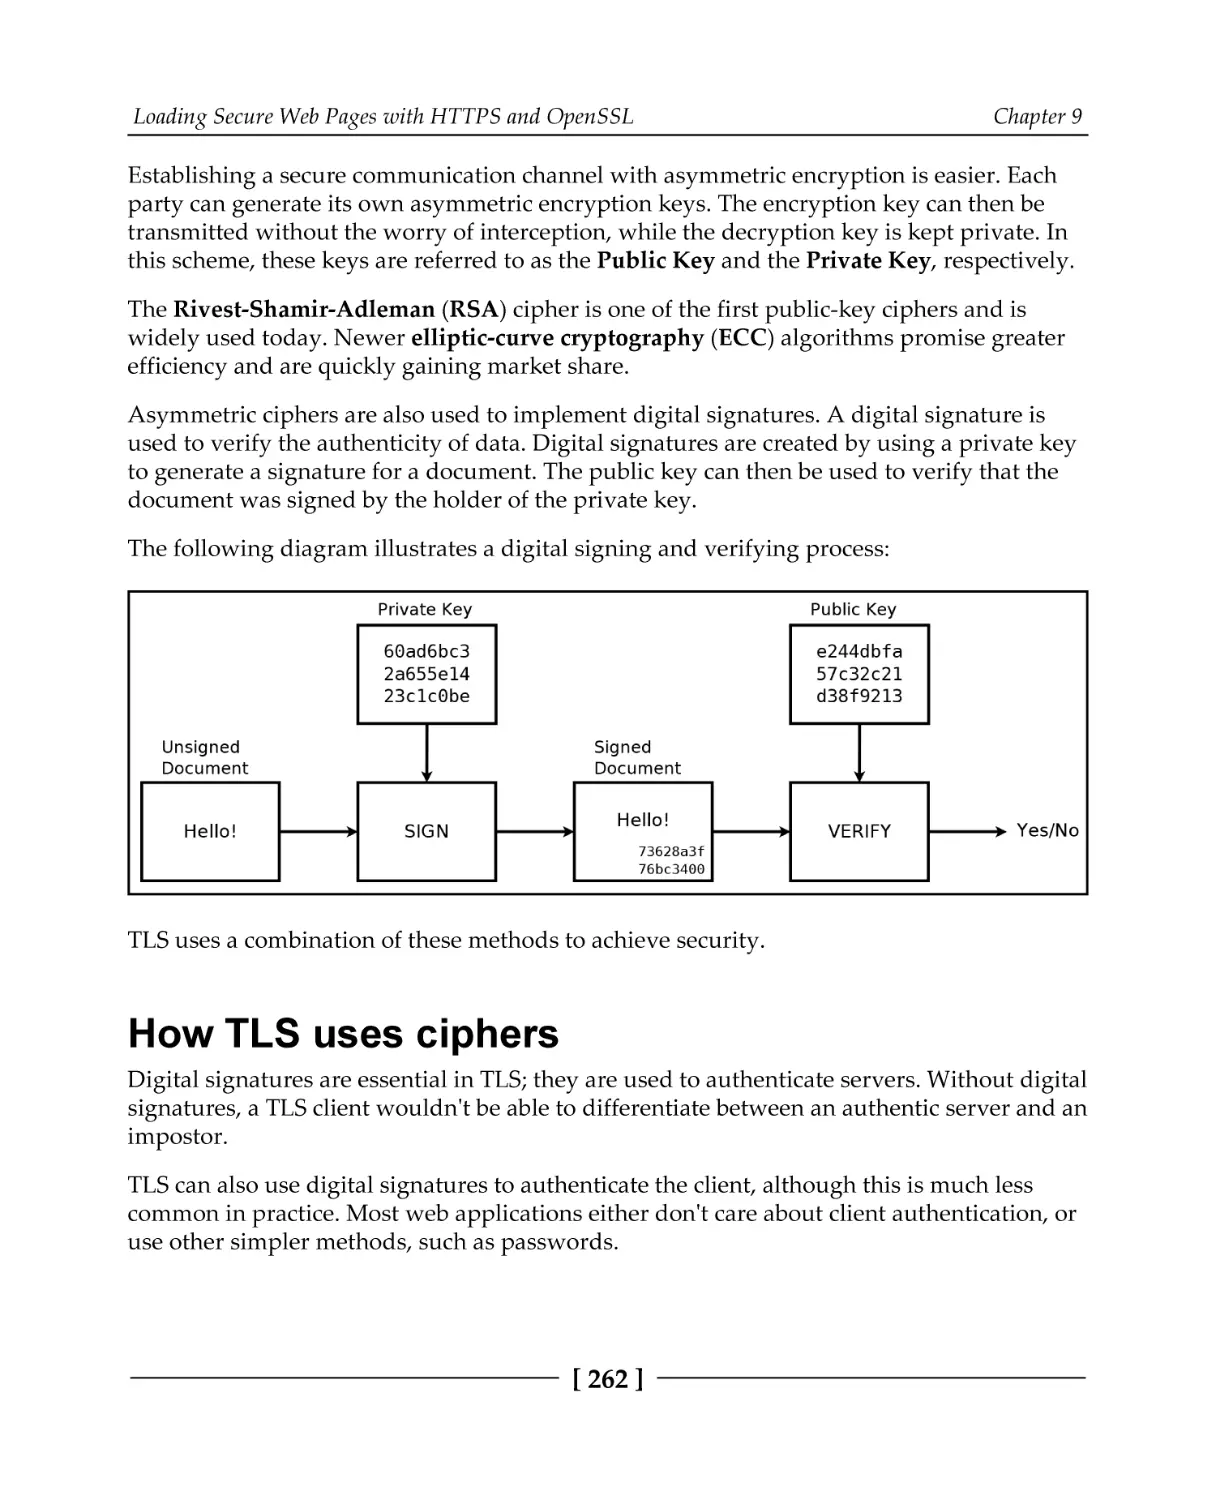
Certificates
Server name identification
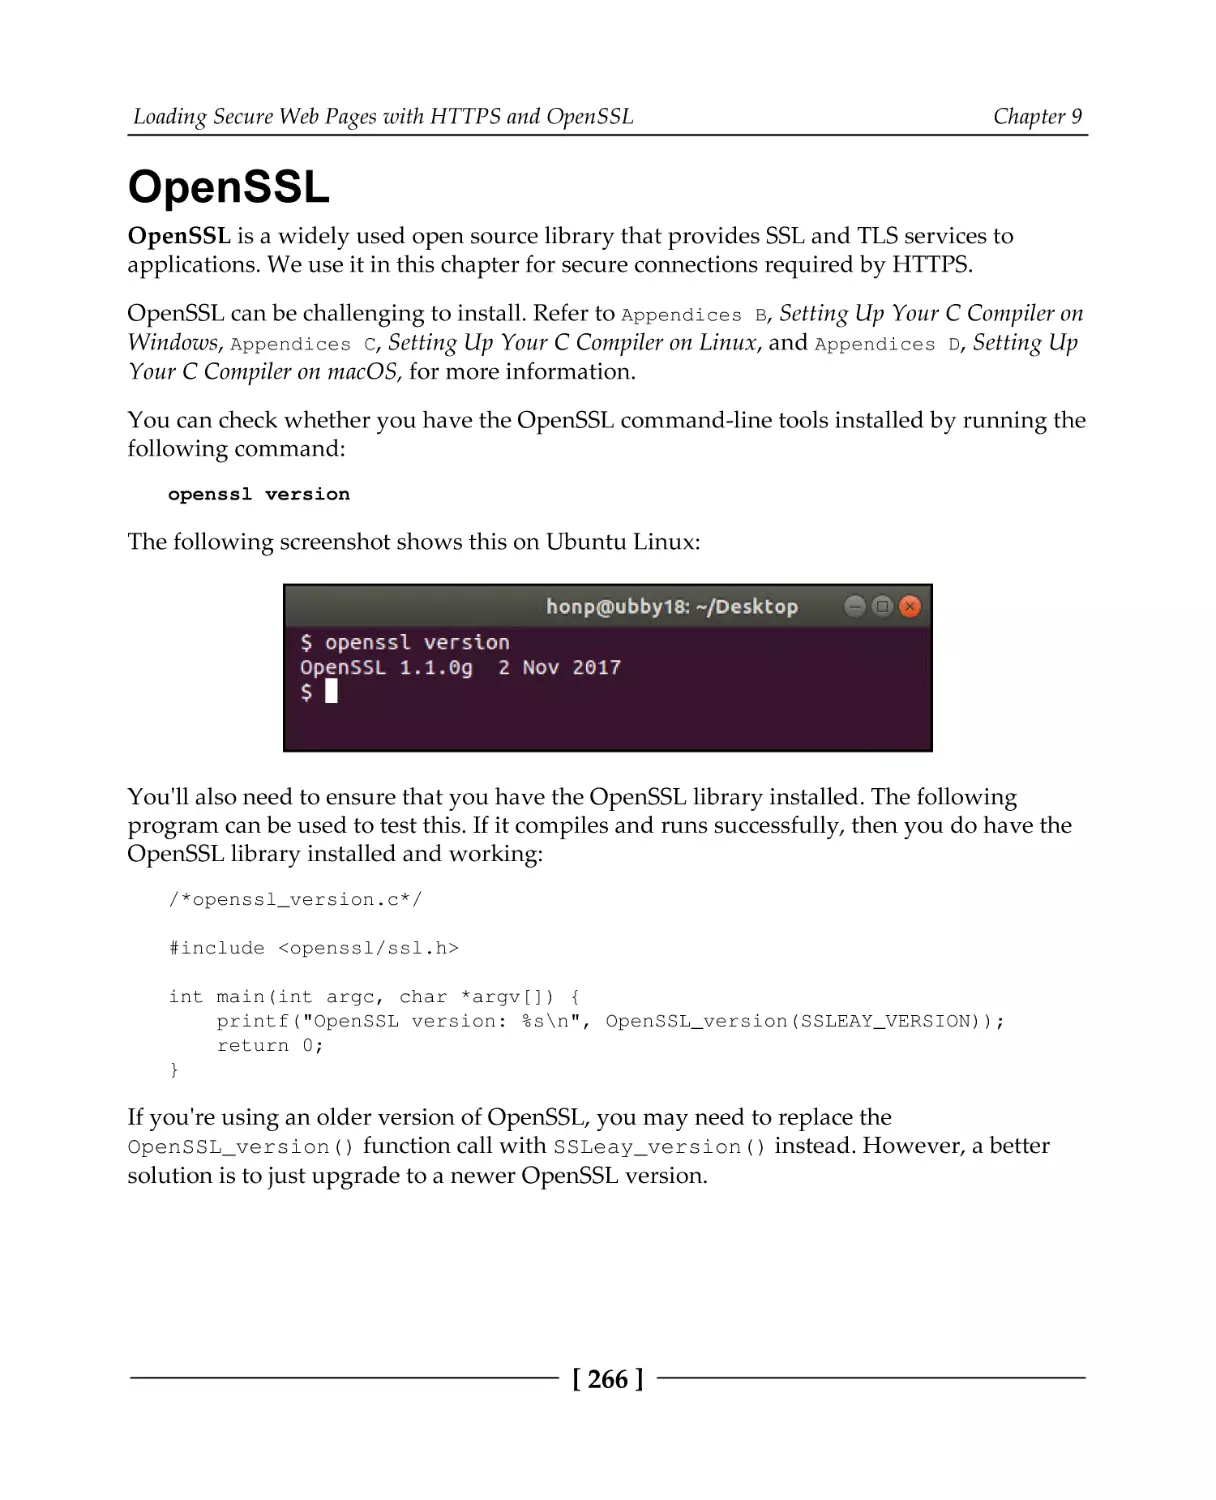
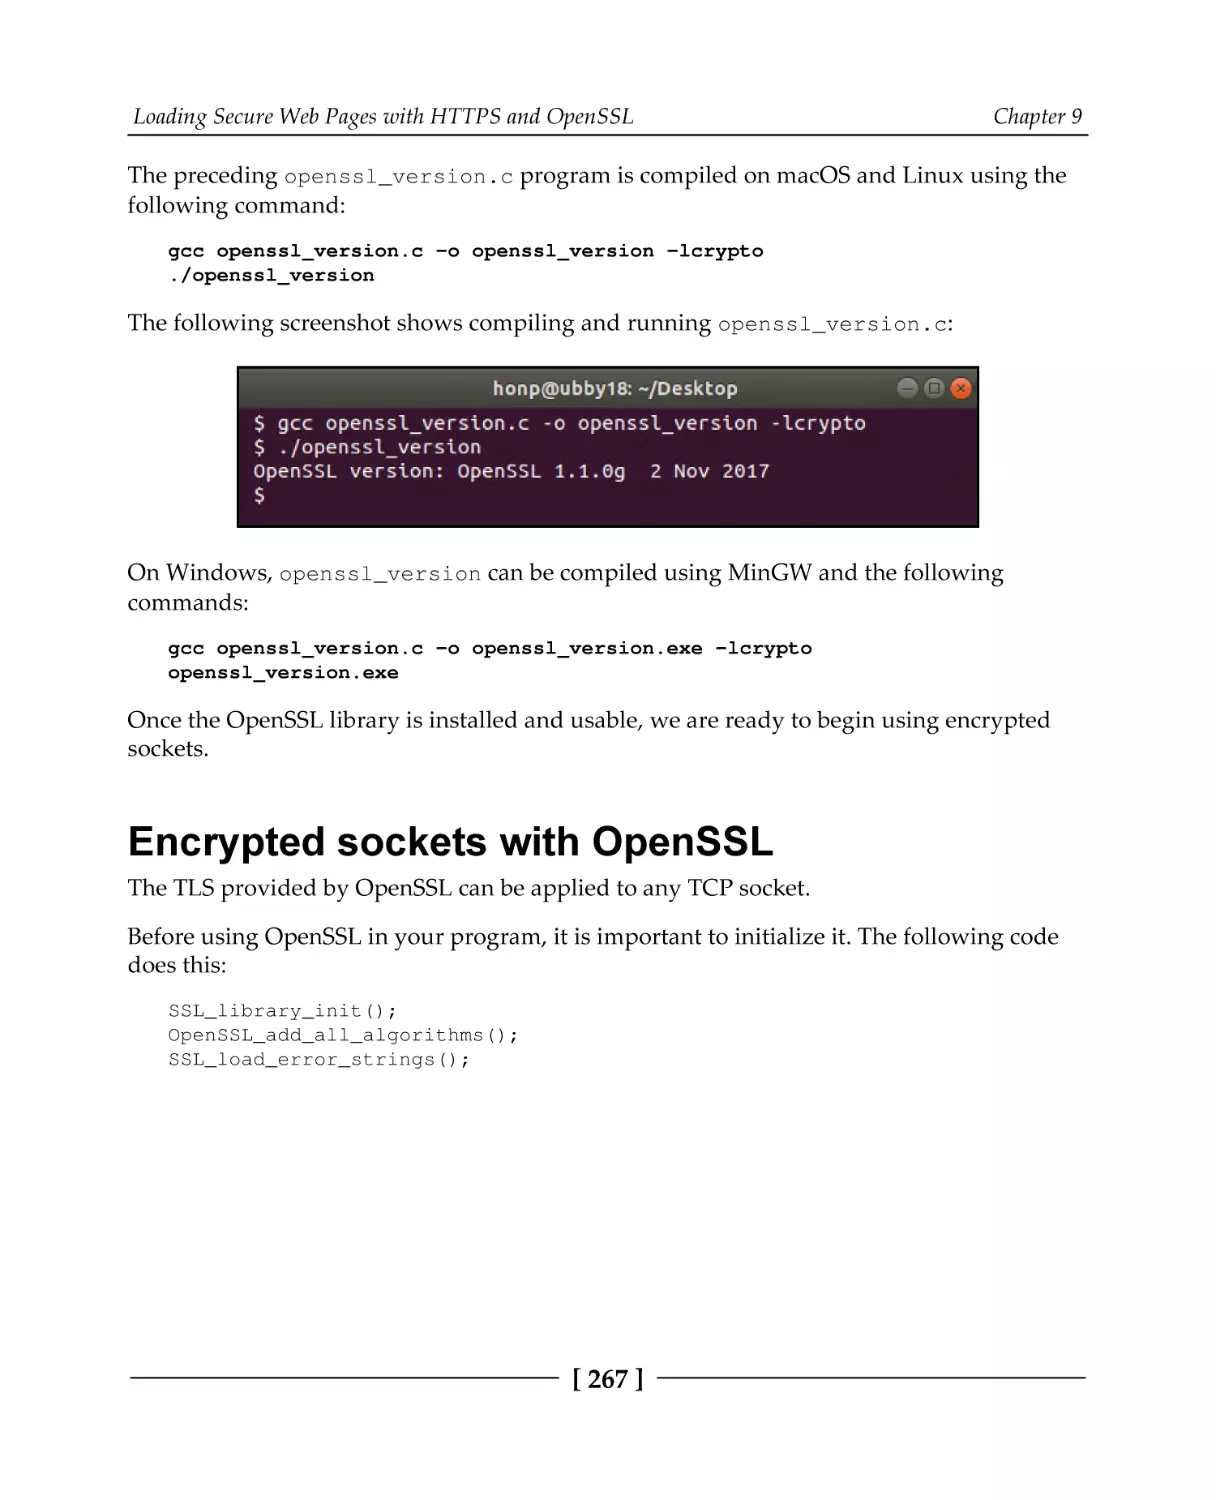
OpenSSL
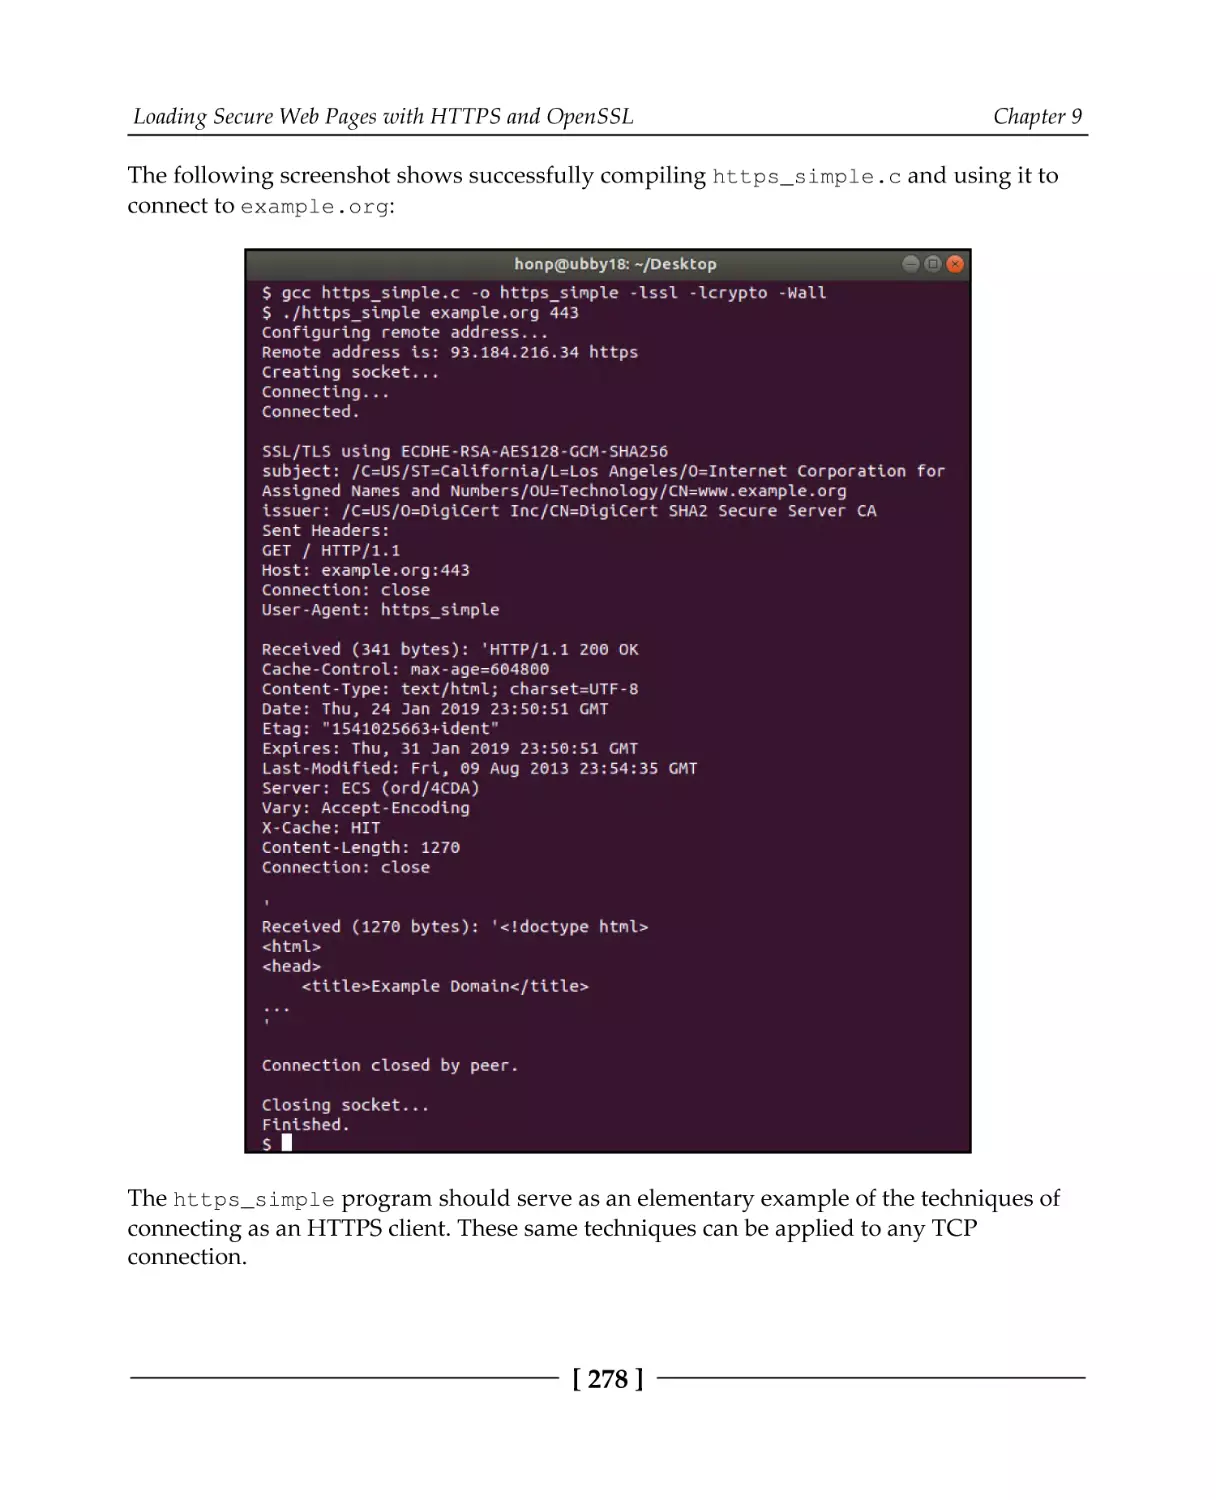
Encrypted sockets with OpenSSL
Certificates
A simple HTTPS client
Other examples
Summary
Questions
Further reading
Chapter 10: Implementing a Secure Web Server
Technical requirements
HTTPS and OpenSSL summary
Certificates
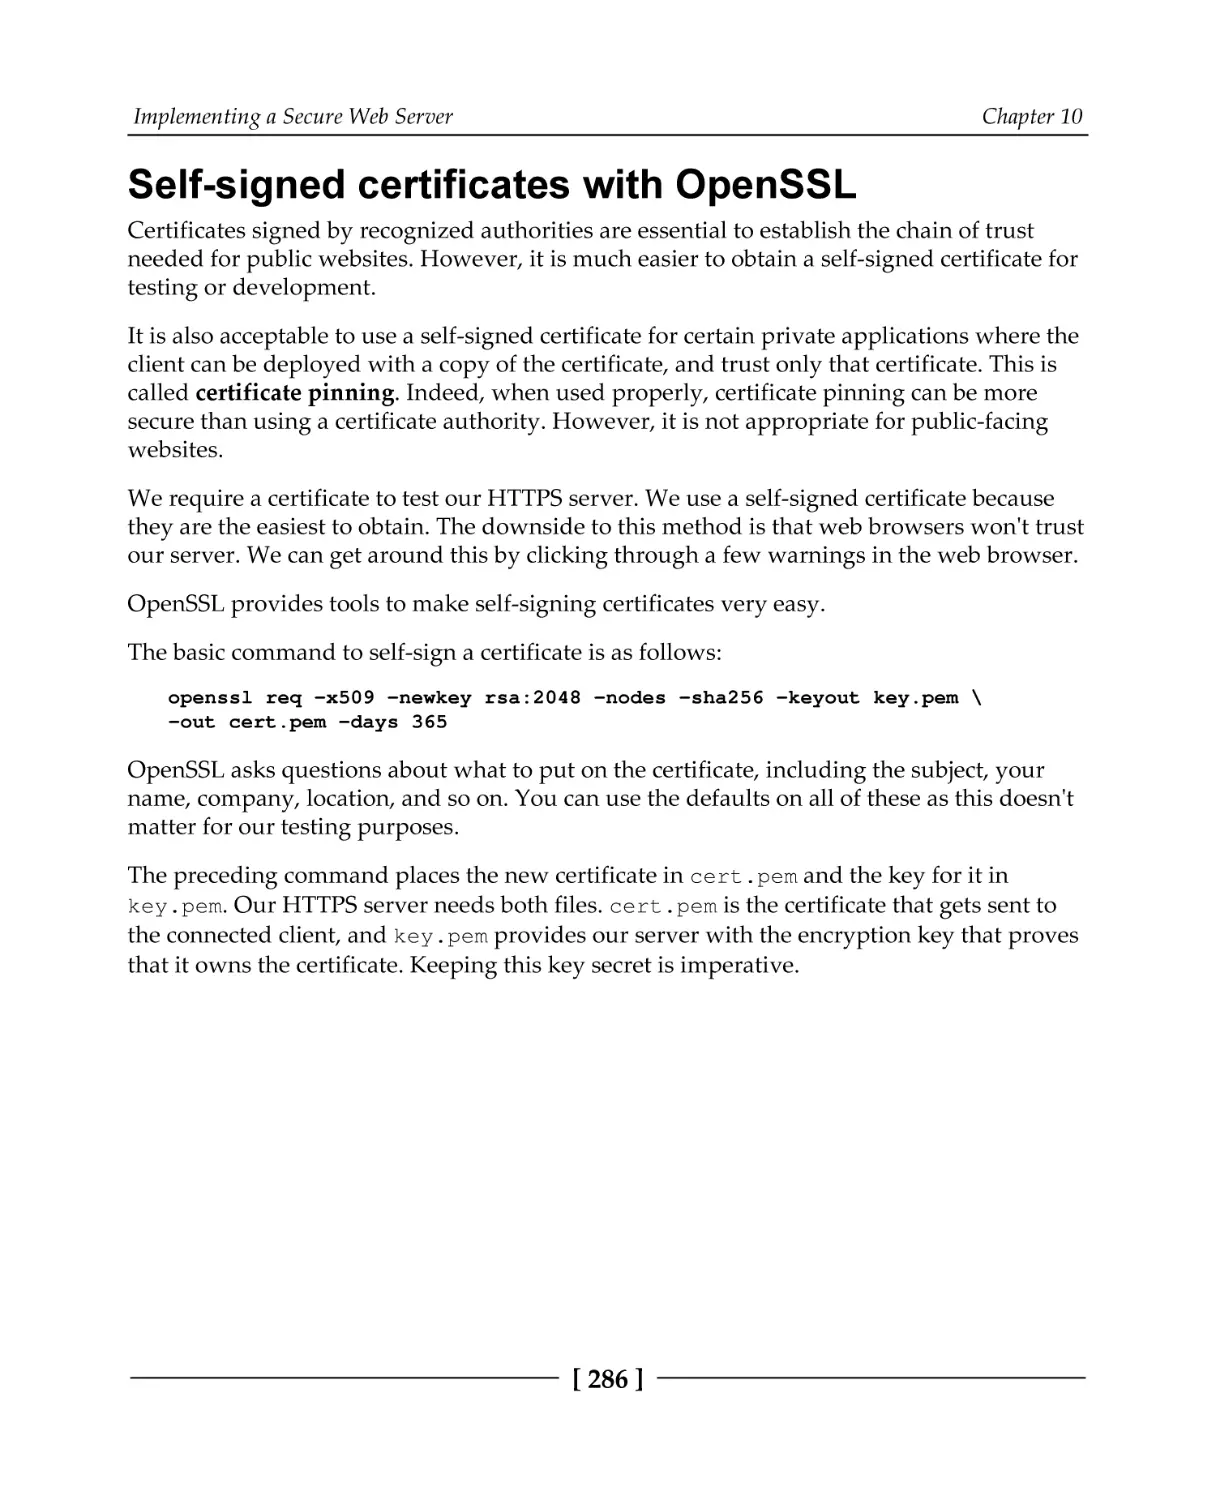
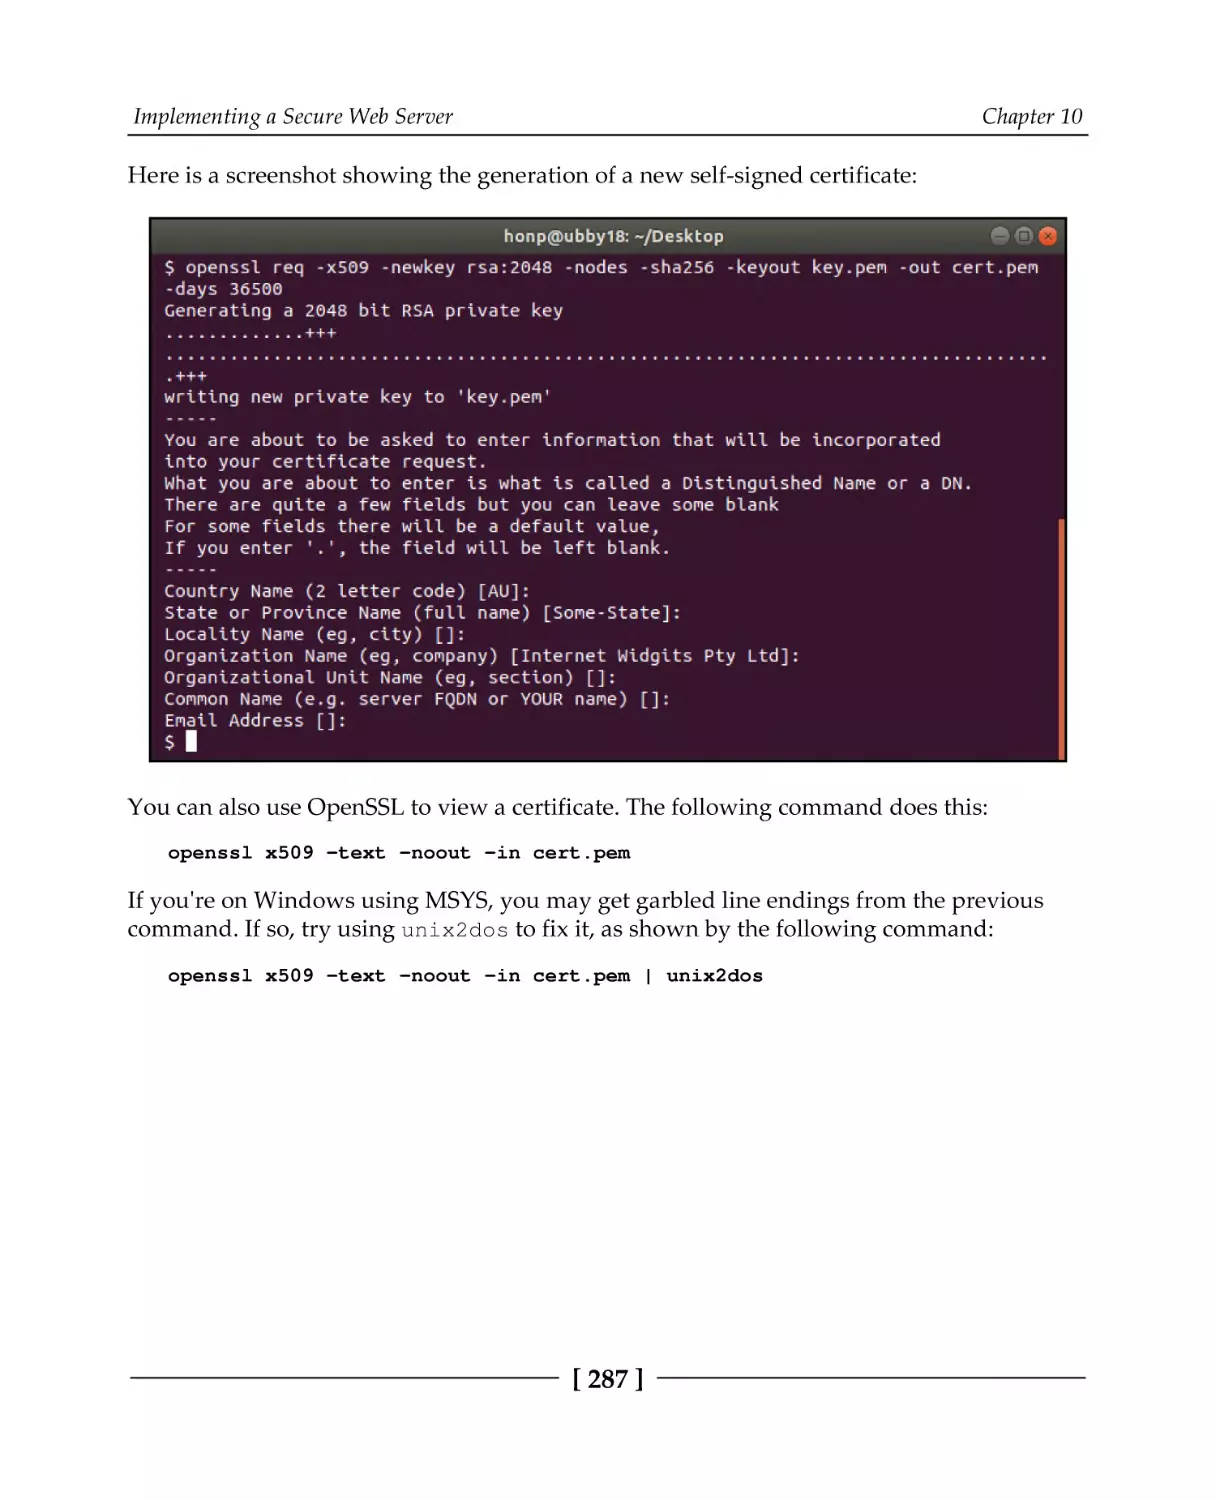
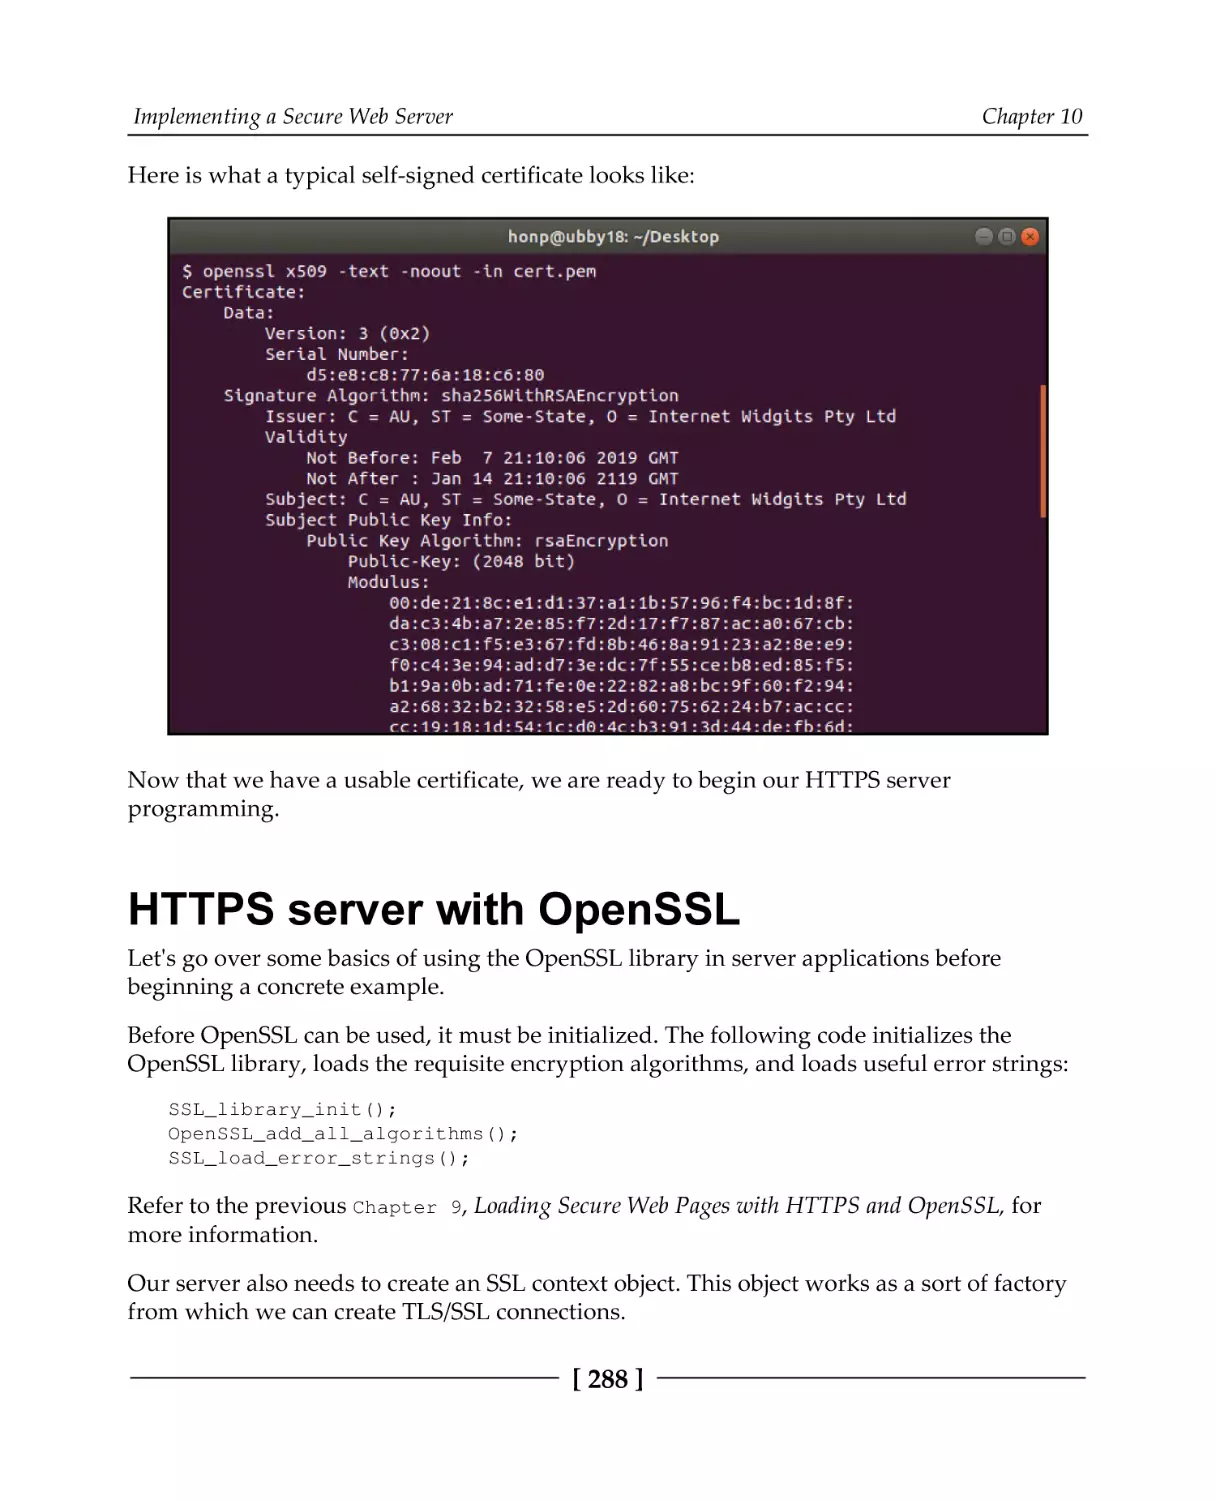
Self-signed certificates with OpenSSL
HTTPS server with OpenSSL
Time server example
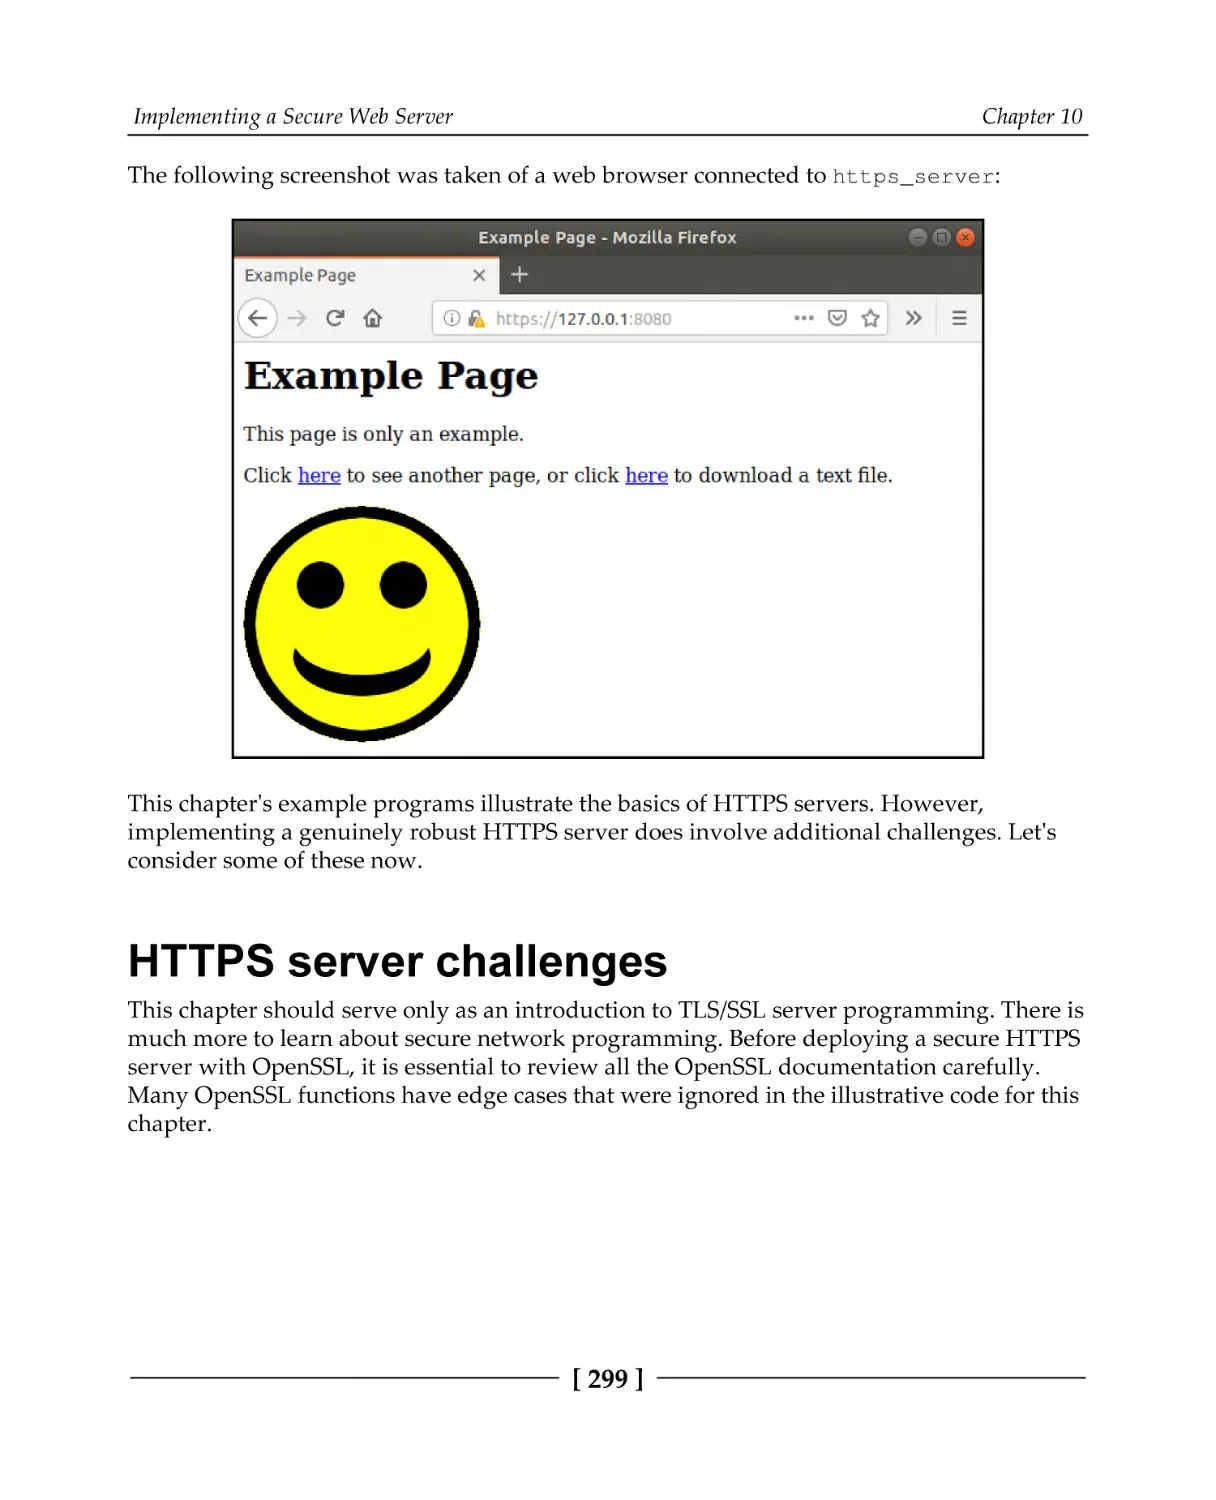
A full HTTPS server
HTTPS server challenges
OpenSSL alternatives
Alternatives to TLS
Summary
Questions
Further reading
Chapter 11: Establishing SSH Connections with libssh
Technical requirements
The SSH protocol
libssh
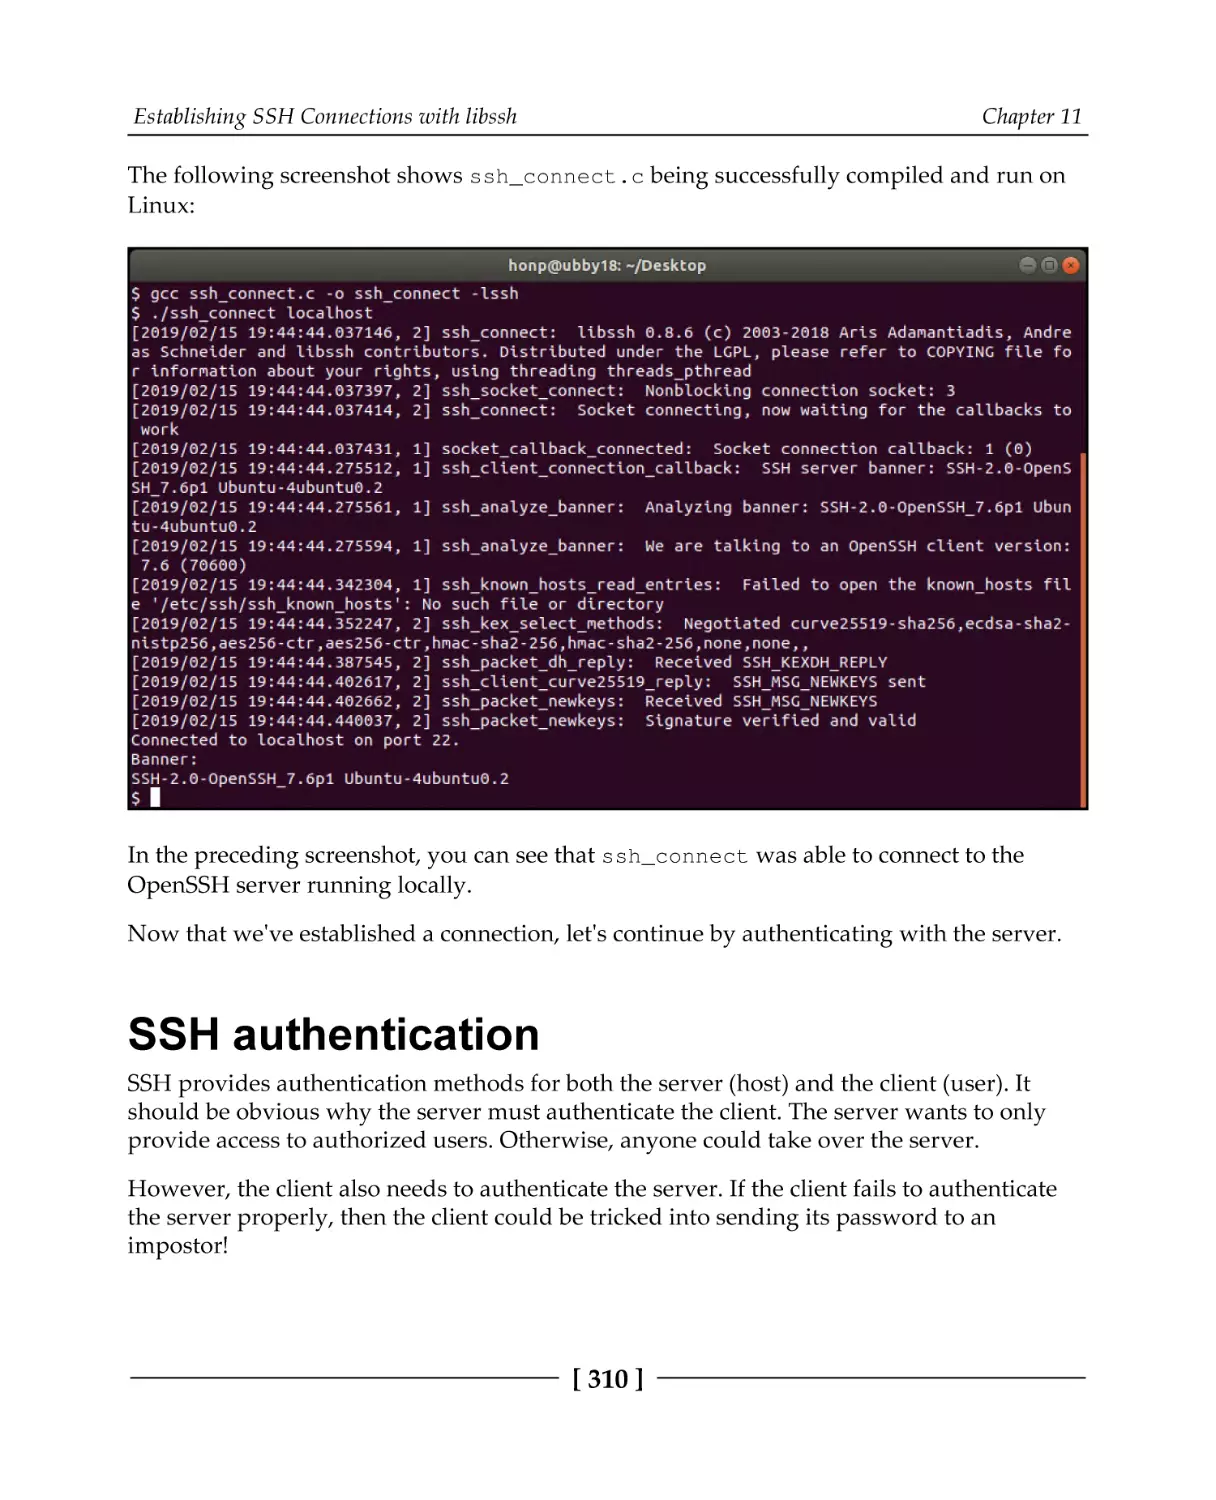
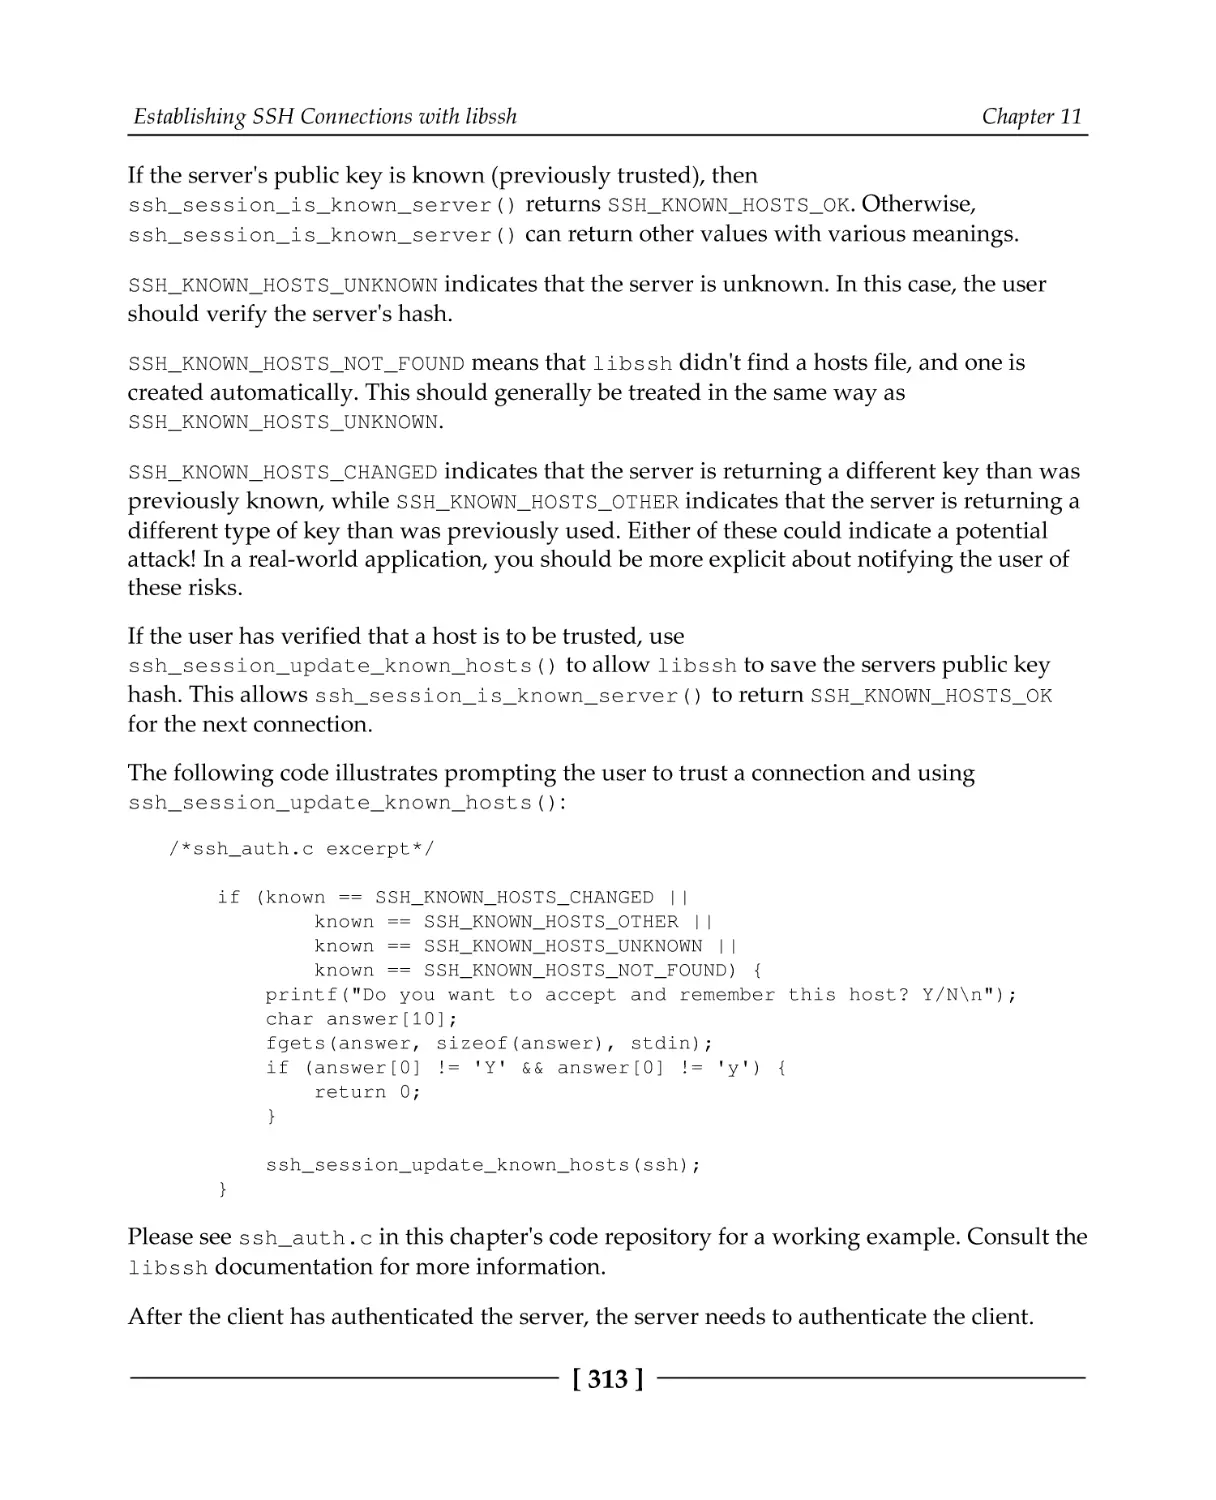
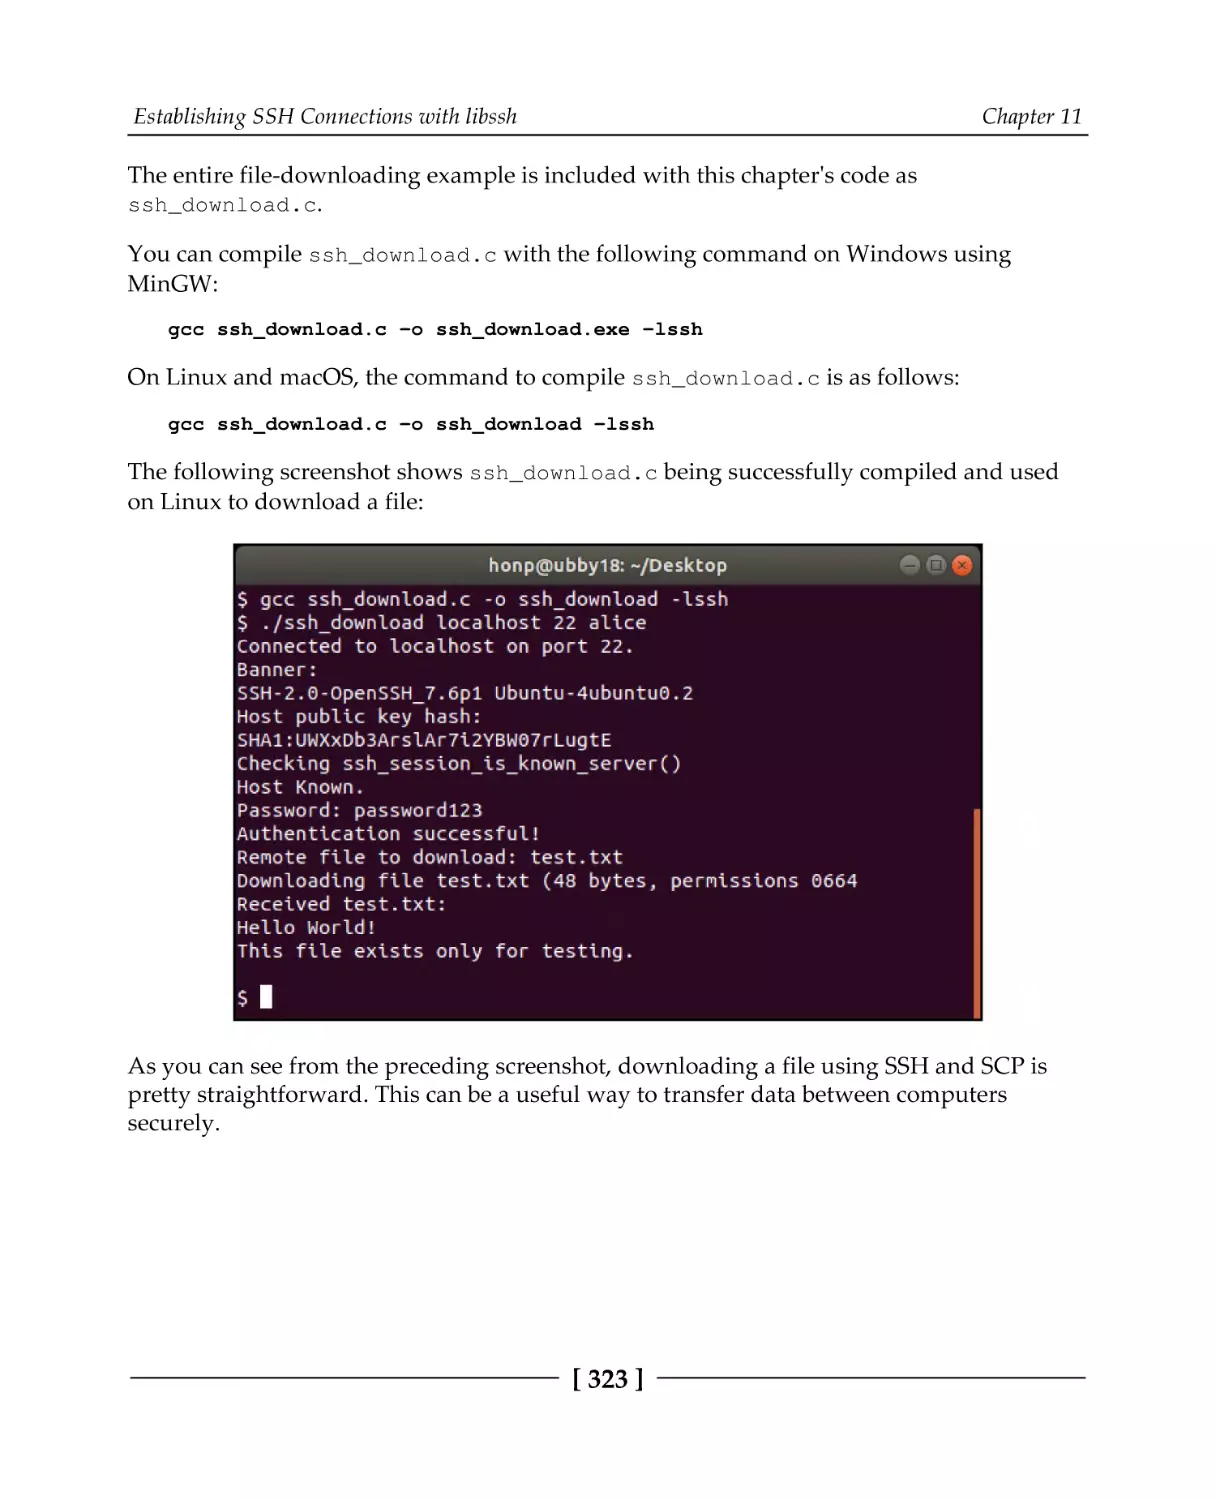
Testing out libssh
Establishing a connection
SSH authentication
Server authentication
Client authentication
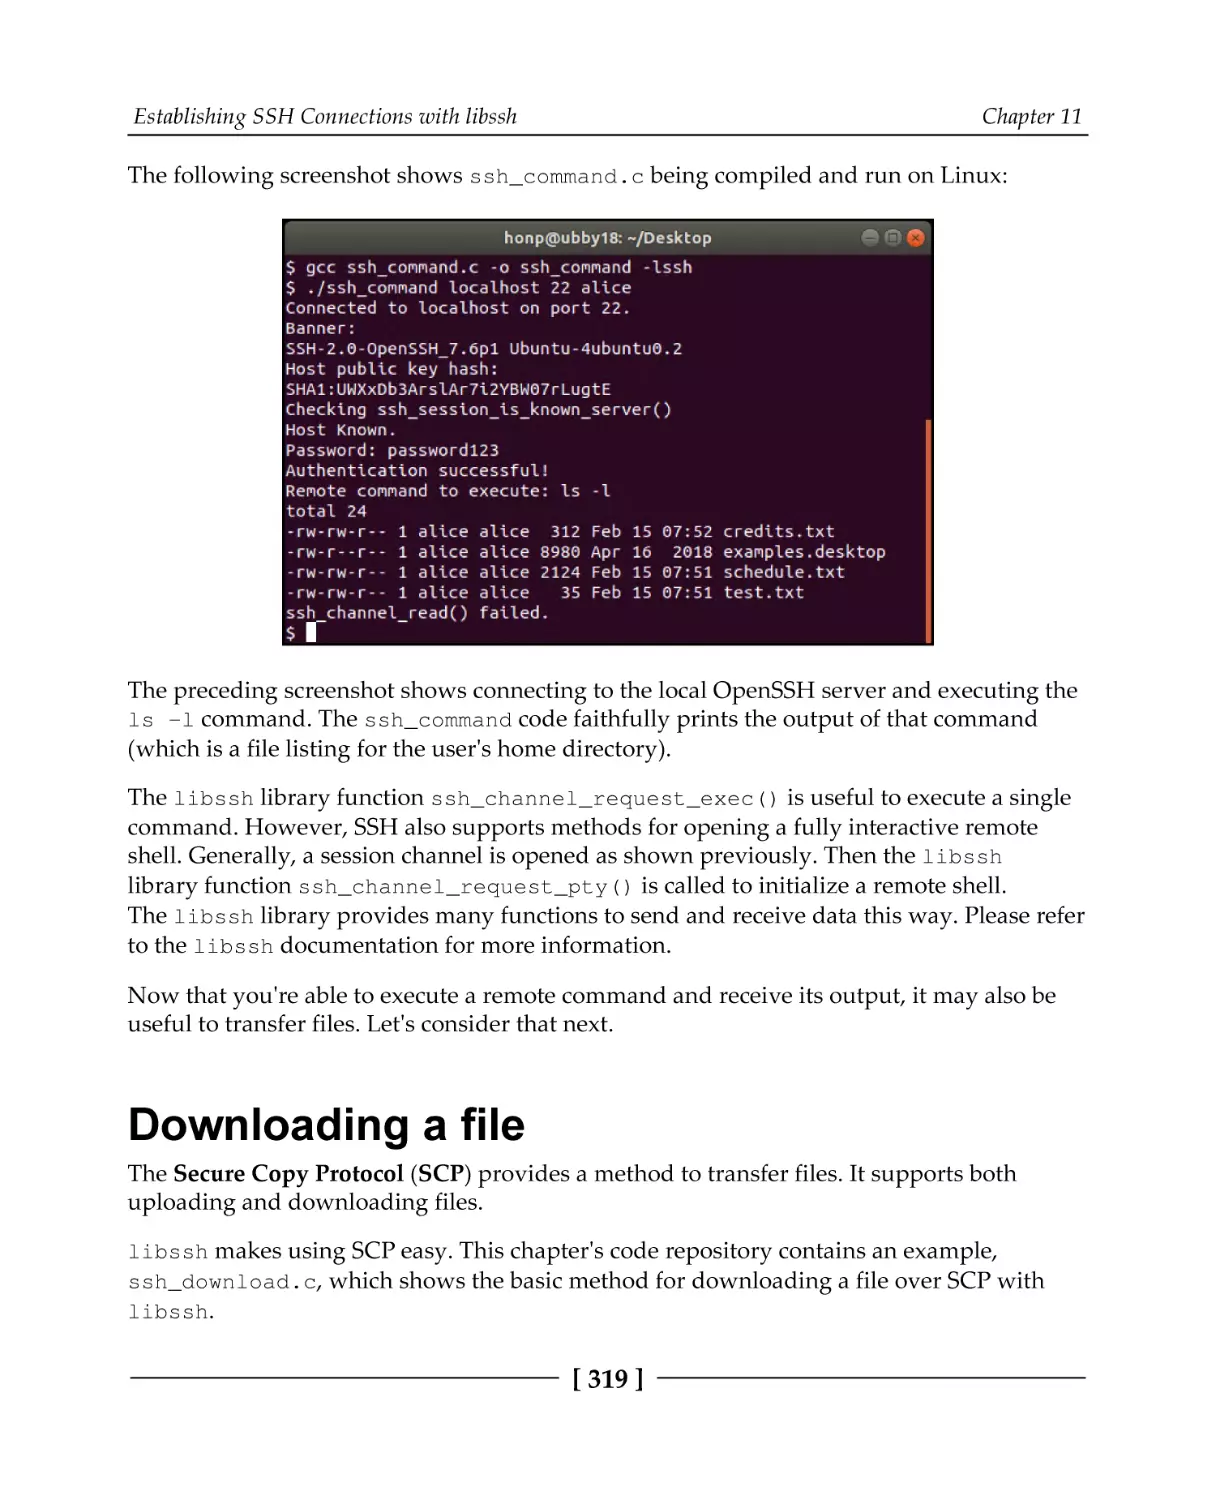
Executing a remote command
Downloading a file
Summary
Questions
[v]
259
260
261
262
263
264
265
266
267
270
272
279
279
280
280
281
281
284
284
286
288
290
298
299
300
300
301
302
302
303
303
304
305
305
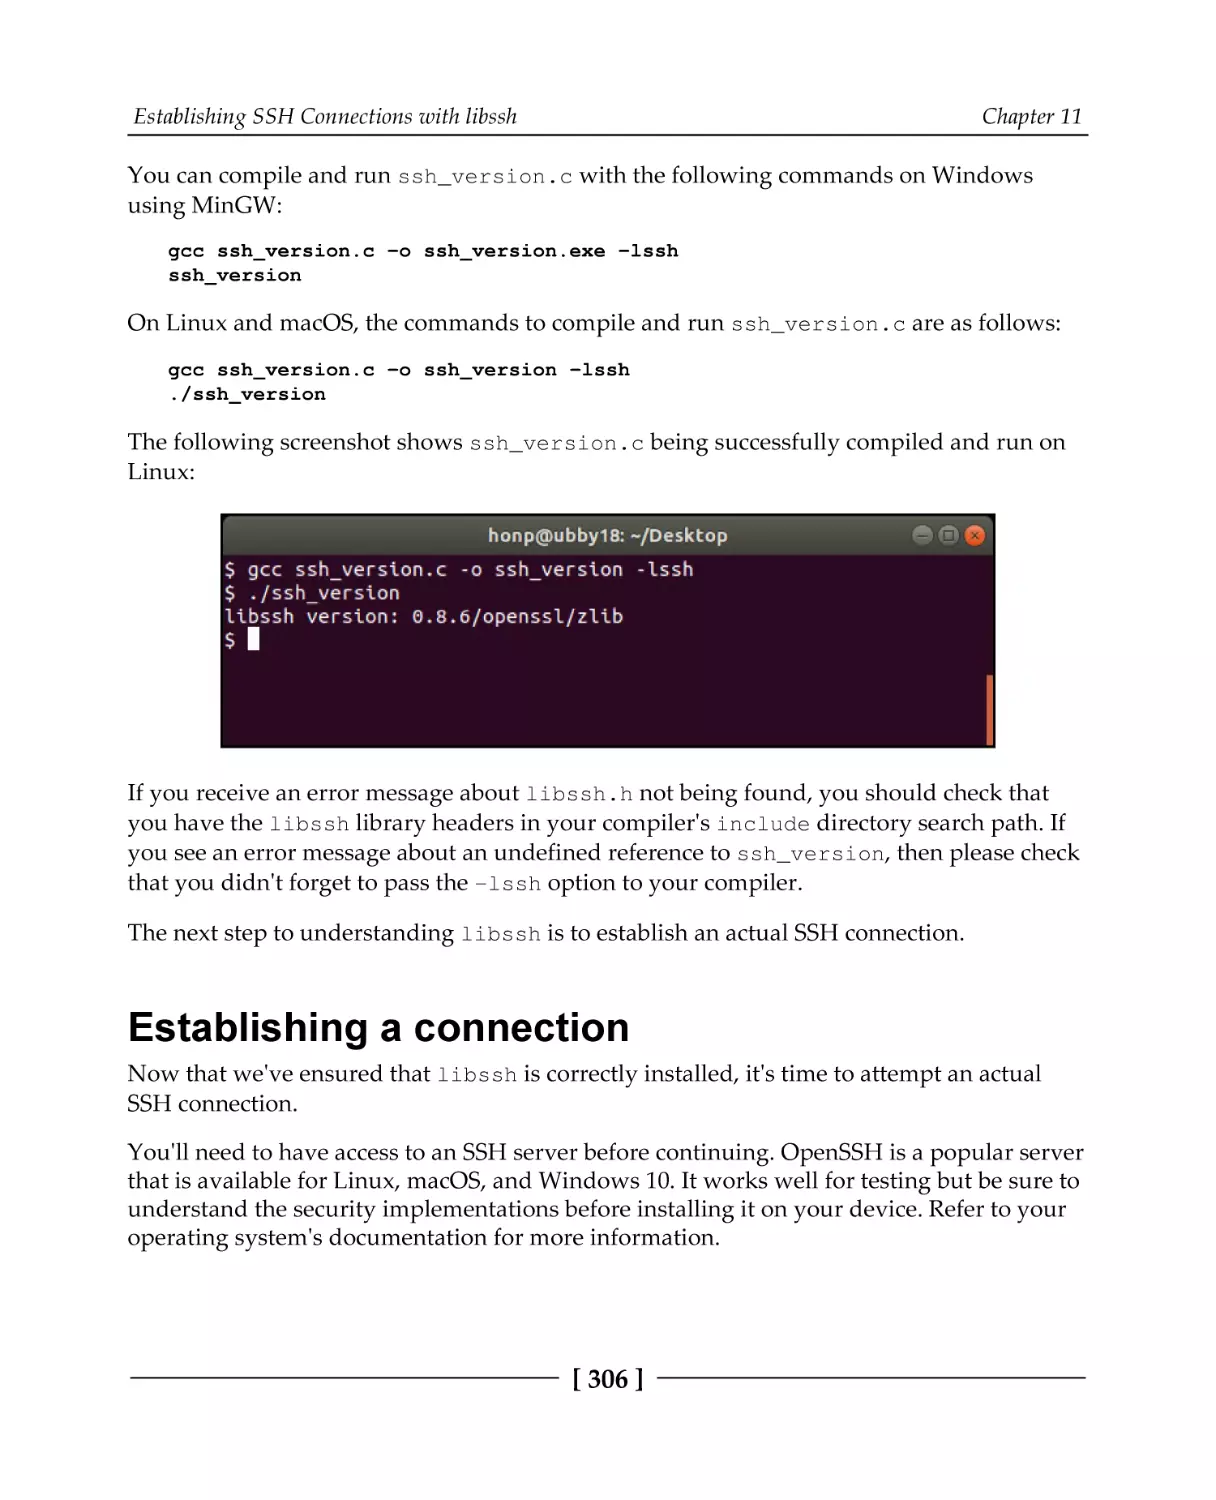
306
310
311
314
316
319
324
324
Table of Contents
Further reading
325
Section 4: Odds and Ends
Chapter 12: Network Monitoring and Security
Technical requirements
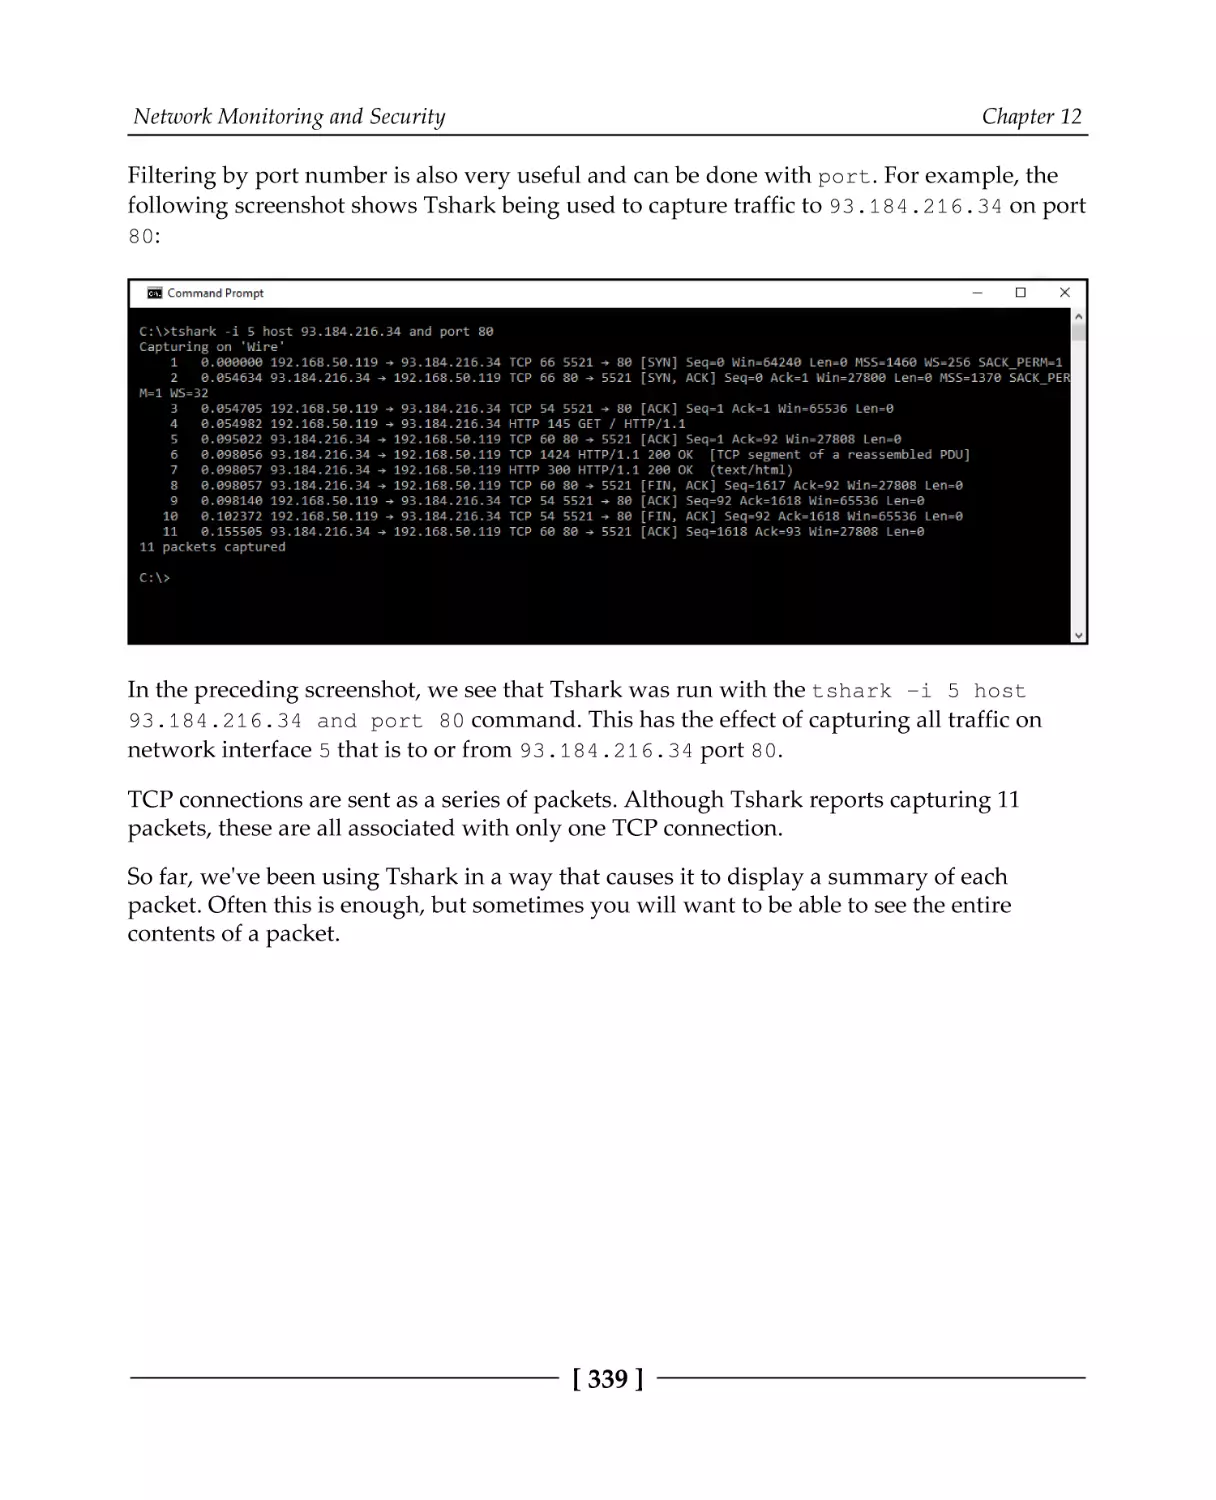
The purpose of network monitoring
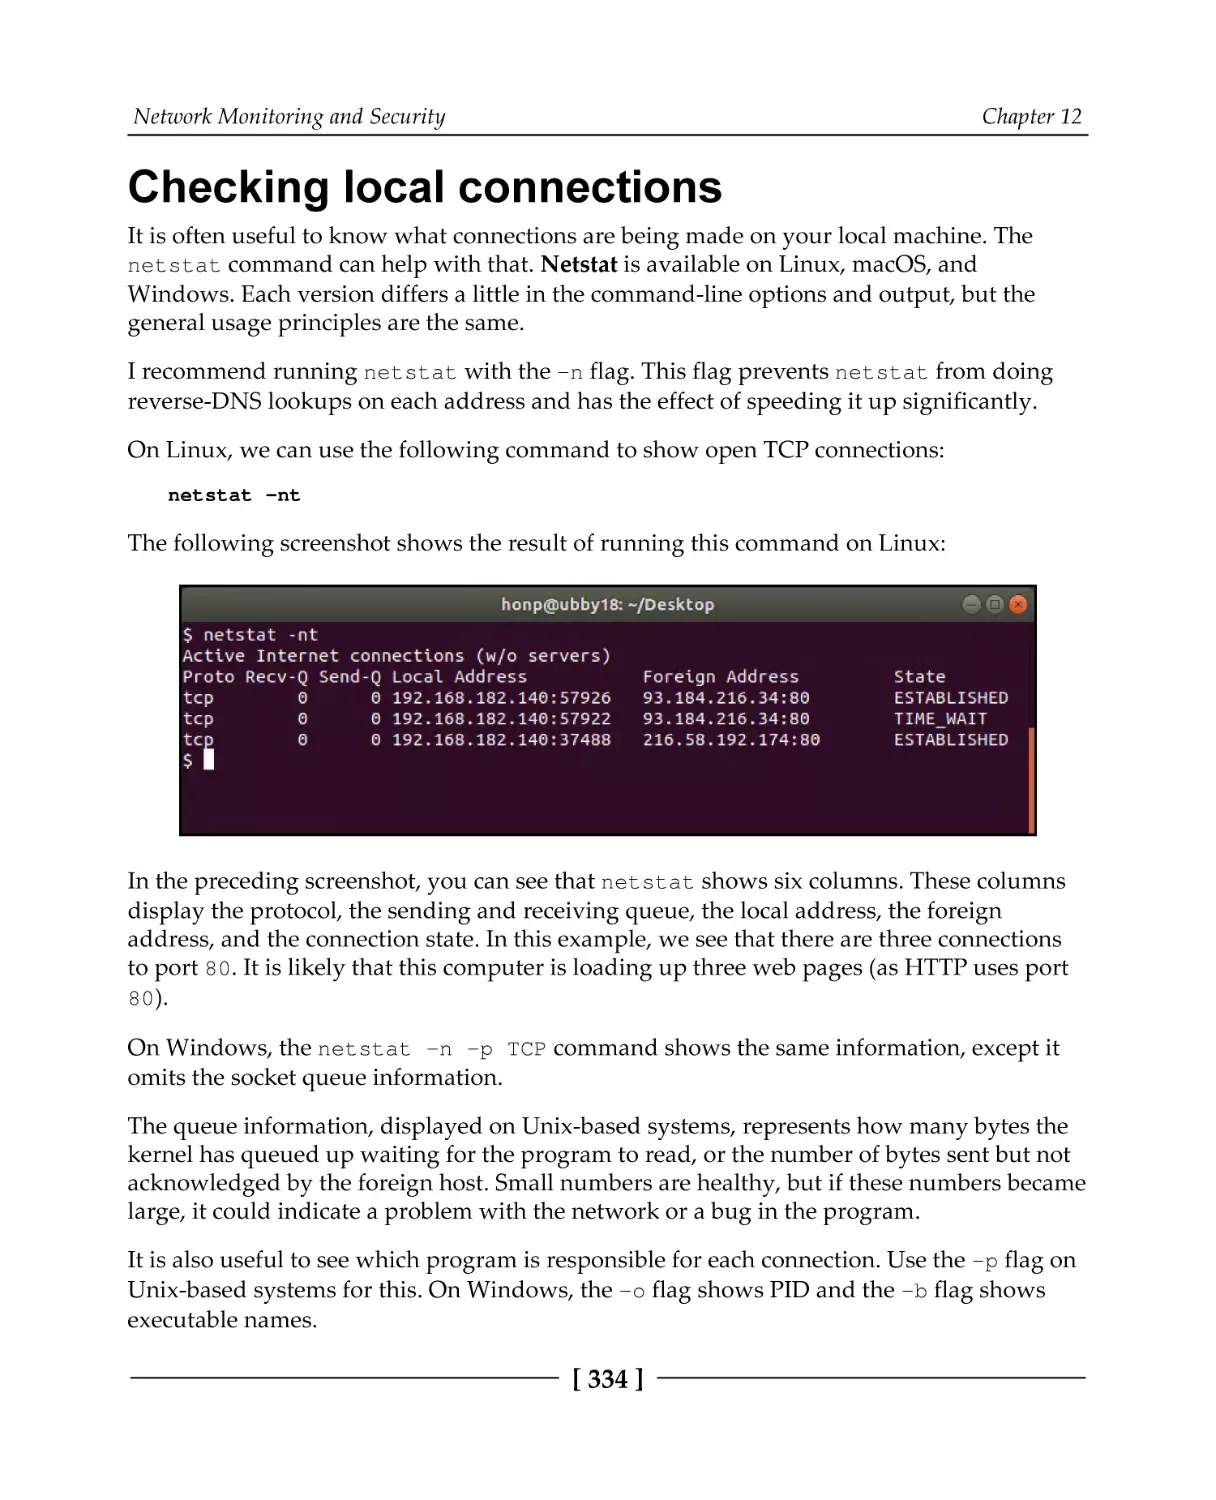
Testing reachability
Checking a route
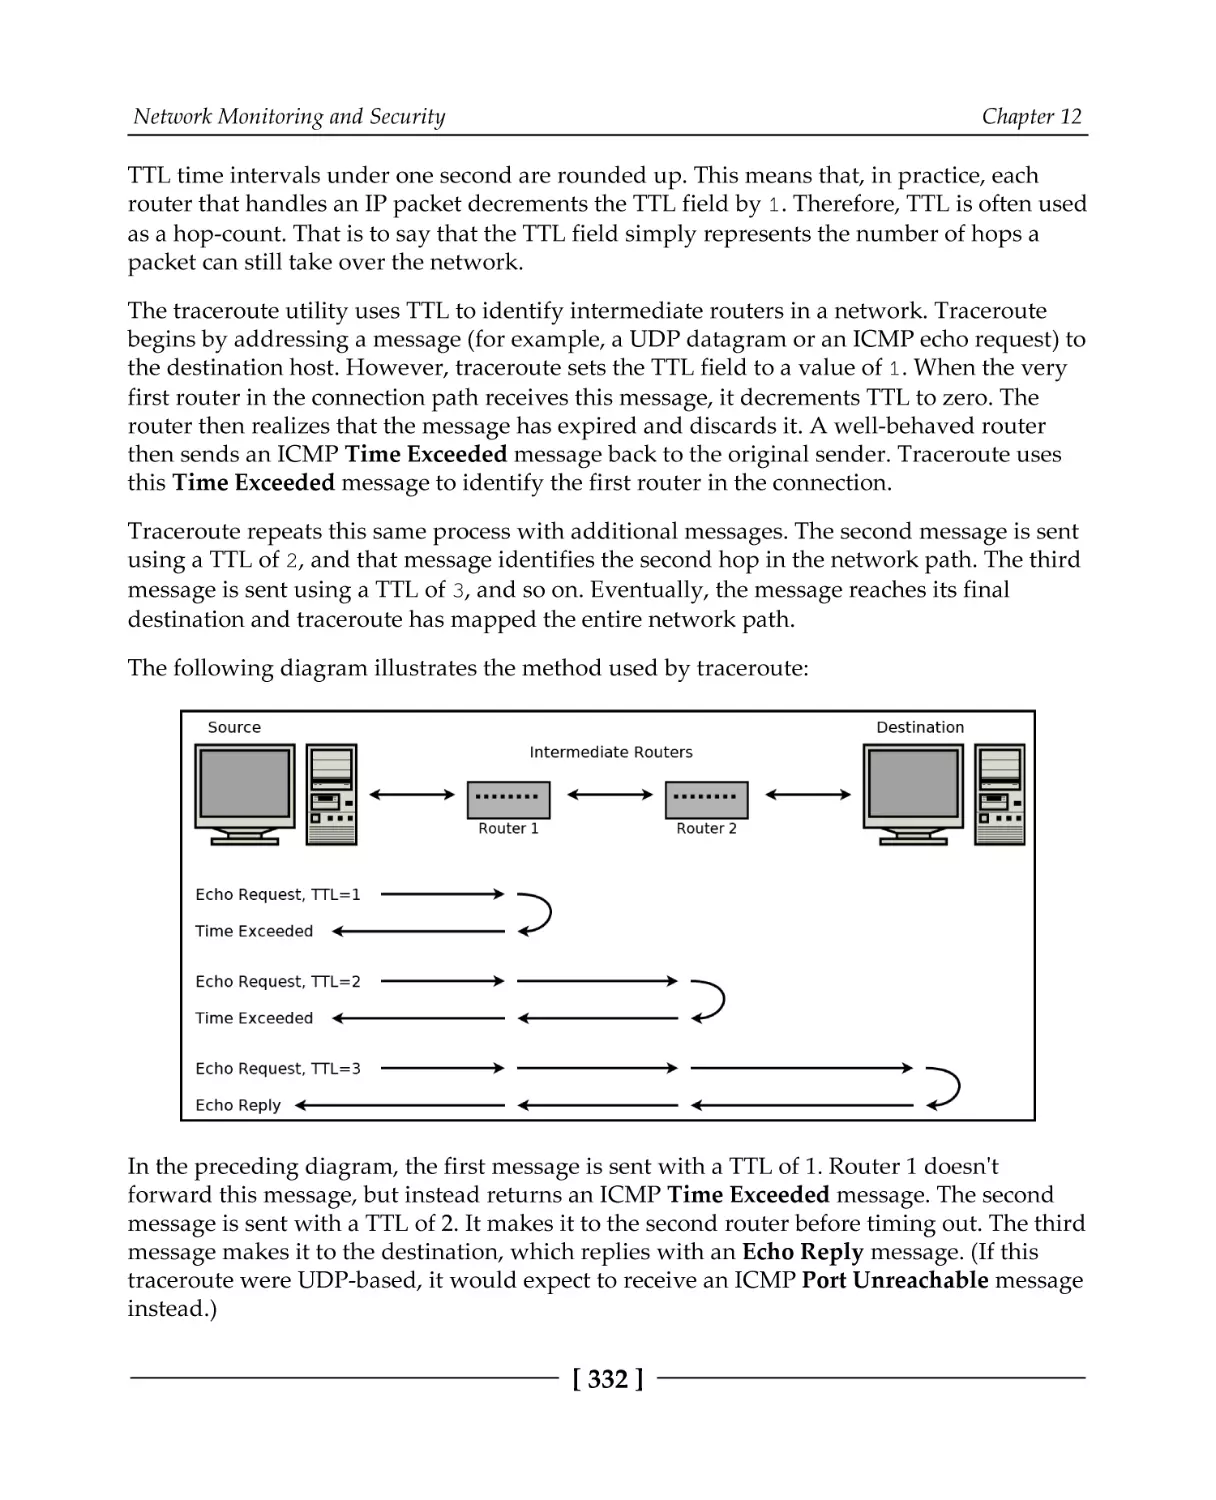
How traceroute works
Raw sockets
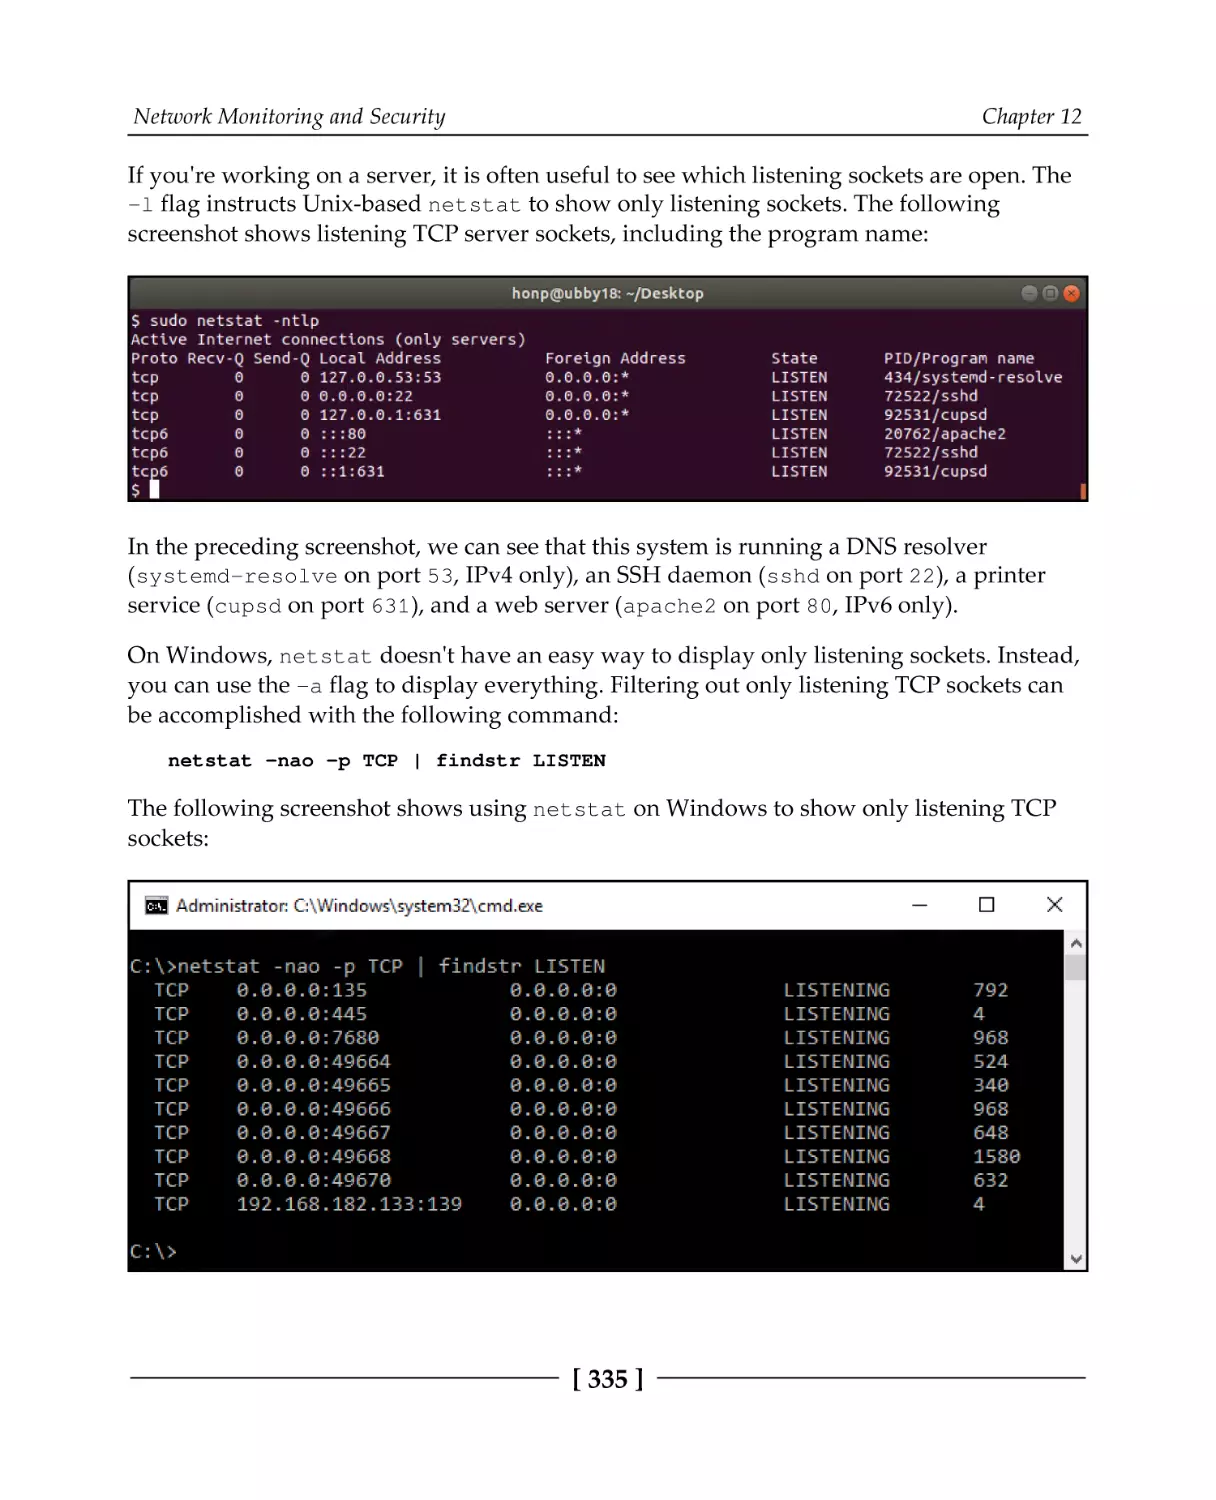
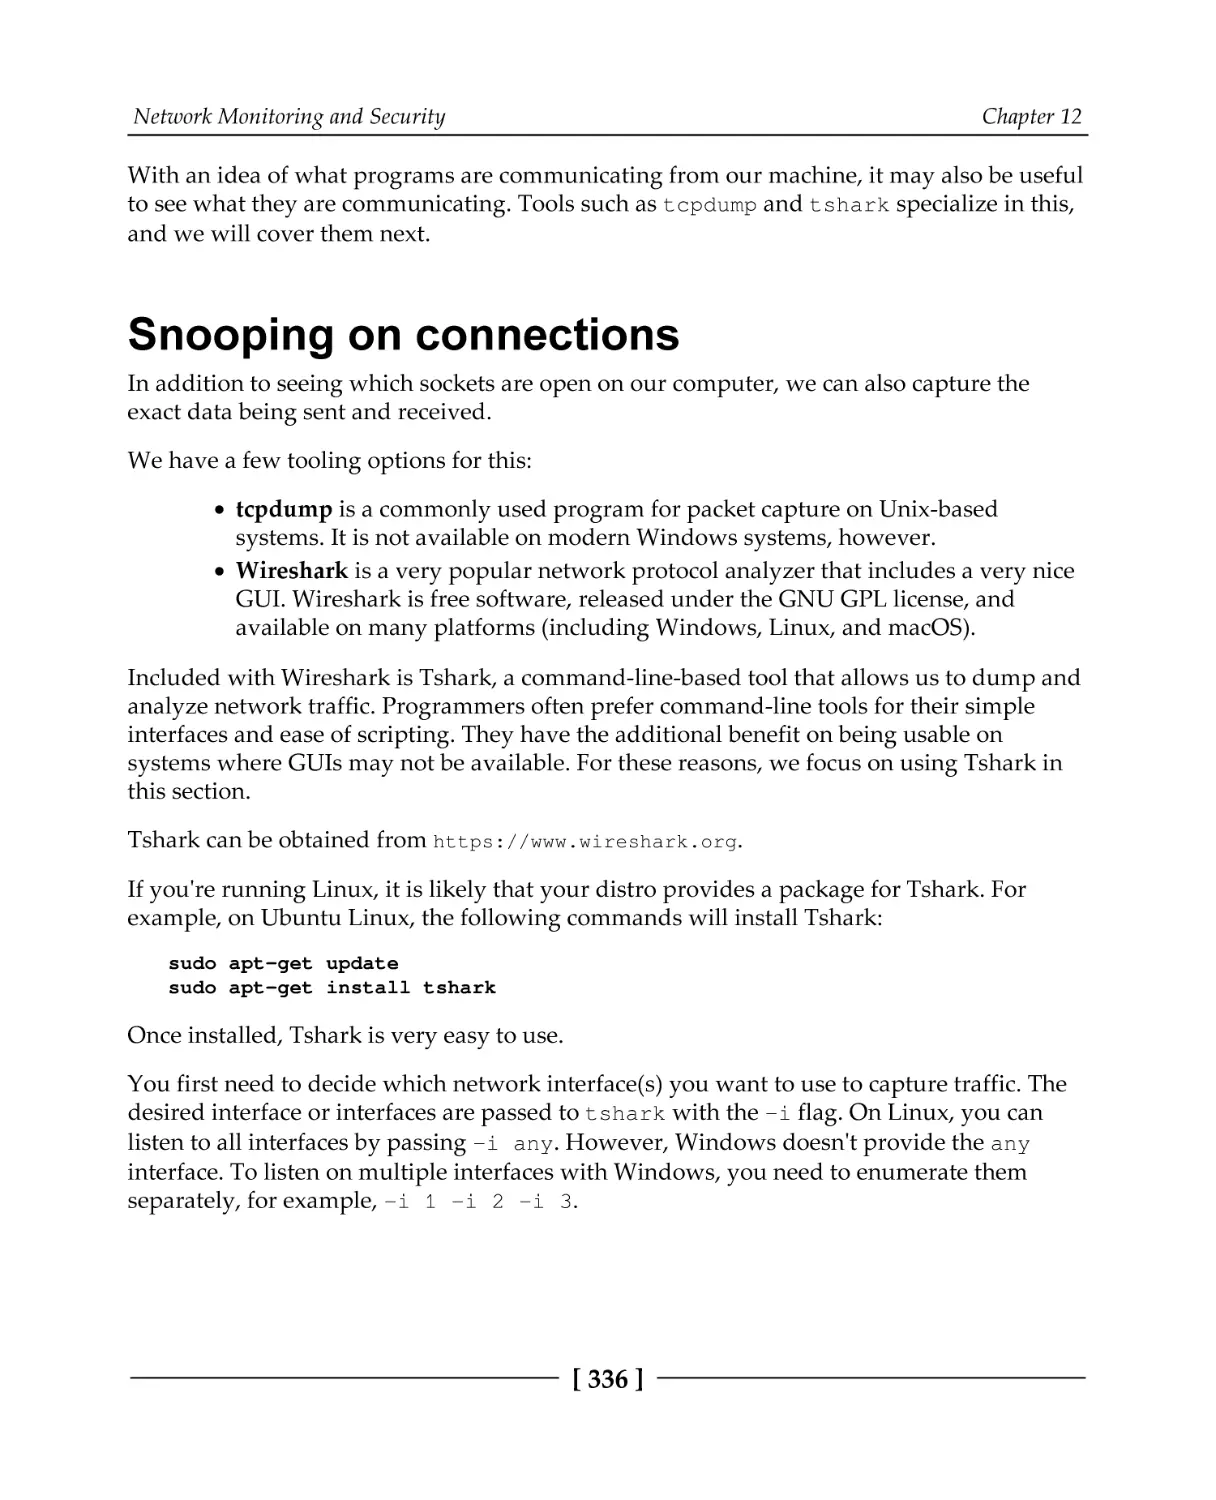
Checking local connections
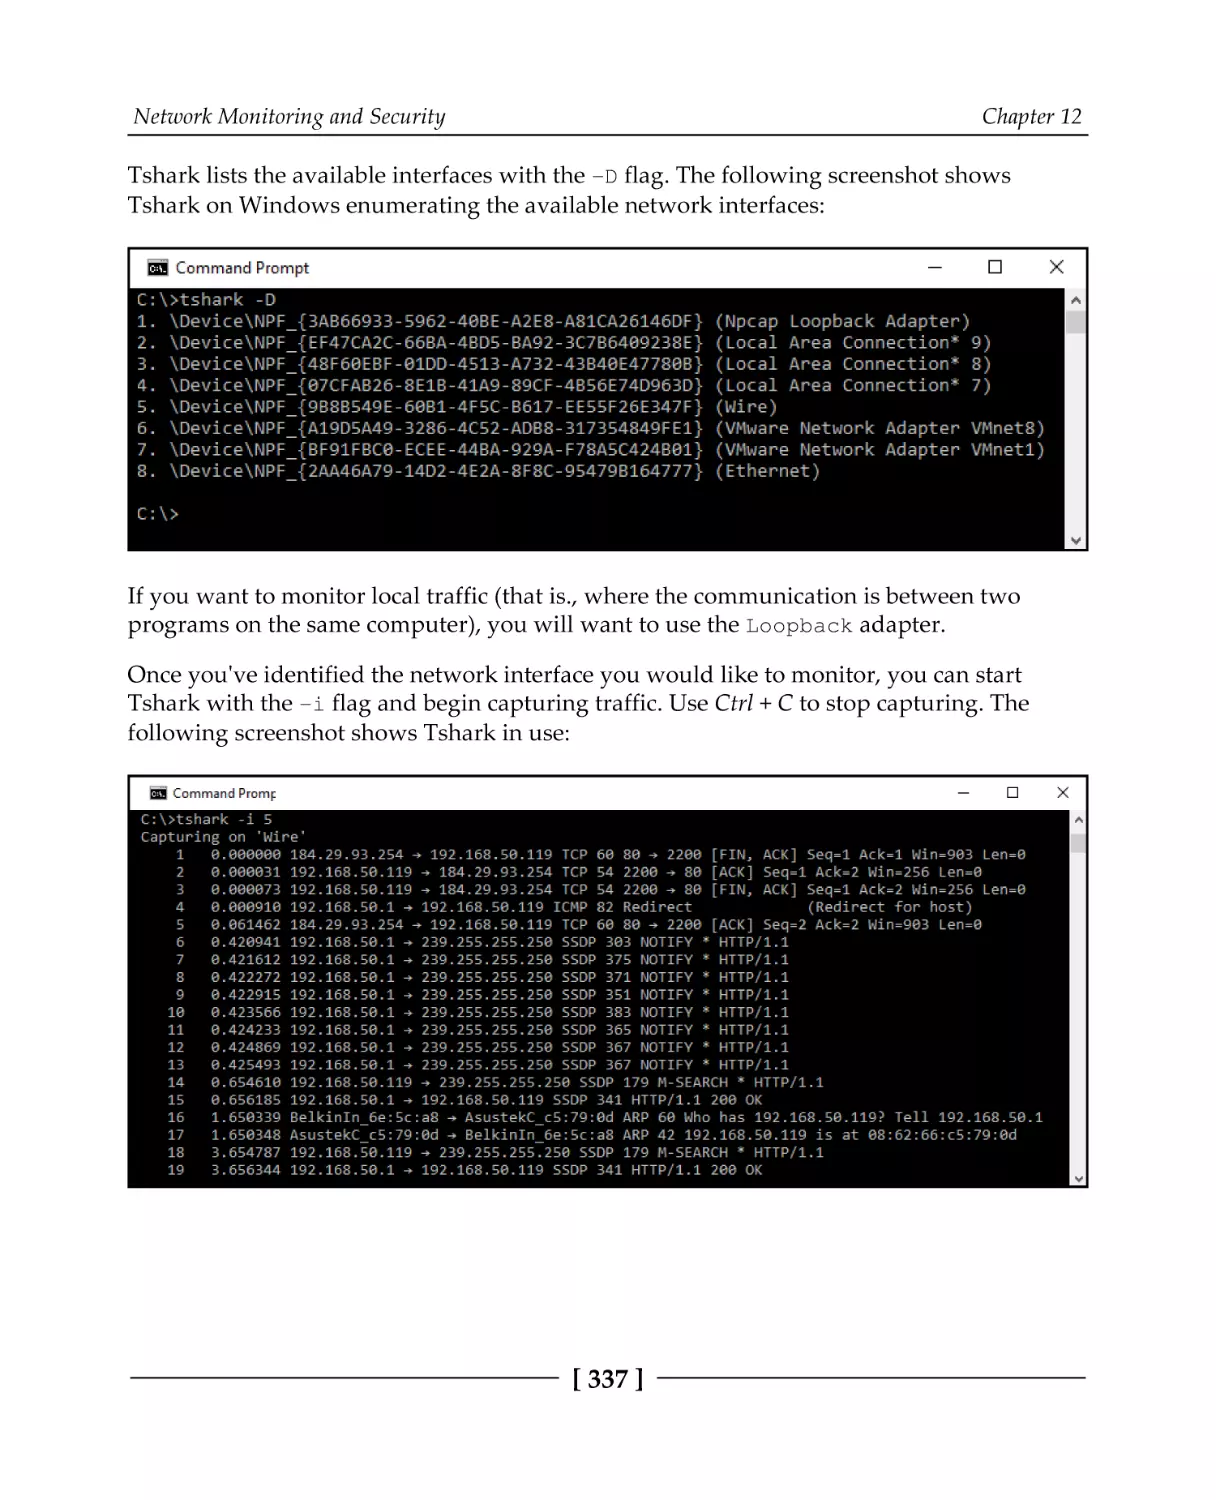
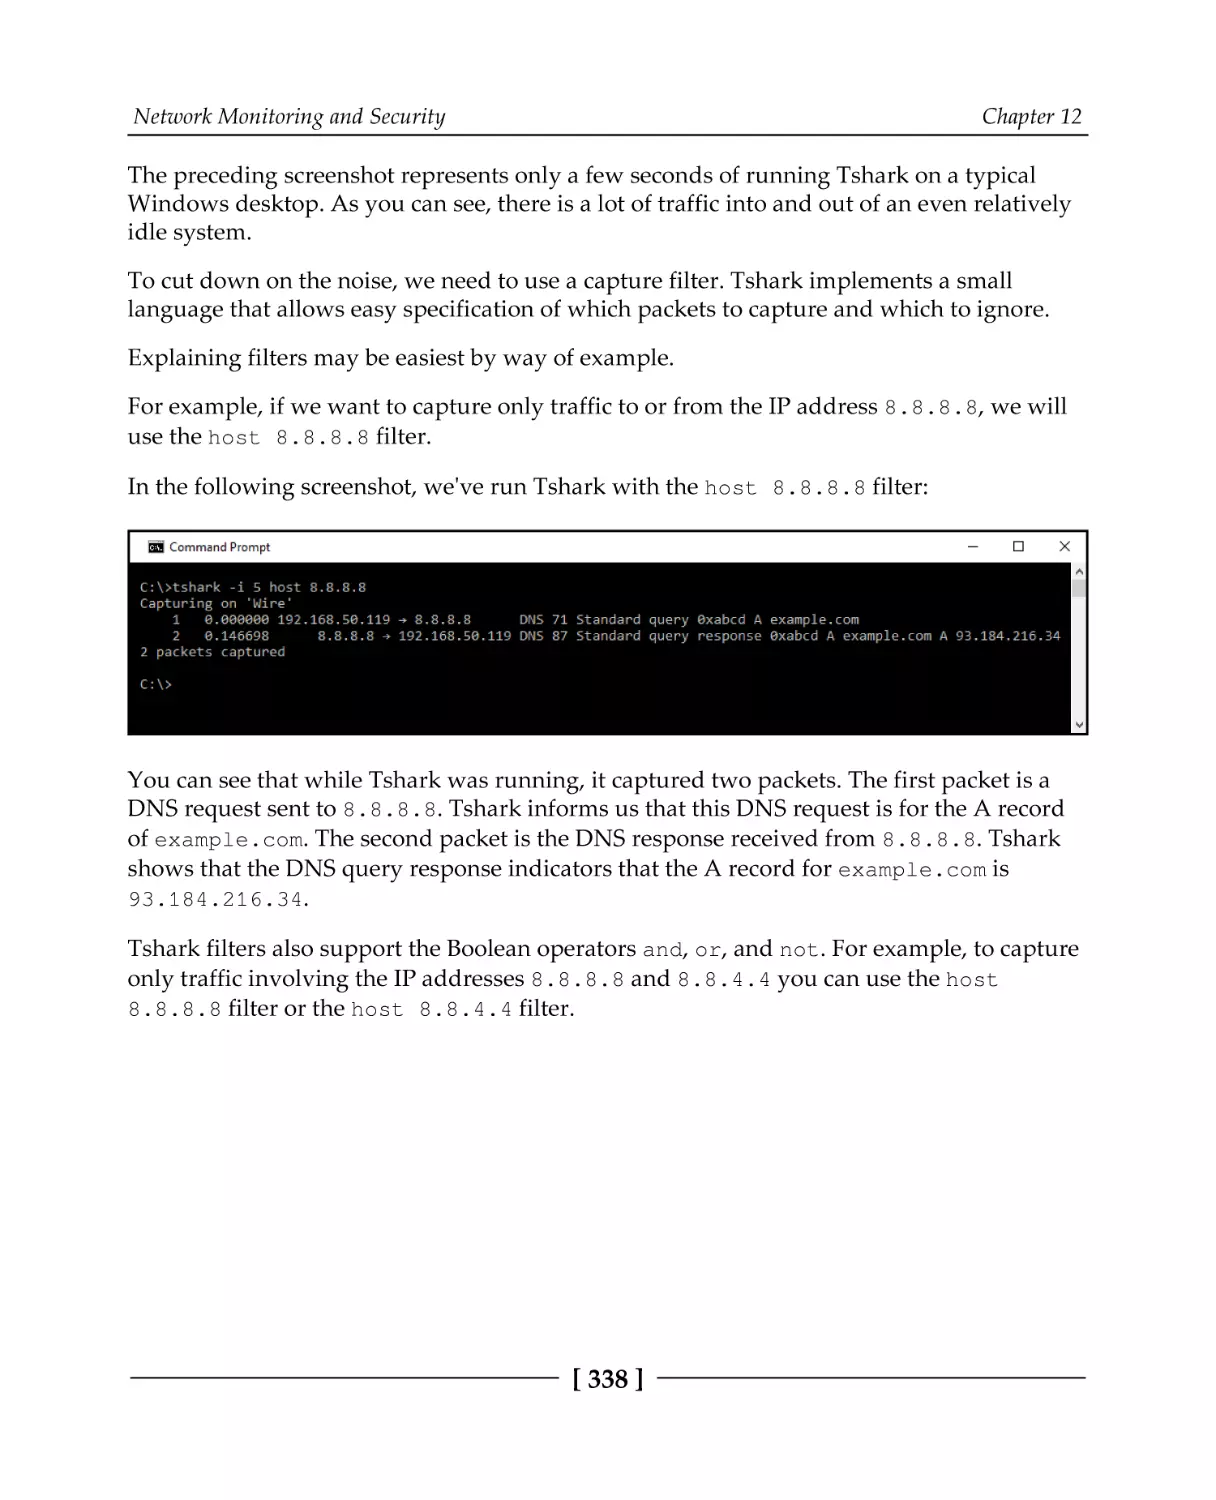
Snooping on connections
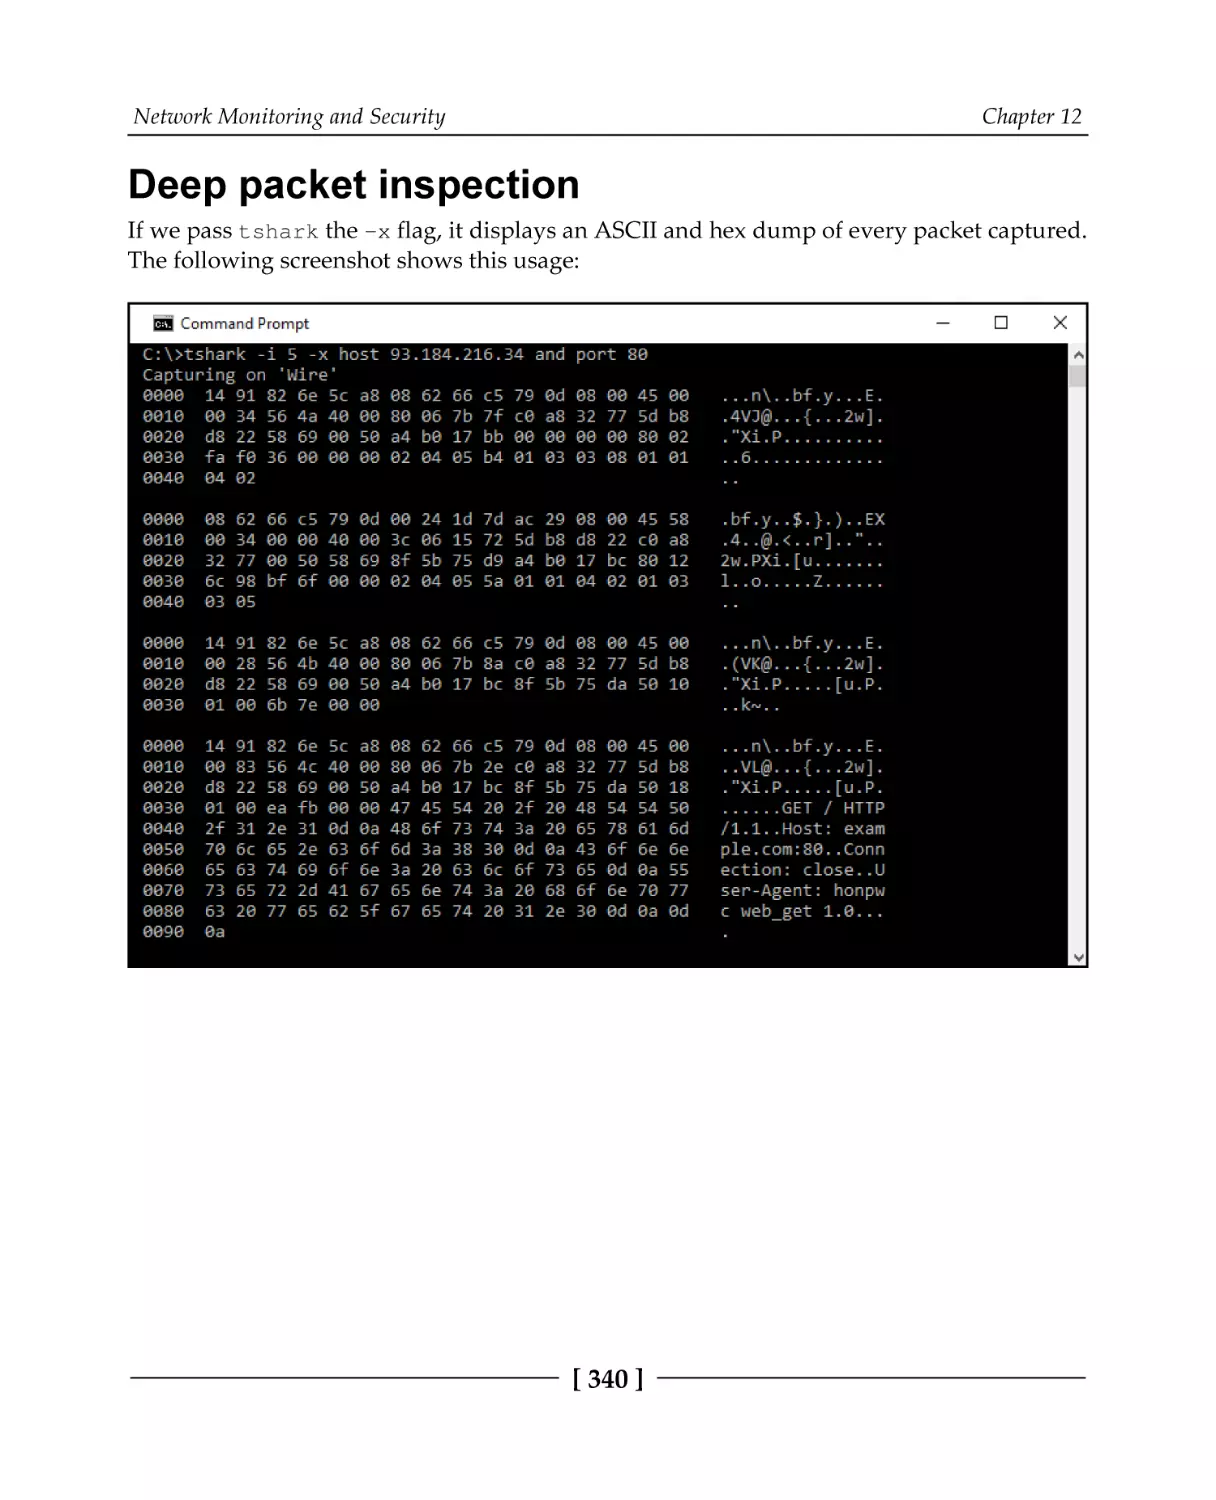
Deep packet inspection
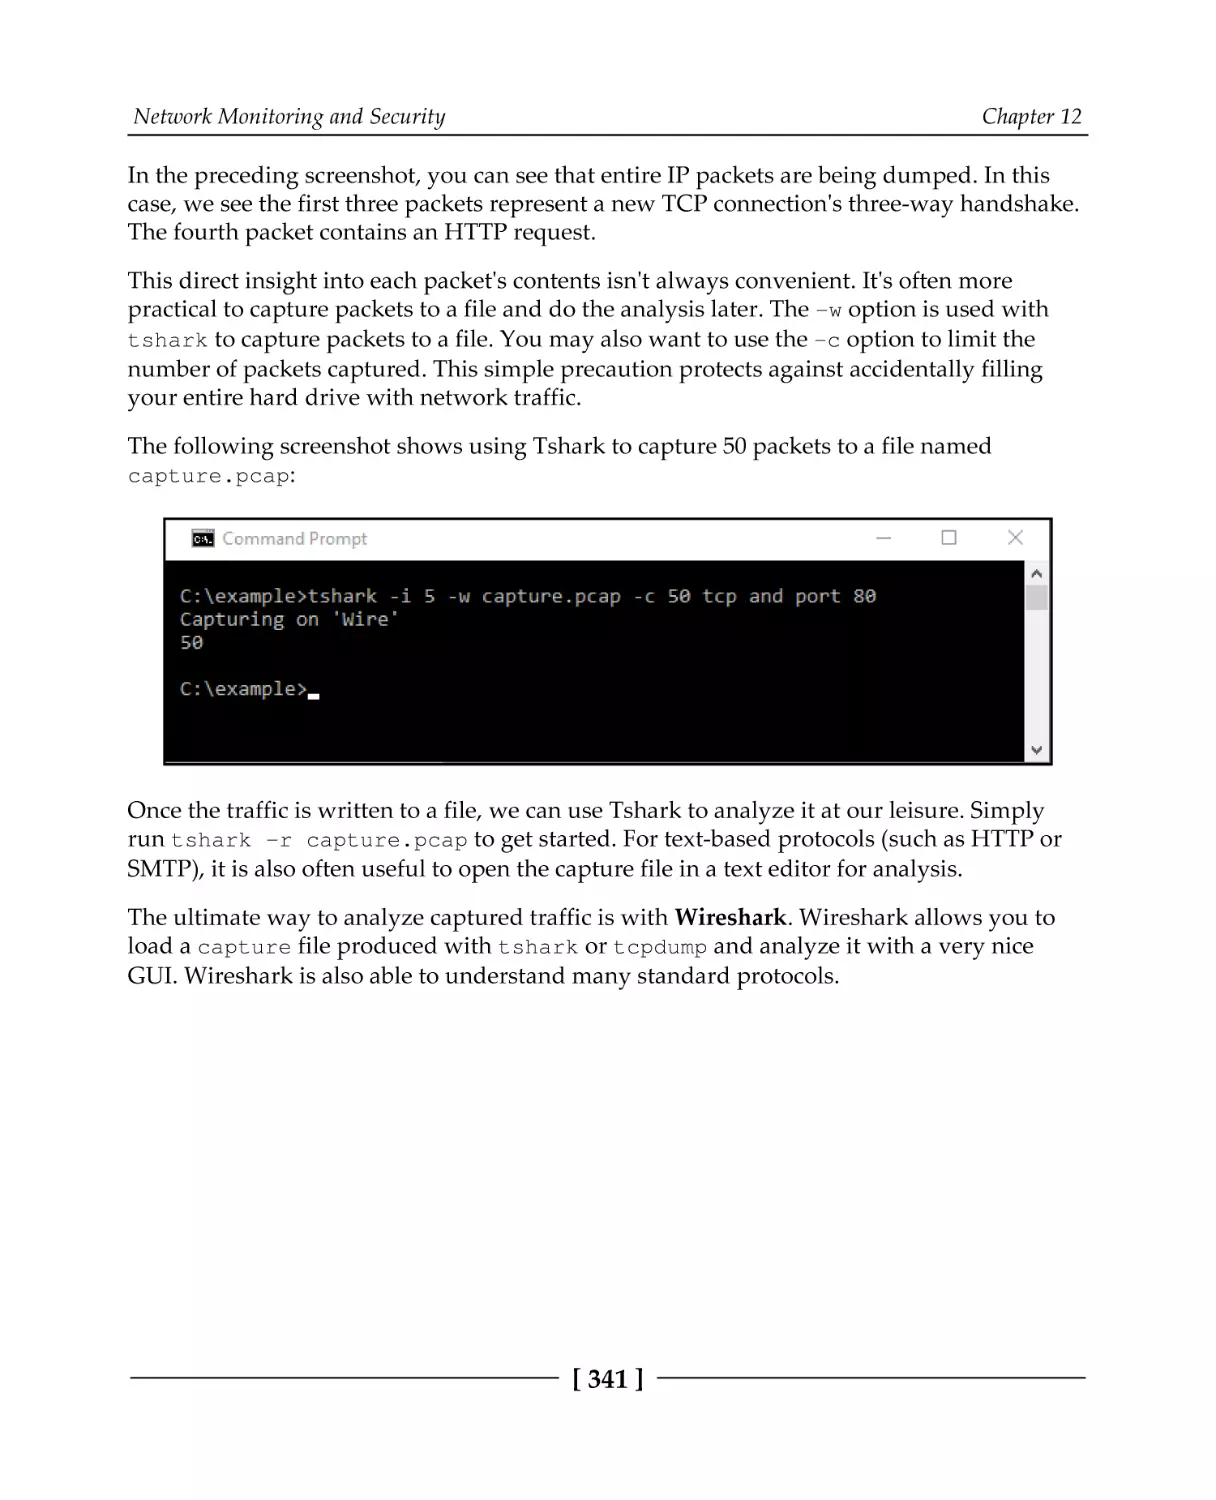
Capturing all network traffic
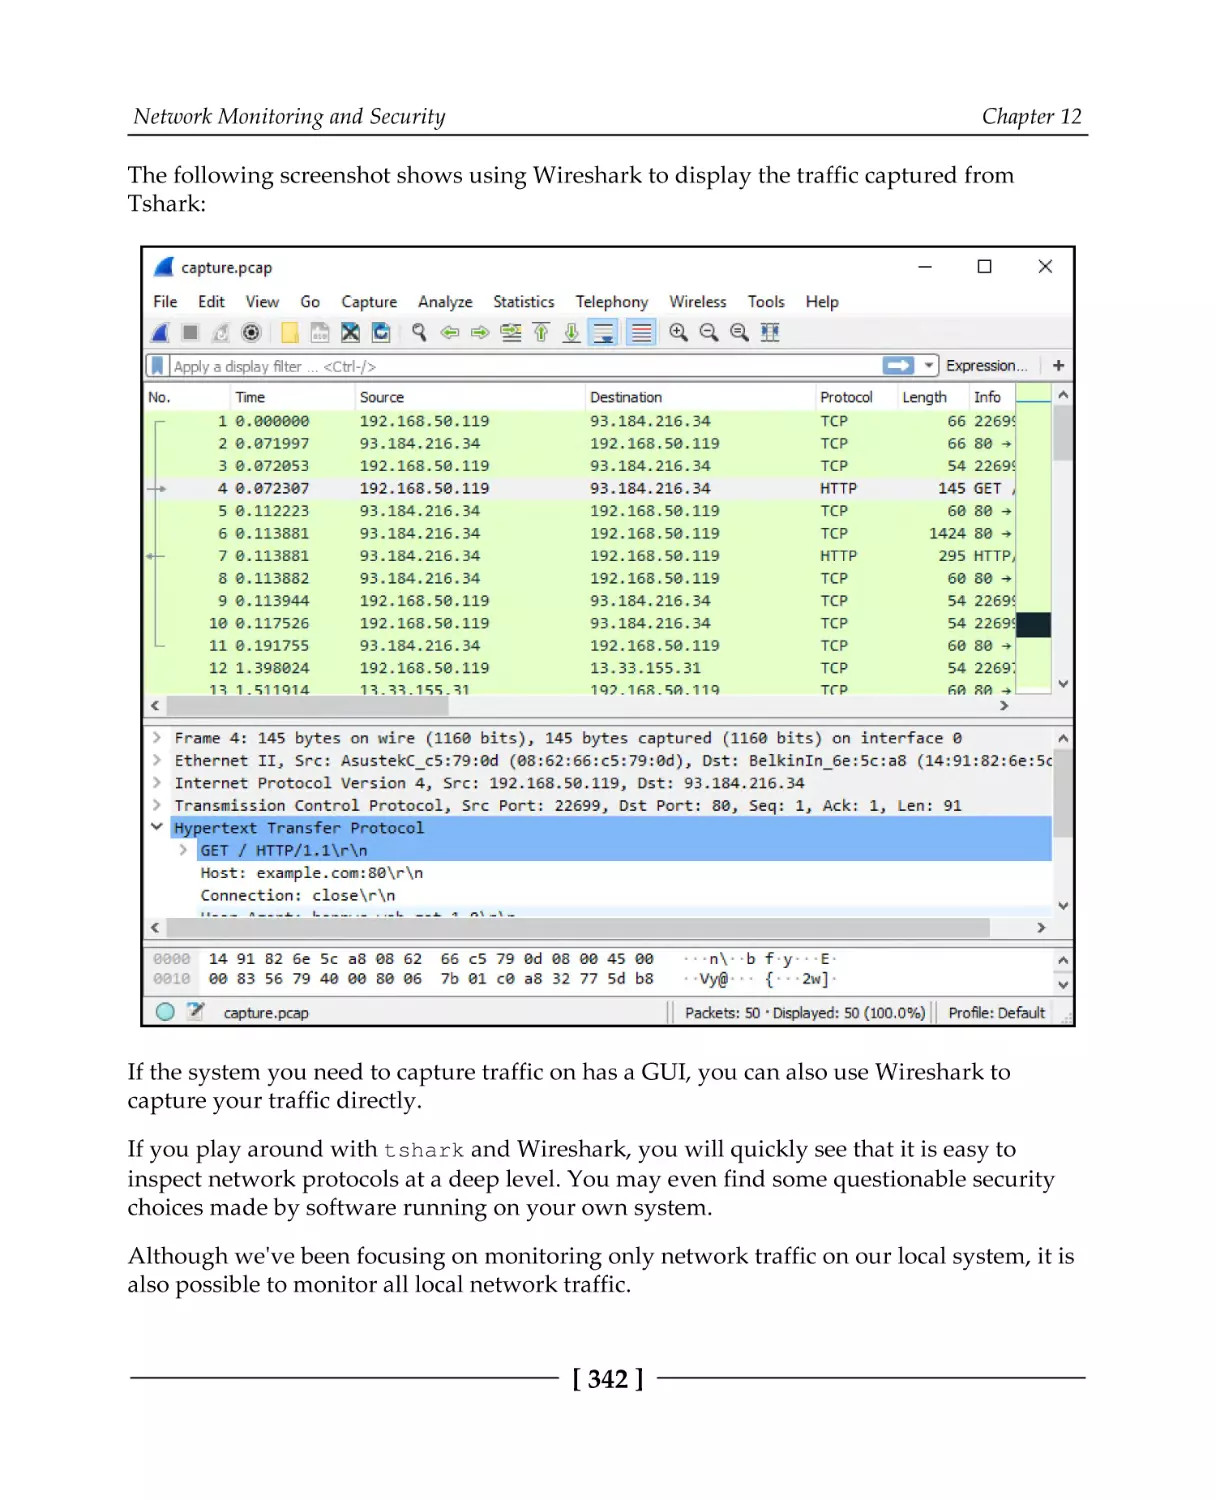
Network security
Application security and safety
Network-testing etiquette
Summary
Questions
Further reading
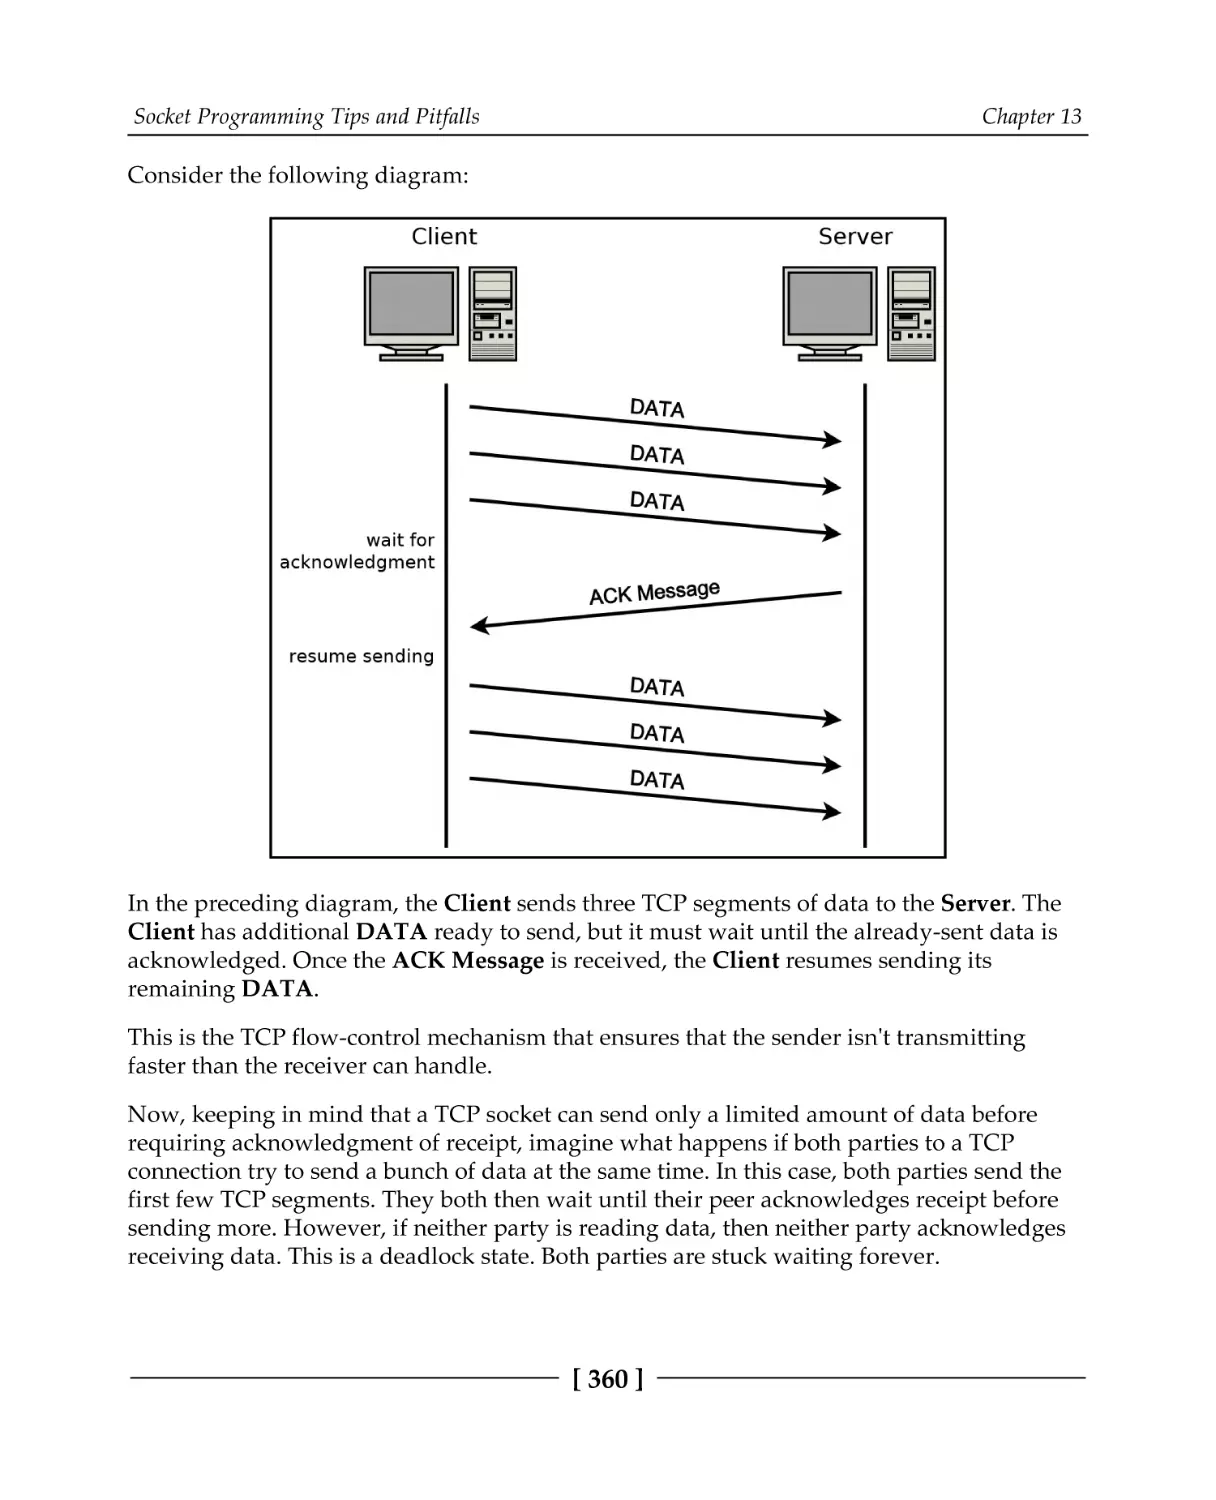
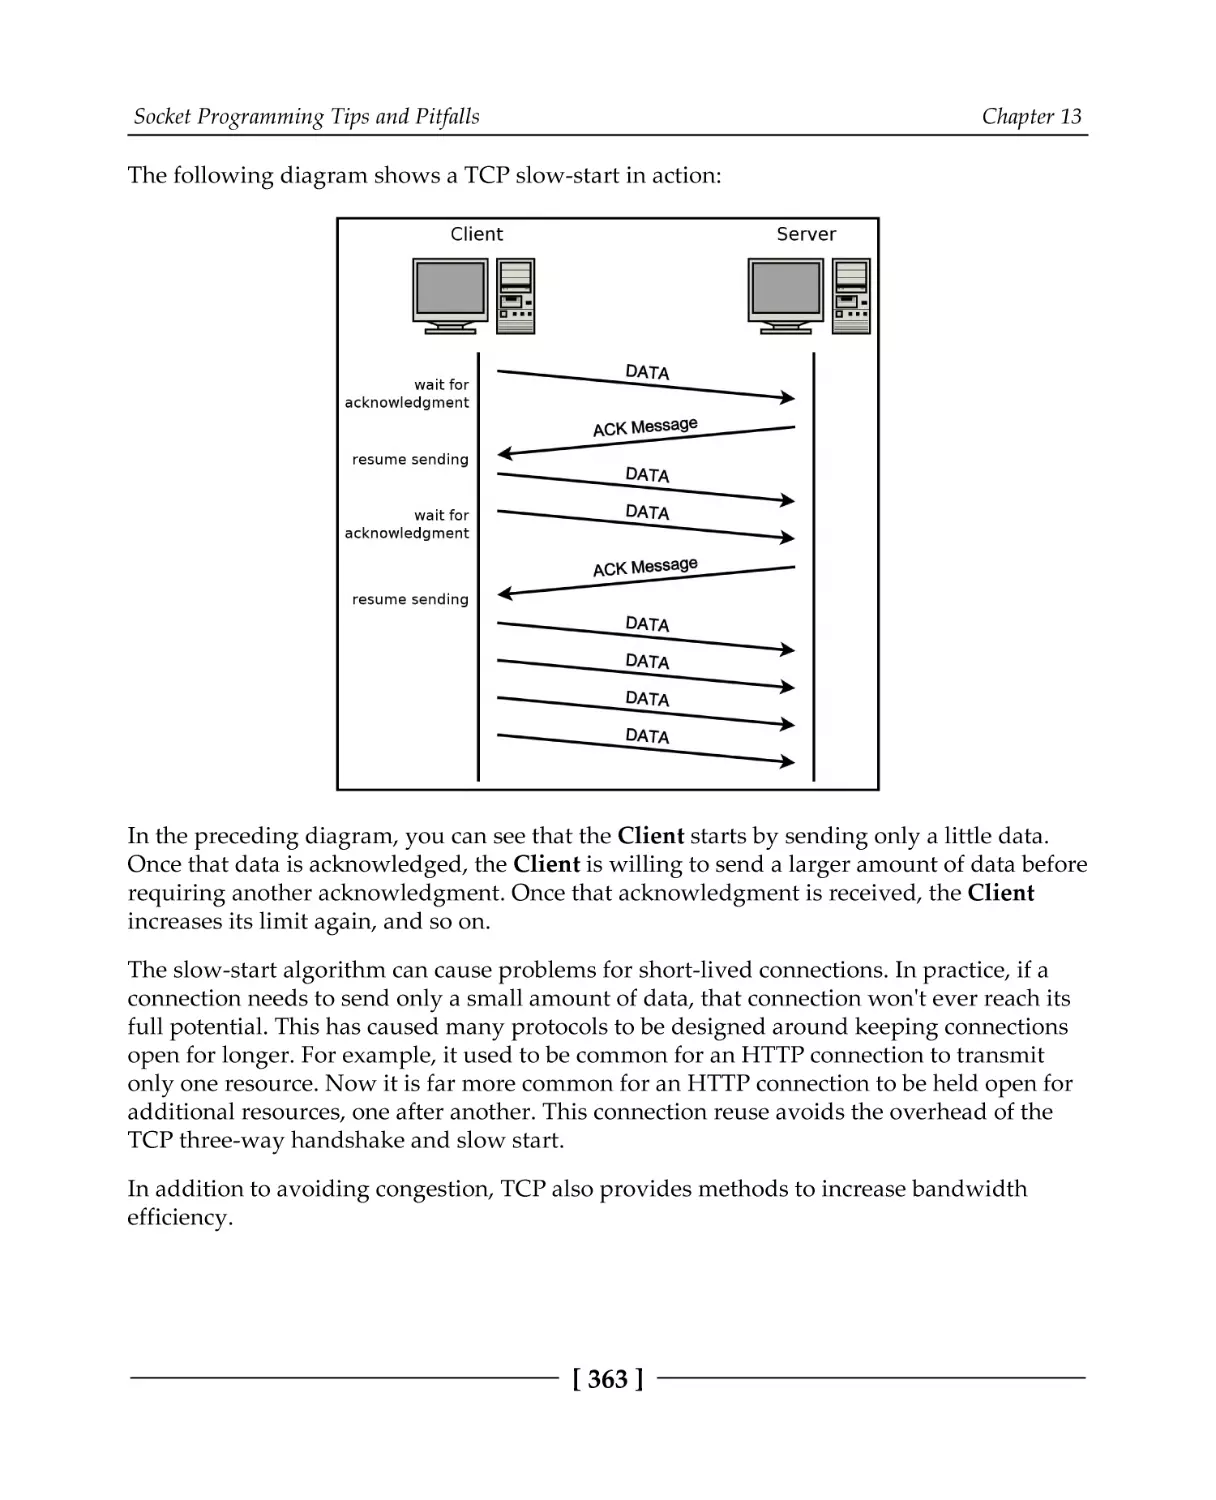
Chapter 13: Socket Programming Tips and Pitfalls
Technical requirements
Error handling
Obtaining error descriptions
TCP socket tips
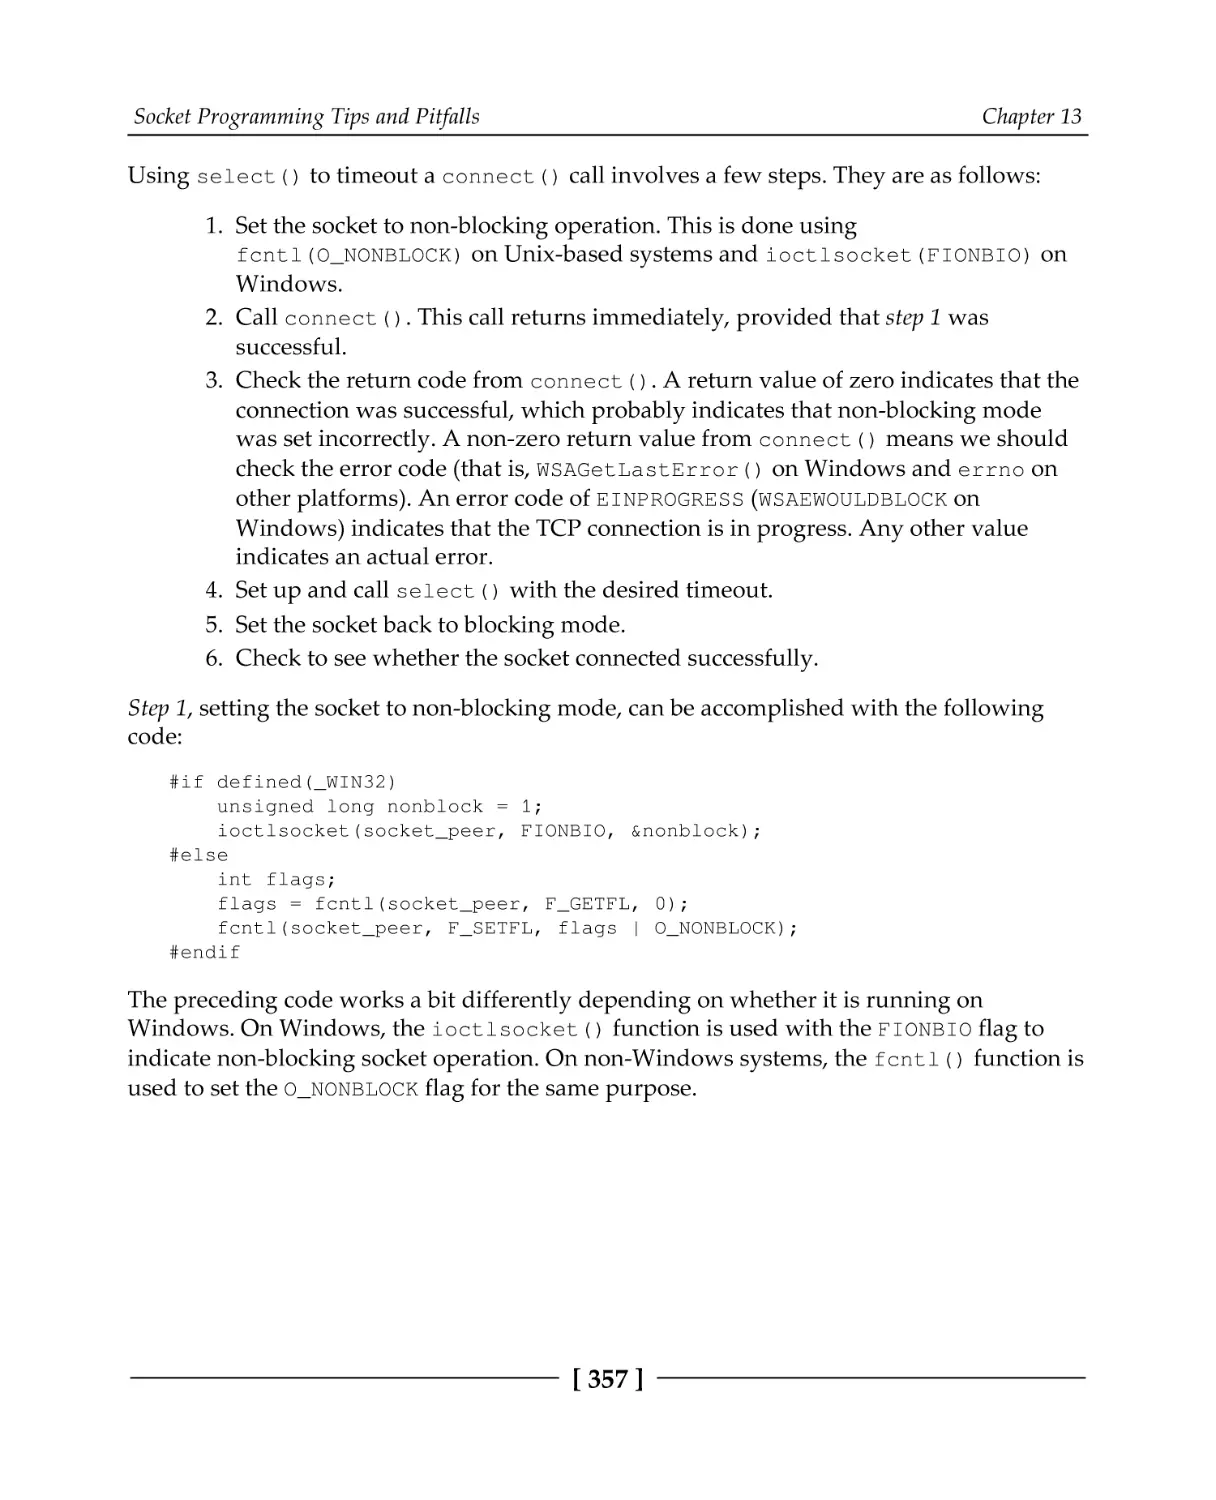
Timeout on connect()
TCP flow control and avoiding deadlock
Congestion control
The Nagle algorithm
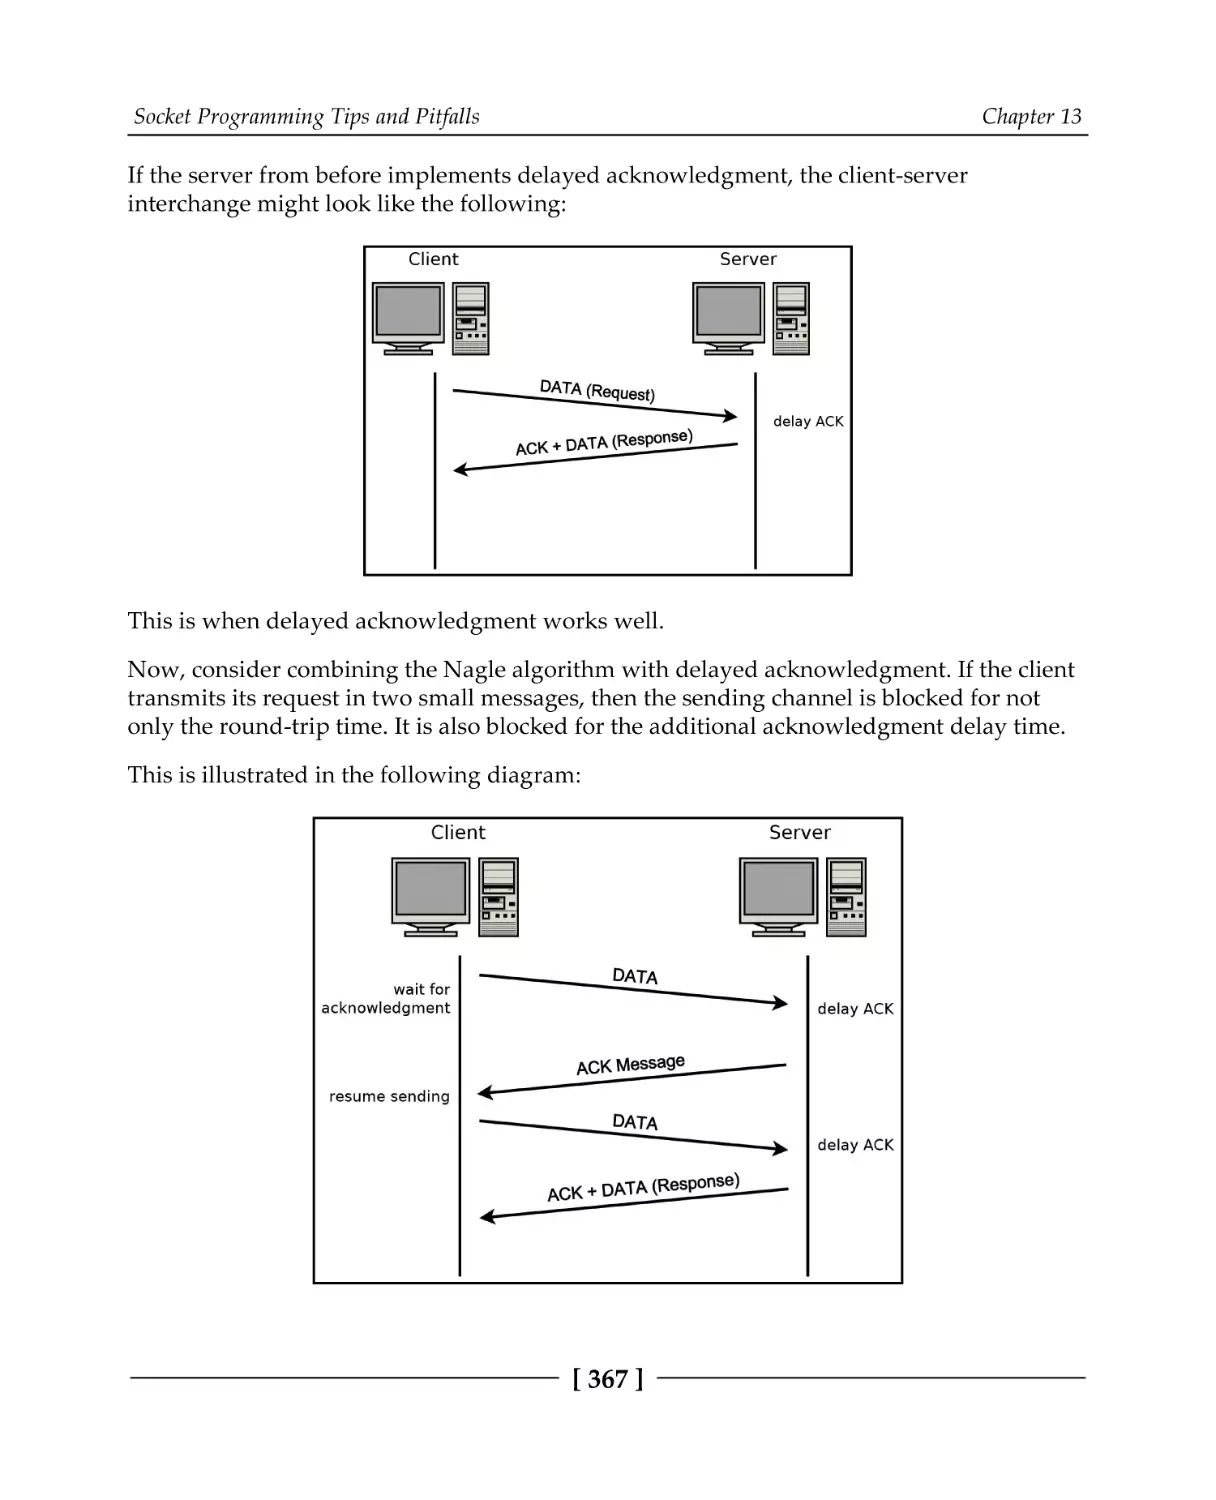
Delayed acknowledgment
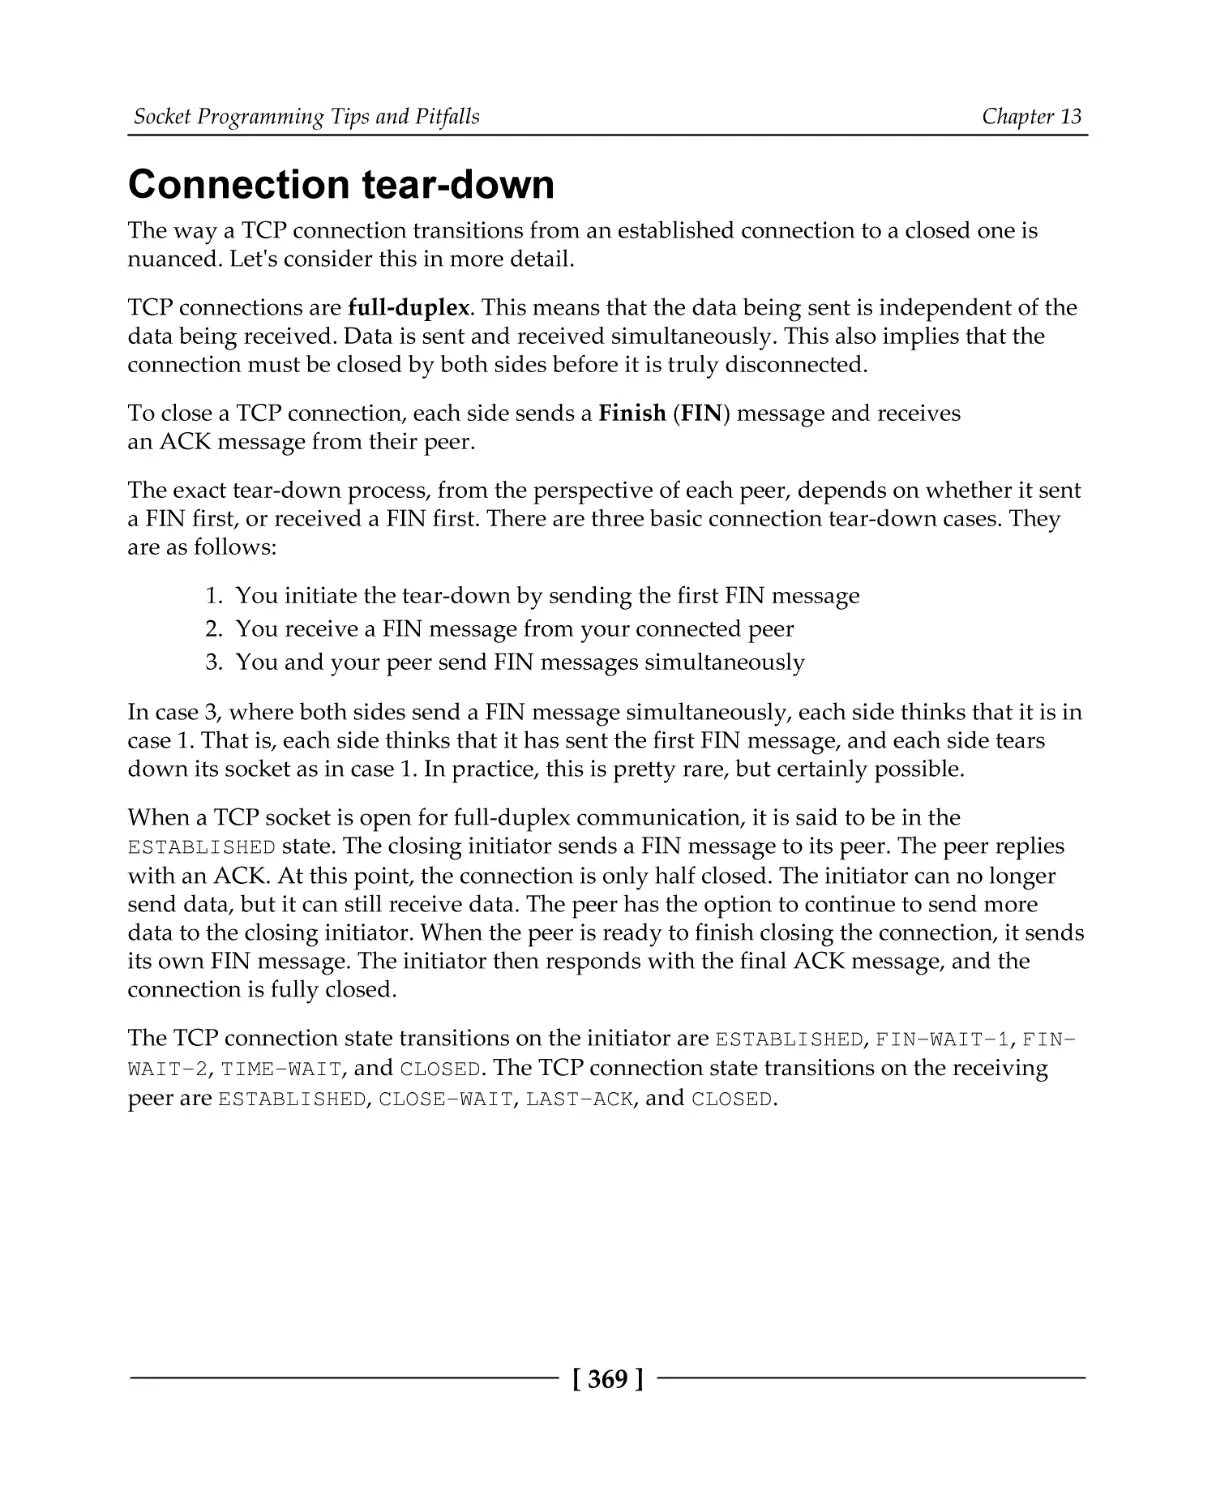
Connection tear-down
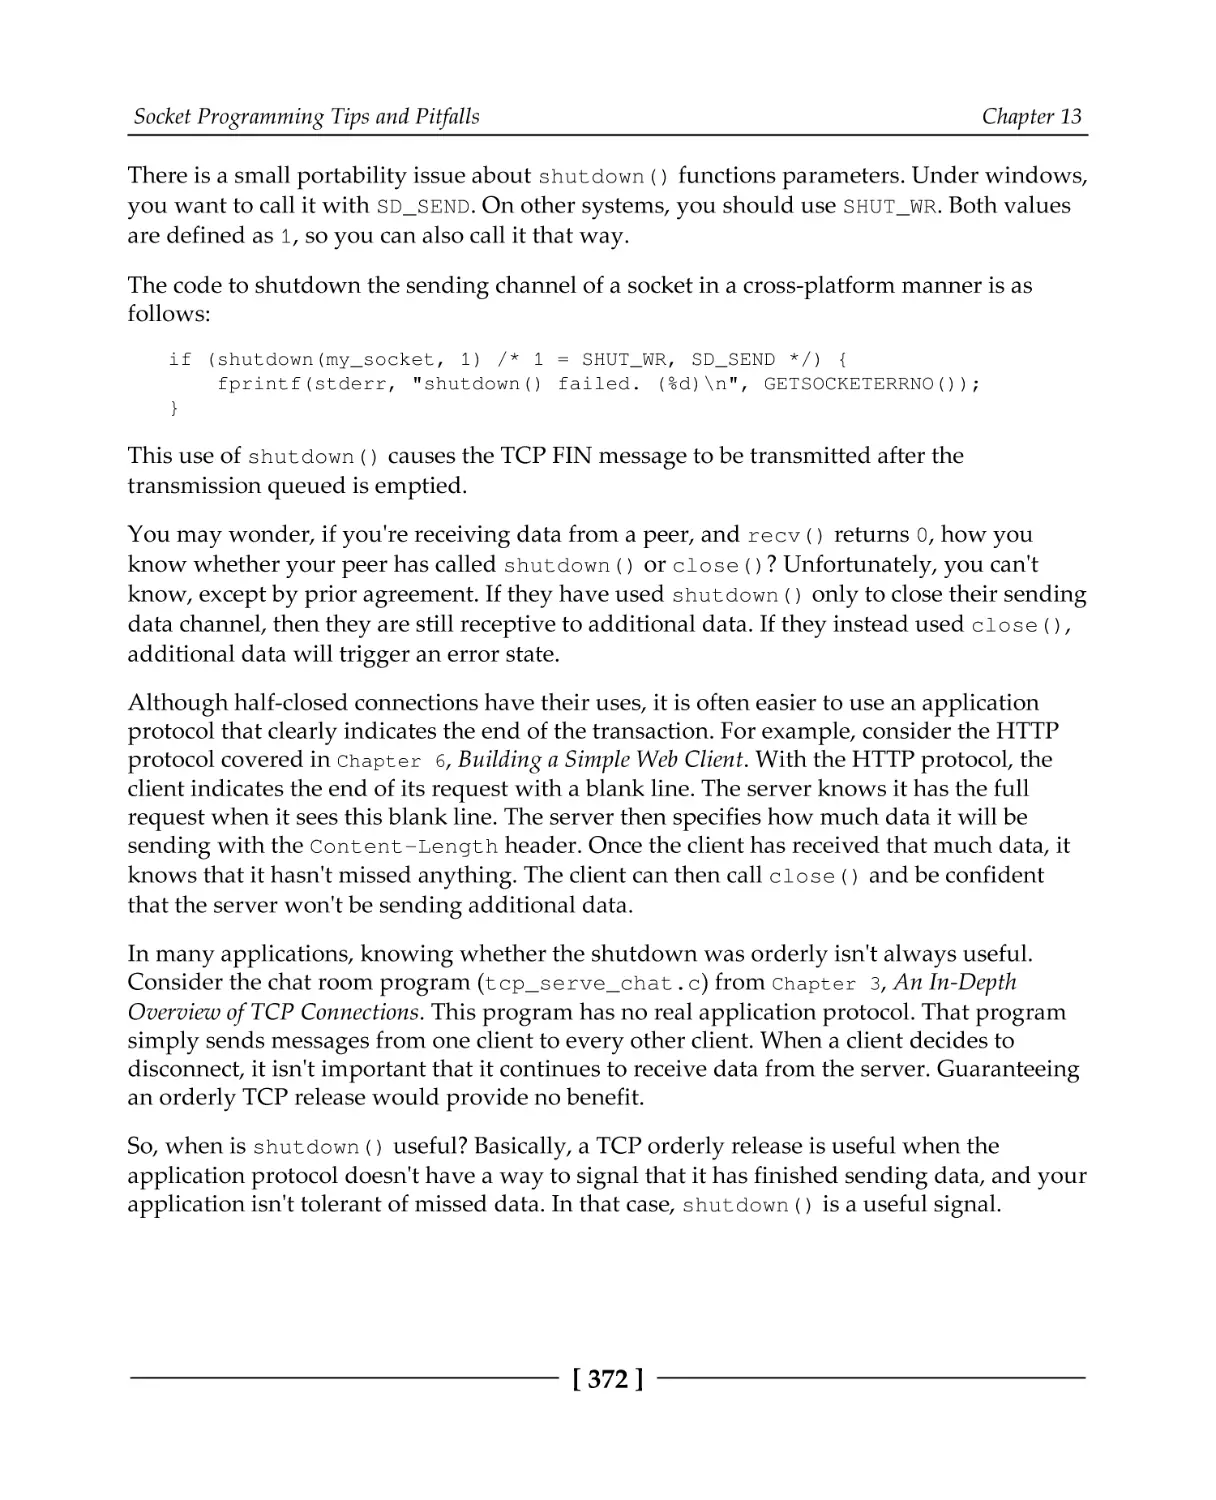
The shutdown() function
Preventing address-in-use errors
Sending to a disconnected peer
Socket's local address
Multiplexing with a large number of sockets
Summary
Questions
Chapter 14: Web Programming for the Internet of Things
Technical requirements
What is the IoT?
Connectivity options
[ vi ]
327
327
328
328
330
331
333
334
336
340
343
344
345
346
346
347
347
348
348
350
351
354
355
359
362
364
366
369
371
373
375
377
378
379
380
381
381
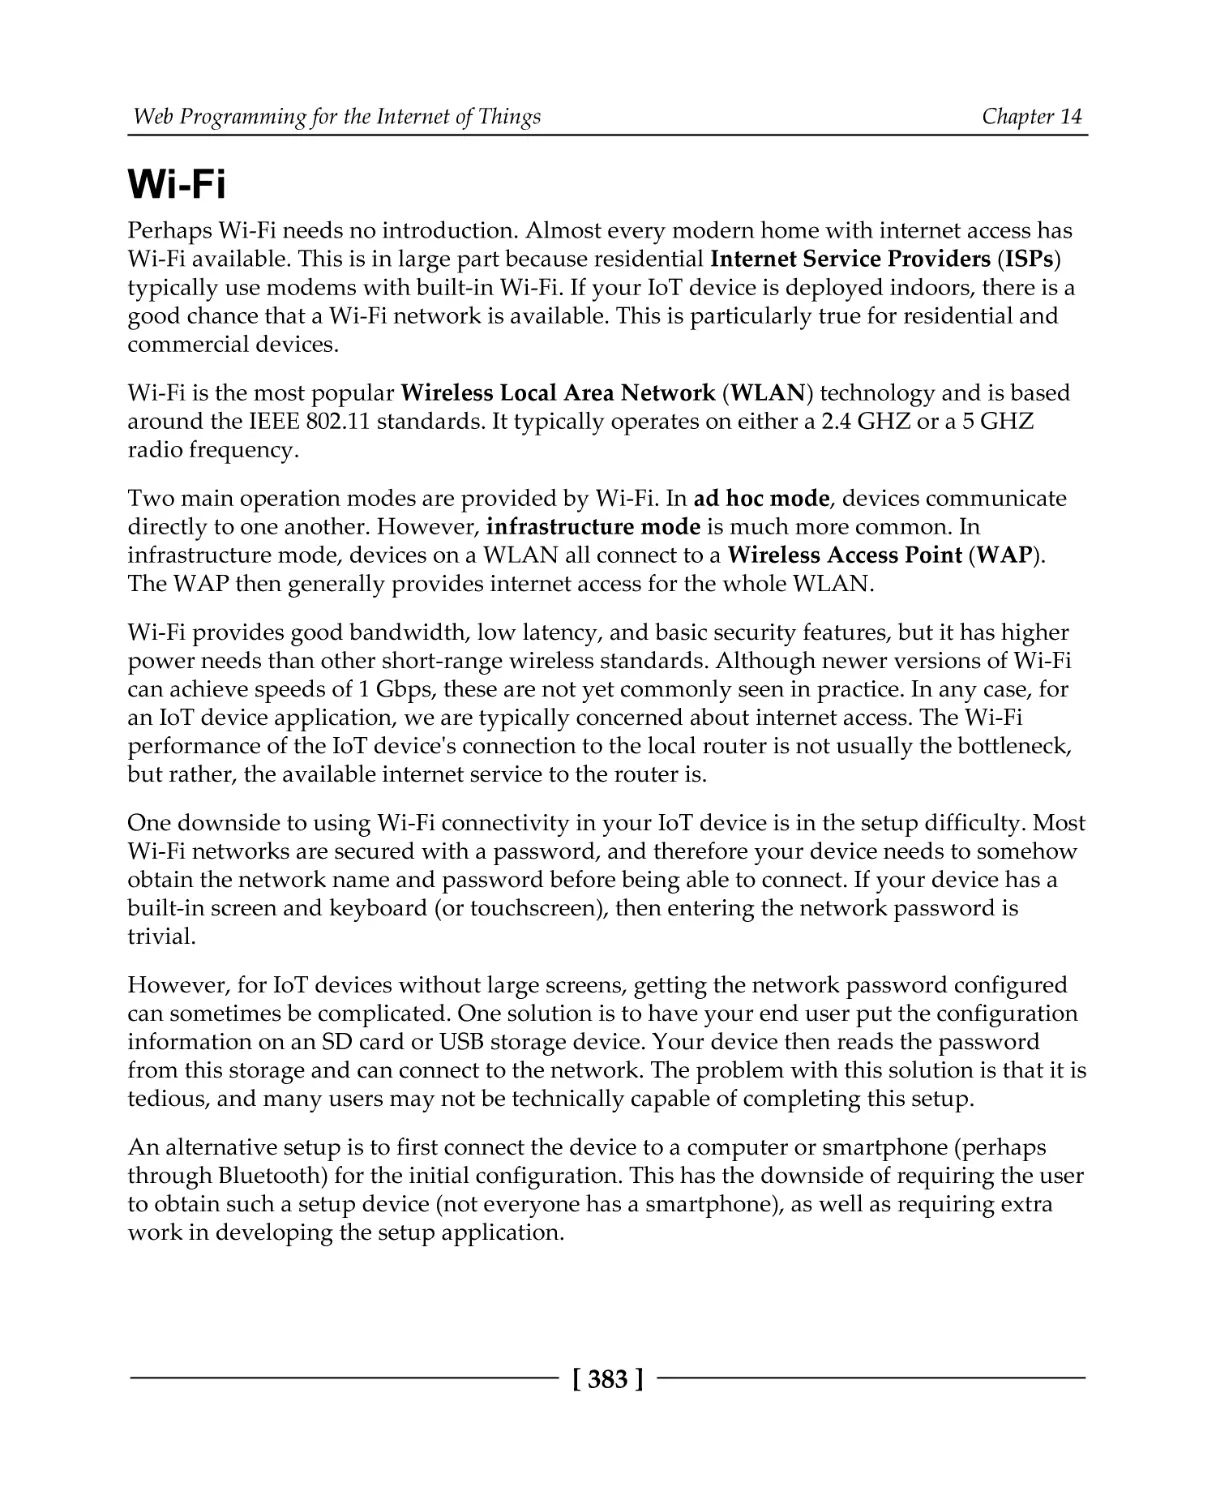
382
382
Table of Contents
Wi-Fi
Ethernet
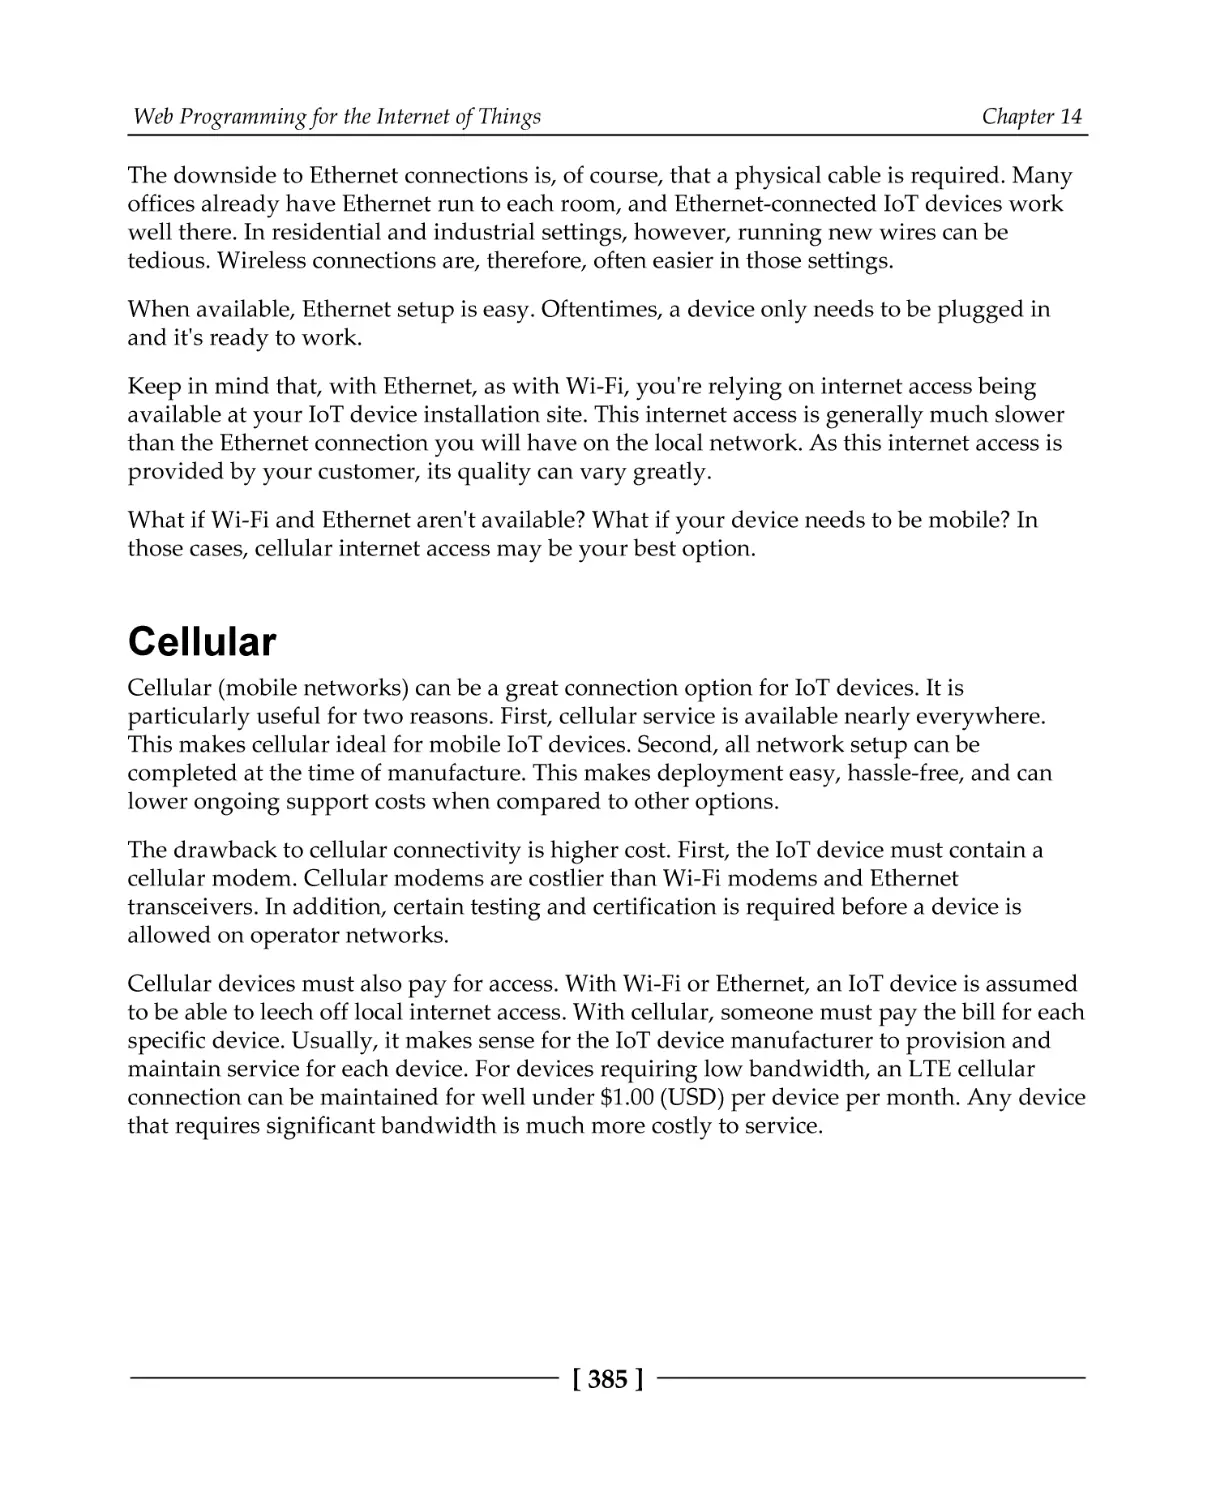
Cellular
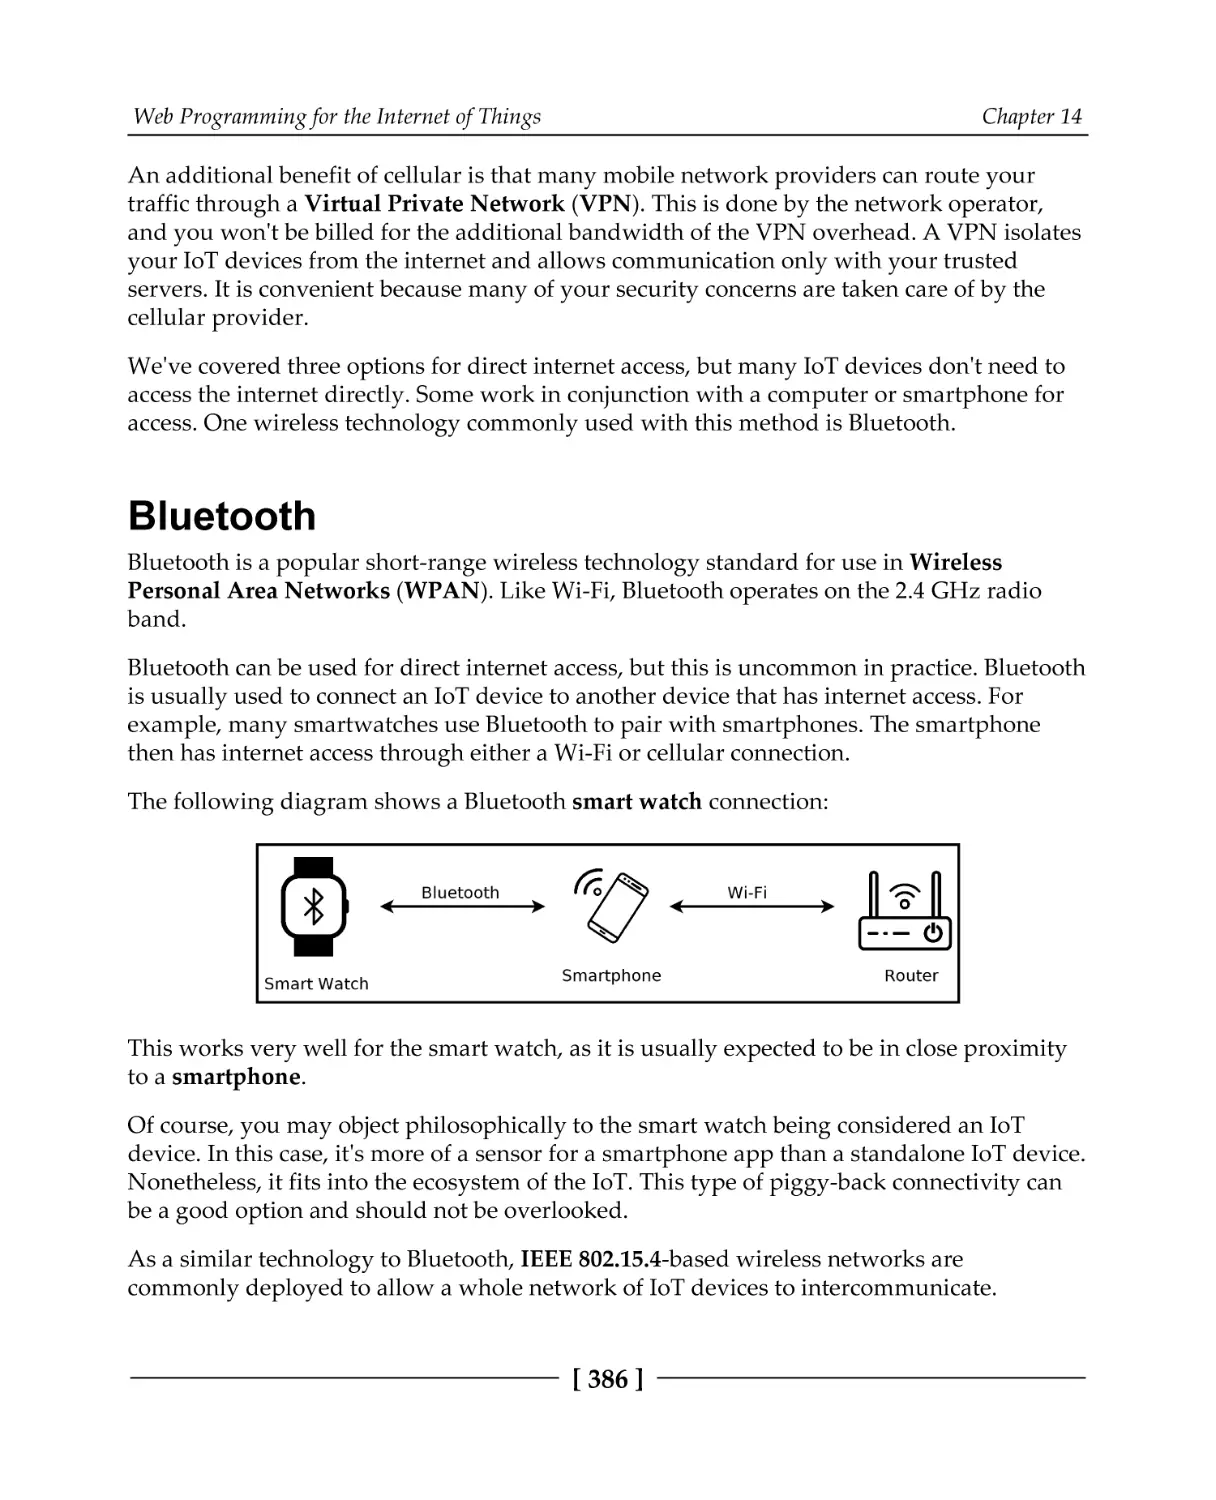
Bluetooth
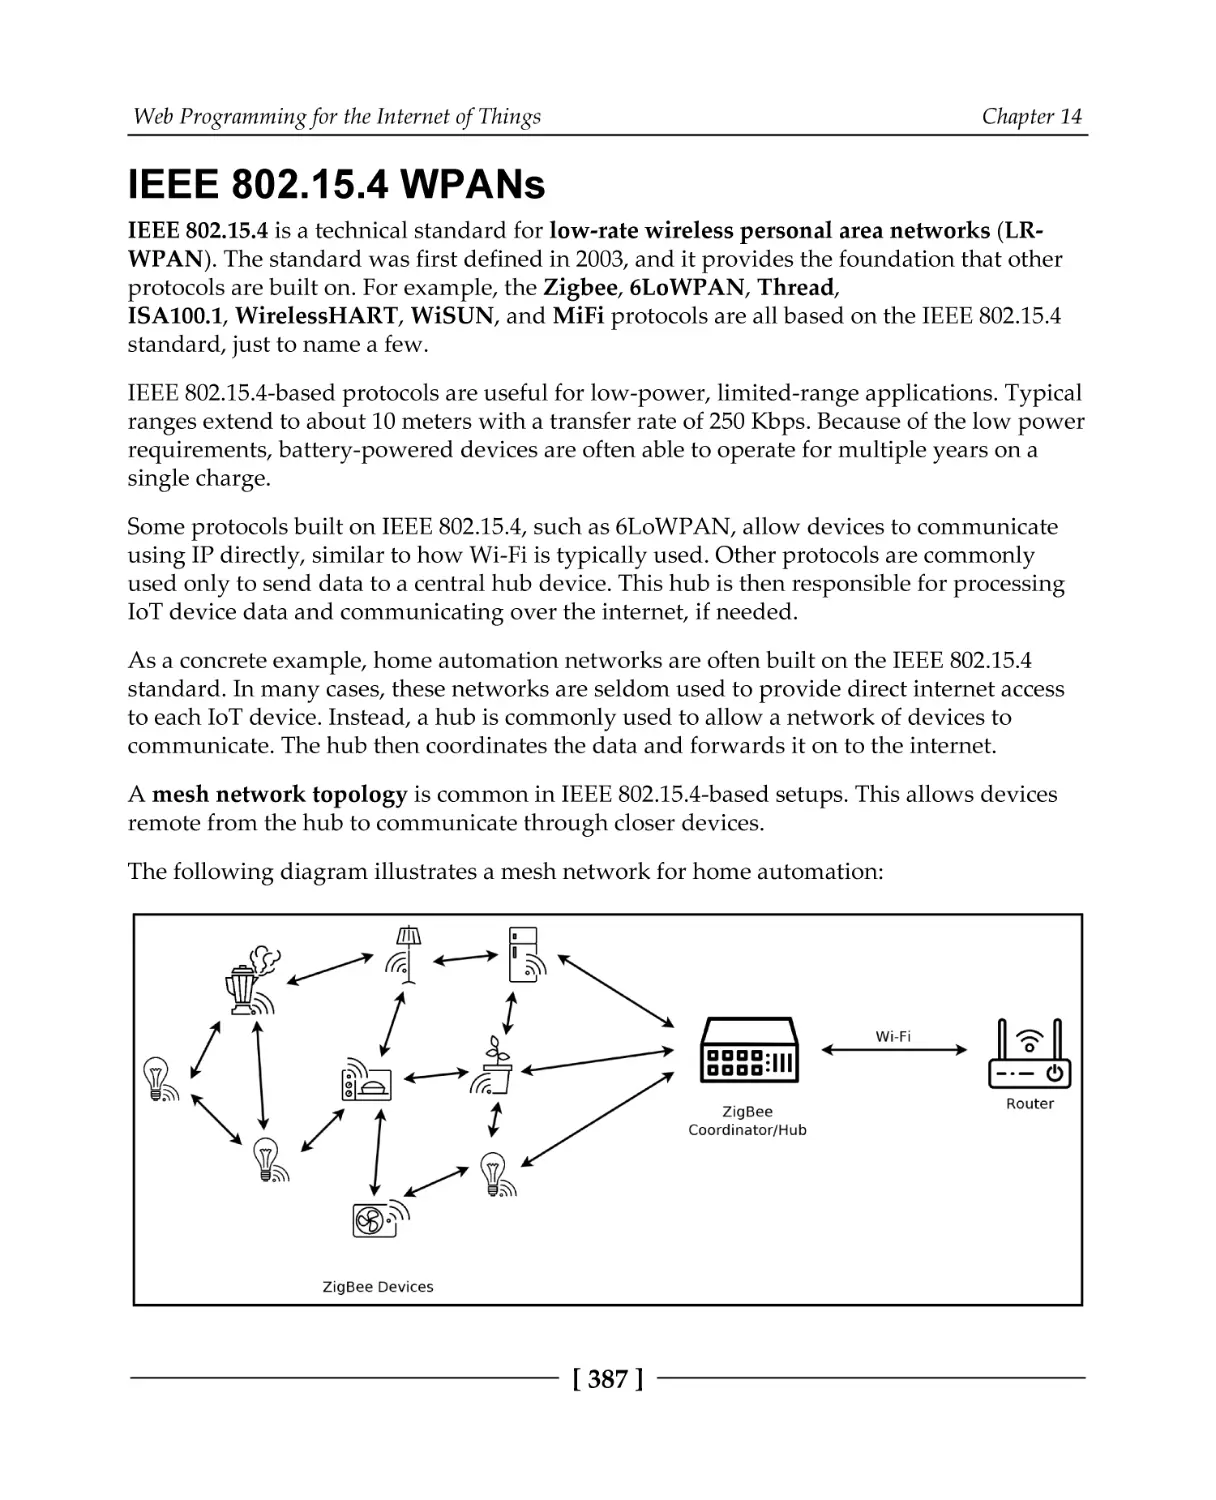
IEEE 802.15.4 WPANs
Hardware choices
Single-board computers
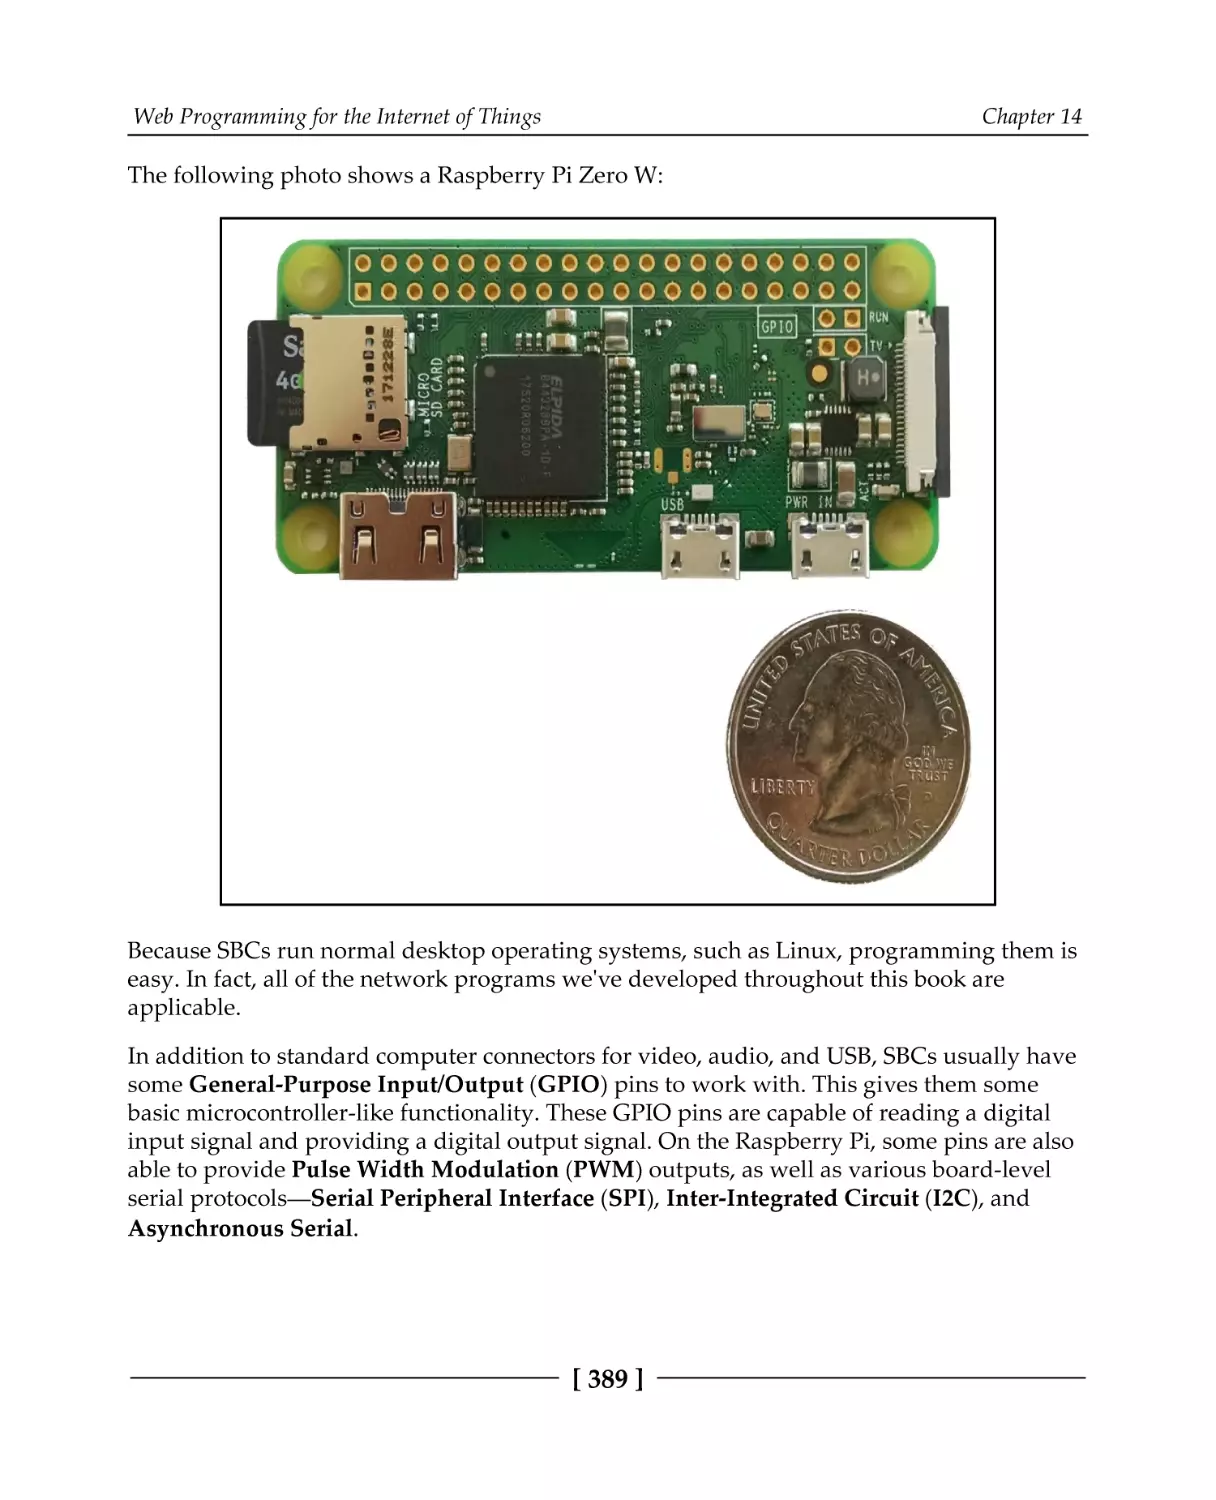
Microcontrollers
FPGAs
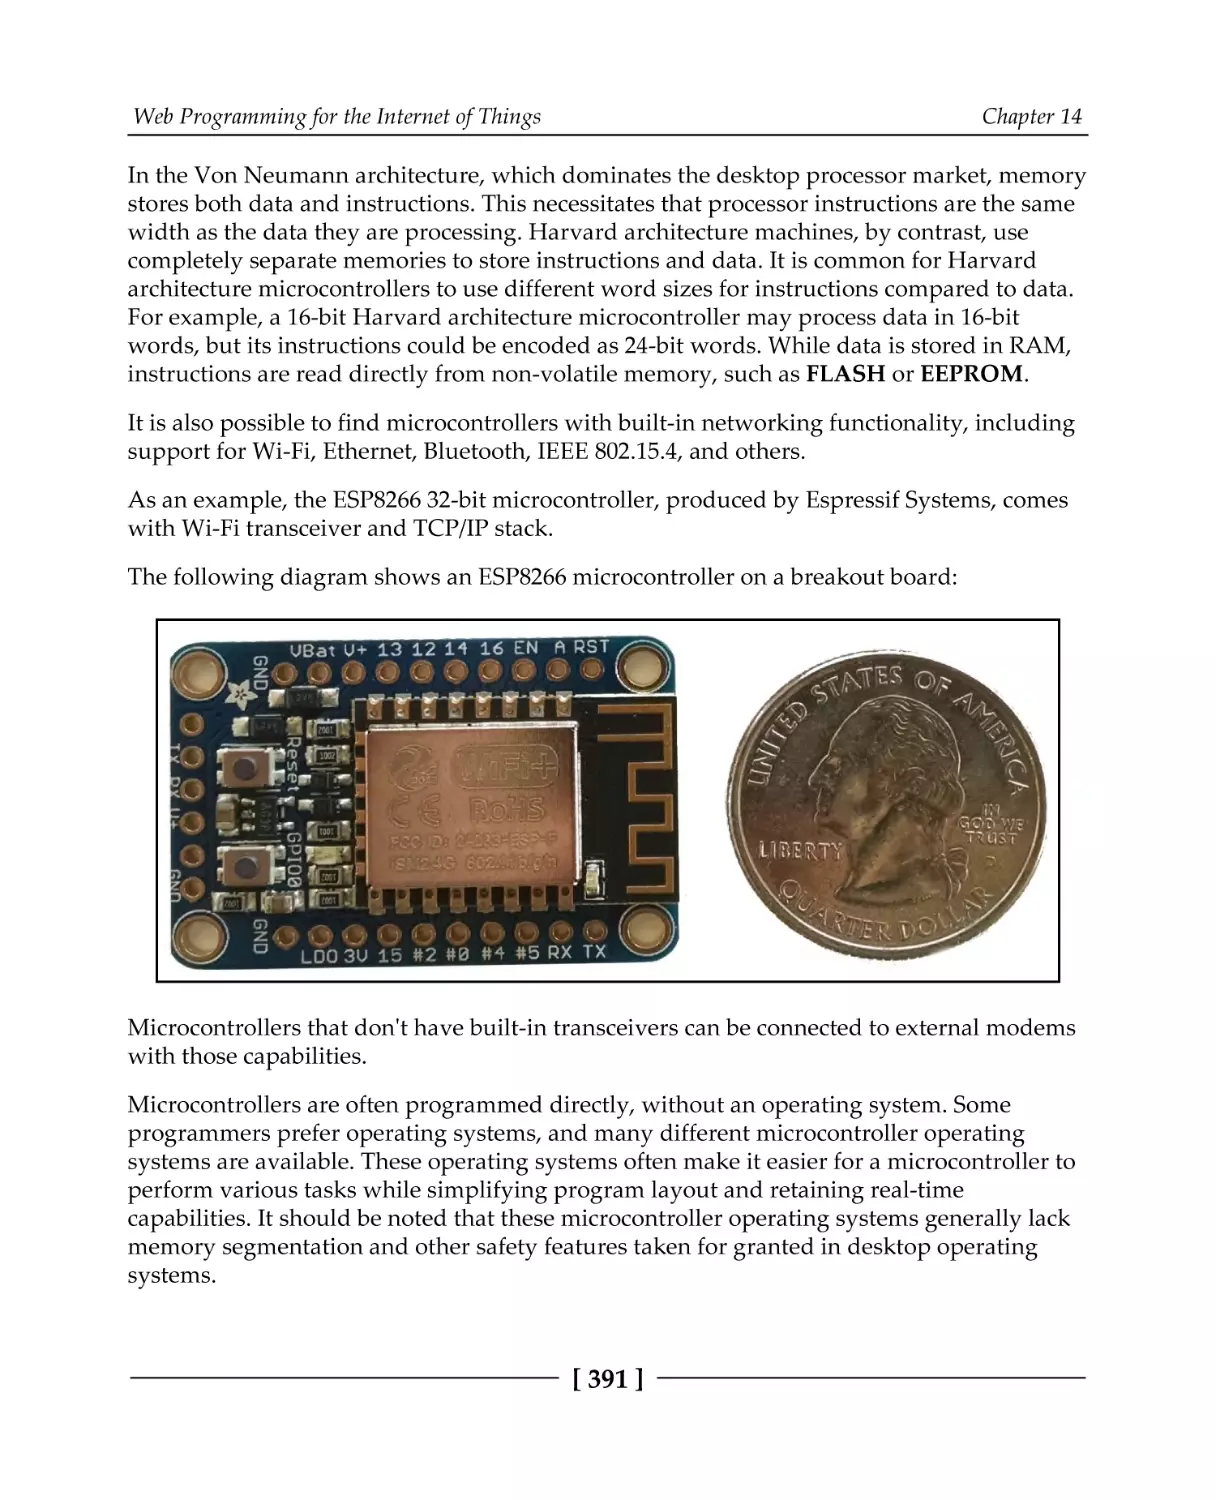
External transceivers and modems
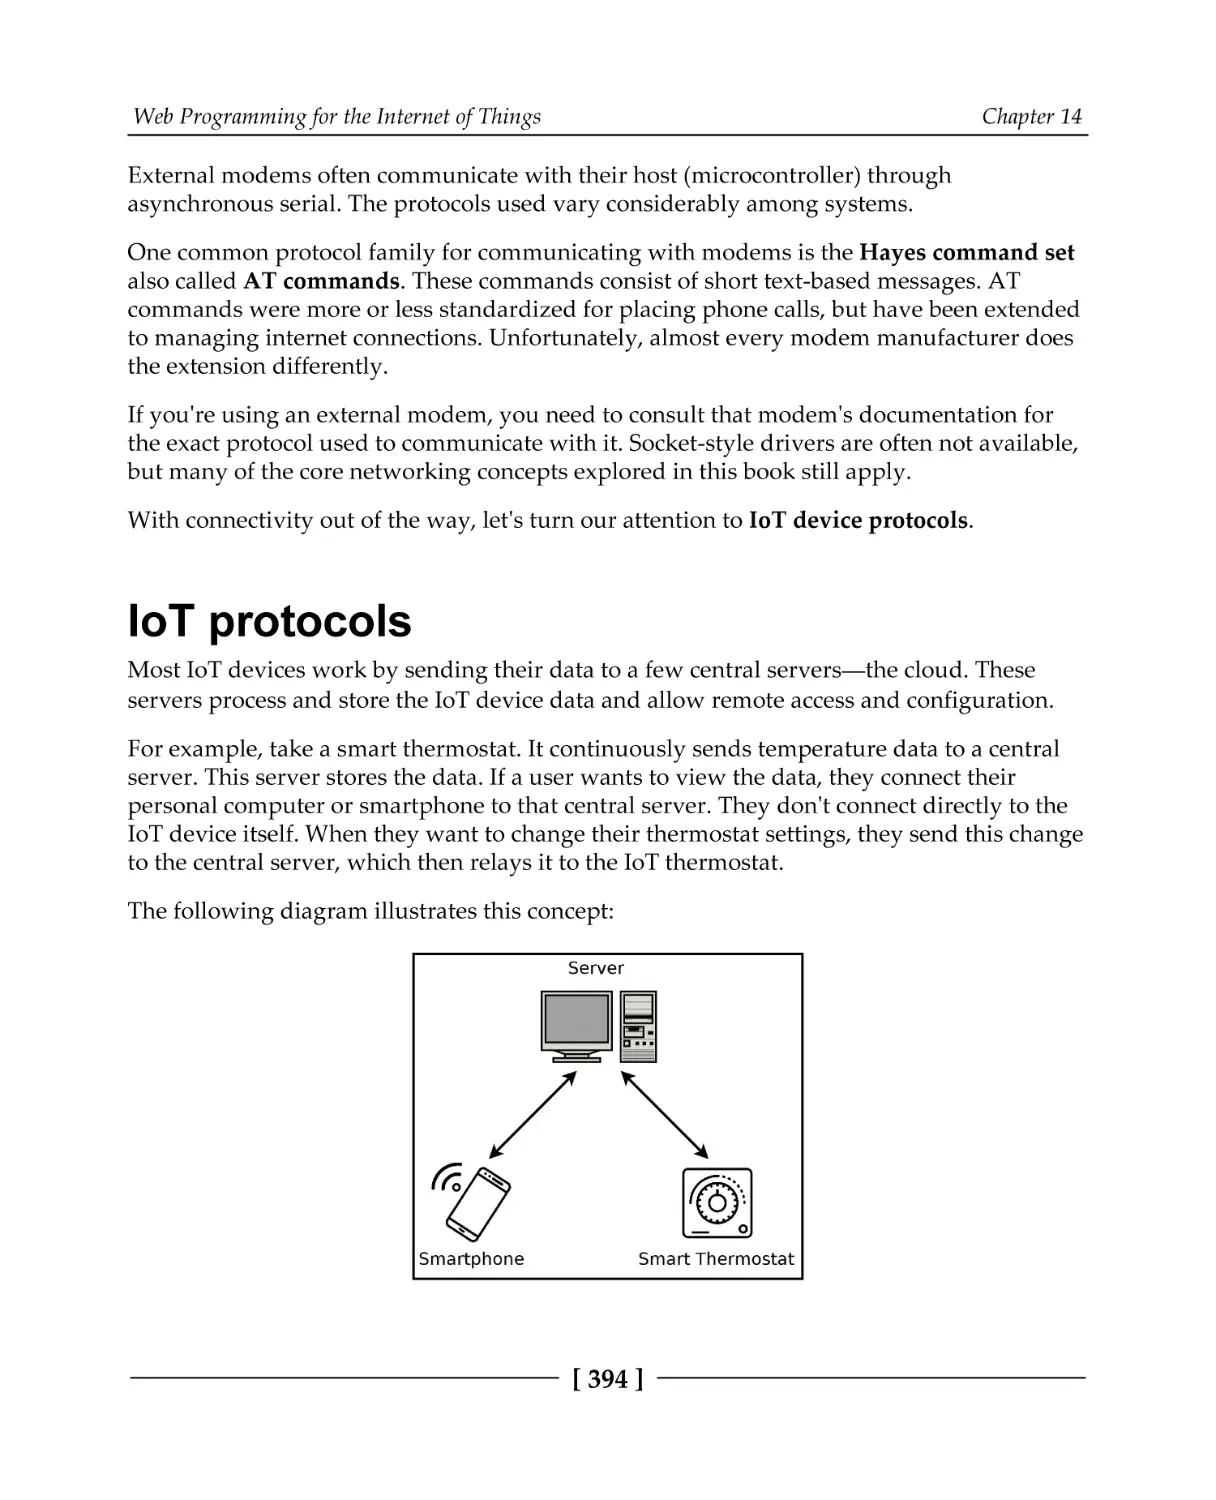
IoT protocols
Firmware updates
Ethics of IoT
Privacy and data collection
End-of-life planning
Security
Summary
Questions
Appendix A: Answers to Questions
Chapter 1, Introducing Networks and Protocols
Chapter 2, Getting to Grips with Socket APIs
Chapter 3, An In-Depth Overview of TCP Connections
Chapter 4, Establishing UDP Connections
Chapter 5, Hostname Resolution and DNS
Chapter 6, Building a Simple Web Client
Chapter 7, Building a Simple Web Server
Chapter 8, Making Your Program Send Email
Chapter 9, Loading Secure Web Pages with HTTPS and OpenSSL
Chapter 10, Implementing a Secure Web Server
Chapter 11, Establishing SSH Connections with libssh
Chapter 12, Network Monitoring and Security
Chapter 13, Socket Programming Tips and Pitfalls
Chapter 14, Web Programming for the Internet of Things
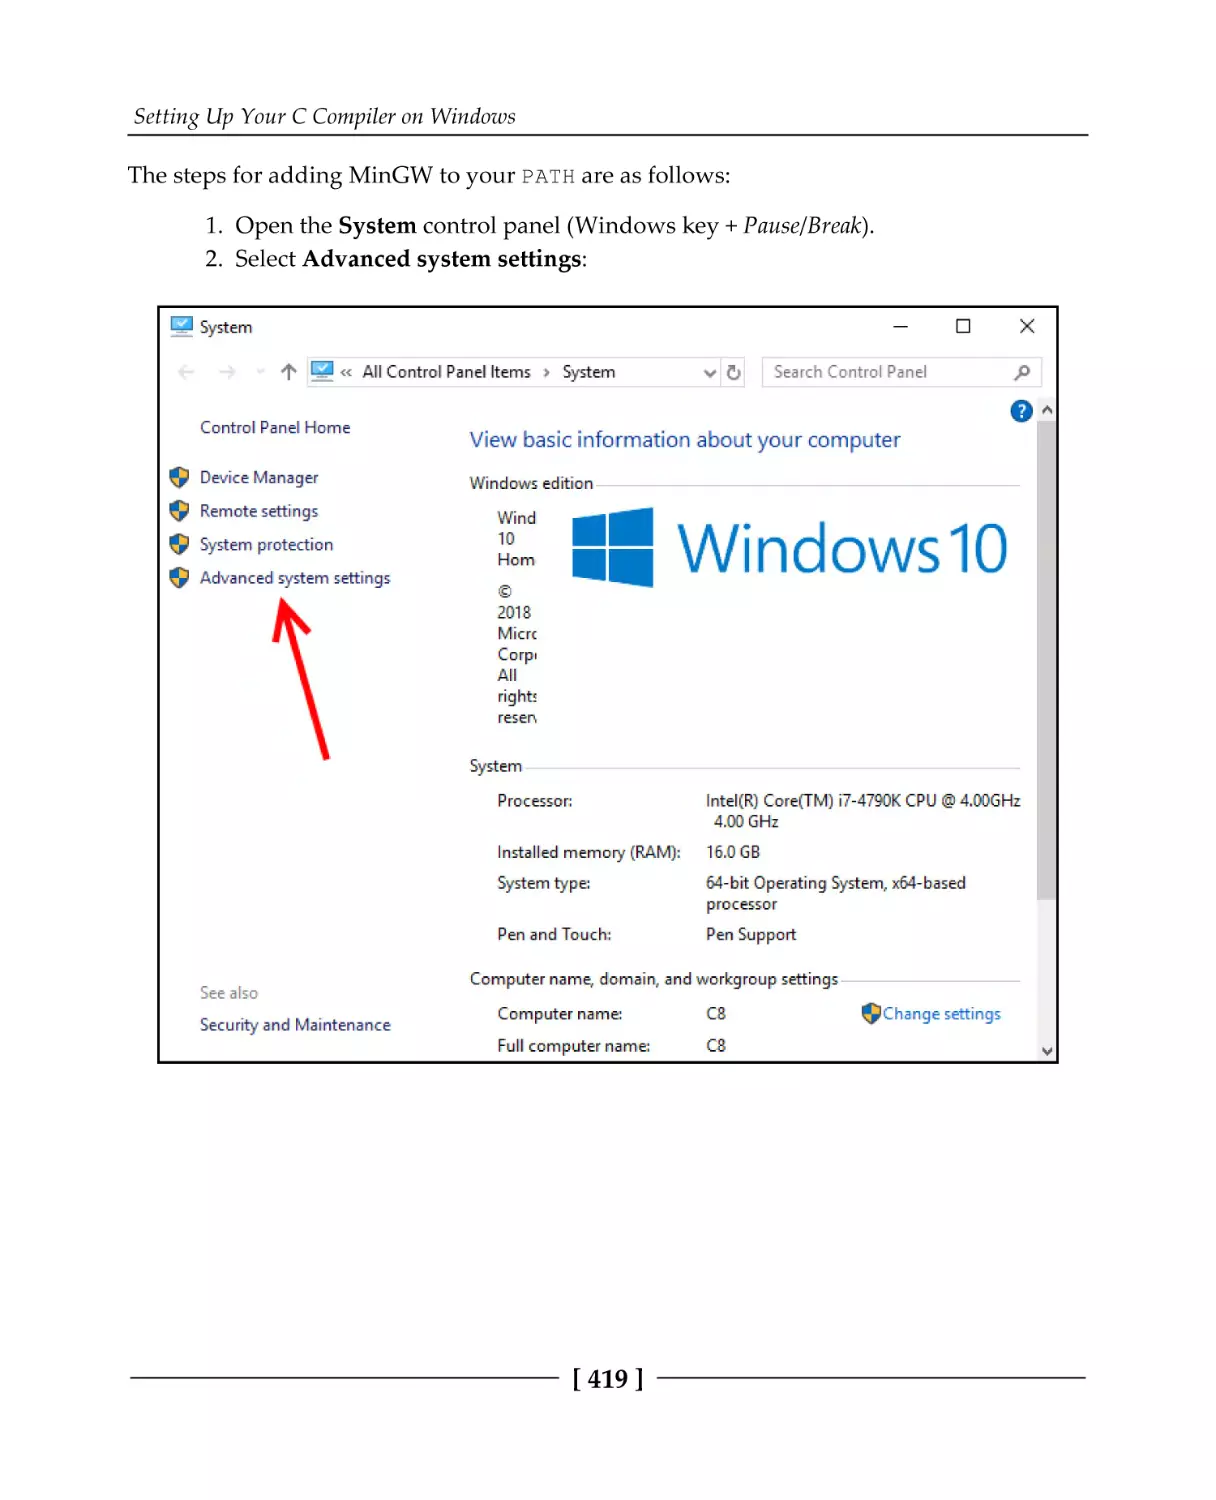
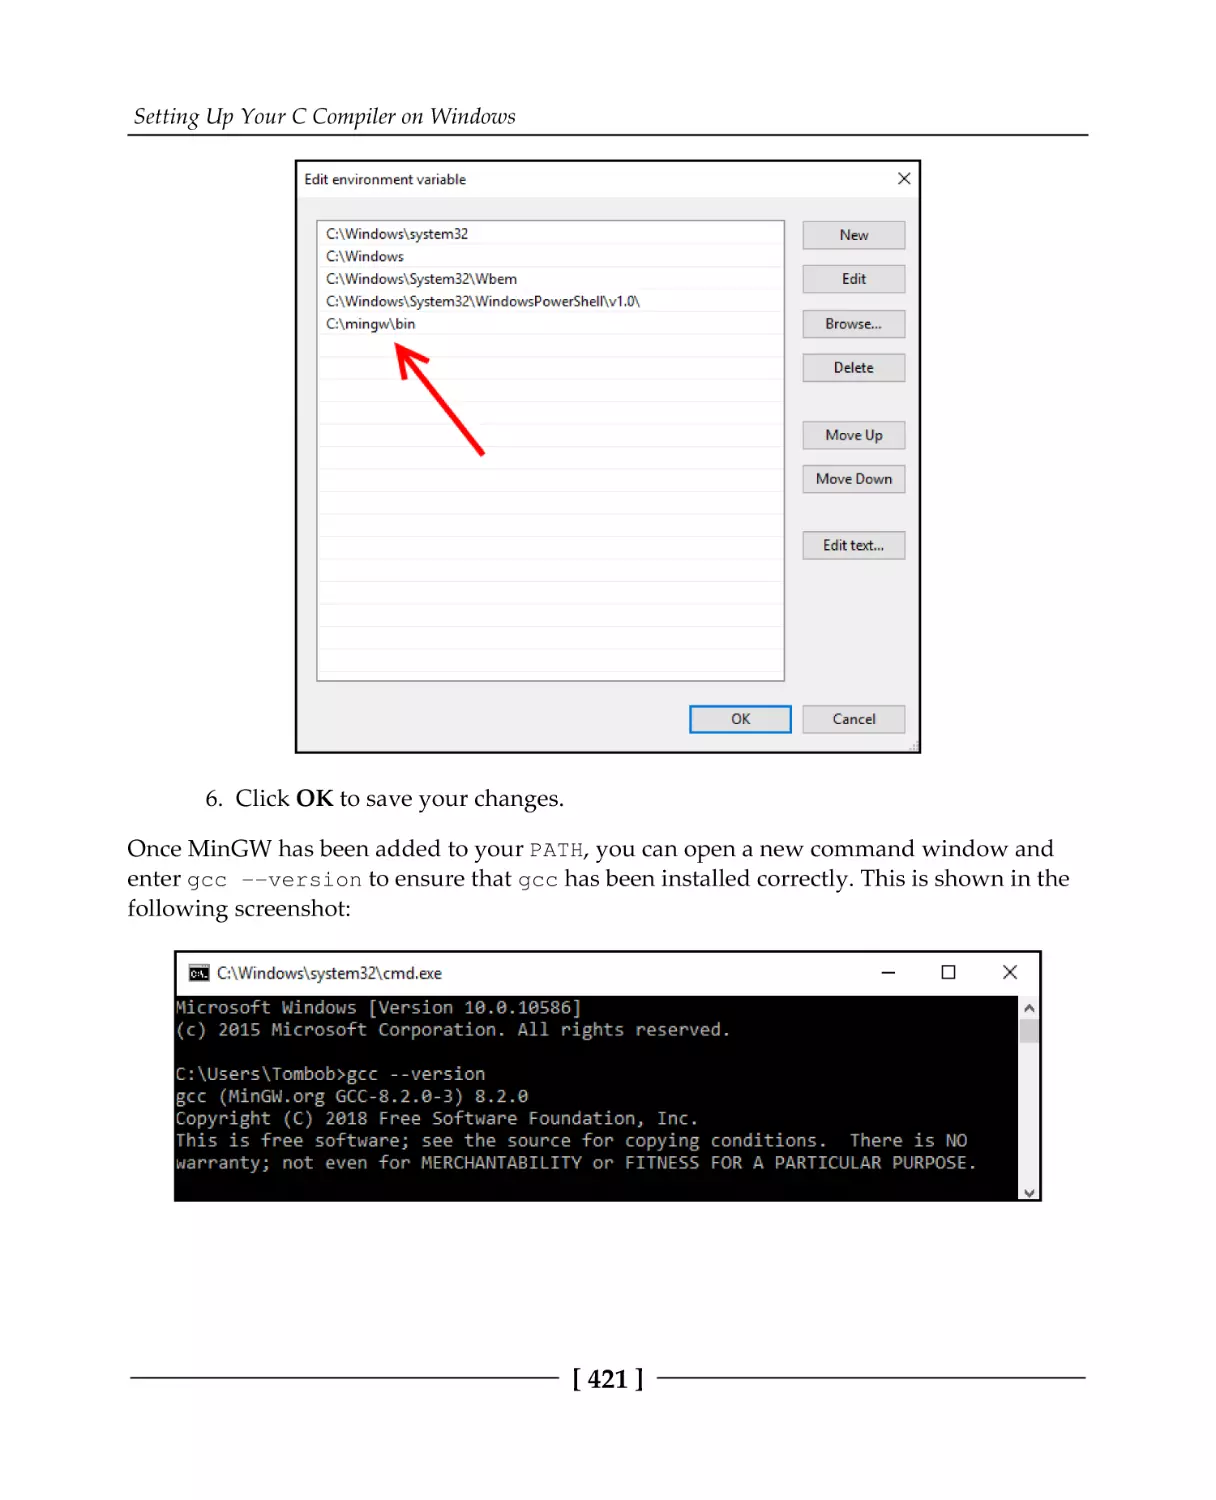
Appendix B: Setting Up Your C Compiler on Windows
Installing MinGW GCC
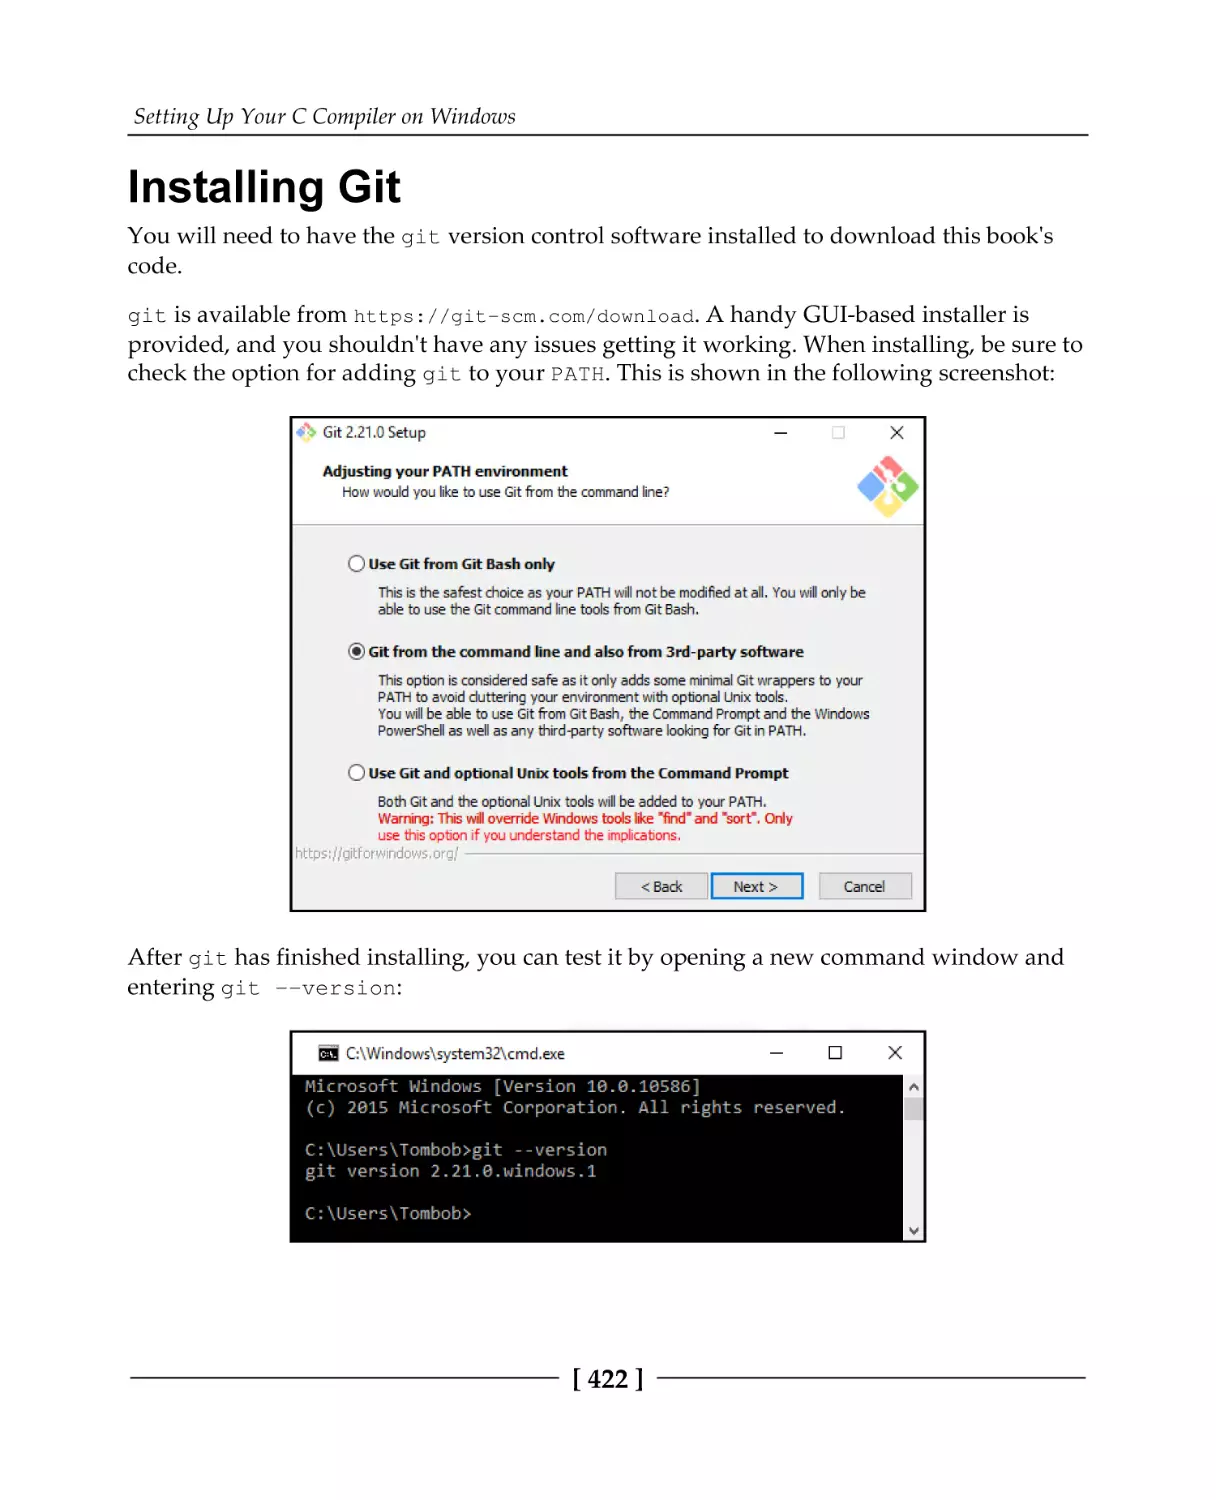
Installing Git
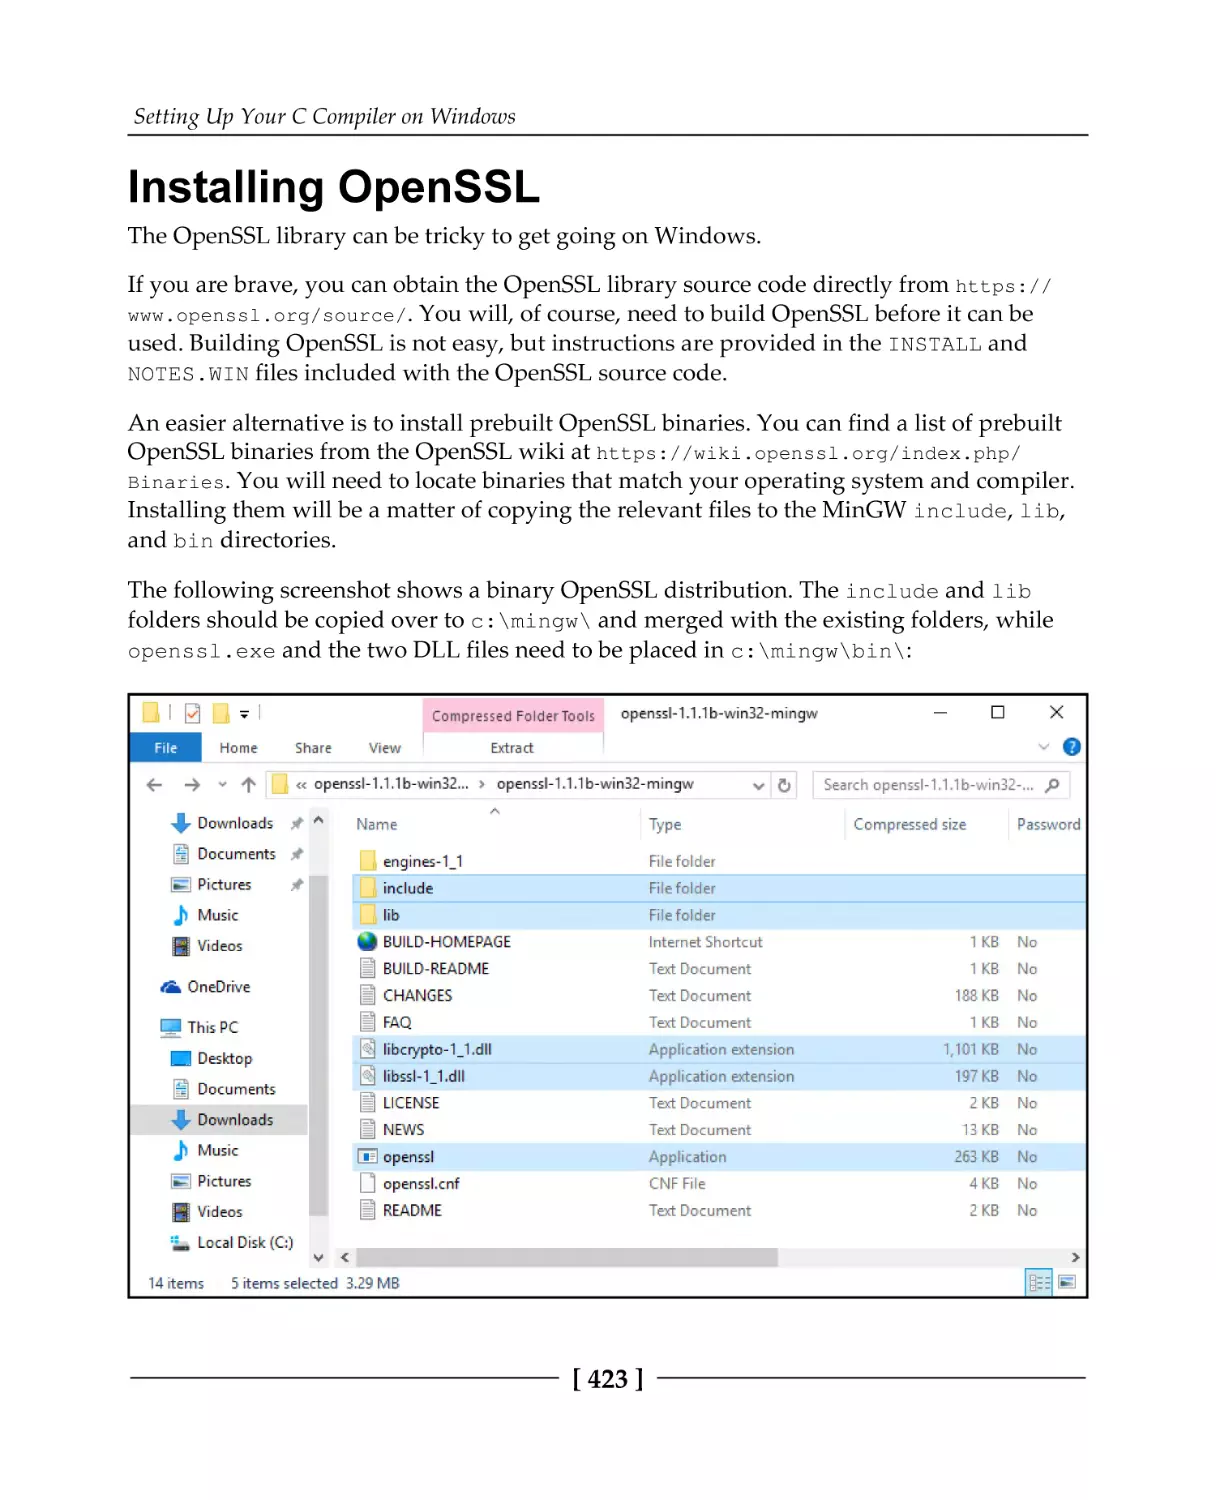
Installing OpenSSL
Installing libssh
Alternatives
Appendix C: Setting Up Your C Compiler on Linux
Installing GCC
[ vii ]
383
384
385
386
387
388
388
390
392
392
394
395
396
397
397
398
400
400
401
401
402
404
405
406
407
408
409
409
410
411
412
412
414
415
415
422
423
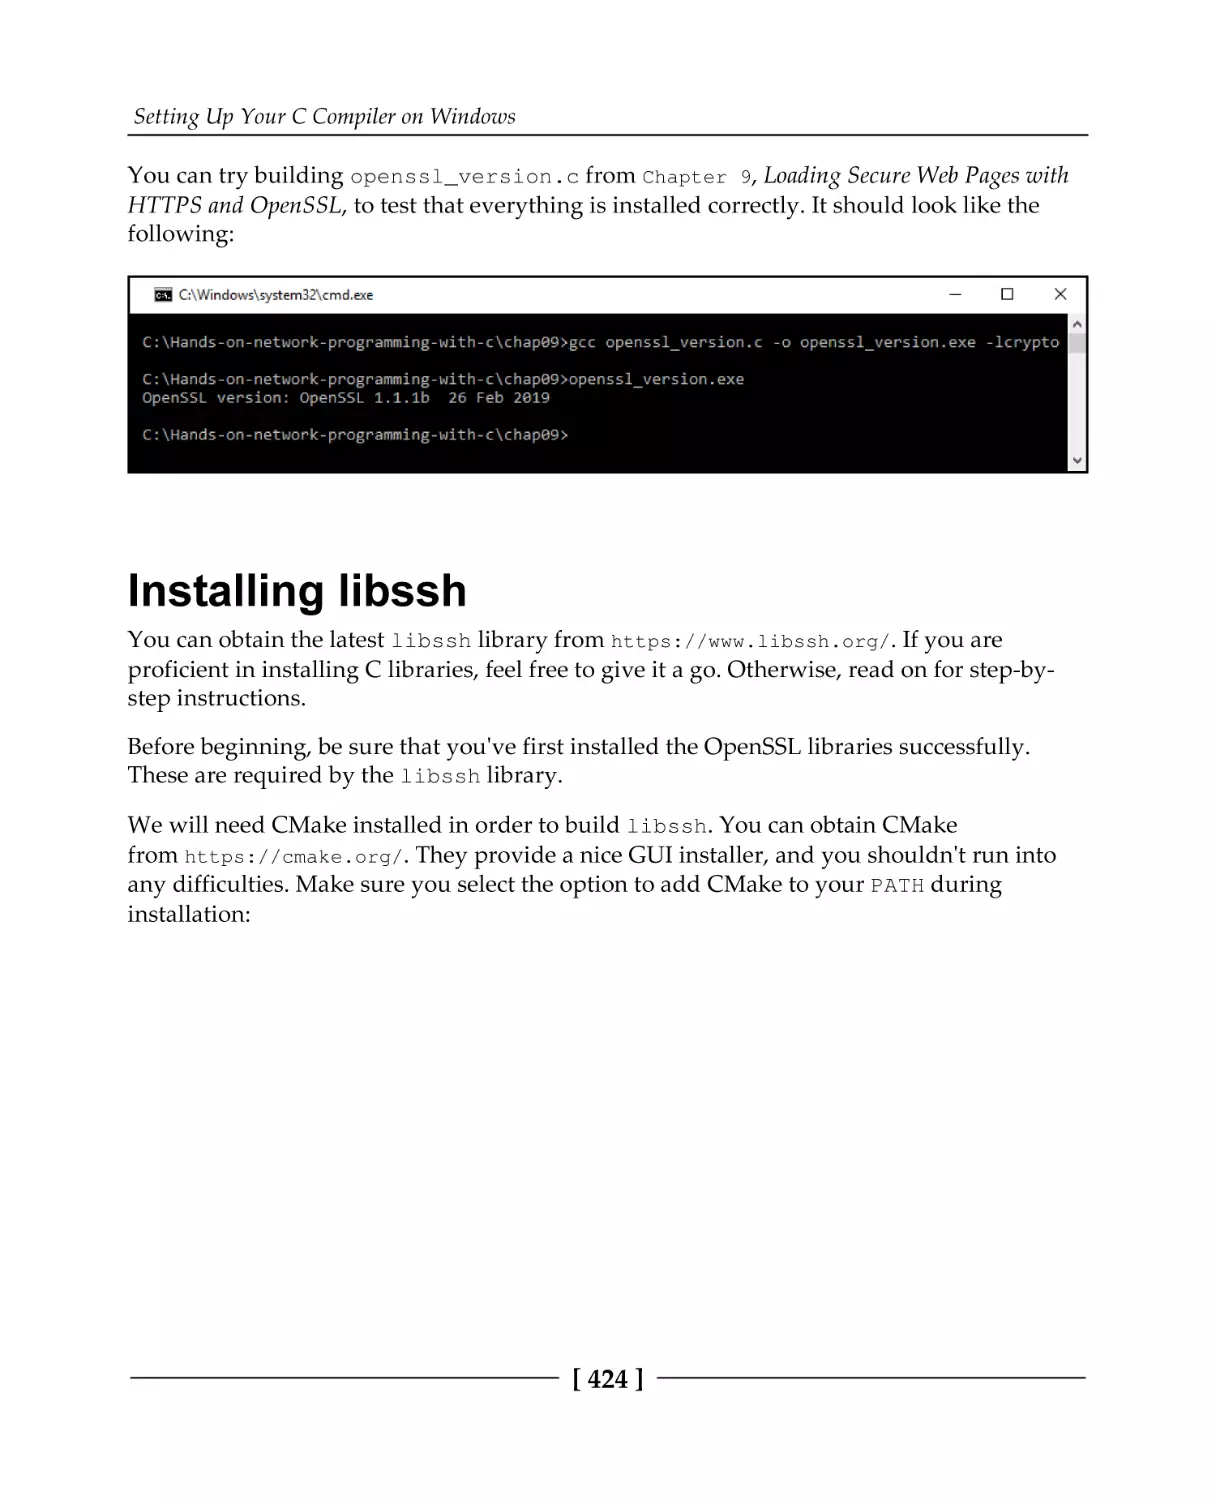
424
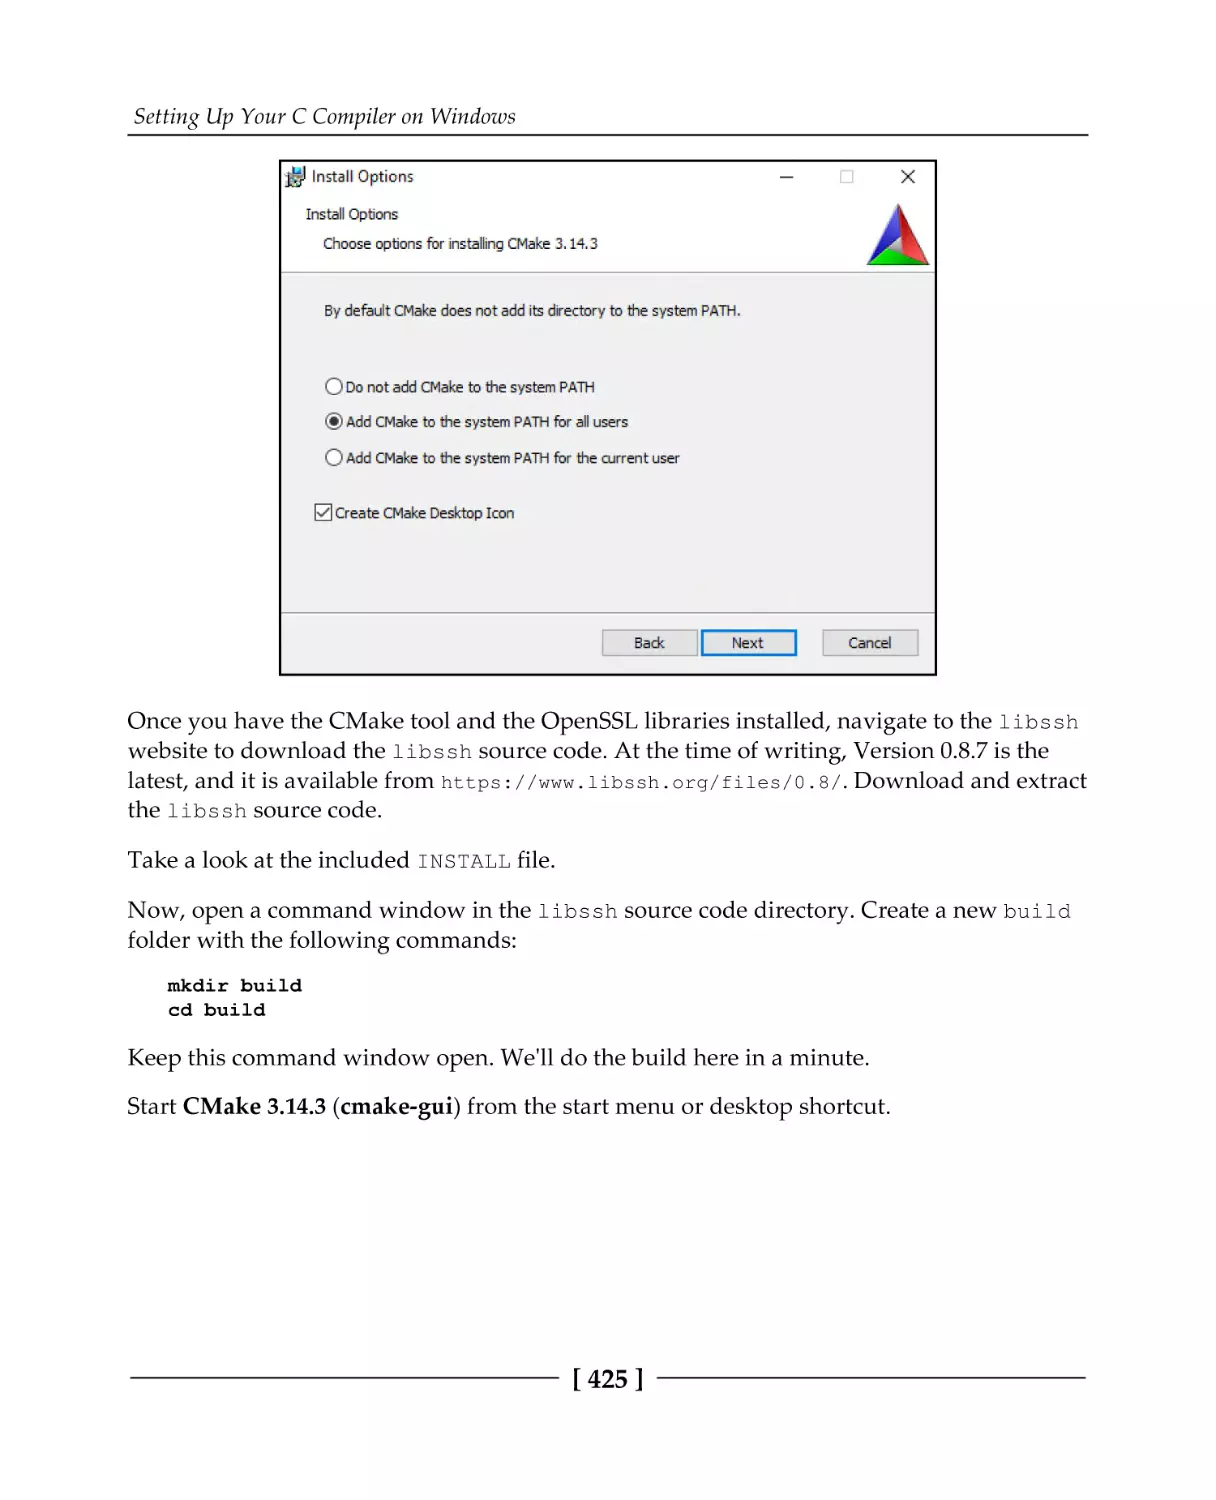
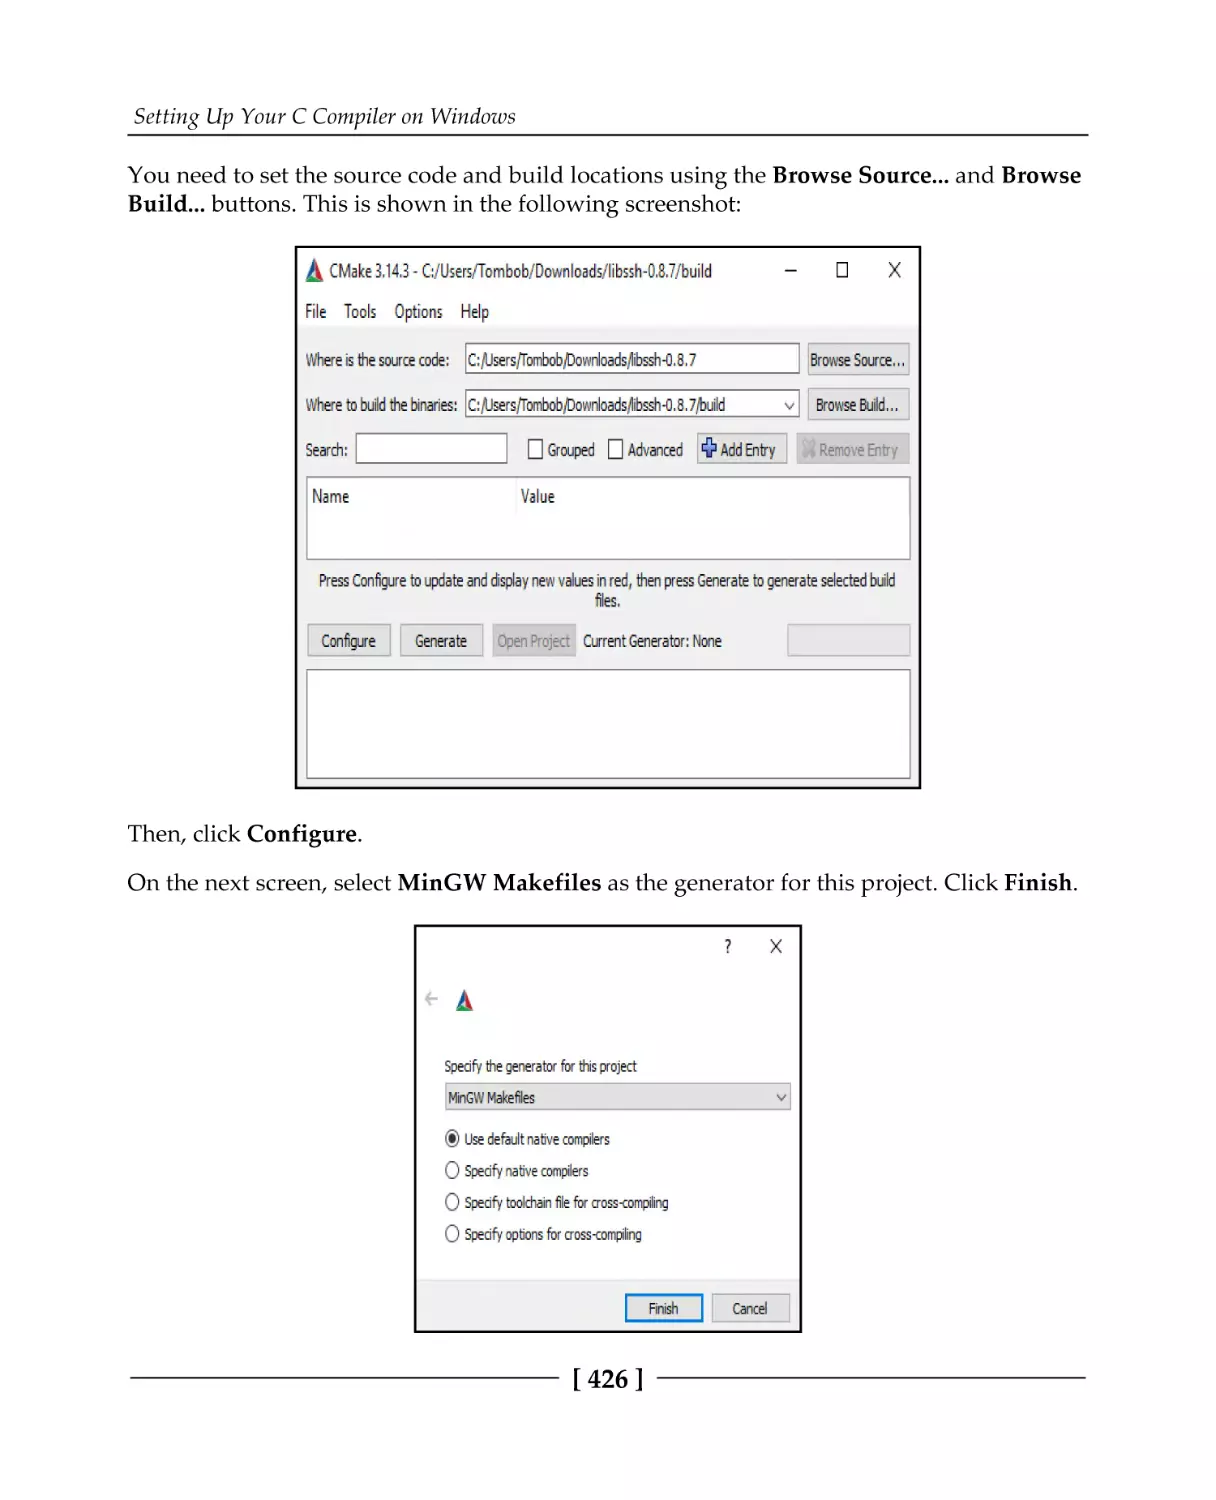
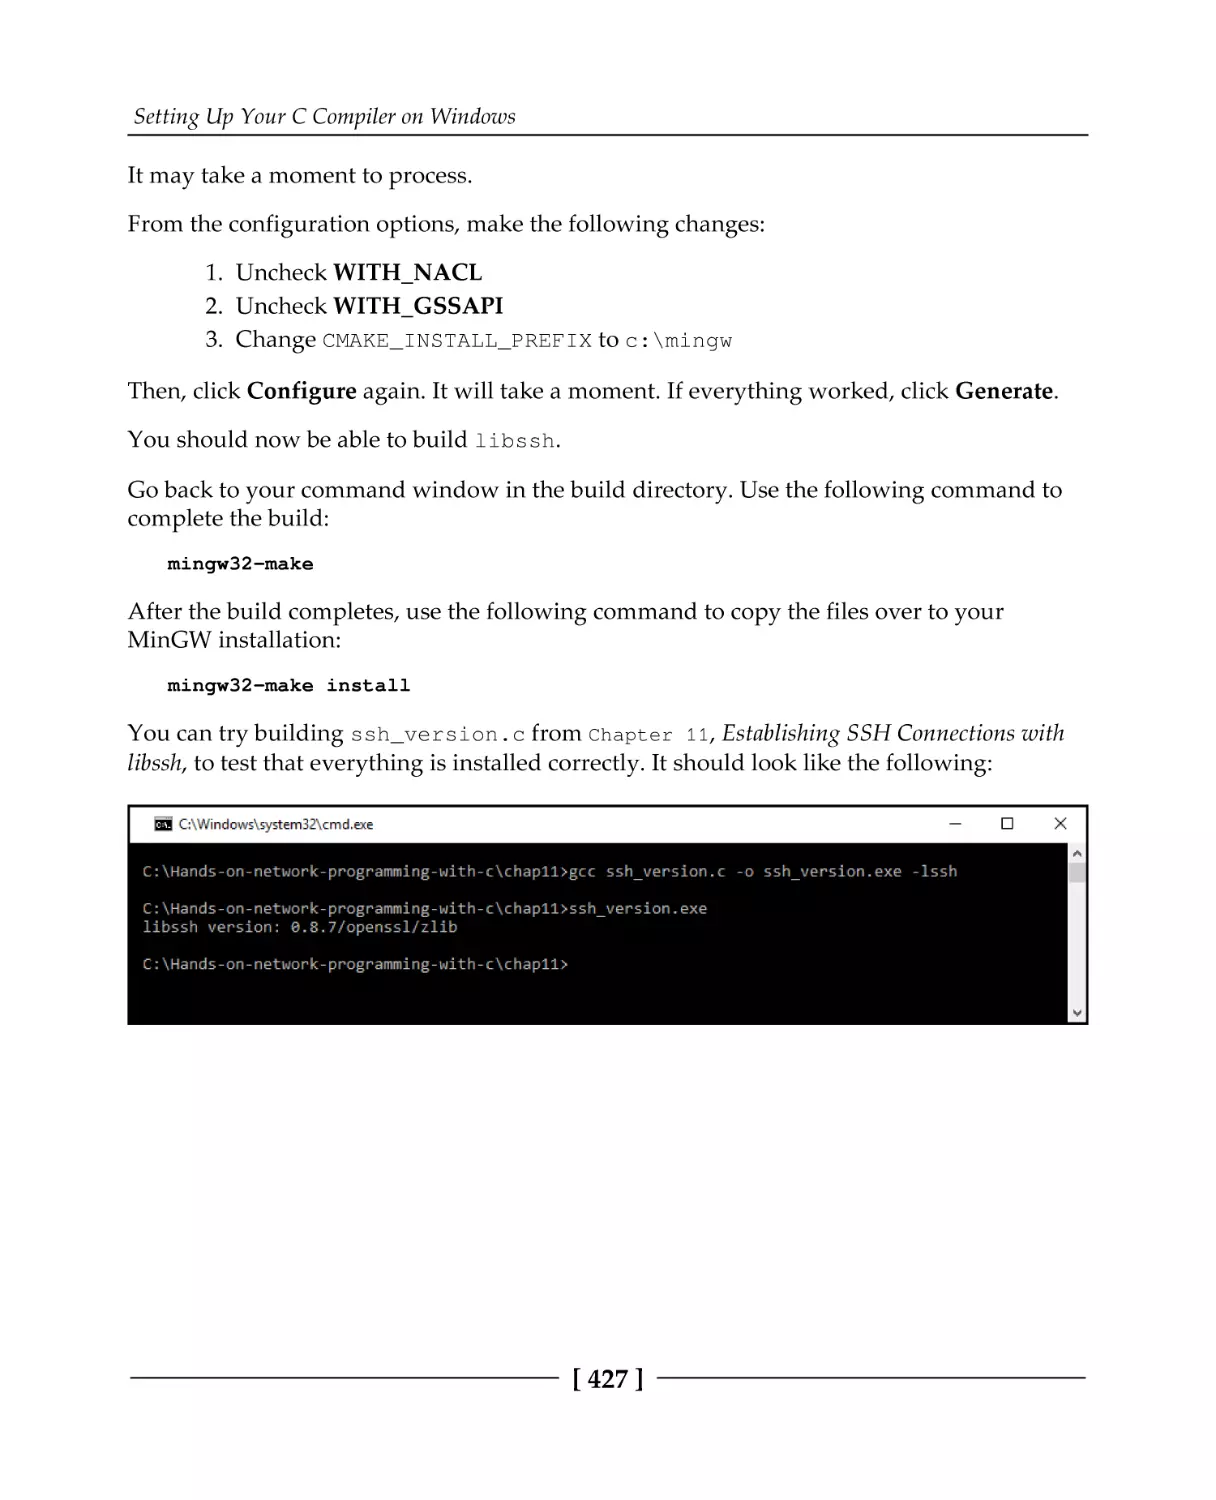
428
429
429
Table of Contents
Installing Git
Installing OpenSSL
Installing libssh
Appendix D: Setting Up Your C Compiler on macOS
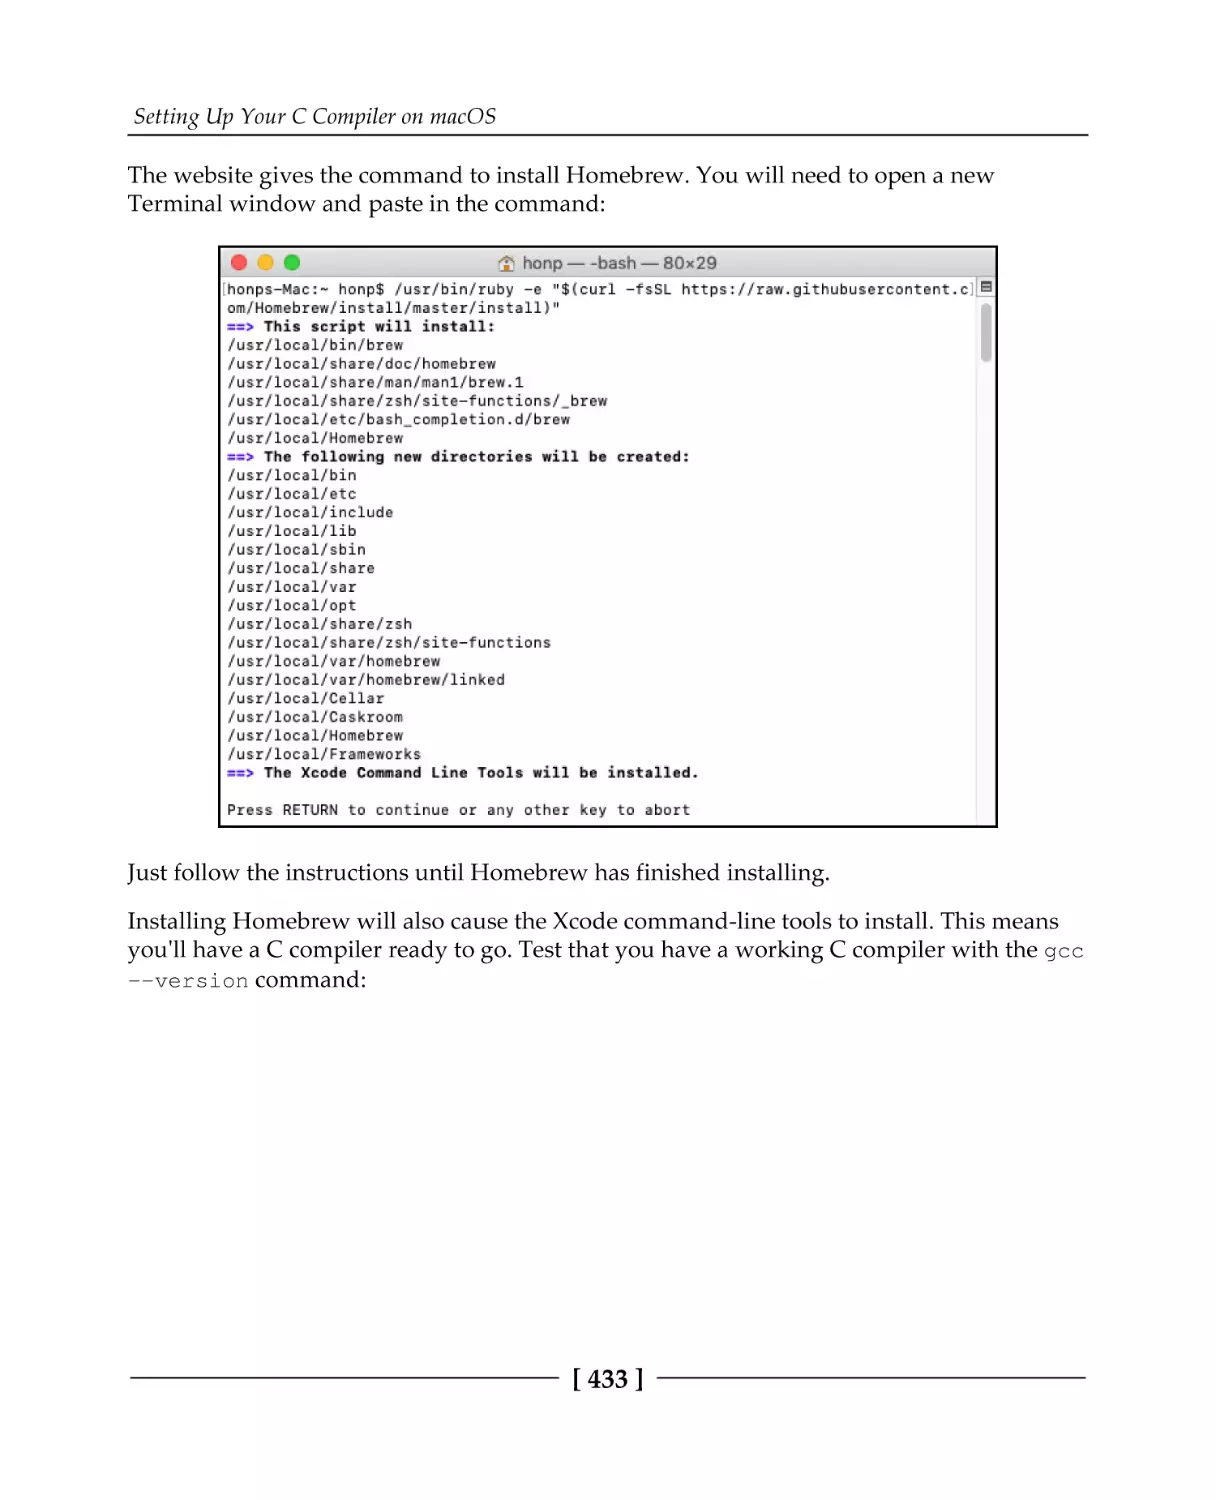
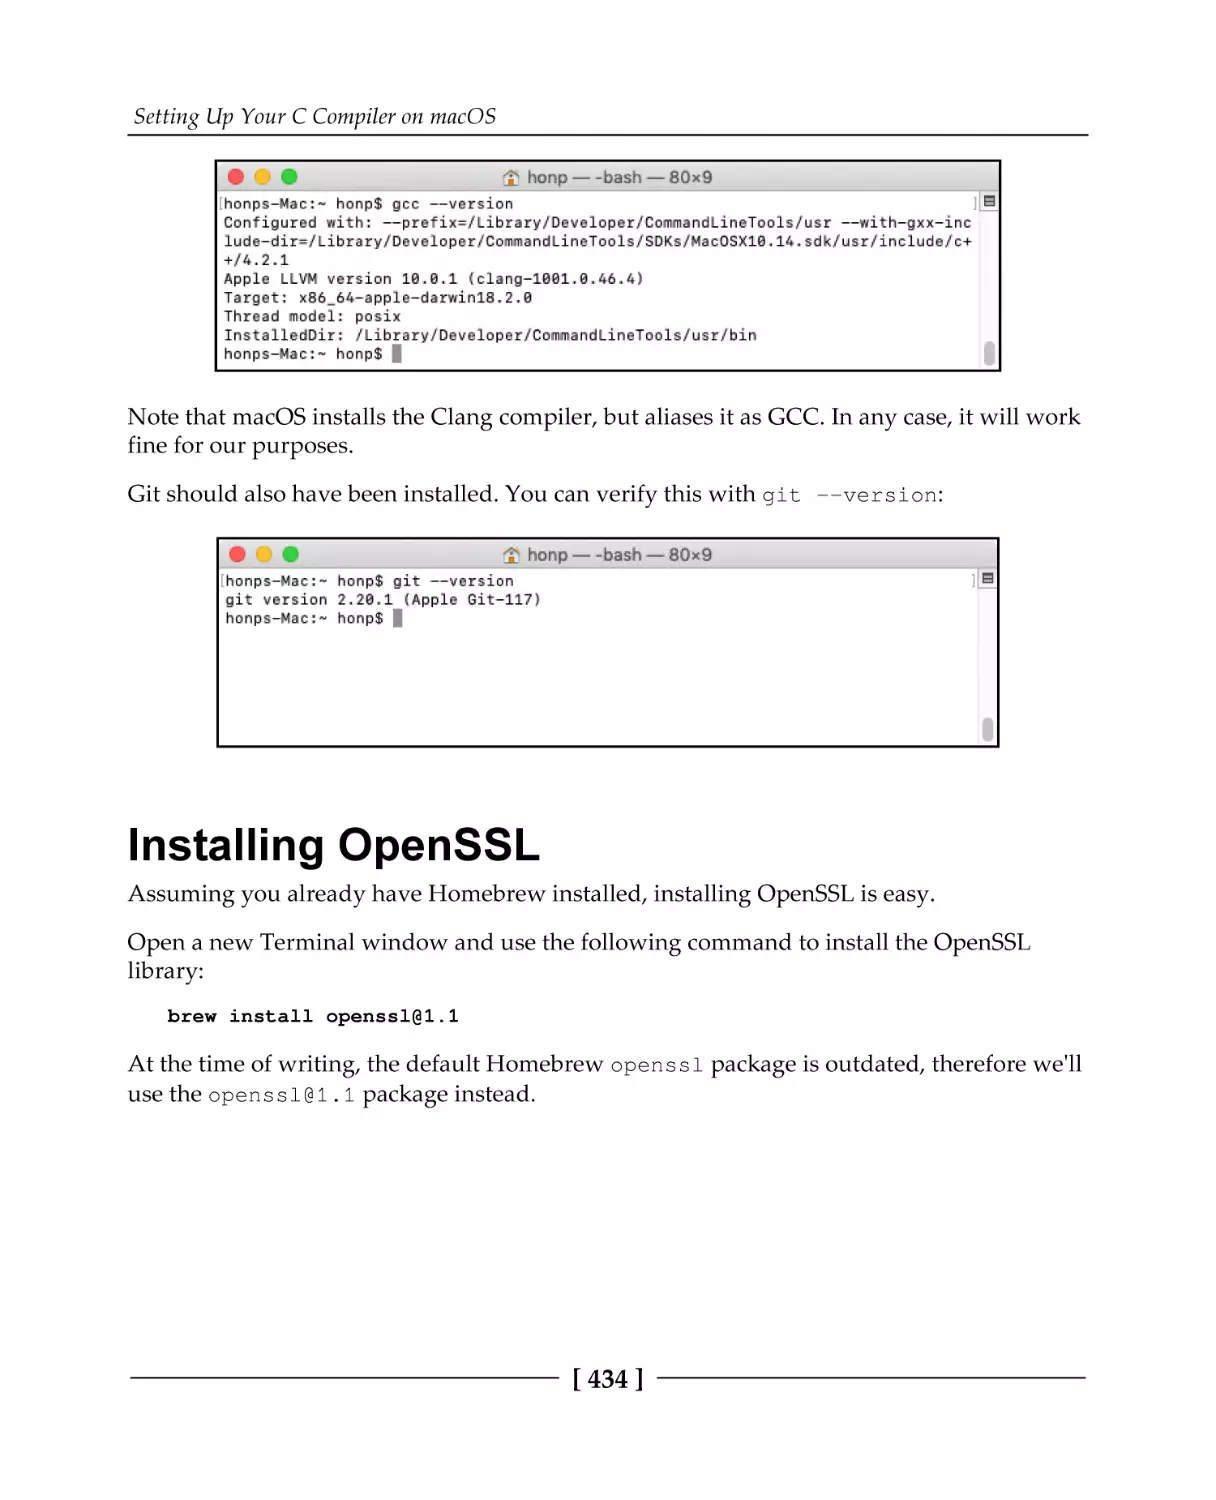
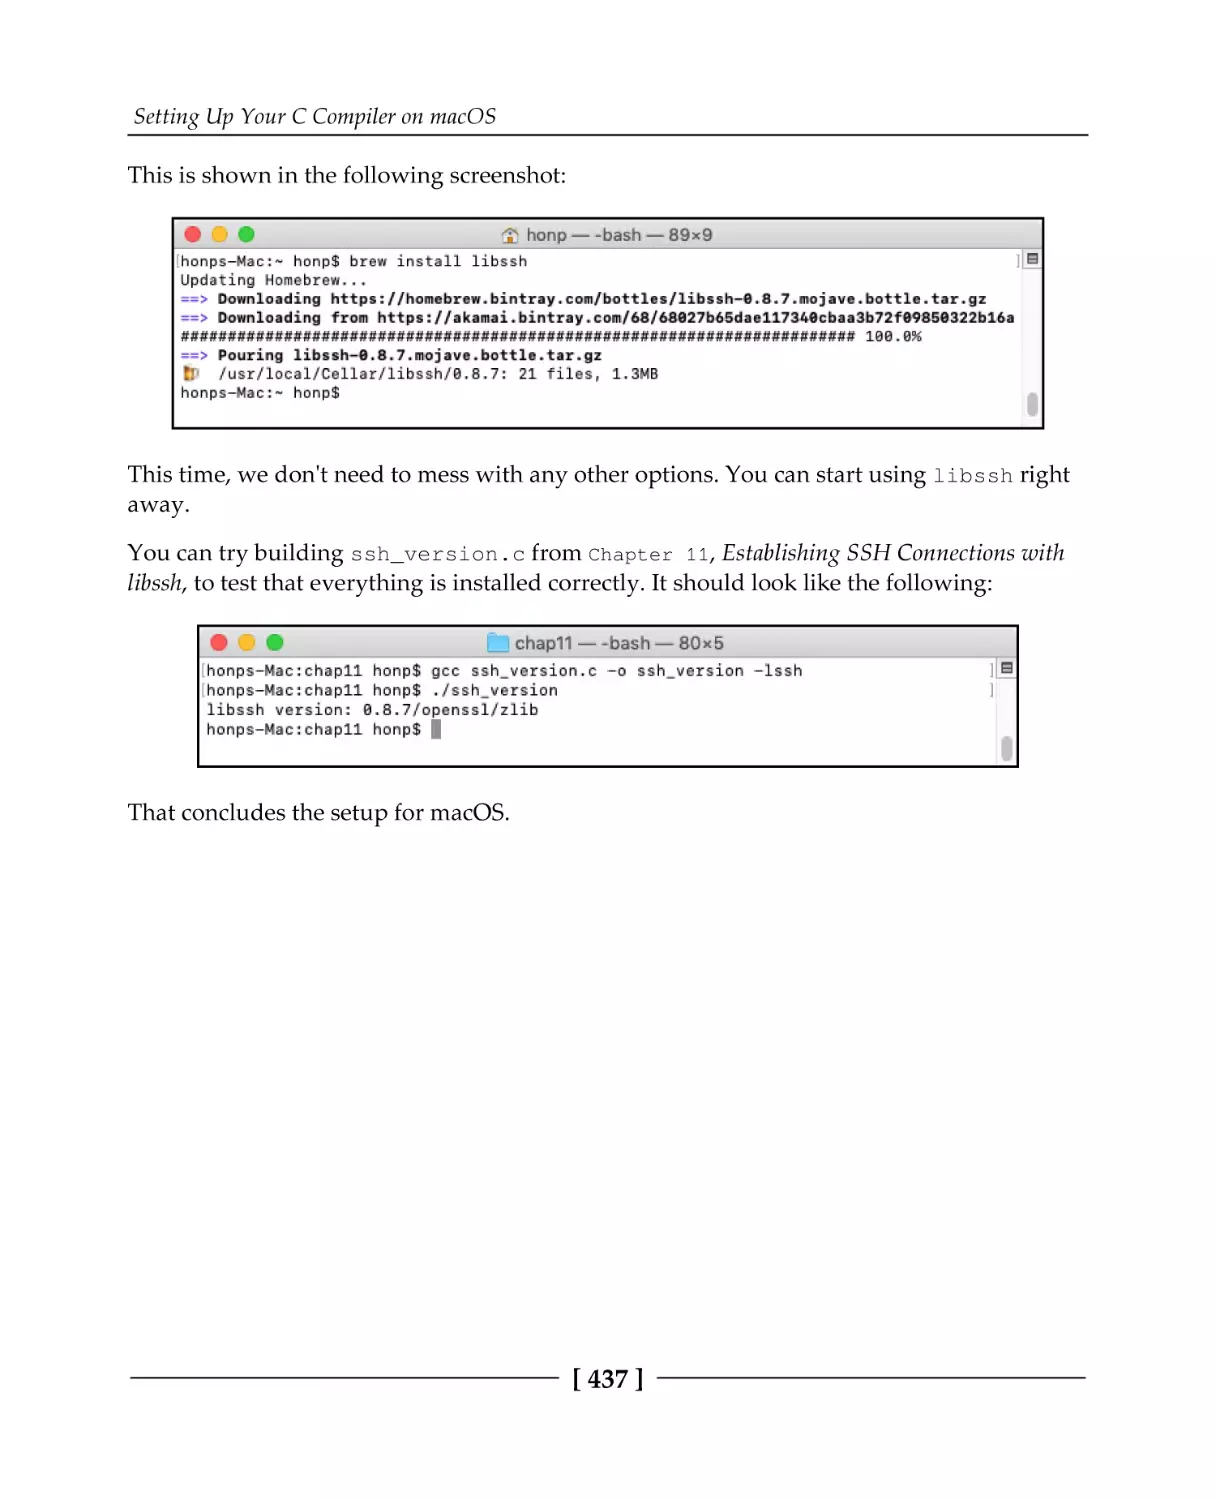
Installing Homebrew and the C compiler
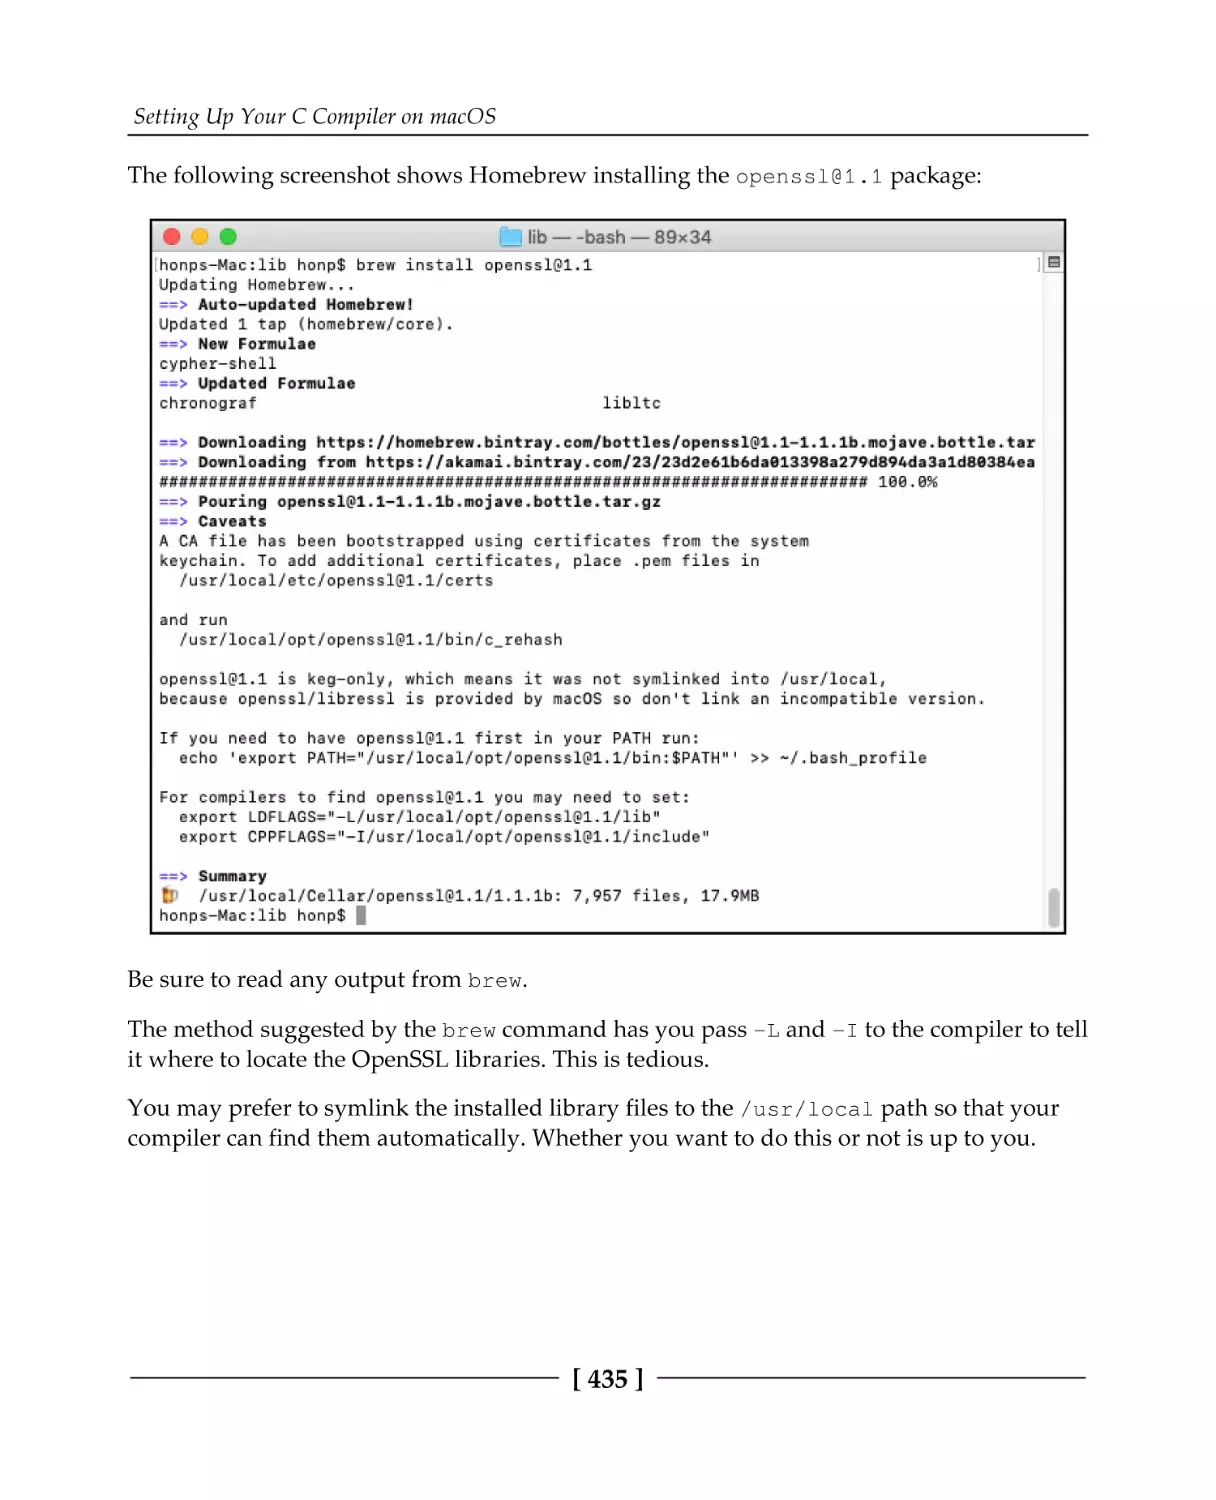
Installing OpenSSL
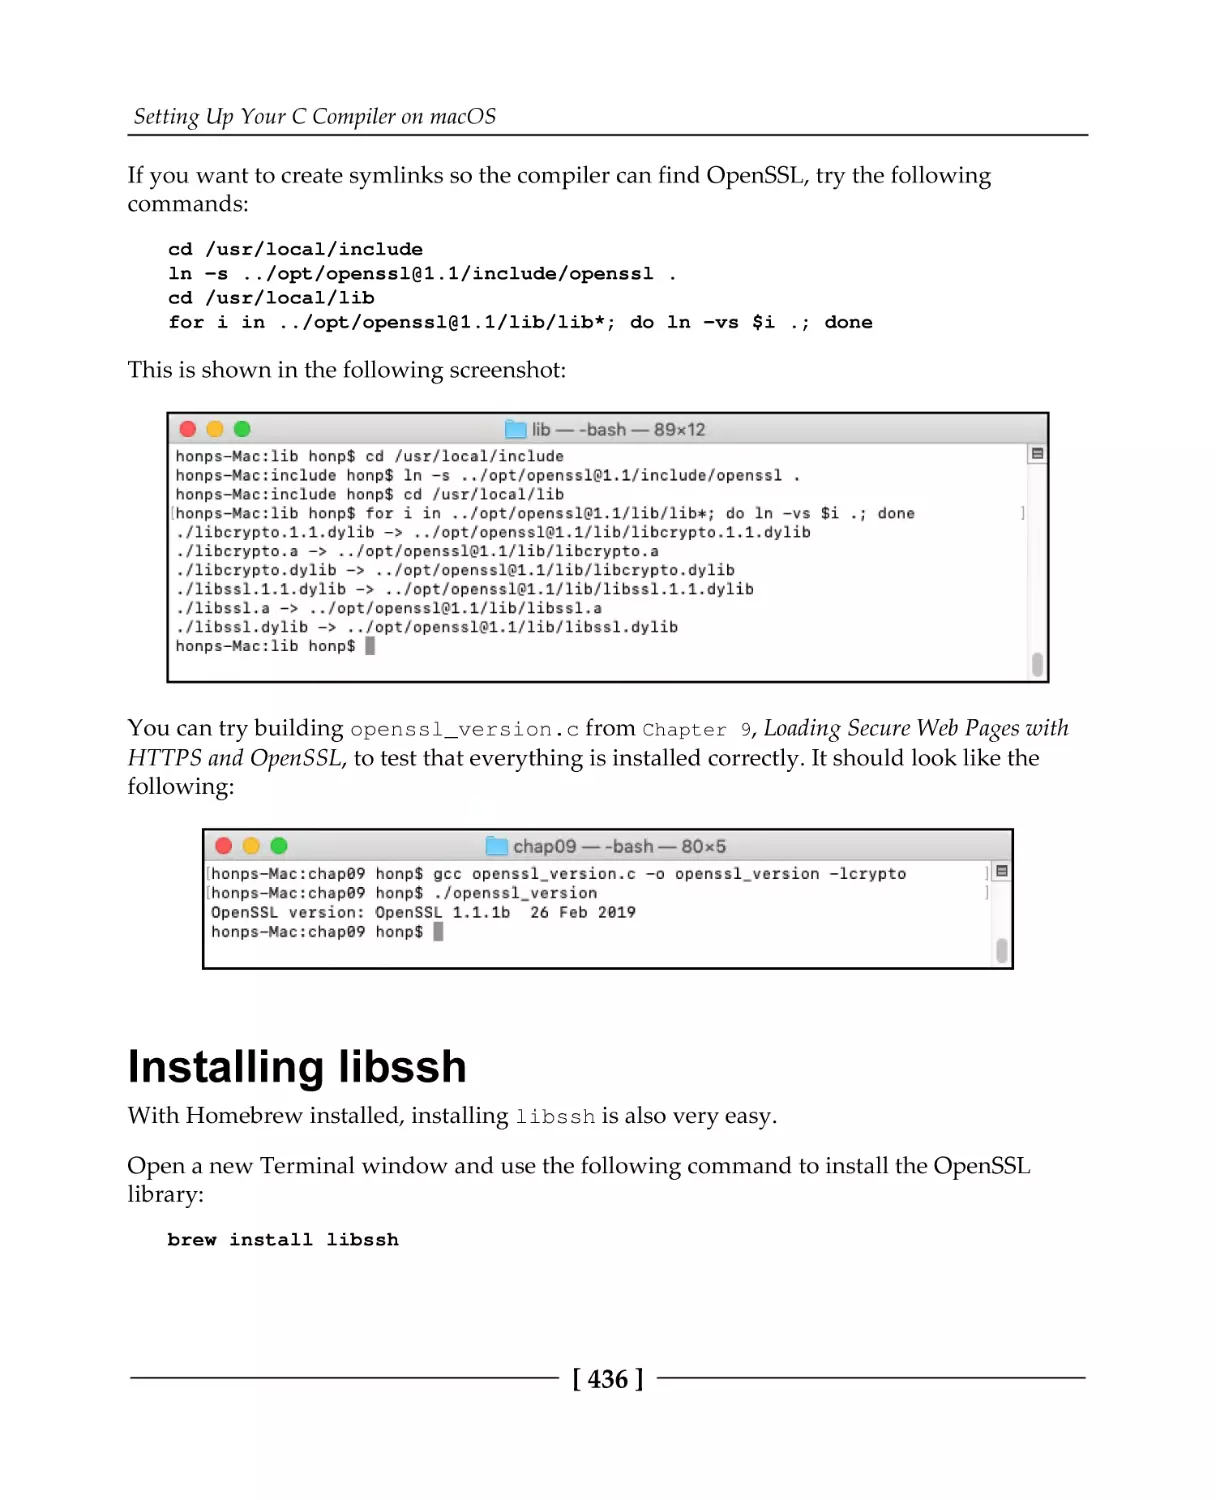
Installing libssh
Appendix E: Example Programs
Code license
Code included with this book
430
430
430
Other Book You May Enjoy
444
Index
446
Chapter 1 – Introducing Networks and Protocols
Chapter 2 – Getting to Grips with Socket APIs
Chapter 3 – An In-Depth Overview of TCP Connections
Chapter 4 – Establishing UDP Connections
Chapter 5 – Hostname Resolution and DNS
Chapter 6 – Building a Simple Web Client
Chapter 7 – Building a Simple Web Server
Chapter 8 – Making Your Program Send Email
Chapter 9 – Loading Secure Web Pages with HTTPS and OpenSSL
Chapter 10 – Implementing a Secure Web Server
Chapter 11 – Establishing SSH Connections with libssh
Chapter 12 – Network Monitoring and Security
Chapter 13 – Socket Programming Tips and Pitfalls
Chapter 14 – Web Programming for the Internet of Things
[ viii ]
432
432
434
436
438
438
439
439
439
439
440
440
440
441
441
441
441
442
442
442
443
Preface
Packt first contacted me about writing this book nearly a year ago. It's been a long journey,
harder than I anticipated at times, and I've learned a lot. The book you hold now is the
culmination of many long days, and I'm proud to finally present it.
I think C is a beautiful programming language. No other language in everyday use gets you
as close to the machine as C does. I've used C to program 8-bit microcontrollers with only
16 bytes of RAM, just the same as I've used it to program modern desktops with multi-core,
multi-GHz processors. It's truly remarkable that C works efficiently in both contexts.
Network programming is a fun topic, but it's also a very deep one; a lot is going on at many
levels. Some programming languages hide these abstractions. In the Python programming
language, for example, you can download an entire web page using only one line of code.
This isn't the case in C! In C, if you want to download a web page, you have to know how
everything works. You need to know sockets, you need to know Transfer Control Protocol
(TCP), and you need to know HTTP. In C network programming, nothing is hidden.
C is a great language to learn network programming in. This is not only because we get to
see all the details, but also because the popular operating systems all use kernels written in
C. No other language gives you the same first-class access as C does. In C, everything is
under your control – you can lay out your data structures exactly how you want, manage
memory precisely as you please, and even shoot yourself in the foot just the way you want.
When I first began writing this book, I surveyed other resources related to learning network
programming with C. I found much misinformation – not only on the web, but even in
print. There is a lot of C networking code that is done wrong. Internet tutorials about C
sockets often use deprecated functions and ignore memory safety completely. When it
comes to network programming, you can't take the it works so it's good enough programmingby-coincidence approach. You have to use reasoning.
In this book, I take care to approach network programming in a modern and safe way. The
example programs are carefully designed to work with both IPv4 and IPv6, and they are all
written in a portable, operating system-independent way, whenever possible. Wherever
there is an opportunity for memory errors, I try to take notice and point out these concerns.
Security is too often left as an afterthought. I believe security is important, and it should be
planned in the system from the beginning. Therefore, in addition to teaching network
basics, this book spends a lot of time working with secure protocols, such as TLS.
I hope you enjoy reading this book as much as I enjoyed writing it.
Preface
Who this book is for
This book is for the C or C++ programmer who wants to add networking features to their
software. It is also designed for the student or professional who simply wants to learn
about network programming and common network protocols.
It is assumed that the reader already has some familiarity with the C programming
language. This includes a basic proficiency with pointers, basic data structures, and manual
memory management.
What this book covers
Chapter 1, Introducing Networks and Protocols, introduces the important concepts related to
networking. This chapter includes example programs to determine your IP address
pragmatically.
Chapter 2, Getting to Grips with Socket APIs, introduces socket programming APIs and has
you build your first networked program—a tiny web server.
Chapter 3, An In-Depth Overview of TCP Connections, focuses on programming TCP sockets.
In this chapter, example programs are developed for both the client and server sides.
Chapter 4, Establishing UDP Connections, covers programming with User Datagram
Protocol (UDP) sockets.
Chapter 5, Hostname Resolution and DNS, explains how hostnames are translated into IP
addresses. In this chapter, we build an example program to perform manual DNS query
lookups using UDP.
Chapter 6, Building a Simple Web Client, introduces HTTP—the protocol that powers
websites. We dive right in and build an HTTP client in C.
Chapter 7, Building a Simple Web Server, describes how to construct a fully functional web
server in C. This program is able to serve a static website to any modern web browser.
Chapter 8, Making Your Program Send Email, describes Simple Mail Transfer Protocol
(SMTP)—the protocol that is powering email. In this chapter, we develop a program that
can send email over the internet.
[2]
Preface
Chapter 9, Loading Secure Web Pages with HTTPS and OpenSSL, explores TLS—the protocol
that secures web pages. In this chapter, we develop an HTTPS client that is capable of
downloading web pages securely.
Chapter 10, Implementing a Secure Web Server, continues on the security theme and explores
the construction of a secure HTTPS web server.
Chapter 11, Establishing SSH Connections with libssh, continues with the secure protocol
theme. The use of Secure Shell (SSH) is covered to connect to a remote server, execute
commands, and download files securely.
Chapter 12, Network Monitoring and Security, discusses the tools and techniques used to test
network functionality, troubleshoot problems, and eavesdrop on insecure communication
protocols.
Chapter 13, Socket Programming Tips and Pitfalls, goes into detail about TCP and addresses
many important edge cases that appear in socket programming. The techniques covered are
invaluable for creating robust network programs.
Chapter 14, Web Programming for the Internet of Things, gives an overview of the design and
programming for Internet of Things (IoT) applications.
Appendix A, Answers to Questions, provides answers to the comprehension questions given
at the end of each chapter.
Appendix B, Setting Up Your C Compiler on Windows, gives instructions for setting up a
development environment on Windows that is needed for compiling all of the example
programs in this book.
Appendix C, Setting Up Your C Compiler on Linux, provides the setup instructions for
preparing your Linux computer to be capable of compiling all of the example programs in
this book.
Appendix D, Setting Up Your C Compiler on macOS, gives step-by-step instructions for
configuring your macOS system to be capable of compiling all of the example programs in
this book.
Appendix E, Example Programs, lists each example program, by chapter, included in this
book's code repository.
[3]
Preface
To get the most out of this book
The reader is expected to be proficient in the C programming language. This includes a
familiarity with memory management, the use of pointers, and basic data structures.
A Windows, Linux, or macOS development machine is recommended; you can refer to the
appendices for setup instructions.
This book takes a hands-on approach to learning and includes 44 example programs.
Working through these examples as you read the book will help enforce the concepts.
The code for this book is released under the MIT open source license. The reader is
encouraged to use, modify, improve, and even publish their changes to these example
programs.
Download the example code files
You can download the example code files for this book from your account at
www.packt.com. If you purchased this book elsewhere, you can visit
www.packt.com/support and register to have the files emailed directly to you.
The code bundle for the book is also publicly hosted on GitHub at https://github.com/
codeplea/hands-on-network-programming-with-c. In case there's an update to the code, it
will be updated on that GitHub repository. Each chapter that introduces example programs
begins with the commands needed to download the book's code.
Download the color images
We also provide a PDF file that has color images of the screenshots/diagrams used in this
book. You can download it here: http://www.packtpub.com/sites/default/files/
downloads/9781789349863_ColorImages.pdf.
Conventions used
There are a number of text conventions used throughout this book.
CodeInText: Indicates code words in text, variable names, function names, directory
names, filenames, file extensions, pathnames, URLs, and user input. Here is an example:
"Use the select() function to wait for network data."
[4]
Preface
A block of code is set as follows:
/* example program */
#include <stdio.h>
int main() {
printf("Hello World!\n");
return 0;
}
Any command-line input or output is written as follows:
gcc hello.c -o hello
./hello
Bold: Indicates a new term, an important word, or words that you see on screen. For
example, words in menus or dialog boxes appear in the text like this. Here is an example:
"Select System info from the Administration panel."
Get in touch
Feedback from our readers is always welcome.
General feedback: If you have questions about any aspect of this book, mention the book
title in the subject of your message and email us at customercare@packtpub.com.
Errata: Although we have taken every care to ensure the accuracy of our content, mistakes
do happen. If you have found a mistake in this book, we would be grateful if you would
report this to us. Please visit www.packt.com/submit-errata, selecting your book, clicking
on the Errata Submission Form link, and entering the details.
Piracy: If you come across any illegal copies of our works in any form on the internet, we
would be grateful if you would provide us with the location address or website name.
Please contact us at copyright@packt.com with a link to the material.
If you are interested in becoming an author: If there is a topic that you have expertise in,
and you are interested in either writing or contributing to a book, please visit
authors.packtpub.com.
[5]
Preface
Reviews
Please leave a review. Once you have read and used this book, why not leave a review on
the site that you purchased it from? Potential readers can then see and use your unbiased
opinion to make purchase decisions, we at Packt can understand what you think about our
products, and our authors can see your feedback on their book. Thank you!
For more information about Packt, please visit packt.com.
[6]
1
Section 1 - Getting Started with
Network Programming
This section will get the reader up and running with the basics of networking, the relevant
network protocols, and basic socket programming.
The following chapters are in this section:
Chapter 1, An Introduction to Networks and Protocols
Chapter 2, Getting to Grips with Socket APIs
Chapter 3, An In-Depth Overview of TCP Connections
Chapter 4, Establishing UDP Connections
Chapter 5, Hostname Resolution and DNS
1
Introducing Networks and
Protocols
In this chapter, we will review the fundamentals of computer networking. We'll look at
abstract models that attempt to explain the main concerns of networking, and we'll explain
the operation of the primary network protocol, the Internet Protocol. We'll look at address
families and end with writing programs to list your computer's local IP addresses.
The following topics are covered in this chapter:
Network programming and C
OSI layer model
TCP/IP reference model
The Internet Protocol
IPv4 addresses and IPv6 addresses
Domain names
Internet protocol routing
Network address translation
The client-server paradigm
Listing your IP addresses programmatically from C
Technical requirements
Most of this chapter focuses on theory and concepts. However, we do introduce some
sample programs near the end. To compile these programs, you will need a good C
compiler. We recommend MinGW on Windows and GCC on Linux and macOS. See
Appendix B, Setting Up Your C Compiler On Windows, Appendix C, Setting Up Your C
Compiler On Linux, and Appendix D, Setting Up Your C Compiler On macOS, for compiler
setup.
Introducing Networks and Protocols
Chapter 1
The code for this book can be found at: https://github.com/codeplea/Hands-On-NetworkProgramming-with-C.
From the command line, you can download the code for this chapter with the following
command:
git clone https://github.com/codeplea/Hands-On-Network-Programming-with-C
cd Hands-On-Network-Programming-with-C/chap01
On Windows, using MinGW, you can use the following command to compile and run code:
gcc win_list.c -o win_list.exe -liphlpapi -lws2_32
win_list
On Linux and macOS, you can use the following command:
gcc unix_list.c -o unix_list
./unix_list
The internet and C
Today, the internet needs no introduction. Certainly, millions of desktops, laptops, routers,
and servers are connected to the internet and have been for decades. However, billions of
additional devices are now connected as well—mobile phones, tablets, gaming systems,
vehicles, refrigerators, television sets, industrial machinery, surveillance systems, doorbells,
and even light bulbs. The new Internet of Things (IoT) trend has people rushing to connect
even more unlikely devices every day.
Over 20 billion devices are estimated to be connected to the internet now. These devices use
a wide variety of hardware. They connect over an Ethernet connection, Wi-Fi, cellular, a
phone line, fiber optics, and other media, but they likely have one thing in common; they
likely use C.
The use of the C programming language is ubiquitous. Almost every network stack is
programmed in C. This is true for Windows, Linux, and macOS. If your mobile phone uses
Android or iOS, then even though the apps for these were programmed in a different
language (Java and Objective C), the kernel and networking code was written in C. It is
very likely that the network routers that your internet data goes through are programmed
in C. Even if the user interface and higher-level functions of your modem or router are
programmed in another language, the networking drivers are still probably implemented
in C.
[9]
Introducing Networks and Protocols
Chapter 1
Networking encompasses concerns at many different abstraction levels. The concerns your
web browser has with formatting a web page are much different than the concerns your
router has with forwarding network packets. For this reason, it is useful to have a
theoretical model that helps us to understand communications at these different levels of
abstraction. Let's look at these models now.
OSI layer model
It's clear that if all of the disparate devices composing the internet are going to
communicate seamlessly, there must be agreed-upon standards that define their
communications. These standards are called protocols. Protocols define everything from
the voltage levels on an Ethernet cable to how a JPEG image is compressed on a web page.
It's clear that, when we talk about the voltage on an Ethernet cable, we are at a much
different level of abstraction compared to talking about the JPEG image format. If you're
programming a website, you don't want to think about Ethernet cables or Wi-Fi
frequencies. Likewise, if you're programming an internet router, you don't want to have to
worry about how JPEG images are compressed. For this reason, we break the problem
down into many smaller pieces.
One common method of breaking down the problem is to place levels of concern into
layers. Each layer then provides services for the layer on top of it, and each upper layer can
rely on the layers underneath it without concern for how they work.
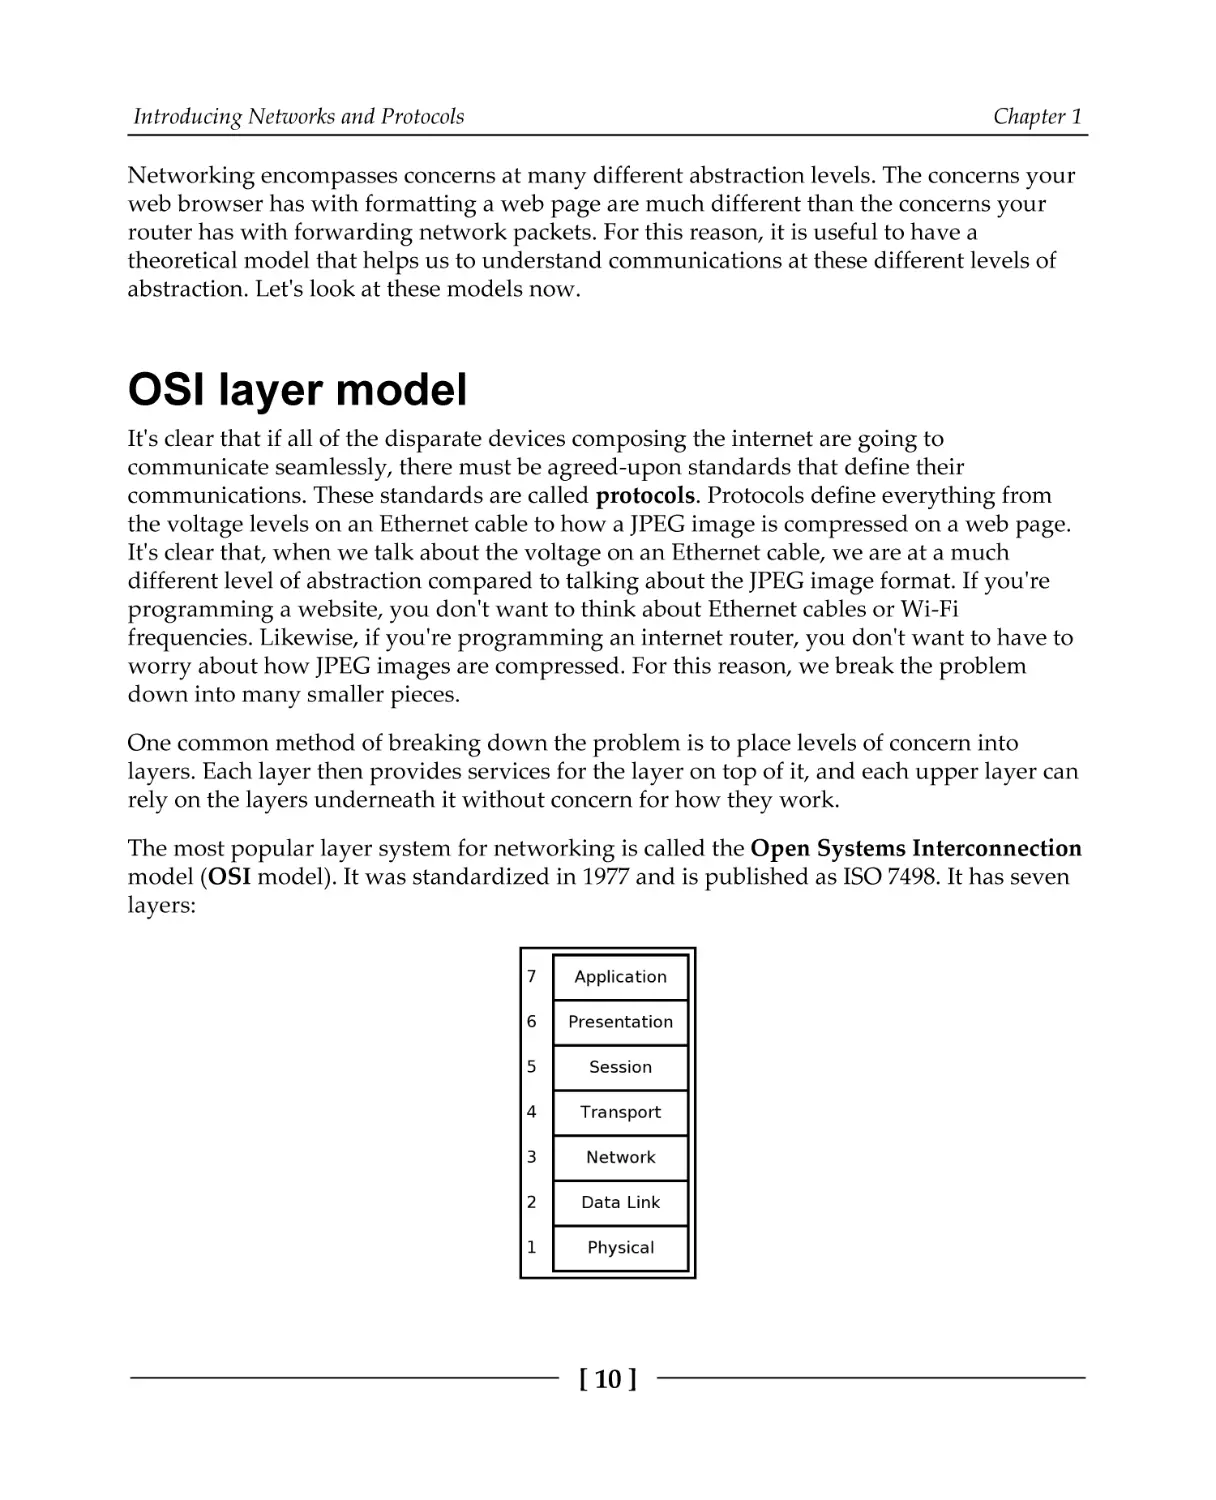
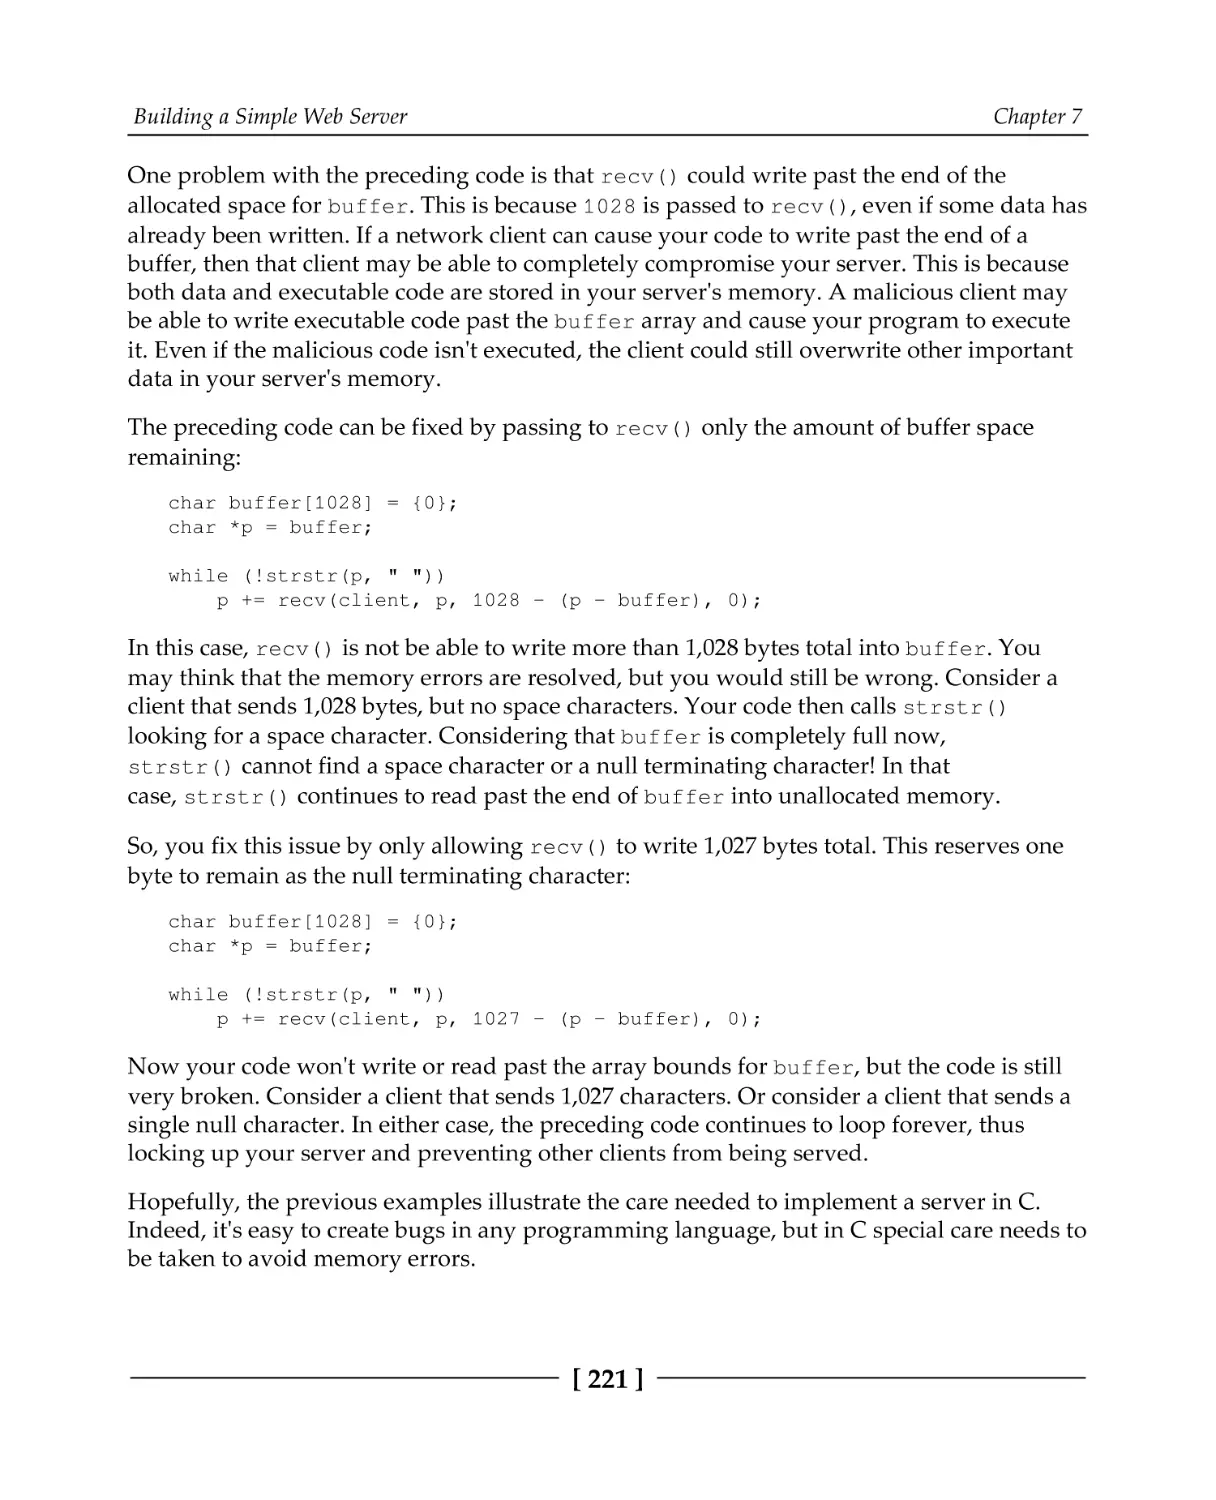
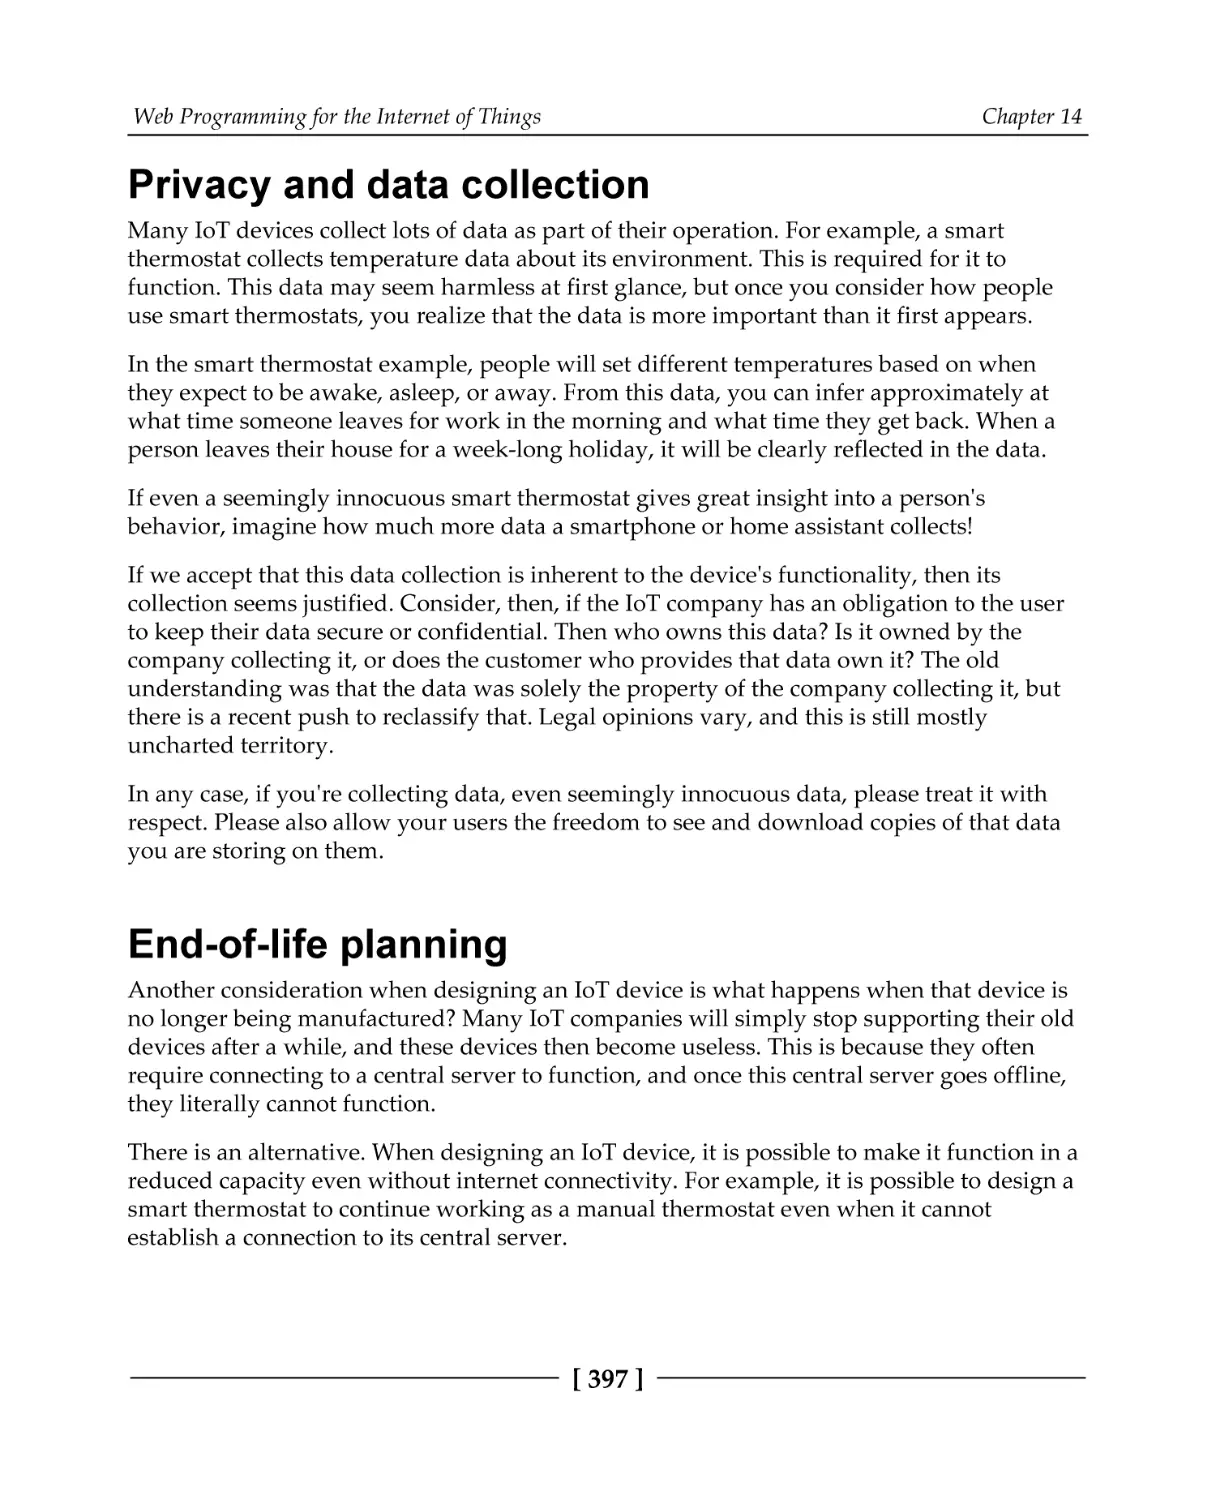
The most popular layer system for networking is called the Open Systems Interconnection
model (OSI model). It was standardized in 1977 and is published as ISO 7498. It has seven
layers:
[ 10 ]
Introducing Networks and Protocols
Chapter 1
Let's understand these layers one by one:
Physical (1): This is the level of physical communication in the real world. At
this level, we have specifications for things such as the voltage levels on an
Ethernet cable, what each pin on a connector is for, the radio frequency of Wi-Fi,
and the light flashes over an optic fiber.
Data Link (2): This level builds on the physical layer. It deals with protocols for
directly communicating between two nodes. It defines how a direct message
between nodes starts and ends (framing), error detection and correction, and
flow control.
Network layer (3): The network layer provides the methods to transmit data
sequences (called packets) between nodes in different networks. It provides
methods to route packets from one node to another (without a direct physical
connection) by transferring through many intermediate nodes. This is the layer
that the Internet Protocol is defined on, which we will go into in some depth
later.
Transport layer (4): At this layer, we have methods to reliably deliver variable
length data between hosts. These methods deal with splitting up data,
recombining it, ensuring data arrives in order, and so on. The Transmission
Control Protocol (TCP) and User Datagram Protocol (UDP) are commonly said
to exist on this layer.
Session layer (5): This layer builds on the transport layer by adding methods to
establish, checkpoint, suspend, resume, and terminate dialogs.
Presentation layer (6): This is the lowest layer at which data structure and
presentation for an application are defined. Concerns such as data encoding,
serialization, and encryption are handled here.
Application layer (7): The applications that the user interfaces with (for example,
web browsers and email clients) exist here. These applications make use of the
services provided by the six lower layers.
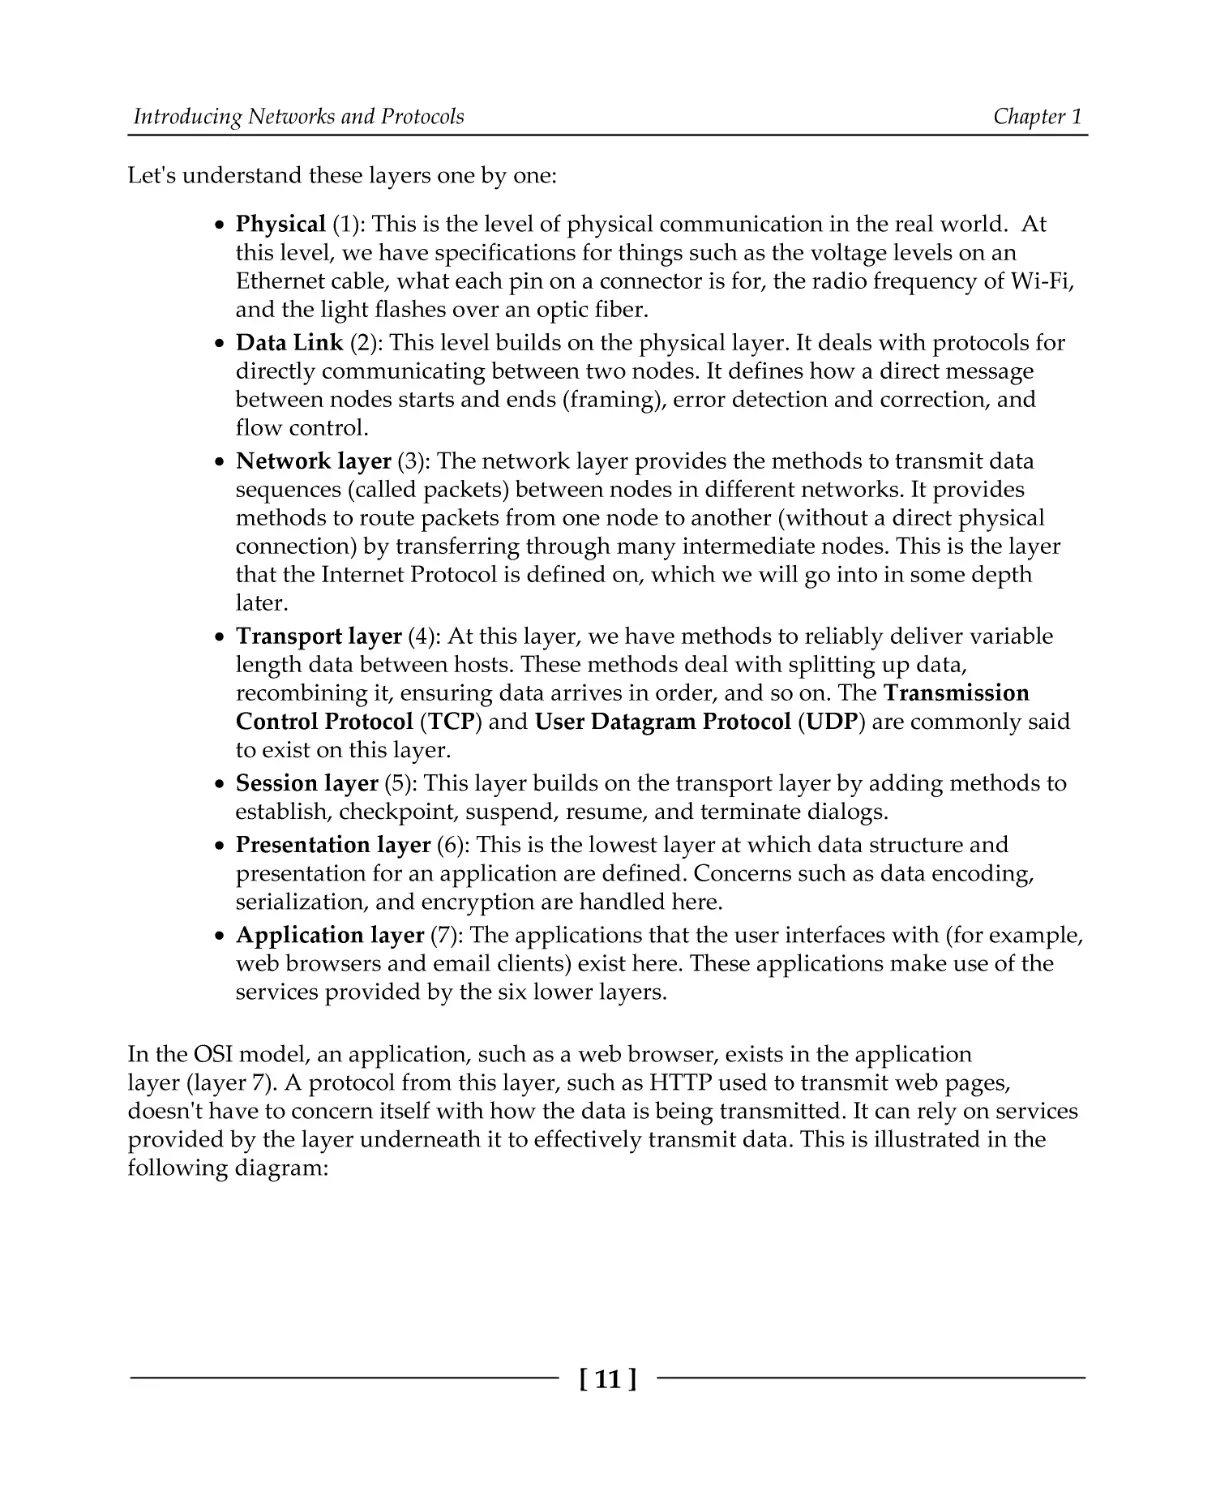
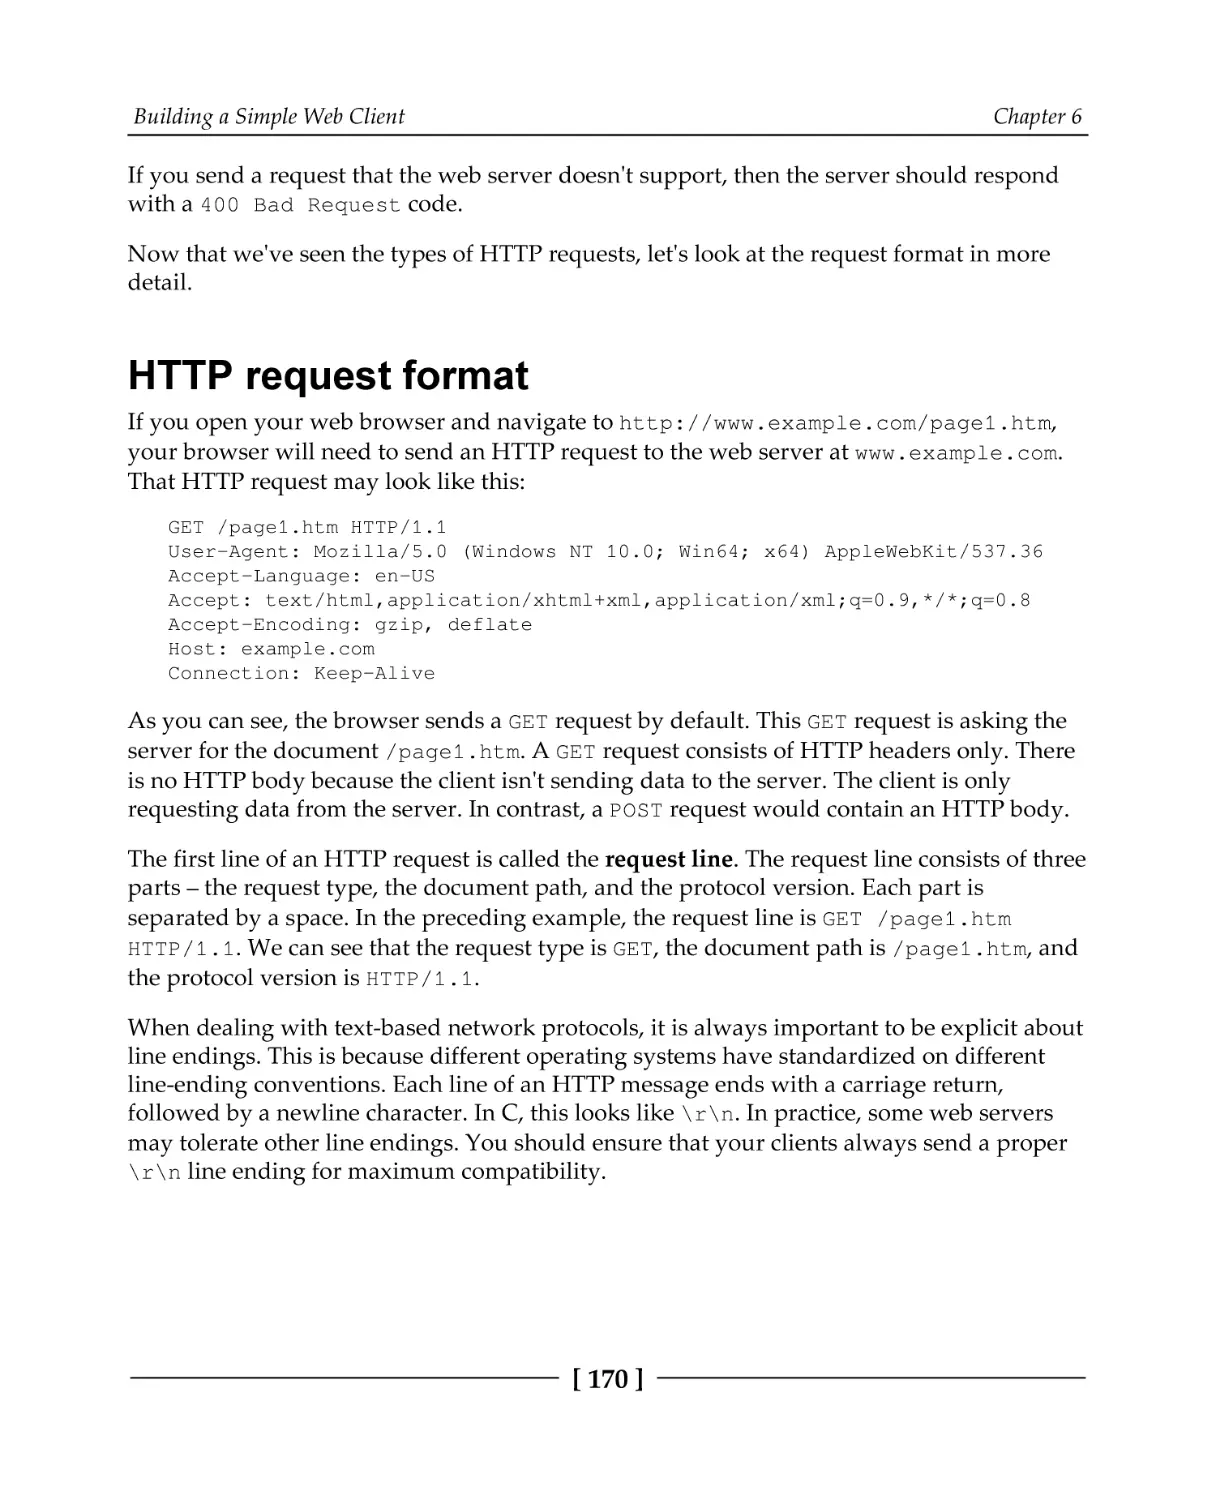
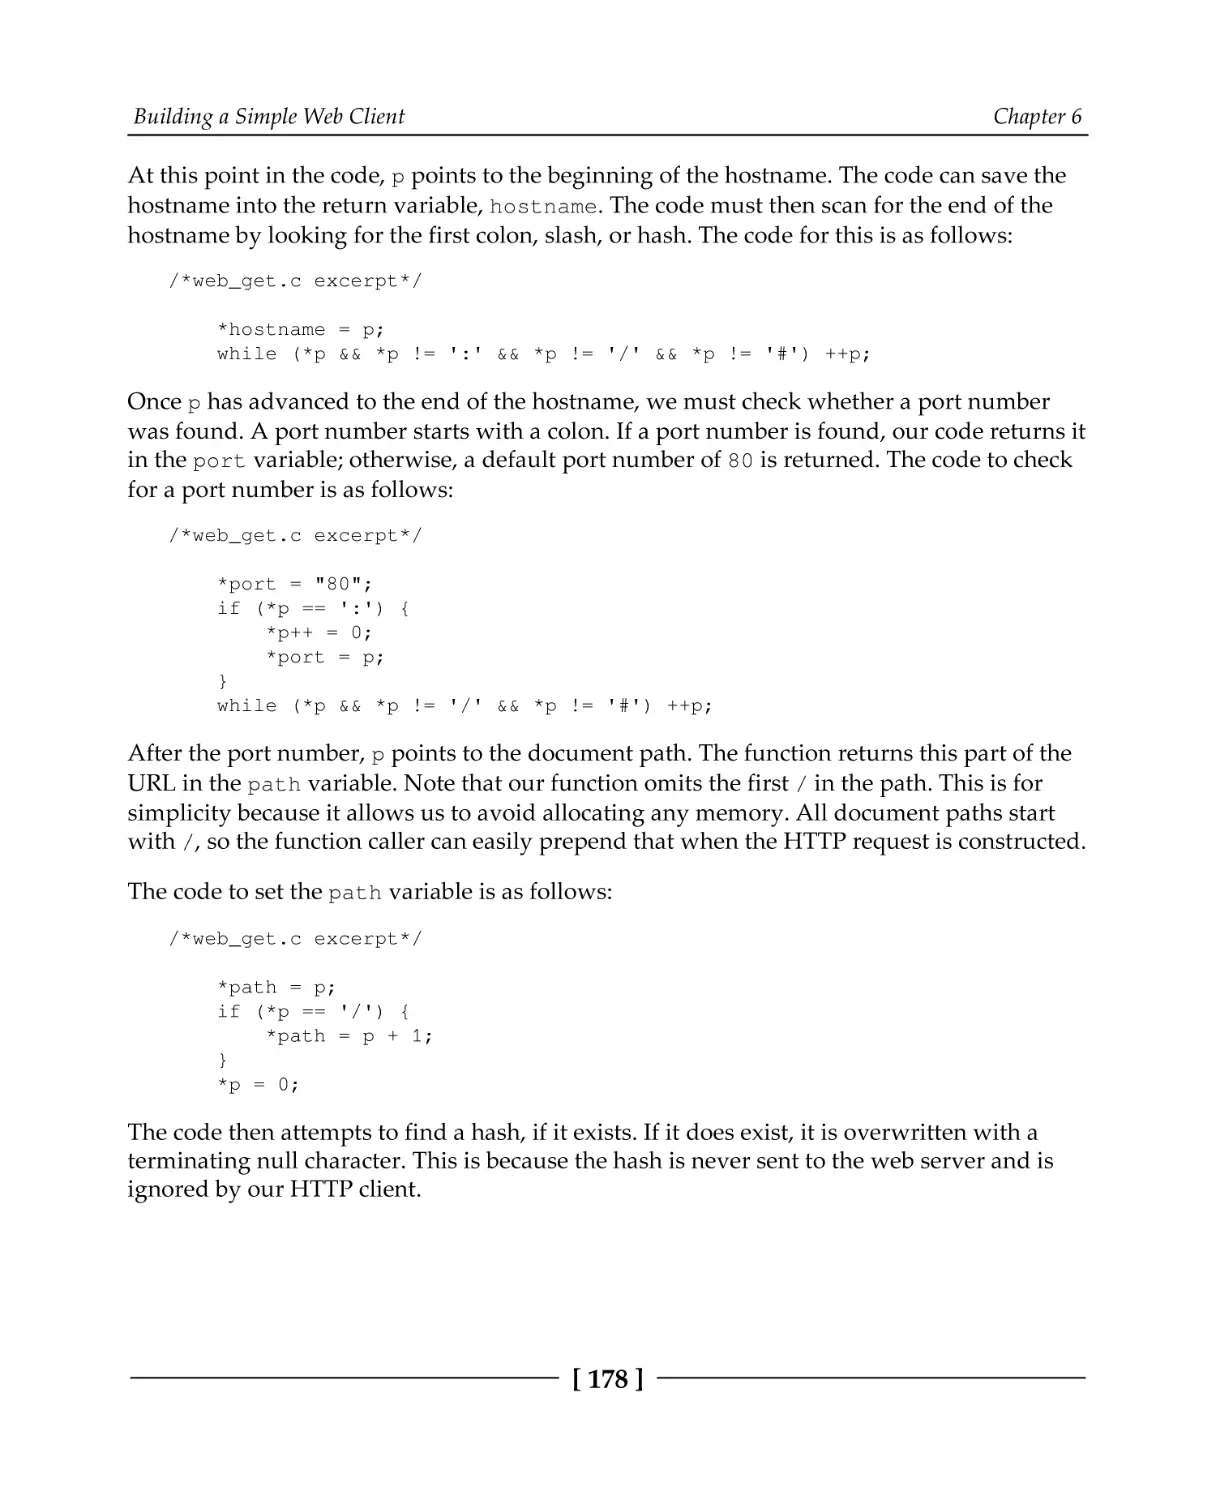
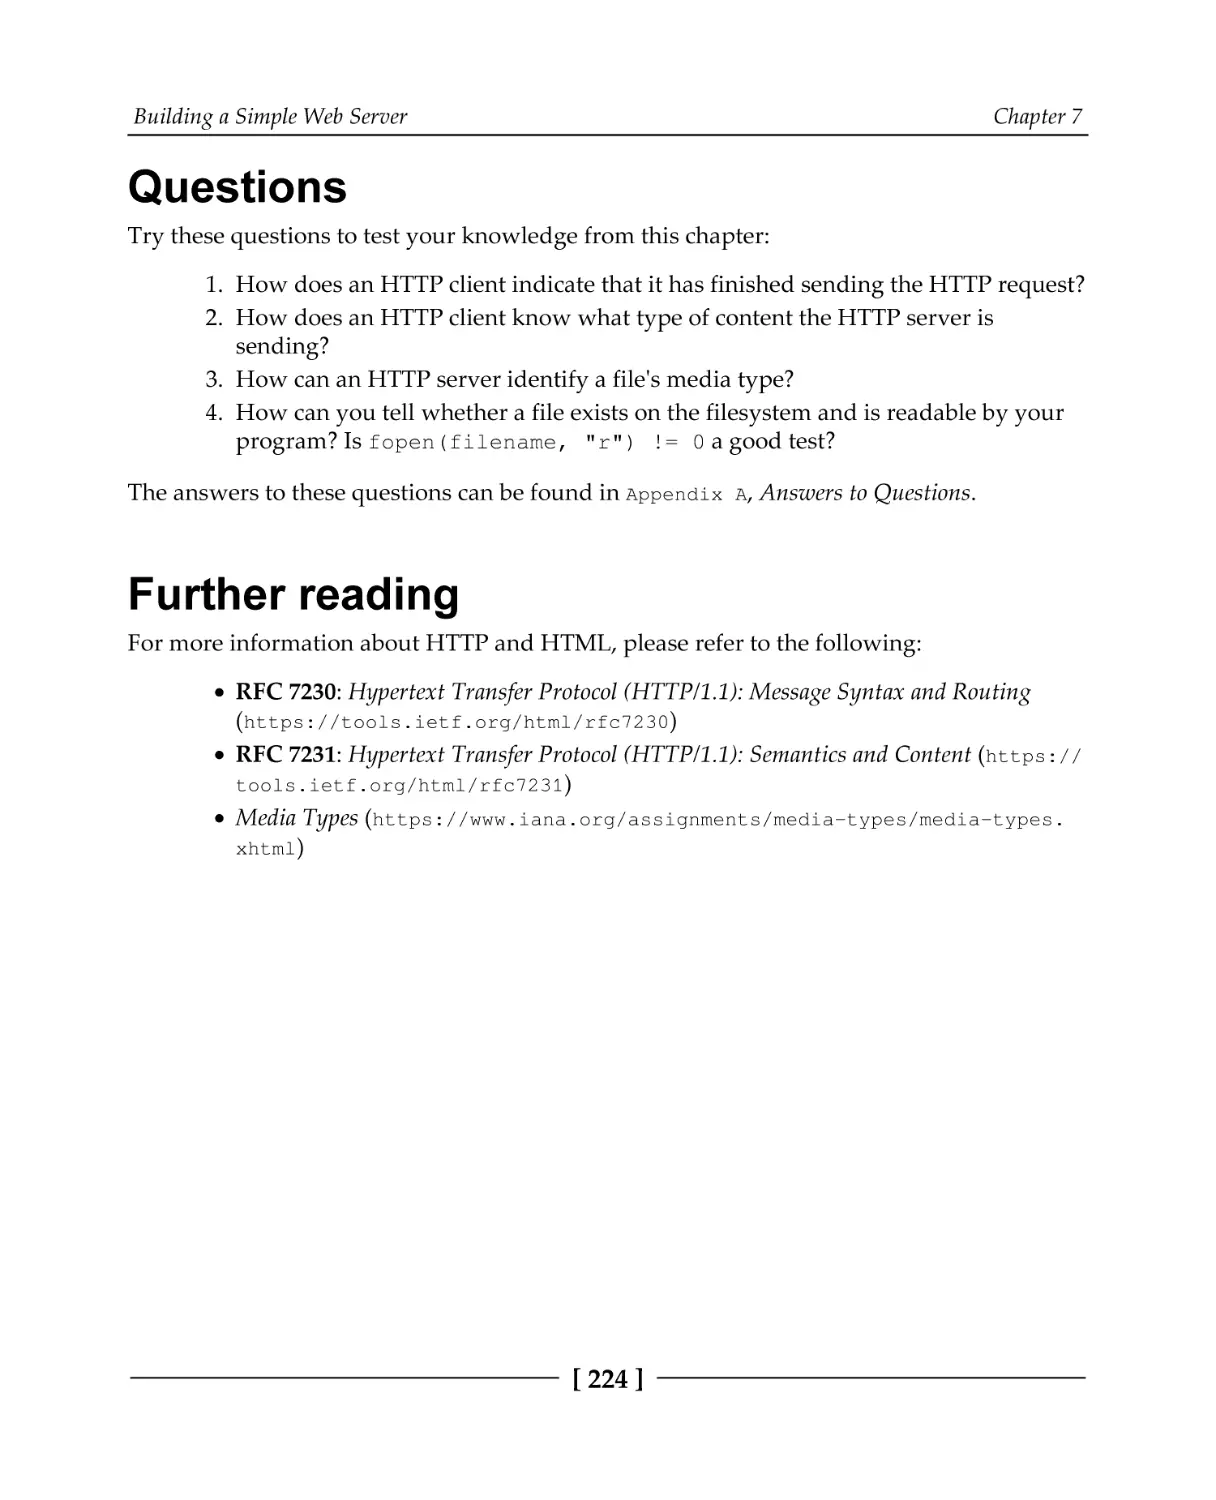
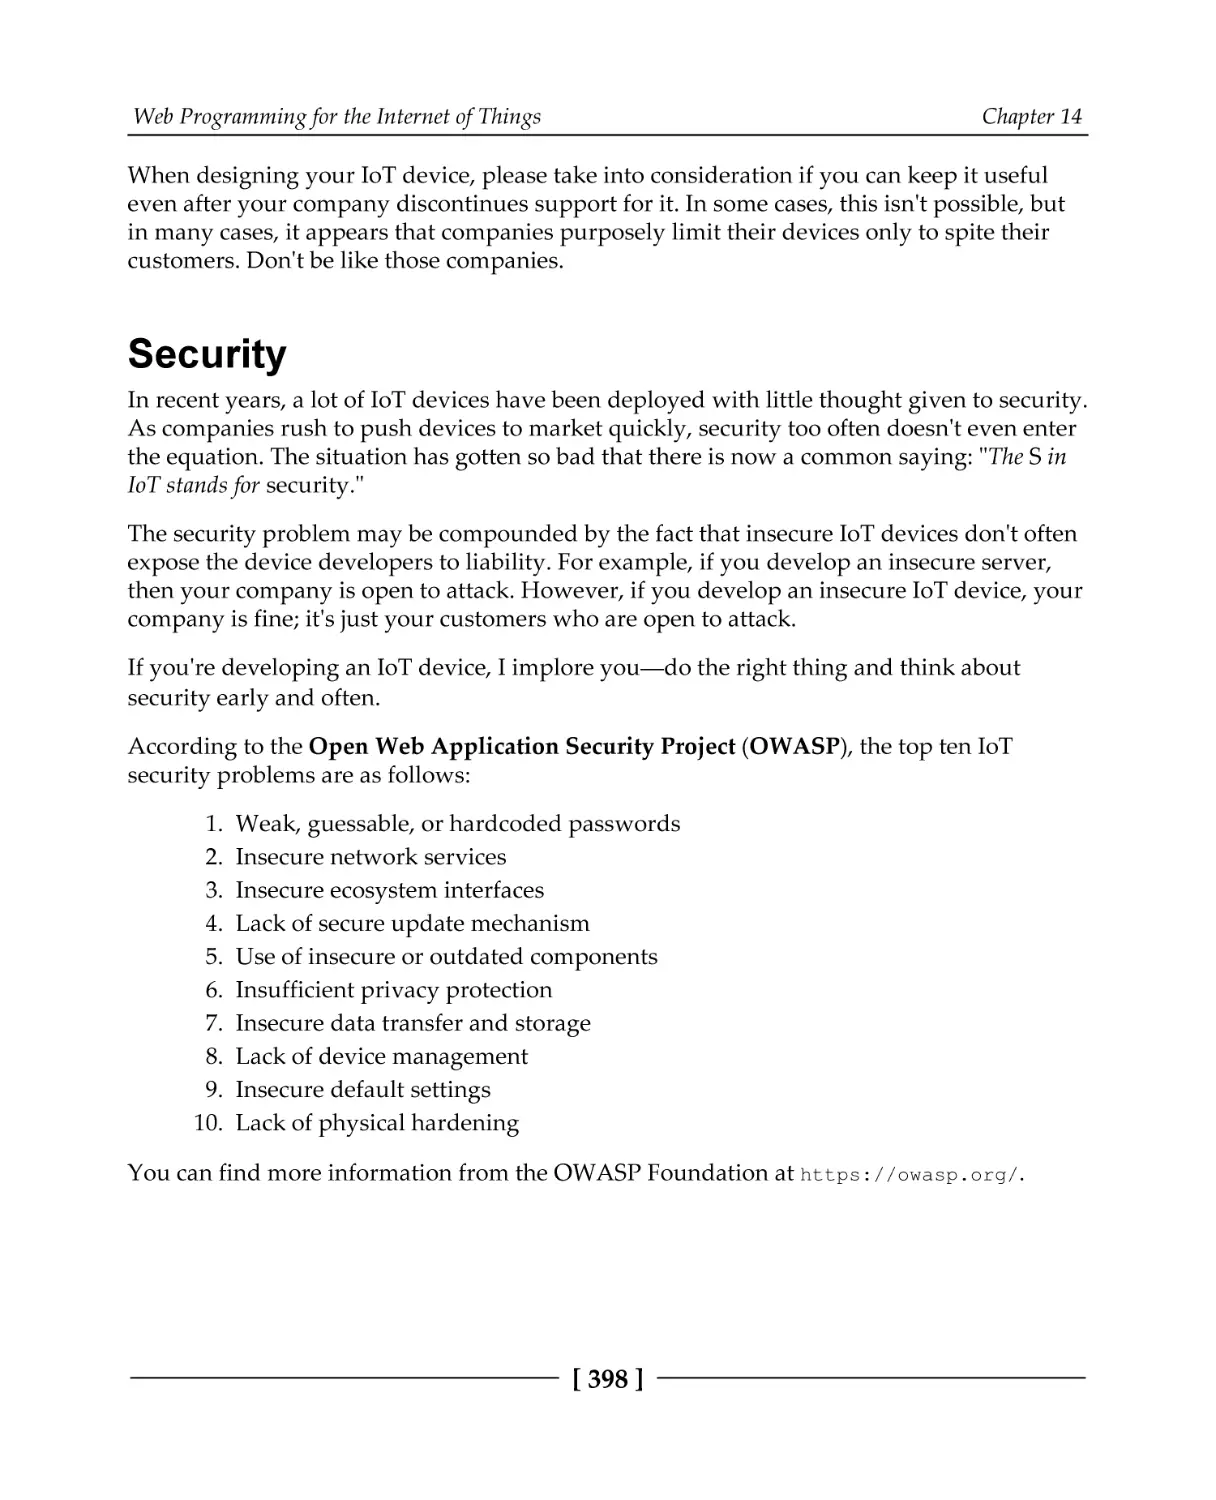
In the OSI model, an application, such as a web browser, exists in the application
layer (layer 7). A protocol from this layer, such as HTTP used to transmit web pages,
doesn't have to concern itself with how the data is being transmitted. It can rely on services
provided by the layer underneath it to effectively transmit data. This is illustrated in the
following diagram:
[ 11 ]
Introducing Networks and Protocols
Chapter 1
It should be noted that chunks of data are often referred to by different names depending
on the OSI layer they're on. A data unit on layer 2 is called a frame, since layer 2 is
responsible for framing messages. A data unit on layer 3 is referred to as a packet, while a
data unit on layer 4 is a segment if it is part of a TCP connection or a datagram if it is a UDP
message.
In this book, we often use the term packet as a generic term to refer to a data unit on any
layer. However, segment will only be used in the context of a TCP connection, and
datagram will only refer to UDP datagrams.
As we will see in the next section, the OSI model doesn't fit precisely with the common
protocols in use today. However, it is still a handy model to explain networking concerns,
and it is still in widespread use for that purpose today.
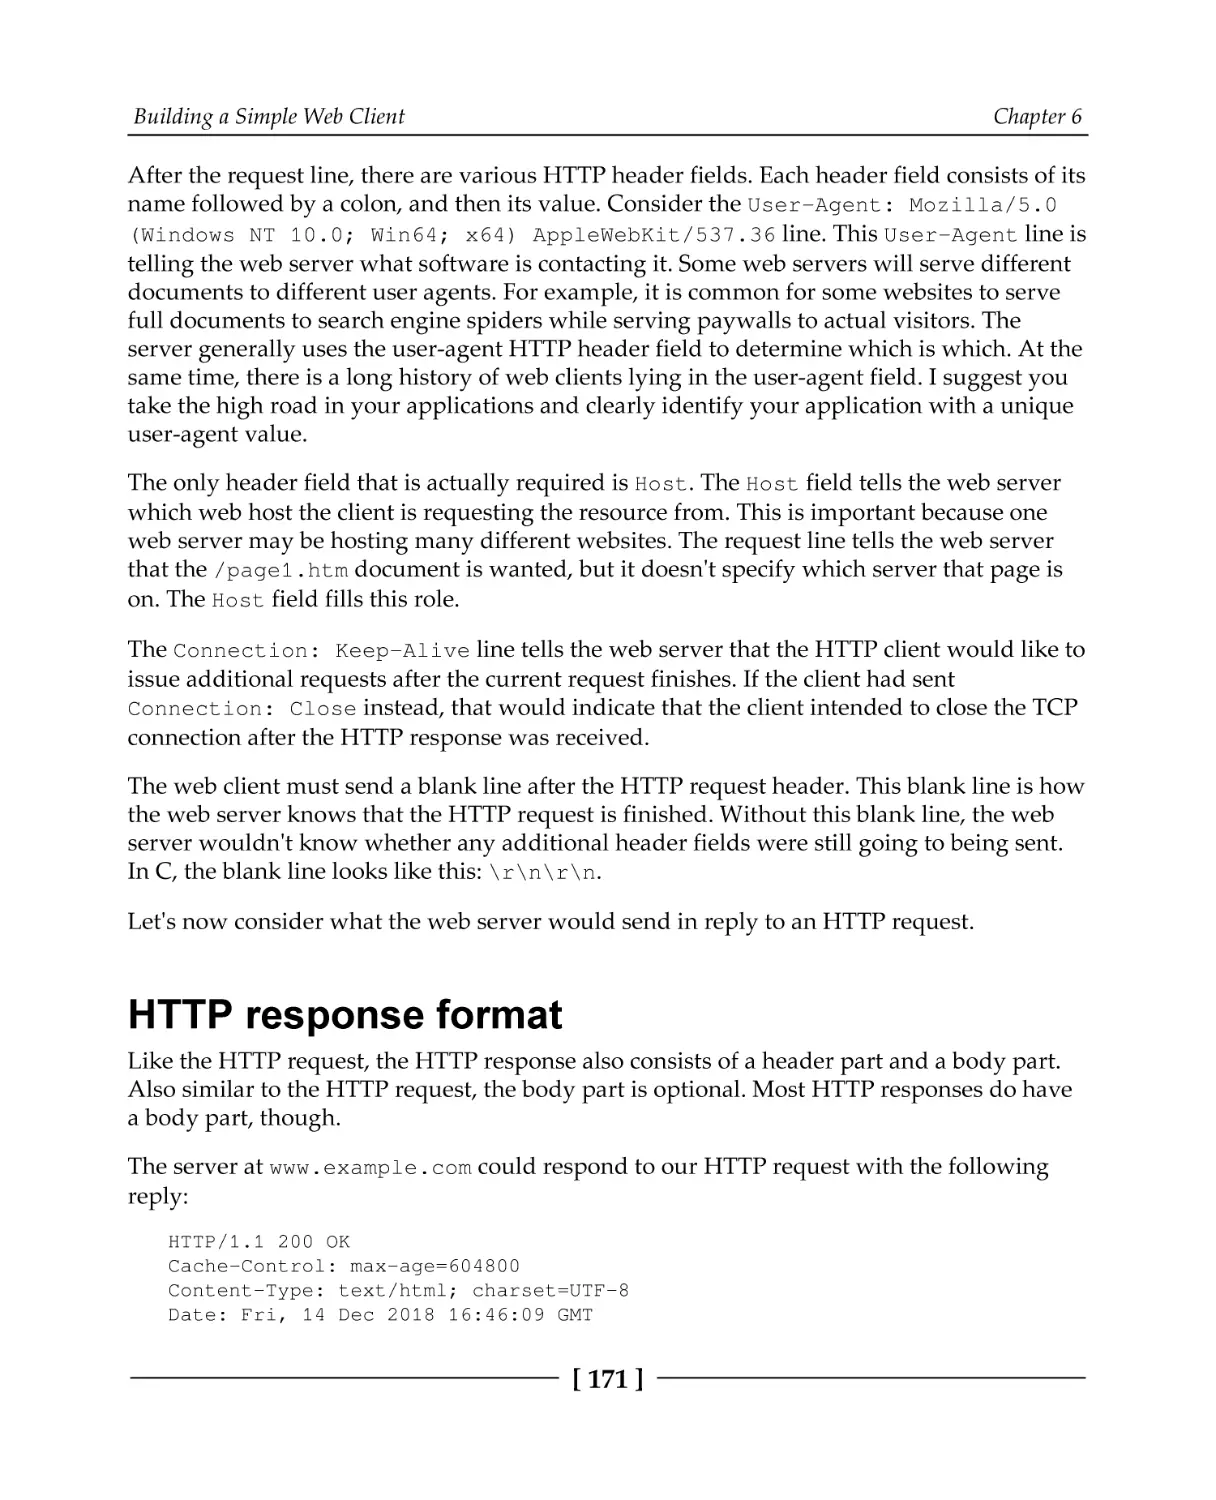
TCP/IP layer model
The TCP/IP protocol suite is the most common network communication model in use
today. The TCP/IP reference model differs a bit from the OSI model, as it has only four
layers instead of seven.
[ 12 ]
Introducing Networks and Protocols
Chapter 1
The following diagram illustrates how the four layers of the TCP/IP model line up to the
seven layers of the OSI model:
Notably, the TCP/IP model doesn't match up exactly with the layers in the OSI model.
That's OK. In both models, the same functions are performed; they are just divided
differently.
The TCP/IP reference model was developed after the TCP/IP protocol was already in
common use. It differs from the OSI model by subscribing a less rigid, although still
hierarchical, model. For this reason, the OSI model is sometimes better for understanding
and reasoning about networking concerns, but the TCP/IP model reflects a more realistic
view of how networking is commonly implemented today.
The four layers of the TCP/IP model are as follows:
Network Access layer (1): On this layer, physical connections and data framing
happen. Sending an Ethernet or Wi-Fi packet are examples of layer 1 concerns.
Internet layer (2): This layer deals with the concerns of addressing packets and
routing them over multiple interconnection networks. It's at this layer that an IP
address is defined.
Host-to-Host layer (3): The host-to-host layer provides two protocols, TCP and
UDP, which we will discuss in the next few chapters. These protocols address
concerns such as data order, data segmentation, network congestion, and error
correction.
Process/Application layer (4): The process/application layer is where protocols
such as HTTP, SMTP, and FTP are implemented. Most of the programs that
feature in this book could be considered to take place on this layer while
consuming functionality provided by our operating system's implementation of
the lower layers.
[ 13 ]
Introducing Networks and Protocols
Chapter 1
Regardless of your chosen abstraction model, real-world protocols do work at many levels.
Lower levels are responsible for handling data for the higher levels. These lower-level data
structures must, therefore, encapsulate data from the higher levels. Let's look at
encapsulating data now.
Data encapsulation
The advantage of these abstractions is that, when programming an application, we only
need to consider the highest-level protocol. For example, a web browser needs only to
implement the protocols dealing specifically with websites—HTTP, HTML, CSS, and so on.
It does not need to bother with implementing TCP/IP, and it certainly doesn't have to
understand how an Ethernet or Wi-Fi packet is encoded. It can rely on ready-made
implementations of the lower layers for these tasks. These implementations are provided by
the operating system (for example, Windows, Linux, and macOS).
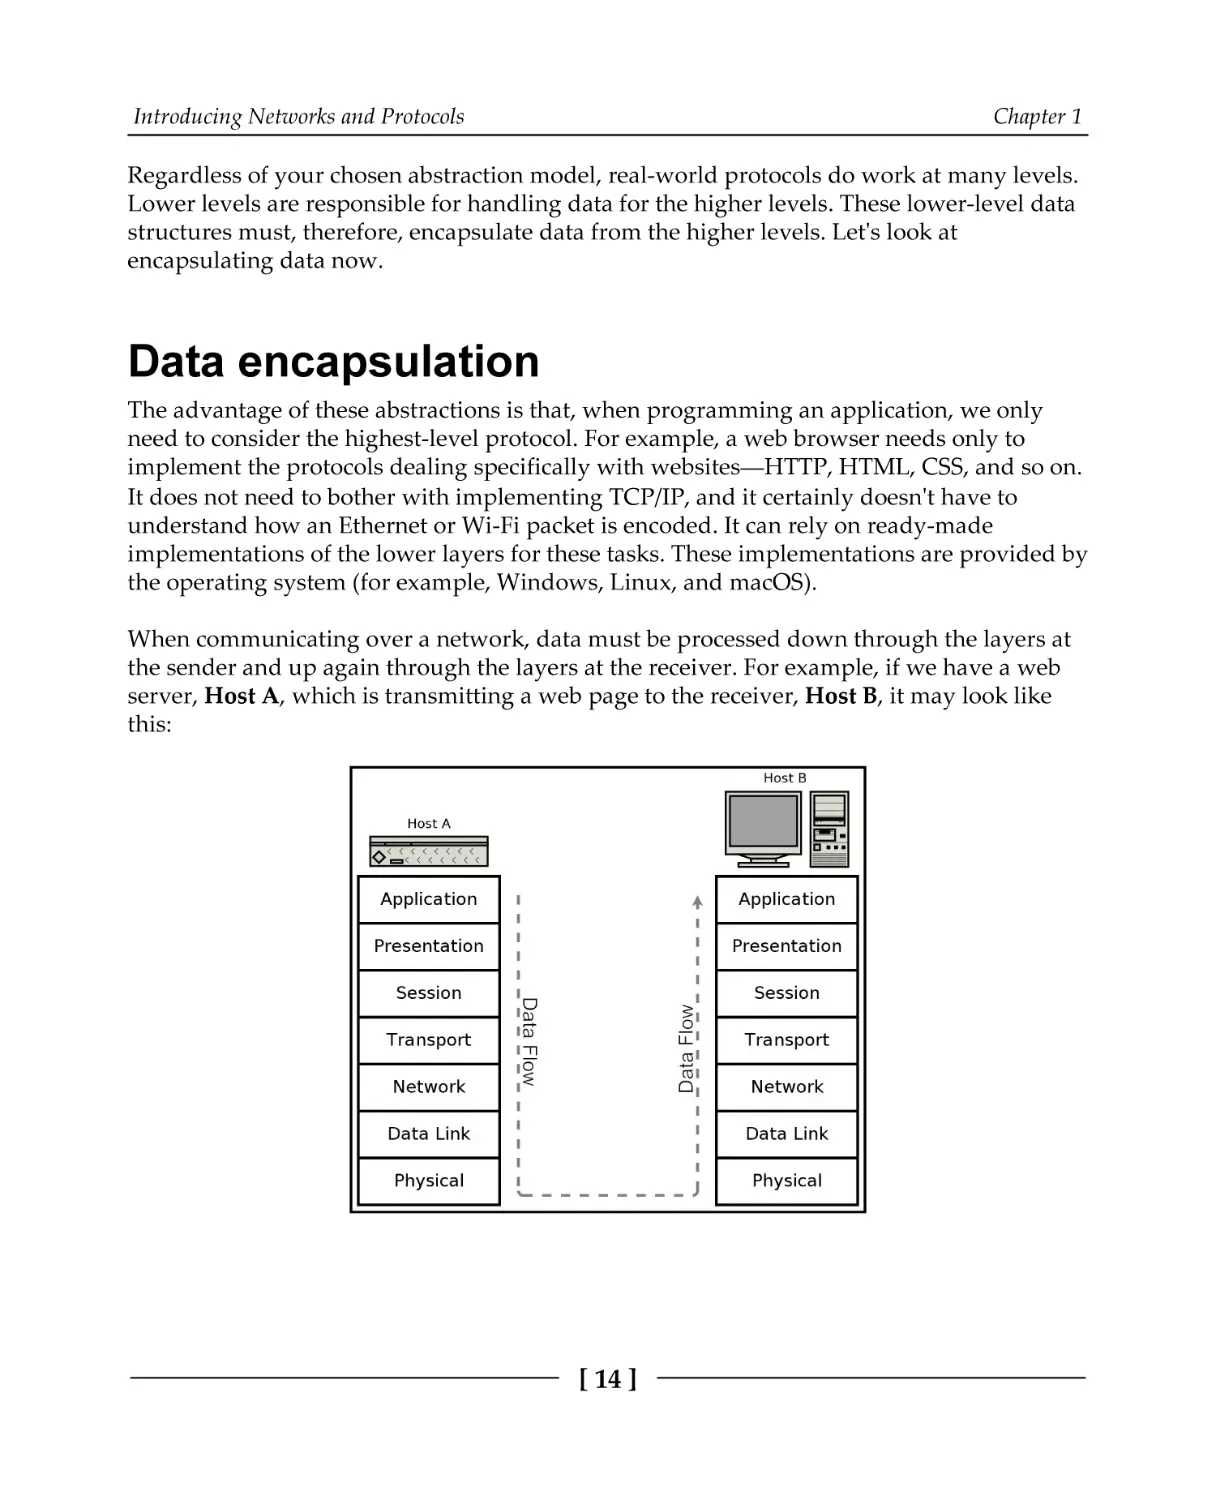
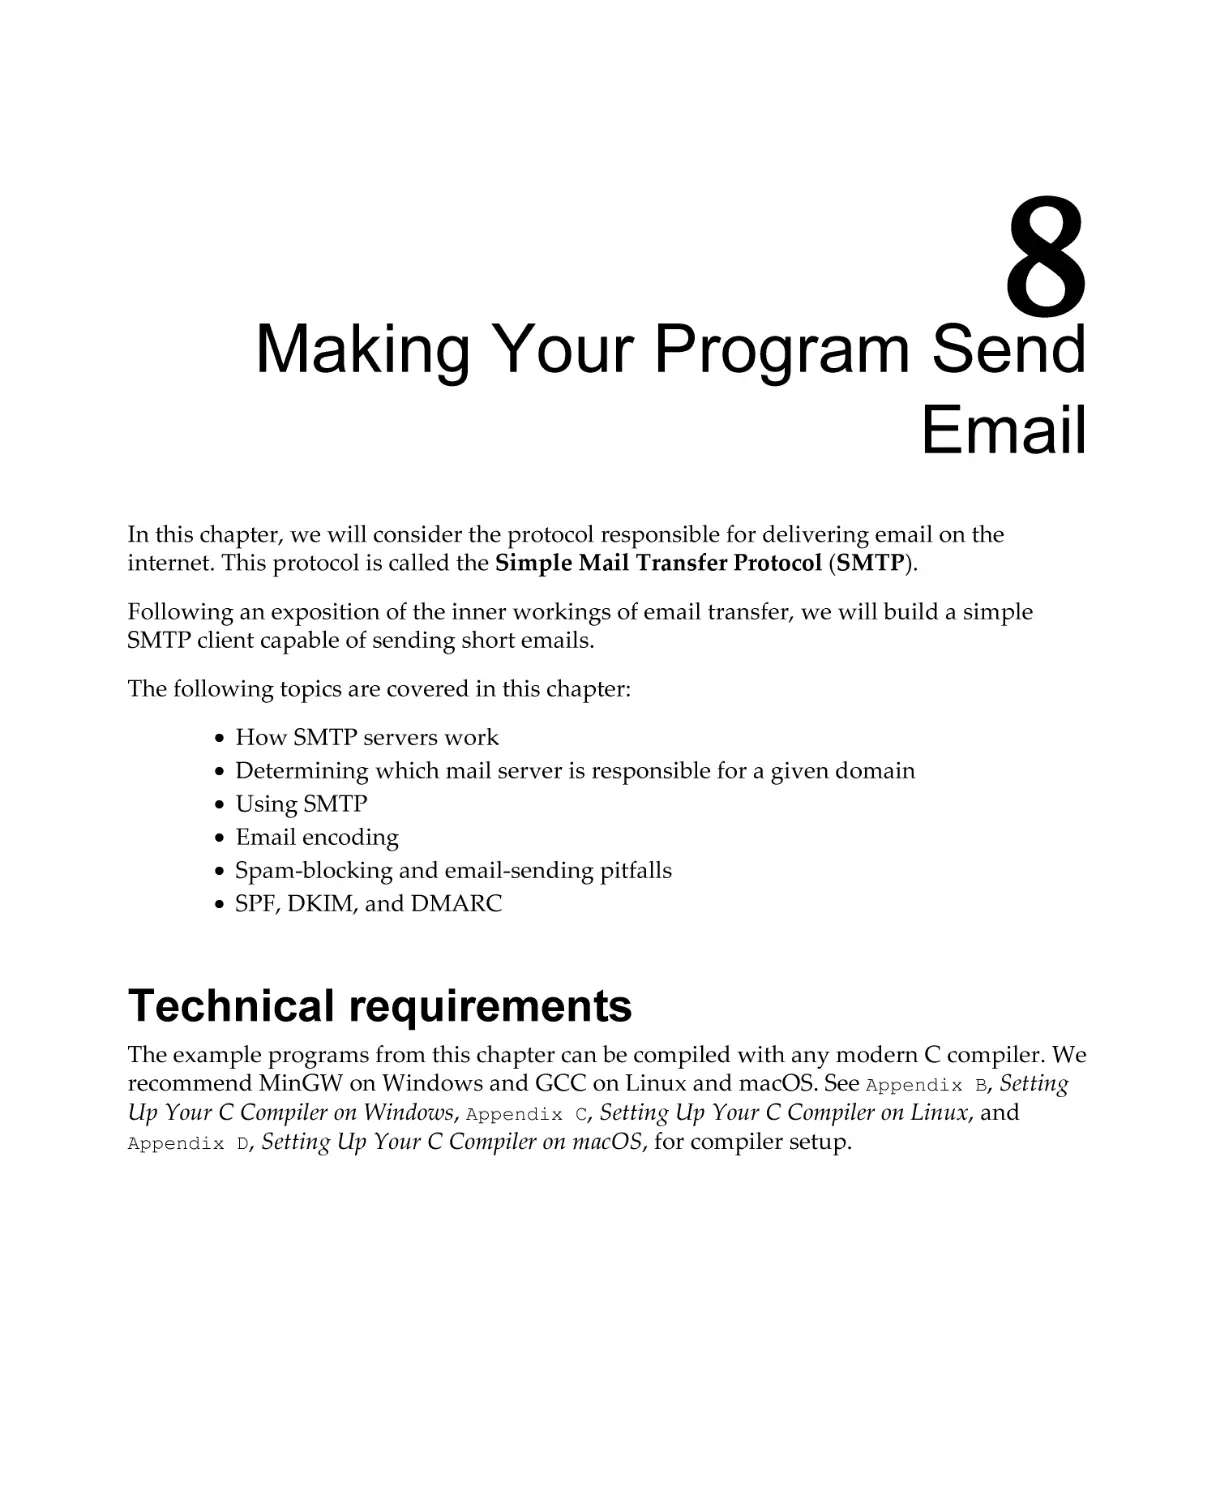
When communicating over a network, data must be processed down through the layers at
the sender and up again through the layers at the receiver. For example, if we have a web
server, Host A, which is transmitting a web page to the receiver, Host B, it may look like
this:
[ 14 ]
Introducing Networks and Protocols
Chapter 1
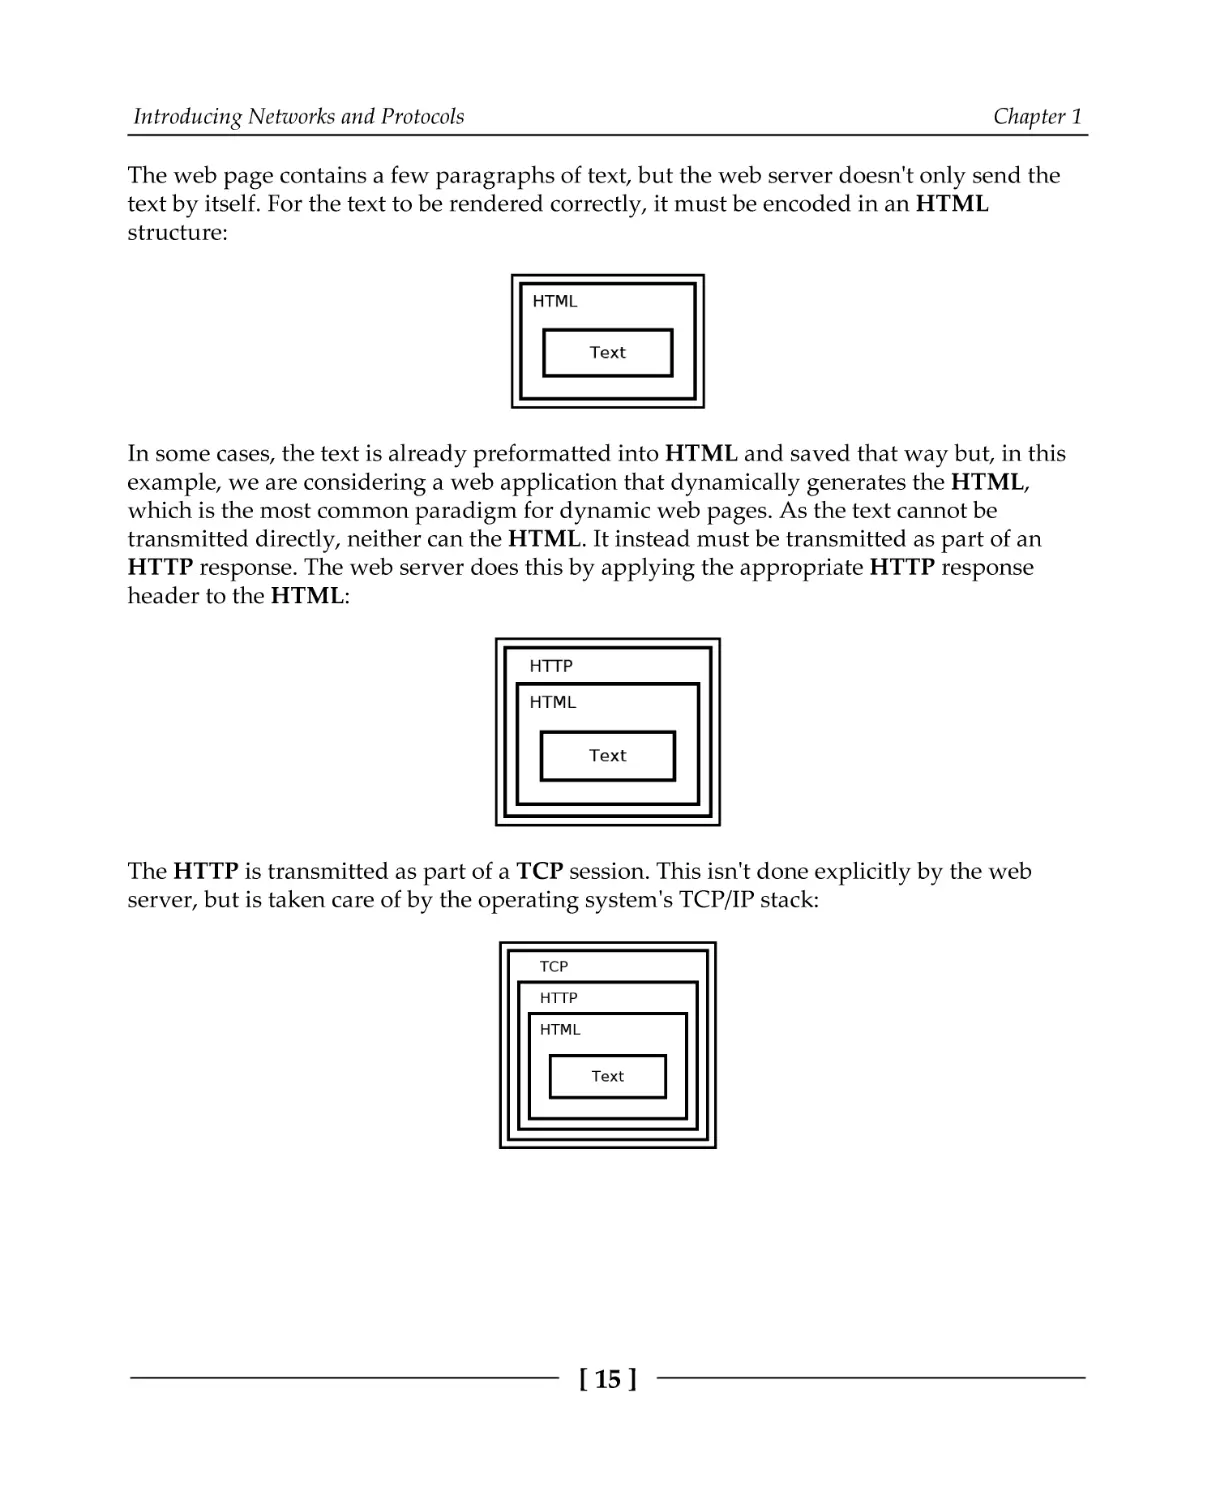
The web page contains a few paragraphs of text, but the web server doesn't only send the
text by itself. For the text to be rendered correctly, it must be encoded in an HTML
structure:
In some cases, the text is already preformatted into HTML and saved that way but, in this
example, we are considering a web application that dynamically generates the HTML,
which is the most common paradigm for dynamic web pages. As the text cannot be
transmitted directly, neither can the HTML. It instead must be transmitted as part of an
HTTP response. The web server does this by applying the appropriate HTTP response
header to the HTML:
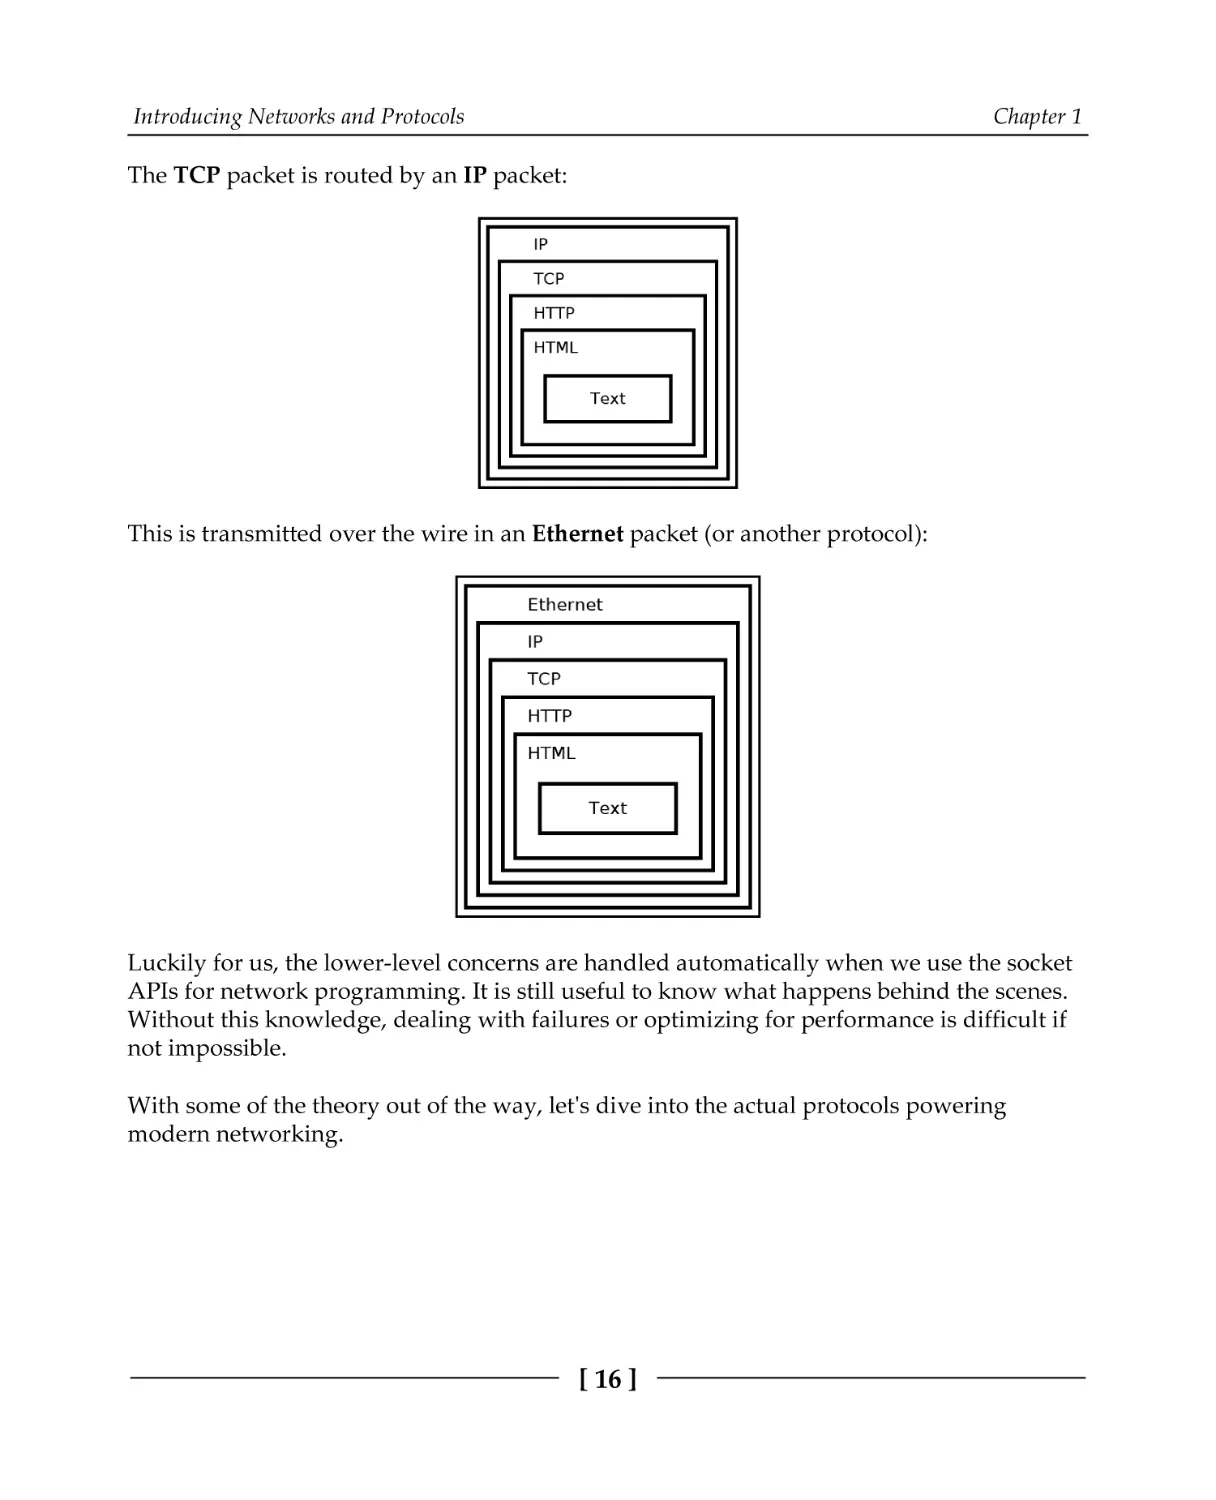
The HTTP is transmitted as part of a TCP session. This isn't done explicitly by the web
server, but is taken care of by the operating system's TCP/IP stack:
[ 15 ]
Introducing Networks and Protocols
Chapter 1
The TCP packet is routed by an IP packet:
This is transmitted over the wire in an Ethernet packet (or another protocol):
Luckily for us, the lower-level concerns are handled automatically when we use the socket
APIs for network programming. It is still useful to know what happens behind the scenes.
Without this knowledge, dealing with failures or optimizing for performance is difficult if
not impossible.
With some of the theory out of the way, let's dive into the actual protocols powering
modern networking.
[ 16 ]
Introducing Networks and Protocols
Chapter 1
Internet Protocol
Twenty years ago, there were many competing networking protocols. Today, one protocol
is overwhelmingly common—the Internet Protocol. It comes in two versions—IPv4 and
IPv6. IPv4 is completely ubiquitous and deployed everywhere. If you're deploying network
code today, you must support IPv4 or risk that a significant portion of your users won't be
able to connect.
IPv4 uses 32-bit addresses, which limits it to addressing no more than 232 or 4,294,967,296
systems. However, these 4.3 billion addresses were not initially assigned efficiently, and
now many Internet Service Providers (ISPs) are forced to ration IPv4 addresses.
IPv6 was designed to replace IPv4 and has been standardized by the Internet Engineering
Task Force (IETF) since 1998. It uses a 128-bit address, which allows it to address a
theoretical 2128 = 340,282,366,920,938,463,463,374,607,431,768,211,456, or about a 3.4 x 1038
addresses.
Today, every major desktop and smartphone operating system supports both IPv4 and
IPv6 in what is called a dual-stack configuration. However, many applications, servers,
and networks are still only configured to use IPv4. From a practical standpoint, this means
that you need to support IPv4 in order to access much of the internet. However, you should
also support IPv6 to be future-proof and to help the world to transition away from IPv4.
What is an address?
All Internet Protocol traffic routes to an address. This is similar to how phone calls must be
dialed to phone numbers. IPv4 addresses are 32 bits long. They are commonly divided into
four 8-bit sections. Each section is displayed as a decimal number between 0 and 255
inclusive and is delineated by a period.
Here are some examples of IPv4 addresses:
0.0.0.0
127.0.0.1
10.0.0.0
172.16.0.5
192.168.0.1
192.168.50.1
255.255.255.255
[ 17 ]
Introducing Networks and Protocols
Chapter 1
A special address, called the loopback address, is reserved at 127.0.0.1. This address
essentially means establish a connection to myself. Operating systems short-circuit this
address so that packets to it never enter the network but instead stay local on the
originating system.
IPv4 reserves some address ranges for private use. If you're using IPv4 through a
router/NAT, then you are likely using an IP address in one of these ranges. These reserved
private ranges are as follows:
10.0.0.0 to 10.255.255.255
172.16.0.0 to 172.31.255.255
192.168.0.0 to 192.168.255.255
The concept of IP address ranges is a useful one that comes up many times in networking.
It's probably not surprising then that there is a shorthand notation for writing them. Using
Classless Inter-Domain Routing (CIDR) notation, we can write the three previous address
ranges as follows:
10.0.0.0/8
172.16.0.0/12
192.168.0.0/16
CIDR notation works by specifying the number of bits that are fixed. For
example, 10.0.0.0/8 specifies that the first eight bits of the 10.0.0.0 address are fixed,
the first eight bits being just the first 10. part; the remaining 0.0.0 part of the address can
be anything and still be on the 10.0.0.0/8 block. Therefore, 10.0.0.0/8 encompasses
10.0.0.0 through 10.255.255.255.
IPv6 addresses are 128 bits long. They are written as eight groups of four hexadecimal
characters delineated by colons. A hexadecimal character can be from 0-9 or from a-f. Here
are some examples of IPv6 addresses:
0000:0000:0000:0000:0000:0000:0000:0001
2001:0db8:0000:0000:0000:ff00:0042:8329
fe80:0000:0000:0000:75f4:ac69:5fa7:67f9
ffff:ffff:ffff:ffff:ffff:ffff:ffff:ffff
Note that the standard is to use lowercase letters in IPv6 addresses. This is in contrast to
many other uses of hexadecimal in computers.
[ 18 ]
Introducing Networks and Protocols
Chapter 1
There are a couple of rules for shortening IPv6 addresses to make them easier. Rule 1
allows for the leading zeros in each section to be omitted (for example, 0db8 = db8). Rule 2
allows for consecutive sections of zeros to be replaced with a double colon (::). Rule 2 may
only be used once in each address; otherwise, the address would be ambiguous.
Applying both rules, the preceding addresses can be shortened as follows:
::1
2001:db8::ff00:42:8329
fe80::75f4:ac69:5fa7:67f9
ffff:ffff:ffff:ffff:ffff:ffff:ffff:ffff
Like IPv4, IPv6 also has a loopback address. It is ::1.
Dual-stack implementations also recognize a special class of IPv6 address that map directly
to an IPv4 address. These reserved addresses start with 80 zero bits, and then by 16 one
bits, followed by the 32-bit IPv4 address. Using CIDR notation, this block of address is
::ffff:0:0/96.
These mapped addresses are commonly written with the first 96 bits in IPv6 format
followed by the remaining 32 bits in IPv4 format. Here are some examples:
IPv6 Address
Mapped IPv4 Address
::ffff:10.0.0.0
::ffff:172.16.0.5
::ffff:192.168.0.1
::ffff:192.168.50.1
10.0.0.0
172.16.0.5
192.168.0.1
192.168.50.1
You may also run into IPv6 site-local addresses. These site-local addresses are in
the fec0::/10 range and are for use on private local networks. Site-local addresses have
now been deprecated and should not be used for new networks, but many existing
implementations still use them.
Another address type that you should be familiar with are link-local addresses. Link-local
addresses are usable only on the local link. Routers never forward packets from these
addresses. They are useful for a system to accesses auto-configuration functions before
having an assigned IP address. Link-local addresses are in the IPv4 169.254.0.0/16
address block or the IPv6 fe80::/10 address block.
[ 19 ]
Introducing Networks and Protocols
Chapter 1
It should be noted the IPv6 introduces many additional features over IPv4 besides just a
greatly expanded address range. IPv6 addresses have new attributes, such as scope and
lifetime, and it is normal for IPv6 network interfaces to have multiple IPv6 addresses. IPv6
addresses are used and managed differently than IPv4 addresses.
Regardless of these differences, in this book, we strive to write code that works well for
both IPv4 and IPv6.
If you think that IPv4 addresses are difficult to memorize, and IPv6 addresses impossible,
then you are not alone. Luckily, we have a system to assign names to specific addresses.
Domain names
The Internet Protocol can only route packets to an IP address, not a name. So, if you try to
connect to a website, such as example.com, your system must first resolve that domain
name, example.com, into an IP address for the server that hosts that website.
This is done by connecting to a Domain Name System (DNS) server. You connect to a
domain name server by knowing in advance its IP address. The IP address for a domain
name server is usually assigned by your ISP.
Many other domain name servers are made publicly available by different organizations.
Here are a few free and public DNS servers:
DNS Provider
IPv4 Addresses
Cloudflare 1.1.1.1
1.1.1.1
2606:4700:4700::1111
1.0.0.1
2606:4700:4700::1001
37.235.1.174
37.235.1.177
8.8.8.8
2001:4860:4860::8888
8.8.4.4
2001:4860:4860::8844
208.67.222.222 2620:0:ccc::2
208.67.220.220 2620:0:ccd::2
FreeDNS
Google Public DNS
OpenDNS
[ 20 ]
IPv6 Addresses
Introducing Networks and Protocols
Chapter 1
To resolve a hostname, your computer sends a UDP message to your domain name server
and asks it for an AAAA-type record for the domain you're trying to resolve. If this record
exists, an IPv6 address is returned. You can then connect to a server at that address to load
the website. If no AAAA record exists, then your computer queries the server again, but
asks for an A record. If this record exists, you will receive an IPv4 address for the server. In
many cases, a site will publish an A record and an AAAA record that route to the same
server.
It is also possible, and common, for multiple records of the same type to exist, each pointing
to a different address. This is useful for redundancy in the case where multiple servers can
provide the same service.
We will see a lot more about DNS queries in Chapter 5, Hostname Resolution and DNS.
Now that we have a basic understanding of IP addresses and names, let's look into detail of
how IP packets are routed over the internet.
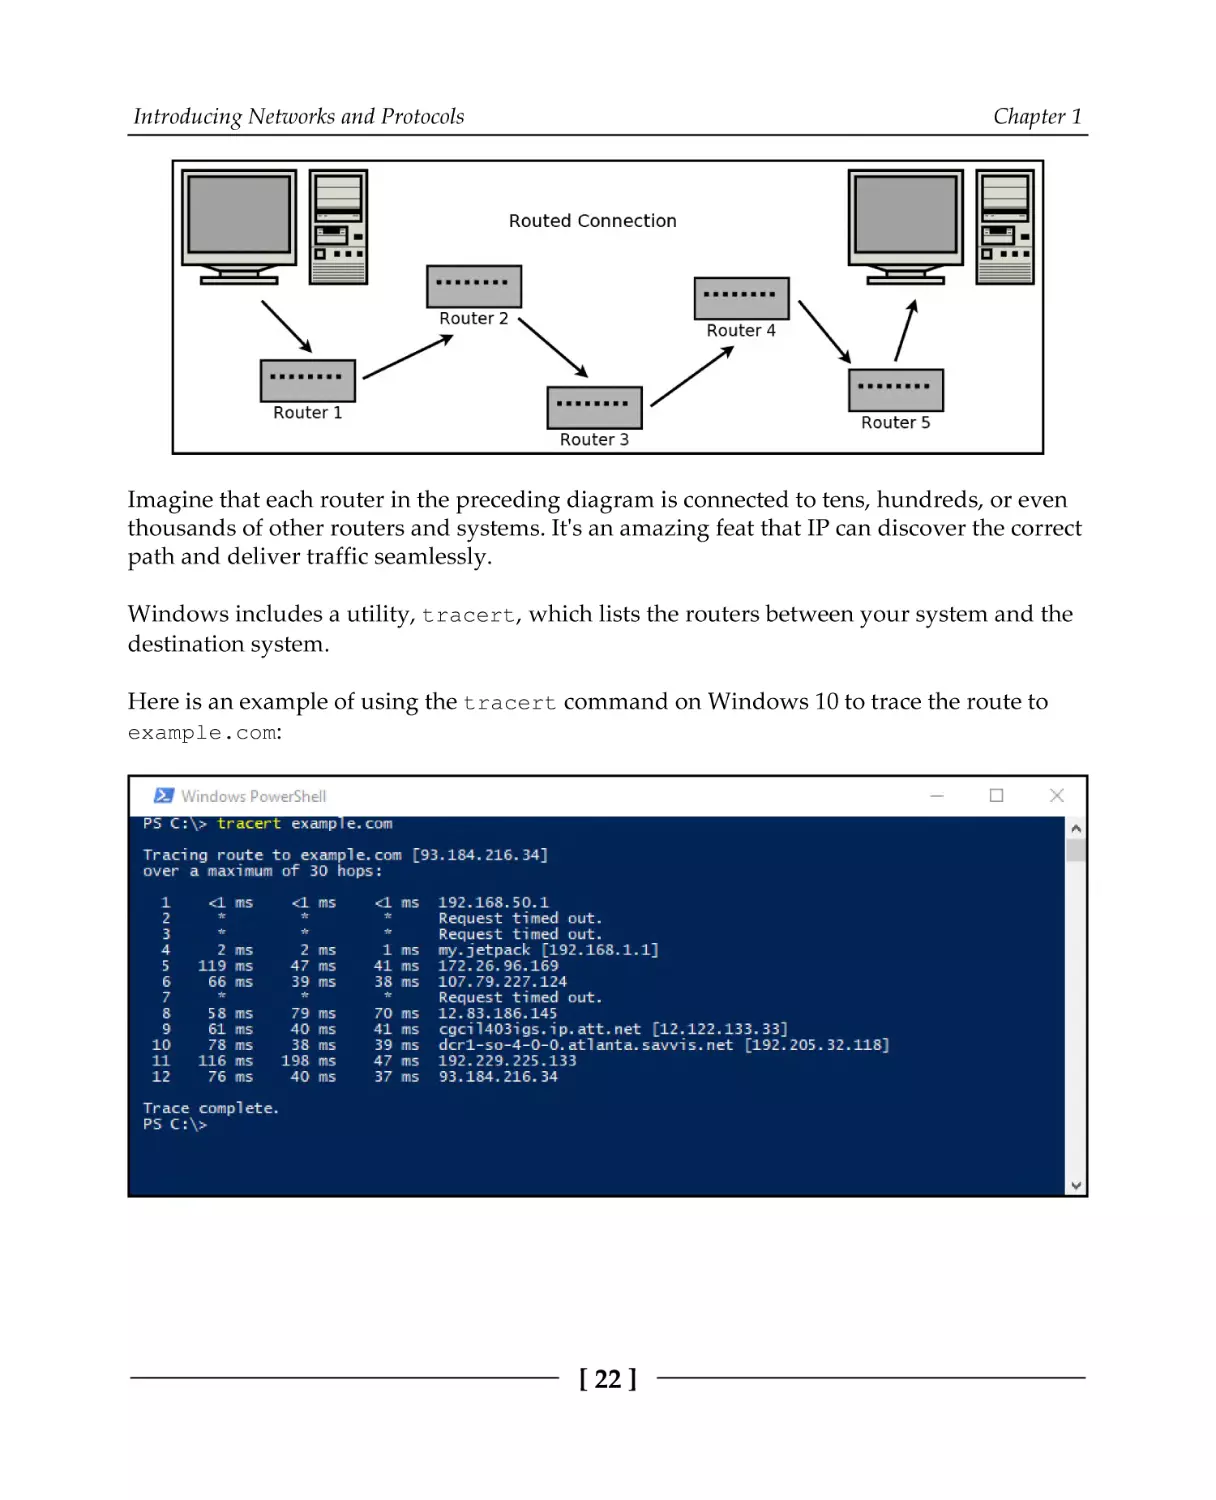
Internet routing
If all networks contained only a maximum of only two devices, then there would be no
need for routing. Computer A would just send its data directly over the wire, and computer
B would receive it as the only possibility:
The internet today has an estimated 20 billion devices connected. When you make a
connection over the internet, your data first transmits to your local router. From there, it is
transmitted to another router, which is connected to another router, and so on. Eventually,
your data reaches a router that is connected to the receiving device, at which point, the data
has reached its destination:
[ 21 ]
Introducing Networks and Protocols
Chapter 1
Imagine that each router in the preceding diagram is connected to tens, hundreds, or even
thousands of other routers and systems. It's an amazing feat that IP can discover the correct
path and deliver traffic seamlessly.
Windows includes a utility, tracert, which lists the routers between your system and the
destination system.
Here is an example of using the tracert command on Windows 10 to trace the route to
example.com:
[ 22 ]
Introducing Networks and Protocols
Chapter 1
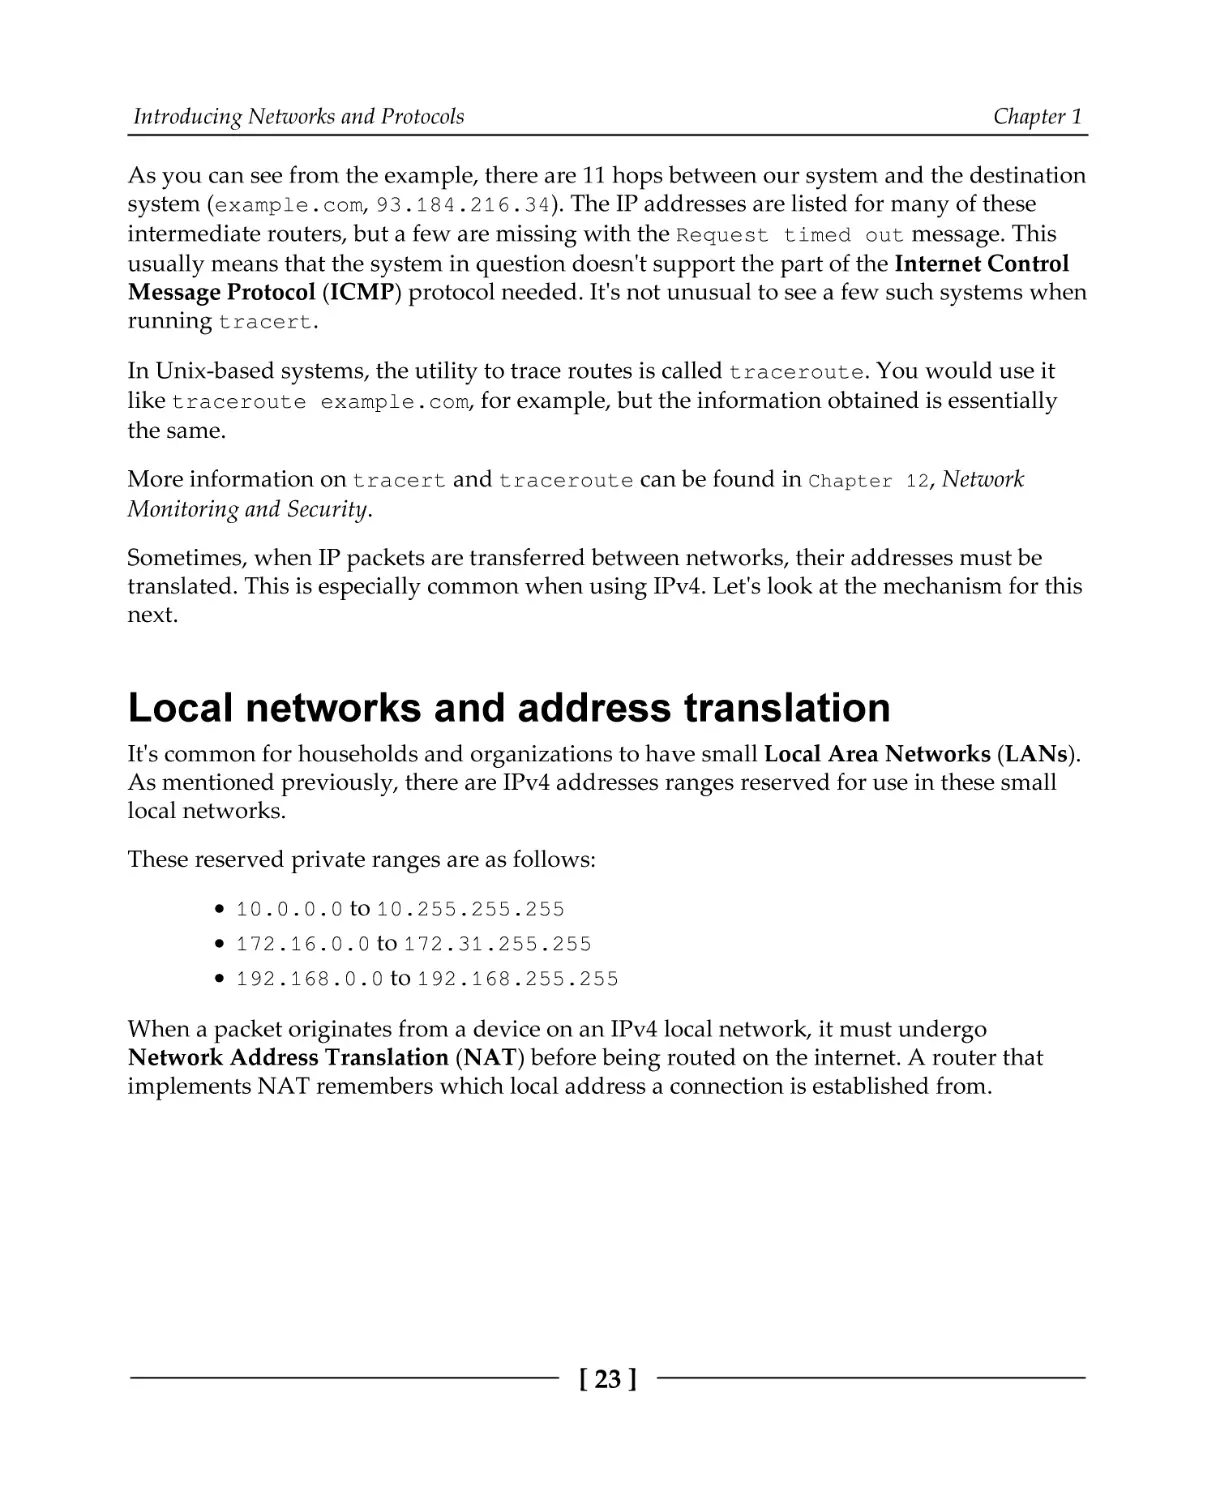
As you can see from the example, there are 11 hops between our system and the destination
system (example.com, 93.184.216.34). The IP addresses are listed for many of these
intermediate routers, but a few are missing with the Request timed out message. This
usually means that the system in question doesn't support the part of the Internet Control
Message Protocol (ICMP) protocol needed. It's not unusual to see a few such systems when
running tracert.
In Unix-based systems, the utility to trace routes is called traceroute. You would use it
like traceroute example.com, for example, but the information obtained is essentially
the same.
More information on tracert and traceroute can be found in Chapter 12, Network
Monitoring and Security.
Sometimes, when IP packets are transferred between networks, their addresses must be
translated. This is especially common when using IPv4. Let's look at the mechanism for this
next.
Local networks and address translation
It's common for households and organizations to have small Local Area Networks (LANs).
As mentioned previously, there are IPv4 addresses ranges reserved for use in these small
local networks.
These reserved private ranges are as follows:
10.0.0.0 to 10.255.255.255
172.16.0.0 to 172.31.255.255
192.168.0.0 to 192.168.255.255
When a packet originates from a device on an IPv4 local network, it must undergo
Network Address Translation (NAT) before being routed on the internet. A router that
implements NAT remembers which local address a connection is established from.
[ 23 ]
Introducing Networks and Protocols
Chapter 1
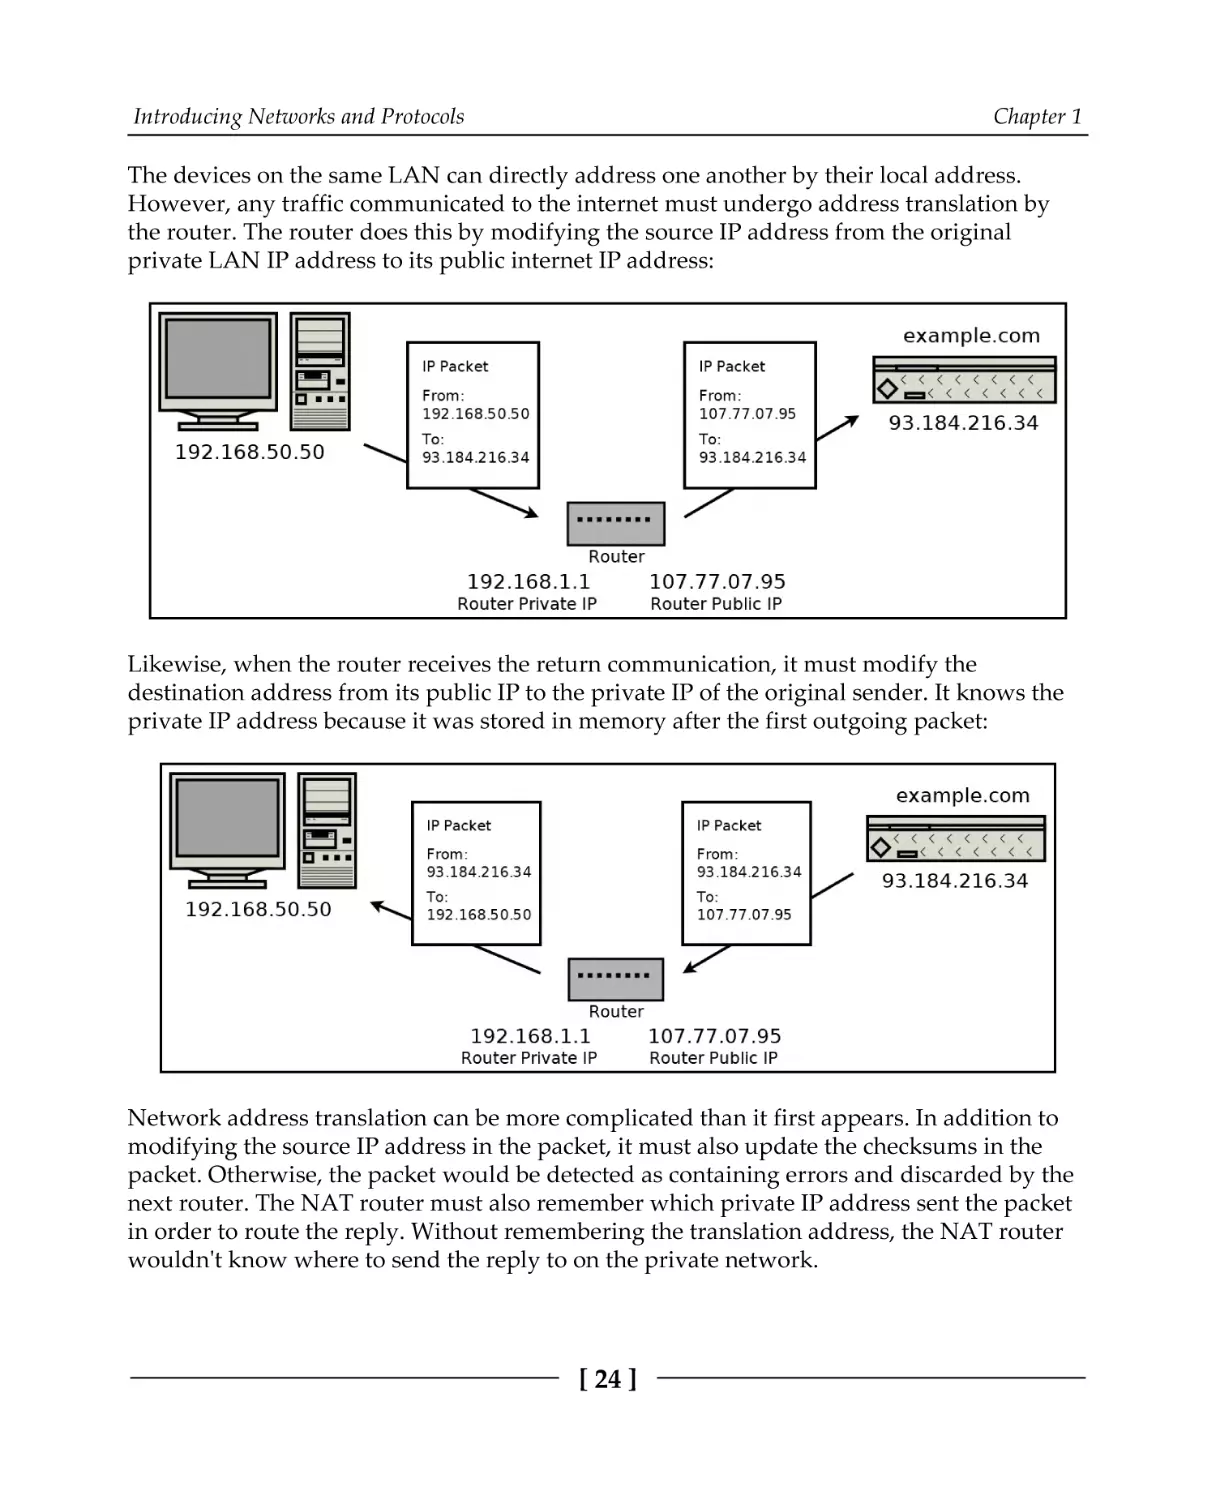
The devices on the same LAN can directly address one another by their local address.
However, any traffic communicated to the internet must undergo address translation by
the router. The router does this by modifying the source IP address from the original
private LAN IP address to its public internet IP address:
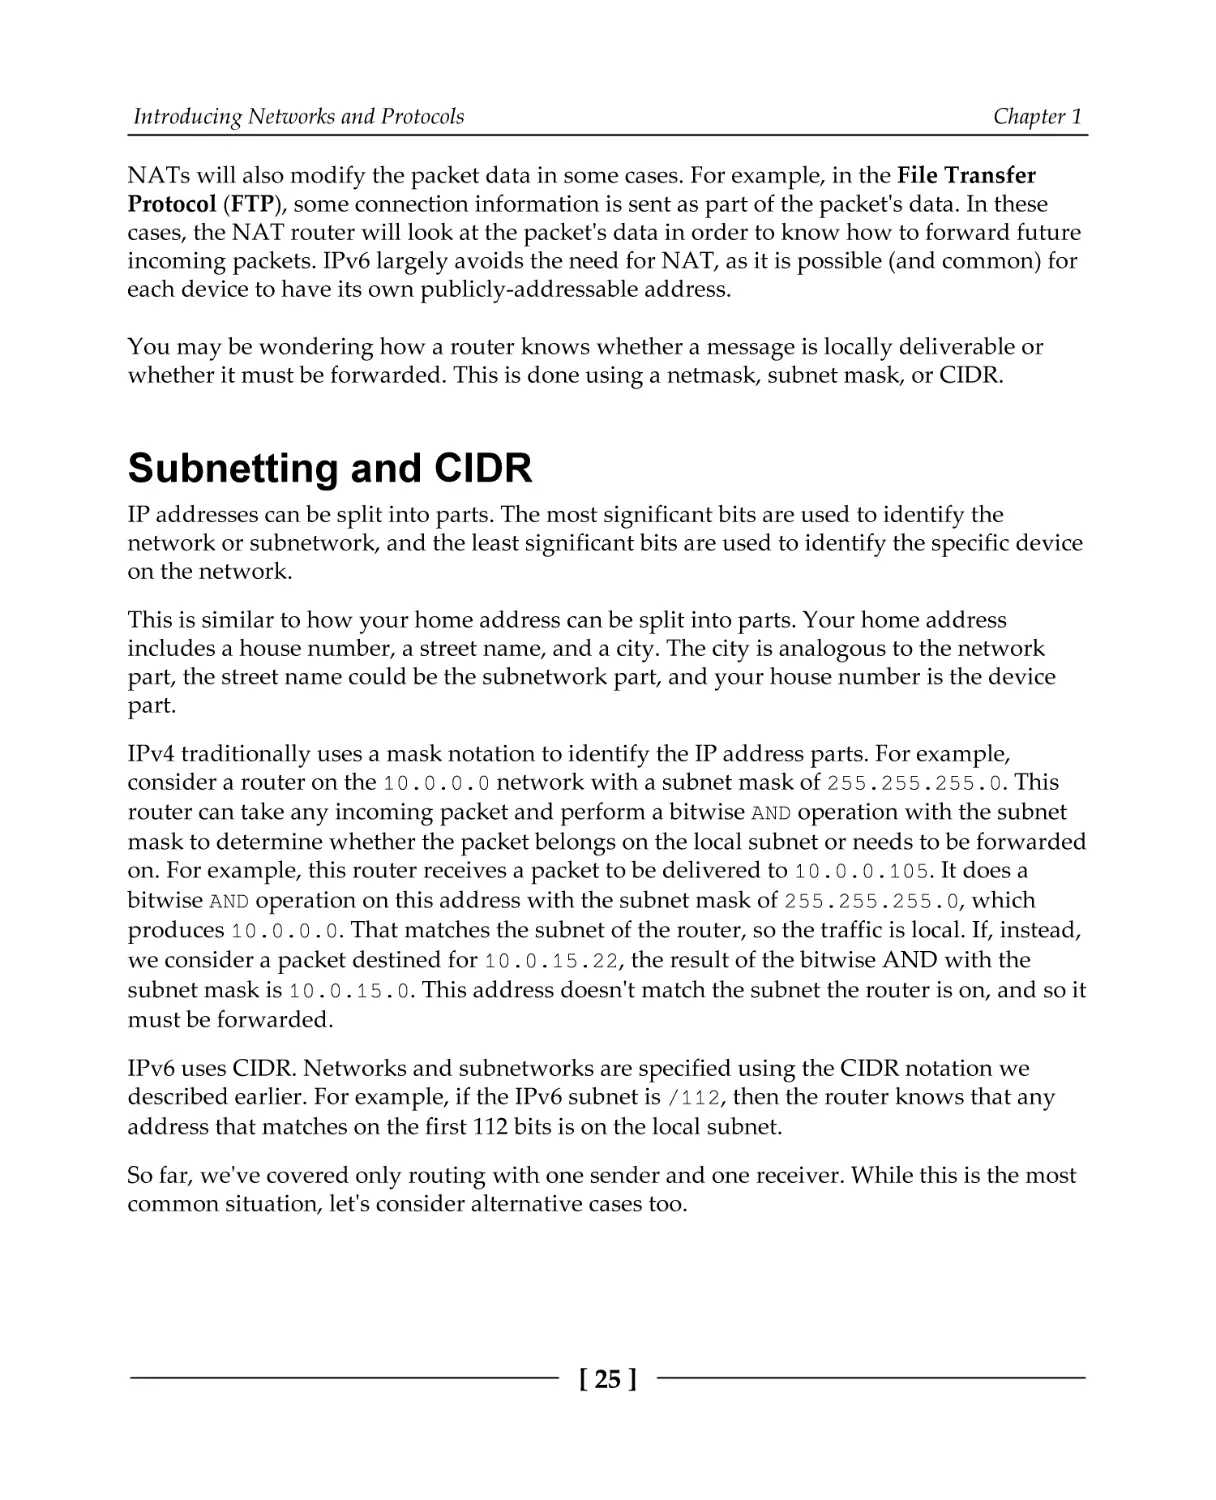
Likewise, when the router receives the return communication, it must modify the
destination address from its public IP to the private IP of the original sender. It knows the
private IP address because it was stored in memory after the first outgoing packet:
Network address translation can be more complicated than it first appears. In addition to
modifying the source IP address in the packet, it must also update the checksums in the
packet. Otherwise, the packet would be detected as containing errors and discarded by the
next router. The NAT router must also remember which private IP address sent the packet
in order to route the reply. Without remembering the translation address, the NAT router
wouldn't know where to send the reply to on the private network.
[ 24 ]
Introducing Networks and Protocols
Chapter 1
NATs will also modify the packet data in some cases. For example, in the File Transfer
Protocol (FTP), some connection information is sent as part of the packet's data. In these
cases, the NAT router will look at the packet's data in order to know how to forward future
incoming packets. IPv6 largely avoids the need for NAT, as it is possible (and common) for
each device to have its own publicly-addressable address.
You may be wondering how a router knows whether a message is locally deliverable or
whether it must be forwarded. This is done using a netmask, subnet mask, or CIDR.
Subnetting and CIDR
IP addresses can be split into parts. The most significant bits are used to identify the
network or subnetwork, and the least significant bits are used to identify the specific device
on the network.
This is similar to how your home address can be split into parts. Your home address
includes a house number, a street name, and a city. The city is analogous to the network
part, the street name could be the subnetwork part, and your house number is the device
part.
IPv4 traditionally uses a mask notation to identify the IP address parts. For example,
consider a router on the 10.0.0.0 network with a subnet mask of 255.255.255.0. This
router can take any incoming packet and perform a bitwise AND operation with the subnet
mask to determine whether the packet belongs on the local subnet or needs to be forwarded
on. For example, this router receives a packet to be delivered to 10.0.0.105. It does a
bitwise AND operation on this address with the subnet mask of 255.255.255.0, which
produces 10.0.0.0. That matches the subnet of the router, so the traffic is local. If, instead,
we consider a packet destined for 10.0.15.22, the result of the bitwise AND with the
subnet mask is 10.0.15.0. This address doesn't match the subnet the router is on, and so it
must be forwarded.
IPv6 uses CIDR. Networks and subnetworks are specified using the CIDR notation we
described earlier. For example, if the IPv6 subnet is /112, then the router knows that any
address that matches on the first 112 bits is on the local subnet.
So far, we've covered only routing with one sender and one receiver. While this is the most
common situation, let's consider alternative cases too.
[ 25 ]
Introducing Networks and Protocols
Chapter 1
Multicast, broadcast, and anycast
When a packet is routed from one sender to one receiver, it uses unicast addressing. This is
the simplest and most common type of addressing. All of the protocols we deal with in this
book use unicast addressing.
Broadcast addressing allows a single sender to address a packet to all recipients
simultaneously. It is typically used to deliver a packet to every receiver on an entire subnet.
If a broadcast is a one-to-all communication, then multicast is a one-to-many
communication. Multicast involves some group management, and a message is addressed
and delivered to members of a group.
Anycast addressed packets are used to deliver a message to one recipient when you don't
care who that recipient is. This is useful if you have several servers that provide the same
functionality, and you simply want one of them (you don't care which) to handle your
request.
IPv4 and lower network levels support local broadcast addressing. IPv4 provides some
optional (but commonly implemented) support for multicasting. IPv6 mandates
multicasting support while providing additional features over IPv4's multicasting. Though
IPv6 is not considered to broadcast, its multicasting functionality can essentially emulate it.
It's worth noting that these alternative addressing methods don't generally work over the
broader internet. Imagine if one peer was able to broadcast a packet to every connected
internet device. It would be a mess!
If you can use IP multicasting on your local network, though, it is worthwhile to implement
it. Sending one IP level multicast conserves bandwidth compared to sending the same
unicast message multiple times.
However, multicasting is often done at the application level. That is, when the application
wants to deliver the same message to several recipients, it sends the message multiple times
– once to each recipient. In Chapter 3, An In-Depth Overview of TCP Connections, we build a
chat room. This chat room could be said to use application-level multicasting, but it does
not take advantage of IP multicasting.
We've covered how messages are routed through a network. Now, let's see how a message
knows which application is responsible for it once it arrives at a specific system.
[ 26 ]
Introducing Networks and Protocols
Chapter 1
Port numbers
An IP address alone isn't quite enough. We need port numbers. To return to the telephone
analogy, if IP addresses are phone numbers, then port numbers are like phone extensions.
Generally, an IP address gets a packet routed to a specific system, but a port number is
used to route the packet to a specific application on that system.
For example, on your system, you may be running multiple web browsers, an email client,
and a video-conferencing client. When your computer receives a TCP segment or UDP
datagram, your operating system looks at the destination port number in that packet. That
port number is used to look up which application should handle it.
Port numbers are stored as unsigned 16-bit integers. This means that they are between 0
and 65,535 inclusive.
Some port numbers for common protocols are as follows:
Port Number
Protocol
20, 21
TCP File Transfer Protocol (FTP)
22
TCP Secure Shell (SSH)
23
TCP Telnet
25
TCP Simple Mail Transfer Protocol (SMTP)
53
UDP Domain Name System (DNS)
Chapter 11, Establishing SSH
Connections with libssh
Chapter 8, Making Your Program Send
Email
Chapter 5, Hostname Resolution and
DNS
Chapter 6, Building a Simple Web
80
TCP Hypertext Transfer Protocol (HTTP)
Client
Chapter 7, Building a Simple Web
Server
110
TCP Post Office Protocol, Version 3 (POP3)
143
TCP
194
TCP Internet Relay Chat (IRC)
Internet Message Access Protocol
(IMAP)
Chapter 9, Loading Secure Web
443
TCP HTTP over TLS/SSL (HTTPS)
993
995
TCP IMAP over TLS/SSL (IMAPS)
TCP POP3 over TLS/SSL (POP3S)
[ 27 ]
Pages with HTTPS and OpenSSL
Chapter 10, Implementing a Secure
Web Server
Introducing Networks and Protocols
Chapter 1
Each of these listed port numbers is assigned by the Internet Assigned Numbers Authority
(IANA). They are responsible for the official assignments of port numbers for specific
protocols. Unofficial port usage is very common for applications implementing custom
protocols. In this case, the application should try to choose a port number that is not in
common use to avoid conflict.
Clients and servers
In the telephone analogy, a call must be initiated first by one party. The initiating party
dials the number for the receiving party, and the receiving party answers.
This is also a common paradigm in networking called the client-server model. In this
model, a server listens for connections. The client, knowing the address and port number
that the server is listening on, establishes the connection by sending the first packet.
For example, the web server at example.com listens on port 80 (HTTP) and port 443
(HTTPS). A web browser (client) must establish the connection by sending the first packet
to the web server address and port.
Putting it together
A socket is one end-point of a communication link between systems. It's an abstraction in
which your application can send and receive data over the network, in much the same way
that your application can read and write to a file using a file handle.
An open socket is uniquely defined by a 5-tuple consisting of the following:
Local IP address
Local port
Remote IP address
Remote port
Protocol (UDP or TCP)
This 5-tuple is important, as it is how your operating system knows which application is
responsible for any packets received. For example, if you use two web browsers to establish
two simultaneous connections to example.com on port 80, then your operating system
keeps the connections separate by looking at the local IP address, local port, remote IP
address, remote port, and protocol. In this case, the local IP addresses, remote IP addresses,
remote port (80), and protocol (TCP) are identical.
[ 28 ]
Introducing Networks and Protocols
Chapter 1
The deciding factor then is the local port (also called the ephemeral port), which will have
been chosen to be different by the operating system for connection. This 5-tuple is also
important to understand how NAT works. A private network may have many systems
accessing the same outside resource, and the router NAT must store this five tuple for each
connection in order to know how to route received packets back into the private network.
What's your address?
You can find your IP address using the ipconfig command on Windows, or the ifconfig
command on Unix-based systems (such as Linux and macOS).
Using the ipconfig command from Windows PowerShell looks like this:
In this example, you can find that the IPv4 address is listed under Ethernet adapter
Ethernet0. Your system may have more network adapters, and each will have its own IP
address. We can tell that this computer is on a local network because the IP address,
192.168.182.133, is in the private IP address range.
[ 29 ]
Introducing Networks and Protocols
Chapter 1
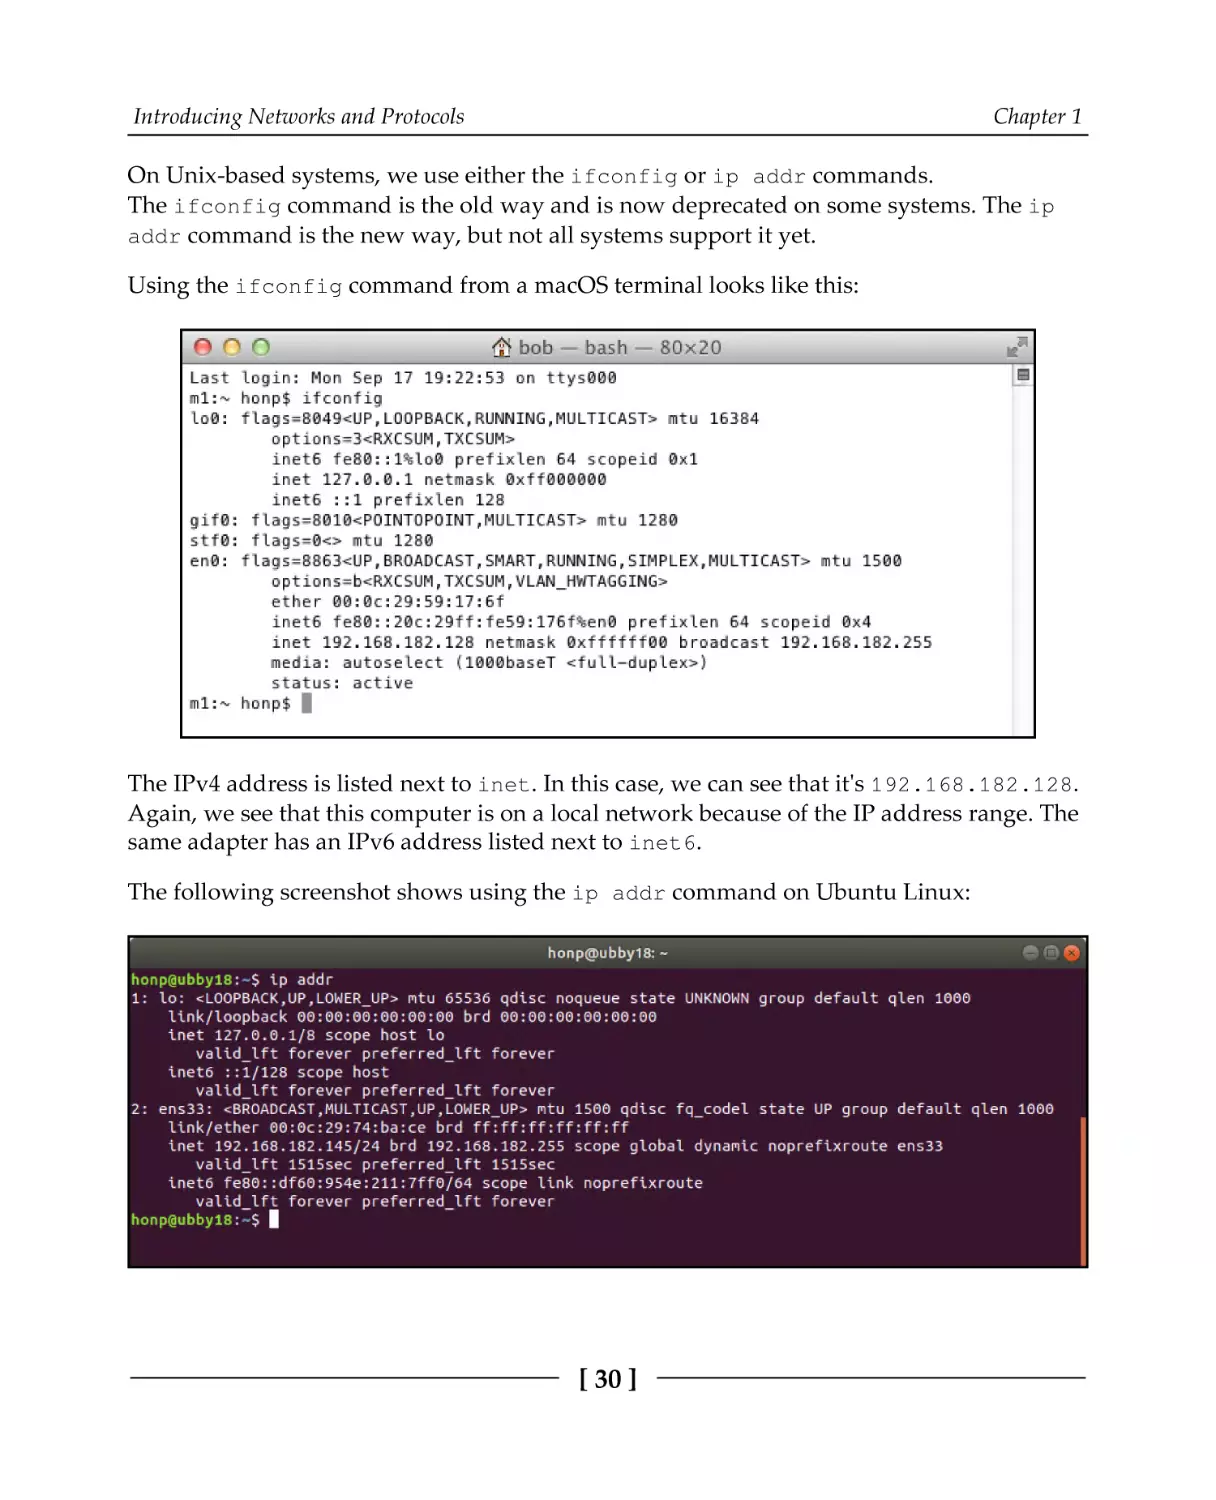
On Unix-based systems, we use either the ifconfig or ip addr commands.
The ifconfig command is the old way and is now deprecated on some systems. The ip
addr command is the new way, but not all systems support it yet.
Using the ifconfig command from a macOS terminal looks like this:
The IPv4 address is listed next to inet. In this case, we can see that it's 192.168.182.128.
Again, we see that this computer is on a local network because of the IP address range. The
same adapter has an IPv6 address listed next to inet6.
The following screenshot shows using the ip addr command on Ubuntu Linux:
[ 30 ]
Introducing Networks and Protocols
Chapter 1
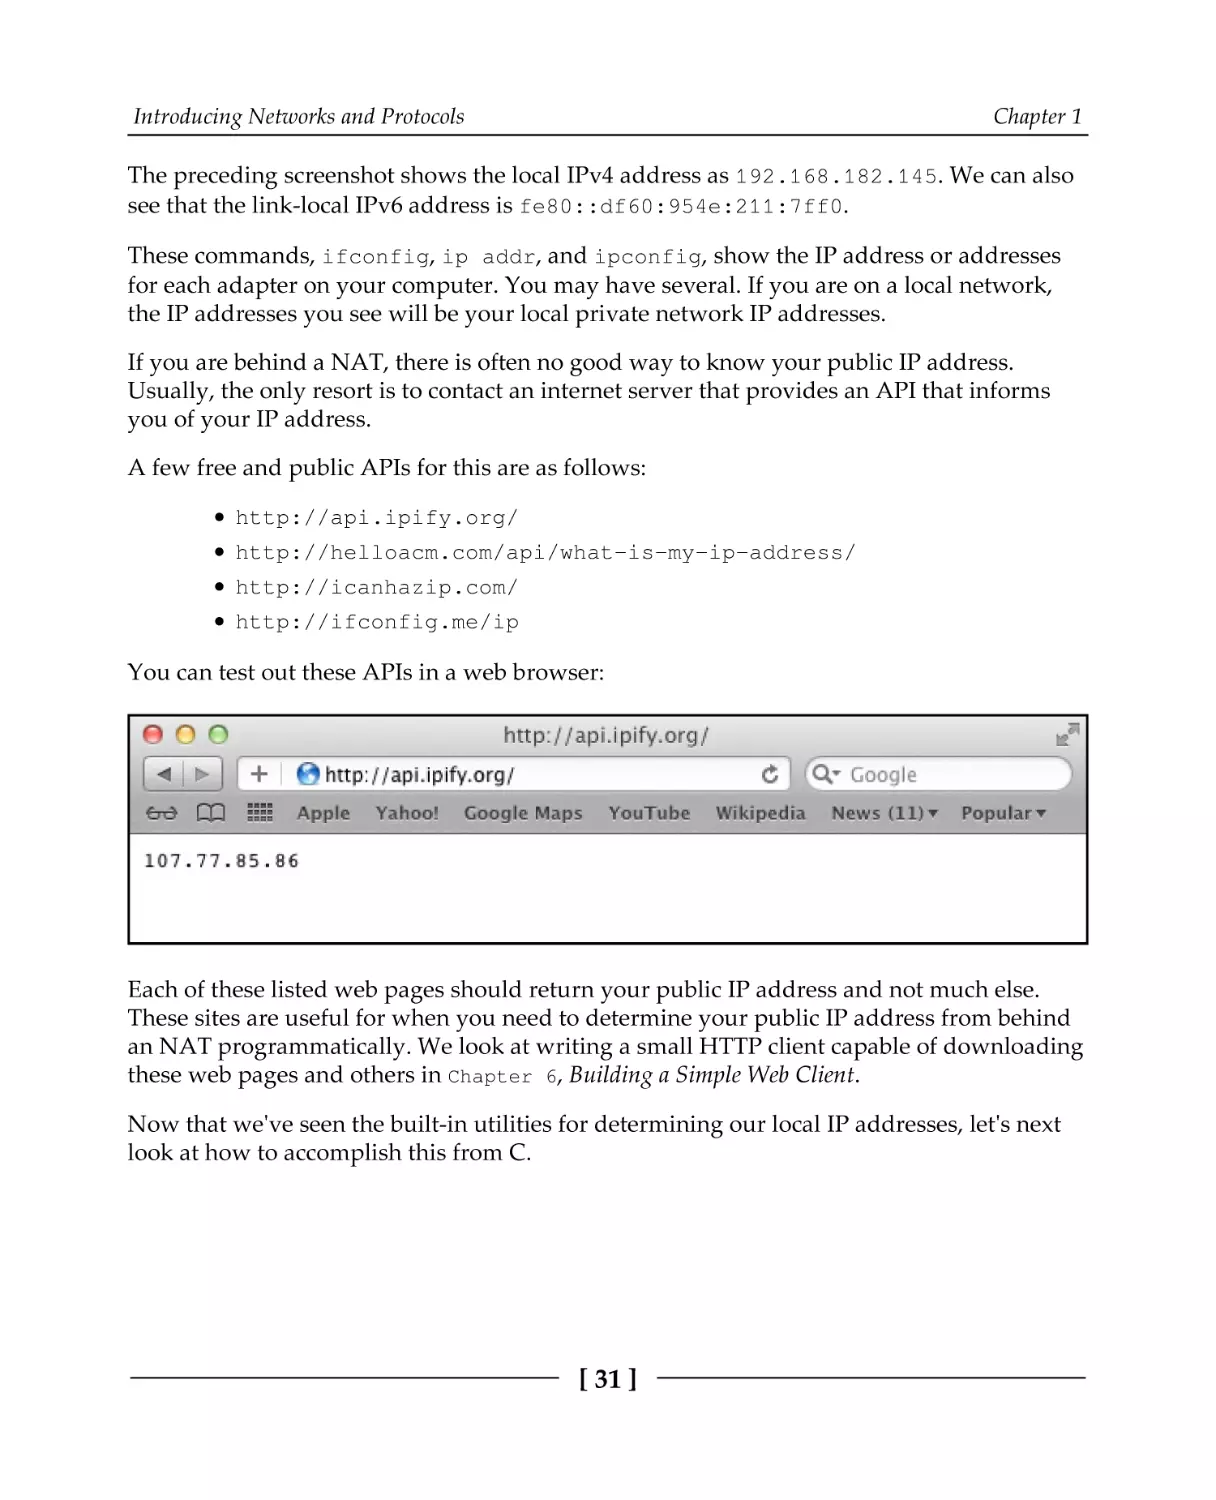
The preceding screenshot shows the local IPv4 address as 192.168.182.145. We can also
see that the link-local IPv6 address is fe80::df60:954e:211:7ff0.
These commands, ifconfig, ip addr, and ipconfig, show the IP address or addresses
for each adapter on your computer. You may have several. If you are on a local network,
the IP addresses you see will be your local private network IP addresses.
If you are behind a NAT, there is often no good way to know your public IP address.
Usually, the only resort is to contact an internet server that provides an API that informs
you of your IP address.
A few free and public APIs for this are as follows:
http://api.ipify.org/
http://helloacm.com/api/what-is-my-ip-address/
http://icanhazip.com/
http://ifconfig.me/ip
You can test out these APIs in a web browser:
Each of these listed web pages should return your public IP address and not much else.
These sites are useful for when you need to determine your public IP address from behind
an NAT programmatically. We look at writing a small HTTP client capable of downloading
these web pages and others in Chapter 6, Building a Simple Web Client.
Now that we've seen the built-in utilities for determining our local IP addresses, let's next
look at how to accomplish this from C.
[ 31 ]
Introducing Networks and Protocols
Chapter 1
Listing network adapters from C
Sometimes, it is useful for your C programs to know what your local address is. For most of
this book, we are able to write code that works both on Windows and Unix-based (Linux
and macOS) systems. However, the API for listing local addresses is very different between
systems. For this reason, we split this program into two: one for Windows and one for
Unix-based systems.
We will address the Windows case first.
Listing network adapters on Windows
The Windows networking API is called Winsock, and we will go into much more detail
about it in the next chapter.
Whenever we are using Winsock, the first thing we must do is initialize it. This is done with
a call to WSAStartup(). Here is a small C program, win_init.c, showing the
initialization and cleanup of Winsock:
/*win_init.c*/
#include <stdio.h>
#include <winsock2.h>
#pragma comment(lib, "ws2_32.lib")
int main() {
WSADATA d;
if (WSAStartup(MAKEWORD(2, 2), &d)) {
printf("Failed to initialize.\n");
return -1;
}
WSACleanup();
printf("Ok.\n");
return 0;
}
The WSAStartup() function is called with the requested version, Winsock 2.2 in this case,
and a WSADATA structure. The WSADATA structure will be filled in by WSAStartup() with
details about the Windows Sockets implementation. The WSAStartup() function returns 0
upon success, and non-zero upon failure.
[ 32 ]
Introducing Networks and Protocols
Chapter 1
When a Winsock program is finished, it should call WSACleanup().
If you are using Microsoft Visual C as your compiler, then #pragma comment(lib,
"ws2_32.lib") tells Microsoft Visual C to link the executable with the Winsock library,
ws2_32.lib.
If you are using MinGW as your compiler, the pragma is ignored. You need to explicitly tell
the compiler to link in the library by adding the command-line option, -lws2_32. For
example, you can compile this program using MinGW with the following command:
gcc win_init.c -o win_init.exe -lws2_32
We will cover Winsock initialization and usage in more detail in Chapter 2, Getting to Grips
with Socket APIs.
Now that we know how to initialize Winsock, we will begin work on the complete program
to list network adapters on Windows. Please refer to the win_list.c file to follow along.
To begin with, we need to define _WIN32_WINNT and include the needed headers:
/*win_list.c*/
#ifndef _WIN32_WINNT
#define _WIN32_WINNT 0x0600
#endif
#include
#include
#include
#include
#include
<winsock2.h>
<iphlpapi.h>
<ws2tcpip.h>
<stdio.h>
<stdlib.h>
The _WIN32_WINNT macro must be defined first so that the proper version of the Windows
headers are included. winsock2.h, iphlpapi.h, and ws2tcpip.h are the Windows
headers we need in order to list network adapters. We need stdio.h for the printf()
function and stdlib.h for memory allocation.
Next, we include the following pragmas to tell Microsoft Visual C which libraries must be
linked with the executable:
/*win_list.c continued*/
#pragma comment(lib, "ws2_32.lib")
#pragma comment(lib, "iphlpapi.lib")
[ 33 ]
Introducing Networks and Protocols
Chapter 1
If you're compiling with MinGW, these lines will have no effect. You will need to link to
these libraries explicitly on the command line, for example, gcc win_list.c -o
win_list.exe -liphlpapi -lws2_32.
We then enter the main() function and initialize Winsock 2.2 using WSAStartup() as
described earlier. We check its return value to detect any errors:
/*win_list.c continued*/
int main() {
WSADATA d;
if (WSAStartup(MAKEWORD(2, 2), &d)) {
printf("Failed to initialize.\n");
return -1;
}
Next, we allocate memory for the adapters, and we request the adapters' addresses from
Windows using the GetAdapterAddresses() function:
/*win_list.c continued*/
DWORD asize = 20000;
PIP_ADAPTER_ADDRESSES adapters;
do {
adapters = (PIP_ADAPTER_ADDRESSES)malloc(asize);
if (!adapters) {
printf("Couldn't allocate %ld bytes for adapters.\n", asize);
WSACleanup();
return -1;
}
int r = GetAdaptersAddresses(AF_UNSPEC, GAA_FLAG_INCLUDE_PREFIX, 0,
adapters, &asize);
if (r == ERROR_BUFFER_OVERFLOW) {
printf("GetAdaptersAddresses wants %ld bytes.\n", asize);
free(adapters);
} else if (r == ERROR_SUCCESS) {
break;
} else {
printf("Error from GetAdaptersAddresses: %d\n", r);
free(adapters);
WSACleanup();
return -1;
}
} while (!adapters);
[ 34 ]
Introducing Networks and Protocols
Chapter 1
The asize variable will store the size of our adapters' address buffer. To begin with, we set
it to 20000 and allocate 20,000 bytes to adapters using the malloc() function.
The malloc() function will return 0 on failure, so we test for that and display an error
message if allocation failed.
Next, we call GetAdapterAddresses(). The first parameter, AF_UNSPEC, tells Windows
that we want both IPv4 and IPv6 addresses. You can pass in AF_INET or AF_INET6 to
request only IPv4 or only IPv6 addresses. The second parameter,
GAA_FLAG_INCLUDE_PREFIX, is required to request a list of addresses. The next parameter
is reserved and should be passed in as 0 or NULL. Finally, we pass in our buffer, adapters,
and a pointer to its size, asize.
If our buffer is not big enough to store all of the addresses, then
GetAdapterAddresses() returns ERROR_BUFFER_OVERFLOW and sets asize to the
required buffer size. In this case, we free our adapters buffer and try the call again with a
larger buffer.
On success, GetAdapterAddresses() returns ERROR_SUCCESS, in which case, we break
from the loop and continue. Any other return value is an error.
When GetAdapterAddresses() returns successfully, it will have written a linked list into
adapters with each adapter's address information. Our next step is to loop through this
linked list and print information for each adapter and address:
/*win_list.c continued*/
PIP_ADAPTER_ADDRESSES adapter = adapters;
while (adapter) {
printf("\nAdapter name: %S\n", adapter->FriendlyName);
PIP_ADAPTER_UNICAST_ADDRESS address = adapter->FirstUnicastAddress;
while (address) {
printf("\t%s",
address->Address.lpSockaddr->sa_family == AF_INET ?
"IPv4" : "IPv6");
char ap[100];
getnameinfo(address->Address.lpSockaddr,
address->Address.iSockaddrLength,
ap, sizeof(ap), 0, 0, NI_NUMERICHOST);
printf("\t%s\n", ap);
address = address->Next;
}
[ 35 ]
Introducing Networks and Protocols
Chapter 1
adapter = adapter->Next;
}
We first define a new variable, adapter, which we use to walk through the linked list of
adapters. The first adapter is at the beginning of adapters, so we initially set adapter to
adapters. At the end of each loop, we set adapter = adapter->Next; to get the next
adapter. The loop aborts when adapter is 0, which means we've reached the end of the
list.
We get the adapter name from adapter->FriendlyName, which we then print using
printf().
The first address for each adapter is in adapter->FirstUnicastAddress. We define a
second pointer, address, and set it to this address. Addresses are also stored as a linked
list, so we begin an inner loop that walks through the addresses.
The address->Address.lpSockaddr->sa_family variable stores the address family
type. If it is set to AF_INET, then we know this is an IPv4 address. Otherwise, we assume it
is an IPv6 address (in which case the family is AF_INET6).
Next, we allocate a buffer, ap, to store the text representation of the address. The
getnameinfo() function is called to convert the address into a standard notation address.
We'll cover more about getnameinfo() in the next chapter.
Finally, we can print the address from our buffer, ap, using printf().
We finish the program by freeing the allocated memory and calling WSACleanup():
/*win_list.c continued*/
free(adapters);
WSACleanup();
return 0;
}
On Windows, using MinGW, you can compile and run the program with the following:
gcc win_list.c -o win_list.exe -liphlpapi -lws2_32
win_list
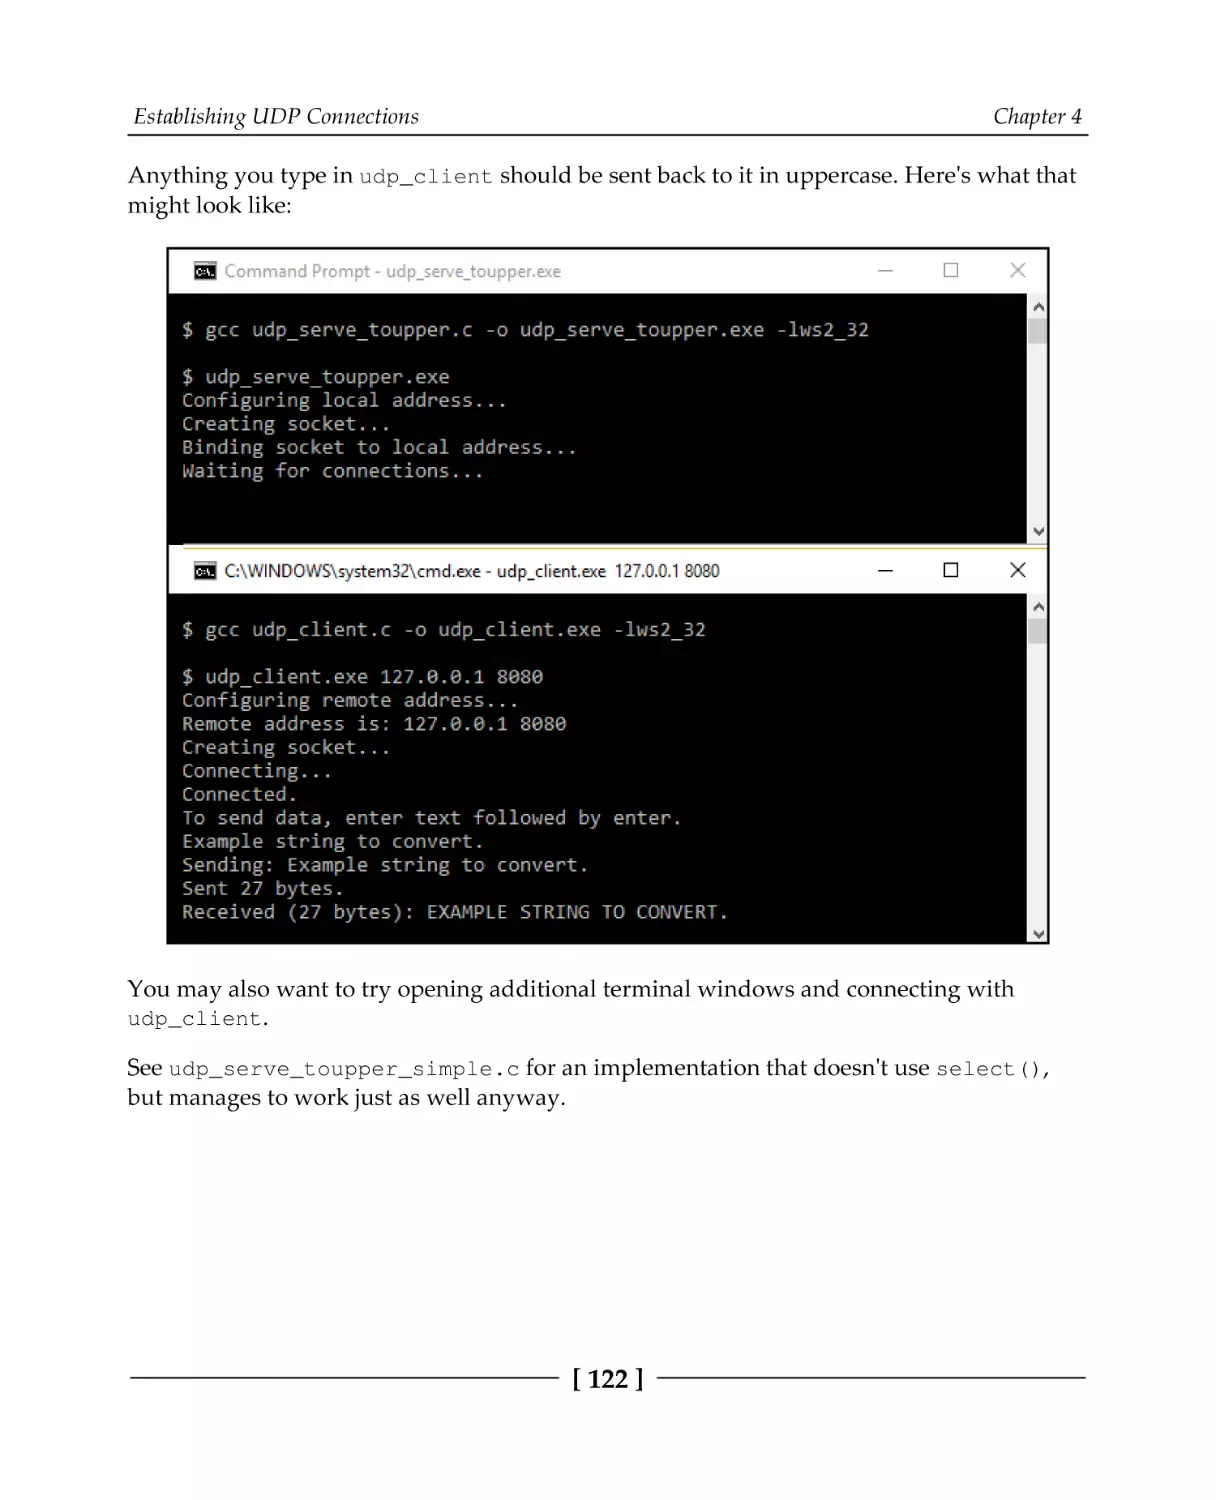
It should list each of your adapter's names and addresses.
Now that we can list local IP addresses on Windows, let's consider the same task for Unixbased systems.
[ 36 ]
Introducing Networks and Protocols
Chapter 1
Listing network adapters on Linux and macOS
Listing local network addresses is somewhat easier on a Unix-based system, compared to
Windows. Load up unix_list.c to follow along.
To begin with, we include the necessary system headers:
/*unix_list.c*/
#include
#include
#include
#include
#include
<sys/socket.h>
<netdb.h>
<ifaddrs.h>
<stdio.h>
<stdlib.h>
We then enter the main function:
/*unix_list.c continued*/
int main() {
struct ifaddrs *addresses;
if (getifaddrs(&addresses) == -1) {
printf("getifaddrs call failed\n");
return -1;
}
We declare a variable, addresses, which stores the addresses. A call to the getifaddrs()
function allocates memory and fills in a linked list of addresses. This function returns 0 on
success or -1 on failure.
Next, we use a new pointer, address, to walk through the linked list of addresses. After
considering each address, we set address = address->ifa_next to get the next address.
We stop the loop when address == 0, which happens at the end of the linked list:
/*unix_list.c continued*/
struct ifaddrs
while(address)
int family
if (family
*address = addresses;
{
= address->ifa_addr->sa_family;
== AF_INET || family == AF_INET6) {
printf("%s\t", address->ifa_name);
printf("%s\t", family == AF_INET ? "IPv4" : "IPv6");
char ap[100];
[ 37 ]
Introducing Networks and Protocols
Chapter 1
const int family_size = family == AF_INET ?
sizeof(struct sockaddr_in) : sizeof(struct sockaddr_in6);
getnameinfo(address->ifa_addr,
family_size, ap, sizeof(ap), 0, 0, NI_NUMERICHOST);
printf("\t%s\n", ap);
}
address = address->ifa_next;
}
For each address, we identify the address family. We are interested in AF_INET (IPv4
addresses) and AF_INET6 (IPv6 addresses). The getifaddrs() function can return other
types, so we skip those.
For each address, we then continue to print its adapter name and its address type, IPv4 or
IPv6.
We then define a buffer, ap, to store the textual address. A call to the getnameinfo()
function fills in this buffer, which we can then print. We cover the getnameinfo()
function in more detail in the next chapter, Chapter 2, Getting to Grips with Socket APIs.
Finally, we free the memory allocated by getifaddrs() and we have finished:
/*unix_list.c continued*/
freeifaddrs(addresses);
return 0;
}
On Linux and macOS, you can compile and run this program with the following:
gcc unix_list.c -o unix_list
./unix_list
It should list each of your adapter's names and addresses.
[ 38 ]
Introducing Networks and Protocols
Chapter 1
Summary
In this chapter, we looked briefly at how internet traffic is routed. We learned that there are
two Internet Protocol versions, IPv4 and IPv6. IPv4 has a limited number of addresses, and
these addresses are running out. One of IPv6's main advantages is that it has enough
address space for every system to have its own unique publicly-routable address. The
limited address space of IPv4 is largely mitigated by network address translation
performed by routers. We also looked at how to detect your local IP address using both
utilities and APIs provided by the operating system.
We saw that the APIs provided for listing local IP addresses differ quite a bit between
Windows and Unix-based operating systems. In future chapters, we will see that most
other networking functions are similar between operating systems, and we can write one
portable program that works between operating systems.
It's OK if you didn't pick up all of the details in this chapter. Most of this information is a
helpful background, but it's not essential to most network application programming.
Details such as network address translation are handled by the network, and these details
will not usually need to be explicitly addressed by your programs.
In the next chapter, we will reinforce the ideas covered here by introducing socketprogramming APIs.
Questions
Try these questions to test your knowledge from this chapter:
1. What are the key differences between IPv4 and IPv6?
2. Are the IP addresses given by the ipconfig and ifconfig commands the
same IP addresses that a remote web server sees if you connect to it?
3. What is the IPv4 loopback address?
4. What is the IPv6 loopback address?
5. How are domain names (for example, example.com) resolved into IP
addresses?
6. How can you find your public IP address?
7. How does an operating system know which application is responsible for an
incoming packet?
The answers are in Appendix A, Answers to Questions.
[ 39 ]
2
Getting to Grips with Socket
APIs
In this chapter, we will begin to really start working with network programming. We will
introduce the concept of sockets, and explain a bit of the history behind them. We will
cover the important differences between the socket APIs provided by Windows and Unixlike operating systems, and we will review the common functions that are used in socket
programming. This chapter ends with a concrete example of turning a simple console
program into a networked program you can access through your web browser.
The following topics are covered in this chapter:
What are sockets?
Which header files are used with socket programming?
How to compile a socket program on Windows, Linux, and macOS
Connection-oriented and connectionless sockets
TCP and UDP protocols
Common socket functions
Building a simple console program into a web server
Technical requirements
The example programs in this chapter can be compiled with any modern C compiler. We
recommend MinGW on Windows and GCC on Linux and macOS. See Appendix B, Setting
Up Your C Compiler On Windows, Appendix C, Setting Up Your C Compiler On Linux, and
Appendix D, Setting Up Your C Compiler On macOS, for compiler setup.
The code for this book can be found here: https://github.com/codeplea/Hands-OnNetwork-Programming-with-C.
Getting to Grips with Socket APIs
Chapter 2
From the command line, you can download the code for this chapter with the following
command:
git clone https://github.com/codeplea/Hands-On-Network-Programming-with-C
cd Hands-On-Network-Programming-with-C/chap02
Each example program in this chapter is standalone, and each example runs on Windows,
Linux, and macOS. When compiling for Windows, keep in mind that most of the example
programs require linking with the Winsock library.
This is accomplished by passing the -lws2_32 option to gcc. We provide the exact
commands needed to compile each example as they are introduced.
What are sockets?
A socket is one endpoint of a communication link between systems. Your application sends
and receives all of its network data through a socket.
There are a few different socket application programming interfaces (APIs). The first were
Berkeley sockets, which were released in 1983 with 4.3BSD Unix. The Berkeley socket API
was widely successful and quickly evolved into a de facto standard. From there, it was
adopted as a POSIX standard with little modification. The terms Berkeley sockets, BSD
sockets, Unix sockets, and Portable Operating System Interface (POSIX) sockets are often
used interchangeably.
If you're using Linux or macOS, then your operating system provides a proper
implementation of Berkeley sockets.
Windows' socket API is called Winsock. It was created to be largely compatible with
Berkeley sockets. In this book, we strive to create cross-platform code that is valid for both
Berkeley sockets and Winsock.
Historically, sockets were used for inter-process communication (IPC) as well as various
network protocols. In this book, we use sockets only for communication with TCP and
UDP.
Before we can start using sockets, we need to do a bit of setup. Let's dive right in!
[ 41 ]
Getting to Grips with Socket APIs
Chapter 2
Socket setup
Before we can use the socket API, we need to include the socket API header files. These files
vary depending on whether we are using Berkeley sockets or Winsock. Additionally,
Winsock requires initialization before use. It also requires that a cleanup function is called
when we are finished. These initialization and cleanup steps are not used with Berkeley
sockets.
We will use the C preprocessor to run the proper code on Windows compared to Berkeley
socket systems. By using the preprocessor statement, #if defined(_WIN32), we can
include code in our program that will only be compiled on Windows.
Here is a complete program that includes the needed socket API headers for each platform
and properly initializes Winsock on Windows:
/*sock_init.c*/
#if defined(_WIN32)
#ifndef _WIN32_WINNT
#define _WIN32_WINNT 0x0600
#endif
#include <winsock2.h>
#include <ws2tcpip.h>
#pragma comment(lib, "ws2_32.lib")
#else
#include
#include
#include
#include
#include
#include
#include
<sys/types.h>
<sys/socket.h>
<netinet/in.h>
<arpa/inet.h>
<netdb.h>
<unistd.h>
<errno.h>
#endif
#include <stdio.h>
int main() {
#if defined(_WIN32)
WSADATA d;
if (WSAStartup(MAKEWORD(2, 2), &d)) {
fprintf(stderr, "Failed to initialize.\n");
return 1;
}
[ 42 ]
Getting to Grips with Socket APIs
Chapter 2
#endif
printf("Ready to use socket API.\n");
#if defined(_WIN32)
WSACleanup();
#endif
return 0;
}
The first part includes winsock.h and ws2tcpip.h on Windows. _WIN32_WINNT must be
defined for the Winsock headers to provide all the functions we need. We also include
the #pragma comment(lib,"ws2_32.lib") pragma statement. This tells the Microsoft
Visual C compiler to link your program against the Winsock library, ws2_32.lib. If you're
using MinGW as your compiler, then #pragma is ignored. In this case, you need to tell the
compiler to link in ws2_32.lib on the command line using the -lws2_32 option.
If the program is not compiled on Windows, then the section after #else will compile. This
section includes the various Berkeley socket API headers and other headers we need on
these platforms.
In the main() function, we call WSAStartup() on Windows to initialize Winsock. The
MAKEWORD macro allows us to request Winsock version 2.2. If our program is unable to
initialize Winsock, it prints an error message and aborts.
When using Berkeley sockets, no special initialization is needed, and the socket API is
always ready to use.
Before our program finishes, WSACleanup() is called if we're compiling for Winsock on
Windows. This function allows the Windows operating system to do additional cleanup.
Compiling and running this program on Linux or macOS is done with the following
command:
gcc sock_init.c -o sock_init
./sock_init
Compiling on Windows using MinGW can be done with the following command:
gcc sock_init.c -o sock_init.exe -lws2_32
sock_init.exe
Notice that the -lws2_32 flag is needed with MinGW to tell the compiler to link in the
Winsock library, ws2_32.lib.
[ 43 ]
Getting to Grips with Socket APIs
Chapter 2
Now that we've done the necessary setup to begin using the socket APIs, let's take a closer
look at what we will be using these sockets for.
Two types of sockets
Sockets come in two basic types—connection-oriented and connectionless. These terms
refer to types of protocols. Beginners sometimes get confused with the term connectionless.
Of course, two systems communicating over a network are in some sense connected. Keep
in mind that these terms are used with special meanings, which we will cover shortly, and
should not imply that some protocols manage to send data without a connection.
The two protocols that are used today are Transmission Control Protocol (TCP) and User
Datagram Protocol (UDP). TCP is a connection-oriented protocol, and UDP is a
connectionless protocol.
The socket APIs also support other less-common or outdated protocols, which we do not
cover in this book.
In a connectionless protocol, such as UDP, each data packet is addressed individually.
From the protocol's perspective, each data packet is completely independent and unrelated
to any packets coming before or after it.
A good analogy for UDP is postcards. When you send a postcard, there is no guarantee that
it will arrive. There is also no way to know if it did arrive. If you send many postcards at
once, there is no way to predict what order they will arrive in. It is entirely possible that the
first postcard you send gets delayed and arrives weeks after the last postcard was sent.
With UDP, these same caveats apply. UDP makes no guarantee that a packet will arrive.
UDP doesn't generally provide a method to know if a packet did not arrive, and UDP does
not guarantee that the packets will arrive in the same order they were sent. As you can see,
UDP is no more reliable than postcards. In fact, you may consider it less reliable, because
with UDP, it is possible that a single packet may arrive twice!
If you need reliable communication, you may be tempted to develop a scheme where you
number each packet that's sent. For the first packet sent, you number it one, the second
packet sent is numbered two, and so on. You could also request that the receiver send an
acknowledgment for each packet. When the receiver gets packet one, it sends a return
message, packet one received. In this way, the receiver can be sure that received packets
are in the proper order. If the same packet arrives twice, the receiver can just ignore the
redundant copy. If a packet isn't received at all, the sender knows from the missing
acknowledgment and can resend it.
[ 44 ]
Getting to Grips with Socket APIs
Chapter 2
This scheme is essentially what connection-oriented protocols, such as TCP, do. TCP
guarantees that data arrives in the same order it is sent. It prevents duplicate data from
arriving twice, and it retries sending missing data. It also provides additional features such
as notifications when a connection is terminated and algorithms to mitigate network
congestion. Furthermore, TCP implements these features with an efficiency that is not
achievable by piggybacking a custom reliability scheme on top of UDP.
For these reasons, TCP is used by many protocols. HTTP (for severing web pages), FTP (for
transferring files), SSH (for remote administration), and SMTP (for delivering email) all use
TCP. We will cover HTTP, SSH, and SMTP in the coming chapters.
UDP is used by DNS (for resolving domain names). It is suitable for this purpose because
an entire request and response can fit in a single packet.
UDP is also commonly used in real-time applications, such as audio streaming, video
streaming, and multiplayer video games. In real-time applications, there is often no reason
to retry sending dropped packets, so TCP's guarantees are unnecessary. For example, if you
are streaming live video and a few packets get dropped, the video simply resumes when
the next packet arrives. There is no reason to resend (or even detect) the dropped packet, as
the video has already progressed past that point.
UDP also has the advantage in cases where you want to send a message without expecting
a response from the other end. This makes it useful when using IP broadcast or multicast.
TCP, on the other hand, requires bidirectional communication to provide its guarantees,
and TCP does not work with IP multicast or broadcast.
If the guarantees that TCP provides are not needed, then UDP can achieve greater
efficiency. This is because TCP adds some additional overhead by numbering packets. TCP
must also delay packets that arrive out of order, which can cause unnecessary delays in
real-time applications. If you do need the guarantees provided by TCP, however, it is
almost always preferable to use TCP instead of trying to add those mechanisms to UDP.
Now that we have an idea of the communication models we use sockets for, let's look at the
actual functions that are used in socket programming.
[ 45 ]
Getting to Grips with Socket APIs
Chapter 2
Socket functions
The socket APIs provide many functions for use in network programming. Here are the
common socket functions that we use in this book:
socket() creates and initializes a new socket.
bind() associates a socket with a particular local IP address and port number.
listen() is used on the server to cause a TCP socket to listen for new
connections.
connect() is used on the client to set the remote address and port. In the case of
TCP, it also establishes a connection.
accept() is used on the server to create a new socket for an incoming TCP
connection.
send() and recv() are used to send and receive data with a socket.
sendto() and recvfrom() are used to send and receive data from sockets
without a bound remote address.
close() (Berkeley sockets) and closesocket() (Winsock sockets) are used to
close a socket. In the case of TCP, this also terminates the connection.
shutdown() is used to close one side of a TCP connection. It is useful to ensure
an orderly connection teardown.
select() is used to wait for an event on one or more sockets.
getnameinfo() and getaddrinfo() provide a protocol-independent manner
of working with hostnames and addresses.
setsockopt() is used to change some socket options.
fcntl() (Berkeley sockets) and ioctlsocket() (Winsock sockets) are also used
to get and set some socket options.
You may see some Berkeley socket networking programs using read() and write().
These functions don't port to Winsock, so we prefer send() and recv() here. Some other
common functions that are used with Berkeley sockets are poll() and dup(). We will
avoid these in order to keep our programs portable.
Other differences between Berkeley sockets and Winsock sockets are addressed later in this
chapter.
Now that we have an idea of the functions involved, let's consider program design and
flow next.
[ 46 ]
Getting to Grips with Socket APIs
Chapter 2
Anatomy of a socket program
As we mentioned in Chapter 1, An Introduction to Networks and Protocols, network
programming is usually done using a client-server paradigm. In this paradigm, a server
listens for new connections at a published address. The client, knowing the server's
address, is the one to establish the connection initially. Once the connection is established,
the client and the server can both send and receive data. This can continue until either the
client or the server terminates the connection.
A traditional client-server model usually implies different behaviors for the client and
server. The way web browsing works, for example, is that the server resides at a known
address, waiting for connections. A client (web browser) establishes a connection and sends
a request that includes which web page or resource it wants to download. The server then
checks that it knows what to do with this request and responds appropriately (by sending
the web page).
An alternative paradigm is the peer-to-peer model. For example, this model is used by the
BitTorrent protocol. In the peer-to-peer model, each peer has essentially the same
responsibilities. While a web server is optimized to send requested data from the server to
the client, a peer-to-peer protocol is balanced in that data is exchanged somewhat evenly
between peers. However, even in the peer-to-peer model, the underlying sockets that are
using TCP or UDP aren't created equal. That is, for each peer-to-peer connection, one peer
was listening and the other connecting. BitTorrent works by having a central server (called
a tracker) that stores a list of peer IP addresses. Each of the peers on that list has agreed to
behave like a server and listen for new connections. When a new peer wants to join the
swarm, it requests a list of peers from the central server, and then tries to establish a
connection to peers on that list while simultaneously listening for new connections from
other peers. In summary, a peer-to-peer protocol doesn't so much replace the client-server
model; it is just expected that each peer be a client and a server both.
Another common protocol that pushes the boundary of the client-server paradigm is FTP.
The FTP server listens for connections until the FTP client connects. After the initial
connection, the FTP client issues commands to the server. If the FTP client requests a file
from the server, the server will attempt to establish a new connection to the FTP client to
transfer the file over. So, for this reason, the FTP client first establishes a connection as a
TCP client, but later accepts connections like a TCP server.
[ 47 ]
Getting to Grips with Socket APIs
Chapter 2
Network programs can usually be described as one of four types—a TCP server, a TCP
client, a UDP server, or a UDP client. Some protocols call for a program to implement two,
or even all four types, but it is useful for us to consider each of the four types separately.
TCP program flow
A TCP client program must first know the TCP server's address. This is often input by a
user. In the case of a web browser, the server address is either input directly by the user
into the address bar, or is known from the user clicking on a link. The TCP client takes this
address (for example, http://example.com) and uses the getaddrinfo() function to
resolve it into a struct addrinfo structure. The client then creates a socket using a call to
socket(). The client then establishes the new TCP connection by calling connect(). At
this point, the client can freely exchange data using send() and recv().
A TCP server listens for connections at a particular port number on a particular interface.
The program must first initialize a struct addrinfo structure with the proper listening
IP address and port number. The getaddrinfo() function is helpful so that you can do
this in an IPv4/IPv6 independent way. The server then creates the socket with a call to
socket(). The socket must be bound to the listening IP address and port. This is
accomplished with a call to bind().
The server program then calls listen(), which puts the socket in a state where it listens
for new connections. The server can then call accept(), which will wait until a client
establishes a connection to the server. When the new connection has been established,
accept() returns a new socket. This new socket can be used to exchange data with the
client using send() and recv(). Meanwhile, the first socket remains listening for new
connections, and repeated calls to accept() allow the server to handle multiple clients.
[ 48 ]
Getting to Grips with Socket APIs
Chapter 2
Graphically, the program flow of a TCP client and server looks like this:
[ 49 ]
Getting to Grips with Socket APIs
Chapter 2
The program flow given here should serve as a good example of how basic client-server
TCP programs interact. That said, considerable variation on this basic program flow is
possible. There is also no rule about which side calls send() or recv() first, or how many
times. Both sides could call send() as soon as the connection is established.
Also, note that the TCP client could call bind() before connect() if it is particular about
which network interface is being used to connect with. This is sometimes important on
servers that have multiple network interfaces. It's often not important for general purpose
software.
Many other variations of TCP operation are possible too, and we will look at some in
Chapter 3, An In-Depth Overview of TCP Connections.
UDP program flow
A UDP client must know the address of the remote UDP peer in order to send the first
packet. The UDP client uses the getaddrinfo() function to resolve the address into a
struct addrinfo structure. Once this is done, the client creates a socket of the proper
type. The client can then call sendto() on the socket to send the first packet. The client can
continue to call sendto() and recvfrom() on the socket to send and receive additional
packets. Note that the client must send the first packet with sendto(). The UDP client
cannot receive data first, as the remote peer would have no way of knowing where to send
data without it first receiving data from the client. This is different from TCP, where a
connection is first established with a handshake. In TCP, either the client or server can send
the first application data.
A UDP server listens for connections from a UDP client. This server should
initialize struct addrinfo structure with the proper listening IP address and port
number. The getaddrinfo() function can be used to do this in a protocol-independent
way. The server then creates a new socket with socket() and binds it to the listening IP
address and port number using bind(). At this point, the server can call recvfrom(),
which causes it to block until it receives data from a UDP client. After the first data is
received, the server can reply with sendto() or listen for more data (from the first client or
any new client) with recvfrom().
[ 50 ]
Getting to Grips with Socket APIs
Chapter 2
Graphically, the program flow of a UDP client and server looks like this:
We cover some variations of this example program flow in Chapter 4, Establishing UDP
Connections.
We're almost ready to begin implementing our first networked program, but before we
begin, we should take care of some cross-platform concerns. Let's work on this now.
Berkeley sockets versus Winsock sockets
As we stated earlier, Winsock sockets were modeled on Berkeley sockets. Therefore, there
are many similarities between them. However, there are also many differences we need to
be aware of.
[ 51 ]
Getting to Grips with Socket APIs
Chapter 2
In this book, we will try to create each program so that it can run on both Windows and
Unix-based operating systems. This is made much easier by defining a few C macros to
help us with this.
Header files
As we mentioned earlier, the needed header files differ between implementations. We've
already seen how these header file discrepancies can be easily overcome with a
preprocessor statement.
Socket data type
In UNIX, a socket descriptor is represented by a standard file descriptor. This means you
can use any of the standard UNIX file I/O functions on sockets. This isn't true on Windows,
so we simply avoid these functions to maintain portability.
Additionally, in UNIX, all file descriptors (and therefore socket descriptors) are small, nonnegative integers. In Windows, a socket handle can be anything. Furthermore, in UNIX, the
socket() function returns an int, whereas in Windows it returns a SOCKET. SOCKET is a
typedef for an unsigned int in the Winsock headers. As a workaround, I find it useful
to either typedef int SOCKET or #define SOCKET int on non-Windows platforms.
That way, you can store a socket descriptor as a SOCKET type on all platforms:
#if !defined(_WIN32)
#define SOCKET int
#endif
Invalid sockets
On Windows, socket() returns INVALID_SOCKET if it fails. On Unix, socket() returns a
negative number on failure. This is particularly problematic as the Windows SOCKET type is
unsigned. I find it useful to define a macro to indicate if a socket descriptor is valid or not:
#if defined(_WIN32)
#define ISVALIDSOCKET(s) ((s) != INVALID_SOCKET)
#else
#define ISVALIDSOCKET(s) ((s) >= 0)
#endif
[ 52 ]
Getting to Grips with Socket APIs
Chapter 2
Closing sockets
All sockets on Unix systems are also standard file descriptors. For this reason, sockets on
Unix systems can be closed using the standard close() function. On Windows, a special
close function is used instead—closesocket(). It's useful to abstract out this difference
with a macro:
#if defined(_WIN32)
#define CLOSESOCKET(s) closesocket(s)
#else
#define CLOSESOCKET(s) close(s)
#endif
Error handling
When a socket function, such as socket(), bind(), accept(), and so on, has an error on
a Unix platform, the error number gets stored in the thread-global errno variable. On
Windows, the error number can be retrieved by calling WSAGetLastError() instead.
Again, we can abstract out this difference using a macro:
#if defined(_WIN32)
#define GETSOCKETERRNO() (WSAGetLastError())
#else
#define GETSOCKETERRNO() (errno)
#endif
In addition to obtaining an error code, it is often useful to retrieve a text description of the
error condition. Please refer to Chapter 13, Socket Programming Tips and Pitfalls, for a
technique for this.
With these helper macros out of the way, let's dive into our first real socket program.
Our first program
Now that we have a basic idea of socket APIs and the structure of networked programs, we
are ready to begin our first program. By building an actual real-world program, we will
learn the useful details of how socket programming actually works.
[ 53 ]
Getting to Grips with Socket APIs
Chapter 2
As an example task, we are going to build a web server that tells you what time it is right
now. This could be a useful resource for anybody with a smartphone or web browser that
needs to know what time it is right now. They can simply navigate to our web page and
find out. This is a good first example because it does something useful but still trivial
enough that it won't distract from what we are trying to learn—network programming.
A motivating example
Before we begin the networked program, it is useful to solve our problem with a simple
console program first. In general, it is a good idea to work out your program's functionality
locally before adding in networked features.
The local, console version of our time-telling program is as follows:
/*time_console.c*/
#include <stdio.h>
#include <time.h>
int main()
{
time_t timer;
time(&timer);
printf ("Local time is: %s", ctime(&timer));
return 0;
}
You can compile and run it like this:
$ gcc time_console.c -o time_console
$ ./time_console
Local time is: Fri Oct 19 08:42:05 2018
The program works by getting the time with the built-in C time() function. It then
converts it into a string with the ctime() function.
[ 54 ]
Getting to Grips with Socket APIs
Chapter 2
Making it networked
Now that we've worked out our program's functionality, we can begin on the networked
version of the same program.
To begin with, we include the needed headers:
/*time_server.c*/
#if defined(_WIN32)
#ifndef _WIN32_WINNT
#define _WIN32_WINNT 0x0600
#endif
#include <winsock2.h>
#include <ws2tcpip.h>
#pragma comment(lib, "ws2_32.lib")
#else
#include
#include
#include
#include
#include
#include
#include
<sys/types.h>
<sys/socket.h>
<netinet/in.h>
<arpa/inet.h>
<netdb.h>
<unistd.h>
<errno.h>
#endif
As we discussed earlier, this detects if the compiler is running on Windows or not and
includes the proper headers for the platform it is running on.
We also define some macros, which abstract out some of the difference between the
Berkeley socket and Winsock APIs:
/*time_server.c continued*/
#if defined(_WIN32)
#define ISVALIDSOCKET(s) ((s) != INVALID_SOCKET)
#define CLOSESOCKET(s) closesocket(s)
#define GETSOCKETERRNO() (WSAGetLastError())
#else
#define
#define
#define
#define
#endif
ISVALIDSOCKET(s) ((s) >= 0)
CLOSESOCKET(s) close(s)
SOCKET int
GETSOCKETERRNO() (errno)
[ 55 ]
Getting to Grips with Socket APIs
Chapter 2
We need a couple of standard C headers, hopefully for obvious reasons:
/*time_server.c continued*/
#include <stdio.h>
#include <string.h>
#include <time.h>
Now, we are ready to begin the main() function. The first thing the main() function will
do is initialize Winsock if we are compiling on Windows:
/*time_server.c continued*/
int main() {
#if defined(_WIN32)
WSADATA d;
if (WSAStartup(MAKEWORD(2, 2), &d)) {
fprintf(stderr, "Failed to initialize.\n");
return 1;
}
#endif
We must now figure out the local address that our web server should bind to:
/*time_server.c continued*/
printf("Configuring local address...\n");
struct addrinfo hints;
memset(&hints, 0, sizeof(hints));
hints.ai_family = AF_INET;
hints.ai_socktype = SOCK_STREAM;
hints.ai_flags = AI_PASSIVE;
struct addrinfo *bind_address;
getaddrinfo(0, "8080", &hints, &bind_address);
We use getaddrinfo() to fill in a struct addrinfo structure with the needed
information. getaddrinfo() takes a hints parameter, which tells it what we're looking
for. In this case, we've zeroed out hints using memset() first. Then, we set ai_family =
AF_INET. AF_INET specifies that we are looking for an IPv4 address. We could use
AF_INET6 to make our web server listen on an IPv6 address instead (more on this later).
[ 56 ]
Getting to Grips with Socket APIs
Chapter 2
Next, we set ai_socktype = SOCK_STREAM. This indicates that we're going to be using
TCP. SOCK_DGRAM would be used if we were doing a UDP server instead.
Finally, ai_flags = AI_PASSIVE is set. This is telling getaddrinfo() that we want it to
bind to the wildcard address. That is, we are asking getaddrinfo() to set up the address,
so we listen on any available network interface.
Once hints is set up properly, we declare a pointer to a struct addrinfo structure,
which holds the return information from getaddrinfo(). We then call
the getaddrinfo() function. The getaddrinfo() function has many uses, but for our
purpose, it generates an address that's suitable for bind(). To make it generate this, we
must pass in the first parameter as NULL and have the AI_PASSIVE flag set in
hints.ai_flags.
The second parameter to getaddrinfo() is the port we listen for connections on. A
standard HTTP server would use port 80. However, only privileged users on Unix-like
operating systems can bind to ports 0 through 1023. The choice of port number here is
arbitrary, but we use 8080 to avoid issues. If you are running with superuser privileges,
feel free to change the port number to 80 if you like. Keep in mind that only one program
can bind to a particular port at a time. If you try to use a port that is already in use, then the
call to bind() fails. In this case, just change the port number to something else and try
again.
It is common to see programs that don't use getaddrinfo() here. Instead, they fill in a
struct addrinfo structure directly. The advantage to using getaddrinfo() is that it is
protocol-independent. Using getaddrinfo() makes it very easy to convert our program
from IPv4 to IPv6. In fact, we only need to change AF_INET to AF_INET6, and our program
will work on IPv6. If we filled in the struct addrinfo structure directly, we would need
to make many tedious changes to convert our program into IPv6.
Now that we've figured out our local address info, we can create the socket:
/*time_server.c continued*/
printf("Creating socket...\n");
SOCKET socket_listen;
socket_listen = socket(bind_address->ai_family,
bind_address->ai_socktype, bind_address->ai_protocol);
[ 57 ]
Getting to Grips with Socket APIs
Chapter 2
Here, we define socket_listen as a SOCKET type. Recall that SOCKET is a Winsock type
on Windows, and that we have a macro defining it as int on other platforms. We call the
socket() function to generate the actual socket. socket() takes three parameters: the
socket family, the socket type, and the socket protocol. The reason we used
getaddrinfo() before calling socket() is that we can now pass in parts of
bind_address as the arguments to socket(). Again, this makes it very easy to change
our program's protocol without needing a major rewrite.
It is common to see programs written so that they call socket() first. The problem with
this is that it makes the program more complicated as the socket family, type, and protocol
must be entered multiple times. Structuring our program as we have here is better.
We should check that the call to socket() was successful:
/*time_server.c continued*/
if (!ISVALIDSOCKET(socket_listen)) {
fprintf(stderr, "socket() failed. (%d)\n", GETSOCKETERRNO());
return 1;
}
We can check that socket_listen is valid using the ISVALIDSOCKET() macro we defined
earlier. If the socket is not valid, we print an error message. Our GETSOCKETERRNO() macro
is used to retrieve the error number in a cross-platform way.
After the socket has been created successfully, we can call bind() to associate it with our
address from getaddrinfo():
/*time_server.c continued*/
printf("Binding socket to local address...\n");
if (bind(socket_listen,
bind_address->ai_addr, bind_address->ai_addrlen)) {
fprintf(stderr, "bind() failed. (%d)\n", GETSOCKETERRNO());
return 1;
}
freeaddrinfo(bind_address);
bind() returns 0 on success and non-zero on failure. If it fails, we print the error number
much like we did for the error handling on socket(). bind() fails if the port we are
binding to is already in use. In that case, either close the program using that port or change
your program to use a different port.
[ 58 ]
Getting to Grips with Socket APIs
Chapter 2
After we have bound to bind_address, we can call the freeaddrinfo() function to
release the address memory.
Once the socket has been created and bound to a local address, we can cause it to start
listening for connections with the listen() function:
/*time_server.c continued*/
printf("Listening...\n");
if (listen(socket_listen, 10) < 0) {
fprintf(stderr, "listen() failed. (%d)\n", GETSOCKETERRNO());
return 1;
}
The second argument to listen(), which is 10 in this case, tells listen() how many
connections it is allowed to queue up. If many clients are connecting to our server all at
once, and we aren't dealing with them fast enough, then the operating system begins to
queue up these incoming connections. If 10 connections become queued up, then the
operating system will reject new connections until we remove one from the existing queue.
Error handling for listen() is done the same way as we did for bind() and socket().
After the socket has begun listening for connections, we can accept any incoming
connection with the accept() function:
/*time_server.c continued*/
printf("Waiting for connection...\n");
struct sockaddr_storage client_address;
socklen_t client_len = sizeof(client_address);
SOCKET socket_client = accept(socket_listen,
(struct sockaddr*) &client_address, &client_len);
if (!ISVALIDSOCKET(socket_client)) {
fprintf(stderr, "accept() failed. (%d)\n", GETSOCKETERRNO());
return 1;
}
accept() has a few functions. First, when it's called, it will block your program until a new
connection is made. In other words, your program will sleep until a connection is made to
the listening socket. When the new connection is made, accept() will create a new socket
for it. Your original socket continues to listen for new connections, but the new socket
returned by accept() can be used to send and receive data over the newly established
connection. accept() also fills in address info of the client that connected.
[ 59 ]
Getting to Grips with Socket APIs
Chapter 2
Before calling accept(), we must declare a new struct sockaddr_storage variable to
store the address info for the connecting client. The struct sockaddr_storage type is
guaranteed to be large enough to hold the largest supported address on your system. We
must also tell accept() the size of the address buffer we're passing in. When accept()
returns, it will have filled in client_address with the connected client's address and
client_len with the length of that address. client_len differs, depending on whether
the connection is using IPv4 or IPv6.
We store the return value of accept() in socket_client. We check for errors by
detecting if client_socket is a valid socket. This is done in exactly the same way as we
did for socket().
At this point, a TCP connection has been established to a remote client. We can print the
client's address to the console:
/*time_server.c continued*/
printf("Client is connected... ");
char address_buffer[100];
getnameinfo((struct sockaddr*)&client_address,
client_len, address_buffer, sizeof(address_buffer), 0, 0,
NI_NUMERICHOST);
printf("%s\n", address_buffer);
This step is completely optional, but it is good practice to log network connections
somewhere.
getnameinfo() takes the client's address and address length. The address length is
needed because getnameinfo() can work with both IPv4 and IPv6 addresses. We then
pass in an output buffer and buffer length. This is the buffer that getnameinfo() writes its
hostname output to. The next two arguments specify a second buffer and its length.
getnameinfo() outputs the service name to this buffer. We don't care about that, so we've
passed in 0 for those two parameters. Finally, we pass in the NI_NUMERICHOST flag, which
specifies that we want to see the hostname as an IP address.
As we are programming a web server, we expect the client (for example, a web browser) to
send us an HTTP request. We read this request using the recv() function:
/*time_server.c continued*/
printf("Reading request...\n");
char request[1024];
int bytes_received = recv(socket_client, request, 1024, 0);
printf("Received %d bytes.\n", bytes_received);
[ 60 ]
Getting to Grips with Socket APIs
Chapter 2
We define a request buffer, so that we can store the browser's HTTP request. In this case,
we allocate 1,024 bytes to it, which should be enough for this application. recv() is then
called with the client's socket, the request buffer, and the request buffer size.
recv() returns the number of bytes that are received. If nothing has been received yet,
recv() blocks until it has something. If the connection is terminated by the client,
recv() returns 0 or -1, depending on the circumstance. We are ignoring that case here for
simplicity, but you should always check that recv() > 0 in production. The last
parameter to recv() is for flags. Since we are not doing anything special, we simply pass
in 0.
The request received from our client should follow the proper HTTP protocol. We will go
into detail about HTTP in Chapter 6, Building a Simple Web Client, and Chapter 7, Building a
Simple Web Server, where we will work on web clients and servers. A real web server would
need to parse the request and look at which resource the web browser is requesting. Our
web server only has one function—to tell us what time it is. So, for now, we just ignore the
request altogether.
If you want to print the browser's request to the console, you can do it like this:
printf("%.*s", bytes_received, request);
Note that we use the printf() format string, "%.*s". This tells printf() that we want to
print a specific number of characters—bytes_received. It is a common mistake to try
printing data that's received from recv() directly as a C string. There is no guarantee that
the data received from recv() is null terminated! If you try to print it with
printf(request) or printf("%s", request), you will likely receive a segmentation
fault error (or at best it will print some garbage).
Now that the web browser has sent its request, we can send our response back:
/*time_server.c continued*/
printf("Sending response...\n");
const char *response =
"HTTP/1.1 200 OK\r\n"
"Connection: close\r\n"
"Content-Type: text/plain\r\n\r\n"
"Local time is: ";
int bytes_sent = send(socket_client, response, strlen(response), 0);
printf("Sent %d of %d bytes.\n", bytes_sent, (int)strlen(response));
[ 61 ]
Getting to Grips with Socket APIs
Chapter 2
To begin with, we set char *response to a standard HTTP response header and the
beginning of our message (Local time is:). We will discuss HTTP in detail in Chapter
6, Building a Simple Web Client, and Chapter 7, Building a Simple Web Server. For now, know
that this response tells the browser three things—your request is OK; the server will close
the connection when all the data is sent and the data you receive will be plain text.
The HTTP response header ends with a blank line. HTTP requires line endings to take the
form of a carriage return character, followed by a newline character. So, a blank line in our
response is \r\n. The part of the string that comes after the blank line, Local time is:, is
treated by the browsers as plain text.
We send the data to the client using the send() function. This function takes the client's
socket, a pointer to the data to be sent, and the length of the data to send. The last
parameter to send() is flags. We don't need to do anything special, so we pass in 0.
send() returns the number of bytes sent. You should generally check that the number of
bytes sent was as expected, and you should attempt to send the rest if it's not. We are
ignoring that detail here for simplicity. (Also, we are only attempting to send a few bytes; if
send() can't handle that, then something is probably very broken, and resending won't
help.)
After the HTTP header and the beginning of our message is sent, we can send the actual
time. We get the local time the same way we did in time_console.c, and we send it using
send():
/*time_server.c continued*/
time_t timer;
time(&timer);
char *time_msg = ctime(&timer);
bytes_sent = send(socket_client, time_msg, strlen(time_msg), 0);
printf("Sent %d of %d bytes.\n", bytes_sent, (int)strlen(time_msg));
We must then close the client connection to indicate to the browser that we've sent all of
our data:
/*time_server.c continued*/
printf("Closing connection...\n");
CLOSESOCKET(socket_client);
[ 62 ]
Getting to Grips with Socket APIs
Chapter 2
If we don't close the connection, the browser will just wait for more data until it times out.
At this point, we could call accept() on socket_listen to accept additional connections.
That is exactly what a real server would do. However, as this is just a quick example
program, we will instead close the listening socket too and terminate the program:
/*time_server.c continued*/
printf("Closing listening socket...\n");
CLOSESOCKET(socket_listen);
#if defined(_WIN32)
WSACleanup();
#endif
printf("Finished.\n");
return 0;
}
That's the complete program. After you compile and run it, you can navigate a web
browser to it, and it'll display the current time.
On Linux and macOS, you can compile and run the program like this:
gcc time_server.c -o time_server
./time_server
On Windows, you can compile and run with MinGW using these commands:
gcc time_server.c -o time_server.exe -lws2_32
time_server
When you run the program, it waits for a connection. You can open a web browser and
navigate to http://127.0.0.1:8080 to load the web page. Recall that 127.0.0.1 is the
IPv4 loopback address, which connects to the same machine it's running on. The :8080
part of the URL specifies the port number to connect to. If it were left out, your browser
would default to port 80, which is the standard for HTTP connections.
[ 63 ]
Getting to Grips with Socket APIs
Chapter 2
Here is what you should see if you compile and run the program, and then connect a web
browser to it on the same computer:
Here is the web browser connected to our time_server program on port 8080:
Working with IPv6
Please recall the hints.ai_family = AF_INET part of time_server.c near the
beginning of the main() function. If this line is changed to hints.ai_family =
AF_INET6, then your web server listens for IPv6 connections instead of IPv4 connections.
This modified file is included in the GitHub repository as time_server_ipv6.c.
[ 64 ]
Getting to Grips with Socket APIs
Chapter 2
In this case, you should navigate your web browser to http://[::1]:8080 to see the web
page. ::1 is the IPv6 loopback address, which tells the web browser to connect to the same
machine it's running on. In order to use IPv6 addresses in URLs, you need to put them in
square brackets, []. :8080 specifies the port number in the same way that we did for the
IPv4 example.
Here is what you should see when compiling, running, and connecting a web browser to
our time_server_ipv6 program:
Here is the web browser that's connected to our server using an IPv6 socket:
See time_server_ipv6.c for the complete program.
[ 65 ]
Getting to Grips with Socket APIs
Chapter 2
Supporting both IPv4 and IPv6
It is also possible for the listening IPv6 socket to accept IPv4 connections with a dual-stack
socket. Not all operating systems support dual-stack sockets. With Linux in particular,
support varies between distros. If your operating system does support dual-stack sockets,
then I highly recommend implementing your server programs using this feature. It allows
your programs to communicate with both IPv4 and IPv6 peers while requiring no extra
work on your part.
We can modify time_server_ipv6.c to use dual-stack sockets with only a minor
addition. After the call to socket() and before the call to bind(), we must clear the
IPV6_V6ONLY flag on the socket. This is done with the setsockopt() function:
/*time_server_dual.c excerpt*/
int option = 0;
if (setsockopt(socket_listen, IPPROTO_IPV6, IPV6_V6ONLY,
(void*)&option, sizeof(option))) {
fprintf(stderr, "setsockopt() failed. (%d)\n", GETSOCKETERRNO());
return 1;
}
We first declare option as an integer and set it to 0. IPV6_V6ONLY is enabled by default, so
we clear it by setting it to 0. setsockopt() is called on the listening socket. We pass in
IPPROTO_IPV6 to tell it what part of the socket we're operating on, and we pass in
IPV6_V6ONLY to tell it which flag we are setting. We then pass in a pointer to our option
and its length. setsockopt() returns 0 on success.
Windows Vista and later supports dual-stack sockets. However, many Windows headers
are missing the definitions for IPV6_V6ONLY. For this reason, it might make sense to
include the following code snippet at the top of the file:
/*time_server_dual.c excerpt*/
#if !defined(IPV6_V6ONLY)
#define IPV6_V6ONLY 27
#endif
Keep in mind that the socket needs to be initially created as an IPv6 socket. This is
accomplished with the hints.ai_family = AF_INET6 line in our code.
[ 66 ]
Getting to Grips with Socket APIs
Chapter 2
When an IPv4 peer connects to our dual-stack server, the connection is remapped to an
IPv6 connection. This happens automatically and is taken care of by the operating system.
When your program sees the client IP address, it will still be presented as a special IPv6
address. These are represented by IPv6 addresses where the first 96 bits consist of the
prefix—0:0:0:0:0:ffff. The last 32 bits of the address are used to store the IPv4 address.
For example, if a client connects with the IPv4 address 192.168.2.107, then your dualstack server sees it as the IPv6 address ::ffff.192.168.2.107.
Here is what it looks like to compile, run, and connect to time_server_dual:
Here is a web browser connected to our time_server_dual program using the loopback
IPv4 address:
Notice that the browser is navigating to the IPv4 address 127.0.0.1, but we can see on the
console that the server sees the connection as coming from the IPv6 address
::ffff:127.0.0.1.
See time_server_dual.c for the complete dual-stack socket server.
[ 67 ]
Getting to Grips with Socket APIs
Chapter 2
Networking with inetd
On Unix-like systems, such as Linux or macOS, a service called inetd can be used to turn
console-only applications into networked ones. You can configure inetd (with
/etc/inetd.conf) with your program's location, port number, protocol (TCP or UDP),
and the user you want it to run as. inetd will then listen for connections on your desired
port. After an incoming connection is accepted by inetd, it will start your program and
redirect all socket input/output through stdin and stdout.
Using inetd, we could have time_console.c behave like time_server.c with very
minimal changes. We would only need to add in an extra printf() function with the
HTTP response header, read from stdin, and configure inetd.
You may be able to use inetd on Windows through Cygwin or the Windows Subsystem for
Linux.
Summary
In this chapter, we learned about the basics of using sockets for network programming.
Although there are many differences between Berkeley sockets (used on Unix-like
operating systems) and Winsock sockets (used on Windows), we mitigated those
differences with preprocessor statements. In this way, it was possible to write one program
that compiles cleanly on Windows, Linux, and macOS.
We covered how the UDP protocol is connectionless and what that means. We learned that
TCP, being a connection-oriented protocol, gives some reliability guarantees, such as
automatically detecting and resending lost packets. We also saw that UDP is often used for
simple protocols (for example, DNS) and for real-time streaming applications. TCP is used
for most other protocols.
After that, we worked through a real example by converting a console application into a
web server. We learned how to write the program using the getaddrinfo() function, and
why that matters for making the program IPv4/IPv6-agnostic. We used bind(), listen(),
and accept() on the server to wait for an incoming connection from the web browser.
Data was then read from the client using recv(), and a reply was sent using send().
Finally, we terminated the connection with close() (closesocket() on Windows).
[ 68 ]
Getting to Grips with Socket APIs
Chapter 2
When we built the web server, time_server.c, we covered much ground. It's OK if you
didn't understand all of it. We will revisit many of these functions again
throughout Chapter 3, An In-Depth Overview of TCP Connections, and the rest of this book.
In the next chapter, Chapter 3, An In-Depth Overview of TCP Connections, we will consider
programming for TCP connections in more depth.
Questions
Try these questions to test your knowledge on this chapter:
1.
2.
3.
4.
5.
6.
7.
8.
What is a socket?
What is a connectionless protocol? What is a connection-oriented protocol?
Is UDP a connectionless or connection-oriented protocol?
Is TCP a connectionless or connection-oriented protocol?
What types of applications generally benefit from using the UDP protocol?
What types of applications generally benefit from using the TCP protocol?
Does TCP guarantee that data will be transmitted successfully?
What are some of the main differences between Berkeley sockets and Winsock
sockets?
9. What does the bind() function do?
10. What does the accept() function do?
11. In a TCP connection, does the client or the server send application data first?
Answers are in Appendix A, Answers to Questions.
[ 69 ]
3
An In-Depth Overview of TCP
Connections
In Chapter 2, Getting to Grips with Socket APIs, we implemented a simple TCP server that
served a web page with HTTP. In this chapter, we will begin by implementing a TCP client.
This client is able to establish an IPv4 or IPv6 TCP connection with any listening TCP
server. It will be a useful debugging tool that we can reuse in the rest of this book.
Our TCP server from the last chapter was limited to accepting only one connection. In this
chapter, we will look at multiplexing techniques to allow our programs to handle many
separate connections simultaneously.
The following topics are covered in this chapter:
Configuring a remote address with getaddrinfo()
Initiating a TCP connection with connect()
Detecting terminal input in a non-blocking manner
Multiplexing with fork()
Multiplexing with select()
Detecting peer disconnects
Implementing a very basic microservice
The stream-like nature of TCP
The blocking behavior of send()
An In-Depth Overview of TCP Connections
Chapter 3
Technical requirements
The example programs for this chapter can be compiled with any modern C compiler. We
recommend MinGW on Windows and GCC on Linux and macOS. See Appendix B, Setting
Up Your C Compiler On Windows, Appendix C, Setting Up Your C Compiler On Linux, and
Appendix D, Setting Up Your C Compiler On macOS, for compiler setup.
The code for this book can be found in this book's GitHub repository: https://github.com/
codeplea/Hands-On-Network-Programming-with-C.
From the command line, you can download the code for this chapter with the following
command:
git clone https://github.com/codeplea/Hands-On-Network-Programming-with-C
cd Hands-On-Network-Programming-with-C/chap03
Each example program in this chapter runs on Windows, Linux, and macOS. While
compiling on Windows, each example program requires that you link with the Winsock
library. This can be accomplished by passing the -lws2_32 option to gcc.
We provide the exact commands that are needed to compile each example as it is
introduced.
All of the example programs in this chapter require the same header files and C macros that
we developed in Chapter 2, Getting to Grips with Socket APIs. For brevity, we put these
statements in a separate header file, chap03.h, which we can include in each program. For
an explanation of these statements, please refer to Chapter 2, Getting to Grips with Socket
APIs.
The contents of chap03.h is as follows:
/*chap03.h*/
#if defined(_WIN32)
#ifndef _WIN32_WINNT
#define _WIN32_WINNT 0x0600
#endif
#include <winsock2.h>
#include <ws2tcpip.h>
#pragma comment(lib, "ws2_32.lib")
#else
#include <sys/types.h>
#include <sys/socket.h>
#include <netinet/in.h>
[ 71 ]
An In-Depth Overview of TCP Connections
#include
#include
#include
#include
Chapter 3
<arpa/inet.h>
<netdb.h>
<unistd.h>
<errno.h>
#endif
#if defined(_WIN32)
#define ISVALIDSOCKET(s) ((s) != INVALID_SOCKET)
#define CLOSESOCKET(s) closesocket(s)
#define GETSOCKETERRNO() (WSAGetLastError())
#else
#define
#define
#define
#define
#endif
ISVALIDSOCKET(s) ((s) >= 0)
CLOSESOCKET(s) close(s)
SOCKET int
GETSOCKETERRNO() (errno)
#include <stdio.h>
#include <string.h>
Multiplexing TCP connections
The socket APIs are blocking by default. When you use accept() to wait for an incoming
connection, your program's execution is blocked until a new incoming connection is
actually available. When you use recv() to read incoming data, your program's execution
blocks until new data is actually available.
In the last chapter, we built a simple TCP server. This server only accepted one connection,
and it only read data from that connection once. Blocking wasn't a problem then, because
our server had no other purpose than to serve its one and only client.
In the general case, though, blocking I/O can be a significant problem. Imagine that our
server from Chapter 2, Getting to Grips with Socket APIs, needed to serve multiple clients.
Then, imagine that one slow client connected to it. Maybe this slow client takes a minute
before sending its first data. During this minute, our server would simply be waiting on the
recv() call to return. If other clients were trying to connect, they would have to wait it out.
[ 72 ]
An In-Depth Overview of TCP Connections
Chapter 3
Blocking on recv() like this isn't really acceptable. A real application usually needs to be
able to manage several connections simultaneously. This is obviously true on the server
side, as most servers are built to manage many connected clients. Imagine running a
website where hundreds of clients are connected at once. Serving these clients one at a time
would be a non-starter.
Blocking also isn't usually acceptable on the client side either. If you imagine building a fast
web browser, it needs to be able to download many images, scripts, and other resources in
parallel. Modern web browsers also have a tab feature where many whole web pages can
be loaded in parallel.
What we need is a technique for handling many separate connections simultaneously.
Polling non-blocking sockets
It is possible to configure sockets to use a non-blocking operation. One way to do this is by
calling fcntl() with the O_NONBLOCK flag (ioctlsocket() with the FIONBIO flag on
Windows), although other ways also exist. Once in non-blocking mode, a call to recv()
with no data will return immediately. See Chapter 13, Socket Programming Tips and Pitfalls,
for more information.
A program structured with this in mind could simply check each of its active sockets in
turn, continuously. It would handle any socket that returned data and ignore any socket
that didn't. This is called polling. Polling can be a waste of computer resources since most
of the time, there will be no data to read. It also complicates the program somewhat, as the
programmer is required to manually track which sockets are active and which state, they
are in. Return values from recv() must also be handled differently than with blocking
sockets.
For these reasons, we won't use polling in this book.
Forking and multithreading
Another possible solution to multiplexing socket connections is to start a new thread or
process for each connection. In this case, blocking sockets are fine, as they block only their
servicing thread/process, and they do not block other threads/processes. This can be a
useful technique, but it also has some downsides. First of all, threading is tricky to get right.
This is especially true if the connections must share any state between them. It is also less
portable as each operating system provides a different API for these features.
[ 73 ]
An In-Depth Overview of TCP Connections
Chapter 3
On Unix-based systems, such as Linux and macOS, starting a new process is very easy. We
simply use the fork() function. The fork() function splits the executing program into
two separate processes. A multi-process TCP server may accept connections like this:
while(1) {
socket_client = accept(socket_listen, &new_client, &new_client_length);
int pid = fork();
if (pid == 0) { //child process
close(socket_listen);
recv(socket_client, ...);
send(socket_client, ...);
close(socket_client);
exit(0);
}
//parent process
close(socket_client);
}
In this example, the program blocks on accept(). When a new connection is established,
the program calls fork() to split into two processes. The child process, where pid == 0,
only services this one connection. Therefore, the child process can use recv() freely
without worrying about blocking. The parent process simply calls close() on the new
connection and returns to listening for more connections with accept().
Using multiple processes/threads is much more complicated on Windows. Windows
provides CreateProcess(), CreateThread(), and many other functions for these
features. However—and I can say this objectively—they are all much harder to use than
Unix's fork().
Debugging these multi-process/thread programs can be much more difficult compared to
the single process case. Communicating between sockets and managing shared state is also
much more burdensome. For these reasons, we will avoid fork() and other multiprocess/thread techniques for the rest of this book.
That being said, an example TCP server using fork is included in this chapter's code. It's
named tcp_serve_toupper_fork.c. It does not run on Windows, but it should compile
and run cleanly on Linux and macOS. I would suggest finishing the rest of this chapter
before looking at it.
[ 74 ]
An In-Depth Overview of TCP Connections
Chapter 3
The select() function
Our preferred technique for multiplexing is to use the select() function. We can give
select() a set of sockets, and it tells us which ones are ready to be read. It can also tell us
which sockets are ready to write to and which sockets have exceptions. Furthermore, it is
supported by both Berkeley sockets and Winsock. Using select() keeps our programs
portable.
Synchronous multiplexing with select()
The select() function has several useful features. Given a set of sockets, it can be used to
block until any of the sockets in that set is ready to be read from. It can also be configured
to return if a socket is ready to be written to or if a socket has an error. Additionally, we can
configure select() to return after a specified time if none of these events take place.
The C function prototype for select() is as follows:
int select(int nfds, fd_set *readfds, fd_set *writefds,
fd_set *exceptfds, struct timeval *timeout);
Before calling select(), we must first add our sockets into an fd_set. If we have three
sockets, socket_listen, socket_a, and socket_b, we add them to an fd_set, like this:
fd_set our_sockets;
FD_ZERO(&our_sockets);
FD_SET(socket_listen, &our_sockets);
FD_SET(socket_a, &our_sockets);
FD_SET(socket_b, &our_sockets);
It is important to zero-out the fd_set using FD_ZERO() before use.
Socket descriptors are then added to the fd_set one at a time using FD_SET(). A socket
can be removed from an fd_set using FD_CLR(), and we can check for the presence of a
socket in the set using FD_ISSET().
You may see some programs manipulating an fd_set directly. I recommend that you use
only FD_ZERO(), FD_SET(), FD_CLR(), and FD_ISSET() to maintain portability between
Berkeley sockets and Winsock.
[ 75 ]
An In-Depth Overview of TCP Connections
Chapter 3
select() also requires that we pass a number that's larger than the largest socket
descriptor we are going to monitor. (This parameter is ignored on Windows, but we will
always do it anyway for portability.) We store the largest socket descriptor in a variable,
like this:
SOCKET max_socket;
max_socket = socket_listen;
if (socket_a > max_socket) max_socket = socket_a;
if (socket_b > max_socket) max_socket = socket_b;
When we call select(), it modifies our fd_set of sockets to indicate which sockets are
ready. For that reason, we want to copy our socket set before calling it. We can copy
an fd_set with a simple assignment like this, and then call select() like this:
fd_set copy;
copy = our_sockets;
select(max_socket+1, ©, 0, 0, 0);
This call blocks until at least one of the sockets is ready to be read from. When select()
returns, copy is modified so that it only contains the sockets that are ready to be read from.
We can check which sockets are still in copy using FD_ISSET(), like this:
if (FD_ISSET(socket_listen, ©)) {
//socket_listen has a new connection
accept(socket_listen...
}
if (FD_ISSET(socket_a, ©)) {
//socket_a is ready to be read from
recv(socket_a...
}
if (FD_ISSET(socket_b, ©)) {
//socket_b is ready to be read from
recv(socket_b...
}
In the previous example, we passed our fd_set as the second argument to select(). If
we wanted to monitor an fd_set for writability instead of readability, we would pass our
fd_set as the third argument to select(). Likewise, we can monitor a set of sockets for
exceptions by passing it as the fourth argument to select().
[ 76 ]
An In-Depth Overview of TCP Connections
Chapter 3
select() timeout
The last argument taken by select() allows us to specify a timeout. It expects a pointer
to struct timeval. The timeval structure is declared as follows:
struct timeval {
long tv_sec;
long tv_usec;
}
tv_sec holds the number of seconds, and tv_usec holds the number of microseconds
(1,000,000th second). If we want select() to wait a maximum of 1.5 seconds, we can call it
like this:
struct timeval timeout;
timeout.tv_sec = 1;
timeout.tv_usec = 500000;
select(max_socket+1, ©, 0, 0, &timeout);
In this case, select() returns after a socket in fd_set copy is ready to read or after 1.5
seconds has elapsed, whichever is sooner.
If timeout.tv_sec = 0 and timeout.tv_usec = 0, then select() returns
immediately (after changing the fd_set as appropriate). As we saw previously, if we pass
in a null pointer for the timeout parameter, then select() does not return until at least
one socket is ready to be read.
select() can also be used to monitor for writeable sockets (sockets where we could call
send() without blocking), and sockets with exceptions. We can check for all three
conditions with one call:
select(max_sockets+1, &ready_to_read, &ready_to_write, &excepted,
&timeout);
On success, select() itself returns the number of socket descriptors contained in the (up
to) three descriptor sets it monitored. The return value is zero if it timed out before any
sockets were readable/writeable/excepted. select() returns -1 to indicate an error.
[ 77 ]
An In-Depth Overview of TCP Connections
Chapter 3
Iterating through an fd_set
We can iterate through an fd_set using a simple for loop. Essentially, we start at 1, since
all socket descriptors are positive numbers, and we continue through to the largest known
socket descriptor in the set. For each possible socket descriptor, we simply use FD_ISSET()
to check if it is in the set. If we wanted to call CLOSESOCKET() for every socket in the
fd_set master, we could do it like this:
SOCKET i;
for (i = 1; i <= max_socket; ++i) {
if (FD_ISSSET(i, &master)) {
CLOSESOCKET(i);
}
}
This may seem like a brute-force approach, and it actually kind of is. However, these are
the tools that we have to work with. FD_ISSET() runs very fast, and it's likely that
processor time spent on other socket operations will dwarf what time was spent iterating
through them in this manner. Nevertheless, you may be able to optimize this operation by
additionally storing your sockets in an array or linked list. I don't recommend that you
make this optimization unless you profile your code and find the simple for loop iteration
to be a significant bottleneck.
select() on non-sockets
On Unix-based systems, select() can also be used on file and terminal I/O, which can be
extremely useful. This doesn't work on Windows, though. Windows only supports
select() for sockets.
A TCP client
It will be useful for us to have a TCP client that can connect to any TCP server. This TCP
client will take in a hostname (or IP address) and port number from the command line. It
will attempt a connection to the TCP server at that address. If successful, it will relay data
that's received from that server to the terminal and data inputted into the terminal to the
server. It will continue until either it is terminated (with Ctrl + C) or the server closes the
connection.
[ 78 ]
An In-Depth Overview of TCP Connections
Chapter 3
This is useful as a learning opportunity to see how to program a TCP client, but it is also
useful for testing the TCP server programs we develop throughout this book.
Our basic program flow looks like this:
[ 79 ]
An In-Depth Overview of TCP Connections
Chapter 3
Our program first uses getaddrinfo() to resolve the server address from the commandline arguments. Then, the socket is created with a call to socket(). The fresh socket has
connect() called on it to connect to the server. We use select() to monitor for socket
input. select() also monitors for terminal/keyboard input on non-Windows systems. On
Windows, we use the _kbhit() function to detect terminal input. If terminal input is
available, we send it over the socket using send(). If select() indicated that socket data
is available, we read it with recv() and display it to the terminal. This select() loop is
repeated until the socket is closed.
TCP client code
We begin our TCP client by including the header file, chap03.h, which was printed at the
beginning of this chapter. This header file includes the various other headers and macros
we need for cross-platform networking:
/*tcp_client.c*/
#include "chap03.h"
On Windows, we also need the conio.h header. This is required for the _kbhit()
function, which helps us by indicating whether terminal input is waiting. We conditionally
include this header, like so:
/*tcp_client.c*/
#if defined(_WIN32)
#include <conio.h>
#endif
We can then begin the main() function and initialize Winsock:
/*tcp_client.c*/
int main(int argc, char *argv[]) {
#if defined(_WIN32)
WSADATA d;
if (WSAStartup(MAKEWORD(2, 2), &d)) {
fprintf(stderr, "Failed to initialize.\n");
return 1;
}
#endif
[ 80 ]
An In-Depth Overview of TCP Connections
Chapter 3
We would like our program to take the hostname and port number of the server it should
connect to as command-line arguments. This makes our program flexible. We have our
program check that these command-line arguments are given. If they aren't, it displays
usage information:
/*tcp_client.c*/
if (argc < 3) {
fprintf(stderr, "usage: tcp_client hostname port\n");
return 1;
}
argc contains the number of argument values available to us. Because the first argument is
always our program's name, we check that there is a total of at least three arguments. The
actual values themselves are stored in argv[].
We then use these values to configure a remote address for connection:
/*tcp_client.c*/
printf("Configuring remote address...\n");
struct addrinfo hints;
memset(&hints, 0, sizeof(hints));
hints.ai_socktype = SOCK_STREAM;
struct addrinfo *peer_address;
if (getaddrinfo(argv[1], argv[2], &hints, &peer_address)) {
fprintf(stderr, "getaddrinfo() failed. (%d)\n", GETSOCKETERRNO());
return 1;
}
This is similar to how we called getaddrinfo() in Chapter 2, Getting to Grips with Socket
APIs. However, in Chapter 2, Getting to Grips with Socket APIs, we wanted it to configure a
local address, whereas this time, we want it to configure a remote address.
We set hints.ai_socktype = SOCK_STREAM to tell getaddrinfo() that we want a TCP
connection. Remember that we could set SOCK_DGRAM to indicate a UDP connection.
In Chapter 2, Getting to Grips with Socket APIs, we also set the family. We don't need to set
the family here, as we can let getaddrinfo() decide if IPv4 or IPv6 is the proper protocol
to use.
For the call to getaddrinfo() itself, we pass in the hostname and port as the first two
arguments. These are passed directly in from the command line. If they aren't suitable, then
getaddrinfo() returns non-zero and we print an error message. If everything goes well,
then our remote address is in the peer_address variable.
[ 81 ]
An In-Depth Overview of TCP Connections
Chapter 3
getaddrinfo() is very flexible about how it takes inputs. The hostname could be a
domain name like example.com or an IP address such as 192.168.17.23 or ::1. The port
can be a number, such as 80, or a protocol, such as http.
After getaddrinfo() configures the remote address, we print it out. This isn't really
necessary, but it is a good debugging measure. We use getnameinfo() to convert the
address back into a string, like this:
/*tcp_client.c*/
printf("Remote address is: ");
char address_buffer[100];
char service_buffer[100];
getnameinfo(peer_address->ai_addr, peer_address->ai_addrlen,
address_buffer, sizeof(address_buffer),
service_buffer, sizeof(service_buffer),
NI_NUMERICHOST);
printf("%s %s\n", address_buffer, service_buffer);
We can then create our socket:
/*tcp_client.c*/
printf("Creating socket...\n");
SOCKET socket_peer;
socket_peer = socket(peer_address->ai_family,
peer_address->ai_socktype, peer_address->ai_protocol);
if (!ISVALIDSOCKET(socket_peer)) {
fprintf(stderr, "socket() failed. (%d)\n", GETSOCKETERRNO());
return 1;
}
This call to socket() is done in exactly the same way as it was in Chapter 2, Getting to
Grips with Socket APIs. We use peer_address to set the proper socket family and protocols.
This keeps our program very flexible, as the socket() call creates an IPv4 or IPv6 socket as
needed.
After the socket has been created, we call connect() to establish a connection to the
remote server:
/*tcp_client.c */
printf("Connecting...\n");
if (connect(socket_peer,
peer_address->ai_addr, peer_address->ai_addrlen)) {
fprintf(stderr, "connect() failed. (%d)\n", GETSOCKETERRNO());
[ 82 ]
An In-Depth Overview of TCP Connections
Chapter 3
return 1;
}
freeaddrinfo(peer_address);
connect() takes three arguments—the socket, the remote address, and the remote address
length. It returns 0 on success, so we print an error message if it returns non-zero. This call
to connect() is extremely similar to how we called bind() in Chapter 2, Getting to Grips
with Socket APIs. Where bind() associates a socket with a local address, connect()
associates a socket with a remote address and initiates the TCP connection.
After we've called connect() with peer_address, we use the freeaddrinfo() function
to free the memory for peer_address.
If we've made it this far, then a TCP connection has been established to the remote server.
We let the user know by printing a message and instructions on how to send data:
/*tcp_client.c */
printf("Connected.\n");
printf("To send data, enter text followed by enter.\n");
Our program should now loop while checking both the terminal and socket for new data. If
new data comes from the terminal, we send it over the socket. If new data is read from the
socket, we print it out to the terminal.
It is clear we cannot call recv() directly here. If we did, it would block until data comes
from the socket. In the meantime, if our user enters data on the terminal, that input is
ignored. Instead, we use select(). We begin our loop and set up the call to select(),
like this:
/*tcp_client.c */
while(1) {
fd_set reads;
FD_ZERO(&reads);
FD_SET(socket_peer, &reads);
#if !defined(_WIN32)
FD_SET(0, &reads);
#endif
struct timeval timeout;
timeout.tv_sec = 0;
timeout.tv_usec = 100000;
if (select(socket_peer+1, &reads, 0, 0, &timeout) < 0) {
[ 83 ]
An In-Depth Overview of TCP Connections
Chapter 3
fprintf(stderr, "select() failed. (%d)\n", GETSOCKETERRNO());
return 1;
}
First, we declare a variable, fd_set reads, to store our socket set. We then zero it with
FD_ZERO() and add our only socket, socket_peer.
On non-Windows systems, we also use select() to monitor for terminal input. We add
stdin to the reads set with FD_SET(0, &reads). This works because 0 is the file
descriptor for stdin. Alternatively, we could have used FD_SET(fileno(stdin),
&reads) to the same effect.
The Windows select() function only works on sockets. Therefore, we cannot use
select() to monitor for console input. For this reason, we set up a timeout to the
select() call for 100 milliseconds (100,000 microseconds). If there is no socket activity
after 100 milliseconds, select() returns, and we can check for terminal input manually.
After select() returns, we check to see whether our socket is set in reads. If it is, then we
know to call recv() to read the new data. The new data is printed to the console with
printf():
/*tcp_client.c*/
if (FD_ISSET(socket_peer, &reads)) {
char read[4096];
int bytes_received = recv(socket_peer, read, 4096, 0);
if (bytes_received < 1) {
printf("Connection closed by peer.\n");
break;
}
printf("Received (%d bytes): %.*s",
bytes_received, bytes_received, read);
}
Remember, the data from recv() is not null terminated. For this reason, we use the
%.*s printf() format specifier, which prints a string of a specified length.
recv() normally returns the number of bytes read. If it returns less than 1, then the
connection has ended, and we break out of the loop to shut it down.
After checking for new TCP data, we also need to check for terminal input:
/*tcp_client.c */
#if defined(_WIN32)
if(_kbhit()) {
[ 84 ]
An In-Depth Overview of TCP Connections
Chapter 3
#else
if(FD_ISSET(0, &reads)) {
#endif
char read[4096];
if (!fgets(read, 4096, stdin)) break;
printf("Sending: %s", read);
int bytes_sent = send(socket_peer, read, strlen(read), 0);
printf("Sent %d bytes.\n", bytes_sent);
}
On Windows, we use the _kbhit() function to indicate whether any console input is
waiting. _kbhit() returns non-zero if an unhandled key press event is queued up. For
Unix-based systems, we simply check if select() sets the stdin file descriptor, 0. If input
is ready, we call fgets() to read the next line of input. This input is then sent over our
connected socket with send().
Note that fgets() includes the newline character from the input. Therefore, our sent input
always ends with a newline.
If the socket has closed, send() returns -1. We ignore this case here. This is because a
closed socket causes select() to return immediately, and we notice the closed socket on
the next call to recv(). This is a common paradigm in TCP socket programming to ignore
errors on send() while detecting and handling them on recv(). It allows us to simplify
our program by keeping our connection closing logic all in one place. Later in this chapter,
we will discuss other concerns regarding send().
This select() based terminal monitoring works very well on Unix-based systems. It also
works equally well if input is piped in. For example, you could use our TCP client program
to send a text file with a command such as cat my_file.txt | tcp_client
192.168.54.122 8080.
The Windows terminal handling leaves a bit to be desired. Windows does not provide an
easy way to tell whether stdin has input available without blocking, so we use _kbhit()
as a poor proxy. However, if the user presses a non-printable key, such as an arrow key, it
still triggers _kbhit(), even though there is no character to read. Also, after the first key
press, our program will block on fgets() until the user presses the Enter key. (This doesn't
happen on shells that buffer entire lines, which is common outside of Windows.) This
blocking behavior is acceptable, but you should know that any received TCP data will not
display until after that point. _kbhit() does not work for piped input. Doing proper piped
and console input on Windows is possible, of course, but it's very complicated.
[ 85 ]
An In-Depth Overview of TCP Connections
Chapter 3
We would need to use separate functions for each (PeekNamedPipe() and
PeekConsoleInput()), and the logic for handling it would be as long as this entire
program! Since handling terminal input isn't the purpose of this book, we're going to accept
_kbhit() function's limitations and move on.
At this point, our program is essentially done. We can end the while loop, close our socket,
and clean up Winsock:
/*tcp_client.c */
}
printf("Closing socket...\n");
CLOSESOCKET(socket_peer);
#if defined(_WIN32)
WSACleanup();
#endif
printf("Finished.\n");
return 0;
}
That's the complete program. You can compile it on Linux and macOS like this:
gcc tcp_client.c -o tcp_client
Compiling on Windows with MinGW is done like this:
gcc tcp_client.c -o tcp_client.exe -lws2_32
To run the program, remember to pass in the remote hostname/address and port number,
for example:
tcp_client example.com 80
Alternatively, you can use the following command:
tcp_client 127.0.0.1 8080
A fun way to test out the TCP client would be to connect to a live web server and send an
HTTP request. For example, you could connect to example.com on port 80 and send the
following HTTP request:
GET / HTTP/1.1
Host: example.com
[ 86 ]
An In-Depth Overview of TCP Connections
Chapter 3
You must then send a blank line to indicate the end of the request. You'll receive an HTTP
response back. It might look something like this:
[ 87 ]
An In-Depth Overview of TCP Connections
Chapter 3
A TCP server
Microservices have become increasingly popular in recent years. The idea of microservices
is that large programming problems can be split up into many small subsystems that
communicate over a network. For example, if your program needs to format a string, you
could add code to your program to do that, but writing code is hard. Alternatively, you
could keep your program simple and instead connect to a service that provides string
formatting for you. This has the added advantage that many programs can use this same
service without reinventing the wheel.
Unfortunately, the microservice paradigm has largely avoided the C ecosystem; until now!
As a motivating example, we are going to build a TCP server that converts strings into
uppercase. If a client connects and sends Hello, then our program will send HELLO back.
This will serve as a very basic microservice. Of course, a real-world microservice might do
something a bit more advanced (such as left-pad a string), but this to-uppercase service
works well for our pedagogical purposes.
For our microservice to be useful, it does need to handle many simultaneous incoming
connections. We again use select() to see which connections need to be serviced.
[ 88 ]
An In-Depth Overview of TCP Connections
Chapter 3
Our basic program flow looks like this:
[ 89 ]
An In-Depth Overview of TCP Connections
Chapter 3
Like in Chapter 2, Getting to Grips with Socket APIs, our TCP server uses getaddrinfo() to
obtain the local address to listen on. It creates a socket with socket(), uses bind() to
associate the local address to the socket, and uses listen() to begin listening for new
connections. Up until that point, it is essentially identical to our TCP server from Chapter
2, Getting to Grips with Socket APIs.
However, our next step is not to call accept() to wait for new connections. Instead, we
call select(), which alerts us if a new connection is available or if any of our established
connections have new data ready. Only when we know that a new connection is waiting do
we call accept(). All established connections are put into an fd_set, which is passed to
every subsequent select() call. In this same way, we know which connections would
block on recv(), and we only service those connections that we know will not block.
When data is received by recv(), we run it through toupper() and return it to the client
using send().
This is a complicated program with several new concepts. Don't worry about
understanding all the details right now. The flow is only intended to give you an overview
of what to expect before we dive into the actual code.
TCP server code
Our TCP server code begins by including the needed headers, starting main(), and
initializing Winsock. Refer to Chapter 2, Getting to Grips with Socket APIs, if this doesn't
seem familiar:
/*tcp_serve_toupper.c*/
#include "chap03.h"
#include <ctype.h>
int main() {
#if defined(_WIN32)
WSADATA d;
if (WSAStartup(MAKEWORD(2, 2), &d)) {
fprintf(stderr, "Failed to initialize.\n");
return 1;
}
#endif
[ 90 ]
An In-Depth Overview of TCP Connections
Chapter 3
We then get our local address, create our socket, and bind(). This is all done exactly as
explained in Chapter 2, Getting to Grips with Socket APIs:
/*tcp_serve_toupper.c */
printf("Configuring local address...\n");
struct addrinfo hints;
memset(&hints, 0, sizeof(hints));
hints.ai_family = AF_INET;
hints.ai_socktype = SOCK_STREAM;
hints.ai_flags = AI_PASSIVE;
struct addrinfo *bind_address;
getaddrinfo(0, "8080", &hints, &bind_address);
printf("Creating socket...\n");
SOCKET socket_listen;
socket_listen = socket(bind_address->ai_family,
bind_address->ai_socktype, bind_address->ai_protocol);
if (!ISVALIDSOCKET(socket_listen)) {
fprintf(stderr, "socket() failed. (%d)\n", GETSOCKETERRNO());
return 1;
}
Note that we are going to listen on port 8080. You can, of course, change that. We're also
doing an IPv4 server here. If you want to listen for connections on IPv6, then just change
AF_INET to AF_INET6.
We then bind() our socket to the local address and have it enter a listening state. Again,
this is done exactly as in Chapter 2, Getting to Grips with Socket APIs:
/*tcp_serve_toupper.c*/
printf("Binding socket to local address...\n");
if (bind(socket_listen,
bind_address->ai_addr, bind_address->ai_addrlen)) {
fprintf(stderr, "bind() failed. (%d)\n", GETSOCKETERRNO());
return 1;
}
freeaddrinfo(bind_address);
printf("Listening...\n");
if (listen(socket_listen, 10) < 0) {
fprintf(stderr, "listen() failed. (%d)\n", GETSOCKETERRNO());
return 1;
}
[ 91 ]
An In-Depth Overview of TCP Connections
Chapter 3
This is the point where we diverge from our earlier methods. We now define
an fd_set structure that stores all of the active sockets. We also maintain a max_socket
variable, which holds the largest socket descriptor. For now, we add only our listening
socket to the set. Because it's the only socket, it must also be the largest, so we set
max_socket = socket_listen too:
/*tcp_serve_toupper.c */
fd_set master;
FD_ZERO(&master);
FD_SET(socket_listen, &master);
SOCKET max_socket = socket_listen;
Later in the program, we will add new connections to master as they are established.
We then print a status message, enter the main loop, and set up our call to select():
/*tcp_serve_toupper.c */
printf("Waiting for connections...\n");
while(1) {
fd_set reads;
reads = master;
if (select(max_socket+1, &reads, 0, 0, 0) < 0) {
fprintf(stderr, "select() failed. (%d)\n", GETSOCKETERRNO());
return 1;
}
This works by first copying our fd_set master into reads. Recall that select()
modifies the set given to it. If we didn't copy master, we would lose its data.
We pass a timeout value of 0 (NULL) to select() so that it doesn't return until a socket in
the master set is ready to be read from. At the beginning of our program, master only
contains socket_listen, but as our program runs, we add each new connection to
master.
We now loop through each possible socket and see whether it was flagged by select() as
being ready. If a socket, X, was flagged by select(), then FD_ISSET(X, &reads) is true.
Socket descriptors are positive integers, so we can try every possible socket descriptor up to
max_socket. The basic structure of our loop is as follows:
/*tcp_serve_toupper.c */
SOCKET i;
for(i = 1; i <= max_socket; ++i) {
[ 92 ]
An In-Depth Overview of TCP Connections
Chapter 3
if (FD_ISSET(i, &reads)) {
//Handle socket
}
}
Remember, FD_ISSET() is only true for sockets that are ready to be read. In the case of
socket_listen, this means that a new connection is ready to be established with
accept(). For all other sockets, it means that data is ready to be read with recv(). We
should first determine whether the current socket is the listening one or not. If it is, we call
accept(). This code snippet and the one that follows replace the //Handle socket
comment in the preceding code:
/*tcp_serve_toupper.c */
if (i == socket_listen) {
struct sockaddr_storage client_address;
socklen_t client_len = sizeof(client_address);
SOCKET socket_client = accept(socket_listen,
(struct sockaddr*) &client_address,
&client_len);
if (!ISVALIDSOCKET(socket_client)) {
fprintf(stderr, "accept() failed. (%d)\n",
GETSOCKETERRNO());
return 1;
}
FD_SET(socket_client, &master);
if (socket_client > max_socket)
max_socket = socket_client;
char address_buffer[100];
getnameinfo((struct sockaddr*)&client_address,
client_len,
address_buffer, sizeof(address_buffer), 0, 0,
NI_NUMERICHOST);
printf("New connection from %s\n", address_buffer);
If the socket is socket_listen, then we accept() the connection much as we did in
Chapter 2, Getting to Grips with Socket APIs. We use FD_SET() to add the new connection's
socket to the master socket set. This allows us to monitor it with subsequent calls to
select(). We also maintain max_socket. As a final step, this code prints out the client's
address using getnameinfo().
[ 93 ]
An In-Depth Overview of TCP Connections
Chapter 3
If the socket i is not socket_listen, then it is instead a request for an established
connection. In this case, we need to read it with recv(), convert it into uppercase using the
built-in toupper() function, and send the data back:
/*tcp_serve_toupper.c */
} else {
char read[1024];
int bytes_received = recv(i, read, 1024, 0);
if (bytes_received < 1) {
FD_CLR(i, &master);
CLOSESOCKET(i);
continue;
}
int j;
for (j = 0; j < bytes_received; ++j)
read[j] = toupper(read[j]);
send(i, read, bytes_received, 0);
}
If the client has disconnected, then recv() returns a non-positive number. In this case, we
remove that socket from the master socket set, and we also call CLOSESOCKET() on it to
clean up.
Our program is now almost finished. We can end the if FD_ISSET() statement, end the
for loop, end the while loop, close the listening socket, and clean up Winsock:
/*tcp_serve_toupper.c */
} //if FD_ISSET
} //for i to max_socket
} //while(1)
printf("Closing listening socket...\n");
CLOSESOCKET(socket_listen);
#if defined(_WIN32)
WSACleanup();
#endif
printf("Finished.\n");
return 0;
}
[ 94 ]
An In-Depth Overview of TCP Connections
Chapter 3
Our program is set up to continuously listen for connections, so the code after the end of
the while loop will never run. Nevertheless, I believe it is still good practice to include it in
case we program in functionality later to abort the while loop.
That's the complete to-uppercase microservice TCP server program. You can compile and
run it on Linux and macOS like this:
gcc tcp_serve_toupper.c -o tcp_serve_toupper
./tcp_serve_toupper
Compiling and running on Windows with MinGW is done like this:
gcc tcp_serve_toupper.c -o tcp_serve_toupper.exe -lws2_32
tcp_serve_toupper.exe
You can abort the program's execution with Ctrl + C.
Once the program is running, I would suggest opening another terminal and running the
tcp_client program from earlier to connect to it:
tcp_client 127.0.0.1 8080
Anything you type in tcp_client should be sent back as uppercase. Here's what this
might look like:
[ 95 ]
An In-Depth Overview of TCP Connections
Chapter 3
As a test of the server program's functionality, try opening several additional terminals and
connecting with tcp_client. Our server should be able to handle many simultaneous
connections.
Also included with this chapter's code is tcp_serve_toupper_fork.c. This program only
runs on Unix-based operating systems, but it performs the same functions as
tcp_serve_toupper.c by using fork() instead of select(). The fork() function is
commonly used by TCP servers, so I think it's helpful to be familiar with it.
Building a chat room
It is also possible, and common, to need to send data between connected clients. We can
modify our tcp_serve_toupper.c program and make it a chat room pretty easily.
First, locate the following code in tcp_serve_toupper.c:
/*tcp_serve_toupper.c excerpt*/
int j;
for (j = 0; j < bytes_received; ++j)
read[j] = toupper(read[j]);
send(i, read, bytes_received, 0);
Replace the preceding code with the following:
/*tcp_serve_chat.c excerpt*/
SOCKET j;
for (j = 1; j <= max_socket; ++j) {
if (FD_ISSET(j, &master)) {
if (j == socket_listen || j == i)
continue;
else
send(j, read, bytes_received, 0);
}
}
This works by looping through all the sockets in the master set. For each socket, j, we
check that it's not the listening socket and we check that it's not the same socket that sent
the data in the first place. If it's not, we call send() to echo the received data to it.
You can compile and run this program in the same way as the previous one.
[ 96 ]
An In-Depth Overview of TCP Connections
Chapter 3
On Linux and macOS, this is done as follows:
gcc tcp_serve_chat.c -o tcp_serve_chat
./tcp_serve_chat
On Windows, this is done as follows:
gcc tcp_serve_chat.c -o tcp_serve_chat.exe -lws2_32
tcp_serve_chat.exe
You should open two or more additional windows and connect to it with the following
code:
tcp_client 127.0.0.1 8080
Whatever you type in one of the tcp_client terminals get sent to all of the other
connected terminals.
Here is an example of what this may look like:
In the preceding screenshot, I am running tcp_serve_chat in the upper-left terminal
windows. The other three terminal windows are running tcp_client. As you can see, any
text entered in one of the tcp_client windows is sent to the server, which relays it to the
other two connected clients.
[ 97 ]
An In-Depth Overview of TCP Connections
Chapter 3
Blocking on send()
When we call send() with an amount of data, send() first copies this data into an
outgoing buffer provided by the operating system. If we call send() when its outgoing
buffer is already full, it blocks until its buffer has emptied enough to accept more of our
data.
In some cases where send() would block, it instead returns without copying all of the data
as requested. In this case, the return value of send() indicates how many bytes were
actually copied. One example of this is if your program is blocking on send() and then
receives a signal from the operating system. In these cases, it is up to the caller to try again
with any remaining data.
In this chapter's TCP server code section, we ignored the possibility that send() could block
or be interrupted. In a fully robust application, what we need to do is compare the return
value from send() with the number of bytes that we tried to send. If the number of bytes
actually sent is less than requested, we should use select() to determine when the socket
is ready to accept new data, and then call send() with the remaining data. As you can
imagine, this can become a bit complicated when keeping track of multiple sockets.
As the operating system usually provides a large enough outgoing buffer, we were able to
avoid this possibility with our earlier server code. If we know that our server may try to
send large amounts of data, we should certainly check for the return value from send().
The following code example assumes that buffer contains buffer_len bytes of data to
send over a socket called peer_socket. This code blocks until we've sent all of buffer or
an error (such as the peer disconnecting) occurs:
int begin = 0;
while (begin < buffer_len) {
int sent = send(peer_socket, buffer + begin, buffer_len - begin, 0);
if (sent == -1) {
//Handle error
}
begin += sent;
}
[ 98 ]
An In-Depth Overview of TCP Connections
Chapter 3
If we are managing multiple sockets and don't want to block, then we should put all
sockets with pending send() into an fd_set and pass it as the third parameter to
select(). When select() signals on these sockets, then we know that they are ready to
send more data.
Chapter 13, Socket Programming Tips and Pitfalls, addresses concerns regarding
the send() function's blocking behavior in more detail.
TCP is a stream protocol
A common mistake beginners make is assuming that any data passed into send() can be
read by recv() on the other end in the same amount. In reality, sending data is similar to
writing and reading from a file. If we write 10 bytes to a file, followed by another 10 bytes,
then the file has 20 bytes of data. If the file is to be read later, we could read 5 bytes and 15
bytes, or we could read all 20 bytes at once, and so on. In any case, we have no way of
knowing that the file was written in two 10 byte chunks.
Using send() and recv() works the same way. If you send() 20 bytes, it's not possible to
tell how many recv() calls these bytes are partitioned into. It is possible that one call to
recv() could return all 20 bytes, but it is also possible that a first call to recv() returns 16
bytes and that a second call to recv() is needed to get the last 4 bytes.
This can make communication difficult. In many protocols, as we will see later in this book,
it is important that received data be buffered up until enough of it has accumulated to
warrant processing. We avoided this issue in this chapter with our to-uppercase sever by
defining a protocol that operates just as well on 1 byte as it does on 100. This isn't true for
most application protocols.
For a concrete example, imagine we wanted to make our tcp_serve_toupper server
terminate if it received the quit command through a TCP socket. You could call
send(socket, "quit", 4, 0) on the client and you may think that a call to recv() on
the server would return quit. Indeed, in your testing, it is very likely to work that way.
However, this behavior is not guaranteed. A call to recv() could just as likely return qui,
and a second call to recv() may be required to receive the last t. If that is the case,
consider how you would interpret whether a quit command has been received. The
straightforward way to do it would be to buffer up data that's received from multiple
recv() calls.
[ 99 ]
An In-Depth Overview of TCP Connections
Chapter 3
We will cover techniques for dealing with recv() buffering in Section 2, An Overview of
Application Layer Protocols, of this book.
In contrast to TCP, UDP is not a stream protocol. With UDP, a packet is received with
exactly the same contents as it was sent with. This can sometimes make handling UDP
somewhat easier, as we will see in Chapter 4, Establishing UDP Connections.
Summary
TCP really serves as the backbone of the modern internet experience. TCP is used by HTTP,
the protocol that powers websites, and by Simple Mail Transfer Protocol (SMTP), the
protocol that powers email.
In this chapter, we saw that building a TCP client was fairly straightforward. The only
really tricky part was having the client monitor for local terminal input while
simultaneously monitoring for socket data. We were able to accomplish this with select()
on Unix-based systems, but it was slightly trickier on Windows. Many real-world
applications don't need to monitor terminal input, and so this step isn't always needed.
Building a TCP server that's suitable for many parallel connections wasn't much harder.
Here, select() was extremely useful, as it allowed a straightforward way of monitoring
the listening socket for new connections while also monitoring existing connections for new
data.
We also touched briefly on some common pain points. TCP doesn't provide a native way to
partition data. For more complicated protocols where this is needed, we have to buffer data
from recv() until a suitable amount is available to interpret. For TCP peers that are
handling large amounts of data, buffering to send() is also necessary.
The next chapter, Chapter 4, Establishing UDP Connections, is all about UDP, the
counterpart to TCP. In some ways, UDP programming is simpler than TCP programming,
but it is also very different.
[ 100 ]
An In-Depth Overview of TCP Connections
Chapter 3
Questions
Try answering these questions to test your knowledge on this chapter:
1. How can we tell whether the next call to recv() will block?
2. How can you ensure that select() doesn't block for longer than a specified
time?
3. When we used our tcp_client program to connect to a web server, why did we
need to send a blank line before the web server responded?
4. Does send() ever block?
5. How can we tell whether the socket has been disconnected by our peer?
6. Is data received by recv() always the same size as data sent with send()?
7. Consider the following code:
recv(socket_peer, buffer, 4096, 0);
printf(buffer);
What is wrong with it?
Also see what is wrong with this code:
recv(socket_peer, buffer, 4096, 0);
printf("%s", buffer);
The answers can be found in Appendix A, Answers to Questions.
[ 101 ]
4
Establishing UDP Connections
In this chapter, we will look at how to send and receive User Datagram Protocol (UDP)
packets. UDP socket programming is very similar to Transmission Control Protocol (TCP)
socket programming, so it is recommended that you read and understand Chapter 3, An
In-Depth Overview of TCP Connections, before beginning this one.
The following topics are covered in this chapter:
The differences between TCP socket programming and UDP socket
programming
The sendto() and recvfrom() functions
How connect() works on a UDP socket
Implementing a UDP server using only one socket
Using select() to tell when a UDP socket has data ready
Technical requirements
The example programs in this chapter can be compiled with any modern C compiler. We
recommend MinGW on Windows and GCC on Linux and macOS. See Appendix B, Setting
Up Your C Compiler On Windows, Appendix C, Setting Up Your C Compiler On Linux, and
Appendix D, Setting Up Your C Compiler On macOS, for compiler setup.
Establishing UDP Connections
Chapter 4
The code for this book can be found in this book's GitHub repository: https://github.com/
codeplea/Hands-On-Network-Programming-with-C.
From the command line, you can download the code for this chapter with the following
command:
git clone https://github.com/codeplea/Hands-On-Network-Programming-with-C
cd Hands-On-Network-Programming-with-C/chap04
Each example program in this chapter runs on Windows, Linux, and macOS. While
compiling on Windows, each example program requires being linked with the Winsock
library. This can be accomplished by passing the -lws2_32 option to gcc.
We provide the exact commands that are needed to compile each example as they are
introduced.
All of the example programs in this chapter require the same header files and C macros that
we developed in Chapter 2, Getting to Grips with Socket APIs. For brevity, we put these
statements in a separate header file, chap04.h, which we can include in each program. For
an explanation of these statements, please refer to Chapter 2, Getting to Grips with Socket
APIs.
The content of chap04.h is shown in the following code:
#if defined(_WIN32)
#ifndef _WIN32_WINNT
#define _WIN32_WINNT 0x0600
#endif
#include <winsock2.h>
#include <ws2tcpip.h>
#pragma comment(lib, "ws2_32.lib")
#else
#include
#include
#include
#include
#include
#include
#include
<sys/types.h>
<sys/socket.h>
<netinet/in.h>
<arpa/inet.h>
<netdb.h>
<unistd.h>
<errno.h>
#endif
#if defined(_WIN32)
#define ISVALIDSOCKET(s) ((s) != INVALID_SOCKET)
[ 103 ]
Establishing UDP Connections
Chapter 4
#define CLOSESOCKET(s) closesocket(s)
#define GETSOCKETERRNO() (WSAGetLastError())
#else
#define
#define
#define
#define
#endif
ISVALIDSOCKET(s) ((s) >= 0)
CLOSESOCKET(s) close(s)
SOCKET int
GETSOCKETERRNO() (errno)
#include <stdio.h>
#include <string.h>
How UDP sockets differ
The socket API for UDP sockets is only very slightly different than what we've already
learned for TCP. In fact, they are similar enough that we can take the TCP client from the
last chapter and turn it into a fully functional UDP client by changing only one line of code:
1. Take tcp_client.c from Chapter 3, An In-Depth Overview of TCP Connections,
and find the following line of code:
hints.ai_socktype = SOCK_STREAM;
2. Change the preceding code to the following:
hints.ai_socktype = SOCK_DGRAM;
This modification is included in this chapter's code as udp_client.c.
You can recompile the program using the same commands as before, and you'll get a fully
functional UDP client.
Unfortunately, changing the TCP servers of the previous chapters to UDP won't be as easy.
TCP and UDP server code are different enough that a slightly different approach is needed.
Also, don't assume that because we had to change only one line of the code that the client
behaves exactly the same way – this won't happen. The two programs are using a different
protocol, after all.
[ 104 ]
Establishing UDP Connections
Chapter 4
Remember from Chapter 2, Getting to Grips with Socket APIs that UDP does not try to be a
reliable protocol. Lost packets are not automatically re-transmitted, and packets may be
received in a different order than they were sent. It is even possible for one packet to
erroneously arrive twice! TCP attempts to solve all these problems, but UDP leaves you to
your own devices.
Do you know what the best thing about a UDP joke is? I don't care if you get it or not.
Despite UDP's (lack of) reliability, it is still appropriate for many applications. Let's look at
the methods that are used by UDP clients and servers.
UDP client methods
Sending data with TCP requires calling connect() to set the remote address and establish
the TCP connection. Thus, we use send() with TCP sockets, as shown in the following
code:
connect(tcp_socket, peer_address, peer_address_length);
send(tcp_socket, data, data_length, 0);
UDP is a connectionless protocol. Therefore, no connection is established before sending
data. A UDP connection is never established. With UDP, data is simply sent and received.
We can call connect() and then send(), as we mentioned previously, but the socket API
provides an easier way for UDP sockets in the form of the sendto() function. It works like
this:
sendto(udp_socket, data, data_length, 0,
peer_address, peer_address_length);
connect() on a UDP socket works a bit differently. All connect() does with a UDP
socket is associate a remote address. Thus, while connect() on a TCP socket involves a
handshake for sending packets over the network, connect() on a UDP socket only stores
an address locally.
So, a UDP client can be structured in two different ways, depending on whether you use
connect(), send(), and recv(), or instead use sendto() and recvfrom().
[ 105 ]
Establishing UDP Connections
Chapter 4
The following diagram compares the program flow of a TCP Client to a UDP Client using
either method:
Note that, while using connect(), the UDP Client only receives data from the peer having
the IP address and the port that is given to connect(). However, when not using
connect(), the recvfrom() function returns data from any peer that addresses us! Of
course, that peer would need to know our address and port. Unless we call bind(), our
local address and port is assigned automatically by the operating system.
UDP server methods
Programming a UDP server is a bit different than TCP. TCP requires managing a socket for
each peer connection. With UDP, our program only needs one socket. That one socket can
communicate with any number of peers.
[ 106 ]
Establishing UDP Connections
Chapter 4
While the TCP program flow required us to use listen() and accept() to wait for and
establish new connections, these functions are not used with UDP. Our UDP server simply
binds to the local address, and then it can immediately start sending and receiving data.
The program flow of a TCP Server compared to a UDP Server is as follows:
[ 107 ]
Establishing UDP Connections
Chapter 4
With either a TCP or UDP server, we use select() when we need to check/wait for
incoming data. The difference is that a TCP Server using select() is likely monitoring
many separate sockets, while a UDP Server often only needs to monitor one socket. If your
program uses both TCP and UDP sockets, you can monitor them all with only one call to
select().
A first UDP client/server
To drive these points home, it will be useful to work through a full UDP client and UDP
server program.
To keep things simple, we will create a UDP client program that simply sends the Hello
World string to 127.0.0.1 on port 8080. Our UDP server listens on 8080. It prints any
data it receives, along with the sender's address and port number.
We will begin by implementing the simple UDP server.
A simple UDP server
We will start with the server, since we already have a usable UDP client, that
is, udp_client.c.
Like all of our networked programs, we will begin by including the necessary headers,
starting with the main() function, and initializing Winsock as follows:
/*udp_recvfrom.c*/
#include "chap04.h"
int main() {
#if defined(_WIN32)
WSADATA d;
if (WSAStartup(MAKEWORD(2, 2), &d)) {
fprintf(stderr, "Failed to initialize.\n");
return 1;
}
#endif
[ 108 ]
Establishing UDP Connections
Chapter 4
If you've been working through this book in order, this code should be very routine for you
by now. If you haven't, then please refer to Chapter 2, Getting to Grips with Socket APIs.
Then, we must configure the local address that our server listens on. We use
getaddrinfo() for this, as follows:
/*udp_recvfrom.c continued*/
printf("Configuring local address...\n");
struct addrinfo hints;
memset(&hints, 0, sizeof(hints));
hints.ai_family = AF_INET;
hints.ai_socktype = SOCK_DGRAM;
hints.ai_flags = AI_PASSIVE;
struct addrinfo *bind_address;
getaddrinfo(0, "8080", &hints, &bind_address);
This differs only slightly from how we've done it before. Notably, we set
hints.ai_socktype = SOCK_DGRAM. Recall that SOCK_STREAM was used there for TCP
connections. We are still setting hints.ai_family = AF_INET here. This makes our
server listen for IPv4 connections. We could change that to AF_INET6 to make our server
listen for IPv6 connections instead.
After we have our local address information, we can create the socket, as follows:
/*udp_recvfrom.c continued*/
printf("Creating socket...\n");
SOCKET socket_listen;
socket_listen = socket(bind_address->ai_family,
bind_address->ai_socktype, bind_address->ai_protocol);
if (!ISVALIDSOCKET(socket_listen)) {
fprintf(stderr, "socket() failed. (%d)\n", GETSOCKETERRNO());
return 1;
}
This code is exactly the same as in the TCP case. The call to socket() uses our address
information from getaddrinfo() to create the proper type of socket.
We must then bind the new socket to the local address that we got from getaddrinfo().
This is as follows:
/*udp_recvfrom.c continued*/
printf("Binding socket to local address...\n");
if (bind(socket_listen,
[ 109 ]
Establishing UDP Connections
Chapter 4
bind_address->ai_addr, bind_address->ai_addrlen)) {
fprintf(stderr, "bind() failed. (%d)\n", GETSOCKETERRNO());
return 1;
}
freeaddrinfo(bind_address);
Again, that code is exactly the same as in the TCP case.
Here is where the UDP server diverges from the TCP server. Once the local address is
bound, we can simply start to receive data. There is no need to call listen() or accept().
We listen for incoming data using recvfrom(), as shown here:
/*udp_recvfrom.c continued*/
struct sockaddr_storage client_address;
socklen_t client_len = sizeof(client_address);
char read[1024];
int bytes_received = recvfrom(socket_listen,
read, 1024,
0,
(struct sockaddr*) &client_address, &client_len);
In the previous code, we created a struct sockaddr_storage to store the client's
address. We also defined socklen_t client_len to hold the address size. This keeps our
code robust in the case that we change it from IPv4 to IPv6. Finally, we created a buffer,
char read[1024], to store incoming data.
recvfrom() is used in a similar manner to recv(), except that it returns the sender's
address, as well as the received data. You can think of recvfrom() as a combination of the
TCP server accept() and recv().
Once we've received data, we can print it out. Keep in mind that the data may not be null
terminated. It can be safely printed with the %.*s printf() format specifier, as shown in
the following code:
/*udp_recvfrom.c continued*/
printf("Received (%d bytes): %.*s\n",
bytes_received, bytes_received, read);
[ 110 ]
Establishing UDP Connections
Chapter 4
It may also be useful to print the sender's address and port number. We can use the
getnameinfo() function to convert this data into a printable string, as shown in the
following code:
/*udp_recvfrom.c continued*/
printf("Remote address is: ");
char address_buffer[100];
char service_buffer[100];
getnameinfo(((struct sockaddr*)&client_address),
client_len,
address_buffer, sizeof(address_buffer),
service_buffer, sizeof(service_buffer),
NI_NUMERICHOST | NI_NUMERICSERV);
printf("%s %s\n", address_buffer, service_buffer);
The last argument to getnameinfo() (NI_NUMERICHOST | NI_NUMERICSERV) tells
getnameinfo() that we want both the client address and port number to be in numeric
form. Without this, it would attempt to return a hostname or protocol name if the port
number matches a known protocol. If you do want a protocol name, pass in the NI_DGRAM
flag to tell getnameinfo() that you're working on a UDP port. This is important for the
few protocols that have different ports for TCP and UDP.
It's also worth noting that the client will rarely set its local port number explicitly. So, the
port number returned here by getnameinfo() is likely to be a high number that's chosen
randomly by the client's operating system. Even if the client did set its local port number,
the port number we can see here might have been changed by network address
translation (NAT).
In any case, if our server were to send data back, it would need to send it to the address and
port stored in client_address. This would be done by passing client_address to
sendto().
Once the data has been received, we'll end our simple UDP server by closing the
connection, cleaning up Winsock, and ending the program:
/*udp_recvfrom.c continued*/
CLOSESOCKET(socket_listen);
#if defined(_WIN32)
WSACleanup();
#endif
printf("Finished.\n");
[ 111 ]
Establishing UDP Connections
Chapter 4
return 0;
}
You can compile and run udp_recvfrom.c on Linux and macOS by using the following
commands:
gcc udp_recvfrom.c -o udp_recvfrom
./udp_recvfrom
Compiling and running on Windows with MinGW is done as follows:
gcc udp_recvfrom.c -o udp_recvfrom.exe -lws2_32
udp_recvfrom.exe
While running, it simply waits for an incoming connection:
You could use udp_client to connect to udp_recvfrom for testing, or you can implement
udp_sendto, which we will do next.
A simple UDP client
Although we've already shown a fairly full-featured UDP client, udp_client.c, it is
worthwhile building a very simple UDP client. This client shows only the minimal required
steps to get a working UDP client, and it uses sendto() instead of send().
[ 112 ]
Establishing UDP Connections
Chapter 4
Let's begin the same way we begin each program, by including the necessary headers,
starting main(), and initializing Winsock, as follows:
/*udp_sendto.c*/
#include "chap04.h"
int main() {
#if defined(_WIN32)
WSADATA d;
if (WSAStartup(MAKEWORD(2, 2), &d)) {
fprintf(stderr, "Failed to initialize.\n");
return 1;
}
#endif
We then configure the remote address using getaddrinfo(). In this minimal example, we
use 127.0.0.1 as the remote address and 8080 as the remote port. This means that it
connects to the UDP server only if it's running on the same computer.
Here is how the remote address is configured:
/*udp_sendto.c continued*/
printf("Configuring remote address...\n");
struct addrinfo hints;
memset(&hints, 0, sizeof(hints));
hints.ai_socktype = SOCK_DGRAM;
struct addrinfo *peer_address;
if (getaddrinfo("127.0.0.1", "8080", &hints, &peer_address)) {
fprintf(stderr, "getaddrinfo() failed. (%d)\n", GETSOCKETERRNO());
return 1;
}
Notice that we hardcoded 127.0.0.1 and 8080 into the call to getaddrinfo(). Also,
notice that we've set hints.ai_socktype = SOCK_DGRAM. This tells getaddrinfo() that
we are connecting over UDP. Notice that we did not set AF_INET or AF_INET6. This
allows getaddrinfo() to return the appropriate address for IPv4 or IPv6. In this case, it is
IPv4 because the address, 127.0.0.1, is an IPv4 address. We will cover getaddrinfo() in
more detail in Chapter 5, Hostname Resolution and DNS.
[ 113 ]
Establishing UDP Connections
Chapter 4
We can print the configured address using getnameinfo(). The call to getnameinfo() is
the same as in the previous UDP server, udp_recvfrom.c. It works as follows:
/*udp_sendto.c continued*/
printf("Remote address is: ");
char address_buffer[100];
char service_buffer[100];
getnameinfo(peer_address->ai_addr, peer_address->ai_addrlen,
address_buffer, sizeof(address_buffer),
service_buffer, sizeof(service_buffer),
NI_NUMERICHOST | NI_NUMERICSERV);
printf("%s %s\n", address_buffer, service_buffer);
Now that we've stored the remote address, we are ready to create our socket with a call to
socket(). We pass in fields from peer_address to create the appropriate socket type. The
code for this is as follows:
/*udp_sendto.c continued*/
printf("Creating socket...\n");
SOCKET socket_peer;
socket_peer = socket(peer_address->ai_family,
peer_address->ai_socktype, peer_address->ai_protocol);
if (!ISVALIDSOCKET(socket_peer)) {
fprintf(stderr, "socket() failed. (%d)\n", GETSOCKETERRNO());
return 1;
}
Once the socket has been created, we can go straight to sending data with sendto(). There
is no need to call connect(). Here is the code to send Hello World to our UDP server:
/*udp_sendto.c continued*/
const char *message = "Hello World";
printf("Sending: %s\n", message);
int bytes_sent = sendto(socket_peer,
message, strlen(message),
0,
peer_address->ai_addr, peer_address->ai_addrlen);
printf("Sent %d bytes.\n", bytes_sent);
Notice that sendto() is much like send(), except that we need to pass in an address as the
last parameter.
[ 114 ]
Establishing UDP Connections
Chapter 4
It is also worth noting that we do not get an error back if sending fails. send() simply tries
to send a message, but if it gets lost or is misdelivered along the way, there is nothing we
can do about it. If the message is important, it is up to the application protocol to
implement the corrective action.
After we've sent our data, we could reuse the same socket to send data to another address
(as long as it's the same type of address, which is IPv4 in this case). We could also try to
receive a reply from the UDP server by calling recvfrom(). Note that if we did call
recvfrom() here, we could get data from anybody that sends to us – not necessarily the
server we just transmitted to.
When we sent our data, our socket was assigned with a temporary local port number by the
operating system. This local port number is called the ephemeral port number. From then
on, our socket is essentially listening for a reply on this local port. If the local port is
important, you can use bind() to associate a specific port before calling send().
If multiple applications on the same system are connecting to a remote server at the same
port, the operating system uses the local ephemeral port number to keep replies separate.
Without this, it wouldn't be possible to know which application should receive which
reply.
We'll end our example program by freeing the memory for peer_address, closing the
socket, cleaning up Winsock, and finishing main(), as follows:
/*udp_sendto.c continued*/
freeaddrinfo(peer_address);
CLOSESOCKET(socket_peer);
#if defined(_WIN32)
WSACleanup();
#endif
printf("Finished.\n");
return 0;
}
You can compile udp_sendto.c on Linux and macOS using the following command:
gcc udp_sendto.c -o udp_sendto
[ 115 ]
Establishing UDP Connections
Chapter 4
Compiling on Windows with MinGW is done in the following way:
gcc udp_sendto.c -o udp_sendto.exe -lws2_32
To test it out, first, start udp_recvfrom in a separate terminal. With udp_recvfrom already
running, you can start udp_sendto. It should look as follows:
If no server is running on port 8080, udp_sendto still produces the same output.
udp_sendto doesn't know that the packet was not delivered.
[ 116 ]
Establishing UDP Connections
Chapter 4
A UDP server
It will be useful to look at a UDP server that's been designed to service many connections.
Fortunately for us, the UDP socket API makes this very easy.
We will take the motivating example from our last chapter, which was to provide a service
that converts all text into uppercase. This is useful because you can directly compare the
UDP code from here to the TCP server code from Chapter 3, An In-Depth Overview of TCP
Connections.
Our server begins by setting up the socket and binding to our local address. It then waits to
receive data. Once it has received a data string, it converts the string into all uppercase and
sends it back.
The program flow looks as follows:
[ 117 ]
Establishing UDP Connections
Chapter 4
If you compare the flow of this program to the TCP server from the last chapter (Chapter 3,
An In-Depth Overview of TCP Connections), you will find that it's much simpler. With TCP,
we had to use listen() and accept(). With UDP, we skip those calls and go straight into
receiving data with recvfrom(). With our TCP server, we had to monitor a listening
socket for new connections while simultaneously monitoring an additional socket for each
connected client. Our UDP server only uses one socket, so there is much less to keep track
of.
Our UDP server program begins by including the necessary headers, starting the main()
function, and initializing Winsock, as follows:
/*udp_serve_toupper.c*/
#include "chap04.h"
#include <ctype.h>
int main() {
#if defined(_WIN32)
WSADATA d;
if (WSAStartup(MAKEWORD(2, 2), &d)) {
fprintf(stderr, "Failed to initialize.\n");
return 1;
}
#endif
We then find our local address that we should listen on, create the socket, and bind to it.
This is all exactly the same as in our earlier server, udp_recvfrom.c. The only difference
between this code and the TCP servers in Chapter 3, An In-Depth Overview of TCP
Connections, is that we use SOCK_DGRAM instead of SOCK_STREAM. Recall that SOCK_DGRAM
specifies that we want a UDP socket.
Here is the code for setting the address and creating a new socket:
/*udp_serve_toupper.c continued*/
printf("Configuring local address...\n");
struct addrinfo hints;
memset(&hints, 0, sizeof(hints));
hints.ai_family = AF_INET;
hints.ai_socktype = SOCK_DGRAM;
hints.ai_flags = AI_PASSIVE;
struct addrinfo *bind_address;
getaddrinfo(0, "8080", &hints, &bind_address);
[ 118 ]
Establishing UDP Connections
Chapter 4
printf("Creating socket...\n");
SOCKET socket_listen;
socket_listen = socket(bind_address->ai_family,
bind_address->ai_socktype, bind_address->ai_protocol);
if (!ISVALIDSOCKET(socket_listen)) {
fprintf(stderr, "socket() failed. (%d)\n", GETSOCKETERRNO());
return 1;
}
Binding the new socket to the local address is done as follows:
/*udp_serve_toupper.c continued*/
printf("Binding socket to local address...\n");
if (bind(socket_listen,
bind_address->ai_addr, bind_address->ai_addrlen)) {
fprintf(stderr, "bind() failed. (%d)\n", GETSOCKETERRNO());
return 1;
}
freeaddrinfo(bind_address);
Because our server uses select(), we need to create a new fd_set to store our listening
socket. We zero the set using FD_ZERO(), and then add our socket to this set using
FD_SET(). We also maintain the maximum socket in the set using max_socket:
/*udp_serve_toupper.c continued*/
fd_set master;
FD_ZERO(&master);
FD_SET(socket_listen, &master);
SOCKET max_socket = socket_listen;
printf("Waiting for connections...\n");
Note that we don't really have to use select() for this program, and omitting it would
make the program simpler (see udp_server_toupper_simple.c). However, we are going
to use select() because it makes our code more flexible. We could easily add in an
additional socket (if we needed to listen on multiple ports, for example), and we could add
in a select() timeout if our program needs to perform other functions. Of course, our
program doesn't do those things, so we don't need select(), but I think that most
programs do, so we will show it that way.
[ 119 ]
Establishing UDP Connections
Chapter 4
Now, we are ready for the main loop. It copies the socket set into a new variable, reads,
and then uses select() to wait until our socket is ready to read from. Recall that we could
pass in a timeout value as the last parameter to select() if we want to set a maximum
waiting time for the next read. Refer to Chapter 3, An In-Depth Overview of TCP Connections,
the Synchronous multiplexing with select() section, for more information on select().
Once select() returns, we use FD_ISSET() to tell if our particular socket,
socket_listen, is ready to be read from. If we had additional sockets, we would need to
use FD_ISSET() for each socket.
If FD_ISSET() returns true, we read from the socket using recvfrom(). recvfrom()
gives us the sender's address, so we must first allocate a variable to hold the address, that
is, client_address. Once we've read a string from the socket using recvfrom(), we
convert the string into uppercase using the C toupper() function. We then send the
modified text back to the sender using sendto(). Note that the last two parameters to
sendto() are the client's addresses that we got from recvfrom().
The main program loop can be seen in the following code:
/*udp_serve_toupper.c continued*/
while(1) {
fd_set reads;
reads = master;
if (select(max_socket+1, &reads, 0, 0, 0) < 0) {
fprintf(stderr, "select() failed. (%d)\n", GETSOCKETERRNO());
return 1;
}
if (FD_ISSET(socket_listen, &reads)) {
struct sockaddr_storage client_address;
socklen_t client_len = sizeof(client_address);
char read[1024];
int bytes_received = recvfrom(socket_listen, read, 1024, 0,
(struct sockaddr *)&client_address, &client_len);
if (bytes_received < 1) {
fprintf(stderr, "connection closed. (%d)\n",
GETSOCKETERRNO());
return 1;
}
int j;
for (j = 0; j < bytes_received; ++j)
read[j] = toupper(read[j]);
[ 120 ]
Establishing UDP Connections
Chapter 4
sendto(socket_listen, read, bytes_received, 0,
(struct sockaddr*)&client_address, client_len);
} //if FD_ISSET
} //while(1)
We can then close the socket, clean up Winsock, and terminate the program. Note that this
code never runs, because the main loop never terminates. We include this code anyway as
good practice; in case the program is adapted in the future to have an exit function.
The cleanup code is as follows:
/*udp_serve_toupper.c continued*/
printf("Closing listening socket...\n");
CLOSESOCKET(socket_listen);
#if defined(_WIN32)
WSACleanup();
#endif
printf("Finished.\n");
return 0;
}
That's our complete UDP server program. You can compile and run it on Linux and macOS
as follows:
gcc udp_serve_toupper.c -o udp_serve_toupper
./udp_serve_toupper
Compiling and running on Windows with MinGW is done in the following manner:
gcc udp_serve_toupper.c -o udp_serve_toupper.exe -lws2_32
udp_serve_toupper.exe
You can abort the program's execution with Ctrl + C.
Once the program is running, you should open another terminal window and run the
udp_client program from earlier to connect to it, as follows:
udp_client 127.0.0.1 8080
[ 121 ]
Establishing UDP Connections
Chapter 4
Anything you type in udp_client should be sent back to it in uppercase. Here's what that
might look like:
You may also want to try opening additional terminal windows and connecting with
udp_client.
See udp_serve_toupper_simple.c for an implementation that doesn't use select(),
but manages to work just as well anyway.
[ 122 ]
Establishing UDP Connections
Chapter 4
Summary
In this chapter, we saw that programming with UDP sockets is somewhat easier than with
TCP sockets. We learned that UDP sockets don't need the listen(), accept(), or
connect() function calls. This is mostly because sendto() and recvfrom() deal with the
addresses directly. For more complicated programs, we can still use the select() function
to see which sockets are ready for I/O.
We also saw that UDP sockets are connectionless. This is in contrast to connection-oriented
TCP sockets. With TCP, we had to establish a connection before sending data, but with
UDP, we simply send individual packets directly to a destination address. This keeps UDP
socket programming simple, but it can complicate application protocol design, and UDP
does not automatically retry communication failures or ensure that packets arrive in order.
The next chapter, Chapter 5, Hostname Resolution and DNS, is all about hostnames.
Hostnames are resolved using the DNS protocol, which works over UDP. Move on
to Chapter 5, Hostname Resolution and DNS, to learn about implementing a real-world UDP
protocol.
Questions
Try answering these questions to test your knowledge of this chapter:
1.
2.
3.
4.
5.
6.
How do sendto() and recvfrom() differ from send() and recv()?
Can send() and recv() be used on UDP sockets?
What does connect() do in the case of a UDP socket?
What makes multiplexing with UDP easier than with TCP?
What are the downsides to UDP when compared to TCP?
Can the same program use UDP and TCP?
The answers can be found in Appendix A, Answers to Questions.
[ 123 ]
5
Hostname Resolution and DNS
Hostname resolution is a vital part of network programming. It allows us to use simple
names, such as www.example.com, instead of tedious addresses such
as ::ffff:192.168.212.115. The mechanism that allows us to resolve hostnames into IP
addresses and IP addresses into hostnames is the Domain Name System (DNS).
In this chapter, we begin by covering the built-in getaddrinfo() and
getnameinfo() socket functions in more depth. Later, we will build a program that does
DNS queries using User Datagram Protocol (UDP) from scratch.
We will cover the following topics in this chapter:
How DNS works
Common DNS record types
The getaddrinfo() and getnameinfo() functions
DNS query data structures
DNS UDP protocol
DNS TCP fallback
Implementing a DNS query program
Technical requirements
The example programs from this chapter can be compiled with any modern C compiler. We
recommend MinGW on Windows and GCC on Linux and macOS. See Appendices B, C,
and D for compiler setup.
The code for this book can be found at https://github.com/codeplea/Hands-On-NetworkProgramming-with-C.
Hostname Resolution and DNS
Chapter 5
From the command line, you can download the code for this chapter with the following
command:
git clone https://github.com/codeplea/Hands-On-Network-Programming-with-C
cd Hands-On-Network-Programming-with-C/chap05
Each example program in this chapter runs on Windows, Linux, and macOS. When
compiling on Windows, each example program should be linked with the Winsock library.
This can be accomplished by passing the -lws2_32 option to gcc.
We'll provide the exact commands needed to compile each example as they are introduced.
All of the example programs in this chapter require the same header files and C macros
which we developed in Chapter 2, Getting to Grips with Socket APIs. For brevity, we put
these statements in a separate header file, chap05.h, which we can include in each
program. For an explanation of these statements, please refer to Chapter 2, Getting to Grips
with Socket APIs.
The contents of chap05.h are as follows:
/*chap05.h*/
#if defined(_WIN32)
#ifndef _WIN32_WINNT
#define _WIN32_WINNT 0x0600
#endif
#include <winsock2.h>
#include <ws2tcpip.h>
#pragma comment(lib, "ws2_32.lib")
#else
#include
#include
#include
#include
#include
#include
#include
<sys/types.h>
<sys/socket.h>
<netinet/in.h>
<arpa/inet.h>
<netdb.h>
<unistd.h>
<errno.h>
#endif
#if defined(_WIN32)
#define ISVALIDSOCKET(s) ((s) != INVALID_SOCKET)
#define CLOSESOCKET(s) closesocket(s)
#define GETSOCKETERRNO() (WSAGetLastError())
[ 125 ]
Hostname Resolution and DNS
#else
#define
#define
#define
#define
#endif
Chapter 5
ISVALIDSOCKET(s) ((s) >= 0)
CLOSESOCKET(s) close(s)
SOCKET int
GETSOCKETERRNO() (errno)
#include <stdio.h>
#include <stdlib.h>
#include <string.h>
With the chap05.h header in place, writing portable network programs is much easier.
Let's continue now with an explanation of how DNS works, and then we will move on to
the actual example programs.
How hostname resolution works
The DNS is used to assign names to computers and systems connected to the internet.
Similar to how a phone book can be used to link a phone number to a name, the DNS
allows us to link a hostname to an IP address.
When your program needs to connect to a remote computer, such as www.example.com, it
first needs to find the IP address for www.example.com. In this book so far, we have been
using the built-in getaddrinfo() function for this purpose. When you call
getaddrinfo(), your operating system goes through a number of steps to resolve the
domain name.
First, your operating system checks whether it already knows the IP address for
www.example.com. If you have used that hostname recently, the OS is allowed to
remember it in a local cache for a time. This time is referred to as time-to-live (TTL) and is
set by the DNS server responsible for the hostname.
If the hostname is not found in the local cache, then your operating system will need to
query a DNS server. This DNS server is usually provided by your Internet Service
Provider (ISP), but there are also many publicly-available DNS servers. When the DNS
server receives a query, it also checks its local cache. This is useful because numerous
systems may be relying on one DNS server. If a DNS server receives 1,000 requests for
gmail.com in one minute, it only needs to resolve the hostname the first time. For the other
999 requests, it can simply return the memorized answer from its local cache.
[ 126 ]
Hostname Resolution and DNS
Chapter 5
If the DNS server doesn't have the requested DNS record in its cache, then it needs to query
other DNS servers until it connects directly to the DNS server responsible for the target
system. Here's an example query resolution broken down step-wise:
Client A's DNS server is trying to resolve www.example.com as follows:
1. It first connects to a root DNS server and asks for www.example.com.
2. The root DNS server directs it to ask the .com server.
3. Our client's DNS server then connects to the server responsible for .com and asks
for www.example.com.
4. The .com DNS server gives our server the address of another server – the
example.com DNS server.
5. Our DNS server finally connects to that server and asks about the record for
www.example.com.
6. The example.com server then shares the address of www.example.com.
7. Our client's DNS server relays it back to our client.
The following diagram illustrates this visually:
[ 127 ]
Hostname Resolution and DNS
Chapter 5
In this example, you can see that resolving www.example.com involved sending eight
messages. It's possible that the lookup could have taken even longer. This is why it's
imperative for DNS servers to implement caching. Let's assume that Client B tries the same
query shortly after Client A; it's likely that the DNS server would have that value cached:
Of course, if a program on Client A wants to resolve www.example.com again, it's likely
that it won't have to contact the DNS server at all – the operating system running on Client
A should have cached the result.
On Windows, you can show your local DNS cache with the following command:
ipconfig /displaydns
On Linux or macOS, the command to show your local DNS varies depending on your exact
system setup.
One downside of setting a large TTL value for a domain record is that you have to wait at
least that long to be sure that all clients are using the new record and not just retrieving the
old cached record.
In addition to DNS records that link a hostname to an IP address, there are other DNS
record types for various purposes. We'll review some of these in the next section.
DNS record types
The DNS has five main types of records—A, AAAA, MX, TXT, CNAME, and * (ALL/ANY).
As we have learned, the DNS's primary purpose is to translate hostnames into IP addresses.
This is done with two record types – type A and type AAAA. These records work in the same
way, but A records return an IPv4 address, while AAAA records return an IPv6 address.
[ 128 ]
Hostname Resolution and DNS
Chapter 5
The MX record type is used to return mail server information. For example, if you wanted to
send an email to larry@example.com, then the MX record(s) for example.com would
indicate which mail server(s) receives emails for that domain.
TXT records can be used to store arbitrary information for a hostname. In practice, these are
sometimes set to prove ownership of a domain name or to publish email sending
guidelines. The Sender Policy Framework (SPF) standard uses TXT records to declare
which systems are allowed to send mail for a given domain name. You can read more about
SPF at http://www.openspf.org/.
CNAME records can be used to provide an alias for a given name. For example, many
websites are accessible at both their root domain name, for example, example.com, and at
the www subdomain. If example.com and www.example.com should point to the same
address, then an A and an AAAA record can be added for example.com, while a CNAME
record can be added for www.example.com pointing to example.com. Note that DNS
clients don't query for CNAME records directly; instead, a client would ask for the A or AAAA
record for www.example.com and the DNS server would reply with the CNAME record
pointing to example.com. The DNS client would then continue the query using
example.com.
When doing a DNS query, there is also a pseudo-record type called * or ALL or ANY. If this
record is requested from a DNS server, then the DNS server returns all known record types
for the current query. Note that a DNS server is allowed to respond with only the records in
its cache, and this query is not guaranteed (or even likely) to actually get all of the records
for the requested domain.
When sending a DNS query, each record type has an associated type ID. The IDs for the
records discussed so far are as follows:
Record Type
A
AAAA
MX
TXT
CNAME
*
Type ID (decimal)
Description
1
IPv4 address record
28
IPv6 address record
15
Mail exchange record
16
Text record
5
Canonical name
255
All cached records
There are many other record types in use. Please see the Further reading section at the end of
this chapter for more information.
[ 129 ]
Hostname Resolution and DNS
Chapter 5
It should be noted that one hostname may be associated with multiple records of the same
type. For example, example.com could have several A records, each with a different IPv4
address. This is useful if multiple servers can provide the same service.
One other aspect of the DNS protocol worth mentioning is security. Let's look at that now.
DNS security
While most web traffic and email are encrypted today, DNS is still widely used in an
unsecured manner. Protocols do exist to provide security for DNS, but they are not widely
adopted yet. This will hopefully change in the near future.
Domain Name System Security Extensions (DNSSEC) are DNS extensions that provide
data authentication. This authentication allows a DNS client to know that a given DNS
reply is authentic, but it does not protect against eavesdropping.
DNS over HTTPS (DoH) is a protocol that provides name resolution over HTTPS. HTTPS
provides strong security guarantees, including resistance to interception. We cover HTTPS
in Chapter 9, Loading Secure Web Pages with HTTPS and OpenSSL, and Chapter 10,
Implementing a Secure Web Server.
What are the implications of using insecure DNS? First, if DNS is not authenticated, then it
could allow an attacker to lie about a domain name's IP address. This could trick a victim
into connecting to a server that they think is example.com, but, in reality, is a malicious
server controlled by the attacker at a different IP address. If the user is connecting via a
secure protocol, such as HTTPS, then this attack will fail. HTTPS provides additional
authentication to prove server identity. However, if the user connects with an insecure
protocol, such as HTTP, then the DNS attack could successfully trick the victim into
connecting to the wrong server.
If DNS is authenticated, then these hijacking attacks are prevented. However, without
encryption, DNS queries are still susceptible to eavesdropping. This could potentially give
an eavesdropper insight into which websites you're visiting and other servers that you are
connecting to (for example, which email server you use). This doesn't let an attacker know
what you are doing on each website. For example, if you do a DNS query for
example.com, an attacker would know that you planned to visit example.com, but the
attacker would not be able to determine which resources you requested from example.com
– assuming that you use a secure protocol (for example, HTTPS) to retrieve those resources.
An attacker with the ability to eavesdrop would be able to see that you established a
connection to the IP address of example.com in any case, so them knowing that you
performed a DNS lookup beforehand is not much extra information.
[ 130 ]
Hostname Resolution and DNS
Chapter 5
With some security discussion out of the way, let's look at how to do actual DNS lookups.
Winsock and Berkeley sockets provide a simple function to do address lookup,
called getaddrinfo(), which we've used in the previous chapters of this book. We will
start with this in the next section.
Name/address translation functions
It is common for networked programs to need to translate text-based representatives of an
address or hostname into an address structure required by the socket programming API.
The common function we've been using is getaddrinfo(). It is a useful function because
it is highly portable (available on Windows, Linux, and macOS), and it works for both IPv4
and IPv6 addresses.
It is also common to need to convert a binary address back into a text format. We use
getnameinfo() for this.
Using getaddrinfo()
Although we've been using getaddrinfo() in previous chapters, we'll discuss it in more
detail here.
The declaration for getaddrinfo() is shown in the following code:
int getaddrinfo(const char *node,
const char *service,
const struct addrinfo *hints,
struct addrinfo **res);
The preceding code snippet is explained as follows:
node specifies a hostname or address as a string. Valid examples could be
example.com, 192.168.1.1, or ::1.
service specifies a service or port number as a string. Valid examples could be
http or 80. Alternately, the null pointer can be passed in for service, in which
case, the resulting address is set to port 0.
[ 131 ]
Hostname Resolution and DNS
Chapter 5
hints is a pointer to a struct addrinfo, which specifies options for selecting
the address. The addrinfo structure has the following fields:
struct addrinfo {
int
ai_flags;
int
ai_family;
int
ai_socktype;
int
ai_protocol;
socklen_t
ai_addrlen;
struct sockaddr *ai_addr;
char
*ai_canonname;
struct addrinfo *ai_next;
};
You should not assume that the fields are stored in the order listed in the
previous code, or that additional fields aren't present. There is some variation
between operating systems.
The call to getaddrinfo() looks at only four fields in *hints. The rest of the structure
should be zeroed-out. The relevant fields are ai_family, ai_socktype, ai_protocol,
and ai_flags:
ai_family specifies the desired address family. It can be AF_INET for IPv4,
AF_INET6 for IPv6, or AF_UNSPEC for any address family. AF_UNSPEC is defined
as 0.
ai_socktype could be SOCK_STREAM for TCP (see Chapter 3, An In-Depth
Overview of TCP Connections), or SOCK_DGRAM for UDP (see Chapter 4,
Establishing UDP Connections). Setting ai_socktype to 0 indicates that the
address could be used for either.
ai_protocol should be left to 0. Strictly speaking, TCP isn't the only streaming
protocol supported by the socket interface, and UDP isn't the only datagram
protocol supported. ai_protocol is used to disambiguate, but it's not needed
for our purposes.
ai_flags specifies additional options about how getaddrinfo() should work.
Multiple flags can be used by bitwise OR-ing them together. In C, the bitwise OR
operator uses the pipe symbol, |. So, bitwise OR-ing two flags together would
use the (flag_one | flag_two) code.
[ 132 ]
Hostname Resolution and DNS
Chapter 5
Common flags you may use for the ai_flags field are:
AI_NUMERICHOST can be used to prevent name lookups. In this case,
getaddrinfo() would expect node to be an address such as 127.0.0.1 and
not a hostname such as example.com. AI_NUMERICHOST can be useful because it
prevents getaddrinfo() from doing a DNS record lookup, which can be slow.
AI_NUMERICSERV can be used to only accept port numbers for the service
argument. If used, this flag causes getaddrinof() to reject service names.
AI_ALL can be used to request both an IPv4 and IPv6 address. The declaration
for AI_ALL seems to be missing on some Windows setups. It can be defined as
0x0100 on those platforms.
AI_ADDRCONFIG forces getaddrinfo() to only return addresses that match the
family type of a configured interface on the local machine. For example, if your
machine is IPv4 only, then using AI_ADDRCONFIG | AI_ALL prevents IPv6
addresses from being returned. It is usually a good idea to use this flag if you
plan to connect a socket to the address returned by getaddrinfo().
AI_PASSIVE can be used with node = 0 to request the wildcard address. This is
the local address that accepts connections on any of the host's network addresses.
It is used on servers with bind(). If node is not 0, then AI_PASSIVE has no
effect. See Chapter 3, An In-Depth Overview of TCP Connections for example
usage.
All other fields in hints should be set to 0. You can also pass in 0 for the hints argument,
but different operating systems implement different defaults in that case.
The final parameter to getaddrinfo(), res, is a pointer to a pointer to struct addrinfo
and returns the address(es) found by getaddrinfo().
If the call to getaddrinfo() succeeds, then its return value is 0. In this case, you should
call freeaddrinfo() on *res when you've finished using the address. Here is an example
of using getaddrinfo() to find the address(es) for example.com:
struct addrinfo hints;
memset(&hints, 0, sizeof(hints));
hints.ai_flags = AI_ALL;
struct addrinfo *peer_address;
if (getaddrinfo("example.com", 0, &hints, &peer_address)) {
fprintf(stderr, "getaddrinfo() failed. (%d)\n", GETSOCKETERRNO());
return 1;
}
[ 133 ]
Hostname Resolution and DNS
Chapter 5
Note that we first zero out hints using a call to memset(). We then set the AI_ALL flag,
which specifies that we want both IPv4 and IPv6 addresses returned. This even returns
addresses that we don't have a network adapter for. If you only want addresses that your
machine can practically connect to, then use AI_ALL | AI_ADDRCONFIG for the ai_flags
field. We can leave the other fields of hints as their defaults.
We then declare a pointer to hold the return address list: struct addrinfo
*peer_address.
If the call to getaddrinfo() succeeds, then peer_address holds the first address result.
The next result, if any, is in peer_address->ai_next.
We can loop through all the returned addresses with the following code:
struct addrinfo *address = peer_address;
do {
/* Work with address... */
} while ((address = address->ai_next));
When we've finished using peer_address, we should free it with the following code:
freeaddrinfo(peer_address);
Now that we can convert a text address or name into an addrinfo structure, it is useful to
see how to convert the addrinfo structure back into a text format. Let's look at that now.
Using getnameinfo()
getnameinfo() can be used to convert an addrinfo structure back into a text format. It
works with both IPv4 and IPv6. It also, optionally, converts a port number into a text
format number or service name.
The declaration for getnameinfo() can be seen in the following code:
int getnameinfo(const struct sockaddr *addr, socklen_t addrlen,
char *host, socklen_t hostlen,
char *serv, socklen_t servlen, int flags);
The first two parameters are passed in from the ai_addr and ai_addrlen fields of struct
addrinfo.
[ 134 ]
Hostname Resolution and DNS
Chapter 5
The next two parameters, host and hostlen, specify a character buffer and buffer length
to store the hostname or IP address text.
The following two parameters, serv and servlen, specify the buffer and length to store
the service name.
If you don't need both the hostname and the service, you can optionally pass in only one of
either host or serv.
Flags can be a bitwise OR combination of the following:
NI_NAMEREQD requires getnameinfo() to return a hostname and not an
address. By default, getnameinfo() tries to return a hostname but returns an
address if it can't. NI_NAMEREQD will cause an error to be returned if the
hostname cannot be determined.
NI_DGRAM specifies that the service is UDP-based rather than TCP-based. This is
only important for ports that have different standard services for UDP versus
TCP. This flag is ignored if NI_NUMERICSERV is set.
NI_NUMERICHOST requests that getnameinfo() returns the IP address and not a
hostname.
NI_NUMERICSERV requests that getnameinfo() returns the port number and
not a service name.
For example, we can use getnameinfo() as follows:
char host[100];
char serv[100];
getnameinfo(address->ai_addr, address->ai_addrlen,
host, sizeof(host),
serv, sizeof(serv),
0);
printf("%s %s\n", host, serv);
In the preceding code, getnameinfo() attempts to perform a reverse DNS lookup. This
works like the DNS queries we've done in this chapter so far, but backward. A DNS query
asks which IP address does this hostname point to? A reverse DNS query asks instead, which
hostname does this IP address point to? Keep in mind that this is not a one-to-one relationship.
Many hostnames can point to one IP address, but an IP address can store a DNS record for
only one hostname. In fact, reverse DNS records are not even set for many IP addresses.
[ 135 ]
Hostname Resolution and DNS
Chapter 5
If address is a struct addrinfo with the address for example.com port 80 (http), then
the preceding code might print as follows:
example.com http
If the code prints something different for you, it's probably working as intended. It is
dependent on which address is in address and how the reverse DNS is set up for that IP
address. Try it with a different address.
If, instead of the hostname, we would like the IP address, we can modify our code to the
following:
char host[100];
char serv[100];
getnameinfo(address->ai_addr, address->ai_addrlen,
host, sizeof(host),
serv, sizeof(serv),
NI_NUMERICHOST | NI_NUMERICSERV);
printf("%s %s\n", host, serv);
In the case of the previous code, it might print the following:
93.184.216.34 80
Using NI_NUMERICHOST generally runs much faster too, as it doesn't require
getnameinfo() to send off any reverse DNS queries.
Alternative functions
Two widely-available functions that replicate getaddrinfo() are gethostbyname() and
getservbyname(). The gethostbyname() function is obsolete and has been removed
from the newer POSIX standards. Furthermore, I recommend against using these functions
in new code, because they introduce an IPv4 dependency. It's very possible to use
getaddrinfo() in such a way that your program does not need to be aware of IPv4 versus
IPv6, but still supports both.
[ 136 ]
Hostname Resolution and DNS
Chapter 5
IP lookup example program
To demonstrate the getaddrinfo() and getnameinfo() functions, we will implement a
short program. This program takes a name or IP address for its only argument. It then
uses getaddrinfo() to resolve that name or that IP address into an address structure, and
the program prints that IP address using getnameinfo() for the text conversion. If
multiple addresses are associated with a name, it prints each of them. It also indicates any
errors.
To begin with, we need to include our required header for this chapter. We also define
AI_ALL for systems that are missing it. The code for this is as follows:
/*lookup.c*/
#include "chap05.h"
#ifndef AI_ALL
#define AI_ALL 0x0100
#endi
We can then begin the main() function and check that the user passed in a hostname to
lookup. If the user doesn't pass in a hostname, we print a helpful reminder. The code for
this is as follows:
/*lookup.c continued*/
int main(int argc, char *argv[]) {
if (argc < 2) {
printf("Usage:\n\tlookup hostname\n");
printf("Example:\n\tlookup example.com\n");
exit(0);
}
We need the following code to initialize Winsock on Windows platforms:
/*lookup.c continued*/
#if defined(_WIN32)
WSADATA d;
if (WSAStartup(MAKEWORD(2, 2), &d)) {
fprintf(stderr, "Failed to initialize.\n");
return 1;
}
#endif
[ 137 ]
Hostname Resolution and DNS
Chapter 5
We can then call getaddrinfo() to convert the hostname or address into a struct
addrinfo. The code for that is as follows:
/*lookup.c continued*/
printf("Resolving hostname '%s'\n", argv[1]);
struct addrinfo hints;
memset(&hints, 0, sizeof(hints));
hints.ai_flags = AI_ALL;
struct addrinfo *peer_address;
if (getaddrinfo(argv[1], 0, &hints, &peer_address)) {
fprintf(stderr, "getaddrinfo() failed. (%d)\n", GETSOCKETERRNO());
return 1;
}
The previous code first prints the hostname or address that is passed in as the first
command-line argument. This argument is stored in argv[1]. We then
set hints.ai_flags = AI_ALL to specify that we want all available addresses of any
type, including both IPv4 and IPv6 addresses.
getaddrinfo() is then called with argv[1]. We pass 0 in for the service argument
because we don't care about the port number. We are only trying to resolve an address. If
argv[1] contains a name, such as example.com, then our operating system performs a
DNS query (assuming the hostname isn't already in the local cache). If argv[1] contains an
address such as 192.168.1.1, then getaddrinfo() simply fills in the resulting struct
addrinfo as needed.
If the user passed in an invalid address or a hostname for which no record could be found,
then getaddrinfo() returns a non-zero value. In that case, our previous code prints out
the error.
Now that peer_address holds the desired address(es), we can use getnameinfo() to
convert them to text. The following code does that:
/*lookup.c continued*/
printf("Remote address is:\n");
struct addrinfo *address = peer_address;
do {
char address_buffer[100];
getnameinfo(address->ai_addr, address->ai_addrlen,
address_buffer, sizeof(address_buffer),
0, 0,
NI_NUMERICHOST);
printf("\t%s\n", address_buffer);
} while ((address = address->ai_next));
[ 138 ]
Hostname Resolution and DNS
Chapter 5
This code works by first storing peer_address in a new variable, address. We then enter
a loop. address_buffer[] is declared to store the text address, and we call
getnameinfo() to fill in that address. The last parameter to getnameinfo(),
NI_NUMERICHOST, indicates that we want it to put the IP address into address_buffer
and not a hostname. The address buffer can then simply be printed out with printf().
If getaddrinfo() returned multiple addresses, then the next address is pointed to by
address->ai_next. We assign address->ai_next to address and loop if it is non-zero.
This is a simple example of walking through a linked list.
After we've printed our address, we should use freeaddrinfo() to free the memory
allocated by getaddrinfo(). We should also call the Winsock cleanup function on
Windows. We can do both with the following code:
/*lookup.c continued*/
freeaddrinfo(peer_address);
#if defined(_WIN32)
WSACleanup();
#endif
return 0;
}
That concludes our lookup program.
You can compile and run lookup.c on Linux and macOS by using the following
command:
gcc lookup.c -o lookup
./lookup example.com
Compiling and running on Windows with MinGW is done in the following way:
gcc lookup.c -o lookup.exe -lws2_32
lookup.exe example.com
[ 139 ]
Hostname Resolution and DNS
Chapter 5
The following screenshot is an example of using lookup to print the IP addresses for
example.com:
Although getaddrinfo() makes performing DNS lookups easy, it is useful to know what
happens behind the scenes. We will now look at the DNS protocol in more detail.
The DNS protocol
When a client wants to resolve a hostname into an IP address, it sends a DNS query to a
DNS server. This is typically done over UDP using port 53. The DNS server then performs
the lookup, if possible, and returns an answer. The following diagram illustrates this
transaction:
[ 140 ]
Hostname Resolution and DNS
Chapter 5
If the query (or, more commonly, the answer) is too large to fit into one UDP packet, then
the query can be performed over TCP instead of UDP. In this case, the size of the query is
sent over TCP as a 16-bit value, and then the query itself is sent. This is called TCP fallback
or DNS transport over TCP. However, UDP works for most cases, and UDP is how DNS is
used the vast majority of the time.
It's also important to note that the client must know the IP address of at least one DNS
server. If the client doesn't know of any DNS servers, then it has a sort of chicken-and-egg
problem. DNS servers are usually provided by your ISP.
The actual UDP data format is simple and follows the same basic format for both the query
and the answer.
DNS message format
The following illustration describes the DNS message format:
Every DNS message follows that format, although a query would leave the Answer,
Authority, and Additional sections blank. A DNS response commonly doesn't use
Authority or Additional. We won't concern ourselves with the Authority or Additional
sections, as they are not needed for typical DNS queries.
DNS message header format
The header is exactly 12 bytes long and is exactly the same for a DNS query or DNS
response. The Header Format is illustrated graphically in the following diagram:
[ 141 ]
Hostname Resolution and DNS
Chapter 5
As the preceding diagram illustrates, the DNS message header contains 13 fields—ID, QR,
OPCODE, AA, TC, RD, RA, Z, RCODE, QDCOUNT, ANCOUNT, NSCOUNT, and
ARCOUNT:
ID is any 16-bit value that is used to identify the DNS message. The client is
allowed to put any 16 bits into the DNS query, and the DNS server copies those
same 16 bits into the DNS response ID. This is useful to allow the client to match
up which response is in reply to which query, in cases where the client is sending
multiple queries.
QR is a 1-bit field. It is set to 0 to indicate a DNS query or 1 to indicate a DNS
response.
Opcode is a 4-bit field, which specifies the type of query. 0 indicates a standard
query. 1 indicates a reverse query to resolve an IP address into a name. 2
indicates a server status request. Other values (3 through 15) are reserved.
AA indicates an authoritative answer.
TC indicates that the message was truncated. In this case, it should be re-sent
using TCP.
RD should be set if recursion is desired. We leave this bit set to indicate that we
want the DNS server to contact additional servers until it can complete our
request.
RA indicates in a response whether the DNS server supports recursion.
Z is unused and should be set to 0.
[ 142 ]
Hostname Resolution and DNS
Chapter 5
RCODE is set in a DNS response to indicate the error condition. Its possible
values are as follows:
RCODE
Description
0
1
2
3
4
5
No error
Format error
Server failure
Name error
Not implemented
Refused
Please see RFC 1035: DOMAIN NAMES – IMPLEMENTATION AND
SPECIFICATION, in the Further reading section of this chapter for more
information on the meaning of these values.
QDCOUNT, ANCOUNT, NSCOUNT, and ARCOUNT indicate the number of
records in their corresponding sections. QDCOUNT indicates the number of
questions in a DNS query. It is interesting that QDCOUNT is a 16-bit value
capable of storing large numbers, and yet no real-world DNS server allows more
than one question per message. ANCOUNT indicates the number of answers,
and it is common for a DNS server to return multiple answers in one message.
Question format
The DNS Question Format consists of a name followed by two 16-bit values—QTYPE and
QCLASS. This Question Format is illustrated as follows:
[ 143 ]
Hostname Resolution and DNS
Chapter 5
QTYPE indicates the record type we are asking for, and QCLASS should be set to 1 to
indicate the internet.
The name field involves a special encoding. First, a hostname should be broken up into its
individual labels. For example, www.example.com would be broken up into www, example,
and com. Then, each label should be prepended with 1 byte, indicating the label length.
Finally, the entire name ends with a 0 byte.
Visually, the name www.example.com is encoded as follows:
If the QTYPE and QCLASS fields were appended to the preceding name example, then it
could make up an entire DNS question.
A DNS response is sometimes required to repeat the same name multiple times. In this
case, a DNS server may encode a pointer to an earlier name instead of sending the same
name multiple times. A pointer is indicated by a 16-bit value with the two most significant
bits set. The lower 14 bits indicate the pointer value. This 14-bit value specifies the location
of the name as an offset from the beginning of the message. Having the two most
significant bits reserved has an additional side-effect of limiting labels to 63 characters. A
longer name would require setting both high bits in the label length specifier, but if both
high bits are set, it indicates a pointer and not a label length!
The answer format is similar to the question format but with a few more fields. Let's look at
that next.
[ 144 ]
Hostname Resolution and DNS
Chapter 5
Answer format
The DNS answer format consists of the same three fields that questions have; namely, a
name followed by a 16-bit TYPE and a 16-bit CLASS. The answer format then has a 32-bit
TTL field. This field specifies how many seconds the answer is allowed to be cached for.
TTL is followed by a 16-bit length specifier, RDLENGTH, followed by data. The data is
RDLENGTH long, and the data's interpretation is dependent upon the type specified by TYPE.
Visually, the answer format is shown in the following diagram:
Keep in mind that most DNS servers use name pointers in their answer names. This is
because the DNS response will have already included the relevant name in the question
section. The answer can simply point back to that, rather than encoding the entire name a
second (or third) time.
Whenever sending binary data over the network, the issue of byte order becomes relevant.
Let's consider this now.
[ 145 ]
Hostname Resolution and DNS
Chapter 5
Endianness
The term endianness refers to the order in which individual bytes are stored in memory or
sent over a network.
Whenever we read a multi-byte number from a DNS message, we should be aware that it's
in big-endian format (or so-called network byte order). The computer you're using likely
uses little-endian format, although we are careful to write our code in an endianindependent manner throughout this book. We accomplish this by avoiding the conversion
of multiple bytes directly to integers, and instead we interpret bytes one at a time.
For example, consider a message with a single 8-bit value, such as 0x05. We know that the
value of that message is 5. Bytes are sent atomically over a network link, so we also know
that anyone receiving our message can unambiguously interpret that message as 5.
The issue of endianness comes into play when we need more than one byte to store our
number. Imagine that we want to send the number 999. This number is too big to fit into 1
byte, so we have to break it up into 2 bytes—a 16-bit value. Because 999 = (3 * 28) +
231, we know that the high-order byte stores 3 while the low-order byte stores 231. In
hexadecimal, the number 999 is 0x03E7. The question is whether to send the high-order or
the low-order byte over the network first.
Network byte order, which is used by the DNS protocol, specifies that the high-order byte
is sent first. Therefore, the number 999 is sent over the network as a 0x03 followed
by 0xE7.
See the Further reading section of this chapter for more information.
Let's now look at encoding an entire DNS query.
A simple DNS query
To perform a simple DNS query, we would put an arbitrary number into ID, set the RD bit
to 1, and set QDCOUNT to 1. We would then add a question after the header. That data
would be sent as a UDP packet to port 53 of a DNS server.
[ 146 ]
Hostname Resolution and DNS
Chapter 5
A hand-constructed DNS for example.com in C is as follows:
char dns_query[] = {0xAB, 0xCD,
/* ID */
0x01, 0x00,
/* Recursion */
0x00, 0x01,
/* QDCOUNT */
0x00, 0x00,
/* ANCOUNT */
0x00, 0x00,
/* NSCOUNT */
0x00, 0x00,
/* ARCOUNT */
7, 'e', 'x', 'a', 'm', 'p', 'l', 'e', /* label */
3, 'c', 'o', 'm',
/* label */
0,
/* End of name */
0x00, 0x01,
/* QTYPE = A */
0x00, 0x01
/* QCLASS */
};
This data could be sent as is to a DNS server over port 53.
The DNS server, if successful, sends a UDP packet back as a response. This packet has ID
set to match our query. QR is set to indicate a response. QDCOUNT is set to 1, and our original
question is included. ANCOUNT is some small positive integer that indicates the number of
answers included in the message.
In the next section, we'll implement a program to send and receive DNS messages.
A DNS query program
We will now implement a utility to send DNS queries to a DNS server and receive the DNS
response.
This should not normally be needed in the field. It is, however, a good opportunity to better
understand the DNS protocol and to get experience of sending binary UDP packets.
We begin with a function to print a name from a DNS message.
Printing a DNS message name
DNS encodes names in a particular way. Normally, each label is indicated by its length,
followed by its text. A number of labels can be repeated, and then the name is terminated
with a single 0 byte.
If a length has its two highest bits set (that is, 0xc0), then it and the next byte should be
interpreted as a pointer instead.
[ 147 ]
Hostname Resolution and DNS
Chapter 5
We must also be aware at all times that the DNS response from the DNS server could be illformed or corrupted. We must try to write our program in such a way that it won't crash if
it receives a bad message. This is easier said than done.
The declaration for our name-printing function looks like this:
/*dns_query.c*/
const unsigned char *print_name(const unsigned char *msg,
const unsigned char *p, const unsigned char *end);
We take msg to be a pointer to the message's beginning, p to be a pointer to the name to
print, and end to be a pointer to one past the end of the message. end is required so that we
can check that we're not reading past the end of the received message. msg is required for
the same reason, but also so that we can interpret name pointers.
Inside the print_name function, our code checks that a proper name is even possible.
Because a name should consist of at least a length and some text, we can return an error if p
is already within two characters of the end. The code for that check is as follows:
/*dns_query.c*/
if (p + 2 > end) {
fprintf(stderr, "End of message.\n"); exit(1);}
We then check to see if p points to a name pointer. If it does, we interpret the pointer and
call print_name recursively to print the name that is pointed to. The code for this is as
follows:
/*dns_query.c*/
if ((*p & 0xC0) == 0xC0) {
const int k = ((*p & 0x3F) << 8) + p[1];
p += 2;
printf(" (pointer %d) ", k);
print_name(msg, msg+k, end);
return p;
Note that 0xC0 in binary is 0b11000000. We use (*p & 0xC0) == 0xC0 to check for a
name pointer. In that case, we take the lower 6 bits of *p and all 8 bits of p[1] to indicate
the pointer. We know that p[1] is still within the message because of our earlier check that
p was at least 2 bytes from the end. Knowing the name pointer, we can pass a new value of
p to print_name().
[ 148 ]
Hostname Resolution and DNS
Chapter 5
If the name is not a pointer, we simply print it one label at a time. The code for printing the
name is as follows:
/*dns_query.c*/
} else {
const int len = *p++;
if (p + len + 1 > end) {
fprintf(stderr, "End of message.\n"); exit(1);}
printf("%.*s", len, p);
p += len;
if (*p) {
printf(".");
return print_name(msg, p, end);
} else {
return p+1;
}
}
In the preceding code, *p is read into len to store the length of the current label. We are
careful to check that reading len + 1 bytes doesn't put us past the end of the buffer. We
can then print the next len characters to the console. If the next byte isn't 0, then the name
is continued, and we should print a dot to separate the labels. We call print_name()
recursively to print the next label of the name.
If the next byte is 0, then that means the name is finished and we return.
That concludes the print_name() function.
Now we will devise a function that prints an entire DNS message.
Printing a DNS message
Using print_name() that we have just defined, we can now construct a function to print
an entire DNS message to the screen. DNS messages share the same format for both the
request and the response, so our function is able to print either.
The declaration for our function is as follows:
/*dns_query.c*/
void print_dns_message(const char *message, int msg_length);
[ 149 ]
Hostname Resolution and DNS
Chapter 5
print_dns_message() takes a pointer to the start of the message, and an int data type
indicates the message's length.
Inside print_dns_message(), we first check that the message is long enough to be a valid
DNS message. Recall that the DNS header is 12 bytes long. If a DNS message is less than 12
bytes, we can easily reject it as an invalid message. This also ensures that we can read at
least the header without worrying about reading past the end of the received data.
The code for checking the DNS message length is as follows:
/*dns_query.c*/
if (msg_length < 12) {
fprintf(stderr, "Message is too short to be valid.\n");
exit(1);
}
We then copy the message pointer into a new variable, msg. We define msg as an
unsigned char pointer, which makes certain calculations easier to work with.
/*dns_query.c*/
const unsigned char *msg = (const unsigned char *)message;
If you want to print out the entire raw DNS message, you can do that with the following
code:
/*dns_query.c*/
int i;
for (i = 0; i < msg_length; ++i) {
unsigned char r = msg[i];
printf("%02d:
%02X %03d '%c'\n", i, r, r, r);
}
printf("\n");
Be aware that running the preceding code will print out many lines. This can be annoying,
so I would recommend using it only if you are curious about seeing the raw DNS message.
The message ID can be printed very easily. Recall that the message ID is simply the first
two bytes of the message. The following code prints it in a nice hexadecimal format:
/*dns_query.c*/
printf("ID = %0X %0X\n", msg[0], msg[1]);
[ 150 ]
Hostname Resolution and DNS
Chapter 5
Next, we get the QR bit from the message header. This bit is the most significant bit of
msg[2]. We use the bitmask 0x80 to see whether it is set. If it is, we know that the message
is a response; otherwise, it's a query. The following code reads QR and prints a
corresponding message:
/*dns_query.c*/
const int qr = (msg[2] & 0x80) >> 7;
printf("QR = %d %s\n", qr, qr ? "response" : "query");
The OPCODE, AA, TC, and RD fields are read in much the same way as QR. The code for
printing them is as follows:
/*dns_query.c*/
const int opcode = (msg[2] & 0x78) >> 3;
printf("OPCODE = %d ", opcode);
switch(opcode) {
case 0: printf("standard\n"); break;
case 1: printf("reverse\n"); break;
case 2: printf("status\n"); break;
default: printf("?\n"); break;
}
const int aa = (msg[2] & 0x04) >> 2;
printf("AA = %d %s\n", aa, aa ? "authoritative" : "");
const int tc = (msg[2] & 0x02) >> 1;
printf("TC = %d %s\n", tc, tc ? "message truncated" : "");
const int rd = (msg[2] & 0x01);
printf("RD = %d %s\n", rd, rd ? "recursion desired" : "");
Finally, we can read in RCODE for response-type messages. Since RCODE can have several
different values, we use a switch statement to print them. Here is the code for that:
/*dns_query.c*/
if (qr) {
const int rcode = msg[3] & 0x07;
printf("RCODE = %d ", rcode);
switch(rcode) {
case 0: printf("success\n"); break;
case 1: printf("format error\n"); break;
case 2: printf("server failure\n"); break;
case 3: printf("name error\n"); break;
case 4: printf("not implemented\n"); break;
[ 151 ]
Hostname Resolution and DNS
Chapter 5
case 5: printf("refused\n"); break;
default: printf("?\n"); break;
}
if (rcode != 0) return;
}
The next four fields in the header are the question count, the answer count, the name server
count, and the additional count. We can read and print them in the following code:
/*dns_query.c*/
const
const
const
const
int
int
int
int
qdcount
ancount
nscount
arcount
printf("QDCOUNT
printf("ANCOUNT
printf("NSCOUNT
printf("ARCOUNT
=
=
=
=
=
=
=
=
(msg[4] << 8) + msg[5];
(msg[6] << 8) + msg[7];
(msg[8] << 8) + msg[9];
(msg[10] << 8) + msg[11];
%d\n",
%d\n",
%d\n",
%d\n",
qdcount);
ancount);
nscount);
arcount);
That concludes reading the DNS message header (the first 12 bytes).
Before reading the rest of the message, we define two new variables as follows:
/*dns_query.c*/
const unsigned char *p = msg + 12;
const unsigned char *end = msg + msg_length;
In the preceding code, the p variable is used to walk through the message. We set
the end variable to one past the end of the message. This is to help us detect whether we're
about to read past the end of the message – a situation we certainly wish to avoid!
We read and print each question in the DNS message with the following code:
/*dns_query.c*/
if (qdcount) {
int i;
for (i = 0; i < qdcount; ++i) {
if (p >= end) {
fprintf(stderr, "End of message.\n"); exit(1);}
printf("Query %2d\n", i + 1);
printf(" name: ");
p = print_name(msg, p, end); printf("\n");
[ 152 ]
Hostname Resolution and DNS
Chapter 5
if (p + 4 > end) {
fprintf(stderr, "End of message.\n"); exit(1);}
const int type = (p[0] << 8) + p[1];
printf(" type: %d\n", type);
p += 2;
const int qclass = (p[0] << 8) + p[1];
printf(" class: %d\n", qclass);
p += 2;
}
}
Although no real-world DNS server will accept a message with multiple questions, the
DNS RFC does clearly define the format to encode multiple questions. For that reason, we
make our code loop through each question using a for loop. First,
the print_name() function, which we defined earlier, is called to print the question name.
We then read in and print out the question type and class.
Printing the answer, authority, and additional sections is slightly more difficult than the
question section. These sections start the same way as the question section – with a name, a
type, and a class. The code for reading the name, type, and class is as follows:
/*dns_query.c*/
if (ancount || nscount || arcount) {
int i;
for (i = 0; i < ancount + nscount + arcount; ++i) {
if (p >= end) {
fprintf(stderr, "End of message.\n"); exit(1);}
printf("Answer %2d\n", i + 1);
printf(" name: ");
p = print_name(msg, p, end); printf("\n");
if (p + 10 > end) {
fprintf(stderr, "End of message.\n"); exit(1);}
const int type = (p[0] << 8) + p[1];
printf(" type: %d\n", type);
p += 2;
const int qclass = (p[0] << 8) + p[1];
printf(" class: %d\n", qclass);
p += 2;
[ 153 ]
Hostname Resolution and DNS
Chapter 5
Note that, in the preceding code, we stored the class in a variable called qclass. This is to
be nice to our C++ friends, who are not allowed to use class as a variable name.
We then expect to find a 16-bit TTL field, and a 16-bit data length field. The TTL field tells
us how many seconds we are allowed to cache an answer for. The data length field tells us
how many bytes of additional data are included for the answer. We read TTL and the data
length in the following code:
/*dns_query.c*/
const unsigned int ttl = (p[0] << 24) + (p[1] << 16) +
(p[2] << 8) + p[3];
printf("
ttl: %u\n", ttl);
p += 4;
const int rdlen = (p[0] << 8) + p[1];
printf(" rdlen: %d\n", rdlen);
p += 2;
Before we can read in the data of the rdlen length, we should check that we won't read
past the end of the message. The following code achieves that:
/*dns_query.c*/
if (p + rdlen > end) {
fprintf(stderr, "End of message.\n"); exit(1);}
We can then try to interpret the answer data. Each record type stores different data. We
need to write code to display each type. For our purposes, we limit this to the A, MX, AAAA,
TXT, and CNAME records. The code to print each type is as follows:
/*dns_query.c*/
if (rdlen == 4 && type == 1) { /* A Record */
printf("Address ");
printf("%d.%d.%d.%d\n", p[0], p[1], p[2], p[3]);
} else if (type == 15 && rdlen > 3) { /* MX Record */
const int preference = (p[0] << 8) + p[1];
printf(" pref: %d\n", preference);
printf("MX: ");
print_name(msg, p+2, end); printf("\n");
} else if (rdlen == 16 && type == 28) { /* AAAA Record */
printf("Address ");
int j;
for (j = 0; j < rdlen; j+=2) {
[ 154 ]
Hostname Resolution and DNS
Chapter 5
printf("%02x%02x", p[j], p[j+1]);
if (j + 2 < rdlen) printf(":");
}
printf("\n");
} else if (type == 16) { /* TXT Record */
printf("TXT: '%.*s'\n", rdlen-1, p+1);
} else if (type == 5) { /* CNAME Record */
printf("CNAME: ");
print_name(msg, p, end); printf("\n");
}
p += rdlen;
We can then finish the loop. We check that all the data was read and print a message if it
wasn't. If our program is correct, and if the DNS message is properly formatted, we should
have read all the data with nothing left over. The following code checks this:
/*dns_query.c*/
}
}
if (p != end) {
printf("There is some unread data left over.\n");
}
printf("\n");
That concludes the print_dns_message() function.
We can now define our main() function to create the DNS query, send it to a DNS server,
and await a response.
Sending the query
We start main() with the following code:
/*dns_query.c*/
int main(int argc, char *argv[]) {
if (argc < 3) {
printf("Usage:\n\tdns_query hostname type\n");
printf("Example:\n\tdns_query example.com aaaa\n");
exit(0);
[ 155 ]
Hostname Resolution and DNS
Chapter 5
}
if (strlen(argv[1]) > 255) {
fprintf(stderr, "Hostname too long.");
exit(1);
}
The preceding code checks that the user passed in a hostname and record type to query. If
they didn't, it prints a helpful message. It also checks that the hostname isn't more than 255
characters long. Hostnames longer than that aren't allowed by the DNS standard, and
checking it now ensures that we don't need to allocate too much memory.
We then try to interpret the record type requested by the user. We support the following
options – a, aaaa, txt, mx, and any. The code to read in those types and store their
corresponding DNS integer value is as follows:
/*dns_query.c*/
unsigned char type;
if (strcmp(argv[2], "a") == 0) {
type = 1;
} else if (strcmp(argv[2], "mx") == 0) {
type = 15;
} else if (strcmp(argv[2], "txt") == 0) {
type = 16;
} else if (strcmp(argv[2], "aaaa") == 0) {
type = 28;
} else if (strcmp(argv[2], "any") == 0) {
type = 255;
} else {
fprintf(stderr, "Unknown type '%s'. Use a, aaaa, txt, mx, or any.",
argv[2]);
exit(1);
}
Like all of our previous programs, we need to initialize Winsock. The code for that is as
follows:
/*dns_query.c*/
#if defined(_WIN32)
WSADATA d;
if (WSAStartup(MAKEWORD(2, 2), &d)) {
fprintf(stderr, "Failed to initialize.\n");
return 1;
}
#endif
[ 156 ]
Hostname Resolution and DNS
Chapter 5
Our program connects to 8.8.8.8, which is a public DNS server run by Google. Refer to
Chapter 1, An Introduction to Networks and Protocols, Domain Names, for a list of additional
public DNS servers you can use.
Recall that we are connecting on UDP port 53. We use getaddrinfo() to set up the
required structures for our socket with the following code:
/*dns_query.c*/
printf("Configuring remote address...\n");
struct addrinfo hints;
memset(&hints, 0, sizeof(hints));
hints.ai_socktype = SOCK_DGRAM;
struct addrinfo *peer_address;
if (getaddrinfo("8.8.8.8", "53", &hints, &peer_address)) {
fprintf(stderr, "getaddrinfo() failed. (%d)\n", GETSOCKETERRNO());
return 1;
}
We then create our socket using the data returned from getaddrinfo(). The following
code does that:
/*dns_query.c*/
printf("Creating socket...\n");
SOCKET socket_peer;
socket_peer = socket(peer_address->ai_family,
peer_address->ai_socktype, peer_address->ai_protocol);
if (!ISVALIDSOCKET(socket_peer)) {
fprintf(stderr, "socket() failed. (%d)\n", GETSOCKETERRNO());
return 1;
}
Our program then constructs the data for the DNS query message. The first 12 bytes
compose the header and are known at compile time. We can store them with the following
code:
/*dns_query.c*/
char query[1024] = {0xAB,
0x01,
0x00,
0x00,
0x00,
0x00,
0xCD, /* ID */
0x00, /* Set recursion */
0x01, /* QDCOUNT */
0x00, /* ANCOUNT */
0x00, /* NSCOUNT */
0x00 /* ARCOUNT */};
[ 157 ]
Hostname Resolution and DNS
Chapter 5
The preceding code sets our query's ID to 0xABCD, sets a recursion request, and indicates
that we are attaching 1 question. As mentioned earlier, 1 is the only number of questions
supported by real-world DNS servers.
We then need to encode the user's desired hostname into the query. The following code
does that:
/*dns_query.c*/
char *p = query + 12;
char *h = argv[1];
while(*h) {
char *len = p;
p++;
if (h != argv[1]) ++h;
while(*h && *h != '.') *p++ = *h++;
*len = p - len - 1;
}
*p++ = 0;
The preceding code first sets a new pointer, p, to the end of the query header. We will be
adding to the query starting at p. We also define a pointer, h, which we use to loop through
the hostname.
We can loop while *h != 0 because *h is equal to zero when we've finished reading the
hostname. Inside the loop, we use the len variable to store the position of the label
beginning. The value in this position needs to be set to indicate the length of the upcoming
label. We then copy characters from *h to *p until we find a dot or the end of the hostname.
If either is found, the code sets *len equal to the label length. The code then loops into the
next label.
Finally, outside the loop, we add a terminating 0 byte to finish the name section of the
question.
We then add the question type and question class to the query with the following code:
/*dns_query.c*/
*p++ = 0x00; *p++ = type; /* QTYPE */
*p++ = 0x00; *p++ = 0x01; /* QCLASS */
[ 158 ]
Hostname Resolution and DNS
Chapter 5
We can then calculate the query size by comparing p to the query beginning. The code for
figuring the total query size is as follows:
/*dns_query.c*/
const int query_size = p - query;
Now, with the query message formed, and its length known, we can use sendto() to
transmit the DNS query to the DNS server. The code for sending the query is as follows:
/*dns_query.c*/
int bytes_sent = sendto(socket_peer,
query, query_size,
0,
peer_address->ai_addr, peer_address->ai_addrlen);
printf("Sent %d bytes.\n", bytes_sent);
For debugging purposes, we can also display the query we sent with the following code:
/*dns_query.c*/
print_dns_message(query, query_size);
The preceding code is useful to see whether we've made any mistakes in encoding our
query.
Now that the query has been sent, we await a DNS response message using recvfrom().
In a practical program, you may want to use select() here to time out. It could also be
wise to listen for additional messages in the case that an invalid message is received first.
The code to receive and display the DNS response is as follows:
/*dns_query.c*/
char read[1024];
int bytes_received = recvfrom(socket_peer,
read, 1024, 0, 0, 0);
printf("Received %d bytes.\n", bytes_received);
print_dns_message(read, bytes_received);
printf("\n");
[ 159 ]
Hostname Resolution and DNS
Chapter 5
We can finish our program by freeing the address(es) from getaddrinfo() and cleaning
up Winsock. The code to complete the main() function is as follows:
/*dns_query.c*/
freeaddrinfo(peer_address);
CLOSESOCKET(socket_peer);
#if defined(_WIN32)
WSACleanup();
#endif
return 0;
}
That concludes the dns_query program.
You can compile and run dns_query.c on Linux and macOS by running the following
command:
gcc dns_query.c -o dns_query
./dns_query example.com a
Compiling and running on Windows with MinGW is done by using the following
command:
gcc dns_query.c -o dns_query.exe -lws2_32
dns_query.exe example.com a
Try running dns_query with different domain names and different record types. In
particular, try it with mx and txt records. If you're brave, try running it with the any record
type. You may find the results interesting.
[ 160 ]
Hostname Resolution and DNS
Chapter 5
The following screenshot is an example of using dns_query to query the A record of
example.com:
[ 161 ]
Hostname Resolution and DNS
Chapter 5
The next screenshot shows dns_query querying the mx record of gmail.com:
Note that UDP is not always reliable. If our DNS query is lost in transit, then dns_query
hangs while waiting forever for a reply that never comes. This could be fixed by using the
select() function to time out and retry.
[ 162 ]
Hostname Resolution and DNS
Chapter 5
Summary
This chapter was all about hostnames and DNS queries. We covered how the DNS works,
and we learned that resolving a hostname can involve many UDP packets being sent over
the network.
We looked at getaddrinfo() in more depth and showed why it is usually the preferred
way to do a hostname lookup. We also looked at its sister function, getnameinfo(), which
is capable of converting an address to text or even doing a reverse DNS query.
Finally, we implemented a program that sent DNS queries from scratch. This program was
a good learning experience to better understand the DNS protocol, and it gave us a chance
to gain experience in implementing a binary protocol. When implementing a binary
protocol, we had to pay special attention to byte order. For the simple DNS message
format, this was achieved by carefully interpreting bytes one at a time.
Now that we've worked with a binary protocol, DNS, we will move on to text-based
protocols in the next few chapters. In the next chapter, we will learn about HTTP, the
protocol used to request and retrieve web pages.
Questions
Try these questions to test your knowledge of this chapter:
1. Which function fills in an address needed for socket programming in a portable
and protocol-independent way?
2. Which socket programming function can be used to convert an IP address back
into a name?
3. A DNS query converts a name into an address, and a reverse DNS query
converts an address back into a name. If you run a DNS query on a name, and
then a reverse DNS query on the resulting address, do you always get back the
name you started with?
4. What are the DNS record types used to return IPv4 and IPv6 addresses for a
name?
5. Which DNS record type stores special information about email servers?
6. Does getaddrinfo() always return immediately? or can it block?
7. What happens when a DNS response is too large to fit into a single UDP packet?
The answers are in Appendix A, Answers to Questions.
[ 163 ]
Hostname Resolution and DNS
Chapter 5
Further reading
For more information about DNS, please refer to:
RFC 1034: DOMAIN NAMES – CONCEPTS AND FACILITIES (https://tools.
ietf.org/html/rfc1034)
RFC 1035: DOMAIN NAMES – IMPLEMENTATION AND SPECIFICATION
(https://tools.ietf.org/html/rfc1035)
RFC 3596: DNS Extensions to Support IP Version 6 (https://tools.ietf.org/
html/rfc3596)
[ 164 ]
2
Section 2 - An Overview of
Application Layer Protocols
In this section, the reader will learn about two of the most common higher-level protocols,
HTTP and SMTP, which build on top of TCP.
The following chapters are in this section:
Chapter 6, Building a Simple Web Client
Chapter 7, Building a Simple Web Server
Chapter 8, Building a Program to Send Emails
6
Building a Simple Web Client
Hypertext Transfer Protocol (HTTP) is the application protocol that powers the World
Wide Web (WWW). Whenever you fire up your web browser to do an internet search,
browse Wikipedia, or make a post on social media, you are using HTTP. Many mobile apps
also use HTTP behind the scenes. It's safe to say that HTTP is one of the most widely used
protocols on the internet.
In this chapter, we will look at the HTTP message format. We will then implement a C
program, which can request and receive web pages.
The following topics are covered in this chapter:
The HTTP message format
HTTP request types
Common HTTP headers
HTTP response code
HTTP message parsing
Implementing an HTTP client
Encoding form data (POST)
HTTP file uploads
Technical requirements
The example programs from this chapter can be compiled with any modern C compiler. We
recommend MinGW on Windows and GCC on Linux and macOS. See appendices B, C, and
D for compiler setup.
The code for this book can be found at https://github.com/codeplea/Hands-On-NetworkProgramming-with-C.
Building a Simple Web Client
Chapter 6
From the command line, you can download the code for this chapter with the following
command:
git clone https://github.com/codeplea/Hands-On-Network-Programming-with-C
cd Hands-On-Network-Programming-with-C/chap06
Each example program in this chapter runs on Windows, Linux, and macOS. When
compiling on Windows, each example program requires linking with the Winsock library.
This is accomplished by passing the -lws2_32 option to gcc.
We provide the exact commands needed to compile each example as they are introduced.
All of the example programs in this chapter require the same header files and C macros that
we developed in Chapter 2, Getting to Grips with Socket APIs. For brevity, we put these
statements in a separate header file, chap06.h, which we can include in each program. For
an explanation of these statements, please refer to Chapter 2, Getting to Grips with Socket
APIs.
The content of chap06.h is as follows:
//chap06.h//
#if defined(_WIN32)
#ifndef _WIN32_WINNT
#define _WIN32_WINNT 0x0600
#endif
#include <winsock2.h>
#include <ws2tcpip.h>
#pragma comment(lib, "ws2_32.lib")
#else
#include
#include
#include
#include
#include
#include
#include
<sys/types.h>
<sys/socket.h>
<netinet/in.h>
<arpa/inet.h>
<netdb.h>
<unistd.h>
<errno.h>
#endif
#if defined(_WIN32)
#define ISVALIDSOCKET(s) ((s) != INVALID_SOCKET)
#define CLOSESOCKET(s) closesocket(s)
#define GETSOCKETERRNO() (WSAGetLastError())
[ 167 ]
Building a Simple Web Client
#else
#define
#define
#define
#define
#endif
Chapter 6
#include
#include
#include
#include
ISVALIDSOCKET(s) ((s) >= 0)
CLOSESOCKET(s) close(s)
SOCKET int
GETSOCKETERRNO() (errno)
<stdio.h>
<stdlib.h>
<string.h>
<clock.h>
The HTTP protocol
HTTP is a text-based client-server protocol that runs over TCP. Plain HTTP runs over TCP
port 80.
It should be noted that plain HTTP is mostly deprecated for security reasons. Today, sites
should use HTTPS, the secure version of HTTP. HTTPS secures HTTP by merely running
the HTTP protocol through a Transport Layer Security (TLS) layer. Therefore, everything
we cover in this chapter regarding HTTP also applies to HTTPS. See Chapter 9, Loading
Secure Web Pages with HTTPS and OpenSSL, for more information about HTTPS.
HTTP works by first having the web client send an HTTP request to the web server. Then,
the web server responds with an HTTP response. Generally, the HTTP request indicates
which resource the client is interested in, and the HTTP response delivers the requested
resource.
Visually, the transaction is illustrated in the following graphic:
[ 168 ]
Building a Simple Web Client
Chapter 6
The preceding graphic illustrates a GET request. A GET request is used when the Web
Client simply wants the Web Server to send it a document, image, file, web page, and so
on. GET requests are the most common. They are what your browser sends to a
Web Server while loading up a web page or downloading a file.
There are a few other request types that are also worth mentioning.
HTTP request types
Although GET requests are the most common, there are, perhaps, three request types that
are commonly used. The three common HTTP request types are as follows:
GET is used when the client wants to download a resource.
HEAD is just like GET, except that the client only wants information about the
resource instead of the resource itself. For example, if the client only wants to
know the size of a hosted file, it could send a HEAD request.
POST is used when the client needs to send information to the server. Your web
browser typically uses a POST request when you submit an online form, for
example. A POST request will typically cause a web server to change its state
somehow. A web server could send an email, update a database, or change a file
in response to a POST request.
In addition to GET, HEAD, and POST, there are a few more HTTP request types that are
rarely used. They are as follows:
PUT is used to send a document to the web server. PUT is not commonly used.
POST is almost universally used to change the web server state.
DELETE is used to request that the web server should delete a document or
resource. Again, in practice, DELETE is rarely used. POST is commonly used to
communicate web server updates of all types.
TRACE is used to request diagnostic information from web proxies. Most web
requests don't go through a proxy, and many web proxies don't fully support
TRACE. Therefore, it's rare to need to use TRACE.
CONNECT is sometimes used to initiate an HTTP connection through a proxy
server.
OPTIONS is used to ask which HTTP request types are supported by the server
for a given resource. A typical web server that implements OPTIONS may
respond with something similar to Allow: OPTIONS, GET, HEAD, POST.
Many common web servers don't support OPTIONS.
[ 169 ]
Building a Simple Web Client
Chapter 6
If you send a request that the web server doesn't support, then the server should respond
with a 400 Bad Request code.
Now that we've seen the types of HTTP requests, let's look at the request format in more
detail.
HTTP request format
If you open your web browser and navigate to http://www.example.com/page1.htm,
your browser will need to send an HTTP request to the web server at www.example.com.
That HTTP request may look like this:
GET /page1.htm HTTP/1.1
User-Agent: Mozilla/5.0 (Windows NT 10.0; Win64; x64) AppleWebKit/537.36
Accept-Language: en-US
Accept: text/html,application/xhtml+xml,application/xml;q=0.9,*/*;q=0.8
Accept-Encoding: gzip, deflate
Host: example.com
Connection: Keep-Alive
As you can see, the browser sends a GET request by default. This GET request is asking the
server for the document /page1.htm. A GET request consists of HTTP headers only. There
is no HTTP body because the client isn't sending data to the server. The client is only
requesting data from the server. In contrast, a POST request would contain an HTTP body.
The first line of an HTTP request is called the request line. The request line consists of three
parts – the request type, the document path, and the protocol version. Each part is
separated by a space. In the preceding example, the request line is GET /page1.htm
HTTP/1.1. We can see that the request type is GET, the document path is /page1.htm, and
the protocol version is HTTP/1.1.
When dealing with text-based network protocols, it is always important to be explicit about
line endings. This is because different operating systems have standardized on different
line-ending conventions. Each line of an HTTP message ends with a carriage return,
followed by a newline character. In C, this looks like \r\n. In practice, some web servers
may tolerate other line endings. You should ensure that your clients always send a proper
\r\n line ending for maximum compatibility.
[ 170 ]
Building a Simple Web Client
Chapter 6
After the request line, there are various HTTP header fields. Each header field consists of its
name followed by a colon, and then its value. Consider the User-Agent: Mozilla/5.0
(Windows NT 10.0; Win64; x64) AppleWebKit/537.36 line. This User-Agent line is
telling the web server what software is contacting it. Some web servers will serve different
documents to different user agents. For example, it is common for some websites to serve
full documents to search engine spiders while serving paywalls to actual visitors. The
server generally uses the user-agent HTTP header field to determine which is which. At the
same time, there is a long history of web clients lying in the user-agent field. I suggest you
take the high road in your applications and clearly identify your application with a unique
user-agent value.
The only header field that is actually required is Host. The Host field tells the web server
which web host the client is requesting the resource from. This is important because one
web server may be hosting many different websites. The request line tells the web server
that the /page1.htm document is wanted, but it doesn't specify which server that page is
on. The Host field fills this role.
The Connection: Keep-Alive line tells the web server that the HTTP client would like to
issue additional requests after the current request finishes. If the client had sent
Connection: Close instead, that would indicate that the client intended to close the TCP
connection after the HTTP response was received.
The web client must send a blank line after the HTTP request header. This blank line is how
the web server knows that the HTTP request is finished. Without this blank line, the web
server wouldn't know whether any additional header fields were still going to being sent.
In C, the blank line looks like this: \r\n\r\n.
Let's now consider what the web server would send in reply to an HTTP request.
HTTP response format
Like the HTTP request, the HTTP response also consists of a header part and a body part.
Also similar to the HTTP request, the body part is optional. Most HTTP responses do have
a body part, though.
The server at www.example.com could respond to our HTTP request with the following
reply:
HTTP/1.1 200 OK
Cache-Control: max-age=604800
Content-Type: text/html; charset=UTF-8
Date: Fri, 14 Dec 2018 16:46:09 GMT
[ 171 ]
Building a Simple Web Client
Chapter 6
Etag: "1541025663+gzip"
Expires: Fri, 21 Dec 2018 16:46:09 GMT
Last-Modified: Fri, 09 Aug 2013 23:54:35 GMT
Server: ECS (ord/5730)
Vary: Accept-Encoding
X-Cache: HIT
Content-Length: 1270
<!doctype html>
<html>
<head>
<title>Example Domain</title>
...
The first line of an HTTP response is the status line. The status line consists of the protocol
version, the response code, and the response code description. In the preceding example,
we can see that the protocol version is HTTP/1.1, the response code is 200, and the
response code description is OK. 200 OK is the typical response code to an HTTP GET
request when everything goes ok. If the server couldn't find the resource the client has
requested, it might respond with a 404 Page Not Found response code instead.
Many of the HTTP response headers are used to assist with caching. The Date, Etag,
Expires, and Last-Modified fields can all be used by the client to cache documents.
The Content-Type field tells the client what type of resource it is sending. In the preceding
example, it is an HTML web page, which is specified with text/html. HTTP can be used
to send all types of resources, such as images, software, and videos. Each resource type has
a specific Content-Type, which tells the client how to interpret the resource.
The Content-Length field specifies the size of the HTTP response body in bytes. In this
case, we see that the requested resource is 1270 bytes long. There are a few ways to
determine the body length, but the Content-Length field is the simplest. We will look at
other ways in the Response Body Length section later in this chapter.
The HTTP response header section is delineated from the HTTP response body by a blank
line. After this blank line, the HTTP body follows. Note that the HTTP body is not
necessarily text-based. For example, if the client requested an image, then the HTTP body
would likely be binary data. Also consider that, if the HTTP body is text-based, such as an
HTML web page, it is free to use its own line-ending convention. It doesn't have to use the
\r\n line ending required by HTTP.
[ 172 ]
Building a Simple Web Client
Chapter 6
If the client had sent a HEAD request type instead of GET, then the server would respond
with exactly the same HTTP headers as before, but it would not include the HTTP body.
With the HTTP response format defined, let's look at some of the most common HTTP
response types.
HTTP response codes
There are many different types of HTTP response codes.
If the request was successful, then the server responds with a code in the 200 range:
200 OK: The client's request is successful, and the server sends the requested
resource
If the resource has moved, the server can respond with a code in the 300 range. These codes
are commonly used to redirect traffic from an unencrypted connection to an encrypted one,
or to redirect traffic from a www subdomain to a bare one. They are also used if a website has
undergone restructuring, but wants to keep incoming links working. The common 300
range codes are as follows:
301 Moved Permanently: The requested resource has moved to a new location.
This location is indicated by the server in the Location header field. All future
requests for this resource should use this new location.
307 Moved Temporarily: The requested resource has moved to a new location.
This location is indicated by the server in the Location header field. This move
may not be permanent, so future requests should still use the original location.
Errors are indicated by 400 or 500 range response codes. Some common ones are as follows:
400 Bad Request: The server doesn't understand/support the client's request
401 Unauthorized: The client isn't authorized for the requested resource
403 Forbidden: The client is forbidden to access the requested resource
500 Internal Server Error: The server encountered an error while trying to
fulfill the client's request
In addition to a response type, the HTTP server must also be able to unambiguously
communicate the length of the response body.
[ 173 ]
Building a Simple Web Client
Chapter 6
Response body length
The HTTP body response length can be determined a few different ways. The simplest is if
the HTTP server includes a Content-Length header line in its response. In that case, the
server simply states the body length directly.
If the server would like to begin sending data before the body's length is known, then it
can't use the Content-Length header line. In this case, the server can send a TransferEncoding: chunked header line. This header line indicates to the client that the response
body will be sent in separate chunks. Each chunk begins with its chunk length, encoded in
base-16 (hexadecimal), followed by a newline, and then the chunk data. The entire HTTP
body ends with a zero-length chunk.
Let's consider an HTTP response example that uses chunked encoding:
HTTP/1.1 200 OK
Content-Type: text/plain; charset=ascii
Transfer-Encoding: chunked
44
Lorem ipsum dolor sit amet, consectetur adipiscing elit, sed do eius
37
mod tempor incididunt ut labore et dolore magna aliqua.
0
In the preceding example, we see the HTTP body starts with 44 followed by a newline. This
44 should be interpreted as hexadecimal. We can use the built-in C strtol() function to
interpret hexadecimal numbers.
Hexadecimal numbers are commonly written with a 0x prefix to disambiguate them from
decimal. We identify them with this prefix here, but keep in mind that the HTTP protocol
does not add this prefix.
The 0x44 hexadecimal number is equal to 68 in decimal. After the 44 and newline, we see
68 characters that are part of the requested resource. After the 68 character chunk, the
server sends a newline.
The server then sent 37. 0x37 is 55 in decimal. After a newline, 55 characters are sent as
chunk data. The server then sends a zero-length chunk to indicate that the response is
finished.
[ 174 ]
Building a Simple Web Client
Chapter 6
The client should interpret the complete HTTP response after it has decoded the chunking
as Lorem ipsum dolor sit amet, consectetur adipiscing elit, sed do
eiusmod tempor incididunt ut labore et dolore magna aliqua.
There are a few other ways to indicate the HTTP response body length besides ContentLength and Transfer-Encoding: chunked. However, the server is limited to those two
unless the client explicitly states support for additional encoding types in the HTTP
request.
You may sometimes see a server that simply closes the TCP connection when it has finished
transmitting a resource. That was a common way to indicate resource size in HTTP/1.0.
However, this method shouldn't be used with HTTP/1.1. The issue with using a closed
connection to indicate response length is that it's ambiguous as to why the connection was
closed. It could be because all data has been sent, or it could be because of some other
reason. Consider what would happen if a network cable is unplugged while data is being
sent.
Now that we've seen the basics of HTTP requests and responses, let's look at how web
resources are identified.
What's in a URL
Uniform Resource Locators (URL), also known as web addresses, provide a convenient
way to specify particular web resources. You can navigate to a URL by typing it into your
web browser's address bar. Alternately, if you're browsing a web page and click on a link,
that link is indicated with a URL.
Consider the http://www.example.com:80/res/page1.php?user=bob#account URL.
Visually, the URL can be broken down like this:
[ 175 ]
Building a Simple Web Client
Chapter 6
The URL can indicate the protocol, the host, the port number, the document path, and hash.
However, the host is the only required part. The other parts can be implied.
We can parse the example URL from the preceding diagram:
http://: The part before the first :// indicates the protocol. In this example, the
protocol is http, but it could be a different protocol such as ftp:// or https://.
If the protocol is omitted, the application will generally make an assumption. For
example, your web browser would assume the protocol to be http.
www.example.com: This specifies the hostname. It is used to resolve an IP
address that the HTTP client can connect to. This hostname must also appear in
the HTTP request Host header field. This is required since multiple hostnames
can resolve to the same IP address. This part can also be an IP address instead of
a name. IPv4 addresses are used directly (http://192.168.50.1/), but IPv6
addresses should be put inside square brackets (http://[::1]/).
:80: The port number can be specified explicitly by using a colon after the
hostname. If the port number is not specified, then the client uses the default port
number for the given protocol. The default port number for http is 80, and the
default port number for https is 443. Non-standard port numbers are common
for testing and development.
/res/page1.php?user/bob: This specifies the document path. The HTTP server
usually makes a distinction between the part before and after the question mark,
but the HTTP client should not assign significance to this. The part after the
question mark is often called the query string.
#account: This is called the hash. The hash specifies a position within a
document, and the hash is not sent to the HTTP server. It instead allows a
browser to scroll to a particular part of a document after the entire document is
received from the HTTP server.
Now that we have a basic understanding of URLs, let's write code to parse them.
Parsing a URL
We will write a C function to parse a given URL.
The function takes as input a URL, and it returns as output the hostname, the port number,
and the document path. To avoid needing to do manual memory management, the outputs
are returned as pointers to specific parts of the input URL. The input URL is modified with
terminating null pointers as required.
[ 176 ]
Building a Simple Web Client
Chapter 6
Our function begins by printing the input URL. This is useful for debugging. The code for
that is as follows:
/*web_get.c excerpt*/
void parse_url(char *url, char **hostname, char **port, char** path) {
printf("URL: %s\n", url);
The function then attempts to find :// in the URL. If found, it reads in the first part of the
URL as a protocol. Our program only supports HTTP. If the given protocol is not HTTP,
then an error is returned. The code for parsing the protocol is as follows:
/*web_get.c excerpt*/
char *p;
p = strstr(url, "://");
char *protocol = 0;
if (p) {
protocol = url;
*p = 0;
p += 3;
} else {
p = url;
}
if (protocol) {
if (strcmp(protocol, "http")) {
fprintf(stderr,
"Unknown protocol '%s'. Only 'http' is supported.\n",
protocol);
exit(1);
}
}
In the preceding code, a character pointer, p, is declared. protocol is also declared and set
to 0 to indicate that no protocol has been found. strstr() is called to search for :// in the
URL. If it is not found, then protocol is left at 0, and p is set to point back to the beginning
of the URL. However, if :// is found, then protocol is set to the beginning of the URL,
which contains the protocol. p is set to one after ://, which should be where the hostname
begins.
If protocol was set, the code then checks that it points to the text http.
[ 177 ]
Building a Simple Web Client
Chapter 6
At this point in the code, p points to the beginning of the hostname. The code can save the
hostname into the return variable, hostname. The code must then scan for the end of the
hostname by looking for the first colon, slash, or hash. The code for this is as follows:
/*web_get.c excerpt*/
*hostname = p;
while (*p && *p != ':' && *p != '/' && *p != '#') ++p;
Once p has advanced to the end of the hostname, we must check whether a port number
was found. A port number starts with a colon. If a port number is found, our code returns it
in the port variable; otherwise, a default port number of 80 is returned. The code to check
for a port number is as follows:
/*web_get.c excerpt*/
*port = "80";
if (*p == ':') {
*p++ = 0;
*port = p;
}
while (*p && *p != '/' && *p != '#') ++p;
After the port number, p points to the document path. The function returns this part of the
URL in the path variable. Note that our function omits the first / in the path. This is for
simplicity because it allows us to avoid allocating any memory. All document paths start
with /, so the function caller can easily prepend that when the HTTP request is constructed.
The code to set the path variable is as follows:
/*web_get.c excerpt*/
*path = p;
if (*p == '/') {
*path = p + 1;
}
*p = 0;
The code then attempts to find a hash, if it exists. If it does exist, it is overwritten with a
terminating null character. This is because the hash is never sent to the web server and is
ignored by our HTTP client.
[ 178 ]
Building a Simple Web Client
Chapter 6
The code that advances to the hash is as follows:
/*web_get.c excerpt*/
while (*p && *p != '#') ++p;
if (*p == '#') *p = 0;
Our function has now parsed out the hostname, port number, and document path. It then
prints out these values for debugging purposes and returns. The final code for the
parse_url() function is as follows:
/*web_get.c excerpt*/
printf("hostname: %s\n", *hostname);
printf("port: %s\n", *port);
printf("path: %s\n", *path);
}
Now that we have code to parse a URL, we are one step closer to building an entire HTTP
client.
Implementing a web client
We will now implement an HTTP web client. This client takes as input a URL. It then
attempts to connect to the host and retrieve the resource given by the URL. The program
displays the HTTP headers that are sent and received, and it attempts to parse out the
requested resource content from the HTTP response.
Our program begins by including the chapter header, chap06.h:
/*web_get.c*/
#include "chap06.h"
We then define a constant, TIMEOUT. Later in our program, if an HTTP response is taking
more than TIMEOUT seconds to complete, then our program abandons the request. You can
define TIMEOUT as you like, but we give it a value of five seconds here:
/*web_get.c continued*/
#define TIMEOUT 5.0
[ 179 ]
Building a Simple Web Client
Chapter 6
Now, please include the entire parse_url() function as given in the previous section. Our
client needs parse_url() to find the hostname, port number, and document path from a
given URL.
Another helper function is used to format and send the HTTP request. We call it
send_request(), and its code is given next:
/*web_get.c continued*/
void send_request(SOCKET s, char *hostname, char *port, char *path) {
char buffer[2048];
sprintf(buffer, "GET /%s HTTP/1.1\r\n", path);
sprintf(buffer + strlen(buffer), "Host: %s:%s\r\n", hostname, port);
sprintf(buffer + strlen(buffer), "Connection: close\r\n");
sprintf(buffer + strlen(buffer), "User-Agent: honpwc web_get 1.0\r\n");
sprintf(buffer + strlen(buffer), "\r\n");
send(s, buffer, strlen(buffer), 0);
printf("Sent Headers:\n%s", buffer);
}
send_request() works by first defining a character buffer in which to store the HTTP
request. It then uses the sprintf() function to write to the buffer until the HTTP request is
complete. The HTTP request ends with a blank line. This blank line tells the server that the
entire request header has been received.
Once the request is formatted into buffer, buffer is sent over an open socket using
send(). buffer is also printed to the console for debugging purposes. We define one more
helper function for our web client. This function, connect_to_host(), takes in a
hostname and port number and attempts to establish a new TCP socket connection to it.
In the first part of connect_to_host(), getaddrinfo() is used to resolve the hostname.
getnameinfo() is then used to print out the server IP address for debugging purposes.
The code for this is as follows:
/*web_get.c continued*/
SOCKET connect_to_host(char *hostname, char *port) {
printf("Configuring remote address...\n");
struct addrinfo hints;
memset(&hints, 0, sizeof(hints));
hints.ai_socktype = SOCK_STREAM;
struct addrinfo *peer_address;
if (getaddrinfo(hostname, port, &hints, &peer_address)) {
fprintf(stderr, "getaddrinfo() failed. (%d)\n", GETSOCKETERRNO());
[ 180 ]
Building a Simple Web Client
Chapter 6
exit(1);
}
printf("Remote address is: ");
char address_buffer[100];
char service_buffer[100];
getnameinfo(peer_address->ai_addr, peer_address->ai_addrlen,
address_buffer, sizeof(address_buffer),
service_buffer, sizeof(service_buffer),
NI_NUMERICHOST);
printf("%s %s\n", address_buffer, service_buffer);
In the second part of connect_to_host(), a new socket is created with socket(), and a
TCP connection is established with connect(). If everything goes well, the function
returns the created socket. The code for the second half of connect_to_host() is as
follows:
/*web_get.c continued*/
printf("Creating socket...\n");
SOCKET server;
server = socket(peer_address->ai_family,
peer_address->ai_socktype, peer_address->ai_protocol);
if (!ISVALIDSOCKET(server)) {
fprintf(stderr, "socket() failed. (%d)\n", GETSOCKETERRNO());
exit(1);
}
printf("Connecting...\n");
if (connect(server,
peer_address->ai_addr, peer_address->ai_addrlen)) {
fprintf(stderr, "connect() failed. (%d)\n", GETSOCKETERRNO());
exit(1);
}
freeaddrinfo(peer_address);
printf("Connected.\n\n");
return server;
}
If you've been working through this book from the beginning, the code in
connect_to_host() should be very familiar by now. If it's not, please refer to the
previous chapters for a more detailed explanation of getaddrinfo(), socket(), and
connect(). Chapter 3, An In-Depth Overview of TCP Connections, should be particularly
helpful.
[ 181 ]
Building a Simple Web Client
Chapter 6
With our helper functions out of the way, we can now begin to define the main() function.
We begin main() with the following code:
/*web_get.c continued*/
int main(int argc, char *argv[]) {
#if defined(_WIN32)
WSADATA d;
if (WSAStartup(MAKEWORD(2, 2), &d)) {
fprintf(stderr, "Failed to initialize.\n");
return 1;
}
#endif
if (argc < 2) {
fprintf(stderr, "usage: web_get url\n");
return 1;
}
char *url = argv[1];
In the preceding code, Winsock is initialized, if needed, and the program's arguments are
checked. If a URL is given as an argument, it is stored in the url variable.
We can then parse the URL into its hostname, port, and path parts with the following code:
/*web_get.c continued*/
char *hostname, *port, *path;
parse_url(url, &hostname, &port, &path);
The program then continues by establishing a connection to the target server and sending
the HTTP request. This is made easy by using the two helper functions we defined
previously, connect_to_host() and send_request(). The code for this is as follows:
/*web_get.c continued*/
SOCKET server = connect_to_host(hostname, port);
send_request(server, hostname, port, path);
[ 182 ]
Building a Simple Web Client
Chapter 6
One feature of our web client is that it times out if a request takes too long to complete. In
order to know how much time has elapsed, we need to record the start time. This is done
using a call to the built-in clock() function. We store the start time in the
start_time variable with the following:
/*web_get.c continued*/
const clock_t start_time = clock();
It is now necessary to define some more variables that can be used for bookkeeping while
receiving and parsing the HTTP response. The requisite variables are as follows:
/*web_get.c continued*/
#define RESPONSE_SIZE 8192
char response[RESPONSE_SIZE+1];
char *p = response, *q;
char *end = response + RESPONSE_SIZE;
char *body = 0;
enum {length, chunked, connection};
int encoding = 0;
int remaining = 0;
In the preceding code, RESPONSE_SIZE is the maximum size of the HTTP response we
reserve memory for. Our program is unable to parse HTTP responses bigger than this. If
you extend this limit, it may be useful to use malloc() to reserve memory on the heap
instead of the stack.
response is a character array that holds the entire HTTP response. p is a char pointer that
keeps track of how far we have written into response so far. q is an additional char
pointer that is used later. We define end as a char pointer, which points to the end of the
response buffer. end is useful to ensure that we don't attempt to write past the end of our
reserved memory.
The body pointer is used to remember the beginning of the HTTP response body once
received.
If you recall, the HTTP response body length can be determined by a few different
methods. We define an enumeration to list the method types, and we define the
encoding variable to store the actual method used. Finally, the remaining variable is used
to record how many bytes are still needed to finish the HTTP body or body chunk.
[ 183 ]
Building a Simple Web Client
Chapter 6
We then start a loop to receive and process the HTTP response. This loop first checks that it
hasn't taken too much time and that we still have buffer space left to store the received
data. The first part of this loop is as follows:
/*web_get.c continued*/
while(1) {
if ((clock() - start_time) / CLOCKS_PER_SEC > TIMEOUT) {
fprintf(stderr, "timeout after %.2f seconds\n", TIMEOUT);
return 1;
}
if (p == end) {
fprintf(stderr, "out of buffer space\n");
return 1;
}
We then include the code to receive data over the TCP socket. Our code uses select()
with a short timeout. This allows us to periodically check that the request hasn't timed out.
You may recall from previous chapters that select() involves creating fd_set and
timeval structures. The following code creates these objects and calls select():
/*web_get.c continued*/
fd_set reads;
FD_ZERO(&reads);
FD_SET(server, &reads);
struct timeval timeout;
timeout.tv_sec = 0;
timeout.tv_usec = 200000;
if (select(server+1, &reads, 0, 0, &timeout) < 0) {
fprintf(stderr, "select() failed. (%d)\n", GETSOCKETERRNO());
return 1;
}
select() returns when either the timeout has elapsed, or new data is available to be read
from the socket. Our code needs to use FD_ISSET() to determine whether new data is
available to be read. If so, we read the data into the buffer at the p pointer.
Alternatively, when attempting to read new data, we may find that the socket was closed
by the web server. If this is the case, we check whether we were expecting a closed
connection to indicate the end of the transmission. That is the case if encoding ==
connection. If so, we print the HTTP body data that was received.
[ 184 ]
Building a Simple Web Client
Chapter 6
The code for reading in new data and detecting a closed connection is as follows:
/*web_get.c continued*/
if (FD_ISSET(server, &reads)) {
int bytes_received = recv(server, p, end - p, 0);
if (bytes_received < 1) {
if (encoding == connection && body) {
printf("%.*s", (int)(end - body), body);
}
printf("\nConnection closed by peer.\n");
break;
}
/*printf("Received (%d bytes): '%.*s'",
bytes_received, bytes_received, p);*/
p += bytes_received;
*p = 0;
Note that, in the preceding code, the p pointer is advanced to point to the end of received
data. *p is set to zero, so our received data always ends with a null terminator. This allows
us to use standard functions on the data that expect a null-terminated string. For example,
we use the built-in strstr() function to search through the received data, and strstr()
expects the input string to be null-terminated.
Next, if the HTTP body hasn't already been found, our code searches through the received
data for a blank line that indicates the end of the HTTP header. A blank line is encoded by
two consecutive line endings. HTTP defines a line ending as \r\n, so our code detects a
blank line by searching for \r\n\r\n.
The following code finds the end of the HTTP header (which is the beginning of the HTTP
body) using strstr(), and updates the body pointer to point to the beginning of the
HTTP body:
/*web_get.c continued*/
if (!body && (body = strstr(response, "\r\n\r\n"))) {
*body = 0;
body += 4;
[ 185 ]
Building a Simple Web Client
Chapter 6
It may be useful to print the HTTP header for debugging. This can be done with the
following code:
/*web_get.c continued*/
printf("Received Headers:\n%s\n", response);
Now that the headers have been received, we need to determine whether the HTTP server
is using Content-Length or Transfer-Encoding: chunked to indicate body length. If it
doesn't send either, then we assume that the entire HTTP body has been received once the
connection is closed.
If the Content-Length is found using strstr(), we set encoding = length and store
the body length in the remaining variable. The actual length is read from the HTTP header
using the strtol() function.
If Content-Length is not found, then the code searches for Transfer-Encoding:
chunked. If found, we set encoding = chunked. remaining is set to 0 to indicate that we
haven't read in a chunk length yet.
If neither Content-Length or Transfer-Encoding: chunked is found, then encoding
= connection is set to indicate that we consider the HTTP body received when the
connection is closed.
The code for determining which body length method is used is as follows:
/*web_get.c continued*/
q = strstr(response, "\nContent-Length: ");
if (q) {
encoding = length;
q = strchr(q, ' ');
q += 1;
remaining = strtol(q, 0, 10);
} else {
q = strstr(response, "\nTransfer-Encoding: chunked");
if (q) {
encoding = chunked;
remaining = 0;
} else {
encoding = connection;
}
}
printf("\nReceived Body:\n");
}
[ 186 ]
Building a Simple Web Client
Chapter 6
The preceding code could be made more robust by doing case-insensitive searching, or by
allowing for some flexibility in spacing. However, it should work with most web servers as
is, and we're going to continue to keep it simple.
If the HTTP body start has been identified, and encoding == length, then the program
simply needs to wait until remaining bytes have been received. The following code checks
for this:
/*web_get.c continued*/
if (body) {
if (encoding == length) {
if (p - body >= remaining) {
printf("%.*s", remaining, body);
break;
}
In the preceding code, once remaining bytes of the HTTP body have been received, it
prints the received body and breaks from the while loop.
If Transfer-Encoding: chunked is used, then the receiving logic is a bit more
complicated. The following code handles this:
/*web_get.c continued*/
} else if (encoding == chunked) {
do {
if (remaining == 0) {
if ((q = strstr(body, "\r\n"))) {
remaining = strtol(body, 0, 16);
if (!remaining) goto finish;
body = q + 2;
} else {
break;
}
}
if (remaining && p - body >= remaining) {
printf("%.*s", remaining, body);
body += remaining + 2;
remaining = 0;
}
} while (!remaining);
}
} //if (body)
[ 187 ]
Building a Simple Web Client
Chapter 6
In the preceding code, the remaining variable is used to indicate whether a chunk length
or chunk data is expected next. When remaining == 0, the program is waiting to receive
a new chunk length. Each chunk length ends with a newline; therefore, if a newline is
found with strstr(), we know that the entire chunk length has been received. In this case,
the chunk length is read using strtol(), which interprets the hexadecimal chunk length.
remaining is set to the expected chunk length. A chunked message is terminated by a
zero-length chunk, so if 0 was read, the code uses goto finish to break out of the main
loop.
If the remaining variable is non-zero, then the program checks whether at
least remaining bytes of data have been received. If so, that chunk is printed, and the body
pointer is advanced to the end of the current chunk. This logic loops until it finds the
terminating zero-length chunk or runs out of data.
At this point, we've shown all of the logic to parse the HTTP response body. We only need
to end our loops, close the socket, and the program is finished. Here is the final code for
web_get.c:
/*web_get.c continued*/
} //if FDSET
} //end while(1)
finish:
printf("\nClosing socket...\n");
CLOSESOCKET(server);
#if defined(_WIN32)
WSACleanup();
#endif
printf("Finished.\n");
return 0;
}
You can compile and run web_get.c on Linux and macOS with the following commands:
gcc web_get.c -o web_get
./web_get http://example.com/
On Windows, the command to compile and run using MinGW is as follows:
gcc web_get.c -o web_get.exe -lws2_32
web_get.exe http://example.com/
[ 188 ]
Building a Simple Web Client
Chapter 6
Try running web_get with different URLs and study the outputs. You may find the HTTP
response headers interesting.
The following screenshot shows what happens when we run web_get on
http://example.com/:
web_get only supports the GET queries. POST queries are also common and useful. Let's
now look at HTTP POST requests.
[ 189 ]
Building a Simple Web Client
Chapter 6
HTTP POST requests
An HTTP POST request sends data from the web client to the web server. Unlike an HTTP
GET request, a POST request includes a body containing data (although this body could be
zero-length).
The POST body format can vary, and it should be identified by a Content-Type header.
Many modern, web-based APIs expect a POST body to be JSON encoded.
Consider the following HTTP POST request:
POST /orders HTTP/1.1
Host: example.com
User-Agent: Mozilla/5.0 (Windows NT 10.0; Win64; x64; rv:64.0)
Content-Type: application/json
Content-Length: 56
Connection: close
{"symbol":"VOO","qty":"10","side":"buy","type":"market"}
In the preceding example, you can see that the HTTP POST request is similar to an HTTP
GET request. Notable differences are as follows: the request starts with POST instead of GET;
a Content-Type header field is included; a Content-Length header field is present; and
an HTTP message body is included. In that example, the HTTP message body is in JSON
format, as specified by the Content-Type header.
Encoding form data
If you encounter a form on a website, such as a login form, that form likely uses a POST
request to transmit its data to the web server. A standard HTML form encodes the data it
sends in a format called URL encoding, also called percent encoding. When URL encoded
form data is submitted in an HTTP POST request, it uses the Content-Type:
application/x-www-form-urlencoded header.
Consider the following HTML for a submittable form:
<form method="post" action="/submission.php">
<label for="name">Name:</label>
<input name="name" type="text"><br>
<label for="comment">Comment:</label>
<input name="comment" type="text"><br>
[ 190 ]
Building a Simple Web Client
Chapter 6
<input type="submit" value="submit">
</form>
In your web browser, the preceding HTML may render as shown in the following
screenshot:
When this form is submitted, its data is encoded in an HTTP request such as the following:
POST /submission.php HTTP/1.1
Host: 127.0.0.1:8080
User-Agent: Mozilla/5.0 (Macintosh; Intel Mac OS X 10_7)
Accept-Language: en-US
Accept-Encoding: gzip, deflate
Content-Type: application/x-www-form-urlencoded
Content-Length: 31
Connection: keep-alive
name=Alice&comment=Well+Done%21
In the preceding HTTP request, you can see that Content-Type: application/x-wwwform-urlencoded is used. In this format, each form field and value is paired by an equal
sign, and multiple form fields are chained together by ampersands.
Special characters in form field names or values must be encoded. Notice that Well Done!
was encoded as Well+Done%21. Spaces are encoded with plus symbols, and special
characters are encoded by a percent sign followed by their two-digit hexadecimal value
(thus, the exclamation point was encoded as %21). A percent sign itself would be encoded
as %25.
[ 191 ]
Building a Simple Web Client
Chapter 6
File uploads
When an HTML form includes file uploads, the browser uses a different content type. In
this case, Content-Type: multipart/form-data is used. When Content-Type:
multipart/form-data is used, a boundary specifier is included. This boundary is a
special delimiter, set by the sender, which separates parts of the submitted form data.
Consider the following HTML form:
<form method="post" enctype="multipart/form-data" action="/submit.php">
<input name="name" type="text"><br>
<input name="comment" type="text"><br>
<input name="file" type="file"><br>
<input type="submit" value="submit">
</form>
If the user navigates to a web page bearing the HTML form from the preceding code, and
enters the name Alice, the comment Well Done!, and selects a file to upload called
upload.txt, then the following HTTP POST request could be sent by the browser:
POST /submit.php HTTP/1.1
Host: example.com
Content-Type: multipart/form-data; boundary=-----------233121195710604
Content-Length: 1727
-------------233121195710604
Content-Disposition: form-data; name="name"
Alice
-------------233121195710604
Content-Disposition: form-data; name="comment"
Well Done!
-------------233121195710604
Content-Disposition: form-data; name="file"; filename="upload.txt"
Content-Type: text/plain
Hello.... <truncated>
As you can see, when using multipart/form-data, each section of data is separated by a
boundary. This boundary is what allows the receiver to delineate between separate fields or
uploaded files. It is important that this boundary is chosen so that it does not appear in any
submitted field or uploaded file!
[ 192 ]
Building a Simple Web Client
Chapter 6
Summary
HTTP is the protocol that powers the modern internet. It is behind every web page, every
link click, every graphic loaded, and every form submitted. In this chapter, we saw that
HTTP is a text-based protocol that runs over a TCP connection. We learned the HTTP
formats for both client requests and server responses.
In this chapter, we also implemented a simple HTTP client in C. This client had a few nontrivial tasks – parsing a URL, formatting a GET request HTTP header, waiting for a
response, and parsing the received data out of the HTTP response. In particular, we looked
at handling two different methods of parsing out the HTTP body. The first, and easiest,
method was Content-Length, where the entire body length is explicitly specified. The
second method was chunked encoding, where the body is sent as separate chunks, which
our program had to delineate between.
We also briefly looked at the POST requests and the content formats associated with them.
In the next chapter, Chapter 7, Building a Simple Web Server, we will develop the
counterpart to our HTTP client—an HTTP server.
Questions
Try these questions to test your knowledge from this chapter:
1.
2.
3.
4.
Does HTTP use TCP or UDP?
What types of resources can be sent over HTTP?
What are the common HTTP request types?
What HTTP request type is typically used to send data from the server to the
client?
5. What HTTP request type is typically used to send data from the client to the
server?
6. What are the two common methods used to determine an HTTP response body
length?
7. How is the HTTP request body formatted for a POST-type HTTP request?
The answers to these questions can be found in Appendix A, Answers to Questions.
[ 193 ]
Building a Simple Web Client
Chapter 6
Further reading
For more information about HTTP and HTML, please refer to the following resources:
RFC 7230: Hypertext Transfer Protocol (HTTP/1.1): Message Syntax and
Routing (https://tools.ietf.org/html/rfc7230)
RFC 7231: Hypertext Transfer Protocol (HTTP/1.1): Semantics and Content (https://
tools.ietf.org/html/rfc7231)
RFC 1866: Hypertext Markup Language – 2.0 (https://tools.ietf.org/html/
rfc1866)
RFC 3986: Uniform Resource Identifier (URI): Generic Syntax (https://tools.ietf.
org/html/rfc3986)
[ 194 ]
7
Building a Simple Web Server
This chapter builds on the previous one by looking at the HTTP protocol from the server's
perspective. In it, we will build a simple web server. This web server will work using the
HTTP protocol, and you will be able to connect to it with any standard web browser.
Although it won't be full-featured, it will be suitable for serving a few static files locally. It
will be able to handle a few simultaneous connections from multiple clients at once.
The following topics are covered in this chapter:
Accepting and buffering multiple connections
Parsing an HTTP request line
Formatting an HTTP response
Serving a file
Security considerations
Technical requirements
The example programs from this chapter can be compiled with any modern C compiler. We
recommend MinGW on Windows and GCC on Linux and macOS; see Appendices
B, Setting Up Your C Compiler on Windows, Appendices C, Setting Up Your C Compiler on
Linux, and Appendices D, Setting Up Your C Compiler on macOS, for compiler setup.
The code for this book can be found at https://github.com/codeplea/Hands-On-NetworkProgramming-with-C.
From the command line, you can download the code for this chapter with the following
command:
git clone https://github.com/codeplea/Hands-On-Network-Programming-with-C
cd Hands-On-Network-Programming-with-C/chap07
Building a Simple Web Server
Chapter 7
Each example program in this chapter runs on Windows, Linux, and macOS. While
compiling on Windows, each example program requires linking to the Winsock library.
This can be accomplished by passing the -lws2_32 option to gcc.
We provide the exact commands needed to compile each example as they are introduced.
All of the example programs in this chapter require the same header files and C macros that
we developed in Chapter 2, Getting to Grips with Socket APIs. For brevity, we put these
statements in a separate header file, chap07.h, which we can include in each program. For
an explanation of these statements, please refer to Chapter 2, Getting to Grips with Socket
APIs.
The content of chap07.h is as follows:
/*chap07.h*/
#if defined(_WIN32)
#ifndef _WIN32_WINNT
#define _WIN32_WINNT 0x0600
#endif
#include <winsock2.h>
#include <ws2tcpip.h>
#pragma comment(lib, "ws2_32.lib")
#else
#include
#include
#include
#include
#include
#include
#include
<sys/types.h>
<sys/socket.h>
<netinet/in.h>
<arpa/inet.h>
<netdb.h>
<unistd.h>
<errno.h>
#endif
#if defined(_WIN32)
#define ISVALIDSOCKET(s) ((s) != INVALID_SOCKET)
#define CLOSESOCKET(s) closesocket(s)
#define GETSOCKETERRNO() (WSAGetLastError())
#else
#define
#define
#define
#define
#endif
ISVALIDSOCKET(s) ((s) >= 0)
CLOSESOCKET(s) close(s)
SOCKET int
GETSOCKETERRNO() (errno)
[ 196 ]
Building a Simple Web Server
Chapter 7
#include <stdio.h>
#include <stdlib.h>
#include <string.h>
The HTTP server
In this chapter, we are going to implement an HTTP web server that can serve static files
from a local directory. HTTP is a text-based client-server protocol that uses
the Transmission Control Protocol (TCP).
When implementing our HTTP server, we need to support multiple, simultaneous
connections from many clients at once. Each received HTTP Request needs to be parsed,
and our server needs to reply with the proper HTTP Response. This HTTP
Response should include the requested file if possible.
Consider the HTTP transaction illustrated in the following diagram:
In the preceding diagram, the client is requesting /document.htm from the server. The
server finds /document.htm and returns it to the client.
Our HTTP server is somewhat simplified, and we only need to look at the first line of the
HTTP request. This first line is called the request line. Our server only supports GET type
requests, so it needs to first check that the request line starts with GET. It then parses out the
requested resource, /document.htm in the preceding example.
[ 197 ]
Building a Simple Web Server
Chapter 7
A more full-featured HTTP server would look at several other HTTP headers. It would look
at the Host header to determine which site it is hosting. Our server only supports hosting
one site, so this header is not meaningful for us.
A production server would also look at headers such as Accept-Encoding and AcceptLanguage, which could inform a proper response format. Our server just ignores these, and
it instead serves files in only the most straightforward way.
The internet can sometimes be a hostile environment. A production-grade web server needs
to include security in layers. It should be absolutely meticulous about file access and
resource allocation. In the interest of clear explanation and brevity, the server we develop
in this chapter is not security-hardened, and it should not be used on the public internet for
this reason.
The server architecture
An HTTP server is a complicated program. It must handle multiple simultaneous
connections, parse a complex text-based protocol, handle malformed requests with the
proper errors, and serve files. The example we develop in this chapter is greatly simplified
from a production-ready server, but it is still a few hundred lines of code. We benefit from
breaking the program down into separate functions and data structures.
At the global level, our program stores a linked list of data structures. This linked list
contains one separate data structure for each connected client. This data structure stores
information about each client such as their address, their socket, and their data received so
far. We implement many helper functions that work on this global linked list. These
functions are used to add new clients, drop clients, wait on client data, look up clients by
their socket (as sockets are returned by select()), serve files to clients, and send error
messages to clients.
Our server's main loop can then be simplified. It waits for new connections or new data.
When new data is received, it checks whether the data consists of a complete HTTP request.
If a complete HTTP request is received, the server attempts to send the requested resource.
If the HTTP request is malformed or the resource cannot be found, then the server sends an
error message to the connected client instead.
[ 198 ]
Building a Simple Web Server
Chapter 7
Most of the server complexity lies in handling multiple connections, parsing the HTTP
request, and handling error conditions.
The server is also responsible for telling the client the content type of each resource it sends.
There are a few ways to accomplish this; let's consider them next.
Content types
It is the HTTP server's job to tell its client the type of content being sent. This is done by the
Content-Type header. The value of the Content-Type header should be a valid media
type (formerly known as the MIME type) registered with the Internet Assigned Numbers
Authority (IANA). See the Further reading section of this chapter for a link to the IANA list
of media types.
There are a few ways to determine the media type of a file. If you're on a Unix-based
system, such as Linux or macOS, then your operating system already provides a utility for
this.
Try the following command on Linux or macOS (replace example.txt with a real
filename):
file --mime-type example.txt
The following screenshot shows its usage:
As you can see in the preceding screenshot, the file utility told us the media type of
index.html is text/html. It also said the media type of smile.png is image/png, and
the media type of test.txt is text/plain.
Our web server just uses the file's extension to determine the media type.
[ 199 ]
Building a Simple Web Server
Chapter 7
Common file extensions and their media type are listed in the following table:
Extension
.css
.csv
.gif
.htm
.html
.ico
.jpeg
.jpg
.js
.json
.png
.pdf
.svg
.txt
Media Type
text/css
text/csv
image/gif
text/html
text/html
image/x-icon
image/jpeg
image/jpeg
application/javascript
application/json
image/png
application/pdf
image/svg+xml
text/plain
If a file's media type is unknown, then our server should use application/octetstream as a default. This indicates that the browser should treat the content as an
unknown binary blob.
Let's continue by writing code to get Content-Type from a filename.
Returning Content-Type from a filename
Our server code uses a series of if statements to determine the proper media type based
only on the requested file's extension. This isn't a perfect solution, but it is a common one,
and it works for our purposes.
The code to determine a file's media type is as follows:
/*web_server.c except*/
const char *get_content_type(const char* path) {
const char *last_dot = strrchr(path, '.');
if (last_dot) {
if (strcmp(last_dot, ".css") == 0) return "text/css";
if (strcmp(last_dot, ".csv") == 0) return "text/csv";
if (strcmp(last_dot, ".gif") == 0) return "image/gif";
if (strcmp(last_dot, ".htm") == 0) return "text/html";
if (strcmp(last_dot, ".html") == 0) return "text/html";
[ 200 ]
Building a Simple Web Server
if
if
if
if
if
if
if
if
if
(strcmp(last_dot,
(strcmp(last_dot,
(strcmp(last_dot,
(strcmp(last_dot,
(strcmp(last_dot,
(strcmp(last_dot,
(strcmp(last_dot,
(strcmp(last_dot,
(strcmp(last_dot,
Chapter 7
".ico") == 0) return "image/x-icon";
".jpeg") == 0) return "image/jpeg";
".jpg") == 0) return "image/jpeg";
".js") == 0) return "application/javascript";
".json") == 0) return "application/json";
".png") == 0) return "image/png";
".pdf") == 0) return "application/pdf";
".svg") == 0) return "image/svg+xml";
".txt") == 0) return "text/plain";
}
return "application/octet-stream";
}
The get_content_type() function works by matching the filename extension to a list of
known extensions. This is done by using the strrchr() function to find the last dot (.) in
the filename. If a dot is found, then strcmp() is used to check for a match on each
extension. When a match is found, the proper media type is returned. Otherwise, the
default of application/octet-stream is returned instead.
Let's continue building helper functions for our server.
Creating the server socket
Before entertaining the exciting parts of the HTTP server, such as message parsing, let's get
the basics out of the way. Our HTTP server, like all servers, needs to create a listening
socket to accept new connections. We define a function, create_socket(), for this
purpose. This function begins by using getaddrinfo() to find the listening address:
/*web_server.c except*/
SOCKET create_socket(const char* host, const char *port) {
printf("Configuring local address...\n");
struct addrinfo hints;
memset(&hints, 0, sizeof(hints));
hints.ai_family = AF_INET;
hints.ai_socktype = SOCK_STREAM;
hints.ai_flags = AI_PASSIVE;
struct addrinfo *bind_address;
getaddrinfo(host, port, &hints, &bind_address);
[ 201 ]
Building a Simple Web Server
Chapter 7
create_socket() then continues with creating a socket using socket(), binding that
socket to the listening address with bind(), and having the socket enter a listening state
with listen(). The following code calls these functions while detecting error conditions:
/*web_server.c except*/
printf("Creating socket...\n");
SOCKET socket_listen;
socket_listen = socket(bind_address->ai_family,
bind_address->ai_socktype, bind_address->ai_protocol);
if (!ISVALIDSOCKET(socket_listen)) {
fprintf(stderr, "socket() failed. (%d)\n", GETSOCKETERRNO());
exit(1);
}
printf("Binding socket to local address...\n");
if (bind(socket_listen,
bind_address->ai_addr, bind_address->ai_addrlen)) {
fprintf(stderr, "bind() failed. (%d)\n", GETSOCKETERRNO());
exit(1);
}
freeaddrinfo(bind_address);
printf("Listening...\n");
if (listen(socket_listen, 10) < 0) {
fprintf(stderr, "listen() failed. (%d)\n", GETSOCKETERRNO());
exit(1);
}
return socket_listen;
}
The preceding code should be very familiar to you if you're working through this book in
order. If not, please refer to Chapter 3, An In-Depth Overview of TCP Connections, for
information about setting up TCP servers.
Multiple connections buffering
One important hurdle to overcome, when implementing any server software, is accepting
and parsing requests from multiple clients simultaneously.
[ 202 ]
Building a Simple Web Server
Chapter 7
Consider a client that sends only the beginning of an HTTP request, followed by a delay,
and then the remainder of the HTTP request. In this case, we cannot respond to that client
until the entire HTTP request is received. However, at the same time, we do not wish to
delay servicing other connected clients while waiting. For this reason, we need to buffer up
received data for each client separately. Only once we've received an entire HTTP request
from a client can we respond to that client.
It is useful to define a C struct to store information on each connected client. Our
program uses the following:
/*web_server.c except*/
#define MAX_REQUEST_SIZE 2047
struct client_info {
socklen_t address_length;
struct sockaddr_storage address;
SOCKET socket;
char request[MAX_REQUEST_SIZE + 1];
int received;
struct client_info *next;
};
This struct allows us to store information about each connected client. A client's address
is stored in the address field, the address length in address_length, and the socket in
the socket field. All of the data received from the client so far is stored in the request
array; received indicates the number of bytes stored in that array. The next field is a
pointer that allows us to store client_info structures in a linked list.
To simplify our code, we store the root of our linked list in a global variable, clients. The
declaration is as follows:
/*web_server.c except*/
static struct client_info *clients = 0;
Declaring clients as a global variable helps to keep our code slightly shorter and clearer.
However, if you require the code to be re-entrant (for example, if you want multiple servers
running simultaneously), you will want to avoid the global state. This can be done by
passing around the linked list root as a separate argument to each function call. This
chapter's code repository includes an example of this alternative technique in
the web_server2.c file.
[ 203 ]
Building a Simple Web Server
Chapter 7
It is useful to define a number of helper functions that work on the client_info data
structure and the clients linked list. We implement the following helper functions for
these purposes:
get_client() takes a SOCKET variable and searches our linked list for the
corresponding client_info data structure.
drop_client() closes the connection to a client and removes it from the
clients linked list.
get_client_address() returns a client's IP address as a string (character
array).
wait_on_clients() uses the select() function to wait until either a client has
data available or a new client is attempting to connect.
send_400() and send_404() are used to handle HTTP error conditions.
serve_resource() attempts to transfer a file to a connected client.
Let's now implement these functions one at a time.
get_client()
Our get_client() function accepts a SOCKET and searches through the linked list of
connected clients to return the relevant client_info for that SOCKET. If no matching
client_info is found in the linked list, then a new client_info is allocated and added
to the linked list. Therefore, get_client() serves two purposes—it can find an existing
client_info, or it can create a new client_info.
get_client() takes a SOCKET as its input and return a client_info structure. The
following code is the first part of the get_client() function:
/*web_server.c except*/
struct client_info *get_client(SOCKET s) {
struct client_info *ci = clients;
while(ci) {
if (ci->socket == s)
break;
ci = ci->next;
}
if (ci) return ci;
[ 204 ]
Building a Simple Web Server
Chapter 7
In the preceding code, we created the get_client() function and implemented our linked
list search functionality. First, the linked list root, clients, is saved into a temporary
variable, ci. If ci->socket is the socket we are searching for, then the loop breaks and ci
is returned. If the client_info structure for the given socket isn't found, then the code
continues on and must create a new client_info structure. The following code achieves
this:
/*web_server.c except*/
struct client_info *n =
(struct client_info*) calloc(1, sizeof(struct client_info));
if (!n) {
fprintf(stderr, "Out of memory.\n");
exit(1);
}
n->address_length = sizeof(n->address);
n->next = clients;
clients = n;
return n;
}
In the preceding code, the calloc() function is used to allocate memory for a new
client_info structure. The calloc() function also zeroes-out the data structure, which
is useful in this case. The code then checks that the memory allocation succeeded, and it
prints an error message if it fails.
The code then sets n->address_length to the proper size. This allows us to use accept()
directly on the client_info address later, as accept() requires the maximum address
length as an input.
The n->next field is set to the current global linked list root, and the global linked list root,
clients, is set to n. This accomplishes the task of adding in the new data structure at the
beginning of the linked list.
The get_client() function ends by returning the newly allocated client_info
structure, n.
[ 205 ]
Building a Simple Web Server
Chapter 7
drop_client()
The drop_client() function searches through our linked list of clients and removes a
given client.
The entire function is given in the following code:
/*web_server.c except*/
void drop_client(struct client_info *client) {
CLOSESOCKET(client->socket);
struct client_info **p = &clients;
while(*p) {
if (*p == client) {
*p = client->next;
free(client);
return;
}
p = &(*p)->next;
}
fprintf(stderr, "drop_client not found.\n");
exit(1);
}
As you can see in the preceding code, CLOSESOCKET() is first used to close and clean up
the client's connection.
The function then declares a pointer-to-pointer variable, p, and sets it to clients. This
pointer-to-pointer variable is useful because we can use it to change the value of clients
directly. Indeed, if the client to be removed is the first element in the linked list, then
clients needs to be updated, so that clients points to the second element in the list.
The code uses a while loop to walk through the linked list. Once it finds that *p ==
client, *p, is set to client->next, which effectively removes the client from the linked
list, the allocated memory is then freed and the function returns.
Although drop_client() is a simple function, it is handy as it can be called in several
circumstances. It must be called when we finish sending a client a resource, and it also must
be called when we finish sending a client an error message.
[ 206 ]
Building a Simple Web Server
Chapter 7
get_client_address()
It is useful to have a helper function that converts a given client's IP address into text. This
function is given in the following code snippet:
/*web_server.c except*/
const char *get_client_address(struct client_info *ci) {
static char address_buffer[100];
getnameinfo((struct sockaddr*)&ci->address,
ci->address_length,
address_buffer, sizeof(address_buffer), 0, 0,
NI_NUMERICHOST);
return address_buffer;
}
get_client_address() is a simple function. It first allocates a char array to store the IP
address in. This char array is declared static, which ensures that its memory is available
after the function returns. This means that we don't need to worry about having the caller
free() the memory. The downside to this method is that get_client_address() has a
global state and is not re-entrant-safe. See web_server2.c for an alternative version that is
re-entrant-safe.
After a char buffer is available, the code simply uses getnameinfo() to convert the binary
IP address into a text address; getnameinfo() was covered in detail in previous chapters,
but Chapter 5, Hostname Resolution and DNS, has a particularly detailed explanation.
wait_on_clients()
Our server is capable of handling many simultaneous connections. This means that our
server must have a way to wait for data from multiple clients at once. We define a function,
wait_on_clients(), which blocks until an existing client sends data, or a new client
attempts to connect. This function uses select() as described in previous
chapters. Chapter 3, An In-Depth Overview of TCP Connections, has a detailed explanation of
select().
The wait_on_clients() function is defined as follows:
/*web_server.c except*/
fd_set wait_on_clients(SOCKET server) {
fd_set reads;
FD_ZERO(&reads);
[ 207 ]
Building a Simple Web Server
Chapter 7
FD_SET(server, &reads);
SOCKET max_socket = server;
struct client_info *ci = clients;
while(ci) {
FD_SET(ci->socket, &reads);
if (ci->socket > max_socket)
max_socket = ci->socket;
ci = ci->next;
}
if (select(max_socket+1, &reads, 0, 0, 0) < 0) {
fprintf(stderr, "select() failed. (%d)\n", GETSOCKETERRNO());
exit(1);
}
return reads;
}
In the preceding code, first a new fd_set is declared and zeroed-out. The server socket is
then added to the fd_set first. Then the code loops through the linked list of connected
clients and adds the socket for each one in turn. A variable, max_socket, is maintained
throughout this process to store the maximum socket number as required by select().
After all the sockets are added to fd_set reads, the code calls select(),
and select() returns when one or more of the sockets in reads is ready.
The wait_on_clients() function returns reads so that the caller can see which socket is
ready.
send_400()
In the case where a client sends an HTTP request which our server does not understand, it
is helpful to send a code 400 error. Because errors of this type can arise in several
situations, we wrap this functionality in the send_400() function. The entire function
follows:
/*web_server.c except*/
void send_400(struct client_info *client) {
const char *c400 = "HTTP/1.1 400 Bad Request\r\n"
"Connection: close\r\n"
"Content-Length: 11\r\n\r\nBad Request";
send(client->socket, c400, strlen(c400), 0);
[ 208 ]
Building a Simple Web Server
Chapter 7
drop_client(client);
}
The send_400() function first declares a text array with the entire HTTP response hardcoded. This text is sent using the send() function, and then the client is dropped by calling
the drop_client() function we defined earlier.
send_404()
In addition to the 400 Bad Request error, our server also needs to handle the case where
a requested resource is not found. In this case, a 404 Not Found error should be returned.
We define a helper function to return this error as follows:
/*web_server.c except*/
void send_404(struct client_info *client) {
const char *c404 = "HTTP/1.1 404 Not Found\r\n"
"Connection: close\r\n"
"Content-Length: 9\r\n\r\nNot Found";
send(client->socket, c404, strlen(c404), 0);
drop_client(client);
}
The send_404() function works exactly like the send_400() function defined previously.
serve_resource()
The serve_resource() function sends a connected client a requested resource. Our server
expects all hosted files to be in a subdirectory called public. Ideally, our server should not
allow access to any files outside of this public directory. However, as we shall see,
enforcing this restriction may be more difficult than it first appears.
Our serve_resource() function takes as arguments a connected client and a requested
resource path. The function begins as follows:
/*web_server.c except*/
void serve_resource(struct client_info *client, const char *path) {
printf("serve_resource %s %s\n", get_client_address(client), path);
[ 209 ]
Building a Simple Web Server
Chapter 7
The connected client's IP address and the requested path are printed to aid in debugging. In
a production server, you would also want to print additional information. Most production
servers log the date, time, request method, the client's user-agent string, and the response
code as a minimum.
Our function then normalizes the requested path. There are a few things to check for. First,
if the path is /, then we need to serve a default file. There is a tradition of serving a file
called index in that case, and, indeed, this is what our code does.
We also check that the path isn't too long. Once we ensure that the path is below a
maximum length, we can use fixed-size arrays to store it without worrying about buffer
overflows.
Our code also checks that the path doesn't contain two consecutive dots—... In file paths,
two dots indicate a reference to a parent directory. However, for security reasons, we want
to allow access only into our public directory. We do not want to provide access to any
parent directory. If we allowed paths with .., then a malicious client could send GET
/../web_server.c HTTP/1.1 and gain access to our server source code!
The following code is used to redirect root requests and to prevent long or obviously
malicious requests:
/*web_server.c except*/
if (strcmp(path, "/") == 0) path = "/index.html";
if (strlen(path) > 100) {
send_400(client);
return;
}
if (strstr(path, "..")) {
send_404(client);
return;
}
Our code now needs to convert the path to refer to files in the public directory. This is
done with the sprintf() function. First, a text-array is reserved, full_path, and then
sprintf() is used to store the full path into it. We are able to reserve a fixed allocation for
full_path, as our earlier code ensured that path does not exceed 100 characters in length.
[ 210 ]
Building a Simple Web Server
Chapter 7
The code to set full_path is as follows:
/*web_server.c except*/
char full_path[128];
sprintf(full_path, "public%s", path);
It is important to note that the directory separator differs between Windows and other
operating systems. While Unix-based systems use a slash (/), Windows instead uses a
backslash (\) as its standard. Many Windows functions handle the conversion
automatically, but the difference is sometimes important. For our simple server, the slash
conversion isn't an absolute requirement. However, we include it anyway as a good
practice.
The following code converts slashes to backslashes on Windows:
/*web_server.c except*/
#if defined(_WIN32)
char *p = full_path;
while (*p) {
if (*p == '/') *p = '\\';
++p;
}
#endif
The preceding code works by stepping through the full_path text array and detecting
slash characters. When a slash is found, it is simply overwritten with a backslash. Note that
the C code '\\' is equivalent to only one backslash. This is because the backslash has
special meaning in C, and therefore the first backslash is used to escape the second
backslash.
At this point, our server can check whether the requested resource actually exists. This is
done by using the fopen() function. If fopen() fails, for any reason, then our server
assumes that the file does not exist. The following code sends a 404 error if the requested
resource isn't available:
/*web_server.c except*/
FILE *fp = fopen(full_path, "rb");
if (!fp) {
send_404(client);
return;
}
[ 211 ]
Building a Simple Web Server
Chapter 7
If fopen() succeeds, then we can use fseek() and ftell() to determine the requested
file's size. This is important, as we need to use the file's size in the Content-Length
header. The following code finds the file size and stores it in the cl variable:
/*web_server.c except*/
fseek(fp, 0L, SEEK_END);
size_t cl = ftell(fp);
rewind(fp);
Once the file size is known, we also want to get the file's type. This is used in the ContentType header. We already defined a function, get_content_type(), which makes this task
easy. The content type is store in the variable ct by the following code:
/*web_server.c except*/
const char *ct = get_content_type(full_path);
Once the file has been located and we have its length and type, the server can begin
sending the HTTP response. We first reserve a temporary buffer to store header fields in:
/*web_server.c except*/
#define BSIZE 1024
char buffer[BSIZE];
Once the buffer is reserved, the server prints relevant headers into it and then sends those
headers to the client. This is done using sprintf() and then send() in turn. The
following code sends the HTTP response header:
/*web_server.c except*/
sprintf(buffer, "HTTP/1.1 200 OK\r\n");
send(client->socket, buffer, strlen(buffer), 0);
sprintf(buffer, "Connection: close\r\n");
send(client->socket, buffer, strlen(buffer), 0);
sprintf(buffer, "Content-Length: %u\r\n", cl);
send(client->socket, buffer, strlen(buffer), 0);
sprintf(buffer, "Content-Type: %s\r\n", ct);
send(client->socket, buffer, strlen(buffer), 0);
sprintf(buffer, "\r\n");
send(client->socket, buffer, strlen(buffer), 0);
[ 212 ]
Building a Simple Web Server
Chapter 7
Note that the last send() statement sends \r\n. This has the effect of transmitting a blank
line. This blank line is used by the client to delineate the HTTP header from the beginning
of the HTTP body.
The server can now send the actual file content. This is done by calling fread() repeatedly
until the entire file is sent:
/*web_server.c except*/
int r = fread(buffer, 1, BSIZE, fp);
while (r) {
send(client->socket, buffer, r, 0);
r = fread(buffer, 1, BSIZE, fp);
}
In the preceding code, fread() is used to read enough data to fill buffer. This buffer is
then transmitted to the client using send(). These steps are looped until fread() returns
0; this indicates that the entire file has been read.
Note that send() may block on large files. In a truly robust, production-ready server, you
would need to handle this case. It could be done by using select() to determine when
each socket is ready to read. Another common method is to use fork() or similar APIs to
create separate threads/processes for each connected client. For simplicity, our server
accepts the limitation that send() blocks on large files. Please refer to Chapter 13, Socket
Programming Tips and Pitfalls, for more information about the blocking behavior of send().
The function can finish by closing the file handle and using drop_client() to disconnect
the client:
/*web_server.c except*/
fclose(fp);
drop_client(client);
}
That concludes the serve_resource() function.
Keep in mind that while serve_resource() attempts to limit access to only the public
directory, it is not adequate in doing so, and serve_resource() should not be used in
production code without carefully considering additional access loopholes. We discuss
more security concerns later in this chapter.
With these helper functions out of the way, implementing our main server loop is a much
easier task. We begin that next.
[ 213 ]
Building a Simple Web Server
Chapter 7
The main loop
With our many helper functions out of the way, we can now finish web_server.c.
Remember to first #include chap07.h and also add in all of the types and functions
we've defined so far—struct client_info, get_content_type(), create_socket(),
get_client(), drop_client(), get_client_address(), wait_on_clients(),
send_400(), send_404(), and serve_resource().
We can then begin the main() function. It starts by initializing Winsock on Windows:
/*web_server.c except*/
int main() {
#if defined(_WIN32)
WSADATA d;
if (WSAStartup(MAKEWORD(2, 2), &d)) {
fprintf(stderr, "Failed to initialize.\n");
return 1;
}
#endif
We then use our earlier function, create_socket(), to create the listening socket. Our
server listens on port 8080, but feel free to change it. On Unix-based systems, listening on
low port numbers is reserved for privileged accounts. For security reasons, our web server
should be running with unprivileged accounts only. This is why we use 8080 as our port
number instead of the HTTP standard port, 80.
The code to create the server socket is as follows:
/*web_server.c except*/
SOCKET server = create_socket(0, "8080");
If you want to accept connections from only the local system, and not outside systems, use
the following code instead:
/*web_server.c except*/
SOCKET server = create_socket("127.0.0.1", "8080");
[ 214 ]
Building a Simple Web Server
Chapter 7
We then begin an endless loop that waits on clients. We call wait_on_clients() to wait
until a new client connects or an old client sends new data:
/*web_server.c except*/
while(1) {
fd_set reads;
reads = wait_on_clients(server);
The server then detects whether a new client has connected. This case is indicated by
server being set in fd_set reads. We use the FD_ISSET() macro to detect this
condition:
/*web_server.c except*/
if (FD_ISSET(server, &reads)) {
struct client_info *client = get_client(-1);
client->socket = accept(server,
(struct sockaddr*) &(client->address),
&(client->address_length));
if (!ISVALIDSOCKET(client->socket)) {
fprintf(stderr, "accept() failed. (%d)\n",
GETSOCKETERRNO());
return 1;
}
printf("New connection from %s.\n",
get_client_address(client));
}
Once a new client connection has been detected, get_client() is called with the
argument -1; -1 is not a valid socket specifier, so get_client() creates a new struct
client_info. This struct client_info is assigned to the client variable.
The accept() socket function is used to accept the new connection and place the
connected clients address information into the respective client fields. The new socket
returned by accept() is stored in client->socket.
The client's address is printed using a call to get_client_address(). This is helpful for
debugging.
[ 215 ]
Building a Simple Web Server
Chapter 7
Our server must then handle the case where an already connected client is sending data.
This is a bit more complicated. We first walk through the linked list of clients and use
FD_ISSET() on each client to determine which clients have data available. Recall that the
linked list root is stored in the clients global variable.
We begin our linked list walk with the following:
/*web_server.c except*/
struct client_info *client = clients;
while(client) {
struct client_info *next = client->next;
if (FD_ISSET(client->socket, &reads)) {
We then check that we have memory available to store more received data for client. If
the client's buffer is already completely full, then we send a 400 error. The following code
checks for this condition:
/*web_server.c except*/
if (MAX_REQUEST_SIZE == client->received) {
send_400(client);
continue;
}
Knowing that we have at least some memory left to store received data, we can use recv()
to store the client's data. The following code uses recv() to write new data into the client's
buffer while being careful to not overflow that buffer:
/*web_server.c except*/
int r = recv(client->socket,
client->request + client->received,
MAX_REQUEST_SIZE - client->received, 0);
A client that disconnects unexpectedly causes recv() to return a non-positive number. In
this case, we need to use drop_client() to clean up our memory allocated for that client:
/*web_server.c except*/
if (r < 1) {
printf("Unexpected disconnect from %s.\n",
get_client_address(client));
drop_client(client);
[ 216 ]
Building a Simple Web Server
Chapter 7
If the received data was written successfully, our server adds a null terminating character
to the end of that client's data buffer. This allows us to use strstr() to search the buffer,
as the null terminator tells strstr() when to stop.
Recall that the HTTP header and body is delineated by a blank line. Therefore, if strstr()
finds a blank line (\r\n\r\n), we know that the HTTP header has been received and we
can begin to parse it. The following code detects whether the HTTP header has been
received:
/*web_server.c except*/
} else {
client->received += r;
client->request[client->received] = 0;
char *q = strstr(client->request, "\r\n\r\n");
if (q) {
Our server only handles GET requests. We also enforce that any valid path should start with
a slash character; strncmp() is used to detect these two conditions in the following code:
/*web_server.c except*/
if (strncmp("GET /", client->request, 5)) {
send_400(client);
} else {
char *path = client->request + 4;
char *end_path = strstr(path, " ");
if (!end_path) {
send_400(client);
} else {
*end_path = 0;
serve_resource(client, path);
}
}
} //if (q)
In the preceding code, a proper GET request causes the execution of the else branch. Here,
we set the path variable to the beginning of the request path, which is starting at the fifth
character of the HTTP request (because C arrays start at zero, the fifth character is located at
client->request + 4).
The end of the requested path is indicated by finding the next space character. If found, we
just call our serve_resource() function to fulfil the client's request.
[ 217 ]
Building a Simple Web Server
Chapter 7
Our server is basically functional at this point. We only need to finish our loops and close
out the main() function. The following code accomplishes this:
/*web_server.c except*/
}
}
client = next;
}
} //while(1)
printf("\nClosing socket...\n");
CLOSESOCKET(server);
#if defined(_WIN32)
WSACleanup();
#endif
printf("Finished.\n");
return 0;
}
Note that our server doesn't actually have a way to break from its infinite loop. It simply
listens to connections forever. As an exercise, you may want to add in functionality that
allows the server to shut down cleanly. This was omitted only to keep the code simpler. It
may also be useful to drop all connected clients with this line of code—while(clients)
drop_client(clients);
That concludes the code for web_server.c. I recommend you download web_server.c
from this book's code repository and try it out.
You can compile and run web_server.c on Linux and macOS with the following
commands:
gcc web_server.c -o web_server
./web_server
On Windows, the command to compile and run using MinGW is as follows:
gcc web_server.c -o web_server.exe -lws2_32
web_server.exe
[ 218 ]
Building a Simple Web Server
Chapter 7
The following screenshot shows the server being compiled and run on macOS:
If you connect to the server using a standard web browser, you should see something such
as the following screenshot:
[ 219 ]
Building a Simple Web Server
Chapter 7
You can also drop different files into the public folder and play around with creating
more complicated websites.
An alternative source file, web_server2.c, is also provided in this chapter's code
repository. It behaves exactly like the code we developed, but it avoids having global state
(at the expense of a little added verbosity). This may make web_server2.c more suitable
for integration into more significant projects and continued development.
Although the web server we developed certainly works, it does have a number of
shortcomings. Please don't deploy this server (or any other network code) in the wild
without very carefully considering these shortcomings, some of which we address next.
Security and robustness
One of the most important rules, when developing networked code, is that your program
should never trust the connected peer. Your code should never assume that the connected
peer sends data in a particular format. This is especially vital for server code that may
communicate with multiple clients at once.
If your code doesn't carefully check for errors and unexpected conditions, then it will be
vulnerable to exploits.
Consider the following code which receives data into a buffer until a space character is
found:
char buffer[1028] = {0};
char *p = buffer;
while (!strstr(p, " "))
p += recv(client, p, 1028, 0);
The preceding code works simply. It reserves 1,028 bytes of buffer space and then uses
recv() to write received data into that space. The p pointer is updated on each read to
indicate where the next data should be written. The code then loops until the strstr()
function detects a space character.
That code could be useful to read data from a client until an HTTP verb is detected. For
example, it could receive data until GET is received, at which point the server can begin to
process a GET request.
[ 220 ]
Building a Simple Web Server
Chapter 7
One problem with the preceding code is that recv() could write past the end of the
allocated space for buffer. This is because 1028 is passed to recv(), even if some data has
already been written. If a network client can cause your code to write past the end of a
buffer, then that client may be able to completely compromise your server. This is because
both data and executable code are stored in your server's memory. A malicious client may
be able to write executable code past the buffer array and cause your program to execute
it. Even if the malicious code isn't executed, the client could still overwrite other important
data in your server's memory.
The preceding code can be fixed by passing to recv() only the amount of buffer space
remaining:
char buffer[1028] = {0};
char *p = buffer;
while (!strstr(p, " "))
p += recv(client, p, 1028 - (p - buffer), 0);
In this case, recv() is not be able to write more than 1,028 bytes total into buffer. You
may think that the memory errors are resolved, but you would still be wrong. Consider a
client that sends 1,028 bytes, but no space characters. Your code then calls strstr()
looking for a space character. Considering that buffer is completely full now,
strstr() cannot find a space character or a null terminating character! In that
case, strstr() continues to read past the end of buffer into unallocated memory.
So, you fix this issue by only allowing recv() to write 1,027 bytes total. This reserves one
byte to remain as the null terminating character:
char buffer[1028] = {0};
char *p = buffer;
while (!strstr(p, " "))
p += recv(client, p, 1027 - (p - buffer), 0);
Now your code won't write or read past the array bounds for buffer, but the code is still
very broken. Consider a client that sends 1,027 characters. Or consider a client that sends a
single null character. In either case, the preceding code continues to loop forever, thus
locking up your server and preventing other clients from being served.
Hopefully, the previous examples illustrate the care needed to implement a server in C.
Indeed, it's easy to create bugs in any programming language, but in C special care needs to
be taken to avoid memory errors.
[ 221 ]
Building a Simple Web Server
Chapter 7
Another issue with server software is that the server wants to allow access to some files on
the system, but not others. A malicious client could send an HTTP request that tries to
download arbitrary files from your server system. For example, if an HTTP request such as
GET /../secret_file.c HTTP/1.1 was sent to a naive HTTP server, that server may
send the secret_file.c to the connected client, even though it exists outside of the
public directory!
Our code in web_server.c detects the most obvious attempts at this by searching for
requests containing .. and denying those requests.
A robust server should use operating systems features to detect that requested files exist as
actual files in the permitted directory. Unfortunately, there is no cross-platform way to do
this, and the platform-dependent options are somewhat complicated.
Please understand that these are not purely theoretical concerns, but actual exploitable
bugs. For example, if you run our web_server.c program on Windows and a client sends
the request GET /this_will_be_funny/PRN HTTP/1.1, what do you suppose happens?
The this_will_be_funny directory doesn't exist, and the PRN file certainly doesn't exist
in that non-existent directory. These facts may lead you to think that the server simply
returns a 404 Not Found error, as expected. However, that's not what happens. Under
Windows, PRN is a special filename. When your server calls fopen() on this special name,
Windows doesn't look for a file, but rather it connects to a printer interface! Other special
names include COM1 (connects to serial port 1) and LPT1 (connects to parallel port 1),
although there are others. Even if these filenames have an extension, such as PRN.txt,
Windows still redirects instead of looking for a file.
One generally applicable piece of security advice is this—run your networked programs
under non-privileged accounts that have access to only the minimum resources needed to
function. In other words, if you are going to run a networked server, create a new account
to run it under. Give that account read access to only the files that server needs to serve.
This is not a substitute for writing secure code, but rather running as a non-privilege user
creates one final barrier. It is advice you should apply even when running hardened,
industry-tested server software.
Hopefully, the previous examples illustrate that programming is complicated, and safe
network programming in C can be difficult. It is best approached with care. Oftentimes, it is
not possible to know that you have all the loopholes covered. Operating systems don't
always have adequate documentation. Operating system APIs often behave in non-obvious
and non-intuitive ways. Be careful.
[ 222 ]
Building a Simple Web Server
Chapter 7
Open source servers
The code developed in this chapter is suitable for use in trusted applications on trusted
networks. For example, if you are developing a video game, it can be very useful to make it
serve a web page that displays debugging information. This doesn't have to be a security
concern, as it can limit connections to the local machine.
If you must deploy a web server on the internet, I suggest you consider using a free and
open source implementation that's already available. The web servers Nginx and Apache,
for example, are highly performant, cross-platform, secure, written in C, and completely
free. They are also well-documented and easy to find support for.
If you want to expose your program to the internet, you can communicate to a web server
using either CGI or FastCGI. With CGI, the web server handles the HTTP request. When a
request comes in, it runs your program and returns your program's output in the HTTP
response body.
Alternatively, many web servers (such as Nginx or Apache) work as a reverse proxy. This
essentially puts the web server between your code and the internet. The web server accepts
and forwards HTTP messages to your HTTP server. This can have the effect of slightly
shielding your code from attackers.
Summary
In this chapter, we worked through implementing an HTTP server in C from scratch. That's
no small feat! Although the text-based nature of HTTP makes parsing HTTP requests
simple, we needed to spend a lot of effort to ensure that multiple clients could be served
simultaneously. We accomplished this by buffering received data for each client separately.
Each client's state information was organized into a linked list.
Another difficulty was ensuring the safe handling of received data and detecting errors. We
learned that a programmer must be very careful when handling network data to avoid
creating security risks. We also saw that even very subtle issues, such as Windows's special
filenames, can potentially create dangerous security holes for networked server
applications.
In the next chapter, Chapter 8, Making Your Program Send Email, we move on from HTTP
and consider the primary protocol associated with email—Simple Mail Transfer Protocol
(SMTP).
[ 223 ]
Building a Simple Web Server
Chapter 7
Questions
Try these questions to test your knowledge from this chapter:
1. How does an HTTP client indicate that it has finished sending the HTTP request?
2. How does an HTTP client know what type of content the HTTP server is
sending?
3. How can an HTTP server identify a file's media type?
4. How can you tell whether a file exists on the filesystem and is readable by your
program? Is fopen(filename, "r") != 0 a good test?
The answers to these questions can be found in Appendix A, Answers to Questions.
Further reading
For more information about HTTP and HTML, please refer to the following:
RFC 7230: Hypertext Transfer Protocol (HTTP/1.1): Message Syntax and Routing
(https://tools.ietf.org/html/rfc7230)
RFC 7231: Hypertext Transfer Protocol (HTTP/1.1): Semantics and Content (https://
tools.ietf.org/html/rfc7231)
Media Types (https://www.iana.org/assignments/media-types/media-types.
xhtml)
[ 224 ]
8
Making Your Program Send
Email
In this chapter, we will consider the protocol responsible for delivering email on the
internet. This protocol is called the Simple Mail Transfer Protocol (SMTP).
Following an exposition of the inner workings of email transfer, we will build a simple
SMTP client capable of sending short emails.
The following topics are covered in this chapter:
How SMTP servers work
Determining which mail server is responsible for a given domain
Using SMTP
Email encoding
Spam-blocking and email-sending pitfalls
SPF, DKIM, and DMARC
Technical requirements
The example programs from this chapter can be compiled with any modern C compiler. We
recommend MinGW on Windows and GCC on Linux and macOS. See Appendix B, Setting
Up Your C Compiler on Windows, Appendix C, Setting Up Your C Compiler on Linux, and
Appendix D, Setting Up Your C Compiler on macOS, for compiler setup.
Making Your Program Send Email
Chapter 8
The code for this book can be found at https://github.com/codeplea/Hands-On-NetworkProgramming-with-C.
From the command line, you can download the code for this chapter with the following
command:
git clone https://github.com/codeplea/Hands-On-Network-Programming-with-C
cd Hands-On-Network-Programming-with-C/chap08
Each example program in this chapter runs on Windows, Linux, and macOS. When
compiling on Windows, each example program requires linking with the Winsock library.
This can be accomplished by passing the -lws2_32 option to gcc.
We provide the exact commands needed to compile each example as they are introduced.
All of the example programs in this chapter require the same header files and C macros that
we developed in Chapter 2, Getting to Grips with Socket APIs. For brevity, we put these
statements in a separate header file, chap08.h, which we can include in each program. For
a detailed explanation of these statements, please refer to Chapter 2, Getting to Grips with
Socket APIs.
The first part of chap08.h includes the needed networking headers for each platform. The
code for this is as follows:
/*chap08.h*/
#if defined(_WIN32)
#ifndef _WIN32_WINNT
#define _WIN32_WINNT 0x0600
#endif
#include <winsock2.h>
#include <ws2tcpip.h>
#pragma comment(lib, "ws2_32.lib")
#else
#include
#include
#include
#include
#include
#include
#include
<sys/types.h>
<sys/socket.h>
<netinet/in.h>
<arpa/inet.h>
<netdb.h>
<unistd.h>
<errno.h>
#endif
[ 226 ]
Making Your Program Send Email
Chapter 8
We also define some macros to make writing portable code easier, and we'll include the
additional headers that our programs require:
/*chap08.h continued*/
#if defined(_WIN32)
#define ISVALIDSOCKET(s) ((s) != INVALID_SOCKET)
#define CLOSESOCKET(s) closesocket(s)
#define GETSOCKETERRNO() (WSAGetLastError())
#else
#define
#define
#define
#define
#endif
ISVALIDSOCKET(s) ((s) >= 0)
CLOSESOCKET(s) close(s)
SOCKET int
GETSOCKETERRNO() (errno)
#include <stdio.h>
#include <stdlib.h>
#include <string.h>
That concludes chap08.h.
Email servers
SMTP is the protocol responsible for delivering emails between servers. It is a text-based
protocol operating on TCP port 25.
Not all emails need to be delivered between systems. For example, imagine you have a
Gmail account. If you compose and send an email to your friend who also has a Gmail
account, then SMTP is not necessarily used. In this case, Gmail only needs to copy your
email into their inbox (or do equivalent database updates).
On the other hand, consider a case where you send an email to your friend's Yahoo!
account. If the email is sent from your Gmail account, then it's clear that the Gmail and
Yahoo! servers must communicate. In that case, your email is transmitted from the Gmail
server to the Yahoo! server using SMTP.
[ 227 ]
Making Your Program Send Email
Chapter 8
This connection is illustrated in the following diagram:
Retrieving your email from your mail service provider is a different issue than delivering
email between service providers. Webmail is very popular now for sending and receiving
mail from your mail provider. Webmail providers allow mailbox access through a web
browser. Web browsers communicate using HTTP (or HTTPS).
Let's consider the full path of an email from Alice to Bob. In this example, Alice has Gmail
as her mail provider, and Bob has Yahoo! as his mail provider. Both Alice and Bob access
their mailbox using a standard web browser. The path an email takes from Bob to Alice is
illustrated by the following diagram:
As you can see in the preceding diagram, SMTP is only used when delivering the mail
between mail providers. This usage of SMTP is called mail transmission.
In fact, the email in this example could take other paths. Let's consider that Alice uses a
desktop email client instead of webmail. Gmail still supports desktop email clients, and
these clients offer many good features, even if they are falling out of fashion. A typical
desktop client connects to a mail provider using either: Internet Message Access Protocol
(IMAP) or Post Office Protocol (POP) and SMTP. In this case, SMTP is used by Alice to
deliver her mail to her mail provider (Gmail). This usage of SMTP is called mail
submission.
[ 228 ]
Making Your Program Send Email
Chapter 8
The Gmail provider then uses SMTP again to deliver the email to the Yahoo! mail server.
This is illustrated in the following diagram:
In the preceding diagram, the Gmail server would be considered an SMTP relay. In
general, an SMTP server should only relay mail for trusted users. If an SMTP server relayed
all mail, it would become quickly overwhelmed by spammers.
Many mail providers have a set of mail servers used to accept incoming mail and a separate
set of mail servers used to accept outgoing mail from their users.
It is important to understand that SMTP is used to send mail. SMTP is not used to retrieve
mail from a server. IMAP and POP are the common protocols used by desktop mail
programs to retrieve mail from a server.
It is not necessary for Alice to send her mail through her provider's SMTP server. Instead,
she could send it directly to Bob's mail provider as illustrated in the following diagram:
In practice, one usually delegates the delivery responsibility to their mail provider. This has
several advantages; namely, the mail provider can attempt a redelivery if the destination
mail server isn't available. Other advantages are discussed later in this chapter.
[ 229 ]
Making Your Program Send Email
Chapter 8
The program we develop in this chapter is used to deliver mail directly to the recipient's
email provider. It is not useful to deliver mail to a relay server because we are not going to
implement authentication techniques. Generally, SMTP servers do not relay mail without
authenticating that the sender has an account with them.
The SMTP protocol we describe in this chapter is unsecured and not encrypted. This is
convenient for explanation and learning purposes, but in the real world, you may want to
secure your email transfer.
SMTP security
We describe unsecured SMTP in this chapter. In real-world use, SMTP should be secured if
both communicating servers support it. Not all do.
Securing SMTP is done by having SMTP connections start out as plaintext on port 25. The
SMTP client then issues a STARTTLS command to upgrade to a secure, encrypted
connection. This secure connection works by merely running the SMTP commands through
a TLS layer; therefore, everything we cover in this chapter is applicable to secure SMTP too.
See Chapter 9, Loading Secure Web Pages with HTTPS and OpenSSL, for more information
about TLS.
Mail transmission between servers is always done on port 25.
Many desktop email clients use TCP ports 465 or 587 for SMTP mail submission. Internet
Service Providers (ISPs) prefer these alternative ports for mail submission, and it allows
them to block port 25 altogether. This is generally justified as a spam prevention technique.
Next, let's see how to determine which mail server receives mail for a given email address.
Finding an email server
Consider the email address bob@example.com. In this case, bob identifies the user, while
example.com identifies the domain name of the service provider. These parts are
delineated by the @ symbol.
[ 230 ]
Making Your Program Send Email
Chapter 8
One domain name can potentially use multiple mail servers. Likewise, one mail server can
provide service for many domain names. For this reason, identifying the mail server or
servers responsible for receiving mail for bob@example.com isn't as easy as connecting to
example.com. Instead, the mail server must be identified by performing a DNS lookup for
an MX record.
DNS was covered in depth back in Chapter 5, Hostname Resolution and DNS. The program
we developed in that chapter can be used to query MX records.
Otherwise, most operating systems provide a command-line tool for DNS lookup.
Windows provides nslookup, while Linux and macOS provide dig.
On Windows, we can find the mail servers responsible for accepting mail
@gmail.com using the following command:
nslookup -type=mx gmail.com
This lookup is shown in the following screenshot:
[ 231 ]
Making Your Program Send Email
Chapter 8
On Linux or macOS, an MX record lookup for a @gmail.com account is done with the
following command:
dig mx gmail.com
The use of dig is shown in the following screenshot:
As you can see in the preceding two screenshots, Gmail uses five mail servers. When
multiple MX records are found, mail should be delivered to the server having the lowest
MX preference first. If mail delivery fails to that server, then an attempt should be made to
deliver to the server having the next lowest preference, and so on. At the time of this
writing, Gmail's primary mail server, having a preference of 5, is gmail-smtpin.l.google.com. That is the SMTP server you would connect to in order to send mail to
an @gmail.com address.
[ 232 ]
Making Your Program Send Email
Chapter 8
It is also possible for MX records to have the same preference. Yahoo! uses mail servers
having the same preference. The following screenshot shows the MX records for
yahoo.com:
In the preceding screenshot, we see that Yahoo! uses three mail servers. Each server has a
preference of 1. This means that mail can be delivered to any one of them with no special
preference. If mail delivery fails to the first chosen server, then another server should be
chosen at random to retry.
Programmatically getting the MX record in a cross-platform manner can be difficult. Please
see Chapter 5, Hostname Resolution and DNS, where this topic was covered in some depth.
The SMTP client we develop in this present chapter assumes that the mail server is known
in advance.
Now that we know which server to connect to, let's consider the SMTP protocol itself in
more detail.
[ 233 ]
Making Your Program Send Email
Chapter 8
SMTP dialog
SMTP is a text-based TCP protocol that works on port 25. SMTP works in a lock-step, oneat-a-time dialog, with the client sending commands and the server sending responses for
each command.
In a typical session, the dialog goes as follows:
1. The client first establishes a connection to the SMTP server.
2. The server initiates with a greeting. This greeting indicates that the server is
ready to receive commands.
3. The client then issues its own greeting.
4. The server responds.
5. The client sends a command indicating who the mail is from.
6. The server responds to indicate that the sender is accepted.
7. The client issues another command, which specifies the mail's recipient.
8. The server responds indicating the recipient is accepted.
9. The client then issues a DATA command.
10. The server responds asking the client to proceed.
11. The client transfers the email.
The protocol is very simple. In the following example SMTP session, mail.example.net is
the client, and the server is mail.example.com (C and S indicate whether the client or
server is sending, respectively):
S:
C:
S:
C:
S:
C:
S:
C:
S:
C:
C:
C:
C:
C:
S:
C:
S:
220 mail.example.com SMTP server ready
HELO mail.example.net
250 Hello mail.example.net [192.0.2.67]
MAIL FROM:<alice@example.net>
250 OK
RCPT TO:<bob@example.com>
250 Accepted
DATA
354 Enter message, ending with "." on a line by itself
Subject: Re: The Cake
Date: Fri, 03 May 2019 02:31:20 +0000
Do NOT forget to bring the cake!
.
250 OK
QUIT
221 closing connection
[ 234 ]
Making Your Program Send Email
Chapter 8
Everything the server sends is in reply to the client's commands, except for the first line.
The first line is simply in response to the client connecting.
You may notice that each of the client's commands start with a four-letter word. Each one of
the server's responses starts with a three-digit code.
The common client commands we use are as follows:
HELO is used for the client to identify itself to the server.
MAIL is used to specify who is sending the mail.
RCPT is used to specify a recipient.
DATA is used to initiate the transfer of the actual email. This email should include
both headers and a body.
QUIT is used to end the session.
The server response codes used in a successful email transfer are the following:
220: The service is ready
250: The requested command was accepted and completed successfully
354: Start sending the message
221: The connection is closing
Error codes vary between providers, but they are generally in the 500 range.
SMTP servers can also send replies spanning multiple lines. In this case, the very last line
begins with the response code followed by a space. All preceding lines begin with the
response code followed by a dash. The following example illustrates a multiline response
after attempting to deliver to a mailbox that does not exist:
C:
S:
C:
S:
S:
S:
MAIL FROM:<alice@example.net>
250 OK
RCPT TO:<not-a-real-user@example.com>
550-The account you tried to deliver to does not
550-exist. Please double-check the recipient's
550 address for typos and try again.
Note that some servers validate that the recipient address is valid before replying to the
RCPT command, but many servers only validate the recipient address after the client sends
the email using the DATA command.
Although that explains the basics of the protocol used to send mail, we still must consider
the format of the email itself. This is covered next.
[ 235 ]
Making Your Program Send Email
Chapter 8
The format of an email
If we make an analogy to physical mail, the SMTP commands MAIL FROM and RCPT TO
address the envelope. Those commands give the SMTP server information on how the mail
is to be delivered. In this analogy, the DATA command would be the letter inside the
envelope. As it's common to address a physical letter inside an envelope, it's also common
to repeat the delivery information in the email, even though it was already sent to the
SMTP server through the MAIL and RCPT commands.
A simple email may look like the following:
From: Alice Doe <alice@example.net>
To: Bob Doe <bob@example.com>
Subject: Re: The Cake
Date: Fri, 03 May 2019 02:31:20 +0000
Hi Bob,
Do NOT forget to bring the cake!
Best,
Alice
The entire email is transmitted to an SMTP server following the DATA command. A single
period on an otherwise blank line is transmitted to indicate the end of the email. If the
email contains any line beginning with a period, the SMTP client should replace it with two
consecutive periods. This prevents the client from indicating the email is over prematurely.
The SMTP server knows that any line beginning with two periods should be replaced with
a single period.
The email itself can be divided into two parts—the header and the body. The two parts are
delineated by the first blank line.
The header part consists of various headers that indicate properties of the email. From, To,
Subject, and Date are the most common headers.
The body part of the email is simply the message being sent.
With a basic understanding of the email format, we are now ready to begin writing a
simple C program to send emails.
[ 236 ]
Making Your Program Send Email
Chapter 8
A simple SMTP client program
With a basic understanding of both SMTP and the email format, we are ready to program a
simple email client. Our client takes as inputs: the destination email server, the recipient's
address, the sender's address, the email subject line, and the email body text.
Our program begins by including the necessary headers with the following statements:
/*smtp_send.c*/
#include "chap08.h"
#include <ctype.h>
#include <stdarg.h>
We also define the following two constants to make buffer allocation and checking easier:
/*smtp_send.c continued*/
#define MAXINPUT 512
#define MAXRESPONSE 1024
Our program needs to prompt the user for input several times. This is required to get the
email server's hostname, the recipient's address, and so on. C provides the gets() function
for this purpose but gets() is deprecated in the latest C standard. Therefore, we
implement our own function.
The following function, get_input(), prompts for user input:
/*smtp_send.c continued*/
void get_input(const char *prompt, char *buffer)
{
printf("%s", prompt);
buffer[0] = 0;
fgets(buffer, MAXINPUT, stdin);
const int read = strlen(buffer);
if (read > 0)
buffer[read-1] = 0;
}
The get_input() function uses fgets() to read from stdin. The buffer passed to
get_input() is assumed to be MAXINPUT bytes, which we defined at the top of the file.
[ 237 ]
Making Your Program Send Email
Chapter 8
The fgets() function does not remove a newline character from the received input;
therefore, we overwrite the last character inputted with a terminating null character.
It is also very helpful to have a function that can send formatted strings directly over the
network. We implement a function called send_format() for this purpose. It takes a
socket, a formatting string, and the additional arguments to send. You can think of
send_format() as being very similar to printf(). The difference is that send_format()
delivers the formatted text over the network instead of printing to the screen.
The code for send_format() is as follows:
/*smtp_send.c continued*/
void send_format(SOCKET server, const char *text, ...) {
char buffer[1024];
va_list args;
va_start(args, text);
vsprintf(buffer, text, args);
va_end(args);
send(server, buffer, strlen(buffer), 0);
printf("C: %s", buffer);
}
The preceding code works by first reserving a buffer. vsprintf() is then used to format
the text into that buffer. It is up to the caller to ensure that the formatted output doesn't
exceed the reserved buffer space. We are assuming for this program that the user is trusted,
but in a production program, you would want to add checks to prevent a buffer overflow
here.
After the output text is formatted into buffer, it is sent using send(). We also print the
sent text to the screen. A C: is printed preceding it to indicate that the text was sent by us,
the client.
One of the trickier parts of our SMTP client is parsing the SMTP server responses. This is
important because the SMTP client must not issue a second command until a response is
received for the first command. If the SMTP client sends a new command before the server
is ready, then the server will likely terminate the connection.
Recall that each SMTP response starts with a three-digit code. We want to parse out this
code to check for errors. Each SMTP response is usually followed by text that we ignore.
SMTP responses are typically only one line long, but they can sometimes span multiple
lines. In this case, each line up to the penultimate line contains a dash character, -, directly
following the three-digit response code.
[ 238 ]
Making Your Program Send Email
Chapter 8
To illustrate how multiline responses work, consider the following two responses as
equivalent:
/*response 1*/
250 Message received!
/*response 2*/
250-Message
250 received!
It is important that our program recognizes multiline responses; it must not mistakenly
treat a single multiline response as separate responses.
We implement a function called parse_response() for this purpose. It takes in a nullterminated response string and returns the parsed response code. If no code is found or the
response isn't complete, then 0 is returned instead. The code for this function is as follows:
/*smtp_send.c continued*/
int parse_response(const char *response) {
const char *k = response;
if (!k[0] || !k[1] || !k[2]) return 0;
for (; k[3]; ++k) {
if (k == response || k[-1] == '\n') {
if (isdigit(k[0]) && isdigit(k[1]) && isdigit(k[2])) {
if (k[3] != '-') {
if (strstr(k, "\r\n")) {
return strtol(k, 0, 10);
}
}
}
}
}
return 0;
}
The parse_response() function begins by checking for a null terminator in the first three
characters of the response. If a null is found there, then the function can return immediately
because response isn't long enough to constitute a valid SMTP response.
[ 239 ]
Making Your Program Send Email
Chapter 8
It then loops through the response input string. The loop goes until a null-terminating
character is found three characters out. Each loop, isdigit() is used to see whether the
current character and the next two characters are all digits. If so, the fourth character, k[3],
is checked. If k[3] is a dash, then the response continues onto the next line. However, if
k[3] isn't a dash, then k[0] represents the beginning of the last line of the SMTP response.
In this case, the code checks if the line ending has been received; strstr() is used for this
purpose. It the line ending was received, the code uses strtol() to convert the response
code to an integer.
If the code loops through response() without returning, then 0 is returned, and the client
needs to wait for more input from the SMTP server.
With parse_response() out of the way, it is useful to have a function that waits until a
particular response code is received over the network. We implement a function called
wait_on_response() for this purpose, which begins as follows:
/*smtp_send.c continued*/
void wait_on_response(SOCKET server, int expecting) {
char response[MAXRESPONSE+1];
char *p = response;
char *end = response + MAXRESPONSE;
int code = 0;
In the preceding code, a response buffer variable is reserved for storing the SMTP server's
response. A pointer, p, is set to the beginning of this buffer; p will be incremented to point
to the end of the received data, but it starts at response since no data has been received
yet. An end pointer variable is set to the end of the buffer, which is useful to ensure we do
not attempt to write past the buffer end.
Finally, we set code = 0 to indicate that no response code has been received yet.
The wait_on_response() function then continues with a loop as follows:
/*smtp_send.c continued*/
do {
int bytes_received = recv(server, p, end - p, 0);
if (bytes_received < 1) {
fprintf(stderr, "Connection dropped.\n");
exit(1);
}
p += bytes_received;
[ 240 ]
Making Your Program Send Email
Chapter 8
*p = 0;
if (p == end) {
fprintf(stderr, "Server response too large:\n");
fprintf(stderr, "%s", response);
exit(1);
}
code = parse_response(response);
} while (code == 0);
The beginning of the preceding loop uses recv() to receive data from the SMTP server.
The received data is written at point p in the response array. We are careful to use end to
make sure received data isn't written past the end of response.
After recv() returns, p is incremented to the end of the received data, and a null
terminating character is set. A check for p == end ensures that we haven't written to the
end of the response buffer.
Our function from earlier, parse_response(), is used to check whether a full SMTP
response has been received. If so, then code is set to that response. If not, then code is
equal to 0, and the loop continues to receive additional data.
After the loop terminates, the wait_on_response() function checks that the received
SMTP response code is as expected. If so, the received data is printed to the screen, and the
function returns. The code for this is as follows:
/*smtp_send.c continued*/
if (code != expecting) {
fprintf(stderr, "Error from server:\n");
fprintf(stderr, "%s", response);
exit(1);
}
printf("S: %s", response);
}
That concludes the wait_on_response() function. This function proves very useful, and
it is needed after every command sent to the SMTP server.
We also define a function called connect_to_host(), which attempts to open a TCP
connection to a given hostname and port number. This function is extremely similar to the
code we've used in the previous chapters.
[ 241 ]
Making Your Program Send Email
Chapter 8
First getaddrinfo() is used to resolve the hostname and getnameinfo() is then used to
print the server IP address. The following code achieves those two purposes:
/*smtp_send.c continued*/
SOCKET connect_to_host(const char *hostname, const char *port) {
printf("Configuring remote address...\n");
struct addrinfo hints;
memset(&hints, 0, sizeof(hints));
hints.ai_socktype = SOCK_STREAM;
struct addrinfo *peer_address;
if (getaddrinfo(hostname, port, &hints, &peer_address)) {
fprintf(stderr, "getaddrinfo() failed. (%d)\n", GETSOCKETERRNO());
exit(1);
}
printf("Remote address is: ");
char address_buffer[100];
char service_buffer[100];
getnameinfo(peer_address->ai_addr, peer_address->ai_addrlen,
address_buffer, sizeof(address_buffer),
service_buffer, sizeof(service_buffer),
NI_NUMERICHOST);
printf("%s %s\n", address_buffer, service_buffer);
A socket is then created with socket(), as shown in the following code:
/*smtp_send.c continued*/
printf("Creating socket...\n");
SOCKET server;
server = socket(peer_address->ai_family,
peer_address->ai_socktype, peer_address->ai_protocol);
if (!ISVALIDSOCKET(server)) {
fprintf(stderr, "socket() failed. (%d)\n", GETSOCKETERRNO());
exit(1);
}
Once the socket has been created, connect() is used to establish the connection. The
following code shows the use of connect() and the end of the connect_to_host()
function:
/*smtp_send.c continued*/
printf("Connecting...\n");
if (connect(server,
peer_address->ai_addr, peer_address->ai_addrlen)) {
fprintf(stderr, "connect() failed. (%d)\n", GETSOCKETERRNO());
[ 242 ]
Making Your Program Send Email
Chapter 8
exit(1);
}
freeaddrinfo(peer_address);
printf("Connected.\n\n");
return server;
}
Don't forget to call freeaddrinfo() to free the memory allocated for the server address,
as shown by the preceding code.
Finally, with those helper functions out of the way, we can begin on main(). The following
code defines main() and initializes Winsock if required:
/*smtp_send.c continued*/
int main() {
#if defined(_WIN32)
WSADATA d;
if (WSAStartup(MAKEWORD(2, 2), &d)) {
fprintf(stderr, "Failed to initialize.\n");
return 1;
}
#endif
See Chapter 2, Getting to Grips with Socket APIs, for more information about initializing
Winsock and establishing connections.
Our program can proceed by prompting the user for an SMTP hostname. This hostname is
stored in hostname, and our connect_to_host() function is used to open a connection.
The following code shows this:
/*smtp_send.c continued*/
char hostname[MAXINPUT];
get_input("mail server: ", hostname);
printf("Connecting to host: %s:25\n", hostname);
SOCKET server = connect_to_host(hostname, "25");
[ 243 ]
Making Your Program Send Email
Chapter 8
After the connection is established, our SMTP client must not issue any commands until the
server responds with a 220 code. We use wait_on_response() to wait for this with the
following code:
/*smtp_send.c continued*/
wait_on_response(server, 220);
Once the server is ready to receive commands, we must issue the HELO command. The
following code sends the HELO command and waits for a 250 response code:
/*smtp_send.c continued*/
send_format(server, "HELO HONPWC\r\n");
wait_on_response(server, 250);
HELO should be followed by the SMTP client's hostname; however, since we are probably
running this client from a development machine, it's likely we don't have a hostname setup.
For this reason, we simply send HONPWC, although any arbitrary string can be used. If you
are running this client from a server, then you should change the HONPWC string to a
domain that points to your server.
Also, note the line ending used in the preceding code. The line ending used by SMTP is a
carriage return character followed by a line feed character. In C, this is represented by
"\r\n".
Our program then prompts the user for the sending and receiving addresses and issues the
appropriate SMTP commands. This is done using get_input() to prompt the user,
send_format() to issue the SMTP commands, and wait_on_response() to receive the
SMTP server's response:
/*smtp_send.c continued*/
char sender[MAXINPUT];
get_input("from: ", sender);
send_format(server, "MAIL FROM:<%s>\r\n", sender);
wait_on_response(server, 250);
char recipient[MAXINPUT];
get_input("to: ", recipient);
send_format(server, "RCPT TO:<%s>\r\n", recipient);
wait_on_response(server, 250);
[ 244 ]
Making Your Program Send Email
Chapter 8
After the sender and receiver are specified, the next step in the SMTP is to issue the DATA
command. The DATA command instructs the server to listen for the actual email. It is issued
by the following code:
/*smtp_send.c continued*/
send_format(server, "DATA\r\n");
wait_on_response(server, 354);
Our client program then prompts the user for an email subject line. After the subject line is
specified, it can send the email headers: From, To, and Subject. The following code does
this:
/*smtp_send.c continued*/
char subject[MAXINPUT];
get_input("subject: ", subject);
send_format(server, "From:<%s>\r\n", sender);
send_format(server, "To:<%s>\r\n", recipient);
send_format(server, "Subject:%s\r\n", subject);
It is also useful to add a date header. Emails use a special format for dates. We can make
use of the strftime() function to format the date properly. The following code formats
the date into the proper email header:
/*smtp_send.c continued*/
time_t timer;
time(&timer);
struct tm *timeinfo;
timeinfo = gmtime(&timer);
char date[128];
strftime(date, 128, "%a, %d %b %Y %H:%M:%S +0000", timeinfo);
send_format(server, "Date:%s\r\n", date);
In the preceding code, the time() function is used to get the current date and time,
and gmtime() is used to convert it into a timeinfo struct. Then, strftime() is called to
format the data and time into a temporary buffer, date. This formatted string is then
transmitted to the SMTP server as an email header.
[ 245 ]
Making Your Program Send Email
Chapter 8
After the email headers are sent, the email body is delineated by a blank line. The following
code sends this blank line:
/*smtp_send.c continued*/
send_format(server, "\r\n");
We can then prompt the user for the body of the email using get_input(). The body is
transmitted one line at a time. When the user finishes their email, they should enter a single
period on a line by itself. This indicates both to our client and the SMTP server that the
email is finished.
The following code sends user input to the server until a single period is inputted:
/*smtp_send.c continued*/
printf("Enter your email text, end with \".\" on a line by itself.\n");
while (1) {
char body[MAXINPUT];
get_input("> ", body);
send_format(server, "%s\r\n", body);
if (strcmp(body, ".") == 0) {
break;
}
}
If the mail was accepted by the SMTP server, it sends a 250 response code. Our client then
issues the QUIT command and checks for a 221 response code. The 221 response code
indicates that the connection is terminating as shown in the following code:
/*smtp_send.c continued*/
wait_on_response(server, 250);
send_format(server, "QUIT\r\n");
wait_on_response(server, 221);
Our SMTP client concludes by closing the socket, cleaning up Winsock (if required), and
exiting as shown here:
/*smtp_send.c continued*/
printf("\nClosing socket...\n");
CLOSESOCKET(server);
#if defined(_WIN32)
[ 246 ]
Making Your Program Send Email
Chapter 8
WSACleanup();
#endif
printf("Finished.\n");
return 0;
}
That concludes smtp_send.c.
You can compile and run smtp_send.c on Windows with MinGW using the following:
gcc smtp_send.c -o smtp_send.exe -lws2_32
smtp_send.exe
On Linux or macOS, compiling and running smtp_send.c is done by the following:
gcc smtp_send.c -o smtp_send
./smtp_send
The following screenshot shows the sending of a simple email using smtp_send.c:
[ 247 ]
Making Your Program Send Email
Chapter 8
If you're doing a lot of testing, you may find it tedious to type in the email each time. In that
case, you can automate it by putting your text in a file and using the cat utility to read it
into smtp_send. For example, you may have the email.txt file as follows:
/*email.txt*/
mail-server.example.net
bob@example.com
alice@example.net
Re: The Cake
Hi Alice,
What about the cake then?
Bob
.
With the program input stored in email.txt, you can send an email using the following
command:
cat email.txt | ./smtp_send
Hopefully, you can send some test emails with smtp_send. There are, however, a few
obstacles you may run into. Your ISP may block outgoing emails from your connection, and
many email servers do not accept mail from residential IP address blocks. See the Spamblocking pitfalls section later in the chapter for more information.
Although smtp_send is useful for sending simple text-based messages, you may be
wondering how to add formatting to your email. Perhaps you want to send files as
attachments. The next section addresses these issues.
Enhanced emails
The emails we've been looking at so far have been only simple text. Modern email usage
often demands fancier formatted emails.
We can control the content type of an email using the Content-Type header. This is very
similar to the content type header used by HTTP, which we covered in Chapter 7, Building
a Simple Web Server.
[ 248 ]
Making Your Program Send Email
Chapter 8
If the content type header is missing, a content type of text/plain is assumed by default.
Therefore, the Content-Type header in the following email is redundant:
From: Alice Doe <alice@example.net>
To: Bob Doe <bob@example.com>
Subject: Re: The Cake
Date: Fri, 03 May 2019 02:31:20 +0000
Content-Type: text/plain
Hi Bob,
Do NOT forget to bring the cake!
Best,
Alice
If you want formatting support in your email, which is common today, you should use a
text/html content type. In the following email, HTML is used to add emphasis:
From: Alice Doe <alice@example.net>
To: Bob Doe <bob@example.com>
Subject: Re: The Cake
Date: Fri, 03 May 2019 02:31:20 +0000
Content-Type: text/html
Hi Bob,<br>
<br>
Do <strong>NOT</strong> forget to bring the cake!<br>
<br>
Best,<br>
Alice<br>
Not all email clients support HTML emails. For this reason, it may be useful to encode your
message as both plaintext and HTML. The following email uses this technique:
From: Alice Doe <alice@example.net>
To: Bob Doe <bob@example.com>
Subject: Re: The Cake
Date: Fri, 03 May 2019 02:31:20 +0000
MIME-Version: 1.0
Content-Type: multipart/alternative; boundary="SEPARATOR"
This is a message with multiple parts in MIME format.
--SEPARATOR
Content-Type: text/plain
Hi Bob,
[ 249 ]
Making Your Program Send Email
Chapter 8
Do NOT forget to bring the cake!
Best,
Alice
--SEPARATOR
Content-Type: text/html
Hi Bob,<br>
<br>
Do <strong>NOT</strong> forget to bring the cake!<br>
<br>
Best,<br>
Alice<br>
--SEPARATOR--
The preceding email example uses two headers to indicate that it's a multipart message.
The first one, MIME-Version: 1.0, indicates which version of Multipurpose Internet
Mail Extensions (MIME) we're using. MIME is used for all emails that aren't simply
plaintext.
The second header, Content-Type: multipart/alternative;
boundary="SEPARATOR", specifies that we're sending a multipart message. It also specifies
a special boundary character sequence that delineates the parts of the email. In our
example, SEPARATOR is used as the boundary. It is important that the boundary not appear
in the email text or attachments. In practice, boundary specifiers are often long randomly
generated strings.
Once the boundary has been set, each part of the email begins with --SEPARATOR on a line
by itself. The email ends with --SEPARATOR--. Note that each part of the message gets its
own header section, specific to only that part. These header sections are used to specify the
content type for each part.
It is also often useful to attach files to email, which we will cover now.
Email file attachments
If a multipart email is being sent, a part can be designated as an attachment using the
Content-Disposition header. See the following example:
From: Alice Doe <alice@example.net>
To: Bob Doe <bob@example.com>
Subject: Re: The Cake
Date: Fri, 03 May 2019 02:31:20 +0000
MIME-Version: 1.0
[ 250 ]
Making Your Program Send Email
Chapter 8
Content-Type: multipart/alternative; boundary="SEPARATOR"
This is a message with multiple parts in MIME format.
--SEPARATOR
Content-Type: text/plain
Hi Bob,
Please see the attached text file.
Best,
Alice
--SEPARATOR
Content-Disposition: attachment; filename=my_file.txt;
modification-date="Fri, 03 May 2019 02:26:51 +0000";
Content-Type: application/octet-stream
Content-Transfer-Encoding: base64
VGhpcyBpcyBhIHNpbXBsZSB0ZXh0IG1lc3NhZ2Uu
--SEPARATOR--
The preceding example includes a file called my_file.txt. SMTP is a purely text-based
protocol; therefore, any attachments that may include binary data need to be encoded into a
text format. Base64 encoding is commonly used for this purpose. In this example, the
header, Content-Transfer-Encoding: base64, specifies that we are going to use
Base64 encoding.
The content of my_file.txt is This is a simple text message. That sentence
encodes to Base64 as VGhpcyBpcyBhIHNpbXBsZSB0ZXh0IG1lc3NhZ2Uu as seen in the
preceding code.
Spam-blocking pitfalls
It can be much harder to send emails today than it was in the past. Spam has become a
major problem, and every provider is taking actions to curb it. Unfortunately, many of
these actions can also make it much more difficult to send legitimate emails.
Many residential ISPs don't allow outgoing connections on port 25. If your residential
provider blocks port 25, then you won't be able to establish an SMTP connection. In this
case, you may consider renting a virtual private server to run this chapter's code.
[ 251 ]
Making Your Program Send Email
Chapter 8
Even if your ISP does allow outgoing connections on port 25, many SMTP servers won't
accept mail from a residential IP address. Of the servers that do, many will send those
emails straight into a spam folder.
For example, if you attempt to deliver an email to Gmail, you may get a response similar to
the following:
550-5.7.1 [192.0.2.67] The IP you're using to send mail is not authorized
550-5.7.1 to send email directly to our servers. Please use the SMTP
550-5.7.1 relay at your service provider instead. Learn more at
550 5.7.1 https://support.google.com/mail/?p=NotAuthorizedError
Another spam-blocking measure that may trip you up is Sender Policy Framework (SPF).
SPF works by listing which servers can send mail for a given domain. If a sending server
isn't on the SPF list, then receiving SMTP servers reject their mail.
DomainKeys Identified Mail (DKIM) is a measure to authenticate email using digital
signatures. Many popular email providers are more likely to treat non-DKIM mail as spam.
DKIM signing is very complicated and out of scope for this book.
Domain-based Message Authentication, Reporting, and Conformance (DMARC) is a
technique used for domains to publish whether SPF and/or DKIM is required of mail
originating from them, among other things.
Most commercial email servers use SPF, DKIM, and DMARC. If you're sending email
without these, your email will likely be treated as spam. If you're sending email in
opposition to these, your email will either be rejected outright or labeled as spam.
Finally, many popular providers assign a reputation to sending domains and servers. This
puts potential emails senders in a catch-22 situation. Email can't be delivered without
building a reputation, but a reputation can't be built without successfully delivering lots of
emails. As spam continues to be a major problem, we may soon come to a time where only
big-name, trusted SMTP servers can operate with each other. Let's hope it doesn't come to
that!
If your program needs to send email reliably, you should likely consider using an email
service provider. One option is to allow an SMTP relay to do the final delivery. A
potentially easier option is to use a mail sending service that operates an HTTP API.
[ 252 ]
Making Your Program Send Email
Chapter 8
Summary
In this chapter, we looked at how email is delivered over the internet. SMTP, the protocol
responsible for email delivery, was studied in some depth. We then constructed a simple
program to send short emails using SMTP.
We looked at the email format too. We saw how MIME could be used to send multipart
emails with file attachments.
We also saw how sending emails over the modern internet is full of pitfalls. Many of these
stems from attempts to block spam. Techniques used by providers, such as blocking
residential IP addresses, SPF, DKIM, DMARC, and IP address reputation monitoring, may
make it difficult for our simple program to deliver email reliably.
In the next chapter, Chapter 9, Loading Secure Web Pages with HTTPS and OpenSSL, we look
at secure web connections using HTTPS.
Questions
Try these questions to test your knowledge from this chapter:
1.
2.
3.
4.
5.
What port does SMTP operate on?
How do you determine which SMTP server receives mail for a given domain?
How do you determine which SMTP server sends mail for a given provider?
Why won't an SMTP server relay mail without authentication?
How are binary files sent as email attachments when SMTP is a text-based
protocol?
The answers can be found in Appendix A, Answers to Questions.
Further reading
For more information about SMTP and email formats, please refer to the following links:
RFC 821: Simple Mail Transfer Protocol (https://tools.ietf.org/html/rfc821)
RFC 2822: Internet Message Format (https://tools.ietf.org/html/rfc2822)
[ 253 ]
3
Section 3 - Understanding
Encrypted Protocols and
OpenSSL
In this section, the reader will learn about the secure, encrypted protocols that are common
on the modern web.
The following chapters are in this section:
Chapter 9, Loading Secure Web Pages with HTTPS and OpenSSL
Chapter 10, Implementing a Secure Web Server
Chapter 11, Establishing SSH Connections
9
Loading Secure Web Pages
with HTTPS and OpenSSL
In this chapter, we'll learn how to initiate secure connections to web servers using
Hypertext Transfer Protocol Secure (HTTPS). HTTPS provides several benefits over
HTTP. HTTPS gives an authentication method to identify servers and detect impostors. It
also protects the privacy of all transmitted data and prevents interceptors from tampering
with or forging transmitted data.
In HTTPS, communication is secured using Transport Layer Security (TLS). In this chapter,
we'll learn how to use the popular OpenSSL library to provide TLS functionality.
The following topics are covered in this chapter:
Background information about HTTPS
Types of encryption ciphers
How servers are authenticated
Basic OpenSSL usage
Creating a simple HTTPS client
Technical requirements
The example programs from this chapter can be compiled using any modern C compiler.
We recommend MinGW for Windows and GCC for Linux and macOS. You also need to
have the OpenSSL library installed. See Appendices B, Setting Up Your C Compiler on
Windows, Appendices C, Setting Up Your C Compiler on Linux, and Appendices D, Setting Up
Your C Compiler on macOS, for compiler setup and OpenSSL installation.
Loading Secure Web Pages with HTTPS and OpenSSL
Chapter 9
The code for this book can be found at https://github.com/codeplea/Hands-On-NetworkProgramming-with-C.
From the command line, you can download the code for this chapter with the following
command:
git clone https://github.com/codeplea/Hands-On-Network-Programming-with-C
cd Hands-On-Network-Programming-with-C/chap09
Each example program in this chapter runs on Windows, Linux, and macOS. While
compiling on Windows, each example program requires linking with the Winsock library.
This can be accomplished by passing the -lws2_32 option to gcc.
Each example also needs to be linked against the OpenSSL libraries, libssl.a and
libcrypto.a. This is accomplished by passing -lssl -lcrypto to gcc.
We provide the exact commands needed to compile each example as it is introduced.
All of the example programs in this chapter require the same header files and C macros that
we developed in Chapter 2, Getting to Grips with Socket APIs. For brevity, we put these
statements in a separate header file, chap09.h, which we can include in each program. For
an explanation of these statements, please refer to Chapter 2, Getting to Grips with Socket
APIs.
The content of chap09.h begins by including the necessary networking header files. The
code for this follows:
#if defined(_WIN32)
#ifndef _WIN32_WINNT
#define _WIN32_WINNT 0x0600
#endif
#include <winsock2.h>
#include <ws2tcpip.h>
#pragma comment(lib, "ws2_32.lib")
#else
#include
#include
#include
#include
#include
#include
#include
<sys/types.h>
<sys/socket.h>
<netinet/in.h>
<arpa/inet.h>
<netdb.h>
<unistd.h>
<errno.h>
#endif
[ 256 ]
Loading Secure Web Pages with HTTPS and OpenSSL
Chapter 9
We also define some macros to assist with writing portable code like so:
/*chap09.h continued*/
#if defined(_WIN32)
#define ISVALIDSOCKET(s) ((s) != INVALID_SOCKET)
#define CLOSESOCKET(s) closesocket(s)
#define GETSOCKETERRNO() (WSAGetLastError())
#else
#define
#define
#define
#define
#endif
ISVALIDSOCKET(s) ((s) >= 0)
CLOSESOCKET(s) close(s)
SOCKET int
GETSOCKETERRNO() (errno)
Finally, chap09.h includes some additional headers, including the headers for the
OpenSSL library. This is shown in the following code:
/*chap09.h continued*/
#include
#include
#include
#include
<stdio.h>
<string.h>
<stdlib.h>
<time.h>
#include
#include
#include
#include
#include
<openssl/crypto.h>
<openssl/x509.h>
<openssl/pem.h>
<openssl/ssl.h>
<openssl/err.h>
HTTPS overview
HTTPS provides security to HTTP. We covered HTTP in Chapter 6, Building a Simple Web
Client. HTTPS secures HTTP by using TLS over TCP on port 443. TLS is a protocol that can
provide security to any TCP connection.
TLS is the successor to Secure Socket Layer (SSL), an earlier protocol also used by HTTPS.
TLS and SSL are compatible, and most of the information in this chapter also applies to SSL.
Generally, establishing an HTTPS connection involves the client and server negotiating
which protocol to use. The ideal outcome is that the client and server agree on the most
secure, mutually supported protocol and cipher.
[ 257 ]
Loading Secure Web Pages with HTTPS and OpenSSL
Chapter 9
When we talk about protocol security, we are generally looking for the following three
things:
Authentication: We need a way to prevent impostors from posing as legitimate
communication partners. TLS provides peer authentication methods for this
reason.
Encryption: TLS uses encryption to obfuscate transmitted data. This prevents an
eavesdropper from correctly interpreting intercepted data.
Integrity: TLS also ensures that received data has not been tampered with or
otherwise forged.
HTTP is most commonly used to transmit web pages. The text on a web page is first
encoded as Hypertext Markup Language (HTML). HTML provides formatting, layout,
and styling to web pages. HTTP is then used to transmit the HTML, and HTTP itself is
transmitted over a TCP connection.
Visually, an HTTP session is encapsulated like the following:
TLS works inside TCP to provide a secure communication channel. HTTPS is then basically
the same as the HTTP protocol, but it is sent inside a TLS channel.
Visually, HTTPS is encapsulated in the following manner:
[ 258 ]
Loading Secure Web Pages with HTTPS and OpenSSL
Chapter 9
Of course, the same abstraction still applies if HTTP is used to transmit an image, video, or
other data instead of HTML.
Do keep in mind that these abstractions are accurate at the conceptual level, but some
details transcend layers. For example, some HTTPS headers are used to refer to security
parameters of how TLS should be applied. In general, though, it is reasonable to think of
TLS as securing the TCP connection used by HTTPS.
Although TLS is most commonly used for HTTPS security, TLS is also used to secure many
other TCP-based protocols. The email protocol, SMTP, which we covered in Chapter 8,
Making Your Program Send Email, is also commonly secured by TLS.
Before going into further detail about using TLS, it is useful to understand some necessary
background information on encryption.
Encryption basics
Encryption is a method of encoding data so that only authorized parties can access it.
Encryption does not prevent interception or interference, but it denies the original data to a
would-be attacker.
Encryption algorithms are called ciphers. An encryption cipher takes unencrypted data as
input, referred to as plaintext. The cipher produces encrypted data, called ciphertext, as its
output. The act of converting plaintext into ciphertext is called encryption, and the act of
reversing it back is called decryption.
Modern ciphers use keys to control the encryption and decryption of data. Keys are
typically relatively short, pseudo-random data sequences. Ciphertext encrypted with a
given key cannot be decrypted without the proper key.
Broadly, there are two categories of ciphers—symmetric and asymmetric. A symmetric
cipher uses the same key for both encryption and decryption, while an asymmetric cipher
uses two different keys.
[ 259 ]
Loading Secure Web Pages with HTTPS and OpenSSL
Chapter 9
Symmetric ciphers
The following diagram illustrates a symmetric cipher:
In the preceding diagram, the plaintext Hello! is encrypted using a symmetric cipher. A
secret key is used with the cipher to produce a ciphertext. This ciphertext can then be
transmitted over an insecure channel, and eavesdroppers cannot decipher it without
knowledge of the secret key. The privileged receiver of the ciphertext uses the decryption
algorithm and secret key to convert it back into plaintext.
Some symmetric ciphers in general use (not just for TLS) are the following:
American Encryption Standard (AES), also known as Rijndael
Camellia
Data Encryption Standard (DES)
Triple DES
International Data Encryption Algorithm (IDEA)
QUAD
RC4
Salsa20, Chacha20
Tiny Encryption Algorithm (TEA)
One issue with symmetric encryption is that the same key must be known to both the
sender and receiver. Generating and transmitting this key securely poses a problem. How
can the key be sent between parties if they don't already have a secure communication
channel? If they do already have a secure communication channel, why is encryption
needed in the first place?
[ 260 ]
Loading Secure Web Pages with HTTPS and OpenSSL
Chapter 9
Key exchange algorithms attempt to address these problems. Key exchange algorithms
work by allowing both communicating parties to generate the same secret key. In general,
the parties first agree on a public, non-secret key. Then, each party generates its own secret
key and combines it with the public key. These combined keys are exchanged. Each party
then adds its own secret to the combined keys to arrive at a combined, secret key. This
combined, secret key is then known to both parties, but not derivable by an eavesdropper.
The most common key exchange algorithm in use today is the Diffie-Hellman key
exchange algorithm.
While key exchange algorithms are resistant against eavesdroppers, they are not resilient to
interception. In the case of interception, an attacker could stand in the middle of a key
exchange, while posing as each corresponding party. This is called a man-in-the-middle
attack.
Asymmetric ciphers can be used to address some of these problems.
Asymmetric ciphers
Asymmetric encryption, also known as public-key encryption, attempts to solve the key
exchange and authentication problems of symmetric encryption. With asymmetric
encryption, two keys are used. One key can encrypt data, while the other key can decrypt
it. These keys are generated together and related mathematically. However, deriving one
key from the other after the fact is not possible.
The following diagram shows an asymmetric cipher:
[ 261 ]
Loading Secure Web Pages with HTTPS and OpenSSL
Chapter 9
Establishing a secure communication channel with asymmetric encryption is easier. Each
party can generate its own asymmetric encryption keys. The encryption key can then be
transmitted without the worry of interception, while the decryption key is kept private. In
this scheme, these keys are referred to as the Public Key and the Private Key, respectively.
The Rivest-Shamir-Adleman (RSA) cipher is one of the first public-key ciphers and is
widely used today. Newer elliptic-curve cryptography (ECC) algorithms promise greater
efficiency and are quickly gaining market share.
Asymmetric ciphers are also used to implement digital signatures. A digital signature is
used to verify the authenticity of data. Digital signatures are created by using a private key
to generate a signature for a document. The public key can then be used to verify that the
document was signed by the holder of the private key.
The following diagram illustrates a digital signing and verifying process:
TLS uses a combination of these methods to achieve security.
How TLS uses ciphers
Digital signatures are essential in TLS; they are used to authenticate servers. Without digital
signatures, a TLS client wouldn't be able to differentiate between an authentic server and an
impostor.
TLS can also use digital signatures to authenticate the client, although this is much less
common in practice. Most web applications either don't care about client authentication, or
use other simpler methods, such as passwords.
[ 262 ]
Loading Secure Web Pages with HTTPS and OpenSSL
Chapter 9
In theory, asymmetric encryption could be used to protect an entire communication
channel. However, in practice, modern asymmetric ciphers are inefficient and only able to
protect small amounts of data. For this reason, symmetric ciphers are preferred whenever
possible. TLS uses asymmetric ciphers only to authenticate the server. TLS uses a key
exchange algorithm and symmetric ciphers to protect the actual communication.
Vulnerabilities are found for encryption algorithms all the time. It is, therefore, imperative
that TLS connections are able to select the best algorithms that are mutually supported by
both parties. This is done using cipher suites. A cipher suite is a list of algorithms,
generally a key exchange algorithm, a bulk encryption algorithm, and a message
authentication algorithm (MAC).
When a TLS connection is first established, the TLS client sends a list of preferred cipher
suites to the server. The TLS server will select one of these cipher suites to be used for the
connection. If the server doesn't support any of the cipher suites given by the client, then a
secure TLS connection cannot be established.
With some background information about security out of the way, we can discuss TLS in
more detail.
The TLS protocol
After a TCP connection is established, the TLS handshake is initiated by the client. The
client sends a number of specifications to the server, including which versions of SSL/TLS it
is running, which cipher suites it supports, and which compression methods it would like
to use.
The server selects the highest mutually supported version of SSL/TLS to use. It also chooses
a cipher suite and compression method from the choices given by the client.
If the client and server do not support any cipher suite in common, then no TLS connection
can be established. This is not uncommon when using very old browsers with newer
servers.
After the basic setup is done, the server sends the client its certificate. This is used by the
client to verify that it's connected to a legitimate server. We'll discuss more on certificates in
the next section.
[ 263 ]
Loading Secure Web Pages with HTTPS and OpenSSL
Chapter 9
Once the client has verified that the server really is who it claims to be, a key exchange is
initiated. After key exchange completes, both the client and server have a shared secret key.
All further communication is encrypted using this key and their chosen symmetric cipher.
Certificates are used to verify server identities with digital signatures. Let's explore how
they work next.
Certificates
Each HTTPS server uses one or more certificates to verify their identity. This certificate
must either be trusted by the client itself or trusted by a third party that the client trusts. In
common usages, such as web browsers, it's not really possible to list all trusted certificates.
For this reason, it's most common to validate certificates by verifying that a trusted third
party trusts them. This trust is proven using digital signatures.
For example, a popular digital certificate authority is DigiCert Inc. Suppose that you trust
DigiCert Inc. and have stored a certificate from them locally; you then connect to a website,
example.com. You may not trust example.com, because you haven't seen their certificate
before. However, example.com shows you that their certificate has been digitally signed
by the DigiCert Inc. certificate you do trust. Therefore, you trust example.com website's
certificate too.
In practice, certificate chains can be several layers deep. As long as you can verify digital
signatures back to a certificate you trust, you are able to validate the whole chain.
This method is the common one used by HTTPS to authenticate servers. It does have some
issues; namely, you must entirely trust the certificate authority. This is because certificate
authorities could theoretically issue a certificate to an impostor, in which case you would be
forced to trust the impostor. Certificate authorities are careful to avoid this, as it would ruin
their reputation.
The most popular certificate authorities at the time of this writing are the following:
IdenTrust
Comodo
DigiCert
GoDaddy
GlobalSign
[ 264 ]
Loading Secure Web Pages with HTTPS and OpenSSL
Chapter 9
The five preceding certificate authorities are responsible for over 90% of the HTTPS
certificates found on the web.
It is also possible to self-sign a certificate. In this case, no certificate authority is used. In
these cases, a client needs to somehow reliably obtain and verify a copy of your certificate
before it can be trusted.
Certificates are usually matched to domain names, but it's also possible for them to identify
other information, such as company names, address, and so on.
In the next chapter, Chapter 10, Implementing a Secure Web Server, certificates are covered in
more detail.
It's common today for one server to host many different domains, and each domain
requires its own certificate. Let's now consider how these servers know which certificate to
send.
Server name identification
Many servers host multiple domains. Certificates are tied to domains; therefore, TLS must
provide a method for the client to specify which domain it's connecting to. You may recall
that the HTTP Host header servers this purpose. The problem is that the TLS connection
should be established before the HTTP data is sent. Therefore, the server must decide
which certificate to transmit before the HTTP Host header is received.
This is accomplished using Server Name Indication (SNI). SNI is a technique that, when
used by TLS, requires the client to indicate to the server which domain it is attempting to
connect to. The server can then find a matching certificate to use for the TLS connection.
SNI is relatively new, and older browsers and servers do not support it. Before SNI was
popular, servers had two choices—they could either host only one domain per IP address,
or they could send certificates for all hosted domains for each connection.
It should be noted that SNI involves sending the unencrypted domain name over the
network. This means an eavesdropper can see which host the client is connecting to, even
though they wouldn't know which resources the client is requesting from that host. Newer
protocols, such as encrypted server name identification (ESNI), address this problem but
are not widely deployed yet.
With a basic understanding of the TLS protocol, we're ready to look at the most popular
library that implements it—OpenSSL.
[ 265 ]
Loading Secure Web Pages with HTTPS and OpenSSL
Chapter 9
OpenSSL
OpenSSL is a widely used open source library that provides SSL and TLS services to
applications. We use it in this chapter for secure connections required by HTTPS.
OpenSSL can be challenging to install. Refer to Appendices B, Setting Up Your C Compiler on
Windows, Appendices C, Setting Up Your C Compiler on Linux, and Appendices D, Setting Up
Your C Compiler on macOS, for more information.
You can check whether you have the OpenSSL command-line tools installed by running the
following command:
openssl version
The following screenshot shows this on Ubuntu Linux:
You'll also need to ensure that you have the OpenSSL library installed. The following
program can be used to test this. If it compiles and runs successfully, then you do have the
OpenSSL library installed and working:
/*openssl_version.c*/
#include <openssl/ssl.h>
int main(int argc, char *argv[]) {
printf("OpenSSL version: %s\n", OpenSSL_version(SSLEAY_VERSION));
return 0;
}
If you're using an older version of OpenSSL, you may need to replace the
OpenSSL_version() function call with SSLeay_version() instead. However, a better
solution is to just upgrade to a newer OpenSSL version.
[ 266 ]
Loading Secure Web Pages with HTTPS and OpenSSL
Chapter 9
The preceding openssl_version.c program is compiled on macOS and Linux using the
following command:
gcc openssl_version.c -o openssl_version -lcrypto
./openssl_version
The following screenshot shows compiling and running openssl_version.c:
On Windows, openssl_version can be compiled using MinGW and the following
commands:
gcc openssl_version.c -o openssl_version.exe -lcrypto
openssl_version.exe
Once the OpenSSL library is installed and usable, we are ready to begin using encrypted
sockets.
Encrypted sockets with OpenSSL
The TLS provided by OpenSSL can be applied to any TCP socket.
Before using OpenSSL in your program, it is important to initialize it. The following code
does this:
SSL_library_init();
OpenSSL_add_all_algorithms();
SSL_load_error_strings();
[ 267 ]
Loading Secure Web Pages with HTTPS and OpenSSL
Chapter 9
In the preceding code, the call to SSL_library_init() is required to initialize the
OpenSSL library. The second call (to OpenSSL_add_all_algorithms()) causes OpenSSL
to load all available algorithms. Alternately, you could load only the algorithms you know
are needed. For our purposes, it is easy to load them all. The third call,
SSL_load_error_strings(), causes OpenSSL to load error strings. This call isn't strictly
needed, but it is handy to have easily readable error messages when something goes
wrong.
Once OpenSSL is initialized, we are ready to create an SSL context. This is done by calling
the SSL_CTX_new() function, which returns an SSL_CTX object. You can think of this
object as a sort of factory for SSL/TLS connections. It holds the initial settings that you want
to use for your connections. Most programs only need to create one SSL_CTX object, and
they can reuse it for all their connections.
The following code creates the SSL context:
SSL_CTX *ctx = SSL_CTX_new(TLS_client_method());
if (!ctx) {
fprintf(stderr, "SSL_CTX_new() failed.\n");
return 1;
}
The SSL_CTX_new() function takes one argument. We use TLS_client_method(), which
indicates that we want general-purpose, version-flexible TLS methods available. Our client
automatically negotiates the best mutually supported algorithm with the server upon
connecting.
If you're using an older version of OpenSSL, you may need to replace
TLS_client_method() with TLSv1_2_client_method() in the preceding code.
However, a much better solution is to upgrade to a newer OpenSSL version.
To secure a TCP connection, you must first have a TCP connection. This TCP connection
should be established in the normal way. The following pseudo-code shows this:
getaddrinfo(hostname, port, hints, address);
socket = socket(address, type, protocol);
connect(socket, address, type);
For more information on setting up a TCP connection, refer to Chapter 3, An In-Depth
Overview of TCP Connections.
[ 268 ]
Loading Secure Web Pages with HTTPS and OpenSSL
Chapter 9
Once connect() has returned successfully, and a TCP connection is established, you can
use the following code to initiate a TLS connection:
SSL *ssl = SSL_new(ctx);
if (!ctx) {
fprintf(stderr, "SSL_new() failed.\n");
return 1;
}
if (!SSL_set_tlsext_host_name(ssl, hostname)) {
fprintf(stderr, "SSL_set_tlsext_host_name() failed.\n");
ERR_print_errors_fp(stderr);
return 1;
}
SSL_set_fd(ssl, socket);
if (SSL_connect(ssl) == -1) {
fprintf(stderr, "SSL_connect() failed.\n");
ERR_print_errors_fp(stderr);
return 1;
}
In the preceding code, SSL_new() is used to create an SSL object. This object is used to
track the new SSL/TLS connection.
We then use SSL_set_tlsext_host_name() to set the domain for the server we are
trying to connect to. This allows OpenSSL to use SNI. This call is optional, but without it,
the server does not know which certificate to send in the case that it hosts more than one
site.
Finally, we call SSL_set_fd() and SSL_connect() to initiate the new TLS/SSL
connection on our existing TCP socket.
It is possible to see which cipher the TLS connection is using. The following code shows
this:
printf ("SSL/TLS using %s\n", SSL_get_cipher(ssl));
Once the TLS connection is established, data can be sent and received using SSL_write()
and SSL_read(), respectively. These functions are used in a nearly identical manner as the
standard socket send() and recv() functions.
The following example shows transmitting a simple message over a TLS connection:
char *data = "Hello World!";
int bytes_sent = SSL_write(ssl, data, strlen(data));
[ 269 ]
Loading Secure Web Pages with HTTPS and OpenSSL
Chapter 9
Receiving data, done with SSL_read(), is shown in the following example:
char read[4096];
int bytes_received = SSL_read(ssl, read, 4096);
printf("Received: %.*s\n", bytes_received, read);
When the connection is finished, it's important to free the used resources by calling
SSL_shutdown() and SSL_free(ssl). This is shown in the following code:
SSL_shutdown(ssl);
CLOSESOCKET(socket);
SSL_free(ssl);
When you're done with an SSL context, you should also call SSL_CTX_free(). In our case,
it looks like this:
SSL_CTX_free(ctx);
If your program requires authentication of the connected peer, it is important to look at the
certificates sent during the TLS initialization. Let's consider that next.
Certificates
Once the TLS connection is established, we can use the SSL_get_peer_certificate()
function to get the server's certificate. It's also easy to print the certificate subject and issuer,
as shown in the following code:
X509 *cert = SSL_get_peer_certificate(ssl);
if (!cert) {
fprintf(stderr, "SSL_get_peer_certificate() failed.\n");
return 1;
}
char *tmp;
if (tmp = X509_NAME_oneline(X509_get_subject_name(cert), 0, 0)) {
printf("subject: %s\n", tmp);
OPENSSL_free(tmp);
}
if (tmp = X509_NAME_oneline(X509_get_issuer_name(cert), 0, 0)) {
printf("issuer: %s\n", tmp);
OPENSSL_free(tmp);
}
X509_free(cert);
[ 270 ]
Loading Secure Web Pages with HTTPS and OpenSSL
Chapter 9
OpenSSL automatically verifies the certificate during the TLS/SSL handshake. You can get
the verification results using the SSL_get_verify_result() function. Its usage is shown
in the following code:
long vp = SSL_get_verify_result(ssl);
if (vp == X509_V_OK) {
printf("Certificates verified successfully.\n");
} else {
printf("Could not verify certificates: %ld\n", vp);
}
If SSL_get_verify_result() returns X509_V_OK, then the certificate chain was verified
by OpenSSL and the connection can be trusted. If SSL_get_verify_result() does not
return X509_V_OK, then HTTPS authentication has failed, and the connection should be
abandoned.
In order for OpenSSL to successfully verify the certificate, we must tell it which certificate
authorities we trust. This can be done by using the SSL_CTX_load_verify_locations()
function. It must be passed the filename that stores all of the trusted root certificates.
Assuming your trusted certificates are in trusted.pem, the following code sets this up:
if (!SSL_CTX_load_verify_locations(ctx, "trusted.pem", 0)) {
fprintf(stderr, "SSL_CTX_load_verify_locations() failed.\n");
ERR_print_errors_fp(stderr);
return 1;
}
Deciding which root certificates to trust isn't easy. Each operating system provides a list of
trusted certificates, but there is no general, easy way to import these lists. Using the
operating system's default list is also not always appropriate for every application. For
these reasons, certificate verification has been omitted from the examples in this chapter.
However, it is absolutely critical that it be implemented appropriately in order for your
HTTPS connections to be secure.
In addition to validating the certificate's signatures, it is also important to validate that the
certificate is actually valid for the particular server you're connected with! Newer versions
of OpenSSL provide functions to help with this, but with older versions of OpenSSL, you're
on your own. Consult the OpenSSL documentation for more information.
We've now covered enough background information about TLS and OpenSSL that we're
ready to tackle a concrete example program.
[ 271 ]
Loading Secure Web Pages with HTTPS and OpenSSL
Chapter 9
A simple HTTPS client
To bring the concepts of this chapter together, we build a simple HTTPS client. This client
can connect to a given HTTPS web server and request the root document /.
Our program begins by including the needed chapter header, defining main(), and
initializing Winsock as shown here:
/*https_simple.c*/
#include "chap09.h"
int main(int argc, char *argv[]) {
#if defined(_WIN32)
WSADATA d;
if (WSAStartup(MAKEWORD(2, 2), &d)) {
fprintf(stderr, "Failed to initialize.\n");
return 1;
}
#endif
We then initialize the OpenSSL library with the following code:
/*https_simple.c continued*/
SSL_library_init();
OpenSSL_add_all_algorithms();
SSL_load_error_strings();
The SSL_load_error_strings() function call is optional, but it's very useful if we run
into problems.
We can also create an OpenSSL context. This is done by calling SSL_CTX_new() as shown
by the following code:
/*https_simple.c continued*/
SSL_CTX *ctx = SSL_CTX_new(TLS_client_method());
if (!ctx) {
fprintf(stderr, "SSL_CTX_new() failed.\n");
return 1;
}
[ 272 ]
Loading Secure Web Pages with HTTPS and OpenSSL
Chapter 9
If we were going to do certificate verification, this would be a good place to include the
SSL_CTX_load_verify_locations() function call, as explained in the Certificates section
of this chapter. We're omitting certification verification in this example for simplicity, but it
is important to include it in real-world applications.
Our program then checks that a hostname and a port number was passed in on the
command line like so:
/*https_simple.c continued*/
if (argc < 3) {
fprintf(stderr, "usage: https_simple hostname port\n");
return 1;
}
char *hostname = argv[1];
char *port = argv[2];
The standard HTTPS port number is 443. Our program lets the user specify any port
number, which can be useful for testing.
We then configure the remote address for the socket connection. This code uses the same
technique that we've been using since Chapter 3, An In-Depth Overview of TCP connections.
The code for this is as follows:
/*https_simple.c continued*/
printf("Configuring remote address...\n");
struct addrinfo hints;
memset(&hints, 0, sizeof(hints));
hints.ai_socktype = SOCK_STREAM;
struct addrinfo *peer_address;
if (getaddrinfo(hostname, port, &hints, &peer_address)) {
fprintf(stderr, "getaddrinfo() failed. (%d)\n", GETSOCKETERRNO());
exit(1);
}
printf("Remote address is: ");
char address_buffer[100];
char service_buffer[100];
getnameinfo(peer_address->ai_addr, peer_address->ai_addrlen,
address_buffer, sizeof(address_buffer),
service_buffer, sizeof(service_buffer),
NI_NUMERICHOST);
printf("%s %s\n", address_buffer, service_buffer);
[ 273 ]
Loading Secure Web Pages with HTTPS and OpenSSL
Chapter 9
We continue to create the socket using a call to socket(), and we connect it using the
connect() function as follows:
/*https_simple.c continued*/
printf("Creating socket...\n");
SOCKET server;
server = socket(peer_address->ai_family,
peer_address->ai_socktype, peer_address->ai_protocol);
if (!ISVALIDSOCKET(server)) {
fprintf(stderr, "socket() failed. (%d)\n", GETSOCKETERRNO());
exit(1);
}
printf("Connecting...\n");
if (connect(server,
peer_address->ai_addr, peer_address->ai_addrlen)) {
fprintf(stderr, "connect() failed. (%d)\n", GETSOCKETERRNO());
exit(1);
}
freeaddrinfo(peer_address);
printf("Connected.\n\n");
At this point, a TCP connection has been established. If we didn't need encryption, we
could communicate over it directly. However, we are going to use OpenSSL to initiate a
TLS/SSL connection over our TCP connection. The following code creates a new SSL object,
sets the hostname for SNI, and initiates the TLS/SSL handshake:
/*https_simple.c continued*/
SSL *ssl = SSL_new(ctx);
if (!ctx) {
fprintf(stderr, "SSL_new() failed.\n");
return 1;
}
if (!SSL_set_tlsext_host_name(ssl, hostname)) {
fprintf(stderr, "SSL_set_tlsext_host_name() failed.\n");
ERR_print_errors_fp(stderr);
return 1;
}
SSL_set_fd(ssl, server);
if (SSL_connect(ssl) == -1) {
fprintf(stderr, "SSL_connect() failed.\n");
ERR_print_errors_fp(stderr);
[ 274 ]
Loading Secure Web Pages with HTTPS and OpenSSL
Chapter 9
return 1;
}
The preceding code is explained in the Encrypted Sockets with OpenSSL section earlier in this
chapter.
The call to SSL_set_tlsext_host_name() is optional, but useful if you may be
connecting to a server that hosts multiple domains. Without this call, the server wouldn't
know which certificates are relevant to this connection.
It is sometimes useful to know which cipher suite the client and server agreed upon. We
can print the selected cipher suite with the following:
/*https_simple.c continued*/
printf("SSL/TLS using %s\n", SSL_get_cipher(ssl));
It is also useful to see the server's certificate. The following code prints the server's
certificate:
/*https_simple.c continued*/
X509 *cert = SSL_get_peer_certificate(ssl);
if (!cert) {
fprintf(stderr, "SSL_get_peer_certificate() failed.\n");
return 1;
}
char *tmp;
if ((tmp = X509_NAME_oneline(X509_get_subject_name(cert), 0, 0))) {
printf("subject: %s\n", tmp);
OPENSSL_free(tmp);
}
if ((tmp = X509_NAME_oneline(X509_get_issuer_name(cert), 0, 0))) {
printf("issuer: %s\n", tmp);
OPENSSL_free(tmp);
}
X509_free(cert);
The certificate subject should match the domain we're connecting to. The issuer should be a
certificate authority that we trust. Note that the preceding code does not validate the
certificate. Refer to the Certificates section in this chapter for more information.
[ 275 ]
Loading Secure Web Pages with HTTPS and OpenSSL
Chapter 9
We can then send our HTTPS request. This request is the same as if we were using plain
HTTP. We begin by formatting the request into a buffer and then sending it over the
encrypted connection using SSL_write(). The following code shows this:
/*https_simple.c continued*/
char buffer[2048];
sprintf(buffer, "GET / HTTP/1.1\r\n");
sprintf(buffer + strlen(buffer), "Host: %s:%s\r\n", hostname, port);
sprintf(buffer + strlen(buffer), "Connection: close\r\n");
sprintf(buffer + strlen(buffer), "User-Agent: https_simple\r\n");
sprintf(buffer + strlen(buffer), "\r\n");
SSL_write(ssl, buffer, strlen(buffer));
printf("Sent Headers:\n%s", buffer);
For more information about the HTTP protocol, please refer back to Chapter 6, Building a
Simple Web Client.
Our client now simply waits for data from the server until the connection is closed. This is
accomplished by using SSL_read() in a loop. The following code receives the HTTPS
response:
/*https_simple.c continued*/
while(1) {
int bytes_received = SSL_read(ssl, buffer, sizeof(buffer));
if (bytes_received < 1) {
printf("\nConnection closed by peer.\n");
break;
}
printf("Received (%d bytes): '%.*s'\n",
bytes_received, bytes_received, buffer);
}
The preceding code also prints any data received over the HTTPS connection. Note that it
does not parse the received HTTP data, which would be more complicated. See the
https_get.c program in this chapter's code repository for a more advanced program that
does parse the HTTP response.
[ 276 ]
Loading Secure Web Pages with HTTPS and OpenSSL
Chapter 9
Our simple client is almost done. We only have to shut down the TLS/SSL connection, close
the socket, and clean up. This is done by the following code:
/*https_simple.c continued*/
printf("\nClosing socket...\n");
SSL_shutdown(ssl);
CLOSESOCKET(server);
SSL_free(ssl);
SSL_CTX_free(ctx);
#if defined(_WIN32)
WSACleanup();
#endif
printf("Finished.\n");
return 0;
}
That concludes https_simple.c.
You should be able to compile and run it on Windows using MinGW and the following
commands:
gcc https_simple.c -o https_simple.exe -lssl -lcrypto -lws2_32
https_simple example.org 443
If you're using certain older versions of OpenSSL, you may also need an additional linker
option—-lgdi32.
Compiling and executing on macOS and Linux can be done using the following:
gcc https_simple.c -o https_simple -lssl -lcrypto
./https_simple example.org 443
If you run into linker errors, you should check that your OpenSSL library is properly
installed. You may find it helpful to attempt compiling the openssl_version.c program
first.
[ 277 ]
Loading Secure Web Pages with HTTPS and OpenSSL
Chapter 9
The following screenshot shows successfully compiling https_simple.c and using it to
connect to example.org:
The https_simple program should serve as an elementary example of the techniques of
connecting as an HTTPS client. These same techniques can be applied to any TCP
connection.
[ 278 ]
Loading Secure Web Pages with HTTPS and OpenSSL
Chapter 9
It's easy to apply these techniques to some of the programs developed earlier in the book,
such as tcp_client and web_get.
It is also worth mentioning that, while TLS works only with TCP connections, Datagram
Transport Layer Security (DTLS) aims to provide many of the same guarantees for User
Datagram Protocol (UDP) datagrams. OpenSSL provides support for DTLS too.
Other examples
A few other examples are included in this chapter's repository. They are the following:
tls_client.c: This is tcp_client.c from Chapter 3, An In-Depth Overview of
TCP Connections, but it has been modified to make TLS connections.
https_get.c: This is the web_get.c program from Chapter 6, Building a Simple
Web Client, but it has been modified for HTTPS. You can think of it as the
extended version of https_simple.c.
tls_get_cert.c: This is like https_simple.c, but it simply prints the
connected server's certificate and exits.
Keep in mind that none of the examples in this chapter perform certification verification.
This is an important step that must be added before using these programs in the field.
Summary
In this chapter, we learned about the features that HTTPS provides over HTTP, such as
authentication and encryption. We saw that HTTPS is really just HTTP over a TLS
connection and that TLS can be applied to any TCP connection.
We also learned about basic encryption concepts. We saw how asymmetric ciphers use two
keys, and how this allows for digital signatures. The very basics of certificates were
covered, and we explored some of the difficulties with verifying them.
Finally, we worked through a concrete example that established a TLS connection to an
HTTPS server.
This chapter was all about HTTPS clients, but in the next chapter, we focus on how HTTPS
servers work.
[ 279 ]
Loading Secure Web Pages with HTTPS and OpenSSL
Chapter 9
Questions
Try these questions to test your knowledge from this chapter:
1.
2.
3.
4.
5.
6.
What port does HTTPS typically operate on?
How many keys does symmetric encryption use?
How many keys does asymmetric encryption use?
Does TLS use symmetric or asymmetric encryption?
What is the difference between SSL and TLS?
What purpose do certificates fill?
Answers are in Appendix A, Answers to Questions.
Further reading
For more information about HTTPS and OpenSSL, please refer to the following:
OpenSSL documentation (https://www.openssl.org/docs/)
RFC 5246: The Transport Layer Security (TLS) Protocol (https://tools.ietf.
org/html/rfc5246)
[ 280 ]
10
Implementing a Secure Web
Server
In this chapter, we will build a simple HTTPS server program. This serves as the
counterpart to the HTTPS client we worked on in the previous chapter.
HTTPS is powered by Transport Layer Security (TLS). HTTPS servers, unlike HTTPS
clients, are expected to identify themselves with certificates. We'll cover how to listen for
HTTPS connections, provide certificates, and send an HTTP response over TLS.
The following topics are covered in this chapter:
HTTPS overview
HTTPS certificates
HTTPS server setup with OpenSSL
Accepting HTTPS connections
Common problems
OpenSSL alternatives
Direct TLS termination alternatives
Technical requirements
This chapter continues where Chapter 9, Loading Secure Web Pages with HTTPS and
OpenSSL, left off. This chapter continues to use the OpenSSL library. It is imperative that
you have the OpenSSL library installed and that you know the basics of programming with
OpenSSL. Refer to Chapter 9, Loading Secure Web Pages with HTTPS and OpenSSL, for basic
information about OpenSSL.
Implementing a Secure Web Server
Chapter 10
The example programs from this chapter can be compiled using any modern C compiler.
We recommend MinGW for Windows and GCC for Linux and macOS. You also need to
have the OpenSSL library installed. See Appendix B, Setting Up Your C Compiler on
Windows; Appendix C, Setting Up Your C Compiler on Linux; and Appendix D, Setting Up Your
C Compiler on macOS, for compiler setup and OpenSSL installation.
The code for this book can be found at https://github.com/codeplea/Hands-On-NetworkProgramming-with-C.
From the command line, you can download the code for this chapter by using the following
command:
git clone https://github.com/codeplea/Hands-On-Network-Programming-with-C
cd Hands-On-Network-Programming-with-C/chap10
Each example program in this chapter runs on Windows, Linux, and macOS. When
compiling on Windows, each example program requires linking with the Winsock library.
This is accomplished by passing the -lws2_32 option to gcc.
Each example also needs to be linked against the OpenSSL libraries, libssl.a and
libcrypto.a. This is accomplished by passing -lssl -lcrypto to GCC.
We provide the exact commands needed to compile each example as it is introduced.
All of the example programs in this chapter require the same header files and C macros that
we developed in Chapter 2, Getting to Grips with Socket APIs. For brevity, we put these
statements in a separate header file, chap10.h, which we can include in each program. For
an explanation of these statements, please refer to Chapter 2, Getting to Grips with Socket
APIs.
The content of chap10.h begins by including the required networking header files. The
code for this is as follows:
/*chap10.h*/
#if defined(_WIN32)
#ifndef _WIN32_WINNT
#define _WIN32_WINNT 0x0600
#endif
#include <winsock2.h>
#include <ws2tcpip.h>
#pragma comment(lib, "ws2_32.lib")
#else
#include <sys/types.h>
[ 282 ]
Implementing a Secure Web Server
#include
#include
#include
#include
#include
#include
Chapter 10
<sys/socket.h>
<netinet/in.h>
<arpa/inet.h>
<netdb.h>
<unistd.h>
<errno.h>
#endif
We also define some macros to assist with writing portable code:
/*chap10.h continued*/
#if defined(_WIN32)
#define ISVALIDSOCKET(s) ((s) != INVALID_SOCKET)
#define CLOSESOCKET(s) closesocket(s)
#define GETSOCKETERRNO() (WSAGetLastError())
#else
#define
#define
#define
#define
#endif
ISVALIDSOCKET(s) ((s) >= 0)
CLOSESOCKET(s) close(s)
SOCKET int
GETSOCKETERRNO() (errno)
Finally, chap10.h includes the additional headers required by this chapter's programs:
/*chap10.h continued*/
#include
#include
#include
#include
<stdio.h>
<string.h>
<stdlib.h>
<time.h>
#include
#include
#include
#include
#include
<openssl/crypto.h>
<openssl/x509.h>
<openssl/pem.h>
<openssl/ssl.h>
<openssl/err.h>
[ 283 ]
Implementing a Secure Web Server
Chapter 10
HTTPS and OpenSSL summary
We begin with a quick review of the HTTPS protocol, as covered in Chapter 9, Loading
Secure Web Pages with HTTPS and OpenSSL. However, we do recommend that you work
through Chapter 9, Loading Secure Web Pages with HTTPS and OpenSSL, before beginning
this chapter.
HTTPS uses TLS to add security to HTTP. You will recall from Chapter 6, Building a Simple
Web Client, and Chapter 7, Building a Simple Web Server, that HTTP is a text-based protocol
that works over TCP on port 80. The TLS protocol can be used to add security to any TCPbased protocol. Specifically, TLS is used to provide security for HTTPS. So in a nutshell,
HTTPS is simply HTTP with TLS. The default HTTPS port is 443.
OpenSSL is a popular open source library that provides functionality for TLS/SSL and
HTTPS. We use it in this book to provide the methods needed to implement HTTPS clients
and servers.
Generally, HTTPS connections are first made using TCP sockets. Once the TCP connection
is established, OpenSSL is used to negotiate a TLS connection over the open TCP
connection. From that point forward, OpenSSL functions are used to send and receive data
over the TLS connection.
An important part of communication security is being able to trust that the connection is to
the intended party. No amount of data encryption helps if you have connected to an
impostor. TLS uses certificates to prevent against connecting to impostors and man-in-themiddle attacks.
We now need to understand certificates in more detail before we can proceed with our
HTTPS server.
Certificates
Certificates are an important part of the TLS protocol. Although certificates can be used on
both the client and server side, HTTPS generally only uses server certificates. These
certificates identify to the client that they are connected to a trusted server.
[ 284 ]
Implementing a Secure Web Server
Chapter 10
Without certificates, a client wouldn't be able to tell whether it was connected to the
intended server or an impostor server.
Certificates work using a chain-of-trust model. Each HTTPS client has a few certificate
authorities that they explicitly trust, and certificate authorities offer services where they
digitally sign certificates. This service is usually done for a small fee, and usually only after
some simple verification of the requester.
When an HTTPS client sees a certificate signed by an authority it trusts, then it also trusts
that certificate. Indeed, these chains of trust can run deep. For example, most certificate
authorities also allow resellers. In these cases, the certificate authority signs an intermediate
certificate to be used by the reseller. The reseller then uses this intermediate certificate to
sign new certificates. Clients trust the intermediate certificates because they are signed by
trusted certificate authorities, and clients trust the certificates signed by resellers because
they trust the intermediate certificates.
Certificate authorities commonly offer two types of validation. Domain validation is where
a signed certificate is issued after simply verifying that the certificate recipient can be
reached at the given domain. This is usually done by having the certificate requester
temporarily modify a DNS record, or reply to an email sent to their whois contact.
Let's Encrypt is a relatively new certificate issuer that issues certificates for free. They do
this using an automated model. Domain validation is done by having the certificate
requester serve a small file over HTTP or HTTPS.
Domain validation is the most common type of validation. An HTTPS server using domain
validation assures an HTTPS client that they are connected to the domain that they think
they are. It implies that their connection wasn't silently hijacked or otherwise intercepted.
Certificate authorities also offer Extended Validation (EV) certificates. EV certificates are
only issued after the authority verifies the recipient's identity. This is usually done using
public records and a phone call.
For public-facing HTTPS applications, it is important that you obtain a certificate from a
recognized certificate authority. However, this can sometimes be tedious, and it is often
much more convenient to obtain a self-signed certificate for development and testing
purposes. Let's do that now.
[ 285 ]
Implementing a Secure Web Server
Chapter 10
Self-signed certificates with OpenSSL
Certificates signed by recognized authorities are essential to establish the chain of trust
needed for public websites. However, it is much easier to obtain a self-signed certificate for
testing or development.
It is also acceptable to use a self-signed certificate for certain private applications where the
client can be deployed with a copy of the certificate, and trust only that certificate. This is
called certificate pinning. Indeed, when used properly, certificate pinning can be more
secure than using a certificate authority. However, it is not appropriate for public-facing
websites.
We require a certificate to test our HTTPS server. We use a self-signed certificate because
they are the easiest to obtain. The downside to this method is that web browsers won't trust
our server. We can get around this by clicking through a few warnings in the web browser.
OpenSSL provides tools to make self-signing certificates very easy.
The basic command to self-sign a certificate is as follows:
openssl req -x509 -newkey rsa:2048 -nodes -sha256 -keyout key.pem \
-out cert.pem -days 365
OpenSSL asks questions about what to put on the certificate, including the subject, your
name, company, location, and so on. You can use the defaults on all of these as this doesn't
matter for our testing purposes.
The preceding command places the new certificate in cert.pem and the key for it in
key.pem. Our HTTPS server needs both files. cert.pem is the certificate that gets sent to
the connected client, and key.pem provides our server with the encryption key that proves
that it owns the certificate. Keeping this key secret is imperative.
[ 286 ]
Implementing a Secure Web Server
Chapter 10
Here is a screenshot showing the generation of a new self-signed certificate:
You can also use OpenSSL to view a certificate. The following command does this:
openssl x509 -text -noout -in cert.pem
If you're on Windows using MSYS, you may get garbled line endings from the previous
command. If so, try using unix2dos to fix it, as shown by the following command:
openssl x509 -text -noout -in cert.pem | unix2dos
[ 287 ]
Implementing a Secure Web Server
Chapter 10
Here is what a typical self-signed certificate looks like:
Now that we have a usable certificate, we are ready to begin our HTTPS server
programming.
HTTPS server with OpenSSL
Let's go over some basics of using the OpenSSL library in server applications before
beginning a concrete example.
Before OpenSSL can be used, it must be initialized. The following code initializes the
OpenSSL library, loads the requisite encryption algorithms, and loads useful error strings:
SSL_library_init();
OpenSSL_add_all_algorithms();
SSL_load_error_strings();
Refer to the previous Chapter 9, Loading Secure Web Pages with HTTPS and OpenSSL, for
more information.
Our server also needs to create an SSL context object. This object works as a sort of factory
from which we can create TLS/SSL connections.
[ 288 ]
Implementing a Secure Web Server
Chapter 10
The following code creates the SSL_CTX object:
SSL_CTX *ctx = SSL_CTX_new(TLS_server_method());
if (!ctx) {
fprintf(stderr, "SSL_CTX_new() failed.\n");
return 1;
}
If you're using an older version of OpenSSL, you may need to
replace TLS_server_method() with TLSv1_2_server_method() in the preceding code.
However, a better solution is to upgrade to a newer OpenSSL version.
After the SSL_CTX object is created, we can set it to use our self-signed certificate and key.
The following code does this:
if (!SSL_CTX_use_certificate_file(ctx, "cert.pem" , SSL_FILETYPE_PEM)
|| !SSL_CTX_use_PrivateKey_file(ctx, "key.pem", SSL_FILETYPE_PEM)) {
fprintf(stderr, "SSL_CTX_use_certificate_file() failed.\n");
ERR_print_errors_fp(stderr);
return 1;
}
That concludes the minimal OpenSSL setup needed for an HTTPS server.
The server should then listen for incoming TCP connections. This was covered in detail in
Chapter 3, An In-Depth Overview of TCP Connections.
After a new TCP connection is established, we use the socket returned by accept() to
create our TLS/SSL socket.
First, a new SSL object is created using our SSL context from earlier. The following code
demonstrates this:
SSL *ssl = SSL_new(ctx);
if (!ctx) {
fprintf(stderr, "SSL_new() failed.\n");
return 1;
}
The SSL object is then linked to our open TCP socket using SSL_set_fd().
The SSL_accept() function is called to establish the TLS/SSL connection. The following
code demonstrates this:
SSL_set_fd(ssl, socket_client);
if (SSL_accept(ssl) <= 0) {
fprintf(stderr, "SSL_accept() failed.\n");
ERR_print_errors_fp(stderr);
[ 289 ]
Implementing a Secure Web Server
Chapter 10
return 1;
}
printf ("SSL connection using %s\n", SSL_get_cipher(ssl));
You may notice that this code is very similar to the HTTPS client code from Chapter 9,
Loading Secure Web Pages with HTTPS and OpenSSL. The only real differences are in the
setup of the SSL context object.
Once the TLS connection is established, data can be sent and received using SSL_write()
and SSL_read(). These functions replace the send() and recv() functions used with
TCP sockets.
When the connection is finished, it is important to free resources, as shown by the following
code:
SSL_shutdown(ssl);
CLOSESOCKET(socket_client);
SSL_free(ssl);
When your program is finished accepting new connections, you should also free the SSL
context object. The following code shows this:
SSL_CTX_free(ctx);
With an understanding of the basics out of the way, let's solidify our knowledge by
implementing a simple example program.
Time server example
In this chapter, we develop a simple time server that displays the time to an HTTPS client.
This program is an adaptation of time_server.c from Chapter 2, Getting to Grips with
Socket APIs, which served the time over plain HTTP. Our program begins by including the
chapter header, defining main(), and initializing Winsock on Windows. The code for this
is as follows:
/*tls_time_server.c*/
#include "chap10.h"
int main() {
#if defined(_WIN32)
WSADATA d;
if (WSAStartup(MAKEWORD(2, 2), &d)) {
[ 290 ]
Implementing a Secure Web Server
Chapter 10
fprintf(stderr, "Failed to initialize.\n");
return 1;
}
#endif
The OpenSSL library is then initialized with the following code:
/*tls_time_server.c continued*/
SSL_library_init();
OpenSSL_add_all_algorithms();
SSL_load_error_strings();
An SSL context object must be created for our server. This is done using a call to
SSL_CTX_new(). The following code shows this call:
/*tls_time_server.c continued*/
SSL_CTX *ctx = SSL_CTX_new(TLS_server_method());
if (!ctx) {
fprintf(stderr, "SSL_CTX_new() failed.\n");
return 1;
}
If you're using an older version of OpenSSL, you may need to replace
TLS_server_method() with TLSv1_2_server_method() in the preceding code.
However, you should probably upgrade to a newer OpenSSL version instead.
Once the SSL context has been created, we can associate our server's certificate with it. The
following code sets the SSL context to use our certificate:
/*tls_time_server.c continued*/
if (!SSL_CTX_use_certificate_file(ctx, "cert.pem" , SSL_FILETYPE_PEM)
|| !SSL_CTX_use_PrivateKey_file(ctx, "key.pem", SSL_FILETYPE_PEM)) {
fprintf(stderr, "SSL_CTX_use_certificate_file() failed.\n");
ERR_print_errors_fp(stderr);
return 1;
}
Make sure that you've generated a proper certificate and key. Refer to the Self-signed
certificate with OpenSSL section from earlier in this chapter.
Once the SSL context is configured with the proper certificate, our program creates a
listening TCP socket in the normal way. It begins with a call to getaddrinfo() and
socket(), as shown in the following code:
/*tls_time_server.c continued*/
printf("Configuring local address...\n");
[ 291 ]
Implementing a Secure Web Server
Chapter 10
struct addrinfo hints;
memset(&hints, 0, sizeof(hints));
hints.ai_family = AF_INET;
hints.ai_socktype = SOCK_STREAM;
hints.ai_flags = AI_PASSIVE;
struct addrinfo *bind_address;
getaddrinfo(0, "8080", &hints, &bind_address);
printf("Creating socket...\n");
SOCKET socket_listen;
socket_listen = socket(bind_address->ai_family,
bind_address->ai_socktype, bind_address->ai_protocol);
if (!ISVALIDSOCKET(socket_listen)) {
fprintf(stderr, "socket() failed. (%d)\n", GETSOCKETERRNO());
return 1;
}
The socket created by the preceding code is bound to the listening address with bind().
The listen() function is used to set the socket in a listening state. The following code
demonstrates this:
/*tls_time_server.c continued*/
printf("Binding socket to local address...\n");
if (bind(socket_listen,
bind_address->ai_addr, bind_address->ai_addrlen)) {
fprintf(stderr, "bind() failed. (%d)\n", GETSOCKETERRNO());
return 1;
}
freeaddrinfo(bind_address);
printf("Listening...\n");
if (listen(socket_listen, 10) < 0) {
fprintf(stderr, "listen() failed. (%d)\n", GETSOCKETERRNO());
return 1;
}
If the preceding code isn't familiar, please refer to Chapter 3, An In-Depth Overview of TCP
Connections.
Note that the preceding code sets the listening port number to 8080. The standard port for
HTTPS is 443. It is often more convenient to test with a high port number, since low port
numbers require special privileges on some operating systems.
[ 292 ]
Implementing a Secure Web Server
Chapter 10
Our server uses a while loop to accept multiple connections. Note that this isn't true
multiplexing, as only one connection is handled at a time. However, it proves convenient
for testing purposes to be able to handle multiple connections serially. Our self-signed
certificate causes mainstream browsers to reject our connection on the first try. The
connection only succeeds after an exception is added. By having our code loop, it makes
adding this exception easier.
Our while loop begins by using accept() to wait for new connections. This is done by the
following code:
/*tls_time_server.c continued*/
while (1) {
printf("Waiting for connection...\n");
struct sockaddr_storage client_address;
socklen_t client_len = sizeof(client_address);
SOCKET socket_client = accept(socket_listen,
(struct sockaddr*) &client_address, &client_len);
if (!ISVALIDSOCKET(socket_client)) {
fprintf(stderr, "accept() failed. (%d)\n", GETSOCKETERRNO());
return 1;
}
Once the connection is accepted, we use getnameinfo() to print out the client's address.
This is sometimes useful for debugging purposes. The following code does this:
/*tls_time_server.c continued*/
printf("Client is connected... ");
char address_buffer[100];
getnameinfo((struct sockaddr*)&client_address,
client_len, address_buffer, sizeof(address_buffer), 0, 0,
NI_NUMERICHOST);
printf("%s\n", address_buffer);
Once the TCP connection is established, an SSL object needs to be created. This is done with
a call to SSL_new(), as shown by the following code:
/*tls_time_server.c continued*/
SSL *ssl = SSL_new(ctx);
if (!ctx) {
fprintf(stderr, "SSL_new() failed.\n");
return 1;
}
[ 293 ]
Implementing a Secure Web Server
Chapter 10
The SSL object is associated with the open socket by a call to SSL_set_fd(). Then, a
TLS/SSL connection can be initialized with a call to SSL_accept(). The following code
shows this:
/*tls_time_server.c continued*/
SSL_set_fd(ssl, socket_client);
if (SSL_accept(ssl) <= 0) {
fprintf(stderr, "SSL_accept() failed.\n");
ERR_print_errors_fp(stderr);
SSL_shutdown(ssl);
CLOSESOCKET(socket_client);
SSL_free(ssl);
continue;
}
printf ("SSL connection using %s\n", SSL_get_cipher(ssl));
In the preceding code, the call to the SSL_accept() function can fail for many reasons. For
example, if the connected client doesn't trust our certificate, or the client and server can't
agree on a cipher suite, then the call to SSL_accept() fails. When it fails, we just clean up
the allocated resources and use continue to repeat our listening loop.
Once the TCP and TLS/SSL connections are fully open, we use SSL_read() to receive the
client's request. Our program ignores the content of this request. This is because our
program only serves the time. It doesn't matter what the client has asked for—our server
responds with the time.
The following code uses SSL_read() to wait on and read the client's request:
/*tls_time_server.c continued*/
printf("Reading request...\n");
char request[1024];
int bytes_received = SSL_read(ssl, request, 1024);
printf("Received %d bytes.\n", bytes_received);
The following code uses SSL_write() to transmit the HTTP headers to the client:
/*tls_time_server.c continued*/
printf("Sending response...\n");
const char *response =
"HTTP/1.1 200 OK\r\n"
[ 294 ]
Implementing a Secure Web Server
Chapter 10
"Connection: close\r\n"
"Content-Type: text/plain\r\n\r\n"
"Local time is: ";
int bytes_sent = SSL_write(ssl, response, strlen(response));
printf("Sent %d of %d bytes.\n", bytes_sent,
(int)strlen(response));
The time() and ctime() functions are then used to format the current time. Once the time
is formatted in time_msg, it is also sent to the client using SSL_write(). The following
code shows this:
/*tls_time_server.c continued*/
time_t timer;
time(&timer);
char *time_msg = ctime(&timer);
bytes_sent = SSL_write(ssl, time_msg, strlen(time_msg));
printf("Sent %d of %d bytes.\n", bytes_sent,
(int)strlen(time_msg));
Finally, after the data is transmitted to the client, the connection is closed, and the loop
repeats. The following code shows this:
/*tls_time_server.c continued*/
printf("Closing connection...\n");
SSL_shutdown(ssl);
CLOSESOCKET(socket_client);
SSL_free(ssl);
}
If the loop terminates, it would be useful to close the listening socket and clean up the SSL
context, as demonstrated by the following code:
/*tls_time_server.c continued*/
printf("Closing listening socket...\n");
CLOSESOCKET(socket_listen);
SSL_CTX_free(ctx);
Finally, Winsock should be cleaned up if necessary:
/*tls_time_server.c continued*/
#if defined(_WIN32)
WSACleanup();
#endif
[ 295 ]
Implementing a Secure Web Server
Chapter 10
printf("Finished.\n");
return 0;
}
That concludes tls_time_server.c.
You can compile and run the program using the following commands on macOS or Linux:
gcc tls_time_server.c -o tls_time_server -lssl -lcrypto
./tls_time_server
On Windows, compiling and running the program is done with the following commands:
gcc tls_time_server.c -o tls_time_server.exe -lssl -lcrypto -lws2_32
tls_time_server
If you have linker errors, please be sure that the OpenSSL library is installed correctly. You
may find it helpful to attempt to compile openssl_version.c from Chapter 9, Loading
Secure Web Pages with HTTPS and OpenSSL.
The following screenshot shows what running tls_time_server might look like:
[ 296 ]
Implementing a Secure Web Server
Chapter 10
You can connect to the time server by navigating your web browser to
https://127.0.0.1:8080. Upon the first connection, your browser will reject the selfsigned certificate. The following screenshot shows what this rejection looks like in Firefox:
To access the time server, you need to add an exception in the browser. The method for this
is different in each browser, but generally, there is an Advanced button that leads to an
option to either add a certificate exception or otherwise proceed with the insecure
connection.
Once the browser connection is established, you will be able to see the current time as given
by our tls_time_server program:
[ 297 ]
Implementing a Secure Web Server
Chapter 10
The tls_time_server program proved useful to show how a TLS/SSL server can be set
up without getting bogged down in the details of actualizing a complete HTTPS server.
However, this chapter's code repository also includes a more substantial HTTPS server.
A full HTTPS server
Included in this chapter's code repository is https_server.c. This program is a
modification of web_server.c from Chapter 7, Building a Simple Web Server. It can be used
to serve a simple static website over HTTPS.
In the https_server.c program, the basic TLS/SSL connection is set up and established
the same way as shown in tls_time_server.c. Once the secure connection is established,
the connection is simply treated as HTTP.
https_server is compiled using the same technique as for tls_time_server. The
following screenshot shows how to compile and run https_server:
Once https_server is running, you can connect to it by navigating your web browser to
https://127.0.0.1:8080. You will likely need to add a security exception when
connecting for the first time. The code is set up to serve the static pages from the chap07
directory.
[ 298 ]
Implementing a Secure Web Server
Chapter 10
The following screenshot was taken of a web browser connected to https_server:
This chapter's example programs illustrate the basics of HTTPS servers. However,
implementing a genuinely robust HTTPS server does involve additional challenges. Let's
consider some of these now.
HTTPS server challenges
This chapter should serve only as an introduction to TLS/SSL server programming. There is
much more to learn about secure network programming. Before deploying a secure HTTPS
server with OpenSSL, it is essential to review all the OpenSSL documentation carefully.
Many OpenSSL functions have edge cases that were ignored in the illustrative code for this
chapter.
[ 299 ]
Implementing a Secure Web Server
Chapter 10
Multiplexing can also be complicated with OpenSSL. In typical TCP servers, we have been
using the select() function to indicate when data is available to be read.
The select() function works directly on the TCP socket. Using select() on a server
secured with TLS/SSL can be tricky. This is because select() indicates when data is
available at the TCP level. This usually, but not always, indicates that data is available to be
read with SSL_read(). It is important that you carefully consult the OpenSSL
documentation for SSL_read() if you are going to use it with select(). The example
program in this chapter ignores these possibilities for reasons of simplicity.
There are also alternatives to OpenSSL. Let's consider some of them now.
OpenSSL alternatives
Although OpenSSL is one of the oldest and most widely deployed libraries implementing
TLS, many alternative libraries have sprung up in recent years. Some of these alternatives
aim to offer better features, performance, or quality control compared to OpenSSL.
The following table contains a number of alternative open source TLS libraries:
TLS Library
cryptlib
Website
https://www.cryptlib.com/
GnuTLS
https://www.gnutls.org/
LibreSSL
https://www.libressl.org/
mbed TLS
https://tls.mbed.org/
Network Security Services
https://developer.mozilla.org/en-US/docs/Mozilla/Projects/
NSS
s2n
https://github.com/awslabs/s2n
wolfSSL
https://www.wolfssl.com/
There are also alternatives to doing TLS termination directly in your application, and this
can simplify program design. Let's consider this next.
Alternatives to TLS
Getting everything right when implementing an HTTPS server can prove difficult, and
missing even a minor detail can compromise security entirely.
[ 300 ]
Implementing a Secure Web Server
Chapter 10
As an alternative to using TLS directly in our server itself, it is sometimes a better idea to
use a reverse proxy server. A reverse proxy server can be configured to accept secure
connections from clients and then forward these connections as plain HTTP to your
program.
Nginx and Apache are two popular open source servers that can work well as HTTPS
reverse proxies.
This setup is illustrated by the following diagram:
A reverse proxy server configured in this way is also called a TLS termination proxy.
An even better alternative may be to create your program using the CGI or FastCGI
standard. In this case, your program communicates directly with a standard web server.
The web server handles all of the HTTPS and HTTP details. This can greatly simplify
program design, and, in some cases, reduce maintenance costs too.
If you do use an off-the-shelf HTTPS server, it is still important to use caution. It can be
easy to inadvertently compromise security through misconfiguration.
Summary
In this chapter, we considered the HTTPS protocol from the server's perspective. We
covered how certificates work, and we showed the method for generating a self-signed
certificate with OpenSSL.
Once we had a certificate, we learned how to use the OpenSSL library to listen for TLS/SSL
connections. We used this knowledge to implement a simple server that displays the
current time over HTTPS.
We also discussed some of the pitfalls and complexity of implementing HTTPS servers.
Many applications may benefit from side-stepping the implementation of HTTPS and
relying on a reverse proxy instead.
In the next chapter, Chapter 11, Establishing SSH Connections with libssh, we will look at
another secure protocol, Secure Shell (SSH).
[ 301 ]
Implementing a Secure Web Server
Chapter 10
Questions
Try these questions to test the knowledge you have acquired from this chapter:
1.
2.
3.
4.
How does a client decide whether it should trust a server's certificate?
What is the main issue with self-signed certificates?
What can cause SSL_accept() to fail?
Can select() be used to multiplex connections for HTTPS servers?
The answers to these questions can be found in Appendix A, Answers to Questions.
Further reading
For more information about HTTPS and OpenSSL, please refer to the following:
OpenSSL documentation (https://www.openssl.org/docs/)
RFC 5246: The Transport Layer Security (TLS) Protocol Version 1.2 (https://
tools.ietf.org/html/rfc5246)
Let's Encrypt (https://letsencrypt.org/)
[ 302 ]
11
Establishing SSH Connections
with libssh
This chapter is all about programming with the Secure Shell (SSH) protocol. SSH is a
secure network protocol used to authenticate with remote servers, grant command-line
access, and securely transfer files.
SSH is widely used for the configuration and management of remote servers. Oftentimes,
web servers aren't connected to monitors or keyboards. For many of these servers, SSH
provides the only method of command-line access and administration.
The following topics are covered in this chapter:
SSH protocol overview
The libssh library
Establishing a connection
SSH authentication methods
Executing a remote command
File transfers
Technical requirements
The example programs from this chapter can be compiled using any modern C compiler.
We recommend MinGW for Windows and GCC for Linux and macOS. You also need to
have the libssh library installed. See Appendix B, Setting Up Your C Compiler on
Windows, Appendix C, Setting Up Your C Compiler on Linux, and Appendix D, Setting Up Your
C Compiler on macOS, for compiler setup and libssh installation.
The code for this book can be found at https://github.com/codeplea/Hands-On-NetworkProgramming-with-C.
Establishing SSH Connections with libssh
Chapter 11
From the command-line, you can download the code for this chapter by using the following
command:
git clone https://github.com/codeplea/Hands-On-Network-Programming-with-C
cd Hands-On-Network-Programming-with-C/chap11
Each example program in this chapter runs on Windows, Linux, and macOS.
Each example needs to be linked against the libssh library. This is accomplished by
passing the -lssh option to gcc.
We provide the exact commands needed to compile each example as it is introduced.
For brevity, we use a standard header file with each example program in this chapter. This
header includes the other needed headers in one place. Its contents are as follows:
/*chap11.h*/
#include <stdio.h>
#include <stdlib.h>
#include <string.h>
#include <libssh/libssh.h>
The SSH protocol
Most servers providing a service (such as websites and emails) over the modern internet
aren't attached to keyboards or monitors. Even when servers do have local input/output
hardware, remote access is often much more convenient.
Various protocols have been used to provide remote command-line access to servers. One
of the first such protocols was Telnet. With Telnet, a client remotely connects to a server
using plaintext over TCP port 23. The server provides more-or-less direct access to the
operating system command-line through this Transmission Control Protocol (TCP)
connection. The client sends plaintext commands to the server, and the server executes
these commands. The command-line output is sent back from the server to the client.
Telnet has a major security shortcoming: it does not encrypt any data sent over the
network. Even user passwords are sent as plaintext when using Telnet. This means that any
network eavesdropper could obtain user credentials!
The SSH protocol has now largely replaced Telnet. The SSH protocol works over TCP using
port 22. SSH uses strong encryption to protect against eavesdropping.
[ 304 ]
Establishing SSH Connections with libssh
Chapter 11
SSH allows clients to verify servers' identities using public-key authentication. Without
public-key authentication of the server, an impostor could masquerade as a legitimate
server and attempt to trick a client into connecting. Once connected, the client would send
its credentials to the impostor server.
SSH also provides many methods for client authentication with severs. These include
sending a password or using public-key authentication. We look at these methods in detail
later.
SSH is a complicated protocol. So, instead of attempting to implement it ourselves, we use
an existing library to provide the needed functionality.
libssh
libssh is a widely used open source C library implementing the SSH protocol. It allows us
to remotely execute commands and transfer files using the SSH protocol.
libssh is structured in a way that abstracts network connections. We won't need to bother
with the low-level networking APIs we've been using so far. The libssh library handles
hostname resolution and creation of the needed TCP sockets for us.
Testing out libssh
Before continuing with this chapter, it is essential that you have the libssh library
installed and available. Please refer to Appendix B, Setting Up Your C Compiler on
Windows, Appendix C, Setting Up Your C Compiler on Linux, and Appendix D, Setting Up Your
C Compiler on macOS, for libssh installation.
Our first program using libssh is designed to ensure that it's installed correctly. This
program merely prints the libssh library version. The program is as follows:
/*ssh_version.c*/
#include "chap11.h"
int main()
{
printf("libssh version: %s\n", ssh_version(0));
return 0;
}
[ 305 ]
Establishing SSH Connections with libssh
Chapter 11
You can compile and run ssh_version.c with the following commands on Windows
using MinGW:
gcc ssh_version.c -o ssh_version.exe -lssh
ssh_version
On Linux and macOS, the commands to compile and run ssh_version.c are as follows:
gcc ssh_version.c -o ssh_version -lssh
./ssh_version
The following screenshot shows ssh_version.c being successfully compiled and run on
Linux:
If you receive an error message about libssh.h not being found, you should check that
you have the libssh library headers in your compiler's include directory search path. If
you see an error message about an undefined reference to ssh_version, then please check
that you didn't forget to pass the -lssh option to your compiler.
The next step to understanding libssh is to establish an actual SSH connection.
Establishing a connection
Now that we've ensured that libssh is correctly installed, it's time to attempt an actual
SSH connection.
You'll need to have access to an SSH server before continuing. OpenSSH is a popular server
that is available for Linux, macOS, and Windows 10. It works well for testing but be sure to
understand the security implementations before installing it on your device. Refer to your
operating system's documentation for more information.
[ 306 ]
Establishing SSH Connections with libssh
Chapter 11
If you would rather test with a remote system, Linux Virtual Private Servers (VPS)
running OpenSSH are available from many providers. They typically cost only a few
dollars a month.
Let's continue by implementing a program that uses libssh to open an SSH connection.
We structure the rest of the programs in this chapter to take the SSH server's hostname and
port number as command-line arguments. Our program starts with the following code,
which checks these arguments:
/*ssh_connect.c*/
#include "chap11.h"
int main(int argc, char *argv[])
{
const char *hostname = 0;
int port = 22;
if (argc < 2) {
fprintf(stderr, "Usage: ssh_connect hostname port\n");
return 1;
}
hostname = argv[1];
if (argc > 2) port = atol(argv[2]);
In the preceding code, argc is checked to see whether at least the hostname was passed in
as a command-line argument. If it wasn't, a usage message is displayed instead. Otherwise,
the server's hostname is stored in the hostname variable. If a port number was passed in, it
is stored in the port variable. Otherwise, the default port 22 is stored instead.
SSH often provides complete and total access to a server. For this reason, some internet
criminals randomly scan IP addresses for SSH connections. When they successfully
establish a connection, they attempt to guess login credentials, and if successful, they take
control of the server. These attacks aren't successful against properly secured servers, but
they are a common nuisance, nonetheless. Using SSH on a port other than the default (22)
often avoids these automated attacks. This is one reason why we want to ensure our
programs work well with non-default port numbers.
[ 307 ]
Establishing SSH Connections with libssh
Chapter 11
Once our program has obtained the hostname and connection port number, we continue by
creating an SSH session object. This is done with a call to ssh_new() as shown in the
following code:
/*ssh_connect.c continued*/
ssh_session ssh = ssh_new();
if (!ssh) {
fprintf(stderr, "ssh_new() failed.\n");
return 1;
}
The preceding code creates a new SSH session object and stores it in the ssh variable.
Once the SSH session is created, we need to specify some options before completing the
connection. The ssh_options_set() function is used to set options. The following code
shows setting the remote hostname and port:
/*ssh_connect.c continued*/
ssh_options_set(ssh, SSH_OPTIONS_HOST, hostname);
ssh_options_set(ssh, SSH_OPTIONS_PORT, &port);
libssh includes useful debugging tools. By setting the SSH_OPTIONS_LOG_VERBOSITY
option, we tell libssh to print almost everything it does. The following code causes
libssh to log a lot of information about which actions it takes:
/*ssh_connect.c continued*/
int verbosity = SSH_LOG_PROTOCOL;
ssh_options_set(ssh, SSH_OPTIONS_LOG_VERBOSITY, &verbosity);
This logging is useful to see, but it can also be distracting. I recommend you try it once and
then disable it unless you run into problems. The rest of this chapter's examples won't use
it.
We can now use ssh_connect() to initiate the SSH connection. The following code shows
this:
/*ssh_connect.c continued*/
int ret = ssh_connect(ssh);
if (ret != SSH_OK) {
fprintf(stderr, "ssh_connect() failed.\n%s\n", ssh_get_error(ssh));
return -1;
}
[ 308 ]
Establishing SSH Connections with libssh
Chapter 11
Note that ssh_connect() returns SSH_OK on success. On failure, we use the
ssh_get_error() function to detail what went wrong.
Next, our code prints out that the connection was successful:
/*ssh_connect.c continued*/
printf("Connected to %s on port %d.\n", hostname, port);
The SSH protocol allows servers to send a message to clients upon connecting. This
message is called the banner. It is typically used to identify the server or provide short
access rules. We can print the banner using the following code:
/*ssh_connect.c continued*/
printf("Banner:\n%s\n", ssh_get_serverbanner(ssh));
This is as far as our ssh_connect.c example goes. Our program simply disconnects and
frees the SSH session before terminating. The following code concludes ssh_connect.c:
/*ssh_connect.c continued*/
ssh_disconnect(ssh);
ssh_free(ssh);
return 0;
}
You can compile ssh_connect.c with the following command on Windows using
MinGW:
gcc ssh_connect.c -o ssh_connect.exe -lssh
On Linux and macOS, the command to compile ssh_connect.c is as follows:
gcc ssh_connect.c -o ssh_connect -lssh
[ 309 ]
Establishing SSH Connections with libssh
Chapter 11
The following screenshot shows ssh_connect.c being successfully compiled and run on
Linux:
In the preceding screenshot, you can see that ssh_connect was able to connect to the
OpenSSH server running locally.
Now that we've established a connection, let's continue by authenticating with the server.
SSH authentication
SSH provides authentication methods for both the server (host) and the client (user). It
should be obvious why the server must authenticate the client. The server wants to only
provide access to authorized users. Otherwise, anyone could take over the server.
However, the client also needs to authenticate the server. If the client fails to authenticate
the server properly, then the client could be tricked into sending its password to an
impostor!
[ 310 ]
Establishing SSH Connections with libssh
Chapter 11
In SSH, servers are authenticated using public key encryption. Conceptually, this is very
similar to how HTTPS provides server authentication. However, SSH doesn't typically rely
on certificate authorities. Instead, when using SSH, most clients simply keep a list of the
public keys (or hashes of the public keys) that they trust. How the clients obtain this list in
the first place varies. Generally, if a client connects to a server under trusted circumstances,
then it can trust that public key in the future too.
libssh implements features to remember trusted servers' public keys. In this way, once a
server has been connected to and trusted once, libssh remembers that it's trusted in the
future.
Some SSH deployments also use other methods to validate SSH hosts' public keys. For
example, a Secure Shell fingerprint (SSHFP) record is a type of DNS record used to
validate SSH public keys. Its use requires secure DNS access.
Regardless of how you decide to trust (or not trust) a server's public key, you'll need to
obtain the server's public key in the first place. Let's look at how libssh provides access to
the server authentication functionality.
Server authentication
Once the SSH session is established, we can get the server's public key using the
ssh_get_server_publickey() function. The following code illustrates this function call:
/*ssh_auth.c excerpt*/
ssh_key key;
if (ssh_get_server_publickey(ssh, &key) != SSH_OK) {
fprintf(stderr, "ssh_get_server_publickey() failed.\n%s\n",
ssh_get_error(ssh));
return -1;
}
It is often useful to obtain and display a hash of the server's SSH public key. Users can look
at hashes and compare these to known keys. The libssh library provides the
ssh_get_publickey_hash() function for this purpose.
The following code prints out an SHA1 hash of the public key obtained earlier:
/*ssh_auth.c excerpt*/
unsigned char *hash;
size_t hash_len;
if (ssh_get_publickey_hash(key, SSH_PUBLICKEY_HASH_SHA1,
[ 311 ]
Establishing SSH Connections with libssh
Chapter 11
&hash, &hash_len) != SSH_OK) {
fprintf(stderr, "ssh_get_publickey_hash() failed.\n%s\n",
ssh_get_error(ssh));
return -1;
}
printf("Host public key hash:\n");
ssh_print_hash(SSH_PUBLICKEY_HASH_SHA1, hash, hash_len);
libssh prints SHA1 hashes using Base64. It also prepends the hash type first. For example,
the preceding code might print the following:
Host public key hash:
SHA1:E348CMNeCGGec/bQqEX7aocDTfI
When you've finished with the public key and hash, free their resources with the following
code:
/*ssh_auth.c excerpt*/
ssh_clean_pubkey_hash(&hash);
ssh_key_free(key);
libssh provides the ssh_session_is_known_server() function to determine whether a
server's public key is known. The following code shows an example of using this code:
/*ssh_auth.c excerpt*/
enum ssh_known_hosts_e known = ssh_session_is_known_server(ssh);
switch (known) {
case SSH_KNOWN_HOSTS_OK: printf("Host Known.\n"); break;
case
case
case
case
SSH_KNOWN_HOSTS_CHANGED: printf("Host Changed.\n"); break;
SSH_KNOWN_HOSTS_OTHER: printf("Host Other.\n"); break;
SSH_KNOWN_HOSTS_UNKNOWN: printf("Host Unknown.\n"); break;
SSH_KNOWN_HOSTS_NOT_FOUND: printf("No host file.\n"); break;
case SSH_KNOWN_HOSTS_ERROR:
printf("Host error. %s\n", ssh_get_error(ssh)); return 1;
default: printf("Error. Known: %d\n", known); return 1;
}
[ 312 ]
Establishing SSH Connections with libssh
Chapter 11
If the server's public key is known (previously trusted), then
ssh_session_is_known_server() returns SSH_KNOWN_HOSTS_OK. Otherwise,
ssh_session_is_known_server() can return other values with various meanings.
SSH_KNOWN_HOSTS_UNKNOWN indicates that the server is unknown. In this case, the user
should verify the server's hash.
SSH_KNOWN_HOSTS_NOT_FOUND means that libssh didn't find a hosts file, and one is
created automatically. This should generally be treated in the same way as
SSH_KNOWN_HOSTS_UNKNOWN.
SSH_KNOWN_HOSTS_CHANGED indicates that the server is returning a different key than was
previously known, while SSH_KNOWN_HOSTS_OTHER indicates that the server is returning a
different type of key than was previously used. Either of these could indicate a potential
attack! In a real-world application, you should be more explicit about notifying the user of
these risks.
If the user has verified that a host is to be trusted, use
ssh_session_update_known_hosts() to allow libssh to save the servers public key
hash. This allows ssh_session_is_known_server() to return SSH_KNOWN_HOSTS_OK
for the next connection.
The following code illustrates prompting the user to trust a connection and using
ssh_session_update_known_hosts():
/*ssh_auth.c excerpt*/
if (known == SSH_KNOWN_HOSTS_CHANGED ||
known == SSH_KNOWN_HOSTS_OTHER ||
known == SSH_KNOWN_HOSTS_UNKNOWN ||
known == SSH_KNOWN_HOSTS_NOT_FOUND) {
printf("Do you want to accept and remember this host? Y/N\n");
char answer[10];
fgets(answer, sizeof(answer), stdin);
if (answer[0] != 'Y' && answer[0] != 'y') {
return 0;
}
ssh_session_update_known_hosts(ssh);
}
Please see ssh_auth.c in this chapter's code repository for a working example. Consult the
libssh documentation for more information.
After the client has authenticated the server, the server needs to authenticate the client.
[ 313 ]
Establishing SSH Connections with libssh
Chapter 11
Client authentication
SSH offers several methods of client authentication. These methods include the following:
No authentication: This allows any user to connect
Password authentication: This requires the user to provide a username and
password
Public key: This uses public key encryption methods to authenticate
Keyboard-interactive: This authenticates by having the user answer several
prompts
Generic Security Service Application Program Interface (GSS-API): This allows
authentication through a variety of other services
Password authentication is the most common method, but it does have some drawbacks. If
an impostor server tricks a user into sending their password, then that user's password is
effectively compromised. Public key user authentication doesn't suffer from this attack to
the same degree. With public key authentication, the server issues a unique challenge for
each authentication attempt. This prevents a malicious impostor server from replaying a
previous authentication to the legitimate server.
Once public key authentication is set up, libssh makes using it very simple. In many
cases, it's as easy as calling the ssh_userauth_publickey_auto() function. However,
setting up public key authentication in the first place can be a tedious process.
Although public key authentication is more secure, password authentication is still in
common use. Password authentication is also more straightforward and easier to test. For
these reasons, we continue the examples in this chapter by using password authentication.
Regardless of the user authentication method, the SSH server must know what user you are
trying to authenticate as. The libssh library lets us provide this information using the
ssh_set_options() function that we saw earlier. It should be called before using
ssh_connect(). To set the user, call ssh_options_set() with SSH_OPTIONS_USER as
shown in the following code:
ssh_options_set(ssh, SSH_OPTIONS_USER, "alice");
[ 314 ]
Establishing SSH Connections with libssh
Chapter 11
After the SSH session has been established, a password can be provided with the
ssh_userauth_password() function. The following code prompts for a password and
sends it to the connected SSH server:
/*ssh_auth.c excerpt*/
printf("Password: ");
char password[128];
fgets(password, sizeof(password), stdin);
password[strlen(password)-1] = 0;
if (ssh_userauth_password(ssh, 0, password) != SSH_AUTH_SUCCESS) {
fprintf(stderr, "ssh_userauth_password() failed.\n%s\n",
ssh_get_error(ssh));
return 0;
} else {
printf("Authentication successful!\n");
}
The preceding code uses the fgets() function to obtain the password from the user.
The fgets() function always includes the newline character with the input, which we
don't want. The password[strlen(password)-1] = 0 code effectively shortens the
password by one character, thus removing the newline character.
Note that using fgets() causes the entered password to display on the screen. This isn't
secure, and it would be an improvement to hide the password while it's being entered.
Unfortunately, there isn't a cross-platform way to do this. If you're using Linux, consider
using the getpass() function in place of fgets().
See ssh_auth.c in this chapter's code repository for a working example of authenticating
with a server using user password authentication.
You can compile and run ssh_auth.c with the following commands on Windows using
MinGW:
gcc ssh_auth.c -o ssh_auth.exe -lssh
ssh_auth example.com 22 alice
[ 315 ]
Establishing SSH Connections with libssh
Chapter 11
On Linux and macOS, the commands to compile and run ssh_auth.c are as follows:
gcc ssh_auth.c -o ssh_auth -lssh
./ssh_auth example.com 22 alice
The following screenshot shows compiling ssh_auth and using it to connect to a locally
running SSH server on Linux:
In the preceding screenshot, ssh_auth was used to successfully authenticate with the
locally running SSH server. The ssh_auth program used password authentication with the
username alice and the password password123. Needless to say, you need to change the
username and password as appropriate for your SSH server. Authentication will be
successful only if you use the username and password for an actual user account on the
server you connect to.
After authenticating, we're ready to run a command over SSH.
Executing a remote command
The SSH protocol works using channels. After we've established an SSH connection, a
channel must be opened to do any real work. The advantage is that many channels can be
opened over one connection. This potentially allows an application to do multiple things
(seemingly) simultaneously.
[ 316 ]
Establishing SSH Connections with libssh
Chapter 11
After the SSH session is open and the user is authenticated, a channel can be opened. A
new channel is opened by calling the ssh_channel_new() function. The following code
illustrates this:
/*ssh_command.c excerpt*/
ssh_channel channel = ssh_channel_new(ssh);
if (!channel) {
fprintf(stderr, "ssh_channel_new() failed.\n");
return 0;
}
The SSH protocol implements many types of channels. The session channel type is used for
executing remote commands and transferring files. With libssh, we can request a session
channel by using the ssh_channel_open_session() function. The following code shows
calling ssh_channel_open_session():
/*ssh_command.c excerpt*/
if (ssh_channel_open_session(channel) != SSH_OK) {
fprintf(stderr, "ssh_channel_open_session() failed.\n");
return 0;
}
Once the session channel is open, we can issue a command to run with the
ssh_channel_request_exec() function. The following code uses fgets() to prompt the
user for a command and ssh_channel_request_exec() to send the command to the
remote host:
/*ssh_command.c excerpt*/
printf("Remote command to execute: ");
char command[128];
fgets(command, sizeof(command), stdin);
command[strlen(command)-1] = 0;
if (ssh_channel_request_exec(channel, command) != SSH_OK) {
fprintf(stderr, "ssh_channel_open_session() failed.\n");
return 1;
}
Once the command has been sent, our program uses ssh_channel_read() to receive the
command output. The following code loops until the entire output is read:
/*ssh_command.c excerpt*/
char output[1024];
[ 317 ]
Establishing SSH Connections with libssh
Chapter 11
int bytes_received;
while ((bytes_received =
ssh_channel_read(channel, output, sizeof(output), 0))) {
if (bytes_received < 0) {
fprintf(stderr, "ssh_channel_read() failed.\n");
return 1;
}
printf("%.*s", bytes_received, output);
}
The preceding code first allocates a buffer, output, to hold the received data from the
command's output. The ssh_channel_read() function returns the number of bytes read,
but it returns 0 when the read is complete or a negative number for an error. Our code
loops while ssh_channel_read() returns data.
After the entire output from the command has been received, the client should send an
end-of-file (EOF) over the channel, close the channel, and free the channel resources. The
following code shows this:
/*ssh_command.c excerpt*/
ssh_channel_send_eof(channel);
ssh_channel_close(channel);
ssh_channel_free(channel);
If your program is also done with the SSH session, be sure to call ssh_disconnect() and
ssh_free() as well.
The ssh_command.c program included in this chapter's code repository is a simple utility
that connects to a remote SSH host and executes a single command.
You can compile ssh_command.c with the following command on Windows using
MinGW:
gcc ssh_command.c -o ssh_command.exe -lssh
On Linux and macOS, the command to compile ssh_command.c is as follows:
gcc ssh_command.c -o ssh_command -lssh
[ 318 ]
Establishing SSH Connections with libssh
Chapter 11
The following screenshot shows ssh_command.c being compiled and run on Linux:
The preceding screenshot shows connecting to the local OpenSSH server and executing the
ls -l command. The ssh_command code faithfully prints the output of that command
(which is a file listing for the user's home directory).
The libssh library function ssh_channel_request_exec() is useful to execute a single
command. However, SSH also supports methods for opening a fully interactive remote
shell. Generally, a session channel is opened as shown previously. Then the libssh
library function ssh_channel_request_pty() is called to initialize a remote shell.
The libssh library provides many functions to send and receive data this way. Please refer
to the libssh documentation for more information.
Now that you're able to execute a remote command and receive its output, it may also be
useful to transfer files. Let's consider that next.
Downloading a file
The Secure Copy Protocol (SCP) provides a method to transfer files. It supports both
uploading and downloading files.
libssh makes using SCP easy. This chapter's code repository contains an example,
ssh_download.c, which shows the basic method for downloading a file over SCP with
libssh.
[ 319 ]
Establishing SSH Connections with libssh
Chapter 11
After the SSH session is started and the user is authenticated, ssh_download.c prompts
the user for the remote filename using the following code:
/*ssh_download.c excerpt*/
printf("Remote file to download: ");
char filename[128];
fgets(filename, sizeof(filename), stdin);
filename[strlen(filename)-1] = 0;
A new SCP session is initialized by calling the libssh library function ssh_scp_new(), as
shown in the following code:
/*ssh_download.c excerpt*/
ssh_scp scp = ssh_scp_new(ssh, SSH_SCP_READ, filename);
if (!scp) {
fprintf(stderr, "ssh_scp_new() failed.\n%s\n",
ssh_get_error(ssh));
return 1;
}
In the preceding code, SSH_SCP_READ is passed to ssh_scp_new(). This specifies that we
are going to use the new SCP session for downloading files. The SSH_SCP_WRITE option
would be used to upload files. The libssh library also provides the
SSH_SCP_RECURSIVE option to assist with uploading or downloading entire directory
trees.
After the SCP session is created successfully, ssh_scp_init() must be called to initialize
the SCP channel. The following code shows this:
/*ssh_download.c excerpt*/
if (ssh_scp_init(scp) != SSH_OK) {
fprintf(stderr, "ssh_scp_init() failed.\n%s\n",
ssh_get_error(ssh));
return 1;
}
ssh_scp_pull_request() must be called to begin the file download. This function
returns SSH_SCP_REQUEST_NEWFILE to indicate that the remote host is going to begin
sending a new file. The following code shows this:
/*ssh_download.c excerpt*/
if (ssh_scp_pull_request(scp) != SSH_SCP_REQUEST_NEWFILE) {
[ 320 ]
Establishing SSH Connections with libssh
Chapter 11
fprintf(stderr, "ssh_scp_pull_request() failed.\n%s\n",
ssh_get_error(ssh));
return 1;
}
libssh provides some methods we can use to retrieve the remote filename, file size, and
permissions. The following code retrieves these values and prints them to the console:
/*ssh_download.c excerpt*/
int fsize = ssh_scp_request_get_size(scp);
char *fname = strdup(ssh_scp_request_get_filename(scp));
int fpermission = ssh_scp_request_get_permissions(scp);
printf("Downloading file %s (%d bytes, permissions 0%o\n",
fname, fsize, fpermission);
free(fname);
Once the file size is known, we can allocate space to store it in memory. This is done using
malloc() as shown in the following code:
/*ssh_download.c excerpt*/
char *buffer = malloc(fsize);
if (!buffer) {
fprintf(stderr, "malloc() failed.\n");
return 1;
}
Our program then accepts the new file request with ssh_scp_accept_request() and
downloads the file with ssh_scp_read(). The following code shows this:
/*ssh_download.c excerpt*/
ssh_scp_accept_request(scp);
if (ssh_scp_read(scp, buffer, fsize) == SSH_ERROR) {
fprintf(stderr, "ssh_scp_read() failed.\n%s\n",
ssh_get_error(ssh));
return 1;
}
[ 321 ]
Establishing SSH Connections with libssh
Chapter 11
The downloaded file can be printed to the screen with a simple call to printf(). When
we're finished with the file data, it's important to free the allocated space too. The following
code prints out the file's contents and frees the allocated memory:
/*ssh_download.c excerpt*/
printf("Received %s:\n", filename);
printf("%.*s\n", fsize, buffer);
free(buffer);
An additional call to ssh_scp_pull_request() should return SSH_SCP_REQUEST_EOF.
This indicates that we received the entire file from the remote host. The following code
checks for the end-of-file request from the remote host:
/*ssh_download.c excerpt*/
if (ssh_scp_pull_request(scp) != SSH_SCP_REQUEST_EOF) {
fprintf(stderr, "ssh_scp_pull_request() unexpected.\n%s\n",
ssh_get_error(ssh));
return 1;
}
The preceding code is simplified a bit. The remote host could also return other values
which aren't necessarily errors. For example, if ssh_scp_pull_request() returns
SSH_SCP_REQUEST_WARNING, then the remote host has sent a warning. This warning can
be read by calling ssh_scp_request_get_warning(), but, in any case,
ssh_scp_pull_request() should be called again.
After the file is received, ssh_scp_close() and ssh_scp_free() should be used to free
resources as shown in the following code excerpt:
/*ssh_download.c excerpt*/
ssh_scp_close(scp);
ssh_scp_free(scp);
After your program is done with the SSH session, don't forget to call ssh_disconnect()
and ssh_free() as well.
[ 322 ]
Establishing SSH Connections with libssh
Chapter 11
The entire file-downloading example is included with this chapter's code as
ssh_download.c.
You can compile ssh_download.c with the following command on Windows using
MinGW:
gcc ssh_download.c -o ssh_download.exe -lssh
On Linux and macOS, the command to compile ssh_download.c is as follows:
gcc ssh_download.c -o ssh_download -lssh
The following screenshot shows ssh_download.c being successfully compiled and used
on Linux to download a file:
As you can see from the preceding screenshot, downloading a file using SSH and SCP is
pretty straightforward. This can be a useful way to transfer data between computers
securely.
[ 323 ]
Establishing SSH Connections with libssh
Chapter 11
Summary
This chapter provided a cursory overview of the SSH protocol and how to use it with
libssh. We learned a lot about authentication with the SSH protocol, and how the server
and client must both authenticate for security. Once the connection was established, we
implemented a simple program to execute a command on a remote host. We also saw how
libssh makes downloading a file using SCP very easy.
SSH provides a secure communication channel, which effectively denies eavesdroppers the
meaning of intercepted communication.
In the next chapter, Chapter 12, Network Monitoring and Security, we continue with the
security theme by looking at tools that can effectively eavesdrop on non-secure
communication channels.
Questions
Try these questions to test your knowledge from this chapter:
1.
2.
3.
4.
5.
What is a significant downside of using Telnet?
Which port does SSH typically run on?
Why is it essential that the client authenticates the SSH server?
How is the server typically authenticated?
How is the SSH client typically authenticated?
The answers to this questions can be found in Appendix A, Answers to Questions.
[ 324 ]
Establishing SSH Connections with libssh
Chapter 11
Further reading
For more information about Telnet, SSH, and libssh, please refer to the following:
The SSH library https://www.libssh.org
RFC 15: Network Subsystem for Time Sharing Hosts (Telnet) (https://tools.ietf.
org/html/rfc15)
RFC 855: Telnet Option Specifications (https://tools.ietf.org/html/rfc855)
RFC 4250: The Secure Shell (SSH) Protocol Assigned Numbers (https://tools.
ietf.org/html/rfc4250)
RFC 4251: The Secure Shell (SSH) Protocol Architecture (https://tools.ietf.org/
html/rfc4251)
RFC 4252: The Secure Shell (SSH) Authentication Protocol (https://tools.ietf.
org/html/rfc4252)
RFC 4253: The Secure Shell (SSH) Transport Layer Protocol (https://tools.ietf.
org/html/rfc4253)
RFC 4254: The Secure Shell (SSH) Connection Protocol (https://tools.ietf.org/
html/rfc4254)
RFC 4255: Using DNS to Securely Publish Secure Shell (SSH) Key
Fingerprints (https://tools.ietf.org/html/rfc4255)
RFC 4256: Generic Message Exchange Authentication for the Secure Shell Protocol
(SSH) (https://tools.ietf.org/html/rfc4256)
[ 325 ]
4
Section 4 - Odds and Ends
In this final section, we will study network testing and review common mistakes to watch
out for in socket application programming. We will end with an exploration of the design
considerations for Internet of Things connected devices.
The following chapters are in this section:
Chapter 12, Network Monitoring and Security
Chapter 13, Socket Programming Tips and Pitfalls
Chapter 14, Web Programming for the Internet of Things
12
Network Monitoring and
Security
In this chapter, we will look at common tools and techniques for network monitoring.
These techniques can be useful to both alert us to developing problems, and to help
troubleshoot existing problems. Network monitoring can be important from a network
security standpoint, where it may be useful to detect, log, or even prevent network
intrusions.
The following topics are covered in this chapter:
Checking host reachability
Displaying a connection route
Showing open ports
Listing open connections
Packet sniffing
Firewalls and packet filtering
Technical requirements
This chapter contains no C code. Instead, it focuses on useful tools and utilities.
The utilities and tools used in this chapter are either built in to your operating system or are
available as free, open source software. We'll provide instructions for each tool as it is
introduced.
Network Monitoring and Security
Chapter 12
The purpose of network monitoring
Network monitoring is a common IT term that has a broad implication. Network
monitoring can refer to the practice, techniques, and tools used to provide insight into the
status of a network. These techniques are used to monitor the availability and performance
of networked systems and troubleshoot problems.
Some reasons you may want to practice network monitoring include the following:
To detect the reachability of networked systems
To measure the availability of networked systems
To determine the performance of networked systems
To inform decisions about network resource allocation
To aid in troubleshooting
To benchmark performance
To reverse engineer a protocol
To debug a program
In this chapter, we look at a small subset of conventional network monitoring techniques
that may be useful when implementing networked programs.
When developing or deploying networked programs, it is often the case that you run into
problems. When this happens, you are faced with two possibilities. The first possibility is
that your program could have a bug in it. The second possibility is that your problem is
caused by a network issue. The methods covered in this chapter help to identify and
troubleshoot network problems.
One of the most fundamental questions you could ask is, can this system reach that system?
The Ping utility, which is perhaps the most elementary network tool, is designed to answer
just that question. Let's consider its usage next.
Testing reachability
Perhaps the most basic network monitoring tool is Ping. Ping uses the Internet Control
Message Protocol (ICMP) to check whether a host is reachable. It also commonly reports
the total round-trip time (latency). Ping is available as a built-in command or utility for all
common operating systems.
[ 328 ]
Network Monitoring and Security
Chapter 12
The ICMP defines a set of special IP messages that are typically useful for diagnostic and
control purposes. Ping works by using two of these messages: echo request and echo reply.
The Ping utility sends an echo request ICMP message to a destination host. When that host
receives the echo request, it should respond with an echo reply message.
When the echo reply is received, Ping knows that the destination host is reachable. Ping can
also report the round-trip time from when the echo request was sent to when the echo reply
was received. ICMP echo messages are usually small and easy to process, so this round-trip
time often serves as a best-case estimate of network latency.
The Ping utility takes one argument: the hostname or address you're requesting a response
from. Ping on Unix-based systems will send packets continuously. On Windows, pass in
the -t flag for this behavior. Press Ctrl +C to stop.
The following screenshot shows using the Ping utility on example.com:
In the preceding screenshot, you can see that several ping messages were sent, and each
received a response. The round-trip time is reported for each ping message, and a summary
of all sent packets is also reported. The summary includes the minimum, average, and
maximum round-trip message time.
It is also possible to use ping to send larger messages. On Linux and macOS, the -s flag
specifies packet size. On Windows, the -l flag is used. It is sometimes interesting to see
how packet size affects latency and reliability.
[ 329 ]
Network Monitoring and Security
Chapter 12
The following screenshot shows pinging example.com with a larger 1,000-byte ping
message:
If ping fails to receive an echo reply, it does not necessarily mean that the target host is
unreachable. It only means that ping did not receive the expected reply. This could be
because the target machine ignored the echo request. However, most systems are set up to
respond to ping requests properly, and an echo request timeout usually means the target
system is unreachable.
Sometimes, just knowing that a host is reachable is enough, but sometimes you'll want
more information. It can be useful to know the exact path an IP packet takes through the
network. The traceroute utility provides this information.
Checking a route
Although we briefly introduced traceroute in Chapter 1, Introducing Networks and Protocols,
it is worth revisiting in more detail.
While Ping can tell us whether a network path exists between two systems, traceroute can
reveal what this path actually is.
Traceroute is used with one argument: the hostname or address you want to map a route
to.
[ 330 ]
Network Monitoring and Security
Chapter 12
On Windows, traceroute is called tracert. Tracert works in a very similar way to the
traceroute utility found on Linux and macOS.
The following screenshot shows the traceroute utility printing the routers used to deliver
data to example.com. The -n flag tells traceroute not to perform reverse-DNS lookups
for each hop. These lookups are rarely useful and omitting them saves a bit of time and
screen space:
The preceding screenshot shows that there are four or five routers (or hops) between us and
the destination system at example.com. Traceroute also shows the round-trip time to each
intermediate router.
Traceroute sends three messages to each router. This often exposes multiple network paths,
and there is no guarantee that any two messages will take precisely the same path.
In the preceding example, we see that the message must first pass through 23.92.28.3.
From there, it goes to one of three different systems, which are listed. The message
continues until it reaches the destination at hop five or six, depending on the exact path it
takes through the network.
This illustrates an interesting point: you shouldn't assume that two consecutive packets
take the same network path.
How traceroute works
To understand how traceroute works, we must understand a detail of the Internet Protocol
(IP). Each IP packet header contains a field called Time to Live (TTL). TTL is the maximum
number of seconds that a packet should live on the network before being discarded. This is
important to keep an IP packet from simply persisting (which is, going in an endless loop)
over the network.
[ 331 ]
Network Monitoring and Security
Chapter 12
TTL time intervals under one second are rounded up. This means that, in practice, each
router that handles an IP packet decrements the TTL field by 1. Therefore, TTL is often used
as a hop-count. That is to say that the TTL field simply represents the number of hops a
packet can still take over the network.
The traceroute utility uses TTL to identify intermediate routers in a network. Traceroute
begins by addressing a message (for example, a UDP datagram or an ICMP echo request) to
the destination host. However, traceroute sets the TTL field to a value of 1. When the very
first router in the connection path receives this message, it decrements TTL to zero. The
router then realizes that the message has expired and discards it. A well-behaved router
then sends an ICMP Time Exceeded message back to the original sender. Traceroute uses
this Time Exceeded message to identify the first router in the connection.
Traceroute repeats this same process with additional messages. The second message is sent
using a TTL of 2, and that message identifies the second hop in the network path. The third
message is sent using a TTL of 3, and so on. Eventually, the message reaches its final
destination and traceroute has mapped the entire network path.
The following diagram illustrates the method used by traceroute:
In the preceding diagram, the first message is sent with a TTL of 1. Router 1 doesn't
forward this message, but instead returns an ICMP Time Exceeded message. The second
message is sent with a TTL of 2. It makes it to the second router before timing out. The third
message makes it to the destination, which replies with an Echo Reply message. (If this
traceroute were UDP-based, it would expect to receive an ICMP Port Unreachable message
instead.)
[ 332 ]
Network Monitoring and Security
Chapter 12
Not all routers return an ICMP Time Exceeded message, and some networks filter out these
messages. In these cases, traceroute will have no way to know these routers' addresses.
Traceroute prints an asterisk instead. Theoretically, if a router exists in the connection path
that doesn't decrement the TTL field, then traceroute has no way of knowing that this
router exists.
Now that we've covered the way ping and traceroute work, you may be wondering how
they could be implemented in C code. Unfortunately, despite their simple algorithms, this
is easier said than done. Keep reading to learn more.
Raw sockets
You may be interested in implementing your own network testing tools. The ping tool
seems pretty simple, and it is. Unfortunately, the socket programming APIs we've been
working with do not provide access at the IP level that the ICMP is built on.
The socket programming API does provide access to raw sockets, in theory. With raw
sockets, a C program can construct the exact IP packet to send. That is, a C programmer
could construct an ICMP packet from scratch and send it over the network. Raw sockets
also allow for programs to receive uninterpreted packets from the network directly. In this
case, the user program would be responsible for deconstructing and interpreting the ICMP
packet, not the operating system.
On systems with raw socket support, getting started can be as simple as changing your
socket() function invocation to the following:
socket(AF_INET, SOCK_RAW, IPPROTO_RAW);
However, the problem is that raw sockets aren't universally supported. It is a difficult
subject to approach in a cross-platform way. Windows, in particular, has varying support
for raw sockets depending on the OS version. Recent versions of Windows have virtually
no support for raw sockets. For this reason, we won't cover raw sockets in any more detail
here.
Now that we've covered two basic tools for network troubleshooting, let's next look at tools
that inform us about our own system's relationship to the network.
[ 333 ]
Network Monitoring and Security
Chapter 12
Checking local connections
It is often useful to know what connections are being made on your local machine. The
netstat command can help with that. Netstat is available on Linux, macOS, and
Windows. Each version differs a little in the command-line options and output, but the
general usage principles are the same.
I recommend running netstat with the -n flag. This flag prevents netstat from doing
reverse-DNS lookups on each address and has the effect of speeding it up significantly.
On Linux, we can use the following command to show open TCP connections:
netstat -nt
The following screenshot shows the result of running this command on Linux:
In the preceding screenshot, you can see that netstat shows six columns. These columns
display the protocol, the sending and receiving queue, the local address, the foreign
address, and the connection state. In this example, we see that there are three connections
to port 80. It is likely that this computer is loading up three web pages (as HTTP uses port
80).
On Windows, the netstat -n -p TCP command shows the same information, except it
omits the socket queue information.
The queue information, displayed on Unix-based systems, represents how many bytes the
kernel has queued up waiting for the program to read, or the number of bytes sent but not
acknowledged by the foreign host. Small numbers are healthy, but if these numbers became
large, it could indicate a problem with the network or a bug in the program.
It is also useful to see which program is responsible for each connection. Use the -p flag on
Unix-based systems for this. On Windows, the -o flag shows PID and the -b flag shows
executable names.
[ 334 ]
Network Monitoring and Security
Chapter 12
If you're working on a server, it is often useful to see which listening sockets are open. The
-l flag instructs Unix-based netstat to show only listening sockets. The following
screenshot shows listening TCP server sockets, including the program name:
In the preceding screenshot, we can see that this system is running a DNS resolver
(systemd-resolve on port 53, IPv4 only), an SSH daemon (sshd on port 22), a printer
service (cupsd on port 631), and a web server (apache2 on port 80, IPv6 only).
On Windows, netstat doesn't have an easy way to display only listening sockets. Instead,
you can use the -a flag to display everything. Filtering out only listening TCP sockets can
be accomplished with the following command:
netstat -nao -p TCP | findstr LISTEN
The following screenshot shows using netstat on Windows to show only listening TCP
sockets:
[ 335 ]
Network Monitoring and Security
Chapter 12
With an idea of what programs are communicating from our machine, it may also be useful
to see what they are communicating. Tools such as tcpdump and tshark specialize in this,
and we will cover them next.
Snooping on connections
In addition to seeing which sockets are open on our computer, we can also capture the
exact data being sent and received.
We have a few tooling options for this:
tcpdump is a commonly used program for packet capture on Unix-based
systems. It is not available on modern Windows systems, however.
Wireshark is a very popular network protocol analyzer that includes a very nice
GUI. Wireshark is free software, released under the GNU GPL license, and
available on many platforms (including Windows, Linux, and macOS).
Included with Wireshark is Tshark, a command-line-based tool that allows us to dump and
analyze network traffic. Programmers often prefer command-line tools for their simple
interfaces and ease of scripting. They have the additional benefit on being usable on
systems where GUIs may not be available. For these reasons, we focus on using Tshark in
this section.
Tshark can be obtained from https://www.wireshark.org.
If you're running Linux, it is likely that your distro provides a package for Tshark. For
example, on Ubuntu Linux, the following commands will install Tshark:
sudo apt-get update
sudo apt-get install tshark
Once installed, Tshark is very easy to use.
You first need to decide which network interface(s) you want to use to capture traffic. The
desired interface or interfaces are passed to tshark with the -i flag. On Linux, you can
listen to all interfaces by passing -i any. However, Windows doesn't provide the any
interface. To listen on multiple interfaces with Windows, you need to enumerate them
separately, for example, -i 1 -i 2 -i 3.
[ 336 ]
Network Monitoring and Security
Chapter 12
Tshark lists the available interfaces with the -D flag. The following screenshot shows
Tshark on Windows enumerating the available network interfaces:
If you want to monitor local traffic (that is., where the communication is between two
programs on the same computer), you will want to use the Loopback adapter.
Once you've identified the network interface you would like to monitor, you can start
Tshark with the -i flag and begin capturing traffic. Use Ctrl + C to stop capturing. The
following screenshot shows Tshark in use:
[ 337 ]
Network Monitoring and Security
Chapter 12
The preceding screenshot represents only a few seconds of running Tshark on a typical
Windows desktop. As you can see, there is a lot of traffic into and out of an even relatively
idle system.
To cut down on the noise, we need to use a capture filter. Tshark implements a small
language that allows easy specification of which packets to capture and which to ignore.
Explaining filters may be easiest by way of example.
For example, if we want to capture only traffic to or from the IP address 8.8.8.8, we will
use the host 8.8.8.8 filter.
In the following screenshot, we've run Tshark with the host 8.8.8.8 filter:
You can see that while Tshark was running, it captured two packets. The first packet is a
DNS request sent to 8.8.8.8. Tshark informs us that this DNS request is for the A record
of example.com. The second packet is the DNS response received from 8.8.8.8. Tshark
shows that the DNS query response indicators that the A record for example.com is
93.184.216.34.
Tshark filters also support the Boolean operators and, or, and not. For example, to capture
only traffic involving the IP addresses 8.8.8.8 and 8.8.4.4 you can use the host
8.8.8.8 filter or the host 8.8.4.4 filter.
[ 338 ]
Network Monitoring and Security
Chapter 12
Filtering by port number is also very useful and can be done with port. For example, the
following screenshot shows Tshark being used to capture traffic to 93.184.216.34 on port
80:
In the preceding screenshot, we see that Tshark was run with the tshark -i 5 host
93.184.216.34 and port 80 command. This has the effect of capturing all traffic on
network interface 5 that is to or from 93.184.216.34 port 80.
TCP connections are sent as a series of packets. Although Tshark reports capturing 11
packets, these are all associated with only one TCP connection.
So far, we've been using Tshark in a way that causes it to display a summary of each
packet. Often this is enough, but sometimes you will want to be able to see the entire
contents of a packet.
[ 339 ]
Network Monitoring and Security
Chapter 12
Deep packet inspection
If we pass tshark the -x flag, it displays an ASCII and hex dump of every packet captured.
The following screenshot shows this usage:
[ 340 ]
Network Monitoring and Security
Chapter 12
In the preceding screenshot, you can see that entire IP packets are being dumped. In this
case, we see the first three packets represent a new TCP connection's three-way handshake.
The fourth packet contains an HTTP request.
This direct insight into each packet's contents isn't always convenient. It's often more
practical to capture packets to a file and do the analysis later. The -w option is used with
tshark to capture packets to a file. You may also want to use the -c option to limit the
number of packets captured. This simple precaution protects against accidentally filling
your entire hard drive with network traffic.
The following screenshot shows using Tshark to capture 50 packets to a file named
capture.pcap:
Once the traffic is written to a file, we can use Tshark to analyze it at our leisure. Simply
run tshark -r capture.pcap to get started. For text-based protocols (such as HTTP or
SMTP), it is also often useful to open the capture file in a text editor for analysis.
The ultimate way to analyze captured traffic is with Wireshark. Wireshark allows you to
load a capture file produced with tshark or tcpdump and analyze it with a very nice
GUI. Wireshark is also able to understand many standard protocols.
[ 341 ]
Network Monitoring and Security
Chapter 12
The following screenshot shows using Wireshark to display the traffic captured from
Tshark:
If the system you need to capture traffic on has a GUI, you can also use Wireshark to
capture your traffic directly.
If you play around with tshark and Wireshark, you will quickly see that it is easy to
inspect network protocols at a deep level. You may even find some questionable security
choices made by software running on your own system.
Although we've been focusing on monitoring only network traffic on our local system, it is
also possible to monitor all local network traffic.
[ 342 ]
Network Monitoring and Security
Chapter 12
Capturing all network traffic
tshark is only able to see traffic that arrives on your machine. This usually means you can
only use it to monitor traffic from applications on your computer.
To capture all internet traffic on your network, you must somehow arrange for that traffic
to arrive at your system, even though it usually wouldn't. There are two basic methods to
do this.
The first method is by using a router that supports mirroring. This feature makes it mirror
all traffic to a given Ethernet port. If you are using such a router, you can configure it to
mirror all network traffic to a particular port, and then plug your computer into that port.
From that point, any traffic capturing tool, such as tcpdump or tshark, can be used to
record this traffic.
The second way to sniff all internet traffic is to install a hub (or a switch with port
mirroring) between your router and internet modem. Hubs work by mirroring all traffic to
all ports. Hubs used to be a common way to build a network. However, they have mostly
been replaced by more efficient switches.
With a hub installed between your router and Internet modem, you can then connect your
system directly to this hub. With that setup, you can receive all the internet traffic into or
out of the network.
To monitor all network traffic (such as, even traffic between devices on the same network),
you need to build your network with either a hub or a switch that supports port mirroring.
It should also be noted, that with the right modem, you can potentially capture all Wi-Fi
traffic wirelessly.
From a security perspective, let this be instructive. You should never consider any network
traffic to be secret. Only traffic which is secured appropriately using encryption is resistant
to monitoring.
Now that we've shown several tools and techniques for testing and monitoring network
traffic, let's consider the important topic of network security next.
[ 343 ]
Network Monitoring and Security
Chapter 12
Network security
Network security encompasses the tools, techniques, and practices to protect a network
from threats. These tools include both hardware and software and can protect against a
variety of threats.
Although the topic is too broad for much detail here, we will cover a few topics that you are
likely to encounter.
Firewalls are one of the most common network security techniques. Firewalls act as a
barrier between one network and another. As commonly used, they monitor network traffic
and allow or block traffic based on a defined set of rules.
Firewalls come in two types: software and hardware. Most operating systems provide
software firewalls now. Software firewalls are typically configured to deny incoming
connections unless a rule is set up to allow it explicitly.
It is also possible to configure software firewalls to deny outgoing traffic by default. In this
case, programs aren't allowed to establish new connections unless a specific rule is added to
the firewall configuration first.
Do be careful about assuming that firewalls catch all traffic. For example, the Windows 10
firewall can be configured to deny all outgoing traffic by default, but it still lets DNS
requests through. An attacker could take advantage of this by using DNS requests to
exfiltrate data even though the user thinks that they are protected via the Windows
firewall.
Hardware firewalls come with various capabilities. Often, they are configured to block any
incoming connections that don't match predefined rules. On networks without firewalls,
routers often implicitly serve this same purpose. If your router provides network address
translation, then it wouldn't even know what to do with an incoming connection unless a
port forwarding rule has been pre-established for it.
Although it is important to understand the basics of network security on a wide level, as C
programmers, we are often more concerned with the security of our own programs.
Security is not something that the C language makes easy, so let's consider application-level
security in more detail now.
[ 344 ]
Network Monitoring and Security
Chapter 12
Application security and safety
When programming in C, special consideration must be given to security. This is because C
is a low-level programming language that gives direct access to system resources. Memory
management, for example, must be done manually in C, and a mistake in memory
management could allow a network attacker to write and execute arbitrary code.
With C, it is vital to ensure that allocated memory buffers aren't written past the end. That
is, whenever you copy data from the network into memory, you must ensure that enough
memory was allocated to store the data. If your program misses this even once, it
potentially allows a window for an attacker to gain control of your program.
Memory management, from a security perspective, isn't a concern with many higher-level
programming languages. In many programming languages, it isn't even possible to write
outside of allocated memory. Of course, these languages also can't provide the precise
control of memory layout and data structures that C programmers enjoy.
Even if you are careful to manage memory perfectly, there are still many more security
gotchas to be on the lookout for. When implementing any network protocol, you should
never assume that the data your program receives will adhere to the protocol specification.
If your program does make these assumptions, it will be open to attack by a rogue program
that doesn't. These protocol bugs are a concern in any programming language, not just C.
Again, though, the thing about C is that these protocol implementation errors can quickly
lead to memory errors, and memory errors quickly become serious.
If you're implementing a C program intended to run as a server, you should employ a
defense in depth approach. That is, you should set up your program in such a manner that
multiple defenses must be overcome before an attacker could cause damage.
The first layer of defense is writing your program without bugs. Whenever dealing with
received network data, carefully consider what would happen if the received data was not
at all what you're expecting. Make sure your program does the appropriate thing.
Also, don't run your program with any more privileges than needed for its functionality. If
your program doesn't need access to a sensitive set of files, make sure your operating
system doesn't allow it to access those files. Never run server software as root.
If you're implementing an HTTP or HTTPS server, consider not connecting your program
directly to the internet. Instead, use a reverse proxy server as the first point of contact to the
internet, and have your software interface only with the proxy server. This provides an
additional layer of isolation against attacks.
[ 345 ]
Network Monitoring and Security
Chapter 12
Finally, consider not writing networked code in C at all, if you can find an alternative.
Many C servers can be rewritten as CGI programs that don't directly interact with the
network at all. TCP or UDP servers can often be rewritten to use inetd, and thus avoid the
socket programming interface altogether. If your program needs to load web pages,
consider using a well-tested library, such as libcurl, for that purpose instead of rolling
your own.
We've covered a few network testing techniques so far. When deploying these techniques
on live networks, it is important to be considerate. Let's finish with a note on etiquette.
Network-testing etiquette
When network testing, it is always important to behave responsibly and ethically.
Generally speaking, don't test someone else's network without their explicit permission.
Doing otherwise could cause embarrassment at best, and land you in serious legal trouble
at worst.
You should also be aware that some network testing techniques can set off alarms. For
example, many network administrators monitor their network's load and performance
characteristics. If you decide to load-test these networks without notice, you might set off
automated alarms causing inconvenience.
Some other testing techniques can look like attacks. Port scanning, for example, is a useful
technique where a tester tries establishing many connections on different ports. It's used to
discover which ports on a system are open. However, it is a common technique used by
malicious attackers to find weaknesses. Some system administrators consider port scans to
be an attack, and you should never port scan a system without permission.
Summary
In this chapter, we covered a lot of ground over the broad topics of network monitoring
and security. We looked at tools useful for testing the reachability of networked devices.
We learned how to trace a path through the network, and how to monitor connections
made on our local machine. We also discovered how to log and inspect network traffic.
We discussed network security and how it may impact the C developer. By showing how
network traffic can be directly inspected, we learned first-hand the importance of
encryption for communication privacy. The importance of security at the application level
was also discussed.
[ 346 ]
Network Monitoring and Security
Chapter 12
In the next chapter, we take a closer look at how our coding practices affect program
behavior. We also discuss many essential odds and ends for writing robust network
applications in C.
Questions
Try these questions to test your knowledge from this chapter:
1.
2.
3.
4.
5.
Which tool would you use to test the reachability of a target system?
Which tool lists the routers to a destination system?
What are raw sockets used for?
Which tools list the open TCP sockets on your system?
What is one of the biggest concerns with security for networked C programs?
The answers to these questions can be found in Appendix A, Answers to Questions.
Further reading
For more information about the topics covered in this chapter, please refer to the following:
RFC 792: Internet Control Message Protocol (https://tools.ietf.org/html/
rfc792)
Wireshark (https://www.wireshark.org)
[ 347 ]
13
Socket Programming Tips and
Pitfalls
This chapter builds on all the knowledge you've obtained throughout this book.
Socket programming can be complicated. There are many pitfalls to avoid and subtle
programming techniques to implement. In this chapter, we consider some nuanced details
of network programming that are essential for writing robust programs.
The following topics are covered in this chapter:
Error handling and error descriptions
TCP handshakes and orderly release
Timeout on connect()
Preventing TCP deadlocks
TCP flow control
Avoiding address-in-use errors
Preventing SIGPIPE crashes
Multiplexing limitations of select()
Technical requirements
Any modern C compiler can compile the example programs from this chapter. We
recommend MinGW on Windows and GCC on Linux and macOS. See Appendix B, Setting
Up Your C Compiler On Windows, Appendix C, Setting Up Your C Compiler On Linux, and
Appendix D, Setting Up Your C Compiler On macOS, for compiler setup.
Socket Programming Tips and Pitfalls
Chapter 13
The code for this book can be found at: https://github.com/codeplea/Hands-On-NetworkProgramming-with-C.
From the command line, you can download the code for this chapter with the following
command:
git clone https://github.com/codeplea/Hands-On-Network-Programming-with-C
cd Hands-On-Network-Programming-with-C/chap13
Each example program in this chapter runs on Windows, Linux, and macOS. When
compiling on Windows, each example program will require linking to the Winsock library.
This can be accomplished by passing the -lws2_32 option to gcc.
All of the example programs in this chapter require the same header files and C macros that
we developed in Chapter 2, Getting to Grips with Socket APIs. For brevity, we put these
statements in a separate header file, chap13.h. For an explanation of these statements,
please refer to Chapter 2, Getting to Grips with Socket APIs.
The first part of chap13.h includes the needed networking headers for each platform. The
code for that is as follows:
/*chap13.h*/
#if defined(_WIN32)
#ifndef _WIN32_WINNT
#define _WIN32_WINNT 0x0600
#endif
#include <winsock2.h>
#include <ws2tcpip.h>
#pragma comment(lib, "ws2_32.lib")
#else
#include
#include
#include
#include
#include
#include
#include
#include
<sys/types.h>
<sys/socket.h>
<netinet/in.h>
<arpa/inet.h>
<netdb.h>
<unistd.h>
<errno.h>
<fcntl.h>
#endif
[ 349 ]
Socket Programming Tips and Pitfalls
Chapter 13
We also define some macros to make writing portable code easier, and we include the
additional headers that our programs need:
/*chap13.h continued*/
#if defined(_WIN32)
#define ISVALIDSOCKET(s) ((s) != INVALID_SOCKET)
#define CLOSESOCKET(s) closesocket(s)
#define GETSOCKETERRNO() (WSAGetLastError())
#else
#define
#define
#define
#define
#endif
ISVALIDSOCKET(s) ((s) >= 0)
CLOSESOCKET(s) close(s)
SOCKET int
GETSOCKETERRNO() (errno)
#include <stdio.h>
#include <stdlib.h>
#include <string.h>
That concludes chap13.h.
Error handling
Error handling can be a problematic topic in C as it does not "hold the programmer's
hand". Any memory or resources allocated must be manually released, and this can be
tricky to get exactly right in every situation.
When a networked program encounters an error or unexpected situation, the normal
program flow is interrupted. This is made doubly difficult when designing a multiplexed
system that handles many connections concurrently.
The example programs in the book take a shortcut to error handling. Almost all of them
simply terminate after an error is detected. While this is sometimes a valid strategy in realworld programs, real-world programs usually need more complicated error recovery.
Sometimes, you can get away with merely having your client program terminate after
encountering an error. This behavior is often the correct response for simple command-line
utilities. At other times, you may need to have your program automatically try again.
[ 350 ]
Socket Programming Tips and Pitfalls
Chapter 13
Event-driven programming can provide the technique needed to simplify this logic a bit.
Mainly, your program is structured so that a data structure is allocated to store information
about each connection. Your program uses a main loop that checks for events, such as a
readable or writable socket, and then handles those events. When structuring your program
in this way, it is often easier to flag a connection as needing an action, rather than calling a
function to process that action immediately.
With careful design, errors can be handled as a simple matter of course, instead of as
exceptions to the normal program flow.
Ultimately, error handling is a very specialized process, and careful care needs to be taken
to consider application requirements. What's appropriate for one system is not necessarily
correct for another.
In any case, a robust program design dictates that you carefully consider how to handle
errors. Many programmers focus only on the happy path. That is, they take care to design
the program flow based on the assumption that everything goes correctly. For robust
programs, this is a mistake. It is equally important to consider the program flow in cases
where everything goes wrong.
Throughout the rest of this chapter, we touch on places where network programming can
go wrong. Network programming can be subtle, and many of these failure modes are
surprising. However, with proper consideration, they are all capable of being handled.
Before diving into all the weird ways a connection can fail, let's first focus on making error
logging a bit easier. In this book, so far, we've been dealing with numeric error codes. It is
often more useful to obtain a text description of an error. We look at a method for this next.
Obtaining error descriptions
In Chapter 2, Getting to Grips with Socket APIs, we developed the GETSOCKETERRNO()
macro as a cross-platform way to obtain the error code after a failed system call.
The GETSOCKETERRNO() macro is repeated here for your convenience:
#if defined(_WIN32)
#define GETSOCKETERRNO() (WSAGetLastError())
#else
#define GETSOCKETERRNO() (errno)
#endif
[ 351 ]
Socket Programming Tips and Pitfalls
Chapter 13
The preceding code has served us well throughout this book. It has the advantage of being
short and simple.
In a real-world program, you may want to display a text-based error message in addition to
the error code. Windows and Unix-based systems both provide functions for this purpose.
We can build a simple function to return the last error message as a C string. The code for
this function is the following:
/*error_text.c excerpt*/
const char *get_error_text() {
#if defined(_WIN32)
static char message[256] = {0};
FormatMessage(
FORMAT_MESSAGE_FROM_SYSTEM|FORMAT_MESSAGE_IGNORE_INSERTS,
0, WSAGetLastError(), 0, message, 256, 0);
char *nl = strrchr(message, '\n');
if (nl) *nl = 0;
return message;
#else
return strerror(errno);
#endif
}
The preceding function formats the error as text using FormatMessage() on Windows and
strerror() on other operating systems.
Unix-based systems provide the strerror() function. This function takes the error code
as its only parameter, and it returns a pointer to an error message string.
Getting an error code description on Windows is a bit more involved. We use the
FormatMessage() function to obtain the text description. This function has many options,
but the parameters used in the preceding code snippet work well for our purposes. Note
that Windows error descriptions are generally returned ending with a newline. Our
function uses strrchr() to find the last line-feed character and truncate the description at
that point.
[ 352 ]
Socket Programming Tips and Pitfalls
Chapter 13
This chapter's code includes a program called error_text.c that demonstrates this
method. This program calls the socket() function with invalid parameters, and then uses
get_error_text() to display the error message:
/*error_text.c excerpt*/
printf("Calling socket() with invalid parameters.\n");
socket(0, 0, 0);
printf("Last error was: %s\n", get_error_text());
Note that error codes and descriptions vary greatly between operating systems. The next
two screenshots show the error message displayed by this program on both Windows and
Linux.
The following screenshot shows error_text running on Windows:
The next screenshot shows error_text running on an Ubuntu Linux desktop:
As you can see from the preceding two screenshots, different operating systems don't often
report errors in the same way.
[ 353 ]
Socket Programming Tips and Pitfalls
Chapter 13
Now that we have a better way to investigate errors, let's move on to consider some ways
that TCP sockets can fail.
TCP socket tips
The Transmission Control Protocol (TCP) is a fantastic protocol, and TCP sockets provide
a beautiful abstraction. They present discrete packets on an unreliable network as a reliable,
continuous stream of data. To the programmer, sending and receiving data from a peer
anywhere in the world is made nearly as easy as reading and writing to a file.
TCP works very well to hide network shortcomings. When a flaky network drops a few
packets, TCP faithfully sorts out the mess and retransmits as needed. The application using
TCP receives the data in perfect order. The application doesn't even know there was a
network problem, and it certainly doesn't need to address the problem.
With this abstraction, like all abstractions, comes some inherent risk. TCP tries very hard to
make networks look reliable. It usually succeeds, but sometimes, abstractions leak. What
happens if your network cable is cut? What happens if the application you are connected to
crashes? TCP isn't magic. It can't fix these problems.
Of course, it's evident that the abstraction must break when faced with severe problems
such as a total network outage. However, sometimes, more subtle problems can arise from
details thought to be abstracted away. For example, what happens when you try to send a
lot of data, but the peer that you are connected to isn't reading it? (Answer: the data gets
backed up.)
In this section, we look at TCP in a little more detail. We're especially interested in the
behavior of TCP sockets in these edge cases.
A TCP connection lifespan can be divided into three distinct phases. They are as follows:
The setup phase
The data-transfer phase
The tear-down phase
Problems can arise in each step.
In the setup phase, we have to consider what happens if the target system doesn't respond.
By default, connect() sometimes waits a long time, attempting to establish a TCP
connection. Sometimes, that is what you want, but often it isn't.
[ 354 ]
Socket Programming Tips and Pitfalls
Chapter 13
For the data-transfer phase, we must be careful to prevent deadlocks. An awareness of TCP
congestion control mechanisms can also help us to prevent degenerate cases where our
connection becomes slow or uses a lot more bandwidth than necessary.
Finally, knowing the details of the tear-down phase helps us to ensure that we haven't lost
data at the end of a connection. Details of how sockets are terminated can also cause
operating systems to hold on to half-dead connections long after they've disconnected.
These lingering sockets can prevent new programs from binding to their local ports.
Let's begin with some information about the three-way handshake that establishes TCP
connections and how to timeout a connect() call.
Timeout on connect()
Usually, when we call connect() on a TCP socket, connect() blocks until the connection
is established.
The following diagram illustrates the TCP three-way handshake that establishes a typical
TCP connection and how it relates to a standard, blocking connect() call:
[ 355 ]
Socket Programming Tips and Pitfalls
Chapter 13
The standard TCP three-way handshake consists of three parts. First, the Client sends a
Synchronize (SYN) message to the Server. Then the Server responds with an SYN
Message of its own, combined with an Acknowledged (ACK) message of the Client's SYN
Message. The Client then responds with an acknowledgment of the Server's SYN
Message. The connection is then open and ready for data transmission.
When the connect() function is called on the Client side, the first SYN Message is sent,
and the connect() function blocks until the SYN+ACK Message is received from the
Server. After the SYN+ACK Message is received, connect() enqueues the final ACK
Message and returns.
This means that connect() blocks for at least one round-trip network time. That is, it
blocks from the time that its SYN Message is sent to the time that the SYN+ACK Message
is received. While one round-trip network time is the best-case scenario, in the worst case, it
could block for much longer. Consider what happens when an overloaded Server receives
an SYN Message. The Server could take some time to reply with the SYN+ACK Message.
If connect() cannot establish a connection successfully (that is, SYN+ACK Message is
never received), then the connect() call eventually times out. This timeout period is
controlled by the operating system. The exact timeout period varies, but 20 seconds is about
typical.
There is no standard way to extend the timeout period of connect(), but you can always
call connect() again if you want to keep trying.
There are a few ways to make connect() timeout early. One way is to use multiple
processes and kill the child process if it doesn't connect in time. Another way is to use
SIGALARM in Unix-based systems.
A cross-platform connect() timeout can be achieved by using select(). Recall from
Chapter 3, An In-Depth Overview of TCP Connections, that select() allows us to wait on a
socket operation with a specified timeout.
select() also has the additional benefit of allowing your program to do useful work
while waiting for the TCP connection to be established. That is, select() can be used to
wait on multiple connect() calls, and other socket events besides. It can work well for a
client that needs to connect to several servers in parallel.
[ 356 ]
Socket Programming Tips and Pitfalls
Chapter 13
Using select() to timeout a connect() call involves a few steps. They are as follows:
1. Set the socket to non-blocking operation. This is done using
fcntl(O_NONBLOCK) on Unix-based systems and ioctlsocket(FIONBIO) on
Windows.
2. Call connect(). This call returns immediately, provided that step 1 was
successful.
3. Check the return code from connect(). A return value of zero indicates that the
connection was successful, which probably indicates that non-blocking mode
was set incorrectly. A non-zero return value from connect() means we should
check the error code (that is, WSAGetLastError() on Windows and errno on
other platforms). An error code of EINPROGRESS (WSAEWOULDBLOCK on
Windows) indicates that the TCP connection is in progress. Any other value
indicates an actual error.
4. Set up and call select() with the desired timeout.
5. Set the socket back to blocking mode.
6. Check to see whether the socket connected successfully.
Step 1, setting the socket to non-blocking mode, can be accomplished with the following
code:
#if defined(_WIN32)
unsigned long nonblock = 1;
ioctlsocket(socket_peer, FIONBIO, &nonblock);
#else
int flags;
flags = fcntl(socket_peer, F_GETFL, 0);
fcntl(socket_peer, F_SETFL, flags | O_NONBLOCK);
#endif
The preceding code works a bit differently depending on whether it is running on
Windows. On Windows, the ioctlsocket() function is used with the FIONBIO flag to
indicate non-blocking socket operation. On non-Windows systems, the fcntl() function is
used to set the O_NONBLOCK flag for the same purpose.
[ 357 ]
Socket Programming Tips and Pitfalls
Chapter 13
In step 2 and step 3, the call to connect() is done normally. The only difference is that you
should expect an error code of EINPROGRESS on Unix-based systems and WSAEWOULDBLOCK
on Windows.
In step 4, the setup for select() is straightforward. The select() function is used in the
same way as described in previous chapters. For your convenience, the following code
shows one way to use select() for this purpose:
fd_set set;
FD_ZERO(&set);
FD_SET(socket_peer, &set);
struct timeval timeout;
timeout.tv_sec = 5; timeout.tv_usec = 0;
select(socket_peer+1, 0, &set, 0, &timeout);
Notice in the preceding code that we set a timeout of five seconds. Therefore, this
select() call returns after either the connection is established, the connection has an error,
or 5 seconds have elapsed.
In step 5, setting the socket back to non-blocking mode is accomplished with the following
code:
#if defined(_WIN32)
nonblock = 0;
ioctlsocket(socket_peer, FIONBIO, &nonblock);
#else
fcntl(socket_peer, F_SETFL, flags);
#endif
In step 6, we are looking to see whether the call to select() timed out, returned early from
an error, or returned early because our socket has successfully connected.
Surprisingly, there is no easy, robust, cross-platform way to check whether the socket is
connected at this point. My advice is to simply assume that any socket marked by
select() as writable has connected successfully. Just try to use the socket. Most TCP client
programs will want to call send() after connecting, anyway. The return value from this
first send() call indicates whether you have a problem.
[ 358 ]
Socket Programming Tips and Pitfalls
Chapter 13
If you really do want to try and determine the socket state without resorting to send(), you
should be aware of some differences in how select() signals in this situation. On Unixbased systems, select() signals a socket as writable once the connection is established. If
an error has occurred, select() signals the socket as both writable and readable.
However, if the socket has connected successfully and data has arrived from the remote
peer, this also produces both the readable and writable situation. In that case, the
getsockopt() function can be used to determine whether an error has occurred. On
Windows, select() marks a socket as excepted if an error occurred.
Please refer to connect_timeout.c in this chapter's code repository for a working
example of the connect() timeout method using select(). An additional
example, connect_blocking.c, is also included for comparison.
Once a new connection is established, our concern moves to preventing data-transfer
problems. In the worst case, our program could get deadlocked with its peer, preventing
any data transfer. We'll consider this in more detail next.
TCP flow control and avoiding deadlock
When designing application protocols and writing network code, we need to be careful to
prevent a deadlock state. A deadlock is when both sides on a connection are waiting for the
other side to do something. The worst-case scenario is when both sides end up waiting
indefinitely.
A trivial example of a deadlock is if both the client and server call recv() immediately
after the connection is established. In that case, both sides wait forever for data that is never
going to come.
A less obvious deadlock situation can happen if both parties try to send data at the same
time. Before we can consider this situation, we must first understand a few more details of
how TCP connections operate.
When data is sent over a TCP connection, this data is broken up into segments. A few
segments are sent immediately, but additional segments aren't sent over the network until
the first few segments are acknowledged as being received by the connected peer. This is
part of TCP's flow-control scheme, and it helps to prevent a sender from transmitting data
faster than a receiver can handle.
[ 359 ]
Socket Programming Tips and Pitfalls
Chapter 13
Consider the following diagram:
In the preceding diagram, the Client sends three TCP segments of data to the Server. The
Client has additional DATA ready to send, but it must wait until the already-sent data is
acknowledged. Once the ACK Message is received, the Client resumes sending its
remaining DATA.
This is the TCP flow-control mechanism that ensures that the sender isn't transmitting
faster than the receiver can handle.
Now, keeping in mind that a TCP socket can send only a limited amount of data before
requiring acknowledgment of receipt, imagine what happens if both parties to a TCP
connection try to send a bunch of data at the same time. In this case, both parties send the
first few TCP segments. They both then wait until their peer acknowledges receipt before
sending more. However, if neither party is reading data, then neither party acknowledges
receiving data. This is a deadlock state. Both parties are stuck waiting forever.
[ 360 ]
Socket Programming Tips and Pitfalls
Chapter 13
Many application protocols prevent this problem by design. These protocols naturally
alternate between sending and receiving data. For example, in HTTP, the client sends a
request, and then the server sends a reply. The server only starts sending data after the
client has finished sending.
However, TCP is a full-duplex protocol. Applications that do need to send data in both
directions simultaneously should take advantage of TCP's ability to do so.
As a motivating example, imagine implementing a file-transfer program where both peers
to a TCP connection are sending large parts of a file at the same time. How do we prevent
the deadlock condition?
The solution to this is straightforward. Both sides should alternate calls to send() with
calls to recv(). The liberal use of select() will help us do this efficiently.
Recall that select() indicates which sockets are ready to be read from and which sockets
are ready to be written to. The send() function should be called only when you know that
a socket is ready to be written to. Otherwise, you risk that send() may block. In the worst
case, send() will block indefinitely.
Thus, one procedure to send a large amount of data is as follows:
1. Call send() with your remaining data.
2. The return value of send() indicates how many bytes were actually consumed
by send(). If fewer bytes were sent than you intended, then your next call to
send() should be used to transmit the remainder.
3. Call select() with your socket in both the read and write sets.
4. If select() indicates that the socket is ready to be read from, call recv() on it
and handle the received data as needed.
5. If select() indicates that the socket is ready to write to again, go to step 1 and
call send() with the remaining data to be sent.
The important point is that calls to send() are interspersed with calls to recv(). In this
way, we can be sure that no data is lost, and this deadlock condition does not occur.
This method also neatly extends to applications with many open sockets. Each socket is
added to the select() call, and ready sockets are serviced as needed. Your application
will need to keep track of which data is remaining to be sent for each connection.
[ 361 ]
Socket Programming Tips and Pitfalls
Chapter 13
It should also be noted that setting sockets to a non-blocking mode can simplify your
program's logic in some cases. Even with non-blocking sockets, select() can still be used
as a central blocking point to wait for socket events.
Two files are included with this chapter's code repository that can help to demonstrate the
deadlock state and how select() can be used to prevent it. The first file,
server_ignore.c, implements a simple TCP server that accepts connections and then
ignores them. The second file, big_send.c, initiates a TCP connection and then attempts to
send lots of data. By using the big_send program to connect to the server_ignore
program, you can investigate the blocking behavior of send() for yourself.
Deadlocks represent only one way a TCP connection can unexpectedly fail. While
deadlocks can be very difficult to diagnose, they are preventable with careful
programming. Besides the risk for deadlock, TCP also presents other data transfer pitfalls.
Let's consider another common performance problem next.
Congestion control
As we've just seen, TCP implements flow control to prevent a sender from overwhelming a
receiver. This flow control works by allowing only a limited number of TCP segments to be
sent before requiring an acknowledgment of receipt.
TCP also implements congestion control methods as part of a network congestionavoidance scheme. While flow control is vital to prevent overwhelming the receiver,
congestion control is essential to prevent overwhelming the network.
One way TCP congestion control works is by allowing only a limited amount of data to be
sent before pausing to wait for an acknowledgment of receipt. This data limit is decreased
when network congestion is detected. In this way, TCP doesn't try putting more data over
the network than the network can handle.
Another way TCP implements congestion control is through the TCP slow start algorithm.
This method provides a way for TCP to ramp-up a connection to its full potential, instead
of immediately dumping a lot of data on the network all at once.
It works like this—when a new TCP connection is established, only a minimal amount of
data is allowed to be sent unacknowledged. When this data is acknowledged, the limit is
increased. Each time a new acknowledgment is received, the limit is increased further until
packet loss happens or the limit reaches the desired maximum.
[ 362 ]
Socket Programming Tips and Pitfalls
Chapter 13
The following diagram shows a TCP slow-start in action:
In the preceding diagram, you can see that the Client starts by sending only a little data.
Once that data is acknowledged, the Client is willing to send a larger amount of data before
requiring another acknowledgment. Once that acknowledgment is received, the Client
increases its limit again, and so on.
The slow-start algorithm can cause problems for short-lived connections. In practice, if a
connection needs to send only a small amount of data, that connection won't ever reach its
full potential. This has caused many protocols to be designed around keeping connections
open for longer. For example, it used to be common for an HTTP connection to transmit
only one resource. Now it is far more common for an HTTP connection to be held open for
additional resources, one after another. This connection reuse avoids the overhead of the
TCP three-way handshake and slow start.
In addition to avoiding congestion, TCP also provides methods to increase bandwidth
efficiency.
[ 363 ]
Socket Programming Tips and Pitfalls
Chapter 13
The Nagle algorithm
One technique used by TCP increase efficiency is the Nagle algorithm. The Nagle
algorithm works to make the sender pool small amounts of data together until it has
enough to justify sending.
Consider sending just one byte of data over a TCP connection. Each TCP segment uses 20
bytes to transmit TCP bookkeeping. An additional 20 bytes are needed for the IPv4 header.
So, this 1 byte of application data becomes 41 bytes on the network. That's an overhead of
4,000%, and we are not even counting the overhead from lower layers (for example, the
Ethernet frame overhead) yet!
The Nagle algorithm states that only one small, unacknowledged TCP segment may be
outstanding at any given time. A small segment is considered any segment less than
the Maximum Segment Size (MSS).
Let's see how this applies to a program doing small writes. Consider the following code
called on a connected, but otherwise idle, TCP socket:
send(my_socket, "a", 1, 0);
send(my_socket, "b", 1, 0);
After the first send() call, the a data is packed into a TCP message and sent off, along with
its 40 bytes of TCP and IPv4 overhead.
The second send() call returns immediately, but the b data isn't actually sent immediately.
The Nagle algorithm causes the b data to be queued-up by the operating system. It won't be
sent until either the first TCP message is acknowledged or send() is called again with
enough additional data to fill up an entire max-size TCP segment.
For both a and b to be received by the recipient, it will take the duration of one round-trip
network time, plus an additional one-way network time.
We can easily get this 1.5 round-trip network time down to 0.5 round-trip network time by
just using the following code:
send(my_socket, "ab", 2, 0);
For this reason, you should always prefer doing one large write to send() instead of many
small ones, whenever possible. Doing one large write allows ab to be sent in the same TCP
message, thereby sidestepping the Nagle algorithm altogether.
[ 364 ]
Socket Programming Tips and Pitfalls
Chapter 13
In some applications, you really do need to send a small packet followed by another small
packet immediately after. For example, in a real-time multiplayer video game, you can't
queue up player commands; they must be sent continuously. In these cases, it makes sense
to disable the Nagle algorithm for reduced latency, at the expense of decreased bandwidth
efficiency.
Disabling the Nagle algorithm can be done using the setsockopt() function. The
following code shows this method in action:
int yes = 1;
if (setsockopt(my_socket, IPPROTO_TCP, TCP_NODELAY,
(void*)&yes, sizeof(yes)) < 0) {
fprintf(stderr, "setsockopt() failed. (%d)\n", GETSOCKETERRNO());
}
Be sure to consider all your options before disabling Nagle. When faced with a poorly
performing network program, some programmers will disable the Nagle algorithm as a
first step. In reality, the decision to disable the Nagle algorithm should be approached
cautiously. Disabling the Nagle algorithm in real-time applications often makes sense.
Disabling it in other contexts rarely does.
For example, imagine that you've implemented an HTTP client. It seems a bit sluggish, and
so you try disabling the Nagle algorithm. You do that and find that it runs much faster
now. However, by disabling the Nagle algorithm, you've increased network overhead. You
could have gotten the same improvement by simply pooling together your send() calls.
If you're implementing a real-time algorithm that does need to send small time-critical
packets, using TCP_NODELAY may still not be the right method for you. TCP can introduce
delays in many other ways. For example, if one TCP packet is lost over the network, no
further data can be delivered until that packet is retransmitted. This can have the effect of
delaying many packets because of one hold-up.
Many real-time applications prefer using UDP over TCP. Each UDP packet is entirely
independent of any other packets sent before or after. Of course, the trade-off is that there is
a lesser guarantee of reliable delivery; messages may arrive in a different order than they
were set, and some messages may arrive twice. Nonetheless, many applications can tolerate
this. Real-time video streaming, for example, can use UDP, where each packet stores a very
short, time-stamped part of the video. If a packet is lost, there is no need to retransmit; the
video stutters for a moment and resumes when the next packet arrives. Packets received
late, or out of order, are safely ignored.
[ 365 ]
Socket Programming Tips and Pitfalls
Chapter 13
Although the Nagle algorithm often works well to improve network utilization, not
understanding how it works can lead to problems. In addition to the Nagle algorithm, TCP
implements many other methods to limit the needless waste of network resources.
Sometimes, these other methods work poorly with one another. The delayed ACK is one
such method that can work badly with the Nagle algorithm.
Delayed acknowledgment
We've seen that many client-server protocols work by having the client send a request and
then the server send a response. We've also seen that when a TCP peer reads data off the
network, it sends an acknowledgment to let the sender know that the data was received
successfully.
A typical client-server interchange might, therefore, look like the following:
In the preceding diagram, the Client first sends a request to the Server. The Server reads
this request, and a TCP ACK Message is sent back to the Client. The Server then processes
the request data and replies with its response.
Some TCP stacks implement a delayed acknowledgment method to reduce network
congestion. This technique works by delaying the acknowledgment of received data. The
hope is that the receiver is going to send a response very soon anyway, and that the
acknowledgment can piggyback on this response. When it works, which is often, it
conserves bandwidth.
If the receiver doesn't send a reply, the acknowledgment is sent after a short delay; 200
milliseconds is typical.
[ 366 ]
Socket Programming Tips and Pitfalls
Chapter 13
If the server from before implements delayed acknowledgment, the client-server
interchange might look like the following:
This is when delayed acknowledgment works well.
Now, consider combining the Nagle algorithm with delayed acknowledgment. If the client
transmits its request in two small messages, then the sending channel is blocked for not
only the round-trip time. It is also blocked for the additional acknowledgment delay time.
This is illustrated in the following diagram:
[ 367 ]
Socket Programming Tips and Pitfalls
Chapter 13
In the preceding diagram, we see that the Client sent the first part of its request in a small
packet. The Nagle algorithm prevents it from sending the second part of its request until it
receives an acknowledgment from the Server. Meanwhile, the Server receives the request,
but it delays acknowledgment in the hope that it can piggyback the ACK Message on the
reply. The Server processes the first part of the request and sees that it doesn't have the full
request yet, so it cannot send a reply. After the delay period elapses, the Server does
eventually send an ACK Message. The Client receives this ACK Message and sends the
rest of the reply. The Server replies with its response.
In this degenerate case, the interaction of the Nagle algorithm and the delayed
acknowledgment technique cased the Client-Server interaction to take two full round-trip
network times plus the delayed acknowledgment time (which could itself be many roundtrip times).
Some programmers jump in these situations to disable the Nagle algorithm. Sometimes that
is needed, but often it is the wrong solution.
In our example, merely passing larger data buffers to send() completely solves the
degenerate interaction. Passing the entire request to send() in one call reduces the
transaction time from two round-trips plus delay to one round-trip and no delay.
My advice is to prefer calling send() with one large write instead of multiple small writes,
whenever possible. Of course, if you're implementing a real-time application with TCP,
then you can't pool send() calls. In that case, disabling the Nagle algorithm can be the
correct call.
For the sake of completeness, it should be noted that a delayed ACK can usually be
disabled. This is done by passing TCP_QUICKACK to setsockopt() on systems that
support it. Again, this is not usually needed.
Now that we've reviewed a few hidden problems that can crop up with active TCP
connections, it's time to move on to connection teardown.
[ 368 ]
Socket Programming Tips and Pitfalls
Chapter 13
Connection tear-down
The way a TCP connection transitions from an established connection to a closed one is
nuanced. Let's consider this in more detail.
TCP connections are full-duplex. This means that the data being sent is independent of the
data being received. Data is sent and received simultaneously. This also implies that the
connection must be closed by both sides before it is truly disconnected.
To close a TCP connection, each side sends a Finish (FIN) message and receives
an ACK message from their peer.
The exact tear-down process, from the perspective of each peer, depends on whether it sent
a FIN first, or received a FIN first. There are three basic connection tear-down cases. They
are as follows:
1. You initiate the tear-down by sending the first FIN message
2. You receive a FIN message from your connected peer
3. You and your peer send FIN messages simultaneously
In case 3, where both sides send a FIN message simultaneously, each side thinks that it is in
case 1. That is, each side thinks that it has sent the first FIN message, and each side tears
down its socket as in case 1. In practice, this is pretty rare, but certainly possible.
When a TCP socket is open for full-duplex communication, it is said to be in the
ESTABLISHED state. The closing initiator sends a FIN message to its peer. The peer replies
with an ACK. At this point, the connection is only half closed. The initiator can no longer
send data, but it can still receive data. The peer has the option to continue to send more
data to the closing initiator. When the peer is ready to finish closing the connection, it sends
its own FIN message. The initiator then responds with the final ACK message, and the
connection is fully closed.
The TCP connection state transitions on the initiator are ESTABLISHED, FIN-WAIT-1, FINWAIT-2, TIME-WAIT, and CLOSED. The TCP connection state transitions on the receiving
peer are ESTABLISHED, CLOSE-WAIT, LAST-ACK, and CLOSED.
[ 369 ]
Socket Programming Tips and Pitfalls
Chapter 13
The following diagram illustrations the normal TCP four-way closing handshake:
It is sometimes possible for the Peer to combine its ACK Message and FIN Message into
one message. In that case, the connection can be torn down with only three messages,
instead of four.
In the case where both sides initiate the tear-down simultaneously, both sides follow the
state transition of the Initiator. The messages sent and received are the same.
[ 370 ]
Socket Programming Tips and Pitfalls
Chapter 13
Networks are inherently unreliable, so there is a chance that the final ACK Message sent by
the Initiator will be lost. In this case, the Peer, having not received an ACK Message,
resends its FIN Message. If the Initiator had completely CLOSED its socket after sending
the final ACK Message, then it would be impossible to reply to this resent FIN Message.
For this reason, the Initiator enters a TIME-WAIT state after sending the last ACK Message.
During this TIME-WAIT state, it responds to any retransmitted FIN Message from the Peer
with an ACK Message. After a delay, the Initiator leaves the TIME-WAIT state and fully
closes its socket.
The TIME-WAIT delay is usually on the order of one minute, but it could be configured for
much longer.
In this book, we've used only the close() function (closesocket() on Windows) to
disconnect a socket. This function, although simple to use, has the disadvantage of always
fully closing a socket. That is, no data can be sent or received on a socket called with
close(). The TCP teardown handshake does allow for data to be received after a FIN
message has been sent. Let's next consider how to do this programmatically.
The shutdown() function
As we've just seen, TCP connections are torn down in two steps. The first one side sends a
FIN message, and then the other side does. However, each side is allowed to continue to
send data until it has sent its own FIN message.
We've used the close() function (closesocket() on Windows) to disconnect sockets
because of its simplicity. The close() function, however, closes both sides of a socket. If
you use close() in your application, and the remote peer tries to send more data, it will
cause an error. Your system will then transmit a Reset (RST) message to indicate to the
peer that the connection was not closed in an orderly manner.
If you want to close your sending channel, but still leave the option for receiving more data,
you should use the shutdown() function instead. The shutdown() function takes two
parameters. The first parameter is a socket, and the second is an int indicating how to shut
down the socket.
In theory, shutdown() supports three options—closing the sending side of a connection,
closing the receiving side, and closing both sides. However, the TCP protocol itself doesn't
reflect these options, and it is rarely useful to use shutdown() for closing the receiving
side.
[ 371 ]
Socket Programming Tips and Pitfalls
Chapter 13
There is a small portability issue about shutdown() functions parameters. Under windows,
you want to call it with SD_SEND. On other systems, you should use SHUT_WR. Both values
are defined as 1, so you can also call it that way.
The code to shutdown the sending channel of a socket in a cross-platform manner is as
follows:
if (shutdown(my_socket, 1) /* 1 = SHUT_WR, SD_SEND */) {
fprintf(stderr, "shutdown() failed. (%d)\n", GETSOCKETERRNO());
}
This use of shutdown() causes the TCP FIN message to be transmitted after the
transmission queued is emptied.
You may wonder, if you're receiving data from a peer, and recv() returns 0, how you
know whether your peer has called shutdown() or close()? Unfortunately, you can't
know, except by prior agreement. If they have used shutdown() only to close their sending
data channel, then they are still receptive to additional data. If they instead used close(),
additional data will trigger an error state.
Although half-closed connections have their uses, it is often easier to use an application
protocol that clearly indicates the end of the transaction. For example, consider the HTTP
protocol covered in Chapter 6, Building a Simple Web Client. With the HTTP protocol, the
client indicates the end of its request with a blank line. The server knows it has the full
request when it sees this blank line. The server then specifies how much data it will be
sending with the Content-Length header. Once the client has received that much data, it
knows that it hasn't missed anything. The client can then call close() and be confident
that the server won't be sending additional data.
In many applications, knowing whether the shutdown was orderly isn't always useful.
Consider the chat room program (tcp_serve_chat.c) from Chapter 3, An In-Depth
Overview of TCP Connections. This program has no real application protocol. That program
simply sends messages from one client to every other client. When a client decides to
disconnect, it isn't important that it continues to receive data from the server. Guaranteeing
an orderly TCP release would provide no benefit.
So, when is shutdown() useful? Basically, a TCP orderly release is useful when the
application protocol doesn't have a way to signal that it has finished sending data, and your
application isn't tolerant of missed data. In that case, shutdown() is a useful signal.
[ 372 ]
Socket Programming Tips and Pitfalls
Chapter 13
Please note that if you're using threading or forking, there are additional differences to the
behavior of close() versus shutdown() that must be considered. When shutdown() is
called, it always affects the socket. The close() function, by contrast, has no effect if
additional processes also hold handles to the socket.
Finally, note that close() must still eventually be called on a socket closed with
shutdown() in order to release associated system resources.
Another issue that comes up around the TCP tear-down procedure is the long delay for the
side that initiated the close to remain in the TIME-WAIT state. This can sometimes cause
problems for TCP servers. Let's look at that next.
Preventing address-in-use errors
If you do TCP server programming for very long, you will eventually run into the
following scenario—your TCP server has one or more open connections, and then you
terminate it (or it crashes). You restart the server, but the call to bind() fails with an
EADDRINUSE (WSAEADDRINUSE on Windows) error.
When this happens, you can wait a few moments, try it again, and it works. What's going
on here?
Essentially, when an application initiates a TCP socket close (or causes the disconnection by
crashing), that socket goes into the TIME-WAIT state. The operating system continues to
keep track of this socket for some time, potentially minutes.
An example program, server_noreuse.c, is included in this chapter's code repo. You can
reproduce this address-in-use problem by running it, accepting a connection, and then
terminating server_noreuse. To reproduce the problem, it is vital that the server is the
one to terminate the open connection, not the client.
If you immediately start server_noreuse again, you will see the bind() error.
[ 373 ]
Socket Programming Tips and Pitfalls
Chapter 13
The following screenshot shows this on a Linux desktop:
You can use the netstat command to see these half-dead connections that are preventing
our server from starting. The following command shows which connections are stuck in the
TIME-WAIT state on Linux:
netstat -na | grep TIME
As long as one of these connections is hanging on, it prevents any new process from calling
bind() on the same local port and address.
This failure of the bind() call can be prevented by setting the SO_REUSEADDR flag on the
server socket before calling bind().
The following code demonstrates this:
int yes = 1;
if (setsockopt(my_socket, SOL_SOCKET, SO_REUSEADDR,
(void*)&yes, sizeof(yes)) < 0) {
fprintf(stderr, "setsockopt() failed. (%d)\n", GETSOCKETERRNO());
}
Once the SO_REUSEADDR flag is set, bind() succeeds even if a few TIME-WAIT connections
are still hanging on to the same local port and address.
An example program, server_reuse.c, is included to demonstrate this technique.
[ 374 ]
Socket Programming Tips and Pitfalls
Chapter 13
I suggest that you always use SO_REUSEADDR for TCP servers because there are few
downsides. The only real drawback is that using SO_REUSEADDR allows your program to
bind to a specific interface even if another program has already bound to the wildcard
address. Usually, this isn't a problem, but it is something to keep in mind.
You may sometimes see programs that attempt to fix this issue by killing sockets in the
TIME-WAIT state. This can be accomplished by setting the socket linger option. This is
dangerous! The TIME-WAIT state is essential to TCP's reliability, and interfering with it can
lead to severe problems.
Why is this address-in-use only a problem for servers and not clients? Because the problem
manifests itself when calling bind(). Client programs don't usually call bind(). If they do,
this can also be a problem on the client-side.
While we are still on the topic of disconnected sockets, what happens when you try to send
data to a peer that has already called close()? Let's consider that next.
Sending to a disconnected peer
There are three basic ways a TCP connection can fail. They are as follows:
A network outage
The peer application crashes
The peer's system crashes
A network outage prevents data from reaching your peer. In this case, TCP tries to
retransmit data. If connectivity is re-established, TCP simply picks back up where it left off.
Otherwise, the connection eventually times out. This timeout can be on the order of 10
minutes.
The second way a TCP connection can fail is if the connected peer application crashes. In
this case, the peer's operating system sends a FIN message. This case is indistinguishable
from the peer calling close() on their end. If your application continues to send data after
having received the FIN message, the peer's system will send an RST message to indicate
an error.
[ 375 ]
Socket Programming Tips and Pitfalls
Chapter 13
Finally, a connection could fail because the peer's whole system has crashed. In this case, it
won't be able to send a FIN message. This case looks the same as a network outage, and the
TCP connection would eventually timeout. However, consider what happens if the crashed
system reboots before the connection times out. In that case, the rebooted system will
eventually receive a TCP message from the original connection. The rebooted system will
not recognize the TCP connection and will send an RST message in response to indicate an
error condition.
To reiterate, if you use send() on a socket that your peer thinks is closed, that peer will
respond with an RST message. This state is easily detected by the return value of recv().
A more serious issue to consider is what happens when send() is called on a socket that
has already received an RST message from its peer. On Unix-based systems, the default is
to send a SIGPIPE signal to your program. If you don't handle this signal, the operating
system will terminate your program.
It is therefore essential for TCP servers to either handle or disable the SIGPIPE signal.
Failure to handle this case means that a rude client could kill your server.
Signals are complicated. If you're already using signals in your program, you may want to
handle SIGPIPE. Otherwise, I recommend you just disable it by setting the SIGPIPE
handler to SIG_IGN.
The following code disables SIGPIPE on Unix-based systems:
#if !defined(_WIN32)
#include <signal.h>
#endif
#if !defined(_WIN32)
signal(SIGPIPE, SIG_IGN);
#endif
As an alternative, you can use MSG_NOSIGNAL with send() as shown in the following code:
send(my_socket, buffer, sizeof(buffer), MSG_NOSIGNAL);
If the signal is ignored or MSG_NOSIGNAL is used, send() returns -1 and sets errno to
EPIPE.
[ 376 ]
Socket Programming Tips and Pitfalls
Chapter 13
On Windows, attempting to call send() on a closed socket generally results in
WSAGetLastError() returning WSAECONNRESET.
An example program, server_crash.c, is included in this chapter's code repository. This
program accepts TCP connections on port 8080. It then waits for the client to disconnect,
and then attempts two sends to that disconnected client. This program is useful as a tool to
explore the return values, error codes, and function behavior in different scenarios.
Socket's local address
When implementing servers, for both TCP and UDP, it is important to bind the listening
socket to a local address and port. If the socket isn't bound, then clients can't know where to
connect.
It is also possible to use bind() on the client side to associate a socket with a particular
address and port. It is sometimes useful to use bind() in this manner on machines that
have multiple network interfaces. The use of bind() can allow the selection of which
network address to use for the outgoing connection.
Sometimes, bind() is used to set the local port for an outgoing connection. This is usually a
bad idea for a few reasons. First, it very seldom serves any purpose. The port number
presented to the connected server is likely to be different because of network address
translation regardless. Binding to a local port also invites the error of selecting a port that is
already in use. Usually, the operating system takes care of selecting a free port. This use of
bind() also raises the issue with TIME-WAIT, which would prevent a new connection from
being established after a closed one without a substantial delay.
We have used bind() in this book mostly for binding servers to a particular port number.
It can also be used to associate servers to a particular address. If a server has multiple
network interfaces, it may be the case that you only care to listen on connections at one
address. In this case, bind() can easily be used to limit the connections to that address. It
can also be used to limit connections to the local machine by binding sockets to 127.0.0.1.
This can be an important security measure for some applications.
We have employed the select() function for many purposes—timing out connect(),
signaling when data is available, and preventing send() from blocking. However,
select() is only suitable for monitoring a limited number of sockets. Let's look at this
limitation, and how to circumvent it, next.
[ 377 ]
Socket Programming Tips and Pitfalls
Chapter 13
Multiplexing with a large number of sockets
We've used select() in this book to multiplex between open sockets.
The select() function is great because it is available on many platforms. However, if you
have a large number of open sockets, you can quickly run into the limitations of select().
There is a maximum number of sockets you can pass to select(). This number is available
through the FD_SETSIZE macro.
This chapter's code repository includes a program, setsize.c, which prints the value of
FD_SETSIZE.
The following screenshot shows this program being compiled and run on Windows 10:
The preceding screenshot shows FD_SETSIZE is 64 on this system. Although Windows's
default size for FD_SETSIZE is quite low, it is common to see higher values on other
systems. The default value of FD_SETSIZE on Linux is 1024.
On Windows, it is possible to increase FD_SETSIZE easily. You only need to define
FD_SETSIZE yourself before including the winsock2.h header. For example, the following
code increases FD_SETSIZE to 1024 on Windows:
#ifndef FD_SETSIZE
#define FD_SETSIZE 1024
#endif
#include <winsock2.h>
This works because Winsock uses FD_SETSIZE to build the fd_set type.
[ 378 ]
Socket Programming Tips and Pitfalls
Chapter 13
On Linux, this trick does not work. Linux defines fd_set as a bitmask, and it is not
possible to increase its size without recompiling the kernel.
There are possible workarounds to effectively cheat select() into accepting socket
descriptors larger than 1023 on Linux. One trick that usually works is to allocate an array
of fd_set variables. Setting a socket is then done like this:
FD_SET(s % FD_SETSIZE, &set_array[s / FD_SETSIZE])
However, if you have to resort to a hack such as the preceding code, you may be better off
avoiding select() and using a different multiplexing technique. The poll() function, for
example, provides the functionality of select() without a limit on the number of file
descriptors it can handle.
Summary
We covered a lot of ground in this chapter. First, we reviewed error-handling methods, and
then we implemented a function to obtain text descriptions for error codes.
We then jumped right into the hard details of TCP sockets. We saw how TCP sockets hide
much complexity, and how it is sometimes necessary to understand that hidden state to get
good application performance. We saw a method for an early timeout on a TCP connect()
call, and we looked at how to terminate a connection with an orderly release.
We then took a closer look at the bind() function and how its usefulness differs between
servers and clients. Finally, we discussed how the select() function limits the total
number of sockets your program can handle, and how to work around it.
So far, this book has been focused mainly on network code as it would pertain to personal
computers and servers. In the next chapter, Chapter 14, Web Programming for the Internet of
Things, we move our focus to the extending of internet access to everyday objects—that is,
the Internet of Things.
[ 379 ]
Socket Programming Tips and Pitfalls
Chapter 13
Questions
Try these questions to test your knowledge acquired from this chapter:
1.
2.
3.
4.
5.
6.
Is it ever acceptable to just terminate a program if a network error is detected?
Which system functions are used to convert error codes into text descriptions?
How long does it take for a call to connect() to complete on a TCP socket?
What happens if you call send() on a disconnected TCP socket?
How can you ensure that the next call to send() won't block?
What happens if both peers to a TCP connection try to send a large amount of
data simultaneously?
7. Can you improve application performance by disabling the Nagle algorithm?
8. How many connections can select() handle?
The answers to these questions are found in Appendix A, Answers to Questions.
[ 380 ]
14
Web Programming for the
Internet of Things
In this chapter, we turn our attention to the Internet of Things (IoT). The IoT is an exciting
new trend where internet connectivity is added to everyday physical objects. When
combined with embedded electronics and sensors, internet access allows physical objects to
interact with one another and be controlled and monitored from anywhere in the world.
The following topics are covered in this chapter:
Defining the IoT
Connectivity types
Bandwidth considerations
Controller types
Ethics of the IoT
Security for the IoT
Technical requirements
This chapter contains no C code. Instead, it focuses on the theory, techniques, and practices
used in the IoT domain.
Web Programming for the Internet of Things
Chapter 14
What is the IoT?
We now live in a world where almost anything that can be connected to the internet, has
been. These devices make up the IoT, and they are in every part of our lives.
In the kitchen at home, devices with internet connectivity include fridges, microwave
ovens, conventional ovens, food scales, dishwashers, coffee-makers, and even juicers.
Elsewhere in the home, we have smart TVs, gaming consoles, thermostats, furnaces,
washing machines, light switches, light bulbs, yoga mats, alarm clocks, cameras, doorbells,
bathroom scales, baby monitors, sound systems, and speakers—all connected to the
internet. Of course, your whole house may be supplied with electricity, water, and gas from
networked smart meters. When you leave home, do you go through an IoT garage door to
get in your always-connected car with built-in Wi-Fi? Many do.
In the industrial sector, IoT devices are central to Industry 4.0, commonly considered the
fourth industrial revolution. Using internet connectivity to interconnect every device in the
manufacturing supply chain has allowed for unprecedented optimizations in efficiency.
The IoT is even affecting the way we grow food. In agriculture, IoT devices allow farmers to
monitor relevant weather conditions, such as temperature, humidity, sunlight, rainfall, and
wind speed. This information informs decisions improving yield and quality.
Of course, these are just a few examples of IoT applications. The concept is also applied to
concerns in environment, healthcare, infrastructure, transportation, and more.
When adding internet connectivity to a device, you have several options. There are
certainly pros and cons to each connection option. We review them next.
Connectivity options
Once you've figured out what your device does, and that it benefits from an internet
connection, you still have to decide how to connect it. There are many options with various
trade-offs.
[ 382 ]
Web Programming for the Internet of Things
Chapter 14
Wi-Fi
Perhaps Wi-Fi needs no introduction. Almost every modern home with internet access has
Wi-Fi available. This is in large part because residential Internet Service Providers (ISPs)
typically use modems with built-in Wi-Fi. If your IoT device is deployed indoors, there is a
good chance that a Wi-Fi network is available. This is particularly true for residential and
commercial devices.
Wi-Fi is the most popular Wireless Local Area Network (WLAN) technology and is based
around the IEEE 802.11 standards. It typically operates on either a 2.4 GHZ or a 5 GHZ
radio frequency.
Two main operation modes are provided by Wi-Fi. In ad hoc mode, devices communicate
directly to one another. However, infrastructure mode is much more common. In
infrastructure mode, devices on a WLAN all connect to a Wireless Access Point (WAP).
The WAP then generally provides internet access for the whole WLAN.
Wi-Fi provides good bandwidth, low latency, and basic security features, but it has higher
power needs than other short-range wireless standards. Although newer versions of Wi-Fi
can achieve speeds of 1 Gbps, these are not yet commonly seen in practice. In any case, for
an IoT device application, we are typically concerned about internet access. The Wi-Fi
performance of the IoT device's connection to the local router is not usually the bottleneck,
but rather, the available internet service to the router is.
One downside to using Wi-Fi connectivity in your IoT device is in the setup difficulty. Most
Wi-Fi networks are secured with a password, and therefore your device needs to somehow
obtain the network name and password before being able to connect. If your device has a
built-in screen and keyboard (or touchscreen), then entering the network password is
trivial.
However, for IoT devices without large screens, getting the network password configured
can sometimes be complicated. One solution is to have your end user put the configuration
information on an SD card or USB storage device. Your device then reads the password
from this storage and can connect to the network. The problem with this solution is that it is
tedious, and many users may not be technically capable of completing this setup.
An alternative setup is to first connect the device to a computer or smartphone (perhaps
through Bluetooth) for the initial configuration. This has the downside of requiring the user
to obtain such a setup device (not everyone has a smartphone), as well as requiring extra
work in developing the setup application.
[ 383 ]
Web Programming for the Internet of Things
Chapter 14
A third setup method is to have the IoT device initially provide its own Wi-Fi network. In
other words, the device acts as a temporary access point. The user then utilizes a laptop or
smartphone to connect directly to the device. The user opens a browser, and the device
serves a web page on which the user can configure the device. Once the parameters are
entered, the IoT device connects to the local Wi-Fi hotspot and is now configured for
internet access.
The following diagram illustrates this setup method:
The advantage of this setup method is that no special software needs to be developed for
the setup. Any device that can connect to a Wi-Fi network and has a standard web browser
will work.
Keep in mind that Wi-Fi networks change occasionally. It is good security practice to
change Wi-Fi passwords from time to time, and each time this happens, the IoT device will
need to be reconfigured.
Although Wi-Fi is convenient, if a wired connection is available, it's often easier and better.
Ethernet
A wired Ethernet connection is ideal for any IoT device, if it's available. Ethernet provides
easy setup and extreme reliability. The newest standards allow for a bandwidth of 400
Gbps, and its low latency is unrivaled. It is even possible to provide power over Ethernet in
some cases, further simplifying deployment.
[ 384 ]
Web Programming for the Internet of Things
Chapter 14
The downside to Ethernet connections is, of course, that a physical cable is required. Many
offices already have Ethernet run to each room, and Ethernet-connected IoT devices work
well there. In residential and industrial settings, however, running new wires can be
tedious. Wireless connections are, therefore, often easier in those settings.
When available, Ethernet setup is easy. Oftentimes, a device only needs to be plugged in
and it's ready to work.
Keep in mind that, with Ethernet, as with Wi-Fi, you're relying on internet access being
available at your IoT device installation site. This internet access is generally much slower
than the Ethernet connection you will have on the local network. As this internet access is
provided by your customer, its quality can vary greatly.
What if Wi-Fi and Ethernet aren't available? What if your device needs to be mobile? In
those cases, cellular internet access may be your best option.
Cellular
Cellular (mobile networks) can be a great connection option for IoT devices. It is
particularly useful for two reasons. First, cellular service is available nearly everywhere.
This makes cellular ideal for mobile IoT devices. Second, all network setup can be
completed at the time of manufacture. This makes deployment easy, hassle-free, and can
lower ongoing support costs when compared to other options.
The drawback to cellular connectivity is higher cost. First, the IoT device must contain a
cellular modem. Cellular modems are costlier than Wi-Fi modems and Ethernet
transceivers. In addition, certain testing and certification is required before a device is
allowed on operator networks.
Cellular devices must also pay for access. With Wi-Fi or Ethernet, an IoT device is assumed
to be able to leech off local internet access. With cellular, someone must pay the bill for each
specific device. Usually, it makes sense for the IoT device manufacturer to provision and
maintain service for each device. For devices requiring low bandwidth, an LTE cellular
connection can be maintained for well under $1.00 (USD) per device per month. Any device
that requires significant bandwidth is much more costly to service.
[ 385 ]
Web Programming for the Internet of Things
Chapter 14
An additional benefit of cellular is that many mobile network providers can route your
traffic through a Virtual Private Network (VPN). This is done by the network operator,
and you won't be billed for the additional bandwidth of the VPN overhead. A VPN isolates
your IoT devices from the internet and allows communication only with your trusted
servers. It is convenient because many of your security concerns are taken care of by the
cellular provider.
We've covered three options for direct internet access, but many IoT devices don't need to
access the internet directly. Some work in conjunction with a computer or smartphone for
access. One wireless technology commonly used with this method is Bluetooth.
Bluetooth
Bluetooth is a popular short-range wireless technology standard for use in Wireless
Personal Area Networks (WPAN). Like Wi-Fi, Bluetooth operates on the 2.4 GHz radio
band.
Bluetooth can be used for direct internet access, but this is uncommon in practice. Bluetooth
is usually used to connect an IoT device to another device that has internet access. For
example, many smartwatches use Bluetooth to pair with smartphones. The smartphone
then has internet access through either a Wi-Fi or cellular connection.
The following diagram shows a Bluetooth smart watch connection:
This works very well for the smart watch, as it is usually expected to be in close proximity
to a smartphone.
Of course, you may object philosophically to the smart watch being considered an IoT
device. In this case, it's more of a sensor for a smartphone app than a standalone IoT device.
Nonetheless, it fits into the ecosystem of the IoT. This type of piggy-back connectivity can
be a good option and should not be overlooked.
As a similar technology to Bluetooth, IEEE 802.15.4-based wireless networks are
commonly deployed to allow a whole network of IoT devices to intercommunicate.
[ 386 ]
Web Programming for the Internet of Things
Chapter 14
IEEE 802.15.4 WPANs
IEEE 802.15.4 is a technical standard for low-rate wireless personal area networks (LRWPAN). The standard was first defined in 2003, and it provides the foundation that other
protocols are built on. For example, the Zigbee, 6LoWPAN, Thread,
ISA100.1, WirelessHART, WiSUN, and MiFi protocols are all based on the IEEE 802.15.4
standard, just to name a few.
IEEE 802.15.4-based protocols are useful for low-power, limited-range applications. Typical
ranges extend to about 10 meters with a transfer rate of 250 Kbps. Because of the low power
requirements, battery-powered devices are often able to operate for multiple years on a
single charge.
Some protocols built on IEEE 802.15.4, such as 6LoWPAN, allow devices to communicate
using IP directly, similar to how Wi-Fi is typically used. Other protocols are commonly
used only to send data to a central hub device. This hub is then responsible for processing
IoT device data and communicating over the internet, if needed.
As a concrete example, home automation networks are often built on the IEEE 802.15.4
standard. In many cases, these networks are seldom used to provide direct internet access
to each IoT device. Instead, a hub is commonly used to allow a network of devices to
communicate. The hub then coordinates the data and forwards it on to the internet.
A mesh network topology is common in IEEE 802.15.4-based setups. This allows devices
remote from the hub to communicate through closer devices.
The following diagram illustrates a mesh network for home automation:
[ 387 ]
Web Programming for the Internet of Things
Chapter 14
In the preceding diagram, we see an IEEE 802.15.4-based network for a home automation
setup. Various IoT devices, such as lights and kitchen gadgets, communicate with a
Coordinator/Hub. This hub controls and coordinates the connected devices. The hub itself
uses Wi-Fi to connect to the local network, and this internet connection allows for remote
control and monitoring of IoT devices.
Now that we've covered a few of the most popular connection options, let's turn our
attention to IoT hardware choices.
Hardware choices
When designing an IoT device, there are many choices for hardware. In many cases, these
choices ultimately must be made based on the functionality of the device, and not on their
connectivity options. Remember, IoT devices need to have a useful purpose besides just
connecting to the internet.
Let's look at three options for hardware—single-board computers, microcontrollers, and
Field-Programmable Gate Arrays (FPGAs).
Single-board computers
Single-Board Computers (SBCs) are complete computers built on a single circuit board.
They include all the usual pieces of a functional computer—the Central Processing Unit
(CPU), Random Access Memory (RAM), non-volatile storage, and input/output ports.
SBCs are capable of running full-featured operating systems. Linux is commonly used.
The Raspberry Pi Zero W, for example, is an SBC measuring just 2.6 by 1.2 inches. It has
512 MB of RAM built-in and uses a micro SD card for storage. Wi-Fi and Bluetooth
connectivity is also included. The Raspberry Pi Zero W currently retails for about $10
(USD).
[ 388 ]
Web Programming for the Internet of Things
Chapter 14
The following photo shows a Raspberry Pi Zero W:
Because SBCs run normal desktop operating systems, such as Linux, programming them is
easy. In fact, all of the network programs we've developed throughout this book are
applicable.
In addition to standard computer connectors for video, audio, and USB, SBCs usually have
some General-Purpose Input/Output (GPIO) pins to work with. This gives them some
basic microcontroller-like functionality. These GPIO pins are capable of reading a digital
input signal and providing a digital output signal. On the Raspberry Pi, some pins are also
able to provide Pulse Width Modulation (PWM) outputs, as well as various board-level
serial protocols—Serial Peripheral Interface (SPI), Inter-Integrated Circuit (I2C), and
Asynchronous Serial.
[ 389 ]
Web Programming for the Internet of Things
Chapter 14
Although SBCs are very easy to get started with, they do have a few drawbacks. They are
relatively expensive, they require a lot of power, and their use of general-purpose operating
systems isn't always ideal for embedded systems. Microcontrollers, by comparison, are
much cheaper and optimized to handle real-time performance constraints.
Microcontrollers
A microcontroller is a small computer contained on a single integrated circuit.
Microcontrollers contain all the parts needed for a functional computer, including a CPU,
RAM, and non-volatile storage.
While SBCs usually have processor speeds in the hundreds or thousands of MHz, it is
common for microcontrollers to be clocked at less than 100 MHz. It's not uncommon to see
microcontrollers clocked at even 1 MHz or less. Microcontrollers often have RAM varying
from between a few dozen bytes to a few megabytes. These humble specifications also
mean that microcontrollers can get by on very little power. It's not uncommon to see
microcontrollers needing only a few nano-amps when in sleep mode.
Microcontrollers usually come with lots of GPIO pins and useful peripherals, such as
timers, real-time clocks, communication interfaces, Pulse Width Modulation (PWM)
outputs, Analog-to-Digital Converter (ADC) comparators, Digital-toAnalog Converter (DAC), Watch-Dog Timers (WDT), serial transceivers, and more.
These microcontroller peripherals are often vital to the functioning of an IoT device core
functionality. For example, a PWM generator peripheral can be used for precise motor
control, while an ADC may be needed to read a sensor. Remember, the internet part of an
IoT device is largely secondary; the device must perform some useful function first. What
use is an internet-connected thermostat if it can't sense the temperature?
Microcontrollers come in various architectures and bus widths. 8-bit, 16-bit, and 32-bit
controllers are all common. Although for IoT devices, 8-bit controllers are probably underpowered.
Modern desktop computers almost always use the Von Neumann architecture, but many
microcontrollers use the Harvard architecture.
[ 390 ]
Web Programming for the Internet of Things
Chapter 14
In the Von Neumann architecture, which dominates the desktop processor market, memory
stores both data and instructions. This necessitates that processor instructions are the same
width as the data they are processing. Harvard architecture machines, by contrast, use
completely separate memories to store instructions and data. It is common for Harvard
architecture microcontrollers to use different word sizes for instructions compared to data.
For example, a 16-bit Harvard architecture microcontroller may process data in 16-bit
words, but its instructions could be encoded as 24-bit words. While data is stored in RAM,
instructions are read directly from non-volatile memory, such as FLASH or EEPROM.
It is also possible to find microcontrollers with built-in networking functionality, including
support for Wi-Fi, Ethernet, Bluetooth, IEEE 802.15.4, and others.
As an example, the ESP8266 32-bit microcontroller, produced by Espressif Systems, comes
with Wi-Fi transceiver and TCP/IP stack.
The following diagram shows an ESP8266 microcontroller on a breakout board:
Microcontrollers that don't have built-in transceivers can be connected to external modems
with those capabilities.
Microcontrollers are often programmed directly, without an operating system. Some
programmers prefer operating systems, and many different microcontroller operating
systems are available. These operating systems often make it easier for a microcontroller to
perform various tasks while simplifying program layout and retaining real-time
capabilities. It should be noted that these microcontroller operating systems generally lack
memory segmentation and other safety features taken for granted in desktop operating
systems.
[ 391 ]
Web Programming for the Internet of Things
Chapter 14
Microcontrollers are great when you don't need much processing power, but do require
real-time processing guarantees. What about when you need both processing power and
real-time guarantees? See FPGAs.
FPGAs
Field-Programmable Gate Arrays (FPGAs) are integrated circuits containing arrays of
programmable logic blocks. These logic blocks can be programmed and combined to
implement complex functions. Essentially, any logic that an Application-Specific
Integrated Circuit (ASIC) can perform can also be done on an FPGA.
FPGAs are useful for highly demanding processing tasks requiring real-time guarantees,
especially tasks that benefit from highly-parallel processing. For example, a videoprocessing algorithm that is too demanding for a single-board computer, much less a
microcontroller, may be trivial for an FPGA.
FPGAs are programmed using Hardware Description Languages (HDL). The two most
common languages used are Verilog and VHSIC Hardware Description Language
(VHDL). These languages are much different than C. While C is an imperative language
that gives the steps to take to complete a calculation, HDLs are declarative languages,
giving descriptions of how logic gates should be connected.
In practice, it is common to implement a soft microprocessor core in an FPGA. This soft
processor can then be programmed like any other microprocessor and is used for sundry
tasks that don't require much processing power. For example, an FPGA that processes
video may implement a microprocessor that is responsible for the setup and configuration
functions of the system. These soft processors are commonly programmed in C.
Regardless of which type of hardware your IoT device uses, if it doesn't have suitable builtin communication, you will need an external transceiver or modem.
External transceivers and modems
External transceivers and modems are available for Wi-Fi, cellular, Ethernet, Bluetooth, and
any other protocol you can think of.
[ 392 ]
Web Programming for the Internet of Things
Chapter 14
The following photo shows an industrial IoT device that uses a cellular modem:
In the preceding diagram, the lower circuit board implements the functionality of the
device (monitoring cryogenic liquids, in this case). On this board, the power supply system,
sensor electronics, and a low-cost, 16-bit microcontroller are found. A cellular modem is
located on the top circuit board, which plugs into a socket on the lower board.
[ 393 ]
Web Programming for the Internet of Things
Chapter 14
External modems often communicate with their host (microcontroller) through
asynchronous serial. The protocols used vary considerably among systems.
One common protocol family for communicating with modems is the Hayes command set
also called AT commands. These commands consist of short text-based messages. AT
commands were more or less standardized for placing phone calls, but have been extended
to managing internet connections. Unfortunately, almost every modem manufacturer does
the extension differently.
If you're using an external modem, you need to consult that modem's documentation for
the exact protocol used to communicate with it. Socket-style drivers are often not available,
but many of the core networking concepts explored in this book still apply.
With connectivity out of the way, let's turn our attention to IoT device protocols.
IoT protocols
Most IoT devices work by sending their data to a few central servers—the cloud. These
servers process and store the IoT device data and allow remote access and configuration.
For example, take a smart thermostat. It continuously sends temperature data to a central
server. This server stores the data. If a user wants to view the data, they connect their
personal computer or smartphone to that central server. They don't connect directly to the
IoT device itself. When they want to change their thermostat settings, they send this change
to the central server, which then relays it to the IoT thermostat.
The following diagram illustrates this concept:
[ 394 ]
Web Programming for the Internet of Things
Chapter 14
In the preceding diagram, note that all communication goes through the server. There is
never direct communication from the smartphone to the IoT device.
Using a central server has several advantages. It allows the IoT device to do much less
processing. The server can further process that data and format it into graphs and such. The
server can also send emails or other alerts, and the server is able to store much more data
than the IoT device is capable of. Furthermore, the server gives both the IoT device and the
user's device (a laptop or smartphone) a place to connect to. Without a central server,
getting the user's device to connect to the IoT device would be its own challenge.
The actual protocols used by IoT devices vary. Many devices use HTTPS. In these cases, the
device usually requests an HTTPS page while passing collected data. The web server will
then collect the data and return any needed information to the IoT device.
There are a few protocol standards aimed specifically for IoT devices, such as Constrained
Application Protocol (CoAP) and Message Queuing Telemetry Transport (MQTT).
However, custom designed TCP and UDP protocols are also common. These custom
protocols can achieve a much higher level of efficiency where bandwidth is a concern.
Perhaps we will see more protocol standardization in the coming years. This could have an
enormous advantage in allowing devices to better interoperate. As it is now, devices rarely
interoperate with devices from different manufacturers.
Another important consideration when deploying an IoT device is how to update the code
after the device is shipped.
Firmware updates
IoT devices are connected to the internet, and this gives us an advantage for product
updates. When new functionality or bug fixes are developed, we can use the internet to
push updates to our IoT devices.
This process is easy when using an SBC. You just push the update as you would for any
software.
If your product uses a microcontroller or FPGA, then things get a bit more complicated.
Your device will need to download a firmware image, and then transfer that into nonvolatile memory as required.
[ 395 ]
Web Programming for the Internet of Things
Chapter 14
If the device's power is interrupted during the firmware update phase, the device could be
left in an unusable state. This can be prevented through careful design. If the device has
enough memory to store the firmware twice, it is possible to download the entire firmware
update without overwriting the original. In this case, the device can detect the failed update
(by using a checksum, watchdog timer, or someother mechanism) and revert to the
previous state.
In any case, there are a few practices that should be followed by any IoT device doing
remote updates.
First, it is essential for security that any firmware update is authenticated. If this step is
missed, then an attacker could send a fake update to your device. Once your device is
running the attacker's code, nothing else you do for security matters. We will discuss
security in more detail later in this chapter.
Despite the focus on authentication, you should consider allowing your device's owner to
install unauthenticated firmware. It is a basic user freedom to run the code they want to run
on their own devices, and some consider it unethical to attempt to prevent this. In any case,
it is not technically possible to retain control of a device that's not physically under your
control. In other words, if you attempt to prevent a user from installing their own firmware
through Digital Rights Management (DRM), you should expect your efforts to be
eventually defeated.
It is often considered good practice to allow the device to return to its original factory
configuration. This usually means storing the factory firmware in a separate non-volatile
memory, such as a low-cost flash chip. This is important in the rare case that a firmware
update fails. If a firmware update fails, the device may be unable to boot. If a redundant
firmware copy was stored, then the device can be rolled back to its original factory state
with some sort of physical reset mechanism. From this state, the update can be retried.
Now that we've covered some technical considerations of IoT design, let's turn our
attention to a few ethical concerns.
Ethics of IoT
Much criticism has been leveled at the IoT concept regarding privacy, security, and other
ethical concerns. This isn't surprising, given these devices' pervasive presence in our lives.
Most IoT devices work in conjunction with a central server. This server gets essentially all
of the collected data from the IoT devices it services. This raises questions about data
ownership and privacy.
[ 396 ]
Web Programming for the Internet of Things
Chapter 14
Privacy and data collection
Many IoT devices collect lots of data as part of their operation. For example, a smart
thermostat collects temperature data about its environment. This is required for it to
function. This data may seem harmless at first glance, but once you consider how people
use smart thermostats, you realize that the data is more important than it first appears.
In the smart thermostat example, people will set different temperatures based on when
they expect to be awake, asleep, or away. From this data, you can infer approximately at
what time someone leaves for work in the morning and what time they get back. When a
person leaves their house for a week-long holiday, it will be clearly reflected in the data.
If even a seemingly innocuous smart thermostat gives great insight into a person's
behavior, imagine how much more data a smartphone or home assistant collects!
If we accept that this data collection is inherent to the device's functionality, then its
collection seems justified. Consider, then, if the IoT company has an obligation to the user
to keep their data secure or confidential. Then who owns this data? Is it owned by the
company collecting it, or does the customer who provides that data own it? The old
understanding was that the data was solely the property of the company collecting it, but
there is a recent push to reclassify that. Legal opinions vary, and this is still mostly
uncharted territory.
In any case, if you're collecting data, even seemingly innocuous data, please treat it with
respect. Please also allow your users the freedom to see and download copies of that data
you are storing on them.
End-of-life planning
Another consideration when designing an IoT device is what happens when that device is
no longer being manufactured? Many IoT companies will simply stop supporting their old
devices after a while, and these devices then become useless. This is because they often
require connecting to a central server to function, and once this central server goes offline,
they literally cannot function.
There is an alternative. When designing an IoT device, it is possible to make it function in a
reduced capacity even without internet connectivity. For example, it is possible to design a
smart thermostat to continue working as a manual thermostat even when it cannot
establish a connection to its central server.
[ 397 ]
Web Programming for the Internet of Things
Chapter 14
When designing your IoT device, please take into consideration if you can keep it useful
even after your company discontinues support for it. In some cases, this isn't possible, but
in many cases, it appears that companies purposely limit their devices only to spite their
customers. Don't be like those companies.
Security
In recent years, a lot of IoT devices have been deployed with little thought given to security.
As companies rush to push devices to market quickly, security too often doesn't even enter
the equation. The situation has gotten so bad that there is now a common saying: "The S in
IoT stands for security."
The security problem may be compounded by the fact that insecure IoT devices don't often
expose the device developers to liability. For example, if you develop an insecure server,
then your company is open to attack. However, if you develop an insecure IoT device, your
company is fine; it's just your customers who are open to attack.
If you're developing an IoT device, I implore you—do the right thing and think about
security early and often.
According to the Open Web Application Security Project (OWASP), the top ten IoT
security problems are as follows:
1.
2.
3.
4.
5.
6.
7.
8.
9.
10.
Weak, guessable, or hardcoded passwords
Insecure network services
Insecure ecosystem interfaces
Lack of secure update mechanism
Use of insecure or outdated components
Insufficient privacy protection
Insecure data transfer and storage
Lack of device management
Insecure default settings
Lack of physical hardening
You can find more information from the OWASP Foundation at https://owasp.org/.
[ 398 ]
Web Programming for the Internet of Things
Chapter 14
Many of the preceding problems are easily addressable simply by caring. For example,
many devices are still shipped with hardcoded passwords or backdoors. There isn't much
to say about this problem from a technical perspective—just don't ship your products with
hardcoded passwords or backdoors.
Some advocate that all IoT devices should use HTTPS to provide a basic level of
security—the so-called Secure Hypertext Internet of Things (SHIoT). See Chapter 9,
Loading Secure Web Pages with HTTPS and OpenSSL, for information about HTTPS from the
client's perspective.
For embedded HTTPS, you may find the OpenSSL library too heavyweight. Consider using
a TLS implementation designed for embedded use. These embedded-first libraries are also
able to take advantage of encryption hardware built in to common microcontrollers.
wolfSSL is one such open-source library. In addition to TLS for TCP, wolfSSL also supports
DTLS for securing UDP-based protocols.
Using TLS can go a long way to secure an IoT device, but it is not a panacea. In particular,
certificates must be carefully managed. Don't make the mistake of assuming that
encryption is good enough. Encryption only protects against passive attacks; both
encryption and authentication are needed to protect against active attacks.
Sometimes, minimizing bandwidth is a priority. This is particularly true for cellular
connections. In many use-cases, an IoT device with limited bandwidth will find TLS and
DTLS too heavyweight. Establishing a new TLS or DTLS connection can take several
kilobytes on average.
If your cellular provider is able to tunnel your traffic over a secure VPN, without metering
the VPN overhead, you may be able to forgo implementing secure communication at the
application level. In this case, your device can use TCP or UDP directly, and the VPN
connection ensures that this traffic will never be visible over the internet. This level of
security isn't appropriate for all use-cases, as your traffic is still visible to your network
provider.
In the case that you must secure a protocol yourself, you may take advantage of the fact
that you have control over the manufacturing of your IoT device. It is possible to assign
each device a unique encryption key at the time of manufacture. This technique is called
Pre-Shared Key (PSK). With PSK, devices can secure their communication using symmetric
ciphers, avoiding much of the overhead required by TLS, DTLS, and other heavyweight
solutions. If doing symmetric encryption, keep in mind that encryption is useless against an
active attacker unless you also implement authentication. This is done using a Message
Authentication Code (MAC).
[ 399 ]
Web Programming for the Internet of Things
Chapter 14
If you do use PSK, be sure to use a unique key for each individual device. Reusing the same
key is not appropriate.
In any case, it is advisable to run your security scheme by a security professional before and
during implementation. Even a small, nearly insignificant mistake with encryption or
authentication can compromise an entire system.
Summary
In this chapter, we looked at the high-level design of IoT devices. We looked at different
types of hardware that IoT devices can be built on—SBCs, microcontrollers, and FPGAs.
We considered the various ways these devices can connect to the internet, including wired
and wireless connections, and we weighed some trade-offs associated with each.
We also took into consideration some of the protocol choices that IoT devices can use and
reiterated the importance of security.
Questions
Try these questions to test your knowledge from this chapter:
1.
2.
3.
4.
What are the drawbacks of using Wi-Fi connectivity?
What are the drawbacks of using Ethernet connectivity?
What are the drawbacks of using cellular connectivity?
What are some advantages of using a Single-Board Computer with embedded
Linux? What are the drawbacks?
5. What are some advantages of using a microcontroller in your IoT device?
6. Is the use of HTTPS always appropriate in IoT device communication?
The answers to these questions can be found in Appendix A, Answers to Questions.
[ 400 ]
Answers to Questions
Chapter 1, Introducing Networks and
Protocols
1. What are the key differences between IPv4 and IPv6?
IPv4 only supports 4 billion unique addresses, and because they were allocated
inefficiently, we are now running out. IPv6 supports 3.4 x 1038 possible addresses.
IPv6 provides many other improvements, but this is the one that affects our
network programming directly.
2. Are the IP addresses given by the ipconfig and ifconfig commands the
same IP addresses that a remote web server sees if you connect to it?
Sometimes, these addresses will match, but not always. If you're on a private IPv4
network, then your router likely performs network address translation. The
remote web server then sees the translated address.
If you have a publicly routable IPv4 or IPv6 address, then the address seen by the
remote web server will match those reported by ipconfig and ifconfig.
3. What is the IPv4 loopback address?
The IPv4 loopback address is 127.0.0.1, and it allows networked programs to
communicate with each other while executing on the same machine.
4. What is the IPv6 loopback address?
The IPv6 loopback address is ::1. It works in the same way as the IPv4 loopback
address.
5. How are domain names (for example, example.com) resolved into IP
addresses?
DNS is used to resolve domain names into IP addresses. This protocol is covered
in detail in Chapter 5, Hostname Resolution and DNS.
Answers to Questions
6. How can you find your public IP address?
The easiest way is to visit a website that reports it for you.
7. How does an operating system know which application is responsible for an
incoming packet?
Each IP packet has a local address, remote address, local port number, remote
port number, and protocol type. These five attributes are memorized by the
operating system to determine which application should handle any given
incoming packet.
Chapter 2, Getting to Grips with Socket APIs
1. What is a socket?
A socket is an abstraction that represents one endpoint of a communication link
between systems.
2. What is a connectionless protocol? What is a connection-oriented protocol?
A connection-oriented protocol sends data packets in the context of a larger
stream of data. A connectionless protocol sends each packet of data
independently of any before or after it.
3. Is UDP a connectionless or connection-oriented protocol?
UDP is considered a connectionless protocol. Each message is sent independently
of any before or after it.
4. Is TCP a connectionless or connection-oriented protocol?
TCP is considered a connection-oriented protocol. Data is sent and received in
order as a stream.
5. What types of applications generally benefit from using the UDP protocol?
UDP applications benefit from better real-time performance while sacrificing
reliability. They are also able to take advantage of IP multicasting.
[ 402 ]
Answers to Questions
6. What types of applications generally benefit from using the TCP protocol?
Applications that need a reliable stream of data transfer benefit from the TCP
protocol.
7. Does TCP guarantee that data will be transmitted successfully?
TCP makes some guarantees about reliability, but nothing can truly guarantee
that data is transmitted successfully. For example, if someone unplugs your
modem, no protocol can overcome that.
8. What are some of the main differences between Berkeley sockets and Winsock
sockets?
The header files are different. Sockets themselves are represented as signed
versus unsigned ints. When socket() or accept() calls fail, the return values
are different. Berkeley sockets are also standard file descriptions. This isn't always
true with Winsock. Error codes are different and retrieved in a different way.
There are additional differences, but these are the main ones that affect our
programs.
9. What does the bind() function do?
The bind() function associates a socket with a particular local network address
and port number. Its usage is almost always required for the server, and it's
usually not required for the client.
10. What does the accept() function do?
The accept() function will block until a new TCP client has connected. It then
returns the socket for this new connection.
11. In a TCP connection, does the client or the server send application data first?
Either the client or the server can send data first. They can even send data
simultaneously. In practice, many client-server protocols (such as HTTP) work by
having the client send a request first and then having the server send a response.
[ 403 ]
Answers to Questions
Chapter 3, An In-Depth Overview of TCP
Connections
1. How can we tell if the next call to recv() will block?
We use the select() function to indicate which sockets are ready to be read
from without blocking.
2. How can you ensure that select() doesn't block for longer than a specified
time?
You can pass select() a timeout parameter.
3. When we used our tcp_client program to connect to a web server, why did
we need to send a blank line before the web server responded?
HTTP, the web server's protocol, expects a blank line to indicate the end of the
request. Without this blank line, it wouldn't know if the client was going to keep
sending additional request headers.
4. Does send() ever block?
Yes. You can use select() to determine when a socket is ready to be written to
without blocking. Alternatively, sockets can be put into non-blocking mode. See
Chapter 13, Socket Programming Tips and Pitfalls, for more information.
5. How can we tell if a socket has been disconnected by our peer?
The return value of recv() can indicate if a socket has been disconnected.
6. Is data received by recv() always the same size as data sent with send()?
No. TCP is a stream protocol. There is no way to tell if the data returned from one
recv() call was sent with one or many calls to send().
[ 404 ]
Answers to Questions
7. Consider this code:
recv(socket_peer, buffer, 4096, 0);
printf(buffer);
What is wrong with it?
Also see what is wrong with this code:
recv(socket_peer, buffer, 4096, 0);
printf("%s", buffer);
The data returned by recv() is not null terminated! Both of the preceding
code excerpts will likely cause printf() to read past the end of the data
returned by recv(). Additionally, in the first code example the data
received could contain format specifiers (for example %d), which would
cause additional memory access violations.
Chapter 4, Establishing UDP Connections
1. How do sendto() and recvfrom() differ from send() and recv()?
The send() and recv() functions are useful after calling connect(). They only
work with the one remote address that was passed to connect(). The sendto()
and recvfrom() functions can be used with multiple remote addresses.
2. Can send() and recv() be used on UDP sockets?
Yes. The connect() function should be called first in that case. However, the
sendto() and recvfrom() functions are often more useful for UDP sockets.
3. What does connect() do in the case of a UDP socket?
The connect() function associates the socket with a remote address.
4. What makes multiplexing with UDP easier than with TCP?
One UDP socket can talk to multiple remote peers. For TCP, one socket is needed
for each peer.
[ 405 ]
Answers to Questions
5. What are the downsides to UDP when compared to TCP?
UDP does not attempt to fix many of the errors that TCP does. For example, TCP
ensures that data arrives in the same order it was sent, TCP tries to avoid causing
network congestion, and TCP attempts to resend lost packets. UDP does none of
this.
6. Can the same program use UDP and TCP?
Yes. It just needs to create sockets for both.
Chapter 5, Hostname Resolution and DNS
1. Which function fills in an address needed for socket programming in a
portable and protocol-independent way?
getaddrinfo() is the function to use for this.
2. Which socket programming function can be used to convert an IP address back
into a name?
getnameinfo() can be used to convert addresses back to names.
3. A DNS query converts a name to an address, and a reverse DNS query
converts an address back into a name. If you run a DNS query on a name, and
then a reverse DNS query on the resulting address, do you always get back the
name you started with?
Sometimes, you will get the same name back but not always. This is because the
forward and reverse lookups use independent records. It's also possible to have
many names point to one address, but that one address can only have one record
that points back to a single name.
4. What are the DNS record types used to return IPv4 and IPv6 addresses for a
name?
The A record type returns an IPv4 address, and the AAAA record type returns an
IPv6 address.
[ 406 ]
Answers to Questions
5. Which DNS record type stores special information about email servers?
The MX record type is used to return email server information.
6. Does getaddrinfo() always return immediately? Or can it block?
If getaddrinfo() is doing name lookups, it will often block. In the worst-case
scenario, many UDP messages would need to be sent to various DNS servers, so
this can be a noticeable delay. This is one reason why DNS caching is important.
If you are simply using getaddrinfo() to convert from a text IP address, then it
shouldn't block.
7. What happens when a DNS response is too large to fit into a single UDP
packet?
The DNS response will have the TC bit set in its header. This indicates that the
message was truncated. The query should be resent using TCP.
Chapter 6, Building a Simple Web Client
1. Does HTTP use TCP or UDP?
HTTP runs over TCP port 80.
2. What types of resources can be sent over HTTP?
HTTP can be used to transfer essentially any computer file. It's commonly used
for web pages (HTML) and the associated files (such as styles, scripts, fonts, and
images).
3. What are the common HTTP request types?
GET, POST, and HEAD are the most common HTTP request types.
4. What HTTP request type is typically used to send data from the server to the
client?
GET is the usual request type for a client to request a resource from the server.
[ 407 ]
Answers to Questions
5. What HTTP request type is typically used to send data from the client to the
server?
POST is used when the client needs to send data to the server.
6. What are the two common methods used to determine an HTTP response body
length?
The HTTP body length is commonly determined by the Content-Length header
or by using Transfer-Encoding: chunked.
7. How is the HTTP request body formatted for a POST-type HTTP request?
This is determined by the application. The client should set the Content-Type
header to specify which format it is using. application/x-www-formurlencoded and application/json are common values.
Chapter 7, Building a Simple Web Server
1. How does an HTTP client indicate that it has finished sending the HTTP
request?
The HTTP request should end with a blank line.
2. How does an HTTP client know what type of content the HTTP server is
sending?
The HTTP server should identify the content with a Content-Type header.
3. How can an HTTP server identify a file's media type?
A common method of identifying a file's media type is just to look at the file
extension. The server is free to use other methods though. When sending dynamic
pages or data from a database, there will be no file and therefore no file extension.
In this case, the server must know the media type from its context.
4. How can you tell whether a file exists on the filesystem and is readable by
your program? Is fopen(filename, "r") != 0 a good test?
This is not a trivial problem. A robust program will need to consider system
specific APIs carefully. Windows uses special filenames that will trip up a
program that relies only on fopen() to check for a file's existence.
[ 408 ]
Answers to Questions
Chapter 8, Making Your Program Send Email
1. What port does SMTP operate on?
SMTP does mail transmission over TCP port 25. Many providers use alternative
ports for mail submission.
2. How do you determine which SMTP server receives mail for a given domain?
The mail servers responsible for receiving mail for a given domain are given by
MX-type DNS records.
3. How do you determine which SMTP server sends mail for a given provider?
It's not possible to determine that in the general case. In any case, several servers
could be responsible. Sometimes these servers will be listed under a TXT-type
DNS record using SPF, but that is certainly not universal.
4. Why won't an SMTP server relay mail without authentication?
Open relay SMTP servers are targeted by spammers. SMTP servers require
authentication to prevent abuse.
5. How are binary files sent as email attachments when SMTP is a text-based
protocol?
Binary files must be re-encoded as plain text. The most common method is
with Content-Transfer-Encoding: base64.
Chapter 9, Loading Secure Web Pages with
HTTPS and OpenSSL
1. What port does HTTPS typically operate on?
HTTPS connects over TCP port 443.
2. How many keys does symmetric encryption use?
Symmetric encryption uses one key. Data is encrypted and decrypted with the
same key.
[ 409 ]
Answers to Questions
3. How many keys does asymmetric encryption use?
Asymmetric encryption use two different, but mathematically related, keys. Data
is encrypted with one and decrypted with the other.
4. Does TLS use symmetric or asymmetric encryption?
TLS use both symmetric and asymmetric encryption algorithms to function.
5. What is the difference between SSL and TLS?
TLS is the successor to SSL. SSL is now deprecated.
6. What purpose do certificates fulfill?
Certificates allow a server or client to verify their identity.
Chapter 10, Implementing a Secure Web
Server
1. How does a client decide whether it should trust a server's certificate?
There are various ways a client can trust a server's certificate. The chain-of-trust
model is the most common. In this model, the client explicitly trusts an authority.
The client then implicitly trusts any certificates it encounters that are signed by
this trusted authority.
2. What is the main issue with self-signed certificates?
Self-signed certificates aren't signed by a trusted certificate authority. Web
browsers won't know to trust self-signed certificates unless the user adds a special
exception.
3. What can cause SSL_accept() to fail?
SSL_accept() fails if the client doesn't trust the server's certificate or if the client
and server can't agree on a mutually supported protocol version and cipher suite.
[ 410 ]
Answers to Questions
4. Can select() be used to multiplex connections for HTTPS servers?
Yes, but be aware that select() works on the underlying TCP connection layer,
not on the TLS layer. Therefore, when select() indicates that a socket has data
waiting, it does not necessarily mean that there is new TLS data ready.
Chapter 11, Establishing SSH Connections
with libssh
1. What is a significant downside of using Telnet?
Essentially, Telnet provides no security features. Passwords are sent as plaintext.
2. Which port does SSH typically run on?
SSH's official port is TCP port 22. In practice, it is common to run SSH on
arbitrary ports in an attempt to hide from attackers. With a properly secured
server, these attackers are a nuisance rather than a legitimate threat.
3. Why is it essential that the client authenticates the SSH server?
If the client doesn't verify the SSH server's identity, then it could be tricked into
sending credentials to an impostor.
4. How is the server typically authenticated?
SSH servers typically use certificates to identity themselves. This is similar to how
servers are authenticated when using HTTPS.
5. How is the SSH client typically authenticated?
It is still common for clients to authenticate with a password. The downside to
this method is that if a client is somehow tricked into connecting to an impostor
server, then their password will be compromised. SSH provides alternate
methods, including authenticating clients using certificates, that aren't susceptible
to replay attacks.
[ 411 ]
Answers to Questions
Chapter 12, Network Monitoring and
Security
1. Which tool would you use to test the reachability of a target system?
The ping tool is useful to test reachability.
2. Which tool lists the routers to a destination system?
The traceroute (tracert on Windows) tool will show the network path to a
target system.
3. What are raw sockets used for?
Raw sockets allow the programmer to specify directly what goes into a network
packet. They provide lower-level access than TCP and UDP sockets, and can be
used to implement additional protocols, such as ICMP.
4. Which tools list the open TCP sockets on your system?
The netstat tool can be used to show open connections on your local system.
5. What is one of the biggest concerns with security for networked C programs?
When programming networked applications in C, special care must be given to
memory safety. Even a small mistake could allow an attacker to compromise your
program.
Chapter 13, Socket Programming Tips and
Pitfalls
1. Is it ever acceptable just to terminate a program if a network error is detected?
Yes. For some applications terminating on error is the right call. For more
substantial applications, the ability to retry and continue on may be needed.
2. Which system functions are used to convert error codes into text descriptions?
You can use FormatMessage() on Windows and strerror() on other
platforms to obtain error messages.
[ 412 ]
Answers to Questions
3. How long does it take for a call to connect() to complete on a TCP socket?
A call to connect() typically blocks for at least one network time round
trip while the TCP three-way handshake is being completed.
4. What happens if you call send() on a disconnected TCP socket?
On Unix-based systems, your program can receive a SIGPIPE signal. It is
important to plan for that. Otherwise, send() returns -1.
5. How can you ensure that the next call to send() won't block?
Either use select() to make sure the socket is ready for more data or use nonblocking sockets.
6. What happens if both peers to a TCP connection try to send a large amount of
data simultaneously?
If both sides to a TCP connection are calling send(), but not recv(), then they
can be trapped in a deadlocked state. It is important to intersperse calls to send()
with calls to recv(). The use of select() can help inform your program about
what to do next.
7. Can you improve application performance by disabling the Nagle algorithm?
It depends on what your application is doing. For real-time applications using
TCP, disabling the Nagle algorithm is often a good trade-off for decreasing
latency at the expense of bandwidth efficiency. For other applications, disabling it
can decrease throughput, increase network congestion, and even increase latency.
8. How many connections can select() handle?
It depends on your platform. It is defined in the FD_SETSIZE macro, which is
easily increased on Windows but not on other platforms. Typically, the upper
limit is around 1,024 sockets.
[ 413 ]
Answers to Questions
Chapter 14, Web Programming for the
Internet of Things
1. What are the drawbacks to using Wi-Fi connectivity?
Wi-Fi can be difficult for end user setup. It's also not available everywhere.
2. What are the drawbacks to using Ethernet connectivity?
Many devices aren't used in areas where wiring has been run.
3. What are the drawbacks to using cellular connectivity?
Cellular connectivity is expensive. It can also have increased latency and larger
power requirements when compared to other methods.
4. What are some advantages to using a single-board computer with embedded
Linux? What are the drawbacks?
Having access to a full operating system, such as Linux, can simplify software
development. However, Single-Board Computers (SBCs) are relatively expensive
and offer few board-level connectivity options and peripherals when compared to
microcontrollers. They also require lots of power, relatively speaking.
5. What are some advantages to using a microcontroller in your IoT device?
Many IoT devices will need to use a microcontroller to provide their basic
functionality anyway. Microcontrollers are cheap, offer a wide range of
peripherals, are able to meet real-time performance constraints, and can run on
very little power.
6. Is the use of HTTPS always appropriate in IoT device communication?
HTTPS is a decent way to secure IoT communication for most applications;
however, it has a lot of processing and bandwidth overhead. Each application is
unique, and the security scheme used should be chosen based on your exact
needs.
[ 414 ]
Setting Up Your C Compiler on
Windows
Microsoft Windows is one of the most popular desktop operating systems.
Before beginning, I highly recommend that you install 7-Zip from https://www.7zip.org/. 7-Zip will allow you to extract the various compression archive formats that
library source code is distributed in.
Let's continue and get MinGW, OpenSSL, and libssh set up on Windows 10.
Installing MinGW GCC
MinGW is a port of GCC to Windows. It is the compiler we recommend for this book.
You can obtain MinGW from http://www.mingw.org/. Find the download link on that page
and download and run the MinGW Installation Manager (mingw-get).
Setting Up Your C Compiler on Windows
The MinGW Installation Manager is a GUI tool for installing MinGW. It's shown in the
following screenshot:
Click Install. Then, click Continue. Wait while some files download, and then click
Continue once again.
At this point, the tool will give you a list of packages that you can install. You need to
mark mingw32-base-bin, msys-base-bin, and mingw32-gcc-g++-bin for installation. This is
shown in the following screenshot:
[ 416 ]
Setting Up Your C Compiler on Windows
You will also want to select the mingw32-libz-dev package. It is listed under the MinGW
Libraries section. The following screenshot shows this selection:
[ 417 ]
Setting Up Your C Compiler on Windows
The g++ and libz packages we've selected are required for building libssh later.
When you're ready to proceed, click Installation from the menu and select Apply Changes.
A new dialog will show the changes to be made. The following screenshot shows what this
dialog may look like:
Click the Apply button to download and install the packages. Once the installation is
complete, you can close the MinGW Installation Manager.
To be able to use MinGW from the command line easily, you will need to add MinGW to
your PATH.
[ 418 ]
Setting Up Your C Compiler on Windows
The steps for adding MinGW to your PATH are as follows:
1. Open the System control panel (Windows key + Pause/Break).
2. Select Advanced system settings:
[ 419 ]
Setting Up Your C Compiler on Windows
3. From the System Properties window, navigate to the Advanced tab and click
the Environment Variables... button:
4. From this screen, find the PATH variable under System variables. Select it and
press Edit....
5. Click New and type in the MinGW path—C:\mingw\bin, as shown in the
following screenshot:
[ 420 ]
Setting Up Your C Compiler on Windows
6. Click OK to save your changes.
Once MinGW has been added to your PATH, you can open a new command window and
enter gcc --version to ensure that gcc has been installed correctly. This is shown in the
following screenshot:
[ 421 ]
Setting Up Your C Compiler on Windows
Installing Git
You will need to have the git version control software installed to download this book's
code.
git is available from https://git-scm.com/download. A handy GUI-based installer is
provided, and you shouldn't have any issues getting it working. When installing, be sure to
check the option for adding git to your PATH. This is shown in the following screenshot:
After git has finished installing, you can test it by opening a new command window and
entering git --version:
[ 422 ]
Setting Up Your C Compiler on Windows
Installing OpenSSL
The OpenSSL library can be tricky to get going on Windows.
If you are brave, you can obtain the OpenSSL library source code directly from https://
www.openssl.org/source/. You will, of course, need to build OpenSSL before it can be
used. Building OpenSSL is not easy, but instructions are provided in the INSTALL and
NOTES.WIN files included with the OpenSSL source code.
An easier alternative is to install prebuilt OpenSSL binaries. You can find a list of prebuilt
OpenSSL binaries from the OpenSSL wiki at https://wiki.openssl.org/index.php/
Binaries. You will need to locate binaries that match your operating system and compiler.
Installing them will be a matter of copying the relevant files to the MinGW include, lib,
and bin directories.
The following screenshot shows a binary OpenSSL distribution. The include and lib
folders should be copied over to c:\mingw\ and merged with the existing folders, while
openssl.exe and the two DLL files need to be placed in c:\mingw\bin\:
[ 423 ]
Setting Up Your C Compiler on Windows
You can try building openssl_version.c from Chapter 9, Loading Secure Web Pages with
HTTPS and OpenSSL, to test that everything is installed correctly. It should look like the
following:
Installing libssh
You can obtain the latest libssh library from https://www.libssh.org/. If you are
proficient in installing C libraries, feel free to give it a go. Otherwise, read on for step-bystep instructions.
Before beginning, be sure that you've first installed the OpenSSL libraries successfully.
These are required by the libssh library.
We will need CMake installed in order to build libssh. You can obtain CMake
from https://cmake.org/. They provide a nice GUI installer, and you shouldn't run into
any difficulties. Make sure you select the option to add CMake to your PATH during
installation:
[ 424 ]
Setting Up Your C Compiler on Windows
Once you have the CMake tool and the OpenSSL libraries installed, navigate to the libssh
website to download the libssh source code. At the time of writing, Version 0.8.7 is the
latest, and it is available from https://www.libssh.org/files/0.8/. Download and extract
the libssh source code.
Take a look at the included INSTALL file.
Now, open a command window in the libssh source code directory. Create a new build
folder with the following commands:
mkdir build
cd build
Keep this command window open. We'll do the build here in a minute.
Start CMake 3.14.3 (cmake-gui) from the start menu or desktop shortcut.
[ 425 ]
Setting Up Your C Compiler on Windows
You need to set the source code and build locations using the Browse Source... and Browse
Build... buttons. This is shown in the following screenshot:
Then, click Configure.
On the next screen, select MinGW Makefiles as the generator for this project. Click Finish.
[ 426 ]
Setting Up Your C Compiler on Windows
It may take a moment to process.
From the configuration options, make the following changes:
1. Uncheck WITH_NACL
2. Uncheck WITH_GSSAPI
3. Change CMAKE_INSTALL_PREFIX to c:\mingw
Then, click Configure again. It will take a moment. If everything worked, click Generate.
You should now be able to build libssh.
Go back to your command window in the build directory. Use the following command to
complete the build:
mingw32-make
After the build completes, use the following command to copy the files over to your
MinGW installation:
mingw32-make install
You can try building ssh_version.c from Chapter 11, Establishing SSH Connections with
libssh, to test that everything is installed correctly. It should look like the following:
[ 427 ]
Setting Up Your C Compiler on Windows
Alternatives
In this book, we recommend free software whenever possible. This is important for user
freedom, and this is one reason we recommend GCC throughout the book.
In addition, to MinGW GCC, the Clang C compiler is also open source and excellent
quality. The code in this book was also tested to run successfully using Clang on Windows.
Command-line tools such as GCC and Clang are often easier to integrate into the
complicated workflows required for larger projects. These open source tools also provide
better standards compliance than Microsoft's compilers.
That said, the code in this book also works with Microsoft's compilers. The code was tested
for both Microsoft Visual Studio 2015 and Microsoft Visual Studio 2017.
[ 428 ]
Setting Up Your C Compiler on
Linux
Linux is an excellent choice for C programming. It has arguably the easiest setup and the
best support for C programming out of the three operating systems covered in this book.
Using Linux also allows you to take the ethical high road and feel good about supporting
free software.
One issue with describing the setup for Linux is that there are many Linux distributions
with different software. In this appendix, we will provide the commands needed to set up
on systems using the apt package manager, such as Debian Linux and Ubuntu Linux. If
you are using a different Linux distribution, you will need to find the commands relevant
to your system. Refer to your distribution's documentation for help.
Before diving right in, take a moment to make sure your package list is up to date. This is
done with the following command:
sudo apt-get update
With apt ready to go, setup is easy. Let's get started.
Installing GCC
The first step is to get the C compiler, gcc, installed.
Assuming your system uses apt as its package manager, try the following commands to
install gcc and prepare your system for C programming:
sudo apt-get install build-essential
Once the install command completes, you should be able to run the following command
to find the version of gcc that was installed:
gcc --version
Setting Up Your C Compiler on Linux
Installing Git
You will need to have the Git version control software installed to download this book's
code.
Assuming your system uses the apt package manager, you can install Git with the
following command:
sudo apt-get install git
Check whether Git has installed successfully by means of the following command:
git --version
Installing OpenSSL
OpenSSL can be tricky. You can try your distribution's package manager with the
following commands:
sudo apt-get install openssl libssl-dev
The problem is that your distribution may have an old version of OpenSSL. If that is the
case, you should obtain the OpenSSL libraries directly from https://www.openssl.org/
source/. You will, of course, need to build OpenSSL before it can be used. Building
OpenSSL is not easy, but instructions are provided in the INSTALL file included with the
OpenSSL source code. Note that its build system requires that you have Perl installed.
Installing libssh
You can try installing libssh from your package manager with the following command:
sudo apt-get install libssh-dev
The problem is that the code in this book is not compatible with older versions of libssh.
Therefore, I recommend you build libssh yourself.
You can obtain the latest libssh library from https://www.libssh.org/. If you are
proficient in installing C libraries, feel free to give it a go. Otherwise, read on for the stepby-step instructions.
[ 430 ]
Setting Up Your C Compiler on Linux
Before beginning, be sure that you've first installed the OpenSSL libraries successfully.
These are required by the libssh library.
We will also need CMake installed in order to build libssh. You can obtain CMake
from https://cmake.org/. You can also get it from your distro's packaging tool with the
following command:
sudo apt-get install cmake
Finally, the zlib library is also required by libssh. You can install the zlib library using
this command:
sudo apt-get install zlib1g-dev
Once you have CMake, the zlib library, and the OpenSSL library installed, locate the
version of libssh you would like from https://www.libssh.org/. Version 0.8.7 is the
latest at the time of writing. You can download and extract the libssh source code with
the following commands:
wget https://www.libssh.org/files/0.8/libssh-0.8.7.tar.xz
tar xvf libssh-0.8.7.tar.xz
cd libssh-0.8.7
I recommend that you take a look at the installation instructions included with libssh.
You can use less to view them. Press the Q key to quit less:
less INSTALL
Once you've familiarized yourself with the build instructions, you can try building libssh
with these commands:
mkdir build
cd build
cmake ..
make
The final step is to install the library with the following command:
sudo make install
[ 431 ]
Setting Up Your C Compiler on
macOS
macOS can be a good development environment for a C programmer. Let's get started.
Installing Homebrew and the C compiler
Setup on macOS will be simplified greatly if we use the Homebrew package manager.
The Homebrew package manager makes installing a C compiler and development libraries
much easier than it would otherwise be.
To install Homebrew, navigate your web browser to https://brew.sh/:
Setting Up Your C Compiler on macOS
The website gives the command to install Homebrew. You will need to open a new
Terminal window and paste in the command:
Just follow the instructions until Homebrew has finished installing.
Installing Homebrew will also cause the Xcode command-line tools to install. This means
you'll have a C compiler ready to go. Test that you have a working C compiler with the gcc
--version command:
[ 433 ]
Setting Up Your C Compiler on macOS
Note that macOS installs the Clang compiler, but aliases it as GCC. In any case, it will work
fine for our purposes.
Git should also have been installed. You can verify this with git --version:
Installing OpenSSL
Assuming you already have Homebrew installed, installing OpenSSL is easy.
Open a new Terminal window and use the following command to install the OpenSSL
library:
brew install openssl@1.1
At the time of writing, the default Homebrew openssl package is outdated, therefore we'll
use the openssl@1.1 package instead.
[ 434 ]
Setting Up Your C Compiler on macOS
The following screenshot shows Homebrew installing the openssl@1.1 package:
Be sure to read any output from brew.
The method suggested by the brew command has you pass -L and -I to the compiler to tell
it where to locate the OpenSSL libraries. This is tedious.
You may prefer to symlink the installed library files to the /usr/local path so that your
compiler can find them automatically. Whether you want to do this or not is up to you.
[ 435 ]
Setting Up Your C Compiler on macOS
If you want to create symlinks so the compiler can find OpenSSL, try the following
commands:
cd /usr/local/include
ln -s ../opt/openssl@1.1/include/openssl .
cd /usr/local/lib
for i in ../opt/openssl@1.1/lib/lib*; do ln -vs $i .; done
This is shown in the following screenshot:
You can try building openssl_version.c from Chapter 9, Loading Secure Web Pages with
HTTPS and OpenSSL, to test that everything is installed correctly. It should look like the
following:
Installing libssh
With Homebrew installed, installing libssh is also very easy.
Open a new Terminal window and use the following command to install the OpenSSL
library:
brew install libssh
[ 436 ]
Setting Up Your C Compiler on macOS
This is shown in the following screenshot:
This time, we don't need to mess with any other options. You can start using libssh right
away.
You can try building ssh_version.c from Chapter 11, Establishing SSH Connections with
libssh, to test that everything is installed correctly. It should look like the following:
That concludes the setup for macOS.
[ 437 ]
Example Programs
This book's code repository, located at https://github.com/codeplea/hands-on-networkprogramming-with-c, includes 44 example programs. These programs are explained in
detail throughout the book.
Code license
The example programs provided in this book's code repository are released under the MIT
license, the text of which follows:
Permission is hereby granted, free of charge, to any person obtaining
a copy of this software and associated documentation files (the
"Software"), to deal in the Software without restriction, including without
limitation the rights to use, copy, modify, merge, publish, distribute,
sublicense, and/or sell copies of the Software, and to permit persons to
whom the Software is furnished to do so, subject to the following
conditions:
The above copyright notice and this permission notice shall be included
in all copies or substantial portions of the Software.
THE SOFTWARE IS PROVIDED "AS IS", WITHOUT WARRANTY OF ANY KIND, EXPRESS
OR IMPLIED, INCLUDING BUT NOT LIMITED TO THE WARRANTIES OF MERCHANTABILITY,
FITNESS FOR A PARTICULAR PURPOSE AND NONINFRINGEMENT. IN NO EVENT SHALL THE
AUTHORS OR COPYRIGHT HOLDERS BE LIABLE FOR ANY CLAIM, DAMAGES OR OTHER
LIABILITY, WHETHER IN AN ACTION OF CONTRACT, TORT OR OTHERWISE, ARISING
FROM, OUT OF OR IN CONNECTION WITH THE SOFTWARE OR THE USE OR OTHER
DEALINGS IN THE SOFTWARE.
Example Programs
Code included with this book
The following is a list of the 44 example programs included with this book, by chapter.
Chapter 1 – Introducing Networks and Protocols
This chapter includes the following example programs:
win_init.c: Example code to initialize Winsock (Windows only)
win_list.c: Lists all local IP addresses (Windows only)
unix_list.c: Lists all local IP addresses (Linux and macOS only)
Chapter 2 – Getting to Grips with Socket APIs
This chapter includes the following example programs:
sock_init.c: Example program to include all necessary headers and initialize
time_console.c: Prints the current date and time to the console
time_server.c: Serves a web page giving the current date and time
time_server_ipv6.c: The same as the preceding code but listens for IPv6
connections
time_server_dual.c: The same as the preceding code but listens for IPv6/IPv4
dual-stack connections
Chapter 3 – An In-Depth Overview of TCP
Connections
This chapter includes the following example programs:
tcp_client.c: Establishes a TCP connection and sends/receives data from the
console.
tcp_serve_toupper.c: A TCP server servicing multiple connections
using select(). Echoes received data back to the client all in uppercase.
[ 439 ]
Example Programs
tcp_serve_toupper_fork.c: The same as the preceding code but
uses fork() instead of select(). (Linux and macOS only.)
tcp_serve_chat.c: A TCP server that relays received data to every other
connected client.
Chapter 4 – Establishing UDP Connections
This chapter includes the following example programs:
udp_client.c: Sends/receives UDP data from the console
udp_recvfrom.c: Uses recvfrom() to receive one UDP datagram
udp_sendto.c: Uses sendto() to send one UDP datagram
udp_serve_toupper.c: Listens for UDP data and echoes it back to the sender
all in uppercase
udp_serve_toupper_simple.c: The same as the preceding code but doesn't
use select()
Chapter 5 – Hostname Resolution and DNS
This chapter includes the following example programs:
lookup.c: Uses getaddrinfo() to look up addresses for a given hostname
dns_query.c: Encodes and sends a UDP DNS query, then listens for and
decodes the response
Chapter 6 – Building a Simple Web Client
This chapter includes the following example program:
web_get.c: A minimal HTTP client to download a web resource from a given
URL
[ 440 ]
Example Programs
Chapter 7 – Building a Simple Web Server
This chapter includes the following example programs:
web_server.c: A minimal web server capable of serving a static website
web_server2.c: A minimal web server (no globals)
Chapter 8 – Making Your Program Send Email
This chapter includes the following example program:
smtp_send.c: A simple program to transmit an email
Chapter 9 – Loading Secure Web Pages with
HTTPS and OpenSSL
The examples in this chapter use OpenSSL. Be sure to link to the OpenSSL libraries when
compiling (-lssl -lcrypto):
openssl_version.c: A program to report the installed OpenSSL version
https_simple.c: A minimal program that requests a web page using HTTPS
https_get.c: The HTTP client of Chapter 6, Building a Simple Web Client,
modified to use HTTPS
tls_client.c: The TCP client program of Chapter 3, An In-Depth Overview of
TCP Connections, modified to use TLS
tls_get_cert.c: Prints a certificate from a TLS server
Chapter 10 – Implementing a Secure Web Server
The examples in this chapter use OpenSSL. Be sure to link to the OpenSSL libraries when
compiling (-lssl -lcrypto):
tls_time_server.c: The time server of Chapter 2, Getting to Grips with Socket
APIs, modified to use HTTPS
https_server.c: The web server of Chapter 7, Building a Simple Web Server,
modified to use HTTPS
[ 441 ]
Example Programs
Chapter 11 – Establishing SSH Connections with
libssh
The examples in this chapter use libssh. Be sure to link to the libssh libraries when
compiling (-lssh):
ssh_version.c: A program to report the libssh version
ssh_connect.c: A minimal client that establishes an SSH connection
ssh_auth.c: A client that attempts SSH client authentication using a password
ssh_command.c: A client that executes a single remote command over SSH
ssh_download.c: A client that downloads a file over SSH/SCP
Chapter 12 – Network Monitoring and Security
This chapter doesn't include any example programs.
Chapter 13 – Socket Programming Tips and
Pitfalls
This chapter includes the following example programs:
connect_timeout.c: Shows how to time out a connect() call early.
connect_blocking.c: For comparison with connect_timeout.c.
server_reuse.c: Demonstrates the use of SO_REUSEADDR.
server_noreuse.c: For comparison with server_reuse.c.
server_crash.c: This server purposefully writes to a TCP socket after the client
disconnects.
error_text.c: Shows how to obtain error code descriptions.
big_send.c: A TCP client that sends lots of data after connecting. Used to show
the blocking behavior of send().
server_ignore.c: A TCP server that accepts connections, then simply ignores
them. Used to show the blocking behavior of send().
setsize.c: Shows the maximum number of sockets select() can handle.
[ 442 ]
Example Programs
Chapter 14 – Web Programming for the Internet of
Things
This chapter doesn't include any example programs.
[ 443 ]
Other Book You May Enjoy
If you enjoyed this book, you may be interested in another book by Packt:
C Programming Cookbook
B.M. Harwani
ISBN: 9781789617450
Manipulate single and multi-dimensional arrays
Perform complex operations on strings
Understand how to use pointers and memory optimally
Discover how to use arrays, functions, and strings to make large applications
Implement multitasking using threads and process synchronization
Establish communication between two or more processes using different
techniques
Store simple text in files and store data in a database
Other Book You May Enjoy
Leave a review - let other readers know what
you think
Please share your thoughts on this book with others by leaving a review on the site that you
bought it from. If you purchased the book from Amazon, please leave us an honest review
on this book's Amazon page. This is vital so that other potential readers can see and use
your unbiased opinion to make purchasing decisions, we can understand what our
customers think about our products, and our authors can see your feedback on the title that
they have worked with Packt to create. It will only take a few minutes of your time, but is
valuable to other potential customers, our authors, and Packt. Thank you!
[ 445 ]
Index
A
ad hoc mode 383
address 29, 30
American Encryption Standard (AES) 260
Analog-to-Digital Converter (ADC) 390
anycast 26
Apache 301
application layer 11
application programming interfaces (APIs) 41
Application-Specific Integrated Circuit (ASIC) 392
asymmetric ciphers 261
asymmetric encryption 261
Asynchronous Serial 389
AT commands 394
B
banner 309
Berkeley sockets
closing sockets 53
error handling 53
header files 52
invalid sockets 52
socket data type 52
versus Winsock sockets 51
Bluetooth 386
Bluetooth smart watch connection 386
broadcast addressing 26
bulk encryption algorithm 263
C
C programming language
about 9
network adapters, listing 32
Central Processing Unit (CPU) 388
certificate pinning 286
certificates 264, 265, 270, 284, 285
CGI standard 301
chain-of-trust model 285
chat room
building 96, 97
cipher 259
cipher suites 263
ciphertext 259
classless inter-domain routing (CIDR) 18
client authentication
about 314, 315, 316
Generic Security Service Application Program
Interface (GSS-API) 314
keyboard-interactive 314
no authentication 314
password authentication 314
public key 314
client-server model 28
congestion control methods 362
congestion-avoidance scheme 362
connectivity options, IoT
about 382
Bluetooth 386
cellular 385
Ethernet 384
IEEE 802.15.4 WPANs 387
Wi-Fi 383, 384
Constrained Application Protocol (CoAP) 395
content types 199
Content-Type
returning, from filename 200
D
data encapsulation 14, 15, 16
Data Encryption Standard (DES) 260
data link layer 11
datagram 12
Datagram Transport Layer Security (DTLS) 279
deadlock
avoiding 359, 361
decryption 259
deep packet inspection 340, 341, 342
defense in depth approach 345
Diffie-Hellman key exchange algorithm 261
Digital Rights Management (DRM) 396
Digital-to-Analog Converter (DAC) 390
DNS message name
printing 147, 148, 149
DNS message
printing 149, 150, 151, 152, 153, 154
DNS over HTTPS (DoH) 130
DNS protocol
about 140
answer format 145
endianness 146
message format 141
message header format 141, 142, 143
question format 143, 144
DNS query program 147
DNS query
about 146, 147
sending 156, 157, 158, 159, 161, 162
DNS record types 128, 129
DNS security 130
DNS transport over TCP 141
domain name 20
Domain Name System (DNS) 20
Domain Name System Security Extensions
(DNSSEC) 130
domain validation 285
Domain-based Message Authentication, Reporting,
and Conformance (DMARC) 252
DomainKeys Identified Mail (DKIM) 252
dual-stack configuration 17
E
echo reply 329
Echo Reply message 332
echo request 329
EEPROM 391
elliptic-curve cryptography (ECC) 262
email file attachments 250
email servers
about 227, 228
finding 230, 231, 232, 233
email
format 236
encrypted server name identification (ESNI) 265
encryption
about 259
asymmetric ciphers 261, 262
basics 259
symmetric ciphers 260
Transport Layer Security (TLS) 262, 263
endianness 146
enhanced emails 248, 249, 250
ephemeral port 29
ephemeral port number 115
error descriptions
obtaining 351, 352, 353
error handling 350, 351
ESP8266 microcontroller 391
Ethernet 384
Extended Validation (EV) certificates 285
external transceivers 393
F
FastCGI standard 301
Field-Programmable Gate Arrays (FPGAs) 392
File Transfer Protocol (FTP) 25
file
downloading 319, 320, 322, 323
firewalls 344
firmware updates 396
FLASH 391
frame 12
G
General-Purpose Input/Output (GPIO) 389
H
hardware choices, IoT
about 388
Field-Programmable Gate Arrays (FPGAs) 392
microcontroller 390
Single-Board Computers (SBCs) 388
Hardware Description Languages (HDL) 392
Hayes command set 394
[ 447 ]
hostname resolution
working 126, 127, 128
HTTP POST requests
about 190
file uploads 192
form data, encoding 190, 191
HTTP protocol
about 168, 169, 284
response body length 174, 175
HTTP request format 170, 171
HTTP request types
CONNECT 169
DELETE 169
GET 169
HEAD 169
OPTIONS 169
POST 169
PUT 169
TRACE 169
HTTP response codes 173
HTTP response format 171, 172
HTTP server
about 197, 198
architecture 198
HTTP web client
implementing 179, 180, 181, 183, 184, 186,
188
HTTPS client 272, 273, 276, 277, 278, 279
HTTPS server, with OpenSSL
about 288, 289
time server example 290, 291, 293, 294, 296,
297
HTTPS server
about 298, 299
challenges 299, 300
Hypertext Markup Language (HTML) 258
Hypertext Transfer Protocol Secure (HTTPS)
about 284
authentication 258
encryption 258
integrity 258
overview 257, 258, 259
I
IEEE 802.15.4 WPANs 387
Industry 4.0 382
inetd 68
infrastructure mode 383
Inter-Integrated Circuit (I2C) 389
inter-process communication (IPC) 41
International Data Encryption Algorithm (IDEA)
260
internet 9
Internet Assigned Numbers Authority (IANA) 28,
199
Internet Control Message Protocol (ICMP) 23, 328
Internet Engineering Task Force (IETF) 17
Internet Message Access Protocol (IMAP) 228
Internet of Things (IoT)
about 9, 382
hardware choices 388
Internet Protocol
about 17
address 17
CIDR 25
local networks and address translation 23
subnetting 25
internet routing 21, 22, 23
Internet Service Providers (ISPs) 17, 126, 230,
383
IoT protocols 394, 395
IoT, ethics
about 396
data collection 397
end-of-life planning 397
privacy 397
security 398, 399
IP lookup
example program 137, 138, 139
ipconfig command 29, 30
IPv4 17, 66, 67
IPv4 addresses 17
IPv6 addresses 18
IPv6
about 17, 66, 67
working with 64, 65
[ 448 ]
K
key exchange algorithm 263
L
Let's Encrypt 285
libssh
about 305
connection, establishing 306, 308, 309, 310
testing 305, 306
link-local addresses 19
Local Area Networks (LANs) 23
local connection
checking 334, 335
deep packet inspection 340, 341, 342
network traffic, capturing 343
snooping 336, 337, 338, 339
local port 28, 29, 111, 115, 377
loopback address 18
low-rate wireless personal area networks (LRWPAN) 387
M
mail submission 228
mail transmission 228
man-in-the-middle attack 261
Maximum Segment Size (MSS) 364
mesh network topology 387
message authentication algorithm (MAC) 263
Message Authentication Code (MAC) 399
Message Queuing Telemetry Transport (MQTT)
395
microcontroller 390
microservices 88
MIME type 199
modem 392, 393
multicast 26
multiple connections buffering
about 202, 203, 204
drop_client() function 206
get_client() function 204, 205
get_client_address() function 207
send_400() function 208
send_404() function 209
serve_resource() function 209, 210, 211, 213
wait_on_clients() function 207
Multipurpose Internet Mail Extensions (MIME) 250
N
Nagle algorithm 364, 365
name/address translation functions
about 131
getaddrinfo(), using 131, 132, 133, 134
getnameinfo(), using 134, 135, 136
Netstat 334
network adapters
listing, from C programming language 32
listing, on Linux 37
listing, on macOS 37
listing, on Windows 32, 33, 34, 35
Network Address Translation (NAT) 23
network address translation (NAT) 111
network layer 11
network monitoring
purpose 328
network security
about 344
application safety 345, 346
application security 345, 346
network testing
etiquette 346
network traffic
capturing 343
networked code
robustness 221
security 220, 221
networked program
about 53
creating 55, 56, 57, 58, 59, 60, 61, 62, 64
motivating example 54
networking
with inetd 68
Nginx 301
O
open source servers 223
Open Systems Interconnection model (OSI model)
10
Open Web Application Security Project (OWASP)
398
[ 449 ]
OpenSSL
about 266, 267, 284
alternatives 300
certificates 270, 271
encrypted sockets 267, 268, 269, 270
HTTPS server 288
self-signed certificates 286, 287, 288
OSI layer model
about 10
application layer 11
data link layer 11
network layer 11
physical layer 11
presentation layer 11
session layer 11
transport layer 11
traceroute, working 331, 333
remote command
executing 316, 317, 319
request line 170, 197
Rijndael 260
Rivest-Shamir-Adleman (RSA) 262
S
P
packet 12
percent encoding 190
physical layer 11
Ping utility 328
plaintext 259
polling 73
port numbers 27
Portable Operating System Interface (POSIX) 41
Post Office Protocol (POP) 228
postcards 44
Pre-Shared Key (PSK) 399
presentation layer 11
Private Key 262
protocols 10
Public Key 262
public-key authentication 305
public-key encryption 261
Pulse Width Modulation (PWM) 389, 390
R
Random Access Memory (RAM) 388
Raspberry Pi Zero W 388
raw sockets 333
reachability
raw sockets 333
route, checking 330, 331
testing 328, 330
Secure Copy Protocol (SCP) 319
Secure Hypertext Internet of Things (SHIoT) 399
Secure Shell fingerprint (SSHFP) 311
Secure Socket Layer (SSL) 257
segment 12
self-signed certificates
with OpenSSL 286, 287, 288
send() method
blocking behavior on 98
Sender Policy Framework (SPF) 129, 252
Serial Peripheral Interface (SPI) 389
server authentication 264, 311, 313
server name identification (SNI) 265
server socket
creating 201, 202
session channel type 317
session layer 11
Single-Board Computers (SBCs) 388
site-local addresses 19
SMTP client program 237, 238, 239, 240, 241,
242, 243, 244, 245, 246, 247, 248
SMTP dialog 234, 235
SMTP relay 229
SMTP
about 227
security 230
socket functions
accept() 46
bind() 46
close() 46
connect() 46
fcntl() 46
getaddrinfo() 46
getnameinfo() 46
ioctlsocket() 46
listen() 46
recv() 46
[ 450 ]
recvfrom() 46
select() 46
send() 46
sendto() 46
setsockopt() 46
shutdown() 46
socket() 46
socket program
anatomy 47
TCP program flow 48, 50
UDP program flow 50, 51
socket
about 41
connection-oriented 44
connectionless 44
implementing 28
local address 377
multiplexing with 378, 379
setting up 42, 43
types 44
spam-blocking
pitfalls 251, 252
SSH authentication
about 310, 311
client authentication 314, 315, 316
server authentication 311, 313
SSH protocol 304
symmetric cipher 260
synchronous multiplexing, with select()
about 75, 76
iteration, through fd_set 78
select() timeout 77
select(), on non-sockets 78
T
tab feature 73
TCP client
about 78, 79
code 80, 81, 82, 84, 85, 86, 87
TCP connection
data-transfer phase 355
setup phase 354
tear-down phase 355
TCP connections, multiplexing
about 72, 73
forking 73
multithreading 74
non-blocking sockets, polling 73
select() function 75
TCP fallback 141
TCP flow control 359, 360, 361
TCP four-way closing handshake 370
TCP program flow 48, 50
TCP server
about 88, 89, 90
code 90, 91, 92, 94, 95
TCP slow start algorithm 362
TCP socket, tips
about 354
address-in-use errors, preventing 373, 374
congestion control 362, 363
connection tear-down 369, 370
deadlock, avoiding 359
delayed acknowledgment 366, 367, 368
message, sending to disconnected peer 375
Nagle algorithm 364
shutdown() function 371, 372
TCP flow control 359
timeout, on connect() 355, 356, 357, 359
TCP stream protocol 99
TCP/IP layer model
about 12, 13
Host-to-Host layer 13
Internet layer 13
Network Access layer 13
Process/Application layer 13
TCP/IP protocol suite 12
Telnet 304
Time Exceeded message 332
time-to-live (TTL) 126, 331
Tiny Encryption Algorithm (TEA) 260
TLS protocol
about 263, 264
alternatives 300, 301
certificates 264, 265
server name identification (SNI) 265
TLS termination proxy 301
tooling options
tcpdump 336
Wireshark 336
[ 451 ]
traceroute
working 331
tracert 331
tracker 47
Transmission Control Protocol (TCP) 11, 44, 45,
197, 304, 354
transport layer 11
Transport Layer Security (TLS)
ciphers, used 262
Tshark
reference 336
U
UDP client
about 108, 112, 113, 114, 115, 116
methods 105, 106
UDP program flow 50, 51
UDP server
about 108, 109, 110, 111, 117, 118, 120, 121,
122
methods 106, 107
UDP sockets 104, 105
unicast addressing 26
Uniform Resource Locators (URL)
about 175, 176
parsing 176, 178
URL encoding 190
User Datagram Protocol (UDP) 11, 44, 45, 279
V
Verilog 392
VHSIC Hardware Description Language (VHDL)
392
Virtual Private Network (VPN) 386
Virtual Private Servers (VPS) 307
W
Watch-Dog Timers (WDT) 390
web server
main loop 214, 215, 216, 217, 218
Wi-Fi 383
Winsock 32, 41
Winsock sockets
versus Berkeley sockets 52
Wireless Access Point (WAP) 383
Wireless Local Area Network (WLAN) 383
Wireless Personal Area Networks (WPAN) 386
Wireshark 341
wolfSSL 399