/


Теги: electrical engineering electronics instruction manual
Год: 2022


Текст
NE
W
’
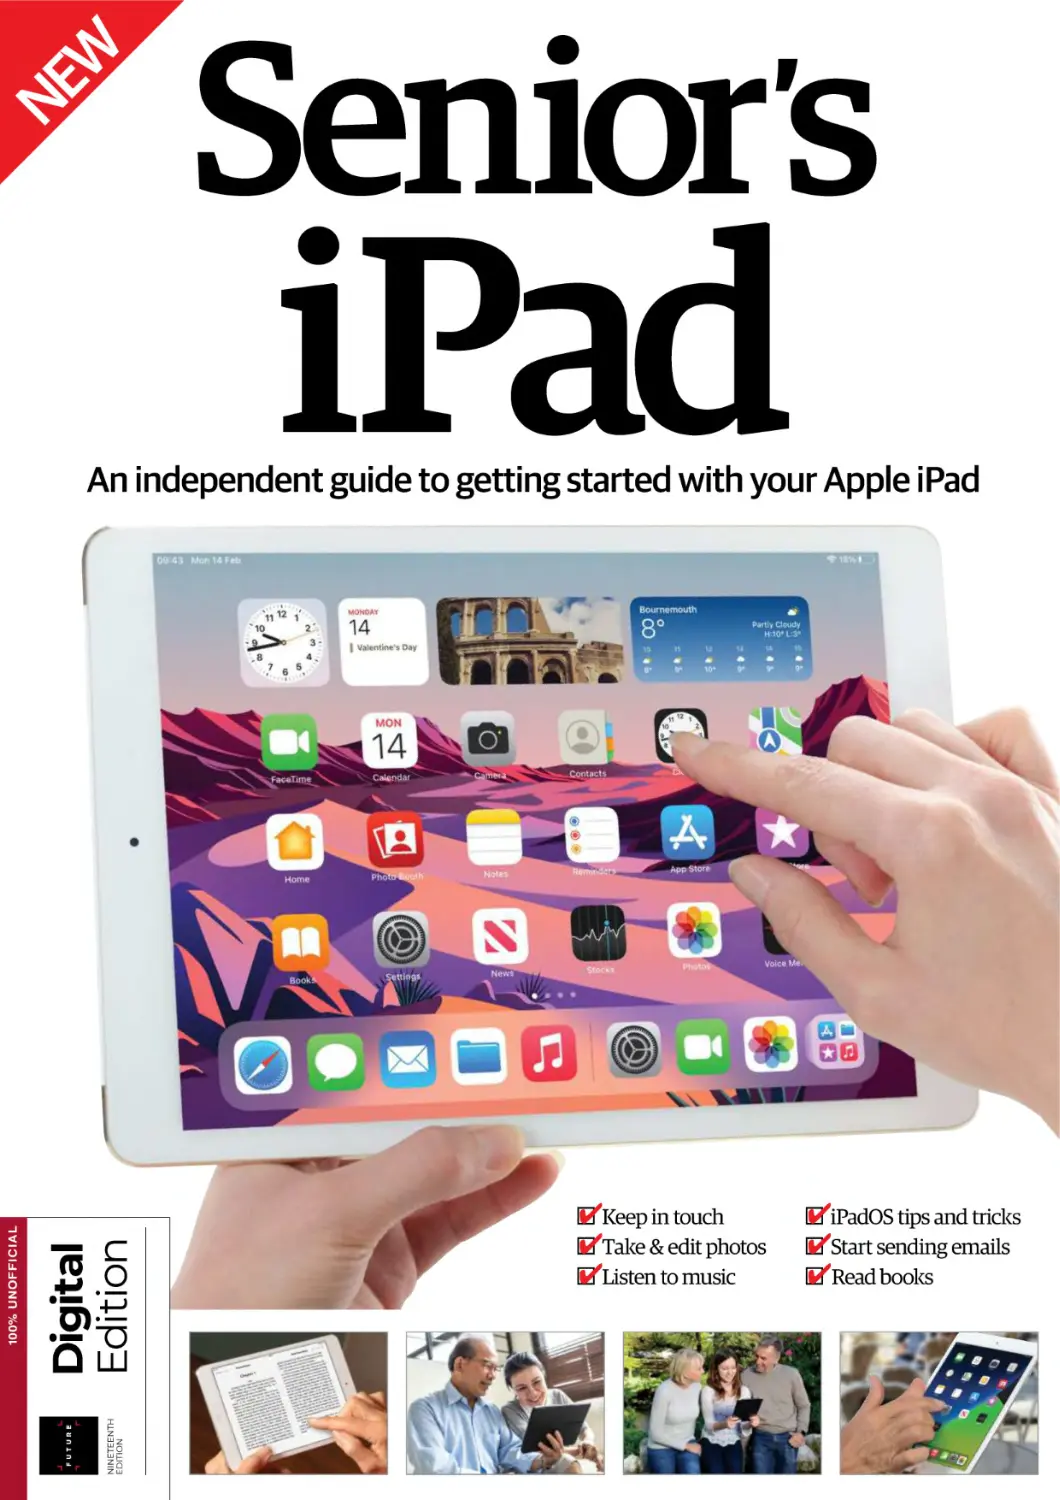
Senior s
iPad
100% UNOFFICIAL
NINETEENTH
EDITION
Digital
Edition
100% UNOFFICIAL
An independent guide to getting started with your Apple iPad
✔Keep in touch
✔Take & edit photos
✔Listen to music
✔iPadOS tips and tricks
✔Start sending emails
✔Read books
Welcome to
Senior’s
iPad
The iPad is one of the most intelligent pieces of technology
on Earth. Owing to its incredible versatility and portability,
it allows you to undertake an incredible number of day-today tasks while on the go, acting as a camera, media hub,
games console and much more. And all of this from a userfriendly and intuitive interface that can be mastered by
tech aficionados and novices alike. It makes sense then that
we rarely go a day without seeing one being used – in one
capacity or another – for work, play or study. So now you have
your hands on this life-changing device it’s time to find your
feet. In this new edition of Senior’s iPad, explore all the basics,
from long-standing features to the latest operating system –
iPadOS 15. Turn the page and you will soon wonder what you
did without your trusty iPad by your side!
e
Senior’s Edition
iPad
Future PLC Quay House, The Ambury, Bath, BA1 1UA
Editorial
Compiled by Aiden Dalby & Adam Markiewicz
Senior Art Editor Andy Downes
Head of Art & Design Greg Whitaker
Editorial Director Jon White
Photography
James Sheppard, Getty Images
All copyrights and trademarks are recognised and respected
Advertising
Media packs are available on request
Commercial Director Clare Dove
International
Head of Print Licensing Rachel Shaw
licensing@futurenet.com
www.futurecontenthub.com
Circulation
Head of Newstrade Tim Mathers
Production
Head of Production Mark Constance
Production Project Manager Matthew Eglinton
Advertising Production Manager Joanne Crosby
Digital Editions Controller Jason Hudson
Production Managers Keely Miller, Nola Cokely,
Vivienne Calvert, Fran Twentyman
Printed in the UK
Distributed by Marketforce, 5 Churchill Place, Canary Wharf, London, E14 5HU
www.marketforce.co.uk Tel: 0203 787 9001
Senior’s Edition: iPad Ninteenth Edition (TCB4892)
© 2022 Future Publishing Limited
We are committed to only using magazine paper which is derived from responsibly managed,
certified forestry and chlorine-free manufacture. The paper in this bookazine was sourced
and produced from sustainable managed forests, conforming to strict environmental and
socioeconomic standards.
All contents © 2022 Future Publishing Limited or published under licence. All rights reserved.
No part of this magazine may be used, stored, transmitted or reproduced in any way without
the prior written permission of the publisher. Future Publishing Limited (company number
2008885) is registered in England and Wales. Registered office: Quay House, The Ambury,
Bath BA1 1UA. All information contained in this publication is for information only and is, as far
as we are aware, correct at the time of going to press. Future cannot accept any responsibility
for errors or inaccuracies in such information. You are advised to contact manufacturers and
retailers directly with regard to the price of products/services referred to in this publication. Apps
and websites mentioned in this publication are not under our control. We are not responsible for
their contents or any other changes or updates to them. This magazine is fully independent and
not affiliated in any way with the companies mentioned herein.
Future plc is a public
company quoted on the
London Stock Exchange
(symbol: FUTR)
www.futureplc.com
Chief executive Zillah Byng-Thorne
Non-executive chairman Richard Huntingford
Chief financial officer Penny Ladkin-Brand
Tel +44 (0)1225 442 244
Contents
18
Accessibility
features
Introduction
42 Control privacy settings
8
Introducing the iPad
44 Find a misplaced iPad
or iPhone
18
Make your iPad easier to use
46 Change your wallpaper
Setting up
24 Activate and register
your new iPad
28 Change settings to suit
your needs
30 Set up iCloud and
start syncing
32 Back up your iPad
34 Set up a Wi-Fi connection
35 Connect to a
Bluetooth device
36 Introducing the
Control Centre
38 Set a Passcode Lock
40 Customise Touch ID settings
6
48 Get to grips
with Multitasking
50 Access email on your iPad
Getting started
54 Move icons and use folders
56 Discover the features
of Safari
58 De-clutter the web with
Safari Reader
60 Explore the Mail app
62 Add an event in Calendar
64 Keep perfect time
with Clock
66 Use Reminders to never
miss events
“It’s unlike any
computer
you’ve ever
laid hands on”
68 Edit Notification Centre
settings
70 Manage contacts in
FaceTime
72 Make video calls using
FaceTime
74 Use Messages to keep
in contact
76 Send audio messages
78 Use the Notes app
80 Navigate in Maps
82 Use turn-by-turn
navigation
84 Use Siri on your iPad
76
Send audio
messages
100
Using the
Camera
122 Get started using Files
124 Send files with AirDrop
106
Enjoy
videos
86 Explore the App Store
102 Edit images in Photos
88 Check out the iTunes Store
app
104 Organise your photos
90 Buy music through the
iTunes Store
92 Purchase films and TV
shows
94 Subscribe and use Apple
Music
96 Create a playlist in Apple
Music
The next step
100 Using the Camera
Helpdesk
126 Your iPad glossary
106 Get the most out of the
iPad videos
108 Listen to podcasts on
your iPad
110 Purchase an iBook
112 Get to know iBooks
114 Stay informed with News
116 Learn to set up
Family Sharing
24
Activate and
register
118 Design a document
120 Make a spreadsheet
7
Introduction
Introducing
the iPad
Let’s explore the iPad’s basic features
T
he iPad is unlike any
computer you’ve ever laid
your hands on. For one thing,
there’s no intermediary between you
and what you’re trying to do; on a
regular computer, you have to learn
to manipulate a pointing device like a
mouse or trackpad to move a cursor
on the screen so you can achieve
what you need to do. On the iPad,
you’re already an expert manipulator
since you just use your fingers
directly on the screen to move and
affect what you see. If you know
how to point, you know how to use
an iPad, and that’s the truly exciting
thing about this device: it makes
personal computing truly personal.
But despite its friendliness, it’s still
a complex piece of hardware and
you’ll need to know a little about
what makes it tick: how you turn it on,
for instance, and what functions its
few buttons offer. And what about all
the other controls embedded in the
software? How can you use its many
features to the fullest?
We will endeavour to show you all
this over the next few pages, helping
you feel comfortable with the device
so you can hit the ground running in
no time at all.
Browsing
As soon as you’ve connected to your
local wireless network, the iPad is
ready to be an internet browsing
device. In fact, when Apple’s
engineers were first experimenting
with touch-screen devices, the
original idea was a tablet designed
for web browsing. As a result, going
online is a very polished experience
and a joy to use. Like all other
apps on the iPad, tapping on the
Safari icon fills the screen with that
program’s content, removing any
other distractions. You can then
browse the web with your fingers.
If you’re familiar with Safari on your
Mac or PC, you’ll feel right at home
– there’s even a Google search field.
Tapping on it increases its size and
reveals the keyboard so you can type
what you’re looking for. The same
applies for the address field if you
know exactly where you want to go.
Thanks to iCloud, you can sync your
Mac’s bookmarks to your iPad, right
down to the Bookmark Bar.
“Chances are someone may already
have designed a great solution that
fits your exact needs”
8
Navigating a webpage is easy: you
flick your finger up, down, left or
right to see other parts of the page.
If you want to focus on a specific
section, double-tap on it to zoom
in on it. There are other browsers
on the App Store, such as Google
Chrome and Opera Mini, so have a
look to see if one suits your needs
better than Safari.
Communication
Browsing the web isn’t the only thing
you need to do online. For one thing,
you need to check your emails and
the iPad’s got you covered there as
well, thanks to the Mail application.
With it, you can set up as many
accounts as you need. Just like Mail
on your Mac, you have a universal
inbox where all your messages,
irrespective of which address they
were sent to, can be accessed, read
and replied to. You can also organise
your messages, making it easier to
keep track of a conversation.
When it comes to social
networking, you can either make
use of Safari – aside from its games,
Facebook works very well in the
iPad’s web browser (the games don’t
work but there may be versions
of them for the iPad, iPhone or
iPod touch available to download
in the App Store) – or look for the
Introducing the iPad
The cameras
The iPad has a FaceTime camera on the
front and an iSight camera on the back
The on/off switch
Turn your iPad on or off by
holding the top-right button
Wi-fi signal
strength
This symbol
lets you know
the signal
strength it is
receiving
The volume
control
Quickly control
your sound with
the buttons on
the right
Battery level
indicator
You can visually
see how much
power your iPad
has left here
The screen
The screens on
iPads vary in size
and resolution,
but new models
have a hi-res,
LED-backlit
Retina screen
with an amazing
level of detail
Available with or
without 4G
If you want to
use your iPad
away from a wi-fi
signal, you’ll need
the 4G model
The Dock
Your favourite and
most recent apps will
appear here. Swipe
up at any point to
access it
The Home button
This button takes
you to the previous
app launch screen
The dock connector to sync
and/or recharge
This is where you plug in your
lead to sync or charge the iPad
The speaker grille
The speaker is located
here, and it does a great
job for a small device
9
Introduction
dedicated iPad apps, like Facebook
and Twitter, at the App Store. These
have been integrated into iOS so that
you can tweet and share from within
a host of default Apple apps.
Other applications, like Skype,
enable you to enjoy full-screen
video calls on your iPad with other
people who don’t necessarily own an
Apple device, or there’s the default
FaceTime app for people who do.
Photos
If you see images on the web you’d
like to keep, you can easily save
them to your Photos application
by tapping and holding on one and
choosing ‘Save Image’ from the
popover menu. But that’s not the
only use of that particular program.
Thanks to iOS’s iCloud feature, you
can activate Photo Stream so that
any pictures taken on your iPad or
iPhone are automatically pushed to
all of your iOS devices and Macs.
You can also dispense with a
bigger computer entirely by getting
the iPad Camera Connection Kit and
transfer photos and videos from
any compatible digital stills camera
straight to your iPad library – after
which Photo Stream will make
them instantly available on all of
your devices, automatically and
completely wirelessly.
Once there, you can browse
through your photos, edit with
the Photo app’s tools, post them
online or send them to friends and
family. If you want to upload them to
Facebook or Twitter, you can do this
via the Photo app. Select the image
you want to use and tap the Share
button to see the options. You can
also set it as wallpaper.
10
First steps
Getting acquainted with your iPad
Turn on
When an iPad’s screen is off, your device is either asleep or shut down
To turn the device on
when it has been fully
turned off, press the On/Off
button, top right of the device.
01
If it’s in Sleep mode, you
can also press the Home
button to bring your iPad back
to life.
02
Sleep mode
Turn off
You may be putting your iPad to
sleep quite often
To turn your iPad off, check out the
following steps
01
You need to make use of
one of your iPad’s few
physical buttons for this; the On/
Off button is located in the top
right of the device.
01
Press and release it once
for the screen to go dark
and become unresponsive to any
touch input.
02
02
Press and hold on its On/
Off button for up to five
seconds. The screen will dim and
a red slider will appear.
Move that red slider
from left to right to
confirm that you wish to shut the
iPad down.
Introducing the iPad
Change volume
Mute
Depending on what you’re doing, you can change the volume in various ways
To mute the volume of the iPad, you
have two options…
If you have the side
switch set to Mute, slide
it down to mute your iPad.
01
Use the physical buttons,
top of the iPad’s right edge.
The top one increases the volume
and the bottom one lowers it.
01
If you’re watching a movie
or listening to music, you’ll
find a slider on the screen to achieve
the same result.
02
Press and hold the
volume-down button.
After two seconds, it’ll be muted.
02
Update iPad
Here’s how to make sure your device is using the latest software
Charge
Recharging the iPad is a simple matter
Unless your computer
is recent enough, there
won’t be enough power from its
USB port to charge the iPad.
01
Go to Settings and, under
‘General’, press ‘Software
Update’. Your iPad will then check if
any updates are available.
01
If there are updates
available you’ll have the
option to ‘Install Now’. Click the
button and follow the instructions.
02
Brightness
Unlock
If the screen is too light or dark for
your tastes, you can alter it like so…
Once you’ve woken your iPad up,
you’ll be graced with its Lock screen
Tap on the Settings app
and select the ‘Display &
Brightness ’ option. Use the slider to
lower or raise the brightness.
01
01
To gain access to your iPad’s
functions, simply press the
Home button.
For a faster, more
efficient charge, it’s
best to use the bundled power
adaptor instead.
02
Sync
To back up or transfer
files, you need to sync
Sync
with iCloud
Go to page 30
for this syncing
option
Use the bundled cable to
connect your iPad via one of
your computer’s USB ports.
01
Double click your Home
button to access your
Control Centre and you will find
brightness controls there too.
02
If you have set a password,
you will have to type it in
before you can proceed any further.
02
Now iTunes will start to
launch and the backup and
syncing processes will, by default, be
totally automatic.
02
11
Introduction
Music
It wouldn’t be an Apple device if it
didn’t let you listen to your music,
but although iTunes is responsible
for almost everything media-related
on your Mac, the iPad has broken
those features into multiple apps
designed for specific purposes. For
instance, you can purchase new
music using the iTunes application,
but if you want to listen to albums
you currently own, then you have to
use the Music app. From there, you
gain access to your songs, podcasts
and audiobooks. If you want to
watch a music video, however, you’ll
need to take a trip to the Videos app.
But iTunes isn’t the only way you
can listen to music on your iPad.
There are other programs that let
you stream songs directly from the
internet and, just like the Music
application, they can be used to
listen to music in the background
while you work in another program
on your iPad. If you’re in the UK,
make sure you check out Spotify,
while US readers should take a look
at Pandora.
Watching
Although it’s no substitute for your
widescreen television, when you’re
away from your couch, the iPad
makes for a surprisingly good TV.
Due to its size, it’s much better than
an iPhone or iPod touch and its builtin speaker is good enough to allow
the device to be shared, but what
can you watch on it? Well, anything
you’ve bought or rented from the
iTunes Store will work on your iPad:
12
you can transfer movies, TV shows,
podcasts and music videos and
they’ll all play flawlessly on your
portable device.
You could also convert your
existing DVD collection into
iTunes-compatible files; but in
order to achieve this, you’d need
desktop computer programs like
HandBrake which are designed to
transform your films and episodes
into compatible files ready for you
to enjoy on your iPad. This can
be a time-consuming process, so
why not try the brilliant television
services such as the BBC iPlayer
and Sky Go, both of which offer
catch-up services? The Sky+ app
lets UK viewers record programmes
remotely to watch on their Sky+ inhome boxes. The EyeTV application
also lets you watch live television as
long as you’re within range of your
wireless signal.
Entertainment
While you can open the Safari
internet browser, go to www.
youtube.com and watch videos,
there is a dedicated YouTube app
Introducing the iPad
iTunes
The desktop software explored
available as opposed to one that
could have been released ages ago.
It’s installed. Now what?
n Double-click on its icon to open it
and agree to the licence agreement.
You can convert your music CDs to
iPad-compatible files or purchase
new songs, movies and shows from
the iTunes Store.
Where can I get it?
n Point your browser towards
www.itunes.com and click on
the ‘Download iTunes’ button,
somewhere on the page.
Do I need it?
n If you plan on buying all of your
media (music, films, etc.) digitally,
then you won’t need iTunes as you
can purchase all of that content
directly from your iPad.
What is iTunes?
n It’s a program designed by Apple
and the purpose was to transfer
your CD collection onto your Mac,
catalogue your songs and transfer
them to a compatible MP3 player.
Why is it not included on a CD?
n Apple now assumes that
broadband is ubiquitous, and that
way the company can make sure that
you’ll be using the very latest version
available. You can watch clips, leave
comments and do pretty much
everything you’d expect to be able
to do through Safari, but the app has
an interface specifically designed for
the iPad. Check out what’s trending,
get recommendations based on
what you’ve viewed and subscribe
to channels you enjoy so you can see
the latest content as it is released.
If you see something that you think
your friends will enjoy, you can share
it with them.
Other video sites, like Vimeo, also
have iPad-compatible versions of
their videos, so you can watch those
straight from your web browser.
But being entertained is much
more than just passively watching
something on the screen; you can
also use your iPad to read the latest
bestseller or enjoy a timeless classic.
The two major programs that allow
you to do this are Apple’s own iBooks
and Amazon’s Kindle. Both are also
compatible with the iPod, iPhone
and Mac (Apple includes the iBooks
app as a default app on your iPad),
so you can stop reading on the iPad
and carry on with another device if
you’d like. Not all titles are available
in digital form, but there’s still plenty
of choice and more are coming to the
store every day.
What happens when I connect my
iPad to my computer?
n iTunes will take over your iPad and
you will be asked not to disconnect
it while the syncing process is
taking place. Your iPad’s data will be
backed up and your media will be
synchronised between your devices.
How do I cancel the sync?
n When your iPad is connected to
iTunes, its screen informs you not
to disconnect it. However, there is a
slider at the bottom which you can
use to cancel the sync should you
need to. Note that your iPad will not
be fully backed up if you do this.
Games
When it comes to games, you will be
spoilt for choice. There are so many
available to download, both free
and paid-for. You can spend hours
getting immersed in an adventure
story (thank goodness for the iPad’s
excellent battery life), or just use it
to while away a few minutes of your
time every now and again.
The obvious choices are there, like
arcade-style games such as Super
13
Introduction
“The iPad is a very
powerful machine capable of
doing almost anything a computer can”
Mario Run and Fruit Ninja HD; plus
adventure games like The Witness
and Terraria; strategy games like
Cut the Rope and Angry Birds; and
role-playing games like Aralon and
Galaxy on Fire 2. There’s even an
iPad version of Farmville.
But none of these offers anything
new from what you could achieve on
a regular computer. What sets the
iPad apart from other platforms is
that its screen is large enough that
it can be easily viewed by multiple
people at the same time. As a
result, it’s become a natural digital
alternative to board games, making
playing on a computer a much more
social experience with people in the
same room as you, just like the good
old days. Make sure you check out
titles like Pandemic, Carcassonne,
Scrabble, Monopoly and The Game
14
very convenient and enables you to
work between the two systems.
But the iPad can go a lot further
than this. For one thing, the iWork
suite is available for it as a separate
purchase. You obviously won’t get
all the features that you’ve grown
accustomed to with the Mac’s
versions, but for a first attempt
at creating a business suite
that’s controlled by touch, it’s
remarkable what you can do
with these apps and you’ll
be designing newsletters,
filling in spreadsheets and
creating presentations in
next to no time at all.
If you need
compatibility with Microsoft
Office well you’re in luck as
Microsoft have apps for the device.
Word, Excel, PowerPoint and other
programs are all available on the
iPad, offering the same tools but for
the iPad. They’re free to use for 30
days and then you can pay a monthly
fee to continue using them.
Of Life. Whatever your tastes,
though, the iPad has them covered.
Productivity
Office work
The iPad isn’t just a device to
browse the web, watch videos
and play games, however. Many
people classify it as just a media
consumption device, but it’s in fact
a very powerful machine capable
of doing almost anything a regular
computer can. It comes with a
Notes program that you can use to
jot down a few ideas, lists or even
the beginning of a draft letter. That
application syncs with your emails
and you can access those documents
in your Mac’s Mail program, which is
As for other productivity
programs, Calendar stores all your
appointments and syncs with
Calendar on your Mac – as long as
you have activated your free iOS
iCloud account. The same applies for
the Contacts app, even preserving
all your groups so you’ll feel right at
home on your device.
Surprisingly, the iPad doesn’t come
with a calculator application built-in
to the system, but this can be easily
remedied with a short visit to the
App Store. Just type in ‘Calculator’
in the search field to find enough
free and paid options to satisfy your
needs. Another feature missing
Introducing the iPad
App Store
A vital part of the iPad explained
iPad’s homescreen. You might find
some websites showcasing various
programs, but you can only get them
from the App Store.
Can I only get them from
my computer?
n No: there’s a program called ‘App
Store’ on your iPad. From there,
you can gain access to the entire
store as well, although you will
need to be within range of a Wi-Fi
network, unless of course you own a
4G-capable iPad.
What’s all this talk about apps?
Do I need them?
n Apps are programs that run on
a computer, like your browser or
word processor. They increase your
device’s functionality and you should
definitely browse through them to
see if there’s anything you might like.
Where do I get these apps?
n Straight from the App Store,
which you can access from the
from the iPad is any possibility of
using it like an external drive, but
the fantastic advantage of the iPad
(and any device powered by the iOS
software) is the huge number of
developers working on it. As a result,
someone’s come up with a way of
achieving just that, thanks to an
application called ’USB Disk Pro for
iPad’ (a free version is also available
under the title of ’USB Disk for iPad’),
so you can easily use your iPad like an
external portable hard drive.
Chances are, whatever it is you’re
looking for, someone may already
have designed a solution that fits
your exact needs.
What if I’m just browsing?
Can I find stuff easily?
n Of course: the App Store is
designed to help you buy. As a result,
you can look through various lists
like top sellers, top free apps, staff
recommendations, and so on.
Is there any trial software?
n Not as such, but many developers
have ‘lite’ or ‘free’ versions of their
applications. These offer limited
functionality or a few sample levels
Creative apps
That’s exactly the case with graphic
design applications. Adobe, maker of
the mighty Photoshop, has released
a number of apps for the iPad, but
other, smaller developers have also
jumped at the opportunity that
this new platform offers them and
there’s a wealth of programs that
allow you to design with your fingers
anything you used to need a mouse
or a graphic tablet for in the past.
if it’s a game. If you like what you
see, you can then purchase the full
program and delete the lite copy.
It’s all a bit of a jumble; can I
narrow my search down?
n The App Store is broken into 25
categories, each with its own top
sellers list. You can narrow your
search by focusing on a single one.
How can I ask questions or get
help from the developer?
n At the bottom of every app
description is a link to the
developer’s website. More often
than not, you’ll find a contact email
address there, which you can use to
write to the developer or company
and get the help you need.
Why does my App Store icon have
red numbers on it?
n These badges are there to show
you that your apps have been
updated and that you can get those
new versions for free directly from
the App Store’s Updates section.
The beauty of the iPad is that these
programs are so cheap compared
to those you’d find on a Mac or
Windows PC that trying some out
isn’t as financially crippling as it can
be on other platforms.
You’re bound to find the right
program that matches your abilities.
If you’re artistically inclined, have
a look at Autodesk SketchBook,
Motion or Education. If you’re
looking for programs that help you
transform pictures into stunning
works of art, explore Oilist or the
PhotoArtista series of applications.
If you fancy more specific effects,
consider Drawing Desk or Assembly.
15
Introduction
Accessories
Enrich your hardware with some great kit…
Protective films Even if you
prefer your iPad to be without a
case, you should consider a film
to protect its most important
part: the screen. Some highquality ones not only protect it
from accidental scratches, they
actually make it easier to clean
and fingerprints don’t stick as
easily as they would on a bare
piece of glass
Case Getting an iPad
case is essential if you
wish to protect your
investment and they
come in many styles.
Most can display your
iPad in portrait or
landscape orientation
and can be supported
at a variety of angles
for browsing, working
or watching movies
Keyboard The iPad is great
for many things, although
some people still struggle
with typing using the
device. You can get around
this by purchasing an Apple
Wireless Keyboard and then
pairing it with your iPad via
Bluetooth
Smartcase This device will enthral you for hours with
its ingenuity. With the clever use of magnets, you can,
literally, sling this cover at your iPad and it will auto-align
to sit perfectly across the screen of your device for
supreme protection. What’s more, when you pull it back,
your device will automatically wake up
16
Styluses Controlling objects with your fingers
undoubtedly feels more natural, but a stylus can
be great for precision work. A few companies
have created such devices that work very well
with the iPad’s capacitive screen
Introducing the iPad
Apple TV Your iPad is a great
device to play all of your
downloaded movies, videos
and music, but if you want to
broadcast them on a bigger
stage then Apple TV is perfect.
This device transforms your
TV into a viewing portal for all
of your Apple content and it
does so wirelessly – you just sit
back and control your evening’s
entertainment from your iPad
“It’s undeniable how truly amazing it is
to be able to scroll through a map and
effortlessly zoom in and out of a location
using your fingers alone”
Those of you who want more than
the Photo app’s adjustment tools
should purchase TouchUp, and your
grandchildren will love to play with
Doodle Buddy.
Maps
Speakers The iPad’s mono
speaker may be surprisingly
good for an item of its size,
but it’s really not sufficient to
enjoy your media to the fullest.
Thankfully, there are many
external speakers available to
improve the experience. They
either connect via its mini-jack,
the dock connector or even
wirelessly via Bluetooth
All of the above can be achieved
whether you own a Wi-Fi-only iPad
or one capable of connecting to a
4G network (that is one that hooks
up to a mobile phone network and
hence gets you online wherever you
have coverage – for a price). If you’ve
decided to invest in a 4G-capable
iPad, the capabilities of your machine
are greatly extended since you’ll be
able to browse, check your emails
or even play online games wherever
you might be.
There’s also the added advantage
of being able to use the Maps
application to help you navigate to
your desired location. Apple replaced
the Google Maps app with its own
Maps app back in iOS 7, which, as
well as giving turn-by-turn directions,
offers the speed limits for the road
you’re on.
You may get tired of hearing
how ‘magical’ the iPad is, but it’s
undeniable how truly amazing it is
to be able to scroll through a map
and effortlessly zoom in and out of a
location using your fingers alone. The
program is incredibly responsive and
the only limitation you’ll experience
will be due to your internet’s
bandwidth. It illustrates just how
wonderful using this device truly
is. There are also other map apps
available, so check out the App Store
to find one that suits you.
Kids
The iPad is an amazing learning tool
no matter what your age is; there’s
even a dedicated kids category in
the App Store, where you can get
interactive books like Winnie the
Pooh or The Cat in the Hat, programs
that teach you how to read and
write or even understand the world
around you, help you play music,
draw… pretty much anything you
can imagine.
Older children haven’t been left
out either: MathBoard is a fantastic
program designed to help you
perfect your algebra. You can even
set which calculations to work on
and how difficult they should be.
There are also many apps designed
to keep kids entertained, such as
wordsearch apps like WordSeek HD
and much more.
If you want to get your kids
interested in space, they can learn
everything they’d need to know
thanks to programs like Solar Walk
or Star Walk HD, and the little ones
can keep up with their older siblings
with Star Walk for Kids. If you want
to explore all the elements that make
up our universe, be sure to look for
The Elements – it has more than 500
HD rotatable images, and detailed
information and fun facts.
17
Accessibility
Make your iPad
easier to use
An iPad can be the perfect computer for anyone who
finds traditional devices slightly out of reach
A
ccessibility is a hallmark
of all Apple products, but
for those who do not need
such features they are hidden away,
which can mean a lack of awareness.
A quick look in the Accessibility
settings, which are available in
the Settings app under their own
menu, will show most of the options
18
available to help you overcome
physical restrictions and make the
most of your iPad. They are all turned
off by default, but once the setup
process is complete the experience
changes. The iPad can speak back
any action you undertake so that
you always know where you are,
the screen can be zoomed in for a
magnified view and text can be set
to the level which is perfect for your
needs. Hardware buttons need never
be touched thanks to AssistiveTouch,
and sound can be sent to just one
earphone speaker to lessen conflict
with hearing aids. Whatever your
requirements, the iPad has every
accessibility function you’ll need.
Make your iPad easier to use
Interact with ease
VoiceOver is an ingenious
feature that’s designed to
help those with any form
of visual impairment. It speaks as
you interact with the iPad and does a
lot more than just read the text that
is on screen. It will read text from
web pages and documents when
a paragraph is tapped. This alone
can bring a world of information to
anyone, but the main benefit lies
in its ability to let you use the iPad
in exactly the same way as anyone
else; tap a button on screen and it is
described aloud, double-tap it and
the action is completed. It can be
activated from the Settings app by
choosing the ‘Accessibility’ option.
Here you can also change the speed
of the voice feedback and many
other settings.
n A paragraph of text that is tapped will be
spoken immediately by the iPad
Get larger text
n Select Braille devices are compatible with
the iPad and connect using Bluetooth
n The Large Text feature offers a
variety of text sizes from 20 point
all the way up to 56 point. Go to
the Settings app, then Accessibility,
‘Display & Text Size’ and ‘Larger Text’.
The text is displayed in scale to let
you choose the most comfortable.
“VoiceOver is an ingenious feature
designed to help those who have any
form of visual impairment”
Spoken Content
n Spoken Content, available via
Settings and Accessibility lets the
iPad to offer a ‘Speak’ option when
you select text. You can set the
speed and also choose from a range
of dialects.
19
Accessibility
Simple keyboard
shortcuts
Split keyboard
01
With the keyboard in view,
hold your finger on the
bottom-right keyboard icon and
then select ‘Split’ from the menu
that pops up. You can now type
with your thumbs and hold the
device with two hands.
Accents
02
To create an accent over
any letter, hold your
finger on the letter and then slide
it to one of the accents that pops
above it. Every accent that you
might need for your language will
be included automatically.
Caps lock
03
Tapping a Shift key (the
arrow) lets you insert a
capital letter and the key will show
a blue outline. If you double-tap
a Shift key, it changes to a white
arrow in a blue icon to signify that
caps lock is enabled.
Quick apostrophes
04
By default, the iPad’s
keyboard has the
apostrophe button on the Numbers
keyboard. However, if you hold
down the exclamation mark key,
you can access a quick apostrophe
on the Letters one.
Punctuation
05
You may need to type
unusual punctuation.
Tap the numbers key (bottom-left)
and then hold your finger on any
punctuation key. Under some you
will find all of the obscure and rare
punctuation that you need.
20
Use simple gestures
AssistiveTouch is designed
to make complex manual
interaction with an iPad a
thing of the past. Once enabled in
the Accessibility options you will see
a small transparent dot on the screen
at all times. It is unobtrusive and
never gets in the way of what you
are doing, but a simple tap gives you
immediate access to every hardware
function you need.
It has options to mimic pressing
the Home button as well as shortcuts
to your notifications and the Control
Centre, but it is the ‘Device’ option
that truly stands out, allowing you
to include tasks such as changing
the volume and rotating the screen.
n The most often used system functions are
a couple of taps away with AssistiveTouch
In effect it removes the need for
hardware keys on the iPad and
brings everything you need together
under a small window which only
appears when you require it. You can
even create your own gestures and
customise the options.
“It makes complex manual interaction
with an iPad a thing of the past”
Make your iPad easier to use
Invert colours
n The ability to invert the colours on
screen and to make a negative photo
effect can make reading much easier
in some circumstances. In the Display
& Text Size page, simply select from
‘Smart Invert’ or ‘Classic Invert’ by
tapping the sliders.
Read subtitles
Get mono audio
n In the Accessibility settings, tap on
‘Subtitles & Captioning’. Now change
Closed Captions to ‘On’ and when
you next watch a TV show or movie
that supports the facility, you will see
the subtitles on screen. You can even
change the style of the subtitles.
n In the Accessibility settings, you
will see a ‘Hearing’ section. Tap the
icon to turn it on and now you can
use the slider to decide which side
you would like the mono audio to
sound. This is particularly useful
when hearing aids are being used.
Zoom in
The Zoom feature in the
Accessibility options of
the Settings app, which
requires just one tap to enable, lets
you increase the size of everything
on screen in a variety of ways. To
zoom in, all you have to do is doubletap three fingers on screen and do
the same to zoom out again.
You move around the screen using
three fingers instead of one and can
also set the zoom to any level you
like by double-tapping with three
fingers and then sliding them until
the appropriate level is reached. This
means that you can choose how
exactly the zoom is set for each app
or task and thus it gives you all of the
control you require in every situation
Please replace
with a black iPad
Air or iPad Mini
you encounter on an iPad. The fact
that it can be turned off easily is
another bonus – for many partially
sighted people it could prove to be
the most useful accessibility feature
of all.
21
Setting up
Get your iPad up and running
with these easy-to-follow tips
24 Activate and register your new iPad
32 Back up your iPad
28 Change settings to suit your needs
34 Set up a Wi-Fi connection
30 Set up iCloud and start syncing
35 Connect to a Bluetooth device
22
36 Introducing the Control Centre
44 Find a misplaced iPad or iPhone
38 Set a Passcode Lock
46 Change your wallpaper
40 Customise Touch ID settings
48 Get to grips with Multitasking
42 Control your privacy settings
50 Access email on your iPad
“Just got an iPad?
We’ll guide you through
the process of setting
up your device”
23
Setting up
Activate and
register your iPad
Just got an iPad? We’ll guide you through the process of setting up
your device and registering it to your Apple ID
W
ith trembling hands and
a giddy sensation in your
stomach, you unpack
your new iPad from its box and
are ready to activate it and start
using it to enhance your life. But
whereas previously you would
have to have had a computer to
plug your iPad into to start the
setup process, since iOS 5 you
are no longer required to tether
your device to a computer and the
entire setup can be carried out
independently, which makes it a
quick and easy process.
All you have to do is connect
your new device to a power source
and then press the Sleep/Wake
button, which is situated on the
top of your iPad. This will bring up
a generic iPad lock screen with a
slider at the bottom. Tap and hold
on the slider with your index finger
and swipe it to the right to unlock
the device and the next series of
screens will guide you through the
setup process. In this tutorial we
will take you through each stage of
the process and explain what each
screen is asking you to do.
Activation Prepare your iPad
When you switch on your
iPad for the very first time
you will be presented with a plainlooking lock screen with a slider at
the bottom. Tap and hold the slider
and swipe it to the right to unlock
the iPad.
01
24
On the first two set-up
screens you will need
to choose a native language for
your device and also choose your
region so that the content of the
iTunes and App Stores can be set
accordingly. Tap your preference.
02
Your iPad chiefly relies
on a Wi-FI network to be
able to connect to the internet and
fuel a wealth of different services.
If you are within range of a Wi-FI
network then it will be detected.
Enter the password and connect.
03
Activate and register your new iPad
Your apps
A selection of Apple
apps are built in to
the operating system
and will appear on
your Home screen as
standard. Tap on an
icon to launch the app
Your Settings
Your first port
of call should be
the Settings app.
Tap on this to
start modifying
and customising
certain aspects of
your device
Your Dock
The Dock is a row
of app icons in a
strip at the bottom
of the screen. This
Dock is present no
matter which of
your screens you’re
on and is best
when used for your
most-used apps
04
Location Services allows
apps to gather and use
data indicating your approximate
location, which can be useful.
Enable or disable it here. You can
activate it later from Settings>
Privacy>Location Services.
Adding apps
The Dock contains
five apps as standard
but you can add
more by tapping and
holding on an icon
until it starts to shake
and then dragging it
with your finger into
the Dock
05
The next screen presents
you with three options.
You can either set up the device as
a new iPad, which is what you’ll be
doing, or restore it from previous
settings backed up to your iCloud
or iTunes.
06
You’ll need your own
Apple ID to enjoy the
main features of your iPad, such
as being able to download apps,
music and videos and back up and
sync your data and settings with
iCloud. Sign in or create a new one.
25
Setting up
07
After signing in, you will be
presented with a screen
of Terms and Conditions that relate
to all aspects of your iPad and the
services that you will be using, such
as iCloud, Game Center and so on.
08
If you wish to use iCloud,
use your Apple ID to sign
into your free account. iCloud lets
you access music, photos, contacts
and more on all of your devices
automatically and is well worth using.
09
The FaceTime app lets you
speak face-to-face with
people using your iPad’s built-in
camera, while iMessage provides
free messaging. Enter your email
address or phone number to use
the services.
11
Next you will be presented
with Create A Passcode. Enter
a four- or six-digit passcode that will
be used to secure your iPad. The
code will need to be entered every
time you unlock your device and
prevents others from using it.
12
10
26
If you misplace your iPad
then Find My iPad will
help you locate it on a map, play a
sound or display a message. You
can activate this service to sync the
location of your device with iCloud.
At this stage of the process
you can choose to enable Siri,
your iOS-based personal assistant.
You can ask Siri questions or give
commands in plain English to access
and open apps, information, perform
tasks and much more.
Activate and register your new iPad
The categories
All of the categories
to which the
Settings apply will
be presented in a list
on the left-hand side
of the screen. Tap an
option to bring up
its individual screen
of settings
All about your iPad
By tapping on the
‘About’ option in the
‘General’ section, you
can get in-depth info
on your device, such
as the serial number,
capacity and the
amount of space that
your various apps and
media take up
Apple ID
Access your
iCloud and iTunes
settings, set up
Family Sharing and
change your
password. You
can sign out at any
point and sign in
with a different
account
13
Apple likes to keep track
of how its products are
performing, so this screen allows
you to send diagnostic data
straight to Apple for their records.
Opt for ‘Don’t Send’ to keep your
information private.
Software Update
By tapping on the
‘Software Update’
option in the
‘General’ section your
device will be able
to find and update
your iOS, without the
need to connect your
device to a computer
14
Congratulations! You have
now worked your way
through the entire set-up process.
A screen will confirm the process is
complete, so what are you waiting
for? Tap on the ‘Get Started’ button
and get using your iPad.
15
You’ll be presented with
your home screen, so start
tapping on icons to launch apps and
find your way around, experimenting
with the gestures needed to operate
your new device. Going into Settings
will let you personalise your device.
27
Setting up
Change Settings
to suit you
The Settings app is the epicentre of your iPad. Here you can
customise everything from how apps work to the feel of the display
O
n the first page of the iPad
screen is an app called
Settings. This controls how
your iPad works, allows individual
apps to be configured and sets the
look and feel of the screens.
With Settings, you can enforce
security, log on to Wi-Fi networks,
save battery power, add signatures
to emails, configure the web browser
Safari to use specific search engines
and much, much more. It is, perhaps,
the most important app on your
iPad, and one you will come to use
a lot. Learn what it has to offer and
how you can change or configure
things and you will take control of
the iPad to make it work the way you
want it to.
In this tutorial we are going
to introduce you to some of the
key features within Settings –
the ones that you may want to
check out straight away to get
yourself acquainted to the system
and personalise it for your own
preferences. More specific tutorials
will follow to show you functions
in more depth, but for now, let’s
delve into the nerve centre of this
incredible piece of kit.
“Learn what the Settings have to offer and
make the iPad work the way you want”
Settings Find your way around the iPad’s control system
Turn your iPad on and press the Home button to
unlock it. The Settings app is on the first screen.
Tap on it to launch. There are a number of parameters, but
you’ll find a lot of useful things to tweak in the ’General’
section. If this isn’t automatically selected, tap on it now.
01
28
Within the General settings you can check for
the latest version of iOS. Tap on the ‘Software
Update’ option in General settings and your iPad will
check for the latest software. You can also set your iPad to
automatically download updates when they’re released.
02
Change Settings to suit you
Wireless Updates
Since iOS 7 you
no longer need
to connect to
a computer to
update the system
software. Simply
choose ‘Software
Update’ to get your
hands on the latest
iOS (if available),
beamed directly to
your device
About Your iPad
Tapping on the About
section will list all
of your device’s
contents – including
songs, videos, photos
– divulge the storage
capacity and how much
space is free and more
Multitasking Gestures
Here you can turn on
or off Multitasking
Gestures, which allow
you to use certain
swipes of your fingers,
such as swipe up, left,
right or pinch with
four or five fingers, to
control your iPad
Lock Settings
Use the AutoLock option found
under Display
and Brightness
to decide how
long you want the
iPad to wait when
inactive before it
automatically locks
and goes to sleep
03
To prevent people form accessing your device,
enable a passcode from the ‘Touch ID & Passcode’
section of Settings. The passcode can be six or four digits
long or for extra security you can use the fingerprint
scanner on the iPad as a security measure.
04
You can change the size of the icons in the
Home screen by going to the ‘Home Screen &
Dock’ menu. The ‘Bigger’ option displays 20 app icons
on your Home screen while the ‘More’ option displays 30
smaller ones.
29
Setting up
Set up iCloud and
start syncing
All of your documents can be moved wirelessly from device to
device without you having to lift a finger
W
ith iOS 5 came iCloud, a
service from Apple that
is so much more than
just a hard drive in the sky. Free to
all iOS users, iCloud automatically
and securely stores your content
so that it’s always available on your
iPad, iPhone, Mac… no matter
what Apple device you’re using.
Through iCloud you get full access
to your music, apps, photos and
documents, and it also wirelessly
syncs all of your emails, contacts
and calendars to keep them up to
date across all of your devices.
When you sign up for iCloud
you get 5GB of free storage,
which is plenty because all of your
music, apps, books, and photos
don’t count against your free
storage. And seeing as your mail,
documents, account info, settings
and other app data don’t use up
much space, you’ll find that your
free quota goes a long way. You
can now set up iCloud when you
register, but if you opted not to or
you registered your iPad before the
iOS 5 update, follow these steps to
set up iCloud now.
iCloud Setting up your personal iCloud
iCloud comes as part of
your Apple account. To
manage your iCloud settings or to
log in for the first time, head to the
account tab of the Settings app. It
will be at the very top of the page.
Tap on ‘Sign in to your iPad’.
01
30
To activate your iCloud
account you will need to
log in using your Apple ID, which
is the same email address and
password that you use for your
other services, such as iTunes and
the App Store.
02
If you go to Settings,
General and then iPad
Storage, you can see if the device
recommends uploading anything to
the cloud. Here it suggests we sync
our photos to the cloud, press on
Enable and then confirm.
03
Set up iCloud and start syncing
Your account
Your free iCloud is
activated when you
enter your Apple ID.
This is the same email
address and password
that you use for other
Apple services, such
as iTunes
Storage & Backup
You can select
the option to
automatically
back up your iPad
to iCloud under
certain conditions
and purchase more
storage space if you
need it
Delete Account
If you are upgrading
your device and
wish to disassociate
your current iPad
with an iCloud
account then scroll
down and select the
‘Sign out’ option
04
Select which of the
apps utilise the service,
such as Mail, Contacts, Calendar,
Reminders, Safari Bookmarks,
Notes, Photo Stream and
Documents & Data. Move the
sliders to activate the apps.
Compatible apps
iCloud is integrated
into a host of default
Apple apps and works
behind the scenes to
make sure everything
is synced across all
your devices
05
To get the most out
of iCloud, click on the
‘iTunes & App Store’ and then
turn on ‘Automatic Downloads’
for Music, Apps and Books to
download all new purchases from
other devices straight to your iPad.
06
If your iCloud is full, tap
on Manage Storage at
the top of the settings. Here you
can see what is taking up space and
then either buy more storage space
or tap on the app using data and
delete it.
31
Setting up
Back up your iPad
using iCloud
With iCloud, you can back up all of your important data to your own
virtual hard drive
Y
our iPad is like a bank vault
where all kinds of important
stuff is stored. So what
happens if your iPad gets lost or
goes awry? Nothing, that’s what.
Thanks to iCloud, all of your data
is automatically backed up and
kept safely in your own cloud
storage space. When your iPad is
connected to a power source and
a Wi-FI network, all of your media,
photos, videos, settings, app data
and messages are backed up.
When you set up a new iOS
device or need to restore the
information on the one you
already have, iCloud Backup does
all the heavy lifting. All you have
to do is ensure that your device
is connected to Wi-Fi, enter your
Apple ID and all of your important
data will appear on your device
without you having to worry. As
you will have read elsewhere in this
book, the benefits of using iCloud
are vast, and the way in which
it goes about its business in the
background without you having to
worry shows how Apple want to
make your life easier.
iCloud Activate iCloud and back up your data
If you don’t have the latest
version of iOS, connect
your device to your computer or
head to Settings>General and the
tap Software Update at the top
of the list to get the latest version
installed on your device.
01
32
If you aren’t already in
it, launch your Settings
app and, in the left-hand column,
click ‘Sign in to your iPad’ and then
enter your Apple ID and password
details. You will now see a new
option called ‘iCloud’. Tap on this.
02
Once your personal
iCloud has been set
up and you have selected which
apps you would like to sync, find
and tap on the ‘Backup’ option
from the list to begin the rest of
the process.
03
Back up your iPad using iCloud
Instant Backup
You can back up
your data by tapping
‘iCloud Backup’ then
the ‘Backup Now’
option. Do this if you
change your settings
or buy new media
Manage your space
You can see how your
free 5GB allocation of
cloud storage space is
being used by tapping
on Storage>Manage
Storage on the main
iCloud setting screen
Progress bar
When your device
is backing up, a
progress bar will
appear that shows
how far along the
process it is. You can
cancel the backup at
any time
04
You will see an option
called ‘iCloud Backup’.
Ensure that the slider is moved to
‘On’. To manage your Storage, head
back to the iCloud options and
tap ‘Storage’ and you’ll be able to
moderate your settings.
Backup
When the ‘iCloud
Backup’ option is
turned on, all settings,
documents, media
and photos will be
automatically backed
up when your device is
connected to a power
supply and Wi-Fi
05
You will be presented
with a message saying
that your iPad will no longer sync
to iTunes when connected to your
computer, just tap ‘OK’ and wait for
a minute while the Backup feature
is activated.
06
Your iPad will now back
up when connected to a
power source and a Wi-Fi network,
but you can perform the backup
whenever you want by accessing
Settings>iCloud and tapping
‘Backup Now’.
33
Setting up
Set up a Wi-Fi
connection
To really make the most of your iPad, you’ll want to connect to Wi-Fi
and get online. Here’s how to do it…
I
nternet access turns your iPad
from an impressive piece of
expensive kit into something
that opens up worlds. This in part is
due to the App Store, a virtual store
that gives you access to literally
thousands of different applications.
Your iPad is a portal to a host
of fantastic services, but first
you need to give it access to the
internet – only then do your options
become plentiful. Follow our simple
instructions in this easy-to-follow
tutorial and unleash the potential of
Apple’s powerful device.
Settings Switch on Wi-Fi on your iPad
01
03
34
You’ll find the Settings icon on the main screen,
it’s silver with cogs in it.
Your iPad will now look for available connection
points. Tap on your desired connection.
02
04
After entering Settings, tap on ‘Wi-Fi’ and then
turn it on by sliding the button.
Fill out your connection’s password details then
tap ‘Join’ and you’re done.
Set up connections
Connect to a
Bluetooth device
Manage your iPad’s Bluetooth connections to other devices
easily in just a few simple steps
I
f you’ve ever wanted to hook up
a wireless speaker, headphones
(like the new AirPods) keyboard
or remote control to your iPad, it’s
probably connecting via Bluetooth.
Bluetooth is an incredibly universal
technology that allows different
devices to connect to each other
wirelessly. Managing Bluetooth
connections on your iPad is easy
as they’re all contained within one
Settings menu. What’s more, the
process to set up and connect
Bluetooth devices is the same, no
matter what you’re working with.
Settings Manage your iPad’s Bluetooth connections
01
In Settings, tap on the ‘Bluetooth’ tab to view the
available devices nearby. Turn your Bluetooth on.
03
You may be asked to confirm that a code is
correct on each device. Once done this tap Pair.
02
04
Tap on the desired device as it appears on the
screen. Your iPad will then start connecting.
Fill in your details on the keyboard. Once filled
in, select Join and you’re done.
35
Setting up
Introducing the
Control Centre
Take advantage of your iPad’s Control Centre to quickly change
settings and access frequently used features
W
hen Control Centre
appeared in iOS 7, it was
something that users had
craved for a long time, but Apple’s
implementation was arguably even
better than we could have hoped for.
The elegance with which it works is
astounding and a raft of shortcuts
and features are available to you with
one swipe and a tap.
A lot is happening in a very small
space on the iPad and it is surprising
that it does not take up more
screen real estate. When iOS 11 was
introduced, Apple redesigned the
whole tool, making it easier to use.
Within one pop-up panel you have
access to the Clock app, the camera,
AirDrop, Night Shift (turning the
screen’s backlight more orange to
stop it disrupting your sleep) plus
volume and brightness bars. Add to
this icons for Airplane mode, Wi-Fi,
Bluetooth, Do Not Disturb and the
Screen Rotation Lock and you can
start to see just how effective it
can be. The second pop-up panel,
accessed by sliding to the right, let’s
you control your music and check
what devices, like headphones,
you’re synced with.
“The iOS 11 update redesigned the whole
tool, making it more streamlined”
Control Centre Understand the Control Centre
Your Home screen looks normal until you start
to move your finger downwards from the topright corner of the screen. The Control Centre will start to
appear no matter what app you are in and will be found on
the right-hand side of the screen.
01
36
Press and hold on some icons to get additional
options. For example: rather than tap on the
camera icon and then navigate the app to find the mode
you’re after, hold on the camera icon and select one of the
options that pop up.
02
Introducing the Control Centre
Quick settings
Changing wireless settings
and enabling AirPlay and
AirDrop are all available with
one tap using the controls
here. You will likely use these
more than any others in the
Control Centre because they
save a lot of time
Setting it up
If you need to
change what
appears in Control
Centre or what order
they are arranged in,
you can do so from
the Settings app
03
The music controls are part of the main Control
Centre options. Simply use icons to Pause,
Play and Skip tracks or hold on the music tab to bring up
additional options such as finding devices paired up with
the iPad that may be playing sound.
Perfect music management
See what music is currently
playing and navigate between
tracks using the arrow icons. The
volume slider below the icons is
particularly useful for music and
any other audio that might be
playing from your iPad, like a video
Tap and Hold
The majority of controls have additional options
which appear if you tap and hold on them. Holding on
the brightness bar will bring up the options for Night
Shift or True Tone while also enlarging the slider
04
Go to Settings>Control Centre and you select
which controls will appear. Tap on green plus
icons to add controls and select the red minus icons to
remove any unwanted ones. You can then arrange them
by tapping and holding on the right side of a control.
37
Setting up
Set a Passcode
Lock on your iPad
Protect your iPad from prying eyes and set a passcode that will
ensure only you have access to everything
Y
ou may store a lot of data
on your tablet. Whether it’s
log-in details for your online
accounts, private messages, or
documents. If someone could gain
access to your iPad, there may be
a lot on there that you don’t want
them to see. Thankfully, Apple’s
iOS has a very simple way for you
to keep your device secure.
Setting a passcode gives you
protection. Working just like a PIN,
you can set a passcode that only
you know, and every time you turn
your iPad on or unlock it, you’ll
have to enter this code. You can
also set up fingerprint security with
Touch ID if you have a newer iPad.
One of the best things about
the previous iOS 9 update was it
enabled users to create six-digit
passcodes for extra protection.
You’ll be surprised with just how
secure one of these passcodes is,
compared to the four-digit offering.
But if a numerical passcode, isn’t
for you, then no worries, as it’s also
possible to set a password lock
instead. Here’s how to set one up
from scratch.
Settings Turn on Passcode Lock
From your home screen,
you first need to select
the Settings icon, and then locate
the ‘Touch ID & Passcode’ option
in the left-hand panel. Tap on the
icon to bring up some more
specific settings.
01
38
Within this list of settings,
you will see a display
similar to this. Currently, there is
no passcode set up on this iPad. In
order to change this, tap the ‘Turn
Passcode On’ option found at the
top of the page.
02
You will be asked to enter
a six-digit passcode.
Use the ‘Passcode Options’ tab
to switch to a six-digit passcode
if necessary. Make sure your
passcode is something that you’ll
be able to easily remember.
03
Set a Passcode Lock
Make a change
If you keep
forgetting your
passcode, or you
think someone
else might know it,
you can change it
anytime by selecting
this option
Turn it off
Once you’ve set a
passcode, if you find it a
chore to repeatedly keep
entering your four digits,
you can choose to turn
the passcode off
Too simple
If you think your
passcode is too easy
and would like to
change it, simply tap
on ‘Change Passcode’.
Here you can choose
a new numeric or
alphanumeric code
for added security
How often?
You can determine
how often you need to
enter your passcode. If
you tire of constantly
entering the code, set
the length to longer.
However, if you wish to
keep your phone safe
every time you lock it,
set it to ‘Immediately’
04
Once you have set your
passcode, you will notice
that a number of extra options are
now available on the iPad’s screen.
You can turn the passcode off, or
change the passcode at this point if
you so wish.
05
By tapping on the
‘Require Passcode’
option, you can decide how long
after you unlock your iPad that
you will be required to enter the
passcode. Shorter periods of time
are safer.
06
If you are not happy
with your current
passcode, simply click on the
‘Change Passcode’ option. You
can then set a different passcode
made up of letters, numbers and
special characters.
39
Setting up
Five fingers
You can add up to
five fingers, but
they could all be the
same finger if you
wished. By doing
this you would
hugely improve the
accuracy for that
single finger, but you
wouldn’t be able to
add any others
Touch ID
You can use Touch
ID to unlock
your device, or
to authenticate
purchases through
the App Store.
Third-party apps
can also use the
sensor to make it
easier to sign in,
and Apple Pay users
in America will need
to set it up to use
the service
Password setting
You can change the passcode settings, including how
often it is needed. You can even set it so that your iPad
will remain unlocked for a few minutes after locking it,
rather than asking for a passcode again right off the bat
Extra security
By default, access to features like the Today
and Notifications View in Notification Centre,
as well as access to Siri is allowed. For extra
security, you can turn these options off
Customise Touch
ID settings
Add and rename extra fingerprints to make sure your iPad is as
secure as possible
N
ow that Touch ID is available
on the latest iPads, it’s
been made easier than ever
before to secure your device against
potential thieves and mischievous
friends who you don’t want
accessing your information. The best
news of all is that it’s just so easy to
set up. You’re prompted to add a
40
fingerprint when you first activate
your device, but you can actually
choose to add up to five individual
prints if you want to make unlocking
your device more natural. If you want
your device to have even greater
security, you can then choose to
add a complex passcode made up
of numbers, letters or both as well
as your finger prints to make it even
harder for people to break into your
device and have access to all of your
personal information. Read on to
get all of our top security tips so you
can rest easy knowing that nobody
unwanted is going to be able to
gain access to your device and your
personal files.
Customise Touch ID settings
Settings Customise Touch ID settings
01
Open Settings, and select the ‘Touch ID &
Passcode’ option from the list. Switch on the
option that says ‘Use Touch ID for iPad unlock’, and add a
fingerprint when prompted.
02
03
When you touch the Touch ID sensor with a
finger that your device has ‘learned’, it will be
highlighted in the list. This actually helps it learn your
print, so keep doing it!
04
You can add up to five fingers to the Touch ID
section, so you can either add different fingers
from your own hands, or fingers of different people if
there are multiple users.
06
05
You will also have to add a security passcode;
when you restart your iOS device, you will need
to input the code the first time you unlock, rather than
using the Touch ID.
Tap on the name of the fingerprint – by default
‘Finger 1’ or ‘Finger 2’ – and you’ll be taken to this
screen, where you can give each one a specific name to
help you keep track.
For each fingerprint, you can change the name
so that you will always know which finger is
which. This will make things easier if you ever need to
remove a print.
41
Setting up
Control your
privacy settings
Keep control of your privacy by monitoring which actions your iPad’s
apps can and can’t perform
I
n today’s age of digital
information, personal details
are moved around at a
moment’s notice. Think about
it: your iPad contains a gamut of
personal information. How many
addresses do you have on your
tablet? Do you use your iPad for
personal banking? In general terms,
you should always be sure to set
up the Find My iPhone app, which
is supplied by Apple for free and
knows what to do if your iPad is
lost or stolen.
Thanks to new features
introduced recently by Apple,
there are other ways to control
the privacy of your data. They now
allow users to control which apps
have access to different kinds of
data on their tablets, giving you a
new level of safety, and peace of
mind for all those times when you
are not exactly sure whether an
app is using information or not. It
allows you to secure your device to
the level that settles your state of
mind. If you don’t want any of your
private data shared, then you don’t
have to.
Settings Secure your iPad’s privacy
The Privacy settings can
be found in Settings. They
include all the settings you may
want to change, such as: Location
Services, Contacts, Calendars,
Reminders, Photos, Bluetooth
Sharing, Twitter and Facebook.
01
42
Navigating to each of
the sections gives you
a suitable list of apps that have
requested access to various apps
on your device. You can enable or
disable access by tapping on the
app and selecting the option.
02
When you enter this area,
you will be told which
apps have requested your location.
More than that, however, you will
also be able to see which app has
used location services recently. It’s
a good way to monitor activity.
03
Control your privacy settings
System services
The System Service area
contains options like
compass calibration,
time zone settings and
location-based iAds.
None of these are vital,
unless you regularly use
compass-based directions
System apps
System apps like Camera
and Maps will all need
to know your location to
function properly. These
apps can be trusted,
so don’t worry about
switching them on
Your location
When an app has
recently looked up
your location, an arrow
will show up next to
its name. Grey arrows
denote that an app has
looked up your location
in the last 24 hours
Privacy section
All of the issues
relating to privacy on
the iPad are stored
within this section,
which is accessible
from your main
Settings screen
04
In Location Services,
you will find that you
can enable or disable location
services for System Services such
as Diagnostics & Usage, Compass
Calibration and much more, as
shown here.
05
Apps that want to share
information via your
Bluetooth will appear here. These
apps can then share data even
when you are not using them, so
be careful to monitor this section
every now and then.
06
At the bottom of the
main Privacy page is a
section called Apple Advertising.
The new advertising identifier can
be used to give you more control
over advertisers’ ability to use
tracking methods on your iPad.
43
Setting up
Find a misplaced
iPad or iPhone
Keep all of your devices safe at any time and take action to render
them impossible to use if they are stolen
F
ind My is an app that can be
used on any iPad and it has
been tweaked to take full
advantage of the bigger iPad screen.
With this app you can quickly find
any iPhone or iPad that signs in using
the same Apple ID as your iPad and
which is currently connected to the
internet. Location Services is used to
pinpoint its exact location at which
point you can take different actions
remotely. Marking a device as lost
will lock the device completely and
let you send a personalised message
to the device lock screen, you can
erase the device with a couple of
taps or you can continually play a
loud sound. All of this is very useful,
but you should at the very least
already have a passcode set up on
your device to stop others seeing
your data. If your device is powered
down or in an area where data
coverage is not available, you will not
be able to track it, but when turned
on, the Find My app should prove
to be useful again. It can make all of
the difference between finding your
precious device and losing it forever,
so get to know the function.
Find My iPhone Find devices from home
Open the Find My app from
your Home Screen and you
will see an ‘Enable Find My’ button
in the corner of the screen. If you
are signed in to your Apple ID, it
will turn on. If you are not signed in,
go to the Settings app and do so.
01
44
As if by magic, your
devices will appear on
a real-time map within Find My
iPhone. As the devices move, you
will see this reflected on the map
so you always know exactly where
they are.
02
Tap on any device and
a new menu will appear
at the right of the screen. The
name of the device will appear on
screen and you’ll be able to tap the
directions icon to find your way to
its location.
03
Find a misplaced iPad or iPhone
Every device covered
All of your Apple devices
should be set up with
the Find My iPhone app
straight away, just in
case any of them gets
lost or is stolen
A perfectly
tracked phone
Each device will be
shown on the map in
its exact location any
time it is connected. It
is a highly accurate and
useful solution
Erase a device
If the iPhone or
iPad is stolen, you
can put it into Lost
Mode or erase it
immediately. This
will stop whoever
has it from using it
04
If you know your device
is nearby but cannot
locate it, tap on the Play Sound
button. Your device will begin to
make an alert noise to help you
find it. When you have the device,
unlock it to stop the sound.
Time to travel
Tapping this icon will
immediately open Apple Maps
with a route pre-planned for
you to travel to where the
device currently is
05
If your device has
been stolen or you are
concerned, you can mark it as lost
remotely or erase it immediately to
stop others seeing your personal
information. It takes a couple of
taps to complete.
06
If you have Family
Sharing enabled in the
Settings app then you can share
your location with family members.
If you ever loose your iPad then
family members can help you find
its location.
45
Setting up
Change your iPad’s
wallpaper
Find out how to quickly customise the background of your iPad’s
Home and Lock screens
T
he iPad enables users
the ability to change the
background of the home
screen as well as the lock screen.
This may seem like a trivial addition
to the software set but for Apple
it’s pretty big. It is a company that
deals in absolutes and employs a
closed system to prevent people
from making the iOS look bad.
Making changes to the system
is very simple; it works in a very
similar way to the iPhone, only you
can see much more of the action
path that you take to get to a
change in settings. This makes the
system clearer, more memorable
and much easier to use. Proficiency
at this simple task should give
you the courage to explore the
settings further to get even more
use from your iPad and make
improvements to the way it works
for you. Whether it’s an image
from the iPad’s supplied Wallpaper
set or a photo from your album,
following this step-by-step tutorial
will instantly customise your iPad
and have it looking the way you
want it to.
Settings Change your iPad’s wallpaper
Load the Settings and
head to ‘Wallpaper’ on
the left hand list. To change your
background, simply tap on the
pictures beneath ‘Choose a New
Wallpaper’ in the right-hand
column of the screen.
01
46
You now have several
options from which to
get a suitable picture, do you want
your own images or a supplied one?
Choose the album that you wish
to pick from. Tap on that album to
then bring up the contents.
02
Once in the album of
your choice, browse the
images on offer to make your final
selection and then simply tap on
that picture. You’ll then be taken
directly to a preview screen to see
your selected image in full.
03
Change your iPad’s wallpaper
Simplicity
Apple always makes
interfaces easy to
use. There’s no mass
of dialogue and only
really a couple of major
options here, so it is
easy to make changes
Move around
While positioning your
picture you will be
able to see just how
responsive the iPad
touch screen is. It’s a
testament to hardware
and software unity
Kill it
Apple also makes it easy
for you to change your
mind and go back to the
last action. In this case
just hit the Cancel button
04
Use a pinch, reverse
pinch and swipe to
position the image and then pick
from the options at the bottom of
the screen: you can pick ‘Set Lock
Screen’, ‘Set Home Screen’, ‘Set
Both’, or cancel everything.
Great resolution
The standard iPad has
a fantastic 2160 x 1620
display at 264 pixels per
inch (ppi) resolution,
so having a cool image
on your home and lock
screens is a must
05
Once you have tapped
an option you’ll be taken
back to the Home screen, where
you can see your changes. Use the
Sleep button if you wish to view
the lock screen, and obviously you
can change it again at any time.
06
Head to the ‘Display &
Brightness’ tab to tweak
your brightness. Here you can
adjust the brightness or turn on
Night Mode, which makes your
screen turn less blue after a certain
time of night to help you sleep.
47
Setting up
Get to grips with
Multitasking
Multitasking is extremely easy to use and there are many useful
features available using just a swipe and a tap
M
ultitasking has been
available on the iPad
since it first arrived on
the shelves, but recent changes
mean that it is easier to use than
ever before. Gone is the small strip
of icons at the bottom of the screen
when you double-tap the Home
button and in its place is a full-screen
display that lets you move between
apps with ease.
Each app is clearly presented
thanks to the large preview images
which show the last position the app
reached and the app icons directly
above to clarify. You can swipe up on
the main panel to close an app fully
or tap it to open it immediately.
From iOS 11, the last three apps you
opened will appear in the dock at the
bottom of the screen and these can
be accessed at any point by simply
swiping up. The biggest addition
from Apple’s latest update is you can
now have two apps open at the same
time. The second app will open in
a smaller window to the right-hand
side of the screen but pressing on
the top of the window will allow you
to slide it left and right or slide it up
to split the screen half and half.
“It really does make the process much
quicker and efficient when used often”
Multitasking Understand the multitasking features
Double-tap the Home button no matter what you
are doing on your iPad and a series of horizontal
panels will appear on the screen. Above each you will see
an icon that’s designed to show which app you are looking
at. The panels show where the app froze.
01
48
To switch between apps, simply scroll your finger
left and all of the recently used and open apps
will be shown one by one. You can now tap either the app
icon or the main panel to jump straight into that app. It
should start up in the exact position you left it in.
02
Get to grips with Multitasking
Drag and drop
While in Split View some
apps (in this example,
Photos) allow you to press
and hold on items in one
app, then drag them over
and place them in another.
Text, photos and files can
be moved between apps
Divider
When in split view,
slide the line dividing
the two apps left and
right to adjust the
window sizes. If you
want to close either
app, then slide this
divider all the way to
one side so it covers
the app you no
longer want to use
03
If you want to close an app, touch your finger on
a panel and then slide it to the top of the screen.
The panel will disappear and the app to the right will slide
over to take its place. The sheer size of the panels makes
closing apps very simple.
Second window
Open a second app by
dragging it from the
dock. It can be used in
a couple of different
windows. This allows
you to do things like
watch a movie while
checking the internet
Dock
This bar holds your favourite apps as well as the
last three you used. You can swipe up while on any
app to bring up the dock, from here you can open a
second app or switch to another
04
Slide up from the bottom of the screen when
in one app, you can then drag and drop an app
icon out of the dock and it will open in a small window
on the right side of the screen. Press on the top of the
window and slide up to switch to Split View.
49
Setting up
Access email on
your iPad
Set up your email accounts on your iPad for even better usage than
your iPhone can provide
I
n today’s digital age, using email
is one of the most essential ways
of being able to stay in touch with
friends and family wherever they are
in the world, as well as being a pretty
vital tool in the business world.
While the iPhone is perfectly
capable of displaying email, the
iPad is just so much better due to its
larger size, making it a much superior
option, especially with the additions
Apple have made over the last few
iOS updates. The virtual keyboard
makes it far easier and quicker to
type on (especially when you need to
write longer emails), in turn making
it far more practical to use in day-today life.
This step-by-step tutorial will not
only show you how to set up a new
or existing email account for use on
the iPad and beyond, but will also
take you through the fundamentals
of reading and sending email. Once
set up you’ll be able to use existing
accounts at will, quickly reply and
forward mail that you receive. Most
importantly, ensure that you stay in
touch with friends and loved ones.
You will never look at your iPad in the
same way again.
“You will never look at your iPad in the
same way again”
Mail Set up an email account on your iPad
In order to sign into your email account you will
first need to head to the Settings app from the
Home Screen of your iPad. Once in the app, scroll down
to the Passwords & Accounts section and tap on Add
Account to get started.
01
50
You’ll now be presented with seven account
options. They are iCloud, Microsoft Exchange,
Google Mail, Yahoo! Mail, AOL, Microsoft Outlook and
Other. Whether you want to create a new account or add
an existing one, the process is as follows…
02
Access email on your iPad
Forwarding mail
If you need to reply
to an email, hit the
arrow icon near the
bottom of the screen.
You can then reply to
the sender or forward
the message on
Move items
Want to organise your mail? Simply
tap the folder icon located at the top
of the screen. You can then send your
mail to a variety of different folders
Send email
Tap the icon in the top-right
corner of the Mail app to send
mail. Fill out the address, add a
subject and write your mail. Hit
‘Send’ when you’re done
03
After choosing your account you’ll be presented
with a screen similar to this. All you need to do
here is fill in the relevant information for each section.
Once this is done simply tap on ‘Next’ in the top righthand corner. Congratulations, you have mail.
04
Head to Settings and you’ll find a Mail option on
the left-hand side of the screen. Here you have
a number of options for customising your mail account,
such as allowing Mail to access certain apps, creating an
email signature and how your emails are presented.
51
Setting up
Getting started
All the basics are covered
here to get you in
control of your iPad
54 Move icons and use folders
56 Discover the features of Safari
58 De-clutter the web with Safari Reader
60 Explore the Mail app
62 Add an event in Calendar
64 Keep perfect time with Clock
66 Use Reminders to never miss events
68 Edit Notification Centre settings
70 Manage contacts in FaceTime
72 Make video calls using FaceTime
74 Use Messages to keep in contact
76 Send audio messages
78 Use the Notes app
80 Navigate in Maps
82 Use turn-by-turn navigation
84 Use Siri on your iPad
86 Explore the App Store
88 Check out the iTunes Store
90 Buy music through the iTunes Store
92 Purchase films and TV shows
94 Subscribe and use Apple Music
96 Create a playlist in Apple Music
52
52
xxx
“Make the most
of the iPad’s
built-in apps”
53
53
Getting started
Move icons and
use folders
Keep your iPad menu tidy by creating themed folders and moving
icons to suit your needs
W
henever a new app is
installed, it just gets
added to the end of
the existing list, or if there’s a gap
anywhere, it can appear there.
This is fine when you only have
a handful of apps, but after a
couple of months with your iPad,
the screens start to fill up and it
all looks disorganised and messy;
a general hubbub of apps in no
real sensible order. Fortunately it
can all be organised into areas of
similar functions, such as games on
one page, utilities on another and
reference apps on a page as well.
You can reorganise your iPad
screens using iTunes, where it is
easy to create extra screens, even
if the current ones are full, but it’s
also possible to move icons around
directly on the iPad itself. Also,
you can create as many folders as
you like and bundle apps together
in order to make your display very
neat and tidy.
The final benefits are that
unwanted apps can be deleted
and must-have apps can be added
to the Dock bar at the bottom of
every screen.
“You can bundle apps together to make
your display very neat and tidy”
Home screen Keep your iPad organised
If you have lots of apps, then the icons for them
will be spread over subsequent screens. To
arrange them together, tap and hold an app you want to
move until a menu pops up. Tap Edit Home Screen and
the icons will start to wiggle.
01
54
Hold down the app you want to move and drag
your finger to the edge of the screen you want
to move to. The apps will then scroll sideways to pull
the next screen into view. Now move your finger over
the place where you want the app to go and then let go.
02
Move icons and use folders
Edit the folder name
Tap a folder to open it.
Tap and hold an app
inside to go into wiggle
editing mode. You can
now completely remove
or change the name
Rearrange apps inside
the folder
If there’s lots of
apps inside a folder,
rearrange them by
tapping and holding
and then dragging to
a new position. The
other apps will shuffle
along and move
Delete an app in a folder
To remove an app that is
inside a folder simply tap
on the ‘X’ icon on the topleft corner. You will still
have a backup of it inside
iTunes however
Take an app out
While in wiggle mode
you can drag an app out
of the folder again simply
by tapping and holding
and then moving outside
the folder area
03
Press the Home button to return your iPad to
normal. To create folders, drop an app over
the top of one you want it to appear in a folder with.
A folder is then instantly created with a name that
reflects the type of apps, if they are fairly similar.
04
If the folder name isn’t to your liking, simply
tap on the ‘X’ icon to delete it and tap in the
text field to enter your own. When complete, press the
Home button twice to exit. To add more apps to the
same folder, simply drag and drop them into it.
55
Getting started
Discover the
features of Safari
Safari consistently gets better with every update; here we take you
through the features you shouldn’t miss out on
S
afari is considered one of the
best mobile browsers. It mixes
a simple user interface with
great functionality and plenty of
extra features to keep everybody
happy. Apple isn’t a company to
stand still, and when iOS 9 came out,
Safari was given a tidy new facelift,
and it’s even better in iOS 13.
While Safari has had plenty of
tweaks to provide a quicker browsing
experience, new features have also
been implemented.
A new ad-blocker system has been
utilised to make it easier to avoid
annoying pop-up adverts that can be
obtrusive on your screen, and trust
us, you’ll be enjoying this feature
more than you think.
There’s also an array of new
sharing features built into Safari, but
by far the best is being able to share
and sync web links directly into the
‘Notes’ app. It’s ideal for creating onthe spot lists, or setting reminders
for certain tasks. Here we take you
through these features in a bit more
detail, as well as a few more nifty
features to sink your teeth into. We’ll
have you browsing the web with
ease in no time at all.
“Safari mixes a simple user interface with
great functionality and additional features”
Safari Explore Safari’s best features
If you don’t want your private information saved
and don’t want Safari to record your search
history, tap the squares icon in the top-right corner and
select Private. The best way to know if you are in a private
browser is it will have a black bar along the top.
01
56
You can put articles in your Reading List if you
want to save it for a later date. To do this, tap
on the Share icon in the top-right corner and a menu will
appear. You can add websites you want to regularly visit in
your favourites from this menu as well.
02
Discover the features of Safari
Reading List
On the surface, your
Reading List service
looks exactly as it did
previously. As we’ve
explained, there’s a
lot more to it now. Hit
this tab and you’ll be
able to view anything
you save regardless
of your internet
connection speed
03
Social networks
Safari continues to support Facebook and
Twitter. Here you have the ability to share
articles or webpages to your News Feed by
tapping the share icon and then choosing
the Twitter or Facebook options
When you start compiling a list of bookmarks
and pages for your Reading List, you’ll find these
listed in the Reading tab. Use this menu for quick access
to your recently viewed sites, as well as quick links to sites
that can be quite hard to find through a search engine.
Extra tabs
This may not be
something that
you will pick up on
straight away, but
Safari now enables
you to have more
tabs open than
ever before. In fact,
on your iPad, you’ll
be able to have
over 20 tabs open
simultaneously
04
Your iPad continues to make it easy to
communicate information through your social
networks straight from Safari. You can share webpages in
a matter of seconds; simply hit the ’Share’ button and then
the Facebook icon to post with a message.
57
Getting started
De-clutter the web
with Safari Reader
Thanks to a new Safari feature, you can read fresh web content
devoid of intrusive ads and page furniture
B
rowsing web pages through
Safari on your iPad is a
pleasurable experience
thanks to its intuitive interface and
useful features designed to make
surfing the internet as effortless and
enjoyable as possible.
The app got even better too,
thanks to the iOS updates that
introduced additional elements
such as tabbed pages and a Reading
List. But perhaps one of the best
elements of Safari’s arsenal of cool
features is Reader.
This feature enables you to read
and enjoy web articles free from
clutter, such as intrusive ad banners
and links. If you have accessed a
page that can benefit from the Safari
Reader function then a list icon will
be visible next to the address bar.
Tap on it and the page will undergo
an instant transformation into a
cleaner, easier-to-read format. This is
particularly useful for reading longer
articles when you don’t want to be
distracted. It’s quick and easy to use,
and when you’ve read the article you
can return the page to its original
state by tapping the list icon again.
Safari How to use Reader
From the Settings app you
can make Safari use the
Reader view as default. You’ll find
it in Settings>Safari>Reader. Tap on
the slider and now every website
you visit will use Reader view if it is
available on that site.
01
58
Launch your Safari app to
access the internet and
then start browsing. As you access
various pages, keep an eye on the
address bar for the tell-tale ‘aA’
icon that signifies that the page you
are on is compatible.
02
If you’re not a fan of the
font, you can change its
style and size as well as the colour
of the background by tapping
on the font tab. It will save your
settings for the next time you’re in
reader view.
03
De-clutter the web with Safari Reader
Reader icon
When a page is
compatible with
Reader, look out for
the list icon next to
the address bar and
tap it to strip the
page of all its clutter
and ads
Sharing stories
You can share
stories from Safari
Reader as you would
through the normal
Safari view, just tap
on the sharing icon
A cleaner look
Pages that are being
viewed through
Reader feature
only the main text,
with all side panels
and ads stripped
out for a fresher,
uncluttered look
Reading List
To store the article
safely, without
having to create a
new bookmark, tap
on the sharing icon
and choose ‘Add to
Reading List’
04
Some websites may
appear different
depending on whether you are
using the Desktop or Mobile
version. Using the ‘aA’ icon you can
switch between versions to find
the ones you prefer.
05
If you like the layout you
have but not the font
size, you can change this. Tap the
‘aA’ icon in the address bar and you
will see two ‘A’ icons. Tap the left
icon to make the text smaller or the
right to make it larger.
06
If you don’t have time to
read your current article
in its entirety, then you can add it
to your ‘Reading List’ to read at a
later time. Tap on the sharing icon
as shown above and choose ‘Add to
Reading List’.
59
Getting started
Explore the
Mail app
Learn how to send and receive emails through your iPad’s builtin Mail app, and see what features it has to offer
O
ne of the main things
people do with their iPad
is send and read emails.
The large touch screen makes it a
beautifully simple way to view your
mail, and with messages displaying
photos inside the message itself,
it’s so much more engaging.
In iOS 11, the formula of Mail
hasn’t changed too much – it still
displays your messages in the same
way. The most notable difference
is the layout of the menus when
you want to see who sent you an
email. Seeing the sender’s address,
creating new contacts and replying
is now simpler than ever.
You can still pull down from the
top of the screen to refresh the list,
and add images to messages simply
by tapping anywhere within a new
email and choosing the ‘Insert
Photo or Video’ option. What’s
also handy is the way you can mark
senders as VIPs. This great feature
marks incoming messages from
VIPs with a star and separates
them into their own tidy inbox so
that you can find them quickly and
easily when needed.
Mail Use the best features of Mail
If you swipe down on your
inbox, you can pull the
list of current emails down – this
gesture prompts the Mail app to
check the server for new messages
and will display any new ones
clearly for you to view.
01
60
To create a new email,
simply tap on the pad and
pen icon in the top-right corner of
the inbox screen. To add a recipient
simply tap on the ‘To:’ box and type
in their credentials. Add a subject
and type in your message.
02
The ‘Add Attachment‘
option arriving with the
iOS 9 update, makes it easy to add
a document to an email via iCloud
Drive. Double-tap in the email, then
choose ‘Add Attachment’. Select
your file and hit ‘Add’.
03
Explore the Mail app
Pull to refresh
It might seem like a
small thing, but Pull
to Refresh really will
change the way you
read emails on your
iPad, with a simple,
time-saving gesture
Extra signatures
Until recently, you
were limited to only
one signature that
was added to every
account. You can now
add one signature for
each account – perfect
for if you use your iPad
for both work and
personal emails
Starry eyes
VIPs are sorted from
other email senders
with a star next to
the emails they send.
Unread messages
have blue stars,
while read messages
appear like this
04
You can also add
multiple signatures
to your accounts in the Settings
app, by going to ‘Mail, Contacts &
Calendars’, choosing ‘Signature’
and then ‘Per Account’, before
typing out a signature.
Photo opportunity
Whereas sending
photos used to
require you to use
the Photos app, you
can now add photos
within Mail itself,
which is very useful
05
To make a contact into a
VIP, click their name and
then choose ‘Add to VIP’ from the
bottom of the list in the drop-down
menu. This means you will be
alerted when an email from them
arrives in your mailbox.
06
You can customise
Notifications for VIP
messages in the Notifications
section of the Settings app. This
way you will always know when
your VIPs send you an email, and
view it immediately.
61
Getting started
Top tabs
These tabs change
the view of the
calendar. They are
great if you want
specific details for a
day or an overview
of an entire month.
Tapping to change
them is as intuitive
as computing gets
Search
This is a really
useful function that
negates the need
for flipping through
countless pages.
You just type in a
parameter and the
app will find what
you are looking for
Pop-ups
The size of the screen means that pop-ups
can jump from any event whenever you tap
them. A great way to view information
Slide navigation
You can navigate through dates along
the top of the app by sliding your
finger or just tapping on a date
Add an event
in Calendar
If you find yourself struggling to remember your schedule, make sure
you never miss an important event with your iPad
T
he Calendar app on the iPad
is useful and easy to use. Like
the Contacts app, Apple has
gone with the classic analogue look
and made the app look like an oldschool, physical calendar. Of course,
this digital version has a multitude of
advantages over a real one. Firstly,
you get the beauty of typeface,
62
rather than scrawled handwriting.
Secondly, it’s easy to undo mistakes.
Thirdly, you can view it in a number
of different ways.
As you will discover here, adding
new events to your Calendar app is
a quick and easy process, but recent
enhancements to the app also make
it easier to use in other ways too.
For example, the app will scour your
emails, look for events and suggest
that you add them. And, based on
where your events are taking place,
the Calendar app will also work with
your Maps app to check the roads
and suggest times that you should
be leaving. Calendar makes it easy to
organise your life.
Add an event in Calendar
Calendar Add an event
01
Open the Calendar app and
turn the iPad horizontal to
see the dual-page layout. Navigate
to the day you want and then tap the
‘+’ button in the top-left corner. This
way you’ll create a new event.
02
A small pop-up window will
appear in the top-left, and
the keyboard will show up too. Tap
the field you wish to edit – such as
‘Title’ – and then name your event by
using the keyboard.
03
04
You now need to add the
start and end date of your
event, just to make sure you don’t
miss it. Tap on the relevant field to
see the pop-up change into a new
window display.
05
Use the tools to select the
times and dates that you
want to use. You can also toggle the
‘All-day’ button instead if the event
that is taking place will take up the
entire day.
06
Tap the ‘Alert’ field to set
reminders for the event.
These will help ensure you don’t miss
an appointment. Alerts pop up on
your iPad at the times you set them.
08
There are a number of
options, ranging from at
the event time to one week before.
Tap on your desired option and save
your progress by clicking ‘Done’.
09
07
You can add as much or as
little detail as you want,
including the location and duration
of the event, as well as invitees. You
have access to a full keyboard so you
can go to town on the detail.
When you have everything
in place, you need to
tap the ‘Add’ button located in the
top-right corner of the window.
Alternatively you can cancel it to
return without saving.
Save your event and it will
appear on the page. Tap
on it to see its details and to make
changes. You can erase it by tapping
the red ‘Delete Event’ button below.
63
Getting started
Keep perfect time
with Clock
We take an in-depth look at your iPad’s native Clock app and what it
can do for you
T
he iPad’s native Clock app
is a versatile little beast that
can carry out five simple and
incredibly useful tasks. The first
option, found at the bottom of the
interface, is World Clock, and this
allows you to track the time in up to
12 locations around the world. Useful
for finding the most sociable time to
call friends on the other side of the
world, you simply tap on one of the
‘+’ slots and pick a location to add.
The tab also features a map showing
the locations of your chosen cities.
The next function is Alarm – we’ll
look at this function in more detail
shortly. The other functions are
Stopwatch and Timer. Stopwatch
provides a timer that counts down
when you tap the Start button, and
get lap times by tapping the Lap
button to record each checkpoint.
Timer offers an accurate countdown
from a predetermined time, useful
for cooking, or use it to automatically
turn off your music if you listen to it
on you iPad when getting to sleep.
Once you explore the Clock app’s
functions you’ll wonder how you
ever lived without it.
Set the time you want
your alarm to sound by
using the keypad. From this box
you can also program repeats –
handy if you use the alarm every
day. You can repeat as many times
as you want.
03
Clock Set an alarm
Tap on the Alarm icon at
the bottom of the interface,
and then tap on the ‘+’ icon in the
top-right corner of the screen to
bring up a new alarm details box.
You can add as many alarms as you
like throughout the day.
01
64
02
Tap on the Sound menu
and you can choose an
alarm sound from a wide range of
pre-installed options. You can also
tap ‘Pick a song’ to choose from
your own Music library. Tap the ‘+’
button next to the song to set it.
Keep perfect time with Clock
Your alarms
The alarms you set
will be instantly
identifiable on a
handy week grid.
You can press and
hold and drag them
to new time slots or
change details by
tapping ‘Edit’ in the
top-left corner
Adding alarms
Tap on the ‘+’ icon in
the top-right corner of
the interface to create
new alarms. The details
box allows you to set
the time, repeat the
alarm, choose your
chime and more
Clock app modes
Tap on the icons at
the bottom of the
interface to access
the four functions of
the Clock app, which
are ‘World Clock‘,
‘Alarm‘, ‘Stopwatch‘
and ‘Timer‘
Snooze function
If you have the Snooze
function enabled in
your alarms (by moving
the green slider to the
‘On‘ position in the
alarm details box) then
you can tap to ‘Snooze‘
when the alert pops up
04
Before closing this
window, ensure that the
‘Snooze’ option is enabled to allow
you to temporarily disable the
alarm when it sounds. When you
are finished, tap ‘Save’ in the topright corner of the window.
05
You can move an alarm
to a different time if you
change your mind and want a lie
in. To edit alarms, simply tap ‘Edit’
in the top-left corner and then
either delete or edit the details of
an alarm.
06
You can also use the
World Clock feature to
see what the time is at locations
around the world. Tap on the ‘+’
icon, search for a location and then
select the one you want and it will
be added to the tab.
65
Getting started
Use Reminders to
never miss events
Thanks to Apple’s task management app, you have no excuse for
forgetting birthdays
e all like to think that
our minds operate like
super-computers. As
such, we utter the words, “Don’t
worry, I’ll remember…” on an alltoo regular basis, only to forget
whatever it was we said we’d never
forget. To help, Apple has created
its own task management app, and
it’s a cracker.
W
Reminders lets you organise your
life into To Do lists, complete with
due dates, notes and reminders to
ensure that you never forget when
something important is pressing.
Simply jot down tasks, record
when you need to do them by, then
tick each one off as you complete
it. Reminders is location-based,
so if you need to pick up some
groceries from the supermarket,
you can be alerted as soon as you
pull in to the car park. The app also
works with Calendar, Outlook and
iCloud, so any changes you make
to your Reminders list will update
automatically on all of them. Here
we guide you through the process
of setting your own reminders and
managing your To Do lists.
When you first open
Reminders you can
immediately start compiling a To
Do list by tapping the ‘Add List’
button in the bottom-left corner.
Use the default keyboard to type
out your reminder.
02
Add reminders to your To
Do list by simply tapping on
the newly created list. The lines on
the paper will even expand to neatly
contain all of your text – just in case
you have a complicated task that you
need to complete.
03
01
66
Select a task and tap on the
‘i’ icon to view your details.
Tap ‘Remind me on a day’ to ‘On’,
then use the nifty wheels to program
it to the date of when you would like
your device to alert you. You can set
the priority level with the menu.
Use Reminders to never miss events
Search
If you end up
with vast lists of
reminders – new
and old – search for
a specific reminder
by entering some
key words into the
search window
Tickboxes
Once you have
successfully
completed a task,
place a tick in the
box, and it will be
removed from
your reminders
list and added to
your ’completed’
list for reference
Your lists
All of your reminder
lists will be
selectable from the
main menu. You can
also create new lists
to add to this section
04
You can set various other
options, such as Remind
me at a time, which list it relates to
and add notes that relate to each
task if you feel you may need more
information. Tap ‘Done’ when you’re
happy. You can edit at any time.
Your reminders
Tap the page or
the ’+’ icon to add
new reminders,
and they will be
presented as an
easy-to-manage
To Do list
05
If the item you need
reminding of is a frequent
occurrence then you can also tap
on Repeat and then set yourself a
timescale for repeating the reminder,
whether it be every day, every week
or every month.
06
Whenever a task is
completed, tap the box
next to it to add a mark. Reminders
that have been marked will be added
to your Completed list, making you
feel good about yourself! They are
viewable at any time.
67
Getting started
Edit Notification
Centre settings
Make sure you never miss a thing by setting up your very own
personalised Notification Centre
T
he iPad has always been
good at notifying you about
updates, messages, and
events. However, the current
iOS truly embraces the concept
of notifications, and features an
enhanced suite of options that
allow you to tailor how your device
gets messages to you.
Now, you are able to get
notifications delivered to the top
of your screen without disturbing
what you are currently doing. All
you have to do in order to set up
your own personalised Notification
Centre is go to Settings, choose
the apps, and then select the
order that they will appear in
your Notification Centre, and the
manner in which they alert you. To
stay in the loop, simply swipe down
from the top of the screen, and
you will be presented with a list of
notifications for all of the apps that
you have featured. In this guide, we
will show you just how to get the
most out of this fantastic feature.
Notification Centre Set up Notification Centre
From your iPad’s home
screen, tap ‘Settings’,
which is housed in your home
screen by default, the silver cog
icon. Then tap on ‘Notifications’,
which should be near the top of
the list.
01
68
In Settings, you can choose
which apps are featured in
your Notification Centre. Simply tap
whichever app you want to change
and choose whether you want to
allow notifications by moving the
slider next to it.
02
Tap the arrow next to
an app, and you will see
options that are specific to that app.
Choose how many items related
to that app are displayed when a
notification relating to it arrives. You
can show up to ten items.
03
Edit Notification Centre settings
Badge icons
This slider will determine
whether the icon for the
app that is notifying you
is displayed in the alert. It
looks better if they are on
Different styles
There are different
types of alert styles for
you to choose from.
If you find ‘persistent’
too intrusive, try using
the ‘Temporary’ option
Alert locations
You can decide
where your
reminders are
displayed. You
can choose any
combination
of the location
options or select
none of them
View in lock screen
This option
determines if alerts
appear on your
device’s lock screen.
It is good to have this
activated so that you
never miss a thing
04
All you need to do is swipe
down from the top of your
iPad’s screen to call up a window of
notifications based on the options
that you have selected. If you liked
the old boxes, you can also select
this option.
05
Notifications arrive in the
form of a message at the
top of the screen, and don’t intrude
with the app you are currently using,
giving you the option to ignore it if
you so wish. Swipe it up to dismiss it.
You will find it in Notification Centre.
06
If you need to respond to
a notification immediately,
tap it to go to the specific app in
order for you to carry out your
actions. You can also swipe the
notification to the side and bring up
more options.
69
Getting started
Manage contacts
in FaceTime
Being able to make calls in FaceTime is easy, but you’ll need to
manage which contacts have it and how to get a hold of them
T
he first time you use
FaceTime it might be
surprising to see that the
Contacts section is fully populated.
It’s because FaceTime uses the
details in the Contacts app and this
in turn can import all the contacts
that you have in your iPhone’s
Contacts. Each time there’s a
sync with iCloud, the contacts are
synchronised across all the apps.
If you don’t use iCloud then – of
course – the people in the Contacts
folder will just be the ones you’ve
added manually.
It isn’t necessary to add or delete
anything using FaceTime; you can
do it in the Contacts app. As soon
as anything is changed here it is
reflected in the FaceTime app. Any
changes will then be propagated
back to the desktop program you
are syncing contacts with to ensure
conformity across all the software.
Equally, any change to a contact in
FaceTime is reflected in Contacts
and then transferred back when
syncing. In this tutorial though,
we’re going to import contacts
from Outlook and manage them
from within FaceTime.
“FaceTime can import all the contacts that
you have in Outlook or Contacts”
FaceTime Managing your contacts
Head into the Settings app select your account
from the top of the menu, then click onto the
‘iCloud’ tab. Now find the contacts tab and turn the
switch to the On position. Your iPad will then sync all of
your contacts saved in iCloud onto your device.
01
70
Once the sync is complete, go back to the home
screen and open the Contacts app. To delete any
unwanted contacts, tap on the name of a contact, then
‘Edit’ in the top-right corner. Scroll to the bottom and tap
‘Delete Contact’.
02
Manage contacts in FaceTime
Add an image
To give your contacts a more visual look, tap the ‘Add
Photo’ button and either use the camera to take a
picture or browse the Photo Library for one. You can
then scale the image to fit inside the square
Change the tune
By default, all
contacts will ring you
with the same built-in
ringtone which is
the Strum noise.
However, you can
change this to any of
the alarm noises by
tapping on ‘Ringtone’
Remove details
To change the entry for a field just tap
on it and edit it. However, to remove
it completely without editing or
replacement, tap on the red dash by
the side on any entry
03
You can edit your contacts in Facetime but only if
they are on your previously called list. Tap on the
‘i’ icon and then select ‘Edit.’ Enter the details you want to
add then click ‘Add Photo’. Select to either take a photo or
choose one from the Library. Once finished, click ‘Done’.
04
To share a contact, again click on the ‘i’ icon. On
the left-hand side is the ‘Share Contact’ option.
You can send a contact via Message or Mail app. Choose
who you would like to receive it, write a message and then
the details will be sent over.
71
Getting started
Make calls
using FaceTime
It’s one of the most exciting features of the iPad; the ability to make
video calls. Here we show you how to do exactly that
F
aceTime allows you to make
video or audio calls to other
iPhone or iPad users at no
cost. A cool new feature that was
added in iOS 12 is the option to add
multiple users to a call. You can
have up to 32 people in a group
call, each with a small chat window.
If you’re concerned that you may
lose track of who is talking don’t
worry – when someone talks their
chat window will increase in size so
you can see them better. If you’ve
used FaceTime on an iPhone
then the process of calling is no
different on the iPad. The first
thing you need to have in place
before any calls are made is to
register FaceTime using your
Apple ID. This is the ID that is used
by Apple and the App Store for
purchases. Once the Apple ID is
set up for the FaceTime account
then an email address needs to be
assigned to it. This is the one that
you use to call other people and
that they will use to call you. If you
have a Wi-Fi or mobile internet
connection then you can use the
FaceTime app. Let’s take a look.
“Before any calls are made, you must
register FaceTime using your Apple ID”
FaceTime Register FaceTime and make calls
To register your details, tap on the Settings app
and scroll down the list of built-in apps until you
get to FaceTime. Tap on this and toggle FaceTime On.
You will be required to enter your Apple ID. Enter the
email address and the password and then tap ‘Sign In’.
01
72
Open the FaceTime app and press the ‘+’ icon
in the top-left of the screen. A search bar will
appear and you can type in the name of the person you
would like to call or start entering their phone number. All
results will be shown below the search bar.
02
Make calls using FaceTime
Switch camera
By tapping this icon you
will switch cameras so
that instead of seeing your
face, the person you are
calling will see what you are
pointing your iPad at. Good
for showing off items
Cameras in use
When activating FaceTime for a call,
the first thing you see is yourself.
When FaceTime connects the call,
this window shrinks to a postage
size so you can still see yourself
and this main window fills with the
video from the contact
Mute calls
The mic icon will mute
the sound from your
end of the call. This is
useful if you need to talk
to people off camera.
Simply click on the same
icon again to restore the
sound as normal
03
If you can’t find the contact using the search
bar, tap on the second ‘+’ icon and all of the
entries from the Contacts app will be displayed. Scroll up
and down using your finger or tap on a letter from the
alphabet towards the right of the menu.
End call
Once your call is finished with, tap
on the middle red button to hang up.
During your call the buttons will fade
so tap the screen to wake them up
04
Tap on the person you would like to call. If they
have a FaceTime account then their name will
appear blue. You can add up to 32 people to a FaceTime
call for a group chat. Tap on either the Audio or Video
button to make a FaceTime call.
73
Getting started
Use Messages to
keep in contact
Get to grips with Apple’s built-in messaging service and send
unlimited text messages to your friends
T
he Messages app has had
some radical enhancements
in recent years. You can
still send unlimited text messages
to anyone else with an iPhone
over Wi-Fi, 3G or 4G by turning on
iMessage (go to Settings>Messages
and turn on iMessage), share
photos, videos, locations and
contacts around your social circles,
and keep everyone in the loop via
group messaging. But now you
can use animations to add some
dazzle to your messages and typing
numbers, symbols or punctuation
marks can be done by flicking down
on certain keys. Despite all of these
enhancements, the Messages
app is still incredibly easy to use.
For example, to draw a message
you just tap the draw icon and
then write your message into the
designated text field. All of your
text conversations are grouped
together to make it easy to keep
track and by going to Settings you
can even get message receipts to
confirm that your messages have
been delivered and read. Read on
to find out more.
Messages How to send expressive text messages
To kick things off you
will need to tap the New
Message icon (a piece of paper
and a pen), and you will then be
prompted to enter the Apple ID or
the mobile number of the person
you wish to send a message to.
01
74
Tap on the text field and
type your message into the
window. There are no text restraints.
When you have finished writing what
you wish to say in your message, tap
the blue ‘up’ arrow and your message
will be delivered.
02
If you wish to handwrite
your message then tap on
the calligraphy icon in the lower-right
corner of the keyboard and then
write with your finger in the space
provided. Tap the clock icon for a
pre-written message.
03
Use Messages to keep in contact
Compose message
Tap on this icon to
start composing a new
message. Add in the
recipient, type your
text and then add any
attachments you like
Audio messages
You can also send audio
messages by pressing and
holding on the mic icon,
which will appear here.
Hold it down to record
and then release when
you have finished
Adding photos
Images and videos
can be added and
attached to your
messages. Just type
your message, and
then tap the camera
icon to select and
send media
04
To send pictures, tap on
the Photos app icon and
you will be able to select one from
your image library. You can also click
on the Camera app icon to take a
new picture without leaving the
Messages app.
More options
Tap here to open a
window featuring
all of your apps and
games for Messages.
This will also open a
link to the App Store
where you can get
more games
05
You can download apps
and play games through
Messages. Tap on the App Store icon
and the keyboard will change to an
app drawer. To download an app tap
on Get or the price and after it has
downloaded it will be added.
06
You can also share links
to songs through the
Messages app. Just tap on the Apple
Music icon on the bottom and your
recently played tracks will appear.
You are limited to sending one song
at a time however.
75
Getting started
Send audio
messages
Spice up the messages you send by sending your contacts audio clips
rather than static text messages
W
ith its yearly updates to
iOS, Apple has done a
brilliant job with adding
some new features to its oldest
apps. For example, gone are the days
where messages are simply visual.
You can wave goodbye to boring
texts and static images; the age of
the quick and easy audio message
is here. You never have to worry
about leaving awkward voice mails
or relying on your contacts to pick
up when you’re calling them from
a concert. They can simply pick the
message up at any time that suits
them and not miss out.
It’s a really simple process that
we take you through here. You start
off by recording your message from
within Messages, so there’s no need
to leave the app to record your
message and awkwardly attach it. All
you have to do is hit the button and
away you go.
What’s more, your recipient can
save the audio file once they have it
so they can keep it on their device. If
you’re receiving the clips, you don’t
need to worry about them taking up
space as you can choose whether or
not you save the message.
“There’s no need to leave the app to
record your message and attach it”
Messages Send your friends audio clips
Head into the iMessage app and then open up
a pre-existing text stream with a contact or
create a new message by tapping the icon found in the
top left-hand corner. This is where you will create your
audio message.
01
76
In order to record your message, look down
at the bottom-right of the screen. To the right
of the text input box you will see a circular icon with a
microphone icon inside it. To record, hold down on the
icon and speak your message.
02
Send audio messages
More options
By holding down on the audio
message you will be shown the
More… options button. Tap it
and you will be able to delete
and share your messages
Your recording
When you are recording
your message, the audio
imprint will appear
where your text message
would usually appear.
You can keep track of
how long it is getting
Tap record
Hold on the record button for
the entire time you want to
record your audio message. Let
go when you are done to either
send or discard your message
03
Hold the icon until you are finished with your
message. When you are done, tap on the up
arrow in order to send your message to your contact.
When they have listened to it, you will be notified. If
they save the message, it will tell you that as well.
04
If somebody sends you a message that you
would like to save, when the audio message
appears, simply tap on the message and the options
shall appear. Tap on Save Message and it will now be
saved to your iPad.
77
Getting started
Use the
Notes app
Make your notes much more interesting and useful by using the
advanced features in the Notes app
T
he Notes app has long been
a source of frustration for
Apple users. While it is a
functional tool, it has traditionally
been a basic, bare bones app, until
iOS 9, which gave users a raft of
extra functions such as formatting
options and writing tools. You can
add photos and other memory aids,
transforming your notes from bland
documents to vibrant, interesting
lists. Although many people will
just want to use it to write down
an address or a booking reference
number, there are plenty of times
where a range of options will prove
useful to people using the Notes
app. The addition of a photograph
can be a much better way to jog
your memory and stops the need to
send photographs separately. Plus
doodling away on your phone is a
lot more entertaining, too. In iOS 11,
Apple added more tools for creating
extensive notes. This tutorial will
take you through the steps of
changing the fonts and formatting of
your notes as well as instructing you
on how to add in extra attachments,
such as photos and tables.
Notes Format your notes
When you first load up
the Notes app, you will
automatically be prompted to turn
on ‘iCloud for Notes’. You can also
do this by simply opening Settings
and then ‘iCloud’ and pressing the
slider that says ‘Notes’.
01
78
Return to the app. You will
see the ‘Welcome to Notes‘
screen, tap continue and there are
some preset folders on the left and a
blank screen on the right. Tap the top
right-hand corner of the screen to
start a new note.
02
Tap the ‘Aa’ icon, which
is located just above the
keyboard on the right hand side.
This will bring up the list of various
formatting options. Tap your chosen
one, type your note and then press
‘return‘ to drop a line.
03
Use the Notes app
Share the note
In the top right-hand
corner is an arrow
in a box. Hit this to
share your note with
selected contacts
via messaging, social
media or AirDrop
Highlight image
Tap and hold the
image. This gives you
the option to cut it
from the note, copy
it, delete it or share it
with a contact
Size options
One slight problem
with the addition of
images is that there
is no control over
what size they are,
so you can’t shrink
them down
04
Tap the pen on the far right
of the screen. This will
display all the handwriting options
available, such as pens, pencils and a
variety of different colours. Doodle
away and when you’re finished,
simply hit the ‘X’ icon.
Add to notes
You should see a plus
icon on the bottom
right of the screen. Tap
this to add a photo to
the note or you can
scan a document
05
To the right of the
keyboard is an icon for
creating and editing tables. Tapping
on this once will make a 2x2 table
which can then be expanded by
tapping on it and then adding rows
or columns.
06
Notes has a new feature
called Scan Documents.
It’s accessed by tapping the More
icon. Scanning is the wrong term as
what you do is take a picture which is
then cropped by moving the circles
around where you want to save.
79
Getting started
Get directions
Once you have
chosen a location
you can get
directions to and
from it by car, by
foot or by public
transport. For
the latter you can
download specific
apps through Maps
to assist you
Other options
Tap this icon to change
the map view from
standard to satellite
and also toggle the
‘Show Traffic‘ option to
highlight possible areas
of congestion
See what’s nearby
Tap the search field
while at a location to
see a range of quick
categories to help you
find places of interest
around you
Your location
By tapping this icon
you will instantly be
transported to your
current location.
You can then check
routes to places from
this point
Navigate
in Maps
Never get lost again using the Maps app’s amazing turn-by-turn
navigation, plus many more handy features
Y
ou will be hard-pushed to
find a better navigational
companion than Maps. This
app has everything you need and it’s
your ‘go-to’ for discovering how to
get there from the comfort of your
own home. What’s more, thanks
to enhancements introduced back
in iOS 9, the ‘Transit‘ view helps
you make use of public transport
80
to see all possible train, bus and
metro links to and from your chosen
destination. If such information
isn’t currently available in your
destination, the Maps app will
suggest a range of third-party apps
that you can download to help relay
the information that you crave.
Another worthwhile feature is the
enhanced search function, which lets
you search for places and activities
nearby. So if you’re hungry you can
check out the best restaurants, or
if you fancy some entertainment
then it will highlight all of the places
of interest near to your current
location. All this plus the regular
turn-by-turn navigation and 3D
flyover features that have steadily
made the app so essential.
Navigate in Maps
Maps Find your way around
01
In the top search bar,
begin typing in the
location that you want to navigate
to. You can start with a place
name or a postcode, and Maps
will automatically start listing
suggestions in a drop down menu.
02
Once you have selected
your intended destination,
Maps will begin to home in on that
location. You will be able to see a
Wikipedia description of the location.
If you want to travel there, tap on the
blue button saying Directions.
03
To see a list of turn-byturn directions, tap the
small ‘Start‘ icon at the bottom of
the screen. Maps will then load and
display a breakdown of your whole
journey into easy to follow step-bystep chunks.
05
If you want to take public
transport, Maps can tell you
how to get there using it. Search for
the location, tap on directions and
then Transport at the bottom of the
screen. It will give you a couple of
options which can be seen in detail.
06
04
Maps will show multiple
routes, with an estimated
travel time for each one plus
any extra info which can be seen by
tapping on Details. Under Driving
Options you can select to avoid
routes using Tolls and Motorways.
A feature introduced in
iOS 11 is indoor maps. Only
a select number of airports and
shopping centres have their floor
plans currently available on Maps but
Apple hope to have more rolled out
over time.
81
Getting started
Use turn-by-turn
navigation
Apple Maps is a great way to get from A to B, without having to take
your eyes off the road
M
aps are vital when it
comes to finding your
way around a strange
town. But it’s harder when you’re
finding your way around in a car.
Unless you have a navigator next
to you, reading a map can be a very
dangerous activity.
This fact makes Apple’s Maps
app, which offers spoken turn-
by-turn navigation, a huge boon.
Set a departure point before you
travel – Maps can even work out
your current location – and a
destination, and Maps will work out
the most efficient way of getting
you there. The app plots your
progress to provide spoken and
visual instructions as you go along
the route. Your route will continue
to be tracked even if you open
another app, and it still works on
the iPad’s lock screen.
Over the years, Maps has
received numerous updates. You
can search for petrol stations on
your route and restaurants near the
destination. With this guide, you’ll
learn how to use Map’s features to
make your journey a smoother one.
Maps Planning the best route
Open up the Maps app
and tap the ‘Search for
a place’ bar at the top-left of the
screen. Then type the name of your
destination and Maps will offer a
number of suggestions including
popular buildings in the area.
01
82
After you have chosen
your destination, select
your mode of transport – you can
choose from car, walking or public
transport. Next, choose a route. Each
shows their travel time but Maps will
suggest the fastest one.
02
Tap the ‘Go’ button at
the top-right of the
interface and Maps will display
navigation instructions on screen.
The app will also speak them to you
as you travel on your route, much like
a normal sat nav.
03
Use turn-by-turn navigation
No mapping
needed
Had enough of the
route? Just tap
here to end turnby-turn navigation
and return to the
standard Maps view
Instructions
Directions to your
destination appear in
the same design as road
signs: clear and obvious,
it’s very easy to follow
these instructions
Nearby places
Search for places to
get food or petrol
using this menu.
Maps will tell you
how far it is from
your location and
how much time it will
add to your journey
04
To zoom in on your
current location, tap the
blue icon located at the bottom of
the screen, next to the arrival time. It
takes a few seconds to zoom in but it
can help give a better understanding
of where you currently are.
Standard view only
Maps normally gives
you the option of a
satellite or hybrid views.
But not in turn-by-turn
mode, which offers a
simpler standard view
05
At the bottom-left is a box
displaying the time and
distance left of the journey. Slide this
up and you can search for places to
get food or petrol stations along the
way. You can also access the audio
options through here.
06
At any point you can
pull up the menu at
the bottom of the screen and tap
‘Details.’ This will then display in a
large box, a text description of your
route which lists each stage of your
journey and the distance.
83
Getting started
Use voice control
on your iPad
Your iPad comes with all the benefits that Siri has to offer, and it’s
time to discover just how useful it can be
A
pple’s decision to bring
Siri to the iPad was initially
greeted with scepticism
by those who could not see a use
for such a feature on a tablet.
However, the advantages do
become clear the moment you
start to use it. Over time, though,
Siri has been improved beyond
recognition and you can now ask
Siri for help with a multitude of
tasks, from the everyday to the
more obscure.
From checking local film times
to finding a local establishment, it
is all there, and the process to use
these features is simple. Siri even
has a sense of humour, as you will
find out if you ask Siri what it looks
like, or ask for the meaning of life.
It seems as though Apple listened
to the main criticisms of the earlier
iOS versions too because Siri now
has a dedicated page with much
more space to display your various
results, all of which you can tap on
to display more.
So although a wave of cynicism
may have greeted the idea of
Siri when it was launched, it is
definitely here to stay on the iPad.
“Siri now has a dedicated page with more
space to display your various results”
Siri Get to grips with Siri
To launch Siri all you need to do is hold down
the home button or say ‘Hey Siri’. You will hear a
beep and the Siri icon will appear, this is your indicator
to start speaking. If you have ticked the option in
Settings, you can also access it from the lock screen.
01
84
You can now ask Siri any question you like. If you
have waited a while, tap the Siri icon and ask your
question. The answer can come back in different forms
depending on what you asked, eg reference questions
usually come back visually.
02
Use voice control on your iPad
Clever answers
The answers can be
spoken to you by Siri or
presented in a manner
that fits the subject
matter perfectly. For
example, football scores
are displayed as they
would be on TV while
movie times have a
cinematic feel to them
Be completely natural
You can ask Siri questions in
just the same way you would
with another person. The
software has been designed
to understand the vagaries of
language and feels much less
computerised than many other
voice recognition solutions
Keep asking
You hold down your Home button to
launch Siri and you can keep asking
questions or telling it information by
tapping on the Siri icon. The more you use
Siri, the smarter it gets and before too long
you’ll be able to ask it pretty much anything
03
In Settings>Siri you can choose whether to
activate the service or not and to specify your
language as well. The ‘My Info’ section is important and
you should make sure that you have a contact set up for
yourself with all of your relevant information detailed.
Edit your question
Siri isn’t perfect and sometimes it will
mishear what you say. If this does happen
you can always edit the question by typing
it. Tap on the ‘Edit’ option and a keyboard
will appear on screen, here you can edit
any parts of what Siri interpreted
04
You can also use Siri to access shortcuts to
other apps without needing to pick up the iPad.
For example, you can ask Siri to start a Facetime call, see
appointments in your Calendar or watch films and TV
shows in the Apple TV app.
85
Getting started
Explore the
App Store
Learn how to navigate the App Store and open up a world of exciting
possibilities for your iPad
T
he App Store has been
gradually tweaked and
enhanced over the years in
order to produce a more efficient
user experience, and it has certainly
succeeded. The App Store on your
iPad is now easier than ever to
navigate and purchase items from,
and discovering new apps and games
has never been easier.
Of all the new features, arguably
the most significant is the ‘Today’
section. Here you can read
interviews with the people who
develop some of the most popular
downloads in the App Store. Each
day also brings a new hand-picked
group of apps and games called
Collections. These can be a Top 10
of a certain genre or a group of apps
that work together to meet a goal
such as losing weight. Before iOS 11,
games used to be something you
would have to shuffle through the
store to find, but now the store has
been split into two sections: Apps
and Games. Each section then has
its own charts and featured section
so you can find the best in those
categories easily.
Let’s have a closer look at some of
these important changes.
“The App Store on your iPad is now easier
than ever to navigate”
App Store So what’s new?
The biggest change to the App Store is the
redesign. The whole store has been changed so
it is easier for you to find the best apps and games. Take
for example the ‘Today’ page, which is updated every day
with a game and app of the day as well as an interview.
01
86
Finding the type of game you want to play can
be done by scrolling down the Game section
and finding the categories page. Each type of game has
its own separate page with an Editor’s choice and what’s
new, as well as charts for free and paid games.
02
Explore the App Store
Number one
You can vertically
swipe through two
different fields in a
chosen category:
Paid and Free. Each
list contains up to
200 of the best apps
in that category
Today
With in-depth
interviews and
features on certain
apps, you should
check here if you
want to keep up-todate with the hottest
apps and games
Installing
If you find the app
you’re looking for,
you can download
it right away. After
installing you’ll see
an ‘Open’ button,
which will take you
straight to the app
03
Every day the App Store will feature a new app
of the day and game of the day. These come
with an in-depth description of the product by Apple,
informing you of what you can do with it and showing this
with screenshots.
Search
If you can’t find exactly what you’re looking
for, there’s always the manual search bar
in the bottom-right of the screen. As you
type into the search, live results will appear
04
If you come across an app you’re fond of, or one
that you think everyone needs to know about,
however well known, the App Store features a selection of
sharing options for you to utilise. Simply hit the share icon
to view your different options.
87
Getting started
Check out the
iTunes Store app
The iTunes Store is designed to make buying and downloading
music that much easier
M
uch like the App Store in
iOS 11, the iTunes Store
underwent a major design
overhaul in a recent iOS update.
The iPad’s screen size showcases
everything on offer perfectly.
When you open up the app, you will
instantly be greeted by the latest and
most popular options. New releases
are showcased at the top of the
screen and you now have the ability
to browse with a simple swipe of
your finger.
Of course, further iCloud
integration ensures that all your
past purchases are up to date. You
can start shopping on your iPhone
and seamlessly check out over on
your iPad. What’s more, you can
download songs, albums, films and
TV shows from iTunes without ever
having to leave the app. It’s all part of
making the buying process simpler
than ever.
All the usual features remain
untouched. The recent update was
only a cosmetic one, but one that
provides a much more intuitive
user experience. Here’s a quick
overview of the features you need
to know about.
“You can now view a download’s progress
via a handy in-app status bar”
iTunes Shop till you drop
The first time you load the app, it will look
similar to the screen above. There are home
pages for the different categories, and you can easily
swipe through popular categories such as top singles,
albums and new releases.
01
88
Each category has its most popular downloads
listed under the Charts tab that you can find
at the bottom of the app highlighted by a star symbol.
The music section, for example, lets you vertically scroll
through the top songs, albums and music videos.
02
Check out the iTunes Store app
Big banners
New releases and
big sellers take
pride of place in the
iTunes app through a
running series of big
banners at the top of
the app. Tap on one
for extra information
or to buy. Record
companies will be
desperate to get this
sort of publicity!
Search
Sometimes, whatever it is
that you’re looking for won’t
be part of the latest charts
or a new release. iTunes has
you covered via an excellent
search facility. Start typing in
what you’re looking for and
live results will appear below
Top Charts
In this tab you will find the most
popular music, film and TV releases
currently on the iTunes Store. Head
to the music section and you will
find most popular songs, albums and
music videos
03
If you find something that you’re interested in, a
straightforward tap on its title will take you to a
page packed with extra information. Do so with a film, and
you’ll find details such as trailers, ratings and reviews, and
you’ll have the ability to buy it by tapping its price.
Your Wish List
The Wish List that lets you add products
that you don’t necessarily wish to
purchase immediately. You can then
share your Wish List with people so that
they will hopefully grant your wishes
04
Since the introduction of iCloud, all your
pre-iCloud purchases can be viewed and
downloaded on multiple devices. Hit the ‘Purchased’ tab
and use the ‘Not on this iPad’ option to search for songs or
an artist. To download a song, tap the cloud icon.
89
Getting started
Buy music through
the iTunes Store
Search, preview, purchase and download music using Apple’s iTunes
Store app on your iPad
T
he iPad may not be the first
device you think of when it
comes to listening to music.
The built-in speakers aren’t great for
playing audio at a high volume but
the device can connect to external
speakers via Bluetooth or audio cable
plugged into the headphone input.
One of the advantages of buying
music digitally is you aren’t restricted
to having to purchase whole albums.
You can buy individual songs from
albums for as little as £0.59 however
there are some songs that can only
be purchased in albums.
With over 60 million songs in
the iTunes Store you are bound to
find something to listen to. You may
be intimidated by the number of
options given to you at the iTunes
main screen but there are several
ways to find what you are looking for.
You can look at specific genres, tap
on the Top Charts tab to see what is
popular or use the Search bar in the
top-right corner.
Before being able to purchase
anything you will need to sign into
the iTunes Store with your Apple ID
and then register a credit card by
following Apple’s instructions.
“You can buy individual songs from
albums for as little as £0.59”
iTunes Purchase a song or album
Tap on the iTunes Store icon from your iPad’s
home screen to launch the app. You’ll be
immediately taken to the Music section with the latest
releases and deals displays in various thumbnails and on a
carousel at the top of the page.
01
90
Tap on the ‘Genre’ link in the top-left corner
of the screen. This lets you look for music in a
specific genre such as blues or classical for example. Tap
on a genre and you will be taken to a special storefront
only featuring music from that genre.
02
Buy music through the iTunes Store
Artist name
Tap this to be taken
to that artist’s store
page, where you
can see all of their
albums as well as
a list of their most
popular songs
Preview
Tap on a song and the
track number will turn
to a pause button as
a short sample of the
song begins to play.
This is a great way of
getting a flavour of
the album
Purchase
If you’re only after a
single track, tap on
the price button next
to a song or tap the
price next to an album
to buy all of the tracks.
Some tracks are only
available when you
purchase the entire
album
Reviews
See what other people think of an album
by tapping on this tab. Go to this page if
you would like to write your own review
and give a star rating for the album
03
Use the Search bar in the top-right corner of the
screen to search for a specific song, album or
artist. Tap on an artist to be taken to a page featuring their
songs and albums. You can listen to a short preview of
each song by tapping on it.
04
To buy a song or album, tap on the price button.
You will be asked to confirm your Apple ID
buy entering your password. Once you have confirmed
a purchase it will automatically download onto your iPad
and you can listen to it through the Apple Music app.
91
Getting started
Purchase films
and TV shows
With iTunes you can purchase whole series or individual episodes as
well as films in HD or SD
W
hen most people refer to
the iTunes Store, they are
talking about the music
section of the app, but iTunes has
Film and TV sections that also boast
wide catalogues. There are over
65,000 films available to purchase,
from major blockbusters to lowbudget independent releases and
as for TV shows, there are countless
box sets to binge. If you just want to
watch one particular episode than
you can buy them individually for as
little as £0.99. The store is organised
so the deals and latest releases
are front and centre but finding a
specific genre is easy. Product pages
feature helpful description of the
plot, reviews from other users and
information on iTunes extra content
such as behind the scenes footage
and deleted scenes.
If you don’t fancy owning films,
then for a lower cost you can rent
it for a limited time. When you’ve
made a purchase, the content can be
viewed on any of your Apple devices,
so you can watch it on the go. In
our guide we will show you how to
navigate the store, purchase content
and then watch it.
“There are over 65,000 films available
to purchase”
iTunes Purchase content from iTunes
Launch the iTunes Store and tap on either the
‘Films’ or ‘TV Programmes’ tab along the bottom
of the screen. Featured content and deals will be displayed
on the carousel at the top of the page. Swipe the carousel
left or right to scroll through the content.
01
92
When you have found something you like, tap
on it to see the price. Some content will offer
you the option to purchase it in standard-definition (SD)
but by default it will be set to High-definition HD. Buying
content in SD can often be cheaper.
02
Purchase films and TV shows
SD or HD
Not all of the content
gives you this option
but it can save you
money as the SD
version is often
cheaper than the HD
option and it takes
up less storage space
Share
If you love
something, why not
share it with others?
By tapping this icon
you can share the
Programme to social
media or email a link.
You can also use this
icon to add it to your
Wish List
Browse the tabs
The ‘Reviews’ tab lets you see what others
think of the show or film and ‘Details’
offers a synopsis as well as a preview. Tap
Related to find more content that could be
of interest
03
Scroll down the information screen to read the
description, see if it comes with iTunes extra
content or you can watch a trailer. The Related tab can be
extremely helpful as it shows other films and TV shows by
the actors and director.
More information
As well as the show itself, each episode
comes with a brief description. Tap the
‘More’ icon to see it in full or you can
watch a short preview by tapping on the
play button
04
To make a purchase or rental, tap the price and
confirm the payment. When you rent a film you
have 30 days to start watching it and once you’ve started
the movie you have 48 hours to finish it. Everything you
purchase or rent can be found in the Apple TV app.
93
Getting started
Subscribe and use
Apple Music
How to use Apple’s streaming service and listen to the library of over
60 million songs
L
aunched in 2015, Apple Music
is a subscription service with
which, for a monthly fee, you
can have unlimited access to Apple’s
library of music.
But with Spotify, Amazon Prime
Music and Tidal among other apps
available through Apple’s App Store
and at a similar price, why should
you choose Apple Music? Well,
Apple’s service has exclusive albums,
curated playlists from Apple’s editors
and access to radio shows from
around the world including Apple’s
own 24/7 station, Beats 1.
Discovering new music that
you’ll like is easy thanks to the
recommended playlists which you
can find in the ‘For You’ section
of the app. Apple’s AI will create
playlists for you based on what
you’ve listened to and added to your
library. The more you use Apple
Music, the more accurate these
recommendations will become.
Before purchasing a subscription,
you can try the service out for free
for three months but if you don’t
like it you can always cancel the
automatic renewal so you won’t be
charged when the trial ends.
“Before purchasing a subscription, you can
try the service out for free”
Apple Music Getting to know the app
Open the Apple Music app, tap on the ‘Listen
Now’ tab and you will see a link to subscribe. Tap
this, select a plan and confirm payment details. Your first
three months will be free and then after that you will be
charged if you continue.
01
94
Go to the ‘Library’ section of the app to find
music you’ve purchased from the iTunes Store.
Use the tabs on the left side of the screen to switch
between viewing albums, artists, songs, etc. You can find
recommendations in the ‘Listen Now’ section.
02
Subscribe and use Apple Music
Beats 1 Radio
You can check the
schedule for Apple’s radio
station from this tab. If
you forget to tune in for
a show there is a ‘In case
you missed it’ section so
you can catch up
Stream Music
For £9.99/$9.99 you
can stream unlimited
music to your iPad,
so if you are a music
lover it’s ideal. Apple
Music is a great way
to discover new
music and go back to
old favourites
Listen Now
This section of the app
will be filled with music
recommendations based on a
short questionnaire you can fill
in, as well as what you’ve been
listening to
03
Tap on a song to start playing it. There is a
window in the bottom-right corner of the screen
displaying what song is currently playing. Press this to
open it in a larger window. From here you can change the
volume, skip tracks or see the song’s lyrics.
Search
If you can remember
the lyrics but not the
song, type them here
and Apple Music will
display all the songs in
its library with those
lyrics. You can also use
this tool to see what
music search topics
are trending
04
The ‘Radio’ tab is where you should go to to find
Apple’s 24/7 music station Beats 1. Scroll to the
bottom of the page, tap on ‘Radio Stations’ and from here
you can search radio stations by genre. Tap on a station to
start listening.
95
Getting started
Create a playlist in
Apple Music
Keep all of your favourite tracks in one place so they’re available at
the touch of a button
I
f you’ve never used a playlist
before, look at it as a digital
mixtape. You take a collection of
songs from different artists and have
them in one place. With Apple Music
you can create playlists using music
purchased from iTunes or Apple
Music’s vast catalogue if you have a
subscription to the service. Whether
it’s for a party, long drive or just as
something to listen to when doing
household chores, a good playlist
can make all the difference.
Thanks to Apple Music’s clean and
simple interface the process of
making your own playlist is hasslefree. Whether it is an individual
song or a whole album you wan to
add, finding the solution is easy. In
this tutorial, we will show you the
basics of how to create and edit a
playlist but there is more you can
do afterwards. Playlist can be given
album covers so they are easier
to find when scrolling through
the menus and you can also share
playlists with other Apple Music
users. If you have an Apple Music
subscription then you can save other
user’s public playlists and tweak
them using these steps.
“The process of making your own playlist
is hassle-free ”
Apple Music Create and tweak a playlist
Open the Apple Music app, tap on the link in the
top-left corner and go to All Playlists. Tap on the
‘New’ button to create a playlist and then ‘Add Music.’
Navigate all of your music or use the search function to
find music to add to the playlist.
01
96
You can also add music to your playlists by going
through your music library. Once you’ve found a
track or album tap on the more icon and you will see the
option to ‘Add to a Playlist.’ Tap on this and select which
playlist you would like to add it to.
02
Create a playlist in Apple Music
Playback controls
The song currently playing will be
displayed in the bottom-right corner
of the screen. Tap this to bring up
the playback controls where you
can adjust the volume, pause what’s
playing or skip a track
Download
If the songs aren’t downloaded onto your
iPad then you cannot listen to without
a Wi-Fi signal. Tap on the cloud icon to
download the song or entire playlist
Options
Instead of using the
‘Edit’ button you can
use this to tweak
the playlist. You can
also use this icon to
find the Share option
which you can use
to send the playlist
to a friend, but you
must both have Apple
Music subscriptions
Edit
You can rearrange the songs by
tapping and dragging them or tap
and hold to bring up other options
such as deleting tracks
03
You can change the name of the playlist as well
as its artwork by taping on the ‘Edit’ button.
You can also add a description of you wish. To change the
order the songs are in, tap and hold the icon with three
lines before dragging it up or down.
04
Once you’re all set, press the ‘Done’ button to
save any changes made to the playlist. When
you’re ready, press the ‘Play’ button to start listening or
you can use the Shuffle function to listen to everything in
a random order.
97
Setting up
The next step
Get to grips
with the
iPad’s more
in-depth
features with
our guides
98
98
xxx
100 Capture images using Camera
118 Design a document
102 Edit images in Photos
120 Make a spreadsheet
104 Organise your photos
122 Get started using Files
106 Get the most out of the iPad videos
124 Send files with AirDrop
108 Listen to podcasts on your iPad
110 Purchase an iBook
112 Get to know iBooks
114 Stay informed with News
116 Learn to set up Family Sharing
“Your iPad can
become a hub
for media”
99
99
The next step
Capture images
using Camera
When you need to capture a moment and you have your iPad with
you, it is capable of everything you’ll need
T
he iPad camera is not an
obvious feature, mainly
because of the size of the
tablet itself, but if you happen
to have it with you and want to
grab a quick snap you may as well
know how it all works. Despite
specifications that are meagre in
comparison to standalone cameras
and some smartphones, it is still
capable of capturing decent quality
photos and videos if you take time
to make it work properly. There are
options for stills and video as you
would expect as well as a Square
option for capturing perfectly
proportioned photos. These could
be used for scanned documents
or anything else and this simple
addition of a unusual shape adds
some charm to the experience.
HDR will help you deal with unusual
lighting and like everything else in
the interface it is just one tap away
at all times. Indeed, it is surprising
how functional and fully featured
iPad cameras are and since iOS 7,
everything has been upgraded just
a little to make the final results even
better than before.
Camera iPad photos and videos
Tap the Camera icon and
you will be presented with a
different look in the main interface.
Swipe along the right-hand bar to
select the available options. Take
your time to familiarise yourself with
the different options.
01
100
Tap the screen where
you would like it to focus
and the lens will pinpoint on that
particular spot. It is highlighted by
a yellow square on the screen. This
can be used to draw attention to a
certain aspect of your photo.
02
Slide the right-hand bar
up to go to video mode,
and press the record button to start.
When it’s recording the capture
button becomes a red square and a
timer is displayed, so you can keep
track of the length of your video.
03
Capture images using Camera
HDR
Turning the HDR
option on is particularly
helpful when you
are taking landscape
shots with varied light
sources. It can greatly
improve any photo
The capture button
The capture button
is logically placed for
ease of use and will
turn red when you are
recording video. Hold
it to take burst shots
Square photos
Square photos are
excellent for taking
more serious photos
such as scanning
documents or trying
to capture a passport
photo. They also look
quite retro
See your snaps
Tap this small icon to
quickly jump to your
camera roll to see all
of your photos. This
is great for quickly
checking your last shot
04
Tapping the icon just
above the shutter will
swap to the front-facing camera, on
the screen face of the iPad, which is
useful if you want to take a picture of
yourself. Alternatively, you could use
this option as a mirror.
05
The HDR function works
particularly well with
landscape shots and scenery
pictures and can help you capture
shots in much better quality.
Experiment with the different
options to see which works best.
06
Go to Settings>Photos
& Camera and you will
be able to add a grid to the camera
view and save a standard shot when
snapping HDR photos. Adding a grid
can help you angle your photos and
frame them nicely.
101
The next step
Edit images
in Photos
Make the most of your iPad’s camera, and take advantage of the
built-in photo-editing app
W
hereas taking photos on
your iPad is quick and
easy with the Camera
app, organising and editing the
photos that you take is equally as
intuitive with the Photos app. All
of the photos that you take are
uploaded to your iCloud library
and made available on all of your
iOS devices and as your collection
grows, they will be neatly
organised by date and location –
and a built-in search facility makes
it easy to find specific photos when
you need them. What’s more, you
can make edits to photos within
the Photos app to make them
look as eye-catching as possible
before sharing them with others.
You can make smart adjustments
to all aspects of the photo with
a single tap or really go to town
fine-tuning each individual aspect
and even applying filters to turn
seemingly standard images into
fabulous works of art. Read on to
discover how the Photos app can
revolutionise your images to really
make them stand out and be ready
for sharing.
Photos Edit your photographs on your iPad
Launch the Photos app
from the home screen, and
you will automatically see all your
pictures and videos sorted in the
order they were taken. Pick one
you want to make amendments to,
and then tap ‘Edit’ in the top right.
01
102
If you tap on the wand
icon at the right of the
screen the software will adjust the
colours of the image. Tap ‘Cancel’
to undo the changes or tap ‘Done’
to finish with your edit and save
your changes.
02
Tapping the frame icon
will allow you to crop the
image by moving the corners of the
frame or make adjustments to the
orientation by rotating the dial at
the bottom of the image so you can
change the alignment.
03
Edit images in Photos
Undo any changes
Thanks to the
intuitiveness of the
iPad, you can easily
revert back to the
original image by
pressing cancel, and
then quickly resave it
Enhance
On the surface this
seems like a basic
option compared
to most dedicated
editing packages,
but in practice it’s a
great feature that can
transform your photo
within moments
Crop photos
You can chop out
parts of the photo
(such as a blurred
section or distraction)
that you don’t want
anymore
04
If you wish to apply a filter
effect to an image, tap
on the filter icon and then swipe
through the various options. Tap
on one to preview what it looks like
when applied to the image. There’s
plenty to choose from!
Multi-touch controls
Before you choose
how to edit a photo,
you can use the multitouch pinch controls to
zoom in to the photo
to focus on the areas
you want to improve
05
To make slight adjustments
to the colour levels, tap
on the dial icon, then choose one of
the options, and move the slider to
the left of the screen up or down to
make adjustments. You can see the
results in real-time.
06
There are a wide range of
adjustment options, such
as Exposure, Shadows and Contrast.
We recommend experimenting with
what there is. Tap ‘Done’ to complete
your edits and it will save to your
photo stream.
103
The next step
Organise
your photos
You can organise and keep all of your most important photos
in order on an iPad with ease
P
hotos will always have a
special place in our hearts,
but it is very easy to take and
collect so many that you often miss
the truly special moments.
On an iPad and with the Photos
app you have the ability to organise
your collection logically and to
ensure that the ones you view most
often are always available. Some
of the organisation can be done in
iTunes, but for quick tweaks and for
making changes on the move you
have everything you need on the
iPad to keep all of your photos in
logical order. The Photos app also
includes Memories and People, so
that you can look back at photos
from say, the current date, but a year
ago. The Search feature lets you look
for specific buildings or animals you
have in your photos.
The iPad is the perfect tool for
viewing photos thanks to the superb
screen and portable form. With its
larger screen and capability to show
more detail than other devices, you
may well find that you prefer storing
and viewing all your photos on your
iPad rather than one your laptop or
desktop computer.
“The iPad is the perfect tool for viewing
photos thanks to the superb screen”
Photos Manage your photo collection
All of your iPad photos are available to view by
date using the menu in the corner and tapping
‘Library.’ They will be broken up by time and also by
the location they were taken in and this is completely
automatic. Tap the ‘Albums’ icon to continue.
01
104
The ‘Search’ tool is a handy way of finding
specific images. Photos can detect animals,
buildings and more. Tap on an icon and it will display all
images containing that thing or you can also tap on the
search bar at the top and type what you are looking for.
02
Organise your photos
Static photos
If you have an album
of photos which has
been synchronised
from a desktop via
iTunes, the photos
will remain in the
album even if copied
to another album.
This may create
duplicates, but you
will never lose any
Using albums
Albums still represent the best way to organise
a large photo collection and if you use them
wisely through iTunes when syncing everything
you need will be one or two taps away.
03
When in the album view, tap the ‘+’ icon top-left
to create a new album. You will be asked to give
it a name and you can then choose which photos you want
to add to the album. The photos you add will still stay in
their original albums as well.
Add to albums
You can choose
photos to move to
other albums on
the iPad using the
‘Select’ option and
then ‘Add to’. This will
add selected photos
to the album of your
choosing which should
help when dealing with
hundreds of images
Automatically ordered
Your photos will be ordered by date and
location. It does not matter which albums
they are in and once you are used to it, you
may find this to be the best view of all
04
To add from the Library tab, tap the ‘Select’
option and then choose the photos. Now tap
the Share icon followed by ‘Add To’ and select the album.
As before, the original photos will remain in the album you
have copied them from.
105
The next step
Get the most
out of the TV app
The iPad is perfectly designed for the mobile movie experience
thanks to its large screen
T
he Apple TV feature alone
has the potential to keep
you occupied on long plane
journeys, in hotels or waiting
rooms, and adds a use to the
iPad that could justify half of the
cost straight away. It has been
designed for ease of use, as most
Apple software has, and takes care
of many of the niggles found in
competing devices. For example, it
will automatically play a film from
the point you left it, and expanding
the screen requires just a simple
double tap.
Everything is designed to
help you get the most from the
experience, but some tips are still
useful to get you off to a flying
start. In this step-by-step we will
show you how to obtain new
movies, how to transfer them to
your iPad and how to make the
most of the viewing experience.
You could easily do all of this
yourself, but in this instance a little
knowledge certainly goes a long
way and missing out on the movie
capabilities of the iPad would be
a real shame given the benefits it
offers you.
“It adds a use to the iPad that could justify
half of the cost straight away”
Videos Make the most of movies
The easiest way to obtain the highest-quality
content is via iTunes. Navigate to the ‘Films’
or ‘TV Programmes’ section of the store and choose
the film you would like to rent or buy. The trailers are
perfectly designed to give you an idea of content.
01
106
Your purchases will be downloaded and stored
on your iPad. If you have iCloud activated then
they will also automatically be pushed to your other
devices wirelessly, such as your Mac or iPhone, allowing
you to view them on those devices too.
02
Get the most out of iPad videos
Full screen
Tapping on this icon will alternate
between full-screen and widescreen
viewing. You can also double tap
anywhere on screen to achieve this effect
Back where you left off
The app automatically remembers
where you last finished watching
something and will start any film at that
exact place when you open it up again
Full control
You can move to specific parts of
a video by moving the slider at the
bottom with your finger; the further
down the screen your finger is, the
more precise the movement will be
Main controls
The main control keys are standard and are
brought up by tapping the screen once. You can
play, pause, forward or rewind when you need to
03
To find your videos, tap on the menu icon in
the top corner. Choose Movies or TV Shows,
followed by what you want to watch. The film (or TV
programme, for that matter) will immediately start to play
from the beginning.
04
Double-tapping the screen will make the movie
zoom in, and doing so again will take it back to
standard format (which is useful for widescreen films).
The rest of the on-screen tweaks are obvious in their
implementation, such as play, pause, etc.
107
The next step
Listen to podcasts
on your iPad
Search for, subscribe to, and listen to fantastically immersive
podcasts on your iPad
T
he iTunes store became so
big that it had to migrate
particular wings to their own
standalone apps, such as Books
and Podcasts. Search the app by
tapping the magnifying glass. When
you find a suitable podcast, select
it to view its info page and then tap
on the ‘Subscribe’ button to ensure
that new episodes are added to
your library when they’re available.
When you subscribe to a show, the
latest episodes will automatically
begin downloading to your iPad. You
can also tap on the cloud icons to
download individual episodes.
To listen to your downloaded
shows, tap on the Library icon and
then select a podcast, followed
by the episode. You will then be
presented with a familiar set of
playback controls to Play/Pause
and skip forward and back. You can
also press, hold and drag the scrub
bar at the bottom of the controls
to fast track to a particular point in
the episode. Even if you have never
listened to a podcast before, this app
makes it an enjoyable and intuitive
experience from the off.
Podcasts Download a podcast
Tap on the ‘Browse’ to
see the latest or trending
podcasts. At the bottom of the
page is the ‘Categories’ link that will
let you see the top shows in each
genre. Apple also have collections
of noteworthy podcasts.
01
108
Tapping ‘Top Episodes’
will list all of the podcasts
that are currently popular. This is
a good way to find content that
is recent and that other users are
listening to. You may even discover
something new.
02
When you find a podcast
that you would like to
subscribe to, tap on the ‘Subscribe’
button to add it to your library.
When new episodes are available
they will automatically download to
your iPad.
03
Listen to podcasts on your iPad
Your Podcasts
All of the podcasts that
you have downloaded
will be accessible
through this section.
Tap on a brand to view
all of the podcasts
inside and then tap an
individual episode to
start listening to it
Now playing
Like the Music app,
if you currently have
content playing then
you will be able to
access it via the ‘Now
Playing’ link in the topright corner and then
access the playback
controls to Play/Pause,
skip and more
Top charts
Use the charts in the
Browse section to find
the greatest podcasts
in each category. There
are two lists; Top Shows
and Top Episodes. You
can filter these charts
according to genre and
when you find a show
you like, hit ‘Subscribe.’
04
You can also download
individual episodes by
tapping on the plus icon next to a
particular episode then tapping the
cloud icon. All downloaded content
will be accessible from the My
Podcasts section of the app.
Search
If you have a good idea
of the sort of content
that you would like to
download and listen to
then tap on the
Search icon and start
entering keywords to find
content that matches
quickly and easily
05
When you are ready
to start listening to a
podcast, tap on the Library icon
and select a podcast to listen to.
Tap on an individual episode to
start listening to it. It will be tagged
with how many you have per series.
06
When you start listening
to a podcast you will be
presented with a familiar set of
playback controls. You can also
change the speed and use the
scrub bar to jump to a particular
point within the cast.
109
The next step
Purchase
an eBook
Learn how to buy an eBook and open up a whole world of digital
books, revolutionising the way you read
O
ne of the reasons for the
iPad’s existence is to take
on Amazon’s Kindle. The
iPad obviously has a number of
advantages over the Kindle in that
it can do a great deal more than a
dedicated device, but on a purely
ebook-reading scale, the iPad is still
one of the most advanced out there.
What’s more is that Apple already
has a tried-and-tested way to deliver
ebooks directly to its device: the
iTunes Store. However, Apple hasn’t
just bundled the books into that
system, it’s created a separate space
for these so that users can be sure of
what they are downloading.
Apple Books is a fantastic resource
on your iPad, holding all your
ebooks and giving you access to the
custom-built eBooks Store to make
purchases. The system is simple,
although you may need to download
the Books app from the App Store
to kick things off. This tutorial will
take you through your first download
from Apple Books so you can get a
feel for the system. It’s then up to
you to resist buying a library’s worth
of content on each visit!
iBooks Purchase a book
Find the Apple Books icon
on your Home screen, tap
it, and once it’s loaded, you will be
presented with blank shelves. To
get your first book, browse through
the Featured and Top Charts tabs
at the bottom of the screen.
01
110
The Book Store is similar
to the App Store or the
iTunes Store. Books are categorised
and searchable, and everything is
charted so that you can see what
is selling best, but you can also
search for specific authors.
02
The ‘Book Store’ section
displays all of the latest
releases of significance and you can
also scroll down to the ‘Top Charts’
to see which titles are currently
popular. It also shows the prices
next to the books.
03
Purchase an iBook
Promo perfection
Again, like the App
Store, books are
picked by Apple to
be featured on the
front of the Store. This
positioning increases
their sales no end, as
you can imagine
See All
Use the ‘See All’
button in order to
get a bigger list from
any given section.
It’s similar to the
system that’s used
on the App Store
Tabs at the bottom
At the bottom of the
interface there are
five tabs, which will
help you navigate
through the Store
and also see what
you have already
bought previously
04
Like the App Store, there
are a huge number of
free books. These tend to be the
classics, so you can go ahead and
get great content for nothing. Tap
on the book in the store and then
tap ‘Get Book’.
Easy navigation
Navigating through
the Store with your
fingers is easy. Tap
buttons to see more
and tap individual
books in order to get
more information
05
You’ll now be prompted
to enter your iTunes
account password to authorise the
download. Once you’ve done this
and tapped the ‘OK’ button, the
book will start downloading, and
will be available to you shortly.
06
Your new books will now
appear on the bookshelf
and you’ll see a progress bar as
they download. Once downloaded,
the book will become available to
read at your leisure. Start collecting
and fill up those shelves!
111
The next step
Get to know Books
Having an eBook reader on the iPad is very cool, so
here’s how to customise it to your liking
D
espite the conjecture, if
you’ve actually used the
iPad you’ll know full well
that it’s much more than just a large
iPod touch. The size really does
make it feel like you’re holding a
full-blown computer in your hands,
and no other app exemplifies the
difference more than Apple Books.
When you’re reading a book on
the iPad it feels natural, it’s easy
to do, and we are certain that we’ll
be doing a lot more reading now
that it’s so simple to carry books
around with us. The beauty of the
iPad interface means that making
changes to the way Books looks is
very, very simple. Users can opt to
make text bigger, change the font
and alter the brightness of the book
without having to leave the page
they are reading. Try doing the same
three operations on an iPhone and
see how many times you have to
leave and return to the page you
are reading. Books is exceptional,
so follow our tutorial on how to get
more from the reading experience.
True text
With the iPad being
the size it is, reading
is a complete joy.
Once you have
your fonts and the
brightness set up
how you like, you
can read for hours
on this device
iBooks Font, size and brightness
Open the Books app and
then tap on the cover of a
book on your shelf that you would
like to read. The page is presented
as if it were a real book, but by
tapping on the screen you’ll find
options at the top and bottom.
01
112
You can navigate from the
contents page to a chapter
by tapping on it, and once you have
been reading a while, you can head
straight to your own bookmarks
within the pages themselves, for
super-quick navigation.
02
You can flip through pages
by dragging from the righthand side to the left, where you’ll see
the cool page-curl animation. Or use
the less cool but more functional tap
on the right-hand side to skip to the
next page.
03
Get to know iBooks
04
Tap on the ‘aA’ font button
at the top to access the
menu where you can alter the book’s
font and text size. Tap the big ‘A’ to
increase font size and the small one
to decrease it, depending on how
easy you find the text to read.
05
If you’re not keen on the
font used, you can change
the font type. Tap the ‘Fonts’ button
and then pick from the available
options that are listed in the popout window. The selection should
provide an alternative that suits you.
06
Tap on the magnifying
glass icon to bring up a
search field. Every book on the
Store is fully indexed so you can
instantly find individual words in a
book – invaluable for textbooks and
following complicated plots.
08
Tap on the sunshine icon
to bring up brightness
settings of the book. This only
affects the levels within Books and
doesn’t translate to the rest of the
iPad, so you won’t have to change it
back within other apps.
09
07
Tap the font you wish
to select and a tick will
appear next to it. As with all the
other changes you can make to the
appearance of a book within the app,
they happen instantly, and you can
select another one if you wish.
Changing the brightness
means that you can alter
the reading light to whatever is
most comfortable for your eyes.
The brighter the ambient light, the
brighter Books needs to be. You can
also change the background colour.
113
The next step
Stay informed
with News
Discover what is going on in the world from your favourite news
sources thanks to the brand new Apple News app
T
he News app, that was
first introduced with iOS
9 continues to grow and
it flourishes in iOS 15. This app
offers you content from a variety
of newspapers and websites, all
updated regularly to ensure you’re
getting the latest current events.
You are able to set which news
outlets you want to see content
from, as well as set subject interest
areas, such as sport or British
politics. Once you’ve selected
your interests, the app will collect
stories from their original websites,
displaying them for you to browse
through at your own leisure.
If you haven’t got time to read a
story, you can save it for later via
a dedicated button. By using the
‘History‘ tab you can easily find
stories you have read recently if you
are looking for a particular article to
show your friends or family.
This tutorial will take you through
the steps needed to get to grips
with the app and get the most of its
innovative functions. So start here to
stay informed on what’s happening
around the world.
News How to sign up for News
The news app regularly
receives new features.
To update your iPad, tap on the
Settings icon and navigate to
General>Software Update and
install the most recent operating
system available.
01
114
After updating your iPad,
you will need to turn off
your device and restart it. You should
now see the white and red Apple
News app icon on your Home screen.
Just tap on the icon to open up your
own dynamic news feed.
02
The first page you will
see when you open the
app is the ‘Today’ section. You can
scroll down the page to see a small
section of each news category (food,
trending, health etc). Click on ‘More
stories’ to go to that section.
03
Stay informed with News
News+
For £9.99/$9.99 a
month, you can have
unlimited access to
over 150 magazines
and newspapers
from around the
world to read on
your iPad
Search
In the ’Search’ section
you can look for certain
topics or stories but it
will also show you what
topics are currently
trending. Search results
will also bring channels
that feature the topics
Saved
Tapping the ribbon
icon in the corner
of the screen when
reading an article
saves it for later. Tap
this link to find your
saved stories
04
Tap on the icon in the topleft corner of the screen
to reveal a series of options. You will
see different topics of news but at
the bottom is a link to choose what
channels and topics you would like
featured in your feed.
Siri support
Siri will remember
what you read about
and searched for in
other apps and use this
information to tailor
the stories that appear
in the app
05
Simply tap on a story to
open and read it. If you find
a particular article you enjoy, you can
use the share icon in the top-right of
the screen followed by Suggest More
Like This. This will help the app learn
which articles you prefer.
06
Tap the icon in the topright corner. This will
display a list of ways that will allow
you to share whatever story you
have just read with your contacts
via a range of messaging and social
media methods.
115
The next step
Family Sharing
organiser
Family Sharing only
needs to be set up
by one person in the
household. When
setting up, they will
send out invitations
to all of the other
family members
Location sharing
Setting this up allows
those in the family to
see the organiser’s
location. Each member
then has the option
to share their location
through the Find my
Friends app
Find missing devices
One of the most useful
aspects of this service
is that if a family
member loses their
device in the house,
the organiser can track
it and command it to
emit a sound
Many benefits
As you will discover,
family members who
are linked together
can share iTunes
media, schedule
events on the family
calendar and more
Learn to set up
Family Sharing
How to link family members to one account so that all downloaded
media can be shared between devices and much more
F
amily Sharing is a new way
to access content from your
iPad. Up to six accounts can
share all the different types of iTunes
purchases that have been made
within the set up family. This service
is set up by one family member,
known as the organiser, and once
set up, all of the family purchases
are paid for with the same credit
116
card. This means that young children
won’t be able to make purchases
without the organiser’s approval
and all of the content can be shared
between all of the family members
linked to the account.
There are numerous other benefits
from using this service; you can share
photos quickly and easily within the
household, mark up events on a
central family calendar and even help
track down missing devices. Once
set up, family members get instant
access to each other’s downloaded
content without the need to share
Apple IDs and passwords. When
family members try to buy new
content, a permission alert will notify
the organiser who can then approve
or deny the request.
Learn to set up Family Sharing
Settings Get Family Sharing working on your iPad
01
Launch the Settings app
from your Home screen
and tap on your Apple ID at the top
of the screen. You will see the option
to ‘Set Up Family Sharing…‘ in the
middle of the screen highlighted by
the blue font.
02
Tap on the ‘Set Up Family
Sharing‘ option followed
by ‘Get Started‘. Now sign in using
the Apple ID that you wish to use in
order to share iTunes, iBooks and
App Store purchases throughout
your family.
03
Once complete, you
can select other sharing
options. For example, you can
choose to see family member’s
locations. These aren’t an essential
step to completing the process, so
you can skip setting these up.
05
Now the basics have been
put in place, you will be
taken back to the Settings screen
to start adding family members by
entering their name or by iMessage.
An invitation will be sent and, when
accepted, the member will join.
06
04
You will have to check the
payment method that you
wish to use to authorise all iTunes,
iBooks and App Store purchases in
your household, or enter payment
details if they aren’t already linked to
your Apple ID.
From the ‘Family Settings‘
screen of the organiser,
you can tap on the names of
attached family members to grant/
revoke certain app-buying privileges
or remove people from the Family
Sharing circle.
117
The next step
Design a
document
Apple’s Pages takes the mobile word-processing experience
to a whole new level
P
ages is not like most word
processors – it combines
the most used features in
an interface which includes very
few icons. Getting to know the app
is not difficult, although it does
help to understand where the main
functions reside in order to get
you started, and doing so will open
up the power within. Despite the
rather sparse interface, it is packed
with formatting options and clever
little tricks that make previously
tiresome manoeuvres a thing of the
past. The included templates are
completely customisable, which
enables you to get creating in no
time at all.
Not all specific needs are catered
for, such as a word count, but Apple
has done a good job of defining the
most used functions that people
need and being able to share
your creations without touching a
desktop is another advantage. You
can even decide which format to
save these documents in and, best
of all, if you have iCloud enabled
then you can sync your pages
wirelessly between devices.
Pages Create stunning documents on the move
The first step is to search
for Pages in the App
Store, if your iPad came with iOS
7 or higher pre-installed then it
is completely free. The first time
you visit the App Store you will be
prompted to get it.
01
118
Pages is so obviously visual
in the way it is designed
that you could just have a wander
around the icons and start typing.
When you open the app for the first
time, Pages will display a number of
useful tips.
02
In the first screen, tap the
‘+’ icon at the top to create
a document’. This will bring up a
screen with numerous templates
on. You can choose anything from
a blank page to a party invitation or
newsletter.
03
Design a document
Document handling
Your completed
documents are never
far away. A tap of the
‘Documents’ icon
will bring up a page
showing all of your
saved work. Each
document is saved
automatically after
every change
Extra formatting
Simply tap the brush
icon to access extra
formatting features
such as bullet
points, subtitles
and headings. The
options automatically
change if you have an
image highlighted
All the standards
All of the standard
formatting options
such as bold, italics and
underline are easily
accessible from the top
bar. Highlight a word
and click an icon for the
desired effect
Easy image
manipulation
Once inserted, images
can be resized, moved
and even twisted
to the position you
need. The words will
automatically move to
around them and into
the right position
04
Type a few words and
then check the formatting
options at the top. Select words by
tapping and holding, at which point
you can use the icons to format the
text. Tap the paintbrush icon for
more options.
05
Other options include a
document setup wizard,
defined by the top-right More icon,
and a quick tap of the ‘+’ icon lets you
insert an image into your document.
You can also add in text boxes,
shapes and more.
06
You never need to save
your work as you go
because Pages does it whenever a
change is made to a document, but
you can export it to PDF, Pages or
Word format and send by email with
the tap of one icon.
119
The next step
Make a
spreadsheet
Use the versatile Numbers app to create serious or silly spreadsheets
to suit all tastes and requirements
S
preadsheets are a part of
everyone’s lives these days
and have taken on multiple
roles in business and at home. Most
spreadsheet programs tend to
focus on the business side because
this is where they are mainly used,
but spreadsheets have myriad
other uses that aren’t often
explored or understood.
Numbers puts multiple uses
front and centre with special
templates built in and also brings a
new way of working to the mobile
user. However, the interface and
function locations may feel alien
to those that have used Excel
for a long time and so a short
introduction will help you to get
to grips with the app quickly.
There are a lot of functions built
in to Numbers and some of these
are not obvious, so take a look at
these simple steps to start numbercrunching straight away.
In this tutorial we take you
through the basic steps to set
started with Numbers, from
entering your first formula to
adding charts and formatting.
Numbers Explore the power of this spreadsheet app
If you cannot find the
Numbers app on your
Home Screen, don’t worry as it is
available to download for free from
the App Store. We recommend
getting it, even if you only need
spreadsheets on the odd occasion.
01
120
When you first open
Numbers, you’ll be shown
the key features as well as some of
the newer additions before going
to the main menu. If you have any
files in your iCloud Drive they can be
found in the Browse tab.
02
Tap the ‘+’ icon at the
top to create a new
spreadsheet. You will now be offered
a choice of pre-formatted templates
which includes everything from a
blank spreadsheet to a mortgage
calculator. Tap one to open it.
03
Make a spreadsheet
04
For the purpose of this
tutorial, choose the blank
template option in the top-left
corner. Tap an empty cel followed by
the keyboard icon. On the keyboard
are icons for numbers, date/time,
text and formulas.
05
Tapping any of the icons
brings up a dialog with
shortcuts pertinent to the data that
you want to input. For example the
number icon will bring up a number
pad plus a percentage button and
so on.
06
The ‘=’ icon lets you type
formulas. This allows for
some advanced functions such as
Trigonometric, Engineering and
Statistical. Use the keyboard to enter
your required function and tap cells
to add them.
08
Once you have your basic
data built you can tap the
‘+’ icon in the top-right of the screen
and insert photos, tables, shapes
and more which will help to make
the data more visual. Select and
personalise what you need.
09
07
Once you’ve understood
where each function
resides you can now do something
with your content. Tap the lightning
bolt icon and you can choose from a
wide range of simple functions that
will pop up.
Numbers is touch only and
this will present problems
at first, but the more you practise the
more natural it begins to feel. The
interface looks simple, but it hides
a huge range of options that you’ll
come to find essential.
121
The next step
Get started
using Files
Automatically save files on your iPad and access
them from another Apple device
F
iles lets you sync documents
and images across multiple
iOS devices and computers.
The app is part of Apple’s cloud
storage service, iCloud. Going
beyond the regular iCloud service,
Files not only allows you to create
and save documents on your iPad
and then open them on a Mac, for
instance, it also allows you to access
files stored on other cloud storage
services such as Google Drive. Files
that are created by one app are no
longer restricted to that app alone.
This means you could save one
document to your Google Drive on
PC, and then access it on your iPad
using Files. If you have used iCloud
Drive in the past then navigating
Files should be simple.
It’s easy to access all of your stored
files, and there’s even a new range of
exciting editing tools that now makes
arranging all of your documents
whilst on-the-go possible. There are
even some functions exclusive to the
iPad such as dragging and dropping
items into Files. It’s never been easier
to access and organise your content
stored in cloud.
Files Set up app and save files to the cloud
Files comes pre-installed
with iOS 11 and has
received tweaks since then, so if
you haven’t downloaded the latest
update you should do so. Head to
Settings>General>Software Update
and download the latest version.
01
122
After you’ve installed
the update, go to Files
and you may be asked to log into
iCloud. Tapping the login button
will take you to the Settings app
again. The cloud service uses your
Apple ID, so enter the password.
02
Any files that are stored
in your iCloud Drive
which aren’t on your device have
a downward arrow. Tap it to open
and store the file on your iPad. If
you choose to take them off you’ll
be able to download them again.
03
Get started using Files
The structure
You can view all of your
documents through
Files but not all of them
can be edited in the
app. Some files will be
opened in the app they
were created in but will
still save to Files
Change view
The default view is
a grid that displays
everything with
large icons. Tap this
to change to a list
view where items are
shown smaller than in
the grid. It all depends
on what you prefer
Tags
You can group together
certain items by giving
them tags, each has
a different colour
to make it easy to
distinguish. Tap on
Locations and towards
the bottom will be the
Tags section. Tap and
hold on an item then
tap Tags to add one
Storage space
As you fill iCloud with
more files, you may
run out of space. Go
to Settings> iCloud>
Storage>Manage
Storage> Upgrade
to buy more for a
monthly fee (you can
choose from 50GB,
200GB and 2TB)
04
While some of your
files can be opened and
edited within the Files app, others
will open in a different app. There
is currently no way to tell what
app the file will open in until you
tap on it.
05
Any changes you make
to a document will be
saved in its folder in Files, so you
no longer need to make numerous
copies of a single file to keep
everything up-to-date. That’s
rather handy.
06
To tag a file, tap and hold
on an item, tap Tags then
select a category, or choose more
than one if required. These can be
removed at any point by repeating
these steps and then tapping on
the tag again.
123
The next step
Send your files
with AirDrop
AirDrop can help you to share and receive files with anyone who
happens to be in the vicinity
A
irDrop is designed to let
you send and receive files
to any compatible phone or
tablet that is within close proximity
to you. This means that you can
share files in a couple of seconds
with anyone who is happy to
receive it and, of course, it works
the other way around too. The
process really is extremely simple,
and – more importantly – very
reliable. Multiple file types are
supported and you can share many
files at the same time, and even
large files are supported within
the technology. The idea is that
no real set up is required and that
the process feels almost invisible
in use. You may not use it often,
but when you need it everything
will work seamlessly and without
any fuss at all. It is very secure and
you always have control over which
files you are dealing with.
Permission has to be given
to receive files and enough
information is available so that you
know who you are sharing with and
what it is they are sending or you
are sending them. Let’s get started.
AirDrop Share files with AirDrop
Pull up the Control Centre
then tap and hold on the
square with four icons. A menu will
appear, click on the AirDrop option
and you’ll be offered more options:
‘Off’, ‘Contacts Only’ or ‘Everyone’.
Choose ‘Everyone’ to get started.
01
124
The icon will turn blue
which means that AirDrop
is now available to send and receive
files to your device provided
someone else is close to you. It
works a lot like Bluetooth devices in
this manner.
02
Choose a file to send, such
as a photo, and then tap
the share icon. You should see the
Airdrop icon and tapping this will
display available nearby devices.
Select the person you would like to
send your files to.
03
Send your files with AirDrop
File types
Many different file
types are supported in
AirDrop. Some will open
automatically and others
will offer choices for
which app to use
Turning it on
AirDrop is found in the
wireless settings of
Control Centre. Tap and
hold on this square to
access AirDrop’s settings
and turn it on/off
A visual indicator
If someone is within
range and has
AirDrop activated
you will see a
different icon replace
the AirDrop one.
Simply tap to send
Access controls
Access Control Centre
by sliding down with one
finger from the top-right
corner of the screen at
any time
04
Once the recipient has
accepted the file and it
has been sent through, you shall
be able to see the status of the file
beneath their name. You will be able
to track when the file is then ‘sent’, or
observe any issues.
05
If someone sends you a
file, a notification will pop
up no matter what you are currently
doing on the iPad. Tap ‘Accept’ in
order to receive the files. You have
the option to decline unwanted files
if you so wish.
06
Depending on the type
of file received, it may
open automatically in the correct
app. Photos for example will open
immediately in the Photos app.
Others you may have to select the
correct app to open with.
125
Glossary
Your iPad glossary
What does it all mean? We guide you through the common features
and terms that you’re likely to encounter while using your iPad
Apple ID
This is the name and password you
use to log in to the various Apple
services, such as iTunes, the App
Store and iCloud.
were added to iOS 5 and later, that
let you use five fingers to pinch to
reveal your Home screen or swipe
up, left or right to reveal your
multitasking bar or cycle between
open apps.
Application (app)
An application, or app, is a software
program designed to perform one
or more functions. Apps can be
downloaded from the App Store.
App Store
The App Store is a digital distribution
platform for Apple users. Users
are able to browse, purchase and
download iPad and iPhone apps from
the App Store to run on their device.
Game Center
Game Center is Apple’s gaming
portal where you can find friends
and play against them online or
compare high scores.
Gestures
These refer to the finger commands
that you perform on your iPad’s
touch screen to carry out various
functions. Multitasking Gestures
126
This is the large circular button on
the front of your iPad that you use to
quit apps and return to your iPad’s
home screen.
Home Screen
Gestures jargon:
Tap
● This is the most common and
basic gesture to perform on your
iPad; it involves tapping the screen
with your finger.
Double-Tap
● This involves tapping an object
twice in succession. You use this
gesture mainly for zooming or
highlighting text.
Dock
A row of icons that can be set to
appear at the bottom of your Home
screen. The Dock is ever-present
as you scroll through screens and
allows you to access your favourite
apps easily. You can add and remove
apps by pressing and holding on an
icon until it starts to shake and then
dragging it into position.
Home Button
Tap, Hold & Drag
● Some functions, such as
highlighting text, copying and
pasting require that you tap and hold
down on the screen and then drag
your finger to select what you want.
Pinch
● To zoom in or to open something,
place your thumb and index finger,
pinched together, on screen and
spread them apart. To zoom out,
perform the reverse.
Swipe
● Swiping is one of your primary
navigational tools. You perform a left
or right swiping motion with your
index finger to move through app
pages or images in the Photos app,
for instance.
This is essentially the desktop of your
iPad that you see when you boot up
or unlock your device. From your
home screen, you can launch apps
and access your Settings. You can
‘pinch’ with all five digits to return to
the Home screen at any time.
iCloud
iCloud is a free cloud storage and
syncing service. With iCloud you can
share data, files, music and
photographs between devices
without the need for manual
connecting, syncing and transferring.
Go to Settings to log in.
iCloud jargon:
iTunes in the Cloud
● With iCloud, the music you
purchase from iTunes appears
automatically on all of your devices.
You can also download past
purchases where you want, when
you want.
Photo Stream
● With iCloud, when you take a
photo on one device, it automatically
appears on all of your Apple-based
devices. Photos transferred from a
digital camera connected to your
Mac will also be pushed to your
mobile devices.
Your iPad glossary
and news streams are collated and
can be accessed.
Safari
n iTunes is the ultimate digital marketplace
for buying and downloading new music and
entertainment for your iPad
and store payment details to make
downloading media quick and easy.
iTunes jargon:
Featured
● All of the very latest, most notable
music, movies, podcasts and
television shows will be showcased
under this tab at the front of their
respective store windows.
n You can shop and browse apps by
popularity and category at the App Store
Documents in the Cloud
● If you have the same iCloud-enabled
apps on more than one device, iCloud
automatically keeps your documents
up to date across all devices.
iOS
Whereas Macs run on an operating
system called macOS (Monterey
being the most recent version),
Apple’s mobile devices – iPhone and
iPod Touch – use iOS.
iPadOS
This is the operating system running
on all iPad devices.
iTunes
This is Apple’s flagship digital
distribution centre that lets users
browse, purchase and download a
wide range of digital media, including
music, books, movies and television
shows. Using an Apple ID, which is
set up during activation, users log in
Top Charts
● See what’s hot and popular on the
iTunes Store by tapping on this tab.
Genius
● A feature that recommends music,
films and shows based on what is
currently in your library. Genius can
also create playlists for you.
iTunes U
● iTunes is also a great source of
educational materials, and you’ll find
a wide range of digital books, videos
and podcasts by tapping on the
‘iTunes U’ link.
This is Apple’s premier web browsing
app that comes as standard with all
iPad operating systems. The app
boasts a wealth of excellent features
to make surfing the web an enjoyable
and easy experience.
Settings
Accessible from the Dock or Home
screen, Settings is where you can
tweak your iPad as well as the apps
and utilities that make it tick.
Side Switch
This is the small switch on the edge
of the iPad that you can assign, via
Settings, to act as a mute button or
to lock your screen rotation.
Sleep/Wake Button
This is the lozenge-shaped button on
top of the iPad that you use to turn
your device on and off.
Wi-Fi
Wi-Fi refers to a wireless networking
system that allows you to connect to
the internet without any cables. You
will need access to a wireless router
for this to work with your iPad.
Redeem
● Occasionally you may be gifted a
product from iTunes in the form of a
code. You can click on the ‘Redeem’
link and input the code to download
the product.
News
This app comes free with iOS and is a
place where all of your online articles
n It’s not just music and films you can
download from iTunes – don’t miss the latest
episodes of your favourite TV show either
127
Discover
adventures of a
lifetime with our
inspiring travel
books
Take control
of your life
and the world
around you with
our interactive
journals
Get essential
advice on how
to make positive
changes to
your health and
wellbeing
INSPIRING READS
FOR A HAPPIER YOU
From travel and food to mindfulness and fitness,
discover motivational books to enrich and enhance your life
Learn
delicious recipes
and nutritional
information for
all tastes and
lifestyles
Follow us on Instagram
@futurebookazines
www.magazinesdirect.com
SUBSCRIBE &
SAVE UP TO 61%
Delivered direct to your door
or straight to your device
Choose from over 80 magazines and make great savings off the store price!
Binders, books and back issues also available
Simply visit www.magazinesdirect.com
No hidden costs
Shipping included in all prices
We deliver to over 100 countries
Secure online payment
Senior’s
iPad
9021
Everything you need to know to get started with your iPad
✔Secure your device
✔Download the best apps
✔Improve accessibility
✔Keep in contact via email
✔Browse safely online
✔Listen to music
9000
✔Edit & share your photos
✔Stay connected